Lenovo 3000H Users Manual Table Of Contents AP
2015-01-24
: Lenovo Lenovo-3000H-Users-Manual-329615 lenovo-3000h-users-manual-329615 lenovo pdf
Open the PDF directly: View PDF ![]() .
.
Page Count: 51
31027069
Version 1.0 Lenovo 3000H User Guide
cover.indd 2 2006.9.15 5:10:09 PM
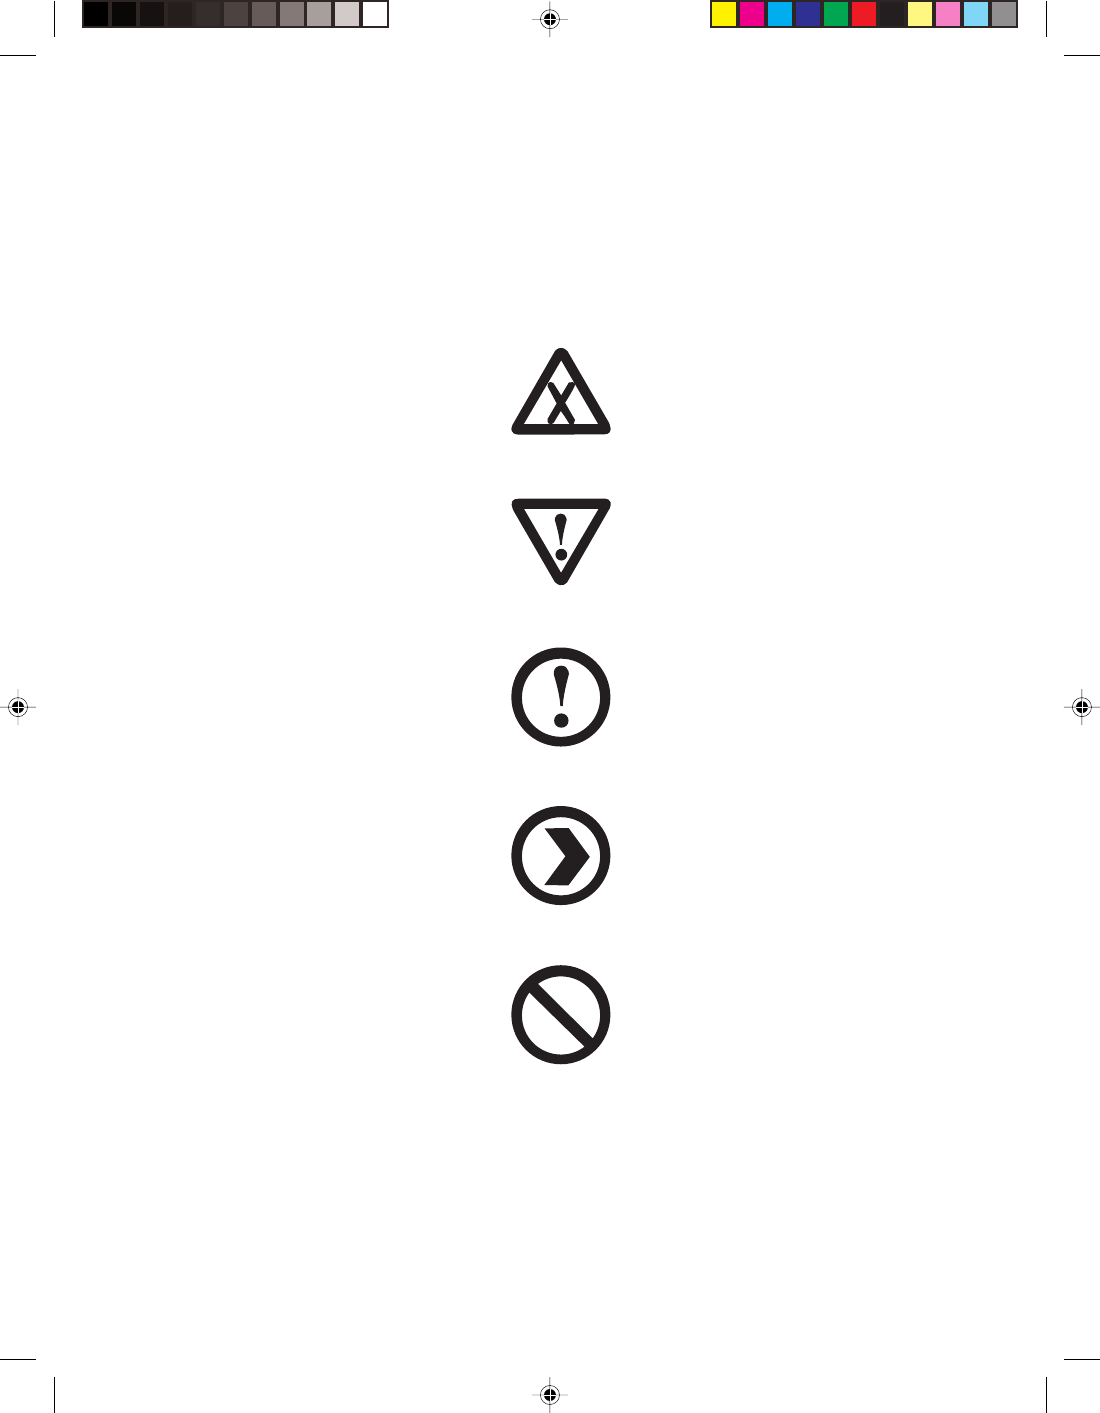
Explanation on Marks
Danger: Watch out for high risks
Caution: Watch out for medium risks
Attention: Pay attention to low risks
Recommendation: Helpful tips
Prohibited: Dangerous operations

Contents
Explanation on Marks
Chapter 1 Instruction for Use of Computer Hardware ...................... 1
1.1 Front View of the Chassis .............................................................. 2
1.2 Back View of the Chassis............................................................... 3
1.3 Connection of the speaker ............................................................. 4
1.4 Helpful tips on computer cabling and installation .......................... 5
1.5 Keyboard ........................................................................................ 5
Chapter 2 System Installation............................................................ 7
2.1 One-Key Recovery ......................................................................... 8
Chapter 3 The introduction on usage of software ......................... 17
3.1 WinDVD........................................................................................ 18
3.2 Disc Burning ................................................................................. 19
3.3 Norton........................................................................................... 29
Chapter 4 Safe Usage of Computer................................................. 33
4.1 System Restoration ...................................................................... 34
4.2 Disk Cleanup ................................................................................ 37
4.3 Hard Disk Error Checking and Fixing .......................................... 38
4.4 Disk Defragment .......................................................................... 39
4.5 Daily Maintenance........................................................................ 40
Chapter 5 Troubleshooting of Common Problems ........................ 41
5.1 Display.......................................................................................... 42
5.2 Sound ........................................................................................... 42
5.3 Desktop Icons............................................................................... 44
5.4 Software Problems ....................................................................... 46
5.5 Optical Drives and Hard Disks ..................................................... 47
5.6 Special Description of Windows................................................... 48
1
2
3
4
5
This chapter will mainly introduce contents as follows:
¾Front view of the chassis (Instruction for use of buttons and functional keys on
the front panel of the chassis)
¾Rear view of the chassis (Instruction for use of all I/O connectors on the rear
panel of the chassis)
¾Connection method of the speaker
¾Keyboard
Hardware Notice
This chapter will describe some necessary operation for the use of computers,
including the method and helpful tips on the connection of components
appropriately. Be sure to read it carefully.
Note: The configuration of all models depends on the
actual product you purchase.
1
Chapter 1
1
Lenovo 3000H User Guide
Instruction for Use of Computer Hardware
2Lenovo 3000H User Guide
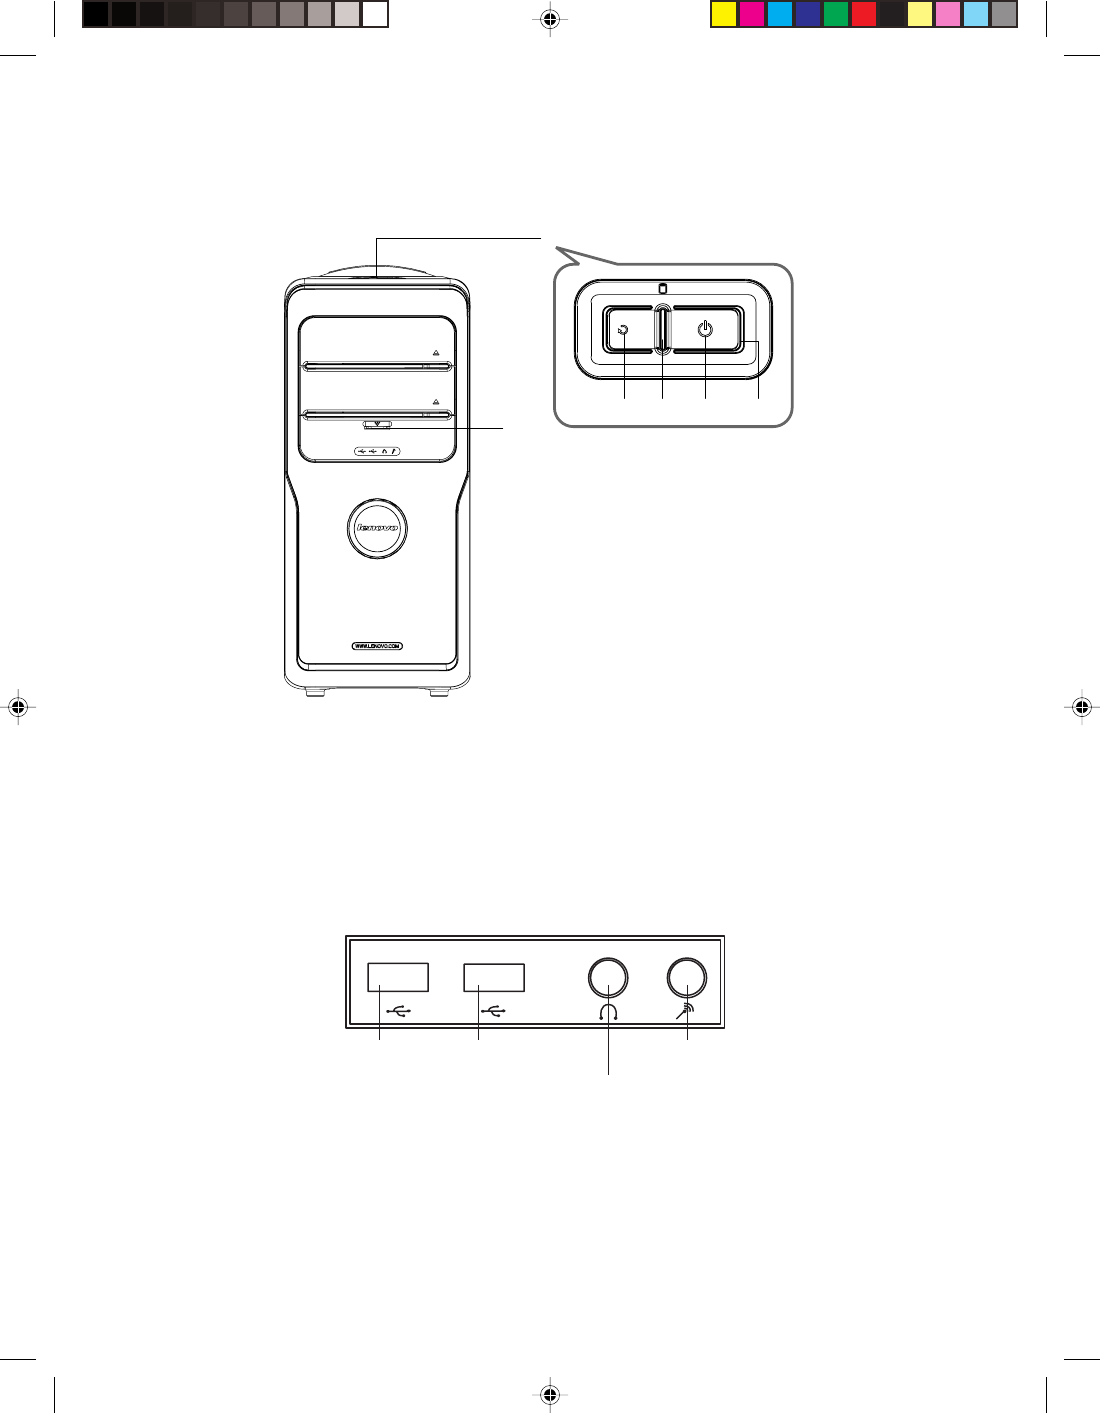
1.1 Front View of the Chassis (Instruction for use of buttons and
functional keys on the front panel of the chassis)
F-1
F-2
[1-1] [1-2] [1-3] [1-4]
F-1 The top button
[1-1] Reset Key: Press this key to restart computer forcibly. It is recommended to take this operation with
caution.
[1-2] Hard Disk Drive Indicator: Indicates read/write operations of the hard disk.
[1-3] Power Switches: Press this key to turn on/off computers.
F-2 Preposition Digital Panel: Open the preposition digital panel and the preposition digital connectors
such as USB will be shown as below:
USB
connector USB
connector Speaker/
headphone connector
Microphone
connector
D-1 USB Connector: Used to connect USB devices.
D-2 Speaker/Headphone Connector: Used to connect speakers or headphones. If it is necessary to
connect the headphone, remove the speaker plug and insert the headphone plug.
D-3 Microphone Connector: Used to connect the microphone and input the sound received by the
microphone into the computer.
3
Lenovo 3000H User Guide
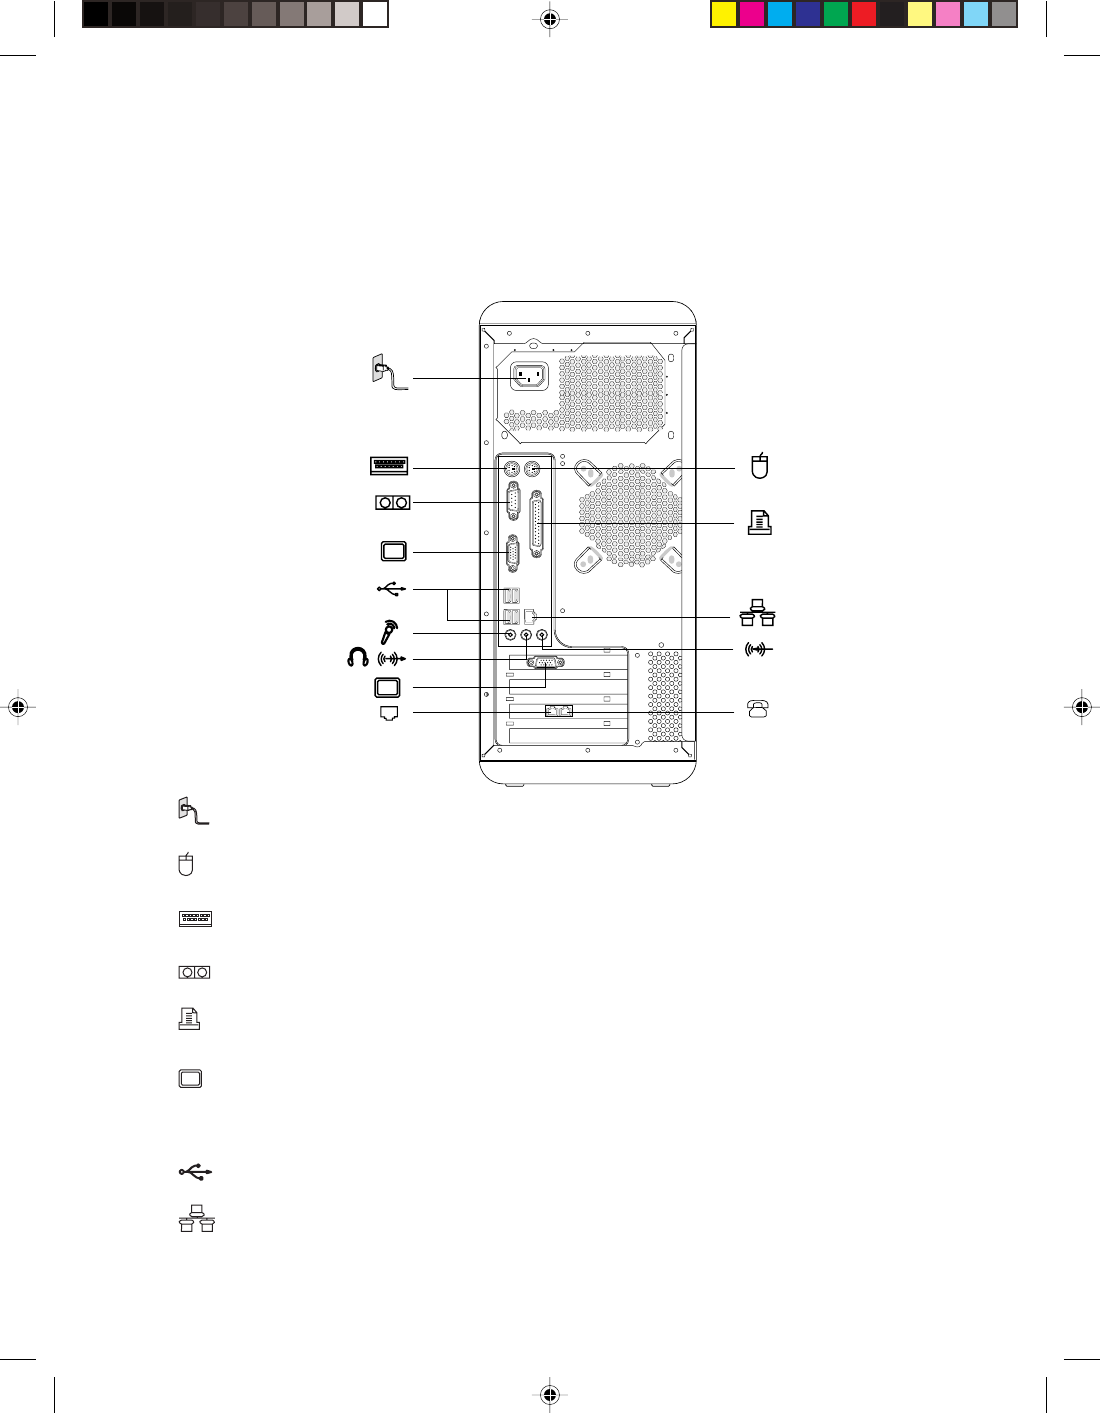
1.2 Back View of the Chassis (usage of all I/O connectors on the
rear panel of the chassis)
The rear panel connectors of some models are as illustrated below, please refer to them
according to your actual configuration;
—— Power connector: Used to connect the mainframe to the power supply
—— PS/2 mouse connector: Used to connect PS/2 mouse
—— PS/2 keyboard connector: Used to connect PS/2 keyboard
—— Serial port: Used to connect devices with serial port (COM port)
—— Parallel port: Used to connect devices with parallel port
—— Onboard graphics card connector: Used to output monitor signals (VGA signals) through the
signal cable connected with the monitor. (On models with external graphics card, onboard graphics
card signals are shielded with no VGA signal outputs - some models are equipped with this connector)
—— USB connector: Used to connect USB devices
—— Ethernet connector: Used to connect LAN or broadband devices
4Lenovo 3000H User Guide
—— External graphics card connector: Used to output monitor signals (VGA signals) through the
signal cable connected with the monitor. If the graphics card is equipped with S-Video connector and
cabled to a TV, pictures displayed on the monitor screen may be redirected to the TV (some models
are equipped with external graphics card).
—— Used to attach your computer to a telephone line for modem use. (some models equipped with
this connector)
—— Used to attach a telephone line to your computer for modem use. (some models equipped with
this connector)
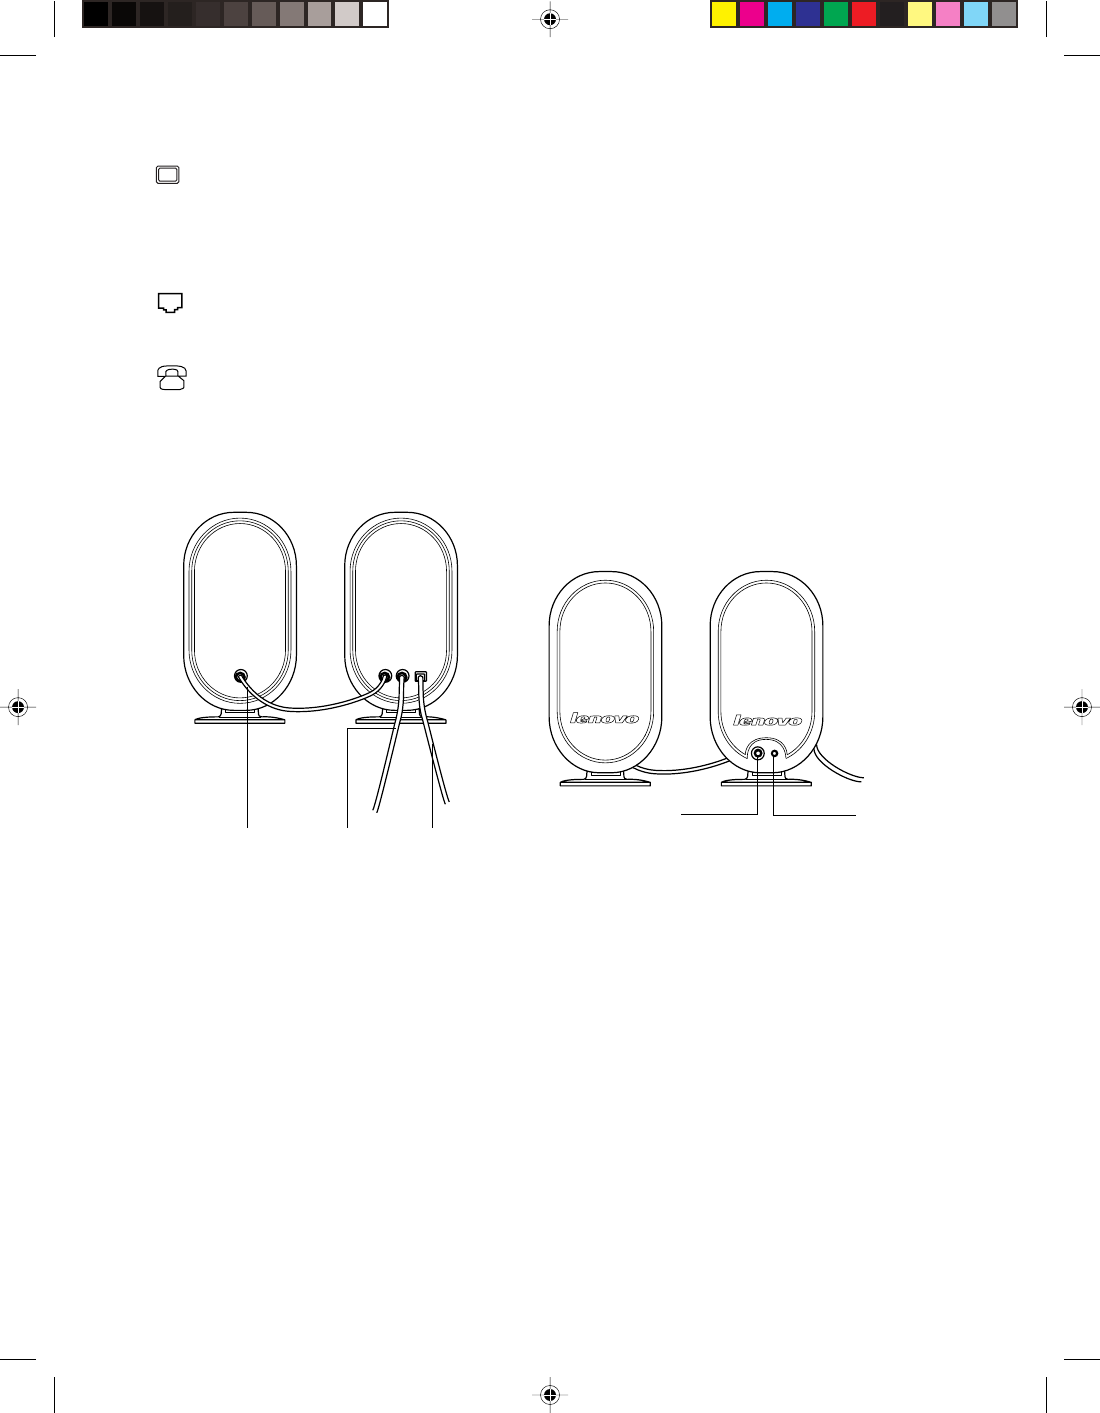
1.3 Connection of the speaker
[Y-1] [Y-2] [Y-3]
[Y-4] [Y-5]
Y-1 Primary/secondary speaker connection cable
Y-2 Connect to mainframe speaker/headphone connector
Y-3 Speaker power cord
Y-4 Volume adjusting knob
Y-5 Speaker power switch
5
Lenovo 3000H User Guide
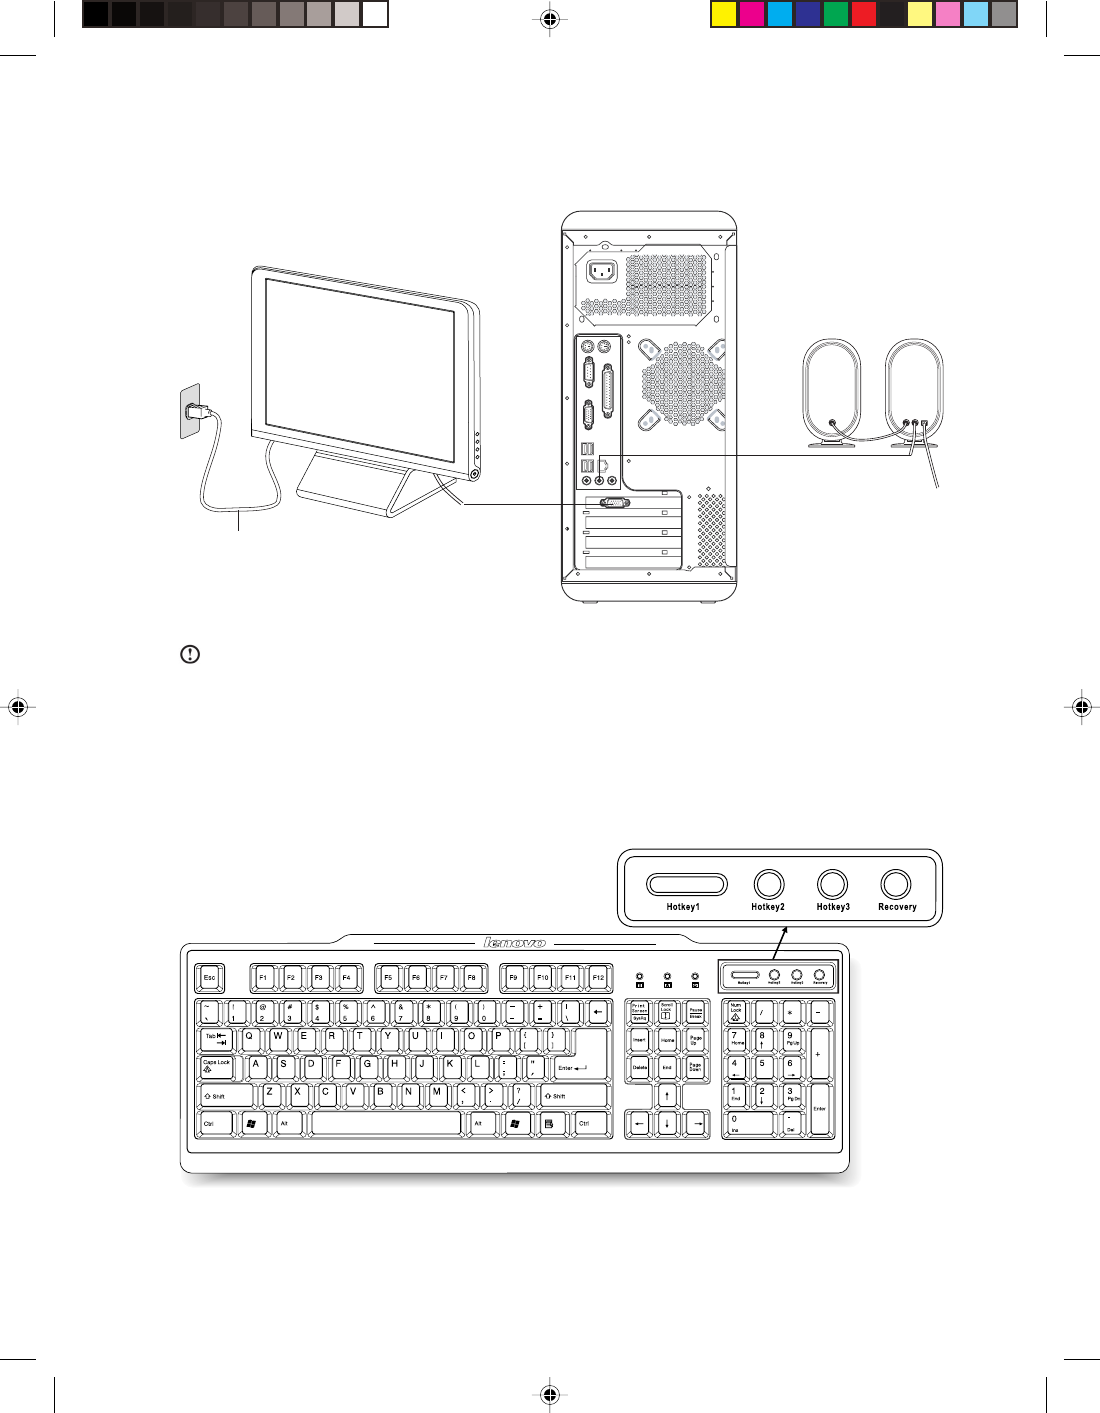
1.4 Helpful tips on computer cabling and installation
C-3
C-1
C-2
C-1 Monitor power cord C-2 Monitor data cable C-3 Speaker audio signal cable
Note:
1. Keep speakers away from monitor to avoid magnetic interference.
2. Ensure the cables between monitor and mainframe are securely connected and the screws on the connector of
monitor signal cable are tightened.
3. Connect the monitor signal cable to the onboard graphics card connector if the model you purchase is not equipped
with stand-alone graphics card.
1.5 Keyboard
The shortcut key on the keyboard can start up the application as soon as you press the key.

6Lenovo 3000H User Guide
Second step
Enter executive program name in the
“Application” field or click “Browse…”
to open the folder and find out the program,
then select it and click “Open”.
At last click “OK” to finish defining.
First step
Press one of the shortcut keys ,the opposite
Hotkey setting dialog box displays.You can
define the key's function.
Hotkey1, 2, 3——Provide you shortcut keys to start up the program you defined in advance.
Recovery——If the computer provide the Recovery function, Press this key when “LENOVO” displayed on
the start screen. In Windows system, the key “Recovery” acts as the “Hotkey” key.
The method of defining the shortcut key:
1
2
3
4
5
2
This chapter provides the following:
OneKey Recovery
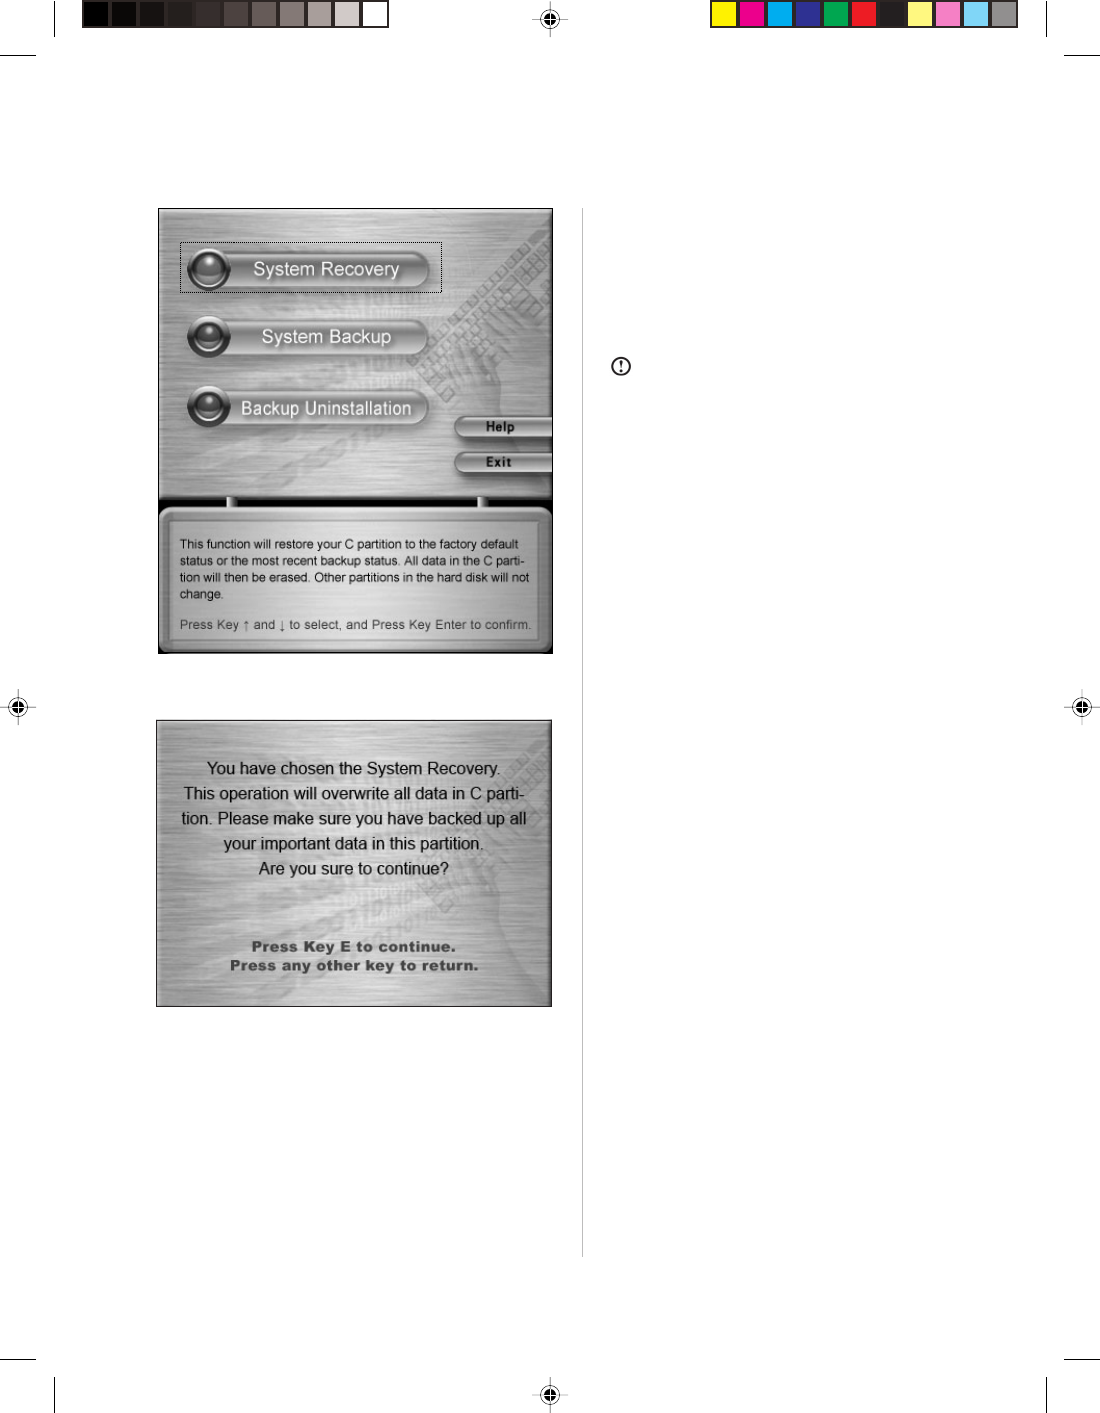
By using the OneKey Recovery function, it will restore your C partition back to the
orginal factory default or to the most recent backup saved. All data inthe C
partition will then be erased. Other partitions in the hard disk will not change.
Note: Your C partition must use the FAT32 partition
format to successfully use the OneKey Recovery
function.
System Installation
Chapter 2
7
Lenovo 3000H User Guide
8Lenovo 3000H User Guide
System Recovery
Follow the onscreen instructions, and press
“E” on the keyboard to start recovery if you
are sure to recover.
System Recovery
Launch the System Recovery feature by
Press the “Recovery” key on the
keyboard,when “LENOVO” displayed on the
start screen.selecting “System Recovery”.
Note: System Recovery will overwrite allof
the data in drive C; please backup relevant
data before performing system recovery to
prevent your important data from missing.
2.1 One-Key Recovery
9
Lenovo 3000H User Guide
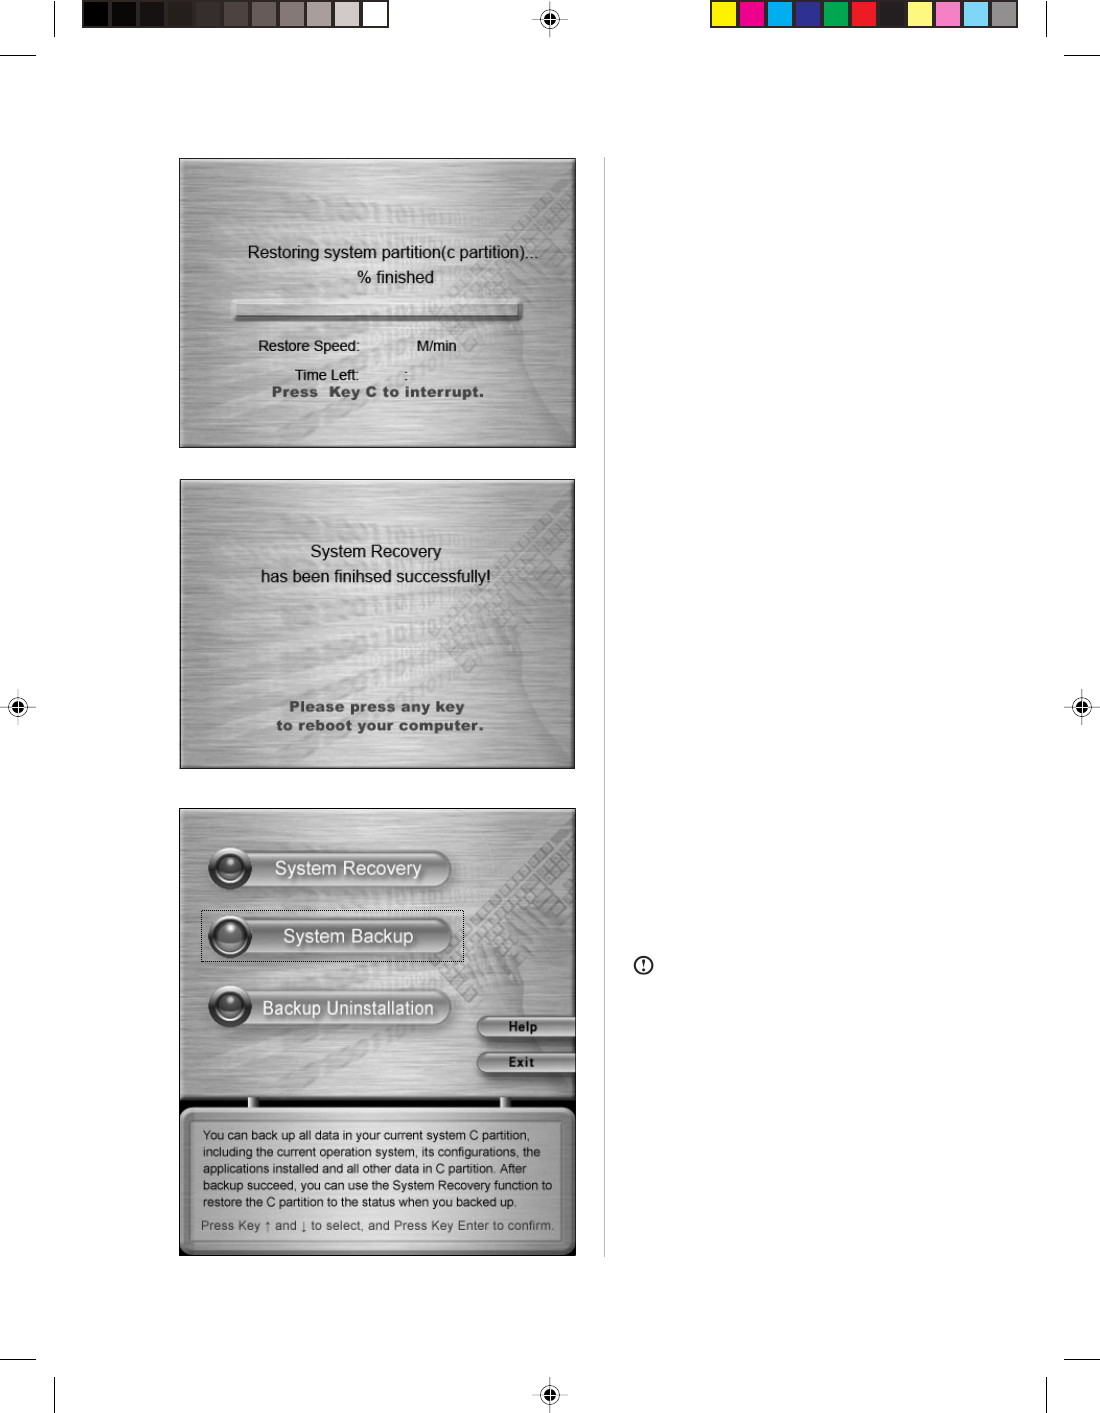
System Recovery
Please wait in the process of system
recovery.
Do not interrupt the operation.
System Recovery
System Recovery
After the system is recovered successfully,
the software prompts to restart the
computer.
Restart the computer and enter the system.
System Backup
This software provides the feature to
backup data currently in drive C. Select
System Backup.
Note:
1. Notice that you will overwrite the backup
in the hidden partition created for factory
delivery or the last backup created when
you backup the existing data in drive C.
2. Do not re-modify size and format of drive
C after backup. Otherwise the backup
data cannot be recovered normally.

10 Lenovo 3000H User Guide
Follow the onscreen instructions, and press
“E” on the keyboard to start backup if you
are sure to backup.
System Backup
The backup operation will obtain enough
space by adjusting the data at the end of
the hard disk; press “E” and continue if you
are sure to backup.
System Backup
Press “E” and continue if you are sure to
backup.
11
Lenovo 3000H User Guide
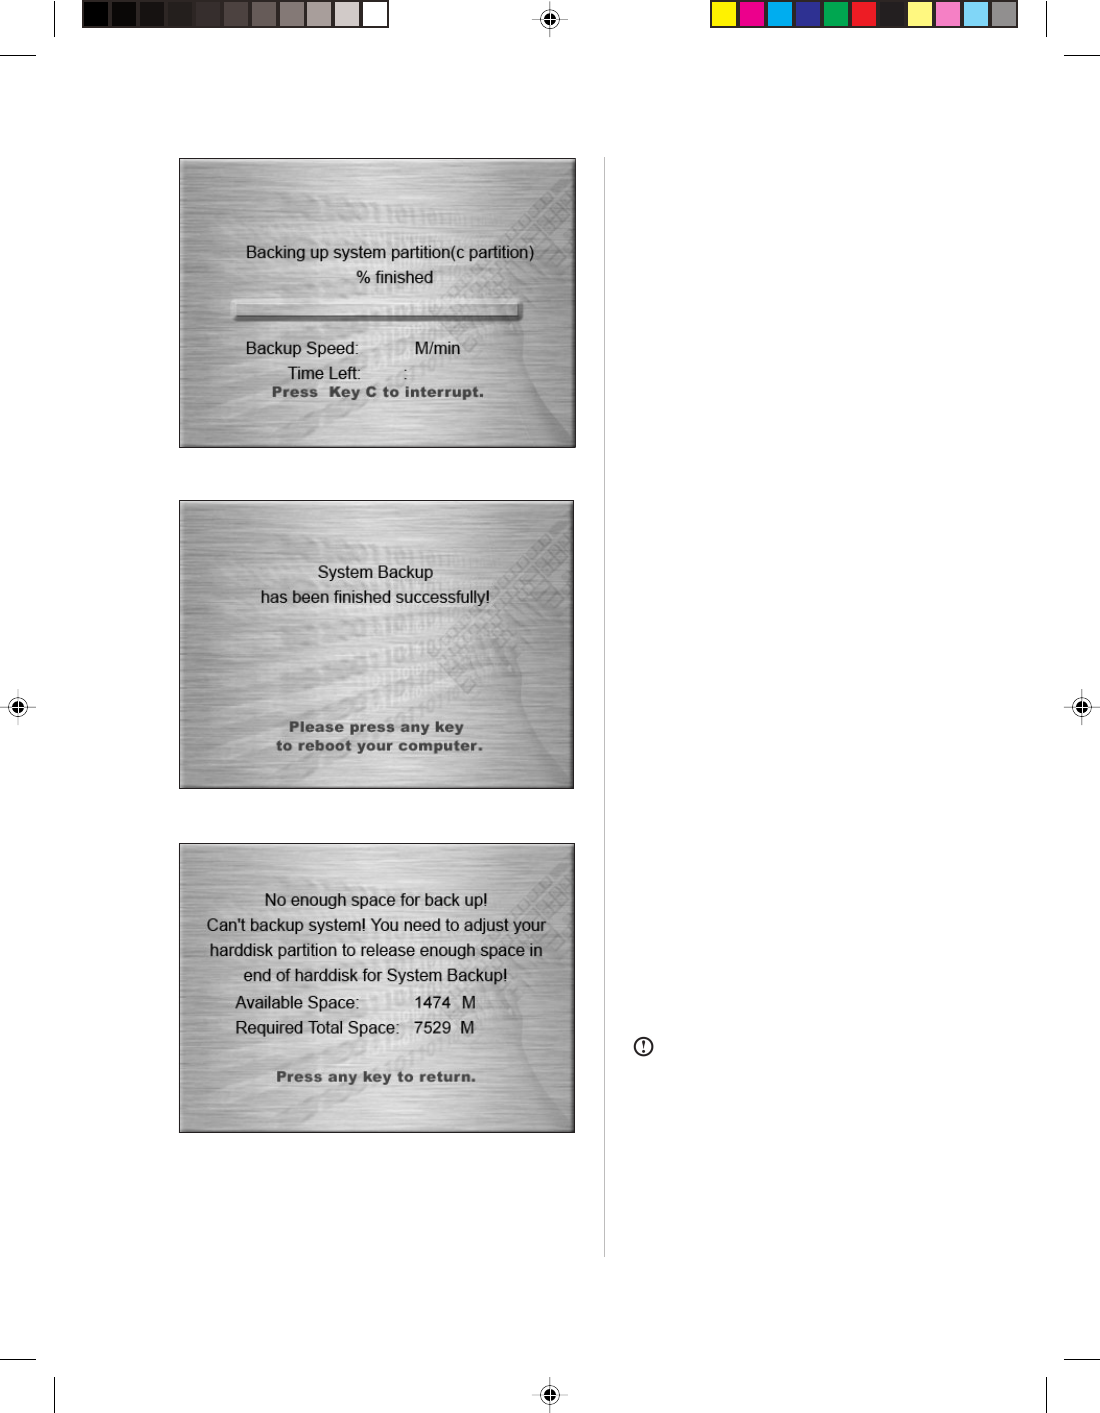
System Backup
Please wait in the process of system
backup.
It is not recommended to interrupt the
operation, if possible.
System Backup
After the system is backed up successfully,
the software prompts to restart the
computer.
Restart the computer and enter the system.
System Backup
If the System Backup prompt is as shown:
There is not enough space for backup!
You need to adjust your harddisk space to
release enough unallocated space at the
end of harddisk.
Note: The unallocated space should exceed
the required total space in size.
12 Lenovo 3000H User Guide
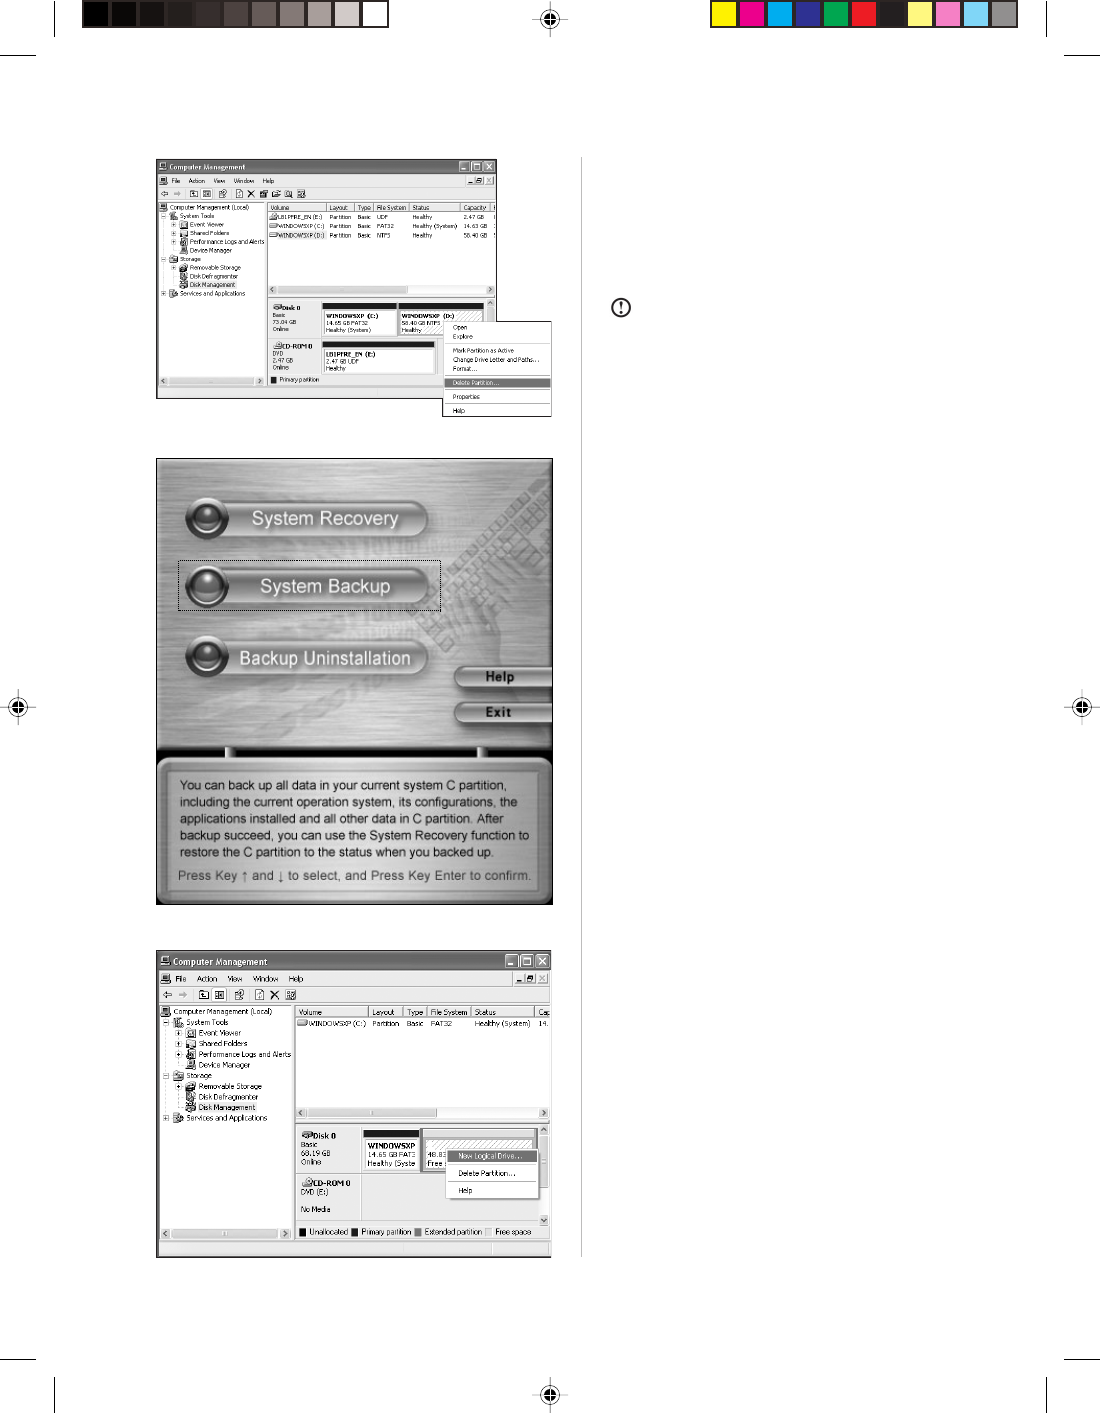
New Partition
•After system backup, Right Click on “My
Computer” Click on “Manage”.
•Now click on “Disk management” in the
list, Right click on Unallocated Space
•Click on “New Partition”.
System Backup
Then startup “System Backup” to backup
the current data in the C partition.
Space Release
Enter “Computer Management” in the
“Control Panel”. Delete partition at the end
of the harddisk to get enough space.
Note: Please make sure to backup all your
data before performing space release. If this
is not done, all data in the released space
will be lost.
13
Lenovo 3000H User Guide
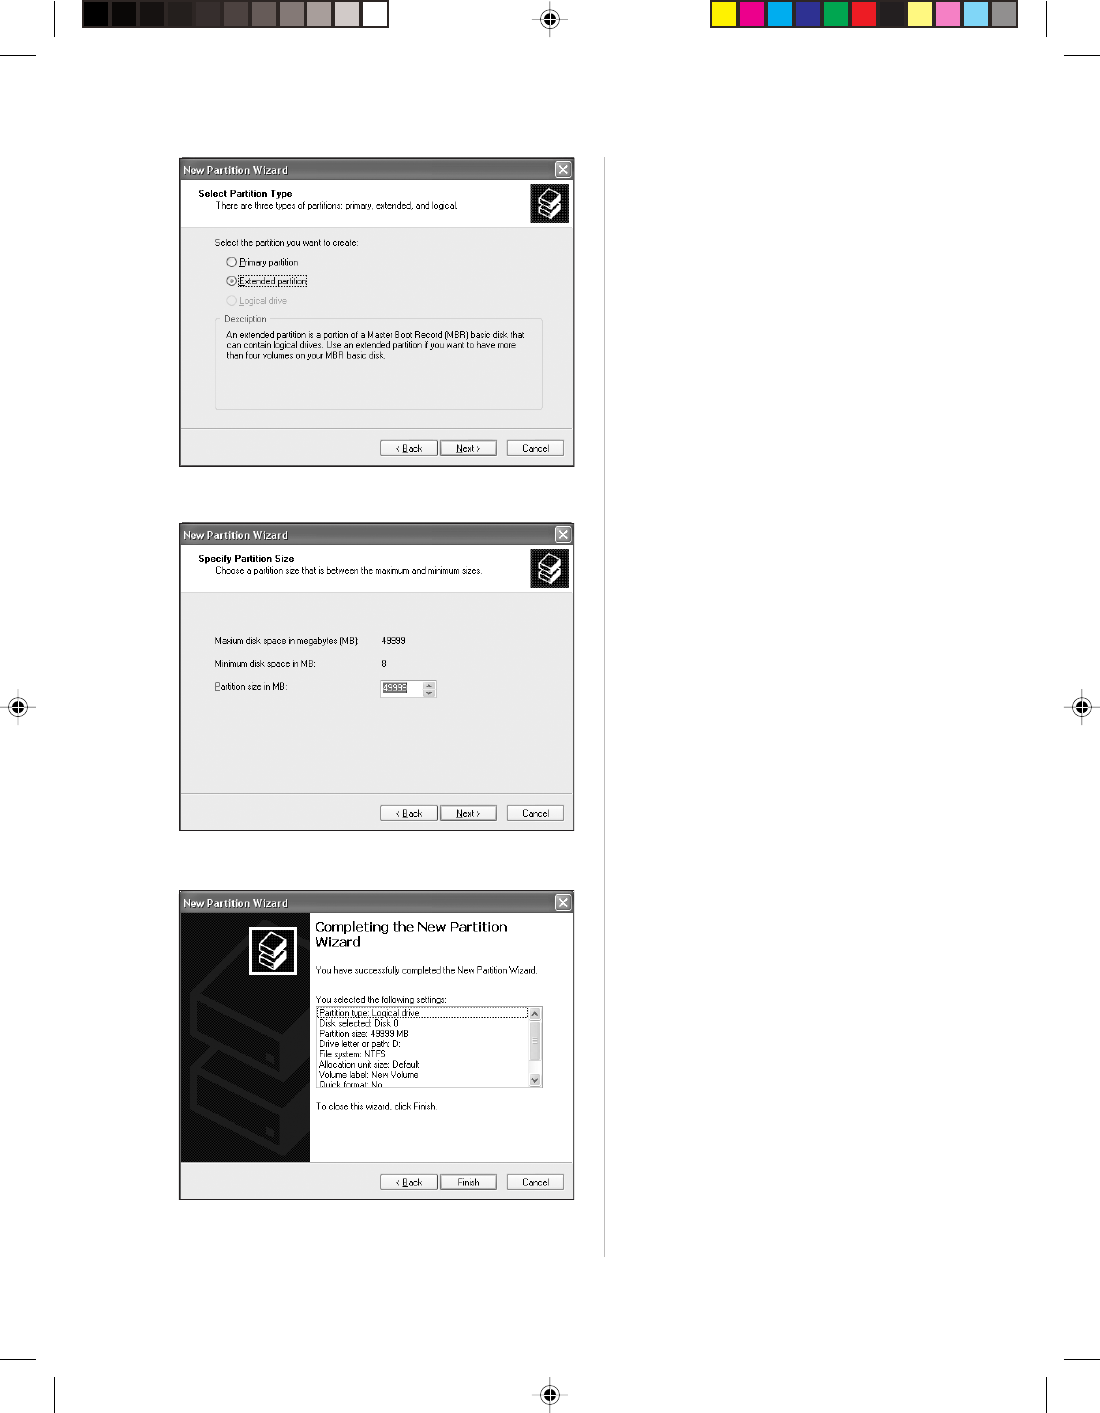
New Partition
Select “Extended partition”. Then click
“Next”.
New Partition
Fill in the Partition size in MB.
New Partition
Click “Finish” to complete the new partition
establishment.
14 Lenovo 3000H User Guide
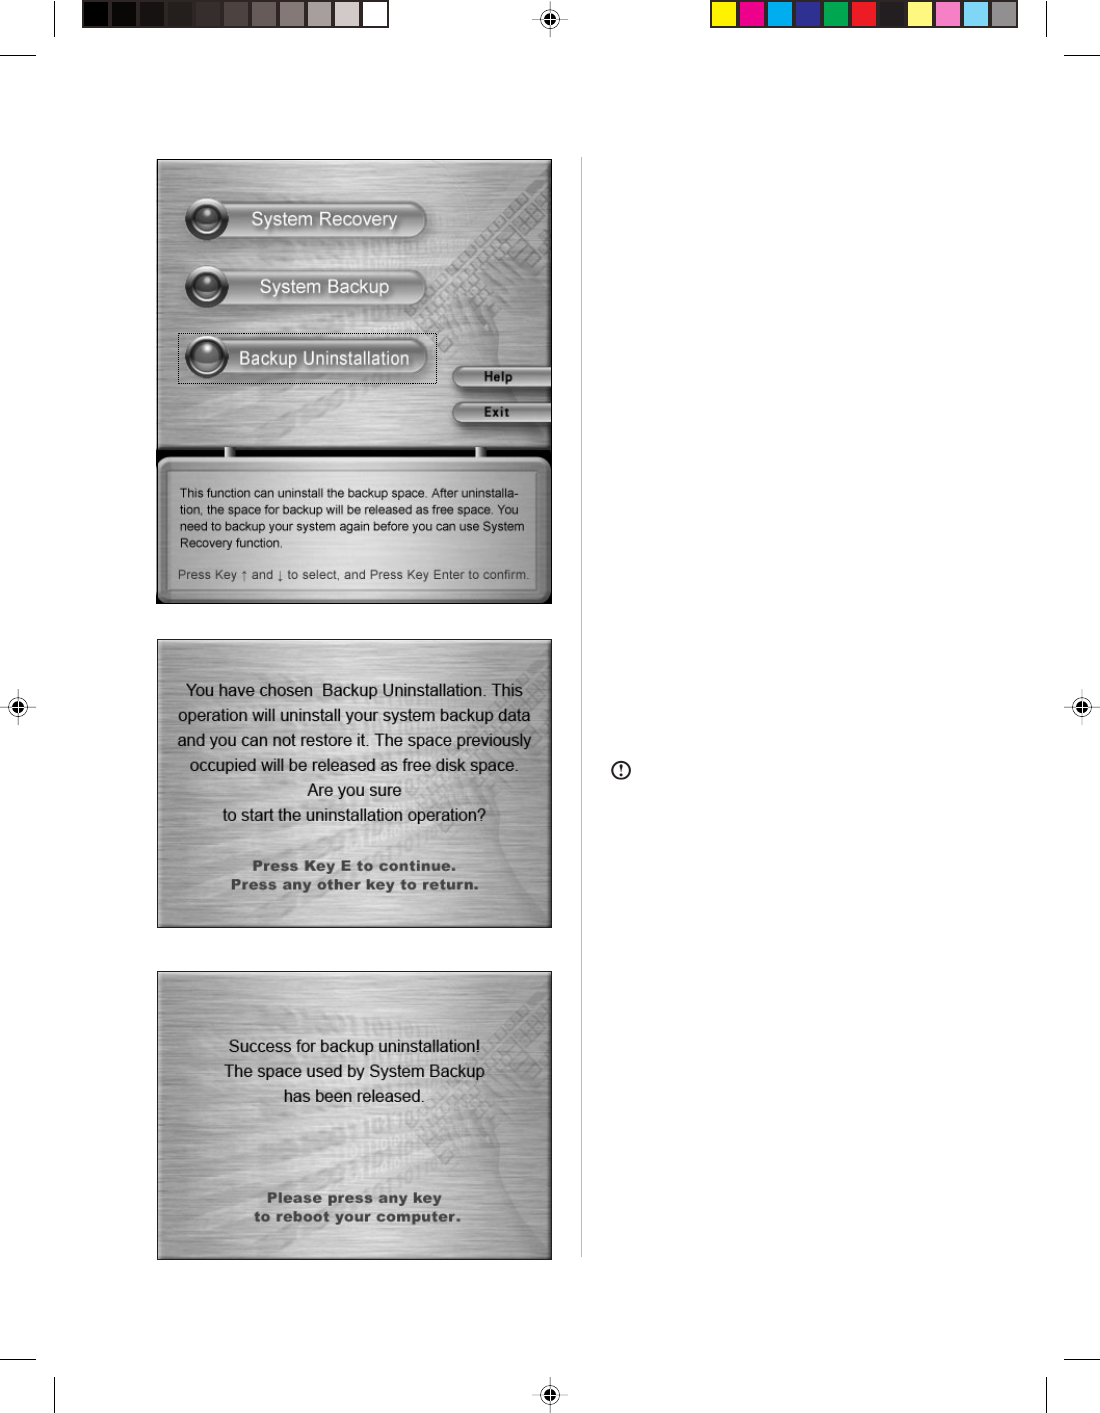
Backup Uninstallation
Perform uninstallation by clicking “E” after
confirmation.
Note: Some space released becomes free
space and cannot be merged to the last
partition.
Backup Uninstallation
You may release the backup space by
performing “backup uninstallation” if you no
longer need the backup information. Select
“Backup Uninstallation” from the Backup
screen.
Backup Uninstallation
Back uninstallation complete.Press any key
to reboot.

15
Lenovo 3000H User Guide
Help
Press key ( R ) or ( r ) to select “Help”,and
press key “Enter” to confirm. You can get
helpful tips about how to use the OneKey
Recovery function.

16 Lenovo 3000H User Guide
1
2
3
4
5
3
This chapter provides the following:
¾The methods of using WinDVD
¾The method of burning optical discs.
¾The usage of anti-virus software.
Note:
1. All the software interfaces follow the software provided with the
computer you purchased.
2. The burning function described in this chapter is only applicable
to the computers equipped with the rewritable optical drives.
3. If you have any question about Norton AntiVirus,please refer to
the following access for help:
http://www.symantec.com/region/reg_ap/techsupp/consumer.html
4. If you have any question about RecordNow, please refer to the
following access for help:
WebMail: http://support.sonic.com
17
Lenovo 3000H User Guide
The introduction on usage of software
Chapter 3
18 Lenovo 3000H User Guide
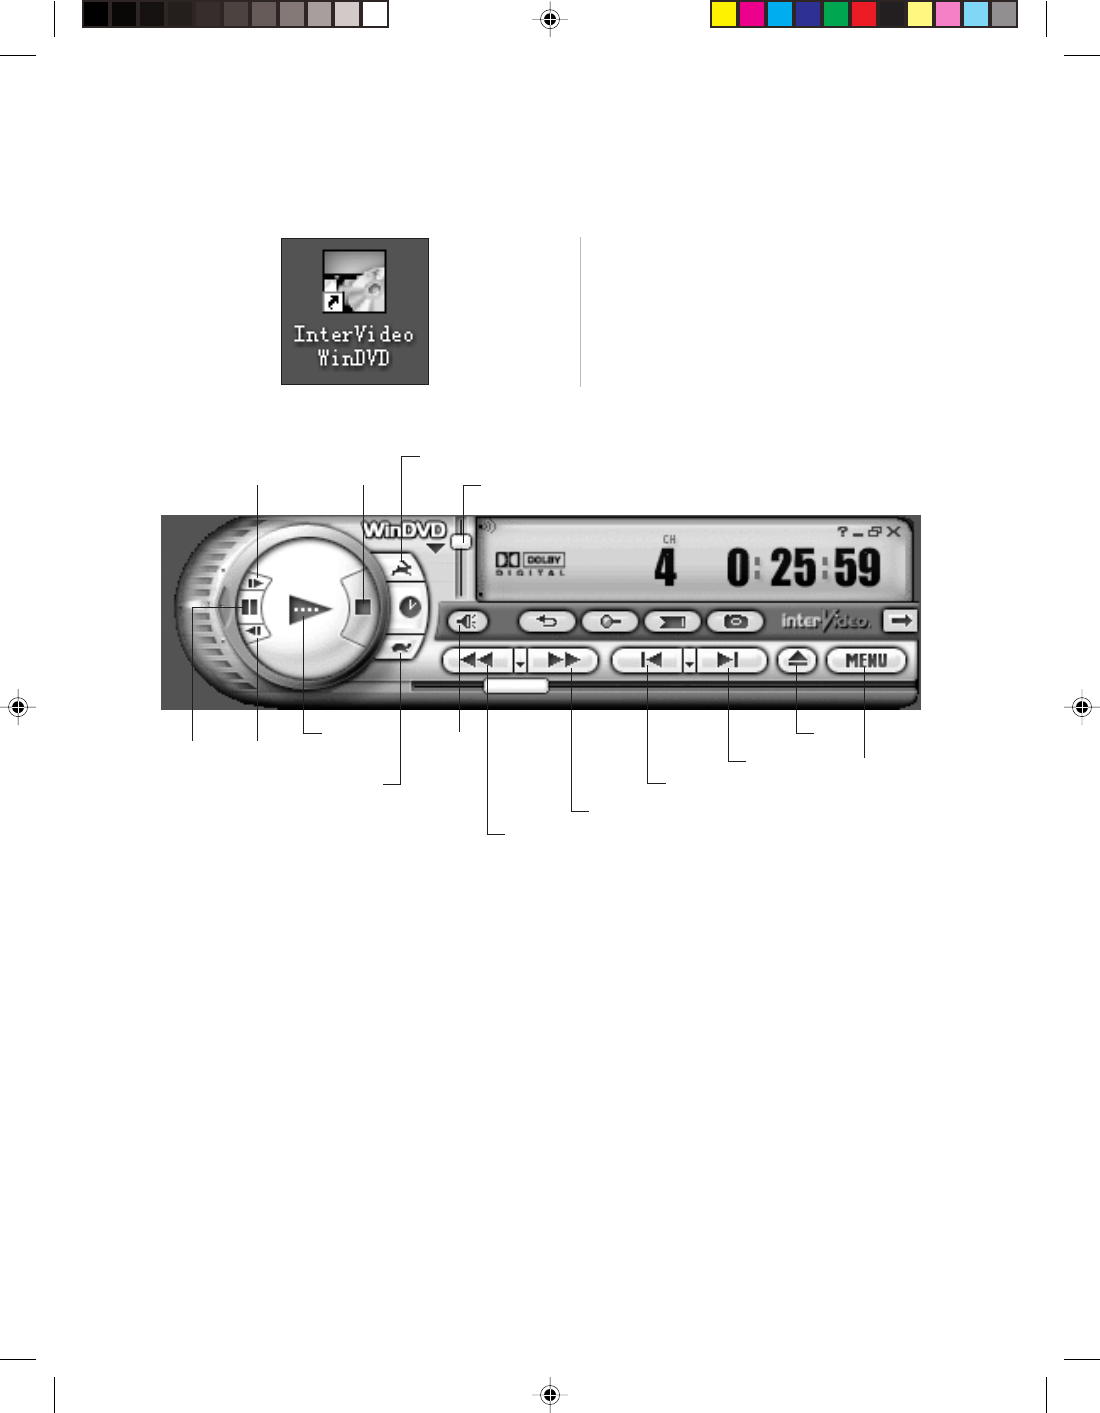
3.1 WinDVD
WinDVD will help you to play DVD video and movie disk.
Launch
Double-click the “InterVideo WinDVD” icon
on the desktop to launch the player.
Forward
Pause Backward
Stop Volume
Speed Up
Speed Down
Play
Prev Chap
Eject
Next Chap
Fast Backward
Fast Forward
Mute
Menu
For more information about WinDVD, click the “?” icon.
19
Lenovo 3000H User Guide
Erase Disc
Click “OK” to erase the disc
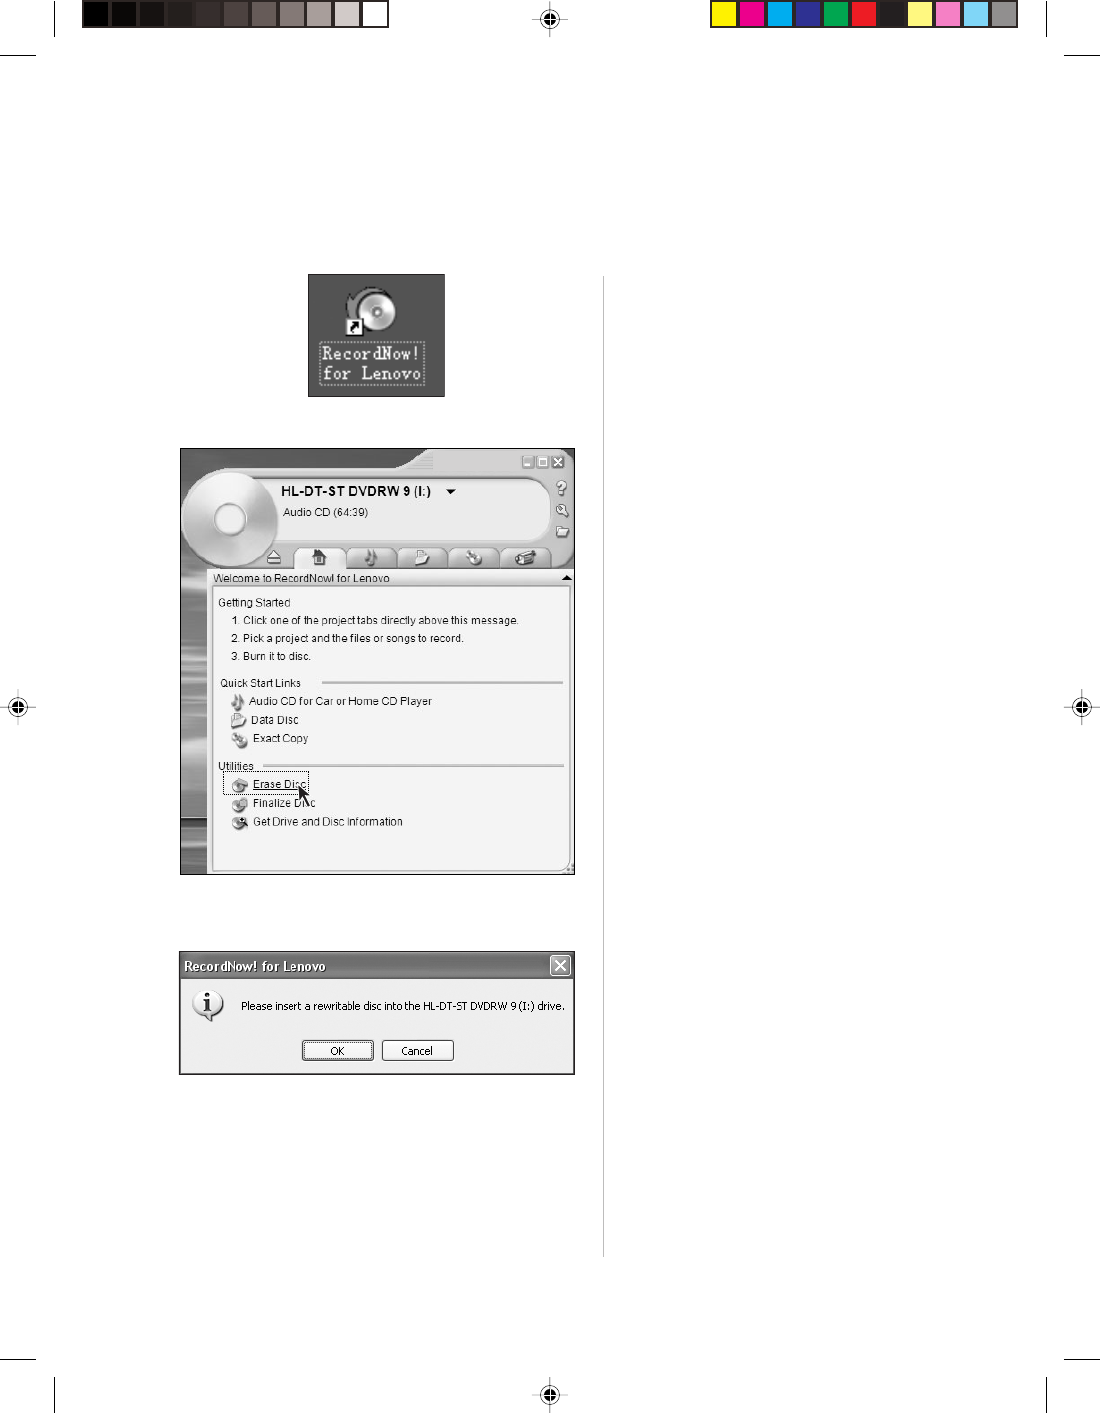
3.2 Disc Burning
RecordNow burning software enables you to easily burn data files, music, videos into CD, VCD or other data
discs. See the following procedure for details:
Launch
Double-click the RecordNow software icon
on the desktop.
Main Feature Screen
You may launch disc burning via the
shortcut link of Burn CD and Data Disc on
the main screen.
You may also erase and finalize disc.
Erase Disc
You may erase data within the disc for
erasable discs.
Click “Erase Disc”.
20 Lenovo 3000H User Guide
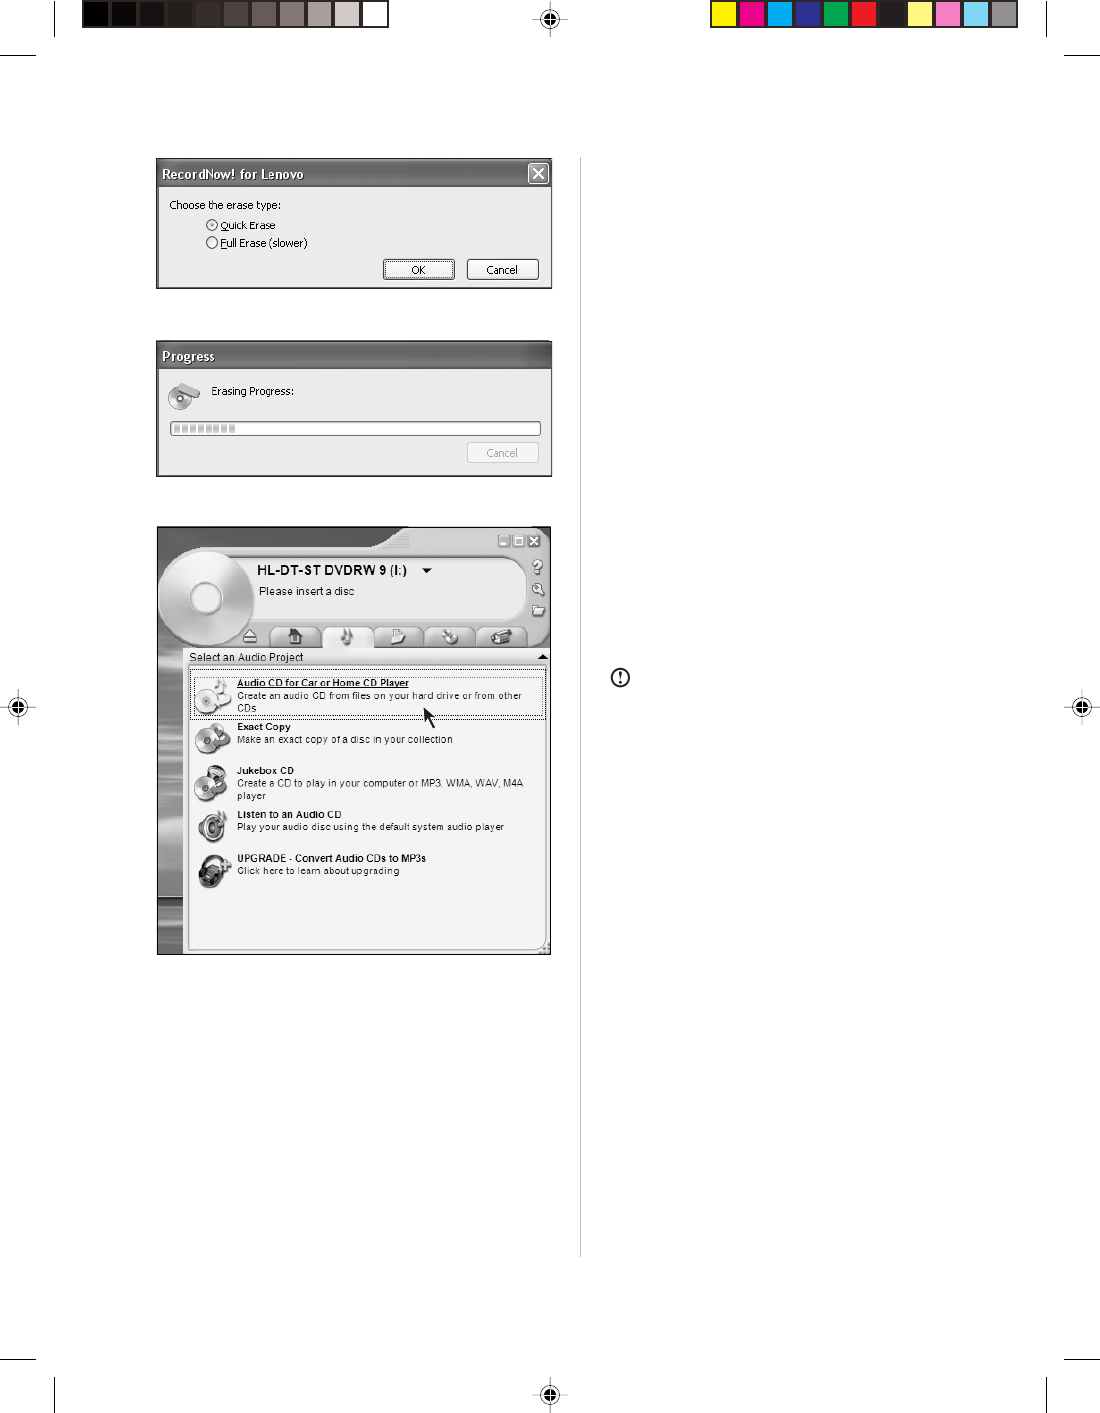
Erase Disc
Select either “Quick Erase” or “Full Erase”.
Erase Disc
Please wait while erasing the disc.
The disc will be ejected when erasing is
completed, then remove the erased disc for
later use.
Burn Music Disc – Step 1
With this option, you may burn music in
your hard disk into CD.
You can create music CD by selecting Audio
CD for Car or Home CD Player.
Note: The following conditions might lead to
burning failure:
•
File is being used by other
applications.
•
File recorded with non-standard
sampling frequency. (Standard files
are: WAV and MP3 must be 16-bit
files recorded with sampling
frequency of 22/44.1KHz. WMA must
be 16-bit stereo files recorded with
sampling frequency of 44.1KHz.)
•
WMA file that has implemented copy
protection (Windows license
protection).
•
Audio files in non-MP3/WMA/WAV
format.
21
Lenovo 3000H User Guide
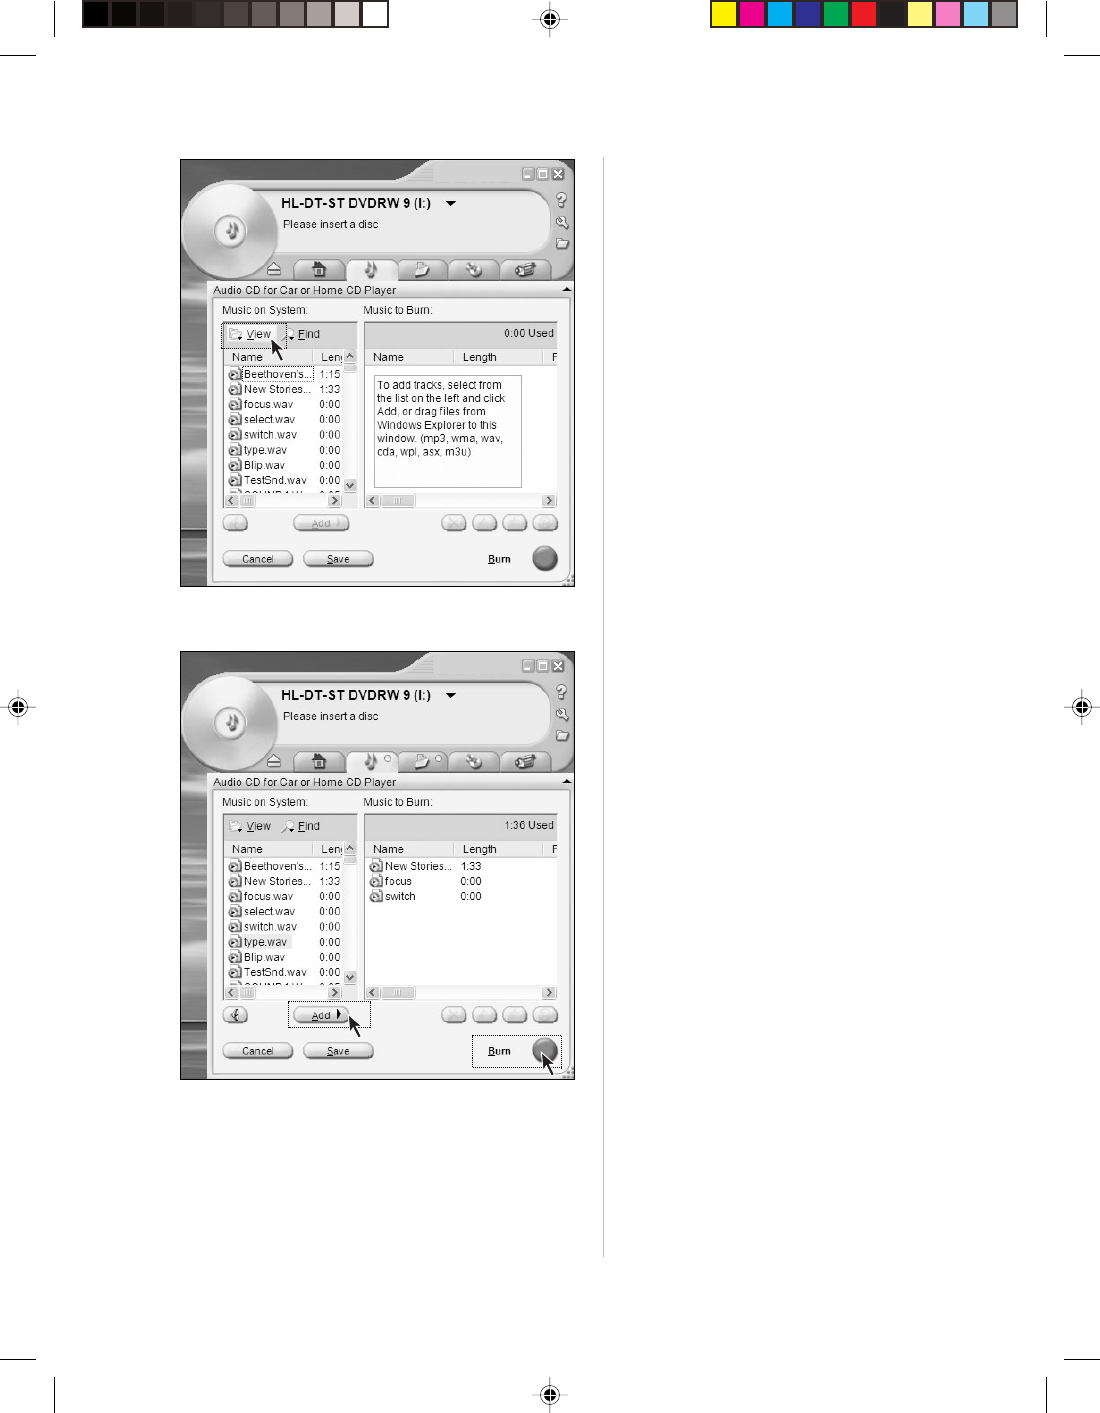
Burn Music Disc – Step 3
Select the music to be burned, and then
click Add to add the music to the Burn Disc
dialog box.
Adjust the sequence of the music items with
the UP/DOWN arrow, get ready and click
Burn. Start burning.
Burn Music Disc – Step 2
Click View and open the music folder, then
add the music to the dialog box.
22 Lenovo 3000H User Guide
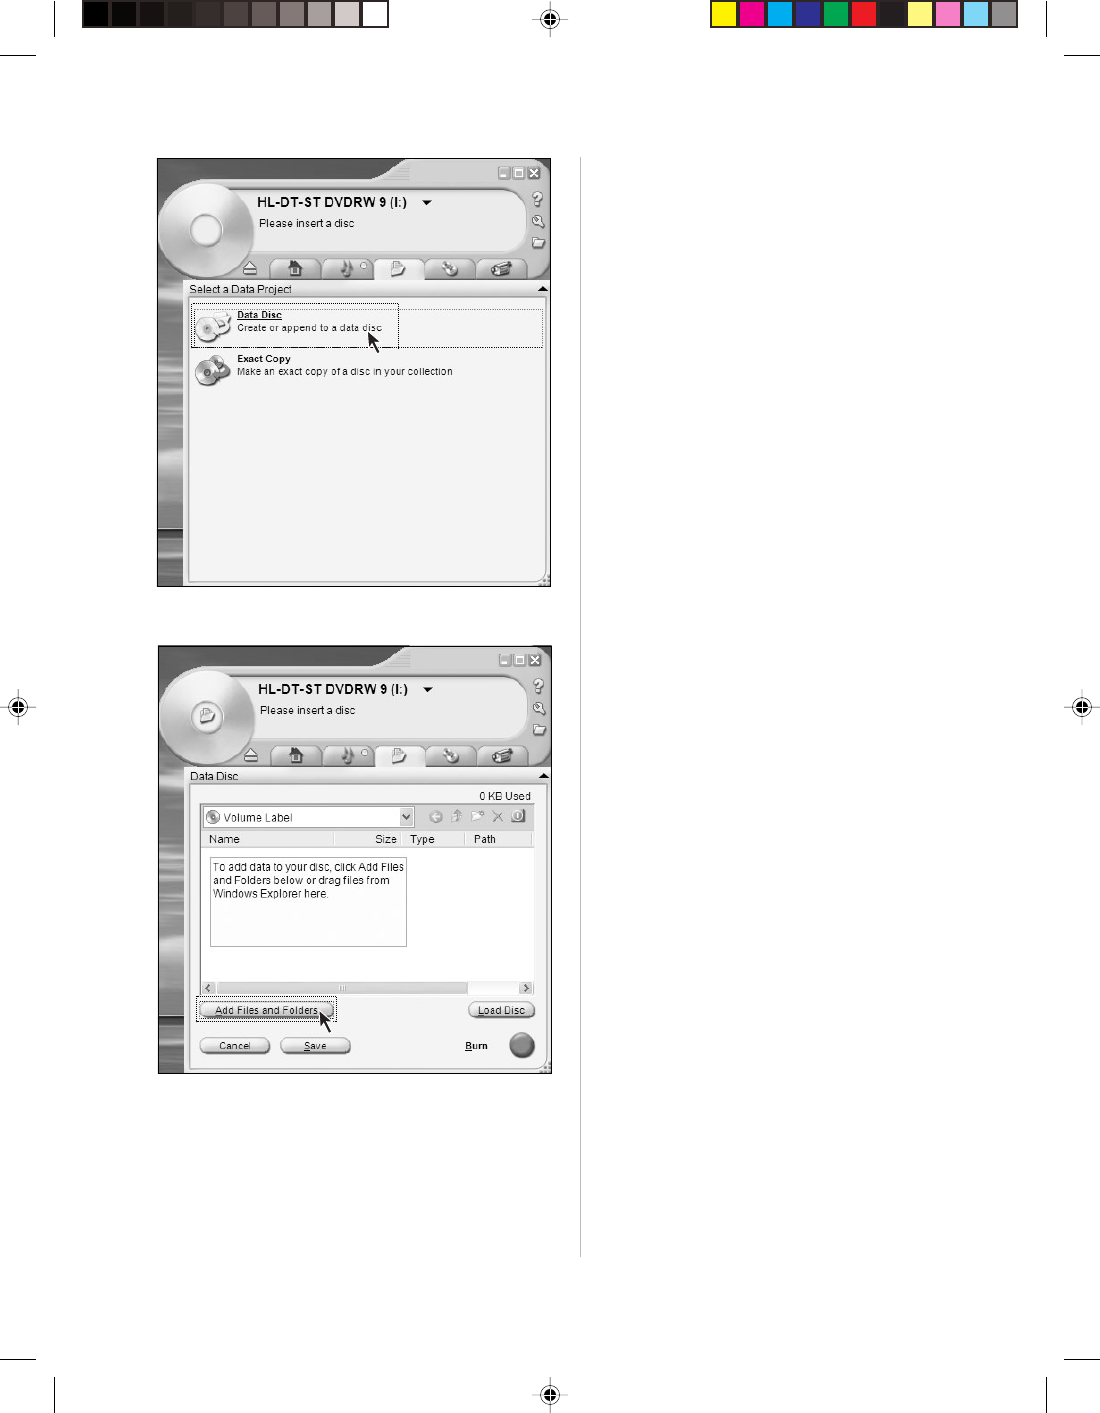
Burn Data Disc – Step 1
With this option, you may select data files
from your hard disk and burn the files into
data disc.
Click “Data Disc”.
Burn Data Disc – Step 2
Open the Browse Data dialog box, then
click “Add File and Folder”.

23
Lenovo 3000H User Guide
Burn Data Disc – Step 4
Click “Burn” after you have selected all files.
Burn Data Disc – Step 3
Open the Browse Hard Disk Files dialog box
and select the files to burn.
24 Lenovo 3000H User Guide
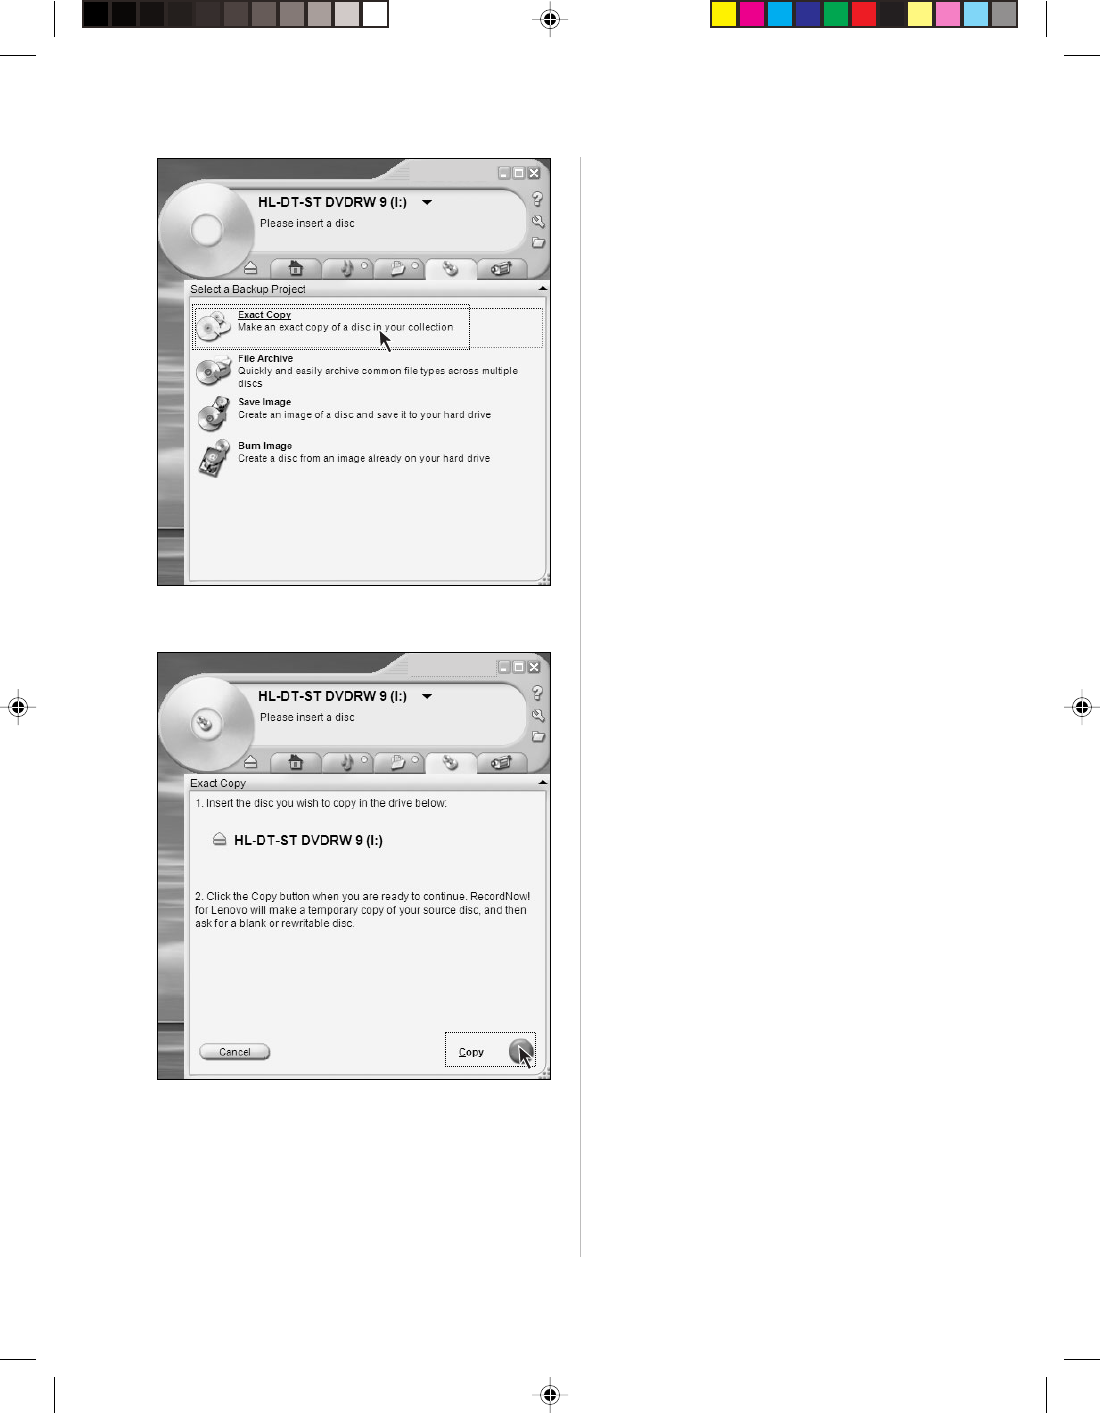
Exact Copy – Step 1
With this option, you may copy disc. Click
“Exact Copy”.
Exact Copy – Step 2
Insert the source disc after the illustrated
screen appears.
Click “Copy”.
25
Lenovo 3000H User Guide
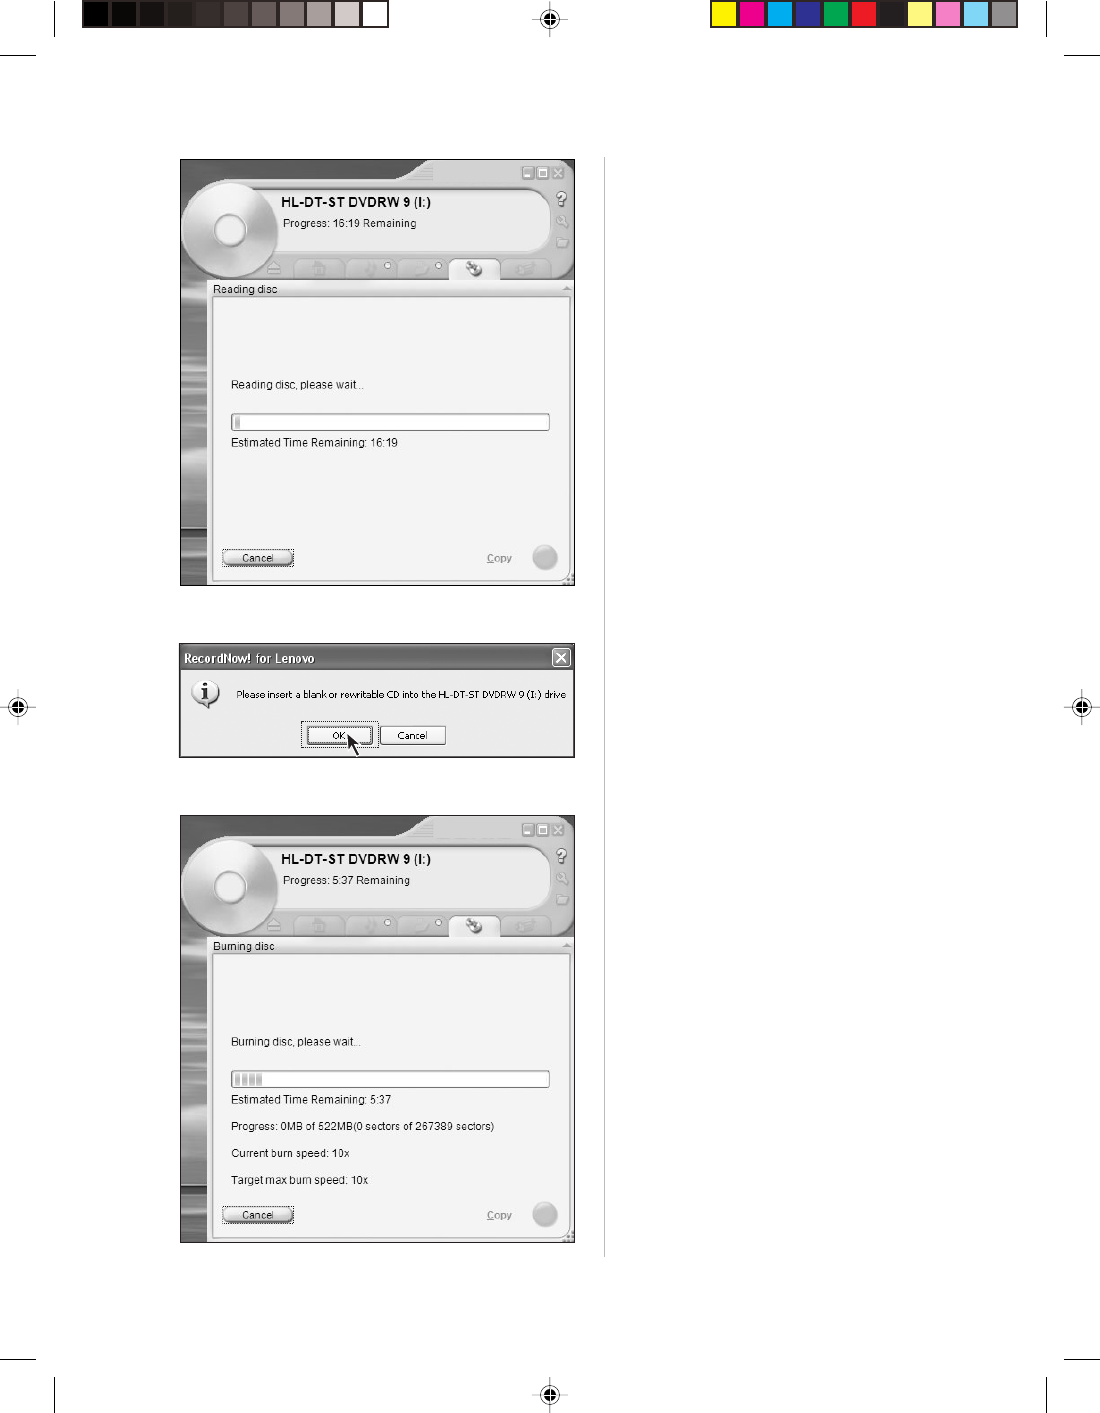
Exact Copy — Step 5
Wait while burning.
Exact Copy – Step 3
Wait while copying.
Exact Copy – Step 4
The illustrated screen appears when the
copy process completes. Now remove the
source disc and insert a blank disc. Then
click “OK”.
26 Lenovo 3000H User Guide
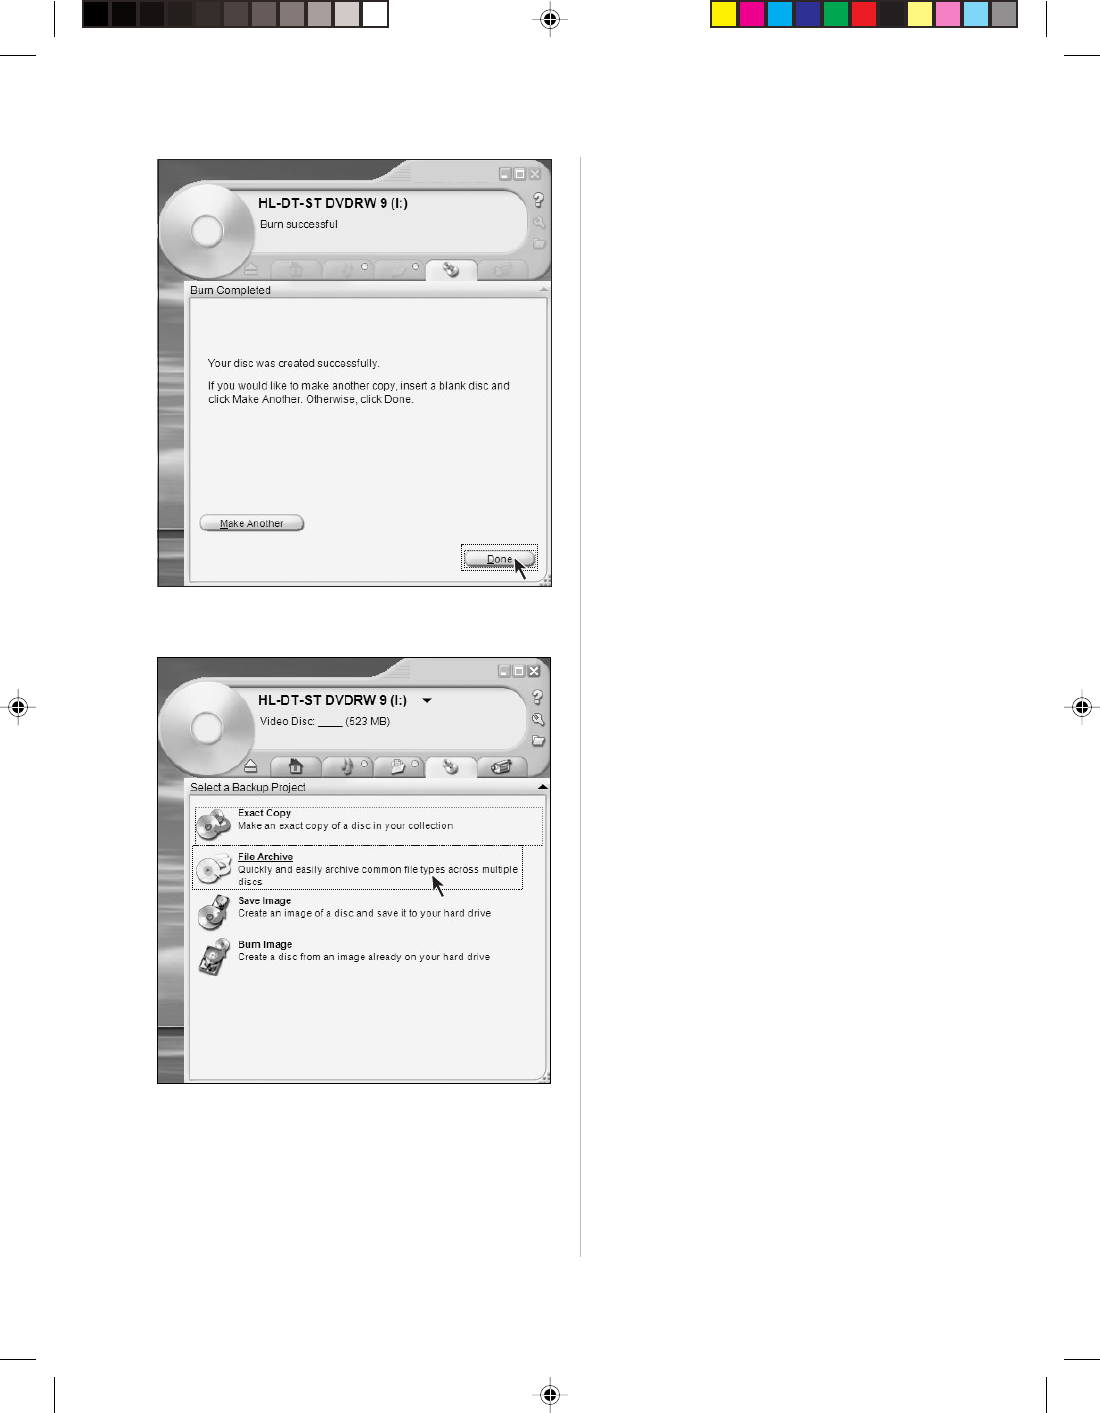
Exact Copy — Step 6
The disc will be ejected after burning is
completed, now remove the burned disc.
Disc copy completes, now click Done.
Click “Make Another” if a copy is needed.
File Archive
Perform achieve management on burned files.
27
Lenovo 3000H User Guide
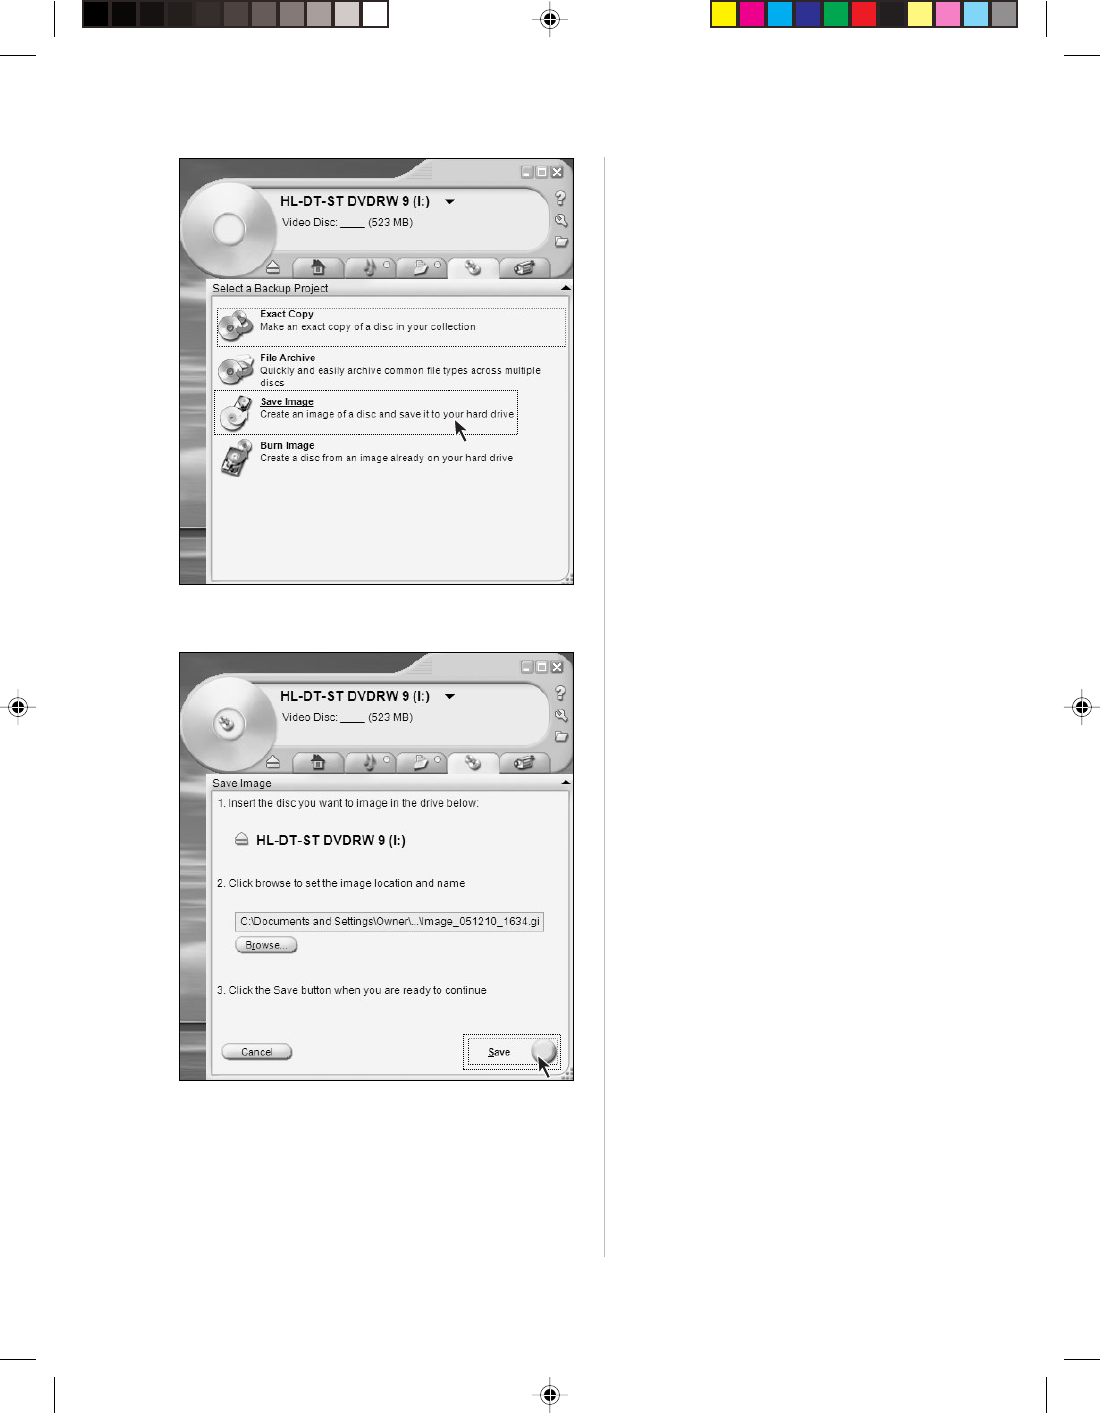
Save Image
Insert a disc, then click “Save” to create
disc images.
Save Image
Create disc images and save them in hard disk.
28 Lenovo 3000H User Guide
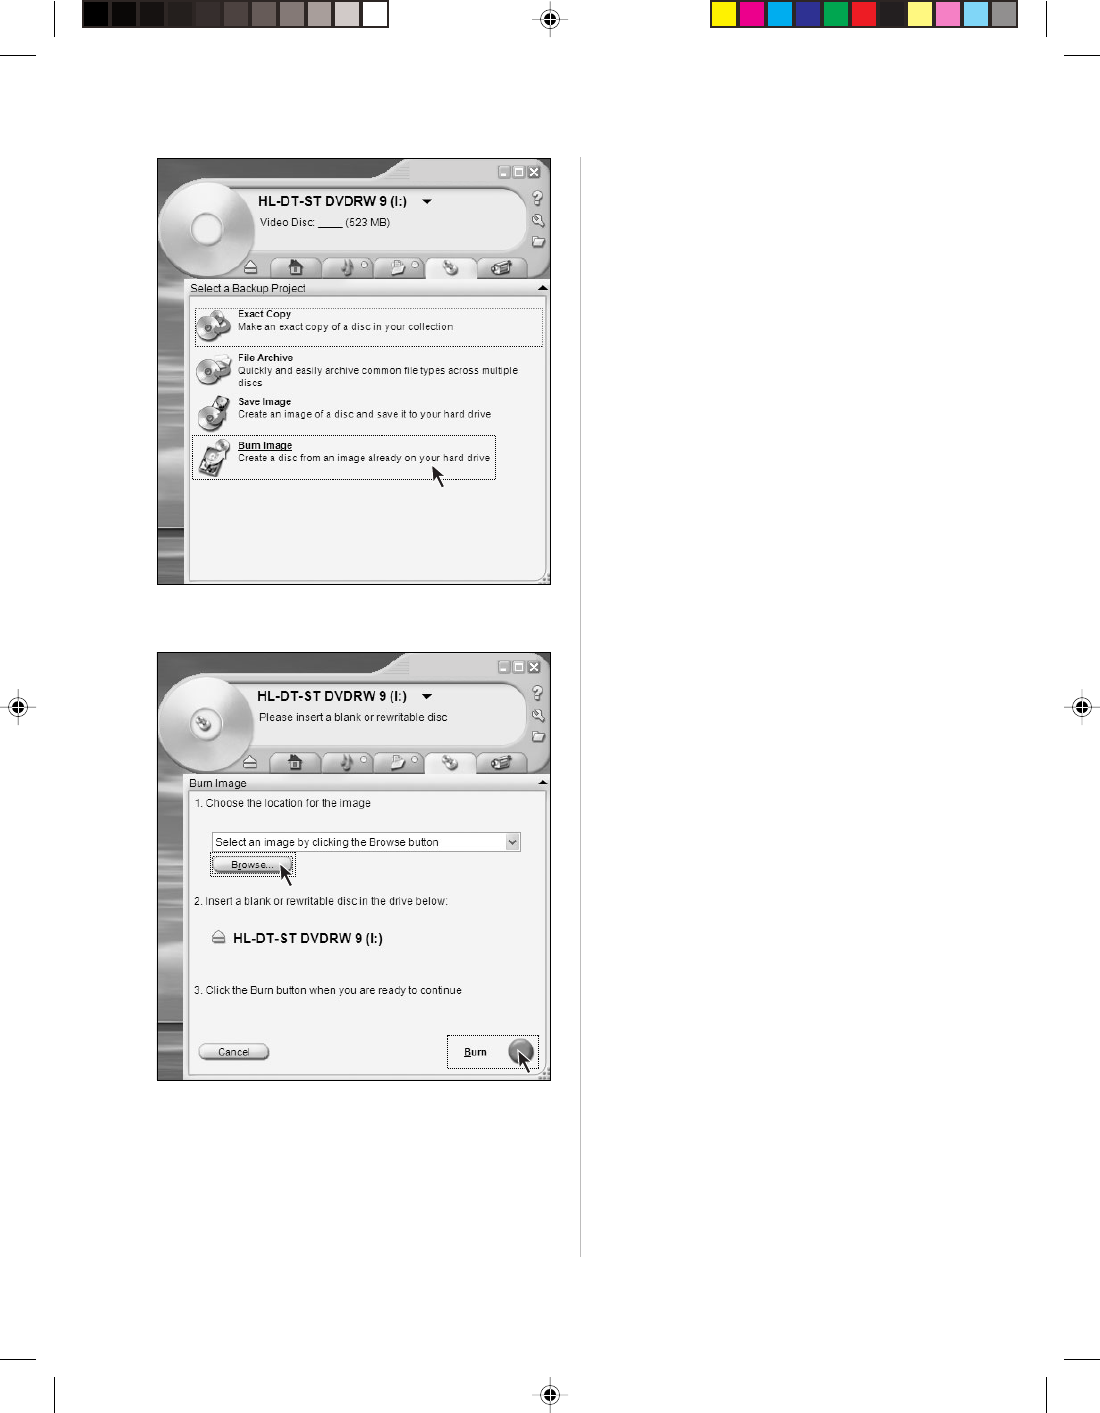
Burn Image
Burn the created disc images into discs.
Burn Image
Click “Browse” and find the pre-burned disc
image files, then click “Burn”. Now click
Burn to create the disc.
29
Lenovo 3000H User Guide
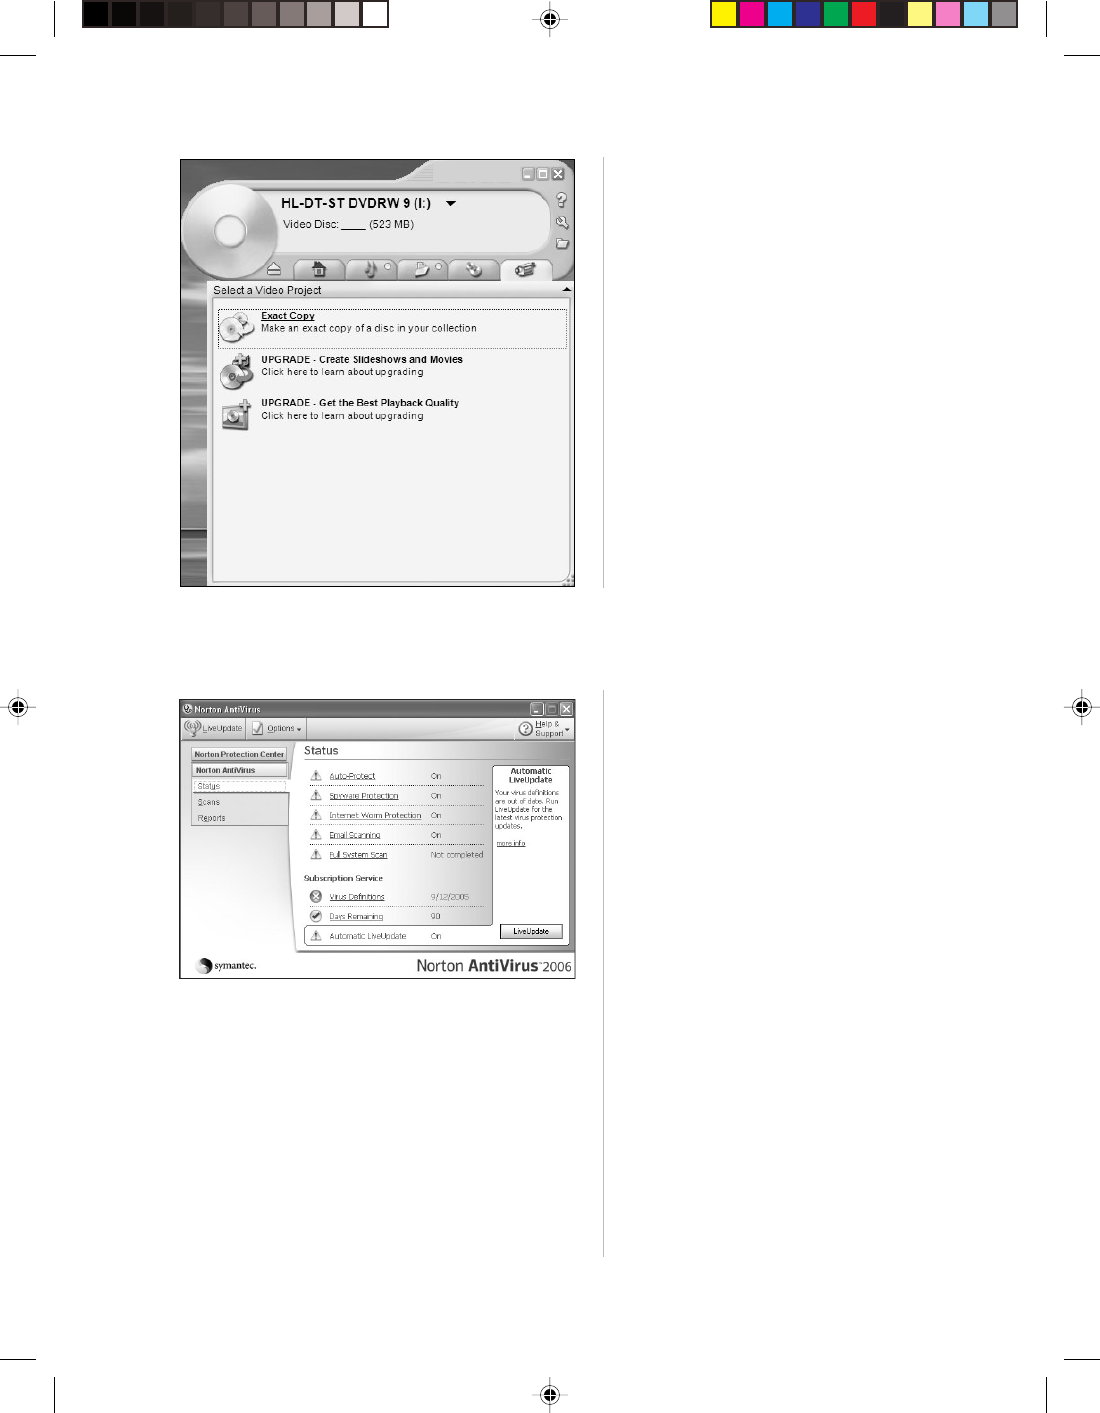
Burn Video Files
With this option, you may export and burn
videos into video discs.
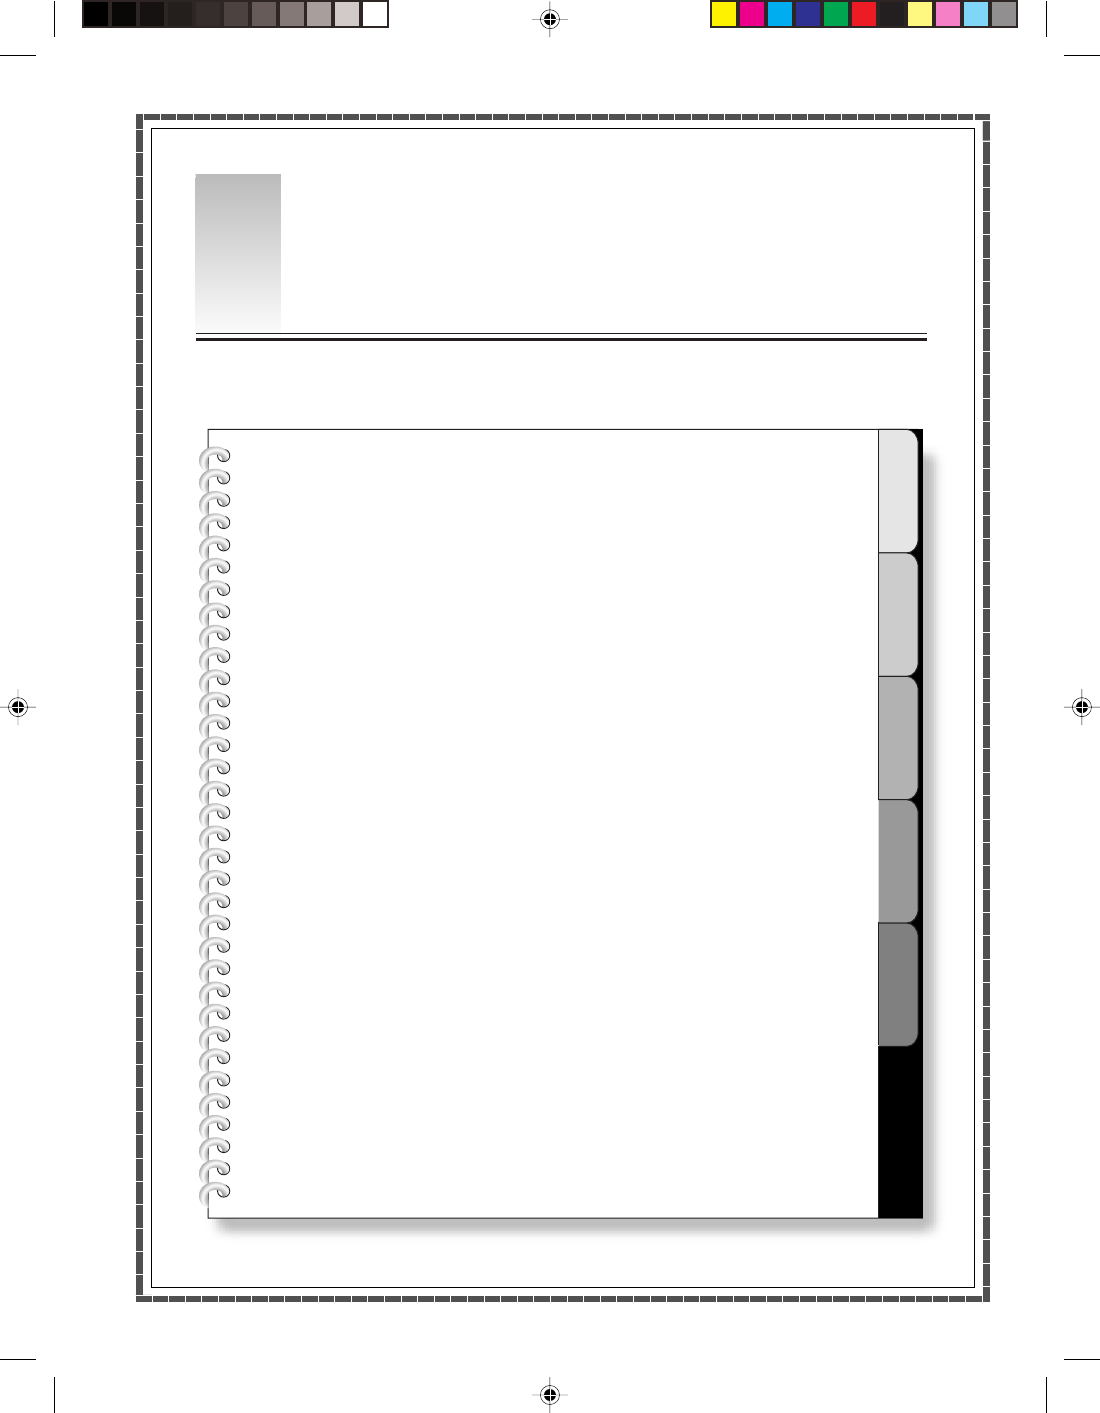
Main Screen
The main screen of Norton AntiVirus
displays when it has been installed and set
up appropriately. Now you can see the
status of the AntiVirus software.
3.3 Norton
30 Lenovo 3000H User Guide
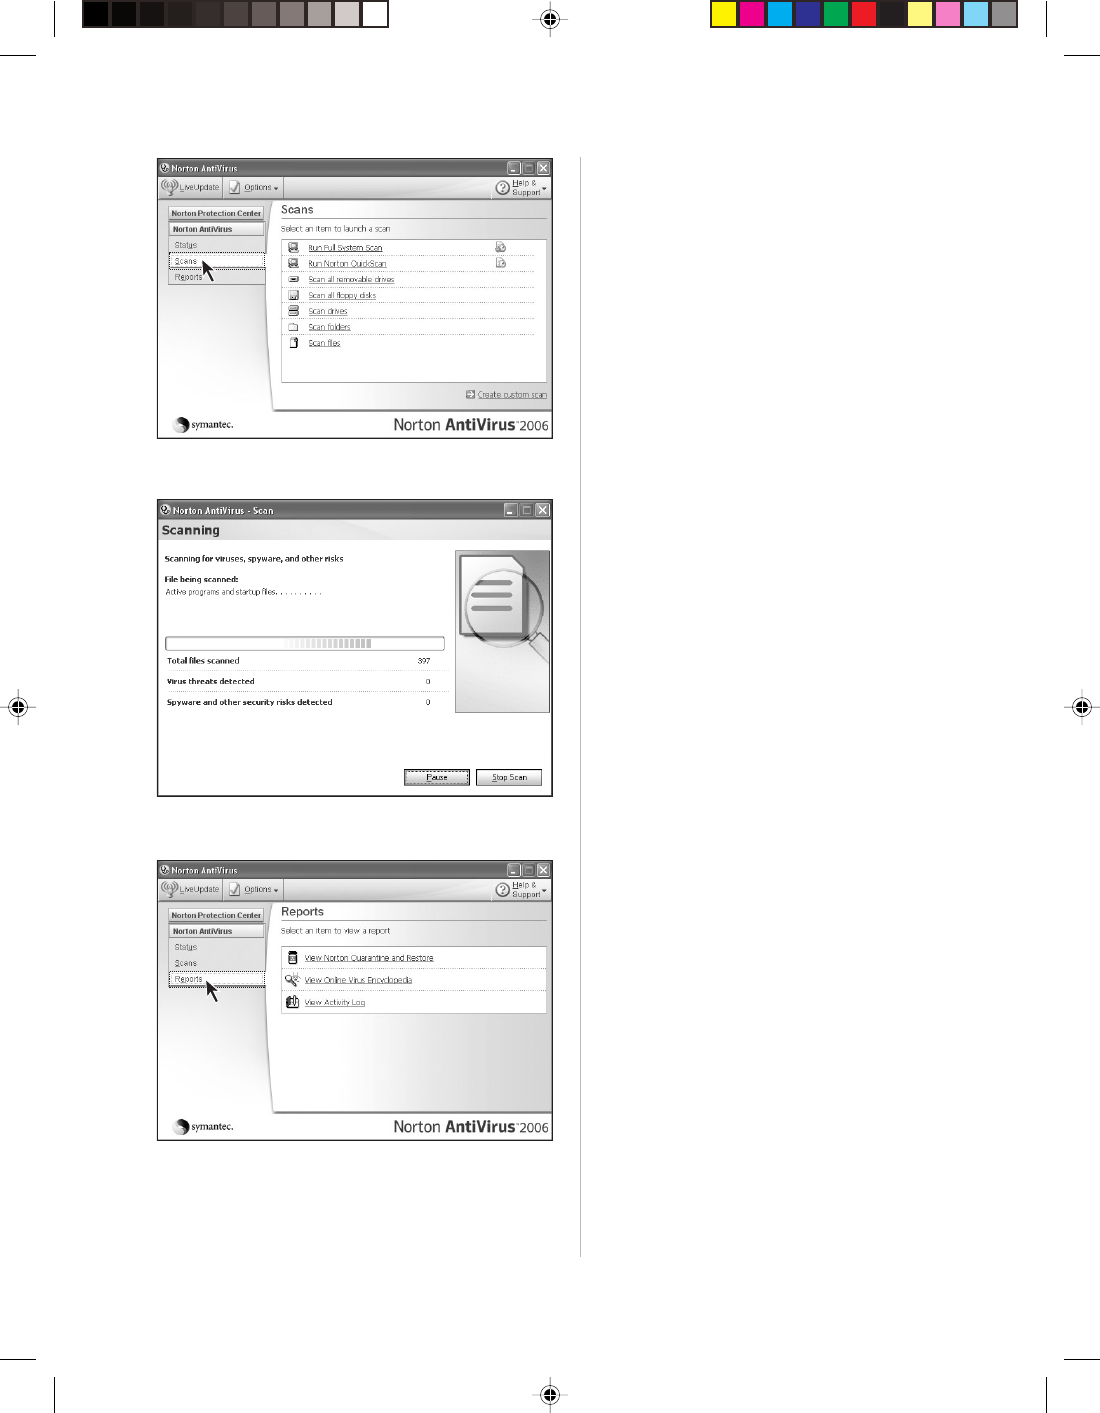
Scan for Virus - Step 3
Click Reports to view the results of virus
scanning.
Scan for Virus - Step 2
Start scanning for viruses. Please wait in the
process of virus scanning.
Scan for Virus - Step 1
Click Scans and select scanning method in
Scans dialog box.
31
Lenovo 3000H User Guide
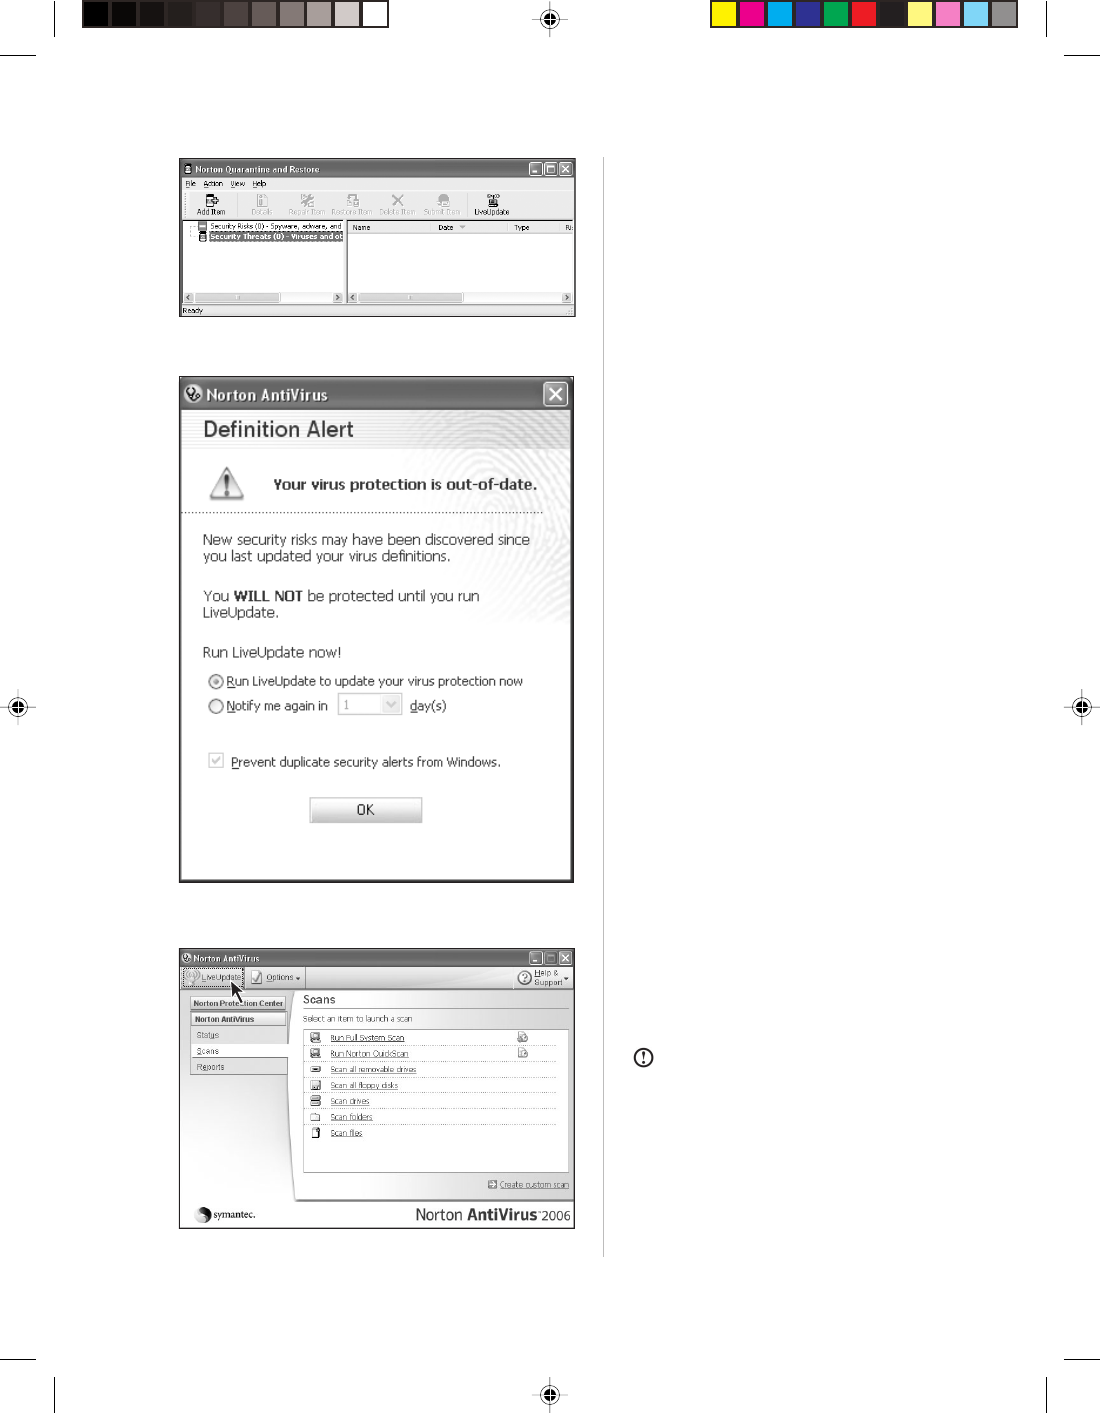
Virus Definition Update - Step 1
When the illustrated dialog box appears,
you need to update the virus definition.
Virus Definition Update - Step 2
Click “LiveUpdate” on the main screen of
the software.
Note: Have Internet connected before
updating the virus definition.
Scan for Virus - Step 4
Click View Norton Quarantine and Restore
in the left of the dialog box to view the list of
viruses.
32 Lenovo 3000H User Guide
Help Information
To obtain more information on the AntiVirus
software, you may obtain help by clicking
Help & Support.
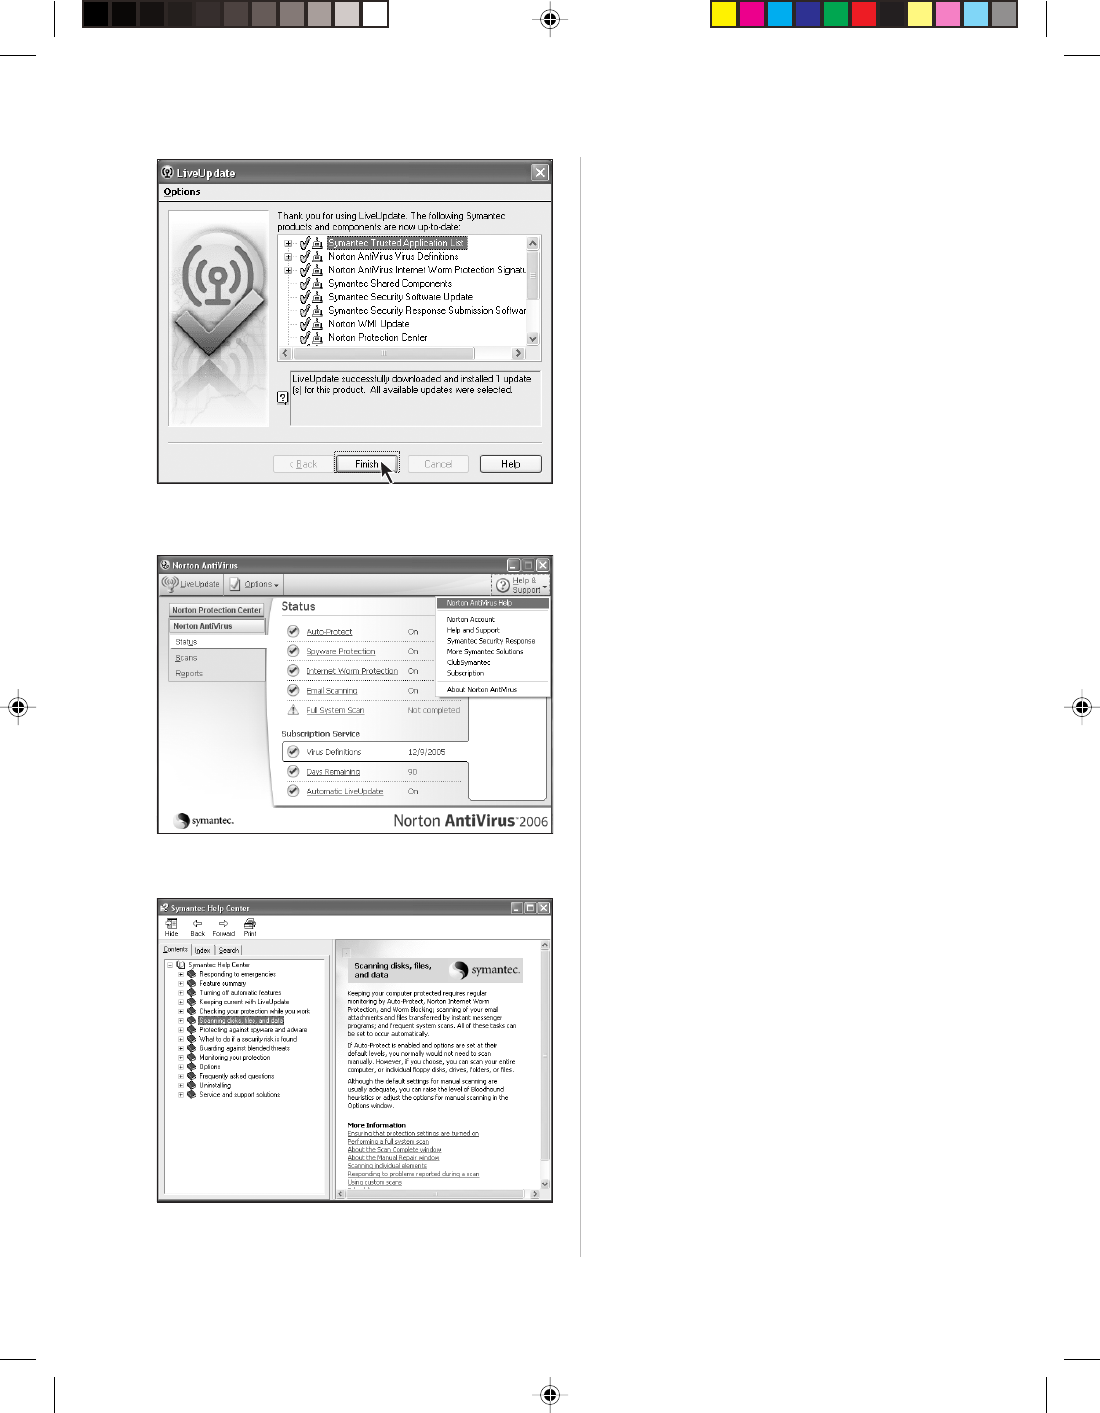
Virus Definition Update - Step 3
Follow the software instructions, and then
click Finish to end the update when it is
completed.
1
2
3
4
5
4
The following topics will be introduced in this chapter:
¾System restoration
¾Disk cleanup
¾Hard disk error checking and fixing
¾Disk defragment
¾Daily maintenance
Safe Usage of Computer
Chapter 4
33
Lenovo 3000H User Guide

34 Lenovo 3000H User Guide
Step2
Click Accessories from the pop-up menu of
All Programs.
4.1 System Restoration
Sometimes the system might encounter problems due to false operations; we could easily have it recovered
through system backup and restoration features.
We may restore the system settings to the normal one as illustrated below:
(Note that the existing system settings will change after restoration, please check backup conditions of all settings)
Step 1
Click Start in the lower left corner of the
desktop. Click All Programs from the pop-
up menu.
35
Lenovo 3000H User Guide
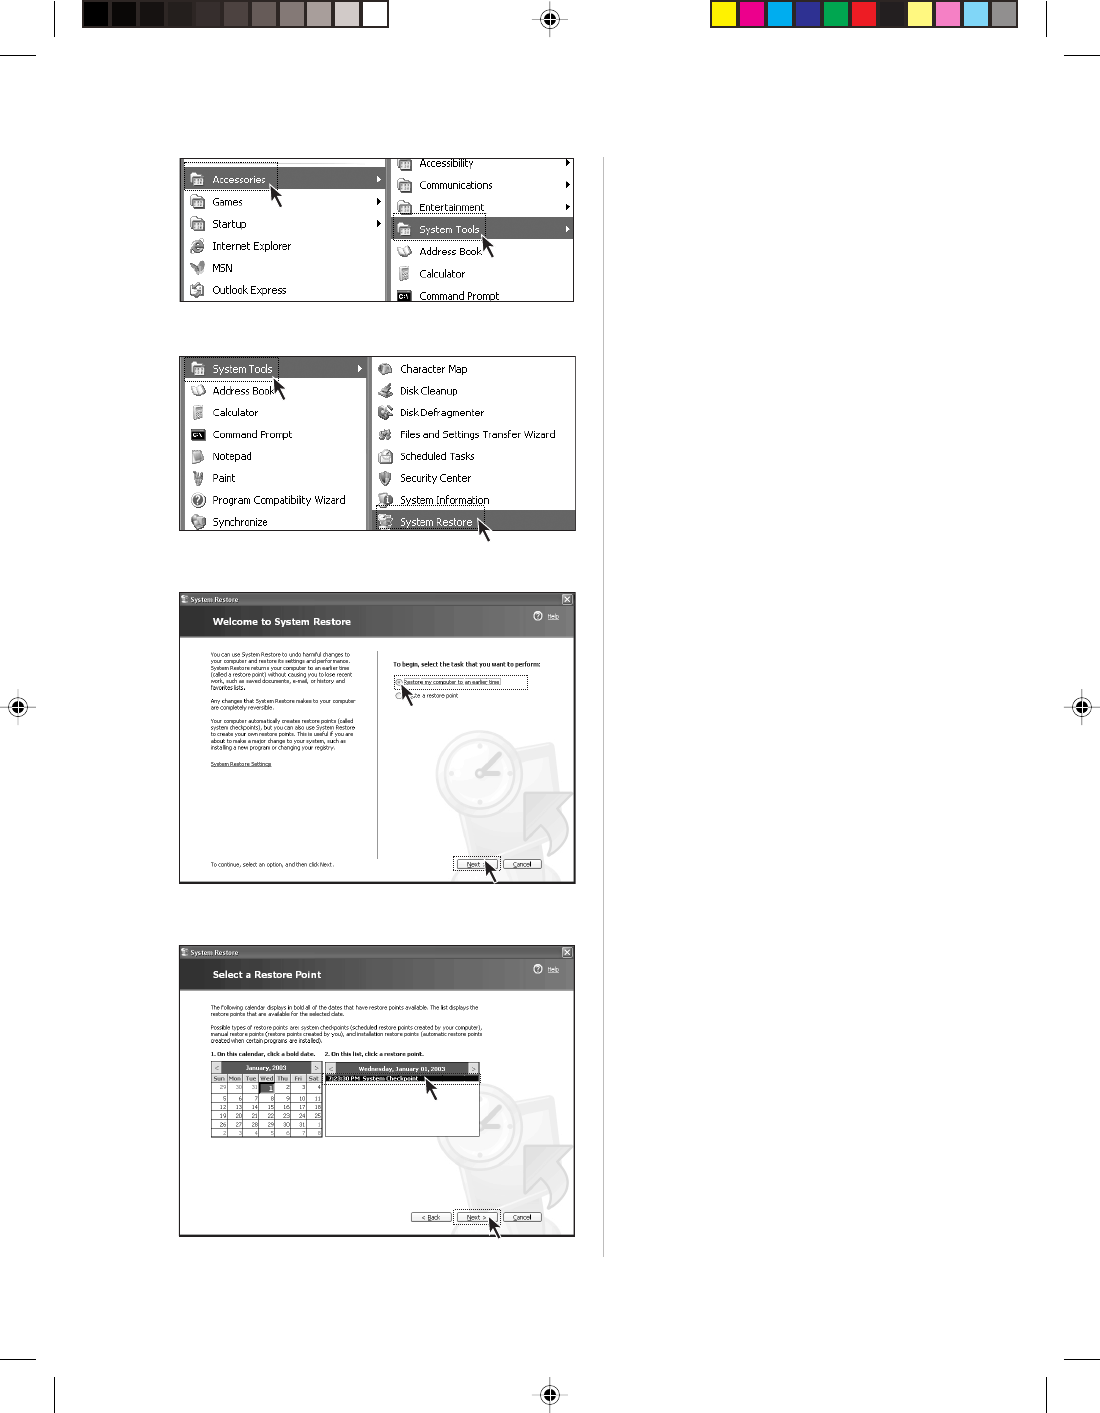
Step 3
Click System Tools from the pop-up menu
of Accessories
Step 4
Click System Restore from the pop-up
menu of System Tools.
Step 5
Select Restore my computer to an earlier
time, then click Next.
Step 6
Select a nearest date from the timetable
when the system was normal (you may
select month by clicking the arrows above
the timetable).Locate the System Check
Point in the right pane or click the Restore
Point, then click Next.
36 Lenovo 3000H User Guide
For safe usage, you may manually set a restoration point before modifying system settings (for example,
installing games). Do the following:
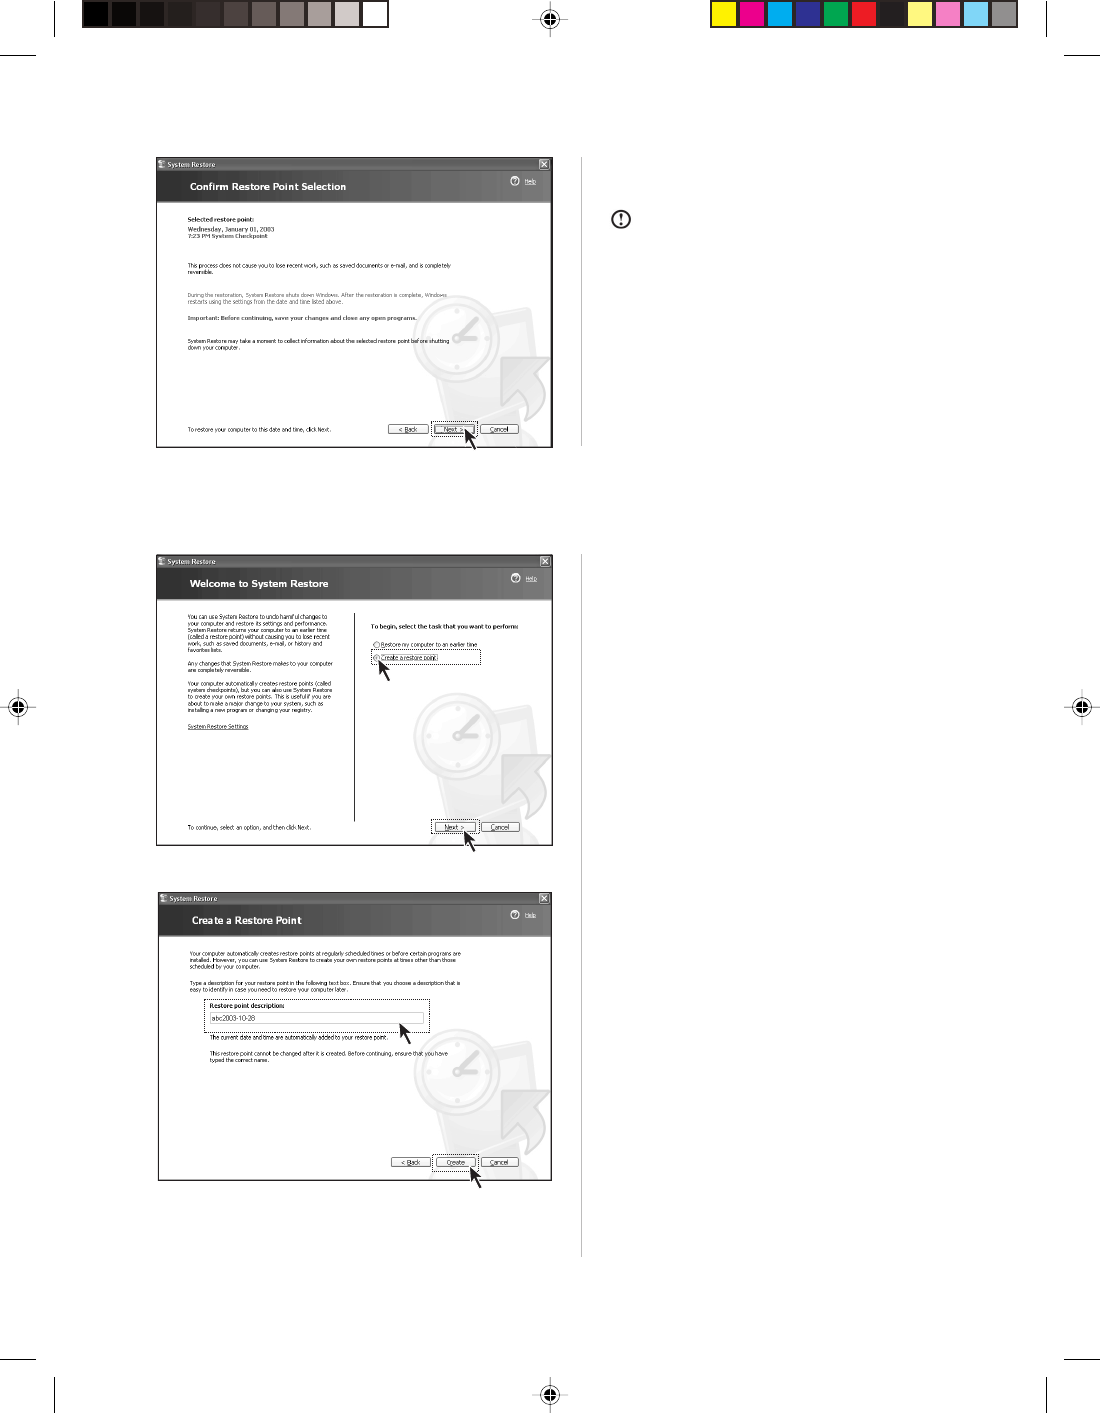
Step 1
Go to the System Restore screen following
the above steps, select Create a restore
point, then click Next.
Step 7
Note: The system will close all programs
before performing system restoration.
Please save data, and then click Next.
The system will start system restoration.
The system will prompt that restoration
succeeds after completing all procedures.
Now click OK.
Step 2
Enter the name you create for the point in
Restore point description, and then click
Create.
Step 3
The system prompts that creation
succeeds, and then click the Close button.
If this restoration fails, you may backup the
relevant data and try One-Key Recovery
feature (refer to the content of One-Key
Recovery for relevant information).Recovery
for more details.
37
Lenovo 3000H User Guide
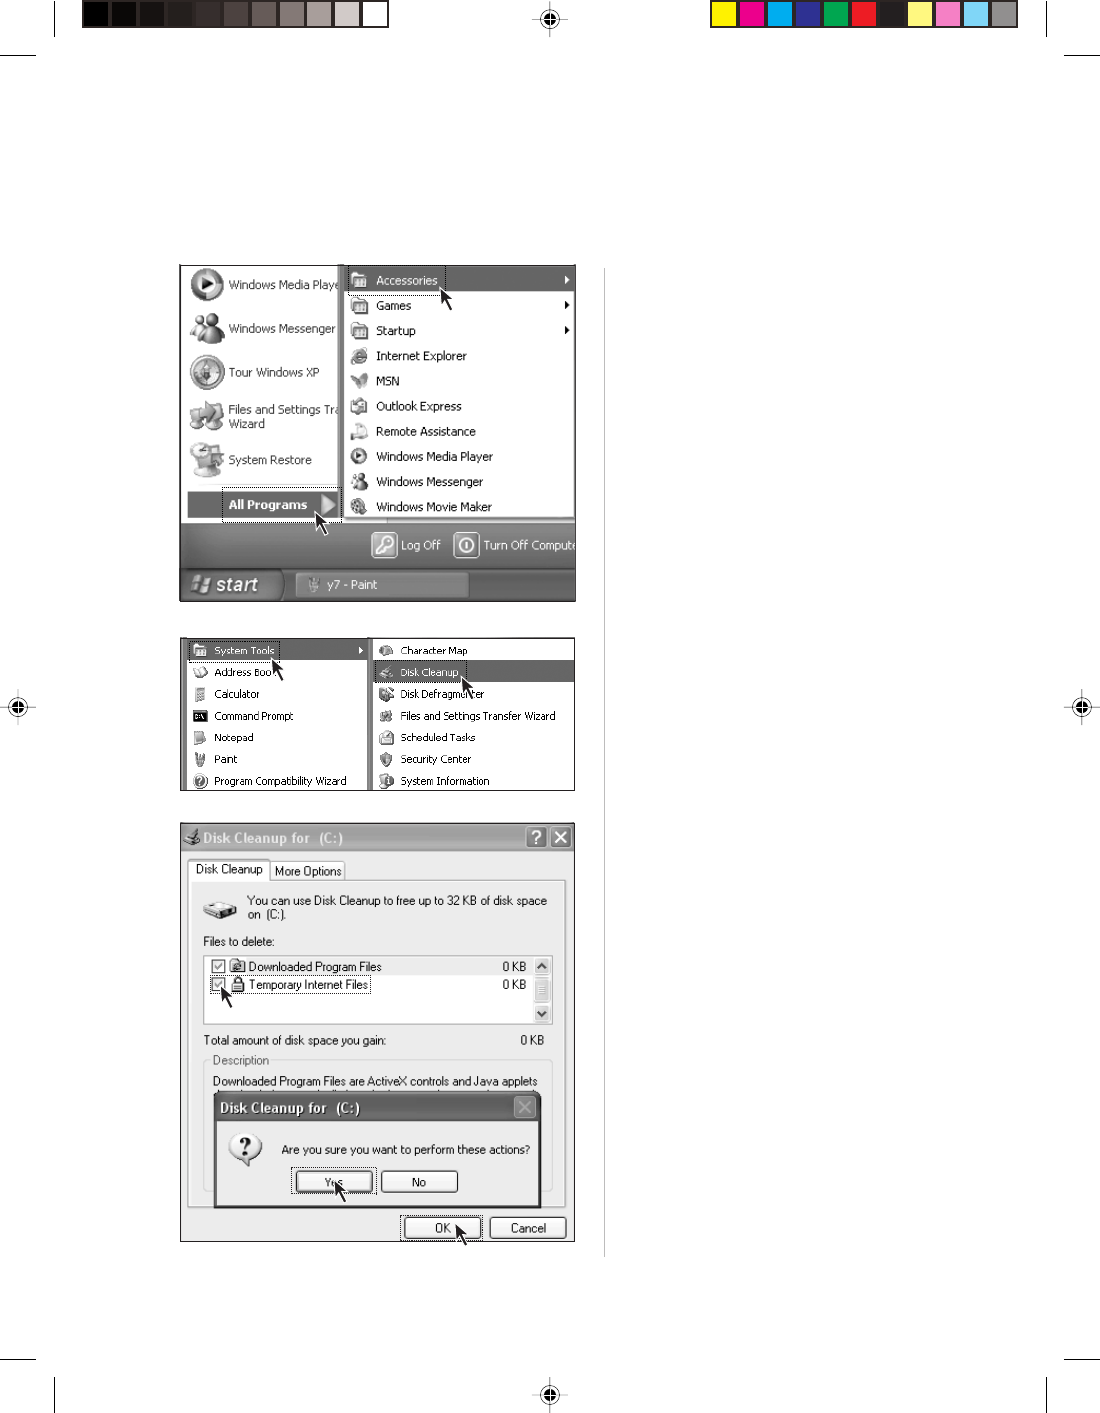
Step 3
Check the files to be deleted in the pop-up
dialog box (usually check all types of files).
Step 4
Click the OK button in the lower right corner.
Step 5
Select Yes in the pop-up dialog box.
4.2 Disk Cleanup
Periodically cleaning up the disks may enhance computer performance.
Step 1
Select All Programs from Start menu in the
lower left corner of the screen, and then
select Accessories from All Programs menu.
Step 2
Select System Tools from Accessories, and
select Disk Cleanup from System Tools.
Select the disk partition to clean up.
38 Lenovo 3000H User Guide
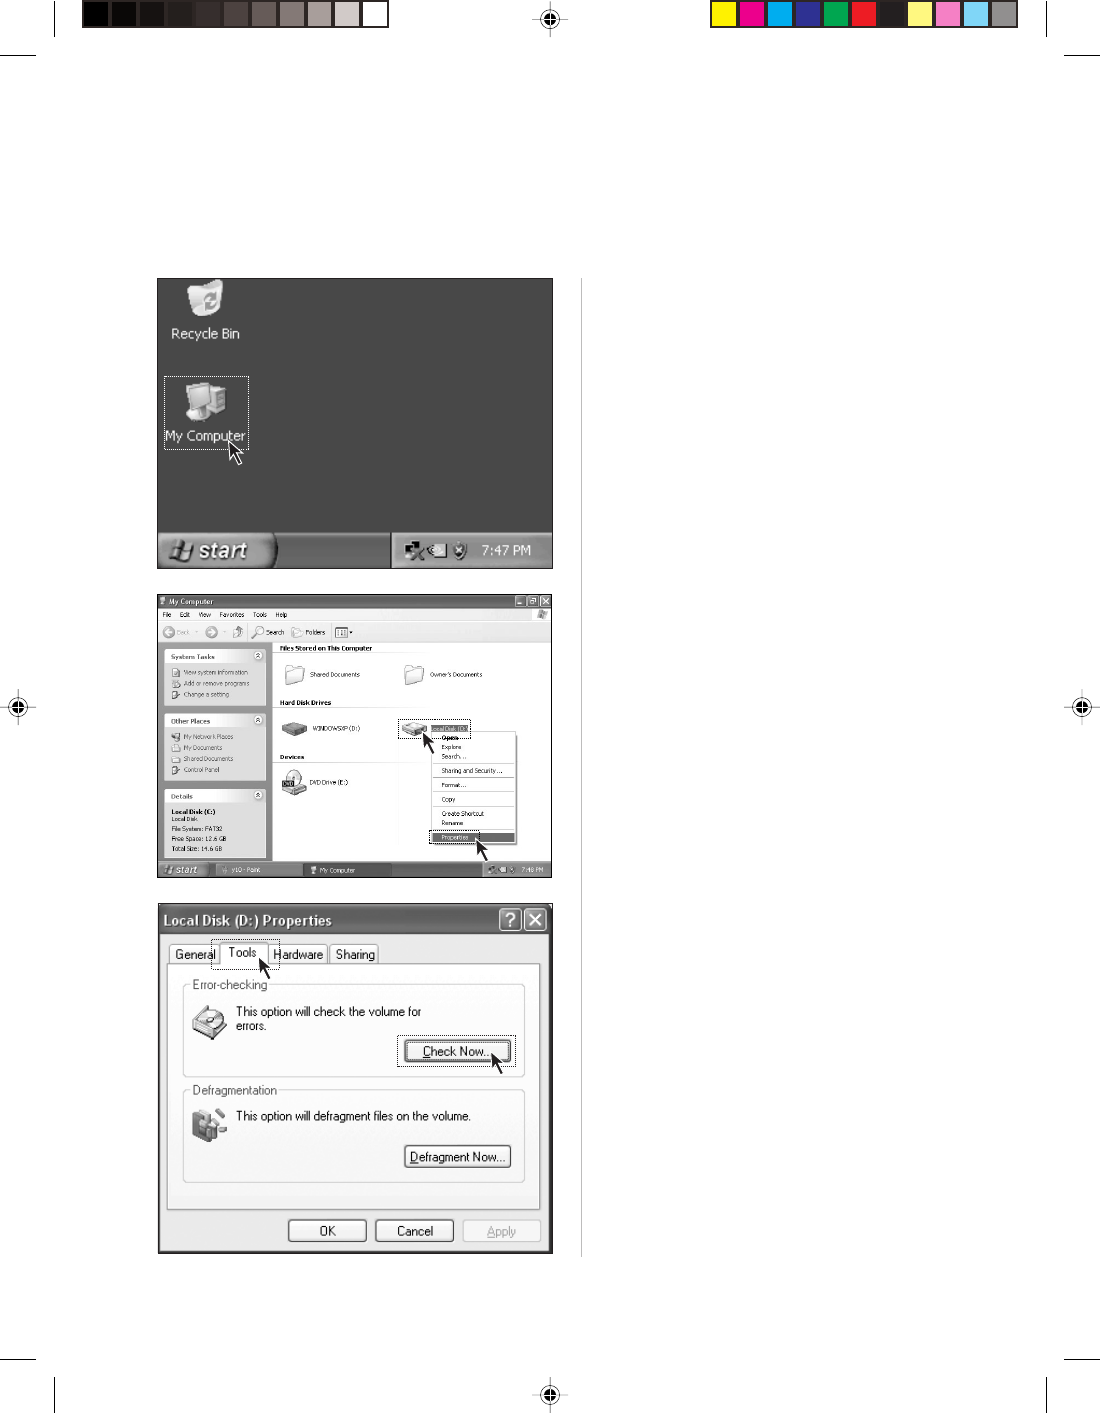
Step 1
Double-click My Computer icon on the
desktop.
4.3 Hard Disk Error Checking and Fixing
Periodically checking and fixing hard disk errors is helpful to maintain favorable status and correct errors
encountered while running the system:
Step 2
Locate the hard disk drive for defragment in
My Computer dialog box. Right-click the
corresponding icon, then select Properties
from the pop-up menu.
Step 3
Select the Tools tab, and then click Check
Now.
39
Lenovo 3000H User Guide
Step 1
Similar with disk error checking, go to the
Tools tab of disk Properties and select
Defragment Now.
4.4 Disk Defragment
Disk fragments refer to the tiny storage areas scattered at different places of the disk - they cannot be re-utilized
directly. System performance might decrease if defragment has not been done for a long time. Do the following:
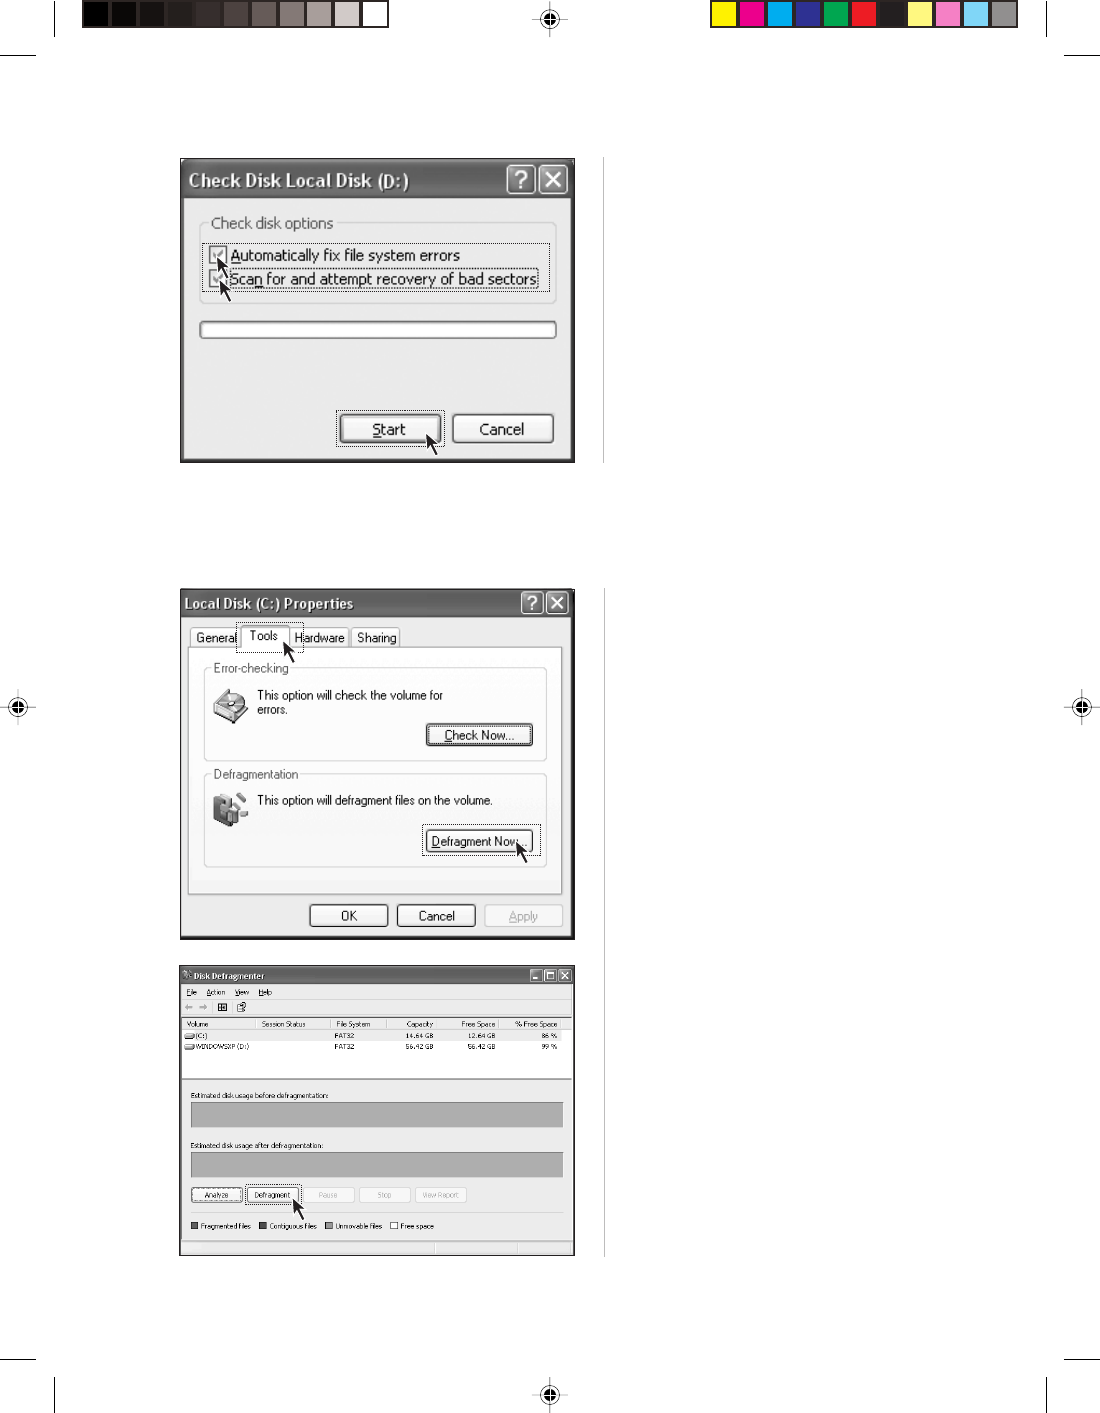
Step 4
Check the two options as illustrated, and
then click Start.
Step 5
You cannot start error checking until the
computer is restarted and initialized.
Step 2
Select the drive for defragment (for example,
drive C), then click Defragment. Defragment
usually takes a long time.
40 Lenovo 3000H User Guide
4.5 Daily Maintenance
1. Component Maintenance
Cleaning: Since many components of computer are composed of sophisticated IC boards, it is mandatory to
clean periodically and avoid dusts.
Cleaning supplies: vacuum cleaner, soft cotton cloth, clear water (pure water preferred) and cotton swabs
can be used to clean the components.
2. General Cleaning Methods
TDusts on the surface of mainframe, monitor, printer, speaker and mouse can be wiped off using soft cloth
while dusts at inaccessible corners can be removed by vacuum cleaner.
To clean the keyboard thoroughly, you may shutdown the mainframe and scrub it gently with a cloth dipped
in water - do not use the keyboard until it is dry.
Prevent water from entering the computer.
Do not use wet cloth. Do not spray water directly onto the surface of monitor and inside of mainframe.
Special attention should be given to LCD monitors - keep it clean and avoid grease stain. It is recommended to
remove the dusts by brushing gently with a dry cloth for daily cleaning.

1
2
3
4
5
5
The following topics will be introduced in this chapter:
¾Display
¾Sound
¾Desktop icons
¾Software problems
¾Optical drives and hard disks
Troubleshooting of Common Problems
Chapter 5
41
Lenovo 3000H User Guide
42 Lenovo 3000H User Guide
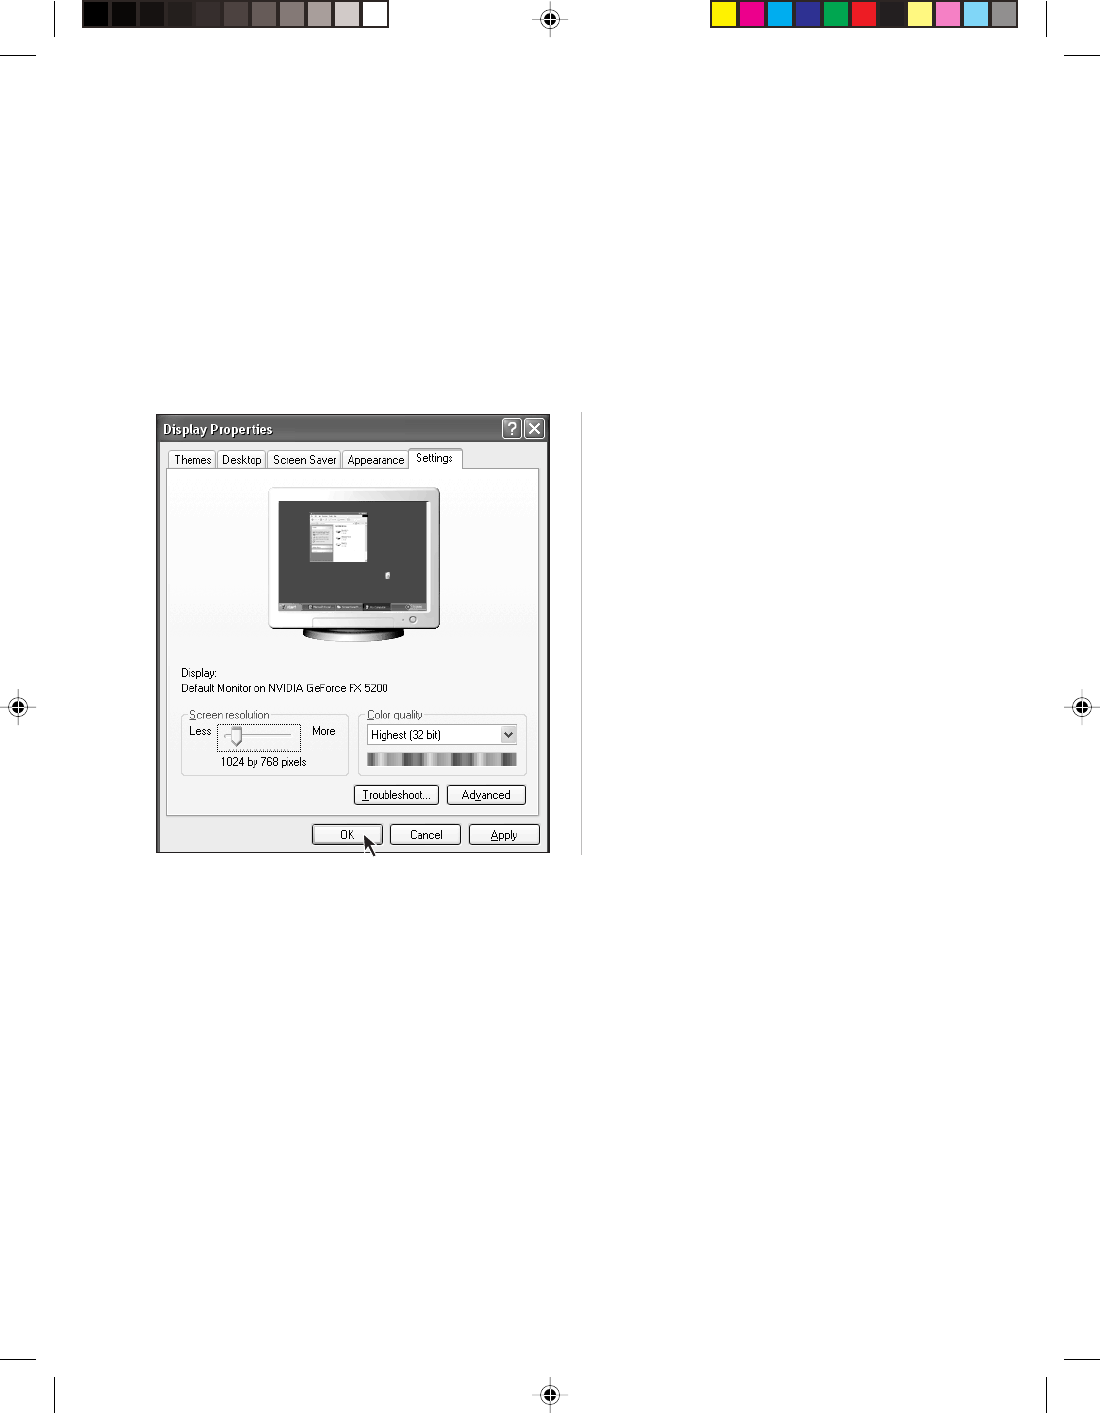
The background and icons of the screen
can be set by adjusting the display
properties. Right-click anywhere without
icon on the desktop, then select Properties
from the pop-up menu.
You will see options such as Theme,
Desktop, Screensaver, Appearance and
Settings in the Properties window.
•Desktop option can be used to set
background picture;
•Screensaver option can be used to select
screensaver;
•Appearance option can be used to set
icons and characters;
•Settings option can be used to set
resolution and colors.
5.1 Display
1.Blank screen and no picture displayed on the monitor
1) Check whether the monitor has been turned on; press the power button if not yet.
2) Check whether the power cord of the monitor is loose. If so, securely connect the power cord of the monitor.
3) Check whether the signal cable of the monitor is securely connected with the connector of the mainframe
graphics card; if not, please shut down the computer and then securely connect the signal cable of the
monitor.
2.Settings of Display Properties
3.Moire on Screen
Carefully check whether there are devices that generate magnetic interference (such as refrigerator,
electric fan, electric drier, UPS, regulator and fluorescent lamp) around the computer with a distance less
than 1 meter. Moire interference will also appear on the screen if the monitors of two computers are placed
closely (within a range of 1 meter). To solve the problem, move the interfering device away from the
computer. If the problem persists, consult Lenovo Service.
5.2 Sound
1.When you connect the headphone to the front audio output connector, the speakers
connected to the back audio output connector is soundless.
The front audio output connector is provided for convenience and has a priority higher than the back audio
output connector. If speaker or headphone is connected to the front audio output connector, sound is
delivered through the front connector while audio devices connected to the back audio output connector
are soundless.
43
Lenovo 3000H User Guide
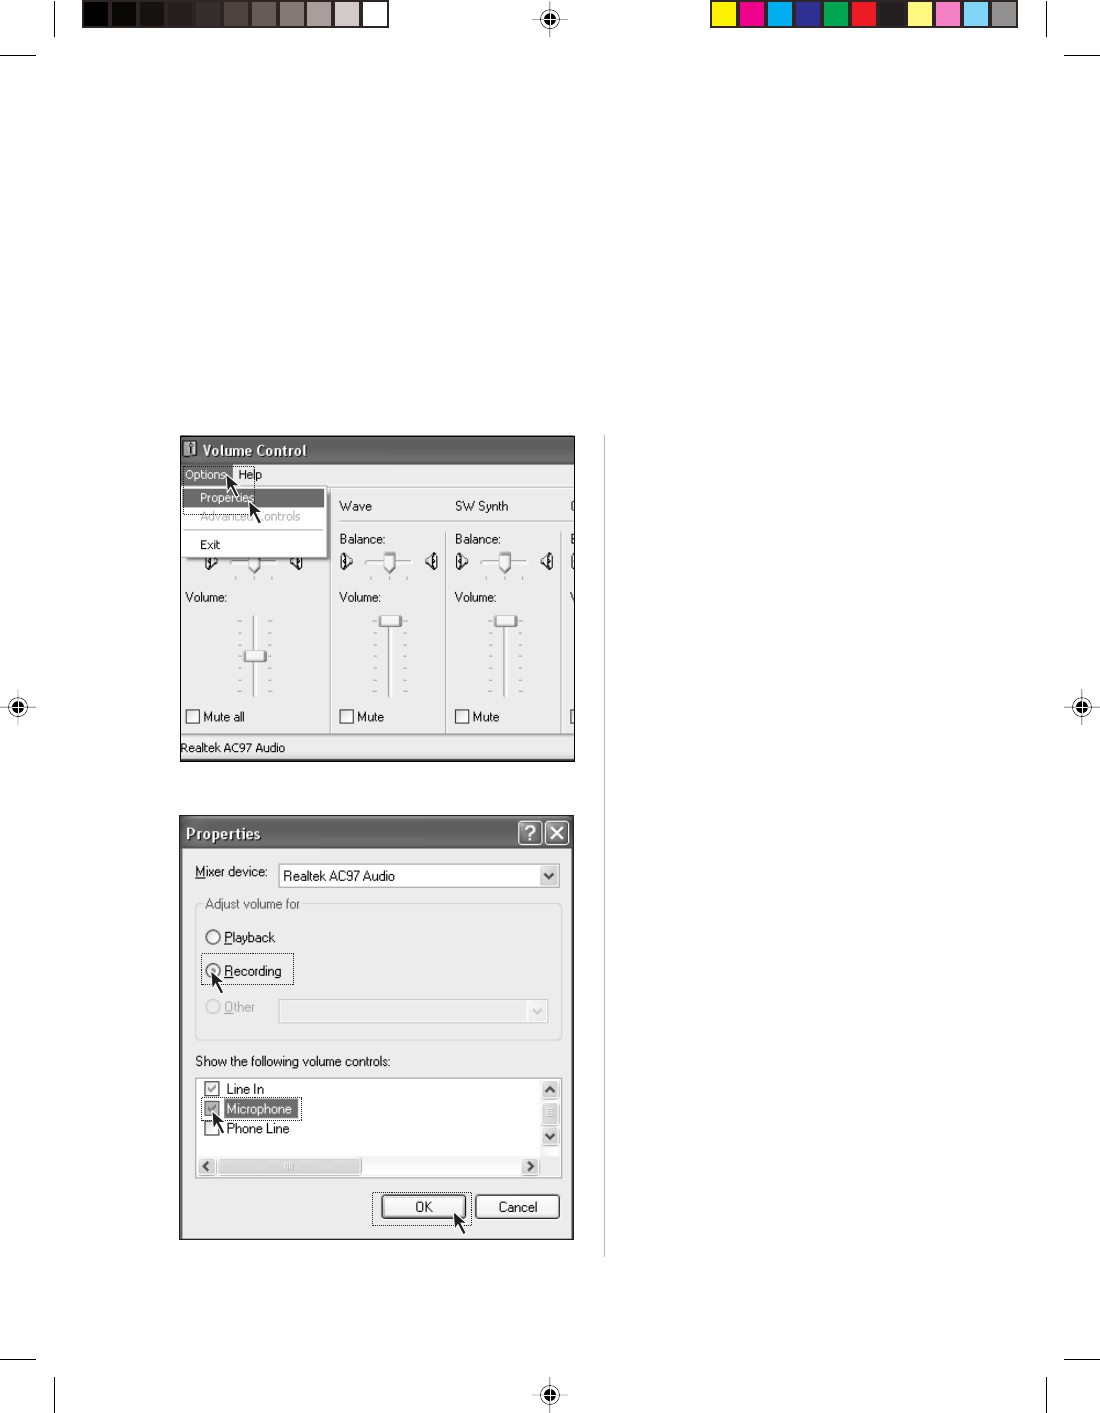
Step 2
Select Record from the Properties menu.
Check Microphone in the scroll box below
and click OK.
Step 1
Click Options and select Properties from the
upper left corner of the Main Volume setting
menu.
2Computer Becomes Soundless Suddenly
1) Carefully check whether the cable between speaker and mainframe is appropriately connected.
2) Check whether each sound channel is set to mute. You can double-click the mini-speaker icon in the
lower right corner of the taskbar, and then check whether you have checked the Mute option for each
channel. If yes, uncheck it by clicking the box.
3) Check whether the volume of each sound channel is set to minimum. If so, adjust the volume to the
appropriate level. If the problem persists, please re-install the driver for audio card by clicking Lenovo
Applications _ Driver and Software Installation from Start _ All Programs.
3Record Sound with Microphone
Do the following if you want to record sound with microphone:
44 Lenovo 3000H User Guide
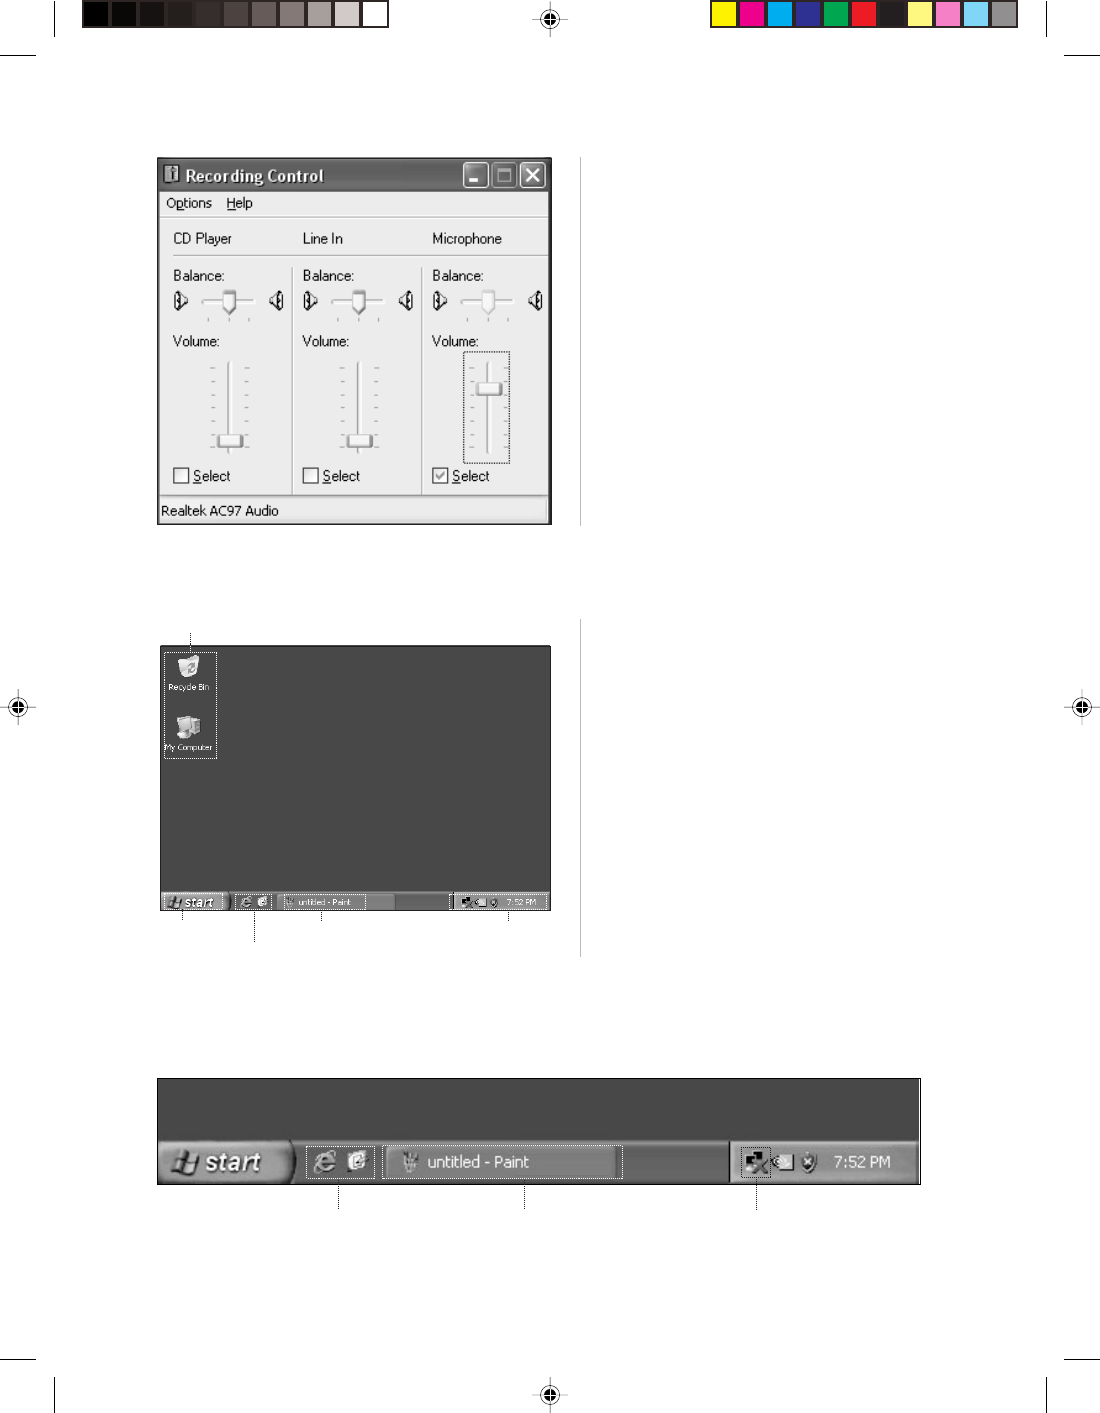
Step 3
Check Select for the microphone and adjust
volume to the appropriate level. Then click
the Close button.
Desktop shortcut
Start menu
Quick launch bar
Task bar Notification area
The entire screen displayed after entering
the system is referred to as “desktop”. Icons
and menus displayed on the desktop vary
by desktop settings.
5.3 Desktop Icons
Usage of Taskbar
At the bottom of the screen are taskbar and some shortcut icons. We will briefly introduce their usage.
1) The quick launch icons 2) The icon of a minimized window 3) Notification area
45
Lenovo 3000H User Guide
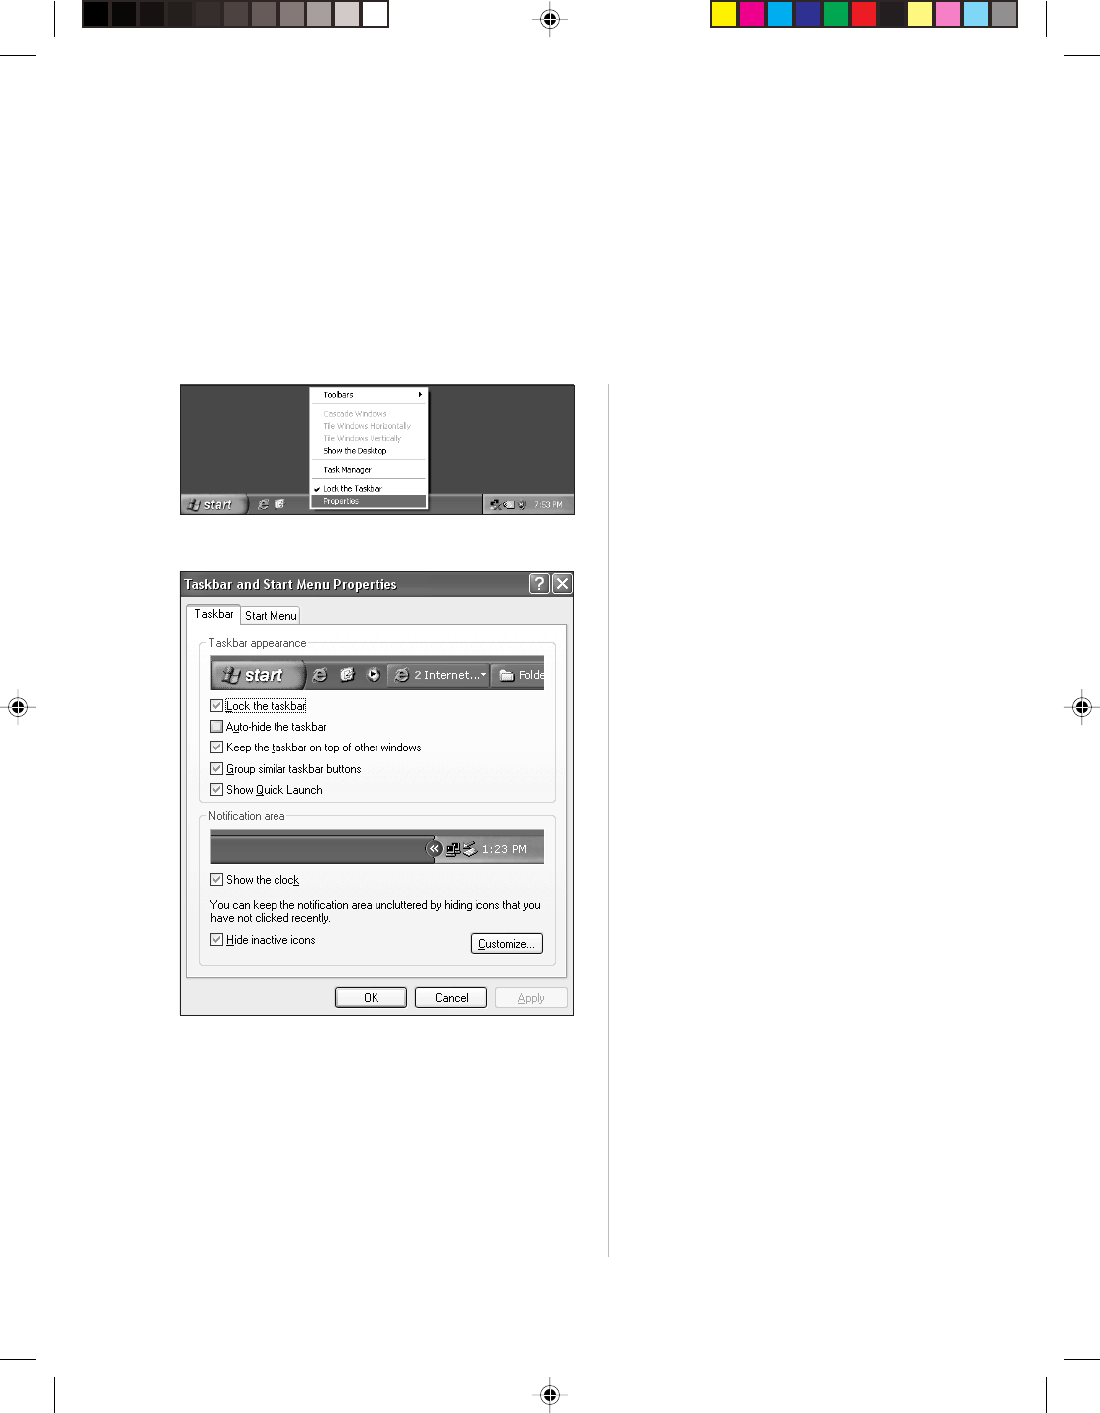
Right-click a blank place in the taskbar, then
select Properties from the pop-up menu.
How to adjust arrangement of taskbar icons:
In the Properties dialog box, you may select
the option Customize for taskbar
appearance.
1) Usually you will see Quick Launch icons such as MediaPlayer and IE browser.
2) Minimize the icon and right-click on the icon, the illustrated menu will appear. You may restore, maximize
or close the window using this menu.
3) You will see small icons such as sound and network connection in the lower right corner of the screen.
You may check their working status by double-clicking and opening them.
46 Lenovo 3000H User Guide
5.4 Software Problems
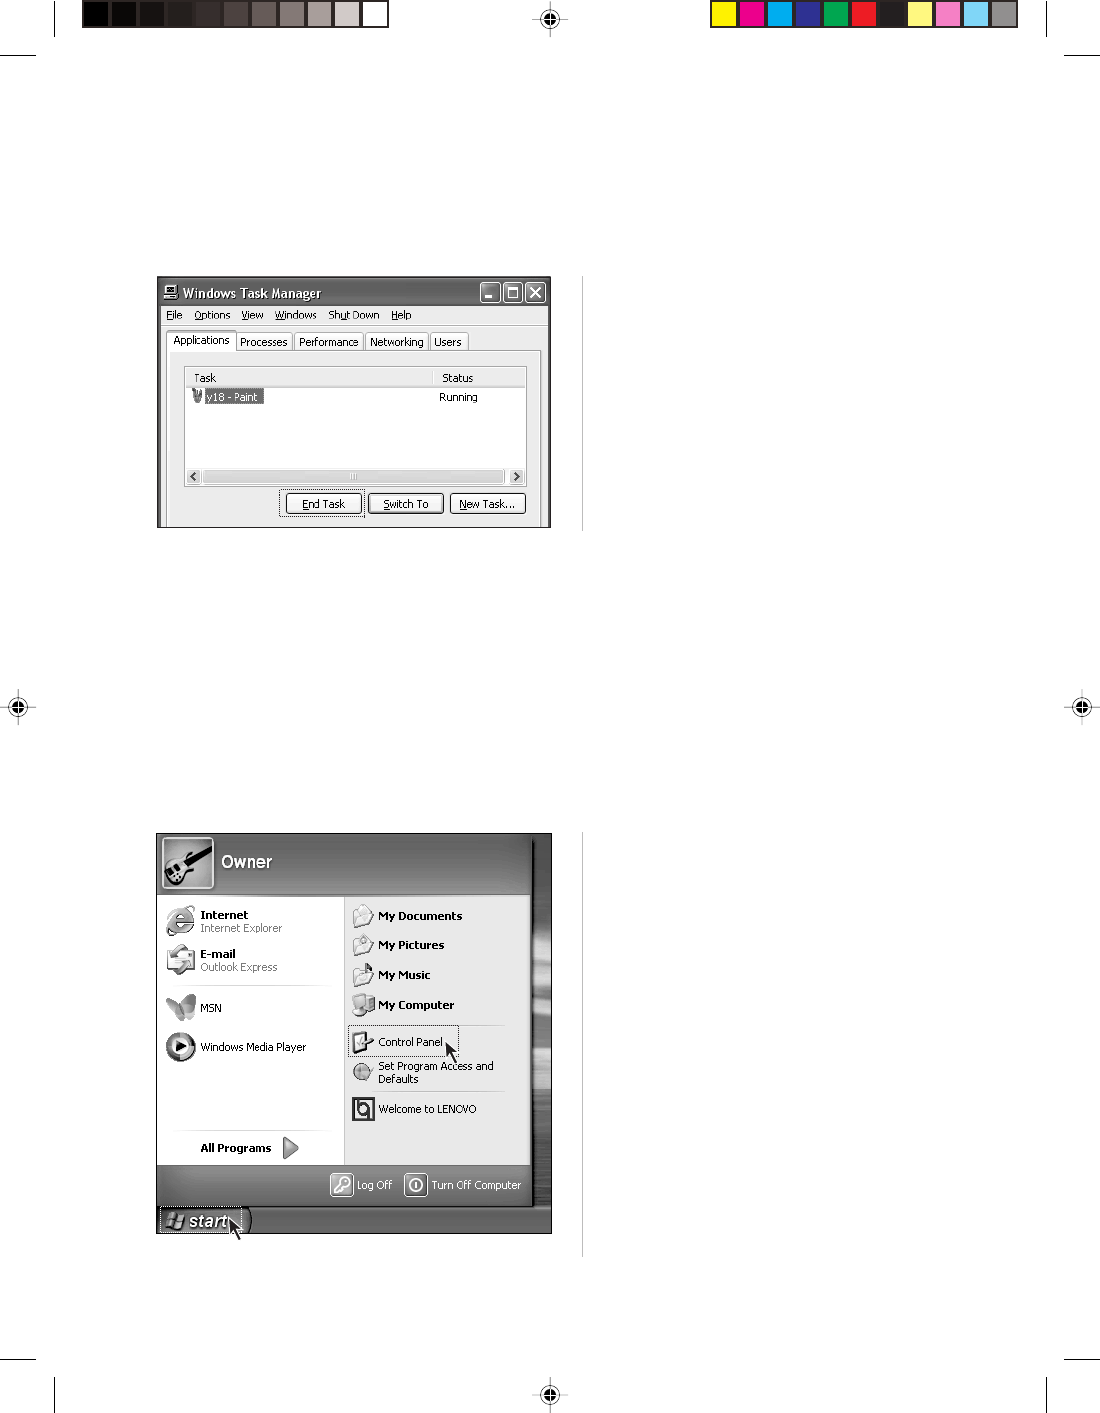
5.4.1 End Program
You may end a program from task manager if you cannot exit the running program normally.
You may invoke Task Manager window by
pressing Ctrl, Alt and Delete at the same
time. To end a program, select it in the
Application tab, then click End Task button.
Step 1
If the program has its own uninstaller, run it
directly to uninstall the program.
Step 2
If not, click Start in the lower left corner of the
desktop, and then click Control Panel in the pop-
up menu.
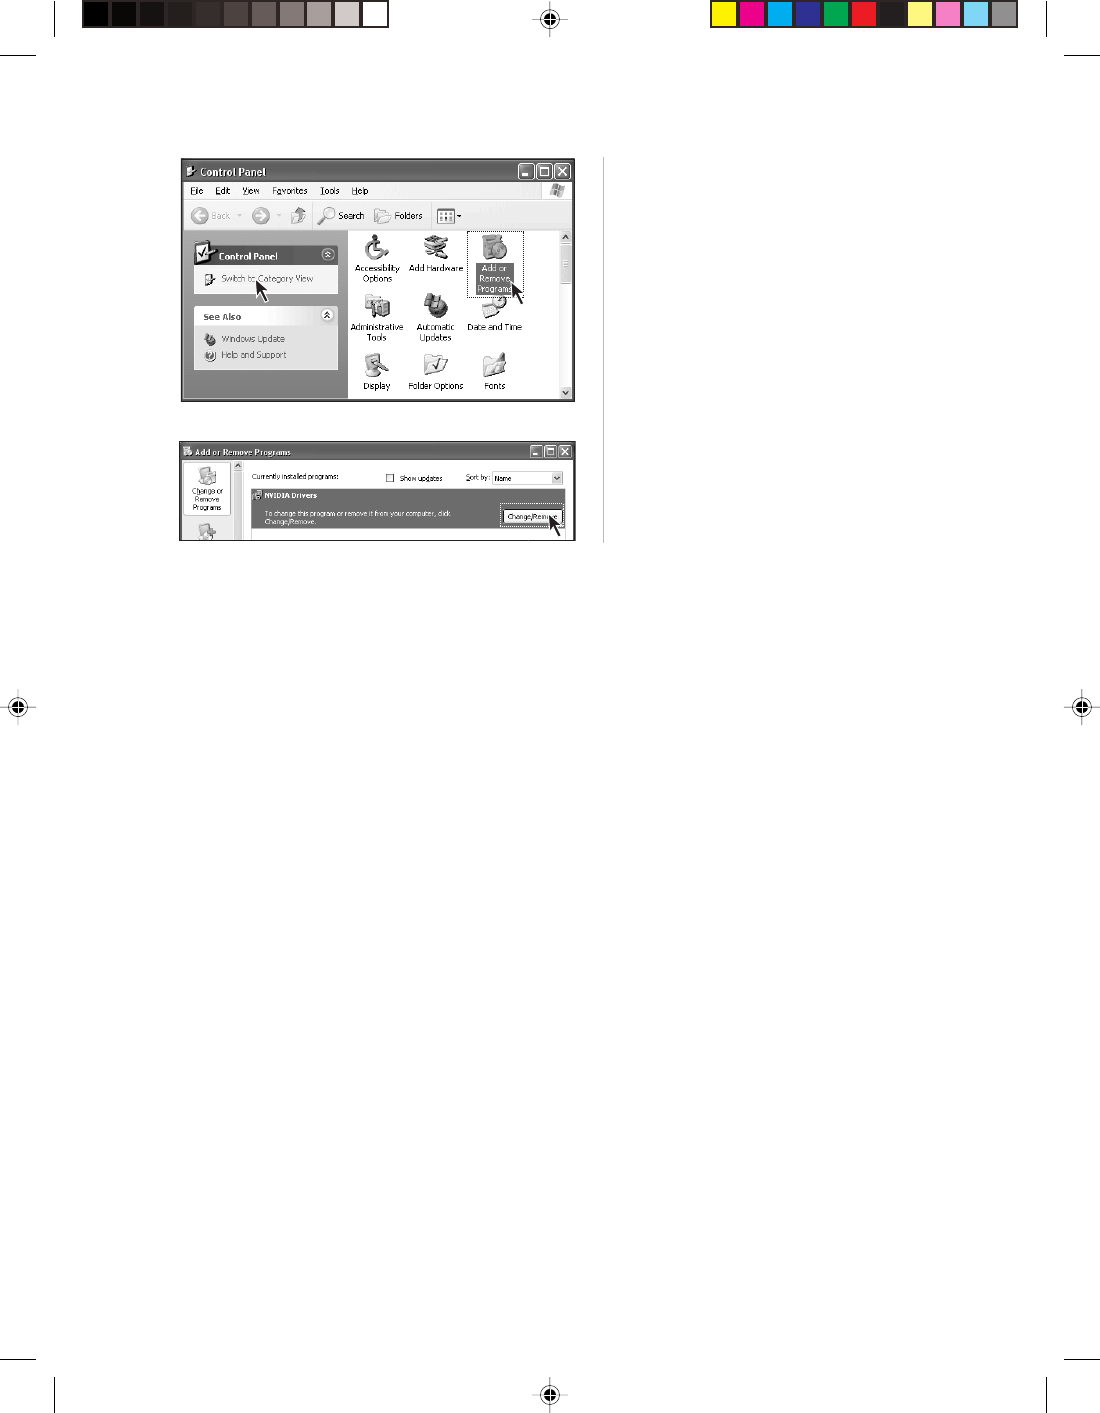
5.4.2 Install and Uninstall Program Appropriately
Install Program Appropriately
If possible, never stop the process illegally during installation (for example, cut off the power supply). This
might lead to system program chaos, and even failure to enter the system normally.
Uninstall Program Appropriately
If you need to remove certain applications, never directly delete the files or folders. This is harmful to the
system, and might lead to system crash. Follow the procedure below to uninstall program appropriately
(backup all documents and system settings related with the program before removing the program):
47
Lenovo 3000H User Guide
Select Yes or Next according to the instructions to uninstall the program. Until the uninstallation completes.
5.5 Optical Drives and Hard Disks
1.Optical Drive Unable to Read CD/DVD
Check whether there is the icon of optical drives in the resource manager of the OS. If not, restart your
computer. And if the problem exists continuously, contact Lenovo Service Otherwise, proceed with the
following steps.
•Check whether the CD/DVD is placed appropriately. If not, replace the CD/DVD.
•Check whether the CD/DVD inserted can be read by the optical drive, for example, the DVD is inserted
into the common CD-ROM drive. If the CD/DVD can not be read, replace it with a CD/DVD shipped with
the computer to check whether it can be read by the computer.
•Check the quality of the CD/DVD inserted. If not, replace it with a working CD/DVD shipped with the
computer to check whether it can be read by the computer.
2.The capacity of the hard disk displayed in the system is less than the nominal
capacity
For equipped with One-Key Recovery feature, the system recovery feature needs to occupy some hard
disk space which is invisible in either the operating system or partition utilities such as FDISK, thus the
available hard disk space is less than the actual capacity.
The nominal capacity of the hard disk uses the decimal system of 1000 bytes, while the actual capacity
uses the binary system of 1024 bytes (for example, the nominal capacity 1G = 1000M, while the actual
capacity 1G = 1024M); the capacity of the hard disk shown in Windows can be calculated according to
the calculation method in the following example:
The nominal capacity of the hard disk is 40G, while its actual capacity should be: 40 x 1000 x 1000
x1000/ (1024 x 1024 x 1024) = 37G.
If the hidden partition of 3G - 3 x 1000 x 1000 x 1000/ (1024 x 1024 x1024) = 2.79G is subtracted, the
capacity of the hard disk shown in the system can be obtained. The capacity of the hard disk calculated
Step 4
Locate the program in the Add/Remove
Programs dialog box, and then click the
Remove button to the right.
Step 3
Double-click the Add/Remove Programs
button in the Control Panel.

48 Lenovo 3000H User Guide
with above method may be slightly different from the actual capacity for such reason as rounding.
5.6 Special Description of Windows
1. Keep the serial number of the software shipped with your computer in a safe place
The serial number of the software shipped with the computer is provided separately by the manufacturer;
keep it in a safe place. We will not be responsible for providing the serial number if it is missed.
2. The drivers for this model only support WINDOWS XP SP2 system.
