Lenovo H4 Series User Guide V1.0 Manual H405 Desktop (Lenovo) Type 7723
2010-11-04
User Manual: Lenovo Lenovo H4 Series User Guide V1.0 Lenovo H4 Series User Guide V1.0 H405 Desktop (Lenovo) - Type 7723
Open the PDF directly: View PDF ![]() .
.
Page Count: 31
Version 1.0 2010.09
User Guide
H4 Series
Machine type: 10059/7723
10060/7724
31045274

Important Safety Information
Before using this manual, it is important that you read and understand all of the
related safety information for this product. Refer to the Safety and Warranty Guide
that you received with this product for the latest safety information. Reading and
understanding this safety information reduces the risk of personal injury or damage
to your product.
Danger: Be aware of extremely hazardous or lethal situations.
Attention: Be aware of possible damage to programs, devices, or data.
Note: Pay attention to this important information.
© Copyright Lenovo 2010
1
Contents
Contents
Important Safety Information
Chapter 1 Using the Computer Hardware .............................. 1
1.1 Front view of the chassis .........................................................2
1.2 Rear view of the chassis ..........................................................3
1.3 Connecting your computer ......................................................5
Chapter 2 Using the Rescue System .................................... 13
2.1 OneKey Recovery ..................................................................14
2.2 Driver and Application Installation ..........................................14
2.3 System Setup ........................................................................15
2.4 System Backup .....................................................................16
2.5 System Recovery ..................................................................16
2.6 Create Recovery Disc ............................................................16
Chapter 3 Using the Computer Software ............................. 17
3.1 Lenovo Dynamic Brightness system ......................................18
3.2 Lenovo Eye Distance System ................................................19
Chapter 4 Troubleshooting and Confirming Setup .............. 21
4.1 Troubleshooting Display Problems .........................................22
4.2 Troubleshooting Audio Problems ...........................................23
4.3 Troubleshooting Software Problems.......................................23
4.4 Troubleshooting Problems with Optical Drives and
Hard Disks .............................................................................24
4.5 Special considerations for troubleshooting Windows .............25
4.6 Performing Daily Maintenance Tasks ......................................26
2Contents
Chapter
This chapter contains the following
topics:
Computer hardware introduction
Information on computer connections
Note: The descriptions in this chapter might
vary from your computer, depending on
computer models and configurations.
User Guide 1
Using the Computer Hardware
2User Guide
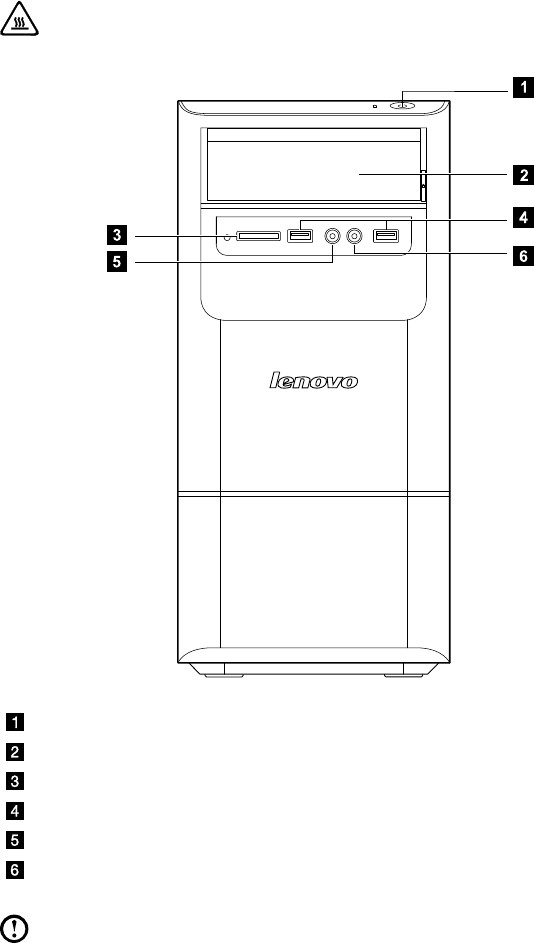
1.1 Front view of the chassis
Attention: Be sure not to block any air vents on the computer. Blocked
air vents can cause thermal problems.
Power button
Optical Drive (selected models only)
Memory card reader (selected models only)
USB connector (2)
Headphone connector
Microphone connector
Note: This computer only can be placed in a vertical position.
3
User Guide
1.2 Rear view of the chassis
(If the rear view configuration in this chapter is different from your actual computer,
the rear view configuration of your actual computer should be taken as final and
binding.)
Voltage selection switch (selected models only)
Power connector
PS/2 keyboard connector
PS/2 mouse connector
On-board VGA connector (selected models only)
HDMI connector (selected models only)
USB connectors (4)
Ethernet connector
Microphone connector
Audio line-out connector
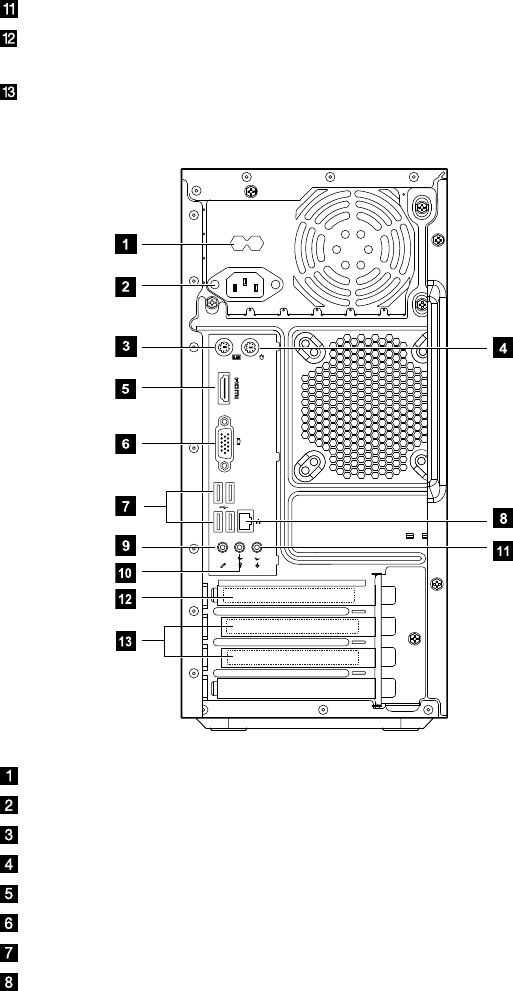
4User Guide
Audio line-in connector
PCI Express x16 graphics adapter connector (Some models are equipped
with graphic card.)
PCI Express x1 adapter connector (Some models are equipped with WIFI
card or TV tuner card.)
Voltage selection switch (selected models only)
Power connector
PS/2 keyboard connector
PS/2 mouse connector
HDMI connector (selected models only)
On-board VGA connector (selected models only)
USB connectors (4)
Ethernet connector
5
User Guide
Microphone connector
Audio line-out connector
Audio line-in connector
PCI Express x16 graphics adapter connector (Some models are equipped
with graphic card.)
PCI Express x1 adapter connector (Some models are equipped with WIFI
card or TV tuner card.)
1.3 Connecting your computer
Use the following information when connecting your computer.
• Lookforthesmallconnectoriconsonthebackofyourcomputer.Matchthe
connectors to the icons.
• Ifyourcomputercablesandconnectorpanelhavecolor-codedconnectors,
match the color of the cable end with the color of the connector.
Note: Your computer might not have all of the connectors that are
described in this section.
1.3.1 Check the position of the voltage-selection switch on
the rear of the computer. Use a ballpoint pen to slide the
switch if necessary.
Note: Some computers do not have the voltage switch. These computers
automatically control the voltage.
• Ifthevoltagesupplyrangeis100-127Vac,settheswitchto115V.
• Ifthevoltagesupplyrangeis200-240Vac,settheswitchto230V.
115
230
6User Guide
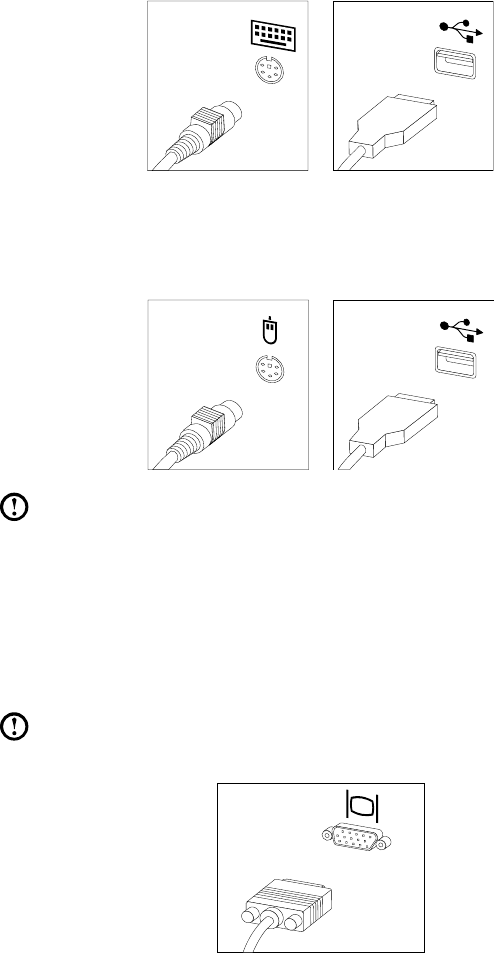
1.3.2 Connect the keyboard cable to the appropriate keyboard
connector. (PS/2 connector or USB connector)
1.3.3 Connect the mouse cable to the appropriate mouse
connector. (PS/2 connector or USB connector)
Note: If your computer is equipped with a wireless keyboard or mouse,
follow those installation instructions.
1.3.4 Connect the monitor cable to the monitor connector on
the computer.
• If you have a Video Graphics Array (VGA) Standard monitor, connect the
cable to the connector as shown.
Note: If your model has two monitor connectors, be sure to use the
connector on the graphics adapter.
7
User Guide
• If you have an HDMI monitor, your computer must have an adapter installed
that supports the HDMI monitor. Connect the cable to the port as shown.
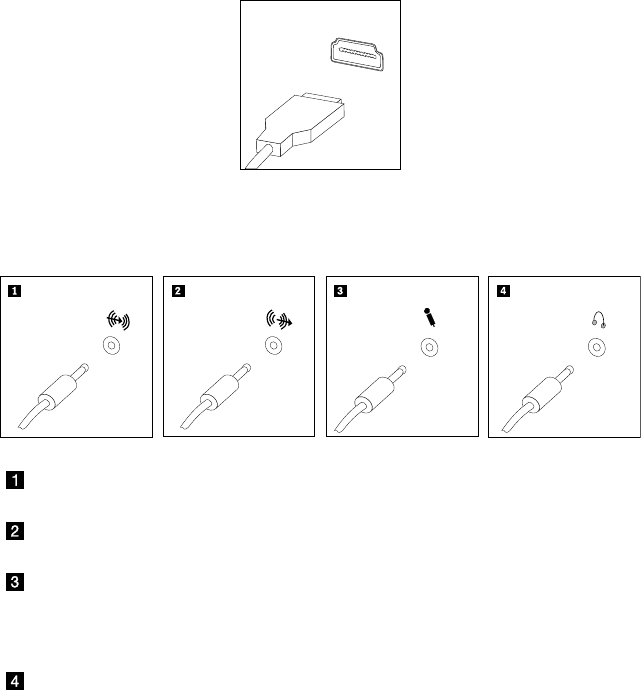
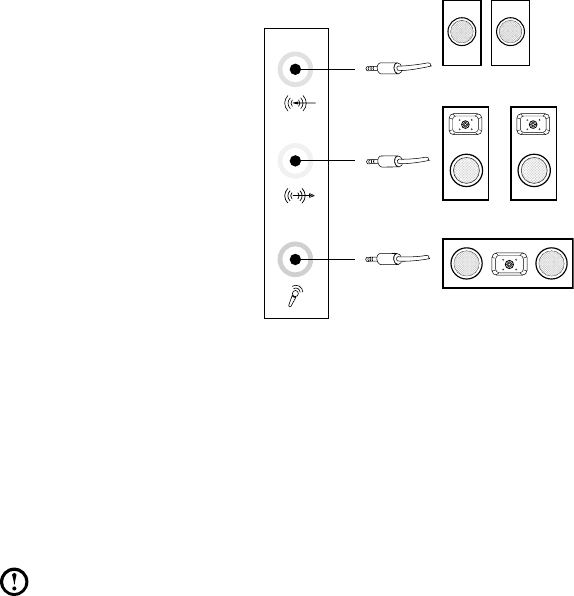
1.3.5 If you have audio devices, attach them using the
following instructions.
Audio line-in This connector receives audio signals from an external audio
device, such as a stereo system.
Audio line-out This connector sends audio signals from the computer to
external devices, such as powered stereo speakers.
Microphone Use this connector to attach a microphone to your
computer when you want to record sound or if you use
speech-recognition software. This connector might be
located on the front of the computer.
Headphone Use this connector to attach headphones to your computer
when you want to listen to music or other sounds without
disturbing anyone. This connector might be located on the
front of the computer.
8User Guide
1.3.6 Audio configuration instruction: (This instruction is only for PC
models whose mainboard supports audio transforming from 2.0 stereo to
5.1 surround.)
This model of computer supports transforming stereo sound into 5.1 surround
sound.
Use the following guides when connecting to the 5.1 surround audio device:
Front channel
Surround
Center-LEF
Blue line-in connector
Green line-out connector
Pink Mic-in connector
The configurations are as follows:
1. Right click the sound icon in system property bar and select the sounds option
to setup the sounds in the pop-up dialog box.
2. Select a playback device from the playback dialog box, and then click the
configure button to configure it.
3. Select 5.1 surround from audio channels in the pop-up speaker setup dialog
box to proceed with the speaker setup by following as prompted.
4. After the configuration, 5.1 surround can be used.
Note: If the audio configuration interfaces in above differ from your actual
computer, you may use the above steps as reference to configure the 5.1
surround audio device in your actual audio configuration interface and read
the electronic help information for further assistance.
9
User Guide
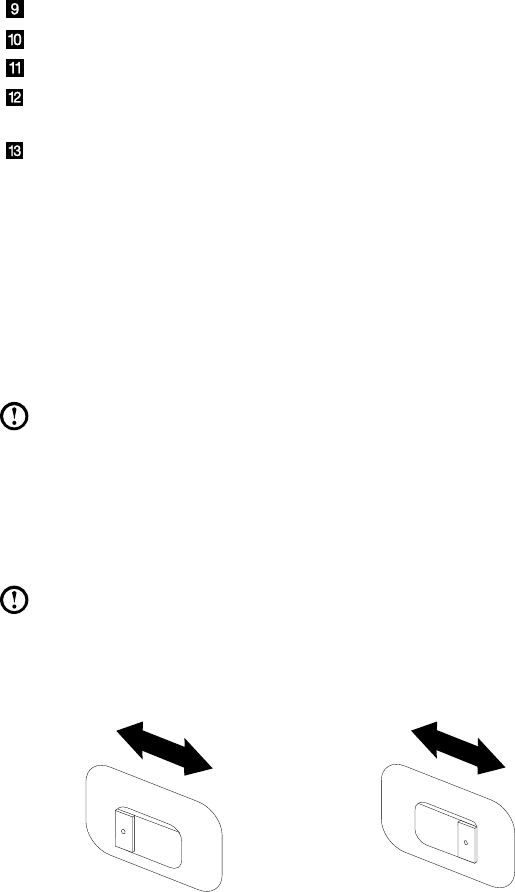
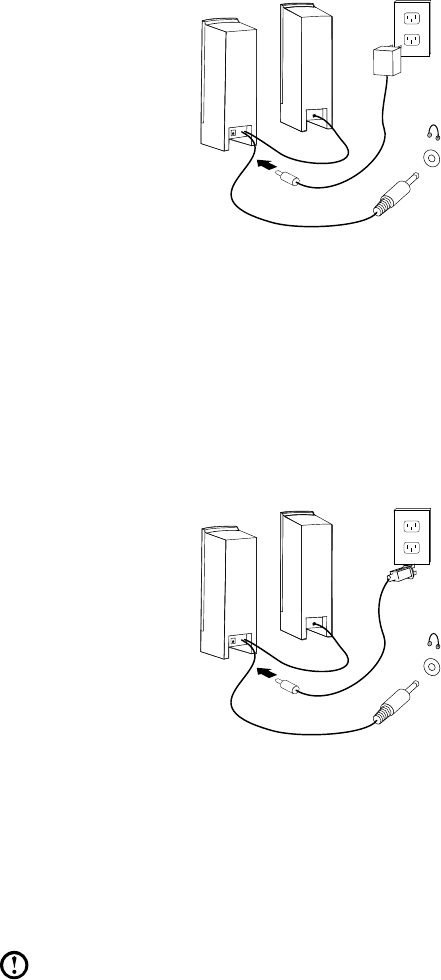
1.3.7 If you have powered speakers with an adapter:
(This picture is only a sketch print, it does not show the actual figure of the speaker.)
a. Connect the cable that runs between the speakers, if necessary. On some
speakers, this cable is permanently attached.
b. Connect the adapter cable to the speaker, if necessary. On some speakers, this
cable is permanently attached.
c. Connect the speakers to audio line-out port on the computer.
d. Connect the adapter to the power source.
1.3.8 If you have powered speakers without an adapter:
(This picture is only a sketch print, it does not show the actual figure of the speaker.)
a. Connect the cable that runs between the speakers, if necessary. On some
speakers, this cable is permanently attached.
b. Connect the cable to the speaker, if necessary. On some speakers, this cable is
permanently attached.
c. Connect the speakers to audio line-out port on the computer.
d. Connect the plug to the power source.
Note: Some models are not equipped with external speaker.
10 User Guide
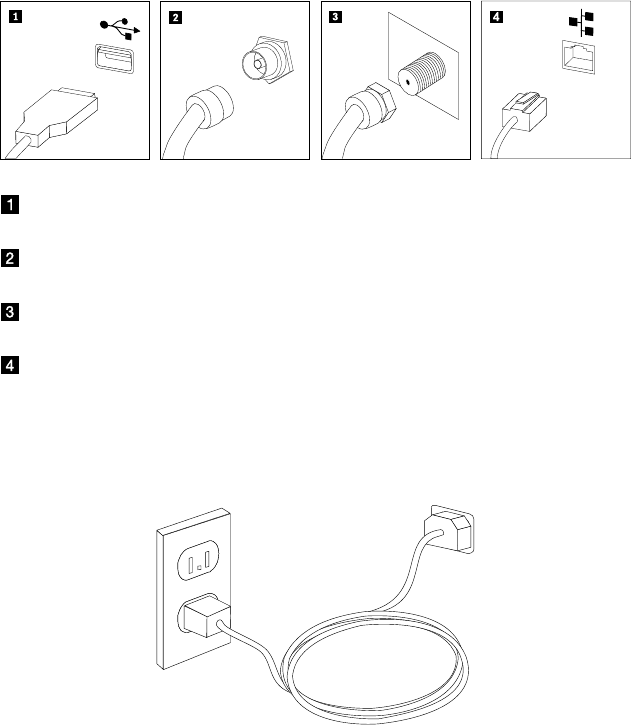
1.3.9 Connect any additional devices that you have. Your
computer might not have all connectors that are shown.
TV IN
USB connector Use this connector to attach a device that requires a
USB connection.
TV-Tuner connector
(IEC type)
Only supported on systems with optional TV tuner
card (Some models are equipped with this connector).
TV antenna
connector (F type)
To connect the signal input cable for CATV (Some
models are equipped with this connector).
Ethernet Use this connector to attach the computer to an
Ethernet-type local area network.
1.3.10 Connect the power cords properly to ground electrical
outlets.
1.3.11 If your computer is equipped with Memory Card Reader
Connector, it is able to read/write data from
SD, SDHC;
MS, MS pro;
MMC, MMC plus.
11
User Guide
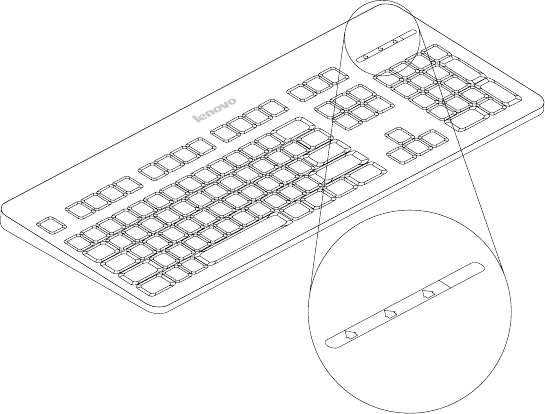
1.3.12 Keyboard and Mouse (wired)
LVT
LVT
LVT —— After entering Windows, press this key to launch the LVT (Lenovo
Vantage Technology) program, Lenovo’s pre-loaded Home PC software.
In addition to its own functions, the LVT program will allow you to start
other Windows compatible software, specially configured to run on this
model of computer.
F2 —— Your computer has the Lenovo Rescue System installed. To learn more
about this program, turn on the computer, and when the Lenovo logo
appears, press the F2 key and the Lenovo Rescue System will open.
12 User Guide

Chapter
Using the Rescue System
This chapter contains the following
topics:
OneKey Recovery
Driver and Application Installation
System Setup
System Backup
System Recovery
Create Recovery Disc
Attention: Using this program will result in
a loss of data.
• YoucanrecovertheCdriveofthecomputer
to the factory default settings or to the
last system backup status using OneKey
Recovery. With this operation, all of the
existing data on drive C will be lost, whereas
the content and format of the other partitions
of the hard disk drive will remain unchanged.
• If you want to install an operating system and
back it up with OneKey Recovery, you must
format the C partition in NTFS format and
install the operating system on the C partition.
Otherwise, the OneKey Recovery system
cannot run.
User Guide 13

14 User Guide
Note about the service partition:
The files and relevant data used by the rescue system are saved in the service
partition. Deleting this partition will make the rescue system unusable. For more
detailed information, see the following instructions:
By selecting Control Panel → Administrative Tools → Computer Management →
Disk Management, you can see the service partition, which must not be deleted.
Note: The recovery files and relevant data used by the rescue system are
saved in the service partition. If the service partition is deleted or damaged
by someone other than authorized Lenovo servicers, Lenovo will not be
liable for any losses arising there from in any way.
2.1 OneKey Recovery
OneKey Recovery is an easy-to use application. You can use it to restore your
computer to the system default or a previously backed up state.
Detailed Operation Procedure
1. Turn on the computer. When the Lenovo logo appears, press the F2 key on the
keyboard to start the Rescue System, then you can select OneKey Recovery.
Note: System Recovery will overwrite all of the data on drive C. To prevent
loss of data, be sure to back up relevant data before performing system
recovery.
2. Follow the onscreen instructions to select the backup task you want to restore
from and disk you want to install operation system, and press Next to start
restoration.
3. Please wait during the process of system recovery. Do not interrupt the
operation during the recovery process.
4. After the system is recovered successfully, the software prompts to restart the
computer. Restart the computer and enter the system.
2.2 Driver and Application Installation
The Driver and Application Installation function in the rescue system provides a way
for the user to conveniently re-install all of the Lenovo applications and drivers that
were shipped with your Lenovo hardware.

15
User Guide
Method 1: Automatic Installation
Turn on the computer. When the Lenovo logo appears, press the F2 key on the
keyboard to start the Rescue System, then select Drivers and Application
Installation.
Follow the screen prompts to install the Lenovo Drivers and Application Installation.
Click Install to start installing the Lenovo Drivers and Application Installation.
The system will restart. After the system has restarted, the installation process will
continue until completion.
Method 2: Manual Installation
In the Windows system, Click Start → All Programs → Lenovo → Lenovo
Drivers and Application Installation.
After starting the procedure, install all the drivers and software manually according
to the prompts.
Notes:
1. It is recommended not to install the software which is already on the
computer.
2. Before accessing the operating system, make sure that the Drivers and
Application installation has been installed automatically. After that, the
manual installation function can be used.
2.3 System Setup
System Setup configures the network configuration for the Lenovo Rescue
System to ensure your Rescue System can connect to internet. In addition, System
Setup sets and manages all passwords for the Lenovo Rescue system.
2.3.1 Launch
Turn on the computer. When the Lenovo logo appears, press the F2 key to launch
Rescue System. Then select System Setup.
2.3.2 Network Settings
Depending on the network access mode of the computer, select “ADSL” or “LAN
Connection” in the network connection modes.
1. If you select “ADSL,” input the username and password of the ADSL
connection.
16 User Guide
2. If you select “LAN connection,” configure the IP address and proxy server of the
LAN.
2.3.3 Password Management
Password Management allows you to set the password for Lenovo Rescue
System and manage it.
The default password is blank.
Set a password when you access the Password Management for the first time.
If you don’t want to set a password, access the system directly and operate
accordingly.
2.4 System Backup
Back up your system partition to an image file. In case of a system failure, you can
restore your system from this image file.
In the Windows system, click Start → All Programs → Lenovo → Lenovo
Rescue System.
After starting the procedure, click System Backup to back up your system
partition according to the prompts.
2.5 System Recovery
Reboot your computer into the system recovery environment. You can choose to
restore to a system backup point or the initial state.
2.6 Create Recovery Disc
Create a bootable recovery disc from current system. These recovery discs are
used to boot your computer and will guide you through the entire restoration
process.
In the Windows system, click Start → All Programs → Lenovo → Lenovo
Rescue System.
After starting the procedure, click Create Recovery Disc to create a bootable
recovery disc from current system.
Follow the screen prompts to create recovery discs.

Chapter
Using the Computer Software
This chapter contains the following
topics:
Lenovo Dynamic Brightness system
Lenovo Eye Distance System
Note: The interface and function of each
of these features are subject to the actual
software that was shipped with the
computer model that you purchased.
User Guide 17
18 User Guide
3.1 Lenovo Dynamic Brightness system
Lenovo Dynamic Brightness System can automatically detect the surrounding
ambient brightness and will adjust display brightness accordingly. You can set the
screen brightness to a comfortable level for different environments. You can also
set the display delay time to automatically turn off the display when you are away
from the computer.
Note: The Auto Switch Display function can not be used when your
computer is in standby mode, sleep mode or turned off.
Note: This function applies only to the computer equipped with a Lenovo
PC camera and is available only after the camera is installed.
Before using this software, do the following:
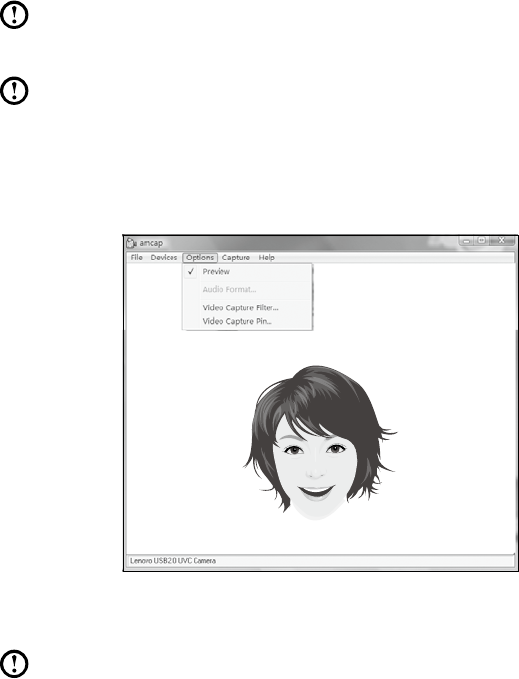
1) Click Start → All Programs → Lenovo USB2.0 UVC Camera → vmcap.
2) Select Options → Preview from the pop-up window to display the image in the
video capture window.
Note: If there is no image display in the AMCAP video capture window,
please confirm that preview in the options has been checked.

19
User Guide
3) Confirm that Devices → Lenovo USB 2.0 UVC Camera has been checked.
If there are other devices in this option, do not check them. Only choose the
“Lenovo USB 2.0 UVC Camera” device, and the window should display
the camera image. An image, which is caught by Lenovo PC camera, will be
displayed in the video capture window. Adjust the position and pitch angle of
the camera to ensure the whole face is displayed in the video capture window.
To use this software, do the following:
Click Start → All Programs → Lenovo → Lenovo Dynamic Brightness system.
The default setting has been pre-selected. You can adjust the brightness and
display delay time according to your needs.
3.2 Lenovo Eye Distance System
Lenovo Eye Distance System can automatically detect the distance between you
and the display. It will alert you automatically when you sit too close to the display.
You can also set viewing distance as well as the time interval beyond which a
warning will pop up.
Note: This function applies only to the computer equipped with a Lenovo
PC camera and is available only after the camera is installed.
To use this software, do the following:
Click Start → All Programs → Lenovo → Lenovo Eye Distance System.

20 User Guide
The default setting has been pre-selected. You can adjust the viewing distance
according to your needs.
Notes:
1. Ensure the lens of the camera is exposed and not covered.
2. Ensure your eyes are exposed and not covered.
(The function that detects the distance between the user and monitor
is based on the position of the user’s eyes. Therefore, if the eyes are
covered or there is a strong reflection, the distance detection may be
affected.)
Wear glasses may affect the accuracy of the face image verification.
3. The limitation of the distance detection by the camera:
The minimum distance: about 20 centimters (7.90 inches)
The maximum distance: about 70 centimeters (27.55 inches)
The pitch angle (the face rotary angle scope in the vertical):
Elevation angle: 20 degrees
Depression angle: 30 degrees
The horizontal rotary angle (the face rotary angle scope in the
horizontal): -20 ~ +20 degrees

Chapter
Troubleshooting and
Confirming Setup
This chapter contains the following
topics:
Troubleshooting and Problem Resolution
Note: The description of the TV-Tuner card
in this manual is only used for the machines
which have the TV-Tuner card. It does not
apply to those machines that do not have a
TV-Tuner card.
User Guide 21

22 User Guide
Solving Problems
Follow these tips when you troubleshoot your computer:
• Ifyouaddedorremovedapartbeforetheproblemstarted,reviewthe
installation procedures and ensure that the part is correctly installed.
• Ifaperipheraldevicedoesnotwork,ensurethatthedeviceisproperly
connected.
• Ifanerrormessageappearsonthescreen,writedowntheexactmessage.This
message may help support personnel diagnose and fix the problem(s).
• Ifanerrormessageoccursinaprogram,seetheprogram’sdocumentation.
Note: The procedures in this document were written for the Windows
default view, so they may not apply if you set your Lenovo® computer to
the Windows Classic view.
4.1 Troubleshooting Display Problems
Problem: Blank screen or no image is displayed on the monitor.
Troubleshooting and problem resolution:
1. Check that the monitor has been turned on; if not, press the Power button.
2. Check to see if the monitor power cord is loose; if so, securely plug the power
cord to the monitor.
3. Check that the signal cable to the monitor is securely connected to the
connector on the computer graphics card; if not, shut down the computer then
securely connect the signal cable of the monitor.
Problem: You need to change display property settings.
Setting display background and icon properties:
1. Right-click the desktop anywhere except over an icon, then select Personalize
from the pop-up menu.
2. From here, select the appropriate options to:
• Changethedesktopbackground
• Selectascreensaver
• Selectcolorsandappearanceoptionsforiconsandcharacters
• SetresolutionandcolorsbyusingDisplaySettingsoptions
23
User Guide
Problem: Ripple on screen
Troubleshooting and problem resolution:
1. Check for devices located less than one meter from the computer such as
refrigerators, electric fans, electric dryers, UPSs, regulators, fluorescent lamps
or other computers that may be generating magnetic interference.
2. Move any interfering devices away from the computer.
3. If the problem persists, consult with Lenovo Service.
4.2 Troubleshooting Audio Problems
Problem: No sound from integrated speakers.
Troubleshooting and problem resolution:
• Adjustthewindowsvolumecontrol—Double-clickthespeakericoninthe
lower-right corner of your screen. Ensure that the volume is turned up and that
the sound is not muted. Adjust the volume, bass, or treble controls to eliminate
distortion.
• Reinstalltheaudiodriver.
• Disconnectheadphonesfromtheheadphoneconnector—Soundfromthe
speakers is automatically disabled when headphones are connected to the
computer’s side-panel headphone connector.
Problem: No sound from headphones.
Troubleshooting and problem resolution:
• Checktheheadphonecableconnection—Ensurethattheheadphonecableis
securely inserted into the headphone connector.
• Adjustthewindowsvolumecontrol—Clickordouble-clickthespeakericonin
the lower-right corner of your screen. Ensure that the volume is turned up and
that the sound is not muted.
4.3 Troubleshooting Software Problems
Problem: You are unable exit a running program normally.
Troubleshooting and problem resolution:
1. Open the Task Manager window by pressing Ctrl, Alt and Delete at the same
time.
2. Select the Application tab, select the problem program, and then click the End
Task button.
24 User Guide
Problem: You need to install or uninstall a program.
Problem resolution:
During installation never abort the install process by powering the system off or
through other drastic means. This can cause system program disorder or even
failure during system initialization.
During the uninstall process, never directly delete the files or folders. This is
harmful to the system, and might cause a system-wide malfunction.
Use the following procedure to properly uninstall programs:
1. Back up all documents and system settings related to the program before
removing it.
2. If the program has its own uninstaller, run it directly to uninstall the program.
3. If the program does not have its own uninstaller, then select Control Panel from
Start menu.
4. From the Control Panel, choose Programs and Functions.
5. Find the applicable program from the Programs and Functions dialog box and
then select Uninstall/Modify.
6. Perform the instructions displayed to uninstall the software.
4.4 Troubleshooting Problems with Optical Drives and
Hard Disks
Problem: The Optical drive is unable to read a CD/DVD.
Troubleshooting and problem resolution:
1. Check to determine if there is an optical drive icon in the resource manager
of the operating system. If not, restart your computer. If there is still no icon,
contact Lenovo Service. Otherwise, continue with the next step of this
procedure.
2. Confirm that the CD/DVD has been properly placed in the drive. If not, reload
the CD or DVD. Otherwise, continue with the next step of this procedure.
3. Check the specifications that came with your computer to confirm that this
optical drive is supposed to be able to read this type of CD or DVD.
4. If the CD/DVD cannot be read, replace it with a known good CD/DVD such as
one that was shipped with the computer.
5. If the known good CD cannot be read, visually check the operating side of the
CD/DVD for defects.
25
User Guide
Problem: The capacity of the hard disk, as indicated by the system, is less than
the nominal capacity.
Troubleshooting and problem resolution: For computers equipped with the
OneKey Recovery feature, the system recovery feature needs to occupy some
hard disk space. This may account for the apparent hard disk capacity deficit.
Further Technical Explanation: The nominal capacity of the hard disk is
expressed in the decimal system, 1000 bytes. But the actual hard disk capacity is
expressed in the binary system as 1024 bytes (For example, the nominal capacity
1G is 1000M, while the actual capacity 1G is 1024M).
The capacity of the hard disk shown in Windows can be calculated according to
the calculations in the following example:
The nominal capacity of the hard disk is 40G, while its actual capacity
shouldbe:40x1000x1000x1000/(1024x1024x1024)=37G.
If the Service partition of 3G - 3 x 1000 x 1000 x 1000/(1024 x 1024 x
1024)=2.79Gissubtracted,thecapacityoftheharddiskshowninthe
system can be obtained.
The capacity of the hard disk as calculated using this method may be slightly
different from the actual capacity due to the rounding of totals.
4.5 Special considerations for troubleshooting Windows
Record the following information that may later be useful in troubleshooting system
problems:
1. The serial number of the software. The serial number was shipped with the
computer and was provided separately by the manufacturer. The Help Center is
unable to retrieve this number.
2. ThedriversforthiscomputermodelonlysupporttheWindows7system.
3. When you use the Windows Media Center to watch TV, be particularly attentive
to the following:
• Inthefollowingtwosituations,youmustre-saveachannellist:
a. When you change your TV signal from digital to analog, your saved
channel list for digital TV is deleted. When you want to watch digital TV
again, you must create and save a new channel list.
b. When you change your TV signal from analog to digital, your saved
channel list for analog TV is deleted. When you want to watch analog TV
again, you must create and save a new channel list.

26 User Guide
• Beforeyoucanwatchteletextprogramming,youmustsettheTVtunerinput
signal to analog.
4.6 Performing Daily Maintenance Tasks
Cleaning the computer components
Because many of the computer components consist of sophisticated integrated
circuit boards, it is very important to periodically clean around the computer
to prevent dust buildup. The cleaning supplies you need in order to clean the
components include: a vacuum cleaner, a soft cotton cloth, clear water (pure water
preferred) and cotton swabs.
Attention: Before you clean your computer, disconnect the computer
from the electrical outlet. Clean your computer with a soft cloth
dampened with water. Do not use liquid or aerosol cleaners, which may
contain flammable substances.
Note: To avoid damaging the computer or display, do not spray cleaning
solution directly onto the display. Only use products specifically designed
for cleaning displays, and follow the instructions that are included with the
product.
The following are general methods for cleaning the components:
• Youcanuseasoftclothtoremovedustonthesurfaceofthecomputer,the
monitor, the printer, the speakers and the mouse.
• Youcanuseavacuumcleanertocleaninotherwiseinaccessiblecorners.
• Tocleanthekeyboardthoroughly,shutdownthecomputerandscrubitgently
with a wet cloth.
• Donot use the keyboard until it is dry.
Do not do any of the following:
• Allowwatertoenterthecomputer
• Useaheavilydampenedcloth
• Spraywaterdirectlyontothesurfaceofthemonitororinsideofcomputer.
Daily attention should be given to LCD monitors. Use a dry cloth daily to brush
dust from the monitor and keyboard. Keep all surfaces clean and free of grease
stains.
