Lenovo T430 Users Manual
T430i to the manual 48983d86-ddf7-487e-b6b2-6eaf5409bc49
2015-01-24
: Lenovo Lenovo-T430-Users-Manual-329201 lenovo-t430-users-manual-329201 lenovo pdf
Open the PDF directly: View PDF ![]() .
.
Page Count: 192 [warning: Documents this large are best viewed by clicking the View PDF Link!]
- Read this first
- Chapter 1. Product overview
- Chapter 2. Using your computer
- Register your computer
- Frequently asked questions
- Special keys and buttons
- Using the UltraNav pointing device
- Power management
- Connecting to the network
- Using a projector or an external display
- Using the NVIDIA Optimus Graphics feature
- Using audio features
- Using the integrated camera
- Using the ThinkLight light feature
- Using the optical drive
- Using an ExpressCard module, a flash media card, or a smart card
- Chapter 3. You and your computer
- Chapter 4. Security
- Chapter 5. Recovery overview
- Chapter 6. Replacing devices
- Chapter 7. Enhancing your computer
- Chapter 8. Advanced configuration
- Chapter 9. Preventing problems
- Chapter 10. Troubleshooting computer problems
- Diagnosing problems
- Troubleshooting
- Computer stops responding
- Spills on the keyboard
- Error messages
- Errors without messages
- Beep errors
- Memory module problems
- Networking problems
- Problems with the keyboard and other pointing devices
- Problems with the display and multimedia devices
- Fingerprint reader problems
- Battery and power problems
- Problems with drives and other storage devices
- Software problems
- Problems with ports and connectors
- A USB problem
- A docking station or port replicator problem
- Chapter 11. Getting support
- Appendix A. Regulatory information
- Wireless related information
- Export classification notice
- Electronic emissions notices
- Federal Communications Commission Declaration of Conformity
- Industry Canada Class B emission compliance statement
- European Union - Compliance to the Electromagnetic Compatibility Directive
- German Class B compliance statement
- Korea Class B compliance statement
- Japanese VCCI Class B statement
- Japan compliance statement for products which connect to the power mains with rated current less than or equal to 20 A per phase
- Lenovo product service information for Taiwan
- Appendix B. WEEE and recycling statements
- Appendix C. Notices
- Appendix D. Restriction of Hazardous Substances Directive (RoHS)

UserGuide
ThinkPadT430andT430i

Notes:Beforeusingthisinformationandtheproductitsupports,besuretoreadandunderstandthe
following:
•Safety,Warranty,andSetupGuide
•RegulatoryNotice
•“Importantsafetyinformation”onpagevi
•AppendixC“Notices”onpage171
TheSafety,Warranty,andSetupGuideandtheRegulatoryNoticehavebeenuploadedtotheWebsite.
Torefertothem,gotohttp://www.lenovo.com/ThinkPadUserGuides.
ThirdEdition(November2012)
©CopyrightLenovo2012.
LIMITEDANDRESTRICTEDRIGHTSNOTICE:IfdataorsoftwareisdeliveredpursuantaGeneralServicesAdministration
“GSA”contract,use,reproduction,ordisclosureissubjecttorestrictionssetforthinContractNo.GS-35F-05925.

Contents
Readthisrst..............v
Importantsafetyinformation..........vi
Conditionsthatrequireimmediateaction..vii
Safetyguidelines............vii
Chapter1.Productoverview......1
Locatingcomputercontrols,connectors,and
indicators..................1
Frontview................1
Right-sideview..............4
Left-sideview..............5
Bottomview...............6
Rearview................7
Statusindicators.............8
Locatingimportantproductinformation.....10
Machinetypeandmodellabel.......10
FCCIDandICCerticationnumberlabel..11
CerticateofAuthenticitylabel......12
Features.................12
Specications...............14
Operatingenvironment...........14
Lenovoprograms.............15
AccessingLenovoprogramsontheWindows
7operatingsystem...........15
AccessingLenovoprogramsontheWindows
8operatingsystem...........17
AnintroductiontoLenovoprograms....17
Chapter2.Usingyourcomputer...21
Registeryourcomputer...........21
Frequentlyaskedquestions.........21
Specialkeysandbuttons..........22
Functionkeycombinations........22
Volumeandmutebuttons........25
Windowskey.............26
UsingtheUltraNavpointingdevice.......26
UsingtheTrackPointpointingdevice....26
Usingthetouchpad...........28
UsingtheUltraNavpointingdeviceandan
externalmouse.............28
AddingtheUltraNavicontothesystemtray.29
Powermanagement............29
Checkingthebatterystatus........29
Usingtheacpoweradapter........29
Chargingthebattery..........30
Maximizingbatterylife..........30
Managingyourbatterypower.......31
Power-savingmodes..........31
Handlingthebattery...........32
Connectingtothenetwork..........34
Ethernetconnections..........34
Wirelessconnections..........34
Usingaprojectororanexternaldisplay.....38
Changingdisplaysettings........38
Connectingaprojectororanexternal
monitor................38
Settingupapresentation.........41
UsingtheExtenddesktopfunction.....42
UsingtheNVIDIAOptimusGraphicsfeature...43
Usingaudiofeatures............43
Usingtheintegratedcamera.........43
UsingtheThinkLightlightfeature.......44
Usingtheopticaldrive...........44
UsinganExpressCardmodule,aashmediacard,
orasmartcard..............45
Chapter3.Youandyourcomputer..47
Accessibilityandcomfort..........47
Ergonomicinformation..........47
Adjustingyourcomputertotyou.....48
Accessibilityinformation.........49
Travelingwithyourcomputer.........49
Traveltips...............49
Travelaccessories...........50
Chapter4.Security..........51
Attachingamechanicallock.........51
Usingpasswords..............51
Passwordsandsleepmode........51
Typingpasswords...........51
Power-onpassword...........52
Harddiskpasswords..........52
Supervisorpassword..........54
Harddisksecurity.............56
Settingthesecuritychip...........57
Usingthengerprintreader..........58
Noticeondeletingdatafromyourharddiskdrive
orsolidstatedrive.............61
Usingrewalls...............62
Protectingdataagainstviruses........62
Chapter5.Recoveryoverview....63
RecoveryoverviewforWindows7models...63
Creatingandusingrecoverymedia.....63
©CopyrightLenovo2012i

Performingbackupandrecoveryoperations.64
UsingtheRescueandRecoveryworkspace.65
Creatingandusingarescuemedium....66
Reinstallingpreinstalledapplicationsand
devicedrivers.............67
Solvingrecoveryproblems........68
RecoveryoverviewforWindows8models....68
Chapter6.Replacingdevices.....71
Staticelectricityprevention..........71
Replacingthebattery............71
Replacingtheharddiskdrive.........75
Replacingthekeyboard...........78
Replacingthememorymodule........82
ReplacingthewirelessLAN/WiMAXcard....86
InstallingandreplacingthewirelessWANcard..92
ReplacingtheSIMcard...........96
ReplacingtheUltrabaydevice........97
Chapter7.Enhancingyour
computer...............99
FindingThinkPadoptions..........99
UsingtheSerialUltrabayEnhancedfeature...99
Performingahotorawarmswap.....99
Installingasecondaryharddiskdrive....100
ThinkPadportreplicatorsanddockingstations..102
Frontview...............102
Rearview...............104
AttachingaThinkPadportreplicatoror
dockingstation.............106
DetachingaThinkPadportreplicatoror
dockingstation.............109
Securityfeature............109
Usingthesystemlockkey........110
Chapter8.Advanced
conguration............111
Installinganewoperatingsystem.......111
Beforeyoubegin............111
InstallingtheWindows7operatingsystem..112
InstallingtheWindows8operatingsystem..113
Installingdevicedrivers...........113
ThinkPadSetup..............115
Mainmenu..............115
Congmenu..............116
DateandTimemenu..........122
Securitymenu.............122
Startupmenu.............126
Restartmenu.............128
UpdatingyoursystemUEFIBIOS.....128
Usingsystemmanagement..........129
Systemmanagement..........129
Settingmanagementfeatures.......129
Chapter9.Preventingproblems..131
Generaltipsforpreventingproblems......131
Makingsuredevicedriversarecurrent.....132
Takingcareofyourcomputer.........133
Cleaningthecoverofyourcomputer....135
Chapter10.Troubleshooting
computerproblems.........137
Diagnosingproblems............137
Troubleshooting..............137
Computerstopsresponding.......137
Spillsonthekeyboard..........138
Errormessages............138
Errorswithoutmessages.........140
Beeperrors..............141
Memorymoduleproblems........141
Networkingproblems..........141
Problemswiththekeyboardandotherpointing
devices................143
Problemswiththedisplayandmultimedia
devices................144
Fingerprintreaderproblems........149
Batteryandpowerproblems.......150
Problemswithdrivesandotherstorage
devices................153
Softwareproblems...........154
Problemswithportsandconnectors....155
AUSBproblem............155
Adockingstationorportreplicator
problem...............155
Chapter11.Gettingsupport....157
BeforeyoucontactLenovo..........157
Gettinghelpandservice...........157
Usingdiagnosticprograms........158
LenovoSupportWebsite.........158
CallingLenovo.............158
Purchasingadditionalservices........159
AppendixA.Regulatory
information.............161
Wirelessrelatedinformation.........161
LocationoftheUltraConnectwireless
antennas...............162
Locatingwirelessregulatorynotices....163
Exportclassicationnotice..........163
Electronicemissionsnotices.........163
FederalCommunicationsCommission
DeclarationofConformity........163
iiUserGuide

IndustryCanadaClassBemissioncompliance
statement...............164
EuropeanUnion-Compliancetothe
ElectromagneticCompatibilityDirective...164
GermanClassBcompliancestatement...164
KoreaClassBcompliancestatement....165
JapaneseVCCIClassBstatement.....165
Japancompliancestatementforproducts
whichconnecttothepowermainswith
ratedcurrentlessthanorequalto20Aper
phase................165
Lenovoproductserviceinformationfor
Taiwan................165
AppendixB.WEEEandrecycling
statements.............167
ImportantWEEEinformation.........167
BatteryrecyclinginformationforJapan.....167
BatteryrecyclinginformationforBrazil.....168
BatteryrecyclinginformationfortheUnitedStates
andCanada................168
BatteryrecyclinginformationfortheEuropean
Union..................169
BatteryrecyclinginformationforTaiwan.....169
AppendixC.Notices.........171
Trademarks................172
AppendixD.RestrictionofHazardous
SubstancesDirective(RoHS)....173
ChinaRoHS................173
TurkishRoHS...............173
UkraineRoHS...............173
IndiaRoHS................174
©CopyrightLenovo2012iii

ivUserGuide
Readthisrst
Besuretofollowtheimportanttipsgivenheretogetthemostuseandenjoymentoutofyourcomputer.
Failuretodosomightleadtodiscomfortorinjury,orcauseyourcomputertofail.
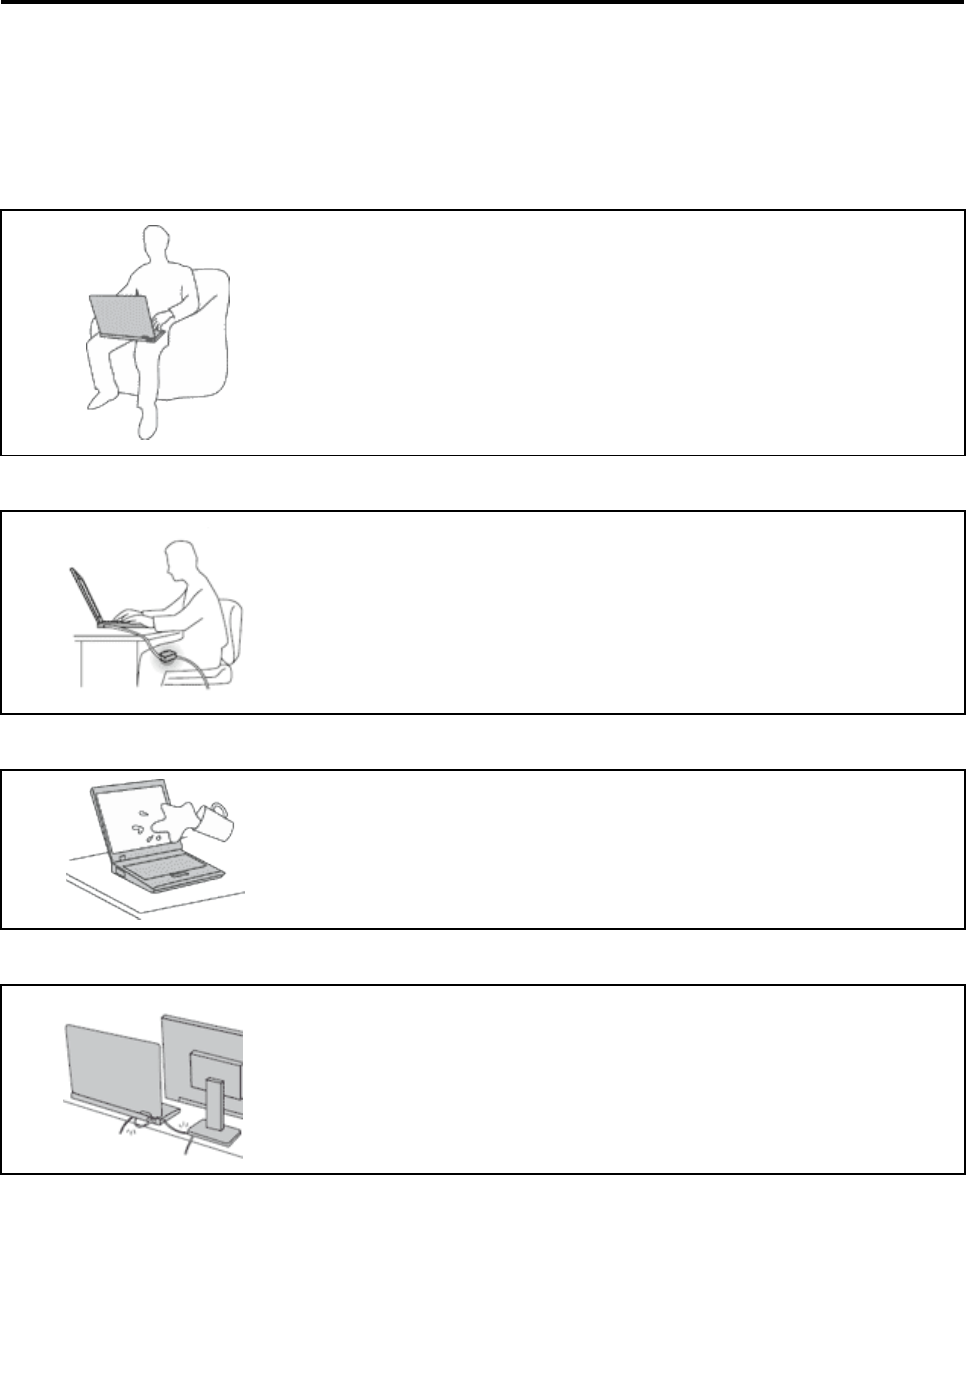
Protectyourselffromtheheatthatyourcomputergenerates.
Whenyourcomputeristurnedonorthebatteryischarging,thebase,thepalm
rest,andsomeotherpartsmaybecomehot.Thetemperaturetheyreach
dependsontheamountofsystemactivityandthelevelofchargeinthebattery.
Extendedcontactwithyourbody,eventhroughclothing,couldcause
discomfortorevenaskinburn.
•Avoidkeepingyourhands,yourlap,oranyotherpartofyourbodyin
contactwithahotsectionofthecomputerforanyextendedtime.
•Periodicallytakehandsfromusingthekeyboardbyliftingyourhandsfrom
thepalmrest.
Protectyourselffromtheheatgeneratedbytheacpoweradapter.
Whentheacpoweradapterisconnectedtoanelectricaloutletandyour
computer,itgeneratesheat.
Extendedcontactwithyourbody,eventhroughclothing,maycauseaskin
burn.
•Donotplacetheacpoweradapterincontactwithanypartofyourbody
whileitisinuse.
•Neveruseittowarmyourbody.
Preventyourcomputerfromgettingwet.
Toavoidspillsandthedangerofelectricalshock,keepliquidsawayfromyour
computer.
Protectthecablesfrombeingdamaged.
Applyingstrongforcetocablesmaydamageorbreakthem.
Routecommunicationlines,orthecablesofanacpoweradapter,amouse,a
keyboard,aprinter,oranyotherelectronicdevice,sothattheycannotbewalked
on,trippedover,pinchedbyyourcomputerorotherobjects,orinanyway
subjectedtotreatmentthatcouldinterferewiththeoperationofyourcomputer.
©CopyrightLenovo2012v
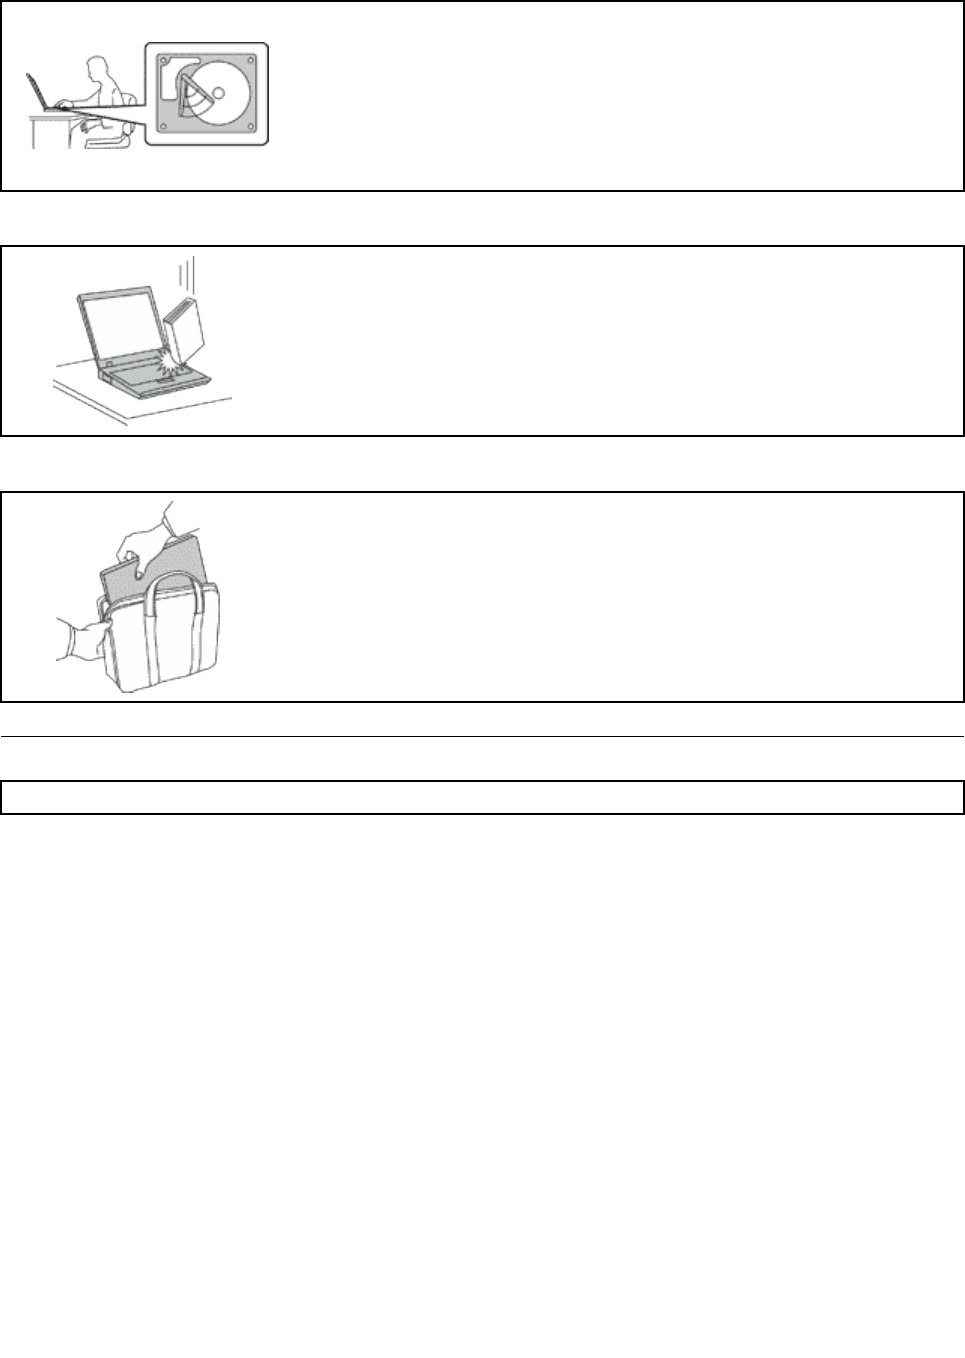
Protectyourcomputeranddatawhenmovingit.
Beforemovingacomputerequippedwithaharddiskdrive,dooneofthe
following,andmakesurethatthepowerswitchisofforisblinking:
•Turnitoff.
•Putitinsleepmode.
•Putitinhibernationmode.
Thiswillhelptopreventdamagetothecomputer,andpossiblelossofdata.
Handleyourcomputergently.
Donotdrop,bump,scratch,twist,hit,vibrate,push,orplaceheavyobjectson
yourcomputer,display,orexternaldevices.
Carryyourcomputercarefully.
•Useaqualitycarryingcasethatprovidesadequatecushioningandprotection.
•Donotpackyourcomputerinatightlypackedsuitcaseorbag.
•Beforeputtingyourcomputerinacarryingcase,makesurethatitisoff,insleep
mode,orinhibernationmode.Donotputacomputerinacarryingcasewhileit
isturnedon.
Importantsafetyinformation
Note:Readtheimportantsafetyinformationrst.
Thisinformationcanhelpyousafelyuseyournotebookcomputer.Followandretainallinformationincluded
withyourcomputer.Theinformationinthisdocumentdoesnotalterthetermsofyourpurchaseagreement
ortheLenovo®LimitedWarranty.Formoreinformation,see“WarrantyInformation”intheSafetyand
WarrantyGuidethatcomeswithyourcomputer.
Customersafetyisimportant.Ourproductsaredevelopedtobesafeandeffective.However,personal
computersareelectronicdevices.Powercords,poweradapters,andotherfeaturescancreatepotential
safetyrisksthatcanresultinphysicalinjuryorpropertydamage,especiallyifmisused.Toreducethese
risks,followtheinstructionsincludedwithyourproduct,observeallwarningsontheproductandinthe
operatinginstructions,andreviewtheinformationincludedinthisdocumentcarefully.Bycarefullyfollowing
theinformationcontainedinthisdocumentandprovidedwithyourproduct,youcanhelpprotectyourself
fromhazardsandcreateasafercomputerworkenvironment.
Note:Thisinformationincludesreferencestopoweradaptersandbatteries.Inadditiontonotebook
computers,someproducts(suchasspeakersandmonitors)shipwithexternalpoweradapters.Ifyouhave
suchaproduct,thisinformationappliestoyourproduct.Inaddition,computerproductscontainacoin-sized
internalbatterythatprovidespowertothesystemclockevenwhenthecomputerisunplugged,sothe
batterysafetyinformationappliestoallcomputerproducts.
viUserGuide

Conditionsthatrequireimmediateaction
Productscanbecomedamagedduetomisuseorneglect.Someproductdamageisseriousenough
thattheproductshouldnotbeusedagainuntilithasbeeninspectedand,ifnecessary,repairedby
anauthorizedservicer.
Aswithanyelectronicdevice,paycloseattentiontotheproductwhenitisturnedon.Onveryrare
occasions,youmightnoticeanodororseeapuffofsmokeorsparksventfromyourproduct.Oryou
mighthearsoundslikepopping,crackingorhissing.Theseconditionsmightmerelymeanthatan
internalelectroniccomponenthasfailedinasafeandcontrolledmanner.Or,theymightindicate
apotentialsafetyissue.However,donottakerisksorattempttodiagnosethesituationyourself.
ContacttheCustomerSupportCenterforfurtherguidance.ForalistofServiceandSupportphone
numbers,seethefollowingWebsite:http://www.lenovo.com/support/phone.
Frequentlyinspectyourcomputeranditscomponentsfordamageorwearorsignsofdanger.Ifyou
haveanyquestionabouttheconditionofacomponent,donotusetheproduct.ContacttheCustomer
SupportCenterortheproductmanufacturerforinstructionsonhowtoinspecttheproductand
haveitrepaired,ifnecessary.
Intheunlikelyeventthatyounoticeanyofthefollowingconditions,orifyouhaveanysafetyconcerns
withyourproduct,stopusingtheproductandunplugitfromthepowersourceandtelecommunication
linesuntilyoucanspeaktotheCustomerSupportCenterforfurtherguidance.
•Powercords,plugs,poweradapters,extensioncords,surgeprotectors,orpowersuppliesthatare
cracked,broken,ordamaged.
•Signsofoverheating,smoke,sparks,orre.
•Damagetoabattery(suchascracks,dents,orcreases),dischargefromabattery,orabuildupofforeign
substancesonthebattery.
•Acracking,hissingorpoppingsound,orstrongodorthatcomesfromtheproduct.
•Signsthatliquidhasbeenspilledoranobjecthasfallenontothecomputerproduct,thepowercordor
poweradapter.
•Thecomputerproduct,powercord,orpoweradapterhasbeenexposedtowater.
•Theproducthasbeendroppedordamagedinanyway.
•Theproductdoesnotoperatenormallywhenyoufollowtheoperatinginstructions.
Note:Ifyounoticetheseconditionswithaproduct(suchasanextensioncord)thatisnotmanufacturedfor
orbyLenovo,stopusingthatproductuntilyoucancontacttheproductmanufacturerforfurtherinstructions,
oruntilyougetasuitablereplacement.
Safetyguidelines
Alwaysobservethefollowingprecautionstoreducetheriskofinjuryandpropertydamage.
Formoreinformation,see“Importantsafetyinformation”intheSafetyandWarrantyGuidethatcomes
withyourcomputer.
Serviceandupgrades
DonotattempttoserviceaproductyourselfunlessinstructedtodosobytheCustomerSupportCenteror
yourdocumentation.OnlyuseaServiceProviderwhoisapprovedtorepairyourparticularproduct.
Note:Somecomputerpartscanbeupgradedorreplacedbythecustomer.Upgradestypicallyare
referredtoasoptions.ReplacementpartsapprovedforcustomerinstallationarereferredtoasCustomer
ReplaceableUnits,orCRUs.Lenovoprovidesdocumentationwithinstructionswhenitisappropriatefor
customerstoinstalloptionsorreplaceCRUs.Youmustcloselyfollowallinstructionswheninstallingor
©CopyrightLenovo2012vii
replacingparts.TheOffstateofapowerindicatordoesnotnecessarilymeanthatvoltagelevelsinsidea
productarezero.Beforeyouremovethecoversfromaproductequippedwithapowercord,alwaysmake
surethatthepoweristurnedoffandthattheproductisunpluggedfromanypowersource.Ifyouhave
anyquestionsorconcerns,contacttheCustomerSupportCenter.
Althoughtherearenomovingpartsinyourcomputerafterthepowercordhasbeendisconnected,the
followingwarningsarerequiredforyoursafety.
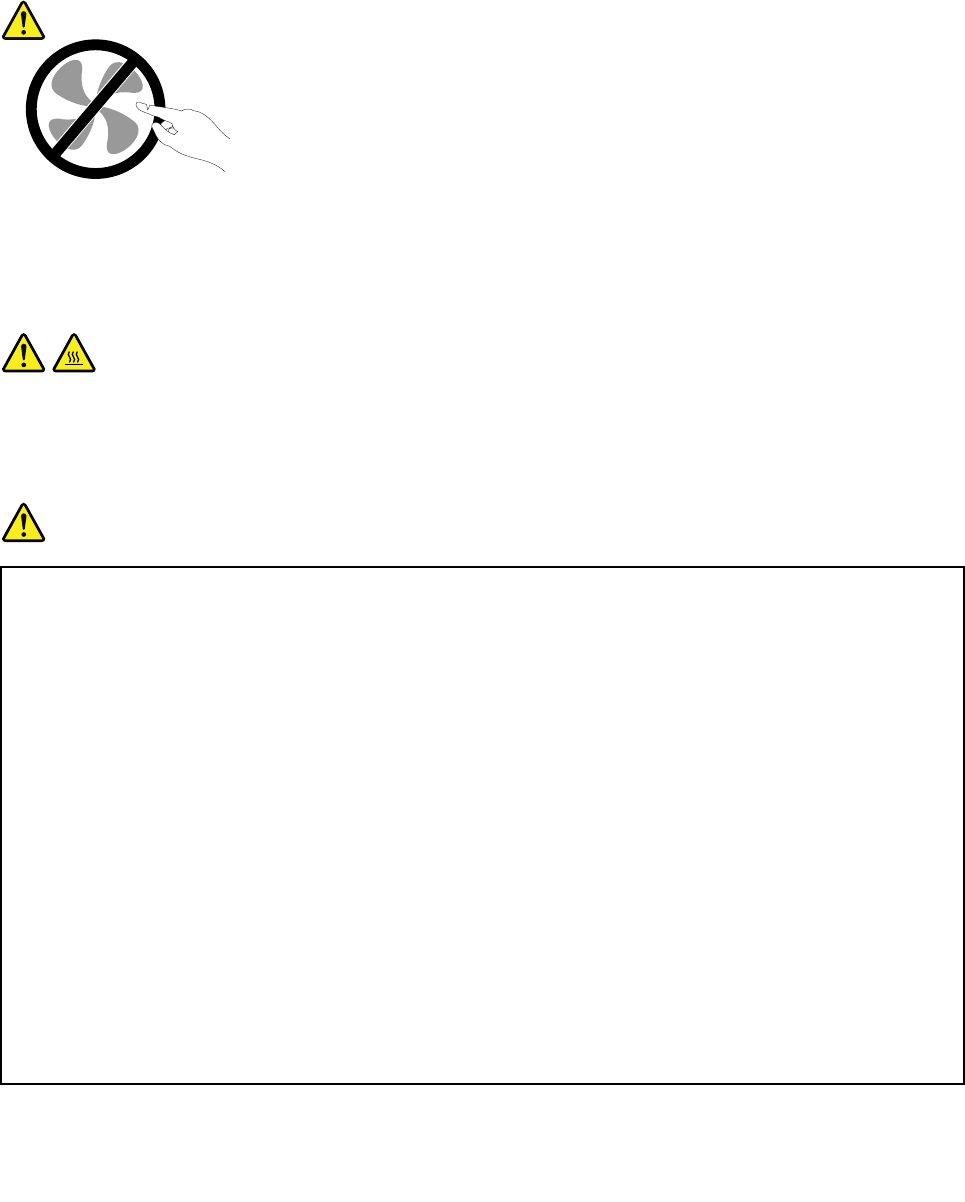
CAUTION:
Hazardousmovingparts.Keepngersandotherbodypartsaway.
CAUTION:
BeforereplacinganyCRUs,turnoffthecomputerandwaitthreetoveminutestoletthecomputer
coolbeforeopeningthecover.
Powercordsandpoweradapters
DANGER
Useonlythepowercordsandpoweradapterssuppliedbytheproductmanufacturer.
Thepowercordsshallbesafetyapproved.ForGermany,itshallbeH05VV-F,3G,0.75mm2,or
better.Forothercountries,thesuitabletypesshallbeusedaccordingly.
Neverwrapapowercordaroundapoweradapterorotherobject.Doingsocanstressthecordin
waysthatcancausethecordtofray,crack,orcrimp.Thiscanpresentasafetyhazard.
Alwaysroutepowercordssothattheywillnotbewalkedon,trippedover,orpinchedbyobjects.
Protectpowercordsandpoweradaptersfromliquids.Forinstance,donotleaveyourpowercord
orpoweradapternearsinks,tubs,toilets,oronoorsthatarecleanedwithliquidcleansers.
Liquidscancauseashortcircuit,particularlyifthepowercordorpoweradapterhasbeenstressed
bymisuse.Liquidsalsocancausegradualcorrosionofpowercordterminalsand/ortheconnector
terminalsonapoweradapter,whichcaneventuallyresultinoverheating.
Alwaysconnectpowercordsandsignalcablesinthecorrectorderandensurethatallpowercord
connectorsaresecurelyandcompletelypluggedintoreceptacles.
Donotuseanypoweradapterthatshowscorrosionattheacinputpinsorshowssignsof
overheating(suchasdeformedplastic)attheacinputpinsoranywhereonthepoweradapter.
viiiUserGuide

Donotuseanypowercordswheretheelectricalcontactsoneitherendshowsignsofcorrosionor
overheatingorwherethepowercordappearstohavebeendamagedinanyway.
Extensioncordsandrelateddevices
Ensurethatextensioncords,surgeprotectors,uninterruptiblepowersupplies,andpowerstripsthatyouuse
areratedtohandletheelectricalrequirementsoftheproduct.Neveroverloadthesedevices.Ifpowerstrips
areused,theloadshouldnotexceedthepowerstripinputrating.Consultanelectricianformoreinformation
ifyouhavequestionsaboutpowerloads,powerrequirements,andinputratings.
Plugsandoutlets
DANGER
Ifareceptacle(poweroutlet)thatyouintendtousewithyourcomputerequipmentappearstobe
damagedorcorroded,donotusetheoutletuntilitisreplacedbyaqualiedelectrician.
Donotbendormodifytheplug.Iftheplugisdamaged,contactthemanufacturertoobtain
areplacement.
Donotshareanelectricaloutletwithotherhomeorcommercialappliancesthatdrawlargeamounts
ofelectricity;otherwise,unstablevoltagemightdamageyourcomputer,data,orattacheddevices.
Someproductsareequippedwithathree-prongedplug.Thisplugtsonlyintoagrounded
electricaloutlet.Thisisasafetyfeature.Donotdefeatthissafetyfeaturebytryingtoinsertitinto
anon-groundedoutlet.Ifyoucannotinserttheplugintotheoutlet,contactanelectricianforan
approvedoutletadapterortoreplacetheoutletwithonethatenablesthissafetyfeature.Never
overloadanelectricaloutlet.Theoverallsystemloadshouldnotexceed80percentofthebranch
circuitrating.Consultanelectricianformoreinformationifyouhavequestionsaboutpowerloads
andbranchcircuitratings.
Besurethatthepoweroutletyouareusingisproperlywired,easilyaccessible,andlocatedclose
totheequipment.Donotfullyextendpowercordsinawaythatwillstressthecords.
Besurethatthepoweroutletprovidesthecorrectvoltageandcurrentfortheproductyouare
installing.
Carefullyconnectanddisconnecttheequipmentfromtheelectricaloutlet.
Powersupplystatement
DANGER
Neverremovethecoveronapowersupplyoranypartthathasthefollowinglabelattached.
©CopyrightLenovo2012ix

Hazardousvoltage,current,andenergylevelsarepresentinsideanycomponentthathasthislabel
attached.Therearenoserviceablepartsinsidethesecomponents.Ifyoususpectaproblemwith
oneoftheseparts,contactaservicetechnician.
Externaldevices
CAUTION:
DonotconnectordisconnectanyexternaldevicecablesotherthanUSBwhilethecomputerpoweris
on;otherwise,youmightdamageyourcomputer.Toavoidpossibledamagetoattacheddevices,wait
atleastvesecondsafterthecomputerisshutdowntodisconnectexternaldevices.
Generalbatterynotice
DANGER
PersonalcomputersmanufacturedbyLenovocontainacoincellbatterytoprovidepowerto
thesystemclock.Inaddition,manymobileproducts,suchasnotebookcomputers,utilizea
rechargeablebatterypacktoprovidesystempowerwheninportablemode.Batteriessuppliedby
Lenovoforusewithyourproducthavebeentestedforcompatibilityandshouldonlybereplaced
withapprovedparts.
Neverattempttoopenorserviceanybattery.Donotcrush,puncture,orincineratebatteriesor
shortcircuitthemetalcontacts.Donotexposethebatterytowaterorotherliquids.Onlyrecharge
thebatterypackstrictlyaccordingtoinstructionsincludedintheproductdocumentation.
Batteryabuseormishandlingcancausethebatterytooverheat,whichcancausegassesorame
to“vent”fromthebatterypackorcoincell.Ifyourbatteryisdamaged,orifyounoticeany
dischargefromyourbatteryorthebuildupofforeignmaterialsonthebatteryleads,stopusingthe
batteryandobtainareplacementfromthebatterymanufacturer.
Batteriescandegradewhentheyareleftunusedforlongperiodsoftime.Forsomerechargeable
batteries(particularlyLithiumIonbatteries),leavingabatteryunusedinadischargedstatecould
increasetheriskofabatteryshortcircuit,whichcouldshortenthelifeofthebatteryandalsocan
poseasafetyhazard.DonotletrechargeableLithium-Ionbatteriescompletelydischargeorstore
thesebatteriesinadischargedstate.
Rechargeablebatterynotice
DANGER
Donotattempttodisassembleormodifythebatterypack.Attemptingtodosocancausean
explosion,orliquidleakagefromthebatterypack.Abatterypackotherthantheonespeciedby
Lenovo,oradisassembledormodiedbatterypackisnotcoveredbythewarranty.
Iftherechargeablebatterypackisincorrectlyreplaced,thereisdangerofanexplosion.Thebattery
packcontainsasmallamountofharmfulsubstances.Toavoidpossibleinjury:
•ReplaceonlywithabatteryofthetyperecommendedbyLenovo.
•Keepthebatterypackawayfromre.
•Donotexposeittowaterorrain.
•Donotattempttodisassembleit.
•Donotshort-circuitit.
xUserGuide

•Keepitawayfromchildren.
•Donotdropthebatterypack.
Donotputthebatterypackintrashthatisdisposedofinlandlls.Whendisposingofthebattery,
complywithlocalordinancesorregulations.
Thebatterypackshouldbestoredatroomtemperature,chargedtoapproximately30to50%
ofcapacity.Werecommendthatbatterypackbechargedaboutonceperyeartoprevent
overdischarge.
Lithiumcoincellbatterynotice
DANGER
Dangerofexplosionifbatteryisincorrectlyreplaced.
Whenreplacingthelithiumcoincellbattery,useonlythesameoranequivalenttypethatis
recommendedbythemanufacturer.Thebatterycontainslithiumandcanexplodeifnotproperly
used,handled,ordisposedof.
Donot:
•Throworimmerseintowater
•Heattomorethan100°C(212°F)
•Repairordisassemble
Disposeofthebatteryasrequiredbylocalordinancesorregulations.
ThefollowingstatementappliestousersinthestateofCalifornia,U.S.A.
CaliforniaPerchlorateInformation:
Productscontainingmanganesedioxidelithiumcoincellbatteriesmaycontainperchlorate.
PerchlorateMaterial-specialhandlingmayapply,See
www.dtsc.ca.gov/hazardouswaste/perchlorate
Heatandproductventilation
DANGER
Computers,acpoweradapters,andmanyaccessoriescangenerateheatwhenturnedonandwhen
batteriesarecharging.Notebookcomputerscangenerateasignicantamountofheatduetotheir
compactsize.Alwaysfollowthesebasicprecautions:
•Whenyourcomputeristurnedonorthebatteryischarging,thebase,thepalmrest,andsome
otherpartsmaybecomehot.Avoidkeepingyourhands,yourlap,oranyotherpartofyour
bodyincontactwithahotsectionofthecomputerforanyextendedlengthoftime.Whenyou
usethekeyboard,avoidkeepingyourpalmsonthepalmrestforaprolongedperiodoftime.
Yourcomputergeneratessomeheatduringnormaloperation.Theamountofheatdependson
theamountofsystemactivityandthebatterychargelevel.Extendedcontactwithyourbody,
eventhroughclothing,couldcausediscomfortorevenaskinburn.Periodicallytakebreaks
©CopyrightLenovo2012xi

fromusingthekeyboardbyliftingyourhandsfromthepalmrest;andbecarefulnottouse
thekeyboardforanyextendedlengthoftime.
•Donotoperateyourcomputerorchargethebatterynearammablematerialsorinexplosive
environments.
•Ventilationslots,fansand/orheatsinksareprovidedwiththeproductforsafety,comfort,and
reliableoperation.Thesefeaturesmightinadvertentlybecomeblockedbyplacingtheproducton
abed,sofa,carpet,orotherexiblesurface.Neverblock,cover,ordisablethesefeatures.
•Whentheacpoweradapterisconnectedtoanelectricaloutletandyourcomputer,itgenerates
heat.Donotplacetheadapterincontactwithanypartofyourbodywhileusingit.Neverusethe
acpoweradaptertowarmyourbody.Extendedcontactwithyourbody,eventhroughclothing,
maycauseaskinburn.
Foryoursafety,alwaysfollowthesebasicprecautionswithyourcomputer:
•Keepthecoverclosedwheneverthecomputerispluggedin.
•Regularlyinspecttheoutsideofthecomputerfordustaccumulation.
•Removedustfromventsandanyperforationsinthebezel.Morefrequentcleaningsmightbe
requiredforcomputersindustyorhigh-trafcareas.
•Donotrestrictorblockanyventilationopenings.
•Donotoperateyourcomputerinsidefurniture,asthismightincreasetheriskofoverheating.
•Airowtemperaturesintothecomputershouldnotexceed35°C(95°F).
Electricalcurrentsafetyinformation
DANGER
Electriccurrentfrompower,telephone,andcommunicationcablesishazardous.
Toavoidashockhazard:
•Donotuseyourcomputerduringalightningstorm.
•Donotconnectordisconnectanycablesorperforminstallation,maintenance,orreconguration
ofthisproductduringanelectricalstorm.
•Connectallpowercordstoaproperlywiredandgroundedelectricaloutlet.
•Connecttoproperlywiredoutletsanyequipmentthatwillbeattachedtothisproduct.
•Wheneverpossible,useonehandonlytoconnectordisconnectsignalcables.
•Neverturnonanyequipmentwhenthereisevidenceofre,water,orstructuraldamage.
•Disconnecttheattachedpowercords,batterypack,andallthecablesbeforeyouopenthe
devicecovers,unlessinstructedotherwiseintheinstallationandcongurationprocedures.
•Donotuseyourcomputeruntilallinternalpartsenclosuresarefastenedintoplace.Neveruse
thecomputerwheninternalpartsandcircuitsareexposed.
xiiUserGuide

DANGER
Connectanddisconnectcablesasdescribedinthefollowingprocedureswheninstalling,moving,
oropeningcoversonthisproductorattacheddevices.
Toconnect:
1.TurneverythingOFF .
2.First,attachallcablestodevices.
3.Attachsignalcablestoconnectors.
4.Attachpowercordstooutlets.
5.TurndevicesON.
Todisconnect:
1.TurneverythingOFF .
2.First,removepowercordsfromoutlets.
3.Removesignalcablesfromconnectors.
4.Removeallcablesfromdevices.
Thepowercordmustbedisconnectedfromthewalloutletorreceptaclebeforeinstallingallother
electricalcablesconnectedtothecomputer.
Thepowercordmaybereconnectedtothewalloutletorreceptacleonlyafterallotherelectrical
cableshavebeenconnectedtothecomputer.
Lasercompliancestatement
CAUTION:
Whenlaserproducts(suchasCD-ROMs,DVDdrives,beropticdevices,ortransmitters)are
installed,notethefollowing:
•Donotremovethecovers.Removingthecoversofthelaserproductcouldresultinexposureto
hazardouslaserradiation.Therearenoserviceablepartsinsidethedevice.
•Useofcontrolsoradjustmentsorperformanceofproceduresotherthanthosespeciedherein
mightresultinhazardousradiationexposure.
DANGER
SomelaserproductscontainanembeddedClass3AorClass3Blaserdiode.Notethefollowing:
Laserradiationwhenopen.Donotstareintothebeam,donotviewdirectlywithoptical
instruments,andavoiddirectexposuretothebeam.
Liquidcrystaldisplay(LCD)notice
CAUTION:
TheLCDismadeofglass,androughhandlingordroppingthecomputercancausetheLCDtobreak.
IftheLCDbreaksandtheinternaluidgetsintoyoureyesoronyourhands,immediatelywashthe
affectedareaswithwaterforatleast15minutes;ifanysymptomsarepresentafterwashing,get
medicalcare.
Note:Forproductswithmercury-containinguorescentlamps(forexample,non-LED),theuorescentlamp
intheliquidcrystaldisplay(LCD)containsmercury;disposeofaccordingtolocal,state,orfederallaws.
Usingheadphonesorearphones
Ifyourcomputerhasbothaheadphoneconnectorandanaudio-outconnector,alwaysusetheheadphone
connectorforheadphones(alsocalledaheadset)orearphones.
©CopyrightLenovo2012xiii

CAUTION:
Excessivesoundpressurefromearphonesandheadphonescancausehearingloss.Adjustmentof
theequalizertomaximumincreasestheearphoneandheadphoneoutputvoltageandthesound
pressurelevel.Therefore,toprotectyourhearing,adjusttheequalizertoanappropriatelevel.
Excessiveuseofheadphonesorearphonesforalongperiodoftimeathighvolumecanbedangerousifthe
outputoftheheadphoneorearphoneconnectorsdonotcomplywithspecicationsofEN50332-2.The
headphoneoutputconnectorofyourcomputercomplieswithEN50332-2Subclause7.Thisspecication
limitsthecomputer’smaximumwidebandtrueRMSoutputvoltageto150mV.Tohelpprotectagainst
hearingloss,ensurethattheheadphonesorearphonesyouusealsocomplywithEN50332-2(Clause7
limits)forawidebandcharacteristicvoltageof75mV.UsingheadphonesthatdonotcomplywithEN
50332-2canbedangerousduetoexcessivesoundpressurelevels.
IfyourLenovocomputercamewithheadphonesorearphonesinthepackage,asaset,thecombinationof
theheadphonesorearphonesandthecomputeralreadycomplieswiththespecicationsofEN50332-1.
Ifdifferentheadphonesorearphonesareused,ensurethattheycomplywithEN50332-1(Clause6.5
LimitationValues).UsingheadphonesthatdonotcomplywithEN50332-1canbedangerousdueto
excessivesoundpressurelevels.
Additionalsafetyinformation
DANGER
Plasticbagscanbedangerous.Keepplasticbagsawayfrombabiesandchildrentoavoiddanger
ofsuffocation.
Noticefortabletpersonalcomputerusers
SafetynoticeforusersinAustralia
DANGER
Donotconnectphonelinewhileusingtabletmode.
NoticeforusersintheU.S.A.
Manypersonalcomputerproductsandaccessoriescontaincords,cablesorwires,suchaspowercordsor
cordstoconnecttheaccessorytoapersonalcomputer.Ifthisproducthassuchacord,cableorwire,then
thefollowingwarningapplies:
WARNING:Handlingthecordonthisproductorcordsassociatedwithaccessoriessoldwiththisproduct
willexposeyoutolead,achemicalknowntotheStateofCaliforniatocausecancer,andbirthdefectsor
otherreproductiveharm.Washhandsafterhandling.
Savetheseinstructions.
xivUserGuide
Chapter1.Productoverview
Thischapterprovidesinformationaboutthelocationsofconnectors,locationsofimportantproductlabels,
computerfeatures,specications,operatingenvironment,andpreinstalledThinkVantage®Technologies
andothersoftware.
Thischaptercontainsthefollowingtopics:
•“Locatingcomputercontrols,connectors,andindicators”onpage1
•“Locatingimportantproductinformation”onpage10
•“Features”onpage12
•“Specications”onpage14
•“Operatingenvironment”onpage14
•“Lenovoprograms”onpage15
Locatingcomputercontrols,connectors,andindicators
Thissectionintroducesthecomputerhardwarefeaturestogiveyouthebasicinformationyouwillneed
tostartusingthecomputer.
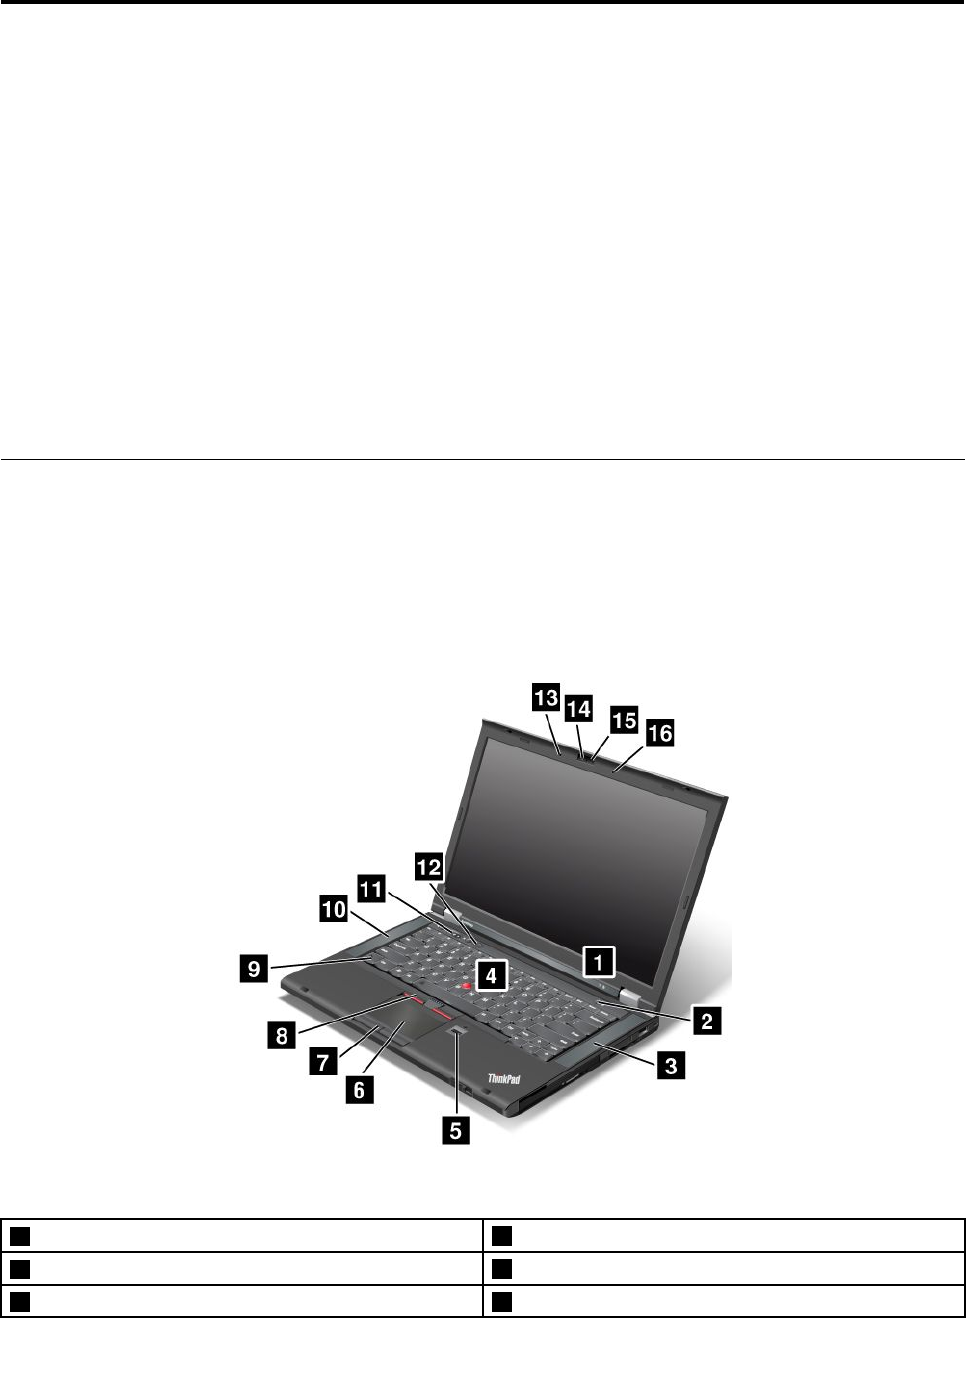
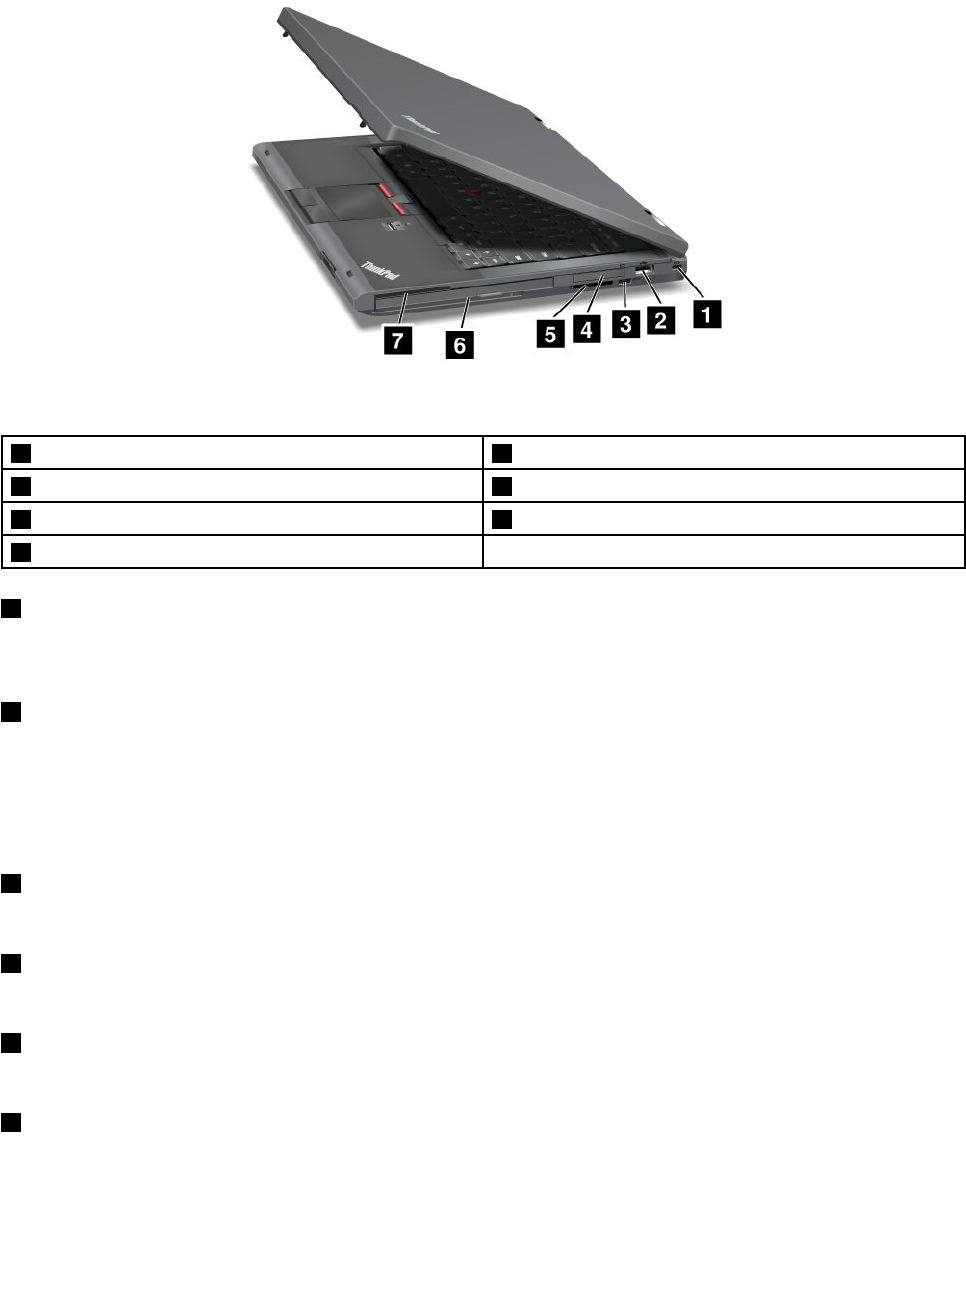
Frontview
Figure1.ThinkPadT430andT430ifrontview
1Statusindicators2Powerbutton
3Built-instereospeaker(right)4TrackPoint®pointingstick
5Fingerprintreader6Touchpad
©CopyrightLenovo20121

7Touchpadbuttons8TrackPointbuttons
9Fnkey10Built-instereospeaker(left)
11Volumecontrolbuttons12Blackbutton
13Built-inmicrophone(left)14Integratedcamera
15ThinkLight®light16Built-inmicrophone(right)
1Statusindicators
Yourcomputerhasseveralstatusindicators.Forthedetailedinformationaboutthelocationandmeaningof
eachindicator,see“System-statusindicators”onpage9.
2Powerbutton
Usethepowerbuttontoturnonthecomputer.
Toturnoffthecomputer,usetheStartmenushutdownoptionontheWindows®7operatingsystem.For
theWindows8operatingsystem,movethecursortothebottom-rightcornerofthescreentobringupthe
charms.ThenclickSettings➙Power➙Shutdown.
Ifyourcomputerstopsrespondingandyoucannotturnitoff,pressandholdthepowerbuttonforfour
secondsormore.Ifthecomputerstillisnotresponding,removetheacpoweradapterandthebattery
toresetthecomputer.
Youalsocanprogramthepowerbuttonsothatbypressingthepowerbuttonyoucanshutdownthe
computerorputitintosleeporhibernationmode.Toachievethis,youneedtochangeyourpowerplan
settings.Toaccesspowerplansettings,dothefollowing:
•ForWindows7:StartthePowerManagerprogramandthenclickthePowerPlantab.Forinstructionson
howtostartthePowerManagerprogram,see“AccessingLenovoprogramsontheWindows7operating
system”onpage15.
•ForWindows8:ClickthebatterystatusiconintheWindowsnoticationarea,andthen,clickMorepower
options➙Choosewhatthepowerbuttonsdo.
3Built-instereospeaker(right)
10Built-instereospeaker(left)
Fordetails,referto“Volumeandmutebuttons”onpage25.
UltraNav®pointingdevice
4TrackPointpointingstick
6Touchpad
7Touchpadbuttons
8TrackPointbuttons
ThekeyboardcontainstheLenovouniqueUltraNavpointingdevice.Pointing,selecting,anddraggingareall
partofasingleprocessthatyoucanperformwithoutmovingyourngersfromatypingposition.
5Fingerprintreader
Somemodelshaveangerprintreader.Thengerprintauthenticationtechnologyenablesyoutouseyour
ngerprinttostartthecomputer,entertheThinkPadSetupprogram,orentertheWindows®operatingsystem.
2UserGuide

9Fnkey
UsetheFnkeytotakeadvantageofThinkPad®functionkeys,suchasturningontheThinkLightlight,
lockingthecomputer,managingthewirelessconnections,andsoon.
11Volumecontrolbuttons
Thevolumecontrolbuttonsenableyoutoquicklyadjustthesoundvolume,mutethespeakers,ormutethe
microphonesofyourcomputer.
12Blackbutton
Whentheoperatingsystemisworkingnormally,pressingtheblackbuttonlaunchestheSimpleTapprogram
ontheWindows7operatingsystemortheLenovoPCDeviceExperienceprogramontheWindows8
operatingsystem.
IfyouareusingtheWindows7operatingsystem,youalsocanusethisbuttontointerruptthestartup
sequenceofyourcomputertostarttheRescueandRecovery®workspace.ToaccesstheRescueand
Recoveryworkspace,turnonyourcomputerandpressthisbuttonwhentheThinkPadlogoisdisplayed
onthescreen.FormoreinformationaboutRescueandRecovery,see“UsingtheRescueandRecovery
workspace”onpage65.
13Built-inmicrophone(left)
16Built-inmicrophone(right)
Thebuilt-inmicrophonescapturesoundandvoicewhenusedwithanapplicationprogramcapableof
handlingaudio.
14Integratedcamera
Somemodelshaveanintegratedcamera.Usethecameratotakepicturesorholdavideoconference.
15ThinkLightlight
TheThinkLightlightenablesyoutouseyourcomputerwhenthelightingconditionisnotideal.Toturnonthe
ThinkLightlight,presstheFnkeyandthespacekeytogether.Toturnitoff,pressthecombinationagain.
CAUTION:
Avoidusingyourcomputerindarkconditionsforprolongedperiods.Itisbadforyoureyes.
Chapter1.Productoverview3
Right-sideview
Figure2.ThinkPadT430andT430iright-sideview
1Securitykeyhole2USB2.0connector
3Wirelessradioswitch4ExpressCardslot
5Mediacardreaderslot6SerialUltrabay™enhancedbay
7Smartcardslot
1Securitykeyhole
Purchaseasecuritycablelockthattsthiskeyholetolockyourcomputertoastationaryobjecttoprotect
yourcomputerfromtheft.
2USB2.0connector
TheUSB2.0connectorisusedforconnectingdevicescompatiblewithaUSBinterface,suchasaUSB
printeroradigitalcamera.
Note:WhenyouattachaUSBcabletotheconnector,makesurethattheUSBmarkisfacingupward.
Otherwisetheconnectormightbedamaged.
3Wirelessradioswitch
Usethisswitchtoquicklyturnonorturnoffallwirelessconnections.
4ExpressCardslot
YourcomputerhasanExpressCardslotfora34mm-wideExpressCard.
5Mediacardreaderslot
Dependingonthemodel,yourcomputermighthaveamediacardreaderslot.
6SerialUltrabayenhancedbay
YourcomputerhasabayforSerialUltrabayEnhanceddevices.Somemodelshaveanopticaldiskdrive
installedinthebay.Forcertainmodels,a9.5mmharddiskdriveisinstalledthroughtheThinkPad12.7
mmSerialHardDriveBayAdapterIII.
4UserGuide
7Smartcardslot
Somemodelshaveasmartcardslot.
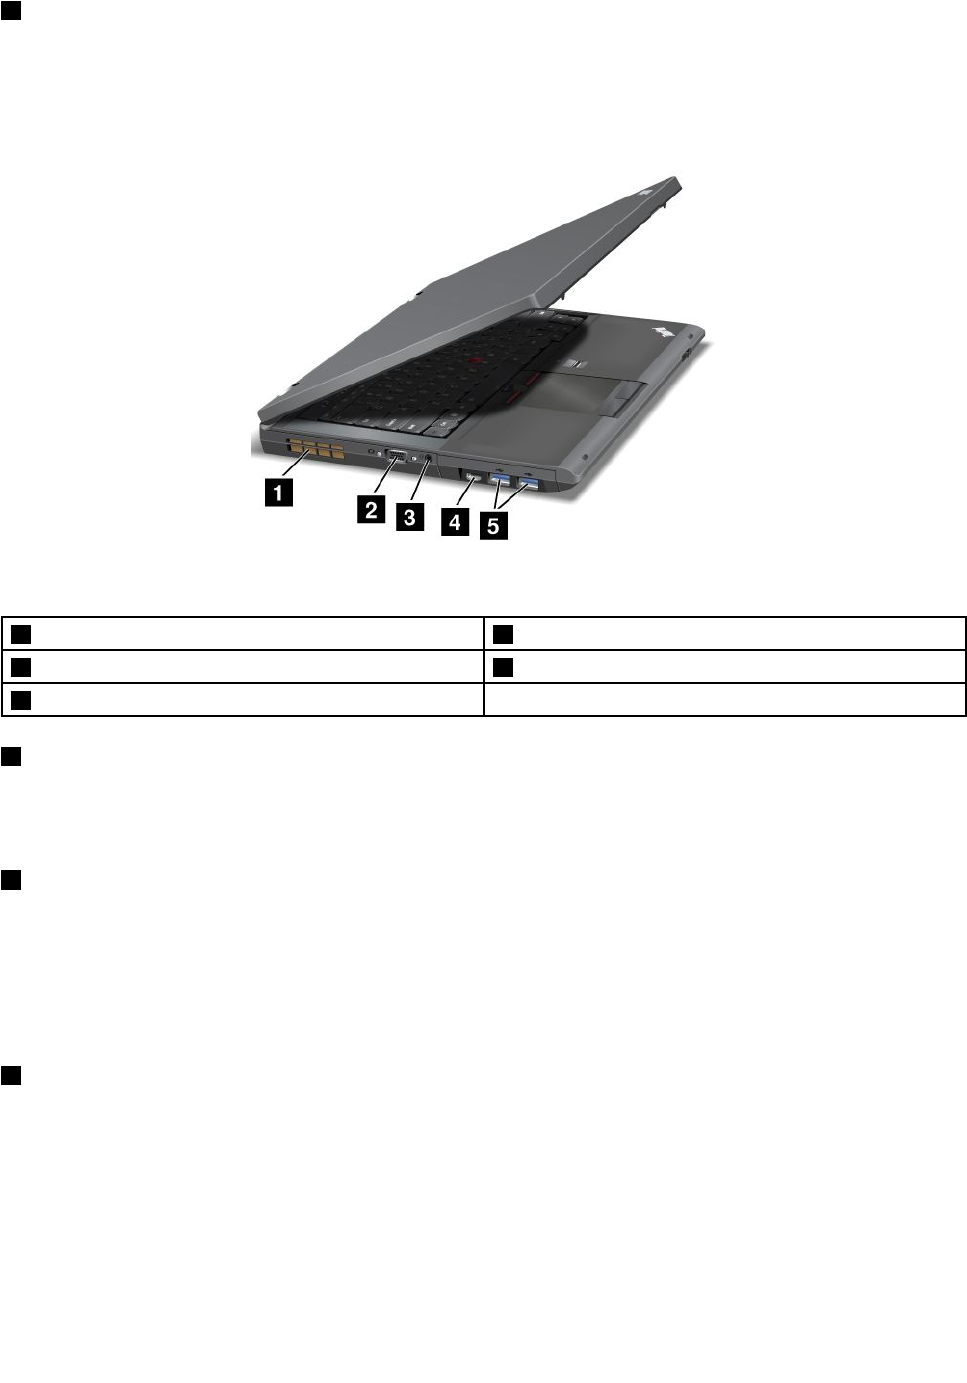
Left-sideview
Figure3.ThinkPadT430andT430ileft-sideview
1Fanlouvers(left)2Monitorconnector
3Comboaudiojack4MiniDisplayPortconnector
5USB3.0connectors
1Fanlouvers(left)
Theinternalfanandlouversenableairtocirculateinthecomputerandcoolthecentralprocessor.
Note:Toavoidimpedingairow,donotplaceanyobstacleinfrontofthefan.
2Monitorconnector
Youcanattachanexternalmonitororaprojectortoyourcomputertodisplaycomputeroutput.
Note:Ifyouattachyourcomputertoaportreplicatororadockingstationanduseamonitorconnector,use
themonitorconnectorontheportreplicatorordockingstation,nottheoneonthecomputer.
Fordetails,referto“Attachinganexternalmonitor”onpage39.
3Comboaudiojack
Tolistentothesoundfromyourcomputer,connectaheadphoneoraheadsetthathasa3.5mm4-pole
plugtothecomboaudiojack.
Notes:
•Ifyouareusingaheadsetwithafunctionswitch,forexample,aheadsetforaniPhone®mobiledigital
device,donotpressthisswitchwhileusingtheheadset.Ifyoupressit,theheadsetmicrophonewillbe
disabled,andtheintegratedmicrophonesonthecomputerwillbeenabledinstead.
•Thecomboaudiojackdoesnotsupportaconventionalmicrophone.
Chapter1.Productoverview5
4MiniDisplayPortconnector
UsetheMiniDisplayPortconnectortoconnectyourcomputertoacompatibleprojector,externalmonitor,or
high-denitiontelevision.
5USB3.0connectors
TheUSB3.0connectorsareusedforconnectingdevicescompatiblewithaUSBinterface,suchasa
USBprinteroradigitalcamera.
Note:TheUSB3.0functiononlyworksintheWindows7operatingsystem.IfyouareusingotherWindows
operatingsystemratherthanWindows7,theconnectorworksasaUSB2.0connector.
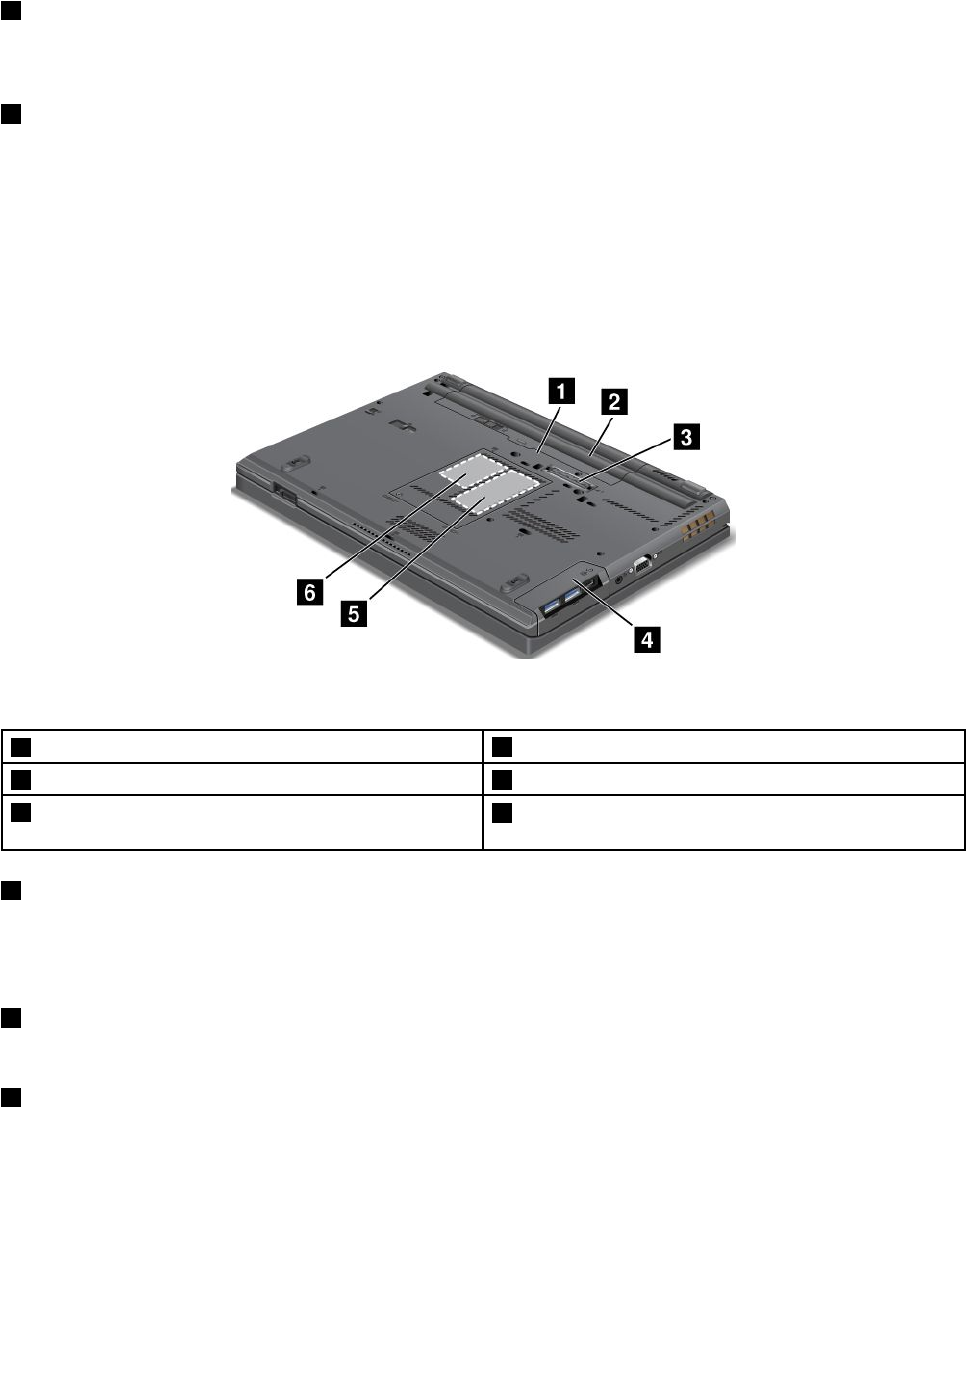
Bottomview
Figure4.ThinkPadT430andT430ibottomview
1SIMcardslot2Battery
3Portreplicatorordockingstationconnector4Harddiskdriveorsolidstatedrive
5Memory-upgradeslot6PCIExpressMiniCardslotforwirelessWANcardor
mSATAsolidstatedrive
1SIMcardslot
IfyourcomputerhasawirelessWANfeature,itmightrequireaSubscriberIdenticationModule(SIM)card
toestablishwirelessWANconnections.Dependingonthecountryofdelivery,theSIMcardmightbe
alreadyinstalledintheSIMcardslot.
2Battery
Useyourcomputerwiththebatterypowerwheneveracpowerisunavailable.
3Portreplicatorordockingstationconnector
Dependingonmodels,yourcomputermightsupportoneofthefollowingportreplicatorsordockingstations:
•ThinkPadPortReplicatorSeries3
•ThinkPadMiniDockSeries3
•ThinkPadMiniDockPlusSeries3
•ThinkPadMiniDockPlusforMobileWorkstationsSeries3(170W)
6UserGuide
Connectyourcomputertothesupporteddockingstationtoextendthecomputercapabilitieswhenyou
areinyourofceorathome.
4Harddiskdriveorsolidstatedrive
Dependingonmodels,yourcomputermighthavealarge-capacity,customer-upgradableharddiskdrive
thatcanmeetavarietyofstoragedemands.
Ifyouwish,youcanpurchaseanotherharddiskdriveandinstallitintheSerialUltrabayEnhancedbay.
Somemodelsareequippedwithasolidstatedrivefordatastorage,makingyourcomputerlighter,smaller,
andfaster.
Note:Thehiddenservicepartitionisthereasonwhythereislessfreespacethanexpectedonyourhard
diskdriveorsolidstatedrive.Thisreductionismorenoticeableonthesolidstatedrivebecauseofits
smallercapacity.
5Memory-upgradeslot
Youcanincreasetheamountofmemoryinyourcomputerbyinstallingamemorymoduleinthe
memory-upgradeslot.MemorymodulesareavailableasoptionsfromLenovo.
6PCIExpressMiniCardslotforwirelessWANcardormSATAsolidstatedrive
Yourcomputermighthaveawirelesswideareanetwork(WAN)cardinstalledinthePCIExpressMini
CardslotforwirelessWANconnections.
Forsomemodels,anmSATAsolidstatedrivemightbeinstalledinsteadofthewirelessWANcard.
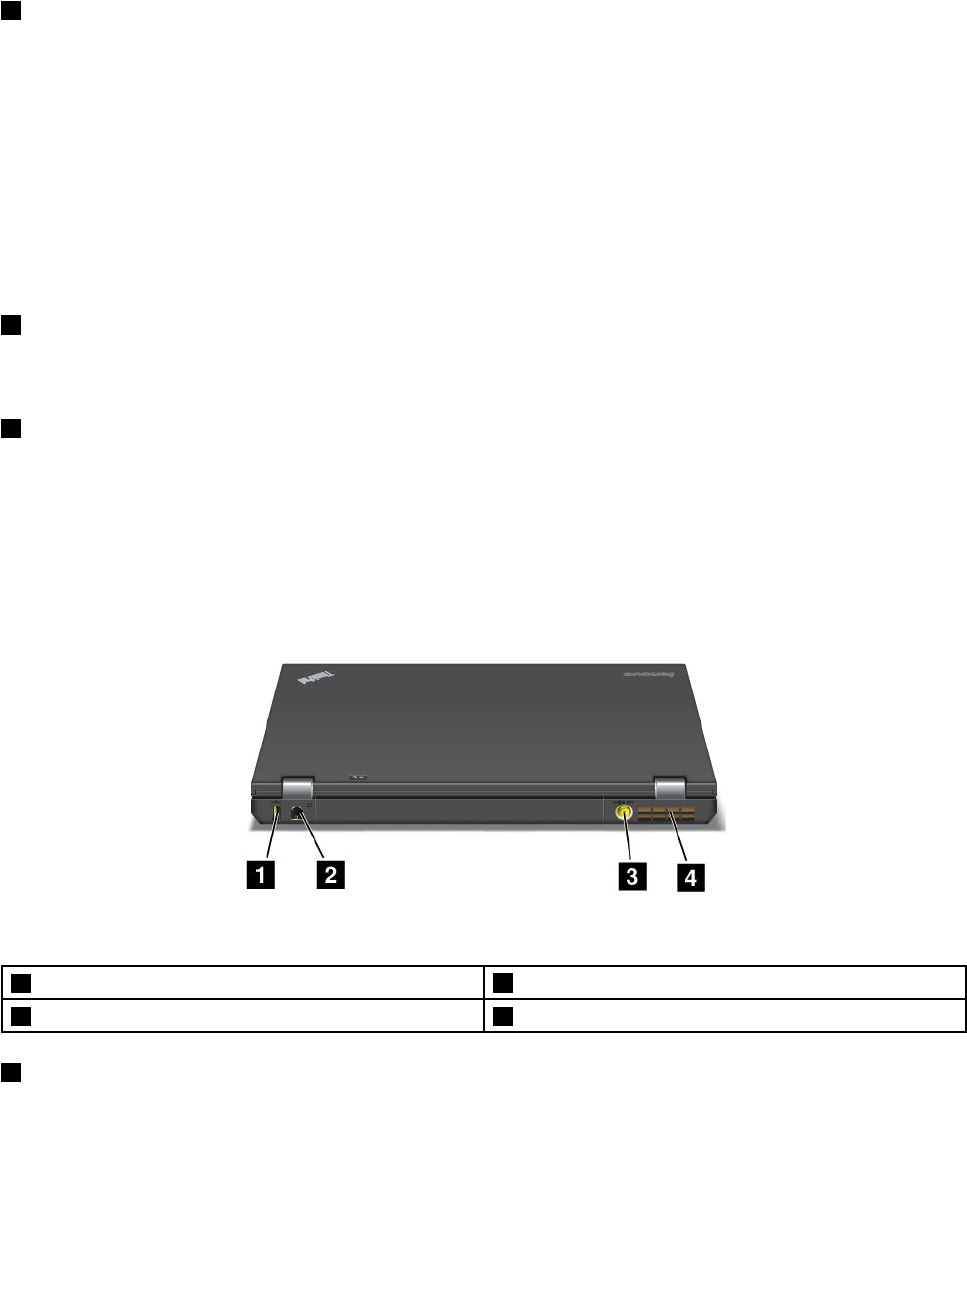
Rearview
Figure5.ThinkPadT430andT430irearview.
1AlwaysOnUSBconnector2Ethernetconnector
3Powerjack4Fanlouvers(rear)
1AlwaysOnUSBconnector
Bydefault,theAlwaysOnUSB2.0connectorenablesyoutochargesomedevices,suchasiPod®,iPhone,
andBlackBerry®smartphones,evenwhenyourcomputerisinsleep(standby)mode.
Ifyouwanttochargethesedeviceswhenyourcomputeristurnedoff,dothefollowing:
1.Connectthecomputertoanacpowersupply.
Chapter1.Productoverview7

2.GotoThinkPadSetupandenableAlwaysOnUSBChargeinoffmode.Formoreinformation,see
“Congmenu”onpage116.
3.Dooneofthefollowing:
•ForWindows7:StartthePowerManagerprogramandclicktheGlobalPowerSettingstab.Then
selecttheEnableAlwaysOnUSBcheckbox.
•ForWindows8:PresstheWindowskeytogototheStartscreen.ClickLenovoSettings➙Power.
ThenselecttheEnablewhenthecomputerisoffcheckbox.
2Ethernetconnector
ConnectyourcomputertoaLANwiththeEthernetconnector.
DANGER
Toavoidtheriskofelectricalshock,donotconnectthetelephonecabletotheEthernetconnector.
YoucanonlyconnectanEthernetcabletothisconnector.
Twoindicators,totheupperrightandleftoftheconnector,showthestatusofthenetworkconnection.
WhenyourcomputerconnectstoaLANandasessionwiththenetworkisavailable,theupperleftindicator
issteadygreen.Whiledataisbeingtransmitted,theupperrightindicatorblinksyellow.
Note:Ifyouattachyourcomputertoaportreplicatorordockingstation,usetheEthernetconnectoronthe
portreplicatorordockingstationtoconnecttoaLAN,nottheoneonthecomputer.
3Powerjack
Connecttheacpoweradaptertothepowerjacktoprovideacpowertothecomputerandchargethebattery.
4Fanlouvers(rear)
Theinternalfanandlouversenableairtocirculateinthecomputerandcoolthecentralprocessor.
Note:Toavoidimpedingairow,donotplaceanyobstacleinfrontofthefan.
Statusindicators
Yourcomputerhassystem-statusindicatorsandpower-statusindicators.Thestatusindicatorsshowthe
currentstatusofyourcomputer.
8UserGuide
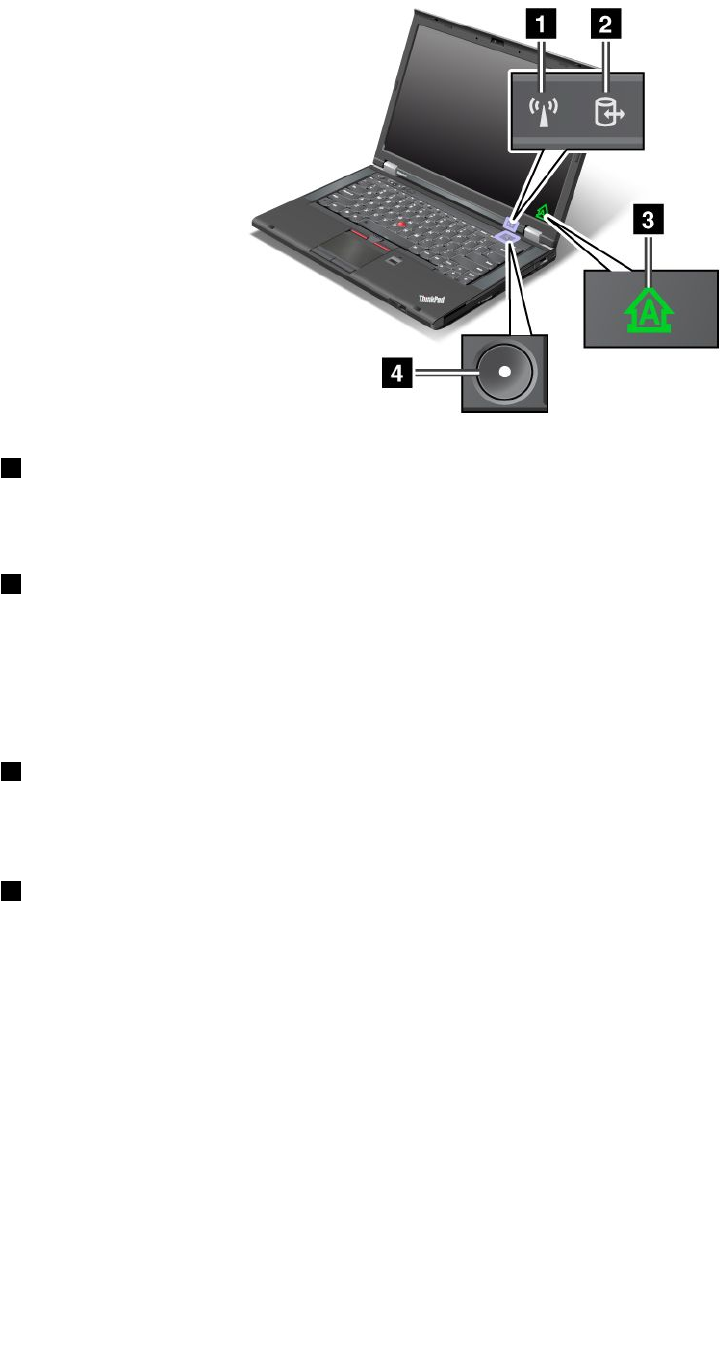
System-statusindicators
1WirelessLAN/WAN/WiMAX/Bluetoothstatusindicator
•Green:ThewirelessLAN,WAN,Bluetooth,orWiMAXfeatureison.
•Off:Wirelessnetworkdevicesaredisabledorthewirelessradioisturnedoff.
2Deviceaccessstatusindicator
Theharddiskdrive,solidstatedrive,mSATAsolidstatedrive,orthesecondharddiskdriveintheSerial
UltrabayEnhancedbayisreadingorwritingdata.
Note:Whenthisindicatorisblinking,donotputthecomputerintosleepmode,removethesecondhard
diskdrive,orturnoffthecomputer.
3CapsLockindicator
Whentheindicatorison,theCapsLockmodeisenabled.Youcantypeallalphabeticcharacters(A-Z)in
uppercasewithoutpressingtheShiftkey.
4Poweronstatusindicator
Thepowerbuttonstayslitwheneverthecomputerison,blinkswhenthecomputerisinsleepmode,and
isoffwhenthecomputeristurnedoff.
Powerstatusindicators
Thecomputerhaspowerstatusindicatorsthatshowpowermode(sleep,hibernation,ornormal),acpower
status,andbatterystatus.Thefollowingshowsthelocationandthemeaningoftheindicators.
Chapter1.Productoverview9
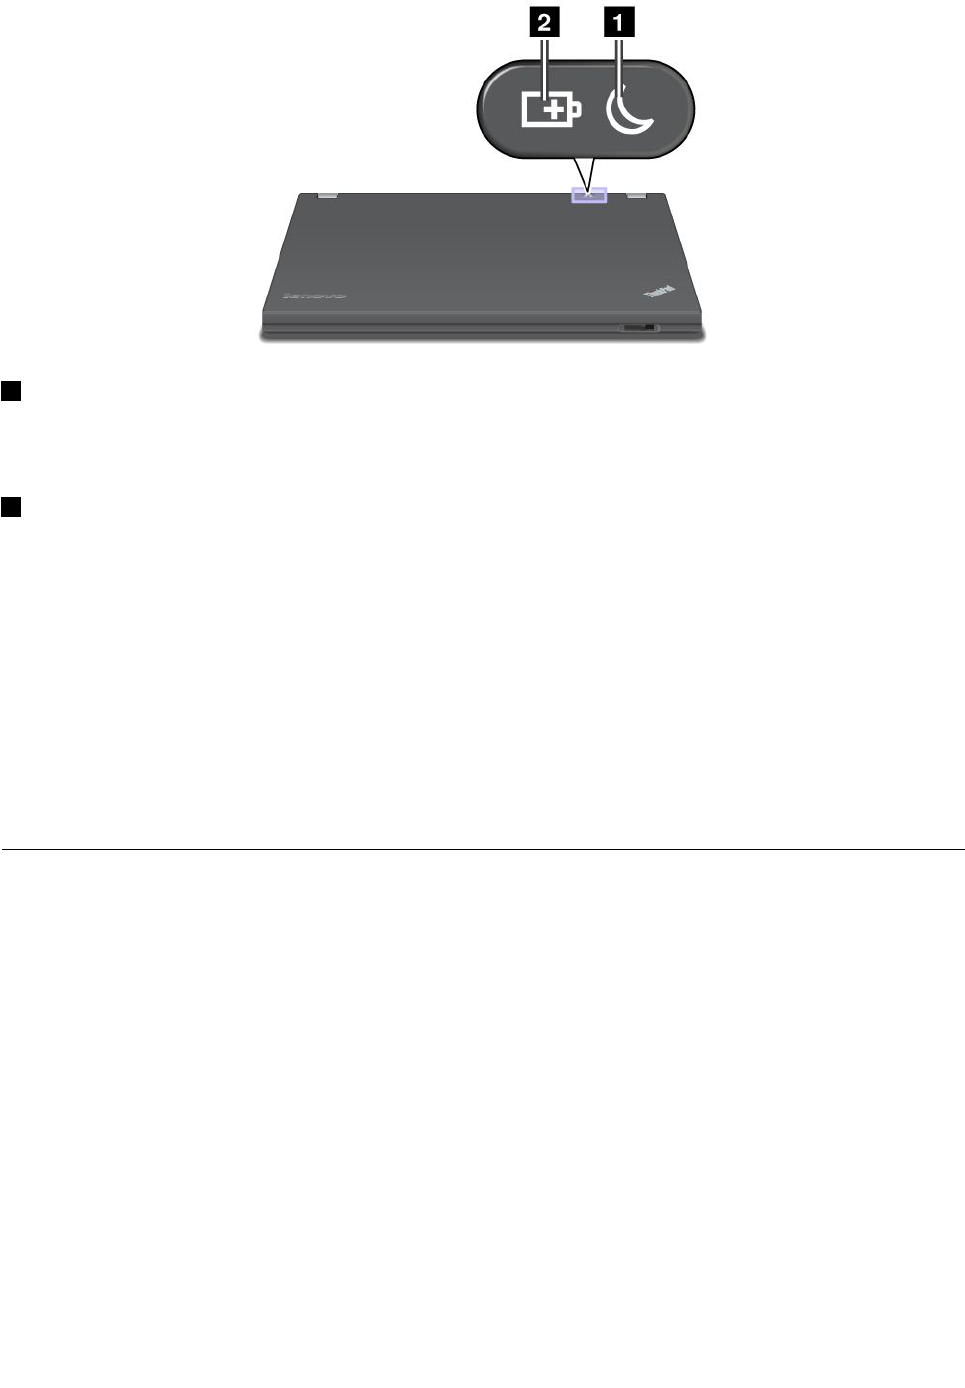
1Sleepstatusindicator
•Green:Thecomputerisinsleepmode.
•Blinkinggreen:Thecomputerisenteringsleeporhibernationmode,orisresumingnormaloperation.
2Batterystatusindicator
•Green:Thebatterychargelevelis20%ormore.
•Orange:Thebatterychargelevelisbetween5%and20%.
•Fastblinkingorange:Thebatterychargelevelis5%orless,orthebatteryischarging.
•Slowblinkingorange:Thebatteryisbeingcharged.Whenthechargelevelreaches20%,theblinking
colorchangestogreen.
•Slowblinkinggreen:Thebatterychargelevelisbetween20%and80%,andchargingiscontinuing.
Whenthebatterychargelevelreaches80%,thebatterystatusindicatorstopsblinking,butthecharging
mightcontinueuntilthebatteryis100%charged.
•Quickblinkingorange:Anerrorhasoccurredwiththebattery.
•Off:Thebatteryisdetachedorthecomputerispoweredoff.
Locatingimportantproductinformation
Thissectionprovidesinformationtohelpyoulocateyourmachinetypeandmodellabel,FCCIDandIC
Certicationlabel,andtheMicrosoft®CerticateofAuthenticity(COA)label.
Machinetypeandmodellabel
Themachinetypeandmodellabelidentiesyourcomputer.IfyoucontactLenovoforhelp,themachine
typeandmodelnumberwillenablesupporttechnicianstoidentifyyourcomputerandprovidethehighest
levelofservice.
10UserGuide
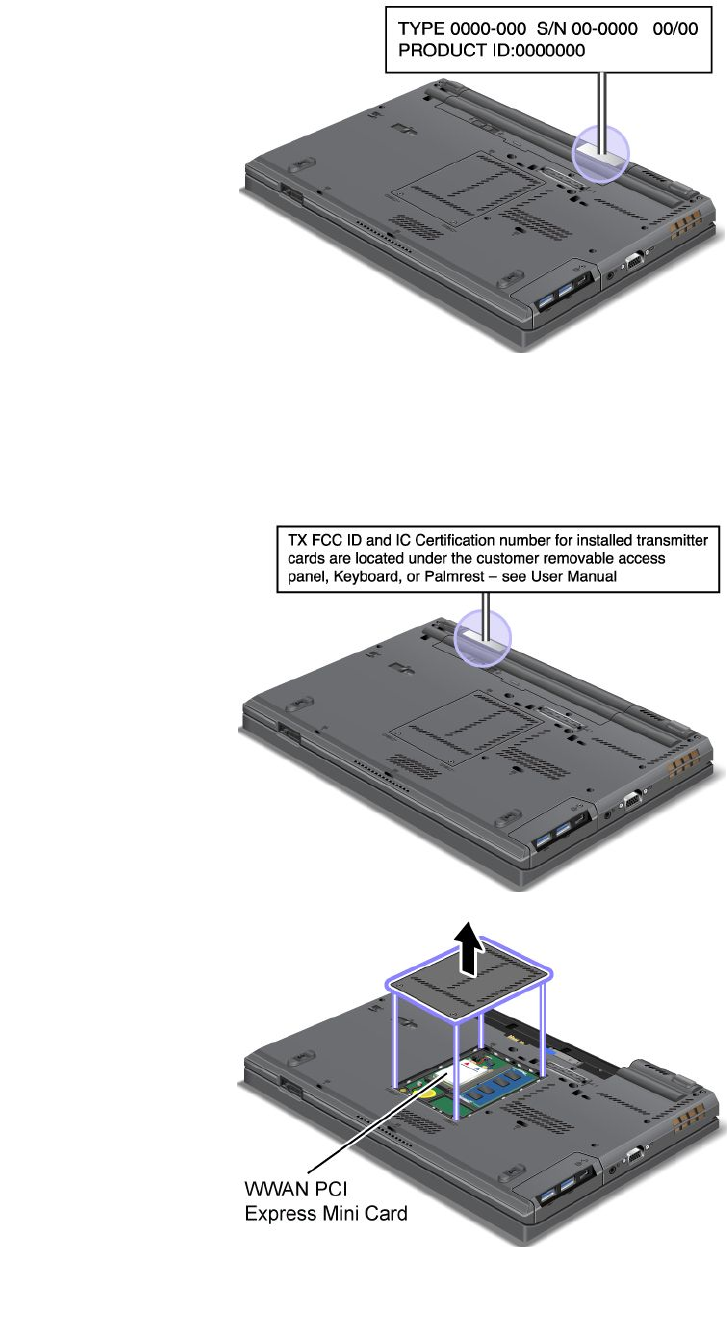
Youcanndthemachinetypeandmodelofyourcomputerinthelabelasshownbelow:
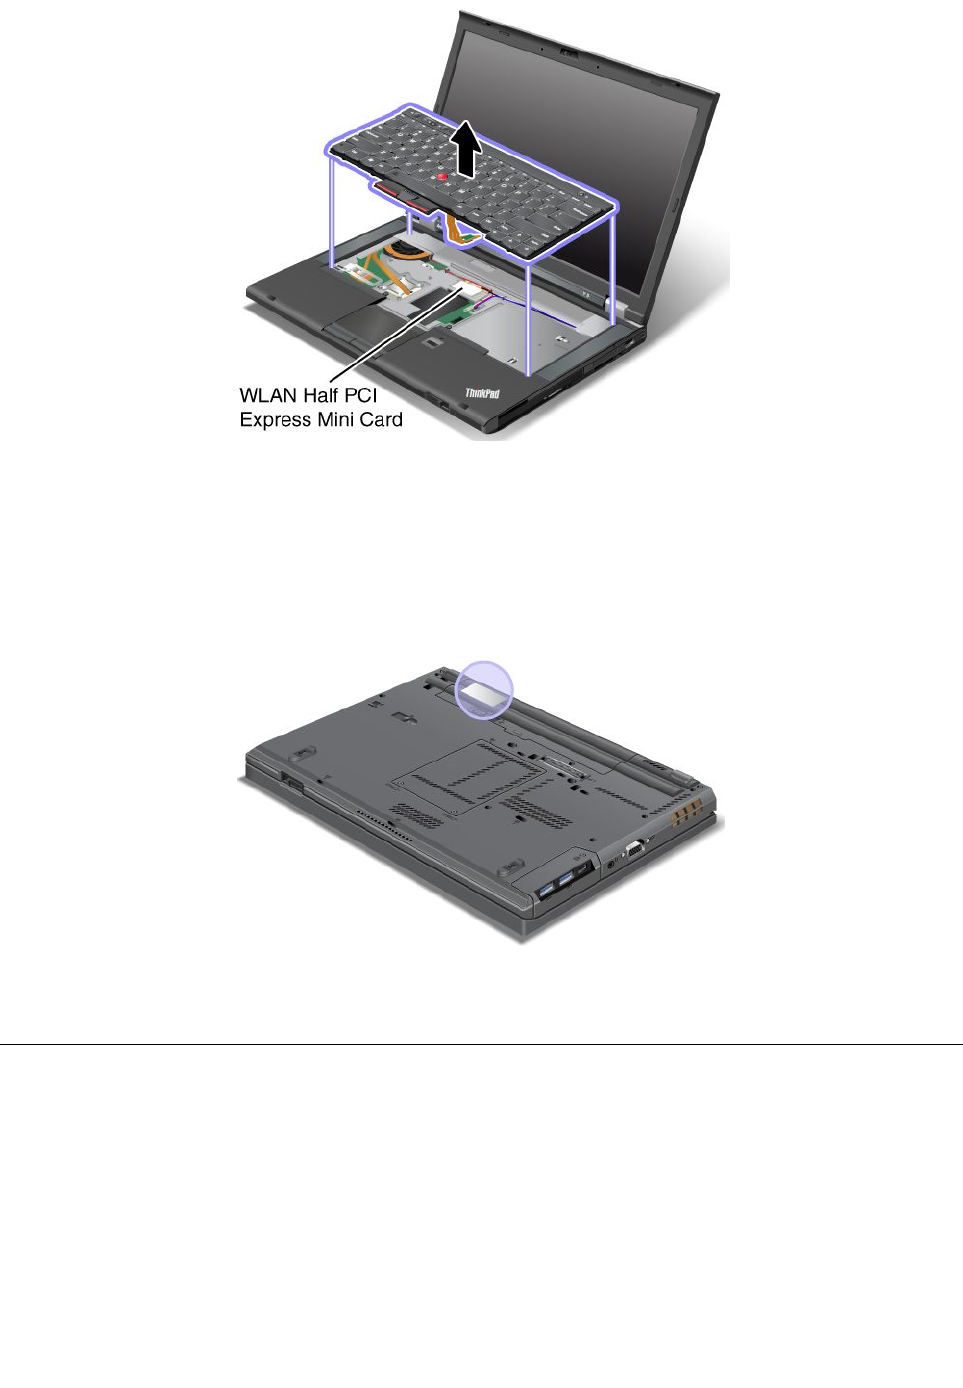
FCCIDandICCerticationnumberlabel
ThereisnoFCCIDorICCerticationnumberforthePCIExpressMiniCardshownontheenclosureof
yourcomputer.TheFCCIDandICCerticationnumberlabelisafxedonthecardinstalledinthePCI
ExpressMiniCardslotofyourcomputer.
Chapter1.Productoverview11
CerticateofAuthenticitylabel
TheMicrosoftCerticateofAuthenticitylabelforthepreinstalledoperatingsystemisattached.Printedonthis
labelaretheproductIDandtheproductkeyinformationforyourcomputer.Recordthisinformationandkeep
itinasafeplace.Youmightneedthesenumberstostartyourcomputerorreinstalltheoperatingsystem.
TheWindowsCerticateofAuthenticityofyourcomputerisshownasbelow:
Note:TheCerticateofAuthenticitylabelappliesonlytocomputerspreinstalledwiththeWindows7
operatingsystem.
Features
Processor
•Toviewtheprocessorinformationofyourcomputer,dothefollowing:
–ForWindows7:ClickStart,right-clickComputer.ThenclickProperties.
–ForWindows8:Movethecursortothebottom-rightcornerofthescreentobringupthecharms.
ThenclickSettings➙PCinfo.
Memory
12UserGuide

•Doubledatarate3synchronousdynamicrandomaccessmemory(DDR3SDRAM)
Storagedevice
•2.5-inchsolidstatedriveor2.5-inchharddiskdrive
Systemperformancefeature
•mSATAsolidstatedrive(onsomemodels)
Display
ThecolordisplayusesTFTtechnology.
•Size:14.0inches(355.6mm)
•Resolution:
–LCD:Upto1600-by-900,dependingonthemodel
–Externalanalogmonitor:Upto2048-by-1536,dependingonthemodel
–Externaldigitalmonitor:Upto2536-by-1600,dependingonthemodel
•Brightnesscontrol
•ThinkLightlight
•Integratedcamera(onsomemodels)
•Built-inmicrophones
Keyboard
•6-rowstandardkeyboardor6-rowbacklitkeyboard(dependingonthemodel)
•84-key,85-key,or89-key
•UltraNavpointingdevice(TrackPointpointingdeviceandtouchpad)
•Fnkeyfunction
•Volumecontrolbuttons
•Speakermutebutton
•Microphonemutebutton
Interface
•Externalmonitorconnectors(VGAandMiniDisplayPort)
•Comboaudiojack
•TwoUSB3.0connectors
•OneUSB2.0connector
•OneAlwaysOnUSBconnector
•RJ45Ethernetconnector
•SerialUltrabayenhancedbay
•ExpressCardslot
•Mediacardreaderslot
•Smartcardreaderslot(onsomemodels)
•Dockingstationconnector
Opticaldrive
Chapter1.Productoverview13

•MultiBurnerdriveorDVD-ROMdrive(dependingonmodel)
Wirelessfeatures
•IntegratedwirelessLAN
•IntegratedBluetooth(onsomemodels)
•IntegratedwirelessWAN(onsomemodels)
•IntegratedWiMAX(onsomemodels)
Securityfeature
•Fingerprintreader(onsomemodels)
Specications
Size
•Width:340.5mm(13.4inches)
•Depth:232mm(9.13inches)
•Height:29.5mm(1.16inches)
Heatoutput
•65W(222Btu/hr)maximum,90W(307Btu/hr)maximum
Powersource(acpoweradapter)
•Sine-waveinputat50to60Hz
•Inputratingoftheacpoweradapter:100to240Vac,50to60Hz
Batterypack
•Lithium-ion(Li-Ion)batterypack
Batterylife
•Forthepercentageofremainingbatterypower,checkthebatterystatusicononthetaskbar.
Operatingenvironment
Thissectionprovidesinformationaboutyourcomputeroperatingenvironment.
Environment:
•Maximumaltitudewithoutpressurization:3048m(10000ft)
•Temperature
–Ataltitudesupto2438m(8000ft)
–Operating:5.0°Cto35.0°C(41°Fto95°F)
–Storage:5.0°Cto43.0°C(41°Fto109°F)
–Ataltitudesabove2438m(8000ft)
–Maximumtemperaturewhenoperatingundertheunpressurizedcondition:31.3°C(88°F)
Note:Whenyouchargethebatterypack,itstemperaturemustbeatleast10°C(50°F).
14UserGuide

•Relativehumidity:
–Operating:8%to80%
–Storage:5%to95%
Ifpossible,placeyourcomputerinawell-ventilatedanddryareawithoutdirectexposuretosunshine.
Keepelectricalappliancessuchasanelectricfan,radio,airconditioner,andmicrowaveovenawayfrom
yourcomputerbecausethestrongmagneticeldsgeneratedbytheseappliancescandamagethemonitor
anddataontheharddiskdrive.
Donotplaceanybeveragesontopoforbesidethecomputerorotherattacheddevices.Ifliquidisspilledon
orinthecomputeroranattacheddevice,ashortcircuitorotherdamagemightoccur.
Donoteatorsmokeoveryourkeyboard.Particlesthatfallintoyourkeyboardcancausedamage.
Lenovoprograms
YourcomputercomeswithLenovoprogramstohelpyouworkmoreeasilyandsecurely.Dependingon
theWindowsoperatingsystempreinstalled,theprogramsmightvary.
TolearnmoreabouttheprogramsandothercomputingsolutionsofferedbyLenovo,goto
http://www.lenovo.com/support.
AccessingLenovoprogramsontheWindows7operatingsystem
OntheWindows7operatingsystem,youcanaccessLenovoprogramsfromeithertheLenovoThinkVantage
ToolsprogramorfromControlPanel.
AccessingLenovoprogramsfromtheLenovoThinkVantageToolsprogram
ToaccessLenovoprogramsfromtheLenovoThinkVantageToolsprogram,clickStart➙AllPrograms➙
LenovoThinkVantageTools.Thendouble-clickaprogramicontoaccesstheprogram.
Note:IfaprogramiconintheLenovoThinkVantageToolsprogramnavigationwindowisdimmed,it
indicatesthatyouneedtoinstalltheprogrammanually.Toinstalltheprogrammanually,double-clickthe
programicon.Then,followtheinstructionsonthescreen.Whentheinstallationprocesscompletes,the
programiconwillbeactivated.
Table1.ProgramsintheLenovoThinkVantageToolsprogram
ProgramIconname
AccessConnections™InternetConnection
ActiveProtectionSystem™AirbagProtection
ClientSecuritySolutionEnhancedSecurity
CommunicationsUtilityWebConferencing
FingerprintSoftwareFingerprintReader
GPSEnablerGPS
LenovoSolutionCenterSystemHealthandDiagnostics
MobileBroadbandConnect3GMobileBroadband
PasswordManagerPasswordVault
PowerManagerPowerControls
Chapter1.Productoverview15

Table1.ProgramsintheLenovoThinkVantageToolsprogram(continued)
ProgramIconname
RecoveryMediaFactoryRecoveryDisks
RescueandRecovery®EnhancedBackupandRestore
SimpleTapSimpleTap
SystemUpdateUpdateandDrivers
Note:Dependingonyourcomputermodel,someoftheprogramsmightnotbeavailable.
AccessingLenovoprogramsfromControlPanel
ToaccessLenovoprogramsfromControlPanel,clickStart➙ControlPanel.Thendependingonthe
programyouwanttoaccess,clickthecorrespondingsectionandthenclickthecorrespondinggreentext.
Note:IfyoudonotndtheprogramyouneedinControlPanel,opentheLenovoThinkVantageTools
programnavigationwindowanddouble-clickthedimmedicontoinstalltheprogramyouneed.Then,
followtheinstructionsonthescreen.Whentheinstallationprocesscompletes,theprogramiconwillbe
activated,andyoucanndtheprograminControlPanel.
TheprogramsandthecorrespondingsectionsandgreentextsinControlPanelarelistedinthefollowing
table.
Table2.ProgramsinControlPanel
ProgramControlPanelsectionGreentextinControlPanel
AccessConnectionsNetworkandInternetLenovo-InternetConnection
ActiveProtectionSystemSystemandSecurity
HardwareandSound
Lenovo-AirbagProtection
ClientSecuritySolutionSystemandSecurityLenovo-EnhancedSecurity
CommunicationsUtilityHardwareandSoundLenovo-WebConferencing
FingerprintSoftwareSystemandSecurity
HardwareandSound
Lenovo-FingerprintReader
or
Lenovo-NotebookFingerprint
Reader
GPSEnablerNetworkandInternetLenovo-GPS
LenovoSolutionCenterSystemandSecurityLenovo-SystemHealthand
Diagnostics
MessageCenterPlusProgramsMessagesfromLenovo
MobileBroadbandConnectNetworkandInternetLenovo-3GMobileBroadband
PasswordManagerSystemandSecurity
UserAccountsandFamilySafety
Lenovo-PasswordVault
PowerManagerHardwareandSound
SystemandSecurity
Lenovo-PowerControls
RecoveryMediaSystemandSecurityLenovo-FactoryRecoveryDisks
SimpleTapProgramsLenovo-SimpleTap
SystemUpdateSystemandSecurityLenovo-UpdateandDrivers
RescueandRecoverySystemandSecurityLenovo-EnhancedBackupand
Restore
16UserGuide

Note:Dependingonyourcomputermodel,someoftheprogramsmightnotbeavailable.
AccessingLenovoprogramsontheWindows8operatingsystem
IfyourcomputerispreinstalledwiththeWindows8operatingsystem,youcanaccessLenovoprogramsby
doingeitherofthefollowing:
•ClicktheLenovoQuickLaunchiconfromthetaskbar.Alistofprogramsisdisplayed.Double-clicka
Lenovoprogramtolaunchit.Ifadesiredprogramisnotinthelist,clicktheplusicon+.
•PresstheWindowskeytogototheStartscreen.ClickaLenovoprogramtolaunchit.Ifyoucannotnd
theprogramyouneed,movethecursortothebottom-rightcornerofthescreentobringupthecharms.
ThenclicktheSearchcharmtosearchforthedesiredprogram.
YourcomputersupportsthefollowingLenovoprograms:
•ActiveProtectionSystem
•FingerprintSoftware
•LenovoCompanion
•LenovoSettings
•LenovoMobileAccess
•LenovoSolutionCenter
•LenovoQuickLaunch
•LenovoSupport
•PasswordManager
•SystemUpdate
AnintroductiontoLenovoprograms
ThistopicprovidesabriefintroductiontosomeLenovoprograms.
Note:Dependingonyourcomputermodel,someoftheprogramsmightnotbeavailable.
•AccessConnections
TheAccessConnectionsprogramisaconnectivityassistantprogramforcreatingandmanaginglocation
proles.EachlocationprolestoresallthenetworkandInternetcongurationsettingsneededfor
connectingtoanetworkinfrastructurefromaspeciclocationsuchasahomeoranofce.
Byswitchingbetweenlocationprolesasyoumoveyourcomputerfromplacetoplace,youcanquickly
andeasilyconnecttoanetworkwithnoneedtorecongureyoursettingsmanuallyandrestartthe
computereachtime.
•ActiveProtectionSystem
TheActiveProtectionSystemprogramprotectsyourharddiskdrivewhentheshocksensorinsideyour
computerdetectsaconditionthatcoulddamagethedrive,suchassystemtilt,excessivevibration,or
shock.Theharddiskdriveislessvulnerabletodamagewhenitisnotoperating.Thisisbecausewhen
theharddiskdriveisnotoperating,thesystemstopsitfromspinning,andmightalsomovetheread
andwriteheadsofthedrivetoareasthatdonotcontaindata.Assoonastheshocksensorsenses
thattheenvironmentisstableagain(minimalchangeinsystemtilt,vibration,orshock),itturnsthe
harddiskdriveon.
•ClientSecuritySolution
TheClientSecuritySolutionprogramprotectsyourcomputerbysecuringclientdataanddeecting
securitybreachattempts.Italsocanhelpmanageyourpasswords,recoveraforgottenpassword,
monitorsecuritysettingsonyourcomputer,andsuggesthowtoenhanceyourcomputersecurity.
Chapter1.Productoverview17

•CommunicationsUtility
UsetheCommunicationsUtilityprogramtoconguresettingsfortheintegratedcameraandaudiodevices.
•FingerprintSoftware
Ifyoursystemcomeswithangerprintreader,theFingerprintSoftwareprogramenablesyoutoenroll
yourngerprintandassociateitwithyourWindowspassword.Asaresult,thengerprintauthentication
canreplaceyourpasswordandenablesimpleandsecureuseraccess.
•GPSEnabler
IfthePCIExpressMiniCardinstalledinyourcomputersupportsGPS,yourcomputercanreceivesignals
fromGPSsatellitesanddetermineitslocation.IfyourcomputerisconnectedtotheInternet,youcannd
yourlocationonareal-timemapprovidedbyGoogleMapsorMicrosoftBing™Maps.
•LenovoCompanion
ThroughtheLenovoCompanionprogram,youcangettheinformationabouttheaccessoriesforyour
computer,viewbolgsandarticlesaboutyourcomputer,andcheckforotherrecommendedprograms.
•LenovoSettings
UsetheLenovoSettingsprogramtoenhanceyourcomputingexperiencebyturningyourcomputerintoa
portablehotspot,conguringcameraandaudiosettings,optimizingyourpowersettings,andcreating
andmanagingmultiplenetworkproles.
•LenovoMobileAccess
TheLenovoMobileAccessprogramenablesyoutomanageyourmobilebroadbandconnection.You
cancreateanaccount,addmoneytotheaccount,andpurchasemobilebroadbandsessionsusing
youraccount.
•LenovoSolutionCenter
TheLenovoSolutionCenterprogramenablesyoutotroubleshootandresolvecomputerproblems.It
combinesdiagnostictests,systeminformationcollection,securitystatus,andsupportinformation,along
withhintsandtipsformaximumsystemperformance.
•LenovoQuickLaunch
TheLenovoQuickLaunchprogramprovidesyouwithquickaccesstoprogramsinstalledonyour
computer,includingLenovoprograms,Microsoftprograms,andotherthirdpartyprograms.
•LenovoSupport
TheLenovoSupportprogramenablesyoutoregisteryourcomputerwithLenovo,checkthecomputer
healthconditionandbatterystatus,downloadandviewusermanualsforyourcomputer,getthewarranty
informationofyourcomputer,andexplorehelpandsupportinformation.
•LenovoThinkVantageT ools
TheLenovoThinkVantageToolsprogramhelpsyouworkmoreeasilyandsecurelybyprovidingeasy
accesstovariousprograms,suchasFingerprintSoftware,LenovoSolutionCenter,andsoon.
•MessageCenterPlus
TheMessageCenterPlusprogramautomaticallydisplaysmessagestoinformyouaboutimportantnotices
fromLenovo,suchasalertsonsystemupdatesandalertsonconditionsthatrequireyourattention.
•MobileBroadbandConnect
TheMobileBroadbandConnectprogramenablesyourcomputertoconnecttothemobilebroadband
(3G)networkthroughasupportedwirelessWANcard.
•PasswordManager
ThePasswordManagerprogramautomaticallycapturesandllsinauthenticationinformationfor
WindowsprogramsandWebsites.
•PowerManager
18UserGuide

ThePowerManagerprogramprovidesconvenient,exible,andcompletepowermanagementforyour
computer.Itenablesyoutoadjustyourcomputerpowersettingstoachievethebestbalancebetween
performanceandpowersaving.
•RecoveryMedia
TheRecoveryMediaprogramenablesyoutorestorethecontentsoftheharddiskdrivetothefactory
defaultsettings.
•RescueandRecovery
TheRescueandRecoveryprogramisaone-buttonrecoveryandrestoresolutionthatincludesasetof
self-recoverytoolstohelpyoudiagnosecomputerproblems,gethelp,andrecoverfromsystemcrashes,
evenifyoucannotstarttheWindowsoperatingsystem.
•SimpleTap
TheSimpleTapprogramprovidesyouwithaquickwaytocustomizesomebasiccomputersettingssuch
asmutingthespeakers,adjustingthevolume,lockingthecomputeroperatingsystem,launchinga
program,openingaWebpage,openingale,andsoon.YoualsocanusetheSimpleTapprogramto
accesstheLenovoAppShop,fromwhichyoucandownloadvariousprogramsandcomputersoftware.
TostarttheSimpleTapprograminaquickway,doanyofthefollowing:
–ClicktheredSimpleTaplaunchpointonthedesktop.Theredlaunchpointisavailableonthedesktop
afteryouhavelaunchedtheSimpleTapprogramforthersttime.
–Presstheblackbuttononthekeyboard(nexttothevolumecontrolbuttons).
Note:TheSimpleTapprogramisonlyavailableoncertainmodelspreinstalledwiththeWindows7
operatingsystem.IfyourWindows7modelisnotpreinstalledwiththeSimpleTapprogram,youcan
downloaditfromhttp://www.lenovo.com/support.
•SystemUpdate
TheSystemUpdateprogramhelpsyoukeepthesoftwareonyourcomputerup-to-datebydownloading
andinstallingsoftwareupdatepackages(Lenovoprograms,devicedrivers,UEFIBIOSupdates,and
otherthirdpartyprograms).
Chapter1.Productoverview19

20UserGuide

Chapter2.Usingyourcomputer
Thischapterprovidesinformationonusingsomeofthecomputercomponents.
Registeryourcomputer
Whenyouregisteryourcomputer,informationisenteredintoadatabase,whichenablesLenovotocontact
youincaseofarecallorothersevereproblem.AfteryouregisteredyourcomputerwithLenovo,youwill
alsoreceivequickerservicewhenyoucallLenovoforhelp.Inaddition,somelocationsofferextended
privilegesandservicestoregisteredusers.
ToregisteryourcomputerwithLenovo,dooneofthefollowing:
•Gotohttp://www.lenovo.com/registerandfollowtheinstructionsonthescreentoregisteryourcomputer.
•ConnectyourcomputertotheInternetandregisteryourcomputerthroughapreinstalledregistration
program:
–ForWindows7:ThepreinstalledLenovoProductRegistrationprogramlaunchesautomaticallyafteryou
haveusedyourcomputerforatime.Followtheinstructionsonthescreentoregisteryourcomputer.
–ForWindows8:OpentheLenovoSupportprogram.ThenclickRegistrationandfollowtheinstructions
onthescreentoregisteryourcomputer.
Frequentlyaskedquestions
HereareafewtipsthatwillhelpyouoptimizetheuseofThinkPadnotebook.
Toensurethatyoureceivethebestperformancefromyourcomputer,browsethefollowingWebpagetond
informationsuchasaidsfortroubleshootingandanswerstofrequentlyaskedquestions:
http://www.lenovo.com/support
CanIgetmyuserguideinanotherlanguage?
•Todownloadtheuserguideinanotherlanguage,gotohttp://www.lenovo.com/support.Thenfollow
theinstructionsonthescreen.
Onthegoandneedtousebatterypowermoreeffectively?
•Toconservepower,ortosuspendoperationwithoutexitingapplicationsorsavingles,seethe
explanationabout“power-savingmodes”onpage31.
•Toachievethebestbalancebetweenperformanceandpowersaving,changepowerplansettings.
See“Managingyourbatterypower”onpage31.
•Ifyourcomputerwillbeturnedoffforanextendedperiodoftime,youcanpreventbatterypower
fromdrainingbyremovingthebattery.Lookformoreinformationaboutusingthebatteryin“Power
management”onpage29.
Concernedaboutsecurityorneedtosecurelydisposeofdatastoredonyourharddiskorsolid
statedrive?
•StudyChapter4“Security”onpage51tondouthowyoucanprotectyourcomputerfromtheftand
unauthorizeduse.
•UsethePasswordManagerprogramtoprotectthedatastoredonyourcomputer.
©CopyrightLenovo201221

•Beforeyoudisposeofthedataontheharddiskdriveorthesolidstatedrive,besuretoread“Noticeon
deletingdatafromyourharddiskorsolidstatedrive”onpage61.
Gettingconnectedindifferentlocationsisachallenge?
•Totroubleshootawirelessnetworkingissue,gotohttp://www.lenovo.com/support/faq.
•TakeadvantageofthenetworkingfeaturesprovidedbytheAccessConnectionsprogram(onthe
Windows7operatingsystem)orLocationAwarenessintheLenovoSettingsprogram(ontheWindows8
operatingsystem).
•Tolearnmoreaboutusingthewirelessfeaturesofyourcomputer,referto“Wirelessconnections”on
page34.
•Totravelmorecondently,besuretocheckthetipsin“Travelingwithyourcomputer”onpage49.
•PressFn+F5,orusethewirelessradioswitchtoenableordisablethewirelessfeatures.
Needtogivepresentationsorattachanexternalmonitoroften?
•UsethePresentationDirectorprogramtosetupapresentation.
•Makesurethatyoufollowtheprocedureinthetopic“Attachinganexternalmonitor”onpage39.
•UsetheExtenddesktopfunction,youcandisplayoutputonboththecomputerdisplayandtheexternal
monitor.
Needtoattachorreplaceadevice?
•SeeChapter6“Replacingdevices”onpage71formoreinformationaboutreplacingthedevicesof
yourcomputer.
•SeeChapter7“Enhancingyourcomputer”onpage99formoreinformationaboutenhancingthefeatures
ofyourcomputer.
Youhavebeenusingyourcomputerforsometimealready,anditisgettingslower?
•Readthetopic“Generaltipsforpreventingproblems”onpage131.
•Diagnoseproblemsyourselfbyusingthepreinstalleddiagnosticsoftware.
•Alsorecoverytoolisprovidedonyourcomputerharddiskorsolidstatedrive.Formoreinformation,
see“Recoveryoverview”onpage63.
Printthefollowingsectionsandkeepthemwithyourcomputerincaseyouareunabletoaccessthis
onlinehelpwhennecessary.
•“Installinganewoperatingsystem”onpage111
•“Computerstopsresponding”onpage137
•“Powerproblems”onpage151
Specialkeysandbuttons
Yourcomputerhasseveralspecialkeysandbuttonstohelpyouworkmoreeasilyandeffectively.
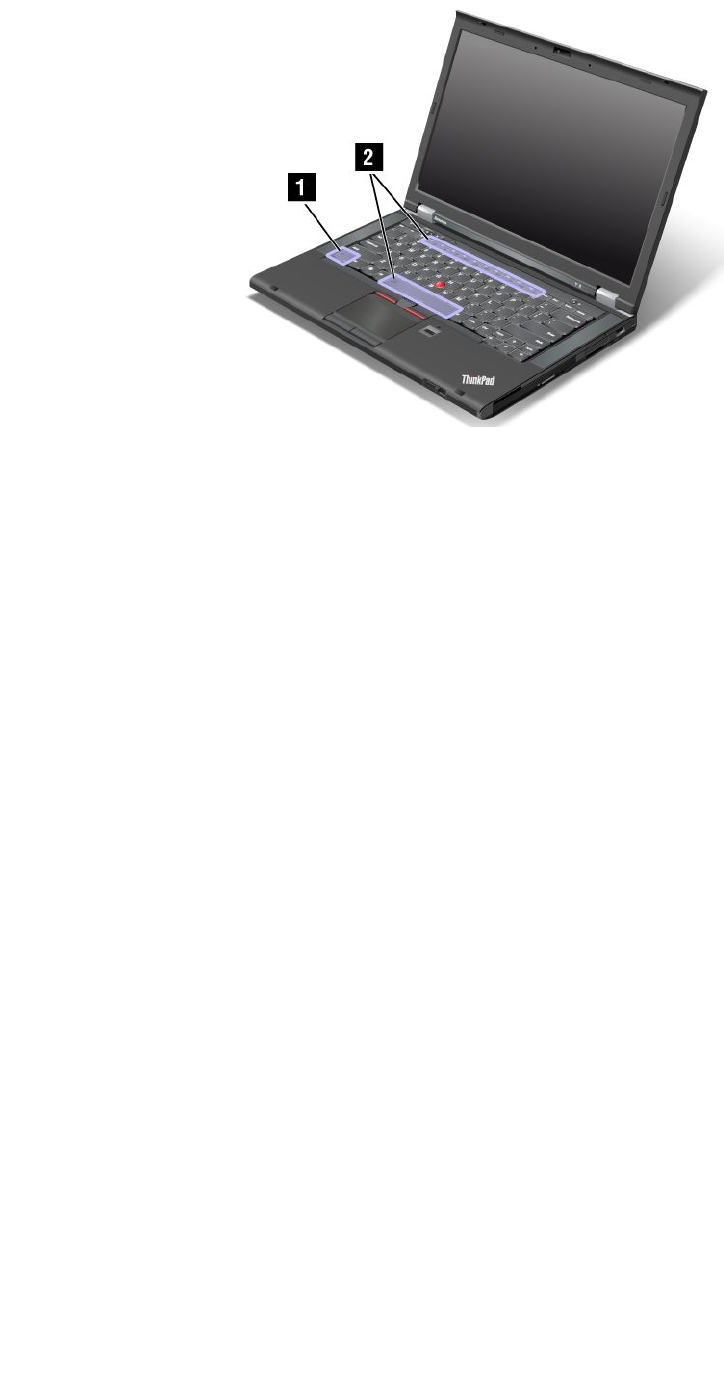
Functionkeycombinations
Tousethefunctionkeycombinations,pressandholdtheFnkey1,thenpressoneofthefunctionkeys2.
22UserGuide
Powerconservation
Fn+F4
Putyourcomputerintosleepmode.Toreturntonormaloperation,presstheFnkeyonly.
Ifyouwanttousethecombinationtoputthecomputerintohibernationmode,youneedtochangeyour
powerplansettings.Toaccesspowerplansettings,dothefollowing:
•ForWindows7:StartthePowerManagerprogramandthenclickthePowerPlantab.Forinstructionson
howtostartthePowerManagerprogram,see“AccessingLenovoprogramsontheWindows7operating
system”onpage15.
•ForWindows8:Right-clickthebatterystatusiconfromtheWindowsnoticationareaandclickPower
Options.ThenclickChangeplansettingsthatisnexttoyourpowerplan.
Switchingadisplayoutputlocation
•Fn+F7
Switchthedisplayoutputlocationbetweenthecomputerdisplayandanexternalmonitorbyselecting
oneofthefollowingoptions:
–Computerdisplayonly
–Computerdisplayandexternalmonitor(sameimage)
–Computerdisplayandexternalmonitor(theExtenddesktopfunction)
–Externalmonitoronly
Note:TheWindows+PkeycombinationhasthesamefunctionalityasFn+F7.
Enablingordisablingthewirelessfeatures
•Fn+F5
Enableordisablethebuilt-inwirelessnetworkingfeatures.
Changingthecameraandaudiosettings
•Fn+F6
Chapter2.Usingyourcomputer23

–ForWindows7:OpentheCommunicationssettingswindow,inwhichyoucanpreviewyourvideo
image,takeasnapshotofyourcurrentimage,andchangethecameraandaudiosettings.
–ForWindows8:StarttheLenovoSettingsprogram.Tousethecameraorchangethecamerasettings,
clickCamera.Toadjusttheaudiosettings,clickAudio.
Adjustingthebrightnesslevelofthecomputerdisplay
•Fn+F8:Thecomputerdisplaybecomesdimmer.
•Fn+F9:Thecomputerdisplaybecomesbrighter.
Thisfunctionchangesthebrightnessleveltemporarily.
Multimediacontrols
•Fn+F10:Previoustrack/scene
•Fn+F11:Playorpause
•Fn+F12:Nexttrack/scene
Otherfunctions
•Fn+Spacebar:ControlthekeyboardbacklightandtheThinkLightlight.
–Pressonce:Turnonthekeyboardbacklighttolowbrightnesslevel.
–Pressagain:Adjustthekeyboardbacklighttohighbrightnesslevel.
–Pressthethirdtime:TurnoffthekeyboardbacklightandturnontheThinkLightlight.
–Pressthefourthtime:TurnofftheThinkLightlight.
Note:Ifyourcomputerdoesnothaveabacklitkeyboard,theFn+Spacebarcombinationcontrolsonlythe
ThinkLightlight.
Tochangethefunctionalityofthiscombination,see“Congmenu”onpage116.
•Fn+F3:Lockyourcomputer.
•Fn+B:HavethesamefunctionastheBreakkeyonaconventionalkeyboard.
•Fn+P:HavethesamefunctionasthePausekeyonaconventionalkeyboard.
•Fn+S:HavethesamefunctionastheSysRqkeyonaconventionalkeyboard.
•Fn+K:HavethesamefunctionastheScrLKkeyonaconventionalkeyboard.
24UserGuide
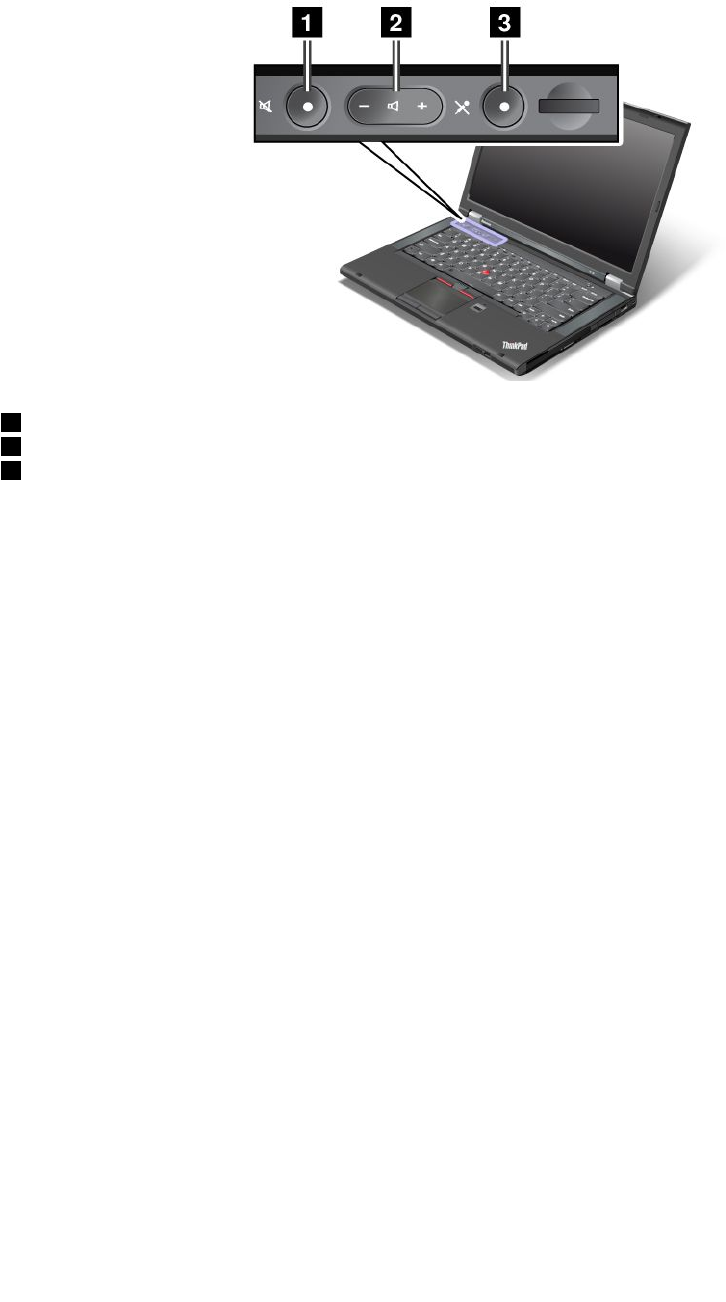
Volumeandmutebuttons
Youcanadjustthesoundlevelofthebuilt-inspeakersbyusingthefollowingthreebuttons:
1Speakermutebutton
2Volumecontrolbutton
3Microphonemutebutton
Ifyoumutethesoundandthenturnoffyourcomputer,thesoundwillremainmutedwhenyouturnonyour
computeragain.Toturnonthesound,presstheplus(+)orminus(-)button.
Settingthevolume
Toadjusttheoutputvolumeortherecordingvolume,dothefollowing:
1.GotoControlPanelandclickHardwareandSound➙Sound.TheSoundwindowopens.
2.ClickthePlaybacktaborRecordingtab,andthenclickadevice,whichyouwanttocustomize.
3.ClickthePropertiesbutton.
4.ClicktheLevelstab,andthenchangethevolumebymovingtheslider.
Youalsocangetaccesstothedesktopvolumecontrolbyusingthevolumeicononthetaskbaratthelower
rightofthescreen.Fordetailsaboutcontrollingvolume,refertoyourWindowshelpinformationsystem.
SettingthemicrophonemutebuttonontheWindows7operatingsystem
Bydefault,whenyoupressthemicrophonemutebutton,alloftherecordingdevicesaresetonmute
orunmute.
Ifyouwanttotoggleoneoftherecordingdevicesbetweenthemutestateandtheun-mutestate,do
thefollowing:
1.PressFn+F6.TheCommunicationssettingswindowopens.
2.ClicktheManageSettingsbutton.TheCommunicationsUtilitywindowopens.
3.OntheVoIPCallSettingstab,clickMicrophonemutebuttonsettings.TheSettingforMicrophone
Mutewindowopens.
4.SelectOnlytherecordingdeviceselectedbelow:.Thenselecttherecordingdevicefromthe
drop-downlistbox.
5.ClickOK.
Chapter2.Usingyourcomputer25

Windowskey
OntheWindows7operatingsystem,presstheWindowskeytoopentheStartmenu.OntheWindows8
operatingsystem,presstheWindowskeytoswitchbetweenthecurrentworkspaceandtheStartscreen.
YoualsocanusetheWindowskeytogetherwithanotherkeytoachieveotherfunctions.Fordetails,referto
thehelpinformationsystemoftheWindowsoperatingsystem.
UsingtheUltraNavpointingdevice
YourcomputercomeswiththeUltraNavpointingdevice.TheUltraNavpointingdeviceconsistsofthe
TrackPointpointingdeviceandthetouchpad,eachofwhichisitselfapointingdevicewithbothbasicand
extendedfunctions.Youcancongurebothdevicesbychoosingthesettingsyouprefer.
•SetboththeTrackPointpointingdeviceandthetouchpadaspointingdevices.
ThissettingenablestheuseofallthebasicandextendedfunctionsoftheTrackPointpointingdevice
andthetouchpad.
•SettheTrackPointpointingdeviceasthemainpointingdeviceandthetouchpadforextended
functionsonly.
ThissettingenablestheuseofallbasicandextendedfunctionswiththeTrackPointpointingdevicewhile
limitingtheuseofthetouchpadtoscrolling,tapzones,orslow-motioncursorfunctions.
•SettheTrackPointpointingdeviceasthemainpointingdevice,anddisablethetouchpad.
•Setthetouchpadasthemainpointingdevice,anddisabletheTrackPointpointingdevice.
ChangingtheUltraNavpointingdevicesettings
TochangeyourUltraNavpointingdevicesettings,gotoControlPanelandclickHardwareandSound➙
Mouse➙UltraNav.Thenchangethesettingsasdesired.
UsingtheTrackPointpointingdevice
TheTrackPointpointingdeviceconsistsofapointingstick1onthekeyboardandthreeclickbuttonsatthe
bottomofthekeyboard.Tomovethepointer5onthescreen,youapplypressuretothenonslipcaponthe
pointingstickinanydirectionparalleltothekeyboard;thepointingstickitselfdoesnotmove.Thespeedat
whichthepointermovesdependsonthepressureyouapplytothepointingstick.Thefunctionsoftheleft4
andright2clickbuttonscorrespondtothoseoftheleftandrightmousebuttonsonaconventionalmouse.
26UserGuide
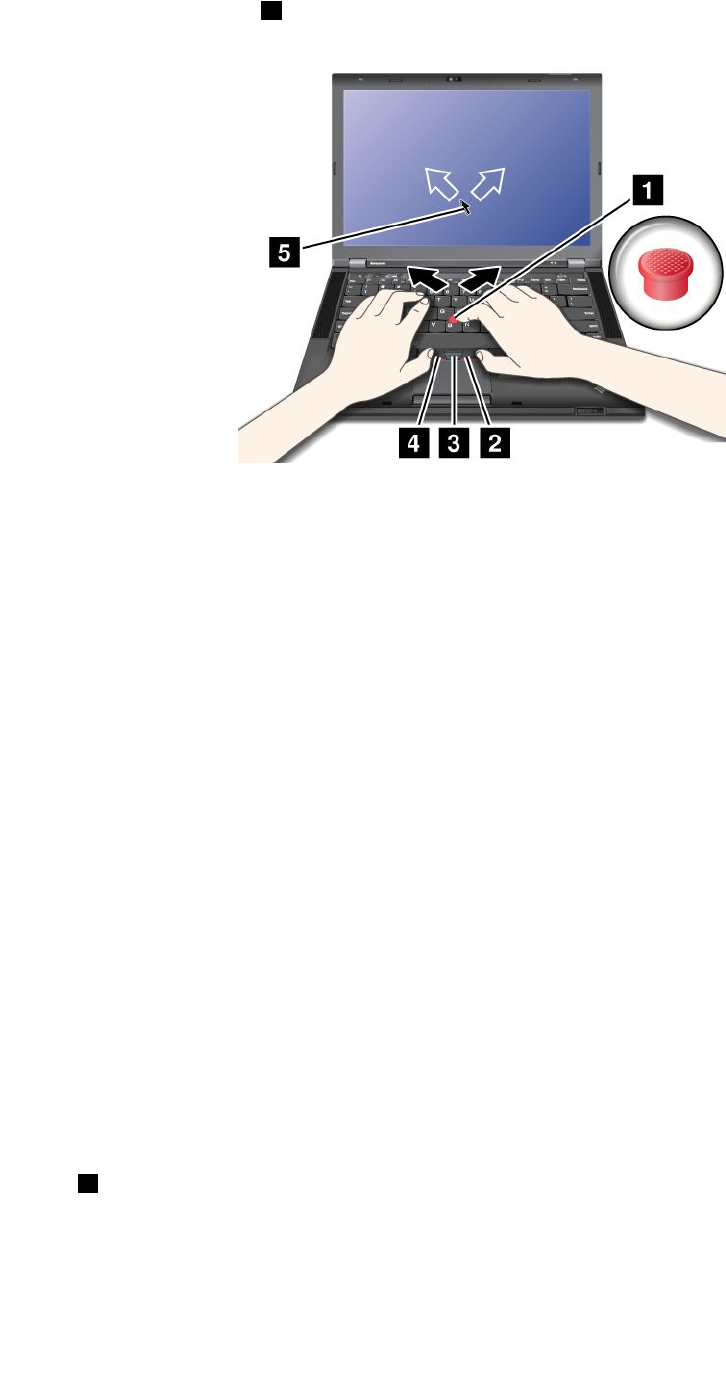
TheTrackPointcenterbutton3,calledthescrollbar,enablesyoutoscrollWebpagesordocumentsinany
directionwithnoneedtousethegraphicscrollbarsonthesideofthewindow.
IfyouarenotfamiliarwiththeTrackPoint,theseinstructionswillhelpyougetstarted:
1.Placeyourhandsinthetypingposition,andpressgentlywitheitherindexngeronthepointingstickin
thedirectioninwhichyouwantthepointertomove.
Tomovethepointer,pressthepointingstickawayfromyoutomoveitup,towardyoutomoveit
down,toonesideortheothertomoveitsideways.
Note:Thepointermightdrift.Thisisnotadefect.StopusingtheTrackPointpointingdevicefora
fewseconds,thenthepointerwillstopmoving.
2.Toselectanddrag,presstheleftorrightclickbuttonwitheitherthumbandmovetheTrackPoint
pointingstick.
ByenablingPress-to-Select,youcanmaketheTrackPointpointingstickfunctionthesameasthe
leftorrightclickbutton.
CustomizingthesettingsoftheTrackPointpointingdevice
YoucancustomizetheTrackPointpointingdeviceanditsbuttonsasfollows:
•Switchthefunctionsoftheleftandrightbuttons.
•ChangethesensitivityoftheTrackPointpointingdevice.
•EnablethePress-to-Selectfunction.
•EnabletheTrackPointScrollingTips.
TocustomizethesettingsoftheTrackPointpointingdevice,dothefollowing:
1.GotoControlPanelandclickHardwareandSound➙Mouse➙UltraNav.
2.UnderTrackPoint,proceedtochangingthesettings.
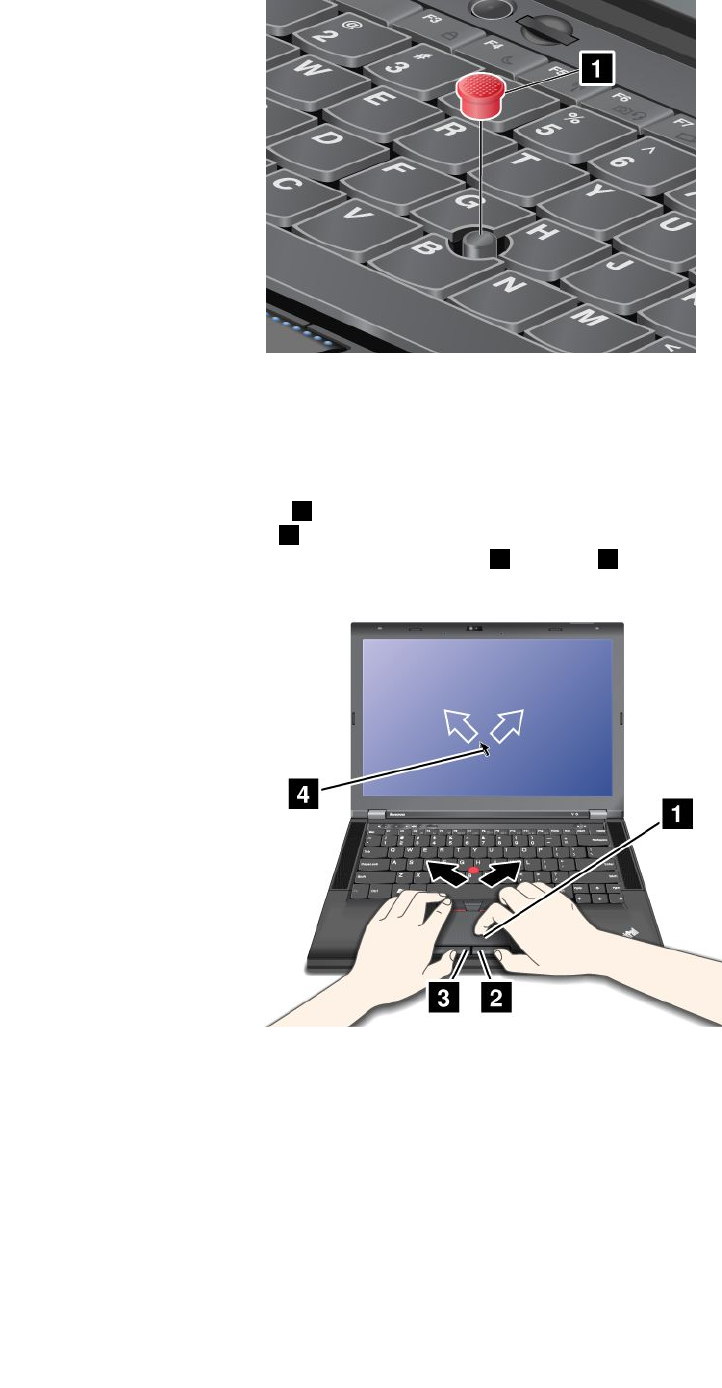
Replacingthecap
Thecap1ontheendoftheTrackPointpointingstickisremovable.Youcanreplaceitasshownin
thedrawing.
Chapter2.Usingyourcomputer27
Note:Ifyoureplacethekeyboard,anewkeyboardisshippedwiththedefaultcap.Ifyouwish,youcan
keepthecapfromyouroldkeyboardanduseitonthenewone.
Usingthetouchpad
Thetouchpadconsistsofapad1andtwoclickbuttonsbelowtheTrackPointbuttonsatthebottomofthe
keyboard.Tomovethepointer4onthescreen,slideyourngertipoverthepadinthedirectioninwhich
youwantthepointertomove.Thefunctionsoftheleft3andright2clickbuttonscorrespondtothoseof
theleftandrightmousebuttonsonaconventionalmouse.
Customizingthetouchpad
Tocustomizethetouchpad,dothefollowing:
1.GotoControlPanelandclickHardwareandSound➙Mouse➙UltraNav.
2.UnderTouchPad,proceedtochangingthesettings.
UsingtheUltraNavpointingdeviceandanexternalmouse
IfyouattachanexternalmousetoaUSBconnector,youcanusetheexternalmousesimultaneouslywith
theTrackPointpointingdeviceandthetouchpad.
28UserGuide

DisablingtheTrackPointpointingdeviceorthetouchpad
TodisabletheTrackPointpointingdeviceorthetouchpad,dothefollowing:
1.GotoControlPanelandclickHardwareandSound➙Mouse➙UltraNav.
2.TodisabletheTrackPointpointingdevice,clearthecheckboxforEnableTrackPoint.Todisablethe
touchpad,clearthecheckboxforEnableTouchPad.
3.ClickOK.
AddingtheUltraNavicontothesystemtray
ForeasyaccesstotheUltraNavproperties,youcanenablethedisplayoftheUltraNaviconintheWindows
noticationarea.
ToenablethedisplayoftheUltraNaviconintheWindowsnoticationarea,dothefollowing:
1.GotoControlPanelandclickHardwareandSound➙Mouse➙UltraNav.
2.SelectthecheckboxforShowUltraNavicononthesystemtray.
3.ClickOK.YoucannowchangethepropertiesoftheUltraNavpointingdevicebyclickingtheUltraNav
iconintheWindowsnoticationarea.
Note:IfyoucannotseetheUltraNavicon,clickthetriangulariconintheWindowsnoticationarea
toshowhiddenicons.
Powermanagement
Whenyouneedtouseyourcomputerawayfromelectricaloutlets,youdependonbatterypowertokeep
yourcomputerrunning.Differentcomputercomponentsconsumepoweratdifferentrates.Themoreyou
usethepower-intensivecomponents,thefasteryouconsumebatterypower.
Checkingthebatterystatus
ThebatterystatusiconintheWindowsnoticationareadisplaysthepercentageofbatterypowerremaining.
Therateatwhichyouusebatterypowerwilldeterminehowlongyoucanusethebatteryofyourcomputer
betweencharges.Becauseeachcomputeruserhasdifferenthabitsandneeds,itisdifculttopredicthow
longabatterychargewilllast.Therearetwomainfactors:
•Howmuchenergyisstoredinthebatterywhenyoubegintowork.
•Thewayyouuseyourcomputer.Forexample:
–Howoftenyouaccesstheharddiskdrive.
–Howbrightyoumakethecomputerdisplay.
–Howoftenyouusethewirelessfeatures.
Tocheckfordetailedbatterystatusinformation,dothefollowing:
•ForWindows7:OpenthePowerManagerprogramandclicktheBatterytab.
•ForWindows8:OpentheLenovoSupportprogramandclickBatteryHealth,oropentheLenovo
SettingsprogramandclickPower.
Usingtheacpoweradapter
Thepowertorunyourcomputercancomeeitherfromthelithium-ion(Li-ion)batterypackprovidedwithit,
orfromacpowerthroughtheacpoweradapter.Whileyouuseacpower,thebatterychargesautomatically.
Chapter2.Usingyourcomputer29

Theacpoweradapterthatcomeswithyourcomputerhastwobasiccomponents:
•Thetransformerpackthatconvertsacpowerforusewiththecomputer.
•Thepowercordthatplugsintotheacoutletandintothetransformerpack.
Attention:Usinganimproperpowercordcouldcauseseveredamagetoyourcomputer.
Connectingtheacpoweradapter
Tousetheacpoweradapter,dothefollowing.Besuretotakethesestepsintheorderinwhichtheyare
givenhere.
1.Plugthepowercordintoanelectricaloutlet.
2.Connectthepowercordtothetransformerpack.
3.Connecttheacpoweradaptertothepowerjackofthecomputer.
Tipsonusingtheacpoweradapter
Youcancheckthestatusofyourbatteryatanytimebylookingatthebatterymeteratthebottomofyour
display.
•Whentheacpoweradapterisnotinuse,disconnectitfromtheelectricaloutlet.
•Donotbindthepowercordtightlyaroundtheacpoweradaptertransformerpackwhenitisconnectedto
thetransformer.
•Beforeyouchargethebattery,makesurethatitstemperatureisatleast10°C(50°F).
•Youcanchargethebatterywhentheacpoweradapterisconnectedtothecomputerandthebatteryis
installed.Youneedtochargeitinanyofthefollowingconditions:
–Whenyoupurchaseanewbattery
–Ifthebatterystatusindicatorstartsblinking
–Ifthebatteryhasnotbeenusedforalongtime
Chargingthebattery
Whenyoucheckbatterystatusandndthatthepercentageofpowerremainingisloworwhenthepower
alarmalertsyouthattheremainingpowerislow,youneedtochargeyourbatteryorreplaceitwitha
chargedbattery.
Ifanacoutletisconvenient,plugtheacpoweradapterintoit,andtheninsertthejackintothecomputer.
Thebatterywillbefullychargedinabout3to6hours.Thisisaffectedbythebatterysizeandthephysical
environment.Thebatterystatusindicatorwillletyouknowthatthebatteryischarging,andwillalsonotify
youwhenthebatteryisfullycharged.
Note:Toincreasethelifeofthebattery,thecomputerdoesnotstartrechargingthebatteryiftheremaining
powerisgreaterthan95%.
Maximizingbatterylife
Tomaximizethelifeofthebattery,dothefollowing:
•Usethebatteryuntilthechargeiscompletelydepleted;thatis,usethebatteryuntilthebatterystatus
indicatorstartsblinkingorange.
•Rechargethebatterycompletelybeforeusingit.Thebatteryisfullychargedifthebatteryindicatorshows
greenwhentheacpoweradapterispluggedin.
•Alwaysusepowermanagementfeaturessuchaspowermodes,screenblank,sleep(standby),and
hibernation.
30UserGuide

Managingyourbatterypower
Toachievethebestbalancebetweenperformanceandpowersaving,adjustyourpowerplansettings.
Toaccesspowerplansettings,dothefollowing:
•ForWindows7:StartthePowerManagerprogramandthenclickthePowerPlantab.Forinstructionson
howtostartthePowerManagerprogram,see“AccessingLenovoprogramsontheWindows7operating
system”onpage15.
•ForWindows8:Right-clickthebatterystatusiconfromtheWindowsnoticationareaandclickPower
Options.ThenclickChangeplansettings.
Formoreinformation,refertothehelpinformationsystemoftheprogram.
Power-savingmodes
Thereareseveralmodesthatyoucanuseatanytimetoconservepower.Thissectionintroduceseach
modeandgivestipsontheeffectiveuseofthebatterypower.
Understandingthepower-savingmodes
•Screenblank(fortheWindows7operatingsystemonly)
Thecomputerdisplayrequiresconsiderablebatterypower.Toturnoffpowertothedisplay,right-clickthe
batterygaugeiconfromtheWindowsnoticationareaandselectPoweroffdisplay.
•Sleep
Insleepmode,yourworkissavedtomemory,andthenthesolidstatedriveortheharddiskdriveandthe
computerdisplayareturnedoff.Whenyourcomputerwakesup,yourworkisrestoredwithinseconds.
Toputyourcomputerintosleepmode,pressFn+F4.Toreturnfromsleepmode,presstheFnkey.
Dependingonthecomputermodel,yourcomputermightsupportthe30DayStandbyfunction.Whenthis
functionisenabled,thecomputerconsumesevenlesspowerinsleepmodeandtakesonlyseconds
toresumenormaloperationwhenyoupressthepowerbutton.Formoreinformationaboutthe30Day
Standbyfunction,dothefollowing:
–ForWindows7:RefertothehelpinformationsystemofthePowerManagerprogram.Forinstructions
onhowtostartthePowerManagerprogram,see“AccessingLenovoprogramsontheWindows7
operatingsystem”onpage15.
–ForWindows8:OpentheLenovoSettingsprogramandclickPower.
•Hibernation
Byusingthismode,youcanturnoffyourcomputercompletelywithoutsavinglesorexitingfromany
programsthatarerunning.Whenthecomputerentershibernation,allopenprograms,folders,andles
aresavedtotheharddisk,andthenthecomputerturnsoff.
Toputthecomputerintohibernationmode,changeyourpowerplansettings.Toaccesspowerplan
settings,dothefollowing:
–ForWindows7:StartthePowerManagerprogramandthenclickthePowerPlantab.Forinstructions
onhowtostartthePowerManagerprogram,see“AccessingLenovoprogramsontheWindows7
operatingsystem”onpage15.
–ForWindows8:Right-clickthebatterystatusiconfromtheWindowsnoticationareaandclickPower
Options.ThenclickChangeplansettingsthatisnexttoyourpowerplan.
•Wirelessoff
Whenyouarenotusingthewirelessfeatures,suchasBluetoothorwirelessLAN,turnthemoff.Thiswill
helpconservepower.Toturnoffthewirelessfeatures,pressFn+F5orusethewirelessradioswitch.
Chapter2.Usingyourcomputer31

Enablingthewakeupfunction
Ifyouputyourcomputerintohibernationmode,andthewakeupfunctionisdisabled(thisisthedefault
setting),thecomputerdoesnotconsumeanypower.Ifthewakeupfunctionisenabled,itconsumesasmall
amountofpower.Toenablethewakeupfunction,dothefollowing:
1.GotoControlPanelandclickSystemandSecurity➙AdministrativeTools.
2.Double-clickTaskScheduler.Ifyouarepromptedforanadministratorpasswordorconrmation,type
thepasswordorprovideconrmation.
3.Fromtheleftpane,selectthetaskfolderforwhichyouwanttoenablethewakeupfunction.The
scheduledtasksaredisplayed.
4.Clickascheduledtask,andthenclicktheConditionstab.
5.UnderPower,selectthecheckboxforWakethecomputertorunthistask.
EnablingthebatteryalarmontheWindows7operatingsystem
FortheWindows7operatingsystem,youcanprogramyourcomputersothatwhenthebatterypowerfalls
belowacertainlevel,threeeventsoccur:
•Thealarmgoesoff.
•Awarningmessageisdisplayed.
•TheLCDisturnedoff.
Toenablethebatteryalarm,dothefollowing:
1.StartthePowerManagerprogram.
2.ClicktheGlobalPowerSettingstab.
3.ForLowbatteryalarmorCriticallylowbatteryalarm,setthepercentageofthepowerlevelandset
theaction.
Note:Ifyourcomputerenterssleeporhibernationmodewhenthebatteryislow,butthealarmmessage
hasnotyetbeendisplayed,themessagewillbedisplayedwhenthecomputerresumes.Toresumenormal
operation,clickOK.
Handlingthebattery
ThissystemsupportsonlybatteriesspeciallydesignedforthisspecicsystemandmanufacturedbyLenovo
oranauthorizedbuilder.Thesystemdoesnotsupportunauthorizedbatteriesorbatteriesdesignedforother
systems.Ifanunauthorizedbatteryorabatterydesignedforanothersystemisinstalled,thesystemwill
notcharge.
Attention:Lenovohasnoresponsibilityfortheperformanceorsafetyofunauthorizedbatteries,and
providesnowarrantiesforfailuresordamagearisingoutoftheiruse.
Note:Ifanunauthorizedbatteryisinstalled,thefollowingmessagewillbedisplayed:“Thebatteryinstalled
isnotsupportedbythissystemandwillnotcharge.PleasereplacethebatterywiththecorrectLenovo
batteryforthissystem.”
32UserGuide

DANGER
Donotattempttodisassembleormodifythebatterypack.
Attemptingtodosocancauseanexplosion,orliquidleakagefromthebatterypack.
AbatterypackotherthantheonespeciedbyLenovo,oradisassembledormodiedbattery
packisnotcoveredbythewarranty.
DANGER
Iftherechargeablebatterypackisincorrectlyreplaced,thereisdangerofanexplosion.Thebattery
packcontainsasmallamountofharmfulsubstances.Toavoidpossibleinjury:
•ReplaceonlywithabatteryofthetyperecommendedbyLenovo.
•Keepthebatterypackawayfromre.
•Donotexposeittoexcessiveheat.
•Donotexposeittowaterorrain.
•Donotshort-circuitit.
•Storeitinacooldryplace.
•Keepitawayfromchildren.
Thebatterypackisaconsumablesupply.
Ifyourbatterybeginstodischargetooquickly,replacethebatterypackwithanewoneofthetype
recommendedbyLenovo.Formoreinformationonreplacingthebatterypack,contactyourCustomer
SupportCenter.
DANGER
Donotdrop,crush,puncture,orsubjecttostrongforces.Batteryabuseormishandlingcancause
thebatterytooverheat,whichcancausegassesorameto“vent”fromthebatterypackorcoin
cell.Ifyourbatteryisdamaged,orifyounoticeanydischargefromyourbatteryorthebuildup
offoreignmaterialsonthebatteryleads,stopusingthebatteryandobtainareplacementfrom
thebatterymanufacturer.
DANGER
Onlyrechargethebatterypackstrictlyaccordingtoinstructionsincludedintheproduct
documentation.
DANGER
Donotputthebatterypackintrashthatisdisposedofinlandlls.Whendisposingofthebattery,
complywithlocalordinancesorregulationsandyourcompany'ssafetystandards.
Chapter2.Usingyourcomputer33

DANGER
Thereisadangerofanexplosionifthebackupbatteryisincorrectlyplaced.Thelithiumbattery
containslithiumandcanexplodeifitisnotproperlyhandled,ordisposedof.Replaceonlywitha
batteryofthesametype.Toavoidpossibleinjuryordeath,donot:(1)throworimmerseintowater,
(2)allowittoheattomorethan100°C(212°F),or(3)attempttorepairordisassembleit.Disposeof
itasrequiredbylocalordinancesorregulationsandyourcompany'ssafetystandards.
Connectingtothenetwork
YourcomputerhasoneormorenetworkcardsforconnectingtotheInternetandtoyourcompany'swired
LANorwirelessLANnetwork.
Note:Somemodelscomewithabuilt-inwirelessWANcardenablingyoutoestablishwirelessconnections
overremotepublicorprivatenetworks.
TheAccessConnectionsprogramisaconnectivityassistantprogramforcreatingandmanaginglocation
proles.EachlocationprolestoresallthenetworkandInternetcongurationsettingsneededforconnecting
toanetworkinfrastructurefromaspeciclocationsuchasahomeoranofce.
Ethernetconnections
YoucanconnecttoyourlocalnetworkorabroadbandconnectionbyuseoftheEthernetfeaturebuiltinto
yourcomputer.IfyouareusingtheWindows7operatingsystem,theAccessConnectionsprogramalso
enablesyoutomanageyourlocationproles.Formoreinformation,see“AccessingLenovoprograms
ontheWindows7operatingsystem”onpage15.
DANGER
YourcomputerhasanEthernetconnector.T oavoidtheriskofelectricalshock,donotconnect
thetelephonecabletotheEthernetconnector.
Wirelessconnections
Wirelesscommunicationisthetransferofdatawithouttheuseofcablesbutbymeansofradiowavesonly.
Dependingonthewirelessdeviceusedinyourcomputer,youmightbeabletoconnecttothefollowing
categoriesofwirelessnetworks.
WirelessLAN
Awirelesslocalareanetwork(LAN)coversarelativelysmallgeographicarea,suchasanofcebuildingora
house.Devicesbasedonthe802.11standardscanconnecttothisnetwork.
Yourcomputercomeswithabuilt-inwirelessnetworkcardandacongurationutilitytohelpyoumake
wirelessconnectionsandmonitorthestatusofyourconnection,sothatyoucanstayconnectedtoyour
networkwhileyouareintheofce,inameetingroom,orathome,withnoneedforawiredconnection.
TipsforusingthewirelessLANfeature
Toachievethebestconnection,usethefollowingguidelines:
•PlaceyourcomputersothatthereareasfewobstaclesaspossiblebetweenthewirelessLANaccess
pointandthecomputer.
•Openyourcomputerdisplaytoanangleofslightlymorethan90degrees.
34UserGuide

•Ifyouusethewirelessfeature(the802.11standard)ofyourcomputersimultaneouslywithaBluetooth
option,thedatatransmissionspeedcanbedelayedandtheperformanceofthewirelessfeaturecanbe
degraded.
WirelessWAN
WirelessWideAreaNetwork(wirelessWAN),usingcellularnetworksfordatatransmission,enablesyou
toestablishwirelessconnectionsoverremotepublicorprivatenetworks.Theseconnectionscanbe
maintainedoveralargegeographicalarea,suchasacityoranentirecountry,byuseofmultipleantenna
sitesorsatellitesystemsmaintainedbywirelessserviceproviders.
SomeThinkPadnotebookcomputerscomewithabuilt-inwirelessWANcardintegratingsomewireless
WANtechnologies,suchas1xEV-DO,HSPA,3G,GPRSorLTE.Byusingthebuilt-inwirelessWANcardand
thecongurationutilitythatcomeswithyourcomputer,youcanestablishwirelessWANconnectionsand
monitorthestatusofyourconnection.
Note:WirelessWANserviceisprovidedbyauthorizedserviceprovidersinsomecountries.
TipsforusingthewirelessWANfeature
Toachievethebestconnection,usethefollowingguidelines:
•Keepyourcomputerawayfromyourbody.
•Placeyourcomputeronaatsurfaceandopenyourcomputerdisplaytoanangelofslightlymore
than90degrees.
•Placeyourcomputerawayfromconcreteorbrickwallsthatmightdampencellularsignals.
•Bestreceptionwillbeavailablenearwindowsandotherlocationswherecellularphonereceptionisthe
strongest.
WiMAX
SomeThinkPadnotebookcomputerscomewithabuilt-inwirelessLANcardintegratingWiMAXtechnology.
Thislong-rangewirelessdatatransmissiontechnologybasedonthe802.16standardisexpectedtoprovide
theusera“lastmile”broadbandconnectivitysimilartothatprovidedbycableorADSL,butwithouttheneed
tophysicallyconnectacabletothepersonalcomputer.
Bluetooth
Bluetoothisoneofanumberoftechnologiesusedtocreateawirelesspersonalareanetwork.Bluetooth
canconnectdevicesashortdistancefromoneanother,andiscommonlyusedforconnectingperipheral
devicestoacomputer,transferringdatabetweenhand-helddevicesandapersonalcomputer,orremotely
controllingandcommunicatingwithdevicessuchasmobilephones.
Establishingwirelessconnections
Toestablishawirelessconnection,dothefollowing:
1.PressFn+F5toturnonthewirelessfeature.
2.ClickthewirelessnetworkconnectionstatusiconintheWindowsnoticationarea.Alistofavailable
wirelessnetworksisdisplayed.
3.Double-clickanetworktoconnecttoit.Providerequiredinformationifneeded.
Ifyouneedtoconnecttodifferentwirelessnetworksindifferentlocations,usethefollowingsoftwareto
managemultiplenetworkprolessothatthecomputerconnectstoanavailablenetworkautomaticallywhen
thelocationchanges:
Chapter2.Usingyourcomputer35

•ForWindows7:UsetheAccessConnectionsprogram.ForinstructionsonhowtostarttheAccess
Connectionsprogram,see“AccessingLenovoprogramsontheWindows7operatingsystem”onpage15.
•ForWindows8:OpentheLenovoSettingsprogramandclickLocationAwareness.See“Accessing
LenovoprogramsontheWindows8operatingsystem”onpage17.
Attention:
•Ifyouwanttousethewirelessfeaturesonanairplane,checkthewirelessserviceswiththeairlinebefore
boardingtheairplane.
•Iftherearerestrictionsontheuseofcomputerwirelessfeaturesonanairplane,youneedtodisableyour
computerwirelessfeaturesbeforeboarding.Todisablethewirelessfeatures,see“Enablingordisabling
thewirelessfeatures”onpage38.
Attention:
•IfyoucarryyourcomputerwiththewirelessLANfeatureintoanairplane,checktheserviceswiththe
airlinebeforeboardingtheairplane.
•Iftherearerestrictionsontheuseofcomputersonanairplanewiththewirelessfeature,youneed
todisableitbeforeboarding.
Note:YoucanpurchaseawirelessnetworkcardasanoptionfromLenovoat
http://www.lenovo.com/accessories/services/index.html.
TipsforusingthewirelessLANfeature
•PlaceyourcomputersothatthereareasfewobstaclesaspossiblebetweenthewirelessLANaccess
pointandthecomputer.
•Toachievethebestwirelessconnection,openyourcomputerdisplaytoanangleslightlygreaterthan
90degrees.
•Ifyouusethewirelessfeature(the802.11standard)ofyourcomputersimultaneouslywithaBluetooth
option,datatransmissionspeedcanbedelayedandtheperformanceofthewirelessfeaturecanbe
degraded.
UsingBluetooth
SomemodelsareequippedwithaBluetoothcardthatiscompliantwithBluetoothSpecication4.0.
ToenabletheBluetoothfeatureontheWindows7operatingsystem,pressFn+F5toopenthewireless
radioswitchboard.ThenturnontheBluetoothradio.FortheWindows8operatingsystem,theBluetooth
featureisonbydefault.
SendingdatatoaBluetooth-enableddevice
TosenddatatoaBluetooth-enableddevice,dothefollowing:
1.EnabletheBluetoothfeature.
2.Right-clickthedatathatyouwanttosend.
3.SelectSendTo➙BluetoothDevices.
4.SelectaBluetoothdeviceandthenfollowtheinstructionsonthescreen.
Note:Ifyouusethewirelessfeature(the802.11standard)ofyourcomputersimultaneouslywithaBluetooth
option,thedatatransmissionspeedcanbedelayedandtheperformanceofthewirelessfeaturecanbe
degraded.
FormoreinformationaboutusingtheBluetoothfeature,refertotheWindowshelpinformationsystemand
theBluetoothhelpinformationsystem.
36UserGuide

Checkingthewirelessnetworkconnectionstatus
Youcancheckyourcomputerwirelessnetworkconnectionstatusandwirelesssignalstrengththroughthe
wirelessnetworkconnectionstatusiconintheWindowsnoticationarea.Themorebarsencompassed,the
betterthesignal.
FortheWindows7operatingsystem,youalsocanchecktheAccessConnectionsgauge,theAccess
Connectionsstatusicon,ortheAccessConnectionswirelessnetworkconnectionstatusiconinthe
Windowsnoticationarea.
AccessConnectionsgauge
OntheWindows7operatingsystem,theAccessConnectionsgaugeintheWindowsnoticationarea
displaysthestatusandsignalstrengthofyourwirelessconnection.
Youcanndmoredetailedinformationaboutthestatusandsignalstrengthofyourwirelessconnection
byopeningtheAccessConnectionsprogramorbyright-clickingtheAccessConnectionsgaugeinthe
WindowsnoticationareaandselectingViewStatusofWirelessConnection.
•AccessConnectionsgaugestates:wirelessLAN
–Powertothewirelessradioisoffornosignal.
–Powertothewirelessradioison.Thesignalstrengthofthewirelessconnectionispoor.To
improvethesignalstrength,moveyourcomputerclosertothewirelessaccesspoint.
–Powertothewirelessradioison.Thesignalstrengthofthewirelessconnection
ismarginal.
–Powertothewirelessradioison.Thesignalstrengthofthewirelessconnectionis
excellent.
•AccessConnectionsgaugestates:wirelessWAN
–Nosignal
–Signallevel1
–Signallevel2
–Signallevel3
AccessConnectionsstatusicon
TheAccessConnectionsstatusicondisplaysgeneralconnectionstatus.
•AccessConnectionsstatusiconstates
–Nolocationproleisactiveornoneexists.
–Currentlocationproleisdisconnected.
–Currentlocationproleisconnected.
Note:Ifyouhavetroubleinmakingaconnection,trymovingyourcomputerclosertoyourwirelessaccess
point.
AccessConnectionswirelessstatusicon
TheAccessConnectionswirelessstatusicondisplaysthestatusandsignalstrengthofyourwireless
connection.
Chapter2.Usingyourcomputer37

Youcanndmoredetailedinformationaboutthestatusandsignalstrengthofyourwirelessconnection
eitherbyopeningtheAccessConnectionsprogramorbydouble-clickingtheAccessConnectionswireless
statusiconintheWindowsnoticationarea.
•Wirelessstatusiconstates:wirelessLAN
–Powertothewirelessradioisoff.
–Powertothewirelessradioison.Noassociation.
–Powertothewirelessradioison.Nosignal.
–Powertothewirelessradioison.Thesignalstrengthofthewirelessconnectionisexcellent.
–Powertothewirelessradioison.Thesignalstrengthofthewirelessconnectionismarginal.
–Powertothewirelessradioison.Thesignalstrengthofthewirelessconnectionispoor.Toimprove
signalstrength,moveyourcomputerclosertothewirelessaccesspoint.
•Wirelessstatusiconstates:wirelessWAN
–PowertotheWANradioisoff
–Noassociation
–Nosignal
–Signallevel1
–Signallevel2
–Signallevel3
Enablingordisablingthewirelessfeatures
Toenableordisablethewirelessfeatures,dooneofthefollowing:
•ForWindows7:PressFn+F5toopenthewirelessradioswitchboard.Turnonorturnoffthewireless
featureasdesired.
•ForWindows8:PressFn+F5toenableordisabletheAirplanemode.WhentheAirplanemodeisenabled,
allofyourwirelessdevicesareturnedoff.
Youalsocanusethewirelessradioswitchtoturnonorturnoffthewirelessradiosofallthewirelessdevices
onyourcomputer.
Usingaprojectororanexternaldisplay
Youcanconnectyourcomputertoaprojectortogivepresentationsoryoucanconnectyourcomputer
toanexternalmonitortoexpandyourworkspace.
Changingdisplaysettings
Youcanchangethedisplaysettings,suchasthedisplayresolution,fontsize,andsoon.
Tochangethedisplaysettings,dothefollowing:
1.OpenControlPanelandclickAppearanceandPersonalization.
2.ClickDisplayforfurtherconguration.
Connectingaprojectororanexternalmonitor
Thistopicprovidesinformationaboutconnectingaprojectororanexternalmonitor.
38UserGuide

Attachinganexternalmonitor
Yourcomputercansupportamaximumvideoresolutionofupto2048x1536(withanexternalmonitor
attachedtotheVGAconnector)orupto2560x1600(withanexternalmonitorattachedtotheMini
DisplayPortconnector),providedthattheexternalmonitoralsosupportsthatresolution.Formoredetails,
refertothemanualsprovidedwithyourmonitor.
Yourcomputercansupportamaximumvideoresolutionofupto2048x1536,providedthattheexternal
monitoralsosupportsthatresolution.Formoredetails,refertothemanualsprovidedwithyourmonitor.
Youcansetanyresolutionforeitherthecomputerdisplayortheexternalmonitor.Whenyouusebothatthe
sametime,theresolutionofbothisthesame.Ifyousetahigherresolutionforthecomputerdisplay,you
canseeonlypartofthescreenatatime.YoucanseeotherpartsbymovingtheimagewiththeTrackPoint
pointingdeviceoranotherpointingdevice.
Youcanmovethedisplayoutputtothecomputerdisplay,theexternalmonitor,orbothintheDisplay
Settingswindow.
Connectinganexternalmonitor
Toattachanexternalmonitor,dothefollowing:
1.Connecttheexternalmonitortothemonitorconnector;thenconnectthemonitortoanelectricaloutlet.
2.Turnontheexternalmonitor.
3.ChangethedisplayoutputlocationbypressingFn+F7.Thisenablesyoutoswitchbetweenviewing
outputontheexternalmonitor,thecomputermonitor,andbothmonitors.
Note:Ifyourcomputercannotdetecttheexternalmonitor,right-clickonthedesktop,thenselectScreen
resolution.ClicktheDetectbutton.
Notes:
•Donotchangethedisplayoutputlocationwhileamovingpictureisbeingdrawn,forexample,while
playingamovieoragame,orviewingabusinesspresentation.Closetheapplicationbeforechangingthe
displayoutputlocation,orchangethedisplaymodebeforeyouopenanMPEGletoplay.
•IfyouareattachinganexternalmonitorthatsupportsonlyVGAmode(640x480resolution),donotview
outputonboththecomputerdisplayandtheexternalmonitor.Doingsowouldcausetheexternalmonitor
screentobescrambledandtheoutputnottobedisplayed;inaddition,itcouldcausedamagetothe
screen.Usetheexternalmonitoronly.
•IftheexternalTFTmonitoryouconnecthasananaloginterface,ickersorripplesmightappearonsome
displays,suchastheshutdownscreenoftheWindowsoperatingsystem.Thisiscausedbytheexternal
TFTmonitor,andcannotbexedbyadjustingtheexternalTFTmonitororthecomputersidesettings.
Settingthemonitortype
Tosetyourmonitortype,dothefollowing:
1.Connecttheexternalmonitortothemonitorconnector,andthenconnectthemonitortoanelectrical
outlet.
2.Turnontheexternalmonitor.
3.Right-clickonthedesktop,andclickScreenresolution.
Note:Ifyourcomputercannotdetecttheexternalmonitor,clicktheDetectbutton.
4.SetResolution.
5.ClickAdvancedSettings.
Chapter2.Usingyourcomputer39

6.ClicktheMonitortab.Checkthemonitorinformationwindowtomakesurethatthemonitortypeis
correct.Ifitis,clickOKtoclosethewindow;otherwiseproceedwiththefollowingsteps.
7.Ifmorethantwomonitortypesaredisplayed,selectGenericPnPMonitororGenericNon-PnP
Monitor.
8.ClickProperties.Ifyouarepromptedforanadministratorpasswordorconrmation,typethepassword
orprovideconrmation.
9.ClicktheDrivertab.
10.ClickUpdateDriver.
11.ClickBrowsemycomputerfordriversoftware,andthenclickLetmepickfromalistofdevice
driversonmycomputer.
12.CleartheShowcompatiblehardwarecheckbox.
13.SelectManufacturerandModelforyourmonitor.Ifyoucannotndyourmonitoronthelist,stopthe
installationofthisdriverandusethedrivershippedwithyourmonitor.
14.Afterupdatingthedriver,clickClose.
15.ClickOK.
Note:FortheWindows7operatingsystem,tochangethecolorsettings,right-clickonthedesktop,and
clickScreenresolution.ClickAdvancedSettings,selecttheMonitortab,thensetColors.
Considerationsforattachinganexternalmonitor
•Wheninstallinganoperatingsystem,youmustinstallthedisplaydriverforyourmonitorthatissupplied
withthecomputer,andthemonitorINFlethatissuppliedwiththeexternalmonitor.
•Ifyousetaresolutionhigherthantheresolutionyouareusingonthecomputermonitor,andusean
externalmonitorthatdoesnotsupportthatresolution,takeadvantageofthevirtualscreenfunction,
whichenablesyoutodisplayonlyapartofthehigh-resolutionscreenimageyourcomputerproduces.
YoucanseeotherpartsoftheimagebymovingthescreenwiththeTrackPointpointingdeviceoranother
pointingdevice.
•Iftheexternalmonitoryouareusingisoutdated,theresolutionandtherefreshratemightbelimited.
UsingtheDVImonitor
Ifyourcomputerhasoneofthefollowingoptionalexpansionunits,youcanusetheDVImonitorthrough
theDVIconnectorofthatunit:
•ThinkPadMiniDockSeries3
•ThinkPadMiniDockSeries3withUSB3.0
•ThinkPadMiniDockPlusSeries3
•ThinkPadMiniDockPlusSeries3withUSB3.0
Notes:
•ThescreenmodethatcanbeuseddependsonthespecicationsoftheDVImonitor.
•BeforeyouattachtheDVImonitor,makesurethatthecomputerisattachedtotheexpansionunitand
thesystemworksproperly.
ToattachtheDVImonitor,dothefollowing:
1.Turnoffthecomputer.
2.ConnecttheDVImonitortotheDVIconnectoroftheexpansionunit,andthenconnectthemonitor
toanelectricaloutlet.
3.TurnontheDVImonitorandthecomputer.
40UserGuide

IfthecomputeroutputdoesnotappearontheDVImonitor,dothefollowing:
•ForacomputerthatsupportsNVIDIAOptimusGraphics:
1.Right-clickonthedesktopandselectNVIDIAControlPanel.TheNVIDIAControlPanelwindow
opens.
2.IntheSelectaTasknavigationpaneatleftunderDisplay,clickSetupmultipledisplays.
3.Right-clickVerifyyourdisplayconguration,andthenright-clickonthemonitoriconandselect
eitherCloneModeorExtendedMode.
4.ClickOK.
•ForacomputerthatsupportstheIntel®graphicscard:
–ForWindows7:
1.PressCtrl+Alt+F12.TheIntelGraphicsandMediaControlPanelwindowopens.
2.SelectAdvancedModeandclickOK.
3.SelectMultipleDisplays.
4.IntheOperatingModeeld,selectanyofthefollowingoptions.
–SingleDisplay:Dependingonyourconguration,thecomputeroutputisdisplayedoneither
thecomputerdisplayortheDVImonitor.
–CloneDisplays:Thesamecomputeroutputisdisplayedonboththecomputerdisplayand
theDVImonitor.
–ExtendedDesktop:Differentcomputeroutputisdisplayedonthecomputerdisplayand
theDVImonitor.
–ForWindows8:
1.Movethecursortothebottom-rightcornerofthescreenandclicktheDevicescharm.
2.ClickSecondscreenandselectDuplicateorExtend.
ConsiderationsforattachingaDVImonitor
ConnecttheDVImonitortotheexpansionunit,andturnitonbeforeyouturnonthecomputer.Otherwise
thesystemcannotrecognizethatthemonitorthatisconnected.IftheoptionforenablingtheDVImonitor
intheDisplayPropertieswindowisnotdisplayed,tryclosingthewindowandopeningitagain.Ifthe
optionstillisnotdisplayed,makesurethattheconnectorofthemonitorisattachedrmly,andrepeat
theprocedureforattachingthemonitor.
UsingtheMiniDisplayPortconnector
YourcomputerhasaMiniDisplayPortconnector,adigitaldisplayinterfaceforconnectiontovariousexternal
devices,suchasCRTmonitors,projectors,orevenhigh-denitiontelevisions.Thiscompactconnector
enablesaplug-and-playsetupandsupportsadaptersthatcanplugintoDVI,VGA,orHDMIconnectors.
TheMiniDisplayPortconnectorofyourcomputersupportsaudioaswellasvideostreaming.
Settingupapresentation
Note:IfyourcomputerisaWindows7model,itdoesnotsupportPresentationDirector,buttheFn+F7or
Win+Pkeycombinationisavailableforswitchingdisplayoutputtoaconnectedprojector.
PresentationDirectorprovidesaneasywaytosetupyourcomputertohelpyougivepresentations,even
whenyouareawayfromyourofce.
UsePresentationDirectortoadjustresolutionsettingsandtemporarilydisablepowermanagementtimersto
ensureanuninterruptedpresentation.
Chapter2.Usingyourcomputer41

PresentationDirectorhassomepredenedpresentationschemes.Toapplyapresentationscheme,press
Fn+F7.
TostartthePresentationDirectorprogram,see“AccessingLenovoprogramsontheWindows7operating
system”onpage15.
Projectingvideo
Todisplayinformationandmakepresentations,youcanattachadataprojectortoyourcomputer.Attachthe
dataprojectortothemonitorconnectoronyourcomputer.
Note:Itmighttakeseveralsecondsbeforetheprojectordisplaystheimage.Ifyoudonotseeyourdesktop
displayedafter60seconds,trypressingFn+F7toswitchbetweendifferentdisplayoutputlocations.
YoucancreateapresentationschemebyfollowingtheinstructionsofPresentationDirector,withtheprojector
attachedtoyourcomputer.Youcansavetheschemeforafuturepresentationwiththesameequipment.
Playingsound
Yourprojectormighthaveoneormoreaudio-inputconnectors.Toprojectsound,youwillneedtoattachthe
comboaudiojackonyourcomputertotheseconnectorsbyusinganaudiocable(commerciallyavailable).
UsingtheExtenddesktopfunction
YourcomputersupportsafunctionnamedtheExtenddesktopfunction.WiththeExtenddesktopfunction,
youcandisplayoutputonboththecomputerdisplayandanexternalmonitor.Youalsocandisplaydifferent
desktopimagesoneachmonitor.
ConsiderationsforusingtheExtenddesktopfunction
•WhenaprogramusingDirectDraworDirect3Displayedinfull-screenmode,itisshownonlyonthe
primarydisplay.
•IfyouwanttoshowDOSfull-screenwhileintheExtenddesktopmode,onlytheprimarydisplayshows
DOS;theotherdisplayisblackedout.
•IfyourcomputerhastheIntelgraphicscard,youcandesignatetheotherdisplayastheprimarydisplay
bydoingthefollowing:
1.Right-clickonthedesktopandselectScreenResolution.
2.ClickthedesireddisplayimageandselecttheMakethismymaindisplaycheckbox.
3.ClickOK.
EnablingtheExtenddesktopfunction
ToenabletheExtenddesktopfunction,dothefollowing:
1.Connecttheexternalmonitortothemonitorconnector;thenconnectthemonitortoanelectricaloutlet.
2.Turnontheexternalmonitor.
3.PressFn+F7,thenselectExtend.
Tochangetheresolutionforeachmonitor,dothefollowing:
1.Right-clickonthedesktop,andclickScreenresolution.
2.ClicktheMonitor-1icon(fortheprimarydisplay,thecomputerdisplay).
3.Settheresolutionfortheprimarydisplay.
4.ClicktheMonitor-2icon(forthesecondarydisplay,theexternaldisplay).
5.Settheresolutionforthesecondarydisplay.
42UserGuide

6.ClickAdvancedsettingsandsetupthecolorqualityontheMonitortab.
7.ClickOKtoapplythechanges.
UsingtheNVIDIAOptimusGraphicsfeature
SomeThinkPadnotebookcomputerssupportNVIDIAOptimusGraphics.
Toachievethebestbalancebetweenthecomputerperformanceandalongbatterylife,dependingonthe
graphicsqualitydemandoftherunningprogramandthesettingsofthepowerplanyouuse,theNVIDIA
OptimusGraphicsfeatureautomaticallyswitchesbetweenHighPerformanceGraphicsandEnergySaving
Graphics.Thedynamicswitchallowsswitchingwithouthavingtorestartyourcomputer,closeprograms,
orintervenemanually.
Note:TheNVIDIAOptimusGraphicsfeatureisonlysupportedinWindows7operatingsystem.
Usingaudiofeatures
Yourcomputerisequippedwiththefollowing:
•Comboaudiojack,1/8inch(3.5mm)indiameter
•Built-inspeakers
•Built-inmicrophone
Thefollowingtableshowswhichfunctionsoftheaudiodevicesattachedtothejacksonyourcomputeror
dockingstationaresupported.
Table3.Audiofeaturelist
Headsetwitha3.5mm
4-poleplug
ConventionalheadphoneConventionalmicrophone
ComboaudiojackHeadphoneand
microphonefunctions
supported
Headphonefunction
supported
Notsupported
Headphonejackofthe
dock
Onlyheadphonefunction
supported
Microphonefunctionnot
supported
Headphonefunction
supported
Notsupported
Microphonejackofthe
dock
NotsupportedNotsupportedMicrophonefunction
supported
Conguringforsoundrecording
Tocongurethemicrophoneforoptimizedsoundrecording,usetheRealtekHDAudioManagerprogram.To
starttheprogram,gototheControlPanel,andclickHardwareandSound➙RealtekHDAudioManager.
Usingtheintegratedcamera
Ifyourcomputerhasanintegratedcamera,youcanusethecameratopreviewyourvideoimageand
takeasnapshotofyourcurrentimage.
Tostartthecamera,dothefollowing:
•ForWindows7:PressFn+F6toopentheCommunicationssettingswindow.
Chapter2.Usingyourcomputer43

•ForWindows8:PressFn+F6tostarttheLenovoSettingsprogram.ThenclickCamera.
Whenthecameraisstarted,thegreencamera-in-useindicatorturnson.Youcanpreviewyourvideo
imageandtakeasnapshotofyourcurrentimage.
Youalsocanusetheintegratedcamerawithotherprogramsthatprovidefeaturessuchasphotographing,
videocapturing,andvideoconferencing.Tousetheintegratedcamerawithotherprograms,openoneofthe
programsandstartthephotographing,videocapturing,orvideoconferencingfunction.Then,thecamera
willstartautomaticallyandthegreencamera-in-useindicatorwillturnon.Formoreinformationaboutusing
thecamerawithaprogram,refertothehelpinformationsystemoftheprogram.
Conguringcamerasettings
Youcancongurethecamerasettingstomeetyourneeds,suchasadjustingthequalityofthevideooutput.
Tocongurethecamerasettings,dothefollowing:
•ForWindows7:PressFn+F6.TheCommunicationssettingswindowopens.ClicktheManageSettings
buttonandcongurethecamerasettingsasdesired.
•ForWindows8,dooneofthefollowing:
–Congurethecamerasettingsdirectlyfromtheprogramthatisusingthecamera.Fordetails,seethe
helpinformationsystemoftheprogram.
–ClickLenovoSettingsfromtheStartscreen.ThenclickCamera.Followtheinstructionsonthe
screentocongurethecamerasettingsasdesired.
UsingtheThinkLightlightfeature
YoucanuseyourcomputerunderlessthanperfectlightingconditionsbyenablingtheThinkLightlight
feature.YoucanturnontheThinkLightlightbypressingFn+Spacebartoilluminatethekeyboard.
Note:Avoidusingyourcomputerindarkconditionsforprolongedperiods.Itisbadforyoureyes.
Usingtheopticaldrive
YourcomputersupportsDVD-ROMDriveandMultiBurnerDrive.
DVD-ROMDrive
ThisdrivecanreadDVD-ROMdiscsandalltypesofCDs,suchasCD-ROMdiscs,CD-RWdiscs,CD-R
discs,andaudioCDs.Thisdrivehasnorecordingcapability.
MultiBurnerdrive
ThisdrivecanreadDVD-ROMdiscs,DVD-Rdiscs,DVD-RAMdiscs,DVD-RWdiscs,andalltypesofCDs,
suchasCD-ROMdiscs,CD-RWdiscs,CD-Rdiscs,andaudioCDs.Inaddition,itcanrecordonDVD-R
discs,DVD-RWdiscs,typeIIDVD-RAMdiscs,CD-RWstandardandhighspeeddiscs,andCD-Rdiscs.
44UserGuide

UsinganExpressCardmodule,aashmediacard,orasmartcard
Dependingonthemodel,yourcomputermighthaveanExpressCardslotfora34mm-widecard,amedia
cardreaderslot,orasmartcardreaderslot.
Ifyourcomputerhasamediacardreaderslot,itsupportsthefollowingcards:
•SecureDigital(SD)cards
•High-Capacity(SDHC)cards
•SecureDigitaleXtended-Capacity(SDXC)cards
•MultiMediaCard(MMC)modules
Notes:
•YourcomputerdoesnotsupporttheCPRMfeaturefortheSDcard.
•Whentransferringdatatoorfromaashmediacard,suchasanSDcard,donotputyourcomputerin
sleeporhibernationmodebeforethedatatransferiscomplete.Todosomightcausedamagetoyour
data.
InstallinganExpressCardmodule,aashmediacard,orasmartcard
Attention:
•Beforeyoustartinstallingacard,touchametaltableoragroundedmetalobject.Thisactionreducesany
staticelectricityfromyourbody.Thestaticelectricitycoulddamagethecard.
•DonotinsertanExpressCardwhilethecomputerisinsleepmodeorhibernationmode.Otherwise,the
computermightnotrespondwhenyoutrytoresumeusingit.
Toinstallacard,dothefollowing:
1.Locatetheappropriatetypeofslotforyourcard.See“Locatingcomputercontrols,connectors,
andindicators”onpage1.
2.Makesurethatthecardiscorrectlyoriented:
•ForExpressCard:Thenotchededgeofthecardisfacingupwardandpointingtowardtothecardslot.
•Forashmediacard:Themetalcontactsarefacingdownandpointingtowardthecardslot.
•Forsmartcard:Themetalcontactsarefacingupwardandpointingtowardthecardslot.
3.Pressthecardrmlyintothecardslot.
Iftheplug-and-playfeatureisnotenabledfortheinstalledExpressCardmodule,ashmediacard,or
smartcard,dothefollowingtoenablethefeature:
1.OpenControlPanel.
2.ClickHardwareandSound.
3.ClickDeviceManager.Ifyouarepromptedforanadministratorpasswordorconrmation,typethe
passwordorprovideconrmation.
4.FromtheActionmenu,selectAddlegacyhardware.TheAddHardwareWizardstarts.
5.Followtheinstructionsonthescreen.
RemovinganExpressCardmodule,aashmediacard,orasmartcard
Attention:Beforeremovingacard,stopthecardrst.Otherwise,dataonthecardmightbecorruptedorlost.
Toremoveacard,dothefollowing:
Chapter2.Usingyourcomputer45

1.ClickthetriangulariconintheWindowsnoticationareatoshowhiddenicons.
2.Selecttheitemyouwanttoremovetostopthecard.
3.Pressthecardtoejectitfromyourcomputer.
4.Removethecardandstoreitsafelyforfutureuse.
Note:IfyoudonotremovethecardfromyourcomputerafteryouejectthecardfromtheWindowsoperating
system,thecardcannolongerbeaccessed.Toaccessthecard,youmustremoveitrst,theninsertitagain.
46UserGuide
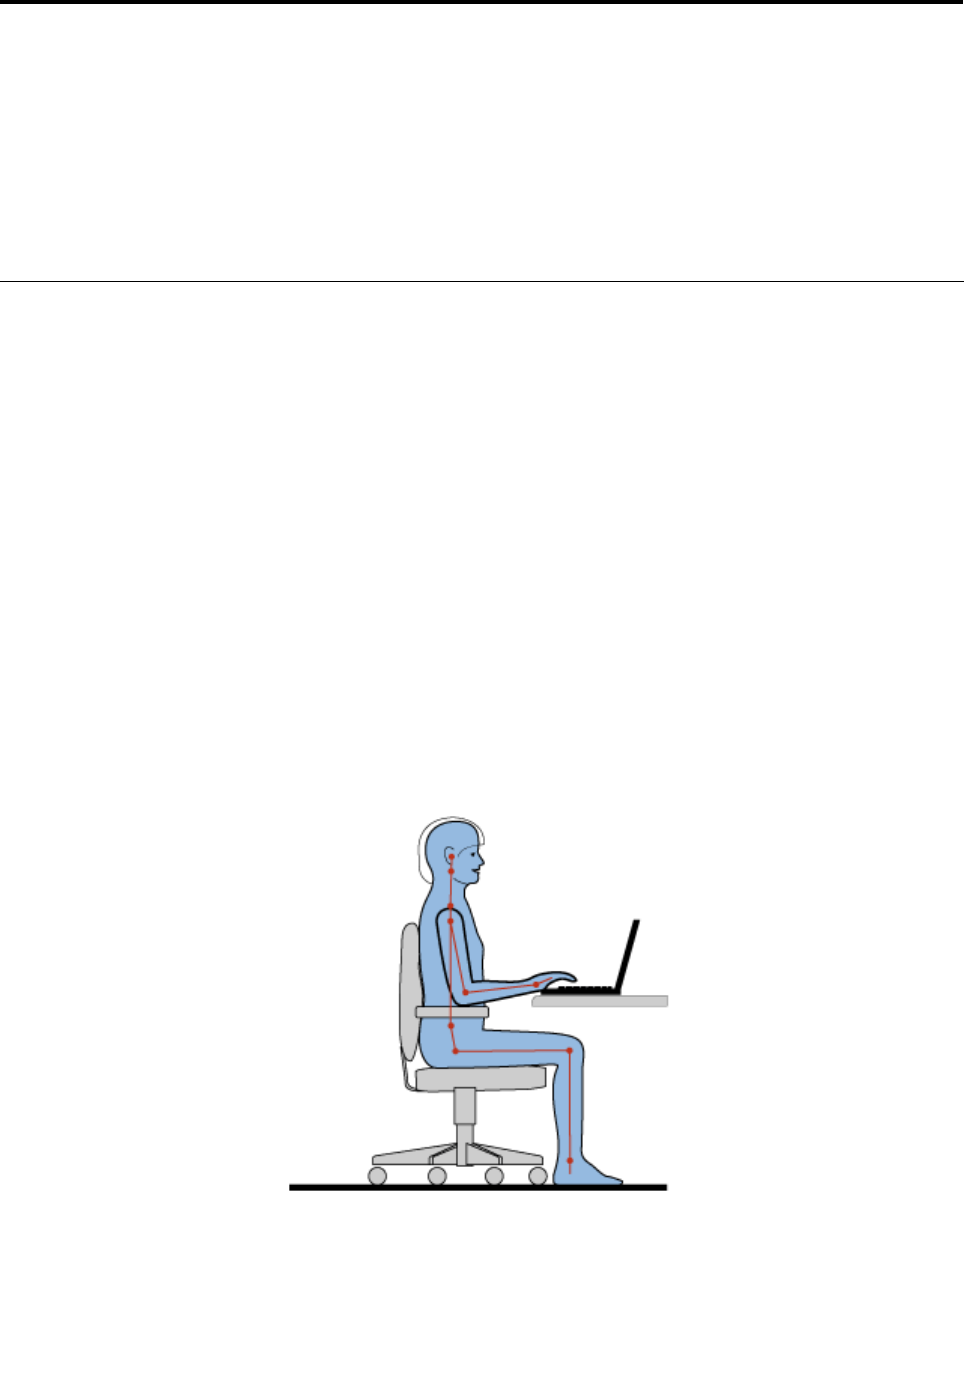
Chapter3.Youandyourcomputer
Thischapterprovidesyouinformationaboutaccessibilityandtravelingwithyourcomputer.
Thischaptercontainsthefollowingtopics:
•“Accessibilityandcomfort”onpage47
•“Travelingwithyourcomputer”onpage49
Accessibilityandcomfort
Goodergonomicpracticeisimportanttogetthemostfromyourpersonalcomputerandtoavoiddiscomfort.
Arrangeyourworkplaceandtheequipmentyouusetosuityourindividualneedsandthekindofwork
thatyouperform.Inaddition,usehealthyworkhabitstomaximizeyourperformanceandcomfortwhile
usingyourcomputer.
Thefollowingtopicsprovideinformationaboutarrangingyourworkarea,settingupyourcomputer
equipment,andestablishinghealthyworkhabits.
Lenovoiscommittedtoprovidingthelatestinformationandtechnologytoourcustomerswithdisabilities.
Refertoouraccessibilityinformationwhichoutlinesoureffortsinthisarea.
Ergonomicinformation
Workinginthevirtualofcemightmeanadaptingtofrequentchangesinyourenvironment.Forexample,
adaptingtothesurroundinglightsources,properseating,andtheplacementofyourcomputerhardware
canhelpyouimproveyourperformanceandachievegreatercomfort.
Note:Thisexampleshowssomeoneinaconventionalsetting.Evenwhennotinsuchasetting,youcan
followmanyofthesetips.Developgoodhabits,andtheywillserveyouwell.
Generalposture:Thefollowingaresomegeneralrecommendationsforassumingahealthyworkingposture.
Itisbesttoperiodicallymakeminormodicationsinyourworkingposturetodetertheonsetofdiscomfort
causedbylongperiodsofworkinginthesameposition.Frequentshortbreaksfromyourworkwillalsohelp
topreventanyminordiscomfortassociatedwithyourworkingposture.
©CopyrightLenovo201247

Display:Positionthedisplaytomaintainacomfortableviewingdistanceof510-760mm(20-30inch).Avoid
glareorreectionsonthedisplayfromoverheadlightingoroutsidesourcesoflight.Keepthedisplayscreen
cleanandsetthebrightnesstolevelsthatenableyoutoseethescreenclearly.PressFn+F8orFn+F9
toadjustdisplaybrightness.
Headposition:Keepyourheadandneckinacomfortableandneutral(vertical,orupright)position.
Chair:Useachairthatgivesyougoodbacksupportandseatheightadjustment.Usechairadjustmentsto
bestsuityourdesiredposture.
Armandhandposition:Ifavailable,utilizechairarmrestsoranareaonyourworkingsurfacetoprovide
weightsupportforyourarms.Keepyourforearms,wrists,andhandsinarelaxedandneutral(horizontal)
position.Typewithasofttouchwithoutpoundingthekeys.
Legposition:Keepyourthighsparalleltotheoorandyourfeetatontheoororonafootrest.
Whatifyouaretraveling?
Itmightnotbepossibletoobservethebestergonomicpracticeswhenyouareusingyourcomputer
whileonthemoveorinacasualsetting.Regardlessofthesetting,trytoobserveasmanyofthetipsas
possible.Sittingproperlyandusingadequatelighting,forexample,willhelpyoumaintaindesirablelevels
ofcomfortandperformance.
Questionsaboutvision?
ThevisualdisplayscreensofThinkPadnotebookcomputersaredesignedtomeetthehigheststandards
andtoprovideyouwithclear,crispimagesandlarge,brightdisplaysthatareeasytosee,yeteasyonthe
eyes.Ofcourse,anyconcentratedandsustainedvisualactivitycanbetiring.Ifyouhavequestionsoneye
fatigueorvisualdiscomfort,consultavisioncarespecialistforadvice.
Adjustingyourcomputertotyou
Becauseyourcomputerenablesyoutoworkinsomanyplaces,itisimportantthatyouremainattentive
togoodposture,goodlightingandproperseating.Refertothefollowingtipstoimproveperformance
andachievegreatercomfort:
Activesittingandrestbreaks:Thelongeryousitandworkwithyourcomputerthemoreimportantitisto
observeyourworkingposture.FollowingErgonomicinformationandpracticing“activesitting”arethebest
waystoavoiddiscomfortassociatedwithyourworkingpostures.Makingminorvoluntaryposturalchanges
andtakingshortfrequentworkbreaksarethekeyingredientsforhealthycomputing.Yourcomputerisalight
andmobilesystem;rememberthatitcaneasilyberepositionedonyourworkingsurfacetoaccommodate
manyposturemodicationsyoumightwishtomake.
Workareasetupoptions:Familiarizeyourselfwithallofyourofcefurnituresothatyouknowhowtoadjust
yourworksurface,seat,andotherworktoolstoaccommodateyourpreferencesforcomfort.Ifyourwork
areaisnotinanofcesetting,besuretotakespecialnoteofemployingactivesittingandutilizingwork
breaks.NotethattherearemanyThinkPadproductsolutionsavailabletohelpyoumodifyandexpand
yourcomputertobestsuityourneeds.AccessthefollowingWebsitetoviewsomeoftheseoptions:
http://www.lenovo.com/accessories/services/index.html.Exploreyouroptionsfordockingsolutionsand
externalproductsthatcanprovidetheadjustabilityandfeaturesthatyouwant.
ThinkPadfeaturesthatpromotecomfort:Thereareeasy-to-useThinkPadfeaturesthatcanhelpmake
yourcomputermorecomfortabletouse.
48UserGuide

Accessibilityinformation
Lenovoiscommittedtoprovidingpeoplewithdisabilitiesgreateraccesstoinformationandtechnology.
Asaresult,thefollowinginformationprovideswaystohelpusersthathavehearing,vision,andmobility
limitationsgetthemostoutoftheircomputerexperience.
Assistivetechnologiesenableuserstoaccessinformationinthemostappropriateway.Someofthese
technologiesarealreadyprovidedinyouroperatingsystem.Otherscanbepurchasedthroughvendors,or
accessedthroughtheWorldWideWebhttp://www.lenovo.com/healthycomputing.
Assistivetechnologies
SomeaccessibilitytechnologiesareavailablethroughtheAccessibilityOptionsprogram.Depending
onyouroperatingsystem,thenumberofaccessibilityoptionsavailablevaries.Ingeneral,accessibility
optionsenhancethewayuserswithhearing,vision,ormobilitylimitationsnavigateandusetheircomputer.
Forexample,someusersmightnothavethenemotorskillsrequiredtouseamouseorselectkey
combinations.Otherusersmightrequirelargerfontsorhigh-contrastdisplaymodes.Insomecases,
magniersandbuilt-inspeechsynthesizersareavailable.Fordetailedinformationabouteachofthese
features,consulttheMicrosofthelpinformationsystem.
TousetheAccessibilityOptionsprogram,openControlPanelandclickEaseofAccess➙Easeof
AccessCenter.
TheMicrosofthelpinformationsystemsupportstheaccessibilityfeaturesprovidedbyyourWindows
operatingsystem,screenreadersdesignedtooperateintheWindowsenvironment,andWindowskeyboard
navigation.ForacompletelistingoftheMicrosoftWindowsKeyboardGuide,goto:
http://www.microsoft.com/enable/Products/altkeyboard.aspx
Screen-readertechnologiesareprimarilyfocusedonsoftwareapplicationinterfaces,helpinformation
systems,andavarietyofonlinedocuments.However,inthecasewhereascreenreadercannotread
documents,thedocumentmustrstgothroughaconversionprocess.OnesolutionconvertsAdobe
PDFlesintoaformatthatisreadbythescreen-readerprograms.ThissolutionisaWeb-basedservice
providedbyAdobeSystemsIncorporated.Throughhttp://access.adobe.com,AdobePDFdocumentscan
beconvertedtoHTMLorplaintextinmanylanguages.OneconversionoptionconvertsPDFdocuments
ontheInternet.AsecondoptionenablesuserstosubmittheURLofanAdobePDFlethroughe-mailto
convertittoHTMLorASCIItext.AdobePDFlesonalocalharddiskdrive,localCD-ROM,orLANalsocan
beconvertedbyattachingtheAdobePDFletoane-mailmessage.
Travelingwithyourcomputer
Thistopicprovidesinformationtohelpyouworkwithyourcomputerwhenyouaretravelingwithyour
computerabroad.
Traveltips
Usethefollowingtraveltipstotravelmorecondentlyandefcientlywithyourcomputer.
1.Whileitissafetoallowyourcomputertogothroughthexraymachinesatairportsecuritystations,itis
importanttokeepyoureyesonthecomputeratalltimestopreventtheft.
2.Considerbringinganairplaneorautomobileadapterforyourcomputer.
3.Becauseyoumightneedtouseyourcomputerinlessthanperfectlightingconditions,turnonthe
ThinkLightlightbypressingFn+Spacebartoilluminatethekeyboard.
4.Ifyoucarryanacpoweradapter,detachtheaccordfromittoavoiddamagingthecord.
Note:IfyouusetheThinkLightlight,thebatterylifeisslightlyreduced.
Chapter3.Youandyourcomputer49

Traveltipsonairplanes
Ifyoucarryyourcomputerintoanairplane,checkthetraveltips.
Notes:
•Forusingonboardcomputerorwireless(suchasInternetandBluetooth)services,checktheserviceswith
theairlinebeforeboardingtheairplane.
•Iftherearerestrictionsontheuseofcomputerswiththewirelessfeatureonanairplane,youneed
todisableitbeforeboarding.
Followthetipsbelow:
1.Becarefulabouttheseatinfrontofyouonairplanes.Angleyourcomputerdisplaysothatitdoesnot
getcaughtwhenthepersoninfrontofyouleansback.
2.Remembertohibernateorturnoffyourcomputerwhentakingoff.
Travelaccessories
Thefollowingisachecklistofthingstoconsiderpackingwhenyouaregoingtobeoutoftheofce:
Travelessentials:
•ThinkPadacpoweradapter
•Externalmouse,ifyouareaccustomedtousingone
•Ethernetcable
•Extrabattery,charged
•Aqualitycarryingcasethatprovidesadequatecushionandprotection
Ifyouaretravelingtoanothercountry,youmightwanttoconsidertheseitems:
•Anacpoweradapterforthecountrythatyouaretravelingto
Otheritemsyoumightwishtoconsider:
•ThinkPadAC/DCComboAdapter
•Externalstoragedevice
50UserGuide

Chapter4.Security
Thischapterprovidesinformationabouthowtoprotectyourcomputerfromtheftandunauthorizeduse.
Attachingamechanicallock
Youcanattachamechanicallocktoyourcomputer,tohelppreventitfrombeingremovedwithoutyour
permission.
Attachamechanicallocktothekeyholeofthecomputer;thensecurethechainonthelocktoastationary
object.Refertotheinstructionsshippedwiththemechanicallock.
Note:Youareresponsibleforevaluating,selecting,andimplementingthelockingdevicesandsecurity
features.Lenovomakesnocomments,judgments,orwarrantiesaboutthefunction,quality,orperformance
oflockingdevicesandsecurityfeatures.
Usingpasswords
Byusingpasswords,youcanhelppreventyourcomputerfrombeingusedbyothers.Onceyouseta
password,apromptisdisplayedonthescreeneachtimeyouturnonthecomputer.Enteryourpasswordat
theprompt.Youcannotusethecomputerunlessyoutypethecorrectpassword.
Passwordsandsleepmode
IfyouhavesetpasswordsandyouputyourcomputerintosleepmodebypressingFn+F4,youwillbe
promptedtoenterthepasswordwhenresumingoperation.
Ifanyharddiskdriveorthesolidstatedrivehasaharddiskpassword,itisunlockedautomaticallywhen
youresumeoperation.
Note:IfaWindowspasswordhasbeenset,youwillbepromptedtoenterit.
Typingpasswords
Ifthisiconisdisplayed,typeapower-onpasswordorasupervisorpassword.
Ifthisiconisdisplayed,typeauserharddiskpassword.Ifyouwanttotypeamasterharddisk
password,dothefollowing:
1.PressF1.Theiconchangestothis:
2.Typethemasterharddiskpassword.
Note:Toreturntotheicon,pressF1again.
Ifthisiconisdisplayed,typeasupervisorpassword.
©CopyrightLenovo201251

Power-onpassword
Youcansetapower-onpasswordtohelpprotectyourcomputeragainstaccessbyunauthorizedusers.
Ifyousetapower-onpassword,thepasswordpromptisdisplayedonthescreenwheneveryouturnonthe
computer.Youmustenterthecorrectpasswordtostartusingthecomputer.
Settingapower-onpassword
1.Printtheseinstructions.
2.Saveallopenles,andexitallapplications.
3.Turnyourcomputeroffandthenturnitonagain.
4.Whenthelogoscreenisdisplayed,pressF1.theThinkPadSetupprogrammainmenuopens.
5.SelectSecurity,usingthecursordirectionalkeystomovedownthemenu.
6.SelectPassword.
7.SelectPower-onPassword.
8.Chooseyourpower-onpassword,andtypeitwithinthebracketsintheEnterNewPasswordeld.
9.PressEnteroncetomovetothenextline.Retypethepasswordyoujustentered,toverifyit.
10.Commityourpasswordtomemory.
Attention:Youmightwanttorecordyourpasswordandstoreitinasafeplace.
11.PressF10toexit.
12.SelectYesintheSetupNoticewindow.
Changingorremovingthepower-onpassword
Tochangethepower-onpassword,followsteps1through7.Enteryourcurrentpassword.WhentheEnter
NewPasswordeldisdisplayed,typeanewpasswordintheeldandthenretypeittoverify.Toremove
thepassword,followsteps1through7.Typeyourcurrentpassword.WhentheEnterNewPasswordeld
isdisplayed,leaveitblankandpressEntertwice.
Harddiskpasswords
Twotypesofharddiskpasswordshelpprotecttheinformationstoredontheharddiskdrive:
•Userharddiskpassword
•Masterharddiskpassword,whichrequiresauserharddiskpassword
Ifauserharddiskpasswordhasbeenset,butnomasterharddiskpasswordhasbeen,theusermustenter
theuserharddiskpasswordinordertogainaccesstolesandapplicationsontheharddiskdrive.
Themasterpasswordcanbesetandusedonlybyasystemadministrator.Likeamasterkey,itenablesthe
administratortogetaccesstoanyharddiskdriveinasystem.Theadministratorsetsthemasterpassword;
nooneelseknowsit.Thentheadministratorsetsauserpasswordforeachcomputerinthenetwork,and
tellseachuserthepasswordforhisorhercomputer.Theusercanthenchangetheuserpasswordas
desired,buttheadministratorstillcangetaccessbyusingthemasterpassword.
Note:Whenamasterharddiskpasswordisset,onlytheadministratorcanremovetheuserharddisk
password.
Settingaharddiskpassword
1.Printtheseinstructions.
2.Saveallopenles,andexitallapplications.
52UserGuide

3.Turnyourcomputeroffandthenonagain.
4.Whenthelogoscreenisdisplayed,pressF1.theThinkPadSetupprogrammainmenuopens.
5.SelectSecurity,usingthecursordirectionalkeystomovedownthemenu.
6.SelectPassword.
7.SelectHardDisk1Password.
8.Apasswordwindowopens.YouarepromptedtoselectUserorUser+Master.SelectUserifyouwant
tosetonlyoneharddiskpassword.Ifyouareanadministratororsupervisor,youcanselectUser+
Mastertosettwopasswords.(Theusercanchangetheuserpasswordlater.)
•IfyouselectUser+Master,dothefollowing:
a.Whenawindowfortypingthenewuserharddiskpasswordopens,typeyournewpassword
intheEnterNewPasswordeld.
b.PressEnteroncetomovetothenextline.Retypethepasswordyoujustenteredtoverifyit.
c.Amessagewindowopensandpromptsyoutosetthemasterharddiskpassword.ClickContinue.
d.Awindowfortypingthenewmasterharddiskpasswordopens.Typeyournewpasswordinthe
EnterNewPasswordeld.
e.PressEnteroncetomovetothenextline.Retypethepasswordyoujustenteredtoverifyit.
•IfyouselectUseronly,dothefollowing:
a.Whenawindowfortypingthenewpasswordopens,typeyournewpasswordintheEnterNew
Passwordeld.
Notes:
–YoucansettheminimumlengthofaharddiskpasswordthroughtheSecuritymenu.
–Ifyousetaharddiskpasswordofoversevencharacters,theharddiskdrivecanbeusedonly
withacomputerthatcanrecognizeaharddiskpasswordofoversevencharacters.Ifyouthen
installtheharddiskdriveinacomputerthatcannotrecognizeaharddiskpasswordthat
containsmorethansevencharacters,youcannotgetaccesstothedrive.
b.PressEnteroncetomovetothenextline.Retypethepasswordyoujustenteredtoverifyit.
9.Commitanypasswordtomemory.
Attention:Youmightwanttorecordyourpasswordandstoreitinasafeplace.Otherwise,ifyou
forgettheuserpassword,orbothuserandmasterpasswords,Lenovocannotresetyourpasswordsor
recoverdatafromtheharddiskdrive.YoumusttakeyourcomputertoaLenovoreselleroramarketing
representativetohavetheharddiskdrivereplaced.Proofofpurchaseisrequired,andafeewillbe
chargedforpartsandservice.
10.PressF10toexit.IntheSetupNoticewindow,selectYes.
Thenexttimeyouturnonyourcomputer,youwillhavetotypetheuserormasterharddiskpasswordin
ordertostartyourcomputerandgetaccesstoyouroperatingsystem.
Changingorremovingaharddiskpassword
Followsteps1through7in“Settingaharddiskpassword”onpage52,typingyourpasswordtogetaccess
totheThinkPadSetupprogram.
Tochangeorremovetheuserharddiskpassword,dothefollowing:
•Tochangetheharddiskpassword,typethecurrentpasswordintheEnterCurrentPasswordeld.Then
typethenewpasswordintheEnterNewPasswordeld,andretypethepasswordyoujustenteredto
verifyitintheConrmNewPasswordeld.PressEnter,andaSetupNoticewindowisdisplayed.Press
F10toexitfromtheSetupNoticewindow.Theuserharddiskpasswordwillbechanged.
Chapter4.Security53

•Toremovetheharddiskpassword,typethecurrentpasswordintheEnterCurrentPasswordeld.
ThenleavetheEnterNewPasswordandConrmNewPasswordeldsblank,andpressEnter.A
SetupNoticewindowisdisplayed.PressF10toexitfromtheSetupNoticewindow.Theuserhard
diskpasswordwillberemoved.
TochangeorremovetheUser+Masterharddiskpasswords,selectUserHDPorMasterHDP.
IfyouchooseUserHDP,dothefollowing:
•Tochangetheuserharddiskpassword,typethecurrentuserharddiskpasswordorthecurrentmaster
harddiskpasswordintheEnterCurrentPasswordeld.Thentypethenewuserharddiskpasswordin
theEnterNewPasswordeld,andretypethepasswordyoujustenteredtoverifyitintheConrmNew
Passwordeld.PressEnter,andaSetupNoticewindowisdisplayed.PressF10toexitfromtheSetup
Noticewindow.Theuserharddiskpasswordischanged.
•Toremovetheuserharddiskpassword,typethecurrentmasterharddiskpasswordintheEnterCurrent
Passwordeld.ThenleavetheEnterNewPasswordandConrmNewPasswordeldsblank,and
pressEnter.ASetupNoticewindowisdisplayed.PressF10toexitfromtheSetupNoticewindow.
Theuserharddiskpasswordswillberemoved.
IfyouchooseMasterHDP,dothefollowing:
•Tochangethemasterharddiskpassword,typethecurrentmasterharddiskpasswordintheEnter
CurrentPasswordeld.ThentypethenewmasterharddiskpasswordintheEnterNewPassword
eld,andretypethepasswordyoujustenteredtoverifyitintheConrmNewPasswordeld.Press
Enter,andaSetupNoticewindowisdisplayed.PressF10toexitfromtheSetupNoticewindow.The
masterharddiskpasswordischanged.
•Toremovethemasterharddiskpassword,typethecurrentmasterharddiskpasswordintheEnter
CurrentPasswordeld.ThenleavetheEnterNewPasswordandConrmNewPasswordeldsblank,
andpressEnter.ASetupNoticewindowisdisplayed.PressF10toexitfromtheSetupNoticewindow.
Boththeuserandmasterharddiskpasswordswillberemoved.
Supervisorpassword
ThesupervisorpasswordprotectsthesysteminformationstoredinThinkPadSetup.Withoutit,noonecan
changethecongurationofthecomputer.Itprovidesthefollowingsecurityfeatures:
•Ifasupervisorpasswordisset,apasswordpromptisdisplayedwhenyoutrytostarttheThinkPadSetup
program.Unauthorizeduserscannotgetaccesstocongurationdata.
•Thesystemadministratorcanusethesupervisorpasswordtogetaccesstoacomputereveniftheuserof
thatcomputerhassetapower-onpassword.Thesupervisorpasswordoverridesthepower-onpassword.
•Ifbothasupervisorpasswordandapower-onpasswordareset,youcandothefollowingonlyifyou
havethesupervisorpassword:
–Deletingthepower-onpassword
–Changingordeletingthesupervisorpassword
–EnablingordisablingtheWakeonLANfeature
–EnablingordisablingtheInternalNetworkOptionROMfeature
–Changingdateandtime
–EnablingordisablingtheLockUEFIBIOSSettingsfeature
–EnablingordisablingthePasswordatunattendedbootfeature
–Specifyingtheminimumlengthforpower-onpasswordsandharddiskpasswords
–Changingthesettingforthesecuritychip
–EnablingordisablingtheBootDeviceListF12Optionfeature
54UserGuide

–EnablingordisablingtheBootOrderLockfeature
–EnablingordisablingtheFlashBIOSUpdatingbyEnd-Usersfeature
–Enablingordisablingtheinternalnetworkdevice
–Enablingordisablingtheinternalwirelessdevice
–EnablingordisablingtheinternalBluetoothdevice
–EnablingordisablingtheinternalwirelessWANdevice
–EnablingordisablingtheSecuritymode
–Enablingordisablingthengerprintreaderpriority
–Erasingthengerprintdata
Notes:
•ThesystemadministratorcansetthesamesupervisorpasswordonmanyThinkPadnotebookcomputers
tomakeadministrationeasier.
•ByenablingtheLockUEFIBIOSSettingsfeatureonthePasswordmenuwhenyousetthesupervisor
password,youmakeitimpossibleforanyonebutyoutomakechanges.
Setting,changing,orremovingasupervisorpassword
Onlyasystemadministratorcanset,change,orremoveasupervisorpassword.
Toset,change,orremoveasupervisorpassword,dothefollowing:
1.Printtheseinstructions.
2.Saveallopenles,andexitallapplications.
3.Turnyourcomputeroffandthenturnitonagain.
4.Whenthelogoscreenisdisplayed,pressF1.theThinkPadSetupprogrammainmenuopens.
5.SelectSecurity,usingthecursordirectionalkeystomovedownthemenu.
6.SelectPassword.
7.SelectSupervisorPassword.
8.Awindowopens,promptingyoutoenteranewpassword.Dependingonyourneeds,dooneofthe
following:
•Tosetapassword,dothefollowing:
a.ChooseyoursupervisorpasswordandtypeitintheEnterNewPasswordeld;thenpressEnter.
b.PressEntertomovetothenextline.Retypethepasswordyoujustenteredtoverifyit.
•Tochangeapassword,dothefollowing:
a.IntheEnterCurrentPasswordeld,typethecurrentsupervisorpassword.
b.IntheEnterNewPasswordeld,typethenewsupervisorpassword;thenretypethepassword
youjustenteredtoverifyitintheConrmNewPasswordeld.
•Toremoveapassword,dothefollowing:
a.IntheEnterCurrentPasswordeld,typethecurrentsupervisorpassword.
b.LeavetheEnterNewPasswordandConrmNewPasswordeldsblank.
9.CommityourpasswordtomemoryandpressEnter.ASetupNoticewindowisdisplayed.
Attention:Youmightwanttorecordyourpasswordandstoreitinasafeplace.Ifyouforgetyour
supervisorpassword,Lenovocannotresetyourpassword.YoumusttakeyourcomputertoaLenovo
reselleroraLenovomarketingrepresentativetohavethesystemboardreplaced.Proofofpurchaseis
required,andafeewillbechargedforpartsandservice.
Chapter4.Security55

10.PressF10toexitfromtheSetupNoticewindow.
ThenexttimeyouopentheThinkPadSetupprogram,youwillbepromptedtotypeyourpasswordtoproceed.
Harddisksecurity
Toprotectpasswordsfromunauthorizedsecurityattacks,severalofthelatesttechnologiesandalgorithms
areintegratedintoUEFIBIOSandhardwaredesignofThinkPadnotebookcomputers.
Tomaximizesecurity,dothefollowing:
1.Setapower-onpasswordaswellasaharddiskpasswordforyourinternalsolidstatedriveorharddisk
drive.Refertotheproceduresin“Power-onpassword”onpage52and“Harddiskpasswords”onpage
52.Forsecurity,alongerpasswordisrecommended.
2.ToprovidereliablesecurityforUEFIBIOS,usethesecuritychipandasecurityapplicationwithaTrusted
PlatformModulemanagementfeature.Referto“Settingthesecuritychip”onpage57.
Note:TheWindows7andWindows8operatingsystemssupporttheTPMmanagementfeature.
3.IfaDiskEncryptionharddiskdriveandEncryptionsolidstatedriveisinstalledinyourcomputer,besure
toprotectthecontentsofyourcomputermemoryfromunauthorizedaccessbyuseofdriveencryption
software,suchasMicrosoftWindowsBitLocker®DriveEncryption,whichissupportedintheUltimate
andEnterpriseeditionsoftheWindows7operatingsystem,andtheProfessionalandEnterpriseeditions
oftheWindows8operatingsystem.Referto“UsingWindowsBitLockerDriveEncryption”onpage56.
4.Beforeyoudisposeof,sell,orhandoveryourcomputer,makesuretodeletedatastoredonit.Referto
“Noticeondeletingdatafromyourharddiskdriveorsolidstatedrive”onpage61.
Notes:ThefollowingdrivescanbeprotectedbyUEFIBIOS:
•Theharddiskdrivebuiltintoyourcomputer.
•TheharddiskdriveinstalledinaSerialUltrabayEnhancedbay.
Note:Youcaninstalla9.5-mm-thickSerialUltrabaySlimdeviceora12.7-mm-thickSerialUltrabay
EnhanceddeviceinaSerialUltrabayEnhancedbay.
UsingWindowsBitLockerDriveEncryption
Tohelpprotectyourcomputeragainstunauthorizedaccess,besuretousedriveencryptionsoftware,such
asWindowsBitLockerDriveEncryption.
WindowsBitLockerDriveEncryptionisanintegralsecurityfeatureoftheWindows7andWindows8
operatingsystems.ItissupportedintheUltimateandEnterpriseeditionsoftheWindows7andProfessional
andEnterpriseeditionsoftheWindows8operatingsystem.Itcanhelpyouprotecttheoperatingsystem
anddatastoredonyourcomputer,evenifyourcomputerislostorstolen.BitLockerworksbyencryptingall
userandsystemles,includingtheswapandhibernationles.
BitLockerusesaTrustedPlatformModuletoprovideenhancedprotectionforyourdataandtoensureearly
bootcomponentintegrity.AcompatibleTPMisdenedasaV1.2TPM.
TochecktheBitLockerstatus,gotoControlPanel,andclickSystemandSecurity➙BitLockerDrive
Encryption.
FordetailsaboutWindowsBitLockerDriveEncryption,seethehelpinformationsystemoftheWindows
operatingsystem,,orsearchfor“MicrosoftWindowsBitLockerDriveEncryptionStep-by-StepGuide”on
theMicrosoftWebsite.
56UserGuide

DiskEncryptionharddiskdriveandEncryptionsolidstatedrive
SomemodelscontaintheDiskEncryptionharddiskdriveorEncryptionsolidstatedrive.Thisfeature
helpstoprotectyourcomputeragainstsecurityattacksonmedia,NANDashordevicecontrollersbyuse
ofahardwareencryptionchip.Fortheefcientuseoftheencryptionfeature,besuretosetaharddisk
passwordfortheinternalstoragedevice.
Settingthesecuritychip
Strictsecurityrequirementsareimposedonnetworkclientcomputersthattransfercondentialinformation
electronically.Dependingontheoptionsyouordered,yourcomputermighthaveanembeddedsecurity
chip,acryptographicmicroprocessor.Withthesecuritychip,youcandothefollowing:
•Protectyourdataandsystem
•Strengthenaccesscontrols
•Securecommunications
Settingthesecuritychip
ThechoicesofferedontheSecurityChipsubmenuundertheSecuritymenuofThinkPadSetuparethe
following:
•SecurityChip:activate,inactivate,ordisablethesecuritychip.
•SecurityReportingOptions:enableordisableeachsecurityreportingoption.
•ClearSecurityChip:cleartheencryptionkey.
Notes:
1.BesurethatthesupervisorpasswordhasbeensetinThinkPadSetup.Otherwiseanyonecanchange
thesettingsforthesecuritychip.
2.IfyouareusingClientSecuritySolution,handlethesecuritychipbydoingthefollowing:
•Donotclearthesecuritychip.Ifyoudo,thefunctionsassignedtothekeyswillbeerased.
•Donotdisablethesecuritychip.Ifyoudo,ClientSecuritySolutionwillnotwork.
3.Ifthesecuritychipisremovedorreplaced,oranewonehasbeenadded,thecomputerwillnotstart.
Youwillhearfourcyclesoffourbeepseach.
4.Ifthesecuritychipisinactiveordisabled,theClearSecurityChipoptionwillnotbedisplayed.
5.Whenyouclearthesecuritychip,besuretoturnyourcomputeroffandthenturnitonagainafteryou
setthesecuritychiptoActive.Otherwise,theClearSecurityChipoptionisnotdisplayed.
TosetanitemontheSecurityChipsubmenu,dothefollowing:
1.Printtheseinstructions.
2.Saveallopenles,andexitallapplications.
3.Turnyourcomputeroffandthenturnitonagain.
4.Whenthelogoscreenisdisplayed,pressF1.theThinkPadSetupprogrammainmenuopens.
5.Usingthecursorkeys,movetoSecurity.TheSecuritymenuopens.
6.Usingthecursorkeys,movetoSecurityChip,andpressEnter.TheSecurityChipsubmenuopens.
7.Usingthecursorkeys,movetoanitemyouwanttoset.Whentheitemishighlighted,pressEnter.
8.Setotheritemsthatyouwanttoset.
9.PressF10tosavechangesandexit.
10.PressEnterintheSetupConrmationwindowtoconrmtheexit.
Chapter4.Security57
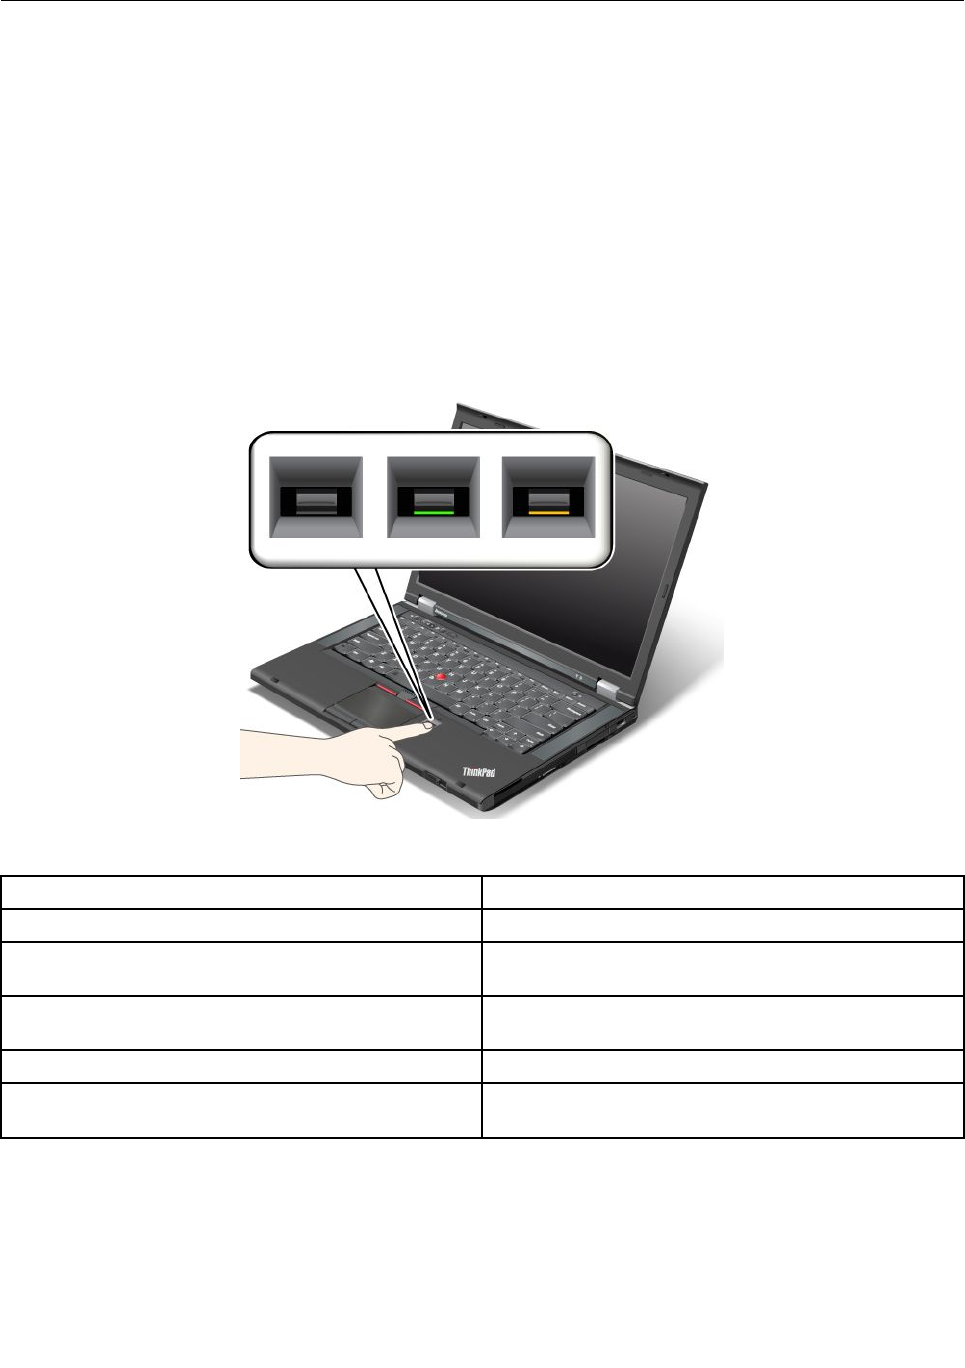
Usingthengerprintreader
Dependingontheoptionsyouordered,yourcomputermighthaveanintegratedngerprintreader.By
enrollingyourngerprintandassociatingitwithapower-onpassword,aharddiskpassword,orboth
passwordsbeforehand,youcanstartthecomputer,logontothesystem,andentertheThinkPadSetupby
swipingyourngeroverthereader,withouttypingapassword.Thusngerprintauthenticationcanreplace
passwordsandenablesimpleandsecureuseraccess.
Enrollingyourngerprint
1.Turnonyourcomputer.
2.TostartLenovoFingerprintsoftware,referto“Lenovoprograms”onpage15.
3.Followtheinstructionsonthescreentoenrollyourngerprint.Fordetails,refertotheHelpforthe
program.
LEDbehaviorofthengerprintreader
Table4.LEDbehaviorlist_ngerprintreader
IndicatorDescription
SteadygreenThengerprintreaderisreadytoswipe.
BlinkinggreenonceThengerprintisbeingauthenticatedorhasbeen
authenticated.
BlinkinggreenThengerprintreaderisreadytoswipeinpower-on
authenticationstate.
BlinkingamberThengerprintcouldnotbeauthenticated.
Steadyamberfor15secondsThepower-onauthenticationfeatureisdisabledafter
threebadngerprintswipes.
Swipingyourngeroverthereader
Toswipeyourngeroverthereader,dothefollowing:
58UserGuide
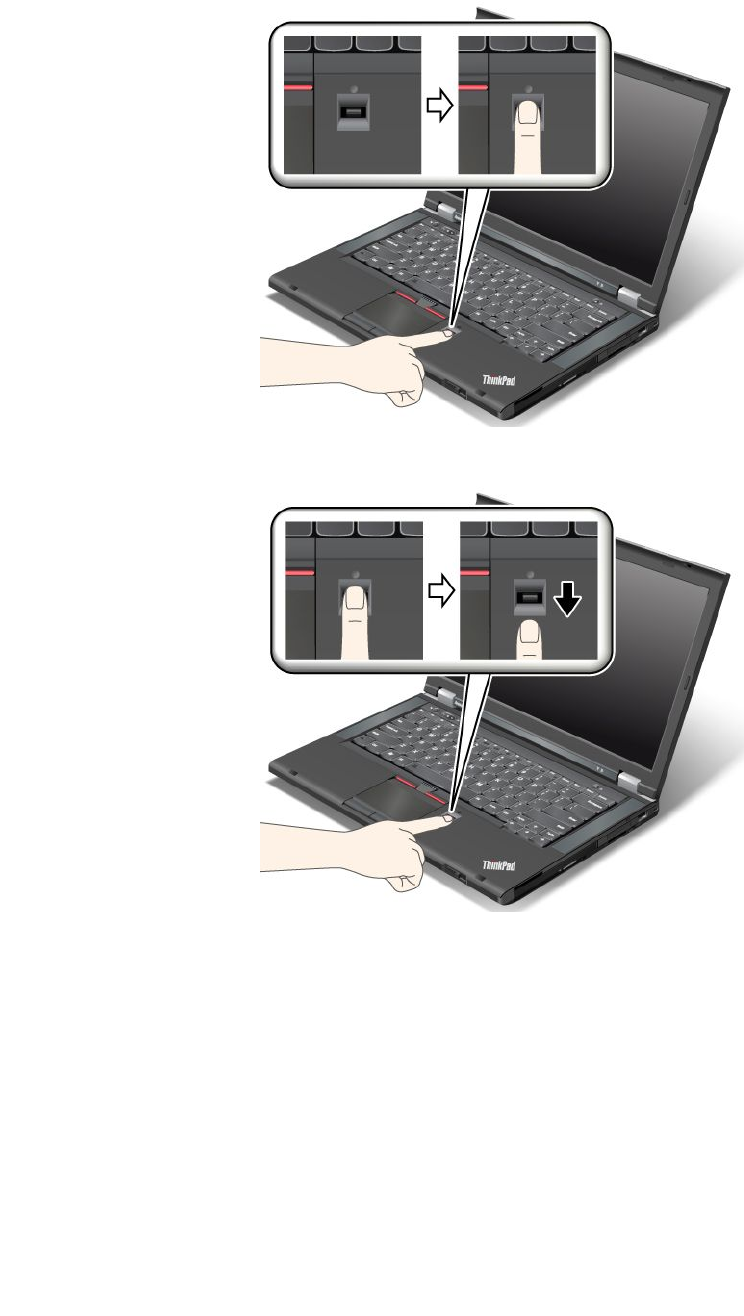
1.Placetheballofyournger—thatis,thecentralpartofthengerprint—onthesmallcircleabovethe
reader.Makesurethattheentiretopjointofthengerisonthereader.
2.Applylightpressureandswipeyourngeracrossthereaderinonesmoothmotion.
Loggingontothesystem
Afteryouenrollyourngerprint,logontothesystemthefollowing:
1.Setapower-onpasswordoraharddiskpassword,orboth.
2.Turnyourcomputeroffandthenonagain.
3.Whenprompted,swipeyourngeroverthereader.
4.Onrequest,typeyourpower-onpassword,yourharddiskpassword,orboth.Theenrolledngerprintis
nowassociatedwithyourpower-onpassword,yourharddiskpassword,orboth.
Thenexttimeyoustartthecomputer,youcanlogontothesystembyswipingyourngeroverthe
readeronce.
Chapter4.Security59

Attention:Ifyoualwaysuseyourngerprinttologontothesystem,youmightforgetyourpassword.Write
downyourpassword,andkeepitinasafeplace.Ifyouforgetitandforsomereasonyoucannotswipeyour
ngeracrossthereader-forexample,ifyouinjurethatnger-youcannotstartthecomputerorchange
thepassword.Ifyouforgetyourpower-onpassword,youmusttakeyourcomputertoaLenovoauthorized
serviceroramarketingrepresentativetohavethepasswordcanceled.
Ifyouforgetyourharddiskpassword,Lenovocannotresetyourpasswordorrecoverdatafromthehard
disk.YoumusttakeyourcomputertoaLenovoauthorizedserviceroramarketingrepresentativetohavethe
harddiskdrivereplaced.Proofofpurchaseisrequired,andafeewillbechargedforpartsandservice.
Settingthengerprintreader
Ifyouwanttochangethesettingsofthengerprintreader,followtheprocedurebelow.
ThengerprintsubmenuundertheSecuritymenuoftheThinkPadSetupoffersthefollowingchoices:
•PredesktopAuthentication:Enablesordisablesngerprintauthenticationbeforetheoperatingsystem
isloaded.
•ReaderPriority:Denesthepriorityforngerprintreadersifanexternalngerprintreaderisattached.
•SecurityMode:Speciesthesettingsofthesecuritymode.
•PasswordAuthentication:Enablesordisablespasswordauthentication.
Note:ThisitemappearsifHighsecuritymodeisselected.
•ResetFingerprintData:Bychoosingthisitem,youeraseallofthengerprintdatastoredineitherthe
internalorexternalngerprintreader.
Tosetaniteminthengerprintsubmenu:
1.Printtheseinstructions.Tocongurethengerprintreader,youmustturnyourcomputeroffand
thenonagain.
2.Saveallopenles,andexitallapplications.
3.Turnyourcomputeroffandthenonagain.
4.Whenthelogoscreenisdisplayed,pressF1.TheThinkPadSetupopens.
5.Usingthecursorkeys,movetoSecurity,andpressEnter.TheSecuritymenuopens.
6.Usingthecursorkeys,movetoFingerprint,andpressEnter.TheFingerprintsubmenuopens.
7.Usingthecursorkeys,movetoanitemyouwanttoset.Whenthatitemishighlighted,pressEnter.
8.Settheitemsyouwanttoset.
9.PressF10toexit.
10.IntheSetupConrmationwindow,selectYes.
Careforthengerprintreader
Thefollowingactionscoulddamagethengerprintreaderorcauseitnottoworkproperly:
•Scratchingthesurfaceofthereaderwithahard,pointedobject.
•Scrapingthesurfaceofthereaderwithyourngernailoranythinghard.
•Usingortouchingthereaderwithadirtynger.
Ifyounoticeanyofthefollowingconditions,gentlycleanthesurfaceofthereaderwithadry,soft,lint-free
cloth:
•Thesurfaceofthereaderisdirtyorstained.
•Thesurfaceofthereaderiswet.
60UserGuide

•Thereaderoftenfailstoenrollorauthenticateyourngerprint.
Ifyourngerhasanyofthefollowingconditions,youmightnotbeabletoregisterorauthenticateit:
•Yourngeriswrinkled.
•Yourngerisrough,dry,orinjured.
•Yourngerisverydry.
•Yourngerisstainedwithdirt,mud,oroil.
•Thesurfaceofyourngerisverydifferentfromwhenyouenrolledyourngerprint.
•Yourngeriswet.
•Angerisusedthathasnotbeenenrolled.
Toimprovethesituation,trythefollowing:
•Cleanorwipeyourhandstoremoveanyexcessdirtormoisturefromthengers.
•Enrollanduseadifferentngerforauthentication.
•Ifyourhandsaretoodry,applylotiontothem.
Noticeondeletingdatafromyourharddiskdriveorsolidstatedrive
Ascomputersspreadintoeverycorneroflife,theyprocessmoreandmoreinformation.Thedataonyour
computer,someofwhichmightbesensitive,isstoredonaharddiskdrive.Beforeyoudisposeof,sell,or
handoveryourcomputer,besuretodeletedatastoredonit.
Handingyourcomputerovertosomeoneelsewithoutdeletingtheloadedsoftware,suchasoperating
systemsandapplicationsoftware,mightevenviolatelicenseagreements.Youareadvisedtocheckthe
termsandconditionsofthoselicenseagreements.
Therearemethodsthatseemtodeletethedata:
•Movethedatatotherecyclebin,andthenclickEmptyrecyclebin.
•UsetheDeleteoption.
•Formatyourharddiskdrive,usingthesoftwareforinitializingit.
•Usingtherecoveryprogramtosettheharddiskdrivebacktothefactorydefaultsettings.
Theseoperations,however,onlychangetheleallocationofthedata,theydonotdeletethedataitself.In
otherwords,thedataretrievalprocessingisdisabledunderanoperatingsystemsuchasWindows.The
dataisstillthere,eventhoughitseemstobelost.Thus,itissometimespossibletoreadthedatabyuseof
specialsoftwarefordatarecovery.Thereisariskthatpeopleofbadfaithmightreadandmisusethecritical
dataonharddiskdrivesforunexpectedpurposes.
Topreventleakageofdata,itbecomesveryimportantthatyoutakeresponsibilityfordeletingallthedata
fromtheharddiskdrivewhenyoudisposeof,sell,orhandoveryourcomputer.Youcandestroythedata
physicallybysmashingtheharddiskdrivewithahammer,ormagneticallybymeansofstrongmagnetic
power,thusmakingthedataunreadable.Butwerecommendthatyoumakeuseofthesoftware(payware)or
service(payservice)specicallydevelopedforthepurpose.
Fordisposingofdataontheharddiskdrive,LenovoprovidestheSecureDataDisposal™tool.Todownload
eitherapplication,gotohttp://www.lenovo.com/support.
Note:Runningtheapplicationwilltakeacoupleofhours.
Chapter4.Security61

IfanEncryptionsolidstatedriveoraDiskEncryptionharddiskdriveissupportedandinstalledinyour
computer,youcanlogicallydisposeofallthedataonthedriveinaveryshorttimebyerasingthe
cryptographickey.Thedataencryptedwiththeoldkeyisnotphysicallyerasedbutremainsonthedrive;
however,itcannotbedecryptedwithouttheoldkey.ThisfeatureisenabledbyThinkPadSetupMenu
ExtensionUtilityandisavailableasamenuiteminThinkPadSetup.
Usingrewalls
Ifyoursystemispreintalledwitharewallprogram,itprotectsagainstcomputerInternetsecuritythreats,
unauthorizedaccess,intrusions,andInternetattacks.Italsoprotectsyourprivacy.
Formoreinformationabouthowtousetherewallprogram,refertothehelpinformationsystemthat
comeswiththeprogram.
Protectingdataagainstviruses
Yourcomputerispreinstalledwithanantivirusprogramsoyoucandetectandeliminateviruses.The
antivirusprogramisdesignedtohelpyoudetectandeliminateviruses.
Lenovoprovidesafullversionofantivirussoftwareonyourcomputerwithafree30-daysubscription.After
30days,youmustrenewthelicensetocontinuereceivingtheantivirussoftwareupdates.
Formoreinformationabouthowtouseyourantivirussoftware,refertothehelpinformationsystemof
yourantivirussoftware.
62UserGuide

Chapter5.Recoveryoverview
Thischapterprovidesinformationabouttherecoverysolutions.
•“RecoveryoverviewforWindows7models”onpage63
•“RecoveryoverviewforWindows8models”onpage68
RecoveryoverviewforWindows7models
ThissectionprovidesinformationabouttherecoverysolutionsprovidedbyLenovooncomputers
preinstalledwiththeWindows7operatingsystem.
Notes:
1.Thereareavarietyofmethodstochoosefromwhenconsideringhowtorecoverintheeventofa
software-orhardware-relatedproblem.Somemethodsvarydependingonthetypeofyouroperating
system.
2.Theproductontherecoverymediamightbeusedonlyforthefollowingpurposes:
•Restoretheproductpreinstalledonyourcomputer
•Reinstalltheproduct
•ModifytheproductusingtheAdditionalFiles
Notes:Topreventpotentialperformancerisksorunexpectedbehaviorthatmightbecausedbythenew
harddiskdrivetechnology,itisrecommendedthatyouuseoneofthefollowingback-upsoftwareprograms:
•ThinkVantageRescueandRecoveryversion4.3orlater(forWindows7)
•SymantecNortonGhostversion15orlater
Notes:Tousethisprogram,dothefollowing:
1.ClickStart➙Run.TheRunwindowopens.
2.Typecmdintheeld.ThenclickOK.
3.Typeghost-align=1mbandpressEnter.
•AcronisTrueImage2010orlater
•ParagonBackup&Recovery10Suiteorlater,ParagonBackup&Recovery10Homeorlater
Creatingandusingrecoverymedia
Youcanuserecoverymediatorestoretheharddiskdrivetothefactorydefaultsettings.Recoverymedia
areusefulifyoutransferthecomputertoanotherarea,sellthecomputer,recyclethecomputer,orputthe
computerinanoperationalstateafterallothermethodsofrecoveryhavefailed.Asaprecautionarymeasure,
itisimportanttocreaterecoverymediaasearlyaspossible.
Note:Therecoveryoperationsyoucanperformusingrecoverymediavarydependingontheoperating
systemfromwhichtherecoverymediawerecreated.Therecoverymediamightcontainabootmedium
andadatamedium.YourMicrosoftWindowslicensepermitsyoutocreateonlyonedatamedium,soitis
importantthatyoustoretherecoverymediainasafeplaceafteryouhavemadethem.
Creatingrecoverymedia
Note:OntheWindows7operatingsystem,youcancreaterecoverymediausingdiscsorexternalUSB
storagedevices.
©CopyrightLenovo201263

Tocreaterecoverymedia,clickStart➙AllPrograms➙LenovoThinkVantageTools➙FactoryRecovery
Disks.Then,followtheinstructionsonthescreen.
Usingrecoverymedia
Thissectionprovidesinstructionsonhowtouserecoverymediaondifferentoperatingsystems.
•OntheWindows7operatingsystem,youcanuserecoverymediatorestorethecomputertothefactory
defaultsettingsonly.Youcanuserecoverymediatoputthecomputerinanoperationalstateafterall
othermethodsofrecoveryhavefailed.
Attention:Whenyouuserecoverymediatorestorethecomputertothefactorydefaultsettings,allthe
lescurrentlyontheharddiskdrivewillbedeletedandreplacedbythefactorydefaultsettings.
Touserecoverymedia,dothefollowing:
1.Dependingonthetypeofyourrecoverymedia,connectthebootmedium(memorykeyorotherUSB
storagedevice)tothecomputer,orinsertthebootdiscintotheopticaldrive.
2.RepeatedlypressandreleasetheF12keywhenturningonthecomputer.WhentheBootMenu
opens,releasetheF12key.
3.SelectthedesiredstartupdeviceandpressEnter.Therestoreprocessbegins.
4.Followtheinstructionsonthescreentocompletetheoperation.
Notes:
1.Afterrestoringyourcomputertothefactorydefaultsettings,youmighthavetoreinstalldevicedrivers
forsomedevices.See“Reinstallingpreinstalledapplicationsanddevicedrivers”onpage67.
2.SomecomputerscomewithMicrosoftOfceorMicrosoftWorkspreinstalled.Ifyouneedtorecover
orreinstallyourMicrosoftOfceorMicrosoftWorksapplications,youmustusetheMicrosoftOfce
CDorMicrosoftWorksCD.ThesediscsareprovidedonlywithcomputerspreinstalledwithMicrosoft
OfceorMicrosoftWorks.
Performingbackupandrecoveryoperations
TheRescueandRecoveryprogramenablesyoutobackupallyourharddiskdrivecontentsincludingthe
operatingsystem,datales,softwareprograms,andpersonalsettings.Youcandesignatewherethe
RescueandRecoveryprogramstoresthebackup:
•Inaprotectedareaofyourharddiskdrive
•Onthesecondaryharddiskdriveifasecondaryharddiskdriveisinstalledinyourcomputer
•OnanattachedexternalUSBharddiskdrive
•Onanetworkdrive
•Onrecordablediscs(arecordableopticaldriveisrequiredforthisoption)
Afteryouhavebackedupthecontentsontheharddiskdrive,youcanrestorethecompletecontentsofthe
harddiskdrive,restoreonlytheselectedles,orrestoreonlytheWindowsoperatingsystemandapplications.
Performingabackupoperation
ThissectionprovidesinstructionsonhowtoperformabackupoperationusingtheRescueandRecovery
program.
ToperformabackupoperationusingtheRescueandRecoveryprogram,dothefollowing:
1.FromtheWindowsdesktop,clickStart➙AllPrograms➙LenovoThinkVantageT ools➙Enhanced
BackupandRestore.TheRescueandRecoveryprogramopens.
2.IntheRescueandRecoverymainwindow,clicktheLaunchadvancedRescueandRecoveryarrow.
64UserGuide

3.ClickBackupyourharddriveandselectbackupoperationoptions.Then,followtheinstructionson
thescreentocompletethebackupoperation.
Performingarecoveryoperation
ThissectionprovidesinstructionsonhowtoperformarecoveryoperationusingtheRescueandRecovery
program.
ToperformarecoveryoperationusingtheRescueandRecoveryprogram,dothefollowing:
1.FromtheWindowsdesktop,clickStart➙AllPrograms➙LenovoThinkVantageT ools➙Enhanced
BackupandRestore.TheRescueandRecoveryprogramopens.
2.IntheRescueandRecoverymainwindow,clicktheLaunchadvancedRescueandRecoveryarrow.
3.ClicktheRestoreyoursystemfromabackupicon.
4.Followtheinstructionsonthescreentocompletetherecoveryoperation.
FormoreinformationaboutperformingarecoveryoperationfromtheRescueandRecoveryworkspace,see
“UsingtheRescueandRecoveryworkspace”onpage65.
UsingtheRescueandRecoveryworkspace
TheRescueandRecoveryworkspaceresidesinaprotected,hiddenareaofyourharddiskdrivethat
operatesindependentlyfromtheWindowsoperatingsystem.Thisenablesyoutoperformrecovery
operationsevenifyoucannotstarttheWindowsoperatingsystem.Youcanperformthefollowingrecovery
operationsfromtheRescueandRecoveryworkspace:
•Rescuelesfromyourharddiskdriveorfromabackup
TheRescueandRecoveryworkspaceenablesyoutolocatelesonyourharddiskdriveandtransfer
themtoanetworkdriveorotherrecordablemedia,suchasaUSBdeviceoradisc.Thissolutionis
availableevenifyoudidnotbackupyourlesorifchangesweremadetothelessinceyourlastbackup
operation.YoualsocanrescueindividuallesfromaRescueandRecoverybackuplocatedonyourlocal
harddiskdrive,aUSBdevice,oranetworkdrive.
•RestoreyourharddiskdrivefromaRescueandRecoverybackup
IfyouhavebackedupyourharddiskdriveusingtheRescueandRecoveryprogram,youcanrestorethe
harddiskdrivefromaRescueandRecoverybackup,evenifyoucannotstarttheWindowsoperating
system.
•Restoreyourharddiskdrivetothefactorydefaultsettings
TheRescueandRecoveryworkspaceenablesyoutorestorethecompletecontentsofyourharddiskdrive
tothefactorydefaultsettings.Ifyouhavemultiplepartitionsonyourharddiskdrive,youhavetheoption
torestorethefactorydefaultsettingstotheC:partitionandleavetheotherpartitionsintact.Becausethe
RescueandRecoveryworkspaceoperatesindependentlyfromtheWindowsoperatingsystem,youcan
restorethefactorydefaultsettingsevenifyoucannotstarttheWindowsoperatingsystem.
Attention:IfyourestoretheharddiskdrivefromaRescueandRecoverybackuporrestoretheharddisk
drivetothefactorydefaultsettings,alllesontheprimaryharddiskdrivepartition(usuallydriveC:)willbe
deletedintherecoveryprocess.Ifpossible,makecopiesofimportantles.Ifyouareunabletostartthe
Windowsoperatingsystem,youcanusetherescuelesfeatureoftheRescueandRecoveryworkspaceto
copylesfromyourharddiskdrivetoothermedia.
TostarttheRescueandRecoveryworkspace,dothefollowing:
1.Makesurethatthecomputeristurnedoff.
2.RepeatedlypressandreleasetheF11keywhenturningonthecomputer.Whenyouhearbeepsor
seealogoscreen,releasetheF11key.
Chapter5.Recoveryoverview65

3.IfyouhavesetaRescueandRecoverypassword,typeyourpasswordwhenprompted.TheRescue
andRecoveryworkspaceopensafterashortdelay.
Note:IftheRescueandRecoveryworkspacefailstoopen,see“Solvingrecoveryproblems”onpage68.
4.Dooneofthefollowing:
•Torescuelesfromyourharddiskdriveorfromabackup,clickRescuelesandfollowthe
instructionsonthescreen.
•TorestoreyourharddiskdrivefromaRescueandRecoverybackuportorestoreyourharddiskdrive
tothefactorydefaultsettings,clickRestoreyoursystemandfollowtheinstructionsonthescreen.
FormoreinformationaboutthefeaturesoftheRescueandRecoveryworkspace,clickHelp.
Notes:
1.Afterrestoringyourharddiskdrivetothefactorydefaultsettings,youmighthavetoreinstalldevice
driversforsomedevices.See“Reinstallingpreinstalledapplicationsanddevicedrivers”onpage67.
2.SomecomputerscomewithMicrosoftOfceorMicrosoftWorkspreinstalled.Ifyouneedtorecover
orreinstallyourMicrosoftOfceorMicrosoftWorksapplications,youmustusetheMicrosoftOfce
CDorMicrosoftWorksCD.ThesediscsareprovidedonlywithcomputerspreinstalledwithMicrosoft
OfceorMicrosoftWorks.
Creatingandusingarescuemedium
Witharescuemedium,suchasadiscoraUSBharddiskdrive,youcanrecoverthecomputerfromfailures
thatpreventyoufromgainingaccesstotheRescueandRecoveryworkspaceonyourharddiskdrive.
Notes:
1.Therecoveryoperationsyoucanperformusingarescuemediumvarydependingontheoperating
system.
2.Therescuedisccanbestartedinalltypesofopticaldrives.
Creatingarescuemedium
Thissectionprovidesinstructionsonhowtocreatearescuemedium.
Tocreatearescuemedium,dothefollowing:
1.FromtheWindowsdesktop,clickStart➙AllPrograms➙LenovoThinkVantageT ools➙Enhanced
BackupandRestore.TheRescueandRecoveryprogramopens.
2.IntheRescueandRecoverymainwindow,clicktheLaunchadvancedRescueandRecoveryarrow.
3.ClicktheCreateRescueMediaicon.TheCreateRescueandRecoveryMediawindowopens.
4.IntheRescueMediaarea,selectthetypeoftherescuemediumyouwanttocreate.Youcancreatea
rescuemediumusingadisc,aUSBharddiskdrive,orasecondaryinternalharddiskdrive.
5.ClickOKandfollowtheinstructionsonthescreentocreatearescuemedium.
Usingarescuemedium
Thissectionprovidesinstructionsonhowtousetherescuemediumyouhavecreated.
•Ifyouhavecreatedarescuemediumusingadisc,usethefollowinginstructionstousetherescuemedium:
1.Turnoffyourcomputer.
2.RepeatedlypressandreleasetheF12keywhenturningonthecomputer.WhentheBootMenuis
displayed,releasetheF12key.
3.IntheBootMenuwindow,selectthedesiredopticaldriveastherstbootdevice.Then,insertthe
rescuediscintotheopticaldriveandpressEnter.Therescuemediumstarts.
66UserGuide

•IfyouhavecreatedarescuemediumusingaUSBharddiskdrive,usethefollowinginstructionsto
usetherescuemedium:
1.AttachtheUSBharddiskdrivetooneoftheUSBconnectorsonyourcomputer.
2.RepeatedlypressandreleasetheF12keywhenturningonthecomputer.WhentheBootMenu
windowopens,releasetheF12key.
3.IntheBootMenuwindow,selecttheUSBharddiskdriveastherstbootdeviceandpressEnter.
Therescuemediumstarts.
•Ifyouhavecreatedarescuemediumusingthesecondaryinternalharddiskdrive,setthesecondary
internalharddiskdriveastherstbootdeviceinthestartupdevicesequencetostarttherescuemedium.
Note:Ifyouwanttoinstallasecondaryharddiskdrive,see“UsingtheSerialUltrabayEnhancedfeature”
onpage99.
Whentherescuemediumstarts,theRescueandRecoveryworkspaceopens.Thehelpinformationfor
eachfeatureisavailablefromtheRescueandRecoveryworkspace.Followtheinstructionstocomplete
therecoveryprocess.
Reinstallingpreinstalledapplicationsanddevicedrivers
Yourcomputerhasprovisionsthatenableyoutoreinstallselectedfactory-installedapplicationsanddevice
drivers.
Reinstallingpreinstalledapplications
Toreinstallselectedapplicationprograms,dothefollowing:
1.Turnonyourcomputer.
2.GototheC:\SWTOOLSdirectory.
3.OpentheAPPSfolder.Initareseveralsubfoldersnamedforthevariouspreinstalledapplications.
4.Openthesubfolderfortheapplicationyouarereinstalling.
5.Double-clickSetup,andthenfollowtheon-screenstepstoreinstalltheprogram.
Reinstallingpreinstalleddevicedrivers
Attention:Whenyoureinstalldevicedrivers,youarechangingthecurrentcongurationofyourcomputer.
Reinstalldevicedriversonlywhenitisnecessarytocorrectaproblemwithyourcomputer.
Toreinstalladevicedriverforafactory-installeddevice,dothefollowing:
1.Turnonyourcomputer.
2.GototheC:\SWTOOLSdirectory.
3.OpentheDRIVERSfolder.WithintheDRIVERSfolderareseveralsubfoldersnamedforthevarious
devicesinstalledinyourcomputer(forexample,AUDIOandVIDEO).
4.Openthesubfolderforthedevice.
5.Reinstallthedevicedriverbyoneofthefollowingmethods:
•Inthesubfolderforthedevice,lookforatextle(alewiththeextension.txt).Thetextlecontains
informationonhowtoreinstallthatdevicedriver.
•Ifthesubfolderforthedevicecontainsaleofsetupinformation(alewiththeextension.inf),you
canusetheAddNewHardwareprogram(intheWindowsControlPanel)toreinstallthedevicedriver.
Notalldevicedriverscanbereinstalledbyuseofthisprogram.IntheAddNewHardwareprogram,
whenpromptedforthedevicedriveryouwanttoinstall,clickHaveDiskandBrowse.Thenselect
thedevicedriverlefromthedevicesubfolder.
Chapter5.Recoveryoverview67

•Inthesubfolderforthedevice,lookfortheexecutablele(alewiththeextension.exe).Double-click
thele,andfollowtheinstructionsonthescreen.
Attention:Ifyouneedupdateddevicedrivers,donotdownloadthemfromtheWindowsUpdateWebsite.
ObtainthemfromLenovo.Formoreinformation,see“Makingsuredevicedriversarecurrent”onpage132.
Solvingrecoveryproblems
IfyouareunabletoaccesstheRescueandRecoveryworkspaceortheWindowsenvironment,doone
ofthefollowing:
•UsearescuemediumtostarttheRescueandRecoveryworkspace.See“Creatingandusingarescue
medium”onpage66.
•Userecoverymediaifallothermethodsofrecoveryhavefailedandyouneedtorestoretheharddisk
drivetothefactorydefaultsettings.See“Creatingandusingrecoverymedia”onpage63.
Note:IfyouareunabletoaccesstheRescueandRecoveryworkspaceortheWindowsenvironmentfrom
arescuemediumorrecoverymedia,youmightnothavetherescuedevice(aninternalharddiskdrive,a
disc,aUSBharddiskdrive,orotherexternaldevices)setastherstbootdeviceinthestartupdevice
sequence.Youmustrstmakesurethatyourrescuedeviceissetastherstbootdeviceinthestartup
devicesequenceintheThinkPadSetupprogram.GototheBootMenutotemporarilyorpermanently
changethestartupdevicesequence.FormoreinformationabouttheThinkPadSetupprogram,see
“ThinkPadSetup”onpage115.
Itisimportanttocreatearescuemediumandasetofrecoverymediaasearlyaspossibleandstorethem
inasafeplaceforfutureuse.
RecoveryoverviewforWindows8models
Thissectionprovidesinformationabouttherecoverysolutionsprovidedoncomputerspreinstalledwiththe
Windows8operatingsystem.
Refreshingyourcomputer
Ifyourcomputerdoesnotperformwellandtheproblemmightbecausedbyarecentlyinstalledprogram,
youcanrefreshyourcomputerwithoutlosingyourpersonallesorchangingyoursettings.
Attention:Ifyourefreshyourcomputer,theprogramsthatcamewithyourcomputerandtheprogramsthat
youinstalledfromWindowsStorewillbereinstalled,butallotherprogramswillberemoved.
Torefreshyourcomputer,dothefollowing:
1.Moveyourcursortothebottom-rightcornerofthescreentobringupthecharms.ClickSettings
➙ChangePCsettings➙General.
2.IntheRefreshyourPCwithoutaffectingyourlessection,clickGetstarted.
Resettingyourcomputertothefactorydefaultsettings
Youcanresetyourcomputertothefactorydefaultsettings.Resettingthecomputerwillreinstallthe
operatingsystem,andreinstallalltheprogramsandsettingsthatcamewithyourcomputer.
Attention:Ifyouresetyourcomputer,allyourpersonallesandsettingswillbedeleted.Toavoiddataloss,
makeabackupcopyofallthedatathatyouwanttokeep.
Toresetyourcomputer,dothefollowing:
1.Moveyourcursortothebottom-rightcornerofthescreentobringupthecharms.ClickSettings
➙ChangePCsettings➙General.
68UserGuide

2.IntheRemoveeverythingandreinstallWindowssection,clickGetstarted.
Advancedstartupoptions
AdvancedstartupoptionsenableyoutochangethestartupsettingsofyourWindowsoperatingsystem,
startthecomputerfromanexternaldevice,orrestoretheWindowsoperatingsystemfromasystemimage.
Tousetheadvancedstartupoptions,dothefollowing:
1.Moveyourcursortothebottom-rightcornerofthescreentobringupthecharms.ClickSettings
➙ChangePCsettings➙General.
2.IntheAdvancedstartupsection,clickRestartnow➙Troubleshoot➙Advancedoptions.
3.Restartyourcomputerfollowingtheinstructionsonthescreen.
FormoredetailsabouttherecoverysolutionsprovidedoncomputerspreinstalledwiththeWindows8
operatingsystem,refertothehelpinformationsystemoftheWindows8operatingsystem.
Chapter5.Recoveryoverview69

70UserGuide

Chapter6.Replacingdevices
Thischapterprovidesinstructionsonhowtoinstallorreplacehardwareforyourcomputer.
•“Staticelectricityprevention”onpage71
•“Replacingthebattery”onpage71
•“Replacingtheharddiskdrive”onpage75
•“Replacingthekeyboard”onpage78
•“Replacingthememorymodule”onpage82
•“ReplacingthewirelessLAN/WiMAXcard”onpage86
•“InstallingandreplacingthewirelessWANcard”onpage92
•“ReplacingtheSIMcard”onpage96
•“ReplacingtheUltrabaydevice”onpage97
Staticelectricityprevention
Staticelectricity,althoughharmlesstoyou,canseriouslydamagecomputercomponentsandoptions.
Improperhandlingofstatic-sensitivepartscancausedamagetothepart.Whenyouunpackanoptionor
aCRU,donotopenthestatic-protectivepackagecontainingthepartuntiltheinstructionsdirectyou
toinstallit.
WhenyouhandleoptionsorCRUs,orperformanyworkinsidethecomputer,takethefollowingprecautions
toavoidstatic-electricitydamage:
•Limityourmovement.Movementcancausestaticelectricitytobuilduparoundyou.
•Alwayshandlecomponentscarefully.Handleadapters,memorymodules,andothercircuitboardsbythe
edges.Nevertouchexposedcircuitry.
•Preventothersfromtouchingcomponents.
•Whenyouinstallastatic-sensitiveoptionorCRU,touchthestatic-protectivepackagecontainingthe
parttoametalexpansion-slotcoverorotherunpaintedmetalsurfaceonthecomputerforatleasttwo
seconds.Thisreducesstaticelectricityinthepackageandyourbody.
•Whenpossible,removethestatic-sensitivepartfromthestatic-protectivepackagingandinstallthepart
withoutsettingitdown.Whenthisisnotpossible,placethestatic-protectivepackagingonasmooth,
levelsurfaceandplacethepartonit.
•Donotplacethepartonthecomputercoverorothermetalsurface.
Replacingthebattery
Beforeyoustart,printtheseinstructions.
ThissystemsupportsonlybatteriesspeciallydesignedforthisspecicsystemandmanufacturedbyLenovo
oranauthorizedbuilder.Thesystemdoesnotsupportunauthorizedbatteriesorbatteriesdesignedforother
systems.Ifanunauthorizedbatteryorabatterydesignedforanothersystemisinstalled,thesystemwill
notcharge.
Attention:Lenovohasnoresponsibilityfortheperformanceorsafetyofunauthorizedbatteries,and
providesnowarrantiesforfailuresordamagearisingoutoftheiruse.
©CopyrightLenovo201271
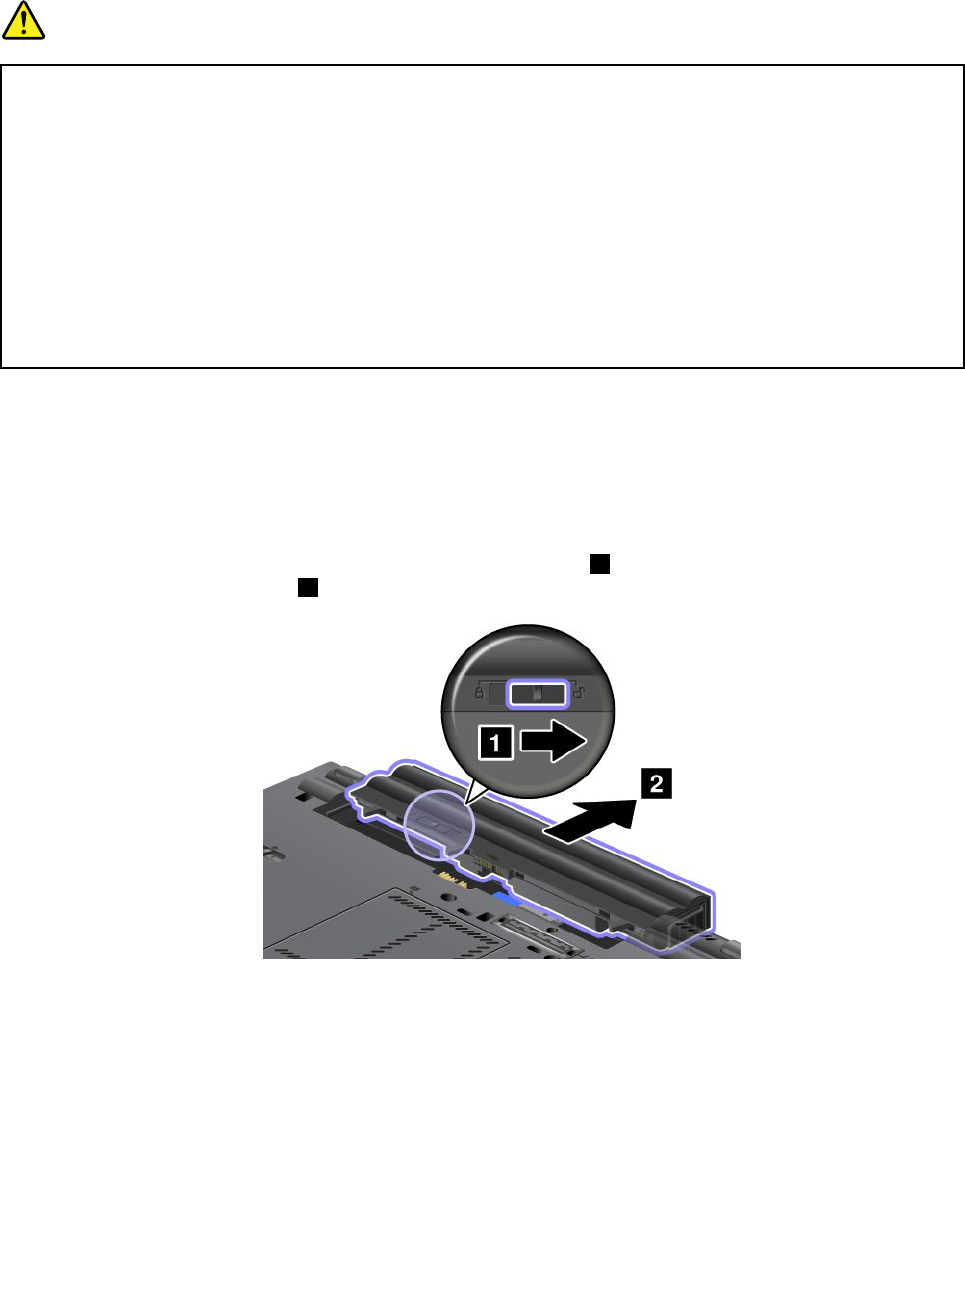
Note:Ifanunauthorizedbatteryisinstalled,thefollowingmessagewillbedisplayed:“Thebatteryinstalled
isnotsupportedbythissystemandwillnotcharge.PleasereplacethebatterywiththecorrectLenovo
batteryforthissystem.”
DANGER
Iftherechargeablebatterypackisincorrectlyreplaced,thereisdangerofanexplosion.Thebattery
packcontainsasmallamountofharmfulsubstances.Toavoidpossibleinjury:
•ReplaceonlywithabatteryofthetyperecommendedbyLenovo.
•Keepthebatterypackawayfromre.
•Donotexposeittoexcessiveheat.
•Donotexposeittowaterorrain.
•Donotshort-circuitit.
•Donotdrop,crush,puncture,orsubjecttostrongforces.Batteryabuseormishandlingcan
causethebatterytooverheat,whichcancausegassesorameto“vent”fromthebattery
packorcoincell.
Replacingthebatteryinstalledinthebatteryspaceofyourcomputer
Toreplacethebattery,dothefollowing:
1.Turnoffthecomputer,orenterhibernationmode.Thendisconnecttheacpoweradapterandallcables
fromthecomputer.
2.Closethecomputerdisplay,andturnthecomputerover.
3.Unlockthebatterylatchbyslidingittotheunlockedposition1.Holdingthelatchintheunlocked
position,removethebattery2.
72UserGuide
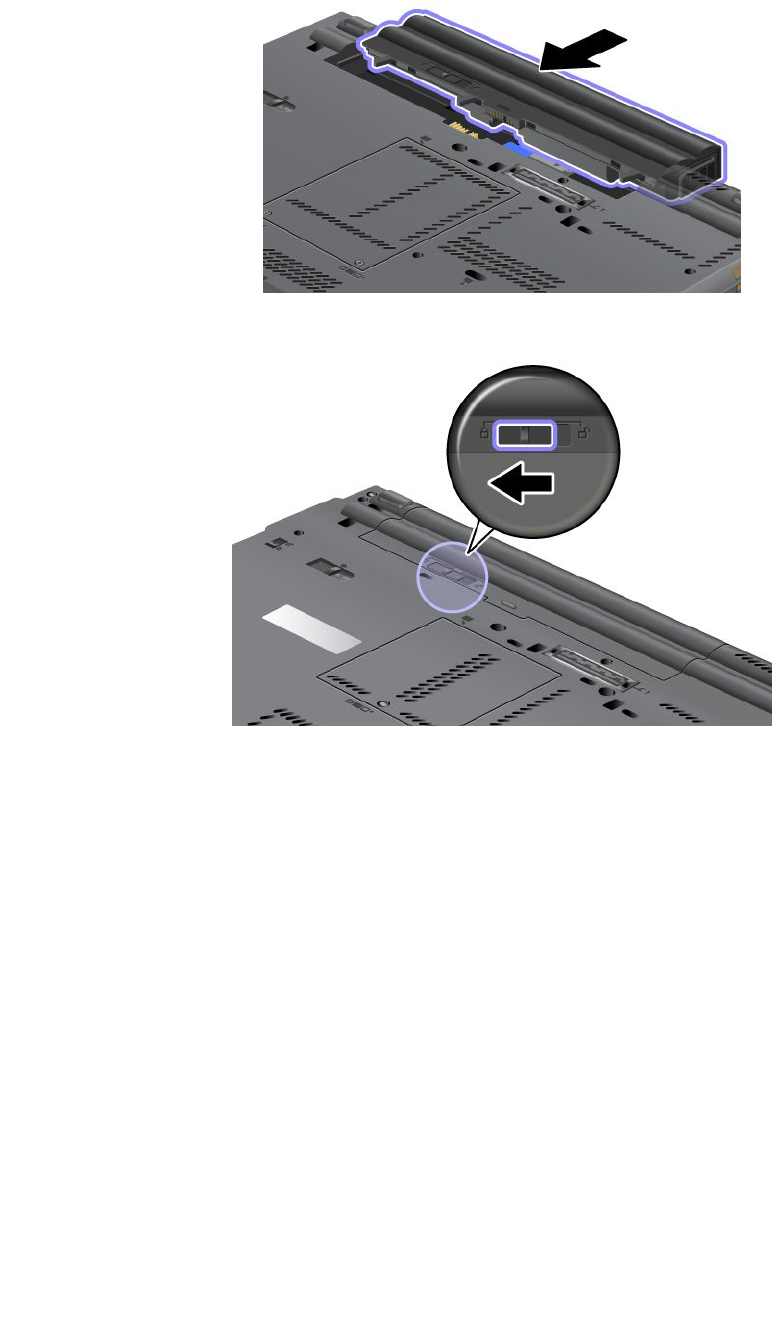
4.Installafullychargedbatteryuntilitclicksintoplace.
5.Slidethebatterylatchtothelockedposition.
6.Turnthecomputeroveragain.Reconnecttheacpoweradapterandallcables.
Usingtheextendedlifebattery
Forlongerbatterylife,anextendedlifebatteryisavailableasanoption.Youcanattachittothedocking
stationconnectorofyourcomputerbydoingthefollowing:
1.Turnoffthecomputer,orenterhibernationmode.Thendisconnecttheacpoweradapterandallcables
fromthecomputer.
2.Closethecomputerdisplay,andturnthecomputerover.
3.Aligntheextendedlifebatterywiththebottomsideofthecomputerasshownandrmlyattachthe
battery.
Chapter6.Replacingdevices73
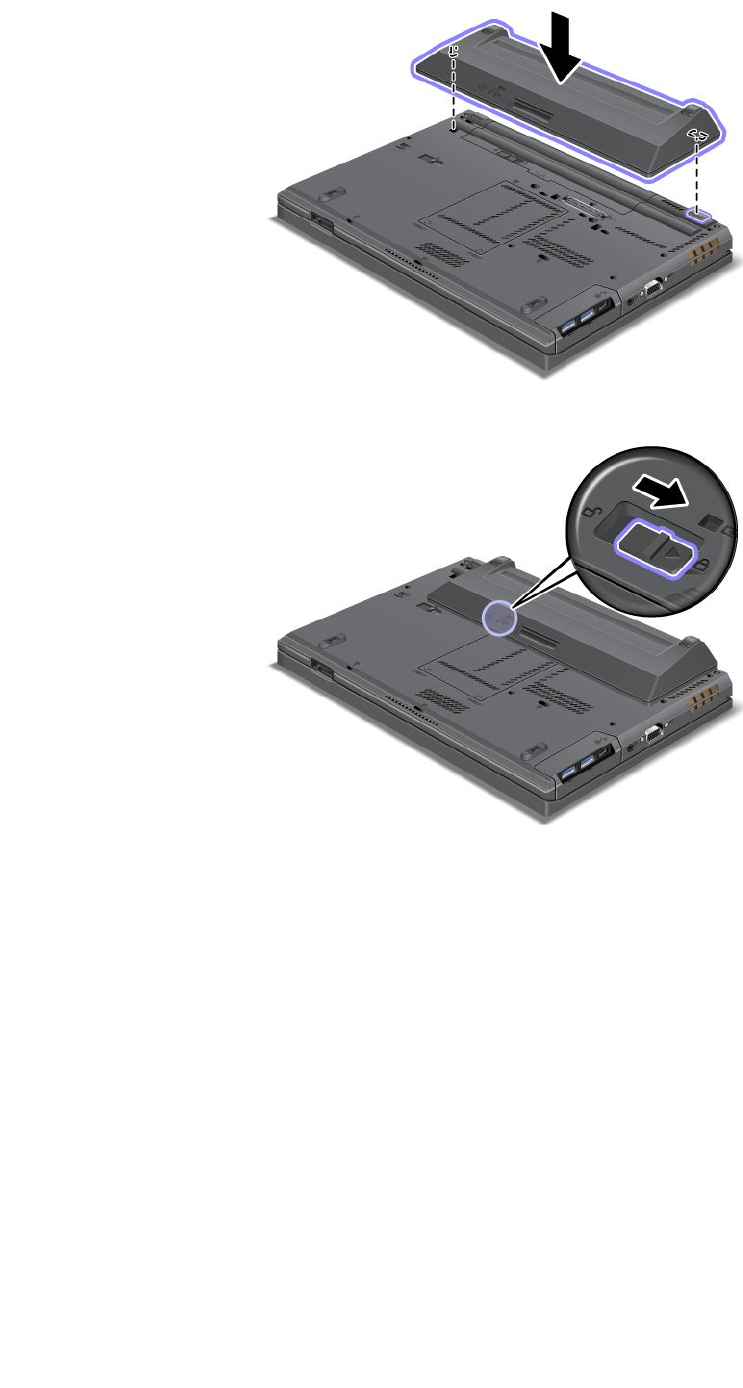
4.Slidethebatterylatchtothelockedposition.
5.Turnthecomputeroveragain.Reconnecttheacpoweradapterandallcables.
Toremovetheextendedlifebattery,dothefollowing:
1.Turnoffthecomputer,orenterhibernationmode.Thendisconnecttheacpoweradapterandallcables
fromthecomputer.
2.Closethecomputerdisplay,andturnthecomputerover.
74UserGuide
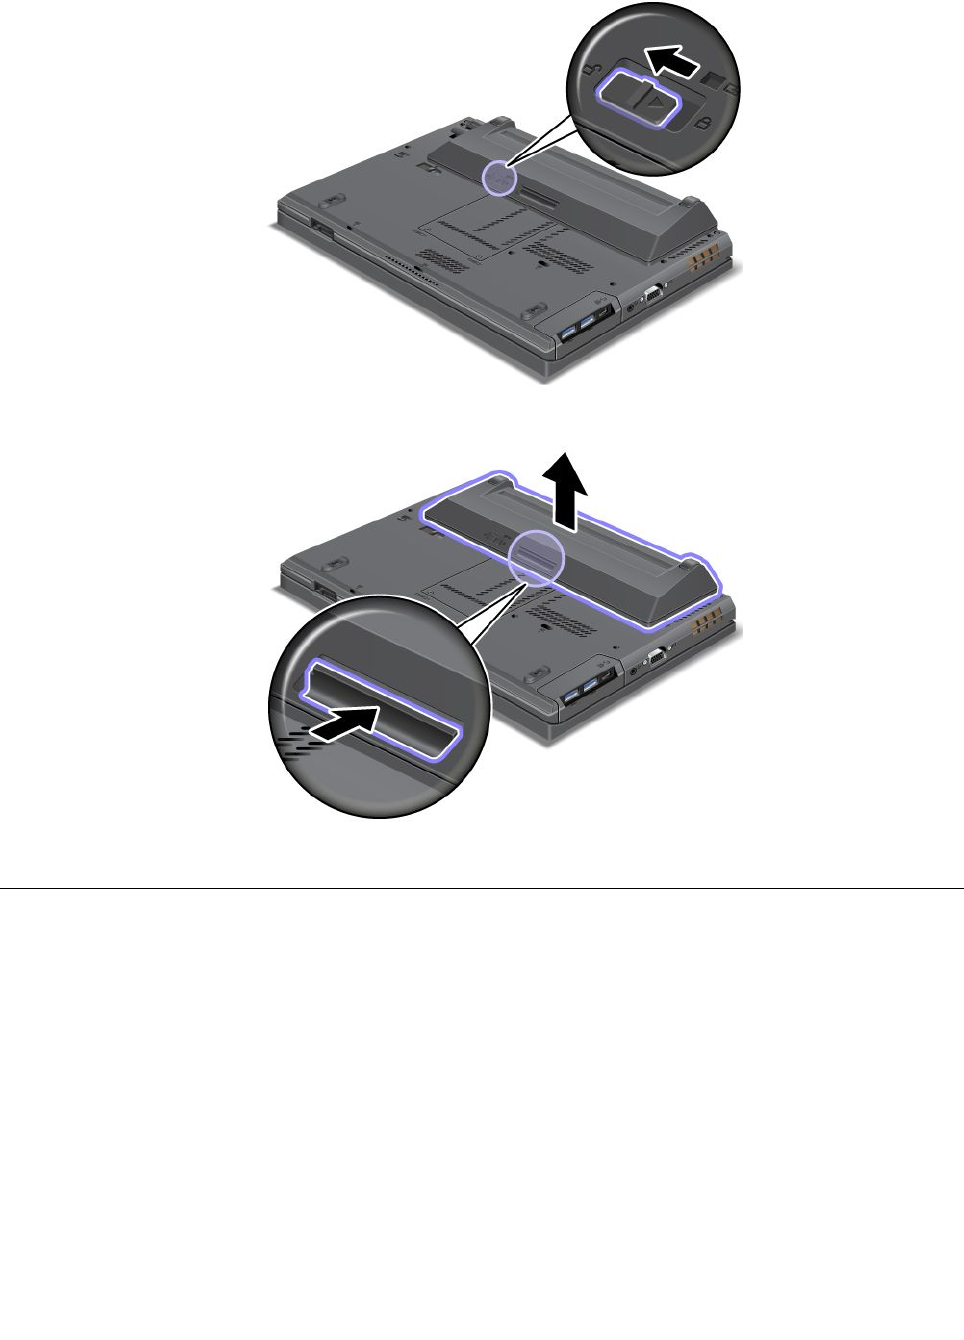
3.Unlockthebatterylatch.
4.Pressthelatchasshownanddetachthebattery.
5.Turnthecomputeroveragain.Reconnecttheacpoweradapterandallcables.
Replacingtheharddiskdrive
Beforeyoustart,printtheseinstructions.
Notes:Theharddiskdriveorsolidstatedriveisverysensitive.Incorrecthandlingcancausedamageand
permanentlossofdata.Observethefollowingguidelines:
•Replacetheharddiskdriveorsolidstatedriveonlyifyouupgradeitorhaveitrepaired.Theconnectors
andslotoftheharddiskdriveorsolidstatedrivearenotdesignedforfrequentchanges,ordriveswapping.
•Donotdropthedriveorsubjectittophysicalshocks.Putthedriveonamaterial,suchassoftcloth,that
absorbsanyphysicalshocks.
•Donotapplypressuretothecoverofthedrive.
•Donottouchtheconnector.
•Beforeremovingtheharddiskdrive,makeabackupcopyofalltheinformationonit,andthenturn
thecomputeroff.
Chapter6.Replacingdevices75
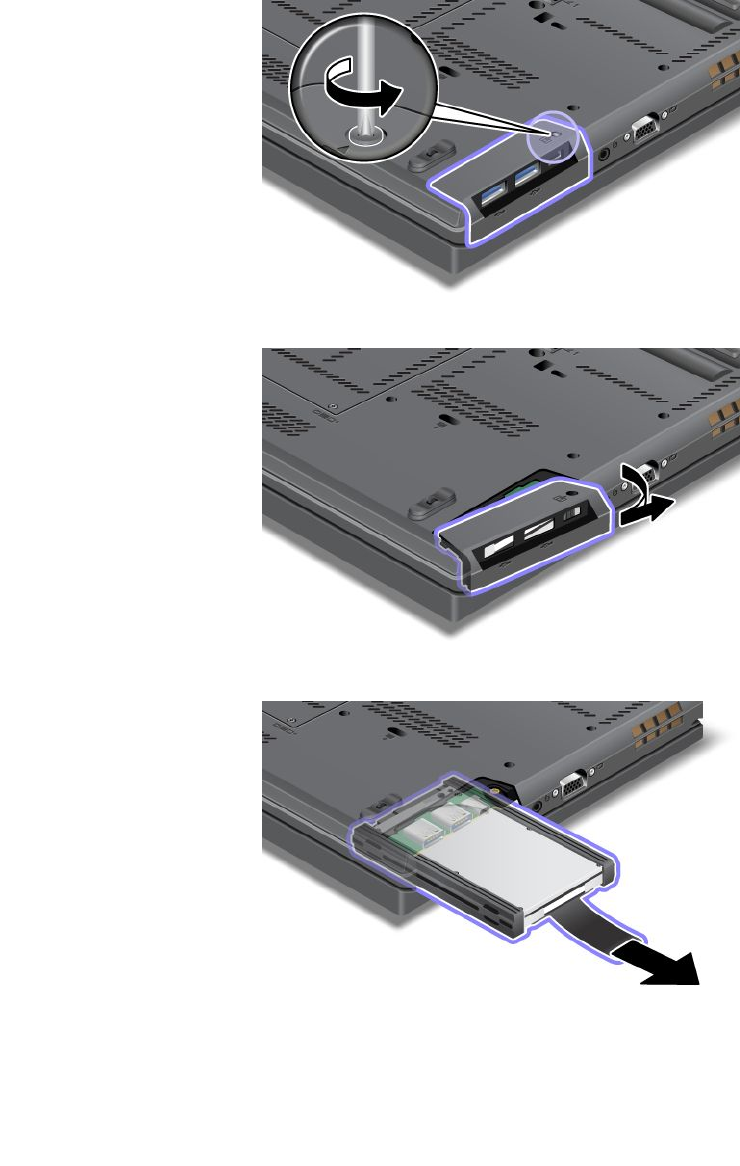
•Neverremovethedrivewhilethesystemisoperating,insleepmode,orinhibernationmode.
Toreplacetheharddiskdriveorsolidstatedrive,dothefollowing:
1.Turnoffthecomputer;thendisconnecttheacpoweradapterandallcablesfromthecomputer.
2.Closethecomputerdisplay,andturnthecomputerover.
3.Removethebattery.See“Replacingthebattery”onpage71.
4.Loosenthescrewthatsecuresthecoveroftheslot.
5.Removetheslotcover.
6.Removetheharddiskdriveorsolidstatedrivebypullingoutthetab.
7.Detachthesiderubberrailsfromtheharddiskdriveorthesidespacerrailsfromthesolidstatedrive.
76UserGuide
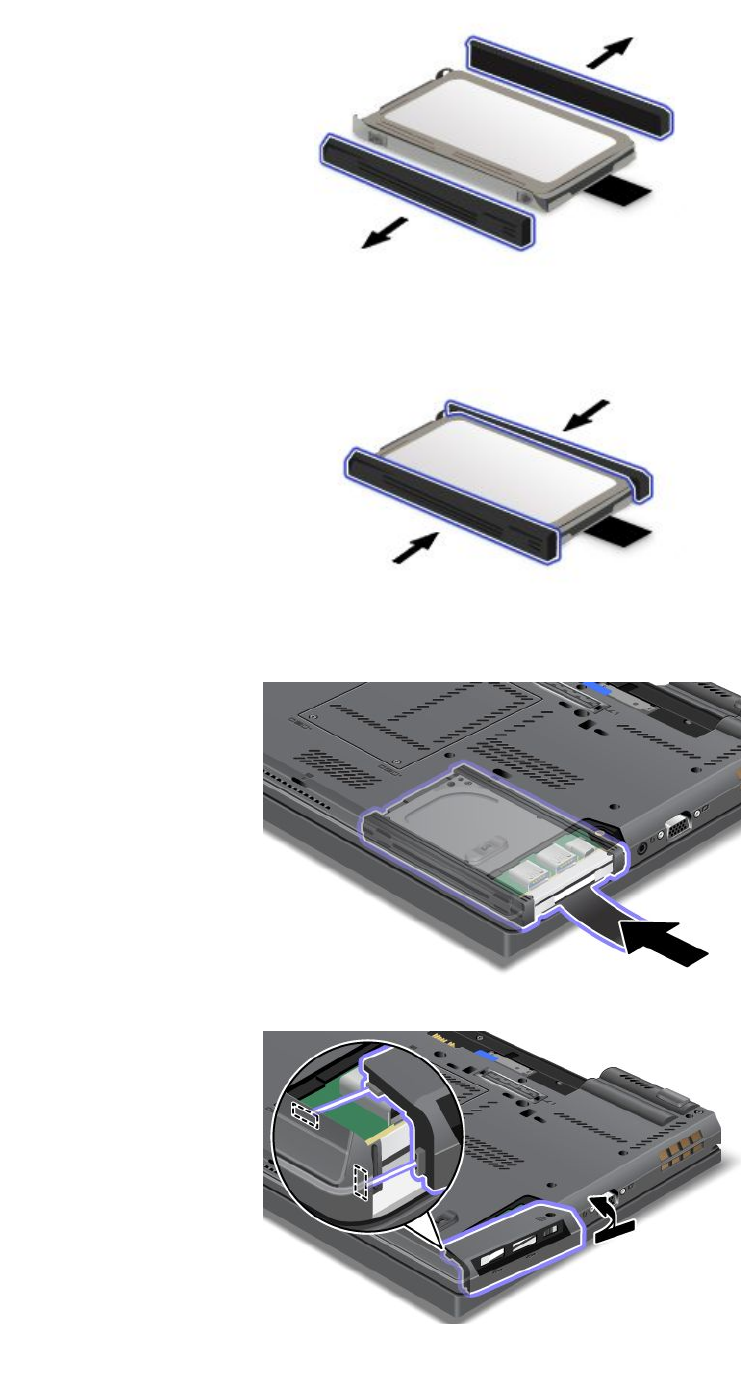
8.Attachthesiderubberrailstothenewharddiskdriveorthesidespacerrailstothenewsolidstatedrive.
9.Inserttheharddiskdriveorsolidstatedriveintotheslot;thenpressitrmlyintoplace.
10.Reinstallthecoveroftheslot.
Chapter6.Replacingdevices77
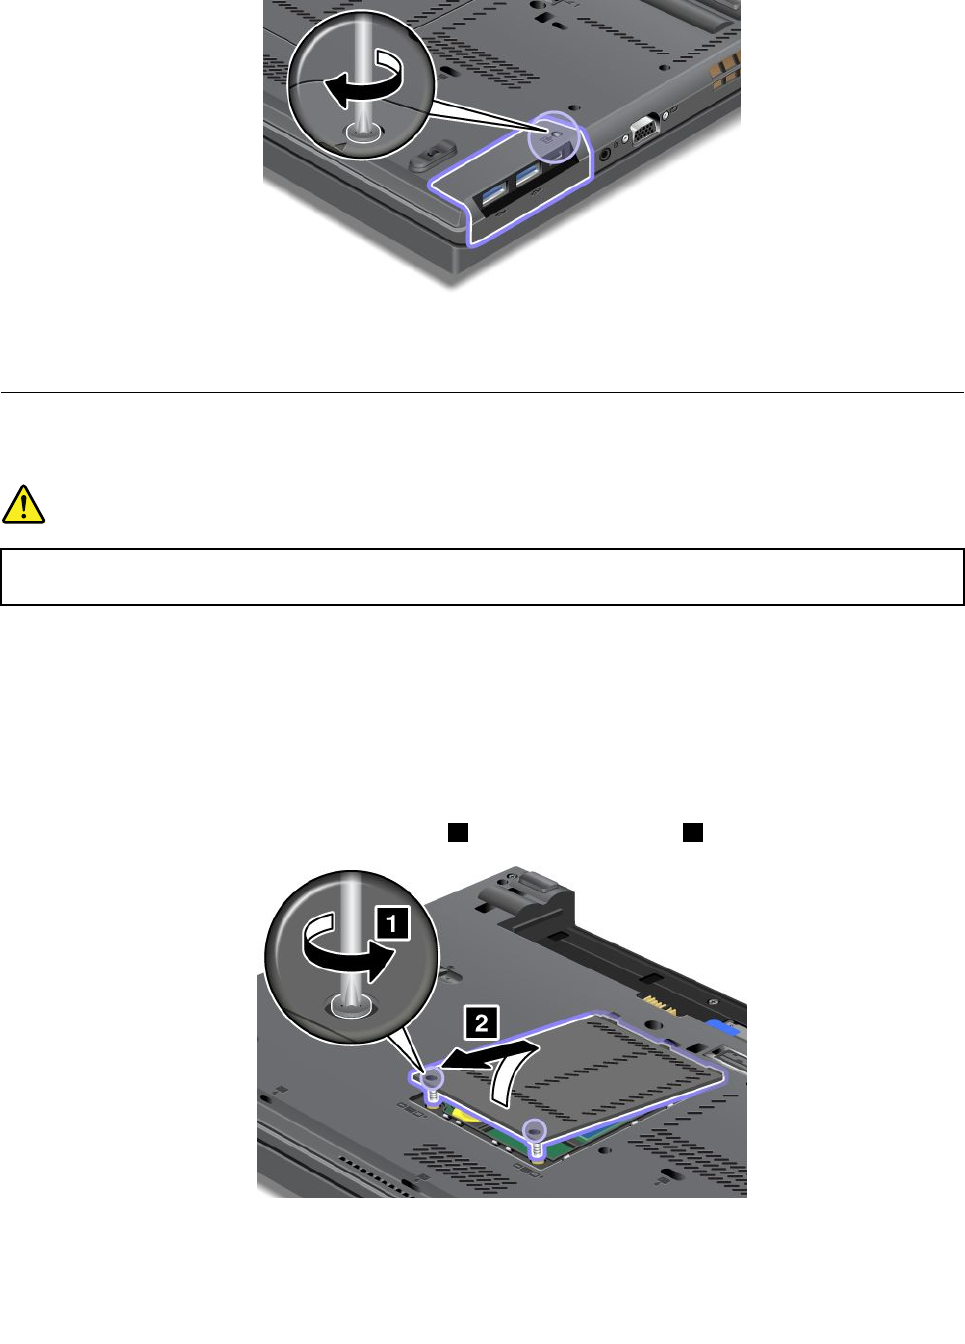
11.Reinstallthescrew.
12.Reinstallthebattery.See“Replacingthebattery”onpage71.
13.Turnthecomputeroveragain.Reconnecttheacpoweradapterandallcables.
Replacingthekeyboard
Beforeyoustart,printtheseinstructions.
DANGER
Electriccurrentfrompower,telephone,andcommunicationcablesishazardous.Toavoidshock
hazard,disconnectthecablesbeforeopeningthecoverofthisslot.
Removingthekeyboard
Toremovethekeyboard,dothefollowing:
1.Turnoffthecomputer;thendisconnecttheacpoweradapterandallcablesfromthecomputer.Wait
threetoveminutestoletthecomputercool.
2.Closethecomputerdisplay,andturnthecomputerover.
3.Removethebattery.See“Replacingthebattery”onpage71.
4.Loosenthescrewsonthememoryslotcover1,thenremovethecover2.
5.Removethescrewsthatsecurethekeyboard.
78UserGuide
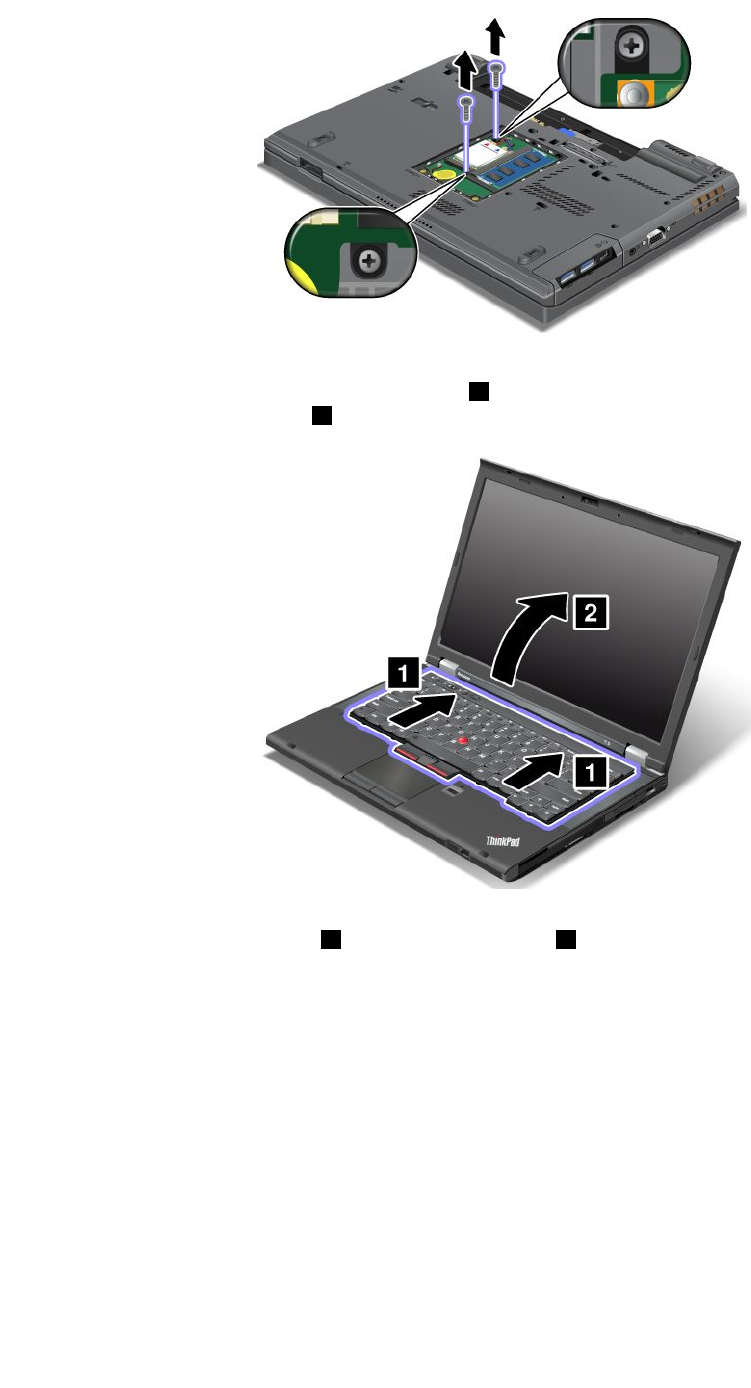
6.Turnthecomputeroverandopenthedisplay.
7.Pushhardinthedirectionshownbythearrows1tounlatchthefrontsideofthekeyboard.The
keyboardwillopenupslightly2.
8.Carefullyliftthekeyboarduntilyoucanseehowitisconnected.Holdthekeyboardabovethecomputer,
andthendetachtheconnector1.Removethekeyboard2.
Chapter6.Replacingdevices79
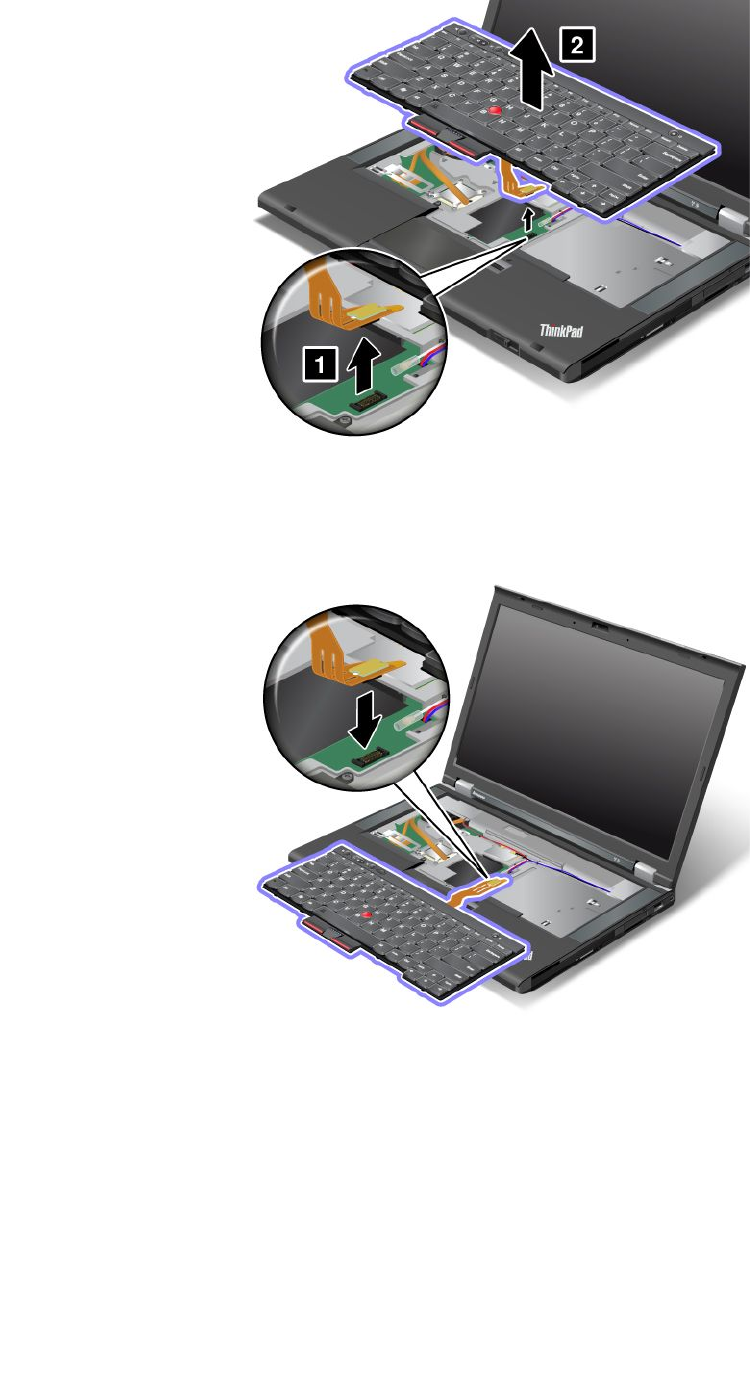
Installingthekeyboard
Toinstallthekeyboard,dothefollowing:
1.Attachtheconnector.
2.Insertthekeyboard.Makesurethattherearedgesofthekeyboardareundertheframe,asshownby
thearrows.
80UserGuide
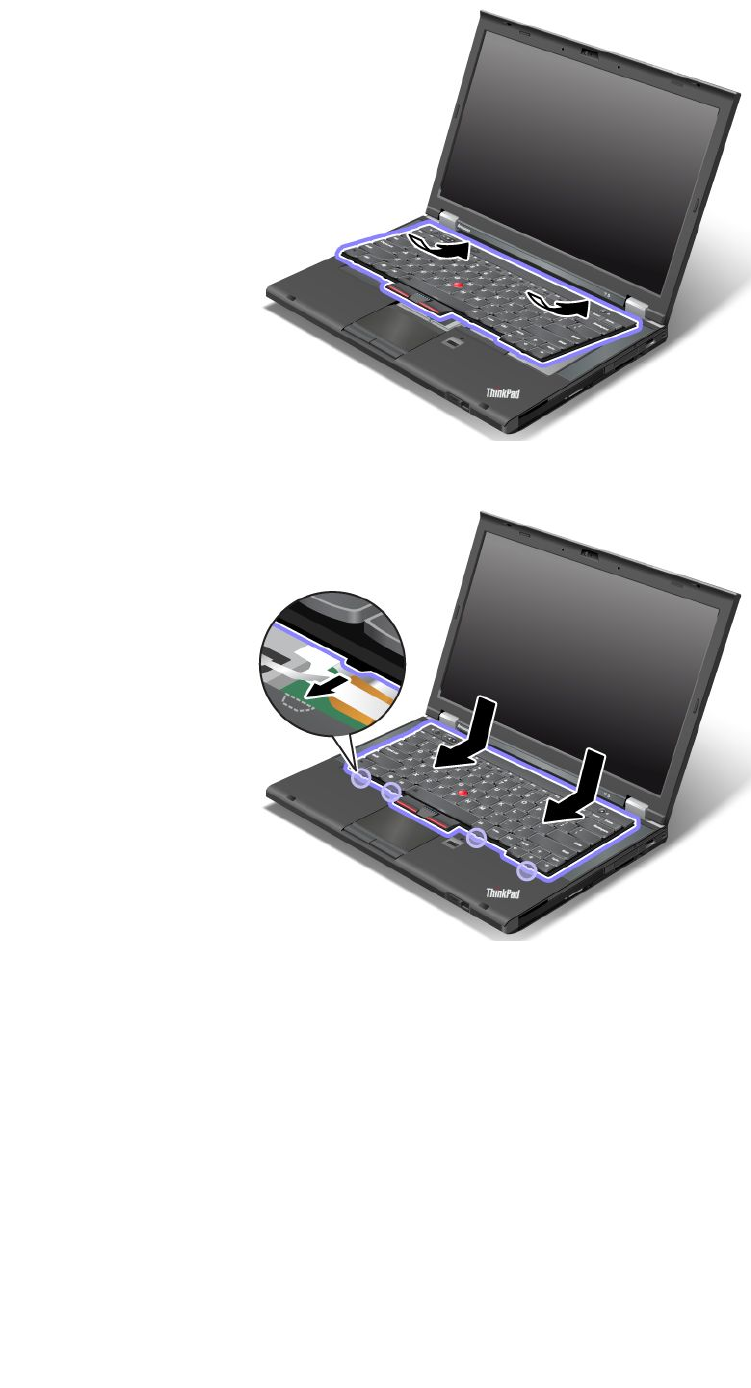
3.Slidethekeyboardinthedirectionshownbythearrows.
4.Closethecomputerdisplay,andturnthecomputerover.Reinstallthescrews.
Chapter6.Replacingdevices81
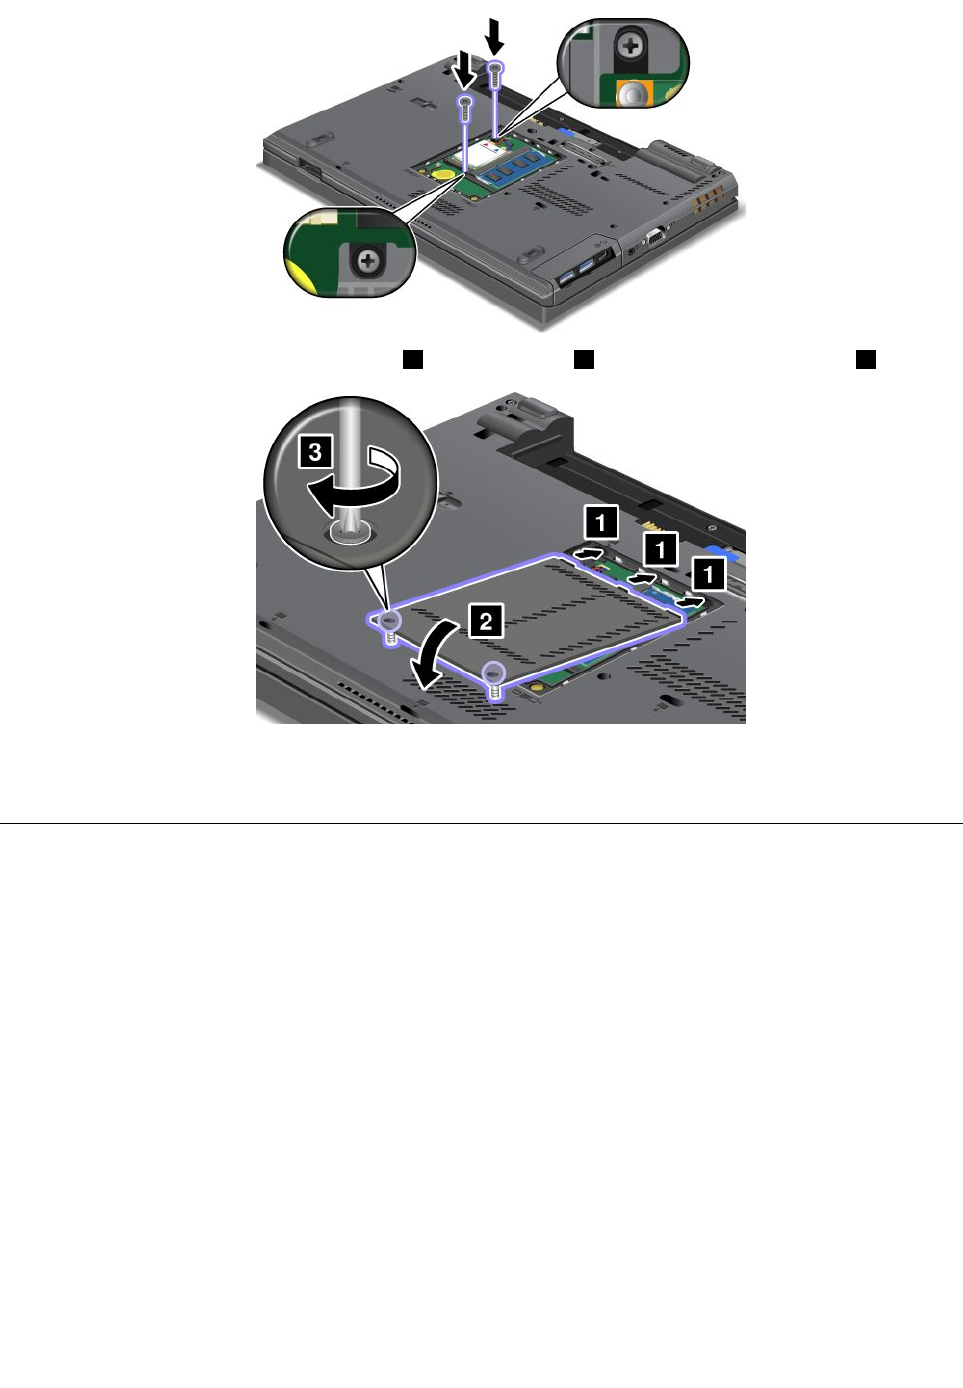
5.Putthememoryslotcoverbackinplace1,closethecover2,andthentightenthescrews3.
6.Reinstallthebattery.See“Replacingthebattery”onpage71.
7.Turnthecomputeroveragain.Reconnecttheacpoweradapterandallcables.
Replacingthememorymodule
Beforeyoustart,printtheseinstructions.
Increasingmemorycapacityisaneffectivewaytomakeprogramsrunfaster.Youcanincreasetheamount
ofmemoryinyourcomputerbyinstallingaadoubledataratethree(DDR3)synchronousdynamicrandom
accessmemory(SDRAM)unbufferedsmalloutlinedualinlinememorymodule(SO-DIMM),availableasan
option,inthememoryslotofthecomputer.
Whenreplacingthememory,besuretofollowtheprecautions.
Note:Theoperatingspeedofthememorymodulehasdependencyonthesystemconguration.Insome
conditions,thememoryinyourcomputermightnotbeabletooperateatthemaximumspeed.
Attention:Beforeyoustartinstallingamemorymodule,touchametaltableoragroundedmetalobject.This
actionreducesanystaticelectricityfromyourbody.Thestaticelectricitycoulddamagethememorymodule.
UseaPC3-12800DDR3synchronousDRAMunbufferedmemorymoduleinyourcomputer.Ifyouinstalla
memorymodulethatisnotsupportedbyyourcomputer,thecomputermightbeep,andthesystemmight
notstartormightnotworkproperly.YoucanpurchasetheappropriatememoryoptionfromyourLenovo
reselleroramarketingrepresentative.
82UserGuide
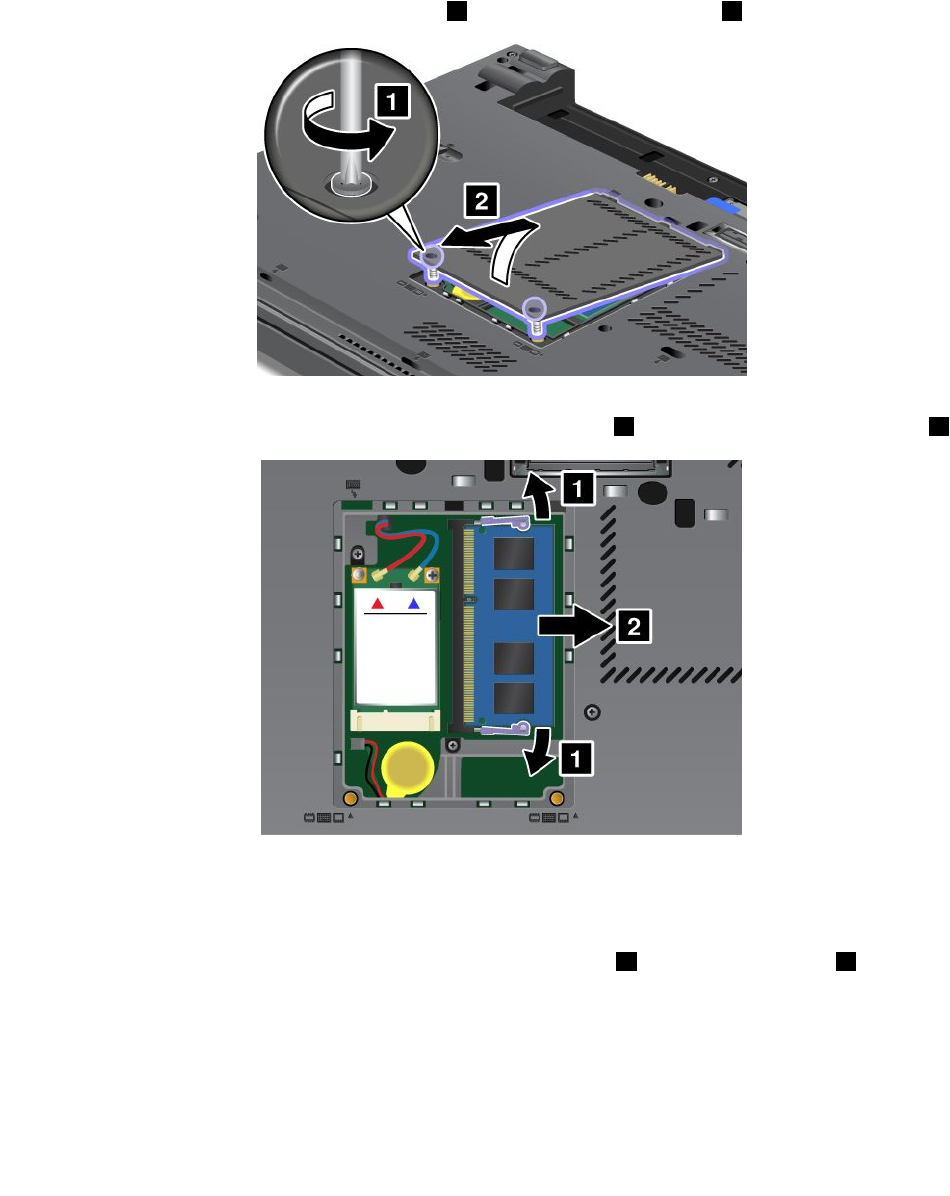
Replacingmemoryintheslotontheundersideofthecomputer
Yourcomputerhastwomemoryslots:oneunderthekeyboardandanotherontheundersideofthe
computer.Toreplacethememorymodule,followtheprocedurebelow:
1.Turnoffthecomputer;thendisconnecttheacpoweradapterandallcablesfromthecomputer.
2.Closethecomputerdisplay,andturnitover.
3.Removethebattery.See“Replacingthebattery”onpage71.
4.Loosenthescrewsonthememoryslotcover1,andthenremovethecover2.
Ifamemorymoduleisalreadyinthememoryslot,removeittomakeroomforthenewonebypressing
outonthelatchesonbothedgesofthesocketatthesametime1.Besuretosaveitforfutureuse2.
5.Findthenotchonthecontactedgesideofthememorymoduleyouareinstalling.
Note:Toavoiddamagingthememorymodule,donottouchitscontactedge.
6.Withthenotchedendofthememorymoduletowardthecontactedgesideofthesocket,insertthe
memorymoduleintothesocketatanangleofabout20degrees1;thenpressitinrmly2.
Chapter6.Replacingdevices83
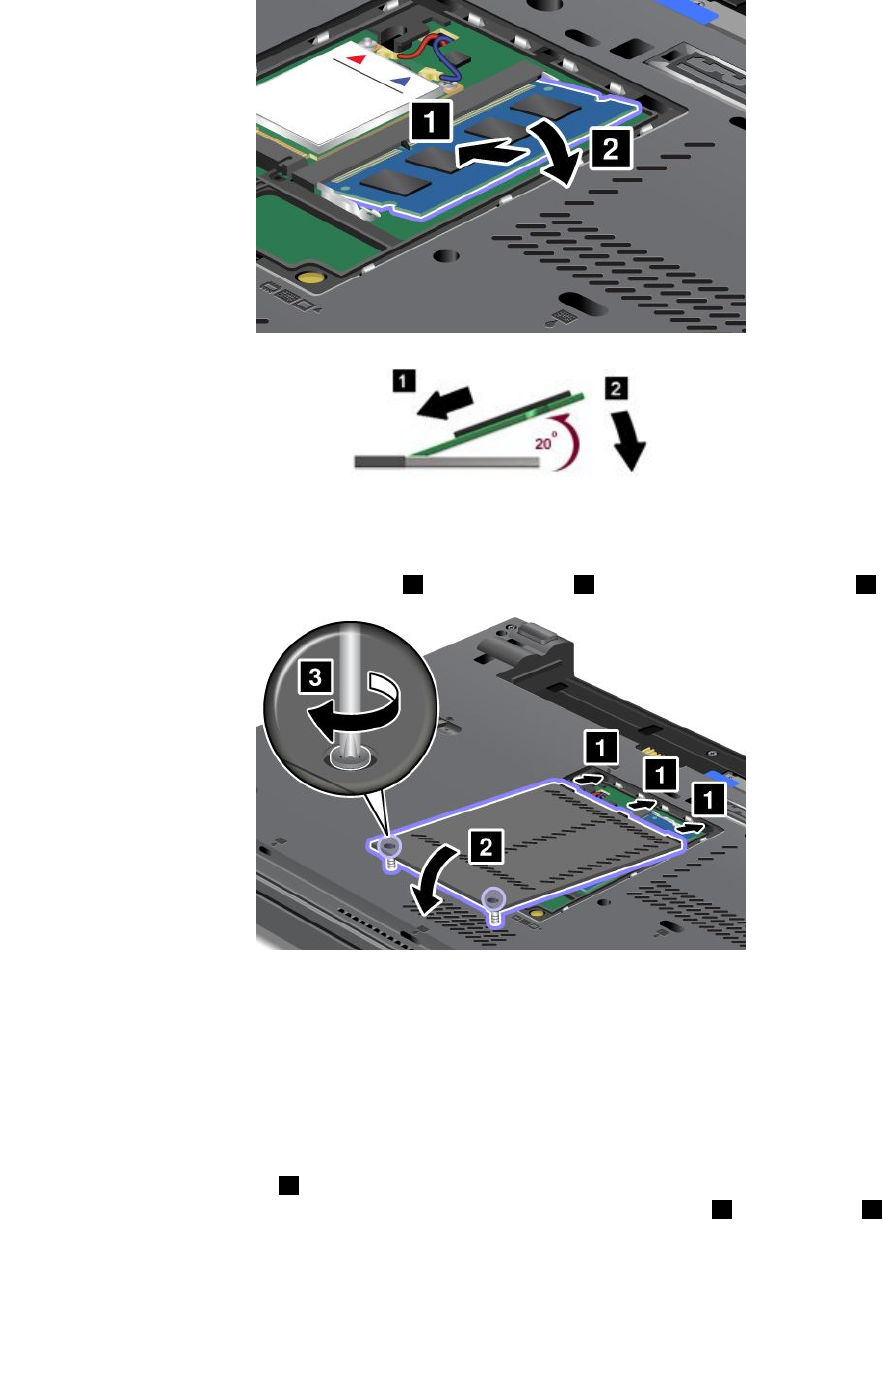
7.Pivotthememorymoduledownwarduntilitsnapsintoplace.
8.Makesurethatthememorymoduleisrmlyxedintheslotandcannotbemovedeasily.
9.Putthememoryslotcoverbackinplace1,closethecover2,andthentightenthescrews3.
10.Reinstallthebattery.See“Replacingthebattery”onpage71.
Replacingmemoryintheslotunderthekeyboard
1.Turnoffthecomputer;thendisconnecttheacpoweradapterandallcablesfromthecomputer.
2.Closethecomputerdisplay,andturnitover.
3.Removethebattery.See“Replacingthebattery”onpage71.
4.Removethekeyboard.See“Replacingthekeyboard”onpage78.
5.Liftuptheinsulationsheet1torevealthememoryslot.Ifamemorymoduleisalreadyinthememory
slot,pressoutonthelatchesonbothedgesofthesocketatthesametime2andremoveit3tomake
roomforthenewone.Besuretosaveitforfutureuse.
84UserGuide
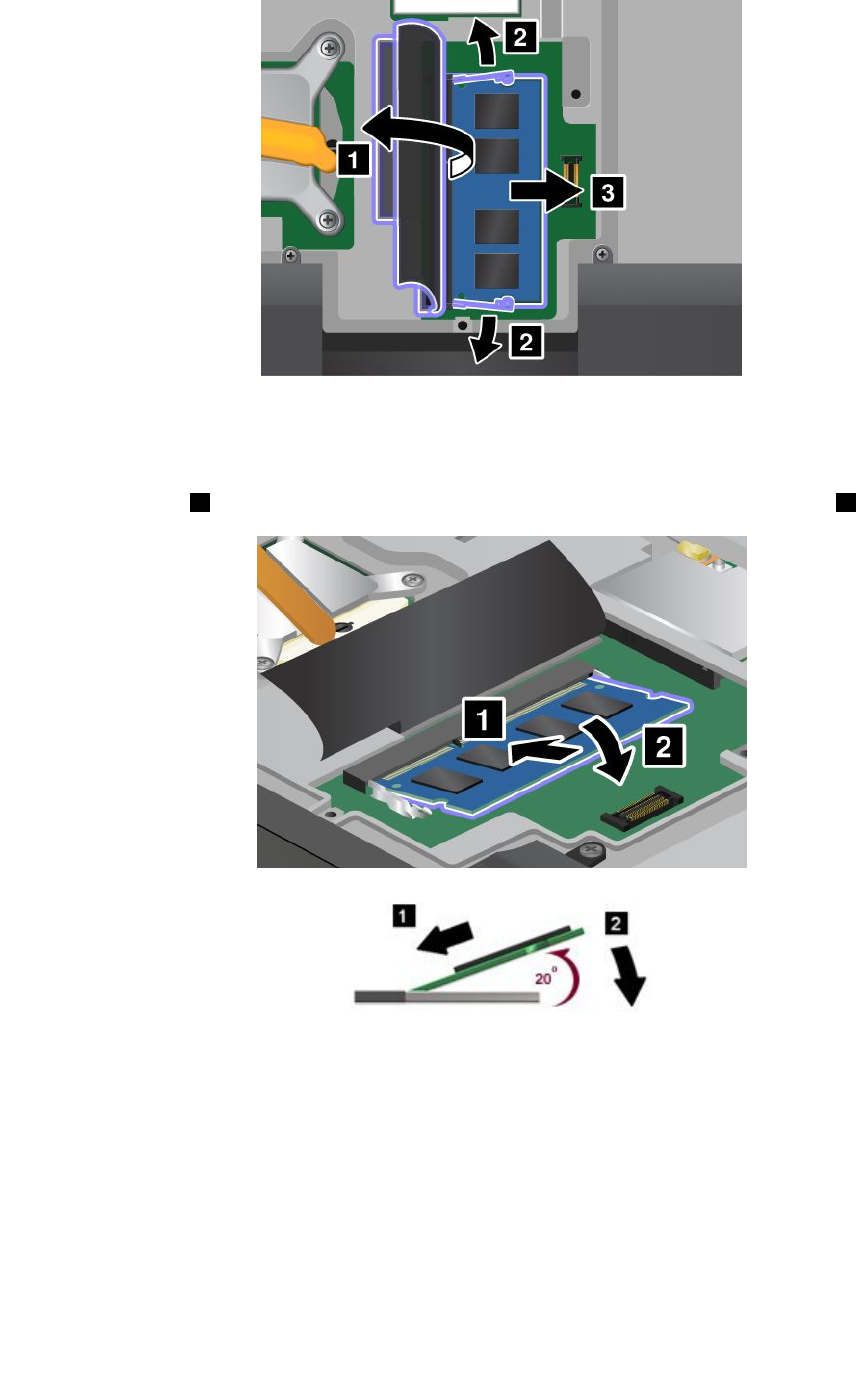
6.Findthenotchonthecontactedgesideofthememorymoduleyouareinstalling.
Attention:Toavoiddamagingthememorymodule,donottouchitscontactedge.
7.Withthenotchedendofthememorymoduletowardthecontactedgesideofthesocket,insertthe
memorymodule1intothesocketatanangleofabout20degrees;thenpressitinrmly2.
Note:Ifyouinstallamemorymoduleinonlyoneofthetwomemoryslots,installitintheslotlocated
underthekeyboard.
8.Pivotthememorymoduledownwarduntilitsnapsintoplace.
9.Makesurethatthememorymoduleisrmlyxedintheslotandcannotbemovedeasily.
10.Reinstallthekeyboard.See“Replacingthekeyboard”onpage78.
11.Reinstallthebattery.See“Replacingthebattery”onpage71.
Tomakesurethatthememorymoduleisinstalledcorrectly,dothefollowing:
1.Turnthecomputeron.
Chapter6.Replacingdevices85
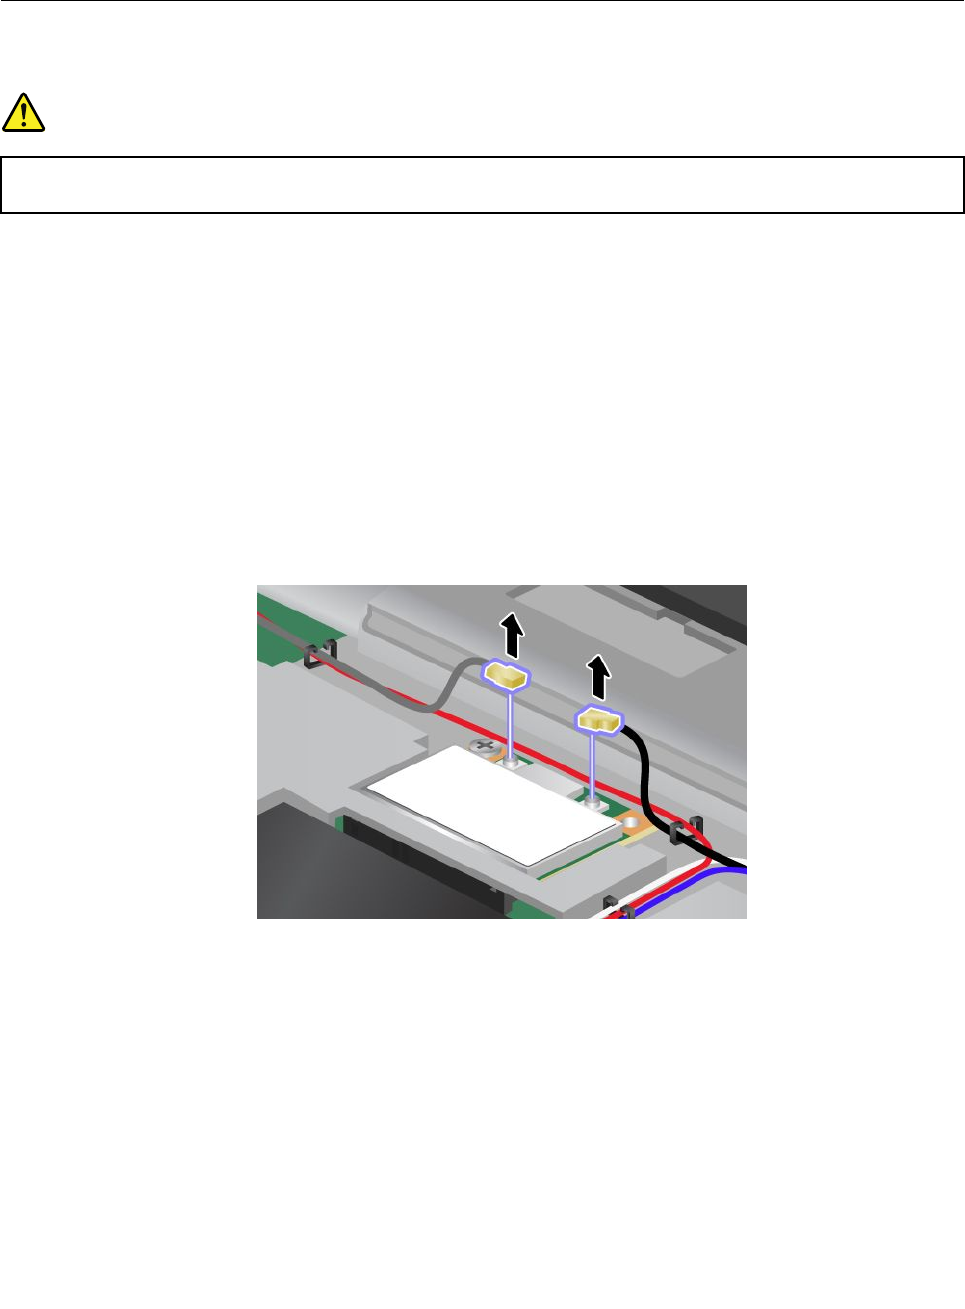
2.Whenthelogoscreenisdisplayed,presstheF1key.TheThinkPadSetupprogrammainmenuopens.
TheInstalledmemoryitemshowsthetotalamountofmemoryinstalledinyourcomputer.
ReplacingthewirelessLAN/WiMAXcard
Beforeyoustart,printtheseinstructions.
DANGER
Electriccurrentfrompower,telephone,andcommunicationcablesishazardous.Toavoidshock
hazard,disconnectthecablesbeforeopeningthecoverofthisslot.
Attention:BeforeyoustartinstallingaPCIExpressMiniCard,touchametaltableoragroundedmetal
object.Thisactionreducesanystaticelectricityfromyourbody.Thestaticelectricitycoulddamagethecard.
ReplacingaPCIExpressMiniCardwithtwoconnectors
1.Turnoffthecomputer;thendisconnecttheacpoweradapterandallcablesfromthecomputer.Wait
threetoveminutestoletthecomputercool.
2.Closethecomputerdisplay,andturnthecomputerover.
3.Removethebattery.See“Replacingthebattery”onpage71.
4.Removethekeyboard.See“Replacingthekeyboard”onpage78.
5.Ifatoolforremovingconnectorsisincludedinthepackagewiththenewcard,useittodisconnectthe
cablesfromthecard.Ifnosuchtoolisincluded,disconnectthecablesbypickinguptheconnectors
withyourngersandgentlyunpluggingthem.
86UserGuide
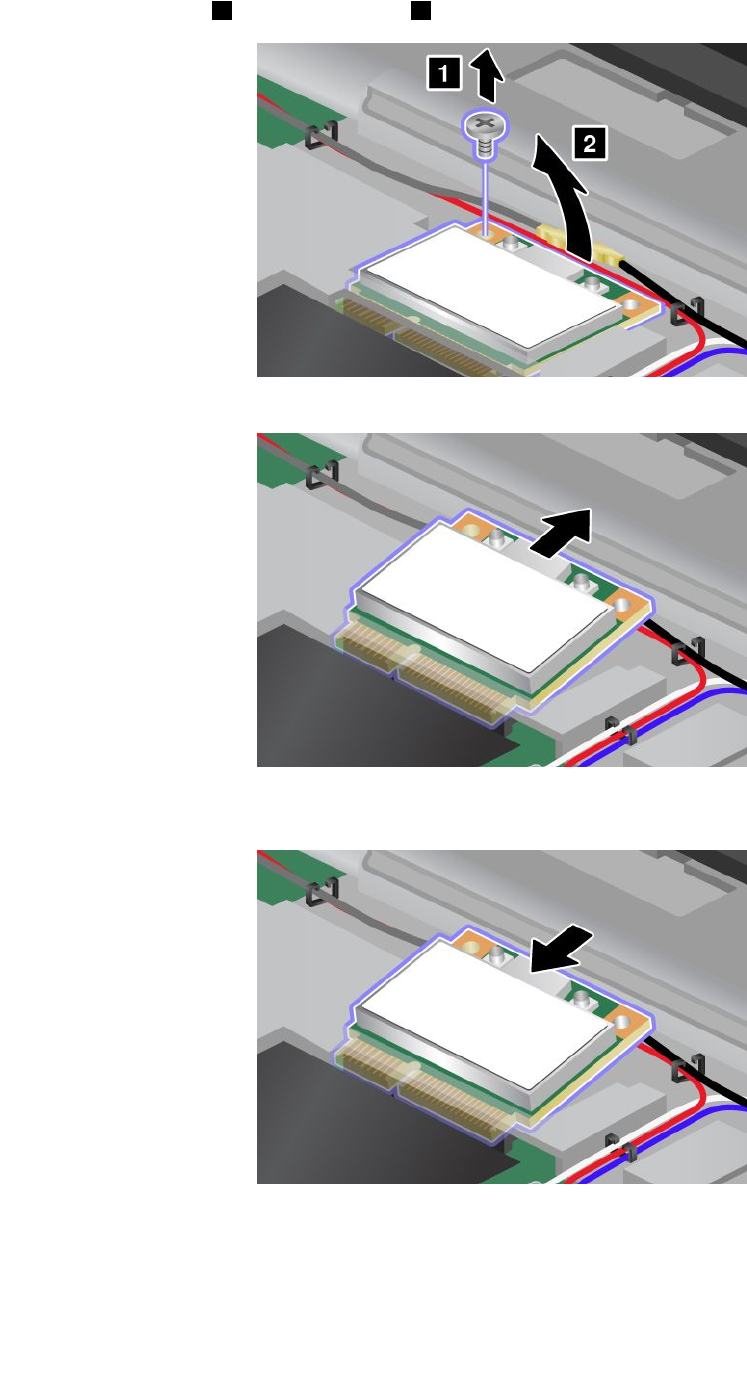
6.Removethescrew1.Thecardpopsup2.
7.Removethecard.
8.AlignthecontactedgeofthenewPCIExpressMiniCardwiththecorrespondingsocketcontactofthe
computer.
Chapter6.Replacingdevices87
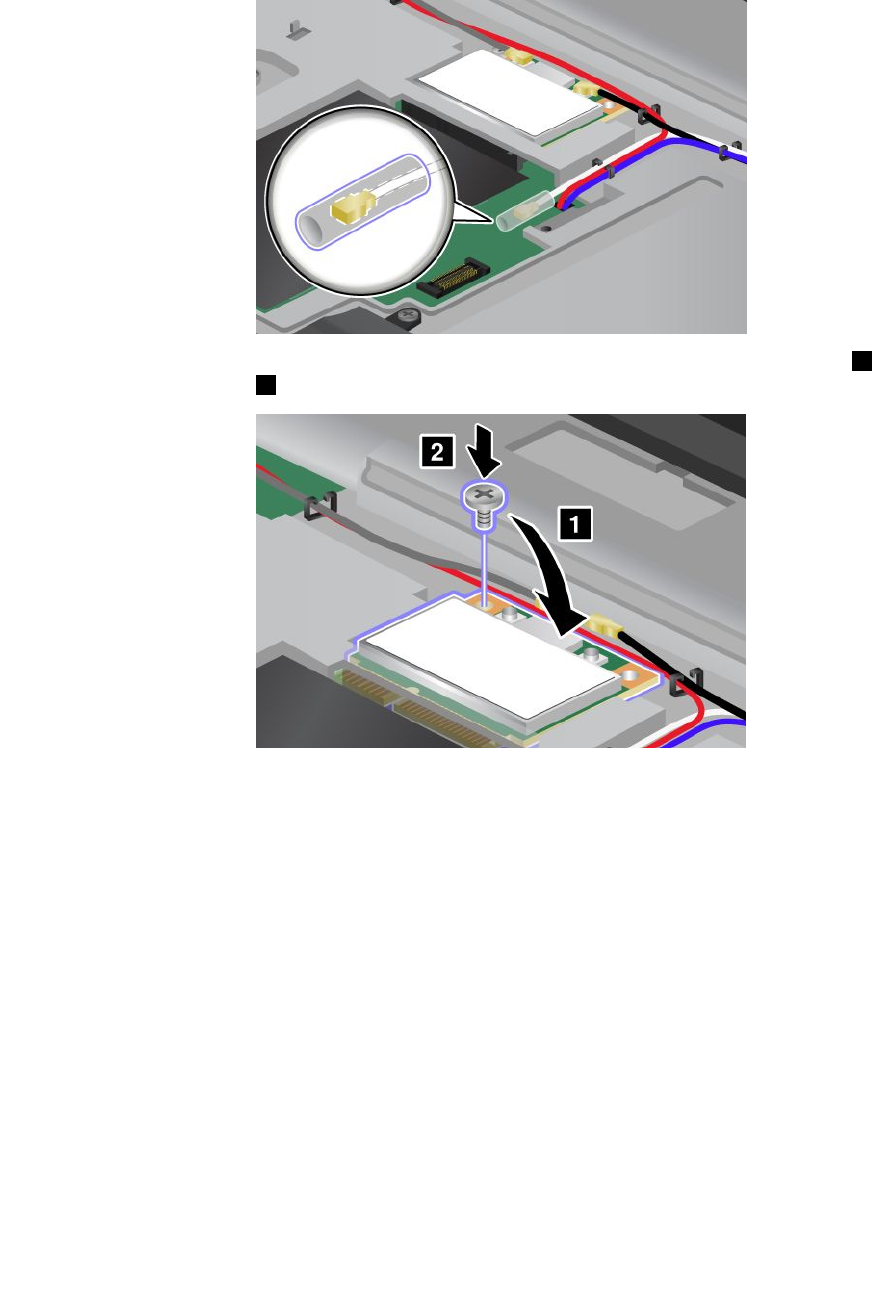
Note:IfthenewPCIExpressMiniCardhastwoconnectors,asinthenextdrawing,putthewhitecable
inthecableprotectiontube.
9.Pivotthecarduntilyoucansnapitintoplacebypressingtheuppersideoftheconnectors1.Secure
thecardwiththescrew2.
88UserGuide
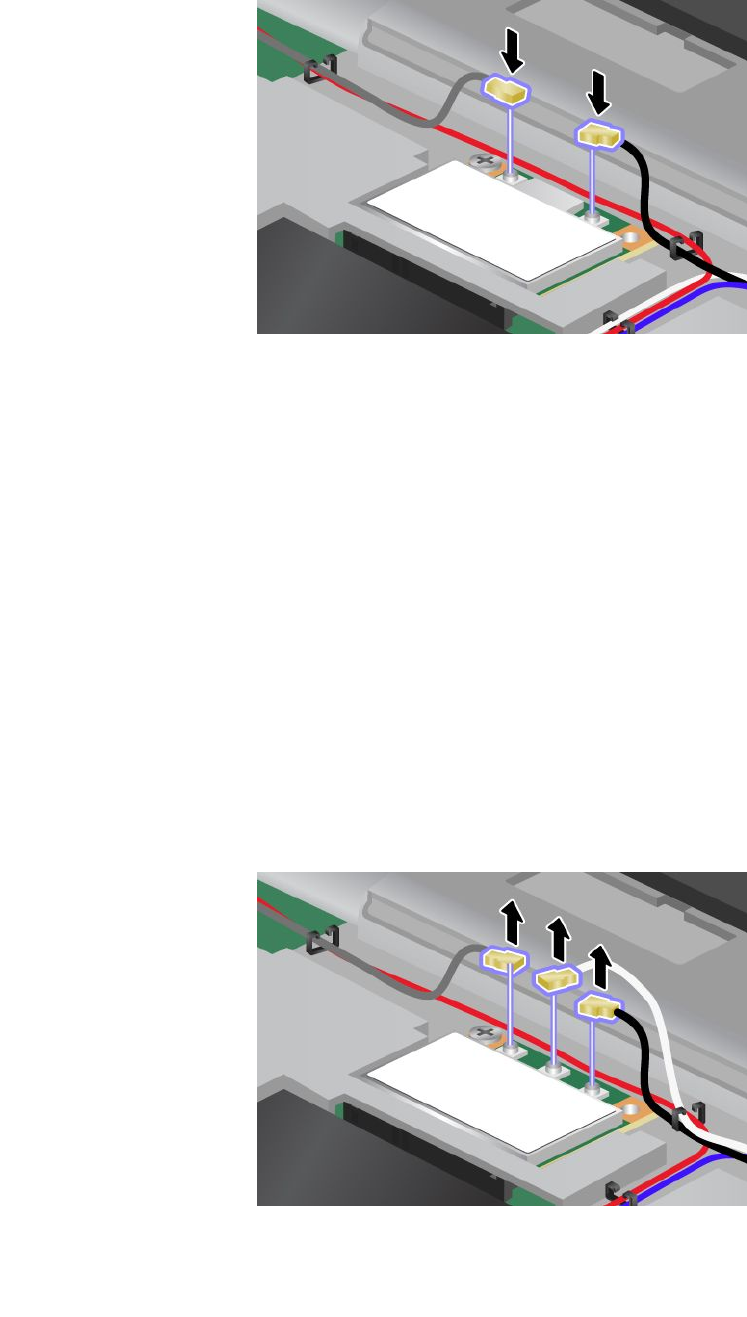
10.ConnectthecablestothenewPCIExpressMiniCard.Besuretoattachthegraycabletotheconnector
marked“MAIN”or“M”onthecard,andtheblackcabletotheconnectormarked“AUX”or“A”.
Note:IfthenewPCIExpressMiniCardhasthreeconnectors,besuretoattachthegraycabletothe
connectormarked“TR1”onthecard,andtheblackcabletotheconnectormarked“TR2”.Ifyouattach
eithercabletothecenterconnector,theconnectionspeedwillbelower.
11.Reinstallthekeyboard.See“Replacingthekeyboard”onpage78.
12.Reinstallthebattery.See“Replacingthebattery”onpage71.
13.Turnthecomputeroveragain.Reconnecttheacpoweradapterandallcables.
ReplacingaPCIExpressMiniCardwiththreeconnectors
IfyourcomputerhasaMultipleInputMultipleOutput(MIMO)feature,aPCIExpressMiniCardthathasthree
connectorscomeswiththecomputer.ToreplacethecardfortheMIMOfeature,dothefollowing:
1.Turnoffthecomputer;thendisconnecttheacpoweradapterandallcablesfromthecomputer.Wait
threetoveminutestoletthecomputercool.
2.Closethecomputerdisplay,andturnthecomputerover.
3.Removethebattery.See“Replacingthebattery”onpage71.
4.Removethekeyboard.See“Replacingthekeyboard”onpage78.
5.Ifatoolforremovingconnectorsisincludedinthepackagewiththenewcard,useittodisconnectthe
cablesfromthecard.Ifnosuchtoolisincluded,disconnectthecablesbypickinguptheconnectors
withyourngersandgentlyunpluggingthem.
Chapter6.Replacingdevices89
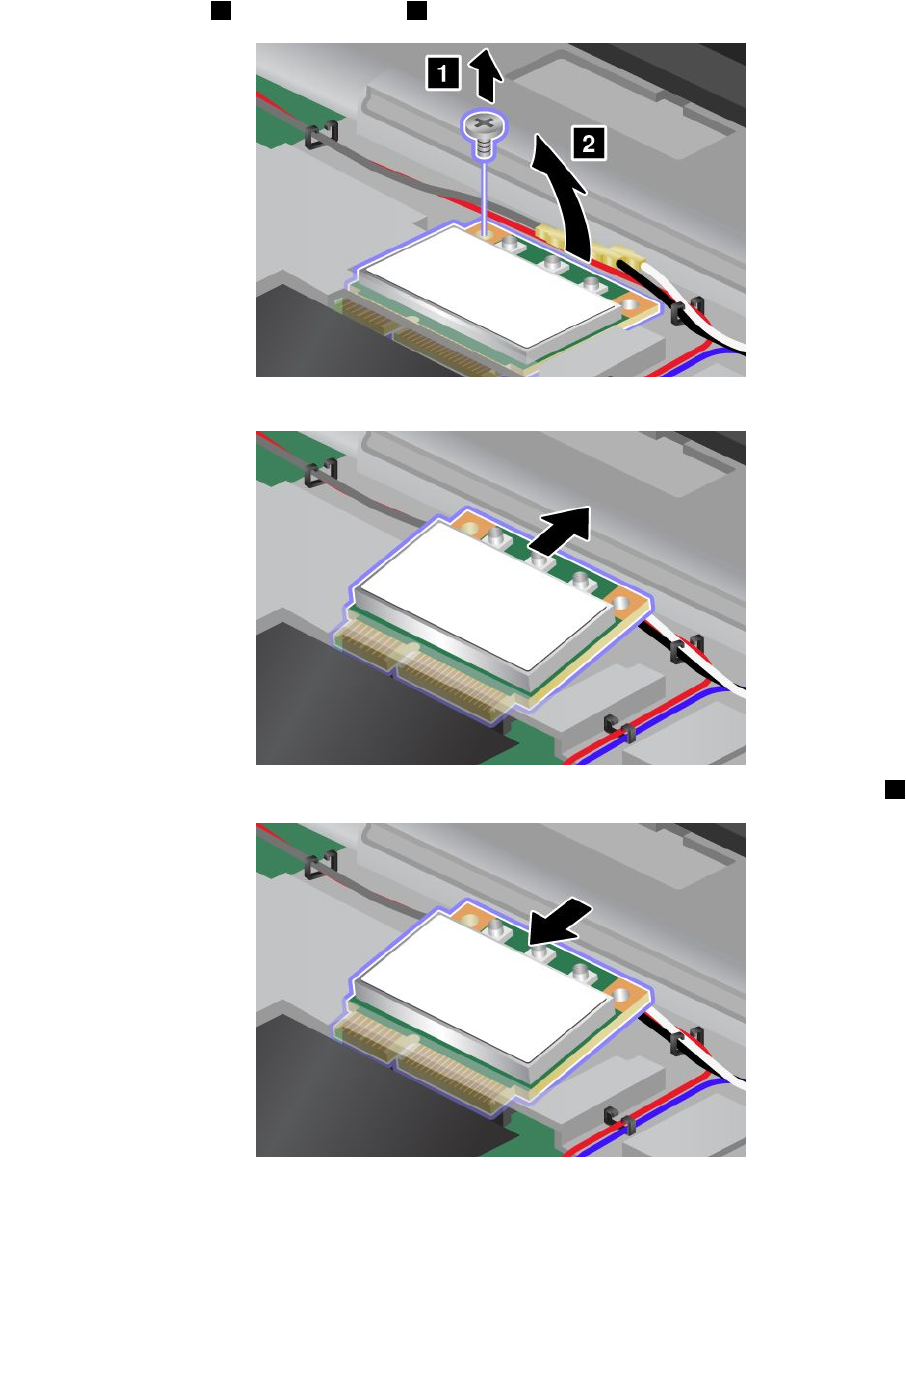
6.Removethescrew1.Thecardpopsup2.Thenremovethecard.
7.Removethecard.
8.Alignthecontactedgeofthenewcardwiththecorrespondingsocketcontactofthecomputer1.
90UserGuide
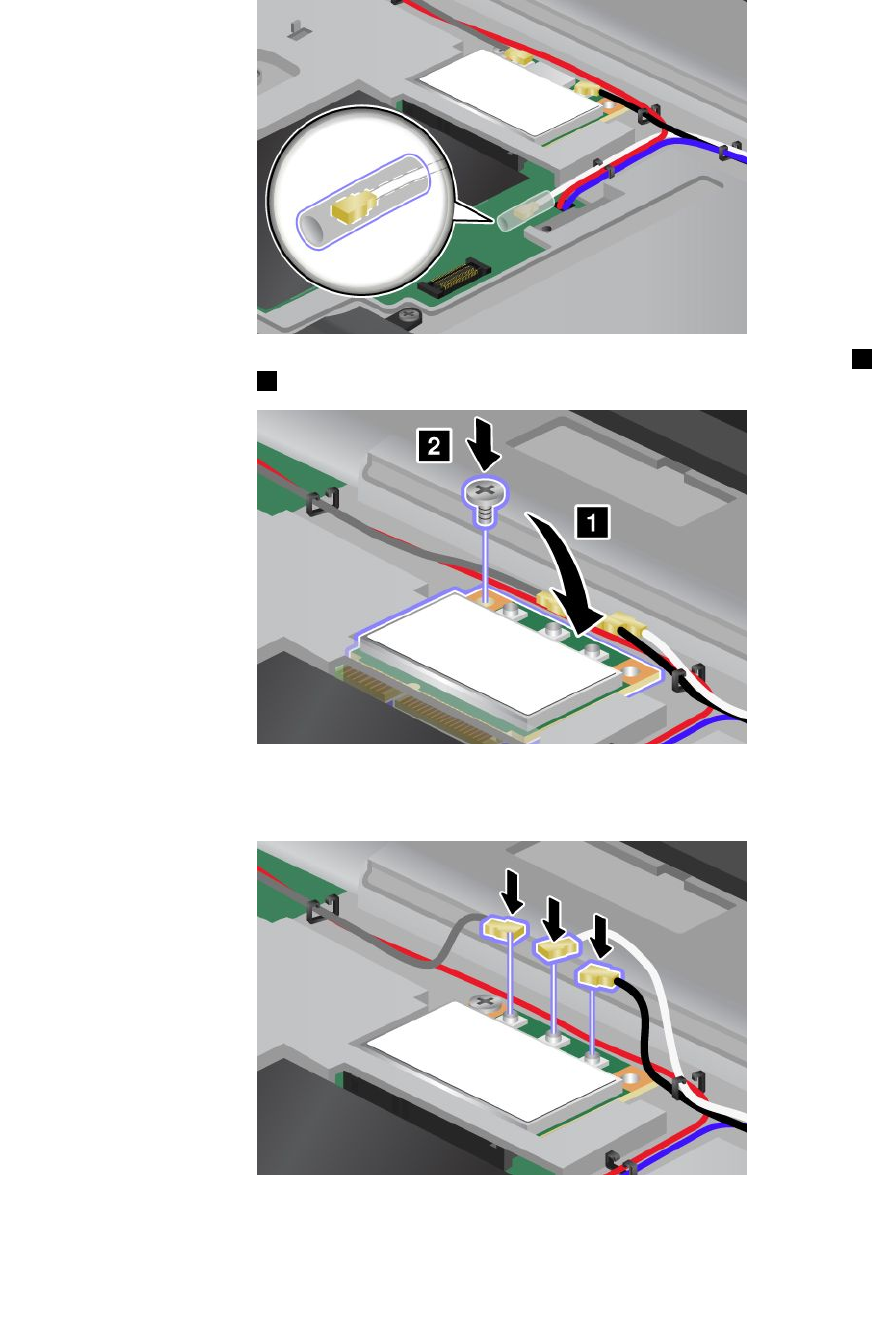
Note:IfthenewPCIExpressMiniCardhastwoconnectors,asinthenextdrawing,putthewhitecable
inthecableprotectiontube.
9.Pivotthecarduntilyoucansnapitintoplacebypressingtheuppersideoftheconnectors1.Secure
thecardwiththescrew2.
10.ConnectthecablestothenewPCIExpressMiniCard.Besuretoattachthegraycabletotheconnector
marked“TR1”onthecard,thewhitecabletotheconnectormarked“RO”or“TR3”(center),andthe
blackcabletotheconnectormarked“TR2”.
11.Reinstallthekeyboard.See“Replacingthekeyboard”onpage78.
12.Reinstallthebattery.See“Replacingthebattery”onpage71.
Chapter6.Replacingdevices91
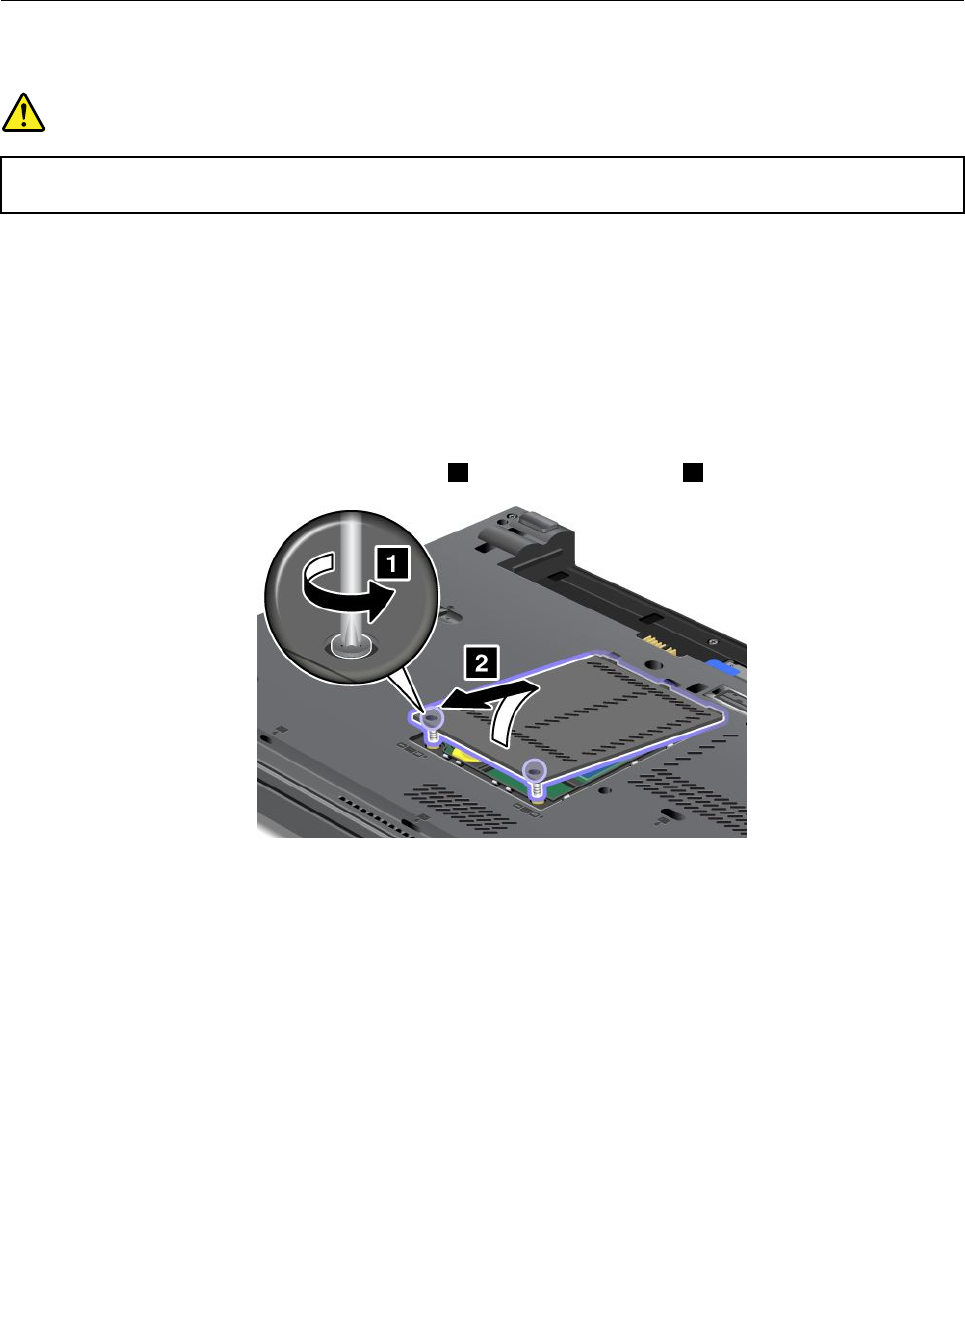
13.Turnthecomputeroveragain.Reconnecttheacpoweradapterandallcables.
InstallingandreplacingthewirelessWANcard
Beforeyoustart,printtheseinstructions.
DANGER
Electriccurrentfrompower,telephone,andcommunicationcablesishazardous.Toavoidshock
hazard,disconnectthecablesbeforeopeningthecoverofthisslot.
Attention:BeforeyoustartinstallingawirelessWANcard,touchametaltableoragroundedmetalobject.
Thisactionreducesanystaticelectricityfromyourbody.Thestaticelectricitycoulddamagethecard.
ToreplaceorinstallthewirelessWANcard,dothefollowing:
1.Turnoffthecomputer;thendisconnecttheacpoweradapterandallcablesfromthecomputer.Wait
threetoveminutestoletthecomputercool.
2.Closethecomputerdisplay,andturnthecomputerover.
3.Removethebattery.See“Replacingthebattery”onpage71.
4.Loosenthescrewsonthememoryslotcover1,thenremovethecover2.
92UserGuide
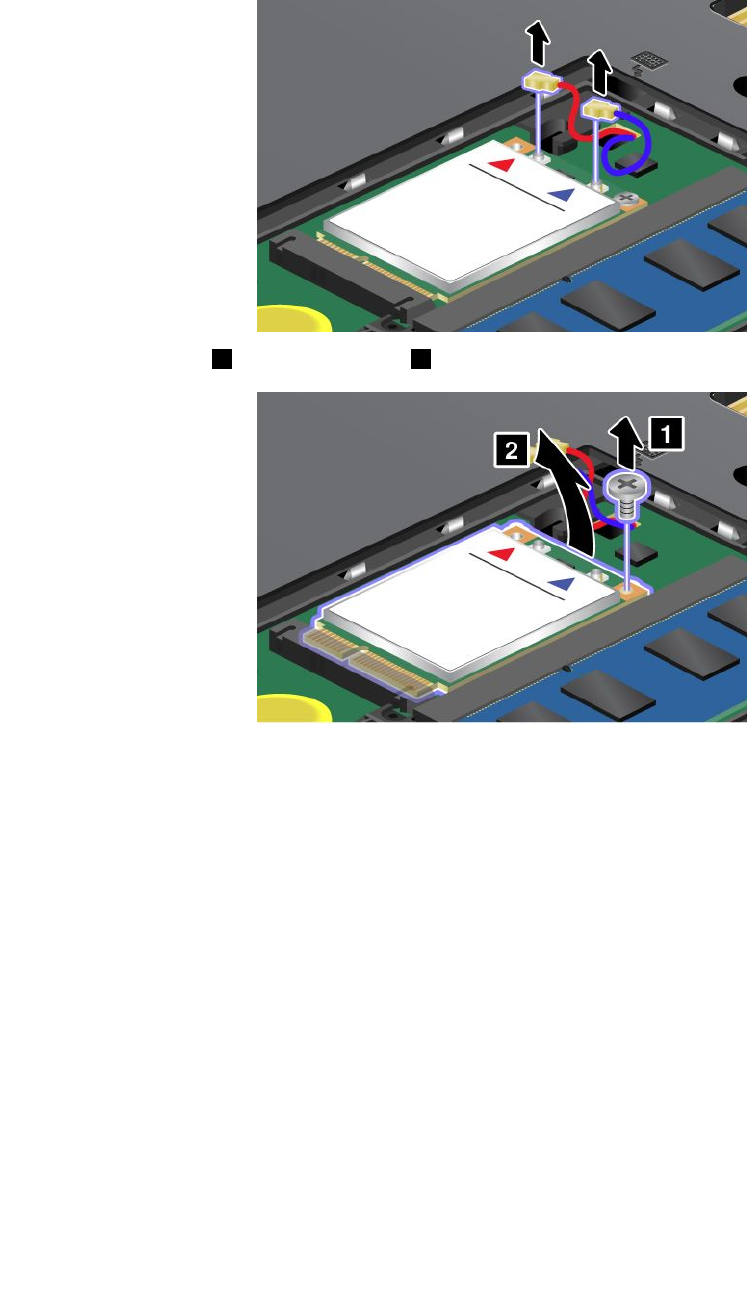
5.Ifatoolforremovingconnectorsisincludedinthepackagewiththenewcard,useittodisconnectthe
cablesfromthecard.Ifnosuchtoolisincluded,disconnectthecablesbypickinguptheconnectors
withyourngersandgentlyunpluggingthem.
6.Removethescrew1.Thecardpopsup2.
Note:Dependingonthesystemcongurationofyourcomputer,thecardmighthaveonlyoneconnector.
Chapter6.Replacingdevices93
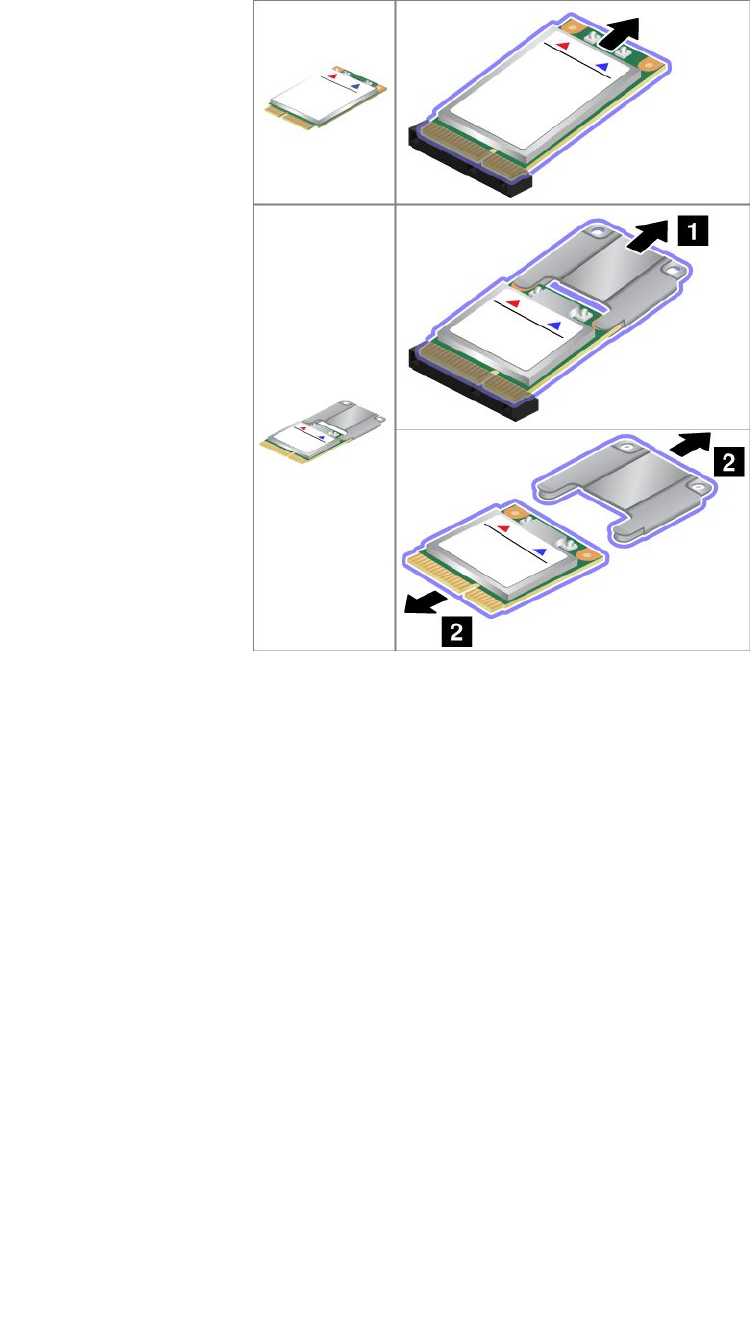
7.Removethecard.
94UserGuide
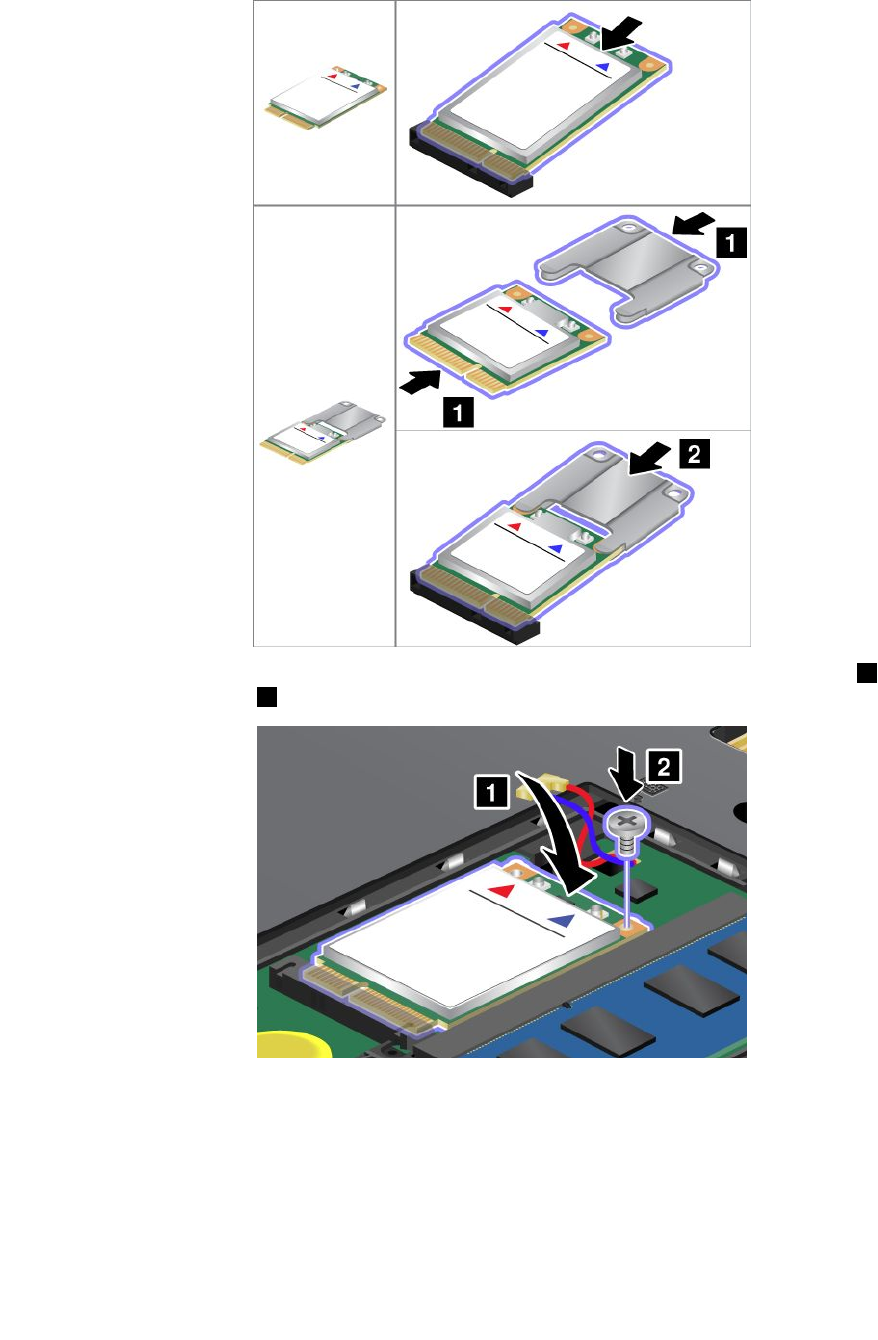
8.AlignthecontactedgeofthenewwirelessWANcardwiththecorrespondingsocket.
9.Pivotthecarduntilyoucansnapitintoplacebypressingtheuppersideofeachconnector1.Secure
thecardwiththescrew2.
Note:Dependingonthesystemcongurationofyourcomputer,thecardmighthaveonlyoneconnector.
Chapter6.Replacingdevices95
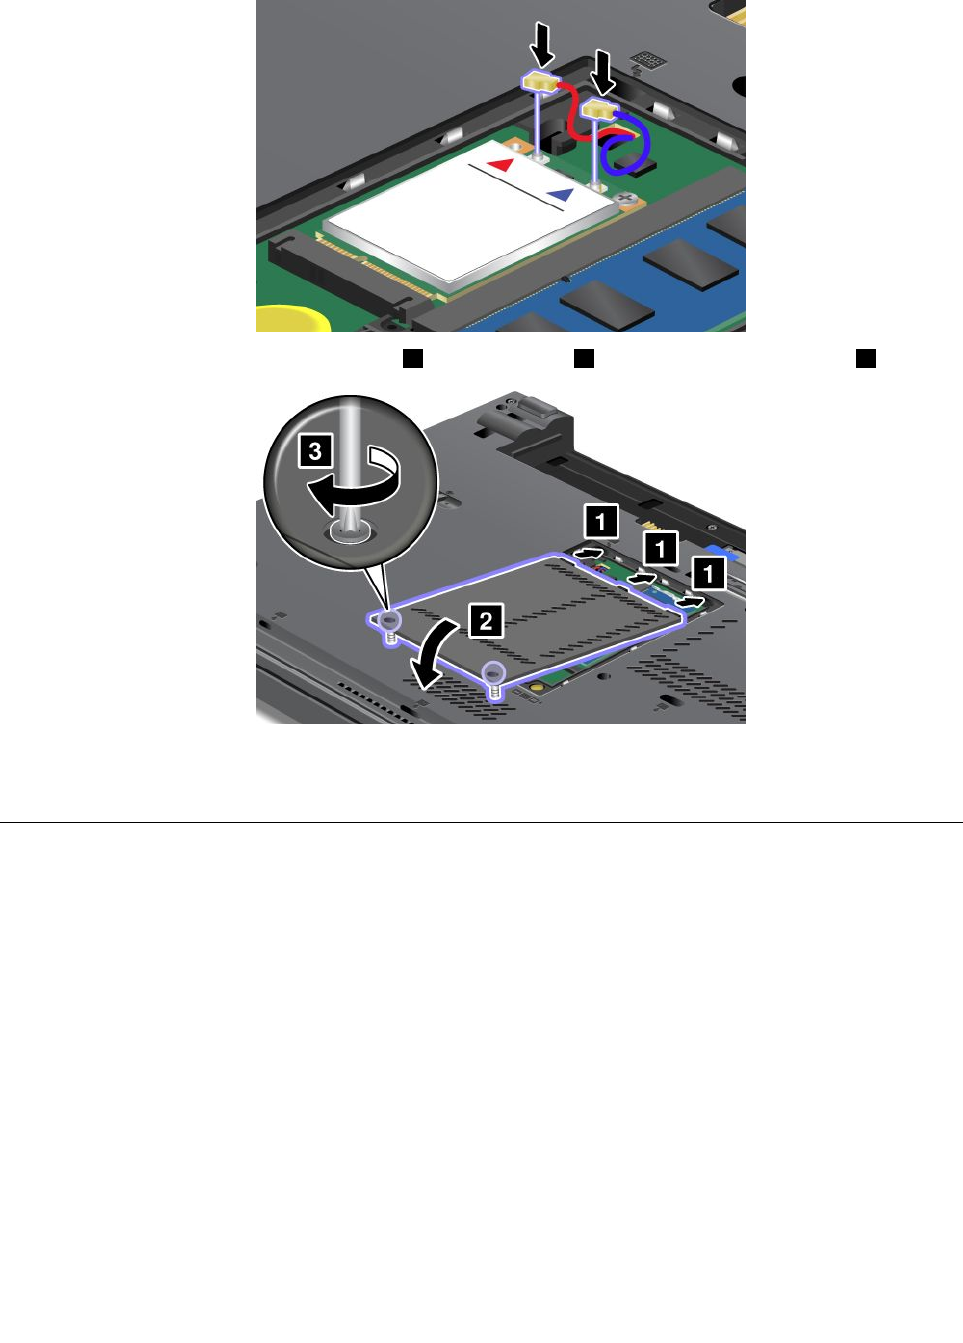
10.ConnectthecablestothenewwirelessWANcard.
11.Putthememoryslotcoverbackinplace1,closethecover2,andthentightenthescrews3.
12.Reinstallthebattery.See“Replacingthebattery”onpage71.
13.Turnthecomputeroveragain.Reconnecttheacpoweradapterandallcables.
ReplacingtheSIMcard
Beforeyoustart,printtheseinstructions.
YourcomputermightrequireaSIMcardtoestablishwirelessWANconnections.Dependingonthecountry
ofdelivery,theSIMcardmightbealreadyinstalledinyourcomputerorispartoftheshippingcontents
thatcomewithyourcomputer.
IfyoundaSIMcardincludedintheshippingcontents,adummycardisinstalledintheSIMcardslot.Then
proceedwiththefollowinginstructions.
Note:TheSIMcardisidentiedbytheICchipmountedononesideofthecard.
ToreplacetheSIMcard,dothefollowing:
1.Turnoffthecomputer;thendisconnecttheacpoweradapterandallcablesfromthecomputer.
2.Closethecomputerdisplay,andturnitover.
3.Removethebattery.See“Replacingthebattery”onpage71.
96UserGuide
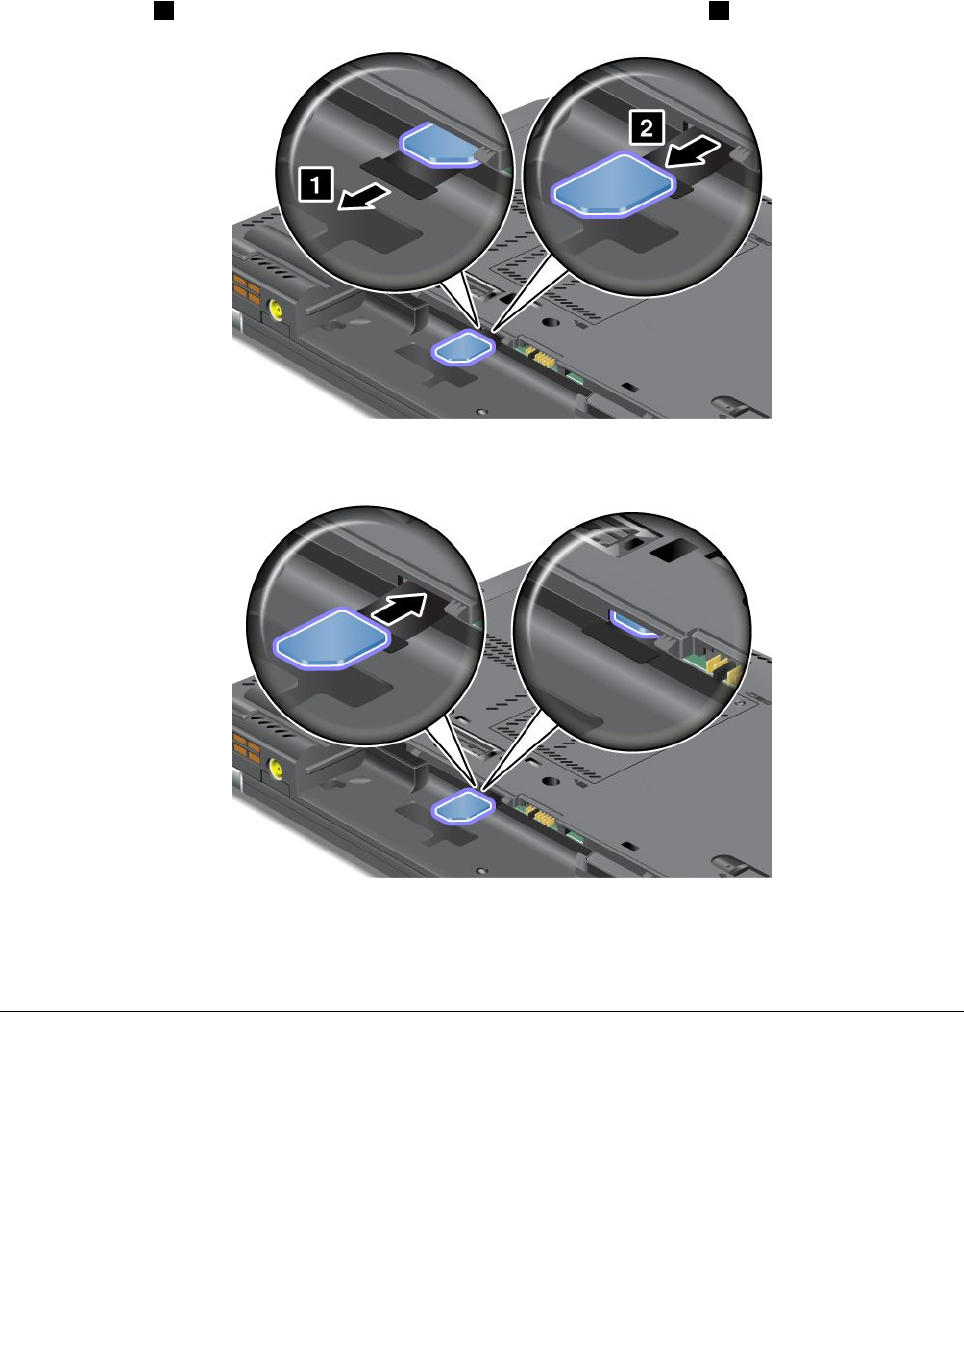
4.LocatetheSIMcardslotinsidethebatterycompartment.Gentlypullthetabextendingfromtheslot
untilitstops1.Thecardcomespartwayoutoftheslot.Removethecard2.
5.Holdthenewcardwiththemetalcontactfacingupwardandgoingintotheslotrst.Then,insert
thecardrmlyintotheslotuntilyouhearaclick.
Note:MakesurethatyouinserttheSIMcardallthewayintotheslot.
6.Putthebatterybackinplace,turnthecomputeroveragain,andreconnectthecables.Formore
informationabouthowtoreinstallthebattery,referto“Replacingthebattery”onpage71.
ReplacingtheUltrabaydevice
Beforeyoustart,printtheseinstructions.
ToreplacetheUltrabaydevice,dothefollowing:
1.Turnoffthecomputer;thendisconnecttheacpoweradapterandallcablesfromthecomputer.
Chapter6.Replacingdevices97
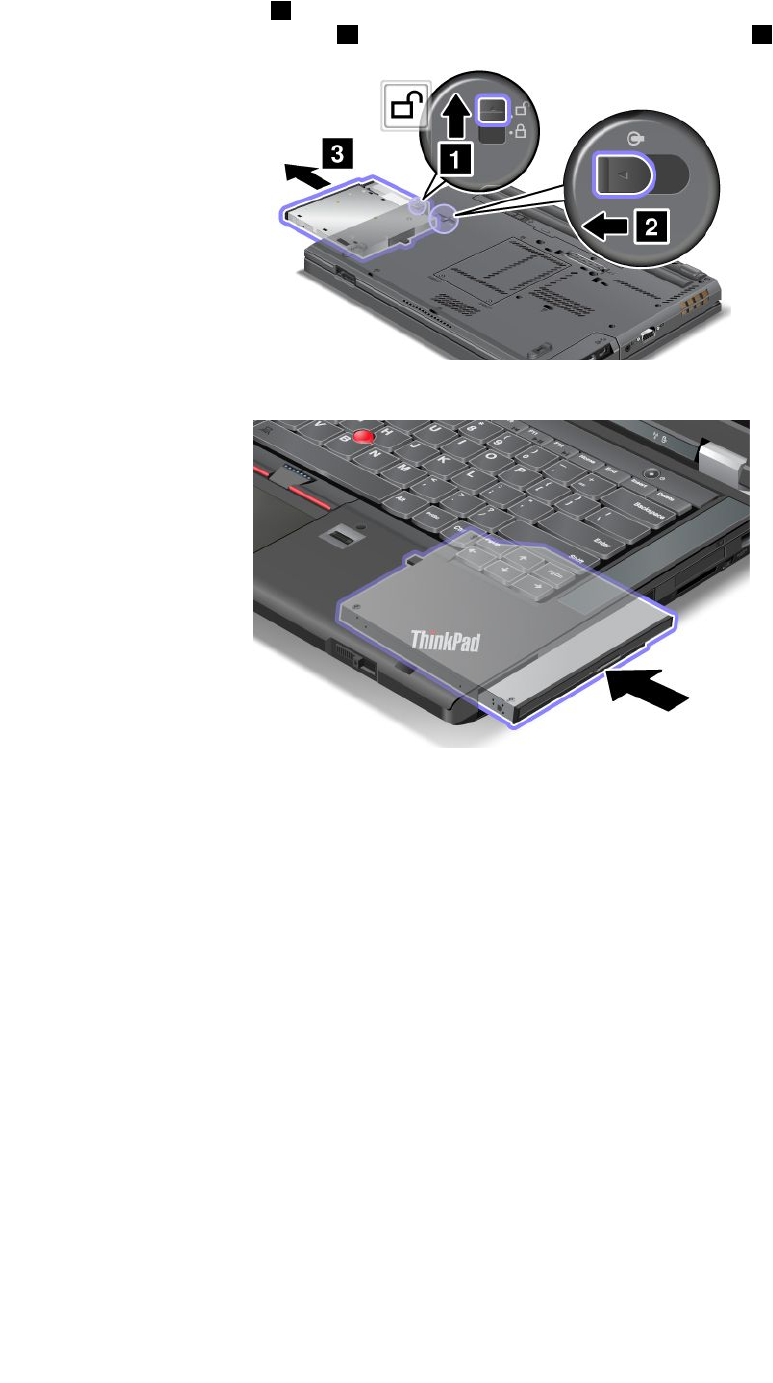
2.Unlockthebaylocklatch1byslidingittothetop.Whileholdingthebaylocklatchintheunlocked
position,slidethebayejectlatch2totheleft,thenpullouttheUltrabaydevice3.
3.Insertthereplaceabledeviceintothebay;thenpressthedevicermlyintotheconnector.
98UserGuide

Chapter7.Enhancingyourcomputer
Thissectionprovidesinformationoninstallingdevicesandtakingadvantageofyourcomputer's
high-technologyfeatures.
•“FindingThinkPadoptions”onpage99
•“UsingtheSerialUltrabayEnhancedfeature”onpage99
•“ThinkPadportreplicatorsanddockingstations”onpage102
FindingThinkPadoptions
Ifyouwanttoexpandthecapabilitiesofyourcomputer,Lenovohasanumberofhardwareaccessories
andupgradestomeetyourneeds.Optionsincludememorymodules,storagedevices,networkcards,port
replicators,batteries,poweradapters,printers,scanners,keyboards,mice,andmore.
YoucanshopatLenovo24hoursaday,7daysaweekdirectlyovertheWorldWideWeb.Allyouneedisan
Internetconnectionandacreditcard.
ToshopatLenovo,goto:
http://www.lenovo.com/accessories/services/index.html
UsingtheSerialUltrabayEnhancedfeature
UsetheSerialUltrabayEnhancedbayforinstallingdevices,suchasaMultiBurnerdrive,aDVD-ROM
drive,andaharddiskdrive.VariousSerialUltrabayEnhanceddevicesareavailableasoptionsat
http://www.lenovo.com/accessories.
Notes:
•Dependingonyourcomputermodel,theSerialUltrabayEnhancedbayofyourcomputersupports:
–9.5-mm-thickSerialUltrabaySlimdevice
–12.7-mm-thickSerialUltrabayEnhanceddevice
•YoucaninserteitheroftheabovedeviceintotheSerialUltrabayEnhancedbayofyourcomputerinone
ofthefollowingconditions:
–Thecomputeristurnedoff.See“ReplacingtheUltrabaydevice”onpage97.
–Thecomputerisworkingorinsleepmode.See“Performingahotorawarmswap”onpage99.
Performingahotorawarmswap
YourcomputersupportsbothhotswapandwarmswapfortheUltrabaydevices.
Performingahotswap
Todoahotswapistoconnect,remove,orreconnectadevicewhilethecomputerisoperating.
Notes:
•Hot-swapisnotsupportedwhenyourcomputerisdockedorwhentheextendedlifebatteryisinstalled.
•Ifaharddiskpasswordisset,youcannothot-swapthedrive.Firstremovetheharddiskpassword,and
thendothehotswap.
©CopyrightLenovo201299
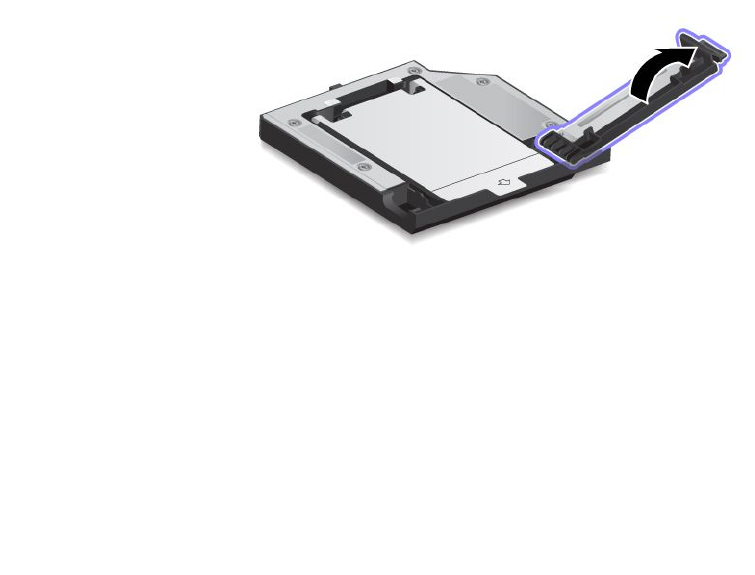
Tohot-swaptheUltrabaydevice,dothefollowing:
1.Clickthetriangularicononthetaskbartoshowhiddenicons,thenclickSafelyRemoveHardware
andEjectMediaicon,andthenstopthedevice.
2.RemoveandinserttheUltrabaydeviceasintroducedin“ReplacingtheUltrabaydevice”onpage97.
Performingawarmswap
Todoawarmswapistoconnect,remove,orreconnectadevicewhilethecomputerisinsleepmode.
Towarm-swaptheUltrabaydevice,dothefollowing:
1.PressFn+F4toputthecomputerintosleepmode.
2.RemoveandinserttheUltrabaydeviceasintroducedin“ReplacingtheUltrabaydevice”onpage97.
3.PresstheFnkeytoreturnfromsleepmode.
Installingasecondaryharddiskdrive
YoucanupgradethecapacityofyourcomputerbyinstallingasecondaryharddiskdriveusingtheThinkPad
12.7mmSerialATAHardDriveBayAdapterIII.
TheThinkPad12.7mmSerialATAHardDriveBayAdapterIII,availableasanoption,supportsthefollowing
drives:
•2.5-inchharddiskdrive(9.5mmheightor7mmheight)
•2.5-inchsolidstatedrive(7mmheight)
Toinstallasecondaryharddiskdrive,dothefollowing:
Attention:Replaceaharddiskdriveonlyifyouareupgradingitorhavingitrepaired.Frequentreplacement
oftheharddiskdrivemightdamagethedriveandbay.
1.RemovetheSerialUltrabaySlimdeviceorSerialUltrabayEnhanceddevicefromyourcomputer.See
“Replacingtheharddiskdrive”onpage75.
2.OpentheharddiskdrivestopperontheThinkPad12.7mmSerialATAHardDriveBayAdapterIII.
100UserGuide
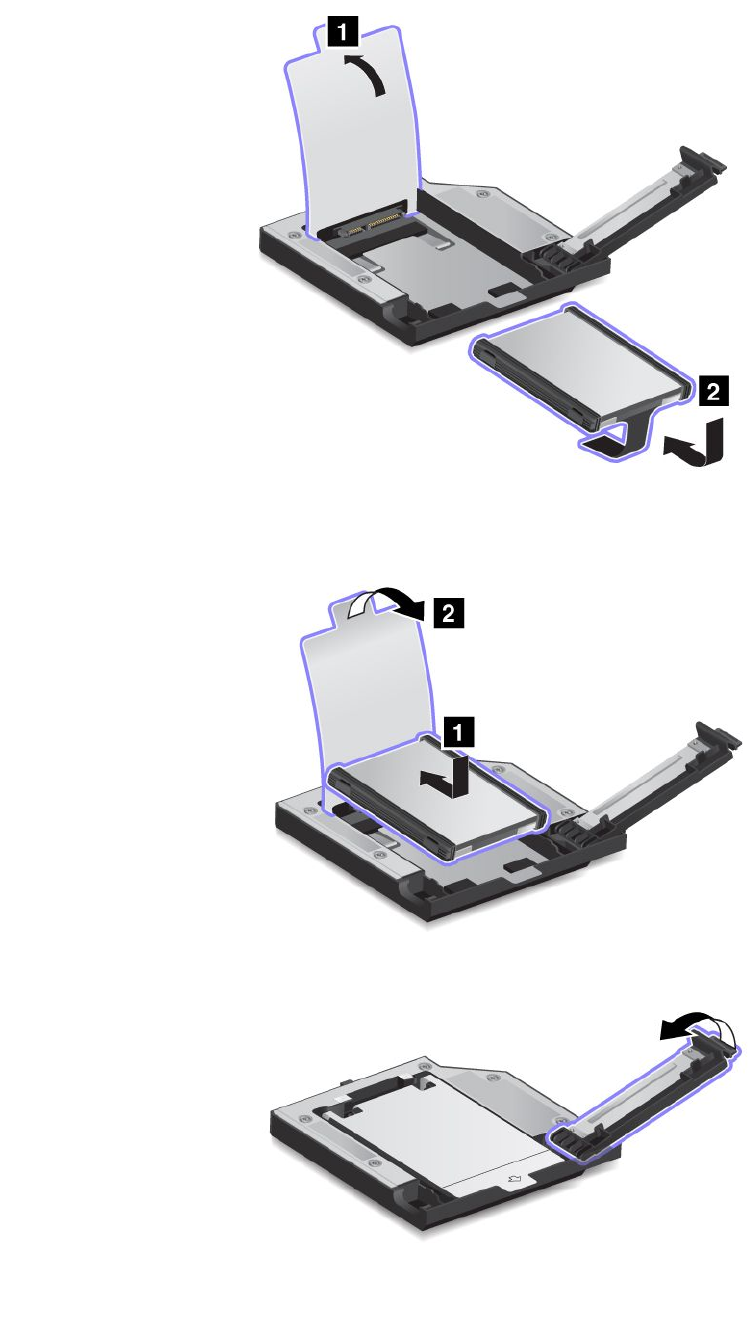
3.Inserttheharddiskdrivewiththelabelfacingupward.
Note:Ifyourharddiskdrivehasastrap,besurenottoleaveitunderthedrive.
4.Ensurethattheharddiskdriveisconnectedrmly.
5.Closetheharddiskdrivestopper.
6.InserttheThinkPad12.7mmSerialATAHardDriveBayAdapterIIIintotheSerialUltrabayEnhancedbay.
Chapter7.Enhancingyourcomputer101
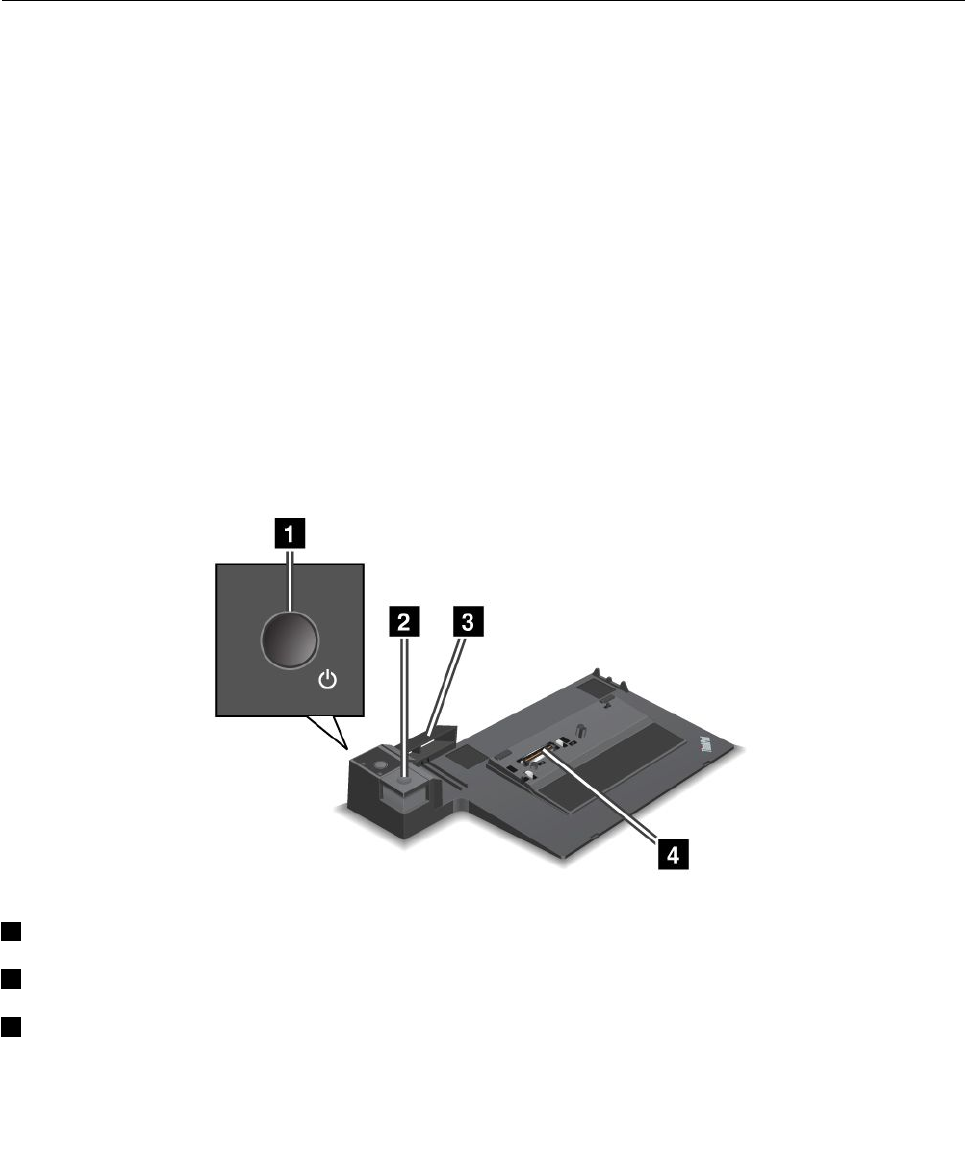
Notes:Ifyouinstallthesecondaryharddiskdriveusinghotswaporwarmswap,andtheharddisk
driveisprotectedbyapassword,youcannotgetaccesstothedriverightafterinsertingtheadapterinto
thebay.Togetaccesstoit,dothefollowing:
a.Putyourcomputerintohibernationmode.Youmighthavetowaitforawhiletillthecomputer
entershibernationmode.
b.Pressthepowerbuttontoreturntonormaloperation.Theharddiskpasswordiconisdisplayed
onthescreen.
c.Typethepassword.Nowyoucangetaccesstotheharddiskdrive.
ThinkPadportreplicatorsanddockingstations
Dependingonthemodel,yourcomputermightsupportthefollowingportreplicatorsordockingstations:
•ThinkPadPortReplicatorSeries3
•ThinkPadPortReplicatorSeries3withUSB3.0
•ThinkPadMiniDockSeries3
•ThinkPadMiniDockSeries3withUSB3.0
•ThinkPadMiniDockPlusSeries3
•ThinkPadMiniDockPlusSeries3withUSB3.0
Attachyourcomputertooneoftheportreplicatorsordockingstationstoexpandtheworkingcapability.
Whenthecomputerisattachedtoaportreplicatorordockingstation,neverpickuptheassemblybytaking
holdofthecomputeralone.Alwaysholdthewholeassembly.
Frontview
ThinkPadPortReplicatorSeries3andThinkPadPortReplicatorSeries3withUSB3.0
1Powerbutton:Pressthepowerbuttontoturnthecomputeronoroff.
2Ejectbutton:Presstheejectbuttontoreleasethecomputerfromtheportreplicator.
3Slidingadjuster:Usetheslidingadjusterasaguidetoalignthedockingstationconnectoronyour
computerasyouattachtheportreplicator.
102UserGuide
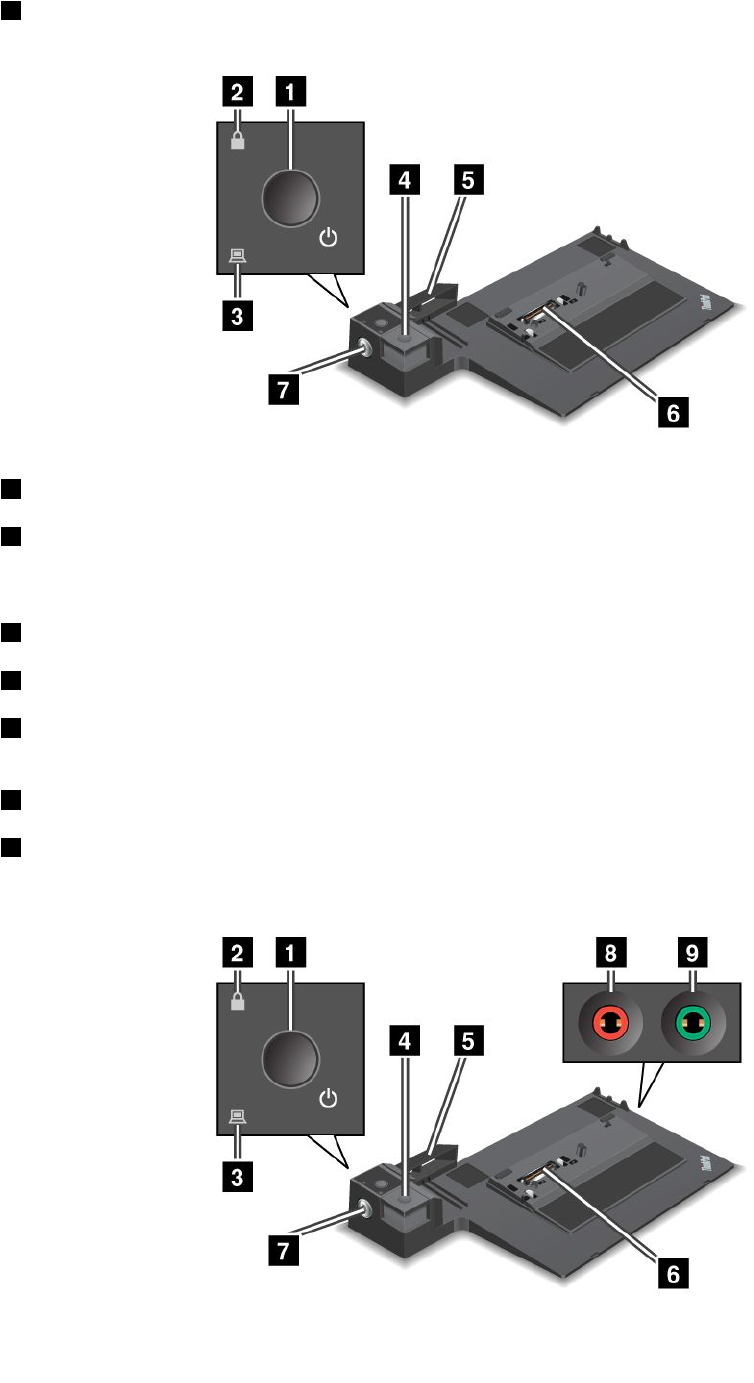
4Dockingstationconnector:Thisiswhereyouattachyourcomputer.
ThinkPadMiniDockSeries3andThinkPadMiniDockSeries3withUSB3.0
1Powerbutton:Pressthepowerbuttontoturnthecomputeronoroff.
2Keylockindicator:Thisindicatorlightswhenthesystemlockkeyisinthelockedposition.Whenthe
systemlockkeyisinthelockedposition,theejectbuttonofthedockingstationislocked;youcannot
attachorremoveyourcomputer.
3Dockingstationindicator:Thisindicatorlightswhenyourcomputerisdocked.
4Ejectbutton:Presstheejectbuttontoreleasethecomputerfromthedockingstation.
5Slidingadjuster:Usetheslidingadjusterasaguidetoalignthedockingstationconnectoronyour
computerasyouattachthedockingstation.
6Dockingstationconnector:Thisiswhereyouattachyourcomputer.
7Systemlockkey:Usethesystemlockkeytolocktheejectbutton.Whentheejectbuttonislocked,you
cannotattachorremoveyourcomputer.
ThinkPadMiniDockPlusSeries3andThinkPadMiniDockPlusSeries3withUSB3.0
Chapter7.Enhancingyourcomputer103
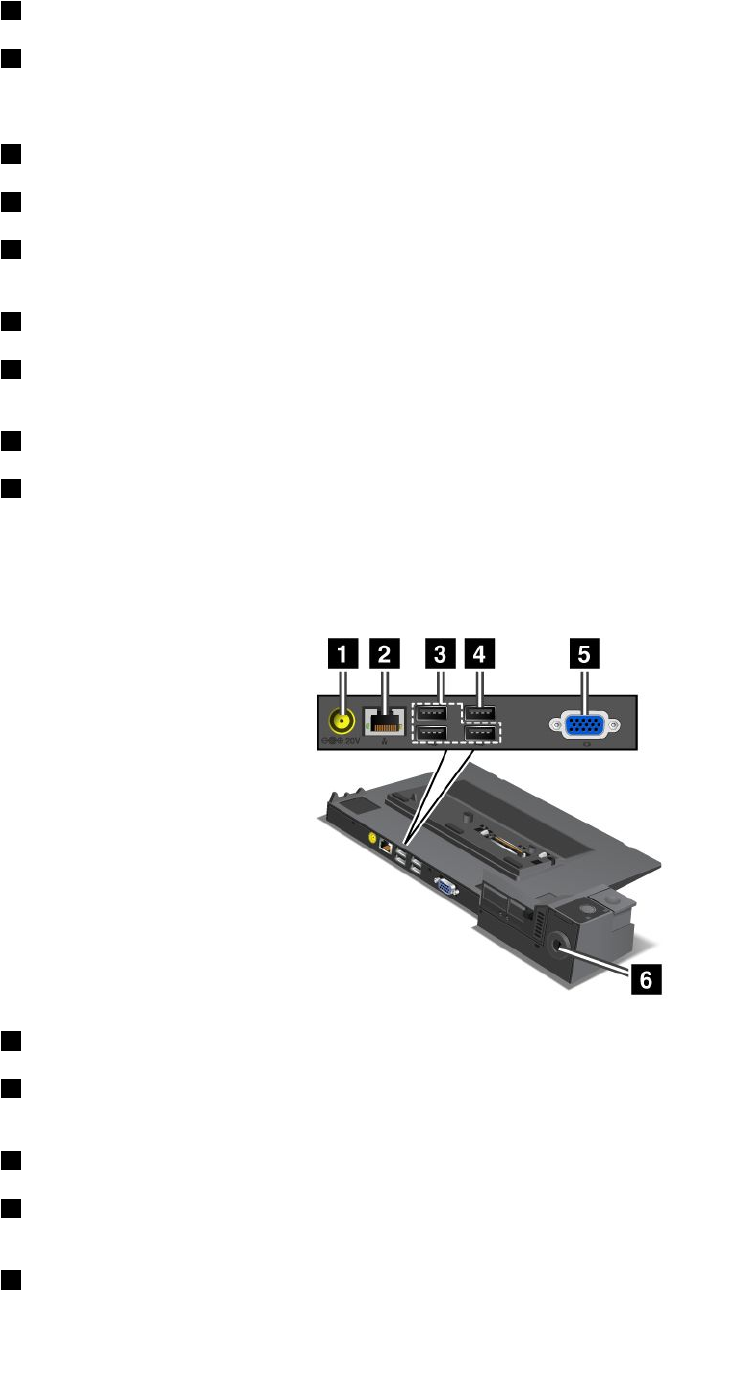
1Powerbutton:Pressthepowerbuttontoturnthecomputeronoroff.
2Keylockindicator:Thisindicatorlightswhenthesystemlockkeyisinthelockedposition.Whenthe
systemlockkeyisinthelockedposition,theejectbuttonofthedockingstationislocked;youcannot
attachorremoveyourcomputer.
3Dockingstationindicator:Thisindicatorlightswhenyourcomputerisdocked.
4Ejectbutton:Presstheejectbuttontoreleasethecomputerfromthedockingstation.
5Slidingadjuster:Usetheslidingadjusterasaguidetoalignthedockingstationconnectoronyour
computerasyouattachthedockingstation.
6Dockingstationconnector:Thisiswhereyouattachyourcomputer.
7Systemlockkey:Usethesystemlockkeytolocktheejectbutton.Whentheejectbuttonislocked,you
cannotattachorremoveyourcomputer.
8Microphonejack:1/8inch(3.5mm)indiameter.Useittoconnectanexternalmicrophone.
9Headphonejack:1/8inch(3.5mm)indiameter.Useittoconnectanexternalheadphone.
Rearview
ThinkPadPortReplicatorSeries3andThinkPadPortReplicatorSeries3withUSB3.0
1Powerjack:Connecttheacpoweradapter.
2Ethernetconnector:ConnecttheportreplicatortoanEthernetLAN.Theindicatorontheconnector
isthesameasthatonthecomputer.
3USB2.0connectors:ConnectUSB2.0compatibledevices.
4USB2.0connector(ontheThinkPadPortReplicatorSeries3)orUSB3.0connector(ontheThinkPad
PortReplicatorSeries3withUSB3.0):ConnectcompatibleUSBdevices.
5Externalmonitorconnector:Connectanexternalmonitor.
104UserGuide
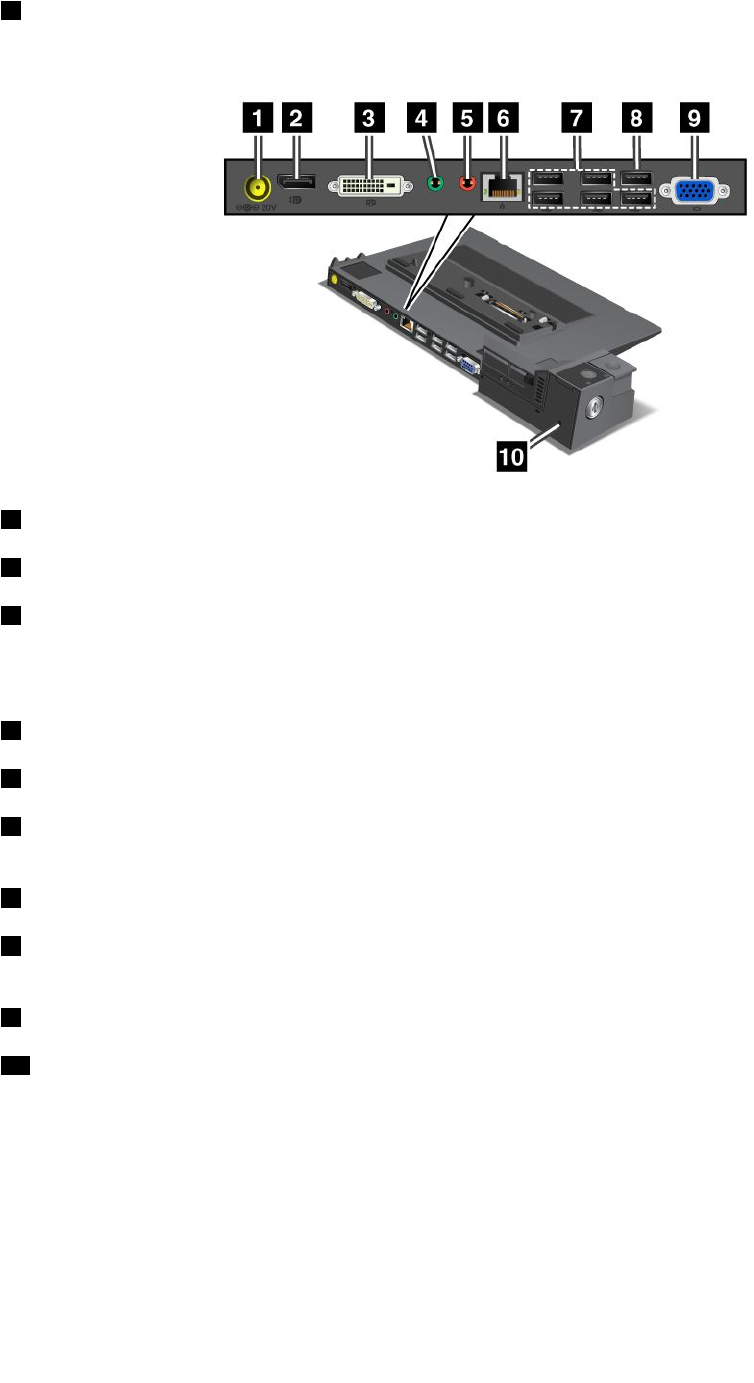
6Securitykeyhole:Useasecuritycablelockthattsthiskeyholetolockyourportreplicatortoa
stationaryobjecttoprotectitfromtheft.
ThinkPadMiniDockSeries3andThinkPadMiniDockSeries3withUSB3.0
1Powerjack:Connecttheacpoweradapter.
2DisplayPortconnector:Connectadisplaydevice.
3DVIconnector:ConnectamonitorthatsupportsSingle-LinkDVI.
Note:TheDVIconnectorprovidesadigitalinterfaceonly.Thisconnectorcanonlybeusedwithacomputer
thatsupportsDVIconnectionestablishedthroughdockingstations.
4Headphonejack:1/8inch(3.5mm)indiameter.Useittoconnectanexternalheadphone.
5Microphonejack:1/8inch(3.5mm)indiameter.Useittoconnectanexternalmicrophone.
6Ethernetconnector:ConnecttheportreplicatortoanEthernetLAN.Theindicatorontheconnector
isthesameasthatonthecomputer.
7USB2.0connectors:ConnectUSB2.0compatibledevices.
8USB2.0connector(ontheThinkPadMiniDockSeries3)orUSB3.0connector(ontheThinkPadMini
DockSeries3withUSB3.0):ConnectcompatibleUSBdevices.
9Externalmonitorconnector:Connectanexternalmonitor.
10Securitykeyhole:Useasecuritycablelockthattsthiskeyholetolockyourportreplicatortoa
stationaryobjecttoprotectitfromtheft.
Chapter7.Enhancingyourcomputer105
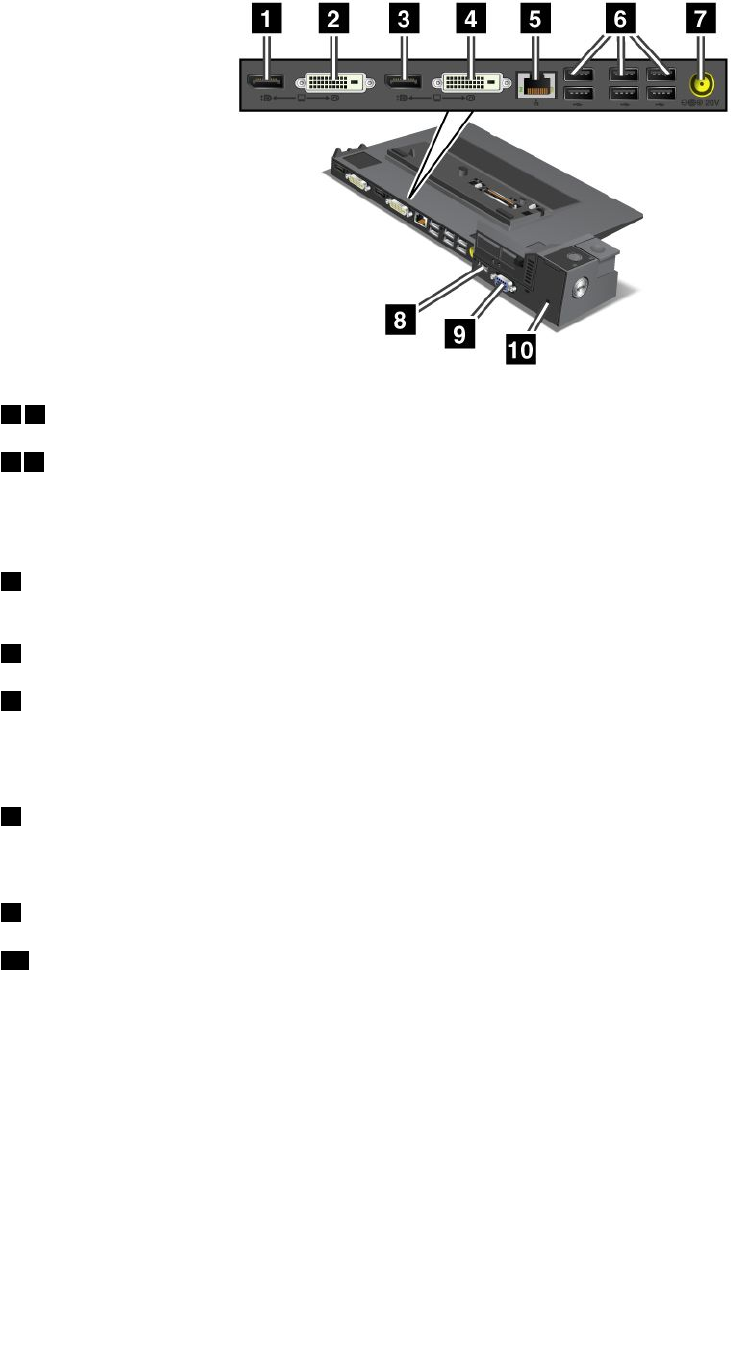
ThinkPadMiniDockPlusSeries3andThinkPadMiniDockPlusSeries3withUSB3.0
13DisplayPortconnector:Connectadisplaydevice.
24DVIconnector:ConnectamonitorthatsupportsSingle-LinkDVI.
Note:TheDVIconnectorprovidesadigitalinterfaceonly.Thisconnectorcanonlybeusedwithacomputer
thatsupportsDVIconnectionestablishedthroughdockingstations.
5Ethernetconnector:ConnecttheportreplicatortoanEthernetLAN.Theindicatorontheconnector
isthesameasthatonthecomputer.
6USB2.0connectors:ConnectUSB2.0compatibledevices.
7Powerjack:Connecttheacpoweradapter.
Note:FortheThinkPadMiniDockPlusSeries3(170W)andThinkPadMiniDockPlusSeries3withUSB
3.0(170W),usetheacpoweradaptershippedwithyourcomputer.
8eSATAconnectororUSB3.0connector:FortheThinkPadMiniDockPlusSeries3,thisisaneSATA
connectorforconnectinganeSATAdevice.FortheThinkPadMiniDockPlusSeries3withUSB3.0,this
isaUSB3.0connectorforconnectingaUSBcompatibledevices.
9Externalmonitorconnector:Connectanexternalmonitor.
10Securitykeyhole:Useasecuritycablelockthattsthiskeyholetolockyourportreplicatortoa
stationaryobjecttoprotectitfromtheft.
Note:IfyouattachyourcomputertoaportreplicatorordockingstationanduseanEthernetconnectoror
anexternalmonitorconnector,usetheEthernetconnectorortheexternalmonitorconnectorontheport
replicatorordockingstation,nottheoneonthecomputer.
AttachingaThinkPadportreplicatorordockingstation
ToattachyourcomputertoasupportedThinkPadportreplicatorordockingstation,dothefollowing:
Notes:
•BeforeyouattachthecomputertoasupportedThinkPadportreplicatorordockingstation,disconnect
theacpoweradapterfromthecomputer.
106UserGuide
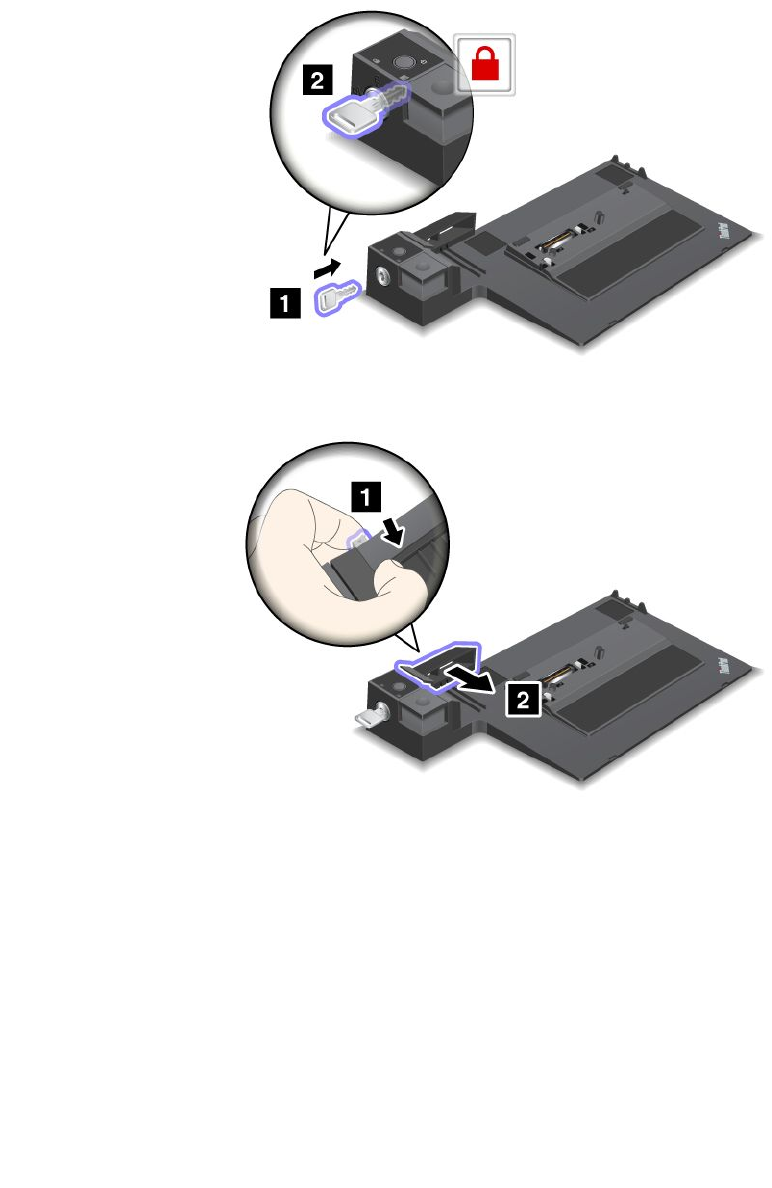
•Ifyourcomputerisoperating,makesurethatithasnishedanyoperationsinvolvingdevicesthatare
connectedtoaUSBconnector.AlsomakesurethatanyconnectiontoanEthernetconnectorhas
beendisconnected.
•ThefollowingillustrationsarefortheThinkPadMiniDockSeries3.Theprocedureisthesameforother
dockingstations.Forportreplicators,startwithstep2.
1.Makesurethatthesystemlockkeyisinplaceandintheunlocked(horizontal)position.
2.Pressandpulltheslidingadjusterasshown.
Chapter7.Enhancingyourcomputer107
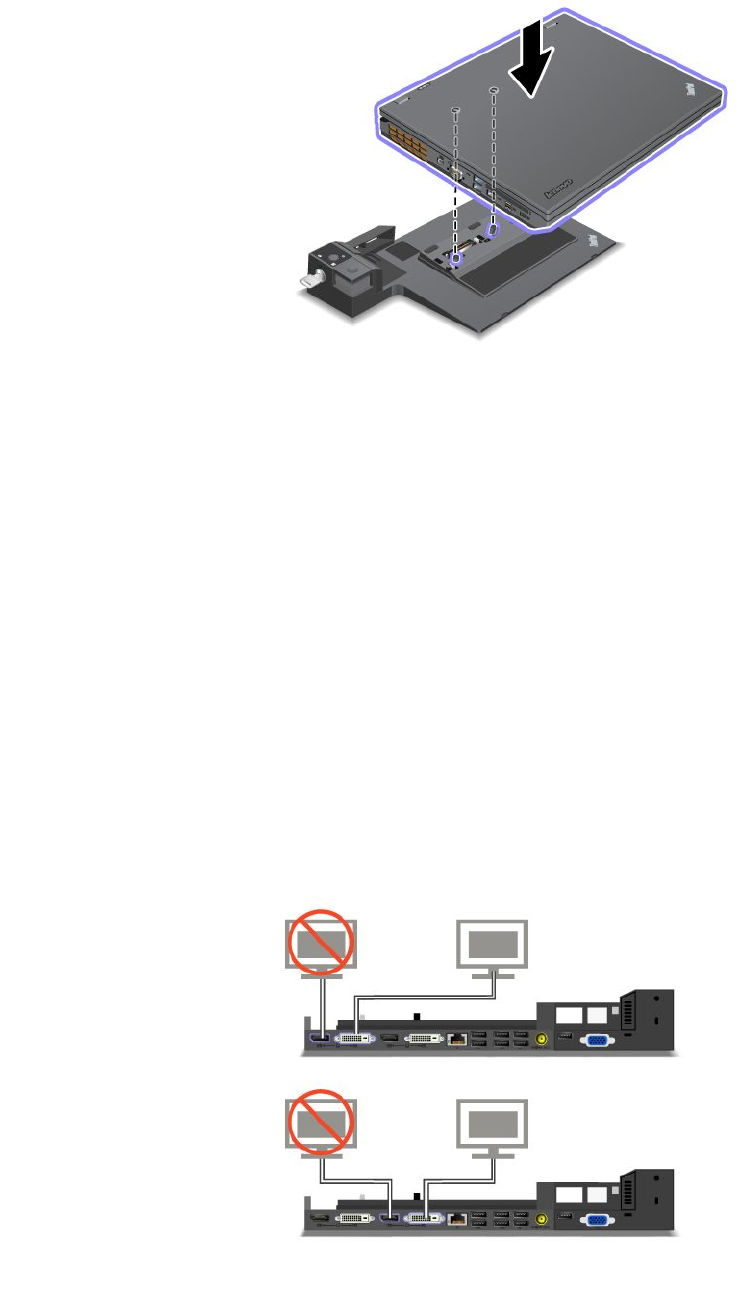
3.Putyourcomputerontheplatformofthedockingstation,makingsurethatthetop-leftcornerofthe
computerisalignedtotheguideplate.
4.Insertyourcomputerintothedockingstationuntilyouhearaclick.Thecomputerisattachedtothe
dockingstation.
Note:Ifthedockingstationindicatorisnotlightedafteryouattachthedockingstation,yourcomputer
isnotcorrectlyconnected.Checktheacpoweradapterofthedockingstation,ordisconnectand
re-attachtheacpoweradapter.Thenattachyourcomputertothedockingstation.
Notes:
•Ifyouattachtheportreplicatorordockingstationtoyourcomputer,butdonotconnecttheacpower
adapterofthatattachmenttothepowerjack,yourcomputergoesintobatterymode.
•Ifyourcomputerandtheportreplicatorordockingstationareconnectedtoseparateacpoweradapters,
yourcomputergoesintobatterymoderst,andthenshiftsintoacpowermode.
•Ifineitheroftheabovetwoprecedingsituationsthebatteryofyourcomputerisdetached,orhasno
batterycharge,yourcomputershutsdown.
ConnectinganexternaldisplaytotheThinkPadMiniDockPlusSeries3andtheThinkPadMiniDock
PlusSeries3withUSB3.0
Group1(topgure)andGroup2(lowergure)areindependentofeachother.EachhasaDisplayPort
connectorandaDVIconnector.IfyouconnectadisplaytoaDisplayPortconnectorandaDVIconnector
thatareinthesamegroup,theDisplayPortconnectorisinactive.
108UserGuide
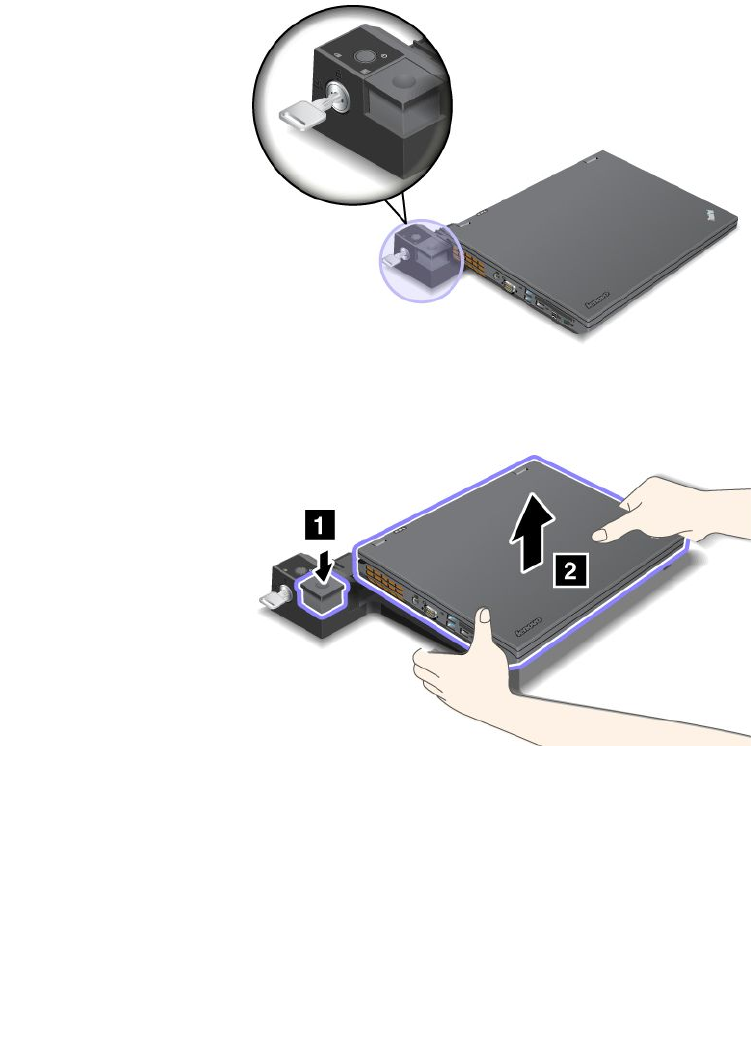
DetachingaThinkPadportreplicatorordockingstation
Todetachyourcomputerfromtheportreplicatorordockingstation,dothefollowing:
1.Ensurethat:
•ThedevicesconnectedtoUSBconnectorsarenotinuse.
•TheconnectiontoanEthernetconnectorhasbeenended.
•Thesystemlockkeyofthedockingstationisinplaceandintheunlocked(horizontal)positionfor:
–ThinkPadMiniDockSeries3
–ThinkPadMiniDockSeries3withUSB3.0
–ThinkPadMiniDockPlusSeries3
–ThinkPadMiniDockPlusSeries3withUSB3.0
2.Presstheejectbuttonuntilthecomputermovesup.Then,graspbothsides,andremovethecomputer.
Securityfeature
UsethesecuritykeyholeontheThinkPadportreplicatorordockingstationtoattachamechanicallock.By
attachingamechanicallock,youcansecuretheportreplicatorordockingstationtoastationaryobject,
suchasadesk,toprotectyourportreplicatorordockingstationfromtheft.Mechanicallocksindifferent
sizesareavailablefromLenovoasoptions.
Chapter7.Enhancingyourcomputer109
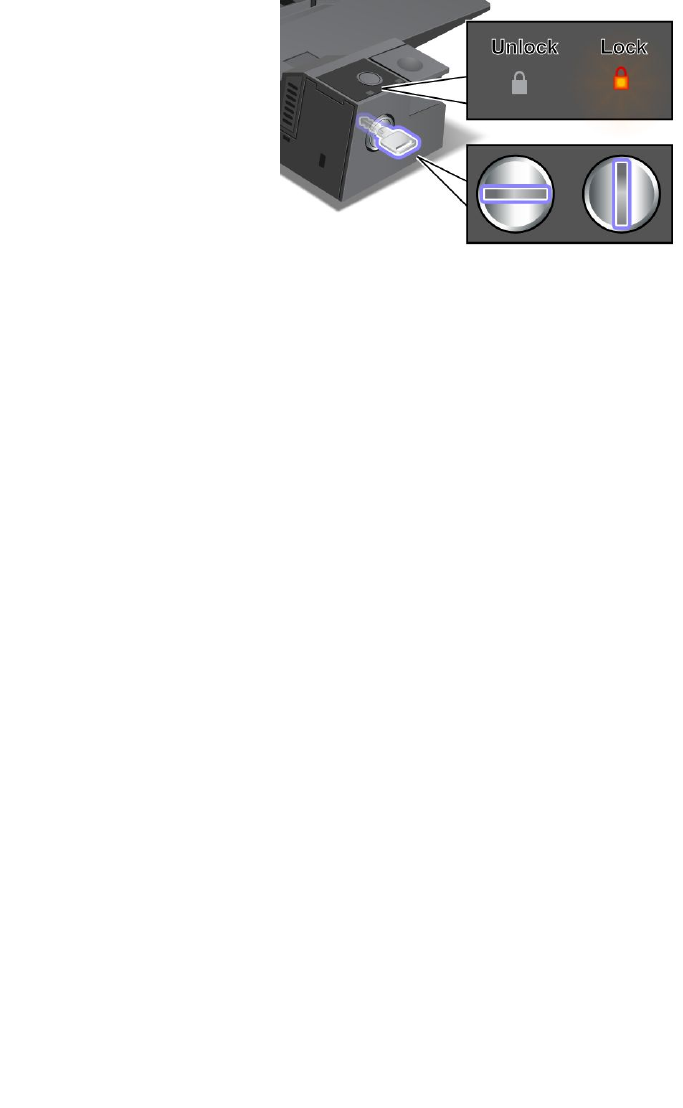
Note:Youareresponsibleforevaluating,selecting,andimplementingthelockingdeviceandsecurity
feature.Lenovomakesnocomments,judgments,orwarrantiesaboutthefunction,quality,orperformance
ofthelockingdeviceorsecurityfeature.
FortheThinkPaddockingstations,inadditiontoattachingamechanicallocktothedockingstation,youalso
canusethesystemlockkeytolocktheejectbutton.Whentheejectbuttonislocked,thecomputercannot
bedetachedfromthedockingstation.Formoreinformation,see“Usingthesystemlockkey”onpage110.
Usingthesystemlockkey
Thesystemlockkeyhastwopositions,unlockedandlocked.
Whenthekeyisinthelockedposition,theejectbuttonofthedockingstationislocked,andyoucannot
removeyourcomputer.Thekeylockindicatorlightswhentheejectbuttonislocked.
110UserGuide

Chapter8.Advancedconguration
Whileitisimportanttoprotectles,data,andsettingsthatareontheharddiskdrive,youalsomight
needtoinstallanewoperatingsystem,installnewdevicedrivers,updateyoursystemUEFIBIOS,or
recoverpreinstalledsoftware.Thisinformationwillhelpyouhandleyourcomputerwithpropercareand
keepitintopworkingshape.
•“Installinganewoperatingsystem”onpage111
•“Installingdevicedrivers”onpage113
•“ThinkPadSetup”onpage115
•“Usingsystemmanagement”onpage129
Installinganewoperatingsystem
Ifyouinstallanewoperatingsysteminyourcomputer,youneedtoinstallthesupplementlesandThinkPad
devicedriversforitatthesametime.
•IfyouinstallanewWindows7operatingsystem,thenecessarylesarelocatedinthefollowingdirectories
ofyoursolidstate-driveorharddiskdrive:
–ThesupplementlesfortheoperatingsystemsupportedareintheC:\SWTOOLS\OSFIXESdirectory.
–ThedevicedriversfortheoperatingsystemsupportedareintheC:\SWTOOLS\DRIVERSdirectory.
–ThepreloadedsoftwareprogramsareintheC:\SWTOOLS\APPSdirectory.
Note:Ifyoucannotndthesupplementles,thedevicedrivers,andprogramsoftwareyouneedon
yourharddiskdrive,orifyouwanttoreceiveupdatesandthelatestinformationaboutthem,goto
http://www.lenovo.com/ThinkPadDrivers.
•IfyouinstallanewWindows8operatingsystem,gotohttp://www.lenovo.com/ThinkPadDriversforthe
latestdevicedrivers,andthenfollowtheinstructionsonthescreen.
Note:Theprocessofinstallingthenewoperatingsystemdeletesallthedataonyourharddiskdrive,
includingbackupsorimagesthatwerestoredinahiddenfolderbyuseofarecoveryprogram.
Beforeyoubegin
Note:IfyourcomputerisequippedwithbothaharddiskdriveandanmSATAsolidstatedrive,youare
notrecommendedtousethemSATAsolidstatedriveasabootabledevice.ThemSATAsolidstatedriveis
designedanddevelopedfor“cache”functionpurposeonly.IfyouusethemSATAsolidstatedriveasa
bootabledevice,itsreliabilityisnotguaranteed.
Beforeyouinstalltheoperatingsystem,dothefollowing:
•IfyouinstallanewWindows7operatingsystem,copyallthesubdirectoriesandlesintheC:\SWTOOLS
directorytoaremovablestoragedevice,toavoidlosinglesduringtheinstallation.
•Printtheinstructionsyouwilluse.Gotothesectionfortheoperatingsystemyouareusing:
–“InstallingtheWindows7operatingsystem”onpage112
–“InstallingtheWindows8operatingsystem”onpage113
Notes:
–TheUEFIBIOSfeaturesaresupportedonlyonthe64-bitversionoftheWindows7andWindows8
operatingsystem.
©CopyrightLenovo2012111

–BesuretosetapreferredsettingfortheUEFI/LegacyBootoptioninThinkPadSetup.
–Afterinstallingthenewoperationsystem,youshouldnotchangetheinitialUEFI/LegacyBootsetting
inThinkPadSetup.TheUEFI/LegacyBootsettingmustbethesameasitwaswhentheWindows
operatingsystemimagewasinstalled.Otherwise,thenewoperatingsystemwillnotbootproperly.
–BeforeyouupgradeyouroperatingsystemfromWindows7toWindows8,ordowngradeyour
operatingsystemfromWindows8toWindows7,youneedtoupdateyourUEFIBIOStothe
versionthattstheoperatingsystemyouaregoingtoinstall.ToupdateyourUEFIBIOS,goto
http://www.lenovo.com/ThinkPadDriversandfollowtheinstructionsonthescreen.
Forthecountryorregioncoderequiredintheinstallation,useoneofthefollowing:
Countryorregion:Code
China:SC
Denmark:DK
Finland:FI
France:FR
Germany:GR
Italy:IT
Japan:JP
Netherlands:NL
Norway:NO
Spain:SP
Sweden:SV
TaiwanandHongKong:TC
UnitedStates:US
InstallingtheWindows7operatingsystem
Beforeyoustart,printtheseinstructions.
ToinstalltheWindows7operatingsystemanditsrelatedsoftwareonyourcomputer,dothefollowing:
1.StartThinkPadSetup.
2.SelectBoot.
3.SelectUEFI/LegacyBoot.
4.Dooneofthefollowing:
•IfyouwanttoinstalltheWindows7(32–bit)operatingsystem,selectLegacyOnlyorBoth.
•IfyouwanttoinstalltheWindows7(64–bit)operatingsysteminLegacymode,selectLegacyOnly.
•IfyouwanttoinstalltheWindows7(64–bit)operatingsysteminUEFImode,selectUEFIOnly.
5.PressF10.
6.InserttheWindows7operatingsysteminstallationDVDintotheDVDdrive,andrestartthecomputer.
7.RestoreC:\SWTOOLSfromthebackupcopyyoumadebeforestartingtheinstallation.
8.InstalltheIntelChipsetSupportforWindows2000/XP/Vista/7.Todothis,runSetup.exein
C:\SWTOOLS\DRIVERS\INTELINF\innst_autol.
9.InstallThinkPadAMDSMBusDriverforWindows7andThinkPadAMDSATAControllerDriverfor
Windows7.
10.Installdevicedrivers.See“Installingdevicedrivers”onpage113.
InstallingtheregistrypatchesforWindows7
Gotohttp://www.lenovo.com/supportandinstallthefollowingregistrypatches:
112UserGuide

•RegistrypatchenablingWakeUponLANfromStandbyforEnergyStar
•FixforIssueofHDDwithHDDetection
InstallingtheWindows7updatemodulepackage
TheWindows7updatemodulesareinthefollowingdirectory:
C:\SWTOOLS\OSFIXES\
Thenameofeachsubfolderisthenumberofaxmodule.Forinformationabouteachxmodule,goto
theMicrosoftKnowledgeBasehomepageathttp://www.lenovo.com/support,typethenumberofthex
moduleyouneedinthesearcheld,andclickSearch.
Toinstallaxmodule,runtheEXEleinasubfolderandfollowtheinstructionsonthescreen.
Note:Ifyouremovetheharddiskdrivefromthecomputerwithasingle-coreprocessorandinstallitona
computerwithadual-coreprocessor,youcangetaccesstotheharddiskdrive.Theopposite,however,is
nottrue:Ifyouremovetheharddiskdrivefromacomputerwithadual-coreprocessorandinstallitona
computerwithasingle-coreprocessor,youcannotgetaccesstotheharddiskdrive.
InstallingtheWindows8operatingsystem
Beforeyoustart,printtheseinstructions.
ToinstalltheWindows8operatingsystemanditsrelatedsoftwareonyourcomputer,dothefollowing:
1.StartThinkPadSetup.
2.SelectStartup➙Boot.
3.ChangethebootpriorityordertobootyourcomputerfromthedrivethatcontainstheWindows
8operatingsysteminstaller.
4.PressF10.
5.ConnectthedrivethatcontainstheWindows8operatingsysteminstallertoyourcomputer,and
restartthecomputer.
6.InstalltheIntelChipsetSupportforWindows2000/XP/Vista/7/8.
7.Installdevicedrivers.See“Installingdevicedrivers”onpage113.
InstallingtheWindows8updatemodulepackage
Forinformationabouteachxmodule,gototheMicrosoftKnowledgeBasehomepageat
http://support.microsoft.com/,typethenumberofthexmoduleyouneedinthesearcheld,andclick
Search.
Installingdevicedrivers
Thedevicedriversareavailableathttp://www.lenovo.com/ThinkPadDrivers.Selecttheproductnameof
yourcomputerintheCurrentThinkPadsystemslisttoseeallthedevicedriversforyourcomputer.
Attention:Alwaysgotohttp://www.lenovo.com/ThinkPadDriversforthelatestdevicedrivers.Donot
downloadthemfromtheWindowsUpdateWebsite.
Installingthedriverforthe4-in-1mediacardreader
Tousethe4-in-1mediacardreader,youneedtodownloadandinstalltheRicohMultiCardReaderDriver
fromtheLenovoSupportWebsiteat:
http://www.lenovo.com/support
Chapter8.Advancedconguration113

InstallingthedriverforUSB3.0ontheWindows7operatingsystem
IfyourcomputerisinstalledwiththeWindows7operatingsystem,itsupportsUSB3.0functions.Touse
theUSB3.0connectors,youneedtodownloadandinstalltheUSB3.0driverafteryoureinstalledthe
Windows7operatingsystembydoingthefollowing:
1.Gotohttp://www.lenovo.com/support.Findyourmodelanddisplaythedriverlinks.
2.SelecttheUSB3.0driverforthe32-bitor64-bitoperatingsystemandextractittoyourlocalhard
diskdrive.
3.Double-clicktheSetup.exeleintheC:\DRIVERS\WIN\USB3.0\directory.
4.ClickNext.Ifthedevicedriverisalreadyinstalled,clickCancel.Followtheinstructionsonthescreen
untiltheinstallationisnished.
InstallingtheThinkPadmonitorleforWindows2000/XP/Vista/7/8ontheWindows7operatingsystem
TheThinkPadmonitorleforWindows2000/XP/Vista/7/8isinthefollowingdirectory:
C:\SWTOOLS\DRIVERS\MONITOR
Note:Ifyoucannotndthisdirectoryonyourharddiskdriveorsolidstatedrive,downloadtheThinkPad
monitorleforWindows2000/XP/Vista/7/8fromtheThinkPadWebsiteat:
http://www.lenovo.com/ThinkPadDrivers
Note:Beforeyouinstallthisle,makesurethatthecorrectvideodriverhasbeeninstalled.
Toinstallthecorrectvideodriver,dothefollowing:
1.Right-clickonthedesktop,andclickPersonalize.
2.ClickDisplayattheleft.
3.ClickChangedisplaysettings.
4.ClickAdvancedSettings.
5.ClicktheMonitortab.
6.ClickProperties.
7.ClicktheDrivertab.
8.ClickUpdateDriver.
9.SelectBrowsemycomputerfordriversoftware,andthenclickLetmepickfromalistofdevice
driversonmycomputer.
10.ClickHaveDisk.
11.SpecifypathC:\SWTOOLS\DRIVERS\MONITORtothismonitorINFle.Then,clickOpen.
12.ClickOK.
13.Conrmthecorrectdisplaytype,thenclickNext.
14.Wheninstallationcompletes,clickClose.
15.ClickClosetoclosetheDisplayPropertieswindow.
16.ClickOKontheMonitortab.
17.ClickOKandclosetheDisplaySettingswindow.
InstallingotherdevicedriversandsoftwareontheWindows7operatingsystem
ThedevicedriversareprovidedintheC:\SWTOOLS\DRIVERSdirectoryonyourharddiskdrive.Youwillalso
needtoinstallprogramsoftware,whichisprovidedintheC:\SWTOOLS\APPSdirectoryonyourharddiskdrive.
Todothis,refertotheinstructionsin“Reinstallingpreinstalledapplicationsanddevicedrivers”onpage67.
114UserGuide

Note:IfyoucannotndtheSupplementles,devicedrivers,andprogramsoftwareyouneedon
yourharddiskdrive,orifyouwanttoreceiveupdatesandthelatestinformationaboutthem,goto
http://www.lenovo.com/ThinkPadDrivers.
ThinkPadSetup
YourcomputercomeswiththeThinkPadSetupprogramtoenableyoutoselectvarioussetupparameters.
TostartThinkPadSetup,dothefollowing:
1.Turnonthecomputer.Whenthelogoscreenisdisplayed,presstheF1key.TheThinkPadSetup
programmainmenuopens.
Note:Ifyouhavesetasupervisorpassword,theThinkPadSetupprogrammainmenuwillbedisplayed
afteryouenterthepassword.YoucanstartThinkPadSetupbypressingEnterinsteadofenteringthe
supervisorpassword.However,youcannotchangetheparametersthatareprotectedbythesupervisor
password.Formoreinformation,referto“Usingpasswords”onpage51.
2.Usethecursorkeystomovetoanitemyouwanttochange.Whentheitemishighlighted,press
Enter.Asubmenuisdisplayed.
3.Changetheitemsyouwishtochange.Tochangethevalueofanitem,pressthefollowingkeys:
•F6orthecombinationofShiftand+:Changetoahighervalue.
•F5or–:Changetoalowervalue.
Iftheitemhasasubmenu,pressEntertodisplayit.
4.PressEsctoexitfromthesubmenu.
5.Ifyouareonanestedsubmenu,pressEscrepeatedlyuntilyoureachtheThinkPadSetupprogram
mainmenu.
Note:Ifyouneedtorestorethesettingstotheiroriginalstateasofthetimeofpurchase,pressF9to
loadthedefaultsettings.YoualsocanselectanoptionontheRestartsubmenutoloadthedefault
settingsordiscardthechanges.
6.SelectRestart.Movethecursortotheoptionyouwantforrestartingyourcomputer,thenpressEnter.
Yourcomputerrestarts.
Note:Dependingontheoperatingsystemyouareusing,somemenuitemsmightnotbeavailable.
Mainmenu
TheMainmenuistherstinterfaceyouseeafteryouenterThinkPadSetup.Itdisplaysthefollowing
congurationofyourcomputer:
•UEFIBIOSVersion
•UEFIBIOSDate(Year-Month-Day)
•EmbeddedControllerVersion
•MachineTypeModel
•System-unitserialnumber
•Systemboardserialnumber
•AssetTag
•CPUType
•CPUSpeed
•Installedmemory
•UUID
Chapter8.Advancedconguration115

•MACaddress(InternalLAN)
Congmenu
Ifyouneedtochangethecongurationofyourcomputer,selectCongfromtheThinkPadSetupmenu.
ThefollowingtableliststheCongmenuitems.
Notes:
•Defaultvaluesareinboldface.Thedefaultsettingsarealreadyoptimizedforyou.Ifyouconsider
changingthecomputerconguration,proceedwithextremecaution.Settingthecongurationincorrectly
mightcauseunexpectedresults.
•Oneachsubmenu,presstheEnterkeytoshowselectableoptionsandselectadesiredoption,ortype
desiredvaluesfromthekeyboarddirectly.
•Someitemsaredisplayedonthemenuonlyifthecomputersupportsthecorrespondingfeatures.
Table5.Congmenuitems
MenuitemSubmenuitemValueComments
WakeOnLAN•Disabled
•AConly
•ACandBattery
Enablethesystemtopower
onwhentheEthernet
controllerreceivesamagic
packet(aspecialnetwork
message).
IfyouselectACOnly,
WakeonLANisenabled
onlywhentheacpower
adapterisattached.
IfyouselectACand
Battery,WakeonLANis
enabledwithanypower
sources.
Notes:
•ACpowerisrequired
withmagicpackettype
WakeonLAN.
•TheWakeonLAN
functiondoesnot
workwhenaharddisk
passwordisset.
EthernetLANOptionROM
(forLegacyOnlyboot
modeorBothwithLegacy
rst)
•Disabled
•Enabled
LoadtheEthernetLAN
OptionROMtoenable
startupfromanintegrated
networkdevice.
Network
UEFIIPv4NetworkStack
(forUEFIOnlybootmode
orBothwithUEFIrst)
•Disabled
•Enabled
EnableordisableIPv4
(InternetProtocolVersion4)
networkstackfortheUEFI
environment.
116UserGuide

Table5.Congmenuitems(continued)
MenuitemSubmenuitemValueComments
USBUEFIBIOSSupport•Disabled
•Enabled
Enableordisableboot
supportforUSBstorage
devices.
AlwaysOnUSB•Disabled
•Enabled
IfyouselectEnabled,the
externalUSBdevicescan
bechargedthroughUSB
connectorsevenwhenthe
systemisinlowpower
mode(sleep,hibernate,or
power-off).
AlwaysOnUSBChargein
offmode
•Disabled
•Enabled
IfyouselectEnabled,the
AlwaysOnUSBconnector
enablesyoutochargesome
devices,suchasiPod,
iPhone,andBlackBerry
smartphoneswhenthe
computeristurnedoff.
USB
USB3.0Mode•Disabled
•Enabled
•Auto
SettheUSB3.0controller
modefortheportsshared
betweenUSB2.0andUSB
3.0controllers.
IfyouselectAuto,it
enablesyoutoconnectand
routeappropriateUSB3.0
orUSB2.0connectors.
IfyouselectEnabled,it
enablesUSB3.0mode
andallowsUSB3.0tobe
supportedintheoperating
system.
IfyouselectDisabled,it
disablesandhidestheUSB
3.0controller,andUSB3.0
connectorswillworkas
USB2.0connectors.
TrackPoint•Disabled
•Enabled
Enableordisablethe
built-inTrackPointpointing
device.
Note:Ifyouwanttouse
anexternalmouse,select
Disabled.
TouchPad•Disabled
•Enabled
Enableordisablethe
built-intouchpad.
Note:Ifyouwanttouse
anexternalmouse,select
Disabled.
FnandCtrlKeyswap•Disabled
•Enabled
IfyouselectEnabled,the
FnkeyworksastheCtrl
key,andtheCtrlkeyworks
astheFnkey.
Keyboard/Mouse
Chapter8.Advancedconguration117

Table5.Congmenuitems(continued)
MenuitemSubmenuitemValueComments
Note:EvenwhenEnabled
isselected,youneedto
presstheFnkeytoresume
thecomputerfromsleep
modetonormaloperation.
FnKeyLock•Disabled
•Enabled
IfyouselectEnabled,
youcanpresstheFnkey
oncetoactivatetheFn
keyfunction,asifthe
keyiskeptinapressed
condition,andthenpress
thedesiredfunctionkey.
Theactionisequivalentto
pressingtheFnkeyand
thedesiredfunctionkey
simultaneously.Ifyoupress
theFnkeytwice,theFn
keyiskeptinapressed
conditionuntilyoupress
theFnkeyagain.
KeyboardIllumination
Control
•ThinkLightOnly
•KeyboardbacklightOnly
•Both
EnabletheThinkLight
lightfeature,thekeyboard
backlightfeature,orboth.
Afteryoumakeaselection,
youcanactivatethe
correspondingfeature(s)by
pressingFn+Spacebar.
BootDisplayDevice•ThinkPadLCD
•Analog(VGA)
•DigitalonThinkPad
•Digital1ondock
•Digital2ondock
Selectthedisplaydevice
thatistobeactivatedat
boottime.Thisselection
iseffectiveforboottime,
passwordprompt,and
ThinkPadSetup.
DigitalonThinkpadisthe
MiniDisplayPortonyour
computer.
Digial1ondockand
Digital2ondock
areDisplayPortorDVI
connectorsonadocking
station.
GraphicsDevice•IntegratedGraphics
•DiscreteGraphics
•NVIDIAOptimus
TheIntegratedGraphics
modewillachievelonger
batterylife.TheDiscrete
Graphicsmodeenhances
graphicsperformance.
WhenNVIDIAOptimus
isselected,thesystem
automaticallyswitches
betweendiscretegraphics
modeandtheintegrated
graphicsmodedepending
ontherunningprogram.
Display
118UserGuide

Table5.Congmenuitems(continued)
MenuitemSubmenuitemValueComments
Note:NVIDIAOptimus
shouldbeselectedonlyif
youareusingaWindows7
model.
OSDetectionforNVIDIA
Optimus
•Disabled
•Enabled
ThesystemBIOS
automaticallyswitches
theGraphicsDevice
settingtoNVIDIAOptimus
iftheoperatingsystem
supportsthefeature,and
toDiscreteGraphicsifthe
operatingsystemdoesnot
supportit.
IntelSpeedStep®
technology
(IntelSpeedStepmounted
modelsonly)
•Disabled
•Enabled
ModeforAC
•MaximumPerformance
•BatteryOptimized
ModeforBattery
•MaximumPerformance
•BatteryOptimized
SelectthemodeofIntel
SpeedSteptechnologyat
runtime.
MaximumPerformance:
Alwayshighestspeed
BatteryOptimized:Always
lowestspeed
Disabled:Noruntime
support,lowestspeed
AdaptiveThermal
Management
SchemeforAC
•MaximizePerformance
•Balanced
SchemeforBattery
•MaximizePerformance
•Balanced
Selectathermal
managementscheme
touse.
MaximizePerformance:
ReduceCPUthrottling
Balanced:Balance
sound,temperature,and
performance
Note:Eachschemeaffects
fansound,temperature,
andperformance.
OpticalDriveSpeed•HighPerformance
•Normal
•Silent
Setthespeedofthe
opticaldrivetothedesired
performance.
CPUPowerManagement•Disabled
•Enabled
Enableordisablethepower
savingfeaturethatstops
themicroprocessorclock
automaticallywhenthere
arenosystemactivities.
Normally,itisnotnecessary
tochangethesetting.
PCIExpressPower
Management
•Disabled
•Enabled
Enableordisableafeature
thatautomaticallyadjusts
powermanagementwhen
thereisnoPCIExpress
Power
Chapter8.Advancedconguration119

Table5.Congmenuitems(continued)
MenuitemSubmenuitemValueComments
activity.Normally,itisnot
necessarytochangethe
setting.
ExpressCardSpeed•Generation1
•Automatic
Setthetransferspeedofthe
ExpressCardtothedesired
levelofperformance.
TheAutomaticoption
enablestheExpressCardto
specifythetransferspeedit
supports.
PowerOnwithACAttach•Disabled
•Enabled
Enableordisableafeature
thatpowersonthesystem
whentheacpoweradapter
isattached.
IfyouselectEnabled,the
systemispoweredonwhen
theacpoweradapteris
attached.Whenthesystem
isinhibernatestate,the
systemresumes.
IfyouselectDisabled,the
systemisnotpoweredon
norresumedwhentheac
poweradapterisattached.
Intel(R)RapidStart
Technology
•Disabled
•Enabled
Enterafter:
•Immediately
•1minute
•2minutes
•5minutes
•10minutes
•15minutes
•30minutes
•1hour
•2hours
•3hours
Tousethisfeature,aspecial
partitiononthesolidstate
driveisrequired.
Whenenabled,youcan
enablethe30DayStandby
functionthroughthePower
Managerprogramorthe
LenovoSettingsprogram.
Thefunctionenablesthe
computertoenteralower
powerstateafterthe
speciedtimeinsleep
state.Andittakesonly
secondstoresumenormal
operation.
PasswordBeep•Disabled
•Enabled
Enablethisoptiontohave
abeepsoundwhenthe
systemiswaitingfora
power-on,harddisk,or
supervisorpassword.
Differentbeepswillsound
whentheenteredpassword
matchesordoesnotmatch
theconguredpassword.
BeepandAlarm
KeyboardBeep•Enabled
•Disabled
Enableordisablekeyboard
beepwhenunmanageable
keycombinationsare
pressed.
120UserGuide

Table5.Congmenuitems(continued)
MenuitemSubmenuitemValueComments
SerialATA(SATA)SATAControllerMode
Option
•Compatibility
•AHCI
SelectSATAcontroller
operationmode.
CoreMulti-Processing•Disabled
•Enabled
Enableordisableadditional
executioncoreunitswithin
aCPU.
Note:Ifyouareusinga
computerwithasingle-core
processor,thisitemisnot
available.
CPU
IntelHyper-Threading
Technology
•Disabled
•Enabled
Enableordisableadditional
logicalprocessorswithina
processorcore.
IntelAMTControl•Disabled
•Enabled
•PermanentlyDisabled
IfyouselectEnabled,Intel
AMT(ActiveManagement
Technology)iscongured
andadditionalsetupitems
areprovidedinMEBx
(ManagementEngineBIOS
Extension)Setup.
IfyouselectPermanently
Disabled,youwillneverbe
abletoenableitagain.Be
cautiouswhenyouwantto
usethisoption.
Note:Youcanenterthe
MEBxSetupmenuby
pressingtheCtrl+Pkey
combinationintheStartup
InterruptMenuwindow.
TodisplaytheStartup
InterruptMenuwindow,
presstheEnterkeyduring
thepower-onself-test
(POST).
CIRATimeout0-255
Note:Thedefaultvalueis
60seconds.
Setthetimeoutoptionfor
CIRAconnectiontobe
established.1though254
secondsareselectable.
Ifyouselect0,use60
secondsasthedefault
timeoutvalue.
Ifyouselect255,the
waitingtimeforestablishing
aconnectionisunlimited.
IntelAMT
ConsoleType•PC-ANSI
•VT100+
•VT-UTF8
Selecttheconsoletypefor
AMT.
Note:Thisconsoletype
shouldmatchtheIntelAMT
remoteconsole.
Chapter8.Advancedconguration121

DateandTimemenu
Ifyouneedtosetthecurrentdateandtimeofyourcomputer,selectDate/TimefromtheThinkPadSetup
menu.Thefollowingsubmenuisdisplayed:
•SystemDate
•SystemTime
Tochangethedateandtime,dothefollowing:
1.Usingtheupanddownarrowkeystoselecttheitemtochangethedateortime.
2.PressTab,ShiftTab,orEntertoselectaeld.
3.Typethedateortime.
Securitymenu
Ifyouneedtosetthesecurityfeaturesofyourcomputer,selectSecurityfromtheThinkPadSetupmenu.
ThefollowingtableliststheSecuritymenuitems.
Notes:
•Defaultvaluesareinboldface.Thedefaultsettingsarealreadyoptimizedforyou.Ifyouconsider
changingthecomputerconguration,proceedwithextremecaution.Settingthecongurationincorrectly
mightcauseunexpectedresults.
•Ineachsubmenu,presstheEnterkeytoshowselectableoptionsandselectadesiredoptionbyusing
cursorkey,ortypedesiredvaluesfromthekeyboarddirectly.
•Someitemsaredisplayedonthemenuonlyifthecomputersupportsthecorrespondingfeatures.
Table6.Securitymenuitems
MenuitemSubmenuitemValueComments
HardwarePassword
Manager
•Disabled
•Enabled
Manageyourpower-onpassword,supervisor
password,andyourharddiskpasswordsbythe
managementserver.
SupervisorPassword•Disabled
•Enabled
See“Supervisorpassword”onpage54.
LockUEFIBIOS
Settings
•Disabled
•Enabled
Enableordisablethefunctionthatprotectsitems
inThinkPadSetupfrombeingchangedbyauser
whodoesnothavethesupervisorpassword.By
default,thisissettoDisabled.Ifyousetthe
supervisorpasswordandenablethisfunction,no
onebutyoucanchangeanyitemsinThinkPad
Setup.
SetMinimumLength•Disabled
•xcharacters
(4≤x≤12)
Specifyaminimumlengthforpower-on
passwordsandharddiskpasswords.Ifyouset
thesupervisorpasswordandspecifyaminimum
lengthforpasswords,noonebutyoucanchange
thelength.
Passwordat
unattendedboot
•Disabled
•Enabled
IfyouselectandenablePasswordatunattended
boot,apasswordpromptisdisplayedwhenthe
computeristurnedon,fromeitherapower-off
stateorhibernationstate,byanunattendedevent
suchasWakeonLAN.IfyouselectDisabled,
nopasswordpromptisdisplayed;thecomputer
goesaheadandloadstheoperatingsystem.
Password
122UserGuide

Table6.Securitymenuitems(continued)
MenuitemSubmenuitemValueComments
Topreventunauthorizedaccess,settheuser
authenticationontheoperatingsystem.
Passwordatrestart•Disabled
•Enabled
IfyouselectandenablePasswordatrestart,
apasswordpromptisdisplayedwhenyou
restartthecomputer.IfyouselectDisabled,no
passwordpromptisdisplayed;thecomputer
goesaheadandloadstheoperatingsystem.
Topreventunauthorizedaccess,settheuser
authenticationontheoperatingsystem.
Power-OnPassword•Disabled
•Enabled
See“Power-onpassword”onpage52.
HardDiskxPassword•Disabled
•Enabled
See“Harddiskpasswords”onpage52.
Notes:
•HardDisk1meanstheharddiskdrivebuilt
intoyourcomputer.
•HardDisk2isdisplayedonthePassword
submenuonlyifasecondaryharddiskdriveis
installedintheSerialUltrabayEnhancedbay.
Predesktop
Authentication
•Disabled
•Enabled
Enableordisablengerprintauthentication
beforetheoperatingsystemisloaded.
ReaderPriority•External➙
Internal
•InternalOnly
IfExternal➙Internalisselected,anexternal
ngerprintreaderisusedifattached.Otherwise,
aninternalngerprintreaderisused.IfInternal
Onlyisselected,aninternalngerprintreaderis
used.
SecurityMode•Normal
•High
Ifngerprintauthenticationfails,youcanstillstart
thecomputerbyenteringapassword.Ifyouhave
selectedNormal,enterapower-onpassword
orasupervisorpassword;ifyouhaveselected
High,enterasupervisorpassword.
Password
Authentication
•Disabled
•Enabled
Enableordisablepasswordauthentication.
Ifhighsecuritymodeisselected,thisitemis
displayed.
Fingerprint
ResetFingerprintData•EnterThisoptionisusedtoeraseallngerprintdata
storedinthengerprintreaderandresetsettings
tothefactorystate.Asaresult,anypower-on
securityfeaturespreviouslyenabledwillnotbe
abletoworkuntiltheyarere-enabledinthe
ngerprintsoftware.
Chapter8.Advancedconguration123

Table6.Securitymenuitems(continued)
MenuitemSubmenuitemValueComments
SecurityChip•Active
•Inactive
•Disabled
IfyouselectActive,thesecuritychipisfunctional.
IfyouselectInactive,theSecurityChipoption
isvisible,butthesecuritychipisnotfunctional.If
youselectDisabled,theSecurityChipoptionis
hiddenandthesecuritychipisnotfunctional.
SecurityReporting
Options
EnableordisablethefollowingSecurityReporting
Options:
•BIOSROMStringReporting:BIOStextstring
•CMOSReporting:CMOSdata
•NVRAMReporting:Securitydatastoredin
theAssetID
•SMBIOSReporting:SMBIOSdata
ClearSecurityChip•EnterCleartheencryptionkey.
Note:Thisitemisdisplayedonlyifyouhave
selectedActivefortheSecurityChipoption.
IntelTXTFeature•Disabled
•Enabled
EnableordisableIntelTrustedExecution
Technology.
PhysicalPresencefor
Provisioning
•Disabled
•Enabled
Thisoptionenablesordisablestheconrmation
messagewhenyouchangethesettingsofthe
securitychip.
SecurityChip
PhysicalPresencefor
Clear
•Disabled
•Enabled
Thisoptionenablesordisablestheconrmation
messagewhenyouclearthesecuritychip.
FlashBIOSUpdating
byEnd-Users
•Disabled
•Enabled
IfyouselectEnabled,alluserscanupdatethe
UEFIBIOS.IfyouselectDisabled,onlythe
personwhoknowsthesupervisorpasswordcan
updatetheUEFIBIOS.
UEFIBIOS
UpdateOption
SecureRollBack
Prevention
•Disabled
•Enabled
IfyouselectDisabled,youcanashtothe
previousversionofUEFIBIOS.Ifyouselect
Enabled,youcannotashtotheprevious
versionofUEFIBIOS.
Memory
Protection
ExecutionPrevention•Disabled
•Enabled
Somecomputervirusesandwormscause
memorybufferstooverowbyrunningcode
whereonlydataisallowed.IftheDataExecution
Preventionfeaturecanbeusedwithyour
operatingsystem,thenbyselectingEnabled
youcanprotectyourcomputeragainstattacks
bysuchvirusesandworms.Ifafterchoosing
Enabledyoundthatanprogramdoesnotrun
correctly,selectDisabledandresetthesetting.
IntelVirtualization
Technology
•Disabled
•Enabled
IfyouselectEnabled,aVirtualMachineMonitor
(VMM)canutilizetheadditionalhardware
capabilitiesprovidedbyIntelVirtualization
Technology.
Virtualization
IntelVT-dFeature•Disabled
•Enabled
IntelVT-disIntelVirtualizationTechnologyfor
DirectedI/O.Whenenabled,aVMMcanutilize
theplatforminfrastructureforI/Ovirtualization.
124UserGuide

Table6.Securitymenuitems(continued)
MenuitemSubmenuitemValueComments
EthernetLAN•Disabled
•Enabled
IfyouselectEnabled,youcanusetheEthernet
LANdevice.
WirelessLAN•Disabled
•Enabled
IfyouselectEnabled,youcanusetheWireless
LANdevice.
WiMAX•Disabled
•Enabled
IfyouselectEnabled,youcanusetheWiMAX
device.
WirelessWAN•Disabled
•Enabled
IfyouselectEnabled,youcanusetheWireless
WANdevice.
Bluetooth•Disabled
•Enabled
IfyouselectEnabled,youcanuseBluetooth
devices.
USBPort•Disabled
•Enabled
IfyouselectEnabled,youcanuseUSB
connectors.
ExpressCardSlot•Disabled
•Enabled
IfyouselectEnabled,youcanusethe
ExpressCardslot.
Ultrabay(HDD/Optical)•Disabled
•Enabled
IfyouselectEnabled,youcanuseUltrabay
Enhanceddevices.
MemoryCardSlot•Disabled
•Enabled
IfyouselectEnabled,youcanusethememory
cardslots.
SmartCardSlot•Disabled
•Enabled
IfyouselectEnabled,youcanusethesmart
cardslot.
IntegratedCamera•Disabled
•Enabled
IfyouselectEnabled,youcanusetheintegrated
camera.
Microphone•Disabled
•Enabled
IfyouselectEnabled,youcanusethe
microphones(internal,external,orline-in).
I/OPortAccess
FingerprintReader•Disabled
•Enabled
IfyouselectEnabled,youcanusethengerprint
reader.
IntelATModule
Activation
•Disabled
•Enabled
•Permanently
Disabled
EnableordisabletheUEFIBIOSinterfaceto
activatetheIntelATmodule,whichisanoptional
anti-theftservicefromIntel.
Note:IfyousettheIntelATmoduleactivation
toPermanentlyDisabled,youwillbeunableto
enablethissettingagain.
IntelATSuspend•EnterThisoptionisdisplayedonlywhentheanti-theft
functionisactivated.
TheIntelanti-theftsuspendscreenwillbe
displayedatnextboottoenterthesuspend
mode.
Anti-Theft
Computrace•Disabled
•Enabled
EnableordisabletheUEFIBIOSinterfaceto
activatethecomputracemodule.Computrace
Chapter8.Advancedconguration125

Table6.Securitymenuitems(continued)
MenuitemSubmenuitemValueComments
•Permanently
Disabled
isanoptionalmonitoringservicefromAbsolute
Software.
Note:Ifyousetthecomputracemodule
activationtoPermanentlyDisabled,youwillbe
unabletoenablethissettingagain.
SecureBoot•Disabled
•Enabled
EnableordisabletheUEFISecureBootfeature.
SelectEnabletopreventunauthorizedoperating
systemsfromrunningatboottime.
SelectDisabledtoallowanyoperatingsystems
torunatboottime.
PlatformMode•UserMode
•SetupMode
Specifythesystemisoperatinginsetupmode
orusermode.
SecureBootMode•StandardMode
•CustomMode
SpecifytheSecureBootmode.
ResettoSetupModeThisoptionisusedtoclearthecurrentplatform
keyandputthesystemintoSetupMode.You
caninstallyourownplatformkeyandcustomize
theSecureBootsignaturedatabasesinSetup
Mode.SecureBootmodewillbesettoCustom
Mode.
SecureBoot
RestoreFactoryKeys
Startupmenu
Youmightneedtochangethecomputerstartupsettings.Todoso,selectStartupfromtheThinkPad
Setupmainmenu.
Attention:
•Afteryouchangeyourstartupsequence,youmustbeextremelycarefulnottospecifyawrongdevice
duringacopy,asave,oraformatoperation.Ifyouspecifyawrongdevice,yourdataandprograms
mightbeerasedoroverwritten.
•IfyouareusingtheBitLockerdriveencryption,youshouldnotchangethestartupsequence.BitLocker
driveencryptiondetectsthechangeofstartupsequenceandlocksthecomputerfrombooting.
Changingthestartupsequence
Tochangethestartupsequence,dothefollowing:
1.SelectBootorNetwork,thenpressEnter.Thedefaultbootlistisdisplayed,showingtheorderinwhich
deviceswillbestartedup,evendevicesthatarenotattachedtoorinstalledonyourcomputerarelisted.
•UsetheBootsubmenutospecifythestartupsequencethatrunswhenyouturnonthepower.
•UsetheNetworksubmenutospecifythestartupsequencethatrunswhenWakeonLANisenabled.
WakeonLANiscommonlyusedbyLANadministratorsincorporatenetworkstogetremoteaccess
toyourcomputer.
2.Setthestartuporderbyusingthefollowingkeys:
•Usecursorkeystoselectadevice.
•UseF6orthecombinationofShiftand+tomovethedeviceuptoahigherpriority.
126UserGuide

•UseF5or–tomovethedevicedowntoalowerpriority.
•UsethecombinationofShiftand!toexcludeorincludeadevice.
3.PressF10tosavethechangesandrestartthesystem.
Tochangethestartupsequencetemporarilysothatthesystemstartsupfromadifferentdrive,dothe
following:
1.Turnoffthecomputer.
2.Turnonthecomputer;then,whiletheThinkPadlogoisdisplayed,pressF12.
3.Selectthedeviceyouwanttostartrst.
Note:TheBootmenuwillbedisplayedwhenthesystemcannotbootfromanydevicesortheoperating
systemcannotbefound.
ThefollowingtableliststheStartupmenuitems.
Notes:
•Defaultvaluesareinboldface.
•Ineachsubmenu,presstheEnterkeytoshowselectableoptionsandselectadesiredoptionbyusing
cursorkey.
•Someitemsaredisplayedonthemenuonlyifthecomputersupportsthecorrespondingfeatures.
Table7.Startupmenuitems
MenuitemValueComments
BootSee“Changingthestartupsequence”on
page126.
NetworkBootSelectthebootdevicewhenthesystem
wakesfromLAN.IfWakeonLANis
enabled,thenetworkadministratorcan
turnonallofthecomputersinaLAN
remotelybyuseofnetworkmanagement
software.
UEFI/LegacyBoot•Both
–UEFI/LegacyBootPriority
–UEFIFirst
–LegacyFirst
–CSMSupport(forUEFIOnly)
–Y es
–No
•UEFIOnly
•LegacyOnly
Selectsystembootcapability.
•Both:Thesystemwillbootfollowing
theUEFI/LegacyBootPriority
setting.
•UEFIOnly:Thesystemwillbootfrom
theUEFIenabledoperatingsystem.
•LegacyOnly:Thesystemwillboot
fromanyoperatingsystemotherthan
theUEFIenabledone.
Note:IfyouselectUEFIOnly,the
systemcannotbootfromthebootable
devicesthatdonothavetheUEFI
enabledoperatingsystem.
Chapter8.Advancedconguration127

Table7.Startupmenuitems(continued)
MenuitemValueComments
BootMode•Quick
•Diagnostics
ScreenduringthePOST:
•Quick:TheThinkPadLogoscreenis
displayed.
•Diagnostics:Textmessagesare
displayed.
Note:YoualsocanenterDiagnostic
modebypressingEscduringthePOST.
OptionKeysdisplay•Disabled
•Enabled
IfyouselectDisabled,the“Tointerrupt
normalstartup,pressEnter.”messageis
notdisplayedduringthePOST.
BootDeviceListF12Option•Disabled
•Enabled
IfyouselectEnabled,theF12keyis
recognizedandtheBootMenuwindow
isdisplayed.
BootOrderLock•Disabled
•Enabled
IfyouselectEnabled,thebootpriority
orderislockedforyourfutureuse.
Restartmenu
IfyouneedtoclosetheThinkPadSetupandrestartthesystem,selectRestartfromtheThinkPadSetup
menu.Thefollowingsubmenuisdisplayed:
•ExitSavingChanges:Restartthesystemaftersavingthechanges.
•ExitDiscardingChanges:Restartthesystemwithoutsavingthechanges.
•LoadSetupDefaults:Loadthedefaultsettingthatwasineffectatthetimeofpurchase.
•OSOptimizedDefaults:EnableOSOptimizedDefaultstomeettheMicrosoftWindows8certication
requirements.Whenyouchangethissetting,someothersettingsarechangedautomatically.Theaffected
settingsareCSMSupport,UEFI/LegacyBoot,SecureBoot,andSecureRollBackPrevention.
•DiscardChanges:Discardthechanges.
•SaveChanges:Savethechanges.
UpdatingyoursystemUEFIBIOS
TheUniedExtensibleFirmwareInterface(UEFI)BIOSisapartofthesystemprogramsthatmakeupthe
basiclayerofsoftwarebuiltintoyourcomputer.TheUEFIBIOStranslatestheinstructionsfromother
softwarelayers.
YourcomputersystemboardhasamodulecalledEEPROM,alsoreferredtoasashmemory.Youcan
updatetheUEFIBIOSandtheThinkPadSetupprogrambystartingyourcomputerwithaashupdate
opticaldiscorashupdateapplicationrunningintheWindowsenvironment.
Insomeinstanceswhenyouaddsoftware,hardware,oradevicedriver,youmightbeinformedthatyou
needtoupdateyourUEFIBIOSinorderforthenewadditiontoworkproperly.
ToupdateyourUEFIBIOS,gotothefollowingWebsiteandfollowtheinstructionsonthescreen:
http://www.lenovo.com/ThinkPadDrivers
128UserGuide

Usingsystemmanagement
Thissectionisintendedprimarilyfornetworkadministrators.
Yourcomputerisdesignedformanageability,sothatyoucanredirectmoreofyourresourcestobetter
meetyourbusinessobjectives.
Thismanageability,or“TotalCostofOwnership”(TCO),enablesyoutoremotelypoweronyourcomputer,
formattheharddiskdrive,installthesoftwareofyourchoice,andhavethecomputerstartupandfunctionin
thesamewayasanordinarydesktopPC.
Oncethecomputerisconguredandoperational,youcanmanageitbyuseofsoftwareandmanageability
featuresalreadyintegratedintotheclientsystemandthenetwork.
Systemmanagement
Readthistopictolearnmoreaboutfeaturesofsystemmanagement.
DesktopManagementInterface
ThesystemUEFIBIOSofyourcomputersupportsaninterfacecalledSystemManagementBIOSReference
Specication(SMBIOS)V2.6.1.SMBIOSprovidesinformationaboutthehardwarecomponentsofyour
system.ItistheresponsibilityoftheBIOStosupplythisdatabasewithinformationaboutitselfandthe
devicesonthesystemboard.ThisspecicationdocumentsthestandardsforgettingaccesstothisBIOS
information.
PrebooteXecutionEnvironment
ThePrebooteXecutionEnvironment(PXE)technologymakesyourcomputermoremanageable(itisPXE
2.1-compliant)byenablingittoboot(loadanoperatingsystemoranotherexecutableimage)froma
server.YourcomputersupportsthepersonalcomputerfunctionsthatPXErequires.Forexample,withthe
appropriateLANcard,yourcomputercanbebootedfromthePXEserver.
Note:TheRemoteInitialProgramLoad(RPL)functioncannotbeusedwithyourcomputer.
WakeonLAN
AnetworkadministratorcanuseWakeonLANtoturnonacomputerfromamanagementconsole.
WhenWakeonLANisusedwithnetworkmanagementsoftware,manyfunctions,suchasdatatransfer,
softwareupdates,andFlashupdatesofUEFIBIOS,canbeperformedremotelywithoutremoteattendance.
Thisupdatingprocesscanbedoneafternormalworkinghoursandonweekends,tosavetimeandincrease
productivity.Usersarenotinterruptedduringnormalworkinghours,andLANtrafciskepttoaminimum.
IfacomputeristurnedonbytheWakeonLANfunction,theNetworkBootsequenceisused.
AssetIDEEPROM
TheAssetIDEEPROMcontainsinformationaboutthesystem,includingitscongurationandtheserial
numbersofkeycomponents.Italsoincludesanumberofblankeldsinwhichyoucanrecordinformation
abouttheendusersinyournetwork.
Settingmanagementfeatures
Toenablethenetworkadministratortocontrolyourcomputerremotely,youmustcongurethenetwork
interfacebysettingthesystem-managementfeaturesintheThinkPadSetupprogram.Youcancongure
thefollowingfunctionsintheprogram:
Chapter8.Advancedconguration129

•WakeonLAN
•NetworkBootsequence
•Flashupdate
Ifanadministratorpassword(supervisorpassword)hasbeenset,youwillneedtospecifyitwhenyoustart
ThinkPadSetuptousethesefunctions.
WakeonLAN
WhentheWakeonLANfeatureisenabledonacomputerthatisconnectedtoaLAN,anetworkadministrator
canstartthecomputerremotelyfromamanagementconsole,usingremotenetwork-managementsoftware.
Whenyourcomputerisnotunderthenetworkadministrator'ssystemmanagement,youcandisableWake
onLAN.
ToenableordisableWakeonLAN,dothefollowing:
1.StartThinkPadSetup.
2.SelectCong.TheCongsubmenuisdisplayed.
3.SelectNetwork.TheNetworkitemsubmenuisdisplayed.
4.ForWakeOnLAN,selectoneofthefollowing:ACOnly,ACandBattery,orDisabled.
5.PressF10tosavechangesandexit.
NetworkBootsequence
Whenyourcomputeristurnedonremotely,thesystemwilltrytobootfromthedevicethatisspeciedinthe
NetworkBootsetting,andthenfollowthebootorderlistontheBootmenu.
Todeneasequence,dothefollowing:
1.OnthetheThinkPadSetupprogrammenu,selectBoot.TheBootsubmenuisdisplayed.
2.SelectNetworkBootandpresstheEnterkey.Thebootdevicelistisdisplayed.
3.Selectabootdevicefromthelisttomakeitasthetopbootpriority.
4.PressF10tosavechangesandexit.
Note:Ifyouwanttoinitializethesettingtoreturntothedefaultstartupsequence,pressF9.Thedefault
settingsareautomaticallyreloaded.
Flashupdate
Yournetworkadministratorcanremotelyupdatethesystemprogramsonyourcomputerfromamanagement
console.Thefollowingrequirementsmustbemet:
•YourcomputermustbestartedovertheLAN.
•YourcomputermustbeengagedinaPrebooteXecutionEnvironment.
•Network-managementsoftwaremustbeinstalledontheremoteadministrator'scomputer.
130UserGuide

Chapter9.Preventingproblems
AnimportantpartofowningaThinkPadnotebookcomputerismaintenance.Withpropercare,you
canavoidcommonproblems.Thischapterprovidesinformationthatcanhelpyoukeepyourcomputer
runningsmoothly.
•“Generaltipsforpreventingproblems”onpage131
•“Makingsuredevicedriversarecurrent”onpage132
•“Takingcareofyourcomputer”onpage133
Generaltipsforpreventingproblems
1.IfyourcomputerisequippedwithbothaharddiskdriveandanmSATAsolidstatedrive,youarenot
recommendedtousethemSATAsolidstatedriveasabootabledevice.ThemSATAsolidstatedriveis
designedanddevelopedfor“cache”functionpurposeonly.IfyouusethemSATAsolidstatedriveasa
bootabledevice,itsreliabilityisnotguaranteed.
2.Checkthecapacityofyourharddiskdrivefromtimetotime.Iftheharddiskdrivegetstoofull,the
Windowsoperatingsystemwillslowdownandmightproduceerrors.
Tochecktheharddiskdrivecapacity,clickStart➙ComputerontheWindows7operatingsystem.For
theWindows8operatingsystem,opentheWindowsExplorerandclickComputer.
3.Emptyyourrecyclebinonaregularbasis.
4.Usediskdefragmenttoolregularlyonyourharddiskdrivetoimprovedataseekandreadtimes.
5.Tofreeupdiskspace,uninstallunusedapplicationprograms.
Note:Youalsomightwanttolookforapplicationprogramduplicationoroverlappingversions.
6.CleanoutyourInbox,Sent,andTrashfoldersfromyoure-mailclientprogram.
7.Backupyourdataatleastonceaweek.Ifcriticaldataispresent,itisagoodideatoperformadaily
backupoperation.Lenovohasmanybackupoptionsavailableforyourcomputer.Rewritableoptical
drivesareavailableformostmachinesandareeasilyinstalled.
8.Schedulesystemrestoreoperationstotakeasystemsnapshotperiodically.Formoreinformationabout
systemrestore,see“RecoveryoverviewforWindows7models”onpage63.
9.UpdatedevicedriversandUEFIBIOSwhenneeded.
10.Proleyourmachineathttp://www.lenovo.com/supporttokeepuptodatewithcurrentdriversand
revisions.
11.Ensuredevicedriversfornon-Lenovoperipheraldevicesarekeptuptodate.Youmightwanttoreadthe
devicedriverinformationreleasenotespriortoupdatingforcompatibilityorknownissues.
12.Keepalogbook.Entriesmightincludemajorhardwareorsoftwarechanges,driverupdates,minor
issuesyouhaveexperienced,andhowyouresolvedtheminorissues.
13.Ifyoueverneedtorunarecoveryonyourcomputertoreturnthepreloadontothemachine,the
followingtipsmighthelpalongtheway:
•Removeallexternaldevicessuchastheprinter,keyboard,andsoon.
•Makesurethatyourbatteryischargedandthatyouhavetheacpowerconnected.
•BootintoThinkPadSetupandloadthedefaultsettings.
•Restartthecomputerandstarttherecoveryoperation.
•Ifyourcomputerusesdiscsastherecoverymedia,donotremovethediscfromthedriveuntil
promptedtodoso.
14.Forsuspectedharddiskdriveissues,referto“Diagnosingproblems”onpage137andruna
diagnostictestofthedrivepriortocallingtheCustomerSupportCenter.Ifyourcomputerdoes
©CopyrightLenovo2012131

notstartup,downloadthelestocreateabootableself-testmediafromthefollowingWebsite:
http://www.lenovo.com/hddtest.Runthetestandrecordanymessagesorerrorcodes.Ifthetest
returnsanyfailingerrorcodesormessages,calltheCustomerSupportCenterwiththecodesor
messagesandthecomputerinfrontofyou.Atechnicianwillassistyoufurther.
15.Ifrequired,youcanndyourcountry'sCustomerSupportCenteratthefollowingWebaddress:
http://support.lenovo.com/en_US/detail.page?LegacyDocID=migr-4hwse3.WhencallingtheCustomer
SupportCenter,makesurethatyouhaveyourmachinemodeltype,serialnumber,andthecomputerin
frontofyou.Also,ifthecomputerisproducingerrorcodes,itishelpfultohavetheerrorscreenonor
themessagewrittendown.
Makingsuredevicedriversarecurrent
Devicedriversareprogramsthatcontaininstructionsfortheoperatingsystemabouthowtooperateor
“drive”acertainpieceofhardware.Eachhardwarecomponentonyourcomputerhasitsownspecicdriver.
Ifyouaddanewcomponent,theoperatingsystemneedstobeinstructedonhowtooperatethatpiece
ofhardware.Afteryouinstallthedriver,theoperatingsystemcanrecognizethehardwarecomponent
andunderstandhowtouseit.
Note:Becausedriversareprograms,likeanyotherleonyourcomputer,theyaresusceptibletocorruption
andmightnotperformcorrectlyifcorruptionoccurs.
Itisnotalwaysnecessarytodownloadthelatestdrivers.However,youshoulddownloadthelatestdriver
foracomponentifyounoticepoorperformancefromthatcomponentorifyouaddedanewcomponent.
Thismighteliminatethedriverasthepotentialcauseoftheproblem.
GettingthelatestdriversfromtheWebsite
YoucandownloadandinstallupdateddevicedriversfromtheLenovoWebsitebydoingthefollowing:
1.Gotohttp://www.lenovo.com/ThinkPadDrivers.
2.EntertheproductnumberofthecomputerorclickDetectmysystemonthescreen.
3.ClickDownloadsanddrivers.
4.Followthedirectionsonthescreenandinstallthenecessarysoftware.
GettingthelatestdriversusingSystemUpdate
TheSystemUpdateprogramhelpsyoukeepthesoftwareonyoursystemup-to-date.Updatepackagesare
storedonLenovoserversandcanbedownloadedfromtheLenovoSupportWebsite.Updatepackagescan
containapplications,devicedrivers,UEFIBIOSashes,orsoftwareupdates.WhentheSystemUpdate
programconnectstotheLenovoSupportWebsite,theSystemUpdateprogramautomaticallyrecognizes
themachinetypeandmodelofyourcomputer,theinstalledoperatingsystem,andthelanguageofthe
operatingsystemtodeterminewhatupdatesareavailableforyourcomputer.TheSystemUpdateprogram
thendisplaysalistofupdatepackagesandcategorizeseachupdateascritical,recommended,oroptionalto
helpyouunderstandtheimportance.Youhavecompletecontrolofwhichupdatestodownloadandinstall.
Afteryouselecttheupdatepackagesyouwant,theSystemUpdateprogramautomaticallydownloadsand
installstheupdateswithoutanyfurtherinterventionfromyou.
TheSystemUpdateprogramispreinstalledonyourcomputerandisreadytorun.Theonlyprerequisiteis
anactiveInternetconnection.Youcanstarttheprogrammanually,oryoucanusetheschedulefeature
toenabletheprogramtosearchforupdatesautomaticallyatspeciedintervals.Youalsocanpredene
scheduledupdatestosearchbyseverity(criticalupdates,criticalandrecommendedupdates,orallupdates)
sothelistyouchoosefromcontainsonlythoseupdatetypesthatareofinteresttoyou.
FormoreinformationabouthowtouseSystemUpdate,refertothehelpinformationsystemoftheprogram..
132UserGuide

Takingcareofyourcomputer
Althoughyourcomputerisdesignedtofunctionreliablyinnormalworkenvironments,youneedtouse
commonsenseinhandlingit.Byfollowingtheseimportanttips,youwillgetthemostuseandenjoyment
outofyourcomputer.
Becarefulaboutwhereandhowyouwork
•Storepackingmaterialssafelyoutofthereachofchildrentopreventtheriskofsuffocationfromplastic
bags.
•Keepyourcomputerawayfrommagnets,activatedcellularphones,electricalappliances,orspeakers
(within13cmor5inches).
•Avoidsubjectingyourcomputertoextremetemperatures(below5°C/41°Forabove35°C/95°F).
•Someappliances,suchascertainportabledesktopfansorairpuriers,canproducenegativeions.Ifa
computerisclosetosuchanappliance,andisexposedforanextendedtimetoaircontainingnegative
ions,itmightbecomeelectrostaticallycharged.Suchachargemightbedischargedthroughyourhands
whenyoutouchthekeyboardorotherpartsofthecomputer,orthroughconnectorsonI/Odevices
connectedtoit.Eventhoughthiskindofelectrostaticdischarge(ESD)istheoppositeofadischargefrom
yourbodyorclothingtothecomputer,itposesthesameriskofacomputermalfunction.
Yourcomputerisdesignedandmanufacturedtominimizeanyeffectsofelectrostaticcharge.Anelectrostatic
chargeaboveacertainlimit,however,canincreasetheriskofESD.Therefore,whenusingthecomputer
closetoanappliancethatcanproducenegativeions,givespecialattentiontothefollowing:
•Avoiddirectlyexposingyourcomputertotheairfromanappliancethatcanproducenegativeions.
•Keepyourcomputerandperipheralsasfaraspossiblefromsuchanappliance.
•Whereverpossible,groundyourcomputertofacilitatesafeelectrostaticdischarge.
Note:Notallsuchappliancescauseasignicantelectrostaticcharge.
Begentlewithyourcomputer
•Avoidplacinganyobjects(includingpaper)betweenthedisplayandthekeyboardorthepalmrest.
•Yourcomputerdisplayisdesignedtobeopenedandusedatanangleslightlygreaterthan90degrees.
Donotopenthedisplaybeyond180degrees,asthismightdamagethecomputerhinge.
•Donotturnyourcomputeroverwhiletheacpoweradapterispluggedin.Thiscouldbreaktheadapter
plug.
Carryyourcomputerproperly
•Beforemovingyourcomputer,besuretoremoveanymedia,turnoffattacheddevices,anddisconnect
cordsandcables.
•Whenpickingupyouropencomputer,holditbythebottom.Donotpickuporholdyourcomputerby
thedisplay.
Handlestoragemediaanddrivesproperly
•Ifyourcomputercomeswithanopticaldrive,donottouchthesurfaceofadiscorthelensonthetray.
•WaituntilyouheartheCDorDVDclickintothecenterpivotofthedrivebeforeclosingthetray.
•Onyourcomputer,useonlyopticaldrivesdesignedforusewiththeSerialUltrabayEnhancedbay.
Note:Youcaninstalla9.5-mm-thickSerialUltrabaySlimdeviceora12.7-mm-thickSerialUltrabay
EnhanceddeviceintheSerialUltrabayEnhancedbay.
Chapter9.Preventingproblems133

•Wheninstallingtheharddiskdrive,solidstatedrive,oropticaldrive,followtheinstructionsshippedwith
yourhardware,andapplypressureonlywhereneededonthedevice.
•Turnoffyourcomputerifyouarereplacingtheharddiskdriveorsolidstatedrive.
•Whenreplacingtheprimaryharddiskdriveorsolidstatedrive,reattachthecoverofthedriveslot.
•Storeyourexternalandremovableharddiskdriveoropticaldrivesintheappropriatecontainersor
packagingwhentheyarenotbeingused.
•Beforeyouinstallanyofthefollowingdevices,touchametaltableoragroundedmetalobject.Thisaction
reducesanystaticelectricityfromyourbody.Thestaticelectricitycoulddamagethedevice.
–Memorymodules
–Mini-PCIcards
–ExpressCardmodules
–CompactFlashcards
–Smartcards
–Memorycards,suchasSDcards,SDHCcards,SDXCcards,andMultiMediaCardmodules
Note:Notalllisteddevicesareincludedinyourcomputer.
Thisactionreducesanystaticelectricityfromyourbody.Thestaticelectricitycoulddamagethedevice.
•Whentransferringdatatoorfromaashmediacard,suchasanSDcard,donotputyourcomputerin
sleeporhibernationmodebeforethedatatransferiscomplete.Todosomightcausedamagetoyour
data.
Takecareinsettingpasswords
•Rememberyourpasswords.Ifyouforgetasupervisororharddiskpassword,Lenovowillnotresetit,and
youmighthavetoreplaceyoursystemboard,orharddiskdriveorsolidstatedrive.
Careforthengerprintreader
Thefollowingactionscoulddamagethengerprintreaderorcauseitnottoworkproperly:
•Scratchingthesurfaceofthereaderwithahard,pointedobject.
•Scrapingthesurfaceofthereaderwithyourngernailoranythinghard.
•Usingortouchingthereaderwithadirtynger.
Ifyounoticeanyofthefollowingconditions,gentlycleanthesurfaceofthereaderwithadry,soft,lint-free
cloth:
•Thesurfaceofthereaderisdirtyorstained.
•Thesurfaceofthereaderiswet.
•Thereaderoftenfailstoenrollorauthenticateyourngerprint.
Registeryourcomputer
•RegisteryourThinkPadcomputerwithLenovoathttp://www.lenovo.com/register.Thiscanhelp
authoritiesreturnyourcomputertoyouifitislostorstolen.Registeringyourcomputeralsoenables
Lenovotonotifyyouaboutpossibletechnicalinformationandupgrades.
Besurenottomodifyyourcomputer
•OnlyanauthorizedThinkPadrepairtechnicianshoulddisassembleandrepairyourcomputer.
•Donotmodifyortapethelatchestokeepthedisplayopenorclosed.
134UserGuide

Cleaningthecoverofyourcomputer
Occasionallycleanyourcomputerbydoingthefollowing:
1.Prepareamixtureofagentlekitchen-usedetergent(onethatdoesnotcontainabrasivepowderor
strongchemicalssuchasacidoralkaline).Use5partswaterto1partdetergent.
2.Absorbthediluteddetergentintoasponge.
3.Squeezeexcessliquidfromthesponge.
4.Wipethecoverwiththesponge,usingacircularmotionandtakingcarenottoletanyexcessliquiddrip.
5.Wipethesurfacetoremovethedetergent.
6.Rinsethespongewithcleanrunningwater.
7.Wipethecoverwiththecleansponge.
8.Wipethesurfaceagainwithadry,soft,lint-freecloth.
9.Waitforthesurfacetodrycompletelyandremoveanybersfromthecloth.
Cleaningyourcomputerkeyboard
Tocleanthecomputerkeyboard,dothefollowing:
1.Applysomeisopropylrubbingalcoholtoasoft,dust-freecloth.
2.Wipeeachkeytopsurfacewiththecloth.Wipethekeysonebyone;ifyouwipeseveralkeysatatime,
theclothmighthookontoanadjacentkeyandpossiblydamageit.Makesurethatnoliquiddripsonto
orbetweenthekeys.
3.Allowtodry.
4.Toremoveanycrumbsordustfrombeneaththekeys,youcanuseacamerablowerwithabrush
orcoolairfromahairdryer.
Note:Avoidsprayingcleanerdirectlyontothedisplayorthekeyboard.
Cleaningyourcomputerdisplay
Tocleanthecomputerdisplay,dothefollowing:
1.Gentlywipethedisplaywithadry,softlint-freecloth.Ifyouseeascratchlikemarkonyourdisplay,
itmightbeastaintransferredfromthekeyboardortheTrackPointpointingstickwhenthecoverwas
pressedfromtheoutside.
2.Wipeordustthestaingentlywithasoft,drycloth.
3.Ifthestainremains,moistenasoft,lint-freeclothwithwaterora50-50mixtureofisopropylalcoholand
waterthatdoesnotcontainimpurities.
4.Wringoutasmuchoftheliquidasyoucan.
5.Wipethedisplayagain;donotletanyliquiddripintothecomputer.
6.Besuretodrythedisplaybeforeclosingit.
Chapter9.Preventingproblems135

136UserGuide

Chapter10.Troubleshootingcomputerproblems
Thischapterprovidesinformationonwhattodoifyouexperienceaproblemwithyourcomputer.
•“Diagnosingproblems”onpage137
•“Troubleshooting”onpage137
Diagnosingproblems
Ifyouexperienceproblemswithyourcomputer,usetheLenovoSolutionCenterprogramasastarting
pointforsolvingthem.
TheLenovoSolutionCenterprogramenablesyoutotroubleshootandresolvecomputerproblems.It
combinesdiagnostictests,systeminformationcollection,securitystatus,andsupportinformation,along
withhintsandtipsformaximumsystemperformance.
Notes:
•TheLenovoSolutionCenterprogramcanbedownloadedfromhttp://www.lenovo.com/diags.
•IfyouareusingtheWindowsoperatingsystemratherthanWindows7andWindows8,goto
http://www.lenovo.com/diagsforthelatestinformationondiagnosticsforyourcomputer.
IfyourcomputerisinstalledwiththeWindows7operatingsystem,Wwhenyouaresettingupyour
computer,theLenovoSolutionCenterprogrampromptsyoutocreaterecoverymedia,whichyoucanuse
torestoretheharddiskdrivetothefactorydefaultstate.Formoreinformation,see“Creatingandusing
recoverymedia”onpage63
ToruntheLenovoSolutionCenterprogram,see“AccessingLenovoprogramsontheWindows7operating
system”onpage15.
Foradditionalinformation,refertotheLenovoSolutionCenterhelpinformationsystem.
Note:Ifyouareunabletoisolateandrepairtheproblemyourselfafterrunningtheprogram,saveandprint
thelogles.YouwillneedthelogleswhenyouspeaktoaLenovotechnicalsupportrepresentative.
Troubleshooting
Ifyourcomputerhasanerror,ittypicallydisplaysamessageoranerrorcode,orabeepsoundswhenyou
turniton.Tocorrectanerror,rstndthedescriptionoftheerrorintheleft-handcolumnofthechartthat
applies.Thenclickthatdescriptiontogetatroubleshootingprocedure.
Tomakesurethatyourcomputerhasthefeaturesoroptionsthatareintroducedinthefollowingsections,
consulttheonlinehelporthelistshippedwithyourcomputer.
Computerstopsresponding
Printtheseinstructionsnowandkeepitwithyourcomputerforreferencelater.
Ifyourcomputeriscompletelyunresponsive(youcannotusetheUltraNavpointingdeviceorthekeyboard),
dothefollowing:
1.Pressandholdthepowerswitchuntilthecomputerturnsoff.Afterthecomputeristurnedoff,restartby
pressingthepowerswitch.Ifthecomputerdoesnotturnon,continuewithstep2.
©CopyrightLenovo2012137

Note:Donotremovethebatteryandtheacpoweradaptertoresetthecomputer.
2.Whilethecomputeristurnedoff,removeallpowersourcesfromthecomputer(batteryandtheacpower
adapter).Holddownthepowerbuttonfor10seconds.Plugintheacpoweradapterwhilekeepingthe
batteryoutofthecomputer.Ifthecomputerdoesnotturnbackon,continuewithstep3.
Note:OncethecomputerstartsupandenterstheWindowsenvironment,usethepropershutdown
proceduretoturnthecomputeroff.Oncethecomputerisoff,reattachthebatteryandrestartthe
computer.Ifthecomputerdoesnotstartwiththebatteryreattached,removethebatteryandagain
startwithstep2.Ifthecomputerstartswithacpowerbutdoesnotstartwhenthebatteryisattached,
calltheCustomerSupportCenterforsupport.
3.Whilethecomputerisoff,removeallsourcesofpower(batteryandtheacpoweradapter).Removeall
externaldevicesthatareattachedtoyourcomputer(keyboard,mouse,printer,scanner,andsoon).
Repeatstep2.Ifstep2isunsuccessful,continuewithstep4.
Note:Thefollowingstepsinvolveremovingstaticsensitivecomponentsfromyourcomputer.Makesure
thatyouareproperlygroundedandremoveallsourcesofpowerattachedtothecomputer.Ifyouare
uncomfortableorunsureaboutremovingcomponentspleasecalltheCustomerSupportCenterfor
assistance.
4.Whilethecomputerisoff,removeallsourcesofpowerandexternalhardware.Removeanynon-original
memorymoduleaddedtoyourcomputer.Afterremovingtheextramemorymoduleandreseatingthe
originalmemorymodule,repeatstep2.Ifthecomputerstilldoesnotturnon,consulttheusermanual
forothercustomer-replaceablecomponentsthatareattachedtoyourcomputer.
Ifthecomputerstilldoesnotstartup,calltheCustomerSupportCenterandaCustomerSupportSpecialist
willassistyou.
Spillsonthekeyboard
Withamobilecomputer,thereareincreasedchancesofspillingliquidsonthekeyboard.Becausemost
liquidsconductelectricity,liquidspilledonthekeyboardcouldcreatenumerousshortcircuits,potentially
causingirreparabledamagetoyourcomputer.
Ifyouspillsomethingonyourcomputer:
Attention:Besurethatnoliquidcreatesashortcircuitbetweenyouandtheacpoweradapter(ifinuse).
Althoughyoumightlosesomedataorworkbyturningoffthecomputerimmediately,leavingthecomputer
onmightmakeyourcomputerunusable.
1.Carefullyunplugtheacpoweradapterimmediately.
2.Turnoffthecomputerimmediately.Ifthecomputerdoesnotturnoff,removethebattery.Themore
quicklyyoustopthecurrentfrompassingthroughthecomputerthemorelikelyyouwillreducedamage
fromshortcircuits.
3.Waituntilyouarecertainthatalltheliquidisdrybeforeturningonyourcomputer.
Note:Ifyouwanttoreplaceyourkeyboard,youcanpurchaseanewone.
Errormessages
•Message:0177:BadSVPdata,stopPOSTtask.
Solution:ChecksumofthesupervisorpasswordintheEEPROMisnotcorrect.Thesystemboard
shouldbereplaced.Havethecomputerserviced.
•Message:0183:BadCRCofSecuritySettingsinEFIVariable.EnterThinkPadSetup.
138UserGuide

Solution:ChecksumoftheSecuritysettingsintheEFIVariableisnotcorrect.EnterThinkPadSetup
tochecksecuritysettings,PressF10andthenpressEntertorestartthesystem.Ifyoustillhavea
problem,havethecomputerserviced.
•Message:0187:EAIAdataaccesserror
Solution:TheaccesstoEEPROMisfailed.Havethecomputerserviced.
•Message:0188:InvalidRFIDSerializationInformationArea
Solution:TheEEPROMchecksumisnotcorrect(block#0and1).Thesystemboardshouldbereplaced,
andtheboxserialnumberneedstobereinstalled.Havethecomputerserviced.
•Message:0189:InvalidRFIDcongurationinformationarea
Solution:TheEEPROMchecksumisnotcorrect(block#4and5).Thesystemboardshouldbereplace,
andtheUUIDneedstobereinstalled.Havethecomputerserviced.
•Message:0190:Criticallow-batteryerror
Solution:Thecomputerturnedoff,becausethebatteryislow.Connecttheacpoweradaptertothe
computerandchargethebattery,orreplacethebatterywithafullychargedone.
•Message:0191:SystemSecurity-Invalidremotechangerequested
Solution:Thesystemcongurationchangehasfailed.Conrmtheoperationandtryagain.Toclearthe
error,enterThinkPadSetup.
•Message:0199:SystemSecurity-Securitypasswordretrycountexceeded.
Solution:Thismessageisdisplayedifyouenterawrongsupervisorpasswordmorethanthreetimes.
Conrmthesupervisorpasswordandtryagain.Tocleartheerror,enterThinkPadSetup.
•Message:1802:Unauthorizednetworkcardispluggedin-Poweroffandremovethenetworkcard.
Solution:TheminiPCIExpressnetworkcardisnotsupportedonthiscomputer.Removeit.
•Message:1820:Morethanoneexternalngerprintreadersareattached.
Solution:Poweroffandremoveallbutthereaderthatyousetupwithinyourmainoperatingsystem.
•Message:2000:ThinkVantageActiveProtectionsensordiagnosticsfailed.
Solution:ThinkVantageActiveProtectionsensorisnotworkingcorrectly.Havethecomputerserviced.
•Message:2100:DetectionerroronHDD0(MainHDD)
Solution:Theharddiskisnotworking.Havetheharddiskserviced.
•Message:2101:DetectionerroronHDD1(UltrabayHDD)
Solution:Theharddiskisnotworking.Havetheharddiskserviced.
•Message:2102:DetectionerroronHDD2(MiniSATA)
Solution:TheMiniSATAdeviceisnotworking.HavetheMiniSATAdeviceserviced.
•Message:2110:ReaderroronHDD0(MainHDD)
Solution:Theharddiskisnotworking.Havetheharddiskserviced.
•Message:2111:ReaderroronHDD1(UltrabayHDD)
Solution:Theharddiskisnotworking.Havetheharddiskserviced.
•Message:2112:ReaderroronHDD2(MiniSATA)
Solution:TheMiniSATAdeviceisnotworking.HavetheMiniSATAdeviceserviced.
•Message:2200:MachineTypeandSerialNumberareinvalid.
Solution:MachineTypeandSerialNumberareinvalid.Havethecomputerserviced.
•Message:2201:MachineUUIDisinvalid.
Solution:MachineUUIDisinvalid.Havethecomputerserviced.
•Message:Fanerror
Chapter10.Troubleshootingcomputerproblems139

Solution:Coolingfanhasfailed.Shutdownthecomputerimmediatelyandhavethecomputerserviced.
•Message:Thermalsensingerror
Solution:Thethermalsensorhasproblem.Shutdownthecomputerimmediatelyandhavethecomputer
serviced.
•Message:ThissystemdoesnotsupportbatteriesthatarenotgenuineLenovomadeorauthorized.The
systemwillcontinuetoboot,butmaynotchargeunauthorizedbatteries.PresstheESCkeytocontinue.
Attention:Lenovohasnoresponsibilityfortheperformanceorsafetyofunauthorizedbatteries,and
providesnowarrantiesforfailuresordamagearisingoutoftheiruse.
Solution:ReplacethebatterywiththecorrectLenovobatteryforthiscomputer.Ifyoustillseethesame
errormessage,contactLenovoservicetohavethecomputerserviced.
•Message:Thebatteryinstalledisnotsupportedbythissystemandwillnotcharge.Pleasereplacethe
batterywiththecorrectLenovobatteryforthissystem.PresstheESCkeytocontinue.
Solution:ReplacethebatterywiththecorrectLenovobatteryforthiscomputer.Ifyoustillseethesame
errormessage,contactLenovoservicetohavethecomputerserviced.
Errorswithoutmessages
•Problem:MyscreenkeepsblankingwhenIdonotwantitto.
Solution:IfyousystemispreinstalledwiththeWindows7operatingsystem,youcandisableanysystem
timers,suchastheLCDturn-offtimerortheblanktimerbydoingthefollowing:
1.StartPowerManager.
2.ClickthePowerplantab,andthenselectMaximumPerformancefromthepredenedpowerplans.
•Problem:WhenIturnonthecomputer,nothingisdisplayedonthescreenandthecomputerdoesnot
beepwhilestartingup.
Note:Ifyouarenotsurewhetheryouheardanybeeps,turnoffthecomputerbypressingandholdingthe
powerswitchforfoursecondsormore.Turnitonandlistenagain.
Solution:Makesurethat:
–Thebatteryisinstalledcorrectly.
–Theacpoweradapterisconnectedtothecomputerandthepowercordispluggedintoaworking
electricaloutlet.
–Thecomputeristurnedon.(Turnthepowerswitchonagainforconrmation.)
Ifapower-onpasswordisset:
–Pressanykeytodisplaythepromptforthepower-onpassword.Ifthebrightnesslevelofthescreen
islow,increaseitbypressingHome.
–TypethecorrectpasswordandpressEnter.
Iftheseitemsarecorrectlyset,andthescreenremainsblank,havethecomputerserviced.
•Problem:WhenIturnonthecomputer,onlyawhitecursorisdisplayedonablankscreen.
Solution:Ifyouhavemodiedapartitiononyourharddiskdrivebyusingpartitionsoftware,information
aboutthatpartition,orthemasterbootrecordmighthavebeendestroyed.
1.Turnoffthecomputer,andthenturnitonagain.
2.Ifyoustillseeonlythecursoronthescreen,dothefollowing:
–IfyoursystemisinstalledwiththeWindows7operatingsystem,useeithertheRescueand
Recoveryworkspaceortherecoverydiscstorestorethesystemtothefactorystate.
140UserGuide

–IfyoursystemisinstalledwiththeWindows8operatingsystem,useeithertheRemoveeverything
andreinstallWindowsfunctionortherecoverydiscstorestorethesystemtothefactorystate.
Iftheproblempersists,havethecomputerserviced.
•Problem:Myscreengoesblankwhilethecomputerison.
Solution:Yourscreensaverorpowermanagementmighthavebeenenabled.Doeitherofthefollowing:
–TouchtheTrackPointpointingdeviceorthetouchpad,orpressakeytoexitthescreensaver.
–Pressthepowerswitchtoresumefromsleeporhibernation.
Beeperrors
Table8.Beeperrors
ProblemSolution
Oneshortbeep,pause,threeshortbeeps,pause,three
moreshortbeeps,andoneshortbeep
Makesurethatmemorymodulesareinstalledcorrectly.If
theyare,andyoustillhearthebeeps,havethecomputer
serviced.
OnelongandtwoshortbeepsThevideofunctionhasaproblem.Havethecomputer
serviced.
FourcyclesoffourshortbeepsTheSecurityChiphasaproblem.Havethecomputer
serviced.
FiveshortbeepsThesystemboardhasaproblem.Havethecomputer
serviced.
Threeshortbeeps,pause,oneshortbeep,pause,one
moreshortbeep,andthreeshortbeeps
PCIresourceallocationfailure.Poweroffandremove
devicefromExpressCardSlot.Ifthebeepspersist,have
thecomputerserviced.
Memorymoduleproblems
Printtheseinstructionsnowandkeepitwithyourcomputerforreferencelater.
Ifyourmemorymoduleisnotoperatingproperly,checkthefollowingitems:
1.Verifythatthememorymoduleisinstalledandseatedcorrectlyinyourcomputer.
Itmightbenecessarytoremovealladdedmemorymodulestotestthecomputerwithonlythe
factory-installedmemorymodules,andthenreinstallthememorymoduleoneatatimetoensure
aproperconnection.
2.Checkforerrormessagesduringstartup.
Followtheappropriatecorrectiveactionsforpower-onself-test(POST)errormessages.
3.VerifythatthelatestUEFIforyourmodelhasbeeninstalled.
4.Verifythepropermemorycongurationandcompatibilityincludingthemaximummemorysizeandthe
memoryspeed.
5.RuntheLenovoSolutionCenterprogram.
Networkingproblems
Thefollowingarethemostcommonnetworkingproblems:
Ethernetproblems
Problem:Yourcomputercannotconnecttothenetwork.
Chapter10.Troubleshootingcomputerproblems141

Solution:Makesurethat:
•Thecableisinstalledcorrectly.
ThenetworkcablemustbesecurelyconnectedbothtotheEthernetconnectorofyourcomputerand
totheRJ45connectorofthehub.Themaximumallowabledistancefromthecomputertohubis100
meters.Ifthecableisconnectedandthedistanceiswithinacceptablelimitsbuttheproblempersists,try
adifferentcable.
•Youareusingthecorrectdevicedriver.
1.GototheControlPanel.ClickHardwareandSound➙DeviceManager.Ifyouarepromptedforan
administratorpasswordorconrmation,typethepasswordorprovideconrmation.
2.Iftheexclamationmark!isdisplayednexttotheadapternameunderNetworkadapters,you
mightnotbeusingthecorrectdriverorthedrivermighthavebeendisabled.Toupdatethedriver,
right-clickthehighlightedadapter.
3.ClickUpdateDriverSoftware,andthenfollowtheinstructionsonthescreen.
•Theswitchportandtheadapterhavethesameduplexsetting.
Ifyouconguredtheadapterforfullduplex,makesurethattheswitchportalsoisconguredfor
fullduplex.Settingthewrongduplexmodecandegradeperformance,causedataloss,orresultin
lostconnections.
•Youhaveinstalledallnetworkingsoftwarethatisnecessaryforyournetworkenvironment.
CheckwithyourLANadministratorforthenecessarynetworkingsoftware.
Problem:Theadapterstopsworkingfornoapparentreason.
Solution:Thenetworkdriverlesmightbecorruptormissing.Updatethedriverbyreferringtotheabove
solutionfortheproceduretomakesurethatthecorrectdevicedriverisinstalled.
Problem:IfyourcomputerisaGigabitEthernetmodelandyouuseaspeedof1000Mbps,theconnection
failsorerrorsoccur.
Solution:
•UseCategory5wiringandmakesurethatthenetworkcableissecurelyconnected.
•Connecttoa1000BASE-Thub/switch(not1000BASE-X).
Problem:TheWakeonLANfeatureisnotworking.
Solution:
•MakesurethatWakeonLANisenabledinThinkPadSetup.
•Ifitis,checkwithyourLANadministratorforthenecessarysettings.
Problem:IfyourcomputerisaGigabitEthernetmodel,itcannotconnecttothenetworkat1000Mbps.
Instead,itconnectsat100Mbps.
Solution:
•Tryanothercable.
•Makesurethatthelinkpartnerissettoauto-negotiate.
•Makesurethattheswitchis802.3ab-compliant(gigabitovercopper).
AwirelessLANproblem
Problem:Youcannotconnecttothenetworkusingthebuilt-inwirelessnetworkcard.
142UserGuide

Solution:
•IfyoursystemisinstalledwithWindows7operatingsystem,ensurethat:
–YourwirelessLANdriveristhelatestversion.ChecktheWebsiteandconrmthatthedriverversion
supportedbytheAccessConnectionsprogramisthelatestdocumentedinthereadmele.
–Yourcomputeriswithinrangeofawirelessaccesspoint.
–Thewirelessradioisenabledbydouble-clickingtheAccessConnectionsicononthetaskbar.Check
theNetworkName(SSID)andyourencryptioninformation.UsetheAccessConnectionsprogramto
verifythiscase-sensitiveinformation.
•IfyoursystemisinstalledwithWindows8operatingsystem,ensurethat:
–YourwirelessLANdriveristhelatestversion.
–Yourcomputeriswithinrangeofawirelessaccesspoint.
–Thewirelessradioisenabled.
–TheAirplanemodeisoff.
AwirelessWANproblem
Problem:AmessageisdisplayedindicatingthatanunauthorizedWANcardisinstalled.
Solution:TheWANcardisnotsupportedonthiscomputer.Removeit.
Note:Dependingonyourcomputer,somemodelsdonothaveawirelessWANcard.
Bluetoothproblems
Problem:SounddoesnotcomefromtheBluetoothheadset/headphonebutcomesfromthelocalspeaker
eventhoughtheBluetoothheadset/headphoneisconnectedusingaHeadsetproleorAVprole.
Solution:Dothefollowing:
1.Exittheapplicationthatusesthesounddevice(forexample,WindowsMediaPlayer).
2.OpenControlPanel.ClickHardwareandSound➙Sound➙Playback.
3.IfyouareusingaHeadsetprole,selectBluetoothHands-freeAudioandclicktheSetDefaultbutton.
IfyouareusinganAVprole,selectStereoAudioandclicktheSetDefaultbutton.
4.ClickOKtoclosetheSoundwindow.
Problem:PIMitemssentfromtheWindows7operatingsystemcannotbereceivedcorrectlyintothe
addressbookofanyotherBluetooth-enableddevice.
Solution:TheWindows7operatingsystemsendsPIMitemsinXMLformat,butmostBluetooth-enabled
deviceshandlePIMitemsinvCardformat.IfanotherBluetooth-enableddevicecanreceivealethrough
Bluetooth,aPIMitemsentfromWindows7mightbesavedasalewiththeextension.contact.
Problemswiththekeyboardandotherpointingdevices
Thefollowingarethemostcommonproblemswithkeyboardsandotherpointingdevices.
UltraNavpointingdeviceproblems
Problem:Thepointerdriftswhenthecomputeristurnedonorafteritresumesnormaloperation.
Solution:ThepointermightdriftwhenyouarenotusingtheTrackPointpointingdeviceduringnormal
operation.ThisisanormalcharacteristicoftheTrackPointpointingdeviceandisnotadefect.Pointer
driftingmightoccurforseveralsecondsunderthefollowingconditions:
Chapter10.Troubleshootingcomputerproblems143

•Whenthecomputeristurnedon
•Whenthecomputerresumesnormaloperation
•WhentheTrackPointpointingdeviceiskeptpressedforalongtime
•Whenthetemperaturechanges
Problem:TheTrackPointpointingdeviceortouchpaddoesnotwork.
Solution:EnsurethattheTrackPointpointingdeviceortouchpadisenabledintheUltraNavDevice
Settingwindow.
Note:ToopentheUltraNavDeviceSettingwindow,openControlPanel.ThenclickHardwareandSound
➙Mouse.ClicktheUltraNavtab.
Keyboardproblems
Problem:Allorsomekeysonthekeyboarddonotwork.
Solution:Ifanexternalnumerickeypadisconnected:
1.Turnoffthecomputer.
2.Removetheexternalnumerickeypad.
3.Turnonthecomputerandtryusingthekeyboardagain.
Ifthekeyboardproblemisresolved,carefullyreconnecttheexternalnumerickeypadandtheexternal
keyboard.Makesurethatyouhaveseatedtheconnectorscorrectly.
Iftheproblempersists,makesurethatthecorrectdevicedriverisinstalled.
1.OpenControlPanel.ChangetheviewofControlPanelfromCategorytoLargeiconsorSmallicons.
2.ClickKeyboard.
3.SelecttheHardwaretab.IntheDevicePropertiespane,makesurethatyouseethismessage:
DeviceStatus:Thisdeviceisworkingproperly.
Ifkeysonthekeyboardstilldonotwork,havethecomputerserviced.
Problem:Allorsomekeysontheexternalnumerickeypaddonotwork.
Solution:Makesurethattheexternalnumerickeypadiscorrectlyconnectedtothecomputer.
Problemswiththedisplayandmultimediadevices
Thistopicincludesthemostcommonproblemswithdisplaysandmultimediadevices,includingthe
computerdisplay,theexternalmonitor,audiodevices,andtheopticaldrive.
Computerscreenproblems
Problem:Thescreenisblank.
Solution:Dothefollowing:
•PressFn+F7tobringuptheimage.
Note:IfyouusetheFn+F7keycombinationtoapplyapresentationscheme,pressFn+F7atleastthree
timesinthreeseconds,andtheimageisdisplayedonthecomputerscreen.
•Ifyouareusingtheacpoweradapter,orusingthebatteryandthebatterystatusindicatorison(is
green),pressFn+F8tomakethescreenbrighter.
144UserGuide

•Ifthesleepstatusindicatorison(isgreen),pressFntoresumefromthesleepmode.
•Iftheproblempersists,followthesolutionforthefollowingproblem.
Note:IfyouareusingtheWindows7operatingsystem,itdoesnotsupportthepresentationscheme.
Problem:Thescreenisunreadableordistorted.
Solution:Makesurethat:
•Thedisplaydevicedriverisinstalledcorrectly.
•Thescreenresolutionandcolorqualityarecorrectlyset.
•Themonitortypeiscorrect.
Tocheckthesesettings,dothefollowing:
1.Right-clickonthedesktop,andclickPersonalize.
2.ClickDisplayattheleft.
3.SelectChangedisplaysettings.Checkwhetherthescreenresolutioniscorrectlyset.
4.ClickAdvancedSettings.
5.ClicktheAdaptertab.Ensurethatthecorrectdevicedrivernameisshownintheadapterinformation
window.
Note:Thedevicedrivernamedependsonthevideochipthathasbeeninstalledonyourcomputer.
6.ClickthePropertiesbutton.Ifyouarepromptedforanadministratorpasswordorconrmation,type
thepasswordorprovideconrmation.ChecktheDevicestatusboxandmakesurethatthedeviceis
workingcorrectly.Ifnot,clicktheTroubleshootbuttonandfollowtheinstructionsonthescreen.
7.ClicktheMonitortab.Ensurethatthecorrectdevicedrivernameisshownintheadapterinformation
window.
Note:Thedevicedrivernamedependsonthevideochipthathasbeeninstalledonyourcomputer.
8.ClickthePropertiesbutton.Ifyouarepromptedforanadministratorpasswordorconrmation,type
thepasswordorprovideconrmation.ChecktheDevicestatusboxandmakesurethatthedeviceis
workingcorrectly.Ifnot,clicktheTroubleshootbuttonandfollowtheinstructionsonthescreen.
9.ClicktheColorManagementtab.Checkwhetherthecolorqualityiscorrectlyset,andensurethatthe
otherinformationalsoiscorrect.Ifyouarepromptedforanadministratorpasswordorconrmation,
typethepasswordorprovideconrmation.ChecktheDevicestatusboxandensurethatthedeviceis
workingcorrectly.Ifnot,clicktheTroubleshootbuttonandfollowtheinstructionsonthescreen.
Problem:Incorrectcharactersaredisplayedonthescreen.
Solution:Didyouinstalltheoperatingsystemorprogramcorrectly?Iftheyareinstalledandcongured
correctly,havethecomputerserviced.
Problem:Thescreenstaysonevenafteryouturnoffyourcomputer.
Solution:Pressandholdthepowerswitchforfoursecondsormoretoturnoffyourcomputer;thenturn
itonagain.
Problem:Missing,discolored,orbrightdotsappearonthescreeneverytimeyouturnonyourcomputer.
Solution:ThisisanintrinsiccharacteristicoftheTFTtechnology.Yourcomputerdisplaycontainsmultiple
thin-lmtransistors(TFTs).Asmallnumberofmissing,discolored,orbrightdotsonthescreenmight
existallthetime.
Chapter10.Troubleshootingcomputerproblems145

Externalmonitorproblems
Problem:Theexternalmonitorisblank.
Solution:Tobringuptheimage,pressFn+F7andselectthedesiredmonitor.Iftheproblempersists,
dothefollowing:
1.Connecttheexternalmonitortoanothercomputertomakesurethatitworks.
2.Reconnecttheexternalmonitortoyourcomputer.
3.Refertothemanualshippedwiththeexternalmonitortochecktheresolutionsandrefreshratesthatare
supported.
•Iftheexternalmonitorsupportsthesameresolutionasthecomputerdisplayorahigherresolution,
viewoutputontheexternalmonitororonboththeexternalmonitorandthecomputerdisplay.
•Iftheexternalmonitorsupportsalowerresolutionthanthecomputerdisplay,viewoutputonthe
externalmonitoronly.(Ifyouviewoutputonboththecomputerdisplayandtheexternalmonitor,the
externalmonitorscreenwillbeblankordistorted.)
Problem:Youcannotsetahigherresolutionthanthepresentoneonyourexternalmonitor.
Solution:
•Makesurethatthemonitorinformationiscorrect.Dothefollowing:
1.Right-clickonthedesktop,andclickScreenresolution.
Note:Ifyourcomputercannotdetecttheexternalmonitor,clicktheDetectbutton.
2.Clicktheiconforthedesiredmonitor(theMonitor-2iconisfortheexternalmonitor).
3.ClickAdvancedSettings.
4.ClicktheAdaptertab.
5.Makesurethatthecorrectdevicedrivernameisshownintheadapterinformationwindow.
Note:Thedevicedrivernamedependsonthevideochipthathasbeeninstalledonyourcomputer.
6.ClickOK.
Iftheinformationisincorrect,reinstallthedevicedriver.Seebelowformoreinformation.
•Checkthemonitortypeand,ifnecessary,updatethedriverbydoingthefollowing:
1.Connecttheexternalmonitortothemonitorconnector,andthenconnectthemonitortoanelectrical
outlet.
2.Turnontheexternalmonitorandthecomputer.
3.Right-clickonthedesktop,andclickScreenresolution.
Note:Ifyourcomputercannotdetecttheexternalmonitor,clicktheDetectbutton.
4.Clicktheiconforthedesiredmonitor(theMonitor-2iconisfortheexternalmonitor).
5.ClickAdvancedSettings.
6.ClicktheMonitortab.Checkthemonitorinformationwindowtomakesurethatthemonitortypeis
correct.Ifitis,clickOKtoclosethewindow;otherwisedothefollowing.
7.Ifmorethanonemonitortypeisdisplayed,selectGenericPnPMonitororGenericNon-PnP
Monitor.
8.ClickProperties.Ifyouarepromptedforanadministratorpasswordorconrmation,typethe
passwordorprovideconrmation.
9.ClicktheDrivertab.
146UserGuide

10.ClickUpdateDriver.
11.ClickBrowsemycomputerfordriversoftware,andthenclickLetmepickfromalistofdevice
driversonmycomputer.
12.CleartheShowcompatiblehardwarecheckbox.
13.Selectyourmonitormanufacturerandmodel.
14.Afterupdatingthedriver,clickClose.
15.SetResolution.
Note:Tochangethecolorsettings,selecttheMonitortab,thensetColors.
16.ClickOK.
Problem:Thescreenisunreadableordistorted.
Solution:Makesurethat:
•Themonitorinformationiscorrectandtheappropriatemonitortypeisselected.Refertothesolution
totheaboveproblem.
•Makesurethatanappropriaterefreshrateisselectedbydoingthefollowing:
1.Connecttheexternalmonitortothemonitorconnector,andthenconnectthemonitortoanelectrical
outlet.
2.Turnontheexternalmonitorandthecomputer.
3.Right-clickonthedesktop,andclickScreenresolution.
Note:Ifyourcomputercannotdetecttheexternalmonitor,clicktheDetectbutton.
4.Clicktheiconforthedesiredmonitor(theMonitor-2iconisfortheexternalmonitor).
5.ClickAdvancedSettings.
6.ClicktheMonitortab.
7.Selectthecorrectscreenrefreshrate.
Problem:Wrongcharactersaredisplayedonthescreen.
Solution:Didyoufollowthecorrectprocedurewheninstallingtheoperatingsystemorapplicationprogram?
Ifyoudid,havetheexternalmonitorserviced.
Problem:TheExtenddesktopfunctiondoesnotwork.
Solution:EnabletheExtenddesktopfunctionbydoingthefollowing:
1.Connecttheexternalmonitortothemonitorconnector,andthenconnectthemonitortoanelectrical
outlet.
2.Turnontheexternalmonitorandthecomputer.
3.Right-clickonthedesktop,andclickScreenresolution.
4.ClicktheMonitor-2icon.
5.SelectExtendthesedisplaysformultipledisplays.
6.ClicktheMonitor-1icon(fortheprimarydisplay,thecomputerdisplay).
7.Settheresolutionfortheprimarydisplay.
8.ClicktheMonitor-2icon(fortheexternalmonitor).
9.Setthescreenresolutionforthesecondarydisplay.
Chapter10.Troubleshootingcomputerproblems147

10.Settherelativepositionofeachmonitorbydraggingitsicon.Youcansetthemonitorsinanyrelative
position,buttheiconsmusttoucheachother.
11.ClickOKtoapplythechanges.
Note:Tochangethecolorsettings,right-clickonthedesktop,andclickScreenresolution.Click
AdvancedSettings,selecttheMonitortab,thensetColors.
Problem:IfyouusetheExtenddesktopfunction,youcannotsetahigherresolutionorhigherrefresh
rateonthesecondarydisplay.
Solution:Changetheresolutionandthecolordepthtolowersettingsfortheprimarydisplay.Refertothe
solutiontotheaboveproblem.
Problem:Displayswitchingdoesnotwork.
Solution:IfyouusetheExtenddesktopfunction,disableit,andchangethedisplayoutputlocation.Ifa
DVDmovieoravideoclipisplaying,stoptheplayback,closetheapplication,andthenchangethedisplay
outputlocation.
Problem:Thescreenpositionontheexternalmonitorisincorrectwhenthatmonitorissetforahigh
resolution.
Solution:Sometimes,whenyouuseahighresolutionsuchas1600x1200,theimageisshiftedtoleftor
rightonthescreen.Tocorrectthis,rstmakesurethatyourexternalmonitorsupportsthedisplaymode
(theresolutionandtherefreshrate)thatyouhaveset.Ifitdoesnot,setadisplaymodethatthemonitor
supports.Ifitdoessupportthedisplaymodeyouhaveset,gotothesetupmenuforthemonitoritselfand
adjustthesettingsthere.Usuallytheexternalmonitorhasbuttonsforaccesstothesetupmenu.Fordetails,
seethedocumentationthatcomeswiththemonitor.
Audioproblems
•Problem:WaveorMIDIsounddoesnotplaycorrectly.
Solution:Makesurethatthebuilt-inaudiodeviceisconguredcorrectly.
1.OpentheControlPanel.
2.ClickHardwareandSound.
3.ClickDeviceManager.Ifyouarepromptedforanadministratorpasswordorconrmation,typethe
passwordorprovideconrmation.
4.Double-clickSound,videoandgamecontrollers.
5.MakesurethattheRealtekHDAudiodriverisenabledandconguredcorrectly.
•Problem:Recordingsmadeusingthemicrophoneinputarenotloudenough.
Solution:MakesurethattheMicrophoneBoostfunctionisturnedonandsetbydoingthefollowing:
1.OpentheControlPanel.
2.ClickHardwareandSound.
3.ClickSound.
4.ClicktheRecordingtabintheSoundwindow.
5.SelectMicrophone,andclickthePropertiesbutton.
6.ClicktheLevelstab,andmovetheMicrophoneBoostsliderupwards.
7.ClickOK.
Note:Fordetailsaboutcontrollingvolume,refertoyourWindowsonlinehelp.
148UserGuide

•Problem:Avolumeorbalanceslidercannotbemoved.
Solution:Theslidermightbegrayedout.Thismeansthatitspositionisxedbythehardwareand
cannotbechanged.
•Problem:Thevolumeslidersdonotstayinplacewhensomeaudioapplicationsareused.
Solution:Itisnormalforthesliderstochangepositionwhencertainsoundapplicationsareused.The
applicationsareawareofthesettingsintheVolumeMixerwindowandareallowedtochangethesettings
themselves.AnexampleistheWindowsMediaPlayer.Usuallytheapplicationhasslidersavailable
tocontrolthesoundfromwithintheapplication.
•Problem:Thebalanceslidercannotcompletelymuteonechannel.
Solution:Thecontrolisdesignedtocompensateforminordifferencesinbalanceanddoesnot
completelymuteeitherchannel.
•Problem:ThereisnovolumecontrolforMIDIsoundintheVolumeMixerwindow.
Solution:Usethehardwarevolumecontrol.Thisisbecausethebuilt-insynthesizersoftwaredoes
notsupportthecontrol.
•Problem:ThesoundcannotbeturnedoffcompletelyevenifyousettheVolumeMixeratminimum.
Solution:YoustillcanhearsomesoundeventhoughyouhavesettheVolumeMixeratminimum.Toturn
offthesoundcompletely,gototheVolumeMixerbyclickingthespeakericononthetakbar,thenclick
Mixer.ClicktheMuteSpeakericon..
Fingerprintreaderproblems
Problem:Thesurfaceofthereaderisdirty,stained,orwet.
Solution:Gentlycleanthesurfaceofthereaderwithadry,soft,lint-freecloth.
Problem:Thereaderoftenfailstoenrollorauthenticateyourngerprint.
Solution:Ifthesurfaceofthereaderisdirty,stained,orwet,gentlycleanthesurfaceofthereaderwitha
dry,soft,lint-freecloth.
Ifyourngerhasanyofthefollowingconditions,youmightnotbeabletoregisterorauthenticateit:
•Yourngeriswrinkled.
•Yourngerisrough,dry,orinjured.
•Yourngerisverydry.
•Yourngerisstainedwithdirt,mud,oroil.
•Thesurfaceofyourngerisverydifferentfromwhenyouenrolledyourngerprint.
•Yourngeriswet.
•Angerthathasnotbeenenrolledisused.
Toimprovethesituation,trythefollowing:
•Cleanorwipeyourhandstoremoveanyexcessdirtormoisturefromthengers.
•Enrollanduseadifferentngerforauthentication.
•Ifyourhandsaretoodry,applylotiontothem.
Chapter10.Troubleshootingcomputerproblems149

Batteryandpowerproblems
Thistopiccontainsinstructionsontroubleshootingbatteryandpowerproblems.
Batteryproblems
Problem:Thebatterypackcannotbefullychargedinthestandardchargetimewhenthecomputeris
poweredoff.
Solution:Thebatterypackmightbeover-discharged.Dothefollowing:
1.Turnoffthecomputer.
2.Makesurethattheover-dischargedbatterypackisinthecomputer.
3.Connecttheacpoweradaptertothecomputerandletitcharge.
Ifaquickchargerisavailable,useittochargetheover-dischargedbatterypack.
Ifthebatterypackcannotbefullychargedin24hours,useanewbatterypack.
Problem:Yourcomputershutsdownbeforethebatterystatusindicatorshowsempty,oryourcomputer
operatesafterthebatterystatusindicatorshowsempty.
Solution:Dischargeandrechargethebatterypack.
Problem:Theoperatingtimeforafullychargedbatterypackisshort.
Solution:Dischargeandrechargethebatterypack.Ifyourbatteryoperatingtimeisstillshort,useanew
batterypack.
Problem:Thecomputerdoesnotoperatewithafullychargedbatterypack.
Solution:Thesurgeprotectorinthebatterypackmightbeactive.Turnoffthecomputerforoneminuteto
resettheprotector;thenturnonthecomputeragain.
Problem:Thebatterypackcannotbecharged.
Solution:Youcannotchargethebatterywhenitistoohot.Ifthebatteryfeelshot,removeitfromthe
computerandallowittocooltoroomtemperature.Afteritcools,reinstallitandrechargethebattery.Ifit
stillcannotbecharged,haveitserviced.
Anacpoweradapterproblem
Problem:Theacpoweradapterisconnectedtothecomputerandtheworkingelectricaloutlet,butthe
poweradapter(powerplug)iconisnotdisplayedonthetaskbar.Alsotheacpowerindicatordoesnot
lightup.
Solution:Dothefollowing:
1.Makesurethattheconnectionoftheacpoweradapteriscorrect.Forinstructionsonconnectingtheac
poweradatper,seeSetupInstructionsthatcomeswithyourcomputer.
2.Iftheconnectionoftheacpoweradapteriscorrect,turnoffthecomputer,thendisconnecttheacpower
adapterandremovethemainbattery.
3.Reinstallthebatteryandreconnecttheacpoweradapter,thenturnonthecomputer.
4.Ifthepoweradaptericonstillisnotdisplayedonthetaskbarandtheacpowerindicatordoesnotlight
up,havetheacpoweradapterandyourcomputerserviced.
150UserGuide

Note:IfyouareusingtheWindows7operatingsystem,todisplaythepoweradapter(powerplug)icon,
clickShowhiddeniconsonthetaskbar.
Powerproblems
Printtheseinstructionsnowandkeepitwithyourcomputerforreferencelater.
Ifyourcomputerisgettingnopoweratall,checkthefollowingitems:
1.Verifythepowerswitch.Referto“System-statusindicators”onpage9.Thepowerswitchisilluminated
wheneverthecomputerison.
2.Checkallpowerconnections.Removeanypowerstripsandsurgeprotectorstoconnecttheacpower
adapterdirectlytotheacpoweroutlet.
3.Inspecttheacpoweradapter.Checkforanyphysicaldamage,andmakesurethatthepowercableis
rmlyattachedtotheadapterbrickandthecomputer.
4.Verifytheacpowersourceisworkingbyattachinganotherdevicetotheoutlet.
5.RemovethecomputerfromaThinkPadportreplicatorordockingstation.Referto“Detachinga
ThinkPadportreplicatorordockingstation”onpage109.
6.Removealldevicesandthentestforsystempowerwithminimaldevicesattached.
a.Disconnecttheacpoweradapterandallcablesfromthecomputer.
b.Closethecomputerdisplay,andturnthecomputerover.
c.Removethebattery,memorymodule,PCIExpressMiniCards,Ultrabaydevice,harddiskdriveor
solidstatedriveormSATAsolidstatedrive.SeeChapter6“Replacingdevices”onpage71.
d.Waitfor30seconds,andthenreinstallthememorymoduleandtheknowngoodbatteryortheac
poweradaptertotestthecomputerwithminimaldevicesattachedrst.
e.Reinstalleachdeviceoneatatimethatyouhaveremovedintheearliersteps.
Ifyourcomputerdoesnotrunonbatterypower,checkthefollowingitems:
1.Removeandreseatthebatterytomakesurethatitisproperlyconnected.Referto“Replacingthe
battery”onpage71.
2.Swapbatterieswithanothersimilarmodel,ifavailable.
IfanothersimilarThinkPadmodelisavailable,thenverifythatthebatterypackworksintheother
computerandthatthebatterypackfortheothermodelworksinthiscomputer.
3.Verifythebattery-statusindicator.Referto“Powerstatusindicators”onpage9.
Thebattery-statusindicatorisnormallyilluminatedwheneverthebatteryisinstalledandthecomputeris
on,ortheacpoweradapterisconnectedandthebatteryischarging.Thisindicatormightbeblinkingor
solidineitherorangeorgreencolordependingonthestatusofthebattery.
Apowerbuttonproblem
Problem:Thesystemdoesnotrespond,andyoucannotturnoffthecomputer.
Solution:Turnoffthecomputerbypressingandholdingthepowerbuttonfor4secondsormore.Ifthe
systemisstillnotreset,removetheacpoweradapterandthebattery.
Startupproblems
Printtheseinstructionsnowandkeepthemwithyourcomputerforreferencelater.
Ifyoureceiveanerrormessagebeforetheoperatingsystemloads,checkthefollowingitem:
•Ifyoureceiveanerrormessagebeforetheoperatingsystemloads,followtheappropriatecorrective
actionsforpower-onself-test(POST)errormessages.See“Errormessages”onpage138
Chapter10.Troubleshootingcomputerproblems151

Ifyoureceiveanerrormessagewhiletheoperatingsystemisloadingthedesktopcongurationafterthe
POSTiscompleted,checkthefollowingitems:
1.GototheLenovoSupportWebsiteat:http://www.lenovo.com/supportandsearchfortheerror
message.
2.VisittheMicrosoftKnowledgeBasehomepageat:http://support.microsoft.com/andsearchforthe
errormessage.
Sleepandhibernationproblems
•Problem:Thecomputerenterssleepmodeunexpectedly.
Solution:Ifthemicroprocessoroverheats,thecomputerautomaticallyenterssleepmodetoallowthe
computertocoolandtoprotectthemicroprocessorandotherinternalcomponents.Checkthesettings
forsleepmode.
•Problem:Thecomputerenterssleepmode(thesleepindicatorturnson)immediatelyafterthepower-on
self-test.
Solution:Makesurethat:
–Thebatteryischarged.
–Theoperatingtemperatureiswithintheacceptablerange.Referto“Operatingenvironment”onpage
14.
Ifthebatteryischargedandthetemperatureiswithinrange,havethecomputerserviced.
•Problem:Acriticallow-batteryerroroccurs,andthecomputerimmediatelyturnsoff.
Solution:Thebatterypowerisgettinglow.Connecttheacpoweradaptertothecomputerandplugit
intoanelectricaloutlet,orreplacethebatterywithachargedone.
•Problem:ThecomputerdisplayremainsblankafteryoupressFntoreturnfromsleepmode.
Solution:Checkwhetheranexternalmonitorwasdisconnectedorturnedoffwhilethecomputerwas
insleepmode.Ifyoudisconnectedorturnedofftheexternalmonitor,connectitorturnitonbefore
resumingthecomputerfromthesleepmode.Whenresumingthecomputerfromthesleepmodewithout
attachingtheexternalmonitororturningiton,andthecomputerdisplayremainsblank,pressFn+F7to
bringupthecomputerdisplay.
•Problem:Thecomputerdoesnotreturnfromsleepmode,orthesleepindicatorstaysonandthe
computerdoesnotwork.
Solution:Ifthesystemdoesnotreturnfromsleepmode,itmighthaveenteredsleeporhibernationmode
automaticallybecausethebatteryisdepleted.Checkthesleepindicator.
–Ifthesleepindicatorison,yourcomputerisinsleepmode.Connecttheacpoweradaptertothe
computer;thenpressFn.
–Ifthesleepindicatorisoff,yourcomputerisinhibernationmodeorpower-offstate.Connecttheac
poweradaptertothecomputer;thenpressthepowerbuttontoresumeoperation.
Ifthesystemstilldoesnotreturnfromsleepmode,yoursystemmightstoprespondingandyoumightnot
beabletoturnoffthecomputer.Inthiscase,youneedtoresetthecomputer.Ifyouhavenotsavedyour
data,itmightbelost.Toresetthecomputer,pressandholdthepowerbuttonfor4secondsormore.If
thesystemisstillnotreset,removetheacpoweradapterandthebattery.
•Problem:Yourcomputerdoesnotentersleeporhibernationmode.
Solution:Checkwhetheranyoptionhasbeenselectedtodisableyourcomputerfromenteringsleep
orhibernationmode.
152UserGuide

Ifyourcomputertriestoentersleepmodebuttherequestisrejected,thedeviceattachedtotheUSB
connectormighthavebeendisabled.Ifthisoccurs,doahot-unplug-and-plugoperationfortheUSB
device.
•Problem:Thebatterydischargesslightlywhilethecomputerisinhibernationmode.
Solution:Ifthewakeupfunctionisenabled,thecomputerconsumesasmallamountofpower.Thisis
notadefect.Fordetails,referto“Power-savingmodes”onpage31.
Problemswithdrivesandotherstoragedevices
Thissectionincludesharddiskdriveproblemsandopticaldriveproblems.
Harddiskdriveproblems
Problem:Theharddiskdrivemakesarattlingnoiseintermittently.
Solution:Therattlingnoisemightbeheard:
•Whentheharddiskdrivebeginsornishesgettingaccesstodata.
•Whenyoucarrytheharddiskdrive.
•Whenyoucarryyourcomputer.
Thisisanormalcharacteristicofaharddiskdriveandisnotadefect.
Problem:Theharddiskdrivedoesnotwork.
Solution:OntheBootmenuofThinkPadSetup,makesurethattheharddiskdriveisontheBootpriority
orderlist.IfitisontheExcludedfrombootorderlist,itisdisabled.Selecttheentryforitonthelistand
presstheShift+1key.ThismovestheentrytotheBootpriorityorderlist.
Problem:Aftersettingaharddiskpasswordontheharddiskdriveofthecomputer,youmovedthedriveto
anothercomputer.Nowyoucannotunlocktheharddiskpassword.
Solution:Yourcomputersupportsanenhancedpasswordalgorithm.Computersolderthanyoursmight
notsupportsuchasecurityfunction.
Asolidstatedriveproblem
Problem:WhenyoucompresslesorfoldersbyuseofthedatacompressionfunctioninWindows,andthen
decompressthem,theprocessofwritingtoorreadingfromthelesorfoldersisslow.
Solution:ApplythediskdefragmentationtoolinWindowsforfasteraccesstothedata.
Opticaldriveproblems
Problem:Theopticaldrive,suchasaCD,DVD,orCD-RWdrive,doesnotwork.
Solution:MakesurethatthecomputeristurnedonandaCD,DVD,orCD-RWisproperlyloadedonthe
centerpivotofthedrive.(Youshouldhearaclick.)
Makesurethatthedriveconnectorisrmlyconnectedtothecomputer.Ifyouuseanoptionthathasabay
forinstallingthedrive,makesurethattheoptionisrmlyconnectedtothecomputerandworksproperly.
Makesurethatthedrivetrayisrmlyclosed.
Makesurethatthedevicedriversarecorrectlyinstalled.
Chapter10.Troubleshootingcomputerproblems153

Problem:YouhearanoisefromthedrivewhentheCD,DVD,orCD-RWdiscisspinning.
Solution:Ifthediscisnotcorrectlyloadedonthecenterpivotofthedrive,itmightrubagainstthedrive
coverandmakeanoise.Makesurethatthediscisloadedcorrectlyinthedrive.
Problem:Thetraydoesnotopenevenifyoupresstheejectbutton.
Solution:Whenyourcomputerisnotturnedon,pressingtheejectbuttondoesnotcausethedrivetrayto
open.Makesurethatthecomputeristurnedonandthatthedriveconnectorisrmlyconnectedtothe
computer.
Ifthetraystilldoesnotopen,makesurethatthecomputerisrunning,andinserttheendofastraightened
paperclipintotheemergencyejecthole.Thetraywillopen.
Problem:Anopticalmedium,suchasaCD,DVD,orCD-RWdisccannotberead.
Solution:MakesurethattheCD,DVD,orCD-RWdiscisnotdirty.Ifitis,cleanitwithacleanerkit.
TestanotherCD,DVD,orCD-RWdisc.Ifthecomputercanreadtheotherdisc,therstdiscmightbe
defective.
Makesurethatthediscisloadedonthecenterpivotofthedrivewiththelabelsideup.(Youshouldheara
click.)
Makesurethatthediscisinoneofthefollowingformats:
•MusicCD
•CD-ROMorCD-ROMXA
•MultisessionphotoCD
•VideoCD
•DVD-ROM(DVD-video)
Problem:ThecomputercannotplayaCD,orthesoundqualityisnotgood.
Solution:Besurethatthediscmeetsthestandardsforyourcountry.Usually,adiscthatmeetsthelocal
standardsismarkedwithaCDlogoonthelabel.Ifyouuseadiscthatdoesnotmeetthesestandards,we
cannotguaranteethatitwillplay,orthat,ifitdoesplay,thesoundqualitywillbegood.
Problem:TheHDDVDtabintheWinDVD8programisdimmedandIcannotuseit.
Solution:YourcomputerdoesnotsupportanHDDVDdrive.
Softwareproblems
Problem:Anapplicationdoesnotruncorrectly.
Solution:Makesurethattheproblemisnotbeingcausedbytheapplication.
Checkthatyourcomputerhastheminimumrequiredmemorytoruntheapplication.Refertothemanuals
suppliedwiththeapplication.
Checkthefollowing:
•Theapplicationisdesignedtooperatewithyouroperatingsystem.
154UserGuide

•Otherapplicationsruncorrectlyonyourcomputer.
•Thenecessarydevicedriversareinstalled.
•Theapplicationworkswhenitisrunonsomeothercomputer.
Ifanerrormessageisdisplayedwhileyouareusingtheapplicationprogram,refertothemanualssupplied
withtheapplication.
Iftheapplicationstilldoesnotruncorrectly,contactyourplaceofpurchaseoraservicerepresentative
forhelp.
Problemswithportsandconnectors
Thefollowingarethemostcommonproblemswithportsandconnectors.
AUSBproblem
Problem:AdeviceconnectedtotheUSBconnectordoesnotwork.
Solution:OpentheDeviceManagerwindow.MakesurethattheUSBdevicesetupiscorrect,andthatthe
assignmentofcomputerresourceandtheinstallationofthedevicedriverarecorrect.
OpenControlPanel.ClickHardwareandSound➙DeviceManager.Ifyouarepromptedforan
administratorpasswordorconrmation,typethepasswordorprovideconrmation.
Referto“Diagnosingproblems”onpage137andrunadiagnostictestoftheUSBconnector.
Adockingstationorportreplicatorproblem
Problem:Thecomputerdoesnotstartwhenyoutrytoturniton,anddoesnotrespondwhenyoutryto
resumeoperation.
Solution:Makesurethat:
•Theacpoweradapterisconnectedtothedockingstationortheportreplicator.
•Theindicatorofthedockingstationison.
•Thecomputerissecurelyattachedtothedockingstationortheportreplicator.
Chapter10.Troubleshootingcomputerproblems155

156UserGuide

Chapter11.Gettingsupport
ThischapterprovidesinformationaboutgettinghelpandsupportfromLenovo.
•“BeforeyoucontactLenovo”onpage157
•“Gettinghelpandservice”onpage157
•“Purchasingadditionalservices”onpage159
BeforeyoucontactLenovo
Often,youcansolveyourcomputerproblemsbyreferringtotheinformationintheexplanationsoferror
codes,runningdiagnosticprograms,orbyconsultingtheLenovoWebsite.
Registeringyourcomputer
RegisteryourcomputerwithLenovo.Formoreinformation,see“Registeryourcomputer”onpage21.
Downloadingsystemupdates
Downloadingupdatedsoftwaremightresolveproblemsyouexperiencewithyourcomputer.
Todownloadupdatedsoftware,gotothefollowingWebsiteandfollowtheinstructionsonthescreen:
http://www.lenovo.com/support
Recordinginformation
BeforeyoutalktoaLenovorepresentative,recordthefollowingimportantinformationaboutyourcomputer.
Recordingproblemsymptomsanddetails
Collecttheanswerstothequestionsbelowbeforeyoucallforhelp.Then,youwillbeabletogethelp
asquicklyaspossible.
•Whatistheproblem?Isitcontinuousorintermittent?
•Isthereanerrormessage?Whatistheerrorcode,ifany?
•Whatoperatingsystemareyouusing?Whichversion?
•Whichsoftwareapplicationswererunningatthetimeoftheproblem?
•Cantheproblembereproduced?Ifso,how?
Recordingsysteminformation
Theserialnumberlabelisonthebottomofyourcomputer.Recordthemachinetypeandtheserialnumber.
•WhatisthenameofyourLenovoproduct?
•Whatisthemachinetype?
•Whatistheserialnumber?
Gettinghelpandservice
Ifyouneedhelp,service,technicalassistance,orjustwantmoreinformationaboutLenovoproducts,you
willndawidevarietyofsourcesavailablefromLenovotoassistyou.Thissectioncontainsinformation
aboutwheretogoforadditionalinformationaboutLenovoandourproducts,whattodoifyouexperiencea
problemwithyourcomputer,andwhomtocallforserviceshoulditbenecessary.
©CopyrightLenovo2012157

Informationaboutyourcomputerandpreinstalledsoftware,ifany,isavailableinthedocumentationthat
comeswithyourcomputer.Thatdocumentationincludesprintedbooks,onlinebooks,readmeles,and
helples.Inaddition,informationaboutLenovoproductsisavailableontheWorldWideWeb.
MicrosoftServicePacksarethelatestsoftwaresourceforWindowsproductupdates.Theyareavailable
throughWebdownload(connectionchargesmightapply)orthroughdisc.Formorespecicinformationand
links,gotohttp://www.microsoft.com.Lenovoofferstechnicalassistancewithinstallationof,orquestions
relatedto,ServicePacksforyourLenovo-preloadedMicrosoftWindowsproduct.Forinformation,contact
theCustomerSupportCenter.
Usingdiagnosticprograms
Manycomputerproblemscanbesolvedwithoutoutsideassistance.Ifyouexperienceaproblemwithyour
computer,therstplacetostartisthetroubleshootinginformationofyourcomputerdocumentation.Ifyou
suspectasoftwareproblem,seethedocumentation,includingreadmelesandhelpinformationsystems,
thatcomeswiththeoperatingsystemorapplicationprogram.
ThinkPadnotebookcomputerscomewithasetofdiagnosticprogramsthatyoucanusetohelpyouidentify
hardwareproblems.See“Diagnosingproblems”onpage137forinstructionsonusingthediagnostic
programs.
Thetroubleshootinginformationorthediagnosticprogramsmighttellyouthatyouneedadditionalor
updateddevicedriversorothersoftware.Youcangetthelatesttechnicalinformationanddownloaddevice
driversandupdatesfromtheLenovoWebsiteathttp://www.lenovo.com/support.
LenovoSupportWebsite
TechnicalsupportinformationisavailableontheLenovoSupportWebsiteat:
http://www.lenovo.com/support
ThisWebsiteisupdatedwiththelatestsupportinformationsuchasthefollowing:
•Driversandsoftware
•Diagnosticsolutions
•Productandservicewarranty
•Productandpartsdetails
•Userguidesandmanuals
•Knowledgebaseandfrequentlyaskedquestions
CallingLenovo
Ifyouhavetriedtocorrecttheproblemyourselfandstillneedhelp,duringthewarrantyperiod,youcan
gethelpandinformationbytelephonethroughtheCustomerSupportCenter.Thefollowingservicesare
availableduringthewarrantyperiod:
•Problemdetermination-Trainedpersonnelareavailabletoassistyouwithdeterminingifyouhavea
hardwareproblemanddecidingwhatactionisnecessarytoxtheproblem.
•Lenovohardwarerepair-IftheproblemisdeterminedtobecausedbyLenovohardwareunderwarranty,
trainedservicepersonnelareavailabletoprovidetheapplicablelevelofservice.
•Engineeringchangemanagement-Occasionally,theremightbechangesthatarerequiredafteraproduct
hasbeensold.Lenovooryourreseller,ifauthorizedbyLenovo,willmakeselectedEngineeringChanges
(ECs)thatapplytoyourhardwareavailable.
Thefollowingitemsarenotcovered:
158UserGuide

•ReplacementoruseofpartsnotmanufacturedfororbyLenovoornonwarrantedparts
Note:Allwarrantedpartscontaina7-characteridenticationintheformatFRUXXXXXXX.
•Identicationofsoftwareproblemsources
•CongurationofUEFIBIOSaspartofaninstallationorupgrade
•Changes,modications,orupgradestodevicedrivers
•Installationandmaintenanceofnetworkoperatingsystems(NOS)
•Installationandmaintenanceofapplicationprograms
ForthetermsandconditionsoftheLenovoLimitedWarrantythatappliestoyourLenovohardwareproduct,
see“Warrantyinformation”intheSafetyandWarrantyGuidethatcomeswithyourcomputer.
Ifpossible,benearyourcomputerwhenyoumakeyourcallincasethetechnicalassistancerepresentative
needstohelpyouresolveacomputerproblem.Ensurethatyouhavedownloadedthemostcurrentdrivers
andsystemupdates,rundiagnostics,andrecordedinformationbeforeyoucall.Whencallingfortechnical
assistance,havethefollowinginformationavailable:
•Machinetypeandmodel
•Serialnumbersofyourcomputer,monitor,andothercomponents,oryourproofofpurchase
•Descriptionoftheproblem
•Exactwordingofanyerrormessages
•Hardwareandsoftwarecongurationinformationforyoursystem
Telephonenumbers
ForalistoftheLenovoSupportphonenumbersforyourcountryorregion,goto
http://www.lenovo.com/support/phoneorrefertotheSafetyandWarrantyGuidethatcomeswithyour
computer.
Note:Phonenumbersaresubjecttochangewithoutnotice.Thelatestphonenumbersareavailableat
http://www.lenovo.com/support/phone.Ifthenumberforyourcountryorregionisnotprovided,contact
yourLenovoresellerorLenovomarketingrepresentative.
Purchasingadditionalservices
Duringandafterthewarrantyperiod,youcanpurchaseadditionalservices,suchassupportforLenovo
andnon-Lenovohardware,operatingsystems,andapplicationprograms;networksetupandconguration
services;upgradedorextendedhardwarerepairservices;andcustominstallationsservices.Service
availabilityandservicenamemightvarybycountry.
Formoreinformationabouttheseservices,goto:
http://www.lenovo.com/accessories/services/index.html
Chapter11.Gettingsupport159

160UserGuide

AppendixA.Regulatoryinformation
Wirelessrelatedinformation
Wirelessinteroperability
WirelessLANPCIExpressMiniCardisdesignedtobeinteroperablewithanywirelessLANproductthat
isbasedonDirectSequenceSpreadSpectrum(DSSS),ComplementaryCodeKeying(CCK),and/or
OrthogonalFrequencyDivisionMultiplexing(OFDM)radiotechnology,andiscompliantto:
•The802.11b/gStandard,802.11a/b/gor802.11ndraft2.0onWirelessLANs,asdenedandapprovedby
theInstituteofElectricalandElectronicsEngineers.
•TheWirelessFidelity(WiFi)certicationasdenedbytheWi-FiAlliance.
YourBluetoothcardiscomplianttoBluetoothSpecication4.0asdenedbytheBluetoothSpecialInterest
GroupSIG,itsupportthefollowingproles:
•AdvancedAudioDistributionProle(A2DP)
•Audio/VideoControlTransportProtocol(AVCTP)
•Audio/VideoDistributionTransportProtocol(AVDTP)
•A/VRemoteControlProle(AVRCP)
•BasicImagingProle(BIP)
•BasicPrintingProle(BPP)
•Dial-UpNetworkingProle(DUN)
•FileTransferProle(FTP)
•GenericAccessProle(GAP)
•GenericA/VDistributionProle(GAVDP)
•HardcopyCableReplacementProle(HCRP)
•HeadsetProle(HSP)
•Hands-FreeProle(HFP)
•HumanInterfaceDeviceProle(HID)
•MessageAccessProle(MAP)
•ObjectExchangeProtocol(OBEX)
•ObjectPushProle(OPP)
•PersonalAreaNetworkingProle(PAN)
•PhoneBookAccessProle(PBAP)
•ServiceDiscoveryProtocol(SDP)
•SynchronizationProle(SYNC)
•VideoDistributionProle(VDP)
•GenericAttributeProle(GATT)
•ProximityProle
•FindMeProle
•ImmediateAlertProle
©CopyrightLenovo2012161
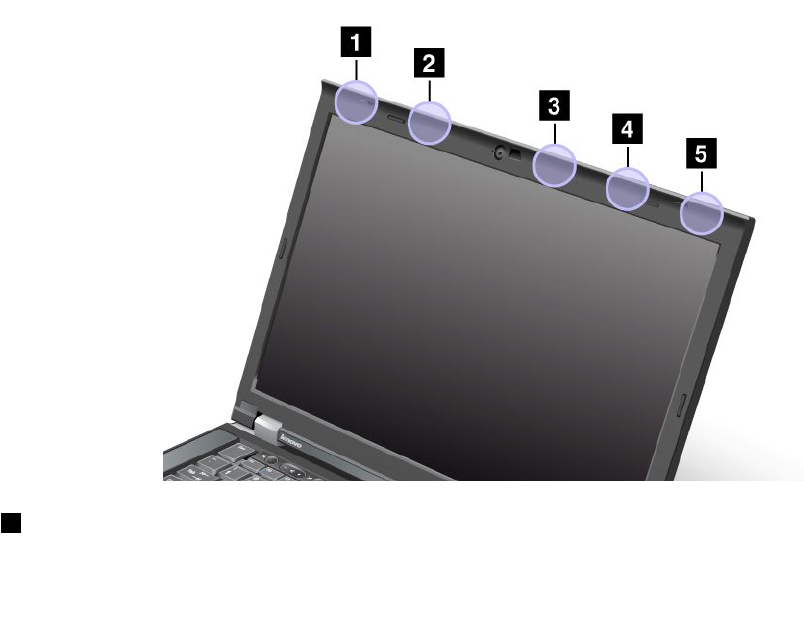
•BatteryStatusProle
Usageenvironmentandyourhealth
Integratedwirelesscardsemitradiofrequencyelectromagneticenergylikeotherradiodevices.However,the
levelofenergyemittedisfarmuchlessthantheelectromagneticenergyemittedbywirelessdeviceslike
forexamplemobilephones.
Duetothefactthatintegratedwirelesscardsoperatewithintheguidelinesfoundinradiofrequencysafety
standardsandrecommendations,Lenovobelievestheyaresafeforusebyconsumers.Thesestandardsand
recommendationsreecttheconsensusofthescienticcommunityandresultfromdeliberationsofpanels
andcommitteesofscientistswhocontinuallyreviewandinterprettheextensiveresearchliterature.
Insomesituationorenvironment,theuseofintegratedwirelesscardsmightberestrictedbytheproprietor
ofthebuildingorresponsiblerepresentativesoftheorganization.Thesesituationsandareasmightfor
exampleinclude:
•Usingtheintegratedwirelesscardsonboardofairplanes,inhospitalsornearpetrolstations,blasting
areas(withelectro-explosivedevices),medicalimplantsorbody-wornelectronicmedicaldevices,such
aspacemakers.
•Inanyotherenvironmentwheretheriskofinterferencetootherdevicesorservicesisperceivedor
identiedasharmful.
Ifyouareuncertainofthepolicythatappliestotheuseofwirelessdevicesinaspecicorganization(suchas
airportorhospital),youareencouragedtoaskforauthorizationtouseintegratedwirelesscardspriorto
turningonthecomputer.
LocationoftheUltraConnectwirelessantennas
ThinkPadmodelsfeatureanintegrateddiversityantennasystembuiltintothedisplayforoptimalreception,
enablingwirelesscommunicationwhereveryouare.
1WirelessLANandWiMAXcomboantenna(Main)
162UserGuide

2WirelessWANantenna(Main)
3WirelessLANantenna(Third)
4WirelessLANandWiMAXcomboantenna(Auxiliary)
5WirelessWANantenna(Auxiliary)
Locatingwirelessregulatorynotices
Formoreinformationaboutthewirelessregulatorynotices,refertotheRegulatoryNoticeshippedwithyour
computer.
IfyourcomputerisshippedwithouttheRegulatoryNotice,youcannditontheWebsiteat:
http://www.lenovo.com/ThinkPadUserGuides
Exportclassicationnotice
ThisproductissubjecttotheUnitedStatesExportAdministrationRegulations(EAR)andhasanExport
ClassicationControlNumber(ECCN)of4A994.b.Itcanbere-exportedexcepttoanyoftheembargoed
countriesintheEARE1countrylist.
Electronicemissionsnotices
ThefollowinginformationreferstotheThinkPadT430andT430i,machinetypes2342,2344,2345,2347,
2349,2350,2351.
FederalCommunicationsCommissionDeclarationofConformity
ThisequipmenthasbeentestedandfoundtocomplywiththelimitsforaClassBdigitaldevice,pursuant
toPart15oftheFCCRules.Theselimitsaredesignedtoprovidereasonableprotectionagainstharmful
interferenceinaresidentialinstallation.Thisequipmentgenerates,uses,andcanradiateradiofrequency
energyand,ifnotinstalledandusedinaccordancewiththeinstructions,maycauseharmfulinterference
toradiocommunications.However,thereisnoguaranteethatinterferencewillnotoccurinaparticular
installation.Ifthisequipmentdoescauseharmfulinterferencetoradioortelevisionreception,whichcanbe
determinedbyturningtheequipmentoffandon,theuserisencouragedtotrytocorrecttheinterferenceby
oneormoreofthefollowingmeasures:
•Reorientorrelocatethereceivingantenna.
•Increasetheseparationbetweentheequipmentandreceiver.
•Connecttheequipmentintoanoutletonacircuitdifferentfromthattowhichthereceiverisconnected.
•Consultanauthorizeddealerorservicerepresentativeforhelp.
Lenovoisnotresponsibleforanyradioortelevisioninterferencecausedbyusingotherthanspeciedor
recommendedcablesandconnectorsorbyunauthorizedchangesormodicationstothisequipment.
Unauthorizedchangesormodicationscouldvoidtheuser'sauthoritytooperatetheequipment.
ThisdevicecomplieswithPart15oftheFCCRules.Operationissubjecttothefollowingtwoconditions:(1)
thisdevicemaynotcauseharmfulinterference,and(2)thisdevicemustacceptanyinterferencereceived,
includinginterferencethatmaycauseundesiredoperation.
ResponsibleParty:
Lenovo(UnitedStates)Incorporated
1009ThinkPlace-BuildingOne
Morrisville,NC27560
PhoneNumber:919-294-5900
AppendixA.Regulatoryinformation163

IndustryCanadaClassBemissioncompliancestatement
ThisClassBdigitalapparatuscomplieswithCanadianICES-003.
CetappareilnumériquedelaclasseBestconformeàlanormeNMB-003duCanada.
EuropeanUnion-CompliancetotheElectromagneticCompatibility
Directive
ThisproductisinconformitywiththeprotectionrequirementsofEUCouncilDirective2004/108/EConthe
approximationofthelawsoftheMemberStatesrelatingtoelectromagneticcompatibility.Lenovocannot
acceptresponsibilityforanyfailuretosatisfytheprotectionrequirementsresultingfromanon-recommended
modicationoftheproduct,includingtheinstallationofoptioncardsfromothermanufacturers.
ThisproducthasbeentestedandfoundtocomplywiththelimitsforClassBInformationTechnology
EquipmentaccordingtoEuropeanStandardEN55022.ThelimitsforClassBequipmentwerederived
fortypicalresidentialenvironmentstoprovidereasonableprotectionagainstinterferencewithlicensed
communicationdevices.
EUcontact:Lenovo,Einsteinova21,85101Bratislava,Slovakia
GermanClassBcompliancestatement
DeutschsprachigerEUHinweis:
HinweisfürGerätederKlasseBEU-RichtliniezurElektromagnetischenVerträglichkeit
DiesesProduktentsprichtdenSchutzanforderungenderEU-Richtlinie2004/108/EG(früher89/336/EWG)zur
AngleichungderRechtsvorschriftenüberdieelektromagnetischeVerträglichkeitindenEU-Mitgliedsstaaten
undhältdieGrenzwertederEN55022KlasseBein.
Umdiesessicherzustellen,sinddieGerätewieindenHandbüchernbeschriebenzuinstallierenundzu
betreiben.DesWeiterendürfenauchnurvonderLenovoempfohleneKabelangeschlossenwerden.
LenovoübernimmtkeineVerantwortungfürdieEinhaltungderSchutzanforderungen,wenndasProdukt
ohneZustimmungderLenovoverändertbzw.wennErweiterungskomponentenvonFremdherstellernohne
EmpfehlungderLenovogesteckt/eingebautwerden.
Deutschland:
EinhaltungdesGesetzesüberdieelektromagnetischeVerträglichkeitvonBetriebsmitteln
DiesesProduktentsprichtdem„GesetzüberdieelektromagnetischeVerträglichkeitvonBetriebsmitteln“
EMVG(früher„GesetzüberdieelektromagnetischeVerträglichkeitvonGeräten“).DiesistdieUmsetzungder
EU-Richtlinie2004/108/EG(früher89/336/EWG)inderBundesrepublikDeutschland.
ZulassungsbescheinigunglautdemDeutschenGesetzüberdieelektromagnetischeVerträglichkeit
vonBetriebsmitteln,EMVGvom20.Juli2007(früherGesetzüberdieelektromagnetische
VerträglichkeitvonGeräten),bzw.derEMVEGRichtlinie2004/108/EC(früher89/336/EWG),für
GerätederKlasseB.
164UserGuide

DiesesGerätistberechtigt,inÜbereinstimmungmitdemDeutschenEMVGdasEG-Konformitätszeichen
-CE-zuführen.VerantwortlichfürdieKonformitätserklärungnachParagraf5desEMVGistdieLenovo
(Deutschland)GmbH,Gropiusplatz10,D-70563Stuttgart.
InformationeninHinsichtEMVGParagraf4Abs.(1)4:
DasGeräterfülltdieSchutzanforderungennachEN55024undEN55022KlasseB.
KoreaClassBcompliancestatement
JapaneseVCCIClassBstatement
Japancompliancestatementforproductswhichconnecttothepower
mainswithratedcurrentlessthanorequalto20Aperphase
LenovoproductserviceinformationforTaiwan
AppendixA.Regulatoryinformation165

166UserGuide

AppendixB.WEEEandrecyclingstatements
Lenovoencouragesownersofinformationtechnologyequipmenttoresponsiblyrecycletheirequipment
whenitisnolongerneeded.Lenovooffersavarietyofprogramsandservicestoassistequipmentownersin
recyclingtheirITproducts.InformationonproductrecyclingofferingscanbefoundonLenovo'sInternetsite
athttp://www.lenovo.com/social_responsibility/us/en/.
ImportantWEEEinformation
TheWEEEmarkingonLenovoproductsappliestocountrieswithWEEEande-wasteregulations(forexample,
EuropeanDirective2002/96/EC,IndiaE-WasteManagement&HandlingRules,2011).Appliancesare
labeledinaccordancewithlocalregulationsconcerningwasteelectricalandelectronicequipment(WEEE).
Theseregulationsdeterminetheframeworkforthereturnandrecyclingofusedappliancesasapplicable
withineachgeography.Thislabelisappliedtovariousproductstoindicatethattheproductisnottobe
thrownaway,butratherputintheestablishedcollectivesystemsforreclaimingtheseendoflifeproducts.
Usersofelectricalandelectronicequipment(EEE)withtheWEEEmarkingmustnotdisposeofendof
lifeEEEasunsortedmunicipalwaste,butusethecollectionframeworkavailabletothemforthereturn,
recycle,andrecoveryofWEEEandtominimizeanypotentialeffectsofEEEontheenvironmentand
humanhealthduetothepresenceofhazardoussubstances.ForadditionalWEEEinformationgoto:
http://www.lenovo.com/recycling
BatteryrecyclinginformationforJapan
CollectingandrecyclingadisusedLenovocomputerormonitor
IfyouareacompanyemployeeandneedtodisposeofaLenovocomputerormonitorthatistheproperty
ofthecompany,youmustdosoinaccordancewiththeLawforPromotionofEffectiveUtilizationof
Resources.Computersandmonitorsarecategorizedasindustrialwasteandshouldbeproperlydisposed
ofbyanindustrialwastedisposalcontractorcertiedbyalocalgovernment.InaccordancewiththeLaw
forPromotionofEffectiveUtilizationofResources,LenovoJapanprovides,throughitsPCCollectingand
RecyclingServices,forthecollecting,reuse,andrecyclingofdisusedcomputersandmonitors.Fordetails,
visittheLenovoWebsiteat:http://www.lenovo.com/services_warranty/jp/ja/recycle/pcrecycle/.
PursuanttotheLawforPromotionofEffectiveUtilizationofResources,thecollectingandrecyclingof
home-usedcomputersandmonitorsbythemanufacturerwasbegunonOctober1,2003.Thisservice
isprovidedfreeofchargeforhome-usedcomputerssoldafterOctober1,2003.Fordetails,goto
http://www.lenovo.com/services_warranty/jp/ja/recycle/personal/.
©CopyrightLenovo2012167

DisposingofLenovocomputercomponents
SomeLenovocomputerproductssoldinJapanmayhavecomponentsthatcontainheavymetalsorother
environmentalsensitivesubstances.Toproperlydisposeofdisusedcomponents,suchasaprintedcircuit
boardordrive,usethemethodsdescribedaboveforcollectingandrecyclingadisusedcomputerormonitor.
DisposingofdisusedlithiumbatteriesfromLenovocomputers
Abutton-shapedlithiumbatteryisinstalledonthesystemboardofyourLenovocomputertoprovidepower
tothecomputerclockwhilethecomputerisoffordisconnectedfromthemainpowersource.Ifyouwantto
replaceitwithanewone,contactyourplaceofpurchaseoraskforarepairserviceprovidedbyLenovo.If
youhavereplaceditbyyourselfandwanttodisposeofthedisusedlithiumbattery,insulateitwithvinyltape,
contactyourplaceofpurchase,andfollowtheirinstructions.IfyouuseaLenovocomputerathomeand
needtodisposeofalithiumbattery,youmustcomplywithlocalordinancesandregulations.
DisposingofdisusedbatterypacksfromLenovonotebookcomputers
YourLenovonotebookcomputerhasalithiumionbatterypackoranickelmetalhydridebatterypack.If
youareacompanyemployeewhousesaLenovonotebookcomputerandneedtodisposeofabattery
pack,contacttheproperpersoninLenovosales,service,ormarketing,andfollowthatperson'sinstructions.
Youalsocanrefertotheinstructionsathttp://www.lenovo.com/jp/ja/environment/recycle/battery/.
IfyouuseaLenovonotebookcomputerathomeandneedtodisposeofabatterypack,you
mustcomplywithlocalordinancesandregulations.Youalsocanrefertotheinstructionsat
http://www.lenovo.com/jp/ja/environment/recycle/battery/.
BatteryrecyclinginformationforBrazil
DeclaraçõesdeReciclagemnoBrasil
DescartedeumProdutoLenovoForadeUso
Equipamentoselétricoseeletrônicosnãodevemserdescartadosemlixocomum,masenviadosàpontosde
coleta,autorizadospelofabricantedoprodutoparaquesejamencaminhadoseprocessadosporempresas
especializadasnomanuseioderesíduosindustriais,devidamentecerticadaspelosorgãosambientais,de
acordocomalegislaçãolocal.
ALenovopossuiumcanalespecícoparaauxiliá-lonodescartedessesprodutos.Casovocêpossua
umprodutoLenovoemsituaçãodedescarte,ligueparaonossoSACouencaminheume-mailpara:
reciclar@lenovo.com,informandoomodelo,númerodesérieecidade,amdeenviarmosasinstruções
paraocorretodescartedoseuprodutoLenovo.
BatteryrecyclinginformationfortheUnitedStatesandCanada
168UserGuide

BatteryrecyclinginformationfortheEuropeanUnion
Notice:ThismarkappliesonlytocountrieswithintheEuropeanUnion(EU).
BatteriesorpackagingforbatteriesarelabeledinaccordancewithEuropeanDirective2006/66/EC
concerningbatteriesandaccumulatorsandwastebatteriesandaccumulators.TheDirectivedeterminesthe
frameworkforthereturnandrecyclingofusedbatteriesandaccumulatorsasapplicablethroughoutthe
EuropeanUnion.Thislabelisappliedtovariousbatteriestoindicatethatthebatteryisnottobethrown
away,butratherreclaimeduponendoflifeperthisDirective.
InaccordancewiththeEuropeanDirective2006/66/EC,batteriesandaccumulatorsarelabeledtoindicate
thattheyaretobecollectedseparatelyandrecycledatendoflife.Thelabelonthebatterymayalso
includeachemicalsymbolforthemetalconcernedinthebattery(Pbforlead,Hgformercury,andCdfor
cadmium).Usersofbatteriesandaccumulatorsmustnotdisposeofbatteriesandaccumulatorsasunsorted
municipalwaste,butusethecollectionframeworkavailabletocustomersforthereturn,recycling,and
treatmentofbatteriesandaccumulators.Customerparticipationisimportanttominimizeanypotential
effectsofbatteriesandaccumulatorsontheenvironmentandhumanhealthduetothepotentialpresenceof
hazardoussubstances.Forpropercollectionandtreatment,goto:
http://www.lenovo.com/lenovo/environment
BatteryrecyclinginformationforTaiwan
AppendixB.WEEEandrecyclingstatements169

170UserGuide

AppendixC.Notices
Lenovomaynotoffertheproducts,services,orfeaturesdiscussedinthisdocumentinallcountries.Consult
yourlocalLenovorepresentativeforinformationontheproductsandservicescurrentlyavailableinyour
area.AnyreferencetoaLenovoproduct,program,orserviceisnotintendedtostateorimplythatonlythat
Lenovoproduct,program,orservicemaybeused.Anyfunctionallyequivalentproduct,program,orservice
thatdoesnotinfringeanyLenovointellectualpropertyrightmaybeusedinstead.However,itistheuser's
responsibilitytoevaluateandverifytheoperationofanyotherproduct,program,orservice.
Lenovomayhavepatentsorpendingpatentapplicationscoveringsubjectmatterdescribedinthis
document.Thefurnishingofthisdocumentdoesnotgiveyouanylicensetothesepatents.Youcansend
licenseinquiries,inwriting,to:
Lenovo(UnitedStates),Inc.
1009ThinkPlace-BuildingOne
Morrisville,NC27560
U.S.A.
Attention:LenovoDirectorofLicensing
LENOVOPROVIDESTHISPUBLICATION“ASIS”WITHOUTWARRANTYOFANYKIND,EITHEREXPRESS
ORIMPLIED,INCLUDING,BUTNOTLIMITEDTO,THEIMPLIEDWARRANTIESOFNON-INFRINGEMENT,
MERCHANTABILITYORFITNESSFORAPARTICULARPURPOSE.Somejurisdictionsdonotallow
disclaimerofexpressorimpliedwarrantiesincertaintransactions,therefore,thisstatementmaynotapply
toyou.
Thisinformationcouldincludetechnicalinaccuraciesortypographicalerrors.Changesareperiodically
madetotheinformationherein;thesechangeswillbeincorporatedinneweditionsofthepublication.
Lenovomaymakeimprovementsand/orchangesintheproduct(s)and/ortheprogram(s)describedinthis
publicationatanytimewithoutnotice.
Theproductsdescribedinthisdocumentarenotintendedforuseinimplantationorotherlifesupport
applicationswheremalfunctionmayresultininjuryordeathtopersons.Theinformationcontainedinthis
documentdoesnotaffectorchangeLenovoproductspecicationsorwarranties.Nothinginthisdocument
shalloperateasanexpressorimpliedlicenseorindemnityundertheintellectualpropertyrightsofLenovo
orthirdparties.Allinformationcontainedinthisdocumentwasobtainedinspecicenvironmentsandis
presentedasanillustration.Theresultobtainedinotheroperatingenvironmentsmayvary.
Lenovomayuseordistributeanyoftheinformationyousupplyinanywayitbelievesappropriatewithout
incurringanyobligationtoyou.
Anyreferencesinthispublicationtonon-LenovoWebsitesareprovidedforconvenienceonlyanddonotin
anymannerserveasanendorsementofthoseWebsites.ThematerialsatthoseWebsitesarenotpartof
thematerialsforthisLenovoproduct,anduseofthoseWebsitesisatyourownrisk.
Anyperformancedatacontainedhereinwasdeterminedinacontrolledenvironment.Therefore,theresult
obtainedinotheroperatingenvironmentsmayvarysignicantly.Somemeasurementsmayhavebeen
madeondevelopment-levelsystemsandthereisnoguaranteethatthesemeasurementswillbethesame
ongenerallyavailablesystems.Furthermore,somemeasurementsmayhavebeenestimatedthrough
extrapolation.Actualresultsmayvary.Usersofthisdocumentshouldverifytheapplicabledatafortheir
specicenvironment.
©CopyrightLenovo2012171

Trademarks
ThefollowingtermsaretrademarksofLenovointheUnitedStates,othercountries,orboth:
Lenovo
AccessConnections
ActiveProtectionSystem
RescueandRecovery
SecureDataDisposal
ThinkLight
ThinkPad
ThinkVantage
TrackPoint
Ultrabay
UltraConnect
UltraNav
IntelandIntelSpeedSteparetrademarksorregisteredtrademarksofIntelCorporationoritssubsidiariesin
theUnitedStatesandothercountries.
Microsoft,Windows,Bing,BitLocker,andInternetExploreraretrademarksoftheMicrosoftgroupof
companies.
BlackBerry®,RIM®,ResearchInMotion®,SureType®andrelatedtrademarks,namesandlogosarethe
propertyofResearchInMotionLimitedandareregisteredand/orusedintheU.S.andcountriesaroundthe
world.UsedunderlicensefromResearchInMotionLimited.
Othercompany,product,andservicenamesmaybetrademarksorservicemarksofothers.
172UserGuide
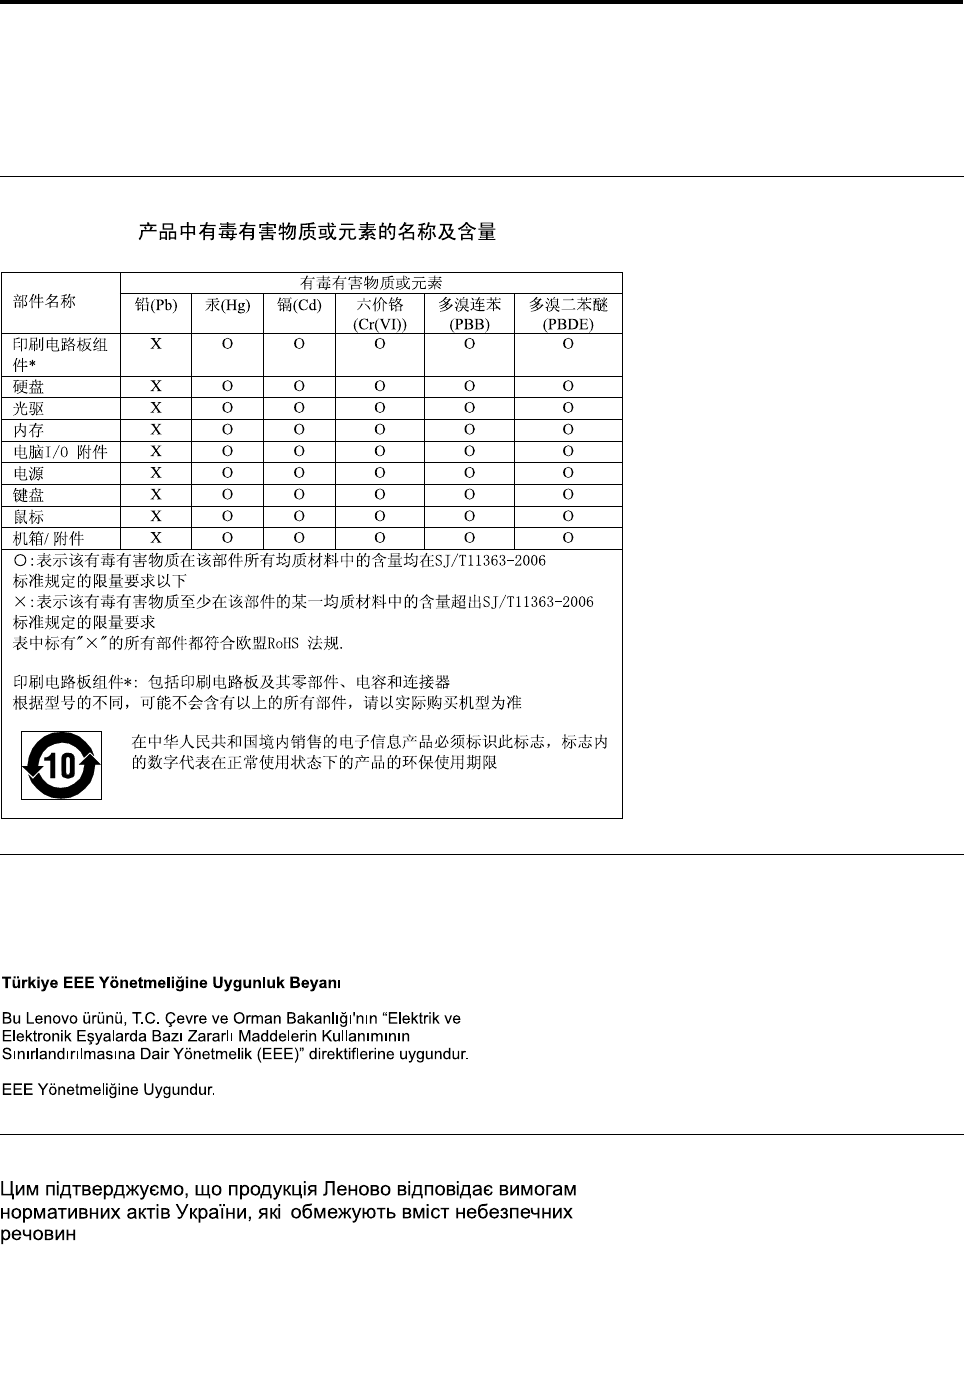
AppendixD.RestrictionofHazardousSubstancesDirective
(RoHS)
ChinaRoHS
TurkishRoHS
TheLenovoproductmeetstherequirementsoftheRepublicofTurkeyDirectiveontheRestrictionoftheUse
ofCertainHazardousSubstancesinElectricalandElectronicEquipment(EEE).
UkraineRoHS
©CopyrightLenovo2012173

IndiaRoHS
RoHScompliantasperE-Waste(Management&Handling)Rules,2011.
174UserGuide

PartNumber:
PrintedinChina
(1P)P/N:
*1P*
