Lenovo Thinkpad Tablet X220 Hardware Maintenance Manual
ThinkPad Tablet X220i - Hardware Maintenance Manual ThinkPad_X220_X220i_Tablet_HMM_EN Free User Guide for Lenovo Tablet and eReader, Manual - page3
2015-08-19
: Lenovo Lenovo-Thinkpad-Tablet-X220-Hardware-Maintenance-Manual-788924 lenovo-thinkpad-tablet-x220-hardware-maintenance-manual-788924 lenovo pdf
Open the PDF directly: View PDF ![]() .
.
Page Count: 150 [warning: Documents this large are best viewed by clicking the View PDF Link!]
- About this manual
- Chapter 1. Safety information
- Chapter 2. Important service information
- Chapter 3. General checkout
- Chapter 4. Related service information
- Chapter 5. Status indicators
- Chapter 6. Fn key combinations
- Chapter 7. FRU replacement notices
- Chapter 8. Removing and replacing a FRU
- Before servicing ThinkPad X220 Tablet and X220i Tablet models
- 1010 Digitizer pen
- 1020 Battery pack
- 1030 Hard disk drive (HDD) and solid state drive (SSD)
- 1040 DIMM
- 1050 Hinge caps
- 1060 Keyboard
- 1070 Palm rest
- 1080 Backup battery
- 1090 PCI Express Mini Card for wireless LAN/WiMAX
- 1100 PCI Express Mini Card for wireless WAN
- 1110 Bluetooth daughter card
- 1120 Keyboard bezel
- 1130 LCD assembly
- 1140 DC-in connector, base cover, fan, digitizer pen case, and pen switch assembly
- 1150 System board and ExpressCard slot assemblies
- 1160 Speaker assembly
- 1170 mSATA solid state drive
- 2010 LCD front bezel
- 2020 Micro-Processor card
- 2030 Hinge
- 2040 LCD panel and LCD cable
- 2050 Integrated camera
- 2060 LCD rear cover and wireless antenna cables
- Chapter 9. Locations
- Chapter 10. Parts list
- Overall
- LCD FRUs
- Keyboard
- Miscellaneous parts
- ac power adapter
- Power cords
- Recovery discs
- Windows XP Professional DVDs
- Windows XP Tablet (32 bit) DVDs
- Windows Vista Business (32 bit) DVDs
- Windows Vista Home Basic (32 bit) DVDs
- Windows 7 Professional (32 bit) DVDs
- Windows 7 Professional (64 bit) DVDs
- Windows 7 Ultimate (32 bit) DVDs
- Windows 7 Ultimate (64 bit) DVDs
- Windows 7 Home Basic (32 bit) DVDs
- Windows 7 Home Basic (64 bit) DVDs
- Windows 7 Home Premium (32 bit) DVDs
- Windows 7 Home Premium (64 bit) DVDs
- Common service tools
- Notices

HardwareMaintenanceManual
ThinkPadX220TabletandX220iTablet

Note:Beforeusingthisinformationandtheproductitsupports,besuretoreadthegeneralinformation
under“Notices”onpage140.
FifthEdition(March2012)
©CopyrightLenovo2012.
LIMITEDANDRESTRICTEDRIGHTSNOTICE:IfdataorsoftwareisdeliveredpursuantaGeneralServices
Administration“GSA”contract,use,reproduction,ordisclosureissubjecttorestrictionssetforthinContract
No.GS-35F-05925.

Contents
Aboutthismanual...........iii
Chapter1.Safetyinformation......1
Generalsafety................1
Electricalsafety...............2
Safetyinspectionguide............3
Handlingdevicesthataresensitivetoelectrostatic
discharge..................3
Groundingrequirements............4
Safetynotices(multilingualtranslations)......4
Lasercompliancestatement(multilingual
translations)................16
Chapter2.Importantservice
information..............23
StrategyforreplacingFRUs.........23
Strategyforreplacingaharddiskdrive...24
Importantnoticeforreplacingasystem
board................24
Howtouseerrormessage........24
StrategyforreplacingFRUsforCTO,CMV,and
GAV...................25
Productdenition............25
FRUidenticationforCTO,CMV,andGAV
products...............25
Chapter3.Generalcheckout.....27
Whattodorst..............27
Checkoutguide..............28
SystemsupportingtheLenovoThinkVantage
ToolboxprogramandthePC-DoctorforDOS
diagnosticsprogram..........28
SystemsupportingtheLenovodiagnostics
programs...............33
Powersystemcheckout...........35
Checkingtheacpoweradapter......35
Checkingoperationalcharging......36
Checkingthebatterypack........36
Checkingthebackupbattery.......37
Chapter4.Relatedservice
information..............39
RestoringthefactorycontentsbyusingProduct
Recoverydiscs..............39
RestoringthefactorycontentsbyusingRecovery
DiscSet.................39
Passwords................41
Power-onpassword...........41
Hard-diskpassword...........41
Supervisorpassword..........41
Howtoremovethepower-onpassword...41
Howtoremovethehard-diskpassword...42
Powermanagement............42
Screenblankmode...........42
Sleep(Standby)mode..........43
Hibernationmode...........43
Symptom-to-FRUindex...........44
Numericerrorcodes..........45
Errormessages............49
Beepsymptoms............50
No-beepsymptoms...........50
LCD-relatedsymptoms.........51
Intermittentproblems..........51
Undeterminedproblems.........51
Chapter5.Statusindicators.....53
Chapter6.Fnkeycombinations...55
Chapter7.FRUreplacement
notices................57
Screwnotices...............57
Retainingserialnumbers...........58
Restoringtheserialnumberofthesystem
unit.................58
RetainingtheUUID...........59
ReadingorwritingtheECAinformation...59
Chapter8.Removingandreplacinga
FRU..................61
BeforeservicingThinkPadX220TabletandX220i
Tabletmodels...............62
1010Digitizerpen.............63
1020Batterypack.............63
1030Harddiskdrive(HDD)andsolidstatedrive
(SSD)..................64
1040DIMM................66
1050Hingecaps..............68
1060Keyboard..............68
1070Palmrest..............71
1080Backupbattery............73
1090PCIExpressMiniCardforwireless
LAN/WiMAX................75
1100PCIExpressMiniCardforwirelessWAN..77
1110Bluetoothdaughtercard........78
1120Keyboardbezel............79
1130LCDassembly............81
©CopyrightLenovo2012i

1140DC-inconnector,basecover,fan,digitizer
pencase,andpenswitchassembly......84
1150SystemboardandExpressCardslot
assemblies................89
1160Speakerassembly...........91
1170mSATAsolidstatedrive.........92
2010LCDfrontbezel............93
2020Micro-Processorcard..........95
2030Hinge................96
2040LCDpanelandLCDcable........97
2050Integratedcamera...........100
2060LCDrearcoverandwirelessantenna
cables..................101
Chapter9.Locations........105
Frontview................105
Rearview.................106
Rearview(tabletmode)...........107
Bottomview...............107
Topview(ThinkPadX220UltraBase)......108
Bottomview(ThinkPadX220UltraBase).....108
Chapter10.Partslist........109
Overall..................110
LCDFRUs................126
Keyboard.................130
Miscellaneousparts............131
acpoweradapter.............132
Powercords...............133
Recoverydiscs..............134
WindowsXPProfessionalDVDs......134
WindowsXPTablet(32bit)DVDs.....134
WindowsVistaBusiness(32bit)DVDs...135
WindowsVistaHomeBasic(32bit)DVDs..135
Windows7Professional(32bit)DVDs....135
Windows7Professional(64bit)DVDs....136
Windows7Ultimate(32bit)DVDs.....137
Windows7Ultimate(64bit)DVDs.....137
Windows7HomeBasic(32bit)DVDs....138
Windows7HomeBasic(64bit)DVDs....138
Windows7HomePremium(32bit)DVDs..138
Windows7HomePremium(64bit)DVDs..139
Commonservicetools...........140
Notices.................140
Electronicemissionsnotices.......141
Trademarks..............141
iiHardwareMaintenanceManual

Aboutthismanual
ThismanualcontainsserviceandreferenceinformationforthefollowingThinkPad®products.
ThinkPadX220Tabletand
X220iTablet
Machinetypes(MT)4294,4296,4297,4298,4299,4300,and4301
Usethismanualalongwiththeadvanceddiagnosticteststotroubleshootproblems.
Important:
ThismanualisintendedonlyfortrainedservicetechnicianswhoarefamiliarwithThinkPadproducts.Usethis
manualalongwiththeadvanceddiagnosticteststotroubleshootproblemseffectively.
BeforeservicingaThinkPadproduct,besuretoreadalltheinformationunderChapter1“Safetyinformation”on
page1andChapter2“Importantserviceinformation”onpage23.
©CopyrightLenovo2012iii

ivHardwareMaintenanceManual

Chapter1.Safetyinformation
Thischapterpresentsfollowingsafetyinformationthatyouneedtobefamiliarwithbeforeyouservice
aThinkPadNotebook.
•“Generalsafety”onpage1
•“Electricalsafety”onpage2
•“Safetyinspectionguide”onpage3
•“Handlingdevicesthataresensitivetoelectrostaticdischarge”onpage3
•“Groundingrequirements”onpage4
•“Safetynotices(multilingualtranslations)”onpage4
•“Lasercompliancestatement(multilingualtranslations)”onpage16
Generalsafety
Followtheserulestoensuregeneralsafety:
•Observegoodhousekeepingintheareaofthemachinesduringandaftermaintenance.
•Whenliftinganyheavyobject:
1.Makesurethatyoucanstandsafelywithoutslipping.
2.Distributetheweightoftheobjectequallybetweenyourfeet.
3.Useaslowliftingforce.Nevermovesuddenlyortwistwhenyouattempttolift.
4.Liftbystandingorbypushingupwithyourlegmuscles;thisactionremovesthestrainfromthe
musclesinyourback.Donotattempttoliftanyobjectthatweighsmorethan16kg(35lb)orthat
youthinkistooheavyforyou.
•Donotperformanyactionthatcauseshazardstothecustomer,orthatmakestheequipmentunsafe.
•Beforeyoustartthemachine,makesurethatotherservicetechniciansandthecustomer'spersonnelare
notinahazardousposition.
•Placeremovedcoversandotherpartsinasafeplace,awayfromallpersonnel,whileyouareservicing
themachine.
•Keepyourtoolcaseawayfromwalkareassothatotherpeoplewillnottripoverit.
•Donotwearlooseclothingthatcanbetrappedinthemovingpartsofamachine.Makesurethatyour
sleevesarefastenedorrolledupaboveyourelbows.Ifyourhairislong,fastenit.
•Inserttheendsofyournecktieorscarfinsideclothingorfastenitwithanonconductiveclip,about8
centimeters(3inches)fromtheend.
•Donotwearjewelry,chains,metal-frameeyeglasses,ormetalfastenersforyourclothing.
Attention:Metalobjectsaregoodelectricalconductors.
•Wearsafetyglasseswhenyouarehammering,drilling,soldering,cuttingwire,attachingsprings,using
solvents,orworkinginanyotherconditionsthatmightbehazardoustoyoureyes.
•Afterservice,reinstallallsafetyshields,guards,labels,andgroundwires.Replaceanysafetydevice
thatiswornordefective.
•Reinstallallcoverscorrectlybeforereturningthemachinetothecustomer.
•Fanlouversonthemachinehelptopreventoverheatingofinternalcomponents.Donotobstructfan
louversorcoverthemwithlabelsorstickers.
©CopyrightLenovo20121

Electricalsafety
Observethefollowingruleswhenworkingonelectricalequipment.
Important:
Useonlyapprovedtoolsandtestequipment.Somehandtoolshavehandlescoveredwithasoftmaterialthatdoes
notinsulateyouwhenworkingwithliveelectricalcurrents.
Manycustomershave,neartheirequipment,rubberoormatsthatcontainsmallconductiveberstodecrease
electrostaticdischarges.Donotusethistypeofmattoprotectyourselffromelectricalshock.
•Findtheroomemergencypower-off(EPO)switch,disconnectingswitch,orelectricaloutlet.Ifanelectrical
accidentoccurs,youcanthenoperatetheswitchorunplugthepowercordquickly.
•Donotworkaloneunderhazardousconditionsornearequipmentthathashazardousvoltages.
•Disconnectallpowerbefore:
–Performingamechanicalinspection
–Workingnearpowersupplies
–Removingorinstallingmainunits
•Beforeyoustarttoworkonthemachine,unplugthepowercord.Ifyoucannotunplugit,askthecustomer
topower-offthewallboxthatsuppliespowertothemachine,andtolockthewallboxintheoffposition.
•Ifyouneedtoworkonamachinethathasexposedelectricalcircuits,observethefollowingprecautions:
–Ensurethatanotherperson,familiarwiththepower-offcontrols,isnearyou.
Attention:Anotherpersonmustbetheretoswitchoffthepower,ifnecessary.
–Useonlyonehandwhenworkingwithpowered-onelectricalequipment;keeptheotherhandinyour
pocketorbehindyourback.
Attention:Anelectricalshockcanoccuronlywhenthereisacompletecircuit.Byobservingtheabove
rule,youmaypreventacurrentfrompassingthroughyourbody.
–Whenusingtesters,setthecontrolscorrectlyandusetheapprovedprobeleadsandaccessoriesfor
thattester.
–Standonsuitablerubbermats(obtainedlocally,ifnecessary)toinsulateyoufromgroundssuchas
metaloorstripsandmachineframes.
Observethespecialsafetyprecautionswhenyouworkwithveryhighvoltages;Instructionsforthese
precautionsareinthesafetysectionsofmaintenanceinformation.Useextremecarewhenmeasuring
highvoltages.
•Regularlyinspectandmaintainyourelectricalhandtoolsforsafeoperationalcondition.
•Donotusewornorbrokentoolsandtesters.
•Neverassumethatpowerhasbeendisconnectedfromacircuit.First,checkthatithasbeenpoweredoff.
•Alwayslookcarefullyforpossiblehazardsinyourworkarea.Examplesofthesehazardsaremoistoors,
nongroundedpowerextensioncables,powersurges,andmissingsafetygrounds.
•Donottouchliveelectricalcircuitswiththereectivesurfaceofaplasticdentalmirror.Thesurfaceis
conductive;suchtouchingcancausepersonalinjuryandmachinedamage.
•Donotservicethefollowingpartswiththepoweronwhentheyareremovedfromtheirnormaloperating
placesinamachine:
–Powersupplyunits
–Pumps
–Blowersandfans
–Motorgenerators
–Similarunitstolistedabove
Thispracticeensurescorrectgroundingoftheunits.
•Ifanelectricalaccidentoccurs:
2HardwareMaintenanceManual

–Usecaution;donotbecomeavictimyourself.
–Switchoffpower.
–Sendanotherpersontogetmedicalaid.
Safetyinspectionguide
Thepurposeofthisinspectionguideistoassistyouinidentifyingpotentiallyunsafeconditions.Aseach
machinewasdesignedandbuilt,requiredsafetyitemswereinstalledtoprotectusersandservicetechnicians
frominjury.Thisguideaddressesonlythoseitems.Youshouldusegoodjudgmenttoidentifypotential
safetyhazardsduetoattachmentofnon-ThinkPadfeaturesoroptionsnotcoveredbythisinspectionguide.
Ifanyunsafeconditionsarepresent,youmustdeterminehowserioustheapparenthazardcouldbeand
whetheryoucancontinuewithoutrstcorrectingtheproblem.
Considertheseconditionsandthesafetyhazardstheypresent:
•Electricalhazards,especiallyprimarypower(primaryvoltageontheframecancauseseriousorfatal
electricalshock)
•Explosivehazards,suchasadamagedCRTfaceorabulgingcapacitor
•Mechanicalhazards,suchaslooseormissinghardware
Todeterminewhetherthereareanypotentiallyunsafeconditions,usethefollowingchecklistatthebeginning
ofeveryservicetask.Beginthecheckswiththepoweroff,andthepowercorddisconnected.
Checklist:
1.Checkexteriorcoversfordamage(loose,broken,orsharpedges).
2.Poweroffthecomputer.Disconnectthepowercord.
3.Checkthepowercordfor:
a.Athird-wiregroundconnectoringoodcondition.Useametertomeasurethird-wireground
continuityfor0.1ohmorlessbetweentheexternalgroundpinandtheframeground.
b.Thepowercordshouldbethetypespeciedinthepartslist.
c.Insulationmustnotbefrayedorworn.
4.Checkforcrackedorbulgingbatteries.
5.Removethecover.
6.Checkforanyobviousnon-ThinkPadalterations.Usegoodjudgmentastothesafetyofany
non-ThinkPadalterations.
7.Checkinsidetheunitforanyobviousunsafeconditions,suchasmetallings,contamination,wateror
otherliquids,orsignsofreorsmokedamage.
8.Checkforworn,frayed,orpinchedcables.
9.Checkthatthepower-supplycoverfasteners(screwsorrivets)havenotbeenremovedortamperedwith.
Handlingdevicesthataresensitivetoelectrostaticdischarge
Anycomputerpartcontainingtransistorsorintegratedcircuits(ICs)shouldbeconsideredsensitiveto
electrostaticdischarge(ESD).ESDdamagecanoccurwhenthereisadifferenceinchargebetweenobjects.
ProtectagainstESDdamagebyequalizingthechargesothatthemachine,thepart,theworkmat,andthe
personhandlingthepartareallatthesamecharge.
Chapter1.Safetyinformation3
Notes:
1.Useproduct-specicESDprocedureswhentheyexceedtherequirementsnotedhere.
2.MakesurethattheESDprotectivedevicesyouusehavebeencertied(ISO9000)asfullyeffective.
WhenhandlingESD-sensitiveparts:
•Keepthepartsinprotectivepackagesuntiltheyareinsertedintotheproduct.
•Avoidcontactwithotherpeople.
•Wearagroundedwriststrapagainstyourskintoeliminatestaticonyourbody.
•Preventthepartfromtouchingyourclothing.Mostclothingisinsulativeandretainsachargeevenwhen
youarewearingawriststrap.
•Useagroundedworkmattoprovideastatic-freeworksurface.Thematisespeciallyusefulwhen
handlingESD-sensitivedevices.
•Selectagroundingsystem,suchasthoselistedbelow,toprovideprotectionthatmeetsthespecic
servicerequirement.
Note:TheuseofagroundingsystemtoguardagainstESDdamageisdesirablebutnotnecessary.
–AttachtheESDgroundcliptoanyframeground,groundbraid,orgreen-wireground.
–Whenworkingonadouble-insulatedorbattery-operatedsystem,useanESDcommongroundor
referencepoint.Y oucanusecoaxorconnector-outsideshellsonthesesystems.
–Usetheroundgroundprongoftheacplugonac-operatedcomputers.
Groundingrequirements
Electricalgroundingofthecomputerisrequiredforoperatorsafetyandcorrectsystemfunction.Proper
groundingoftheelectricaloutletcanbeveriedbyacertiedelectrician.
Safetynotices(multilingualtranslations)
Thesafetynoticesinthissectionareprovidedinthefollowinglanguages:
•English
•Arabic
•BrazilianPortuguese
•French
•German
•Hebrew
•Japanese
•Korean
•Spanish
•T raditionalChinese
DANGER
BeforethecomputerispoweredonafterFRUreplacement,makesureallscrews,springs,andothersmall
partsareinplaceandarenotleftlooseinsidethecomputer.Verifythisbyshakingthecomputerandlistening
forrattlingsounds.Metallicpartsormetalakescancauseelectricalshorts.
4HardwareMaintenanceManual

DANGER
Somestandbybatteriescontainasmallamountofnickelandcadmium.Donotdisassembleastandbybattery,
rechargeit,throwitintoreorwater,orshort-circuitit.Disposeofthebatteryasrequiredbylocalordinances
orregulations.Useonlythebatteryintheappropriatepartslisting.Useofanincorrectbatterycanresult
inignitionorexplosionofthebattery.
DANGER
Thebatterypackcontainssmallamountsofnickel.Donotdisassembleit,throwitintoreorwater,or
short-circuitit.Disposeofthebatterypackasrequiredbylocalordinancesorregulations.Useonlythe
batteryintheappropriatepartslistingwhenreplacingthebatterypack.Useofanincorrectbatterycanresult
inignitionorexplosionofthebattery.
DANGER
Thelithiumbatterycancauseare,anexplosion,orasevereburn.Donotrechargeit,removeitspolarized
connector,disassembleit,heatitabove100°C(212°F),incinerateit,orexposeitscellcontentstowater.
Disposeofthebatteryasrequiredbylocalordinancesorregulations.Useonlythebatteryintheappropriate
partslisting.Useofanincorrectbatterycanresultinignitionorexplosionofthebattery.
DANGER
IftheLCDbreaksandtheuidfrominsidetheLCDgetsintoyoureyesoronyourhands,immediatelywash
theaffectedareaswithwaterforatleast15minutes.Seekmedicalcareifanysymptomsfromtheuidare
presentafterwashing.
DANGER
Toavoidshock,donotremovetheplasticcoverthatprotectsthelowerpartoftheinvertercard.
DANGER
Thoughthemainbatterieshavelowvoltage,ashortedorgroundedbatterycanproduceenoughcurrentto
burnpersonnelorcombustiblematerials.
Chapter1.Safetyinformation5
DANGER
UnlesshotswapisallowedfortheFRUbeingreplaced,doasfollowsbeforeremovingit:poweroffthe
computer,unplugallpowercordsfromelectricaloutlets,removethebatterypack,anddisconnectany
interconnectingcables.
6HardwareMaintenanceManual
PERIGO
AntesdeligarocomputadorapósasubstituiçãodaFRU,certique-sedequetodososparafusos,molase
outraspeçaspequenasestejamnolugarenãoestejamsoltosdentrodocomputador.Veriqueissosacudindo
ocomputadoreprocurandoouvirsonsdepeçassoltas.Peçasmetálicasoulascasdemetalpodemcausar
curto-circuito.
PERIGO
Algumasbateriasreservacontêmumapequenaquantidadedeníquelecádmio.Nãodesmonteumabateria
reserva,recarregue-a,jogue-anofogoounaágua,oudeixe-aentraremcurto-circuito.Descarteabateria
conformerequeridopelasleisouregulamentoslocais.Usesomenteabaterianasparteslistadasapropriadas.
Ousodeumabateriaincorretapoderesultaremcombustãoouexplosãodabateria.
PERIGO
Opacotedabateriacontémumapequenaquantidadedeníquel.Nãoodesmonte,jogue-onofogoouna
água,oudeixe-oentraremcurto-circuito.Descarteopacotedabateriaconformerequeridopelasleisou
regulamentoslocais.Usesomenteabaterianasparteslistadasapropriadasaosubstituiropacotedabateria.
Ousodeumabateriaincorretapoderesultaremcombustãoouexplosãodabateria.
PERIGO
Chapter1.Safetyinformation7

Abateriadelítiopodecausarincêndio,explosãoougravesqueimaduras.Nãoarecarregue,removaseu
conectorpolarizado,desmonte-a,aqueça-aacimade100°C(212°F),incinere-a,ouexponhaoconteúdode
suacélulaàágua.Descarteabateriaconformerequeridopelasleisouregulamentoslocais.Usesomente
abaterianasparteslistadasapropriadas.Ousodeumabateriaincorretapoderesultaremcombustão
ouexplosãodabateria.
PERIGO
SeoLCDquebrareouidodedentrodeleentraremcontatocomseusolhosoucomsuasmãos,laveas
áreasafetadasimediatamentecomáguadurantepelomenos15minutos.Procurecuidadosmédicossealgum
sintomacausadopelouidosurgirapósalavagem.
PERIGO
Paraevitarchoqueelétrico,nãoremovaacapaplásticaqueprotegeaparteinferiordaplacainversora.
PERIGO
Emboraasprincipaisbateriaspossuambaixavoltagem,umabateriaemcurto-circuitoouaterradapode
produzircorrenteobastanteparaqueimarmateriaisdepessoalouinamáveis.
PERIGO
AmenosqueumahotswapsejapermitidaparaaFRUqueestásendosubstituída,façaoseguinteantesde
removê-la:desligueocomputador,desconectetodososcabosdeenergiadastomadas,removaopacotede
bateriasedesconectequaisquercabosdeinterconexão.
DANGER
Avantderemettrel'ordinateursoustensionaprèsremplacementd'uneunitéenclientèle,vériezquetousles
ressorts,visetautrespiècessontbienenplaceetbienxées.Pourcefaire,secouezl'unitéetassurez-vous
qu'aucunbruitsuspectneseproduit.Despiècesmétalliquesoudescopeauxdemétalpourraientcauser
uncourt-circuit.
DANGER
8HardwareMaintenanceManual

Certainesbatteriesdesecourscontiennentdunickeletducadmium.Nelesdémontezpas,nelesrechargez
pas,nelesexposezniaufeuniàl'eau.Nelesmettezpasencourt-circuit.Pourlesmettreaurebut,
conformez-vousàlaréglementationenvigueur.Lorsquevousremplacezlapiledesauvegardeoucellede
l'horlogetempsréel,veillezàn'utiliserquelesmodèlescitésdanslalistedepiècesdétachéesadéquate.Une
batterieouunepileinappropriéerisquedeprendrefeuoud'exploser.
DANGER
Labatteriecontientdunickel.Neladémontezpas,nel'exposezniaufeuniàl'eau.Nelamettezpasen
court-circuit.Pourlamettreaurebut,conformez-vousàlaréglementationenvigueur.Lorsquevousremplacez
labatterie,veillezàn'utiliserquelesmodèlescitésdanslalistedepiècesdétachéesadéquate.Eneffet,une
batterieinappropriéerisquedeprendrefeuoud'exploser.
DANGER
Lapiledesauvegardecontientdulithium.Elleprésentedesrisquesd'incendie,d'explosionoudebrûlures
graves.Nelarechargezpas,neretirezpassonconnecteurpolariséetneladémontezpas.Nel'exposezpasà
unetemperaturesupérieureà100°C,nelafaitespasbrûleretn'enexposezpaslecontenuàl'eau.Mettezla
pileaurebutconformémentàlaréglementationenvigueur.Unepileinappropriéerisquedeprendrefeuou
d'exploser.
DANGER
Silepanneaud'afchageàcristauxliquidessebriseetquevousrecevezdanslesyeuxousurlesmainsune
partieduuide,rincez-lesabondammentpendantaumoinsquinzeminutes.Consultezunmédecinsides
symptômespersistentaprèslelavage.
DANGER
And'évitertoutrisquedechocélectrique,neretirezpaslecacheenplastiqueprotégeantlapartieinférieure
delacarted'alimentation.
DANGER
Bienquelevoltagedesbatteriesprincipalessoitpeuélevé,lecourt-circuitoulamiseàlamassed'une
batteriepeutproduiresufsammentdecourantpourbrûlerdesmatériauxcombustiblesoucauserdes
brûlurescorporellesgraves.
Chapter1.Safetyinformation9

DANGER
Sileremplacementàchaudn'estpasautorisépourl'unitéremplaçablesursitequevousremplacez,
procédezcommesuitavantderetirerl'unité:mettezl'ordinateurhorstension,débrancheztousles
cordonsd'alimentationdesprisesdecourant,retirezleblocdebatterieetdéconnecteztouslescâbles
d'interconnexion.
VORSICHT
BevornacheinemFRU-AustauschderComputerwiederangeschlossenwird,mußsichergestelltwerden,daß
keineSchrauben,FedernoderandereKleinteilefehlenoderimGehäusevergessenwurden.DerComputermuß
geschütteltundaufKlappergeräuschegeprüftwerden.Metallteileoder-splitterkönnenKurzschlüsseerzeugen.
VORSICHT
DieBereitschaftsbatterie,diesichunterdemDiskettenlaufwerkbendet,kanngeringeMengenNickel
undCadmiumenthalten.SiedarfnurdurchdieVerkaufsstelleoderdenIBMKundendienstausgetauscht
werden.Siedarfnichtzerlegt,wiederaufgeladen,kurzgeschlossen,oderFeueroderWasserausgesetzt
werden.DieBatteriekannschwereVerbrennungenoderVerätzungenverursachen.BeiderEntsorgungdie
örtlichenBestimmungenfürSondermüllbeachten.BeimErsetzenderBereitschafts-oderSystembatterienur
BatteriendesTypsverwenden,derinderErsatzteillisteaufgeführtist.DerEinsatzfalscherBatterienkann
zuEntzündungoderExplosionführen.
VORSICHT
AkkusenthaltengeringeMengenvonNickel.Siedürfennichtzerlegt,wiederaufgeladen,kurzgeschlossen,
oderFeueroderWasserausgesetztwerden.BeiderEntsorgungdieörtlichenBestimmungenfürSondermüll
beachten.BeimErsetzenderBatterienurBatteriendesTypsverwenden,derinderErsatzteillisteaufgeführt
ist.DerEinsatzfalscherBatterienkannzuEntzündungoderExplosionführen.
VORSICHT
DieSystembatterieisteineLithiumbatterie.Siekannsichentzünden,explodierenoderschwereVerbrennungen
hervorrufen.BatteriendiesesTypsdürfennichtaufgeladen,zerlegt,über100°Cerhitztoderverbranntwerden.
AuchdarfihrInhaltnichtmitWasserinVerbindunggebrachtoderderzurrichtigenPolungangebrachte
Verbindungssteckerentferntwerden.BeiderEntsorgungdieörtlichenBestimmungenfürSondermüll
beachten.BeimErsetzenderBatterienurBatteriendesTypsverwenden,derinderErsatzteillisteaufgeführt
ist.DerEinsatzfalscherBatterienkannzuEntzündungoderExplosionführen.
VORSICHT
10HardwareMaintenanceManual
DieLeuchtstoffröhreimLCD-BildschirmenthältQuecksilber.BeiderEntsorgungdieörtlichenBestimmungen
fürSondermüllbeachten.DerLCD-BildschirmbestehtausGlasundkannzerbrechen,wennerunsachgemäß
behandeltwirdoderderComputeraufdenBodenfällt.WennderBildschirmbeschädigtistunddiedarin
bendlicheFlüssigkeitinKontaktmitHautundAugengerät,solltendiebetroffenenStellenmindestens15
MinutenmitWasserabgespültundbeiBeschwerdenanschließendeinArztaufgesuchtwerden.
VORSICHT
AusSicherheitsgründendieKunststoffabdeckung,diedenunterenTeilderSpannungswandlerplatineumgibt,
nichtentfernen.
VORSICHT
ObwohlHauptbatterieneineniedrigeSpannunghaben,könnensiedochbeiKurzschlußoderErdunggenug
Stromabgeben,umbrennbareMaterialienzuentzündenoderVerletzungenbeiPersonenhervorzurufen.
VORSICHT
WenneinAustauschderFRUbeilaufendemBetriebnichterlaubtist,gehenSiebeimAustauschderFRUwie
folgtvor:SchaltenSiedenComputeraus,ziehenSiealleNetzkabelvondenNetzsteckdosenab,entfernen
SiedenAkkuundziehenSieallemiteinanderverbundenenKabelab.
Chapter1.Safetyinformation11

12HardwareMaintenanceManual
Chapter1.Safetyinformation13
AntesdeencenderelsistemadespuesdesustituirunaFRU,compruebequetodoslostornillos,muellesy
demáspiezaspequeñasseencuentranensusitioynoseencuentransueltasdentrodelsistema.Compruébelo
agitandoelsistemayescuchandolosposiblesruidosqueprovocarían.Laspiezasmetálicaspuedencausar
cortocircuitoseléctricos.
Algunasbateríasdereservacontienenunapequeñacantidaddeníquelycadmio.Nolasdesmonte,ni
recargue,nilasechealfuegooalaguanilascortocircuite.Deséchelastalcomodisponelanormativalocal.
Utilicesólobateríasqueseencuentrenenlalistadepiezas.Lautilizacióndeunabateríanoapropiada
puedeprovocarlaigniciónoexplosióndelamisma.
14HardwareMaintenanceManual

Lasbateríascontienenpequeñascantidadesdeníquel.Nolasdesmonte,nirecargue,nilasechealfuego
oalaguanilascortocircuite.Deséchelastalcomodisponelanormativalocal.Utilicesólobateríasquese
encuentrenenlalistadepiezasalsustituirlabatería.Lautilizacióndeunabateríanoapropiadapuede
provocarlaigniciónoexplosióndelamisma.
Labateríaderepuestoesunabateríadelitioypuedeprovocarincendios,explosionesoquemadurasgraves.
Nolarecargue,niquiteelconectorpolarizado,niladesmonte,nicalienteporencimadelos100°C(212°F),ni
laincinereniexpongaelcontenidodesusceldasalagua.Deséchelatalcomodisponelanormativalocal.
SilaLCDserompeyeluidodesuinteriorentraencontactoconsusojososusmanos,laveinmediatamente
lasáreasafectadasconaguadurante15minutoscomomínimo.Obtengaatenciónmedicasisepresenta
algúnsíntomadeluidodespuesdelavarse.
Paraevitardescargas,noquitelacubiertadeplásticoquerodealapartebajadelatarjetainvertida.
Aunquelasbateríasprincipalestienenunvoltajebajo,unabateríacortocircuitadaoconcontactoatierra
puedeproducirlacorrientesucientecomoparaquemarmaterialcombustibleoprovocarquemadurasen
elpersonal.
Salvoquesepermitaelintercambioencalienteparalaunidadsustituiblelocalmente,realicelosiguienteantes
deextraerla:apagueelsistema,desconectetodosloscablesdealimentacióndelastomasdealimentación
eléctrica,extraigalabateríaydesconecteloscablesdeinterconexión.
Chapter1.Safetyinformation15
Chapter1.Safetyinformation17
18HardwareMaintenanceManual

Chapter1.Safetyinformation19

20HardwareMaintenanceManual
Chapter1.Safetyinformation21

22HardwareMaintenanceManual

Chapter2.Importantserviceinformation
Thischapterpresentsfollowingimportantserviceinformationthatappliestoallmachinetypessupportedby
thismanual:
•“StrategyforreplacingFRUs”onpage23
–“Strategyforreplacingaharddiskdrive”onpage24
–“Importantnoticeforreplacingasystemboard”onpage24
–“Howtouseerrormessage”onpage24
•“StrategyforreplacingFRUsforCTO,CMV,andGAV”onpage25
–“Productdenition”onpage25
–“FRUidenticationforCTO,CMV,andGAVproducts”onpage25
Important:
AdvisecustomerstocontacttheLenovoCustomerSupportCenteriftheyneedanyassistanceinobtainingor
installinganysoftwarexes,drivers,andUEFIBIOSdownloads.TelephonenumbersforLenovoSupportare
availableat:
http://www.lenovo.com/support/phone
SystemDisassembly/ReassemblyvideosthatshowtheFRUremovalsorreplacementsfortheLenovo®authorized
servicetechniciansareavailableinthefollowingsupportsite:
http://www.lenovoservicetraining.com/ion/
StrategyforreplacingFRUs
Beforereplacingparts:
Makesurethatallsoftwarexes,drivers,andUEFIBIOSdownloadsareinstalledbeforereplacingany
FRUslistedinthismanual.
Afterasystemboardisreplaced,ensurethatthelatestUEFIBIOSisloadedtothesystemboardbefore
completingtheserviceaction.
Todownloadsoftwarexes,drivers,andUEFIBIOS,doasfollows:
1.Gotohttp://www.lenovo.com/support.
2.EntertheproductnumberofthecomputerorpressAuto-detectbuttononthescreen.
3.SelectDownloadsanddrivers.
4.Followthedirectionsonthescreenandinstallthenecessarysoftware.
UsethefollowingstrategytopreventunnecessaryexpenseforreplacingandservicingFRUs:
•IfyouareinstructedtoreplaceaFRUbutthereplacementdoesnotcorrecttheproblem,reinstall
theoriginalFRUbeforeyoucontinue.
•Somecomputershavebothaprocessorboardandasystemboard.Ifyouareinstructedtoreplaceeither
theprocessorboardorthesystemboard,andreplacingoneofthemdoesnotcorrecttheproblem,
reinstallthatboard,andthenreplacetheotherone.
•IfanadapteroradeviceconsistsofmorethanoneFRU,anyoftheFRUsmaybethecauseoftheerror.
Beforereplacingtheadapterordevice,removetheFRUs,onebyone,toseeifthesymptomschange.
ReplaceonlytheFRUthatchangedthesymptoms.
©CopyrightLenovo201223

Attention:Thesetupcongurationonthecomputeryouareservicingmayhavebeencustomized.Running
AutomaticCongurationmayalterthesettings.Notethecurrentcongurationsettings(usingtheView
Congurationoption);then,whenservicehasbeencompleted,verifythatthosesettingsremainineffect.
Strategyforreplacingaharddiskdrive
IfyourcomputerisshippedwithanmSATAdriveandasolidstatedriveorharddiskdrive,themSATAdrive
willbeseenasharddisk0inthesystem,andassigneddriveC:.Thesolidstatedriveorharddiskdrivewill
beseenasharddisk1,andassigneddriveD:.ThemSATAdriveisinstalledinthewirelessWANcardslotof
thecomputer.TheLenovopreloadedsoftwareisinstalledonthemSATAdrive.
Alwaystrytorunalow-levelformatbeforereplacingaharddiskdrive.Thiswillcauseallcustomerdataon
theharddisktobelost.Besurethatthecustomerhasacurrentbackupofthedatabeforedoingthistask.
Attention:Thedrivestartupsequenceinthecomputeryouareservicingmayhavebeenchanged.Be
extremelycarefulduringwriteoperationssuchascopying,saving,orformatting.Ifyouselectanincorrect
drive,dataorprogramscanbeoverwritten.
Importantnoticeforreplacingasystemboard
Somecomponentsmountedonasystemboardareverysensitive.Improperhandlingofasystemboardcan
causedamagetothosecomponents,andmaycauseasystemmalfunction.
Attention:Whenhandlingasystemboard:
•Donotdropasystemboardorapplyanyexcessiveforcetoit.
•Avoidroughhandlingofanykind.
•AvoidbendingasystemboardandhardpushingtopreventcrackingateachBGA(BallGridArray)chipset.
Howtouseerrormessage
Usetheerrorcodesdisplayedonthescreentodiagnosefailures.Ifmorethanoneerrorcodeisdisplayed,
beginthediagnosiswiththersterrorcode.Whatevercausesthersterrorcodemayalsocausefalseerror
codes.Ifnoerrorcodeisdisplayed,seewhethertheerrorsymptomislistedintheSymptom-to-FRU
Indexforthecomputeryouareservicing.
24HardwareMaintenanceManual

StrategyforreplacingFRUsforCTO,CMV,andGAV
Productdenition
DynamicCongureToOrder(CTO)
ThisprovidestheabilityforacustomertocongureaLenovosolutionfromaneSite,andhavethis
congurationsenttofulllment,whereitisbuiltandshippeddirectlytothecustomer.Themachinelabel,
ProductEntitlementWarehouse(PEW),eSupport,andtheHMMwillloadtheseproductsasthe4-digitMT
and3-digitmodel,wheremodel=“CTO”(Example:1829-CTO).
CustomModelVariant(CMV)
ThisisauniquecongurationthathasbeennegotiatedbetweenLenovoandthecustomer.Aunique4-digit
MTand3-digitmodelisprovidedtothecustomertoplaceorders(Example:1829-W15).ACMVisaspecial
bidoffering.Therefore,itisNOTgenerallyannounced.
•TheMTMportionofthemachinelabelisthe4-digitMTand3-digitmodel,wheremodel=“CTO”
(Example:1829-CTO).ThePRODUCTIDportionofthemachinelabelisthe4-digitMTand3-digitCMV
model(Example:1829-W15).
•ThePEWrecordisthe4-digitMTand3-digitmodel,wheremodel=“CTO”(Example:1829-CTO).
•eSupportwillshowboththeCTOandCMVmachinetypemodels(Example:1829-CTOand1829-W15
willbefoundontheeSupportsite.)
•TheHMMwillhavethe4-digitMTand3-digitCTOmodelonly(Example:1829-CTO).Again,CMVsare
custommodelsandarenotfoundintheHMM.
GeneralAnnounceVariant(GAV)
Thisisastandardmodel(xedconguration).GAVsareannouncedandofferedtoallcustomers.TheMTM
portionofthemachinelabelisa4-digitMTand3-digitmodel,wheremodel=a“xedpartnumber”,not
“CTO”(Example:1829-F1U).Also,PEW,eSupport,andtheHMMwilllisttheseproductsunderthesame
xedmodelnumber.
FRUidenticationforCTO,CMV,andGAVproducts
TherearethreeinformationresourcestoidentifywhichFRUsareusedtosupportCTO,CMV,andGAV
products.ThesesourcesarePEW,eSupport,andtheHMM.
UsingPEW
•PEWistheprimarysourceforidentifyingFRUpartnumbersandFRUdescriptionsforthekeycommodities
forCTO,CMVandGAVproductsataMT-serialnumberlevel.Anexampleofkeycommoditiesarehard
diskdrives,systemboards,microprocessors,LiquidCrystalDisplays(LCDs),andmemory.
•Remember,allCTOandCMVproductsareloadedinPEWunderthe4-digitMTand3-digitmodel,where
model=“CTO”(Example:1829-CTO).GAVsareloadedinPEWunderthe4-digitMTand3-digitmodel,
wheremodel=a“xedpartnumber”,not“CTO”(Example:1829-F1U).
•PEWcanbeaccessedatthefollowingWebsite:
http://www.lenovo.com/support/site.wss/document.do?lndocid=LOOK-WARNTY
SelectWarrantylookup.InputtheMTandtheSerialnumberandthelistofkeycommoditieswillbe
returnedinthePEWrecordunderCOMPONENTINFORMATION.
UsingeSupport
ForKeyCommodities(Examples-harddiskdrive,systemboard,microprocessor,LCD,andmemory)
Chapter2.Importantserviceinformation25

•eSupportcanbeusedtoviewthelistofkeycommoditiesbuiltinaparticularmachineserial(thisisthe
samerecordfoundinPEW).
•eSupportcanbeaccessedatthefollowingWebsite:
http://www.lenovo.com/support
•T oviewthekeycommodities,dothefollowing:
1.ClickProducts&ServiceWarranty.
2.ClickCheckWarrantyStatus.
3.OntheWarrantyStatusLookuppage,clickPartsLookup.
4.Typeyourmachinetypeandserialnumber,andthenclickSubmit.Thekeycommoditieswillbe
displayed.
FortheRemainingFRUs(thecompletelistofFRUsattheMTModellevel)
•eSupportcanbeusedtoviewthecompletelistofFRUsforamachinetypeandmodel.
•T oviewthecompletelistofFRUs,dothefollowing:
1.ClickProduct&PartsDetailandthenfollowtheinstructionsonthescreentoreachtheProduct
andPartsDetailspage.
2.ClickthePartsDetailtabtoviewthelistofserviceparts.
UsingtheHMM
ForKeyCommodities(Examples-harddiskdrive,systemboard,microprocessor,LCD,andmemory)
UsetheHMMasaback-uptoPEWandeSupporttoviewthecompletelistofFRUsattheMTModellevel.
26HardwareMaintenanceManual

Chapter3.Generalcheckout
Thischapterpresentsthefollowinginformation:
•“Whattodorst”onpage27
•“Checkoutguide”onpage28
–“SystemsupportingtheLenovoThinkVantageToolboxprogramandthePC-DoctorforDOS
diagnosticsprogram”onpage28
–“SystemsupportingtheLenovodiagnosticsprograms”onpage33
•“Powersystemcheckout”onpage35
ThedescriptionsinthischapterapplytoanyThinkPadmodelthatsupportsthePC-Doctor®forDOS
diagnosticsprogram.Somedescriptionsmightnotapplytoyourparticularcomputer.
Beforeyougotothecheckoutguide,besuretoreadthefollowingimportantnotes.
Importantnotes:
•Onlycertiedtrainedpersonnelshouldservicethecomputer.
•BeforereplacinganyFRU,readtheentirepageonremovingandreplacingFRUs.
•WhenyoureplaceFRUs,itisrecommendedtousenewnylon-coatedscrews.
•Beextremelycarefulduringsuchwriteoperationsascopying,saving,orformatting.Drivesinthecomputer
thatyouareservicingsequencemighthavebeenaltered.Ifyouselectanincorrectdrive,dataorprograms
mightbeoverwritten.
•ReplaceaFRUonlywithanotherFRUofthecorrectmodel.WhenyoureplaceaFRU,makesurethatthemodel
ofthemachineandtheFRUpartnumberarecorrectbyreferringtotheFRUpartslist.
•AFRUshouldnotbereplacedbecauseofasingle,unreproduciblefailure.Singlefailurescanoccurfora
varietyofreasonsthathavenothingtodowithahardwaredefect,suchascosmicradiation,electrostaticdischarge,
orsoftwareerrors.ConsiderreplacingaFRUonlywhenaproblemrecurs.IfyoususpectthataFRUisdefective,
cleartheerrorlogandrunthetestagain.Iftheerrordoesnotrecur,donotreplacetheFRU.
•BecarefulnottoreplaceanondefectiveFRU.
Whattodorst
WhenyoudoreturnaFRU,youmustincludethefollowinginformationinthepartsexchangeformor
partsreturnformthatyouattachtoit:
1.Nameandphonenumberofservicetechnician
2.Dateofservice
3.Dateonwhichthemachinefailed
4.Dateofpurchase
5.Failuresymptoms,errorcodesappearingonthedisplay,andbeepsymptoms
6.ProcedureindexandpagenumberinwhichthefailingFRUwasdetected
7.FailingFRUnameandpartnumber
8.Machinetype,modelnumber,andserialnumber
9.Customer'snameandaddress
Note:Duringthewarrantyperiod,thecustomermayberesponsibleforrepaircostsifthecomputerdamage
wascausedbymisuse,accident,modication,unsuitablephysicaloroperatingenvironment,orimproper
maintenancebythecustomer.Followingisalistofsomecommonitemsthatarenotcoveredunderwarranty
andsomesymptomsthatmightindicatethatthesystemwassubjectedtostressbeyondnormaluse.
Beforecheckingproblemswiththecomputer,determinewhetherthedamageiscoveredunderthewarranty
byreferringtothefollowinglist:
©CopyrightLenovo201227

Thefollowingarenotcoveredunderwarranty:
•LCDpanelcrackedfromtheapplicationofexcessiveforceorfrombeingdropped
•Scratched(cosmetic)parts
•Distortion,deformation,ordiscolorationofthecosmeticparts
•Plasticparts,latches,pins,orconnectorsthathavebeencrackedorbrokenbyexcessiveforce
•Damagecausedbyliquidspilledintothesystem
•DamagecausedbytheimproperinsertionofaPCCardortheinstallationofanincompatiblecard
•Improperdiscinsertionoruseofanopticaldrive
•Diskettedrivedamagecausedbypressureonthediskettedrivecover,foreignmaterialinthedrive,
ortheinsertionofadiskettewithmultiplelabels
•Damagedorbentdisketteejectbutton
•Fusesblownbyattachmentofanonsupporteddevice
•Forgottencomputerpassword(makingthecomputerunusable)
•Stickykeyscausedbyspillingaliquidontothekeyboard
•Useofanincorrectacpoweradapteronlaptopproducts
Thefollowingsymptomsmightindicatedamagecausedbynonwarrantedactivities:
•Missingpartsmightbeasymptomofunauthorizedserviceormodication.
•Ifthespindleofaharddiskdrivebecomesnoisy,itmayhavebeensubjectedtoexcessiveforce,
ordropped.
Checkoutguide
UsethefollowingproceduresasaguideinidentifyingandcorrectingproblemswiththeThinkPadNotebook.
1.Identifythefailingsymptomsinasmuchdetailaspossible.
2.Verifythesymptoms.Trytore-createthefailurebyrunningthediagnostictestorbyrepeatingthe
operation.
SystemsupportingtheLenovoThinkVantageToolboxprogramandthe
PC-DoctorforDOSdiagnosticsprogram
ThesectionprovidesinformationaboutThinkPadcomputersthatsupporttheLenovoThinkVantageT oolbox
programandthePC-Doctor®forDOSdiagnosticsprogram.Somedescriptionsmightnotapplytoyour
particularcomputer.
DiagnosticsusingPC-DoctorforDOS
TheThinkPadNotebookhasatestprogramcalledPC-DoctorforDOS(hereaftercalledPC-Doctor.)Youcan
detecterrorsbyrunningthediagnosticstestincludedinPC-Doctor.
Note:PC-DoctorforDOSisavailableatthefollowingWebsite:
http://www.lenovo.com/support
TocreatethePC-DoctordiagnosticCD,followtheinstructionsontheWebsite.
Forsomepossiblecongurationsofthecomputer,PC-Doctormightnotruncorrectly.T oavoidthisproblem,
youneedtoinitializethecomputersetupbyuseoftheThinkPadSetupprogrambeforeyourunPC-Doctor.
ToentertheThinkPadSetupprogram,doasfollows:
1.Turnonthecomputer.
2.WhentheThinkPadlogocomesup,immediatelypressF1toentertheThinkPadSetupprogram.
Note:Ifasupervisorpasswordhasbeensetbythecustomer,theThinkPadSetupprogrammenuappears
afterthepasswordisentered.YoucanstartThinkPadSetupbypressingEnterinsteadofenteringthe
28HardwareMaintenanceManual

supervisorpassword;however,youcannotchangetheparametersthatareprotectedbythesupervisor
password.
OntheThinkPadSetupprogramscreen,pressF9,Enter,F10,andthenEnter.
Note:Whenyouinitializethecomputerconguration,somedevicesaredisabled,suchastheserialport.If
youtestoneofthesedevices,youwillneedtoenableitbyusingCongurationutilityforDOS.Theutilityis
availableonthefollowingWebsite:
http://www.lenovo.com/support
PC-Doctorcannotbeusedtotestadevicethatisinthedockingstation,evenifthecomputersupportsthe
dockingstation.TotestaUSBdevice,connectittotheUSBconnectorofthecomputer.
Testingthecomputer
Inthisproduct,youneedanexternalopticaldrivetousetheopticalPC-DoctordiagnosticCDtotest
thehardwarefeatures.
Note:ThePC-DoctorforDOSCD-R/CD-RWdiscsupportsonlytestofinternalopticaldiscdrives(CD-RW,
CD-RW/DVDCombo,andDVDMultidrives)onThinkPadcomputers.Itdoesnotsupporttestofanyoptical
discdrivesconnectedthroughUSBdevices,PCcards,CardBuscards,orsimilar.TheUSBlimitationonly
appliestotestingofthedevice.UsingabootablePC-DoctorforDOSCD/DVD,thecomputercanbe
startedfromaUSBattachedopticaldrive.
Torunthetest,doasfollows:
1.Turnoffthecomputer.
2.Makesurethattheopticaldrivethatissupportedasastartupdeviceisinstalledtothecomputer.
3.Turnonthecomputer.Ifthecomputercannotbepoweredon,goto“Powersystemcheckout”on
page35,andcheckthepowersources.
Ifanerrorcodeappears,goto“Symptom-to-FRUindex”onpage44.
4.WhentheThinkPadlogocomesup,immediatelypressF12toentertheBootMenu.
5.InsertthePC-DoctorCDintotheopticaldrive.
6.PresscursorkeystoselectATAPICDx(x:0,1,...)andthenpressEnter.
7.Followtheinstructionsonthescreen.
8.ThemainpanelofPC-Doctorappears.
9.SelectDiagnosticswiththearrowkeys,andpressEnter.
Note:Youcanselectanitemnotonlywiththearrowkeys,butalsowiththeTrackPoint®pointer.
InsteadofpressingEnter,clicktheleftbutton.
Apull-downmenuappears.(Itsexactformdependsonthemodel.)
Note:PC-Doctormenudoesnotmeantheformalsupportdevicelist.Someunsupporteddevicenames
mayappearinthePC-Doctormenu.
Chapter3.Generalcheckout29

Diagnostics
Run Normal Test
Run Quick Test
CPU/Coprocessor
Systemboard
System Memory
Video Adapter
Fixed Disks
Diskette Drives
Other Devices
Communication
Interactive Tests Hardware Info Utility Quit F1=Help
PC-DOCTOR 2.0 Copyright 2008 PC-Doctor, Inc. All Rights Reserved.
Use the cursor keys and ESC to move in menus. Press ENTER to select.
Wireless LAN
Theoptionsonthetestmenuareasfollows:
DiagnosticsInteractiveTests
•RunNormalTest
•RunQuickTest
•CPU/Coprocessor
•SystemMemory
•Systemboard
•VideoAdapter
•FixedDisks
•DisketteDrives
•OtherDevices
•Communication
•WirelessLAN
•Keyboard
•Video
•InternalSpeaker
•Mouse
•Diskette
•SystemLoad
•OpticalDriveTest
•IntelWLANRadioTest
Notes:
•IntheKeyboardtestinInteractiveT ests,theFnkeyshouldbehelddownforatleast2seconds;otherwise,it
cannotbesensed.
•VideoAdaptertestsupportsonlytheLCDdisplayontheThinkPadNotebook.Ifyouhaveanexternalmonitor
attachedtoyourcomputer,detachitbeforerunningPC-DoctorforDOS.
•TotestDigitalSignatureChip,thesecuritychipmustbesettoActive.
•Formodelswithnointernalopticaldrives,OpticalDriveTestcannotbeselected.
10.Runtheapplicablefunctiontest.
11.Followtheinstructionsonthescreen.Ifthereisaproblem,PC-Doctorshowsmessagesdescribingit.
12.Toexitthetest,selectQuit-ExitDiag.Tocancelthetest,pressEsc.
Note:AfterrunningPC-Doctor,checkthetimeanddateonthesystemandresetthemiftheyareincorrect.
DetectingsysteminformationwithPC-Doctor
PC-Doctorcandetectthefollowingsysteminformation:
30HardwareMaintenanceManual

HardwareInfo
•SystemConguration
•MemoryContents
•PhysicalDiskDrives
•LogicalDiskDrives
•VGAInformation
•IDEDriveInfo
•PCIInformation
•PNPISAInfo
•SMBIOSInfo
•VESALCDInfo
•HardwareEventsLog
Utility
•RunExternalT ests
•SurfaceScanHardDisk
•BenchmarkSystem
•DOSShell
•TechSupportForm
•BatteryRundown
•ViewTestLog
•PrintLog
•SaveLog
•FullEraseHardDrive
•QuickEraseHardDrive
LenovoThinkVantageToolbox
LenovoThinkVantage®ToolboxisadiagnosticprogramthatworksthroughtheWindowsoperatingsystem.
Itenablesyoutoviewsymptomsofcomputerproblemsandsolutionsforthem,andincludesautomatic
noticationwhenactionisrequired,computingassistance,advanceddiagnostics,anddiagnostichistory.
Notes:
•ThelatestLenovoThinkVantageT oolboxisavailableatthefollowingWebsite:
http://web.lenovothinkvantagetoolbox.com/
•ToinstallthelatestLenovoThinkVantageToolboxonthecomputer,clickDownloadLenovoThinkVantage
Toolbox,andthenfollowtheinstructionsontheWebsite.
Torunthisprogram,doasfollows:
Windows7:
WhiletheWindowsoperatingsystemisrunning,presstheThinkVantagebutton.
Tostartthisprogram,dothefollowing:
•ClickStart➙ControlPanel➙SystemandSecurity➙Lenovo-SystemHealthandDiagnostics.
WindowsVistaandWindowsXP:
ClickStart➙AllPrograms➙ThinkVantage➙LenovoThinkVantageToolbox
Followtheinstructionsonthescreen.LenovoThinkVantageToolboxalsohasproblemdeterminationaids
thatdeterminesoftwareandusageproblems.
Foradditionalinformationaboutthisprogram,seetheHelpfortheprogram.
Chapter3.Generalcheckout31

PC-DoctorforWindows
InsomemodelsofThinkPadNotebook,PC-DoctorforWindowsenablesyoutotroubleshootandresolve
problemsrelatedtothecomputer.
Selectoneofthecategorieslistedbelowtodisplaysymptomsandsolutions:
•CheckSystemHealth
•SystemandDeviceTests
•LenovoTroubleshootingCenter
•SystemReports
•UpdatesandSupport
PC-DoctorforRescueandRecovery
InsomemodelsofThinkPadNotebook,theRescueandRecoveryworkspaceenablesyoutorunthe
PC-Doctorprogramtotestthehardwarefeaturesofthecomputer.
Torunthetest,click“RunDiagnostics”ontheRescueandRecoverymainscreen.
FRUtests
ThefollowingtableshowsthetestforeachFRU.
Table1.FRUtests
FRUApplicabletest
Systemboard1.Diagnostics➙CPU/Coprocessor
2.Diagnostics➙Systemboard
3.IfthedockingstationortheportreplicatorisattachedtotheThinkPadcomputer,
detachit.
4.Placethecomputeronahorizontalsurface,andrunDiagnostics➙ThinkPad
Devices➙HDDActiveProtectionTest.
Note:Donotapplyanyphysicalshocktothecomputerwhilethetestisrunning.
PowerDiagnostics➙ThinkPadDevices➙acpoweradapter,Battery1(Battery2)
LCDunit1.Diagnostics➙VideoAdapter
2.InteractiveTests➙Video
AudioEntertheThinkPadSetupprogramandchangeSerialATA(SATA)settingto
Compatibility,andrunDiagnostics➙OtherDevice➙ConexantAudio.
SpeakerInteractiveT ests➙InternalSpeaker
Note:OnceAudiotestisdone,thenosoundisheardthistest.Inthiscase,turnoff
andturnonthecomputer.Then,runthistestagain.
Keyboard1.Diagnostics➙Systemboard➙Keyboard
2.InteractiveTests➙Keyboard
EntertheThinkPadSetupprogramandchangeSerialATA(SATA)settingto
Compatibility,andrunDiagnostics➙FixedDisks.
Harddiskdriveorsolidstate
drive
Youcanalsodiagnosethedrivewithoutstartinguptheoperatingsystem.Todiagnose
thedrivefromtheThinkPadSetupprogram,doasfollows:
1.Removeanydiskettefromthediskettedrive,andthenturnoffthecomputer.
2.Turnonthecomputer.
3.Whilethemessage,“Tointerruptnormalstartup,presstheblueThinkVangate
button,”isdisplayedatthelowerleftofthescreen,pressF1toentertheThinkPad
Setupprogram.
4.Usingcursorkeys,selectHDDdiagnosticprogram.Pressenter.
5.Usingcursorkeys,selectMainharddiskdriveorUltrabayharddiskdrive.
6.PressEntertostartthediagnosticprogram.
32HardwareMaintenanceManual

Table1.FRUtests(continued)
FRUApplicabletest
Diskettedrive1.Diagnostics➙DisketteDrives
2.InteractiveTests➙Diskette
Memory1.IftwoDIMMsareinstalled,removeoneofthemandrunDiagnostics➙System
Memory.
2.Iftheproblemdoesnotrecur,returntheDIMMtoitsplace,removetheotherone,
andrunthetestagain.
TrackPointorpointing
device
IftheTrackPointdoesnotwork,checkthecongurationasspeciedintheThinkPad
Setupprogram.IftheTrackPointisdisabled,selectAutomatictoenableit.
AfteryouusetheTrackPoint,thepointermaydriftonthescreenforashorttime.This
driftcanoccurwhenaslight,steadypressureisappliedtotheTrackPointpointer.
Thissymptomisnotahardwareproblem.Ifthepointerstopsafterashorttime,no
serviceactionisnecessary.
IfenablingtheTrackPointdoesnotcorrecttheproblem,continuewiththefollowing:
•InteractiveT ests➙Mouse
TouchPadIftheTouchPaddoesnotwork,checkthecongurationasspeciedintheThinkPad
Setupprogram.IftheTouchPadisdisabled,selectAutomatictoenableit.Ifenabling
theT ouchPaddoesnotcorrecttheproblem,continuewiththefollowing:
•InteractiveT ests➙Mouse
SystemsupportingtheLenovodiagnosticsprograms
ThesectionprovidesinformationaboutThinkPadcomputersthatsupporttheLenovodiagnosticsprograms.
Somedescriptionsmightnotapplytoyourparticularcomputer.
TheLenovodiagnosticsprogramsincludefollowing:
•LenovoSolutionCenter
•Quicktestprograms
•UEFIdiagnosticprogram
•Bootablediagnosticprograms
LenovoSolutionCenter
TheLenovoSolutionCenterprogramenablesyoutotroubleshootandresolvecomputerproblems.It
combinesdiagnostictests,systeminformationcollection,securitystatus,andsupportinformation,along
withhintsandtipsformaximumsystemperformance.
Note:TheLenovoSolutionCenterprogramisavailableonlyonmodelspreinstalledwiththeWindows7
operatingsystem.Italsocanbedownloadedfromhttp://www.lenovo.com/diags.
ToruntheLenovoSolutionCenterprogram,clickStart➙ControlPanel➙SystemandSecurity➙Lenovo
-SystemHealthandDiagnostics,andthenfollowtheinstructionsonthescreen.
Foradditionalinformationaboutthisprogram,seethehelpinformationsystem.
Quicktestprograms
LenovoHardDriveQuickTestandLenovoMemoryQuickTestaretwoquicktestprogramsthatenableyou
totroubleshootandresolvecomputerinternalstorageandmemoryproblems.
Notes:
Chapter3.Generalcheckout33

•IfthecomputeryouareservicingisnotinstalledwiththeLenovoSolutionCenterprogram,youcan
downloadthequicktestprogramsfromtheLenovoSupportWebsite.
•ThetwoprogramsareapplicabletocomputersinstalledwiththeWindows7,WindowsXP ,Windows
Server2003,orWindowsServer2008operatingsystem.
Todownloadandinstallaquicktestprogram,gotohttp://www.lenovo.com/diags,andfollowtheinstructions
ontheWebsite.
Torunaquicktestusingthedownloadedprogram,dothefollowing:
1.GototheC:\SWTOOLS\ldiagfolder.
2.Double-clickthegui_lsc_lite.exele.
3.WhentheUserAccountControlwindowopens,clickYes.
4.Selectthedeviceclasstobetested.
5.Selectthedevicestobetested.
6.Selecttheteststobeperformed.
7.Followtheinstructionsonthescreentostartthetest.Whenaproblemisdetected,information
messageswillbedisplayed.Refertothemessagestotroubleshoottheproblem.
UEFIdiagnosticprogram
AUEFIdiagnosticprogramispreinstalledonthecomputer.Itenablesyoutotestmemoryandinternal
storageproblems,viewsysteminformation,andcheckandrecoverbadsectorsoninternalstoragedevices.
ToruntheUEFIdiagnosticprogram,dothefollowing:
1.Turnonthecomputer.Ifthecomputercannotbeturnedon,goto“Powersystemcheckout”onpage35,
andcheckthepowersources.Ifanerrorcodeisdisplayed,goto“Symptom-to-FRUindex”onpage44
forerrorcodedescriptionsandtroubleshootinghints.
2.WhentheThinkPadlogoisdisplayed,repeatedlypressandreleasetheF12key.WhentheBootMenu
windowopens,releasetheF12key.
3.PresstheTabkeytoswitchtotheApplicationMenuwindow.
4.UsethearrowkeystoselectLenovoDiagnosticsandthenpressEnter.ThemainscreenoftheUEFI
diagnosticprogramisdisplayed.
5.Followtheinstructionsonthescreentousethediagnosticprogram.
Theoptionsonthemainscreenareasfollows:
TestsTools
•QuickMemoryTest
•QuickStorageDeviceTest
•ExitApplication
•SystemInformation
•RecoverBadSectorsTool
Bootablediagnosticprograms
IfthecomputeryouareservicingisnotinstalledwiththeUEFIdiagnosticprogram,youcandownloada
bootablediagnosticprogramfromtheLenovoSupportWebsite.Thebootablediagnosticprogramsenable
youtotestcomputermemoryandinternalstoragedevices,viewsysteminformation,andcheckandrecover
theinternalstoragedevices.Tousethebootablediagnosticprograms,youcancreateabootablediagnostic
mediumonaUSBdeviceorCD.
Tocreateabootablediagnosticmedium,dothefollowing:
1.Gotohttp://www.lenovo.com/diags.
34HardwareMaintenanceManual

2.ClickLenovoBootableDiagnostics.
3.FollowtheinstructionsontheWebsitetocreateabootablediagnosticmediumonaUSBdeviceorCD.
Tousethediagnosticmediumyouhavecreated,dooneofthefollowing:
•IfyouhavecreatedthebootablediagnosticmediumonaUSBdevice,dothefollowing:
1.AttachtheUSBdevicetothecomputer.
2.Turnonthecomputer.Ifthecomputercannotbeturnedon,goto“Powersystemcheckout”onpage
35,andcheckthepowersources.Ifanerrorcodeisdisplayed,goto“Symptom-to-FRUindex”on
page44forerrorcodedescriptionsandtroubleshootinghints.
3.WhentheThinkPadlogoisdisplayed,repeatedlypressandreleasetheF12key.WhentheBoot
Menuwindowopens,releasetheF12key.
4.UsethearrowkeystoselectUSBHDDandthenpressEnter.Thediagnosticprogramwillbe
launchedautomatically.
5.Followtheinstructionsonthescreentousethediagnosticprogram.
•IfyouhavecreatedthebootablediagnosticmediumonaCD,dothefollowing:
1.Turnonthecomputer.Ifthecomputercannotbeturnedon,goto“Powersystemcheckout”onpage
35,andcheckthepowersources.Ifanerrorcodeisdisplayed,goto“Symptom-to-FRUindex”on
page44forerrorcodedescriptionsandtroubleshootinghints.
2.InserttheCDintotheopticaldrive.
3.Restartthecomputer.
4.WhentheThinkPadlogoisdisplayed,repeatedlypressandreleasetheF12key.WhentheBoot
Menuwindowopens,releasetheF12key.
5.UsethearrowkeystoselectATAPICDx(x:0,1,...)andthenpressEnter.Thediagnosticprogram
willbelaunchedautomatically.
6.Followtheinstructionsonthescreentousethediagnosticprogram.
Powersystemcheckout
Toverifyasymptom,dothefollowing:
1.Turnoffthecomputer.
2.Removethebatterypack.
3.Connecttheacpoweradapter.
4.Checkthatpowerissuppliedwhenyouturnonthecomputer.
5.Turnoffthecomputer.
6.Disconnecttheacpoweradapterandinstallthechargedbatterypack.
7.Checkthatthebatterypacksuppliespowerwhenyouturnonthecomputer.
Ifyoususpectapowerproblem,seetheappropriateoneofthefollowingpowersupplycheckouts:
•“Checkingtheacpoweradapter”onpage35
•“Checkingoperationalcharging”onpage36
•“Checkingthebatterypack”onpage36
•“Checkingthebackupbattery”onpage37
Checkingtheacpoweradapter
Youareherebecausethecomputerfailsonlywhentheacpoweradapterisused.
•Ifthepowerproblemoccursonlywhenthedockingstationortheportreplicatorisused,replacethe
dockingstationortheportreplicator.
Chapter3.Generalcheckout35

•Ifthepower-onindicatordoesnotturnon,checkthepowercordoftheacpoweradapterforcorrect
continuityandinstallation.
•Ifthecomputerdoesnotchargeduringoperation,goto“Checkingoperationalcharging”onpage36.
Tochecktheacpoweradapter,dothefollowing:
1.Unplugtheacpoweradaptercablefromthecomputer.
2.Measuretheoutputvoltageattheplugoftheacpoweradaptercable.Seethefollowinggure:
PinVoltage(Vdc)
1+20
20
3Ground
1
2
3
(20V)
Note:Outputvoltageofpinno.2oftheacpoweradaptermaydifferentfromtheoneyouareservicing.
3.Ifthevoltageisnotcorrect,replacetheacpoweradapter.
4.Ifthevoltageisacceptable,dothefollowing:
•Replacethesystemboard.
•IftheproblempersistsandyoursystemsupportsthePCdoctorforDOS,goto“FRUtests”on
page32.
Note:Noisefromtheacpoweradapterdoesnotalwaysindicateadefect.
Checkingoperationalcharging
Tocheckwhetherthebatterychargesproperlyduringoperation,useadischargedbatterypackorabattery
packthathaslessthan50%ofthetotalpowerremainingwheninstalledinthecomputer.
Performoperationalcharging.Ifthebatterystatusindicatororicondoesnotturnon,removethebattery
packandletitreturntoroomtemperature.Reinstallthebatterypack.Ifthechargeindicatororiconstilldoes
notturnon,replacethebatterypack.
Ifthechargeindicatorstilldoesnotturnon,replacethesystemboard.Thenreinstallthebatterypack.Ifitis
stillnotcharged,gotothenextsection.
Checkingthebatterypack
BatterychargingdoesnotstartuntilthePowerManagerBatteryGaugeshowsthatlessthan96%ofthe
totalpowerremains;underthisconditionthebatterypackcanchargeto100%ofitscapacity.Thisprotects
thebatterypackfrombeingoverchargedorfromhavingashortenedlife.
Tocheckyourbattery,moveyourcursortothePowerManagerBatteryGaugeiconintheicontrayofthe
Windowstaskbarandwaitforamoment(butdonotclick),andthepercentageofbatterypowerremaining
isdisplayed.Togetdetailedinformationaboutthebattery,double-clickthePowerManagerBattery
Gaugeicon.
Note:Ifthebatterypackbecomeshot,itmaynotbeabletocharge.Removeitfromthecomputerandleave
itatroomtemperatureforawhile.Afteritcoolsdown,reinstallandrechargeit.
Tocheckthebatterypack,dothefollowing:
1.Poweroffthecomputer.
36HardwareMaintenanceManual
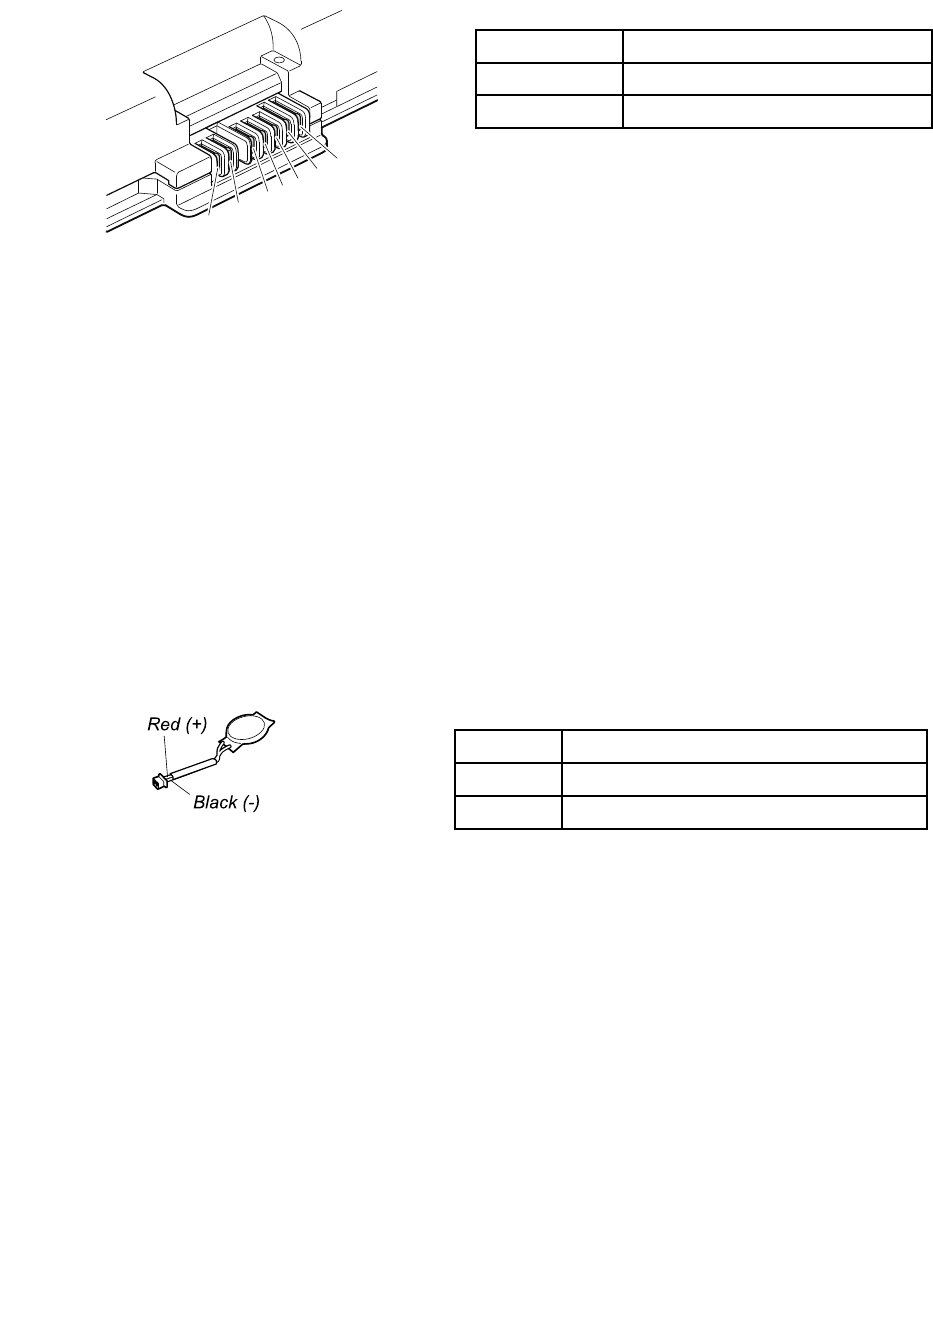
2.Removethebatterypackandmeasurethevoltagebetweenbatteryterminals1(+)and7(-).Seethe
followinggure:
TerminalVoltage(Vdc)
1+0to+16.8
7Ground(-)
1(+)2(+) 3456(-)7(-)
3.Ifthevoltageislessthan+11.0Vdc,thebatterypackhasbeendischarged.
Note:Rechargingwilltakeatleast3hours,eveniftheindicatordoesnotturnon.
Ifthevoltageisstilllessthan+11.0Vdcafterrecharging,replacethebattery.
4.Ifthevoltageismorethan+11.0Vdc,measuretheresistancebetweenbatteryterminals5and7.
Theresistancemustbe4to30KΩ.Iftheresistanceisnotcorrect,replacethebatterypack.Ifthe
resistanceiscorrect,replacethesystemboard.
Checkingthebackupbattery
Dothefollowing:
1.Poweroffthecomputer,andunplugtheacpoweradapterfromit.
2.Turnthecomputerupsidedown.
3.Removethebatterypack(see“1020Batterypack”onpage63).
4.Removethebackupbattery(see“1080Backupbattery”onpage73).
5.Measurethevoltageofthebackupbattery.Seethefollowinggure.
WireVoltage(Vdc)
Red+2.5to+3.2
BlackGround
•Ifthevoltageiscorrect,replacethesystemboard.
•Ifthevoltageisnotcorrect,replacethebackupbattery.
•Ifthebackupbatterydischargesquicklyafterreplacement,replacethesystemboard.
Chapter3.Generalcheckout37

38HardwareMaintenanceManual

Chapter4.Relatedserviceinformation
Thischapterpresentsfollowinginformation:
•“RestoringthefactorycontentsbyusingProductRecoverydiscs”onpage39
•“RestoringthefactorycontentsbyusingRecoveryDiscSet”onpage39
•“Passwords”onpage41
•“Powermanagement”onpage42
•“Symptom-to-FRUindex”onpage44
ServiceWebsite:
Whenthelatestmaintenancedisketteandthesystemprogramservicediskettebecomeavailable,they
willbepostedonhttp://www.lenovo.com/support.
RestoringthefactorycontentsbyusingProductRecoverydiscs
Whentheharddiskdrive(HDD)orsolidstatedrive(SSD)isreplacedbecauseofafailure,noProduct
Recoveryprogramisonthenewdrive.Inthiscase,youmustusetherecoverydiscsforthecomputer.Order
therecoverydiscsandthedriveatthesametimesothatyoucanrecoverthenewdrivewiththepre-installed
softwarewhentheyarrive.Forinformationonwhichdiscstoorder,see“Recoverydiscs”onpage134.
ToinstallthefactorycontentsbyusingProductRecoverydiscs,dothefollowing:
Note:Recoverytakesseveralhours.Thelengthoftimedependsonthemethodyouuse.Ifyouuserecovery
discs,recoverytakesatleastvehours.
1.InsertthebootableStartRecoveryDiscintotheDVDdrive.
2.SelectyourlanguageandclickNext.
3.Readthelicense.Ifyouagreewiththeterms,selectIacceptthesetermsandconditionsandthen
clickNext.
4.InserttheOperatingSystemRecoveryDiscwhenpromptedandclickYestobegintheoperating
systemrecoveryprocess.
5.InserttheProductRecoveryDiscwhenpromptedandclickOK.
6.IfyouhaveaSupplementalRecoveryDisc,insertitwhenpromptedandclickYes.Ifyoudonot
haveaSupplementalRecoveryDisc,clickNo.
Note:NotallrecoverydiscsetscomewithaSupplementalRecoveryDisc.IfthereisaSupplemental
RecoveryDisc,itwillbeclearlymarkedassuch.
7.Whenallofthedatahasbeencopiedfromthelastdiscintheset,amessageisdisplayedprompting
youtorestartthecomputer.RemovethediscandthenclickYes.
Note:Theremainderoftherecoveryprocessisfullyautomatedandnoactionisrequiredbyyou.The
computerwillrestartintotheWindowsdesktopseveraltimesandyoumightexperienceperiodswhen
noactivityisapparentonthescreenforseveralminutesatatime.Thisisnormal.
8.Whentherecoveryprocessiscomplete,theWelcometoMicrosoftWindowsscreenisdisplayed.Follow
theinstructionsonthescreentocompletetheWindowssetup.
RestoringthefactorycontentsbyusingRecoveryDiscSet
Whentheharddiskdrive(HDD)orsolidstatedrive(SSD)isreplacedbecauseofafailure,noproductrecovery
programisonthenewdrive.Inthiscase,youmustusetheRecoveryDiscSetforthecomputer.Orderthe
©CopyrightLenovo201239

RecoveryDiscSetandthedriveatthesametimesothatyoucanrecoverthenewdrivewiththepre-installed
softwarewhentheyarrive.Forinformationonwhichdiscstoorder,see“Recoverydiscs”onpage134.
TherecoverydiscsetconsistsoftheuserinstructionsandthefollowingsetofDVDstorestorethecomputer
totheoriginalfactoryconguration.
OperatingSystemRecoveryDisc(onedisc)ThisdiscrestorestheMicrosoft®Windowsoperating
system.Usethisdisctostarttherecoveryprocess.
ApplicationsandDriversRecoveryDisc(oneor
morediscs)
Thisdiscrestoresthepreinstalledapplicationsand
driversonthecomputer.
SupplementalRecoveryDiscThisdisccontainsadditionalcontent,suchas
updatestothesoftwarethatwaspreinstalledonthe
computer.Notallrecoverydiscsetscomewitha
SupplementalRecoveryDisc.
Notes:
•Y oumusthaveaDVDdrivetousetherecoverydiscs.IfyoudonothaveaninternalDVDdrive,you
canuseanexternalUSBDVDdrive.
•Duringtherecoveryprocess,alldataonthedrivewillbedeleted.Ifpossible,copyanyimportantdata
orpersonallesthatyouwanttokeepontoremovablemediaoranetworkdrivebeforeyoustartthe
recoveryprocess.
Torestorethecomputertotheoriginalfactorycongurationusingtherecoverydiscset,dothefollowing:
Note:Recoverytakesonetotwohourstocomplete.Thelengthoftimedependsonthemethodyouuse.Ifyouuse
recoverydiscs,therecoveryprocesswilltakeabouttwohours.
1.MaketheCD/DVDdrivetherststartupdeviceinthestartupsequenceusingthefollowingprocedure:
a.PressandholddowntheF1key,andthenturnonthecomputer.Whenthelogoscreenisdisplayed
orifyouhearrepeatingbeeps,releasetheF1key.TheThinkPadSetupprogramopens.
b.UsethearrowkeystoselectStartup➙Boot.
c.SelecttheCD/DVDdriveasthe1stBootDevice.
2.InserttheOperatingSystemRecoveryDiscintotheDVDdrive.
3.PressF10tosavetheThinkPadSetupprogramcongurationchanges.Followtheinstructionsonthe
screentobegintherecoveryprocess.
4.SelectyourlanguageandclickNext.
5.Readthelicense.Ifyouagreewiththetermsandconditions,selectIacceptthesetermsand
conditionsandthenclickNext.Ifyoudonotagreewiththetermsandconditions,followthe
instructionsonthescreen.
6.ClickYesinthedisplayedwindowtobegintheoperatingsystemrecoveryprocess.
7.InserttheApplicationsandDriversRecoveryDiscwhenpromptedandthenclickOKtobeginthe
applicationsanddriversrecoveryprocess.
8.IfyouhaveaSupplementalRecoveryDisc,insertitwhenpromptedandclickYes.Ifyoudonothavea
SupplementalRecoveryDisc,clickNo.
9.Whenallofthedatahasbeencopiedfromthelastdiscinthesetandhasbeenprocessed,removethe
discandrestartthecomputer.
Note:Therestoftherecoveryprocessisfullyautomatedandnoactionisrequiredbyyou.The
computerwillrestartintotheMicrosoftWindowsdesktopseveraltimesandyoumightexperience
periodswhennoactivityisapparentonthescreenforseveralminutesatatime.Thisisnormal.
10.Whentherecoveryprocessiscomplete,theSetUpWindowsscreenisdisplayed.Followthe
instructionsonthescreentocompletetheWindowssetup.
40HardwareMaintenanceManual

11.AfteryouhavecompletedtheWindowssetup,youmightwanttorestoretheoriginalstartupsequence.
StarttheThinkPadSetupprogramandthenpressF9torestorethedefaultsettings.PressF10tosave
andexittheThinkPadSetupprogram.
Note:Afterrestoringadrivetothefactorydefaultsettings,youmightneedtoreinstallsomedevicedrivers.
Passwords
AsmanyasthreepasswordsmaybeneededforanyThinkPadNotebook:thepower-onpassword(POP),
thehard-diskpassword(HDP),andthesupervisorpassword(SVP).
Ifanyofthesepasswordshasbeenset,apromptforitappearsonthescreenwheneverthecomputeris
turnedon.Thecomputerdoesnotstartuntilthepasswordisentered.
Note:IfonlyanSVPisinstalled,thepasswordpromptdoesnotappearwhentheoperatingsystemisbooted.
Power-onpassword
Apower-onpassword(POP)protectsthesystemfrombeingpoweredonbyanunauthorizedperson.The
passwordmustbeenteredbeforeanoperatingsystemcanbebooted.ForhowtoremovethePOP ,see
“Howtoremovethepower-onpassword”onpage41.
Hard-diskpassword
Therearetwohard-diskpasswords(HDPs):
•UserHDP-fortheuser
•MasterHDP-forthesystemadministrator,whocanuseittogetaccesstotheharddiskeveniftheuser
haschangedtheuserHDP
Note:TherearetwomodesfortheHDP:UseronlyandMaster+User.TheMaster+Usermoderequires
twoHDPs;thesystemadministratorentersbothinthesameoperation.Thesystemadministratorthen
providestheuserHDPtothesystemuser.
Attention:IftheuserHDPhasbeenforgotten,checkwhetheramasterHDPhasbeenset.Ifithas,itcanbe
usedforaccesstotheharddiskdrive.IfnomasterHDPisavailable,neitherLenovonorLenovoauthorized
servicetechniciansprovideanyservicestoreseteithertheuserorthemasterHDP ,ortorecoverdatafrom
theharddiskdrive.Theharddiskdrivecanbereplacedforascheduledfee.
ForhowtoremovethePOP ,see“Howtoremovethehard-diskpassword”onpage42.
Supervisorpassword
Asupervisorpassword(SVP)protectsthesysteminformationstoredintheThinkPadSetupprogram.
TheusermustentertheSVPinordertogetaccesstotheThinkPadSetupprogramandchangethe
systemconguration.
Attention:IftheSVPhasbeenforgottenandcannotbemadeavailabletotheservicetechnician,thereisno
serviceproceduretoresetthepassword.Thesystemboardmustbereplacedforascheduledfee.
Howtoremovethepower-onpassword
ToremoveaPOPthatyouhaveforgotten,dothefollowing:
(A)IfnoSVPhasbeenset:
1.Turnoffthecomputer.
Chapter4.Relatedserviceinformation41

2.Removethebatterypack.Forhowtoremovethebatterypack,see“1020Batterypack”onpage63.
3.Removethebackupbattery.Forhowtoremovethebackupbattery,see“1080Backupbattery”on
page73.
4.TurnonthecomputerandwaituntilthePOSTends.AfterthePOSTends,thepasswordpromptdoes
notappear.ThePOPhasbeenremoved.
5.Reinstallthebackupbatteryandthebatterypack.
(B)IfanSVPhasbeensetandisknownbytheservicetechnician:
1.Turnonthecomputer.
2.WhentheThinkPadlogocomesup,immediatelypressF1toentertheThinkPadSetupprogram.When
thePOPiconisappearingonthescreen,enterthePOP .
3.SelectSecurity,usingthecursordirectionalkeystomovethemenu.
4.SelectPassword.
5.SelectPower-OnPassword.
6.TypethecurrentSVPintheEnterCurrentPasswordeld.thenleavetheEnterNewPasswordeld
blank,andpressEntertwice.
7.IntheChangeshavebeensavedwindow,pressEnter.
8.PressF10tosavechangesandexittheThinkPadSetupprogram.
Howtoremovethehard-diskpassword
Attention:IfUseronlymodeisselectedandtheuserHDPhasbeenforgottenandcannotbemade
availabletotheservicetechnician,neitherLenovonorLenovoauthorizedservicetechniciansprovideany
servicestoresettheuserHDPsortorecoverdatafromtheharddiskdrive.Theharddiskdrivecanbe
replacedforascheduledfee.
ToremoveauserHDPthathasbeenforgotten,whentheSVPandthemasterHDPareknown,dothe
following:
1.Turnonthecomputer.
2.WhentheThinkPadlogocomesup,immediatelypressF1toentertheThinkPadSetupprogram.When
thePOPiconisappearingonthescreen,enterthePOP .
3.SelectSecurity,usingthecursordirectionalkeystomovethemenu.
4.SelectPassword.
5.SelectHard-diskxpassword,wherexistheletteroftheharddiskdrive.Apop-upwindowopens.
6.SelectMasterHDP.
7.TypethecurrentmasterHDPintheEnterCurrentPasswordeld.thenleavetheEnterNewPassword
eldblank,andpressEntertwice.
8.PressF10.
9.SelectYesintheSetupCongurationwindow.BothuserHDPandmasterHDPwillhavebeenremoved.
Powermanagement
Toreducepowerconsumption,thecomputerhasthreepowermanagementmodes:screenblank,sleep
(standbyinWindowsXP),andhibernation.
Screenblankmode
Ifthetimesetonthe“Turnoffmonitor”timerintheoperatingsystemexpires,theLCDbacklightturnsoff.
Toputthecomputerintoscreenblankmode,doasfollows:
42HardwareMaintenanceManual

1.PressFn+F3.Apanelforselectingapowerplan(inWindowsXP ,powerscheme)appears.
2.SelectPoweroffdisplay(keepcurrentpowerplan)(inWindowsXP ,keepcurrentpowerscheme).
Youcanalsoputthecomputerintoscreenblankmode,pressThinkVantagebuttonandusetheThinkVantage
ProductivityCenter.
Note:IfthecomputerisaWindows7model,itdoesnotsupportThinkVantageProductivityCenter.
Toendscreenblankmodeandresumenormaloperation,pressanykey.
Sleep(Standby)mode
Whenthecomputerenterssleep(standby)mode,thefollowingeventsoccurinadditiontowhatoccurs
inscreenblankmode:
•TheLCDispoweredoff.
•Theharddiskdriveorthesolidstatedriveispoweredoff.
•TheCPUstops.
Toentersleep(standby)mode,pressFn+F4.
Note:YoucanchangetheactionoftheFn+F4keycombinationbychangingthesettingsinPowerManager.
Incertaincircumstances,thecomputergoesintosleep(standby)modeautomatically:
•Ifa“suspendtime”hasbeensetonthetimer,andtheuserdoesnotdoanyoperationwiththekeyboard,
theTrackPoint,theharddisk,theparallelconnector,orthediskettedrivewithinthattime.
•Ifthebatteryindicatorblinksorange,indicatingthatthebatterypowerislow.
Note:Evenifyoudonotsetthelow-batteryalarm,thechargeindicatornotiesyouwhenthebatteryislow,
andthenthecomputerentersthepower-savingmodeautomatically.
Tocausethecomputertoreturnfromsleep(standby)modeandresumeoperation,dooneofthefollowing:
•PresstheFnkey.
•OpentheLCDcover.
•T urnonthepowerswitch.
Also,ineitherofthefollowingevents,thecomputerautomaticallyreturnsfromsleep(standby)modeand
resumesoperation:
•Theringindicator(RI)issignaledbyaserialdeviceoraPCCarddevice.
•Thetimesetontheresumetimerelapses.
Note:Thecomputerdoesnotacceptanyinputimmediatelyafteritenterssleep(standby)mode.Waita
fewsecondsbeforetakinganyactiontoreenteroperationmode.
Hibernationmode
Inhibernationmode,thefollowingoccurs:
•Thesystemstatus,RAM,VRAM,andsetupdataarestoredontheharddisk.
•Thesystemispoweredoff.
Tocausethecomputertoenterhibernationmode,doanyofthefollowing:
•PresstheFn+F12keys.
Chapter4.Relatedserviceinformation43
•Ifyouhavedenedoneofthefollowingactionsastheeventthatcausesthesystemtogointohibernation
mode,performthataction.
–Closingthelid.
–Pressingthepowerbutton.
–PressingFn+F4keys.
Also,thecomputergoesintohibernationmodeautomaticallyineitherofthefollowingconditions:
•Ifa“hibernationtime”hasbeensetonthetimer,andiftheuserdoesnotdoanyoperationwiththe
keyboard,theTrackPoint,theharddiskdrive,theparallelconnector,orthediskettedrivewithinthattime.
•Ifthetimerconditionsaresatisedinsuspendmode.
Whenthepoweristurnedon,thecomputerreturnsfromhibernationmodeandresumesoperation.The
hibernationleinthebootrecordontheharddiskdriveisread,andsystemstatusisrestoredfromthe
harddiskdrive.
Symptom-to-FRUindex
Thissectioncontainsfollowinginformation:
•“Numericerrorcodes”onpage45
•“Errormessages”onpage49
•“Beepsymptoms”onpage50
•“No-beepsymptoms”onpage50
•“LCD-relatedsymptoms”onpage51
•“Intermittentproblems”onpage51
•“Undeterminedproblems”onpage51
Thesymptom-to-FRUindexinthissectionlistssymptomsanderrorsandtheirpossiblecauses.Themost
likelycauseislistedrst,inboldfacetype.
Note:DotheFRUreplacementorotheractionsinthesequenceshowninthecolumnheaded“FRUor
action,insequence.”IfreplacingaFRUdoesnotsolvetheproblem,puttheoriginalpartbackinthe
computer.DonotreplaceanondefectiveFRU.
Thisindexcanalsohelpyoudetermine,duringregularservicing,whatFRUsarelikelytoneedtobe
replacednext.
AnumericerrorisdisplayedforeacherrordetectedinPOSTorsystemoperation.Inthedisplays,ncan
beanynumber.
Ifnonumericcodeisdisplayed,checkthenarrativedescriptionsofsymptoms.Ifthesymptomisnot
describedthere,goto“Intermittentproblems”onpage51.
Note:ForadevicenotsupportedbydiagnosticcodesintheThinkPadNotebooks,seethemanualforthatdevice.
44HardwareMaintenanceManual

Numericerrorcodes
Table2.Numericerrorcodes
SymptomorerrorFRUoraction,insequence
0175
BadCRC1,stopPOSTtask-TheEEPROMchecksumis
notcorrect.
Systemboard.
0176
SystemSecurity-Thesystemhasbeentamperedwith.
1.RuntheThinkPadSetupprogram,andsavethe
currentsettingbypressingF10.
2.Systemboard.
0177
BadSVPdata,stopPOSTtask-Thechecksumofthe
supervisorpasswordintheEEPROMisnotcorrect.
Systemboard.
0182
BadCRC2.EntertheThinkPadSetupprogramandload
Setupdefaults.-ThechecksumoftheCRS2settingin
theEEPROMisnotcorrect.
1.RuntheThinkPadSetupprogram.PressF9,and
Entertoloadthedefaultsetting.Thensavethe
currentsettingbypressingF10.
2.Systemboard.
0185
Badstartupsequencesettings.EntertheThinkPadSetup
programandloadSetupdefaults.
1.RuntheThinkPadSetupprogram.PressF9,and
Entertoloadthedefaultsetting.Thensavethe
currentsettingbypressingF10.
0187
EAIAdataaccesserror-TheaccesstoEEPROMisfailed.
Systemboard.
0188
InvalidRFIDSerializationInformationArea.
Systemboard.
0189
InvalidRFIDcongurationinformationarea-TheEEPROM
checksumisnotcorrect.
Systemboard.
0190
Criticallow-batteryerror
1.Chargethebatterypack.
2.Batterypack.
0191
SystemSecurity-InvalidRemoteChangerequested.
1.RuntheThinkPadSetupprogram,andthensave
currentsettingbypressingF10.
2.Systemboard.
0192
SystemSecurity-EmbeddedSecurityhardwaretamper
detected.
Systemboard.
0193
RFantennahasbeenremoved
Enterthesupervisorpassword.
0194
Thecomputerhasbeencarriedthroughasecuritygate
Enterthesupervisorpassword.
0195
Securityhardwaretamperdetected
1.EntertheThinkPadSetupprogrambyentering
supervisorpassword,andselectPassword➙
SecurityChip➙ClearSecurityChiptoclearthis
error.
2.Securitychip.
3.Systemboard.
0196
Securityhardwareremoved
1.EntertheThinkPadSetupprogrambyentering
supervisorpassword,andselectPassword➙
SecurityChip➙ClearSecurityChiptoclearthis
error.
2.Securitychip.
3.Systemboard.
Chapter4.Relatedserviceinformation45

Table2.Numericerrorcodes(continued)
SymptomorerrorFRUoraction,insequence
0197
Invalidremotechangerequested.
Theremotecongurationforthesecuritychiphas
failed.Conrmtheoperationandtryagain.
0199
SystemSecurity-Securitypasswordretrycount
exceeded.
1.RuntheThinkPadSetupprogram,andthensave
thecurrentsettingbypressingF10.
2.Systemboard.
01C8
Twoormoremodemdevicesarefound.Removeallbut
oneofthem.Press<Esc>tocontinue.
1.RemoveeitheraMini-PCICardoramodem
daughtercard.Otherwise,pressEsctoignore
thewarningmessage.
2.Systemboard.
01C9
TwoormoreEthernetdevicesarefound.Removeallbut
oneofthem.Press<Esc>tocontinue.
1.RemoveeitheraMiniPCIEthernetcardoran
Ethernetdaughtercard.Otherwise,pressEscto
ignorethewarningmessage.
2.Systemboard.
01C9
MorethanoneEthernetdevicesarefound.Removeone
ofthem.Press<Esc>tocontinue.
1.RemovetheEthernetdevicethatyouinstalled;or
pressEsctoignorethewarningmessage.
2.Systemboard.
01CA
MorethanoneWirelessLANdevicesarefound.Remove
oneofthem.
1.RemovethewirelessLANdevicethatyou
installed.
2.Systemboard.
0200
Harddiskerror-Theharddiskisnotworking.
1.Reseattheharddiskdrive.
2.LoadSetupDefaultsintheThinkPadSetupprogram.
3.Harddiskdrive.
4.Systemboard.
021x
Keyboarderror.
Runinteractivetestsofthekeyboardandtheauxiliary
inputdevice.
0220
Monitortypeerror-Monitortypedoesnotmatchtheone
speciedinCMOS.
LoadSetupDefaultsintheThinkPadSetupprogram.
0230
ShadowRAMerror-ShadowRAMfailsatoffsetnnnn.
Systemboard.
0231
SystemRAMerror-SystemRAMfailsatoffsetnnnn.
1.DIMM.
2.Systemboard.
0232
ExtendedRAMerror-ExtendedRAMfailsatoffsetnnnn.
1.DIMM.
2.Systemboard.
0250
Systembatteryerror-Systembatteryisdead.
1.Chargethebackupbatteryformorethan8hours
byconnectingtheacpoweradapter.
2.ReplacethebackupbatteryandruntheThinkPad
Setupprogramtoresetthetimeanddate.
0251
SystemCMOSchecksumbad-Defaultconguration
used.
1.Chargethebackupbatteryformorethan8hours
byconnectingtheacpoweradapter.
2.ReplacethebackupbatteryandruntheThinkPad
Setupprogramtoresetthetimeanddate.
0252
Passwordchecksumbad-Thepasswordiscleared.
ResetthepasswordbyrunningtheThinkPadSetup
program.
0260
Systemtimererror.
1.Chargethebackupbatteryformorethan8hours
byconnectingtheacpoweradapter.
2.ReplacethebackupbatteryandruntheThinkPad
Setupprogramtoresetthetimeanddate.
3.Systemboard.
46HardwareMaintenanceManual

Table2.Numericerrorcodes(continued)
SymptomorerrorFRUoraction,insequence
0270
Real-timeclockerror.
1.Chargethebackupbatteryformorethan8hours
byconnectingtheacpoweradapter.
2.ReplacethebackupbatteryandruntheThinkPad
Setupprogramtoresetthetimeanddate.
3.Systemboard.
0271
Dateandtimeerror-Neitherthedatenorthetimeisset
inthecomputer.
RuntheThinkPadSetupprogramtoresetthetime
anddate.
0280
Previousbootincomplete-Defaultcongurationused.
1.Load“SetupDefault”intheThinkPadSetup
program.
2.DIMM.
3.Systemboard.
02B2
IncorrectdriveAtype.
1.Diskettedrive.
2.ExternalFDDcable.
3.I/Ocard.
02D0
Systemcacheerror.
02F0
CPUID:xxFailed.
1.CPU.
2.Systemboard.
02F4
EISACMOSnotwritable.
1.LoadSetupDefaultsintheThinkPadSetup
program.
2.Replacethebackupbattery.
3.Systemboard.
02F5
DMAtestfailed.
1.DIMM.
2.Systemboard.
02F6
SoftwareNMIfailed
1.DIMM.
2.Systemboard.
02F7
Fail-safetimerNMIfailed
1.DIMM.
2.Systemboard.
1801
Attacheddockingstationisnotsupported
Shutdownthecomputerandremoveitfromthe
dockingstation.
1802
Unauthorizednetworkcardispluggedin-Turnoffand
removetheminiPCInetworkcard.
1.RemoveMiniPCInetworkcard.
2.Systemboard.
1803
Unauthorizeddaughtercardispluggedin-Turnoffand
removethedaughtercard.
1.Removethedaughtercardthatyouinstalled.
2.Systemboard.
1804
UnauthorizedWANcardispluggedin-Poweroffand
removetheWANcard.
1.RemovetheWANcardthatyouinstalled.
2.Systemboard.
1805
UnauthorizedWirelessUSBcardispluggedin-Poweroff
andremovetheWirelessUSBcard.
1.RemovetheWirelessUSBcardthatyouinstalled.
2.Systemboard.
Chapter4.Relatedserviceinformation47

Table2.Numericerrorcodes(continued)
SymptomorerrorFRUoraction,insequence
1810
Harddiskpartitionlayouterror.
1.IftheAccessPredesktopAreahasbeenpreviously
disabled,thengototheThinkPadSetupprogram
bypressingF1toopentheThinkPadSetup
program.SelectSecurity➙PredesktopArea
➙AccessPredesktopArea.Setthisitemto
Disabled.Saveandexit.
2.IftheAccessPredesktopAreahasnotbeen
previouslydisabled,pressEntertoloadAccess
PredesktopArea.ThenrunRECOVERTOFACTORY
CONTENTSinAccessPredesktopArea.
3.Ifitem2failed,pressF3intheWelcomescreenin
RECOVERTOFACTORYCONTENTS.RunFDISK,
andthendeleteallpartitions.RunRECOVERTO
FACTORYCONTENTSinAccessPredesktopArea
again.
4.Ifitem3failed,selectCD-ROMbootinStartupin
AccessPredesktopArea.BootfromtheRecovery
CDandperformfullrecoveryfromit.
5.Ifitem4failed,replacetheharddiskdrive.
1820
Morethanoneexternalngerprintreaderisattached.
Poweroffandremoveallbutthereaderthatyousetup
withinyourmainoperatingsystem.
Removeallbutthereaderthatyousetupforthe
authentication.
1830
Invalidmemoryconguration-Poweroffandinstalla
memorymoduletoSlot-0orthelowerslot.
InstallDIMMinSlot-0,butnotinSlot-1.
Note:FortheconstructionoftheDIMMslot,see“1040
DIMM”onpage66.
2000
HardDriveActiveProtectionsensordiagnostics
failed.Press<Esc>tocontinue.Press<F1>toenter
SETUP
1.Undockdockingstationorportreplicatorifitis
attachedtotheThinkPadNotebook.
2.PlacetheThinkPadNotebookonahorizontalsurface.
Donotapplyanyphysicalshocktothecomputer.
3.RunDiagnostics➙ThinkPadDevices➙HDD
ActiveProtectionTest.
2010
Warning:Y ourinternalharddiskdrive(HDD)maynot
functioncorrectlyonthissystem.EnsurethatyourHDD
issupportedonthissystemandthatthelatestHDD
rmwareisinstalled.
Informthefollowinginformationtothecustomer:Ifinthe
primarybaythecustomerisusinganon-Lenovohard
diskdrive(HDD),whichisnotsupportedbythissystem,
withtheriskinmind,thecustomercanstilluseitby
pressingESC.Ifintheprimarydrivebaythecustomeris
usingasupportedLenovoHDDwithanoldrmware,the
customerneedstoupdateitsrmwaretothelatest.The
latestversionisavailableat
http://www.lenovo.com/support
201x
Thesolidstatedriveyouhaveinstalledhasnotpassed
qualicationforuseinthiscomputer.Usingthisdrivemay
causecompatibilityissuesandpotentialissueswithdata
integrity,includingdataloss.Press<Esc>tocontinue.
Informthefollowinginformationtothecustomer:Ifthe
customerisusinganonqualiedSSDwhichisnot
supportedbythissystem,withtheriskinmind,the
customercanstilluseitbypressingESC.Locationofthe
SSDisdesignatedasbelow:
2010:HDD0(inHDDslot-0)
2011:HDD1(inHDDslot-1)
2012:Ultrabay™withHDDadapter
2100
InitializationerroronHDD0(Mainharddiskdrive)
1.Reseattheharddiskdrive.
2.Mainharddiskdrive.
3.Systemboard.
48HardwareMaintenanceManual

Table2.Numericerrorcodes(continued)
SymptomorerrorFRUoraction,insequence
2102
InitializationerroronHDD1(Ultrabayharddiskdrive)
1.Reseattheharddiskdrive.
2.Ultrabayharddiskdrive.
3.Systemboard.
2110
ReaderroronHDD0(Mainharddiskdrive)
1.Reseattheharddiskdrive.
2.Mainharddiskdrive.
3.Systemboard.
2112
ReaderroronHDD1(Ultrabayharddiskdrive)
1.Reseattheharddiskdrive.
2.Ultrabayharddiskdrive.
3.Systemboard.
Errormessages
Table3.Errormessages
SymptomorerrorFRUoraction,insequence
Deviceaddressconict.1.Load“SetupDefaults”intheThinkPadSetup
program.
2.Backupbattery.
3.Systemboard.
Allocationerrorfordevice.1.Load“SetupDefaults”intheThinkPadSetup
program.
2.Backupbattery.
3.Systemboard.
Failingbits:nnnn.1.DIMM.
2.Systemboard.
Invalidsystemcongurationdata.1.DIMM.
2.Systemboard.
I/OdeviceIRQconict.1.Load“SetupDefaults”intheThinkPadSetup
program.
2.Backupbattery.
3.Systemboard.
Hibernationerror.1.Restorethesystemcongurationtowhatitwas
beforethecomputerenteredhibernationmode.
2.Ifmemorysizehasbeenchanged,re-createthe
hibernationle.
Fanerror.1.Fan.
2.Thermalgrease.
3.Systemboard.
Thermalsensingerror.Systemboard.
Cannotbootfromanydevice.Checkthestatusofdevicewhichyouwanttoboot
from.
Devicenotfound.
1.Thedeviceyouwanttobootfrom.
2.Systemboard.
DeviceError.
1.Thedeviceyouwanttobootfrom.
2.Systemboard.
Novalidoperatingsystem.
Chapter4.Relatedserviceinformation49

Table3.Errormessages(continued)
SymptomorerrorFRUoraction,insequence
1.Checkthattheoperatingsystemhasnofailureandis
installedcorrectly.
2.Reinstalltheoperationsystem.
Excludedfrombootorder.
•EntertheThinkPadSetupprogramandaddthedevice
inbootorder.
Beepsymptoms
Table4.Beepsymptoms
SymptomorerrorFRUoraction,insequence
Onebeepandablank,unreadable,orashingLCD.1.ReseattheLCDconnector.
2.LCDassembly.
3.ExternalCRT.
4.Systemboard.
Onelongandtwoshortbeeps,andablankorunreadable
LCD.
1.Systemboard.
2.LCDassembly.
3.DIMM.
Twoshortbeepswitherrorcodes.POSTerror.See“Numericerrorcodes”onpage45.
Twoshortbeepsandablankscreen.1.Systemboard.
2.DIMM.
Twoormorebeeps,oracontinuousbeep.Operating
systemstartssuccessfully.
Ifamini-PCIEthernetcardisinstalled,conrmthatAlert
OnLAN2intheThinkPadSetupprogramisdisabled.
Threeshortbeeps,pause,threemoreshortbeeps,and
oneshortbeep.
Oneshortbeep,pause,threeshortbeeps,pause,three
moreshortbeeps,andoneshortbeep.
1.DIMM.
2.Systemboard.
Onlythecursorappears.Reinstalltheoperatingsystem.
Fourcyclesoffourshortbeepsandablankscreen.Systemboard(securitychip)
Fiveshortbeepsandablankscreen.Systemboard
No-beepsymptoms
Table5.No-beepsymptoms
SymptomorerrorFRUoraction,insequence
Nobeep,power-onindicatoron,LCDblank,andno
POST.
1.Makesurethateveryconnectorisconnected
tightlyandcorrectly.
2.DIMM.
3.Systemboard.
Nobeep,power-onindicatoron,andLCDblankduring
POST.
1.ReseatDIMM.
2.Systemboard.
Thepower-onpasswordpromptappears.Apower-onpasswordorasupervisorpasswordisset.
TypethepasswordandpressEnter.
Thehard-diskpasswordpromptappears.Ahard-diskpasswordisset.Typethepasswordand
pressEnter.
50HardwareMaintenanceManual

LCD-relatedsymptoms
Important:TheTFTLCDforthenotebookcomputercontainsmanythin-lmtransistors(TFTs).Thepresenceofa
smallnumberofdotsthataremissing,discolored,oralwayslightedischaracteristicofTFTLCDtechnology,but
excessivepixelproblemscancauseviewingconcerns.
IftheLCDyouareservicinghastwoorlessvisibledefectivepixels,itshouldnotbeconsideredfaulty.However,ifthe
LCDhasthreeormorevisibledefectivepixels,itwillbedeemedasdefectivebyLenovoanditshouldbereplaced.
Notes:
•ThispolicyappliestoallThinkPadNotebookspurchasedon1January,2008orlater.
•LenovowillnotprovidereplacementiftheLCDiswithinspecicationaswecannotguaranteethatany
replacementLCDwillhavezeropixeldefects.
•OnepixelconsistsofR,G,Bsub-pixels.
Table6.LCD-relatedsymptoms
SymptomorerrorFRUoraction,insequence
Nobeep,power-onindicatoron,andablankLCDduring
POST.
Systemboard.
•LCDbacklightnotworking.
•LCDtoodark.
•LCDbrightnesscannotbeadjusted.
•LCDcontrastcannotbeadjusted.
1.ReseattheLCDconnectors.
2.LCDassembly.
3.Systemboard.
•LCDscreenunreadable.
•Charactersmissingpixels.
•Screenabnormal.
•Wrongcolordisplayed.
1.Seeimportantnotefor“LCD-relatedsymptoms.”
2.ReseatallLCDconnectors.
3.LCDassembly.
4.Systemboard.
HorizontalorverticallinesdisplayedonLCD.LCDassembly.
Intermittentproblems
Intermittentsystemhangproblemscanbeduetoavarietyofcausesthathavenothingtodowithahardware
defect,suchascosmicradiation,electrostaticdischarge,orsoftwareerrors.FRUreplacementshouldbe
consideredonlywhenaproblemrecurs.
Whenanalyzinganintermittentproblem,dothefollowing:
1.Runthediagnostictestforthesystemboardinloopmodeatleast10times.
2.Ifnoerrorisdetected,donotreplaceanyFRUs.
3.Ifanyerrorisdetected,replacetheFRUshownbytheFRUcode.Rerunthetesttoverifythatno
moreerrorsexist.
Undeterminedproblems
Ifthediagnostictestsdidnotidentifytheadapterordevicethathasfailed,ifwrongdevicesareinstalled,
orifthesystemsimplyisnotoperating,followtheseprocedurestoisolatethefailingFRU(donotisolate
FRUsthathavenodefects).
Verifythatallattacheddevicesaresupportedbythecomputer.
Verifythatthepowersupplybeingusedatthetimeofthefailureisoperatingcorrectly.(See“Powersystem
checkout”onpage35.)
1.Turnoffthecomputer.
2.VisuallycheckeachFRUfordamage.ReplaceanydamagedFRU.
Chapter4.Relatedserviceinformation51

3.Removeordisconnectallofthefollowingdevices:
a.Non-ThinkPaddevices
b.Devicesattachedtothedockingstationortheportreplicator
c.Printer,mouse,andotherexternaldevices
d.Batterypack
e.Harddiskdrive
f.Externaldiskettedriveoropticaldrive
g.DIMM
h.PCCards
4.Turnonthecomputer.
5.Determinewhethertheproblemhasbeensolved.
6.Iftheproblemdoesnotrecur,reconnecttheremoveddevicesoneatatimeuntilyoundthefailingFRU.
7.Iftheproblemremains,replacethefollowingFRUsoneatatime(donotreplaceanondefectiveFRU):
a.Systemboard
b.LCDassembly
52HardwareMaintenanceManual

Chapter5.Statusindicators
Thischapterpresentsthesystemstatusindicatorsthatshowthestatusofthecomputer.
56
©CopyrightLenovo201253
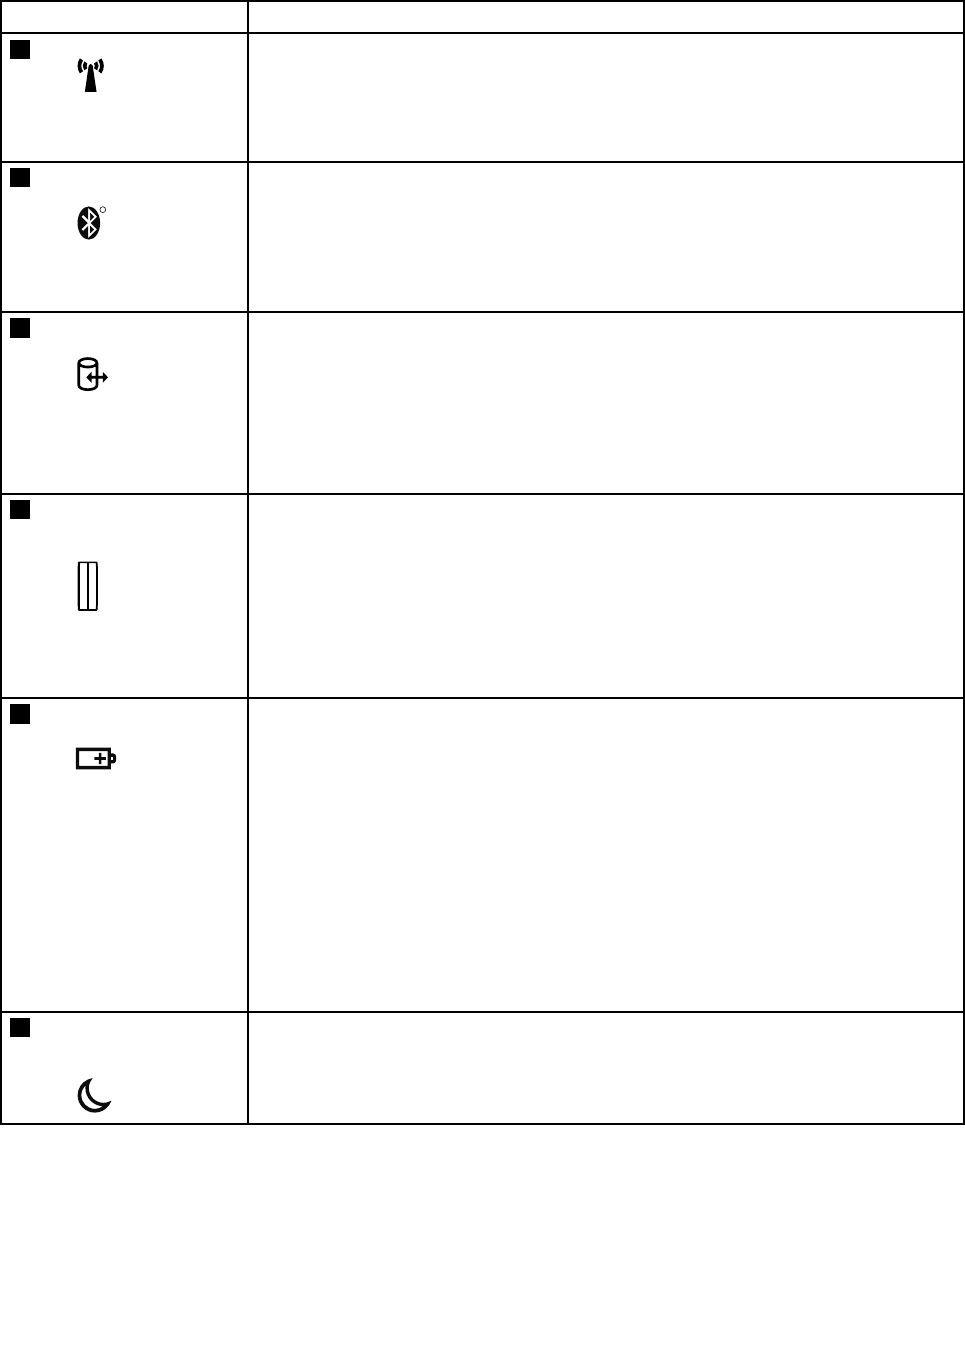
Table7.Statusindicators
IndicatorMeaning
1WirelessLANstatusGreen:ThewirelessLANfeatureison,andtheradiolinkisreadyforuse,
orthedataisbeingtransmitted.
Blinking
green:
Dataisbeingtransmitted(forsomemodels).
2Wirelessstatus
R
Green:WirelessPAN(BluetoothwirelessorWirelessUSB)isoperational.
ThisindicatorisonwhenWirelessPANisonandnotinsuspend
mode,orthedataisbeingtransmitted.
Blinking
green:
Dataisbeingtransmitted(forsomemodels).
3DriveinuseGreen:Dataisbeingreadfromorwrittentotheharddiskdrive,the
diskettedrive,orthedriveintheSerialUltrabaySlimdevice.When
thisindicatorison,donotputthecomputerintosleep(standby)
modeorturnoffthecomputer.
Note:Donotmovethesystemwhilethegreendrive-in-uselightison.Suddenphysical
shockcouldcausedriveerrors.
4Fingerprintreader
statusGreen:Thengerprintreaderisreadytoswipe.
Blinking
green:
Thengerprintisbeingauthenticatedorhasbeenauthenticated.
Blinking
amber:
Thengerprintcouldnotbeauthenticated.
5BatterystatusGreen:Thebatteryisbeingchargedwhenitschargelevelisbetween
80%and100%.Orthebatteryisbeingdischargedwhenits
chargelevelisbetween0%and80%.
Blinkinggreen:Thebatterychargelevelisbetween20%and80%,andthe
batteryisbeingcharged.
Orange:Thebatterychargelevelisbetween5%and20%,andthe
batteryisbeingdischarged.
Blinkingorange
(slow):
Thebatterychargelevelisbetween5%and20%,andthe
batteryisbeingcharged.
Blinkingorange
(rapid):
Thebatterychargelevelisbetween0%and5%,andthebattery
isbeingcharged.
6Sleep(standby)
statusGreen:Thecomputerisinsleep(standby)mode.
Blinking
green:
Thecomputerisenteringsleep(standby)modeorhibernationmode,
orisresumingnormaloperation.
54HardwareMaintenanceManual

Chapter6.Fnkeycombinations
ThefollowingtableshowsthefunctionofeachcombinationofFnwithafunctionkey.
Table8.Fnkeycombinations
KeycombinationDescription
Fn+F1Reserved.
Fn+F2Lockthecomputer.
Fn+F3Selectapowerplan(inWindowsXP ,powerscheme)thathasbeencreatedbyPowerManager,
oradjustthepowerlevelbyusingtheslidercontrol.Whenyoupressthiscombination,a
panelforselectingapowerplan(powerscheme)appears.
Notes:
1.TousetheFn+F3keycombination,youmusthavetheThinkPadPMdevicedriver
installedonthecomputer.
2.IfyouhaveloggedonwithanadministratoruserID,andyoupressFn+F3,thepanelfor
selectingapowerplan(powerscheme)appears.Ifyouhaveloggedonwithanotheruser
ID,andyoupressFn+F3,thepaneldoesnotappear.
3.YoucannotturnoffthecomputerdisplaybypressingFn+F3.
Fn+F4Putthecomputerinsleep(standby)mode.Toreturntonormaloperation,presstheFnkey
only,withoutpressingafunctionkey.
Notes:
1.TousetheFn+F4keycombination,youmusthavetheThinkPadPMdevicedriver
installedonthecomputer.
2.Ifyouwanttousethecombinationtoputthecomputerintohibernationmodeor
do-nothingmode(inWindowsXP ,shutthecomputerdownorshowthepanelforturning
offthecomputer),changethesettingsinthePowerManager.
Fn+F5Enableordisablethebuilt-inwirelessnetworkingfeaturesandtheBluetoothfeatures.Ifyou
pressFn+F5,alistofwirelessfeaturesisdisplayed.Y oucanquicklychangethepowerstate
ofeachfeatureinthelist.
Notes:IfyouwanttouseFn+F5toenablethewirelessfeature,thefollowingdevicedrivers
mustbeinstalledonthecomputerbeforehand:
•ThinkPadPowerManagementdriver
•OnScreenDisplayUtility
•Wirelessdevicedrivers
Fn+F6Changethecameraandaudiosettings.
Applyapresentationschemedirectly,withnoneedtostartPresentationDirector.
TodisablethisfunctionandusetheFn+F7keycombinationforswitchingadisplayoutput
location,startPresentationDirector,andchangethesettings.
Note:IfthecomputerisaWindows7model,itdoesnotsupportpresentationschemes,but
theFn+F7combinationisavailableforswitchingadisplayoutputlocation.
Fn+F7
ForWindows7:
Switchadisplayoutputlocation
•Computerdisplayonly(LCD)
•Computerdisplayandexternalmonitor(sameimage)
•Computerdisplayandexternalmonitor(extendeddesktop)
•Externalmonitoronly
©CopyrightLenovo201255

Table8.Fnkeycombinations(continued)
KeycombinationDescription
Note:Toswitchbetweenthecomputerdisplayandanexternalmonitor,theWin+Pkey
combinationisalsoavailable.
ForWindowsVistaandWindowsXP:
Switchadisplayoutputlocation
•Externalmonitor
•Computerdisplay(LCD)andexternalmonitor
•Computerdisplay(LCD)
Notes:
1.Thisfunctionisnotsupportedifdifferentdesktopimagesaredisplayedonthecomputer
displayandtheexternalmonitor(theExtenddesktopfunction).
2.ThisfunctiondoesnotworkwhileaDVDmovieoravideoclipisplaying.
Toenablethisfunction,startPresentationDirector,andchangetheFn+F7settings.
Note:MultipleuserscanlogontoasingleoperatingsystembyusingdifferentuserIDs.Each
userneedstochangethesettings.
Fn+F8Changethesettingsoftheinputdevice.
Fn+F9OpentheThinkPadEasyEjectUtilityscreen.Buttonsforthefollowingchoicesaredisplayed:
•EjectThinkPadPCfromUltraBase:ThisbuttonisdisplayedonlyiftheThinkPad
computerhasbeenattachedtoaThinkPadX200UltraBase.Thecomputercanbe
detachedfromtheThinkPadX200UltraBase.
•RunEasyEjectActions:Thisbuttonisusedtoselect,stop,orremoveexternaldevices
connectedtotheThinkPadcomputer.
•CongureEasyEjectActions:OpenstheThinkPadEasyEjectUtilitymainwindow.
•Fn+F9Settings:ConguresthesettingsfortheFn+F9function.
Note:IfthecomputerisaWindows7model,itdoesnotsupporttheEasyEjectUtilityfunction.
Fn+F10Reserved.
Fn+F11Reserved.
Fn+F12Putthecomputerintohibernationmode.T oreturntonormaloperation,pressthepower
buttonforlessthanfourseconds.
Note:T ouseFn+F12forhibernation,youmusthavetheThinkPadPMdevicedriverinstalled
onthecomputer.
Fn+HomeThecomputerdisplaybecomesbrighter.
Fn+EndThecomputerdisplaybecomesdimmer.
Fn+SpacebarEnabletheFullScreenMagnierfunction.
Fn+PrtScHasthesamefunctionastheSysRqkey.
Fn+ScrLkEnableordisablethenumerickeypad.
Fn+PauseHasthesamefunctionastheBreakkey.
Fn+cursorkeysThesekeycombinationsworkwithWindowsMediaPlayer.Fn+downarrowkeyworksforthe
PlayorPausebutton,Fn+uparrowkeyfortheStopbutton,Fn+rightarrowkeyfortheNext
Trackbutton,andFn+leftarrowkeyforthePreviousTrackbutton.
56HardwareMaintenanceManual
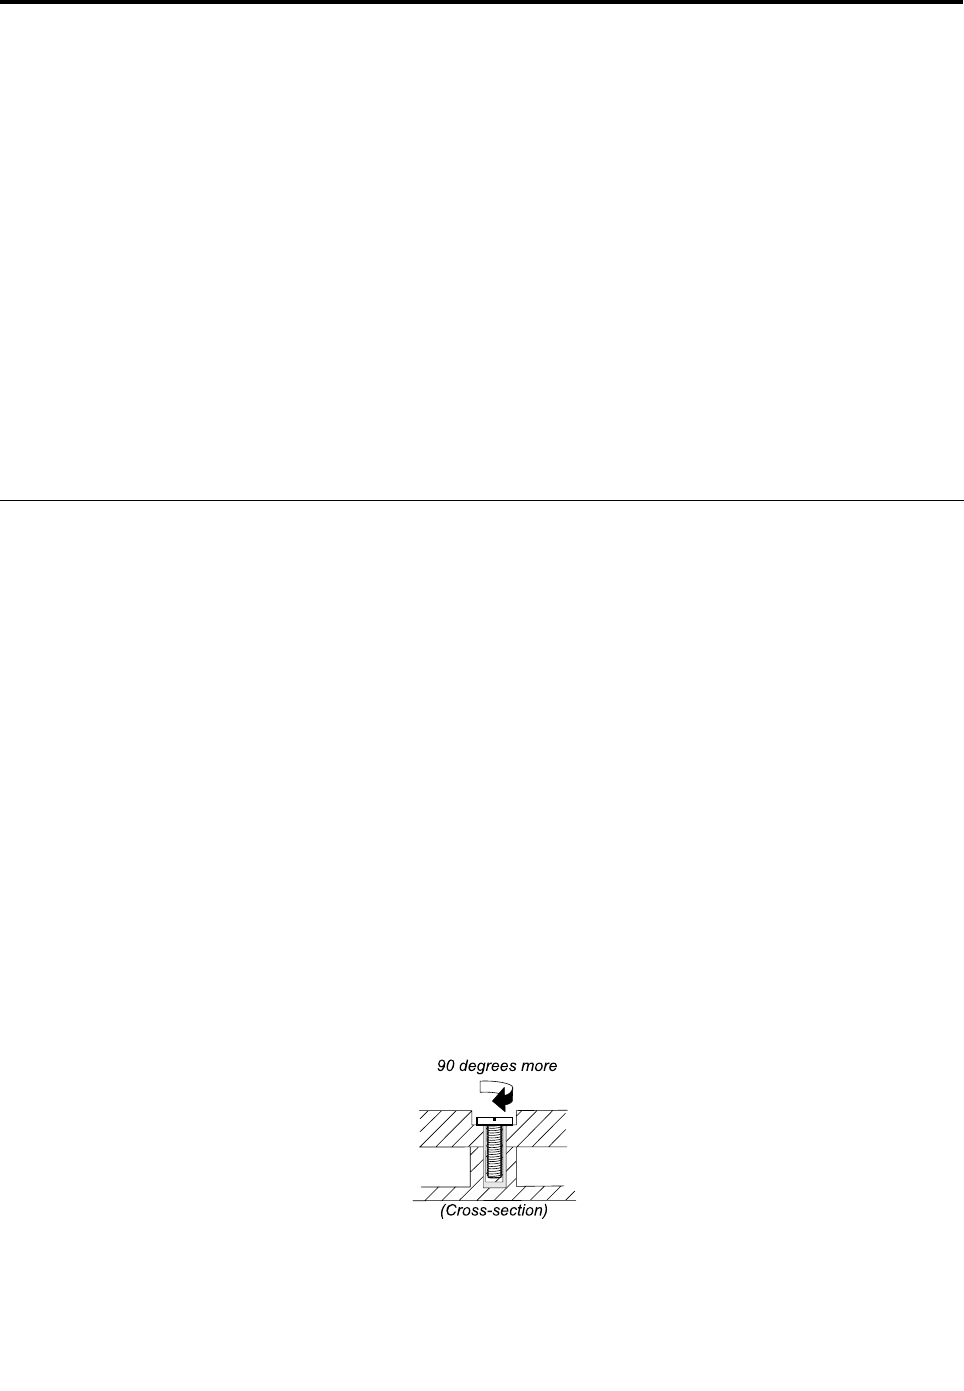
Chapter7.FRUreplacementnotices
ExternalCRUstatementtocustomers:
Someproblemswithyourproductcanberesolvedwithareplacementpartyoucaninstallyourself,called
a“CustomerReplaceableUnit”or“CRU.”SomeCRUsaredesignatedasSelf-serviceCRUsandothers
aredesignatedasOptional-serviceCRUs.InstallationofSelf-serviceCRUsisyourresponsibility;youmay
requestthatLenovoinstallsanOptional-serviceCRUaccordingtothewarrantyserviceforyourproduct.
WhereyouareinstallingtheCRU,LenovowillshiptheCRUtoyou.CRUinformationandreplacement
instructionsareshippedwithyourproductandareavailablefromLenovoatanytimeuponrequest.Y oumay
ndalistofCRUsinthepublicationsthatshipwithyourproductorathttp://www.lenovo.com/CRUs.You
mayberequiredtoreturnthedefectivepartthatisreplacedbytheCRU.Whenreturnisrequired:(1)return
instructions,aprepaidshippinglabel,andacontainerwillbeincludedwiththereplacementCRU;and(2)you
maybechargedforthereplacementCRUifLenovodoesnotreceivethedefectivepartwithinthirty(30)days
ofyourreceiptofthereplacementCRU.SeeyourLenovoLimitedWarrantydocumentationforfulldetails.
Thischapterpresentsnoticesrelatedtoremovingandreplacingparts.Readthischaptercarefullybefore
replacinganyFRU.
Screwnotices
Loosescrewscancauseareliabilityproblem.IntheThinkPadnotebookcomputer,thisproblemisaddressed
withspecialnylon-coatedscrewsthathavethefollowingcharacteristics:
•Theymaintaintightconnections.
•Theydonoteasilycomeloose,evenwithshockorvibration.
•Theyarehardertotighten.
•Eachoneshouldbeusedonlyonce.
Dothefollowingwhenyouservicethismachine:
•Keepthescrewkitinyourtoolbag.Forthepartnumberofthescrewkit,see“Miscellaneousparts”on
page131.
•Itisrecommendedtousenewscrews.
•Itisrecommendedtouseeachscrewonlyonce.
•Useatorquescrewdriverifyouhaveone.
Tightenscrewsasfollows:
•Plastictoplastic
Turnanadditional90degreesafterthescrewheadtouchesthesurfaceoftheplasticpart:
•Logiccardtoplastic
Turnanadditional180degreesafterthescrewheadtouchesthesurfaceofthelogiccard:
©CopyrightLenovo201257

•T orquedriver
Ifyouhaveatorquedriver,refertotheTorquecolumninthescrewinformationtableforeachstep.
•Makesurethatyouusethecorrectscrew.Itisrecommendedtousenewscrewsforreplacements.If
youhaveatorquescrewdriver,tightenallscrewsrmlytothetorquespeciedinthescrewinformation
tableforeachstep.
•Ensuretorquescrewdriversarecalibratedcorrectlyfollowingcountryspecications.
Retainingserialnumbers
Thissectionincludesthefollowingdescriptions:
•“Restoringtheserialnumberofthesystemunit”onpage58
•“RetainingtheUUID”onpage59
•“ReadingorwritingtheECAinformation”onpage59
Restoringtheserialnumberofthesystemunit
Whenthecomputerwasmanufactured,theEEPROMonthesystemboardwasloadedwiththeserial
numbersofthesystemandallmajorcomponents.Thesenumbersneedtoremainthesamethroughout
thelifeofthecomputer.
Ifyoureplacethesystemboard,youmustrestoretheserialnumberofthesystemunittoitsoriginalvalue.
Beforereplacingthesystemboard,savetheoriginalserialnumberbydoingthefollowing:
1.InstalltheLENOVOThinkPadHardwareMaintenanceDisketteVersion1.76orlater,andrestartthe
computer.
2.Fromthemainmenu,select1.SetSystemIdentication.
3.Select2.ReadS/NdatafromEEPROM.
Theserialnumberofeachdeviceinyourcomputerisdisplayed;theserialnumberofthesystemunitis
listedasfollows:
•20:Serialnumber
Writedownthatnumber.
Note:Theserialnumberofthesystemunitisalsowrittenonthelabelattachedtothebottomofthecomputer.
Afteryouhavereplacedthesystemboard,restoretheserialnumberbydoingthefollowing:
1.InstalltheLENOVOThinkPadHardwareMaintenanceDisketteVersion1.76orlaterandrestartthe
computer.
2.Fromthemainmenu,select1.SetSystemIdentication.
3.Select1.AddS/NdatafromEEPROM.Followtheinstructionsonthescreen.
IftheMTMandProductIDnumbersdifferfromeachotherontherearlabel,usewhatisshownforthe
ProductIDeld.Seeexamplebelow:
58HardwareMaintenanceManual

MTMonrearlabel:TTTT-CTOS/NSSSSSSS
ProductIDonrearlabel:TTTT-MMM(UsethisnumberwhensettingSerial
Number)
Intheexample,theSerialNumbertobeinputis“1STTTTMMMSSSSSSS”.
RetainingtheUUID
TheUniversallyUniqueIdentier(UUID)isa128-bitnumberuniquelyassignedtoyourcomputerat
productionandstoredintheEEPROMofyoursystemboard.Thealgorithmthatgeneratesthenumberis
designedtoprovideuniqueIDsuntiltheyearA.D.3400.Notwocomputersintheworldhavethesame
number.
Whenyoureplacethesystemboard,youmustsettheUUIDonthenewsystemboardasfollows:
1.InstalltheLENOVOThinkPadHardwareMaintenanceDisketteVersion1.76orlater,andrestartthe
computer.
2.Fromthemainmenu,select4.AssignUUID.AnewUUIDiscreatedandwritten.IfavalidUUIDalready
exists,itisnotoverwritten.
ReadingorwritingtheECAinformation
InformationonEngineeringChangeAnnouncements(ECA)arestoredintheEEPROMofthesystemboard.
TheelectronicstorageofthisinformationsimpliestheproceduretocheckiftheECAhasbeenpreviously
appliedtoamachine.ThemachinedoesnotneedtobedisassembledtocheckfortheECAapplication.
TocheckwhatECAshavebeenpreviouslyappliedtothemachine,usetheECAInformationRead/Write
functionontheLENOVOThinkPadHardwareMaintenanceDisketteVersion1.76orlater.
1.InserttheLENOVOThinkPadHardwareMaintenanceDisketteVersion1.76orlater,andrestartthe
computer.
2.Fromthemainmenu,select6.SetECAInformation.
3.ToreadECAinformation,select2.ReadECA/reworknumberfromEEPROMandfollowthe
instruction.
4.Toreadboxbuilddate,select5.ReadboxbuilddatefromEEPROM,andfollowtheinstructionon
thescreen.
AfteranECAhasbeenappliedtothemachine,theEEPROMmustbeupdatedtoreecttheECA's
application.UsetheLENOVOThinkPadHardwareMaintenanceDisketteVersion1.76orlatertoupdatethe
EEPROM.
Note:OnlytheECAnumberisstoredintheEEPROM.ThemachinetypeoftheECAisassumedbethesame
asthemachinetypeofthemachinethathadtheECAappliedtoit.
1.InserttheLENOVOThinkPadHardwareMaintenanceDisketteVersion1.76orlater,andrestartthe
computer.
2.Fromthemainmenu,select6.SetECAInformation.
3.TowriteECAinformation,select1.WriteECA/reworknumberfromEEPROM,andfollowthe
instruction.
4.Towriteboxbuilddate,select4.WriteboxbuilddatefromEEPROM,andfollowtheinstructionon
thescreen.
Ifthesystemboardisbeingreplaced,trytoreadtheECAinformationfromtheoldsystemboardandtransfer
theinformationtothenewsystem.Ifthesystemboardisinoperable,thiswillnotbepossible.
Chapter7.FRUreplacementnotices59

60HardwareMaintenanceManual

Chapter8.RemovingandreplacingaFRU
ExternalCRUstatementtocustomers:
Someproblemswithyourproductcanberesolvedwithareplacementpartyoucaninstallyourself,called
a“CustomerReplaceableUnit”or“CRU.”SomeCRUsaredesignatedasSelf-serviceCRUsandothers
aredesignatedasOptional-serviceCRUs.InstallationofSelf-serviceCRUsisyourresponsibility;youmay
requestthatLenovoinstallsanOptional-serviceCRUaccordingtothewarrantyserviceforyourproduct.
WhereyouareinstallingtheCRU,LenovowillshiptheCRUtoyou.CRUinformationandreplacement
instructionsareshippedwithyourproductandareavailablefromLenovoatanytimeuponrequest.Y oumay
ndalistofCRUsinthepublicationsthatshipwithyourproductorathttp://www.lenovo.com/CRUs.You
mayberequiredtoreturnthedefectivepartthatisreplacedbytheCRU.Whenreturnisrequired:(1)return
instructions,aprepaidshippinglabel,andacontainerwillbeincludedwiththereplacementCRU;and(2)you
maybechargedforthereplacementCRUifLenovodoesnotreceivethedefectivepartwithinthirty(30)days
ofyourreceiptofthereplacementCRU.SeeyourLenovoLimitedWarrantydocumentationforfulldetails.
ThischapterpresentsdirectionsanddrawingsforuseinremovingandreplacingaFRU.Besuretoobserve
thefollowinggeneralrules:
1.Donottrytoserviceanycomputerunlessyouhavebeentrainedandcertied.Anuntrainedpersonruns
theriskofdamagingparts.
2.BeforereplacinganyFRU,reviewChapter7“FRUreplacementnotices”onpage57.
3.BeginbyremovinganyFRUsthathavetoberemovedbeforereplacingthefailingFRU.AnysuchFRUs
arelistedatthetopofeachFRUreplacementpage.Removethemintheorderinwhichtheyarelisted.
4.FollowthecorrectsequenceinthestepsforremovingaFRU,asgiveninthedrawingsbythenumbers
insquarecallouts.
5.WhenturningascrewtoreplaceaFRU,turnitinthedirectionasgivenbythearrowinthedrawing.
6.WhenremovingaFRU,moveitinthedirectionasgivenbythearrowinthedrawing.
7.ToputthenewFRUinplace,reversetheremovalprocedureandfollowanynotesthatpertainto
replacement.Forinformationaboutconnectingandarranginginternalcables,seeChapter9“Locations”
onpage105.
8.WhenreplacingaFRU,usethecorrectscrew(s)asshownintheprocedures.
DANGER
BeforeremovinganyFRU,turnoffthecomputer,unplugallpowercordsfromelectricaloutlets,
removethebatterypack,andthendisconnectanyinterconnectingcables.
Attention:AfterreplacingaFRU,donotturnonthecomputeruntilyouhavemadesurethatallscrews,
springs,andothersmallpartsareinplaceandnonearelooseinsidethecomputer.Verifythisbyshaking
thecomputergentlyandlisteningforrattlingsounds.Metallicpartsormetalakescancauseelectrical
shortcircuits.
Attention:Thesystemboardissensitiveto,andcanbedamagedby,electrostaticdischarge.Before
touchingit,establishpersonalgroundingbytouchingagroundpointwithonehandorbyusingan
electrostaticdischarge(ESD)strap(P/N6405959).
©CopyrightLenovo201261
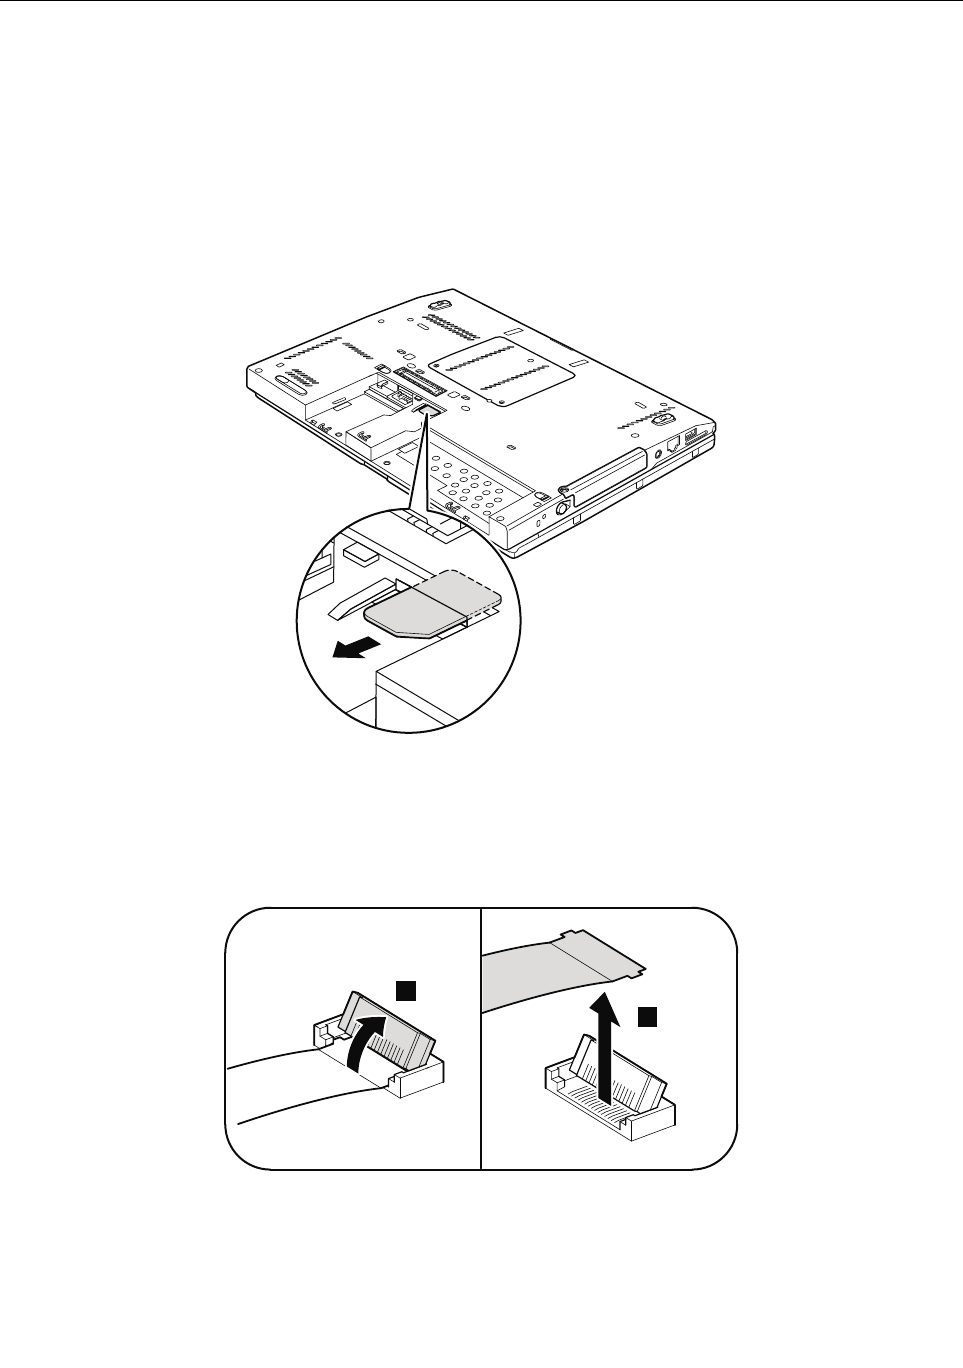
BeforeservicingThinkPadX220TabletandX220iTabletmodels
RemovingtheSIMcard:
SomemodelsoftheThinkPadX220TabletandX220iT abletyouareservicingmighthavetheSIMcardthatthe
customerhasbeeninstalled.
IfthecomputeryouareservicinghastheSIMcard,removeitbeforeyoustarttheservicing.
ToremovetheSIMcard,youneedtoremovethebatterypackrst.(See“1020Batterypack”onpage63.)
Afteryounishtheservicing,makesurethatyouinsertthecardbackintotheslotrmly.
Noticeondisconnectingacablefromaip-lockZIFconnector:
SomecablesusedinThinkPadX220TabletandX220iTabletmodelsareconnectedtoip-lockZIFconnectors.
Whendisconnectingacablefromaip-lockZIFconnector,doasshowninthefollowinggure.
1
2
62HardwareMaintenanceManual

1010Digitizerpen
Removalstepsofdigitizerpen
1020Batterypack
Importantnoticeforreplacingabatterypack:
TheLenovoThinkVantageToolboxandLenovoSolutionCenter(inWindows7)haveanautomaticbattery
diagnosticthatdeterminesifthebatterypackisdefective.AbatterypackFRUshouldnotbereplacedunless
thisdiagnosticshowsthatthebatteryisdefective.
Theonlyexceptiontothisisifthebatterypackisphysicallydamagedoracustomerisreportingapossible
safetyissue.
IfLenovoThinkVantageToolboxisnotinstalledinthecomputer,thecustomershoulddownloadthisprogram
beforeanon-physicallydamagedbatterypackisreplaced.Notethatthereplacementofaphysically
damagedbatterypackisnotcoveredbythewarranty.
DANGER
Useonlythebatteryspeciedinthepartslistforyourcomputer.Anyotherbatterycouldignite
orexplode.
Removalstepsofbatterypack
Slidetheleftbatterylatchtotheunlockedposition1,andthenholdtherightbatterylatchtotheunlocked
positionuntilyouremovethebattery2.
Chapter8.RemovingandreplacingaFRU63
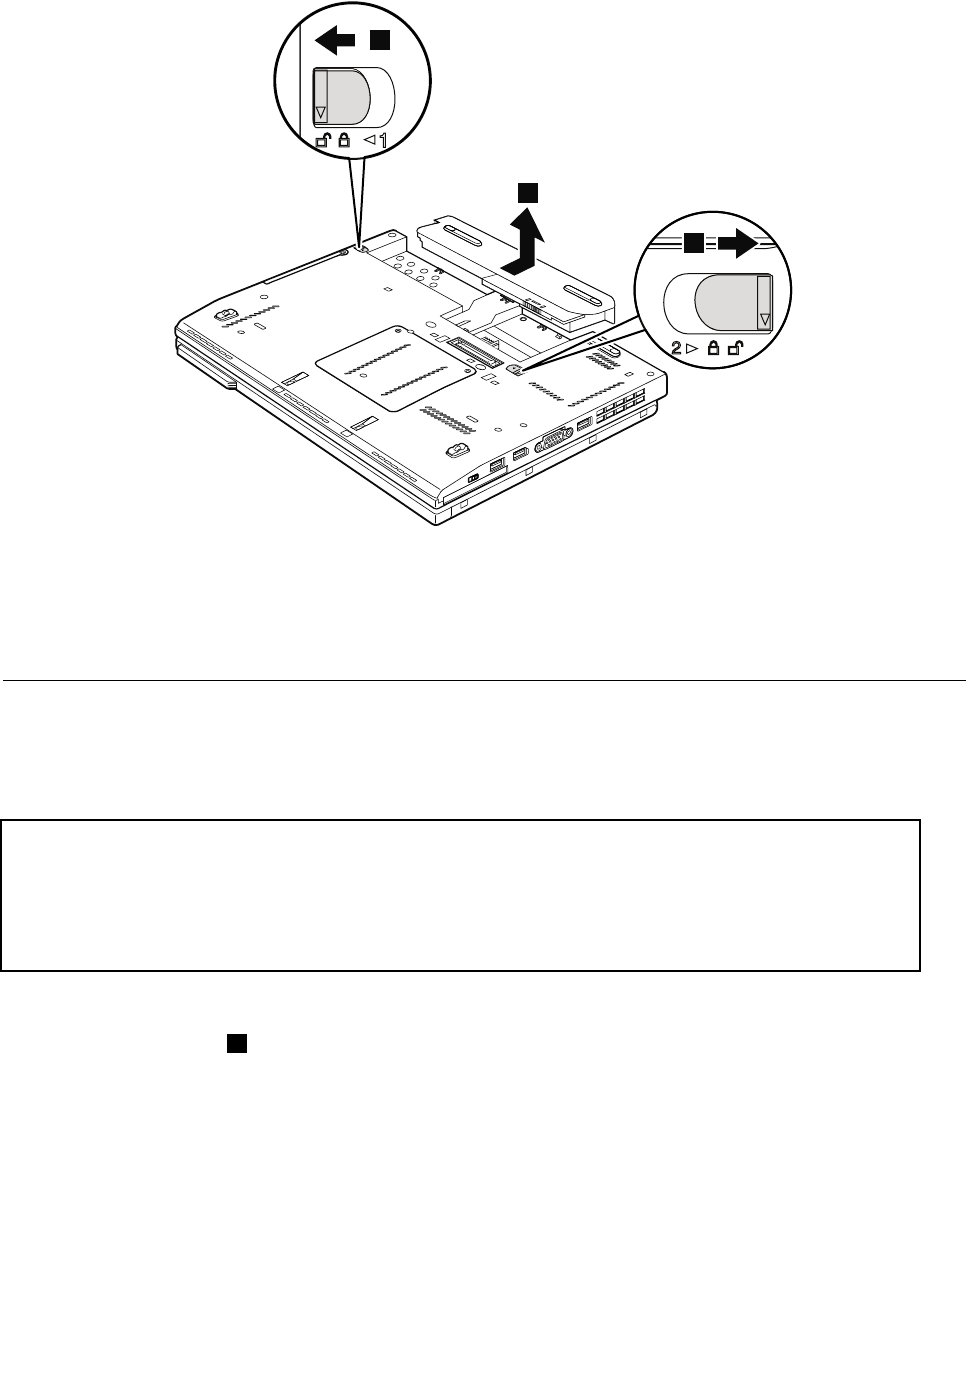
1
2
2
Wheninstalling:
Installthebatterypackalongthesliderailsoftheslot.Makesurethattheleftbatteryreleaseleveris
inthelockedposition.
1030Harddiskdrive(HDD)andsolidstatedrive(SSD)
•“1020Batterypack”onpage63
Attention:
•Donotdroptheharddiskdriveorapplyanyphysicalshocktoit.Theharddiskdriveissensitiveto
physicalshock.Improperhandlingcancausedamageandpermanentlossofdata.
•Beforeremovingthedrive,havetheusermakeabackupcopyofalltheinformationonitifpossible.
•Neverremovethedrivewhilethesystemisoperatingorisinsuspendmode.
Removalstepsofharddiskdriveandsolidstatedrive
Note:Loosenthescrew1.
64HardwareMaintenanceManual
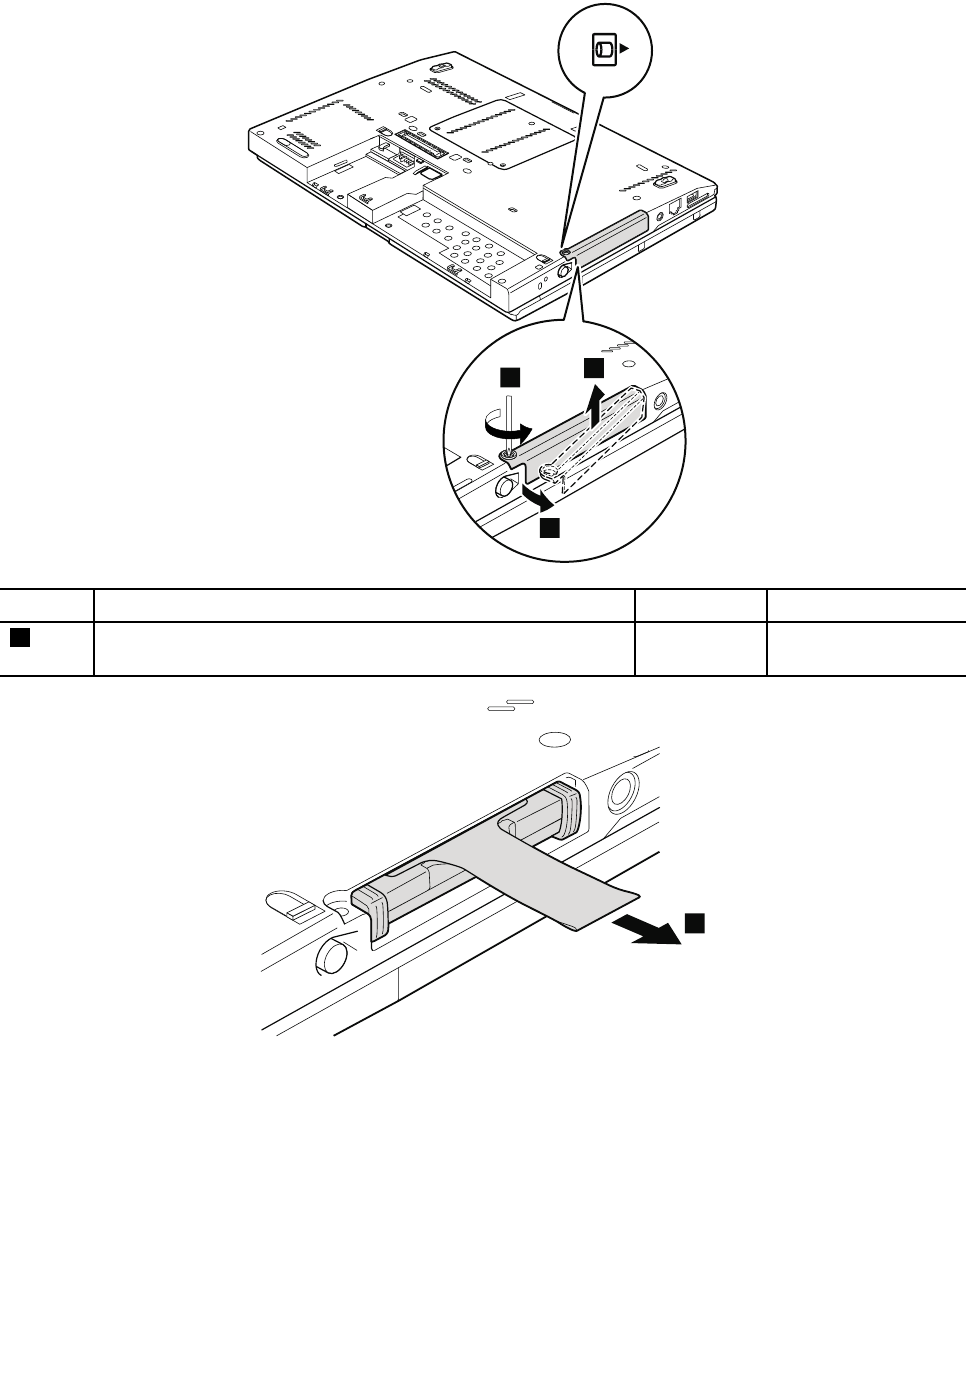
1
2
3
StepScrew(quantity)ColorTorque
1Harddiskdrivescrew,M3×3mm,wafer-head,nylon-coated(1)Black0.181Nm
(1.85kgfcm)
4
Chapter8.RemovingandreplacingaFRU65
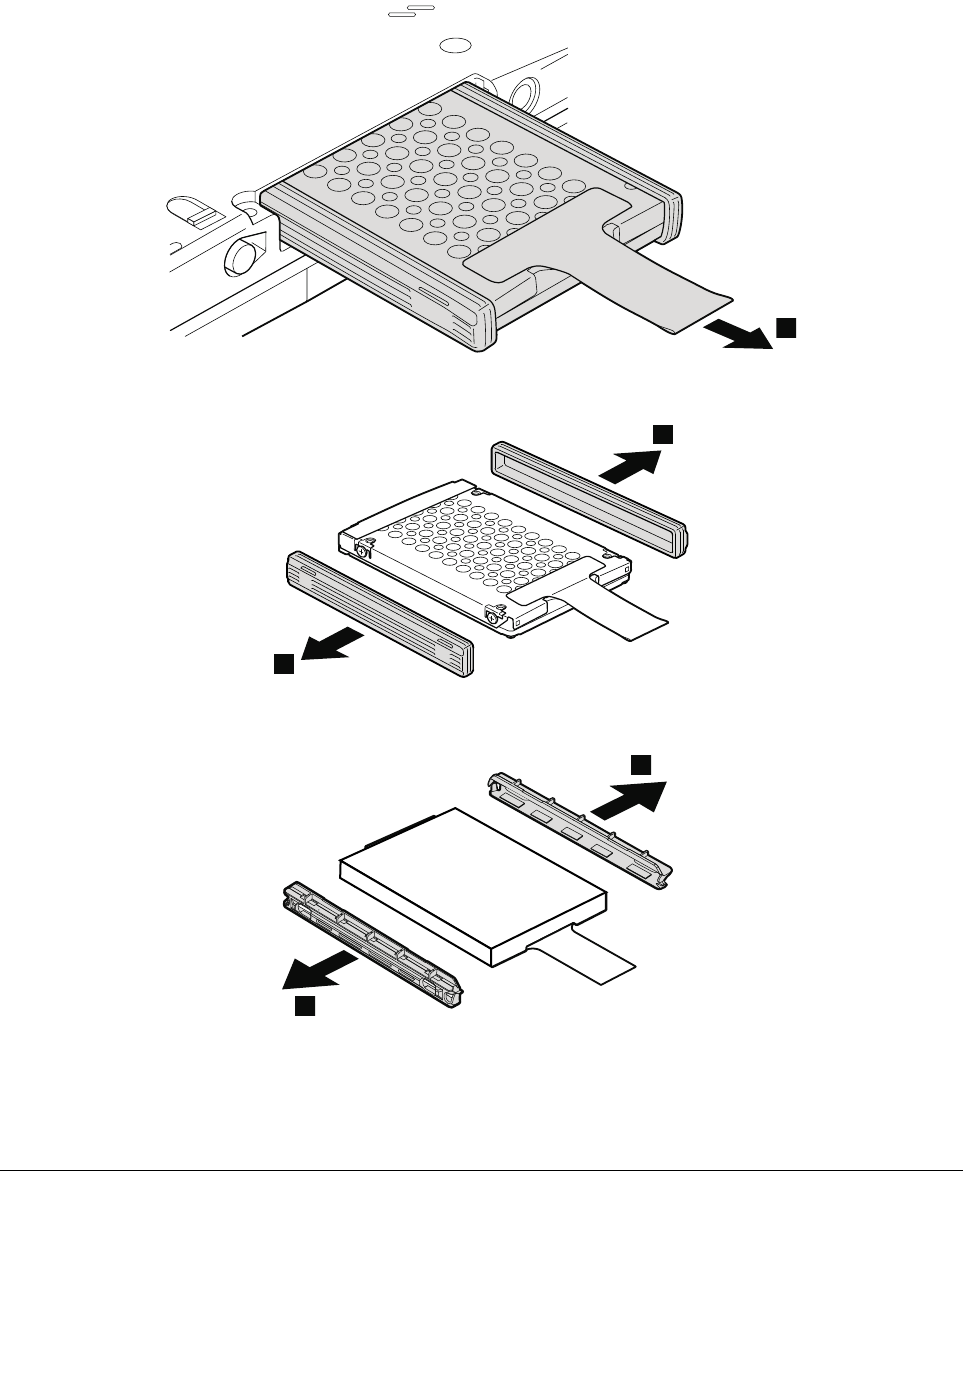
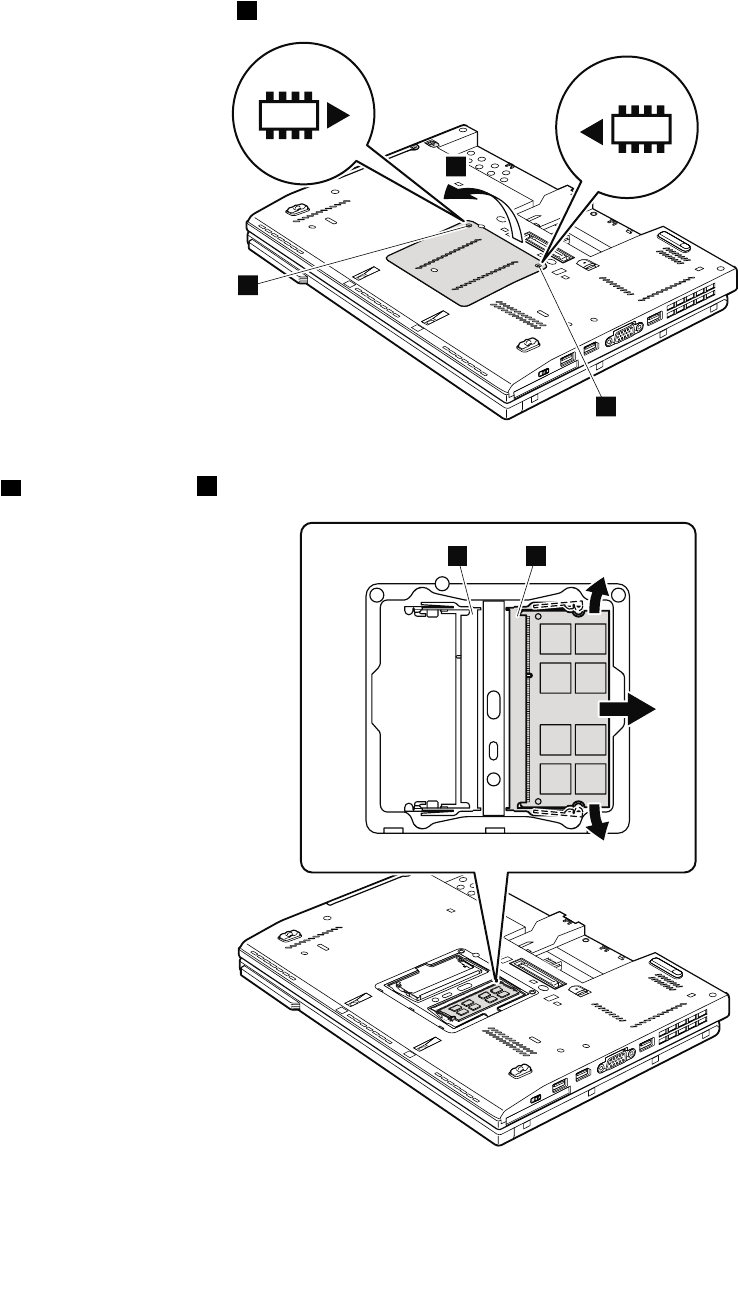
RemovalstepsofDIMM
RemovetheDIMMslotcoverasshowninthefollowinggure.
Note:Loosenthescrews1.
2
1
1
Note:IfonlyoneDIMMisusedonthecomputeryouareservicing,thecardmustbeinstalledinSLOT-0
a,butnotinSLOT-1b.
ab
Wheninstalling:
Chapter8.RemovingandreplacingaFRU67

InsertthenotchedendoftheDIMMintothesocket.PresstheDIMMrmly,andpivotituntilitsnapsinto
place.Makesurethatitisrmlyinstalledintheslotanddoesnotmoveeasily.
1050Hingecaps
Foraccess,removethisFRU:
•“1020Batterypack”onpage63
Removalstepsofhingecaps
1
OpentheLCDunit,andthenremovethehingecap.
2
3
1060Keyboard
Foraccess,removethisFRU:
•“1020Batterypack”onpage63
68HardwareMaintenanceManual
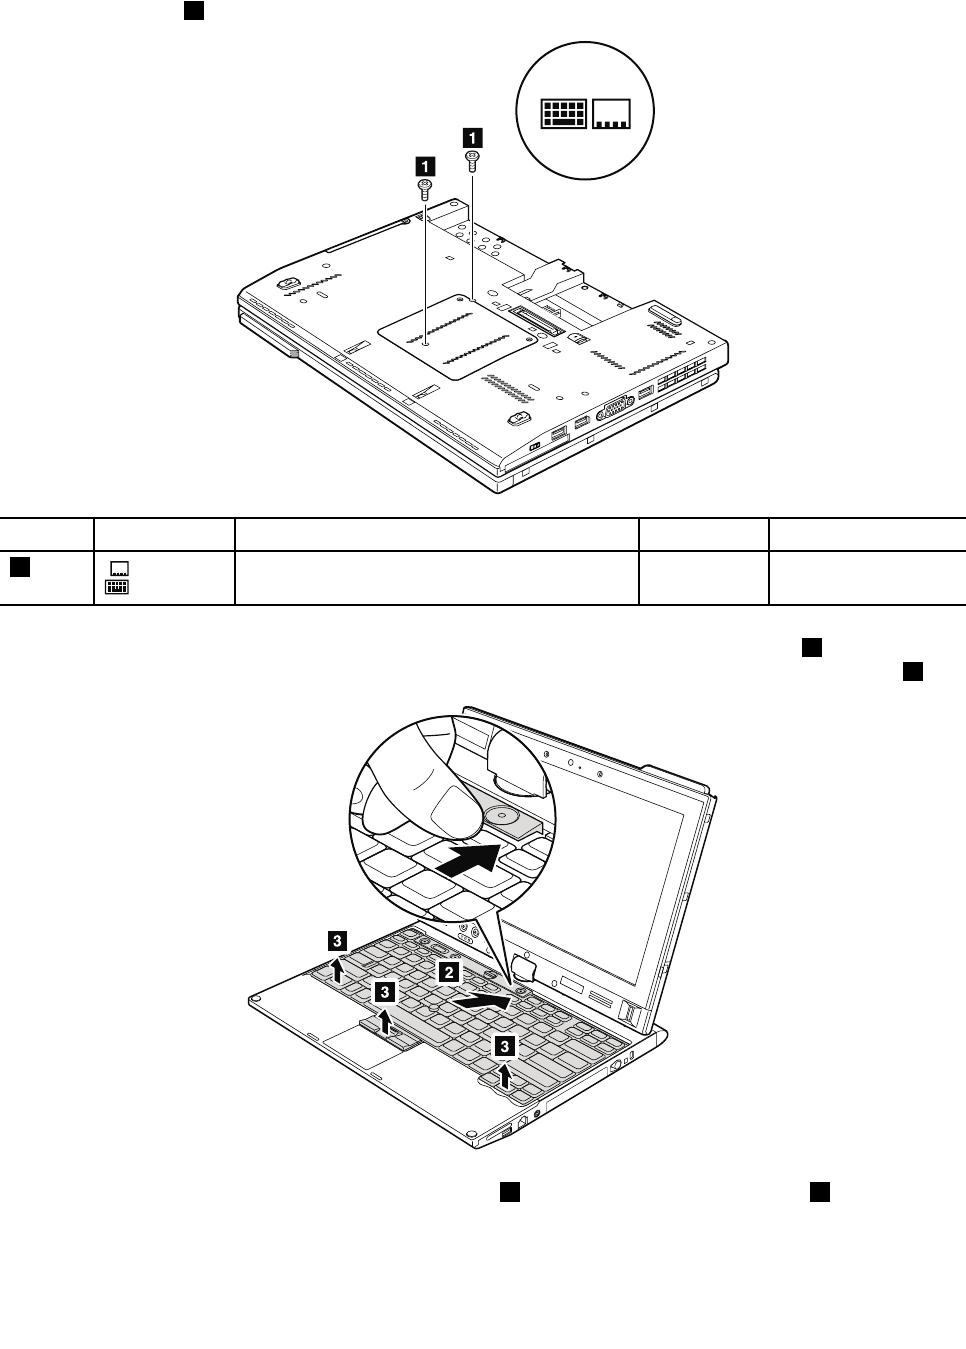
Removalstepsofkeyboard
Removethescrews1.
StepIconScrew(quantity)ColorTorque
1M2×6mm,wafer-head,nylon-coated(2)Black0.181Nm
(1.85kgfcm)
Slightlypressthekeyboardandslideitalittlebitforward,inthedirectionshownbyarrow2,todetachthe
frontedgeofthekeyboardfromtheframe.Then,liftupthekeyboardinthedirectionshownbyarrow3.
Liftthekeyboardalittleinthedirectionshownbyarrow5,andthendetachtheconnector4.
Chapter8.RemovingandreplacingaFRU69
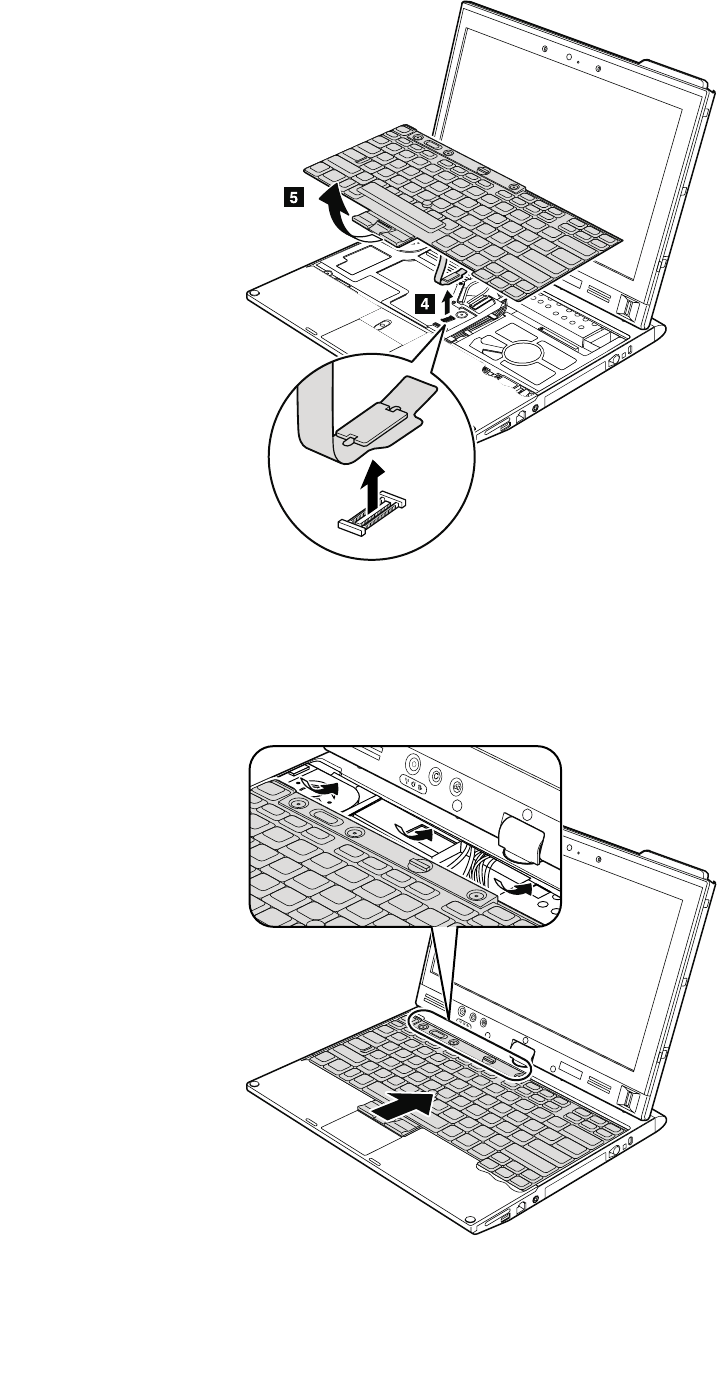
Wheninstalling:
1.Attachthekeyboardconnectorrmly.
2.Makesurethatthekeyboardedgeisundertheframeasshowninthefollowinggure.Thenpress
thekeystolatchthekeyboardrmlyinplace.
3.Gentlypressthekeyswithyourpalmsandslightlyslidethekeyboardtowardyouuntilitsnapsinto
position.
70HardwareMaintenanceManual

4.Securethekeyboardbytighteningthescrewsfromthebottomsideofthecomputer.
1070Palmrest
Foraccess,removetheseFRUsinorder:
•“1020Batterypack”onpage63
•“1060Keyboard”onpage68
Removalstepsofpalmrest
StepIconScrew(quantity)ColorTorque
1M2×6mm,wafer-head,nylon-coated(5)Black0.181Nm
(1.85kgfcm)
Chapter8.RemovingandreplacingaFRU71
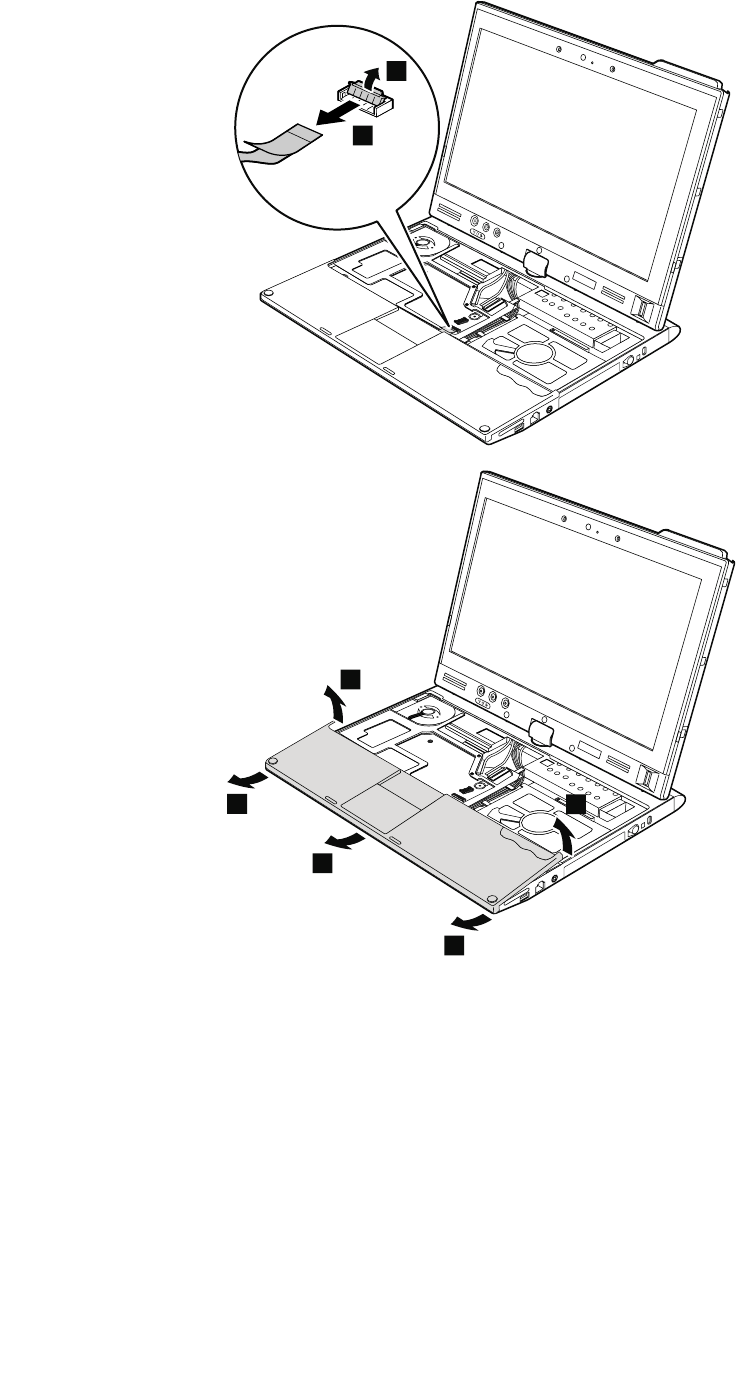
2
3
4
4
5
5
5
Wheninstalling:
Whenyouattachthepalmrest,doasfollows:
1.Attachthetouchpadconnectorrmlytothesystemboard.
2.Presstheleftandrighttopedgesofthepalmresttotitintoplace.
3.Pushthefrontsideofthepalmrestuntilitclicksintoplace.
4.ClosetheLCDcoverandturnthecomputerover.Andthenfastenthevescrewstosecurethepalmrest.
72HardwareMaintenanceManual
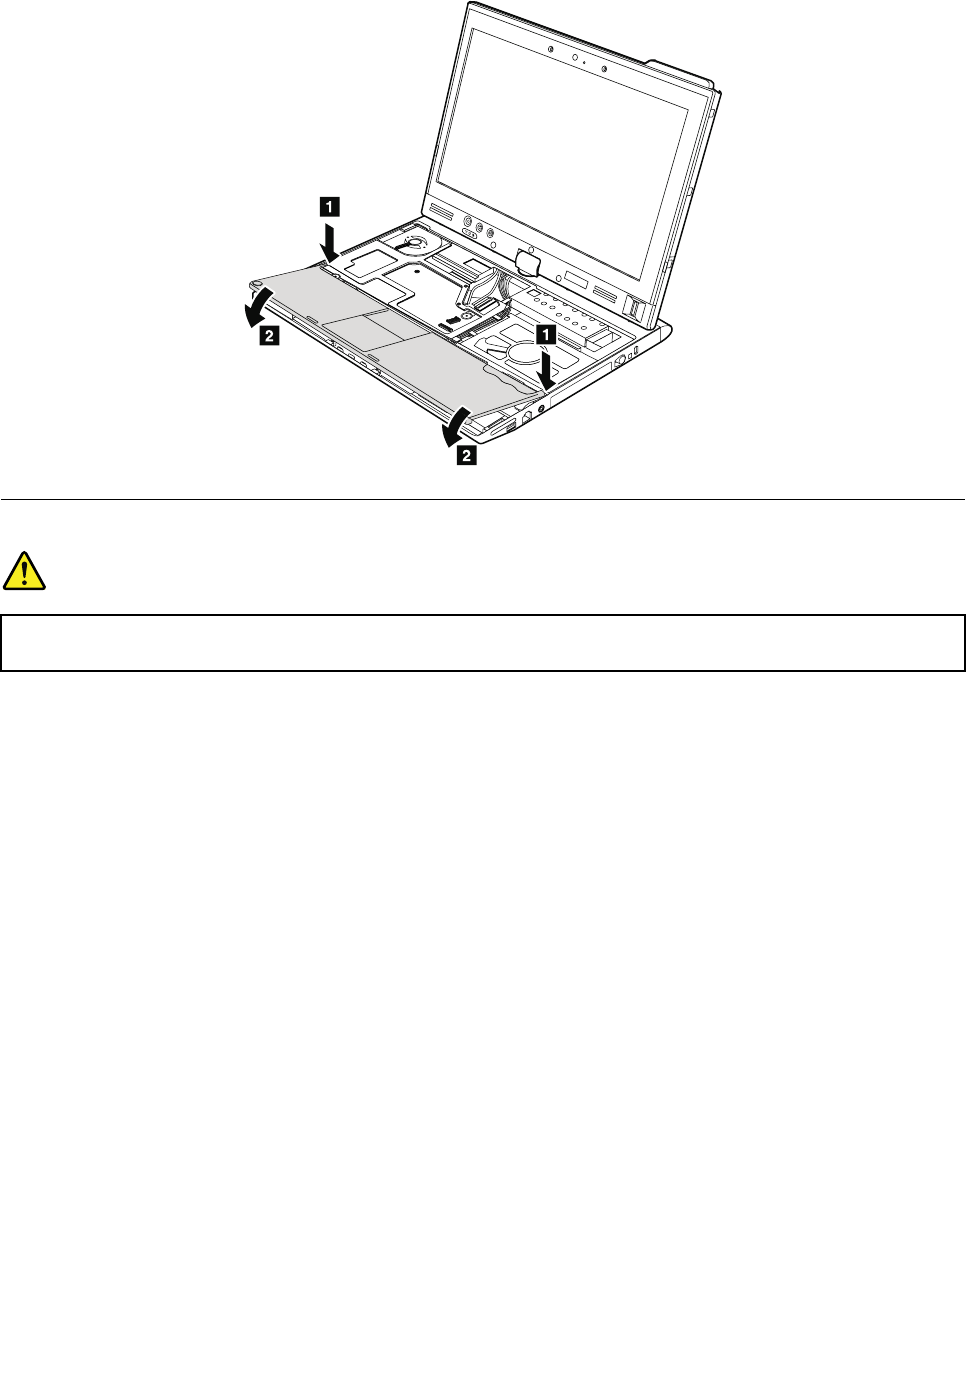
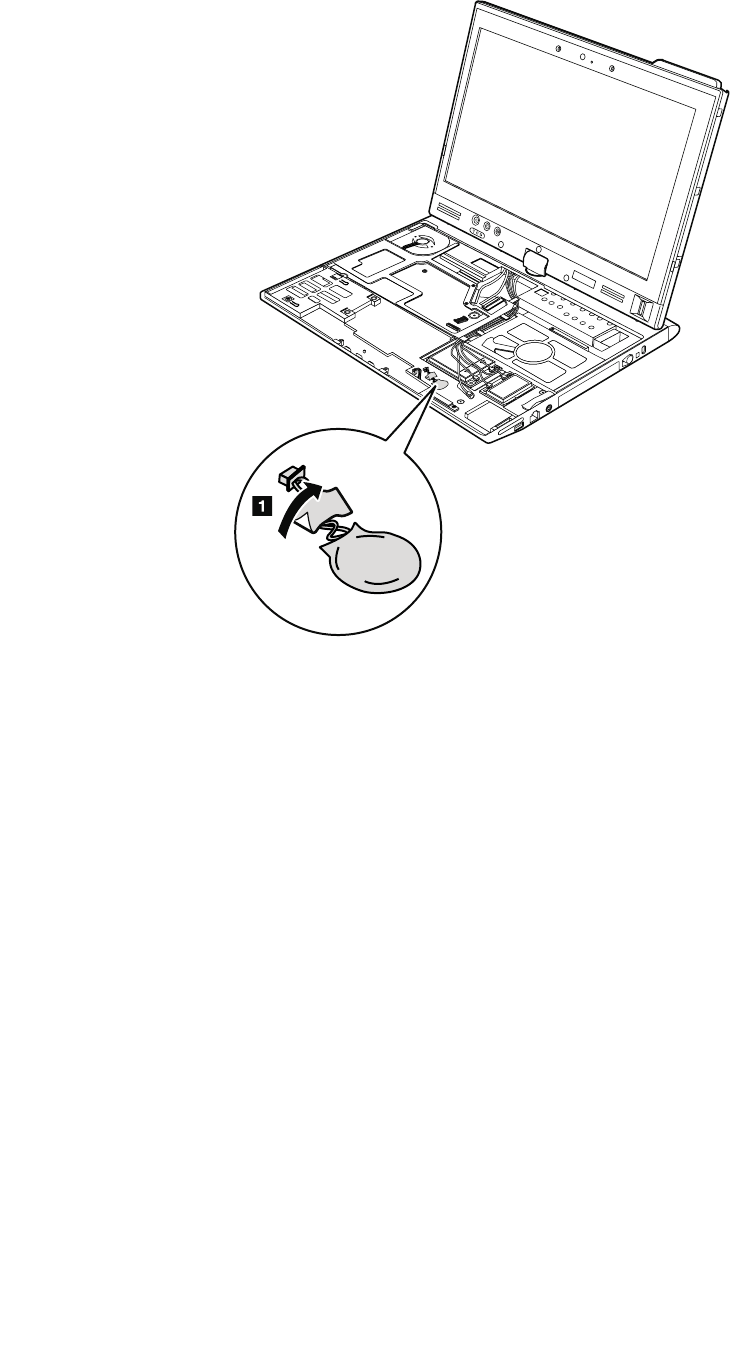
Removalstepsofbackupbattery
74HardwareMaintenanceManual
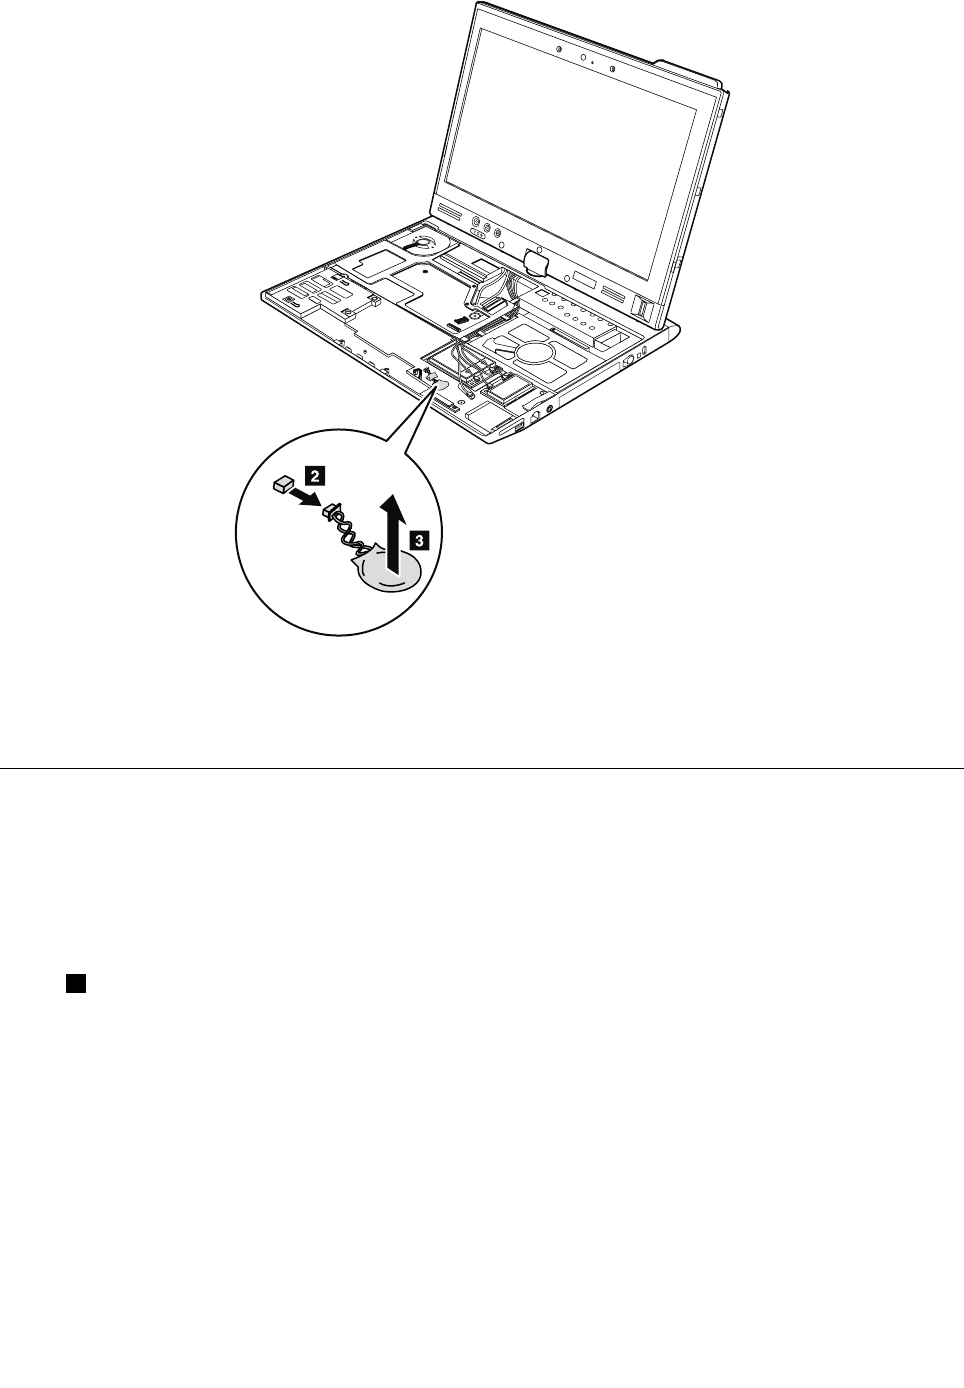
Wheninstalling:
Makesurethatthebatteryconnectorisattachedrmly.
1090PCIExpressMiniCardforwirelessLAN/WiMAX
Foraccess,removetheseFRUsinorder:
•“1020Batterypack”onpage63
•“1060Keyboard”onpage68
•“1070Palmrest”onpage71
RemovalstepsofPCIExpressMiniCardforwirelessLAN/WiMAX
Instep1,unplugthejacksbyusingtheremovaltoolantennaRFconnector(P/N:08K7159)orpickthe
connectorswithyourngersandgentlyunplugtheminthedirectionshownbythearrow.
Note:Somemodelsmighthavethreeantennacables.
Chapter8.RemovingandreplacingaFRU75
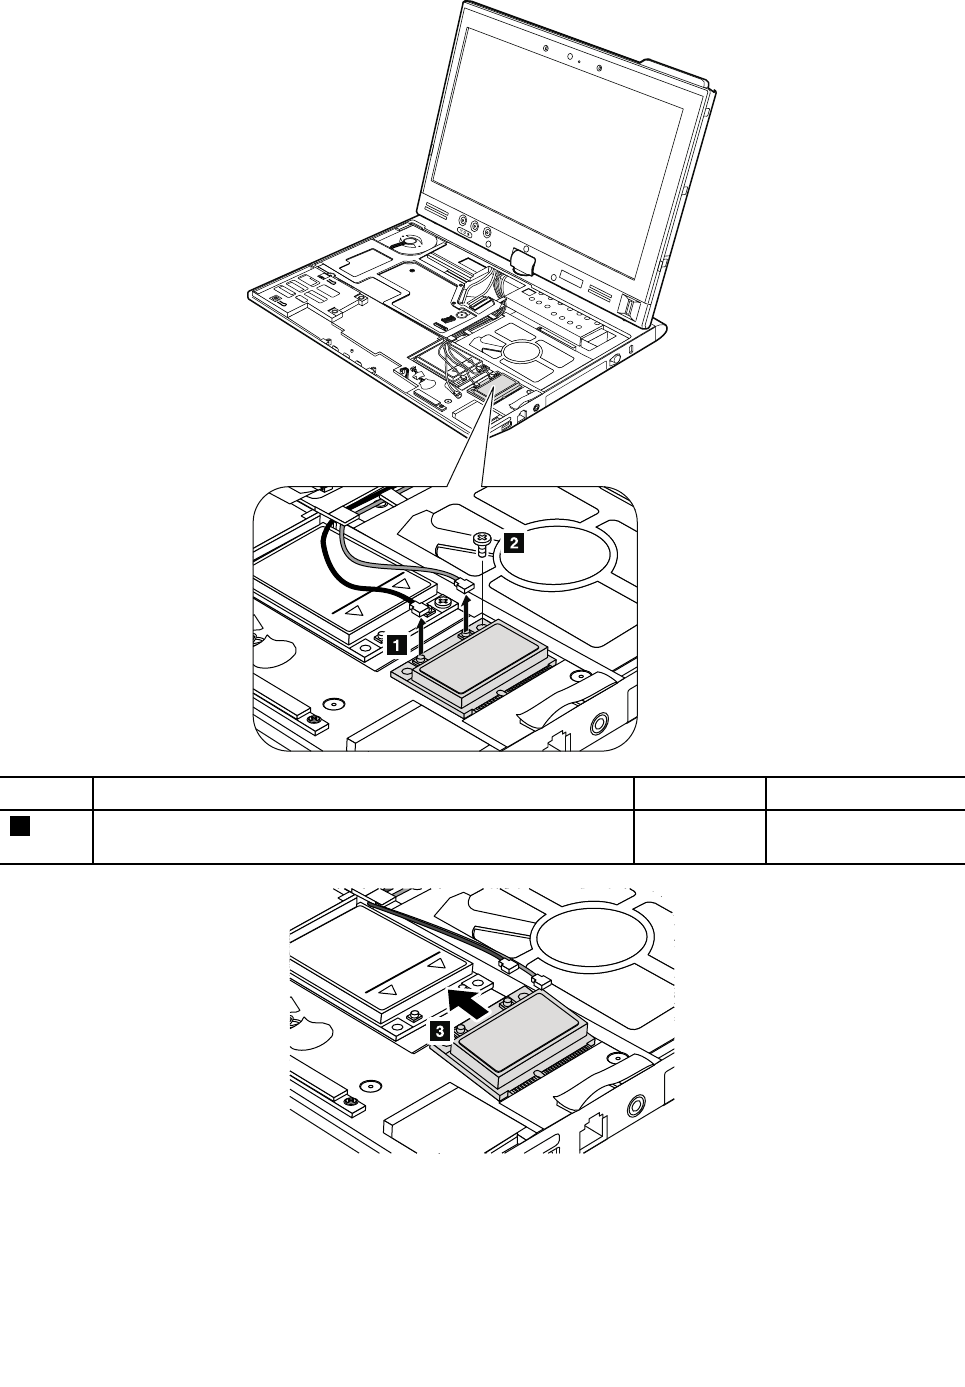
StepScrew(quantity)ColorT orque
2M2×3.5mm,wafer-head,nylon-coated(1)Silver0.181Nm
(1.85kgfcm)
Wheninstalling
•InmodelswithawirelessLANcardthathastwoantennaconnectors,plugthegraycableintothejack
labeledMAINorMonthecard,andtheblackcableintothejacklabeledAUXorA.Ifthecomputeryou
areservicinghasthreecables,putthewhitecableinthecableprotectiontube.
76HardwareMaintenanceManual
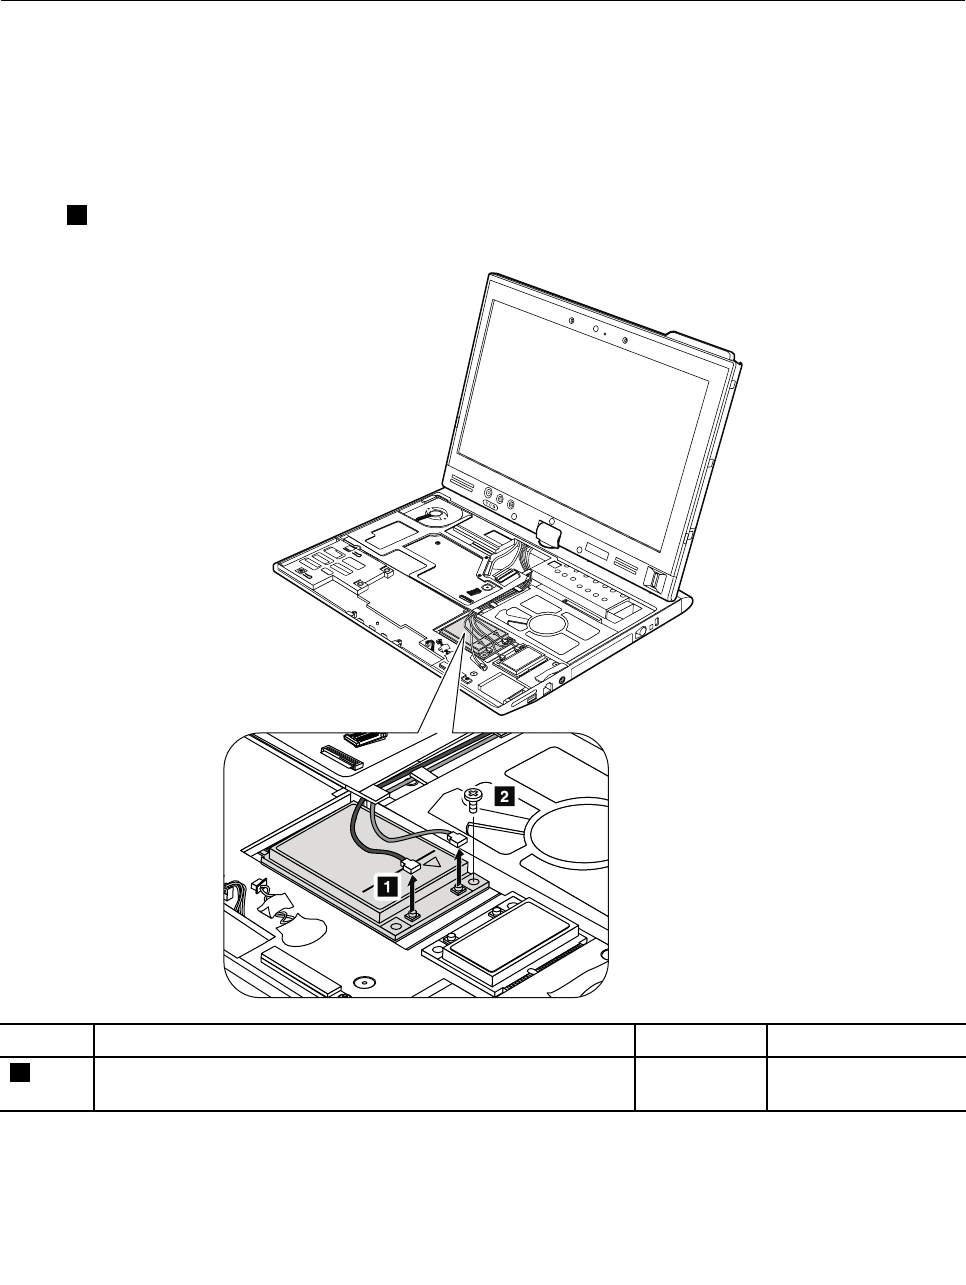
•InmodelswithawirelessLANcardthathasthreeantennaconnectors,plugthegraycable(MAIN)into
thejacklabeledTR1,thewhitecable(third)intothejacklabeledROorTR3,andtheblackcable(AUX)
intothejacklabeledTR2onthecard.
1100PCIExpressMiniCardforwirelessWAN
Foraccess,removetheseFRUsinorder:
•“1020Batterypack”onpage63
•“1060Keyboard”onpage68
•“1070Palmrest”onpage71
RemovalstepsofPCIExpressMiniCardforwirelessWAN
Instep1,unplugthejacksbyusingtheremovaltoolantennaRFconnector(P/N:08K7159)orpickthe
connectorswithyourngersandgentlyunplugtheminthedirectionofthearrow.
StepScrew(quantity)ColorT orque
2M2×3.5mm,wafer-head,nylon-coated(1)Silver0.181Nm
(1.85kgfcm)
Chapter8.RemovingandreplacingaFRU77
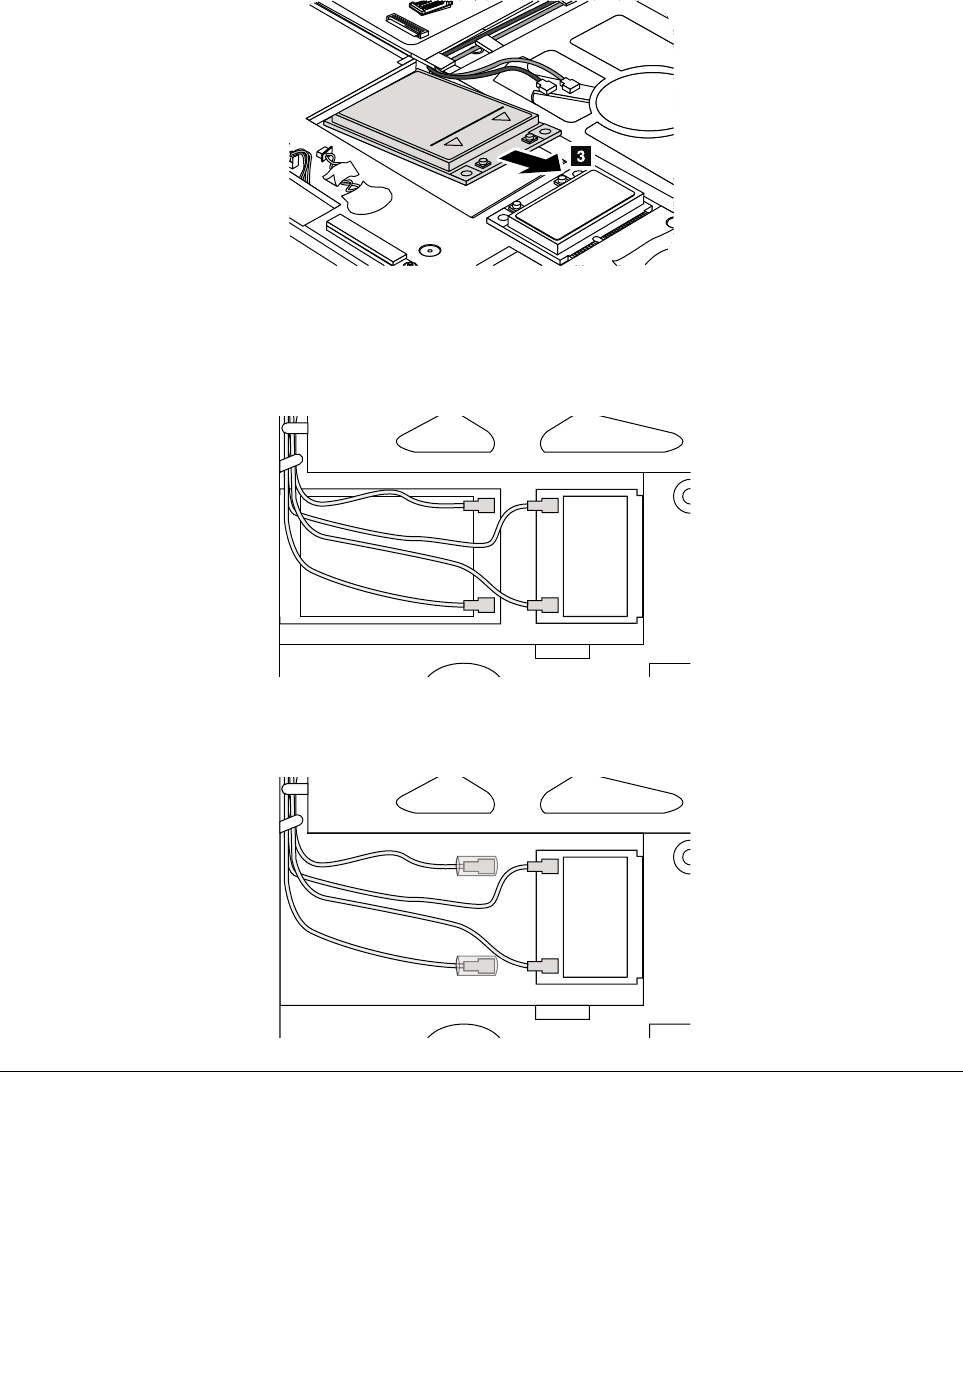
Wheninstalling:
Whenyouinstallthecard,plugtheredcableintothejacklabeledMAINonthecard,andthebluecableinto
thejacklabeledAUX.
IfthecomputeryouareservicingisthewirelessWAN-readymodel,puttheantennacablesinthecable
protectiontubeandplacethemasshowninthefollowinggure.
1110Bluetoothdaughtercard
Foraccess,removetheseFRUsinorder:
•“1020Batterypack”onpage63
•“1060Keyboard”onpage68
•“1070Palmrest”onpage71
78HardwareMaintenanceManual

RemovalstepsofBluetoothdaughtercard
StepScrew(quantity)ColorT orque
1M2×3.5mm,wafer-head,nylon-coated(1)Silver0.181Nm
(1.85kgfcm)
Wheninstalling:
Makesurethattheconnector2isattachedrmly.
1120Keyboardbezel
Foraccess,removetheseFRUsinorder:
•“1010Digitizerpen”onpage63
•“1020Batterypack”onpage63
•“1060Keyboard”onpage68
•“1070Palmrest”onpage71
Chapter8.RemovingandreplacingaFRU79

Removalstepsofkeyboardbezel
1
2
2
1
1
StepScrew(quantity)ColorT orque
1M2×6mm,wafer-head,nylon-coated(3)Black0.181Nm
(1.85kgfcm)
2M2×3.5mm,wafer-head,nylon-coated(2)Silver0.181Nm
(1.85kgfcm)
3
33
3
StepScrew(quantity)ColorT orque
3M2×2mm,wafer-head,nylon-coated(4)Black0.181Nm
(1.85kgfcm)
RotatetheLCDunitasshowninthefollowinggure.
80HardwareMaintenanceManual

4
Instep5,detachtheclaws.Thenremovethekeyboardbezelinthedirectionshownbyarrow6.
Attention:Whenyouservicethekeyboardbezel,avoidanykindofroughhandling.
5
6
5
5
5
6
Wheninstalling:
Makesurethatalltheclawsareattachedrmly.
1130LCDassembly
Foraccess,removetheseFRUsinorder:
•“1010Digitizerpen”onpage63
•“1020Batterypack”onpage63
•“1050Hingecaps”onpage68
•“1060Keyboard”onpage68
•“1070Palmrest”onpage71
•“1090PCIExpressMiniCardforwirelessLAN/WiMAX”onpage75
Chapter8.RemovingandreplacingaFRU81
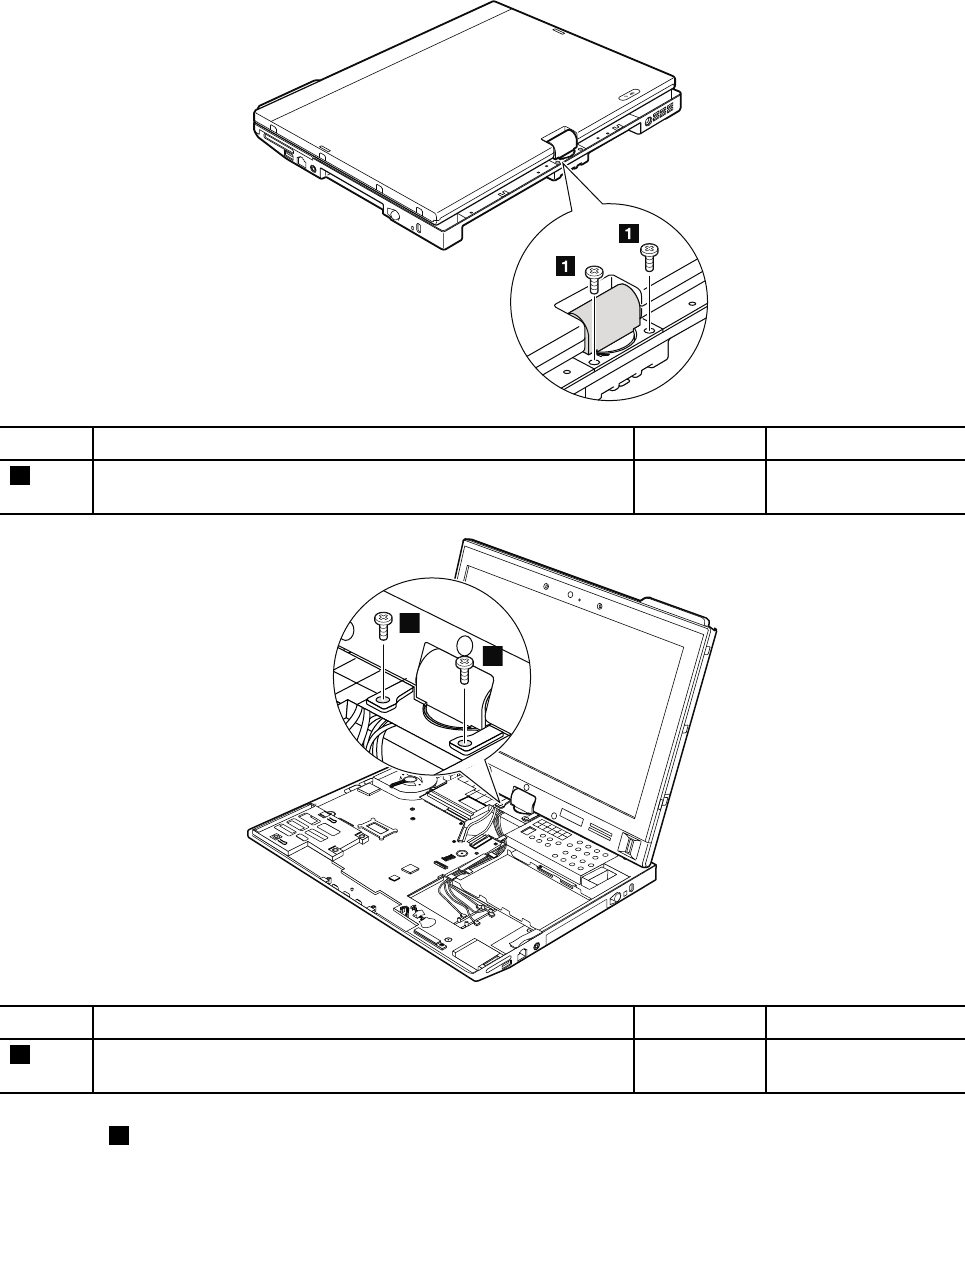
•“1100PCIExpressMiniCardforwirelessWAN”onpage77
•“1120Keyboardbezel”onpage79
RemovalstepsofLCDassembly
StepScrew(quantity)ColorT orque
1M2.5×6mm,wafer-head,nylon-coated(2)Black0.392Nm
(4kgfcm)
2
2
StepScrew(quantity)ColorT orque
2M2.5×6mm,wafer-head,nylon-coated(2)Black0.392Nm
(4kgfcm)
Beforestep3,stripoffthetapessecuringtheantennacables,andreleasethecablesfromthecable
guidesoftheframe.
82HardwareMaintenanceManual
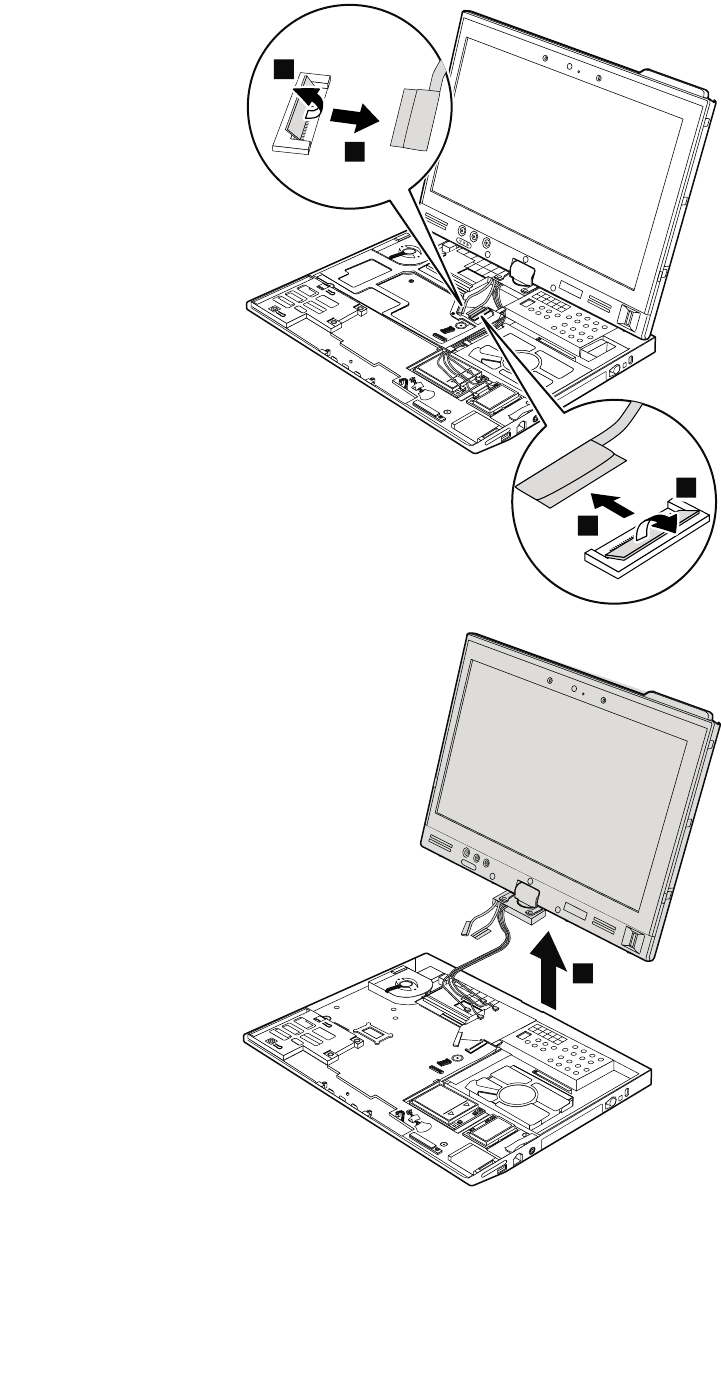
3
4
5
6
7
Wheninstalling:
•Makesurethatyouattachtheconnectorsrmly.
Chapter8.RemovingandreplacingaFRU83

•Makesurethatyouroutethecablescorrectlyandyoutapeupthecablesintheproperpositionsas
showninthefollowinggure.
•Whenyouroutethecables,makesurethattheyarenotsubjectedtoanytension.Tensioncouldcause
thecablestobedamagedbythecableguides,orawiretobebroken.
1140DC-inconnector,basecover,fan,digitizerpencase,andpen
switchassembly
Foraccess,removetheseFRUsinorder:
•“1010Digitizerpen”onpage63
•“1020Batterypack”onpage63
•“1050Hingecaps”onpage68
•“1060Keyboard”onpage68
•“1070Palmrest”onpage71
•“1090PCIExpressMiniCardforwirelessLAN/WiMAX”onpage75
•“1100PCIExpressMiniCardforwirelessWAN”onpage77
•“1110Bluetoothdaughtercard”onpage78
•“1120Keyboardbezel”onpage79
•“1130LCDassembly”onpage81
RemovalstepsofDC-inconnector,basecover,fan,digitizerpencase,andpenswitchassembly
Removethetopshieldingassemblyatrst.
84HardwareMaintenanceManual
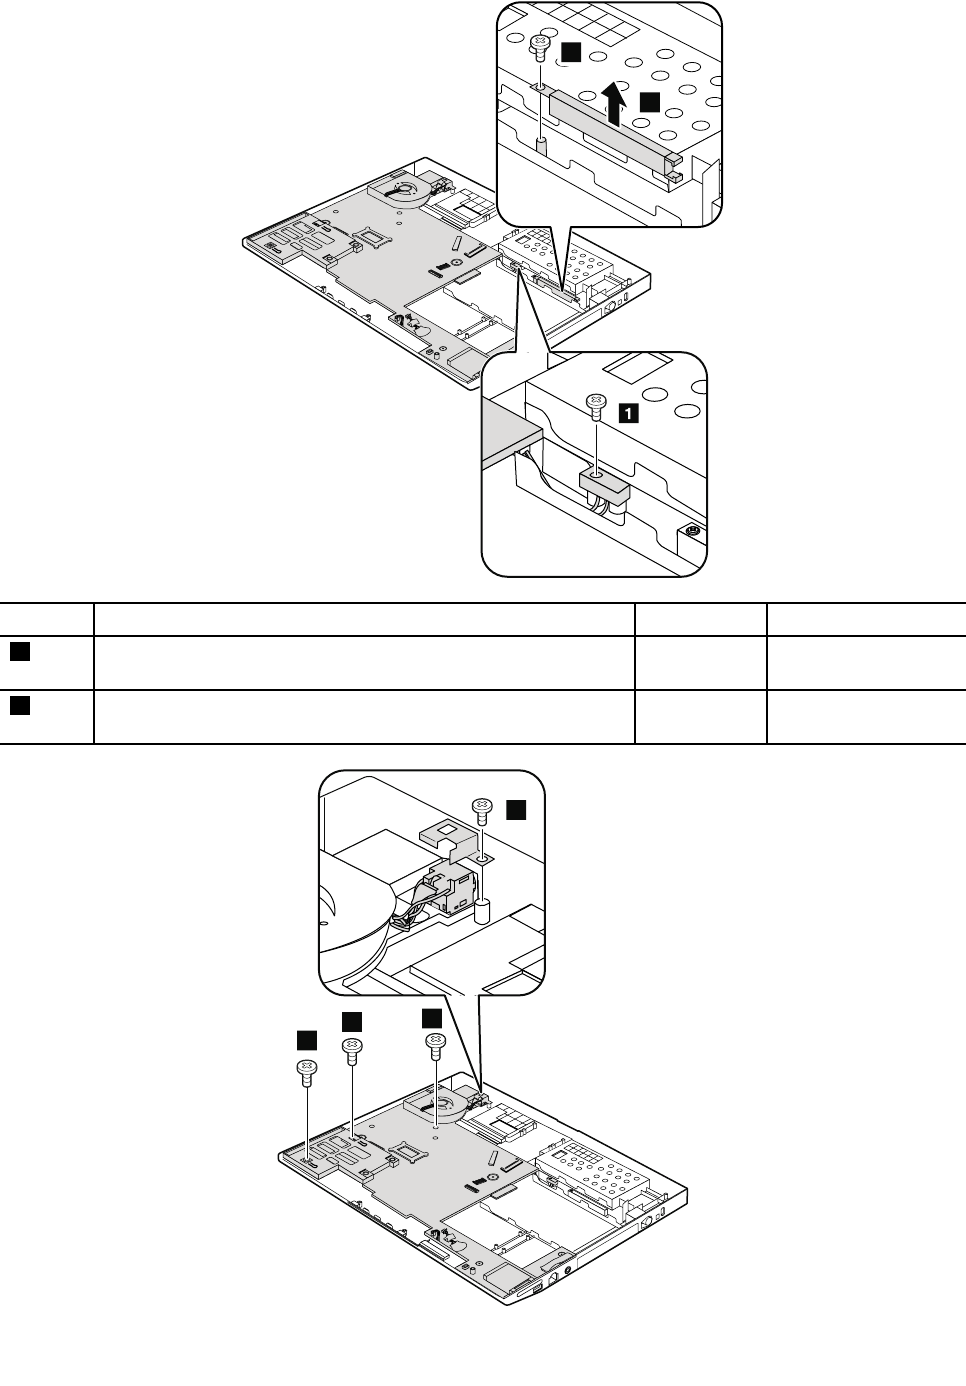
3
2
StepScrew(quantity)ColorT orque
1M1.6x3+4.2Amm,shouldersocket-head,nylon-coated(1)Black0.181Nm
(1.85kgfcm)
2M2x3.5mm,wafer-head,nylon-coated(1)Silver0.181Nm
(1.85kgfcm)
4
4
4
4
Chapter8.RemovingandreplacingaFRU85

StepScrew(quantity)ColorT orque
4M2×3.5mm,wafer-head,nylon-coated(4)Silver0.181Nm
(1.85kgfcm)
5
6
7
Wheninstalling:
Makesurethatthewirelessswitchisadjustedasshownbycallouta.
Turnthesystemboardover,andthendisconnecttheDC-inconnector,thefanconnector,andthepen
switchconnectorfromthesystemboard.
8
9
10
86HardwareMaintenanceManual
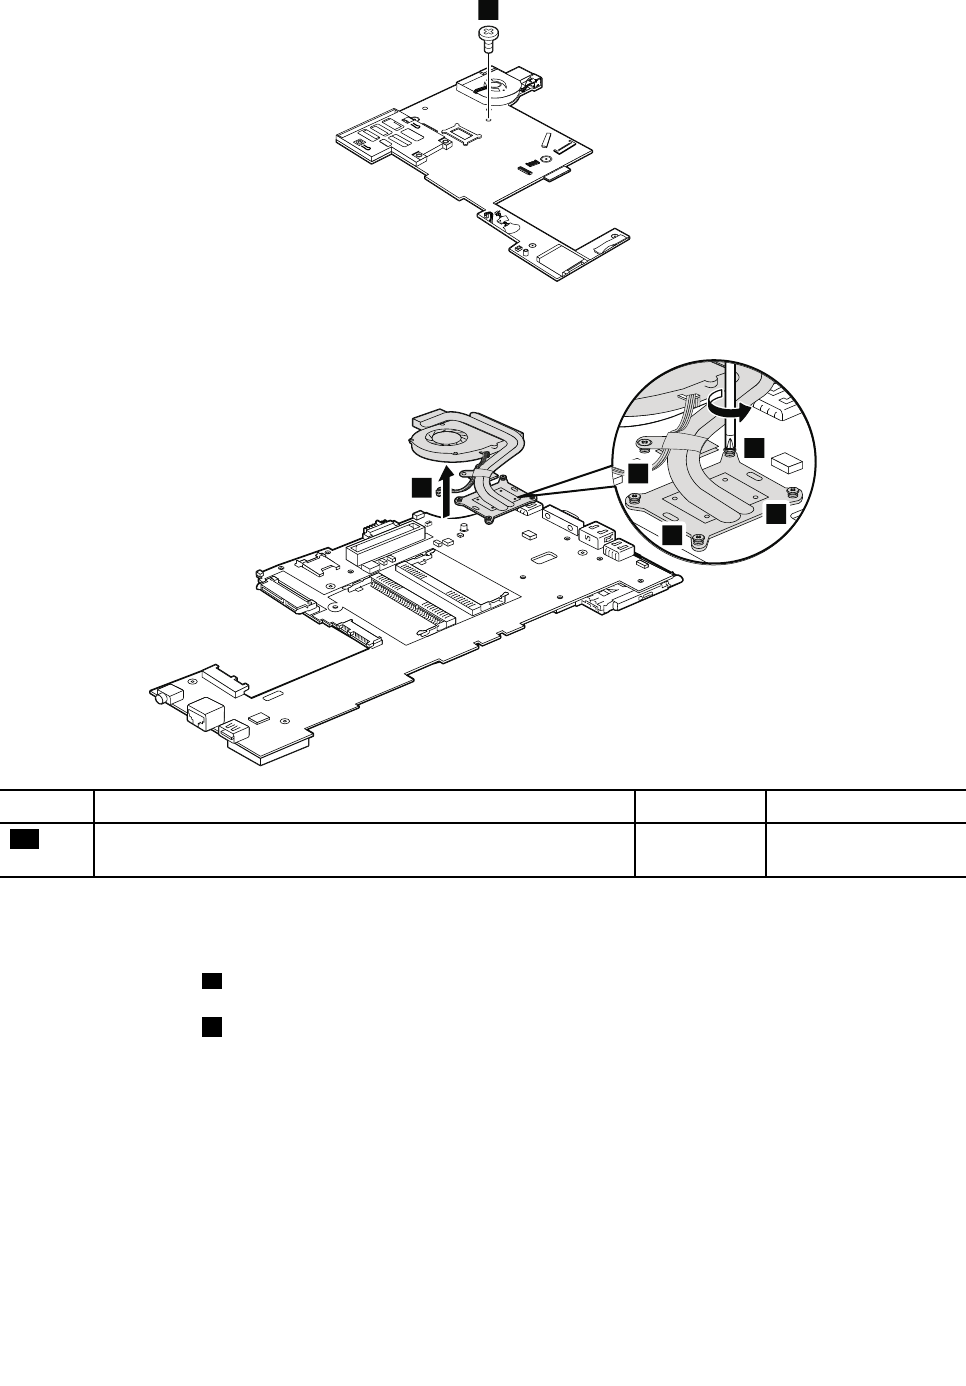
11
Disconnectthefanassemblyfromthesystemboard.
12
13
14
15
16
StepScrew(quantity)ColorT orque
11M2×3.5mm,at-head,nylon-coated(1)Silver0.181Nm
(1.85kgfcm)
Wheninstalling:
•Beforeyouattachthefanassemblytothecomputer,applythermalgrease,atanamountof0.2grams,
onthepartmarkedaasinthefollowinggure.Eithertoomuchortoolessapplicationofgreasecan
causeathermalproblemduetoimperfectcontactwithacomponent.Youneedtopeelthethinlm
offfromtherubberb.
•MakesurethattheDC-inconnector,thefanconnector,andthepenswitchconnectorareattachedto
thesystemboardrmly.
Chapter8.RemovingandreplacingaFRU87
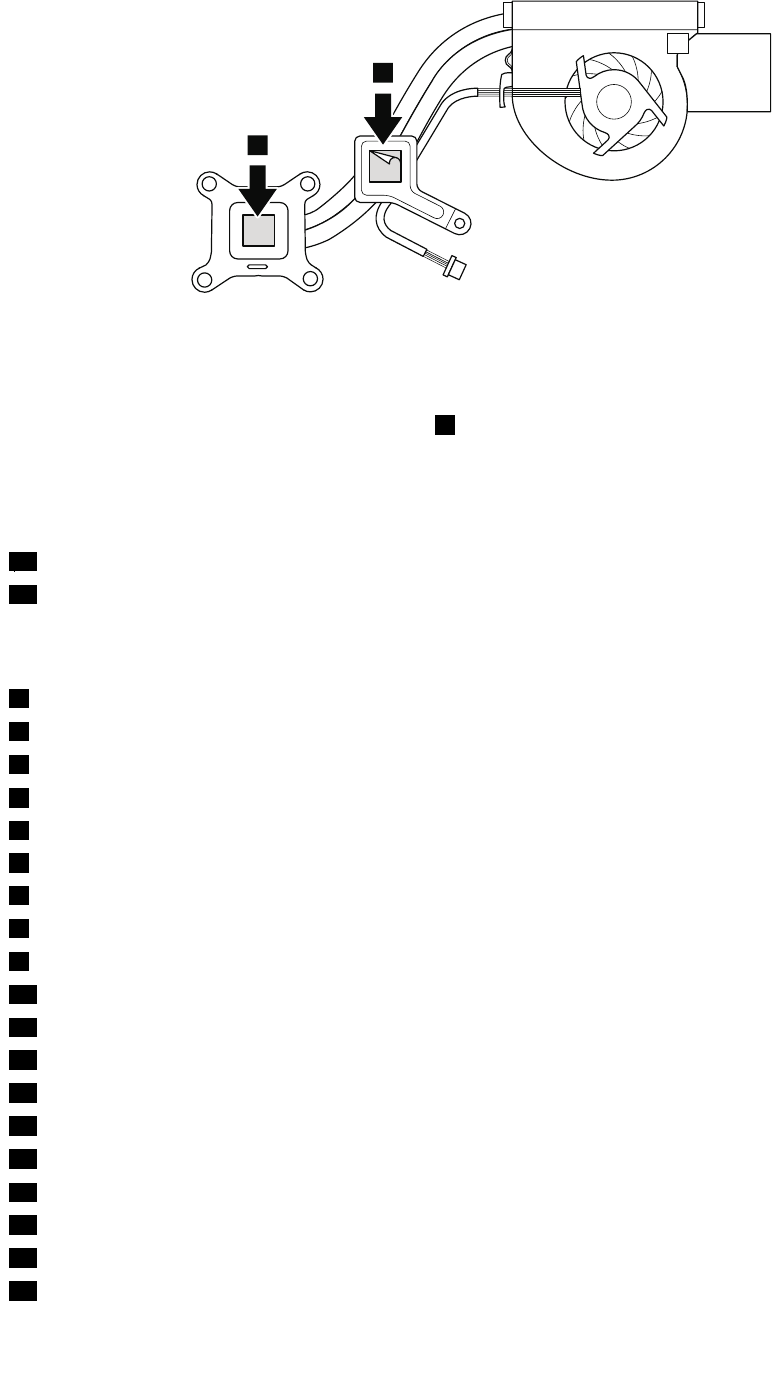
a
b
a
Applyinglabelstothebasecover:
ThenewbasecoverFRUisshippedwithakitcontaininglabelsofseveralkinds.
Note:IftheWindowsAuthenticationlabel(COA)2isattachedtoapartthatisreplaced,returntheoldpart
withthelabelattachedtothecustomer,orprovidealettertothecustomerstatingwhatthelabelwas
originallyonthesystemandwhatthelabelpartnumber,serialnumber,andproductkeywere.
Whenyoureplacethebasecover,youneedtoapplythefollowinglabels:
19Homologationlabel
20Productlabel
Thefollowinglabelsneedtobepeeledofffromtheoldbasecover,andneedtobeputonthenewbasecover.
1Chinatelecomlabel
2WindowsCerticateofAuthenticationlabel(COA)
3SIMlabel
4BTYwordlabel
5Assettag
6IMEIlabel
7BrazilWWANlabel
8Wirelesscardlabel(onlyforBrazil)
9ModemAMOMlabel
10MEDEMlabel(onlyforPRCmodel)
11Bluetoothlabel
12ChinaWWANlabel
13SIRIMlabelorPOSTELlabel
14Non-encryptionlabel(fornon-TPMmodel)orRatinglabel(onlyforIndonesia)
15ATWirelessLANMACaddresslabel
16Vodafonelabel
17FCClabel
18Serialnumberlabel
21FCC-IDlabelforcontactlesssmartcardmodel
88HardwareMaintenanceManual
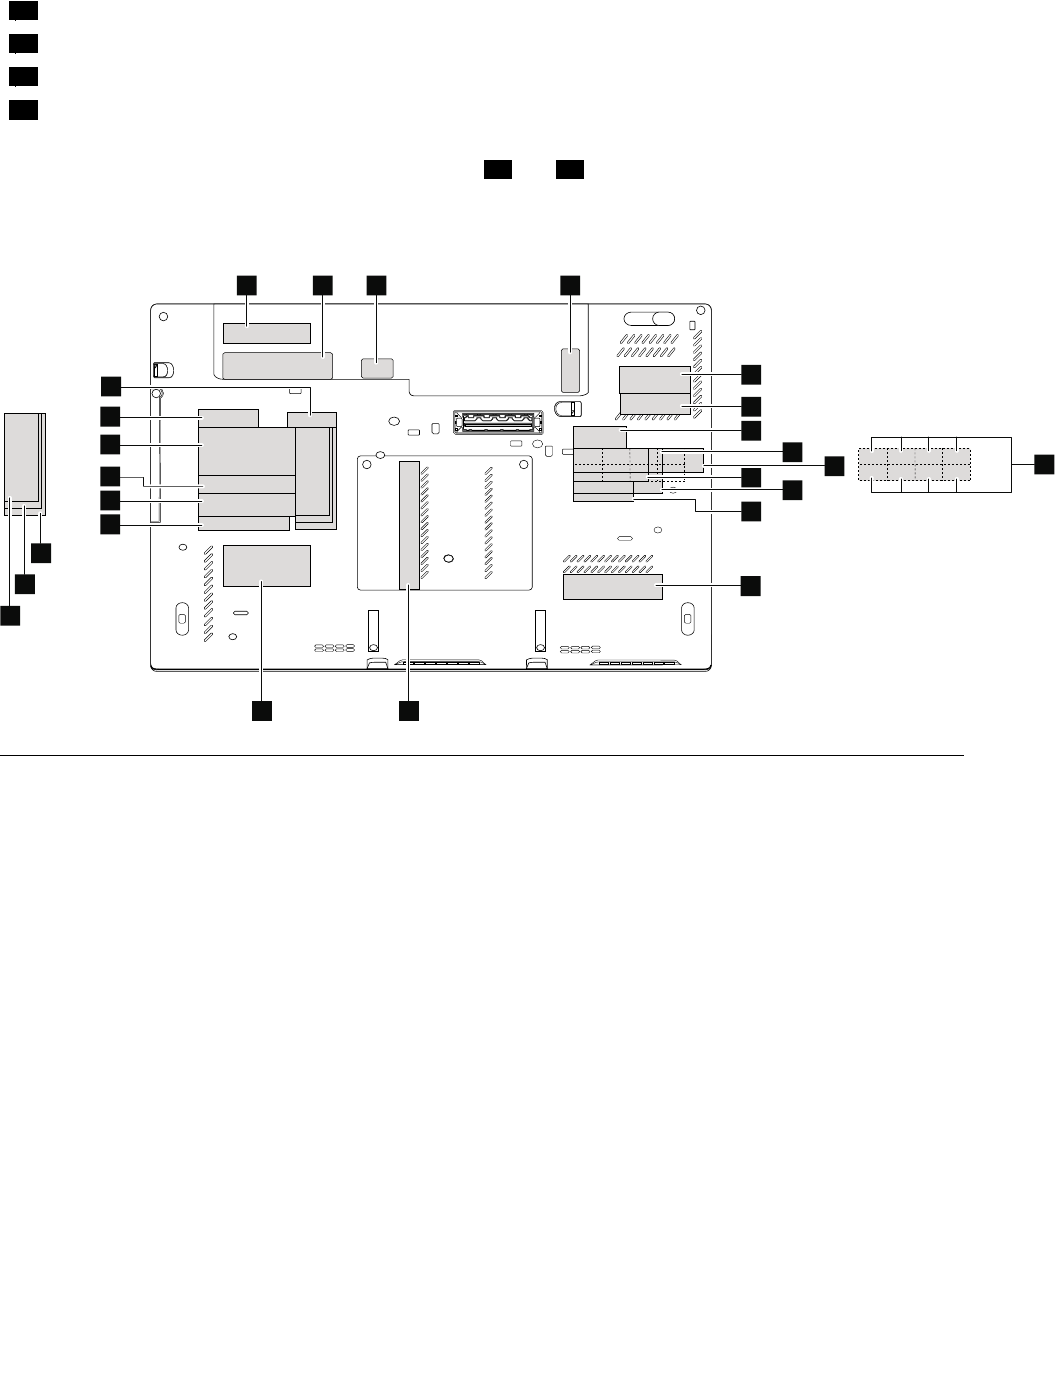
22Israellabel(67.8mmx27.9mm)
23Israellabel(72.2mmx29.7mm)
24Israellabel(76.2mmx31.8mm)
25EthernetlabelorOnboardLANMAVaddresslabel
Forsomemodels,youneedtoapplytwoFCClabels,17and21.Checktheoldbasecover;ifithas
twoFCClabels,applybothtothenewbasecover.
Forthelocationofeachlabel,referthefollowinggure:
1234
5
6
7
8
10
14
1516
24
23
22
17
18
19
20
21
9
11
12
13
25
1150SystemboardandExpressCardslotassemblies
Importantnoticesforhandlingthesystemboard:
Whenhandlingthesystemboard,bearthefollowinginmind.
•Thesystemboardhasanaccelerometer,whichcanbebrokenifseveralthousandsofG-forcesareapplied.
Note:Droppingasystemboardfromaheightofaslittleas6inchessothatitfallsatonahardbench
cansubjecttheaccelerometertoasmuchas6,000G'sofshock.
•Becarefulnottodropthesystemboardonabenchtopthathasahardsurface,suchasmetal,wood,or
composite.
•Ifasystemboardisdropped,testitusingPC-DoctorforDOSifthesystemsupportsPC-DoctorforDOS,
tomakesurethattheHDDActiveProtectionSystem™stillfunctions.
Note:IfthetestshowsthattheHDDActiveProtectionSystemisnotfunctioning,besuretodocumentthe
dropinarejectreport,andreplacethesystemboard.
•Avoidroughhandlingofanykind.
•Ateverypointintheprocess,besurenottodroporstackthesystemboard.
•Ifyouputasystemboarddown,besuretoputitonlyonapaddedsurfacesuchasanESDmatora
corrugatedconductivesurface.
Chapter8.RemovingandreplacingaFRU89
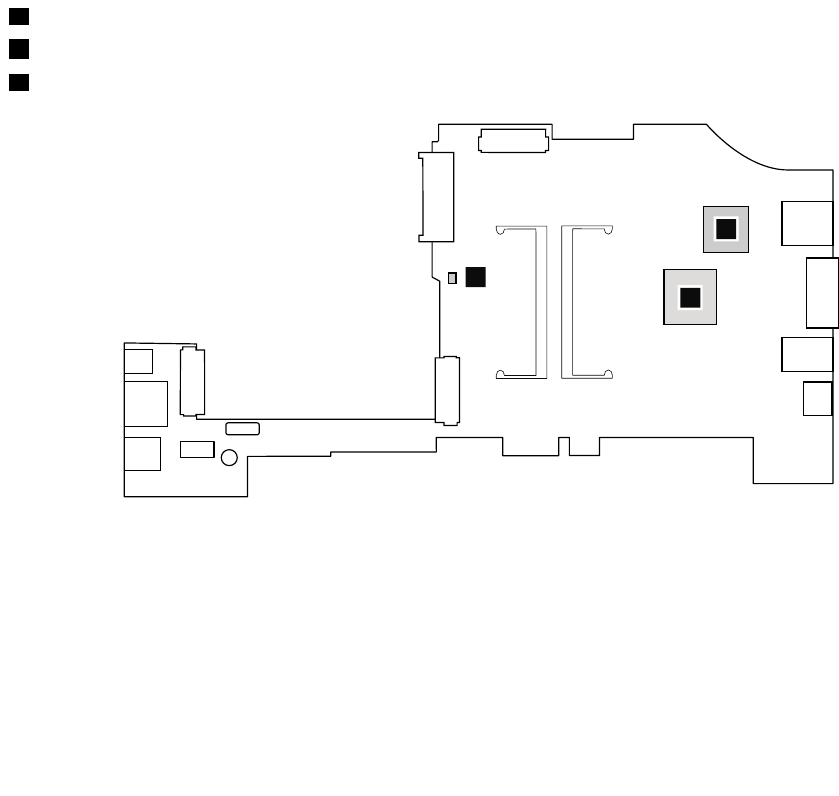
IfthesystemsupportsPC-DoctorforDOS,afterreplacingthesystemboard,runPC-DoctorforDOSto
makesurethatHDDActiveProtectionSystemstillfunctions.Theprocedureisasfollows:
1.Placethecomputeronahorizontalsurface.
2.RunDiagnostics➙ThinkPadDevices➙HDDActiveProtectionTest.
Attention:Donotapplyphysicalshocktothecomputerwhilethetestisrunning.
Foraccess,removetheseFRUsinorder:
•“1010Digitizerpen”onpage63
•“1020Batterypack”onpage63
•“1050Hingecaps”onpage68
•“1060Keyboard”onpage68
•“1070Palmrest”onpage71
•“1090PCIExpressMiniCardforwirelessLAN/WiMAX”onpage75
•“1100PCIExpressMiniCardforwirelessWAN”onpage77
•“1110Bluetoothdaughtercard”onpage78
•“1120Keyboardbezel”onpage79
•“1130LCDassembly”onpage81
•“1140DC-inconnector,basecover,fan,digitizerpencase,andpenswitchassembly”onpage84
RemovalstepsofsystemboardandExpressCardslotassembly
Thefollowingcomponentssolderedonthesystemboardareextremelysensitive.Whenyouservicethe
systemboard,avoidanykindofroughhandling.
aPlatformControllerHub(PCH)
bCPU
cAccelerometerchipfortheHDDActiveProtectionSystem
b
c
a
Note:TheExpressCardslotassemblyisattachedtothesystemboard.
90HardwareMaintenanceManual
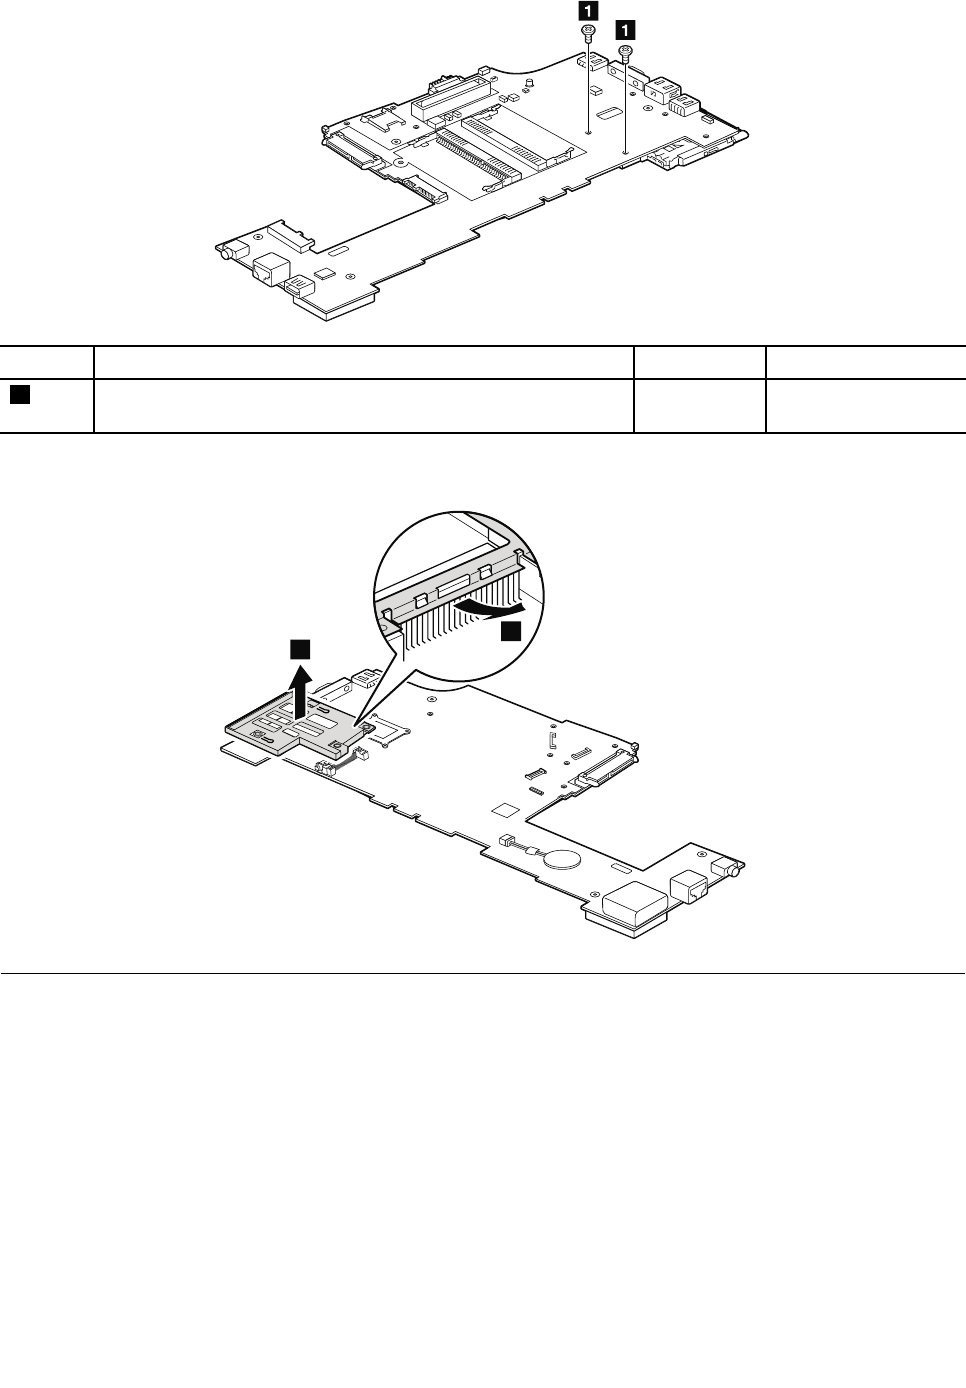
StepScrew(quantity)ColorTorque
1M2×3.5mm,wafer-head,nylon-coated(2)Silver0.181Nm
(1.85kgfcm)
Turnthesystemboardover,andthenremovetheExpressCardslotassemblyfromthesystemboard.
2
3
1160Speakerassembly
Foraccess,removetheseFRUsinorder:
•“1010Digitizerpen”onpage63
•“1020Batterypack”onpage63
•“1050Hingecaps”onpage68
•“1060Keyboard”onpage68
•“1070Palmrest”onpage71
•“1090PCIExpressMiniCardforwirelessLAN/WiMAX”onpage75
•“1100PCIExpressMiniCardforwirelessWAN”onpage77
•“1110Bluetoothdaughtercard”onpage78
•“1120Keyboardbezel”onpage79
•“1130LCDassembly”onpage81
•“1140DC-inconnector,basecover,fan,digitizerpencase,andpenswitchassembly”onpage84
Chapter8.RemovingandreplacingaFRU91

Removalstepsofspeakerassembly
Removethespeakerassemblyfromthebasecoverassembly.
StepScrew(quantity)ColorTorque
2M2×3mm,wafer-head,nylon-coated(1)Black0.181Nm
(1.85kgfcm)
Wheninstalling:
Routethespeakercablesalongthecableguidesasshowninthefollowinggure.
1170mSATAsolidstatedrive
Foraccess,removetheseFRUsinorder:
•“1020Batterypack”onpage63
•“1060Keyboard”onpage68
•“1070Palmrest”onpage71
Attention:
•Donotdroptheharddiskdriveorapplyanyphysicalshocktoit.Theharddiskdriveissensitiveto
physicalshock.Improperhandlingcancausedamageandpermanentlossofdata.
•Beforeremovingthedrive,havetheusermakeabackupcopyofalltheinformationonitifpossible.
•Neverremovethedrivewhilethesystemisoperatingorisinsuspendmode.
92HardwareMaintenanceManual

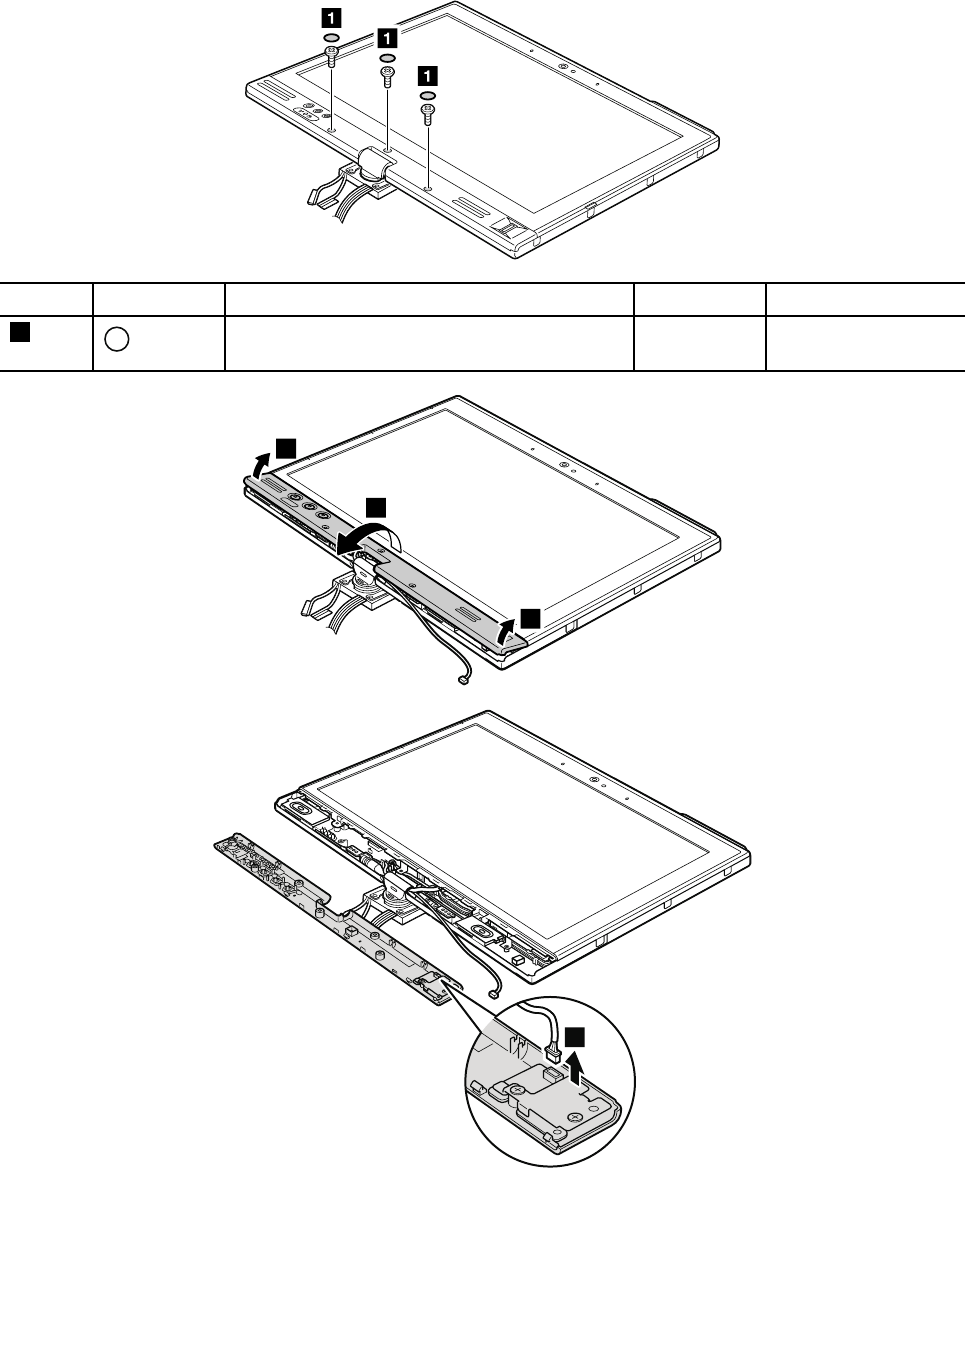
RemovalstepsofLCDfrontbezel
StepScrewcapScrew(quantity)ColorTorque
1M2.5×8mm,wafer-head,nylon-coated(3)Black0.392Nm
(4kgfcm)
2
3
2
4
Wheninstalling:
Attachthengerprintreaderconnectorrmly.
94HardwareMaintenanceManual

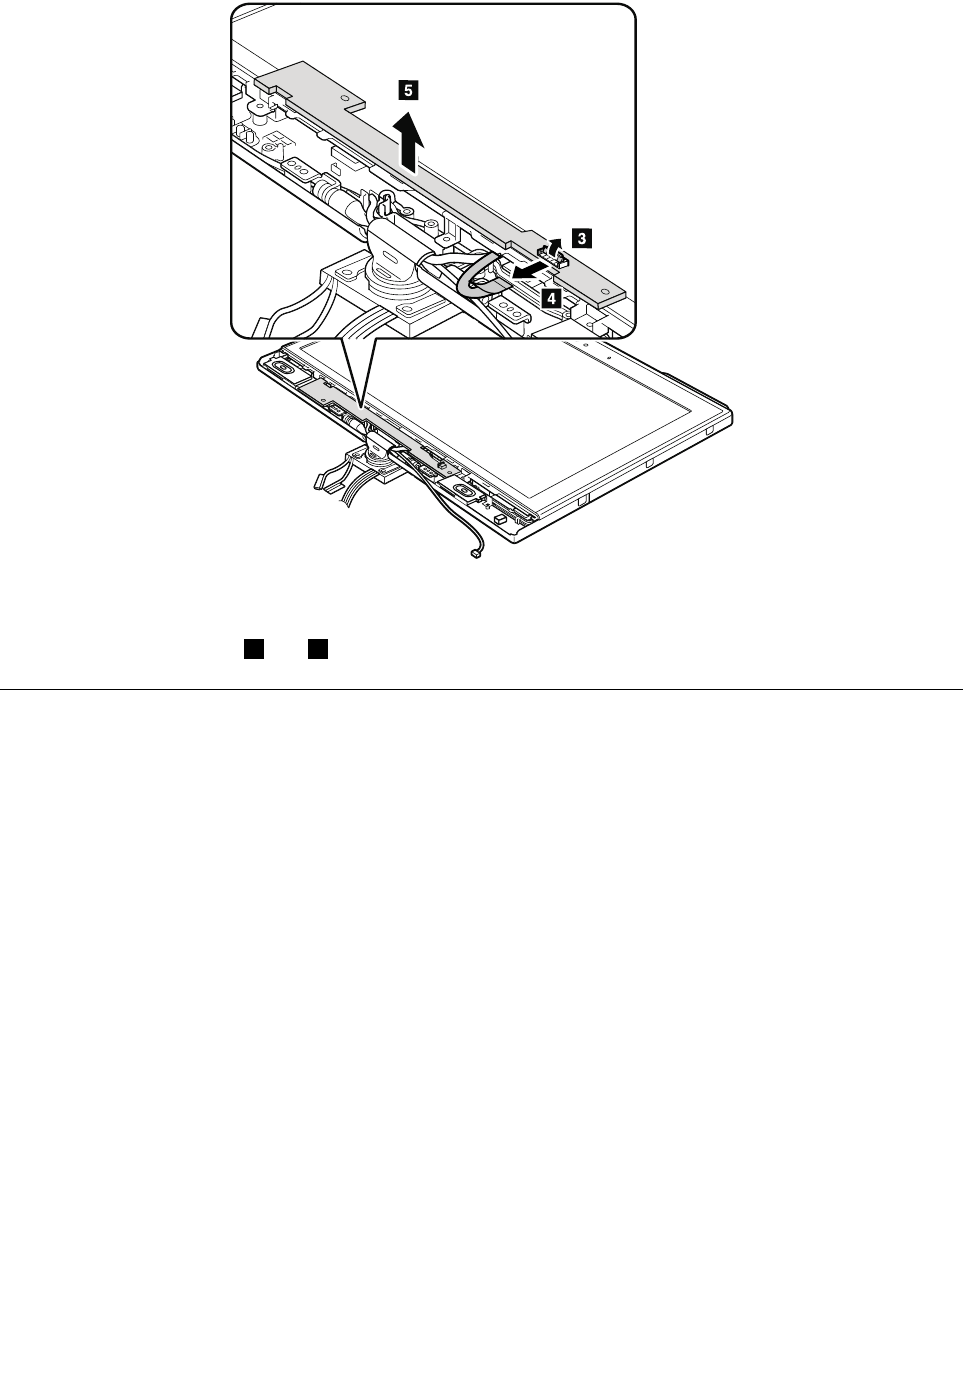
Wheninstalling:
Makesurethatconnectors2and3areattachedrmly.
2030Hinge
Foraccess,removetheseFRUsinorder:
•“1010Digitizerpen”onpage63
•“1020Batterypack”onpage63
•“1050Hingecaps”onpage68
•“1060Keyboard”onpage68
•“1070Palmrest”onpage71
•“1090PCIExpressMiniCardforwirelessLAN/WiMAX”onpage75
•“1100PCIExpressMiniCardforwirelessWAN”onpage77
•“1120Keyboardbezel”onpage79
•“1130LCDassembly”onpage81
•“2010LCDfrontbezel”onpage93
•“2020Micro-Processorcard”onpage95
96HardwareMaintenanceManual
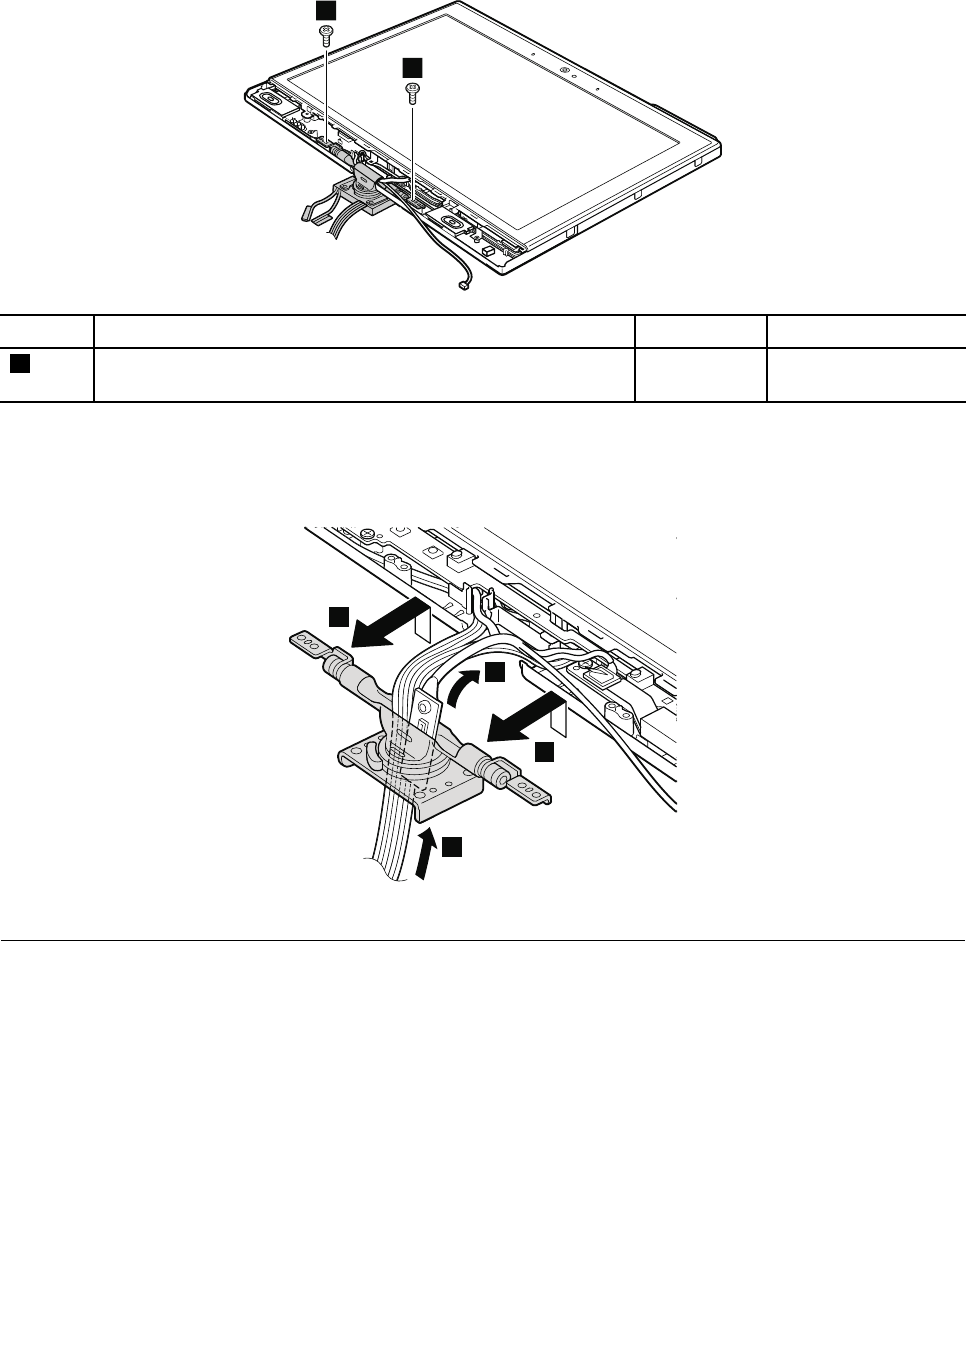
Removalstepsofthehinge
1
1
StepScrew(quantity)ColorT orque
1M2.5×6mm,wafer-head,nylon-coated(2)Black0.392Nm
(4kgfcm)
DetachthehingefromtheLCDrearcover,andgentlypullthecablesoutthroughtheguideholeinthehinge.
Pullthemallatonce.Asyoupullthem,besurenottosubjectthemtoanytension,whichcouldcausethem
tobedamagedbythecableguides,orawiretobebroken.
3
3
2
2
2040LCDpanelandLCDcable
Foraccess,removetheseFRUsinorder:
•“1010Digitizerpen”onpage63
•“1020Batterypack”onpage63
•“1050Hingecaps”onpage68
•“1060Keyboard”onpage68
•“1070Palmrest”onpage71
•“1090PCIExpressMiniCardforwirelessLAN/WiMAX”onpage75
•“1100PCIExpressMiniCardforwirelessWAN”onpage77
•“1120Keyboardbezel”onpage79
•“1130LCDassembly”onpage81
•“2010LCDfrontbezel”onpage93
•“2020Micro-Processorcard”onpage95
Chapter8.RemovingandreplacingaFRU97
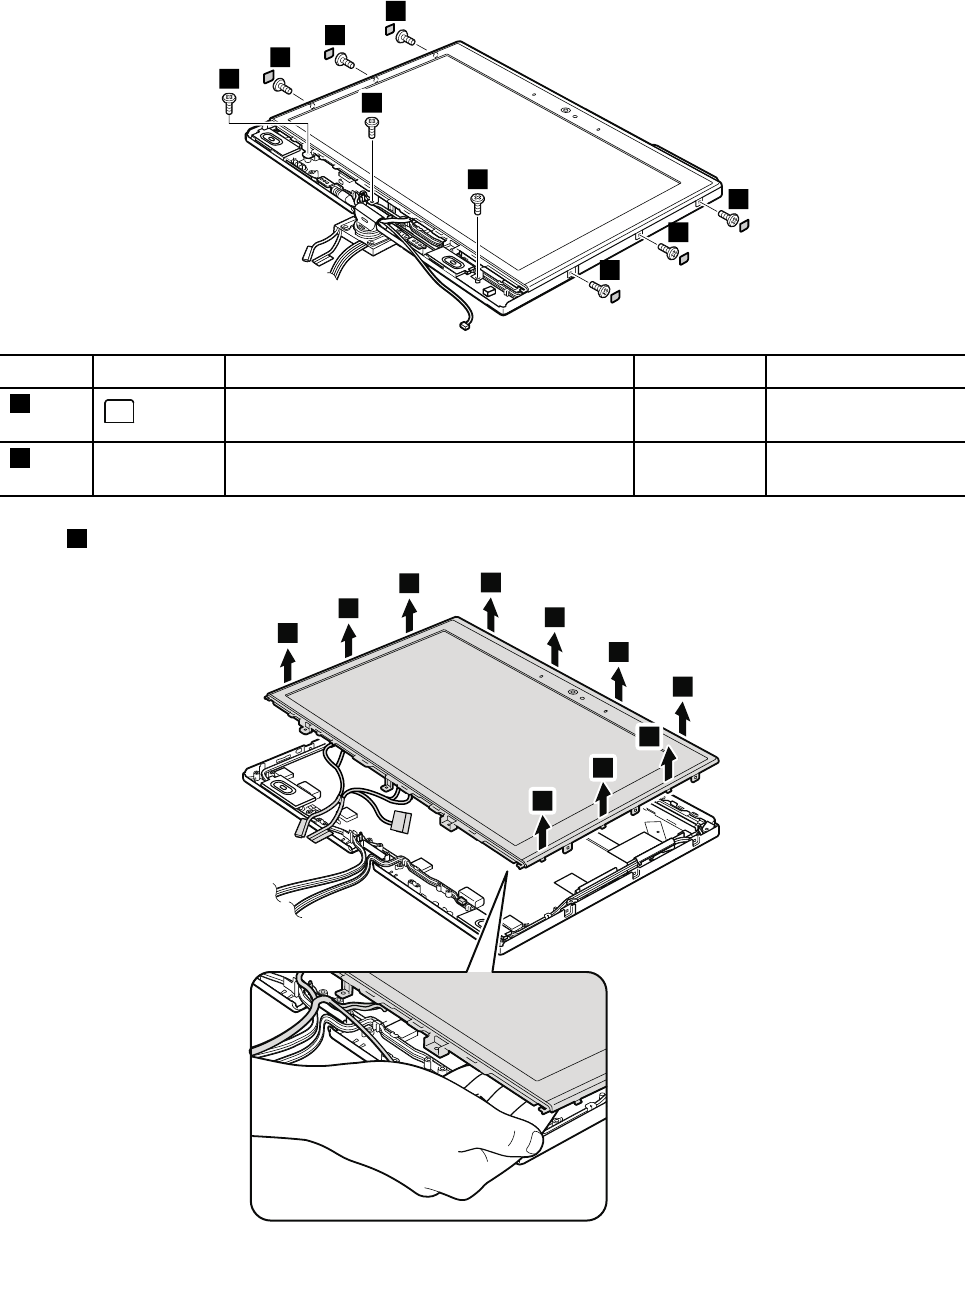
•“2030Hinge”onpage96
RemovalstepsofLCDpanelandLCDcable
2
2
2
1
1
1
1
1
1
StepScrewcapScrew(quantity)ColorTorque
1M2.5×8mm,wafer-head,nylon-coated(6)Black0.392Nm
(4kgfcm)
2—M2×3.5mm,wafer-head,nylon-coated(3)Silver0.181Nm
(1.85kgfcm)
Instep3,detachtheclaws.ThenremovetheLCDpanel.
3
3
3
3
3
3
3
3
3
3
98HardwareMaintenanceManual

Wheninstalling:
•Makesurethatalltheclawsareattachedrmly.
•WhenattachingtheLCDpaneltothecover,gentlypresstheleftandrightedgescoveredwithmetal.Do
notpressthesurfaceofthepanelorapplyanyexcessiveforcetothepanel.
TurntheLCDpanelover,andthenremovetheLCDcablefromtheLCDpanel.
6
7
10
11
8
9
4
5
1
2
Chapter8.RemovingandreplacingaFRU99
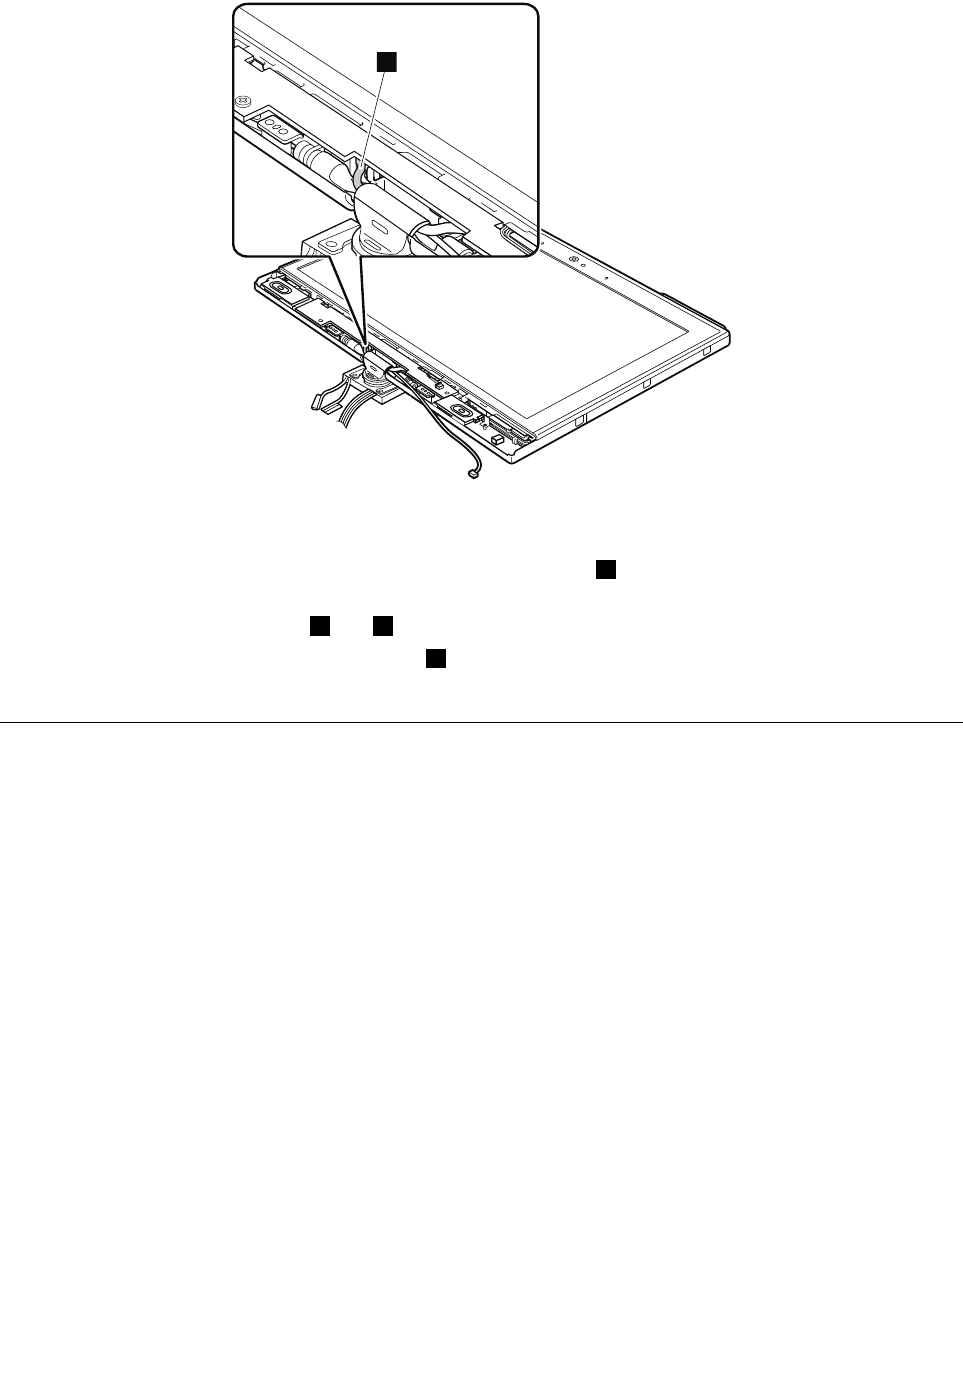
3
Wheninstalling:
•Routethecablethroughthehooksandmakesurethewhitedot1onthecableisalignedwiththehooks.
Thenpastealmontopofthehookstosecurethecable.
•Keepthecablebetweencallout1and2shorttopreventthecablefrombeingwinded.
•Routeallthecablesonthefarsideoftherib3sotheyarenotpinched.Nocablesarepinchedunder
thehinge.
2050Integratedcamera
Foraccess,removetheseFRUsinorder:
•“1010Digitizerpen”onpage63
•“1020Batterypack”onpage63
•“1050Hingecaps”onpage68
•“1060Keyboard”onpage68
•“1070Palmrest”onpage71
•“1090PCIExpressMiniCardforwirelessLAN/WiMAX”onpage75
•“1100PCIExpressMiniCardforwirelessWAN”onpage77
•“1120Keyboardbezel”onpage79
•“1130LCDassembly”onpage81
•“2010LCDfrontbezel”onpage93
•“2020Micro-Processorcard”onpage95
•“2030Hinge”onpage96
•“2040LCDpanelandLCDcable”onpage97
100HardwareMaintenanceManual

RemovalstepsofIntegratedcamera
1
2
StepScrew(quantity)ColorT orque
1M2×3.5mm,wafer-head,nylon-coated(1)Silver0.181Nm
(1.85kgfcm)
2060LCDrearcoverandwirelessantennacables
Foraccess,removetheseFRUsinorder:
•“1010Digitizerpen”onpage63
•“1020Batterypack”onpage63
•“1050Hingecaps”onpage68
•“1060Keyboard”onpage68
•“1070Palmrest”onpage71
•“1090PCIExpressMiniCardforwirelessLAN/WiMAX”onpage75
•“1100PCIExpressMiniCardforwirelessWAN”onpage77
•“1120Keyboardbezel”onpage79
•“1130LCDassembly”onpage81
•“2010LCDfrontbezel”onpage93
•“2020Micro-Processorcard”onpage95
•“2030Hinge”onpage96
•“2040LCDpanelandLCDcable”onpage97
•“2050Integratedcamera”onpage100
Chapter8.RemovingandreplacingaFRU101
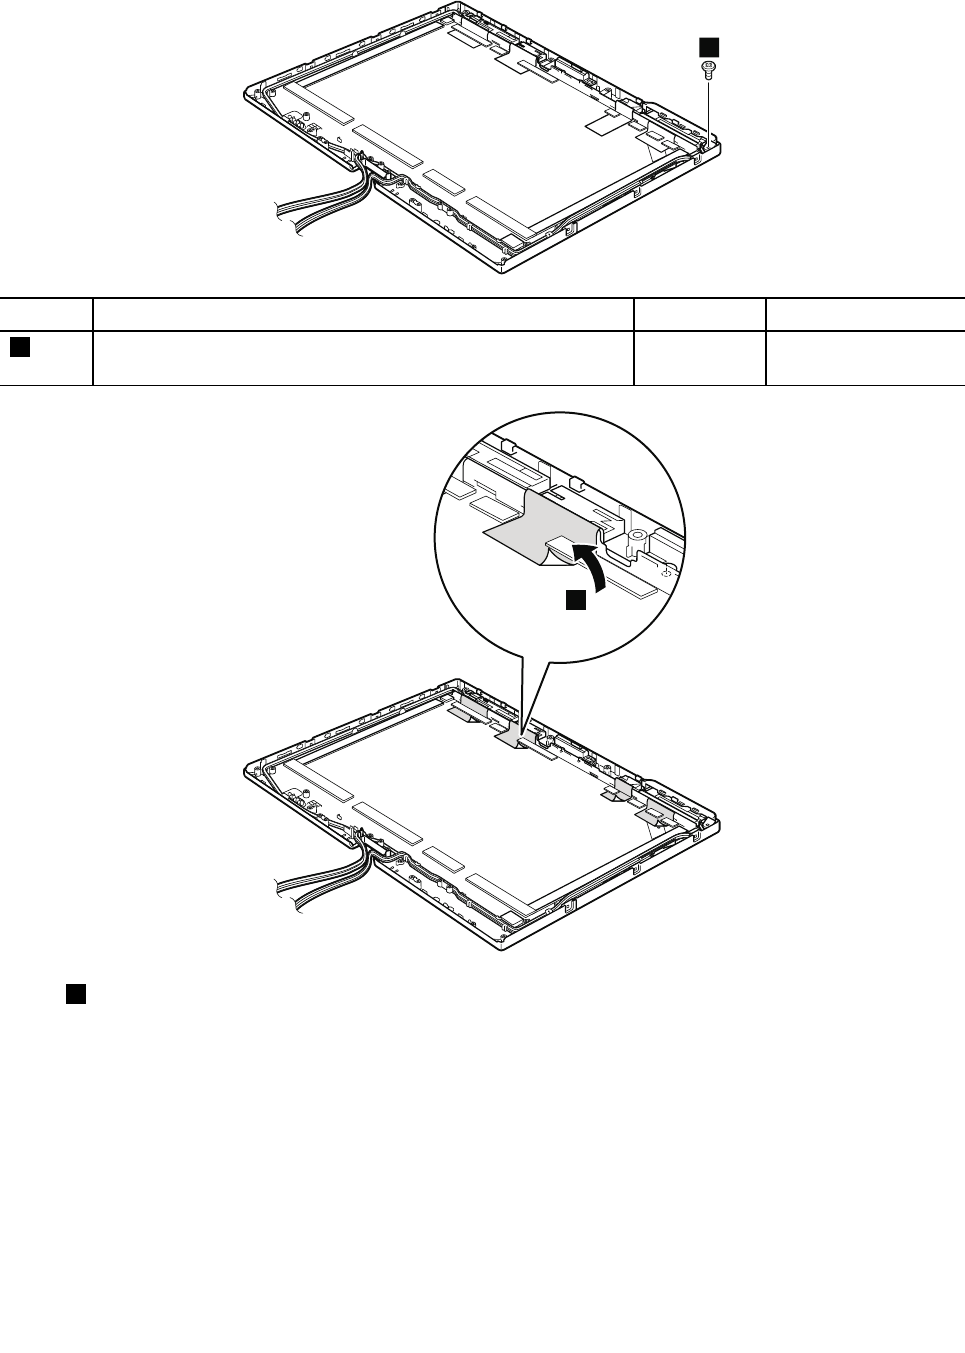
RemovalstepsofLCDrearcoverandwirelessantennacables
1
StepScrew(quantity)ColorT orque
1M2×3.5mm,wafer-head,nylon-coated(1)Silver0.181Nm
(1.85kgfcm)
2
Instep3,releasetheantennacablesfromthecableguidesoftherearcover.
102HardwareMaintenanceManual
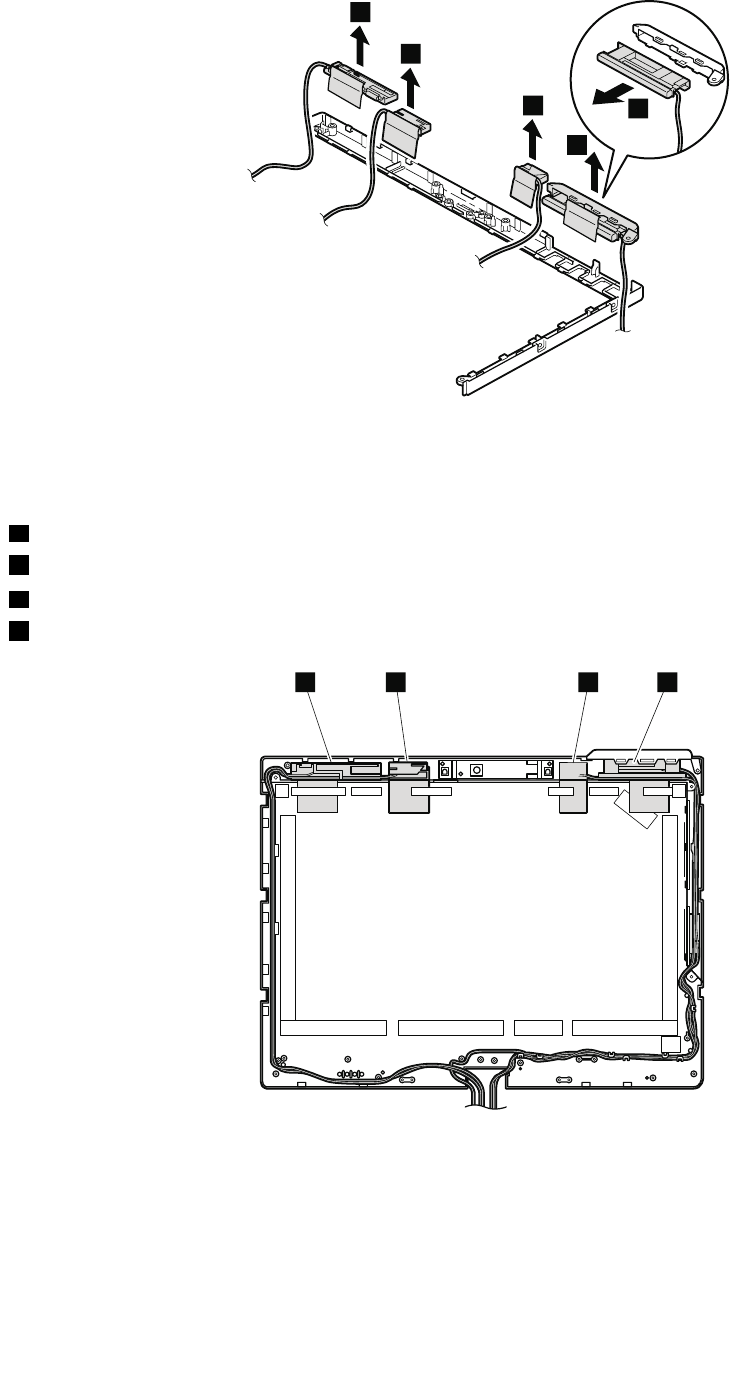
3
3
3
3
4
Wheninstalling:
Placetheantennaassemblyasshowninthefollowinggure.
aWirelessWANantenna,AUX(blue)
bWirelessLANantenna,AUX(black)
cWirelessLANantenna,MAIN(gray)
dWirelessWANantenna,MAIN(red)
abcd
Attention:Asyouroutetheantennacables,makesurethattheyarenotsubjectedtoanytension.Tension
couldcausethecablestobedamagedbythecableguides,orawiretobebroken.
Chapter8.RemovingandreplacingaFRU103

104HardwareMaintenanceManual

Chapter9.Locations
ThischapterpresentsthelocationsofThinkPadX220TabletandX220iTabletfeaturesandhardware
components.
Frontview
1Integratedcamera
2Built-inmicrophone
3Securitykeyhole
4Tabletdigitizerpen
5Harddiskdrive(HDD)orsolidstatedrive(SSD)
6Comboaudiojack
7Ethernetconnector
8AlwaysOnUSBconnector
9Mediacardreaderslot
10TrackPointpointingstick
11TrackPointbuttons
12Touchpad
13UltraNav®
14Volumecontrolbuttons
15ThinkVantagebutton
16Powerswitch
©CopyrightLenovo2012105
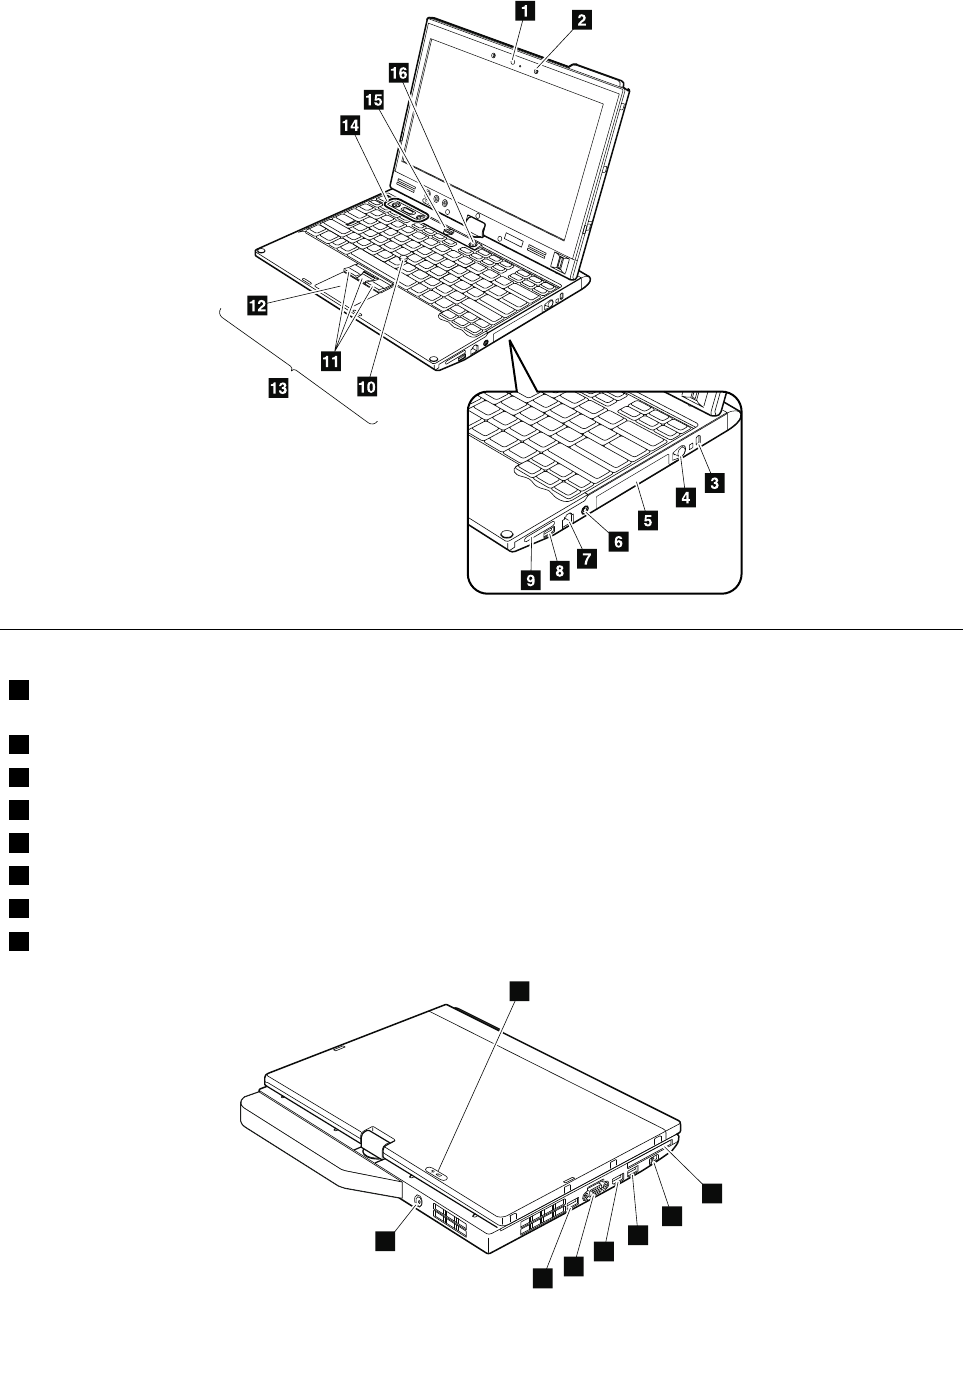

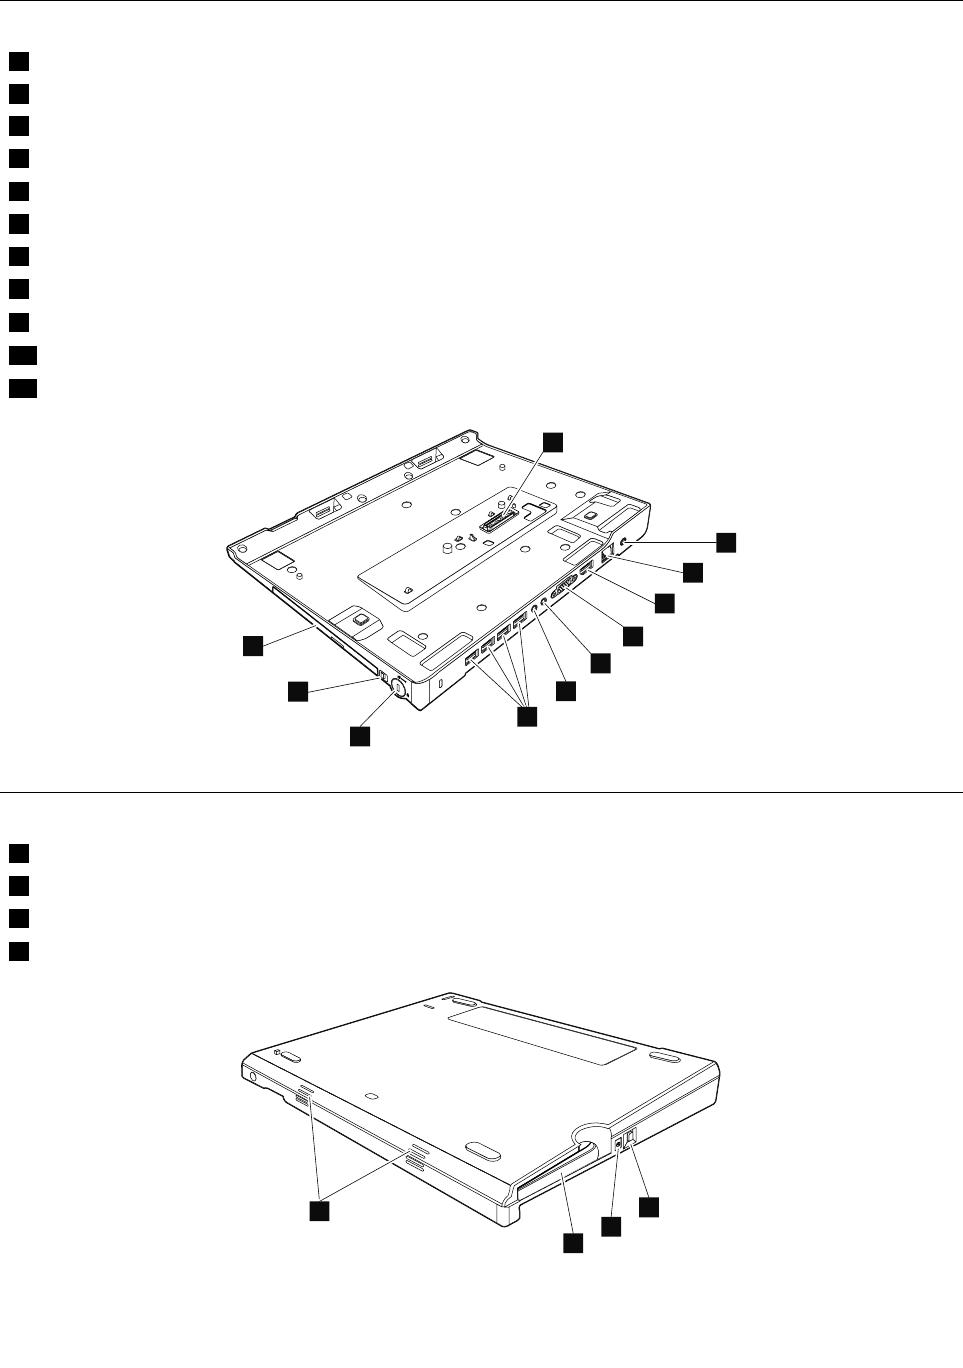
Topview(ThinkPadX220UltraBase)
1Dockingconnector
2acpowerconnector
3Ethernetconnector
4DisplayPortconnector
5Externalmonitorconnector
6Headphonejack
7Microphonejack
8USBconnectors
9Securitykeyhole
10Securitylockkey
11SerialUltrabaySlimdevice
1
2
3
4
5
6
7
9
10
11
8
Bottomview(ThinkPadX220UltraBase)
1UltraBaseejectrequestbutton
2Dockingindicator
3UltraBaseejectlever
4Holesforspeakers
1
2
3
4
108HardwareMaintenanceManual

Chapter10.Partslist
Thissectioncontainsfollowinglistsoftheserviceparts.
•“Overall”onpage110
•“LCDFRUs”onpage126
•“Keyboard”onpage130
•“Miscellaneousparts”onpage131
•“acpoweradapter”onpage132
•“Powercords”onpage133
•“Recoverydiscs”onpage134
•“Commonservicetools”onpage140
Notes:
•EachFRUisavailableforalltypesormodels,unlessspecictypesormodelsarespecied.
•FRUwithspecicmodelslistedanddescribedasxxU(whereUisanexampleofacountrydesignator)shouldbe
usedforallmodelsendinginU.
•FRUwithspecicmodelslistedanddescribedas3Dx(where3Disanexampleofauniqueconguration)shouldbe
usedforallofthesemodels,unlessspeciccountryorregiondesignatorisspecied.
•ACRU(customerreplaceableunit)isidentiedbyasingleasterisk(*)ortwoasterisks(**)intheCRUIDcolumn.An
NintheCRUIDcolumnmeansthatthepartisnotaCRU.Asingleasterisk(*)meansthatthepartisaSelf-service
CRU;twoasterisks(**)meansthatthepartisanOptional-serviceCRU.
ExternalCRUstatementtocustomers:
Someproblemswithyourproductcanberesolvedwithareplacementpartyoucaninstallyourself,called
a“CustomerReplaceableUnit”or“CRU.”SomeCRUsaredesignatedasSelf-serviceCRUsandothersare
designatedasOptional-serviceCRUs.InstallationofSelf-serviceCRUsisyourresponsibility;youmayrequest
thatLenovoinstallsanOptional-serviceCRUaccordingtothewarrantyserviceforyourproduct.Whereyouare
installingtheCRU,LenovowillshiptheCRUtoyou.CRUinformationandreplacementinstructionsareshipped
withyourproductandareavailablefromLenovoatanytimeuponrequest.YoumayndalistofCRUsinthe
publicationsthatshipwithyourproductorathttp://www.lenovo.com/CRUs.Youmayberequiredtoreturnthe
defectivepartthatisreplacedbytheCRU.Whenreturnisrequired:(1)returninstructions,aprepaidshippinglabel,
andacontainerwillbeincludedwiththereplacementCRU;and(2)youmaybechargedforthereplacementCRUif
Lenovodoesnotreceivethedefectivepartwithinthirty(30)daysofyourreceiptofthereplacementCRU.Seeyour
LenovoLimitedWarrantydocumentationforfulldetails.
ThinkPadcomputerscontainthefollowingtypesofCRUs:
–Self-serviceCRUs:TheseCRUsunplugorareheldbynomorethantwoscrews.Examplesofthesetypes
ofCRUsincludetheacpoweradapter,powercord,battery,andharddiskdrive.OtherSelf-serviceCRUs
dependingonproductdesignmayincludethememorymodule,wirelesscard,keyboard,andpalmrestwith
ngerprintreaderandtouchpad.
–Optional-serviceCRUs:TheseCRUsareisolatedpartswithinthecomputerthatareconcealedbyanaccess
panelthatistypicallysecuredbymorethantwoscrews.Oncetheaccesspanelisremoved,thespecic
CRUisvisible.
©CopyrightLenovo2012109
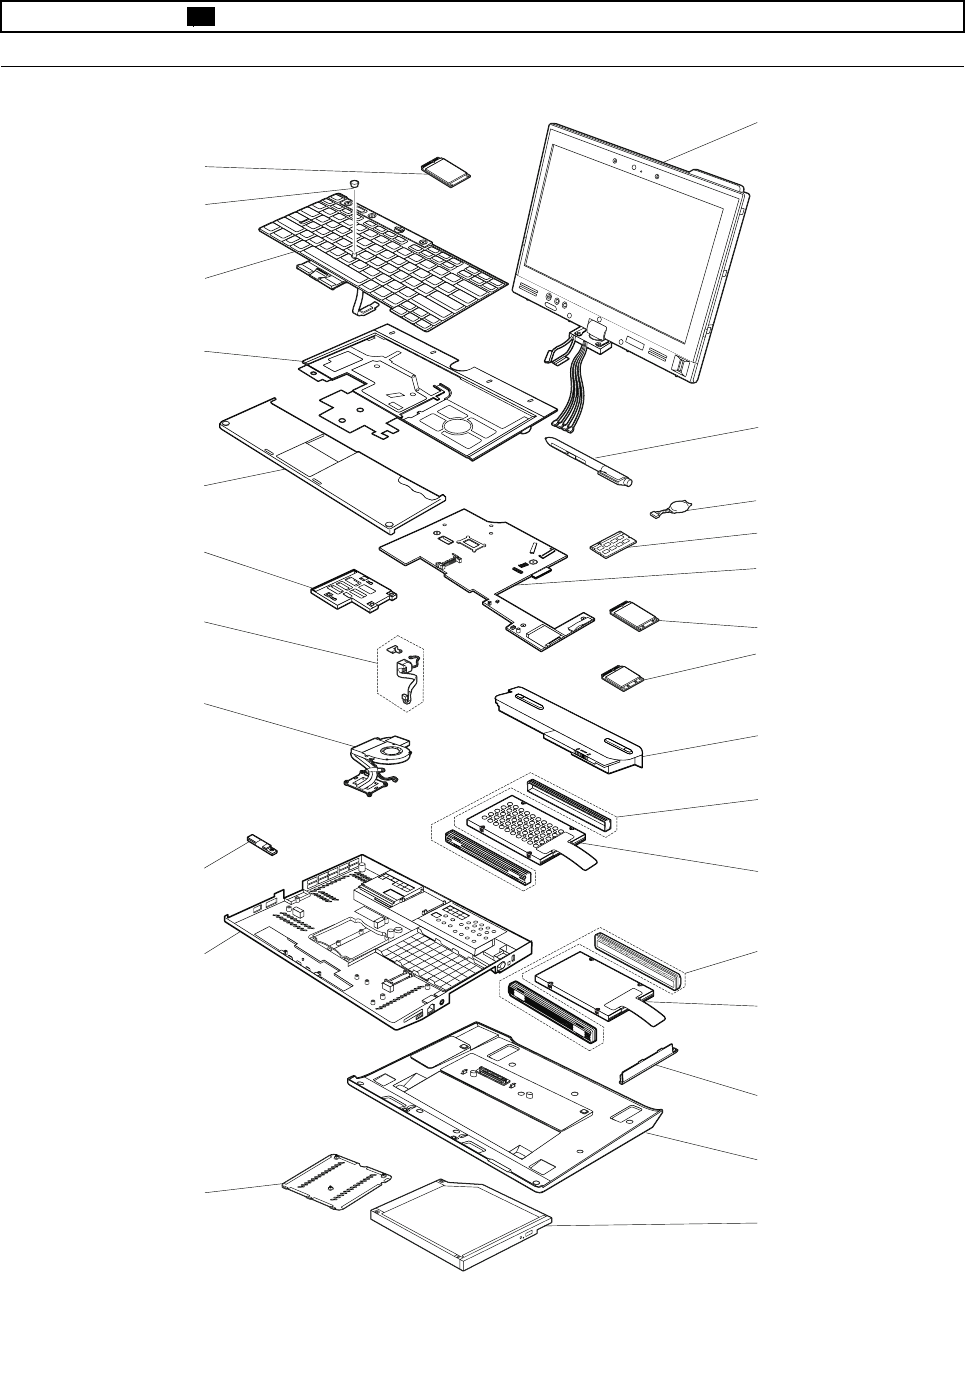
•FRUsmarkedwithOPareavailableasoptions.
Overall
1
2
3
6
7
11
10
12
13
15
16
18
19
20
21
22
23
24
25
26
14
17
4
5
8
9
110HardwareMaintenanceManual

Table9.Partslist-Overall
No.FRUFRUno.CRU
ID
1LCDunit(see“LCDFRUs”onpage126.)
2Digitizerpencaseassembly04W1477N
3Backupbattery02K7078N
41-GBDDR3-1333SDRAMSO-DIMM(PC3-10600)card
•4294-CTO
•4296-CTO,2Rx
•4297-CTO
•4298-CTO,38x,3Mx,3Nx
•4299-CTO
•4300-CTO
•4301-CTO
55Y3715*
42-GBDDR3-1333SDRAMSO-DIMM(PC3-10600)card
•4294-CTO,23x,28x,29x,2Bx,2Cx,2Fx,2Gx,2Hx,2Jx,2Lx,2Mx,2Nx,2Tx,2Ux
•4296-CTO,2Ax,2Cx,2Dx,2Ex,2Qx,2Rx,3Cx,3Gx,3Jx,3Sx
•4297-CTO,23x,24x
•4298-CTO,26x,27x,2Rx,2Xx,2Yx,2Zx,32x,33x,34x,37x,38x,3Mx,3Nx,4Hx,4Jx
•4299-CTO,26x,27x,28x,29x,2Ax,2Bx,2Cx,2Kx,2Mx,3Bx,3Cx,3Dx,3Ex,57x
•4300-CTO
•4301-CTO
55Y3716*
44-GBDDR3-1333SDRAMSO-DIMM(PC3-10600)card
•4294-CTO,23x,24x,26x,27x,29x,2Ax,2Dx,2Ex,2Hx,2Jx,2Kx,2Lx,2Mx,2Nx,2Px,
2Qx,2Rx,2Sx
•4296-CTO,22x,23x,24x,25x,26x,27x,28x,29x,2Bx,2Dx,2Ex,2Fx,2Gx,2Hx,2Jx,
2Kx,2Lx,2Mx,2Nx,2Px,2Sx,2Tx,2Ux,2Wx,2Xx,2Yx,2Zx,32x,33x,34x,35x,36x,
37x,38x,39x,3Ax,3Bx,3Dx,3Ex,3Fx,3Hx,3Kx,3Lx,3Mx,3Nx,3Px,3Qx,3Rx,3Tx,
3Ux,3Vx,3Wx,3Xx,3Yx
•4297-CTO,22x
•4298-CTO,28x,29x,2Ax,2Bx,2Cx,2Dx,2Ex,2Fx,2Gx,2Hx,2Jx,2Kx,2Lx,2Mx,2Nx,
2Px,2Qx,2Sx,2Tx,2Ux,2Vx,2Wx,35x,36x,39x,3Ax,3Bx,3Cx,3Dx,3Ex,3Fx,3Gx,
3Hx,3Jx,3Kx,3Lx,3Px,3Qx,3Rx,3Sx,3Tx,3Ux,3Vx,3Wx,3Xx,3Yx,3Zx,42x,43x,
44x,45x,46x,47x,48x,49x,4Ax,4Bx,4Cx,4Dx,4Ex,4Fx,4Gx,4Kx,4Lx,4Mx,4Nx,4Px,
4Qx,4Rx,4Sx,4Tx,4Ux,4Vx,4Wx,4Xx,4Yx,4Zx,52x,53x,54x,55x,56x
•4299-CTO,2Dx,2Ex,2Fx,2Gx,2Hx,2Jx,2Lx,2Nx,2Px,2Qx,2Rx,2Sx,2Tx,2Ux,2Vx,
2Wx,2Xx,2Yx,2Zx,32x,33x,34x,35x,36x,37x,38x,39x,3Ax,4Bx,4Cx,4Tx,4Ux,4Vx,
4Wx,4Xx,4Yx,4Zx,52x,53x,54x,55x,56x,58x,59x,5Ax,5Bx,5Cx
•4300-CTO
•4301-CTO
55Y3717*
5SystemboardassemblywithIntel®Core™i5-2520Mprocessor,AMT,TPM,AES
•4294-CTO,23x,24x,2Nx
•4296-CTO,22x,2Ax,2Bx,2Kx,2Lx,2Mx,2Wx,2Xx,32x,33x,36x,3Bx,3Cx,3Jx,3Tx,
3Vx,3Xx
•4297-CTO,23x,24x
•4298-CTO,27x,28x,2Ax,2Dx,2Gx,2Hx,2Jx,2Kx,2Lx,2Mx,2Nx,2Px,2Qx,2Rx,2Vx,
2Xx,2Zx,34x,37x,38x,39x,3Ax,3Bx,3Cx,3Dx,3Ex,3Jx,3Mx,3Px,3Qx,3Rx,3Sx,
3Vx,3Wx,3Zx,42x,4Bx,4Cx,4Gx,4Hx,4Vx,4Yx,54x,55x,56x
•4299-CTO,27x,28x,2Ax,2Fx,2Hx,2Jx,2Kx,2Px,2Qx,2Tx,2Ux,2Vx,2Wx,2Xx,2Yx,
35x,36x,4Bx,4Cx,4Ux,4Vx,4Xx,53x,56x,5Ax,5Cx
•4300-CTO
•4301-CTO
04W2127N
Chapter10.Partslist111

Table9.Partslist-Overall(continued)
No.FRUFRUno.CRU
ID
5SystemboardassemblywithIntelCorei5-2520Mprocessor,AMT,non-TPM,non-AES
•4294-CTO
•4296-CTO
•4297-CTO
•4298-CTO,4Ax,49x
•4299-CTO
•4300-CTO
•4301-CTO
04W2131N
5SystemboardassemblywithIntelCorei5-2520Mprocessor,non-AMT,TPM,AES
•4294-CTO,2Rx,2Kx
•4296-CTO,26x,27x
•4297-CTO
•4298-CTO,4Xx,4Jx,46x,45x
•4299-CTO,3Bx
•4300-CTO
•4301-CTO
04W2129N
5SystemboardassemblywithIntelCorei5-2520Mprocessor,non-AMT,non-TPM,non-AES
•4294-CTO,2Kx,2Rx
•4296-CTO,26x,27x
•4297-CTO
•4298-CTO,45x,46x,4Jx,4Xx
•4299-CTO,3Bx
•4300-CTO
•4301-CTO
04W2133N
5SystemboardassemblywithIntelCorei7-2620Mprocessor,AMT,TPM,AES
•4294-CTO
•4296-CTO,2Dx,2Ex,2Nx,2Px,2Ux,2Yx,2Zx,34x,35x,37x,38x,39x,3Ex
•4297-CTO
•4298-CTO,26x,29x,2Bx,2Cx,2Ex,2Fx,2Sx,2Tx,2Ux,2Wx,2Yx,32x,33x,35x,3Fx,
3Gx,3Hx,3Kx,3Lx,3Tx,3Ux,3Xx,3Yx,43x,44x,47x,48x,4Dx,4Ux
•4299-CTO,26x,29x,2Bx,2Cx,2Dx,2Ex,2Gx,2Lx,2Rx,2Sx,2Zx,32x,33x,34x,37x,
38x,39x,3Ax,3Cx,3Dx,3Ex,4Yx,54x
•4300-CTO
•4301-CTO
04W2128N
5SystemboardassemblywithIntelCorei7-2620Mprocessor,AMT,non-TPM,non-AES
•4294-CTO,2Ax
•4296-CTO,3Dx
•4297-CTO
•4298-CTO,4Ax,49x
•4299-CTO
•4300-CTO
•4301-CTO
04W2132N
5SystemboardassemblywithIntelCorei7-2620Mprocessor,non-AMT,TPM,AES
•4294-CTO
•4296-CTO
•4297-CTO
•4298-CTO
•4299-CTO
•4300-CTO
•4301-CTO
04W2130N
112HardwareMaintenanceManual

Table9.Partslist-Overall(continued)
No.FRUFRUno.CRU
ID
5SystemboardassemblywithIntelCorei7-2620Mprocessor,non-AMT,non-TPM,non-AES
•4294-CTO
•4296-CTO
•4297-CTO
•4298-CTO
•4299-CTO
•4300-CTO
•4301-CTO
04W2134N
5SystemboardassemblywithIntelCorei3-2310Mprocessor,non-AMT,TPM,non-AES
•4294-CTO,26x,27x,2Dx,2Ex
•4296-CTO,23x,24x,25x,2Cx,2Fx,2Gx,2Hx,2Jx
•4297-CTO
•4298-CTO,3Nx,4Ex,4Fx
•4299-CTO,2Mx,2Nx
•4300-CTO
•4301-CTO
04W2136N
5SystemboardassemblywithIntelCorei3-2310Mprocessor,non-AMT,non-TPM,non-AES
•4294-CTO,2Bx,2Cx
•4296-CTO,2Qx,2Rx,2Sx,2Tx
•4297-CTO,22x
•4298-CTO,36x
•4299-CTO
•4300-CTO
•4301-CTO
04W2135N
5SystemboardassemblywithIntelCorei5-2520Mprocessor,AMT,TPM,AES
•4294-CTO,23x,24x,2Nx
•4296-CTO,22x,2Ax,2Bx,2Kx,2Lx,2Mx,2Wx,2Xx,32x,33x,36x,3Bx,3Cx,3Jx,3Tx,
3Vx,3Xx
•4297-CTO,23x,24x
•4298-CTO,27x,28x,2Ax,2Dx,2Gx,2Hx,2Jx,2Kx,2Lx,2Mx,2Nx,2Px,2Qx,2Rx,2Vx,
2Xx,2Zx,34x,37x,38x,39x,3Ax,3Bx,3Cx,3Dx,3Ex,3Jx,3Mx,3Px,3Qx,3Rx,3Sx,
3Vx,3Wx,3Zx,42x,4Bx,4Cx,4Gx,4Hx,4Vx,4Yx,54x,55x,56x
•4299-CTO,27x,28x,2Ax,2Fx,2Hx,2Jx,2Kx,2Px,2Qx,2Tx,2Ux,2Vx,2Wx,2Xx,2Yx,
35x,36x,4Bx,4Cx,4Ux,4Vx,4Xx,53x,56x,5Ax,5Cx
•4300-CTO
•4301-CTO
04W1534N
5SystemboardassemblywithIntelCorei5-2520MAMT,non-TPM,non-AES
•4294-CTO
•4296-CTO
•4297-CTO
•4298-CTO,4Ax,49x
•4299-CTO
•4300-CTO
•4301-CTO
04W1535N
5SystemboardassemblywithIntelCorei5-2520M,non-AMT,non-TPM,AES
•4294-CTO
•4296-CTO
•4297-CTO
•4298-CTO
•4299-CTO
•4300-CTO
•4301-CTO
04W1536N
Chapter10.Partslist113

Table9.Partslist-Overall(continued)
No.FRUFRUno.CRU
ID
5SystemboardassemblywithIntelCorei5-2520M,non-AMT,non-TPM,non-AES
•4294-CTO,29x,28x
•4296-CTO,3Ax,28x
•4297-CTO
•4298-CTO
•4299-CTO
•4300-CTO
•4301-CTO
04W1537N
5SystemboardassemblywithIntelCorei7-2620M,AMT,TPM,AES
•4294-CTO
•4296-CTO,2Dx,2Ex,2Nx,2Px,2Ux,2Yx,2Zx,34x,35x,37x,38x,39x,3Ex
•4297-CTO
•4298-CTO,26x,29x,2Bx,2Cx,2Ex,2Fx,2Sx,2Tx,2Ux,2Wx,2Yx,32x,33x,35x,3Fx,
3Gx,3Hx,3Kx,3Lx,3Tx,3Ux,3Xx,3Yx,43x,44x,47x,48x,4Dx,4Ux
•4299-CTO,26x,29x,2Bx,2Cx,2Dx,2Ex,2Gx,2Lx,2Rx,2Sx,2Zx,32x,33x,34x,37x,
38x,39x,3Ax,3Cx,3Dx,3Ex,4Yx,54x
•4300-CTO
•4301-CTO
04W1538N
5SystemboardassemblywithIntelCorei7-2620M,AMT,non-TPM,non-AES
•4294-CTO,2Ax
•4296-CTO,3Dx
•4297-CTO
•4298-CTO
•4299-CTO
•4300-CTO
•4301-CTO
04W1539N
5SystemboardassemblywithIntelCorei7-2620M,non-AMT,TPM,AES
•4294-CTO
•4296-CTO
•4297-CTO
•4298-CTO
•4299-CTO
•4300-CTO
•4301-CTO
04W1540N
5SystemboardassemblywithIntelCorei7-2620M,non-AMT,non-TPM,non-AES
•4294-CTO
•4296-CTO,29x
•4297-CTO
•4298-CTO
•4299-CTO
•4300-CTO
•4301-CTO
04W1541N
5SystemboardassemblywithIntelCorei3-2310M,non-AMT,TPM,non-AES
•4294-CTO,26x,27x,2Dx,2Ex
•4296-CTO,23x,24x,25x,2Cx,2Fx,2Gx,2Hx,2Jx
•4297-CTO
•4298-CTO,3Nx,4Ex,4Fx
•4299-CTO,2Nx,2Mx
•4300-CTO
•4301-CTO
04W1542N
114HardwareMaintenanceManual

Table9.Partslist-Overall(continued)
No.FRUFRUno.CRU
ID
5SystemboardassemblywithIntelCorei3-2310M,non-AMT,non-TPM,non-AES
•4294-CTO,2Cx,2Bx
•4296-CTO,2Tx,2Sx,2Rx,2Qx
•4297-CTO,22x
•4298-CTO,36x
•4299-CTO
•4300-CTO
•4301-CTO
04W1543N
5SystemboardassemblywithIntelCorei5-2520M,AMT,TPM,AES
•4294-CTO,2Nx,23x,24x
•4296-CTO,22x,2Ax,2Bx,2Kx,2Lx,2Mx,2Wx,2Xx,32x,33x,36x,3Bx,3Cx,3Jx,3Tx,
3Vx,3Xx
•4297-CTO,23x,24x
•4298-CTO,27x,28x,2Ax,2Dx,2Gx,2Hx,2Jx,2Kx,2Lx,2Mx,2Nx,2Px,2Qx,2Rx,2Vx,
2Xx,2Zx,34x,37x,38x,39x,3Ax,3Bx,3Cx,3Dx,3Ex,3Jx,3Mx,3Px,3Qx,3Rx,3Sx,
3Vx,3Wx,3Zx,42x,4Bx,4Cx,4Gx,4Hx,4Vx,4Yx,54x,55x,56x
•4299-CTO,27x,28x,2Ax,2Fx,2Hx,2Jx,2Kx,2Px,2Qx,2Tx,2Ux,2Vx,2Wx,2Xx,2Yx,
35x,36x,4Bx,4Cx,4Ux,4Vx,4Xx,53x,56x,5Ax,5Cx
•4300-CTO
•4301-CTO
04W3276N
5SystemboardassemblywithIntelCorei5-2520M,non-AMT,TPM,AES
•4294-CTO,2Rx,2Kx
•4296-CTO,27x,26x
•4297-CTO
•4298-CTO,4Xx,4Jx,46x,45x
•4299-CTO,3Bx
•4300-CTO
•4301-CTO
04W3277N
5SystemboardassemblywithIntelCorei5-2520M,AMT,non-TPM,non-AES
•4294-CTO
•4296-CTO
•4297-CTO
•4298-CTO,4Ax,49x
•4299-CTO
•4300-CTO
•4301-CTO
04W3278N
5SystemboardassemblywithIntelCorei5-2520M,non-AMT,non-TPM,non-AES
•4294-CTO,29x,28x
•4296-CTO,3Ax,28x
•4297-CTO
•4298-CTO
•4299-CTO
•4300-CTO
•4301-CTO
04W3279N
5SystemboardassemblywithIntelCorei7-2620M,AMT,TPM,AES
•4294-CTO
•4296-CTO,2Dx,2Ex,2Nx,2Px,2Ux,2Yx,2Zx,34x,35x,37x,38x,39x,3Ex
•4297-CTO
•4298-CTO,26x,29x,2Bx,2Cx,2Ex,2Fx,2Sx,2Tx,2Ux,2Wx,2Yx,32x,33x,35x,3Fx,
3Gx,3Hx,3Kx,3Lx,3Tx,3Ux,3Xx,3Yx,43x,44x,47x,48x,4Dx,4Ux
•4299-CTO,26x,29x,2Bx,2Cx,2Dx,2Ex,2Gx,2Lx,2Rx,2Sx,2Zx,32x,33x,34x,37x,
38x,39x,3Ax,3Cx,3Dx,3Ex,4Yx,54x
•4300-CTO
•4301-CTO
04W3280N
Chapter10.Partslist115

Table9.Partslist-Overall(continued)
No.FRUFRUno.CRU
ID
5SystemboardassemblywithIntelCorei7-2620M,non-AMT,TPM,AES
•4294-CTO
•4296-CTO
•4297-CTO
•4298-CTO
•4299-CTO
•4300-CTO
•4301-CTO
04W3281N
5SystemboardassemblywithIntelCorei7-2620M,AMT,non-TPM,non-AES
•4294-CTO,2Ax
•4296-CTO,3Dx
•4297-CTO
•4298-CTO
•4299-CTO
•4300-CTO
•4301-CTO
04W3282N
5SystemboardassemblywithIntelCorei7-2620M,non-AMT,non-TPM,non-AES
•4294-CTO,29x
•4296-CTO
•4297-CTO
•4298-CTO
•4299-CTO
•4300-CTO
•4301-CTO
04W3283N
5SystemboardassemblywithIntelCorei3-2310M,non-AMT,TPM,non-AES
•4294-CTO,26x,27x,2Dx,2Ex
•4296-CTO,23x,24x,25x,2Cx,2Fx,2Gx,2Hx,2Jx
•4297-CTO
•4298-CTO,4Fx,4Ex,3Nx
•4299-CTO,2Nx,2Mx
•4300-CTO
•4301-CTO
04W3284N
5SystemboardassemblywithIntelCorei3-2310M,non-AMT,non-TPM,non-AES
•4294-CTO,2Cx,2Bx
•4296-CTO,2Tx,2Sx,2Rx,2Qx
•4297-CTO,22x
•4298-CTO,36x
•4299-CTO
•4300-CTO
•4301-CTO
04W3285N
5SystemboardassemblywithIntelCorei7-2640M,AMT,TPM
•4294-CTO,2Hx,2Jx,2Lx,2Mx,2Sx
•4296-CTO,3Lx,3Mx,3Ux,3Yx
•4297-CTO
•4298-CTO,4Kx,4Lx,4Mx,4Qx,4Rx,4Sx,4Tx,52x,53x
•4299-CTO,4Tx,4Wx,4Zx,52x,55x,57x,58x,59x,5Bx
•4300-CTO
•4301-CTO
04W3380N
116HardwareMaintenanceManual

Table9.Partslist-Overall(continued)
No.FRUFRUno.CRU
ID
5SystemboardassemblywithIntelCorei7-2640M,AMT,non-TPM
•4294-CTO
•4296-CTO
•4297-CTO
•4298-CTO
•4299-CTO
•4300-CTO
•4301-CTO
04W3381N
5SystemboardassemblywithIntelCorei7-2640M,non-AMT,TPM
•4294-CTO
•4296-CTO
•4297-CTO
•4298-CTO,4Px,4Nx
•4299-CTO
•4300-CTO
•4301-CTO
04W3382N
5SystemboardassemblywithIntelCorei7-2640M,non-AMT,non-TPM
•4294-CTO
•4296-CTO,29x
•4297-CTO
•4298-CTO
•4299-CTO
•4300-CTO
•4301-CTO
04W3383N
5SystemboardassemblywithIntelCorei3-2350M,non-AMT,TPM
•4294-CTO,2Gx,2Fx
•4296-CTO,3Wx,3Nx,3Kx,3Hx,3Gx,3Fx
•4297-CTO
•4298-CTO,4Zx,4Wx
•4299-CTO
•4300-CTO
•4301-CTO
04W3384N
5SystemboardassemblywithIntelCorei3-2350M,non-AMT,non-TPM
•4294-CTO
•4296-CTO
•4297-CTO
•4298-CTO
•4299-CTO
•4300-CTO
•4301-CTO
04W3385N
5SystemboardassemblywithIntelCorei3-2370M,non-AMT,TPM
•4294-CTO,2Qx,2Px,2Ux,2Tx
•4296-CTO,3Sx,3Rx,3Qx,3Px
•4297-CTO
•4298-CTO
•4299-CTO
•4300-CTO
•4301-CTO
04W3598N
Chapter10.Partslist117

Table9.Partslist-Overall(continued)
No.FRUFRUno.CRU
ID
5SystemboardassemblywithIntelCorei3-2370M,non-AMT,non-TPM
•4294-CTO
•4296-CTO
•4297-CTO
•4298-CTO
•4299-CTO
•4300-CTO
•4301-CTO
04W3599N
6IntegratedMobileBroadband(Gobi30003GwithGPS)
•4294-CTO
•4296-CTO,2Xx
•4297-CTO
•4298-CTO,2Jx
•4299-CTO
•4300-CTO
•4301-CTO
60Y3257**
6IntegratedMobileBroadband(Gobi3000Malaysia)
•4294-CTO
•4296-CTO
•4297-CTO
•4298-CTO
•4299-CTO
•4300-CTO
•4301-CTO
60Y3283**
6IntegratedMobileBroadband(EricssonF5521gw)
•4294-CTO
•4296-CTO,2Lx,3Fx
•4297-CTO,24x
•4298-CTO,2Bx,2Cx,3Kx,3Tx,42x,47x,48x,4Bx,4Cx,4Dx,4Gx,4Hx,4Kx,4Vx
•4299-CTO,2Ex,3Ex,4Bx,4Cx,59x
•4300-CTO
•4301-CTO
60Y3279**
6IntegratedMobileBroadband(EricssonF5521gwMalaysiaSKU)
•4294-CTO
•4296-CTO
•4297-CTO
•4298-CTO
•4299-CTO
•4300-CTO
•4301-CTO
60Y3267**
6IntegratedChinaTelecomMobileBroadband(LeadcoreLC5740TD-SCDMA)
•4294-CTO
•4296-CTO
•4297-CTO
•4298-CTO
•4299-CTO
•4300-CTO
•4301-CTO
60Y3261**
118HardwareMaintenanceManual

Table9.Partslist-Overall(continued)
No.FRUFRUno.CRU
ID
6IntegratedChinaTelecomMobileBroadband(HuaweiEM660)
•4294-CTO
•4296-CTO
•4297-CTO
•4298-CTO,52x,53x,33x,35x,3Bx,3Cx
•4299-CTO
•4300-CTO
•4301-CTO
60Y3239**
7ThinkPadb/g/nWireless(1x1BGN)
•4294-CTO,29x,28x,2Px,2Qx
•4296-CTO,3Px,3Qx
•4297-CTO
•4298-CTO
•4299-CTO
•4300-CTO
•4301-CTO
60Y3247**
7ThinkPadb/g/nWireless(1x1BGN)
•4294-CTO,29x,28x,2Px,2Qx
•4296-CTO,3Px,3Qx
•4297-CTO
•4298-CTO
•4299-CTO
•4300-CTO
•4301-CTO
60Y3249**
7IntelCentrinoWireless-N1000
•4294-CTO,26x,2Bx,2Cx,2Dx,2Ex,2Fx,2Gx,2Kx,2Rx,2Tx,2Ux
•4296-CTO,26x,27x,28x,29x,2Fx,2Gx,2Hx,2Qx,2Rx,2Sx,2Tx,3Ax,3Kx,3Nx
•4297-CTO,22x
•4298-CTO,36x,45x,46x,4Fx,4Jx,4Nx,4Px,4Xx,4Zx
•4299-CTO,2Mx,3Bx
•4300-CTO
•4301-CTO
60Y3241**
7IntelCentrinoAdvanced-N6205(2x2AGN)
•4294-CTO,23x,27x,2Ax,2Hx,2Jx,2Lx,2Mx,2Nx,2Sx
•4296-CTO,22x,23x,24x,25x,2Ax,2Bx,2Cx,2Dx,2Ex,2Jx,2Kx,2Lx,2Nx,2Px,2Ux,
2Xx,2Yx,2Zx,32x,33x,34x,35x,36x,37x,38x,39x,3Bx,3Cx,3Dx,3Ex,3Fx,3Gx,3Hx,
3Jx,3Lx,3Mx,3Rx,3Sx,3Tx,3Ux,3Vx,3Wx,3Xx,3Yx
•4297-CTO,24x
•4298-CTO,26x,27x,28x,29x,2Ax,2Bx,2Cx,2Dx,2Ex,2Fx,2Gx,2Hx,2Jx,2Kx,2Lx,
2Mx,2Nx,2Px,2Qx,2Rx,2Sx,2Tx,2Ux,2Vx,2Wx,2Xx,2Yx,2Zx,32x,33x,34x,35x,
37x,38x,39x,3Ax,3Bx,3Cx,3Dx,3Ex,3Fx,3Gx,3Hx,3Jx,3Kx,3Lx,3Mx,3Nx,3Px,
3Qx,3Rx,3Sx,3Tx,3Ux,3Vx,3Wx,3Xx,3Yx,3Zx,42x,43x,44x,47x,48x,49x,4Ax,
4Bx,4Cx,4Dx,4Ex,4Gx,4Hx,4Kx,4Lx,4Mx,4Qx,4Rx,4Sx,4Tx,4Vx,4Wx,4Yx,52x,
53x,54x,55x,56x
•4299-CTO,26x,27x,28x,29x,2Ax,2Bx,2Cx,2Dx,2Ex,2Fx,2Hx,2Jx,2Kx,2Mx,2Px,
2Qx,2Sx,2Tx,2Ux,2Vx,2Wx,2Xx,2Yx,2Zx,32x,33x,34x,35x,36x,37x,38x,39x,
3Ax,3Dx,3Ex,4Bx,4Cx,4Tx,4Ux,4Vx,4Wx,4Xx,4Yx,4Zx,52x,53x,55x,56x,57x,
58x,59x,5Ax,5Bx,5Cx
•4300-CTO
•4301-CTO
60Y3253**
Chapter10.Partslist119

Table9.Partslist-Overall(continued)
No.FRUFRUno.CRU
ID
7IntelCentrinoUltimate-N6300
•4294-CTO
•4296-CTO
•4297-CTO
•4298-CTO,4Ux
•4299-CTO,2Gx,2Lx,2Rx,3Cx,54x
•4300-CTO
•4301-CTO
60Y3233**
7IntelCentrinoAdvanced-N+WiMAX6250
•4294-CTO,24x
•4296-CTO,2Mx,2Wx
•4297-CTO,23x
•4298-CTO
•4299-CTO
•4300-CTO
•4301-CTO
60Y3195**
7IntelCentrinoAdvanced-N+WiMAX6250,RussianSKU
•4294-CTO
•4296-CTO
•4297-CTO
•4298-CTO
•4299-CTO
•4300-CTO
•4301-CTO
60Y3209**
8Batterypack,3cell
•4294-CTO,2Ex,2Fx,2Kx,2Px,2Qx,2Rx
•4296-CTO,22x,23x,26x,2Hx,2Nx,2Qx,2Rx,2Sx,2Tx,2Wx,3Ax,3Kx,3Px,3Qx
•4297-CTO,23x
•4298-CTO,2Cx,2Kx,2Lx,3Ex,3Fx,3Gx,3Hx,3Jx,3Kx,3Lx,3Mx,3Nx,3Px,3Qx,3Rx,
3Sx,3Tx,4Fx,4Zx
•4299-CTO,4Xx
•4300-CTO
•4301-CTO
42T4877*
8Batterypack,6cell
•4294-CTO,23x,24x,26x,27x,28x,29x,2Ax,2Bx,2Cx,2Dx,2Gx,2Hx,2Jx,2Lx,2Mx,
2Nx,2Sx,2Tx,2Ux
•4296-CTO,24x,25x,27x,28x,29x,2Ax,2Bx,2Cx,2Dx,2Ex,2Fx,2Gx,2Jx,2Kx,2Lx,
2Mx,2Px,2Ux,2Xx,2Yx,2Zx,32x,33x,34x,35x,36x,37x,38x,39x,3Bx,3Cx,3Dx,3Ex,
3Fx,3Gx,3Hx,3Jx,3Lx,3Mx,3Nx,3Rx,3Sx,3Tx,3Ux,3Vx,3Wx,3Xx,3Yx
•4297-CTO,22x,24x
•4298-CTO,26x,27x,28x,29x,2Ax,2Bx,2Dx,2Ex,2Fx,2Gx,2Hx,2Jx,2Mx,2Nx,2Px,
2Qx,2Rx,2Sx,2Tx,2Ux,2Vx,2Wx,2Xx,2Yx,2Zx,32x,33x,34x,35x,36x,37x,38x,39x,
3Ax,3Bx,3Cx,3Dx,3Ux,3Vx,3Wx,3Xx,3Yx,3Zx,42x,43x,44x,45x,46x,47x,48x,49x,
4Ax,4Bx,4Cx,4Dx,4Ex,4Gx,4Hx,4Jx,4Kx,4Lx,4Mx,4Nx,4Px,4Qx,4Rx,4Sx,4Tx,
4Ux,4Vx,4Wx,4Xx,4Yx,52x,53x,54x,55x,56x
•4299-CTO,26x,27x,28x,29x,2Ax,2Bx,2Cx,2Dx,2Ex,2Fx,2Gx,2Hx,2Jx,2Kx,2Lx,
2Mx,2Nx,2Px,2Qx,2Rx,2Sx,2Tx,2Ux,2Vx,2Wx,2Xx,2Yx,2Zx,32x,33x,34x,35x,
36x,37x,38x,39x,3Ax,3Bx,3Cx,3Dx,3Ex,4Bx,4Cx,4Tx,4Ux,4Vx,4Wx,4Yx,4Zx,
52x,53x,54x,55x,56x,57x,58x,59x,5Ax,5Bx,5Cx
•4300-CTO
•4301-CTO
42T4879*
120HardwareMaintenanceManual

Table9.Partslist-Overall(continued)
No.FRUFRUno.CRU
ID
8Batterypack,6cell
•4294-CTO,23x,24x,26x,27x,28x,29x,2Ax,2Bx,2Cx,2Dx,2Gx,2Hx,2Jx,2Lx,2Mx,
2Nx,2Sx,2Tx,2Ux
•4296-CTO,24x,25x,27x,28x,29x,2Ax,2Bx,2Cx,2Dx,2Ex,2Fx,2Gx,2Jx,2Kx,2Lx,
2Mx,2Px,2Ux,2Xx,2Yx,2Zx,32x,33x,34x,35x,36x,37x,38x,39x,3Bx,3Cx,3Dx,3Ex,
3Fx,3Gx,3Hx,3Jx,3Lx,3Mx,3Nx,3Rx,3Sx,3Tx,3Ux,3Vx,3Wx,3Xx,3Yx
•4297-CTO,22x,24x
•4298-CTO,26x,27x,28x,29x,2Ax,2Bx,2Dx,2Ex,2Fx,2Gx,2Hx,2Jx,2Mx,2Nx,2Px,
2Qx,2Rx,2Sx,2Tx,2Ux,2Vx,2Wx,2Xx,2Yx,2Zx,32x,33x,34x,35x,36x,37x,38x,39x,
3Ax,3Bx,3Cx,3Dx,3Ux,3Vx,3Wx,3Xx,3Yx,3Zx,42x,43x,44x,45x,46x,47x,48x,49x,
4Ax,4Bx,4Cx,4Dx,4Ex,4Gx,4Hx,4Jx,4Kx,4Lx,4Mx,4Nx,4Px,4Qx,4Rx,4Sx,4Tx,
4Ux,4Vx,4Wx,4Xx,4Yx,52x,53x,54x,55x,56x
•4299-CTO,26x,27x,28x,29x,2Ax,2Bx,2Cx,2Dx,2Ex,2Fx,2Gx,2Hx,2Jx,2Kx,2Lx,
2Mx,2Nx,2Px,2Qx,2Rx,2Sx,2Tx,2Ux,2Vx,2Wx,2Xx,2Yx,2Zx,32x,33x,34x,35x,
36x,37x,38x,39x,3Ax,3Bx,3Cx,3Dx,3Ex,4Bx,4Cx,4Tx,4Ux,4Vx,4Wx,4Yx,4Zx,
52x,53x,54x,55x,56x,57x,58x,59x,5Ax,5Bx,5Cx
•4300-CTO
•4301-CTO
42T4881*
8Batterypack,6cell
•4294-CTO,23x,24x,26x,27x,28x,29x,2Ax,2Bx,2Cx,2Dx,2Gx,2Hx,2Jx,2Lx,2Mx,
2Nx,2Sx,2Tx,2Ux
•4296-CTO,24x,25x,27x,28x,29x,2Ax,2Bx,2Cx,2Dx,2Ex,2Fx,2Gx,2Jx,2Kx,2Lx,
2Mx,2Px,2Ux,2Xx,2Yx,2Zx,32x,33x,34x,35x,36x,37x,38x,39x,3Bx,3Cx,3Dx,3Ex,
3Fx,3Gx,3Hx,3Jx,3Lx,3Mx,3Nx,3Rx,3Sx,3Tx,3Ux,3Vx,3Wx,3Xx,3Yx
•4297-CTO,22x,24x
•4298-CTO,26x,27x,28x,29x,2Ax,2Bx,2Dx,2Ex,2Fx,2Gx,2Hx,2Jx,2Mx,2Nx,2Px,
2Qx,2Rx,2Sx,2Tx,2Ux,2Vx,2Wx,2Xx,2Yx,2Zx,32x,33x,34x,35x,36x,37x,38x,39x,
3Ax,3Bx,3Cx,3Dx,3Ux,3Vx,3Wx,3Xx,3Yx,3Zx,42x,43x,44x,45x,46x,47x,48x,49x,
4Ax,4Bx,4Cx,4Dx,4Ex,4Gx,4Hx,4Jx,4Kx,4Lx,4Mx,4Nx,4Px,4Qx,4Rx,4Sx,4Tx,
4Ux,4Vx,4Wx,4Xx,4Yx,52x,53x,54x,55x,56x
•4299-CTO,26x,27x,28x,29x,2Ax,2Bx,2Cx,2Dx,2Ex,2Fx,2Gx,2Hx,2Jx,2Kx,2Lx,
2Mx,2Nx,2Px,2Qx,2Rx,2Sx,2Tx,2Ux,2Vx,2Wx,2Xx,2Yx,2Zx,32x,33x,34x,35x,
36x,37x,38x,39x,3Ax,3Bx,3Cx,3Dx,3Ex,4Bx,4Cx,4Tx,4Ux,4Vx,4Wx,4Yx,4Zx,
52x,53x,54x,55x,56x,57x,58x,59x,5Ax,5Bx,5Cx
•4300-CTO
•4301-CTO
42T4903*
9Harddiskdriverubberrails04W1716*
10SATAharddiskdrive,250GB,5,400rpm
•4294-CTO
•4296-CTO,3Tx
•4297-CTO,24x
•4298-CTO,3Ex,3Zx,46x,4Cx,4Ux,54x,55x
•4299-CTO,58x
•4300-CTO
•4301-CTO
42T1153*
10SATAharddiskdrive,250GB,5,400rpm
•4294-CTO
•4296-CTO,3Tx
•4297-CTO,24x
•4298-CTO,3Ex,3Zx,46x,4Cx,4Ux,54x,55x
•4299-CTO,58x
•4300-CTO
•4301-CTO
42T1167*
Chapter10.Partslist121

Table9.Partslist-Overall(continued)
No.FRUFRUno.CRU
ID
10SATAharddiskdrive,320GB,5,400rpm
•4294-CTO,2Kx,2Px,2Qx,2Rx
•4296-CTO,26x
•4297-CTO
•4298-CTO,28x,2Qx,2Xx,2Yx,2Zx,32x,4Zx
•4299-CTO,2Wx
•4300-CTO
•4301-CTO
42T1155*
10SATAharddiskdrive,160GB,7,200rpm
•4294-CTO
•4296-CTO
•4297-CTO
•4298-CTO
•4299-CTO
•4300-CTO
•4301-CTO
42T1157*
10SATAharddiskdrive,160GB,7,200rpm
•4294-CTO
•4296-CTO
•4297-CTO
•4298-CTO
•4299-CTO
•4300-CTO
•4301-CTO
42T1169*
10SATAharddiskdrive,250GB,7,200rpm
•4294-CTO
•4296-CTO
•4297-CTO
•4298-CTO
•4299-CTO
•4300-CTO
•4301-CTO
42T1163*
10SATAharddiskdrive,250GB,7,200rpm
•4294-CTO
•4296-CTO
•4297-CTO
•4298-CTO
•4299-CTO
•4300-CTO
•4301-CTO
42T1173*
122HardwareMaintenanceManual

Table9.Partslist-Overall(continued)
No.FRUFRUno.CRU
ID
10SATAharddiskdrive,320GB,7,200rpm
•4294-CTO,2Bx,2Ex,2Gx,2Jx,2Nx,2Sx,2Tx,2Ux
•4296-CTO,23x,2Ax,2Bx,2Cx,2Ex,2Fx,2Hx,2Kx,2Lx,2Nx,2Qx,2Tx,2Ux,2Wx,2Xx,
2Yx,2Zx,32x,33x,34x,36x,37x,39x,3Ax,3Bx,3Dx,3Fx,3Gx,3Hx,3Jx,3Kx,3Lx,3Mx,
3Nx,3Px,3Qx,3Rx,3Sx,3Vx,3Wx,3Yx
•4297-CTO,22x,23x
•4298-CTO,2Ax,2Bx,2Jx,2Mx,2Px,2Rx,2Sx,2Vx,2Wx,33x,34x,35x,36x,39x,3Ax,
3Bx,3Cx,3Dx,3Hx,3Lx,3Mx,3Qx,3Sx,3Tx,3Ux,3Vx,3Wx,3Yx,42x,44x,45x,4Ax,
4Bx,4Dx,4Ex,4Fx,4Gx,4Lx,4Mx,4Qx,4Rx,4Tx,4Xx,4Yx,52x
•4299-CTO,27x,2Bx,2Ex,2Fx,2Hx,2Sx,2Tx,2Ux,2Vx,2Xx,2Yx,2Zx,32x,33x,34x,
35x,38x,39x,3Ax,3Bx,3Cx,3Dx,3Ex,4Bx,4Cx,4Wx,4Xx,4Yx,4Zx,52x,53x,54x,56x,
57x,59x,5Ax,5Bx,5Cx
•4300-CTO
•4301-CTO
42T1159*
10SATAharddiskdrive,320GB,7,200rpm
•4294-CTO,2Bx,2Ex,2Gx,2Jx,2Nx,2Sx,2Tx,2Ux
•4296-CTO,23x,2Ax,2Bx,2Cx,2Ex,2Fx,2Hx,2Kx,2Lx,2Nx,2Qx,2Tx,2Ux,2Wx,2Xx,
2Yx,2Zx,32x,33x,34x,36x,37x,39x,3Ax,3Bx,3Dx,3Fx,3Gx,3Hx,3Jx,3Kx,3Lx,3Mx,
3Nx,3Px,3Qx,3Rx,3Sx,3Vx,3Wx,3Yx
•4297-CTO,22x,23x
•4298-CTO,2Ax,2Bx,2Jx,2Mx,2Px,2Rx,2Sx,2Vx,2Wx,33x,34x,35x,36x,39x,3Ax,
3Bx,3Cx,3Dx,3Hx,3Lx,3Mx,3Qx,3Sx,3Tx,3Ux,3Vx,3Wx,3Yx,42x,44x,45x,4Ax,
4Bx,4Dx,4Ex,4Fx,4Gx,4Lx,4Mx,4Qx,4Rx,4Tx,4Xx,4Yx,52x
•4299-CTO,27x,2Bx,2Ex,2Fx,2Hx,2Sx,2Tx,2Ux,2Vx,2Xx,2Yx,2Zx,32x,33x,34x,
35x,38x,39x,3Ax,3Bx,3Cx,3Dx,3Ex,4Bx,4Cx,4Wx,4Xx,4Yx,4Zx,52x,53x,54x,56x,
57x,59x,5Ax,5Bx,5Cx
•4300-CTO
•4301-CTO
42T1171*
11Solidstatedrivespacers04W1717*
12SATAsolidstatedrive,128GB
•4294-CTO,2Dx,2Mx
•4296-CTO,27x,28x,35x
•4297-CTO
•4298-CTO,4Tx,4Rx,4Lx,4Cx,4Bx,3Yx,3Xx,3Mx,3Lx,3Kx,3Gx,3Ax,2Wx,2Mx,2Kx
•4299-CTO,2Px,2Qx,2Rx,36x,37x
•4300-CTO
•4301-CTO
45N8081*
12SATAsolidstatedrive,128GB
•4294-CTO,2Dx,2Mx
•4296-CTO,27x,28x,35x
•4297-CTO
•4298-CTO,4Tx,4Rx,4Lx,4Cx,4Bx,3Yx,3Xx,3Mx,3Lx,3Kx,3Gx,3Ax,2Wx,2Mx,2Kx
•4299-CTO,2Px,2Qx,2Rx,36x,37x
•4300-CTO
•4301-CTO
45N8007*
Chapter10.Partslist123

Table9.Partslist-Overall(continued)
No.FRUFRUno.CRU
ID
12SATAsolidstatedrive,128GB
•4294-CTO,2Dx,2Mx
•4296-CTO,27x,28x,35x
•4297-CTO
•4298-CTO,4Tx,4Rx,4Lx,4Cx,4Bx,3Yx,3Xx,3Mx,3Lx,3Kx,3Gx,3Ax,2Wx,2Mx,2Kx
•4299-CTO,2Px,2Qx,2Rx,36x,37x
•4300-CTO
•4301-CTO
45N7981*
12SATAsolidstatedrive,160GB
•4294-CTO,27x,2Ax,2Cx,2Hx
•4296-CTO,24x,25x,29x,2Dx,2Gx,2Jx,2Mx,2Px,38x,3Cx,3Ex,3Ux,3Xx
•4297-CTO
•4298-CTO,26x,29x,2Ex,2Gx,2Lx,2Nx,3Jx,3Nx,3Px,43x,48x,49x,4Jx,4Nx,4Px,
4Sx,4Vx,4Wx,56x
•4299-CTO,2Cx,2Dx,2Gx,2Jx,2Kx,4Tx,4Ux,4Vx,55x
•4300-CTO
•4301-CTO
45N8057*
13Harddiskdrivecoverassembly04W1414*
14ThinkPadX220UltraBase04W1420*
14ThinkPadX220UltraBase04W1890*
15DVD-ROMdrive
•4294-CTO
•4296-CTO
•4297-CTO
•4298-CTO
•4299-CTO
•4300-CTO
•4301-CTO
45N7485*
15DVD-ROMdrive
•4294-CTO
•4296-CTO
•4297-CTO
•4298-CTO
•4299-CTO
•4300-CTO
•4301-CTO
45N7521*
124HardwareMaintenanceManual

Table9.Partslist-Overall(continued)
No.FRUFRUno.CRU
ID
15DVD/CD-RWcombodrive
•4294-CTO,23x,24x,2Hx,2Lx,2Mx
•4296-CTO,27x,28x,2Ax,2Jx,2Lx,2Nx,33x,35x,3Bx,3Hx,3Ux,3Vx
•4297-CTO,22x
•4298-CTO,2Ax,2Sx,33x,34x,35x,36x,3Nx,3Sx,3Tx,44x,4Jx,4Kx
•4299-CTO,2Nx,32x,33x,34x,35x,54x
•4300-CTO
•4301-CTO
45N7457*
15DVD/CD-RWcombodrive
•4294-CTO,23x,24x,2Hx,2Lx,2Mx
•4296-CTO,27x,28x,2Ax,2Jx,2Lx,2Nx,33x,35x,3Bx,3Hx,3Ux,3Vx
•4297-CTO,22x
•4298-CTO,2Ax,2Sx,33x,34x,35x,36x,3Nx,3Sx,3Tx,44x,4Jx,4Kx
•4299-CTO,2Nx,32x,33x,34x,35x,54x
•4300-CTO
•4301-CTO
45N7451*
15DVD-RAM/RWcombodrive
•4294-CTO,23x,24x,2Hx,2Lx,2Mx
•4296-CTO,27x,28x,2Ax,2Jx,2Lx,2Nx,33x,35x,3Bx,3Hx,3Ux,3Vx
•4297-CTO,22x
•4298-CTO,2Ax,2Sx,33x,34x,35x,36x,3Nx,3Sx,3Tx,44x,4Jx,4Kx
•4299-CTO,2Nx,32x,33x,34x,35x,54x
•4300-CTO
•4301-CTO
45N7453*
16DIMMdoorkit04W1416**
17Basecoverassembly04W2239N
17Basecoverassembly04W2240N
18Bluetoothdaughtercard
•4294-CTO,23x,24x,26x,27x,28x,29x,2Ax,2Bx,2Cx,2Dx,2Ex,2Fx,2Gx,2Hx,2Jx,
2Kx,2Lx,2Mx,2Nx,2Rx,2Sx,2Tx,2Ux
•4296-CTO,22x,23x,24x,25x,26x,27x,28x,29x,2Ax,2Bx,2Cx,2Dx,2Ex,2Fx,2Gx,
2Hx,2Jx,2Kx,2Lx,2Mx,2Nx,2Px,2Qx,2Rx,2Sx,2Tx,2Ux,2Wx,2Xx,2Yx,2Zx,32x,
33x,34x,35x,36x,37x,38x,39x,3Ax,3Bx,3Cx,3Dx,3Ex,3Fx,3Gx,3Hx,3Jx,3Kx,3Lx,
3Mx,3Nx,3Px,3Qx,3Rx,3Sx,3Tx,3Ux,3Vx,3Wx,3Xx,3Yx
•4297-CTO,22x,23x,24x
•4298-CTO,26x,27x,28x,29x,2Ax,2Bx,2Cx,2Dx,2Ex,2Fx,2Gx,2Hx,2Jx,2Kx,2Lx,
2Mx,2Nx,2Px,2Rx,2Sx,2Tx,2Ux,2Vx,2Wx,2Xx,2Yx,2Zx,32x,33x,34x,35x,36x,
37x,38x,39x,3Ax,3Bx,3Cx,3Dx,3Fx,3Gx,3Hx,3Jx,3Kx,3Nx,3Px,3Qx,3Rx,3Sx,
3Tx,3Ux,3Vx,3Wx,3Xx,3Yx,3Zx,42x,43x,44x,45x,46x,47x,48x,49x,4Ax,4Bx,
4Dx,4Ex,4Fx,4Gx,4Hx,4Jx,4Kx,4Lx,4Mx,4Nx,4Px,4Qx,4Rx,4Sx,4Tx,4Ux,4Vx,
4Wx,4Xx,4Yx,4Zx,52x,53x,54x,55x,56x
•4299-CTO,26x,27x,28x,29x,2Ax,2Bx,2Cx,2Dx,2Ex,2Fx,2Gx,2Hx,2Jx,2Kx,2Lx,
2Mx,2Nx,2Px,2Qx,2Rx,2Sx,2Tx,2Ux,2Vx,2Wx,2Xx,2Yx,2Zx,32x,33x,34x,35x,
36x,37x,38x,39x,3Cx,3Dx,3Ex,4Bx,4Cx,4Tx,4Ux,4Vx,4Wx,4Xx,4Yx,4Zx,52x,53x,
54x,55x,56x,57x,58x,59x,5Ax,5Bx,5Cx
60Y3271N
Chapter10.Partslist125

Table9.Partslist-Overall(continued)
No.FRUFRUno.CRU
ID
•4300-CTO
•4301-CTO
18Bluetoothdaughtercard
•4294-CTO,23x,24x,26x,27x,28x,29x,2Ax,2Bx,2Cx,2Dx,2Ex,2Fx,2Gx,2Hx,2Jx,
2Kx,2Lx,2Mx,2Nx,2Rx,2Sx,2Tx,2Ux
•4296-CTO,22x,23x,24x,25x,26x,27x,28x,29x,2Ax,2Bx,2Cx,2Dx,2Ex,2Fx,2Gx,
2Hx,2Jx,2Kx,2Lx,2Mx,2Nx,2Px,2Qx,2Rx,2Sx,2Tx,2Ux,2Wx,2Xx,2Yx,2Zx,32x,
33x,34x,35x,36x,37x,38x,39x,3Ax,3Bx,3Cx,3Dx,3Ex,3Fx,3Gx,3Hx,3Jx,3Kx,3Lx,
3Mx,3Nx,3Px,3Qx,3Rx,3Sx,3Tx,3Ux,3Vx,3Wx,3Xx,3Yx
•4297-CTO,22x,23x,24x
•4298-CTO,26x,27x,28x,29x,2Ax,2Bx,2Cx,2Dx,2Ex,2Fx,2Gx,2Hx,2Jx,2Kx,2Lx,
2Mx,2Nx,2Px,2Rx,2Sx,2Tx,2Ux,2Vx,2Wx,2Xx,2Yx,2Zx,32x,33x,34x,35x,36x,
37x,38x,39x,3Ax,3Bx,3Cx,3Dx,3Fx,3Gx,3Hx,3Jx,3Kx,3Nx,3Px,3Qx,3Rx,3Sx,
3Tx,3Ux,3Vx,3Wx,3Xx,3Yx,3Zx,42x,43x,44x,45x,46x,47x,48x,49x,4Ax,4Bx,
4Dx,4Ex,4Fx,4Gx,4Hx,4Jx,4Kx,4Lx,4Mx,4Nx,4Px,4Qx,4Rx,4Sx,4Tx,4Ux,4Vx,
4Wx,4Xx,4Yx,4Zx,52x,53x,54x,55x,56x
•4299-CTO,26x,27x,28x,29x,2Ax,2Bx,2Cx,2Dx,2Ex,2Fx,2Gx,2Hx,2Jx,2Kx,2Lx,
2Mx,2Nx,2Px,2Qx,2Rx,2Sx,2Tx,2Ux,2Vx,2Wx,2Xx,2Yx,2Zx,32x,33x,34x,35x,
36x,37x,38x,39x,3Cx,3Dx,3Ex,4Bx,4Cx,4Tx,4Ux,4Vx,4Wx,4Xx,4Yx,4Zx,52x,53x,
54x,55x,56x,57x,58x,59x,5Ax,5Bx,5Cx
•4300-CTO
•4301-CTO
60Y3275N
19Fanassembly04W1774N
20DC-incableassembly04W1651N
21ExpressCardslot04W1413N
22Palmrestassembly04W2188N
23Keyboardbezelassembly04W1771N
24Keyboard(see“Keyboard”onpage130.)
25T rackPointstickcaps91P9642*
2680GBmSATA
•4294-CTO,28x,2Bx
•4296-CTO,2Ex,35x
•4297-CTO
•4298-CTO,2Gx,2Hx,2Jx,3Hx,3Kx,43x,4Dx,54x
•4299-CTO
•4300-CTO
•4301-CTO
45N8259**
—acpoweradapter(see“acpoweradapter”onpage132.)
LCDFRUs
12.5-in.HDLEDbacklightLCD(Table10“Partslist-12.5-in.HDLEDbacklightLCDformulti-touchpanel
LCDoroutdoorLCD”onpage127)
126HardwareMaintenanceManual

1
3
2
4
5
6
7
8
9
10
11
12
Table10.Partslist-12.5-in.HDLEDbacklightLCDformulti-touchpanelLCDoroutdoorLCD
No.FRUFRUno.CRU
ID
1LCDpanel,12.5-in.WXGA,LEDbacklightformulti-touchpanel
•4294-CTO,23x,24x,29x,2Fx,2Gx,2Hx,2Jx,2Kx,2Lx,2Mx,2Nx,2Px,2Qx,2Rx,
2Sx,2Tx
•4296-CTO,22x,23x,24x,25x,26x,27x,28x,29x,2Ax,2Bx,2Cx,2Dx,2Jx,2Kx,
2Lx,2Mx,2Px,2Qx,2Rx,2Tx,2Wx,2Xx,2Yx,2Zx,32x,33x,34x,37x,39x,3Ax,
3Dx,3Ex,3Fx,3Gx,3Hx,3Jx,3Kx,3Lx,3Mx,3Nx,3Px,3Qx,3Rx,3Sx,3Tx,3Ux,
3Vx,3Wx,3Xx,3Yx
•4297-CTO,22x,23x,24x
04W1545N
Chapter10.Partslist127

Table10.Partslist-12.5-in.HDLEDbacklightLCDformulti-touchpanelLCDoroutdoorLCD(continued)
No.FRUFRUno.CRU
ID
•4298-CTO,26x,27x,28x,29x,2Ax,2Bx,2Dx,2Ex,2Fx,2Kx,2Lx,2Mx,2Nx,2Px,2Sx,
2Ux,2Wx,2Xx,2Yx,34x,35x,37x,3Ax,3Bx,3Fx,3Mx,3Nx,3Px,3Qx,3Rx,3Sx,3Tx,
3Ux,3Vx,3Wx,3Xx,3Yx,46x,47x,48x,4Ax,4Bx,4Cx,4Ex,4Fx,4Gx,4Hx,4Jx,4Kx,
4Lx,4Nx,4Px,4Tx,4Ux,4Vx,4Wx,4Xx,4Zx,53x,54x,56x
•4299-CTO,26x,27x,28x,29x,2Ax,2Bx,2Cx,2Dx,2Ex,2Fx,2Gx,2Hx,2Jx,2Kx,2Lx,
2Mx,2Nx,2Px,2Rx,2Tx,2Ux,2Vx,2Wx,33x,34x,37x,38x,3Bx,3Cx,4Bx,4Cx,
4Tx,4Vx,4Xx,52x,53x,57x,58x,59x
•4300-CTO
•4301-CTO
1LCDpanel,12.5-in.WXGA,LEDbacklightforoutdoorpanel
•4294-CTO,23x,24x,29x,2Fx,2Gx,2Hx,2Jx,2Kx,2Lx,2Mx,2Nx,2Px,2Qx,2Rx,
2Sx,2Tx
•4296-CTO,22x,23x,24x,25x,26x,27x,28x,29x,2Ax,2Bx,2Cx,2Dx,2Jx,2Kx,
2Lx,2Mx,2Px,2Qx,2Rx,2Tx,2Wx,2Xx,2Yx,2Zx,32x,33x,34x,37x,39x,3Ax,
3Dx,3Ex,3Fx,3Gx,3Hx,3Jx,3Kx,3Lx,3Mx,3Nx,3Px,3Qx,3Rx,3Sx,3Tx,3Ux,
3Vx,3Wx,3Xx,3Yx
•4297-CTO,22x,23x,24x
•4298-CTO,26x,27x,28x,29x,2Ax,2Bx,2Dx,2Ex,2Fx,2Kx,2Lx,2Mx,2Nx,2Px,2Sx,
2Ux,2Wx,2Xx,2Yx,34x,35x,37x,3Ax,3Bx,3Fx,3Mx,3Nx,3Px,3Qx,3Rx,3Sx,3Tx,
3Ux,3Vx,3Wx,3Xx,3Yx,46x,47x,48x,4Ax,4Bx,4Cx,4Ex,4Fx,4Gx,4Hx,4Jx,4Kx,
4Lx,4Nx,4Px,4Tx,4Ux,4Vx,4Wx,4Xx,4Zx,53x,54x,56x
•4299-CTO,26x,27x,28x,29x,2Ax,2Bx,2Cx,2Dx,2Ex,2Fx,2Gx,2Hx,2Jx,2Kx,2Lx,
2Mx,2Nx,2Px,2Rx,2Tx,2Ux,2Vx,2Wx,33x,34x,37x,38x,3Bx,3Cx,4Bx,4Cx,
4Tx,4Vx,4Xx,52x,53x,57x,58x,59x
•4300-CTO
•4301-CTO
04W1546N
2Fingerprintreader
•4294-CTO,2Sx,23x,24x,26x,27x,28x,29x,2Ax,2Bx,2Cx,2Dx,2Ex,2Fx,2Gx,2Hx,
2Jx,2Kx,2Lx,2Mx,2Px,2Qx,2Sx,2Tx,2Ux
•4296-CTO,22x,23x,24x,25x,26x,27x,28x,29x,2Ax,2Bx,2Cx,2Dx,2Ex,2Fx,2Gx,
2Hx,2Jx,2Kx,2Lx,2Mx,2Nx,2Px,2Qx,2Rx,2Sx,2Tx,2Ux,2Wx,2Xx,2Yx,2Zx,32x,
33x,34x,35x,36x,37x,38x,39x,3Ax,3Bx,3Cx,3Dx,3Ex,3Fx,3Gx,3Hx,3Jx,3Lx,
3Mx,3Nx,3Qx,3Rx,3Sx,3Tx,3Ux,3Vx,3Wx,3Xx,3Yx
•4297-CTO,22x,23x
•4298-CTO,26x,27x,28x,29x,2Ax,2Cx,2Dx,2Ex,2Fx,2Gx,2Hx,2Jx,2Kx,2Lx,2Mx,
2Nx,2Px,2Rx,2Sx,2Tx,2Ux,2Vx,2Wx,2Xx,2Yx,2Zx,32x,33x,34x,35x,36x,37x,
38x,39x,3Ax,3Bx,3Cx,3Dx,3Fx,3Gx,3Hx,3Jx,3Kx,3Nx,3Px,3Qx,3Rx,3Sx,
3Tx,3Ux,3Vx,3Wx,3Xx,3Yx,3Zx,42x,43x,44x,45x,46x,47x,48x,49x,4Ax,4Bx,
4Dx,4Ex,4Fx,4Hx,4Jx,4Kx,4Lx,4Mx,4Nx,4Px,4Qx,4Rx,4Sx,4Tx,4Ux,4Vx,
4Wx,4Xx,4Yx,52x,55x,56x
•4299-CTO,26x,27x,28x,29x,2Ax,2Bx,2Cx,2Dx,2Ex,2Fx,2Gx,2Hx,2Jx,2Kx,2Lx,
2Mx,2Nx,2Px,2Qx,2Rx,2Sx,2Tx,2Ux,2Vx,2Wx,2Xx,2Yx,2Zx,32x,33x,34x,35x,
36x,37x,38x,39x,3Cx,3Dx,3Ex,4Bx,4Cx,4Tx,4Ux,4Vx,4Wx,4Xx,4Yx,4Zx,52x,
53x,54x,55x,56x,57x,58x,59x,5Ax,5Bx,5Cx
•4300-CTO
•4301-CTO
04W1548N
2Fingerprintreaderdummy
•4294-CTO,2Nx,2Rx
•4296-CTO,3Kx,3Px
•4297-CTO,24x
•4298-CTO,2Bx,3Ex,2Qx,3Lx,3Mx,4Cx,4Gx,4Zx,53x,54x
•4299-CTO,3Ax,3Bx
•4300-CTO
•4301-CTO
04W1549N
128HardwareMaintenanceManual

Table10.Partslist-12.5-in.HDLEDbacklightLCDformulti-touchpanelLCDoroutdoorLCD(continued)
No.FRUFRUno.CRU
ID
3Integratedcamera
•4294-CTO,23x,24x,26x,27x,28x,29x,2Ax,2Bx,2Cx,2Dx,2Ex,2Fx,2Gx,2Hx,2Jx,
2Kx,2Lx,2Mx,2Nx,2Px,2Qx,2Rx,2Sx,2Tx,2Ux
•4296-CTO,22x,23x,24x,25x,26x,27x,28x,29x,2Ax,2Bx,2Cx,2Dx,2Ex,2Fx,2Gx,
2Hx,2Jx,2Kx,2Lx,2Mx,2Nx,2Px,2Sx,2Tx,2Ux,2Wx,2Xx,2Yx,2Zx,32x,33x,34x,
35x,36x,37x,38x,39x,3Ax,3Bx,3Cx,3Dx,3Ex,3Fx,3Gx,3Hx,3Jx,3Kx,3Lx,3Mx,
3Nx,3Px,3Qx,3Rx,3Sx,3Tx,3Ux,3Vx,3Wx,3Xx,3Yx
•4297-CTO,22x,23x,24x
•4298-CTO,26x,27x,28x,29x,2Ax,2Bx,2Cx,2Dx,2Ex,2Fx,2Gx,2Hx,2Jx,2Kx,2Lx,
2Mx,2Nx,2Px,2Rx,2Sx,2Tx,2Ux,2Vx,2Wx,2Xx,2Yx,2Zx,32x,33x,34x,35x,36x,
37x,38x,39x,3Ax,3Bx,3Cx,3Dx,3Fx,3Gx,3Hx,3Jx,3Kx,3Nx,3Px,3Qx,3Rx,3Sx,
3Tx,3Ux,3Vx,3Wx,3Xx,3Yx,3Zx,43x,44x,45x,46x,47x,48x,49x,4Ax,4Bx,4Dx,
4Fx,4Gx,4Hx,4Jx,4Kx,4Mx,4Nx,4Px,4Qx,4Rx,4Sx,4Tx,4Ux,4Vx,4Wx,4Zx,
52x,53x,54x,55x,56x
•4299-CTO,26x,27x,28x,29x,2Ax,2Cx,2Dx,2Ex,2Fx,2Gx,2Hx,2Jx,2Kx,2Lx,2Mx,
2Nx,2Px,2Qx,2Rx,2Sx,2Tx,2Ux,2Vx,2Wx,32x,33x,34x,35x,36x,37x,38x,
39x,3Cx,3Dx,3Ex,4Bx,4Cx,4Tx,4Ux,4Vx,4Wx,4Xx,4Yx,4Zx,52x,54x,55x,
56x,57x,58x,5Bx,5Cx
•4300-CTO
•4301-CTO
04W1364N
4LCDcableassembly04W1775N
4LEDcableassembly04W1776N
5WirelessLANantennaassembly04W1779N
6WirelessWANantennaassembly
•4294-CTO,23x,24x,29x,2Fx,2Gx,2Hx,2Jx,2Kx,2Lx,2Mx,2Nx,2Px,2Qx,2Rx,
2Sx,2Tx,2Ux
•4296-CTO,22x,23x,24x,25x,26x,27x,28x,29x,2Ax,2Bx,2Cx,2Dx,2Gx,2Hx,2Jx,
2Kx,2Lx,2Mx,2Nx,2Px,2Qx,2Rx,2Sx,2Tx,2Ux,2Wx,2Xx,2Yx,2Zx,32x,33x,34x,
37x,39x,3Ax,3Bx,3Cx,3Dx,3Ex,3Fx,3Gx,3Hx,3Jx,3Kx,3Lx,3Mx,3Nx,3Px,3Qx,
3Rx,3Sx,3Tx,3Ux,3Vx,3Wx,3Xx,3Yx
•4297-CTO,22x,23x,24x
•4298-CTO,26x,27x,28x,29x,2Ax,2Bx,2Cx,2Dx,2Ex,2Fx,2Kx,2Lx,2Mx,2Nx,
2Px,2Rx,2Sx,2Tx,2Ux,2Vx,2Wx,2Xx,2Yx,33x,34x,35x,36x,37x,38x,39x,3Ax,
3Bx,3Cx,3Dx,3Fx,3Gx,3Jx,3Lx,3Mx,3Nx,3Px,3Qx,3Rx,3Sx,3Tx,3Ux,3Vx,
3Wx,3Xx,3Yx,44x,45x,46x,47x,48x,49x,4Ax,4Bx,4Cx,4Ex,4Fx,4Gx,4Hx,
4Jx,4Kx,4Lx,4Mx,4Nx,4Px,4Qx,4Rx,4Sx,4Tx,4Ux,4Vx,4Wx,4Xx,4Yx,4Zx,
52x,53x,54x,55x,56x
•4299-CTO,26x,27x,28x,29x,2Ax,2Bx,2Cx,2Dx,2Ex,2Fx,2Gx,2Hx,2Jx,2Kx,2Lx,
2Mx,2Nx,2Px,2Qx,2Rx,2Sx,2Tx,2Ux,2Vx,2Wx,32x,33x,34x,35x,36x,37x,38x,
39x,3Ax,3Bx,3Cx,3Dx,3Ex,4Bx,4Cx,4Tx,4Ux,4Vx,4Wx,4Xx,4Yx,4Zx,52x,53x,
55x,56x,57x,58x,59x,5Ax,5Bx,5Cx
•4300-CTO
•4301-CTO
04W1778N
6WirelessWANantennaassemblydummy
•4294-CTO,26x,27x,2Ax,2Cx,2Dx,2Ex
•4296-CTO,2Fx,36x,38x
•4297-CTO
•4298-CTO,2Qx,2Zx,32x,3Ex,3Zx,42x
•4299-CTO,2Xx,2Yx,2Zx
•4300-CTO
•4301-CTO
04W1780N
7LCDrearcoverassembly04W1772N
8Hinges04W1773N
Chapter10.Partslist129
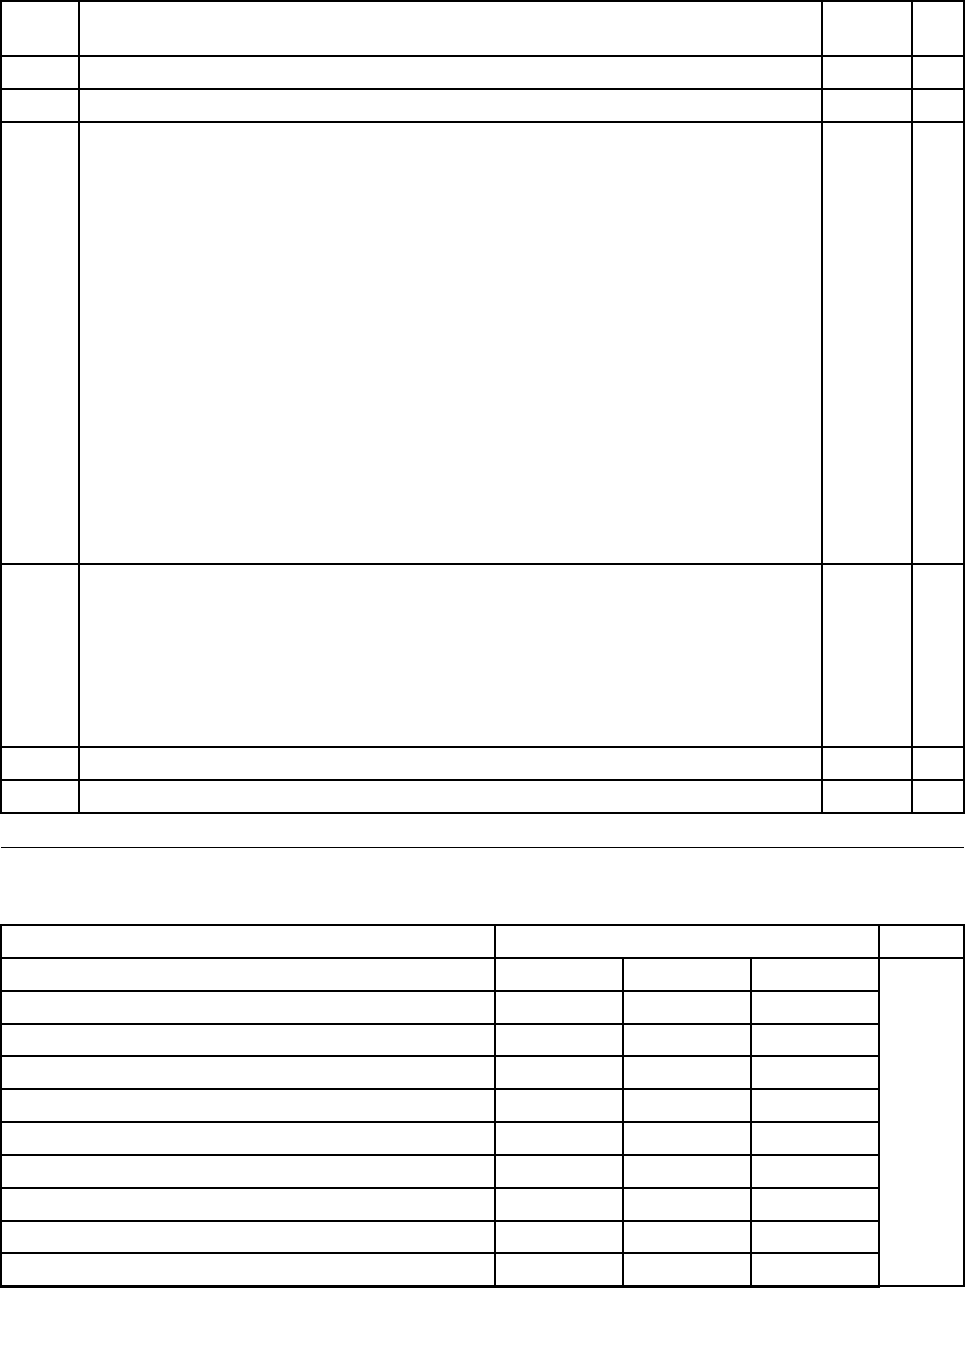
Table10.Partslist-12.5-in.HDLEDbacklightLCDformulti-touchpanelLCDoroutdoorLCD(continued)
No.FRUFRUno.CRU
ID
9LEDcard04W1777N
10Speakerassembly04W1782N
11LCDbuttonbezelwithngerprintreader
•4294-CTO,2Sx,23x,24x,26x,27x,28x,29x,2Ax,2Bx,2Cx,2Dx,2Ex,2Fx,2Gx,2Hx,
2Jx,2Kx,2Lx,2Mx,2Px,2Qx,2Sx,2Tx,2Ux
•4296-CTO,22x,23x,24x,25x,26x,27x,28x,29x,2Ax,2Bx,2Cx,2Dx,2Ex,2Fx,2Gx,
2Hx,2Jx,2Kx,2Lx,2Mx,2Nx,2Px,2Qx,2Rx,2Sx,2Tx,2Ux,2Wx,2Xx,2Yx,2Zx,32x,
33x,34x,35x,36x,37x,38x,39x,3Ax,3Bx,3Cx,3Dx,3Ex,3Fx,3Gx,3Hx,3Jx,3Lx,
3Mx,3Nx,3Qx,3Rx,3Sx,3Tx,3Ux,3Vx,3Wx,3Xx,3Yx
•4297-CTO,22x,23x
•4298-CTO,26x,27x,28x,29x,2Ax,2Cx,2Dx,2Ex,2Fx,2Gx,2Hx,2Jx,2Kx,2Lx,2Mx,
2Nx,2Px,2Rx,2Sx,2Tx,2Ux,2Vx,2Wx,2Xx,2Yx,2Zx,32x,33x,34x,35x,36x,37x,
38x,39x,3Ax,3Bx,3Cx,3Dx,3Fx,3Gx,3Hx,3Jx,3Kx,3Nx,3Px,3Qx,3Rx,3Sx,
3Tx,3Ux,3Vx,3Wx,3Xx,3Yx,3Zx,42x,43x,44x,45x,46x,47x,48x,49x,4Ax,4Bx,
4Dx,4Ex,4Fx,4Hx,4Jx,4Kx,4Lx,4Mx,4Nx,4Px,4Qx,4Rx,4Sx,4Tx,4Ux,4Vx,
4Wx,4Xx,4Yx,52x,55x,56x
•4299-CTO,26x,27x,28x,29x,2Ax,2Bx,2Cx,2Dx,2Ex,2Fx,2Gx,2Hx,2Jx,2Kx,2Lx,
2Mx,2Nx,2Px,2Qx,2Rx,2Sx,2Tx,2Ux,2Vx,2Wx,2Xx,2Yx,2Zx,32x,33x,34x,35x,
36x,37x,38x,39x,3Cx,3Dx,3Ex,4Bx,4Cx,4Tx,4Ux,4Vx,4Wx,4Xx,4Yx,4Zx,52x,
53x,54x,55x,56x,57x,58x,59x,5Ax,5Bx,5Cx
•4300-CTO
•4301-CTO
04W1550N
11LCDbuttonbezelwithoutngerprintreader
•4294-CTO,2Nx,2Rx
•4296-CTO,3Kx,3Px
•4297-CTO,24x
•4298-CTO,2Bx,3Ex,2Qx,3Lx,3Mx,4Cx,4Gx,4Zx,53x,54x
•4299-CTO,3Ax,3Bx
•4300-CTO
•4301-CTO
04W1666N
12IconplateforX220Tablet04W2044N
—N
Keyboard
Table11.Partslist-Keyboard
LanguageP/NCRUID
Arabic45N221645N207645N2146
Belgian45N221745N207745N2147
BrazilianPortuguese45N221545N207545N2145
Bulgarian45N221845N207845N2148
CanadianFrench(058)45N221345N207345N2143
CanadianFrench(Acnor)45N221245N207245N2142
Czech45N221945N207945N2149
Danish45N222045N208045N2150
Dutch45N223045N209045N2160
French45N222245N208245N2152
*
130HardwareMaintenanceManual

Table11.Partslist-Keyboard(continued)
LanguageP/NCRUID
German45N222345N208345N2153
Greek(U.S.EnglishandGreeklayout)45N222445N208445N2154
Hungarian45N222645N208645N2156
Icelandic45N222745N208745N2157
Israel(Hebrew)45N222545N208545N2155
Italian45N222845N208845N2158
Japanese45N224245N210245N2172
Kazakhstan45N222945N208945N2159
Korean45N224345N210345N2173
LatinAmericanSpanish45N221445N207445N2144
Norwegian45N223145N209145N2161
Polish45N223245N209245N2162
Portuguese45N223345N209345N2163
Russian45N223445N209445N2164
Slovak45N223545N209545N2165
Slovenian45N223645N209645N2166
Swedish,Finnish45N223745N209745N2167
Spanish45N222145N208145N2151
Swiss45N223845N209845N2168
Thai45N224545N210545N2175
TraditionalChinese45N224445N210445N2174
Turkish45N223945N209945N2169
Turkish(FType)60Y955060Y955260Y9554
U.K.English45N224045N210045N2170
U.S.English45N221145N207145N2141
U.S.English(International,withaEurosymbol)45N224145N210145N2171
Miscellaneousparts
Table12.Partslist-Miscellaneousparts
FRUP/NCRU
ID
Screwkit:
•M2×3mm,(2)
•M2×3.5,mm(31)
•M2×5mm,(10)
•M2×2mm,(1)
•M2×3.5mm,(3)
•M2×3mm,(8)
•M2.5×6mm,(9)
•M3×3.5mm,(1)
•Hexstud,(2)
•IMS2x5mm,(10)
04W1785N
Chapter10.Partslist131

Table12.Partslist-Miscellaneousparts(continued)
FRUP/NCRU
ID
•LCMLCDbezelscrewmylar,(3)
•LCMLCDbezelscrewmylar,(3)
•LCDsidescrewmylar,(8)
•LCDsidescrewmylar,(8)
•Microphonesupportmylar,(1)
•Microphonesupportmylar,(1)
•Nameplate,(1)
•Nameplate,(1)
Basecovermiscellaneouspartskit:
•ScrewM2x2,(1)
•ScrewM2x3.5,(3)
•StepscrewM1.6x3,(1)
•Penpush
•Penswitch
•Basecoverbracket
•DC-incablebracket
•Frontrubberfoot,(2)
•Rearrubberfootleft
•Rearrubberfootright
•Batterylatchright
•Batterylatchleft
•Batteryknobright
•Batteryknobleft
•Batterylatchspring
04W1547N
Systemmiscellaneouspartskit:
•EMItouchpadconductiveclothesLDB-1
•Touchpadmylar
•EMIgasket,(2)
•Nameplatemylar
•LCDsidescrewmylar,(8)
•LCDconductivetapecateronLCO-1,(2)
•Spongepanel01
•Spongepanel02,(4)
•Sponge09panelLCO-1
•Sponge10panelLCO-1
04W1784N
Rubberkit04W1783N
acpoweradapter
Table13.Partslist-acpoweradapters
FRUP/NCRU
ID
2-pin(65W,20V)adapter(modelsCTO,xxE,xxF ,xxJ,xxL,xxP ,xxS,xxY,xxU)42T5282
2-pin(65W,20V)adapter(modelsCTO,xxE,xxF ,xxJ,xxL,xxP ,xxS,xxY,xxU)42T4419
2-pin(65W,20V)adapter(modelsCTO,xxE,xxF ,xxJ,xxL,xxP ,xxS,xxY,xxU)42T4423
3-pin(65W,20V)adapter(modelsCTO,xxA,xxB,xxC,xxG,xxH,xxK,xxM,xxT,xxV)OP42T5283
3-pin(65W,20V)adapter(modelsCTO,xxA,xxB,xxC,xxG,xxH,xxK,xxM,xxT,xxV)OP42T4417
3-pin(65W,20V)adapter(modelsCTO,xxA,xxB,xxC,xxG,xxH,xxK,xxM,xxT,xxV)OP42T4421
*
132HardwareMaintenanceManual

Powercords
AThinkPadpowercordforaspeciccountryorregionisusuallyavailableonlyinthatcountryorregion:
Table14.Partslist-2-pinpowercords
CountryorregionFRUno.CRU
ID
Argentina
•Models:CTO,xxY
42T502042T5105
Brazil
•Models:CTO,xxP
42T518042T5183
Canada,U.S.
•Models:CTO,xxF ,xxL,xxS,xxU
42T500842T5093
Japan
•Models:CTO,xxE,xxJ
42T501442T5099
*
Table15.Partslist-3-pinpowercords
CountryorregionFRUno.CRU
ID
Australia,NewZealand
•Models:CTO,xxM
42T505042T5135
Bangladesh,SriLanka,SouthAfrica
•Models:CTO,xxG
42T505642T5141
Canada,U.S.
•Models:CTO,xxG,xxT
42T500442T5089
China(P .R.C.)(otherthanHongKongS.A.R.)
•Models:CTO,xxC
42T506542T5150
Denmark
•Models:CTO,xxG
42T504142T5126
Europeancountries
•Models:CTO,xxG
42T502942T5114
India
•Models:CTO,xxQ
42T508342T5168
Israel
•Models:CTO,xxG
42T506242T5147
Italy
•Models:CTO,xxG
42T504742T5132
Korea
•Models:CTO,xxK
42T507742T5162
Switzerland
•Models:CTO,xxG
42T504442T5129
Taiwan
•Models:CTO,xxV
42T507142T5156
U.K.,China(HongKongS.A.R.)
•Models:CTO,xxB,xxG,xxH
42T503542T5120
*
Chapter10.Partslist133

Recoverydiscs
WindowsXPProfessionalDVDs
Note:TheWindowsXPProfessionalrecoveryDVDsareavailableonlyformodelswithavalidMicrosoft
WindowsXPProfessionalcerticateofauthenticity(COA)afxedtothesystem.DuetoaMicrosoftlicensing
limitation,ifamodelcamewithWindowsXPProfessionalpreinstalledfromthefactory,buthaseithera
Windows7orWindowsVistaCOAafxedtothesystem,thatmodeliseligibleonlyforrecoveryDVDsthat
matchtheoperatingsystemspeciedontheCOA.
•4294-CTO
•4296-CTO
•4297-CTO
•4298-CTO
•4299-CTO
•4300-CTO
•4301-CTO
Table16.Partslist-WindowsXPProfessional(32bit)recoveryDVDs
LanguageP/NCRU
ID
English04T1049
French04T1594
German04T1595
Japanese04T1048
Italian04T1596
SimpliedChinese04T1593
*
WindowsXPTablet(32bit)DVDs
Note:TheWindowsXPProfessionalrecoveryDVDsareavailableonlyformodelswithavalidMicrosoft
WindowsXPProfessionalcerticateofauthenticity(COA)afxedtothesystem.DuetoaMicrosoftlicensing
limitation,ifamodelcamewithWindowsXPProfessionalpreinstalledfromthefactory,buthaseithera
Windows7orWindowsVistaCOAafxedtothesystem,thatmodeliseligibleonlyforrecoveryDVDsthat
matchtheoperatingsystemspeciedontheCOA.
•4294-CTO
•4296-CTO
•4297-CTO
•4298-CTO
•4299-CTO
Table17.Partslist-WindowsXPTablet(32bit)recoveryDVDs
LanguageP/NCRU
ID
English04T1051
Japanese04T1050
*
134HardwareMaintenanceManual

WindowsVistaBusiness(32bit)DVDs
Note:TheWindowsVistarecoveryDVDsareavailableonlyformodelswithavalidMicrosoftWindowsVista
certicateofauthenticity(COA)afxedtothesystem.DuetoaMicrosoftlicensinglimitation,ifamodelcame
withWindowsVistaBusinessorWindowsVistaUltimatepreinstalledfromthefactory,buthasaWindows7
COAafxedtothesystem,thatmodeliseligibleonlyforrecoveryDVDsthatmatchtheoperatingsystem
speciedontheCOA.
•4294-CTO
•4296-CTO
•4297-CTO
•4298-CTO
•4299-CTO
•4300-CTO
•4301-CTO
Table18.Partslist-WindowsVistaBusiness(32bit)recoveryDVDs
LanguageP/NCRU
ID
English04T3564
Japanese04T3563
*
WindowsVistaHomeBasic(32bit)DVDs
Note:TheWindowsVistarecoveryDVDsareavailableonlyformodelswithavalidMicrosoftWindowsVista
certicateofauthenticity(COA)afxedtothesystem.DuetoaMicrosoftlicensinglimitation,ifamodelcame
withWindowsVistaBusinessorWindowsVistaUltimatepreinstalledfromthefactory,buthasaWindows7
COAafxedtothesystem,thatmodeliseligibleonlyforrecoveryDVDsthatmatchtheoperatingsystem
speciedontheCOA.
•4294-CTO
•4296-CTO
•4297-CTO
•4298-CTO
•4299-CTO
•4300-CTO
•4301-CTO
Table19.Partslist-WindowsVistaHomeBasic(32bit)recoveryDVDs
LanguageP/NCRU
ID
English04T3565*
Windows7Professional(32bit)DVDs
Windows7Professional(32bit)ispreinstalledastheoperatingsysteminthefollowingmodels:
•4294-CTO
•4296-CTO,22x,23x,2Mx,2Wx
•4297-CTO,23x
•4298-CTO,2Mx,3Sx,3Tx,3Vx,4Fx,4Zx
•4299-CTO,4Xx
•4300-CTO
•4301-CTO
Chapter10.Partslist135

Table20.Partslist-Windows7Professional(32bit)recoveryDVDs
LanguageP/NCRU
ID
English04T3571
Japanese04T3569
SimpliedChinese04T3566
French04T3567
German04T3568
Spanish04T3570
English,Danish,Finnish,Swedish,andNorwegian04T3572
English,Dutch,French,German,andItalian04T3573
*
Windows7Professional(64bit)DVDs
Windows7Professional(64bit)ispreinstalledastheoperatingsysteminthefollowingmodels:
•4294-CTO,23x,24x,26x,27x,28x,29x,2Ax,2Bx,2Cx,2Dx,2Gx,2Hx,2Jx,2Lx,2Mx,2Nx,2Sx,2Tx,2Ux
•4296-CTO,24x,25x,27x,28x,29x,2Ax,2Bx,2Cx,2Dx,2Ex,2Fx,2Gx,2Jx,2Kx,2Lx,2Nx,2Px,2Rx,
2Ux,2Xx,2Yx,2Zx,33x,34x,35x,36x,37x,38x,39x,3Bx,3Cx,3Dx,3Ex,3Fx,3Gx,3Hx,3Jx,3Kx,3Lx,
3Mx,3Nx,3Qx,3Rx,3Tx,3Vx,3Wx,3Xx,3Yx
•4297-CTO,22x,
•4298-CTO,26x,27x,28x,29x,2Ax,2Cx,2Dx,2Ex,2Fx,2Gx,2Hx,2Jx,2Kx,2Lx,2Nx,2Px,2Qx,2Rx,
2Sx,2Tx,2Vx,2Wx,2Xx,2Yx,2Zx,32x,33x,34x,35x,36x,37x,38x,39x,3Ax,3Bx,3Cx,3Dx,3Ex,3Fx,
3Gx,3Hx,3Jx,3Kx,3Lx,3Mx,3Nx,3Px,3Qx,3Rx,3Ux,3Wx,3Xx,3Yx,3Zx,42x,43x,44x,45x,46x,
47x,48x,49x,4Ax,4Bx,4Cx,4Dx,4Ex,4Gx,4Hx,4Jx,4Kx,4Lx,4Mx,4Nx,4Px,4Qx,4Rx,4Sx,4Tx,
4Ux,4Vx,4Wx,4Xx,4Yx,52x,53x,55x
•4299-CTO,26x,27x,28x,29x,2Ax,2Bx,2Cx,2Dx,2Ex,2Fx,2Hx,2Jx,2Kx,2Mx,2Nx,2Px,2Qx,2Sx,
2Tx,2Ux,2Vx,2Wx,2Xx,2Zx,32x,33x,34x,35x,36x,37x,38x,39x,3Ax,3Bx,3Cx,3Dx,3Ex,4Bx,4Cx,
4Tx,4Ux,4Vx,4Wx,4Yx,4Zx,52x,53x,54x,55x,56x,57x,58x,59x,5Ax,5Bx,5Cx
•4300-CTO
•4301-CTO
Table21.Partslist-Windows7Professional(64bit)recoveryDVDs
LanguageP/NCRU
ID
Arabic04T3575
BrazilianPortuguese04T3576
Czech04T3579
English,Danish,Finnish,Swedish,andNorwegian04T3599
English,Dutch,French,German,andItalian04T3600
English,Slovenian,andCroatian04T3601
French04T3581
German04T3583
Greek04T3582
Hebrew04T3584
Hungarian04T3586
IndianEnglish04T3580
*
136HardwareMaintenanceManual
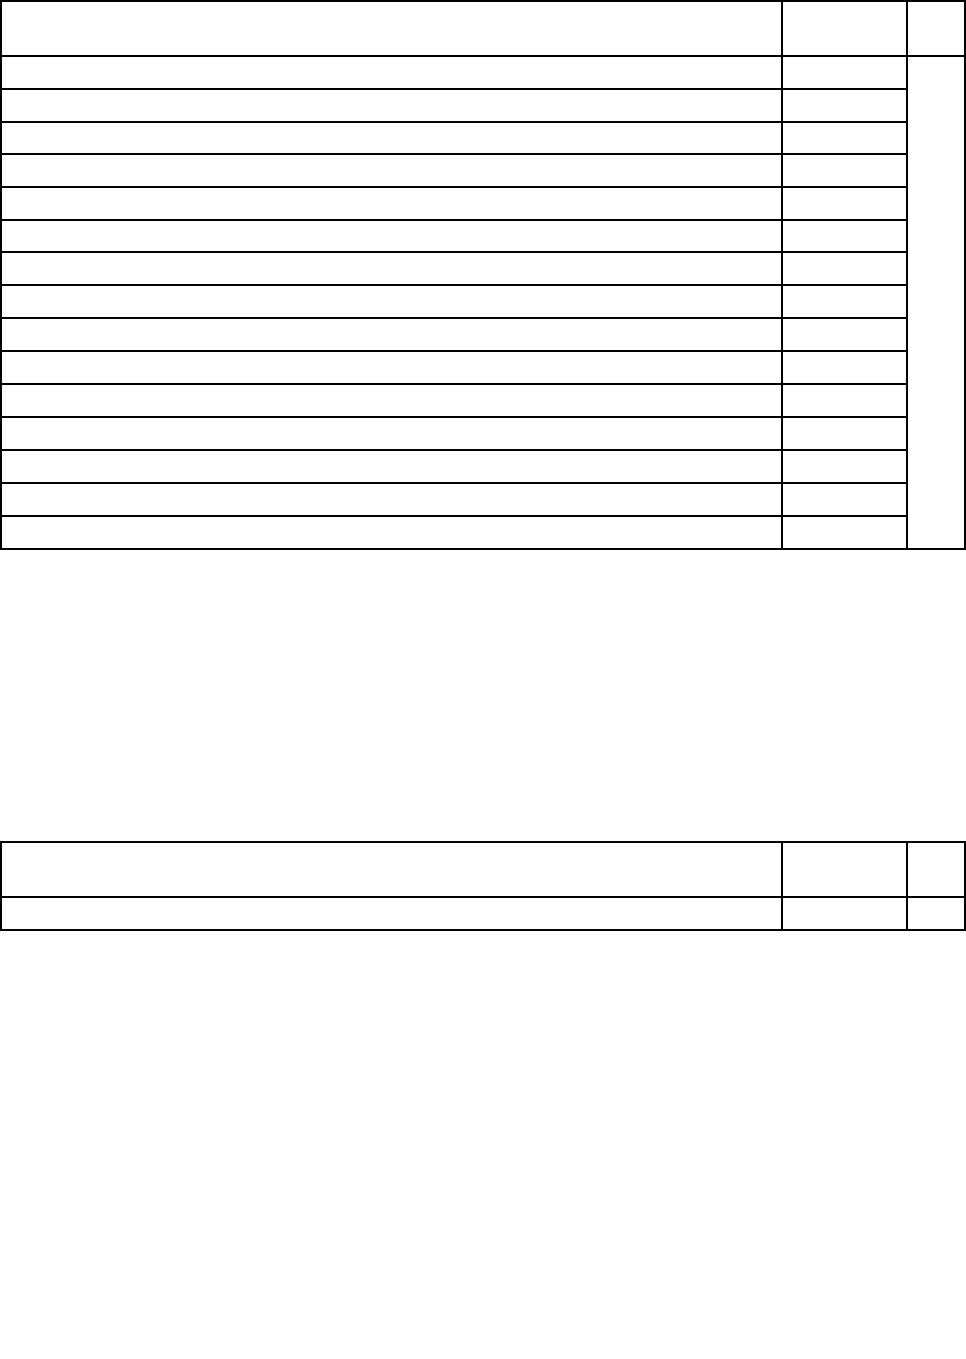
Table21.Partslist-Windows7Professional(64bit)recoveryDVDs(continued)
LanguageP/NCRU
ID
Japanese04T3587
Korean/English04T3588
Polish04T3589
Romanian04T3591
Portuguese04T2237
Russian04T3592
Serbian-Latin04T3595
SimpliedChinese04T3577
Slovakian04T3593
Spanish04T3594
TraditionalChinese04T3578
TraditionalChinese(HongKongS.A.R.)04T3585
Turkish04T3596
USEnglish04T3597
USEnglish(Disabled)04T3598
Windows7Ultimate(32bit)DVDs
•4294-CTO
•4296-CTO
•4297-CTO
•4298-CTO
•4299-CTO
•4300-CTO
•4301-CTO
Table22.Partslist-Windows7Ultimate(32bit)recoveryDVDs
LanguageP/NCRU
ID
English04T3574*
Windows7Ultimate(64bit)DVDs
•4294-CTO
•4296-CTO
•4297-CTO
•4298-CTO
•4299-CTO
•4300-CTO
•4301-CTO
Chapter10.Partslist137
Table23.Partslist-Windows7Ultimate(64bit)recoveryDVDs
LanguageP/NCRU
ID
English04T3602*
Windows7HomeBasic(32bit)DVDs
•4294-CTO
•4296-CTO
•4297-CTO
•4298-CTO
•4299-CTO
•4300-CTO
•4301-CTO
Table24.Partslist-Windows7HomeBasic(32bit)DVDs
LanguageP/NCRU
ID
Arabic04T3603
BrazilianPortuguese04T3604
English04T3613
IndianEnglish04T3606
French04T3607
Portuguese04T3608
Russian04T3609
Serbian-Latin04T3611
SimpliedChinese04T3605
Spanish04T3610
Turkish04T3612
*
Windows7HomeBasic(64bit)DVDs
•4294-CTO
•4296-CTO
•4297-CTO
•4298-CTO
•4299-CTO
•4300-CTO
•4301-CTO
Table25.Partslist-Windows7HomeBasic(64bit)DVDs
LanguageP/NCRU
ID
SimpliedChinese04T3614*
Windows7HomePremium(32bit)DVDs
Windows7HomePremium(32bit)ispreinstalledastheoperatingsysteminthefollowingmodels:
•4294-CTO,2Ex,2Fx,2Kx,2Px,2Qx,2Rx
138HardwareMaintenanceManual

•4296-CTO,26x,2Qx,2Tx,3Ax,3Px
•4297-CTO
•4298-CTO
•4299-CTO
•4300-CTO
•4301-CTO
Table26.Partslist-WindowsHomePremium(32bit)recoveryDVDs
LanguageP/NCRU
ID
English04T3617
IndianEnglish04T3616
SimpliedChinese04T3615
*
Windows7HomePremium(64bit)DVDs
•4294-CTO
•4296-CTO,2Hx,2Sx,32x,3Sx,3Ux
•4297-CTO,24x
•4298-CTO,2Bx,54x,56x
•4299-CTO,2Gx,2Lx,2Rx
•4300-CTO
•4301-CTO
Table27.Partslist-Windows7HomePremium(64bit)recoveryDVDs
LanguageP/NCRU
ID
Arabic04T3618
BrazilianPortuguese04T3619
Czech04T3622
English,Danish,Finnish,Swedish,andNorwegian04T3641
English,Dutch,French,German,andItalian04T3642
English,Slovenian,andCroatian04T3643
French04T3623
German04T3625
Greek04T3624
Hebrew04T3626
Hungarian04T3628
Japanese04T3629
Korean/English04T3630
Polish04T3631
Portuguese04T3632
Romanian04T3633
Russian04T3634
Serbian-Latin04T3637
*
Chapter10.Partslist139

Table27.Partslist-Windows7HomePremium(64bit)recoveryDVDs(continued)
LanguageP/NCRU
ID
SimpliedChinese04T3620
Slovakian04T3635
Spanish04T3636
TraditionalChinese04T3621
TraditionalChinese(HongKongS.A.R.)04T3627
Turkish04T3638
USEnglish04T3640
USEnglish(Disabled)04T3639
Commonservicetools
Table28.Partslist-Commonservicetools
ToolP/N
Screwdriverkit95F3598
1/4"drivespinnerhandle1650840
1/4"Sq.to1/4"hextorxadapter93F2838
TR7-TR-10tamperresistanttorxbits00P6967
RemovaltoolantennaRFconnector08K7159
USB2.0CD-RW/DVD-ROMcombodriveII40Y8687
USBcable40Y8704
USBoppydiskettedriveformaintenancediskette05K9283
USBoppydiskettedrivetoolkit27L3452
TestcardforintegratedSmartCard42W7820
ThinkPadHardwareMaintenanceDisketteVersion1.73orlater
Note:DownloadthelefromthefollowingWebsite:http://www.lenovo.com/spm
-
Notices
Lenovomaynotoffertheproducts,services,orfeaturesdiscussedinthisdocumentinallcountries.Consult
yourlocalLenovorepresentativeforinformationontheproductsandservicescurrentlyavailableinyour
area.AnyreferencetoaLenovoproduct,program,orserviceisnotintendedtostateorimplythatonlythat
Lenovoproduct,program,orservicemaybeused.Anyfunctionallyequivalentproduct,program,orservice
thatdoesnotinfringeanyLenovointellectualpropertyrightmaybeusedinstead.However,itistheuser's
responsibilitytoevaluateandverifytheoperationofanyotherproduct,program,orservice.
Lenovomayhavepatentsorpendingpatentapplicationscoveringsubjectmatterdescribedinthis
document.Thefurnishingofthisdocumentdoesnotgiveyouanylicensetothesepatents.Y oucansend
licenseinquiries,inwriting,to:
Lenovo(UnitedStates),Inc.
1009ThinkPlace-BuildingOne
Morrisville,NC27560
U.S.A.
140HardwareMaintenanceManual

Attention:LenovoDirectorofLicensing
LENOVOPROVIDESTHISPUBLICATION“ASIS”WITHOUTWARRANTYOFANYKIND,EITHEREXPRESS
ORIMPLIED,INCLUDING,BUTNOTLIMITEDTO,THEIMPLIEDWARRANTIESOFNON-INFRINGEMENT,
MERCHANTABILITYORFITNESSFORAPARTICULARPURPOSE.Somejurisdictionsdonotallow
disclaimerofexpressorimpliedwarrantiesincertaintransactions,therefore,thisstatementmaynotapply
toyou.
Thisinformationcouldincludetechnicalinaccuraciesortypographicalerrors.Changesareperiodically
madetotheinformationherein;thesechangeswillbeincorporatedinneweditionsofthepublication.
Lenovomaymakeimprovementsand/orchangesintheproduct(s)and/ortheprogram(s)describedinthis
publicationatanytimewithoutnotice.
Theproductsdescribedinthisdocumentarenotintendedforuseinimplantationorotherlifesupport
applicationswheremalfunctionmayresultininjuryordeathtopersons.Theinformationcontainedinthis
documentdoesnotaffectorchangeLenovoproductspecicationsorwarranties.Nothinginthisdocument
shalloperateasanexpressorimpliedlicenseorindemnityundertheintellectualpropertyrightsofLenovo
orthirdparties.Allinformationcontainedinthisdocumentwasobtainedinspecicenvironmentsandis
presentedasanillustration.Theresultobtainedinotheroperatingenvironmentsmayvary.
Lenovomayuseordistributeanyoftheinformationyousupplyinanywayitbelievesappropriatewithout
incurringanyobligationtoyou.
Anyreferencesinthispublicationtonon-LenovoWebsitesareprovidedforconvenienceonlyanddonotin
anymannerserveasanendorsementofthoseWebsites.ThematerialsatthoseWebsitesarenotpartof
thematerialsforthisLenovoproduct,anduseofthoseWebsitesisatyourownrisk.
Anyperformancedatacontainedhereinwasdeterminedinacontrolledenvironment.Therefore,theresult
obtainedinotheroperatingenvironmentsmayvarysignicantly.Somemeasurementsmayhavebeen
madeondevelopment-levelsystemsandthereisnoguaranteethatthesemeasurementswillbethesame
ongenerallyavailablesystems.Furthermore,somemeasurementsmayhavebeenestimatedthrough
extrapolation.Actualresultsmayvary.Usersofthisdocumentshouldverifytheapplicabledatafortheir
specicenvironment.
Electronicemissionsnotices
ForelectronicemissioninformationonClassBdigitaldevices,refertothecorrespondinginformationin
theUserGuide.
Trademarks
ThefollowingtermsaretrademarksofLenovointheUnitedStates,othercountriesorboth:
ActiveProtectionSystem
Lenovo
RescueandRecovery
ThinkPad
ThinkVantage
TrackPoint
UltraBase
Ultrabay
UltraNav
Chapter10.Partslist141

ThefollowingtermsaretrademarksofMicrosoftCorporationintheUnitedStates,othercountries,orboth:
Windows
WindowsVista
ThefollowingaretrademarksofIntelCorporationoritssubsidiariesintheUnitedStates,othercountries,or
both:
Intel
IntelCeleron
IntelCore2Duo
IntelCore2Solo
Othercompany,product,orservicenamesmaybethetrademarksorservicemarksofothers.
142HardwareMaintenanceManual

PartNumber:0A60175_04
PrintedinChina
(1P)P/N:0A60175_04
*0A60175_04*
