Lenovo M123 ThinkPad Stack Mobile Projector User Manual Manual
Lenovo (Beijing) Limited ThinkPad Stack Mobile Projector Manual
Lenovo >
Contents
- 1. User Manual
- 2. Manual
Manual
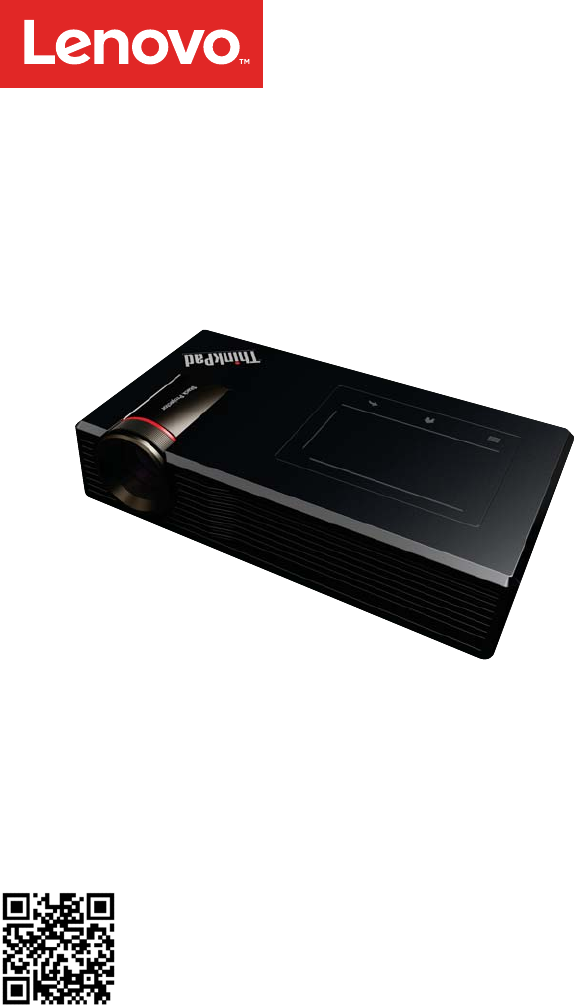
ThinkPad Stack Mobile Projector User Guide
For Android 4.4 or later
Download the ThinkPad Stack Assistant app at:
http://www.lenovo.com/stack
Contents
Chapter 1. In the box ............................................................................... 1
Chapter 2. Product overview .................................................................. 2
Chapter 3. Starting the projector ........................................................... 3
Turning on the projector .................................................................................................... 3
Turning off the projector .................................................................................................... 3
Status LEDs ...................................................................................................................... 3
Chapter 4. Initializing the projector ....................................................... 4
Chapter 5. Adjusting the projection angle ............................................ 5
Chapter 6. Using the projector ............................................................... 6
Projector operating system ............................................................................................... 6
Controlling the projector ................................................................................................... 6
Touch pad touch gestures ................................................................................................ 7
Accessing the storage devices ......................................................................................... 8
Sharing the phone or computer screen with the projector ................................................ 8
Sharing the phone screen ............................................................................................ 8
Sharing the computer screen....................................................................................... 8
Sharing the projector screen with an external monitor ..................................................... 8
Casting files from the phone or computer to the projector ............................................... 9
Stacking with ThinkPad Stack devices ............................................................................. 9
ThinkPad Stack devices ............................................................................................... 9
Projector functions extended ....................................................................................... 9
Pairing the projector ....................................................................................................... 10
System update ................................................................................................................ 10
Resetting the projector ................................................................................................... 10
Charging the projector .................................................................................................... 10
Chapter 7. Troubleshooting .................................................................. 11
1
Chapter 1. In the box
Your option package contains the following:
ThinkPad Stack Mobile Projector (referred to as projector)
Lenovo 65W Travel AC Adapter (referred to as ac power adapter)
ThinkPad Stack Mobile Projector Stand (referred to as stand)
High-Definition Multimedia Interface (HDMI™) cable
Documentation
Protective case
If any item is missing or damaged, contact your place of purchases. Be sure to
retain your proof of purchase and packing material. They might be required to
receive warranty service.
2
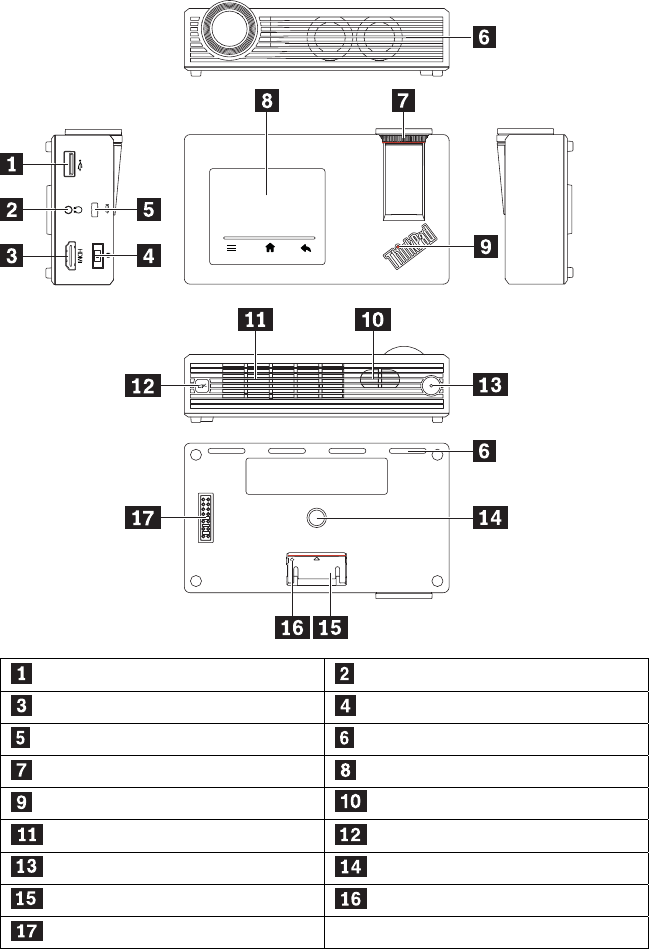
Chapter 2. Product overview
USB 2.0 connector Audio connector
HDMI connector ac power connector
Security-lock slot Vent-out*
Focus wheel Touch pad
ThinkPad logo LED Speaker
Vent-in* Projector icon indicator
Power button Tripod screw hole
Foldout foot Reset hole
Pogo pad
Vent-out* and Vent-in*:
Caution: Do not block the vents when the projector is on.

3
Chapter 3. Starting the projector
Turning on the projector
Press and hold the power button for 1 second until the projector icon indicator is
solid on.
Turning off the projector
There are three methods to turn off the projector:
Press and hold the power button for 1 second. Then follow the
instructions on the projector screen to turn off the projector.
Press and hold the power button for 4 seconds until the projector icon
indicator is off.
Use ThinkPad Stack Assistant (referred to as Assistant app) to turn off
the projector.
Status LEDs
The status LEDs on the projector flash in the following ways to indicate different
working status of the projector.
LED activity Projector status
Power button LED and projector icon
indicator stay on.
Turned on
Projector icon indicator stays on and
power button LED flashes in green.
Standby
Power button LED and projector icon
indicator stay off.
Turned off
Power button LED turns amber. Battery low (below 25%)
Power button LED flashes in amber. Battery low (below 10%)
ThinkPad logo LED flashes for 5 times. Power present
4
Chapter 4. Initializing the projector
After the projector is turned on, follow the instructions on the projector screen to
initialize the projector:
1. Set the language, date, and time.
2. Download the Assistant app.
Before using the Assistant app, do the following:
1. Enable Hotspot from the Settings page of the projector.
2. Connect your phone to the projector through Wi-Fi.
Then you can start the Assistant app to enjoy the following functions:
Easy control of the projector
Easy display of files from external storage devices
5
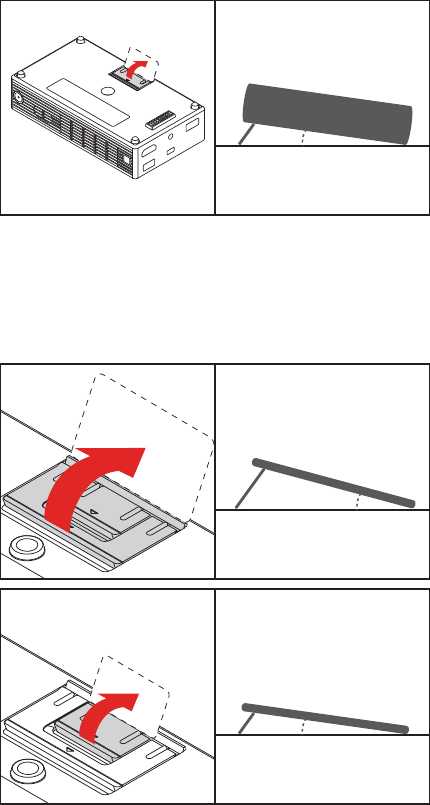
Chapter 5. Adjusting the projection angle
To adjust the projection angle, you can expand the foldout feet on the projector or
stand.
ThinkPad Stack Mobile Projector
Attention: Handle your projector gently. Do not push hard on your
projector when the foldout foot is expanded.
ThinkPad Stack Mobile Projector Stand
8°
A
B
15°
8°

6
Chapter 6. Using the projector
Projector operating system
The projector is preinstalled with Android operating system.
To make your projector easier to use, the operating system provides vairous
functions on the Home page and Settings page.
On the Home page
Function Description
Cast Screen Share a phone or computer screen with the projector
through Wi-Fi.
HDMI HDMI off: Disable the HDMI function.
HDMI in: Share a phone or computer screen with
the projector through the HDMI cable.
HDMI out: Share the projector screen with an
external display through the HDMI cable.
External
Storage Device
Access the external storage device connected to the
projector.
On the Settings page
Function Action
Wi-Fi Click Settings → Network Settings and Connection
→ Wi-Fi and select a network to connect.
Hotspot Click Settings → Network Settings and Connection
→ Hotspot and enable Hotspot.
Bluetooth Click Settings → Network Settings and Connection
→ Bluetooth and select an available device to connect.
HDMI Click Settings → Others → HDMI and select HDMI
off, HDMI in, or HDMI out.
Keystone
Correction
Click Settings → Others → Keystone Correction
and enable Auto Keystone Correction or set the
Manual Keystone Correction value.
Controlling the projector
You can control the projector through the following ways:
7
Projector touch pad: The touch pad surface is sensitive to finger touch
and movement. Use the touch pad to control the projector.
Assistant app: Connect your phone or computer to the projector hotspot
and use the Assistant app to control the projector from your phone or
computer.
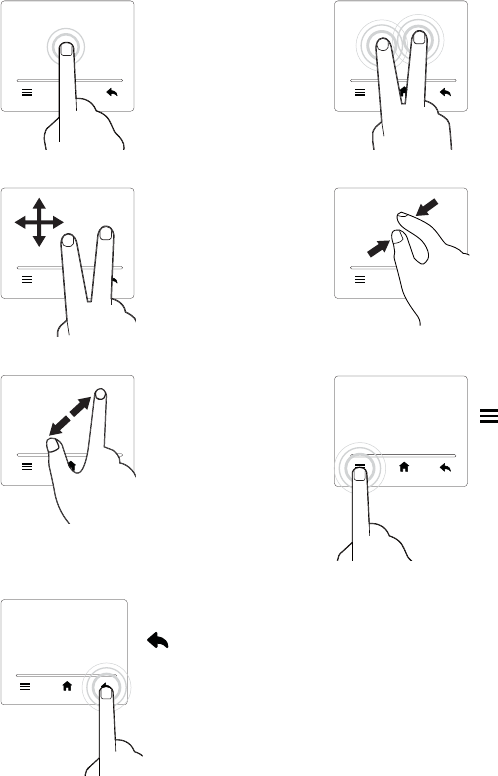
Touch pad touch gestures
You can use the touch pad to perform the same point and click actions as a
traditional mouse.
You also can use the touch pad to perform the following touch gestures:
Touch: Tap.
Function: Perform an
action.
Touch: Tap and hold.
Function: Display a
shortcut menu.
Touch: Slide.
Function: Scroll
through items, such
as lists, pages, and
photos.
Touch: Move two
fingers closer together.
Function: Zoom out.
Touch: Move two
fingers farther apart.
Function: Zoom in.
Touch: Tap and hold
for 2 seconds.
Function: Display the
volume control.
Touch: Tap and hold
for 2 seconds.
Function: Switch
from the HDMI in or
HDMI out mode into
the projection mode.
8
Accessing the storage devices
You can access the following storage devices:
Internal memory of the projector
External storage devices connected to the projector, such as a ThinkPad
Stack 1TB USB3.0 Hard Drive or a Universal Serial Bus (USB) storage
device
Sharing the phone or computer screen with the projector
You can share the phone or computer screen with the projector through a wired
or wireless connection.
For wireless connection, ensure that your phone or computer is equipped with
the following function:
Phone: Cast screen or similar function
Computer: Intel® Wireless Display (Intel WiDi) on the Windows 8,
Windows 8.1, or Windows 10 operating system
Sharing the phone screen
Wireless connection
1. Projector: Enable Wi-Fi from the Settings page. Enable Cast screen
from the Home page.
2. Phone: Enable Wi-Fi and Cast screen. Then follow the screen
instructions to connect the phone with the projector through Cast
screen.
Sharing the computer screen
Wired connection
1. Connect the computer with the projector through the HDMI cable.
2. Set the projector in the HDMI in mode.
Wireless connection
1. Projector: Enable Wi-Fi from the Settings page. Enable Cast screen
from the Home page.
2. Computer: Enable Wi-Fi and press Windows+K. Then follow the
screen instruction to connect the computer with the projector
through Cast screen.
Sharing the projector screen with an external monitor
Ensure that the external monitor has an available HDMI connector. Then you can
share the projector screen with the external monitor by doing the following:
9
1. Turn on the external monitor and connect the monitor with the projector
through the HDMI cable.
2. Set the projector in the HDMI out mode.
Casting files from the phone or computer to the projector
With the Assistant app, you can cast files from your phone or computer to the
projector by doing the following:
1. Projector: Enable Hotspot.
2. Phone or computer: Connect with the projector through Wi-Fi.
3. Assistant app: Start the Assistant app. Click the Projector icon, click the
Folder icon, select one or more files, and click Cast for display.
The supported files include:
Pictures: BMP, JPEG, JPG, and PNG
Audios and Videos: 3GP, MP3, MP4, MKV, MPG, WAV, WEBM, TS, and
VOB
Documents: DOC, DOCX, PDF, PPT, PPTX, XLS, XLSX
Stacking with ThinkPad Stack devices
You can stack the projector with one or more ThinkPad Stack devices to extend
the projector functions.
ThinkPad Stack devices
ThinkPad Stack 10000mAh Power Bank (referred to as power bank)
ThinkPad Stack 1TB USB3.0 Hard Drive (referred to as hard disk drive)
ThinkPad Stack Bluetooth Speaker (referred to as Bluetooth speaker)
Projector functions extended
With power bank: Extend power supply.
With hard disk drive: Access the hard disk drive and display files on the
projector.
With Bluetooth speaker: Switch the audio output to the Bluetooth speaker.
Notes:
It is not recommended to stack the projector with the router. The
projector might not work correctly due to the heat generated by the
router.
The projection brightness varies with different power supplies. The
brightness is higher by the ac power adapter than the power bank or
internal battery.
10
Pairing the projector
You can pair the projector with a Bluetooth device by doing the following:
1. Turn on the Bluetooth device and set it in the paring mode.
2. Set the projector in the Bluetooth mode and pair it with the Bluetooth
device.
System update
Ensure that the projector is connected to the Internet. Then you can go to the
Settings page of the projector to start System update. Follow the screen
instructions to complete the update.
Attention: During the system update, ensure that the projector is sufficiently
charged to prevent update interruption and system damage.
Resetting the projector
Ensure that the ac power adapter is disconnected from the projector. Then you
can reset the projector by doing the following:
1. Insert a needle or a straightened paper clip into the reset hole to press
and hold the reset button for 5 seconds. Then release the button.
2. The Power button LED flashes for 3 times. Then the resetting process is
completed.
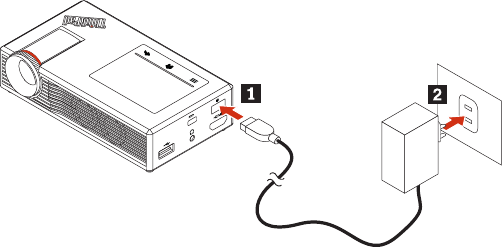
Charging the projector

11
Chapter 7. Troubleshooting
Problem: The projector cannot be turned on by pressing the power button.
Solution: Ensure that the projector is sufficiently charged or is charging with the ac power
adapter.
Problem: The projector icon indicator is on, but the focus wheel does not work.
Solution: The projector might be in the standby mode. To awake the projector, quickly
press the power button on the projector. The focus wheel works when the power button
LED is solid on.
Problem: The projector is turned on, but it takes too long to enter the Home page.
Solution: The projector needs about 25 seconds to enter the Home page. To solve the
problem, restart the projector.
Problem: The HDMI in function does not work.
Solution:
1. Disconnect the HDMI cable and reconnect it to the computer and projector.
2. Set the projector to the HDMI in mode again.
Problem: The projector Wi-Fi function does not work.
Solution: Ensure that the projector is in the Wi-Fi mode.
Problem: The Bluetooth device cannot connect with the projector through Bluetooth.
Solution: Ensure that you have followed the correct pairing steps and enabled the
Bluetooth function on the Bluetooth device.
Problem: The projector is stacked with the Bluetooth speaker, but there is no audio
output from either device.
Solutions: The audio output is switched from the projector to the Bluetooth speaker.
Ensure that the Bluetooth speaker is turned on and paired with the projector
only.
Ensure that the Bluetooth speaker is not stacked with a router.
Press the play/pause button on the Bluetooth speaker.
Problem: There is noise in the Bluetooth speaker.
Solution: Ensure that:
The Bluetooth speaker is correctly stacked with the projector.
The projector has sufficient power. Otherwise, charge the projector through ac
power adapter or correctly stack the projector to a power bank.
Problem: There is no audio output in the HDMI out mode.

12
Solution: The audio output is switched from the projector to the external monitor.
Ensure that the external monitor is equipped with internal or external speakers.
Problem: The projected image displays in a trapezoid shape.
Solution: Go to the Settings page of the projector. Then enable Auto Keystone Correction
or set the Manual Keystone Correction value.
Problem: There is response delay or mosaic during the video play through Cast screen.
Solution: Reduce the distance between your phone or computer and projector.
Problem: The projector does not recognize the stacked hard disk drive.
Solution: Ensure that:
The hard disk drive is correctly and directly stacked with the projector.
The hard disk drive is not stacked with a router.
Problem: The projector fans become noisy.
Solution: Ensure that:
The projector vents are not blocked.
The projector is not stacked with a power bank.
Problem: The projector turns off unexpectedly.
Solution: Ensure that the projector is well-ventilated. Allow the projector to cool down and
then turn on the projector.
Problem: The ac power adapter cannot charge the projector when the projector is
stacked with a power bank.
Solution: The power bank has the priority of charging. To solve the problem, remove the
power bank from the projector.
First Edition (August 2016)
© Copyright Lenovo 2016.
Lenovo, the Lenovo logo, and ThinkPad are trademarks of Lenovo in the United States, other countries,
or both.
Intel is a trademark of Intel Corporation or its subsidiaries in the U.S. and/or other countries.
Microsoft and Windows are trademarks of the Microsoft group of companies.
The terms HDMI and HDMI High-Definition Multimedia Interface are trademarks or registered
trademarks of HDMI Licensing LLC in the United States and other countries.
Other company, product, or service names may be trademarks or service marks of others.
LIMITED AND RESTRICTED RIGHTS NOTICE: If data or software is delivered pursuant to a General
Services Administration “GSA” contract, use, reproduction, or disclosure is subject to restrictions set
forth in Contract No. GS-35F-05925.