Lenovo M53 Hmm User Manual Hardware Maintenance Think Centre Desktop (Think Centre) Type 10ER
2014-11-24
User Manual: Lenovo M53 Hmm Hardware Maintenance Manual - ThinkCentre M53 M53 Desktop (ThinkCentre) - Type 10ER 10ER
Open the PDF directly: View PDF ![]() .
.
Page Count: 184 [warning: Documents this large are best viewed by clicking the View PDF Link!]
- About this manual
- Chapter 1. Read this first: Important safety information
- Chapter 2. Product overview
- Chapter 3. Using your computer
- Chapter 4. You and your computer
- Chapter 5. Security
- Chapter 6. Advanced configuration
- Chapter 7. Preventing problems
- Chapter 8. Troubleshooting and diagnostics
- Basic troubleshooting
- Troubleshooting procedure
- Troubleshooting
- Audio problems
- CD problems
- DVD problems
- Intermittent problems
- Hard disk drive problems
- Problems with the keyboard or mouse
- Monitor problems
- Networking problems
- I have connected an option to my computer, but it does not work
- Performance and lockup problems
- The printer does not work
- Serial connector cannot be accessed
- Software problems
- My USB connectors cannot be accessed
- Diagnostics
- Chapter 9. Service checkout and symptom-to-FRU index
- Chapter 10. Recovery information
- Chapter 11. Installing or replacing hardware
- Handling static-sensitive devices
- Installing or replacing hardware
- Installing external options
- Installing and removing the ac power adapter bracket
- Installing and removing the ac power adapter
- Installing and removing the vertical stand
- Installing and removing the VESA mount bracket
- Installing or replacing the external optical drive
- Installing or replacing the external hard disk drive
- Removing the computer cover
- Replacing the microprocessor fan
- Replacing the heat sink
- Replacing the memory module
- Installing or replacing the cover presence switch
- Replacing the internal speaker
- Replacing the power button board
- Replacing the hard disk drive assembly
- Replacing the coin-cell battery
- Installing or replacing the Wi-Fi card module
- Installing and removing the front Wi-Fi antenna
- Installing and removing the rear Wi-Fi antenna
- Replacing the system board
- Installing or replacing the keyboard or mouse
- Completing the parts replacement
- Chapter 12. Getting information, help, and service
- Appendix A. Regulatory information
- Appendix B. WEEE and recycling information
- Appendix C. Restriction of Hazardous Substances Directive (RoHS)
- Appendix D. China Energy Label
- Appendix E. ENERGY STAR model information
- Appendix F. Notices
- Index

ThinkCentreM53
HardwareMaintenanceManual
MachineTypes:10DB,10DC,10DD,10DE,10DV,10DW,10DX,
10DY,10EC,and10ED

Note:Beforeusingthisinformationandtheproductitsupports,besuretoreadandunderstandtheChapter
1“Readthisfirst:Importantsafetyinformation”onpage1andAppendixF“Notices”onpage169.
FirstEdition(September2014)
©CopyrightLenovo2014.
LIMITEDANDRESTRICTEDRIGHTSNOTICE:IfdataorsoftwareisdeliveredpursuantaGeneralServicesAdministration
“GSA”contract,use,reproduction,ordisclosureissubjecttorestrictionssetforthinContractNo.GS-35F-05925.

Contents
Aboutthismanual............v
Chapter1.Readthisfirst:Important
safetyinformation............1
Powercordsandpoweradapters........1
Generalsafety................1
Electricalsafety...............2
Safetyinspectionguide............4
Handlingelectrostaticdischarge-sensitive
devices..................4
Groundingrequirements............5
Safetynotices(multi-lingualtranslations).....5
Chapter2.Productoverview.....27
Locations.................27
Locatingconnectors,controls,andindicators
onthefrontofyourcomputer.......28
Locatingconnectorsontherearofyour
computer...............29
Locatingcomponents..........30
LocatingmajorFRUsandCRUs......32
Locatingpartsonthesystemboard....34
Locatingthemachinetypeandmodellabel.35
Features.................35
Specifications...............39
Lenovoprograms.............39
AccessingLenovoprogramsontheWindows
7operatingsystem...........39
AccessingLenovoprogramsontheWindows
8.1operatingsystem..........40
AnintroductiontoLenovoprograms....41
Chapter3.Usingyourcomputer...43
Registeringyourcomputer..........43
Usingkeyboardshortcuts..........43
Usingthewheelmouse...........44
Managingpower..............44
Advancedconfigurationandpowerinterface
(ACPI)BIOS..............44
AutomaticPower-onfeatures.......44
Settingthecomputervolume.........45
Settingthevolumefromthedesktop....45
SettingthevolumefromControlPanel...45
Usingadisc................46
Usingtheopticaldrive..........46
Handlingandstoringadisc........46
Playingandremovingadisc.......47
Recordingadisc............47
NavigatingamongscreensontheWindows8.1
operatingsystem..............47
AccessingControlPanelontheWindows8.1
operatingsystem..............49
Frequentlyaskedquestions.........49
Chapter4.Youandyourcomputer..51
Accessibilityandcomfort..........51
Arrangingyourworkspace........51
Comfort...............51
Glareandlighting............52
Aircirculation.............52
Electricaloutletsandcablelengths.....52
Accessibilityinformation.........52
Movingyourcomputertoanothercountryor
region..................56
Chapter5.Security..........57
AttachingaKensington-stylecablelock.....57
Usingpasswords..............57
BIOSpasswords............57
Windowspasswords..........58
Usingthecoverpresenceswitch.......58
Usingthefingerprintreader..........58
Usingandunderstandingfirewalls.......59
Protectingdataagainstviruses........59
Chapter6.Advancedconfiguration..61
UsingtheSetupUtilityprogram........61
StartingtheSetupUtilityprogram.....61
Viewingandchangingsettings......61
UsingBIOSpasswords.........62
Enablingordisablingadevice.......63
Selectingastartupdevice........64
EnablingErPLPScompliancemode....64
Smartperformancechoices........65
ICEperformancemode.........65
ICEthermalalert............66
ExitingtheSetupUtilityprogram......66
UpdatingorrecoveringtheBIOS.......66
BIOSlevels..............67
Usingsystemprograms.........67
ChangingtheBIOSsettingsbeforeinstallinga
newoperatingsystem..........67
UpdatingtheBIOSfromadisc......68
UpdatingtheBIOSfromyouroperating
system................69
RecoveringfromaBIOSupdatefailure...69
©CopyrightLenovo2014i

Chapter7.Preventingproblems...71
Keepingyourcomputercurrent........71
Gettingthelatestdevicedriversforyour
computer...............71
Updatingyouroperatingsystem......71
UsingtheSystemUpdateprogram.....72
Cleaningandmaintenance..........72
Basics................72
Cleaningyourcomputer.........72
Goodmaintenancepractices.......73
Movingyourcomputer...........74
Chapter8.Troubleshootingand
diagnostics..............75
Basictroubleshooting............75
Troubleshootingprocedure..........76
Troubleshooting..............76
Audioproblems............77
CDproblems.............77
DVDproblems.............78
Intermittentproblems..........79
Harddiskdriveproblems.........79
Problemswiththekeyboardormouse...80
Monitorproblems............81
Networkingproblems..........82
Ihaveconnectedanoptiontomycomputer,
butitdoesnotwork...........84
Performanceandlockupproblems.....84
Theprinterdoesnotwork........85
Serialconnectorcannotbeaccessed....85
Softwareproblems...........85
MyUSBconnectorscannotbeaccessed..86
Diagnostics................86
LenovoSolutionCenter.........86
UEFIdiagnosticprogram.........87
Chapter9.Servicecheckoutand
symptom-to-FRUindex........89
Servicecheckout..............89
Problemdeterminationtips........89
Symptom-to-FRUindex...........90
Harddiskdrivebooterror........90
Powersupplyproblems.........91
Beepsymptoms............91
POSTerrorcodes............91
Miscellaneouserrorconditions......92
Undeterminedproblems.........94
Chapter10.Recoveryinformation..95
RecoveryinformationfortheWindows7operating
system..................95
Creatingandusingrecoverymedia.....95
Performingbackupandrecoveryoperations.96
Creatingandusingarescuemedium....98
Reinstallingprogramsanddevicedrivers..98
Solvingrecoveryproblems........100
RecoveryinformationfortheWindows8.1
operatingsystem..............100
Refreshingyourcomputer........100
Resettingyourcomputertothefactory-default
settings................100
Usingtheadvancedstartupoptions....101
RecoveringyouroperatingsystemifWindows
8.1failstostart.............101
Chapter11.Installingorreplacing
hardware..............103
Handlingstatic-sensitivedevices.......103
Installingorreplacinghardware........103
Installingexternaloptions........103
Installingandremovingtheacpoweradapter
bracket................104
Installingandremovingtheacpower
adapter................105
Installingandremovingtheverticalstand..107
InstallingandremovingtheVESAmount
bracket................109
Installingorreplacingtheexternaloptical
drive.................111
Installingorreplacingtheexternalharddisk
drive.................117
Removingthecomputercover.......123
Replacingthemicroprocessorfan.....125
Replacingtheheatsink.........127
Replacingthememorymodule......129
Installingorreplacingthecoverpresence
switch................130
Replacingtheinternalspeaker.......131
Replacingthepowerbuttonboard.....133
Replacingtheharddiskdriveassembly...134
Replacingthecoin-cellbattery......136
InstallingorreplacingtheWi-Ficard
module................137
InstallingandremovingthefrontWi-Fi
antenna...............139
InstallingandremovingtherearWi-Fi
antenna...............141
Replacingthesystemboard.......143
Installingorreplacingthekeyboardor
mouse................146
Completingthepartsreplacement.....147
Chapter12.Gettinginformation,help,
andservice.............151
iiThinkCentreM53HardwareMaintenanceManual

Informationresources............151
LenovoThinkVantageTools........151
HelpandSupport............151
SafetyandWarranty...........151
LenovoWebsite............151
LenovoSupportWebsite.........152
Helpandservice..............152
Usingthedocumentationanddiagnostic
program...............152
Callingforservice............152
Usingotherservices..........153
Purchasingadditionalservices......153
AppendixA.Regulatory
information.............155
Exportclassificationnotice..........155
Electronicemissionsnotices.........155
FederalCommunicationsCommission
DeclarationofConformity........155
Eurasiancompliancemark..........157
Brazilregulatorynotice...........157
Mexicoregulatorynotice...........157
Additionalregulatoryinformation.......157
AppendixB.WEEEandrecycling
information.............159
ImportantWEEEinformation.........159
RecyclinginformationforJapan........159
RecyclinginformationforBrazil........160
BatteryrecyclinginformationforTaiwan.....160
BatteryrecyclinginformationfortheEuropean
Union..................160
AppendixC.RestrictionofHazardous
SubstancesDirective(RoHS)....163
EuropeanUnionRoHS...........163
ChinaRoHS................163
TurkishRoHS...............163
UkraineRoHS...............164
IndiaRoHS................164
AppendixD.ChinaEnergyLabel..165
AppendixE.ENERGYSTARmodel
information.............167
AppendixF.Notices.........169
Trademarks................170
Index.................171
©CopyrightLenovo2014iii

ivThinkCentreM53HardwareMaintenanceManual

Aboutthismanual
ThismanualprovidesserviceandreferenceinformationforThinkCentre®computerslistedonthefrontcover.
Usethismanualalongwiththeadvanceddiagnosticteststotroubleshootproblems.
Important:ThismanualisintendedonlyfortrainedservicetechnicianswhoarefamiliarwithThinkCentre
computers.Usethismanualalongwiththeadvanceddiagnosticteststotroubleshootproblemseffectively.
BeforeservicingaThinkCentrecomputer,besuretoreadandunderstandChapter1“Readthisfirst:
Importantsafetyinformation”onpage1.
©CopyrightLenovo2014v

viThinkCentreM53HardwareMaintenanceManual

Chapter1.Readthisfirst:Importantsafetyinformation
Thischaptercontainsthesafetyinformationthatyoumustbefamiliarwith.
Powercordsandpoweradapters
Useonlythepowercordsandpoweradapterssuppliedbytheproductmanufacturer.
Thepowercordsshallbesafetyapproved.ForGermany,itshallbeH05VV-F,3G,0.75mm2,orbetter.For
othercountries,thesuitabletypesshallbeusedaccordingly.
Neverwrapapowercordaroundapoweradapterorotherobject.Doingsocanstressthecordinwaysthat
cancausethecordtofray,crack,orcrimp.Thiscanpresentasafetyhazard.
Alwaysroutepowercordssothattheywillnotbewalkedon,trippedover,orpinchedbyobjects.
Protectpowercordandpoweradaptersfromliquids.Forinstance,donotleaveyourpowercordorpower
adapternearsinks,tubs,toilets,oronfloorsthatarecleanedwithliquidcleansers.Liquidscancausea
shortcircuit,particularlyifthepowercordorpoweradapterhasbeenstressedbymisuse.Liquidsalsocan
causegradualcorrosionofpowercordterminalsand/ortheconnectorterminalsonapoweradapter,
whichcaneventuallyresultinoverheating.
Ensurethatallpowercordconnectorsaresecurelyandcompletelypluggedintoreceptacles.
Donotuseanypoweradapterthatshowscorrosionattheacinputpinsorshowssignsofoverheating(such
asdeformedplastic)attheacinputoranywhereonthepoweradapter.
Donotuseanypowercordswheretheelectricalcontactsoneitherendshowsignsofcorrosionor
overheatingorwherethepowercordappearstohavebeendamagedinanyway.
Generalsafety
Followtheserulestoensuregeneralsafety:
•Observegoodhousekeepingintheareaofthemachinesduringandaftermaintenance.
•Whenliftinganyheavyobject:
1.Ensureyoucanstandsafelywithoutslipping.
2.Distributetheweightoftheobjectequallybetweenyourfeet.
3.Useaslowliftingforce.Nevermovesuddenlyortwistwhenyouattempttolift.
4.Liftbystandingorbypushingupwithyourlegmuscles;thisactionremovesthestrainfromthe
musclesinyourback.
Attention:
Donotattempttoliftanyobjectsthatweighmorethan16kg(35lb)orobjectsthatyouthinkare
tooheavyforyou.
•Donotperformanyactionthatcauseshazardstothecustomer,orthatmakestheequipmentunsafe.
•Beforeyoustartthemachine,ensurethatotherservicerepresentativesandthecustomer'spersonnelare
notinahazardousposition.
©CopyrightLenovo20141
•Placeremovedcoversandotherpartsinasafeplace,awayfromallpersonnel,whileyouareservicing
themachine.
•Keepyourtoolcaseawayfromwalkareassothatotherpeoplewillnottripoverit.
•Donotwearlooseclothingthatcanbetrappedinthemovingpartsofamachine.Ensurethatyoursleeves
arefastenedorrolledupaboveyourelbows.Ifyourhairislong,fastenit.
•Inserttheendsofyournecktieorscarfinsideclothingorfastenitwithanonconductiveclip,approximately
8centimeters(3inches)fromtheend.
•Donotwearjewelry,chains,metal-frameeyeglasses,ormetalfastenersforyourclothing.
Remember:Metalobjectsaregoodelectricalconductors.
•Wearsafetyglasseswhenyouare:hammering,drilling,soldering,cuttingwire,attachingsprings,using
solvents,orworkinginanyotherconditionsthatmightbehazardoustoyoureyes.
•Afterservice,reinstallallsafetyshields,guards,labels,andgroundwires.Replaceanysafetydevice
thatiswornordefective.
•Reinstallallcoverscorrectlybeforereturningthemachinetothecustomer.
CAUTION:
Hazardousmovingparts.Keepfingersandotherbodypartsaway.
CAUTION:
Beforeyouopenthecomputercover,turnoffthecomputerandwaitseveralminutesuntilthe
computeriscool.
Electricalsafety
CAUTION:
Electricalcurrentfrompower,telephone,andcommunicationcablescanbehazardous.Toavoid
personalinjuryorequipmentdamage,disconnecttheattachedpowercords,telecommunication
systems,networks,andmodemsbeforeyouopenthecomputercovers,unlessinstructedotherwise
intheinstallationandconfigurationprocedures.
Observethefollowingruleswhenworkingonelectricalequipment.
Important:Useonlyapprovedtoolsandtestequipment.Somehandtoolshavehandlescoveredwithasoft
materialthatdoesnotinsulateyouwhenworkingwithliveelectricalcurrents.Manycustomershave,near
theirequipment,rubberfloormatsthatcontainsmallconductivefiberstodecreaseelectrostaticdischarges.
Donotusethistypeofmattoprotectyourselffromelectricalshock.
2ThinkCentreM53HardwareMaintenanceManual

•Findtheroomemergencypower-off(EPO)switch,disconnectingswitch,orelectricaloutlet.Ifanelectrical
accidentoccurs,youcanthenoperatetheswitchorunplugthepowercordquickly.
•Donotworkaloneunderhazardousconditionsornearequipmentthathashazardousvoltages.
•Disconnectallpowerbefore:
–Performingamechanicalinspection
–Workingnearpowersupplies
–RemovingorinstallingFieldReplaceableUnits(FRUs)
•Beforeyoustarttoworkonthemachine,unplugthepowercord.Ifyoucannotunplugit,poweroffthe
wallboxthatsuppliespowertothemachineandlockthewallboxintheoffposition.
•Ifyouneedtoworkonamachinethathasexposedelectricalcircuits,observethefollowingprecautions:
–Ensurethatanotherperson,familiarwiththepower-offcontrols,isnearyou.
Remember:Anotherpersonmustbetheretoswitchoffthepower,ifnecessary.
–Useonlyonehandwhenworkingwithpowered-onelectricalequipment;keeptheotherhandinyour
pocketorbehindyourback.
Remember:Theremustbeacompletecircuittocauseelectricalshock.Byobservingtheaboverule,
youmaypreventacurrentfrompassingthroughyourbody.
–Whenusingatester,setthecontrolscorrectlyandusetheapprovedprobeleadsandaccessoriesfor
thattester.
–Standonsuitablerubbermats(obtainedlocally,ifnecessary)toinsulateyoufromgroundssuchas
metalfloorstripsandmachineframes.
Observethespecialsafetyprecautionswhenyouworkwithveryhighvoltages;theseinstructionsarein
thesafetysectionsofmaintenanceinformation.Useextremecarewhenmeasuringhighvoltages.
•Regularlyinspectandmaintainyourelectricalhandtoolsforsafeoperationalcondition.
•Donotusewornorbrokentoolsandtesters.
•Neverassumethatpowerhasbeendisconnectedfromacircuit.First,checkthatithasbeenpowered-off.
•Alwayslookcarefullyforpossiblehazardsinyourworkarea.Examplesofthesehazardsaremoistfloors,
nongroundedpowerextensioncables,powersurges,andmissingsafetygrounds.
•Donottouchliveelectricalcircuitswiththereflectivesurfaceofaplasticdentalmirror.Thesurfaceis
conductive;suchtouchingcancausepersonalinjuryandmachinedamage.
•Donotservicethefollowingpartswiththepoweronwhentheyareremovedfromtheirnormaloperating
placesinamachine:
–Powersupplyunits
–Pumps
–Blowersandfans
–Motorgenerators
andsimilarunits.(Thispracticeensurescorrectgroundingoftheunits.)
•Ifanelectricalaccidentoccurs:
–Usecaution;donotbecomeavictimyourself.
–Switchoffpower.
–Sendanotherpersontogetmedicalaid.
Chapter1.Readthisfirst:Importantsafetyinformation3

Safetyinspectionguide
Theintentofthisinspectionguideistoassistyouinidentifyingpotentiallyunsafeconditionsonthese
products.Eachmachine,asitwasdesignedandbuilt,hadrequiredsafetyitemsinstalledtoprotectusers
andservicepersonnelfrominjury.Thisguideaddressesonlythoseitems.However,goodjudgmentshould
beusedtoidentifypotentialsafetyhazardsduetoattachmentoffeaturesoroptionsnotcoveredbythis
inspectionguide.
Ifanyunsafeconditionsarepresent,youmustdeterminehowserioustheapparenthazardcouldbeand
whetheryoucancontinuewithoutfirstcorrectingtheproblem.
Considertheseconditionsandthesafetyhazardstheypresent:
•Electricalhazards,especiallyprimarypower(primaryvoltageontheframecancauseseriousorfatal
electricalshock).
•Explosivehazards,suchasadamagedCRTfaceorbulgingcapacitor
•Mechanicalhazards,suchaslooseormissinghardware
Theguideconsistsofaseriesofstepspresentedinachecklist.Beginthecheckswiththepoweroff,and
thepowercorddisconnected.
Checklist:
1.Checkexteriorcoversfordamage(loose,broken,orsharpedges).
2.Power-offthecomputer.Disconnectthepowercord.
3.Checkthepowercordfor:
a.Athird-wiregroundconnectoringoodcondition.Useametertomeasurethird-wireground
continuityfor0.1ohmorlessbetweentheexternalgroundpinandframeground.
b.Thepowercordshouldbetheappropriatetypeasspecifiedinthepartslistings.
c.Insulationmustnotbefrayedorworn.
4.Removethecover.
5.Checkforanyobviousalterations.Usegoodjudgmentastothesafetyofanyalterations.
6.Checkinsidetheunitforanyobviousunsafeconditions,suchasmetalfilings,contamination,wateror
otherliquids,orsignsoffireorsmokedamage.
7.Checkforworn,frayed,orpinchedcables.
8.Checkthatthepower-supplycoverfasteners(screwsorrivets)havenotbeenremovedortamperedwith.
Handlingelectrostaticdischarge-sensitivedevices
Anycomputerpartcontainingtransistorsorintegratedcircuits(ICs)shouldbeconsideredsensitiveto
electrostaticdischarge(ESD).ESDdamagecanoccurwhenthereisadifferenceinchargebetweenobjects.
ToprotectagainstESDdamage,equalizethechargebetweenobjects.Then,themachine,thepart,the
workmat,andthepersonhandlingthepartareallatthesamecharge.
Notes:
1.Useproduct-specificESDprocedureswhentheyexceedtherequirementsnotedhere.
2.MakesurethattheESDprotectivedevicesyouusehavebeencertified(ISO9000)asfullyeffective.
WhenhandlingESD-sensitiveparts:
•Keepthepartsinprotectivepackagesuntiltheyareinsertedintotheproduct.
•Avoidcontactwithotherpeoplewhilehandlingthepart.
4ThinkCentreM53HardwareMaintenanceManual

•Wearagroundedwriststrapagainstyourskintoeliminatestaticonyourbody.
•Preventthepartfromtouchingyourclothing.Mostclothingisinsulativeandretainsachargeeven
whenyouarewearingawriststrap.
•Usetheblacksideofagroundedworkmattoprovideastatic-freeworksurface.Thematisespecially
usefulwhenhandlingESD-sensitivedevices.
•Selectagroundingsystem,suchasthoselistedbelow,toprovideprotectionthatmeetsthespecific
servicerequirement.
Note:TheuseofagroundingsystemisdesirablebutnotrequiredtoprotectagainstESDdamage.
–AttachtheESDgroundcliptoanyframeground,groundbraid,orgreen-wireground.
–UseanESDcommongroundorreferencepointwhenworkingonadouble-insulatedor
battery-operatedsystem.Youcanusecoaxorconnector-outsideshellsonthesesystems.
–Usetheroundground-prongoftheacplugonac-operatedcomputers.
Groundingrequirements
Electricalgroundingofthecomputerisrequiredforoperatorsafetyandcorrectsystemfunction.Proper
groundingoftheelectricaloutletcanbeverifiedbyacertifiedelectrician.
Safetynotices(multi-lingualtranslations)
Thecautionanddangersafetynoticesinthissectionareprovidedinthefollowinglanguages:
•English
•Arabic
•Brazilian/Portuguese
•Chinese(simplified)
•Chinese(traditional)
•French
•German
•Hebrew
•Italian
•Korean
•Spanish
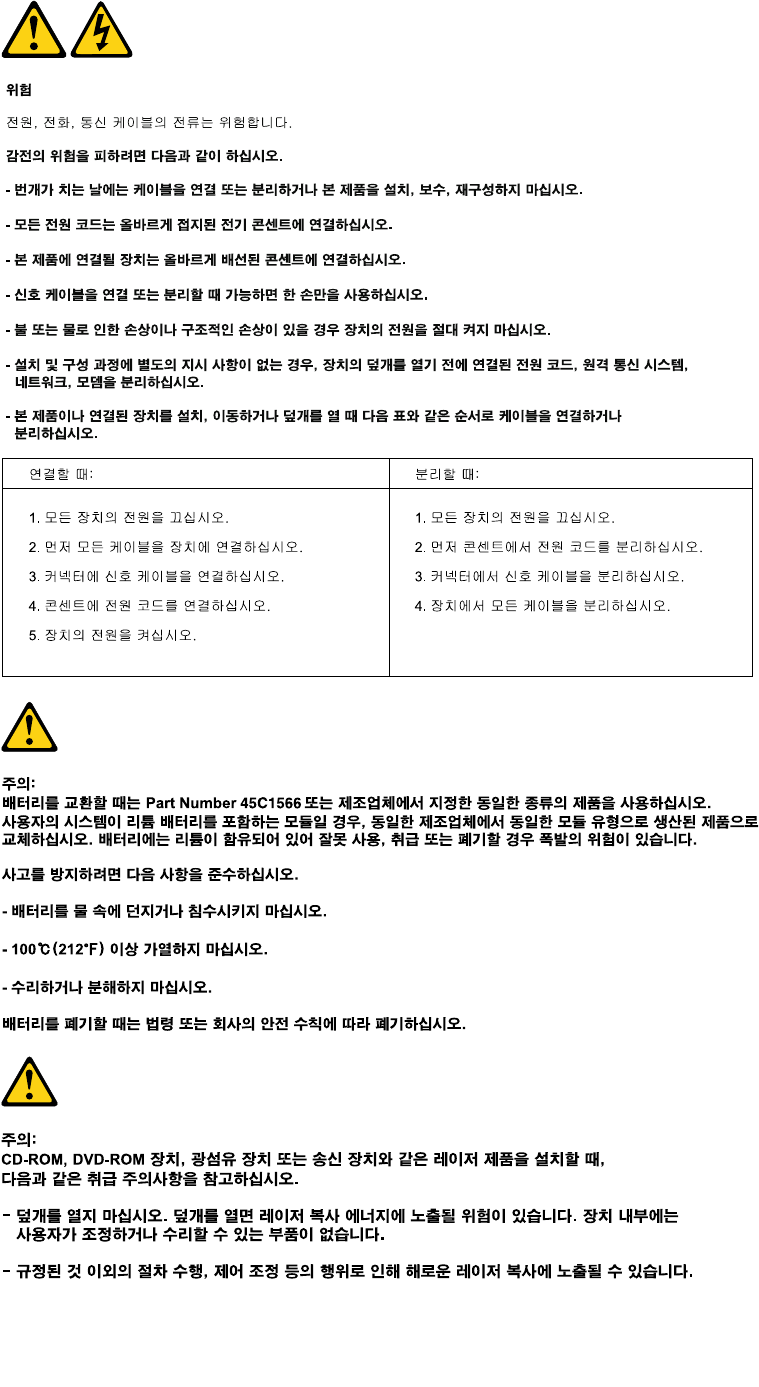
DANGER
Electricalcurrentfrompower,telephoneandcommunicationcablesishazardous.
Toavoidashockhazard:
•Donotconnectordisconnectanycablesorperforminstallation,maintenance,orreconfiguration
ofthisproductduringanelectricalstorm.
•Connectallpowercordstoaproperlywiredandgroundedelectricaloutlet.
Chapter1.Readthisfirst:Importantsafetyinformation5
•Connecttoproperlywiredoutletsanyequipmentthatwillbeattachedtothisproduct.
•Whenpossible,useonehandonlytoconnectordisconnectsignalcables.
•Neverturnonanyequipmentwhenthereisevidenceoffire,water,orstructuraldamage.
•Disconnecttheattachedpowercords,telecommunicationssystems,networks,andmodems
beforeyouopenthedevicecovers,unlessinstructedotherwiseintheinstallationandconfiguration
procedures.
•Connectanddisconnectcablesasdescribedinthefollowingtableswheninstalling,moving,or
openingcoversonthisproductorattacheddevices.
ToConnectToDisconnect
1.TurneverythingOFF.
2.First,attachallcablestodevices.
3.Attachsignalcablestoconnectors.
4.Attachpowercordstooutlet.
5.TurndeviceON.
1.TurneverythingOFF.
2.First,removepowercordsfromoutlet.
3.Removesignalcablesfromconnectors.
4.Removeallcablesfromdevices.
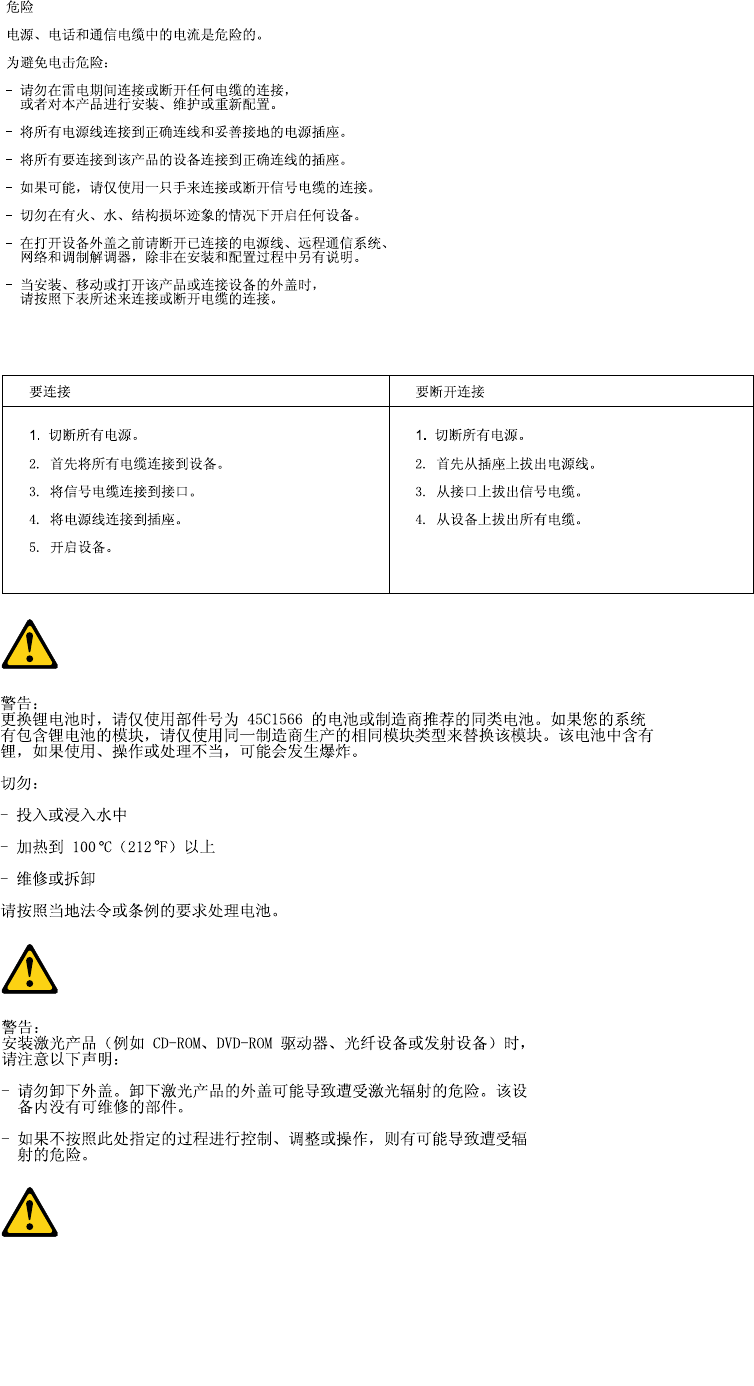
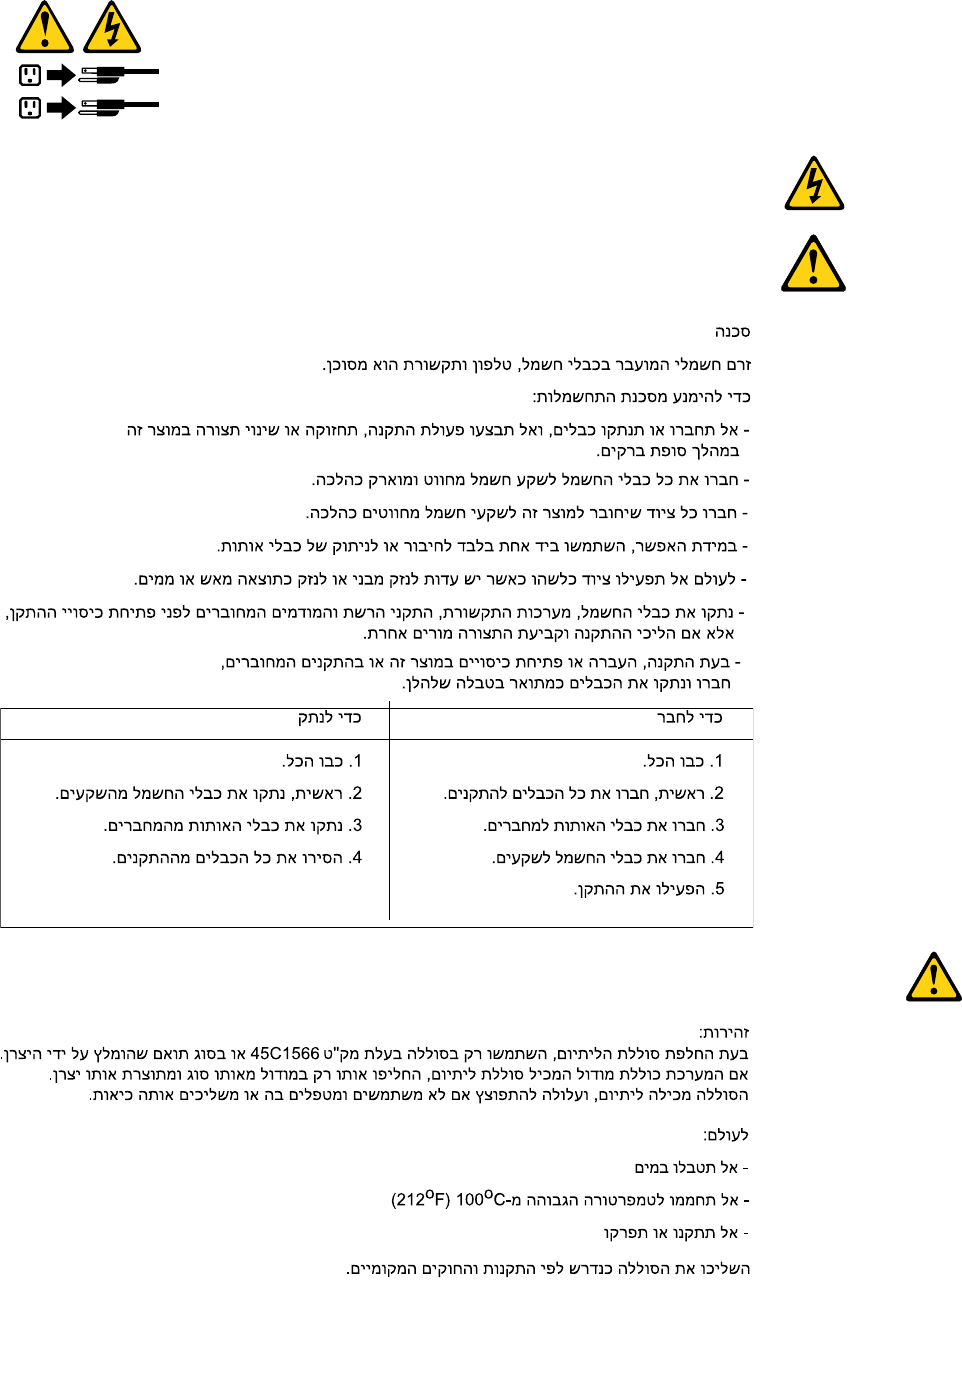
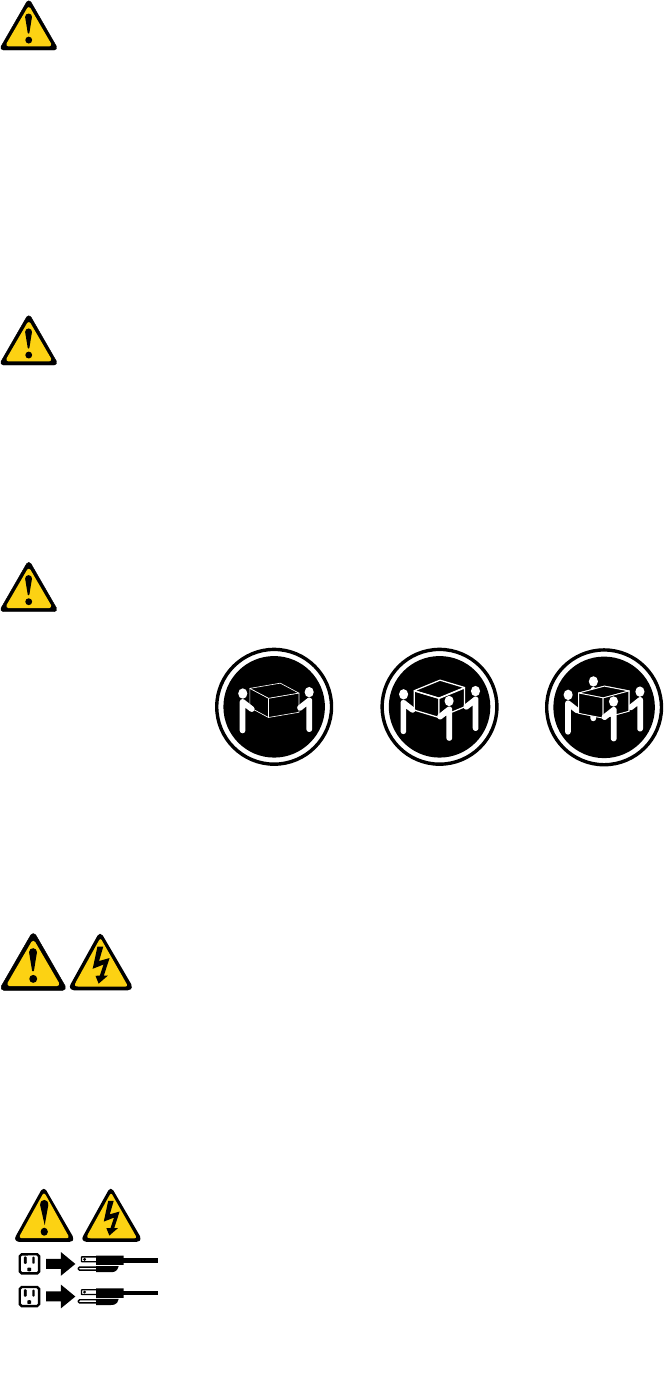
CAUTION:
Whenreplacingthelithiumbattery,useonlyPartNumber45C1566oranequivalenttypebattery
recommendedbythemanufacturer.Ifyoursystemhasamodulecontainingalithiumbattery,replace
itonlywiththesamemoduletypemadebythesamemanufacturer.Thebatterycontainslithiumand
canexplodeifnotproperlyused,handled,ordisposedof.Donot:
•Throworimmerseintowater
•Heattomorethan100°C(212°F)
•Repairordisassemble
Disposeofthebatteryasrequiredbylocalordinancesorregulations.
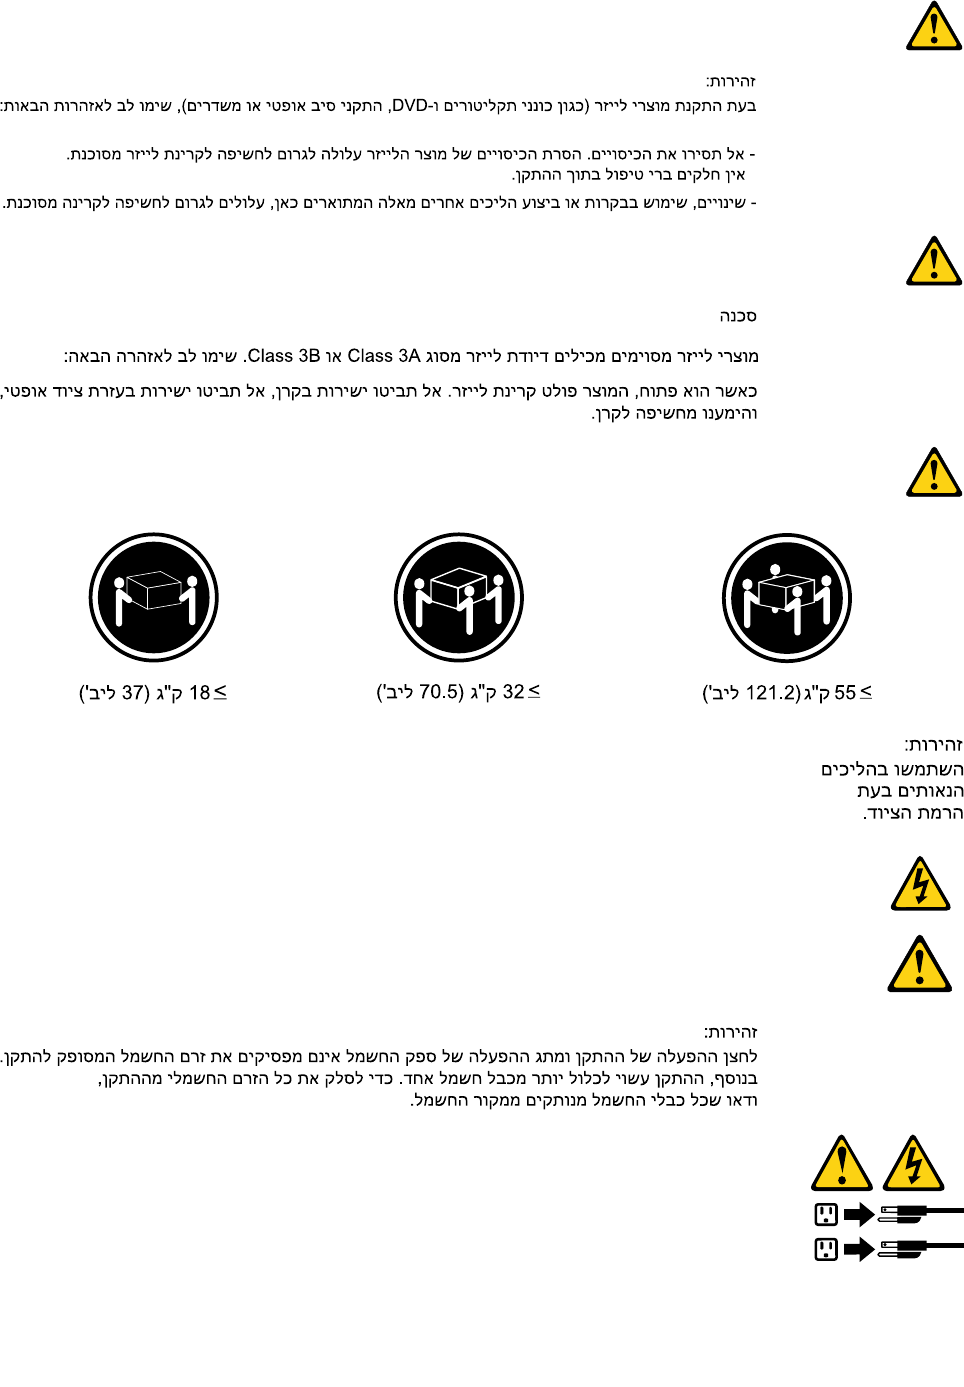
CAUTION:
Whenlaserproducts(suchasCD-ROMs,DVD-ROMdrives,fiberopticdevices,ortransmitters)are
installed,notethefollowing:
•Donotremovethecovers.Removingthecoversofthelaserproductcouldresultinexposureto
hazardouslaserradiation.Therearenoserviceablepartsinsidethedevice.
•Useofcontrolsoradjustmentsorperformanceofproceduresotherthanthosespecifiedherein
mightresultinhazardousradiationexposure.
DANGER
SomelaserproductscontainanembeddedClass3AorClass3Blaserdiode.Notethefollowing:
Laserradiationwhenopen.Donotstareintothebeam,donotviewdirectlywithoptical
instruments,andavoiddirectexposuretothebeam.
6ThinkCentreM53HardwareMaintenanceManual
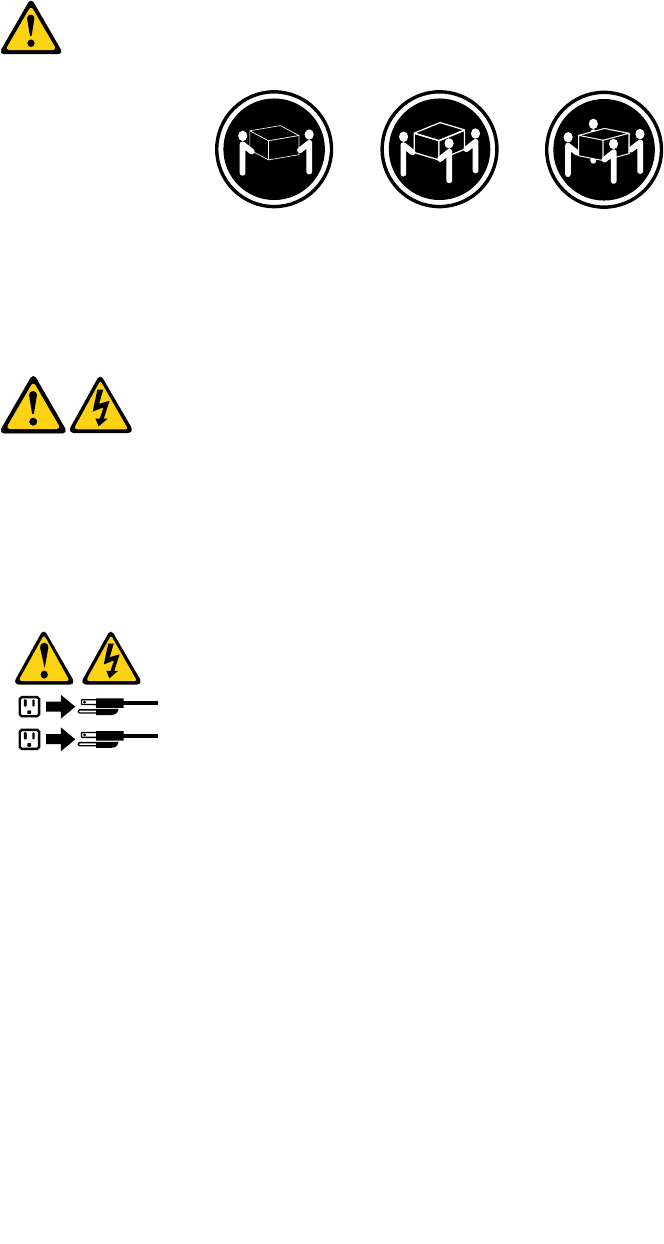
≥18kg(37lb)≥32kg(70.5lb)≥55kg(121.2lb)
CAUTION:
Usesafepracticeswhenlifting.
CAUTION:
Thepowercontrolbuttononthedeviceandthepowerswitchonthepowersupplydonotturnoff
theelectricalcurrentsuppliedtothedevice.Thedevicealsomighthavemorethanonepower
cord.Toremoveallelectricalcurrentfromthedevice,ensurethatallpowercordsaredisconnected
fromthepowersource.
1
2
Chapter1.Readthisfirst:Importantsafetyinformation7
8ThinkCentreM53HardwareMaintenanceManual
Paraevitarriscodechoqueelétrico:
•Nãoconectenemdesconectenenhumcaboouexecuteinstalação,manutençãooureconfiguração
desteprodutoduranteumatempestadecomraios.
•Conectetodososcabosdealimentaçãoatomadaselétricascorretamenteinstaladaseaterradas.
•Todoequipamentoqueforconectadoaesteprodutodeveserconectadoatomadascorretamente
instaladas.
•Quandopossível,utilizeapenasumadasmãosparaconectaroudesconectarcabosdesinal.
•Nuncaliguenenhumequipamentoquandohouverevidênciadefogo,águaoudanosestruturais.
•Antesdeabrirtampasdedispositivos,desconectecabosdealimentação,sistemasdetelecomunicação,
redesemodemsconectados,amenosqueespecificadodemaneiradiferentenosprocedimentosde
instalaçãoeconfiguração.
•Conecteedesconecteoscabosconformedescritonatabelaapresentadaaseguiraoinstalar,moverou
abrirtampasdesteprodutooudedispositivosconectados.
ParaConectar:ParaDesconectar:
1.DESLIGUETudo.
2.Primeiramente,conectetodososcabosaos
dispositivos.
3.Conecteoscabosdesinalaosconectores.
4.Conecteoscabosdealimentaçãoàstomadas.
5.LIGUEosdispositivos.
1.DESLIGUETudo.
2.Primeiramente,removaoscabosdealimentaçãodas
tomadas.
3.Removaoscabosdesinaldosconectores.
4.Removatodososcabosdosdispositivos.
CUIDADO:
Aosubstituirabateriadelítio,utilizeapenasumabateriacomNúmerodePeça45C1566ouumtipo
debateriaequivalenterecomendadopeloSeoseusistemapossuiummódulocomumabateriade
lítio,substitua-oapenasporummódulodomesmotipoedomesmofabricante.Abateriacontémlítio
epodeexplodirsenãoforutilizada,manuseadaoudescartadademaneiracorreta.
Não:
•Jogueoucoloquenaágua
•Aqueçaamaisde100°C(212°F)
•Consertenemdesmonte
Descarteabateriaconformerequeridopelasleisouregulamentoslocais.
PRECAUCIÓN:
Quandoprodutosalaser(comounidadesdeCD-ROMs,unidadesdeDVD-ROM,dispositivosdefibraótica
outransmissores)estivereminstalados,observeoseguinte:
•Nãoremovaastampas.Aremoçãodastampasdeumprodutoalaserpoderesultaremexposição
prejudicialàradiaçãodelaser.Nãoexistempeçasquepodemserconsertadasnointeriordodispositivo.
10ThinkCentreM53HardwareMaintenanceManual
•Autilizaçãodecontrolesouajustesouaexecuçãodeprocedimentosdiferentesdosespecificadosaqui
poderesultaremexposiçãoprejudicialàradiação.
PERIGO
AlgunsprodutosalasercontêmdiododelaserintegradodaClasse3AoudaClasse3B.Observeoseguinte:
Radiaçãoalaserquandoaberto.Nãoolhediretamenteparaofeixeaolhonuoucominstrumentosópticose
eviteexposiçãodiretaaofeixe.
≥18kg(37lb)≥32kg(70.5lb)≥55kg(121.2lb)
CUIDADO:
Utilizeprocedimentosdesegurançaparalevantarequipamentos.
CUIDADO:
Obotãodecontroledealimentaçãododispositivoeobotãoparaligar/desligardafontedealimentação
nãodesligamacorrenteelétricafornecidaaodispositivo.Odispositivotambémpodetermaisdeumcabo
dealimentação.Pararemovertodaacorrenteelétricadodispositivo,assegurequetodososcabosde
alimentaçãoestejamdesconectadosdafontedealimentação.
1
2
Chapter1.Readthisfirst:Importantsafetyinformation11
12ThinkCentreM53HardwareMaintenanceManual
1
2
14ThinkCentreM53HardwareMaintenanceManual

DANGER
Lecourantélectriqueprovenantdel'alimentation,dutéléphoneetdescâblesdetransmissionpeutprésenter
undanger.
Pourévitertoutrisquedechocélectrique:
•Nemanipulezaucuncâbleetn'effectuezaucuneopérationd'installation,d'entretienoudereconfiguration
deceproduitaucoursd'unorage.
•Brancheztouslescordonsd'alimentationsurunsocledeprisedecourantcorrectementcâbléetmisàla
terre.
•Branchezsurdessoclesdeprisedecourantcorrectementcâbléstoutéquipementconnectéàceproduit.
•Lorsquecelaestpossible,n'utilisezqu'uneseulemainpourconnecteroudéconnecterlescâbles
d'interface.
•Nemettezjamaisunéquipementsoustensionencasd'incendieoud'inondation,ouenprésencede
dommagesmatériels.
•Avantderetirerlescartersdel'unité,mettezcelle-cihorstensionetdéconnectezsescordons
d'alimentation,ainsiquelescâblesquilarelientauxréseaux,auxsystèmesdetélécommunicationetaux
modems(saufinstructioncontrairementionnéedanslesprocéduresd'installationetdeconfiguration).
•Lorsquevousinstallez,quevousdéplacez,ouquevousmanipulezleprésentproduitoudespériphériques
quiluisontraccordés,reportez-vousauxinstructionsci-dessouspourconnecteretdéconnecterles
différentscordons.
ConnexionDéconnexion
1.MettezlesunitésHORSTENSION.
2.Commencezparbranchertouslescordonssurles
unités.
3.Branchezlescâblesd'interfacesurdesconnecteurs.
4.Branchezlescordonsd'alimentationsurdesprises.
5.MettezlesunitésSOUSTENSION.
1.MettezlesunitésHORSTENSION.
2.Débranchezlescordonsd'alimentationdesprises.
3.Débranchezlescâblesd'interfacedesconnecteurs.
4.Débrancheztouslescâblesdesunités.
ATTENTION:
Remplacerlapileaulithiumusagéeparunepilederéférenceidentiqueexclusivement,(référence
45C1566),ousuivrelesinstructionsdufabricantquiendéfinitleséquivalences.Sivotresystèmeest
dotéd'unmodulecontenantunepileaulithium,vousdevezleremplaceruniquementparunmodule
identique,produitparlemêmefabricant.Lapilecontientdulithiumetpeutexploserencasde
mauvaiseutilisation,demauvaisemanipulationoudemiseaurebutinappropriée.
Nepas:
•lajeteràl'eau,
•l'exposeràdestempératuressupérieuresà100°C,
•chercheràlaréparerouàladémonter.
Nepasmettrelapileàlapoubelle.Pourlamiseaurebut,sereporteràlaréglementationenvigueur.
Chapter1.Readthisfirst:Importantsafetyinformation15
ATTENTION:
Sidesproduitsàlaser(telsquedesunitésdeCD-ROM,deDVD-ROM,desunitésàfibresoptiques,ou
desémetteurs)sontinstallés,prenezconnaissancedesinformationssuivantes:
•Neretirezpaslecarter.Enouvrantl'unitédeCD-ROMoudeDVD-ROM,vousvousexposezau
rayonnementdangereuxdulaser.Aucunepiècedel'unitén'estréparable.
•Pourévitertoutrisqued'expositionaurayonlaser,respectezlesconsignesderéglageet
d'utilisationdescommandes,ainsiquelesprocéduresdécritesdansleprésentmanuel.
DANGER
Certainsproduitsàlasercontiennentunediodeàlaserintégréedeclasse3Aou3B.Prenez
connaissancedesinformationssuivantes:
Rayonnementlaserlorsquelecarterestouvert.Eviteztouteexpositiondirecteaurayonlaser.Evitez
deregarderfixementlefaisceauoudel'observeràl'aided'instrumentsoptiques.
≥18kg(37lb)≥32kg(70.5lb)≥55kg(121.2lb)
ATTENTION:
Soulevezlamachineavecprécaution.
ATTENTION:
L'interrupteurdecontrôled'alimentationdel'unitéetl'interrupteurdublocd'alimentationnecoupent
paslecourantélectriquealimentantl'unité.Enoutre,lesystèmepeutêtreéquipédeplusieurs
cordonsd'alimentation.Pourmettrel'unitéhorstension,vousdevezdéconnectertouslescordons
delasourced'alimentation.
16ThinkCentreM53HardwareMaintenanceManual
1
2
VORSICHT
AnNetz-,Telefon-undDatenleitungenkönnengefährlicheSpannungenanliegen.
AusSicherheitsgründen:
•BeiGewitterandiesemGerätkeineKabelanschließenoderlösen.FernerkeineInstallations-,
Wartungs-oderRekonfigurationsarbeitendurchführen.
•GerätnuraneineSchutzkontaktsteckdosemitordnungsgemäßgeerdetemSchutzkontakt
anschließen.
•AlleangeschlossenenGeräteebenfallsanSchutzkontaktsteckdosenmitordnungsgemäß
geerdetemSchutzkontaktanschließen.
•DieSignalkabelnachMöglichkeiteinhändiganschließenoderlösen,umeinenStromschlagdurch
BerührenvonOberflächenmitunterschiedlichemelektrischemPotenzialzuvermeiden.
•Geräteniemalseinschalten,wennHinweiseaufFeuer,WasseroderGebäudeschädenvorliegen.
•DieVerbindungzudenangeschlossenenNetzkabeln,Telekommunikationssystemen,Netzwerken
undModemsistvordemÖffnendesGehäuseszuunterbrechen,sofernindenInstallations-und
KonfigurationsprozedurenkeineanderslautendenAnweisungenenthaltensind.
•ZumInstallieren,TransportierenundÖffnenderAbdeckungendesComputersoderder
angeschlossenenEinheitendieKabelgemäßderfolgendenTabelleanschließenundabziehen.
ZumAnschließenderKabelgehenSiewiefolgtvorZumAbziehenderKabelgehenSiewiefolgtvor
1.SchaltenSiealleEinheitenAUS.
2.SchließenSieerstalleKabelandieEinheitenan.
3.SchließenSiedieSignalkabelandieBuchsenan.
4.SchließenSiedieNetzkabelandieSteckdosean.
5.SchaltenSiedieEinheitEIN.
1.SchaltenSiealleEinheitenAUS.
2.ZiehenSiezuerstalleNetzkabelausden
Netzsteckdosen.
3.ZiehenSiedieSignalkabelausdenBuchsen.
4.ZiehenSiealleKabelvondenEinheitenab.
CAUTION:
EineverbrauchteLithiumbatterienurdurcheineBatteriemitderTeilenummer45C1566odereine
gleichwertige,vomHerstellerempfohleneBatterieersetzen.EnthältdasSystemeinModulmiteiner
Lithiumbatterie,diesesnurdurcheinModuldesselbenTypsundvondemselbenHerstellerersetzen.
DieBatterieenthältLithiumundkannbeiunsachgemäßerVerwendung,HandhabungoderEntsorgung
explodieren.
DieBatterienicht:
•mitWasserinBerührungbringen.
Chapter1.Readthisfirst:Importantsafetyinformation17
•über100Cerhitzen.
•reparierenoderzerlegen.
DieörtlichenBestimmungenfürdieEntsorgungvonSondermüllbeachten.
ACHTUNG:
BeiderInstallationvonLasergeräten(wieCD-ROM-Laufwerken,DVD-aufwerken,Einheitenmit
LichtwellenleitertechnikoderSendern)Folgendesbeachten:
•DieAbdeckungennichtentfernen.DurchEntfernenderAbdeckungendesLasergerätskönnen
gefährlicheLaserstrahlungenfreigesetztwerden.DasGerätenthältkeinezuwartendenTeile.
•WerdenSteuerelemente,EinstellungenoderDurchführungenvonProzedurenandersalshier
angegebenverwendet,kanngefährlicheLaserstrahlungauftreten.
VORSICHT
EinigeLasergeräteenthalteneineLaserdiodederKlasse3Aoder3B.BeachtenSieFolgendes:
LaserstrahlungbeigeöffneterVerkleidung.NichtindenStrahlblicken.KeineLupenoderSpiegel
verwenden.Strahlungsbereichmeiden.
≥18kg≥32kg≥55kg
ACHTUNG:
ArbeitsschutzrichtlinienbeimAnhebenderMaschinebeachten.
ACHTUNG:
MitdemNetzschalteranderEinheitundamNetzteilwirddieStromversorgungfürdieEinheit
nichtunterbrochen.DieEinheitkannauchmitmehrerenNetzkabelnausgestattetsein.Umdie
StromversorgungfürdieEinheitvollständigzuunterbrechen,müssenallezumGerätführenden
NetzkabelvomNetzgetrenntwerden.
18ThinkCentreM53HardwareMaintenanceManual
1
2
20ThinkCentreM53HardwareMaintenanceManual
PERICOLO
Lacorrenteelettricaprovenientedaicavidialimentazione,deltelefonoedicomunicazionepuòessere
pericolosa.
Perevitareilrischiodiscosseelettriche:
•Noncollegareoscollegarequalsiasicavooppureeffettuarel'installazione,lamanutenzioneola
riconfigurazionedelprodottoduranteuntemporale.
•Collegaretuttiifilielettriciaunapresadialimentazionecorrettamentecablataedotatadimessaa
terra.
•Collegareallepreseelettricheappropriatetutteleapparecchiaturecheverrannoutilizzateper
questoprodotto.
•Sepossibile,utilizzaresolounamanopercollegareoscollegareicavidisegnale.
•Nonaccendereassolutamenteapparecchiatureinpresenzadiincendi,perdited'acquaodanno
strutturale.
•Scollegareicavidialimentazione,isistemiditelecomunicazione,leretieilmodemprimadi
aprireicoperchideldispositivo,salvoistruzionicontrarierelativealleprocedurediinstallazionee
configurazione.
•Collegareescollegareicavicomedescrittonellaseguentetabellaquandovengonoeffettuate
operazionidiinstallazione,spostamentooaperturadeicoperchidiquestoprodottoodelleunità
collegate.
PercollegarsiPerscollegarsi
1.SPEGNEREleapparecchiature.
2.Innanzitutto,collegaretuttiicavialleunità.
3.Collegareicavidisegnaleaiconnettori.
4.Collegareicavidialimentazioneallapresa.
5.Accenderel'unità.
1.SPEGNEREleapparecchiature.
2.Innanzitutto,rimuovereicavidialimentazionedalla
presa.
3.Rimuovereicavidisegnaledaiconnettori.
4.Rimuoveretuttiicavidalleunità.
ATTENZIONE:
Quandosisostituiscelabatteriaallitio,utilizzaresoloilNumeroparte45C1566ountipodibatteria
equivalenteconsigliatodalproduttore.Sesulsistemaèpresenteunmodulochecontieneunabatteria
allitio,sostituirlosoloconuntipodimodulodellostessotipodellastessacasadiproduzione.La
batteriacontienelitioepuòesplodereseusata,maneggiataosmaltitainmodononcorretto.
Non:
•Gettareoimmergerelabatterianell'acqua
•Riscaldarlaadunatemperaturasuperioreai100gradiC(212gradiF)
•Smontarla,ricaricarlaotentarediripararla
Lebatterieusatevannosmaltiteinaccordoallanormativainvigore(DPR915/82esuccessive
disposizioniedisposizionilocali).
Chapter1.Readthisfirst:Importantsafetyinformation21
ATTENZIONE:
Quandovengonoinstallatiprodottilaser(qualiCD-ROM,unitàDVD-ROM,unitàafibreotticheo
trasmittenti),tenerpresentequantosegue:
•Nonrimuovereglisportelli.L'aperturadiun'unitàlaserpuòdeterminarel'esposizionearadiazioni
laserpericolose.All'internodell'unitànonvisonopartisucuieffettuarel'assistenzatecnica.
•L'utilizzodicontrolli,regolazioniol'esecuzionediprocedurenondescrittinelpresentemanuale
possonoprovocarel'esposizionearadiazionipericolose.
PERICOLO
AlcuneunitàlasercontengonoundiodolaserdiClasse3AoClasse3B.Tenerpresentequantosegue:
Aprendol'unitàvengonoemesseradiazionilaser.Nonfissareilfascio,nonguardarlodirettamente
construmentiotticiedevitarel'esposizionealfascio.
≥18kg≥32kg≥55kg
ATTENZIONE:
Prestareattenzionenelsollevarel'apparecchiatura.
ATTENZIONE:
Ilpulsantedicontrollodell'alimentazionepresentesull'unitàel'interruttoredell'alimentatorenon
disattivanol'alimentazionecorrentefornitaall'unità.E'possibilechel'unitàdispongadipiùcavidi
alimentazione.Perdisattivarel'alimentazionedall'unità,accertarsichetuttiicavidialimentazione
sianoscollegatidallafontedialimentazione.
1
2
22ThinkCentreM53HardwareMaintenanceManual

1
2
PELIGRO
Lacorrienteeléctricaprocedentedecablesdealimentación,teléfonosycablesdecomunicaciónpuede
serpeligrosa.
Paraevitarelriesgodedescargaeléctrica:
•Noconectenidesconecteloscablesnirealiceningunatareadeinstalación,mantenimientoo
reconfiguracióndeesteproductoduranteunatormentaeléctrica.
•Conectetodosloscablesdealimentaciónatomasdecorrientedebidamentecableadasy
conectadasatierra.
•Cualquierequipoqueseconecteaesteproductotambiéndebeconectarseatomasdecorriente
debidamentecableadas.
•Siemprequeseaposible,utiliceunasolamanoparaconectarodesconectarloscablesdeseñal.
24ThinkCentreM53HardwareMaintenanceManual
•Noenciendanuncaunequipocuandohayseñalesdefuego,aguaodañosestructurales.
•Desconecteloscablesdealimentación,lossistemasdetelecomunicaciones,lasredesylos
módemsconectadosantesdeabrirlascubiertasdelosdispositivos,amenosqueseindiquelo
contrarioenlosprocedimientosdeinstalaciónyconfiguración.
•Conecteydesconecteloscables,comosedescribeenlatablasiguiente,cuandoinstale,muevao
abralascubiertasdeesteproductoodelosdispositivosconectados.
ParaconectarParadesconectar
1.APÁGUELOtodo.
2.Enprimerlugar,conectetodosloscablesalos
dispositivos.
3.Conecteloscablesdeseñalalosconectores.
4.Enchufeloscablesdealimentaciónalastomasde
corriente.
5.Enciendaeldispositivo.
1.APÁGUELOtodo.
2.Enprimerlugar,desenchufeloscablesdealimentación
delastomasdecorriente.
3.Desconecteloscablesdeseñaldelosconectores.
4.Desconectetodosloscablesdelosdispositivos.
PRECAUCIÓN:
Cuandosustituyaunabateríadelitio,utilicesolamenteunabateríanúmerodepieza45C1566uotra
detipoequivalenterecomendadaporelfabricante.Sisusistemadisponedeunmóduloquecontiene
unabateríadelitio,reemplácelosóloconelmismotipodemódulo,delmismofabricante.Labatería
contienelitioypuedeexplotarsinoseutiliza,manipulaodesechacorrectamente.
Nodebe:
•Arrojarlaalaguaosumergirlaenella
•Exponerlaatemperaturassuperioresa100°C(212°F)
•Repararlaodesmontarla
Deshágasedelabateríasegúnespecifiquenlasleyesonormaslocales.
PRECAUCIÓN:
Cuandohayaproductosláser(comounidadesdeCD-ROM,unidadesdeDVD,dispositivosdefibra
ópticaotransmisores)instalados,tengaencuentalosiguiente:
•Noquitelascubiertas.Siquitalascubiertasdelproductoláser,podríaquedarexpuestoaradiación
láserpeligrosa.Dentrodeldispositivonoexisteningunapiezaquerequieraserviciotécnico.
•Siusacontrolesoajustesorealizaprocedimientosquenoseanlosespecificadosaquí,podría
exponersearadiacionespeligrosas.
PELIGRO
Chapter1.Readthisfirst:Importantsafetyinformation25
Algunosproductoslásertienenincorporadoundiodoláserdeclase3Aoclase3B.Tengaencuentalo
siguiente:
Cuandoseabre,quedaexpuestoaradiaciónláser.Nomiredirectamentealrayoláser,nisiquieracon
instrumentosópticos,yeviteexponersedirectamentealrayoláser.
≥18kg≥32kg≥55kg
PRECAUCIÓN:
Adopteprocedimientossegurosallevantarelequipo.
PRECAUCIÓN:
Elbotóndecontroldealimentacióndeldispositivoyelinterruptordealimentacióndelafuentede
alimentaciónnodesconectanlacorrienteeléctricasuministradaaldispositivo.Además,eldispositivo
podríatenermásdeuncabledealimentación.Parasuprimirtodalacorrienteeléctricadeldispositivo,
asegúresedequetodosloscablesdealimentaciónesténdesconectadosdelatomadecorriente.
1
2
26ThinkCentreM53HardwareMaintenanceManual

Chapter2.Productoverview
Thischapterprovidesthefollowinginformation:
•Locationsofconnectors
•Locationsofcomponents
•Locationsofpartsonthesystemboard
•Locationsofinternaldrives
•Computerfeatures
•SoftwareprogramsprovidedbyLenovo
Locations
Thissectionprovidesthefollowingtopics:
•“Locatingconnectors,controls,andindicatorsonthefrontofyourcomputer”onpage28
•“Locatingconnectorsontherearofyourcomputer”onpage29
•“Locatingcomponents”onpage30
•“Locatingpartsonthesystemboard”onpage34
•“Locatingthemachinetypeandmodellabel”onpage35
Note:Thecomponentsinyourcomputermightlookslightlydifferentfromtheillustrations.
©CopyrightLenovo201427
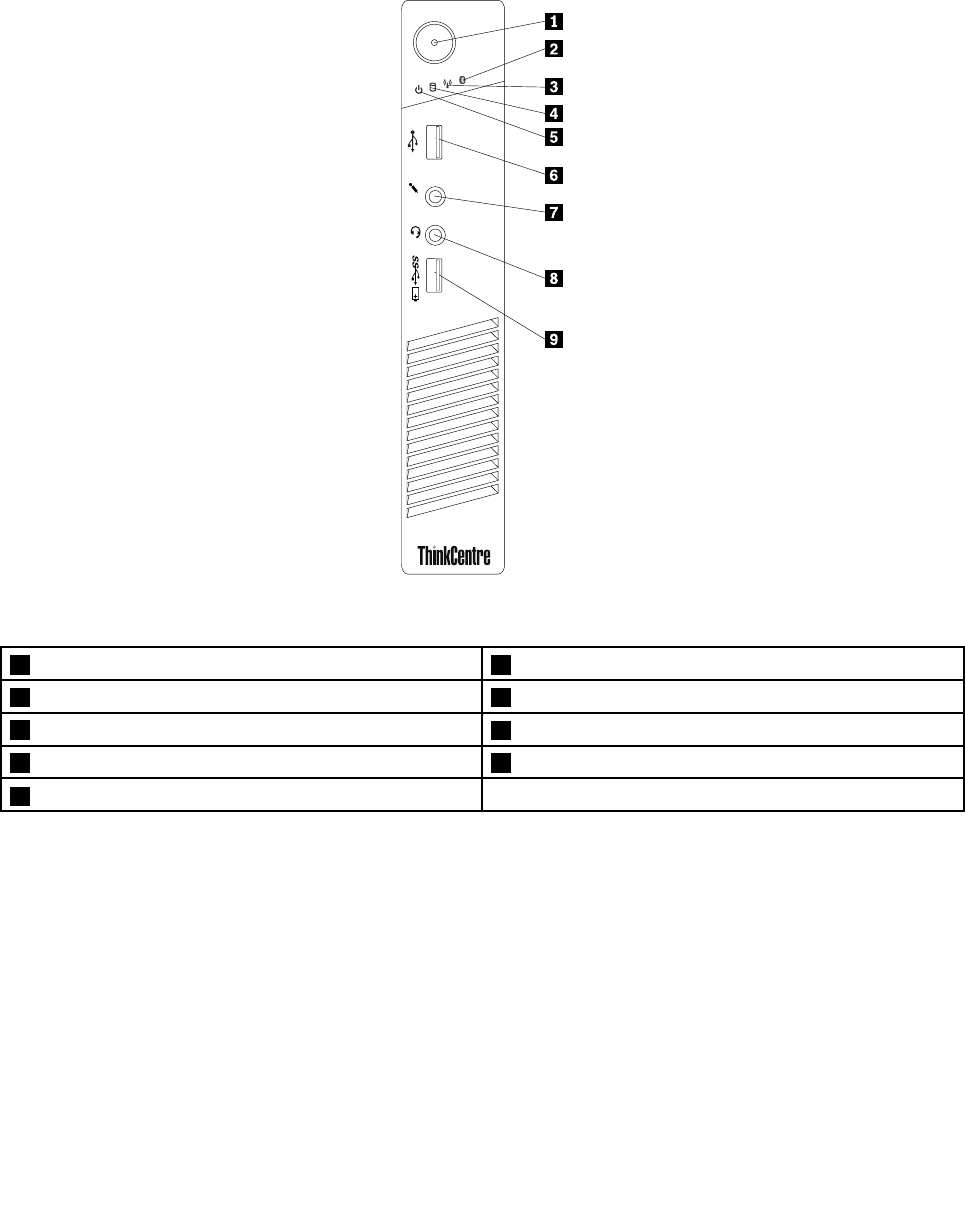
Locatingconnectors,controls,andindicatorsonthefrontofyour
computer
Thefollowingillustrationshowsthelocationsoftheconnectors,controls,andindicatorsonthefrontofyour
computer.
1
2
Figure1.Frontconnector,control,andindicatorlocations
1Powerbutton2Bluetoothactivityindicator
3Wirelessactivityindicator4Harddiskdriveactivityindicator
5Powerindicator6USB2.0connector
7Microphoneconnector8Headsetconnector
9Always-onUSB3.0connector
28ThinkCentreM53HardwareMaintenanceManual
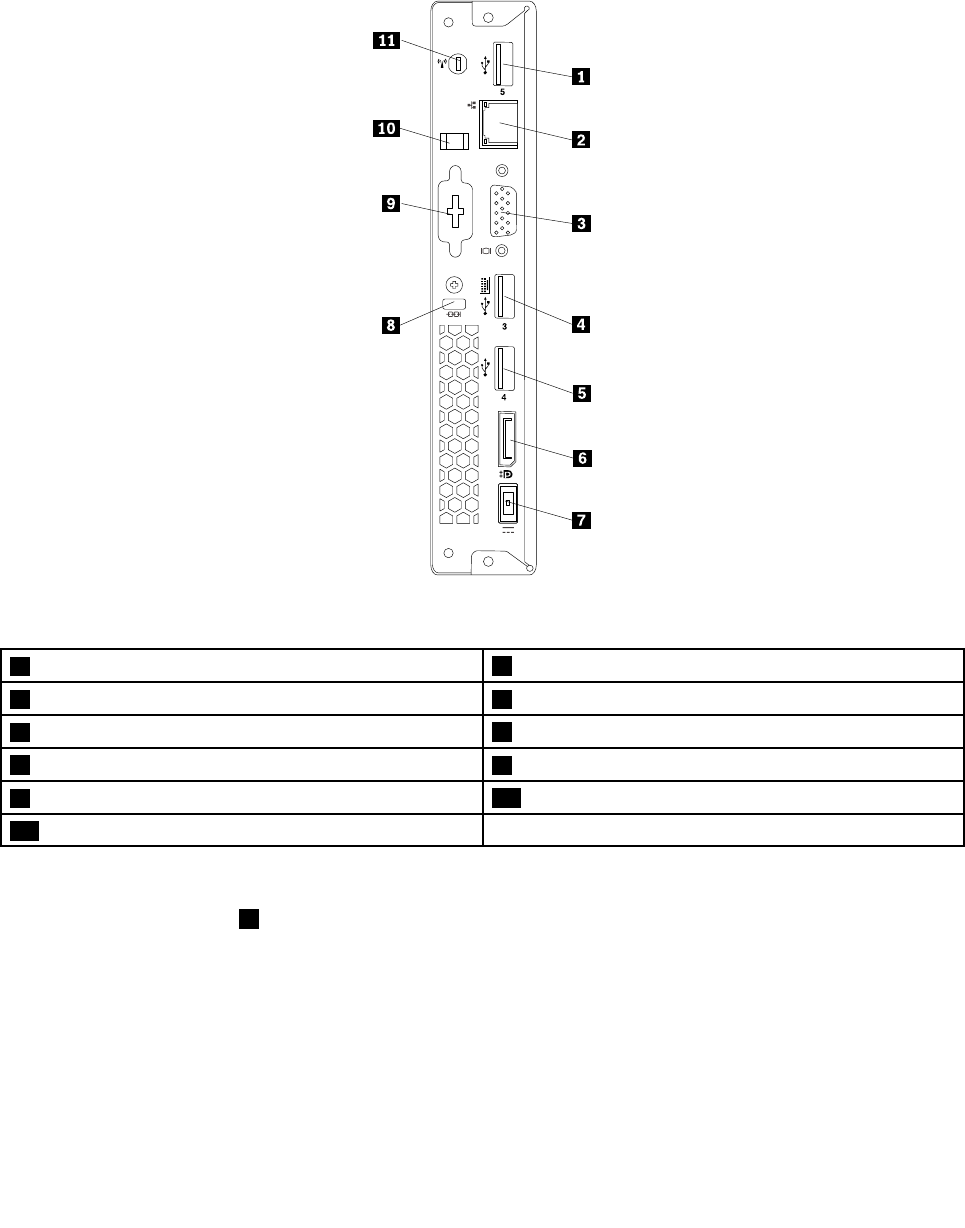
Locatingconnectorsontherearofyourcomputer
Thefollowingillustrationshowsthelocationsoftheconnectorsontherearofyourcomputer.Some
connectorsontherearofyourcomputerarecolor-codedtohelpyoudeterminewheretoconnectthe
cablesonyourcomputer.
Figure2.Rearconnectorlocations
1USB2.0connector2Ethernetconnector
3VGAconnector4USB2.0connector
5USB2.0connector6DisplayPort®connector
7acpoweradapterconnector8Security-lockslot
9Optionalconnector10acpoweradaptercableloop
11Wi-Fiantennaslot
Notes:
•TheUSB2.0connector4supportsthesmartpoweronfeaturethatenablesyoutoturnonthecomputer
orwakeitupfromS4hibernationmodebypressingAlt+Ponthekeyboard.Youcanenableordisable
thesmartpoweronfeaturefromtheSetupUtilityprogram.Fordetailedinformation,see“Enablingor
disablingadevice”onpage63.
•Ifyouusetheoptionalconnectorforinstallingaserialconnector,theserialconnectorandtheadjacent
VGAconnectormightinterferewitheachotherwhenconnectingcables.Toavoidtheinterference,ensure
thatyouusetheserialconnectorconvertcablethatcomeswiththecomputerwhenyouconnecta
devicetotheserialconnector.
Chapter2.Productoverview29

ConnectorDescription
DisplayPortconnectorUsedtoattachahigh-performancemonitor,adirect-drivemonitor,orotherdevices
thatuseaDisplayPortconnector.
EthernetconnectorUsedtoattachanEthernetcableforalocalareanetwork(LAN).
Note:TooperatethecomputerwithinFCCClassBlimits,useaCategory5eor
betterEthernetcable.
HeadsetconnectorUsedtoattachasupportedheadsettoyourcomputertorecordsound,use
speech-recognitionsoftware,listentomusic,orothersoundswithoutdisturbing
anyone.Theheadsetconnectorisalsoknownasaudiojack.
MicrophoneconnectorUsedtoattachamicrophonetoyourcomputerwhenyouwanttorecordsoundorif
youusespeech-recognitionsoftware.
USB2.0connectorUsethisconnectortoattachadevicethatrequiresaUSB2.0connection,suchasa
keyboard,amouse,ascanner,aprinter,orapersonaldigitalassistant(PDA).
USB3.0connectorUsethisconnectortoattachadevicethatrequiresaUSB2.0orUSB3.0
connection,suchasakeyboard,amouse,ascanner,aprinter,oraPDA.
VGAconnectorUsedtoattachaVGAmonitororotherdevicesthatuseaVideoGraphicsArray
(VGA)connector.
Locatingcomponents
Thefollowingillustrationshowsthelocationsofthevariouscomponentsinyourcomputer.Toremovethe
computercover,see“Removingthecomputercover”onpage123.
30ThinkCentreM53HardwareMaintenanceManual
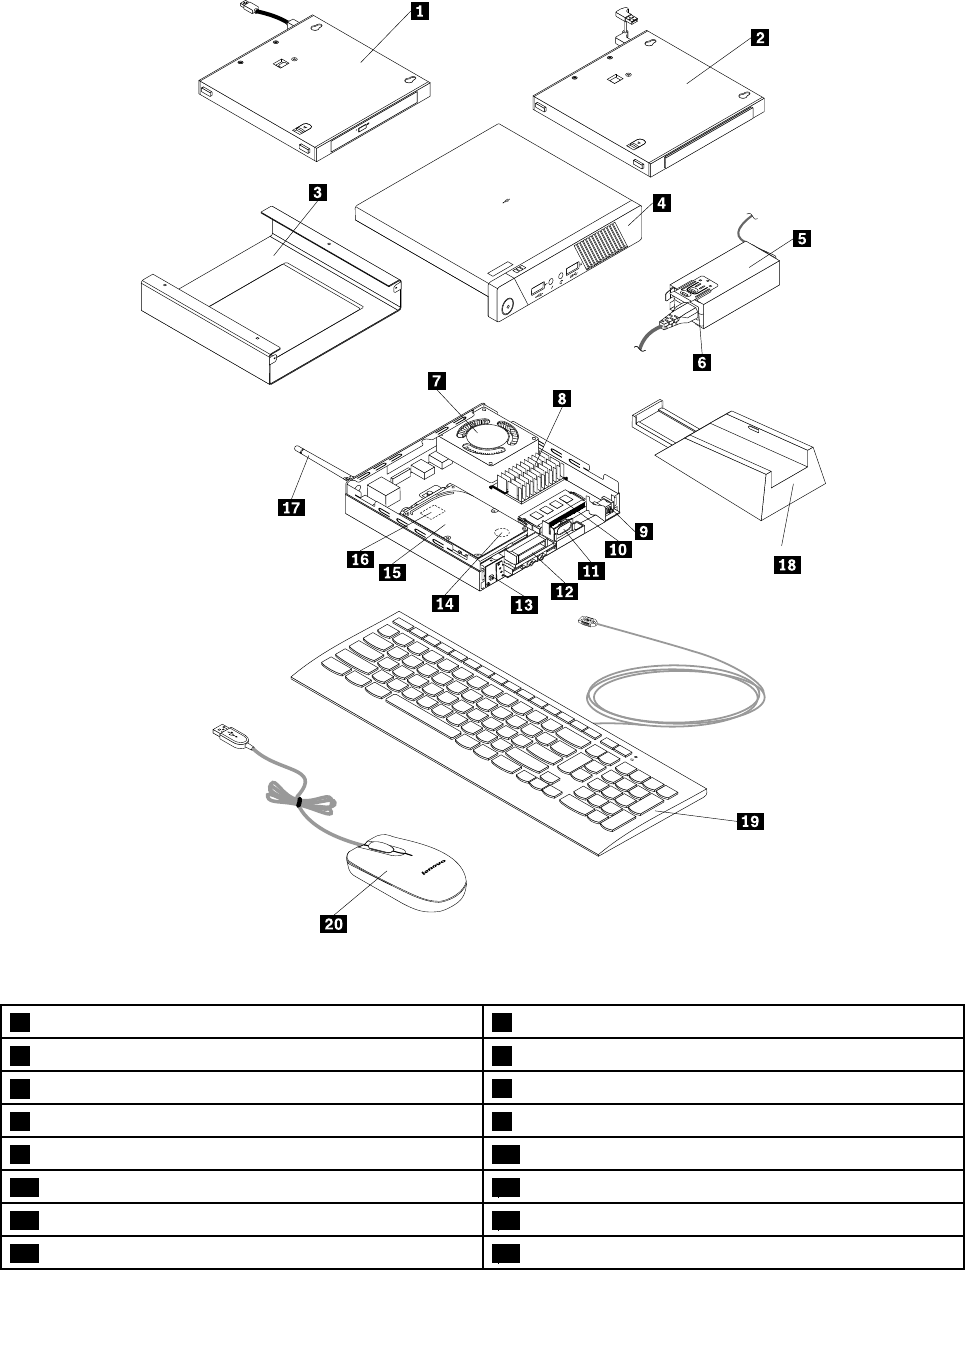
Figure3.Componentlocations
1Externalopticaldrive(somemodels)2Externalharddiskdrive(somemodels)
3VESA®mountbracket(somemodels)4Computercover
5acpoweradapterbracket(somemodels)6acpoweradapter
7Microprocessorfan8Heatsink
9Coverpresenceswitch(intrusionswitch)(somemodels)10Memorymodule
11Internalspeaker12FrontWi-Fiantenna(somemodels)
13Powerbuttonboard14Coin-cellbattery
15Harddiskdriveassembly16Wi-Ficardmodule(somemodels)
Chapter2.Productoverview31
17RearWi-Fiantenna(somemodels)18Verticalstand(somemodels)
19Keyboard20Mouse
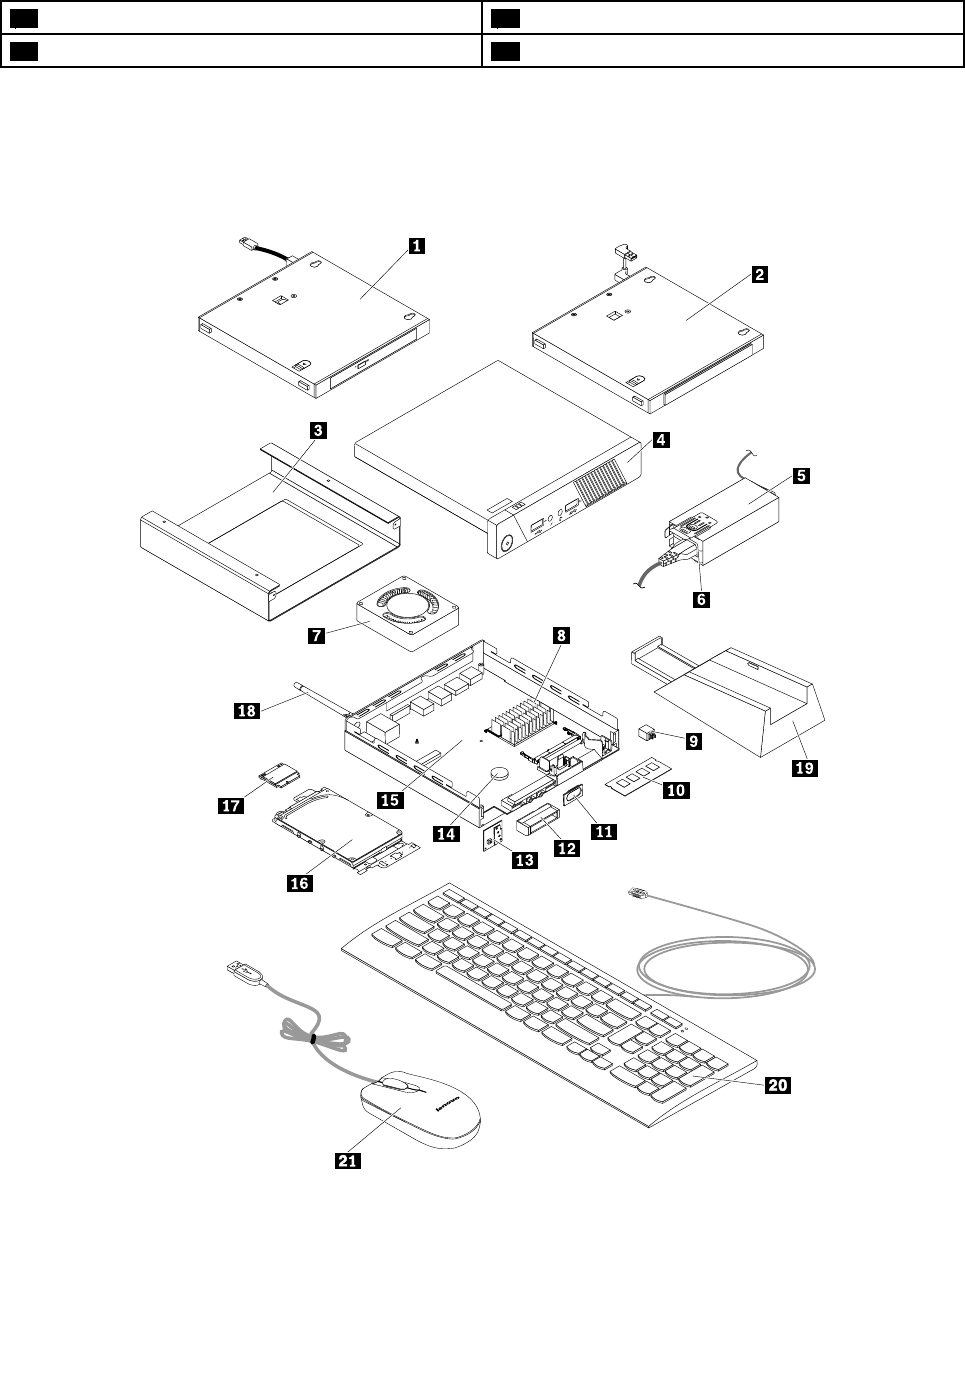
LocatingmajorFRUsandCRUs
ThefollowingillustrationshowsthelocationsofthemajorFRUsandCustomerReplaceableUnits(CRUs)in
thecomputer.Toremovethecomputercover,see“Removingthecomputercover”onpage123.
Figure4.LocatingmajorFRUsandCRUs
ThefollowingtableliststhemajorFRUsshownintheillustrationaboveandidentifieswhichFRUsare
alsoself-serviceCRUsoroptional-serviceCRUs.
32ThinkCentreM53HardwareMaintenanceManual

Notes:
•Self-serviceCRUs:TheseCRUsunplugoraresecuredbynomorethantwoscrews.Examplesof
thesetypesofCRUsincludethekeyboard,themouse,anyUSBdevice,andthepowercord.Other
self-serviceCRUsdependingonproductdesignmightincludememorymodules,adaptercards,hard
diskdrives,andopticaldrives.
•Optional-serviceCRUs:TheseCRUsareisolatedpartswithinthecomputerandareconcealedbyan
accesspanelthatistypicallysecuredbymorethantwoscrews.Oncetheaccesspanelisremoved,the
specificCRUisvisible.
NumberFRUdescriptionSelf-serviceCRUOptional-serviceCRU
1Externalopticaldrive(somemodels)NoYes
2Externalharddiskdrive(somemodels)NoYes
3VESAmountbracket(somemodels)NoYes
4ComputercoverYesNo
5acpoweradapterbracket(somemodels)YesNo
6acpoweradapterYesNo
7MicroprocessorfanNoYes
8HeatsinkYesNo
9Coverpresenceswitch(intrusionswitch)(some
models)
NoYes
10MemorymoduleNoYes
11InternalspeakerNoYes
12FrontWi-Fiantenna(somemodels)NoYes
13PowerbuttonboardNoYes
14Coin-cellbatteryNoYes
15SystemboardNoNo
16HarddiskdriveassemblyNoYes
17Wi-Ficardmodule(somemodels)NoYes
18RearWi-Fiantenna(somemodels)YesNo
19Verticalstand(somemodels)YesNo
20KeyboardYesNo
21MouseYesNo
FordetailedFRUinformation,suchastheFRUpartnumbersandsupportedcomputermodels,goto:
http:/www.lenovo.com/serviceparts-lookup
Chapter2.Productoverview33
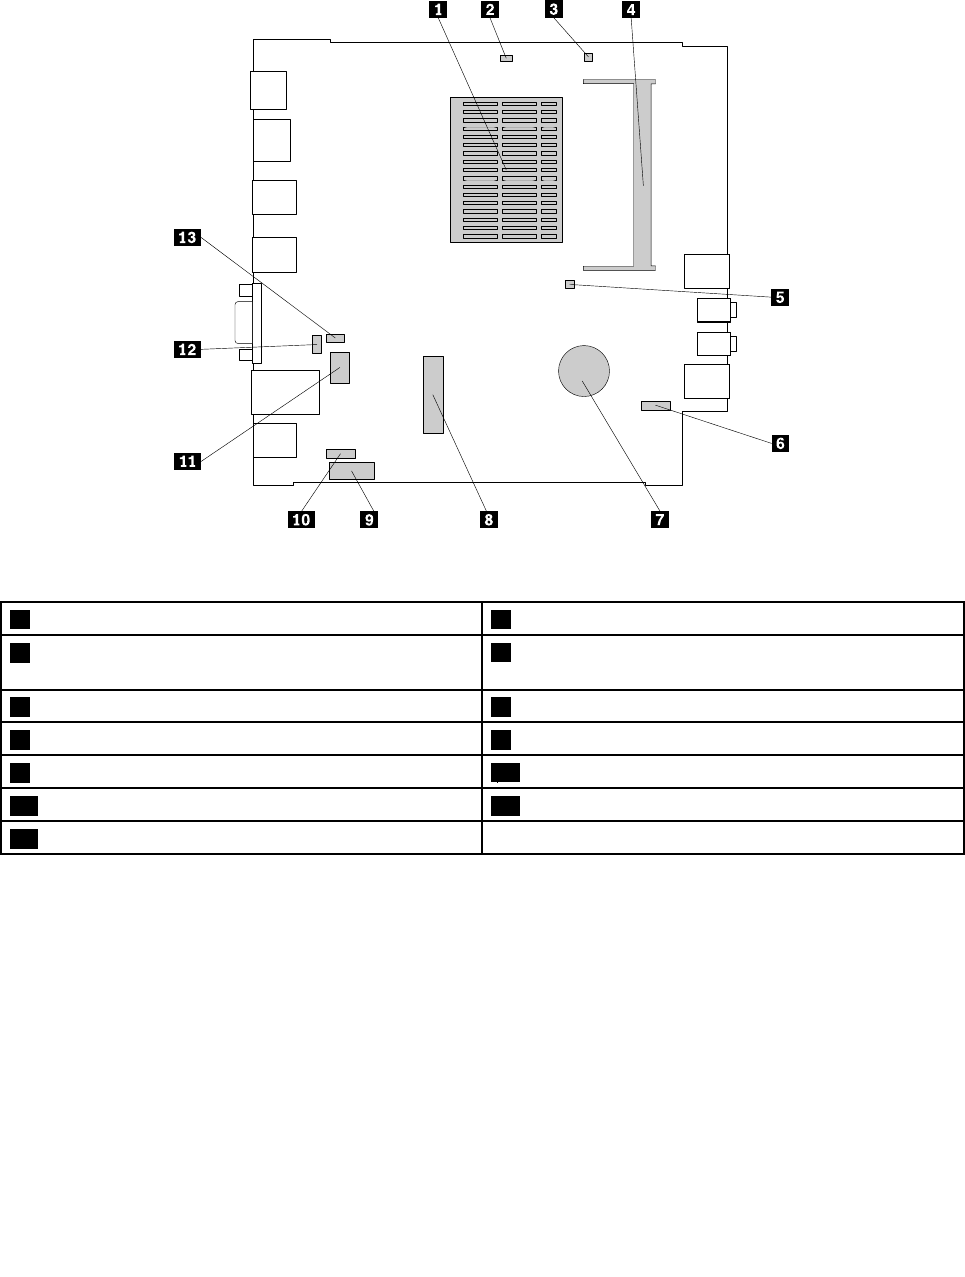
Locatingpartsonthesystemboard
Thefollowingillustrationshowsthelocationsofthepartsonthesystemboard.
Figure5.Systemboardpartlocations
1Heatsink(withthemicroprocessorunderneath)2ClearCMOS/Recoveryjumper
3Cover-presence-switchconnector(intrusionswitch
connector)
4Memoryslot
5Internalspeakerconnector6Powerbuttonboardcableconnector
7Coin-cellbattery8MiniPCIExpresscardslot
9SATA2.0connector10Harddiskdrivepowerconnector
11Serial(COM)connector12OptionalUSB2.0connector
13Microprocessorfanconnector
34ThinkCentreM53HardwareMaintenanceManual
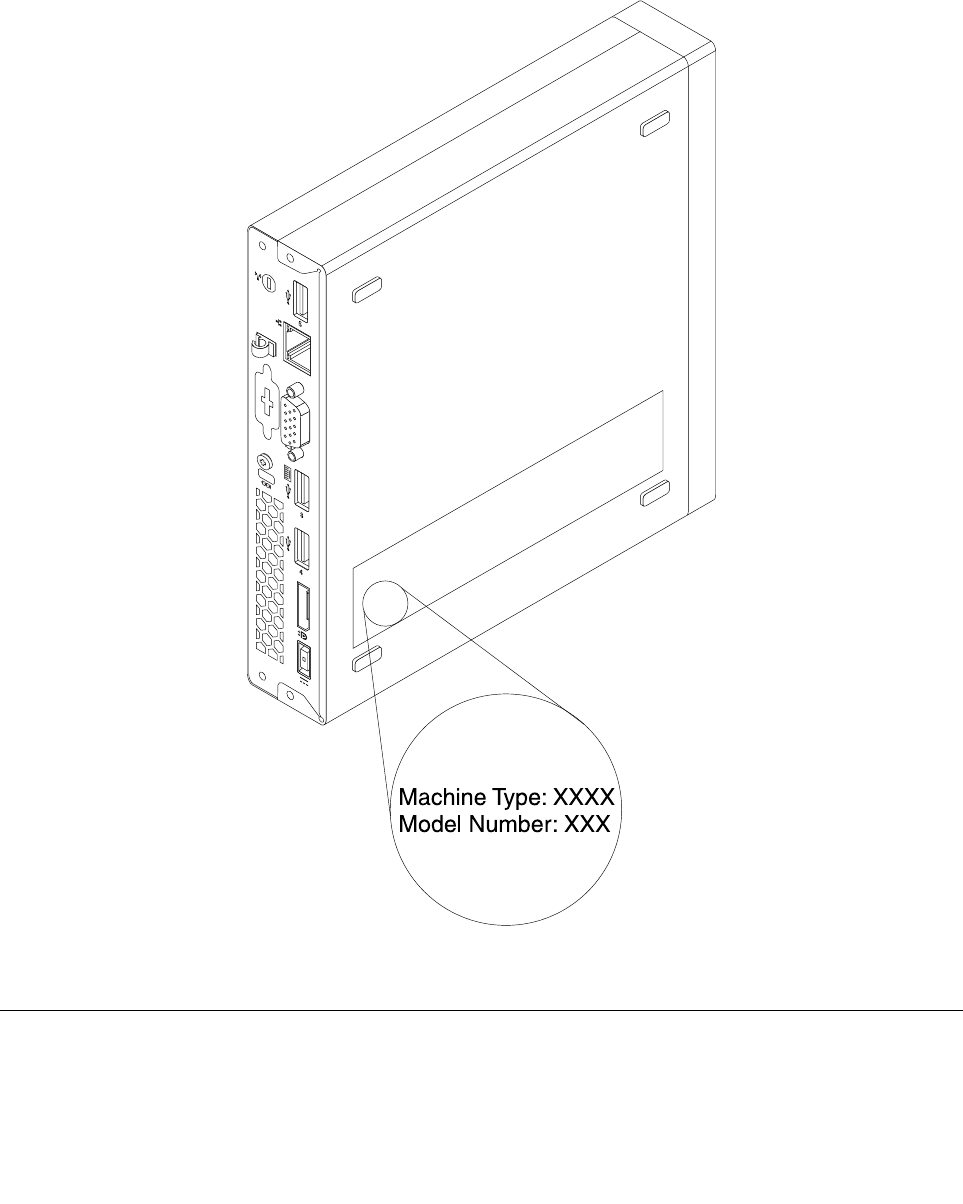
Locatingthemachinetypeandmodellabel
Themachinetypeandmodellabelidentifiesyourcomputer.WhenyoucontactLenovoforhelp,themachine
typeandmodelinformationhelpssupporttechnicianstoidentifyyourcomputerandprovidefasterservice.
Themachinetypeandmodellabelisattachedonthesideofyourcomputerasshown.
Figure6.Machinetypeandmodellabel
Features
Thecomputerfeaturesintroducedinthissectioncoversavarietyofmodels.
Chapter2.Productoverview35

Microprocessor
Toviewthemicroprocessorinformationofyourcomputer,dothefollowing:
•OntheMicrosoft®Windows®7operationsystem,clickStart,right-clickComputer,andselectProperties
toviewtheinformation.
•OntheMicrosoftWindows8.1operatingsystem,gotothedesktopandmoveyourpointertothe
top-rightorbottom-rightcornerofthescreentodisplaythecharms.ThenclickSettings➙PCinfoto
viewtheinformation.
Memory
Yourcomputersupportsuptoonedoubledatarate3smalloutlinedualinlinememorymodules(DDR3
SODIMMs).
Todeterminetheamountofmemoryinstalledonyourcomputer,dothefollowing:
•OnWindows7,clickStart,right-clickComputer,andselectPropertiestoviewtheinformation.
•OnWindows8.1,gotothedesktopandmoveyourpointertothetop-rightorbottom-rightcornerofthe
screentodisplaythecharms.ThenclickSettings➙PCinfotoviewtheinformation.
Formoreinformation,see“Replacingthememorymodule”onpage129.
Internaldrives
•Externalopticaldrive(availableonsomemodels)
•Harddiskdrive
•Hybriddrive(availableonsomemodels)
•Solid-statedrive(availableonsomemodels)
Videofeatures
Integratedgraphicssupportsthefollowingconnectorsonyourcomputer:
•DisplayPortconnector
•VGAconnector
Audiofeatures
Integratedaudiocontrollersupportsthefollowingconnectorsanddevicesonyourcomputer:
•Headsetconnector
•Internalspeaker(availableonsomemodels)
•Microphoneconnectors
Input/Output(I/O)features
•Audioconnectors(headsetconnectorandmicrophoneconnectors)
•Displayconnectors(DisplayPortconnectorandVGAconnector)
•Ethernetconnector
•Oneoptionalconnector
•USBconnectors
Formoreinformation,see“Locatingconnectors,controls,andindicatorsonthefrontofyourcomputer”on
page28and“Locatingconnectorsontherearofyourcomputer”onpage29.
36ThinkCentreM53HardwareMaintenanceManual

Expansion
•Externalopticaldrivebox(availableonsomemodels)
•Harddiskdrivebay
•Memoryslot
•MiniPCIExpresscardslot
Powersupply
Yourcomputercomeswitha65-wattacpoweradapter.
Wirelessfeatures
Dependingonyourcomputermodel,thefollowingwirelessfeaturesmightbesupported:
•Wirelesslocalareanetwork(LAN)
•Bluetooth
Systemmanagementfeatures
•Abilitytostorepower-onself-test(POST)hardwaretestresults
•DesktopManagementInterface(DMI)
DesktopManagementInterfaceprovidesacommonpathforuserstoaccessinformationaboutall
aspectsofacomputer.Theinformationincludesprocessortype,installationdate,attachedprintersand
otherperipherals,powersources,maintenancehistory,andsoon.
•ErPLPScompliancemode
Theenergy-relatedproductsdirective(ErP)lowestpowerstate(LPS)compliancemodereducesthe
consumptionofelectricitywhenyourcomputerisinsleeporoffmode.Formoreinformation,see
“EnablingErPLPScompliancemode”onpage64.
•IntelligentCoolingEngine(ICE)
TheIntelligentCoolingEngineisasystemthermalmanagementsolutionthatenablesyourcomputer
torunwithbetterthermalandacousticperformance.TheICEfunctionalsomonitorsthethermal
performanceofyourcomputertoidentifythermalproblems.Formoreinformation,see“ICEperformance
mode”onpage65and“ICEthermalalert”onpage66.
•Intel®StandardManageability
IntelStandardManageabilityishardware-andfirmware-basedtechnologythatmakescomputerseasier
andlessexpensiveforbusinessestomonitor,maintain,update,upgrade,andrepair.
•PrebootExecutionEnvironment(PXE)
PrebootExecutionEnvironmentenablescomputerstostartthroughanetworkinterfaceindependentof
datastoragedevices(suchastheharddiskdrive)orinstalledoperatingsystems.
•SmartPerformanceChoice
TheSmartPerformanceChoicefunctionenablesyourcomputertorunwithbetteracousticperformance
orbetterthermalperformance.See“Smartperformancechoices”onpage65.
•SystemManagement(SM)BasicInput/OutputSystem(BIOS)andSMsoftware
TheSMBIOSspecificationdefinesdatastructuresandaccessmethodsthatcanbeusedtoread
managementdatastoredintheBIOSofacomputer.
•WakeonLAN
WakeonLANisanEthernetcomputernetworkingstandardthatallowsacomputertobeturnedon
orwokenupbyanetworkmessage.Themessageisusuallysentbyaprogramrunningonanother
computeronthesameLAN.
Chapter2.Productoverview37

•WakeonRing
WakeonRing,sometimesreferredtoasWakeonModem,isaspecificationthatallowssupported
computersanddevicestoresumefromsleeporhibernationmode.
•WindowsManagementInstrumentation(WMI)
WindowsManagementInstrumentationisasetofextensionstotheWindowsDriverModel.Itprovidesan
operatingsysteminterfacethroughwhichinstrumentedcomponentsprovideinformationandnotification.
Securityfeatures
•AbilitytoenableanddisabledevicesandUSBconnectors
Formoreinformation,see“Enablingordisablingadevice”onpage63.
•Avarietyofpasswordstodeterunauthorizeduseofyourcomputer
Formoreinformation,see“Usingpasswords”onpage57.
•ComputraceAgentsoftwareembeddedinfirmware
TheComputraceAgentsoftwareisanITassetmanagementandcomputertheftrecoverysolution.
Thesoftwaredetectsifchangeshavebeenmadeonthecomputer,suchashardware,software,or
thecomputercall-inlocation.YoumighthavetopurchaseasubscriptiontoactivatetheComputrace
Agentsoftware.
•Coverpresenceswitch(alsocalledintrusionswitch)(availableonsomemodels)
Formoreinformation,see“Usingthecoverpresenceswitch”onpage58.
•Keyboardwithfingerprintreader(availableonsomemodels)
Formoreinformation,see“Usingthefingerprintreader”onpage58.
•Startupsequencecontrol
Formoreinformation,see“Selectingorchangingthestartupdevicesequence”onpage64.
•Startupwithoutkeyboardormouse
Yourcomputerisabletologintotheoperatingsystemwithoutkeyboardormouseconnected.
•SupportforaKensington-stylecablelock
Formoreinformation,see“AttachingaKensington-stylecablelock”onpage57.
Preinstalledoperatingsystem
Yourcomputerispreinstalledwithoneofthefollowingoperatingsystems:
•Windows7operatingsystem
•Windows8.1operatingsystem
Operatingsystem(s),certifiedortestedforcompatibility(variesbymodeltype)
Theoperatingsystem(s)listedherearebeingcertifiedortestedforcompatibilityatthetimethispublication
goestopress.AdditionaloperatingsystemsmightbeidentifiedbyLenovoascompatiblewithyourcomputer
followingthepublicationofthismanual.Thislistissubjecttochange.Todetermineifanoperatingsystem
hasbeencertifiedortestedforcompatibility,checktheWebsiteoftheoperatingsystemprovider.
•Linux®
38ThinkCentreM53HardwareMaintenanceManual

Specifications
Thissectionliststhephysicalspecificationsforyourcomputer.
Dimensions
Width:179mm(7.05inches)
Height:34.5mm(1.36inches)
Depth:182mm(7.17inches)
Weight
Maximumconfigurationasshipped:4.86kg(10.71lb)(withpackage)
Maximumconfigurationasshipped:4.14kg(9.13lb)(withoutpackage)
Environment
•Airtemperature:
Operating:From10°C(50°F)to35°C(95°F)
Storageinoriginalshippingpackage:From-40°C(-40°F)to60°C(140°F)
Storagewithoutpackage:From-10°C(14°F)to60°C(140°F)
•Humidity:
Operating:20%–80%(non-condensing)
Storage:20%–90%(non-condensing)
•Altitude:
Operating:From-15.2m(-50ft)to3048m(10000ft)
Storage:From-15.2m(-50ft)to10668m(35000ft)
Electricalinput
Inputvoltage:From100Vacto240Vac
Inputfrequency:50/60Hz
Lenovoprograms
YourcomputercomeswithLenovoprogramstohelpyouworkmoreeasilyandsecurely.Dependingon
theWindowsoperatingsystempreinstalled,theprogramsmightvary.
AccessingLenovoprogramsontheWindows7operatingsystem
YoucanaccessLenovoprogramsontheWindows7operatingsystemthroughWindowsSearchorfrom
ControlPanel.TheiconnamedisplayedinthesearchresultorControlPanelmightbedifferentfromthe
programname.YoucanfindtheprogrambyitsprogramnameoriconnameasshownintheLenovo
programsavailableontheWindows7operatingsystemtable.
Note:Ifyoudonotfindtheprogramyouneed,opentheLenovoThinkVantage®Toolsprogramtofindthe
dimmediconfortheprogram.Thendouble-clicktheicontoinstalltheprogram.
ToaccessLenovoprogramsthroughWindowsSearch,dothefollowing:
1.ClicktheStartbuttonandthentypetheprogramnameortheiconnameintothesearchbox.
2.Locatetheprogrambytheprogramnameortheiconnameandthenclicktheprogramtolaunchit.
ToaccessLenovoprogramsfromControlPanel,dothefollowing:
Chapter2.Productoverview39

Note:SomeLenovoprogramsmightnotbedisplayedinControlPanel.Tofindtheseprograms,use
WindowsSearch.
1.ClickStart➙ControlPanel.ChangetheviewofControlPanelfromCategorytoLargeiconsorSmall
icons.
2.Locatetheprogrambytheiconnameandthenclicktheprogramtolaunchit.
ThefollowingtableliststheprogramsavailableontheWindows7operatingsystem.
Note:Dependingonyourcomputermodel,someoftheLenovoprogramsmightnotbeavailable.
Table1.LenovoprogramsavailableontheWindows7operatingsystem
ProgramnameIconname
CommunicationsUtilityLenovo-WebConferencing
FingerprintManagerProor
ThinkVantageFingerprintSoftware
Lenovo-FingerprintManagerProorLenovo-FingerprintReader
LenovoBluetoothLockLenovoBluetoothLock
LenovoReachLenovoReach
LenovoSHAREitLenovoSHAREit
LenovoSolutionCenterLenovo-SystemHealthandDiagnostics
LenovoThinkVantageToolsLenovoThinkvantageTools
PasswordManagerLenovo-PasswordVault
PCCloudManagerPCCloudManager
PowerManagerLenovo-PowerControls
RecoveryMediaLenovo-FactoryRecoveryDisksorCreateRecoveryMedia
RescueandRecovery®Lenovo-EnhancedBackupandRestore
SystemUpdateLenovo-UpdateandDrivers
ViewManagementUtilityLenovo-ViewManagementUtility
WifiDisplayReceiverWifiDisplayReceiver
AccessingLenovoprogramsontheWindows8.1operatingsystem
IfyourcomputerispreinstalledwiththeWindows8.1operatingsystem,youcanaccessLenovoprograms
bydoingthefollowing:
PresstheWindowskeytogototheStartscreen.ClickaLenovoprogramtolaunchit.Ifyoucannotfind
theprogramyouneed,clickthearrowiconinthebottom-leftcornerofthescreentogototheAppsscreen.
Findthedesiredprogramintheappslistorsearchforitinthesearchboxinthetop-rightcornerofthescreen.
Note:Dependingonyourcomputermodel,someoftheLenovoprogramsmightnotbeavailable.
•FingerprintManagerProorThinkVantageFingerprintSoftware
•LenovoBluetoothLock
•LenovoCompanion
•LenovoReach
•LenovoSHAREit
•LenovoSolutionCenter
40ThinkCentreM53HardwareMaintenanceManual

•LenovoSupport
•LenovoTools
•PasswordManager
•PCCloudManager
•PowerManager
•SystemUpdate
•WifiDisplayReceiver
AnintroductiontoLenovoprograms
ThistopicprovidesabriefintroductiontosomeLenovoprograms.
Note:Dependingonyourcomputermodel,someoftheLenovoprogramsmightnotbeavailable.
•CommunicationsUtility(Windows7)
TheCommunicationsUtilityprogramprovidesacentrallocationforintegratedcameraandmicrophone
settings.ItcontrolsadvancedsettingsfortheintegratedmicrophoneandcameratooptimizeWeb
conferencingandVoiceoverIP(VOIP)experience.
•FingerprintManagerProorThinkVantageFingerprintSoftware(Windows7andWindows8.1)
Theintegratedfingerprintreaderprovidedonsomekeyboardsenablesyoutoenrollyourfingerprintand
associateitwithyourpower-onpassword,harddiskpassword,andWindowspassword.Asaresult,
fingerprintauthenticationcanreplacepasswordsandenablesimpleandsecureuseraccess.
•LenovoBluetoothLock(Windows7andWindows8.1)
TheLenovoBluetoothLockprogramenablesyoutouseaBluetoothdevice(suchasyoursmartphone)as
aproximity-basedunitforlockingorunlockingyourcomputerautomatically.Bydetectingthedistance
betweenyourcomputerandthepredefinedBluetoothdevicethatyouarecarrying,theLenovoBluetooth
Lockprogramautomaticallylocksyourcomputerwhenyouwalkawayandunlocksyourcomputerwhen
youcomeback.Thisisasimplewaytoprotectyourcomputeragainstunauthorizedaccessincase
thatyouforgettolockyourcomputer.
•LenovoCompanion(Windows8.1)
ThroughtheLenovoCompanionprogram,youcangetinformationaboutaccessoriesforyourcomputer,
viewblogsandarticlesaboutyourcomputer,andlearnaboutotherrecommendedprograms.
•LenovoReach(Windows7andWindows8.1)
UsetheLenovoReachprogramtoenhanceyourcloudexperience.LenovoReachkeepsyouconnected
atalltimesandenablesyoutoaccessallyourfavoriteitemsfrompersonalcomputers,smartphones,
ortablets.Asaresult,youcanaccess,edit,andshareyourfilesfromanywhere.WithLenovoReach,
youalsocanaddyourfavoriteWebservicestoyourclouddesktopandstaylogged-intoWebsiteswith
thecloudpasswordmanager.
•LenovoSHAREit(Windows7andWindows8.1)
TheLenovoSHAREitprogramprovidesaquickandeasywaytosharefilesandfoldersamongcomputers,
smartphones,tablets,orsmartTVswiththeAndroidortheWindowsoperatingsysteminstalled.SHAREit
usesanytypeofnetworkorevennonetworkatalltosharefilesandfolders.
•LenovoSolutionCenter(Windows7andWindows8.1)
TheLenovoSolutionCenterprogramenablesyoutotroubleshootandresolvecomputerproblems.It
combinesdiagnostictests,systeminformationcollection,securitystatus,andsupportinformation,along
withhintsandtipsformaximumsystemperformance.
•LenovoSupport(Windows8.1)
Chapter2.Productoverview41

TheLenovoSupportprogramenablesyoutoregisteryourcomputerwithLenovoandcheckthecomputer
healthconditionandbatterystatus.Theprogramalsoenablesyoutodownloadandviewusermanuals
foryourcomputer,getthewarrantyinformation,andexplorehelpandsupportinformation.
•LenovoThinkVantageTools(Windows7)
TheLenovoThinkVantageToolsprogramprovideseasyaccesstovarioustoolstohelpyouworkmore
easilyandsecurely.
•LenovoTools(Windows8.1)
TheLenovoToolsprogramguidesyoutoahostofinformationsourcesandprovideseasyaccessto
varioustoolstohelpyouworkmoreeasilyandsecurely.
•PasswordManager(Windows7andWindows8.1)
ThePasswordManagerprogramautomaticallycapturesandfillsinauthenticationinformationfor
WindowsprogramsandWebsites.
•PCCloudManager(Windows7andWindows8.1)
ThePCCloudManager(PCM)programisabrowser-basedsolutionforclient-computermanagement.
ThePCMprogramhastwocomponents:PCMServerandPCMClient.PCMServerisinstalledonthe
computer,wheretheadministratorperformsmanagementwork,suchaspowermanagementandsecurity
management.PCMClientisinstalledontheclientcomputerstobemanaged.Theadministratorcanlog
intoPCMServertomanagecomputerswithPCMClientinstalled,throughtheInternetWebbrowser.
•PowerManager(Windows7andWindows8.1)
ThePowerManagerprogramprovidesconvenient,flexible,andcompletepowermanagementforyour
computer.Itenablesyoutoadjustyourcomputerpowersettingstoachievethebestbalancebetween
performanceandpowersaving.
•RecoveryMedia(Windows7)
TheRecoveryMediaprogramenablesyoutorestorethecontentsoftheharddiskdrivetothe
factory-defaultsettings.
•RescueandRecovery(Windows7)
TheRescueandRecoveryprogramisaone-buttonrecoveryandrestoresolution.Itincludesasetof
self-recoverytoolstohelpyoudiagnosecomputerproblems,gethelp,andrecoverfromsystemcrashes,
evenifyoucannotstarttheWindowsoperatingsystem.
•SystemUpdate(Windows7andWindows8.1)
TheSystemUpdateprogramhelpsyoukeepthesoftwareonyourcomputerup-to-datebydownloading
andinstallingsoftwareupdatepackages.ExamplesofthesesoftwareupdatepackagesincludeLenovo
programs,devicedrivers,UEFIBIOSupdates,andotherthird-partyprograms.
•ViewManagementUtility(Windows7)
TheViewManagementUtilityprogramenablesyoutoeasilyorganizeyouropenwindows.Itdividesyour
screenintomultiplepartsandthenresizesandpositionsopenwindowsintodifferentpartstomakethe
bestuseofyourdesktop.Theprogramalsoisabletoworkacrossmultiplemonitorstoimproveyour
productivity.
•WifiDisplayReceiver(Windows7andWindows8.1)
TheWifiDisplayReceiverprogramenablesyoutoviewandcontrolthedisplayofaMiracastsource
device(suchasyoursmartphoneandtablet)onthecomputerwithnoneedtousecablesoranetwork
connection.Toachievethis,yourcomputermustbeequippedwithaRealtekWi-Ficardandhasthe
WifiDisplayReceiverprograminstalled.
42ThinkCentreM53HardwareMaintenanceManual

Chapter3.Usingyourcomputer
Thischapterprovidesinformationaboutthefollowingtopics:
•“Registeringyourcomputer”onpage43
•“Usingkeyboardshortcuts”onpage43
•“Usingthewheelmouse”onpage44
•“Settingthecomputervolume”onpage45
•“Usingadisc”onpage46
•“NavigatingamongscreensontheWindows8.1operatingsystem”onpage47
•“AccessingControlPanelontheWindows8.1operatingsystem”onpage49
•“Frequentlyaskedquestions”onpage49
Registeringyourcomputer
Whenyouregisteryourcomputer,informationisenteredintoadatabase,whichenablesLenovotocontact
youincaseofarecallorothersevereproblem.AfteryouregisteryourcomputerwithLenovo,youwillreceive
quickerservicewhenyoucallLenovoforhelp.Inaddition,somelocationsofferextendedprivilegesand
servicestoregisteredusers.
ToregisteryourcomputerwithLenovo,dooneofthefollowing:
•Gotohttp://www.lenovo.com/registerandfollowtheinstructionsonthescreentoregisteryourcomputer.
•Registeryourcomputerthroughapreinstalledregistrationprogramwithyourcomputerconnectedto
theInternet:
–ForWindows7:ThepreinstalledLenovoProductRegistrationprogramlaunchesautomaticallyafteryou
haveusedyourcomputerforatime.Followtheinstructionsonthescreentoregisteryourcomputer.
–ForWindows8.1:OpentheLenovoSupportprogram.Then,clickRegistrationandfollowthe
instructionsonthescreentoregisteryourcomputer.
Note:FordetailedinformationonhowtoopentheLenovoSupportprogramonWindows8.1,see
“AccessingLenovoprogramsontheWindows8.1operatingsystem”onpage40.
Usingkeyboardshortcuts
Akeyboardshortcutisonekeyorcombinationofmultiplekeys.Throughkeyboardshortcuts,youcan
performtasksthatwouldtypicallyrequireamouseorotherpointingdevices.Keyboardshortcutsprovide
aneasieralternativetointeractwithyourcomputerasyouworkwiththeWindowsoperatingsystemand
mostapplications.
Formoreinformationaboutthekeyboardshortcuts,gotohttp://windows.microsoft.com/,andthentypeany
ofthefollowingkeywordsforsearching:keyboardshortcuts,keycombinations,shortcutkeys.
©CopyrightLenovo201443
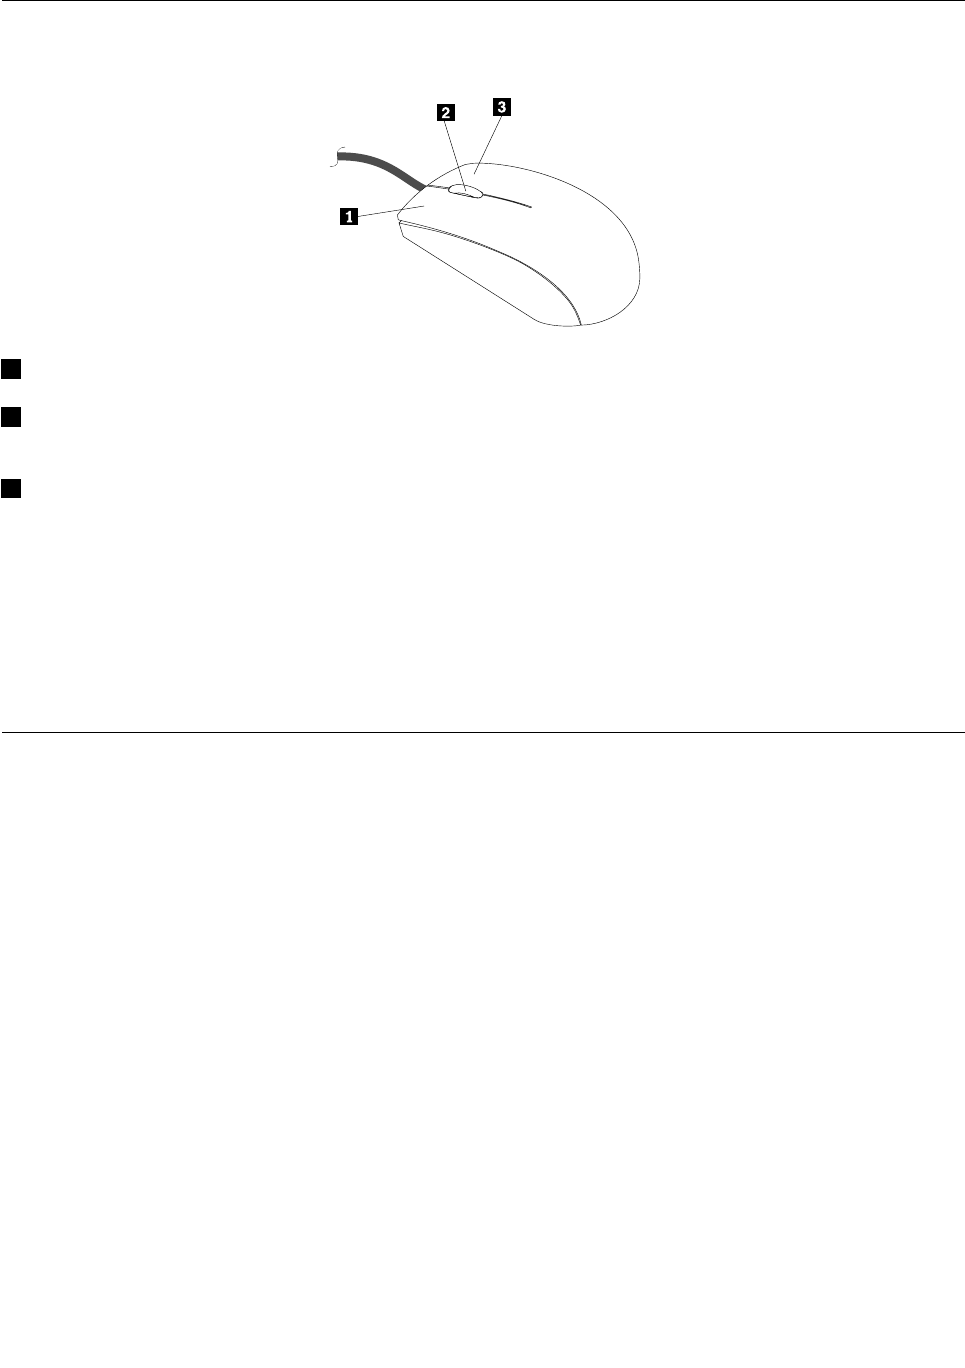
Usingthewheelmouse
Thewheelmousehasthefollowingcontrols:
1Primarymousebutton:Usethisbuttontoselectorstartaprogramormenuitem.
2Wheel:Usethewheeltocontrolthescrollingactionofthemouse.Thedirectioninwhichyourotatethe
wheelcontrolsthedirectionofthescrollingaction.
3Secondarymousebutton:Usethisbuttontodisplayamenufortheactiveprogram,icon,orobject.
Youcanviewandchangethesettingsofyourmousebydoingthefollowing:
1.OntheWindows7operatingsystem,clickStart➙ControlPanel➙HardwareandSound.Onthe
Windows8.1operatingsystem,openControlPanelandclickHardwareandSound.
Note:FordetailedinformationonhowtoopenControlPanelonWindows8.1,see“AccessingControl
PanelontheWindows8.1operatingsystem”onpage49.
2.IntheDevicesandPrinterssection,clickMousetoviewandchangethesettings.
Managingpower
Powermanagementreducesthepowerconsumptionofcertaincomponentsofthecomputersuchasthe
systempowersupply,processor,harddiskdrives,andsomemonitors.
Advancedconfigurationandpowerinterface(ACPI)BIOS
BeinganACPIBIOSsystem,theoperatingsystemisallowedtocontrolthepowermanagementfeatures
ofthecomputerandthesettingforAdvancedPowerManagement(APM)BIOSmodeisignored.Not
alloperatingsystemssupportACPIBIOSmode.
AutomaticPower-onfeatures
TheAutomaticPower-OnfeatureswithinthePowerManagementmenuallowyoutoenableanddisable
featuresthatturnonthecomputerautomatically.
•WakeUponAlarm:Youcanspecifyadateandtimeatwhichthecomputerwillbeturnedon
automatically.Thiscanbeeitherasingleeventoradailyevent.
•WakeonLAN:Ifthecomputerhasaproperlyconfiguredtoken-ringorEthernetLANadaptercardthatis
WakeonLAN-enabledandthereisremotenetworkmanagementsoftware,youcanusetheWakeonLAN
feature.WhenyousetWakeonLANtoEnabled,thecomputerwillturnonwhenitreceivesaspecific
signalfromanothercomputeronthelocalareanetwork(LAN).
44ThinkCentreM53HardwareMaintenanceManual

ToenabletheWakeonLANfunctionortheWakeUponAlarmfunctionontheWindows8.1operating
system,dothefollowing:
1.OpenControlPanel.
2.ClickHardwareandSound➙PowerOptions.
3.Intheleftpanel,clickChoosewhatthepowerbuttondoes.
4.IntheShutdownsettingsection,clearTurnonfaststartup.
Note:Ifthesettingsareunavailable,clickChangesettingsthatarecurrentlyunavailable.
5.ClickSavechanges.
Settingthecomputervolume
Anaudiocontrollerisbuiltintothecomputersystemboardtosupporttheaudioconnectorsonyour
computer.See“Audiofeatures”onpage36.
ThissectionprovidesinstructionsonhowtosetthecomputervolumefromthedesktopandControlPanel.
Settingthevolumefromthedesktop
Tosetthecomputervolumefromthedesktop,dothefollowing:
1.Clickthevolumeicononthetaskbar.Youcanlocatethetaskbaratthebottom-rightcornerofthe
desktop.
2.Movetheslideruptoincreaseordowntodecreasethevolume.Clickthemute-speakericontoturnoff
theaudio.
Ifthevolumeiconisnotonthetaskbar,addthevolumeicontothetaskbar.Toaddthevolumeicon,
dothefollowing:
•ForWindows7:
1.FromtheWindowsdesktop,clickStart➙ControlPanel➙AppearanceandPersonalization.
2.IntheTaskbarandStartMenusection,clickCustomizeiconsonthetaskbar.
3.ClickTurnsystemiconsonoroffandchangethevolumebehaviorsfromOfftoOn.
4.ClickOKtosavethenewsettings.
•ForWindows8.1:
1.OpenControlPanel,andclickAppearanceandPersonalization.
Note:FordetailedinformationonhowtoopenControlPanelonWindows8.1,see“Accessing
ControlPanelontheWindows8.1operatingsystem”onpage49.
2.IntheTaskbarandNavigationsection,clickCustomizeiconsonthetaskbar.
3.ClickTurnsystemiconsonoroffandchangethevolumebehaviorfromOfftoOn.
4.ClickOKtosavethenewsettings.
SettingthevolumefromControlPanel
TosetthecomputervolumefromControlPanel,dothefollowing:
1.OntheWindows7operatingsystem,clickStart➙ControlPanel➙HardwareandSound.Onthe
Windows8.1operatingsystem,openControlPanelandclickHardwareandSound.
Note:FordetailedinformationonhowtoopenControlPanelonWindows8.1,see“AccessingControl
PanelontheWindows8.1operatingsystem”onpage49.
Chapter3.Usingyourcomputer45

2.IntheSoundsection,clickAdjustsystemvolume.
3.Movetheslideruptoincreaseordowntodecreasethevolume.
Usingadisc
Thissectionprovidesinformationaboutthefollowingtopics:
•“Usingtheopticaldrive”onpage46
•“Handlingandstoringadisc”onpage46
•“Playingandremovingadisc”onpage47
•“Recordingadisc”onpage47
Usingtheopticaldrive
Dependingonthemodel,yourcomputerisequippedwithoneofthefollowingopticaldrives:
•CD-ROMdrive:UsedtoreadCDsonly.
•DVD-ROMdrive:UsedtoreadDVDsandCDs.
•BD-ROMdrive:Usedtoreadblu-raydiscs(BDs),DVDs,andCDs.
•Recordableopticaldrive:Usedtoreadandrecordadisc.
Whenusingtheopticaldrive,followtheseguidelines:
•Donotplacethecomputerinalocationwherethedriveisexposedtoanyofthefollowingconditions:
–Hightemperature
–Highhumidity
–Excessivedust
–Excessivevibrationorsuddenshock
–Aninclinedsurface
–Directsunlight
•Donotinsertanyobjectotherthanadiscintothedrive.
•Donotinsertdamageddiscsintothedrive.Warped,scratched,ordirtydiscscandamagethedrive.
•Beforemovingthecomputer,removethediscfromthedrive.
Handlingandstoringadisc
Whenhandlingandstoringadisc,followtheseguidelines:
•Holdthediscbyitsedges.Donottouchthesurfaceofthesidethatisnotlabeled.
•Toremovedustorfingerprints,wipethediscwithaclean,softclothfromthecentertotheoutside.Wiping
thediscinacirculardirectionmightcauselossofdata.
•Donotwriteorstickpaperonthedisc.
•Donotscratchormarkthedisc.
•Donotplaceorstorethediscindirectsunlight.
•Donotusebenzene,thinners,orothercleanerstocleanthedisc.
•Donotdroporbendthedisc.
46ThinkCentreM53HardwareMaintenanceManual

Playingandremovingadisc
Toplayadisc,dothefollowing:
1.Withthecomputeron,presstheeject/closebuttononthefrontoftheopticaldrive.Thetrayslides
outofthedrive.
2.Insertadiscintothetray.Someopticaldrivehasasnaphubinthecenterofthetray.Ifyourdrivehasa
snaphub,supportthetraywithonehandandthenpushcenterofthediscuntilitsnapsintoplace.
3.Presstheeject/closebuttonagainorgentlypushthetrayforwardtoclosethetray.Thediscplayer
programstartsautomatically.Formoreinformation,refertothehelpsystemofthediscplayerprogram.
Toremoveadiscfromtheopticaldrive,dothefollowing:
1.Withthecomputeron,presstheeject/closebuttononthefrontoftheopticaldrive.Thetrayslides
outofthedrive.
2.Carefullyremovethediscfromthetray.
3.Presstheeject/closebuttonagainorgentlypushthetrayforwardtoclosethetray.
Note:Ifthetraydoesnotslideoutofthedrivewhenyoupresstheeject/closebutton,turnoffyourcomputer.
Then,insertastraightenedpaperclipintotheemergency-ejectholeadjacenttotheeject/closebutton.
Usetheemergencyejectonlyinanemergency.
Recordingadisc
Ifyourcomputerisinstalledwitharecordableopticaldrive,youcanusethedrivetorecordadisc.
Torecordadisc,dothefollowing:
•OntheWindows7operatingsystem,useeithertheCorelDVDMovieFactoryLenovoEditionprogramor
thePower2Goprograminstalledonyourcomputer.
–ToruntheCorelDVDMovieFactoryLenovoEditionprogram,clickStart➙AllPrograms➙Corel
DVDMovieFactoryLenovoEdition➙CorelDVDMovieFactoryLenovoEdition.Followthe
instructionsonthescreen.
–TorunthePower2Goprogram,clickStart➙AllPrograms➙PowerDVDCreate➙Power2Go.
Followtheinstructionsonthescreen.
•OntheWindows8.1operatingsystem,runthePower2Goprogrambydoingthefollowing:
1.OntheStartscreen,clickthedownarrowinthebottom-leftcornertogototheAppsscreen.Then
typePower2Gointhesearchboxinthetop-rightcornerofthescreen.
2.ClickPower2Gointhesearchresulttoopentheprogram.
3.Followtheinstructionsonthescreen.
NavigatingamongscreensontheWindows8.1operatingsystem
Tonavigateamongthedesktop,theStartscreen,andapplicationsopenedfromtheStartscreenonthe
Windows8.1operatingsystem,dooneofthefollowing:
•FromtheStartscreen,dooneofthefollowingtonavigatetothemostrecentlyaccessedworkspace
(application,setting,ordesktop):
–Usingapointingdevice:Movethepointertotheextremebottom-leftcornerofthescreenuntilthe
Windowsscreen-controliconisdisplayed;thenclicktheicon.
–Usingatouchscreen:Swipeinandoutontheleftedgeofthescreen.Representationsofallavailable
workspacesaredisplayedalongtheleftedgeofthescreen.TaptheWindowsscreen-controlicon
atthebottom.
Chapter3.Usingyourcomputer47

Note:TheWindowsscreen-controliconisdisplayedonlywhenyouhaveatleastoneactive
workspaceinthebackgroundofthesystem.
•FromthedesktoporanyotherworkspacethatisopenedfromtheStartscreen,dooneofthefollowingto
navigatetotheStartscreen:
–Usingapointingdevice:
–Fromthedesktop,clicktheWindowsscreen-controliconinthebottom-leftcornerofthescreen.
–Fromanyotherworkspace,movethepointertotheextremebottom-leftcornerofthescreenuntil
theWindowsscreen-controliconisdisplayed;thenclicktheicon.
–Usingatouchscreen:Dooneofthefollowing:
–Fromthedesktop,taptheWindowsscreen-controliconinthebottom-leftcornerofthescreen.
–Fromanyotherworkspace,dooneofthefollowing:
•Swipeinandoutontheleftedgeofthescreen.Representationsofallavailableworkspaces
aredisplayedalongtheleftedgeofthescreen.TaptheWindowsscreen-controliconat
thebottom.
•Swipeinfromtherightedgeofthescreentodisplaythecharms;thentapStart.
•Fromanyworkspace(Startscreen,desktop,PCsettings,orapplicationopenedfromtheStartscreen),go
toanotherpreviously-openedworkspaceusinganyofthefollowingprocedures:
–Tonavigatetoapreviouslyaccessedworkspace(application,setting,ordesktop),dooneofthe
following:
–Usingapointingdevice:
1.Dooneofthefollowing:
•Movethepointertotheextremetop-leftcornerofthescreenandthenmovethepointer
downwardalongtheleftedgeofthescreen.
•Movethepointertotheextremebottom-leftcornerofthescreenandthenmovethepointer
upwardalongtheleftedgeofthescreen.
Representationsofallavailableworkspacesaredisplayedalongtheleftedgeofthescreen.
Note:OnlyactiveworkspacesthatyouhaveaccessedduringthecurrentWindowssessionare
displayedalongtheleftedge.Ifyoucloseanactiveworkspace,itsrepresentationwillnotbe
displayedalongtheleftedgeofthescreen.
2.Clicktherepresentation.
–Usingatouchscreen:
•Method1
1.Swipeinandoutontheleftedgeofthescreen.Representationsofallavailableworkspaces
aredisplayedalongtheleftedgeofthescreen.
2.Tapthedesiredworkspace.
•Method2
1.Swipeinfromtheleftedgeofthescreentonavigatetothenextavailableworkspace.
2.Repeatstep1untilyounavigatetothedesiredworkspace.
–Tonavigatetothemostrecentlyaccessedworkspace(application,PCsettings,ordesktop),doone
ofthefollowing:
–Usingapointingdevice:Movethepointertotheextremetop-leftcornerofthescreenuntilthe
Windowsscreen-controliconisdisplayed;thenclicktheicon.
48ThinkCentreM53HardwareMaintenanceManual

–Usingatouchscreen:Swipeinfromtheleftedgeofthescreen.
ForinformationaboutusingotherfeaturesoftheWindows8.1operatingsystem,opentheHelp+Tips
applicationfromtheStartscreenorAppsscreen.Alternatively,refertotheWindowsHelpandSupport
informationsystem.Formoreinformation,see“HelpandSupport”onpage151.
AccessingControlPanelontheWindows8.1operatingsystem
OntheWindowsoperatingsystem,youcanviewandchangecomputersettingsthroughControlPanel.To
accessControlPanelontheWindows8.1operatingsystem,dooneofthefollowing:
•Fromthedesktop
1.Movethepointertothetop-rightorbottom-rightcornerofthescreentodisplaythecharms.
2.ClickSettings.
3.ClickControlPanel.
•FromtheStartscreen
1.Clickthedownarrowinthebottom-leftcornerofthescreentogototheAppsscreen.
2.Scrolltotherightside,andclickControlPanelintheWindowsSystemsection.
Frequentlyaskedquestions
Thefollowingaresomeofthefrequentlyaskedquestionsandtheiranswers.Theanswerscanhelpyou
optimizetheuseofyourcomputer.
Fortheanswerstomorefrequentlyaskedquestionsaboutusingyourcomputer,goto:
http://www.lenovo.com/support/faq
HowcanIgetmyuserguideinanotherlanguage?
Theuserguideisavailableinvariouslanguagesat:
http://www.lenovo.com/UserManuals
HowcanIrestoremycomputersettings?
Yourcomputerprovidesaprogramthatenablesyoutorestorethecomputersettings.Formoreinformation,
seeChapter10“Recoveryinformation”onpage95.
Additionally,incaseofahard-disk-drivefailure,youcanorderarecoverydiscsetfromtheLenovoCustomer
SupportCenter.ForinformationaboutcontactingtheCustomerSupportCenter,seeChapter12“Getting
information,help,andservice”onpage151.Beforeusingtherecoverydiscset,refertothedocumentation
thatcomeswiththediscset.
Note:Arecoverydiscsetmightcontainmultiplediscs.Ensurethatyouhaveallofthediscsreadybefore
startingtherecoveryprocess.Duringtherecoveryprocess,youmightbepromptedtochangediscs.
WherecanIfindhelpabouttheWindowsoperatingsystem?
TheWindowsHelpandSupportinformationsystemprovidesyouwithdetailedinformationaboutusing
theWindowsoperatingsystem.ToaccesstheWindowsHelpandSupportinformationsystem,doone
ofthefollowing:
•OntheWindows7operatingsystem,clickStart➙HelpandSupport.
•OntheWindows8.1operatingsystem,moveyourpointertothetop-rightorbottom-rightcornerofthe
screentodisplaythecharms.ThenclickSettings➙Help.Additionally,theWindows8.1operating
systemprovidesaHelp+TipsapplicationthatyoucanopenfromtheStartscreenorAppsscreen.
Chapter3.Usingyourcomputer49

HowcanIchangetheWindows8.1startupbehaviortoopeneitherthedesktoportheStartscreen?
OntheWindows8.1operatingsystem,youcansetthecomputertoopeneitherthedesktoportheStart
screenbydefault.Tosetthedefaultstartupscreen,dothefollowing:
1.Onthedesktop,right-clickonthetaskbaratthebottomofthescreen.
2.ClickProperties.The“TaskbarandNavigationproperties”windowisdisplayed.
3.OntheNavigationtab,locatetheStartscreensection,andthendooneofthefollowing:
•Tosetthedesktopasyourdefaultstartupscreen,selectWhenIsigninorcloseallappsona
screen,gotothedesktopinsteadofStart.
•TosettheStartscreenasyourdefaultstartupscreen,cleartheWhenIsigninorcloseallappson
ascreen,gotothedesktopinsteadofStartcheckbox.
4.ClickOKtosavethenewsetting.
50ThinkCentreM53HardwareMaintenanceManual
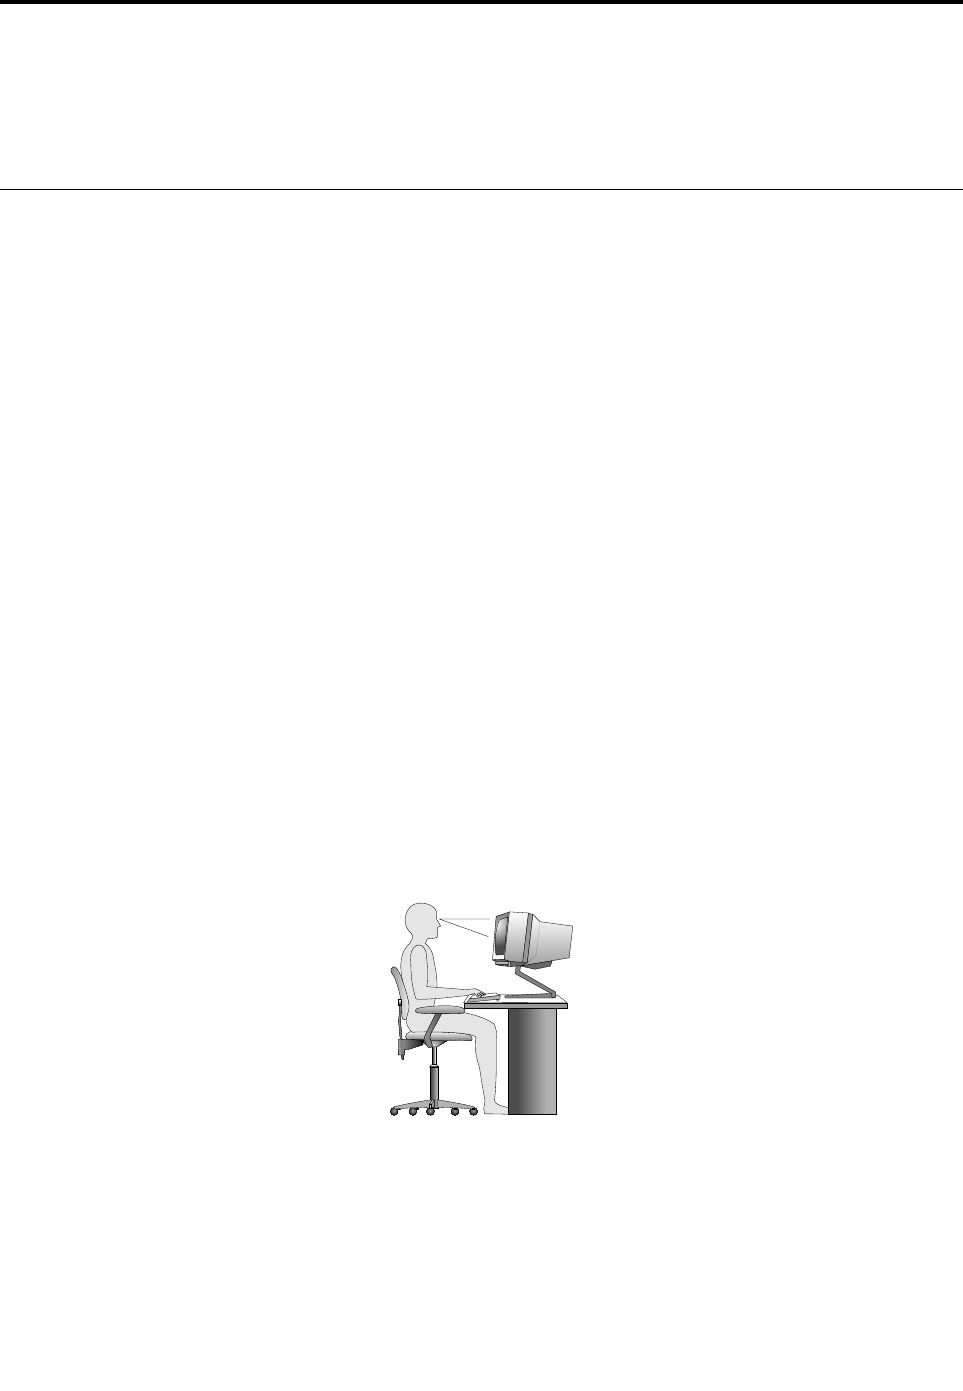
Chapter4.Youandyourcomputer
Thischapterprovidesinformationaboutaccessibility,comfort,andrelocatingyourcomputertoother
countriesorregions.
Accessibilityandcomfort
Goodergonomicpracticeisimportanttogetthemostfromyourpersonalcomputerandtoavoiddiscomfort.
Arrangeyourworkplaceandtheequipmentyouusetosuityourindividualneedsandthekindofwork
thatyouperform.Inaddition,usehealthyworkhabitstomaximizeyourperformanceandcomfortwhile
usingyourcomputer.
Thefollowingtopicsprovideinformationaboutarrangingyourworkarea,settingupyourcomputer
equipment,andestablishinghealthyworkhabits.
Arrangingyourworkspace
Togetthemostfromyourcomputer,arrangeboththeequipmentyouuseandyourworkareatosuityour
needsandthekindofworkyoudo.Yourcomfortisofforemostimportance,butlightsources,aircirculation,
andthelocationofelectricaloutletscanalsoaffectthewayyouarrangeyourworkspace.
Comfort
Althoughnosingleworkingpositionisidealforeveryone,hereareafewguidelinestohelpyoufinda
positionthatsuitsyoubest.
Sittinginthesamepositionforalongtimecancausefatigue.Thebackrestandseatofyourchairshould
adjustindependentlyandprovidegoodsupport.Theseatshouldhaveacurvedfronttorelievepressureon
thethighs.Adjusttheseatsothatyourthighsareparalleltothefloorandyourfeetareeitherflatonthe
floororonafootrest.
Whenusingthekeyboard,keepyourforearmsparalleltothefloorandyourwristsinacomfortableposition.
Usealighttouchonthekeyboardandyourhandsandfingersrelaxed.Changetheangleofthekeyboard
formaximumcomfortbyadjustingthepositionofthekeyboardfeet.
Adjustthemonitorsothetopofthescreenisat,orslightlybelow,eyelevel.Placethemonitorata
comfortableviewingdistance,usually51–61cm(20–24inches).Then,positionthemonitorsothatyoucan
viewitwithouttwistingyourbody.Also,positionotherequipmentyouuseregularly,suchasthetelephone
oramouse,withineasyreach.
©CopyrightLenovo201451

Glareandlighting
Positionthemonitortominimizeglareandreflectionsfromoverheadlights,windows,andotherlightsources.
Reflectedlightfromshinysurfacescancauseannoyingreflectionsonyourmonitorscreen.Placethe
monitoratrightanglestowindowsandotherlightsources,whenpossible.Reduceoverheadlighting,if
necessary,byturningofflightsorusinglowerwattagebulbs.Ifyouinstallthemonitornearawindow,use
curtainsorblindstoblockthesunlight.Youcanadjustthebrightnessandcontrastcontrolsonthemonitor
astheroomlightingchangesthroughouttheday.
Whereitisimpossibletoavoidreflectionsortoadjustthelighting,anantiglarefilterplacedoverthescreen
mightbehelpful.However,thesefiltersmightaffecttheclarityoftheimageonthescreen;trythemonlyafter
youhaveexhaustedothermethodsofreducingglare.
Dustbuildupcompoundsproblemsassociatedwithglare.Remembertocleanyourmonitorscreen
periodicallyusingasoftclothasdirectedinyourmonitordocumentation.
Aircirculation
Yourcomputerandmonitorproduceheat.Thecomputerhasafanthatpullsinfreshairandforcesouthot
air.Themonitorletshotairescapethroughvents.Blockingtheairventscancauseoverheating,whichmight
resultinamalfunctionordamage.Placethecomputerandmonitorsothatnothingblockstheairvents;
usually,51mm(2inches)ofairspaceissufficient.Also,ensurethattheventedairisnotblowingonpeople.
Electricaloutletsandcablelengths
Thefollowingfactorsmightdeterminethefinalplacementofyourcomputer:
•Locationofelectricaloutlets
•Lengthofpowercords
•Lengthofthecablesthatareconnectedtothemonitorandotherdevices
Whenarrangingyourworkspace:
•Avoidtheuseofextensioncords.Whenpossible,plugthecomputerpowercorddirectlyintoanelectrical
outlet.
•Keeppowercordsandcablesneatlyroutedawayfromwalkwaysandotherareaswheretheymight
getkickedaccidentally.
Formoreinformationaboutpowercords,see“Powercordsandpoweradapters”onpage1.
Accessibilityinformation
Lenovoiscommittedtoprovidingpeoplewithdisabilitiesgreateraccesstoinformationandtechnology.
Sometechnologiesarealreadyprovidedinyouroperatingsystem.Otherscanbepurchasedthrough
vendors.
UsersalsocanusetheEaseofAccessCenterprovidedintheWindowsoperatingsystemtoconfiguretheir
computerstosuittheirphysicalandcognitiveneeds.TheEaseofAccessCenterisacentrallocationthat
youcanusetoconfiguretheaccessibilitysettingsandprogramsavailableontheMicrosoftWindows
operatingsystem.TousetheEaseofAccessCenter,openControlPanelandclickEaseofAccess
➙EaseofAccessCenter.
Thefollowinginformationprovideswaystohelpuserswhohavehearing,vision,andmobilitylimitationsget
themostoutoftheircomputerexperience.
52ThinkCentreM53HardwareMaintenanceManual

On-screennotification
On-screennotificationhelpshearing-impairedpeoplebeawareofthestatusoftheircomputer.On-screen
notificationreplacessoundswithvisualcuesortextcaptionstoindicatethatactivityishappeningonthe
computer.Asaresult,systemalertsarenoticeableevenwhentheyarenotheard.Forexample,whenyou
selectoneobjectwithyourkeyboard,theobjectishighlighted.Whenyoumovethepointertooneobject
withyourmouse,theintroductorytextoftheobjectisdisplayed.
Touseon-screennotification,openControlPanel,clickEaseofAccess➙EaseofAccessCenter,and
thenclickUsetextorvisualalternativesforsounds.
Audionotification
Audionotificationhelpsvisuallyimpairedpeopleorpeoplewithweaksightbeawareofthestatusoftheir
computer.
Touseaudionotification,openControlPanel,clickEaseofAccess➙EaseofAccessCenter➙Usethe
computerwithoutadisplay,andthenselectTurnonAudioDescription.
Narrator
Narratorisascreenreaderthatreadswhatisdisplayedonthescreenaloudanddescribeseventslike
errormessages.
ToopenNarrator,dothefollowing:
•ForWindows7:ClicktheStartbutton.Then,typeNarratorintothesearchfield.Inthelistofresults,
clickNarrator.
•ForWindows8.1:Moveyourpointertothetop-rightorbottom-rightcornerofthescreentodisplaythe
charmsandclickSearch.Then,typeNarratorintothesearchfield.Inthelistofresults,clickNarrator.
FormoreinformationabouthowtouseandconfigureNarrator,seetheWindowsHelpandSupport
informationsystem.
Screen-readertechnologies
Screen-readertechnologiesareprimarilyfocusedonsoftwareprograminterfaces,helpinformationsystems,
andavarietyofonlinedocuments.Foradditionalinformationaboutscreenreaders,seethefollowing:
•UsingPDFswithscreenreaders:
http://www.adobe.com/accessibility.html?promoid=DJGVE
•UsingtheJAWSscreenreader:
http://www.freedomscientific.com/jaws-hq.asp
•UsingtheNVDAscreenreader:
http://www.nvaccess.org/
SpeechRecognition
SpeechRecognitionenablesyoutocontrolyourcomputerbyvoice.
Usingonlyyourvoice,youcanstartprograms,openmenus,clickobjectsonthescreen,dictatetextinto
documents,andwriteandsende-mails.Everythingyoudowiththekeyboardandmousecanbedonewith
onlyyourvoice.
ToopenSpeechRecognition,dothefollowing:
•ForWindows7:ClicktheStartbutton.Then,typeSpeechRecognitionintothesearchfield.Inthelist
ofresults,clickSpeechRecognition.
Chapter4.Youandyourcomputer53

•ForWindows8.1:Moveyourpointertothetop-rightorbottom-rightcornerofthescreentodisplaythe
charmsandclickSearch.Then,typeSpeechRecognitionintothesearchfield.Inthelistofresults,
clickSpeechRecognition.
FormoreinformationabouthowtouseandconfigureSpeechRecognition,seetheWindowsHelpand
Supportinformationsystem.
Customizabletextsize
Dependingonyourpreference,youcanchangeonlythetextsizeinsteadofchangingthesizeofeverything
onthedesktop.Tochangethetextsize,openControlPanelandclickAppearancesandPersonalization➙
Display.Then,gotoChangeonlythetextsizeandsetatextsizethatmeetsyourneeds.
Magnifier
YourcomputerisequippedwiththeMicrosoftMagnifiertohelpvisuallyimpairedpeopleusethecomputer
morecomfortably.Magnifierisausefulutilitythatenlargestheentirescreenorpartofthescreensothatyou
canseethewordsandimagesbetter.YoucanopenMagnifierfromtheEaseofAccessCenter.
ToopenMagnifier,dothefollowing:
•ForWindows7:ClicktheStartbutton,clickAllPrograms➙Accessories➙EaseofAccess,and
thenclickMagnifier.
•ForWindows8.1:Moveyourpointertothetop-rightorbottom-rightcornerofthescreentodisplaythe
charmsandclickSearch.Then,typeMagnierintothesearchfield.Inthelistofresults,clickMagnifier.
FormoreinformationabouthowtouseandconfigureMagnifier,seetheWindowsHelpandSupport
informationsystem.
Note:Fortouch-screencomputermodels,youalsocanzoominandzoomoutbyusingtouchgestures
insteadofthekeyboard.See“Zoom”onpage54.
Zoom
Youcanusethezoomfeaturetoenlargeorreducethesizeoftext,pictures,maps,orotherobjects.
•Fromthekeyboard:
–Zoomin:PresstheWindowslogokey+theplus-signkey(+)toenlargethesizeoftext,pictures,
maps,orotherobjects.
–Zoomout:PresstheWindowslogokey+theminus-sign(-)keytoreducethesizeoftext,pictures,
maps,orotherobjects.
•Fromthetouchscreen:
–Zoomin:Movetwofingersfartherapartonthetouchscreentoenlargethesizeoftext,pictures,
maps,orotherobjects.
–Zoomout:Movetwofingersclosertogetheronthetouchscreentoreducethesizeoftext,pictures,
maps,orotherobjects.
Screenresolution
Youcanmakeyourdocumentseasiertoreadbyadjustingthescreenresolutionofyourcomputer.Toadjust
thescreenresolution,rightclickanywhereonthedesktop,clickScreenresolution,andthenadjustthe
settingsasyouprefer.
Note:Settingtoolowofaresolutionmightpreventsomeitemsfromfittingonthescreen.
Foralternativesonincreasingthesizeoftextandotherobjects,seethefollowing:
54ThinkCentreM53HardwareMaintenanceManual

•“Customizabletextsize”onpage54
•“Magnifier”onpage54
•“Zoom”onpage54
EaseofAccesskeyboardshortcuts
Thefollowingtablecontainskeyboardshortcutsthatcanhelpmakeyourcomputereasiertouse.
KeyboardshortcutFunction
Windowslogokey+UOpentheEaseofAccessCenter
RightShiftforeightsecondsTurnFilterKeysonoroff
ShiftfivetimesTurnStickyKeysonoroff
NumLockforfivesecondsTurnToggleKeysonoroff
LeftAlt+LeftShift+NumLockTurnMouseKeysonoroff
LeftAlt+LeftShift+PrtScn(orPrtSc)TurnHighContrastonoroff
Formoreinformation,gotohttp://windows.microsoft.com/,andthentypeanyofthefollowingkeywords
forsearching:keyboardshortcuts,keycombinations,shortcutkeys.
On-ScreenKeyboard
Ifyouprefertotypeorenterdataintoyourcomputerwithoutusingaphysicalkeyboard,youcanuse
On-ScreenKeyboard.On-ScreenKeyboarddisplaysavisualkeyboardwithallthestandardkeys.Youcan
selectkeysusingthemouseoranotherpointingdevice,oryoucantaptoselectthekeysifyourcomputer
supportsmulti-touchscreen.
ToopenOn-ScreenKeyboard,dothefollowing:
•ForWindows7:ClicktheStartbutton.Then,typeOn-ScreenKeyboardintothesearchfield.Inthelistof
results,clickOn-ScreenKeyboard.
•ForWindows8.1:Moveyourpointertothetop-rightorbottom-rightcornerofthescreentodisplaythe
charmsandclickSearch.Then,typeOn-ScreenKeyboardintothesearchfield.Inthelistofresults,
clickOn-ScreenKeyboard.
FormoreinformationabouthowtouseandconfigureOn-ScreenKeyboard,seetheWindowsHelpand
Supportinformationsystem.
Personalizedkeyboard
Thetactilebumpsonthekeyboardprovideareferencepointfromwhichyoucaneasilylocateallkeyson
thekeyboardwithoutvisualassistance.
Toadjustyourkeyboardsettings,openControlPanel,clickEaseofAccess➙EaseofAccessCenter,
andthenclickMakethekeyboardeasiertouse.
Industry-standardconnectors
Yourcomputerprovidesindustry-standardconnectorsthatenableyoutoconnectassistivedevices,
ifneeded.
Formoreinformationaboutthelocationandfunctionoftheconnectors,see“Locatingconnectors,controls,
andindicatorsonthefrontofyourcomputer”onpage28and“Locatingconnectorsontherearofyour
computer”onpage29.
Chapter4.Youandyourcomputer55

TTY/TDDconversionmodem
Yourcomputersupportstheuseofthetexttelephone(TTY)orthetelecommunicationsdeviceforthe
deaf(TDD)conversionmodem.ThemodemmustbeconnectedbetweenyourcomputerandaTTY/TDD
telephone.Then,youcantypeamessageonyourcomputerandsendittothetelephone.
Documentationinaccessibleformats
Lenovoprovideselectronicdocumentationinaccessibleformats,suchasproperlytaggedPDFfilesor
HyperTextMarkupLanguage(HTML)files.Lenovoelectronicdocumentationisdevelopedtoensure
thatvisuallyimpaireduserscanreadthedocumentationthroughascreenreader.Eachimageinthe
documentationalsoincludesadequatealternativetextsothatvisuallyimpaireduserscanunderstandthe
imagewhentheyuseascreenreader.
Movingyourcomputertoanothercountryorregion
Whenyoumoveyourcomputertoanothercountryorregion,youmusttakelocalelectricalstandards
intoconsideration.
Ifyourelocateyourcomputertoacountryorregionthatusesanelectricaloutletstyledifferentfromthe
typeyouarecurrentlyusing,youwillhavetopurchaseeitherelectricalplugadaptersornewpowercords.
YoucanorderpowercordsdirectlyfromLenovo.
Forpowercordinformationandpartnumbers,goto:
http://www.lenovo.com/powercordnotice
56ThinkCentreM53HardwareMaintenanceManual
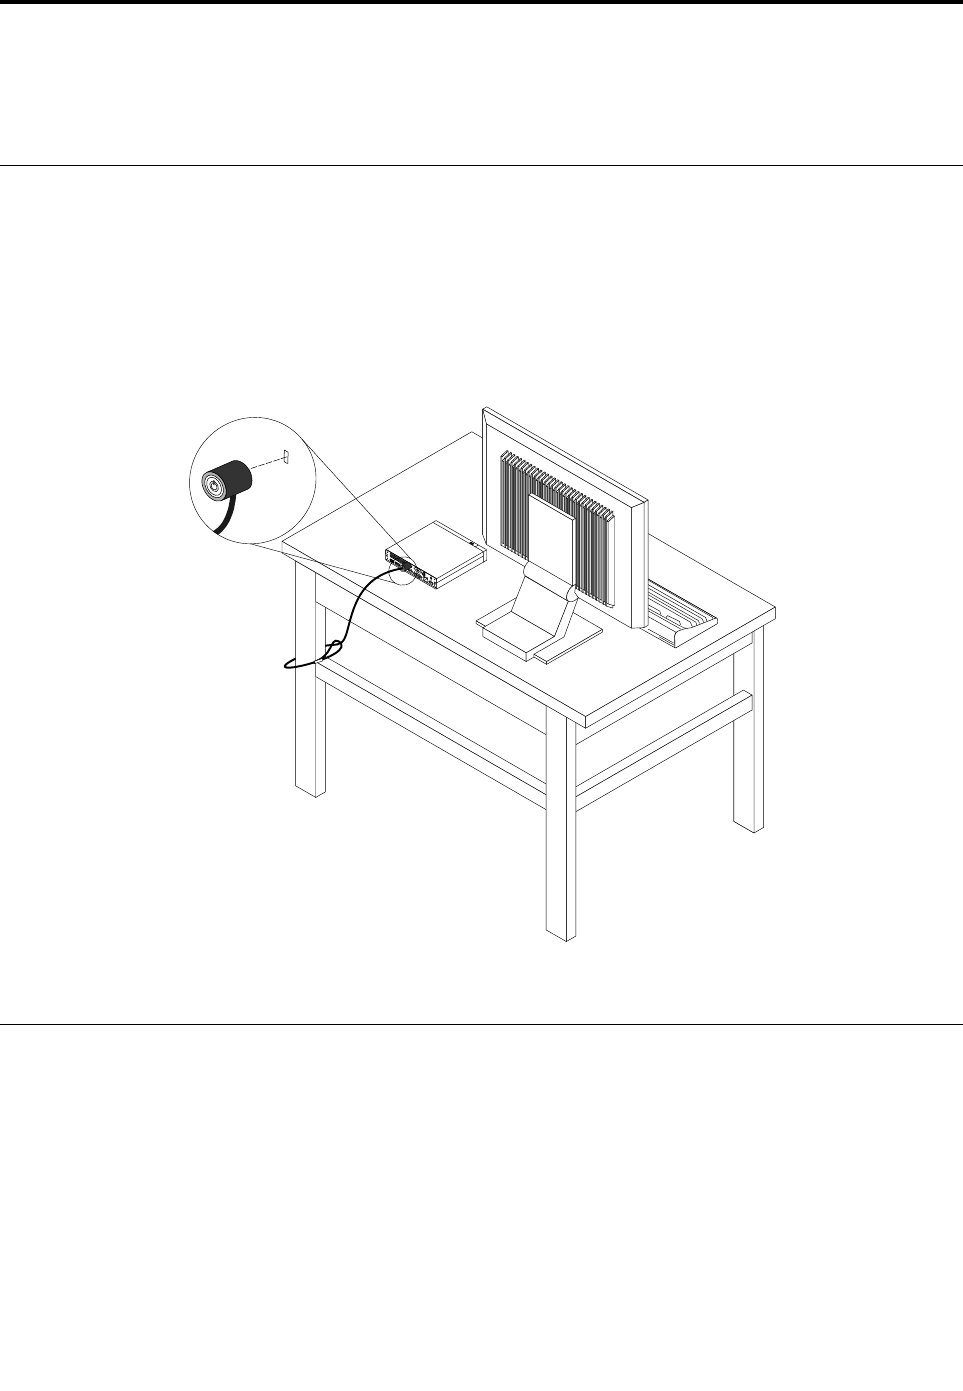
Chapter5.Security
Thischapterprovidesinformationabouthowtoprotectyourcomputerfromtheftandunauthorizeduse.
AttachingaKensington-stylecablelock
YoucanuseaKensington-stylecablelocktosecureyourcomputertoadesk,table,orothernon-permanent
fixture.Thecablelockattachestothesecurity-lockslotattherearofyourcomputer.Dependingonthetype
selected,thecablelockcanbeoperatedwithakeyorcombination.Thecablelockalsolocksthebuttons
usedtoopenthecomputercover.Thisisthesametypeoflockusedwithmanynotebookcomputers.You
canordersuchacablelockdirectlyfromLenovobysearchingforKensingtonat:
http://www.lenovo.com/support
Figure7.Kensington-stylecablelock
Usingpasswords
YoucansetavarietyofpasswordsthroughtheMicrosoftWindowsoperatingsystemandthroughtheBIOS
ofyourcomputertohelpdeterunauthorizeduseofyourcomputer.
BIOSpasswords
YoucanusetheBIOSSetupUtilityprogramtosetpasswordstopreventunauthorizedaccesstoyour
computeranddata.Thefollowingtypesofpasswordsareavailable:
•Administratorpassword
•Harddiskpassword
©CopyrightLenovo201457

•Power-onpassword(POP)
FormoreinformationaboutBIOSpasswords,see“UsingBIOSpasswords”onpage62.Youdonothaveto
setanypasswordstouseyourcomputer.However,usingpasswordsimprovescomputingsecurity.
Windowspasswords
DependingonyourversionoftheWindowsoperatingsystem,youcanuseWindowspasswordsforavariety
offeatures,includingaccesscontrolandindividualusersettings.Formoreinformation,seetheWindows
HelpandSupportinformationsystem.
Usingthecoverpresenceswitch
Thecoverpresenceswitchpreventsyourcomputerfromloggingintotheoperatingsystemwhenthe
computercoverisnotproperlyinstalledorclosed.Toenablethecover-presence-switchconnectoronthe
systemboard,dothefollowing:
1.StarttheSetupUtilityprogram.See“StartingtheSetupUtilityprogram”onpage61.
2.Settheadministratorpassword.See“Setting,changing,anddeletingapassword”onpage62.
3.FromtheSecuritysubmenu,selectChassisIntrusionDetection➙Enabled.The
cover-presence-switchconnectoronthesystemboardisenabled.
Whenyouturnonthecomputer,ifthecoverpresenceswitchdetectsthatyourcomputercoverisnot
correctlyinstalledorclosed,anerrormessagewillbedisplayed.Tobypasstheerrormessageandloginto
theoperatingsystem,dothefollowing:
1.Properlyinstallorcloseyourcomputercover.See“Completingthepartsreplacement”onpage147.
2.PressF1toentertheSetupUtilityprogram.ThenpressF10tosaveandexittheSetupUtilityprogram.
Theerrormessagewillnotbedisplayedagain.
Usingthefingerprintreader
Theintegratedfingerprintreaderprovidedonsomekeyboardsenablesyoutoenrollyourfingerprintand
associateitwithyourpower-onpassword,harddiskpassword,andWindowspassword.Asaresult,
fingerprintauthenticationcanreplacepasswordsandenablesimpleandsecureuseraccess.
ToopenFingerprintManagerProorThinkVantageFingerprintSoftwareandusethefingerprintreader,
dothefollowing:
•OntheWindows7operatingsystem,see“AccessingLenovoprogramsontheWindows7operating
system”onpage39.
•OntheWindows8.1operatingsystem,see“AccessingLenovoprogramsontheWindows8.1operating
system”onpage40.
Toconfigurethefingerprintreader,dothefollowing:
1.StarttheSetupUtilityprogram.See“StartingtheSetupUtilityprogram”onpage61.
2.FromtheSetupUtilityprogrammainmenu,selectSecurity➙FingerprintSetup,andpressEnter.
TheFingerprintSetupwindowopens.
3.SelectPrebootAuthenticationorEraseFingerprintDataasdesired,andpressEnter.
Note:
•PrebootAuthentication:enablesordisablesthefingerprintauthenticationforaccessingtheBIOS.
•EraseFingerprintData:clearsthefingerprintdatastoredinafingerprintreader.
58ThinkCentreM53HardwareMaintenanceManual

4.SelectthedesiredsettingsandpressEnter.
5.PressF10tosavechangesandexittheSetupUtilityprogram.PressEnterwhenpromptedtoconfirm
theexit.
Formoreinformationaboutusingthefingerprintreader,refertothehelpsystemofFingerprintManagerPro
orThinkVantageFingerprintSoftware.
Usingandunderstandingfirewalls
Afirewallcanbehardware,software,oracombinationofbothdependingonthelevelofsecurityrequired.
Firewallsworkonasetofrulestodeterminewhichinboundandoutboundconnectionsareauthorized.If
yourcomputerispreinstalledwithafirewallprogram,ithelpsprotectagainstcomputerInternetsecurity
threats,unauthorizedaccess,intrusions,andInternetattacks.Italsoprotectsyourprivacy.Formore
informationabouthowtousethefirewallprogram,refertothehelpsystemofyourfirewallprogram.
TheWindowsoperatingsystempreinstalledonyourcomputerprovidestheWindowsFirewall.Fordetailson
usingtheWindowsFirewall,referto“HelpandSupport”onpage151.
Protectingdataagainstviruses
Yourcomputerispreinstalledwithanantivirusprogramtohelpyouguardagainst,detect,andeliminate
viruses.
Lenovoprovidesafullversionofantivirussoftwareonyourcomputerwithafree30-daysubscription.After
30days,youmustrenewthelicensetocontinuereceivingtheantivirussoftwareupdates.
Note:Virusdefinitionfilesmustbekeptup-to-datetoguardagainstnewviruses.
Formoreinformationabouthowtouseyourantivirussoftware,refertothehelpsystemofyourantivirus
software.
Chapter5.Security59

60ThinkCentreM53HardwareMaintenanceManual

Chapter6.Advancedconfiguration
Thischapterprovidesthefollowinginformationtohelpyouconfigurethecomputer:
•“UsingtheSetupUtilityprogram”onpage61
•“UpdatingorrecoveringtheBIOS”onpage66
UsingtheSetupUtilityprogram
TheSetupUtilityprogramisusedtoviewandchangetheconfigurationsettingsofyourcomputer,regardless
ofwhichoperatingsystemyouareusing.However,theoperatingsystemsettingsmightoverrideanysimilar
settingsintheSetupUtilityprogram.
StartingtheSetupUtilityprogram
TostarttheSetupUtilityprogram,dothefollowing:
1.Ensurethatyourcomputeristurnedoff.
2.RepeatedlypressandreleasetheF1keywhenturningonthecomputer.Whenyouhearmultiple
beepsorseealogoscreen,releasetheF1key.
Note:Ifapower-onpasswordoranadministratorpasswordhasbeenset,theSetupUtilityprogram
menuwillnotbedisplayeduntilyouenterthecorrectpassword.Formoreinformation,see“Using
BIOSpasswords”onpage62.
WhenthePOSTdetectsthattheharddiskdrivehasbeenremovedfromyourcomputerorthememorysize
hasdecreased,anerrormessagewillbedisplayed.Youmustdooneofthefollowing:
•PressF1toentertheSetupUtilityprogram.
Note:AfteryouentertheSetupUtilityprogram,pressF10tosavechangesandexittheSetupUtility
program.PressEnterwhenpromptedtoconfirmtheexit.Theerrormessagewillnotbedisplayedagain.
•PressF2tobypasstheerrormessageandlogintotheoperatingsystem.
Note:YouhavetoenabletheconfigurationchangedetectionfeatureforthePOSTtodetecttheremovalof
theharddiskdrive.Toenabletheconfigurationchangedetectionfeature,dothefollowing:
1.StarttheSetupUtilityprogram.
2.FromtheSetupUtilityprogrammainmenu,selectSecurity➙ConfigurationChangeDetection,
andpressEnter.
3.SelectEnabledandpressEnter.
4.PressF10tosavechangesandexittheSetupUtilityprogram.PressEnterwhenpromptedtoconfirm
theexit.
Viewingandchangingsettings
TheSetupUtilityprogrammenulistsvariousitemsaboutthesystemconfiguration.Tovieworchange
settings,starttheSetupUtilityprogram.See“StartingtheSetupUtilityprogram”onpage61.Then,follow
theinstructionsonthescreen.
Youcanuseeitherthekeyboardorthemousetonavigatethroughmenuchoices.Thekeysusedtoperform
varioustasksaredisplayedatthebottomofeachscreen.
©CopyrightLenovo201461

UsingBIOSpasswords
ByusingtheSetupUtilityprogram,youcansetpasswordstopreventunauthorizedaccesstoyourcomputer
anddata.
Youdonothavetosetanypasswordstouseyourcomputer.However,usingpasswordsimprovescomputer
security.Ifyoudecidetosetanypasswords,readthefollowingtopics.
SetupUtilityprogrampasswordtypes
Thefollowingtypesofpasswordsareavailable:
•Power-onpassword
Whenapower-onpasswordisset,youarepromptedtoenteravalidpasswordeachtimethecomputeris
turnedon.Thecomputercannotbeuseduntilthevalidpasswordisentered.
•Administratorpassword
Settinganadministratorpassworddetersunauthorizedusersfromchangingconfigurationsettings.Ifyou
areresponsibleformaintainingtheconfigurationsettingsofseveralcomputers,youmightwanttoset
anAdministratorpassword.
Whenanadministratorpasswordisset,youarepromptedtoenteravalidpasswordeachtimeyou
trytoaccesstheSetupUtilityprogram.TheSetupUtilityprogramcannotbeaccesseduntilavalid
passwordisentered.
Ifboththepower-onpasswordandadministratorpasswordareset,youcanentereitherpassword.
However,youmustuseyourAdministratorpasswordtochangeanyconfigurationsettings.
•Harddiskpassword
Settingaharddiskpasswordpreventsunauthorizedaccesstothedataontheharddiskdrive.Whena
harddiskpasswordisset,youarepromptedtoenteravalidpasswordeachtimeyoutrytoaccessthe
harddiskdrive.
Notes:
–Afteryousetaharddiskpassword,yourdataontheharddiskdriveisprotectedeveniftheharddisk
driveisremovedfromonecomputerandinstalledinanother.
–Iftheharddiskpasswordisforgotten,thereisnowaytoresetthepasswordorrecoverdatafromthe
harddiskdrive.
Passwordconsiderations
Apasswordcanbeanycombinationofupto64alphabeticandnumericcharacters.Forsecurityreasons,it
isrecommendedtouseastrongpasswordthatcannotbeeasilycompromised.
Note:TheSetupUtilityprogrampasswordsarenotcasesensitive.
Tosetastrongpassword,considerthefollowingguidelines:
•Haveatleasteightcharactersinlength
•Containatleastonealphabeticcharacterandonenumericcharacter
•Notbeyournameoryourusername
•Notbeacommonwordoracommonname
•Besignificantlydifferentfromyourpreviouspasswords
Setting,changing,anddeletingapassword
Toset,change,ordeleteapassword,dothefollowing:
1.StarttheSetupUtilityprogram.See“StartingtheSetupUtilityprogram”onpage61.
2.FromtheSetupUtilityprogrammainmenu,selectSecurity.
62ThinkCentreM53HardwareMaintenanceManual

3.Dependingonthepasswordtype,selectSetPower-OnPassword,SetAdministratorPassword,or
HardDiskPassword.
4.Followtheinstructionsontherightsideofthescreentoset,change,ordeleteapassword.
Note:Apasswordcanbeanycombinationofupto64alphabeticandnumericcharacters.Formore
information,see“Passwordconsiderations”onpage62.
Erasinglostorforgottenpasswords(clearingCMOS)
Thissectionprovidesinstructionsonhowtoeraselostorforgottenpasswords,suchasauserpassword.
Toerasealostorforgottenpassword,dothefollowing:
1.Removeallmediafromthedrivesandturnoffallattacheddevicesandthecomputer.Then,disconnect
allpowercordsfromelectricaloutletsanddisconnectallcablesthatareconnectedtothecomputer.
2.Removethecomputercover.See“Removingthecomputercover”onpage123.
3.LocatetheClearCMOS/Recoveryjumperonthesystemboard.See“Locatingpartsonthesystem
board”onpage34.
4.Movethejumperfromthestandardposition(pin1andpin2)tothemaintenanceposition(pin2and
pin3).
5.Reinstallthecomputercoverandconnectthepowercord.See“Completingthepartsreplacement”on
page147.
6.Turnonthecomputerandleaveitonforapproximately10seconds.Then,turnoffthecomputerby
holdingthepowerbuttonforapproximatelyfiveseconds.
7.Repeatstep1throughstep2.
8.MovetheClearCMOS/Recoveryjumperbacktothestandardposition(pin1andpin2).
9.Reinstallthecomputercoverandconnectthepowercord.See“Completingthepartsreplacement”on
page147.
Enablingordisablingadevice
Thissectionprovidesinformationonhowtoenableordisableuseraccesstothefollowingdevices:
USBSetupUsethisoptiontoenableordisableaUSBconnector.WhenaUSBconnectoris
disabled,thedeviceconnectedtotheUSBconnectorcannotbeused.
SATAControllerWhenthisoptionissettoDisable,alldevicesconnectedtotheSATAconnectors
(suchasharddiskdrivesoropticaldrives)aredisabledandcannotbeaccessed.
Toenableordisableadevice,dothefollowing:
1.StarttheSetupUtilityprogram.See“StartingtheSetupUtilityprogram”onpage61.
2.FromtheSetupUtilityprogrammainmenu,selectDevices.
3.Dependingonthedeviceyouwanttoenableordisable,dooneofthefollowing:
•SelectUSBSetuptoenableordisableaUSBdevice.
•SelectATADriveSetuptoenableordisableaninternalorexternalSATAdevice.
4.SelectthedesiredsettingsandpressEnter.
5.PressF10tosavechangesandexittheSetupUtilityprogram.See“ExitingtheSetupUtilityprogram”
onpage66.
Chapter6.Advancedconfiguration63

Selectingastartupdevice
Ifyourcomputerdoesnotstartupfromadeviceasexpected,dooneofthefollowingtoselectthestartup
deviceyouwant.
Selectingatemporarystartupdevice
Usethisproceduretoselectatemporarystartupdevice.
Note:Notalldiscsandharddiskdrivesarebootable.
1.Turnonorrestartyourcomputer.
2.Whenyouseethelogoscreen,repeatedlypressandreleasetheF12key.TheStartupDeviceMenu
windowisdisplayed.
3.SelectthedesiredstartupdeviceandpressEnter.Thecomputerwillstartupfromthedeviceyou
selected.
Note:SelectingastartupdevicefromtheStartupDeviceMenuwindowdoesnotpermanentlychange
thestartupsequence.
Selectingorchangingthestartupdevicesequence
Tovieworpermanentlychangetheconfiguredstartupdevicesequence,dothefollowing:
1.StarttheSetupUtilityprogram.See“StartingtheSetupUtilityprogram”onpage61.
2.FromtheSetupUtilityprogrammainmenu,selectStartup.
3.SelectthedevicesforthePrimaryStartupSequence,theAutomaticStartupSequence,andtheError
StartupSequence.Readtheinformationdisplayedontherightsideofthescreen.
4.PressF10tosavechangesandexittheSetupUtilityprogram.See“ExitingtheSetupUtilityprogram”
onpage66.
EnablingErPLPScompliancemode
Lenovocomputersmeettheeco-designrequirementsoftheErPLot3regulation.Formoreinformation,go
to:
http://www.lenovo.com/ecodeclaration
YoucanenableErPLPScompliancemodeintheSetupUtilityprogramtoreducetheconsumptionof
electricitywhenyourcomputerisofforinsleepmode.
ToenableErPLPScompliancemodeintheSetupUtilityprogram,dothefollowing:
1.StarttheSetupUtilityprogram.See“StartingtheSetupUtilityprogram”onpage61.
2.FromtheSetupUtilityprogrammainmenu,selectPower➙EnhancedPowerSavingMode,and
pressEnter.
3.SelectEnabledandpressEnter.
4.FromthePowermenu,selectAutomaticPowerOnandpressEnter.
5.SelectWakeonLanandpressEnter.
6.SelectDisabledandpressEnter.
7.PressF10tosavechangesandexittheSetupUtilityprogram.PressEnterwhenpromptedtoconfirm
theexit.
WhenErPLPScompliancemodeisenabled,youcanwakeupyourcomputerbydoingoneofthefollowing:
•Pressthepowerbutton
•Enablethewakeuponalarmfeature
64ThinkCentreM53HardwareMaintenanceManual

Thewakeuponalarmfeatureenablesyourcomputertowakeupatasettime.Toenablethewake
uponalarmfeature,dothefollowing:
1.StarttheSetupUtilityprogram.
2.FromtheSetupUtilityprogrammainmenu,selectPower➙AutomaticPowerOn,andpressEnter.
3.SelectWakeUponAlarmandpressEnter.Thenfollowtheinstructionsonthescreen.
4.PressF10tosavechangesandexittheSetupUtilityprogram.PressEnterwhenpromptedto
confirmtheexit.
•Enabletheafterpowerlossfeature
Theafterpowerlossfeatureenablesyourcomputertowakeupwhenthepowersupplyresumesaftera
suddenlossofelectricity.Toenabletheafterpowerlossfeature,dothefollowing:
1.StarttheSetupUtilityprogram.
2.FromtheSetupUtilityprogrammainmenu,selectPower➙AfterPowerLoss,andpressEnter.
3.SelectPowerOnandpressEnter.
4.PressF10tosavechangesandexittheSetupUtilityprogram.PressEnterwhenpromptedto
confirmtheexit.
Smartperformancechoices
YoucanadjusttheacousticandthermalperformanceofyourcomputerthroughtheSmartPerformance
Choicemenu.Twochoicesareavailable:
•BetterAcousticPerformance(defaultchoice)
•BetterThermalPerformance
ByenablingBetterAcousticPerformance,yourcomputerwillrunwithlessnoiseatanormalthermal
level.ByenablingBetterThermalPerformance,yourcomputerwillrunatabetterthermallevelwith
normalacousticperformance.
Toswitchbetweenbetteracousticperformanceandbetterthermalperformance,dothefollowing:
1.StarttheSetupUtilityprogram.See“StartingtheSetupUtilityprogram”onpage61.
2.FromtheSetupUtilityprogrammainmenu,selectPower.
3.SelectSmartPerformanceChoice.TheSmartPerformanceChoicewindowisdisplayed.
4.SelectBetterAcousticPerformanceorBetterThermalPerformanceasdesired.
5.PressF10tosaveyoursettingandexittheSetupUtilityprogram.See“ExitingtheSetupUtility
program”onpage66.
ICEperformancemode
YoucanadjusttheacousticandthermalperformanceofyourcomputerthroughtheICEPerformance
Modemenu.Twochoicesareavailable:
•BetterAcousticPerformance(defaultsetting)
•BetterThermalPerformance
ByenablingBetterAcousticPerformance,yourcomputerwillrunwithlessnoiseatanormalthermal
level.ByenablingBetterThermalPerformance,yourcomputerwillrunatabetterthermallevelwith
normalacousticperformance.
ToconfiguretheICEperformancemode,dothefollowing:
1.StarttheSetupUtilityprogram.See“StartingtheSetupUtilityprogram”onpage61.
Chapter6.Advancedconfiguration65

2.FromtheSetupUtilityprogrammainmenu,selectPower.
3.SelectIntelligentCoolingEngine(ICE).TheIntelligentCoolingEngine(ICE)windowisdisplayed.
4.SelectICEPerformanceMode.TheICEPerformanceModewindowisdisplayed.
5.SelectBetterAcousticPerformanceorBetterThermalPerformanceasdesired.
6.PressF10tosavechangesandexittheSetupUtilityprogram.See“ExitingtheSetupUtilityprogram”
onpage66.
ICEthermalalert
YoucanmonitorthethermalfunctionofyourcomputerundercriticalthermalsituationsthroughtheICE
ThermalAlertmenu.Twochoicesareavailable:
•Enabled(defaultsetting)
•Disabled
AfterenablingtheICEthermalalertfunction,whencriticalthermalsituationsoccur,suchasmalfunctioning
fans,abnormallyhightemperature,andpoorcoolingperformances,analertlogwillbewrittenintothe
Windowssystemlog.Thealertlogcanhelpyouidentifythethermalproblems.
ToconfiguretheICEthermalalertfunction,dothefollowing:
1.StarttheSetupUtilityprogram.See“StartingtheSetupUtilityprogram”onpage61.
2.FromtheSetupUtilityprogrammainmenu,selectPower.
3.SelectIntelligentCoolingEngine(ICE).TheIntelligentCoolingEngine(ICE)windowisdisplayed.
4.SelectICEThermalAlert.TheICEThermalAlertwindowisdisplayed.
5.SelectEnabledorDisabledasdesired.
6.PressF10tosavechangesandexittheSetupUtilityprogram.See“ExitingtheSetupUtilityprogram”
onpage66.
ExitingtheSetupUtilityprogram
Afteryoufinishviewingorchangingsettings,pressEsctoreturntotheSetupUtilityprogrammainmenu.
YoumighthavetopressEscseveraltimes.Dooneofthefollowing:
•Ifyouwanttosavethenewsettings,pressF10tosavechangesandexittheSetupUtilityprogram.
•Ifyoudonotwanttosavethesettings,selectExit➙DiscardChangesandExit,andthenpressEnter.
WhentheResetWithoutSavingwindowdisplays,selectYes,andthenpressEntertoexittheSetup
Utilityprogram.
•Ifyouwanttoreturntothedefaultsettings,pressF9toloadthedefaultsettings,andthenpressF10to
saveandexittheSetupUtilityprogram.
UpdatingorrecoveringtheBIOS
LenovomightmakechangesandenhancementstotheBIOS.Whenupdatesarereleased,theyareavailable
asdownloadablefilesontheLenovoWebsiteathttp://www.lenovo.com/drivers.Instructionsforusingthe
BIOSupdatesareavailableinaTXTfilethatisincludedwiththeupdatefiles.Formostmodels,youcan
downloadeitheranupdateprogramtocreateasystem-program-updatediscoranupdateprogramthat
canberunfromtheoperatingsystem.
ThischapterprovidesinformationaboutupdatingtheBIOS,andhowtorecoverfromaBIOSupdatefailure.
66ThinkCentreM53HardwareMaintenanceManual

BIOSlevels
AnincorrectlevelofBIOScancausefalseerrorsandunnecessaryFRUreplacement.Usethefollowing
informationtodeterminethecurrentlevelofBIOSinstalledinthecomputer,thelatestBIOSavailableforthe
computer,andwheretoobtainthelatestlevelofBIOS.
•TodeterminethecurrentLevelofBIOS:
–StarttheSetupUtility.
–SelectMainmenu.
•SourcesforobtainingthelatestlevelBIOSavailable
1.Lenovosupportwebsite:http://www.lenovo.com/support/
2.LenovoCustomerSupportCenter
3.Levels1and2Support
ToupdatetheBIOS,see“UpdatingorrecoveringtheBIOS”onpage66.
Note:BIOSsettingsvarybyoperatingsystem.ChangetheBIOSsettingsbeforeinstallinganewoperating
system.See“ChangingtheBIOSsettingsbeforeinstallinganewoperatingsystem”onpage67.
Usingsystemprograms
Systemprogramsarethebasiclayerofsoftwarebuiltintoyourcomputer.Systemprogramsincludethe
POST,theBIOS,andtheSetupUtilityprogram.ThePOSTisasetoftestsandproceduresthatare
performedeachtimeyouturnonyourcomputer.TheBIOSisalayerofsoftwarethattranslatesinstructions
fromotherlayersofsoftwareintoelectricalsignalsthatthecomputerhardwarecanexecute.Youcanusethe
SetupUtilityprogramtovieworchangetheconfigurationsettingsofyourcomputer.See“UsingtheSetup
Utilityprogram”onpage61fordetailedinformation.
Thesystemboardofyourcomputerhasamodulecalledelectricallyerasableprogrammableread-only
memory(EEPROM,alsoreferredtoasflashmemory).ItenablesyoutoupdatethePOST,theBIOS,and
theSetupUtilityprogrameasily.Toperformsuchanupdate,youcaneitherstartyourcomputerwitha
system-program-updatediscorrunaspecialupdateprogramfromyouroperatingsystem.
LenovomightmakechangesandenhancementstothePOSTandBIOS.Whenupdatesarereleased,they
areavailableasdownloadablefilesontheLenovoWebsiteathttp://www.lenovo.com.Instructionsforusing
thePOSTandBIOSupdatesareavailableinaTXTfilethatisincludedwiththeupdatefiles.Formost
models,youcandownloadanupdateprogramthatcanbeusedtocreateasystem-program-updatedisc
orberunfromtheoperatingsystem.
ChangingtheBIOSsettingsbeforeinstallinganewoperatingsystem
BIOSsettingsvarybyoperatingsystem.ChangetheBIOSsettingsbeforeinstallinganewoperatingsystem.
TochangetheBIOSsettings,dothefollowing:
1.StarttheSetupUtilityprogram.See“StartingtheSetupUtilityprogram”onpage61.
2.FromtheSetupUtilityprogrammainmenu,selectExit➙OSOptimizedDefault.
3.Dependingontheoperatingsystemtobeinstalled,dooneofthefollowing:
•ToinstalltheWindows8.1(64-bit)operatingsystem,selectEnabled.
•ToinstallanoperatingsystemotherthanWindows8.1(64-bit),selectDisabled.
4.SelectYesinthewindowdisplayedandpressEntertoconfirmyourselection.
5.PressF10tosavechangesandexittheSetupUtilityprogram.See“ExitingtheSetupUtilityprogram”
onpage66.
Chapter6.Advancedconfiguration67

UpdatingtheBIOSfromadisc
Thissectionprovidesinstructionsonhowtoupdate(flash)theBIOSfromadiscontheWindows8.1(64-bit)
operatingsystemandonotheroperatingsystems.
Note:Youcandownloadaself-startingbootablediscimage(knownasanISOimage)withthesystem
programupdatestocreateasystem-program-updatedisc.Goto:
http://www.lenovo.com/support
Toupdate(flash)theBIOSfromadiscontheWindows8.1(64-bit)operatingsystem,dothefollowing:
1.StarttheSetupUtilityprogram.See“StartingtheSetupUtilityprogram”onpage61.
2.FromtheSetupUtilityprogrammainmenu,selectExit➙OSOptimizedDefault➙Disabled.
3.SelectYesinthewindowdisplayedandpressEntertoconfirmyourselection.
4.PressF10tosavechangesandexittheSetupUtilityprogram.See“ExitingtheSetupUtilityprogram”
onpage66.
5.Turnoffyourcomputer.
6.Pressthepowerbuttontoturnonthecomputer.ThenrepeatedlypressandreleasetheF12keyuntilthe
StartupDeviceMenuwindowopens.
7.FromtheStartupDeviceMenuwindow,selectthedesiredopticaldriveasthestartupdevice.Then,
insertthediscintothisopticaldriveandpressEnter.Theupdatebegins.
8.Whenpromptedtochangetheserialnumber,itissuggestedthatyoudonotmakethischangeby
pressingN.However,ifyoudowanttochangetheserialnumber,pressY,andthentypeintheserial
numberandpressEnter.
9.Whenpromptedtochangethemachinetypeandmodel,itissuggestedthatyoudonotmakethis
changebypressingN.However,ifyoudowanttochangethemachinetypeandmodel,pressY,and
thentypeinthemachinetypeandmodelandpressEnter.
10.Followtheinstructionsonthescreentocompletetheupdate.Aftertheupdateiscompleted,removethe
discfromtheopticaldrive.
11.RestartyourcomputerandstarttheSetupUtilityprogram.See“StartingtheSetupUtilityprogram”
onpage61.
12.FromtheSetupUtilityprogrammainmenu,selectExit➙OSOptimizedDefault➙Enabled.
13.SelectYesinthewindowdisplayedandpressEntertoconfirmyourselection.
14.PressF10tosavechangesandexittheSetupUtilityprogram.See“ExitingtheSetupUtilityprogram”
onpage66.
ToupdatetheBIOSfromadisc,dothefollowing:
1.Turnoffyourcomputer.
2.Pressthepowerbuttontoturnonthecomputer.ThenrepeatedlypressandreleasetheF12keyuntilthe
StartupDeviceMenuwindowopens.
3.FromtheStartupDeviceMenuwindow,selectthedesiredopticaldriveasthestartupdevice.Then,
insertthediscintothisopticaldriveandpressEnter.Theupdatebegins.
4.Whenpromptedtochangetheserialnumber,itissuggestedthatyoudonotmakethischangeby
pressingN.However,ifyoudowanttochangetheserialnumber,pressY,thentypeintheserialnumber
andpressEnter.
5.Whenpromptedtochangethemachinetypeandmodel,itissuggestedthatyoudonotmakethis
changebypressingN.However,ifyoudowanttochangethemachinetypeandmodel,pressY,then
typeinthemachinetypeandmodelandpressEnter.
68ThinkCentreM53HardwareMaintenanceManual

6.Followtheinstructionsonthescreentocompletetheupdate.Aftertheupdateiscompleted,removethe
discfromtheopticaldrive.
UpdatingtheBIOSfromyouroperatingsystem
LenovomakesconstantimprovementstoitsWebsites.TheWebpagecontentsaresubjecttochange
withoutnotice,includingthecontentsreferencedinthefollowingprocedure.ToupdatetheBIOSfrom
youroperatingsystem,dothefollowing:
1.Gotohttp://www.lenovo.com/driversandfollowtheinstructionsontheWebpagetolocatetheBIOS
driverthatyouneed.
2.DownloadtheBIOSdriverandtheTXTfilethatcontainstheinstructions.
3.PrinttheTXTfilethatcontainstheinstallationinstructionsandfollowtheinstructionstoupdateyour
BIOS.
RecoveringfromaBIOSupdatefailure
TorecoverfromaBIOSupdatefailure,dothefollowing:
1.Removeallmediafromthedrivesandturnoffallattacheddevicesandthecomputer.Then,disconnect
allpowercordsfromelectricaloutletsanddisconnectallcablesthatareconnectedtothecomputer.
2.Removethecomputercover.See“Removingthecomputercover”onpage123.
3.LocatetheClearCMOS/Recoveryjumperonthesystemboard.See“Locatingpartsonthesystem
board”onpage34.
4.RemoveanycablesthatimpedeaccesstotheClearCMOS/Recoveryjumper.
5.Movethejumperfromthestandardposition(pin1andpin2)tothemaintenanceposition(pin2and
pin3).
6.ReconnectanycablesthatweredisconnectedandreinstallthePCIcardifremoved.
7.Reinstallthecomputercoverandreconnectthepowercordsforthecomputerandmonitortoelectrical
outlets.See“Completingthepartsreplacement”onpage147.
8.PressthepowerbuttontoturnonthecomputerandinserttheBIOSupdatediscintotheopticaldrive.
Waitafewminutes.Therecoveryprocessbegins.Aftertherecoveryprocessiscompleted,your
computerwillbeturnedoffautomatically.
Note:Dependingonthecomputermodel,therecoveryprocesswilltaketwotothreeminutes.
9.Repeatstep1throughstep4.
10.MovetheClearCMOS/Recoveryjumperbacktothestandardposition(pin1andpin2).
11.ReconnectanycablesthatweredisconnectedandreinstallthePCIcardifremoved.
12.Reinstallthecomputercoverandreconnectanycablesthatweredisconnected.
13.Pressthepowerbuttontoturnonthecomputerandrestarttheoperatingsystem.
Chapter6.Advancedconfiguration69

70ThinkCentreM53HardwareMaintenanceManual

Chapter7.Preventingproblems
Thischapterprovidesinformationthatcanhelpyouavoidcommonproblemsandkeepyourcomputer
runningsmoothly.
Keepingyourcomputercurrent
Insomesituationsyoumightfinditnecessarytohavethemostcurrentsoftwareprograms,devicedrivers,or
operatingsystem.Thissectionexplainshowtogetthelatestupdatesforyourcomputer.
Gettingthelatestdevicedriversforyourcomputer
Note:LenovomakesconstantimprovementstoitsWebsites.ThecontentsontheWebpagearesubjectto
changewithoutnotice,includingthecontentsreferencedinthefollowingprocedure.
Togetthelatestdevicedriversforyourcomputer,dothefollowing:
1.Gotohttp://www.lenovo.com/supportandfollowtheinstructionsonthescreen.
2.Selectyourproductbydoingoneofthefollowing:
•Enteryourmachineinformationinthequickpath.
•Choosefromtheproductoptions.
3.Selectthecategoryofdeviceandtheoperatingsystemforwhichyouneedthedevicedriver.
4.Inthefilteredlist,downloadandinstalltheappropriatedevicedriver.
Attention:DonotdownloadthelatestdevicedriversfromtheWindowsUpdateWebsite.Thedevicedrivers
providedontheWindowsUpdateWebsitehavenotbeentestedbyLenovoandusingthemmightcause
unexpectedproblems.ObtainthelatestdevicedriversfromLenovo.
Updatingyouroperatingsystem
Youcanupdateyouroperatingsystemthroughthesystemupdatefeatureprovidedbytheoperatingsystem.
Systemupdatesincludesecurityfixes,newversionsofWindowscomponents,fixestootherportionsof
theWindowsoperatingsystem,orenhancements.
Toupdateyouroperatingsystem,dothefollowing:
Note:EnsurethatyourcomputerisconnectedtotheInternet.
•ForWindows7:
1.FromtheWindowsdesktop,clickStart➙AllPrograms➙WindowsUpdate.
2.ClickCheckforupdates.
3.Ifanyupdatesareavailable,selecttheupdatesyouneedandclickInstallupdates.
•ForWindows8.1:
1.Movethepointertothetop-rightorbottom-rightcornerofthescreentodisplaythecharms.Click
Settings➙ChangePCsettings➙Updateandrecovery➙WindowsUpdate.
2.ClickChecknow.
3.Ifanyupdatesareavailable,clickViewdetails,selecttheupdatesyouneed,andclickInstall.
©CopyrightLenovo201471

UsingtheSystemUpdateprogram
TheSystemUpdateprogram(hereinafterreferredtoasSystemUpdate)providesregularaccesstosystem
andsoftwareupdatesforyourcomputertokeepyoursystemandsoftwareup-to-date.SystemUpdate
gathersinformationfromtheLenovoHelpCenteraboutnewupdatesforyourcomputer.ThenSystem
Updatesortsanddisplayseachupdateascritical,recommended,oroptionaltohelpyouunderstandthe
importance.Youhavecompletecontrolofwhichupdatestodownloadandinstall.Afteryouselectthe
updatesyouwant,SystemUpdateautomaticallydownloadsandinstallstheupdateswithoutanyfurther
interventionfromyou.
SystemUpdateispreinstalledonmostLenovocomputersandisreadytorun.Theonlyprerequisiteis
anactiveInternetconnection.Youcanstarttheprogrammanually,oryoucanusetheschedulefeature
toenabletheprogramtosearchforupdatesautomaticallyatspecifiedintervals.Youalsocanpredefine
scheduledupdatestosearchbyseverity(criticalupdates,criticalandrecommendedupdates,orallupdates).
Asaresult,thelistyouchoosefromcontainsonlythoseupdatetypesthatareofinteresttoyou.
ToopenSystemUpdate,see“AccessingLenovoprogramsontheWindows7operatingsystem”onpage39
or“AccessingLenovoprogramsontheWindows8.1operatingsystem”onpage40.
IfSystemUpdateisnotcurrentlyinstalledonyourcomputer,youcandownloaditfromtheLenovoSupport
Websiteat:
http://www.lenovo.com/support
Cleaningandmaintenance
Withappropriatecareandmaintenanceyourcomputerwillserveyoureliably.Thefollowingtopicsoffer
informationtohelpyoukeepyourcomputerintopworkingorder.
Basics
Herearesomebasicpointsaboutkeepingyourcomputerfunctioningproperly:
•Keepyourcomputerinaclean,dryenvironment.Ensurethatthecomputerrestsonaflat,steadysurface.
•Donotcoveranyoftheventsinthecomputerormonitor.Theseventsprovideairflowtokeepyour
computerfromoverheating.
•Keepfoodanddrinksawayfromallpartsofyourcomputer.Foodparticlesandspillsmightmakethe
keyboardandmousestickandunusable.
•Donotgetthepowerswitchesorothercontrolswet.Moisturecandamagethesepartsandcausean
electricalhazard.
•Alwaysdisconnectapowercordbygraspingthepluginsteadofthecord.
Cleaningyourcomputer
Itisagoodpracticetocleanyourcomputerperiodicallytoprotectthesurfacesandensuretrouble-free
operation.
CAUTION:
Besuretoturnoffthecomputerandmonitorbeforecleaningthecomputerandmonitorscreen.
Computer
Useonlymildcleaningsolutionsandadampclothtocleanthepaintedsurfacesofthecomputer.
Keyboard
Tocleanyourcomputerkeyboard,dothefollowing:
72ThinkCentreM53HardwareMaintenanceManual

1.Applysomeisopropylrubbingalcoholtoasoft,dust-freecloth.
2.Wipeeachkeytopsurfacewiththecloth.Wipethekeysonebyone;ifyouwipeseveralkeysatatime,
theclothmayhookontoanadjacentkeyandpossiblydamageit.Ensurethatnoliquiddripsonto
orbetweenthekeys.
3.Toremoveanycrumbsordustfrombeneaththekeys,youcanuseacamerablowerwithabrush
orcoolairfromahairdryer.
Note:Avoidsprayingcleanerdirectlyontothekeyboard.
Opticalmouse
Anopticalmouseusesalight-emittingdiode(LED)andanopticalsensortonavigatethepointer.Ifthe
pointeronthescreendoesnotmovesmoothlywiththeopticalmouse,youmightneedtocleanthemouse.
Tocleananopticalmouse,dothefollowing:
1.Turnoffyourcomputer.
2.Disconnectthemousecablefromthecomputer.
3.Turnthemouseupsidedowntocheckthelens.
•Ifthereisasmudgeonthelens,gentlycleantheareawithaplaincotton-tippedswab.
•Ifthereisdebrisinthelens,gentlyblowthedebrisawayfromthearea.
4.Checkthesurfaceonwhichyouareusingthemouse.Ifyouhaveaveryintricatepictureorpattern
beneaththemouse,itmightbedifficultforthedigitalsignalprocessortodeterminechangesinthe
mouseposition.
5.Reconnectthemousecabletothecomputer.
6.Turnyourcomputerbackon.
Displayscreen
Dustbuildupcompoundsproblemsassociatedwithglare.Remembertocleanyourmonitorscreen
periodically.
Cleaningaflat-panelmonitorsurface
Tocleantheflexiblefilmsurfaceofaflat-panelcomputerdisplay,wipeitgentlywithasoft,drycloth,or
blowonthescreentoremovegritandotherlooseparticles.ThenmoistenaclothwithLCDcleanerand
wipethescreensurface.
Manycomputersupplystorescarrythespecialcleaningfluidsfordisplays.Usecleaningfluidsdevelopedfor
LCDdisplaysonly.Firstapplythefluidtoalint-free,softcloth,thencleantheLCDdisplay.Somecomputer
supplystorescarrypre-moistenedtowelettesforLCDmaintenance.
Cleaningaglass-screensurface
Tocleanaglass-screensurface,wipeitgentlywithasoft,drycloth,orblowonthescreentoremovegritand
otherlooseparticles.Thenuseasoftclothmoistenedwithanonabrasiveliquidglasscleaner.
Goodmaintenancepractices
Byperformingafewgoodmaintenancepractices,youcanmaintaingoodcomputerperformance,protect
yourdata,andbepreparedincaseofacomputerfailure.
•Emptyyourrecyclebinonaregularbasis.
•Usethediskdefragmentationordiskoptimizationfeatureofyouroperatingsystemoccasionallyto
preventperformanceproblemscausedbyanexcessivenumberoffragmentedfiles.
Chapter7.Preventingproblems73

•CleanoutyourInbox,SentItems,andDeletedItemsfoldersinyoure-mailapplicationonaregularbasis.
•Backupcriticaldataregularlyonremovablemediamemory,suchasdiscsandUSBstoragedevices,
andstoretheremovablemediainasafelocation.Thefrequencyofmakingbackupcopiesdependson
howcriticalthedataistoyouoryourbusiness.
•Backupyourentireharddiskdriveonaregularbasis.
•Keepyourcomputersoftware,devicedrivers,andoperatingsystemup-to-date.See“Keepingyour
computercurrent”onpage71.
•Keepalogbook.Entriesmightincludemajorsoftwareorhardwarechanges,device-driverupdates,
intermittentproblemsandwhatyoudidtoresolvethem,andotherissuesyoumighthaveexperienced.
Thecauseofaproblemmightbechangeinhardware,changeinsoftware,oranyotheractionsthatmight
havetakenplace.AlogbookcanhelpyouoraLenovotechniciandeterminesthecauseofaproblem.
•CreateProductRecoverydiscs.See“Creatingandusingrecoverymedia”onpage95formoreinformation
aboutusingProductRecoverydiscstorestoretheharddiskdrivetothefactory-defaultsettings.
•CreaterescuemediausingdiscsorUSBstoragedevicesasearlyaspossible.Youcanusearescue
mediumtorecoverfromfailuresthatpreventyoufromgainingaccesstotheWindowsenvironmentorthe
RescueandRecoveryworkspaceonyourharddiskdrive.
Movingyourcomputer
Takethefollowingprecautionsbeforemovingyourcomputer:
1.Backupallfilesanddatafromtheharddiskdrive.Thereareavarietyofbackupprogramsavailable
commercially.IfyouusetheWindows7operatingsystem,LenovoprovidestheRescueandRecovery
programtohelpyoubackupandrestoredata.See“Performingbackupandrecoveryoperations”
onpage96.
2.Removeallmediafromyourcomputer,suchasdiscs,USBstoragedevices,memorycards,andsoon.
3.Turnoffthecomputerandallattacheddevices.Yourharddiskdriveautomaticallyparkstheread/write
headinanondataarea.Thispreventsdamagetotheharddiskdrive.
4.Unplugthepowercordsfromelectricaloutlets.
5.Disconnectcommunicationcables,suchasmodemornetworkcables,fromtheoutletsfirst,andthen
disconnecttheotherendsfromthecomputer.
6.Notewhereanyremainingcablesareattachedtothecomputer;then,removethem.
7.Ifyousavedtheoriginalshippingcartonsandpackingmaterials,usethemtopacktheunits.Ifyouare
usingdifferentcartons,cushiontheunitstoavoiddamage.
74ThinkCentreM53HardwareMaintenanceManual

Chapter8.Troubleshootinganddiagnostics
Thischapterprovidesinformationaboutdiagnosingandtroubleshootingcomputerproblems.Ifyour
computerproblemisnotdescribedhere,seeChapter12“Gettinginformation,help,andservice”onpage
151foradditionaltroubleshootingresources.
Basictroubleshooting
Thefollowingtableprovidessomebasicinstructionstohelpyoutroubleshootyourcomputerproblems.
Note:Ifyoucannotcorrecttheproblem,havethecomputerserviced.Foralistofserviceandsupport
telephonenumbers,refertotheSafety,Warranty,andSetupGuidethatcomeswithyourcomputerorgoto
theLenovoSupportWebsiteat:
http://www.lenovo.com/support/phone
SymptomAction
Thecomputerdoesnotstart
whenyoupressthepower
button.
Ensurethat:
•Thepowercordiscorrectlyconnectedtotherearofthecomputerandtoa
workingelectricaloutlet.
•Ifyourcomputerhasasecondarypowerswitchontherearofthecomputer,
ensurethatitisswitchedon.
•Thepowerindicatoronthefrontofthecomputerison.
•Thecomputervoltagematchesthevoltageavailableattheelectricaloutletfor
yourcountryorregion.
Themonitorscreenisblank.Ensurethat:
•Themonitorsignalcableiscorrectlyconnectedtothemonitorandtothe
appropriatemonitorconnectoronthecomputer.
•Themonitorpowercordiscorrectlyconnectedtothemonitorandtoaworking
electricaloutlet.
•Themonitoristurnedonandthebrightnessandcontrastissetcorrectly.
•Thecomputervoltagematchesthevoltageavailableattheelectricaloutletfor
yourcountryorregion.
•Ifyourcomputerhasadiscretegraphicscardinstalled,besuretouseamonitor
connectoronthediscretegraphicscard.
Thekeyboarddoesnotwork.Ensurethat:
•Thecomputeristurnedon.
•ThekeyboardissecurelyconnectedtoaPS/2keyboardconnectororaUSB
connectoronthecomputer.
•Nokeysarestuck.
Themousedoesnotwork.Ensurethat:
•Thecomputeristurnedon.
•ThemouseissecurelyconnectedtoaPS/2mouseconnectororaUSB
connectoronthecomputer.
•Themouseisclean.Referto“Opticalmouse”onpage73forfurtherinformation.
©CopyrightLenovo201475

SymptomAction
Theoperatingsystemdoesnot
start.
Ensurethatthestartupsequenceincludesthedevicewheretheoperatingsystem
resides.Usually,theoperatingsystemisontheharddiskdrive.Formore
information,see“Selectingastartupdevice”onpage64.
Thecomputerbeepsmultiple
timesbeforetheoperating
systemstarts.
Ensurethatnokeysarestuck.
Troubleshootingprocedure
Usethefollowingprocedureasastartingpointfordiagnosingproblemsyouareexperiencingwithyour
computer:
1.Ensurethatthecablesforallattacheddevicesareconnectedcorrectlyandsecurely.
2.Ensurethatallattacheddevicesthatrequireacpowerareconnectedtoproperlygrounded,functioning
electricaloutlets.
3.EnsurethatallattacheddevicesareenabledintheBIOSsettingsofyourcomputer.Formoreinformation
aboutaccessingandchangingtheBIOSsettings,referto“UsingtheSetupUtilityprogram”onpage61.
4.Goto“Troubleshooting”onpage76andfollowtheinstructionsforthetypeofproblemyouare
experiencing.IftheTroubleshootinginformationdoesnothelpyouresolveaproblem,continuewiththe
nextstep.
5.Tryusingapreviouslycapturedconfigurationtoseeifarecentchangetohardwareorsoftwaresettings
hascausedaproblem.Beforerestoringapreviousconfiguration,captureyourcurrentconfigurationin
casetheolderconfigurationsettingsdonotsolvetheproblemorhaveadverseeffects.Torestorea
capturedconfiguration,dothefollowing:
•ForWindows7:ClickStart➙ControlPanel➙SystemandSecurity➙System➙System
Protection➙SystemRestore.
•ForWindows8.1:OpenControlPanel,andthenclickSystemandSecurity➙System➙System
Protection➙SystemRestore.
Note:FordetailedinformationonhowtoopenControlPanelonWindows8.1,see“Accessing
ControlPanelontheWindows8.1operatingsystem”onpage49.
Ifthisdoesnotcorrecttheproblem,continuewiththenextstep.
6.Runthediagnosticprogram.See“LenovoSolutionCenter”onpage86formoreinformation.
•Ifthediagnosticprogramdetectsahardwarefailureorifyouareunabletorunthediagnostic
program,contacttheLenovoCustomerSupportCenter.SeeChapter12“Gettinginformation,help,
andservice”onpage151formoreinformation.
•Ifthediagnosticprogramdoesnotdetectahardwarefailure,continuewiththenextstep.
7.Useanantivirusprogramtoseeifyourcomputerhasbeeninfectedbyavirus.Iftheprogramdetectsa
virus,removethevirus.
8.Ifnoneoftheseactionssolvetheproblem,seektechnicalassistance.SeeChapter12“Getting
information,help,andservice”onpage151formoreinformation.
Troubleshooting
Usethetroubleshootinginformationtofindsolutionstoproblemsthathavedefinitesymptoms.
Ifthesymptomoccurredimmediatelyafteryouinstallednewsoftwareoranewhardwareoption,dothe
followingbeforereferringtothetroubleshootinginformation:
76ThinkCentreM53HardwareMaintenanceManual

1.Removethenewhardwareoptionorsoftware.Ifyoumustremovethecomputercovertoremovea
hardwareoption,ensurethatyoureviewandfollowtheelectricalsafetyinformationprovidedwithyour
computer.Foryoursafety,donotoperatethecomputerwiththecoverremoved.
2.Runthediagnosticprogramtoensureyourcomputerisoperatingcorrectly.
3.Reinstallthenewhardwareoptionorsoftwarefollowingtheinstructionsprovidedbythemanufacturer.
Audioproblems
Thissectionprovidessolutionstoaudio-relatedproblems.
NoaudioinWindows
Solutions:
•IfyouareusingpoweredexternalspeakersthathaveanOn/Offcontrol,ensurethefollowing:
–TheOn/OffcontrolissettotheOnposition.
–Thespeakerpowercableisconnectedtoaproperlygrounded,functionalacelectricaloutlet.
•Ifyourexternalspeakershaveavolumecontrol,ensurethatthevolumeisnotsettoolow.
•OntheWindowsdesktop,clickthespeakericonintheWindowsnotificationarea.ThenclickMixer.
Ensurethatthemutespeakerssettingsarenotselectedandnoneofthevolumesettingsissettoolow.
•Somemodelshaveafrontaudiopanelyoucanusetoadjustvolume.Ifyouhaveafrontaudiopanel,
ensurethatthevolumeisnotsettoolow.
•Ensurethatyourexternalspeakers(andheadphones,ifused)areconnectedtothecorrectaudio
connectoronthecomputer.Mostspeakercablesarecolor-codedtomatchtheconnector.
Note:Whenexternal-speakerorheadphonecablesareattachedtotheaudioconnector,theinternal
speaker,ifpresent,isdisabled.Inmostcases,ifanaudioadapterisinstalledinoneoftheexpansion
slots,theaudiofunctionbuiltintothesystemboardisdisabled.Therefore,youmustusetheaudio
connectorsontheaudioadapter.
•EnsurethattheprogramyouarerunningisdesignedforuseintheMicrosoftWindowsoperatingsystem.
IftheprogramisdesignedtoruninDOS,theprogramdoesnotusetheWindowssoundfeature.The
programmustbeconfiguredtouseSoundBlasterProorSoundBlasteremulation.
•Ensurethattheaudiodevicedriversarecorrectlyinstalled.SeeWindowsHelpandSupportinformation
systemformoreinformation.
Soundcomesfromoneexternalspeakeronly
Solutions:
•Ensurethatthespeakercableisinsertedcompletelyintotheconnectoronthecomputer.
•Ensurethatthecablethatattachestheleftspeakertotherightspeakerissecurelyconnected.
•ClickthespeakericonintheWindowsnotificationarea.Thenclickthespeakericonontopofthevolume
control.ClicktheLevelstabandensurethattheBalancesettingsaresetcorrectly.
CDproblems
ThissectionprovidessolutionstoCD-relatedproblems.
AnaudiodiscorAutoPlay-enableddiscdoesnotautomaticallyplaywhenitis
insertedintoaCDdrive
Solutions:
•IfyouhavemultipleCDorDVDdrivesinstalled(oracombinationofCDandDVDdrives),tryinsertingthe
discintotheotherdrive.Insomecases,onlyoneofthedrivesisconnectedtotheaudiosubsystem.
Chapter8.Troubleshootinganddiagnostics77

•Ifthisdoesnotcorrecttheproblem,followthesolutionsfor“ACDorDVDdoesnotwork”onpage78.
ACDorDVDdoesnotwork
Solutions:
•Ensurethatthediscisinsertedcorrectly,withitslabelup.
•Ensurethatthediscyouareusingisclean.Toremovedustorfingerprints,wipethedisccleanwithasoft
clothfromthecentertotheoutside.Wipingadiscinacircularmotionmightcauselossofdata.
•Ensurethatthediscyouareusingisnotscratchedordamaged.Tryinsertinganotherdiscthatyou
knowisgood.Ifyoucannotreadfromaknown-gooddisc,youmighthaveaproblemwithyouroptical
driveorthecablingtoyouropticaldrive.Ensurethatthepowercableandsignalcablearesecurely
connectedtothedrive.
Unabletouseabootablerecoverymedium,suchastheProductRecoveryCD,to
startyourcomputer
Solution:EnsurethattheCDorDVDdriveisinthestartupsequencebeforetheharddiskdrive.Referto
“Selectingorchangingthestartupdevicesequence”onpage64forinformationonviewingandchanging
thestartupsequence.Notethatonsomemodelsthestartupsequenceispermanentlysetandcannot
bechanged.
DVDproblems
ThissectionprovidessolutionstoDVD-relatedproblems.
BlackscreeninsteadofDVDvideo
Solutions:
•RestarttheDVDplayerprogram.
•Tryalowerscreenresolutionorcolordepth.
•Closeanyopenfiles,andthenrestartthecomputer.
DVDmoviedoesnotplay
Solutions:
•Ensurethatthediscsurfaceiscleanandnotscratched.
•Checkthediscorpackageforregionalcoding.Youmightneedtopurchaseadiscwithcodingfor
theregionwhereyouareusingyourcomputer.
NoaudioorintermittentaudiowhileplayingaDVDmovie
Solutions:
•Checkthevolumecontrolsettingsonyourcomputerandonyourspeakers.
•Ensurethatthediscsurfaceiscleanandnotscratched.
•Checkallcableconnectionstoandfromthespeakers.
•UsetheDVDmenuforthevideotoselectadifferentaudiotrack.
Playbackissloworchoppy
Solutions:
•Disableanybackgroundprograms,suchasAntiVirusorDesktopThemes.
•Ensurethatvideoresolutionissettolessthan1152x864pixels.
78ThinkCentreM53HardwareMaintenanceManual

Invaliddiscornodiscfoundmessage
Solutions:
•EnsurethataDVDdiscisinthedrivewiththeshinysideofthediscfacingdown.
•Ensurethatvideoresolutionissettolessthan1152x864pixels.
•OncomputersthathaveaCD-ROMorCD-RWdriveinadditiontoaDVD-ROMdrive,ensurethatthe
DVDdiscisinthedrivelabeled“DVD”.
Intermittentproblems
Someproblemsoccuronlyoccasionallyandaredifficulttorepeat.
Solutions:
•Ensurethatallcablesandcordsaresecurelyconnectedtothecomputerandattacheddevices.
•Ensurethatwhenthecomputerison,thefangrillisnotblocked(thereisairflowaroundthegrill),andthe
fansareworking.Ifairflowisblockedorthefansarenotworking,thecomputermightoverheat.
•IfSmallComputerSystemInterface(SCSI)devicesareinstalled,ensurethatthelastexternaldevicein
eachSCSIchainisterminatedcorrectly.Formoreinformation,seeyourSCSIdocumentation.
Harddiskdriveproblems
Selectyoursymptomfromthefollowinglist:
•“SomeorallharddiskdrivesmissingfromtheSetupUtilityprogram”onpage79
•“"NoOperatingSystemFound"messageorthesystemnotstartingfromthecorrectharddiskdrive”
onpage79
SomeorallharddiskdrivesmissingfromtheSetupUtilityprogram
Symptom:SomeorallharddiskdrivesmissingfromtheSetupUtilityprogram
Actions:
•Ensurethatallharddiskdrivesignalcablesandpowercablesareconnectedcorrectly.
•Ensurethatyourcomputerisconfiguredcorrectlytosupporttheharddiskdrives.
–IfyourcomputerisinstalledwithfiveSATAharddiskdrives,ensurethattheSATAharddiskdrive
enablementmodule(onetofiveharddiskdrives)isinstalled.
–IfyourcomputerisinstalledwithSASharddiskdrives,ensurethattheSASharddiskdriveenablement
module(onetofiveharddiskdrives)ortheLSIMegaRAIDSASadapterisinstalled.
Iftheseactionsdonotcorrecttheproblem,runthediagnosticprogramLenovoSolutionCenter.See
“LenovoSolutionCenter”onpage86.Ifyouneedtechnicalassistance,seeChapter12“Gettinginformation,
help,andservice”onpage151.
"NoOperatingSystemFound"messageorthesystemnotstartingfromthecorrect
harddiskdrive
Symptom:"NoOperatingSystemFound"messageorthesystemnotstartingfromthecorrectharddiskdrive
Actions:
•Ensurethatallharddiskdrivesignalcablesandpowercablesareconnectedcorrectly.
•EnsurethattheharddiskdriveyourcomputerstartsfromislistedasthefirststartupdeviceintheSetup
Utilityprogram.Referto“Selectingastartupdevice”onpage64.
Chapter8.Troubleshootinganddiagnostics79

Note:Inrarecases,theharddiskdrivewiththeoperatingsystemmightgetcorruptedordamaged.Insuch
cases,youmightneedtoreplacetheharddiskdrive.Referto“Replacingtheharddiskdriveassembly”on
page134.
Iftheseactionsdonotcorrecttheproblem,runthediagnosticprogramLenovoSolutionCenter.See
“LenovoSolutionCenter”onpage86.
Problemswiththekeyboardormouse
Thissectionprovidessolutionstokeyboard-relatedandmouse-relatedproblems.
Keysonthekeyboarddonotwork
Solutions:
•ConnectthekeyboardcabletoaUSBconnectororPS/2keyboardconnector.
•IfyouareusingaUSBkeyboard,enabletheUSBconnectorsintheBIOSsettings.Formoreinformation,
see“Enablingordisablingadevice”onpage63.
•IfyouareusinganEnhancedPerformanceUSBkeyboard,usethehelpsystemintheEnhanced
PerformanceCustomizationKeyboardprogramtohelpdiagnoseproblems.
ToopentheEnhancedPerformanceCustomizationKeyboardprogram,dooneofthefollowing:
–OnWindows7:
1.ClickStart➙ControlPanel.
2.ClickHardwareandSound.
3.ClickDevicesandPrinters.
4.Double-clickUSBEnhancedPerformanceKeyboard.
–OnWindows8.1:
1.OpenControlPanel.Formoreinformation,see“AccessingControlPanelontheWindows8.1
operatingsystem”onpage49.
2.ClickHardwareandSound.
3.ClickDevicesandPrinters.
4.Double-clickUSBEnhancedPerformanceKeyboard.
Themousedoesnotwork
Solutions:
•ConnectthemousecabletoaUSBconnectororPS/2mouseconnector.
Note:Dependingonyourkeyboard,integratedUSBconnectorsmightbeavailabletobeusedto
connectaUSBmouse.
•Installthedevicedriversforthemouse.
•IfyouareusingaUSBmouse,enabletheUSBconnectorsintheBIOSsettings.Formoreinformation,
see“Enablingordisablingadevice”onpage63.
Thepointeronthescreendoesnotmovesmoothlywiththemouse
Solution:Cleanthemouse.Formoreinformation,see“Opticalmouse”onpage73.
Thefingerprintreaderonthekeyboarddoesnotwork
Note:Thekeyboardwithfingerprintreaderisonlyavailableonsomemodels.
Solutions:
80ThinkCentreM53HardwareMaintenanceManual

•Enrollyourfingerprintcorrectly.
•Neverscratchthesurfaceofthereaderwithahard,pointedobject.
•Neverscrapthesurfaceofthereaderwithyournailoranythinghard.
•Useortouchthereaderwithacleanfinger.
•Ensurethatthesurfaceofyourfingeristhesamewiththeonewhenyoulastenrolled.
Thewirelesskeyboarddoesnotwork
Solutions:
•IfthetransceivercommunicationsLEDisnoton,reconnectthetransceiverandthekeyboard.
•IfthewirelesskeyboarddoesnotworkwhenthetransceivercommunicationsLEDison,restartyour
computer.
Iftheproblempersistsaftertherestart,ensurethat:
•Thebatteriesareinstalledcorrectly.
•Thebatteriesstillretaintheircurrent.
•Thedistancefromthewirelesskeyboardtothetransceiverislessthan10m(393.7inches).
•Thetransceiverisinstalledfully.
Monitorproblems
Thissectionprovidessolutionstomonitor-relatedproblems.
Myscreengoesblankwhilethecomputerison
Solutions:Yourscreensaverorpowermanagementmighthavebeenenabled.Dooneofthefollowing:
•Pressakeytoexitthescreensaver.
•Pressthepowerbuttontoresumethecomputerfromsleeporhibernationmode.
ThemonitorworkswhenIturnonthecomputer,butgoesblankwhenIstartsome
applicationprograms
Solutions:
•Connectthemonitorsignalcablefromyourmonitortoanappropriateconnectoronthecomputer.A
loosecablemightcauseintermittentproblems.
•Installthedevicedriversfortheapplicationprograms.Refertothedocumentationfortheaffected
applicationprogramtocheckwhetheranydevicedriversarerequired.
Theimageappearstobeflickering
Solution:Resettherefreshrate.
1.OpenControlPanel.
Note:ToopenControlPanelonWindows8.1,see“AccessingControlPanelontheWindows8.1
operatingsystem”onpage49
2.ClickHardwareandSound➙Adjustscreenresolution➙Advancedsettings.
3.ClicktheMonitortabtoresettherefreshrate.
Settherefreshratetobethehighest,noninterlacedrefreshratesupportedonyourcomputer.Referto
thedocumentationthatcomeswithyourmonitorforthesupportedrefreshrates.
Chapter8.Troubleshootinganddiagnostics81

Theimageisdiscolored
Solution:Themonitormightbeaffectedbyinterferencefromnearbyequipment.Movefluorescentdesk
lightingoranyequipmentthatproducesmagneticfieldsfurtherawayfromthemonitor.Iftheproblem
persists,dothefollowing:
1.Turnoffthemonitor.
2.Adjusttheplacementofthemonitorandotherdevicessothattheyareatleast305mm(12inches)apart.
3.Turnonthemonitor.
Networkingproblems
Thissectionprovidessolutionstonetworking-relatedproblems.
Ethernetproblems
Mycomputercannotbeconnectedtothenetwork
Solutions:
•ConnectthecablefromtheEthernetconnectortotheRJ45connectorofthehub.
•Havethelatestdevicedriverinstalledonyourcomputer.
Tocheckwhetheryouareusingthelatestdevicedriver,dooneofthefollowing:
–OnWindows7:
1.ClickStart➙ControlPanel.
2.ClickHardwareandSound.
3.ClickDeviceManager.Typetheadministratorpasswordorprovideconfirmationifprompted.
4.IfanexclamationmarkisdisplayednexttoanadapternameunderNetworkadapters,theadapter
drivermightnotbethelatestorisdisabled.Right-clickthehighlightedadaptertoupdatethedriver.
5.ClickUpdateDriverSoftware,andthenfollowtheinstructionsonthescreen.
–OnWindows8.1:
1.OpenControlPanel.Formoreinformation,see“AccessingControlPanelontheWindows8.1
operatingsystem”onpage49.
2.ClickHardwareandSound.
3.ClickDeviceManager.Typetheadministratorpasswordorprovideconfirmationifprompted.
4.IfanexclamationmarkisdisplayednexttoanadapternameunderNetworkadapters,theadapter
drivermightnotbecorrectorisdisabled.Right-clickthehighlightedadaptertoupdatethedriver.
5.ClickUpdateDriverSoftware,andthenfollowtheinstructionsonthescreen.
•Setthesameduplexfortheswitchportandtheadapter.
Ifyouconfiguredtheadapterforfullduplex,ensurethattheswitchportisalsoconfiguredforfullduplex.
Settingthewrongduplexmodemightdegradeperformance,causedataloss,orresultinlostconnections.
•Installallnetworkingsoftwarethatisnecessaryforyournetworkenvironment.
CheckwithyourLANadministratorforthenecessarynetworkingsoftware.
Theadapterstopsworkingfornoreason
Solution:Thenetworkdriverfilesmightbecorruptormissing.Updatethedriverbyreferringtothe“Solution”
descriptionforthepreviousproblemtoensurethatthelatestdevicedriverisinstalled.
TheWakeOnLANfeatureisnotworking
Solution:EnabletheWakeOnLAN(WOL)featureintheBIOSprogram.
82ThinkCentreM53HardwareMaintenanceManual

MycomputerisaGigabitEthernetmodelandIuseaspeedof1000Mbps,buttheconnectionfails
orerrorsoccur
Solution:ConnectthenetworkcabletotheEthernetconnectorusingCategory5wiringanda100BASE-T
hub/switch(not100BASE-X).
MycomputerisaGigabitEthernetmodel,butitcannotbeconnectedtothenetworkat1000Mbps,
butatonly100Mbps
Solutions:
•Tryanothercable.
•Setthelinkpartnertoauto-negotiate.
•Settheswitchtobe802.3ab-compliant(gigabitovercopper).
IcannotconnecttoawirelessLANusingthebuilt-inwirelessnetworkingcard
Solutions:
•InstallthelatestwirelessLANdrivers.
•Placeyourcomputerwithintherangeofawirelessaccesspoint.
•Enablethewirelessradio.
•CheckNetworkName(SSID)andyourpassword.
–OnWindows7:
1.ClickStart➙LenovoThinkVantageTools➙AccessConnections.
2.SwitchtotheAdvancedview,andthenclicktheMobileHotspottabtocheckyourSSIDand
password.
–OnWindows8.1:
1.OpenControlPanel.Formoreinformation,see“AccessingControlPanelontheWindows8.1
operatingsystem”onpage49.
2.ClickNetworkandInternet➙NetworkandSharingCentertocheckyourSSIDandpassword.
SounddoesnotcomefromtheBluetoothheadsetorheadphonebutcomesfrom
thelocalspeakereventhoughtheheadsetorheadphoneisconnectedusingthe
HeadsetprofileorAVprofile
Solution:
1.Exittheapplicationthatusesthesounddevice(forexample,WindowsMediaPlayer).
2.OpenControlPanel.
Note:FordetailedinformationonhowtoopenControlPanelonWindows8.1,see“AccessingControl
PanelontheWindows8.1operatingsystem”onpage49.
3.ClickHardwareandSound➙Sound.
4.SelectthePlaybacktab.
5.IfyouareusingtheHeadsetprofile,selectBluetoothHands-freeAudio,andthenclickSetDefault.If
youareusingtheAVprofile,selectStereoAudio,andthenclickSetDefault.
6.ClickOK.
Note:Bluetoothissupportedonlyonsomecomputermodels.
Chapter8.Troubleshootinganddiagnostics83

Ihaveconnectedanoptiontomycomputer,butitdoesnotwork
Solution:Refertothedocumentationthatcomeswiththeoptiontoensurethatyouhaveconnectedthe
optioncorrectly.
Performanceandlockupproblems
Thissectionprovidessolutionstoperformance-relatedproblemsofyourcomputer.
Insufficientfreeharddiskdrivespace
Solution:Freeupharddiskdrivespace.
•Method1
1.ClickStart➙ComputeronWindows7oropenFileExploreronWindows8.1.
2.Right-clickyourCdriveentryandthenclickProperties.
3.ClickDiskCleanup,andthenfollowtheinstructionsonthescreen.
•Method2
1.OpenControlPanel.
Note:FordetailedinformationonhowtoopenControlPanelonWindows8.1,see“Accessing
ControlPanelontheWindows8.1operatingsystem”onpage49.
2.ClickPrograms.
3.ClickTurnWindowsfeaturesonoroff,andthenfollowtheinstructionsonthescreen.
•Method3
1.ClickStart➙ComputeronWindows7oropenFileExploreronWindows8.1.
2.Right-clickyourCdriveentryandthenclickProperties.
3.ClickDiskCleanup.
4.ClickCleanupsystemfiles.
5.ClicktheMoreOptionstab.
6.ClickCleanupintheProgramsandFeaturesarea,andthenfollowtheinstructionsonthescreen.
•CleanoutyourInbox,SentItems,andDeletedItemsfoldersfromyoure-mailapplication.Thefolder
namesandproceduresvarydependingonyoure-mailapplication.Ifyouneedassistance,seethe
helpsystemforyoure-mailapplication.
Excessivenumberoffragmentedfiles
Solution:UsetheWindowsdiskdefragmentationordiskoptimizationfeaturetocleanupthefiles.
Note:Dependingonthevolumeoftheharddiskdrivesandamountofdatastoredontheharddiskdrives,
thedisk-defragmentationprocessmighttakeuptoseveralhours.
•OnWindows7:
1.Closeanyopenprogramsandwindows.
2.ClickStart➙Computer.
3.Right-clickyourCdriveentryandthenclickProperties.
4.ClickDefragmentnowundertheToolstabtostartadisk-defragmentationprocess.
•OnWindows8.1:
1.Closeanyopenprogramsandwindows.
2.OpenFileExplorer.
84ThinkCentreM53HardwareMaintenanceManual

3.Right-clickyourCdriveentryandthenclickProperties.
4.ClickOptimizeundertheToolstabtostartadisk-defragmentationprocess.
Insufficientmemory
Solution:Installadditionalmemorymodules.Forinstructionsoninstallingmemorymodules,see“Replacing
thememorymodule”onpage129.
Topurchasememorymodules,goto:
http://www.lenovo.com
Theprinterdoesnotwork
Solutions:
•IfyouareusingIEEE-approvedprintersignalcables,dothefollowing:
1.Connecttheprintersignalcablefirmlytothecorrectparallel,serial,orUSBconnectoronthe
computer.
2.Loadthepapercorrectly.
3.Turnontheprinterandkeeptheprinteronline.
•Ifyouareusingnon-IEEE-approvedprintersignalcables,dothefollowing:
1.Correctlyinstalldevicedriversandsoftwarethatcomewiththeprinter.
2.Assigntheprinterportcorrectlyinyouroperatingsystem,applicationprogram,orBIOSsettings.For
moreinformationaboutBIOSsettings,see“UsingtheSetupUtilityprogram”onpage61.
Iftheproblempersists,runthetestsdescribedinthedocumentationthatcomeswithyourprinter.Ifyou
cannotcorrecttheproblem,havethecomputerserviced.SeeChapter12“Gettinginformation,help,and
service”onpage151.
Serialconnectorcannotbeaccessed
Solutions:
•Connecttheserialcabletotheserialconnectoronthecomputerandtotheserialdevice.Iftheserial
devicehasitsownpowercord,attachthepowercordtoagroundedelectricaloutlet.
•Turnontheserialdeviceandkeepthedeviceonline.
•Installanyapplicationprogramssuppliedwiththeserialdevice.Refertothedocumentationthatcomes
withtheserialdeviceformoreinformation.
•Ifyouaddedoneserial-connectoradapter,installtheadaptercorrectly.
Softwareproblems
Thissectionprovidessolutionstosoftware-relatedproblems.
Whenusingasortfeature,datescannotbesortedinthecorrectorder
Solution:Someprogramsdevelopedbeforetheyear2000usedonlythelasttwodigitsofayeartosort
dates,assumingthefirsttwodigitswere19.Consequently,datescannotbesortedinthecorrectorder.
Checkwithyoursoftwaremanufacturertoseeifanyupdatesareavailable.Manysoftwaremanufacturers
makeupdatesavailablefromtheWorldWideWeb.
Someapplicationprogramsdonotworkasexpected
Solutions:
Chapter8.Troubleshootinganddiagnostics85

•Ifyouarehavingdifficultywithperformingaspecifictaskwithinanapplicationprogram,refertothe
helpsystemfortheprogram.
•IfyouarehavingdifficultywiththeWindowsoperatingsystemoroneofitscomponents,refertothe
Windowshelpsystem.
•Checkwhethertheproblemsarecausedbyanewly-installedapplicationprogram.
1.Ensurethatthesoftwareiscompatiblewithyourcomputer.Refertotheinformationsuppliedwiththe
softwareformoreinformation.
2.Verifythatothersoftwareworkscorrectlyonyourcomputer.
3.Verifythatthesoftwareyouareusingworksonanothercomputer.
•Ifyoureceivedanyerrormessageswhileusingtheprogram,seetheprinteddocumentationthatcomes
withtheprogramorthehelpsystemforsolutions.
•CheckifanyupdatesareavailablefromyourmanufacturerorWebsite.Manysoftwaremanufacturers
makeupdatesavailablefromtheWorldWideWeb.
•Ifthesoftwareprogramusedtoworkcorrectly,butdoesnotworkcorrectlynow,uninstalltheapplication
programandreinstallit.
MyUSBconnectorscannotbeaccessed
Solutions:
•ConnecttheUSBcablefromtheUSBconnectortotheUSBdevice.IftheUSBdevicehasitsownpower
cord,attachthepowercordtoagroundedelectricaloutlet.
•TurnontheUSBdeviceandkeepthedeviceonline.
•InstallanydevicedriversorapplicationprogramssuppliedwiththeUSBdevice.Refertothe
documentationthatcomeswiththeUSBdeviceformoreinformation.
•DetachandreattachtheUSBconnectortoresettheUSBdevice.
Diagnostics
Thediagnosticprogramisusedtotesthardwarecomponentsofyourcomputer.Thediagnosticprogramcan
alsoreportoperating-system-controlledsettingsthatinterferewiththecorrectoperationofyourcomputer.
Youcanusethepreinstalleddiagnosticprogramtodiagnosecomputerproblems,ifyourcomputeris
runningtheWindowsoperatingsystem.
Notes:
1.YourcomputerispreinstalledwiththeLenovoSolutionCenterprogramfordiagnosticpurposes.For
moreinformationabouttheLenovoSolutionCenterprogram,see“LenovoSolutionCenter”onpage86.
2.Ifyouareunabletoisolateandrepairtheproblemyourselfafterrunningthediagnosticprogram,save
andprintthelogfilescreatedbythediagnosticprogram.Youwillneedthelogfileswhenyouspeaktoa
Lenovotechnicalsupportrepresentative.
LenovoSolutionCenter
TheLenovoSolutionCenterprogramenablesyoutotroubleshootandresolvecomputerproblems.It
combinesdiagnostictests,systeminformationcollection,securitystatus,andsupportinformation,along
withhintsandtipsformaximumsystemperformance.
•YourcandownloadtheLenovoSolutionCenterprogramfromhttp://www.lenovo.com/diags.
•IfyouareusingaWindowsoperatingsystemotherthanWindows7orWindows8.1,goto
http://www.lenovo.com/diagsforthelatestinformationondiagnosticsforyourcomputer.
86ThinkCentreM53HardwareMaintenanceManual

ToruntheLenovoSolutionCenterprogram,see“Lenovoprograms”onpage39.
Note:Ifyoucannotisolateandrepairtheproblemyourselfafterrunningtheprogram,saveandprintthelog
files.YouwillneedthelogfileswhenyouspeaktoaLenovotechnicalsupportrepresentative.
Foradditionalinformation,refertotheLenovoSolutionCenterhelpsystem.
UEFIdiagnosticprogram
AUEFIdiagnosticprogramispreinstalledonthecomputer.Itenablesyoutotestmemorymodulesand
internalstoragedevices,viewsysteminformation,andcheckandrecoverbadsectorsoninternalstorage
devices.
ToruntheUEFIdiagnosticprogram,dothefollowing:
1.Turnonthecomputer.Ifthecomputercannotbeturnedon,goto“Basictroubleshooting”onpage75.If
anerrorcodeisdisplayed,goto“Symptom-to-FRUindex”onpage90forerrorcodedescriptionsand
troubleshootinghints.
2.RepeatedlypressandreleasetheF10keywhenturningonthecomputer.Themainscreenofthe
UEFIdiagnosticprogramisdisplayed.
3.Followtheinstructionsonthescreentousethediagnosticprogram.
Theoptionsonthemainscreenareasfollows:
Table2.ItemsonthemainscreenoftheUEFIdiagnosticprogram
DIAGNOSTICSTOOLS
•LCDtest
•Memory-Quicktest
•Memory-Extendedtest
•Motherboardtest
•PCI-etest
•Storage-Quicktest
•Systeminformation
•Recoverbadsectorstool
•Generateconfigurationfile
•Executefromconfigurationfile
•Exitapplication
Chapter8.Troubleshootinganddiagnostics87

88ThinkCentreM53HardwareMaintenanceManual

Chapter9.Servicecheckoutandsymptom-to-FRUindex
Thischapterprovidesinformationaboutgeneralservicecheckoutandsymptom-to-FRUindex.
Servicecheckout
Attention:Thedrivesinthecomputeryouareservicingmighthavebeenrearrangedorthedrivestartup
sequencechanged.Beextremelycarefulduringwriteoperationssuchascopying,saving,orformatting.
Dataorprogramscanbeoverwrittenifyouselectanincorrectdrive.
Generalerrormessagesappearifaproblemorconflictisfoundbyanapplicationprogram,theoperating
system,orboth.Foranexplanationofthesemessages,refertotheinformationsuppliedwiththatsoftware
package.
BeforereplacinganyFRUs,ensurethatthelatestlevelofBIOSisinstalledonthesystem.Adown-levelBIOS
mightcausefalseerrorsandunnecessaryreplacementofthesystemboard.Formoreinformationonhowto
determineandobtainthelatestlevelBIOS,see“BIOSlevels”onpage67.
Usethefollowingproceduretohelpdeterminethecauseoftheproblem:
1.Power-offthecomputerandallexternaldevices.
2.Checkallcablesandpowercords.
3.Setalldisplaycontrolstothemiddleposition.
4.Power-onallexternaldevices.
5.Power-onthecomputer.
•Lookfordisplayederrorcodes
•Listenforbeepcodes
•Lookforreadableinstructionsoramainmenuonthedisplay.
Ifyoudidnotreceivethecorrectresponse,proceedtostep6onpage89.
Ifyoudoreceivethecorrectresponse,proceedtostep7onpage89.
6.Lookatthefollowingconditionsandfollowtheinstructions:
•IfyouhearbeepcodesduringPOST,goto“Beepsymptoms”onpage91.
•IfthecomputerdisplaysaPOSTerror,goto“POSTerrorcodes”onpage91.
•Ifthecomputerhangsandnoerrorisdisplayed,continueatstep7onpage89.
7.RuntheDiagnosticprograms.See“Diagnostics”onpage86.
•Ifyoureceiveanerror,replacethepartthatthediagnosticprogramcallsout.
•Iftheteststopsandyoucannotcontinue,replacethelastdevicetested.
Problemdeterminationtips
Duetothevarietyofhardwareandsoftwarecombinationsthatcanbeencountered,usethefollowing
informationtoassistyouinproblemdetermination.Ifpossible,havethisinformationavailablewhen
requestingassistancefromServiceSupportandEngineeringfunctions.
•Machinetypeandmodel
•Processororharddiskdriveupgrades
•Failuresymptom
–Dodiagnosticsindicateafailure?
©CopyrightLenovo201489

–What,when,where,single,ormultiplesystems?
–Isthefailurerepeatable?
–Hasthisconfigurationeverworked?
–Ifithasbeenworking,whatchangesweremadepriortoitfailing?
–Isthistheoriginalreportedfailure?
•Diagnosticsversion
–Typeandversionlevel
•Hardwareconfiguration
–Print(printscreen)configurationcurrentlyinuse
–BIOSlevel
•Operatingsystemsoftware
–Typeandversionlevel
Notes:Toeliminateconfusion,identicalsystemsareconsideredidenticalonlyifthey:
1.Aretheexactmachinetypeandmodels
2.HavethesameBIOSlevel
3.Havethesameadapters/attachmentsinthesamelocations
4.Havethesameaddressjumpers/terminators/cabling
5.Havethesamesoftwareversionsandlevels
6.HavethesameDiagnosticDiskettes(version)
7.Havethesameconfigurationoptionssetinthesystem
8.Havethesamesetupfortheoperatingsystemcontrolfiles
Comparingtheconfigurationandsoftwareset-upbetween“workingandnon-working”systemswilloften
leadtoproblemresolution.
Symptom-to-FRUindex
TheSymptom-to-FRUindexlistserrorsymptomsandpossiblecauses.Themostlikelycauseislistedfirst.
Alwaysbeginwith“Servicecheckout”onpage89.Thisindexcanalsobeusedtohelpyoudecidewhich
FRUstohaveavailablewhenservicingacomputer.Ifyouareunabletocorrecttheproblemusingthis
index,goto“Undeterminedproblems”onpage94.
Notes:
•TheSymptom-to-FRUindexisnotspecifictoanymachinetypeandareapplicabletoallThinkCentrecomputers.
•Ifyouhavebothanerrormessageandanincorrectaudioresponse,diagnosetheerrormessagefirst.
•Ifyoucannotrunthediagnostictestsorgetadiagnosticerrorcodewhenrunningatest,firstdiagnosethePOST
errormessageyoureceive.
•Ifyoudidnotreceiveanyerrormessage,lookforadescriptionofyourerrorsymptomsinthefirstpartofthisindex.
Harddiskdrivebooterror
Aharddiskdrivebooterrorcanhavethefollowingcauses.
90ThinkCentreM53HardwareMaintenanceManual

ErrorFRU/Action
Thestart-updriveisnotinthebootsequencein
configuration.
Checktheconfigurationandensurethestart-updriveis
inthebootsequence.
Nooperatingsysteminstalledonthebootdrive.Installanoperatingsystemonthebootdrive.
Thebootsectoronthestartupdriveiscorrupted.Thedrivemustbeformatted.Dothefollowing:
1.Attempttobackupthedataonthefailingharddisk
drive.
2.Usingtheoperatingsystemprograms,formatthe
harddiskdrive.
Thedriveisdefective.Replacetheharddiskdrive.
Powersupplyproblems
Ifyoususpectapowerproblem,usethefollowingprocedures.
Check/VerifyFRU/Action
Checkthefollowingforproperinstallation.
•Powercord
•On/Offswitchconnector
•On/Offswitchpowersupplyconnector
•Systemboardpowersupplyconnectors
•Microprocessor(s)connection
Reseatconnectors
Checkthepowercordforcontinuity.Powercord
Checkthepower-onswitchforcontinuity.Power-onswitch
Beepsymptoms
Beepsymptomsaretonesoraseriesoftonesseparatedbypauses(intervalswithoutsound)duringPOST.
Thefollowingtabledescribesthebeepsymptoms.
BeepsymptomFRU/Action
2shortbeepsCMOSsettingerrorCommonerrorcode,seethedetailfailureinformationin
“POSTerrorcodes”onpage91.
3shortand1longbeepsDRAMmemoryerrorPerformthefollowingactionsinorder.
1.Makesurethememorymodule(s)areproperlyseated
intheconnector(s).
2.Replacethememorymodule(s).
3.Replacethesystemboard.
POSTerrorcodes
Eachtimeyoupower-onthesystem,itperformsaseriesofteststhatchecktheoperationofthesystem
andsomeoptions.ThisseriesoftestsiscalledthePower-OnSelf-Test,orPOST.POSTdoesthefollowing
operations.
•Checkssomebasicsystem-boardoperations
•Checksthememoryoperation
Chapter9.Servicecheckoutandsymptom-to-FRUindex91

•Startsthevideooperation
•Verifiesthatthebootdriveisworking
IfthePOSTdetectsaproblem,anerrormessageappearsonthescreen.Asingleproblemcancauseseveral
errormessagestoappear.Whenyoucorrectthecauseofthefirsterrormessage,theothererrormessages
probablywillnotbedisplayednexttimeyouturnonthesystem.
ErrorcodePOSTerrormessageDescription/Action
0135FanfailureThesystemmightbeoverheating.
PressF10toexit.
Note:Iftheproblemiscausedbythe
microprocessorfan,pressF10will
notsolvetheproblem.
0211KeyboardnotfoundWhenthereisnokeyboarddetected,
theerrormessagewillbedisplayed.
0164MemorysizedecreasedPressF10toexit.
1762ConfigurationchangehasoccurredThiserrormessageisdisplayedwhen
aharddiskdriveoropticaldrive
changehasbeenmade.
PressF10toexit.
1820Morethanoneexternalfingerprint
readerareattached.Poweroffand
removeallbutthereaderthatyouset
upwithinyourmainoperatingsystem.
Ifmorethanoneexternalfingerprint
readerareconnectedtoacomputer,
thiserrormessagewillbedisplayed.
Removeallofthefingerprint
keyboardsexcepttheonecompatible
withthefingerprintapplicationon
yourcomputer.
1962Nooperatingsystemfound.Press
anykeytorepeatbootsequence.
ThiserroroccursonlyafterthePOST
iscompleted.
Pressanykeytorepeatboot
sequence.
Miscellaneouserrorconditions
Message/SymptomFRU/Action
ChangingdisplaycolorsDisplay/Monitor
Computerwillnotpower-off.See“Harddiskdriveboot
error”onpage90.
1.PowerSwitch
2.SystemBoard
3.Risercard,ifinstalled.
ComputerwillnotRPLfromserver1.Ensurethatnetworkisinstartupsequenceasfirst
deviceorfirstdeviceafterdiskette.
2.EnsurethatnetworkadapterisenabledforRPL.
3.Networkadapter(Advisenetworkadministratorof
newMACaddress)
92ThinkCentreM53HardwareMaintenanceManual

Message/SymptomFRU/Action
ComputerwillnotperformaWakeOnLAN®(ifapplicable)1.Checkpowersupplyandsignalcableconnections
tonetworkadapter.
2.Ensurethattheoperatingsystemsettingsaresetto
enableWakeonLAN.
3.EnsureWakeOnLANfeatureisenabledin
Setup/Configuration(see“StartingtheSetupUtility
program”onpage61)
4.EnsurenetworkadministratorisusingcorrectMAC
address.
5.EnsurenointerruptorI/Oaddressconflicts.
6.Networkadapter(advisenetworkadministratorof
newMACaddress)
Deadcomputer.See“Harddiskdrivebooterror”onpage
90.
1.PowerSupply
2.SystemBoard
Diskettedrivein-uselightremainsonordoesnotlight
whendriveisactive.
1.DisketteDrive
2.SystemBoard
3.DisketteDriveCable
Blankscreenexceptforflashingcursor.1.SystemBoard
2.PrimaryHardDiskDrive
3.HardDiskDriveCable
IncorrectmemorysizeduringPOST1.RuntheMemorytests.
2.MemoryModule
3.SystemBoard
"InsertaDiskette"iconappearswithaknown-good
diagnosticsdisketteinthefirst3.5-inchdiskettedrive.
1.SystemBoard
2.DisketteDriveCable
3.NetworkAdapter
Intensityorcolorvariesfromlefttorightofcharacters
andcolorbars
1.Display
2.Videoadapter(ifpresent)
3.SystemBoard
Nopowerorfannotrunning1.See“Harddiskdrivebooterror”onpage90.
Non-systemdiskordiskerror-typemessagewitha
known-gooddiagnosticdiskette.
1.DisketteDrive
2.SystemBoard
3.DisketteDriveCable
Otherdisplaysymptomsnotlistedabove(includingblank
orillegibledisplay)
1.Display
2.SystemBoard
Power-onindicatororharddiskdrivein-uselightnoton,
butcomputerworkscorrectly
1.Powerswitch/LEDassembly
2.SystemBoard
Printerproblems1.Printer
2.SystemBoard
Chapter9.Servicecheckoutandsymptom-to-FRUindex93

Message/SymptomFRU/Action
Programloadsfromtheharddiskwithaknown-good
diagnosticsdisketteinthefirst3.5-inchdiskettedrive
1.RuntheSetupUtilityprogramandcheckStartup
sequence.
2.DisketteDrive
3.DisketteDriveCable
4.SystemBoard
5.PowerSupply
RPLcomputercannotaccessprogramsfromitsownhard
disk.
1.IfnetworkadministratorisusingLCCMHybridRPL,
checkstartupsequence:
a.Firstdevice-network
b.Seconddevice-harddisk
2.Harddiskdrive
RPLcomputerdoesnotRPLfromserver1.Checkstartupsequence.
2.CheckthenetworkadapterLEDstatus.
Serialorparallelconnectordevicefailure(systemboard
connector)
1.ExternalDeviceSelf-TestOK?
2.ExternalDevice
3.Cable
4.SystemBoard
Serialorparallelconnectordevicefailure(adapter
connector)
1.ExternalDeviceSelf-TestOK?
2.ExternalDevice
3.Cable
4.AlternateAdapter
5.SystemBoard
Someorallkeysonthekeyboarddonotwork1.Keyboard
2.KeyboardCable
3.SystemBoard
Undeterminedproblems
Thissectionprovidesinstructionsonhowtofindoutthefailingdevicesoradapters.
1.Power-offthecomputer.
2.Removeordisconnectthefollowingcomponents(ifinstalled)oneatatime.
a.Externaldevices(modem,printer,ormouse)
b.Anyadapters
c.Memorymodules
d.Extendedvideomemory
e.ExternalCache
f.ExternalCacheRAM
g.Harddiskdrive
h.Diskettedrive
3.Power-onthecomputertore-testthesystem.
4.Repeatsteps1through3untilyoufindthefailingdeviceoradapter.
Ifalldevicesandadaptershavebeenremoved,andtheproblemcontinues,replacethesystemboard.
See“Replacingthesystemboard”onpage143.
94ThinkCentreM53HardwareMaintenanceManual

Chapter10.Recoveryinformation
Thischapterprovidesinformationabouttherecoverysolutions.Thereareavarietyofmethodstochoose
fromwhenconsideringhowtorecoverfromasoftware-orhardware-relatedproblem.Somemethods
varydependingonthetypeofoperatingsystemthatisinstalled.Youcanrestorethecomputersettings
usingaprogramortherecoverydiscset.Formoreinformationaboutusingtherecoverydiscset,see
thedocumentationthatcomeswiththediscset.
Thischaptercontainsthefollowingtopics:
•“RecoveryinformationfortheWindows7operatingsystem”onpage95
•“RecoveryinformationfortheWindows8.1operatingsystem”onpage100
RecoveryinformationfortheWindows7operatingsystem
TherecoveryinformationinthissectiononlyappliestothecomputersthathavetheRescueandRecovery
programortheProductRecoveryprograminstalled.IftheEnhancedBackupandRestoreiconinthe
LenovoThinkVantageToolsprogramisdimmed,itindicatesthatyoumustinstalltheRescueandRecovery
programmanuallybeforeenablingitsfeatures.ToinstalltheRescueandRecoveryprogram,dothefollowing:
1.ClickStart➙AllPrograms➙LenovoThinkVantageTools,anddouble-clickEnhancedBackup
andRestore.
2.Followtheinstructionsonthescreen.
3.Whentheinstallationprocessfinishes,theEnhancedBackupandRestoreiconisactivated.
Thissectioncontainsthefollowingtopics:
•“Creatingandusingrecoverymedia”onpage95
•“Performingbackupandrecoveryoperations”onpage96
•“Creatingandusingarescuemedium”onpage98
•“Reinstallingprogramsanddevicedrivers”onpage98
•“Solvingrecoveryproblems”onpage100
Creatingandusingrecoverymedia
Recoverymediaenableyoutorestoretheharddiskdrivetothefactory-defaultstateandputthecomputerin
anoperationalstateafterallotherrecoverymethodshavefailed.Recoverymediaareusefulifyoutransfer
thecomputertoanotherarea,sellthecomputer,orrecyclethecomputer.Asaprecautionarymeasure,itis
importanttocreaterecoverymediaasearlyaspossible.Thedataontherecoverymediacanbeusedfor
thefollowingpurposes:
•Reinstalltheprogramsanddevicedriversonyourcomputer
•Reinstalltheoperatingsystem
•ModifythedatafilesontheharddiskdriveusingtheAdditionalFiles
Note:Therecoveryoperationsyoucanperformusingrecoverymediavarydependingontheoperating
systemfromwhichtherecoverymediawerecreated.Therecoverymediamightcontainabootmedium
andadatamedium.YourMicrosoftWindowslicensepermitsyoutocreateonlyonedatamedium.Itis
recommendedthatyoustoretherecoverymediainasafeplaceafteryouhavemadethem.
©CopyrightLenovo201495

Creatingrecoverymedia
Note:OntheWindows7operatingsystem,youcancreaterecoverymediausingdiscsorexternalUSB
storagedevices.
TocreaterecoverymediaontheWindows7operatingsystem,clickStart➙AllPrograms➙Lenovo
ThinkVantageTools➙FactoryRecoveryDisks.Then,followtheinstructionsonthescreen.
Usingrecoverymedia
Attention:Whenyouuserecoverymediatorestoretheharddiskdrivetothefactory-defaultstate,allthe
filescurrentlyontheharddiskdrivewillbedeleted.Thesefileswillbereplacedbythefactory-defaultfiles.
TouserecoverymediaontheWindows7operatingsystem,dothefollowing:
1.Dependingonthetypeofyourrecoverymedia,connectthebootUSBstoragedevicetothecomputer,
orinsertthebootdiscintotheopticaldrive.
2.Turnonorrestartyourcomputer.
3.Whenyouseethelogoscreen,repeatedlypressandreleasetheF12key.TheStartupDeviceMenu
windowisdisplayed.
4.SelectthedesiredstartupdeviceandpressEnter.Therestoreprocessbegins.
5.Followtheinstructionsonthescreentocompletetheoperation.
Note:Afterrestoringyourcomputerharddiskdrivetothefactory-defaultstate,youmighthavetoreinstall
devicedriversforsomedevices.See“Reinstallingprogramsanddevicedrivers”onpage98.
Performingbackupandrecoveryoperations
TheRescueandRecoveryprogramenablesyoutobackupallyourharddiskdrivecontentsincluding
theoperatingsystem,datafiles,softwareprograms,andpersonalsettings.Youcanstorethebackupat
thefollowinglocations:
•TheRescueandRecoveryworkspace
•Thesecondaryharddiskdriveifasecondaryharddiskdriveisinstalledinyourcomputer
•AnexternalUSBharddiskdriveconnectedtoyourcomputer
•Anetworkdrive
•Recordablediscs(arecordableopticaldriveisrequiredforthisoption)
Afteryouhavecompletedthebackupoperation,youcanrestorepartsorwholeofthedataonthehard
diskdrive.
Performingabackupoperation
ToperformabackupoperationusingtheRescueandRecoveryprogramontheWindows7operating
system,dothefollowing:
1.FromtheWindowsdesktop,clickStart➙AllPrograms➙LenovoThinkVantageTools➙Enhanced
BackupandRestore.TheRescueandRecoveryprogramopens.
2.IntheRescueandRecoverymainwindow,clicktheLaunchadvancedRescueandRecoveryarrow.
3.ClickBackupyourharddriveandselectbackupoperationoptions.Then,followtheinstructionson
thescreentocompletethebackupoperation.
Performingarecoveryoperation
Thissectionprovidesthefollowingtopics:
•“PerformingarecoveryoperationfromWindows7”onpage97
96ThinkCentreM53HardwareMaintenanceManual

•“PerformingarecoveryoperationfromtheRescueandRecoveryworkspace”onpage97
PerformingarecoveryoperationfromWindows7
ToperformarecoveryoperationusingtheRescueandRecoveryprogramontheWindows7operating
system,dothefollowing:
1.FromtheWindowsdesktop,clickStart➙AllPrograms➙LenovoThinkVantageTools➙Enhanced
BackupandRestore.TheRescueandRecoveryprogramopens.
2.IntheRescueandRecoverymainwindow,clicktheLaunchadvancedRescueandRecoveryarrow.
3.ClicktheRestoreyoursystemfromabackupicon.
4.Followtheinstructionsonthescreentocompletetherecoveryoperation.
PerformingarecoveryoperationfromtheRescueandRecoveryworkspace
TheRescueandRecoveryworkspaceresidesinaprotectedandhiddenareaofyourharddiskdrivethat
operatesindependentlyfromtheWindowsoperatingsystem.TheRescueandRecoveryworkspaceenables
youtoperformrecoveryoperationsevenifyoucannotstarttheWindowsoperatingsystem.Youcanperform
thefollowingrecoveryoperationsfromtheRescueandRecoveryworkspace:
•Rescuefilesfromyourharddiskdriveorfromabackup:
Youcanlocatefilesonyourharddiskdriveandtransferthemtoanetworkdriveorotherrecordable
media,suchasaUSBdeviceoradisc.Thissolutionisavailableevenifyoudidnotbackupyourfilesorif
changesweremadetothefilessinceyourlastbackupoperation.Youalsocanrescueindividualfilesfrom
aRescueandRecoverybackuplocatedonyourlocalharddiskdrive,aUSBdevice,oranetworkdrive.
•RestoreyourharddiskdrivefromaRescueandRecoverybackup:
IfyouhavebackedupyourharddiskdriveusingtheRescueandRecoveryprogram,youcanrestorethe
harddiskdrivefromaRescueandRecoverybackup,evenifyoucannotstarttheWindowsoperating
system.
•Restoreyourharddiskdrivetothefactory-defaultstate:
Youcanrestorethecompletecontentsofyourharddiskdrivetothefactory-defaultstateevenifyou
cannotstarttheWindowsoperatingsystem.Ifyouhavemultiplepartitionsonyourharddiskdrive,you
havetheoptiontorestoretheC:partitionandleavetheotherpartitionsintact.
Attention:YoucanrestoretheharddiskdrivefromaRescueandRecoverybackuporrestoretheharddisk
drivetothefactory-defaultsettings.Duringeitherprocess,allfilesontheprimaryharddiskdrivepartition
(usuallydriveC:)willbedeleted.Ifpossible,makecopiesofimportantfiles.IfyoucannotstarttheWindows
operatingsystem,youcanusetherescuefilesfeatureoftheRescueandRecoveryworkspacetocopyfiles
fromyourharddiskdrivetoothermedia.
ToperformarecoveryoperationfromtheRescueandRecoveryworkspace,dothefollowing:
1.Turnonorrestartyourcomputer.
2.Whenyouseethelogoscreen,pressEnter,andthenpressF11toentertheRescueandRecovery
workspace.
3.IfyouhavesetaRescueandRecoverypassword,enteryourpasswordwhenprompted.TheRescue
andRecoveryworkspaceopensafterashortdelay.
Note:IftheRescueandRecoveryworkspacefailstoopen,see“Solvingrecoveryproblems”on
page100.
4.Dooneofthefollowing:
•Torescuefilesfromyourharddiskdrive,clickRescuefilesandfollowtheinstructionsonthescreen.
•TorestoreyourharddiskdrivefromaRescueandRecoverybackuportorestoreyourharddiskdrive
tothefactory-defaultstate,clickFullRestoreandfollowtheon-screeninstructions.
Chapter10.Recoveryinformation97

Note:Afterrestoringyourcomputerharddiskdrivetothefactory-defaultstate,youmighthaveto
reinstalldevicedriversforsomedevices.See“Reinstallingprogramsanddevicedrivers”onpage98.
FormoreinformationaboutthefeaturesoftheRescueandRecoveryworkspace,clickHelp.
Creatingandusingarescuemedium
CreaterescuemediausingdiscsorUSBstoragedevicesasearlyaspossible.Youcanusearescuemedium
torecoverfromfailuresthatpreventyoufromgainingaccesstotheWindowsenvironmentortheRescue
andRecoveryworkspaceonyourharddiskdrive.
Notes:
•Therecoveryoperationsyoucanperformusingarescuemediumvarydependingontheoperatingsystem.
•Therescuedisccanbestartedinalltypesofopticaldrives.
Creatingarescuemedium
TocreatearescuemediumontheWindows7operatingsystem,dothefollowing:
1.FromtheWindowsdesktop,clickStart➙AllPrograms➙LenovoThinkVantageTools➙Enhanced
BackupandRestore.TheRescueandRecoveryprogramopens.
2.IntheRescueandRecoverymainwindow,clicktheLaunchadvancedRescueandRecoveryarrow.
3.ClicktheCreateRescueMediaicon.The“CreateRescueandRecoveryMedia”windowopens.
4.IntheRescueMediaarea,selectthetypeoftherescuemediumyouwanttocreate.Youcancreatea
rescuemediumusingadisc,aUSBstoragedevicewithsufficientcapacity,orasecondaryinternal
harddiskdrive.
5.ClickOKandfollowtheinstructionsonthescreentocreatearescuemedium.
Usingarescuemedium
DependingonwhetheryouhavecreatedarescuemediumusingadiscoraUSBharddiskdrive,doone
ofthefollowing:
•Ifyouhavecreatedarescuemediumusingadisc,dothefollowing:
1.Turnonorrestartyourcomputer.
2.Whenyouseethelogoscreen,repeatedlypressandreleasetheF12key.TheStartupDeviceMenu
windowisdisplayed.
3.Selectthedesiredopticaldriveasthefirstbootdevice.Then,inserttherescuediscintotheoptical
driveandpressEnter.Therescuemediumstarts.
•IfyouhavecreatedarescuemediumusingaUSBharddiskdrive,dothefollowing:
1.ConnecttheUSBharddiskdrivetooneoftheUSBconnectorsonyourcomputer.
2.Turnonorrestartyourcomputer.
3.Whenyouseethelogoscreen,repeatedlypressandreleasetheF12key.TheStartupDeviceMenu
windowisdisplayed.
4.SelecttheUSBharddiskdriveasthefirstbootdeviceandpressEnter.Therescuemediumstarts.
Whentherescuemediumstarts,theRescueandRecoveryworkspaceopens.Thehelpinformationfor
eachfeatureisavailablefromtheRescueandRecoveryworkspace.Followtheinstructionstocomplete
therecoveryprocess.
Reinstallingprogramsanddevicedrivers
Thissectionprovidesthefollowingitems:
98ThinkCentreM53HardwareMaintenanceManual

•“Reinstallingpreinstalledprogramsanddevicedrivers”onpage99
•“Reinstallingprogramsanddevicedriversthatarenotpreinstalled”onpage99
Reinstallingpreinstalledprogramsanddevicedrivers
Yourcomputerenablesyoutoreinstallpreinstalledprogramsanddevicedrivers.
Reinstallingpreinstalledprograms
ToreinstallprogramspreinstalledonyourLenovocomputer,dothefollowing:
1.Turnonthecomputer.
2.GotoC:\SWTOOLS.
3.Opentheappsfolderandlocatethesubfolderthatisnamedaftertheprogrampreinstalledonyour
computer.
4.OpenthesubfolderandlocatetheEXEfile.
5.Double-clicktheEXEfileandfollowtheinstructionsonthescreentocompletetheinstallation.
Reinstallingpreinstalleddevicedrivers
Attention:Reinstallingdevicedriverswillchangethecurrentconfigurationofyourcomputer.Reinstall
devicedriversonlywhenitisnecessarytocorrectaproblemwithyourcomputer.
Toreinstallthedevicedriverforafactory-installeddevice,dothefollowing:
1.Turnonthecomputer.
2.GotoC:\SWTOOLS.
3.OpentheDRIVERSfolderandlocatethesubfolderthatisnamedafterthefactory-installeddevicein
yourcomputer,suchasAUDIOorVIDEO.
4.Openthesubfolder.
5.Dooneofthefollowing:
•LocatetheEXEfile.Double-clicktheEXEfileandfollowtheinstructionsonthescreentocomplete
theinstallation.
•Locatethereadmefilewiththe.txtextension.Thedevicedriverinstallationinformationisincludedin
thereadmefile.Followtheinstructionstocompletetheinstallation.
•IfthedevicesubfoldercontainsanINFfileandyouwanttoinstallthedevicedriverusingtheINFfile,
seetheWindowsHelpandSupportinformationsystemfordetailedinformation.
Note:Formoreinformationaboutthelatestdevicedrivers,see“Gettingthelatestdevicedriversforyour
computer”onpage71.
Reinstallingprogramsanddevicedriversthatarenotpreinstalled
Yourcomputerenablesyoutoreinstallprogramsanddevicedriversthatarenotpreinstalled.
Reinstallingprogramsthatarenotpreinstalled
Ifasoftwareprogramyouinstalledonyourcomputerisnotworkingcorrectly,youmightneedtouninstall
andthenreinstallit.Reinstallingaprogramoverwritestheexistingprogramfilesandusuallyfixesany
problemsthatyoumighthavehadwiththeprogram.
Touninstallaprogramfromyoursystem,refertotheMicrosoftWindowshelpsystem.
Toreinstallmostcommerciallyavailableprogramsonyoursystem,refertotheMicrosoftWindowshelp
systemtogetherwiththedocumentationprovidedwiththeprogram.
Chapter10.Recoveryinformation99

Reinstallingdevicedriversthatarenotpreinstalled
Toreinstalladevicedriverforanoptionyouinstalled,refertothedocumentationthatcomeswiththeoption.
Note:Reinstalldevicedriverswillchangethecurrentconfigurationofyourcomputer.Reinstalldevicedrivers
onlywhenitisnecessarytocorrectaproblemwithyourcomputer.
Solvingrecoveryproblems
Note:Ensurethatyourrescuedeviceissetasthefirstbootdeviceinthestartupdevicesequencein
theSetupUtilityprogram.See“Selectingastartupdevice”onpage64fordetailedinformationabout
temporarilyorpermanentlychangingthestartupdevicesequence.FormoreinformationabouttheSetup
Utilityprogram,see“UsingtheSetupUtilityprogram”onpage61.
IfyoucannotaccesstheRescueandRecoveryworkspaceortheWindowsenvironment,dooneofthe
following:
•UsearescuemediumtostarttheRescueandRecoveryworkspace.See“Creatingandusingarescue
medium”onpage98.
•Userecoverymediaifallothermethodsofrecoveryhavefailedandyoumustrestoretheharddiskdrive
tothefactory-defaultsettings.See“Creatingandusingrecoverymedia”onpage95.
Itisimportanttocreatearescuemediumandasetofrecoverymediaasearlyaspossibleandstorethem
inasafeplaceforfutureuse.
RecoveryinformationfortheWindows8.1operatingsystem
Thissectioncontainsthefollowingtopics:
•“Refreshingyourcomputer”onpage100
•“Resettingyourcomputertothefactory-defaultsettings”onpage100
•“Usingtheadvancedstartupoptions”onpage101
•“RecoveringyouroperatingsystemifWindows8.1failstostart”onpage101
Refreshingyourcomputer
Ifyourcomputerdoesnotperformwellandtheproblemmightbecausedbyarecentlyinstalledprogram,
youcanrefreshyourcomputer.
Attention:Ifyourefreshyourcomputer,theprogramspreinstalledonyourcomputerandtheprogramsthat
youinstalledfromWindowsStorewillbereinstalled.However,allotherprogramswillbeuninstalled.
Torefreshyourcomputer,dothefollowing:
1.Movethepointertothetop-rightorbottom-rightcornerofthescreentodisplaythecharms.Click
Settings➙ChangePCsettings➙Updateandrecovery➙Recovery.
2.IntheRefreshyourPCwithoutaffectingyourfilessection,clickGetstarted.
Resettingyourcomputertothefactory-defaultsettings
Youcanresetyourcomputertothefactory-defaultsettings.Resettingthecomputerwillreinstallthe
operatingsystemandalltheprogramsthatcomewithyourcomputer.
Attention:Ifyouresetyourcomputer,allyourpersonalfilesandsettingswillbedeleted.Toavoiddataloss,
makeabackupcopyofallthedatathatyouwanttokeep.
Toresetyourcomputer,dothefollowing:
100ThinkCentreM53HardwareMaintenanceManual

1.Movethepointertothetop-rightorbottom-rightcornerofthescreentodisplaythecharms.Click
Settings➙ChangePCsettings➙Updateandrecovery➙Recovery.
2.IntheRemoveeverythingandreinstallWindowssection,clickGetstarted.
Usingtheadvancedstartupoptions
AdvancedstartupoptionsenableyoutochangethestartupsettingsofyourWindowsoperatingsystem,
startthecomputerfromanexternaldevice,orrestoretheWindowsoperatingsystemfromasystemimage.
Tousetheadvancedstartupoptions,dothefollowing:
1.Movethepointertothetop-rightorbottom-rightcornerofthescreentodisplaythecharms.Click
Settings➙ChangePCsettings➙Updateandrecovery➙Recovery.
2.IntheAdvancedstartupsection,clickRestartnow➙Troubleshoot➙Advancedoptions.
3.Restartyourcomputerfollowingtheinstructionsonthescreen.
RecoveringyouroperatingsystemifWindows8.1failstostart
TheWindowsrecoveryenvironmentonyourcomputeriscapableofoperatingindependentlyfromthe
Windows8.1operatingsystem.ItenablesyoutorecoverorrepairtheoperatingsystemeveniftheWindows
8.1operatingsystemfailstostart.
Aftertwoconsecutivefailedbootattempts,theWindowsrecoveryenvironmentstartsautomatically.Then
youcanchooserepairandrecoveryoptionsbyfollowingtheinstructionsonthescreen.
Note:Ensurethatyourcomputerisconnectedtoacpowerduringtherecoveryprocess.
FormoredetailsabouttherecoverysolutionsprovidedoncomputerspreinstalledwiththeWindows8.1
operatingsystem,refertothehelpinformationsystemoftheWindows8.1operatingsystem.
Chapter10.Recoveryinformation101

102ThinkCentreM53HardwareMaintenanceManual

Chapter11.Installingorreplacinghardware
Thischapterprovidesinstructionsonhowtoinstallorreplacehardwareforyourcomputer.
Handlingstatic-sensitivedevices
Donotopenthestatic-protectivepackagecontainingthenewpartuntilthedefectiveparthasbeenremoved
andyouarereadytoinstallthenewpart.Staticelectricity,althoughharmlesstoyou,canseriouslydamage
computercomponentsandparts.
Whenyouhandlepartsandothercomputercomponents,taketheseprecautionstoavoidstatic-electricity
damage:
•Limityourmovement.Movementcancausestaticelectricitytobuilduparoundyou.
•Alwayshandlepartsandothercomputercomponentscarefully.HandlePCIcards,memorymodules,
systemboards,andmicroprocessorsbytheedges.Nevertouchanyexposedcircuitry.
•Preventothersfromtouchingthepartsandothercomputercomponents.
•Touchthestatic-protectivepackagecontainingtheparttoametalexpansion-slotcoverorother
unpaintedmetalsurfaceonthecomputerforatleasttwoseconds.Thisreducesstaticelectricityfrom
thepackageandyourbodybeforeyouinstallorreplaceanewpart.
•Whenpossible,removethenewpartfromthestatic-protectivepackage,andinstallitdirectlyinthe
computerwithoutsettingthepartdown.Whenthisisnotpossible,placethestatic-protectivepackage
thatthepartcameinonasmooth,levelsurfaceandplacethepartonthepackage.
•Donotplacethepartonthecomputercoverorothermetalsurface.
Installingorreplacinghardware
Thissectionprovidesinstructionsonhowtoinstallorreplacehardwareforyourcomputer.Youcanexpand
thecapabilitiesofyourcomputerandmaintainyourcomputerbyinstallingorreplacinghardware.
Attention:DonotopenyourcomputerorattemptanyrepairbeforereadingandunderstandingtheChapter
1“Readthisfirst:Importantsafetyinformation”onpage1.
Notes:
•Formachinetypes10DV,10DW,10DX,10DY,youmustinstallyourcomputeronthematchedmonitor.
Therefore,thestepsofinstallingsomepartsmightbedifferentfromthestepsinthechapter.Formore
information,refertotheuserguideintheCDthatcomeswiththemonitor.
•UseonlycomputerpartsprovidedbyLenovo.
•Wheninstallingorreplacinganoption,usetheappropriateinstructionsinthissectionalongwiththe
instructionsthatcomewiththeoption.
Installingexternaloptions
Youcanconnectexternaloptionstoyourcomputer,suchasexternalspeakers,aprinter,orascanner.For
someexternaloptions,youmustinstalladditionalsoftwareinadditiontomakingthephysicalconnection.
Wheninstallinganexternaloption,see“Locatingconnectors,controls,andindicatorsonthefrontofyour
computer”onpage28and“Locatingconnectorsontherearofyourcomputer”onpage29toidentifythe
requiredconnector.Usetheinstructionsshippedwiththeoptiontohelpyoumaketheconnectionandinstall
anysoftwareordevicedriversthatarerequiredfortheoption.
©CopyrightLenovo2014103
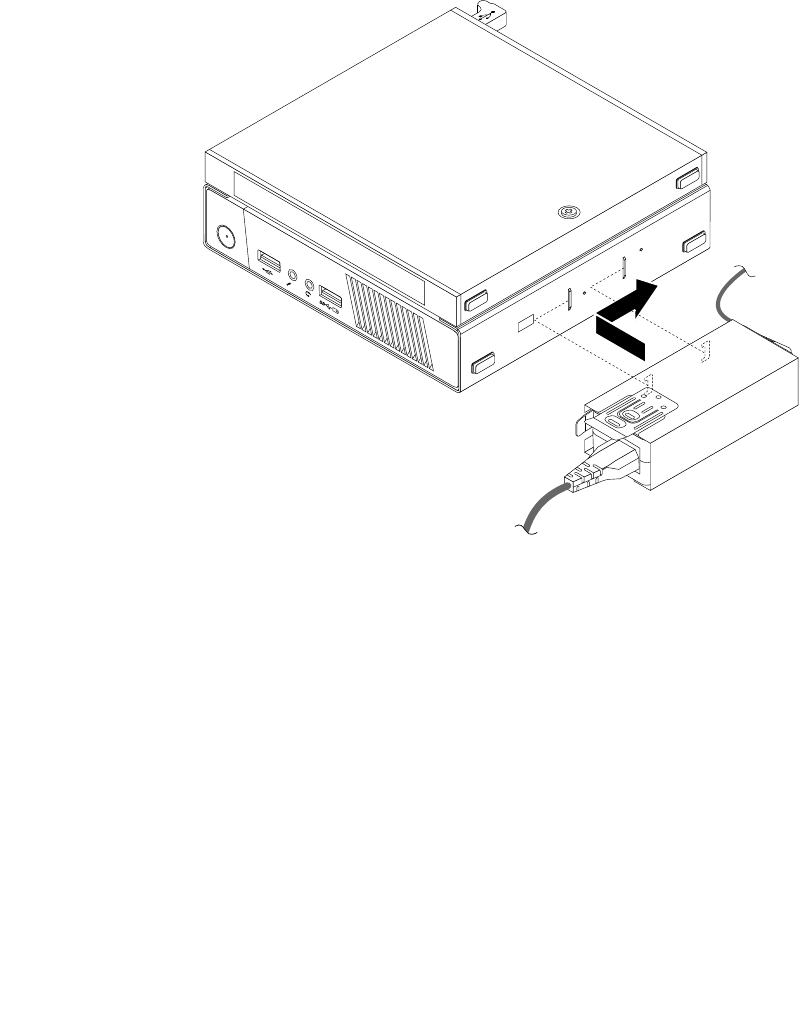
Installingandremovingtheacpoweradapterbracket
Attention:DonotopenyourcomputerorattemptanyrepairbeforereadingandunderstandingtheChapter
1“Readthisfirst:Importantsafetyinformation”onpage1.
Note:TheacpoweradapterbracketisinstalledontheVideoElectronicsStandardsAssociation(VESA)
mountbracket.TheacpoweradapterbracketandtheVESAmountbracketareonlyavailableonsome
models.
Toinstalltheacpoweradapterbracket,dothefollowing:
1.Slidetheacpoweradapterintotheacpoweradapterbracket.Ensuretheacpoweradapterissecured
bythebracket.
2.AlignthetwotabsontheacpoweradapterbracketwiththeslotsintheVESAmountbracket.Then,
slidetheacpoweradapterbracketasshowntoinstallitontheVESAmountbracket.
1
2
Figure8.Installingtheacpoweradapterbracket
Toremovetheacpoweradapterbracket,dothefollowing:
1.Removeallmediafromthedrivesandturnoffallattacheddevicesandthecomputer.Then,disconnect
allpowercordsfromelectricaloutletsanddisconnectallcablesthatareconnectedtothecomputer.
104ThinkCentreM53HardwareMaintenanceManual
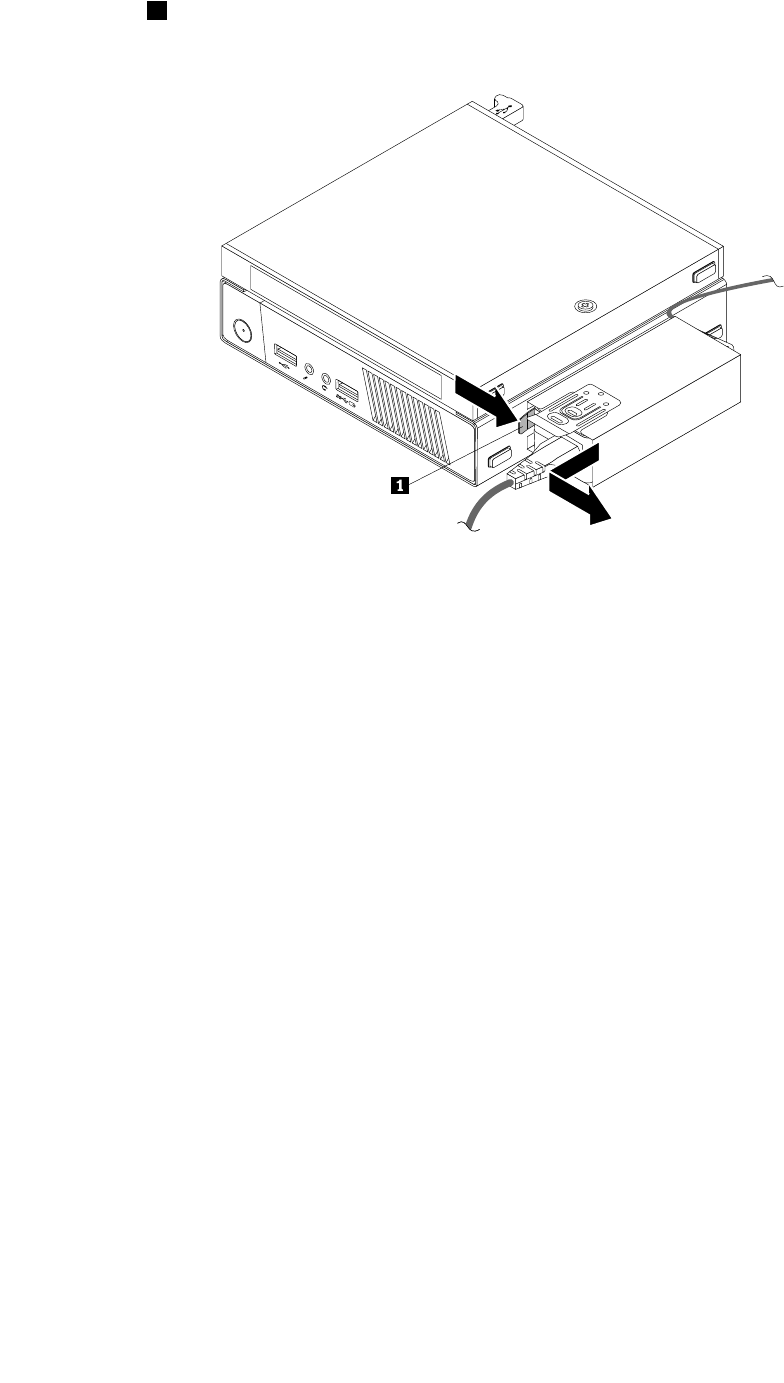
2.Pullthetab1andthenslidetheacpoweradapterbracketasshowntoremoveitfromtheVESA
mountbracket.
1
2
Figure9.Removingtheacpoweradapterbracket
3.Removetheacpoweradapterfromtheacpoweradapterbracket.
Installingandremovingtheacpoweradapter
Attention:DonotopenyourcomputerorattemptanyrepairbeforereadingandunderstandingtheChapter
1“Readthisfirst:Importantsafetyinformation”onpage1.
Toinstalltheacpoweradapter,dothefollowing:
Chapter11.Installingorreplacinghardware105
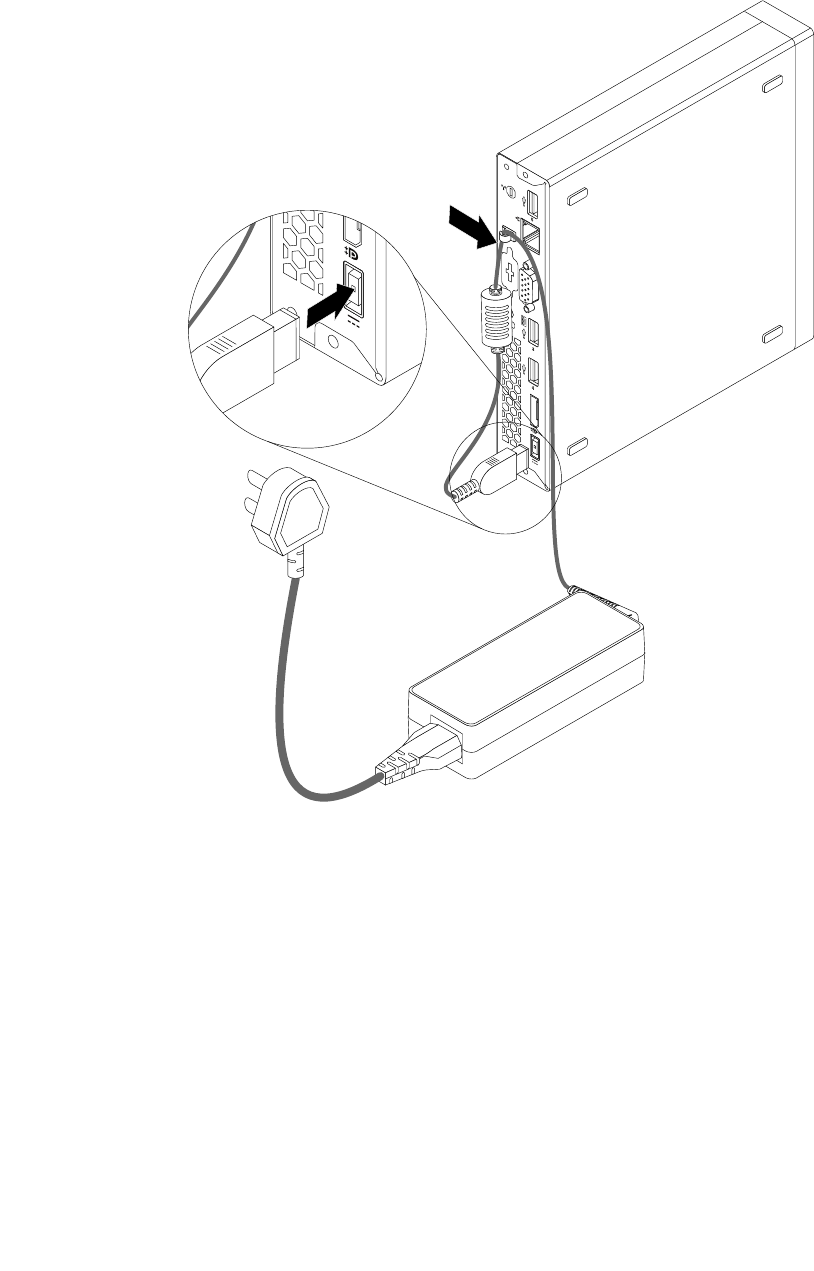
1.Connecttheacpoweradaptertotheacpoweradapterconnectorattherearofyourcomputeranda
workableelectricaloutlet.Then,securethepowercordintothepoweradaptercableloopattherear
ofthecomputerasshown.
Figure10.Installingtheacpoweradapter
2.Iftheacpoweradapterbracketisavailable,installtheacpoweradapterbracket.See“Installingand
removingtheacpoweradapterbracket”onpage104.
Toremovetheacpoweradapter,dothefollowing:
1.Removeallmediafromthedrivesandturnoffallattacheddevicesandthecomputer.Then,disconnect
allpowercordsfromelectricaloutletsanddisconnectallcablesthatareconnectedtothecomputer.
2.Iftheacpoweradapterbracketisavailable,removetheacpoweradapterbracket.See“Installingand
removingtheacpoweradapterbracket”onpage104.
106ThinkCentreM53HardwareMaintenanceManual
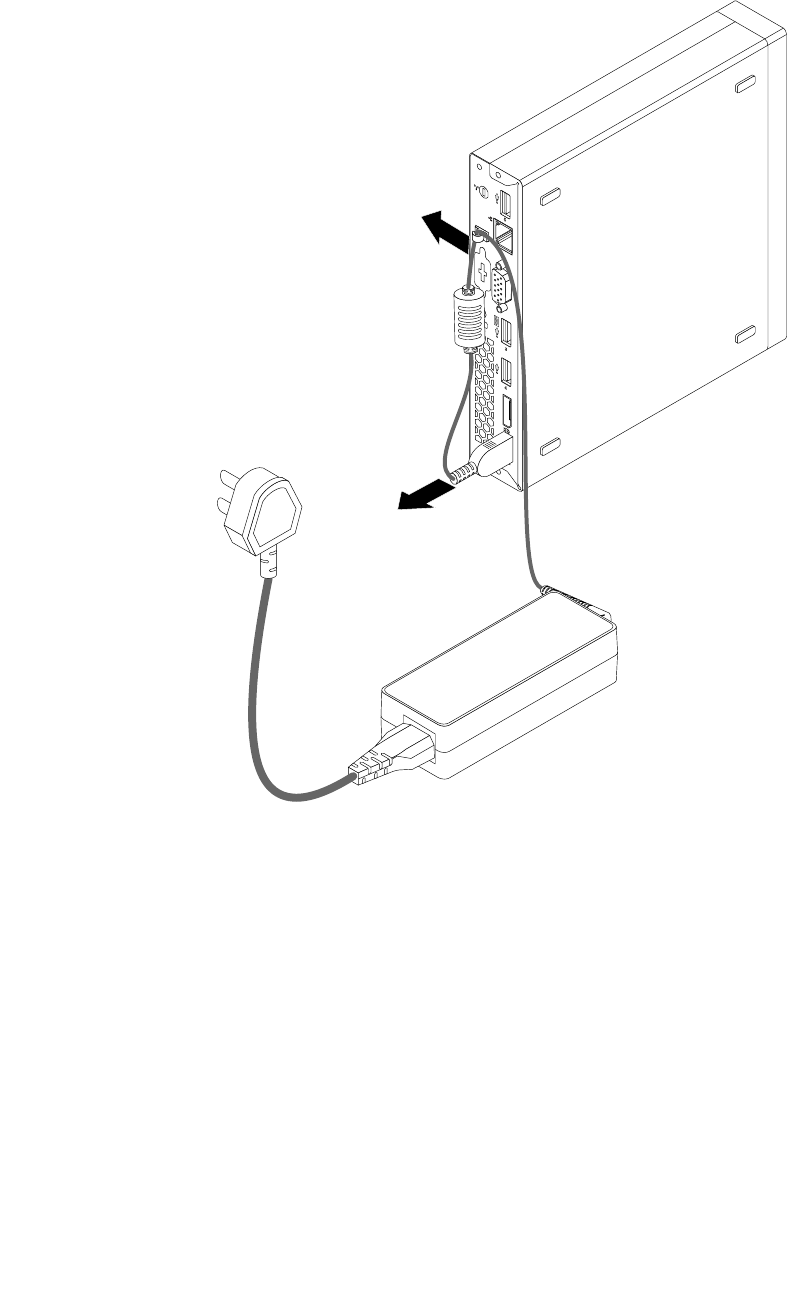
3.Removethepowercordfromtheacpoweradaptercableloopattherearofthecomputerandthen
disconnecttheacpoweradapterfromthecomputer.
Figure11.Removingtheacpoweradapter
Installingandremovingtheverticalstand
Attention:DonotopenyourcomputerorattemptanyrepairbeforereadingandunderstandingtheChapter
1“Readthisfirst:Importantsafetyinformation”onpage1.
Note:TheverticalstandandVESAmountbracketareonlyavailableonsomemodels.Ifyourcomputer
comeswiththeVESAmountbracketinstalled,ensurethatyouremovetheVESAmountbracketbefore
youinstalltheverticalstand.ToremovetheVESAmountbracket,see“InstallingandremovingtheVESA
mountbracket”onpage109.
Toinstalltheverticalstand,dothefollowing:
1.Removeallmediafromthedrivesandturnoffallattacheddevicesandthecomputer.Then,disconnect
allpowercordsfromelectricaloutletsanddisconnectallcablesthatareconnectedtothecomputer.
Chapter11.Installingorreplacinghardware107
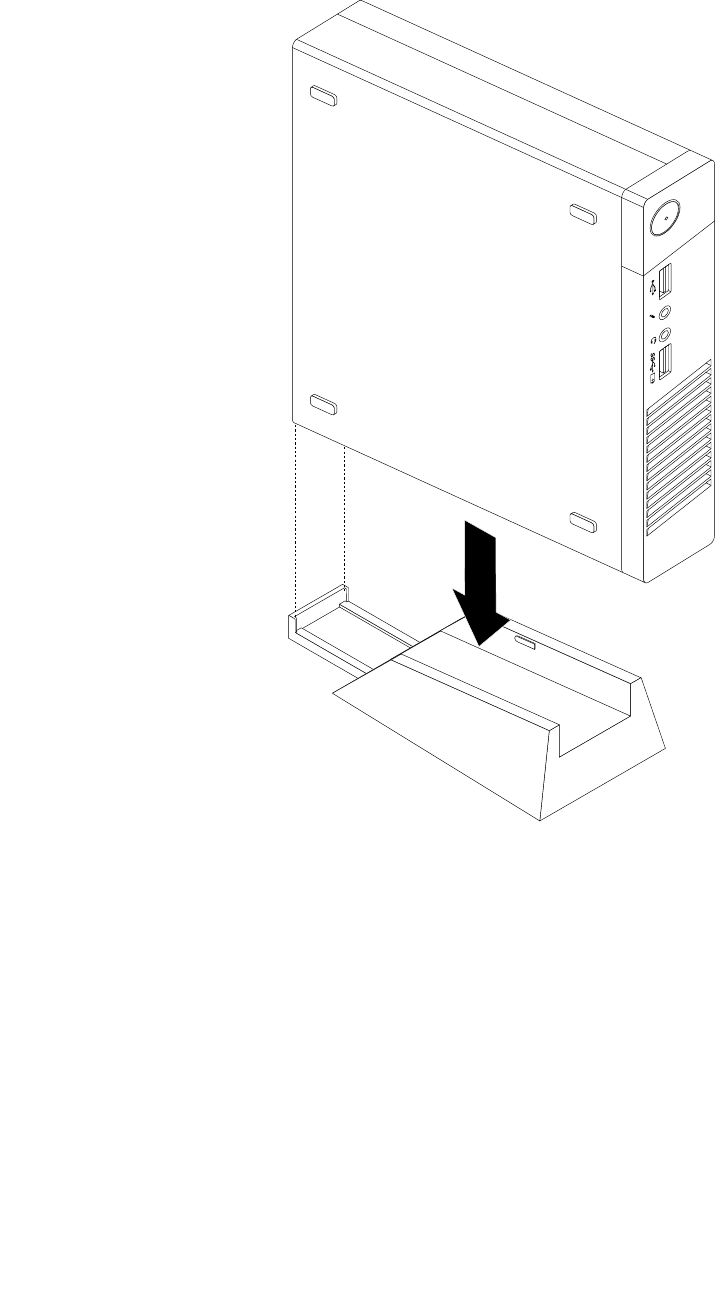
2.Aligntherearofthecomputerwiththerearoftheverticalstandandpositionthecomputeronthe
verticalstandasshown.
1
2
Figure12.Installingtheverticalstand
Toremovetheverticalstand,dothefollowing:
1.Removeallmediafromthedrivesandturnoffallattacheddevicesandthecomputer.Then,disconnect
allpowercordsfromelectricaloutletsanddisconnectallcablesthatareconnectedtothecomputer.
108ThinkCentreM53HardwareMaintenanceManual
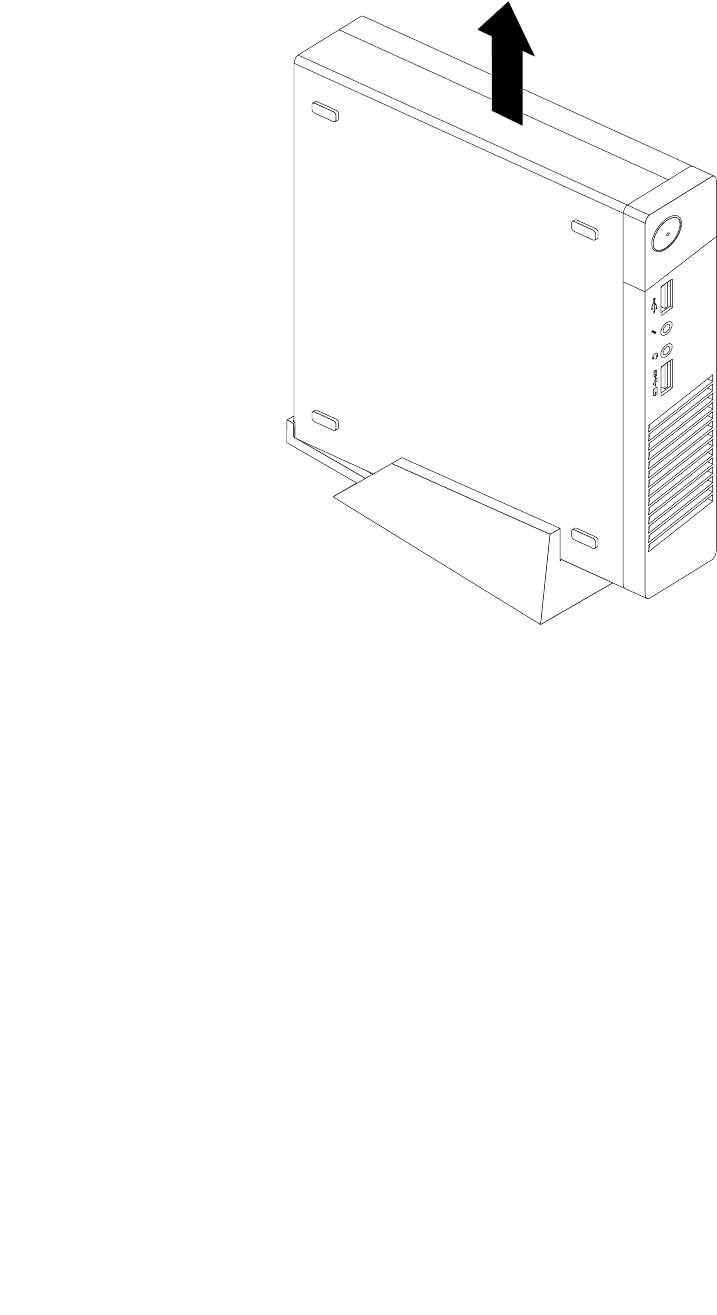
2.Liftthecomputertoremoveitfromtheverticalstand.
1
2
Figure13.Removingthecomputerfromtheverticalstand
InstallingandremovingtheVESAmountbracket
Attention:DonotopenyourcomputerorattemptanyrepairbeforereadingandunderstandingtheChapter
1“Readthisfirst:Importantsafetyinformation”onpage1.
Note:TheVESAmountbracketisonlyavailableonsomemodels.
ToinstalltheVESAmountbracket,dothefollowing:
1.Removeallmediafromthedrivesandturnoffallattacheddevicesandthecomputer.Then,disconnect
allpowercordsfromelectricaloutletsanddisconnectallcablesthatareconnectedtothecomputer.
Chapter11.Installingorreplacinghardware109

2.SlidethecomputerintotheVESAmountbracket.
Figure14.InstallingtheVESAmountbracket
3.InstallthetwoscrewstosecuretheVESAmountbrackettothecomputer.
Figure15.InstallingthescrewsthatsecuretheVESAmountbracket
4.Iftheacpoweradapterbracketisavailable,installtheacpoweradapterbracket.See“Installingand
removingtheacpoweradapterbracket”onpage104.
ToremovetheVESAmountbracket,dothefollowing:
1.Removeallmediafromthedrivesandturnoffallattacheddevicesandthecomputer.Then,disconnect
allpowercordsfromelectricaloutletsanddisconnectallcablesthatareconnectedtothecomputer.
2.Iftheacpoweradapterbracketisavailable,removetheacpoweradapterbracket.See“Installingand
removingtheacpoweradapterbracket”onpage104.
110ThinkCentreM53HardwareMaintenanceManual
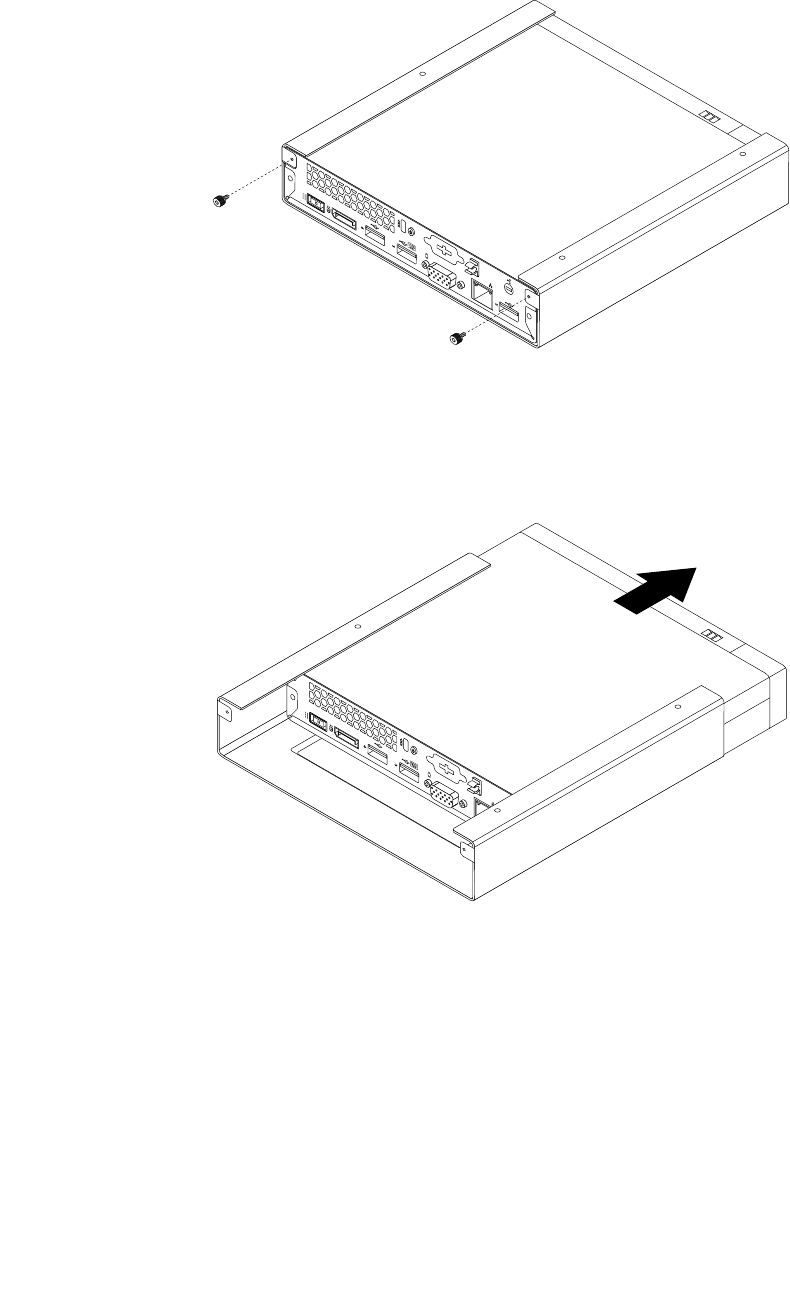
3.RemovethetwoscrewsthatsecuretheVESAmountbrackettothecomputer.
Figure16.RemovingthescrewsthatsecuretheVESAmountbracket
4.SlidethecomputerfromthefrontoftheVESAmountbrackettoremovetheVESAmountbracket
fromthecomputer.
Figure17.RemovingtheVESAmountbracket
Installingorreplacingtheexternalopticaldrive
Attention:DonotopenyourcomputerorattemptanyrepairbeforereadingandunderstandingtheChapter
1“Readthisfirst:Importantsafetyinformation”onpage1.
Note:Theexternalopticaldriveisonlyavailableonsomemodels.
Toinstallorreplacetheexternalopticaldrive,dothefollowing:
1.Removeallmediafromthedrivesandturnoffallattacheddevicesandthecomputer.Then,disconnect
allpowercordsfromelectricaloutletsanddisconnectallcablesthatareconnectedtothecomputer.
Chapter11.Installingorreplacinghardware111
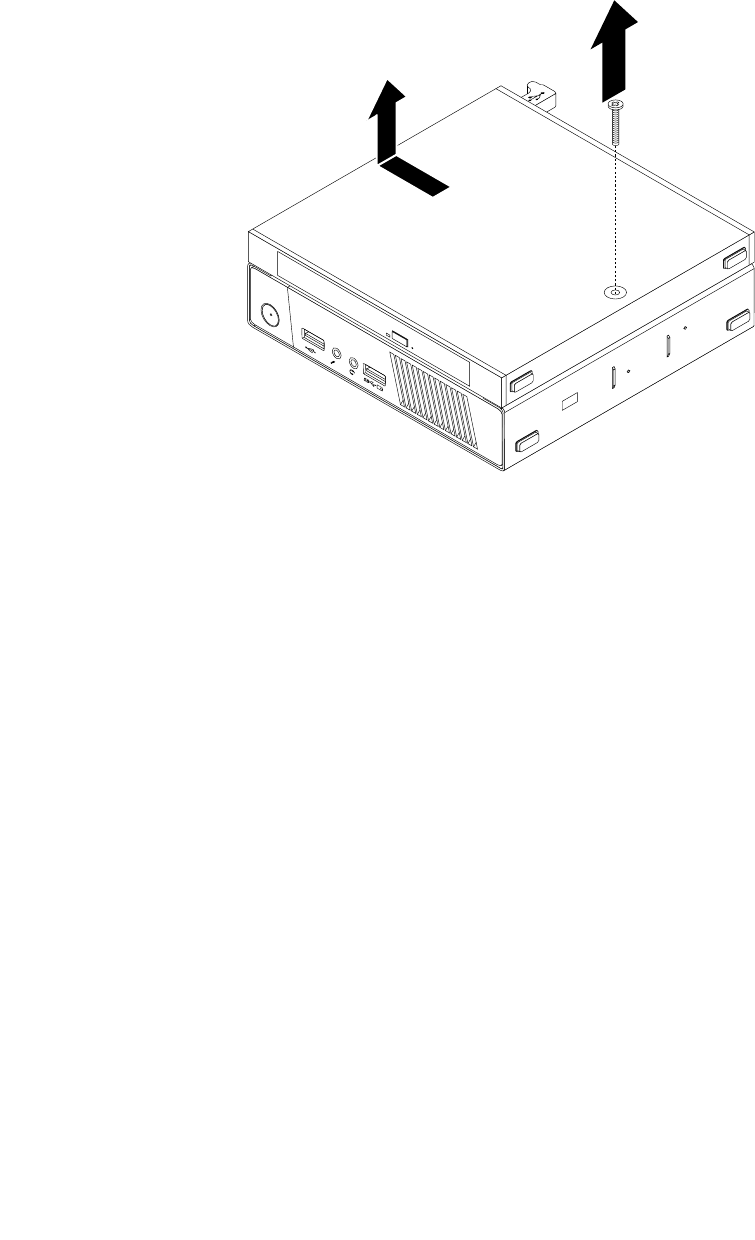
2.Ifyouarereplacingtheexternalopticaldrive,disconnecttheexternalopticaldrivecablefromtheUSB
connectoronthecomputer.
3.RemovethescrewthatsecurestheexternalopticaldriveboxontheVESAmountbracketandthenslide
theexternalopticaldriveboxtoremoveitfromtheVESAmountbracket.
1
2
Figure18.Removingtheexternalopticaldrivebox
112ThinkCentreM53HardwareMaintenanceManual
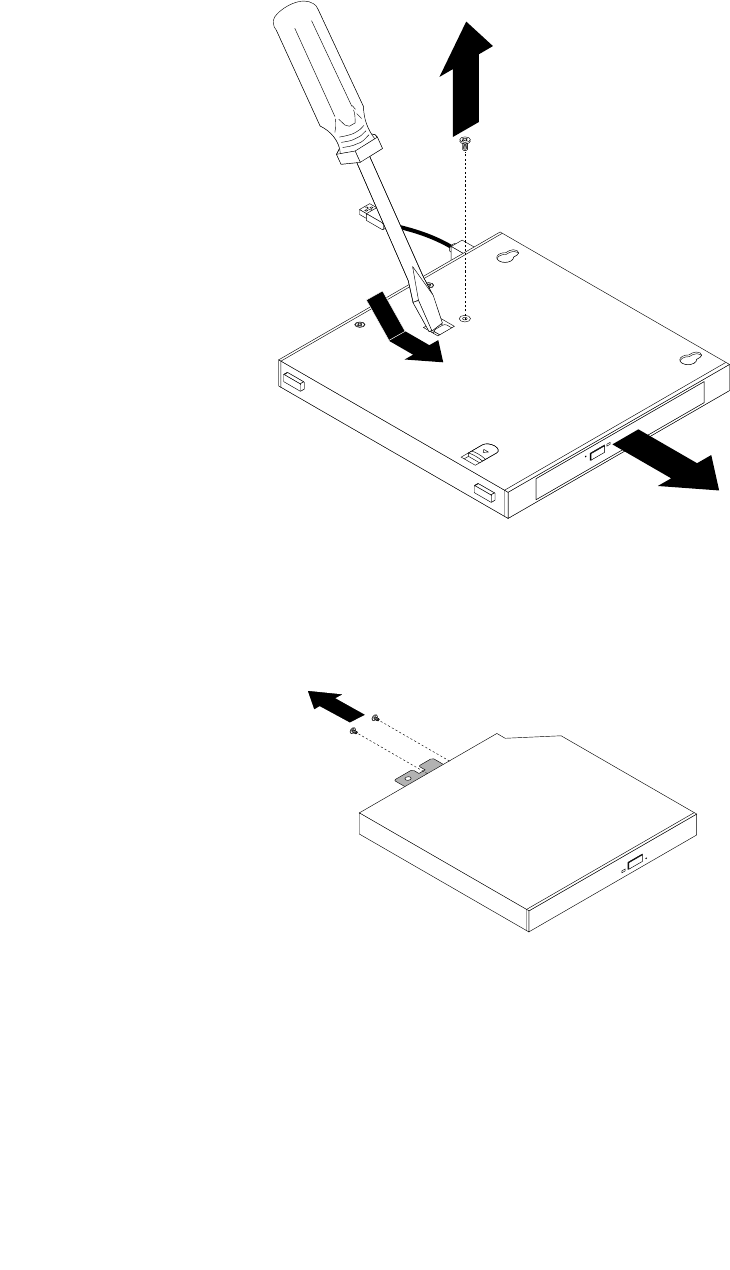
4.Removethescrewthatsecurestheexternalopticaldriveintheexternalopticaldrivebox.Usethe
screwdrivertoslidetheexternalopticaldriveforwardandthenremovetheexternalopticaldrivefrom
theexternalopticaldrivebox.
Figure19.Removingtheexternalopticaldrivefromtheexternalopticaldrivebox
5.Removethetwoscrewsthatsecuretheexternalopticaldrivemetalplateandthenremovethemetal
platefromtheexternalopticaldrive.
Figure20.Removingtheexternalopticaldrivemetalplate
Chapter11.Installingorreplacinghardware113
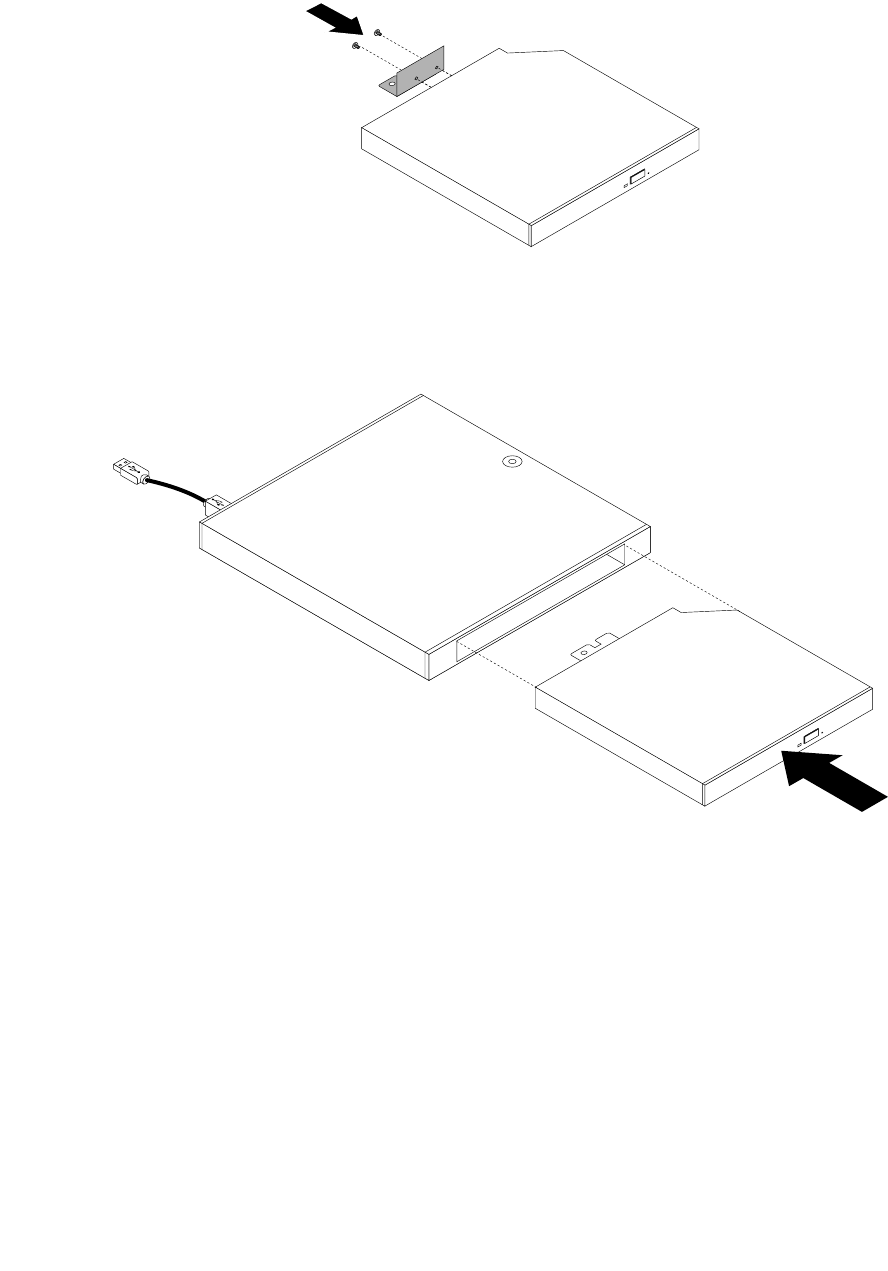
6.Alignthetwoscrewholesintheexternalopticaldrivemetalplatewiththecorrespondingholesin
thenewexternalopticaldriveandtheninstallthetwoscrewstosecurethemetalplateonthenew
externalopticaldrive.
Figure21.Installingtheexternalopticaldrivemetalplate
7.Slidethenewexternalopticaldriveintotheexternalopticaldriveboxuntilitsnapsintoposition.
Figure22.Installingtheexternalopticaldriveintotheexternalopticaldrivebox
114ThinkCentreM53HardwareMaintenanceManual
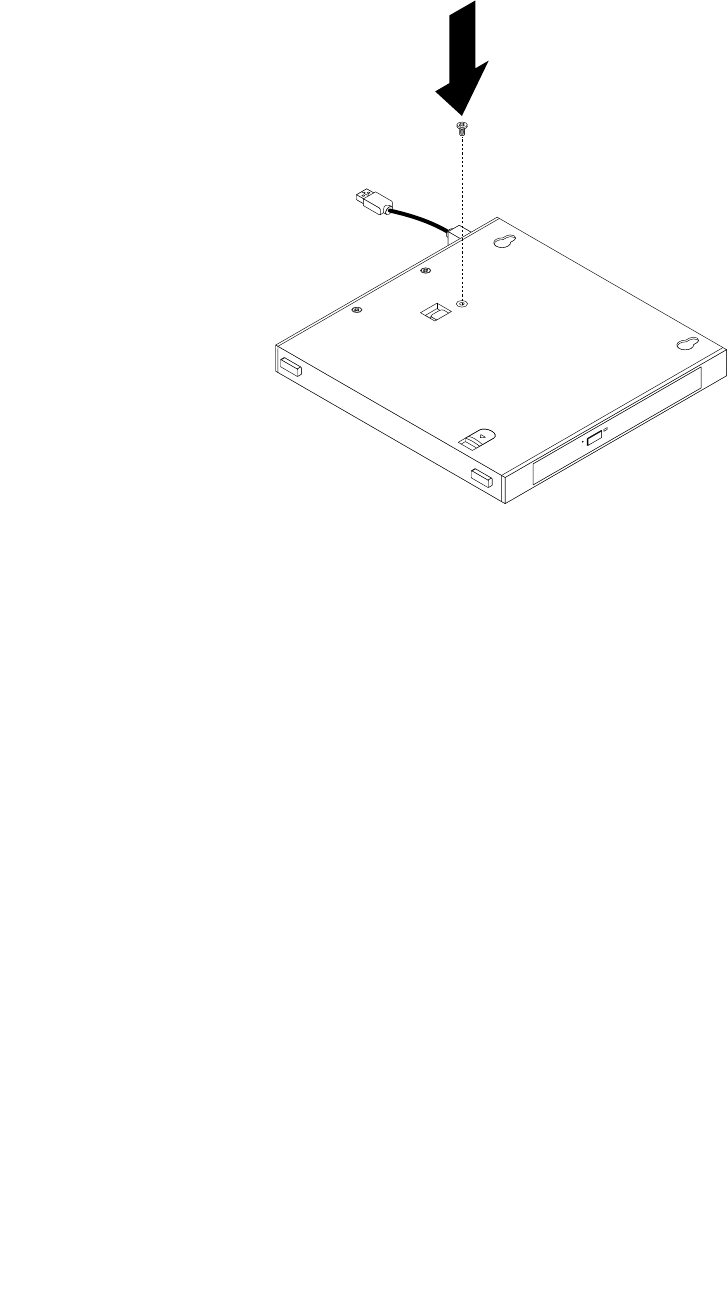

9.AlignthescrewholesintheexternalopticaldriveboxwiththetwoscrewsontheVESAmountbracket
andthenslidetheexternalopticaldriveboxtoinstallitontheVESAmountbracket.
1
2
Figure24.Installingtheexternalopticaldrivebox
116ThinkCentreM53HardwareMaintenanceManual
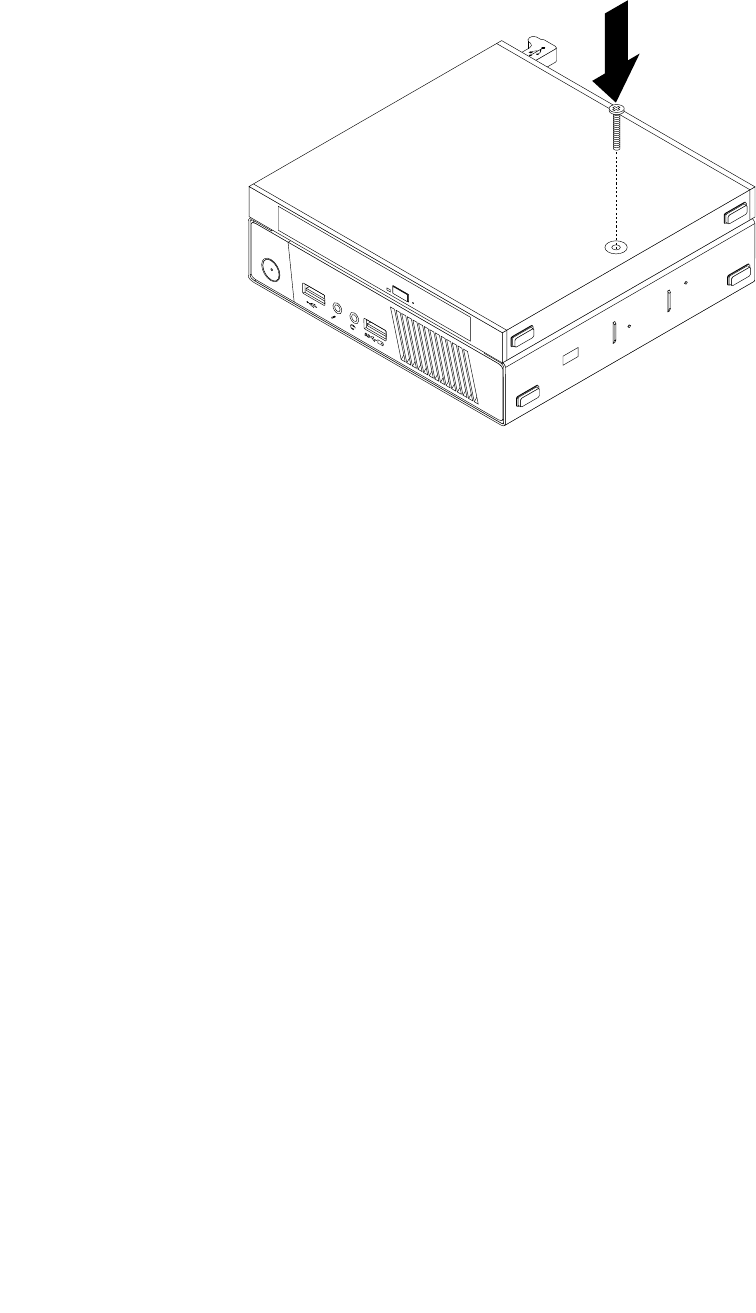
10.InstallthescrewthatsecurestheexternalopticaldriveboxontheVESAmountbracket.
1
2
Figure25.Installingthescrewthatsecurestheexternalopticaldrivebox
11.ConnecttheexternalopticaldrivecabletoaUSBconnectoronthecomputer.See“Locatingconnectors
ontherearofyourcomputer”onpage29.
Installingorreplacingtheexternalharddiskdrive
Attention:DonotopenyourcomputerorattemptanyrepairbeforereadingandunderstandingtheChapter
1“Readthisfirst:Importantsafetyinformation”onpage1.
Notes:
•Theexternalharddiskdrive,externalhybriddrive,andexternalsolid-statedriveareonlyavailableon
somemodels.
•Toinstallorreplacetheexternalhybriddriveorexternalsolid-statedrive,followthestepsofinstallingor
replacingtheexternalharddiskdrive.
Toinstallorreplacetheexternalharddiskdrive,dothefollowing:
1.Removeallmediafromthedrivesandturnoffallattacheddevicesandthecomputer.Then,disconnect
allpowercordsfromelectricaloutletsanddisconnectallcablesthatareconnectedtothecomputer.
2.Ifyouarereplacingtheexternalharddiskdrive,disconnecttheexternalharddiskdrivecablefrom
theUSBconnectoronthecomputer.
Chapter11.Installingorreplacinghardware117
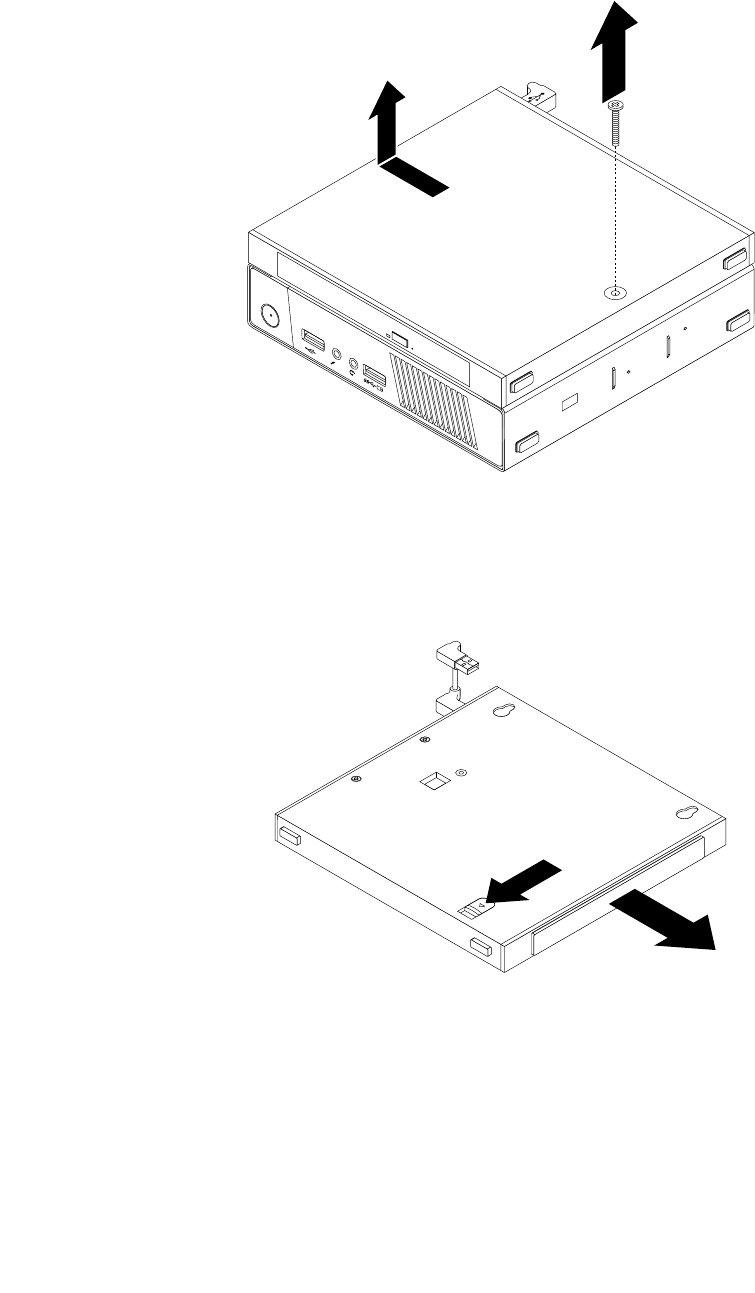
3.RemovethescrewthatsecurestheopticaldriveboxontheVESAmountbracketandthenslidethe
opticaldriveboxasshowntoremoveitfromtheVESAmountbracket.
1
2
Figure26.Removingtheopticaldrivebox
4.Slidethereleasebuttonontheopticaldriveboxandthenremovetheexternalharddiskdriveadapter
fromtheopticaldrivebox.
Figure27.Removingtheexternalharddiskdriveadapterfromtheopticaldrivebox
118ThinkCentreM53HardwareMaintenanceManual
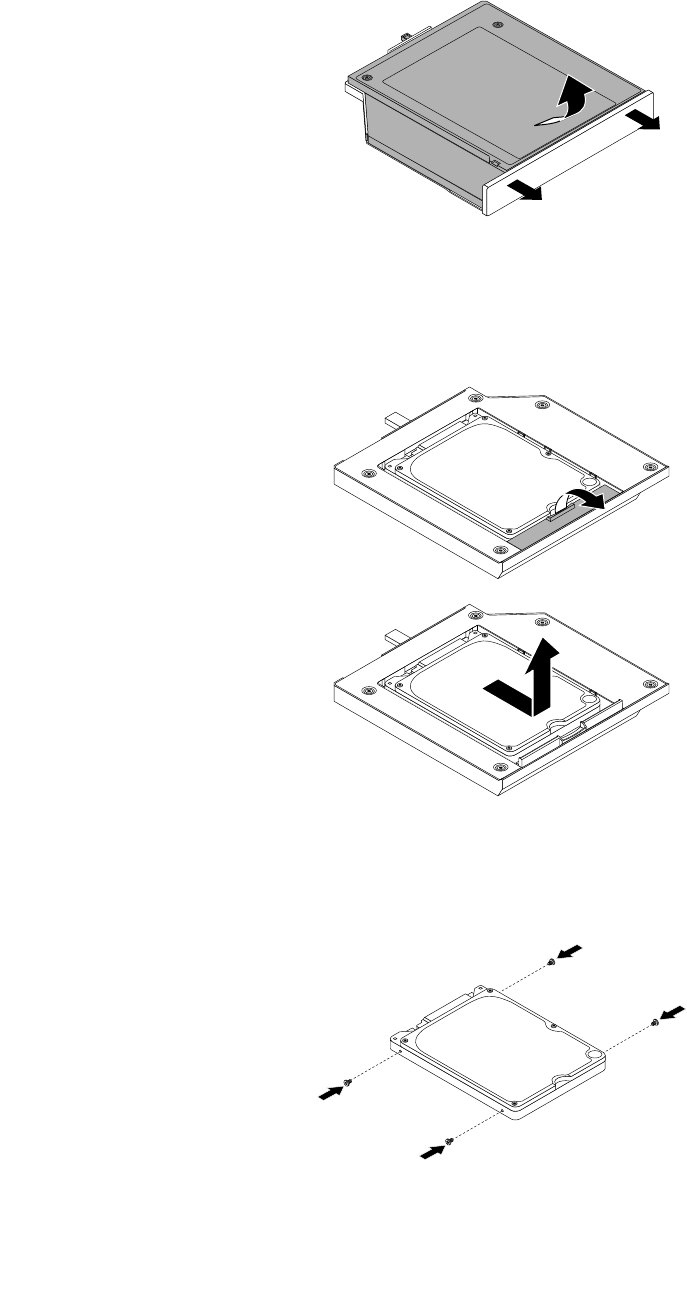
5.Flexthesidesoftheexternalharddiskdriveadapterbracketandthenpivottheexternalharddiskdrive
adaptertoremovetheadapterfromtheadapterbracket.
Figure28.Removingtheexternalharddiskdriveadapterfromtheadapterbracket
6.Toremovetheexternalharddiskdrivefromtheadapter,lifttheadapterretaininglatch.Slidetheexternal
harddiskdrivetowardstheretaininglatchandthenlifttheexternalharddiskdriveoutoftheadapter.
Figure29.Removingtheexternalharddiskdrivefromtheadapter
7.Installthefourscrewstothenewexternalharddiskdrive.
Figure30.Installingthefourscrewstotheexternalharddiskdrive
Chapter11.Installingorreplacinghardware119
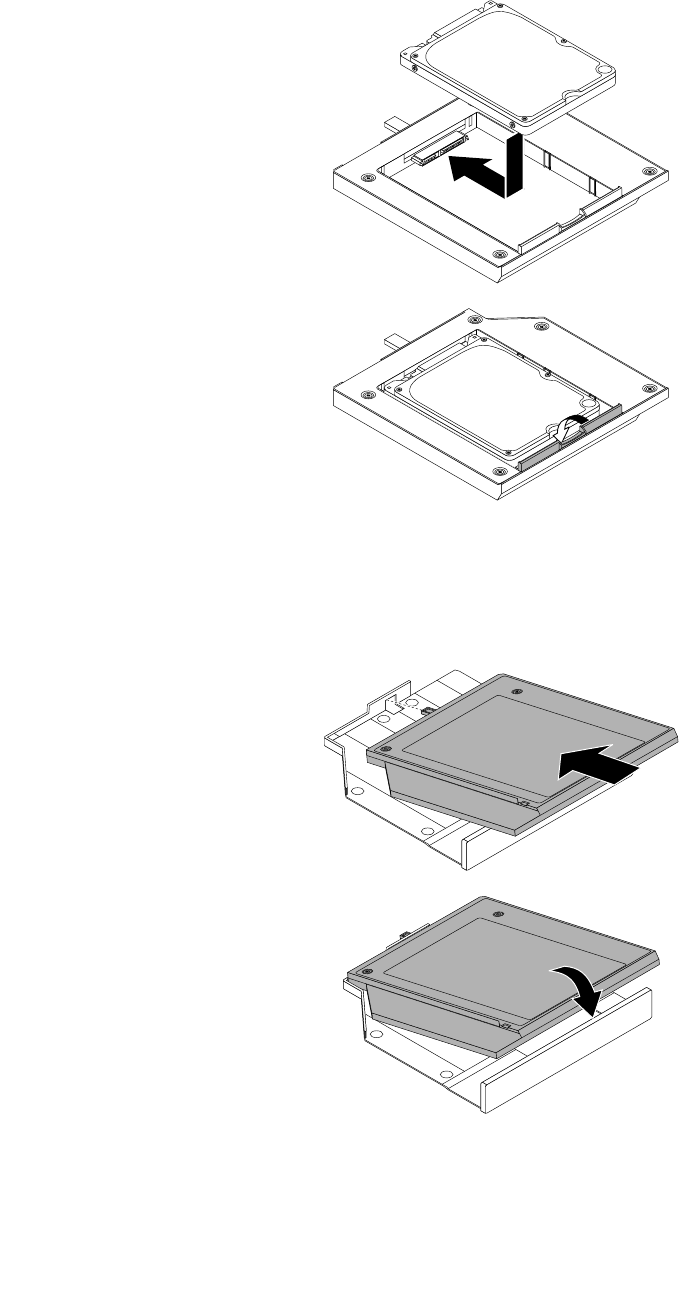
8.Installthenewexternalharddiskdriveintotheadapterasshown.Then,lowertheadapterretaining
latchuntilitsnapsintoposition.
Figure31.Installinganewexternalharddiskdriveintotheadapter
9.Positiontheadapterintotheadapterbracketandthenpivottheadapterdownwarduntilitsnapsinto
position.
Figure32.Installingtheexternalharddiskdriveadapterintotheadapterbracket
120ThinkCentreM53HardwareMaintenanceManual
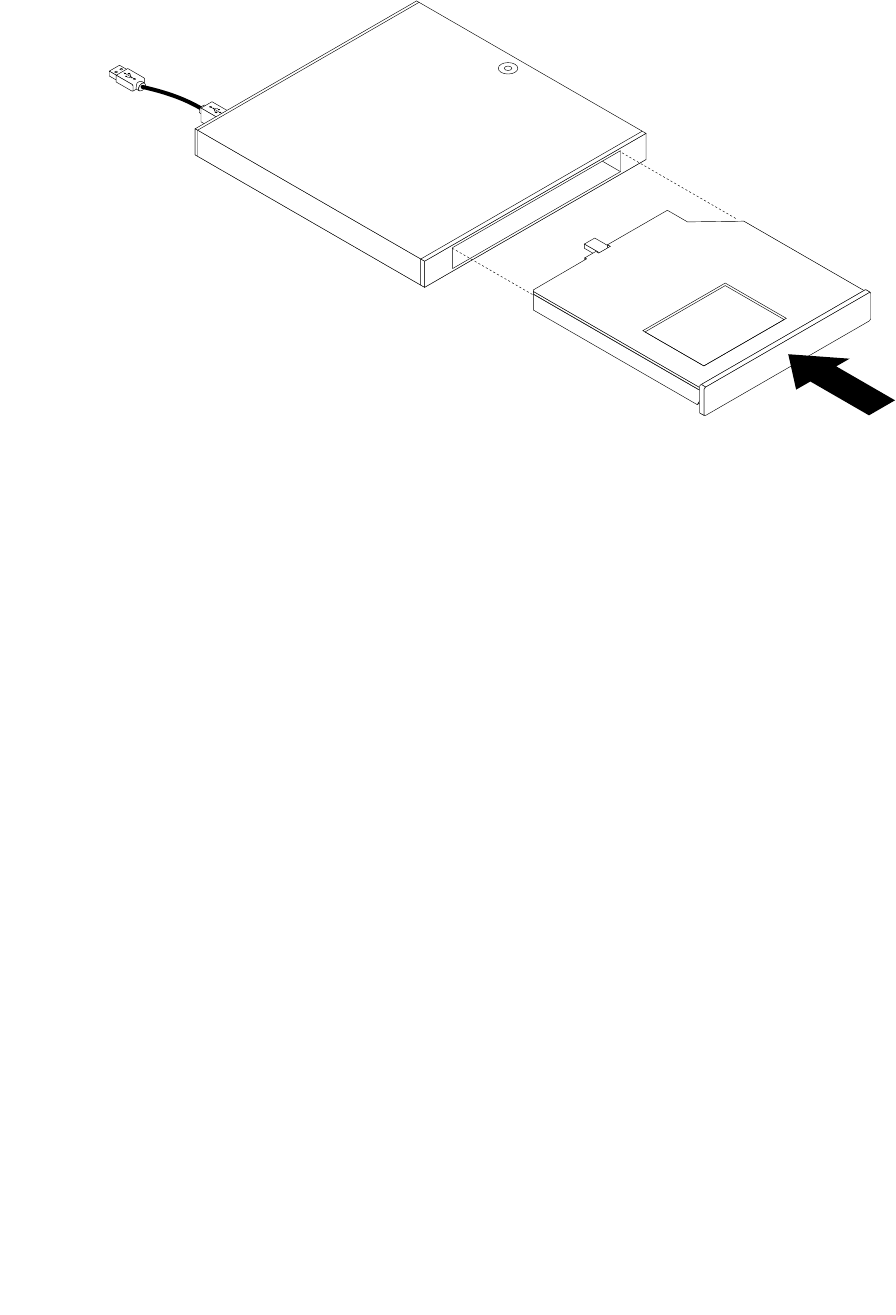
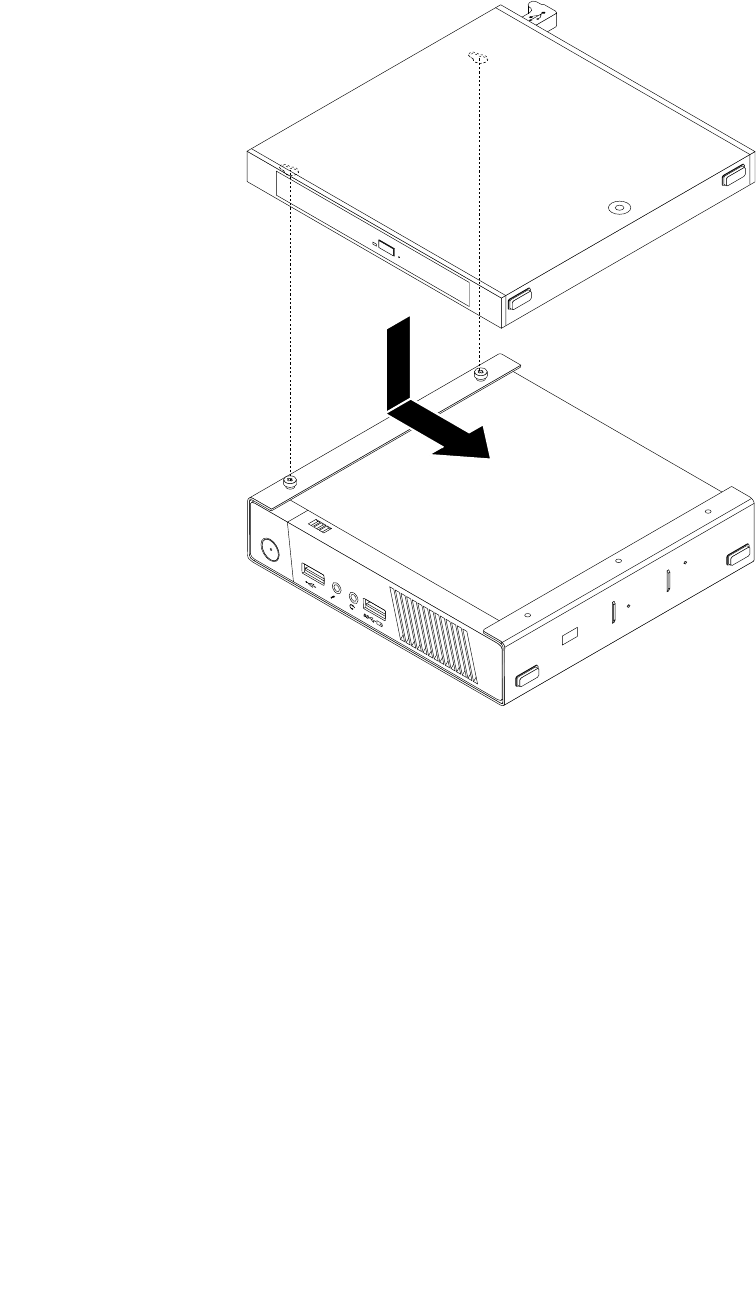
11.AlignthescrewholesintheopticaldriveboxwiththetwoscrewsontheVESAmountbracketandthen
slidetheopticaldriveboxtoinstallitontheVESAmountbracket.
1
2
Figure34.Installingtheopticaldrivebox
122ThinkCentreM53HardwareMaintenanceManual
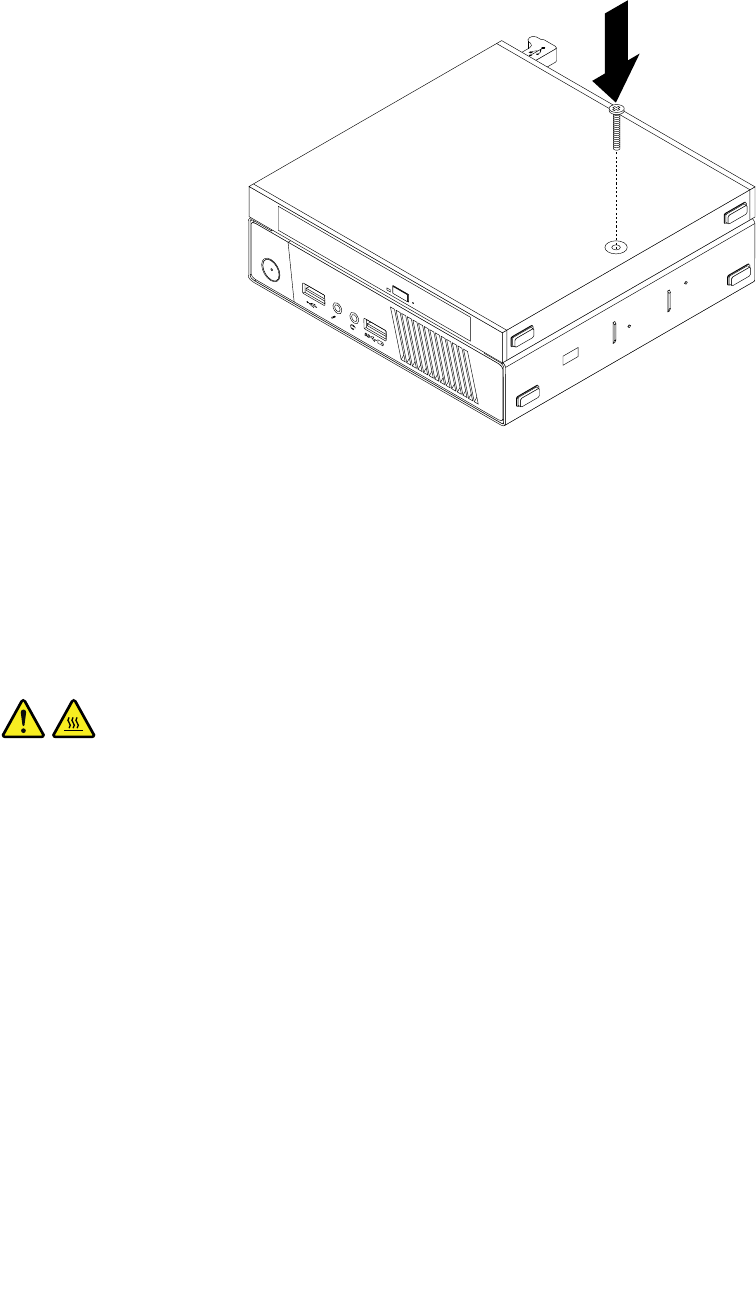
12.InstallthescrewthatsecurestheopticaldriveboxontheVESAmountbracket.
1
2
Figure35.Installingthescrewthatsecurestheopticaldrivebox
13.ConnecttheexternalharddiskdrivecabletoaUSBconnectoronthecomputer.See“Locating
connectorsontherearofyourcomputer”onpage29.
Removingthecomputercover
Attention:DonotopenyourcomputerorattemptanyrepairbeforereadingandunderstandingtheChapter
1“Readthisfirst:Importantsafetyinformation”onpage1.
CAUTION:
Beforeyouopenthecomputercover,turnoffthecomputerandwaitseveralminutesuntilthe
computeriscool.
Toremovethecomputercover,dothefollowing:
1.Removeallmediafromthedrivesandturnoffallattacheddevicesandthecomputer.Then,disconnect
allpowercordsfromelectricaloutletsanddisconnectallcablesthatareconnectedtothecomputer.
2.Removeanylockingdevicethatsecuresthecomputercover,suchasaKensington-stylecablelock.
See“AttachingaKensington-stylecablelock”onpage57.
Chapter11.Installingorreplacinghardware123
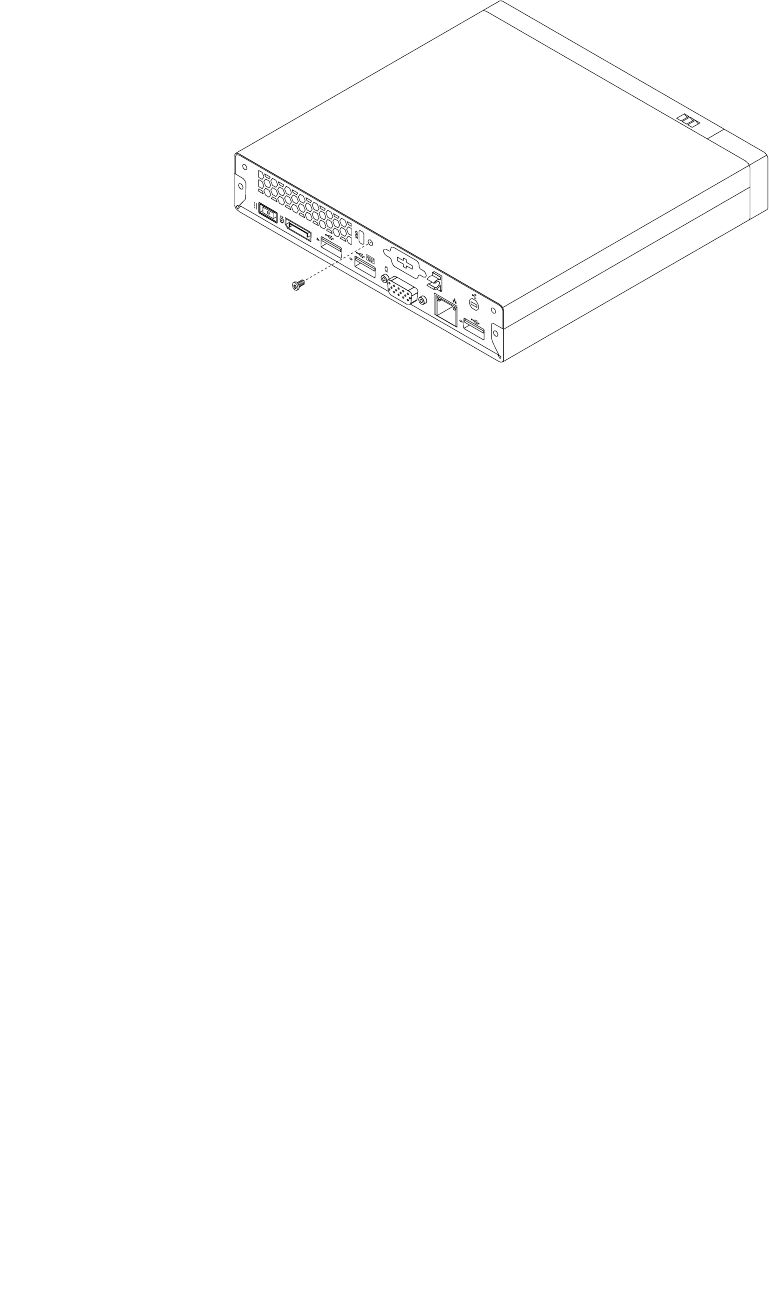
3.Removethescrewthatsecuresthecomputercover.
Figure36.Removingthecomputercoverscrew
124ThinkCentreM53HardwareMaintenanceManual

4.Slidethecomputercovertothefrontofthecomputerasmallamount.Then,liftthecomputercoverto
removeitfromthecomputer.
Figure37.Removingthecomputercover
Replacingthemicroprocessorfan
Attention:DonotopenyourcomputerorattemptanyrepairbeforereadingandunderstandingtheChapter
1“Readthisfirst:Importantsafetyinformation”onpage1.
Chapter11.Installingorreplacinghardware125
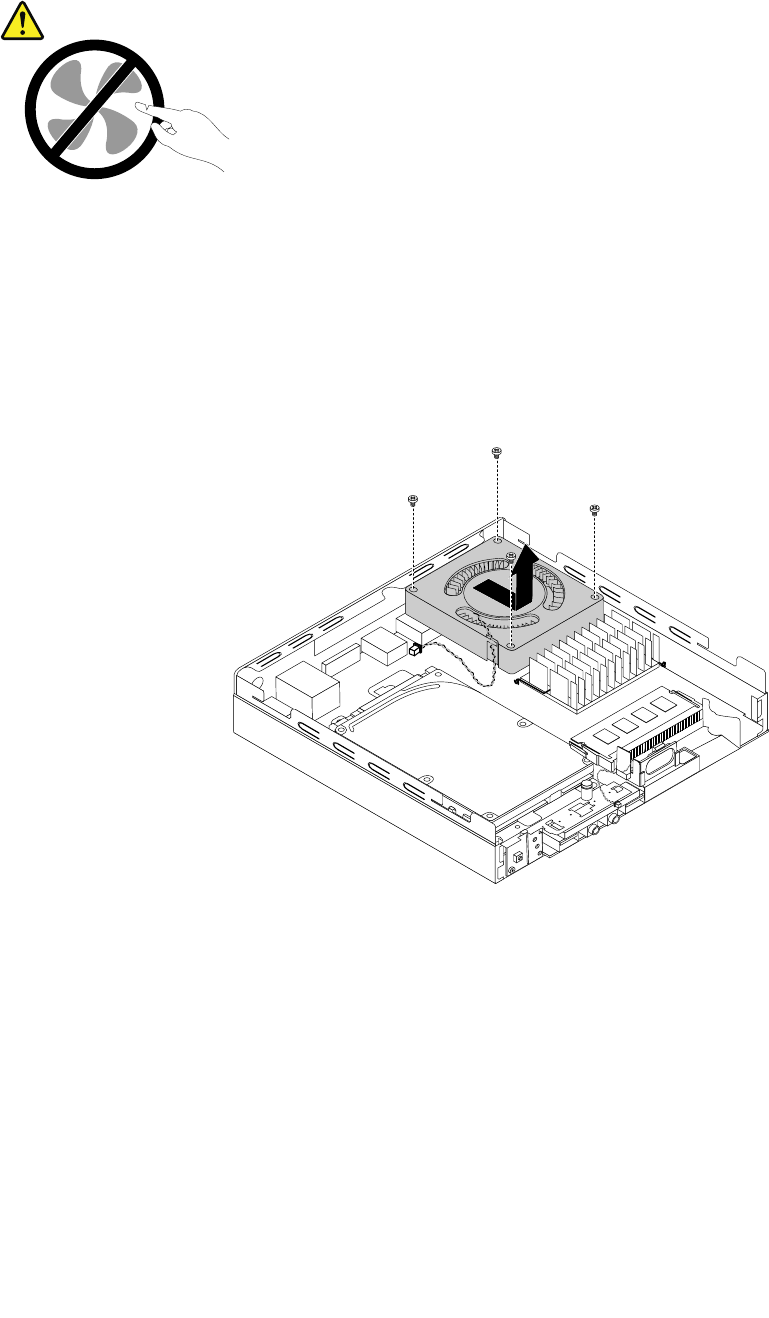
CAUTION:
Hazardousmovingparts.Keepfingersandotherbodypartsaway.
Toreplacethemicroprocessorfan,dothefollowing:
1.Removeallmediafromthedrivesandturnoffallattacheddevicesandthecomputer.Then,disconnect
allpowercordsfromelectricaloutletsanddisconnectallcablesthatareconnectedtothecomputer.
2.Removethecomputercover.See“Removingthecomputercover”onpage123.
3.Disconnectthemicroprocessorfancablefromthesystemboard.
4.Removethefourscrewsthatsecurethemicroprocessorfan,andthenremovethemicroprocessorfan
asshown.
Figure38.Removingthemicroprocessorfan
126ThinkCentreM53HardwareMaintenanceManual
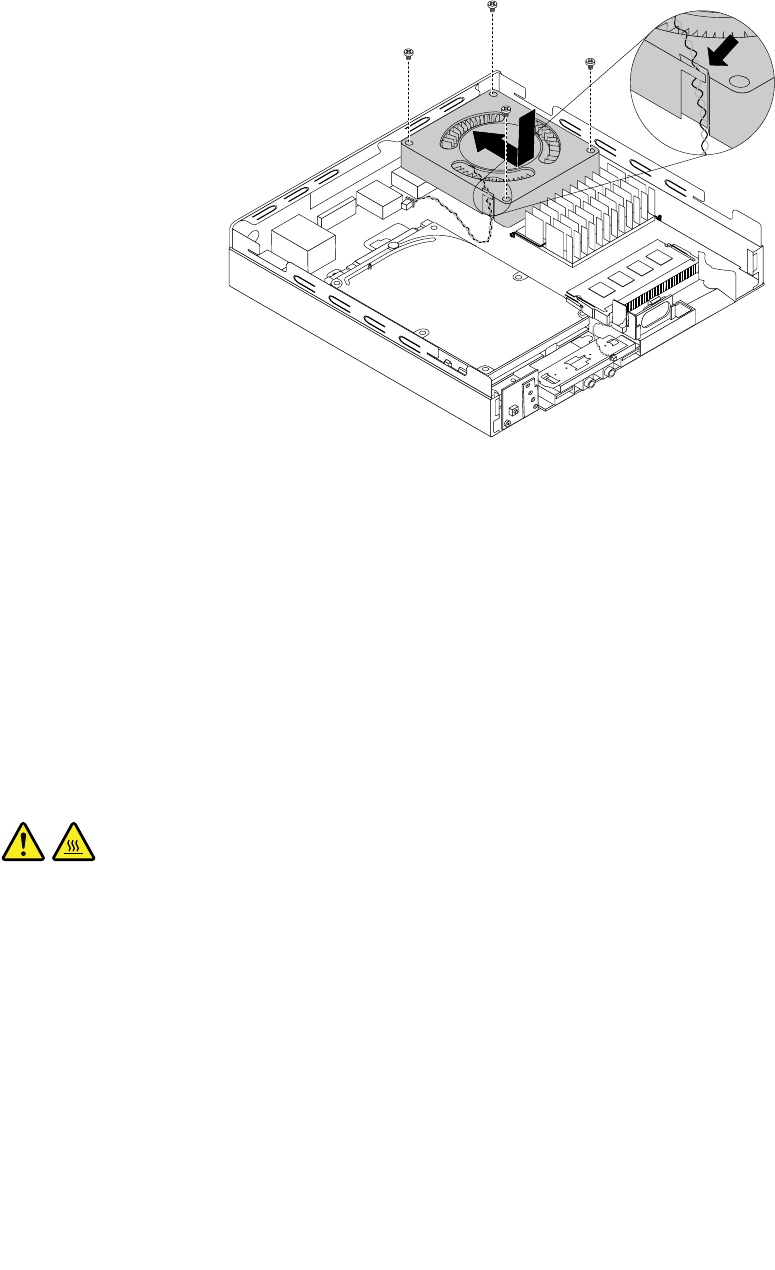
5.Positionthenewmicroprocessorfanasshown,andalignthefourscrewholesinthemicroprocessor
fanwiththecorrespondingmountingstudsonthesystemboard.Then,installthefourscrewsto
securethemicroprocessorfantothechassis.
Figure39.Installingthemicroprocessorfan
6.Connectthecableofthenewmicroprocessorfantothemicroprocessorfanconnectoronthesystem
board.See“Locatingpartsonthesystemboard”onpage34.
Whattodonext:
•Toworkwithanotherpieceofhardware,gototheappropriatesection.
•Tocompletetheinstallationorreplacement,goto“Completingthepartsreplacement”onpage147.
Replacingtheheatsink
Attention:DonotopenyourcomputerorattemptanyrepairbeforereadingandunderstandingtheChapter
1“Readthisfirst:Importantsafetyinformation”onpage1.
CAUTION:
Theheatsinkmightbeveryhot.Beforeyouopenthecomputercover,turnoffthecomputerand
waitseveralminutesuntilthecomputeriscool.
Toreplacetheheatsink,dothefollowing:
1.Removeallmediafromthedrivesandturnoffallattacheddevicesandthecomputer.Then,disconnect
allpowercordsfromelectricaloutletsanddisconnectallcablesthatareconnectedtothecomputer.
2.Removethecomputercover.See“Removingthecomputercover”onpage123.
Chapter11.Installingorreplacinghardware127
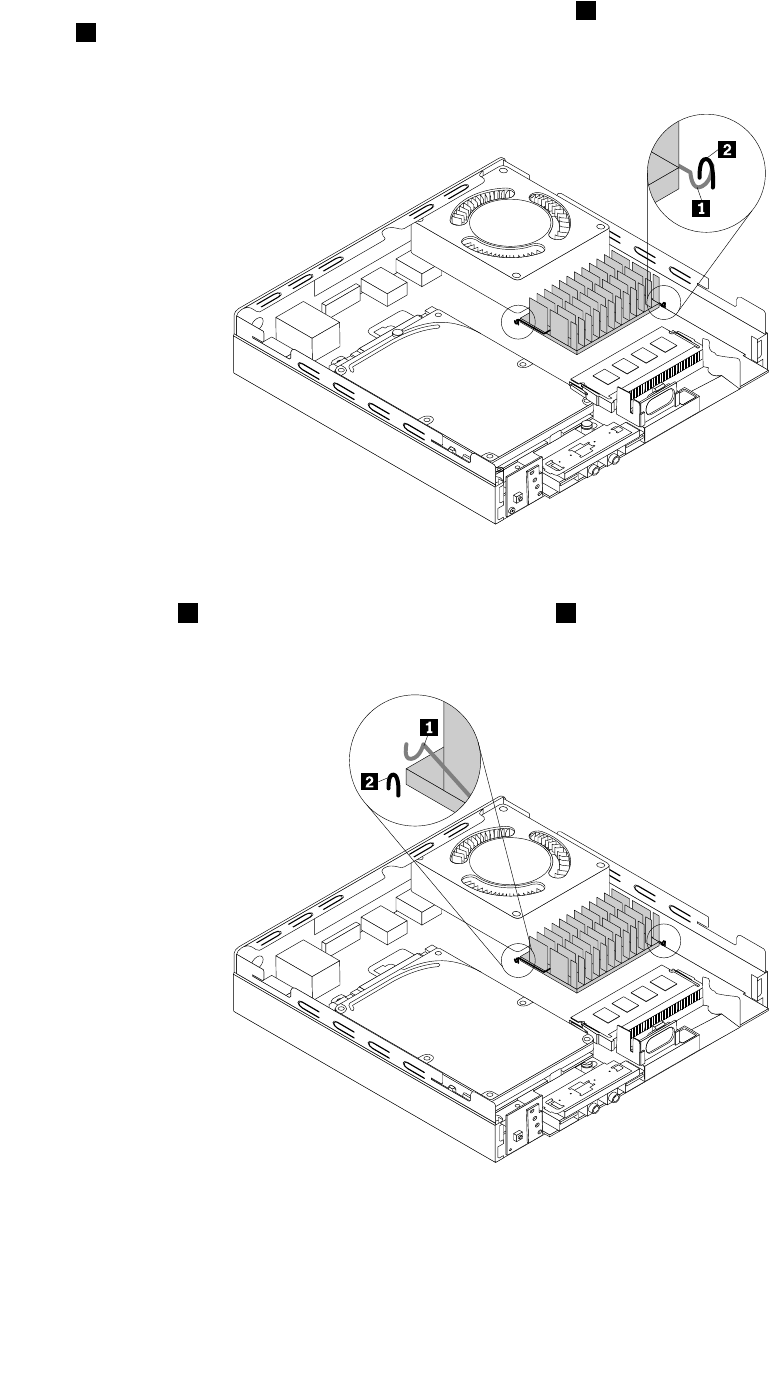
3.Withatool(suchasascrewdriver),carefullypressthehook1todisengagethehookfromthecircle
clip2onthesystemboard.Then,disengagetheotherhookontheheatsinkfromthecorresponding
circleclip.Removetheheatsinkfromthechassis.
Figure40.Removingtheheatsink
4.Insertthehook1onthenewheatsinkintothecircleclip2onthesystemboard.Then,usethetool
youusedinstep3toinserttheotherhookontheheatsinkintothecorrespondingcircleclip.
Figure41.Installingtheheatsink
Whattodonext:
•Toworkwithanotherpieceofhardware,gototheappropriatesection.
128ThinkCentreM53HardwareMaintenanceManual
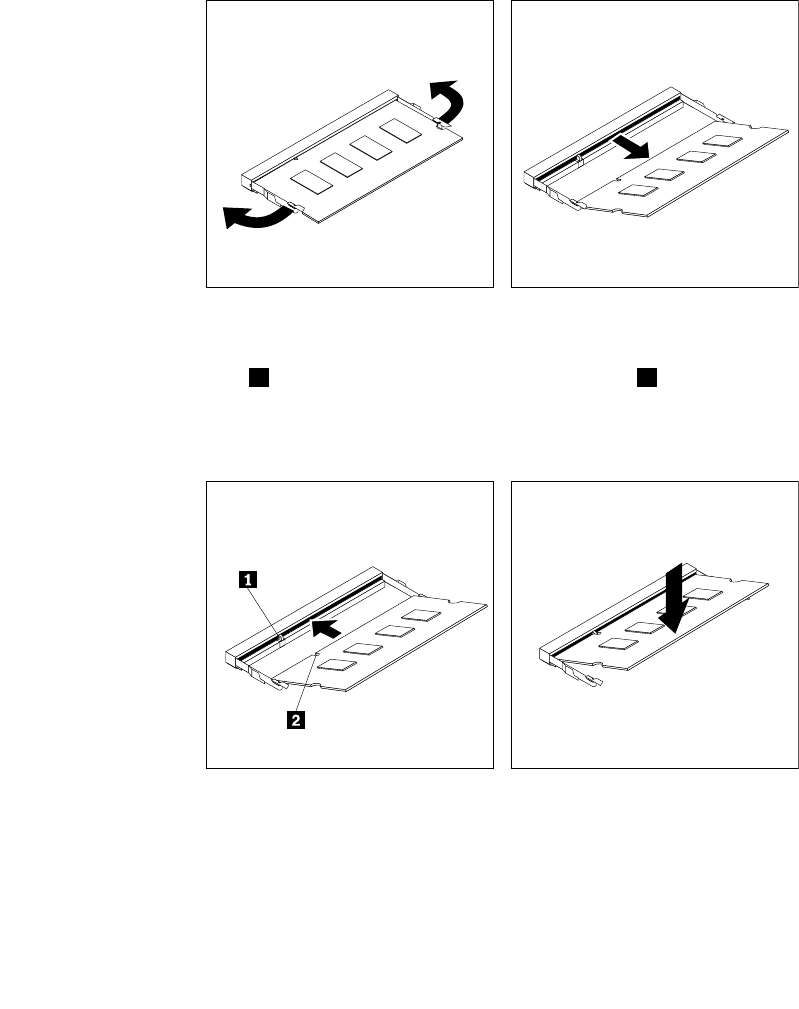
•Tocompletetheinstallationorreplacement,goto“Completingthepartsreplacement”onpage147.
Replacingthememorymodule
Attention:DonotopenyourcomputerorattemptanyrepairbeforereadingandunderstandingtheChapter
1“Readthisfirst:Importantsafetyinformation”onpage1.
Toreplacethememorymodule,dothefollowing:
1.Removeallmediafromthedrivesandturnoffallattacheddevicesandthecomputer.Then,disconnect
allpowercordsfromelectricaloutletsanddisconnectallcablesthatareconnectedtothecomputer.
2.Removethecomputercover.See“Removingthecomputercover”onpage123.
3.Locatethememoryslot.See“Locatingpartsonthesystemboard”onpage34.
4.Opentheretainingclipsandgentlypullthememorymoduleoutofthememoryslot.
Figure42.Removingthememorymodule
5.Insertthenotchedend2ofthenewmemorymoduleintotheslot1.Pressthememorymodule
firmlyandpivotthememorymoduleuntilitsnapsintoplace.Makesurethatthememorymoduleis
securedintheslotanddoesnotmoveeasily.
Figure43.Installingthememorymodule
Whattodonext:
•Toworkwithanotherpieceofhardware,gototheappropriatesection.
•Tocompletetheinstallationorreplacement,goto“Completingthepartsreplacement”onpage147.
Chapter11.Installingorreplacinghardware129
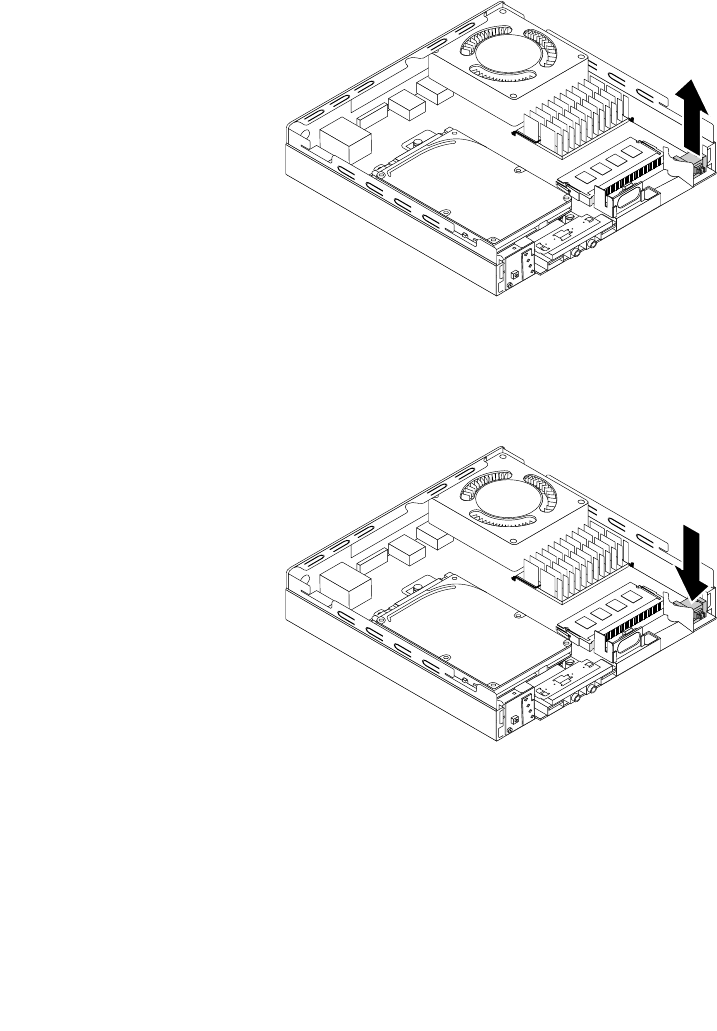
Installingorreplacingthecoverpresenceswitch
Attention:DonotopenyourcomputerorattemptanyrepairbeforereadingandunderstandingtheChapter
1“Readthisfirst:Importantsafetyinformation”onpage1.
Note:Thecoverpresenceswitchisonlyavailableinsomemodels.
Toinstallorreplacethecoverpresenceswitch,dothefollowing:
1.Removeallmediafromthedrivesandturnoffallattacheddevicesandthecomputer.Then,disconnect
allpowercordsfromelectricaloutletsanddisconnectallcablesthatareconnectedtothecomputer.
2.Removethecomputercover.See“Removingthecomputercover”onpage123.
3.Ifyouarereplacingthecoverpresenceswitch,disconnectthecover-presence-switchcablefromthe
systemboard.Then,liftthecoverpresenceswitchoutoftheholder.
Figure44.Removingthecoverpresenceswitch
4.Insertthenewcoverpresenceswitchintoplaceasshown.
Figure45.Installingthecoverpresenceswitch
5.Connectthecableofthenewcoverpresenceswitchtothecover-presence-switchconnectoronthe
systemboard.See“Locatingpartsonthesystemboard”onpage34.
Whattodonext:
•Toworkwithanotherpieceofhardware,gototheappropriatesection.
130ThinkCentreM53HardwareMaintenanceManual
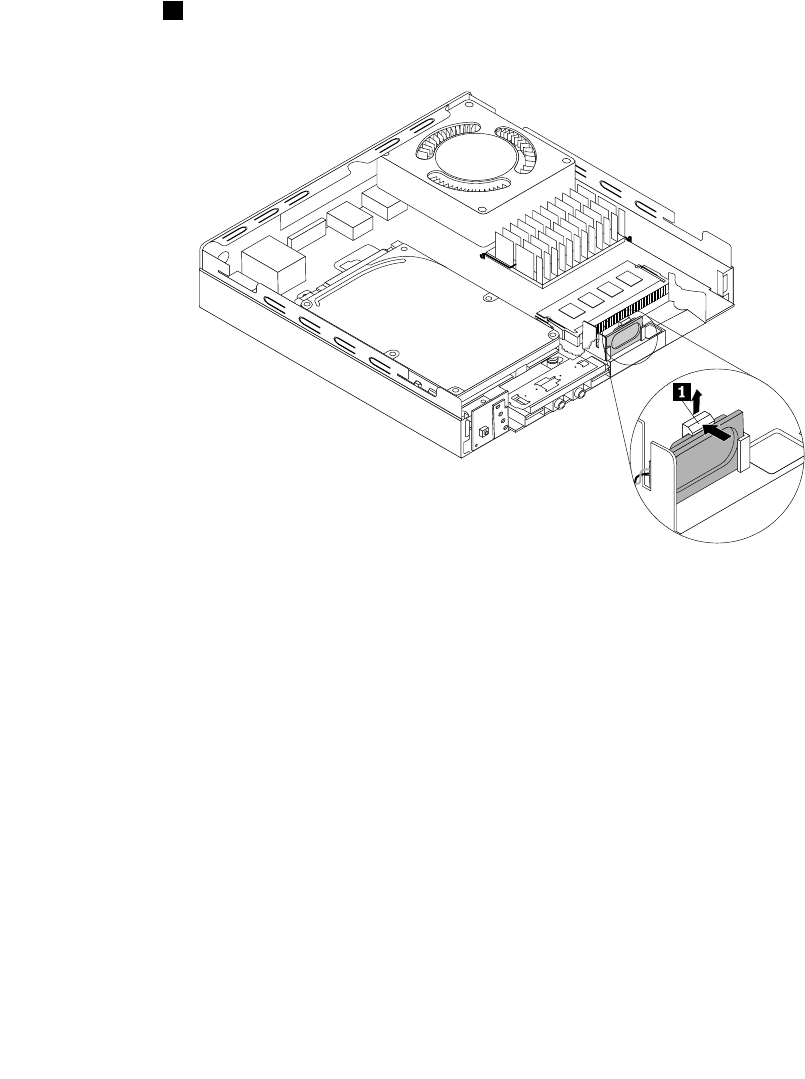
•Tocompletetheinstallationorreplacement,goto“Completingthepartsreplacement”onpage147.
Replacingtheinternalspeaker
Attention:DonotopenyourcomputerorattemptanyrepairbeforereadingandunderstandingtheChapter
1“Readthisfirst:Importantsafetyinformation”onpage1.
Toreplacetheinternalspeaker,dothefollowing:
1.Removeallmediafromthedrivesandturnoffallattacheddevicesandthecomputer.Then,disconnect
allpowercordsfromelectricaloutletsanddisconnectallcablesthatareconnectedtothecomputer.
2.Removethecomputercover.See“Removingthecomputercover”onpage123.
3.Disconnecttheinternalspeakercablefromthesystemboard.
4.Pressthetab1thatsecurestheinternalspeakerasshown,andthenlifttheinternalspeakeroutof
theinternalspeakerholder.
Figure46.Removingtheinternalspeaker
Chapter11.Installingorreplacinghardware131

5.Insertthenewinternalspeakerintotheinternalspeakerholderuntilthenewinternalspeakersnapsinto
positionandissecuredbythetab1.
Figure47.Installingtheinternalspeaker
6.Securethecableofthenewinternalspeakerintheretainingcliponthesideoftheinternalspeaker
holderasshown.
Figure48.Securingtheinternalspeakercable
7.Connectthecableofthenewinternalspeakertotheinternalspeakerconnectoronthesystemboard.
See“Locatingpartsonthesystemboard”onpage34.
132ThinkCentreM53HardwareMaintenanceManual
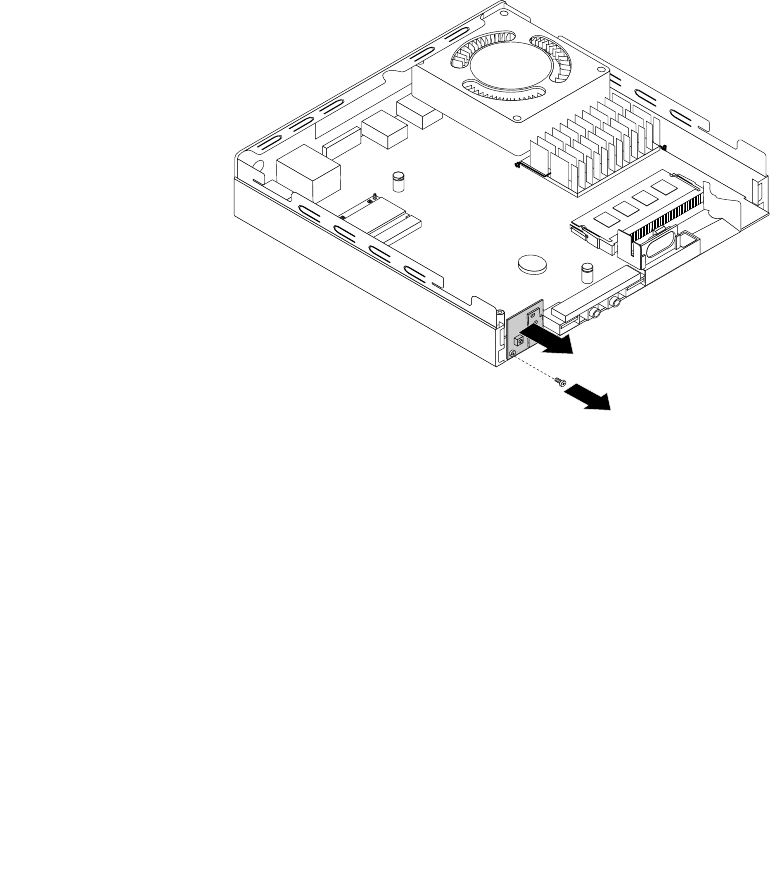
Whattodonext:
•Toworkwithanotherpieceofhardware,gototheappropriatesection.
•Tocompletetheinstallationorreplacement,goto“Completingthepartsreplacement”onpage147.
Replacingthepowerbuttonboard
Attention:DonotopenyourcomputerorattemptanyrepairbeforereadingandunderstandingtheChapter
1“Readthisfirst:Importantsafetyinformation”onpage1.
Toreplacethepowerbuttonboard,dothefollowing:
1.Removeallmediafromthedrivesandturnoffallattacheddevicesandthecomputer.Then,disconnect
allpowercordsfromelectricaloutletsanddisconnectallcablesthatareconnectedtothecomputer.
2.Removethecomputercover.See“Removingthecomputercover”onpage123.
3.Removetheharddiskdriveassembly.See“Replacingtheharddiskdriveassembly”onpage134.
4.Disconnectthepowerbuttonboardcablefromthecorrespondingconnectoronthesystemboard.
5.Removethescrewthatsecuresthepowerbuttonboardtothecomputer,andthenpullthepower
buttonboardtoremoveitfromthecomputer.
Figure49.Removingthepowerbuttonboard
Chapter11.Installingorreplacinghardware133
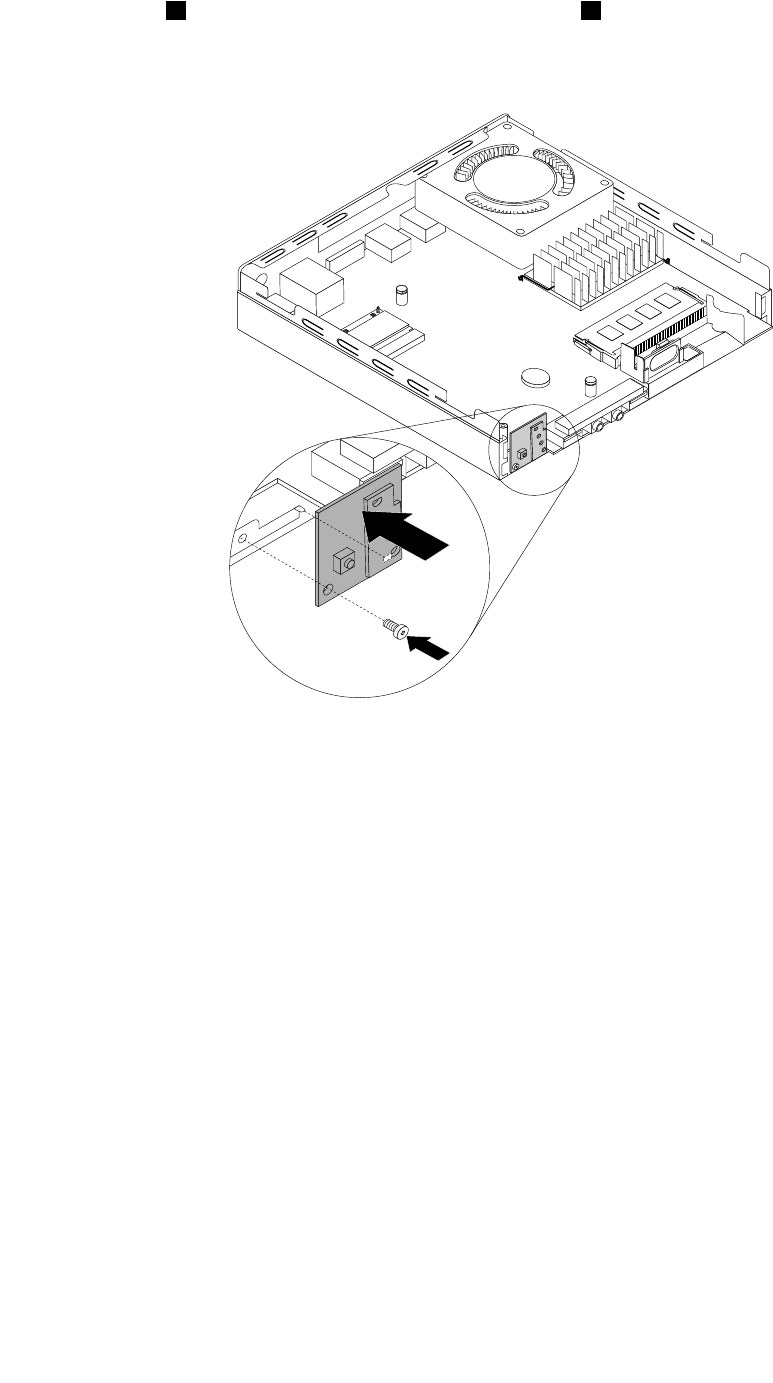
6.Alignthehole1inthenewpowerbuttonboardwiththetab2onthecomputerandpositionthenew
powerbuttonboardinthecomputer.Then,installthescrewtosecurethenewpowerbuttonboard
onthechassis.
Figure50.Installingthepowerbuttonboard
7.Connectthepowerbuttonboardcabletothepowerbuttonboardcableconnectoronthesystemboard.
See“Locatingpartsonthesystemboard”onpage34.
8.Reinstalltheharddiskdriveassembly.See“Replacingtheharddiskdriveassembly”onpage134.
Whattodonext:
•Toworkwithanotherpieceofhardware,gototheappropriatesection.
•Tocompletetheinstallationorreplacement,goto“Completingthepartsreplacement”onpage147.
Replacingtheharddiskdriveassembly
Attention:DonotopenyourcomputerorattemptanyrepairbeforereadingandunderstandingtheChapter
1“Readthisfirst:Importantsafetyinformation”onpage1.
Notes:
•Thehybriddriveassemblyandsolid-statedriveassemblyareonlyavailableonsomemodels.
•Toreplacethehybriddriveassemblyorsolid-statedriveassembly,followthestepsofreplacingthe
harddiskdriveassembly.
Toreplacetheharddiskdriveassembly,dothefollowing:
1.Removeallmediafromthedrivesandturnoffallattacheddevicesandthecomputer.Then,disconnect
allpowercordsfromelectricaloutletsanddisconnectallcablesthatareconnectedtothecomputer.
134ThinkCentreM53HardwareMaintenanceManual
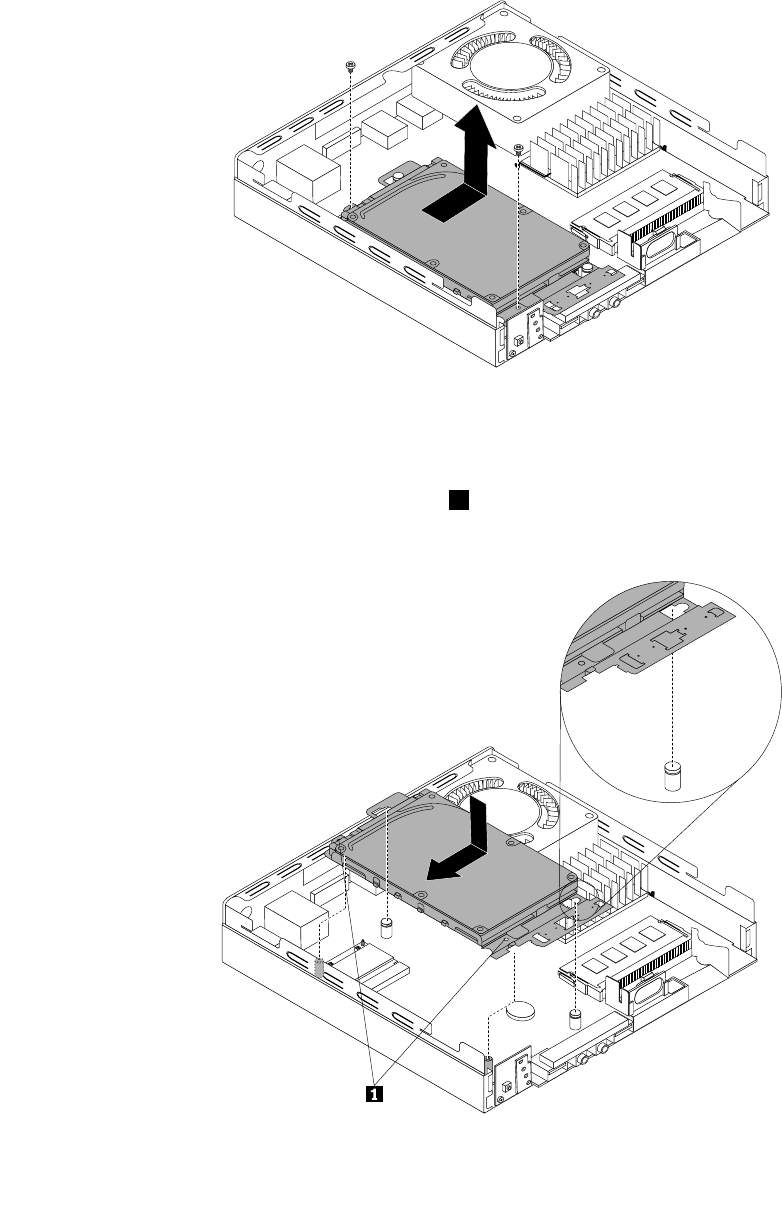
2.Removethecomputercover.See“Removingthecomputercover”onpage123.
3.Disconnectthesignalcableandthepowercablefromtheharddiskdriveassembly.
4.Removethetwoscrewsthatsecuretheharddiskdriveassembly.Slidetheharddiskdriveassemblyas
shown,andthenlifttheharddiskdriveassemblytoremoveitfromthecomputer.
Figure51.Removingtheharddiskdriveassembly
5.Positionthenewharddiskdriveassemblyonthesystemboardsothatthetwoholesinthehard
diskdriveassemblyarealignedwiththestandoffsonthesystemboard.Slidetheharddiskdrive
assemblyasshownuntilthetwoscrewholes1arealignedwiththecorrespondingmountingstuds
onthesystemboard.
Figure52.Installingtheharddiskdriveassembly
Chapter11.Installingorreplacinghardware135
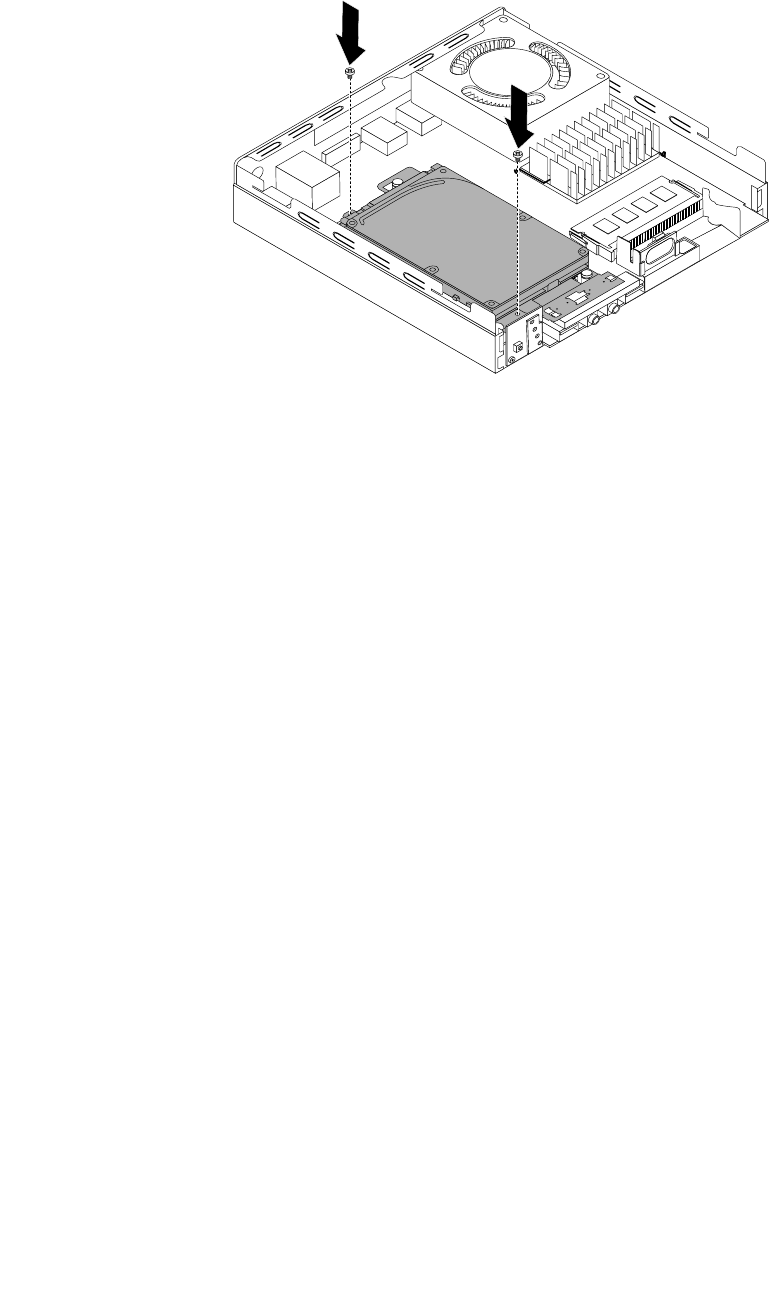
6.Installthetwoscrewstosecuretheharddiskdriveassembly.
Figure53.Installingthescrewstosecuretheharddiskdriveassembly
7.Connectthesignalcableandthepowercabletotheharddiskdriveassembly.
Whattodonext:
•Toworkwithanotherpieceofhardware,gototheappropriatesection.
•Tocompletetheinstallationorreplacement,goto“Completingthepartsreplacement”onpage147.
Replacingthecoin-cellbattery
Attention:DonotopenyourcomputerorattemptanyrepairbeforereadingandunderstandingtheChapter
1“Readthisfirst:Importantsafetyinformation”onpage1.
Yourcomputerhasaspecialtypeofmemorythatmaintainsthedate,time,andsettingsforbuilt-infeatures,
suchasparallel-connectorassignments(configuration).Acoin-cellbatterykeepsthisinformationactive
whenyouturnoffthecomputer.
Thecoin-cellbatterynormallyrequiresnochargingormaintenancethroughoutitslife;however,nocoin-cell
batterylastsforever.Ifthecoin-cellbatteryfails,thedate,time,andconfigurationinformation(including
passwords)arelost.Anerrormessageisdisplayedwhenyouturnonthecomputer.
Refertothe“Lithiumcoincellcoin-cellbatterynotice”intheSafety,Warranty,andSetupGuidefor
informationaboutreplacinganddisposingofthecoin-cellbattery.
Toreplacethecoin-cellbattery,dothefollowing:
1.Removeallmediafromthedrivesandturnoffallattacheddevicesandthecomputer.Then,disconnect
allpowercordsfromelectricaloutletsanddisconnectallcablesthatareconnectedtothecomputer.
2.Removethecomputercover.See“Removingthecomputercover”onpage123.
3.Removetheharddiskdriveassemblytogetaccesstothecoin-cellbattery.See“Replacingthehard
diskdriveassembly”onpage134.
136ThinkCentreM53HardwareMaintenanceManual
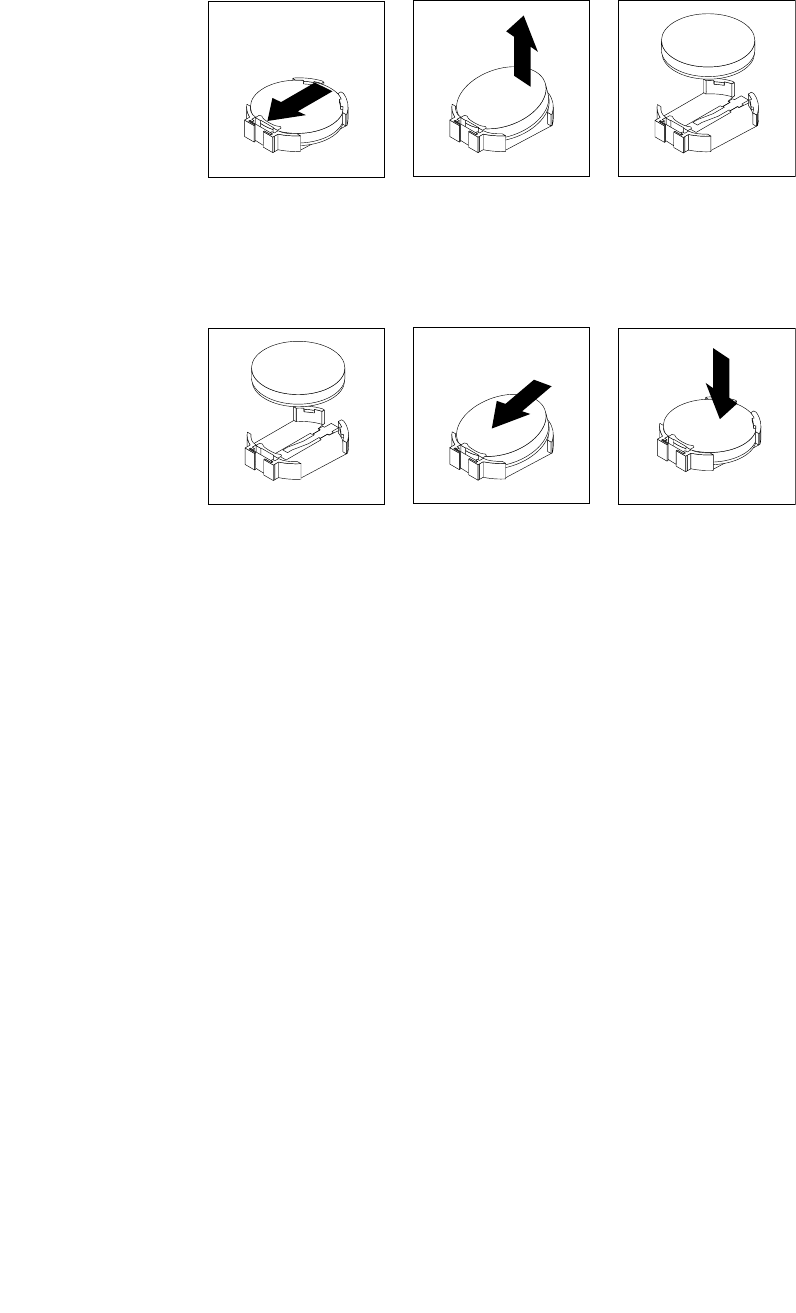
4.Removetheoldcoin-cellbattery.
Figure54.Removingtheoldcoin-cellbattery
5.Installanewcoin-cellbattery.
Figure55.Installinganewcoin-cellbattery
6.Reinstalltheharddiskdriveassembly.See“Replacingtheharddiskdriveassembly”onpage134.
7.Reinstallthecomputercoverandconnectthecables.See“Completingthepartsreplacement”on
page147.
Note:Whenthecomputeristurnedonforthefirsttimeafterreplacingthecoin-cellbattery,anerror
messagemightbedisplayed.Thisisnormalafterreplacingthecoin-cellbattery.
8.Turnonthecomputerandallattacheddevices.
9.UsetheSetupUtilityprogramtosetthedate,time,andanypasswords.See“UsingtheSetupUtility
program”onpage61.
InstallingorreplacingtheWi-Ficardmodule
Attention:DonotopenyourcomputerorattemptanyrepairbeforereadingandunderstandingtheChapter
1“Readthisfirst:Importantsafetyinformation”onpage1.
Note:TheWi-Ficardmoduleisonlyavailableinsomemodels.
ToinstallorreplacetheWi-Ficardmodule,dothefollowing:
1.Removeallmediafromthedrivesandturnoffallattacheddevicesandthecomputer.Then,disconnect
allpowercordsfromelectricaloutletsanddisconnectallcablesthatareconnectedtothecomputer.
2.Removethecomputercover.See“Removingthecomputercover”onpage123.
3.Removetheharddiskdriveassembly.See“Replacingtheharddiskdriveassembly”onpage134.
4.LocatetheMiniPCIExpresscardslot.See“Locatingpartsonthesystemboard”onpage34.
Chapter11.Installingorreplacinghardware137
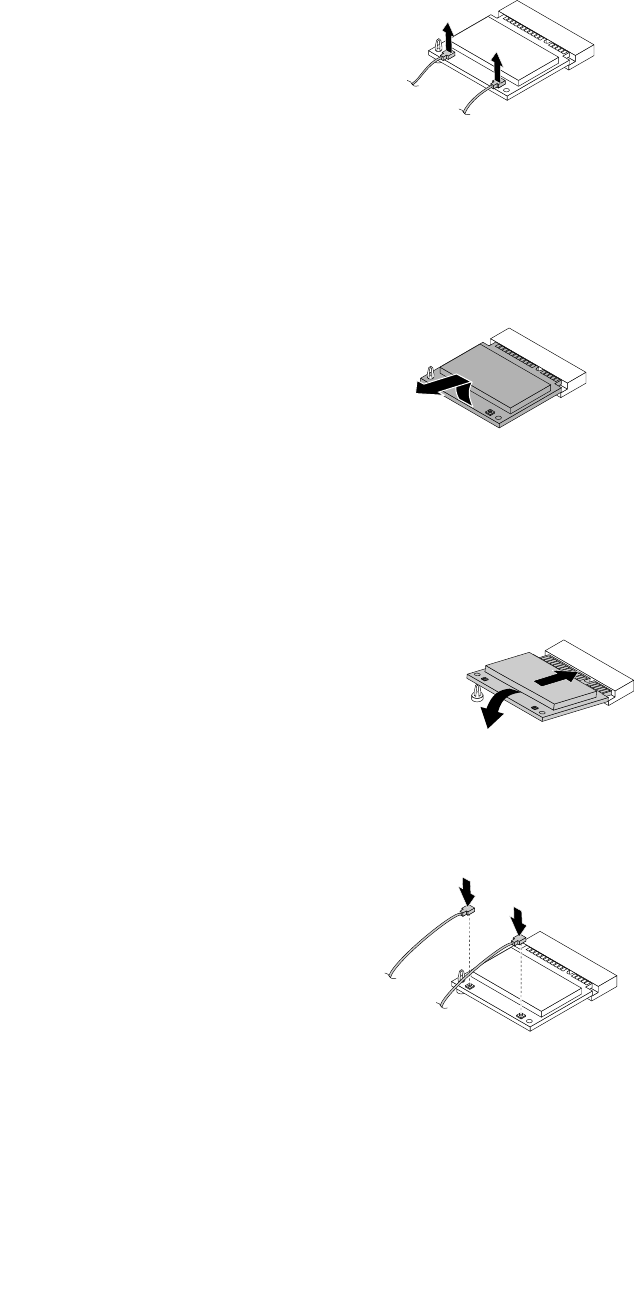
5.IfyouarereplacingtheWi-Ficardmodule,disconnecttheWi-FiantennacablesfromtheWi-Ficard
module.
Figure56.RemovingtheWi-Ficardmodulecables
6.CarefullypivottheWi-Ficardmoduleuptoreleaseitfromtheplasticpostthatsecuresit.Then,pullthe
Wi-FicardmoduletoremoveitfromtheMiniPCIExpresscardslot.
Note:DonotoverpivottheWi-Ficardmodule.
Figure57.RemovingtheWi-Ficardmodule
7.InsertthenewWi-FicardmoduleintotheMiniPCIExpresscardslot.Then,pivottheWi-Ficardmodule
downwarduntilitsnapsintopositionandissecuredbytheplasticpost.
Note:DonottouchthenotchededgeoftheWi-Ficardmodule.
Figure58.InstallingtheWi-Ficardmodule
8.ConnecttheWi-FiantennacablestotheWi-Ficardmodule.
Figure59.ConnectingtheWi-Fiantennacables
9.Reinstalltheharddiskdriveassembly.See“Replacingtheharddiskdriveassembly”onpage134.
Whattodonext:
•Toworkwithanotherpieceofhardware,gototheappropriatesection.
138ThinkCentreM53HardwareMaintenanceManual

•Tocompletetheinstallationorreplacement,goto“Completingthepartsreplacement”onpage147.
InstallingandremovingthefrontWi-Fiantenna
Attention:DonotopenyourcomputerorattemptanyrepairbeforereadingandunderstandingtheChapter
1“Readthisfirst:Importantsafetyinformation”onpage1.
Note:ThefrontWi-Fiantennaisonlyavailableonsomemodels.
ToinstallthefrontWi-Fiantenna,dothefollowing:
1.Removeallmediafromthedrivesandturnoffallattacheddevicesandthecomputer.Then,disconnect
allpowercordsfromelectricaloutletsanddisconnectallcablesthatareconnectedtothecomputer.
2.Removethecomputercover.See“Removingthecomputercover”onpage123.
3.Removetheharddiskdriveassembly.See“Replacingtheharddiskdriveassembly”onpage134.
4.PeeloffthepaperthatprotectsthestickeronthebottomofthefrontWi-Fiantenna.
Figure60.Peelingoffthepaperthatprotectsthesticker
5.AlignthetwosmallcolumnsonthebottomofthefrontWi-Fiantennawiththetwoholesintheharddisk
drivebracketasshown.Then,stickthefrontWi-Fiantennaontotheharddiskdrivebracket.
Figure61.StickingthefrontWi-Fiantenna
Chapter11.Installingorreplacinghardware139
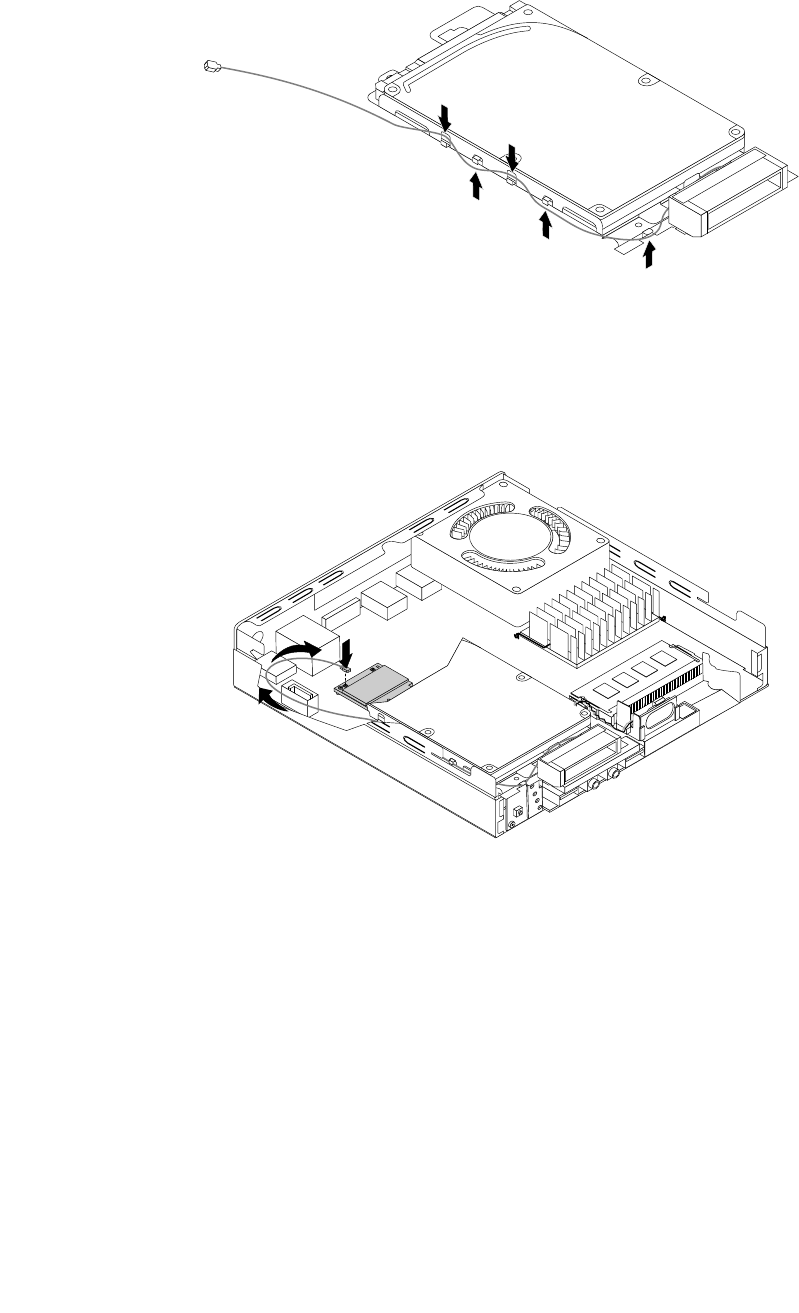
6.RoutethefrontWi-Fiantennacablethroughthefivehooksintheharddiskdrivebracketasshown.
Figure62.RoutingthefrontWi-Fiantennacable
7.Reinstalltheharddiskdriveassemblywithoutconnectingthesignalcableandpowercable.See
“Replacingtheharddiskdriveassembly”onpage134.
8.RoutethefrontWi-Fiantennacableasshown,andthenconnectittotheWi-Ficardmodule.
Figure63.InstallingthefrontWi-Fiantennacable
9.Reconnectthesignalcableandpowercabletotheharddiskdrive.
ToremovetherearWi-Fiantenna,dothefollowing:
1.Removeallmediafromthedrivesandturnoffallattacheddevicesandthecomputer.Then,disconnect
allpowercordsfromelectricaloutletsanddisconnectallcablesthatareconnectedtothecomputer.
2.Disconnectthesignalcableandpowercablefromtheharddiskdrive.
3.DisconnectthefrontWi-FiantennacablefromtheWi-Ficardmodule.
4.Removetheharddiskdriveassembly.See“Replacingtheharddiskdriveassembly”onpage134.
140ThinkCentreM53HardwareMaintenanceManual
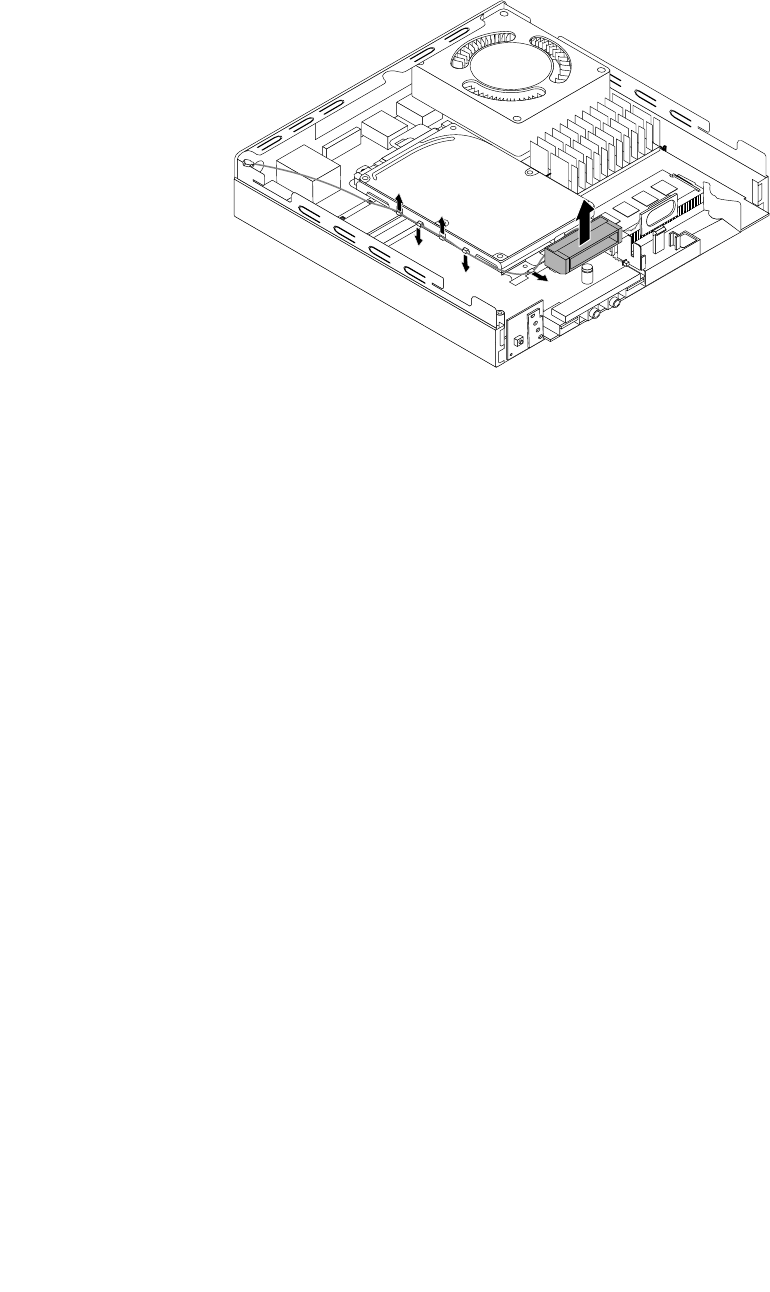
5.ReleasethefrontWi-Fiantennacablefromthehooksontheharddiskdrivebracket.Then,unstickthe
frontWi-Fiantennafromtheharddiskdrivebracket.
Figure64.RemovingthefrontWi-Fiantennacable
Whattodonext:
•Toworkwithanotherpieceofhardware,gototheappropriatesection.
•Tocompletetheinstallationorreplacement,goto“Completingthepartsreplacement”onpage147.
InstallingandremovingtherearWi-Fiantenna
Attention:DonotopenyourcomputerorattemptanyrepairbeforereadingandunderstandingtheChapter
1“Readthisfirst:Importantsafetyinformation”onpage1.
Note:TherearWi-Fiantennaisonlyavailableonsomemodels.
ToinstalltherearWi-Fiantenna,dothefollowing:
1.Removeallmediafromthedrivesandturnoffallattacheddevicesandthecomputer.Then,disconnect
allpowercordsfromelectricaloutletsanddisconnectallcablesthatareconnectedtothecomputer.
2.InstalltherearWi-FiantennatotherearWi-Fiantennacableconnectorattachedontherearofthe
computer.
Chapter11.Installingorreplacinghardware141
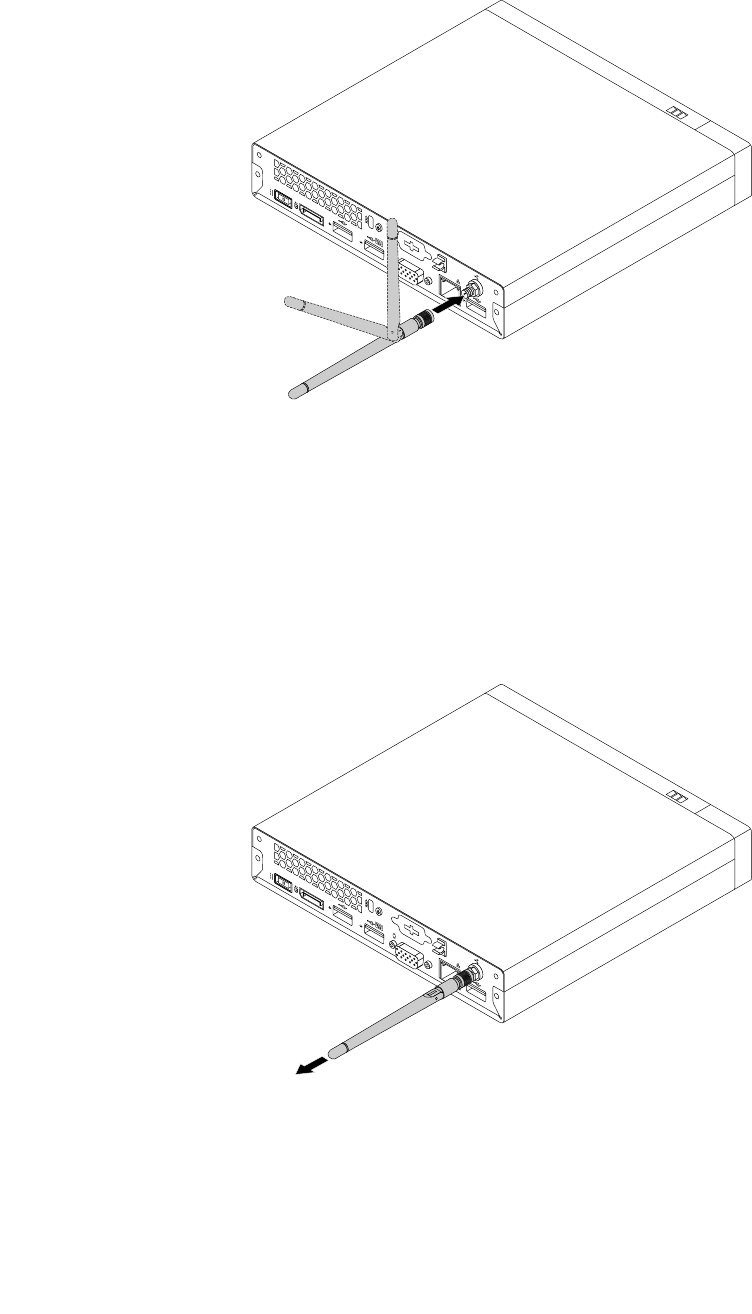
3.Adjusttheangleoftherearantennatolowertheriskofbreakingtheantennabyaccident.
Figure65.InstallingtherearWi-Fiantenna
ToremovetherearWi-Fiantenna,dothefollowing:
1.Removeallmediafromthedrivesandturnoffallattacheddevicesandthecomputer.Then,disconnect
allpowercordsfromelectricaloutletsanddisconnectallcablesthatareconnectedtothecomputer.
2.StraightentherearWi-Fiantennasothatitcanbemoreeasilytwisted.
3.HoldthethickerendoftherearWi-FiantennaandunscrewtheWi-Fiantennafromtherearofthe
computer.
Figure66.RemovingtherearWi-Fiantenna
Whattodonext:
•Toworkwithanotherpieceofhardware,gototheappropriatesection.
•Tocompletetheinstallationorreplacement,goto“Completingthepartsreplacement”onpage147.
142ThinkCentreM53HardwareMaintenanceManual
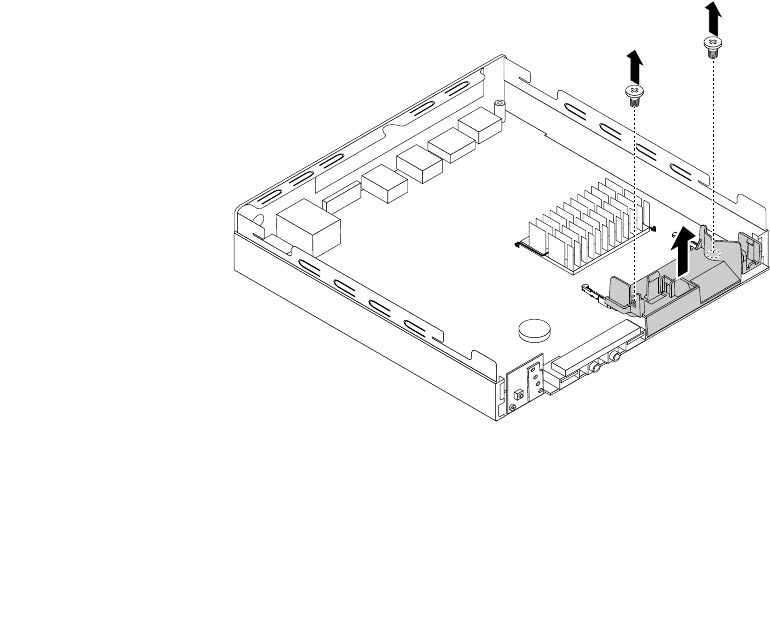
Replacingthesystemboard
Attention:DonotopenyourcomputerorattemptanyrepairbeforereadingandunderstandingtheChapter
1“Readthisfirst:Importantsafetyinformation”onpage1.
Note:EachcomputerhasauniqueVitalProductData(VPD)codestoredinthenonvolatilememoryonthe
systemboard.Afteryoureplacethesystemboard,theVPDmustbeupdated.ToupdatetheVPD,see
“UpdatingorrecoveringtheBIOS”onpage66.
Toreplacethesystemboard,dothefollowing:
1.Removeallmediafromthedrivesandturnoffallattacheddevicesandthecomputer.Then,disconnect
allpowercordsfromelectricaloutletsanddisconnectallcablesthatareconnectedtothecomputer.
2.Removethecomputercover.See“Removingthecomputercover”onpage123.
3.Removethemicroprocessorfan.See“Replacingthemicroprocessorfan”onpage125.
4.Removethememorymodule.See“Replacingthememorymodule”onpage129.
5.Ifthecoverpresenceswitchisavailable,removeit.See“Installingorreplacingthecoverpresence
switch”onpage130.
6.Removethepowerbuttonboard.See“Replacingthepowerbuttonboard”onpage133.
7.Removetheharddiskdriveassembly.See“Replacingtheharddiskdriveassembly”onpage134.
8.IftheWi-Ficardmoduleisavailable,removeit.See“InstallingorreplacingtheWi-Ficardmodule”on
page137.
9.IfthefrontWi-Fiantennaisavailable,removeit.See“InstallingandremovingthefrontWi-Fiantenna”
onpage139.
10.IftherearWi-Fiantennaisavailable,removeit.See“InstallingandremovingtherearWi-Fiantenna”on
page141.
11.Removetheinternalspeaker.See“Replacingtheinternalspeaker”onpage131.
12.Removethetwoscrewsthatsecuretheinternalspeakerholderasshown.Then,removetheinternal
speakerholderfromthechassis.
Figure67.Removingtheinternalspeakerholder
13.Recordthecableroutingandcableconnections,andthendisconnectallcablesfromthesystemboard.
Chapter11.Installingorreplacinghardware143
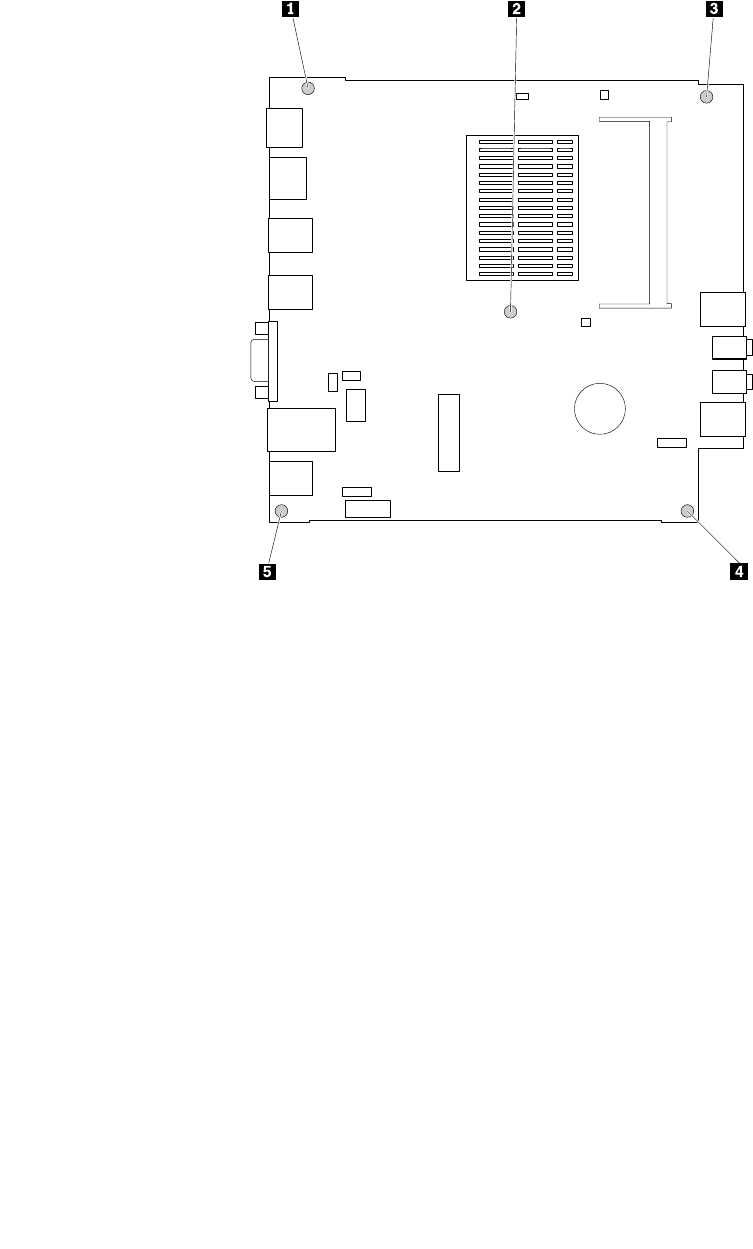
14.Removethefivescrewsthatsecurethesystemboard,andthencarefullymovethesystemboard
fromthechassis.
Note:Carefullyhandlethesystemboardbyitsedges.
Figure68.Removingthesystemboard
144ThinkCentreM53HardwareMaintenanceManual
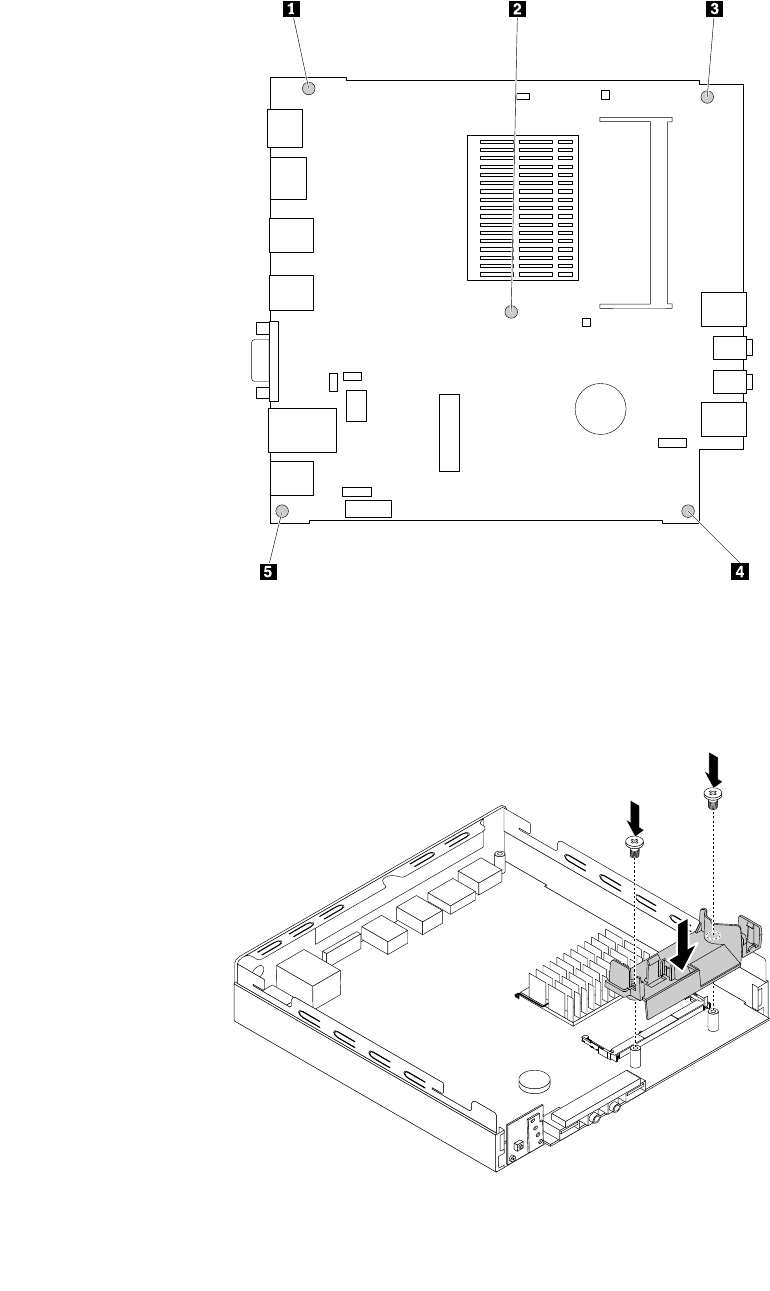
15.Installthenewsystemboardintoplacebyaligningthefivescrewholesinthenewsystemboardwiththe
correspondingmountingstudsonthechassis.Then,installthefivescrewstosecurethesystemboard.
Figure69.Installingthesystemboard
16.Alignthetwoscrewholesintheinternalspeakerholderwiththecorrespondingmountingstudsonthe
systemboard.Then,installthetwoscrewstosecuretheinternalspeakerholder.
Figure70.Installingtheinternalspeakerholder
Chapter11.Installingorreplacinghardware145
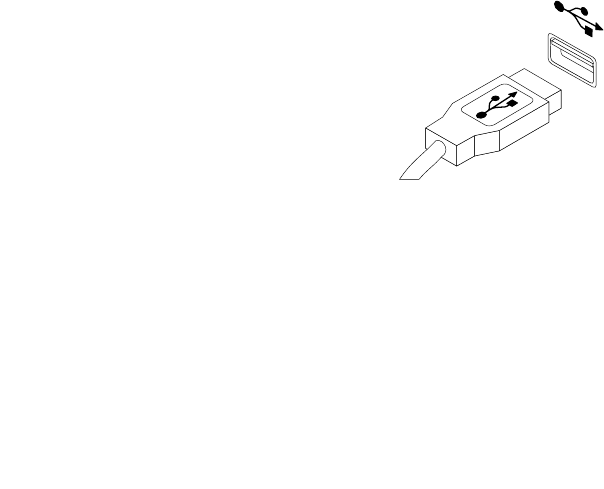
17.Reinstalltheinternalspeaker.See“Replacingtheinternalspeaker”onpage131.
18.IftherearWi-Fiantennaisavailable,installit.See“InstallingandremovingtherearWi-Fiantenna”on
page141.
19.IfthefrontWi-Fiantennaisavailable,installit.See“InstallingandremovingthefrontWi-Fiantenna”on
page139.
20.IftheWi-Ficardmoduleisavailable,installit.See“InstallingorreplacingtheWi-Ficardmodule”on
page137.
21.Reinstalltheharddiskdriveassembly.See“Replacingtheharddiskdriveassembly”onpage134.
22.Reinstallthepowerbuttonboard.See“Replacingthepowerbuttonboard”onpage133.
23.Ifthecoverpresenceswitchisavailable,installit.See“Installingorreplacingthecoverpresence
switch”onpage130.
24.Reinstallthememorymodule.See“Replacingthememorymodule”onpage129.
25.Reinstallthemicroprocessorfan.See“Replacingthemicroprocessorfan”onpage125.
26.Refertoyourrecordtoconnectcablestothenewsystemboard.Youalsocanreferto“Locating
partsonthesystemboard”onpage34tohelpyoulocatetheconnectorsonthesystemboardand
connectcables.
Whattodonext:
•Toworkwithanotherpieceofhardware,gototheappropriatesection.
•Tocompletetheinstallationorreplacement,goto“Completingthepartsreplacement”onpage147.
Installingorreplacingthekeyboardormouse
Attention:DonotopenyourcomputerorattemptanyrepairbeforereadingandunderstandingtheChapter
1“Readthisfirst:Importantsafetyinformation”onpage1.
Toinstallorreplacethekeyboardormouse,dothefollowing:
1.Ifyouarereplacingthekeyboardormouse,disconnecttheoldkeyboardcableormousecablefromthe
computer.
2.ConnectanewkeyboardormousetooneoftheUSBconnectorsonthecomputer.Dependingon
whereyouwanttoconnectthenewkeyboardormouse,see“Locatingconnectors,controls,and
indicatorsonthefrontofyourcomputer”onpage28or“Locatingconnectorsontherearofyour
computer”onpage29.
Figure71.ConnectingtheUSBkeyboardormouse
Whattodonext:
•Toworkwithanotherpieceofhardware,gototheappropriatesection.
•Tocompletetheinstallationorreplacement,goto“Completingthepartsreplacement”onpage147.
146ThinkCentreM53HardwareMaintenanceManual

Completingthepartsreplacement
Aftercompletingtheinstallationorreplacementforallparts,youneedtoreinstallthecomputercoverand
reconnectcables.Dependingonthepartsyouinstalledorreplaced,youmightneedtoconfirmtheupdated
informationintheSetupUtilityprogram.Referto“UsingtheSetupUtilityprogram”onpage61.
Toreinstallthecomputercoverandreconnectcablestoyourcomputer,dothefollowing:
1.Ensurethatallcomponentshavebeenreassembledcorrectlyandthatnotoolsorloosescrewsareleft
insideyourcomputer.See“Locatingcomponents”onpage30forthelocationsofvariouscomponents
inyourcomputer.
2.Beforereinstallingthecomputercover,ensurethatthecablesareroutedcorrectly.Keepcablesclearof
thehingesandsidesofthecomputerchassistoavoidinterferencewithreinstallingthecomputercover.
Chapter11.Installingorreplacinghardware147
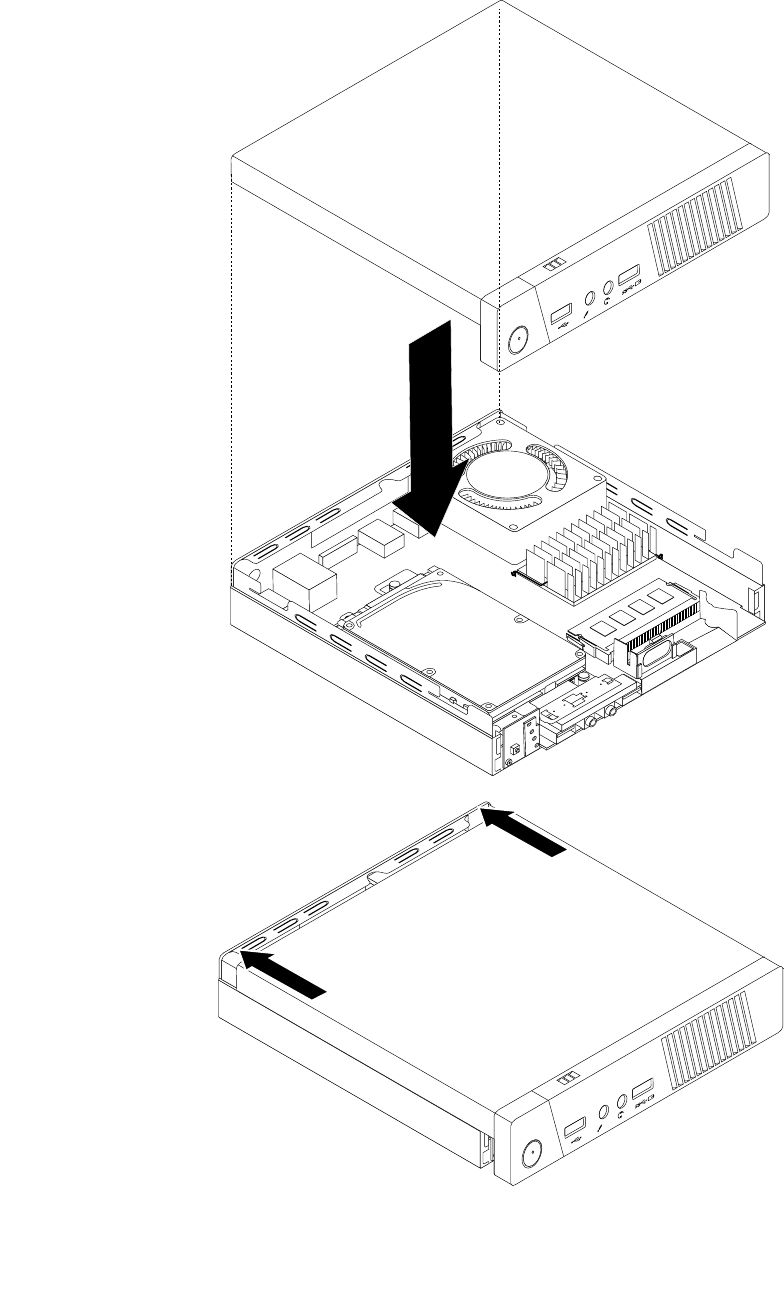
3.Positionthecomputercoveronthechassisandthenpushthecovertotherearofthecomputeruntil
itsnapsintoposition.
1
2
1
2
Figure72.Installingthecomputercover
148ThinkCentreM53HardwareMaintenanceManual
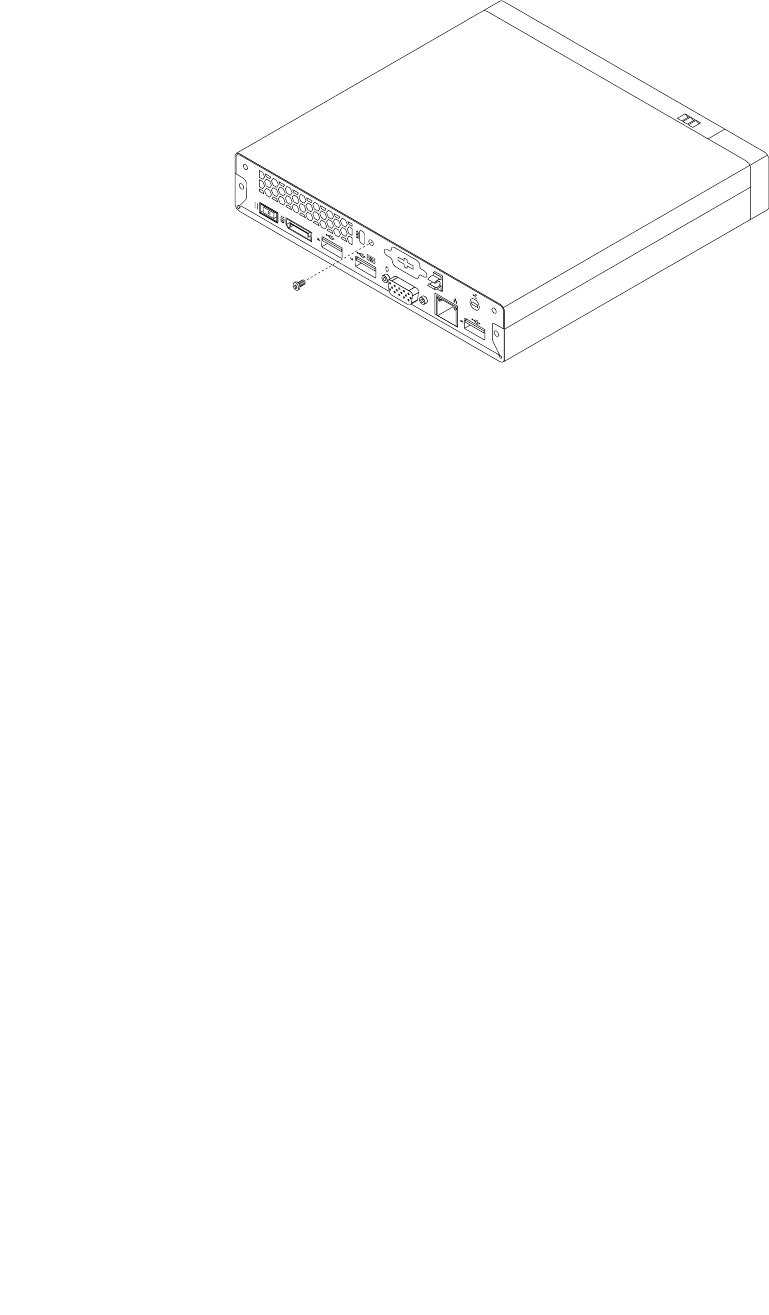
4.Installthescrewtosecurethecomputercover.
Figure73.Installingthecomputercoverscrew
5.IfthereisaKensington-stylecablelockavailable,lockthecomputer.See“AttachingaKensington-style
cablelock”onpage57.
6.Reconnecttheexternalcablesandpowercordstothecomputer.See“Locatingconnectorsonthe
rearofyourcomputer”onpage29.
7.Toupdateyourconfiguration,referto“UsingtheSetupUtilityprogram”onpage61.
Note:Inmostareasoftheworld,LenovorequiresthereturnofthedefectiveCustomerReplaceableUnit
(CRU).InformationaboutthiswillcomewiththeCRUorwillcomeafewdaysaftertheCRUarrives.
Obtainingdevicedrivers
Youcanobtaindevicedriversthatarenotpreinstalledinyouroperatingsystemat
http://www.lenovo.com/support.Installationinstructionsareprovidedinreadmefileswiththedevice-driver
files.
LenovoThinClientManager
TheLenovoThinClientManager(LTM)programisamanagementtoolthatenablesyoutomanageallthe
thinclientdevices.TodownloadLTMandfindmoreinformationaboutLenovoThinClientdevices,goto
http://www.lenovo.com/support/thinclientandfollowtheinstructionsonthescreen.
Chapter11.Installingorreplacinghardware149

150ThinkCentreM53HardwareMaintenanceManual

Chapter12.Gettinginformation,help,andservice
Thischaptercontainsinformationabouthelp,service,andtechnicalassistanceforproductsmanufactured
byLenovo.
Informationresources
Youcanusetheinformationinthissectiontoaccessusefulresourcesrelatingtoyourcomputingneeds.
LenovoThinkVantageTools
TheLenovoThinkVantageToolsprogramprovideseasyaccesstovarioustoolstohelpyouworkmore
easilyandsecurely.
ToaccesstheLenovoThinkVantageToolsprogram,clickStart➙AllPrograms➙LenovoThinkVantage
Tools.
HelpandSupport
TheWindowsHelpandSupportinformationsystemprovidesyouwithvarioushelpandsupportinformation
fromLenovoandMicrosoft,suchasupdatingdrivers,accessingprograms,andaccessingusermanuals.
ToaccesstheWindowsHelpandSupportinformationsystem,dooneofthefollowing:
•OntheWindows7operatingsystem,clickStart➙HelpandSupport.
•OntheWindows8.1operatingsystem,movethepointertothetop-rightorbottom-rightcornerofthe
screentodisplaythecharms.ThenclickSettings➙Help.
SafetyandWarranty
TheSafety,Warranty,andSetupGuidethatisprovidedwithyourcomputercontainsinformationonsafety,
setup,warranty,andnotices.ThesafetyinformationintheSafety,Warranty,andSetupGuideprovides
informationyouneedtoknowbeforesettingupandusingthisproduct.Readandunderstandallsafety
informationprovidedintheSafety,Warranty,andSetupGuidebeforeusingthisproduct.
TheinformationinChapter1“Readthisfirst:Importantsafetyinformation”onpage1ofthisUserGuide
providesadditionalsafetyinformationthatappliestotopicsandtasksdescribedinthispublication.Readand
understandallsafetyinformationprovidedinthatsectionbeforedisassemblingorupgradingthisproduct.
LenovoWebsite
TheLenovoWebsite(http://www.lenovo.com)providesup-to-dateinformationandservicestohelpyoubuy,
upgrade,andmaintainyourcomputer.Youcanalsodothefollowing:
•Shopfordesktopandnotebookcomputers,monitors,projectors,upgradesandaccessoriesforyour
computer,andspecialoffers.
•Purchaseadditionalservices,suchassupportforhardware,operatingsystems,applicationprograms,
networksetupandconfiguration,andcustominstallations.
•Purchaseupgradesandextendedhardwarerepairservices.
•Downloadthelatestdevicedriversandsoftwareupdatesforyourcomputermodel.
•Accesstheonlinemanualsforyourproducts.
•AccesstheLenovoLimitedWarranty.
©CopyrightLenovo2014151

•Accesstroubleshootingandsupportinformationforyourcomputermodelandothersupportedproducts.
•Findtheserviceandsupportphonenumbersforyourcountryorregion.
•FindaServiceProviderlocatednearyou.
LenovoSupportWebsite
TechnicalsupportinformationisavailableontheLenovoSupportWebsiteat:
http://www.lenovo.com/support
ThisWebsiteisupdatedwiththelatestsupportinformationsuchasthefollowing:
•Driversandsoftware
•Diagnosticsolutions
•Productandservicewarranty
•Productandpartsdetails
•Userguidesandmanuals
•Knowledgebaseandfrequentlyaskedquestions
Helpandservice
Thissectioncontainsinformationaboutobtaininghelpandservice.
Usingthedocumentationanddiagnosticprogram
Ifyouexperienceaproblemwithyourcomputer,seeChapter8“Troubleshootinganddiagnostics”on
page75.Forinformationonadditionalresourcestohelpyoutroubleshootyourcomputerproblem,see
“Informationresources”onpage151.
Ifyoususpectasoftwareproblem,seethedocumentationthatcomeswiththeoperatingsystemorsoftware
program,includingreadmefilesandonlinehelp.
Mostcomputerscomewithadiagnosticprogramthathelpyouidentifyhardwareproblems.
YoucanalsogetthelatesttechnicalinformationanddownloaddevicedriversandupdatesfromLenovo
SupportWebsiteat:
http://www.lenovo.com/support
Callingforservice
Duringthewarrantyperiod,youcangethelpandinformationbytelephonethroughtheCustomerSupport
Center.
Thefollowingservicesareavailableduringthewarrantyperiod:
•Problemdetermination-Trainedservicepersonnelareavailabletoassistyouwithdetermininga
hardwareproblemanddecidingwhatactionisnecessarytofixtheproblem.
•Hardwarerepair-Iftheproblemiscausedbyhardwareunderwarranty,trainedservicepersonnelare
availabletoprovidetheapplicablelevelofservice.
•EngineeringChangemanagement-Theremightbechangesthatarerequiredafteraproducthas
beensold.LenovooryourresellerwillmakeselectedEngineeringChanges(ECs)thatapplytoyour
hardwareavailable.
Theseitemsarenotcoveredbythewarranty:
152ThinkCentreM53HardwareMaintenanceManual

•ReplacementoruseofpartsnotmanufacturedfororbyLenovoornon-warrantedLenovoparts
•Identificationofsoftwareproblemsources
•ConfigurationofBIOSaspartofaninstallationorupgrade
•Changes,modifications,orupgradestodevicedrivers
•Installationandmaintenanceofnetworkoperatingsystems(NOS)
•Installationandmaintenanceofapplicationprograms
RefertotheSafety,Warranty,andSetupGuidethatcomeswithyourcomputerforinformationaboutyour
warrantytypeandduration.Youmustretainyourproofofpurchasetoobtainwarrantyservice.
ForalistofLenovoSupportphonenumbers,gotohttp://www.lenovo.com/support/phoneorrefertothe
Safety,Warranty,andSetupGuidethatcomeswithyourcomputer.
Note:Phonenumbersaresubjecttochangewithoutnotice.Ifthenumberforyourcountryorregionisnot
provided,contactyourLenovoresellerorLenovomarketingrepresentative.
Ifpossible,beatyourcomputerwhenyoucall.Havethefollowinginformationavailable:
•Machinetypeandmodel
•Serialnumbersofyourhardwareproducts
•Descriptionoftheproblem
•Exactwordingofanyerrormessages
•Hardwareandsoftwareconfigurationinformation
Usingotherservices
Youmighttravelwithyourcomputerorrelocateittoacountryorregionwherethemachinetypeforyour
desktopornotebookcomputerissold.Insuchasituation,yourcomputermightbeeligibleforInternational
WarrantyService,whichautomaticallyentitlesyoutoobtainwarrantyservicethroughoutthewarrantyperiod.
Servicewillbeperformedbyserviceprovidersauthorizedtoperformwarrantyservice.
Servicemethodsandproceduresvarybycountry,andsomeservicesmightnotbeavailableinallcountries.
InternationalWarrantyServiceisdeliveredthroughthemethodofservice(suchasdepot,carry-in,or
on-siteservice)thatisprovidedintheservicingcountry.Servicecentersincertaincountriesmightnotbe
abletoserviceallmodelsofaparticularmachinetype.Insomecountries,feesandrestrictionsmight
applyatthetimeofservice.
TodeterminewhetheryourcomputeriseligibleforInternationalWarrantyServiceandtoviewalistofthe
countriesorregionswhereserviceisavailable,gotohttp://www.lenovo.com/support.ThenclickProduct&
ServiceWarranty,andfollowtheinstructionsonthescreen.
FortechnicalassistancewiththeinstallationoforquestionsrelatedtoServicePacksforyourpreinstalled
MicrosoftWindowsproduct,gototheMicrosoftProductSupportWebsiteathttp://support.microsoft.com.
YoualsocancontacttheLenovoCustomerSupportCenterforhelp.Somefeesmightapply.
Purchasingadditionalservices
Duringandafterthewarrantyperiod,youcanpurchaseadditionalservices.Examplesoftheseadditional
servicesinclude:
•Supportforhardware,operatingsystems,andapplicationprograms
•Networksetupandconfigurationservices
•Upgradedorextendedhardwarerepairservices
•Custominstallationservices
Chapter12.Gettinginformation,help,andservice153


AppendixA.Regulatoryinformation
Exportclassificationnotice
ThisproductissubjecttotheUnitedStatesExportAdministrationRegulations(EAR)andhasanExport
ClassificationControlNumber(ECCN)of4A994.b.Itcanbere-exportedexcepttoanyoftheembargoed
countriesintheEARE1countrylist.
Electronicemissionsnotices
ThefollowinginformationreferstoLenovopersonalcomputermachinetypes10DB,10DC,10DD,10DE,
10DV,10DW,10DX,10DY,10EC,and10ED.
FederalCommunicationsCommissionDeclarationofConformity
ThisequipmenthasbeentestedandfoundtocomplywiththelimitsforaClassBdigitaldevice,pursuant
toPart15oftheFCCRules.Theselimitsaredesignedtoprovidereasonableprotectionagainstharmful
interferenceinaresidentialinstallation.Thisequipmentgenerates,uses,andcanradiateradiofrequency
energyand,ifnotinstalledandusedinaccordancewiththeinstructions,maycauseharmfulinterference
toradiocommunications.However,thereisnoguaranteethatinterferencewillnotoccurinaparticular
installation.Ifthisequipmentdoescauseharmfulinterferencetoradioortelevisionreception,whichcanbe
determinedbyturningtheequipmentoffandon,theuserisencouragedtotrytocorrecttheinterferenceby
oneormoreofthefollowingmeasures:
•Reorientorrelocatethereceivingantenna.
•Increasetheseparationbetweentheequipmentandreceiver.
•Connecttheequipmentintoanoutletonacircuitdifferentfromthattowhichthereceiverisconnected.
•Consultanauthorizeddealerorservicerepresentativeforhelp.
Lenovoisnotresponsibleforanyradioortelevisioninterferencecausedbyusingotherthanspecifiedor
recommendedcablesandconnectorsorbyunauthorizedchangesormodificationstothisequipment.
Unauthorizedchangesormodificationscouldvoidtheuser'sauthoritytooperatetheequipment.
ThisdevicecomplieswithPart15oftheFCCRules.Operationissubjecttothefollowingtwoconditions:(1)
thisdevicemaynotcauseharmfulinterference,and(2)thisdevicemustacceptanyinterferencereceived,
includinginterferencethatmaycauseundesiredoperation.
ResponsibleParty:
Lenovo(UnitedStates)Incorporated
1009ThinkPlace-BuildingOne
Morrisville,NC27560
PhoneNumber:919-294-5900
IndustryCanadaClassBemissioncompliancestatement
CANICES-3(B)/NMB-3(B)
EuropeanUnion-CompliancetotheElectromagneticCompatibilityDirective
©CopyrightLenovo2014155

ThisproductisinconformitywiththeprotectionrequirementsofEUCouncilDirective2004/108/EConthe
approximationofthelawsoftheMemberStatesrelatingtoelectromagneticcompatibility.Lenovocannot
acceptresponsibilityforanyfailuretosatisfytheprotectionrequirementsresultingfromanon-recommended
modificationoftheproduct,includingtheinstallationofoptioncardsfromothermanufacturers.
ThisproducthasbeentestedandfoundtocomplywiththelimitsforClassBInformationTechnology
EquipmentaccordingtoEuropeanStandardEN55022.ThelimitsforClassBequipmentwerederived
fortypicalresidentialenvironmentstoprovidereasonableprotectionagainstinterferencewithlicensed
communicationdevices.
Lenovo,Einsteinova21,85101Bratislava,Slovakia
GermanClassBcompliancestatement
DeutschsprachigerEUHinweis:
HinweisfürGerätederKlasseBEU-RichtliniezurElektromagnetischenVerträglichkeit
DiesesProduktentsprichtdenSchutzanforderungenderEU-Richtlinie2004/108/EG(früher89/336/EWG)zur
AngleichungderRechtsvorschriftenüberdieelektromagnetischeVerträglichkeitindenEU-Mitgliedsstaaten
undhältdieGrenzwertederEN55022KlasseBein.
Umdiesessicherzustellen,sinddieGerätewieindenHandbüchernbeschriebenzuinstallierenundzu
betreiben.DesWeiterendürfenauchnurvonderLenovoempfohleneKabelangeschlossenwerden.
LenovoübernimmtkeineVerantwortungfürdieEinhaltungderSchutzanforderungen,wenndasProdukt
ohneZustimmungderLenovoverändertbzw.wennErweiterungskomponentenvonFremdherstellernohne
EmpfehlungderLenovogesteckt/eingebautwerden.
Deutschland:
EinhaltungdesGesetzesüberdieelektromagnetischeVerträglichkeitvonBetriebsmitteln
DiesesProduktentsprichtdem„GesetzüberdieelektromagnetischeVerträglichkeitvonBetriebsmitteln“
EMVG(früher„GesetzüberdieelektromagnetischeVerträglichkeitvonGeräten“).DiesistdieUmsetzungder
EU-Richtlinie2004/108/EG(früher89/336/EWG)inderBundesrepublikDeutschland.
ZulassungsbescheinigunglautdemDeutschenGesetzüberdieelektromagnetischeVerträglichkeit
vonBetriebsmitteln,EMVGvom20.Juli2007(früherGesetzüberdieelektromagnetische
VerträglichkeitvonGeräten),bzw.derEMVEGRichtlinie2004/108/EC(früher89/336/EWG),für
GerätederKlasseB.
DiesesGerätistberechtigt,inÜbereinstimmungmitdemDeutschenEMVGdasEG-Konformitätszeichen
-CE-zuführen.VerantwortlichfürdieKonformitätserklärungnachParagraf5desEMVGistdieLenovo
(Deutschland)GmbH,Gropiusplatz10,D-70563Stuttgart.
InformationeninHinsichtEMVGParagraf4Abs.(1)4:
DasGeräterfülltdieSchutzanforderungennachEN55024undEN55022KlasseB.
KoreaClassBcompliancestatement
156ThinkCentreM53HardwareMaintenanceManual
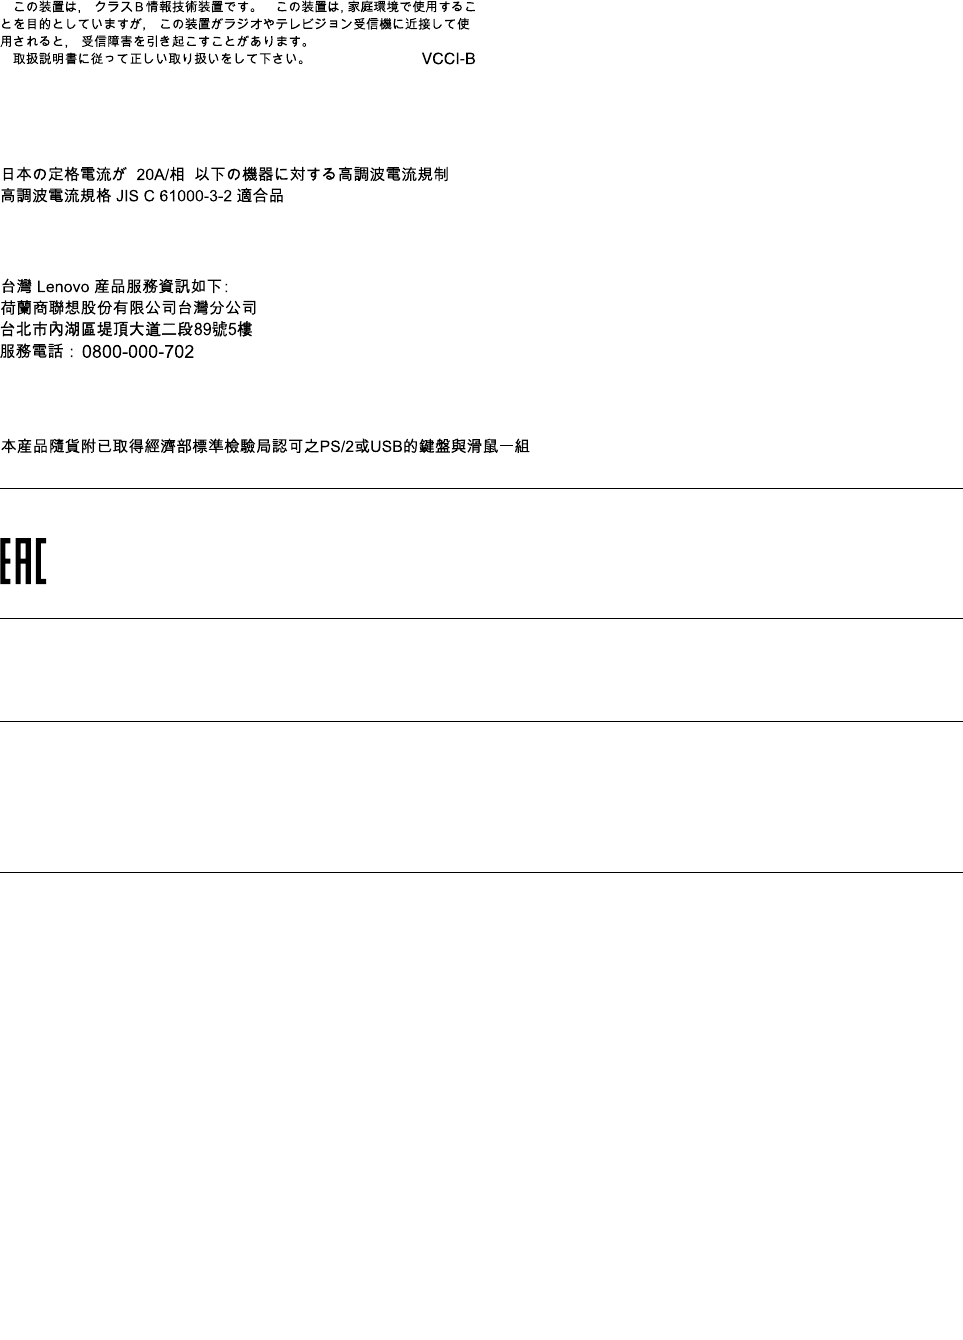
JapanVCCIClassBcompliancestatement
Japancompliancestatementforproductswhichconnecttothepowermainswithratedcurrent
lessthanorequalto20Aperphase
LenovoproductserviceinformationforTaiwan
KeyboardandmousecompliancestatementforTaiwan
Eurasiancompliancemark
Brazilregulatorynotice
Ouvirsonscommaisde85decibéisporlongosperíodospodeprovocardanosaosistemaauditivo.
Mexicoregulatorynotice
Advertencia:EnMexicolaoperacióndeesteequipoestásujetaalassiguientesdoscondiciones:(1)es
posiblequeesteequipoodispositivonocauseinterferenciaperjudicialy(2)esteequipoodispositivodebe
aceptarcualquierinterferencia,incluyendolaquepuedacausarsuoperaciónnodeseada.
Additionalregulatoryinformation
Foradditionalregulatoryinformation,refertotheRegulatoryNoticeshippedwithyourcomputer.Depending
ontheconfigurationofyourcomputerandthecountryorregionwherethecomputerwaspurchased,
youmighthavereceivedadditionalprintedregulatorynotices.Allregulatorynoticesareavailableonthe
LenovoSupportWebsiteinelectronicformat.Toaccesselectroniccopiesofthedocumentation,goto
http://www.lenovo.com/UserManuals.
AppendixA.Regulatoryinformation157

158ThinkCentreM53HardwareMaintenanceManual

AppendixB.WEEEandrecyclinginformation
Lenovoencouragesownersofinformationtechnology(IT)equipmenttoresponsiblyrecycletheirequipment
whenitisnolongerneeded.Lenovooffersavarietyofprogramsandservicestoassistequipmentownersin
recyclingtheirITproducts.ForinformationonrecyclingLenovoproducts,goto:
http://www.lenovo.com/recycling
ImportantWEEEinformation
TheWEEEmarkingonLenovoproductsappliestocountrieswithWEEEande-wasteregulations(forexample,
EuropeanDirective2002/96/EC,IndiaE-WasteManagement&HandlingRules,2011).Appliancesare
labeledinaccordancewithlocalregulationsconcerningwasteelectricalandelectronicequipment(WEEE).
Theseregulationsdeterminetheframeworkforthereturnandrecyclingofusedappliancesasapplicable
withineachgeography.Thislabelisappliedtovariousproductstoindicatethattheproductisnottobe
thrownaway,butratherputintheestablishedcollectionsystemsforreclaimingtheseendoflifeproducts.
Usersofelectricalandelectronicequipment(EEE)withtheWEEEmarkingmustnotdisposeofendof
lifeEEEasunsortedmunicipalwaste,butusethecollectionframeworkavailabletothemforthereturn,
recycle,andrecoveryofWEEEandtominimizeanypotentialeffectsofEEEontheenvironmentand
humanhealthduetothepresenceofhazardoussubstances.ForadditionalWEEEinformationgoto:
http://www.lenovo.com/recycling
RecyclinginformationforJapan
CollectingandrecyclingadisusedLenovocomputerormonitor
IfyouareacompanyemployeeandneedtodisposeofaLenovocomputerormonitorthatistheproperty
ofthecompany,youmustdosoinaccordancewiththeLawforPromotionofEffectiveUtilizationof
Resources.Computersandmonitorsarecategorizedasindustrialwasteandshouldbeproperlydisposed
ofbyanindustrialwastedisposalcontractorcertifiedbyalocalgovernment.InaccordancewiththeLaw
forPromotionofEffectiveUtilizationofResources,LenovoJapanprovides,throughitsPCCollecting
andRecyclingServices,forthecollecting,reuse,andrecyclingofdisusedcomputersandmonitors.For
details,visittheLenovoWebsiteathttp://www.lenovo.com/recycling/japan.PursuanttotheLawfor
PromotionofEffectiveUtilizationofResources,thecollectingandrecyclingofhome-usedcomputers
andmonitorsbythemanufacturerwasbegunonOctober1,2003.Thisserviceisprovidedfreeof
chargeforhome-usedcomputerssoldafterOctober1,2003.Fordetails,visittheLenovoWebsiteat
http://www.lenovo.com/recycling/japan.
©CopyrightLenovo2014159
DisposingofLenovocomputercomponents
SomeLenovocomputerproductssoldinJapanmayhavecomponentsthatcontainheavymetalsorother
environmentalsensitivesubstances.Toproperlydisposeofdisusedcomponents,suchasaprintedcircuit
boardordrive,usethemethodsdescribedaboveforcollectingandrecyclingadisusedcomputerormonitor.
DisposingofdisusedlithiumbatteriesfromLenovocomputers
Abutton-shapedlithiumbatteryisinstalledinsideyourLenovocomputertoprovidepowertothecomputer
clockwhilethecomputerisoffordisconnectedfromthemainpowersource.Ifyouneedtoreplaceitwitha
newone,contactyourplaceofpurchaseorcontactLenovoforservice.Ifyouneedtodisposeofadisused
lithiumbattery,insulateitwithvinyltape,contactyourplaceofpurchaseoranindustrial-waste-disposal
operator,andfollowtheirinstructions.Disposalofalithiumbatterymustcomplywithlocalordinances
andregulations.
RecyclinginformationforBrazil
DeclaraçõesdeReciclagemnoBrasil
DescartedeumProdutoLenovoForadeUso
Equipamentoselétricoseeletrônicosnãodevemserdescartadosemlixocomum,masenviadosàpontosde
coleta,autorizadospelofabricantedoprodutoparaquesejamencaminhadoseprocessadosporempresas
especializadasnomanuseioderesíduosindustriais,devidamentecertificadaspelosorgãosambientais,de
acordocomalegislaçãolocal.
ALenovopossuiumcanalespecíficoparaauxiliá-lonodescartedessesprodutos.Casovocêpossua
umprodutoLenovoemsituaçãodedescarte,ligueparaonossoSACouencaminheume-mailpara:
reciclar@lenovo.com,informandoomodelo,númerodesérieecidade,afimdeenviarmosasinstruções
paraocorretodescartedoseuprodutoLenovo.
BatteryrecyclinginformationforTaiwan
BatteryrecyclinginformationfortheEuropeanUnion
Notice:ThismarkappliesonlytocountrieswithintheEuropeanUnion(EU).
160ThinkCentreM53HardwareMaintenanceManual

BatteriesorpackagingforbatteriesarelabeledinaccordancewithEuropeanDirective2006/66/EC
concerningbatteriesandaccumulatorsandwastebatteriesandaccumulators.TheDirectivedeterminesthe
frameworkforthereturnandrecyclingofusedbatteriesandaccumulatorsasapplicablethroughoutthe
EuropeanUnion.Thislabelisappliedtovariousbatteriestoindicatethatthebatteryisnottobethrown
away,butratherreclaimeduponendoflifeperthisDirective.
InaccordancewiththeEuropeanDirective2006/66/EC,batteriesandaccumulatorsarelabeledtoindicate
thattheyaretobecollectedseparatelyandrecycledatendoflife.Thelabelonthebatterymayalso
includeachemicalsymbolforthemetalconcernedinthebattery(Pbforlead,Hgformercury,andCdfor
cadmium).Usersofbatteriesandaccumulatorsmustnotdisposeofbatteriesandaccumulatorsasunsorted
municipalwaste,butusethecollectionframeworkavailabletocustomersforthereturn,recycling,and
treatmentofbatteriesandaccumulators.Customerparticipationisimportanttominimizeanypotential
effectsofbatteriesandaccumulatorsontheenvironmentandhumanhealthduetothepotentialpresenceof
hazardoussubstances.Forpropercollectionandtreatment,goto:
http://www.lenovo.com/recycling
AppendixB.WEEEandrecyclinginformation161

162ThinkCentreM53HardwareMaintenanceManual
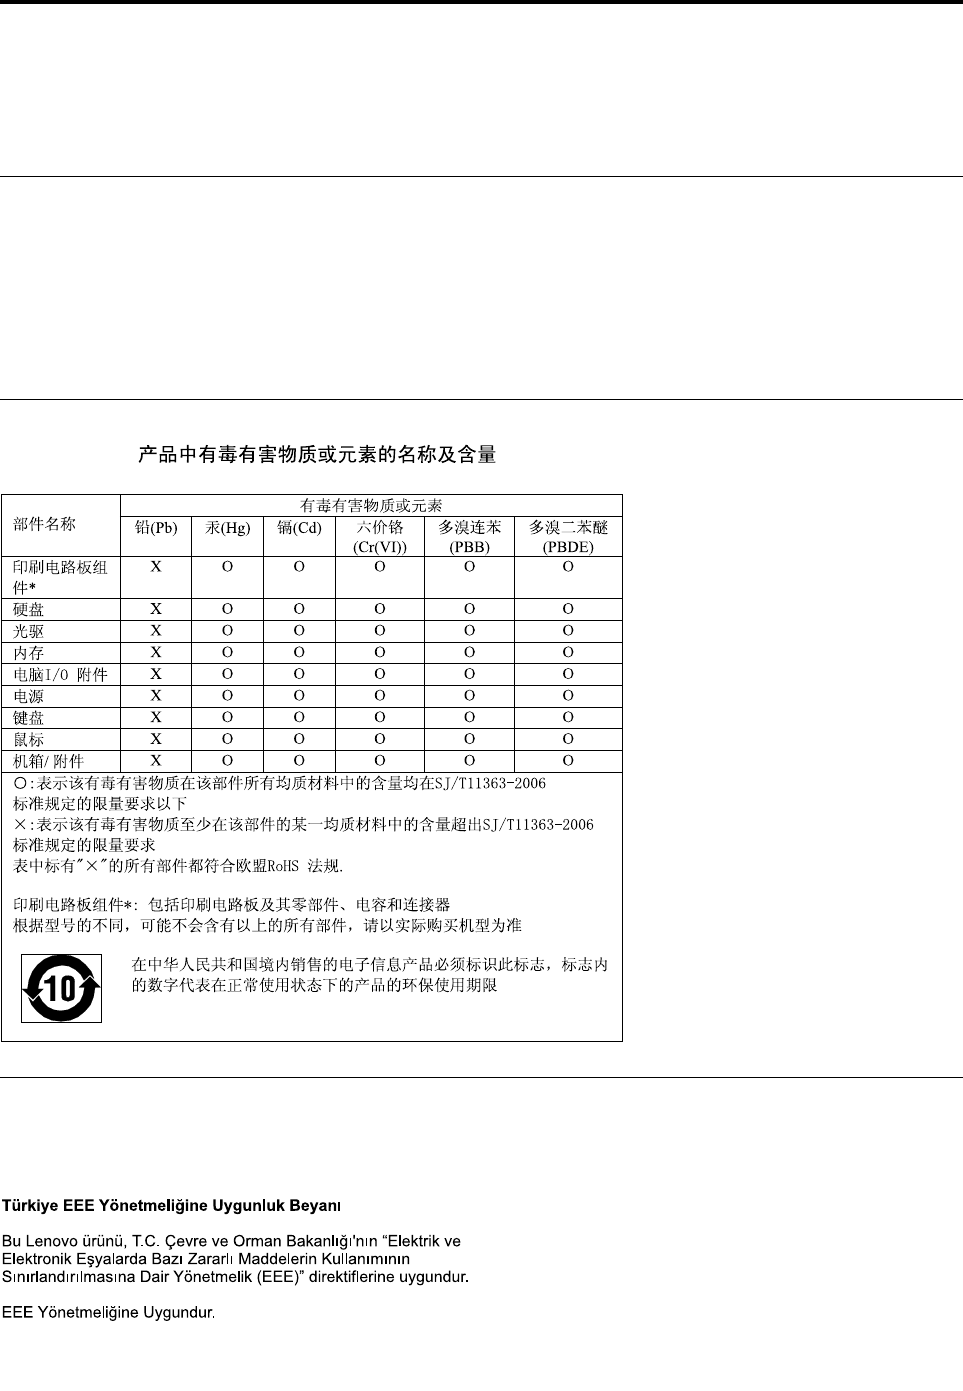
AppendixC.RestrictionofHazardousSubstancesDirective
(RoHS)
EuropeanUnionRoHS
LenovoproductssoldintheEuropeanUnion,onorafter3January2013meettherequirementsofDirective
2011/65/EUontherestrictionoftheuseofcertainhazardoussubstancesinelectricalandelectronic
equipment(“RoHSrecast”or“RoHS2”).
FormoreinformationaboutLenovoprogressonRoHS,goto:
http://www.lenovo.com/social_responsibility/us/en/RoHS_Communication.pdf
ChinaRoHS
TurkishRoHS
TheLenovoproductmeetstherequirementsoftheRepublicofTurkeyDirectiveontheRestrictionoftheUse
ofCertainHazardousSubstancesinElectricalandElectronicEquipment(EEE).
©CopyrightLenovo2014163

UkraineRoHS
IndiaRoHS
RoHScompliantasperE-Waste(Management&Handling)Rules,2011.
164ThinkCentreM53HardwareMaintenanceManual
AppendixD.ChinaEnergyLabel
©CopyrightLenovo2014165

166ThinkCentreM53HardwareMaintenanceManual

AppendixE.ENERGYSTARmodelinformation
ENERGYSTAR®isajointprogramoftheU.S.EnvironmentalProtectionAgencyandtheU.S.Department
ofEnergyaimedatsavingmoneyandprotectingtheenvironmentthroughenergyefficientproductsand
practices.
LenovoisproudtoofferourcustomersproductswithanENERGYSTARcompliantdesignation.Some
modelsofthefollowingmachinetypeshavebeendesignedandtestedtoconformtotheENERGYSTAR
programrequirementforcomputersatthetimeofmanufacture:10DB,10DC,10DD,10DE,10DV,10DW,
10DX,10DY,10EC,and10ED.FormoreinformationaboutENERGYSTARratingsforLenovocomputers,
gotohttp://www.lenovo.com.
ByusingENERGYSTARcompliantproductsandtakingadvantageofthepower-managementfeaturesof
yourcomputer,youreducetheconsumptionofelectricity.Reducedelectricalconsumptioncontributesto
potentialfinancialsavings,acleanerenvironment,andthereductionofgreenhousegasemissions.
FormoreinformationaboutENERGYSTAR,goto:
http://www.energystar.gov
Lenovoencouragesyoutomakeefficientuseofenergyanintegralpartofyourday-to-dayoperations.To
helpinthisendeavor,setthefollowingpower-managementfeaturestotakeeffectwhenyourcomputerhas
beeninactiveforaspecifiedduration:
Table3.ENERGYSTARpower-managementfeatures
Windows7orWindows8.1operatingsystem
Powerplan:ThinkCentre®Default
•Turnoffthedisplay:After10minutes
•Putthecomputertosleep:After25minutes
•Advancedpowersettings:
–Turnoffharddiskdrives:After20minutes
–Hibernate:Never
ToawakenyourcomputerfromaSleepmode,pressanykeyonyourkeyboard.Formoreinformationabout
thesesettings,refertoyourWindowsHelpandSupportinformationsystem.
©CopyrightLenovo2014167

168ThinkCentreM53HardwareMaintenanceManual

AppendixF.Notices
Lenovomaynotoffertheproducts,services,orfeaturesdiscussedinthisdocumentinallcountries.Consult
yourlocalLenovorepresentativeforinformationontheproductsandservicescurrentlyavailableinyour
area.AnyreferencetoaLenovoproduct,program,orserviceisnotintendedtostateorimplythatonlythat
Lenovoproduct,program,orservicemaybeused.Anyfunctionallyequivalentproduct,program,orservice
thatdoesnotinfringeanyLenovointellectualpropertyrightmaybeusedinstead.However,itistheuser's
responsibilitytoevaluateandverifytheoperationofanyotherproduct,program,orservice.
Lenovomayhavepatentsorpendingpatentapplicationscoveringsubjectmatterdescribedinthis
document.Thefurnishingofthisdocumentdoesnotgiveyouanylicensetothesepatents.Youcansend
licenseinquiries,inwriting,to:
Lenovo(UnitedStates),Inc.
1009ThinkPlace-BuildingOne
Morrisville,NC27560
U.S.A.
Attention:LenovoDirectorofLicensing
LENOVOPROVIDESTHISPUBLICATION“ASIS”WITHOUTWARRANTYOFANYKIND,EITHEREXPRESS
ORIMPLIED,INCLUDING,BUTNOTLIMITEDTO,THEIMPLIEDWARRANTIESOFNON-INFRINGEMENT,
MERCHANTABILITYORFITNESSFORAPARTICULARPURPOSE.Somejurisdictionsdonotallow
disclaimerofexpressorimpliedwarrantiesincertaintransactions,therefore,thisstatementmaynotapply
toyou.
Thisinformationcouldincludetechnicalinaccuraciesortypographicalerrors.Changesareperiodically
madetotheinformationherein;thesechangeswillbeincorporatedinneweditionsofthepublication.
Lenovomaymakeimprovementsand/orchangesintheproduct(s)and/ortheprogram(s)describedinthis
publicationatanytimewithoutnotice.
Theproductsdescribedinthisdocumentarenotintendedforuseinimplantationorotherlifesupport
applicationswheremalfunctionmayresultininjuryordeathtopersons.Theinformationcontainedinthis
documentdoesnotaffectorchangeLenovoproductspecificationsorwarranties.Nothinginthisdocument
shalloperateasanexpressorimpliedlicenseorindemnityundertheintellectualpropertyrightsofLenovo
orthirdparties.Allinformationcontainedinthisdocumentwasobtainedinspecificenvironmentsandis
presentedasanillustration.Theresultobtainedinotheroperatingenvironmentsmayvary.
Lenovomayuseordistributeanyoftheinformationyousupplyinanywayitbelievesappropriatewithout
incurringanyobligationtoyou.
Anyreferencesinthispublicationtonon-LenovoWebsitesareprovidedforconvenienceonlyanddonotin
anymannerserveasanendorsementofthoseWebsites.ThematerialsatthoseWebsitesarenotpartof
thematerialsforthisLenovoproduct,anduseofthoseWebsitesisatyourownrisk.
Anyperformancedatacontainedhereinwasdeterminedinacontrolledenvironment.Therefore,theresult
obtainedinotheroperatingenvironmentsmayvarysignificantly.Somemeasurementsmayhavebeen
madeondevelopment-levelsystemsandthereisnoguaranteethatthesemeasurementswillbethesame
ongenerallyavailablesystems.Furthermore,somemeasurementsmayhavebeenestimatedthrough
extrapolation.Actualresultsmayvary.Usersofthisdocumentshouldverifytheapplicabledatafortheir
specificenvironment.
©CopyrightLenovo2014169

Trademarks
ThefollowingtermsaretrademarksofLenovointheUnitedStates,othercountries,orboth:
Lenovo
RescueandRecovery
TheLenovologo
TheThinkCentrelogo
ThinkCentre
ThinkVantage
Microsoft,Windows,andWindowsMediaaretrademarksoftheMicrosoftgroupofcompanies.
IntelisatrademarkofIntelCorporationintheU.S.and/orothercountries.
LinuxisaregisteredtrademarkofLinusTorvalds.
DisplayPortandVESAaretrademarksoftheVideoElectronicsStandardsAssociation.
Othercompany,product,orservicenamesmaybetrademarksorservicemarksofothers.
170ThinkCentreM53HardwareMaintenanceManual

Index
A
arescuemedium,creatingandusing98
acpoweradapter
installing105
removing105
acpoweradapterbracket
installing104
removing104
Administrator,password62
Advanceconfiguration61
audiofeatures36
B
backupandrecoveryoperations96
basictroubleshooting75
BIOSpasswords,using62
BIOSsettings,changing67
boot-blockrecovery69
C
cablelock,security57
changing
password62
startupdevicesequence64
cleaninganopticalmouse73
CMOS,clearing63
coin-cellbattery
replacing136
components,internal30,32
computercover
removing123
computercover,reinstalling147
connector30
connectors
rear29
connectors,controls,indicators
front28
considerations,passwords62
coverpresenceswitch
installing130
replacing130
creating
andusingarescuemedium98
creatingandusing
recoverymedia95
CRU
completingtheinstallation147
CRUs(CustomerReplaceableUnits),returningdefective32
customersupportcenter152
D
deletingapassword62
Description30
devicedrivers149
devices,handlingstatic-sensitive103
diagnosticprogram86
diagnosticsprogram,using152
diagnostics,troubleshooting75
DisplayPortconnector30
documentation,using152
drivers,device149
E
environment,operating39
Ethernetconnector30
exiting,SetupUtility66
expansion37
externalharddiskdrive
installing117
replacing117
externalopticaldrive
installing111
replacing111
externaloptions,installing103
F
failure,recoveringfromBIOS69
features35
front
connectors,controls,indicators28
frontWi-Fiantenna
installing139
removing139
FRUlocations32
FRUpartnumbersv,32
G
getting
help151
information151
service151
H
harddiskdriveassembly,replacing134
Harddisk,password62
Headsetconnector30
heatsink
replacing127
help
andservice152
©CopyrightLenovo2014171

getting151
HelpandSupport151
I
IdentifyingFRUs32
information
getting151
resources151
safety151
warranty151
Input/Output(I/O)features36
installing
acpoweradapter105
acpoweradapterbracket104
coverpresenceswitch130
externalharddiskdrive117
externalopticaldrive111
frontWi-Fiantenna139
keyboard146
mouse146
operatingsystem67
rearWi-Fiantenna141
verticalstand107
VESAmountbracket109
Wi-Ficardmodule137
internaldrives36
internalspeaker
replacing131
K
Kensington-style
cablelock57
keyboard
installing146
replacing146
L
LenovoSolutionCenter86
LenovoThinClientManager149
LenovoThinClientManager,LTM149
LenovoThinkVantageTools151
locatingcomponents30,32
lookinguppartnumbersv,32
M
media,creatingandusingrecoverymedia95
memory36
memorymodule
replacing129
Microphoneconnector30
microprocessor36
microprocessorfan
replacing125
microprocessorsocketcover
installing143
mouse
installing146
replacing146
N
notices169
O
operations,backupandrecovery96
opticalmouse
cleaning73
Optional-serviceCRUs32
P
partnumbersv,32
partsreplacement,completing147
password
Administrator62
considerations62
Harddisk62
Power-onpassword62
setting,changing,deleting62
passwords
erasing63
lostorforgotten63
physicalspecifications39
power
features37
powerbuttonboard,replacing133
power-onself-test(POST)67
Power-on,password62
programs,updatingsystem66
purchasingadditionalservices153
R
rearconnectors29
rearWi-Fiantenna
installing141
removing141
recovering
fromaBIOSupdatefailure69
software95
recovery
boot-block69
operations,backupand96
problems,solving100
recoverymedia,creatingandusing95
removing
acpoweradapter105
acpoweradapterbracket104
frontWi-Fiantenna139
rearWi-Fiantenna141
verticalstand107
VESAmountbracket109
removingcomputercover123
replacing
coin-cellbattery136
172ThinkCentreM53HardwareMaintenanceManual

coverpresenceswitch130
externalharddiskdrive117
externalopticaldrive111
harddiskdriveassembly134
heatsink127
internalspeaker131
keyboard146
memorymodule129
microprocessorfan125
mouse146
powerbuttonboard133
systemboard143
Wi-Ficardmodule137
RescueandRecovery95
workspace,RescueandRecovery97
RescueandRecoveryworkspace97
resources,information151
S
safetyinformation151
security
enablingordisabling63
features38
selecting
startupdevice64
temporarystartupdevice64
Self-serviceCRUs32
service
andhelp152
customersupportcenter152
getting151
services
other153
purchasingadditional153
setting
password62
settings
changing61
viewing61
SetupUtility61
SetupUtilityprogram,starting61
SetupUtility,exiting66
software
recovering95
solvingrecoveryproblems100
startingtheSetupUtilityprogram61
startupdevice64
sequence,changing64
temporary,selecting64
static-sensitivedevices,handling103
system
management37
programs67
systemboard
connectors34
locatingparts34
locations34
replacing143
T
temporarystartupdevice64
theBIOS68
theBIOS,updating68–69
trademarks170
troubleshooting,basic75
troubleshooting,diagnostics75
U
updating
systemprograms66
theBIOS68
updatingtheBIOS69
USB2.0connector30
USB3.0connector30
using
arescuemedium,creatingand98
BIOSpasswords62
diagnosticprogram152
documentation152
otherservices153
SetupUtility61
V
verticalstand
installing107
removing107
VESAmountbracket
installing109
removing109
VGAconnector30
videofeatures36
viewingandchangingsettings61
W
warrantyinformation151
Wi-Ficardmodule
installing137
replacing137
wireless
features37
workspace,backupandrecovery97
©CopyrightLenovo2014173

174ThinkCentreM53HardwareMaintenanceManual