Lenovo M700Z M800Z Hmm User Manual Hardware Maintenance Think Centre M700z, All In One (Think Centre)
2016-09-28
User Manual: Lenovo M700Z M800Z Hmm Hardware Maintenance Manual - ThinkCentre M700z, M800z M700z All-in-One (ThinkCentre) ThinkCentre M700z
Open the PDF directly: View PDF ![]() .
.
Page Count: 174 [warning: Documents this large are best viewed by clicking the View PDF Link!]
- About this manual
- Chapter 1. Read this first: Important safety information
- Chapter 2. Product overview
- Chapter 3. Using your computer
- Chapter 4. You and your computer
- Chapter 5. Security
- Locking your computer
- Viewing and changing security settings in the Setup Utility program
- Preventing unauthorized access to your computer
- Using fingerprint authentication
- Using and understanding firewalls
- Protecting data against viruses
- Computrace Agent software embedded in firmware
- Trusted Platform Module (TPM)
- Chapter 6. Advanced configuration
- Using the Setup Utility program
- Starting the Setup Utility program
- Enabling or disabling a device
- Enabling or disabling the Automatic Power On features
- Enabling or disabling ErP LPS compliance mode
- Changing ICE Performance Mode
- Enabling or disabling the Configuration Change Detection feature
- Using the cover presence switch
- Using BIOS passwords
- Selecting a startup device
- Exiting the Setup Utility program
- Updating the BIOS
- Using the Setup Utility program
- Chapter 7. Troubleshooting, diagnostics, and recovery
- Chapter 8. Service checkout and symptom-to-FRU index
- Chapter 9. Installing or replacing hardware
- Handling static-sensitive devices
- Installing or replacing hardware
- Installing external options
- Replacing the computer stand
- Replacing the power adapter (for M700z)
- Removing the computer cover
- Replacing the system-board shield
- Replacing the VESA mount bracket
- Replacing the power supply assembly (for M800z)
- Replacing the storage drive
- Replacing the optical drive
- Replacing the integrated camera
- Replacing the cover presence switch
- Replacing the system fan
- Replacing the internal speakers
- Replacing the control-button board
- Replacing the I/O bracket
- Replacing the heat sink
- Replacing a memory module
- Replacing the card reader
- Replacing the serial connector module
- Replacing the coin-cell battery
- Replacing the Wi-Fi card
- Replacing a Wi-Fi antenna
- Replacing the microprocessor
- Replacing the system board
- Replacing the LCD panel
- Completing the parts replacement
- Chapter 10. Getting information, help, and service
- Appendix A. Regulatory information
- Appendix B. WEEE and recycling information
- Appendix C. Restriction of Hazardous Substances Directive (RoHS)
- Appendix D. China Energy Label
- Appendix E. ENERGY STAR model information
- Appendix F. Notices

ThinkCentreM700zandM800z
HardwareMaintenanceManual
MachineTypes:10ET,10EU,10EV,10EW,10EY,and10F1

Note:Beforeusingthisinformationandtheproductitsupports,besuretoreadandunderstandtheChapter
1“Readthisfirst:Importantsafetyinformation”onpage1andAppendixF“Notices”onpage163.
SecondEdition(December2015)
©CopyrightLenovo2015.
LIMITEDANDRESTRICTEDRIGHTSNOTICE:IfdataorsoftwareisdeliveredpursuantaGeneralServicesAdministration
“GSA”contract,use,reproduction,ordisclosureissubjecttorestrictionssetforthinContractNo.GS-35F-05925.

Contents
Aboutthismanual............v
Chapter1.Readthisfirst:Important
safetyinformation............1
Powercordsandpoweradapters........1
Generalsafety................1
Electricalsafety...............2
Safetyinspectionguide............4
Handlingelectrostaticdischarge-sensitive
devices..................4
Groundingrequirements............5
Safetynotices(multi-lingualtranslations).....5
Chapter2.Productoverview.....27
Hardwarelocations.............27
Frontview...............27
Rearview...............30
Computercomponents.........33
MajorFRUsandCRUs..........36
Partsonthesystemboard........41
Machinetypeandmodellabel.......42
Features.................43
Specifications...............45
Programs.................46
Accessingaprogramonyourcomputer...46
Installingaprogramthatisreadytobe
installed...............47
AnintroductiontoLenovoprograms....47
Chapter3.Usingyourcomputer...49
Adjustingthecomputerstand.........49
Adjustingthefull-functionmonitorstand(for
M700z)................49
Adjustingthetilt-onlymonitorstand....51
AdjustingtheUltraFlexIIStand(forM800z)..51
Registeringyourcomputer..........53
Settingthecomputervolume.........53
AddinganicontotheWindowsnotificationarea.53
Usingadisc................54
Guidelinesaboutusingtheopticaldrive...54
Handlingandstoringadisc........54
Playingandremovingadisc.......54
Recordingadisc............55
Connectingtoanetwork...........55
ConnectingtoanEthernetLAN......55
ConnectingtoawirelessLAN.......55
ConnectingtoaBluetooth-enableddevice..56
Usingthesingle-touchormulti-touchfeature...56
Chapter4.Youandyourcomputer..57
Arrangingyourworkspace..........57
Glareandlighting............57
Aircirculation.............57
Electricaloutletlocationsandcablelengths.57
Comfort...............57
Accessibilityinformation...........58
Cleaningyourcomputer...........61
Maintenance...............61
Basicmaintenancetips.........61
Goodmaintenancepractices.......62
Keepingyourcomputercurrent......62
Movingyourcomputer...........63
Chapter5.Security..........65
Lockingyourcomputer...........65
AttachingaKensington-stylecablelock...65
Viewingandchangingsecuritysettingsinthe
SetupUtilityprogram............67
Preventingunauthorizedaccesstoyour
computer.................67
Usingfingerprintauthentication........68
Usingandunderstandingfirewalls.......68
Protectingdataagainstviruses........68
ComputraceAgentsoftwareembeddedin
firmware.................68
TrustedPlatformModule(TPM)........69
Chapter6.Advancedconfiguration..71
UsingtheSetupUtilityprogram........71
StartingtheSetupUtilityprogram.....71
Enablingordisablingadevice.......71
EnablingordisablingtheAutomaticPowerOn
features...............71
EnablingordisablingErPLPScompliance
mode................72
ChangingICEPerformanceMode.....72
EnablingordisablingtheConfiguration
ChangeDetectionfeature........72
Usingthecoverpresenceswitch......73
UsingBIOSpasswords.........73
Selectingastartupdevice........74
ExitingtheSetupUtilityprogram......75
UpdatingtheBIOS.............75
©CopyrightLenovo2015i

Chapter7.Troubleshooting,
diagnostics,andrecovery......77
Basicprocedureforresolvingcomputer
problems.................77
Troubleshooting..............77
Startupproblems............77
Audioproblems............78
CDproblems.............79
DVDproblems.............79
Intermittentproblems..........80
Storagedriveproblems.........80
Screenproblems............81
Networkingproblems..........81
Performanceproblems..........83
Serialconnectorcannotbeaccessed....85
USBdeviceproblems..........85
Softwareanddriverproblems.......85
Diagnostics................86
LenovoSolutionCenter.........86
UEFIdiagnosticprogram.........86
Recoveryinformation............87
RecoveryinformationforWindows7....87
RecoveryinformationforWindows10....88
Chapter8.Servicecheckoutand
symptom-to-FRUindex........89
Servicecheckout..............89
Problemdeterminationtips........89
Symptom-to-FRUindex...........90
Harddiskdrivebooterror........90
Powersupplyproblems.........91
Beepsymptoms............91
POSTerrorcodes............91
Miscellaneouserrorconditions......92
Undeterminedproblems.........94
Chapter9.Installingorreplacing
hardware...............95
Handlingstatic-sensitivedevices.......95
Installingorreplacinghardware........95
Installingexternaloptions........95
Replacingthecomputerstand.......96
Replacingthepoweradapter(forM700z)..100
Removingthecomputercover.......101
Replacingthesystem-boardshield.....102
ReplacingtheVESAmountbracket.....104
Replacingthepowersupplyassembly(for
M800z)................105
Replacingthestoragedrive........107
Replacingtheopticaldrive........109
Replacingtheintegratedcamera......112
Replacingthecoverpresenceswitch....114
Replacingthesystemfan.........115
Replacingtheinternalspeakers......116
Replacingthecontrol-buttonboard.....118
ReplacingtheI/Obracket........121
Replacingtheheatsink.........122
Replacingamemorymodule.......124
Replacingthecardreader........125
Replacingtheserialconnectormodule...127
Replacingthecoin-cellbattery......129
ReplacingtheWi-Ficard.........131
ReplacingaWi-Fiantenna........132
Replacingthemicroprocessor.......134
Replacingthesystemboard.......136
ReplacingtheLCDpanel.........138
Completingthepartsreplacement.....142
Chapter10.Gettinginformation,help,
andservice.............145
Informationresources............145
Accessingtheuserguideinvarious
languages...............145
Windowshelpsystem..........145
Safetyandwarranty...........145
LenovoWebsite............145
LenovoSupportWebsite.........146
Frequentlyaskedquestions........146
Helpandservice..............146
Callingforservice............146
Usingotherservices..........147
Purchasingadditionalservices......147
AppendixA.Regulatory
information.............149
Exportclassificationnotice..........149
Electronicemissionsnotices.........149
FederalCommunicationsCommission
DeclarationofConformity........149
Eurasiancompliancemark..........151
Brazilaudionotice.............151
Mexicowireless-radiocomplianceinformation..151
Taiwanvisionprecautionnotice........151
Additionalregulatoryinformation.......151
AppendixB.WEEEandrecycling
information.............153
ImportantWEEEinformation.........153
RecyclinginformationforJapan........153
RecyclinginformationforBrazil........154
BatteryrecyclinginformationforTaiwan.....154
iiThinkCentreM700zandM800zHardwareMaintenanceManual

BatteryrecyclinginformationfortheEuropean
Union..................154
AppendixC.RestrictionofHazardous
SubstancesDirective(RoHS)....157
EuropeanUnionRoHS...........157
ChinaRoHS................157
TurkishRoHS...............157
UkraineRoHS...............158
IndiaRoHS................158
AppendixD.ChinaEnergyLabel..159
AppendixE.ENERGYSTARmodel
information.............161
AppendixF.Notices.........163
Trademarks................164
©CopyrightLenovo2015iii

ivThinkCentreM700zandM800zHardwareMaintenanceManual

Aboutthismanual
ThismanualprovidesserviceandreferenceinformationforLenovo®computerslistedonthefrontcover.
Usethismanualalongwiththeadvanceddiagnosticteststotroubleshootproblems.
Important:ThismanualisintendedonlyfortrainedservicetechnicianswhoarefamiliarwithLenovo
computers.Usethismanualalongwiththeadvanceddiagnosticteststotroubleshootproblemseffectively.
BeforeservicingaLenovocomputer,besuretoreadandunderstandChapter1“Readthisfirst:Important
safetyinformation”onpage1.
©CopyrightLenovo2015v

viThinkCentreM700zandM800zHardwareMaintenanceManual

Chapter1.Readthisfirst:Importantsafetyinformation
Thischaptercontainsthesafetyinformationthatyoumustbefamiliarwith.
Powercordsandpoweradapters
Useonlythepowercordsandpoweradapterssuppliedbytheproductmanufacturer.Donotusetheac
powercordforotherdevices.
Thepowercordsshallbesafetyapproved.ForGermany,itshallbeH05VV-F,3G,0.75mm2,orbetter.For
othercountries,thesuitabletypesshallbeusedaccordingly.
Neverwrapapowercordaroundapoweradapterorotherobject.Doingsocanstressthecordinwaysthat
cancausethecordtofray,crack,orcrimp.Thiscanpresentasafetyhazard.
Alwaysroutepowercordssothattheywillnotbewalkedon,trippedover,orpinchedbyobjects.
Protectpowercordandpoweradaptersfromliquids.Forinstance,donotleaveyourpowercordorpower
adapternearsinks,tubs,toilets,oronfloorsthatarecleanedwithliquidcleansers.Liquidscancausea
shortcircuit,particularlyifthepowercordorpoweradapterhasbeenstressedbymisuse.Liquidsalsocan
causegradualcorrosionofpowercordterminalsand/ortheconnectorterminalsonapoweradapter,
whichcaneventuallyresultinoverheating.
Ensurethatallpowercordconnectorsaresecurelyandcompletelypluggedintoreceptacles.
Donotuseanypoweradapterthatshowscorrosionattheacinputpinsorshowssignsofoverheating(such
asdeformedplastic)attheacinputoranywhereonthepoweradapter.
Donotuseanypowercordswheretheelectricalcontactsoneitherendshowsignsofcorrosionor
overheatingorwherethepowercordappearstohavebeendamagedinanyway.
Generalsafety
Followtheserulestoensuregeneralsafety:
•Observegoodhousekeepingintheareaofthemachinesduringandaftermaintenance.
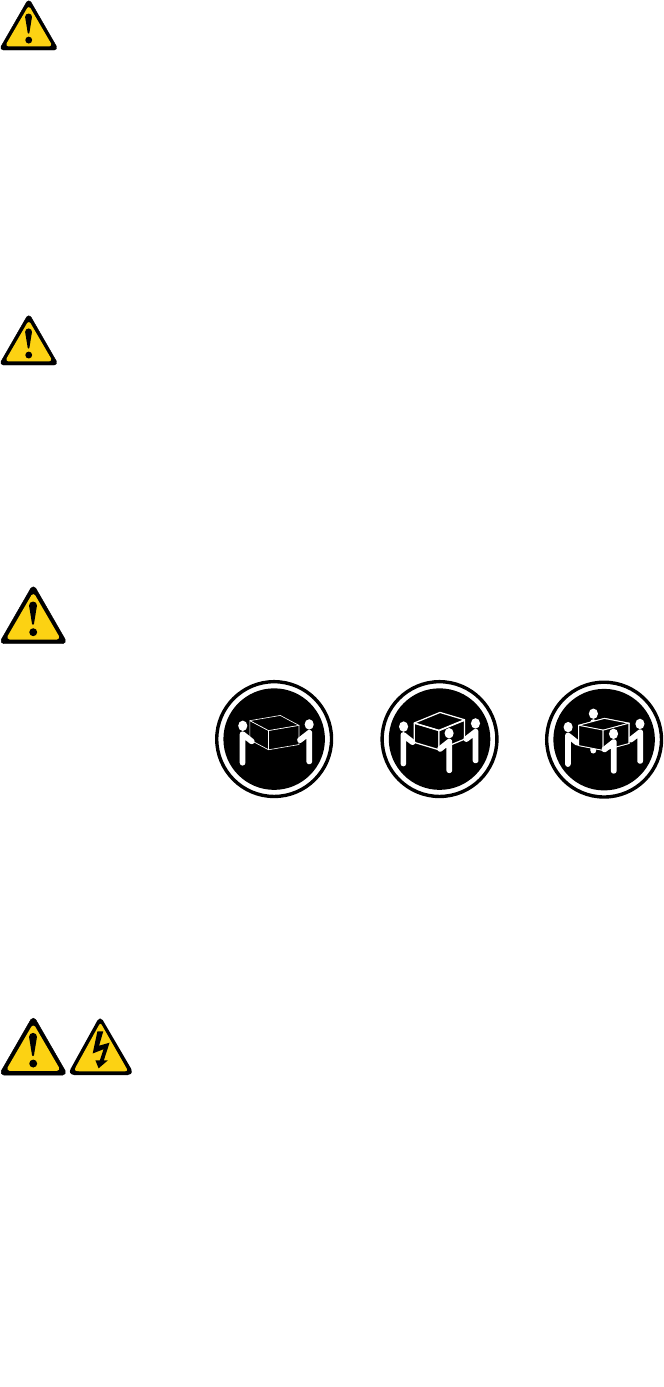
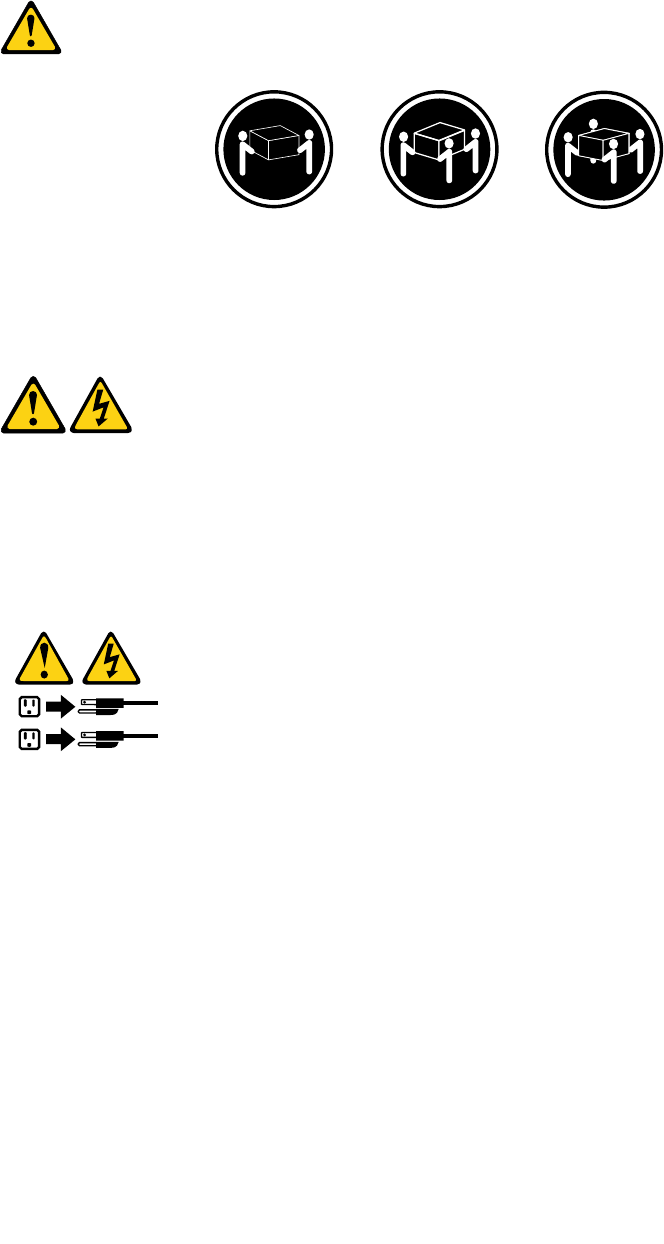
•Whenliftinganyheavyobject:
1.Ensureyoucanstandsafelywithoutslipping.
2.Distributetheweightoftheobjectequallybetweenyourfeet.
3.Useaslowliftingforce.Nevermovesuddenlyortwistwhenyouattempttolift.
4.Liftbystandingorbypushingupwithyourlegmuscles;thisactionremovesthestrainfromthe
musclesinyourback.
Attention:
Donotattempttoliftanyobjectsthatweighmorethan16kg(35lb)orobjectsthatyouthinkare
tooheavyforyou.
•Donotperformanyactionthatcauseshazardstothecustomer,orthatmakestheequipmentunsafe.
•Beforeyoustartthemachine,ensurethatotherservicerepresentativesandthecustomer'spersonnelare
notinahazardousposition.
©CopyrightLenovo20151
•Placeremovedcoversandotherpartsinasafeplace,awayfromallpersonnel,whileyouareservicing
themachine.
•Keepyourtoolcaseawayfromwalkareassothatotherpeoplewillnottripoverit.
•Donotwearlooseclothingthatcanbetrappedinthemovingpartsofamachine.Ensurethatyoursleeves
arefastenedorrolledupaboveyourelbows.Ifyourhairislong,fastenit.
•Inserttheendsofyournecktieorscarfinsideclothingorfastenitwithanonconductiveclip,approximately
8centimeters(3inches)fromtheend.
•Donotwearjewelry,chains,metal-frameeyeglasses,ormetalfastenersforyourclothing.
Remember:Metalobjectsaregoodelectricalconductors.
•Wearsafetyglasseswhenyouare:hammering,drilling,soldering,cuttingwire,attachingsprings,using
solvents,orworkinginanyotherconditionsthatmightbehazardoustoyoureyes.
•Afterservice,reinstallallsafetyshields,guards,labels,andgroundwires.Replaceanysafetydevice
thatiswornordefective.
•Reinstallallcoverscorrectlybeforereturningthemachinetothecustomer.
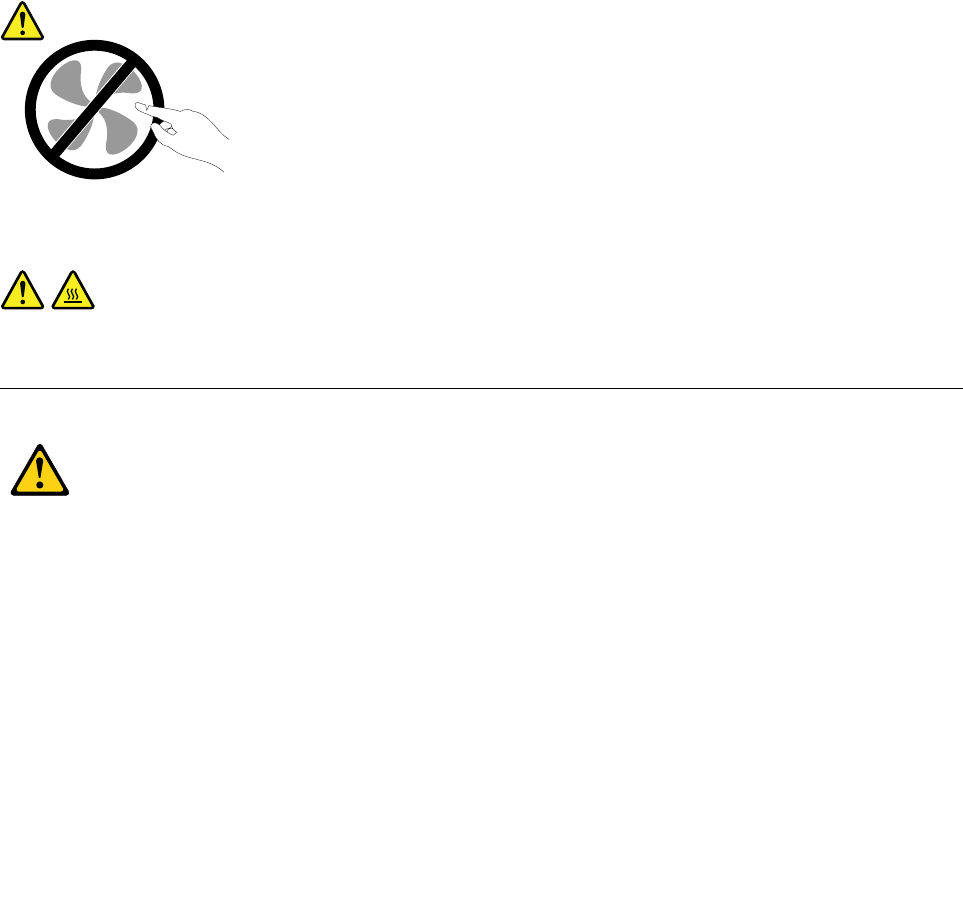
CAUTION:
Hazardousmovingparts.Keepfingersandotherbodypartsaway.
CAUTION:
Beforeyouopenthecomputercover,turnoffthecomputerandwaitseveralminutesuntilthe
computeriscool.
Electricalsafety
CAUTION:
Electricalcurrentfrompower,telephone,andcommunicationcablescanbehazardous.Toavoid
personalinjuryorequipmentdamage,disconnecttheattachedpowercords,telecommunication
systems,networks,andmodemsbeforeyouopenthecomputercovers,unlessinstructedotherwise
intheinstallationandconfigurationprocedures.
Observethefollowingruleswhenworkingonelectricalequipment.
Important:Useonlyapprovedtoolsandtestequipment.Somehandtoolshavehandlescoveredwithasoft
materialthatdoesnotinsulateyouwhenworkingwithliveelectricalcurrents.Manycustomershave,near
theirequipment,rubberfloormatsthatcontainsmallconductivefiberstodecreaseelectrostaticdischarges.
Donotusethistypeofmattoprotectyourselffromelectricalshock.
2ThinkCentreM700zandM800zHardwareMaintenanceManual

•Findtheroomemergencypower-off(EPO)switch,disconnectingswitch,orelectricaloutlet.Ifanelectrical
accidentoccurs,youcanthenoperatetheswitchorunplugthepowercordquickly.
•Donotworkaloneunderhazardousconditionsornearequipmentthathashazardousvoltages.
•Disconnectallpowerbefore:
–Performingamechanicalinspection
–Workingnearpowersupplies
–RemovingorinstallingFieldReplaceableUnits(FRUs)
•Beforeyoustarttoworkonthemachine,unplugthepowercord.Ifyoucannotunplugit,poweroffthe
wallboxthatsuppliespowertothemachineandlockthewallboxintheoffposition.
•Ifyouneedtoworkonamachinethathasexposedelectricalcircuits,observethefollowingprecautions:
–Ensurethatanotherperson,familiarwiththepower-offcontrols,isnearyou.
Remember:Anotherpersonmustbetheretoswitchoffthepower,ifnecessary.
–Useonlyonehandwhenworkingwithpowered-onelectricalequipment;keeptheotherhandinyour
pocketorbehindyourback.
Remember:Theremustbeacompletecircuittocauseelectricalshock.Byobservingtheaboverule,
youmaypreventacurrentfrompassingthroughyourbody.
–Whenusingatester,setthecontrolscorrectlyandusetheapprovedprobeleadsandaccessoriesfor
thattester.
–Standonsuitablerubbermats(obtainedlocally,ifnecessary)toinsulateyoufromgroundssuchas
metalfloorstripsandmachineframes.
Observethespecialsafetyprecautionswhenyouworkwithveryhighvoltages;theseinstructionsarein
thesafetysectionsofmaintenanceinformation.Useextremecarewhenmeasuringhighvoltages.
•Regularlyinspectandmaintainyourelectricalhandtoolsforsafeoperationalcondition.
•Donotusewornorbrokentoolsandtesters.
•Neverassumethatpowerhasbeendisconnectedfromacircuit.First,checkthatithasbeenpowered-off.
•Alwayslookcarefullyforpossiblehazardsinyourworkarea.Examplesofthesehazardsaremoistfloors,
nongroundedpowerextensioncables,powersurges,andmissingsafetygrounds.
•Donottouchliveelectricalcircuitswiththereflectivesurfaceofaplasticdentalmirror.Thesurfaceis
conductive;suchtouchingcancausepersonalinjuryandmachinedamage.
•Donotservicethefollowingpartswiththepoweronwhentheyareremovedfromtheirnormaloperating
placesinamachine:
–Powersupplyunits
–Pumps
–Blowersandfans
–Motorgenerators
andsimilarunits.(Thispracticeensurescorrectgroundingoftheunits.)
•Ifanelectricalaccidentoccurs:
–Usecaution;donotbecomeavictimyourself.
–Switchoffpower.
–Sendanotherpersontogetmedicalaid.
Chapter1.Readthisfirst:Importantsafetyinformation3

Safetyinspectionguide
Theintentofthisinspectionguideistoassistyouinidentifyingpotentiallyunsafeconditionsonthese
products.Eachmachine,asitwasdesignedandbuilt,hadrequiredsafetyitemsinstalledtoprotectusers
andservicepersonnelfrominjury.Thisguideaddressesonlythoseitems.However,goodjudgmentshould
beusedtoidentifypotentialsafetyhazardsduetoattachmentoffeaturesoroptionsnotcoveredbythis
inspectionguide.
Ifanyunsafeconditionsarepresent,youmustdeterminehowserioustheapparenthazardcouldbeand
whetheryoucancontinuewithoutfirstcorrectingtheproblem.
Considertheseconditionsandthesafetyhazardstheypresent:
•Electricalhazards,especiallyprimarypower(primaryvoltageontheframecancauseseriousorfatal
electricalshock).
•Explosivehazards,suchasadamagedCRTfaceorbulgingcapacitor
•Mechanicalhazards,suchaslooseormissinghardware
Theguideconsistsofaseriesofstepspresentedinachecklist.Beginthecheckswiththepoweroff,and
thepowercorddisconnected.
Checklist:
1.Checkexteriorcoversfordamage(loose,broken,orsharpedges).
2.Power-offthecomputer.Disconnectthepowercord.
3.Checkthepowercordfor:
a.Athird-wiregroundconnectoringoodcondition.Useametertomeasurethird-wireground
continuityfor0.1ohmorlessbetweentheexternalgroundpinandframeground.
b.Thepowercordshouldbetheappropriatetypeasspecifiedinthepartslistings.
c.Insulationmustnotbefrayedorworn.
4.Removethecover.
5.Checkforanyobviousalterations.Usegoodjudgmentastothesafetyofanyalterations.
6.Checkinsidetheunitforanyobviousunsafeconditions,suchasmetalfilings,contamination,wateror
otherliquids,orsignsoffireorsmokedamage.
7.Checkforworn,frayed,orpinchedcables.
8.Checkthatthepower-supplycoverfasteners(screwsorrivets)havenotbeenremovedortamperedwith.
Handlingelectrostaticdischarge-sensitivedevices
Anycomputerpartcontainingtransistorsorintegratedcircuits(ICs)shouldbeconsideredsensitiveto
electrostaticdischarge(ESD).ESDdamagecanoccurwhenthereisadifferenceinchargebetweenobjects.
ToprotectagainstESDdamage,equalizethechargebetweenobjects.Then,themachine,thepart,the
workmat,andthepersonhandlingthepartareallatthesamecharge.
Notes:
1.Useproduct-specificESDprocedureswhentheyexceedtherequirementsnotedhere.
2.MakesurethattheESDprotectivedevicesyouusehavebeencertified(ISO9000)asfullyeffective.
WhenhandlingESD-sensitiveparts:
•Keepthepartsinprotectivepackagesuntiltheyareinsertedintotheproduct.
•Avoidcontactwithotherpeoplewhilehandlingthepart.
4ThinkCentreM700zandM800zHardwareMaintenanceManual

•Wearagroundedwriststrapagainstyourskintoeliminatestaticonyourbody.
•Preventthepartfromtouchingyourclothing.Mostclothingisinsulativeandretainsachargeeven
whenyouarewearingawriststrap.
•Usetheblacksideofagroundedworkmattoprovideastatic-freeworksurface.Thematisespecially
usefulwhenhandlingESD-sensitivedevices.
•Selectagroundingsystem,suchasthoselistedbelow,toprovideprotectionthatmeetsthespecific
servicerequirement.
Note:TheuseofagroundingsystemisdesirablebutnotrequiredtoprotectagainstESDdamage.
–AttachtheESDgroundcliptoanyframeground,groundbraid,orgreen-wireground.
–UseanESDcommongroundorreferencepointwhenworkingonadouble-insulatedor
battery-operatedsystem.Youcanusecoaxorconnector-outsideshellsonthesesystems.
–Usetheroundground-prongoftheacplugonac-operatedcomputers.
Groundingrequirements
Electricalgroundingofthecomputerisrequiredforoperatorsafetyandcorrectsystemfunction.Proper
groundingoftheelectricaloutletcanbeverifiedbyacertifiedelectrician.
Safetynotices(multi-lingualtranslations)
Thecautionanddangersafetynoticesinthissectionareprovidedinthefollowinglanguages:
•English
•Arabic
•Brazilian/Portuguese
•Chinese(simplified)
•Chinese(traditional)
•French
•German
•Hebrew
•Italian
•Korean
•Spanish
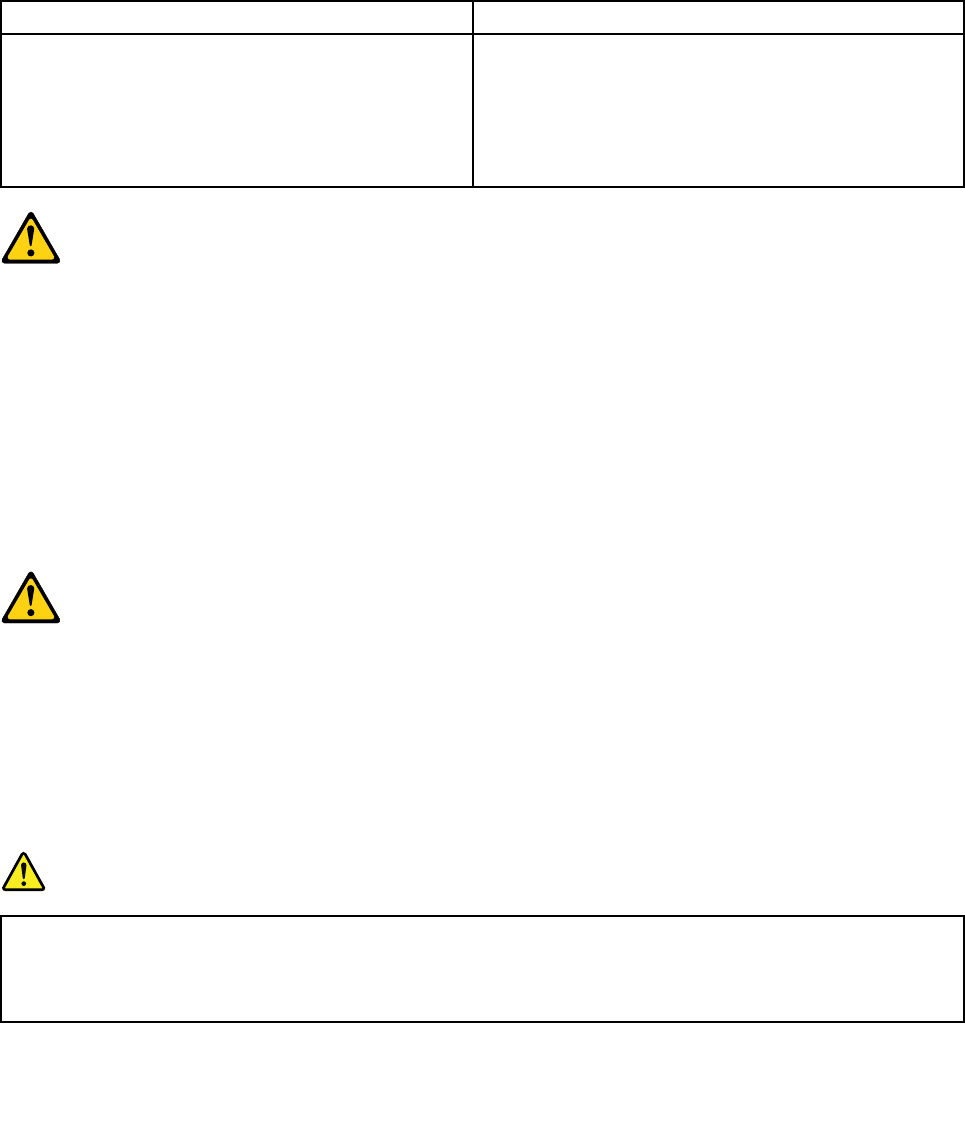
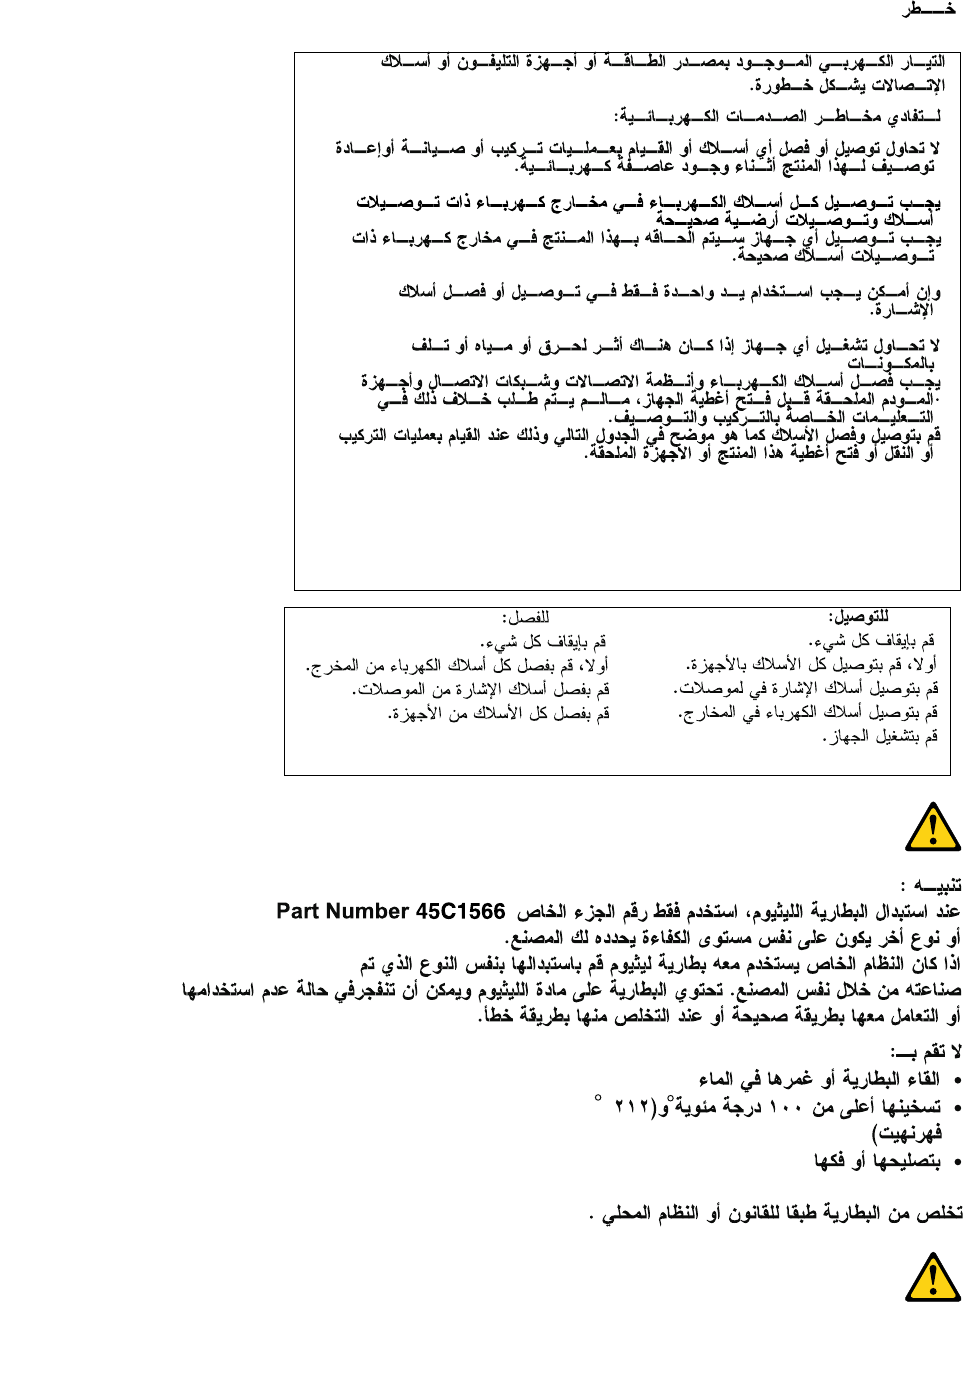
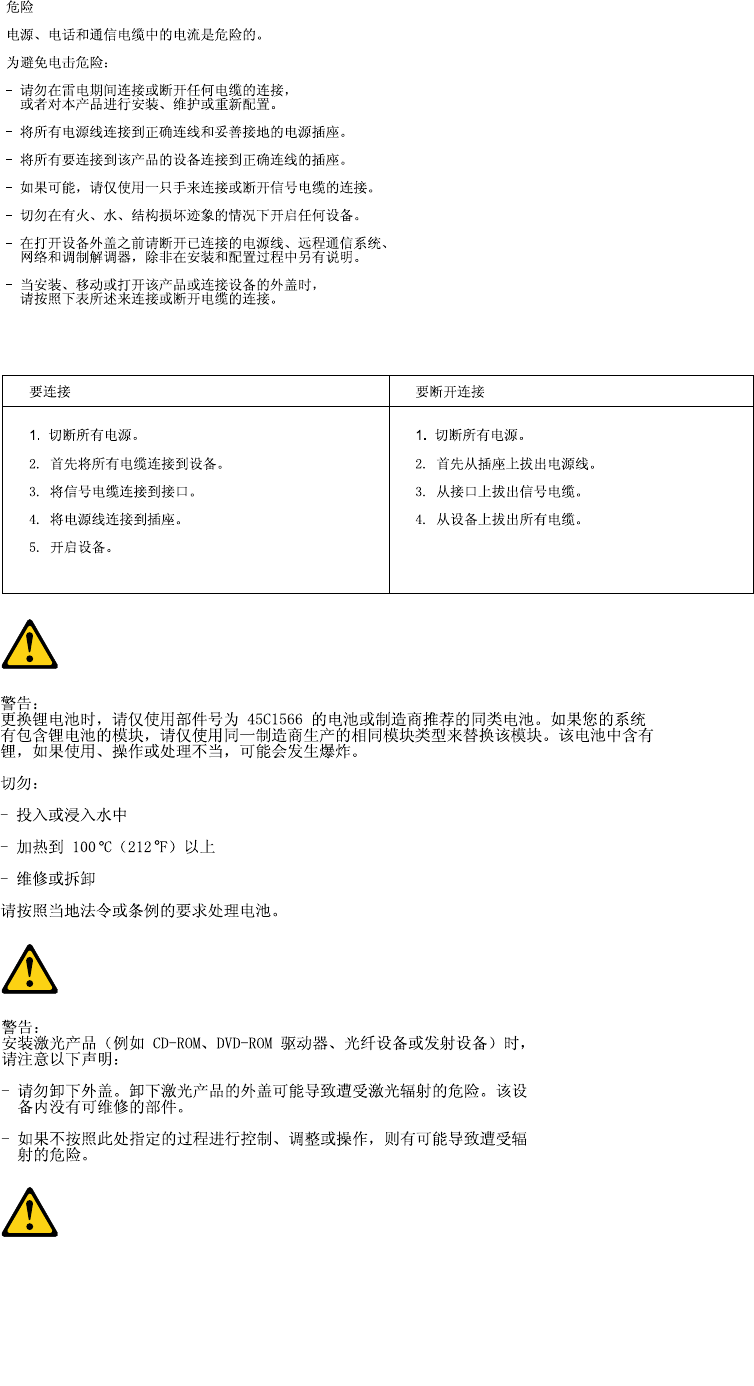
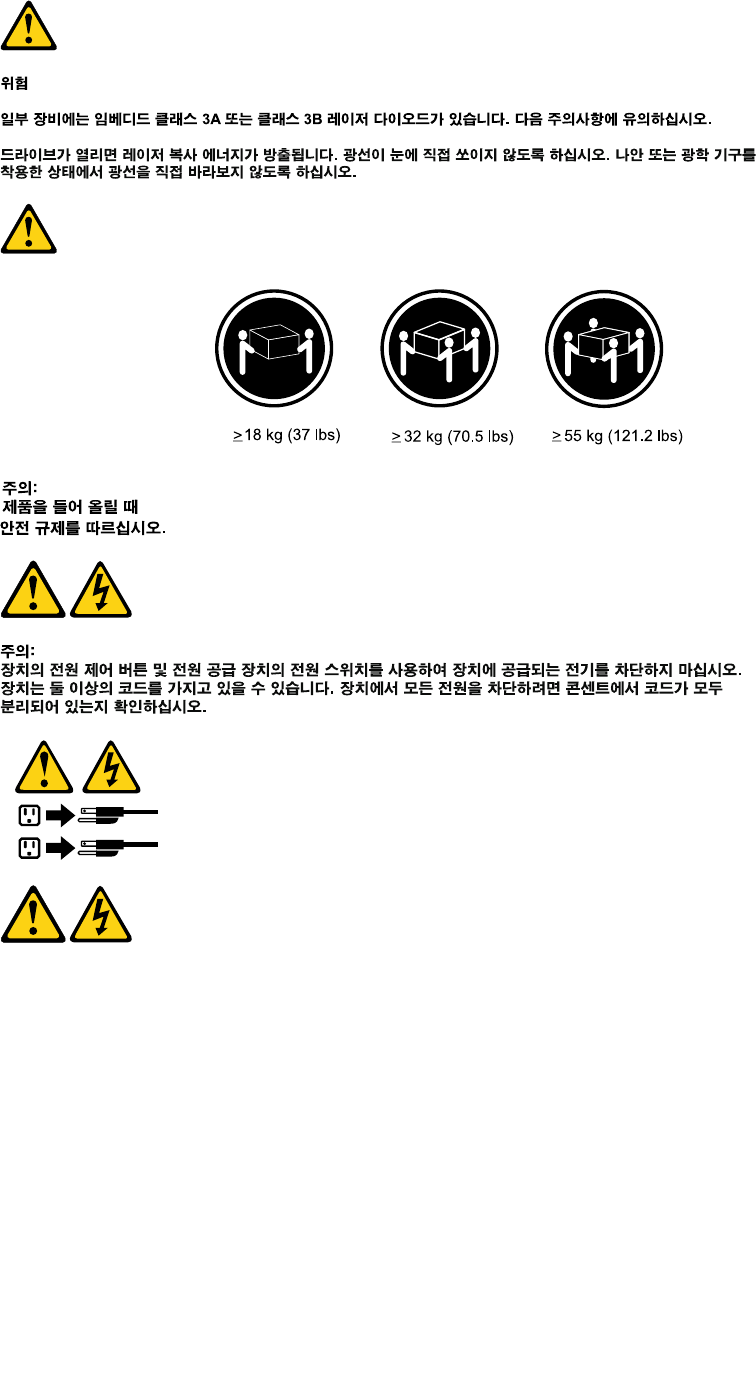
DANGER
Electricalcurrentfrompower,telephoneandcommunicationcablesishazardous.
Toavoidashockhazard:
•Donotconnectordisconnectanycablesorperforminstallation,maintenance,orreconfiguration
ofthisproductduringanelectricalstorm.
•Connectallpowercordstoaproperlywiredandgroundedelectricaloutlet.
Chapter1.Readthisfirst:Importantsafetyinformation5
•Connecttoproperlywiredoutletsanyequipmentthatwillbeattachedtothisproduct.
•Whenpossible,useonehandonlytoconnectordisconnectsignalcables.
•Neverturnonanyequipmentwhenthereisevidenceoffire,water,orstructuraldamage.
•Disconnecttheattachedpowercords,telecommunicationssystems,networks,andmodems
beforeyouopenthedevicecovers,unlessinstructedotherwiseintheinstallationandconfiguration
procedures.
•Connectanddisconnectcablesasdescribedinthefollowingtableswheninstalling,moving,or
openingcoversonthisproductorattacheddevices.
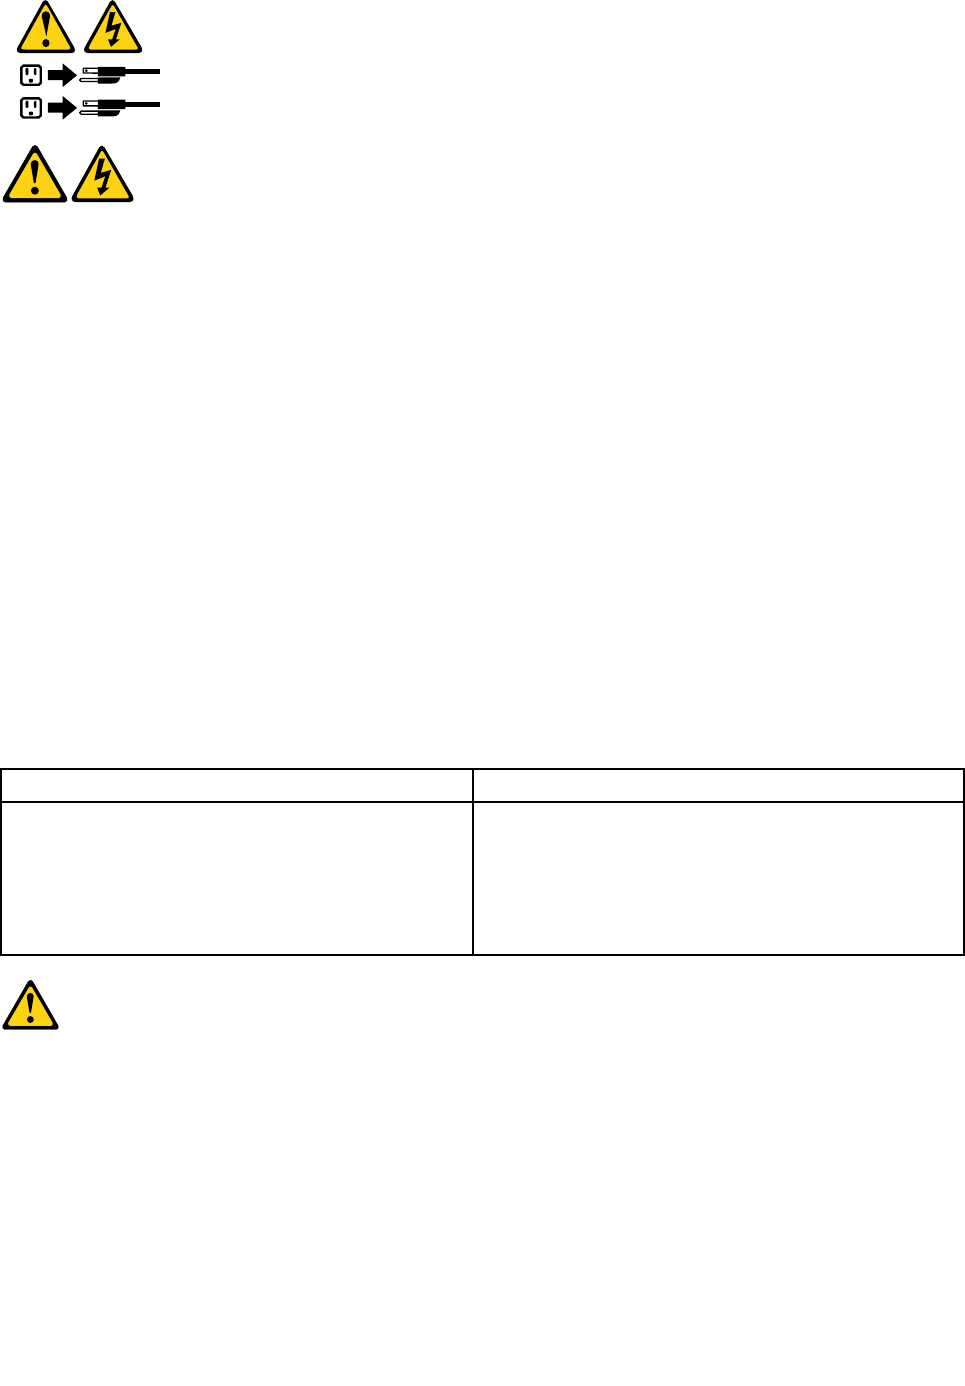
ToConnectToDisconnect
1.TurneverythingOFF.
2.First,attachallcablestodevices.
3.Attachsignalcablestoconnectors.
4.Attachpowercordstooutlet.
5.TurndeviceON.
1.TurneverythingOFF.
2.First,removepowercordsfromoutlet.
3.Removesignalcablesfromconnectors.
4.Removeallcablesfromdevices.
CAUTION:
Whenreplacingthelithiumbattery,useonlyPartNumber45C1566oranequivalenttypebattery
recommendedbythemanufacturer.Ifyoursystemhasamodulecontainingalithiumbattery,replace
itonlywiththesamemoduletypemadebythesamemanufacturer.Thebatterycontainslithiumand
canexplodeifnotproperlyused,handled,ordisposedof.Donot:
•Throworimmerseintowater
•Heattomorethan100°C(212°F)
•Repairordisassemble
Disposeofthebatteryasrequiredbylocalordinancesorregulations.
CAUTION:
Whenlaserproducts(suchasCD-ROMs,DVD-ROMdrives,fiberopticdevices,ortransmitters)are
installed,notethefollowing:
•Donotremovethecovers.Removingthecoversofthelaserproductcouldresultinexposureto
hazardouslaserradiation.Therearenoserviceablepartsinsidethedevice.
•Useofcontrolsoradjustmentsorperformanceofproceduresotherthanthosespecifiedherein
mightresultinhazardousradiationexposure.
DANGER
SomelaserproductscontainanembeddedClass3AorClass3Blaserdiode.Notethefollowing:
Laserradiationwhenopen.Donotstareintothebeam,donotviewdirectlywithoptical
instruments,andavoiddirectexposuretothebeam.
6ThinkCentreM700zandM800zHardwareMaintenanceManual
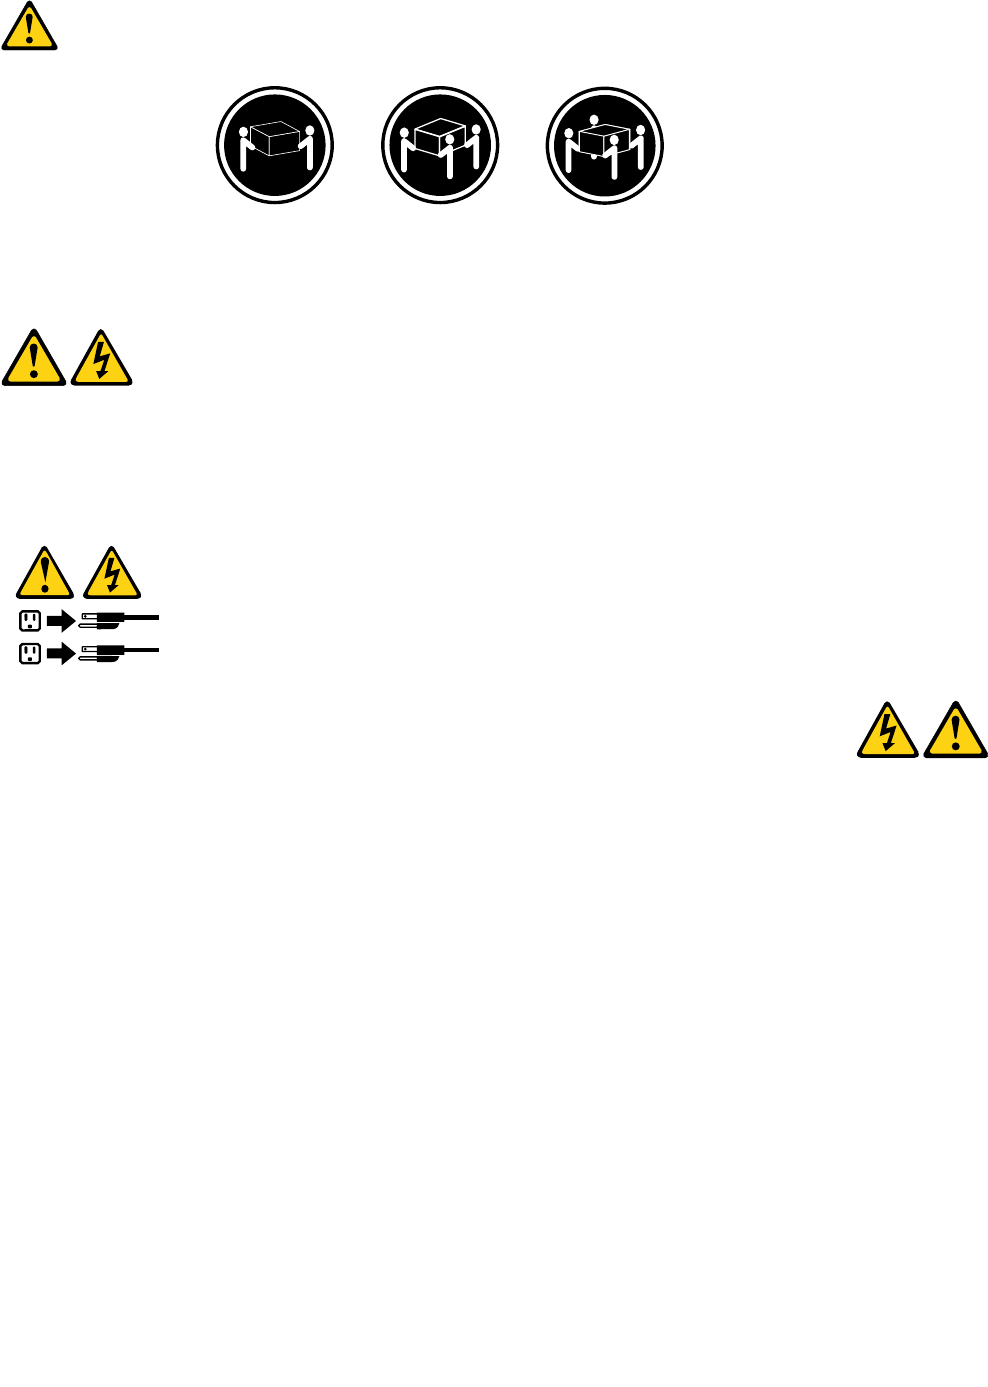
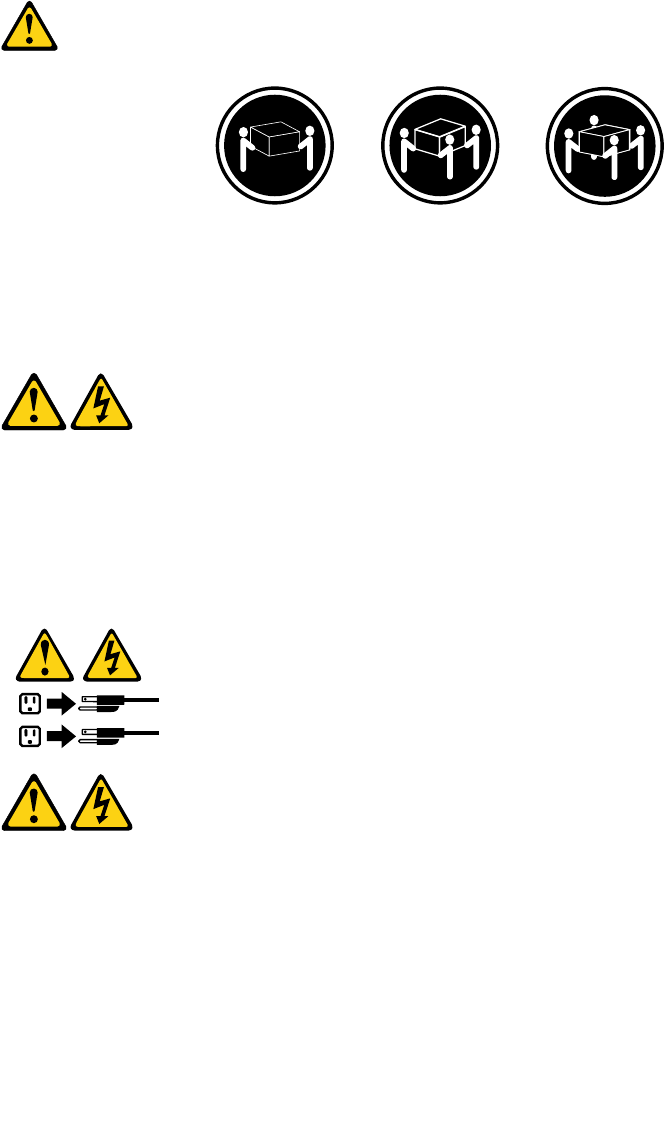
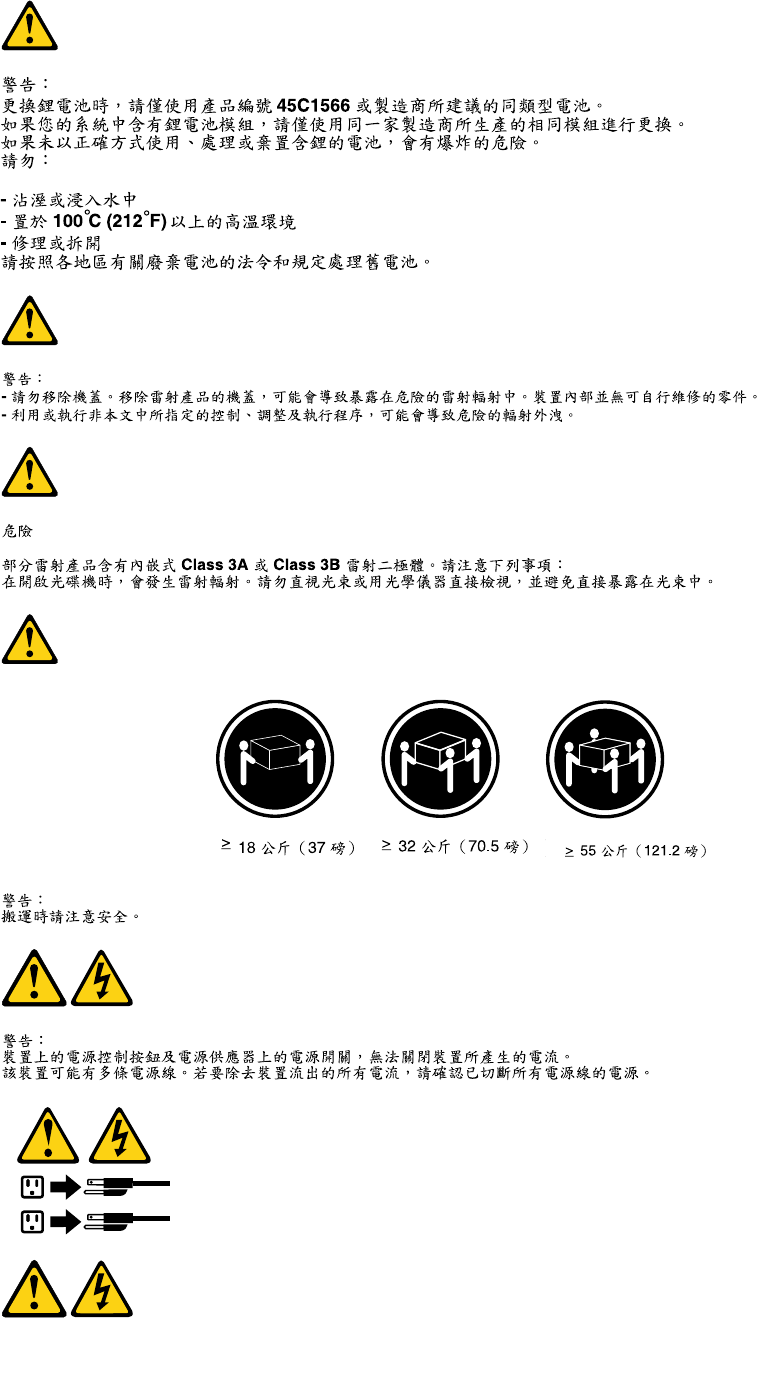
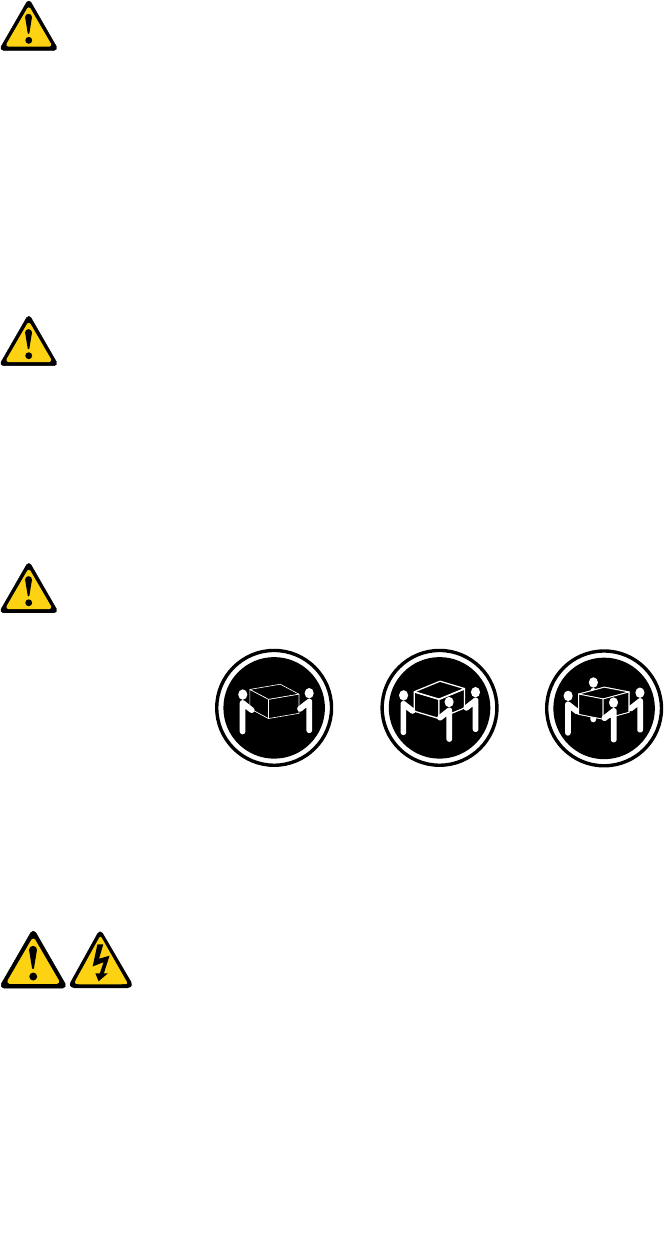
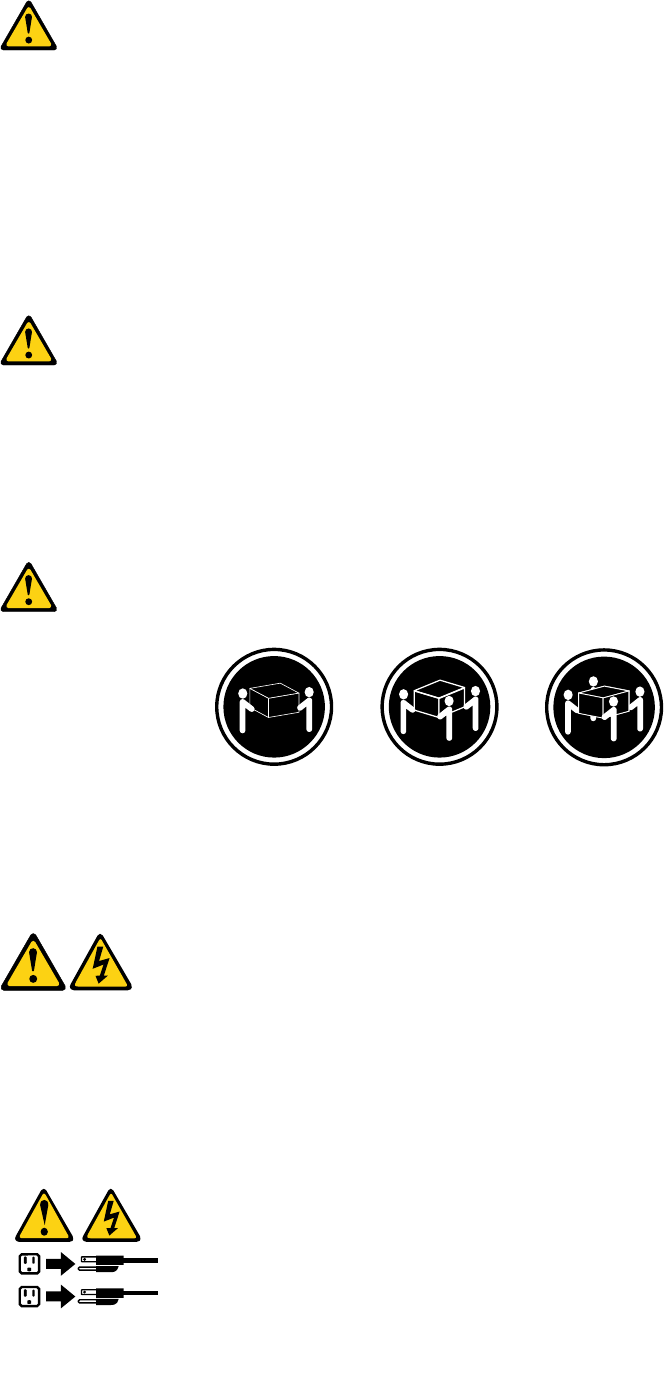
≥18kg(37lb)≥32kg(70.5lb)≥55kg(121.2lb)
CAUTION:
Usesafepracticeswhenlifting.
CAUTION:
Thepowercontrolbuttononthedeviceandthepowerswitchonthepowersupplydonotturnoff
theelectricalcurrentsuppliedtothedevice.Thedevicealsomighthavemorethanonepower
cord.Toremoveallelectricalcurrentfromthedevice,ensurethatallpowercordsaredisconnected
fromthepowersource.
1
2
Chapter1.Readthisfirst:Importantsafetyinformation7
8ThinkCentreM700zandM800zHardwareMaintenanceManual

Paraevitarriscodechoqueelétrico:
•Nãoconectenemdesconectenenhumcaboouexecuteinstalação,manutençãooureconfiguração
desteprodutoduranteumatempestadecomraios.
•Conectetodososcabosdealimentaçãoatomadaselétricascorretamenteinstaladaseaterradas.
•Todoequipamentoqueforconectadoaesteprodutodeveserconectadoatomadascorretamente
instaladas.
•Quandopossível,utilizeapenasumadasmãosparaconectaroudesconectarcabosdesinal.
•Nuncaliguenenhumequipamentoquandohouverevidênciadefogo,águaoudanosestruturais.
•Antesdeabrirtampasdedispositivos,desconectecabosdealimentação,sistemasdetelecomunicação,
redesemodemsconectados,amenosqueespecificadodemaneiradiferentenosprocedimentosde
instalaçãoeconfiguração.
•Conecteedesconecteoscabosconformedescritonatabelaapresentadaaseguiraoinstalar,moverou
abrirtampasdesteprodutooudedispositivosconectados.
ParaConectar:ParaDesconectar:
1.DESLIGUETudo.
2.Primeiramente,conectetodososcabosaos
dispositivos.
3.Conecteoscabosdesinalaosconectores.
4.Conecteoscabosdealimentaçãoàstomadas.
5.LIGUEosdispositivos.
1.DESLIGUETudo.
2.Primeiramente,removaoscabosdealimentaçãodas
tomadas.
3.Removaoscabosdesinaldosconectores.
4.Removatodososcabosdosdispositivos.
CUIDADO:
Aosubstituirabateriadelítio,utilizeapenasumabateriacomNúmerodePeça45C1566ouumtipo
debateriaequivalenterecomendadopeloSeoseusistemapossuiummódulocomumabateriade
lítio,substitua-oapenasporummódulodomesmotipoedomesmofabricante.Abateriacontémlítio
epodeexplodirsenãoforutilizada,manuseadaoudescartadademaneiracorreta.
Não:
•Jogueoucoloquenaágua
•Aqueçaamaisde100°C(212°F)
•Consertenemdesmonte
Descarteabateriaconformerequeridopelasleisouregulamentoslocais.
PRECAUCIÓN:
Quandoprodutosalaser(comounidadesdeCD-ROMs,unidadesdeDVD-ROM,dispositivosdefibraótica
outransmissores)estivereminstalados,observeoseguinte:
•Nãoremovaastampas.Aremoçãodastampasdeumprodutoalaserpoderesultaremexposição
prejudicialàradiaçãodelaser.Nãoexistempeçasquepodemserconsertadasnointeriordodispositivo.
10ThinkCentreM700zandM800zHardwareMaintenanceManual
•Autilizaçãodecontrolesouajustesouaexecuçãodeprocedimentosdiferentesdosespecificadosaqui
poderesultaremexposiçãoprejudicialàradiação.
PERIGO
AlgunsprodutosalasercontêmdiododelaserintegradodaClasse3AoudaClasse3B.Observeoseguinte:
Radiaçãoalaserquandoaberto.Nãoolhediretamenteparaofeixeaolhonuoucominstrumentosópticose
eviteexposiçãodiretaaofeixe.
≥18kg(37lb)≥32kg(70.5lb)≥55kg(121.2lb)
CUIDADO:
Utilizeprocedimentosdesegurançaparalevantarequipamentos.
CUIDADO:
Obotãodecontroledealimentaçãododispositivoeobotãoparaligar/desligardafontedealimentação
nãodesligamacorrenteelétricafornecidaaodispositivo.Odispositivotambémpodetermaisdeumcabo
dealimentação.Pararemovertodaacorrenteelétricadodispositivo,assegurequetodososcabosde
alimentaçãoestejamdesconectadosdafontedealimentação.
1
2
Chapter1.Readthisfirst:Importantsafetyinformation11
12ThinkCentreM700zandM800zHardwareMaintenanceManual

1
2
14ThinkCentreM700zandM800zHardwareMaintenanceManual

DANGER
Lecourantélectriqueprovenantdel'alimentation,dutéléphoneetdescâblesdetransmissionpeutprésenter
undanger.
Pourévitertoutrisquedechocélectrique:
•Nemanipulezaucuncâbleetn'effectuezaucuneopérationd'installation,d'entretienoudereconfiguration
deceproduitaucoursd'unorage.
•Brancheztouslescordonsd'alimentationsurunsocledeprisedecourantcorrectementcâbléetmisàla
terre.
•Branchezsurdessoclesdeprisedecourantcorrectementcâbléstoutéquipementconnectéàceproduit.
•Lorsquecelaestpossible,n'utilisezqu'uneseulemainpourconnecteroudéconnecterlescâbles
d'interface.
•Nemettezjamaisunéquipementsoustensionencasd'incendieoud'inondation,ouenprésencede
dommagesmatériels.
•Avantderetirerlescartersdel'unité,mettezcelle-cihorstensionetdéconnectezsescordons
d'alimentation,ainsiquelescâblesquilarelientauxréseaux,auxsystèmesdetélécommunicationetaux
modems(saufinstructioncontrairementionnéedanslesprocéduresd'installationetdeconfiguration).
•Lorsquevousinstallez,quevousdéplacez,ouquevousmanipulezleprésentproduitoudespériphériques
quiluisontraccordés,reportez-vousauxinstructionsci-dessouspourconnecteretdéconnecterles
différentscordons.
ConnexionDéconnexion
1.MettezlesunitésHORSTENSION.
2.Commencezparbranchertouslescordonssurles
unités.
3.Branchezlescâblesd'interfacesurdesconnecteurs.
4.Branchezlescordonsd'alimentationsurdesprises.
5.MettezlesunitésSOUSTENSION.
1.MettezlesunitésHORSTENSION.
2.Débranchezlescordonsd'alimentationdesprises.
3.Débranchezlescâblesd'interfacedesconnecteurs.
4.Débrancheztouslescâblesdesunités.
ATTENTION:
Remplacerlapileaulithiumusagéeparunepilederéférenceidentiqueexclusivement,(référence
45C1566),ousuivrelesinstructionsdufabricantquiendéfinitleséquivalences.Sivotresystèmeest
dotéd'unmodulecontenantunepileaulithium,vousdevezleremplaceruniquementparunmodule
identique,produitparlemêmefabricant.Lapilecontientdulithiumetpeutexploserencasde
mauvaiseutilisation,demauvaisemanipulationoudemiseaurebutinappropriée.
Nepas:
•lajeteràl'eau,
•l'exposeràdestempératuressupérieuresà100°C,
•chercheràlaréparerouàladémonter.
Nepasmettrelapileàlapoubelle.Pourlamiseaurebut,sereporteràlaréglementationenvigueur.
Chapter1.Readthisfirst:Importantsafetyinformation15
ATTENTION:
Sidesproduitsàlaser(telsquedesunitésdeCD-ROM,deDVD-ROM,desunitésàfibresoptiques,ou
desémetteurs)sontinstallés,prenezconnaissancedesinformationssuivantes:
•Neretirezpaslecarter.Enouvrantl'unitédeCD-ROMoudeDVD-ROM,vousvousexposezau
rayonnementdangereuxdulaser.Aucunepiècedel'unitén'estréparable.
•Pourévitertoutrisqued'expositionaurayonlaser,respectezlesconsignesderéglageet
d'utilisationdescommandes,ainsiquelesprocéduresdécritesdansleprésentmanuel.
DANGER
Certainsproduitsàlasercontiennentunediodeàlaserintégréedeclasse3Aou3B.Prenez
connaissancedesinformationssuivantes:
Rayonnementlaserlorsquelecarterestouvert.Eviteztouteexpositiondirecteaurayonlaser.Evitez
deregarderfixementlefaisceauoudel'observeràl'aided'instrumentsoptiques.
≥18kg(37lb)≥32kg(70.5lb)≥55kg(121.2lb)
ATTENTION:
Soulevezlamachineavecprécaution.
ATTENTION:
L'interrupteurdecontrôled'alimentationdel'unitéetl'interrupteurdublocd'alimentationnecoupent
paslecourantélectriquealimentantl'unité.Enoutre,lesystèmepeutêtreéquipédeplusieurs
cordonsd'alimentation.Pourmettrel'unitéhorstension,vousdevezdéconnectertouslescordons
delasourced'alimentation.
16ThinkCentreM700zandM800zHardwareMaintenanceManual
1
2
VORSICHT
AnNetz-,Telefon-undDatenleitungenkönnengefährlicheSpannungenanliegen.
AusSicherheitsgründen:
•BeiGewitterandiesemGerätkeineKabelanschließenoderlösen.FernerkeineInstallations-,
Wartungs-oderRekonfigurationsarbeitendurchführen.
•GerätnuraneineSchutzkontaktsteckdosemitordnungsgemäßgeerdetemSchutzkontakt
anschließen.
•AlleangeschlossenenGeräteebenfallsanSchutzkontaktsteckdosenmitordnungsgemäß
geerdetemSchutzkontaktanschließen.
•DieSignalkabelnachMöglichkeiteinhändiganschließenoderlösen,umeinenStromschlagdurch
BerührenvonOberflächenmitunterschiedlichemelektrischemPotenzialzuvermeiden.
•Geräteniemalseinschalten,wennHinweiseaufFeuer,WasseroderGebäudeschädenvorliegen.
•DieVerbindungzudenangeschlossenenNetzkabeln,Telekommunikationssystemen,Netzwerken
undModemsistvordemÖffnendesGehäuseszuunterbrechen,sofernindenInstallations-und
KonfigurationsprozedurenkeineanderslautendenAnweisungenenthaltensind.
•ZumInstallieren,TransportierenundÖffnenderAbdeckungendesComputersoderder
angeschlossenenEinheitendieKabelgemäßderfolgendenTabelleanschließenundabziehen.
ZumAnschließenderKabelgehenSiewiefolgtvorZumAbziehenderKabelgehenSiewiefolgtvor
1.SchaltenSiealleEinheitenAUS.
2.SchließenSieerstalleKabelandieEinheitenan.
3.SchließenSiedieSignalkabelandieBuchsenan.
4.SchließenSiedieNetzkabelandieSteckdosean.
5.SchaltenSiedieEinheitEIN.
1.SchaltenSiealleEinheitenAUS.
2.ZiehenSiezuerstalleNetzkabelausden
Netzsteckdosen.
3.ZiehenSiedieSignalkabelausdenBuchsen.
4.ZiehenSiealleKabelvondenEinheitenab.
CAUTION:
EineverbrauchteLithiumbatterienurdurcheineBatteriemitderTeilenummer45C1566odereine
gleichwertige,vomHerstellerempfohleneBatterieersetzen.EnthältdasSystemeinModulmiteiner
Lithiumbatterie,diesesnurdurcheinModuldesselbenTypsundvondemselbenHerstellerersetzen.
DieBatterieenthältLithiumundkannbeiunsachgemäßerVerwendung,HandhabungoderEntsorgung
explodieren.
DieBatterienicht:
•mitWasserinBerührungbringen.
Chapter1.Readthisfirst:Importantsafetyinformation17
•über100Cerhitzen.
•reparierenoderzerlegen.
DieörtlichenBestimmungenfürdieEntsorgungvonSondermüllbeachten.
ACHTUNG:
BeiderInstallationvonLasergeräten(wieCD-ROM-Laufwerken,DVD-aufwerken,Einheitenmit
LichtwellenleitertechnikoderSendern)Folgendesbeachten:
•DieAbdeckungennichtentfernen.DurchEntfernenderAbdeckungendesLasergerätskönnen
gefährlicheLaserstrahlungenfreigesetztwerden.DasGerätenthältkeinezuwartendenTeile.
•WerdenSteuerelemente,EinstellungenoderDurchführungenvonProzedurenandersalshier
angegebenverwendet,kanngefährlicheLaserstrahlungauftreten.
VORSICHT
EinigeLasergeräteenthalteneineLaserdiodederKlasse3Aoder3B.BeachtenSieFolgendes:
LaserstrahlungbeigeöffneterVerkleidung.NichtindenStrahlblicken.KeineLupenoderSpiegel
verwenden.Strahlungsbereichmeiden.
≥18kg≥32kg≥55kg
ACHTUNG:
ArbeitsschutzrichtlinienbeimAnhebenderMaschinebeachten.
ACHTUNG:
MitdemNetzschalteranderEinheitundamNetzteilwirddieStromversorgungfürdieEinheit
nichtunterbrochen.DieEinheitkannauchmitmehrerenNetzkabelnausgestattetsein.Umdie
StromversorgungfürdieEinheitvollständigzuunterbrechen,müssenallezumGerätführenden
NetzkabelvomNetzgetrenntwerden.
18ThinkCentreM700zandM800zHardwareMaintenanceManual

1
2
20ThinkCentreM700zandM800zHardwareMaintenanceManual
PERICOLO
Lacorrenteelettricaprovenientedaicavidialimentazione,deltelefonoedicomunicazionepuòessere
pericolosa.
Perevitareilrischiodiscosseelettriche:
•Noncollegareoscollegarequalsiasicavooppureeffettuarel'installazione,lamanutenzioneola
riconfigurazionedelprodottoduranteuntemporale.
•Collegaretuttiifilielettriciaunapresadialimentazionecorrettamentecablataedotatadimessaa
terra.
•Collegareallepreseelettricheappropriatetutteleapparecchiaturecheverrannoutilizzateper
questoprodotto.
•Sepossibile,utilizzaresolounamanopercollegareoscollegareicavidisegnale.
•Nonaccendereassolutamenteapparecchiatureinpresenzadiincendi,perdited'acquaodanno
strutturale.
•Scollegareicavidialimentazione,isistemiditelecomunicazione,leretieilmodemprimadi
aprireicoperchideldispositivo,salvoistruzionicontrarierelativealleprocedurediinstallazionee
configurazione.
•Collegareescollegareicavicomedescrittonellaseguentetabellaquandovengonoeffettuate
operazionidiinstallazione,spostamentooaperturadeicoperchidiquestoprodottoodelleunità
collegate.
PercollegarsiPerscollegarsi
1.SPEGNEREleapparecchiature.
2.Innanzitutto,collegaretuttiicavialleunità.
3.Collegareicavidisegnaleaiconnettori.
4.Collegareicavidialimentazioneallapresa.
5.Accenderel'unità.
1.SPEGNEREleapparecchiature.
2.Innanzitutto,rimuovereicavidialimentazionedalla
presa.
3.Rimuovereicavidisegnaledaiconnettori.
4.Rimuoveretuttiicavidalleunità.
ATTENZIONE:
Quandosisostituiscelabatteriaallitio,utilizzaresoloilNumeroparte45C1566ountipodibatteria
equivalenteconsigliatodalproduttore.Sesulsistemaèpresenteunmodulochecontieneunabatteria
allitio,sostituirlosoloconuntipodimodulodellostessotipodellastessacasadiproduzione.La
batteriacontienelitioepuòesplodereseusata,maneggiataosmaltitainmodononcorretto.
Non:
•Gettareoimmergerelabatterianell'acqua
•Riscaldarlaadunatemperaturasuperioreai100gradiC(212gradiF)
•Smontarla,ricaricarlaotentarediripararla
Lebatterieusatevannosmaltiteinaccordoallanormativainvigore(DPR915/82esuccessive
disposizioniedisposizionilocali).
Chapter1.Readthisfirst:Importantsafetyinformation21
ATTENZIONE:
Quandovengonoinstallatiprodottilaser(qualiCD-ROM,unitàDVD-ROM,unitàafibreotticheo
trasmittenti),tenerpresentequantosegue:
•Nonrimuovereglisportelli.L'aperturadiun'unitàlaserpuòdeterminarel'esposizionearadiazioni
laserpericolose.All'internodell'unitànonvisonopartisucuieffettuarel'assistenzatecnica.
•L'utilizzodicontrolli,regolazioniol'esecuzionediprocedurenondescrittinelpresentemanuale
possonoprovocarel'esposizionearadiazionipericolose.
PERICOLO
AlcuneunitàlasercontengonoundiodolaserdiClasse3AoClasse3B.Tenerpresentequantosegue:
Aprendol'unitàvengonoemesseradiazionilaser.Nonfissareilfascio,nonguardarlodirettamente
construmentiotticiedevitarel'esposizionealfascio.
≥18kg≥32kg≥55kg
ATTENZIONE:
Prestareattenzionenelsollevarel'apparecchiatura.
ATTENZIONE:
Ilpulsantedicontrollodell'alimentazionepresentesull'unitàel'interruttoredell'alimentatorenon
disattivanol'alimentazionecorrentefornitaall'unità.E'possibilechel'unitàdispongadipiùcavidi
alimentazione.Perdisattivarel'alimentazionedall'unità,accertarsichetuttiicavidialimentazione
sianoscollegatidallafontedialimentazione.
1
2
22ThinkCentreM700zandM800zHardwareMaintenanceManual

1
2
PELIGRO
Lacorrienteeléctricaprocedentedecablesdealimentación,teléfonosycablesdecomunicaciónpuede
serpeligrosa.
Paraevitarelriesgodedescargaeléctrica:
•Noconectenidesconecteloscablesnirealiceningunatareadeinstalación,mantenimientoo
reconfiguracióndeesteproductoduranteunatormentaeléctrica.
•Conectetodosloscablesdealimentaciónatomasdecorrientedebidamentecableadasy
conectadasatierra.
•Cualquierequipoqueseconecteaesteproductotambiéndebeconectarseatomasdecorriente
debidamentecableadas.
•Siemprequeseaposible,utiliceunasolamanoparaconectarodesconectarloscablesdeseñal.
24ThinkCentreM700zandM800zHardwareMaintenanceManual
•Noenciendanuncaunequipocuandohayseñalesdefuego,aguaodañosestructurales.
•Desconecteloscablesdealimentación,lossistemasdetelecomunicaciones,lasredesylos
módemsconectadosantesdeabrirlascubiertasdelosdispositivos,amenosqueseindiquelo
contrarioenlosprocedimientosdeinstalaciónyconfiguración.
•Conecteydesconecteloscables,comosedescribeenlatablasiguiente,cuandoinstale,muevao
abralascubiertasdeesteproductoodelosdispositivosconectados.
ParaconectarParadesconectar
1.APÁGUELOtodo.
2.Enprimerlugar,conectetodosloscablesalos
dispositivos.
3.Conecteloscablesdeseñalalosconectores.
4.Enchufeloscablesdealimentaciónalastomasde
corriente.
5.Enciendaeldispositivo.
1.APÁGUELOtodo.
2.Enprimerlugar,desenchufeloscablesdealimentación
delastomasdecorriente.
3.Desconecteloscablesdeseñaldelosconectores.
4.Desconectetodosloscablesdelosdispositivos.
PRECAUCIÓN:
Cuandosustituyaunabateríadelitio,utilicesolamenteunabateríanúmerodepieza45C1566uotra
detipoequivalenterecomendadaporelfabricante.Sisusistemadisponedeunmóduloquecontiene
unabateríadelitio,reemplácelosóloconelmismotipodemódulo,delmismofabricante.Labatería
contienelitioypuedeexplotarsinoseutiliza,manipulaodesechacorrectamente.
Nodebe:
•Arrojarlaalaguaosumergirlaenella
•Exponerlaatemperaturassuperioresa100°C(212°F)
•Repararlaodesmontarla
Deshágasedelabateríasegúnespecifiquenlasleyesonormaslocales.
PRECAUCIÓN:
Cuandohayaproductosláser(comounidadesdeCD-ROM,unidadesdeDVD,dispositivosdefibra
ópticaotransmisores)instalados,tengaencuentalosiguiente:
•Noquitelascubiertas.Siquitalascubiertasdelproductoláser,podríaquedarexpuestoaradiación
láserpeligrosa.Dentrodeldispositivonoexisteningunapiezaquerequieraserviciotécnico.
•Siusacontrolesoajustesorealizaprocedimientosquenoseanlosespecificadosaquí,podría
exponersearadiacionespeligrosas.
PELIGRO
Chapter1.Readthisfirst:Importantsafetyinformation25
Algunosproductoslásertienenincorporadoundiodoláserdeclase3Aoclase3B.Tengaencuentalo
siguiente:
Cuandoseabre,quedaexpuestoaradiaciónláser.Nomiredirectamentealrayoláser,nisiquieracon
instrumentosópticos,yeviteexponersedirectamentealrayoláser.
≥18kg≥32kg≥55kg
PRECAUCIÓN:
Adopteprocedimientossegurosallevantarelequipo.
PRECAUCIÓN:
Elbotóndecontroldealimentacióndeldispositivoyelinterruptordealimentacióndelafuentede
alimentaciónnodesconectanlacorrienteeléctricasuministradaaldispositivo.Además,eldispositivo
podríatenermásdeuncabledealimentación.Parasuprimirtodalacorrienteeléctricadeldispositivo,
asegúresedequetodosloscablesdealimentaciónesténdesconectadosdelatomadecorriente.
1
2
26ThinkCentreM700zandM800zHardwareMaintenanceManual
Chapter2.Productoverview
Thischapterprovidesinformationaboutthefollowingtopics:
•“Hardwarelocations”onpage27
•“Features”onpage43
•“Specifications”onpage45
•“Programs”onpage46
Hardwarelocations
Thissectionprovidesinformationaboutthelocationsofyourcomputerhardware.
Note:Thecomputerhardwaremightlookslightlydifferentfromtheillustrations.
Frontview
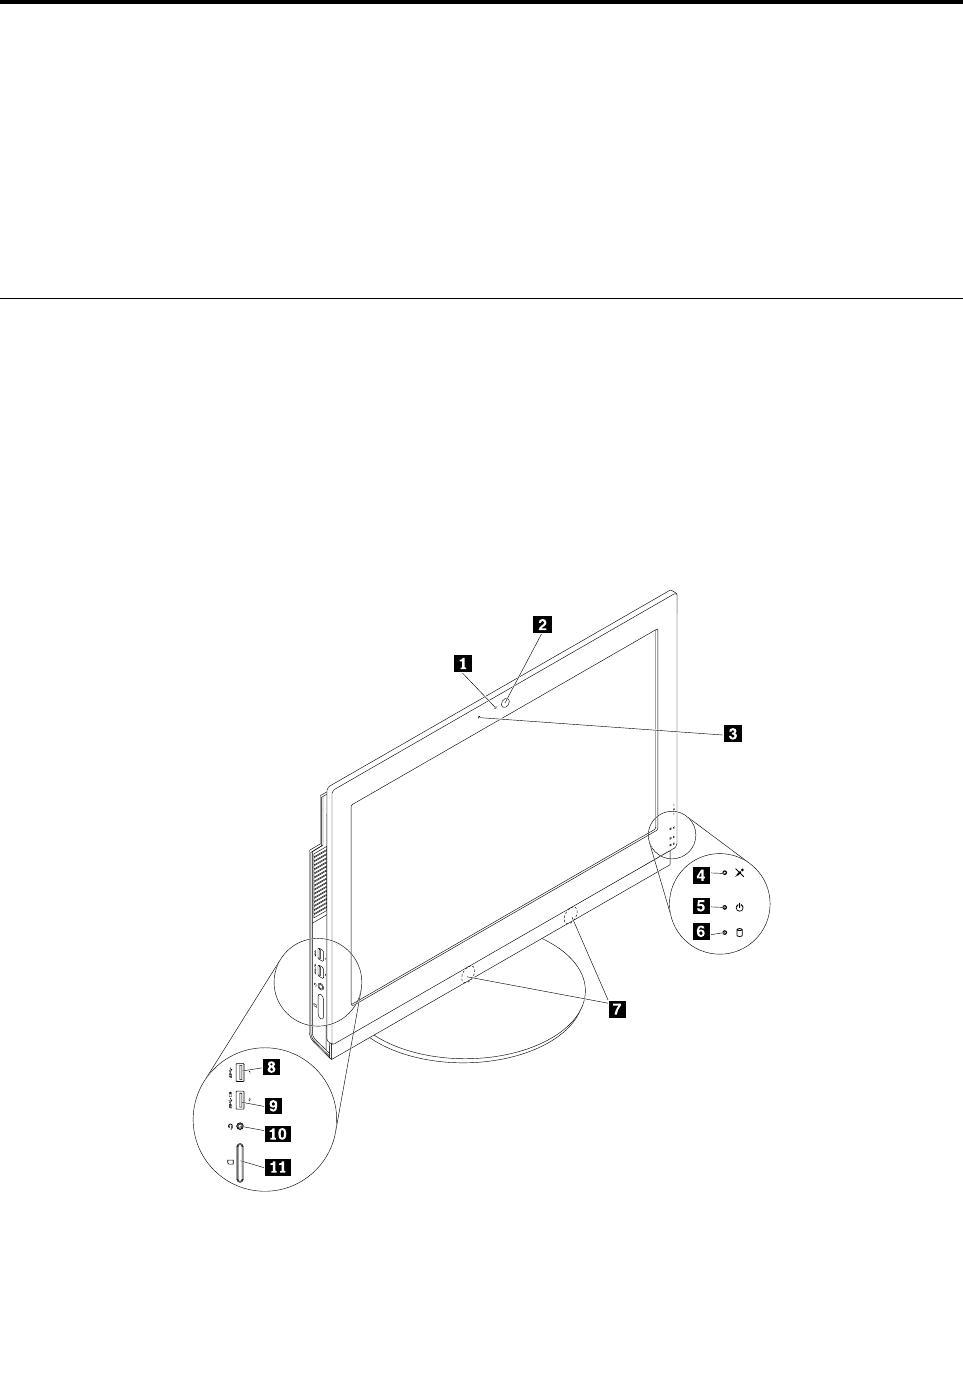
ForM700z
Figure1.Frontview
©CopyrightLenovo201527
1Integratedcameraactivityindicator(somemodels)2Integratedcamera(somemodels)
3Integratedmicrophone(somemodels)4Microphone-muteindicator
5Powerindicator6Storagedriveactivityindicator
7Internalspeakers(2)8USB3.0connector
9AlwaysOnUSB3.0connector(forrapidcharge)10Headsetconnector(alsoknownascomboaudiojack)
11Cardreaderslot(somemodels)
ForM800z
1Integratedcameraactivityindicator(somemodels)2Integratedcamera(somemodels)
3Integratedmicrophone(somemodels)4Microphone-muteindicator
5Powerindicator6Storagedriveactivityindicator
7Internalspeakers(2)8USB3.0connector
9AlwaysOnUSB3.0connector(forrapidcharge)10Headsetconnector(alsoknownascomboaudiojack)
11Cardreaderslot(somemodels)
•AlwaysOnUSB3.0connector(forrapidcharge)
UsedtoconnectadevicethatrequiresaUSB2.0orUSB3.0connection,suchasakeyboard,amouse,a
scanner,aprinter,orapersonaldigitalassistant(PDA).Withtheacpoweradapterconnected,youcan
chargetheautomaticallydetecteddeviceevenwhenthecomputerisinhibernationmodeorturnedoff.If
theAlwaysOnUSBconnectorfunctionisnotenabled,openthePowerManagerprogramandenablethe
function.ToopenthePowerManagerprogram,see“Accessingaprogramonyourcomputer”onpage
46.ToenabletheAlwaysOnUSBconnector,refertothehelpsystemofthePowerManagerprogram.
28ThinkCentreM700zandM800zHardwareMaintenanceManual

•Cardreaderslot
Usedtoholdacard-shapedstoragemediumsothatthecardreadercanreadthedataonthestorage
medium.
•Headsetconnector(alsoknownascomboaudiojack)
Usedtoconnectaheadsetorheadphonestoyourcomputer.
•Microphone-muteindicator
Whenthemicrophone-muteindicatorison,themicrophonesaremuted.
•Integratedcamera
Usedtotakepicturesorholdavideoconference.
•Integratedcameraactivityindicator
Whentheindicatorison,thecameraisinuse.
•Integratedmicrophone
Usedtorecordsoundsorusespeech-recognitionsoftwarewithoutusingamicrophone.
•Internalspeaker
Usedtolistentothesoundsfromyourcomputerwithoutusingaheadsetorheadphones.
•Powerindicator
Whentheindicatorison,thecomputerison.
•Storagedriveactivityindicator
Whentheindicatorison,thestoragedrivesareinuse.
•USB3.0connector
UsedtoconnectadevicethatrequiresaUSB2.0orUSB3.0connection,suchasakeyboard,amouse,a
scanner,aprinter,oraPDA.
Chapter2.Productoverview29
Rearview
Note:Thecomputerstandisavailableonlyonsomemodels.
•Ifyourcomputercomeswithacomputerstand,ensurethatyouusethecomputerwiththestandinstalled.
Ifyouwanttousethecomputerwiththestandremoved,donotturnonthecomputerbeforecontacting
theLenovoCustomerSupportCenterfortheadditionalthermalsolution.
•Ifyourcomputerdoesnotcomewithacomputerstand,donottearofftheMylarontherearofthe
computer.Afterinitialsetup,youcanusethecomputer.
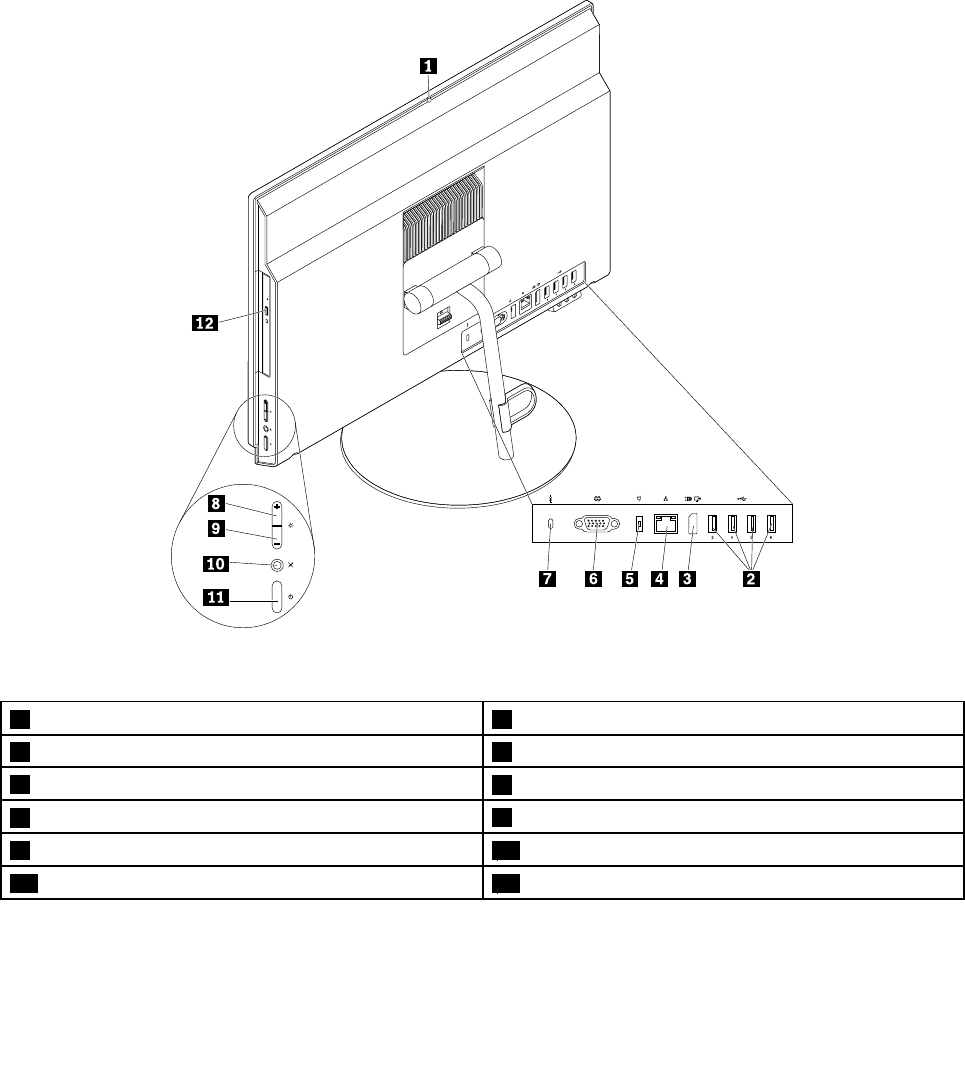
ForM700z
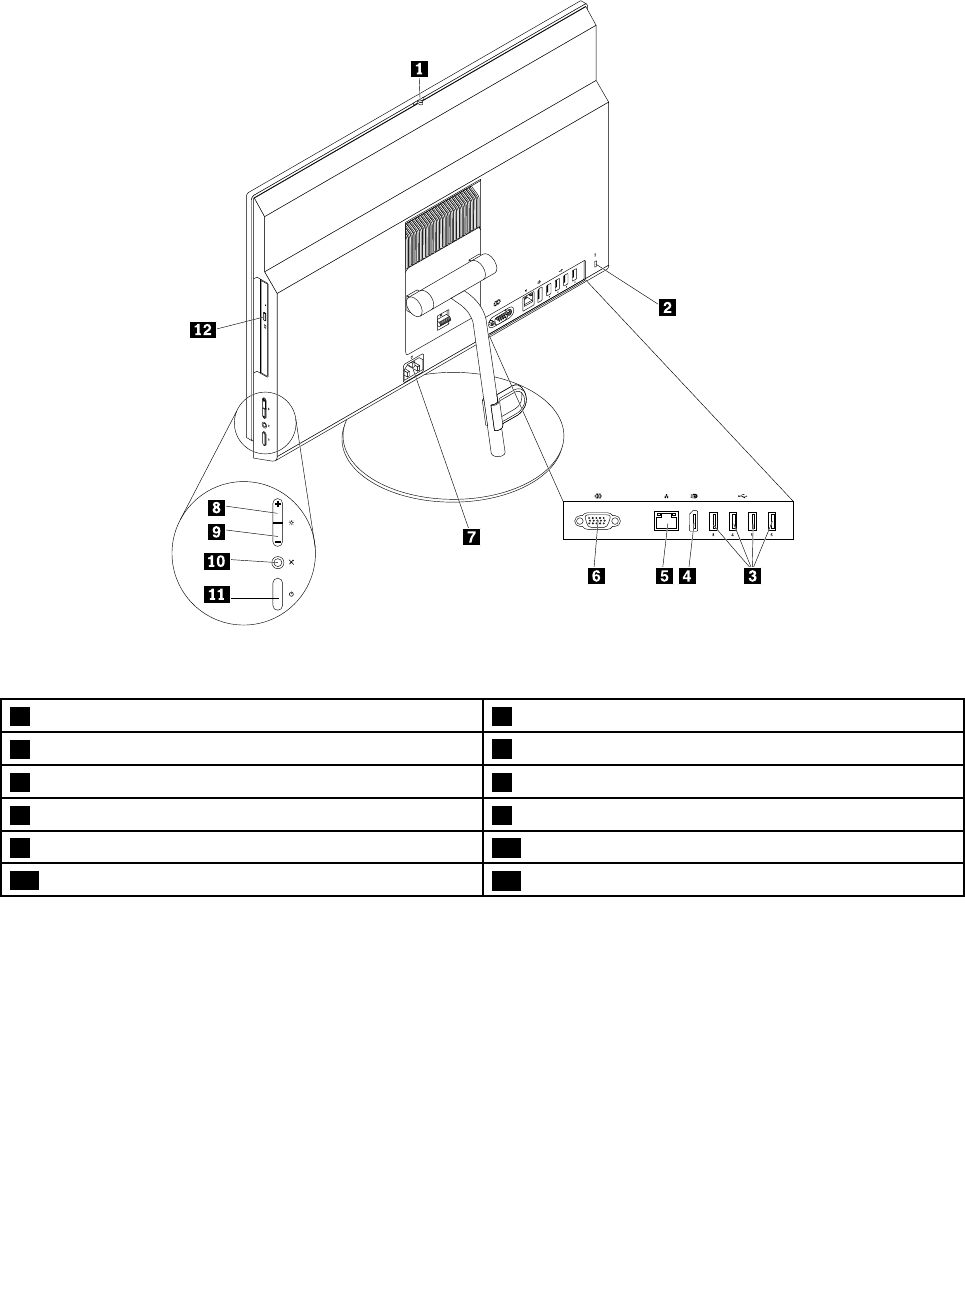
Figure2.Rearview
1Integratedcamerashieldcontrolslider(somemodels)2USB2.0connectors(4)
3DisplayPort®-outconnector4Ethernetconnector
5Powercordconnector6Serialconnector(somemodels)
7Security-lockslot8Brightness-upcontrol
9Brightness-downcontrol10Microphone-mutebutton
11Powerbutton12Opticaldriveeject/closebutton(somemodels)
30ThinkCentreM700zandM800zHardwareMaintenanceManual
ForM800z
Figure3.Rearview
1Integratedcamerashieldcontrolslider(somemodels)2Security-lockslot
3USB2.0connectors(4)4DisplayPort®-outconnector
5Ethernetconnector6Serialconnector(somemodels)
7Powercordconnector8Brightness-upcontrol
9Brightness-downcontrol10Microphone-mutebutton
11Powerbutton12Opticaldriveeject/closebutton(somemodels)
•Brightness-downcontrol
Usedtodecreasethebrightness.
•Brightness-upcontrol
Usedtoincreasethebrightness.
•DisplayPort-outconnector
Usedtoconnectahigh-performancemonitor,adirect-drivemonitor,orotherdevicesthatusea
DisplayPortconnector.
Chapter2.Productoverview31

•Ethernetconnector
UsedtoconnectanEthernetcableforaLAN.
Note:TooperatethecomputerwithinFederalCommunicationsCommission(FCC)ClassBlimits,usea
Category5eorbetterEthernetcable.
•Integratedcamerashieldcontrolslider
Usedtoblocktheintegratedcamera.
•Microphone-mutebutton
Usedtomuteorunmutethemicrophones.
•Opticaldriveeject/closebutton
Usedtoejectthetrayoftheopticaldrivefromthedrive.Afteryouinsertadiscintothetray,press
theeject/closebuttontoclosethetray.
•Powerbutton
Usedtoturnonyourcomputer.Youalsocanusethepowerbuttontoturnoffyourcomputeronlywhen
youcannotuseanyMicrosoft®Windows®shutdownproceduretoturnoffyourcomputer.
•Powercordconnector
Usedtoconnectthepowercordtoyourcomputerforpowersupply.
•Serialconnector
Usedtoconnectanexternalmodem,aserialprinter,orotherdevicesthatusea9-pinserialconnector.
•Security-lockslot
Forinformation,see“AttachingaKensington-stylecablelock”onpage65.
•USB2.0connector
UsedtoconnectadevicethatrequiresaUSB2.0connection,suchasakeyboard,amouse,ascanner,a
printer,orapersonaldigitalassistant(PDA).
32ThinkCentreM700zandM800zHardwareMaintenanceManual


1Tilt-onlymonitorstand2Tilt-onlymonitorstandbase
3Full-functionmonitorstand4Full-functionmonitorstandbase
5Computercover6I/Obracket
7System-boardshield8Integratedcamera
9Integratedcamerabracket10Wi-Fiantennas(2)
11Wi-Ficard12Chassis
13LCDpanel14Heatsink
15Microprocessor16Memorymodule
17Cardreader18Systemboard
19Serialconnectormodule20Coin-cellbattery
21Internalspeakers(2)22Storagedrive
23Control-buttonboard24Control-buttonboardholder
25Storagedrivebracket26Opticaldrive
27Opticaldriveholder28Systemfan
29Coverpresenceswitch(intrusionswitch)30VESA®mountbracket
31Powercord32acpoweradapter
34ThinkCentreM700zandM800zHardwareMaintenanceManual


7Integratedcamera8Integratedcamerabracket
9Wi-Fiantennas(2)10Wi-Ficard
11Chassis12Systemboard
13LCDpanel14Heatsink
15Microprocessor16Memorymodule
17Cardreader18Serialconnectormodule
19Coin-cellbattery20Internalspeakers(2)
21Control-buttonboardholder22Control-buttonboard
23Powersupplyassembly24Opticaldrive
25Storagedrive26Opticaldriveholder
27Systemfan28Coverpresenceswitch(intrusionswitch)
29VESAmountbracket30Powercord
MajorFRUsandCRUs
Note:Dependingonyourcomputermodel,someofthefollowingcomponentsmightnotbeavailable.
36ThinkCentreM700zandM800zHardwareMaintenanceManual


NumberFRUdescriptionSelf-serviceCRUOptional-serviceCRU
1Tilt-onlymonitorstandYesNo
2Tilt-onlymonitorstandbaseYesNo
3Full-functionmonitorstandYesNo
4Full-functionmonitorstandbaseYesNo
5ComputercoverYesNo
6I/ObracketNoNo
7System-boardshieldNoYes
8HeatsinkNoNo
9MicroprocessorNoNo
10SystemboardNoNo
11Wi-FicardNoYes
12MemorymoduleNoYes
13CardreaderNoYes
14IntegratedcamerabracketNoNo
15IntegratedcameraNoNo
16Wi-Fiantennas(2)NoNo
17ChassisNoNo
18LCDpanelNoNo
19PowercordYesNo
20acpoweradapterYesNo
21Internalspeakers(2)NoNo
22Control-buttonboardholderNoNo
23Control-buttonboardYesNo
24Coverpresenceswitch(intrusionswitch)NoNo
25StoragedriveNoYes
26StoragedrivebracketNoYes
27SerialconnectormoduleNoYes
28Coin-cellbatteryNoYes
29SystemfanNoNo
30OpticaldriveNoNo
31OpticaldriveholderNoNo
32VESAmountbracketNoYes
38ThinkCentreM700zandM800zHardwareMaintenanceManual


NumberFRUdescriptionSelf-serviceCRUOptional-serviceCRU
1Tilt-onlymonitorstandYesNo
2Tilt-onlymonitorstandbaseYesNo
3TransformerstandYesNo
4ComputercoverYesNo
5I/ObracketNoNo
6System-boardshieldNoYes
7SerialconnectormoduleNoYes
8Wi-FicardNoYes
9MicroprocessorNoNo
10SystemboardNoNo
11Coin-cellbatteryNoYes
12MemorymoduleNoYes
13CardreaderNoYes
14IntegratedcamerabracketNoNo
15IntegratedcameraNoNo
16Wi-Fiantennas(2)NoNo
17ChassisNoNo
18LCDpanelNoNo
19PowercordYesNo
20Internalspeakers(2)NoNo
21Control-buttonboardholderNoNo
22Control-buttonboardYesNo
23Coverpresenceswitch(intrusionswitch)NoNo
24PowersupplyassemblyNoNo
25SystemfanNoNo
26HeatsinkNoNo
27OpticaldriveNoNo
28OpticaldriveholderNoNo
29StoragedriveYesNo
30VESAmountbracketNoNo
Notes:
•Self-serviceCRUs:TheseCRUsunplugoraresecuredbynomorethantwoscrews.Examplesof
thesetypesofCRUsincludethekeyboard,themouse,anyUSBdevice,andthepowercord.Other
self-serviceCRUsdependingonproductdesignmightincludememorymodules,adaptercards,hard
diskdrives,andopticaldrives.
•Optional-serviceCRUs:TheseCRUsareisolatedpartswithinthecomputerandareconcealedbyan
accesspanelthatistypicallysecuredbymorethantwoscrews.Oncetheaccesspanelisremoved,the
specificCRUisvisible.
FordetailedFRUinformation,suchastheFRUpartnumbersandsupportedcomputermodels,goto:
http:/www.lenovo.com/serviceparts-lookup
40ThinkCentreM700zandM800zHardwareMaintenanceManual
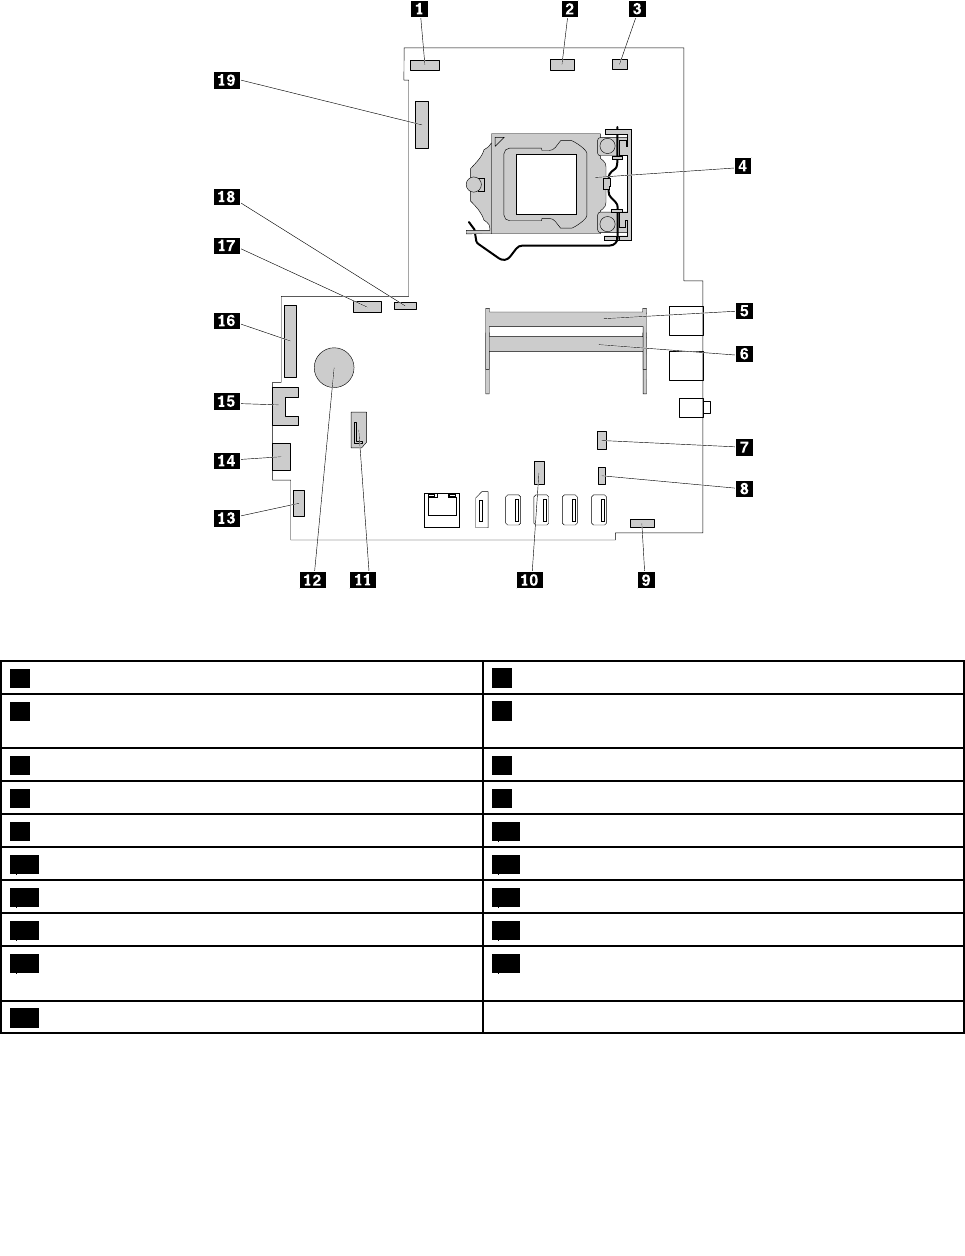
Partsonthesystemboard
Note:Forthepartsthataredisplayedonthefollowingfigurebutnotintroducedinthefollowingtable,see
“Frontview”onpage27and“Rearview”onpage30.
Figure8.Partsonthesystemboard
1LCDpanelpowerconnector2Integratedcameraconnector
3Coverpresenceswitchconnector(intrusionswitch
connector)
4Microprocessorsocket
5Memoryslot16Memoryslot2
7Touchboardconnector(forM800z)8Cardreaderconnector
9Internalspeakerconnector10Serialconnector
11SATA3.0connector(opticaldrivesignalconnector)12Coin-cellbattery
13Control-buttonboardconnector14Powersupplyassemblyconnector(forM800z)
15SATA2.0connector(storagedrivesignalconnector)16LCDpanelsignalconnector
17SATApowerconnector(storagedriveandoptical
drivepowerconnector)
18Systemfanconnector
19M.2Wi-Ficardslot
Chapter2.Productoverview41
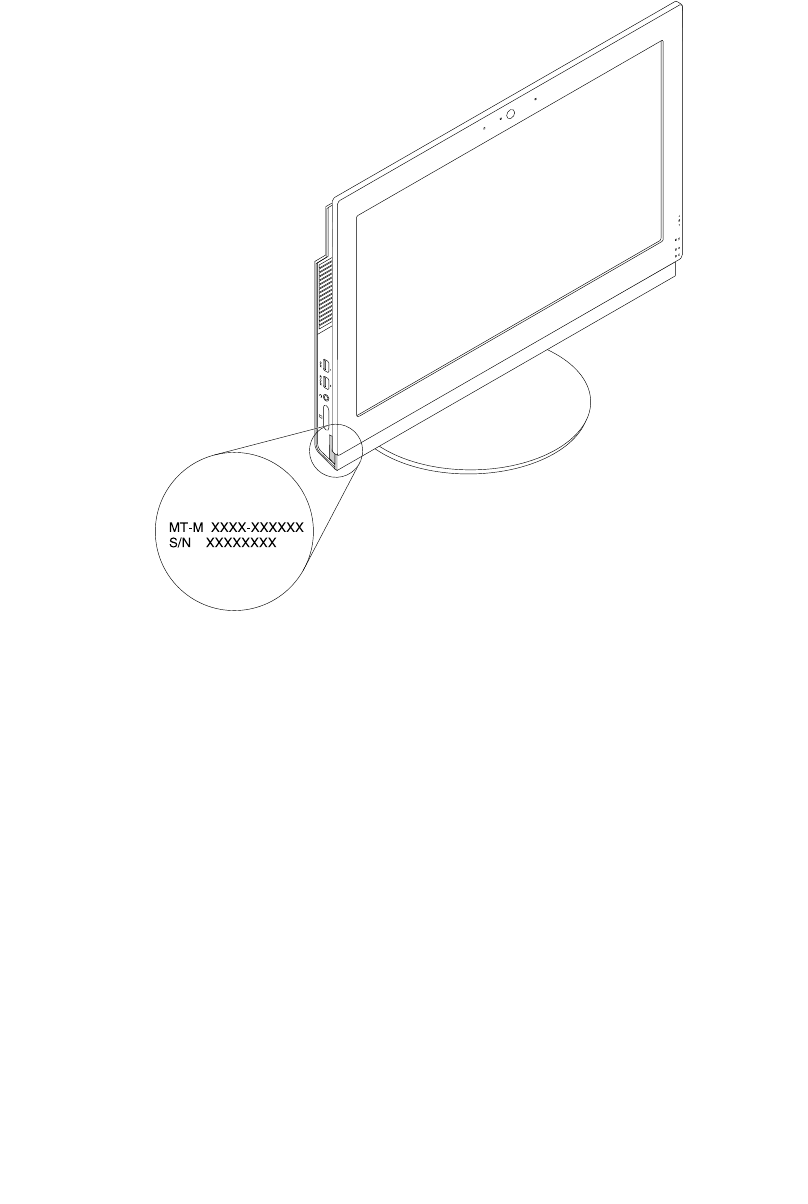
Machinetypeandmodellabel
Themachinetypeandmodellabelidentifiesyourcomputer.WhenyoucontactLenovoforhelp,themachine
typeandmodelinformationhelpssupporttechnicianstoidentifyyourcomputerandprovidefasterservice.
Themachinetypeandmodellabelisattachedonthesideofyourcomputerasshown.
Figure9.Machinetypeandmodellabel(forM700z)
42ThinkCentreM700zandM800zHardwareMaintenanceManual
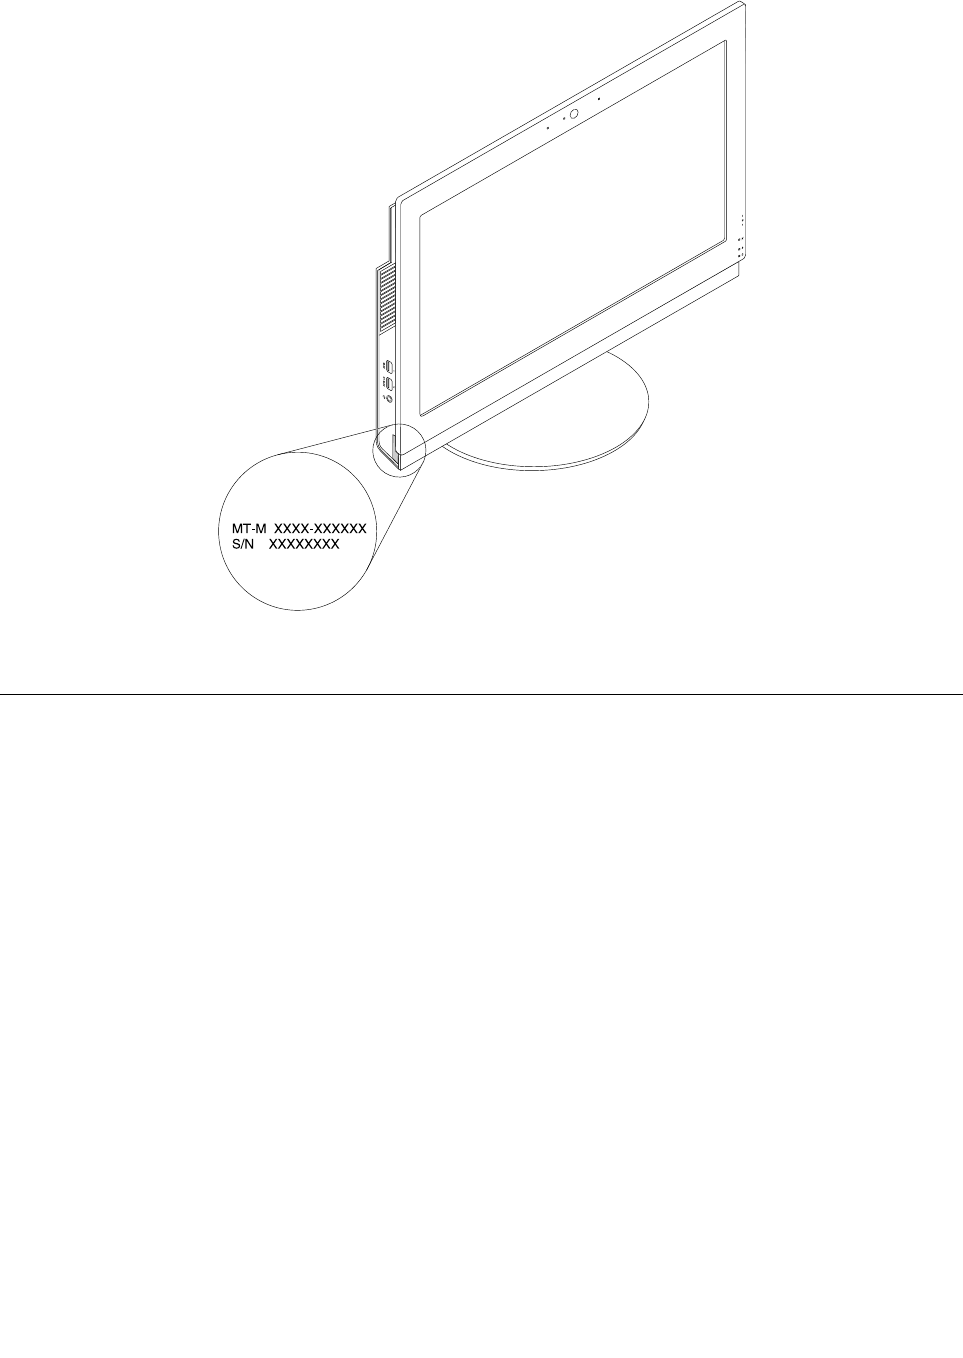
Figure10.Machinetypeandmodellabel(forM800z)
Features
Thecomputerfeaturesintroducedinthissectionapplytovariousmodels.
Informationaboutyourcomputer
•Toviewbasicinformation(suchasmicroprocessorandmemoryinformation)aboutyourcomputer,
dothefollowing:
1.ClicktheStartbuttontoopentheStartmenu.
2.DependingonyourWindowsversion,dooneofthefollowing:
–ForWindows7:Right-clickComputer,andthenclickProperties.
–ForWindows10:ClickSettings➙System➙About.
•Toviewdetailedinformationaboutthedevices(suchastheopticaldriveandnetworkadapters)onyour
computer,dothefollowing:
1.DependingonyourWindowsversion,dooneofthefollowing:
–ForWindows7:ClicktheStartbuttontoopentheStartmenu.Right-clickComputer,andthen
clickProperties.
–ForWindows10:Right-clicktheStartbuttontoopentheStartcontextmenu.
2.ClickDeviceManager.Typetheadministratorpasswordorprovideconfirmationifprompted.
Chapter2.Productoverview43

Preinstalledoperatingsystem
YourcomputerispreinstalledwithWindows7orWindows10operatingsystem.Additionaloperating
systemsmightbeidentifiedbyLenovoascompatiblewithyourcomputer.Todetermineifanoperating
systemhasbeencertifiedortestedforcompatibility,checktheWebsiteoftheoperatingsystemprovider.
Powersupply
•ForM700z:120-wattacpoweradapter
•ForM800z:150-wattautomaticvoltage-sensingpowersupply
Storagedrives
Yourcomputersupportsuptoonestoragedrives(harddiskdrives,hybriddrives,orsolid-statedrives).
Toviewtheamountofstoragedrivespace,dothefollowing:
1.DependingonyourWindowsversion,dooneofthefollowing:
•ForWindows7:ClicktheStartbuttontoopentheStartmenu.Right-clickComputer,andthenclick
Manage.
•ForWindows10:Right-clicktheStartbuttontoopentheStartcontextmenu.
2.ClickDiskManagement.
Videofeatures
TheintegratedgraphicscardsupportstheDisplayPort-outconnectoronyourcomputer.
Audiofeatures
Theintegratedaudiocardsupportsthefollowingaudioconnectorsanddevicesonyourcomputer:
•Headsetconnector
•Integratedmicrophone(availableonsomemodels)
•Internalspeakers(availableonsomemodels)
Input/Output(I/O)features
•Cardreaderslot(availableonsomemodels)
•DisplayPort-outconnector
•Ethernetconnector
•Headsetconnector
•Serialconnector(availableonsomemodels)
•USBconnector
Expansion
•Cardreader(availableonsomemodels)
•Memoryslot
•Opticaldrive(availableonsomemodels)
•Storagedrivebay
Networkfeatures
•EthernetLAN
TheintegratednetworkinterfacecardsupportstheEthernetconnectoronyourcomputer.
•WirelessLAN(availableonsomemodels)
44ThinkCentreM700zandM800zHardwareMaintenanceManual

•Bluetooth(availableonsomemodels)
Securityfeatures
Formoreinformation,seeChapter5“Security”onpage65.
Systemmanagementfeatures
•Abilitytostorepower-onself-test(POST)hardwaretestresults
•DesktopManagementInterface(DMI)
DesktopManagementInterfaceprovidesacommonpathforuserstoaccessinformationaboutall
aspectsofacomputer.Theinformationincludesprocessortype,installationdate,connectedprintersand
otherperipherals,powersources,maintenancehistory,andsoon.
•ErPLPScompliancemode
Theenergy-relatedproductsdirective(ErP)lowestpowerstate(LPS)compliancemodereducesthe
consumptionofelectricitywhenyourcomputerisinsleeporoffmode.Formoreinformation,see
“EnablingordisablingErPLPScompliancemode”onpage72.
•IntelligentCoolingEngine(ICE)
TheIntelligentCoolingEngineisasystemthermalmanagementsolutionthatenablesyourcomputer
torunwithbetterthermalandacousticperformance.TheICEfunctionalsomonitorsthethermal
performanceofyourcomputertoidentifythermalproblems.Formoreinformation,see“ChangingICE
PerformanceMode”onpage72.
•PrebootExecutionEnvironment(PXE)
PrebootExecutionEnvironmentenablescomputerstostartthroughanetworkinterfaceindependentof
datastoragedrives(suchasharddiskdrives)orinstalledoperatingsystems.
•SystemManagement(SM)BasicInput/OutputSystem(BIOS)andSMsoftware
TheSMBIOSspecificationdefinesdatastructuresandaccessmethodsthatcanbeusedtoread
managementdatastoredintheBIOSofacomputer.
•WakeonLAN
WakeonLANisanEthernetcomputernetworkingstandardthatallowsacomputertobeturnedon
orwokenupbyanetworkmessage.Themessageusuallyissentbyaprogramrunningonanother
computeronthesameLAN.
•WakeonRing
WakeonRing,sometimesreferredtoasWakeonModem,isaspecificationthatallowssupported
computersanddevicestoresumefromsleeporhibernationmode.
•WindowsManagementInstrumentation(WMI)
WindowsManagementInstrumentationisasetofextensionstotheWindowsDriverModel.Itprovidesan
operatingsysteminterfacethroughwhichinstrumentedcomponentsprovideinformationandnotification.
Specifications
Thissectionliststhephysicalspecificationsforyourcomputer.
Chapter2.Productoverview45

Dimensions
•ForM700z:
Width:502.8mm(19.7inches)
Height:343.6mm(13.5inches)
Depth:38mm(1.5inches)
•ForM800z
Width:535mm(21.1inches)
Height:363mm(14.3inches)
Depth:45mm(1.8inches)
Weight
•ForM700z
Maximumconfigurationasshipped:6.43kg(14.2lb)
•ForM800z
Maximumconfigurationasshipped:8.98kg(19.8lb)
Environment
•Airtemperature:
Operating:From10°C(50°F)to35°C(95°F)
Storageinoriginalshippingpackage:From-40°C(-40°F)to60°C(140°F)
Storagewithoutpackage:From-10°C(14°F)to60°C(140°F)
•Humidity:
Operating:20%–80%(non-condensing)
Storage:20%–90%(non-condensing)
•Altitude:
Operating:From-15.2m(-50ft)to3048m(10000ft)
Storage:From-15.2m(-50ft)to10668m(35000ft)
Electricalinput
Inputvoltage:From100Vacto240Vac
Inputfrequency:50/60Hz
Programs
Thissectionprovidesinformationabouttheprogramsonyourcomputer.
Accessingaprogramonyourcomputer
Note:ForWindows7,dependingonyourcomputermodel,someoftheLenovoprogramsmightbereadyto
beinstalled,soyouneedtoinstallthemmanually.Then,youcanaccessandusetheseprograms.
Toaccessaprogramonyourcomputer,dooneofthefollowing:
•FromWindowsSearch:
1.DependingonyourWindowsversion,dooneofthefollowing:
–ForWindows7:ClicktheStartbuttontoopentheStartmenu,andthentypetheprogramname
intothesearchbox.
–ForWindows10:TypetheprogramnameintothesearchboxnexttotheStartbutton.
46ThinkCentreM700zandM800zHardwareMaintenanceManual

2.Inthesearchresults,clickthenameofthedesiredprogramtolaunchtheprogram.
•FromtheStartmenuorControlPanel:
1.ClicktheStartbuttontoopentheStartmenu.Then,clickthenameofthedesiredprogramto
launchtheprogram.
2.Iftheprogramnameisnotdisplayed,clickAllProgramsforWindows7orAllappsforWindows
10todisplaytheprogramlist.Fromthelistorafolderinthelist,clickthenameofthedesired
programtolaunchtheprogram.
3.IftheprogramnameisnotdisplayedontheStartmenu,accesstheprogramfromControlPanel.
a.DependingonyourWindowsversion,dooneofthefollowing:
–ForWindows7:ClickControlPanelontheStartmenu.
–ForWindows10:Right-clicktheStartbuttontoopentheStartcontextmenu,andthenclick
ControlPanel.
b.ViewControlPanelusingLargeiconsorSmallicons,andthenclickthenameofthedesired
programtolaunchtheprogram.
Installingaprogramthatisreadytobeinstalled
Toinstallaprogramthatisreadytobeinstalled,dothefollowing:
1.OpentheLenovoThinkVantage®Toolsprogram.See“Accessingaprogramonyourcomputer”on
page46.
2.ViewtheprogramiconsusingTiles.
3.Followtheinstructionsundergreyed-outiconstolocatetheiconforthedesiredprogram.Then,
double-clicktheicontoinstalltheprogram.
AnintroductiontoLenovoprograms
ThissectionprovidesinformationaboutthemajorLenovoprogramsavailableonyouroperatingsystem.
Note:Dependingonyourcomputermodel,someofthefollowingprogramsmightnotbeavailable.
•ForWindows7only:
–CreateRecoveryMedia
TheCreateRecoveryMediaprogramenablesyoutorestoreonlytheCdriveortheentirestorage
drivetothefactory-defaultsettings.
–FingerprintManagerProorThinkVantageFingerprintSoftware
TheFingerprintManagerProorThinkVantageFingerprintSoftwareprogramenablesyoutousea
fingerprintreader.Theintegratedfingerprintreaderprovidedonsomekeyboardsenablesyoutoenroll
yourfingerprintandassociateitwithyourpower-onpassword,harddiskpassword,andWindows
password.Asaresult,fingerprintauthenticationcanreplacepasswordsandenablesimpleandsecure
useraccess.
–LenovoPowerENGAGE
TheLenovoPowerENGAGEprogramenablesyoutoregisteryourcomputerwithLenovo.
–PasswordManager
ThePasswordManagerprogramautomaticallycapturesandfillsinauthenticationinformationfor
WindowsprogramsandWebsites.
–RescueandRecovery®
TheRescueandRecoveryprogramisaone-buttonrecoveryandrestoresolution.Itincludesaset
ofself-recoverytoolstohelpyoudiagnosecomputerproblems,gethelp,andrecoverfromsystem
crashes,evenifyoucannotstarttheWindowsoperatingsystem.
Chapter2.Productoverview47

–SystemUpdate
TheSystemUpdateprogramprovidesregularaccesstothesystemupdatesforyourcomputer,such
asdevicedriverupdates,softwareupdates,andBIOSupdates.Theprogramgathersinformationfrom
theLenovoHelpCenteraboutnewupdatesforyourcomputer,thensortsanddisplaystheupdatesfor
downloadandinstallation.Youhavecompletecontrolofwhichupdatestodownloadandinstall.
•ForWindows10only:
–LenovoCompanion
Yourcomputer’sbestfeaturesandcapabilitiesshouldbeeasytoaccessandunderstand.WithLenovo
Companion,theyare.UseLenovoCompaniontodothefollowing:
–Optimizeyourcomputer’sperformance,monitoryourcomputer’shealth,andmanageupdates.
–Accessyouruserguide,checkwarrantystatus,andviewaccessoriescustomizedforyourcomputer.
–Readhow-toarticles,exploreLenovoforums,andstayup-to-dateontechnologynewswitharticles
andblogsfromtrustedsources.
LenovoCompanionisfilledwithexclusiveLenovocontenttohelpyoulearnmoreaboutwhatyou
candowithyourcomputer.
–LenovoID
TheLenovoIDprogramenablesyoutocreateyourLenovoIDandaccessallsupportedLenovo
programsandwebportalswithsinglesign-on.
–LenovoSettings
TheLenovoSettingsprogramistheonestopshopforyoutocontrolhardwarefeatures,sensors
andprogramsonyourcomputer.LenovoSettingsenablesyoutooptimizedeviceperformanceby
customizingkeyfunctions,suchaspowerplans,audio,camera,andnetworks.
•ForWindows7andWindows10:
–LenovoBluetoothLock
TheLenovoBluetoothLockprogramenablesyoutouseaBluetoothdevice(suchasyoursmartphone)
asaproximity-basedunitforlockingorunlockingyourcomputerautomatically.Bydetectingthe
distancebetweenyourcomputerandthepredefinedBluetoothdevicethatyouarecarrying,theLenovo
BluetoothLockprogramautomaticallylocksyourcomputerwhenyouwalkawayandunlocksyour
computerwhenyoucomeback.Thisisasimplewaytoprotectyourcomputeragainstunauthorized
accessincasethatyouforgettolockyourcomputer.
–LenovoDeviceExperienceorLenovoPCExperience
TheLenovoDeviceExperienceorLenovoPCExperienceprogramhelpsyouworkmoreeasilyand
securely.TheprogramprovideseasyaccesstoLenovoThinkVantageToolsorLenovoTools,important
settingsandinformationaboutyourcomputer,theLenovoSupportWebsite,andsoon.
–LenovoSolutionCenter
TheLenovoSolutionCenterprogramenablesyoutotroubleshootandresolvecomputerproblems.It
combinesdiagnostictests,systeminformationcollection,securitystatus,andsupportinformation,
alongwithhintsandtipsformaximumsystemperformance.
–PowerManager
ThePowerManagerprogramprovidesconvenient,flexible,andcompletepowermanagementfor
yourcomputer.Itenablesyoutoadjustyourcomputerpowersettingstoachievethebestbalance
betweenperformanceandpowersaving.
48ThinkCentreM700zandM800zHardwareMaintenanceManual

Chapter3.Usingyourcomputer
Thischaptercontainsthefollowingtopics:
•“Adjustingthecomputerstand”onpage49
•“Registeringyourcomputer”onpage53
•“Settingthecomputervolume”onpage53
•“AddinganicontotheWindowsnotificationarea”onpage53
•“Usingadisc”onpage54
•“Connectingtoanetwork”onpage55
•“Usingthesingle-touchormulti-touchfeature”onpage56
Adjustingthecomputerstand
Youcanusethecomputerstandtoadjustthecomputertoapositioncomfortableforyou.
Notes:Thecomputerstandisavailableonlyonsomemodels.
•Ifyourcomputercomeswithacomputerstand,ensurethatyouusethecomputerwiththestandinstalled.
Ifyouwanttousethecomputerwiththestandremoved,donotturnonthecomputerbeforecontacting
theLenovoCustomerSupportCenterfortheadditionalthermalsolution.
•Ifyourcomputerdoesnotcomewithacomputerstand,donottearofftheMylarontherearofthe
computer.Afterinitialsetup,youcanusethecomputer.
Adjustingthefull-functionmonitorstand(forM700z)
Youcanusethefull-functionmonitorstandtoadjustthecomputerbydoingtheoneofthefollowing:
©CopyrightLenovo201549
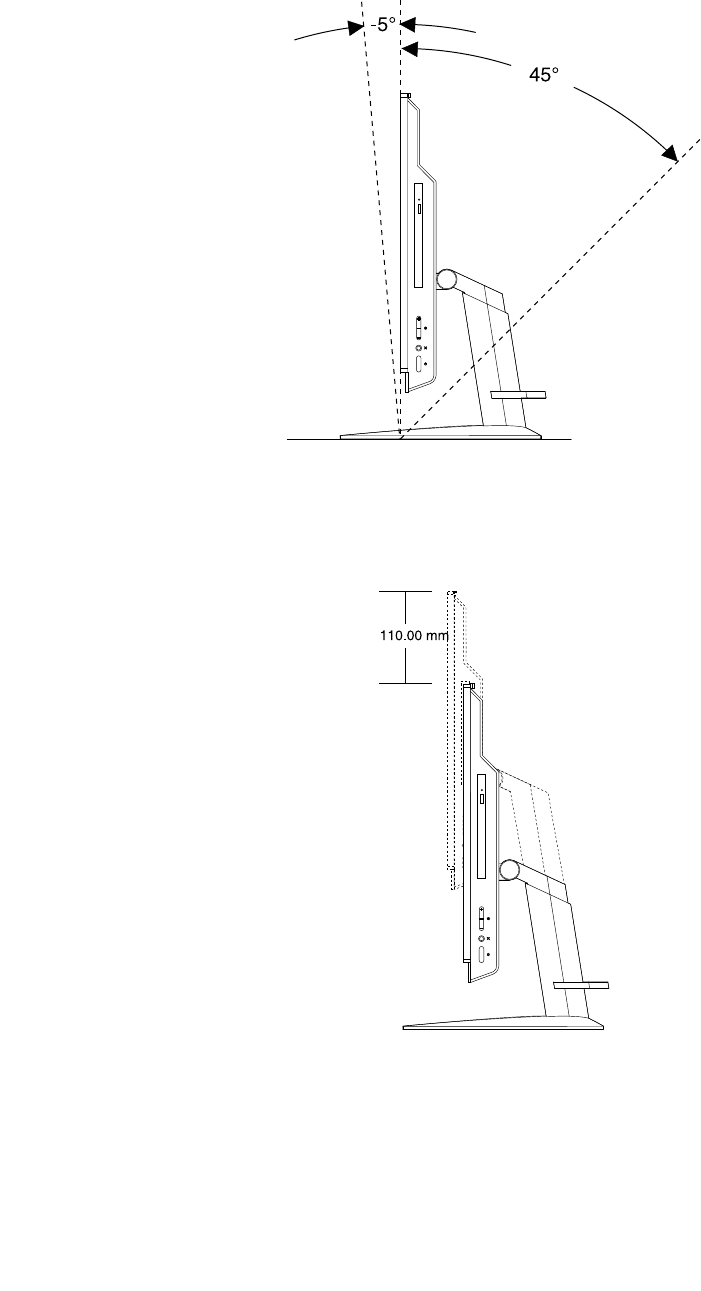
•Youcanadjusttheverticalpositionofthecomputeratanangleofbetween5°tothefrontand45°
totherear.
Figure11.Adjustingthecomputertothefrontortotherear
•Youcanadjusttheheightofthefull-functionmonitorstandwithinalengthof110.00mm(4.33inches)
Figure12.Adjustingtheheightofthefull-functionmonitorstand
50ThinkCentreM700zandM800zHardwareMaintenanceManual
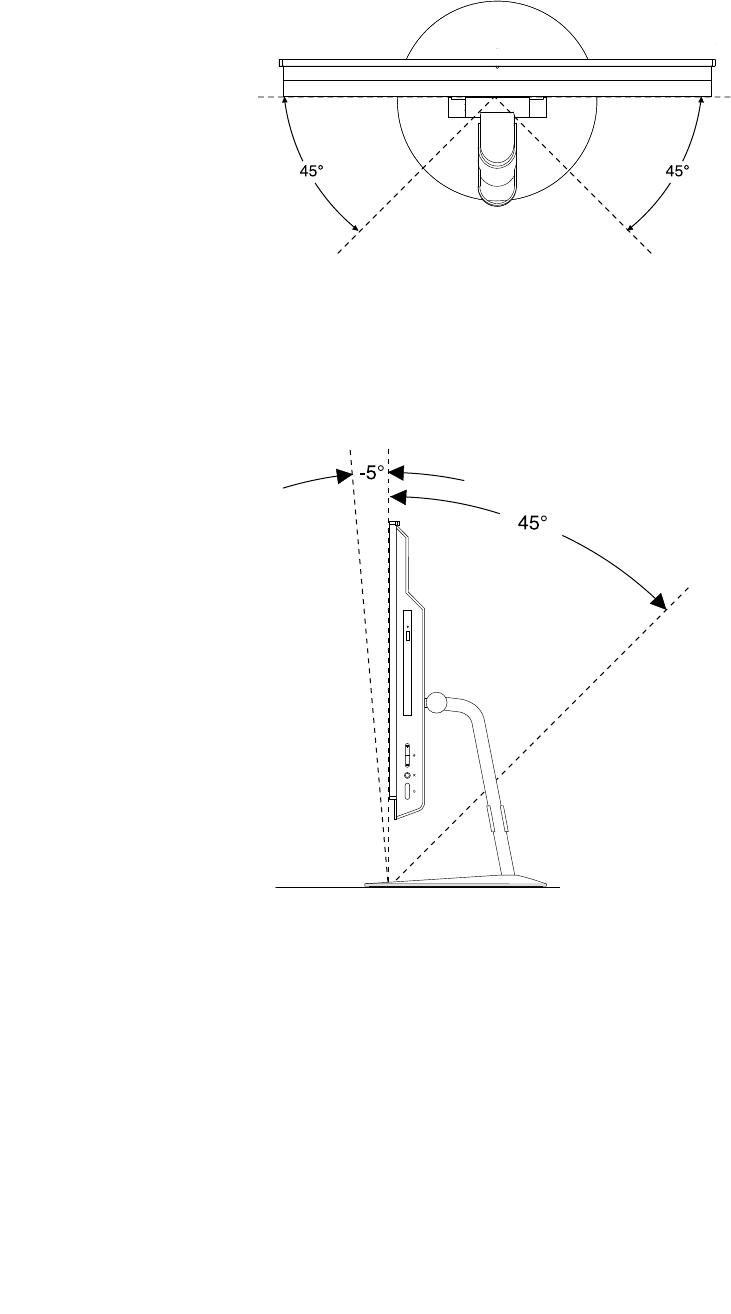
•Youcanturnthecomputeratanangelof45°totheleftand45°totheright.
Figure13.Turningthecomputertotheleftortotheright
Adjustingthetilt-onlymonitorstand
Youcanadjusttheverticalpositionofthecomputerbetween5°tothefrontand45°totherearasshown.
Figure14.Adjustingthetilt-onlymonitorstand
AdjustingtheUltraFlexIIStand(forM800z)
YoucanusetheUltraFlexIIStandtoadjustthecomputerbydoingthefollowing:
Chapter3.Usingyourcomputer51
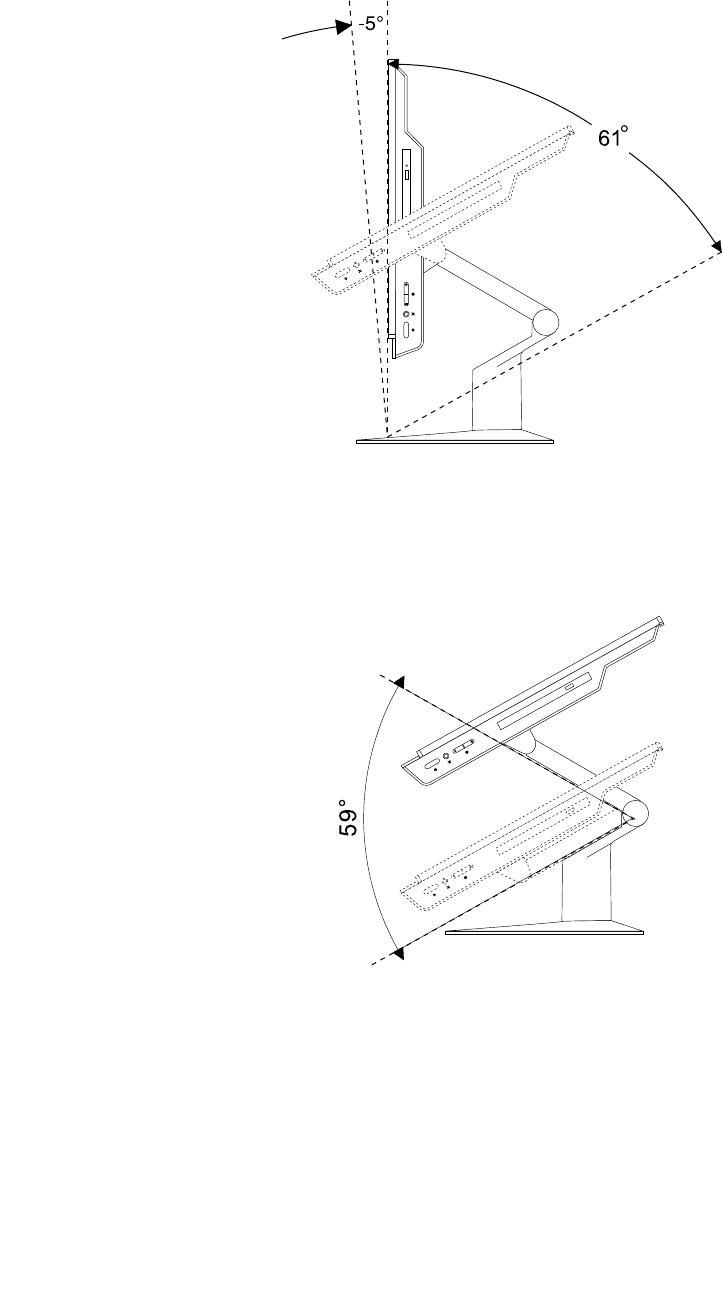
1.Youcanadjusttheverticalpositionofthecomputeratanangleofbetween5°tothefrontand61°
totherearasshown.
Figure15.Adjustingthecomputertothefrontortotherear
2.Afteryouadjustyourcomputertotherear,youcanadjusttheUltraFlexIIStanddownwardwithina
rangeof59°asshown.
Figure16.AdjustingtheUltraFlexIIStand
52ThinkCentreM700zandM800zHardwareMaintenanceManual
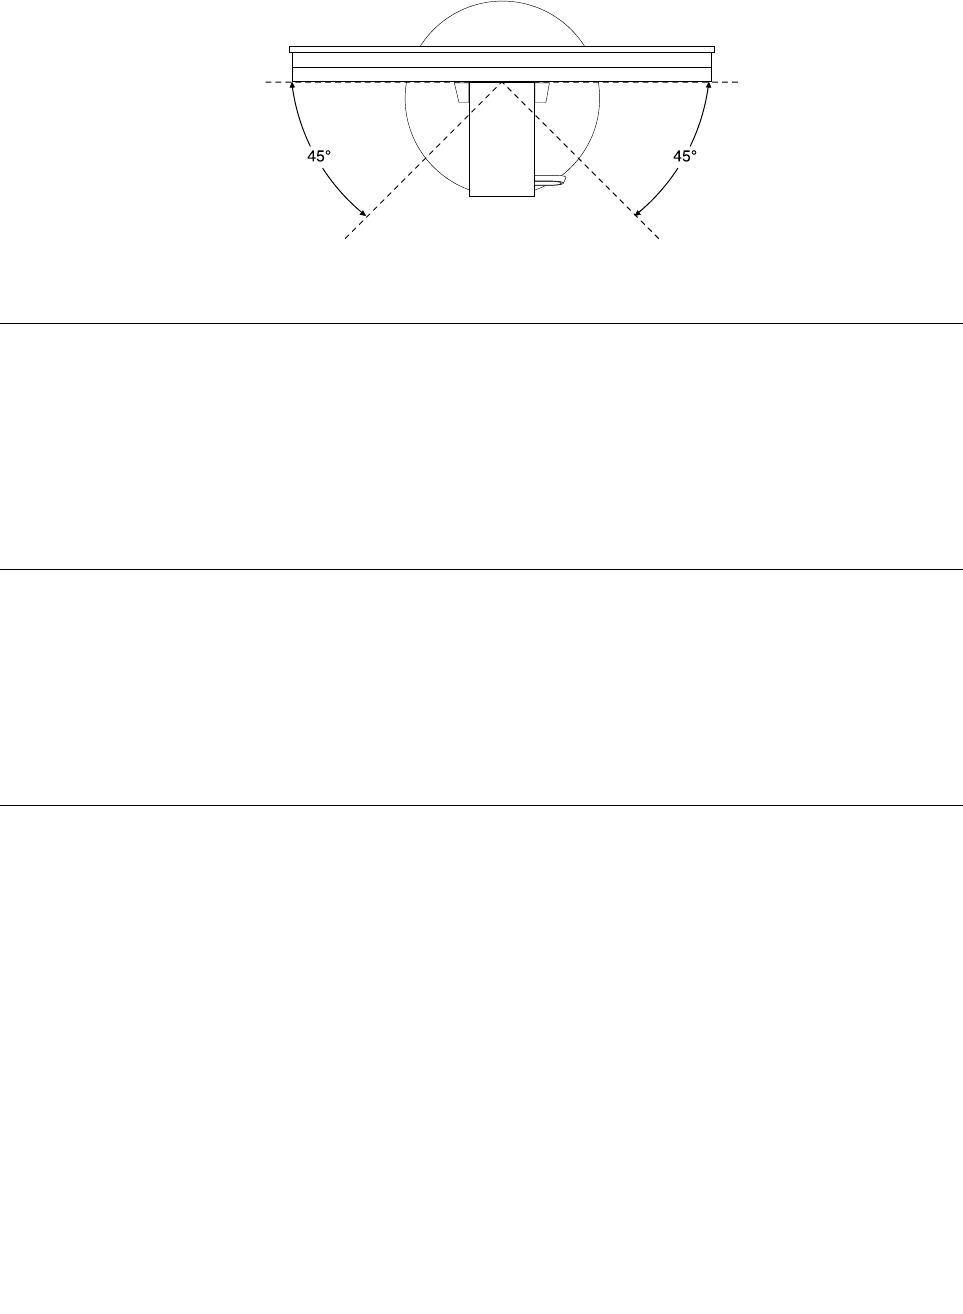
3.Youcanadjustthecomputeratanangleofbetween45°totheleftand45°totherightasshown.
Figure17.Adjustingthecomputertotheleftortotheright
Registeringyourcomputer
WhenyouregisteryourcomputerwithLenovo,youenterrequiredinformationintoaLenovodatabase.The
informationenablesLenovotocontactyouwhenthereisarecallorothersevereproblemandprovide
quickerservicewhenyoucallLenovoforhelp.Inaddition,somelocationsofferextendedprivilegesand
servicestoregisteredusers.
ToregisteryourcomputerwithLenovo,ensurethatyourcomputerisconnectedtotheInternet.Then,goto
http://www.lenovo.com/registerandfollowtheinstructionsonthescreen.
Settingthecomputervolume
Tosetthecomputervolume,dothefollowing:
1.ClickthevolumeiconintheWindowsnotificationareaonthetaskbar.
Note:IfthevolumeiconisnotdisplayedintheWindowsnotificationarea,addtheicontothe
notificationarea.See“AddinganicontotheWindowsnotificationarea”onpage53.
2.Followtheinstructionsonthescreentoadjustthevolume.Clickthespeakericontomutetheaudio.
AddinganicontotheWindowsnotificationarea
ToaddanicontotheWindowsnotificationarea,dothefollowing:
1.Clickthearrownexttothenotificationareatoviewhiddenicons.Then,clickthedesirediconand
dragittothenotificationarea.
2.Iftheiconisnotdisplayed,turnontheicon.
a.ClicktheStartbuttontoopentheStartmenu.
b.DependingonyourWindowsversion,dooneofthefollowing:
•ForWindows7:ClickControlPanel.ViewControlPanelusingLargeiconsorSmallicons,and
thenclickNotificationAreaIcons➙Turnsystemiconsonoroff.
•ForWindows10:ClickSettings➙System➙Notifications&actions➙Turnsystemicons
onoroff.
c.Turnonthedesiredicon.
3.IftheiconisstillnotdisplayedintheWindowsnotificationarea,repeatstep1.
Chapter3.Usingyourcomputer53

Usingadisc
Thissectionprovidesinformationaboutusingadiscandtheopticaldrive.
Guidelinesaboutusingtheopticaldrive
Whenusingtheopticaldrive,followtheseguidelines:
•Donotplacethecomputerinalocationwherethedriveisexposedtoanyofthefollowingconditions:
–Hightemperature
–Highhumidity
–Excessivedust
–Excessivevibrationorsuddenshock
–Aninclinedsurface
–Directsunlight
•Donotinsertanyobjectotherthanadiscintothedrive.
•Donotinsertdamageddiscsintothedrive.Warped,scratched,ordirtydiscscandamagethedrive.
•Beforemovingthecomputer,removethediscfromthedrive.
Handlingandstoringadisc
Whenhandlingandstoringadisc,followtheseguidelines:
•Holdthediscbyitsedges.Donottouchthesurfaceofthesidethatisnotlabeled.
•Toremovedustorfingerprints,wipethediscwithaclean,softclothfromthecentertotheoutside.Wiping
thediscinacirculardirectionmightcauselossofdata.
•Donotwriteorstickpaperonthedisc.
•Donotscratchormarkthedisc.
•Donotplaceorstorethediscindirectsunlight.
•Donotusebenzene,thinners,orothercleanerstocleanthedisc.
•Donotdroporbendthedisc.
Playingandremovingadisc
Toplayadisc,dothefollowing:
1.Withthecomputeron,presstheeject/closebuttononthefrontoftheopticaldrive.Thetrayslides
outofthedrive.
2.Insertadiscintothetray.Someopticaldrivehasasnaphubinthecenterofthetray.Ifyourdrivehasa
snaphub,supportthetraywithonehandandthenpushcenterofthediscuntilitsnapsintoplace.
3.Presstheeject/closebuttonagainorgentlypushthetrayforwardtoclosethetray.Thediscplayer
programstartsautomatically.Formoreinformation,refertothehelpsystemofthediscplayerprogram.
Toremoveadiscfromtheopticaldrive,dothefollowing:
1.Withthecomputeron,presstheeject/closebuttononthefrontoftheopticaldrive.Thetrayslides
outofthedrive.
2.Carefullyremovethediscfromthetray.
3.Presstheeject/closebuttonagainorgentlypushthetrayforwardtoclosethetray.
54ThinkCentreM700zandM800zHardwareMaintenanceManual
Note:Ifthetraydoesnotslideoutofthedrivewhenyoupresstheeject/closebutton,turnoffyourcomputer.
Then,insertastraightenedpaperclipintotheemergency-ejectholeadjacenttotheeject/closebutton.
Usetheemergencyejectonlyinanemergency.
Recordingadisc
Ifyouropticaldrivesupportsrecording,youcanrecordadisc.
RecordingadiscusingWindowstools
TorecordadiscusingWindowstools,dooneofthefollowing:
•BurnadiscusingtheAutoPlaywindow.
1.Ensurethatthediscisplayedautomatically.
a.ClicktheStartbuttontoopentheStartmenu.
b.DependingonyourWindowsversion,dooneofthefollowing:
–ForWindows7:ClickControlPanel.ViewControlPanelusingLargeiconsorSmallicons,
andthenclickAutoPlay.
–ForWindows10:ClickSettings➙Devices➙AutoPlay.
c.SelectorturnonUseAutoPlayforallmediaanddevices.
2.Insertarecordablediscintotheopticaldrivethatsupportsrecording.TheAutoPlaywindowopens.
3.Followtheinstructionsonthescreen.
•BurnadiscusingWindowsMedia®Player.
1.Insertarecordablediscintotheopticaldrivethatsupportsrecording.
2.OpenWindowsMediaPlayer.See“Accessingaprogramonyourcomputer”onpage46.
3.Followtheinstructionsonthescreen.
•BurnadiscfromanISOfile.
1.Insertarecordablediscintotheopticaldrivethatsupportsrecording.
2.Double-clicktheISOfile.
3.Followtheinstructionsonthescreen.
Connectingtoanetwork
Thissectionprovidesinformationaboutconnectingtoanetwork.Ifyoucannotconnectyourcomputertoa
network,see“Networkingproblems”onpage81.
ConnectingtoanEthernetLAN
YoucanconnectyourcomputertoanEthernetLANbyconnectinganEthernetcabletotheEthernet
connector.
DANGER
Toavoidtheriskofelectricalshock,donotconnectthetelephonecabletotheEthernetconnector.
ConnectingtoawirelessLAN
YoucanconnectyourcomputertoawirelessLANwithouttheuseofanEthernetcablebutbymeansof
radiowavesonly.
Chapter3.Usingyourcomputer55

Note:ThewirelessLANfeatureissupportedonlyonsomemodels.
Toestablishawireless-LANconnection,dothefollowing:
1.EnsurethatawirelessLANisavailableandthewirelessLANfeatureonyourcomputerisworking.
2.Clickthewireless-network-connection-statusiconintheWindowsnotificationareatodisplayavailable
wirelessnetworks.
Note:Ifthewireless-network-connection-statusiconisnotdisplayedintheWindowsnotificationarea,
addtheicontothenotificationarea.See“AddinganicontotheWindowsnotificationarea”onpage53.
3.ClickawirelessLAN,andthenclickConnecttoconnectyourcomputertoit.Providerequired
informationifneeded.
ConnectingtoaBluetooth-enableddevice
Bluetoothisashort-rangewirelesscommunicationstechnology.UseBluetoothtoestablishawireless
connectionbetweenyourcomputerandanotherBluetooth-enableddevicewithinadistanceofabout10
m(32.8ft).
Note:TheBluetoothfeatureissupportedonlyonsomemodels.
ToconnecttoaBluetooth-enableddevice,dothefollowing:
1.EnsurethattheBluetoothfeatureonyourcomputerisworkingandtheBluetooth-enableddeviceis
locatedwithinadistanceofabout10m(32.8ft)fromyourcomputer.
2.ClicktheBluetoothiconintheWindowsnotificationareaonthetaskbar.Then,clickAddaDeviceand
followtheinstructionsonthescreen.
Note:IftheBluetoothiconisnotdisplayedintheWindowsnotificationarea,addtheicontothe
notificationarea.See“AddinganicontotheWindowsnotificationarea”onpage53.
Usingthesingle-touchormulti-touchfeature
Dependingonyourcomputermodel,yourcomputercomeswiththesingle-touchormulti-touchfeature.
Thesingle-touchfeatureenablesyoutouseonlyonefingeratatimetointeractwithyourcomputer.The
multi-touchfeatureenablesyoutouseoneortwofingerstointeractwithyourcomputer.
Note:Thesingle-touchandmulti-touchfeaturesareavailableonlyonsomemodels.
Tousethesingle-touchormulti-touchfeature,dothefollowing:
•Tomakeasingleclick,tapthetouchscreenoncewithyourfinger.
•Tomakeadouble-click,taptwicewithoutpausing.
•Tomakearight-click,tapthetouchscreenonceandthenholdyourfingeronthetouchscreenuntila
roundcircleisdisplayed.Then,liftyourfingeroffthetouchscreensothatacontextmenuisdisplayed.
Youcanmakeyourselectiononthemenu.
•Tomakeiteasiertoreadoreditadocument,usetwofingerstozoomin,zoomout,scroll,orrotate
onthetouchscreen.
56ThinkCentreM700zandM800zHardwareMaintenanceManual

Chapter4.Youandyourcomputer
Thischaptercontainsthefollowingtopics:
•“Arrangingyourworkspace”onpage57
•“Accessibilityinformation”onpage58
•“Cleaningyourcomputer”onpage61
•“Maintenance”onpage61
•“Movingyourcomputer”onpage63
Arrangingyourworkspace
Arrangeyourworkspacetosuityourneedsandthekindofworkyoudo.Thissectionprovidesinformation
aboutthefactorsthataffectthewayyouarrangeyourworkspace.
Glareandlighting
Positionthecomputertominimizeglareandreflectionsfromoverheadlights,windows,andotherlight
sources.Reflectedlightfromshinysurfacescancauseannoyingreflectionsonyourscreen.Whenpossible,
placethecomputeratrightanglestowindowsandotherlightsources.Ifnecessary,reduceoverhead
lightingbyturningofflightsorusinglowerwattagebulbs.Ifyouinstallthecomputernearawindow,use
curtainsorblindstoblockthesunlight.Youcanadjustthebrightnessandcontrastcontrolsonthecomputer
astheroomlightingchangesthroughouttheday.
Whereitisimpossibletoavoidreflectionsortoadjustthelighting,anantiglarefilterplacedoverthescreen
mightbehelpful.However,thesefiltersmightaffecttheclarityoftheimageonthescreen;trythemonlyafter
youhaveexhaustedothermethodsofreducingglare.
Aircirculation
Yourcomputerproducesheat.Thecomputerhasafanthatpullsinfreshairandforcesouthotairthrough
theairvents.Blockingtheairventscancauseoverheating,whichmightresultinamalfunctionordamage.
Positionthecomputersothatnothingblockstheairvents;usually,51mm(2inches)ofairspaceissufficient.
Ensurethattheventedairisnotblowingonpeople.
Electricaloutletlocationsandcablelengths
Thefollowingfactorsmightdeterminethefinalplacementofyourcomputer:
•Locationsofelectricaloutlets
•Lengthofpowercordsorpoweradapters
•Lengthofthecablesthatareconnectedtootherdevices
Formoreinformationaboutpowercordsorpoweradapters,see“Powercordsandpoweradapters”on
page1.
Comfort
Althoughnosingleworkingpositionisidealforeveryone,hereareafewguidelinestohelpyoufindaposition
thatsuitsyoubest.Thefollowingfiguresetsanexampleforyourreference.
©CopyrightLenovo201557
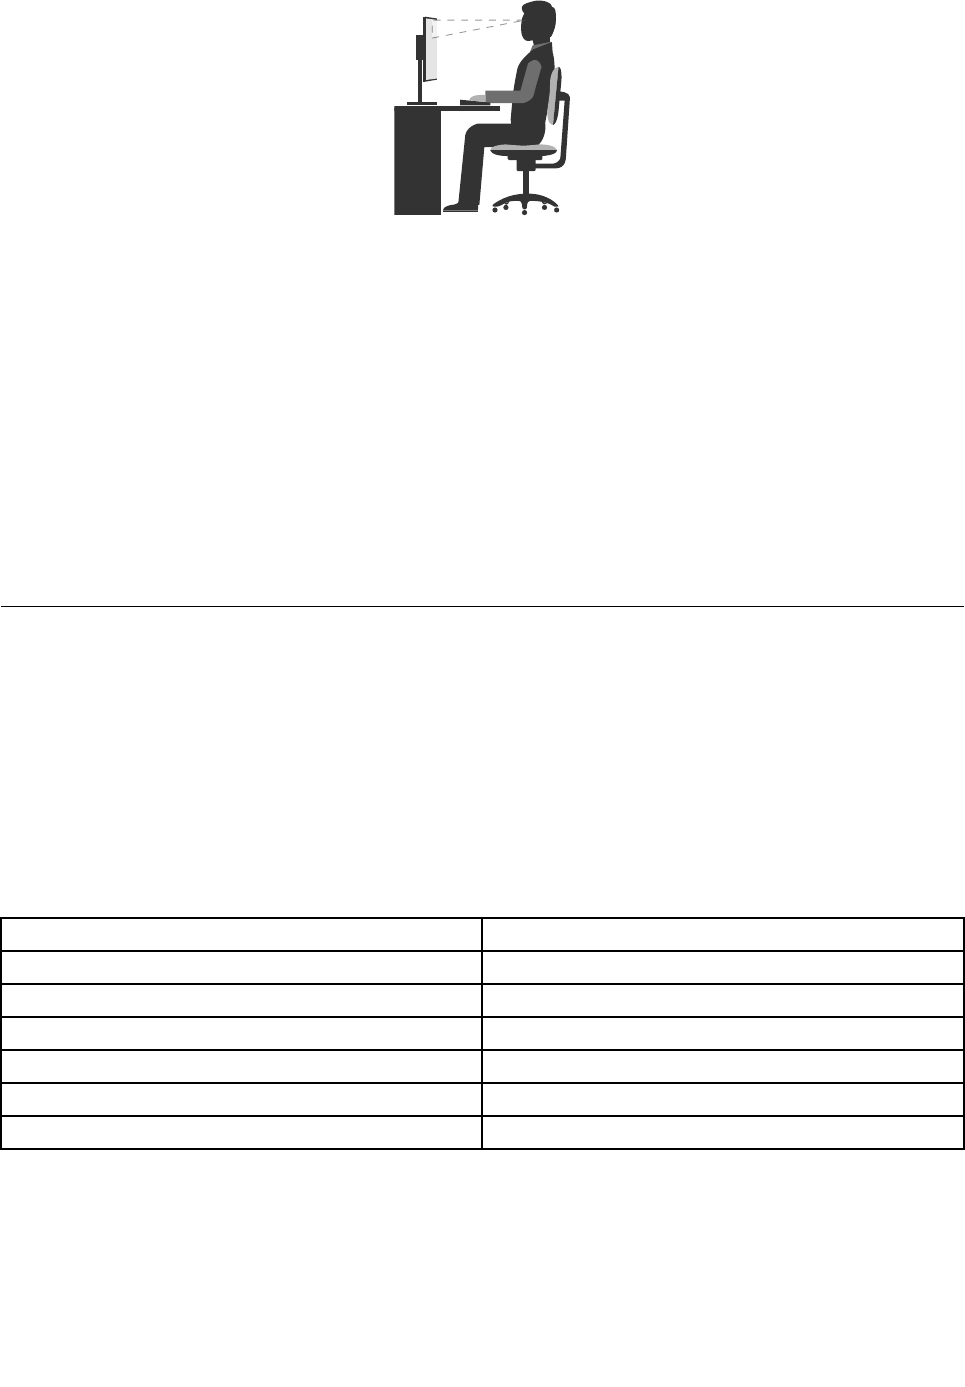
•Screenposition:Keepthescreenatacomfortableviewingdistance,usually51-61cm(20-24inches).
Then,adjustthescreensothatthetopofthescreenisatorslightlybeloweyelevelandyoucanviewit
withouttwistingyourbody.
•Chairposition:Useachairthatgivesyougoodbacksupportandseatheightadjustment.Usechair
adjustmentstobestsuityourdesiredposture.
•Headposition:Keepyourheadandneckinacomfortableandneutral(verticalorupright)position.
•Armandhandpositions:Keepyourforearms,wrists,andhandsinarelaxedandneutral(horizontal)
position.Typewithasofttouchwithoutpoundingthekeys.
•Legposition:Keepyourthighsparalleltothefloorandyourfeetflatonthefloororonafootrest.
Makeminormodificationsinyourworkingposturetodetertheonsetofdiscomfortcausedbylongperiodsof
workinginthesameposition.Frequent,shortbreaksfromyourworkalsohelptopreventminordiscomfort
associatedwithyourworkingposture.
Accessibilityinformation
Lenovoiscommittedtoprovidinguserswhohavehearing,vision,andmobilitylimitationswithgreater
accesstoinformationandtechnology.Thissectionprovidesinformationaboutthewaystheseuserscanget
themostoutoftheircomputerexperience.Youalsocangetthemostup-to-dateaccessibilityinformation
fromthefollowingWebsite:
http://www.lenovo.com/accessibility
Keyboardshortcuts
Thefollowingtablecontainskeyboardshortcutsthatcanhelpmakeyourcomputereasiertouse.
Note:Dependingonyourkeyboard,someofthefollowingkeyboardshortcutsmightnotbeavailable.
KeyboardshortcutFunction
Windowslogokey+UOpenEaseofAccessCenter
RightShiftforeightsecondsTurnonorturnoffFilterKeys
ShiftfivetimesTurnonorturnoffStickyKeys
NumLockforfivesecondsTurnonorturnoffToggleKeys
LeftAlt+LeftShift+NumLockTurnonorturnoffMouseKeys
LeftAlt+LeftShift+PrtScn(orPrtSc)TurnonorturnoffHighContrast
Formoreinformation,gotohttp://windows.microsoft.com/,andthenperformasearchusinganyofthe
followingkeywords:keyboardshortcuts,keycombinations,shortcutkeys.
58ThinkCentreM700zandM800zHardwareMaintenanceManual

EaseofAccessCenter
EaseofAccessCenterontheWindowsoperatingsystemenablesuserstoconfiguretheircomputersto
suittheirphysicalandcognitiveneeds.
TouseEaseofAccessCenter,dothefollowing:
1.ClicktheStartbuttontoopentheStartmenu.
2.DependingonyourWindowsversion,dooneofthefollowing:
•ForWindows7:ClickControlPanel.ViewControlPanelusingLargeiconsorSmallicons,and
thenclickEaseofAccessCenter.
•ForWindows10:ClickSettings➙EaseofAccess.
3.Choosetheappropriatetoolbyfollowingtheinstructionsonthescreen.
EaseofAccessCentermainlyincludesthefollowingtools:
•Magnifier
Magnifierisausefulutilitythatenlargestheentirescreenorpartofthescreensothatyoucansee
theitemsbetter.
•Narrator
Narratorisascreenreaderthatreadsaloudwhatisdisplayedonthescreenanddescribeseventssuchas
errormessages.
•On-ScreenKeyboard
Ifyouprefertotypeorenterdataintoyourcomputerusingamouse,joystick,orotherpointingdevice
insteadofaphysicalkeyboard,youcanuseOn-ScreenKeyboard.On-ScreenKeyboarddisplaysavisual
keyboardwithallthestandardkeys.
•HighContrast
HighContrastisafeaturethatheightensthecolorcontrastofsometextandimagesonyourscreen.Asa
result,thoseitemsaremoredistinctandeasiertoidentify.
•Personalizedkeyboard
Adjustkeyboardsettingstomakeyourkeyboardeasiertouse.Forexample,youcanuseyourkeyboard
tocontrolthepointerandtypecertainkeycombinationseasier.
•Personalizedmouse
Adjustmousesettingstomakeyourmouseeasiertouse.Forexample,youcanchangethepointer
appearanceandmakeiteasiertomanagewindowswiththemouse.
SpeechRecognition
SpeechRecognitionenablesyoutocontrolyourcomputerbyvoice.
Usingonlyyourvoice,youcanstartprograms,openmenus,clickobjectsonthescreen,dictatetextinto
documents,andwriteandsende-mails.Everythingyoudowiththekeyboardandmousecanbedonewith
onlyyourvoice.
TouseSpeechRecognition,dothefollowing:
1.DependingonyourWindowsversion,dooneofthefollowing:
•ForWindows7:ClicktheStartbuttontoopentheStartmenu.
•ForWindows10:Right-clicktheStartbuttontoopentheStartcontextmenu.
2.ClickControlPanel.ViewControlPanelusingLargeiconsorSmallicons,andthenclickSpeech
Recognition.
Chapter4.Youandyourcomputer59

3.Followtheinstructionsonthescreen.
Screen-readertechnologies
Screen-readertechnologiesareprimarilyfocusedonsoftwareprograminterfaces,helpinformationsystems,
andvariousonlinedocuments.Foradditionalinformationaboutscreenreaders,seethefollowing:
•UsingPDFswithscreenreaders:
http://www.adobe.com/accessibility.html?promoid=DJGVE
•UsingtheJAWSscreenreader:
http://www.freedomscientific.com/jaws-hq.asp
•UsingtheNVDAscreenreader:
http://www.nvaccess.org/
Screenresolution
Youcanmakethetextandimagesonyourscreeneasiertoreadbyadjustingthescreenresolutionofyour
computer.
Toadjustthescreenresolution,dothefollowing:
1.Right-clickablankareaonthedesktop.
2.DependingonyourWindowsversion,dooneofthefollowing:
•ForWindows7:ClickScreenresolution.
•ForWindows10:ClickDisplaysettings.OntheDisplaytab,clickAdvanceddisplaysettings.
3.Followtheinstructionsonthescreen.
Note:Settingtheresolutiontoolowmightpreventsomeitemsfromfittingonthescreen.
Customizableitemsize
Youcanmaketheitemsonyourscreeneasiertoreadbychangingtheitemsize.
•Tochangetheitemsizetemporarily,usetheMagnifiertoolinEaseofAccessCenter.See“Easeof
AccessCenter”onpage59.
•Tochangetheitemsizepermanently,dothefollowing:
–Changethesizeofalltheitemsonyourscreen.
1.Right-clickablankareaonthedesktop.
2.DependingonyourWindowsversion,dooneofthefollowing:
–ForWindows7:ClickScreenresolution➙Maketextandotheritemslargerorsmaller.
–ForWindows10:ClickDisplaysettings.
3.Changetheitemsizebyfollowingtheinstructionsonthescreen.
4.ClickApply.Thischangewilltakeeffectthenexttimeyoulogintotheoperatingsystem.
–ChangethesizeoftheitemsonaWebpage.
PressandholdCtrl,andthenpresstheplus-signkey(+)toenlargeortheminus-signkey(-)to
reducethetextsize.
–Changethesizeoftheitemsonthedesktoporawindow.
Note:Thisfunctionmightnotworkonsomewindows.
Ifyourmousehasawheel,pressandholdCtrl,andthenscrollthewheeltochangetheitemsize.
60ThinkCentreM700zandM800zHardwareMaintenanceManual

Industry-standardconnectors
Yourcomputerprovidesindustry-standardconnectorsthatenableyoutoconnectassistivedevices.
Formoreinformationaboutthelocationandfunctionoftheconnectors,see“Hardwarelocations”on
page27.
TTY/TDDconversionmodem
Yourcomputersupportstheuseofatexttelephone(TTY)orthetelecommunicationsdeviceforthedeaf
(TDD)conversionmodem.ThemodemmustbeconnectedbetweenyourcomputerandaTTY/TDD
telephone.Then,youcantypeamessageonyourcomputerandsendittothetelephone.
Documentationinaccessibleformats
Lenovoprovideselectronicdocumentationinaccessibleformats,suchasproperlytaggedPDFfilesor
HyperTextMarkupLanguage(HTML)files.Lenovoelectronicdocumentationisdevelopedtoensure
thatvisuallyimpaireduserscanreadthedocumentationthroughascreenreader.Eachimageinthe
documentationalsoincludesadequatealternativetextsothatvisuallyimpaireduserscanunderstandthe
imagewhentheyuseascreenreader.
Cleaningyourcomputer
CAUTION:
Removeanymediafromthedrivesandturnoffallconnecteddevicesandthecomputer.Then,
disconnectallpowercordsfromelectricaloutletsanddisconnectallcablesthatareconnected
tothecomputer.
Itisagoodpracticetocleanyourcomputerperiodicallytoprotectthesurfacesandensuretrouble-free
operation.Useonlymildcleaningsolutionsandadampclothtocleanthepaintedsurfacesofthecomputer.
Dustbuildupcompoundsproblemsassociatedwithglare,soremembertocleanthescreenperiodically.
Wipethescreensurfacegentlywithasoft,drycloth,orblowonthescreentoremovegritandotherloose
particles.Dependingonthetypeofthescreen,moistenasoft,lint-freeclothwithanLCDcleanerorliquid
glasscleanerandthenwipethescreensurface.
Maintenance
Withappropriatecareandmaintenance,yourcomputerwillserveyoureliably.Thissectionprovides
informationaboutmaintainingyourcomputersothatitcankeepworkingintoporder.
Basicmaintenancetips
Herearesomebasicpointsaboutkeepingyourcomputerfunctioningproperly:
•Keepyourcomputerinaclean,dryenvironment.Ensurethatthecomputerrestsonaflat,steadysurface.
•Donotcoveranyofairvents.Theseairventsprovideairflowtokeepyourcomputerfromoverheating.
•Keepfoodanddrinksawayfromallpartsofyourcomputer.Foodparticlesandspillsmightmakethe
keyboardandmousestickandunusable.
•Donotgetthepowerswitchesorothercontrolswet.Moisturecandamagethesepartsandcausean
electricalhazard.
•Alwaysdisconnectapowercordbygraspingthepluginsteadofthecord.
Chapter4.Youandyourcomputer61

Goodmaintenancepractices
Byperformingafewgoodmaintenancepractices,youcanmaintaingoodcomputerperformance,protect
yourdata,andbepreparedincaseofacomputerfailure.
•Keepyourcomputersoftware,devicedrivers,andoperatingsystemup-to-date.See“Keepingyour
computercurrent”onpage62.
•Emptyyourrecyclebinonaregularbasis.
•CleanoutyourInbox,SentItems,andDeletedItemsfoldersinyoure-mailapplicationonaregularbasis.
•Cleanupfilesandfreeupstoragedrivespaceandmemoryspaceoccasionallytopreventperformance
problems.See“Performanceproblems”onpage83.
•Keepalogbook.Entriesmightincludemajorsoftwareorhardwarechanges,device-driverupdates,
intermittentproblemsandwhatyoudidtoresolvethem,andotherissuesyoumighthaveexperienced.
Thecauseofaproblemmightbechangeinhardware,changeinsoftware,oranyotheractionsthatmight
havetakenplace.AlogbookcanhelpyouoraLenovotechniciandeterminethecauseofaproblem.
•Backupyourdataonthestoragedriveregularly.Youcanrestorethestoragedrivefromabackup.
Tobackupyourdata,dooneofthefollowing:
–ForWindows7:OpentheRescueandRecoveryprogram.See“Accessingaprogramonyour
computer”onpage46.Formoreinformationaboutbackingupyourdata,refertothehelpsystem
oftheprogram.
–ForWindows10:Right-clicktheStartbuttontoopentheStartcontextmenu,andthenclickControl
Panel.ViewControlPanelusingLargeiconsorSmallicons,andthenclickFileHistory.Followthe
instructionsonthescreen.
•Createarecoverymediumasearlyaspossible.Youcanusetherecoverymediumtorecoveryour
operatingsystemevenifWindowsfailstostartup.
Tocreatearecoverymedium,dooneofthefollowing:
–ForWindows7:OpentheCreateRecoveryMediaprogram.See“Accessingaprogramonyour
computer”onpage46.Formoreinformationaboutcreatingarecoverymedium,refertothehelp
systemoftheprogram.
–ForWindows10:Right-clicktheStartbuttontoopentheStartcontextmenu,andthenclickControl
Panel.ViewControlPanelusingLargeiconsorSmallicons,andthenclickRecovery.Followthe
instructionsonthescreen.
•ForWindows7,createarescuemediumasearlyaspossible.Youcanusetherescuemediumto
recoverfromfailuresthatpreventyoufromgainingaccesstotheRescueandRecoveryworkspace
onyourstoragedrive.
Tocreatearescuemedium,opentheRescueandRecoveryprogram.See“Accessingaprogramonyour
computer”onpage46.Formoreinformationaboutcreatingarescuemedium,refertothehelpsystem
oftheprogram.
Keepingyourcomputercurrent
Inmostcases,itisagoodpracticetohavethemostup-to-dateoperatingsystemupdatepatches,software
programs,anddevicedrivers.Thissectionprovidesinformationabouthowtogetthelatestupdatesforyour
computer.
Gettingthelatestdevicedrivers
Attention:Reinstallingdevicedriverswillchangethecurrentconfigurationofyourcomputer.
Togetthelatestdevicedriversforyourcomputer,dooneofthefollowing:
•Downloadthedevicedriversthatarepreinstalledonyourcomputer.Gotohttp://www.lenovo.com/drivers.
62ThinkCentreM700zandM800zHardwareMaintenanceManual

•UsetheLenovoprogramorWindowsUpdate.See“Gettingthelatestsystemupdates”onpage63.
Note:ThedevicedriversprovidedbyWindowsUpdatemightnotbetestedbyLenovo.Itisrecommended
thatyougetdevicedriversfromLenovo.
Gettingthelatestsystemupdates
Togetthelatestsystemupdatesforyourcomputer,ensurethatyourcomputerisconnectedtotheInternet
anddooneofthefollowing:
•UseoneofthefollowingLenovoprogramstogetthesystemupdates,suchasdevicedriverupdates,
softwareupdates,andBIOSupdates:
–ForWindows7:UsetheSystemUpdateprogram.
–ForWindows10:UsetheLenovoCompanionprogram.
ToopentheSystemUpdateorLenovoCompanionprogram,see“Accessingaprogramonyourcomputer”
onpage46.Formoreinformationaboutusingtheprogram,refertothehelpsystemoftheprogram.
•UseWindowsUpdatetogetthesystemupdates,suchassecurityfixes,newversionsofWindows
components,anddevicedriverupdates.
1.ClicktheStartbuttontoopentheStartmenu.
2.DependingonyourWindowsversion,dooneofthefollowing:
–ForWindows7:ClickControlPanel.ViewControlPanelusingLargeiconsorSmallicons,and
thenclickWindowsUpdate.
–ForWindows10:ClickSettings➙Update&security➙WindowsUpdate.
3.Followtheinstructionsonthescreen.
Movingyourcomputer
Beforemovingyourcomputer,takethefollowingprecautions:
1.Backupyourdataonthestoragedrive.See“Goodmaintenancepractices”onpage62.
2.Removeanymediafromthedrivesandturnoffallconnecteddevicesandthecomputer.Then,
disconnectallpowercordsfromelectricaloutletsanddisconnectallcablesthatareconnectedtothe
computer.
3.Ifyousavedtheoriginalshippingcartonsandpackingmaterials,usethemtopacktheunits.Ifyouare
usingdifferentcartons,cushiontheunitstoavoiddamage.
Movingyourcomputertoanothercountryorregion
Whenyoumoveyourcomputertoanothercountryorregion,youmusttakelocalelectricalstandardsinto
consideration.Ifthelocalelectricaloutletstyleisdifferentfromthetypeyouarecurrentlyusing,contactthe
LenovoCustomerSupportCentertopurchaseeitheranelectricalplugadapteroranewpowercord.Fora
listofLenovoSupportphonenumbers,gotohttp://www.lenovo.com/support/phone.Ifyoucannotfindthe
supporttelephonenumberforyourcountryorregion,contactyourLenovoreseller.
Chapter4.Youandyourcomputer63

64ThinkCentreM700zandM800zHardwareMaintenanceManual

Chapter5.Security
Thischaptercontainsthefollowingtopics:
•“Lockingyourcomputer”onpage65
•“ViewingandchangingsecuritysettingsintheSetupUtilityprogram”onpage67
•“Preventingunauthorizedaccesstoyourcomputer”onpage67
•“Usingfingerprintauthentication”onpage68
•“Usingthecoverpresenceswitch”onpage73
•“Usingandunderstandingfirewalls”onpage68
•“Protectingdataagainstviruses”onpage68
•“ComputraceAgentsoftwareembeddedinfirmware”onpage68
•“TrustedPlatformModule(TPM)”onpage69
Lockingyourcomputer
Thissectionprovidesinformationaboutlockingyourcomputerwiththelockingdevicestokeepyour
computersafe.
AttachingaKensington-stylecablelock
YoucanuseaKensington-stylecablelocktosecureyourcomputertoadesk,table,orothernon-permanent
fixture.Thecablelockconnectstothesecurity-lockslotattherearofyourcomputer.Dependingonthetype
selected,thecablelockcanbeoperatedwithakeyorcombination.Thecablelockalsolocksthebuttons
usedtoopenthecomputercover.Thisisthesametypeoflockusedwithmanynotebookcomputers.You
canordersuchacablelockdirectlyfromLenovobysearchingforKensingtonat:
http://www.lenovo.com/support
©CopyrightLenovo201565

Figure18.Kensington-stylecablelock(forM700z)
66ThinkCentreM700zandM800zHardwareMaintenanceManual
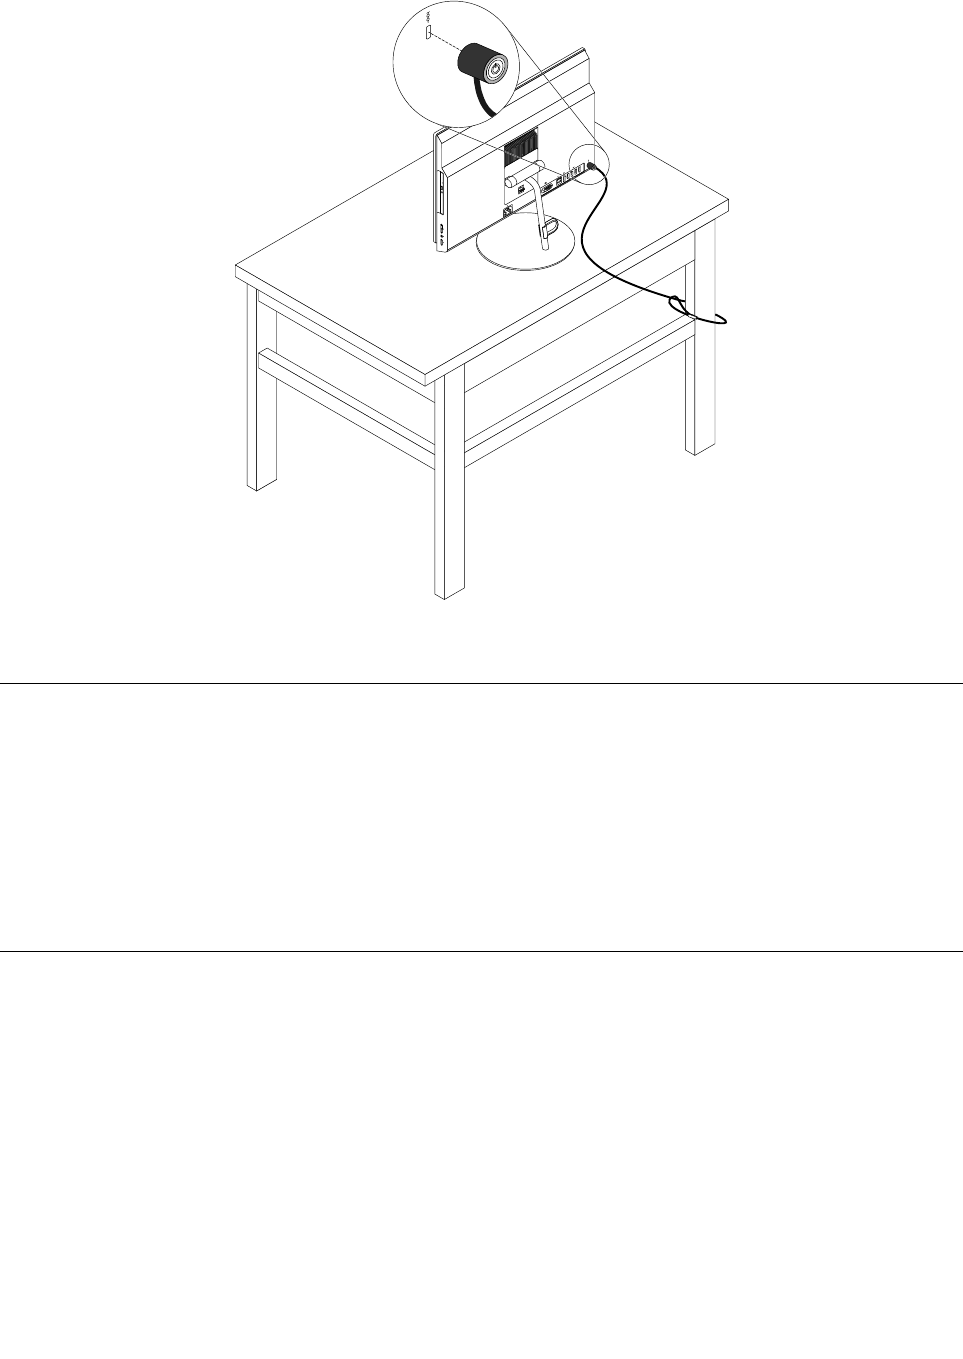
Figure19.Kensington-stylecablelock(forM800z)
ViewingandchangingsecuritysettingsintheSetupUtilityprogram
ToviewandchangesecuritysettingsintheSetupUtilityprogram,dothefollowing:
1.StarttheSetupUtilityprogram.See“StartingtheSetupUtilityprogram”onpage71.
2.SelectSecurity.
3.Followtheinstructionsontherightsideofthescreentoviewandchangesecuritysettings.Youcan
referto“UsingtheSetupUtilityprogram”onpage71togetbasicinformationaboutsomemajor
securitysettings.
4.ExittheSetupUtilityprogram.See“ExitingtheSetupUtilityprogram”onpage75.
Preventingunauthorizedaccesstoyourcomputer
YoucanuseBIOSpasswordsandWindowsaccountstopreventunauthorizedaccesstoyourcomputerand
data.
•TouseBIOSpasswords,see“UsingBIOSpasswords”onpage73.
•TouseWindowsaccounts,dothefollowing:
1.ClicktheStartbuttontoopentheStartmenu.
2.DependingonyourWindowsversion,dooneofthefollowing:
–ForWindows7:ClickControlPanel➙UserAccounts.
–ForWindows10:ClickSettings➙Accounts.
3.Followtheinstructionsonthescreen.
Chapter5.Security67

Usingfingerprintauthentication
Ifyourkeyboardhasafingerprintreader,youcanusefingerprintauthenticationtoreplacepasswordsfor
simpleandsecureuseraccess.Tousefingerprintauthentication,firstenrollyourfingerprintsandassociate
themwithyourpasswords(suchasthepower-onpassword,harddiskpassword,andWindowspassword).
Usethefingerprintreaderandthefingerprintprogramtocompletethisprocedure.
Tousefingerprintauthentication,dooneofthefollowing:
•ForWindows7:UsetheFingerprintManagerProorThinkVantageFingerprintSoftwareprogramprovided
byLenovo.Toopentheprogram,see“Accessingaprogramonyourcomputer”onpage46.Formore
informationaboutusingtheprogram,refertothehelpsystemoftheprogram.
•ForWindows10:UsethefingerprinttoolprovidedbyWindows.ClicktheStartbuttontoopentheStart
menu,andthenclickSettings➙Accounts➙Sign-inoptions.Followtheinstructionsonthescreen.
Tousethefingerprintreader,refertothedocumentationshippedwiththefingerprintkeyboardorlocatedon
theLenovoSupportWebsiteathttp://www.lenovo.com/support/keyboards.
Usingandunderstandingfirewalls
Afirewallcanbehardware,software,oracombinationofbothdependingonthelevelofsecurityrequired.
Firewallsworkonasetofrulestodeterminewhichinboundandoutboundconnectionsareauthorized.If
yourcomputerispreinstalledwithafirewallprogram,ithelpsprotectagainstcomputerInternetsecurity
threats,unauthorizedaccess,intrusions,andInternetattacks.Italsoprotectsyourprivacy.Formore
informationabouthowtousethefirewallprogram,refertothehelpsystemofyourfirewallprogram.
TouseWindowsFirewall,dothefollowing
1.DependingonyourWindowsversion,dooneofthefollowing:
•ForWindows7:ClicktheStartbuttontoopentheStartmenu.
•ForWindows10:Right-clicktheStartbuttontoopentheStartcontextmenu.
2.ClickControlPanel.ViewControlPanelusingLargeiconsorSmallicons,andthenclickWindows
Firewall.
3.Followtheinstructionsonthescreen.
Protectingdataagainstviruses
Yourcomputerispreinstalledwithanantivirusprogramtohelpyouguardagainst,detect,andeliminate
viruses.
Lenovoprovidesafullversionofantivirussoftwareonyourcomputerwithafree30-daysubscription.After
30days,youmustrenewthelicensetocontinuereceivingtheantivirussoftwareupdates.
Note:Virusdefinitionfilesmustbekeptup-to-datetoguardagainstnewviruses.
Formoreinformationabouthowtouseyourantivirussoftware,refertothehelpsystemofyourantivirus
software.
ComputraceAgentsoftwareembeddedinfirmware
TheComputraceAgentsoftwareisanITassetmanagementandcomputertheftrecoverysolution.The
softwaredetectsifchangeshavebeenmadeonthecomputer,suchashardware,software,orthecomputer
call-inlocation.YoumighthavetopurchaseasubscriptiontoactivatetheComputraceAgentsoftware.
68ThinkCentreM700zandM800zHardwareMaintenanceManual


70ThinkCentreM700zandM800zHardwareMaintenanceManual

Chapter6.Advancedconfiguration
Thischaptercontainsthefollowingtopics:
•“UsingtheSetupUtilityprogram”onpage71
•“UpdatingtheBIOS”onpage75
•“UpdatingtheBIOS”onpage75
UsingtheSetupUtilityprogram
TheSetupUtilityprogramisusedtoviewandchangetheconfigurationsettingsofyourcomputer.This
sectionprovidesinformationaboutonlythemajorconfigurationsettingsavailableintheprogram.
Note:TheoperatingsystemsettingsmightoverrideanysimilarsettingsintheSetupUtilityprogram.
StartingtheSetupUtilityprogram
TostarttheSetupUtilityprogram,dothefollowing:
1.Turnonorrestartyourcomputer.
2.BeforeWindowsstartsup,repeatedlypressandreleasetheF1keyuntiltheSetupUtilityprogram
opens.IfaBIOSpasswordhasbeenset,theSetupUtilityprogramwillnotopenuntilyouenterthe
correctpassword.Formoreinformation,see“UsingBIOSpasswords”onpage73.
Note:Forsomekeyboards,youmightneedtopressFn+F1toopentheSetupUtilityprogram.
Toviewandchangetheconfigurationsettings,followtheinstructionsontherightsideofthescreen.The
keysusedtoperformvarioustasksaredisplayedatthebottomofthescreen.
Enablingordisablingadevice
Thissectionprovidesinformationabouthowtoenableordisableuseraccesstohardwaredevices(such
asUSBconnectorsorstoragedrives).
Toenableordisableadevice,dothefollowing:
1.StarttheSetupUtilityprogram.See“StartingtheSetupUtilityprogram”onpage71.
2.SelectDevices.
3.SelectthedeviceyouwanttoenableordisableandpressEnter.
4.SelectthedesiredsettingandpressEnter.
5.ExittheSetupUtilityprogram.See“ExitingtheSetupUtilityprogram”onpage75.
EnablingordisablingtheAutomaticPowerOnfeatures
IfyouenabletheAutomaticPowerOnfeatures,yourcomputerwillstartupautomatically.
ToenableordisabletheAutomaticPowerOnfeatures,dothefollowing:
1.StarttheSetupUtilityprogram.See“StartingtheSetupUtilityprogram”onpage71.
2.SelectPower➙AutomaticPowerOnandpressEnter.
3.SelectthefeatureyouwanttoenableordisableandpressEnter.
4.SelectthedesiredsettingandpressEnter.
©CopyrightLenovo201571

5.ExittheSetupUtilityprogram.See“ExitingtheSetupUtilityprogram”onpage75.
EnablingordisablingErPLPScompliancemode
Lenovocomputersmeettheeco-designrequirementsoftheErPLot3regulation.Formoreinformation,go
to:
http://www.lenovo.com/ecodeclaration
YoucanenableErPLPScompliancemodeintheSetupUtilityprogramtoreducetheconsumptionof
electricitywhenyourcomputerisofforinsleepmode.
ToenableordisableErPLPScompliancemode,dothefollowing:
1.StarttheSetupUtilityprogram.See“StartingtheSetupUtilityprogram”onpage71.
2.SelectPower➙EnhancedPowerSavingModeandpressEnter.
3.DependingonwhetheryouselectEnabledorDisabled,dooneofthefollowing:
•IfyouselectEnabled,pressEnter.Then,disabletheWakeonLANfeature.See“Enablingor
disablingtheAutomaticPowerOnfeatures”onpage71.
•IfyouselectDisabled,pressEnter.Then,gotothenextstep.
4.ExittheSetupUtilityprogram.See“ExitingtheSetupUtilityprogram”onpage75.
WhenErPLPScompliancemodeisenabled,youcanwakeupyourcomputerbydoingoneofthefollowing:
•Pressthepowerbutton.
•EnabletheWakeUponAlarmfeaturetomakeyourcomputerwakeupatasettime.See“Enablingor
disablingtheAutomaticPowerOnfeatures”onpage71.
•EnabletheAfterPowerLossfeaturetomakeyourcomputerwakeupwhenthepowersupplyresumes
afterasuddenlossofelectricity.
1.StarttheSetupUtilityprogram.See“StartingtheSetupUtilityprogram”onpage71.
2.SelectPower➙AfterPowerLossandpressEnter.
3.SelectPowerOnandpressEnter.
4.ExittheSetupUtilityprogram.See“ExitingtheSetupUtilityprogram”onpage75.
ChangingICEPerformanceMode
YoucanadjusttheacousticandthermalperformanceofyourcomputerbychangingtheICEperformance
mode.
TochangetheICEperformancemode,dothefollowing:
1.StarttheSetupUtilityprogram.See“StartingtheSetupUtilityprogram”onpage71.
2.SelectPower➙IntelligentCoolingEngine(ICE)andpressEnter.
3.SelectICEPerformanceModeandpressEnter.
4.FollowtheinstructionsonthescreentochoosetheappropriateICEperformancemode.
5.ExittheSetupUtilityprogram.See“ExitingtheSetupUtilityprogram”onpage75.
EnablingordisablingtheConfigurationChangeDetectionfeature
IfyouenabletheConfigurationChangeDetectionfeature,whenthePOSTdetectstheconfigurationchanges
ofsomehardwaredevices(suchasstoragedrivesormemorymodules),anerrormessagewillbedisplayed
whenyouturnonthecomputer.
72ThinkCentreM700zandM800zHardwareMaintenanceManual

ToenableordisabletheConfigurationChangeDetectionfeature,dothefollowing:
1.StarttheSetupUtilityprogram.See“StartingtheSetupUtilityprogram”onpage71.
2.SelectSecurity➙ConfigurationChangeDetectionandpressEnter.
3.SelectthedesiredsettingandpressEnter.
4.ExittheSetupUtilityprogram.See“ExitingtheSetupUtilityprogram”onpage75.
Tobypasstheerrormessageandlogintotheoperatingsystem,dooneofthefollowing:
•PresstheF2key.
Note:Forsomekeyboards,youmightneedtopressFn+F2tobypasstheerrormessage.
•StartandthenexittheSetupUtilityprogram.See“StartingtheSetupUtilityprogram”onpage71and
“ExitingtheSetupUtilityprogram”onpage75.
Usingthecoverpresenceswitch
Thecoverpresenceswitchpreventsyourcomputerfromloggingintotheoperatingsystemwhenthe
computercoverisnotproperlyinstalledorclosed.
Toenablethecover-presence-switchconnectoronthesystemboard,dothefollowing:
1.StarttheSetupUtilityprogram.See“StartingtheSetupUtilityprogram”onpage71.
2.SelectSecurity➙ChassisIntrusionDetectionandpressEnter.
3.SelectEnabledandpressEnter.
4.ExittheSetupUtilityprogram.See“ExitingtheSetupUtilityprogram”onpage75.
Whenthecover-presence-switchconnectoronthesystemboardisenabled,ifthecoverpresenceswitch
detectsthatthecomputercoverisnotcorrectlyinstalledorclosed,anerrormessagewillbedisplayedwhen
youturnonthecomputer.Tobypasstheerrormessageandlogintotheoperatingsystem,dothefollowing:
1.Properlyinstallorcloseyourcomputercover.SeeChapter9“Installingorreplacinghardware”on
page95.
2.StartandthenexittheSetupUtilityprogram.See“StartingtheSetupUtilityprogram”onpage71and
“ExitingtheSetupUtilityprogram”onpage75.
UsingBIOSpasswords
ByusingtheSetupUtilityprogram,youcansetpasswordstopreventunauthorizedaccesstoyourcomputer
anddata.
Youdonothavetosetanypasswordstouseyourcomputer.However,usingpasswordsimprovescomputer
security.Ifyoudecidetosetanypasswords,readthefollowingtopics.
SetupUtilityprogrampasswordtypes
Thefollowingtypesofpasswordsareavailable:
•Power-onpassword
Whenapower-onpasswordisset,youarepromptedtoenteravalidpasswordeachtimethecomputeris
turnedon.Thecomputercannotbeuseduntilthevalidpasswordisentered.
•Administratorpassword
Settinganadministratorpassworddetersunauthorizedusersfromchangingconfigurationsettings.Ifyou
areresponsibleformaintainingtheconfigurationsettingsofseveralcomputers,youmightwanttoset
anadministratorpassword.
Chapter6.Advancedconfiguration73

Whenanadministratorpasswordisset,youarepromptedtoenteravalidpasswordeachtimeyou
trytoaccesstheSetupUtilityprogram.TheSetupUtilityprogramcannotbeaccesseduntilavalid
passwordisentered.
Ifboththepower-onpasswordandadministratorpasswordareset,youcanentereitherpassword.
However,youmustuseyouradministratorpasswordtochangeanyconfigurationsettings.
•Harddiskpassword
Settingaharddiskpasswordpreventsunauthorizedaccesstothedataonthestoragedrive.Whena
harddiskpasswordisset,youarepromptedtoenteravalidpasswordeachtimeyoutrytoaccess
thestoragedrive.
Notes:
–Afteryousetaharddiskpassword,yourdataonthestoragedriveisprotectedevenifthestoragedrive
isremovedfromonecomputerandinstalledinanother.
–Iftheharddiskpasswordisforgotten,thereisnowaytoresetthepasswordorrecoverdatafrom
thestoragedrive.
Passwordconsiderations
Apasswordcanbeanycombinationofupto64alphabeticandnumericcharacters.Forsecurityreasons,it
isrecommendedtouseastrongpasswordthatcannotbeeasilycompromised.
Note:TheSetupUtilityprogrampasswordsarenotcasesensitive.
Tosetastrongpassword,considerthefollowingguidelines:
•Haveatleasteightcharactersinlength
•Containatleastonealphabeticcharacterandonenumericcharacter
•Notbeyournameoryourusername
•Notbeacommonwordoracommonname
•Besignificantlydifferentfromyourpreviouspasswords
Setting,changing,anddeletingapassword
Toset,change,ordeleteapassword,dothefollowing:
1.StarttheSetupUtilityprogram.See“StartingtheSetupUtilityprogram”onpage71.
2.SelectSecurity.
3.Dependingonthepasswordtype,selectSetPower-OnPassword,SetAdministratorPassword,or
HardDiskPasswordandpressEnter.
4.Followtheinstructionsontherightsideofthescreentoset,change,ordeleteapassword.
Note:Apasswordcanbeanycombinationofupto64alphabeticandnumericcharacters.Formore
information,see“Passwordconsiderations”onpage74.
5.ExittheSetupUtilityprogram.See“ExitingtheSetupUtilityprogram”onpage75.
Selectingastartupdevice
Ifyourcomputerdoesnotstartupfromadeviceasexpected,youcanchoosetochangethestartupdevice
sequencepermanentlyorselectatemporarystartupdevice.
Changingthestartupdevicesequencepermanently
Tochangethestartupdevicesequencepermanently,dothefollowing:
1.Dependingonthetypeofthestoragedevice,dooneofthefollowing:
74ThinkCentreM700zandM800zHardwareMaintenanceManual

•Ifthestoragedeviceisinternal,gotostep2.
•Ifthestoragedeviceisadisc,ensurethatyourcomputerisonorturnonthecomputer.Then,
insertthediscintotheopticaldrive.
•Ifthestoragedeviceisanexternaldeviceotherthanadisc,connectthestoragedevicetothe
computer.
2.StarttheSetupUtilityprogram.See“StartingtheSetupUtilityprogram”onpage71.
3.SelectStartup.
4.Followtheinstructionsontherightsideofthescreentochangethestartupdevicesequence.
5.ExittheSetupUtilityprogram.See“ExitingtheSetupUtilityprogram”onpage75.
Selectingatemporarystartupdevice
Note:Notalldiscsandstoragedrivesarebootable.
Toselectatemporarystartupdevice,dothefollowing:
1.Dependingonthetypeofthestoragedevice,dooneofthefollowing:
•Ifthestoragedeviceisinternal,gotostep2.
•Ifthestoragedeviceisadisc,ensurethatyourcomputerisonorturnonthecomputer.Then,
insertthediscintotheopticaldrive.
•Ifthestoragedeviceisanexternaldeviceotherthanadisc,connectthestoragedevicetothe
computer.
2.Turnonorrestartthecomputer.BeforeWindowsstartsup,repeatedlypressandreleasetheF12key
untilStartupDeviceMenuisdisplayed.
Note:Forsomekeyboards,youmightneedtopressFn+F12todisplayStartupDeviceMenu.
3.SelectthedesiredstoragedeviceandpressEnter.Thecomputerwillstartupfromthedeviceyouselect.
Ifyouwanttoselectapermanentstartupdevice,selectEnterSetuponStartupDeviceMenuandpress
EntertostarttheSetupUtilityprogram.Formoreinformationabouthowtoselectapermanentstartup
device,see“Changingthestartupdevicesequencepermanently”onpage74.
ExitingtheSetupUtilityprogram
ToexittheSetupUtilityprogram,dooneofthefollowing:
•Ifyouwanttosavethenewsettings,presstheF10key.Then,selectYesinthewindowdisplayed
andpressEnter.
Note:Forsomekeyboards,youmightneedtopressFn+F10toexittheSetupUtilityprogram.
•Ifyoudonotwanttosavethenewsettings,selectExit➙DiscardChangesandExitandpressEnter.
Then,selectYesinthewindowdisplayedandpressEnter.
UpdatingtheBIOS
Whenyouinstallanewprogram,hardwaredevice,ordevicedriver,youmightbeinformedtoupdate
theBIOS.YoucanupdatetheBIOSfromyouroperatingsystemoraflashupdatedisc(supportedonly
onsomemodels).
ToupdatetheBIOS,dothefollowing:
1.Gotohttp://www.lenovo.com/drivers.
Chapter6.Advancedconfiguration75

2.DownloadtheflashBIOSupdatedriverfortheoperatingsystemversionortheISOimageversion(used
tocreateaflashupdatedisc).Then,downloadtheinstallationinstructionsfortheflashBIOSupdate
driveryoudownload.
3.PrinttheinstallationinstructionsyoudownloadandfollowtheinstructionstoupdatetheBIOS.
Note:IfyouwanttoupdatetheBIOSfromaflashupdatedisc,theinstallationinstructionsmightnotprovide
theinformationabouthowtorecordtheupdatedisc.See“Recordingadisc”onpage55.
76ThinkCentreM700zandM800zHardwareMaintenanceManual

Chapter7.Troubleshooting,diagnostics,andrecovery
Thischapterprovidessolutionstoresolveyourcomputerproblems.Followthestepsinthebasicprocedure
forresolvingcomputerproblems,whichhelpsyoumakegooduseofthetroubleshooting,diagnostics,
andrecoveryinformation.
•“Basicprocedureforresolvingcomputerproblems”onpage77
•“Troubleshooting”onpage77
•“Diagnostics”onpage86
•“Recoveryinformation”onpage87
Basicprocedureforresolvingcomputerproblems
Itisrecommendedthatyouusethefollowingproceduretoresolvecomputerproblemsyouareexperiencing:
1.Ensurethat:
a.Thecablesforallconnecteddevicesareconnectedcorrectlyandsecurely.
b.Allconnecteddevicesthatrequireacpowerareconnectedtoproperlygrounded,functioning
electricaloutlets.
c.AllconnecteddevicesareenabledintheBIOSsettingsofyourcomputer.See“Enablingordisabling
adevice”onpage71.
Iftheseactionsdonotresolveyourproblem,continuewiththenextstep.
2.Useanantivirusprogramtoseeifyourcomputerhasbeeninfectedbyavirus.Iftheprogramdetects
avirus,removethevirus.Iftheantivirusprogramdoesnotresolveyourproblem,continuewiththe
nextstep.
3.Goto“Troubleshooting”onpage77andfollowtheinstructionsforthetypeofproblemyouare
experiencing.Ifthesetroubleshootinginstructionsdonotresolveyourproblem,continuewiththe
nextstep.
4.Runthediagnosticprogram.See“Diagnostics”onpage86.Ifthediagnosticprogramdoesnotresolve
yourproblem,continuewiththenextstep.
5.Recoveryouroperatingsystem.See“Recoveryinformation”onpage87.
6.Ifnoneoftheseactionssolveyourproblem,contacttheLenovoCustomerSupportCenter.Foralistof
LenovoSupportphonenumbers,gotohttp://www.lenovo.com/support/phone.Formoreinformation
abouthelp,service,andtechnicalassistance,seeChapter10“Gettinginformation,help,andservice”
onpage145.
Troubleshooting
Attention:DonotopenyourcomputerorattemptanyrepairbeforereadingandunderstandingtheChapter
1“Readthisfirst:Importantsafetyinformation”onpage1.
Usethetroubleshootinginformationtofindsolutionstoproblemsthathavedefinitesymptoms.
Startupproblems
Thissectionprovidessolutionstostartup-relatedproblems.
Thecomputerdoesnotstartupwhenyoupressthepowerbutton
Solutions:Ensurethat:
•Thepowercordiscorrectlyconnectedtotherearofthecomputerandtoaworkingelectricaloutlet.
©CopyrightLenovo201577

•Ifyourcomputerhasasecondarypowerswitchontherearofthecomputer,ensurethatitisswitchedon.
•Thepowerindicatoronthefrontofthecomputerison.
•Thecomputervoltagematchesthevoltageavailableattheelectricaloutletforyourcountryorregion.
Theoperatingsystemfailstostartup
Solution:Ensurethatthestartupsequenceincludesthedevicewheretheoperatingsystemresides.Usually,
theoperatingsystemisonthestoragedrive.Formoreinformation,see“Changingthestartupdevice
sequencepermanently”onpage74.
Thecomputerbeepsmultipletimesbeforetheoperatingsystemstartsup
Solution:Ensurethatnokeysarestuck.
Audioproblems
Thissectionprovidessolutionstoaudio-relatedproblems.
NoaudioinWindows
Solutions:
•IfyouareusingpoweredexternalspeakersthathaveanOn/Offcontrol,ensurethat:
–TheOn/OffcontrolissettotheOnposition.
–Thespeakerpowercableisconnectedtoaproperlygrounded,functionalacelectricaloutlet.
•Ifyourexternalspeakershaveavolumecontrol,ensurethatthevolumeisnotsettoolow.
•ClickthevolumeiconintheWindowsnotificationareaonthetaskbar.Ensurethatthemutespeakers
settingsarenotselectedandnoneofthevolumesettingsissettoolow.
Note:IfthevolumeiconisnotdisplayedintheWindowsnotificationarea,addtheicontothenotification
area.See“AddinganicontotheWindowsnotificationarea”onpage53.
•Somemodelshaveafrontaudiopanelyoucanusetoadjustvolume.Ifyouhaveafrontaudiopanel,
ensurethatthevolumeisnotsettoolow.
•Ensurethatyourexternalspeakers(andheadphones,ifused)areconnectedtothecorrectaudio
connectoronthecomputer.Mostspeakercablesarecolor-codedtomatchtheconnector.
Note:Whenexternal-speakerorheadphonecablesareconnectedtotheaudioconnector,theinternal
speaker,ifpresent,isdisabled.Inmostcases,ifanaudioadapterisinstalledinoneoftheexpansion
slots,theaudiofunctionbuiltintothesystemboardisdisabled.Therefore,youmustusetheaudio
connectorsontheaudioadapter.
•EnsurethattheprogramyouarerunningisdesignedforuseintheMicrosoftWindowsoperatingsystem.
IftheprogramisdesignedtoruninDOS,theprogramdoesnotusetheWindowssoundfeature.The
programmustbeconfiguredtouseSoundBlasterProorSoundBlasteremulation.
•Ensurethattheaudiodevicedriversarecorrectlyinstalled.
Soundcomesonlyfromoneexternalspeaker
Solutions:
•Ensurethatthespeakercableisinsertedcompletelyintotheconnectoronthecomputer.
•Ensurethatthecablethatconnectstheleftspeakertotherightspeakerissecurelyconnected.
•ClickthevolumeiconintheWindowsnotificationareaonthetaskbar.Then,clickthespeakericonontop
ofthevolumecontrol.ClicktheLevelstabandensurethattheBalancesettingsaresetcorrectly.
78ThinkCentreM700zandM800zHardwareMaintenanceManual

Note:IfthevolumeiconisnotdisplayedintheWindowsnotificationarea,addtheicontothenotification
area.See“AddinganicontotheWindowsnotificationarea”onpage53.
CDproblems
ThissectionprovidessolutionstoCD-relatedproblems.
ACDorDVDdoesnotwork
Solutions:
•IfyouhavemultipleCDorDVDdrivesinstalled(oracombinationofCDandDVDdrives),tryinsertingthe
discintotheotherdrive.Insomecases,onlyoneofthedrivesisconnectedtotheaudiosubsystem.
•Ensurethatthediscisinsertedcorrectly,withitslabelup.
•Ensurethatthediscyouareusingisclean.Toremovedustorfingerprints,wipethedisccleanwithasoft
clothfromthecentertotheoutside.Wipingadiscinacircularmotionmightcauselossofdata.
•Ensurethatthediscyouareusingisnotscratchedordamaged.Tryinsertinganotherdiscthatyou
knowisgood.Ifyoucannotreadfromaknown-gooddisc,youmighthaveaproblemwithyouroptical
driveorthecablingtoyouropticaldrive.Ensurethatthepowercableandsignalcablearesecurely
connectedtothedrive.
Unabletouseabootablerecoverymedium,suchastheProductRecoveryCD,to
startyourcomputer
Solution:EnsurethattheCDorDVDdriveisinthestartupsequencebeforethestoragedrive.Referto
“Selectingatemporarystartupdevice”onpage75forinformationonviewingandchangingthestartup
sequence.Notethatonsomemodelsthestartupsequenceispermanentlysetandcannotbechanged.
DVDproblems
ThissectionprovidessolutionstoDVD-relatedproblems.
BlackscreeninsteadofDVDvideo
Solutions:
•RestarttheDVDplayerprogram.
•Tryalowerscreenresolutionorcolordepth.
•Closeanyopenfiles,andthenrestartthecomputer.
DVDmoviedoesnotplay
Solutions:
•Ensurethatthediscsurfaceiscleanandnotscratched.
•Checkthediscorpackageforregionalcoding.Youmightneedtopurchaseadiscwithcodingfor
theregionwhereyouareusingyourcomputer.
NoaudioorintermittentaudiowhileplayingaDVDmovie
Solutions:
•Checkthevolumecontrolsettingsonyourcomputerandonyourspeakers.
•Ensurethatthediscsurfaceiscleanandnotscratched.
•Checkallcableconnectionstoandfromthespeakers.
•UsetheDVDmenuforthevideotoselectadifferentaudiotrack.
Chapter7.Troubleshooting,diagnostics,andrecovery79

Playbackissloworchoppy
Solutions:
•Disableanybackgroundprograms,suchasAntiVirusorDesktopThemes.
•Ensurethatvideoresolutionissettolessthan1152x864pixels.
Invaliddiscornodiscfoundmessage
Solutions:
•EnsurethataDVDdiscisinthedrivewiththeshinysideofthediscfacingdown.
•Ensurethatvideoresolutionissettolessthan1152x864pixels.
•OncomputersthathaveaCD-ROMorCD-RWdriveinadditiontoaDVD-ROMdrive,ensurethatthe
DVDdiscisinthedrivelabeled“DVD”.
Intermittentproblems
Someproblemsoccuronlyoccasionallyandaredifficulttorepeat.
Solutions:
•Ensurethatallcablesandcordsaresecurelyconnectedtothecomputerandconnecteddevices.
•Ensurethatwhenthecomputerison,thefangrillisnotblocked(thereisairflowaroundthegrill),andthe
fansareworking.Ifairflowisblockedorthefansarenotworking,thecomputermightoverheat.
•IfSmallComputerSystemInterface(SCSI)devicesareinstalled,ensurethatthelastexternaldevicein
eachSCSIchainisterminatedcorrectly.Formoreinformation,seeyourSCSIdocumentation.
Storagedriveproblems
Selectyoursymptomfromthefollowinglist:
•“SomeorallstoragedrivesmissingfromtheSetupUtilityprogram”onpage80
•“"NoOperatingSystemFound"messageorthesystemnotstartingupfromthecorrectstoragedrive”
onpage80
SomeorallstoragedrivesmissingfromtheSetupUtilityprogram
Symptom:SomeorallstoragedrivesmissingfromtheSetupUtilityprogram
Solutions:
•Ensurethatallstoragedrivesignalcablesandpowercablesareconnectedcorrectly.
•Ensurethatyourcomputerisconfiguredcorrectlytosupportthestoragedrives.
–IfyourcomputerisinstalledwithfiveSATAstoragedrives,ensurethattheSATAstoragedrive
enablementmodule(onetofivestoragedrives)isinstalled.
–IfyourcomputerisinstalledwithSASstoragedrives,ensurethattheSASstoragedriveenablement
module(onetofivestoragedrives)ortheLSIMegaRAIDSASadapterisinstalled.
"NoOperatingSystemFound"messageorthesystemnotstartingupfromthe
correctstoragedrive
Symptom:"NoOperatingSystemFound"messageorthesystemnotstartingupfromthecorrectstorage
drive
Solutions:
•Ensurethatallstoragedrivesignalcablesandpowercablesareconnectedcorrectly.
80ThinkCentreM700zandM800zHardwareMaintenanceManual

•EnsurethatthestoragedriveyourcomputerstartsupfromislistedasthefirststartupdeviceintheSetup
Utilityprogram.Referto“Changingthestartupdevicesequencepermanently”onpage74.
Note:Inrarecases,thestoragedrivewiththeoperatingsystemmightgetcorruptedordamaged.Insuch
cases,youmightneedtoreplacethestoragedrive.RefertoChapter9“Installingorreplacinghardware”
onpage95.
Screenproblems
Thissectionprovidessolutionstoscreen-relatedproblems.
Myscreengoesblankwhilethecomputerison
Solutions:
•Thecomputervoltagematchesthevoltageavailableattheelectricaloutletforyourcountryorregion.
•Pressakeytoexitthescreensaver.
•Pressthepowerbuttontoresumethecomputerfromsleeporhibernationmode.
•Thebrightnessandcontrastissetcorrectly.
•IfthescreengoesblankwhenIstartsomeapplicationprograms,installthedevicedriversforthe
applicationprograms.Refertothedocumentationfortheaffectedapplicationprogramtocheckwhether
anydevicedriversarerequired.
Theimageappearstobeflickering
Solutions:
•Thescreenmightbeaffectedbyinterferencefromnearbyequipment.Magneticfieldsaroundother
devices,suchastransformers,appliances,fluorescentlights,andothermonitorsmightbecausingthe
problem.Movefluorescentdesklightingoranyequipmentthatproducesmagneticfieldsfartheraway
fromthescreen.Ifthisdoesnotcorrecttheproblem,turnoffthecomputer.Then,adjusttheplacementof
thecomputerandotherdevicessothattheyareatleast305mm(12inches)apart.Turnonthecomputer.
•Resettherefreshratesupportedbyyourcomputer.
1.Right-clickablankareaonthedesktop.
2.DependingonyourWindowsversion,dooneofthefollowing:
–ForWindows7:ClickScreenresolution➙Advancedsettings.
–ForWindows10:ClickDisplaysettings.OntheDisplaytab,clickAdvanceddisplaysettings➙
Displayadapterproperties.
3.ClicktheMonitortab,andthenresettherefreshratetobethehighestandnoninterlaced.
Theimageisdiscolored
Solution:Thescreenmightbeaffectedbyinterferencefromnearbyequipment.Movefluorescentdesk
lightingoranyequipmentthatproducesmagneticfieldsfurtherawayfromthescreen.Iftheproblem
persists,dothefollowing:
1.Turnoffthecomputer.
2.Adjusttheplacementofthecomputerandotherdevicessothattheyareatleast305mm(12inches)
apart.
3.Turnonthecomputer.
Networkingproblems
Thissectionprovidessolutionstonetworking-relatedproblems.
Chapter7.Troubleshooting,diagnostics,andrecovery81

EthernetLANproblems
MycomputercannotbeconnectedtoanEthernetLAN
Solutions:
•ConnectthecablefromtheEthernetconnectortotheRJ45connectorofthehub.
•EnabletheEthernetLANfeatureintheSetupUtilityprogram.See“StartingtheSetupUtilityprogram”on
page71.Then,followtheinstructionsonthescreen.
•EnabletheEthernetLANadapter.
1.DependingonyourWindowsversion,dooneofthefollowing:
–ForWindows7:ClicktheStartbuttontoopentheStartmenu.
–ForWindows10:Right-clicktheStartbuttontoopentheStartcontextmenu.
2.ClickControlPanel.ViewControlPanelusingLargeiconsorSmallicons,andthenclickNetwork
andSharingCenter➙Changeadaptersettings.
3.Right-clicktheEthernetLANadaptericonandclickEnable.
•UpdateorreinstalltheEthernetLANdriver.See“Keepingyourcomputercurrent”onpage62.
•Installallnetworkingsoftwarethatisnecessaryforyournetworkenvironment.CheckwithyourLAN
administratorforthenecessarynetworkingsoftware.
•Setthesameduplexfortheswitchportandtheadapter.Ifyouconfiguredtheadapterforfullduplex,
ensurethattheswitchportisalsoconfiguredforfullduplex.Settingthewrongduplexmodemight
degradeperformance,causedataloss,orresultinlostconnections.
MycomputerisaGigabitEthernetmodelandIuseaspeedof1000Mbps,buttheconnectionfails
orerrorsoccur
Solution:ConnectthenetworkcabletotheEthernetconnectorusingCategory5wiringanda100BASE-T
hub/switch(not100BASE-X).
MycomputerisaGigabitEthernetmodel,butitcannotbeconnectedtothenetworkat1000Mbps,
butatonly100Mbps
Solutions:
•Tryanothercable.
•Setthelinkpartnertoauto-negotiate.
•Settheswitchtobe802.3ab-compliant(gigabitovercopper).
TheWakeOnLANfeaturedoesnotwork
Solution:EnabletheWakeOnLAN(WOL)featureintheSetupUtilityprogram.See“StartingtheSetupUtility
program”onpage71.Then,followtheinstructionsonthescreen.
WirelessLANproblem
Note:ThewirelessLANfeatureissupportedonlyonsomemodels.
ThewirelessLANfeaturedoesnotwork
Solutions:
•EnablethewirelessLANfeatureintheSetupUtilityprogram.See“StartingtheSetupUtilityprogram”on
page71.Then,followtheinstructionsonthescreen.
•ForWindows10,enablethewirelessLANfeatureinWindowsSettings.ClicktheStartbuttontoopenthe
Startmenu,andthenclickSettings➙Network&Internet➙Wi-Fi.TurnontheWi-Fifeature.
•EnablethewirelessLANadapter.
82ThinkCentreM700zandM800zHardwareMaintenanceManual

1.DependingonyourWindowsversion,dooneofthefollowing:
–ForWindows7:ClicktheStartbuttontoopentheStartmenu.
–ForWindows10:Right-clicktheStartbuttontoopentheStartcontextmenu.
2.ClickControlPanel.ViewControlPanelusingLargeiconsorSmallicons,andthenclickNetwork
andSharingCenter➙Changeadaptersettings.
3.Right-clickthewirelessLANadaptericonandclickEnable.
•UpdateorreinstallthewirelessLANdriver.See“Keepingyourcomputercurrent”onpage62.
Bluetoothproblems
Note:TheBluetoothfeatureissupportedonlyonsomemodels.
TheBluetoothfeaturedoesnotwork
Solutions:
•EnabletheBluetoothfeatureintheSetupUtilityprogram.See“StartingtheSetupUtilityprogram”on
page71.Then,followtheinstructionsonthescreen.
•TurnontheBluetoothradios.
1.DependingonyourWindowsversion,dooneofthefollowing:
–ForWindows7:ClicktheStartbuttontoopentheStartmenu.Right-clickComputer,andthen
clickProperties.
–ForWindows10:Right-clicktheStartbuttontoopentheStartcontextmenu.
2.ClickDeviceManager.Typetheadministratorpasswordorprovideconfirmationifprompted.
3.Right-clicktheBluetoothradiosunderBluetoothRadiosandclickEnable.
•EnabletheBluetoothadapter.
1.DependingonyourWindowsversion,dooneofthefollowing:
–ForWindows7:ClicktheStartbuttontoopentheStartmenu.
–ForWindows10:Right-clicktheStartbuttontoopentheStartcontextmenu.
2.ClickControlPanel.ViewControlPanelusingLargeiconsorSmallicons,andthenclickNetwork
andSharingCenter➙Changeadaptersettings.
3.Right-clicktheBluetoothadaptericonandclickEnable.
•UpdateorreinstalltheBluetoothdriver.See“Keepingyourcomputercurrent”onpage62.
SounddoesnotcomefromtheBluetoothheadsetorheadphones
Solution:SettheBluetoothheadsetorheadphonesasthedefaultdevice.
1.Exittheapplicationthatusesthesounddevice(forexample,WindowsMediaPlayer).
2.Right-clickthevolumeiconintheWindowsnotificationareaonthetaskbar.
Note:IfthevolumeiconisnotdisplayedintheWindowsnotificationarea,addtheicontothe
notificationarea.See“AddinganicontotheWindowsnotificationarea”onpage53.
3.ClickPlaybackdevices.
4.IfyouareusingtheHeadsetprofile,selectBluetoothHands-freeAudio,andthenclickSetDefault.If
youareusingtheAVprofile,selectStereoAudio,andthenclickSetDefault.
5.ClickOK.
Performanceproblems
Thissectionprovidessolutionstoperformance-relatedproblemsofyourcomputer.
Chapter7.Troubleshooting,diagnostics,andrecovery83

Excessivenumberoffragmentedfiles
Solution:UsetheWindowsdiskdefragmentationordiskoptimizationfeaturetocleanupthefiles.
Note:Dependingonthevolumeofthestoragedrivesandamountofdatastoredonthestoragedrives,the
disk-defragmentationprocessmighttakeuptoseveralhours.
1.Closeanyopenprogramsandwindows.
2.ClicktheStartbuttontoopentheStartmenu.
3.DependingonyourWindowsversion,dooneofthefollowing:
•ForWindows7:ClickComputer.
•ForWindows10:ClickFileExplorer➙ThisPC.
4.Right-clickyourCdriveandthenclickProperties.
5.ClicktheToolstab.
6.DependingonyourWindowsversion,dooneofthefollowing:
•ForWindows7:ClickDefragmentnow.
•ForWindows10:ClickOptimize.Selectthedesireddrive,andthenclickOptimize.
7.Followtheinstructionsonthescreen.
Insufficientfreestoragedrivespace
Solutions:Freeupstoragedrivespace.
•CleanoutyourInbox,SentItems,andDeletedItemsfoldersfromyoure-mailapplication.
•CleanupyourCdrive.
1.ClicktheStartbuttontoopentheStartmenu.
2.DependingonyourWindowsversion,dooneofthefollowing:
–ForWindows7:ClickComputer.
–ForWindows10:ClickFileExplorer➙ThisPC.
3.Right-clickyourCdriveandthenclickProperties.
4.Checktheamountoffreespace,andthenclickDiskCleanup.
5.Alistofunnecessaryfilecategoriesisdisplayed.Selecteachfilecategoryyouwanttodelete,
andthenclickOK.
•TurnsomeWindowsfeaturesofforremovesomeunnecessaryprograms.
1.DependingonyourWindowsversion,dooneofthefollowing:
–ForWindows7:ClicktheStartbuttontoopentheStartmenu.
–ForWindows10:Right-clicktheStartbuttontoopentheStartcontextmenu.
2.ClickControlPanel.ViewControlPanelusingLargeiconsorSmallicons,andthenclickPrograms
andFeatures.
3.Dooneofthefollowing:
–ToturnsomeWindowsfeaturesoff,clickTurnWindowsfeaturesonoroff.Followthe
instructionsonthescreen.
–Toremovesomeunnecessaryprograms,selecttheprogramyouwanttoremove,andthenclick
Uninstall/ChangeorUninstall.
Insufficientfreememoryspace
Solutions:
84ThinkCentreM700zandM800zHardwareMaintenanceManual

•Right-clickablankareaonthetaskbarandopenTaskManager.Then,endsometasksyouarenot
performing.
•Installadditionalmemorymodules.SeeChapter9“Installingorreplacinghardware”onpage95.To
purchasememorymodules,goto
http://www.lenovo.com.
Serialconnectorcannotbeaccessed
Solutions:
•Connecttheserialcabletotheserialconnectoronthecomputerandtotheserialdevice.Iftheserial
devicehasitsownpowercord,connectthepowercordtoagroundedelectricaloutlet.
•Turnontheserialdeviceandkeepthedeviceonline.
•Installanyapplicationprogramssuppliedwiththeserialdevice.Refertothedocumentationthatcomes
withtheserialdeviceformoreinformation.
•Ifyouaddedoneserial-connectoradapter,installtheadaptercorrectly.
USBdeviceproblems
ThissectionprovidessolutionstoUSBdevice-relatedproblems.
MyUSBdevicecannotbeaccessed
Solutions:
•ConnecttheUSBcablefromtheUSBconnectortotheUSBdevice.IftheUSBdevicehasitsownpower
cord,connectthepowercordtoagroundedelectricaloutlet.
•TurnontheUSBdeviceandkeepthedeviceonline.
•InstallanydevicedriversorapplicationprogramssuppliedwiththeUSBdevice.Refertothe
documentationthatcomeswiththeUSBdeviceformoreinformation.
•DetachandreconnecttheUSBconnectortoresettheUSBdevice.
IcannotinstalltheWindows7operatingsystemusinganexternalUSBdevice
Solution:Gotohttp://www.lenovo.com/supporttodownloadandinstallUSBdrivers.
Softwareanddriverproblems
Thissectionprovidessolutionstosoftware-anddriver-relatedproblems.
Forsomeprograms,datescannotbesortedincorrectorder
Solution:Someprogramsdevelopedbeforetheyear2000useonlythelasttwodigitsofayeartosortdates,
assumingthefirsttwodigitsare19.Consequently,datescannotbesortedincorrectordernowadays.
Checkwithyoursoftwaremanufacturertoseeifanyupdatesareavailable.Manysoftwaremanufacturers
makeupdatesavailablefromtheWorldWideWeb.
Someapplicationprogramsdonotworkasexpected
Solutions:
1.Checkwhethertheproblemiscausedbyanapplicationprogram.
a.Ensurethatthesoftwareiscompatiblewithyourcomputer.Refertotheinformationsuppliedwith
thesoftwareformoreinformation.
b.Verifythatothersoftwareworkscorrectlyonyourcomputer.
c.Verifythatthesoftwareyouareusingworksonanothercomputer.
Chapter7.Troubleshooting,diagnostics,andrecovery85

2.Iftheproblemiscausedbyanapplicationprogram:
•Refertotheprinteddocumentationthatcomeswiththeprogramorthehelpsystemoftheprogram.
•Updatetheprogram.See“Keepingyourcomputercurrent”onpage62.
•Uninstalltheprogramandthenreinstallit.Todownloadaprogramthatispreinstalledonyour
computer,gotohttp://www.lenovo.com/supportandfollowtheinstructionsonthescreen.
Adevicedoesnotworknormallyduetodevicedriverproblems
Solution:Updatethedevicedriver.See“Keepingyourcomputercurrent”onpage62.
Diagnostics
Note:IfyouareusingaWindowsoperatingsystemotherthanWindows7orWindows10,goto
http://www.lenovo.com/diagsforthediagnosticsinformationforyourcomputer.
Thediagnosticprogramisusedtotesthardwarecomponentsofyourcomputer.Thediagnosticprogramalso
canreportoperating-system-controlledsettingsthatinterferewiththecorrectoperationofyourcomputer.
LenovoSolutionCenter
TheLenovoSolutionCenterprogramisthediagnosticprogrampreinstalledonyourcomputer.Theprogram
enablesyoutotroubleshootandresolvecomputerproblems.Itcombinesdiagnostictests,system
informationcollection,securitystatus,andsupportinformation,alongwithhintsandtipsformaximum
systemperformance.
ToopentheLenovoSolutionCenterprogram,see“Accessingaprogramonyourcomputer”onpage46.For
moreinformationaboutusingtheprogram,refertothehelpsystemoftheprogram.
IfyouareunabletoisolateandrepairtheproblemyourselfafterrunningLenovoSolutionCenter,save
andprintthelogfilescreatedbytheprogram.YoumightneedthelogfileswhenyouspeaktoaLenovo
technicalsupportrepresentative.
UEFIdiagnosticprogram
TheUEFIdiagnosticprogramenablesyoutotesthardwaredevices(suchasmemorymodulesorstorage
drives)andprovidesthefollowingtools:
•Systeminformation
•Recoverbadsectorstool
•Generateconfigurationfile
•Executefromconfigurationfile
TousetheUEFIdiagnosticprogram,dothefollowing:
1.Turnonorrestartyourcomputer.
2.BeforeWindowsstarts,repeatedlypressandreleasetheF10keyuntiltheUEFIdiagnosticprogram
opens.
Note:IfaBIOSpasswordhasbeenset,theSetupUtilityprogramwillnotopenuntilyouenterthe
correctpassword.Formoreinformation,see“UsingBIOSpasswords”onpage73.
3.Followtheinstructionsonthescreentousethediagnosticprogram.
86ThinkCentreM700zandM800zHardwareMaintenanceManual

Recoveryinformation
Thissectionprovidesinstructionsabouthowtorecoveryouroperatingsystem.
Note:Ifadevicedoesnotworknormallyafterrecoveringtheoperatingsystem,updatethedevicedriver.
See“Keepingyourcomputercurrent”onpage62.
RecoveryinformationforWindows7
TorecoveryourWindows7operatingsystem,usethefollowingsolutions:
•UseWindowsrecoverysolutions.
–UseSystemRestoretorestoresystemfilesandsettingstoanearlierpoint.
1.ClicktheStartbuttontoopentheStartmenu.
2.ClickControlPanel.ViewControlPanelusingLargeiconsorSmallicons,andthenclick
Recovery➙OpenSystemRestore.
3.Followtheinstructionsonthescreen.
–UsetheWindowsrecoveryenvironmentbydoingoneofthefollowing:
–Afterseveralconsecutivefailedbootattempts,theWindowsrecoveryenvironmentmightstart
automatically.Followtheinstructionsonthescreentochoosetheappropriaterecoverysolution.
–Turnonorrestartyourcomputer.Then,repeatedlypressandreleasetheF8keyuntiltheAdvanced
BootOptionswindowopens.SelectRepairYourComputer,pressEnter,andfollowtheinstructions
onthescreentochoosetheappropriaterecoverysolution.
Note:Forsomekeyboards,youmightneedtopressFn+F8toopentheAdvancedBootOptions
window.
•UsetheRescueandRecoveryprogramtorestorethestoragedrivefromabackup,orrestoretheC
drivetothefactory-defaultsettings.
Notes:
–Dependingonyourcomputermodel,theRescueandRecoveryprogrammightnotbeavailableunless
youinstalleditmanuallyearlier.
–IfyouusetheRescueandRecoveryprogramtorestorethestoragedrivefromabackup,ensurethat
youbackedupyourdataearlierwiththeprogram.
TousetheRescueandRecoveryprogram,dooneofthefollowing:
–OpentheRescueandRecoveryprogram.See“Accessingaprogramonyourcomputer”onpage46.
Formoreinformationaboutusingtheprogram,refertothehelpsystemoftheprogram.
–OpentheRescueandRecoveryworkspace.
1.Turnoffyourcomputer.PressandholdtheEnterkeyandthenturnonthecomputer.Release
theEnterkeywhenStartupInterruptMenuisdisplayed.Then,pressF11toopentheRescue
andRecoveryworkspace.
2.IftheRescueandRecoveryworkspacefailstoopen,usetherescuemediumyoucreatedearlierto
resolvetheproblem.Selecttherescuemediumasthestartupdevice.See“Selectingatemporary
startupdevice”onpage75.Whentherescuemediumstarts,theRescueandRecoveryworkspace
opens.Followtheinstructionsonthescreen.
•UsetherecoverymediumyoucreatedearlierwiththeCreateRecoveryMediaprogramtorestoreonly
theCdriveortheentirestoragedrivetothefactory-defaultsettings.
Note:Tocreatearecoverymedium,see“Goodmaintenancepractices”onpage62.
Chapter7.Troubleshooting,diagnostics,andrecovery87

1.Selecttherecoverymediumasthestartupdevice.See“Selectingatemporarystartupdevice”
onpage75.
2.Followtheinstructionsonthescreentochoosetheappropriaterecoverysolution.
•UsetherecoverydiscsetprovidedbyLenovotorestoretheentirestoragedrivetothefactory-default
settings.
–Ifyourcomputercomeswiththerecoverydiscset,followtheinstructionsshippedwiththediscset.
–Ifyourcomputerdoesnotcomewiththerecoverydiscset,contacttheLenovoCustomerSupport
Centertoorderarecoverydiscset.See“Callingforservice”onpage146.
RecoveryinformationforWindows10
TorecoveryourWindows10operatingsystem,usethefollowingsolutions:
•UseWindowsrecoverysolutions.
–UserecoverysolutionsinWindowsSettings.
1.ClicktheStartbuttontoopentheStartmenu.
2.ClickSettings➙Update&security➙Recovery.
3.Choosetheappropriaterecoverysolutionbyfollowingtheinstructionsonthescreen.
–UseSystemRestoretorestoresystemfilesandsettingstoanearlierpoint.
1.Right-clicktheStartbuttontoopentheStartcontextmenu.
2.ClickControlPanel.ViewControlPanelusingLargeiconsorSmallicons,andthenclick
Recovery➙OpenSystemRestore.
3.Followtheinstructionsonthescreen.
–UsetheFileHistorytooltorestoreyourfilesfromabackup.
Note:IfyouusetheFileHistorytooltorestoreyourfilesfromabackup,ensurethatyoubackedup
yourdataearlierwiththetool.
1.Right-clicktheStartbuttontoopentheStartcontextmenu.
2.ClickControlPanel.ViewControlPanelusingLargeiconsorSmallicons,andthenclickFile
History➙Restorepersonalfiles.
3.Followtheinstructionsonthescreen.
–UsetheWindowsrecoveryenvironmentbydoingoneofthefollowing:
–Afterseveralconsecutivefailedbootattempts,theWindowsrecoveryenvironmentmightstart
automatically.Followtheinstructionsonthescreentochoosetheappropriaterecoverysolution.
–SelecttherecoverymediumyoucreatedearlierwiththeWindowstoolasthestartupdevice.See
“Selectingatemporarystartupdevice”onpage75.Then,followtheinstructionsonthescreen
tochoosetheappropriaterecoverysolution.
Note:Tocreatearecoverymedium,see“Goodmaintenancepractices”onpage62.
•UsetherecoveryUSBkeyprovidedbyLenovotorestoretheentirestoragedrivetothefactory-default
settings.
–IfyourcomputercomeswiththerecoveryUSBkey,followtheinstructionsshippedwiththeUSBkey.
–IfyourcomputerdoesnotcomewiththerecoveryUSBkey,contacttheLenovoCustomerSupport
CentertoorderarecoveryUSBkey.See“Callingforservice”onpage146.
88ThinkCentreM700zandM800zHardwareMaintenanceManual

Chapter8.Servicecheckoutandsymptom-to-FRUindex
Thischapterprovidesinformationaboutgeneralservicecheckoutandsymptom-to-FRUindex.
Servicecheckout
Attention:Thedrivesinthecomputeryouareservicingmighthavebeenrearrangedorthedrivestartup
sequencechanged.Beextremelycarefulduringwriteoperationssuchascopying,saving,orformatting.
Dataorprogramscanbeoverwrittenifyouselectanincorrectdrive.
Generalerrormessagesappearifaproblemorconflictisfoundbyanapplicationprogram,theoperating
system,orboth.Foranexplanationofthesemessages,refertotheinformationsuppliedwiththatsoftware
package.
BeforereplacinganyFRUs,ensurethatthelatestlevelofBIOSisinstalledonthesystem.Adown-levelBIOS
mightcausefalseerrorsandunnecessaryreplacementofthesystemboard.
Usethefollowingproceduretohelpdeterminethecauseoftheproblem:
1.Power-offthecomputerandallexternaldevices.
2.Checkallcablesandpowercords.
3.Setalldisplaycontrolstothemiddleposition.
4.Power-onallexternaldevices.
5.Power-onthecomputer.
•Lookfordisplayederrorcodes
•Listenforbeepcodes
•Lookforreadableinstructionsoramainmenuonthedisplay.
Ifyoudidnotreceivethecorrectresponse,gotostep6.
Ifyoudoreceivethecorrectresponse,gotostep7.
6.Lookatthefollowingconditionsandfollowtheinstructions:
•IfyouhearbeepcodesduringPOST,goto“Beepsymptoms”onpage91.
•IfthecomputerdisplaysaPOSTerror,goto“POSTerrorcodes”onpage91.
•Ifthecomputerhangsandnoerrorisdisplayed,gotostep7.
7.RuntheDiagnosticprograms.See“Diagnostics”onpage86.
•Ifyoureceiveanerror,replacethepartthatthediagnosticprogramcallsout.
•Iftheteststopsandyoucannotcontinue,replacethelastdevicetested.
Problemdeterminationtips
Duetothevarietyofhardwareandsoftwarecombinationsthatcanbeencountered,usethefollowing
informationtoassistyouinproblemdetermination.Ifpossible,havethisinformationavailablewhen
requestingassistancefromServiceSupportandEngineeringfunctions.
•Machinetypeandmodel
•Processororharddiskdriveupgrades
•Failuresymptom
–Dodiagnosticsindicateafailure?
–What,when,where,single,ormultiplesystems?
©CopyrightLenovo201589

–Isthefailurerepeatable?
–Hasthisconfigurationeverworked?
–Ifithasbeenworking,whatchangesweremadepriortoitfailing?
–Isthistheoriginalreportedfailure?
•Diagnosticsversion
–Typeandversionlevel
•Hardwareconfiguration
–Print(printscreen)configurationcurrentlyinuse
–BIOSlevel
•Operatingsystemsoftware
–Typeandversionlevel
Notes:Toeliminateconfusion,identicalsystemsareconsideredidenticalonlyifthey:
1.Aretheexactmachinetypeandmodels
2.HavethesameBIOSlevel
3.Havethesameadapters/attachmentsinthesamelocations
4.Havethesameaddressjumpers/terminators/cabling
5.Havethesamesoftwareversionsandlevels
6.HavethesameDiagnosticDiskettes(version)
7.Havethesameconfigurationoptionssetinthesystem
8.Havethesamesetupfortheoperatingsystemcontrolfiles
Comparingtheconfigurationandsoftwareset-upbetween“workingandnon-working”systemswilloften
leadtoproblemresolution.
Symptom-to-FRUindex
TheSymptom-to-FRUindexlistserrorsymptomsandpossiblecauses.Themostlikelycauseislistedfirst.
Alwaysbeginwith“Servicecheckout”onpage89.Thisindexcanalsobeusedtohelpyoudecidewhich
FRUstohaveavailablewhenservicingacomputer.Ifyouareunabletocorrecttheproblemusingthis
index,goto“Undeterminedproblems”onpage94.
Notes:
•TheSymptom-to-FRUindexisnotspecifictoanymachinetypeandareapplicabletoallLenovocomputers.
•Ifyouhavebothanerrormessageandanincorrectaudioresponse,diagnosetheerrormessagefirst.
•Ifyoucannotrunthediagnostictestsorgetadiagnosticerrorcodewhenrunningatest,firstdiagnosethePOST
errormessageyoureceive.
•Ifyoudidnotreceiveanyerrormessage,lookforadescriptionofyourerrorsymptomsinthefirstpartofthisindex.
Harddiskdrivebooterror
Aharddiskdrivebooterrorcanhavethefollowingcauses.
ErrorFRU/Action
Thestart-updriveisnotinthebootsequencein
configuration.
Checktheconfigurationandensurethestart-updriveis
inthebootsequence.
Nooperatingsysteminstalledonthebootdrive.Installanoperatingsystemonthebootdrive.
90ThinkCentreM700zandM800zHardwareMaintenanceManual

ErrorFRU/Action
Thebootsectoronthestartupdriveiscorrupted.Thedrivemustbeformatted.Dothefollowing:
1.Attempttobackupthedataonthefailingharddisk
drive.
2.Usingtheoperatingsystemprograms,formatthe
harddiskdrive.
Thedriveisdefective.Replacetheharddiskdrive.
Powersupplyproblems
Ifyoususpectapowerproblem,usethefollowingprocedures.
Check/VerifyFRU/Action
Checkthefollowingforproperinstallation.
•Powercord
•On/Offswitchconnector
•On/Offswitchpowersupplyconnector
•Systemboardpowersupplyconnectors
•Microprocessor(s)connection
Reseatconnectors
Checkthepowercordforcontinuity.Powercord
Checkthepower-onswitchforcontinuity.Power-onswitch
Beepsymptoms
Beepsymptomsaretonesoraseriesoftonesseparatedbypauses(intervalswithoutsound)duringPOST.
Thefollowingtabledescribesthebeepsymptoms.
BeepsymptomFRU/Action
2shortbeepsCMOSsettingerrorCommonerrorcode,seethedetailfailureinformationin
“POSTerrorcodes”onpage91.
3shortand1longbeepsDRAMmemoryerrorPerformthefollowingactionsinorder.
1.Makesurethememorymodule(s)areproperlyseated
intheconnector(s).
2.Replacethememorymodule(s).
3.Replacethesystemboard.
POSTerrorcodes
Eachtimeyoupower-onthesystem,itperformsaseriesofteststhatchecktheoperationofthesystem
andsomeoptions.ThisseriesoftestsiscalledthePower-OnSelf-Test,orPOST.POSTdoesthefollowing
operations.
•Checkssomebasicsystem-boardoperations
•Checksthememoryoperation
•Startsthevideooperation
•Verifiesthatthebootdriveisworking
Chapter8.Servicecheckoutandsymptom-to-FRUindex91

IfthePOSTdetectsaproblem,anerrormessageappearsonthescreen.Asingleproblemcancauseseveral
errormessagestoappear.Whenyoucorrectthecauseofthefirsterrormessage,theothererrormessages
probablywillnotbedisplayednexttimeyouturnonthesystem.
ErrorcodePOSTerrormessageDescription/Action
0135FanfailureThesystemmightbeoverheating.
PressF10toexit.
Note:Iftheproblemiscausedbythe
microprocessorfan,pressF10will
notsolvetheproblem.
0211KeyboardnotfoundWhenthereisnokeyboarddetected,
theerrormessagewillbedisplayed.
0164MemorysizedecreasedPressF10toexit.
1762ConfigurationchangehasoccurredThiserrormessageisdisplayedwhen
aharddiskdriveoropticaldrive
changehasbeenmade.
PressF10toexit.
1820Morethanoneexternalfingerprint
readerareattached.Poweroffand
removeallbutthereaderthatyouset
upwithinyourmainoperatingsystem.
Ifmorethanoneexternalfingerprint
readerareconnectedtoacomputer,
thiserrormessagewillbedisplayed.
Removeallofthefingerprint
keyboardsexcepttheonecompatible
withthefingerprintapplicationon
yourcomputer.
1962Nooperatingsystemfound.Press
anykeytorepeatbootsequence.
ThiserroroccursonlyafterthePOST
iscompleted.
Pressanykeytorepeatboot
sequence.
Miscellaneouserrorconditions
Message/SymptomFRU/Action
ChangingdisplaycolorsDisplay/Monitor
Computerwillnotpower-off.See“Harddiskdriveboot
error”onpage90.
1.PowerSwitch
2.SystemBoard
3.Risercard,ifinstalled.
ComputerwillnotRPLfromserver1.Ensurethatnetworkisinstartupsequenceasfirst
deviceorfirstdeviceafterdiskette.
2.EnsurethatnetworkadapterisenabledforRPL.
3.Networkadapter(Advisenetworkadministratorof
newMACaddress)
92ThinkCentreM700zandM800zHardwareMaintenanceManual

Message/SymptomFRU/Action
ComputerwillnotperformaWakeOnLAN®(ifapplicable)1.Checkpowersupplyandsignalcableconnections
tonetworkadapter.
2.Ensurethattheoperatingsystemsettingsaresetto
enableWakeonLAN.
3.EnsureWakeOnLANfeatureisenabledin
Setup/Configuration(see“StartingtheSetupUtility
program”onpage71)
4.EnsurenetworkadministratorisusingcorrectMAC
address.
5.EnsurenointerruptorI/Oaddressconflicts.
6.Networkadapter(advisenetworkadministratorof
newMACaddress)
Deadcomputer.See“Harddiskdrivebooterror”onpage
90.
1.PowerSupply
2.SystemBoard
Diskettedrivein-uselightremainsonordoesnotlight
whendriveisactive.
1.DisketteDrive
2.SystemBoard
3.DisketteDriveCable
Blankscreenexceptforflashingcursor.1.SystemBoard
2.PrimaryHardDiskDrive
3.HardDiskDriveCable
IncorrectmemorysizeduringPOST1.RuntheMemorytests.
2.MemoryModule
3.SystemBoard
"InsertaDiskette"iconappearswithaknown-good
diagnosticsdisketteinthefirst3.5-inchdiskettedrive.
1.SystemBoard
2.DisketteDriveCable
3.NetworkAdapter
Intensityorcolorvariesfromlefttorightofcharacters
andcolorbars
1.Display
2.Videoadapter(ifpresent)
3.SystemBoard
Nopowerorfannotrunning1.See“Harddiskdrivebooterror”onpage90.
Non-systemdiskordiskerror-typemessagewitha
known-gooddiagnosticdiskette.
1.DisketteDrive
2.SystemBoard
3.DisketteDriveCable
Otherdisplaysymptomsnotlistedabove(includingblank
orillegibledisplay)
1.Display
2.SystemBoard
Power-onindicatororharddiskdrivein-uselightnoton,
butcomputerworkscorrectly
1.Powerswitch/LEDassembly
2.SystemBoard
Printerproblems1.Printer
2.SystemBoard
Chapter8.Servicecheckoutandsymptom-to-FRUindex93

Message/SymptomFRU/Action
Programloadsfromtheharddiskwithaknown-good
diagnosticsdisketteinthefirst3.5-inchdiskettedrive
1.RuntheSetupUtilityprogramandcheckStartup
sequence.
2.DisketteDrive
3.DisketteDriveCable
4.SystemBoard
5.PowerSupply
RPLcomputercannotaccessprogramsfromitsownhard
disk.
1.IfnetworkadministratorisusingLCCMHybridRPL,
checkstartupsequence:
a.Firstdevice-network
b.Seconddevice-harddisk
2.Harddiskdrive
RPLcomputerdoesnotRPLfromserver1.Checkstartupsequence.
2.CheckthenetworkadapterLEDstatus.
Serialorparallelconnectordevicefailure(systemboard
connector)
1.ExternalDeviceSelf-TestOK?
2.ExternalDevice
3.Cable
4.SystemBoard
Serialorparallelconnectordevicefailure(adapter
connector)
1.ExternalDeviceSelf-TestOK?
2.ExternalDevice
3.Cable
4.AlternateAdapter
5.SystemBoard
Someorallkeysonthekeyboarddonotwork1.Keyboard
2.KeyboardCable
3.SystemBoard
Undeterminedproblems
Thissectionprovidesinstructionsonhowtofindoutthefailingdevicesoradapters.
1.Power-offthecomputer.
2.Removeordisconnectthefollowingcomponents(ifinstalled)oneatatime.
a.Externaldevices(modem,printer,ormouse)
b.Anyadapters
c.Memorymodules
d.Extendedvideomemory
e.ExternalCache
f.ExternalCacheRAM
g.Harddiskdrive
h.Diskettedrive
3.Power-onthecomputertore-testthesystem.
4.Repeatsteps1through3untilyoufindthefailingdeviceoradapter.
Ifalldevicesandadaptershavebeenremoved,andtheproblemcontinues,replacethesystemboard.
See“Replacingthesystemboard”onpage136.
94ThinkCentreM700zandM800zHardwareMaintenanceManual

Chapter9.Installingorreplacinghardware
Thischaptercontainsthefollowingtopics:
•“Handlingstatic-sensitivedevices”onpage95
•“Installingorreplacinghardware”onpage95
Handlingstatic-sensitivedevices
Donotopenthestatic-protectivepackagecontainingthenewpartuntilthedefectiveparthasbeenremoved
andyouarereadytoinstallthenewpart.Staticelectricity,althoughharmlesstoyou,canseriouslydamage
computercomponentsandparts.
Whenyouhandlepartsandothercomputercomponents,taketheseprecautionstoavoidstatic-electricity
damage:
•Limityourmovement.Movementcancausestaticelectricitytobuilduparoundyou.
•Alwayshandlepartsandothercomputercomponentscarefully.HandlePCI/PCI-Expresscards,memory
modules,systemboards,andmicroprocessorsbytheedges.Nevertouchanyexposedcircuitry.
•Preventothersfromtouchingthepartsandothercomputercomponents.
•Touchthestatic-protectivepackagecontainingtheparttoametalexpansion-slotcoverorother
unpaintedmetalsurfaceonthecomputerforatleasttwoseconds.Thisreducesstaticelectricityfrom
thepackageandyourbodybeforeyouinstallorreplaceanewpart.
•Whenpossible,removethenewpartfromthestatic-protectivepackage,andinstallitdirectlyinthe
computerwithoutsettingthepartdown.Whenthisisnotpossible,placethestatic-protectivepackage
thatthepartcameinonasmooth,levelsurfaceandplacethepartonthepackage.
•Donotplacethepartonthecomputercoverorothermetalsurface.
Installingorreplacinghardware
Thissectionprovidesinstructionsonhowtoinstallorreplacehardwareforyourcomputer.Youcanexpand
thecapabilitiesofyourcomputerandmaintainyourcomputerbyinstallingorreplacinghardware.
Attention:DonotopenyourcomputerorattemptanyrepairbeforereadingandunderstandingtheChapter
1“Readthisfirst:Importantsafetyinformation”onpage1.
Notes:
•Dependingonyourcomputermodel,someofthehardwarepartsinthissectionmightnotbeavailable.
•UsecomputerpartsprovidedonlybyLenovo.
•Wheninstallingorreplacinganoption,usetheappropriateinstructionsinthissectionalongwiththe
instructionsthatcomewiththeoption.
•Inmostareasoftheworld,LenovorequiresthereturnofthedefectiveCRU.Informationaboutthiswill
comewiththeCRUorwillcomeafewdaysaftertheCRUarrives.
Installingexternaloptions
Youcanconnectexternaloptionstoyourcomputer,suchasexternalspeakers,aprinter,orascanner.For
someexternaloptions,youmustinstalladditionalsoftwareinadditiontomakingthephysicalconnection.
Wheninstallinganexternaloption,see“Hardwarelocations”onpage27toidentifytherequiredconnector.
©CopyrightLenovo201595
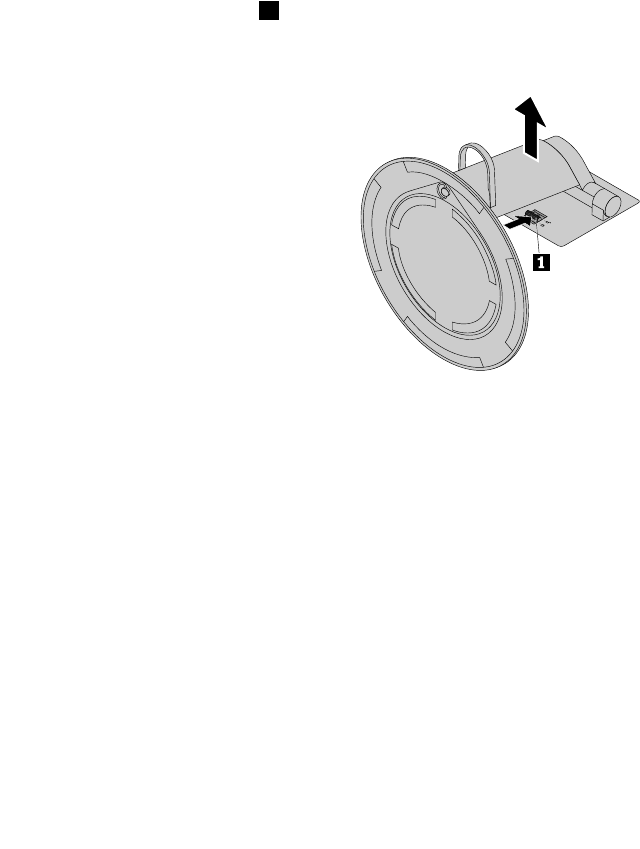
Usetheinstructionsshippedwiththeoptiontohelpyoumaketheconnectionandinstallanysoftware
ordevicedriversthatarerequiredfortheoption.
Replacingthecomputerstand
Attention:DonotopenyourcomputerorattemptanyrepairbeforereadingandunderstandingtheChapter
1“Readthisfirst:Importantsafetyinformation”onpage1.
Toreplacethecomputerstand,refertothefollowingtopics:
•“Replacingthefull-functionmonitorstand(forM700z)”onpage96
•“Replacingthetilt-onlymonitorstand”onpage98
•“ReplacingtheUltraFlexIIStand(forM800z)”onpage99
Replacingthefull-functionmonitorstand(forM700z)
Toreplacethefull-functionmonitorstand,dothefollowing:
1.Removeanymediafromthedrivesandturnoffallconnecteddevicesandthecomputer.Then,
disconnectallpowercordsfromelectricaloutletsanddisconnectallcablesthatareconnectedtothe
computer.
2.Placeasoft,cleantowelorclothonthedeskorsurface.Holdthesidesofyourcomputerandgentlylay
itdownsothatthescreenisagainstthesurfaceandthecomputercoverisfacingup.
3.Presstheretaininglatch1onthefull-functionmonitorstandasshowntodisengagethelatch.Then,
removefull-functionmonitorstandfromthecomputer.
Figure20.Removingthefull-functionmonitorstand
96ThinkCentreM700zandM800zHardwareMaintenanceManual
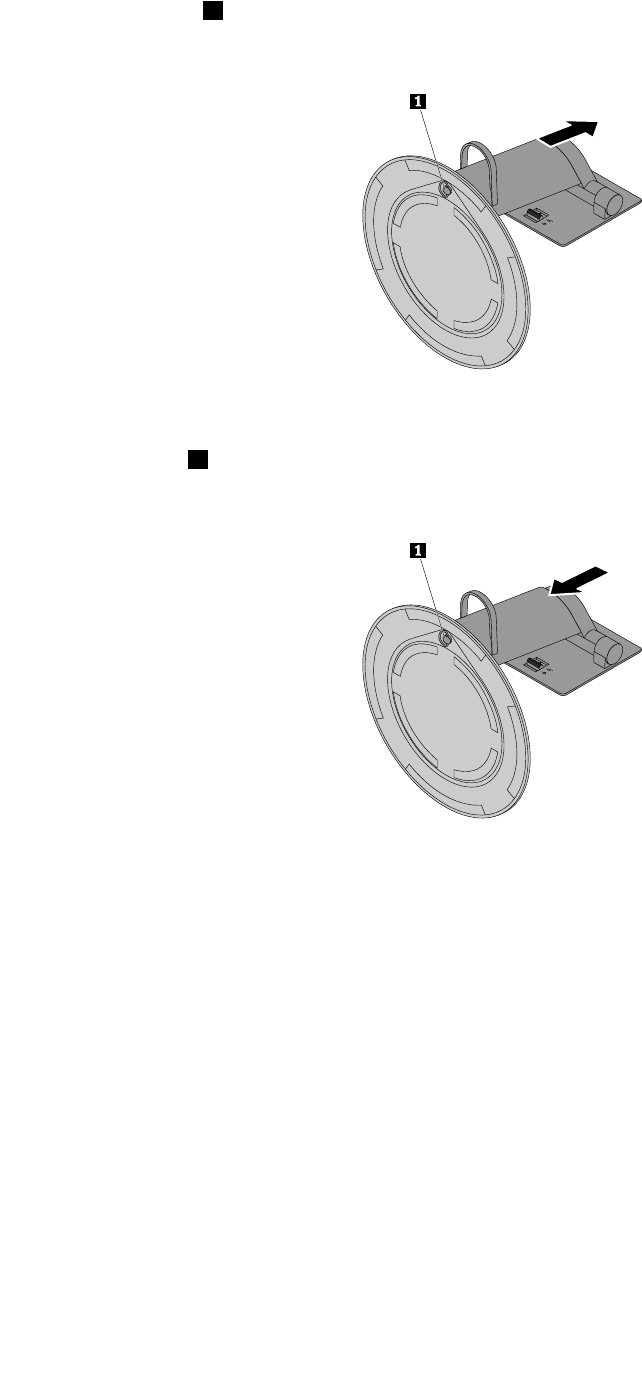
4.Loosenthescrew1onthebase,andthenremovethefull-functionmonitorstandfromthebaseas
shown.
Figure21.Removingthetilt-onlymonitorstandfromthebase
5.Insertthescrew1onthebaseintothecorrespondingholeinthenewtilt-onlymonitorstand.Then,
tightenthescrewtosecurethemonitorstand.
Figure22.Installingthefull-functionmonitorstandonthebase
Chapter9.Installingorreplacinghardware97
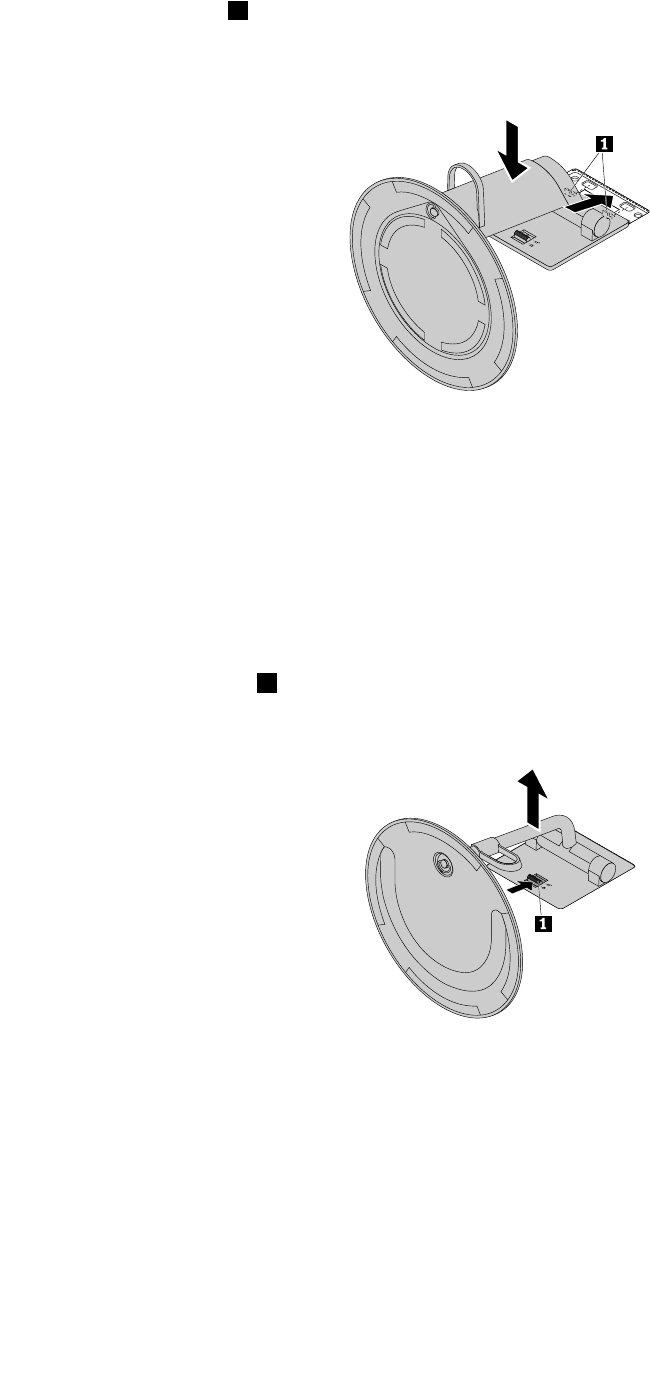
6.Insertthetwohooks1onthenewfull-functionmonitorstandintothecorrespondingholesinthe
computercoverasshown.Then,pivotthefull-functionmonitorstanddownwarduntilitsnapsinto
position.
Figure23.Installingthefull-functionmonitorstand
Replacingthetilt-onlymonitorstand
Toreplacethetilt-onlymonitorstand,dothefollowing:
1.Removeanymediafromthedrivesandturnoffallconnecteddevicesandthecomputer.Then,
disconnectallpowercordsfromelectricaloutletsanddisconnectallcablesthatareconnectedtothe
computer.
2.Placeasoft,cleantowelorclothonthedeskorsurface.Holdthesidesofyourcomputerandgentlylay
itdownsothatthescreenisagainstthesurfaceandthecomputercoverisfacingup.
3.Presstheretaininglatch1onthetilt-onlymonitorstandasshowntodisengagethelatch.Then,remove
thetilt-onlymonitorstandfromthecomputercover.
Figure24.Removingthetilt-onlymonitorstandfromthecomputercover
98ThinkCentreM700zandM800zHardwareMaintenanceManual
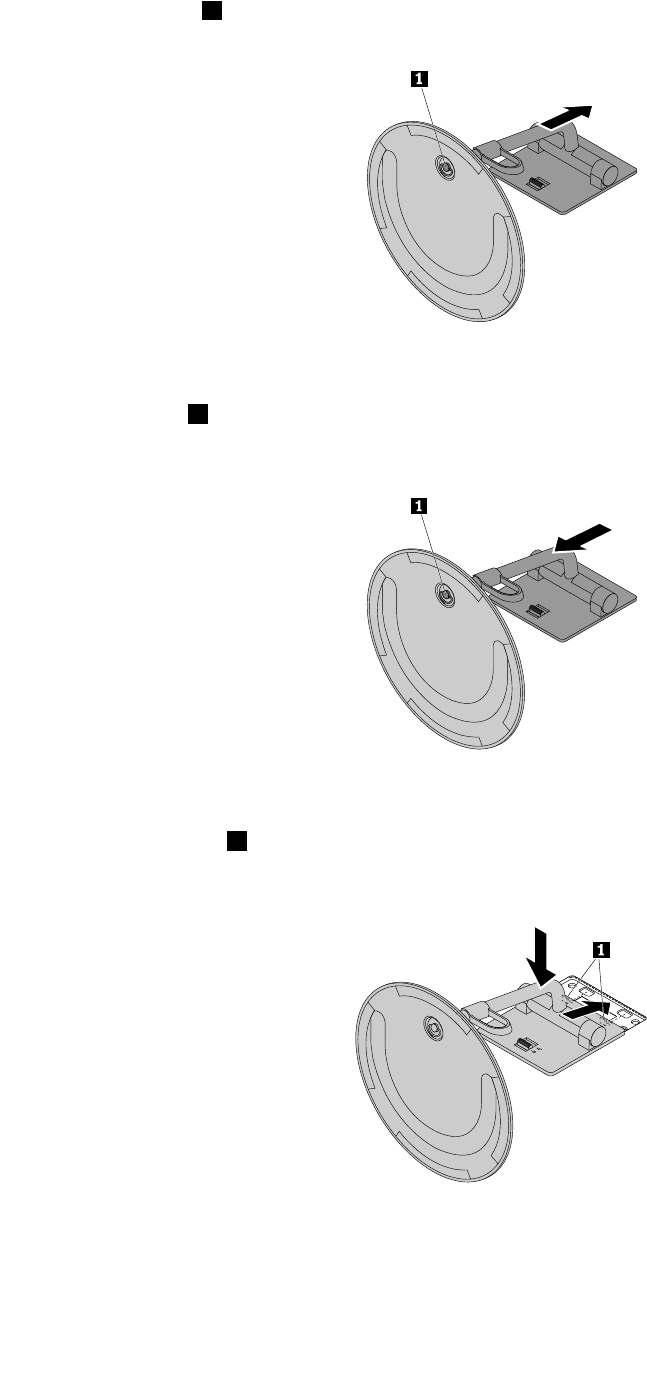
4.Loosenthescrew1onthebase,andthenremovethetilt-onlymonitorstandfromthebaseasshown.
Figure25.Removingthetilt-onlymonitorstandfromthebase
5.Insertthescrew1onthebaseintothecorrespondingholeinthenewtilt-onlymonitorstand.Then,
tightenthescrewtosecurethemonitorstand.
Figure26.Installingthetilt-onlymonitorstandonthebase
6.Insertthetwohooks1onthenewtilt-onlymonitorstandintothecorrespondingholesinthecomputer
coverasshown.Then,pivotthetilt-onlymonitorstanddownwarduntilitsnapsintoposition.
Figure27.Installingthetilt-onlymonitorstandonthecomputercover
ReplacingtheUltraFlexIIStand(forM800z)
ToreplacetheUltraFlexIIStand,dothefollowing:
Chapter9.Installingorreplacinghardware99
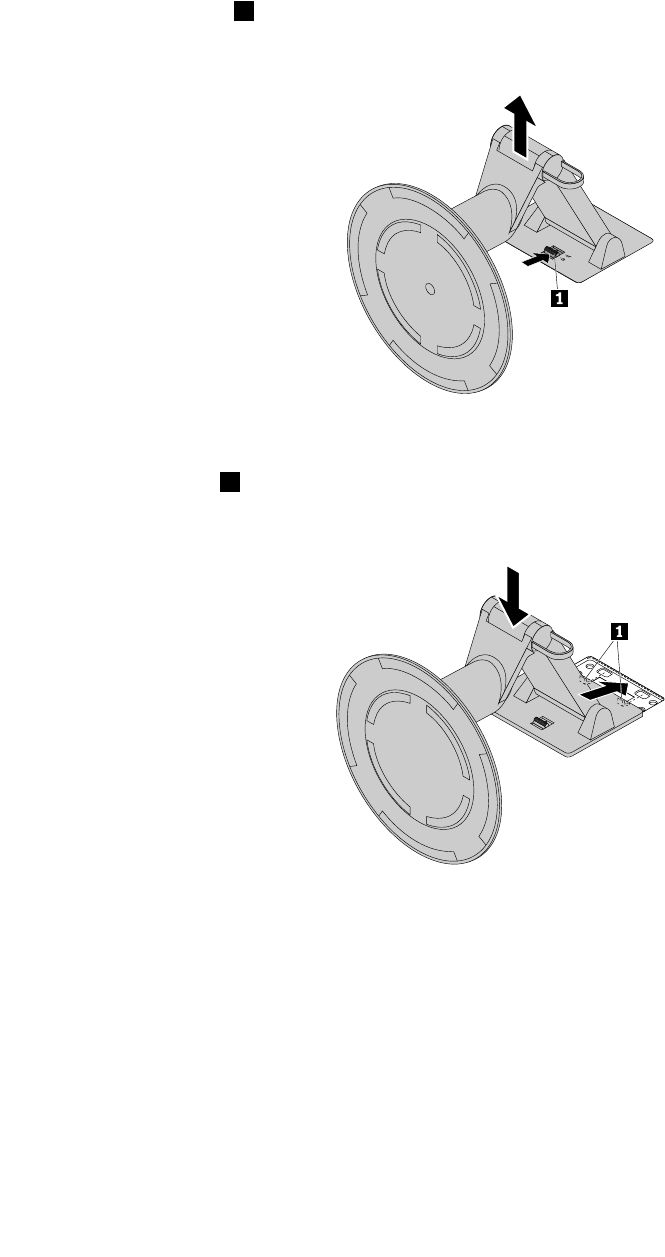
1.Removeanymediafromthedrivesandturnoffallconnecteddevicesandthecomputer.Then,
disconnectallpowercordsfromelectricaloutletsanddisconnectallcablesthatareconnectedtothe
computer.
2.Placeasoft,cleantowelorclothonthedeskorsurface.Holdthesidesofyourcomputerandgentlylay
itdownsothatthescreenisagainstthesurfaceandthecomputercoverisfacingup.
3.Pressthestandlatch1ontheUltraFlexIIStandasshowntodisengagethelatch.Then,remove
theUltraFlexIIStandfromthecomputercover.
Figure28.RemovingtheUltraFlexIIStandfromthecomputercover
4.Insertthetwohooks1onthenewUltraFlexIIStandintothecorrespondingholesinthecomputercover
asshown.Then,pivottheUltraFlexIIStanddownwarduntilitsnapsintoposition.
Figure29.InstallingtheUltraFlexIIStandonthecomputercover
Replacingthepoweradapter(forM700z)
Attention:DonotopenyourcomputerorattemptanyrepairbeforereadingandunderstandingtheChapter
1“Readthisfirst:Importantsafetyinformation”onpage1.
Toreplacethepoweradapter,dothefollowing:
1.Removeallmediafromthedrivesandturnoffallattacheddevicesandthecomputer.Then,disconnect
allpowercordsfromelectricaloutletsanddisconnectallcablesthatareconnectedtothecomputer.
100ThinkCentreM700zandM800zHardwareMaintenanceManual
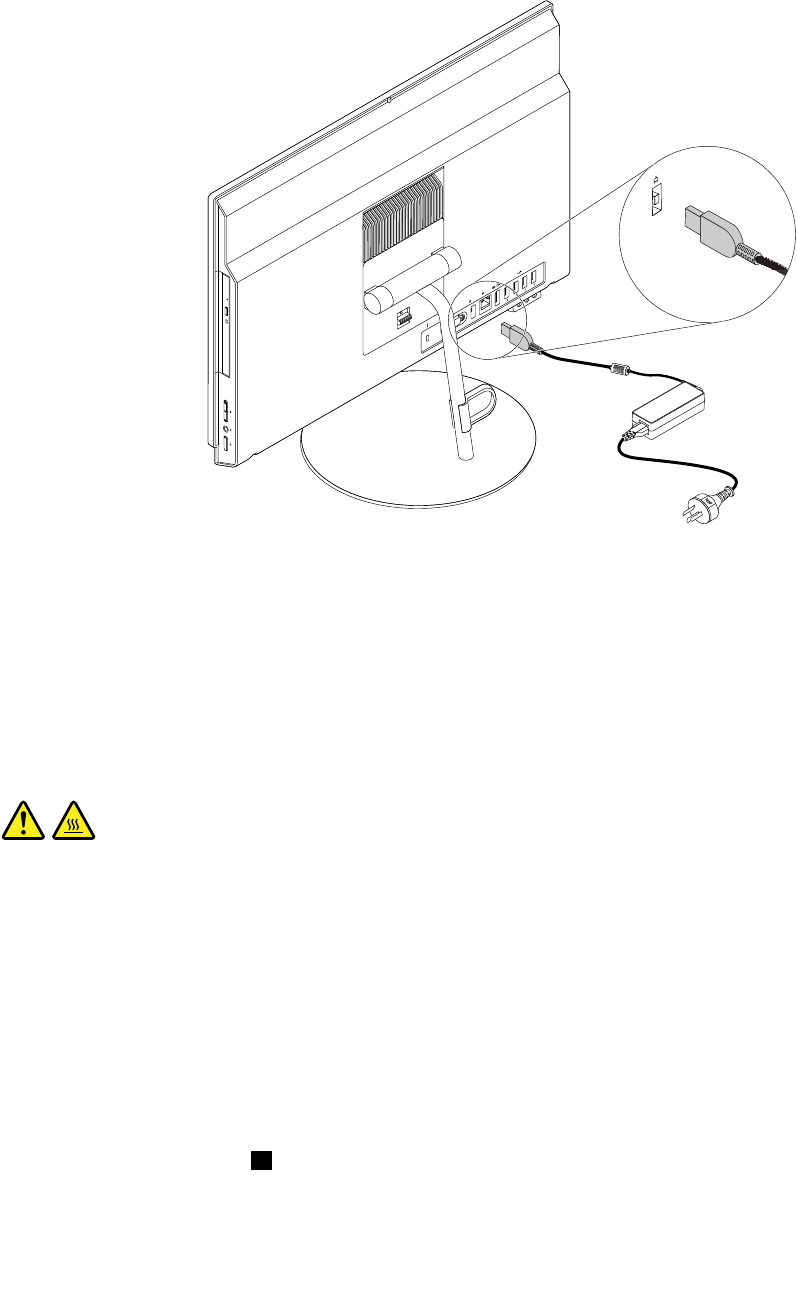
2.Disconnectthepoweradaptercablefromthecomputer.
Figure30.Disconnectingthepoweradapter
Toinstallthepoweradapter,connectthepoweradaptertothepoweradapterconnectorattherearofyour
computerandaworkableelectricaloutlet.
Removingthecomputercover
Attention:DonotopenyourcomputerorattemptanyrepairbeforereadingandunderstandingtheChapter
1“Readthisfirst:Importantsafetyinformation”onpage1.
CAUTION:
Beforeyouopenthecomputercover,turnoffthecomputerandwaitseveralminutesuntilthe
computeriscool.
Toremovethecomputercover,dothefollowing:
1.Removeanymediafromthedrivesandturnoffallconnecteddevicesandthecomputer.Then,
disconnectallpowercordsfromelectricaloutletsanddisconnectallcablesthatareconnectedtothe
computer.
2.Unlockanylockingdevicethatsecuresthecomputercover.
3.Placeasoft,cleantowelorclothonthedeskorsurface.Holdthesidesofyourcomputerandgentlylay
itdownsothatthescreenisagainstthesurfaceandthecoverisfacingup.
4.Removethecomputerstand.See“Replacingthecomputerstand”onpage96.
5.Loosenthetwoscrews1atthebottomofthecomputer,andthenliftthecomputercovertoremove
itfromthecomputer.
Chapter9.Installingorreplacinghardware101
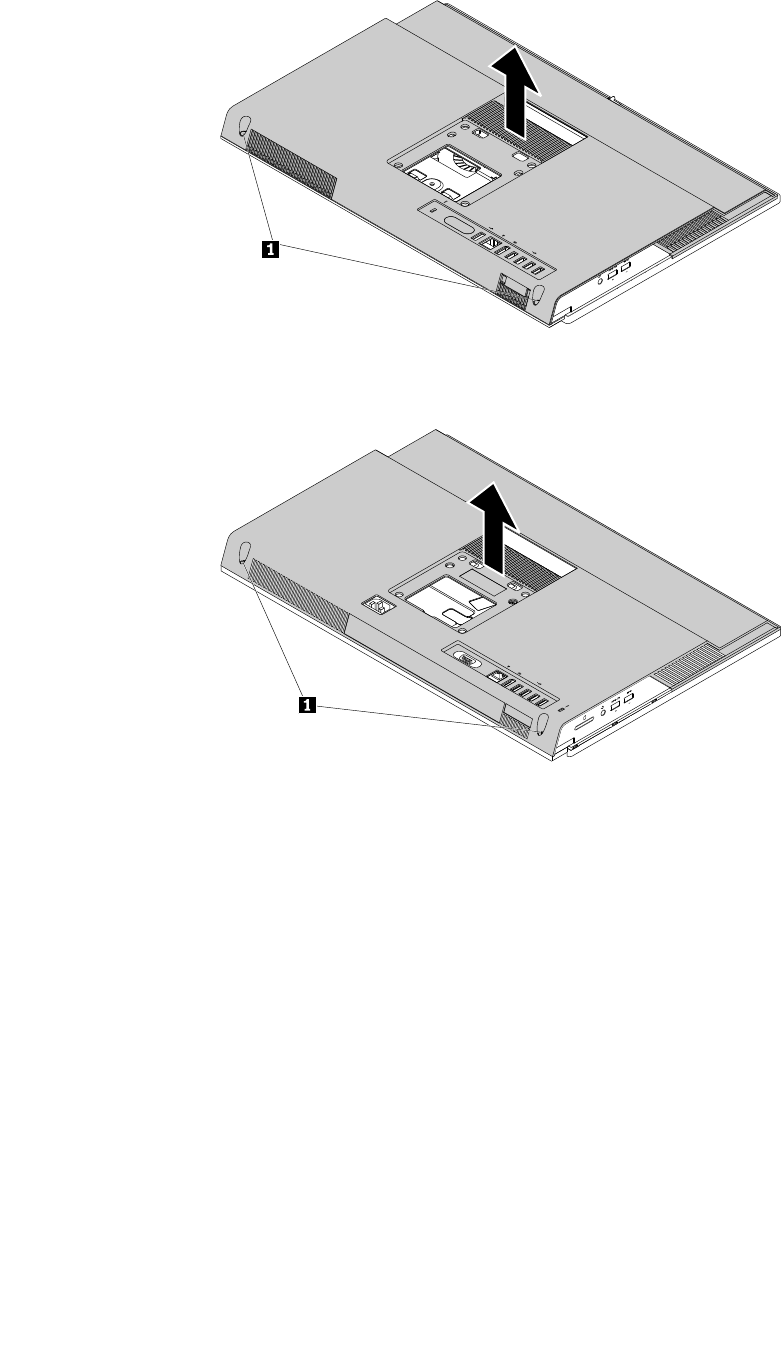
Figure31.Removingthecomputercover(forM700z)
Figure32.Removingthecomputercover(forM800z)
Replacingthesystem-boardshield
Attention:DonotopenyourcomputerorattemptanyrepairbeforereadingandunderstandingtheChapter
1“Readthisfirst:Importantsafetyinformation”onpage1.
ForM700z
Toreplacethesystem-boardshield,dothefollowing:
1.Removeallmediafromthedrivesandturnoffallattacheddevicesandthecomputer.Then,disconnect
allpowercordsfromelectricaloutletsanddisconnectallcablesthatareconnectedtothecomputer.
2.Placeasoft,cleantowelorclothonthedeskorsurface.Holdthesidesofyourcomputerandgentlylay
itdownsothatthescreenisagainstthesurfaceandthecoverisfacingup.
3.Removethecomputerstand.See“Replacingthecomputerstand”onpage96.
4.Removethecomputercover.See“Removingthecomputercover”onpage101.
5.Locatethesystem-boardshield.See“Computercomponents”onpage33.
6.Removethefourscrewsthatsecurethesystem-boardshieldtothechassis,andthenremovethe
system-boardshieldfromthechassis.
102ThinkCentreM700zandM800zHardwareMaintenanceManual
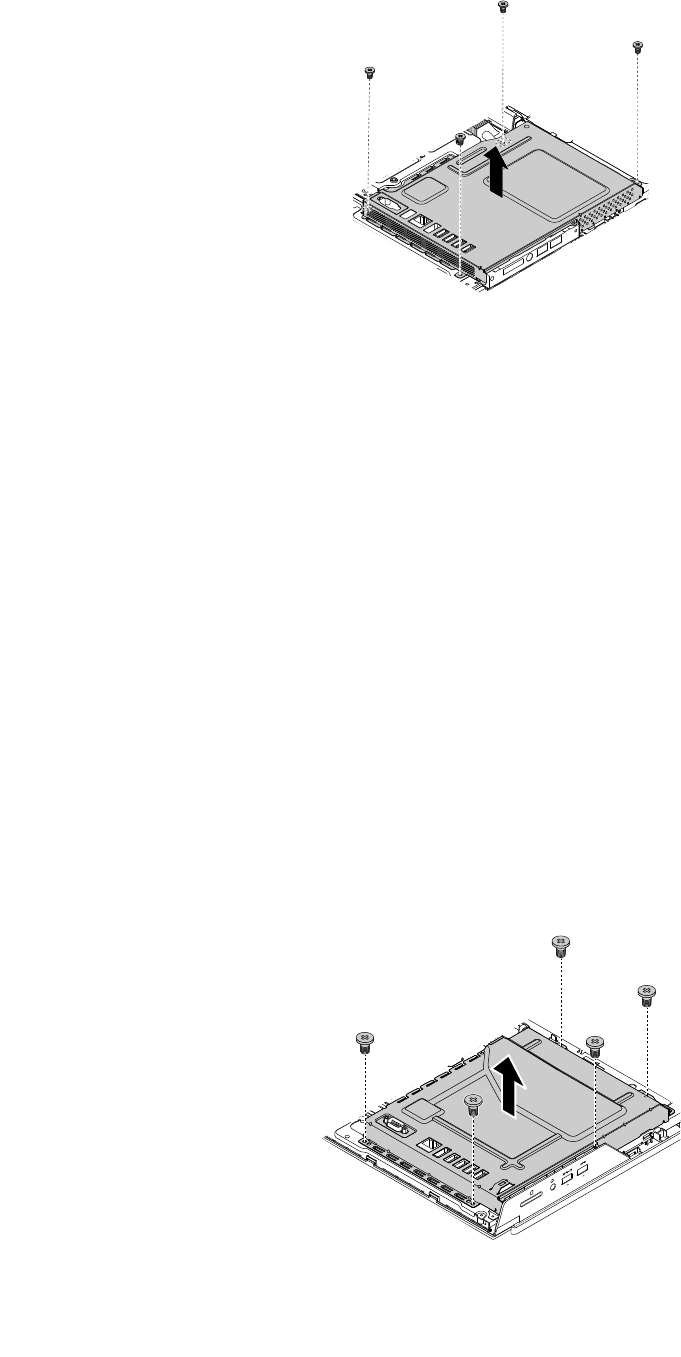
Figure33.Removingthesystem-boardshieldscrews
7.Positionthenewsystem-boardshieldonthechassissothatthefourscrewholesinthesystem-board
shieldalignwiththecorrespondingholesinthechassis.
8.Installthefourscrewstosecurethesystem-boardshieldtothechassis.
Whattodonext:
•Toworkwithanotherpieceofhardware,gototheappropriatesection.
•Tocompletetheinstallationorreplacement,goto“Completingthepartsreplacement”onpage142.
ForM800z
Toreplacethesystem-boardshield,dothefollowing:
1.Removeallmediafromthedrivesandturnoffallattacheddevicesandthecomputer.Then,disconnect
allpowercordsfromelectricaloutletsanddisconnectallcablesthatareconnectedtothecomputer.
2.Placeasoft,cleantowelorclothonthedeskorsurface.Holdthesidesofyourcomputerandgentlylay
itdownsothatthescreenisagainstthesurfaceandthecoverisfacingup.
3.Removethecomputerstand.See“Replacingthecomputerstand”onpage96.
4.Removethecomputercover.See“Removingthecomputercover”onpage101.
5.Locatethesystem-boardshield.See“Computercomponents”onpage33.
6.Removethefivescrewsthatsecurethesystem-boardshieldtothechassis,andthenremovethe
system-boardshieldfromthechassis.
Figure34.Removingthesystem-boardshieldscrews
Chapter9.Installingorreplacinghardware103

7.Positionthenewsystem-boardshieldonthechassissothatthefivescrewholesinthesystem-board
shieldalignwiththecorrespondingholesinthechassis.
8.Installthefivescrewstosecurethesystem-boardshieldtothechassis.
Whattodonext:
•Toworkwithanotherpieceofhardware,gototheappropriatesection.
•Tocompletetheinstallationorreplacement,goto“Completingthepartsreplacement”onpage142.
ReplacingtheVESAmountbracket
Attention:DonotopenyourcomputerorattemptanyrepairbeforereadingandunderstandingtheChapter
1“Readthisfirst:Importantsafetyinformation”onpage1.
ForM700z
ToreplacetheVESAmountbracket,dothefollowing:
1.Removeanymediafromthedrivesandturnoffallconnecteddevicesandthecomputer.Then,
disconnectallpowercordsfromelectricaloutletsanddisconnectallcablesthatareconnectedtothe
computer.
2.Placeasoft,cleantowelorclothonthedeskorsurface.Holdthesidesofyourcomputerandgentlylay
itdownsothatthescreenisagainstthesurfaceandthecoverisfacingup.
3.Removethecomputerstand.See“Replacingthecomputerstand”onpage96.
4.Removethecomputercover.See“Removingthecomputercover”onpage101.
5.Removethesystem-boardshield.See“Replacingthesystem-boardshield”onpage102.
6.LocatetheVESAmountbracket.See“Computercomponents”onpage33.
7.Removethefourscrews1,andthenlifttheVESAmountbracketoffthechassis.
Figure35.RemovingtheVESAmountbracket
8.PositionthenewVESAmountbracketinthechassissothatthefourscrewholesintheVESAmount
bracketalignwiththecorrespondingholesinthechassis.Then,installthefourscrewstosecurethe
VESAmountbracket.
9.Installthesystem-boardshield.See“Replacingthesystem-boardshield”onpage102.
Whattodonext:
•Toworkwithanotherpieceofhardware,gototheappropriatesection.
•Tocompletetheinstallationorreplacement,goto“Completingthepartsreplacement”onpage142.
ForM800z
ToreplacetheVESAmountbracket,dothefollowing:
104ThinkCentreM700zandM800zHardwareMaintenanceManual
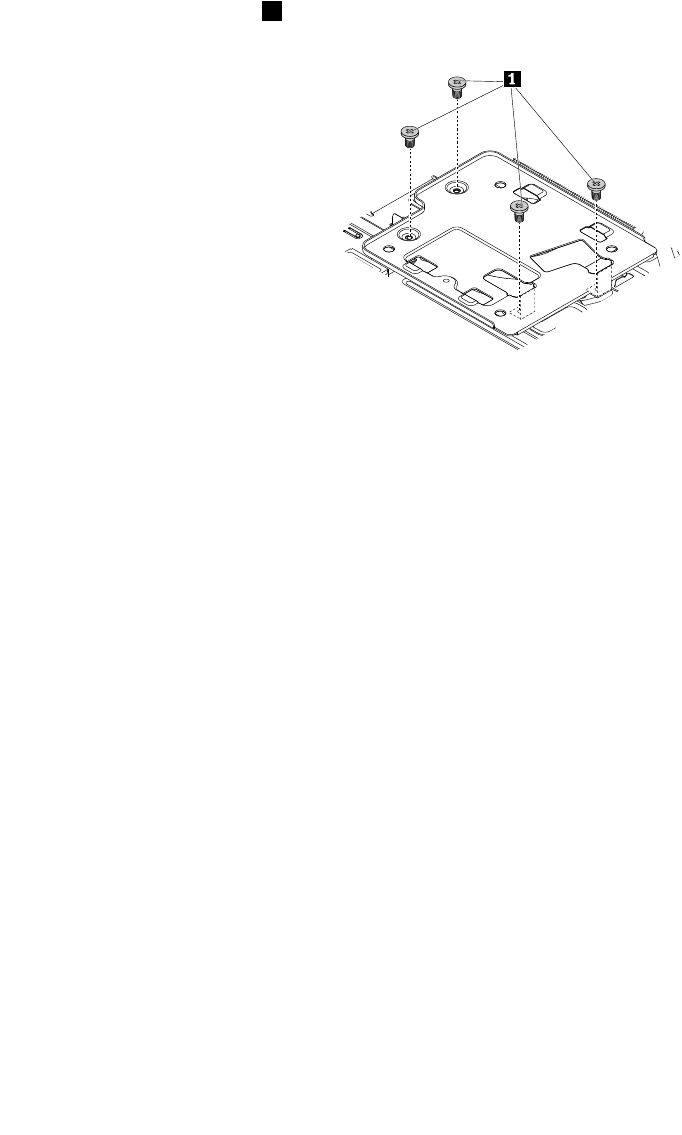
1.Removeanymediafromthedrivesandturnoffallconnecteddevicesandthecomputer.Then,
disconnectallpowercordsfromelectricaloutletsanddisconnectallcablesthatareconnectedtothe
computer.
2.Placeasoft,cleantowelorclothonthedeskorsurface.Holdthesidesofyourcomputerandgentlylay
itdownsothatthescreenisagainstthesurfaceandthecoverisfacingup.
3.Removethecomputerstand.See“Replacingthecomputerstand”onpage96.
4.Removethecomputercover.See“Removingthecomputercover”onpage101.
5.Removethesystem-boardshield.See“Replacingthesystem-boardshield”onpage102.
6.LocatetheVESAmountbracket.See“Computercomponents”onpage33.
7.Removethefourscrews1,andthenlifttheVESAmountbracketfromthechassis.
Figure36.RemovingtheVESAmountbracket
8.PositionthenewVESAmountbracketinthechassissothatthefourscrewholesintheVESAmount
bracketalignwiththecorrespondingholesinthechassis.Then,installthefourscrewstosecurethe
VESAmountbracket.
9.Installthesystem-boardshield.See“Replacingthesystem-boardshield”onpage102.
Whattodonext:
•Toworkwithanotherpieceofhardware,gototheappropriatesection.
•Tocompletetheinstallationorreplacement,goto“Completingthepartsreplacement”onpage142.
Replacingthepowersupplyassembly(forM800z)
Attention:DonotopenyourcomputerorattemptanyrepairbeforereadingandunderstandingtheChapter
1“Readthisfirst:Importantsafetyinformation”onpage1.
Althoughtherearenomovingpartsinyourcomputerafterthepowercordhasbeendisconnected,the
followingwarningsarerequiredforyoursafetyandproperUnderwritersLaboratories(UL)certification.
CAUTION:
Chapter9.Installingorreplacinghardware105

Hazardousmovingparts.Keepfingersandotherbodypartsaway.
CAUTION:
Neverremovethecoveronapowersupplyoranypartthathasthefollowinglabelattached.
Hazardousvoltage,current,andenergylevelsarepresentinsideanycomponentthathasthislabel
attached.Therearenoserviceablepartsinsidethesecomponents.Ifyoususpectaproblemwith
oneoftheseparts,contactaservicetechnician.
Toreplacethepowersupplyassembly,dothefollowing:
1.Removeanymediafromthedrivesandturnoffallconnecteddevicesandthecomputer.Then,
disconnectallpowercordsfromelectricaloutletsanddisconnectallcablesthatareconnectedtothe
computer.
2.Placeasoft,cleantowelorclothonthedeskorsurface.Holdthesidesofyourcomputerandgentlylay
itdownsothatthescreenisagainstthesurfaceandthecoverisfacingup.
3.Removethecomputerstand.See“Replacingthecomputerstand”onpage96.
4.Removethecomputercover.See“Removingthecomputercover”onpage101.
5.Removethesystem-boardshield.See“Replacingthesystem-boardshield”onpage102.
6.RemovetheVESAmountbracket.See“ReplacingtheVESAmountbracket”onpage104.
7.Locatethepowersupplyassembly.See“Computercomponents”onpage33.
8.Disconnectthepowersupplyassemblycablesfromthepowersupplyassemblyconnectoronthe
systemboardandthepowercordconnector.See“Partsonthesystemboard”onpage41.
106ThinkCentreM700zandM800zHardwareMaintenanceManual
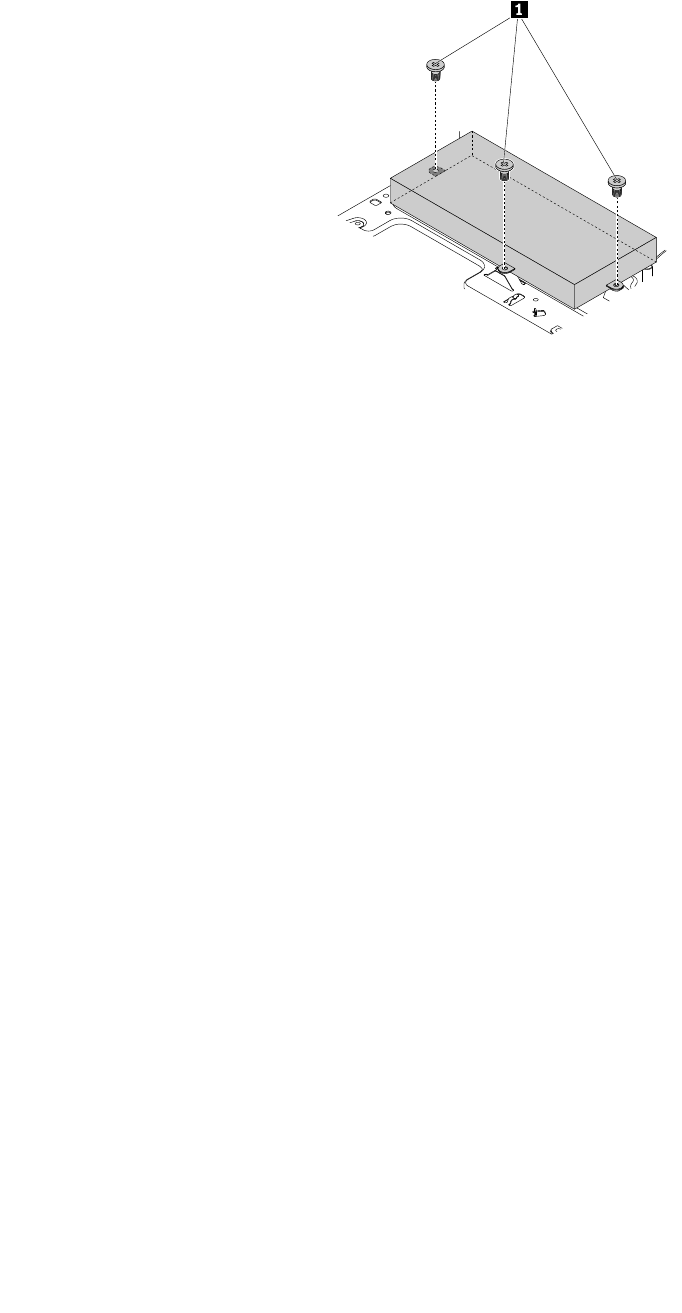
9.Removethethreescrewsthatsecurethepowersupplyassembly.
Figure37.Removingthescrewsforthepowersupplyassembly
10.Liftthepowersupplyassemblyoffthechassis.
11.Ensurethatthenewpowersupplyassemblyisthecorrectreplacement.
12.Positionthenewpowersupplyassemblyonthechassissothatthethreescrewholesinthepower
supplyassemblyalignwiththoseinthechassis.
13.Installandtightenthethreescrewstosecurethepowersupplyassembly.
Note:UseonlyscrewsprovidedbyLenovo.
14.Reconnectthepowersupplyassemblycablestothesystemboardandthepowercordconnector.
15.InstalltheVESAmountbracket.See“ReplacingtheVESAmountbracket”onpage104.
16.Installthesystem-boardshield.See“Replacingthesystem-boardshield”onpage102.
Whattodonext:
•Toworkwithanotherpieceofhardware,gototheappropriatesection.
•Tocompletetheinstallationorreplacement,goto“Completingthepartsreplacement”onpage142.
Replacingthestoragedrive
Attention:DonotopenyourcomputerorattemptanyrepairbeforereadingandunderstandingtheChapter
1“Readthisfirst:Importantsafetyinformation”onpage1.
ForM700z
Toreplacethestoragedrive,dothefollowing:
1.Removeanymediafromthedrivesandturnoffallconnecteddevicesandthecomputer.Then,
disconnectallpowercordsfromelectricaloutletsanddisconnectallcablesthatareconnectedtothe
computer.
2.Placeasoft,cleantowelorclothonthedeskorsurface.Holdthesidesofyourcomputerandgentlylay
itdownsothatthescreenisagainstthesurfaceandthecoverisfacingup.
3.Removethecomputerstand.See“Replacingthecomputerstand”onpage96.
4.Removethecomputercover.See“Removingthecomputercover”onpage101.
5.Removethesystem-boardshield.See“Replacingthesystem-boardshield”onpage102.
6.RemovetheVESAmountbracket.See“ReplacingtheVESAmountbracket”onpage104.
Chapter9.Installingorreplacinghardware107
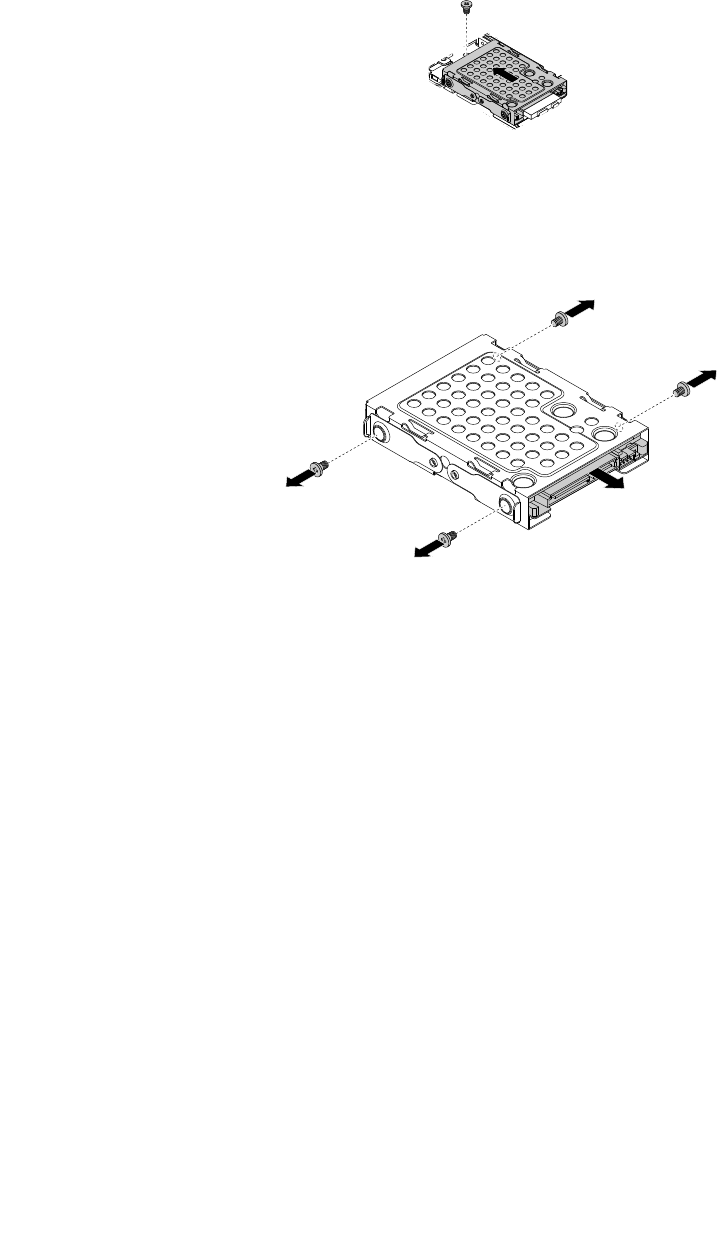
7.Locatethestoragedrive.See“Computercomponents”onpage33.
8.Disconnectthecablefromthestoragedrive.
9.Removethescrew,andthenslidethestoragedrivebracketoutofthechassisasshown.
Figure38.Removingthestoragedrivebracket
10.Removethefourscrewsthatsecurethestoragedrivetothebracket,andthenslidethestoragedrive
outofthebracket.Donottouchthecircuitboardonthebottomoftheharddiskdrive.
Figure39.Removingthestoragedrive
11.Positionthenewstoragedriveinthestoragedrivebracketsothatthefourscrewholesintheharddisk
drivealignwiththecorrespondingholesinthebracket.Then,installthefourscrewstosecurethe
harddiskdrivetothebracket.
12.Slidethestoragedrivebracketwiththenewharddiskdriveonthechassissothatthescrewhole
inthebracketalignswiththecorrespondingholeinthechassis.Then,installthescrewtosecure
thebrackettothechassis.
13.Connectthecabletothenewstoragedrive.
14.InstalltheVESAmountbracket.See“ReplacingtheVESAmountbracket”onpage104.
15.Installthesystem-boardshield.See“Replacingthesystem-boardshield”onpage102.
Whattodonext:
•Toworkwithanotherpieceofhardware,gototheappropriatesection.
•Tocompletetheinstallationorreplacement,goto“Completingthepartsreplacement”onpage142.
ForM800z
Toreplacethestoragedrive,dothefollowing:
1.Removeanymediafromthedrivesandturnoffallconnecteddevicesandthecomputer.Then,
disconnectallpowercordsfromelectricaloutletsanddisconnectallcablesthatareconnectedtothe
computer.
2.Placeasoft,cleantowelorclothonthedeskorsurface.Holdthesidesofyourcomputerandgentlylay
itdownsothatthescreenisagainstthesurfaceandthecoverisfacingup.
108ThinkCentreM700zandM800zHardwareMaintenanceManual
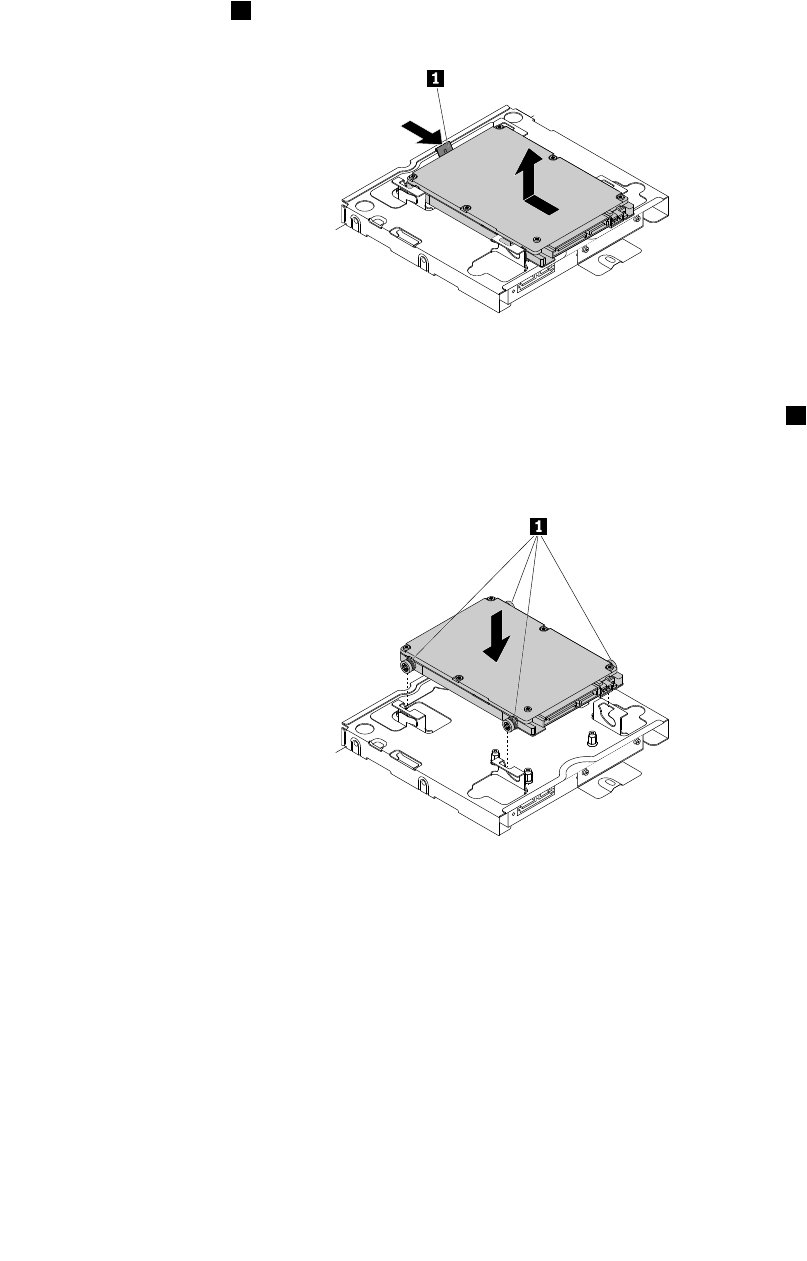
3.Removethecomputerstand.See“Replacingthecomputerstand”onpage96.
4.Removethecomputercover.See“Removingthecomputercover”onpage101.
5.Locatethestoragedrive.See“Computercomponents”onpage33.
6.Disconnectthesignalcableandthepowercablefromthestoragedrive.
7.Pressthereleasetab1,andthenremovethestoragedrivefromthestoragedriveholderasshown.
Figure40.Removingthestoragedrive
8.Positionthenewstoragedriveoverthestoragedriveholdersothatthefourwheels1onthestorage
drivealignwiththecorrespondingholesinthestoragedriveholder.Then,pressthestoragedrive
downwarduntilitsnapsintopositionandissecuredbythereleasetab.
Figure41.Installingthestoragedrive
9.Connectthesignalcableandthepowercabletothestoragedrive.
Whattodonext:
•Toworkwithanotherpieceofhardware,gototheappropriatesection.
•Tocompletetheinstallationorreplacement,goto“Completingthepartsreplacement”onpage142.
Replacingtheopticaldrive
Attention:DonotopenyourcomputerorattemptanyrepairbeforereadingandunderstandingtheChapter
1“Readthisfirst:Importantsafetyinformation”onpage1.
Chapter9.Installingorreplacinghardware109
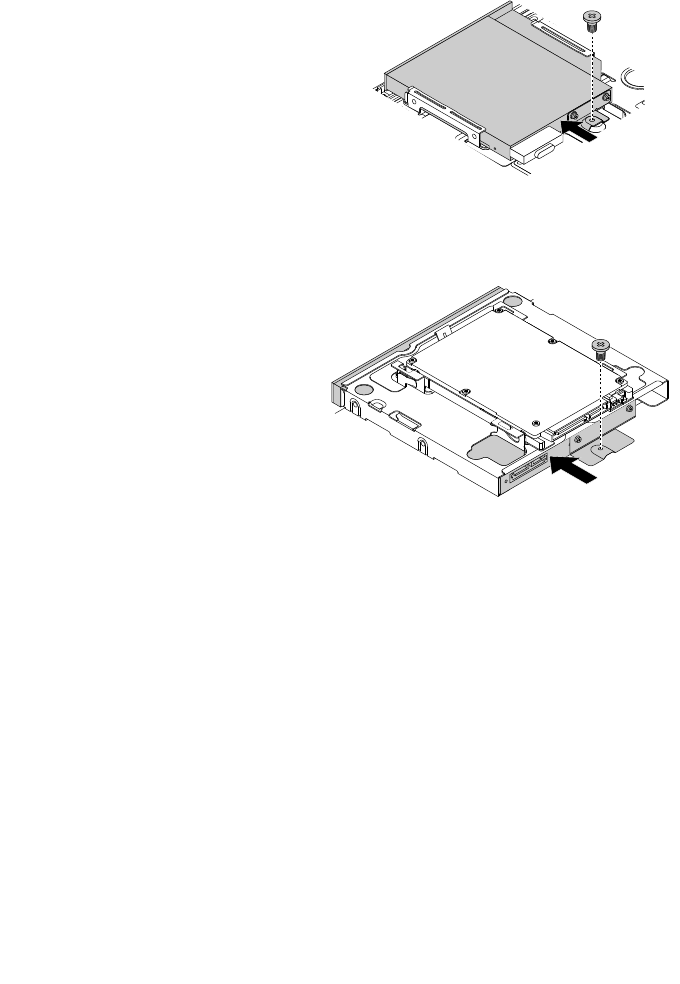
Toreplacetheopticaldrive,dothefollowing:
1.Removeanymediafromthedrivesandturnoffallconnecteddevicesandthecomputer.Then,
disconnectallpowercordsfromelectricaloutletsanddisconnectallcablesthatareconnectedtothe
computer.
2.Placeasoft,cleantowelorclothonthedeskorsurface.Holdthesidesofyourcomputerandgentlylay
itdownsothatthescreenisagainstthesurfaceandthecoverisfacingup.
3.Removethecomputerstand.See“Replacingthecomputerstand”onpage96.
4.Removethecomputercover.See“Removingthecomputercover”onpage101.
5.Locatetheopticaldrive.See“Computercomponents”onpage33.
6.IfyouarereplacingtheopticaldriveofanM800zcomputer,disconnectthesignalcableandthepower
cablefromthestoragedrive.
7.Removethescrewthatsecurestheopticaldriveholdertothechassis,andthenslidetheopticaldrive
outofthesideofthecomputer.
Figure42.Removingtheopticaldrive(forM700z)
Figure43.Removingtheopticaldrive(forM800z)
110ThinkCentreM700zandM800zHardwareMaintenanceManual
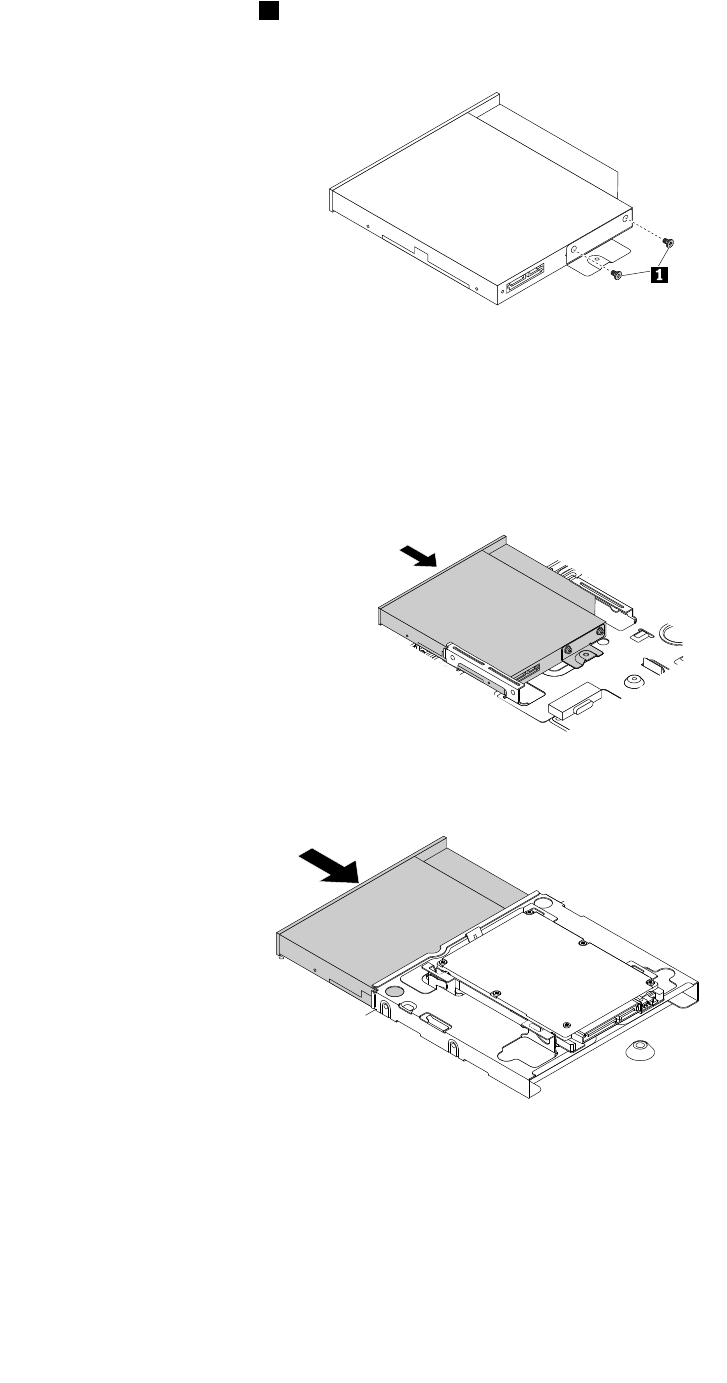
8.Removethetwoscrews1thatsecuretheopticaldriveholdertotheopticaldrive,andthenremovethe
holderfromtheopticaldrive.
Figure44.Removingtheopticaldriveholder
9.Installthetwoscrewstosecuretheopticaldriveholdertothenewopticaldrive.
10.Slidethenewopticaldriveintothedrivebayfromthesideofthecomputeruntilthescrewholeinthe
opticaldriveholderalignswiththecorrespondingholeinthechassis.
Figure45.Installingtheopticaldrive(forM700z)
Figure46.Installingtheopticaldrive(forM800z)
11.Installthescrewtosecuretheopticaldriveholdertothechassis.
Chapter9.Installingorreplacinghardware111
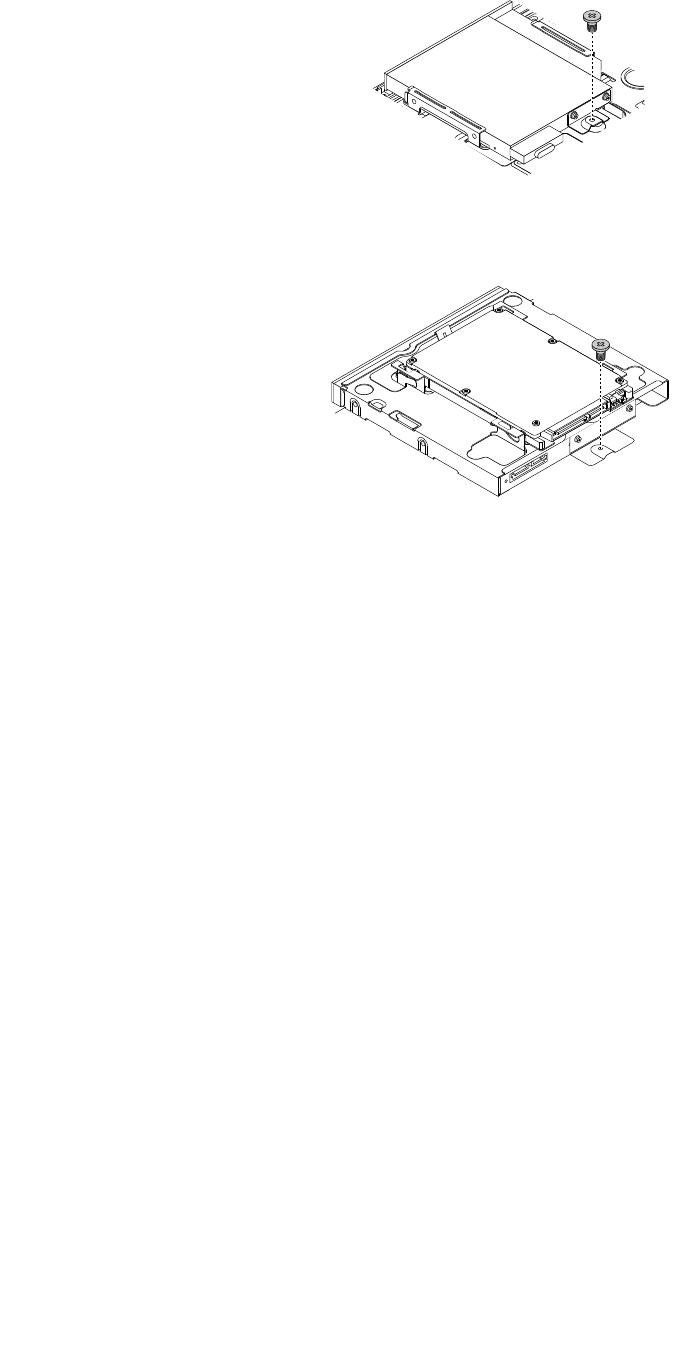
Figure47.Installingtheopticaldrive(forM700z)
Figure48.Installingtheopticaldrive(forM800z)
12.Ifyouhavedisconnectedthesignalcableandthepowercable,reconnectthemtothestoragedrive.
Whattodonext:
•Toworkwithanotherpieceofhardware,gototheappropriatesection.
•Tocompletetheinstallationorreplacement,goto“Completingthepartsreplacement”onpage142.
Replacingtheintegratedcamera
Attention:DonotopenyourcomputerorattemptanyrepairbeforereadingandunderstandingtheChapter
1“Readthisfirst:Importantsafetyinformation”onpage1.
Toreplacetheintegratedcamera,dothefollowing:
1.Removeanymediafromthedrivesandturnoffallconnecteddevicesandthecomputer.Then,
disconnectallpowercordsfromelectricaloutletsanddisconnectallcablesthatareconnectedtothe
computer.
2.Placeasoft,cleantowelorclothonthedeskorsurface.Holdthesidesofyourcomputerandgentlylay
itdownsothatthescreenisagainstthesurfaceandthecoverisfacingup.
3.Removethecomputerstand.See“Replacingthecomputerstand”onpage96.
4.Removethecomputercover.See“Removingthecomputercover”onpage101.
5.Disconnecttheintegrated-cameracablefromtheintegratedcamera.
112ThinkCentreM700zandM800zHardwareMaintenanceManual
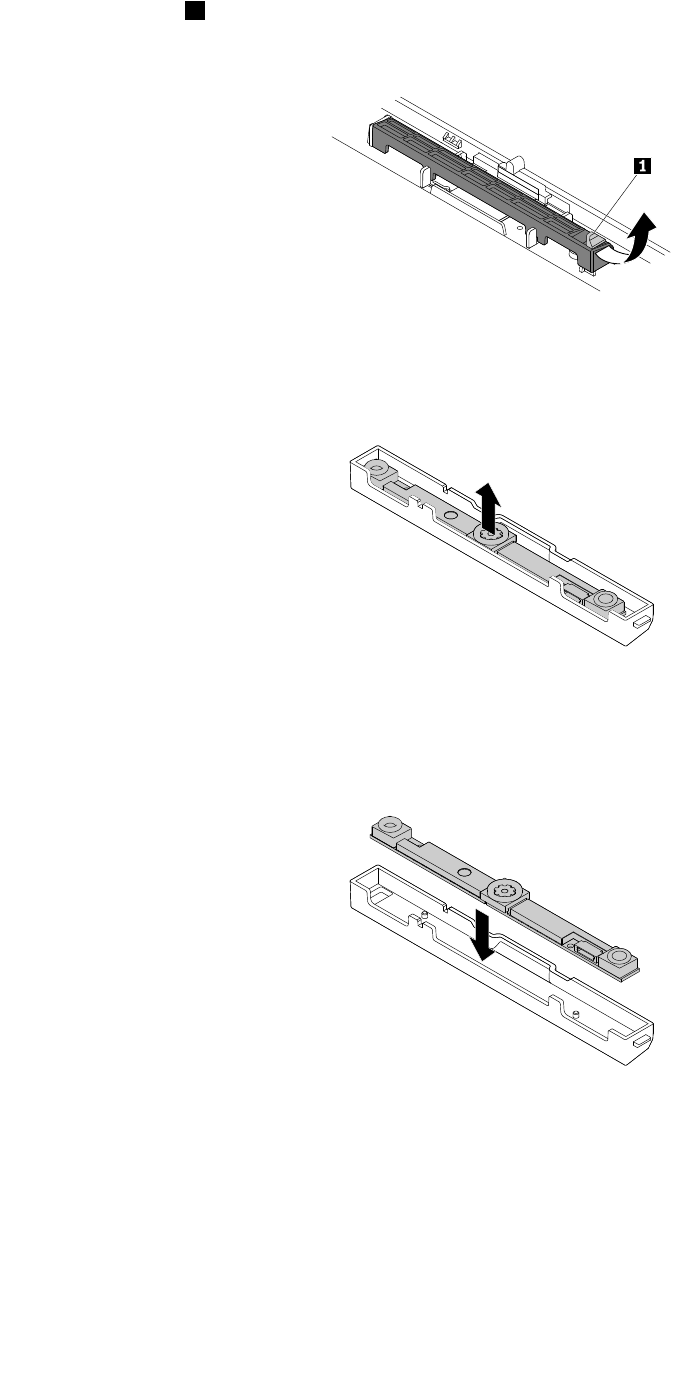
6.Releasethetab1thatsecurestheintegratedcamerabracket,andlifttheintegratedcameraoffthe
chassisasshown.
Figure49.Removingtheintegratedcamera
7.Lifttheintegratedcameraupwardtoremoveitfromtheintegratedcamerabracket.
Figure50.Installingtheintegratedcamera
8.Aligntheholesinthenewintegratedcamerawiththemountingstudsonthebracketasshown.Then,
presstheintegratedcameraintothebracketuntilitsnapsintoposition.
Figure51.Installingtheintegratedcamera
Chapter9.Installingorreplacinghardware113
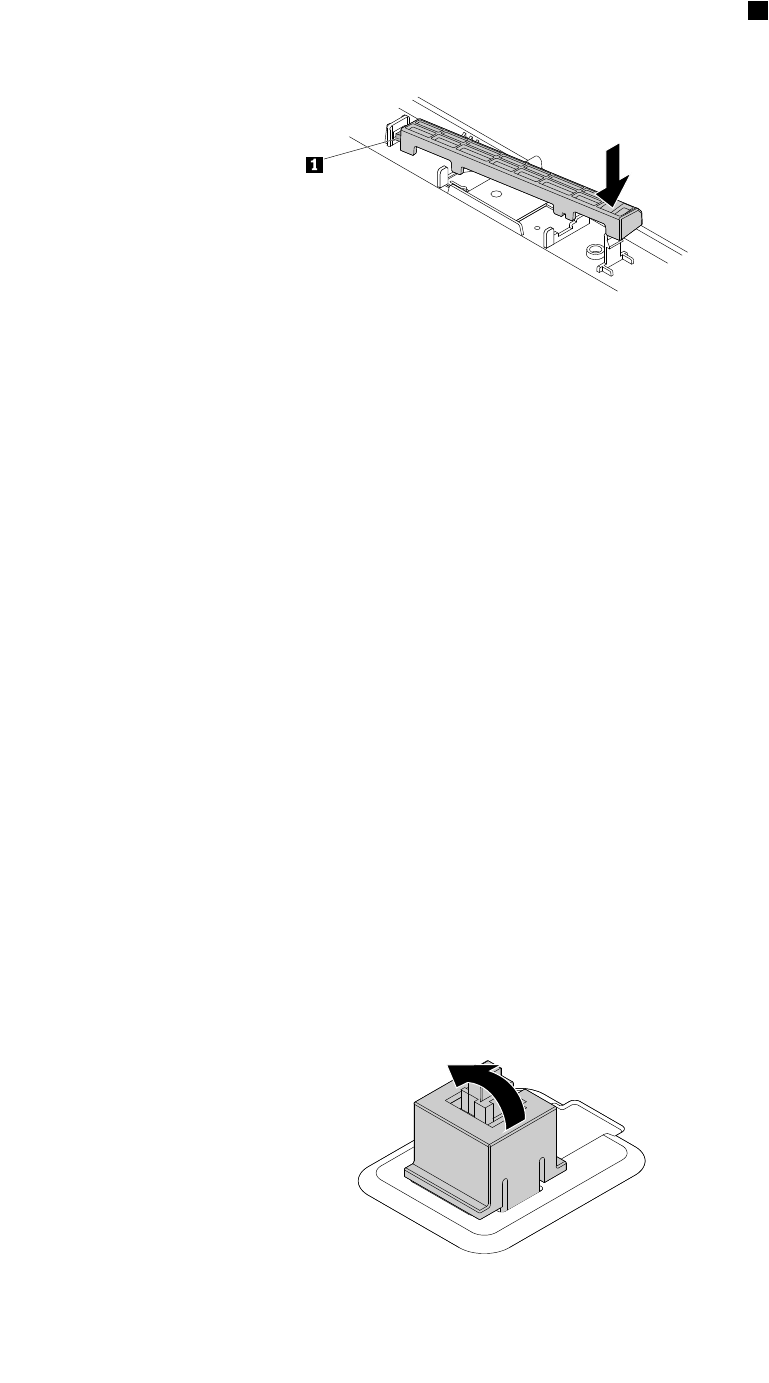
9.Inserttheleftendoftheintegratedcamerabracketintothecorrespondingloop1onthechassis,and
thenpressthebracketuntilitsnapsintopositionandissecuredbythetab.
Figure52.Installingtheintegratedcamera
10.Reconnecttheintegrated-cameracabletothenewintegratedcamera.
Whattodonext:
•Toworkwithanotherpieceofhardware,gototheappropriatesection.
•Tocompletetheinstallationorreplacement,goto“Completingthepartsreplacement”onpage142.
Replacingthecoverpresenceswitch
Attention:DonotopenyourcomputerorattemptanyrepairbeforereadingandunderstandingtheChapter
1“Readthisfirst:Importantsafetyinformation”onpage1.
Toreplacethecoverpresenceswitch,dothefollowing:
1.Removeanymediafromthedrivesandturnoffallconnecteddevicesandthecomputer.Then,
disconnectallpowercordsfromelectricaloutletsanddisconnectallcablesthatareconnectedtothe
computer.
2.Placeasoft,cleantowelorclothonthedeskorsurface.Holdthesidesofyourcomputerandgentlylay
itdownsothatthescreenisagainstthesurfaceandthecoverisfacingup.
3.Removethecomputerstand.See“Replacingthecomputerstand”onpage96.
4.Removethecomputercover.See“Removingthecomputercover”onpage101.
5.Removethesystem-boardshield.See“Replacingthesystem-boardshield”onpage102.
6.Locatethecoverpresenceswitch.See“Computercomponents”onpage33.
7.Disconnectthecoverpresenceswitchcablefromthecoverpresenceswitchconnectoronthesystem
board.See“Partsonthesystemboard”onpage41.
8.Removethecoverpresenceswitchbypivotingitoutward.
Figure53.Removingthecoverpresenceswitch
114ThinkCentreM700zandM800zHardwareMaintenanceManual
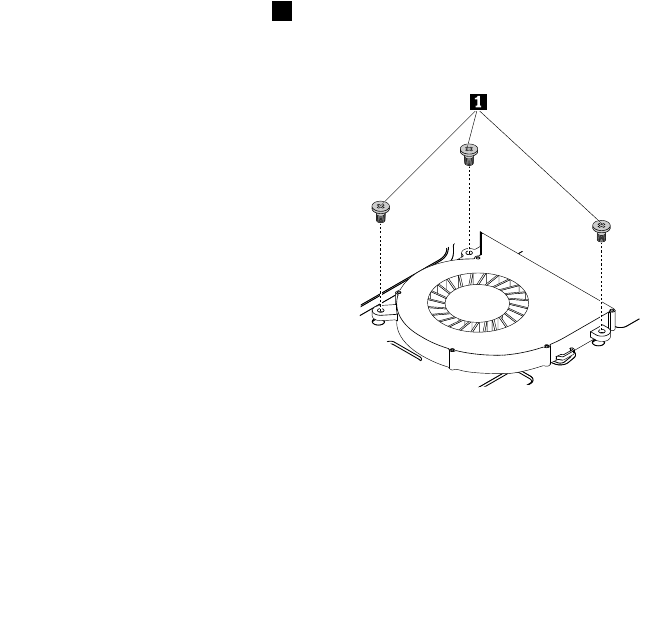
9.Aligntheplastictabontheleftsideofthenewcoverpresenceswitchwiththeleftedgeofthe
correspondingholeinthechassis.Thenpivotthecoverpresenceswitchinwarduntilitsnapsinto
positionontherightside.
10.Reconnectthecoverpresenceswitchcabletothecoverpresenceswitchconnectoronthesystem
board.See“Partsonthesystemboard”onpage41.
11.Installthesystem-boardshield.See“Replacingthesystem-boardshield”onpage102.
Whattodonext:
•Toworkwithanotherpieceofhardware,gototheappropriatesection.
•Tocompletetheinstallationorreplacement,goto“Completingthepartsreplacement”onpage142.
Replacingthesystemfan
Attention:DonotopenyourcomputerorattemptanyrepairbeforereadingandunderstandingtheChapter
1“Readthisfirst:Importantsafetyinformation”onpage1.
Toreplacethesystemfan,dothefollowing:
1.Removeanymediafromthedrivesandturnoffallconnecteddevicesandthecomputer.Then,
disconnectallpowercordsfromelectricaloutletsanddisconnectallcablesthatareconnectedtothe
computer.
2.Placeasoft,cleantowelorclothonthedeskorsurface.Holdthesidesofyourcomputerandgentlylay
itdownsothatthescreenisagainstthesurfaceandthecoverisfacingup.
3.Removethecomputerstand.See“Replacingthecomputerstand”onpage96.
4.Removethecomputercover.See“Removingthecomputercover”onpage101.
5.Removethesystem-boardshield.See“Replacingthesystem-boardshield”onpage102.
6.RemovetheVESAmountbracket.See“ReplacingtheVESAmountbracket”onpage104.
7.Locatethesystemfan.See“Computercomponents”onpage33.
8.Disconnectthesystemfancablefromthepowerfanconnectoronthesystemboard.See“Partsonthe
systemboard”onpage41.
9.Removethethreescrews1thatsecurethesystemfantothechassis,andthenremovethesystem
fanfromthechassis.
Figure54.Removingthesystemfan(forM700z)
Chapter9.Installingorreplacinghardware115
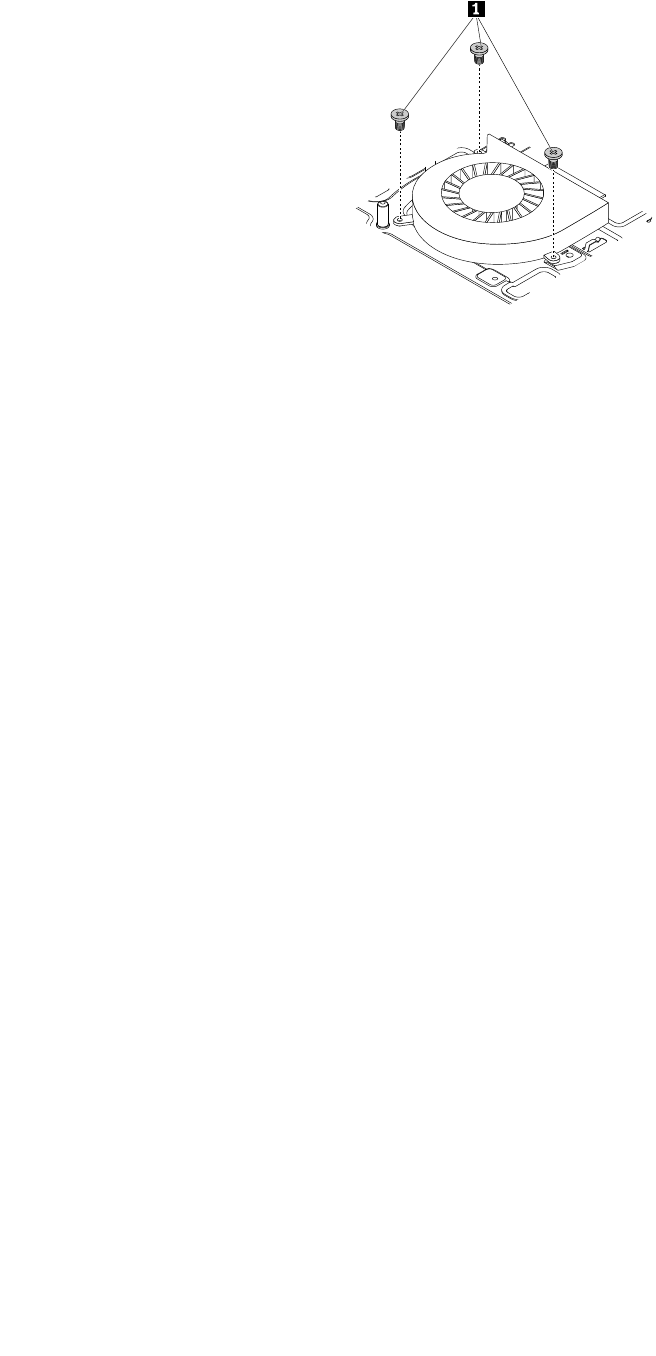
Figure55.Removingthesystemfan(forM800z)
10.Positionthenewsystemfanonthechassissothatthethreescrewholesinthesystemfanalignwiththe
correspondingholesinthechassis.
11.Installthethreescrewstosecurethesystemfantothechassis.
12.InstalltheVESAmountbracket.See“ReplacingtheVESAmountbracket”onpage104.
13.Installthesystem-boardshield.See“Replacingthesystem-boardshield”onpage102.
Whattodonext:
•Toworkwithanotherpieceofhardware,gototheappropriatesection.
•Tocompletetheinstallationorreplacement,goto“Completingthepartsreplacement”onpage142.
Replacingtheinternalspeakers
Attention:DonotopenyourcomputerorattemptanyrepairbeforereadingandunderstandingtheChapter
1“Readthisfirst:Importantsafetyinformation”onpage1.
Toreplacetheinternalspeakers,dothefollowing:
1.Removeanymediafromthedrivesandturnoffallconnecteddevicesandthecomputer.Then,
disconnectallpowercordsfromelectricaloutletsanddisconnectallcablesthatareconnectedtothe
computer.
2.Placeasoft,cleantowelorclothonthedeskorsurface.Holdthesidesofyourcomputerandgentlylay
itdownsothatthescreenisagainstthesurfaceandthecoverisfacingup.
3.Removethecomputerstand.See“Replacingthecomputerstand”onpage96.
4.Removethecomputercover.See“Removingthecomputercover”onpage101.
5.Removethesystem-boardshield.See“Replacingthesystem-boardshield”onpage102.
6.Locatetheinternalspeakers.See“Computercomponents”onpage33.
7.Disconnecttheinternal-speakercablefromtheinternal-speakerconnectoronthesystemboard.See
“Partsonthesystemboard”onpage41.
8.Lifttheinternalspeakerstoremovethemfromthechassis.
116ThinkCentreM700zandM800zHardwareMaintenanceManual
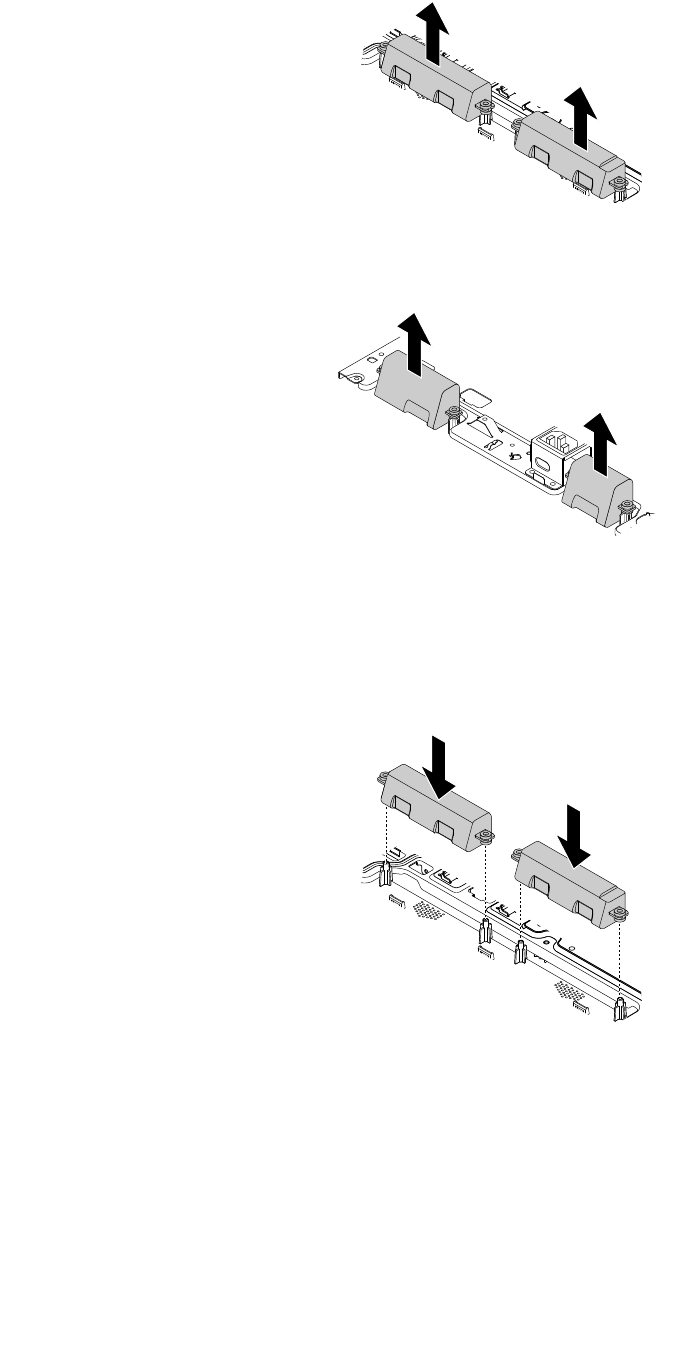
Figure56.Removingtheinternalspeakers(forM700z)
Figure57.Removingtheinternalspeakers(forM800z)
9.Positionthenewinternalspeakersoverthechassissothatthetwoholesineachspeakeralignwith
thecorrespondingplasticstudsonthechassis.Then,presstheinternalspeakersdownwarduntilthey
aresecuredinplace.
Figure58.Installingtheinternalspeakers(forM700z)
Chapter9.Installingorreplacinghardware117
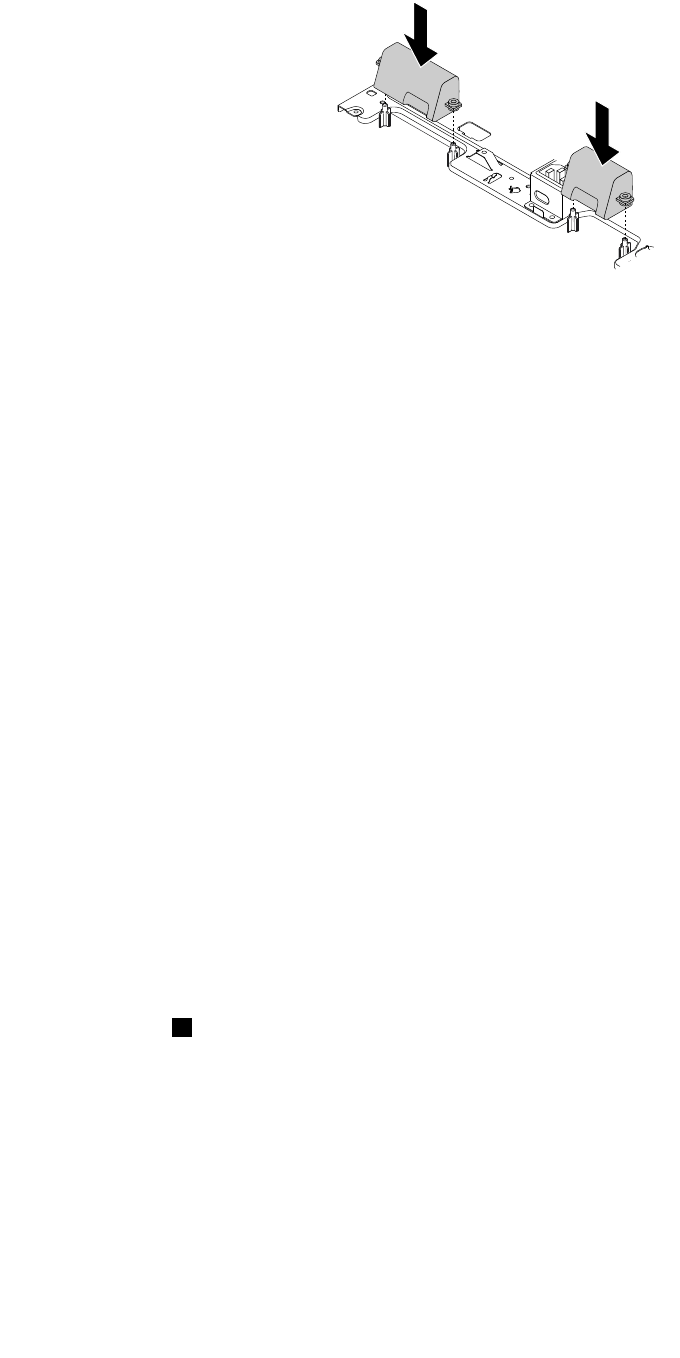
Figure59.Installingtheinternalspeakers(forM800z)
10.Connectthecableofthenewinternalspeakerstotheinternal-speakerconnectoronthesystemboard.
See“Partsonthesystemboard”onpage41.
11.Installthesystem-boardshield.See“Replacingthesystem-boardshield”onpage102.
Whattodonext:
•Toworkwithanotherpieceofhardware,gototheappropriatesection.
•Tocompletetheinstallationorreplacement,goto“Completingthepartsreplacement”onpage142.
Replacingthecontrol-buttonboard
Attention:BeforeyoureplaceanyFRU,besuretoreadandunderstandChapter1“Readthisfirst:Important
safetyinformation”onpage1.Theseprecautionsandguidelineswillhelpyouworksafely.
Toreplacethecontrol-buttonboard,dothefollowing:
1.Removeallmediafromthedrivesandturnoffallattacheddevicesandthecomputer.Then,disconnect
allpowercordsfromelectricaloutletsanddisconnectallcablesthatareconnectedtothecomputer.
2.Placeasoft,cleantowelorclothonthedeskorsurface.Holdthesidesofyourcomputerandgentlylay
itdownsothatthescreenisagainstthesurfaceandthecoverisfacingup.
3.Removethecomputerstand.See“Replacingthecomputerstand”onpage96.
4.Removethecomputercover.See“Removingthecomputercover”onpage101.
5.Removethesystem-boardshield.See“Replacingthesystem-boardshield”onpage102.
6.Ifyourcomputerisinstalledwithaserialconnectormodule,removetheserialconnectormodule.See
“Replacingtheserialconnectormodule”onpage127.
7.Locatethecontrol-buttonboard.See“Computercomponents”onpage33.
8.Disconnectthecontrol-buttonboardcablefromthecontrol-buttonboard.
9.Pressthetabs1thatsecurethecontrol-buttonboardasshown,andthenliftthecontrol-buttonboard
outofthecontrol-buttonboardholder.
118ThinkCentreM700zandM800zHardwareMaintenanceManual

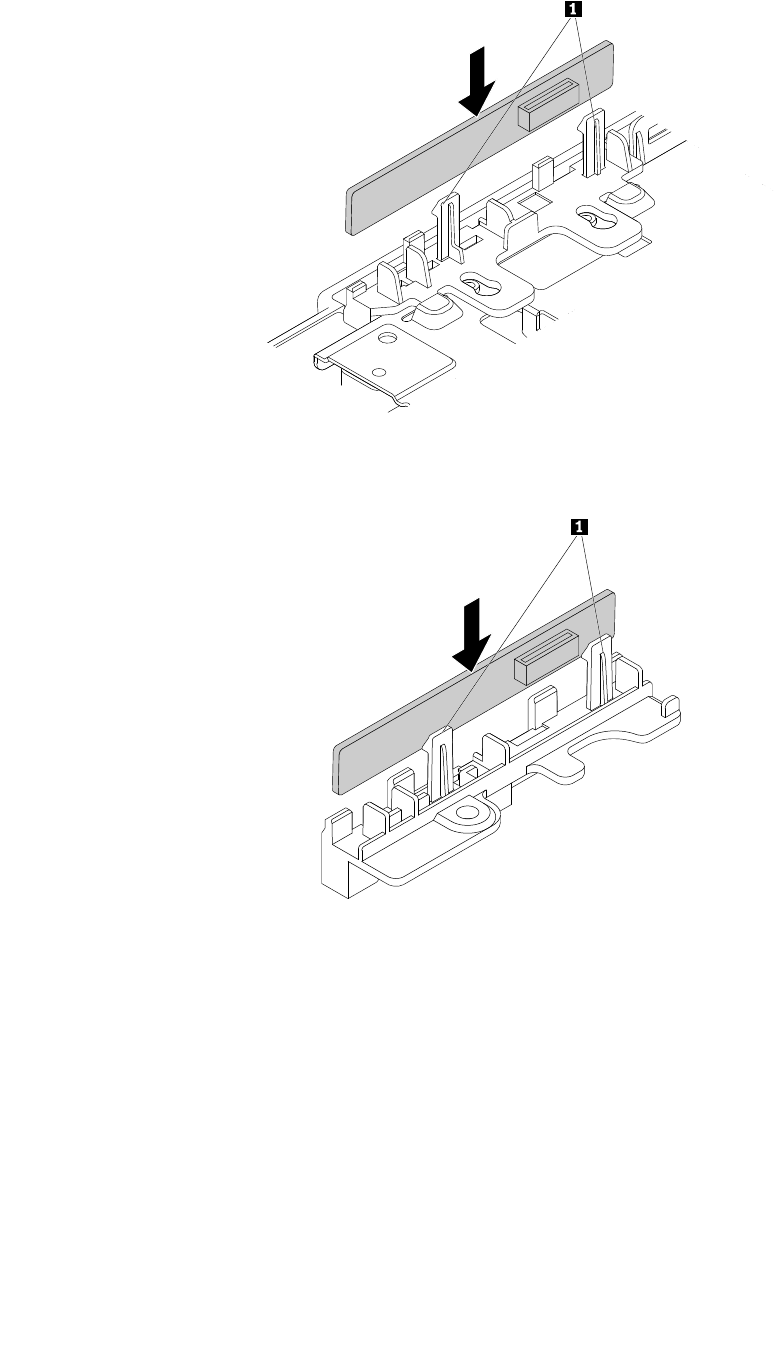
Figure62.Installingthecontrol-buttonboard(forM700z)
Figure63.Installingthecontrol-buttonboard(forM800z)
11.Connectthecontrol-buttonboardcabletothecontrol-buttonboard.
12.Ifyouhaveremovedtheserialconnectormodule,reinstallit.See“Replacingtheserialconnector
module”onpage127.
13.Installthesystem-boardshield.See“Replacingthesystem-boardshield”onpage102.
Whattodonext:
•Toworkwithanotherpieceofhardware,gototheappropriatesection.
•Tocompletetheinstallationorreplacement,goto“Completingthepartsreplacement”onpage142.
120ThinkCentreM700zandM800zHardwareMaintenanceManual
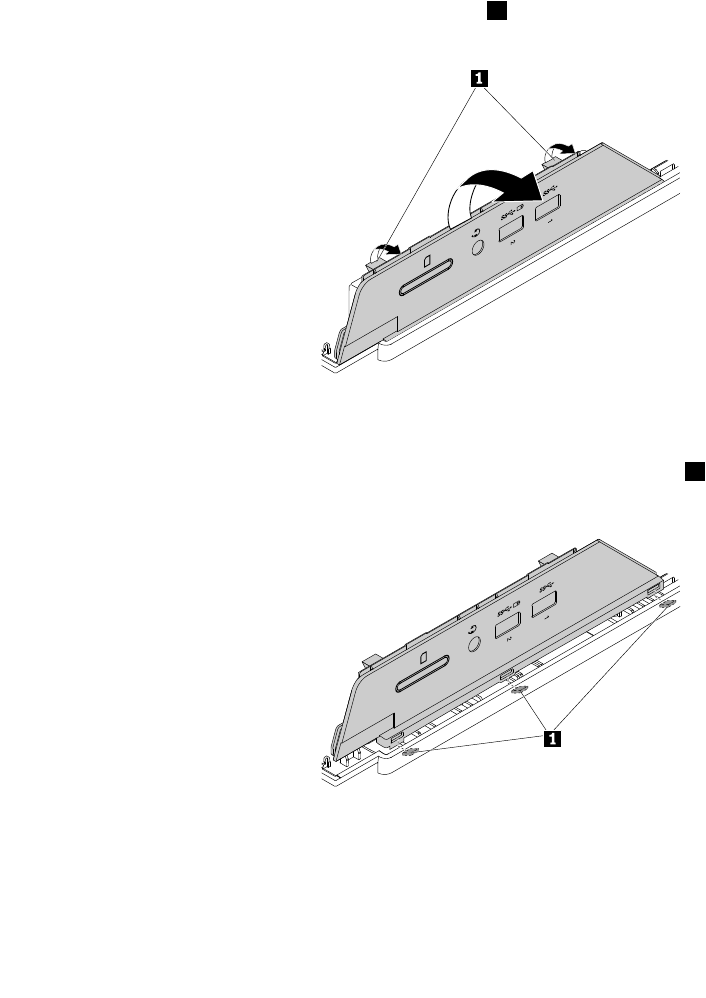
ReplacingtheI/Obracket
Attention:DonotopenyourcomputerorattemptanyrepairbeforereadingandunderstandingtheChapter
1“Readthisfirst:Importantsafetyinformation”onpage1.
ToreplacetheI/Obracket,dothefollowing:
1.Removeanymediafromthedrivesandturnoffallconnecteddevicesandthecomputer.Then,
disconnectallpowercordsfromelectricaloutletsanddisconnectallcablesthatareconnectedtothe
computer.
2.Placeasoft,cleantowelorclothonthedeskorsurface.Holdthesidesofyourcomputerandgentlylay
itdownsothatthescreenisagainstthesurfaceandthecoverisfacingup.
3.Removethecomputerstand.See“Replacingthecomputerstand”onpage96.
4.Removethecomputercover.See“Removingthecomputercover”onpage101.
5.Removethesystem-boardshield.See“Replacingthesystem-boardshield”onpage102.
6.LocatetheI/Obracket.See“Computercomponents”onpage33.
7.RemovetheI/Obracketbyreleasingthetwotabs1andpivotingtheI/Obracketoutward.
Figure64.RemovingtheI/Obracket
8.AlignthethreeholesinthenewI/Obracketwiththecorrespondingtabs1onthechassis.
Figure65.InstallingtheI/Obracket(forM700z)
Chapter9.Installingorreplacinghardware121
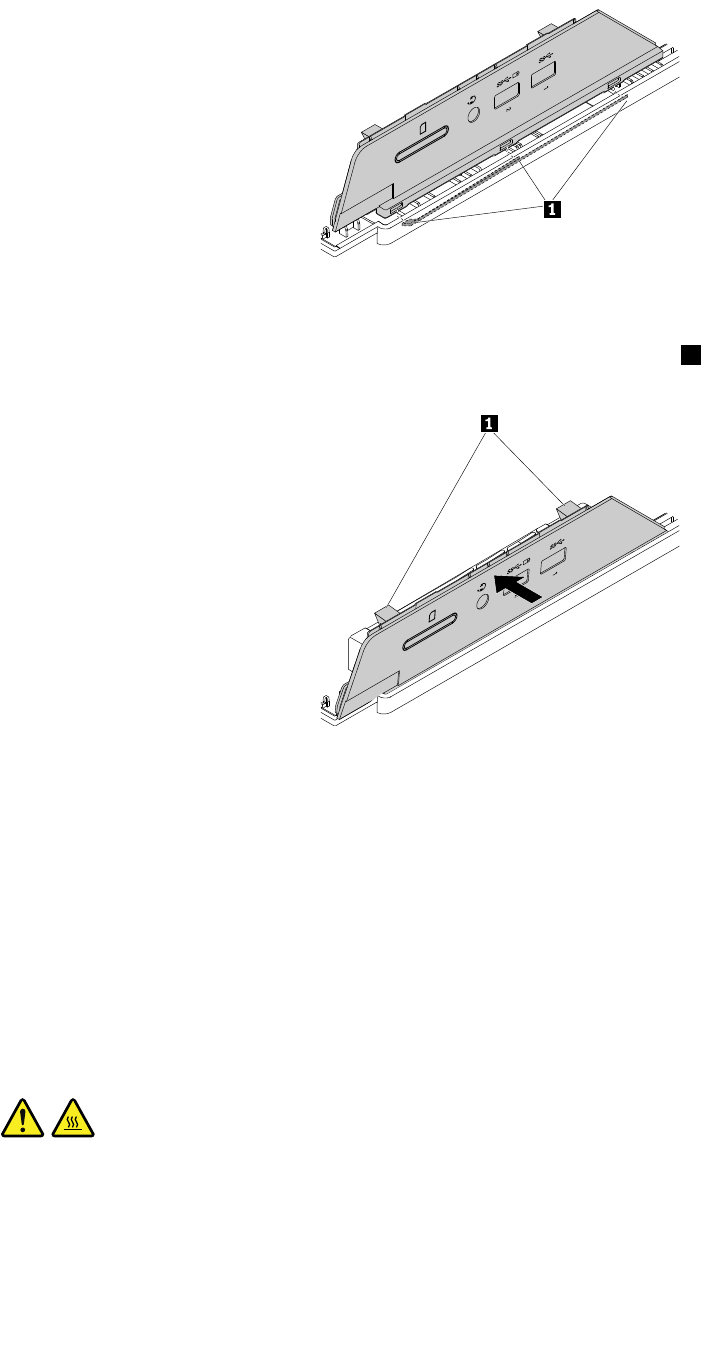
Figure66.InstallingtheI/Obracket(forM800z)
9.PivottheI/Obracketinwarduntilitsnapsintopositionandthetwotabs1aresecuredbythechassis.
Figure67.InstallingtheI/Obracket
10.Installthesystem-boardshield.See“Replacingthesystem-boardshield”onpage102.
Whattodonext:
•Toworkwithanotherpieceofhardware,gototheappropriatesection.
•Tocompletetheinstallationorreplacement,goto“Completingthepartsreplacement”onpage142.
Replacingtheheatsink
Attention:DonotopenyourcomputerorattemptanyrepairbeforereadingandunderstandingtheChapter
1“Readthisfirst:Importantsafetyinformation”onpage1.
CAUTION:
Theheatsinkmightbeveryhot.Beforeyouopenthecomputercover,turnoffthecomputerand
waitseveralminutesuntilthecomputeriscool.
Toreplacetheheatsink,dothefollowing:
122ThinkCentreM700zandM800zHardwareMaintenanceManual
1.Removeanymediafromthedrivesandturnoffallconnecteddevicesandthecomputer.Then,
disconnectallpowercordsfromelectricaloutletsanddisconnectallcablesthatareconnectedtothe
computer.
2.Placeasoft,cleantowelorclothonthedeskorsurface.Holdthesidesofyourcomputerandgentlylay
itdownsothatthescreenisagainstthesurfaceandthecoverisfacingup.
3.Removethecomputerstand.See“Replacingthecomputerstand”onpage96.
4.Removethecomputercover.See“Removingthecomputercover”onpage101.
5.Removethesystem-boardshield.See“Replacingthesystem-boardshield”onpage102.
6.Locatetheheatsink.See“Computercomponents”onpage33.
7.Loosenthefourscrewsthatsecuretheheatsinktothesystemboardinthefollowingsequence,and
thenliftouttheheatsinktoremoveitfromthesystemboard:
a.Partiallyremovescrew1,fullyremovescrew2,andthenfullyremovescrew1.
b.Partiallyremovescrew3,fullyremovescrew4,andthenfullyremovescrew3.
Notes:
•Carefullyremovethefourscrewsfromthesystemboardtoavoidanypossibledamagetothesystem
board.Thefourscrewscannotberemovedfromtheheatsink.
•Donottouchthethermalgreasewhilehandlingtheheatsink.
Figure68.Removingtheheatsink(forM700z)
Figure69.Removingtheheatsink(forM800z)
8.Insertthetab5ofthenewheatsinkintotheholeinthechassis.Then,tightenthefourscrewstosecure
thenewheatsinkandfanassemblyinthefollowingsequence.Donotover-tightenthescrews.
a.Partiallytightenscrew1,fullytightenscrew2,andthenfullytightenscrew1.
b.Partiallytightenscrew3,fullytightenscrew4,andthenfullytightenscrew3.
Chapter9.Installingorreplacinghardware123
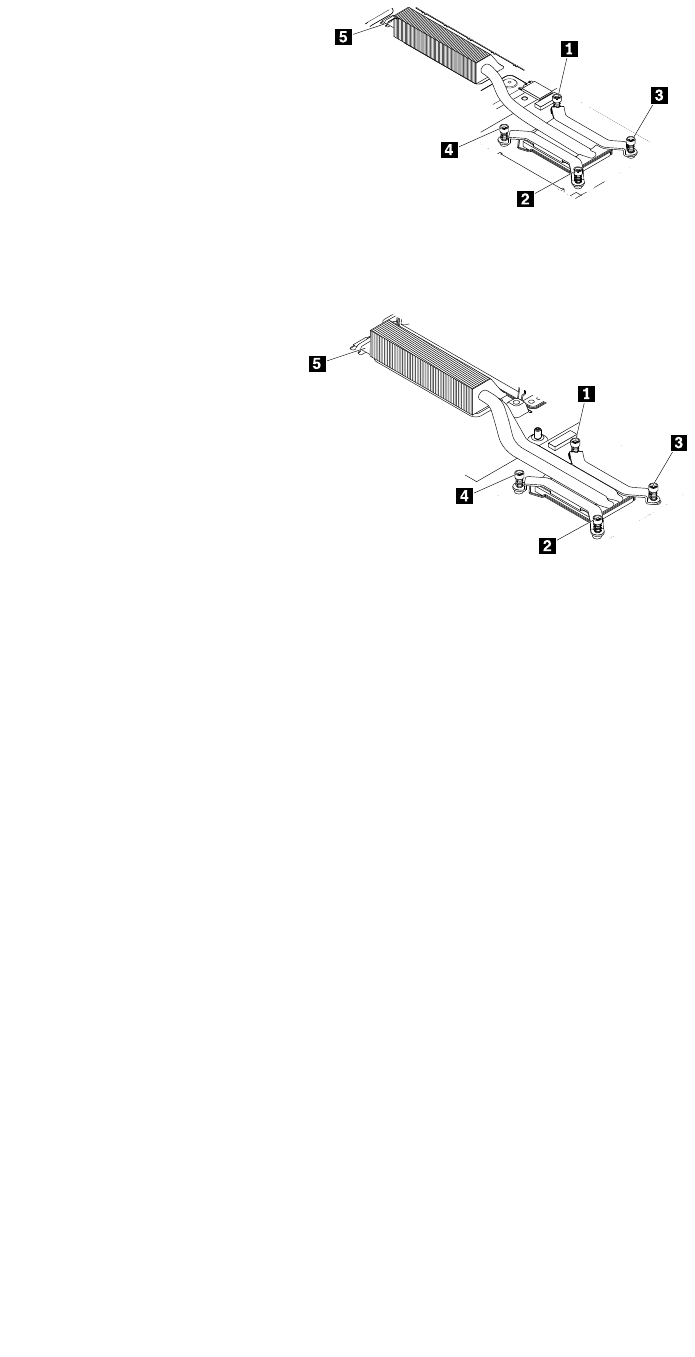
Figure70.Installingtheheatsink(forM700z)
Figure71.Installingtheheatsink(forM800z)
9.Installthesystem-boardshield.See“Replacingthesystem-boardshield”onpage102.
Whattodonext:
•Toworkwithanotherpieceofhardware,gototheappropriatesection.
•Tocompletetheinstallationorreplacement,goto“Completingthepartsreplacement”onpage142.
Replacingamemorymodule
Attention:DonotopenyourcomputerorattemptanyrepairbeforereadingandunderstandingtheChapter
1“Readthisfirst:Importantsafetyinformation”onpage1.
Toreplaceamemorymodule,dothefollowing:
1.Removeanymediafromthedrivesandturnoffallconnecteddevicesandthecomputer.Then,
disconnectallpowercordsfromelectricaloutletsanddisconnectallcablesthatareconnectedtothe
computer.
2.Placeasoft,cleantowelorclothonthedeskorsurface.Holdthesidesofyourcomputerandgentlylay
itdownsothatthescreenisagainstthesurfaceandthecoverisfacingup.
3.Removethecomputerstand.See“Replacingthecomputerstand”onpage96.
4.Removethecomputercover.See“Removingthecomputercover”onpage101.
5.Removethesystem-boardshield.See“Replacingthesystem-boardshield”onpage102.
6.Locatethememorymoduleyouwanttoreplace.Thememorymodulesareinstalledinthememoryslots
onthesystemboard.See“Partsonthesystemboard”onpage41.
124ThinkCentreM700zandM800zHardwareMaintenanceManual
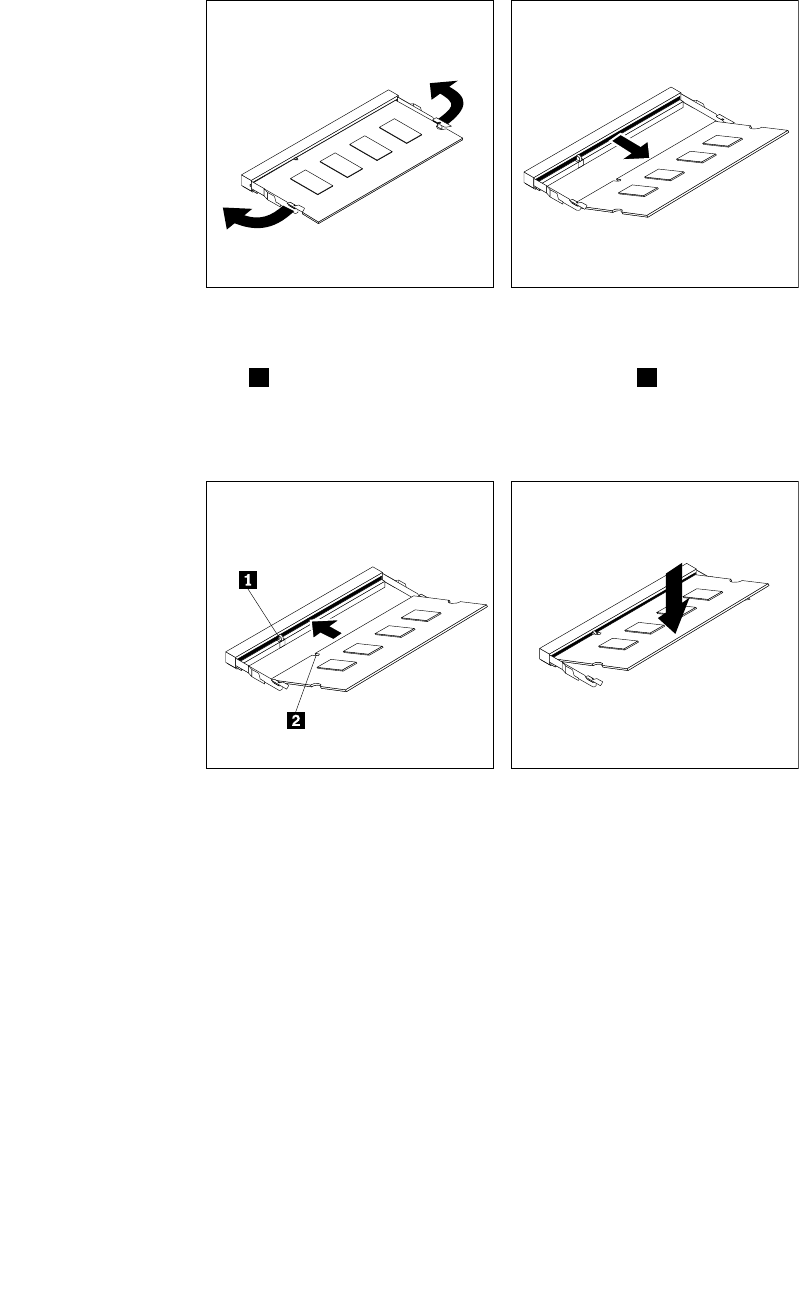
7.Opentheretainingclipsandgentlypullthememorymoduleoutofthememoryslot.
Figure72.Removingthememorymodule
8.Insertthenotchedend2ofthenewmemorymoduleintotheslot1.Pressthememorymodule
firmlyandpivotthememorymoduleuntilitsnapsintoplace.Makesurethatthememorymoduleis
securedintheslotanddoesnotmoveeasily.
Figure73.Installingthememorymodule
9.Installthesystem-boardshield.See“Replacingthesystem-boardshield”onpage102.
Whattodonext:
•Toworkwithanotherpieceofhardware,gototheappropriatesection.
•Tocompletetheinstallationorreplacement,goto“Completingthepartsreplacement”onpage142.
Replacingthecardreader
Attention:DonotopenyourcomputerorattemptanyrepairbeforereadingandunderstandingtheChapter
1“Readthisfirst:Importantsafetyinformation”onpage1.
Toreplacethecardreader,dothefollowing:
1.Removeallmediafromthedrivesandturnoffallattacheddevicesandthecomputer.Then,disconnect
allpowercordsfromelectricaloutletsanddisconnectallcablesthatareconnectedtothecomputer.
2.Placeasoft,cleantowelorclothonthedeskorotherflatsurface.Holdthesidesofyourcomputerand
gentlylayitdownsothatthescreenisagainstthesurfaceandthecoverisfacingup.
Chapter9.Installingorreplacinghardware125
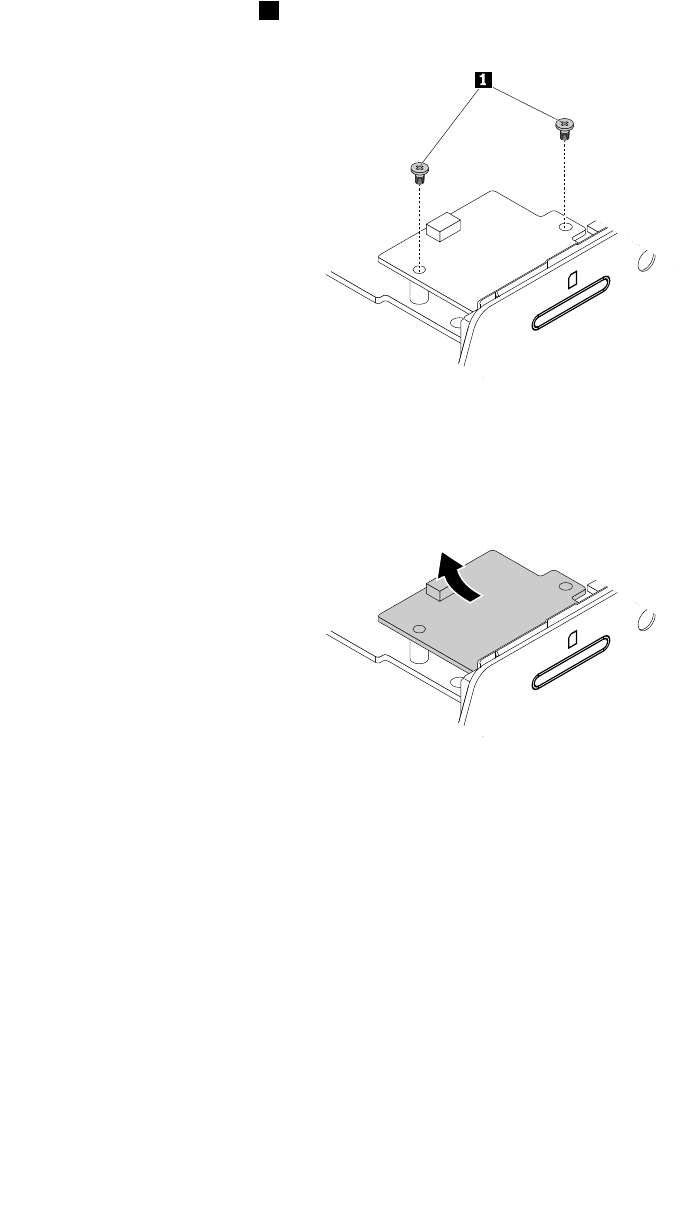
3.Removethecomputerstand.See“Replacingthecomputerstand”onpage96.
4.Removethecomputercover.See“Removingthecomputercover”onpage101.
5.Removethesystem-boardshield.See“Replacingthesystem-boardshield”onpage102.
6.Locatethecardreader.See“Computercomponents”onpage33.
7.Disconnectthecardreadercablefromthecardreader.
8.Removethetwoscrews1thatsecurethecardreadertothesystemboard.
Figure74.Removingthecardreaderscrews
9.Removethecardreaderfromthesystemboardasshown.
Figure75.Removingthecardreader
126ThinkCentreM700zandM800zHardwareMaintenanceManual
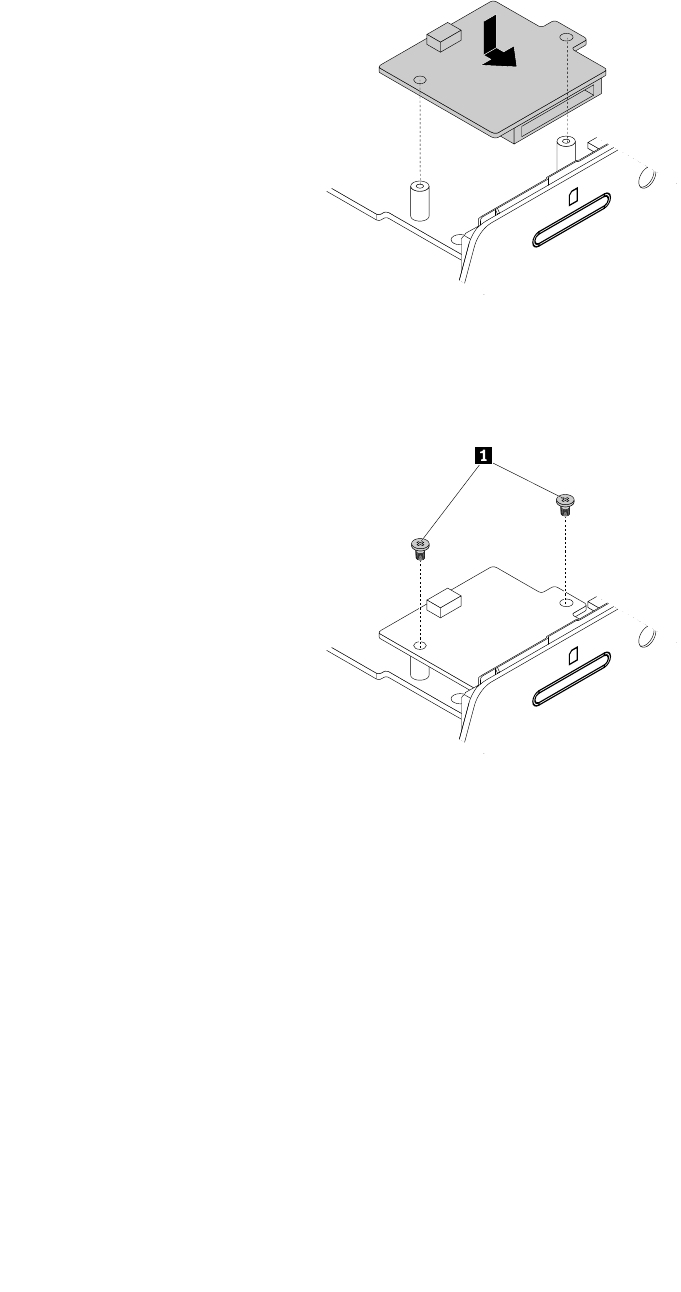
10.Positionthenewcardreaderonthesystemboardsothatthetwoscrewholesinthecardreaderalign
withthecorrespondingmountingstudsonthesystemboard.
Figure76.Installingthecardreader
11.Installthetwoscrewstosecurethecardreadertothesystemboard.
Figure77.Installingthecardreaderscrews
12.Connectthecardreadercabletothecardreader.
13.Installthesystemboardshield.See“Replacingthesystem-boardshield”onpage102.
Whattodonext:
•Toworkwithanotherpieceofhardware,gototheappropriatesection.
•Tocompletetheinstallationorreplacement,goto“Completingthepartsreplacement”onpage142.
Replacingtheserialconnectormodule
Attention:DonotopenyourcomputerorattemptanyrepairbeforereadingandunderstandingtheChapter
1“Readthisfirst:Importantsafetyinformation”onpage1.
Toreplacetheserialconnectormodule,dothefollowing:
1.Removeallmediafromthedrivesandturnoffallattacheddevicesandthecomputer.Then,disconnect
allpowercordsfromelectricaloutletsanddisconnectallcablesthatareconnectedtothecomputer.
Chapter9.Installingorreplacinghardware127
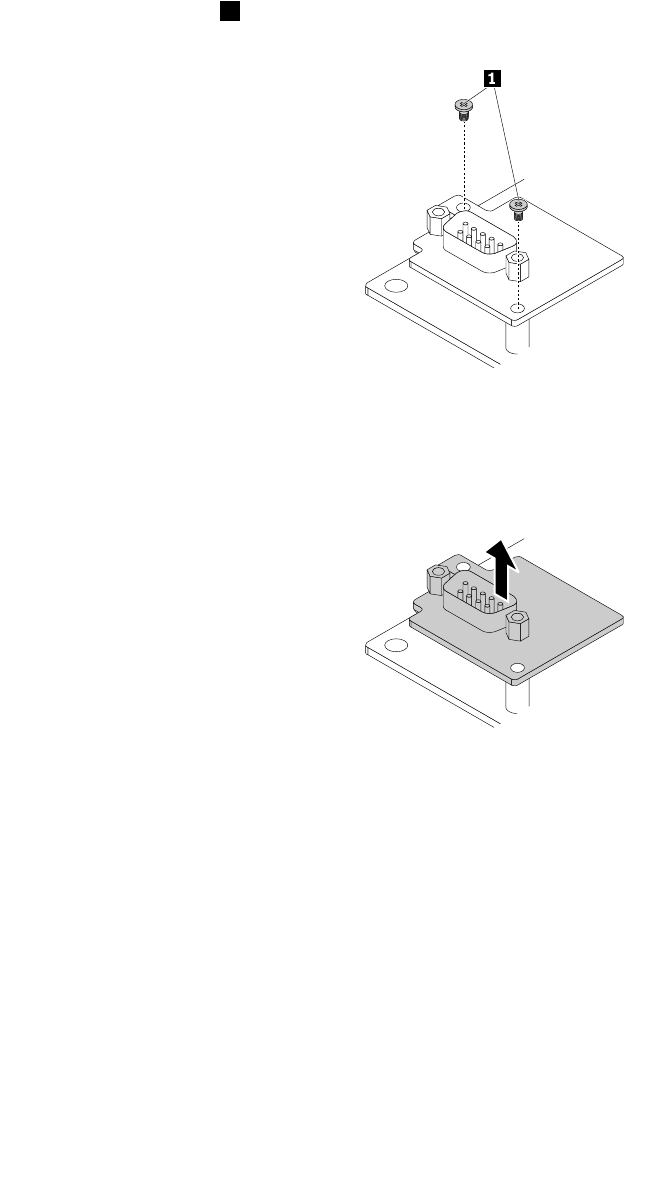
2.Placeasoft,cleantowelorclothonthedeskorotherflatsurface.Holdthesidesofyourcomputerand
gentlylayitdownsothatthescreenisagainstthesurfaceandthecoverisfacingup.
3.Removethecomputerstand.See“Replacingthecomputerstand”onpage96.
4.Removethecomputercover.See“Removingthecomputercover”onpage101.
5.Removethesystem-boardshield.See“Replacingthesystem-boardshield”onpage102.
6.Locatetheserialconnectormodule.See“Computercomponents”onpage33.
7.Disconnecttheserialconnectormodulecablefromtheserialconnectormodule.
8.Removethescrews1thatsecuretheserialconnectormoduleonthesystemboard.
Figure78.Removingtheserialconnectormodulescrews
9.Lifttheserialconnectormoduletoremoveitfromthesystemboard.
Figure79.Removingtheserialconnectormodule
128ThinkCentreM700zandM800zHardwareMaintenanceManual
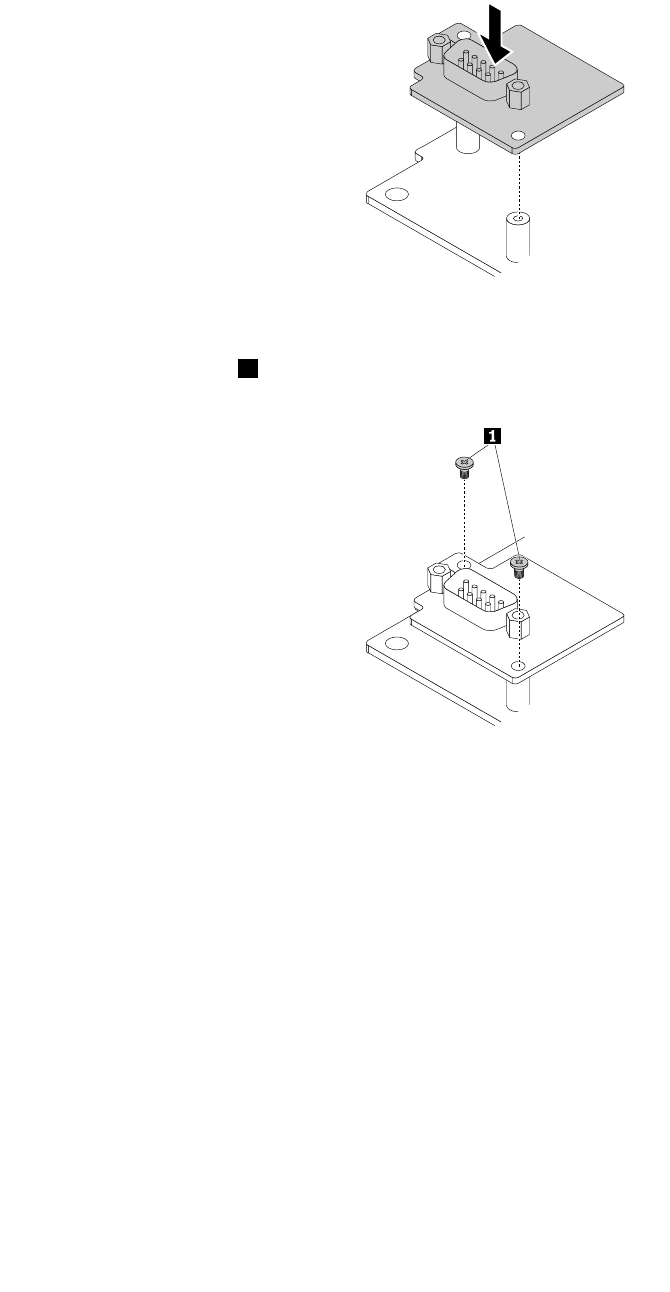
10.Positionthenewserialconnectormoduleonthesystemboard,sothatthescrewholesintheserial
connectormodulealignwiththecorrespondingmountingstudsonthesystemboard.
Figure80.Installingtheserialconnectormodule
11.Installthetwoscrews1tosecuretheserialconnectormoduleonthesystemboard.
Figure81.Installingtheserialconnectormodulescrews
12.Connecttheserialconnectormodulecabletotheserialconnectormodule.
13.Installthesystem-boardshield.See“Replacingthesystem-boardshield”onpage102.
Whattodonext:
•Toworkwithanotherpieceofhardware,gototheappropriatesection.
•Tocompletetheinstallationorreplacement,goto“Completingthepartsreplacement”onpage142.
Replacingthecoin-cellbattery
Attention:DonotopenyourcomputerorattemptanyrepairbeforereadingandunderstandingtheChapter
1“Readthisfirst:Importantsafetyinformation”onpage1.
Yourcomputerhasaspecialtypeofmemorythatmaintainsthedate,time,andsettingsforbuilt-infeatures,
suchasparallel-connectorassignments(configuration).Acoin-cellbatterykeepsthisinformationactive
whenyouturnoffthecomputer.
Chapter9.Installingorreplacinghardware129

Thecoin-cellbatterynormallyrequiresnochargingormaintenancethroughoutitslife;however,nocoin-cell
batterylastsforever.Ifthecoin-cellbatteryfails,thedate,time,andconfigurationinformation(including
passwords)arelost.Anerrormessageisdisplayedwhenyouturnonthecomputer.
Refertothe“Lithiumcoin-cellbatterynotice”intheSafety,Warranty,andSetupGuideforinformationabout
replacinganddisposingofthecoin-cellbattery.
Toreplacethecoin-cellbattery,dothefollowing:
1.Removeanymediafromthedrivesandturnoffallconnecteddevicesandthecomputer.Then,
disconnectallpowercordsfromelectricaloutletsanddisconnectallcablesthatareconnectedtothe
computer.
2.Placeasoft,cleantowelorclothonthedeskorsurface.Holdthesidesofyourcomputerandgentlylay
itdownsothatthescreenisagainstthesurfaceandthecoverisfacingup.
3.Removethecomputerstand.See“Replacingthecomputerstand”onpage96.
4.Removethecomputercover.See“Removingthecomputercover”onpage101.
5.Removethesystem-boardshield.See“Replacingthesystem-boardshield”onpage102.
6.Locatethecoin-cellbattery.See“Computercomponents”onpage33.
7.Removethecoin-cellbatteryasshown.
Figure82.Removingthecoin-cellbattery
8.Installthenewcoin-cellbatteryasshown.
Figure83.Installingthecoin-cellbattery
9.Installthesystem-boardshield.See“Replacingthesystem-boardshield”onpage102
10.Reinstallthecomputercoverandconnectthecables.See“Completingthepartsreplacement”on
page142.
11.Reinstallthecomputerstand.See“Replacingthecomputerstand”onpage96.
12.Turnonthecomputerandallconnecteddevices.
Note:Whenthecomputeristurnedonforthefirsttimeafterreplacingthecoin-cellbattery,anerror
messagemightbedisplayed.Thisisnormalafterreplacingthecoin-cellbattery.
13.UsetheSetupUtilityprogramtosetthedate,time,andanypasswords.See“UsingtheSetupUtility
program”onpage71.
130ThinkCentreM700zandM800zHardwareMaintenanceManual
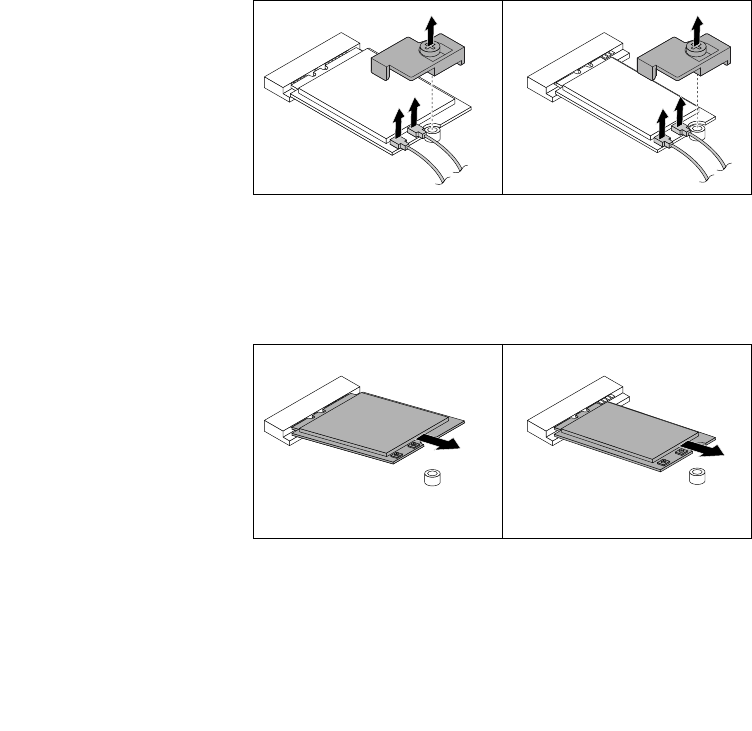
ReplacingtheWi-Ficard
Attention:DonotopenyourcomputerorattemptanyrepairbeforereadingandunderstandingtheChapter
1“Readthisfirst:Importantsafetyinformation”onpage1.
Notes:
•TheWi-Ficardmightcomeintwosizes,refertothefigurethatmatchesyourWi-Ficardwhenreading
thissection.
•ThelocationsofWi-Fiantennaconnectorsmightvary.
ToreplacetheWi-Ficard,dothefollowing:
1.Removeanymediafromthedrivesandturnoffallconnecteddevicesandthecomputer.Then,
disconnectallpowercordsfromelectricaloutletsanddisconnectallcablesthatareconnectedtothe
computer.
2.Placeasoft,cleantowelorclothonthedeskorotherflatsurface.Holdthesidesofyourcomputerand
gentlylayitdownsothatthescreenisagainstthesurfaceandthecoverisfacingup.
3.Removethecomputerstand.See“Replacingthecomputerstand”onpage96.
4.Removethecomputercover.See“Removingthecomputercover”onpage101.
5.Removethesystem-boardshield.See“Replacingthesystem-boardshield”onpage102.
6.LocatetheWi-Ficard.See“Computercomponents”onpage33.
7.RemovethescrewontheWi-FicardshieldthatsecurestheWi-Ficard.Then,disconnecttheWi-Fi
antennacablesfromtheWi-Ficard.
Note:ThescrewcannotberemovedfromtheWi-Ficardshield.
Figure84.RemovingtheWi-FicardshieldanddisconnectingtheWi-Fiantennacables
8.PulltheWi-FicardoutoftheM.2Wi-Ficardslot.
Figure85.RemovingtheWi-Ficard
Chapter9.Installingorreplacinghardware131
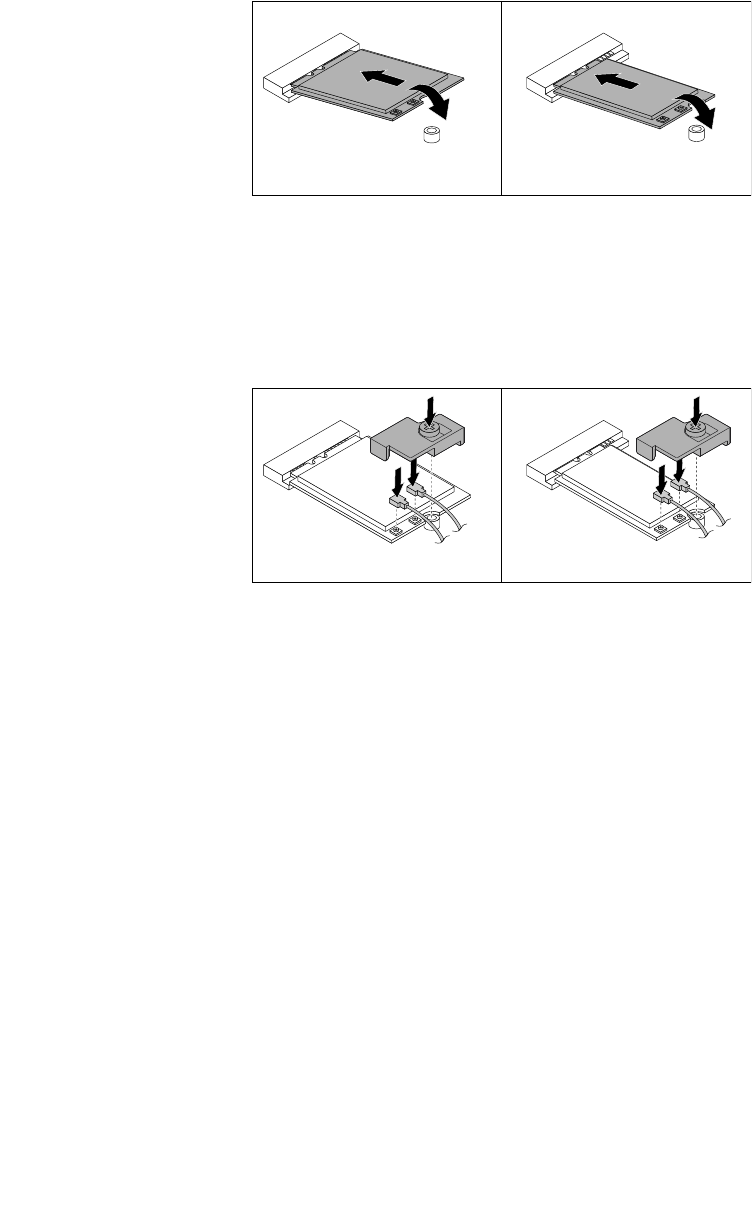
9.InsertthenewWi-FicardintotheM.2Wi-Ficardslot.EnsurethattheWi-Ficardisinsertedfirmly.Then,
pivottheWi-FicarddownwardsothatthescrewnotchontheWi-Ficardalignswiththemountingstud
onthechassis.
Note:DonottouchthenotchededgeoftheWi-Ficard.
Figure86.InstallingtheWi-Ficard
10.PositiontheWi-FicardshieldovertheWi-Ficardsothatthescrewontheshieldalignswiththe
mountingstudonthechassis.Then,connecttheWi-FiantennacablestotheWi-Ficard,andtheninstall
thescrewontheWi-FicardshieldtosecuretheWi-Ficardtothesystemboard.
Figure87.ConnectingtheWi-FiantennacablesandinstallingtheWi-Ficardshield
11.Installthesystem-boardshield.See“Replacingthesystem-boardshield”onpage102.
Whattodonext:
•Toworkwithanotherpieceofhardware,gototheappropriatesection.
•Tocompletetheinstallationorreplacement,goto“Completingthepartsreplacement”onpage142.
ReplacingaWi-Fiantenna
Attention:DonotopenyourcomputerorattemptanyrepairbeforereadingandunderstandingtheChapter
1“Readthisfirst:Importantsafetyinformation”onpage1.
ToreplaceaWi-Fiantenna,dothefollowing:
1.Removeanymediafromthedrivesandturnoffallconnecteddevicesandthecomputer.Then,
disconnectallpowercordsfromelectricaloutletsanddisconnectallcablesthatareconnectedtothe
computer.
2.Placeasoft,cleantowelorclothonthedeskorsurface.Holdthesidesofyourcomputerandgentlylay
itdownsothatthescreenisagainstthesurfaceandthecoverisfacingup.
3.Removethecomputerstand.See“Replacingthecomputerstand”onpage96.
4.Removethecomputercover.See“Removingthecomputercover”onpage101.
132ThinkCentreM700zandM800zHardwareMaintenanceManual
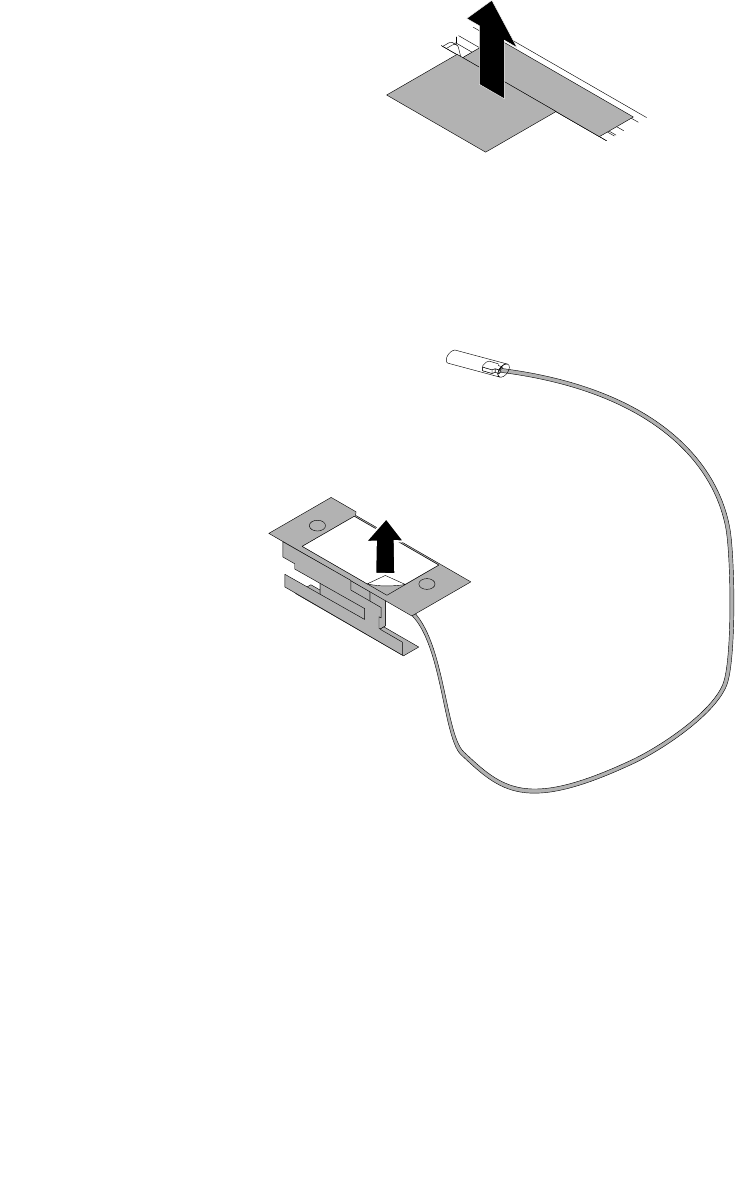
5.Removethesystem-boardshield.See“Replacingthesystem-boardshield”onpage102.
6.LocatetheWi-Fiantennayouwanttoreplace.See“Computercomponents”onpage33.
7.RemovetheWi-Fiantennashield.See“ReplacingtheWi-Ficard”onpage131.
8.DisconnecttheWi-FiantennacablefromtheWi-Ficard.
9.Removetheantennaandcablefromthechassis.
Figure88.RemovingtheWi-Fiantenna
10.PeeloffthepaperthatprotectsthestickersonthenewWi-Fiantenna.
Figure89.Peelingoffthepaperthatprotectsthestickers
Chapter9.Installingorreplacinghardware133
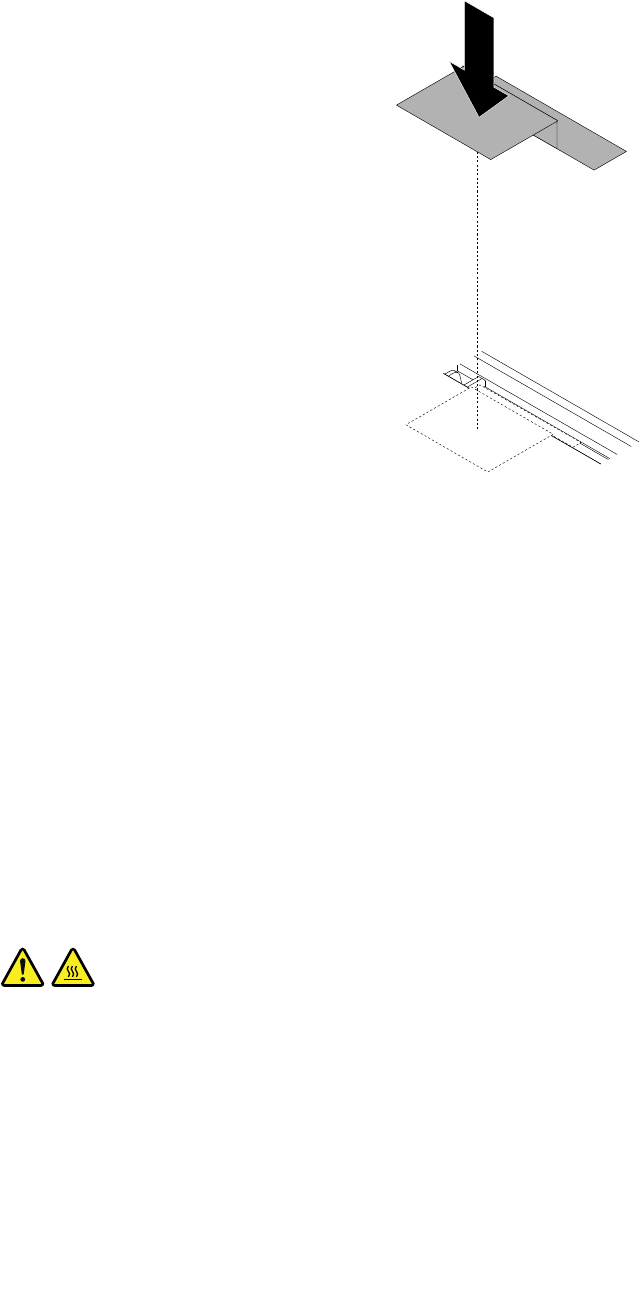
11.SticktheWi-Fiantennatothechassisasshown.
Figure90.InstallingtheWi-Fiantenna
12.ConnecttheWi-FiantennacabletotheWi-Ficard.
13.InstalltheWi-Fiantennashield.See“ReplacingtheWi-Ficard”onpage131.
14.Installthesystem-boardshield.See“Replacingthesystem-boardshield”onpage102.
Whattodonext:
•Toworkwithanotherpieceofhardware,gototheappropriatesection.
•Tocompletetheinstallationorreplacement,goto“Completingthepartsreplacement”onpage142.
Replacingthemicroprocessor
Attention:DonotopenyourcomputerorattemptanyrepairbeforereadingandunderstandingtheChapter
1“Readthisfirst:Importantsafetyinformation”onpage1.
CAUTION:
Theheatsinkandmicroprocessormightbeveryhot.Beforeyouopenthecomputercover,turnoff
thecomputerandwaitseveralminutesuntilthecomputeriscool.
Toreplacethemicroprocessor,dothefollowing:
1.Removeanymediafromthedrivesandturnoffallconnecteddevicesandthecomputer.Then,
disconnectallpowercordsfromelectricaloutletsanddisconnectallcablesthatareconnectedtothe
computer.
2.Placeasoft,cleantowelorclothonthedeskorsurface.Holdthesidesofyourcomputerandgentlylay
itdownsothatthescreenisagainstthesurfaceandthecoverisfacingup.
3.Removethecomputerstand.See“Replacingthecomputerstand”onpage96.
134ThinkCentreM700zandM800zHardwareMaintenanceManual
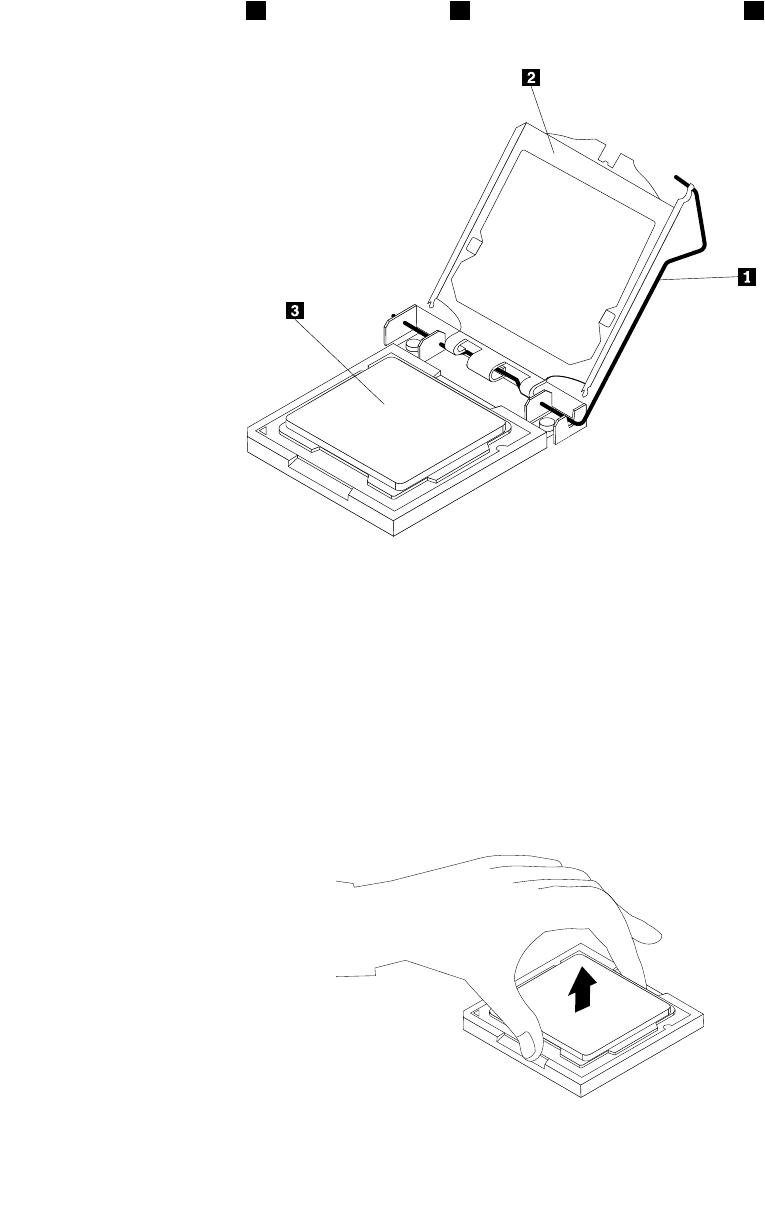
4.Removethecomputercover.See“Removingthecomputercover”onpage101.
5.Removethesystem-boardshield.See“Replacingthesystem-boardshield”onpage102.
6.Locatethemicroprocessor.See“Computercomponents”onpage33.
7.Disconnectallcablesconnectedtothesystemboard.
8.Removetheheatsink.See“Replacingtheheatsink”onpage122.
9.Pressthesmallhandle1toopentheretainer2toaccessthemicroprocessor3.
Figure91.Openingtheretainertoaccessthemicroprocessor
10.Liftthemicroprocessorstraightupandoutofthemicroprocessorsocket.
Notes:
•Yourmicroprocessorandsocketmightlookdifferentfromtheoneillustrated.
•Touchonlytheedgesofthemicroprocessor.Donottouchthegoldcontactsonthebottom.
•Donotdropanythingontothemicroprocessorsocketwhileitisexposed.Thesocketpinsmustbe
keptascleanaspossible.
Figure92.Removingthemicroprocessor
Chapter9.Installingorreplacinghardware135
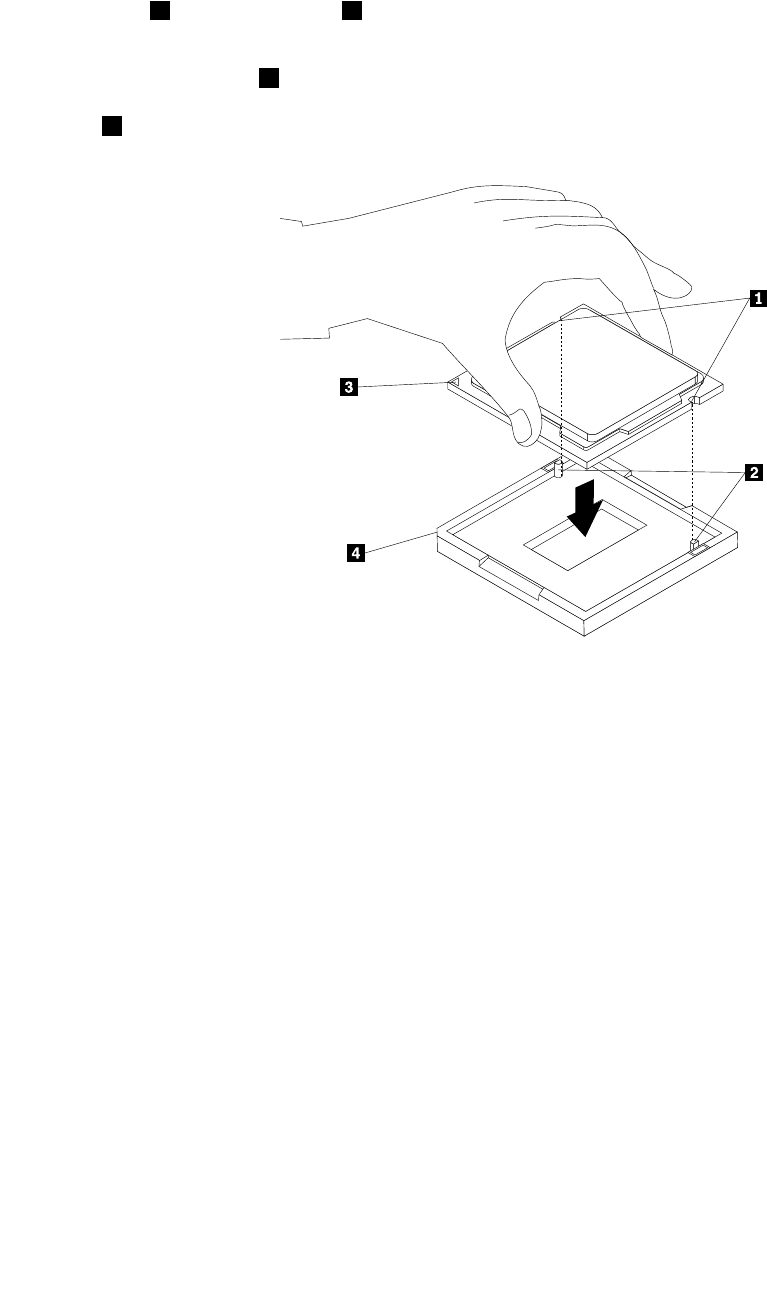
11.Ensurethatthesmallhandleisintheraisedpositionandthemicroprocessorretainerisfullyopen.
12.Removetheprotectivecoverthatprotectsthegoldcontactsofthenewmicroprocessor.
13.Notetheorientationofthenewmicroprocessor.Holdthenewmicroprocessorbyitsedgesandalign
thenotches1onitwiththetabs2inthemicroprocessorsocket.Then,carefullylowerthenew
microprocessorstraightdownintothemicroprocessorsocket.
Note:Thesmalltriangle3ononecornerofthenewmicroprocessoristhemicroprocessororientation
indicator.Thenewmicroprocessorisinthecorrectorientationwhenthisindicatorpointstothebeveled
corner4ofthemicroprocessorsocket.
Figure93.Installingthemicroprocessor
14.Closethemicroprocessorretainerandlockitintopositionwiththesmallhandletosecurethenew
microprocessorinthesocket.
15.Installtheheatsink.See“Replacingtheheatsink”onpage122.
16.Reconnectallcablesthatweredisconnectedfromthesystemboard.
17.Installthesystem-boardshield.See“Replacingthesystem-boardshield”onpage102.
Whattodonext:
•Toworkwithanotherpieceofhardware,gototheappropriatesection.
•Tocompletethereplacement,goto“Completingthepartsreplacement”onpage142.
Replacingthesystemboard
Attention:DonotopenyourcomputerorattemptanyrepairbeforereadingandunderstandingtheChapter
1“Readthisfirst:Importantsafetyinformation”onpage1.
Note:EachcomputerhasauniqueVitalProductData(VPD)codestoredinthenonvolatilememoryon
thesystemboard.Afteryoureplacethesystemboard,theVPDmustbeupdated.ToupdatetheVPD,
see“UpdatingtheBIOS”onpage75.
Toreplacethesystemboard,dothefollowing:
136ThinkCentreM700zandM800zHardwareMaintenanceManual
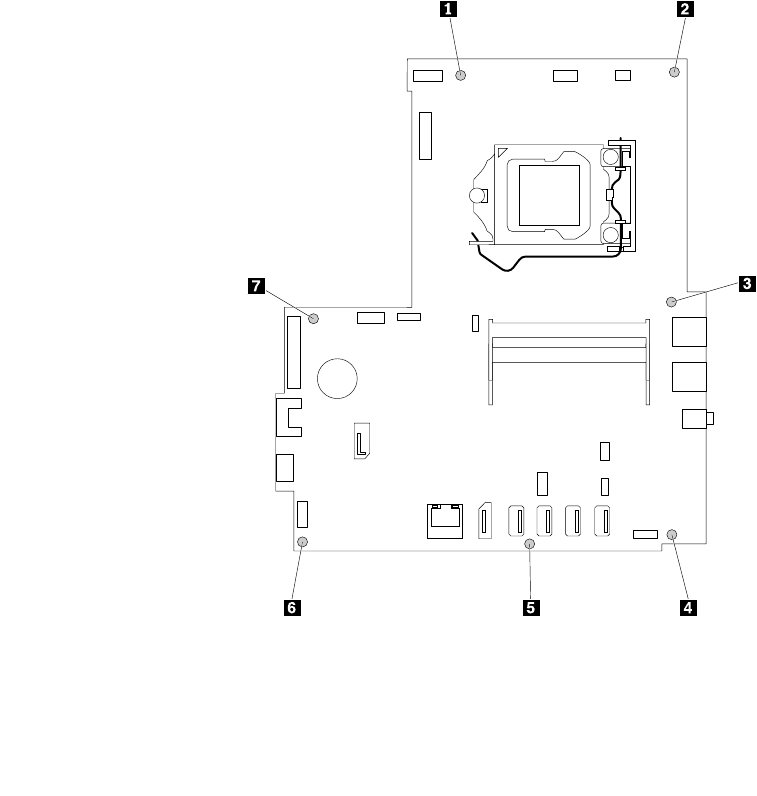
1.Removeanymediafromthedrivesandturnoffallconnecteddevicesandthecomputer.Then,
disconnectallpowercordsfromelectricaloutletsanddisconnectallcablesthatareconnectedtothe
computer.
2.Placeasoft,cleantowelorclothonthedeskorsurface.Holdthesidesofyourcomputerandgentlylay
itdownsothatthescreenisagainstthesurfaceandthecoverisfacingup.
3.Removethecomputerstand.See“Replacingthecomputerstand”onpage96.
4.Removethecomputercover.See“Removingthecomputercover”onpage101.
5.Removethesystem-boardshield.See“Replacingthesystem-boardshield”onpage102.
6.RemovetheVESAmountbracket.See“ReplacingtheVESAmountbracket”onpage104.
7.Removetheheatsink.See“Replacingtheheatsink”onpage122.
8.Removethememorymodules.See“Replacingamemorymodule”onpage124.
9.Removethecardreader.See“Replacingthecardreader”onpage125.
10.Removetheserialconnectormodule.See“Replacingtheserialconnectormodule”onpage127.
11.RemovetheWi-Ficard.See“ReplacingtheWi-Ficard”onpage131.
12.Recordthecableroutingandcableconnections,andthendisconnectallcablesfromthesystemboard.
See“Partsonthesystemboard”onpage41.
13.Removethesevenscrewsthatsecurethesystemboard,andthencarefullyliftthesystemboardoutof
thechassis.
Note:Carefullyhandlethesystemboardbyitsedges.
Figure94.Removingthesevenscrewsthatsecurethesystemboard
Chapter9.Installingorreplacinghardware137
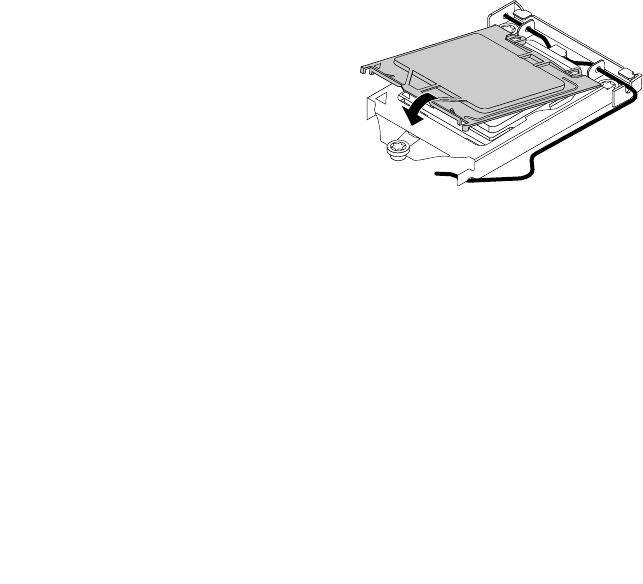
14.Removethemicroprocessorfromthefailingsystemboard,andtheninstallitontothenewsystem
board.See“Replacingthemicroprocessor”onpage134.
15.Alignthesevenscrewholesinthenewsystemboardwiththecorrespondingholesinthechassis.Then,
installthesevenscrewstosecurethesystemboardtothechassis.
16.Routeallthecablesthatyoudisconnectedfromthesystemboard,andthenconnectthecablestothe
systemboard.See“Partsonthesystemboard”onpage41.
17.InstalltheWi-Ficard.See“ReplacingtheWi-Ficard”onpage131.
18.Installtheserialconnectormodule.See“Replacingtheserialconnectormodule”onpage127.
19.Installthecardreader.See“Replacingthecardreader”onpage125.
20.Installthememorymodules.See“Replacingamemorymodule”onpage124.
21.Installtheheatsink.See“Replacingtheheatsink”onpage122.
22.InstalltheVESAmountbracket.See“ReplacingtheVESAmountbracket”onpage104.
23.Installthesystem-boardshield.See“Replacingthesystem-boardshield”onpage102.
24.Installthecomputercover.See“Completingthepartsreplacement”onpage142.
25.Installthecomputerstand.See“Replacingthecomputerstand”onpage96.
26.Connecttheexternalcablesandthepowercordtothecomputer.
Thefailingsystemboardmustbereturnedwithamicroprocessorsocketcovertoprotectthepinsduring
shippingandhandling.
Toinstallthemicroprocessorsocketcover,dothefollowing:
1.Afteryouhaveremovedthemicroprocessorfromthefailingsystemboard,closethemicroprocessor
retainer.Then,putthelevertothelockedpositiontosecuretheretainerinplace.
2.Notetheorientationofthesocketcover,andinstallonesideofthesocketcoverintothemicroprocessor
socket.Carefullypresstheothersideofthesocketcoverdownwarduntilthesocketcoversnaps
intoposition.
Note:Themicroprocessorsocketcovermightlookslightlydifferentfromtheillustration.
Figure95.Installingthemicroprocessorsocketcover
3.Carefullycheckthefourcornersofthesocketcovertoensurethatthecoverisseatedsecurely.
4.Followanyadditionalinstructionsthatareincludedwiththereplacementpartyoureceived.
ReplacingtheLCDpanel
Attention:DonotopenyourcomputerorattemptanyrepairbeforereadingandunderstandingtheChapter
1“Readthisfirst:Importantsafetyinformation”onpage1.
ToreplacetheLCDpanel,dothefollowing:
138ThinkCentreM700zandM800zHardwareMaintenanceManual

1.Removeanymediafromthedrivesandturnoffallconnecteddevicesandthecomputer.Then,
disconnectallpowercordsfromelectricaloutletsanddisconnectallcablesthatareconnectedtothe
computer.
2.Placeasoft,cleantowelorclothonthedeskorsurface.Holdthesidesofyourcomputerandgentlylay
itdownsothatthescreenisagainstthesurfaceandthecoverisfacingup.
3.Removethecomputerstand.See“Replacingthecomputerstand”onpage96.
4.Removethecomputercover.See“Removingthecomputercover”onpage101.
5.Removethesystem-boardshield.See“Replacingthesystem-boardshield”onpage102.
6.RemovetheVESAmountbracket.See“ReplacingtheVESAmountbracket”onpage104.
7.Ifyourcomputerisinstalledwithapowersupplyassembly,removethepowersupplyassembly.See
“Replacingthepowersupplyassembly(forM800z)”onpage105.
8.Removethestoragedrive.See“Replacingthestoragedrive”onpage107.
9.Removetheopticaldrive.See“Replacingtheopticaldrive”onpage109.
10.IfyouarereplacingtheLCDpanelofanM700zcomputer,removethesidebracketbyliftingitoff
theLCDpanel.
11.Removetheintegratedcamera.See“Replacingtheintegratedcamera”onpage112.
12.Removethecoverpresenceswitch.See“Replacingthecoverpresenceswitch”onpage114.
13.Removethesystemfan.See“Replacingthesystemfan”onpage115.
14.Removetheinternalspeakers.See“Replacingtheinternalspeakers”onpage116.
15.Removethecontrolbuttonboard.See“Replacingthecontrol-buttonboard”onpage118.
16.RemovetheI/Obracket.See“ReplacingtheI/Obracket”onpage121.
17.Removetheheatsink.See“Replacingtheheatsink”onpage122.
18.Removethecardreader.See“Replacingthecardreader”onpage125.
19.Removetheserialconnectormodule.See“Replacingtheserialconnectormodule”onpage127.
20.RemovetheWi-Ficard.See“ReplacingtheWi-Ficard”onpage131.
21.RemovetheWi-Fiantennas.See“ReplacingaWi-Fiantenna”onpage132.
22.Removethesystemboard.See“Replacingthesystemboard”onpage136.
Chapter9.Installingorreplacinghardware139
23.Removethescrews1thatsecurethechassistotheLCDpanel.
Figure96.RemovingthescrewsthatsecurethechassistotheLCDpanel(forM700z)
Figure97.RemovingthescrewsthatsecurethechassistotheLCDpanel(forM800z)
140ThinkCentreM700zandM800zHardwareMaintenanceManual
24.Pivottheretainingclips1outwardasshownonebyonetoremovethechassisfromtheLCDpanel.
Figure98.RemovingtheLCDpanelfromthechassis(forM700z)
Figure99.RemovingtheLCDpanelfromthechassis(forM800z)
25.DisconnecttheLCDpanelpowercableandsignalcablefromthefailingLCDpanel.
26.ConnecttheLCDpanelpowercableandsignalcabletothenewLCDpanel.
27.AlignthechassiswiththenewLCDpanel.Then,pressthechassisintotheLCDpaneluntilitsnaps
intoposition.
Chapter9.Installingorreplacinghardware141

28.Installthesystemboard.See“Replacingthesystemboard”onpage136.
29.InstalltheWi-Fiantennas.See“ReplacingaWi-Fiantenna”onpage132.
30.InstalltheWi-Ficard.See“ReplacingtheWi-Ficard”onpage131.
31.Installtheserialconnectormodule.See“Replacingtheserialconnectormodule”onpage127.
32.Installthecardreader.See“Replacingthecardreader”onpage125.
33.Installtheheatsink.See“Replacingtheheatsink”onpage122.
34.InstalltheI/Obracket.See“ReplacingtheI/Obracket”onpage121.
35.Installthecontrolbuttonboard.See“Replacingthecontrol-buttonboard”onpage118.
36.Installtheinternalspeakers.See“Replacingtheinternalspeakers”onpage116.
37.Installthesystemfan.See“Replacingthesystemfan”onpage115.
38.Installthecoverpresenceswitch.See“Replacingthecoverpresenceswitch”onpage114.
39.Installtheintegratedcamera.See“Replacingtheintegratedcamera”onpage112.
40.Installtheopticaldrive.See“Replacingtheopticaldrive”onpage109.
41.Ifyouhaveremovedthesidebracket,reinstallitbypositionitonthechassissothatthethreeholesin
thesidebracketalignwiththecorrespondingpinsontheLCDpanel.
42.Installthestoragedrive.See“Replacingthestoragedrive”onpage107.
43.Ifyouhaveremovedthepowersupplyassembly,reinstallit.See“Replacingthepowersupplyassembly
(forM800z)”onpage105.
44.InstalltheVESAmountbracket.See“ReplacingtheVESAmountbracket”onpage104.
45.Installthesystem-boardshield.See“Replacingthesystem-boardshield”onpage102.
Whattodonext:
•Toworkwithanotherpieceofhardware,gototheappropriatesection.
•Tocompletetheinstallationorreplacement,goto“Completingthepartsreplacement”onpage142.
Completingthepartsreplacement
Aftercompletingtheinstallationorreplacementforallparts,reinstallthecomputercoverandreconnect
cables.Dependingonthepartsyouinstalledorreplaced,youmightneedtoconfirmtheupdatedinformation
intheSetupUtilityprogram.Referto“UsingtheSetupUtilityprogram”onpage71.
Toreinstallthecomputercoverandreconnectcablestoyourcomputer,dothefollowing:
1.Ensurethatallcomponentshavebeenreassembledcorrectlyandthatnotoolsorloosescrewsare
leftinsideyourcomputer.See“Computercomponents”onpage33forthelocationsofvarious
componentsinyourcomputer.
2.Ensurethatthecablesareroutedcorrectlybeforereinstallingthecomputercover.Keepcablesclearof
thehingesandsidesofthecomputerchassistoavoidinterferencewithreinstallingthecomputercover.
3.Positionthecomputercoverintoplaceandthentightenthetwoscrews1tosecurethecomputercover.
142ThinkCentreM700zandM800zHardwareMaintenanceManual
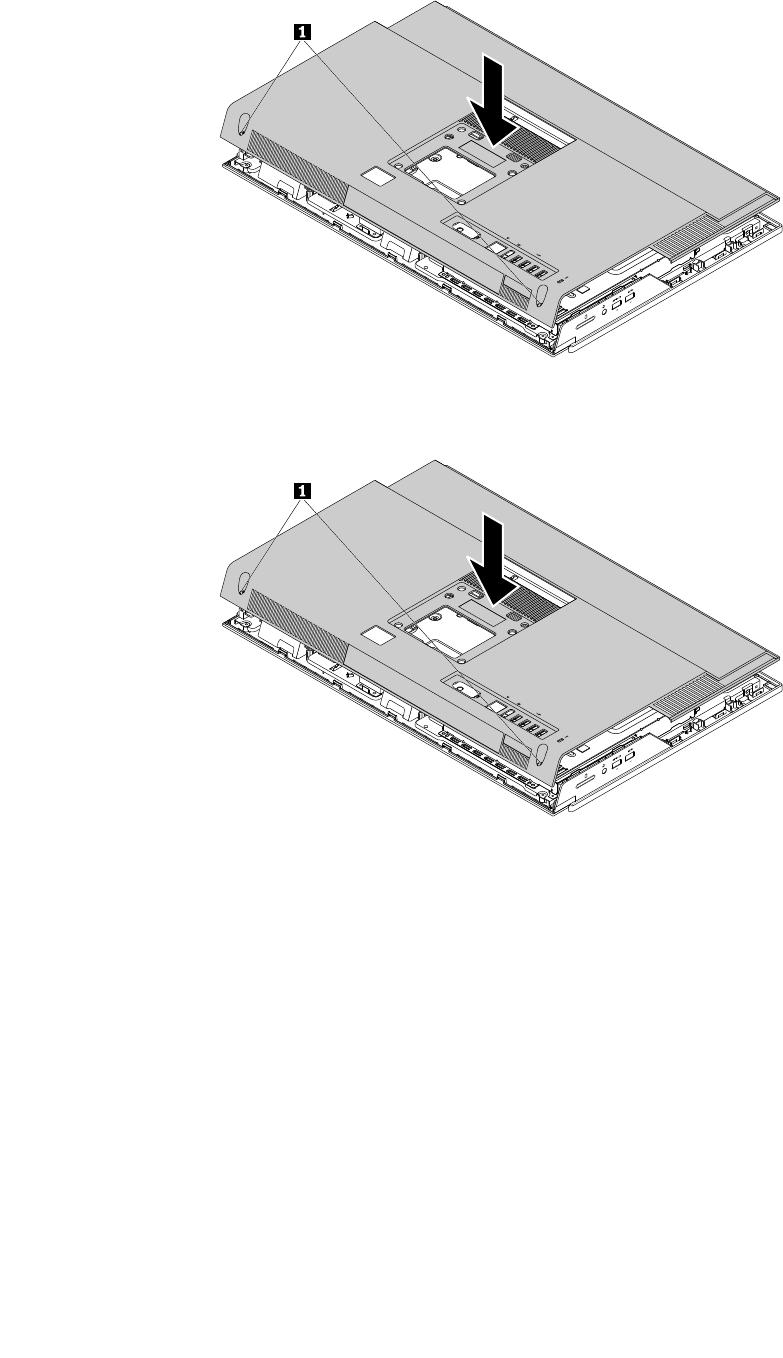
Figure100.Reinstallingthecomputercover(forM700z)
Figure101.Reinstallingthecomputercover(forM800z)
4.Installthecomputerstand.See“Replacingthecomputerstand”onpage96.
5.Placethecomputerinanuprightposition.
6.Ifalockingdeviceisavailable,useittolockthecomputer.See“Lockingyourcomputer”onpage65.
7.Reconnecttheexternalcablesandpowercordstothecorrespondingconnectorsonthecomputer.
See“Hardwarelocations”onpage27.
8.Updateyourconfiguration.See“UsingtheSetupUtilityprogram”onpage71.
9.Ifanewlyinstalledhardwarecomponentdoesnotworknormally,updatethedevicedriver.See
“Keepingyourcomputercurrent”onpage62.
Chapter9.Installingorreplacinghardware143

144ThinkCentreM700zandM800zHardwareMaintenanceManual

Chapter10.Gettinginformation,help,andservice
Thischaptercontainsthefollowingtopics:
•“Informationresources”onpage145
•“Helpandservice”onpage146
Informationresources
Youcanusetheinformationinthissectiontoaccessusefulresourcesrelatingtoyourcomputingneeds.
Accessingtheuserguideinvariouslanguages
Toaccesstheuserguideinvariouslanguages,goto:
http://www.lenovo.com/UserManuals
Windowshelpsystem
Note:IfyouusetheonlinehelpforWindows7orthehelpforWindows10,ensurethatyourcomputer
isconnectedtotheInternet.
TheWindowshelpsystemprovidesyouwithdetailedinformationaboutusingtheWindowsoperatingsystem.
ToaccesstheWindowshelpsystem,dothefollowing:
1.ClicktheStartbuttontoopentheStartmenu.
2.DependingonyourWindowsversion,dooneofthefollowing:
•ForWindows7:ClickHelpandSupport.Youcanchoosetousetheonlineorofflinehelpatthe
bottomofthescreen.
•ForWindows10:ClickGetstarted.
Safetyandwarranty
TheSafety,Warranty,andSetupGuideprovidedwithyourcomputercontainsimportantsafetyinformation,
productwarrantyterms,initialsetupprocedure,andlegalnotices.Ensurethatyoureadandunderstandall
safetyinformationintheSafety,Warranty,andSetupGuidebeforeusingyourcomputer.
Inaddition,readandunderstandChapter1“Readthisfirst:Importantsafetyinformation”onpage1before
usingyourcomputer.Thisprefaceprovidesadditionalsafetyinformationthatappliestotopicsandtasks
describedinthisUserGuide.
LenovoWebsite
TheLenovoWebsite(http://www.lenovo.com)providesup-to-dateinformationandservicestohelpyoubuy,
upgrade,andmaintainyourcomputer.Youalsocandothefollowing:
•Shopfordesktopandnotebookcomputers,monitors,projectors,upgradesandaccessoriesforyour
computer,andspecialoffers.
•Purchaseadditionalservices,suchassupportforhardware,operatingsystems,applicationprograms,
networksetupandconfiguration,andcustominstallations.
•Purchaseupgradesandextendedhardwarerepairservices.
•Accesstroubleshootingandsupportinformationforyourcomputermodelandothersupportedproducts.
©CopyrightLenovo2015145

•FindaServiceProviderlocatednearyou.
LenovoSupportWebsite
TechnicalsupportinformationisavailableontheLenovoSupportWebsiteat:
http://www.lenovo.com/support
ThisWebsiteisupdatedwiththelatestsupportinformationsuchasthefollowing:
•Driversandsoftware
•Diagnosticsolutions
•Productandservicewarranty
•Productandpartsdetails
•Userguidesandmanuals
•Knowledgebaseandfrequentlyaskedquestions
•LenovoSupportphonenumbers
Frequentlyaskedquestions
Fortheanswerstofrequentlyaskedquestionsaboutyourcomputer,goto:
http://www.lenovo.com/support/faq
Helpandservice
Thissectionprovidesinformationaboutobtaininghelpandservice.
Callingforservice
Duringthewarrantyperiod,youcangethelpandinformationbytelephonethroughtheCustomerSupport
Center.Forthewarrantyperiodofyourcomputer,gotohttp://www.lenovo.com/warranty-status.Foralistof
LenovoSupportphonenumbers,gotohttp://www.lenovo.com/support/phone.
Note:Phonenumbersaresubjecttochangewithoutnotice.Ifthenumberforyourcountryorregionisnot
provided,contactyourLenovoresellerorLenovomarketingrepresentative.
Thefollowingservicesareavailableduringthewarrantyperiod:
•Problemdetermination-Trainedservicepersonnelareavailabletoassistyouwithdetermininga
hardwareproblemanddecidingwhatactionisnecessarytofixtheproblem.
•Hardwarerepair-Iftheproblemiscausedbyhardwareunderwarranty,trainedservicepersonnelare
availabletoprovidetheapplicablelevelofservice.
•EngineeringChangemanagement-Theremightbechangesthatarerequiredafteraproducthas
beensold.LenovooryourresellerwillmakeselectedEngineeringChanges(ECs)thatapplytoyour
hardwareavailable.
Theseitemsarenotcoveredbythewarranty:
•ReplacementoruseofpartsnotmanufacturedfororbyLenovoornon-warrantedLenovoparts
•Identificationofsoftwareproblemsources
•ConfigurationofBIOSaspartofaninstallationorupgrade
•Changes,modifications,orupgradestodevicedrivers
•Installationandmaintenanceofnetworkoperatingsystems(NOS)
•Installationandmaintenanceofapplicationprograms
Ifpossible,beatyourcomputerwhenyoucall.Havethefollowinginformationavailable:
146ThinkCentreM700zandM800zHardwareMaintenanceManual

•Machinetypeandmodel
•Serialnumbersofyourhardwareproducts
•Descriptionoftheproblem
•Exactwordingofanyerrormessages
•Hardwareandsoftwareconfigurationinformation
Usingotherservices
Youmighttravelwithyourcomputerorrelocateittoacountryorregionwherethemachinetypeforyour
desktopornotebookcomputerissold.Insuchasituation,yourcomputermightbeeligibleforInternational
WarrantyService,whichautomaticallyentitlesyoutoobtainwarrantyservicethroughoutthewarrantyperiod.
Servicewillbeperformedbyserviceprovidersauthorizedtoperformwarrantyservice.
Servicemethodsandproceduresvarybycountry,andsomeservicesmightnotbeavailableinallcountries.
InternationalWarrantyServiceisdeliveredthroughthemethodofservice(suchasdepot,carry-in,or
on-siteservice)thatisprovidedintheservicingcountry.Servicecentersincertaincountriesmightnotbe
abletoserviceallmodelsofaparticularmachinetype.Insomecountries,feesandrestrictionsmight
applyatthetimeofservice.
TodeterminewhetheryourcomputeriseligibleforInternationalWarrantyServiceandtoviewalistofthe
countriesorregionswhereserviceisavailable,gotohttp://www.lenovo.com/support.
FortechnicalassistancewiththeinstallationoforquestionsrelatedtoServicePacksforyourpreinstalled
MicrosoftWindowsproduct,gototheMicrosoftProductSupportWebsiteathttp://support.microsoft.com.
YoualsocancontacttheLenovoCustomerSupportCenterforhelp.Somefeesmightapply.
Purchasingadditionalservices
Duringandafterthewarrantyperiod,youcanpurchaseadditionalservices.Examplesoftheseadditional
servicesinclude:
•Supportforhardware,operatingsystems,andapplicationprograms
•Networksetupandconfigurationservices
•Upgradedorextendedhardwarerepairservices
•Custominstallationservices
Serviceavailabilityandservicenamemightvarybycountryorregion.Formoreinformationaboutthese
services,gototheLenovoWebsiteat:
http://www.lenovo.com
Chapter10.Gettinginformation,help,andservice147

148ThinkCentreM700zandM800zHardwareMaintenanceManual

AppendixA.Regulatoryinformation
Thelatestcomplianceinformationisavailableathttp://www.lenovo.com/compliance.
Exportclassificationnotice
ThisproductissubjecttotheUnitedStatesExportAdministrationRegulations(EAR)andhasanExport
ClassificationControlNumber(ECCN)of5A992.c.Itcanbere-exportedexcepttoanyoftheembargoed
countriesintheEARE1countrylist.
Electronicemissionsnotices
ThefollowinginformationreferstoLenovopersonalcomputermachinetypes10ET,10EU,10EV,10EW,
10EYand10F1.
FederalCommunicationsCommissionDeclarationofConformity
ThisequipmenthasbeentestedandfoundtocomplywiththelimitsforaClassBdigitaldevice,pursuant
toPart15oftheFCCRules.Theselimitsaredesignedtoprovidereasonableprotectionagainstharmful
interferenceinaresidentialinstallation.Thisequipmentgenerates,uses,andcanradiateradiofrequency
energyand,ifnotinstalledandusedinaccordancewiththeinstructions,maycauseharmfulinterference
toradiocommunications.However,thereisnoguaranteethatinterferencewillnotoccurinaparticular
installation.Ifthisequipmentdoescauseharmfulinterferencetoradioortelevisionreception,whichcanbe
determinedbyturningtheequipmentoffandon,theuserisencouragedtotrytocorrecttheinterferenceby
oneormoreofthefollowingmeasures:
•Reorientorrelocatethereceivingantenna.
•Increasetheseparationbetweentheequipmentandreceiver.
•Connecttheequipmentintoanoutletonacircuitdifferentfromthattowhichthereceiverisconnected.
•Consultanauthorizeddealerorservicerepresentativeforhelp.
Lenovoisnotresponsibleforanyradioortelevisioninterferencecausedbyusingotherthanspecifiedor
recommendedcablesandconnectorsorbyunauthorizedchangesormodificationstothisequipment.
Unauthorizedchangesormodificationscouldvoidtheuser'sauthoritytooperatetheequipment.
ThisdevicecomplieswithPart15oftheFCCRules.Operationissubjecttothefollowingtwoconditions:(1)
thisdevicemaynotcauseharmfulinterference,and(2)thisdevicemustacceptanyinterferencereceived,
includinginterferencethatmaycauseundesiredoperation.
ResponsibleParty:
Lenovo(UnitedStates)Incorporated
1009ThinkPlace-BuildingOne
Morrisville,NC27560
PhoneNumber:919-294-5900
IndustryCanadaClassBemissioncompliancestatement
CANICES-3(B)/NMB-3(B)
EuropeanUnion-CompliancetotheElectromagneticCompatibilityDirective
©CopyrightLenovo2015149

ThisproductisinconformitywiththeprotectionrequirementsofEUCouncilDirective2004/108/EConthe
approximationofthelawsoftheMemberStatesrelatingtoelectromagneticcompatibility.Lenovocannot
acceptresponsibilityforanyfailuretosatisfytheprotectionrequirementsresultingfromanon-recommended
modificationoftheproduct,includingtheinstallationofoptioncardsfromothermanufacturers.
ThisproducthasbeentestedandfoundtocomplywiththelimitsforClassBInformationTechnology
EquipmentaccordingtoEuropeanStandardEN55022.ThelimitsforClassBequipmentwerederived
fortypicalresidentialenvironmentstoprovidereasonableprotectionagainstinterferencewithlicensed
communicationdevices.
Lenovo,Einsteinova21,85101Bratislava,Slovakia
GermanClassBcompliancestatement
DeutschsprachigerEUHinweis:
HinweisfürGerätederKlasseBEU-RichtliniezurElektromagnetischenVerträglichkeit
DiesesProduktentsprichtdenSchutzanforderungenderEU-Richtlinie2004/108/EG(früher89/336/EWG)zur
AngleichungderRechtsvorschriftenüberdieelektromagnetischeVerträglichkeitindenEU-Mitgliedsstaaten
undhältdieGrenzwertederEN55022KlasseBein.
Umdiesessicherzustellen,sinddieGerätewieindenHandbüchernbeschriebenzuinstallierenundzu
betreiben.DesWeiterendürfenauchnurvonderLenovoempfohleneKabelangeschlossenwerden.
LenovoübernimmtkeineVerantwortungfürdieEinhaltungderSchutzanforderungen,wenndasProdukt
ohneZustimmungderLenovoverändertbzw.wennErweiterungskomponentenvonFremdherstellernohne
EmpfehlungderLenovogesteckt/eingebautwerden.
Deutschland:
EinhaltungdesGesetzesüberdieelektromagnetischeVerträglichkeitvonBetriebsmitteln
DiesesProduktentsprichtdem„GesetzüberdieelektromagnetischeVerträglichkeitvonBetriebsmitteln“
EMVG(früher„GesetzüberdieelektromagnetischeVerträglichkeitvonGeräten“).DiesistdieUmsetzungder
EU-Richtlinie2004/108/EG(früher89/336/EWG)inderBundesrepublikDeutschland.
ZulassungsbescheinigunglautdemDeutschenGesetzüberdieelektromagnetischeVerträglichkeit
vonBetriebsmitteln,EMVGvom20.Juli2007(früherGesetzüberdieelektromagnetische
VerträglichkeitvonGeräten),bzw.derEMVEGRichtlinie2004/108/EC(früher89/336/EWG),für
GerätederKlasseB.
DiesesGerätistberechtigt,inÜbereinstimmungmitdemDeutschenEMVGdasEG-Konformitätszeichen
-CE-zuführen.VerantwortlichfürdieKonformitätserklärungnachParagraf5desEMVGistdieLenovo
(Deutschland)GmbH,Gropiusplatz10,D-70563Stuttgart.
InformationeninHinsichtEMVGParagraf4Abs.(1)4:
DasGeräterfülltdieSchutzanforderungennachEN55024undEN55022KlasseB.
KoreaClassBcompliancestatement
150ThinkCentreM700zandM800zHardwareMaintenanceManual
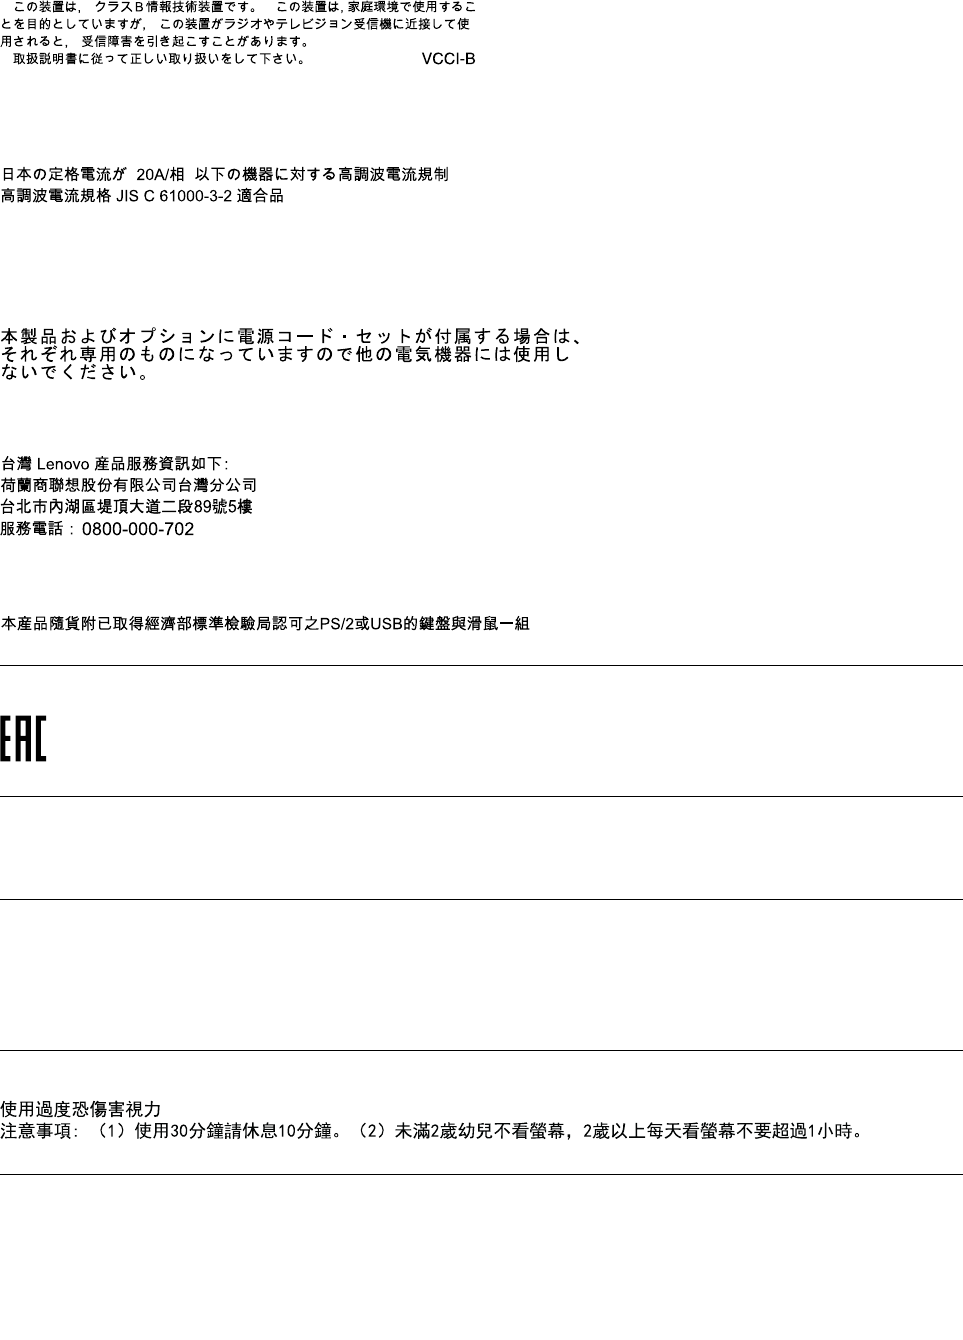
JapanVCCIClassBcompliancestatement
Japancompliancestatementforproductswhichconnecttothepowermainswithratedcurrent
lessthanorequalto20Aperphase
Japannoticeforacpowercord
Theacpowercordshippedwithyourproductcanbeusedonlyforthisspecificproduct.Donotusetheac
powercordforotherdevices.
LenovoproductserviceinformationforTaiwan
KeyboardandmousecompliancestatementforTaiwan
Eurasiancompliancemark
Brazilaudionotice
Ouvirsonscommaisde85decibéisporlongosperíodospodeprovocardanosaosistemaauditivo.
Mexicowireless-radiocomplianceinformation
Advertencia:EnMexicolaoperacióndeesteequipoestásujetaalassiguientesdoscondiciones:(1)es
posiblequeesteequipoodispositivonocauseinterferenciaperjudicialy(2)esteequipoodispositivodebe
aceptarcualquierinterferencia,incluyendolaquepuedacausarsuoperaciónnodeseada.
Taiwanvisionprecautionnotice
Additionalregulatoryinformation
Foradditionalregulatoryinformation,refertotheRegulatoryNoticeshippedwithyourcomputer.Depending
ontheconfigurationofyourcomputerandthecountryorregionwherethecomputerwaspurchased,
AppendixA.Regulatoryinformation151

AppendixB.WEEEandrecyclinginformation
Lenovoencouragesownersofinformationtechnology(IT)equipmenttoresponsiblyrecycletheir
equipmentwhenitisnolongerneeded.Lenovooffersavarietyofprogramsandservicestoassist
equipmentownersinrecyclingtheirITproducts.ForinformationonrecyclingLenovoproducts,goto
http://www.lenovo.com/recycling.Thelatestenvironmentalinformationaboutourproductsisavailableat
http://www.lenovo.com/ecodeclaration.
ImportantWEEEinformation
TheWEEEmarkingonLenovoproductsappliestocountrieswithWEEEande-wasteregulations(for
example,theEuropeanWEEEDirective,IndiaE-WasteManagement&HandlingRules,2011).Appliancesare
labeledinaccordancewithlocalregulationsconcerningwasteelectricalandelectronicequipment(WEEE).
Theseregulationsdeterminetheframeworkforthereturnandrecyclingofusedappliancesasapplicable
withineachgeography.Thislabelisappliedtovariousproductstoindicatethattheproductisnottobe
thrownaway,butratherputintheestablishedcollectionsystemsforreclaimingtheseendoflifeproducts.
Usersofelectricalandelectronicequipment(EEE)withtheWEEEmarkingmustnotdisposeofendof
lifeEEEasunsortedmunicipalwaste,butusethecollectionframeworkavailabletothemforthereturn,
recycle,andrecoveryofWEEEandtominimizeanypotentialeffectsofEEEontheenvironmentand
humanhealthduetothepresenceofhazardoussubstances.ForadditionalWEEEinformation,goto:
http://www.lenovo.com/recycling
RecyclinginformationforJapan
CollectingandrecyclingadisusedLenovocomputerormonitor
IfyouareacompanyemployeeandneedtodisposeofaLenovocomputerormonitorthatistheproperty
ofthecompany,youmustdosoinaccordancewiththeLawforPromotionofEffectiveUtilizationof
Resources.Computersandmonitorsarecategorizedasindustrialwasteandshouldbeproperlydisposed
ofbyanindustrialwastedisposalcontractorcertifiedbyalocalgovernment.InaccordancewiththeLaw
forPromotionofEffectiveUtilizationofResources,LenovoJapanprovides,throughitsPCCollecting
andRecyclingServices,forthecollecting,reuse,andrecyclingofdisusedcomputersandmonitors.For
details,visittheLenovoWebsiteathttp://www.lenovo.com/recycling/japan.PursuanttotheLawfor
PromotionofEffectiveUtilizationofResources,thecollectingandrecyclingofhome-usedcomputers
andmonitorsbythemanufacturerwasbegunonOctober1,2003.Thisserviceisprovidedfreeof
chargeforhome-usedcomputerssoldafterOctober1,2003.Fordetails,visittheLenovoWebsiteat
http://www.lenovo.com/recycling/japan.
©CopyrightLenovo2015153
DisposingofLenovocomputercomponents
SomeLenovocomputerproductssoldinJapanmayhavecomponentsthatcontainheavymetalsorother
environmentalsensitivesubstances.Toproperlydisposeofdisusedcomponents,suchasaprintedcircuit
boardordrive,usethemethodsdescribedaboveforcollectingandrecyclingadisusedcomputerormonitor.
DisposingofdisusedlithiumbatteriesfromLenovocomputers
Abutton-shapedlithiumbatteryisinstalledinsideyourLenovocomputertoprovidepowertothecomputer
clockwhilethecomputerisoffordisconnectedfromthemainpowersource.Ifyouneedtoreplaceitwitha
newone,contactyourplaceofpurchaseorcontactLenovoforservice.Ifyouneedtodisposeofadisused
lithiumbattery,insulateitwithvinyltape,contactyourplaceofpurchaseoranindustrial-waste-disposal
operator,andfollowtheirinstructions.Disposalofalithiumbatterymustcomplywithlocalordinances
andregulations.
RecyclinginformationforBrazil
DeclaraçõesdeReciclagemnoBrasil
DescartedeumProdutoLenovoForadeUso
Equipamentoselétricoseeletrônicosnãodevemserdescartadosemlixocomum,masenviadosàpontosde
coleta,autorizadospelofabricantedoprodutoparaquesejamencaminhadoseprocessadosporempresas
especializadasnomanuseioderesíduosindustriais,devidamentecertificadaspelosorgãosambientais,de
acordocomalegislaçãolocal.
ALenovopossuiumcanalespecíficoparaauxiliá-lonodescartedessesprodutos.Casovocêpossua
umprodutoLenovoemsituaçãodedescarte,ligueparaonossoSACouencaminheume-mailpara:
reciclar@lenovo.com,informandoomodelo,númerodesérieecidade,afimdeenviarmosasinstruções
paraocorretodescartedoseuprodutoLenovo.
BatteryrecyclinginformationforTaiwan
BatteryrecyclinginformationfortheEuropeanUnion
Notice:ThismarkappliesonlytocountrieswithintheEuropeanUnion(EU).
154ThinkCentreM700zandM800zHardwareMaintenanceManual

BatteriesorpackagingforbatteriesarelabeledinaccordancewithEuropeanDirective2006/66/EC
concerningbatteriesandaccumulatorsandwastebatteriesandaccumulators.TheDirectivedeterminesthe
frameworkforthereturnandrecyclingofusedbatteriesandaccumulatorsasapplicablethroughoutthe
EuropeanUnion.Thislabelisappliedtovariousbatteriestoindicatethatthebatteryisnottobethrown
away,butratherreclaimeduponendoflifeperthisDirective.
InaccordancewiththeEuropeanDirective2006/66/EC,batteriesandaccumulatorsarelabeledtoindicate
thattheyaretobecollectedseparatelyandrecycledatendoflife.Thelabelonthebatterymayalso
includeachemicalsymbolforthemetalconcernedinthebattery(Pbforlead,Hgformercury,andCdfor
cadmium).Usersofbatteriesandaccumulatorsmustnotdisposeofbatteriesandaccumulatorsasunsorted
municipalwaste,butusethecollectionframeworkavailabletocustomersforthereturn,recycling,and
treatmentofbatteriesandaccumulators.Customerparticipationisimportanttominimizeanypotential
effectsofbatteriesandaccumulatorsontheenvironmentandhumanhealthduetothepotentialpresenceof
hazardoussubstances.Forpropercollectionandtreatment,goto:
http://www.lenovo.com/recycling
AppendixB.WEEEandrecyclinginformation155

156ThinkCentreM700zandM800zHardwareMaintenanceManual
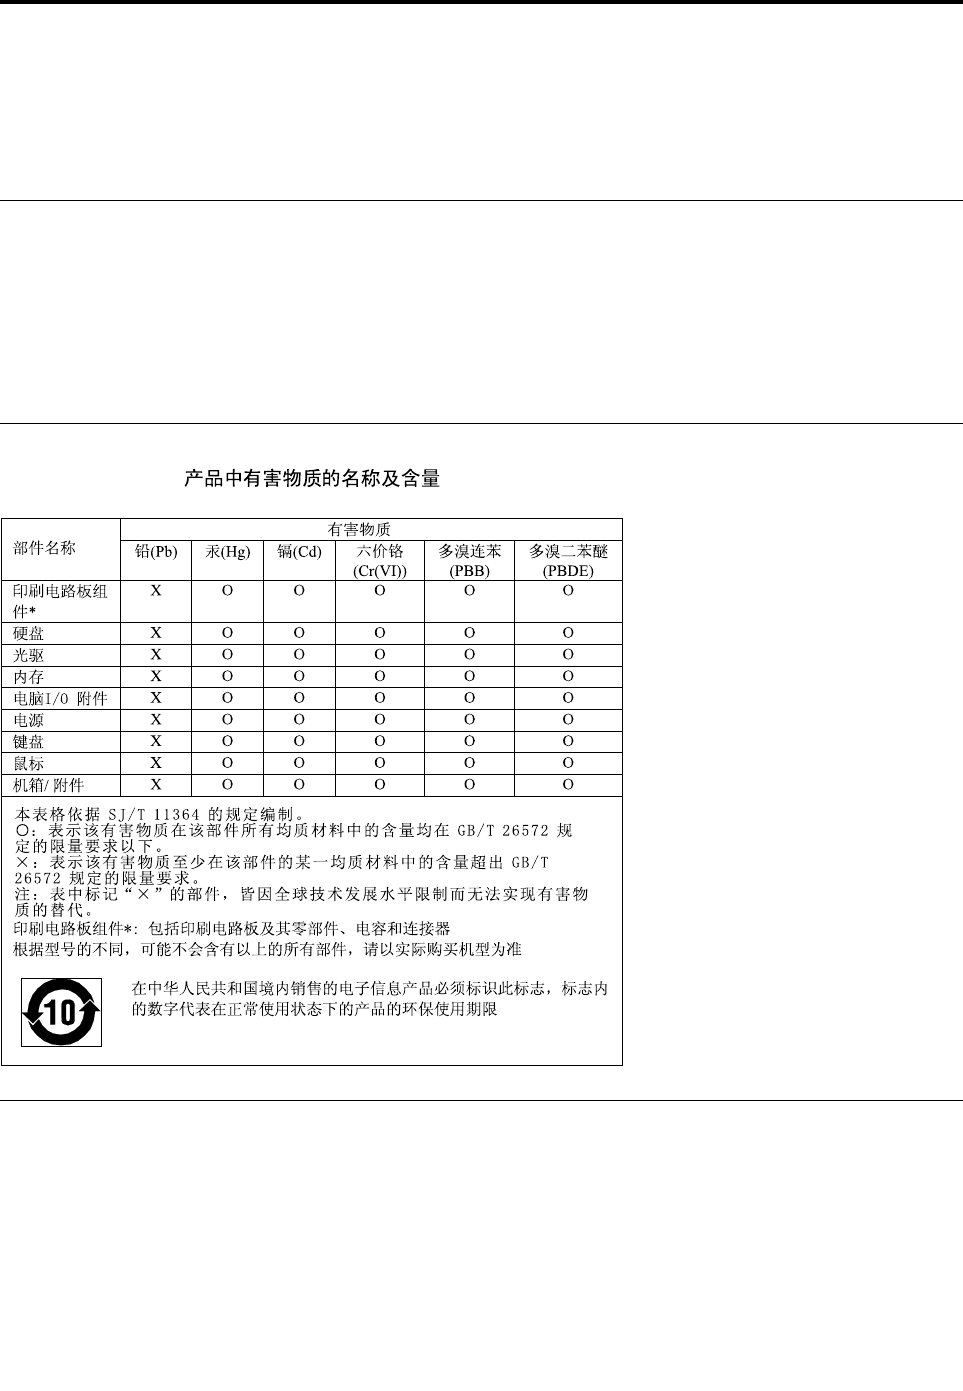
AppendixC.RestrictionofHazardousSubstancesDirective
(RoHS)
Thelatestenvironmentalinformationisavailableathttp://www.lenovo.com/ecodeclaration.
EuropeanUnionRoHS
ThisLenovoproduct,withincludedparts(cables,cords,andsoon)meetstherequirementsofDirective
2011/65/EUontherestrictionoftheuseofcertainhazardoussubstancesinelectricalandelectronic
equipment(“RoHSrecast”or“RoHS2”).
FormoreinformationaboutLenovoworldwidecomplianceonRoHS,goto:
http://www.lenovo.com/social_responsibility/us/en/RoHS_Communication.pdf
ChinaRoHS
TurkishRoHS
TheLenovoproductmeetstherequirementsoftheRepublicofTurkeyDirectiveontheRestrictionoftheUse
ofCertainHazardousSubstancesinWasteElectricalandElectronicEquipment(WEEE).
©CopyrightLenovo2015157

UkraineRoHS
IndiaRoHS
RoHScompliantasperE-Waste(Management&Handling)Rules,2011.
158ThinkCentreM700zandM800zHardwareMaintenanceManual
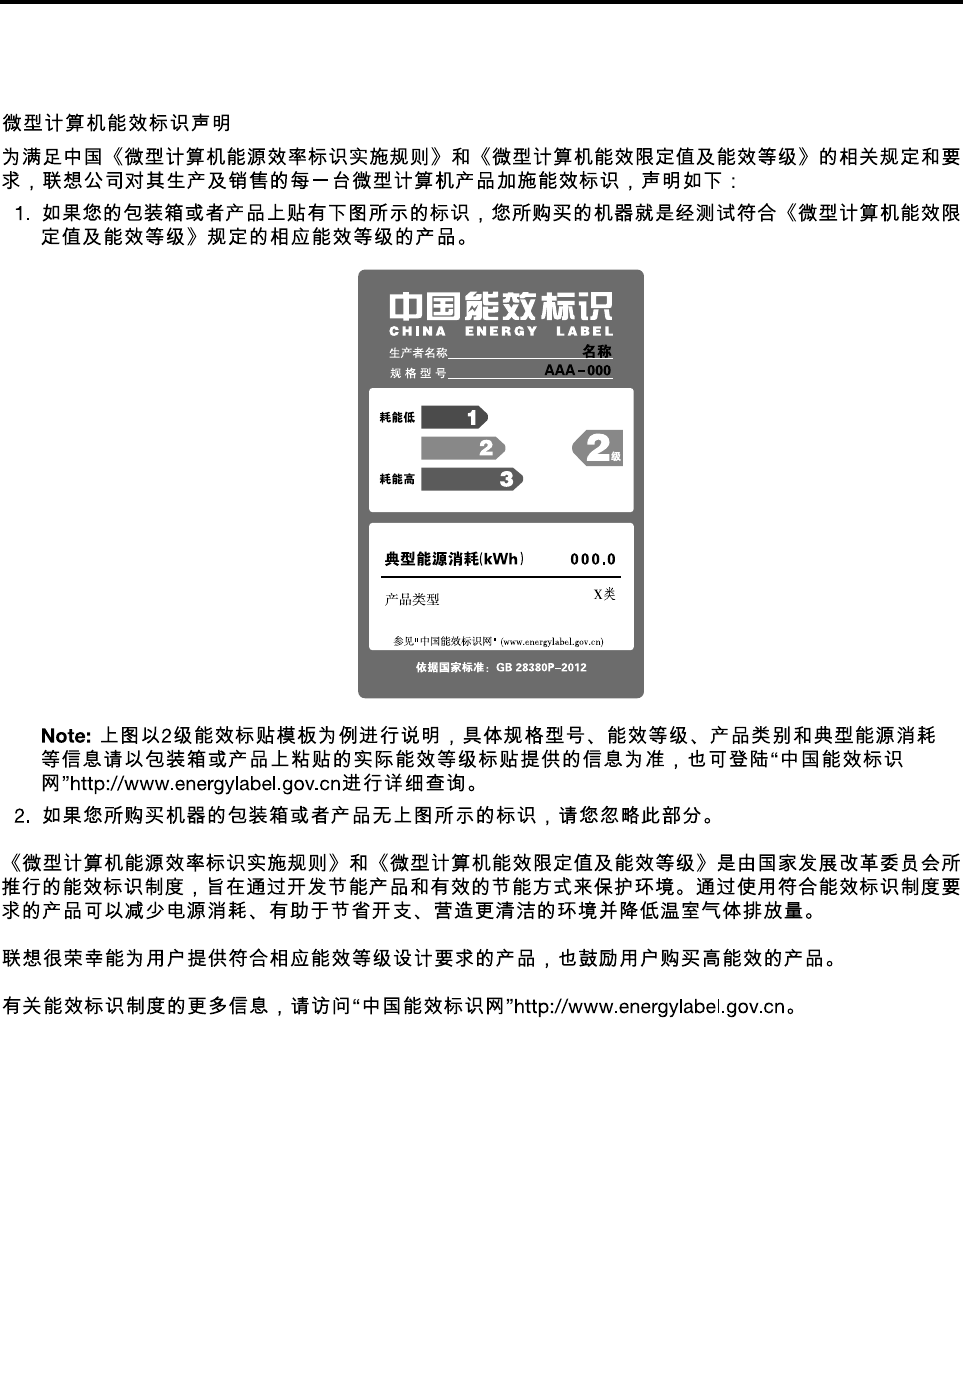
AppendixD.ChinaEnergyLabel
©CopyrightLenovo2015159

160ThinkCentreM700zandM800zHardwareMaintenanceManual

AppendixE.ENERGYSTARmodelinformation
ENERGYSTAR®isajointprogramoftheU.S.EnvironmentalProtectionAgencyandtheU.S.Department
ofEnergyaimedatsavingmoneyandprotectingtheenvironmentthroughenergyefficientproductsand
practices.
LenovoisproudtoofferourcustomersproductswithanENERGYSTARcompliantdesignation.Some
modelsofthefollowingmachinetypeshavebeendesignedandtestedtoconformtotheENERGYSTAR
programrequirementforcomputersatthetimeofmanufacture:10ET,10EU,10EV,10EW,10EYand10F1.
FormoreinformationaboutENERGYSTARratingsforLenovocomputers,gotohttp://www.lenovo.com.
ByusingENERGYSTARcompliantproductsandtakingadvantageofthepower-managementfeaturesof
yourcomputer,youreducetheconsumptionofelectricity.Reducedelectricalconsumptioncontributesto
potentialfinancialsavings,acleanerenvironment,andthereductionofgreenhousegasemissions.
FormoreinformationaboutENERGYSTAR,goto:
http://www.energystar.gov
Lenovoencouragesyoutomakeefficientuseofenergyanintegralpartofyourday-to-dayoperations.To
helpinthisendeavor,setthefollowingpower-managementfeaturestotakeeffectwhenyourcomputerhas
beeninactiveforaspecifiedduration:
Table1.ENERGYSTARpower-managementfeatures
Windows7orWindows10operatingsystem
Powerplan:Default
•Turnoffthedisplay:After10minutes
•Putthecomputertosleep:After25minutes
•Advancedpowersettings:
–Turnoffharddiskdrives:After20minutes
–Hibernate:Never
ToawakenyourcomputerfromaSleepmode,pressanykeyonyourkeyboard.
Tochangepowersettings,dothefollowing:
1.OpenControlPanelbydoingoneofthefollowing:
•ForWindows7:ClicktheStartbuttontoopentheStartmenu.
•ForWindows10:Right-clicktheStartbuttontoopentheStartcontextmenu.
2.ClickControlPanel.ViewControlPanelusingLargeiconsorSmallicons,andthenclickPower
Options.
3.Followtheinstructionsonthescreen.
©CopyrightLenovo2015161

162ThinkCentreM700zandM800zHardwareMaintenanceManual

AppendixF.Notices
Lenovomaynotoffertheproducts,services,orfeaturesdiscussedinthisdocumentinallcountries.Consult
yourlocalLenovorepresentativeforinformationontheproductsandservicescurrentlyavailableinyour
area.AnyreferencetoaLenovoproduct,program,orserviceisnotintendedtostateorimplythatonlythat
Lenovoproduct,program,orservicemaybeused.Anyfunctionallyequivalentproduct,program,orservice
thatdoesnotinfringeanyLenovointellectualpropertyrightmaybeusedinstead.However,itistheuser's
responsibilitytoevaluateandverifytheoperationofanyotherproduct,program,orservice.
Lenovomayhavepatentsorpendingpatentapplicationscoveringsubjectmatterdescribedinthis
document.Thefurnishingofthisdocumentdoesnotgiveyouanylicensetothesepatents.Youcansend
licenseinquiries,inwriting,to:
Lenovo(UnitedStates),Inc.
1009ThinkPlace-BuildingOne
Morrisville,NC27560
U.S.A.
Attention:LenovoDirectorofLicensing
LENOVOPROVIDESTHISPUBLICATION“ASIS”WITHOUTWARRANTYOFANYKIND,EITHEREXPRESS
ORIMPLIED,INCLUDING,BUTNOTLIMITEDTO,THEIMPLIEDWARRANTIESOFNON-INFRINGEMENT,
MERCHANTABILITYORFITNESSFORAPARTICULARPURPOSE.Somejurisdictionsdonotallow
disclaimerofexpressorimpliedwarrantiesincertaintransactions,therefore,thisstatementmaynotapply
toyou.
Thisinformationcouldincludetechnicalinaccuraciesortypographicalerrors.Changesareperiodically
madetotheinformationherein;thesechangeswillbeincorporatedinneweditionsofthepublication.
Lenovomaymakeimprovementsand/orchangesintheproduct(s)and/ortheprogram(s)describedinthis
publicationatanytimewithoutnotice.
Theproductsdescribedinthisdocumentarenotintendedforuseinimplantationorotherlifesupport
applicationswheremalfunctionmayresultininjuryordeathtopersons.Theinformationcontainedinthis
documentdoesnotaffectorchangeLenovoproductspecificationsorwarranties.Nothinginthisdocument
shalloperateasanexpressorimpliedlicenseorindemnityundertheintellectualpropertyrightsofLenovo
orthirdparties.Allinformationcontainedinthisdocumentwasobtainedinspecificenvironmentsandis
presentedasanillustration.Theresultobtainedinotheroperatingenvironmentsmayvary.
Lenovomayuseordistributeanyoftheinformationyousupplyinanywayitbelievesappropriatewithout
incurringanyobligationtoyou.
Anyreferencesinthispublicationtonon-LenovoWebsitesareprovidedforconvenienceonlyanddonotin
anymannerserveasanendorsementofthoseWebsites.ThematerialsatthoseWebsitesarenotpartof
thematerialsforthisLenovoproduct,anduseofthoseWebsitesisatyourownrisk.
Anyperformancedatacontainedhereinwasdeterminedinacontrolledenvironment.Therefore,theresult
obtainedinotheroperatingenvironmentsmayvarysignificantly.Somemeasurementsmayhavebeen
madeondevelopment-levelsystemsandthereisnoguaranteethatthesemeasurementswillbethesame
ongenerallyavailablesystems.Furthermore,somemeasurementsmayhavebeenestimatedthrough
extrapolation.Actualresultsmayvary.Usersofthisdocumentshouldverifytheapplicabledatafortheir
specificenvironment.
©CopyrightLenovo2015163

Trademarks
ThefollowingtermsaretrademarksofLenovointheUnitedStates,othercountries,orboth:
Lenovo
TheLenovologo
ThinkCentre
TheThinkCentrelogo
RescueandRecovery
ThinkVantage
Microsoft,Windows,andWindowsMediaaretrademarksoftheMicrosoftgroupofcompanies.
DisplayPortandVESAaretrademarksoftheVideoElectronicsStandardsAssociation.
Othercompany,product,orservicenamesmaybetrademarksorservicemarksofothers.
164ThinkCentreM700zandM800zHardwareMaintenanceManual