Lenovo M92P Tiny Ug En User Manual (English) Guide For Form Factor M92 Desktop (Think Centre) Type 2982
2012-10-19
User Manual: Lenovo M92P Tiny Ug En (English) User Guide for Tiny Form Factor M92 Desktop (ThinkCentre) - Type 2982 ThinkCentre M92, 2982
Open the PDF directly: View PDF ![]() .
.
Page Count: 152 [warning: Documents this large are best viewed by clicking the View PDF Link!]
- Important safety information
- Service and upgrades
- Static electricity prevention
- Power cords and power adapters
- Extension cords and related devices
- Plugs and outlets
- External devices
- General battery notice
- Rechargeable battery notice
- Heat and product ventilation
- Operating environment
- Modem safety information
- Laser compliance statement
- Power supply statement
- Cleaning and maintenance
- Additional important information
- Chapter 1. Product overview
- Chapter 2. Using your computer
- Chapter 3. You and your computer
- Chapter 4. Security
- Chapter 5. Installing or replacing hardware
- Handling static-sensitive devices
- Installing or replacing hardware
- Installing external options
- Installing or removing the vertical stand
- Installing or removing the VESA mount bracket
- Removing the computer cover
- Installing or replacing a memory module
- Replacing the optical drive
- Replacing the secondary hard disk drive
- Replacing the battery
- Replacing the ac power adapter
- Replacing the ac power adapter bracket
- Replacing the power switch board
- Replacing the heat sink
- Replacing the microprocessor
- Replacing the hard disk drive bracket
- Replacing the WiFi card module
- Installing or removing the rear WiFi antenna
- Replacing the system fan
- Replacing the internal speaker
- Replacing the keyboard or mouse
- Completing the parts replacement
- Chapter 6. Recovery information
- Chapter 7. Using the Setup Utility program
- Chapter 8. Updating system programs
- Chapter 9. Preventing problems
- Chapter 10. Troubleshooting and diagnostics
- Chapter 11. Getting information, help, and service
- Appendix A. Notices
- Appendix B. Regulatory information
- Appendix C. WEEE and recycling information
- Appendix D. Restriction of Hazardous Substances Directive (RoHS)
- Appendix E. ENERGY STAR model information
- Index

ThinkCentre
UserGuide
MachineTypes:2119,2121,3229,3234,3235,3236,3237,3238,
3240,3242,and3243

Note:Beforeusingthisinformationandtheproductitsupports,besuretoreadandunderstandthe
“Importantsafetyinformation”onpagevandAppendixA“Notices”onpage119.
FifthEdition(October2012)
©CopyrightLenovo2012.
LIMITEDANDRESTRICTEDRIGHTSNOTICE:IfdataorsoftwareisdeliveredpursuantaGeneralServicesAdministration
“GSA”contract,use,reproduction,ordisclosureissubjecttorestrictionssetforthinContractNo.GS-35F-05925.

Contents
Importantsafetyinformation......v
Serviceandupgrades.............v
Staticelectricityprevention...........v
Powercordsandpoweradapters........vi
Extensioncordsandrelateddevices.......vi
Plugsandoutlets..............vii
Externaldevices..............vii
Generalbatterynotice............vii
Rechargeablebatterynotice.........viii
Heatandproductventilation.........viii
Operatingenvironment............ix
Modemsafetyinformation...........ix
Lasercompliancestatement..........x
Powersupplystatement............x
Cleaningandmaintenance...........x
Additionalimportantinformation.........x
Chapter1.Productoverview......1
Features..................1
Specications................4
Lenovoprograms..............4
AccessingLenovoprogramsontheWindows
7operatingsystem............4
AccessingLenovoprogramsontheWindows
8operatingsystem............6
AnintroductiontoLenovoprograms.....6
Locations..................8
Locatingconnectors,controls,andindicators
onthefrontofyourcomputer........9
Locatingconnectorsontherearofyour
computer...............10
Locatingcomponents..........12
Locatingpartsonthesystemboard....13
Machinetypeandmodellabel.......14
Chapter2.Usingyourcomputer...15
Frequentlyaskedquestions.........15
AccessingControlPanelontheWindows8
operatingsystem..............15
Usingthekeyboard.............16
UsingWindowsshortcutkeys.......16
UsingtheblueThinkVantagebutton....16
Usingangerprintreader........16
Usingthewheelmouse...........17
Adjustingaudio..............17
Aboutyourcomputeraudio........17
Settingthevolumefromthedesktop....17
SettingthevolumefromControlPanel...18
UsingCDsandDVDs............18
HandlingandstoringCDandDVDmedia..18
PlayingaCDorDVD..........19
RecordingaCDorDVD.........19
Chapter3.Youandyourcomputer..21
Accessibilityandcomfort..........21
Arrangingyourworkspace........21
Comfort...............21
Glareandlighting............22
Aircirculation.............22
Electricaloutletsandcablelengths.....22
RegisteryourcomputerwithLenovo......23
Movingyourcomputertoanothercountryor
region..................23
Voltage-selectionswitch.........23
Replacementpowercords........24
Chapter4.Security..........25
Securityfeatures..............25
Attachinganintegratedcablelock.......26
Usingpasswords..............26
BIOSpasswords............26
Windowspasswords..........27
Conguringthengerprintreader.......27
Usingandunderstandingrewalls.......27
Protectingdataagainstviruses........27
Chapter5.Installingorreplacing
hardware...............29
Handlingstatic-sensitivedevices.......29
Installingorreplacinghardware........29
Installingexternaloptions........29
Installingorremovingtheverticalstand...30
InstallingorremovingtheVESAmount
bracket................31
Removingthecomputercover.......33
Installingorreplacingamemorymodule...35
Replacingtheopticaldrive........37
Replacingthesecondaryharddiskdrive...42
Replacingthebattery..........48
Replacingtheacpoweradapter......49
Replacingtheacpoweradapterbracket...51
Replacingthepowerswitchboard.....53
Replacingtheheatsink.........55
Replacingthemicroprocessor.......58
Replacingtheharddiskdrivebracket....60
©CopyrightLenovo2012i

ReplacingtheWiFicardmodule......64
InstallingorremovingtherearWiFiantenna.66
Replacingthesystemfan.........69
Replacingtheinternalspeaker.......71
Replacingthekeyboardormouse.....73
Completingthepartsreplacement.....74
Chapter6.Recoveryinformation...77
RecoveryinformationfortheWindows7operating
system..................77
Creatingandusingrecoverymedia.....77
Performingbackupandrecoveryoperations.78
UsingtheRescueandRecoveryworkspace.79
Creatingandusingarescuemedium....80
Reinstallingpreinstalledapplicationsand
devicedrivers.............81
Reinstallingsoftwareprograms......82
Reinstallingdevicedrivers........82
Solvingrecoveryproblems........82
RecoveryinformationfortheWindows8operating
system..................83
Chapter7.UsingtheSetupUtility
program................85
StartingtheSetupUtilityprogram.......85
Viewingandchangingsettings........85
Usingpasswords..............85
Passwordconsiderations.........86
Power-OnPassword..........86
AdministratorPassword.........86
HardDiskPassword...........86
Setting,changing,anddeletingapassword.86
Erasinglostorforgottenpasswords(clearing
CMOS)................87
Enablingordisablingadevice........87
Selectingastartupdevice..........88
Selectingatemporarystartupdevice....88
Selectingorchangingthestartupdevice
sequence...............88
EnablingErPcompliancemode........88
ICEperformancemode...........89
ICEthermalalert..............89
ExitingtheSetupUtilityprogram.......90
Chapter8.Updatingsystem
programs...............91
Usingsystemprograms...........91
Updating(ashing)theBIOSfromadisc....91
Updating(ashing)theBIOSfromyouroperating
system..................92
RecoveringfromaPOST/BIOSupdatefailure..92
Chapter9.Preventingproblems...93
Keepingyourcomputercurrent........93
Gettingthelatestdevicedriversforyour
computer...............93
Updatingyouroperatingsystem......93
UsingSystemUpdate..........94
Cleaningandmaintenance..........94
Basics................94
Cleaningyourcomputer.........95
Goodmaintenancepractices.......96
Movingyourcomputer...........96
Chapter10.Troubleshootingand
diagnostics..............97
Basictroubleshooting............97
Troubleshootingprocedure..........98
Troubleshooting..............98
Audioproblems............99
CDproblems.............100
DVDproblems.............101
Intermittentproblems..........103
Keyboard,mouse,orpointingdevice
problems...............103
Monitorproblems............105
Networkingproblems..........106
Optionproblems............109
Performanceandlockupproblems.....110
Printerproblems............111
Serialportproblems...........112
Softwareproblems...........112
USBproblems.............113
LenovoSolutionCenter...........114
Chapter11.Gettinginformation,help,
andservice.............115
Informationresources............115
LenovoThinkVantageTools........115
LenovoWelcome............115
HelpandSupport............115
SafetyandWarranty...........115
LenovoWebsite............115
LenovoSupportWebsite.........116
Helpandservice..............116
Usingthedocumentationanddiagnostic
program...............116
Callingforservice............116
Usingotherservices..........117
Purchasingadditionalservices......117
AppendixA.Notices.........119
Trademarks................120
iiThinkCentreUserGuide

AppendixB.Regulatory
information.............121
Exportclassicationnotice..........121
Electronicemissionsnotices.........121
FederalCommunicationsCommission
DeclarationofConformity........121
Additionalregulatoryinformation.......123
AppendixC.WEEEandrecycling
information.............125
ImportantWEEEinformation.........125
Recyclinginformation............125
RecyclinginformationforBrazil........126
BatteryrecyclinginformationforTaiwan.....126
BatteryrecyclinginformationfortheEuropean
Union..................127
AppendixD.RestrictionofHazardous
SubstancesDirective(RoHS)....129
ChinaRoHS................129
TurkishRoHS...............129
UkraineRoHS...............129
IndiaRoHS................130
AppendixE.ENERGYSTARmodel
information.............131
Index.................133
©CopyrightLenovo2012iii

ivThinkCentreUserGuide
Importantsafetyinformation
CAUTION:
Beforeusingthismanual,besuretoreadandunderstandalltherelatedsafetyinformationforthis
product.RefertotheinformationinthissectionandthesafetyinformationintheSafety,Warranty,and
SetupGuidethatyoureceivedwiththisproduct.Readingandunderstandingthissafetyinformation
reducestheriskofpersonalinjuryanddamagetoyourproduct.
IfyounolongerhaveacopyoftheSafety,Warranty,andSetupGuide,youcanobtainaPortableDocument
Format(PDF)versionfromtheLenovo®SupportWebsiteathttp://www.lenovo.com/support.TheLenovo
SupportWebsitealsoprovidestheSafety,Warranty,andSetupGuideandthisUserGuideinadditional
languages.
Serviceandupgrades
DonotattempttoserviceaproductyourselfunlessinstructedtodosobytheCustomerSupportCenteror
yourdocumentation.OnlyuseaServiceProviderwhoisapprovedtorepairyourparticularproduct.
Note:Somecomputerpartscanbeupgradedorreplacedbythecustomer.Upgradestypicallyare
referredtoasoptions.ReplacementpartsapprovedforcustomerinstallationarereferredtoasCustomer
ReplaceableUnits,orCRUs.Lenovoprovidesdocumentationwithinstructionswhenitisappropriatefor
customerstoinstalloptionsorreplaceCRUs.Youmustcloselyfollowallinstructionswheninstallingor
replacingparts.TheOffstateofapowerindicatordoesnotnecessarilymeanthatvoltagelevelsinsidea
productarezero.Beforeyouremovethecoversfromaproductequippedwithapowercord,alwaysmake
surethatthepoweristurnedoffandthattheproductisunpluggedfromanypowersource.Formore
informationonCRUs,refertoChapter5“Installingorreplacinghardware”onpage29.Ifyouhaveany
questionsorconcerns,contacttheCustomerSupportCenter.
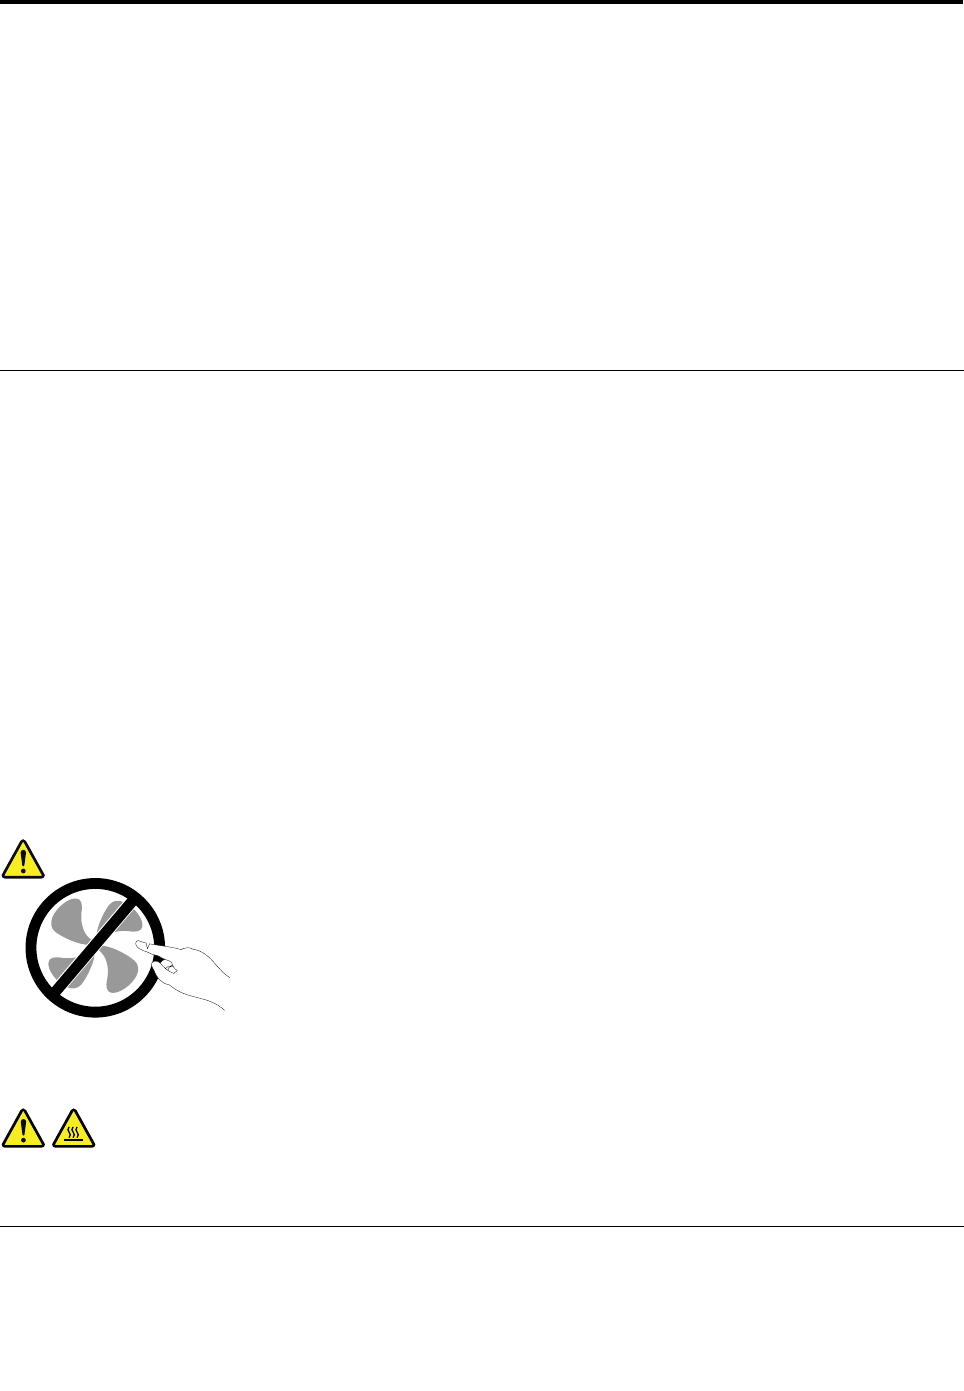
Althoughtherearenomovingpartsinyourcomputerafterthepowercordhasbeendisconnected,the
followingwarningsarerequiredforyoursafety.
CAUTION:
Hazardousmovingparts.Keepngersandotherbodypartsaway.
CAUTION:
BeforereplacinganyCRUs,turnoffthecomputerandwaitthreetoveminutestoletthecomputer
coolbeforeopeningthecover.
Staticelectricityprevention
Staticelectricity,althoughharmlesstoyou,canseriouslydamagecomputercomponentsandoptions.
Improperhandlingofstatic-sensitivepartscancausedamagetothepart.Whenyouunpackanoption
©CopyrightLenovo2012v

orCRU,donotopenthestatic-protectivepackagecontainingthepartuntiltheinstructionsdirectyou
toinstallit.
WhenyouhandleoptionsorCRUs,orperformanyworkinsidethecomputer,takethefollowingprecautions
toavoidstatic-electricitydamage:
•Limityourmovement.Movementcancausestaticelectricitytobuilduparoundyou.
•Alwayshandlecomponentscarefully.Handleadapters,memorymodules,andothercircuitboardsbythe
edges.Nevertouchexposedcircuitry.
•Preventothersfromtouchingcomponents.
•Whenyouinstallastatic-sensitiveoptionorCRU,touchthestatic-protectivepackagecontainingthe
parttoametalexpansion-slotcoverorotherunpaintedmetalsurfaceonthecomputerforatleasttwo
seconds.Thisreducesstaticelectricityinthepackageandyourbody.
•Whenpossible,removethestatic-sensitivepartfromthestatic-protectivepackagingandinstallthepart
withoutsettingitdown.Whenthisisnotpossible,placethestatic-protectivepackagingonasmooth,
levelsurfaceandplacethepartonit.
•Donotplacethepartonthecomputercoverorothermetalsurface.
Powercordsandpoweradapters
Useonlythepowercordsandpoweradapterssuppliedbytheproductmanufacturer.
Thepowercordsshallbesafetyapproved.ForGermany,itshallbeH05VV-F,3G,0.75mm2,orbetter.For
othercountries,thesuitabletypesshallbeusedaccordingly.
Neverwrapapowercordaroundapoweradapterorotherobject.Doingsocanstressthecordinwaysthat
cancausethecordtofray,crack,orcrimp.Thiscanpresentasafetyhazard.
Alwaysroutepowercordssothattheywillnotbewalkedon,trippedover,orpinchedbyobjects.
Protectpowercordandpoweradaptersfromliquids.Forinstance,donotleaveyourpowercordorpower
adapternearsinks,tubs,toilets,oronoorsthatarecleanedwithliquidcleansers.Liquidscancausea
shortcircuit,particularlyifthepowercordorpoweradapterhasbeenstressedbymisuse.Liquidsalsocan
causegradualcorrosionofpowercordterminalsand/ortheconnectorterminalsonapoweradapter,
whichcaneventuallyresultinoverheating.
Alwaysconnectpowercordsandsignalcablesinthecorrectorderandensurethatallpowercord
connectorsaresecurelyandcompletelypluggedintoreceptacles.
Donotuseanypoweradapterthatshowscorrosionattheacinputpinsorshowssignsofoverheating(such
asdeformedplastic)attheacinputoranywhereonthepoweradapter.
Donotuseanypowercordswheretheelectricalcontactsoneitherendshowsignsofcorrosionor
overheatingorwherethepowercordappearstohavebeendamagedinanyway.
Topreventpossibleoverheating,donotcoverthepoweradapterwithclothingorotherobjectswhenthe
poweradapterispluggedintoanelectricaloutlet.
Extensioncordsandrelateddevices
Ensurethatextensioncords,surgeprotectors,uninterruptiblepowersupplies,andpowerstripsthatyouuse
areratedtohandletheelectricalrequirementsoftheproduct.Neveroverloadthesedevices.Ifpowerstrips
viThinkCentreUserGuide
areused,theloadshouldnotexceedthepowerstripinputrating.Consultanelectricianformoreinformation
ifyouhavequestionsaboutpowerloads,powerrequirements,andinputratings.
Plugsandoutlets
Ifareceptacle(poweroutlet)thatyouintendtousewithyourcomputerequipmentappearstobedamaged
orcorroded,donotusetheoutletuntilitisreplacedbyaqualiedelectrician.
Donotbendormodifytheplug.Iftheplugisdamaged,contactthemanufacturertoobtainareplacement.
Donotshareanelectricaloutletwithotherhomeorcommercialappliancesthatdrawlargeamountsof
electricity;otherwise,unstablevoltagemightdamageyourcomputer,data,orattacheddevices.
Someproductsareequippedwithathree-prongedplug.Thisplugtsonlyintoagroundedelectricaloutlet.
Thisisasafetyfeature.Donotdefeatthissafetyfeaturebytryingtoinsertitintoanon-groundedoutlet.If
youcannotinserttheplugintotheoutlet,contactanelectricianforanapprovedoutletadapterortoreplace
theoutletwithonethatenablesthissafetyfeature.Neveroverloadanelectricaloutlet.Theoverallsystem
loadshouldnotexceed80percentofthebranchcircuitrating.Consultanelectricianformoreinformation
ifyouhavequestionsaboutpowerloadsandbranchcircuitratings.
Besurethatthepoweroutletyouareusingisproperlywired,easilyaccessible,andlocatedclosetothe
equipment.Donotfullyextendpowercordsinawaythatwillstressthecords.
Besurethatthepoweroutletprovidesthecorrectvoltageandcurrentfortheproductyouareinstalling.
Carefullyconnectanddisconnecttheequipmentfromtheelectricaloutlet.
Externaldevices
DonotconnectordisconnectanyexternaldevicecablesotherthanUniversalSerialBus(USB)and1394
cableswhilethecomputerpowerison;otherwise,youmightdamageyourcomputer.Toavoidpossible
damagetoattacheddevices,waitatleastvesecondsafterthecomputerisshutdowntodisconnect
externaldevices.
Generalbatterynotice
DANGER
PersonalcomputersmanufacturedbyLenovomightcontainacoincellbatteryandarechargeable
batterypacktothesystem.BatteriessuppliedbyLenovoforusewithyourproducthavebeen
testedforcompatibilityandshouldonlybereplacedwithapprovedparts.
Neverattempttoopenorserviceanybattery.Donotcrush,puncture,orincineratebatteriesor
shortcircuitthemetalcontacts.Donotexposethebatterytowaterorotherliquids.Onlyrecharge
thebatterypackstrictlyaccordingtoinstructionsincludedintheproductdocumentation.
Batteryabuseormishandlingcancausethebatterytooverheat,whichcancausegassesorame
to“vent”fromthebatterypackorcoincell.Ifyourbatteryisdamaged,orifyounoticeany
dischargefromyourbatteryorthebuildupofforeignmaterialsonthebatteryleads,stopusingthe
batteryandobtainareplacementfromthebatterymanufacturer.
Batteriescandegradewhentheyareleftunusedforlongperiodsoftime.Forsomerechargeable
batteries(particularlyLithiumIonbatteries),leavingabatteryunusedinadischargedstatecould
©CopyrightLenovo2012vii

increasetheriskofabatteryshortcircuit,whichcouldshortenthelifeofthebatteryandalsocan
poseasafetyhazard.DonotletrechargeableLithium-Ionbatteriescompletelydischargeorstore
thesebatteriesinadischargedstate.
Rechargeablebatterynotice
DANGER
Donotattempttodisassembleormodifythebatterypack.Attemptingtodosocancausean
explosion,orliquidleakagefromthebatterypack.Abatterypackotherthantheonespeciedby
Lenovo,oradisassembledormodiedbatterypackisnotcoveredbythewarranty.
Iftherechargeablebatterypackisincorrectlyreplaced,thereisdangerofanexplosion.Thebattery
packcontainsasmallamountofharmfulsubstances.Toavoidpossibleinjury:
•ReplaceonlywithabatteryofthetyperecommendedbyLenovo.
•Keepthebatterypackawayfromre.
•Donotexposeittowaterorrain.
•Donotattempttodisassembleit.
•Donotshort-circuitit.
•Keepitawayfromchildren.
•Donotdropthebatterypack.
Donotputthebatterypackintrashthatisdisposedofinlandlls.Whendisposingofthebattery,
complywithlocalordinancesorregulations.
Thebatterypackshouldbestoredatroomtemperature,chargedtoapproximately30to50%
ofcapacity.Werecommendthatbatterypackbechargedaboutonceperyeartoprevent
overdischarge.
Heatandproductventilation
Computers,poweradapters,andmanyaccessoriescangenerateheatwhenturnedonandwhenbatteries
arecharging.Alwaysfollowthesebasicprecautions:
•Donotleaveyourcomputer,poweradapter,oraccessoriesincontactwithyourlaporanypartofyour
bodyforanextendedperiodwhentheproductsarefunctioningorwhenthebatteryischarging.Your
computer,poweradapter,andmanyaccessoriesproducesomeheatduringnormaloperation.Extended
contactwiththebodycouldcausediscomfortor,potentially,askinburn.
•Donotchargethebatteryoroperateyourcomputer,poweradapter,oraccessoriesnearammable
materialsorinexplosiveenvironments.
•Ventilationslots,fans,andheatsinksareprovidedwiththeproductforsafety,comfort,andreliable
operation.Thesefeaturesmightinadvertentlybecomeblockedbyplacingtheproductonabed,sofa,
carpet,orotherexiblesurface.Neverblock,cover,ordisablethesefeatures.
Inspectyourdesktopcomputerfordustaccumulationatleastonceeverythreemonths.Beforeinspecting
yourcomputer,turnoffthepowerandunplugthecomputer'spowercordfromtheelectricaloutlet;then
removeanydustfromventsandperforationsinthebezel.Ifyounoticeexternaldustaccumulation,then
examineandremovedustfromtheinsideofthecomputerincludingheatsinkinletns,powersupplyvents,
andfans.Alwaysturnoffandunplugthecomputerbeforeopeningthecover.Ifpossible,avoidoperating
viiiThinkCentreUserGuide

yourcomputerwithintwofeetofhigh-trafcareas.Ifyoumustoperateyourcomputerinornearahigh-trafc
area,inspectand,ifnecessary,cleanyourcomputermorefrequently.
Foryoursafetyandtomaintainoptimumcomputerperformance,alwaysfollowthesebasicprecautions
withyourdesktopcomputer:
•Keepthecoverclosedwheneverthecomputerispluggedin.
•Regularlyinspecttheoutsideofthecomputerfordustaccumulation.
•Removedustfromventsandanyperforationsinthebezel.Morefrequentcleaningsmightberequiredfor
computersindustyorhigh-trafcareas.
•Donotrestrictorblockanyventilationopenings.
•Donotstoreoroperateyourcomputerinsidefurniture,asthismightincreasetheriskofoverheating.
•Airowtemperaturesintothecomputershouldnotexceed35°C(95°F).
•Donotinstallairltrationdevices.Theymayinterferewithpropercooling.
Operatingenvironment
Theoptimalenvironmentinwhichtouseyourcomputeris10°C-35°C(50°F-95°F)withhumidityranging
between35%and80%.Ifyourcomputerisstoredortransportedintemperatureslessthan10°C(50°F),
allowthecoldcomputertoriseslowlytoanoptimaloperatingtemperatureof10°C-35°C(50°F-95°F)before
use.Thisprocesscouldtaketwohoursinextremeconditions.Failuretoallowyourcomputertorisetoan
optimaloperatingtemperaturebeforeusecouldresultinirreparabledamagetoyourcomputer.
Ifpossible,placeyourcomputerinawell-ventilatedanddryareawithoutdirectexposuretosunshine.
Keepelectricalappliancessuchasanelectricfan,radio,high-poweredspeakers,airconditioner,and
microwaveovenawayfromyourcomputerbecausethestrongmagneticeldsgeneratedbythese
appliancescandamagethemonitoranddataontheharddiskdrive.
Donotplaceanybeveragesontopoforbesidethecomputerorotherattacheddevices.Ifliquidisspilledon
orinthecomputeroranattacheddevice,ashortcircuitorotherdamagemightoccur.
Donoteatorsmokeoveryourkeyboard.Particlesthatfallintoyourkeyboardcancausedamage.
Modemsafetyinformation
CAUTION:
Toreducetheriskofre,useonlyNo.26AWGorlarger(forexample,No.24AWG)telecommunication
linecordlistedbyUnderwritersLaboratories(UL)orcertiedbytheCanadianStandardsAssociation
(CSA).
Toreducetheriskofre,electricalshock,orinjurywhenusingtelephoneequipment,alwaysfollowbasic
safetyprecautions,suchas:
•Neverinstalltelephonewiringduringalightningstorm.
•Neverinstalltelephonejacksinwetlocationsunlessthejackisspecicallydesignedforwetlocations.
•Nevertouchuninsulatedtelephonewiresorterminalsunlessthetelephonelinehasbeendisconnectedat
thenetworkinterface.
•Usecautionwheninstallingormodifyingtelephonelines.
•Avoidusingatelephone(otherthanacordlesstype)duringanelectricalstorm.Theremaybearemote
riskofelectricshockfromlightning.
•Donotusethetelephonetoreportagasleakinthevicinityoftheleak.
©CopyrightLenovo2012ix
Lasercompliancestatement
CAUTION:
Whenlaserproducts(suchasCD-ROMs,DVDdrives,beropticdevices,ortransmitters)are
installed,notethefollowing:
•Donotremovethecovers.Removingthecoversofthelaserproductcouldresultinexposureto
hazardouslaserradiation.Therearenoserviceablepartsinsidethedevice.
•Useofcontrolsoradjustmentsorperformanceofproceduresotherthanthosespeciedherein
mightresultinhazardousradiationexposure.
DANGER
SomelaserproductscontainanembeddedClass3AorClass3Blaserdiode.Notethefollowing.
Laserradiationwhenopen.Donotstareintothebeam,donotviewdirectlywithoptical
instruments,andavoiddirectexposuretothebeam.
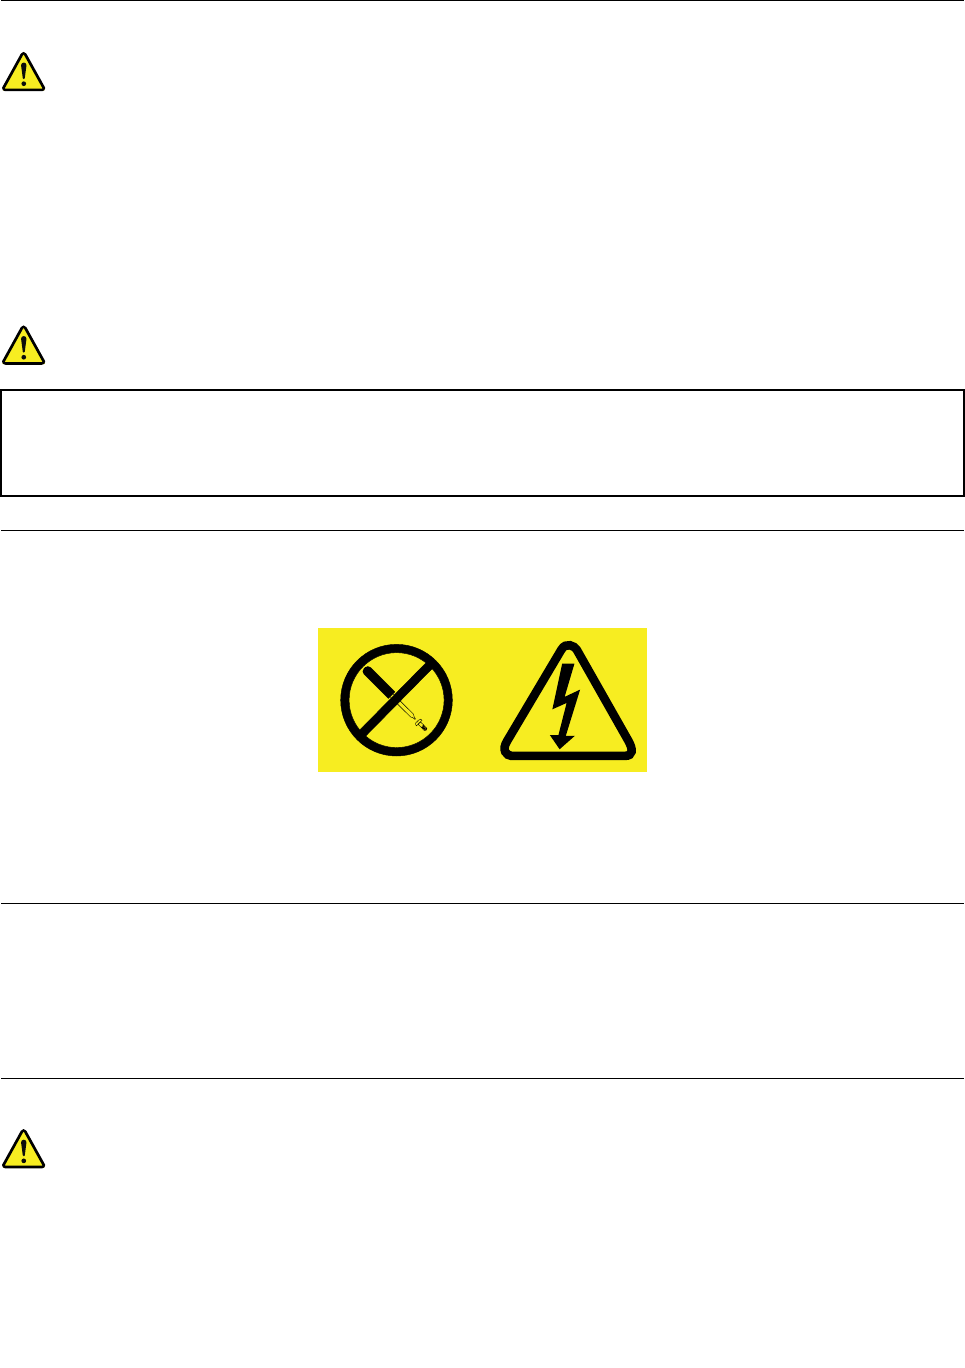
Powersupplystatement
Neverremovethecoveronapowersupplyoranypartthathasthefollowinglabelattached.
Hazardousvoltage,current,andenergylevelsarepresentinsideanycomponentthathasthislabelattached.
Therearenoserviceablepartsinsidethesecomponents.Ifyoususpectaproblemwithoneoftheseparts,
contactaservicetechnician.
Cleaningandmaintenance
Keepyourcomputerandworkspaceclean.Shutdownthecomputerandthendisconnectthepower
cordbeforecleaningthecomputer.Donotsprayanyliquiddetergentdirectlyonthecomputeroruse
anydetergentcontainingammablematerialtocleanthecomputer.Spraythedetergentonasoftcloth
andthenwipethecomputersurfaces.
Additionalimportantinformation
CAUTION:
Donotputanyobjectontopofthecomputerortheopticaldrivebox.
xThinkCentreUserGuide

©CopyrightLenovo2012xi

xiiThinkCentreUserGuide

Chapter1.Productoverview
Thischapterprovidesinformationaboutthecomputerfeatures,specications,softwareprogramsprovided
byLenovo,andlocationsofconnectors,components,partsonthesystemboard,andinternaldrives.
Features
Thissectionintroducesthecomputerfeatures.Theinformationcoversavarietyofmodels.
Toviewtheinformationaboutyourspecicmodel,dooneofthefollowing:
•GointotheSetupUtilityprogrambyfollowingtheinstructionsinChapter7“UsingtheSetupUtility
program”onpage85.Then,selectMain➙SystemSummarytoviewtheinformation.
•OntheMicrosoft®Windows®7operationsystem,clickStart,right-clickComputer,andselectProperties
toviewtheinformation.
•OntheWindows8operatingsystem,moveyourcursortothetop-rightorbottom-rightcornerofthe
screentodisplaythecharms.ThenclickSettings➙PCinfotoviewtheinformation.
Microprocessor
Yourcomputercomeswithoneofthefollowingmicroprocessors(internalcachesizevariesbymodeltype):
•Intel®Core™i3microprocessor
•IntelCorei5microprocessor
•IntelCeleron®microprocessor
•IntelPentium®microprocessor
Memory
Yourcomputersupportsuptotwodoubledatarate3smalloutlinedualinlinememorymodules(DDR3
SODIMMs).
Drives
•Externalopticaldrive:DVD-ROMorDVD-R(optional)
•SerialAdvancedTechnologyAttachment(SATA)harddiskdrive
•Solid-statedrive(optional)
Videosubsystem
•IntegratedgraphicsforaVideoGraphicsArray(VGA)connectorandaDisplayPortconnector
Audiosubsystem
•Integratedhigh-denition(HD)audio
•Microphoneconnectorandheadphoneconnectoronthefrontpanel
•Internalspeaker
Connectivity
•100/1000MbpsintegratedEthernetcontroller
•WiFicardmodule(optional)
©CopyrightLenovo20121

•WiFiwithBluetoothmodule(optional)
Systemmanagementfeatures
•Abilitytostorepower-onself-test(POST)hardwaretestresults
•DesktopManagementInterface(DMI)
DesktopManagementInterfaceprovidesacommonpathforuserstoaccessinformationaboutall
aspectsofacomputer,includingprocessortype,installationdate,attachedprintersandotherperipherals,
powersources,andmaintenancehistory.
•ErPcompliancemode
Theenergy-relatedproductsdirective(ErP)compliancemodereducestheconsumptionofelectricity
whenyourcomputerisinstandbyoroffmode.Formoreinformation,see“EnablingErPcompliance
mode”onpage88.
•IntelStandardManageability
IntelStandardManageabilityishardwareandrmwaretechnologythatbuildscertainfunctionality
intocomputersinordertomakethemeasierandlessexpensiveforbusinessestomonitor,maintain,
update,upgrade,andrepair.
•IntelActiveManagementTechnology(AMT)(availableonsomemodels)
IntelActiveManagementTechnologyishardwareandrmwaretechnologythatbuildscertainfunctionality
intocomputersinordertomakethemeasierandlessexpensiveforbusinessestomonitor,maintain,
update,upgrade,andrepair.
•PrebootExecutionEnvironment(PXE)
ThePrebootExecutionEnvironmentisanenvironmenttostartcomputersusinganetworkinterface
independentofdatastoragedevices(suchastheharddiskdrive)orinstalledoperatingsystems.
•IntelligentCoolingEngine(ICE)
TheIntelligentCoolingEngineisasystemthermalmanagementsolutionthatenablesyourcomputer
torunwithbetterthermalandacousticperformance.TheICEfunctionalsomonitorsthethermal
performanceofyourcomputertoidentifythermalproblems.Formoreinformation,see“ICEperformance
mode”onpage89and“ICEthermalalert”onpage89.
•SystemManagement(SM)BasicInput/OutputSystem(BIOS)andSMsoftware
TheSMBIOSspecicationdenesdatastructuresandaccessmethodsinaBIOSthatallowsauseror
applicationtostoreandretrieveinformationspecicaboutthecomputerinquestion.
•WakeonLAN
WakeonLANisanEthernetcomputernetworkingstandardthatallowsacomputertobeturnedon
orwokenupbyanetworkmessage.Themessageisusuallysentbyaprogramrunningonanother
computeronthesamelocalareanetwork.
•WindowsManagementInstrumentation(WMI)
WindowsManagementInstrumentationisasetofextensionstotheWindowsDriverModel.Itprovidesan
operatingsysteminterfacethroughwhichinstrumentedcomponentsprovideinformationandnotication.
2ThinkCentreUserGuide

Input/Output(I/O)features
•FourUniversalSerialBus(USB)3.0connectors(twoonthefrontpanelandtwoontherearpanel)
•OneDisplayPortconnector
•OneEthernetconnector
•Oneoptionalport(forinstallingaserialport,aDisplayPortconnector,aUSB2.0connector,oranoptional
WiFicardmoduleantenna)
•OneUSB2.0connectorontherearpanel
•OneVGAmonitorconnector
•Twoaudioconnectorsonthefrontpanel(microphoneconnectorandheadphoneconnector)
Formoreinformation,see“Locatingconnectors,controls,andindicatorsonthefrontofyourcomputer”on
page9and“Locatingconnectorsontherearofyourcomputer”onpage10.
Expansion
•Oneharddiskdrivebay
•OneminiPCIExpresscardslot
Poweradapter
Yourcomputercomeswitha65-wattacpoweradapter.
Securityfeatures
•ComputraceAgentsoftwareembeddedinrmware
•Coverpresenceswitch(alsocalledintrusionswitch)
•Abilitytoenableordisableadevice
•AbilitytoenableanddisableUSBconnectorsindividually
•Keyboardwithngerprintreader(shippedwithsomemodels)
•Power-onpassword(POP),administratorpassword,andharddiskdrivepasswordtodeterunauthorized
useofyourcomputer
•Startupsequencecontrol
•Startupwithoutkeyboardormouse
•Supportforanintegratedcablelock(Kensingtonlock)
•TrustedPlatformModule(TPM)
Formoreinformation,seeChapter4“Security”onpage25.
Preinstalledsoftwareprograms
Yourcomputerispreinstalledwithsoftwareprogramstohelpyouworkmoreeasilyandsecurely.Formore
information,see“Lenovoprograms”onpage4.
Preinstalledoperatingsystem
Yourcomputerispreinstalledwithoneofthefollowingoperatingsystems:
•MicrosoftWindows7operatingsystem
•MicrosoftWindows8operatingsystem
Chapter1.Productoverview3

Operatingsystem(s),certiedortestedforcompatibility1(variesbymodeltype)
•Linux®
•MicrosoftWindowsXPProfessionalSP3
Specications
Thissectionliststhephysicalspecicationsforyourcomputer.
Dimensions
Width:179mm(7.05inches)
Height:34.5mm(1.36inches)
Depth:182mm(7.17inches)
Weight
Maximumcongurationasshipped:4.86kg(10.71lb)(withpackage)
Maximumcongurationasshipped:4.14kg(9.13lb)(withoutpackage)
Environment
•Airtemperature:
Operating:10°Cto35°C(50°Fto95°F)
Storage:-40°Cto60°C(-40°Fto140°F)inoriginalshippingpackage
Storage:-10°Cto60°C(14°Fto140°F)withoutpackage
•Humidity:
Operating:20%to80%(non-condensing)
Storage:20%to90%(non-condensing)
•Altitude:
Operating:-50to10000ft(-15.2to3048m)
Storage:-50to35000ft(-15.2to10668m)
Electricalinput
Theacpoweradapterinputvoltage:100to240Vac
Inputfrequencyrange:50to60Hz
Lenovoprograms
YourcomputercomeswithLenovoprogramstohelpyouworkmoreeasilyandsecurely.Dependingon
theWindowsoperatingsystempreinstalled,theprogramsmightvary.
AccessingLenovoprogramsontheWindows7operatingsystem
OntheWindows7operatingsystem,youcanaccessLenovoprogramsfromeithertheLenovo
ThinkVantage®ToolsprogramorfromControlPanel.
1.Theoperatingsystem(s)listedherearebeingcertiedortestedforcompatibilityatthetimethispublicationgoesto
press.AdditionaloperatingsystemsmightbeidentiedbyLenovoascompatiblewithyourcomputerfollowingthe
publicationofthismanual.Thislistissubjecttochange.Todetermineifanoperatingsystemhasbeencertiedor
testedforcompatibility,checktheWebsiteoftheoperatingsystemvendor.
4ThinkCentreUserGuide

AccessingLenovoprogramsfromtheLenovoThinkVantageToolsprogram
ToaccessLenovoprogramsfromtheLenovoThinkVantageToolsprogram,clickStart➙AllPrograms➙
LenovoThinkVantageTools.Thendouble-clickaprogramicontoaccesstheprogram.
Note:IfaprogramiconintheLenovoThinkVantageToolsprogramnavigationwindowisdimmed,it
indicatesthatyouneedtoinstalltheprogrammanually.Toinstalltheprogrammanually,double-clickthe
programicon.Then,followtheinstructionsonthescreen.Whentheinstallationprocesscompletes,the
programiconwillbeactivated.
Table1.ProgramsintheLenovoThinkVantageToolsprogram
ProgramIconname
CommunicationsUtilityWebConferencing
FingerprintSoftwareFingerprintReader
LenovoSolutionCenterSystemHealthandDiagnostics
PasswordManagerPasswordVault
PowerManagerPowerControls
RecoveryMediaFactoryRecoveryDisks
RescueandRecovery®EnhancedBackupandRestore
SimpleTapSimpleTap
SystemUpdateUpdateandDrivers
ViewManagementUtilityScreenLayout
Note:Dependingonyourcomputermodel,someoftheprogramsmightnotbeavailable.
AccessingLenovoprogramsfromControlPanel
ToaccessLenovoprogramsfromControlPanel,clickStart➙ControlPanel.Thendependingonthe
programyouwanttoaccess,clickthecorrespondingsectionandthenclickthecorrespondinggreentext.
Note:IfyoudonotndtheprogramyouneedinControlPanel,opentheLenovoThinkVantageTools
programnavigationwindowanddouble-clickthedimmedicontoinstalltheprogramyouneed.Then,
followtheinstructionsonthescreen.Whentheinstallationprocesscompletes,theprogramiconwillbe
activated,andyoucanndtheprograminControlPanel.
TheprogramsandthecorrespondingsectionsandgreentextsinControlPanelarelistedinthefollowing
table.
Table2.ProgramsinControlPanel
ProgramControlPanelsectionGreentextinControlPanel
CommunicationsUtilityHardwareandSoundLenovo-WebConferencing
FingerprintSoftwareSystemandSecurity
HardwareandSound
Lenovo-FingerprintReader
LenovoSolutionCenterSystemandSecurityLenovo-SystemHealthand
Diagnostics
PasswordManagerSystemandSecurity
UserAccountsandFamilySafety
Lenovo-PasswordVault
PowerManagerHardwareandSound
SystemandSecurity
Lenovo-PowerControls
Chapter1.Productoverview5

Table2.ProgramsinControlPanel(continued)
ProgramControlPanelsectionGreentextinControlPanel
RecoveryMediaSystemandSecurityLenovo-FactoryRecoveryDisks
RescueandRecoverySystemandSecurityLenovo-EnhancedBackupand
Restore
SimpleTapProgramsLenovo-SimpleTap
SystemUpdateSystemandSecurityLenovo-UpdateandDrivers
ViewManagementUtilitySystemandSecurityLenovoViewManagementUtility
Note:Dependingonyourcomputermodel,someoftheprogramsmightnotbeavailable.
AccessingLenovoprogramsontheWindows8operatingsystem
IfyourcomputerispreinstalledwiththeWindows8operatingsystem,youcanaccessLenovoprogramsby
doingeitherofthefollowing:
•ClicktheLenovoQuickLaunchiconfromthetaskbar.Alistofprogramsisdisplayed.Double-clicka
Lenovoprogramtolaunchit.Ifadesiredprogramisnotinthelist,clicktheplusicon+.
•PresstheWindowskeytogototheStartscreen.ClickaLenovoprogramtolaunchit.Ifyoucannotnd
theprogramyouneed,movethepointertothebottom-rightcornerofthescreentodisplaythecharms.
ThenclicktheSearchcharmtosearchforthedesiredprogram.
YourcomputersupportsthefollowingLenovoprograms:
•FingerprintSoftware
•LenovoCompanion
•LenovoSettings
•LenovoSolutionCenter
•LenovoQuickLaunch
•LenovoSupport
•PasswordManager
•SystemUpdate
AnintroductiontoLenovoprograms
ThistopicprovidesabriefintroductiontosomeLenovoprograms.
Note:Dependingonyourcomputermodel,someoftheprogramsmightnotbeavailable.
•CommunicationsUtility
TheCommunicationsUtilityprogramprovidesacentrallocationforintegratedcameraandmicrophone
settings.ItcontrolsadvancedsettingsfortheintegratedmicrophoneandcameratooptimizeWeb
conferencingandVoiceoverIP(VOIP)experience.
•FingerprintSoftware
Theintegratedngerprintreaderprovidedonsomekeyboardsenablesyoutoenrollyourngerprint
andassociateitwithyourpower-onpassword,harddiskpassword,andWindowspassword.Asa
result,ngerprintauthenticationcanreplacepasswordsandenablesimpleandsecureuseraccess.A
ngerprintreaderkeyboardisavailablewithselectcomputersorcanbepurchasedforcomputersthat
supportthisoption.
•LenovoCloudStorage
6ThinkCentreUserGuide

TheLenovoCloudStorageprogramisacloudstoragesolutionthatenablesyoutostoreyourles,such
asdocumentsandpictures,onaserver.YoucanaccessthestoredlesthroughtheInternetfrom
differentdevicessuchaspersonalcomputers,smartphones,ortablets.Formoreinformationaboutthe
LenovoCloudStorageprogram,gotohttp://www.lenovo.com/cloud.
•LenovoCompanion
ThroughtheLenovoCompanionprogram,youcangettheinformationabouttheaccessoriesforyour
computer,viewbolgsandarticlesaboutyourcomputer,andcheckforotherrecommendedprograms.
•LenovoSettings
UsetheLenovoSettingsprogramtoenhanceyourcomputingexperiencebyturningyourcomputerintoa
portablehotspot,conguringcameraandaudiosettings,optimizingyourpowerplansettings,and
creatingandmanagingmultiplenetworkproles.
•LenovoSolutionCenter
TheLenovoSolutionCenterprogramenablesyoutotroubleshootandresolvecomputerproblems.It
combinesdiagnostictests,systeminformationcollection,securitystatus,andsupportinformation,along
withhintsandtipsformaximumsystemperformance.
•LenovoQuickLaunch
TheLenovoQuickLaunchprogramprovidesyouwithquickaccesstoprogramsinstalledonyour
computer,includingLenovoprograms,Microsoftprograms,andotherthirdpartyprograms.
•LenovoSupport
TheLenovoSupportprogramenablesyoutoregisteryourcomputerwithLenovo,checkthecomputer
healthconditionandbatterystatus,downloadandviewusermanualsforyourcomputer,getthewarranty
informationofyourcomputer,andexplorehelpandsupportinformation.
•LenovoThinkVantageTools
TheLenovoThinkVantageToolsprogramguidesyoutoahostofinformationsourcesandprovideseasy
accesstovarioustoolstohelpyouworkmoreeasilyandsecurely.
•LenovoWelcome
TheLenovoWelcomeprogramintroducesyoutosomeinnovativebuilt-infeaturesofLenovoandguides
youthroughafewimportantsetuptaskstohelpyoumakethemostofyourcomputer.
•PasswordManager
ThePasswordManagerprogramautomaticallycapturesandllsinauthenticationinformationfor
WindowsprogramsandWebsites.
•PowerManager
ThePowerManagerprogramprovidesconvenient,exible,andcompletepowermanagementforyour
computer.Itenablesyoutoadjustyourcomputerpowersettingstoachievethebestbalancebetween
performanceandpowersaving.
•RecoveryMedia
TheRecoveryMediaprogramenablesyoutorestorethecontentsoftheharddiskdrivetothefactory
defaultsettings.
•RescueandRecovery
TheRescueandRecoveryprogramisaone-buttonrecoveryandrestoresolutionthatincludesasetof
self-recoverytoolstohelpyoudiagnosecomputerproblems,gethelp,andrecoverfromsystemcrashes,
evenifyoucannotstarttheWindowsoperatingsystem.
•SimpleTap
TheSimpleTapprogramprovidesyouwithaquickwaytocustomizesomebasiccomputersettingssuch
asmutingthespeakers,adjustingthevolume,lockingthecomputeroperatingsystem,launchinga
Chapter1.Productoverview7

program,openingaWebpage,openingale,andsoon.YoualsocanusetheSimpleTapprogramto
accesstheLenovoAppShop,fromwhichyoucandownloadvariousapplicationsandcomputersoftware.
TostarttheSimpleTapprograminaquickway,doanyofthefollowing:
–ClicktheredSimpleTaplaunchpointonthedesktop.Theredlaunchpointisavailableonthedesktop
afteryouhavelaunchedtheSimpleTapprogramforthersttime.
–PresstheblueThinkVantagebuttonifyourkeyboardhasone.
Note:TheSimpleTapprogramisonlyavailableoncertainmodelspreinstalledwiththeWindows7
operatingsystem.IfyourWindows7modelisnotpreinstalledwiththeSimpleTapprogram,youcan
downloaditfromhttp://www.lenovo.com/support.
•SystemUpdate
TheSystemUpdateprogramhelpsyoukeepthesoftwareonyourcomputerup-to-datebydownloading
andinstallingsoftwareupdatepackages(Lenovoprograms,devicedrivers,UEFIBIOSupdates,and
otherthirdpartyprograms).
•ViewManagementUtility
TheViewManagementUtilityprogramenablesyoutoeasilyorganizeyouropenwindows.Itdividesyour
screenintomultiplepartsandthenresizesandpositionsopenwindowsintodifferentpartstomakethe
bestuseofyourdesktop.Theprogramalsoisabletoworkacrossmultiplemonitorstoimproveyour
productivity.
Locations
Thissectionprovidesinformationtohelpyoulocatetheconnectorsonthefrontandrearofyourcomputer,
partsonthesystemboard,andcomponentsandinternaldrivesinyourcomputer.
8ThinkCentreUserGuide
Locatingconnectors,controls,andindicatorsonthefrontofyour
computer
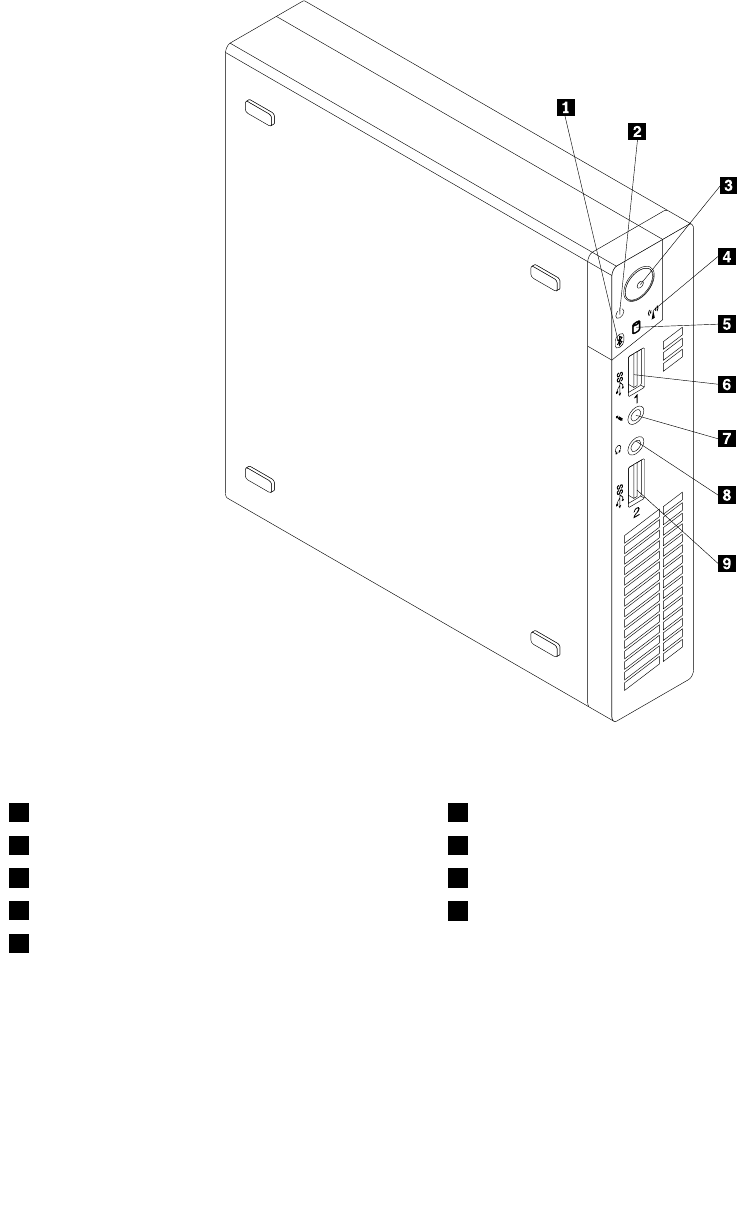
Figure1“Frontconnector,control,andindicatorlocations”onpage9showsthelocationsoftheconnectors,
controls,andindicatorsonthefrontofyourcomputer.
Figure1.Frontconnector,control,andindicatorlocations
1Bluetoothactivityindicator6USB3.0connector(USBport1)
2Powerindicator7Microphoneconnector
3Powerswitch8Headphoneconnector
4Wirelessactivityindicator9USB3.0connector(USBport2)
5Harddiskdriveactivityindicator
Chapter1.Productoverview9
Locatingconnectorsontherearofyourcomputer
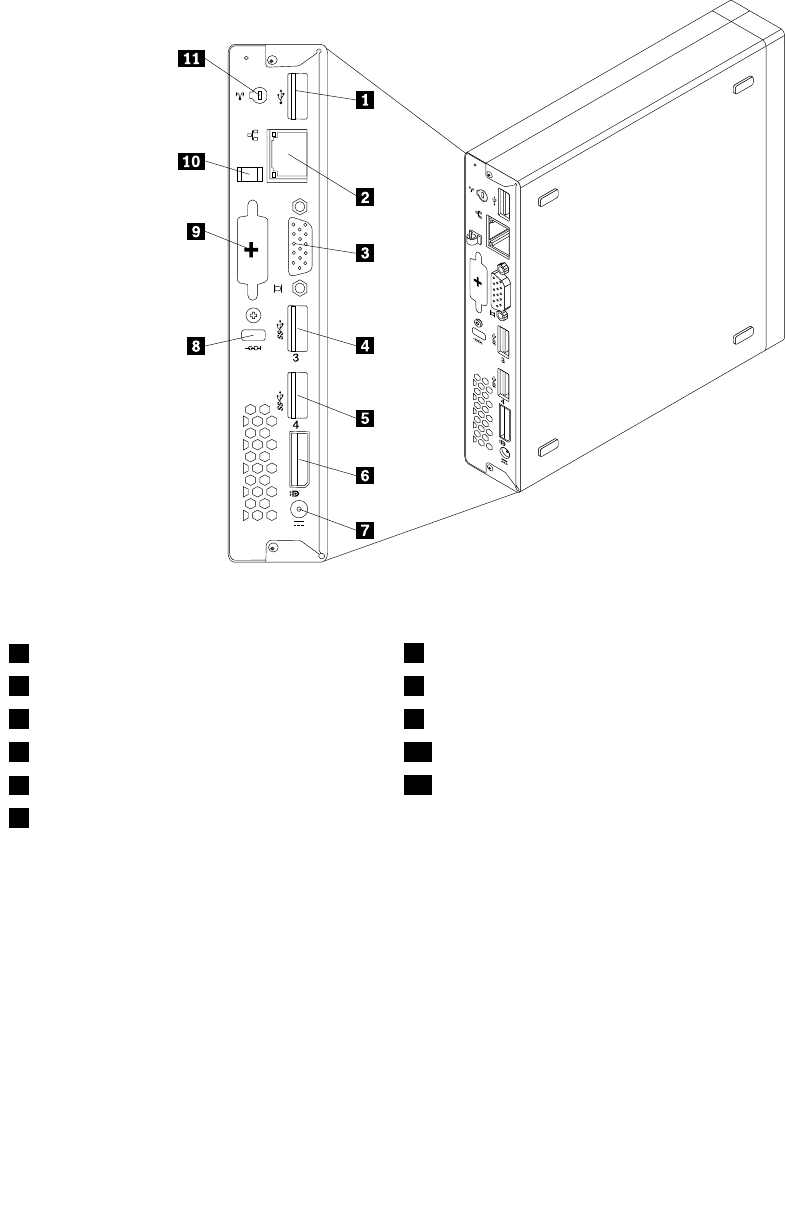
Figure2“Rearconnectorlocations”onpage10showsthelocationsoftheconnectorsontherearofyour
computer.Someconnectorsontherearofyourcomputerarecolor-codedtohelpyoudeterminewhereto
connectthecablesonyourcomputer.
Figure2.Rearconnectorlocations
1USB2.0connector7acpoweradapterconnector
2Ethernetconnector8Integratedcablelockslot
3VGAmonitorconnector9Optionalport
4USB3.0connector(USBport3)10acpoweradaptercableloop
5USB3.0connector(USBport4)11WiFicardmoduleantennaslot
6DisplayPortconnector
ConnectorDescription
DisplayPortconnectorUsedtoattachahigh-performancemonitor,adirect-drivemonitor,orotherdevices
thatuseaDisplayPortconnector.
EthernetconnectorUsedtoattachanEthernetcableforalocalareanetwork(LAN).
Note:TooperatethecomputerwithinFCCClassBlimits,useaCategory5Ethernet
cable.
OptionalportUsedtoinstallaserialport,aDisplayPortconnector,aUSB2.0connector,oran
optionalWiFicardmoduleantenna.
Note:Ifyouusetheoptionalportforinstallingaserialport,theserialportandthe
adjacentVGAmonitorconnectormightinterferewitheachotherwhenconnecting
cables.Toavoidtheinterference,ensurethatyouusetheserialportconvertcable
thatcomeswiththecomputerwhenyouconnectadevicetotheserialport.
10ThinkCentreUserGuide

ConnectorDescription
USB2.0connectorUsethisconnectortoattachadevicethatrequiresaUSB2.0connection,suchasa
keyboard,amouse,ascanner,aprinter,orapersonaldigitalassistant(PDA).
USB3.0connectorUsethisconnectortoattachadevicethatrequiresaUSB2.0or3.0connection,
suchasakeyboard,amouse,ascanner,aprinter,orapersonaldigitalassistant
(PDA).
VGAmonitorconnectorUsedtoattachaVGAmonitororotherdevicesthatuseaVGAmonitorconnector.
Chapter1.Productoverview11
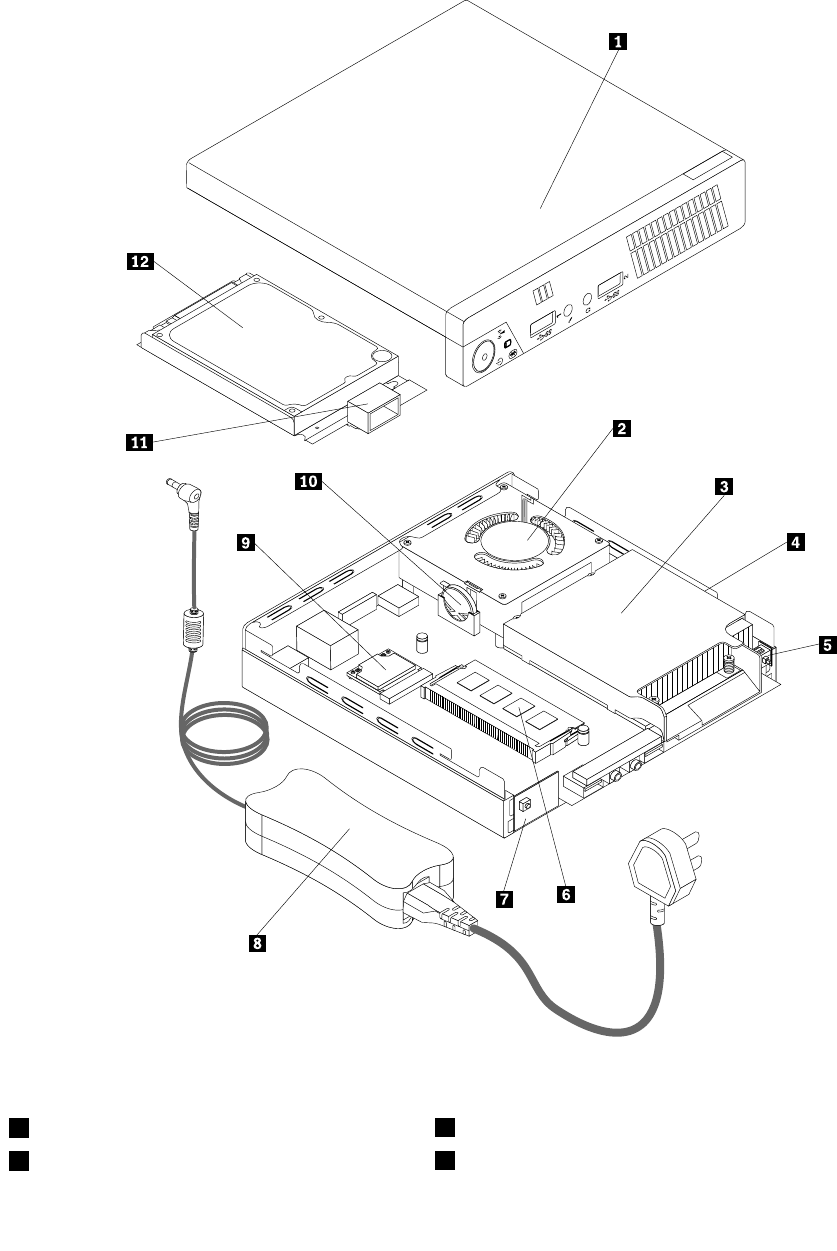
3Heatsink9WiFicardmodule
4Microprocessor10Battery
5Coverpresenceswitch(Intrusionswitch)11Internalspeaker
6Memorymodule(s)12Harddiskdriveorsolid-statedrive
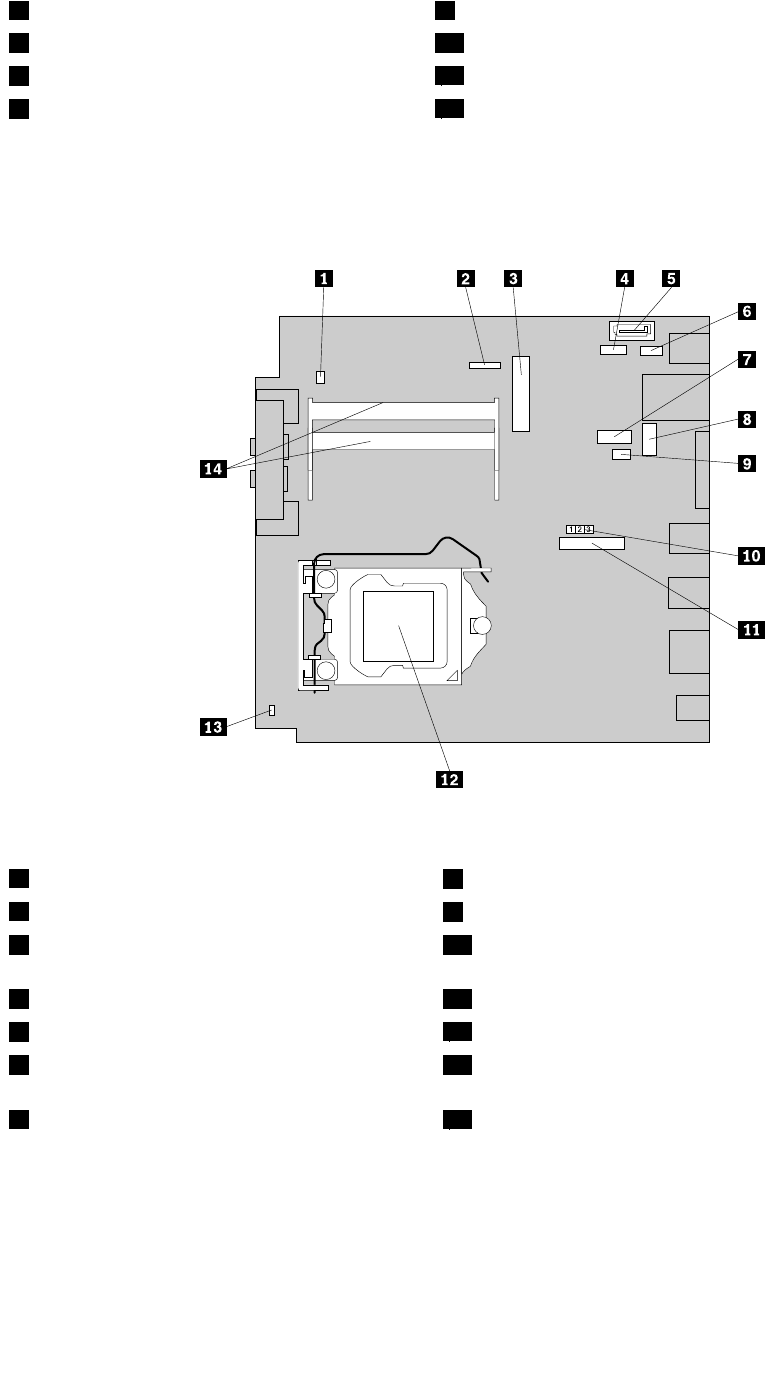
Locatingpartsonthesystemboard
Figure4“Systemboardpartlocations”onpage13showsthelocationsofthepartsonthesystemboard.
Figure4.Systemboardpartlocations
1Internalspeakerconnector8OptionalDisplayPortconnector
2Powerswitchboardcableconnector9Systemfanconnector
3MiniPCIExpresscardslot10ClearCMOS(ComplementaryMetalOxideSemiconductor)
/Recoveryjumper
4Harddiskdrivepowerconnector11Battery
5SATAconnector12Microprocessor
6OptionalUSBconnector13Coverpresenceswitchconnector(Intrusionswitch
connector)
7Serial(COM1)connector14Memoryslots(2)
Chapter1.Productoverview13
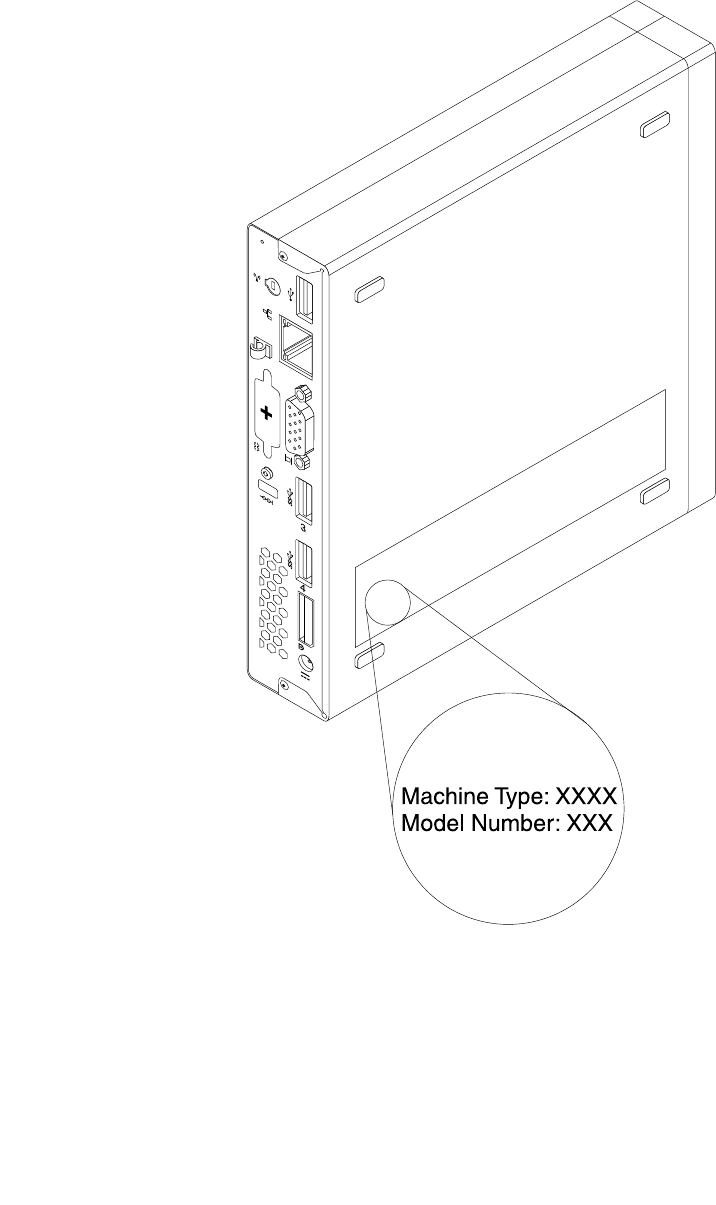
Machinetypeandmodellabel
Themachinetypeandmodellabelidentiesyourcomputer.WhenyoucontactLenovoforhelp,themachine
typeandmodelinformationhelpssupporttechnicianstoidentifyyourcomputerandprovidefasterservice.
Thefollowingisasampleofthemachinetypeandmodellabel.
Figure5.Machinetypeandmodellabel
14ThinkCentreUserGuide

Chapter2.Usingyourcomputer
Thischapterprovidesinformationonusingsomeofthecomputercomponents.
Frequentlyaskedquestions
Thefollowingareafewtipsthatwillhelpyouoptimizetheuseofyourcomputer.
CanIgetmyuserguideinanotherlanguage?
TheuserguideisavailableinvariouslanguagesontheLenovoSupportWebsiteat:
http://www.lenovo.com/ThinkCentreUserGuides
Wherearemyrecoverydiscs?
Lenovoprovidesaprogramthatenablesyoutocreaterecoverydiscs.Fordetailsaboutcreatingrecovery
discs,see“Creatingrecoverymedia”onpage78.
Additionally,incaseofaharddiskfailure,youcanorderProductRecoverydiscsfromtheLenovoCustomer
SupportCenter.ForinformationaboutcontactingtheCustomerSupportCenter,seeChapter11“Getting
information,help,andservice”onpage115.BeforeusingtheProductRecoverydiscs,refertothe
documentationthatcomeswiththediscs.
Attention:AProductRecoverydiscpackagemightcontainmultiplediscs.Makesureyouhaveallofthe
discsreadybeforestartingtherecoveryprocess.Duringtherecoveryprocess,youmightbeprompted
tochangediscs.
WherecanIndhelpabouttheWindowsoperatingsystem?
TheWindowsHelpandSupportinformationsystemprovidesyouwithdetailedinformationaboutusingthe
Windowsoperatingsystemtohelpyougetthemostofyourcomputer.ToaccesstheWindowsHelpand
Supportinformationsystem,dooneofthefollowing:
•OntheWindows7operatingsystem,clickStart➙HelpandSupport.
•OntheWindows8operatingsystem,moveyourcursortothetop-rightorbottom-rightcornerofthe
screentodisplaythecharms.ThenclickSettings➙Help.
AccessingControlPanelontheWindows8operatingsystem
OntheWindowsoperatingsystem,youcanviewandchangecomputersettingsthroughControlPanel.To
accessControlPanelontheWindows8operatingsystem,dooneofthefollowing:
•Fromthedesktop
1.Movethecursortothetop-rightorbottom-rightcornerofthescreentodisplaythecharms.
2.ClickSettings.
3.ClickControlPanel.
•FromtheStartscreen
1.Movethecursortothetop-rightorbottom-rightcornerofthescreentodisplaythecharms.
2.ClickSearch.
3.OntheAppsscreen,scrolltotherightside,andclickControlPanelintheWindowsSystemsection.
©CopyrightLenovo201215

Usingthekeyboard
Dependingonyourmodel,yourcomputercomeswitheitherastandardkeyboardorangerprintreader
keyboard.TheMicrosoftWindowsshortcutkeysareprovidedonbothkeyboardtypes.
Thissectionprovidesinformationaboutthefollowingtopics:
•“UsingWindowsshortcutkeys”onpage16
•“UsingtheblueThinkVantagebutton”onpage16
•“Usingangerprintreader”onpage16
UsingWindowsshortcutkeys
Boththestandardkeyboardandthengerprintreaderkeyboardprovidethreekeysyoucanusewithyour
MicrosoftWindowsoperatingsystem.
•ThetwoWindowslogokeysarelocatedbesidetheAltkeyoneithersideofthespacebar.Theyfeature
theWindowslogo.OntheWindows7operatingsystem,presstheWindowskeytoopentheStartmenu.
OntheWindows8operatingsystem,presstheWindowskeytoswitchbetweenthecurrentworkspace
andtheStartscreen.ThestyleoftheWindowslogovariesdependingonthekeyboardtype.
•Thecontext-menukeyislocatednexttotheCtrlkeyontherightsideoftheSpacebar.Pressingthe
context-menukeyopensthecontextmenufortheactiveprogram,icon,orobject.
Note:YoucanusethemouseortheUpandDownarrowkeystohighlightmenuselections.Youcanclose
theStartmenuorthecontextmenubyclickingthemouseorpressingEsc.
UsingtheblueThinkVantagebutton
SomekeyboardshaveablueThinkVantagebuttonthatyoucanusetoopenacomprehensiveon-boardhelp
andinformationcenterfromLenovo.PressingtheblueThinkVantagebuttonopenstheSimpleTapprogram
ontheWindows7operatingsystemortheLenovoPCDeviceExperienceprogramontheWindows8
operatingsystem.
Usingangerprintreader
Somecomputersmightcomewithakeyboardthathasangerprintreader.Formoreinformationaboutthe
ngerprintreader,see“AnintroductiontoLenovoprograms”onpage6.
ToopentheThinkVantageFingerprintSoftwareprogramandusethengerprintreader,see“Lenovo
programs”onpage4.
Followtheinstructionsonthescreen.Foradditionalinformation,refertotheThinkVantageFingerprint
Softwarehelpsystem.
16ThinkCentreUserGuide
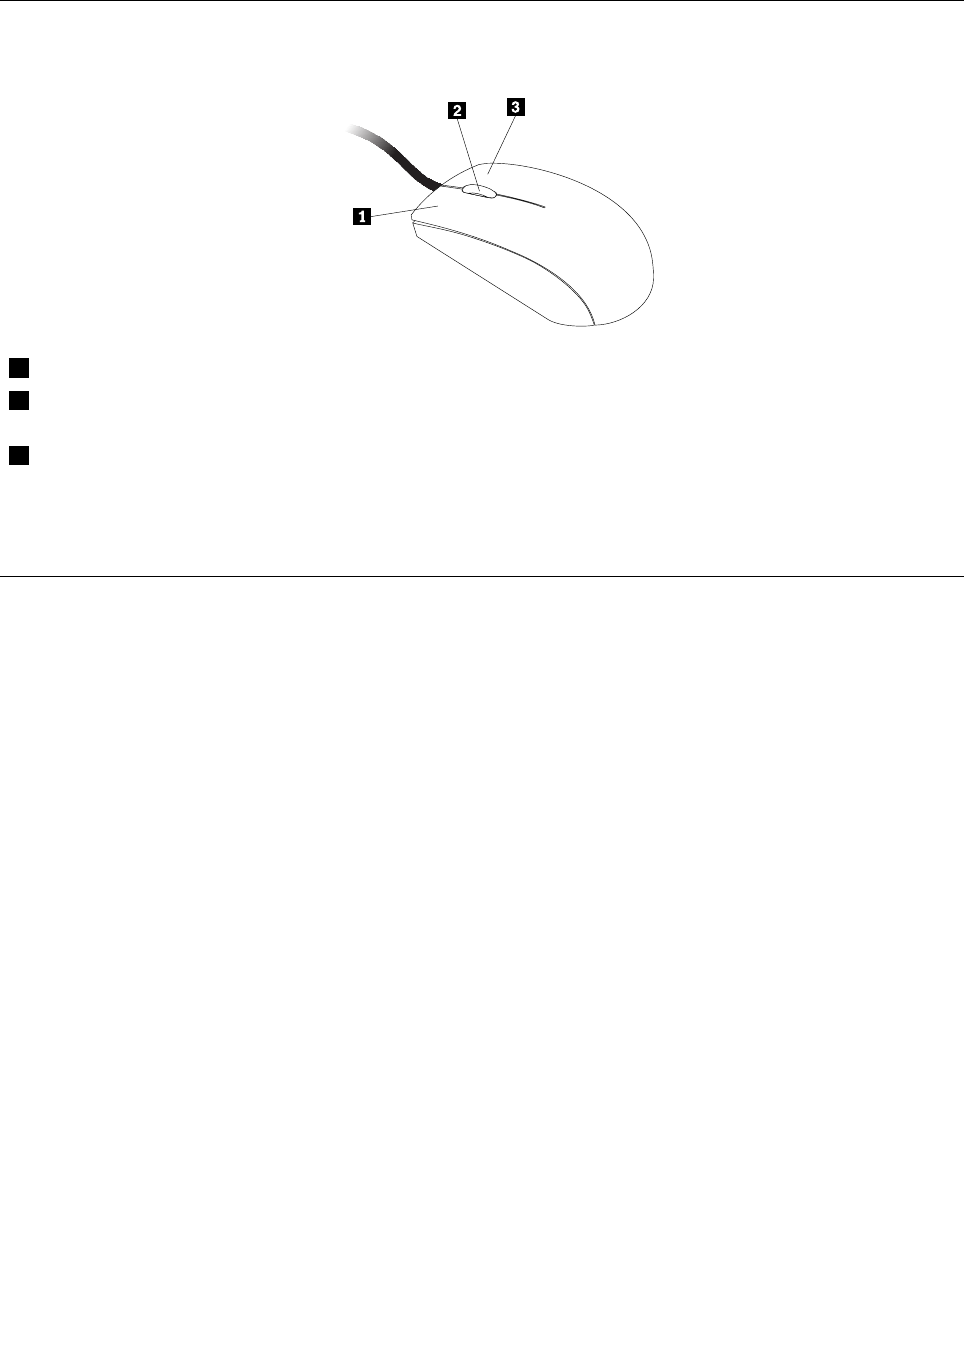
Usingthewheelmouse
Thewheelmousehasthefollowingcontrols:
1PrimarymousebuttonUsethisbuttontoselectorstartaprogramormenuitem.
2WheelUsethewheeltocontrolthescrollingactionofthemouse.Thedirectioninwhichyou
rotatethewheelcontrolsthedirectionofthescrollingaction.
3SecondarymousebuttonUsethisbuttontodisplayamenufortheactiveprogram,icon,orobject.
Youcanswitchthefunctionoftheprimaryandsecondarymousebuttonsandchangeotherdefaultbehavior
throughthemousepropertiesfunctionintheWindowsControlPanel.
Adjustingaudio
Soundisanimportantpartofthecomputerexperience.Yourcomputerhasadigitalaudiocontrollerbuilt
intothesystemboard.Somemodelsalsohaveahigh-performanceaudioadapterinstalledinoneofthePCI
cardslots.
Aboutyourcomputeraudio
Ifafactory-installed,high-performanceaudioadapterisinstalledinyourcomputer,thesystem-board
audioconnectorsontherearofthecomputeraretypicallydisabled;usetheconnectorsprovidedonthe
audioadapter.
Eachaudiosolutionprovidesatleastthreeaudioconnectors:audioline-inconnector,audioline-out
connector,andMicrophoneconnector.Onsomemodels,afourthconnectorisprovidedfortheattachment
ofunpoweredstereospeakers(speakersthatdonotrequireanacpowersource).Theaudioadapter
providesyouwiththeabilitytorecordandplaybacksoundandmusic,aswellastoenjoysoundwith
multimediaapplicationsandworkwithspeech-recognitionsoftware.
Optionally,youcanconnectasetofpoweredstereospeakerstotheaudioline-outconnectortoenjoy
bettersoundwithmultimediaapplications.
Settingthevolumefromthedesktop
Thedesktopvolumecontrolisaccessiblethroughthevolumeiconinthetaskbar,whichislocatedatthe
bottom-rightcorneroftheWindowsdesktop.Clickthevolumeiconandmovethesliderupordownto
controlthevolume,orclicktheMuteicontoturntheaudiooff.Ifthevolumeiconisnotinthetaskbar,see
“Addingthevolumeicontothetaskbar”onpage17.
Addingthevolumeicontothetaskbar
ToaddthevolumeicontothetaskbarontheWindows7operatingsystem,dothefollowing:
Chapter2.Usingyourcomputer17

1.FromtheWindowsdesktop,clickStart➙ControlPanel➙AppearanceandPersonalization.
2.IntheTaskbarandStartMenusection,clickCustomizeiconsonthetaskbar.
3.ClickTurnsystemiconsonoroffandchangethevolumebehaviorsfromOfftoOn.
4.ClickOKtosavethenewsettings.
ToaddthevolumeicontothetaskbarontheWindows8operatingsystem,dothefollowing:
1.OpenControlPanel,andclickAppearanceandPersonalization.
2.IntheTaskbarsection,clickCustomizeiconsonthetaskbar.
3.ClickTurnsystemiconsonoroffandchangethevolumebehaviorsfromOfftoOn.
4.ClickOKtosavethenewsettings.
SettingthevolumefromControlPanel
YoucansetthecomputervolumefromControlPanel.TosetthecomputervolumefromControlPanel,
dothefollowing:
1.OntheWindows7operatingsystem,clickStart➙ControlPanel➙HardwareandSound.Onthe
Windows8operatingsystem,openControlPanel,andclickHardwareandSound.
2.IntheSoundsection,clickAdjustsystemvolume.
3.Movetheslidersupordowntoraiseorlowerthevolumeofyourcomputer.
UsingCDsandDVDs
YourcomputermighthaveaDVDROMdriveorrecordableDVDdriveinstalled.DVDdrivesuse
industry-standard,12cm(4.75-inch)CDmediaorDVDmedia.IfyourcomputercomeswithaDVDdrive,
thedrivecanreadDVD-ROMdiscs,DVD-Rdiscs,DVD-RAMdiscs,DVD-RWdiscs,andalltypesofCDs,
suchasCD-ROMdiscs,CD-RWdiscs,CD-Rdiscs,andaudioCDs.IfyouhavearecordableDVDdrive,
itcanalsorecordonDVD-Rdiscs,DVD-RWdiscs,typeIIDVD-RAMdiscs,CD-RWstandardandhigh
speeddiscs,andCD-Rdiscs.
FollowtheseguidelineswhenusingtheDVDdrive:
•Donotplacethecomputerinalocationwherethedriveisexposedtothefollowing:
–Hightemperature
–Highhumidity
–Excessivedust
–Excessivevibrationorsuddenshock
–Aninclinedsurface
–Directsunlight
•DonotinsertanyobjectotherthanaCDorDVDintothedrive.
•Beforemovingthecomputer,removetheCDorDVDfromthedrive.
HandlingandstoringCDandDVDmedia
CDandDVDmediaaredurableandreliable,buttheydorequiresomecareandspecialhandling.When
handlingandstoringaCDorDVD,followtheseguidelines:
•Holdthediscbyitsedges.Donottouchthesurfaceofthesidethatisnotlabeled.
•Toremovedustorngerprints,wipethediscwithaclean,softclothfromthecentertotheoutside.Wiping
thediscinacirculardirectionmightcauselossofdata.
18ThinkCentreUserGuide

•Donotwriteorstickpaperonthedisc.
•Donotscratchormarkthedisc.
•Donotplaceorstorethediscindirectsunlight.
•Donotusebenzene,thinners,orothercleanerstocleanthedisc.
•Donotdroporbendthedisc.
•Donotinsertdamageddiscsintothedrive.Warped,scratched,ordirtydiscscandamagethedrive.
PlayingaCDorDVD
IfyourcomputercomeswithaDVDdrive,youcanlistentoaudioCDsorwatchDVDmovies.Toplaya
CDorDVD,dothefollowing:
1.PresstheEject/LoadbuttonontheDVDdrivetoopenthetray.
2.Withthetrayfullyextended,inserttheCDorDVDintothetray.SomeDVDdriveshaveasnaphubinthe
centerofthetray.Ifyourdrivehasasnaphub,supportthetraywithonehandandthenpushonthe
centeroftheCDorDVDuntilitsnapsintoplace.
3.PresstheEject/Loadbuttonagainorgentlypushthetrayforwardtoclosethetray.TheCDorDVD
playerprogramstartsautomatically.Foradditionalinformation,refertotheCDorDVDplayerprogram
helpsystem.
ToremoveaCDorDVDfromtheDVDdrive,dothefollowing:
1.Withthecomputeron,presstheEject/Loadbutton.Whenthetrayslidesoutautomatically,carefully
removethedisc.
2.ClosethetraybypressingtheEject/Loadbuttonorbygentlypushingthetrayforward.
Note:IfthetraydoesnotslideoutofthedrivewhenyoupresstheEject/Loadbutton,insertastraightened
paperclipintotheemergency-ejectholelocatedonthefrontoftheDVDdrive.Besurethedriveispowered
offwhenusingtheemergencyeject.UsetheEject/Loadbuttoninsteadoftheemergencyejectexcept
inanemergency.
RecordingaCDorDVD
IfyourcomputercomeswitharecordableDVDdrive,youcanusethedrivetorecordCDsorDVDs.
TorecordaCDorDVD,dooneofthefollowing:
•OntheWindows7operatingsystem,youhaveeithertheCorelDVDMovieFactoryLenovoEditionprogram
orthePower2Goprograminstalledonyourcomputer.
–ToruntheCorelDVDMovieFactoryLenovoEditionprogram,clickStart➙AllPrograms➙Corel
DVDMovieFactoryLenovoEdition➙CorelDVDMovieFactoryLenovoEdition.Followthe
instructionsonthescreen.
–TorunthePower2Goprogram,clickStart➙AllPrograms➙PowerDVDCreate➙Power2Go.
Followtheinstructionsonthescreen.
•OntheWindows8operatingsystem,runthePower2Goprogrambydoingthefollowing:
1.Movethecursortothetop-rightorbottom-rightcornerofthescreentodisplaythecharms.Then
clickSearchandtypePower2Go.
2.ClickPower2Gointheleftpaneltoopentheprogram.
3.Followtheinstructionsonthescreen.
YoucanalsouseWindowsMedia®PlayertorecordCDsanddataDVDs.Formoreinformation,see“Help
andSupport”onpage115.
Chapter2.Usingyourcomputer19

20ThinkCentreUserGuide

Chapter3.Youandyourcomputer
Thischapterprovidesinformationaboutaccessibility,comfort,andrelocatingyourcomputertoother
countriesorregions.
Accessibilityandcomfort
Goodergonomicpracticeisimportanttogetthemostfromyourpersonalcomputerandtoavoiddiscomfort.
Arrangeyourworkplaceandtheequipmentyouusetosuityourindividualneedsandthekindofwork
thatyouperform.Inaddition,usehealthyworkhabitstomaximizeyourperformanceandcomfortwhile
usingyourcomputer.
Thefollowingtopicsprovideinformationaboutarrangingyourworkarea,settingupyourcomputer
equipment,andestablishinghealthyworkhabits.
Lenovoiscommittedtoprovidingpeoplewithdisabilitiesgreateraccesstoinformationandtechnology.
Asaresult,thefollowinginformationprovideswaystohelpusersthathavehearing,vision,andmobility
limitationsgetthemostoutoftheircomputerexperience.
Assistivetechnologiesenableuserstoaccessinformationinthemostappropriateway.Someofthese
technologiesarealreadyprovidedinyouroperatingsystem,otherscanbepurchasedthroughvendors,or
accessedthroughtheWorldWideWeb:
http://www.lenovo.com/healthycomputing
Arrangingyourworkspace
Togetthemostfromyourcomputer,arrangeboththeequipmentyouuseandyourworkareatosuityour
needsandthekindofworkyoudo.Yourcomfortisofforemostimportance,butlightsources,aircirculation,
andthelocationofelectricaloutletscanalsoaffectthewayyouarrangeyourworkspace.
Comfort
Althoughnosingleworkingpositionisidealforeveryone,hereareafewguidelinestohelpyounda
positionthatsuitsyoubest.
Sittinginthesamepositionforalongtimecancausefatigue.Thebackrestandseatofyourchairshould
adjustindependentlyandprovidegoodsupport.Theseatshouldhaveacurvedfronttorelievepressureon
thethighs.Adjusttheseatsothatyourthighsareparalleltotheoorandyourfeetareeitheratonthe
oororonafootrest.
Whenusingthekeyboard,keepyourforearmsparalleltotheoorandyourwristsinacomfortableposition.
Usealighttouchonthekeyboardandyourhandsandngersrelaxed.Changetheangleofthekeyboard
formaximumcomfortbyadjustingthepositionofthekeyboardfeet.
©CopyrightLenovo201221

Adjustthemonitorsothetopofthescreenisat,orslightlybelow,eyelevel.Placethemonitorata
comfortableviewingdistance,usually51to61cm(20to24inches),andpositionitsoyoucanviewit
withouthavingtotwistyourbody.Also,positionotherequipmentyouuseregularly,suchasthetelephoneor
amouse,withineasyreach.
Glareandlighting
Positionthemonitortominimizeglareandreectionsfromoverheadlights,windows,andotherlightsources.
Reectedlightfromshinysurfacescancauseannoyingreectionsonyourmonitorscreen.Placethe
monitoratrightanglestowindowsandotherlightsources,whenpossible.Reduceoverheadlighting,if
necessary,byturningofflightsorusinglowerwattagebulbs.Ifyouinstallthemonitornearawindow,use
curtainsorblindstoblockthesunlight.Youcanadjustthebrightnessandcontrastcontrolsonthemonitor
astheroomlightingchangesthroughouttheday.
Whereitisimpossibletoavoidreectionsortoadjustthelighting,anantiglarelterplacedoverthescreen
mightbehelpful.However,theseltersmightaffecttheclarityoftheimageonthescreen;trythemonlyafter
youhaveexhaustedothermethodsofreducingglare.
Dustbuildupcompoundsproblemsassociatedwithglare.Remembertocleanyourmonitorscreen
periodicallyusingasoftclothasdirectedinyourmonitordocumentation.
Aircirculation
Yourcomputerandmonitorproduceheat.Thecomputerhasafanthatpullsinfreshairandforcesouthot
air.Themonitorletshotairescapethroughvents.Blockingtheairventscancauseoverheating,whichmight
resultinamalfunctionordamage.Placethecomputerandmonitorsothatnothingblockstheairvents;
usually,51mm(2inches)ofairspaceissufcient.Also,makesuretheventedairisnotblowingonpeople.
Electricaloutletsandcablelengths
Thelocationofelectricaloutlets,thelengthofpowercordsandcablesthatconnecttothemonitor,printer,
andotherdevicesmightdeterminethenalplacementofyourcomputer.
Whenarrangingyourworkspace:
•Avoidtheuseofextensioncords.Whenpossible,plugthecomputerpowercorddirectlyintoanelectrical
outlet.
•Keeppowercordsandcablesneatlyroutedawayfromwalkwaysandotherareaswheretheymight
getkickedaccidentally.
Formoreinformationaboutpowercords,see“Powercordsandpoweradapters”onpagevi.
22ThinkCentreUserGuide

RegisteryourcomputerwithLenovo
Whenyouregisteryourcomputer,informationisenteredintoadatabase,whichenablesLenovotocontact
youincaseofarecallorothersevereproblem.AfteryouregisteryourcomputerwithLenovo,youwillreceive
quickerservicewhenyoucallLenovoforhelp.Inaddition,somelocationsofferextendedprivilegesand
servicestoregisteredusers.
ToregisteryourcomputerwithLenovo,dooneofthefollowing:
•Gotohttp://www.lenovo.com/registerandfollowtheinstructionsonthescreentoregisteryourcomputer.
•ConnectyourcomputertotheInternetandregisteryourcomputerthroughapreinstalledregistration
program:
–ForWindows7:ThepreinstalledLenovoProductRegistrationprogramlaunchesautomaticallyafteryou
haveusedyourcomputerforatime.Followtheinstructionsonthescreentoregisteryourcomputer.
–ForWindows8:OpentheLenovoSupportprogram.ThenclickRegistrationandfollowtheinstructions
onthescreentoregisteryourcomputer.
Movingyourcomputertoanothercountryorregion
Whenyoumoveyourcomputertoanothercountryorregion,youmusttakelocalelectricalstandardsinto
consideration.Thissectionprovidesinformationonthefollowing:
•“Voltage-selectionswitch”onpage23
•“Replacementpowercords”onpage24
Voltage-selectionswitch
Somecomputersareequippedwithavoltage-selectionswitchlocatednearthepower-cordconnection
pointonthecomputerandsomecomputersdonothaveavoltage-selectionswitch.Beforeyouinstall
yourcomputerorrelocateyourcomputertoanothercountryorregion,youmustbecertainthatyouhave
matchedyourcomputertothevoltageavailableatyourelectricaloutlet.
CAUTION:
Youmustknowthevoltageoftheelectricalconnection(outlet)whereyourcomputerwillbe
connected.Ifyoudonotknowthevoltage,contactyourlocalelectriccompanyorrefertoofcial
Websitesorotherliteraturefortravelerstothecountryorregionwhereyouarelocated.
Ifyourcomputerhasavoltage-selectionswitch,youmustsettheswitchtomatchthevoltageavailableat
yourelectricaloutlet.Settingthevoltage-selectionswitchincorrectlywillcausethecomputertomalfunction
andmightcausepermanentdamagetothecomputer.Donotconnectthecomputertoanelectrical
outletuntilyouhaveveriedthatthevoltage-selectionswitchsettingmatchesthevoltageavailableatthe
electricaloutlets.
Ifyourcomputerdoesnothaveavoltage-selectionswitch,inspectthevoltage-ratinglabelonthebottomof
thecomputerandnotethefollowing:
•Ifthevoltage-ratinglabelshowsarangeofeither“100-127V”or“200-240V,”youmustensurethatthe
voltageprovidedattheelectricaloutletmatchesthevoltageratingonthecomputerlabel.Ifitdoes
notmatch,donotattempttoconnectthecomputertotheelectricaloutlet,unlessanexternaldevice
suchasavoltage-convertingtransformerisused.
•Ifthevoltage-ratinglabelshowsadualrangeof“100-127V”and“200-240V,”thissigniesthatthe
computerissuitableforworldwideoperationandthecomputerwillautomaticallyadjusttothevoltageat
theelectricaloutletregardlessofthecountryorregionwherethecomputerisbeingconnected.
Chapter3.Youandyourcomputer23

Replacementpowercords
Ifyourelocateyourcomputertoacountryorregionthatusesanelectricaloutletstyledifferentfromthe
typeyouarecurrentlyusing,youwillhavetopurchaseeitherelectricalplugadaptersornewpowercords.
YoucanorderpowercordsdirectlyfromLenovo.
Forpowercordinformationandpartnumbers,goto:
http://www.lenovo.com/powercordnotice
24ThinkCentreUserGuide

Chapter4.Security
Thischapterprovidesinformationabouthowtoprotectyourcomputerfromtheftandunauthorizeduse.
Securityfeatures
Thefollowingsecurityfeaturesareavailableonyourcomputer:
•ComputraceAgentsoftwareembeddedinrmware
TheComputraceAgentsoftwareisanITassetmanagementandcomputertheftrecoverysolution.
Thesoftwaredetectsifchangeshavebeenmadeonthecomputer,suchashardware,software,or
thecomputercall-inlocation.
Note:YoumighthavetopurchaseasubscriptiontoactivatetheComputraceAgentsoftware.
•Coverpresenceswitch(alsocalledintrusionswitch)
Thecoverpresenceswitchpreventsyourcomputerfromloggingintotheoperatingsystemwhenthe
computercoverisnotproperlyinstalledorclosed.Toenablethecoverpresenceswitchconnector
onthesystemboard,tothefollowing:
1.StarttheSetupUtilityprogram.See“StartingtheSetupUtilityprogram”onpage85.
2.SettheAdministratorPassword.See“Setting,changing,anddeletingapassword”onpage86.
3.FromtheSecuritysubmenu,selectChassisIntrusionDetection➙Enabled.Thecoverpresence
switchconnectoronthesystemboardisenabled.
Whenthecoverpresenceswitchdetectsthatyourcomputercoverisnotproperlyinstalledorclosed
whenyouturnonthecomputer,anerrormessagewillbedisplayed.Tobypasstheerrormessageand
logintotheoperatingsystem,dothefollowing:
1.Properlyinstallorcloseyourcomputercover.See“Completingthepartsreplacement”onpage74.
2.PressF1toentertheSetupUtilityprogram.ThenpressF10tosaveandexittheSetupUtility
program.Theerrormessagewillnotbedisplayedagain.
•AbilitytoenableanddisabledevicesandUSBconnectors
Formoreinformation,see“Enablingordisablingadevice”onpage87.
•Integratedngerprintreader(availableonsomemodels)
Dependingonthemodelsofyourcomputer,thekeyboardmayhaveanintegratedngerprintreader.
ByenrollingyourngerprintandassociatingitwithaPower-onPassword,aHardDiskPassword,or
bothpasswordsbeforehand,youcanstartthecomputer,logontothesystem,andentertheSetup
Utilityprogrambyswipingyourngeroverthereader,withouttypingapassword.Thusngerprint
authenticationcanreplacepasswordsandenablesimpleandsecureuseraccess.
•Startupsequencecontrol
Formoreinformation,see“Selectingorchangingthestartupdevicesequence”onpage88.
•Startupwithoutkeyboardormouse
Yourcomputerisabletologintotheoperatingsystemwithoutkeyboardormouseconnected.
•TrustedPlatformModule(TPM)
TrustedPlatformModuleisasecurecryptoprocessorthatcanstorecryptographickeysthatprotect
informationstoredinyourcomputer.
©CopyrightLenovo201225
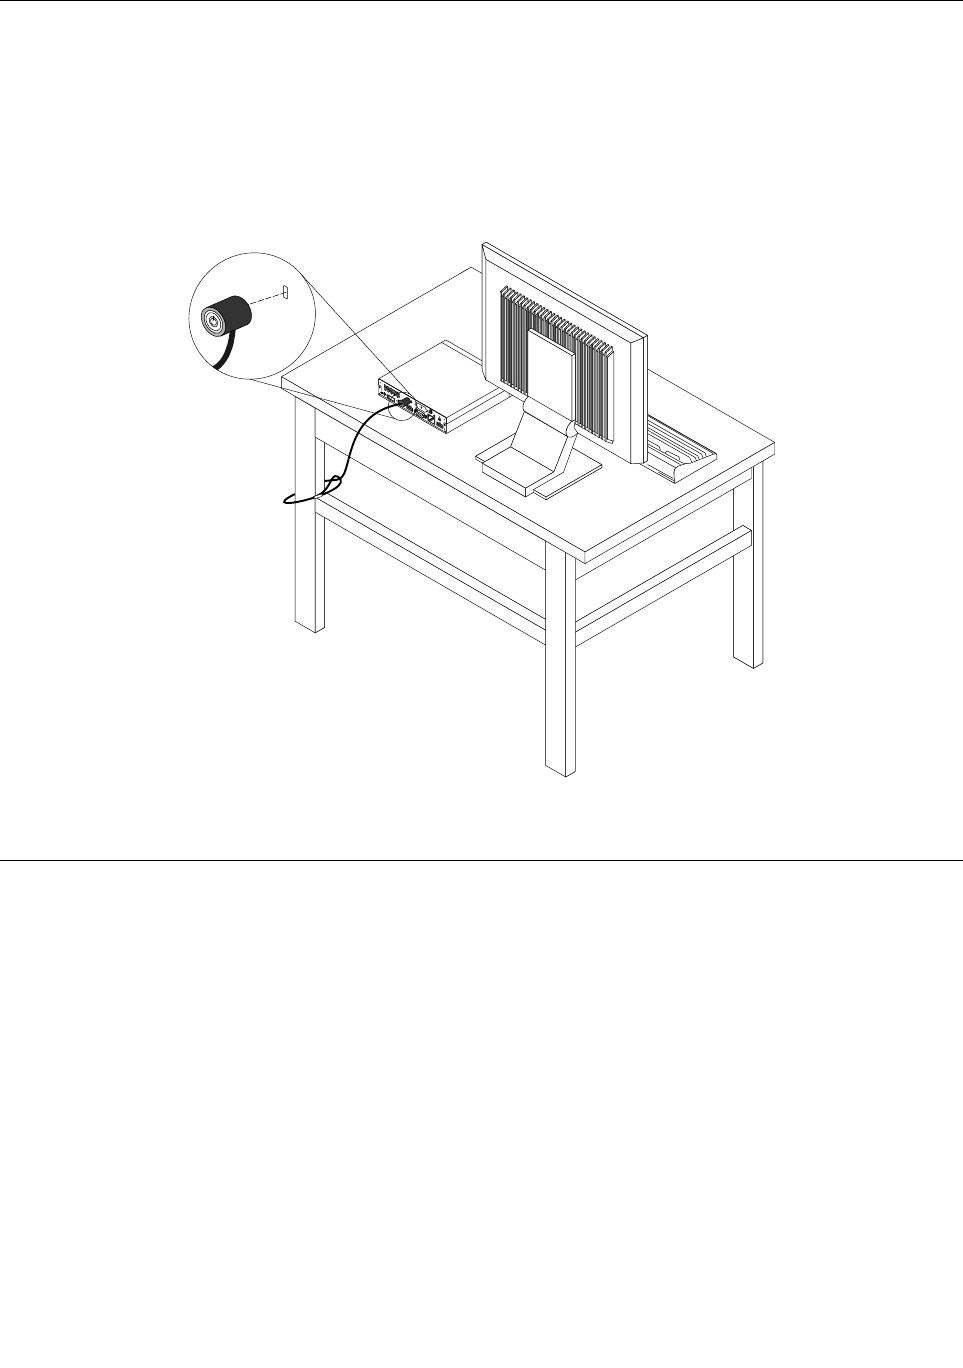
Attachinganintegratedcablelock
Anintegratedcablelock,sometimesreferredtoastheKensingtonlock,canbeusedtosecureyour
computertoadesk,table,orothernon-permanentxture.Thecablelockattachestotheintegratedcable
lockslotattherearofyourcomputerandisoperatedwithakey.Thecablelockalsolocksthebuttonsused
toopenthecomputercover.Thisisthesametypeoflockusedwithmanynotebookcomputers.Youcan
orderanintegratedcablelockdirectlyfromLenovobysearchingforKensingtonat:
http://www.lenovo.com/support
Figure6.Integratedcablelock
Usingpasswords
YoucansetavarietyofpasswordsthroughtheMicrosoftWindowsoperatingsystemandthroughtheBIOS
ofyourcomputertohelpdeterunauthorizeduseofyourcomputer.
BIOSpasswords
YoucanusetheBIOSSetupUtilityprogramtosetpasswordstopreventunauthorizedaccesstoyour
computeranddata.Thefollowingtypesofpasswordsareavailable:
•Power-OnPassword:WhenaPower-OnPasswordisset,youarepromptedtotypeavalidpassword
eachtimethecomputeristurnedon.Thecomputercannotbeuseduntilthevalidpasswordistyped
in.Formoreinformation,see“Power-OnPassword”onpage86.
•HardDiskPassword:SettingaHardDiskPasswordpreventsunauthorizedaccesstothedataonthehard
diskdrive.WhenaHardDiskPasswordisset,youarepromptedtotypeavalidpasswordeachtimeyou
trytoaccesstheharddiskdrive.Formoreinformation,see“HardDiskPassword”onpage86.
•AdministratorPassword:SettinganAdministratorPassworddetersunauthorizedusersfromchanging
congurationsettings.Ifyouareresponsibleformaintainingthecongurationsettingsofseveral
26ThinkCentreUserGuide

computers,youmightwanttosetanAdministratorPassword.Formoreinformation,see“Administrator
Password”onpage86.
Youdonothavetosetanypasswordstouseyourcomputer.However,usingpasswordsimproves
computingsecurity.
Windowspasswords
DependingonyourversionoftheWindowsoperatingsystem,youcanusepasswordsforavarietyof
features,includingcontrollingloginaccess,accesstosharedresources,networkaccess,andindividualuser
settings.Formoreinformation,see“HelpandSupport”onpage115.
Conguringthengerprintreader
Ifyourkeyboardhasangerprintreader,youcancongurethengerprintreaderintheSetupUtilityprogram.
TheFingerprintSetupsubmenuundertheSecuritymenuoftheSetupUtilityprogramprovidesthe
followingoptions:
•PrebootAuthentication:enablesordisablesthengerprintauthenticationforaccessingtheBIOS.
•EraseFingerprintData:clearsthengerprintdatastoredinangerprintreader.
Tocongurethengerprintreader,dothefollowing:
1.StarttheSetupUtilityprogram.See“StartingtheSetupUtilityprogram”onpage85.
2.FromtheSetupUtilityprogrammainmenu,selectSecurity➙FingerprintSetup,andpressEnter.
TheFingerprintSetupwindowopens.
3.SelectPrebootAuthenticationorEraseFingerprintDataasdesired,andpressEnter.
4.SelectthedesiredsettingsandpressEnter.
5.PressF10tosavechangesandexittheSetupUtilityprogram.PressEnterwhenpromptedtoconrm
theexit.
Usingandunderstandingrewalls
Arewallcanbehardware,software,oracombinationofbothdependingonthelevelofsecurityrequired.
Firewallsworkonasetofrulestodeterminewhichinboundandoutboundconnectionsareauthorized.If
yourcomputerispreintalledwitharewallprogram,ithelpsprotectagainstcomputerInternetsecurity
threats,unauthorizedaccess,intrusions,andInternetattacks.Italsoprotectsyourprivacy.Formore
informationabouthowtousetherewallprogram,refertothehelpsystemofyourrewallprogram.
TheWindowsoperatingsystempreinstalledonyourcomputerprovidestheWindowsFirewall.Fordetailson
usingtheWindowsFirewall,referto“HelpandSupport”onpage115.
Protectingdataagainstviruses
Yourcomputerispreinstalledwithanantivirusprogramtohelpyouguardagainst,detect,andeliminate
viruses.
Lenovoprovidesafullversionofantivirussoftwareonyourcomputerwithafree30-daysubscription.After
30days,youmustrenewthelicensetocontinuereceivingtheantivirussoftwareupdates.
Note:Virusdenitionlesmustbekeptup-to-datetoguardagainstnewviruses.
Chapter4.Security27

Formoreinformationabouthowtouseyourantivirussoftware,refertothehelpsystemofyourantivirus
software.
28ThinkCentreUserGuide

Chapter5.Installingorreplacinghardware
Thischapterprovidesinstructionsonhowtoinstallorreplacehardwareforyourcomputer.
Handlingstatic-sensitivedevices
Donotopenthestatic-protectivepackagecontainingthenewpartuntilthedefectiveparthasbeenremoved
fromthecomputerandyouarereadytoinstallthenewpart.Staticelectricity,althoughharmlesstoyou,can
seriouslydamagecomputercomponentsandparts.
Whenyouhandlepartsandothercomputercomponents,taketheseprecautionstoavoidstatic-electricity
damage:
•Limityourmovement.Movementcancausestaticelectricitytobuilduparoundyou.
•Alwayshandlepartsandothercomputercomponentscarefully.HandlePCIcards,memorymodules,
systemboards,andmicroprocessorsbytheedges.Nevertouchanyexposedcircuitry.
•Preventothersfromtouchingthepartsandothercomputercomponents.
•Beforeyoureplaceanewpart,touchthestatic-protectivepackagecontainingtheparttoametal
expansion-slotcoverorotherunpaintedmetalsurfaceonthecomputerforatleasttwoseconds.This
reducesstaticelectricityfromthepackageandyourbody.
•Whenpossible,removethenewpartfromthestatic-protectivepackaging,andinstallitdirectlyinthe
computerwithoutsettingthepartdown.Whenthisisnotpossible,placethestatic-protectivepackage
thatthepartcameinonasmooth,levelsurfaceandplacethepartonit.
•Donotplacethepartonthecomputercoverorothermetalsurface.
Installingorreplacinghardware
Thissectionprovidesinstructionsonhowtoinstallorreplacehardwareforyourcomputer.Youcanexpand
thecapabilitiesofyourcomputerandmaintainyourcomputerbyinstallingorreplacinghardware.
Attention:
Donotopenyourcomputerorattemptanyrepairbeforereadingandunderstandingthe“Importantsafetyinformation”
onpagev.
Notes:
1.UseonlycomputerpartsprovidedbyLenovo.
2.Wheninstallingorreplacinganoption,usetheappropriateinstructionsinthissectionalongwiththe
instructionsthatcomewiththeoption.
Installingexternaloptions
Youcanconnectexternaloptionstoyourcomputer,suchasexternalspeakers,aprinter,orascanner.For
someexternaloptions,youmustinstalladditionalsoftwareinadditiontomakingthephysicalconnection.
Wheninstallinganexternaloption,see“Locatingconnectors,controls,andindicatorsonthefrontofyour
computer”onpage9and“Locatingconnectorsontherearofyourcomputer”onpage10toidentifythe
requiredconnector.Then,usetheinstructionsthatcomewiththeoptiontohelpyoumaketheconnection
andinstallanysoftwareordevicedriversthatarerequiredfortheoption.
©CopyrightLenovo201229
Installingorremovingtheverticalstand
Attention:
Donotopenyourcomputerorattemptanyrepairbeforereadingandunderstandingthe“Importantsafetyinformation”
onpagev.
Thissectionprovidesinstructionsonhowtoinstallorremovetheverticalstand.
Note:TheverticalstandandVideoElectronicsStandardsAssociation(VESA)mountbracketareoptional
parts.IfyourcomputercomeswiththeVESAmountbracketinstalled,ensurethatyouremovetheVESA
mountbracketbeforeyouinstalltheverticalstand.ToremovetheVESAmountbracket,see“Installingor
removingtheVESAmountbracket”onpage31.
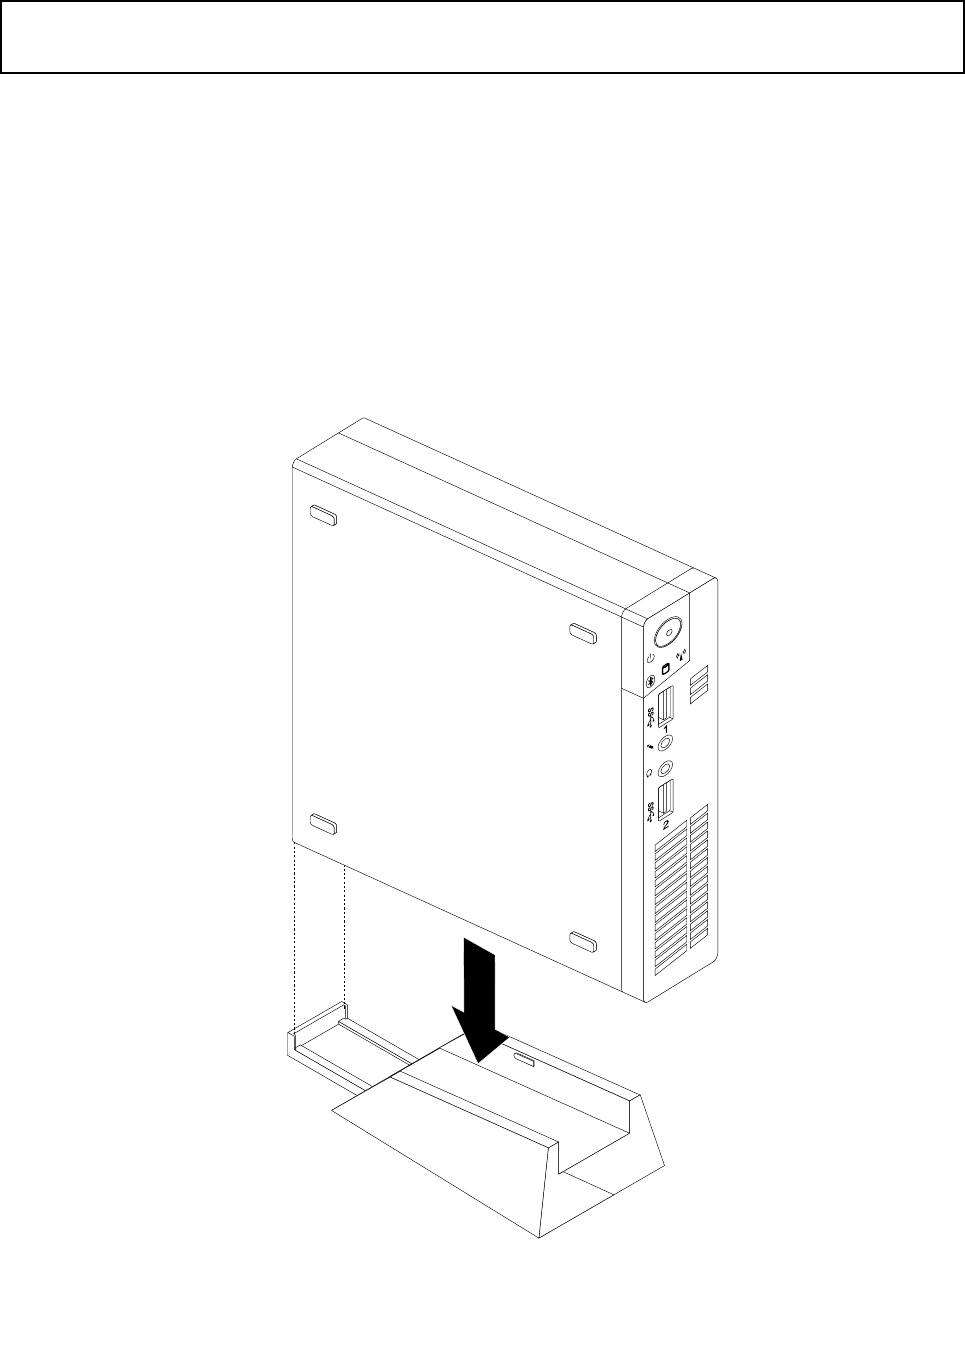
Toinstallorremovetheverticalstand,dothefollowing:
1.Turnoffthecomputer.
2.Aligntherearofthecomputerwiththerearoftheverticalstandandpositionthecomputeronthe
verticalstandasshown.
Figure7.Installingtheverticalstand
30ThinkCentreUserGuide
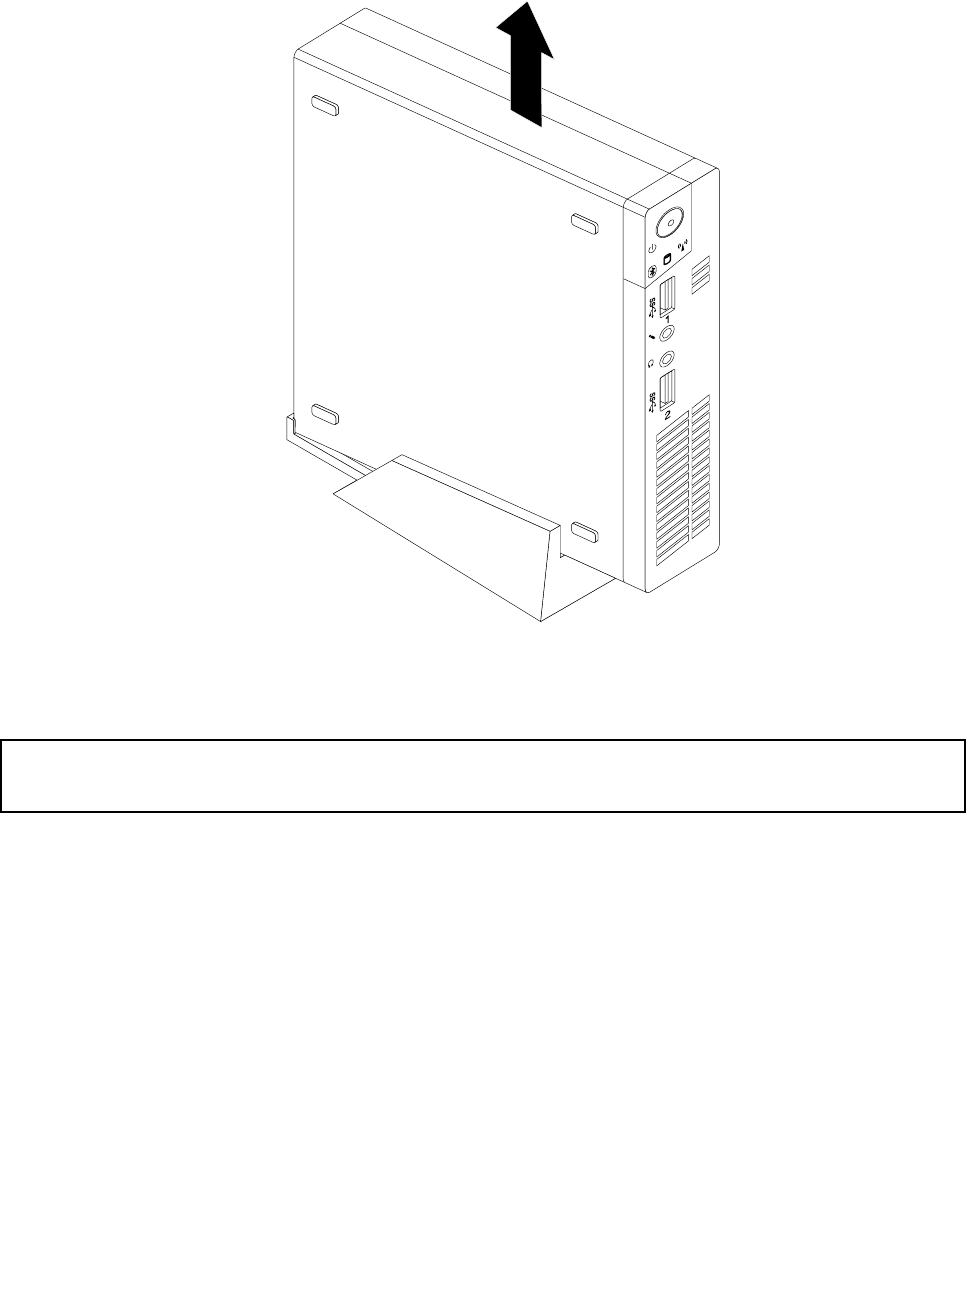
3.Toremovetheverticalstand,liftthecomputertoremoveitfromtheverticalstand.
Figure8.Removingthecomputerfromtheverticalstand
InstallingorremovingtheVESAmountbracket
Attention:
Donotopenyourcomputerorattemptanyrepairbeforereadingandunderstandingthe“Importantsafetyinformation”
onpagev.
ThissectionprovidesinstructionsonhowtoinstallorremovetheVESAmountbracket.
Note:TheVESAmountbracketisonlyavailableonsomemodels.
ToinstallorremovetheVESAmountbracket,dothefollowing:
1.Turnoffthecomputeranddisconnectallpowercordsfromelectricaloutlets.
Chapter5.Installingorreplacinghardware31
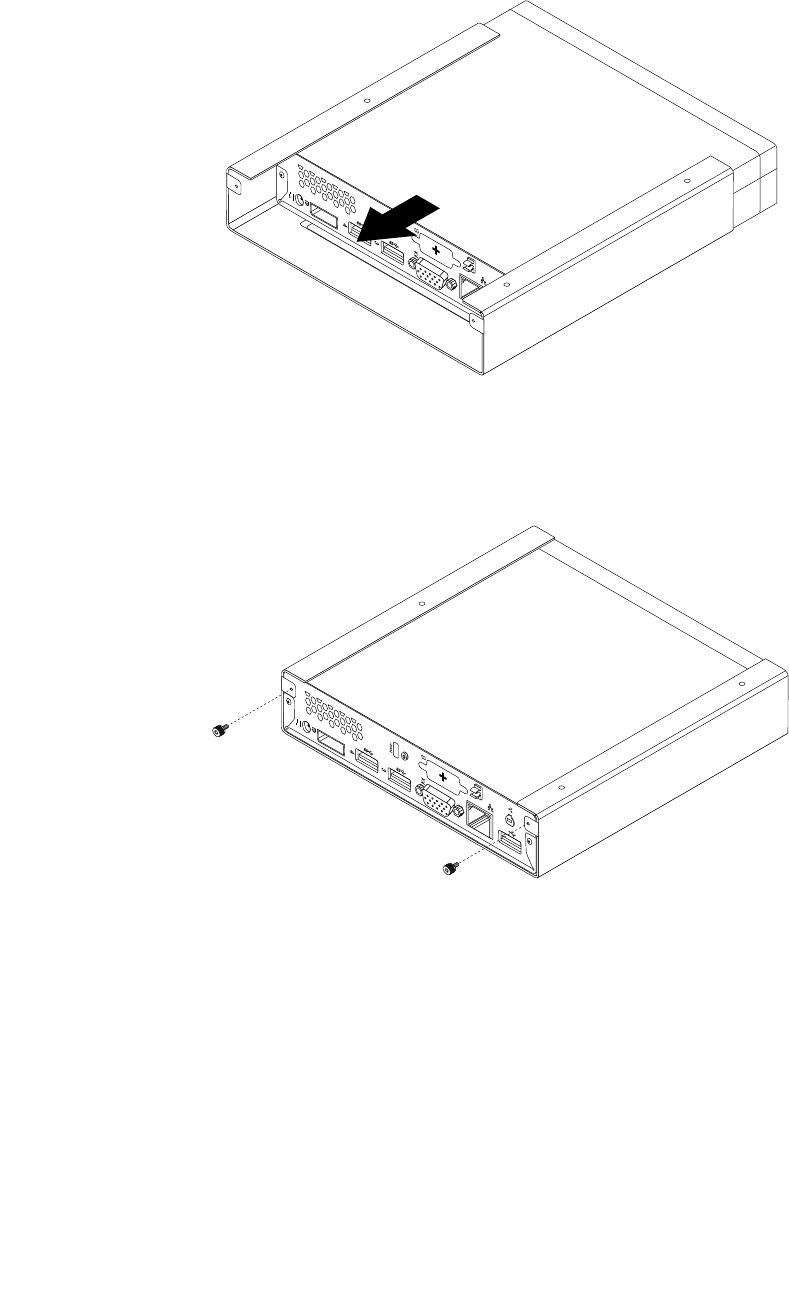
2.ToinstalltheVESAmountbracket,slidethecomputerintotheVESAmountbracket.
Figure9.InstallingtheVESAmountbracket
3.InstallthetwoscrewstosecuretheVESAmountbrackettothecomputer.
Figure10.InstallingthescrewsthatsecuretheVESAmountbracket
32ThinkCentreUserGuide
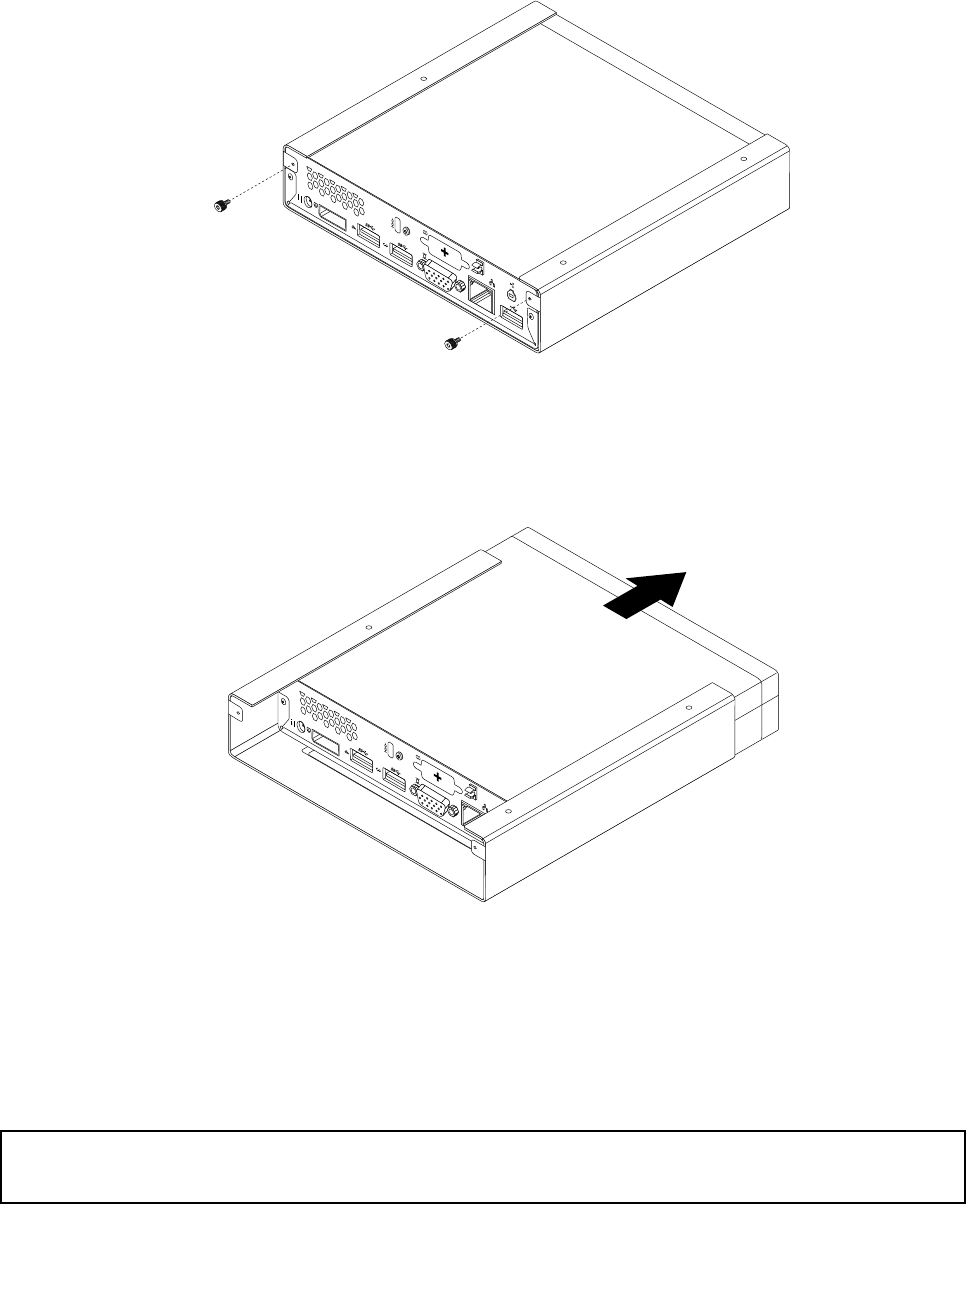
4.ToremovetheVESAmountbracketfromthecomputer,removethetwoscrewsthatsecuretheVESA
mountbrackettothecomputer.
Figure11.RemovingthescrewsthatsecuretheVESAmountbracket
5.SlidethecomputerfromthefrontoftheVESAmountbrackettoremovetheVESAmountbracket
fromthecomputer.
Figure12.RemovingtheVESAmountbracket
Whattodonext:
•Toworkwithanotherpieceofhardware,gototheappropriatesection.
•Tocompletetheinstallationorreplacement,goto“Completingthepartsreplacement”onpage74.
Removingthecomputercover
Attention:
Donotopenyourcomputerorattemptanyrepairbeforereadingandunderstandingthe“Importantsafetyinformation”
onpagev.
Chapter5.Installingorreplacinghardware33

Thissectionprovidesinstructionsonhowtoremovethecomputercover.
CAUTION:
Turnoffthecomputerandwaitthreetoveminutestoletthecomputercoolbeforeremovingthe
computercover.
Toremovethecomputercover,dothefollowing:
1.Removeanymediafromthedrivesandturnoffallattacheddevicesandthecomputer.
2.Disconnectallpowercordsfromelectricaloutlets.
3.Disconnectthepowercords,Input/Outputcables,andanyothercablesthatareconnectedtothe
computer.See“Locatingconnectors,controls,andindicatorsonthefrontofyourcomputer”onpage9
and“Locatingconnectorsontherearofyourcomputer”onpage10.
4.Removeanylockingdevicethatsecuresthecomputercover,suchasanintegratedcablelock.See
“Attachinganintegratedcablelock”onpage26.
5.Removethescrewthatsecuresthecomputercover.
Figure13.Removingthecomputercoverscrew
34ThinkCentreUserGuide
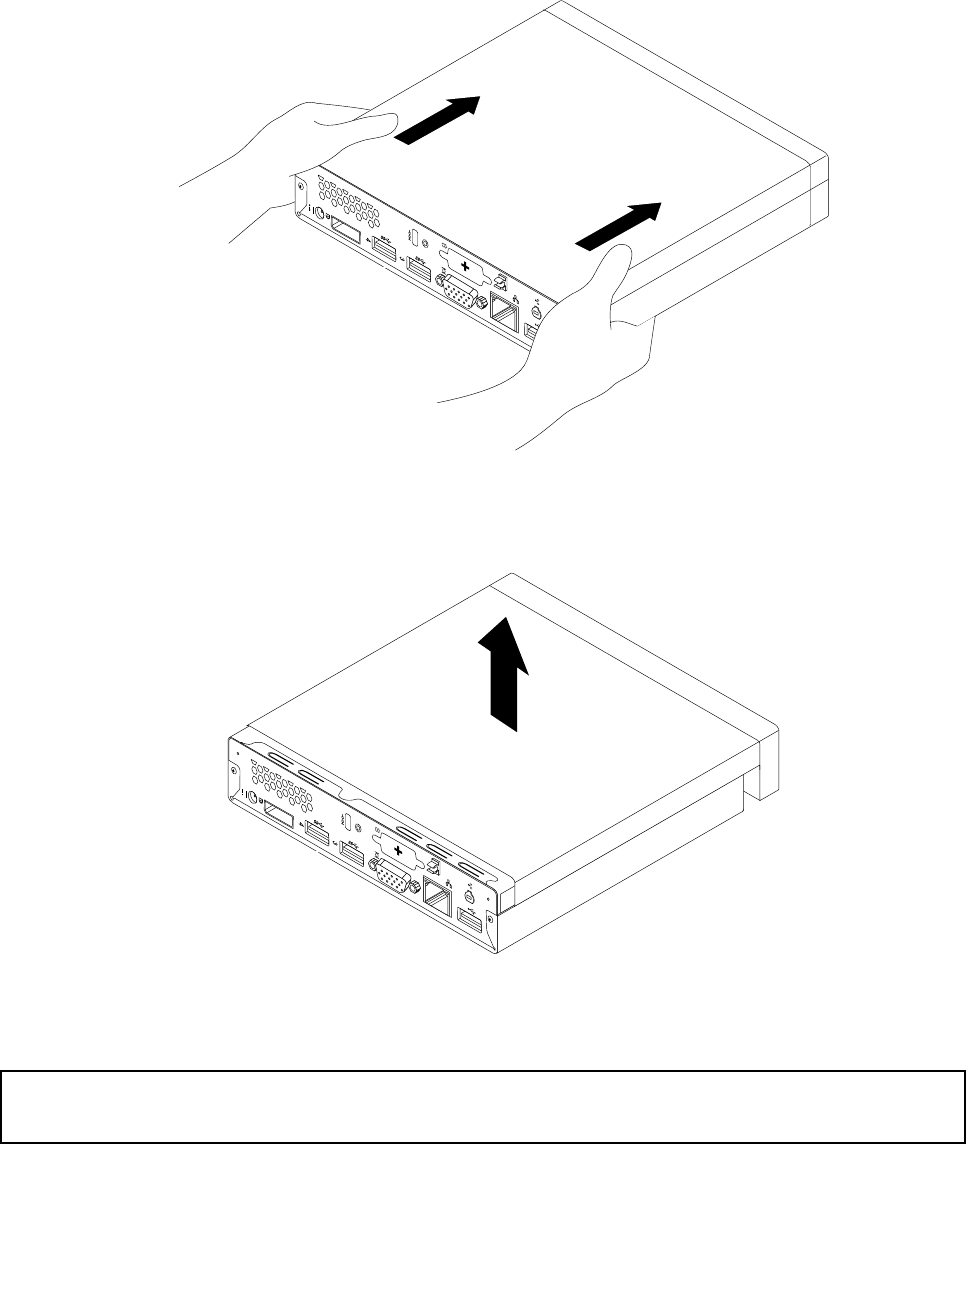
6.Slidethecomputercovertothefrontofthecomputerasmallamount.Liftthecomputercoverto
removeitfromthecomputer.
Figure14.Removingthecomputercover
Installingorreplacingamemorymodule
Attention:
Donotopenyourcomputerorattemptanyrepairbeforereadingandunderstandingthe“Importantsafetyinformation”
onpagev.
Thissectionprovidesinstructionsonhowtoinstallorreplaceamemorymodule.
Chapter5.Installingorreplacinghardware35
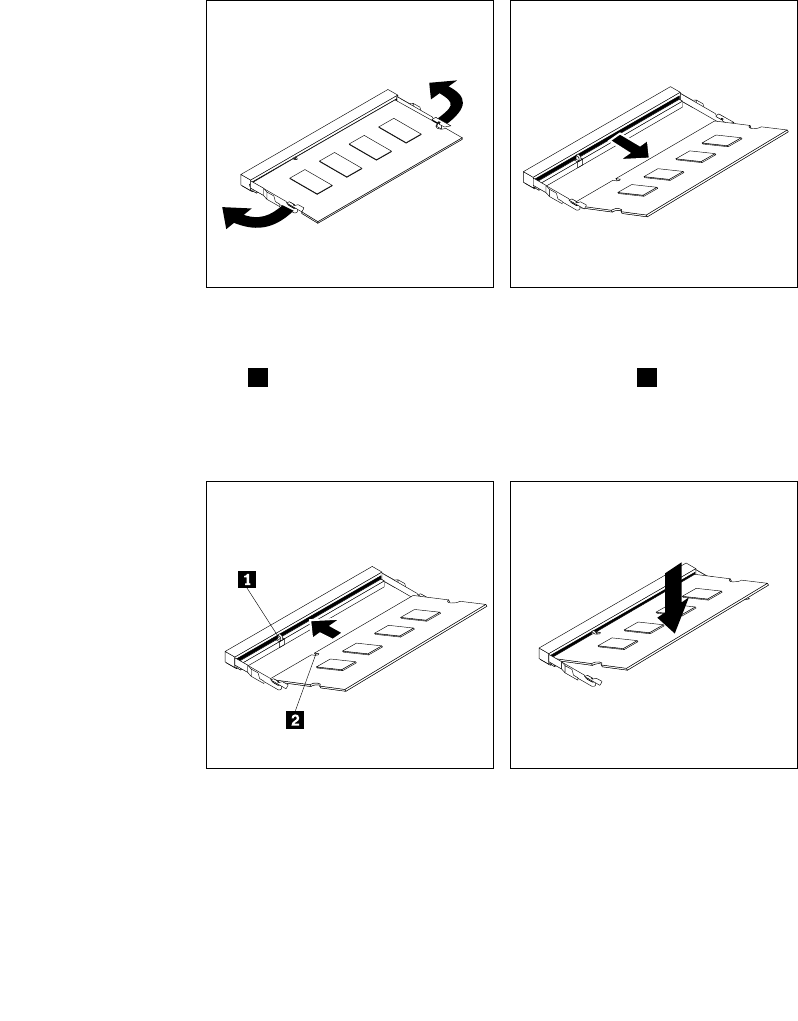
YourcomputerhastwoslotsforinstallingorreplacingDDR3SODIMMsthatprovideuptoamaximumof
16GBsystemmemory.Wheninstallingorreplacingamemorymodule,use2GB,4GB,or8GBDDR3
SODIMMsinanycombinationuptoamaximumof16GB.
Toinstallorreplaceamemorymodule,dothefollowing:
1.Turnoffthecomputeranddisconnectallpowercordsfromelectricaloutlets.
2.Removethecomputercover.See“Removingthecomputercover”onpage33.
3.Locatethememoryslots.See“Locatingpartsonthesystemboard”onpage13.
4.Removetheharddiskdrivebrackettogetyouraccesstothememoryslots.See“Replacingthehard
diskdrivebracket”onpage60.
5.Ifyouarereplacinganoldmemorymodule,opentheretainingclipsandgentlypullthememorymodule
outofthememoryslot.
Figure15.Removingthememorymodule
6.Insertthenotchedend2ofthenewmemorymoduleintotheslot1.Pressthememorymodule
rmlyandpivotthememorymoduleuntilitsnapsintoplace.Makesurethatthememorymoduleis
securedintheslotanddoesnotmoveeasily.
Figure16.Installingamemorymodule
7.Reinstalltheharddiskdrivebracket.See“Replacingtheharddiskdrivebracket”onpage60.
Whattodonext:
•Toworkwithanotherpieceofhardware,gototheappropriatesection.
36ThinkCentreUserGuide
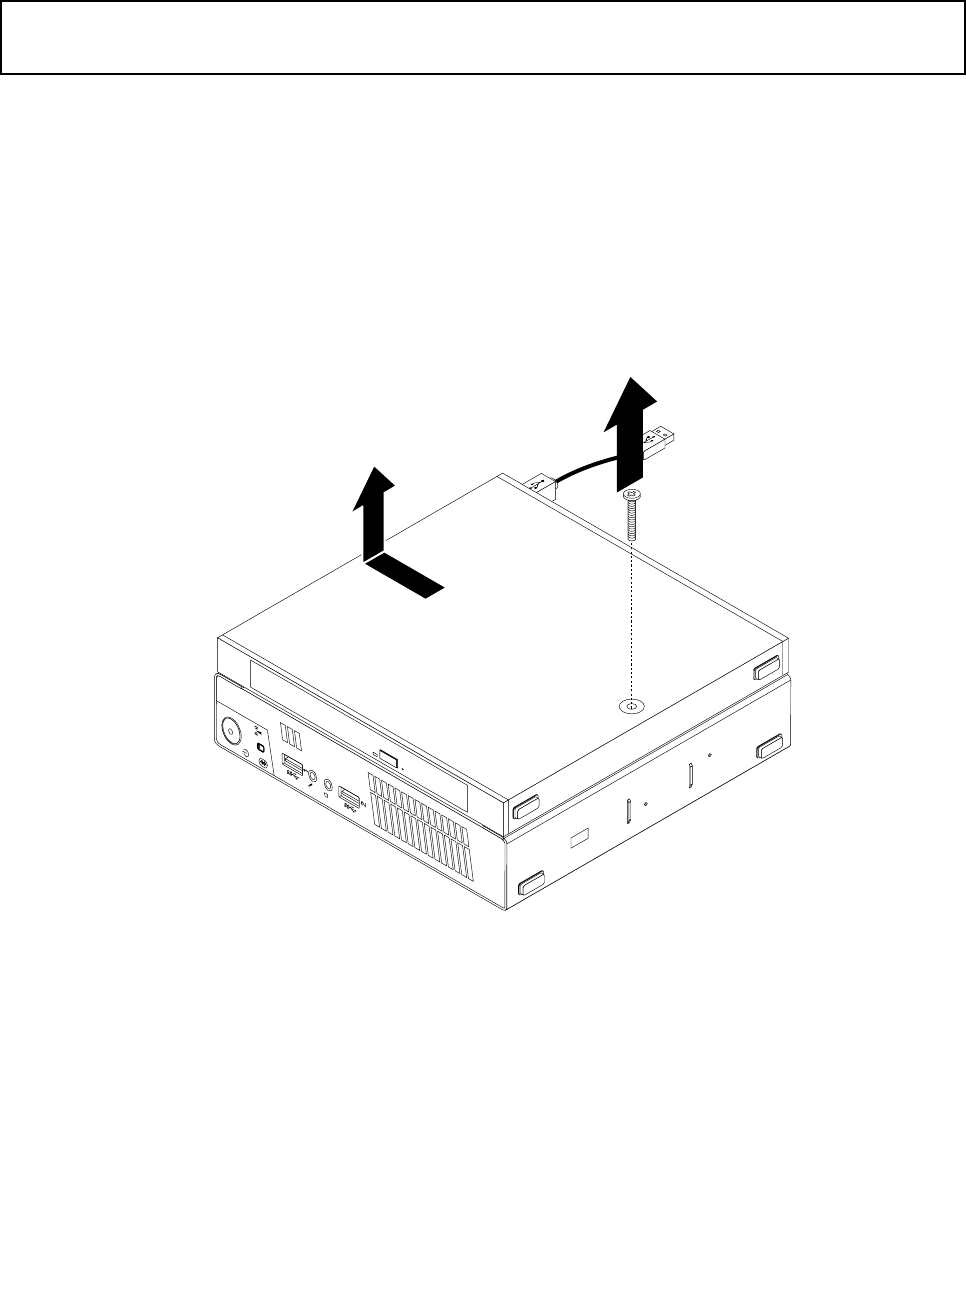
•Tocompletetheinstallationorreplacement,goto“Completingthepartsreplacement”onpage74.
Replacingtheopticaldrive
Attention:
Donotopenyourcomputerorattemptanyrepairbeforereadingandunderstandingthe“Importantsafetyinformation”
onpagev.
Thissectionprovidesinstructionsonhowtoreplacetheopticaldrive.
Note:Theopticaldriveisonlyavailableonsomemodels.
Toreplacetheopticaldrive,dothefollowing:
1.Turnoffthecomputeranddisconnectallpowercordsfromelectricaloutlets.
2.DisconnecttheopticaldrivecablefromtheUSBconnectoronthecomputer.
3.RemovethescrewthatsecurestheopticaldriveboxontheVESAmountbracketandthenslidethe
opticaldriveboxtoremoveitfromtheVESAmountbracket.
Figure17.Removingtheopticaldrivebox
Chapter5.Installingorreplacinghardware37
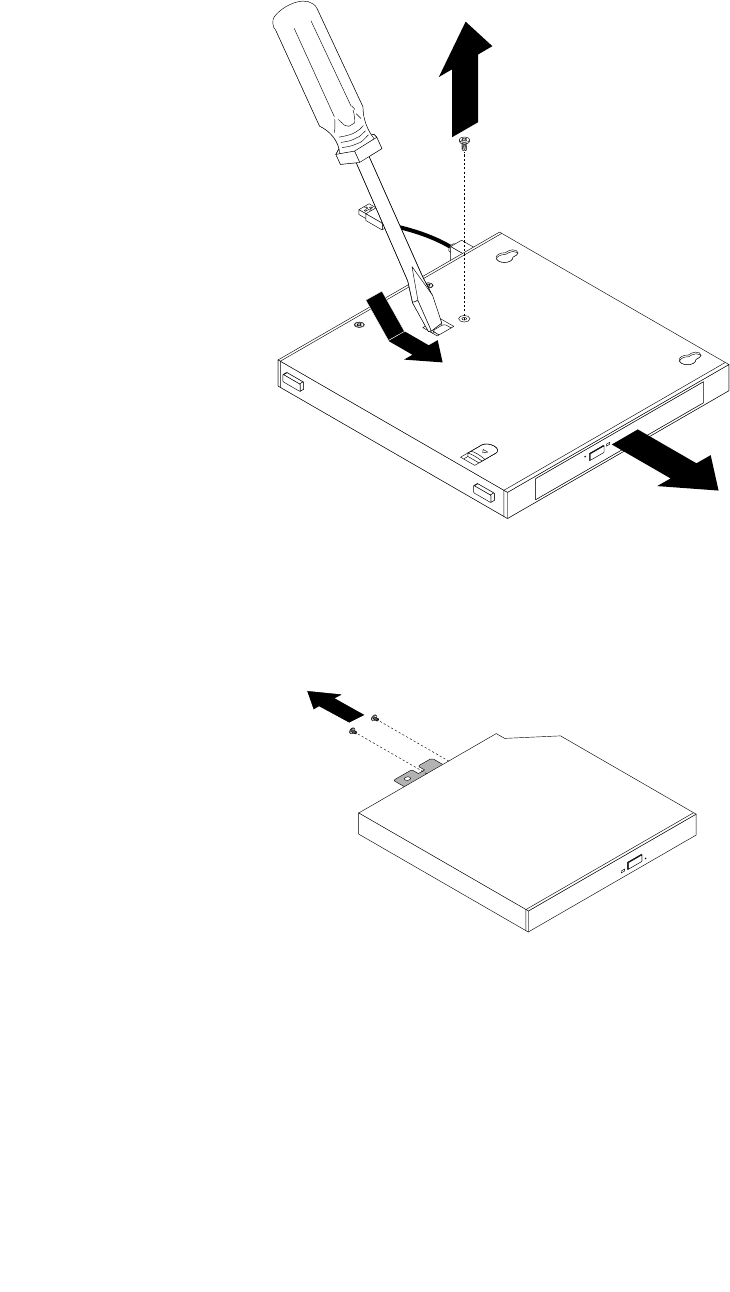
4.Removethescrewthatsecurestheopticaldriveintheopticaldrivebox.Usethescrewdrivertoslide
theopticaldriveforwardandthenremovetheopticaldrivefromtheopticaldrivebox.
Figure18.Removingtheopticaldrivefromtheopticaldrivebox
5.Removethetwoscrewsthatsecuretheopticaldrivemetalplateandthenremovethemetalplate
fromtheopticaldrive.
Figure19.Removingtheopticaldrivemetalplate
38ThinkCentreUserGuide
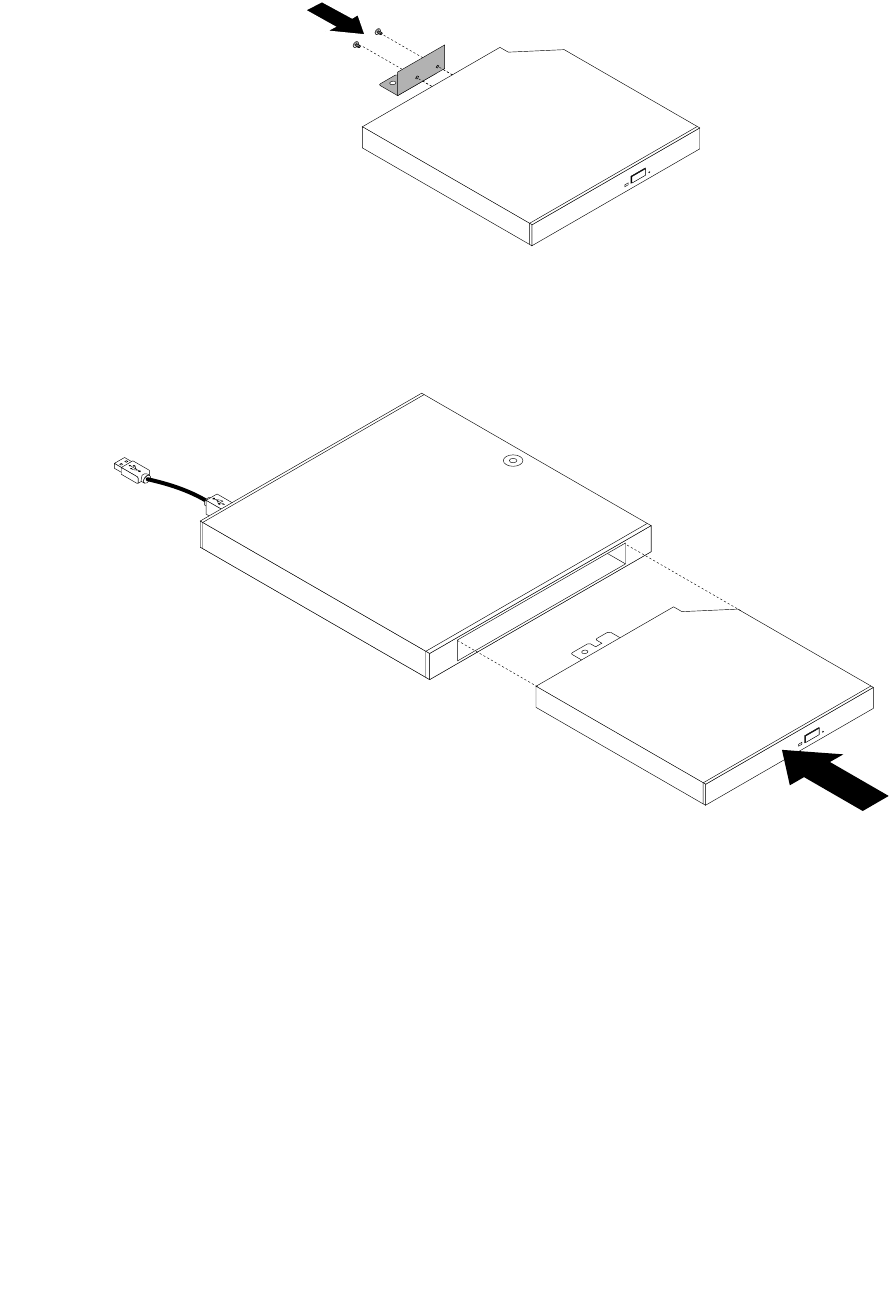
6.Alignthetwoscrewholesintheopticaldrivemetalplatewiththecorrespondingholesinthenewoptical
driveandtheninstallthetwoscrewstosecurethemetalplateonthenewopticaldrive.
Figure20.Installingtheopticaldrivemetalplate
7.Slidethenewopticaldriveintotheopticaldriveboxuntilitsnapsintoposition.
Figure21.Installingtheopticaldriveintotheopticaldrivebox
Chapter5.Installingorreplacinghardware39
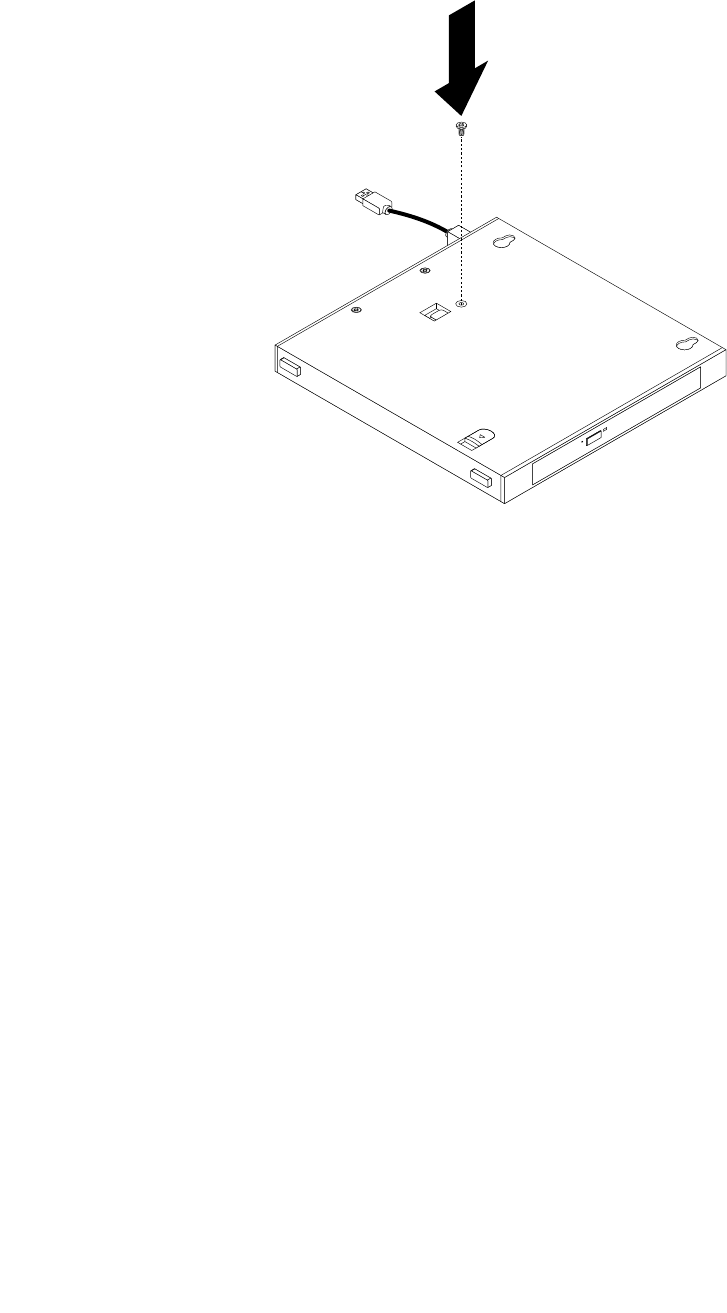
8.Installthescrewthatsecurestheopticaldriveintheopticaldrivebox.
Figure22.Installingthescrewthatsecurestheopticaldrive
40ThinkCentreUserGuide

9.AlignthescrewholesintheopticaldriveboxwiththetwoscrewsontheVESAmountbracketandthen
slidetheopticaldriveboxtoinstallitontheVESAmountbracket.
Figure23.Installingtheopticaldrivebox
Chapter5.Installingorreplacinghardware41
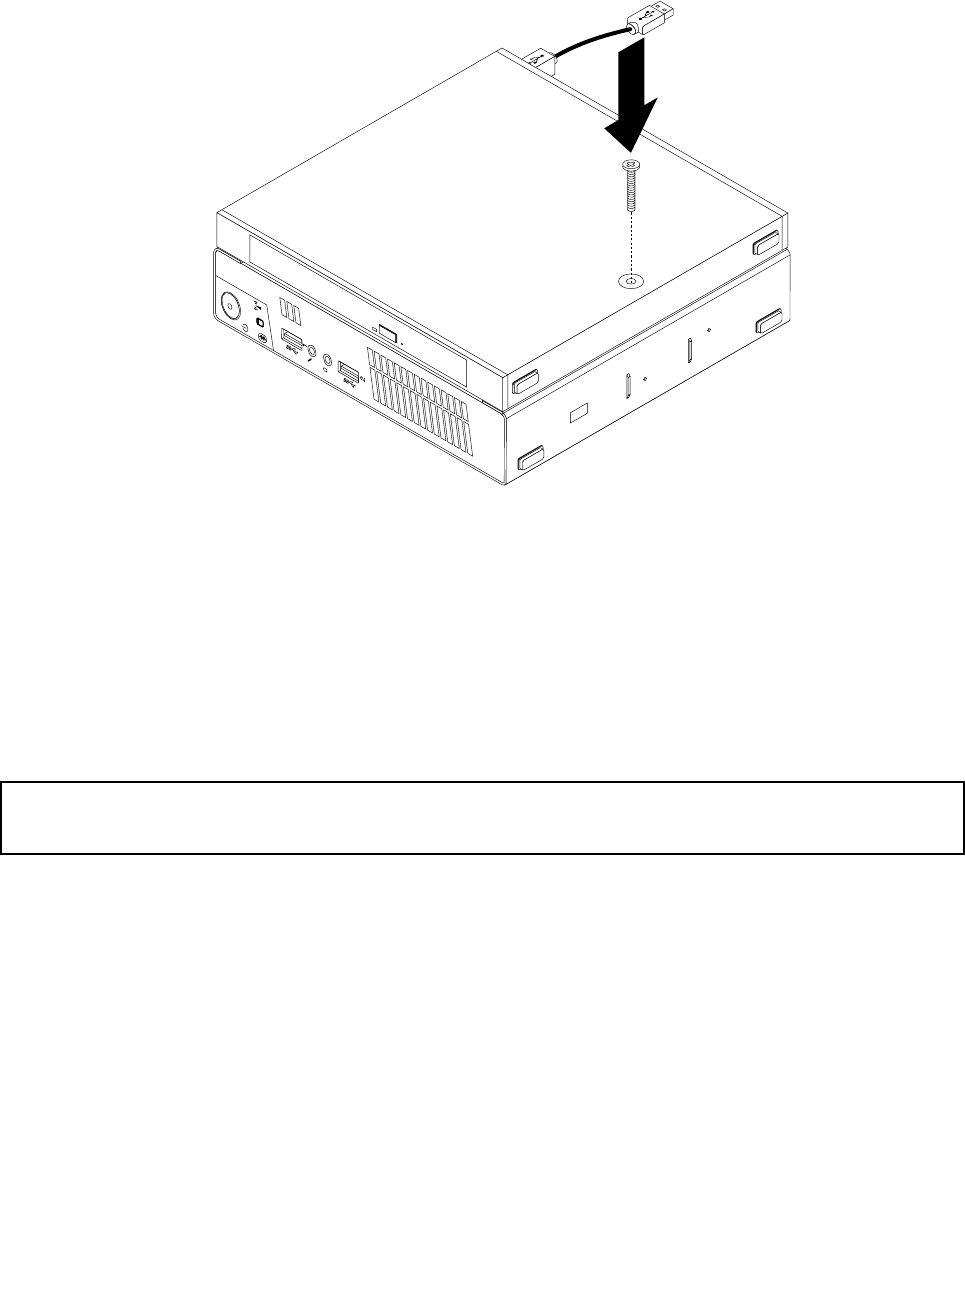
10.InstallthescrewthatsecurestheopticaldriveboxontheVESAmountbracket.
Figure24.Installingthescrewthatsecurestheopticaldrivebox
11.ConnecttheopticaldrivecabletoaUSBconnectoronthecomputer.See“Locatingconnectorsonthe
rearofyourcomputer”onpage10.
Whattodonext:
•Toworkwithanotherpieceofhardware,gototheappropriatesection.
•Tocompletetheinstallationorreplacement,goto“Completingthepartsreplacement”onpage74.
Replacingthesecondaryharddiskdrive
Attention:
Donotopenyourcomputerorattemptanyrepairbeforereadingandunderstandingthe“Importantsafetyinformation”
onpagev.
Thissectionprovidesinstructionsonhowtoreplacethesecondaryharddiskdrive.
Note:Thesecondaryharddiskdriveisonlyavailableonsomemodels.
Toreplacethesecondaryharddiskdrive,dothefollowing:
1.Turnoffthecomputeranddisconnectallpowercordsfromelectricaloutlets.
2.DisconnectthesecondaryharddiskdrivecablefromtheUSBconnectoronthecomputer.
42ThinkCentreUserGuide
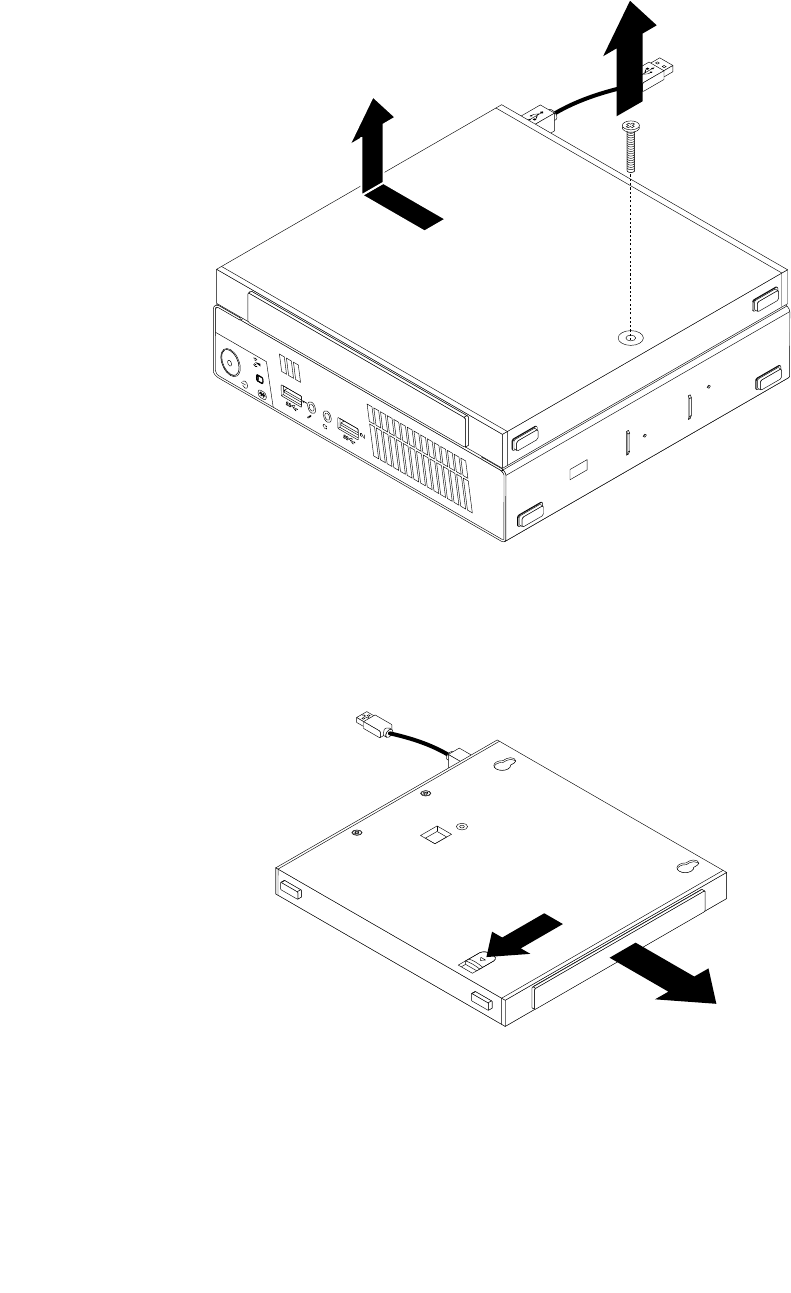
3.RemovethescrewthatsecurestheopticaldriveboxontheVESAmountbracketandthenslidethe
opticaldriveboxtoremoveitfromtheVESAmountbracket.
Figure25.Removingtheopticaldrivebox
4.Slidethereleasebuttonontheopticaldriveboxandthenremovethesecondaryharddiskdriveadapter
fromtheopticaldrivebox.
Figure26.Removingthesecondaryharddiskdriveadapterfromtheopticaldrivebox
Chapter5.Installingorreplacinghardware43
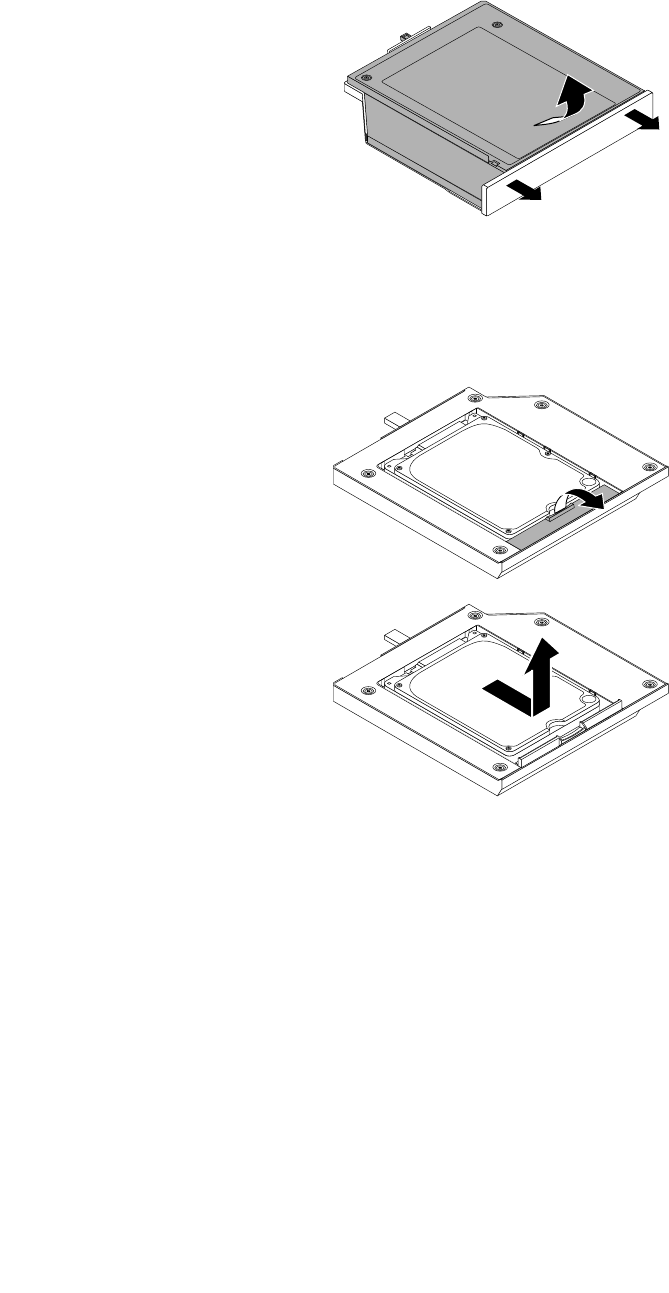
5.Flexthesidesoftheharddiskdriveadapterbracketandthenpivottheharddiskdriveadapterto
removetheadapterfromtheadapterbracket.
Figure27.Removingtheharddiskdriveadapterfromtheadapterbracket
6.Toremovetheharddiskdrivefromtheadapter,lifttheadapterretaininglatch.Slidetheharddiskdrive
towardstheretaininglatchandthenlifttheharddiskdriveoutoftheadapter.
Figure28.Removingthesecondaryharddiskdrivefromtheadapter
44ThinkCentreUserGuide
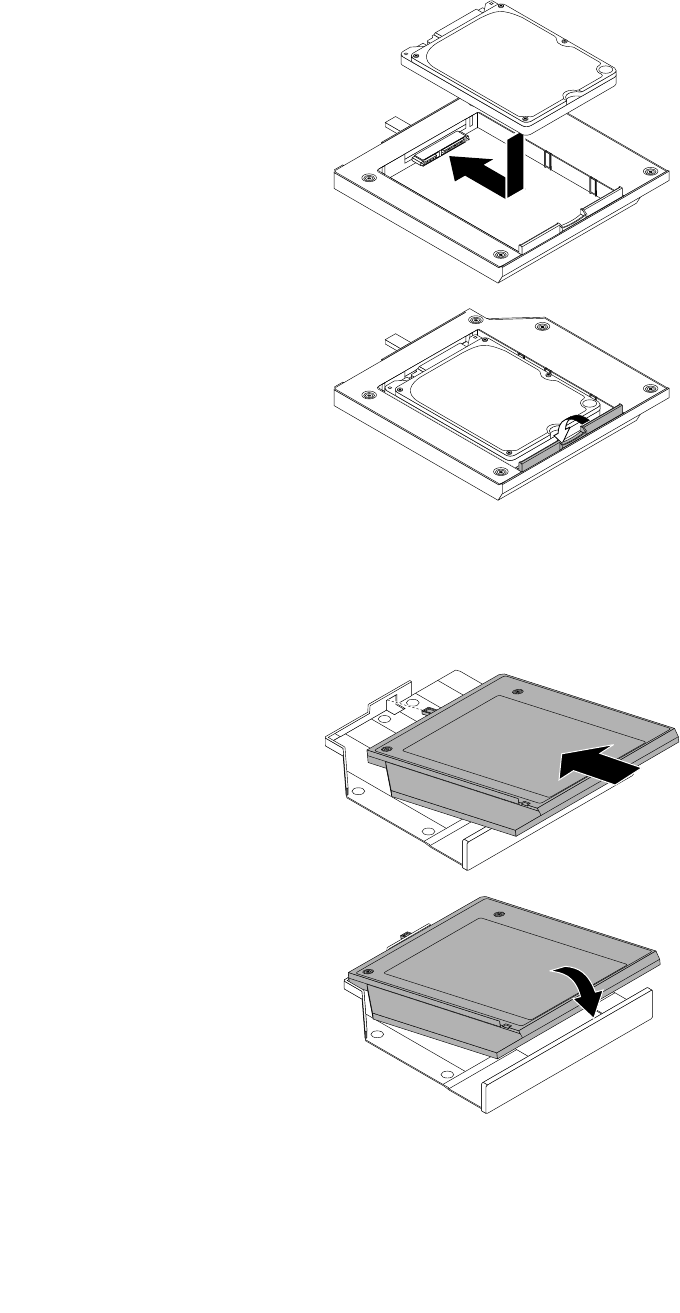
7.Installanewharddiskdriveintotheadapter.Lowertheadapterretaininglatchuntilitsnapsintoposition.
Figure29.Installinganewharddiskdriveintotheadapter
8.Positiontheadapterintotheadapterbracketandthenpivottheadapterdownwarduntilitsnapsinto
position.
Figure30.Installingtheharddiskdriveadapterintotheadapterbracket
Chapter5.Installingorreplacinghardware45
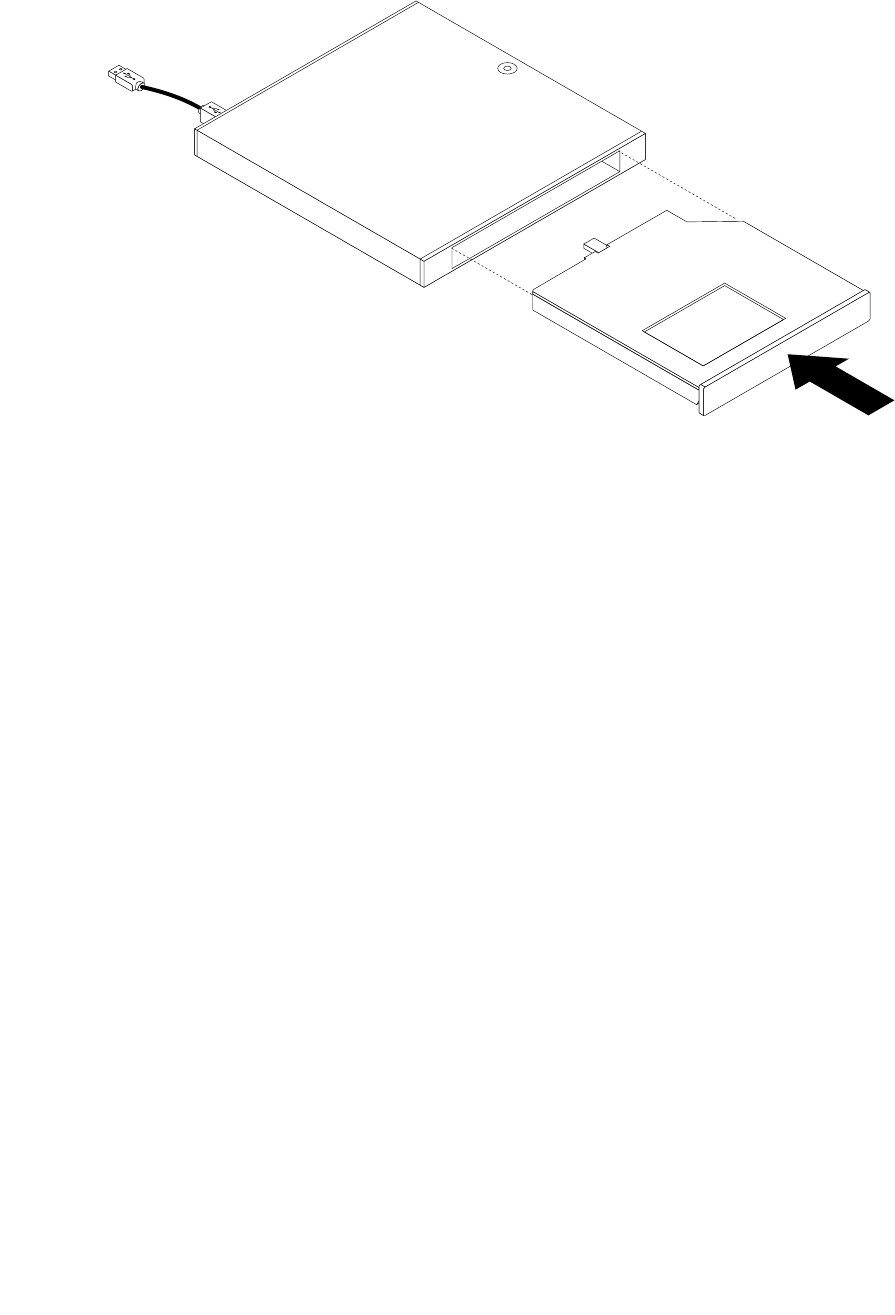
9.Slidetheadapterbracketintotheopticaldriveboxuntilitsnapsintoposition.
Figure31.Installingtheadapterbracketintotheopticaldrivebox
46ThinkCentreUserGuide
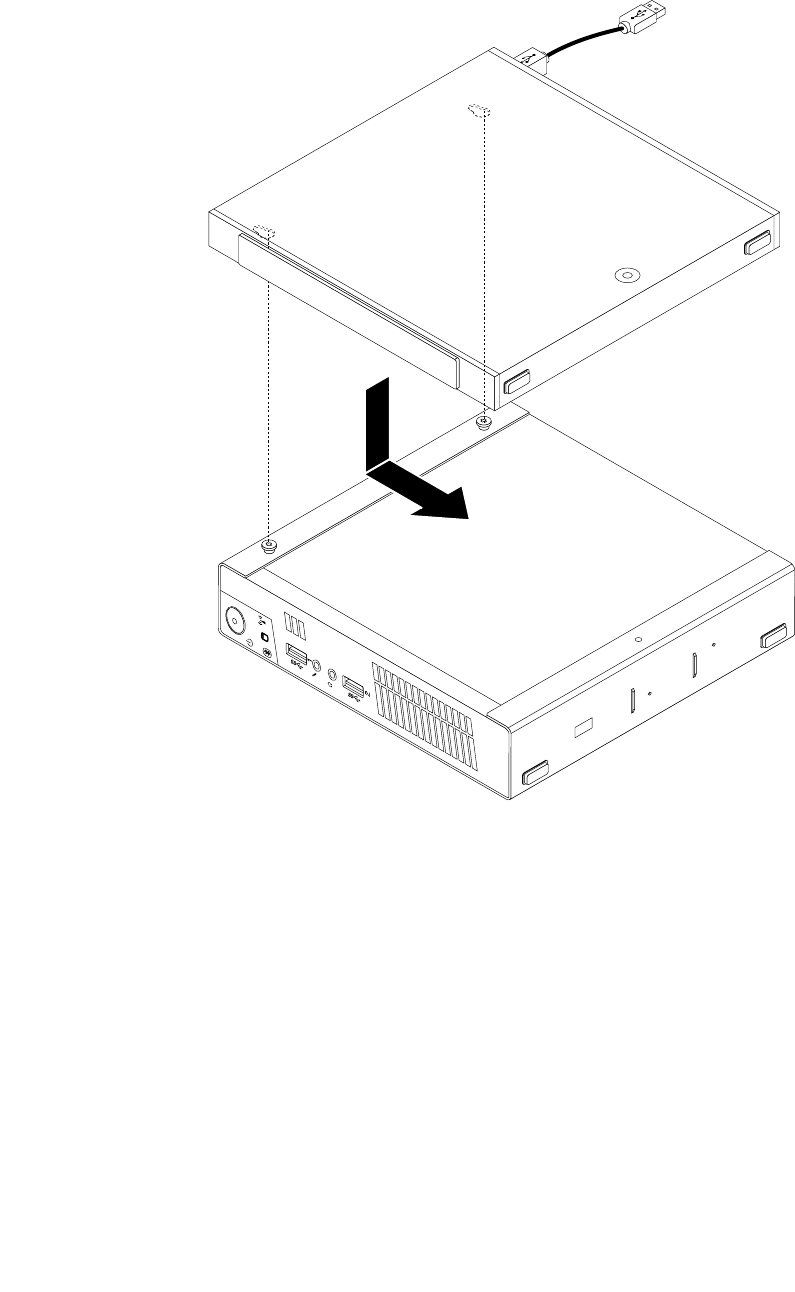
10.AlignthescrewholesintheopticaldriveboxwiththetwoscrewsontheVESAmountbracketandthen
slidetheopticaldriveboxtoinstallitontheVESAmountbracket.
Figure32.Installingtheopticaldrivebox
Chapter5.Installingorreplacinghardware47
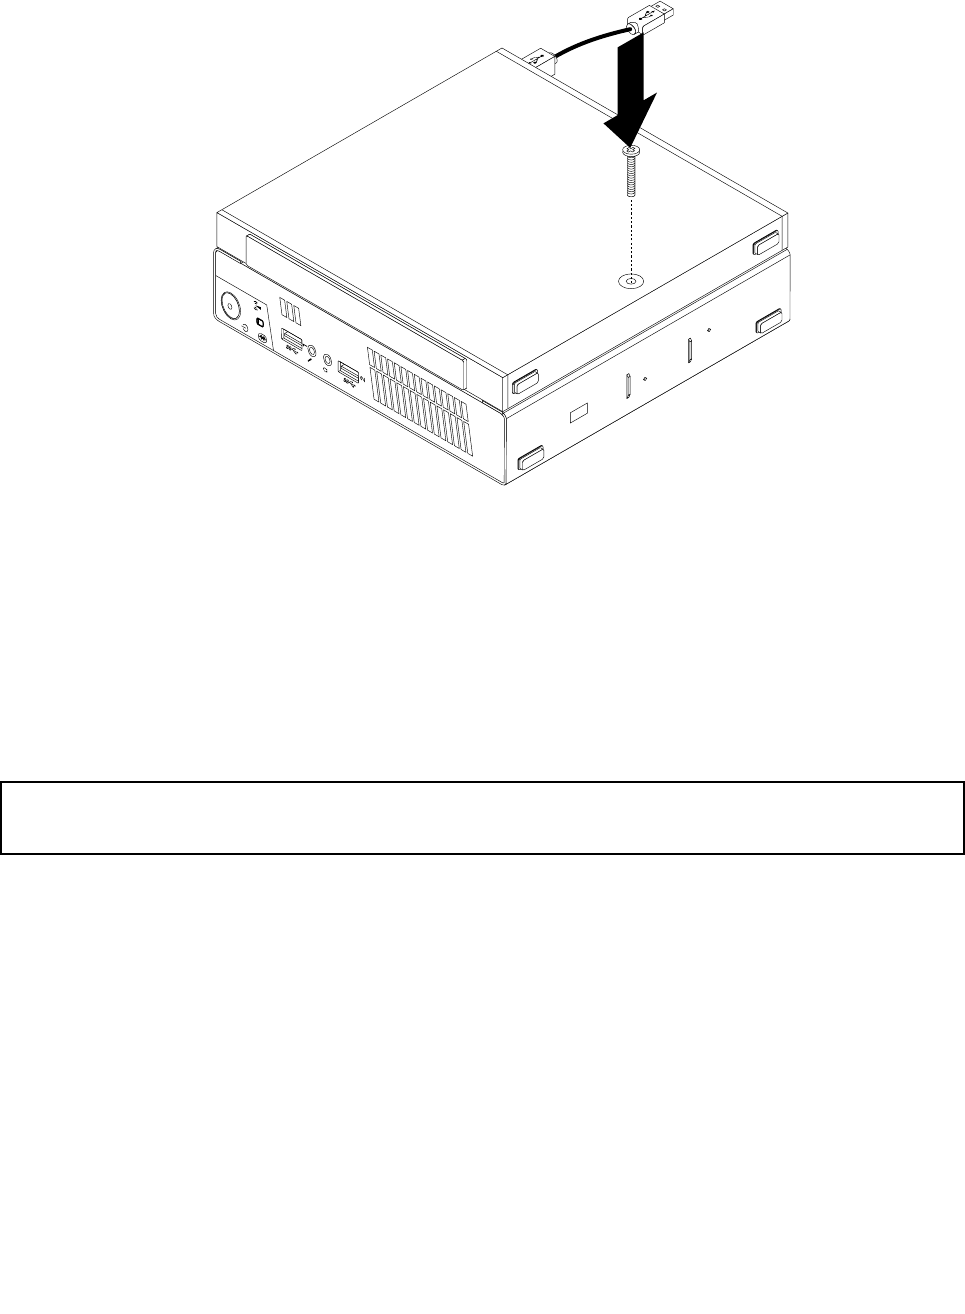
11.InstallthescrewthatsecurestheopticaldriveboxontheVESAmountbracket.
Figure33.Installingthescrewthatsecurestheopticaldrivebox
12.ConnectthesecondaryharddiskdrivecabletoaUSBconnectoronthecomputer.See“Locating
connectorsontherearofyourcomputer”onpage10.
Whattodonext:
•Toworkwithanotherpieceofhardware,gototheappropriatesection.
•Tocompletetheinstallationorreplacement,goto“Completingthepartsreplacement”onpage74.
Replacingthebattery
Attention:
Donotopenyourcomputerorattemptanyrepairbeforereadingandunderstandingthe“Importantsafetyinformation”
onpagev.
Yourcomputerhasaspecialtypeofmemorythatmaintainsthedate,time,andsettingsforbuilt-infeatures,
suchasparallel-portassignments(conguration).Abatterykeepsthisinformationactivewhenyouturn
offthecomputer.
Thebatterynormallyrequiresnochargingormaintenancethroughoutitslife;however,nobatterylasts
forever.Ifthebatteryfails,thedate,time,andcongurationinformation(includingpasswords)arelost.An
errormessageisdisplayedwhenyouturnonthecomputer.
Refertothe“Lithiumbatterynotice”intheSafety,Warranty,andSetupGuideforinformationaboutreplacing
anddisposingofthebattery.
Toreplacethebattery,dothefollowing:
1.Turnoffthecomputeranddisconnectallpowercordsfromelectricaloutlets.
2.Removethecomputercover.See“Removingthecomputercover”onpage33.
48ThinkCentreUserGuide
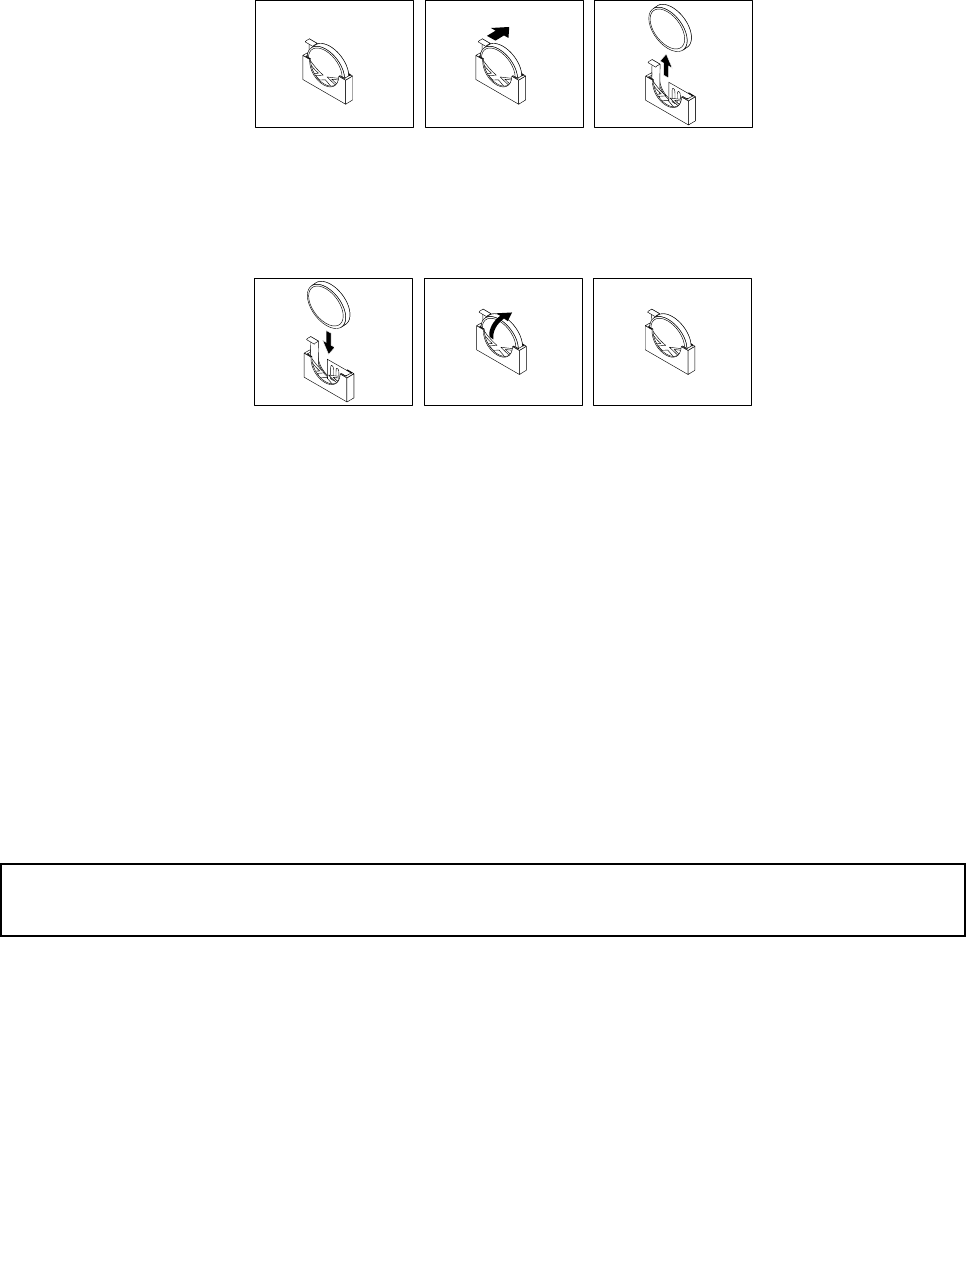
3.Locatethebattery.See“Locatingpartsonthesystemboard”onpage13.
4.Removetheoldbattery.
Figure34.Removingtheoldbattery
5.Installanewbattery.
Figure35.Installinganewbattery
6.Reinstallthecomputercoverandconnectthecables.See“Completingthepartsreplacement”on
page74.
Note:Whenthecomputeristurnedonforthersttimeafterreplacingthebattery,anerrormessage
mightbedisplayed.Thisisnormalafterreplacingthebattery.
7.Turnonthecomputerandallattacheddevices.
8.UsetheSetupUtilityprogramtosetthedate,time,andanypasswords.SeeChapter7“UsingtheSetup
Utilityprogram”onpage85.
Whattodonext:
•Toworkwithanotherpieceofhardware,gototheappropriatesection.
•Tocompletetheinstallationorreplacement,goto“Completingthepartsreplacement”onpage74.
Replacingtheacpoweradapter
Attention:
Donotopenyourcomputerorattemptanyrepairbeforereadingandunderstandingthe“Importantsafetyinformation”
onpagev.
Thissectionprovidesinstructionsonhowtoreplacetheacpoweradapter.
Toreplacetheacpoweradapter,dothefollowing:
1.Turnoffthecomputeranddisconnectallpowercordsfromelectricaloutlets.
Chapter5.Installingorreplacinghardware49

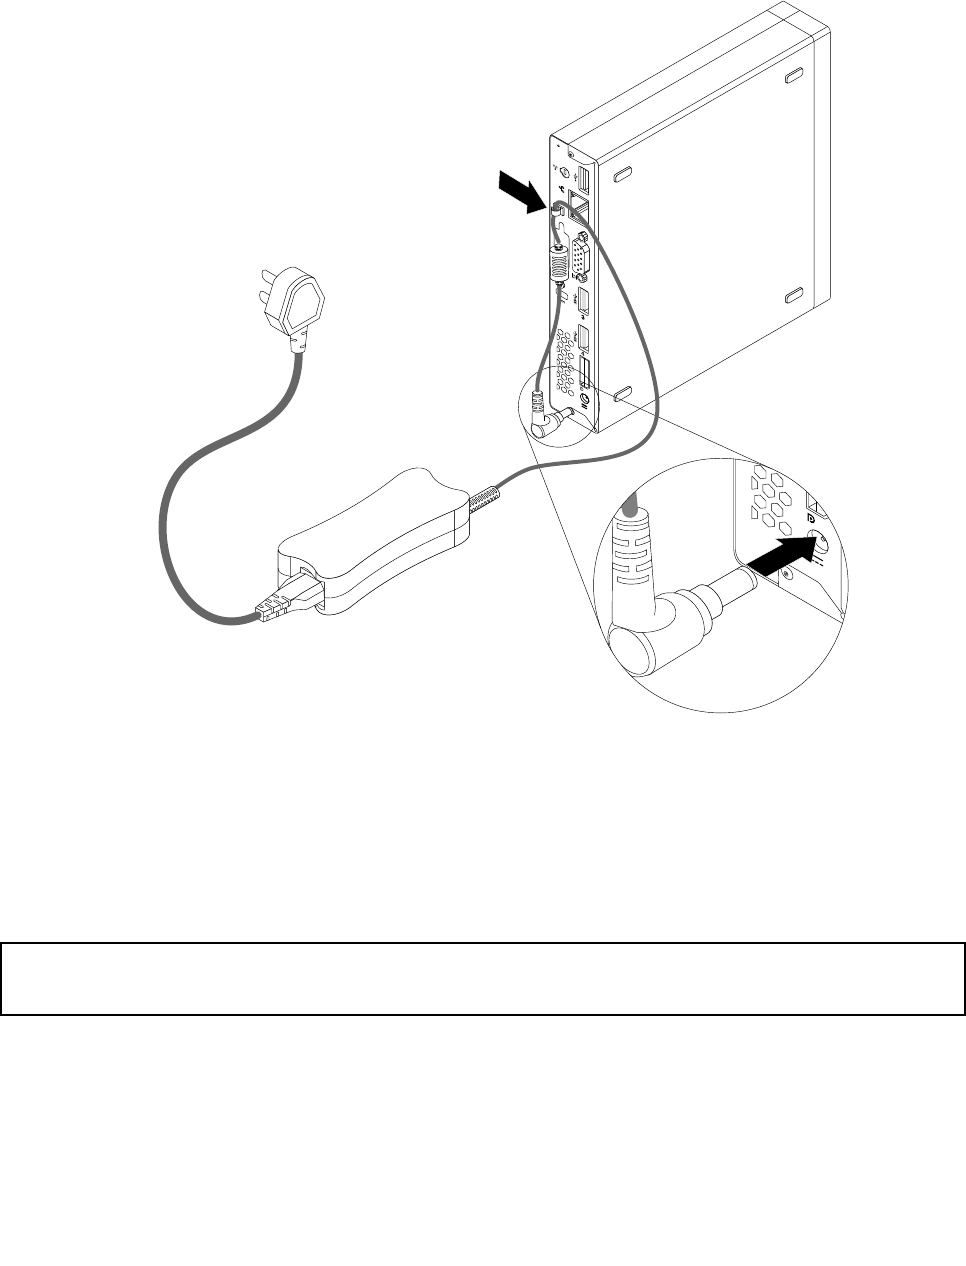
3.Connectthenewacpoweradaptertotheacpoweradapterconnectorattherearofyourcomputer
andanworkableelectricaloutlet.Securethepowercordintothepoweradaptercableloopattherear
ofthecomputerasshown.
Figure37.Connectingthenewacpoweradapter
Whattodonext:
•Toworkwithanotherpieceofhardware,gototheappropriatesection.
•Tocompletetheinstallationorreplacement,goto“Completingthepartsreplacement”onpage74.
Replacingtheacpoweradapterbracket
Attention:
Donotopenyourcomputerorattemptanyrepairbeforereadingandunderstandingthe“Importantsafetyinformation”
onpagev.
Thissectionprovidesinstructionsonhowtoreplacetheacpoweradapterbracket.
Note:Theacpoweradapterbracketisonlyavailableonsomemodels.
Toreplacetheacpoweradapterbracket,dothefollowing:
1.Turnoffthecomputeranddisconnectallpowercordsfromelectricaloutlets.
Chapter5.Installingorreplacinghardware51
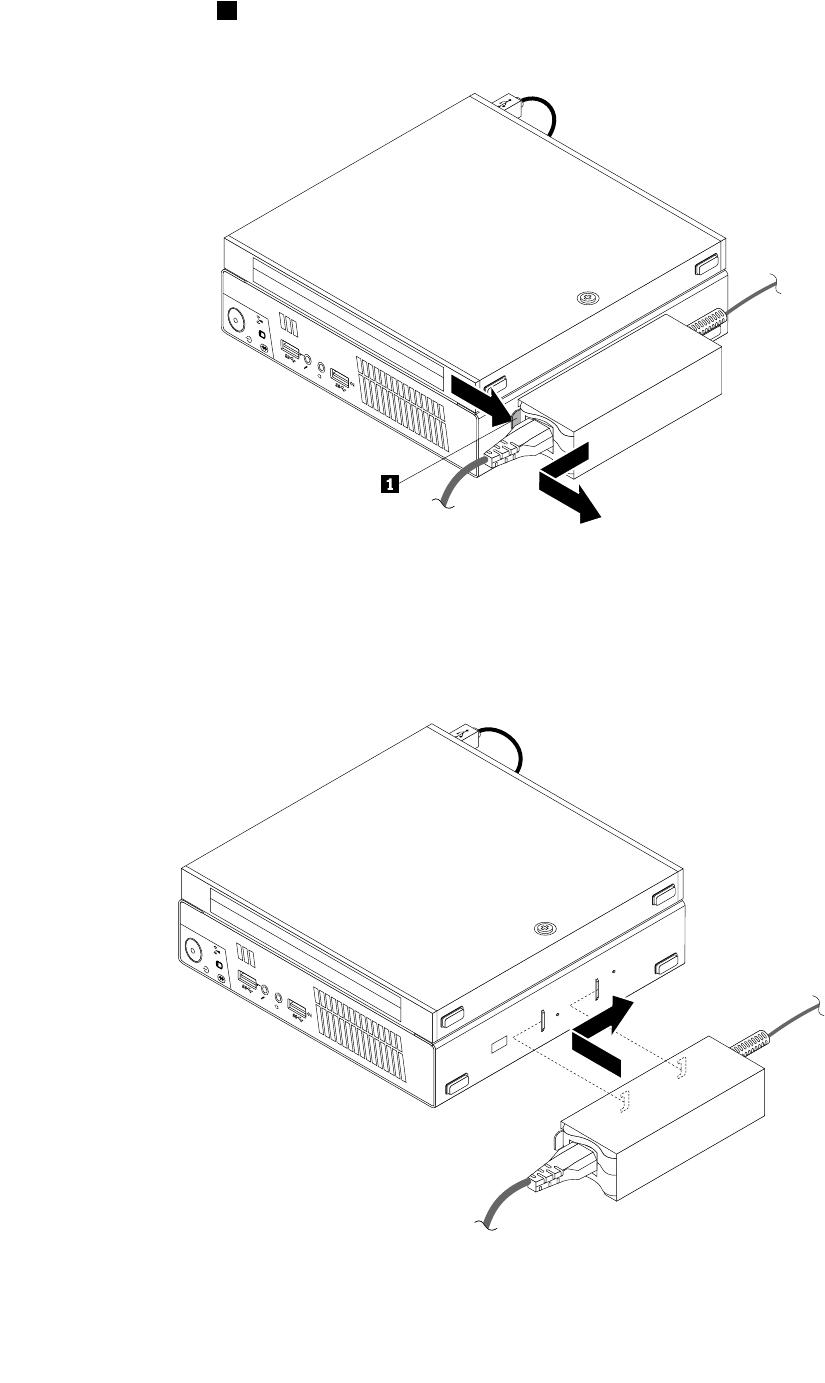
2.Pressthemetaltab1andthenslidetheacpoweradapterbrackettoremoveitfromtheVESAmount
bracket.
Figure38.Removingtheacpoweradapterbracket
3.ToinstalltheacpoweradapterbrackettotheVESAmountbracket,alignthetwotabsontheacpower
adapterbracketwiththeslotsintheVESAmountbracket,andthenslidetheacpoweradapterbracket
toinstallitontheVESAmountbracket.
Figure39.Installingtheacpoweradapterbracket
52ThinkCentreUserGuide
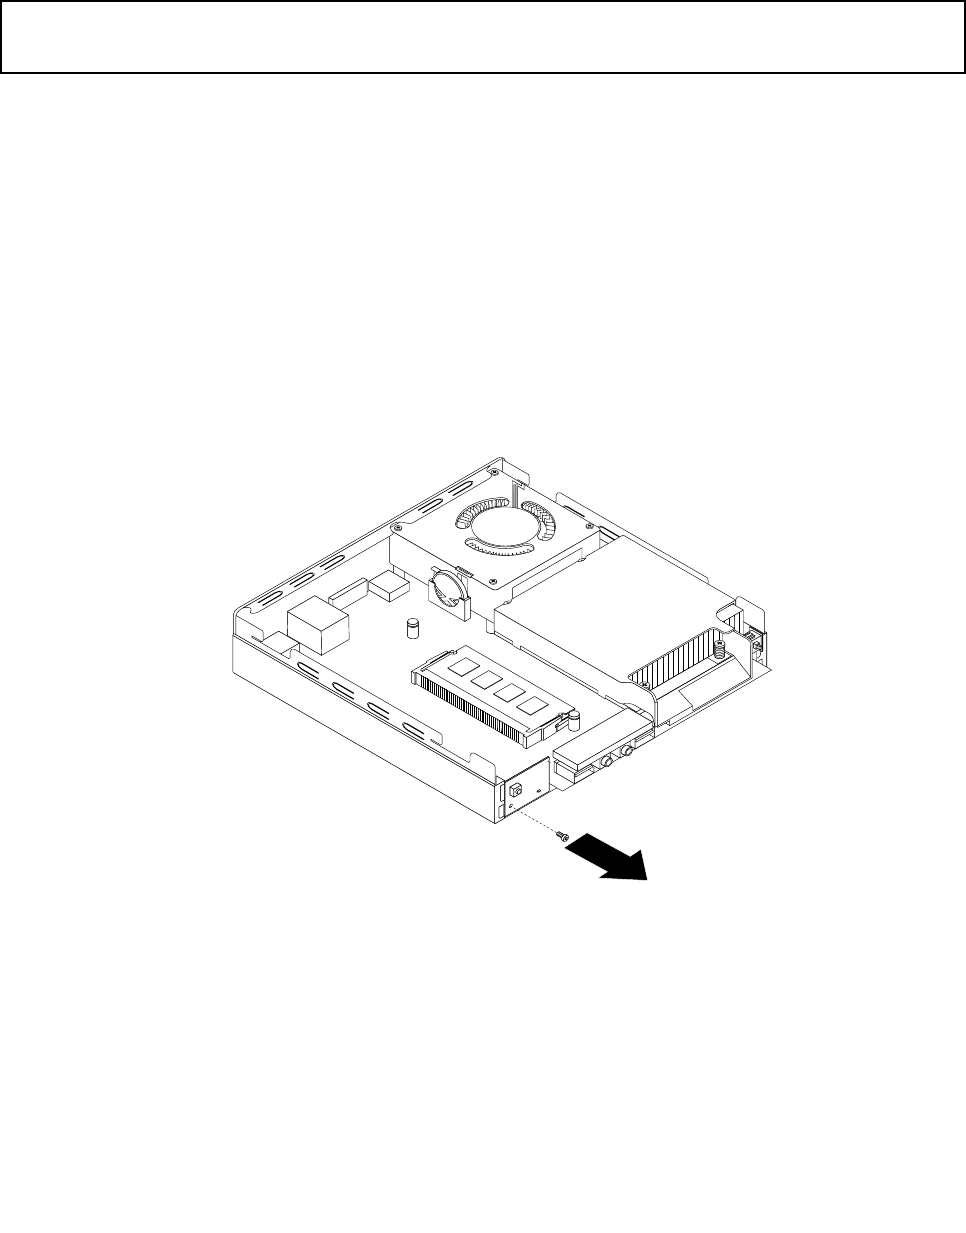
Whattodonext:
•Toworkwithanotherpieceofhardware,gototheappropriatesection.
•Tocompletetheinstallationorreplacement,goto“Completingthepartsreplacement”onpage74.
Replacingthepowerswitchboard
Attention:
Donotopenyourcomputerorattemptanyrepairbeforereadingandunderstandingthe“Importantsafetyinformation”
onpagev.
Thissectionprovidesinstructionsonhowtoreplacethepowerswitchboard.
Toreplacethepowerswitchboard,dothefollowing:
1.Turnoffthecomputeranddisconnectallpowercordsfromelectricaloutlets.
2.Removethecomputercover.See“Removingthecomputercover”onpage33.
3.Locatethepowerswitchboard.See“Locatingcomponents”onpage12.
4.Removetheharddiskdrivefromthecomputer.See“Replacingtheharddiskdrivebracket”onpage60.
5.Disconnectthepowerswitchboardcablefromthecorrespondingconnectoronthesystemboard.See
“Locatingpartsonthesystemboard”onpage13.
6.Removethepowerswitchboardcablefromthecabletieinthecomputer.
7.Removethescrewthatsecuresthepowerswitchboardtothecomputer.
Figure40.Removingthescrewthatsecuresthepowerswitchboard
Chapter5.Installingorreplacinghardware53
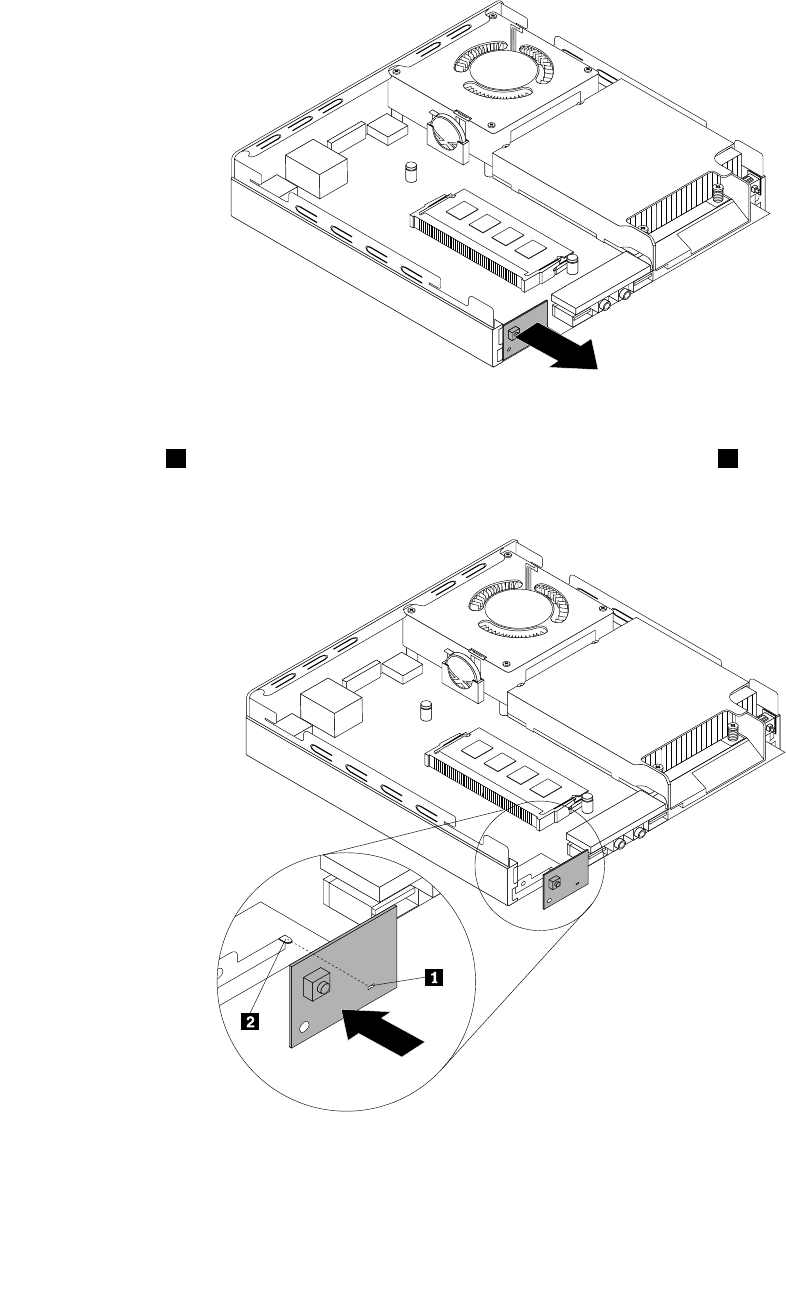
8.Removethepowerswitchboardfromthecomputer.
Figure41.Removingthepowerswitchboard
9.Alignthehole1inthenewpowerswitchboardwiththecorrespondingtab2onthecomputerand
positionthenewpowerswitchboardinthecomputer.
Figure42.Installingthepowerswitchboard
54ThinkCentreUserGuide
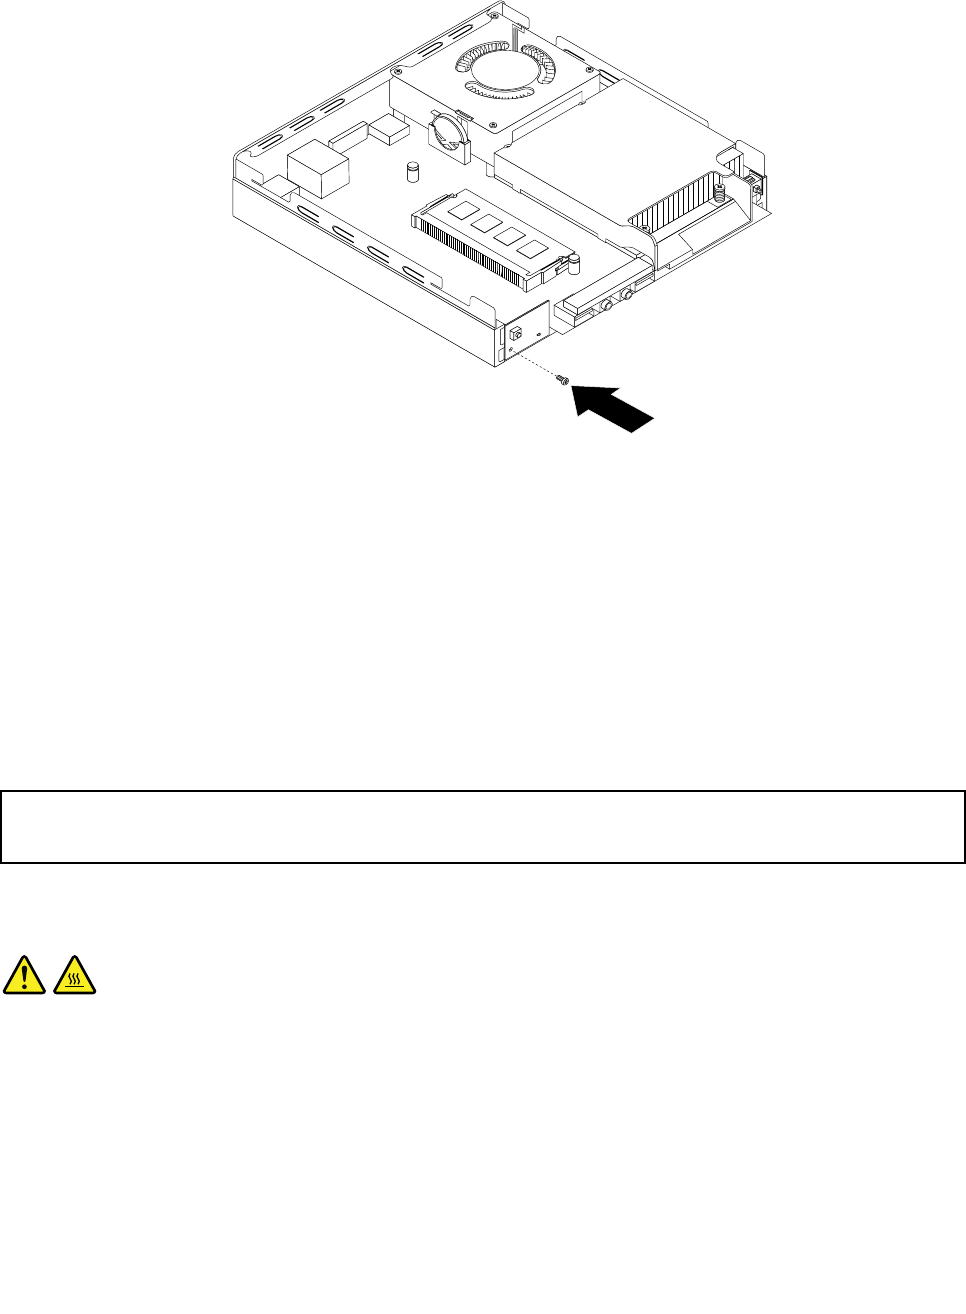
10.Installthescrewtosecurethenewpowerswitchboardinthecomputer.
Figure43.Installingthescrewthatsecuresthepowerswitchboard
11.Connectthepowerswitchboardcabletothepowerswitchboardcableconnectoronthesystemboard.
See“Locatingpartsonthesystemboard”onpage13.
12.Securethenewpowerswitchboardcableintothecabletieinthecomputer.
13.Installtheharddiskdriveintothecomputer.See“Replacingtheharddiskdrivebracket”onpage60.
Whattodonext:
•Toworkwithanotherpieceofhardware,gototheappropriatesection.
•Tocompletetheinstallationorreplacement,goto“Completingthepartsreplacement”onpage74.
Replacingtheheatsink
Attention:
Donotopenyourcomputerorattemptanyrepairbeforereadingandunderstandingthe“Importantsafetyinformation”
onpagev.
Thissectionprovidesinstructionsonhowtoreplacetheheatsink.
CAUTION:
Theheatsinkandfanassemblymightbeveryhot.Turnoffthecomputerandwaitthreetove
minutestoletthecomputercoolbeforeremovingthecomputercover.
Toreplacetheheatsink,dothefollowing:
1.Turnoffthecomputeranddisconnectallpowercordsfromelectricaloutlets.
2.Removethecomputercover.See“Removingthecomputercover”onpage33.
3.Locatetheheatsinkonthesystemboard.See“Locatingcomponents”onpage12.
Chapter5.Installingorreplacinghardware55
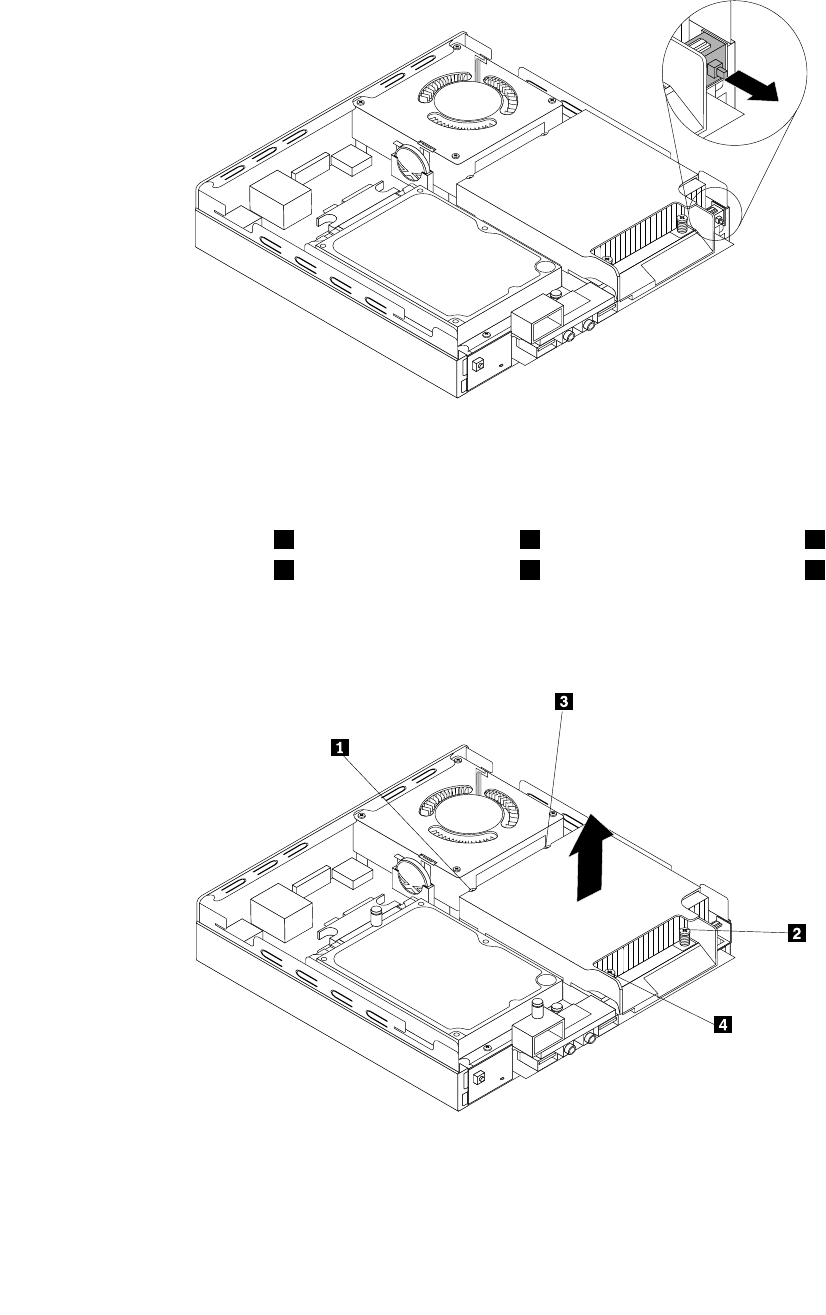
4.Pulltheintrusionswitchtoremoveitfromtheheatsinkbracket.
Figure44.Removingtheintrusionswitch
5.Followthissequencetoremovethefourscrewsthatsecuretheheatsinkandfanassemblytothe
systemboard:
a.Partiallyremovescrew1,thenfullyremovescrew2,andthenfullyremovescrew1.
b.Partiallyremovescrew3,thenfullyremovescrew4,andthenfullyremovescrew3.
Note:Carefullyremovethefourscrewsfromthesystemboardtoavoidanypossibledamagetothe
systemboard.Thefourscrewscannotberemovedfromtheheatsinkandfanassembly.
Figure45.Removingtheheatsink
6.Liftthefailingheatsinkoffthesystemboard.
Notes:
56ThinkCentreUserGuide
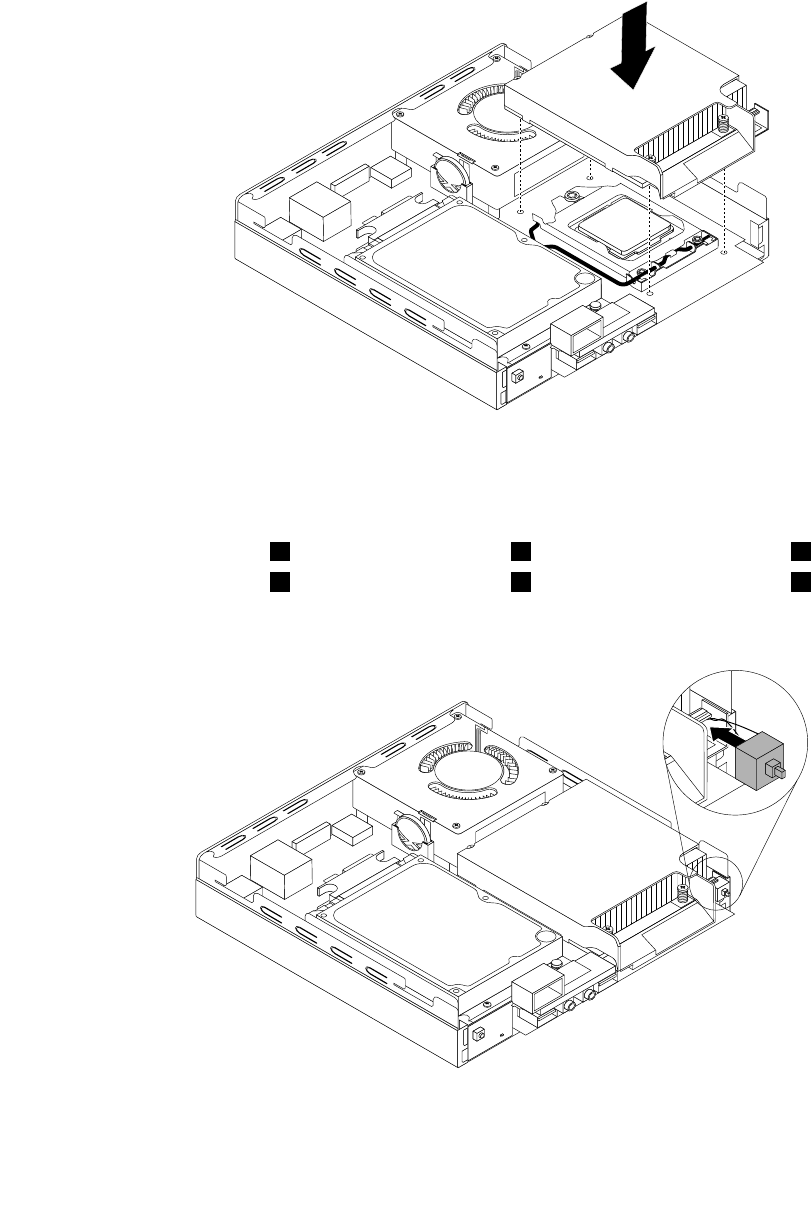
a.Youmighthavetogentlytwisttheheatsinkandfanassemblytofreeitfromthemicroprocessor.
b.Donottouchthethermalgreasewhilehandlingtheheatsinkandfanassembly.
7.Positionthenewheatsinkandfanassemblyonthesystemboardsothatthefourscrewsarealigned
withtheholesinthesystemboard.
Figure46.Installingtheheatsink
8.Followthissequencetoinstallthefourscrewstosecurethenewheatsinkandfanassembly.Do
notover-tightenthescrews.
a.Partiallytightenscrew1,thenfullytightenscrew2,andthenfullytightenscrew1.
b.Partiallytightenscrew3,thenfullytightenscrew4,andthenfullytightenscrew3.
9.Attachtheintrusionswitchtotheheatsinkbracket.
Figure47.Installingtheintrusionswitch
Chapter5.Installingorreplacinghardware57
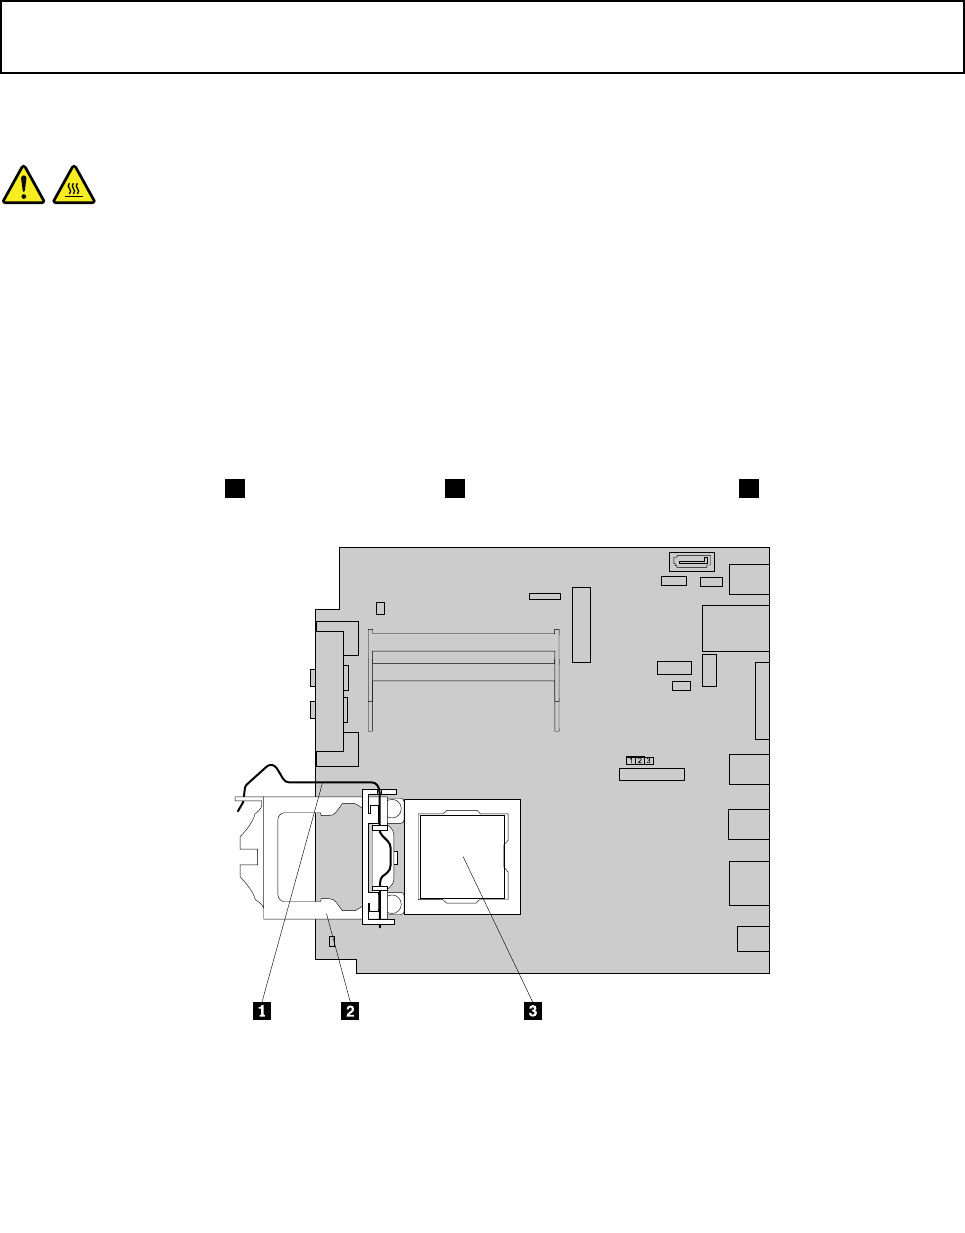
Whattodonext:
•Toworkwithanotherpieceofhardware,gototheappropriatesection.
•Tocompletetheinstallationorreplacement,goto“Completingthepartsreplacement”onpage74.
Replacingthemicroprocessor
Attention:
Donotopenyourcomputerorattemptanyrepairbeforereadingandunderstandingthe“Importantsafetyinformation”
onpagev.
Thissectionprovidesinstructionsonhowtoreplacethemicroprocessor.
CAUTION:
Theheatsinkandmicroprocessormightbeveryhot.Turnoffthecomputerandwaitthreetove
minutestoletthecomputercoolbeforeremovingthecomputercover.
Toreplacethemicroprocessor,dothefollowing:
1.Turnoffthecomputeranddisconnectallpowercordsfromelectricaloutlets.
2.Removethecomputercover.See“Removingthecomputercover”onpage33.
3.Removetheheatsink.See“Replacingtheheatsink”onpage55.
Note:Placetheheatsinkonitssidesothatthethermalgreaseonthebottomofitdoesnotgetin
contactwithanything.
4.Liftthesmallhandle1andopentheretainer2toaccessthemicroprocessor3.
Figure48.Accessingthemicroprocessor
58ThinkCentreUserGuide
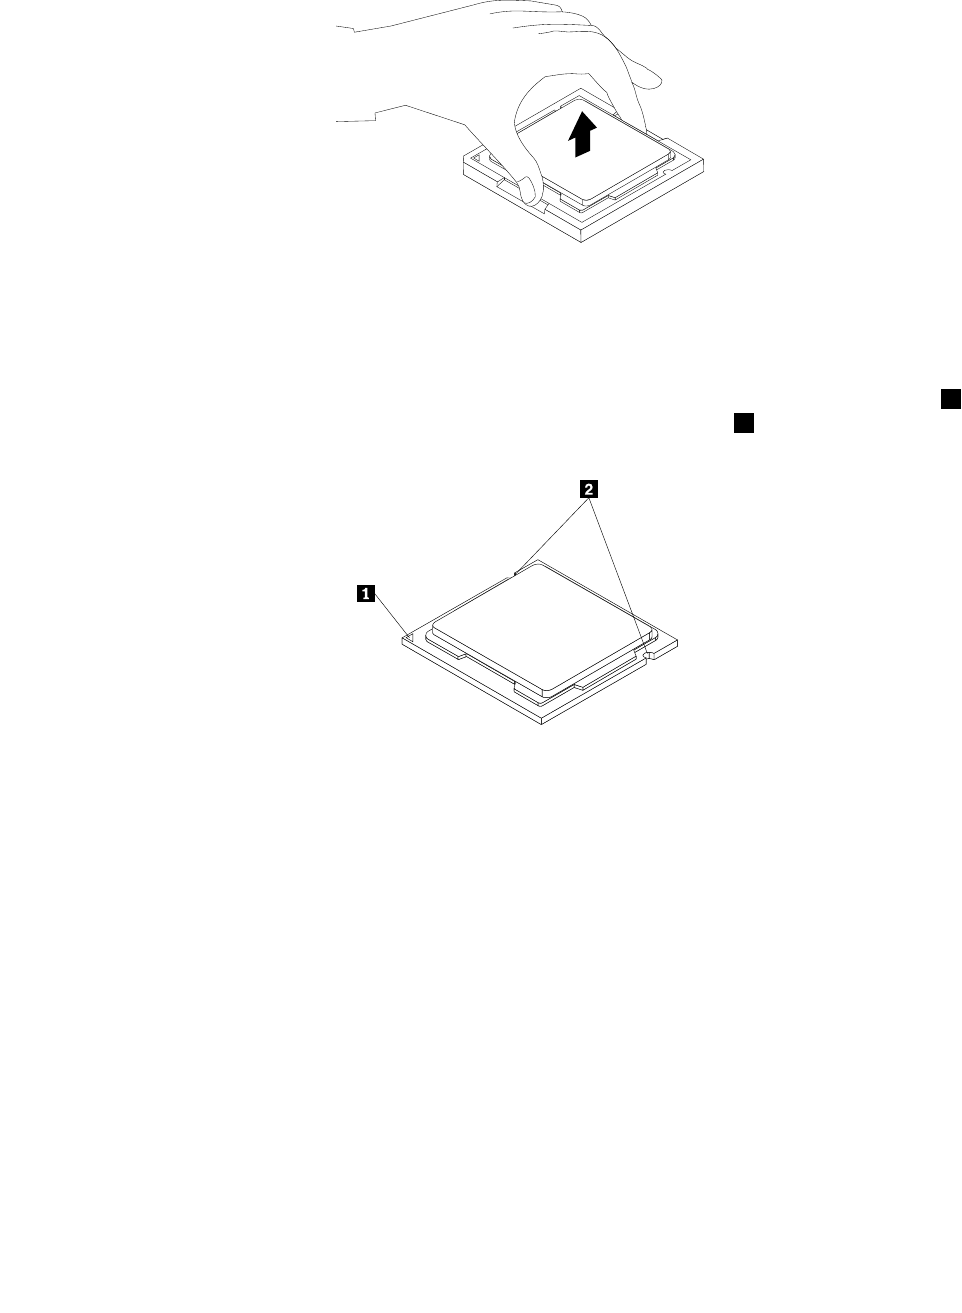
5.Liftthemicroprocessorstraightupandoutofthemicroprocessorsocket.
Figure49.Removingthemicroprocessor
Notes:
a.Yourmicroprocessorandsocketmightlookdifferentfromtheoneillustrated.
b.Notetheorientationofthemicroprocessorinthesocket.Youcaneitherlookforthesmalltriangle1
ononecornerofthemicroprocessorornotetheorientationofthenotches2onthemicroprocessor.
Thisisimportantwheninstallingthenewmicroprocessoronthesystemboard.
c.Touchonlytheedgesofthemicroprocessor.Donottouchthegoldcontactsonthebottom.
d.Donotdropanythingontothemicroprocessorsocketwhileitisexposed.Thesocketpinsmustbe
keptascleanaspossible.
6.Makesurethatthesmallhandleisintheraisedpositionandthemicroprocessorretainerisfullyopen.
7.Removetheprotectivecoverthatprotectsthegoldcontactsofthenewmicroprocessor.
8.Holdthenewmicroprocessorbyitssidesandalignthesmalltriangleononecornerofthenew
microprocessorwiththecorrespondingsmalltriangleononecornerofthemicroprocessorsocket.
Chapter5.Installingorreplacinghardware59
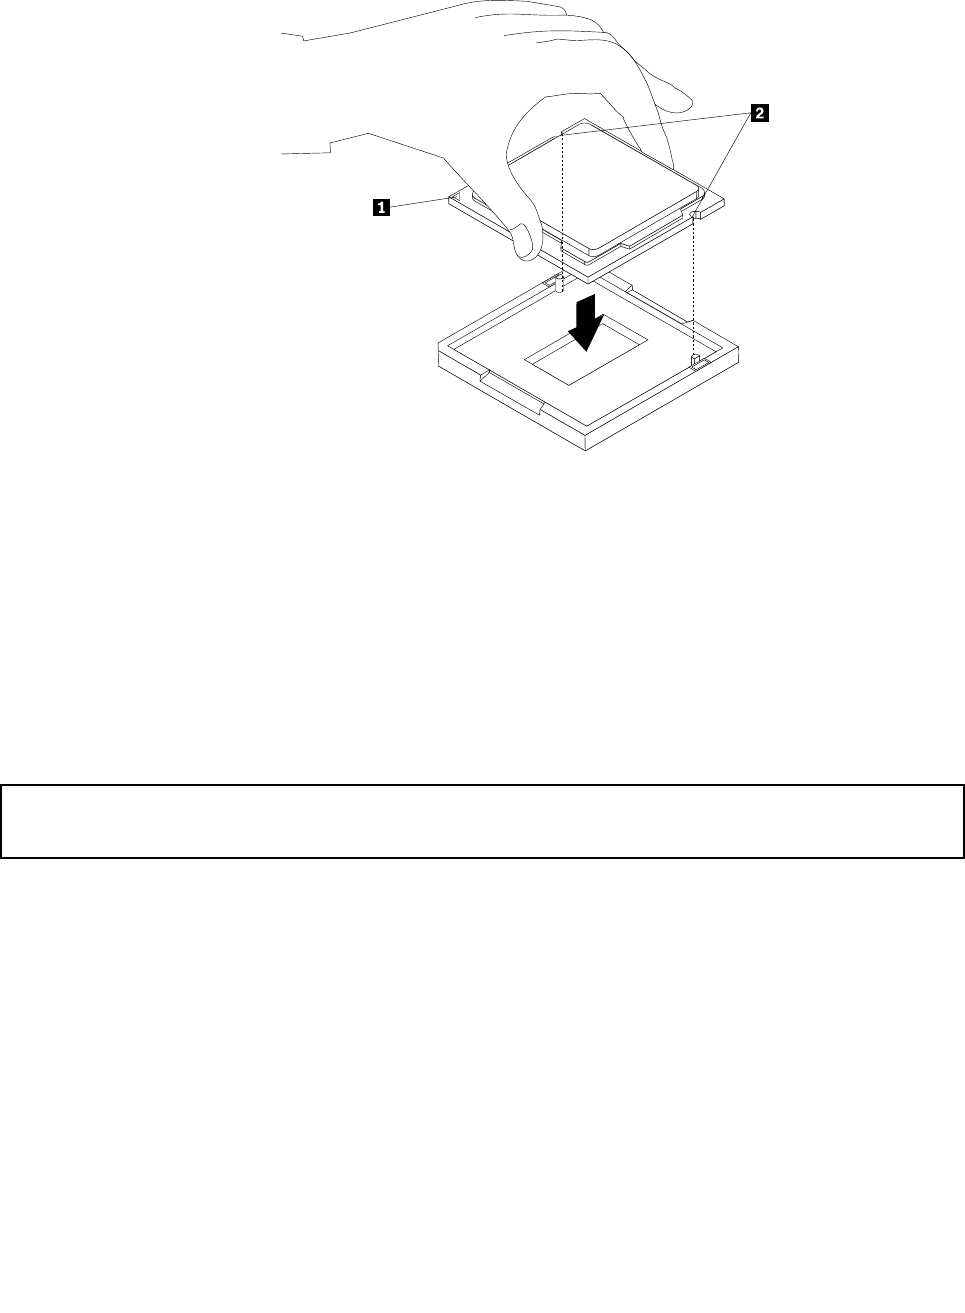
9.Lowerthenewmicroprocessorstraightdownintothemicroprocessorsocketonthesystemboard.
Figure50.Installingthemicroprocessor
10.Closethemicroprocessorretainerandlockitintopositionwiththesmallhandletosecurethenew
microprocessorinthesocket.
11.Reinstalltheheatsink.See“Replacingtheheatsink”onpage55.
Whattodonext:
•Toworkwithanotherpieceofhardware,gototheappropriatesection.
•Tocompletethereplacement,goto“Completingthepartsreplacement”onpage74.
Replacingtheharddiskdrivebracket
Attention:
Donotopenyourcomputerorattemptanyrepairbeforereadingandunderstandingthe“Importantsafetyinformation”
onpagev.
Thissectionprovidesinstructionsonhowtoreplacetheharddiskdrivebracket.
Toreplacetheharddiskdrivebracket,dothefollowing:
1.Turnoffthecomputeranddisconnectallpowercordsfromelectricaloutlets.
2.Removethecomputercover.See“Removingthecomputercover”onpage33.
3.Locatetheharddiskdrive.See“Locatingcomponents”onpage12.
4.Disconnectthesignalcableandthepowercablefromtheharddiskdrive.
60ThinkCentreUserGuide

5.Removethetwoscrews1thatsecuretheharddiskdrivebracketonthesystemboard.
Figure51.Removingthescrewsthatsecuretheharddiskdrivebracket
Chapter5.Installingorreplacinghardware61
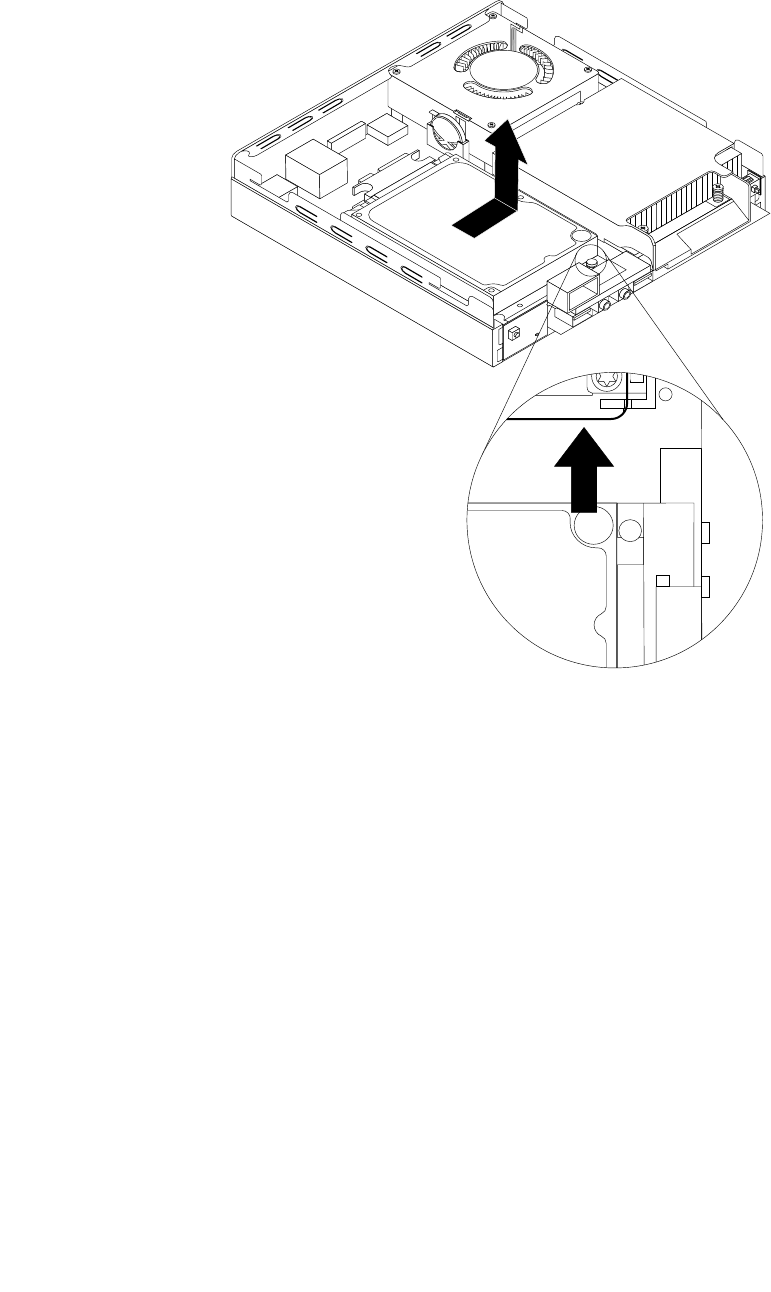
6.Slidetheharddiskdrivebrackettowardtheheatsinkandthenlifttheharddiskdrivebrackettoremove
itfromthecomputer.
Figure52.Removingtheharddiskdrivebracket
62ThinkCentreUserGuide
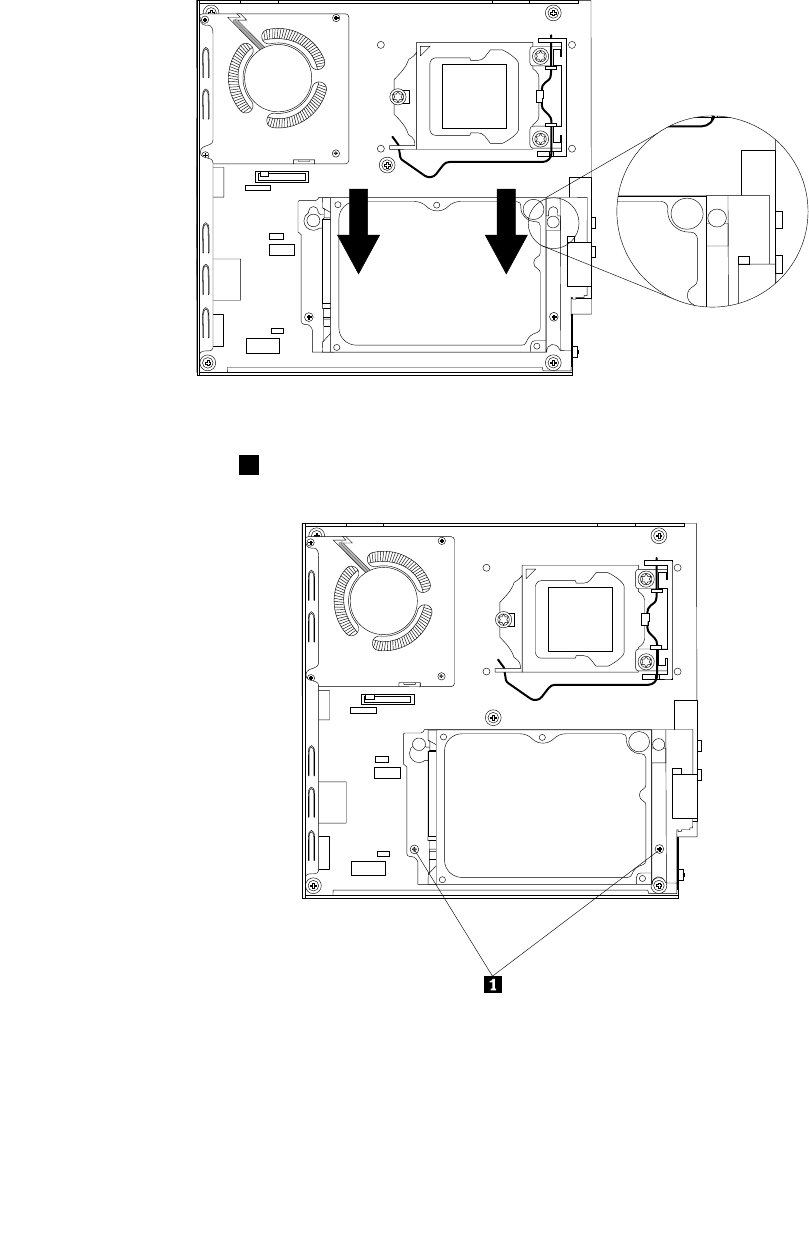
7.Toinstalltheharddiskdrivebracketintothecomputer,positiontheharddiskdrivebracketonthe
systemboardsothatthetwoholesintheharddiskdrivebracketarealignedwiththestandoffsonthe
systemboard.Slidetheharddiskdrivebracketasshownuntilthetwoscrewholesarealignedwiththe
correspondingscrewpostsonthesystemboard.
Figure53.Installingtheharddiskdrivebracket
8.Installthetwoscrews1thatsecuretheharddiskdrivebracket.
Figure54.Installingthetwoscrewsthatsecuretheharddiskdrivebracket
9.Connectthesignalcableandthepowercabletotheharddiskdrive.
Whattodonext:
•Toworkwithanotherpieceofhardware,gototheappropriatesection.
Chapter5.Installingorreplacinghardware63
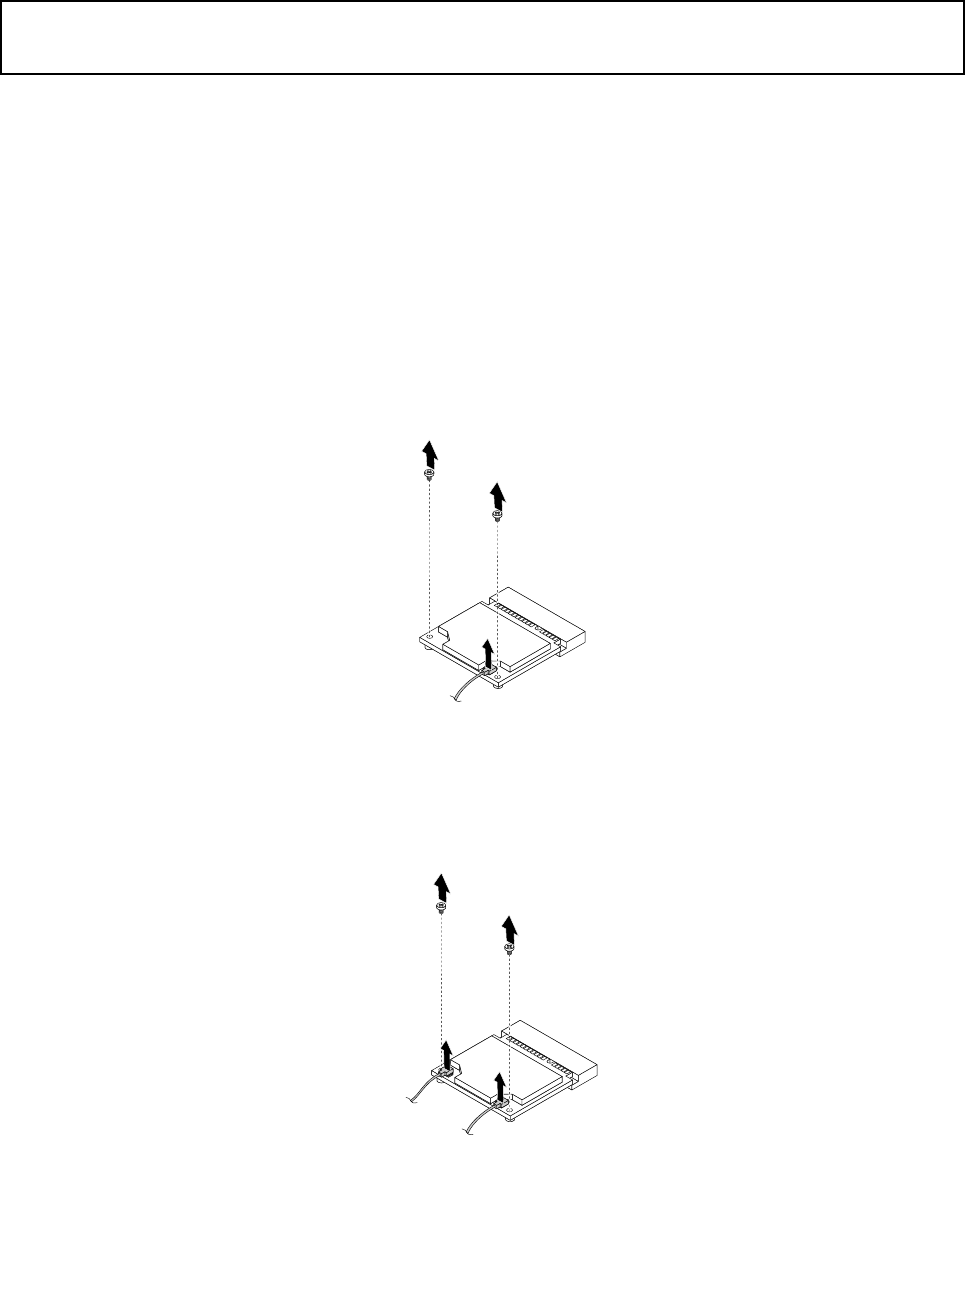
•Tocompletetheinstallationorreplacement,goto“Completingthepartsreplacement”onpage74.
ReplacingtheWiFicardmodule
Attention:
Donotopenyourcomputerorattemptanyrepairbeforereadingandunderstandingthe“Importantsafetyinformation”
onpagev.
ThissectionprovidesinstructionsonhowtoreplacetheWiFicardmodule.
Note:TheWiFicardmoduleisonlyavailableinsomemodels.
ToreplacetheWiFicardmodule,dothefollowing:
1.Turnoffthecomputeranddisconnectallpowercordsfromelectricaloutlets.
2.Removethecomputercover.See“Removingthecomputercover”onpage33.
3.Removetheharddiskdrivebracket.See“Replacingtheharddiskdrivebracket”onpage60.
4.LocatetheWiFicardmoduleonthesystemboard.See“Locatingcomponents”onpage12.
5.DisconnecttheWiFiantennacablefromtheWiFicardmoduleandremovethetwoscrewsthatsecure
theWiFicardmoduletothesystemboard.
Figure55.RemovingtheWiFicardmodulecableandscrews
Note:Dependingonyourcomputermodel,theWiFicardmodulethatcomeswithyourcomputer
mighthavetwocables.
Figure56.RemovingtheWiFicardmodulecablesandscrews
64ThinkCentreUserGuide
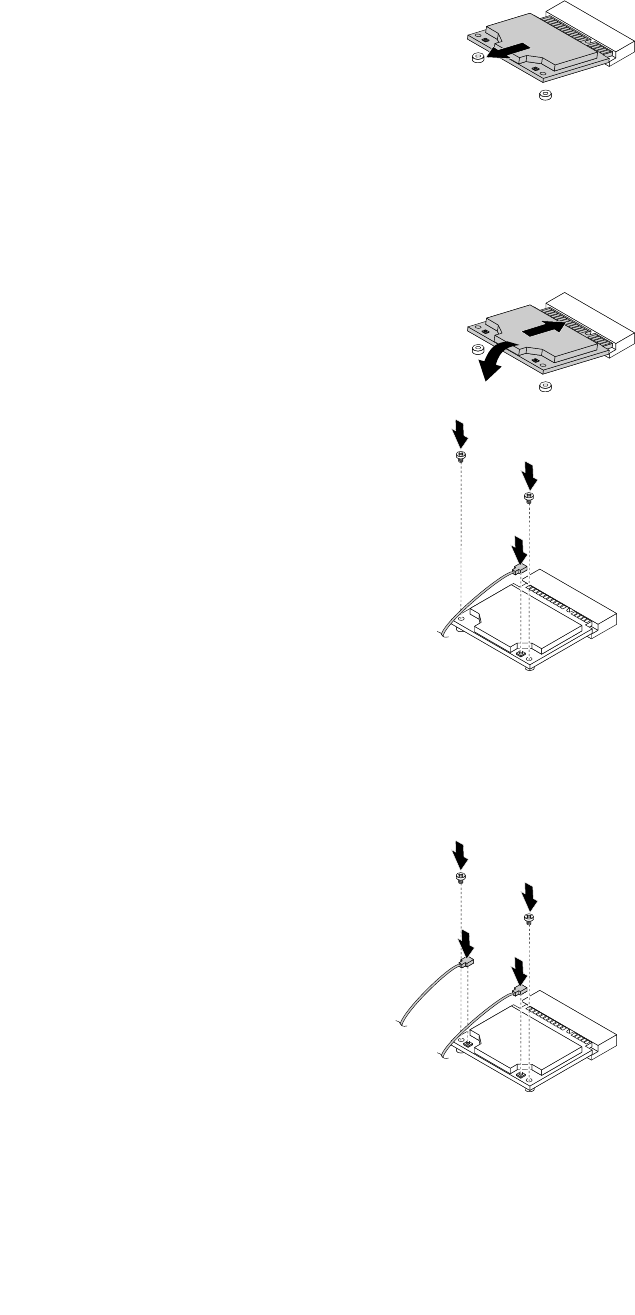
6.PulltheWiFicardmoduletoremoveitoutoftheminiPCIExpressslot.
Figure57.RemovingtheWiFicardmodule
7.InsertthenewWiFicardmoduleintotheminiPCIExpressslot.PivottheWiFicardmoduledownward
andtheninstallthetwoscrewstosecuretheWiFicardmodule.ConnecttheWiFiantennacableto
theWiFicardmodule.
Figure58.InstallingtheWiFicardmodule
Note:Dependingonyourcomputermodel,theWiFicardmodulethatcomeswithyourcomputer
mighthavetwocables.
Figure59.InstallingtheWiFicardmodule
8.Installtheharddiskdrivebracket.See“Replacingtheharddiskdrivebracket”onpage60.
Chapter5.Installingorreplacinghardware65

Whattodonext:
•Toworkwithanotherpieceofhardware,gototheappropriatesection.
•Tocompletetheinstallationorreplacement,goto“Completingthepartsreplacement”onpage74.
InstallingorremovingtherearWiFiantenna
Attention:
Donotopenyourcomputerorattemptanyrepairbeforereadingandunderstandingthe“Importantsafetyinformation”
onpagev.
ThissectionprovidesinstructionsonhowtoinstallorremovetherearWiFiantenna.
Note:Therearantennaisonlyavailableonsomemodels.
InstallingtherearWiFiantenna
Note:Dependingonyourcomputermodel,theWiFicardmodulethatcomeswithyourcomputermight
workwithoneortworearantennas.Ifyoureceivetworearantennas,installbothofthemtotherearofyour
computer.
ToinstalltherearWiFiantenna,dothefollowing:
1.Turnoffthecomputeranddisconnectallpowercordsfromelectricaloutlets.
2.InstalltherearWiFiantennatotherearWiFiantennacableconnectorattachedontherearofthe
computer.
66ThinkCentreUserGuide
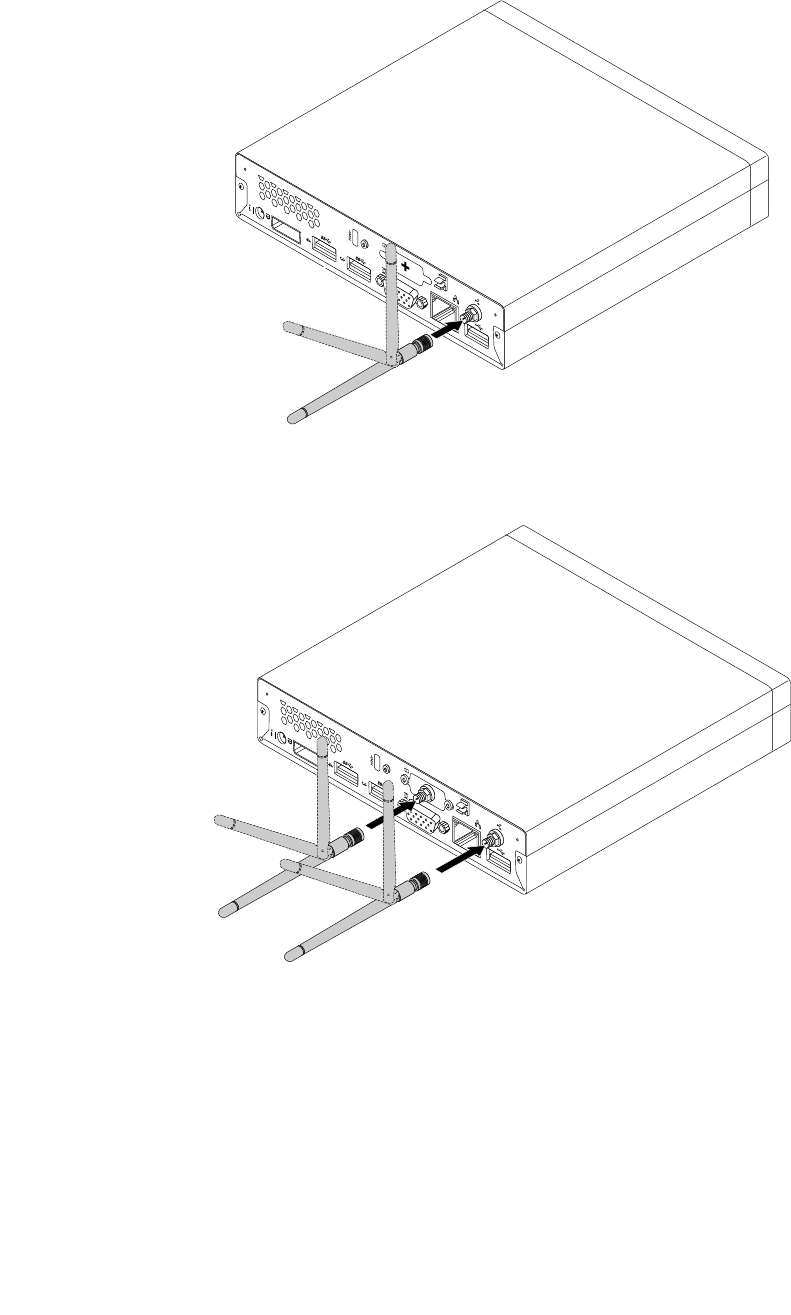
3.Adjusttheangleoftherearantennatolowertheriskofbreakingtheantennabyaccident.
Figure60.InstallingtherearWiFiantenna
Figure61.InstallingtherearWiFiantennas
Whattodonext:
•Toworkwithanotherpieceofhardware,gototheappropriatesection.
•Tocompletetheinstallationorreplacement,goto“Completingthepartsreplacement”onpage74.
RemovingtherearWiFiantenna
ToremovetherearWiFiantenna,dothefollowing:
1.Turnoffthecomputeranddisconnectallpowercordsfromelectricaloutlets.
Chapter5.Installingorreplacinghardware67
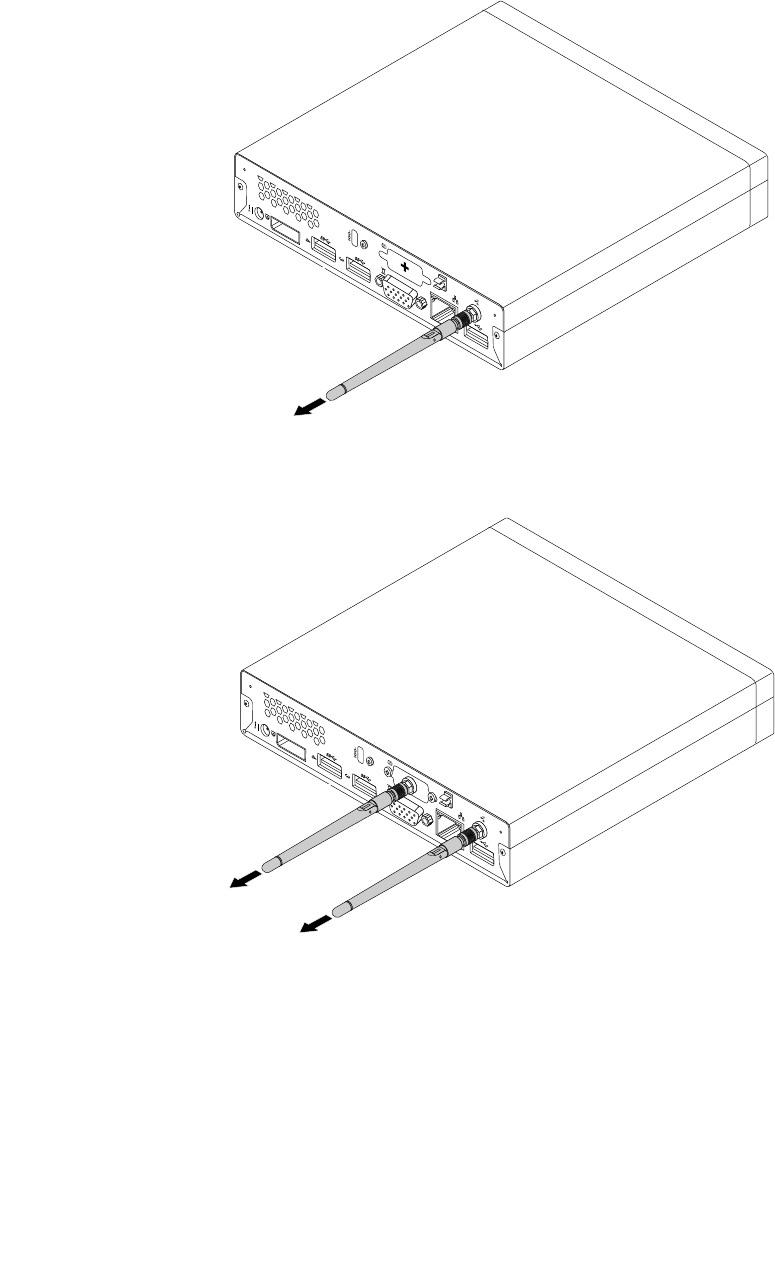
2.StraightentherearWiFiantennasothatitcanbemoreeasilytwisted.
3.HoldthethickerendoftherearWiFiantennaandunscrewtheWiFiantennafromtherearofthe
computer.
Figure62.RemovingtherearWiFiantenna
Figure63.RemovingtherearWiFiantennas
Whattodonext:
•Toworkwithanotherpieceofhardware,gototheappropriatesection.
•Tocompletetheinstallationorreplacement,goto“Completingthepartsreplacement”onpage74.
68ThinkCentreUserGuide
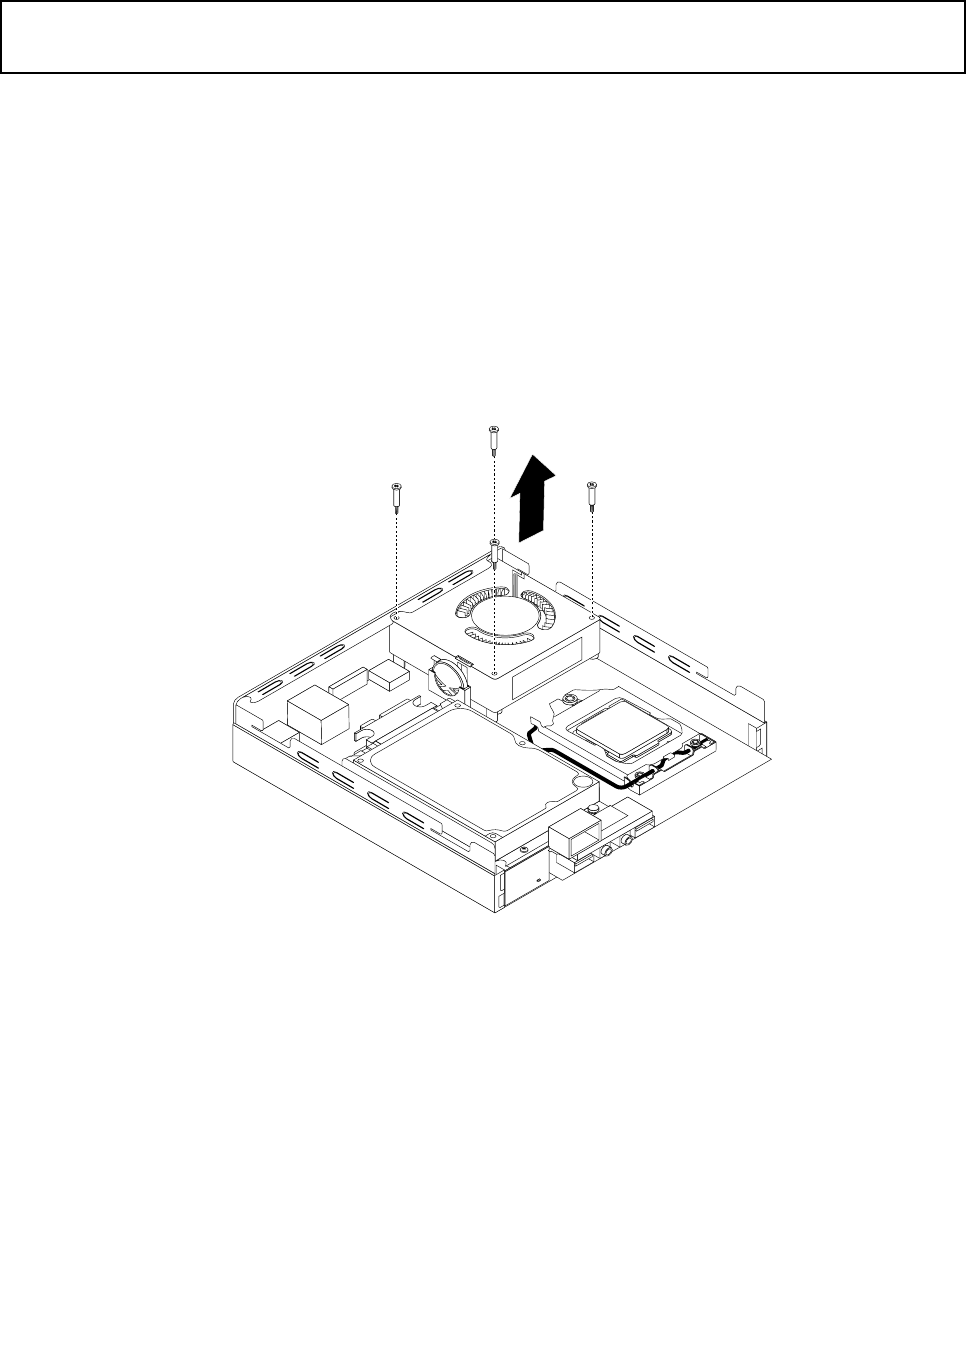
Replacingthesystemfan
Attention:
Donotopenyourcomputerorattemptanyrepairbeforereadingandunderstandingthe“Importantsafetyinformation”
onpagev.
Thissectionprovidesinstructionsonhowtoreplacethesystemfan.
Toreplacethesystemfan,dothefollowing:
1.Turnoffthecomputeranddisconnectallpowercordsfromelectricaloutlets.
2.Removethecomputercover.See“Removingthecomputercover”onpage33.
3.Locatethesystemfaninthecomputer.See“Locatingcomponents”onpage12.
4.Removetheheatsinkforeasieraccesstothesystemfan.See“Replacingtheheatsink”onpage55.
5.Disconnectthesystemfancablefromthesystemboard.See“Locatingpartsonthesystemboard”
onpage13.
6.Removethefourscrewsthatsecurethesystemfantothesystemboard.
Figure64.Removingthescrewsthatsecurethesystemfan
Chapter5.Installingorreplacinghardware69
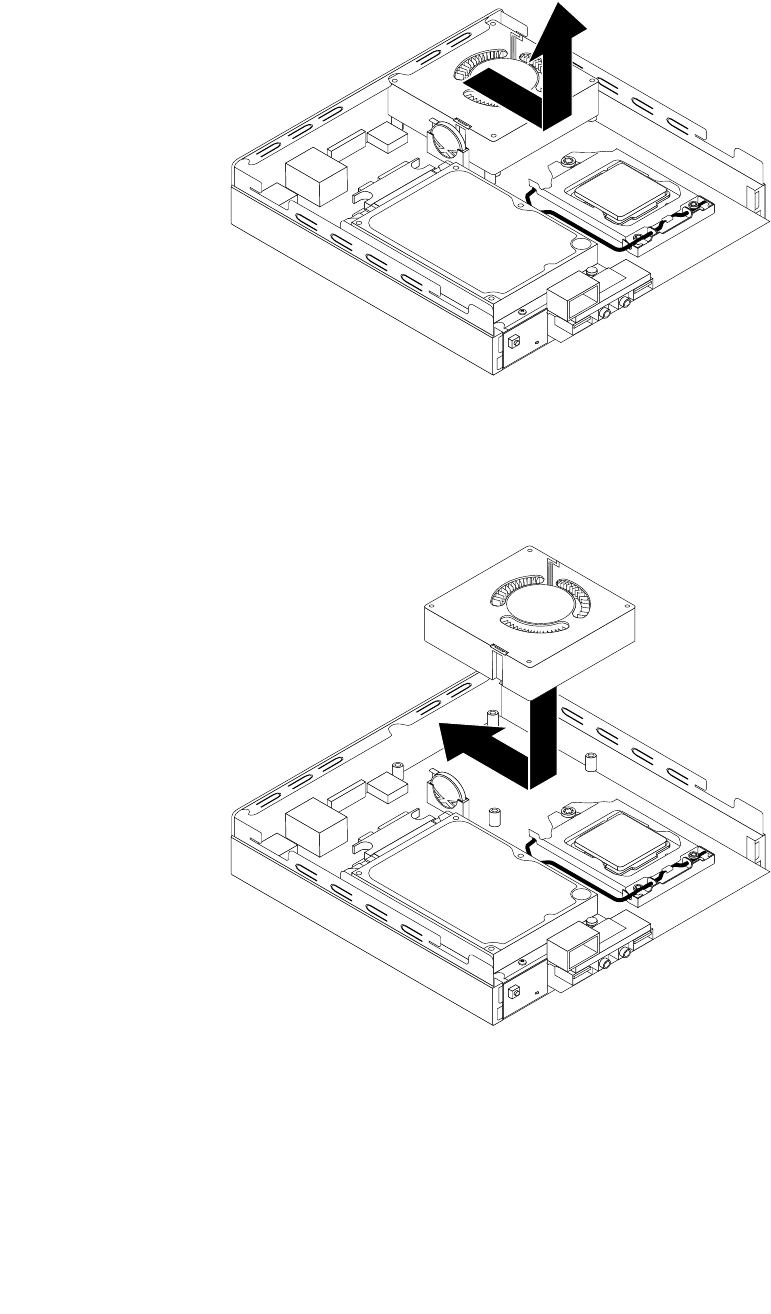
7.Liftthefailingsystemfanoffthesystemboard.
Figure65.Removingthesystemfan
8.Positionthenewsystemfanonthesystemboardsothatthefourscrewsarealignedwiththescrew
postsonthesystemboard.
Figure66.Installingthesystemfan
70ThinkCentreUserGuide
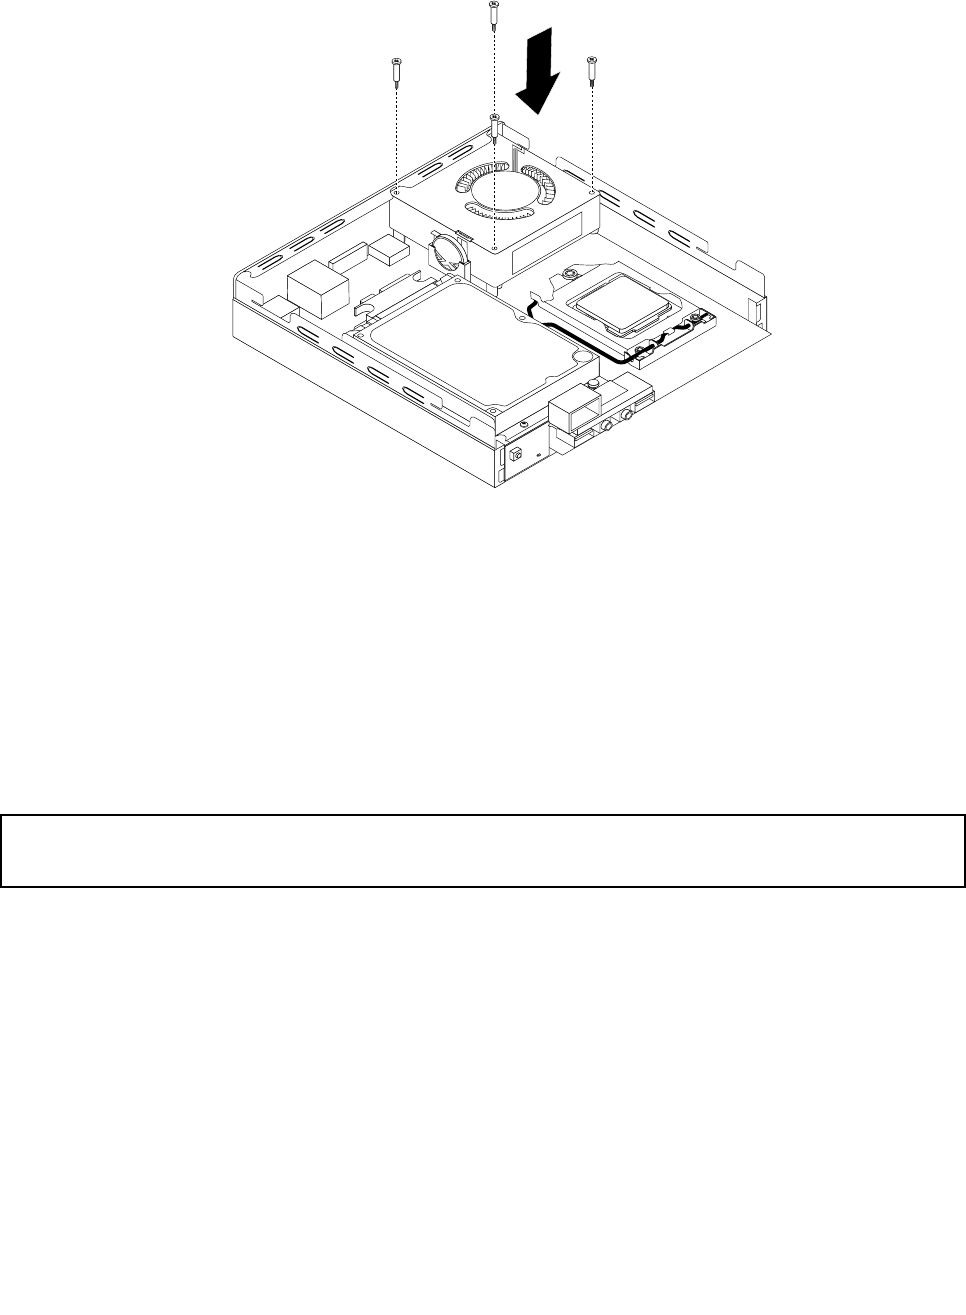
9.Installthefourscrewsthatsecurethesystemfan.
Figure67.Installingthescrewsthatsecurethesystemfan
10.Connectthesystemfancabletothesystemfanconnectoronthesystemboard.See“Locatingpartson
thesystemboard”onpage13.
11.Reinstalltheheatsink.See“Replacingtheheatsink”onpage55.
Whattodonext:
•Toworkwithanotherpieceofhardware,gototheappropriatesection.
•Tocompletetheinstallationorreplacement,goto“Completingthepartsreplacement”onpage74.
Replacingtheinternalspeaker
Attention:
Donotopenyourcomputerorattemptanyrepairbeforereadingandunderstandingthe“Importantsafetyinformation”
onpagev.
Thissectionprovidesinstructionsonhowtoreplacetheinternalspeaker.
Note:Theinternalspeakerisonlyavailableinsomemodels.
Toreplacetheinternalspeaker,dothefollowing:
1.Turnoffthecomputeranddisconnectallpowercordsfromelectricaloutlets.
2.Removethecomputercover.See“Removingthecomputercover”onpage33.
3.Locatetheinternalspeakerinthecomputer.See“Locatingpartsonthesystemboard”onpage13.
4.Removetheharddiskdrivebracket.See“Replacingtheharddiskdrivebracket”onpage60.
5.Disconnecttheinternalspeakercablefromthesystemboard.See“Locatingpartsonthesystem
board”onpage13.
Chapter5.Installingorreplacinghardware71
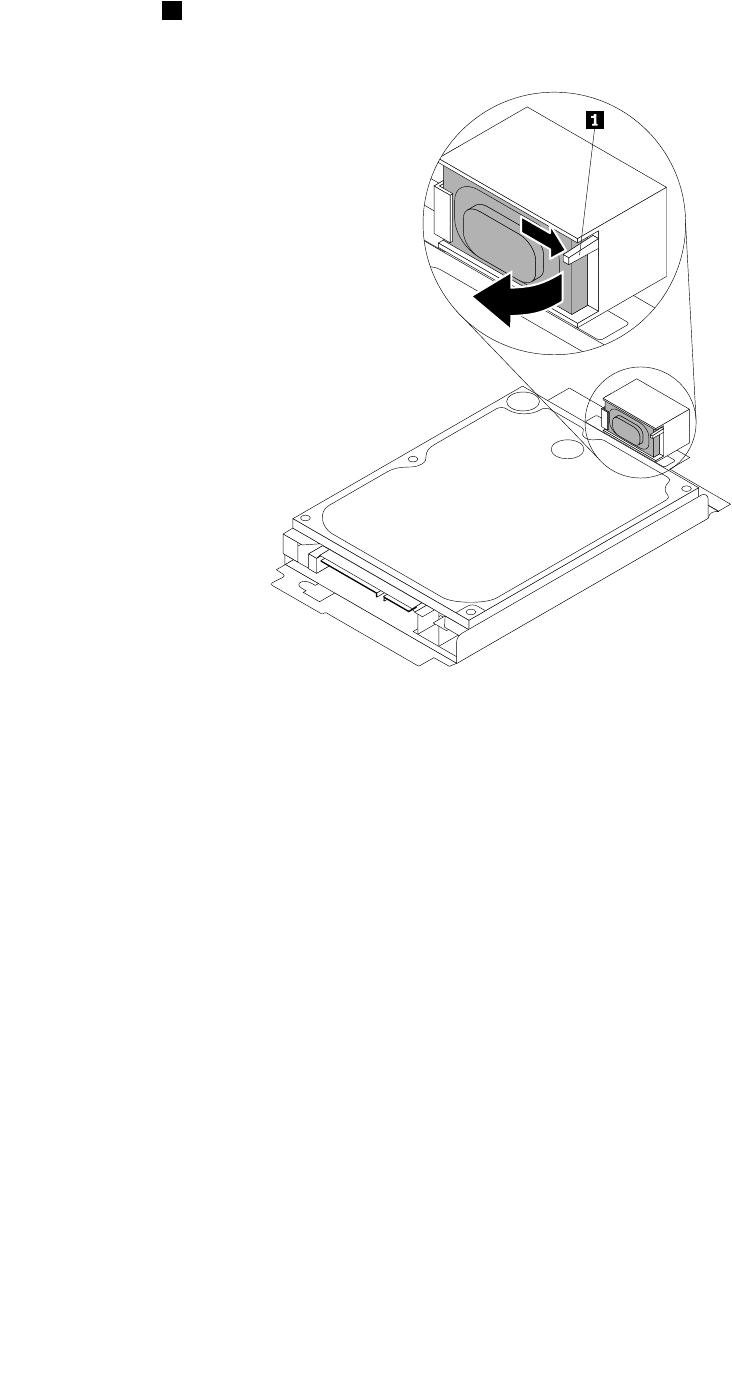
6.Pressthetab1thatsecurestheinternalspeakerandthenpivottheinternalspeakeroutwardasshown
tocompletelyremovetheinternalspeakerfromtheinternalspeakerholder.
Figure68.Removingtheinternalspeaker
72ThinkCentreUserGuide
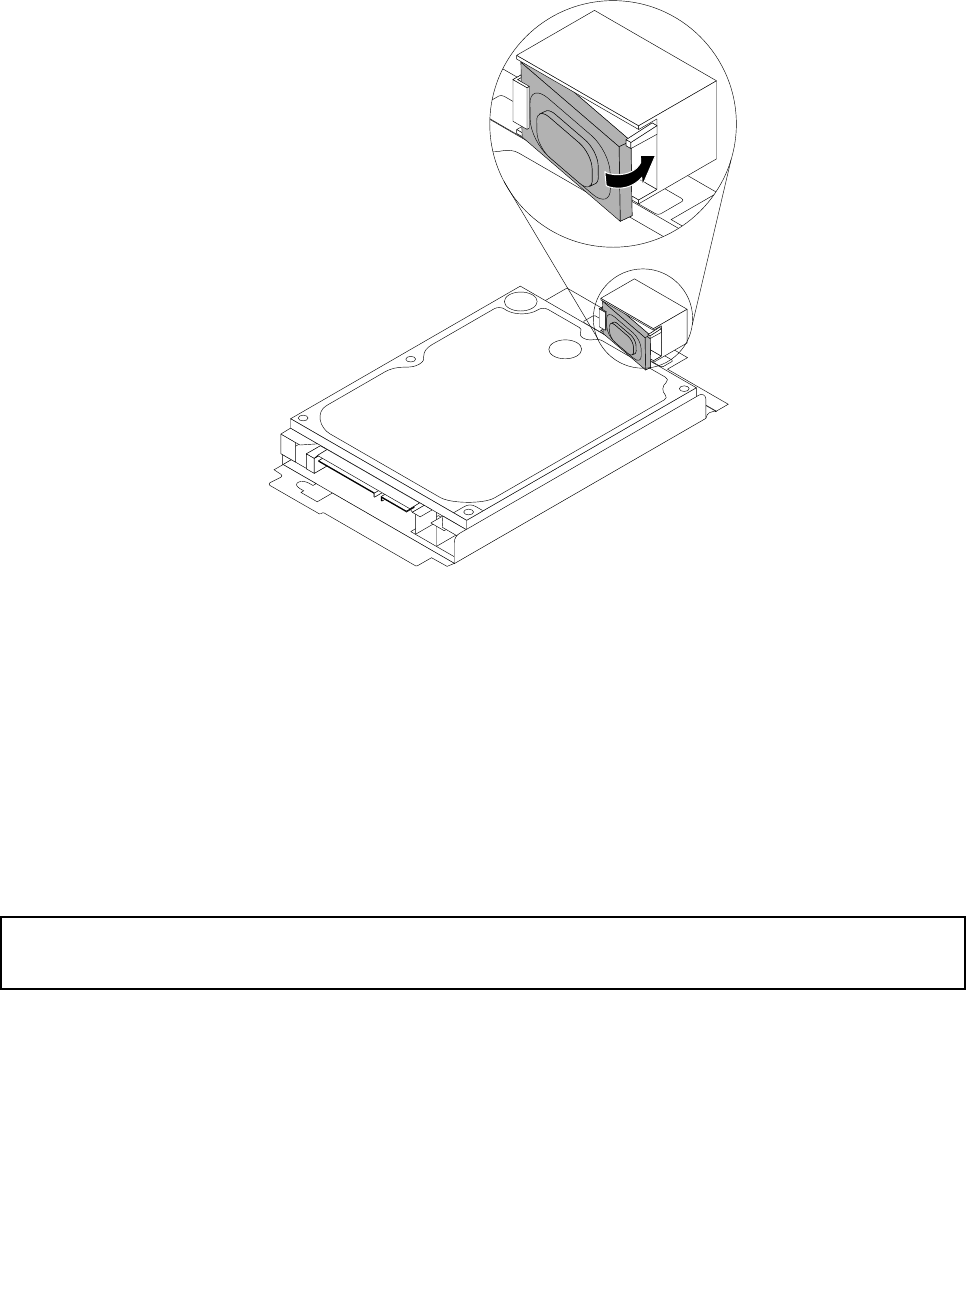
7.Positionthenewinternalspeakerintotheinternalspeakerholderandthenpivottheinternalspeaker
inwarduntilitissecuredinplace.
Figure69.Installinganewinternalspeaker
8.Connecttheinternalspeakercabletothesystemboard.See“Locatingpartsonthesystemboard”
onpage13.
9.Installtheharddiskdrivebracketonthesystemboard.See“Replacingtheharddiskdrivebracket”
onpage60.
Whattodonext:
•Toworkwithanotherpieceofhardware,gototheappropriatesection.
•Tocompletetheinstallationorreplacement,goto“Completingthepartsreplacement”onpage74.
Replacingthekeyboardormouse
Attention:
Donotopenyourcomputerorattemptanyrepairbeforereadingandunderstandingthe“Importantsafetyinformation”
onpagev.
Thissectionprovidesinstructionsonhowtoreplacethekeyboardormouse.
Toreplacethekeyboardormouse,dothefollowing:
1.Disconnecttheoldkeyboardcableormousecablefromthecomputer.
Chapter5.Installingorreplacinghardware73
2.ConnectanewkeyboardormousetooneoftheUSBconnectorsonthecomputer.Dependingonwhere
youwanttoconnectthenewkeyboardormouse,see“Locatingconnectors,controls,andindicatorson
thefrontofyourcomputer”onpage9or“Locatingconnectorsontherearofyourcomputer”onpage10.
Figure70.ConnectingtheUSBkeyboardormouse
Whattodonext:
•Toworkwithanotherpieceofhardware,gototheappropriatesection.
•Tocompletetheinstallationorreplacement,goto“Completingthepartsreplacement”onpage74.
Completingthepartsreplacement
Aftercompletingtheinstallationorreplacementforallparts,youneedtoreinstallthecomputercoverand
reconnectcables.Dependingonthepartsyouinstalledorreplaced,youmightneedtoconrmtheupdated
informationintheSetupUtilityprogram.RefertoChapter7“UsingtheSetupUtilityprogram”onpage85.
Toreinstallthecomputercoverandreconnectcablestoyourcomputer,dothefollowing:
1.Ensurethatallcomponentshavebeenreassembledcorrectlyandthatnotoolsorloosescrewsareleft
insideyourcomputer.See“Locatingcomponents”onpage12forthelocationsofvariouscomponents
inyourcomputer.
2.Beforereinstallingthecomputercover,ensurethatthecablesareroutedcorrectly.Keepcablesclearof
thehingesandsidesofthecomputerchassistoavoidinterferencewithreinstallingthecomputercover.
74ThinkCentreUserGuide
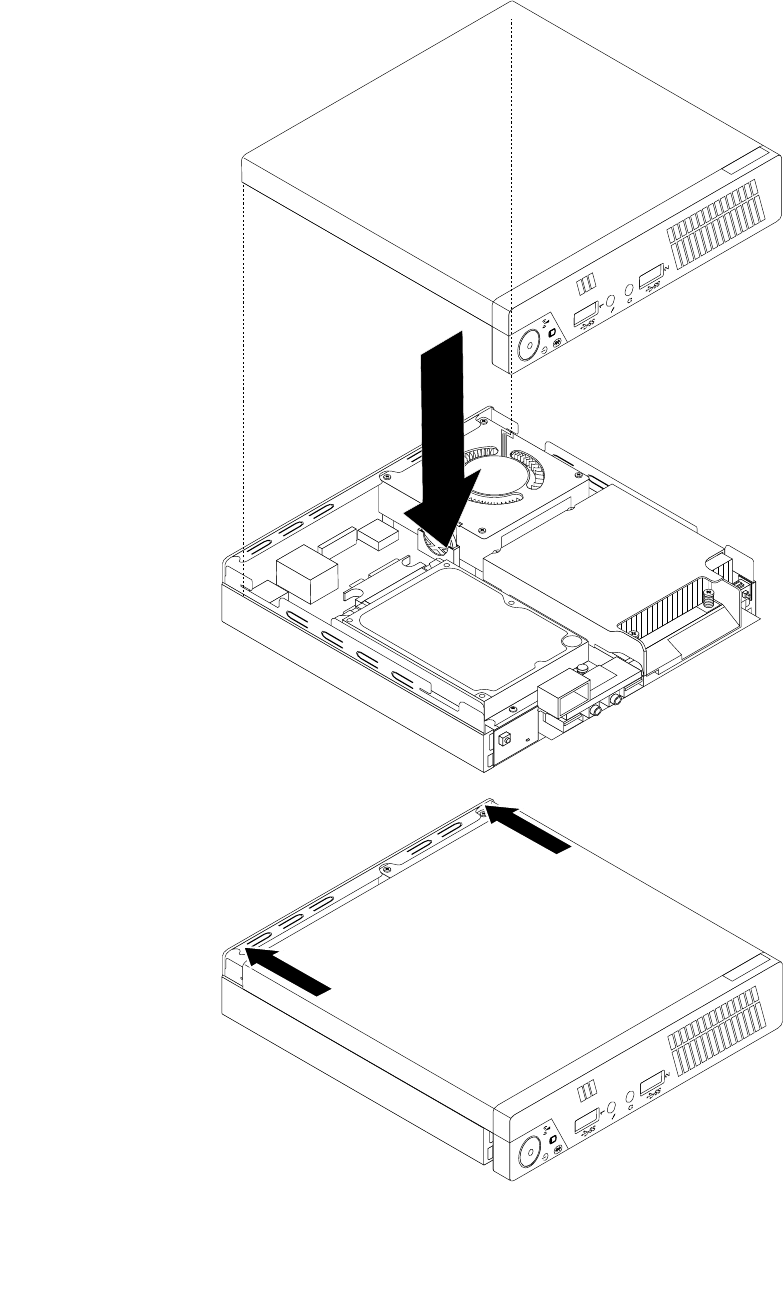
3.Positionthecomputercoveronthechassisandthenpushthecovertotherearofthecomputeruntil
itsnapsintoposition.
Figure71.Installingthecomputercover
Chapter5.Installingorreplacinghardware75
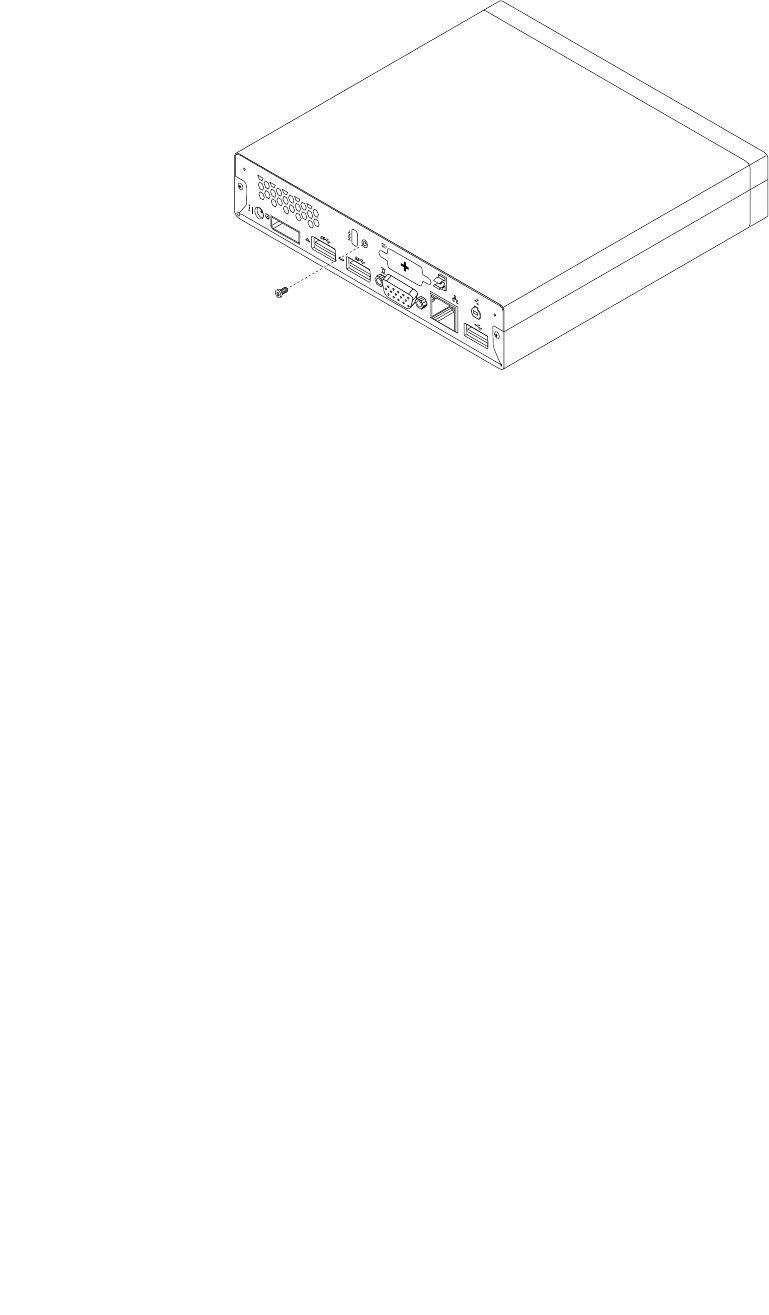
4.Installthescrewtosecurethecomputercover.
Figure72.Installingthecomputercoverscrew
5.Ifthereisanintegratedcablelockavailable,lockthecomputer.See“Attachinganintegratedcable
lock”onpage26.
6.Reconnecttheexternalcablesandpowercordstothecomputer.See“Locatingconnectorsonthe
rearofyourcomputer”onpage10.
7.Toupdateyourconguration,refertoChapter7“UsingtheSetupUtilityprogram”onpage85.
Note:Inmostareasoftheworld,LenovorequiresthereturnofthedefectiveCustomerReplaceableUnit
(CRU).InformationaboutthiswillcomewiththeCRUorwillcomeafewdaysaftertheCRUarrives.
Obtainingdevicedrivers
Youcanobtaindevicedriversforoperatingsystemsthatarenotpreinstalledat
http://www.lenovo.com/support.Installationinstructionsareprovidedinreadmeleswiththedevice-driver
les.
76ThinkCentreUserGuide

Chapter6.Recoveryinformation
ThischapterprovidesinformationabouttherecoverysolutionsprovidedbyLenovo.
•“RecoveryinformationfortheWindows7operatingsystem”onpage77
•“RecoveryinformationfortheWindows8operatingsystem”onpage83
RecoveryinformationfortheWindows7operatingsystem
ThischapterprovidesinformationabouttherecoverysolutionsprovidedbyLenovo.
Thischaptercontainsthefollowingtopics:
•Creatingandusingrecoverymedia
•Performingbackupandrecoveryoperations
•UsingtheRescueandRecoveryworkspace
•Creatingandusingarescuemedium
•Installingorreinstallingdevicedrivers
•Solvingrecoveryproblems
Notes:
1.TherecoveryinformationinthischapteronlyappliestothecomputersthathavetheRescueand
RecoveryprogramortheProductRecoveryprograminstalled.IftheEnhancedBackupandRestore
iconintheLenovoThinkVantageToolsprogramisdimmed,itindicatesthatyouneedtoinstall
theRescueandRecoveryprogrammanuallybeforeenablingitsfeatures.ToinstalltheRescueand
Recoveryprogram,dothefollowing:
a.ClickStart➙AllPrograms➙LenovoThinkVantageTools,anddouble-clickEnhancedBackup
andRestore.
b.Followtheinstructionsonthescreen.
c.Whentheinstallationprocesscompletes,theEnhancedBackupandRestoreiconisactivated.
2.Thereareavarietyofmethodstochoosefromwhenconsideringhowtorecoverintheeventofa
software-orhardware-relatedproblem.Somemethodsvarydependingonthetypeofoperatingsystem
thatisinstalled.
3.Theproductontherecoverymediamaybeusedonlyforthefollowingpurposes:
•Restoretheproductpreinstalledonyourcomputer
•Reinstalltheproduct
•ModifytheproductusingtheAdditionalFiles
Creatingandusingrecoverymedia
Youcanuserecoverymediatorestoretheharddiskdrivetothefactorydefaultstate.Recoverymediaare
usefulifyoutransferthecomputertoanotherarea,sellthecomputer,recyclethecomputer,orputthe
computerinanoperationalstateafterallothermethodsofrecoveryhavefailed.Asaprecautionarymeasure,
itisimportanttocreaterecoverymediaasearlyaspossible.
Note:Therecoveryoperationsyoucanperformusingrecoverymediavarydependingontheoperating
systemfromwhichtherecoverymediawerecreated.Therecoverymediamightcontainabootmedium
andadatamedium.YourMicrosoftWindowslicensepermitsyoutocreateonlyonedatamedium,soitis
importantthatyoustoretherecoverymediainasafeplaceafteryouhavemadethem.
©CopyrightLenovo201277

Creatingrecoverymedia
Thissectionprovidesinstructionsonhowtocreaterecoverymedia.
Note:OntheWindows7operatingsystem,youcancreaterecoverymediausingdiscsorexternalUSB
storagedevices.
TocreaterecoverymediaontheWindows7operatingsystem,clickStart➙AllPrograms➙Lenovo
ThinkVantageTools➙FactoryRecoveryDisks.Then,followtheinstructionsonthescreen.
Usingrecoverymedia
Thissectionprovidesinstructionsonhowtouserecoverymedia.
OntheWindows7operatingsystem,youcanuserecoverymediatorestorethecontentsoftheharddisk
drivetothefactorydefaultstate.Also,youcanuserecoverymediatoputthecomputerinanoperational
stateafterallothermethodsofharddiskdriverecoveryhavefailed.
Attention:Whenyouuserecoverymediatorestorethecontentsoftheharddisktothefactorydefaultstate,
allthelescurrentlyontheharddiskdrivewillbedeletedandreplacedbythefactorydefaultles.
TouserecoverymediaontheWindows7operatingsystem,dothefollowing:
1.Dependingonthetypeofyourrecoverymedia,connectthebootmedium(memorykeyorotherUSB
storagedevice)tothecomputer,orinsertthebootdiscintotheopticaldrive.
2.RepeatedlypressandreleasetheF12keywhenturningonthecomputer.WhentheStartupDevice
Menuwindowopens,releasetheF12key.
3.SelectthedesiredstartupdeviceandpressEnter.Therestoreprocessbegins.
4.Followtheinstructionsonthescreentocompletetheoperation.
Note:Afterrestoringyourcomputerharddiskdrivetothefactorydefaultstate,youmighthavetoreinstall
devicedriversforsomedevices.See“Reinstallingdevicedrivers”onpage82.
Performingbackupandrecoveryoperations
TheRescueandRecoveryprogramenablesyoutobackupallyourharddiskdrivecontentsincludingthe
operatingsystem,datales,softwareprograms,andpersonalsettings.Youcandesignatewherethe
RescueandRecoveryprogramstoresthebackup:
•Inaprotectedareaofyourharddiskdrive
•Onthesecondaryharddiskdriveifasecondaryharddiskdriveisinstalledinyourcomputer
•OnanattachedexternalUSBharddiskdrive
•Onanetworkdrive
•Onrecordablediscs(arecordableopticaldriveisrequiredforthisoption)
Afteryouhavebackedupthecontentsoftheharddiskdrive,youcanrestorethecompletecontentsofthe
harddiskdrive,restoreselectedlesonly,orrestoretheWindowsoperatingsystemandapplicationsonly
whilekeepingtheotherdataonyourharddiskdrive.
Performingabackupoperation
ThissectionprovidesinstructionsonhowtoperformabackupoperationusingtheRescueandRecovery
program.
ToperformabackupoperationusingtheRescueandRecoveryprogramontheWindows7operating
system,dothefollowing:
78ThinkCentreUserGuide

1.FromtheWindowsdesktop,clickStart➙AllPrograms➙LenovoThinkVantageTools➙Enhanced
BackupandRestore.TheRescueandRecoveryprogramopens.
2.IntheRescueandRecoverymainwindow,clicktheLaunchadvancedRescueandRecoveryarrow.
3.ClickBackupyourharddriveandselectbackupoperationoptions.Then,followtheinstructionson
thescreentocompletethebackupoperation.
Performingarecoveryoperation
ThissectionprovidesinstructionsonhowtoperformarecoveryoperationusingtheRescueandRecovery
program.
ToperformarecoveryoperationusingtheRescueandRecoveryprogramontheWindows7operating
system,dothefollowing:
1.FromtheWindowsdesktop,clickStart➙AllPrograms➙LenovoThinkVantageTools➙Enhanced
BackupandRestore.TheRescueandRecoveryprogramopens.
2.IntheRescueandRecoverymainwindow,clicktheLaunchadvancedRescueandRecoveryarrow.
3.ClicktheRestoreyoursystemfromabackupicon.
4.Followtheinstructionsonthescreentocompletetherecoveryoperation.
FormoreinformationaboutperformingarecoveryoperationfromtheRescueandRecoveryworkspace,see
“UsingtheRescueandRecoveryworkspace”onpage79.
UsingtheRescueandRecoveryworkspace
TheRescueandRecoveryworkspaceresidesinaprotected,hiddenareaofyourharddiskdrivethat
operatesindependentlyfromtheWindowsoperatingsystem.Thisenablesyoutoperformrecovery
operationsevenifyoucannotstarttheWindowsoperatingsystem.Youcanperformthefollowingrecovery
operationsfromtheRescueandRecoveryworkspace:
•Rescuelesfromyourharddiskdriveorfromabackup:TheRescueandRecoveryworkspaceenables
youtolocatelesonyourharddiskdriveandtransferthemtoanetworkdriveorotherrecordablemedia,
suchasaUSBdeviceoradisc.Thissolutionisavailableevenifyoudidnotbackupyourlesorif
changesweremadetothelessinceyourlastbackupoperation.Youcanalsorescueindividuallesfrom
aRescueandRecoverybackuplocatedonyourlocalharddiskdrive,aUSBdevice,oranetworkdrive.
•RestoreyourharddiskdrivefromaRescueandRecoverybackup:Ifyouhavebackedupyourharddisk
driveusingtheRescueandRecoveryprogram,youcanrestoretheharddiskdrivefromaRescueand
Recoverybackup,evenifyoucannotstarttheWindowsoperatingsystem.
•Restoreyourharddiskdrivetothefactorydefaultstate:TheRescueandRecoveryworkspaceenables
youtorestorethecompletecontentsofyourharddiskdrivetothefactorydefaultstate.Ifyouhave
multiplepartitionsonyourharddiskdrive,youhavetheoptiontorestoretheC:partitionandleavethe
otherpartitionsintact.BecausetheRescueandRecoveryworkspaceoperatesindependentlyfrom
theWindowsoperatingsystem,youcanrestoretheharddiskdrivetothefactorydefaultstateevenif
youcannotstarttheWindowsoperatingsystem.
Attention:IfyourestoretheharddiskdrivefromaRescueandRecoverybackuporrestoretheharddisk
drivetothefactorydefaultsettings,alllesontheprimaryharddiskdrivepartition(usuallydriveC:)willbe
deletedintherecoveryprocess.Ifpossible,makecopiesofimportantles.Ifyouareunabletostartthe
Windowsoperatingsystem,youcanusetherescuelesfeatureoftheRescueandRecoveryworkspaceto
copylesfromyourharddiskdrivetoothermedia.
TostarttheRescueandRecoveryworkspace,dothefollowing:
1.Makesurethecomputeristurnedoff.
Chapter6.Recoveryinformation79

2.Turnonyourcomputer.Whenyouseethelogoscreen,pressEnter,andthenpressF11toenterthe
RescueandRecoveryworkspace.
3.IfyouhavesetaRescueandRecoverypassword,typeyourpasswordwhenprompted.TheRescue
andRecoveryworkspaceopensafterashortdelay.
Note:IftheRescueandRecoveryworkspacefailstoopen,see“Solvingrecoveryproblems”onpage82.
4.Dooneofthefollowing:
•Torescuelesfromyourharddiskdrive,clickRescuelesandfollowtheinstructionsonthescreen.
•TorestoreyourharddiskdrivefromaRescueandRecoverybackuportorestoreyourharddiskdrive
tothefactorydefaultsettings,clickFullRestoreandfollowtheinstructionsonthescreen.
FormoreinformationaboutthefeaturesoftheRescueandRecoveryworkspace,clickHelp.
Note:Afterrestoringyourharddiskdrivetothefactorydefaultstate,youmighthavetoreinstalldevice
driversforsomedevices.See“Reinstallingdevicedrivers”onpage82.
Creatingandusingarescuemedium
Witharescuemedium,suchasadiscoraUSBharddiskdrive,youcanrecoverthecomputerfromfailures
thatpreventyoufromgainingaccesstotheRescueandRecoveryworkspaceonyourharddiskdrive.
Notes:
1.Therecoveryoperationsyoucanperformusingarescuemediumvarydependingontheoperating
system.
2.Therescuedisccanbestartedinalltypesofopticaldrives.
Creatingarescuemedium
Thissectionprovidesinstructionsonhowtocreatearescuemedium.
TocreatearescuemediumontheWindows7operatingsystem,dothefollowing:
1.FromtheWindowsdesktop,clickStart➙AllPrograms➙LenovoThinkVantageTools➙Enhanced
BackupandRestore.TheRescueandRecoveryprogramopens.
2.IntheRescueandRecoverymainwindow,clicktheLaunchadvancedRescueandRecoveryarrow.
3.ClicktheCreateRescueMediaicon.TheCreateRescueandRecoveryMediawindowopens.
4.IntheRescueMediaarea,selectthetypeoftherescuemediumyouwanttocreate.Youcancreatea
rescuemediumusingadisc,aUSBharddiskdrive,orasecondaryinternalharddiskdrive.
5.ClickOKandfollowtheinstructionsonthescreentocreatearescuemedium.
Usingarescuemedium
Thissectionprovidesinstructionsonhowtousetherescuemediumyouhavecreated.
•Ifyouhavecreatedarescuemediumusingadisc,usethefollowinginstructionstousetherescuemedium:
1.Turnoffyourcomputer.
2.RepeatedlypressandreleasetheF12keywhenturningonthecomputer.WhentheStartupDevice
Menuwindowopens,releasetheF12key.
3.IntheStartupDeviceMenuwindow,selectthedesiredopticaldriveastherstbootdevice.Then,
inserttherescuediscintotheopticaldriveandpressEnter.Therescuemediumstarts.
•IfyouhavecreatedarescuemediumusingaUSBharddiskdrive,usethefollowinginstructionsto
usetherescuemedium:
1.AttachtheUSBharddiskdrivetooneoftheUSBconnectorsonyourcomputer.
80ThinkCentreUserGuide

2.RepeatedlypressandreleasetheF12keywhenturningonthecomputer.WhentheStartupDevice
Menuwindowopens,releasetheF12key.
3.IntheStartupDeviceMenuwindow,selecttheUSBharddiskdriveastherstbootdeviceand
pressEnter.Therescuemediumstarts.
Whentherescuemediumstarts,theRescueandRecoveryworkspaceopens.Thehelpinformationfor
eachfeatureisavailablefromtheRescueandRecoveryworkspace.Followtheinstructionstocomplete
therecoveryprocess.
Reinstallingpreinstalledapplicationsanddevicedrivers
Yourcomputerhasprovisionsthatenableyoutoreinstallselectedfactory-installedapplicationsanddevice
drivers.
Reinstallingpreinstalledapplications
Thissectionprovidesinstructionsonhowtoreinstallpreinstalledapplications.
ToreinstalltheselectedapplicationspreinstalledonyourLenovocomputer,dothefollowing:
1.Turnonthecomputer.
2.GototheC:\SWTOOLSdirectory.
3.Opentheappsfolder.Withintheappsfolder,thereareseveralsubfoldersnamedforvariousapplications
installedinyourcomputer.
4.Opentheappropriateapplicationsubfolder.
5.Intheapplicationsubfolder,lookforaSETUP.EXEleorotherappropriateEXElesforsetup.
Double-clicktheleandfollowtheinstructionsonthescreentocompletetheinstallation.
Reinstallingpreinstalleddevicedrivers
Thissectionprovidesinstructionsonhowtoreinstallpreinstalleddevicedrivers.
Attention:Whenyoureinstalldevicedrivers,youarechangingthecurrentcongurationofyourcomputer.
Reinstalldevicedriversonlywhenitisnecessarytocorrectaproblemwithyourcomputer.
Toreinstallthedevicedriverforafactory-installeddevice,dothefollowing:
1.Turnonthecomputer.
2.GototheC:\SWTOOLSdirectory.
3.OpentheDRIVERSfolder.WithintheDRIVERSfolder,thereareseveralsubfoldersnamedforvarious
devicesinstalledinyourcomputer,suchasAUDIOorVIDEO.
4.Opentheappropriatedevicesubfolder.
5.Dooneofthefollowing:
•Inthedevicesubfolder,lookforaSETUP .exele.Double-clicktheleandfollowtheinstructionson
thescreentocompletetheinstallation.
•Inthedevicesubfolder,lookforaREADME.txtleoralewiththe.txtextension.Thislemightbe
namedaftertheoperatingsystem,suchasWIN98.txt.TheTXTlecontainsinformationabouthowto
installthedevicedriver.Followtheinstructionstocompletetheinstallation.
•Ifthedevicesubfoldercontainsalewiththe.infextensionandyouwanttoinstallthedevice
driverusingtheINFle,refertoyourWindowsHelpandSupportinformationsystemfordetailed
informationabouthowtoinstallthedevicedriver.
Note:Ifyouneedupdateddevicedrivers,see“Gettingthelatestdevicedriversforyourcomputer”on
page93formoreinformation.
Chapter6.Recoveryinformation81

Reinstallingsoftwareprograms
Ifasoftwareprogramyouinstalledonyourcomputerisnotworkingcorrectly,youmightneedtoremove
andreinstallit.Reinstallingoverwritestheexistingprogramslesandusuallyxesanyproblemsthat
youmighthavehadwiththatprogram.
Toremoveaprograminyoursystem,seeMicrosoftWindowshelpsystemfordetailedinformation.
Toreinstalltheprogram,dooneofthefollowing:
Note:Themethodofreinstallingaprogramvariesfromprogramtoprogram.Refertothedocumentation
providedwiththeprogramtoseeifyourprogramhasspecialinstallationinstructions.
•Toreinstallmostcommerciallyavailableprogramsinyoursystem,seeMicrosoftWindowshelpsystem
formoreinformation.
•ToreinstallselectedapplicationprogramsthatcamepreinstalledfromLenovo,dothefollowing:
1.Turnonthecomputer.
2.GototheC:\SWTOOLSdirectory.
3.OpentheAPPSfolder.WithintheAPPSfolder,thereareseveralsubfoldersnamedforvarious
applicationsinstalledinyourcomputer.
4.Opentheappropriateapplicationsubfolder.
5.Intheapplicationsubfolder,lookforaSETUP.EXEleorotherappropriateEXElesforsetup.
Double-clicktheleandfollowtheinstructionsonthescreentocompletetheinstallation.
Reinstallingdevicedrivers
Toreinstalladevicedriverforanoptionyouinstalled,refertothedocumentationthatcomeswiththeoption.
Whenyoureinstalldevicedrivers,youarechangingthecurrentcongurationofyourcomputer.Reinstall
devicedriversonlywhenitisnecessarytocorrectaproblemwithyourcomputer.
Formoreinformationaboutreinstallingdevicedriversthatcamewithyourcomputer,see“Reinstalling
preinstalledapplicationsanddevicedrivers”onpage81.
Solvingrecoveryproblems
IfyouareunabletoaccesstheRescueandRecoveryworkspaceortheWindowsenvironment,doone
ofthefollowing:
•UsearescuemediumtostarttheRescueandRecoveryworkspace.See“Creatingandusingarescue
medium”onpage80.
•Userecoverymediaifallothermethodsofrecoveryhavefailedandyouneedtorestoretheharddisk
drivetothefactorydefaultsettings.See“Creatingandusingrecoverymedia”onpage77.
Note:IfyouareunabletoaccesstheRescueandRecoveryworkspaceortheWindowsenvironmentfrom
arescuemediumorrecoverymedia,youmightnothavetherescuedevice(aninternalharddiskdrive,a
disc,aUSBharddiskdrive,orotherexternaldevices)setastherstbootdeviceinthestartupdevice
sequence.Youmustrstmakesurethatyourrescuedeviceissetastherstbootdeviceinthestartup
devicesequenceintheSetupUtilityprogram.See“Selectingastartupdevice”onpage88fordetailed
informationabouttemporarilyorpermanentlychangingthestartupdevicesequence.Formoreinformation
abouttheSetupUtilityprogram,seeChapter7“UsingtheSetupUtilityprogram”onpage85.
Itisimportanttocreatearescuemediumandasetofrecoverymediaasearlyaspossibleandstorethem
inasafeplaceforfutureuse.
82ThinkCentreUserGuide

RecoveryinformationfortheWindows8operatingsystem
Thissectionprovidesinformationabouttherecoverysolutionsprovidedoncomputerspreinstalledwiththe
Windows8operatingsystem.
Refreshingyourcomputer
Ifyourcomputerdoesnotperformwellandtheproblemmightbecausedbyarecentlyinstalledprogram,
youcanrefreshyourcomputerwithoutlosingyourpersonallesorchangingyoursettings.
Attention:Ifyourefreshyourcomputer,theprogramsthatcamewithyourcomputerandtheprogramsthat
youinstalledfromWindowsStorewillbereinstalled,butallotherprogramswillberemoved.
Torefreshyourcomputer,dothefollowing:
1.Movethecursortothetop-rightorbottom-rightcornerofthescreentodisplaythecharms.Click
Settings➙ChangePCsettings➙General.
2.IntheRefreshyourPCwithoutaffectingyourlessection,clickGetstarted.
Resettingyourcomputertothefactorydefaultsettings
Youcanresetyourcomputertothefactorydefaultsettings.Resettingthecomputerwillreinstallthe
operatingsystem,andreinstallalltheprogramsandsettingsthatcamewithyourcomputer.
Attention:Ifyouresetyourcomputer,allyourpersonallesandsettingswillbedeleted.Toavoiddataloss,
makeabackupcopyofallthedatathatyouwanttokeep.
Toresetyourcomputer,dothefollowing:
1.Movethecursortothetop-rightorbottom-rightcornerofthescreentodisplaythecharms.Click
Settings➙ChangePCsettings➙General.
2.IntheRemoveeverythingandreinstallWindowssection,clickGetstarted.
Advancedstartupoptions
AdvancedstartupoptionsenableyoutochangethestartupsettingsofyourWindowsoperatingsystem,
startthecomputerfromanexternaldevice,orrestoretheWindowsoperatingsystemfromasystemimage.
Tousetheadvancedstartupoptions,dothefollowing:
1.Movethecursortothetop-rightorbottom-rightcornerofthescreentodisplaythecharms.Click
Settings➙ChangePCsettings➙General.
2.IntheAdvancedstartupsection,clickRestartnow➙Troubleshoot➙Advancedoptions.
3.Restartyourcomputerfollowingtheinstructionsonthescreen.
FormoredetailsabouttherecoverysolutionsprovidedoncomputerspreinstalledwiththeWindows8
operatingsystem,refertothehelpinformationsystemoftheWindows8operatingsystem.
Chapter6.Recoveryinformation83

84ThinkCentreUserGuide

Chapter7.UsingtheSetupUtilityprogram
TheSetupUtilityprogramisusedtoviewandchangethecongurationsettingsofyourcomputer,regardless
ofwhichoperatingsystemyouareusing.However,theoperatingsystemsettingsmightoverrideanysimilar
settingsintheSetupUtilityprogram.
StartingtheSetupUtilityprogram
TostarttheSetupUtilityprogram,dothefollowing:
1.Makesureyourcomputeristurnedoff.
2.RepeatedlypressandreleasetheF1keywhenturningonthecomputer.Whenyouhearmultiple
beepsorseealogoscreen,releasetheF1key.
Note:IfaPower-OnPasswordoranAdministratorPasswordhasbeenset,theSetupUtilityprogram
menuwillnotbedisplayeduntilyoutypethecorrectpassword.Formoreinformation,see“Using
passwords”onpage85.
WhenthePOSTdetectsthattheharddiskdrivehasbeenremovedfromyourcomputerorthememory
modulesizehasdecreased,anerrormessagewillbedisplayedwhenyoustartthecomputerandyouwillbe
promptedtodooneofthefollowing:
•PressF1toentertheSetupUtilityprogram.
Note:AfteryouentertheSetupUtilityprogram,selectSaveChangesandExitatthebottomofthe
screen.Theerrormessagewillnotbedisplayedagain.
•PressF2tobypasstheerrormessageandlogintotheoperatingsystem.
Note:YouhavetoenablethecongurationchangedetectionfeatureforthePOSTtodetecttheremovalof
theharddiskdrive.Toenablethecongurationchangedetectionfeature,dothefollowing:
1.StarttheSetupUtilityprogram.
2.FromtheSetupUtilityprogrammainmenu,selectSecurity➙CongurationChangeDetection,
andpressEnter.
3.SelectEnabledandpressEnter.
4.PressF10tosavechangesandexittheSetupUtilityprogram.PressEnterwhenpromptedtoconrm
theexit.
Viewingandchangingsettings
TheSetupUtilityprogrammenulistsvariousitemsaboutthesystemconguration.Tovieworchange
settings,starttheSetupUtilityprogram.See“StartingtheSetupUtilityprogram”onpage85.Then,follow
theinstructionsonthescreen.
YoucanuseeitherthekeyboardorthemousetonavigatethroughBIOSmenuchoices.Thekeysusedto
performvarioustasksaredisplayedatthebottomofeachscreen.
Usingpasswords
ByusingtheSetupUtilityprogram,youcansetpasswordstopreventunauthorizedaccesstoyourcomputer
anddata.Thefollowingtypesofpasswordsareavailable:
•Power-OnPassword
©CopyrightLenovo201285

•AdministratorPassword
•HardDiskPassword
Youdonothavetosetanypasswordstouseyourcomputer.However,usingpasswordsimproves
computingsecurity.Ifyoudecidetosetanypasswords,readthefollowingsections.
Passwordconsiderations
Apasswordcanbeanycombinationofupto64alphabeticandnumericcharacters.Forsecurityreasons,it
isrecommendedtouseastrongpasswordthatcannotbeeasilycompromised.Tosetastrongpassword,
usethefollowingguidelines:
•Haveatleasteightcharactersinlength
•Containatleastonealphabeticcharacterandonenumericcharacter
•SetupUtilityprogramandharddiskdrivepasswordsarenotcasesensitive
•Notbeyournameoryourusername
•Notbeacommonwordoracommonname
•Besignicantlydifferentfromyourpreviouspasswords
Power-OnPassword
WhenaPower-OnPasswordisset,youarepromptedtotypeavalidpasswordeachtimethecomputeris
turnedon.Thecomputercannotbeuseduntilthevalidpasswordistypedin.
AdministratorPassword
SettinganAdministratorPassworddetersunauthorizedusersfromchangingcongurationsettings.Ifyou
areresponsibleformaintainingthecongurationsettingsofseveralcomputers,youmightwanttosetan
AdministratorPassword.
WhenanAdministratorPasswordisset,youarepromptedtotypeavalidpasswordeachtimeyoutryto
accesstheSetupUtilityprogram.TheSetupUtilityprogramcannotbeaccesseduntilavalidpassword
istypedin.
IfboththePower-OnPasswordandAdministratorPasswordareset,youcantypeeitherpassword.However,
youmustuseyourAdministratorPasswordtochangeanycongurationsettings.
HardDiskPassword
SettingaHardDiskPasswordpreventsunauthorizedaccesstothedataontheharddiskdrive.Whena
HardDiskPasswordisset,youarepromptedtotypeavalidpasswordeachtimeyoutrytoaccessthe
harddiskdrive.
Notes:
•AfteryousetaHardDiskPassword,yourdataontheharddiskdriveisprotectedeveniftheharddisk
driveisremovedfromonecomputerandinstalledinanother.
•IftheHardDiskPasswordisforgotten,thereisnowaytoresetthepasswordorrecoverdatafromthe
harddiskdrive.
Setting,changing,anddeletingapassword
Toset,change,ordeleteapassword,dothefollowing:
1.StarttheSetupUtilityprogram.See“StartingtheSetupUtilityprogram”onpage85.
86ThinkCentreUserGuide

2.FromtheSetupUtilityprogrammainmenu,selectSecurity.
3.Dependingonthepasswordtype,selectSetPower-OnPassword,SetAdministratorPassword,or
HardDiskPassword.
4.Followtheinstructionsontherightsideofthescreentoset,change,ordeleteapassword.
Note:Apasswordcanbeanycombinationofupto64alphabeticandnumericcharacters.Formore
information,see“Passwordconsiderations”onpage86.
Erasinglostorforgottenpasswords(clearingCMOS)
Thissectionprovidesinstructionsonhowtoeraselostorforgottenpasswords,suchasauserpassword.
Toerasealostorforgottenpassword,dothefollowing:
1.Removeallmediafromthedrivesandturnoffallattacheddevicesandthecomputer.Then,disconnect
allpowercordsfromelectricaloutletsanddisconnectallcablesthatareconnectedtothecomputer.
2.Removethecomputercover.See“Removingthecomputercover”onpage33.
3.LocatetheClearCMOS/Recoveryjumperonthesystemboard.See“Locatingpartsonthesystem
board”onpage13.
4.Movethejumperfromthestandardposition(pin1andpin2)tothemaintenanceposition(pin2and
pin3).
5.Reinstallthecomputercoverandconnectthepowercord.See“Completingthepartsreplacement”
onpage74.
6.Turnonthecomputerandleaveitonforapproximately10seconds.Then,turnoffthecomputerby
holdingthepowerswitchforapproximatelyveseconds.
7.Repeatstep1throughstep2.
8.MovetheClearCMOS/Recoveryjumperbacktothestandardposition(pin1andpin2).
9.Reinstallthecomputercoverandconnectthepowercord.See“Completingthepartsreplacement”
onpage74.
Enablingordisablingadevice
Thissectionprovidesinformationonhowtoenableordisableuseraccesstothefollowingdevices:
USBSetupUsethisoptiontoenableordisableaUSBconnector.WhenaUSBconnectoris
disabled,thedeviceconnectedtotheUSBconnectorcannotbeused.
SATAControllerWhenthisfeatureissettoDisable,alldevicesconnectedtotheSATAconnectors
(suchasharddiskdrives)aredisabledandcannotbeaccessed.
Toenableordisableadevice,dothefollowing:
1.StarttheSetupUtilityprogram.See“StartingtheSetupUtilityprogram”onpage85.
2.FromtheSetupUtilityprogrammainmenu,selectDevices.
3.Dependingonthedeviceyouwanttoenableordisable,dooneofthefollowing:
•SelectUSBSetuptoenableordisableaUSBdevice.
•SelectATADriveSetuptoenableordisableaSATAdevice.
4.SelectthedesiredsettingsandpressEnter.
5.PressF10tosavechangesandexittheSetupUtilityprogram.See“ExitingtheSetupUtilityprogram”
onpage90.
Chapter7.UsingtheSetupUtilityprogram87

Selectingastartupdevice
Ifyourcomputerdoesnotstartupfromadevicesuchasthediscorharddiskdriveasexpected,dooneof
thefollowingtoselectthestartupdeviceyouwant.
Selectingatemporarystartupdevice
Usethisproceduretoselectatemporarystartupdevice.
Note:Notalldiscsandharddiskdrivesarebootable.
1.Turnoffyourcomputer.
2.RepeatedlypressandreleasetheF12keywhenturningonthecomputer.WhentheStartupDevice
Menuwindowdisplays,releasetheF12key.
3.SelectthedesiredstartupdeviceandpressEnter.Thecomputerwillstartupfromthedeviceyou
selected.
Note:SelectingastartupdevicefromtheStartupDeviceMenuwindowdoesnotpermanentlychange
thestartupsequence.
Selectingorchangingthestartupdevicesequence
Tovieworpermanentlychangetheconguredstartupdevicesequence,dothefollowing:
1.StarttheSetupUtilityprogram.See“StartingtheSetupUtilityprogram”onpage85.
2.FromtheSetupUtilityprogrammainmenu,selectStartup.
3.SelectthedevicesforthePrimaryBootSequence,theAutomaticBootSequence,andtheErrorBoot
Sequence.Readtheinformationdisplayedontherightsideofthescreen.
4.PressF10tosavechangesandexittheSetupUtilityprogram.See“ExitingtheSetupUtilityprogram”
onpage90.
EnablingErPcompliancemode
Youcanenabletheenergy-relatedproductsdirective(ErP)compliancemodethroughthePowermenuinthe
SetupUtilityprogramtoreducetheconsumptionofelectricitywhenyourcomputerisinstandbyoroffmode.
ToenableErPcompliancemodeintheSetupUtilityprogram,dothefollowing:
1.StarttheSetupUtilityprogram.See“StartingtheSetupUtilityprogram”onpage85.
2.FromtheSetupUtilityprogrammainmenu,selectPower➙EnhancedPowerSavingMode,and
pressEnter.
3.SelectEnabledandpressEnter.
4.FromthePowermenu,selectAutomaticPowerOnandpressEnter.
5.SelectWakeonLanandpressEnter.
6.SelectDisabledandpressEnter.
7.PressF10tosavechangesandexittheSetupUtilityprogram.PressEnterwhenpromptedtoconrm
theexit.
Note:WhenErPcompliancemodeisenabled,youcanwakeupyourcomputerbydoingoneofthefollowing:
•Pressingthepowerswitch
•Enablingthewakeuponalarmfeature
Thewakeuponalarmfeatureenablesyourcomputertowakeupatasettime.Toenablethewake
uponalarmfeature,dothefollowing:
88ThinkCentreUserGuide

1.StarttheSetupUtilityprogram.
2.FromtheSetupUtilityprogrammainmenu,selectPower➙AutomaticPowerOn,andpressEnter.
3.SelectWakeUponAlarmandpressEnter.Thenfollowtheinstructionsonthescreen.
4.PressF10tosavechangesandexittheSetupUtilityprogram.PressEnterwhenpromptedto
conrmtheexit.
•Enablingtheafterpowerlossfeature
Theafterpowerlossfeatureenablesyourcomputertowakeupwhenthepowersupplyresumesaftera
suddenlossofelectricity.Toenabletheafterpowerlossfeature,dothefollowing:
1.StarttheSetupUtilityprogram.
2.FromtheSetupUtilityprogrammainmenu,selectPower➙AfterPowerLoss,andpressEnter.
3.SelectPowerOnandpressEnter.
4.PressF10tosavechangesandexittheSetupUtilityprogram.PressEnterwhenpromptedto
conrmtheexit.
ICEperformancemode
YoucanadjusttheacousticandthermalperformanceofyourcomputerthroughtheICEPerformance
Modemenu.Twochoicesareavailable:
•BetterAcousticPerformance(defaultsetting)
•BetterThermalPerformance
ByenablingBetterAcousticPerformance,yourcomputerwillrunwithlessnoiseatanormalthermal
level.ByenablingBetterThermalPerformance,yourcomputerwillrunatabetterthermallevelwith
normalacousticperformance.
ToconguretheICEperformancemode,dothefollowing:
1.StarttheSetupUtilityprogram.See“StartingtheSetupUtilityprogram”onpage85.
2.FromtheSetupUtilityprogrammainmenu,selectPower.
3.SelectIntelligentCoolingEngine(ICE).TheIntelligentCoolingEngine(ICE)windowisdisplayed.
4.SelectICEPerformanceMode.TheICEPerformanceModewindowisdisplayed.
5.SelectBetterAcousticPerformanceorBetterThermalPerformanceasdesired.
6.PressF10tosavechangesandexittheSetupUtilityprogram.See“ExitingtheSetupUtilityprogram”
onpage90.
ICEthermalalert
YoucanmonitorthethermalfunctionofyourcomputerundercriticalthermalsituationsthroughtheICE
ThermalAlertmenu.Twochoicesareavailable:
•Enabled(defaultsetting)
•Disabled
AfterenablingtheICEthermalalertfunction,whencriticalthermalsituationsoccur,suchasmalfunctioning
fans,abnormallyhightemperature,andpoorcoolingperformances,analertlogwillbewrittenintothe
Windowssystemlog.Thealertlogcanhelpyouidentifythethermalproblems.
ToconguretheICEthermalalertfunction,dothefollowing:
1.StarttheSetupUtilityprogram.See“StartingtheSetupUtilityprogram”onpage85.
Chapter7.UsingtheSetupUtilityprogram89

2.FromtheSetupUtilityprogrammainmenu,selectPower.
3.SelectIntelligentCoolingEngine(ICE).TheIntelligentCoolingEngine(ICE)windowisdisplayed.
4.SelectICEThermalAlert.TheICEThermalAlertwindowisdisplayed.
5.SelectEnabledorDisabledasdesired.
6.PressF10tosavechangesandexittheSetupUtilityprogram.See“ExitingtheSetupUtilityprogram”
onpage90.
ExitingtheSetupUtilityprogram
Afteryounishviewingorchangingsettings,pressEsctoreturntotheSetupUtilityprogrammainmenu.
YoumighthavetopressEscseveraltimes.Dooneofthefollowing:
•Ifyouwanttosavethenewsettings,pressF10tosavechangesandexittheSetupUtilityprogram.
•Ifyoudonotwanttosavethesettings,selectExit➙DiscardChangesandExit,andthenpressEnter.
WhentheResetWithoutSavingwindowshows,selectYes,andthenpressEntertoexittheSetup
Utilityprogram.
•Ifyouwanttoreturntothedefaultsettings,pressF9toloadthedefaultsettings,andthenpressF10to
saveandexittheSetupUtilityprogram.
90ThinkCentreUserGuide

Chapter8.Updatingsystemprograms
ThischapterprovidesinformationaboutupdatingthePOSTandBIOS,andhowtorecoverfromaPOST
andBIOSupdatefailure.
Usingsystemprograms
Systemprogramsarethebasiclayerofsoftwarebuiltintoyourcomputer.Systemprogramsincludethe
POST,theBIOS,andtheSetupUtilityprogram.ThePOSTisasetoftestsandproceduresthatare
performedeachtimeyouturnonyourcomputer.TheBIOSisalayerofsoftwarethattranslatesinstructions
fromotherlayersofsoftwareintoelectricalsignalsthatthecomputerhardwarecanexecute.Youcanuse
theSetupUtilityprogramtovieworchangethecongurationsettingsofyourcomputer.SeeChapter7
“UsingtheSetupUtilityprogram”onpage85fordetailedinformation.
Yourcomputersystemboardhasamodulecalledelectricallyerasableprogrammableread-onlymemory
(EEPROM,alsoreferredtoasashmemory).YoucaneasilyupdatethePOST,theBIOS,andtheSetup
Utilityprogrambystartingyourcomputerwithasystem-program-updatediscorrunningaspecialupdate
programfromyouroperatingsystem.
LenovomightmakechangesandenhancementstothePOSTandBIOS.Whenupdatesarereleased,they
areavailableasdownloadablelesontheLenovoWebsiteathttp://www.lenovo.com.Instructionsforusing
thePOSTandBIOSupdatesareavailableinaTXTlethatisincludedwiththeupdateles.Formost
models,youcandownloadeitheranupdateprogramtocreateasystem-program-updatediscoranupdate
programthatcanberunfromtheoperatingsystem.
Updating(ashing)theBIOSfromadisc
Thissectionprovidesinstructionsonhowtoupdate(ash)theBIOSfromadisc.
Note:Youcandownloadaself-startingbootablediscimage(knownasanISOimage)withthesystem
programupdatestocreateasystem-program-updatedisc.Goto:
http://www.lenovo.com/support
Toupdate(ash)theBIOSfromadisc,dothefollowing:
1.Turnoffyourcomputer.
2.RepeatedlypressandreleasetheF12keywhenturningonthecomputer.WhentheStartupDevice
Menuwindowopens,releasetheF12key.
3.FromtheStartupDeviceMenuwindow,selectthedesiredopticaldriveasthestartupdevice.Then,
insertthediscintothisopticaldriveandpressEnter.Theupdatebegins.
4.Whenpromptedtochangetheserialnumber,itissuggestedthatyoudonotmakethischangeby
pressingN.However,ifyoudowanttochangetheserialnumber,pressY,thentypeintheserialnumber
andpressEnter.
5.Whenpromptedtochangethemachinetypeandmodel,itissuggestedthatyoudonotmakethis
changebypressingN.However,ifyoudowanttochangethemachinetypeandmodel,pressY,then
typeinthemachinetypeandmodelandpressEnter.
6.Followtheinstructionsonthescreentocompletetheupdate.Aftertheupdateiscompleted,removethe
discfromtheopticaldrive.
©CopyrightLenovo201291

Updating(ashing)theBIOSfromyouroperatingsystem
Note:BecauseLenovomakesconstantimprovementstoitsWebsites,theWebpagecontentsaresubject
tochangewithoutnotice,includingthecontentsreferencedinthefollowingprocedure.
Toupdate(ash)theBIOSfromyouroperatingsystem,dothefollowing:
1.Gotohttp://www.lenovo.com/support.
2.ClickDownloadDrivers&Software.
3.ClickUseQuickPath.
4.Typethe4-digitmachinetypeforyourcomputerintheQuickPatheldandthenclickFindMyProduct.
5.ClickBIOS.
6.LocatetheBIOSversionthatyouwanttodownload.
7.ClickClickforles.Allavailableleswillbedisplayed.
8.Clickthelinkforthereadmelethatcontainstheinstructionsforupdating(ashing)theBIOSfrom
youroperatingsystem.
9.Printtheseinstructions.Thisisveryimportantbecausetheseinstructionswillnotbedisplayedon
thescreenafterthedownloadbegins.
10.Followtheprintedinstructionstodownload,extract,andinstalltheupdate.
RecoveringfromaPOST/BIOSupdatefailure
IfthepowertoyourcomputerisinterruptedwhilethePOSTandBIOSisbeingupdated,yourcomputer
mightnotrestartcorrectly.Ifthishappens,performthefollowingproceduretorecoverfromthePOSTand
BIOSupdatefailure.ThisprocedureiscommonlycalledBoot-blockRecovery.
1.Removeallmediafromthedrivesandturnoffallattacheddevicesandthecomputer.Then,disconnect
allpowercordsfromelectricaloutletsanddisconnectallcablesthatareconnectedtothecomputer.
2.Removethecomputercover.See“Removingthecomputercover”onpage33.
3.LocatetheClearCMOS/Recoveryjumperonthesystemboard.See“Locatingpartsonthesystem
board”onpage13.
4.RemoveanycablesthatimpedeaccesstotheClearCMOS/Recoveryjumper.
5.Movethejumperfromthestandardposition(pin1andpin2)tothemaintenanceposition(pin2and
pin3).
6.ReconnectanycablesthatweredisconnectedandreinstallthePCIcardifremoved.
7.Reinstallthecomputercoverandreconnectthepowercordsforthecomputerandmonitortoelectrical
outlets.See“Completingthepartsreplacement”onpage74.
8.TurnonthecomputerandtheninsertthePOSTandBIOSupdate(ashupdate)discintotheoptical
drive.Waitafewminutes.Then,therecoverysessionbegins.Therecoverysessionwilltaketwoto
threeminutes.Duringthistime,awarningmessagewillbedisplayedandnoactionisneededfromyou.
9.Aftertherecoverysessioniscompleted,therewillbenovideo,andyourcomputerwillautomatically
turnoff.
10.Repeatstep1throughstep4.
11.MovetheClearCMOS/Recoveryjumperbacktothestandardposition(pin1andpin2).
12.Reconnectanycablesthatweredisconnected.
13.Reinstallthecomputercoverandreconnectanycablesthatweredisconnected.
14.Turnonthecomputertorestarttheoperatingsystem.
92ThinkCentreUserGuide

Chapter9.Preventingproblems
Thischapterprovidesinformationthatcanhelpyouavoidcommonproblemsandkeepyourcomputer
runningsmoothly.
Keepingyourcomputercurrent
Insomesituationsyoumaynditnecessarytohavethemostcurrentsoftwareprograms,devicedrivers,or
operatingsystem.Thissectionexplainshowtogetthelatestupdatesforyourcomputer.
Selectanyofthefollowingtopics:
•“Gettingthelatestdevicedriversforyourcomputer”onpage93
•“Updatingyouroperatingsystem”onpage93
•“UsingSystemUpdate”onpage94
Gettingthelatestdevicedriversforyourcomputer
Note:BecauseLenovomakesconstantimprovementstoitsWebsites,theWebpagecontentsaresubject
tochangewithoutnotice,includingthecontentsreferencedinthefollowingprocedure.
YoucandownloadandinstallupdateddevicedriversfromtheLenovoWebsitebydoingthefollowing:
Attention:DonotdownloadupdateddevicedriversfromtheWindowsUpdateWebsite.Thedevice
driversprovidedontheWindowsWebsitehavenotbeentestedbyLenovoandusingthemmightcause
unexpectedproblems.ObtainupdateddevicedriversfromLenovo.
1.Gotohttp://www.lenovo.com/support.
2.ClickDownload&Drivers.
3.Selectthemachinetypeofyourcomputerfromthemachinetypelist.
4.Clickthecategoryofdeviceforwhichyouneedthedevicedriver.
5.Clicktheappropriatedevicedriver.
6.Downloadandinstallthedevicedriver.
Updatingyouroperatingsystem
MicrosoftmakesupdatesavailableforthevariousWindowsoperatingsystemsthroughtheMicrosoft
WindowsUpdateWebsite.TheWebsiteautomaticallydetermineswhatWindowsupdatesareavailablefor
yourspeciccomputerandliststhoseupdatesonly.Updatescouldincludesecurityxes,newversionsof
Windowscomponents(suchasMediaPlayer),xestootherportionsoftheWindowsoperatingsystem,
orenhancements.
Attention:DonotdownloadupdateddevicedriversfromtheWindowsWebsite.Thedevicedrivers
providedontheWindowsWebsitehavenotbeentestedbyLenovoandusingthemmightcauseunexpected
problems.ObtainupdateddevicedriversfromLenovo.See“Gettingthelatestdevicedriversforyour
computer”onpage93formoreinformation.
ToaccesstheMicrosoftWindowsUpdatesite,dothefollowing:
1.Gotohttp://windowsupdate.microsoft.com/.
2.Followtheinstructionsonthescreen.
©CopyrightLenovo201293

UsingSystemUpdate
TheSystemUpdateprogramhelpsyoukeepthesoftwareonyourcomputerup-to-date.Updatepackages
arestoredonLenovoserversandcanbedownloadedfromtheLenovoSupportWebsite.Updatepackages
cancontainapplications,devicedrivers,BIOSashes,orsoftwareupdates.WhentheSystemUpdate
programconnectstotheLenovoSupportWebsite,theSystemUpdateprogramautomaticallyrecognizes
themachinetypeandmodelofyourcomputer,theinstalledoperatingsystem,andthelanguageofthe
operatingsystemtodeterminewhatupdatesareavailableforyourcomputer.TheSystemUpdateprogram
thendisplaysalistofupdatepackagesandcategorizeseachupdateascritical,recommended,and
optionaltohelpyouunderstandtheimportance.Youhavecompletecontrolofwhichupdatestodownload
andinstall.Afteryouselecttheupdatepackagesyouwant,theSystemUpdateprogramautomatically
downloadsandinstallstheupdateswithoutanyfurtherinterventionfromyou.
TheSystemUpdateprogramispreinstalledonmostLenovocomputersandisreadytorun.Theonly
prerequisiteisanactiveInternetconnection.Youcanstarttheprogrammanually,oryoucanusethe
schedulefeaturetoenabletheprogramtosearchforupdatesautomaticallyatspeciedintervals.Youalso
canpredenescheduledupdatestosearchbyseverity(criticalupdates,criticalandrecommendedupdates,
orallupdates)sothelistyouchoosefromcontainsonlythoseupdatetypesthatareofinteresttoyou.
ToopentheSystemUpdateprogram,see“AccessingLenovoprogramsontheWindows7operatingsystem”
onpage4or“AccessingLenovoprogramsontheWindows8operatingsystem”onpage6.
IftheSystemUpdateprogramisnotcurrentlyinstalledonyourcomputer,youcandownloaditfromthe
LenovoSupportWebsiteathttp://www.lenovo.com/support.
Cleaningandmaintenance
Withappropriatecareandmaintenanceyourcomputerwillserveyoureliably.Thefollowingtopicsoffer
informationtohelpyoukeepyourcomputerintopworkingorder.
•“Basics”onpage94
•“Cleaningyourcomputer”onpage95
–“Computer”onpage95
–“Keyboard”onpage95
–“Opticalmouse”onpage95
–“Displayscreen”onpage95
•“Goodmaintenancepractices”onpage96
Basics
Herearesomebasicpointsaboutkeepingyourcomputerfunctioningproperly:
•Keepyourcomputerinaclean,dryenvironment.Makesureitrestsonaat,steadysurface.
•Donotplaceitemsontopofthemonitororcoveranyoftheventsinthemonitororcomputer.These
ventsprovideairowtokeepyourcomputerfromoverheating.
•Keepfoodanddrinksawayfromallpartsofyourcomputer.Foodparticlesandspillsmightmakethe
keyboardandmousestickandunusable.
•Donotgetthepowerswitchesorothercontrolswet.Moisturecandamagethesepartsandcausean
electricalhazard.
•Alwaysdisconnectapowercordbygraspingtheplug,butnotthecord.
94ThinkCentreUserGuide

Cleaningyourcomputer
Itisagoodpracticetocleanyourcomputerperiodicallytoprotectthesurfacesandensuretrouble-free
operation.
CAUTION:
Besuretoturnoffthecomputerandmonitorpowerswitchesbeforecleaningthecomputerand
monitorscreen.
Computer
Useonlymildcleaningsolutionsandadampclothtocleanthepaintedsurfacesofthecomputer.
Keyboard
Tocleanyourcomputerkeyboard,dothefollowing:
1.Applysomeisopropylrubbingalcoholtoasoft,dust-freecloth.
2.Wipeeachkeytopsurfacewiththecloth.Wipethekeysonebyone;ifyouwipeseveralkeysatatime,
theclothmayhookontoanadjacentkeyandpossiblydamageit.Makesurethatnoliquiddripsonto
orbetweenthekeys.
3.Toremoveanycrumbsordustfrombeneaththekeys,youcanuseacamerablowerwithabrush
orcoolairfromahairdryer.
Note:Avoidsprayingcleanerdirectlyontothedisplayorthekeyboard.
Opticalmouse
Thissectionprovidesinstructionsonhowtocleananopticalmouse.
Anopticalmouseusesalight-emittingdiode(LED)andanopticalsensortonavigatethepointer.Ifthe
pointeronthescreendoesnotmovesmoothlywiththeopticalmouse,youmightneedtocleanthemouse.
Tocleananopticalmouse,dothefollowing:
1.Turnoffyourcomputer.
2.Disconnectthemousecablefromthecomputer.
3.Turnthemouseupsidedowntocheckthelens.
a.Ifthereisasmudgeonthelens,gentlycleantheareawithaplaincotton-tippedswab.
b.Ifthereisdebrisinthelens,gentlyblowthedebrisawayfromthearea.
4.Checkthesurfaceonwhichyouareusingthemouse.Ifyouhaveaveryintricatepictureorpattern
beneaththemouse,itmaybedifcultforthedigitalsignalprocessor(DSP)todeterminechanges
inthemouseposition.
5.Reconnectthemousecabletothecomputer.
6.Turnyourcomputerbackon.
Displayscreen
Dustbuildupcompoundsproblemsassociatedwithglare.Remembertocleanyourmonitorscreen
periodically.See“Cleaningaat-panelmonitorsurface”onpage95or“Cleaningaglass-screensurface”
onpage96.
Cleaningaat-panelmonitorsurface
Ifyouhaveaat-panelcomputerdisplaythathasaexiblelmsurface,dothefollowingtocleanthespecial
surface.Wipeitgentlywithasoft,drycloth,orblowonthescreentoremovegritandotherlooseparticles.
ThenmoistenaclothwithLCDcleanerandwipethescreensurface.
Chapter9.Preventingproblems95

Manycomputersupplystorescarrythespecialcleaninguidsfordisplays.Usecleaninguidsdevelopedfor
LCDdisplaysonly.Firstapplytheuidtoalint-free,softcloth,thencleantheLCDdisplay.Somecomputer
supplystorescarrypre-moistenedtowelettesforLCDmaintenance.
Cleaningaglass-screensurface
Tocleanaglass-screensurface,wipeitgentlywithasoft,drycloth,orblowonthescreentoremovegritand
otherlooseparticles.Thenuseasoftclothmoistenedwithanonabrasiveliquidglasscleaner.
Goodmaintenancepractices
Byperformingafewgoodmaintenancepractices,youcanmaintaingoodcomputerperformance,protect
yourdata,andbepreparedincaseofacomputerfailure.
•Emptyyourrecyclebinonaregularbasis.
•RuntheWindowsDiskDefragmenterprogramoccasionallytopreventperformanceproblemscausedby
anexcessivenumberoffragmentedles.
•CleanoutyourInbox,SentItems,andDeletedItemsfoldersinyoure-mailapplicationonaregularbasis.
•Makebackupcopiesofcriticaldataonremovablemediamemoryatregularintervalsandstorethe
removablemediainasafelocation.Thefrequencyofmakingbackupcopiesdependsonhowcriticalthe
dataistoyouoryourbusiness.Lenovomakesanumberofremovable-mediastoragedevicesavailable
asoptions,suchasCD-RWdrivesandrecordableDVDdrives.
•Backupyourentireharddiskdriveonaregularbasis.
•Keepyourcomputersoftwareup-to-date.See“Keepingyourcomputercurrent”onpage93formore
information.
•Keepalogbook.Entriesmightincludemajorsoftwareorhardwarechanges,device-driverupdates,
intermittentproblemsandwhatyoudidtoresolvethem,andanyminorissuesyoumighthave
experienced.AlogbookcanhelpyouoraLenovotechniciandetermineifaproblemisrelatedtochange
inhardware,changeinsoftware,orsomeotheractionthatmighthavetakenplace.
•CreateProductRecoverydiscs.See“Creatingandusingrecoverymedia”onpage77formoreinformation
aboutusingProductRecoverydiscstorestoretheharddiskdrivetothefactorydefaultsettings.
•Createrescuemedia.See“Creatingandusingarescuemedium”onpage80formoreinformationabout
usingaRescuemediumsuchasaCDorDVDtorecoverfromfailuresthatpreventyoufromgaining
accesstotheWindowsenvironmentortheRescueandRecoveryworkspaceonyourharddiskdrive.
Movingyourcomputer
Takethefollowingprecautionsbeforemovingyourcomputer.
1.Backupalllesanddatafromtheharddiskdrive.Thereareavarietyofbackupprogramsavailable
commercially.Youroperatingsystemalsomighthaveabackupprogramthatyoucanuse.Lenovo
providestheRescueandRecoveryprogramtohelpyoubackupandrestoredata.See“Performing
backupandrecoveryoperations”onpage78formoreinformation.
2.Removeallmedia(diskettes,compactdiscs,tapes,andsoon)fromthedrives.
3.Turnoffthecomputerandallattacheddevices.Yourharddiskdriveautomaticallyparkstheread/write
headinanondataarea.Thispreventsdamagetotheharddiskdrive.
4.Unplugthepowercordsfromelectricaloutlets.
5.Disconnectcommunicationcables,suchasmodemornetworkcables,fromtheoutletsrst,andthen
disconnecttheotherendsfromthecomputer.
6.Notewhereanyremainingcablesareattachedtothecomputer;then,removethem.
7.Ifyousavedtheoriginalshippingcartonsandpackingmaterials,usethemtopacktheunits.Ifyouare
usingdifferentcartons,cushiontheunitstoavoiddamage.
96ThinkCentreUserGuide

Chapter10.Troubleshootinganddiagnostics
Thischapterprovidesinformationaboutdiagnosingandtroubleshootingcomputerproblems.Ifyour
computerproblemisnotdescribedhere,seeChapter11“Gettinginformation,help,andservice”onpage
115foradditionaltroubleshootingresources.
Basictroubleshooting
Thefollowingtableprovidesinformationtohelpyoutroubleshootyourcomputerproblems.
Note:Ifyoucannotcorrecttheproblem,havethecomputerserviced.Foralistofserviceandsupport
telephonenumbers,refertotheSafety,Warranty,andSetupGuidethatcomeswithyourcomputerorgoto
theLenovoSupportWebsiteathttp://www.lenovo.com/support/phone.
SymptomAction
Thecomputerdoesnotstart
whenyoupressthepower
switch.
Verifythat:
•Thepowercordiscorrectlyconnectedtotherearofthecomputerandtoa
workingelectricaloutlet.
•Ifyourcomputerhasasecondarypowerswitchontherearofthecomputer,
makesurethatitisswitchedon.
•Thepowerindicatoronthefrontofthecomputerison.
•Thecomputervoltagematchesthevoltageavailableattheelectricaloutletfor
yourcountryorregion.
Themonitorscreenisblank.Verifythat:
•Themonitorsignalcableiscorrectlyconnectedtothemonitorandtothe
appropriatemonitorconnectoronthecomputer.
•Themonitorpowercordiscorrectlyconnectedtothemonitorandtoaworking
electricaloutlet.
•Themonitoristurnedonandthebrightnessandcontrastcontrolsareset
correctly.
•Thecomputervoltagematchesthevoltageavailableattheelectricaloutletfor
yourcountryorregion.
•Ifyourcomputerhastwomonitorconnectors,besuretousetheconnector
onthegraphicscard.
Thekeyboarddoesnotwork.Verifythat:
•Thecomputeristurnedon.
•ThekeyboardissecurelyconnectedtoaUSBconnectoronthecomputer.
•Nokeysarestuck.
Themousedoesnotwork.Verifythat:
•Thecomputeristurnedon.
•ThemouseissecurelyconnectedtoaUSBconnectoronthecomputer.
•Themouseisclean.Referto“Opticalmouse”onpage95forfurtherinformation.
©CopyrightLenovo201297

SymptomAction
Theoperatingsystemdoesnot
start.
Verifythat:
•Thestartupsequenceincludesthedevicewheretheoperatingsystemresides.
Usually,theoperatingsystemisontheharddiskdrive.Formoreinformation,
see“Selectingastartupdevice”onpage88.
Thecomputerbeepsmultiple
timesbeforetheoperating
systemstarts.
Verifythatnokeysarestuck.
Troubleshootingprocedure
Usethefollowingprocedureasastartingpointfordiagnosingproblemsyouareexperiencingwithyour
computer:
1.Verifythatthecablesforallattacheddevicesareconnectedcorrectlyandsecurely.
2.Verifythatallattacheddevicesthatrequireacpowerareconnectedtoproperlygrounded,functioning
electricaloutlets.
3.VerifythatallattacheddevicesareenabledintheBIOSsettingsofyourcomputer.Formoreinformation
aboutaccessingandchangingtheBIOSsettings,refertoyourChapter7“UsingtheSetupUtility
program”onpage85.
4.Gotothe“Troubleshooting”onpage98andfollowtheinstructionsforthetypeofproblemyouare
experiencing.IftheTroubleshootinginformationdoesnothelpyouresolveaproblem,continuewiththe
nextstep.
5.Tryusingapreviouslycapturedcongurationtoseeifarecentchangetohardwareorsoftwaresettings
hascausedaproblem.Beforerestoringapreviousconguration,captureyourcurrentcongurationin
casetheoldercongurationsettingsdonotsolvetheproblemorhaveadverseaffects.Torestorea
capturedconguration,dothefollowing:
•ForWindows7:ClickStart➙ControlPanel➙SystemandSecurity➙System➙System
Protection➙SystemRestore.
•ForWindows8:OpenControlPanel,andthenclickSystemandSecurity➙System➙System
Protection➙SystemRestore.
Ifthisdoesnotcorrecttheproblem,continuewiththenextstep.
6.Runthediagnosticprogram.See“LenovoSolutionCenter”onpage114formoreinformation.
•Ifthediagnosticprogramdetectsahardwarefailure,contacttheLenovoCustomerSupportCenter.
SeeChapter11“Gettinginformation,help,andservice”onpage115formoreinformation.
•Ifyouareunabletorunthediagnosticprogram,contacttheLenovoCustomerSupportCenter.See
Chapter11“Gettinginformation,help,andservice”onpage115formoreinformation.
•Ifthediagnosticprogramdoesnotdetectahardwarefailure,continuewiththenextstep.
7.Useanantivirusprogramtoseeifyourcomputerhasbeeninfectedbyavirus.Iftheprogramdetectsa
virus,removethevirus.
8.Ifnoneoftheseactionssolvetheproblem,seektechnicalassistance.SeeChapter11“Getting
information,help,andservice”onpage115formoreinformation.
Troubleshooting
Usethetroubleshootinginformationtondsolutionstoproblemsthathavedenitesymptoms.
Ifthesymptomyourcomputerisexperiencingoccurredimmediatelyafteryouinstalledanewhardware
optionornewsoftware,dothefollowingbeforereferringtothetroubleshootinginformation:
98ThinkCentreUserGuide

1.Removethenewhardwareoptionorsoftware.Ifyoumustremovethecomputercovertoremovea
hardwareoption,makesureyoureviewandfollowtheelectricalsafetyinformationprovidedwithyour
computer.Foryoursafety,donotoperatethecomputerwiththecoverremoved.
2.Runthediagnosticprogramtoensureyourcomputerisoperatingcorrectly.
3.Reinstallthenewhardwareoptionorsoftwarefollowingthemanufacturer'sinstructions.
Selecttheproblemyourcomputerisexperiencingfromthefollowinglist:
•“Audioproblems”onpage99
•“CDproblems”onpage100
•“DVDproblems”onpage101
•“Intermittentproblems”onpage103
•“Keyboard,mouse,orpointingdeviceproblems”onpage103
•“Monitorproblems”onpage105
•“Networkingproblems”onpage106
•“Optionproblems”onpage109
•“Performanceandlockupproblems”onpage110
•“Printerproblems”onpage111
•“Serialportproblems”onpage112
•“Softwareproblems”onpage112
•“USBproblems”onpage113
Audioproblems
Selectyoursymptomfromthefollowinglist:
•“NoaudioinWindows”onpage99
•“AnaudiodiscorAutoPlay-enableddiscdoesnotautomaticallyplaywhenitisinsertedintoadrive”
onpage100
•“Soundcomesfromoneexternalspeakeronly”onpage100
•“NoaudioinDOSapplicationsorgames”onpage100
NoaudioinWindows
Symptom:NoaudioinWindows
Actions:
•IfyouareusingpoweredexternalspeakersthathaveanOn/Offcontrol,verifythattheOn/Offcontrolis
settotheOnpositionandthespeakerpowercableisconnectedtoaproperlygrounded,functionalac
electricaloutlet.
•Ifyourexternalspeakershaveavolumecontrol,verifythatthevolumecontrolisnotsettoolow.
•Double-clickthespeakericonintheWindowsnoticationarea.Amastervolume-controlwindowopens.
VerifythattheMutesettingsarenotcheckedandnoneofthevolumesettingsissettoolow.
•Somemodelshaveafrontaudiopanelyoucanusetoadjustvolume.Ifyouhaveafrontaudiopanel,
verifythatthevolumeisnotsettoolow.
•Verifythatyourexternalspeakers(andheadphones,ifused)areconnectedtothecorrectaudioconnector
onthecomputer.Mostspeakercablesarecolor-codedtomatchtheconnector.
Chapter10.Troubleshootinganddiagnostics99

Note:Whenexternal-speakerorheadphonecablesareattachedtotheaudioconnector,theinternal
speaker,ifpresent,isdisabled.Inmostcases,ifanaudioadapterisinstalledinoneoftheexpansionslots,
theaudiofunctionbuiltintothesystemboardisdisabled;usetheaudiojacksontheadapter.
•MakesurethattheprogramyouarerunningisdesignedforuseintheMicrosoftWindowsoperating
system.IftheprogramisdesignedtoruninDOS,theprogramdoesnotusetheWindowssoundfeature
andmustbeconguredtouseSoundBlasterProorSoundBlasteremulation.
•Verifythattheaudiodevicedriversarecorrectlyinstalled.SeeMicrosoftWindowshelpsystemformore
information.
Iftheseactionsdonotcorrecttheproblem,runtheLenovoSolutionCenterprogram.Ifyouneedtechnical
assistance,seeChapter11“Gettinginformation,help,andservice”onpage115.
AnaudiodiscorAutoPlay-enableddiscdoesnotautomaticallyplaywhenitis
insertedintoadrive
Symptom:AnaudiodiscorAutoPlay-enableddiscdoesnotautomaticallyplaywhenitisinsertedintoadrive
Action:See“CDproblems”onpage100.
Soundcomesfromoneexternalspeakeronly
Symptom:Soundcomesfromoneexternalspeakeronly.
Actions:
•Ensurethatthespeakercableisinsertedcompletelyintotheconnectoronthecomputer.
•Makesurethecablethatattachestheleftspeakertotherightspeakerissecurelyconnected.
•Double-clickthespeakericonintheWindowsnoticationarea.Amastervolume-controlwindowopens.
VerifythattheBalancesettingsaresetcorrectly.
Iftheseactionsdonotcorrecttheproblem,youmighthaveafailingspeaker.Havethespeakerserviced.If
youneedtechnicalassistance,seeChapter11“Gettinginformation,help,andservice”onpage115.
NoaudioinDOSapplicationsorgames
Symptom:NoaudioinDOSapplicationsorgames
Actions:
•MakesuretheDOSapplicationorgameisconguredtouseSoundBlasterProorSoundBlaster
emulation.Refertothedocumentationthatcomeswiththeapplicationorgameforinstructionson
settingsound-cardsettings.
•Iftheseactionsdonotcorrecttheproblem,runtheLenovoSolutionCenterprogram.Ifyouneedtechnical
assistance,seeChapter11“Gettinginformation,help,andservice”onpage115.
CDproblems
Selectyoursymptomfromthefollowinglist:
•“AnaudiodiscorAutoPlay-enableddiscdoesnotautomaticallyplaywhenitisinsertedintoaCD
drive”onpage101
•“ACDorDVDdoesnotwork”onpage101
•“Unabletouseastartable(bootable)recoverymedium,suchastheProductRecoveryCD,tostart
yourcomputer”onpage101
100ThinkCentreUserGuide

AnaudiodiscorAutoPlay-enableddiscdoesnotautomaticallyplaywhenitis
insertedintoaCDdrive
Symptom:AnaudiodiscorAutoPlay-enableddiscdoesnotautomaticallyplaywhenitisinsertedinto
aCDdrive.
Actions:
•IfyouhavemultipleCDorDVDdrivesinstalled(oracombinationofCDandDVDdrives),tryinsertingthe
discintotheotherdrive.Insomecases,onlyoneofthedrivesisconnectedtotheaudiosubsystem.
•IfyouareusingtheWindows7operatingsystem,followtheactionfor“ACDorDVDdoesnotwork”on
page101.
Ifthisdoesnotcorrecttheproblem,followtheactionfor“ACDorDVDdoesnotwork”onpage101.
ACDorDVDdoesnotwork
Symptom:ACDorDVDdoesnotwork.
Actions:
•Verifythatthediscisinsertedcorrectly,withitslabelup.
•Makesurethatthediscyouareusingisclean.Toremovedustorngerprints,wipethedisccleanwitha
softclothfromthecentertotheoutside.Wipingadiscinacircularmotionmightcauselossofdata.
•Verifythatthediscyouareusingisnotscratchedordamaged.Tryinsertinganotherdiscthatyouknow
isgood.Ifyoucannotreadfromaknown-gooddisc,youmighthaveaproblemwithyourCDorDVD
driveorthecablingtoyourCDorDVDdrive.Makesurethatthepowercableandsignalcableare
securelyconnectedtothedrive.
Unabletouseastartable(bootable)recoverymedium,suchastheProductRecovery
CD,tostartyourcomputer
Symptom:Unabletouseastartable(bootable)recoverymedium,suchastheProductRecoveryCD,
tostartyourcomputer.
Action:MakesurethattheCDorDVDdriveisinthestartupsequencebeforetheharddiskdrive.Refer
toyour“Selectingorchangingthestartupdevicesequence”onpage88forinformationonviewingand
changingthestartupsequence.Notethatonsomemodelsthestartupsequenceispermanentlysetand
cannotbechanged.
Iftheseactionsdonotcorrecttheproblem,runtheLenovoSolutionCenterprogram.Ifyouneedtechnical
assistance,seeChapter11“Gettinginformation,help,andservice”onpage115.
DVDproblems
Selectyoursymptomfromthefollowinglist:
•“BlackscreeninsteadofDVDvideo”onpage101
•“DVDmoviewillnotplay”onpage102
•“NoaudioorintermittentaudiowhileplayingDVDmovie”onpage102
•“Playbackisverysloworchoppy”onpage102
•“Invaliddiscornodiscfoundmessage”onpage102
BlackscreeninsteadofDVDvideo
Symptom:BlackscreeninsteadofDVDvideo
Chapter10.Troubleshootinganddiagnostics101

Actions:
•RestarttheDVDplayerprogram.
•Closeanyopenles,turnoffthecomputer,andthenrestartthecomputer.
•Tryalowerscreenresolutionorcolordepth.
Iftheseactionsdonotcorrecttheproblem,runtheLenovoSolutionCenterprogram.Ifyouneedtechnical
assistance,seeChapter11“Gettinginformation,help,andservice”onpage115.
DVDmoviewillnotplay
Symptom:DVDmoviewillnotplay.
Actions:
•Makesurethatthediscsurfaceiscleanandnotscratched.
•Checkthediscorpackageforregionalcoding.Youmightneedtopurchaseadiscwithcodingfor
theregionwhereyouareusingyourcomputer.
Iftheseactionsdonotcorrecttheproblem,runtheLenovoSolutionCenterprogram.Ifyouneedtechnical
assistance,seeChapter11“Gettinginformation,help,andservice”onpage115.
NoaudioorintermittentaudiowhileplayingDVDmovie
Symptom:NoaudioorintermittentaudiowhileplayingDVDmovie.
Actions:
•Checkthevolumecontrolsettingsonyourcomputerandonyourspeakers.
•Makesurethatthediscsurfaceiscleanandnotscratched.
•Checkallcableconnectionstoandfromthespeakers.
•UsetheDVDmenuforthevideotoselectadifferentaudiotrack.
Iftheseactionsdonotcorrecttheproblem,runtheLenovoSolutionCenterprogram.Ifyouneedtechnical
assistance,seeChapter11“Gettinginformation,help,andservice”onpage115.
Playbackisverysloworchoppy
Symptom:Playbackisverysloworchoppy.
Actions:
•Disableanybackgroundprograms,suchasAntiVirusorDesktopThemes.
•Ensurethatvideoresolutionissettolessthan1152x864.
Iftheseactionsdonotcorrecttheproblem,runtheLenovoSolutionCenterprogram.Ifyouneedtechnical
assistance,seeChapter11“Gettinginformation,help,andservice”onpage115.
Invaliddiscornodiscfoundmessage
Symptom:Invaliddiscornodiscfoundmessage
Actions:
•EnsurethataDVDdiscisinthedrivewiththeshinysideofthediscfacingdown.
•Ensurethatvideoresolutionissettolessthan1152x864.
102ThinkCentreUserGuide

•OncomputersthathaveaCD-ROMorCD-RWdriveinadditiontoaDVD-ROMdrive,makesurethatthe
DVDdiscisinthedrivelabeled“DVD”.
Iftheseactionsdonotcorrecttheproblem,runtheLenovoSolutionCenterprogram.Ifyouneedtechnical
assistance,seeChapter11“Gettinginformation,help,andservice”onpage115.
Intermittentproblems
Symptom:Aproblemoccursonlyoccasionallyandisdifculttorepeat.
Actions:
•Verifythatallcablesandcordsaresecurelyconnectedtothecomputerandattacheddevices.
•Verifythatwhenthecomputerison,thefangrillisnotblocked(thereisairowaroundthegrill),andthe
fansareworking.Ifairowisblockedorthefansarenotworking,thecomputermightoverheat.
•IfSCSIdevicesareinstalled,verifythatthelastexternaldeviceineachSCSIchainisterminatedcorrectly.
(SeeyourSCSIdocumentation.)
Iftheseactionsdonotcorrecttheproblem,runtheLenovoSolutionCenterprogram.Ifyouneedtechnical
assistance,seeChapter11“Gettinginformation,help,andservice”onpage115.
Keyboard,mouse,orpointingdeviceproblems
Selectyoursymptomfromthefollowinglist:
•“Allorsomekeysonthekeyboarddonotwork”onpage103
•“Themouseorpointingdevicedoesnotwork”onpage104
•“Thepointeronthescreendoesnotmovesmoothlywiththemouse”onpage104
•“Thengerprintreaderdoesnotwork”onpage104
•“Thewirelesskeyboarddoesnotwork”onpage104
Allorsomekeysonthekeyboarddonotwork
Symptom:Allorsomekeysonthekeyboarddonotwork.
Actions:
•Verifythatthekeyboardcableissecurelyconnectedtothecorrectconnectoronthecomputer.
•IfyouareusinganEnhancedPerformanceUSBkeyboardandoneormoreoftheRapidAccessbuttons
aretheonlykeysthatarenotworking,thesebuttonsmighthavebeendisabledorhavenotbeenassigned
toafunction.UsethehelpsystemintheEnhancedPerformanceCustomizationKeyboardprogramto
helpdiagnoseproblemswiththeRapidAccessbuttons.
ToopentheEnhancedPerformanceCustomizationKeyboardprogram,dooneofthefollowing:
–OntheWindows7operatingsystem,dothefollowing:
1.ClickStart➙ControlPanel.
2.ClickHardwareandSound.
3.ClickDevicesandPrinters.
4.Double-clickUSBEnhancedPerformanceKeyboard.TheUSBEnhancedPerformance
KeyboardCustomizationprogramstarts.
–OntheWindows8operatingsystem,dothefollowing:
1.OpenControlPanel.
2.ClickHardwareandSound.
Chapter10.Troubleshootinganddiagnostics103

3.ClickDevicesandPrinters.
4.Double-clickUSBEnhancedPerformanceKeyboard.TheUSBEnhancedPerformance
KeyboardCustomizationprogramstarts.
Iftheseactionsdonotcorrecttheproblem,havethecomputerandkeyboardserviced.SeeChapter11
“Gettinginformation,help,andservice”onpage115fordetails.
Themouseorpointingdevicedoesnotwork
Symptom:Themouseorpointingdevicedoesnotwork.
Actions:
•Verifythatthemouseorpointing-devicecableissecurelyattachedtothecorrectconnectoronthe
computer.Dependingonthetypeofmouseyouhave,themousecablewillconnecttoeitherthe
mouse,serial,orUSBconnector.SomekeyboardshaveintegratedUSBconnectorsthatcanbeused
foraUSBmouseorpointingdevice.
•Verifythatthedevicedriversforthemouseorpointingdeviceareinstalledcorrectly.
•IfyouareusingaUSBkeyboardormouse,verifythattheUSBconnectorsareenabledintheBIOS
settings.See“Enablingordisablingadevice”onpage87.
Iftheseactionsdonotcorrecttheproblem,runtheLenovoSolutionCenterprogram.Ifyouneedtechnical
assistance,seeChapter11“Gettinginformation,help,andservice”onpage115.
Thepointeronthescreendoesnotmovesmoothlywiththemouse
Symptom:Thepointeronthescreendoesnotmovesmoothlywiththemouse.
Action:Erraticmovementofthemousepointerisgenerallycausedbyabuildupofdirt,oils,andother
contaminantsontheballinsidethemouse.Cleanthemouse.See“Opticalmouse”onpage95for
instructions.
Thengerprintreaderdoesnotwork
Symptom:Thengerprintreaderdoesnotwork.
Action:Thefollowingcouldcausethengerprintreadernottooperateproperly:
•Notenrollingyourngerprintcorrectly.
•Scratchingthesurfaceofthereaderwithahard,pointedobject.
•Scrapingthesurfaceofthereaderwithyournailoranythinghard.
•Usingortouchingthereaderwithadirtynger.
•Thesurfaceofyourngerisverydifferentfromwhenyouenrolledyourngerprint.
Thewirelesskeyboarddoesnotwork
Symptom:Thewirelesskeyboarddoesnotwork.
Action:IftheTransceiverCommunicationsLEDisonandthewirelessKeyboarddoesnotwork,restartyour
computer.Ifrestartingyourcomputerdoesnotsolvetheproblem,verifythatthefollowingconditionsaremet:
•Thebatteriesareproperlyinstalled.
•Thebatteriesstillretaintheircurrent.
•ThewirelessKeyboardislocatedlessthantenmetersawayfromthetransceiver.
•Thetransceiverisfullyinstalled.
104ThinkCentreUserGuide

Action:IftheTransceiverCommunicationsLEDisnoton,reconnectthetransceiverandthekeyboard.
Monitorproblems
Note:Manymonitorshavestatus-indicatorlightsandbuilt-incontrolsforadjustingbrightness,contrast,
width,height,andotherpictureadjustments.However,thecontrolsvaryfrommonitortypetomonitortype.
Forinformationaboutthestatuslightsandusingthecontrols,refertothedocumentationthatcomes
withyourmonitor.
Selectyoursymptomfromthefollowinglist:
•“Wrongcharactersappearonthescreen”onpage105
•“Themonitorworkswhenyouturnonthecomputer,butgoesblankaftersomeperiodofcomputer
inactivity”onpage105
•“Themonitorworkswhenyouturnonthecomputer,butgoesblankwhenyoustartsomeapplication
programs”onpage105
•“Theimageappearstobeickering”onpage105
•“Theimageisdiscolored”onpage106
Wrongcharactersappearonthescreen
Symptom:Wrongcharactersappearonthescreen.
Action:Havethecomputerserviced.Fordetails,seeChapter11“Gettinginformation,help,andservice”on
page115.
Themonitorworkswhenyouturnonthecomputer,butgoesblankaftersomeperiod
ofcomputerinactivity
Symptom:Themonitorworkswhenyouturnonthecomputer,butgoesblankaftersomeperiodofcomputer
inactivity.
Action:Thecomputerisprobablysetforenergysavingswiththepower-managementfeature.Ifthe
power-managementfeatureisenabled,disablingitorchangingthesettingsmightsolvetheproblem.
Iftheseactionsdonotcorrecttheproblem,runtheLenovoSolutionCenterprogram.Ifyouneedtechnical
assistance,seeChapter11“Gettinginformation,help,andservice”onpage115.
Themonitorworkswhenyouturnonthecomputer,butgoesblankwhenyoustart
someapplicationprograms
Symptom:Themonitorworkswhenyouturnonthecomputer,butgoesblankwhenyoustartsome
applicationprograms.
Actions:
•Makesurethemonitorsignalcableissecurelyconnectedtothemonitorandthemonitorconnectoron
thecomputer.Aloosecablecancauseintermittentproblems.
•Verifythatthenecessarydevicedriversfortheapplicationprogramsareinstalled.Refertothe
documentationfortheaffectedapplicationprogramtoseeifdevicedriversarerequired.
Iftheseactionsdonotcorrecttheproblem,runtheLenovoSolutionCenterprogram.Ifyouneedtechnical
assistance,seeChapter11“Gettinginformation,help,andservice”onpage115.
Theimageappearstobeickering
Symptom:Theimageappearstobeickering.
Chapter10.Troubleshootinganddiagnostics105

Actions:
•Themonitormightbeoperatinginalow-refreshratedisplaymode.Setthemonitortothehighest,
noninterlacedrefreshratesupportedbyyourmonitorandthevideocontrollerinyourcomputer.
Attention:Usingaresolutionorrefreshratethatisnotsupportedbyyourmonitormightdamageit.Check
thedocumentationthatcomeswithyourmonitortoverifythesupportedrefreshrates.
•Themonitormightbeaffectedbyinterferencefromnearbyequipment.Magneticeldsaroundother
devices,suchastransformers,appliances,uorescentlights,andothermonitorsmightbecausingthe
problem.Moveuorescentdesklightingoranyequipmentthatproducesmagneticeldsfartheraway
fromthemonitor.Ifthisdoesnotcorrecttheproblem,dothefollowing:
1.Turnoffthemonitor.(Movingacolormonitorwhileitisturnedonmightcausescreendiscoloration.)
2.Adjusttheplacementofthemonitorandotherdevicessothattheyareatleast305mm(12inches)
apart.
3.Turnonthemonitor.
•YoucanresettherefreshratethroughyouroperatingsystemControlPanel:
OntheWindows7operatingsystem,clickStart➙ControlPanel➙HardwareandSound➙Adjust
screenresolution➙AdvancedSettings.ThenclicktheMonitortabandselectanewrefreshrate.
OntheWindows8operatingsystem,openControlPanelandclickHardwareandSound➙Adjust
screenresolution➙AdvancedSettings.ThenclicktheMonitortabandselectanewrefreshrate.
•Seeyouroperatingsystemdocumentationorhelpforfurtherinformationonmonitorsettings.
Iftheseactionsdonotcorrecttheproblem,yourmonitormightneedservice.SeeChapter11“Getting
information,help,andservice”onpage115fordetails.
Theimageisdiscolored
Symptom:Theimageisdiscolored.
Action:Themonitormightbeaffectedbyinterferencefromnearbyequipment.Magneticeldsaroundother
devices,suchastransformers,appliances,uorescentlights,andothermonitorsmightbecausingthe
problem.Moveuorescentdesklightingoranyequipmentthatproducesmagneticeldsfurtherawayfrom
themonitor.Ifthisdoesnotcorrecttheproblem,dothefollowing:
1.Turnoffthemonitor.(Movingacolormonitorwhileitisturnedonmightcausescreendiscoloration.)
2.Adjusttheplacementofthemonitorandotherdevicessothattheyareatleast305mm(12inches)apart.
3.Turnonthemonitor.
Iftheseactionsdonotcorrecttheproblem,yourmonitormightneedservice.SeeChapter11“Getting
information,help,andservice”onpage115fordetails.
Networkingproblems
Thefollowingarethemostcommonnetworkingproblems.Selectyournetworkingproblemfromthe
followinglist:
•“Ethernetproblems”onpage107
•“AwirelessLANproblem”onpage108
•“AwirelessWANproblem”onpage108
•“Bluetoothproblem”onpage109
Formoreinformation,see“HelpandSupport”onpage115.
106ThinkCentreUserGuide

Ethernetproblems
ForEthernetproblems,selectyoursymptomfromthefollowinglist:
•“Yourcomputercannotconnecttothenetwork”onpage107
•“Theadapterstopsworkingfornoapparentreason”onpage107
•“IfyourcomputerisaGigabitEthernetmodelandyouuseaspeedof1000Mbps,theconnectionfails
orerrorsoccur”onpage108
•“IfyourcomputerisaGigabitEthernetmodel,itcannotconnecttothenetworkat1000Mbps.Instead,it
connectsat100Mbps”onpage108
Yourcomputercannotconnecttothenetwork
Symptom:Yourcomputercannotconnecttothenetwork.
Actions:Makesurethat:
•Thecableisinstalledproperly.
ThenetworkcablemustbesecurelyconnectedtoboththeEthernetconnectorofyourcomputerand
theRJ45connectorofthehub.Themaximumallowabledistancefromthecomputertohubis100
meters.Ifthecableisconnectedandthedistanceiswithinacceptablelimitsbuttheproblempersists,try
adifferentcable.
•Thecableisinstalledproperly.
•Youareusingthecorrectdevicedriver.
OntheWindows7operatingsystem,dothefollowing:
1.ClickStart➙ControlPanel.
2.ClickHardwareandSound.
3.ClickDeviceManager.Ifyouarepromptedforanadministratorpasswordorconrmation,typethe
passwordorprovideconrmation.
4.IfanexclamationmarkisdisplayednexttoanadapternameunderNetworkadapters,youmight
notbeusingthecorrectdriverorthedriverisnotenabled.Toupdatethedriver,right-clickthe
highlightedadapter.
5.ClickUpdateDriverSoftware,andthenfollowtheinstructionsonthescreen.
OntheWindows8operatingsystem,dothefollowing:
1.OpenControlPanel.
2.ClickHardwareandSound.
3.ClickDeviceManager.Ifyouarepromptedforanadministratorpasswordorconrmation,typethe
passwordorprovideconrmation.
4.IfanexclamationmarkisdisplayednexttoanadapternameunderNetworkadapters,youmight
notbeusingthecorrectdriverorthedriverisnotenabled.Toupdatethedriver,right-clickthe
highlightedadapter.
5.ClickUpdateDriverSoftware,andthenfollowtheinstructionsonthescreen.
•Theswitchportandtheadapterhavethesameduplexsetting.
Ifyouconguredtheadapterforfullduplex,ensurethattheswitchportisalsoconguredforfullduplex.
Settingthewrongduplexmodecandegradeperformance,causedataloss,orresultinlostconnections.
•Youhaveinstalledallnetworkingsoftwarethatisnecessaryforyournetworkenvironment.
CheckwithyourLANadministratorforthenecessarynetworkingsoftware.
Theadapterstopsworkingfornoapparentreason
Symptom:Theadapterstopsworkingfornoapparentreason.
Chapter10.Troubleshootinganddiagnostics107

Action:Thenetworkdriverlesmaybecorruptormissing.Updatethedriverbyreferringtothe“Solution”
descriptionfortheproceduretomakesurethatthecorrectdevicedriverisinstalled.
TheWakeonLANfeatureisnotworking
Symptom:TheWakeonLAN(WOL)featureisnotworking.
Actions:
•MakesurethatWOLisenabledintheBIOSSetupUtilityprogram.
•Ifitis,checkwithyourLANadministratorforthenecessarysettings.
IfyourcomputerisaGigabitEthernetmodelandyouuseaspeedof1000Mbps,theconnection
failsorerrorsoccur
Symptom:IfyourcomputerisaGigabitEthernetmodelandyouuseaspeedof1000Mbps,theconnection
failsorerrorsoccur.
Actions:
•UseCategory5wiringandmakesurethatthenetworkcableissecurelyconnected.
•Connecttoa1000BASE-Thub/switch(not1000BASE-X).
IfyourcomputerisaGigabitEthernetmodel,itcannotconnecttothenetworkat1000Mbps.Instead,
itconnectsat100Mbps
Symptom:IfyourcomputerisaGigabitEthernetmodel,itcannotconnecttothenetworkat1000Mbps.
Instead,itconnectsat100Mbps.
Actions:
•Tryanothercable.
•Makesurethatthelinkpartnerissettoauto-negotiate.
•Makesurethattheswitchis802.3ab-compliant(gigabitovercopper).
AwirelessLANproblem
Symptom:Youcannotconnectusingthebuilt-inwirelessnetworkingcard.
Actions:
•MakesurethatyourwirelessLANdriveristhelatestversion.ChecktheWebsiteandverifythedriver
versionsupportedbyAccessConnectionsisthelatestdocumentedinthereadmele.
•Makesurethatyourcomputeriswithinrangeofawirelessaccesspoint.
•Makesurethatthewirelessradioisenabledbydouble-clickingtheAccessConnectionsiconinthe
Windowsnoticationarea.
•CheckNetworkName(SSID),andyourencryptioninformation.UseAccessConnectionstoverifythis
case-sensitiveinformation.
AwirelessWANproblem
Message:UnauthorizedWANcardispluggedin-PoweroffandremovetheWANcard.
Action:TheWANcardisnotsupportedonthiscomputer.Removeit.
Note:SomecomputermodelsdonothaveawirelessWAN.
108ThinkCentreUserGuide

Bluetoothproblem
Symptom:SounddoesnotcomefromtheBluetoothheadsetorheadphonebutcomesfromthelocal
speakereventhoughtheheadsetorheadphoneisconnectedusingtheHeadsetproleorAVprole.
Action:Dothefollowing:
1.Exittheapplicationthatusesthesounddevice(forexample,WindowsMediaPlayer).
2.OpenControlPanel.
3.ClickHardwareandSound➙Sound.
4.SelectthePlaybacktab.
5.IfyouareusingtheHeadsetprole,selectBluetoothHands-freeAudioandclicktheSetDefault
button.IfyouareusingtheAVprole,selectStereoAudioandclicktheSetDefaultbutton.
6.ClickOKtoclosetheSoundwindow.
Optionproblems
UsethisinformationtodiagnoseproblemswithLenovohardwareoptionsthatdonothavetheirown
troubleshootinginformation.
Selectyoursymptomfromthefollowinglist:
•“Anoptionthatwasjustinstalleddoesnotwork”onpage109
•“Anoptionthatpreviouslyworkeddoesnotworknow”onpage109
Anoptionthatwasjustinstalleddoesnotwork
Symptom:Anoptionthatwasjustinstalleddoesnotwork.
Action:Verifythat:
•Theoptionisdesignedforyourcomputer.
•Youfollowedtheinstallationinstructionssuppliedwiththeoptionandtheinstallationinstructionsprovided
withyourcomputer,andalloptionles(suchasdevicedrivers,ifrequired)areinstalledcorrectly.
•Youhavenotloosenedotherinstalledoptionsorcables.
•Iftheoptionisanadapter,youhaveprovidedenoughhardwareresourcesfortheadaptertofunction
correctly.Seethedocumentationsuppliedwiththeadapter(aswellasthedocumentationforanyother
installedadapters)todeterminetheresourcesrequiredforeachadapter.
Iftheseactionsdonotcorrecttheproblem,runtheLenovoSolutionCenterprogram.Ifyouneedtechnical
assistance,seeChapter11“Gettinginformation,help,andservice”onpage115.
Anoptionthatpreviouslyworkeddoesnotworknow
Symptom:Anoptionthatpreviouslyworkeddoesnotworknow.
Actions:
•Verifythatalloptionhardwareandcableconnectionsaresecure.
•Iftheoptioncomeswithitsowntestinstructions,usethoseinstructionstotesttheoption.
•IfthefailingoptionisaSCSIoption,verifythat:
–ThecablesforallexternalSCSIoptionsareconnectedcorrectly.
–ThelastoptionineachSCSIchain,ortheendoftheSCSIcable,isterminatedcorrectly.
Chapter10.Troubleshootinganddiagnostics109

–AllexternalSCSIoptionsareturnedon.ExternalSCSIoptionsmustbeturnedonbeforethecomputer
isturnedon.Formoreinformation,seeyourSCSIdocumentation.
•Verifythattheoptionandanyrequireddevicedriversareinstalledcorrectly.
Iftheseactionsdonotcorrecttheproblem,runtheLenovoSolutionCenterprogram.Ifyouneedtechnical
assistance,seeChapter11“Gettinginformation,help,andservice”onpage115.
Performanceandlockupproblems
Poorperformanceandlockupproblemscanbearesultofanyofthefollowing:
•“Insufcientfreeharddiskdrivespace”onpage110
•“Excessivenumberoffragmentedles”onpage111
•“Insufcientmemory”onpage111
Makeaselectionfromtheabovelisttondoutmoreaboutthecorrectiveactionsyoucantake.
Insufcientfreeharddiskdrivespace
Symptom:Insufcientfreeharddiskdrivespace
TheWindowsoperatingsystemwillslowdownandmightproduceerrorsiftheharddiskdrivegetstoofull.
TochecktheamountoffreespaceontheWindows7operatingsystem,dothefollowing:
1.ClickStart➙Computer.
2.Right-clickyourCdriveentryandthenclickProperties.Theamountoffreediskspaceisdisplayed.
Tofreeupdiskspace,doanyofthefollowing:
•Procedure1
1.OntheWindows7operatingsystem,clickStart➙Computer.OntheWindows8operatingsystem,
opentheWindowsExplorerandclickComputer.
2.Right-clickyourCdriveentryandthenclickProperties.
3.ClickDiskCleanup.
4.Alistofunnecessarylecategoriesisdisplayed.Selecteachlecategoryyouwanttodelete,
andthenclickOK.
•Procedure2
1.OpenControlPanel.
2.ClickPrograms.
3.ClickTurnWindowsfeaturesonoroff.
4.AlistofoptionalWindowscomponentsisdisplayed.Followtheinstructionsonthescreen.
•Procedure3
1.OntheWindows7operatingsystem,clickStart➙Computer.OntheWindows8operatingsystem,
opentheWindowsExplorerandclickComputer.
2.Right-clickyourCdriveentryandthenclickProperties.
3.ClickDiskCleanup.
4.ClickCleanupsystemles.
5.ClicktheMoreOptionstab.
6.IntheProgramsandFeaturesarea,clicktheCleanupbutton.
110ThinkCentreUserGuide

7.Alistofinstalledprogramsisdisplayed.Selecttheprogramthatyouwanttoremove.Click
Uninstall/Change.
•CleanoutyourInbox,SentItems,andDeletedItemsfoldersfromyoure-mailapplication.Thefolder
namesandproceduresvarydependingonyoure-mailapplication.Ifyouneedassistance,seethe
helpsystemforyoure-mailapplication.
Excessivenumberoffragmentedles
Symptom:Excessivenumberoffragmentedles
Action:RuntheWindowsDiskDefragmenterprogram.
Note:Dependingonthesizeoftheharddiskdriveandamountofdatacurrentlystoredontheharddisk
drive,thedisk-defragmentationprocessmighttakeuptoseveralhourstocomplete.
OntheWindows7operatingsystem,dothefollowing:
1.Closeanyprogramsthatarecurrentlyrunningandcloseanyopenwindows.
2.ClickStart➙Computer.
3.Right-clickyourCdriveentryandthenclickProperties.
4.ClicktheToolstab.
5.ClickDefragmentNow,thenclickContinue.
6.ClickDefragmentNowagaintostartadisk-defragmentationprocess.
OntheWindows8operatingsystem,dothefollowing:
1.Closeanyprogramsthatarecurrentlyrunningandcloseanyopenwindows.
2.OpentheWindowsExplorerandclickComputer.
3.Right-clickyourCdriveentryandthenclickProperties.
4.ClicktheToolstab.
5.ClickOptimize.
6.ClickOptimizeagaintostartadisk-defragmentationprocess.
Insufcientmemory
Symptom:Insufcientmemory
Ingeneral,themorememorythatisinstalled,thebettertheWindowsoperatingsystemruns.
Action:Installadditionalmemory.Forinformationaboutpurchasingmemory,seeChapter11“Getting
information,help,andservice”onpage115.Forstep-by-stepinstructionsoninstallingmemory,see
“Installingorreplacingamemorymodule”onpage35.
Iftheseactionsdonotcorrecttheproblem,runtheLenovoSolutionCenterprogram.Ifyouneedtechnical
assistance,seeChapter11“Gettinginformation,help,andservice”onpage115.
Printerproblems
Symptom:Theprinterdoesnotwork.
Actions:Verifythat:
1.Theprinteristurnedonandisonline.
2.Paperisloadedcorrectly.
Chapter10.Troubleshootinganddiagnostics111

3.Theprintersignalcableissecurelyconnectedtothecorrectparallel,serial,orUSBconnectoronthe
computer.
Note:Non-IEEE-approvedprintersignalcablesmightcauseunpredictableproblems.
1.Anydevicedriversandothersoftwarethatcamewiththeprinterarecorrectlyinstalled.
2.Youhaveassignedtheprinterportcorrectlyinyouroperatingsystem,applicationprogram,orBIOS
settings.FormoreinformationaboutBIOSsettings,seeChapter7“UsingtheSetupUtilityprogram”
onpage85.
Iftheproblempersists,runthetestsdescribedinthedocumentationthatcomeswithyourprinter.Ifyou
cannotcorrecttheproblem,havethecomputerserviced.SeeChapter11“Gettinginformation,help,and
service”onpage115.
Serialportproblems
Usethisinformationtotroubleshoottheserialportanddevicesattachedtotheserialport.
Symptom:Serialportcannotbeaccessed.
Actions:
•Makesuretheserialcableissecurelyconnectedtotheserialportonthecomputerandtotheserialdevice.
Iftheserialdevicehasitsownpowercord,makesureitisattachedtoaproperlygroundedelectricaloutlet.
•IftheserialdevicehasitsownOn/Offswitch,makesureitisintheOnposition.
•IftheserialdevicehasanOnlineswitch,makesureitisintheOnlineposition.
•Iftheserialdeviceisaprinter,makesurepaperisloadedcorrectly.
•Verifythatanysoftwaresuppliedwiththeserialdeviceiscorrectlyinstalled.Refertothedocumentation
fortheserial-deviceoption.
•Makesurethattheserial-portadapter,ifyouaddedone,isproperlyinstalledandrmlyseated.
Iftheseactionsdonotcorrecttheproblem,runtheLenovoSolutionCenterprogram.Ifyouneedtechnical
assistance,seeChapter11“Gettinginformation,help,andservice”onpage115.
Softwareproblems
Selectyoursymptomfromthefollowinglist:
•“Whenusingasortfeature,datesdonotsortinthecorrectorder”onpage112
•“Softwaredoesnotworkasexpected”onpage112
Whenusingasortfeature,datesdonotsortinthecorrectorder
Symptom:Whenusingasortfeature,datesdonotsortinthecorrectorder.
Action:Somesoftwaredevelopedbeforetheyear2000usedonlythelasttwodigitsofayeartosort
dates,alwaysassumingthersttwodigitswere19.Consequently,theseprogramssortdatesoutoforder.
Checkwithyoursoftwaremanufacturertoseeifanyupdatesareavailable.Manysoftwaremanufacturers
makeupdatesavailablefromtheWorldWideWeb.
Softwaredoesnotworkasexpected
Symptom:Softwaredoesnotworkasexpected.
Actions:
112ThinkCentreUserGuide

•Mostsoftwareprogramshavebuilt-inhelpsystemsthatprovideinstructionsformosttasks.Ifyouare
havingdifcultyperformingaspecictaskwithinasoftwareprogram,refertothehelpsystemforthat
program.Helpsystemsaretypicallyaccessiblefromamenuorbuttonintheprogram,andfrequently
fromtheF1key.
•IfyouarehavingdifcultywiththeWindowsoperatingsystemoroneofitscomponents,refertothe
Windowshelpsystem.ItisaccessiblefromtheWindowsStartmenu.
•Todetermineifproblemsarecausedbynewlyinstalledsoftware,verifythat:
–Yourcomputerhastheminimummemoryrequirementsneededtousethesoftware.Seethe
informationsuppliedwiththesoftwaretoverifymemoryrequirements.(Ifyoujustinstalledanadapter
ormemory,youmighthaveamemory-addressconict.)
–Thesoftwareisdesignedtooperateonyourcomputer.
–Othersoftwareworksonyourcomputer.
–Thesoftwareyouareusingworkscorrectlyonanothercomputer.
•Ifyoureceivedanyerrormessageswhileusingthesoftwareprogram,seetheprinteddocumentation
suppliedwiththesoftwareorthehelpsystemforthatsoftwareforadescriptionofthemessagesand
solutionstotheproblem.
•Checkwithyoursoftwaremanufacturertoseeifanyupdatesareavailable.Manysoftwaremanufacturers
makeupdatesavailablefromtheWorldWideWeb.
•Ifthesoftwareprogramusedtoworkcorrectly,butdoesnotworkcorrectlynow,dothefollowing:
–OntheWindows7operatingsystem,clickStart➙ControlPanel➙SystemandSecurity➙System
➙SystemProtection➙SystemRestore.Then,followtheinstructionsonthescreen.
–OntheWindows8operatingsystem,openControlPanelandclickSystemandSecurity➙System➙
SystemProtection➙SystemRestore.Then,followtheinstructionsonthescreen.
•Ifyouareunabletoresolvetheproblemthroughothermethods,uninstallthesoftwareprogramand
reinstallit.
Iftheseactionsdonotcorrecttheproblem,youmightneedtechnicalassistance.Contactyoursoftware
manufacturerorseeChapter11“Gettinginformation,help,andservice”onpage115fordetails.
USBproblems
Symptom:TheUSBconnectorscannotbeaccessed.
Actions:
•MakesuretheUSBcableissecurelyconnectedtotheUSBconnectorandtotheUSBdevice.IftheUSB
devicehasitsownpowercord,makesureitisattachedtoaproperlygroundedelectricaloutlet.
•IftheUSBdevicehasitsownOn/Offswitch,makesureitisintheOnposition.
•IftheUSBdevicehasanOnlineswitch,makesureitisintheOnlineposition.
•IftheUSBdeviceisaprinter,makesurepaperisloadedcorrectly.
•MakesureanydevicedriversorothersoftwaresuppliedwiththeUSBdeviceiscorrectlyinstalled.
RefertothedocumentationfortheUSBdevice.
•ResetthedevicebydetachingandreattachingtheUSBconnector.
Iftheseactionsdonotcorrecttheproblem,runtheLenovoSolutionCenterprogramtotesttheUSB
connector.IftheUSBdevicecamewithitsowndiagnostics,runthosediagnosticsagainsttheUSBdevice.
Ifyouneedtechnicalassistance,seeChapter11“Gettinginformation,help,andservice”onpage115.
Chapter10.Troubleshootinganddiagnostics113

LenovoSolutionCenter
TheLenovoSolutionCenterprogramenablesyoutotroubleshootandresolvecomputerproblems.It
combinesdiagnostictests,systeminformationcollection,securitystatus,andsupportinformation,along
withhintsandtipsformaximumsystemperformance.
Notes:
•TheLenovoSolutionCenterprogramcanbedownloadedfromhttp://www.lenovo.com/diags.
•IfyouareusingotherWindowsoperatingsystemratherthanWindows7andWindows8,goto
http://www.lenovo.com/diagsforthelatestinformationondiagnosticsforyourcomputer.
ToruntheLenovoSolutionCenterprogram,see“Lenovoprograms”onpage4.
Foradditionalinformation,refertotheLenovoSolutionCenterhelpsystem.
Note:Ifyouareunabletoisolateandrepairtheproblemyourselfafterrunningtheprogram,saveandprint
thelogles.YouwillneedthelogleswhenyouspeaktoaLenovotechnicalsupportrepresentative.
114ThinkCentreUserGuide

Chapter11.Gettinginformation,help,andservice
Thischaptercontainsinformationabouthelp,service,andtechnicalassistanceforproductsmanufactured
byLenovo.
Informationresources
Youcanusetheinformationinthissectiontoaccessusefulresourcesrelatingtoyourcomputingneeds.
LenovoThinkVantageTools
TheLenovoThinkVantageToolsprogramguidesyoutoahostofinformationsourcesandprovideseasy
accesstovarioustoolstohelpyouworkmoreeasilyandsecurely.
ToaccesstheLenovoThinkVantageToolsprogram,clickStart➙AllPrograms➙LenovoThinkVantage
Tools.
LenovoWelcome
TheLenovoWelcomeprogramintroducesyoutosomeinnovativebuilt-infeaturesofLenovoandguidesyou
throughafewimportantsetuptaskstohelpyoumakethemostofyourcomputer.
HelpandSupport
TheWindowsHelpandSupportinformationsystemguidesyoutovarioushelpandsupportinformationfrom
LenovoandMicrosoft,suchasupdatingdrivers,accessingprograms,andaccessingusermanuals.
ToaccesstheWindowsHelpandSupportinformationsystem,dooneofthefollowing:
•OntheWindows7operatingsystem,clickStart➙HelpandSupport.
•OntheWindows8operatingsystem,movethecursortothetop-rightorbottom-rightcornerofthescreen
todisplaythecharms.ThenclickSettings➙Help.
SafetyandWarranty
TheSafety,Warranty,andSetupGuidethatisprovidedwithyourcomputercontainsinformationonsafety,
setup,warranty,andnotices.Readandunderstandallsafetyinformationbeforeusingthisproduct.
LenovoWebsite
TheLenovoWebsiteprovidesup-to-dateinformationandservicestohelpyoubuy,upgrade,andmaintain
yourcomputer.Youcanalsodothefollowing:
•Shopfordesktopandnotebookcomputers,monitors,projectors,upgradesandaccessoriesforyour
computer,andspecialoffers.
•Purchaseadditionalservices,suchassupportforhardware,operatingsystems,applicationprograms,
networksetupandconguration,andcustominstallations.
•Purchaseupgradesandextendedhardwarerepairservices.
•Downloadthelatestdevicedriversandsoftwareupdatesforyourcomputermodel.
•Accesstheonlinemanualsforyourproducts.
•AccesstheLenovoLimitedWarranty.
©CopyrightLenovo2012115

•Accesstroubleshootingandsupportinformationforyourcomputermodelandothersupportedproducts.
•Findtheserviceandsupportphonenumbersforyourcountryorregion.
•FindaServiceProviderlocatednearyou.
LenovoSupportWebsite
TechnicalsupportinformationisavailableontheLenovoSupportWebsiteat:
http://www.lenovo.com/support
ThisWebsiteisupdatedwiththelatestsupportinformationsuchasthefollowing:
•Driversandsoftware
•Diagnosticsolutions
•Productandservicewarranty
•Productandpartsdetails
•Userguidesandmanuals
•Knowledgebaseandfrequentlyaskedquestions
Helpandservice
Thissectioncontainsinformationaboutobtaininghelpandservice.
Usingthedocumentationanddiagnosticprogram
Ifyouexperienceaproblemwithyourcomputer,seeChapter10“Troubleshootinganddiagnostics”on
page97.Forinformationonadditionalresourcestohelpyoutroubleshootyourcomputerproblem,see
“Informationresources”onpage115.
Ifyoususpectasoftwareproblem,seethedocumentationthatcomeswiththeoperatingsystemorsoftware
program,includingreadmelesandonlinehelp.
Mostcomputerscomewithadiagnosticprogramthathelpyouidentifyhardwareproblems.
YoucanalsogetthelatesttechnicalinformationanddownloaddevicedriversandupdatesfromLenovo
SupportWebsiteat:
http://www.lenovo.com/support
Callingforservice
Duringthewarrantyperiod,youcangethelpandinformationbytelephonethroughtheCustomerSupport
Center.
Thefollowingservicesareavailableduringthewarrantyperiod:
•Problemdetermination-Trainedservicepersonnelareavailabletoassistyouwithdetermininga
hardwareproblemanddecidingwhatactionisnecessarytoxtheproblem.
•Hardwarerepair-Iftheproblemiscausedbyhardwareunderwarranty,trainedservicepersonnelare
availabletoprovidetheapplicablelevelofservice.
•EngineeringChangemanagement-Theremightbechangesthatarerequiredafteraproducthas
beensold.LenovooryourresellerwillmakeselectedEngineeringChanges(ECs)thatapplytoyour
hardwareavailable.
Theseitemsarenotcoveredbythewarranty:
116ThinkCentreUserGuide

•ReplacementoruseofpartsnotmanufacturedfororbyLenovoornon-warrantedLenovoparts
•Identicationofsoftwareproblemsources
•CongurationofBIOSaspartofaninstallationorupgrade
•Changes,modications,orupgradestodevicedrivers
•Installationandmaintenanceofnetworkoperatingsystems(NOS)
•Installationandmaintenanceofapplicationprograms
RefertotheSafety,Warranty,andSetupGuidethatcomeswithyourcomputerforinformationaboutyour
warrantytypeandduration.Youmustretainyourproofofpurchasetoobtainwarrantyservice.
ForalistoftheLenovoSupportphonenumbersforyourcountryorregion,goto
http://www.lenovo.com/support/phoneorrefertotheSafety,Warranty,andSetupGuidethatcomeswith
yourcomputer.
Note:Phonenumbersaresubjecttochangewithoutnotice.Ifthenumberforyourcountryorregionisnot
provided,contactyourLenovoresellerorLenovomarketingrepresentative.
Ifpossible,beatyourcomputerwhenyoucall.Havethefollowinginformationavailable:
•Machinetypeandmodel
•Serialnumbersofyourhardwareproducts
•Descriptionoftheproblem
•Exactwordingofanyerrormessages
•Hardwareandsoftwarecongurationinformation
Usingotherservices
Ifyoutravelwithyourcomputerorrelocateittoacountrywhereyourdesktopornotebookcomputer
machinetypeissold,yourcomputermightbeeligibleforInternationalWarrantyService,whichautomatically
entitlesyoutoobtainwarrantyservicethroughoutthewarrantyperiod.Servicewillbeperformedbyservice
providersauthorizedtoperformwarrantyservice.
Servicemethodsandproceduresvarybycountry,andsomeservicesmightnotbeavailableinallcountries.
InternationalWarrantyServiceisdeliveredthroughthemethodofservice(suchasdepot,carry-in,or
on-siteservice)thatisprovidedintheservicingcountry.Servicecentersincertaincountriesmightnotbe
abletoserviceallmodelsofaparticularmachinetype.Insomecountries,feesandrestrictionsmight
applyatthetimeofservice.
TodeterminewhetheryourcomputeriseligibleforInternationalWarrantyServiceandtoviewalistof
thecountrieswhereserviceisavailable,gotohttp://www.lenovo.com/support,clickProduct&Service
Warranty,andfollowtheinstructionsonthescreen.
FortechnicalassistancewiththeinstallationoforquestionsrelatedtoServicePacksforyour
preinstalledMicrosoftWindowsproduct,refertotheMicrosoftProductSupportServicesWebsiteat
http://support.microsoft.com/directoryoryoucancontacttheCustomerSupportCenter.Somefeesmight
apply.
Purchasingadditionalservices
Duringandafterthewarrantyperiod,youcanpurchaseadditionalservices,suchassupportforhardware,
operatingsystems,andapplicationprograms;networksetupandcongurationservices;upgradedor
extendedhardwarerepairservices;andcustominstallationservices.Serviceavailabilityandservicename
mightvarybycountryorregion.Formoreinformationabouttheseservices,gototheLenovoWebsiteat:
http://www.lenovo.com
Chapter11.Gettinginformation,help,andservice117

118ThinkCentreUserGuide

AppendixA.Notices
Lenovomaynotoffertheproducts,services,orfeaturesdiscussedinthisdocumentinallcountries.Consult
yourlocalLenovorepresentativeforinformationontheproductsandservicescurrentlyavailableinyour
area.AnyreferencetoaLenovoproduct,program,orserviceisnotintendedtostateorimplythatonlythat
Lenovoproduct,program,orservicemaybeused.Anyfunctionallyequivalentproduct,program,orservice
thatdoesnotinfringeanyLenovointellectualpropertyrightmaybeusedinstead.However,itistheuser's
responsibilitytoevaluateandverifytheoperationofanyotherproduct,program,orservice.
Lenovomayhavepatentsorpendingpatentapplicationscoveringsubjectmatterdescribedinthis
document.Thefurnishingofthisdocumentdoesnotgiveyouanylicensetothesepatents.Youcansend
licenseinquiries,inwriting,to:
Lenovo(UnitedStates),Inc.
1009ThinkPlace-BuildingOne
Morrisville,NC27560
U.S.A.
Attention:LenovoDirectorofLicensing
LENOVOPROVIDESTHISPUBLICATION“ASIS”WITHOUTWARRANTYOFANYKIND,EITHEREXPRESS
ORIMPLIED,INCLUDING,BUTNOTLIMITEDTO,THEIMPLIEDWARRANTIESOFNON-INFRINGEMENT,
MERCHANTABILITYORFITNESSFORAPARTICULARPURPOSE.Somejurisdictionsdonotallow
disclaimerofexpressorimpliedwarrantiesincertaintransactions,therefore,thisstatementmaynotapply
toyou.
Thisinformationcouldincludetechnicalinaccuraciesortypographicalerrors.Changesareperiodically
madetotheinformationherein;thesechangeswillbeincorporatedinneweditionsofthepublication.
Lenovomaymakeimprovementsand/orchangesintheproduct(s)and/ortheprogram(s)describedinthis
publicationatanytimewithoutnotice.
Theproductsdescribedinthisdocumentarenotintendedforuseinimplantationorotherlifesupport
applicationswheremalfunctionmayresultininjuryordeathtopersons.Theinformationcontainedinthis
documentdoesnotaffectorchangeLenovoproductspecicationsorwarranties.Nothinginthisdocument
shalloperateasanexpressorimpliedlicenseorindemnityundertheintellectualpropertyrightsofLenovo
orthirdparties.Allinformationcontainedinthisdocumentwasobtainedinspecicenvironmentsandis
presentedasanillustration.Theresultobtainedinotheroperatingenvironmentsmayvary.
Lenovomayuseordistributeanyoftheinformationyousupplyinanywayitbelievesappropriatewithout
incurringanyobligationtoyou.
Anyreferencesinthispublicationtonon-LenovoWebsitesareprovidedforconvenienceonlyanddonotin
anymannerserveasanendorsementofthoseWebsites.ThematerialsatthoseWebsitesarenotpartof
thematerialsforthisLenovoproduct,anduseofthoseWebsitesisatyourownrisk.
Anyperformancedatacontainedhereinwasdeterminedinacontrolledenvironment.Therefore,theresult
obtainedinotheroperatingenvironmentsmayvarysignicantly.Somemeasurementsmayhavebeen
madeondevelopment-levelsystemsandthereisnoguaranteethatthesemeasurementswillbethesame
ongenerallyavailablesystems.Furthermore,somemeasurementsmayhavebeenestimatedthrough
extrapolation.Actualresultsmayvary.Usersofthisdocumentshouldverifytheapplicabledatafortheir
specicenvironment.
©CopyrightLenovo2012119

Trademarks
ThefollowingtermsaretrademarksofLenovointheUnitedStates,othercountries,orboth:
Lenovo
TheLenovologo
RescueandRecovery
ThinkCentre
ThinkVantage
Microsoft,Windows,andWindowsMediaaretrademarksoftheMicrosoftgroupofcompanies.
Intel,IntelCore,Celeron,andPentiumaretrademarksofIntelCorporationintheU.S.and/orothercountries.
LinuxisatrademarkofLinusTorvaldsintheUnitedStates,othercountries,orboth.
Othercompany,product,orservicenamesmaybetrademarksorservicemarksofothers.
120ThinkCentreUserGuide

AppendixB.Regulatoryinformation
Exportclassicationnotice
ThisproductissubjecttotheUnitedStatesExportAdministrationRegulations(EAR)andhasanExport
ClassicationControlNumber(ECCN)of4A994.b.Itcanbere-exportedexcepttoanyoftheembargoed
countriesintheEARE1countrylist.
Electronicemissionsnotices
ThefollowinginformationreferstoLenovopersonalcomputermachinetypes2119,2121,3229,3234,
3235,3236,3237,3238,3240,3242,and3243.
FederalCommunicationsCommissionDeclarationofConformity
ThisequipmenthasbeentestedandfoundtocomplywiththelimitsforaClassBdigitaldevice,pursuant
toPart15oftheFCCRules.Theselimitsaredesignedtoprovidereasonableprotectionagainstharmful
interferenceinaresidentialinstallation.Thisequipmentgenerates,uses,andcanradiateradiofrequency
energyand,ifnotinstalledandusedinaccordancewiththeinstructions,maycauseharmfulinterference
toradiocommunications.However,thereisnoguaranteethatinterferencewillnotoccurinaparticular
installation.Ifthisequipmentdoescauseharmfulinterferencetoradioortelevisionreception,whichcanbe
determinedbyturningtheequipmentoffandon,theuserisencouragedtotrytocorrecttheinterferenceby
oneormoreofthefollowingmeasures:
•Reorientorrelocatethereceivingantenna.
•Increasetheseparationbetweentheequipmentandreceiver.
•Connecttheequipmentintoanoutletonacircuitdifferentfromthattowhichthereceiverisconnected.
•Consultanauthorizeddealerorservicerepresentativeforhelp.
Lenovoisnotresponsibleforanyradioortelevisioninterferencecausedbyusingotherthanspeciedor
recommendedcablesandconnectorsorbyunauthorizedchangesormodicationstothisequipment.
Unauthorizedchangesormodicationscouldvoidtheuser'sauthoritytooperatetheequipment.
ThisdevicecomplieswithPart15oftheFCCRules.Operationissubjecttothefollowingtwoconditions:(1)
thisdevicemaynotcauseharmfulinterference,and(2)thisdevicemustacceptanyinterferencereceived,
includinginterferencethatmaycauseundesiredoperation.
ResponsibleParty:
Lenovo(UnitedStates)Incorporated
1009ThinkPlace-BuildingOne
Morrisville,NC27560
PhoneNumber:919-294-5900
IndustryCanadaClassBemissioncompliancestatement
ThisClassBdigitalapparatuscomplieswithCanadianICES-003.
CetappareilnumériquedelaclasseBestconformeàlanormeNMB-003duCanada.
©CopyrightLenovo2012121
EuropeanUnion-CompliancetotheElectromagneticCompatibilityDirective
ThisproductisinconformitywiththeprotectionrequirementsofEUCouncilDirective2004/108/EConthe
approximationofthelawsoftheMemberStatesrelatingtoelectromagneticcompatibility.Lenovocannot
acceptresponsibilityforanyfailuretosatisfytheprotectionrequirementsresultingfromanon-recommended
modicationoftheproduct,includingtheinstallationofoptioncardsfromothermanufacturers.
ThisproducthasbeentestedandfoundtocomplywiththelimitsforClassBInformationTechnology
EquipmentaccordingtoEuropeanStandardEN55022.ThelimitsforClassBequipmentwerederived
fortypicalresidentialenvironmentstoprovidereasonableprotectionagainstinterferencewithlicensed
communicationdevices.
GermanClassBcompliancestatement
DeutschsprachigerEUHinweis:
HinweisfürGerätederKlasseBEU-RichtliniezurElektromagnetischenVerträglichkeit
DiesesProduktentsprichtdenSchutzanforderungenderEU-Richtlinie2004/108/EG(früher89/336/EWG)zur
AngleichungderRechtsvorschriftenüberdieelektromagnetischeVerträglichkeitindenEU-Mitgliedsstaaten
undhältdieGrenzwertederEN55022KlasseBein.
Umdiesessicherzustellen,sinddieGerätewieindenHandbüchernbeschriebenzuinstallierenundzu
betreiben.DesWeiterendürfenauchnurvonderLenovoempfohleneKabelangeschlossenwerden.
LenovoübernimmtkeineVerantwortungfürdieEinhaltungderSchutzanforderungen,wenndasProdukt
ohneZustimmungderLenovoverändertbzw.wennErweiterungskomponentenvonFremdherstellernohne
EmpfehlungderLenovogesteckt/eingebautwerden.
Deutschland:
EinhaltungdesGesetzesüberdieelektromagnetischeVerträglichkeitvonBetriebsmitteln
DiesesProduktentsprichtdem„GesetzüberdieelektromagnetischeVerträglichkeitvonBetriebsmitteln“
EMVG(früher„GesetzüberdieelektromagnetischeVerträglichkeitvonGeräten“).DiesistdieUmsetzungder
EU-Richtlinie2004/108/EG(früher89/336/EWG)inderBundesrepublikDeutschland.
ZulassungsbescheinigunglautdemDeutschenGesetzüberdieelektromagnetischeVerträglichkeit
vonBetriebsmitteln,EMVGvom20.Juli2007(früherGesetzüberdieelektromagnetische
VerträglichkeitvonGeräten),bzw.derEMVEGRichtlinie2004/108/EC(früher89/336/EWG),für
GerätederKlasseB.
DiesesGerätistberechtigt,inÜbereinstimmungmitdemDeutschenEMVGdasEG-Konformitätszeichen
-CE-zuführen.VerantwortlichfürdieKonformitätserklärungnachParagraf5desEMVGistdieLenovo
(Deutschland)GmbH,Gropiusplatz10,D-70563Stuttgart.
InformationeninHinsichtEMVGParagraf4Abs.(1)4:
DasGeräterfülltdieSchutzanforderungennachEN55024undEN55022KlasseB.
KoreaClassBcompliancestatement
122ThinkCentreUserGuide

JapaneseVCCIClassBstatement
Japancompliancestatementforproductswhichconnecttothepowermainswithratedcurrent
lessthanorequalto20Aperphase
LenovoproductserviceinformationforTaiwan
KeyboardandmousecompliancestatementforTaiwan
Additionalregulatoryinformation
Foradditionalregulatoryinformation,refertotheRegulatoryNoticeshippedwithyourcomputer.Depending
onthecongurationofyourcomputerandthecountryorregionwherethecomputerwaspurchased,
youmighthavereceivedadditionalprintedregulatorynotices.Allregulatorynoticesareavailableonthe
LenovoSupportWebsiteinelectronicformat.Toaccesselectroniccopiesofthedocumentation,goto
http://www.lenovo.com/supportandclickUserGuides&Manuals.
AppendixB.Regulatoryinformation123

124ThinkCentreUserGuide
AppendixC.WEEEandrecyclinginformation
ImportantWEEEinformation
TheWEEEmarkingonLenovoproductsappliestocountrieswithWEEEande-wasteregulations(forexample,
EuropeanDirective2002/96/EC,IndiaE-WasteManagement&HandlingRules,2011).Appliancesare
labeledinaccordancewithlocalregulationsconcerningwasteelectricalandelectronicequipment(WEEE).
Theseregulationsdeterminetheframeworkforthereturnandrecyclingofusedappliancesasapplicable
withineachgeography.Thislabelisappliedtovariousproductstoindicatethattheproductisnottobe
thrownaway,butratherputintheestablishedcollectivesystemsforreclaimingtheseendoflifeproducts.
Usersofelectricalandelectronicequipment(EEE)withtheWEEEmarkingmustnotdisposeofendof
lifeEEEasunsortedmunicipalwaste,butusethecollectionframeworkavailabletothemforthereturn,
recycle,andrecoveryofWEEEandtominimizeanypotentialeffectsofEEEontheenvironmentand
humanhealthduetothepresenceofhazardoussubstances.ForadditionalWEEEinformationgoto:
http://www.lenovo.com/recycling
Recyclinginformation
Lenovoencouragesownersofinformationtechnology(IT)equipmenttoresponsiblyrecycletheirequipment
whenitisnolongerneeded.Lenovooffersavarietyofprogramsandservicestoassistequipmentownersin
recyclingtheirITproducts.ForinformationonrecyclingLenovoproducts,goto:
http://www.lenovo.com/recycling
©CopyrightLenovo2012125

CollectingandrecyclingadisusedLenovocomputerormonitor
IfyouareacompanyemployeeandneedtodisposeofaLenovocomputerormonitorthatistheproperty
ofthecompany,youmustdosoinaccordancewiththeLawforPromotionofEffectiveUtilizationof
Resources.Computersandmonitorsarecategorizedasindustrialwasteandshouldbeproperlydisposed
ofbyanindustrialwastedisposalcontractorcertiedbyalocalgovernment.InaccordancewiththeLaw
forPromotionofEffectiveUtilizationofResources,LenovoJapanprovides,throughitsPCCollecting
andRecyclingServices,forthecollecting,reuse,andrecyclingofdisusedcomputersandmonitors.For
details,visittheLenovoWebsiteathttp://www.lenovo.com/recycling/japan.PursuanttotheLawfor
PromotionofEffectiveUtilizationofResources,thecollectingandrecyclingofhome-usedcomputers
andmonitorsbythemanufacturerwasbegunonOctober1,2003.Thisserviceisprovidedfreeof
chargeforhome-usedcomputerssoldafterOctober1,2003.Fordetails,visittheLenovoWebsiteat
http://www.lenovo.com/recycling/japan.
DisposingofLenovocomputercomponents
SomeLenovocomputerproductssoldinJapanmayhavecomponentsthatcontainheavymetalsorother
environmentalsensitivesubstances.Toproperlydisposeofdisusedcomponents,suchasaprintedcircuit
boardordrive,usethemethodsdescribedaboveforcollectingandrecyclingadisusedcomputerormonitor.
DisposingofdisusedlithiumbatteriesfromLenovocomputers
Abutton-shapedlithiumbatteryisinstalledonthesystemboardofyourLenovocomputertoprovidepower
tothecomputerclockwhilethecomputerisoffordisconnectedfromthemainpowersource.Ifyouwantto
replaceitwithanewone,contactyourplaceofpurchaseoraskforarepairserviceprovidedbyLenovo.If
youhavereplaceditbyyourselfandwanttodisposeofthedisusedlithiumbattery,insulateitwithvinyltape,
contactyourplaceofpurchase,andfollowtheirinstructions.IfyouuseaLenovocomputerathomeand
needtodisposeofalithiumbattery,youmustcomplywithlocalordinancesandregulations.
RecyclinginformationforBrazil
DeclaraçõesdeReciclagemnoBrasil
DescartedeumProdutoLenovoForadeUso
Equipamentoselétricoseeletrônicosnãodevemserdescartadosemlixocomum,masenviadosàpontosde
coleta,autorizadospelofabricantedoprodutoparaquesejamencaminhadoseprocessadosporempresas
especializadasnomanuseioderesíduosindustriais,devidamentecerticadaspelosorgãosambientais,de
acordocomalegislaçãolocal.
ALenovopossuiumcanalespecícoparaauxiliá-lonodescartedessesprodutos.Casovocêpossua
umprodutoLenovoemsituaçãodedescarte,ligueparaonossoSACouencaminheume-mailpara:
reciclar@lenovo.com,informandoomodelo,númerodesérieecidade,amdeenviarmosasinstruções
paraocorretodescartedoseuprodutoLenovo.
BatteryrecyclinginformationforTaiwan
126ThinkCentreUserGuide

BatteryrecyclinginformationfortheEuropeanUnion
Notice:ThismarkappliesonlytocountrieswithintheEuropeanUnion(EU).
BatteriesorpackagingforbatteriesarelabeledinaccordancewithEuropeanDirective2006/66/EC
concerningbatteriesandaccumulatorsandwastebatteriesandaccumulators.TheDirectivedeterminesthe
frameworkforthereturnandrecyclingofusedbatteriesandaccumulatorsasapplicablethroughoutthe
EuropeanUnion.Thislabelisappliedtovariousbatteriestoindicatethatthebatteryisnottobethrown
away,butratherreclaimeduponendoflifeperthisDirective.
InaccordancewiththeEuropeanDirective2006/66/EC,batteriesandaccumulatorsarelabeledtoindicate
thattheyaretobecollectedseparatelyandrecycledatendoflife.Thelabelonthebatterymayalso
includeachemicalsymbolforthemetalconcernedinthebattery(Pbforlead,Hgformercury,andCdfor
cadmium).Usersofbatteriesandaccumulatorsmustnotdisposeofbatteriesandaccumulatorsasunsorted
municipalwaste,butusethecollectionframeworkavailabletocustomersforthereturn,recycling,and
treatmentofbatteriesandaccumulators.Customerparticipationisimportanttominimizeanypotential
effectsofbatteriesandaccumulatorsontheenvironmentandhumanhealthduetothepotentialpresenceof
hazardoussubstances.Forpropercollectionandtreatment,goto:
http://www.lenovo.com/recycling
AppendixC.WEEEandrecyclinginformation127

128ThinkCentreUserGuide
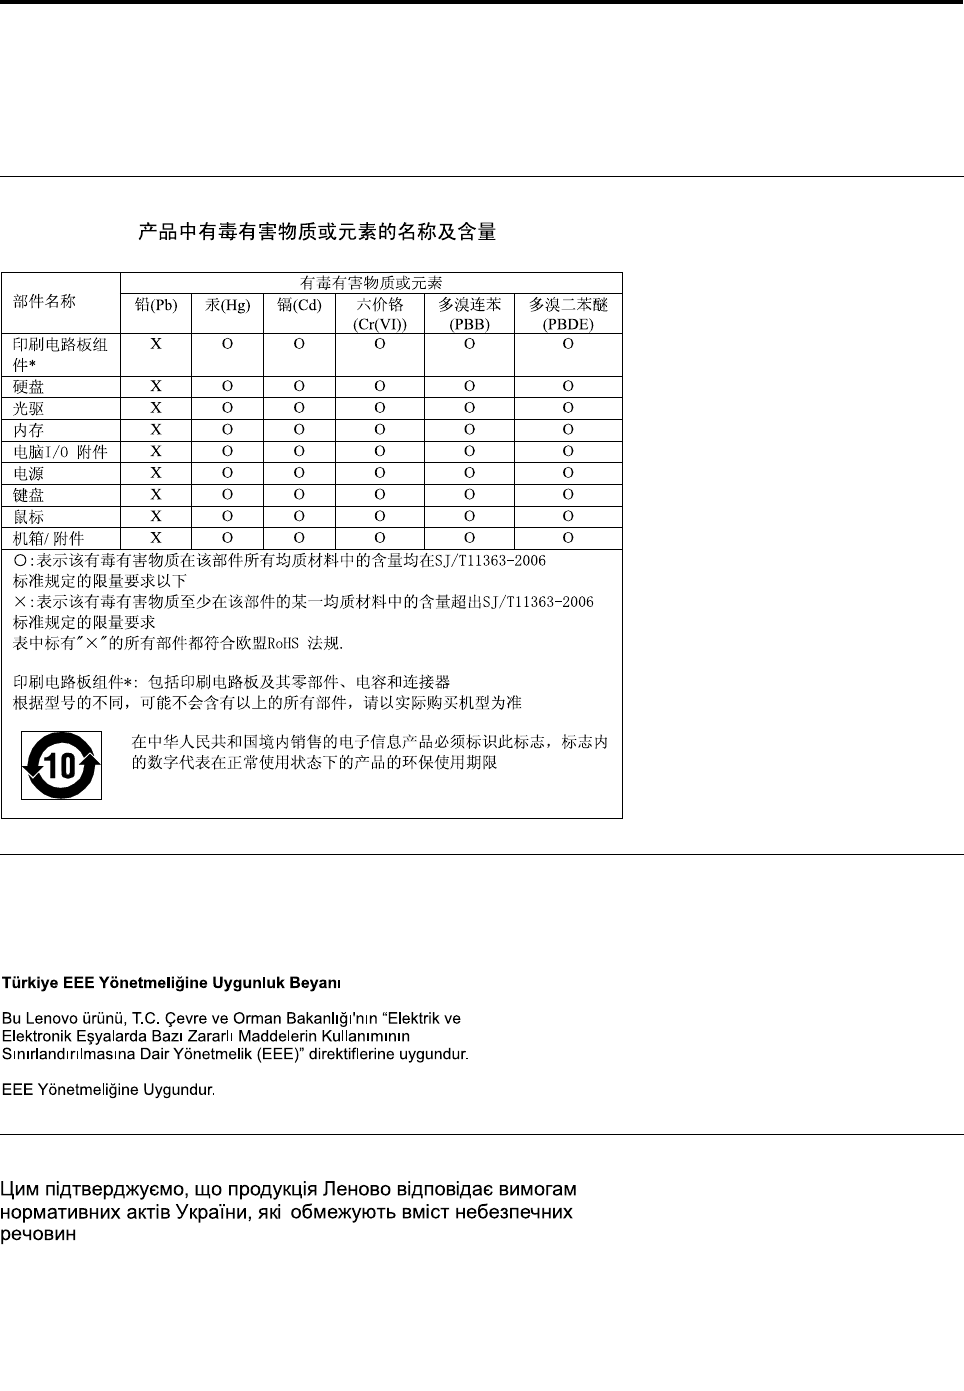
AppendixD.RestrictionofHazardousSubstancesDirective
(RoHS)
ChinaRoHS
TurkishRoHS
TheLenovoproductmeetstherequirementsoftheRepublicofTurkeyDirectiveontheRestrictionoftheUse
ofCertainHazardousSubstancesinElectricalandElectronicEquipment(EEE).
UkraineRoHS
©CopyrightLenovo2012129

IndiaRoHS
RoHScompliantasperE-Waste(Management&Handling)Rules,2011.
130ThinkCentreUserGuide

AppendixE.ENERGYSTARmodelinformation
ENERGYSTAR®isajointprogramoftheU.S.EnvironmentalProtectionAgencyandtheU.S.Department
ofEnergyaimedatsavingmoneyandprotectingtheenvironmentthroughenergyefcientproductsand
practices.
LenovoisproudtoofferourcustomersproductswithanENERGYSTARcompliantdesignation.Some
modelsofthefollowingmachinetypeshavebeendesignedandtestedtoconformtotheENERGYSTAR
programrequirementforcomputersatthetimeofmanufacture:2119,2121,3229,3234,3235,3236,3237,
3238,3240,3242,and3243.FormoreinformationaboutENERGYSTARratingsforLenovocomputers,
gotohttp://www.lenovo.com.
ByusingENERGYSTARcompliantproductsandtakingadvantageofthepower-managementfeaturesof
yourcomputer,youreducetheconsumptionofelectricity.Reducedelectricalconsumptioncontributesto
potentialnancialsavings,acleanerenvironment,andthereductionofgreenhousegasemissions.
FormoreinformationaboutENERGYSTAR,goto:
http://www.energystar.gov
Lenovoencouragesyoutomakeefcientuseofenergyanintegralpartofyourday-to-dayoperations.To
helpinthisendeavor,setthefollowingpower-managementfeaturestotakeeffectwhenyourcomputerhas
beeninactiveforaspeciedduration:
Table3.ENERGYSTARpower-managementfeatures
Windows7orWindows8operatingsystem
Powerplan:ThinkCentreDefault
•Turnoffthedisplay:After10minutes
•Putthecomputertosleep:After25minutes
•Advancedpowersettings:
–Turnoffharddiskdrives:After20minutes
–Hibernate:Never
ToawakenyourcomputerfromaSleeporStandbymode,pressanykeyonyourkeyboard.Formore
informationaboutthesesettings,refertoyourWindowsHelpandSupportinformationsystem.
©CopyrightLenovo2012131

132ThinkCentreUserGuide

Index
A
arescuemedium,creatingandusing80
acpoweradapterbracket,replacing51
acpoweradapter,replacing49
Administrator,password86
audiosubsystem1
B
backupandrecoveryoperations78
basictroubleshooting97
battery,replacing48
boot-blockrecovery92
C
cablelock,security26
changing
password86
startupdevicesequence88
cleaninganopticalmouse95
CMOS,clearing87
components,internal12
computercover
removing33
computercover,reinstalling74
connector10
connectors
rear10
connectors,controls,indicators
front9
considerations,passwords86
creating
andusingarescuemedium80
creatingandusing
recoverymedia77
CRU
completingtheinstallation74
customersupportcenter116
D
deletingapassword86
Description10
devicedrivers76
devices,handlingstatic-sensitive29
diagnosticsprogram,using116
diagnostics,troubleshooting97
DisplayPortconnector10
documentation,using116
drivers,device76
E
environment,operating4
Ethernet1
Ethernetconnector10
exiting,SetupUtility90
expansion3
externaloptions,installing29
F
failure,recoveringfromPOST/BIOS92
features1
ashingtheBIOS91
front
connectors,controls,indicators9
G
getting
help115
information115
service115
H
harddiskdrivebracket,replacing60
heatsink,replacing55
help
andservice116
getting115
HelpandSupport115
I
importantsafetyinformationv
information
getting115
importantsafetyv
resources115
safety115
warranty115
Input/Output(I/O)features3
installingoptions
memorymodule35
installingorremoving
verticalstand30
VESAmountbracket31
internaldrives1
internalspeaker,replacing71
K
keyboard,replacing73
©CopyrightLenovo2012133

L
LenovoSolutionCenter114
LenovoThinkVantageTools115
LenovoWelcome115
locatingcomponents12
M
media,creatingandusingrecoverymedia77
memorymodule
installing,replacing35
systemboard35
microprocessor
replacing58
mouse,replacing73
N
notices119
O
operations,backupandrecovery78
opticaldrive,replacing37
opticalmouse
cleaning95
Optionalport10
P
partsreplacement,completing74
password
Administrator86
considerations86
Power-OnPassword86
setting,changing,deleting86
passwords
erasing87
lostorforgotten87
passwords,using85
physicalspecications4
power
features3
powerswitchboard,replacing53
power-onself-test(POST)91
Power-On,Password86
programs,updatingsystem91
purchasingadditionalservices117
R
rearconnectors10
rearWiFiantenna,installingorremoving66
recovering
fromaPOST/BIOSupdatefailure92
software77
recovery
boot-block92
operations,backupand78
problems,solving82
recoverymedia,creatingandusing77
removingcomputercover33
replacing
battery48
harddiskdrivebracket60
heatsink55
microprocessor58
powerswitchboard53
RescueandRecovery77
workspace,RescueandRecovery79
RescueandRecoveryworkspace79
resources,information115
S
safetyv
safetyinformation115
secondaryharddiskdrive,replacing42
security
cablelock26
enablingordisabling87
features3
selecting
startupdevice88
temporarystartupdevice88
service
andhelp116
customersupportcenter116
getting115
services
other117
purchasingadditional117
setting
password86
settings
changing85
viewing85
SetupUtility85
SetupUtilityprogram,starting85
SetupUtility,exiting90
software
recovering77
solvingrecoveryproblems82
startingtheSetupUtilityprogram85
startupdevice88
sequence,changing88
temporary,selecting88
static-sensitivedevices,handling29
system
management2
programs91
systemboard
connectors13
locatingparts13
locations13
memorymodule35
systemfan,replacing69
134ThinkCentreUserGuide

T
temporarystartupdevice88
theBIOS,updating(ashing)91–92
trademarks120
troubleshooting,basic97
troubleshooting,diagnostics97
U
updating
(ashing)theBIOS91
systemprograms91
updating(ashing)theBIOS92
USB2.0connector11
USB3.0connector11
using
arescuemedium,creatingand80
diagnosticprogram116
documentation116
otherservices117
passwords85
SetupUtility85
V
verticalstand
installingorremoving30
VESAmountbracket,installingorremoving31
VGAmonitorconnector11
videosubsystem1
viewingandchangingsettings85
W
warrantyinformation115
WiFicardmodule,replacing64
workspace,backupandrecovery79
©CopyrightLenovo2012135

136ThinkCentreUserGuide

PartNumber:
Printedin
(1P)P/N:
*1P*
