Lenovo P310 Tower Ug En User Guide Manual (English) (Tower Form Factor) Think Station (type 30AS, 30AT, 30AY, And 30B0) Workstation (Think Station)
2017-07-28
User Manual: Lenovo P310 Tower Ug En (English) User guide - (Tower Form Factor) ThinkStation P310 (type 30AS, 30AT, 30AY, and 30B0) P310 Workstation (ThinkStation) ThinkStation P310 is available in tower and small factor forms, both featuring a rich set of hardware options to choose from, including Intel Xeon E3 and 6th generation Core processors, as well as NVIDIA Quadro graphics.
Open the PDF directly: View PDF ![]() .
.
Page Count: 140 [warning: Documents this large are best viewed by clicking the View PDF Link!]
- Read this first: Important safety information
- Before using this manual
- Service and upgrades
- Static electricity prevention
- Power cords and power adapters
- Extension cords and related devices
- Polyvinyl Chloride (PVC) cable and cord notice
- Plugs and outlets
- External devices
- Heat and product ventilation
- Operating environment
- Laser compliance statement
- Power supply statement
- Cleaning and maintenance
- Chapter 1. Product overview
- Chapter 2. Using your computer
- Chapter 3. You and your computer
- Chapter 4. Security
- Chapter 5. Advanced configuration
- Using the Setup Utility program
- Starting the Setup Utility program
- Enabling or disabling a device
- Enabling or disabling the automatic power-on of your computer
- Enabling or disabling the ErP LPS compliance mode
- Switching between better acoustic and better thermal performance
- Enabling or disabling the system to record thermal alert logs
- Enabling or disabling the configuration change detection
- Changing the BIOS settings before installing a new operating system
- Using the cover presence switch
- Using BIOS passwords
- Selecting a startup device
- Exiting the Setup Utility program
- Configuring RAID
- Updating and recovering the BIOS
- Using the Setup Utility program
- Chapter 6. Troubleshooting, diagnostics, and recovery
- Chapter 7. Installing or replacing hardware
- Handling static-sensitive devices
- Installing or replacing hardware
- Installing external options
- Removing the computer cover
- Removing and reinstalling the front bezel
- Installing or replacing a PCI card
- Installing or replacing an M.2 solid-state drive
- Installing or replacing a memory module
- Installing or replacing an optical drive
- Installing or replacing a device in the 5.25-inch flex module
- Installing or replacing a hard disk drive in the front-access storage enclosure
- Installing or replacing a device in the optical/storage combination enclosure
- Replacing the battery
- Replacing the power supply assembly
- Replacing the heat sink and fan assembly
- Installing or replacing the solid-state drive
- Replacing the primary hard disk drive
- Replacing the secondary hard disk drive
- Installing the tertiary hard disk drive
- Replacing the front fan assembly
- Replacing the rear fan assembly
- Replacing the Wi-Fi units
- Completing the parts replacement
- Chapter 8. Getting information, help, and service
- Appendix A. System memory speed
- Appendix B. Regulatory information
- Appendix C. WEEE and recycling information
- Appendix D. Restriction of Hazardous Substances Directive (RoHS)
- Appendix E. ENERGY STAR model information
- Appendix F. Notices

ThinkStationP310
UserGuide
MachineTypes:30AS,30AT,30AY,and30B0

Note:Beforeusingthisinformationandtheproductitsupports,besuretoreadandunderstandthe“Read
thisfirst:Importantsafetyinformation”onpagevandAppendixF“Notices”onpage125.
FirstEdition(January2016)
©CopyrightLenovo2016.
LIMITEDANDRESTRICTEDRIGHTSNOTICE:IfdataorsoftwareisdeliveredpursuantaGeneralServicesAdministration
“GSA”contract,use,reproduction,ordisclosureissubjecttorestrictionssetforthinContractNo.GS-35F-05925.

Contents
Readthisfirst:Importantsafety
information...............v
Beforeusingthismanual............v
Serviceandupgrades.............v
Staticelectricityprevention...........vi
Powercordsandpoweradapters........vi
Extensioncordsandrelateddevices.......vi
PolyvinylChloride(PVC)cableandcordnotice..vii
Plugsandoutlets..............vii
Externaldevices..............vii
Heatandproductventilation.........vii
Operatingenvironment...........viii
Lasercompliancestatement.........viii
Powersupplystatement............ix
Cleaningandmaintenance...........ix
Chapter1.Productoverview......1
Hardwarelocations..............1
Frontview................1
Rearview................3
Computercomponents..........6
Partsonthesystemboard.........7
Internaldrives..............8
Machinetypeandmodellabel........9
Computerfeatures..............9
Computerspecifications...........13
Programs.................13
Accessingaprogramonyourcomputer...13
Installingaprogramthatisreadytobe
installed(Windows7only)........14
AnintroductiontoLenovoprograms....14
Chapter2.Usingyourcomputer...17
Registeringyourcomputer..........17
Settingthecomputervolume.........17
Usingadisc................17
Guidelinesaboutusingtheopticaldrive...17
Handlingandstoringadisc........18
Playingandremovingadisc.......18
Recordingadisc............18
Connectingtoanetwork...........19
ConnectingtoanEthernetLAN......19
ConnectingtoawirelessLAN.......19
ConnectingtoaBluetooth-enableddevice..20
Chapter3.Youandyourcomputer..21
Arrangingyourworkspace..........21
Glareandlighting............21
Aircirculation.............21
Electricaloutletlocationsandcablelengths.21
Comfort...............21
Accessibilityinformation...........22
Cleaningyourcomputer...........25
Maintenance...............25
Basicmaintenancetips.........25
Goodmaintenancepractices.......25
Keepingyourcomputercurrent......26
Movingyourcomputer...........27
Chapter4.Security..........29
Lockingyourcomputer...........29
Attachingapadlock...........29
AttachingaKensington-stylecablelock...30
Attachingacablelock..........31
Viewingandchangingsecuritysettingsinthe
SetupUtilityprogram............31
UsingpasswordsandWindowsaccounts....31
Usingfingerprintauthentication........32
Usingfirewalls..............32
Protectingdataagainstviruses........32
ComputraceAgentsoftwareembeddedin
firmware.................33
TrustedPlatformModule(TPM)........33
Chapter5.Advancedconfiguration..35
UsingtheSetupUtilityprogram........35
StartingtheSetupUtilityprogram.....35
Enablingordisablingadevice.......35
Enablingordisablingtheautomaticpower-on
ofyourcomputer............35
EnablingordisablingtheErPLPScompliance
mode................36
Switchingbetweenbetteracousticandbetter
thermalperformance..........36
Enablingordisablingthesystemtorecord
thermalalertlogs............37
Enablingordisablingtheconfigurationchange
detection...............37
ChangingtheBIOSsettingsbeforeinstallinga
newoperatingsystem..........38
Usingthecoverpresenceswitch......38
UsingBIOSpasswords.........38
Selectingastartupdevice........40
ExitingtheSetupUtilityprogram......41
ConfiguringRAID..............41
©CopyrightLenovo2016i

RAIDLevel..............41
ConfiguringthesystemBIOStoenableSATA
RAIDfunctionality............41
CreatingRAIDvolumes.........42
DeletingRAIDvolumes.........42
Resettingdiskstonon-RAID.......42
UpdatingandrecoveringtheBIOS.......43
UpdatingtheBIOS...........43
RecoveringfromaBIOSupdatefailure...43
Chapter6.Troubleshooting,
diagnostics,andrecovery......45
Basicprocedureforresolvingcomputer
problems.................45
Troubleshooting..............45
Startupproblems............45
Audioproblems............46
CDorDVDproblems..........47
Intermittentproblems..........48
Storagedriveproblems.........48
Networkingproblems..........49
Performanceproblems..........51
Serialconnectorcannotbeaccessed....52
MyUSBconnectorscannotbeaccessed..52
Softwareanddriverproblems.......52
Diagnostics................53
LenovoSolutionCenter.........53
Recoveryinformation............53
RecoveryinformationforWindows7....53
RecoveryinformationforWindows10....54
Chapter7.Installingorreplacing
hardware...............57
Handlingstatic-sensitivedevices.......57
Installingorreplacinghardware........57
Installingexternaloptions........57
Removingthecomputercover.......58
Removingandreinstallingthefrontbezel..59
InstallingorreplacingaPCIcard......59
InstallingorreplacinganM.2solid-state
drive.................62
Installingorreplacingamemorymodule...63
Installingorreplacinganopticaldrive....66
Installingorreplacingadeviceinthe5.25-inch
flexmodule..............69
Installingorreplacingaharddiskdriveinthe
front-accessstorageenclosure......76
Installingorreplacingadeviceinthe
optical/storagecombinationenclosure...78
Replacingthebattery..........82
Replacingthepowersupplyassembly...83
Replacingtheheatsinkandfanassembly..85
Installingorreplacingthesolid-statedrive..87
Replacingtheprimaryharddiskdrive....91
Replacingthesecondaryharddiskdrive...92
Installingthetertiaryharddiskdrive....93
Replacingthefrontfanassembly.....97
Replacingtherearfanassembly......98
ReplacingtheWi-Fiunits.........100
Completingthepartsreplacement.....105
Chapter8.Gettinginformation,help,
andservice.............107
Informationresources............107
Accessingtheuserguideinvarious
languages...............107
Windowshelpsystem..........107
Safetyandwarranty...........107
LenovoWebsite............107
LenovoSupportWebsite.........108
Frequentlyaskedquestions........108
Helpandservice..............108
Callingforservice............108
Usingotherservices..........109
Purchasingadditionalservices......109
AppendixA.Systemmemory
speed................111
AppendixB.Regulatory
information.............113
Exportclassificationnotice..........113
Electronicemissionsnotices.........113
FederalCommunicationsCommission
DeclarationofConformity........113
Eurasiancompliancemark..........115
Brazilaudionotice.............115
Mexicowireless-radiocomplianceinformation..115
Additionalregulatoryinformation.......116
AppendixC.WEEEandrecycling
information.............117
ImportantWEEEinformation.........117
RecyclinginformationforJapan........117
RecyclinginformationforBrazil........118
BatteryrecyclinginformationforTaiwan.....118
BatteryrecyclinginformationfortheEuropean
Union..................118
AppendixD.RestrictionofHazardous
SubstancesDirective(RoHS)....121
EuropeanUnionRoHS...........121
ChinaRoHS................121
TurkishRoHS...............121
iiThinkStationP310UserGuide


ivThinkStationP310UserGuide

Readthisfirst:Importantsafetyinformation
Thischaptercontainsthesafetyinformationthatyoumustbefamiliarwith.
Beforeusingthismanual
CAUTION:
Beforeusingthismanual,besuretoreadandunderstandalltherelatedsafetyinformationforthis
product.RefertotheinformationinthissectionandthesafetyinformationintheSafety,Warranty,and
SetupGuidethatyoureceivedwiththisproduct.Readingandunderstandingthissafetyinformation
reducestheriskofpersonalinjuryanddamagetoyourproduct.
IfyounolongerhaveacopyoftheSafety,Warranty,andSetupGuide,youcanobtainaPortableDocument
Format(PDF)versionfromtheLenovo®SupportWebsiteathttp://www.lenovo.com/UserManuals.The
LenovoSupportWebsitealsoprovidestheSafety,Warranty,andSetupGuideandthisUserGuidein
additionallanguages.
Serviceandupgrades
DonotattempttoserviceaproductyourselfunlessinstructedtodosobytheCustomerSupportCenteror
yourdocumentation.OnlyuseaServiceProviderwhoisapprovedtorepairyourparticularproduct.
Note:Somecomputerpartscanbeupgradedorreplacedbythecustomer.Upgradestypicallyare
referredtoasoptions.ReplacementpartsapprovedforcustomerinstallationarereferredtoasCustomer
ReplaceableUnits,orCRUs.Lenovoprovidesdocumentationwithinstructionswhenitisappropriatefor
customerstoinstalloptionsorreplaceCRUs.Youmustcloselyfollowallinstructionswheninstallingor
replacingparts.TheOffstateofapowerindicatordoesnotnecessarilymeanthatvoltagelevelsinsidea
productarezero.Beforeyouremovethecoversfromaproductequippedwithapowercord,alwaysensure
thatthepoweristurnedoffandthattheproductisunpluggedfromanypowersource.Formoreinformation
aboutCRUs,refertoChapter7“Installingorreplacinghardware”onpage57.Ifyouhaveanyquestionsor
concerns,contacttheCustomerSupportCenter.
Althoughtherearenomovingpartsinyourcomputerafterthepowercordhasbeendisconnected,the
followingwarningsarerequiredforyoursafety.
CAUTION:
Hazardousmovingparts.Keepfingersandotherbodypartsaway.
CAUTION:
Beforeyouopenthecomputercover,turnoffthecomputerandwaitseveralminutesuntilthe
computeriscool.
©CopyrightLenovo2016v

Staticelectricityprevention
Staticelectricity,althoughharmlesstoyou,canseriouslydamagecomputercomponentsandoptions.
Improperhandlingofstatic-sensitivepartscandamagethepart.WhenyouunpackanoptionorCRU,do
notopenthestatic-protectivepackagecontainingthepartuntiltheinstructionsdirectyoutoinstallit.
WhenyouhandleoptionsorCRUs,orperformanyworkinsidethecomputer,takethefollowingprecautions
toavoidstatic-electricitydamage:
•Limityourmovement.Movementcancausestaticelectricitytobuilduparoundyou.
•Alwayshandlecomponentscarefully.Handleadapters,memorymodules,andothercircuitboardsbythe
edges.Nevertouchexposedcircuitry.
•Preventothersfromtouchingcomponents.
•Whenyouinstallastatic-sensitiveoptionorCRU,touchthestatic-protectivepackagecontainingthe
parttoametalexpansion-slotcoverorotherunpaintedmetalsurfaceonthecomputerforatleasttwo
seconds.Thisreducesstaticelectricityinthepackageandyourbody.
•Whenpossible,removethestatic-sensitivepartfromthestatic-protectivepackagingandinstallthepart
withoutsettingitdown.Whenthisisnotpossible,placethestatic-protectivepackagingonasmooth,
levelsurfaceandplacethepartonit.
•Donotplacethepartonthecomputercoverorothermetalsurface.
Powercordsandpoweradapters
Useonlythepowercordsandpoweradapterssuppliedbytheproductmanufacturer.Donotusetheac
powercordforotherdevices.
Thepowercordsshallbesafetyapproved.ForGermany,itshallbeH05VV-F,3G,0.75mm2,orbetter.For
othercountries,thesuitabletypesshallbeusedaccordingly.
Neverwrapapowercordaroundapoweradapterorotherobject.Doingsocanstressthecordinwaysthat
cancausethecordtofray,crack,orcrimp.Thiscanpresentasafetyhazard.
Alwaysroutepowercordssothattheywillnotbewalkedon,trippedover,orpinchedbyobjects.
Protectpowercordandpoweradaptersfromliquids.Forinstance,donotleaveyourpowercordorpower
adapternearsinks,tubs,toilets,oronfloorsthatarecleanedwithliquidcleansers.Liquidscancausea
shortcircuit,particularlyifthepowercordorpoweradapterhasbeenstressedbymisuse.Liquidsalsocan
causegradualcorrosionofpowercordterminalsand/ortheconnectorterminalsonapoweradapter,
whichcaneventuallyresultinoverheating.
Ensurethatallpowercordconnectorsaresecurelyandcompletelypluggedintoreceptacles.
Donotuseanypoweradapterthatshowscorrosionattheacinputpinsorshowssignsofoverheating(such
asdeformedplastic)attheacinputoranywhereonthepoweradapter.
Donotuseanypowercordswheretheelectricalcontactsoneitherendshowsignsofcorrosionor
overheatingorwherethepowercordappearstohavebeendamagedinanyway.
Extensioncordsandrelateddevices
Ensurethatextensioncords,surgeprotectors,uninterruptiblepowersupplies,andpowerstripsthatyouuse
areratedtohandletheelectricalrequirementsoftheproduct.Neveroverloadthesedevices.Ifpowerstrips
viThinkStationP310UserGuide

areused,theloadshouldnotexceedthepowerstripinputrating.Consultanelectricianformoreinformation
ifyouhavequestionsaboutpowerloads,powerrequirements,andinputratings.
PolyvinylChloride(PVC)cableandcordnotice
Manypersonalcomputerproductsandaccessoriescontaincords,cablesorwires,suchaspowercordsor
cordstoconnecttheaccessorytoapersonalcomputer.Ifthisproducthassuchacord,cableorwire,then
thefollowingwarningapplies:
WARNING:Handlingthecordonthisproductorcordsassociatedwithaccessoriessoldwiththisproduct
willexposeyoutolead,achemicalknowntotheStateofCaliforniatocausecancer,andbirthdefectsor
otherreproductiveharm.Washhandsafterhandling.
Plugsandoutlets
Ifareceptacle(poweroutlet)thatyouintendtousewithyourcomputerequipmentappearstobedamaged
orcorroded,donotusetheoutletuntilitisreplacedbyaqualifiedelectrician.
Donotbendormodifytheplug.Iftheplugisdamaged,contactthemanufacturertoobtainareplacement.
Donotshareanelectricaloutletwithotherhomeorcommercialappliancesthatdrawlargeamountsof
electricity.Otherwise,unstablevoltagemightdamageyourcomputer,data,orconnecteddevices.
Someproductsareequippedwithathree-prongedplug.Thisplugfitsonlyintoagroundedelectricaloutlet.
Thisisasafetyfeature.Donotdefeatthissafetyfeaturebytryingtoinsertitintoanon-groundedoutlet.If
youcannotinserttheplugintotheoutlet,contactanelectricianforanapprovedoutletadapterortoreplace
theoutletwithonethatenablesthissafetyfeature.Neveroverloadanelectricaloutlet.Theoverallsystem
loadshouldnotexceed80percentofthebranchcircuitrating.Consultanelectricianformoreinformation
ifyouhavequestionsaboutpowerloadsandbranchcircuitratings.
Besurethatthepoweroutletyouareusingisproperlywired,easilyaccessible,andlocatedclosetothe
equipment.Donotfullyextendpowercordsinawaythatwillstressthecords.
Besurethatthepoweroutletprovidesthecorrectvoltageandcurrentfortheproductyouareinstalling.
Carefullyconnectanddisconnecttheequipmentfromtheelectricaloutlet.
Externaldevices
DonotconnectordisconnectanyexternaldevicecablesotherthanUniversalSerialBus(USB)cableswhile
thecomputerpowerison;otherwise,youmightdamageyourcomputer.Toavoidpossibledamageto
connecteddevices,waitatleastfivesecondsafterthecomputerisshutdowntodisconnectexternaldevices.
Heatandproductventilation
Computers,poweradapters,andmanyaccessoriescangenerateheatwhenturnedonandwhenbatteries
arecharging.Alwaysfollowthesebasicprecautions:
•Donotleaveyourcomputer,poweradapter,oraccessoriesincontactwithyourlaporanypartofyour
bodyforanextendedperiodwhentheproductsarefunctioningorwhenthebatteryischarging.Your
computer,poweradapter,andmanyaccessoriesproducesomeheatduringnormaloperation.Extended
contactwiththebodycouldcausediscomfortor,potentially,askinburn.
•Donotchargethebatteryoroperateyourcomputer,poweradapter,oraccessoriesnearflammable
materialsorinexplosiveenvironments.
©CopyrightLenovo2016vii

•Ventilationslots,fans,andheatsinksareprovidedwiththeproductforsafety,comfort,andreliable
operation.Thesefeaturesmightinadvertentlybecomeblockedbyplacingtheproductonabed,sofa,
carpet,orotherflexiblesurface.Neverblock,cover,ordisablethesefeatures.
Inspectyourdesktopcomputerfordustaccumulationatleastonceeverythreemonths.Beforeinspecting
yourcomputer,turnoffthepowerandunplugthecomputer'spowercordfromtheelectricaloutlet;then
removeanydustfromventsandperforationsinthebezel.Ifyounoticeexternaldustaccumulation,then
examineandremovedustfromtheinsideofthecomputerincludingheatsinkinletfins,powersupplyvents,
andfans.Alwaysturnoffandunplugthecomputerbeforeopeningthecover.Ifpossible,avoidoperating
yourcomputerwithintwofeetofhigh-trafficareas.Ifyoumustoperateyourcomputerinornearahigh-traffic
area,inspectand,ifnecessary,cleanyourcomputermorefrequently.
Foryoursafetyandtomaintainoptimumcomputerperformance,alwaysfollowthesebasicprecautions
withyourdesktopcomputer:
•Keepthecoverclosedwheneverthecomputerispluggedin.
•Regularlyinspecttheoutsideofthecomputerfordustaccumulation.
•Removedustfromventsandanyperforationsinthebezel.Morefrequentcleaningsmightberequiredfor
computersindustyorhigh-trafficareas.
•Donotrestrictorblockanyventilationopenings.
•Donotstoreoroperateyourcomputerinsidefurniture,asthismightincreasetheriskofoverheating.
•Airflowtemperaturesintothecomputershouldnotexceed35°C(95°F).
•Donotinstallairfiltrationdevices.Theymayinterferewithpropercooling.
Operatingenvironment
Theoptimalenvironmentinwhichtouseyourcomputeris10°C–35°C(50°F–95°F)withhumidityranging
between35%and80%.Ifyourcomputerisstoredortransportedintemperatureslessthan10°C(50°F),
allowthecoldcomputertoriseslowlytoanoptimaloperatingtemperatureof10°C–35°C(50°F–95°F)before
use.Thisprocesscouldtaketwohoursinextremeconditions.Failuretoallowyourcomputertorisetoan
optimaloperatingtemperaturebeforeusecouldresultinirreparabledamagetoyourcomputer.
Ifpossible,placeyourcomputerinawell-ventilatedanddryareawithoutdirectexposuretosunshine.
Keepelectricalappliancessuchasanelectricfan,radio,high-poweredspeakers,airconditioner,and
microwaveovenawayfromyourcomputerbecausethestrongmagneticfieldsgeneratedbythese
appliancescandamagethemonitoranddataonthestoragedrive.
Donotplaceanybeveragesontopoforbesidethecomputerorotherconnecteddevices.Ifliquidisspilled
onorinthecomputeroraconnecteddevice,ashortcircuitorotherdamagemightoccur.
Donoteatorsmokeoveryourkeyboard.Particlesthatfallintoyourkeyboardcancausedamage.
Lasercompliancestatement
CAUTION:
Whenlaserproducts(suchasCD-ROMs,DVDdrives,fiberopticdevices,ortransmitters)are
installed,notethefollowing:
viiiThinkStationP310UserGuide
•Donotremovethecovers.Removingthecoversofthelaserproductcouldresultinexposureto
hazardouslaserradiation.Therearenoserviceablepartsinsidethedevice.
•Useofcontrolsoradjustmentsorperformanceofproceduresotherthanthosespecifiedherein
mightresultinhazardousradiationexposure.
DANGER
SomelaserproductscontainanembeddedClass3AorClass3Blaserdiode.Notethefollowing:
Laserradiationwhenopen.Donotstareintothebeam,donotviewdirectlywithoptical
instruments,andavoiddirectexposuretothebeam.
Powersupplystatement
Neverremovethecoveronapowersupplyoranypartthathasthefollowinglabelattached.
Hazardousvoltage,current,andenergylevelsarepresentinsideanycomponentthathasthislabelattached.
Therearenoserviceablepartsinsidethesecomponents.Ifyoususpectaproblemwithoneoftheseparts,
contactaservicetechnician.
Cleaningandmaintenance
Keepyourcomputerandworkspaceclean.Shutdownthecomputerandthendisconnectthepower
cordbeforecleaningthecomputer.Donotsprayanyliquiddetergentdirectlyonthecomputeroruse
anydetergentcontainingflammablematerialtocleanthecomputer.Spraythedetergentonasoftcloth
andthenwipethecomputersurfaces.
©CopyrightLenovo2016ix

xThinkStationP310UserGuide
Chapter1.Productoverview
Thischapterprovidesinformationaboutthefollowingtopics:
•“Hardwarelocations”onpage1
•“Computerfeatures”onpage9
•“Computerspecifications”onpage13
•“Programs”onpage13
Hardwarelocations
Thissectionprovidesinformationaboutthelocationsofyourcomputerhardware.
Note:Thecomputerhardwaremightlookslightlydifferentfromtheillustrations.
Frontview
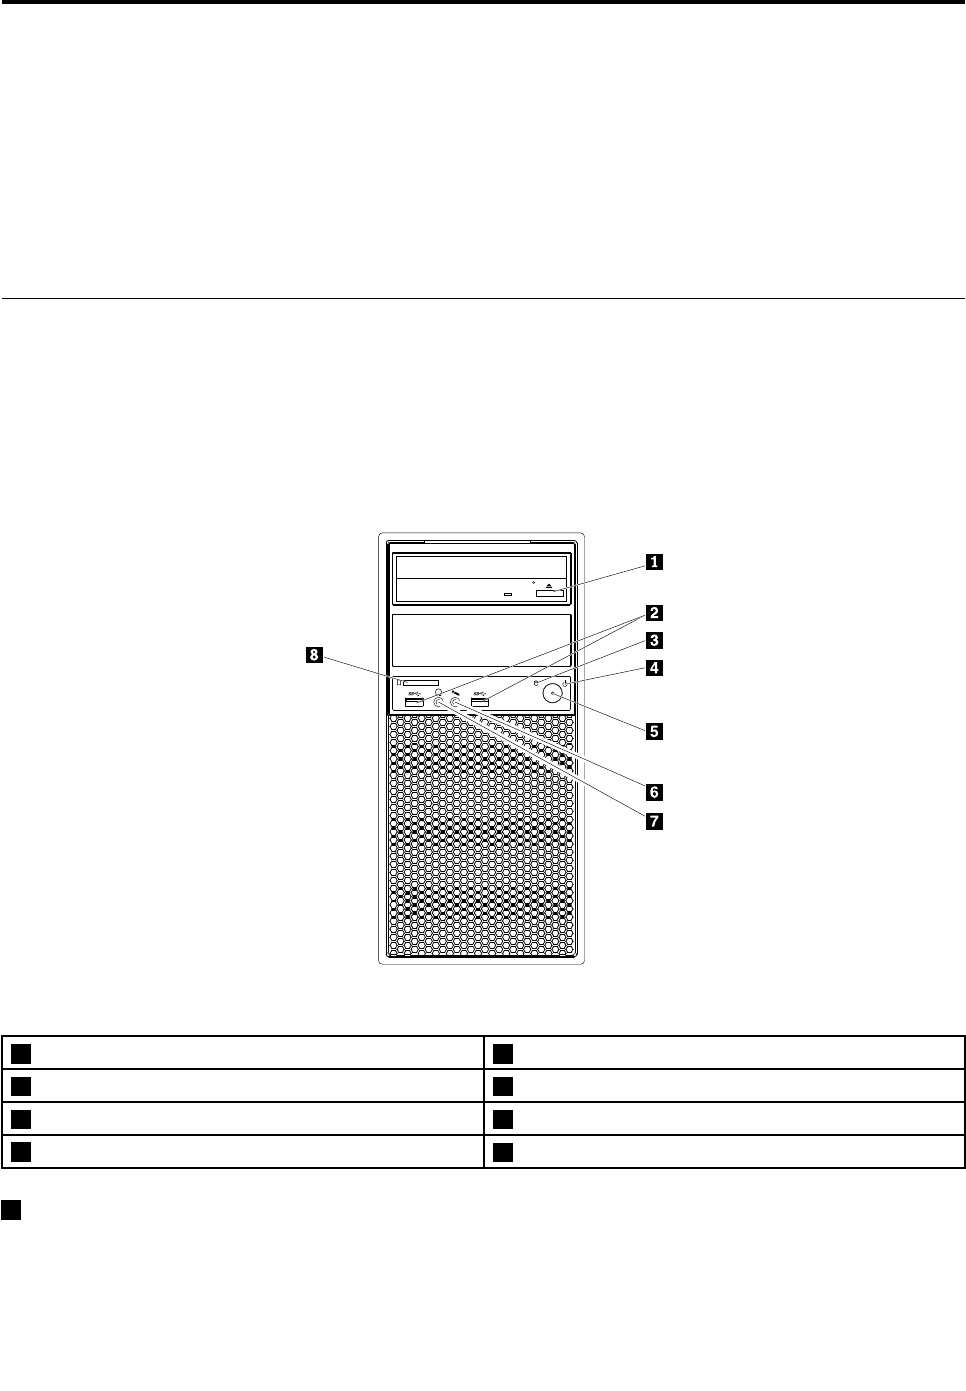
Figure1.Frontview
1Opticaldriveeject/closebutton2USB3.0connectors(2)
3Hard-disk-driveactivityindicator4Powerindicator
5Powerbutton6Microphoneconnector
7Headphoneconnector8Cardreader
1Opticaldriveeject/closebutton
Usedtoejectthetrayoftheopticaldrivefromthedrive.Afteryouinsertadiscintothetray,pressthe
eject/closebuttontoclosethetray.
©CopyrightLenovo20161

2USB3.0connector
UsedtoconnectaUSB-compatibledevice,suchasaUSBkeyboard,mouse,storagedrive,orprinter.
3Hard-disk-driveactivityindicator
Usedtoindicatethestatusoftheinternalstoragedrives(suchasharddiskdrivesorsolid-statedrives).
Whentheindicatorison,thestoragedrivesarereadyforuse,orthedataisbeingtransmitted.Whenthe
computerisonbuttheindicatorisoff,thestoragedrivesdonotworkproperlyorotherproblemsoccur.
4Powerindicator
Whenthepowerindicatorison,thecomputerison.
5Powerbutton
Usedtoturnonyourcomputer.Ifyourcomputerisunresponsive,youcanturnoffthecomputerbypressing
andholdingthepowerbuttonforfourormoreseconds.
6Microphoneconnector
Usedtoconnectamicrophonetoyourcomputer.Youcanusethemicrophonetorecordsoundsthrough
speech-recognitionsoftware.
7Headphoneconnector
Usedtoconnectheadphonestoyourcomputer.
8Cardreader
Usedtoinsertasupportedcard-shapedstoragemediumtoreadthedataonthemedium.
2ThinkStationP310UserGuide
Rearview
4
3
5 6 7 8
/
Figure2.Rearview
1Power-cordconnector2Serialconnector
3VGAconnector4DisplayPort®connectors
5USB3.0connectors(4)6USB2.0connectors(2)
7Microphoneconnector8PCI/PCI-Expresscardarea(differentcardsprovide
differentconnectors)
9Audioline-inconnector10Optionalserialconnector
11Cable-lockslots12Padlockloop
13Audioline-outconnector14Ethernetconnector
15PS/2keyboardandmouseconnectors(somemodels)16Security-lockslot
Note:Adiscretegraphicscard,networkinterfacecard,oraudiocardmightbeinstalledinthePeripheral
ComponentInterconnect(PCI)orPCIExpresscardarea.Ifsuchacardisinstalled,ensurethatyouusethe
connectorsonthecardinsteadofthecorrespondingconnectorsonthecomputer.
1Powercordconnector(availableonsomemodels)
Usedtoconnectthepowercordtoyourcomputerforpowersupply.
210Serialconnector
Usedtoconnectanexternalmodem,aserialprinter,orotherdevicesthatuseaserialconnector.
3VGAconnector
Usedtoconnectavideographicsarray(VGA)monitororotherdevicesthatuseaVGAconnector.
Chapter1.Productoverview3

4DisplayPortconnector
Usedtoconnectahigh-performancemonitor,adirect-drivemonitor,orotherdevicesthatuseaDisplayPort
connector.
5USB3.0connector
UsedtoconnectaUSB-compatibledevice,suchasaUSBkeyboard,mouse,storagedrive,orprinter.
ConnectUSB3.0devicestotheUSB3.0connectorforoptimalperformance.
6USB2.0connector
UsedtoconnectaUSB-compatibledevice,suchasaUSBkeyboard,mouse,storagedrive,orprinter.
7Microphoneconnector
Usedtoconnectamicrophonetoyourcomputerwhenyouwanttorecordsoundorifyouuse
speech-recognitionsoftware.
8PCI/PCI-Expresscardarea(differentcardsprovidedifferentconnectors)
Toimprovetheoperatingperformanceofyourcomputer,youcanconnectPCI/PCI-Expresscardsintothis
area.Dependingonyourcomputermodel,thecardsinstalledinthisareamightvary.
9Audioline-inconnector
Usedtoreceiveaudiosignalsfromanexternalaudiodevice,suchasastereosystem.Whenyouattachan
externalaudiodevice,acableisconnectedbetweentheaudioline-outconnectorofthedeviceandthe
audioline-inconnectorofthecomputer.
11Cable-lockslots(2)
Usedtosecureacablelock.Formoreinformation,see“Attachingacablelock”onpage31.
12Padlockloop
Usedtosecureapadlock.Formoreinformation,see“Attachingapadlock”onpage29.
13Audioline-outconnector
Usedtosendaudiosignalsfromthecomputertoexternaldevices,suchaspoweredstereospeakers,
headphones,ormultimediakeyboards.Toattachastereosystemorotherexternalrecordingdevice,
acableisconnectedbetweentheaudioline-inconnectorofthedeviceandtheaudioline-outconnector
ofthecomputer.
14Ethernetconnector
UsedtoconnectanEthernetcableforalocalareanetwork(LAN).
Note:TooperatethecomputerwithinFederalCommunicationsCommission(FCC)ClassBlimits,usea
Category5eorbetterEthernetcable.
15PS/2keyboardconnector(availableonsomemodels)
UsedtoconnectakeyboardthatusesaPersonalSystem/2(PS/2)keyboardconnector.
4ThinkStationP310UserGuide


Computercomponents
Note:Dependingonyourcomputermodel,someofthefollowingcomponentsmightnotbeavailable.
Figure3.Computercomponents
1Heatsinkandfanassembly2Memorymodule
3Opticaldrive(somemodels)4Cardreader
5FrontaudioandUSBassembly6Frontbezel
7Frontfanassembly(somemodels)8Harddiskdrives
9Graphicscard(somemodels)10Coverpresenceswitch(alsocalledintrusionswitch)
(somemodels)
11Rearfanassembly12Powersupplyassembly
6ThinkStationP310UserGuide

Partsonthesystemboard
Thefollowingillustrationshowsthelocationsofthepartsonthesystemboard.
Figure4.Partsonthesystemboard
1PS/2keyboardandmouseconnector24-pinpowerconnector
3Microprocessor4Microprocessorfanconnector
5Battery6Memoryslot1(DIMM1)
7Memoryslot2(DIMM2)8Memoryslot3(DIMM3)
9Memoryslot4(DIMM4)10Thermalsensorconnector
1110-pinpowerconnector12Hard-disk-drivefanconnector
134-pinSATApowerconnectors14Thunderbolt™connector
15Parallelconnector16eSATAconnector
17SATAconnectors18Powerfanconnector
19USBhardwaredisableheader20Frontbezelconnector(forconnectingLEDindicators
andthepowerbutton)
21FrontUSB3.0connector(forconnectingUSB
connectorsonthefrontpanel)
22USB2.0connectors(forconnectingthefrontUSB2.0
connector,cardreaderconnector,orBluetoothconnector)
23ClearCMOS(ComplementaryMetalOxide
Semiconductor)/Recoveryjumper
24Serial(COM2)connector
25Internalspeakerconnector26Frontaudioconnector
27PCIExpressx1cardslot228PCIExpressx16cardslot(negotiablelinkwidthx4,
x1)
Chapter1.Productoverview7
29PCIExpressx1cardslot130PCIExpressx16cardslot(graphiccardavailableon
somemodels)
31Systemfanconnector32Coverpresenceswitchconnector(intrusionswitch
connector)
Internaldrives
Internaldrivesaredevicesthatyourcomputerusestoreadandstoredata.Youcanadddrivestoyour
computertoincreasestoragecapacityandenableyourcomputertoreadothertypesofmedia.Internal
drivesareinstalledinbays.
Wheninstallingorreplacinganinternaldrive,itisimportanttonotethetypeandsizeofthedrivethatyou
caninstallorreplaceineachbayandcorrectlyconnectthecablestothedriveinstalled.Refertothe
appropriatesectioninChapter7“Installingorreplacinghardware”onpage57forinstructionsonhowto
installorreplaceinternaldrivesforyourcomputer.
Thefollowingillustrationshowsthelocationsofthedrivebays.
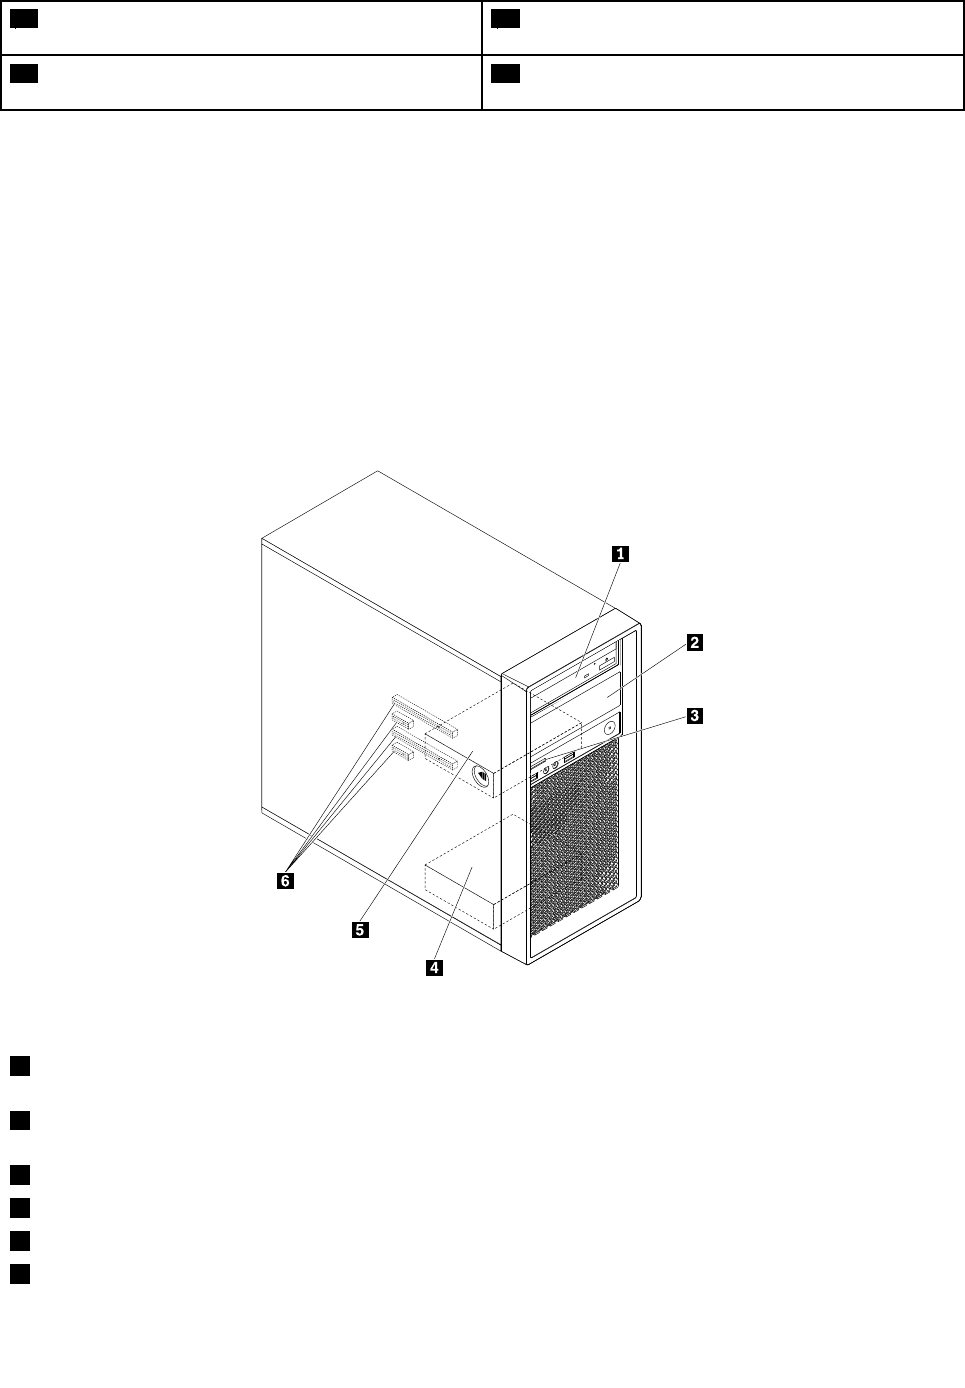
Figure5.Drive-baylocations
1Primaryoptical-drivebay(withanopticaldrive,aflexmodule,afront-accessstorageenclosure,aflexstorage
enclosure,oranoptical/storagecombinationenclosureinstalledinsomemodels)
2Secondaryoptical-drivebay(withanopticaldrive,aflexmodule,afront-accessstorageenclosure,aflexstorage
enclosure,oranoptical/storagecombinationenclosureinstalledinsomemodels)
3Cardreader
4Secondaryhard-disk-drivebay(withaharddiskdrive,solid-statedrive,orhybriddriveinstalledinsomemodels)
5Primaryhard-disk-drivebay(withaharddiskdrive,solid-statedrive,orhybriddriveinstalledinsomemodels)
6PCIExpresscardslots(withPCIExpresssolid-statedrivesorotherPCIcardsinstalledinsomemodels)
8ThinkStationP310UserGuide
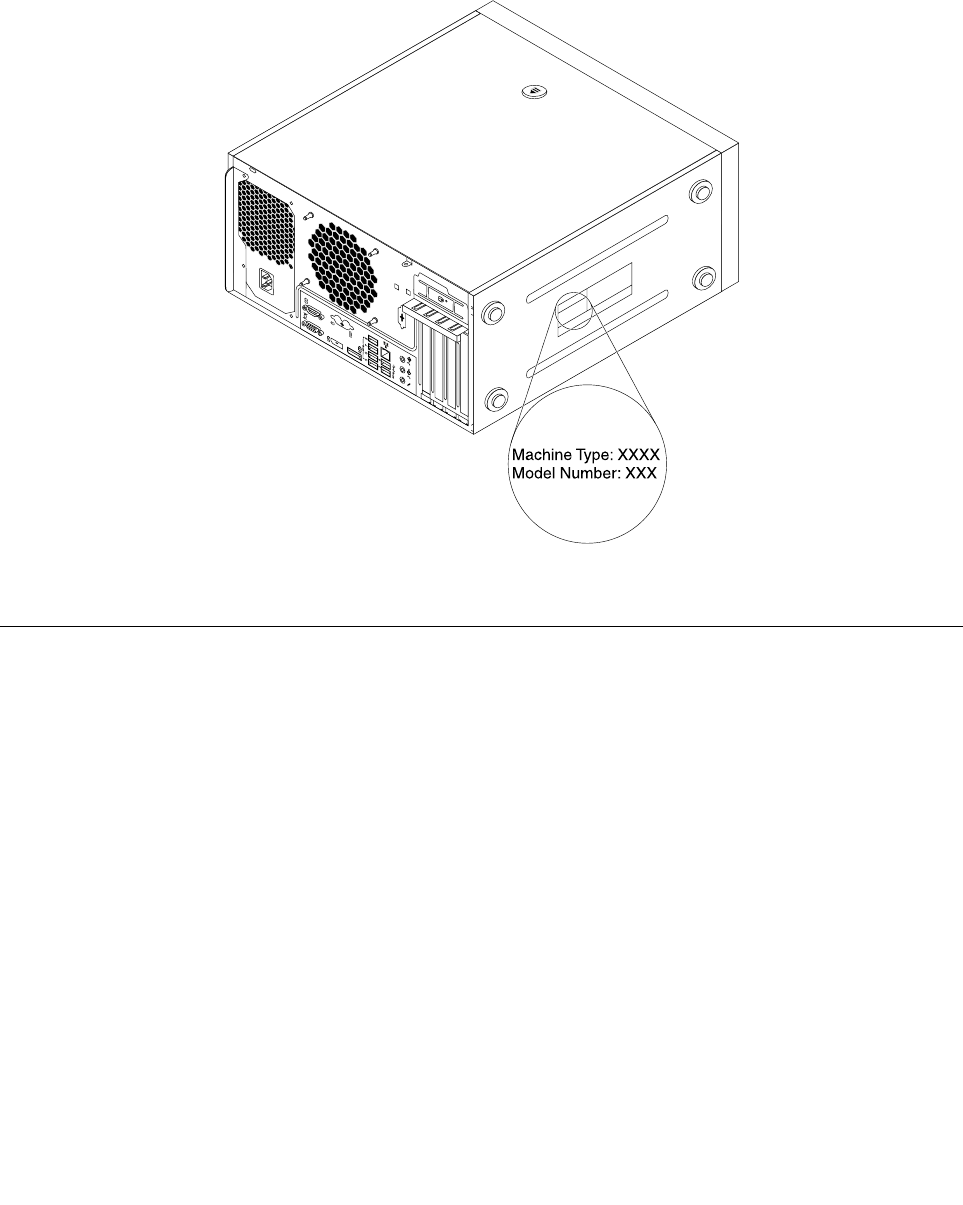
Machinetypeandmodellabel
Themachinetypeandmodellabelidentifiesyourcomputer.WhenyoucontactLenovoforhelp,themachine
typeandmodelinformationhelpssupporttechnicianstoidentifyyourcomputerandprovidefasterservice.
Thefollowingisasampleofthemachinetypeandmodellabel.
/
3
4
Figure6.Machinetypeandmodellabel
Computerfeatures
Foryourspecificcomputermodel,somefeaturesmightvaryornotapply.
Informationaboutyourcomputer
•Toviewbasicinformation(suchasmicroprocessorandmemoryinformation)aboutyourcomputer,
dothefollowing:
1.ClicktheStartbuttontoopentheStartmenu.
2.DependingonyourWindowsversion,dooneofthefollowing:
–ForWindows7:Right-clickComputer,andthenclickProperties.
–ForWindows10:ClickSettings➙System➙About.
•Toviewdetailedinformationaboutthedevices(suchastheopticaldriveandnetworkadapters)onyour
computer,dothefollowing:
1.DependingonyourWindowsversion,dooneofthefollowing:
–ForWindows7:ClicktheStartbuttontoopentheStartmenu.Right-clickComputer,andthen
clickProperties.
–ForWindows10:Right-clicktheStartbuttontoopentheStartcontextmenu.
Chapter1.Productoverview9

2.Locateanddouble-clickyourdeviceinDeviceManagertoviewdeviceproperties.Typethe
administratorpasswordorprovideconfirmationifprompted.
Memory
Yourcomputersupportsuptofourdoubledatarate4(DDR4)errorcorrectioncode(ECC)unbuffereddual
inlinememorymodules(UDIMMs)andnon-ECCUDIMMs.
Formoreinformation,see“Installingorreplacingamemorymodule”onpage63.
Storagedrives
Yourcomputersupportsthefollowingstoragedrives:
•Cardreader
•Opticaldrive(availableonsomemodels)
•SerialAdvancedTechnologyAttachment(SATA)harddiskdrive
•SATAhybriddrive(availableonsomemodels)
•SATAsolid-statedrive(availableonsomemodels)
•PCIExpresssolid-statedrive(M.2solid-statedrive)(availableonsomemodels)
Toviewtheamountofstoragedrivespace,dothefollowing:
1.DependingonyourWindowsversion,dooneofthefollowing:
•ForWindows7:ClicktheStartbuttontoopentheStartmenu.Right-clickComputer,andthenclick
Manage.
•ForWindows10:Right-clicktheStartbuttontoopentheStartcontextmenu.
2.ClickDiskManagementandfollowtheinstructionsonthescreen.
Videofeatures
•Integratedgraphicssupportsthefollowingconnectorsonyourcomputer:
–DisplayPortconnector
–VideoGraphicsArray(VGA)connector
•DiscretegraphicscardinstalledinoneofthePeripheralComponentInterconnect(PCI)Expressx16
graphicscardslots(availableonsomemodels)(theconnectorsvarybygraphicscard)
Audiofeatures
•Integratedaudiocontrollersupportsthefollowingconnectorsanddevicesonyourcomputer:
–Audioline-inconnector
–Audioline-outconnector
–Headphoneconnector
–Internalspeaker
–Microphoneconnector
•DiscreteaudiocardinstalledinoneofthePCIcardslots(availableonsomemodels)(theconnectors
varybyaudiocard)
Input/Output(I/O)features
•100/1000MbpsEthernetconnector
•Serialconnectors
10ThinkStationP310UserGuide

•Audioconnectors
•Displayconnectors
•eSATAconnector(availableonsomemodels)
•InstituteofElectricalandElectronicsEngineers(IEEE)1394connector(availableonsomemodels)
•PersonalSystem/2(PS/2)keyboardconnector(availableonsomemodels)
•PS/2mouseconnector(availableonsomemodels)
•USB2.0connectors
•USB3.0connectors
Formoreinformation,see“Frontview”onpage1and“Rearview”onpage3.
Expansion
•Cardreader
•Hard-disk-drivebays
•Memoryslots
•Optical-drivebays
•PCIExpressx1cardslots
•PCIExpressx16cardslot(negotiablelinkwidthx4,x1)
•PCIExpressx16graphicscardslot(graphicscardavailableonsomemodels)
Formoreinformation,see“Internaldrives”onpage8and“Partsonthesystemboard”onpage7.
Powersupply
•250-wattautomatic85%voltage-sensingpowersupply
•400-wattautomatic92%voltage-sensingpowersupply
Wirelessfeatures
Dependingonyourcomputermodel,thefollowingwirelessfeaturesaresupported:
•WirelessLAN
•Bluetooth
Systemmanagementfeatures
•Abilitytostorepower-onself-test(POST)hardwaretestresults
•DesktopManagementInterface(DMI)
DesktopManagementInterfaceprovidesacommonpathforuserstoaccessinformationaboutall
aspectsofacomputer.Theinformationincludesprocessortype,installationdate,connectedprintersand
otherperipherals,powersources,maintenancehistory,andsoon.
•ErPLPScompliancemode
Theenergy-relatedproductsdirective(ErP)lowestpowerstate(LPS)compliancemodereducesthe
consumptionofelectricitywhenyourcomputerisinsleeporoffmode.Formoreinformation,see
“EnablingordisablingtheErPLPScompliancemode”onpage36.
•IntelligentCoolingEngine(ICE)
TheIntelligentCoolingEngineisasystemthermalmanagementsolutionthatenablesyourcomputer
torunwithbetterthermalandacousticperformance.TheICEfunctionalsomonitorsthethermal
performanceofyourcomputertoidentifythermalproblems.Formoreinformation,see“Switching
betweenbetteracousticandbetterthermalperformance”onpage36and“Enablingordisablingthe
systemtorecordthermalalertlogs”onpage37.
Chapter1.Productoverview11

•Intel®StandardManageability
IntelStandardManageabilityishardware-andfirmware-basedtechnologythatmakescomputerseasier
andlessexpensiveforbusinessestomonitor,maintain,update,upgrade,andrepair.
•IntelActiveManagementTechnology(AMT)(availableonsomemodels)
IntelActiveManagementTechnologyishardware-andfirmware-basedtechnologythatmakescomputers
easierandlessexpensiveforbusinessestomonitor,maintain,update,upgrade,andrepair.
•IntelMatrixStorageManager
IntelMatrixStorageManagerisadevicedriverthatprovidessupportforSerialAdvancedTechnology
Attachment(SATA)RedundantArrayofIndependentDisks(RAID)5arraysandSATARAID10arrayson
specificIntelchipsetsystemboardstoenhanceharddiskperformance.
•PrebootExecutionEnvironment(PXE)
PrebootExecutionEnvironmentenablescomputerstostartthroughanetworkinterfaceindependentof
datastoragedrives(suchasharddiskdrives)orinstalledoperatingsystems.
•SystemManagement(SM)BasicInput/OutputSystem(BIOS)andSMsoftware
TheSMBIOSspecificationdefinesdatastructuresandaccessmethodsthatcanbeusedtoread
managementdatastoredintheBIOSofacomputer.
•WakeonLAN
WakeonLANisanEthernetcomputernetworkingstandardthatallowsacomputertobeturnedon
orwokenupbyanetworkmessage.Themessageusuallyissentbyaprogramrunningonanother
computeronthesameLAN.
•WakeonRing
WakeonRing,sometimesreferredtoasWakeonModem,isaspecificationthatallowssupported
computersanddevicestoresumefromsleeporhibernationmode.
•WindowsManagementInstrumentation(WMI)
WindowsManagementInstrumentationisasetofextensionstotheWindowsDriverModel.Itprovidesan
operatingsysteminterfacethroughwhichinstrumentedcomponentsprovideinformationandnotification.
Securityfeatures
Formoreinformation,seeChapter4“Security”onpage29.
Preinstalledoperatingsystem
YourcomputerispreinstalledwithWindows7orWindows10operatingsystem.Additionaloperating
systemsmightbeidentifiedbyLenovoascompatiblewithyourcomputer.Todetermineifanoperating
systemhasbeencertifiedortestedforcompatibility,checktheWebsiteoftheoperatingsystemprovider.
12ThinkStationP310UserGuide

Computerspecifications
Thissectionliststhephysicalspecificationsforyourcomputer.
Dimensions
Width:175mm(6.89inches)
Height:376mm(14.80inches)
Depth:426mm(16.77inches)
Weight
Maximumconfigurationasshipped:13kg(28.66lb)
Environment
•Airtemperature:
Operating:from10°Cto35°C(50°Fto95°F)
Storageinoriginalshippingpackage:from-40°Cto60°C(-40°Fto140°F)
Storagewithoutpackage:from-10°Cto60°C(14°Fto140°F)
•Humidity:
Operating:20%to80%(non-condensing)
Storage:20%to90%(non-condensing)
•Altitude:
Operating:from-15.2to3048m(-50to10000ft)
Storage:from-15.2to10668m(-50to35000ft)
Electricalinput
Inputvoltage:from100Vacto240Vac
Inputfrequency:50/60Hz
Programs
Thissectionprovidesinformationabouttheprogramsonyourcomputer.
Accessingaprogramonyourcomputer
Note:ForWindows7,dependingonyourcomputermodel,someoftheLenovoprogramsmightbereadyto
beinstalled,soyoumustinstallthemmanually.Then,youcanaccessandusetheseprograms.
Toaccessaprogramonyourcomputer,dooneofthefollowing:
•FromWindowsSearch:
1.DependingonyourWindowsversion,dooneofthefollowing:
–ForWindows7:ClicktheStartbuttontoopentheStartmenu,andthentypetheprogramname
intothesearchbox.
–ForWindows10:TypetheprogramnameintothesearchboxnexttotheStartbutton.
2.Inthesearchresults,clickthenameofthedesiredprogramtolaunchtheprogram.
•FromtheStartmenuorControlPanel:
1.ClicktheStartbuttontoopentheStartmenu.Then,clickthenameofthedesiredprogramto
launchtheprogram.
Chapter1.Productoverview13

2.Iftheprogramnameisnotdisplayed,clickAllPrograms(Windows7)orAllapps(Windows10)to
displaytheprogramlist.Fromthelistorafolderinthelist,clickthenameofthedesiredprogramto
launchtheprogram.
3.IftheprogramnameisnotdisplayedontheStartmenu,accesstheprogramfromControlPanel.
a.DependingonyourWindowsversion,dooneofthefollowing:
–ForWindows7:ClickControlPanelontheStartmenu.
–ForWindows10:Right-clicktheStartbuttontoopentheStartcontextmenu,andthenclick
ControlPanel.
b.ViewControlPanelbyLargeiconsorSmallicons,andthenclickthenameofthedesiredprogram
tolaunchtheprogram.
Installingaprogramthatisreadytobeinstalled(Windows7only)
OntheWindows7operatingsystem,toinstallaprogramthatisreadytobeinstalled,dothefollowing:
1.OpentheLenovoThinkVantage®Toolsprogram.See“Accessingaprogramonyourcomputer”on
page13.
2.ClickView➙Tilestoviewtheprogramicons.
3.Followtheinstructionsundergrayed-outiconstolocatetheiconforthedesiredprogram.Then,
double-clicktheicontoinstalltheprogram.
AnintroductiontoLenovoprograms
ThissectionprovidesinformationaboutthemajorLenovoprogramsavailableonyouroperatingsystem.
Note:Dependingonyourcomputermodel,someofthefollowingprogramsmightnotbeavailable.
•RecoveryMedia(forWindows7)
TheRecoveryMediaprogramenablesyoutorestorethecontentsoftheharddiskdrivetothe
factory-defaultsettings.
•FingerprintManagerProorThinkVantageFingerprintSoftware(forWindows7)
TheFingerprintManagerProorThinkVantageFingerprintSoftwareprogramenablesyoutousea
fingerprintreader.Theintegratedfingerprintreaderprovidedonsomekeyboardsenablesyoutoenrollyour
fingerprintandassociateitwithyourpower-onpassword,harddiskpassword,andWindowspassword.
Asaresult,fingerprintauthenticationcanreplacepasswordsandenablesimpleandsecureuseraccess.
•LenovoCompanion(forWindows10)
Yourcomputer’sbestfeaturesandcapabilitiesshouldbeeasytoaccessandunderstand.WithLenovo
Companion,theyare.UseLenovoCompaniontodothefollowing:
–Optimizeyourcomputer’sperformance,monitoryourcomputer’shealth,andmanageupdates.
–Accessyouruserguide,checkwarrantystatus,andviewaccessoriescustomizedforyourcomputer.
–Readhow-toarticles,exploreLenovoforums,andstayup-to-dateontechnologynewswitharticles
andblogsfromtrustedsources.
LenovoCompanionisfilledwithexclusiveLenovocontenttohelpyoulearnmoreaboutwhatyoucan
dowithyourcomputer.
•LenovoDeviceExperienceorLenovoPCExperience(forWindows7andWindows10)
TheLenovoDeviceExperienceorLenovoPCExperienceprogramhelpsyouworkmoreeasilyand
securely.TheprogramprovideseasyaccesstoLenovoThinkVantageToolsorLenovoTools,important
settingsandinformationaboutyourcomputer,theLenovoSupportWebsite,andsoon.
14ThinkStationP310UserGuide

•LenovoID(forWindows10)
TheLenovoIDprogramenablesyoutocreateandmanageyourLenovoID.WithaLenovoID,youcan
connecttoeverythingLenovothroughasingleaccount.UseyourLenovoIDforquickandsimple
authenticationandthenenjoythevariousservicesprovidedbyLenovo.Suchservicesincludeonline
shopping,appdownload,personalizeddevicesupport,specialpromotionaloffers,Lenovoforums,
andsoon.
•LenovoSolutionCenter(forWindows7andWindows10)
TheLenovoSolutionCenterprogramenablesyoutotroubleshootandresolvecomputerproblems.It
combinesdiagnostictests,systeminformationcollection,securitystatus,andsupportinformation,along
withhintsandtipsformaximumsystemperformance.
•LenovoThinkVantageTools(forWindows7)
TheLenovoThinkVantageToolsprovideseasyaccesstovarioustoolstohelpyourworkmoreeasily
andsecurely.
•LenovoPowerENGAGE(forWindows7)
TheLenovoPowerENGAGEprogramprovidespowermanagementfunction.
•REACHitorLenovoReach(forWindows7andWindows10)
TheREACHitorLenovoReachprogramenhancesyourcloudexperience.Thisprogramkeepsyou
connectedatalltimesandenablesyoutoaccessallyourfavoriteitemsfrompersonalcomputers,
smartphones,ortablets.Asaresult,youcanaccess,edit,andshareyourfilesfromanywhere.You
alsocanaddyourfavoriteWebservicestoyourclouddesktopandstaylogged-intoWebsiteswith
thecloudpasswordmanager.
•RescueandRecovery®(forWindows7)
TheRescueandRecoveryprogramisaone-buttonrecoveryandrestoresolution.Itincludesasetof
self-recoverytoolstohelpyoudiagnosecomputerproblems,gethelp,andrecoverfromsystemcrashes,
evenifyoucannotstarttheWindowsoperatingsystem.
•LenovoSHAREit(forWindows7andWindows10)
TheLenovoSHAREitprogramenablesyoutosharefileseasilyandrapidlyacrossdevicessuchas
computersandsmartphones,evenwithoutanyInternetconnection.Youcanconnecttoyourfriendsand
sendphotos,folders,andotherfilesthroughSHAREit.Everysharingisquickandsimple.
•SystemUpdate(forWindows7)
TheSystemUpdateprogramprovidesregularaccesstothesystemupdatesforyourcomputer,suchas
devicedriverupdates,softwareupdates,andBIOSupdates.Theprogramgathersinformationfromthe
LenovoHelpCenteraboutnewupdatesforyourcomputer,andthensortsanddisplaystheupdatesfor
downloadandinstallation.Youhavecompletecontrolofwhichupdatestodownloadandinstall.
Chapter1.Productoverview15

16ThinkStationP310UserGuide

Chapter2.Usingyourcomputer
Thischaptercontainsthefollowingtopics:
•“Registeringyourcomputer”onpage17
•“Settingthecomputervolume”onpage17
•“Usingadisc”onpage17
•“Connectingtoanetwork”onpage19
Registeringyourcomputer
WhenyouregisteryourcomputerwithLenovo,youenterrequiredinformationintoaLenovodatabase.The
informationenablesLenovotocontactyouwhenthereisarecallorothersevereproblemandprovide
quickerservicewhenyoucallLenovoforhelp.Inaddition,somelocationsofferextendedprivilegesand
servicestoregisteredusers.
ToregisteryourcomputerwithLenovo,gotohttp://www.lenovo.com/registerandfollowtheinstructionson
thescreen.
Settingthecomputervolume
Tosetthecomputervolume,dothefollowing:
1.ClickthevolumeiconintheWindowsnotificationareaonthetaskbar.
Note:IfthevolumeiconisnotdisplayedintheWindowsnotificationarea,addtheicontothe
notificationarea.SeetheWindowshelpsystem.
2.Followtheinstructionsonthescreenandthehovertexttoadjustthevolume,mutethespeaker,or
unmutethespeaker.
Usingadisc
Thissectionprovidesinformationaboutusingadiscandtheopticaldrive.
Guidelinesaboutusingtheopticaldrive
Whenusingtheopticaldrive,followtheseguidelines:
•Donotplacethecomputerinalocationwherethedriveisexposedtoanyofthefollowingconditions:
–Hightemperature
–Highhumidity
–Excessivedust
–Excessivevibrationorsuddenshock
–Aninclinedsurface
–Directsunlight
•Donotinsertanyobjectotherthanadiscintothedrive.
•Donotinsertdamageddiscsintothedrive.Warped,scratched,ordirtydiscscandamagethedrive.
•Beforemovingthecomputer,removethediscfromthedrive.
©CopyrightLenovo201617

Handlingandstoringadisc
Whenhandlingandstoringadisc,followtheseguidelines:
•Holdthediscbyitsedges.Donottouchthesurfaceofthesidethatisnotlabeled.
•Toremovedustorfingerprints,wipethediscwithaclean,softclothfromthecentertotheoutside.Wiping
thediscinacirculardirectionmightcauselossofdata.
•Donotwriteorstickpaperonthedisc.
•Donotscratchormarkthedisc.
•Donotplaceorstorethediscindirectsunlight.
•Donotusebenzene,thinners,orothercleanerstocleanthedisc.
•Donotdroporbendthedisc.
Playingandremovingadisc
Toplayadisc,dothefollowing:
1.Withthecomputeron,presstheeject/closebuttononthefrontoftheopticaldrive.Thetrayslides
outofthedrive.
2.Insertadiscintothetray.Someopticaldrivehasasnaphubinthecenterofthetray.Ifyourdrivehasa
snaphub,supportthetraywithonehandandthenpushthecenterofthediscuntilitsnapsintoplace.
3.Presstheeject/closebuttonagainorgentlypushthetrayforwardtoclosethetray.Thediscplayer
programstartsautomatically.Formoreinformation,refertothehelpsystemofthediscplayerprogram.
Toremoveadiscfromtheopticaldrive,dothefollowing:
1.Withthecomputeron,presstheeject/closebuttononthefrontoftheopticaldrive.Thetrayslides
outofthedrive.
2.Carefullyremovethediscfromthetray.
3.Presstheeject/closebuttonagainorgentlypushthetrayforwardtoclosethetray.
Note:Ifthetraydoesnotslideoutofthedrivewhenyoupresstheeject/closebutton,turnoffyourcomputer.
Then,insertastraightenedpaperclipintotheemergency-ejectholeadjacenttotheeject/closebutton.
Usetheemergencyejectonlyinanemergency.
Recordingadisc
Ifyouropticaldrivesupportsrecording,youcanrecordadisc.
RecordingadiscusingWindowstools
TorecordadiscusingWindowstools,dooneofthefollowing:
•BurnadiscusingtheAutoPlaywindow.
1.Ensurethatthediscisplayedautomatically.
a.ClicktheStartbuttontoopentheStartmenu.
b.DependingonyourWindowsversion,dooneofthefollowing:
–ForWindows7:ClickControlPanel.ViewControlPanelbyLargeiconsorSmallicons,and
thenclickAutoPlay.
–ForWindows10:ClickSettings➙Devices➙AutoPlay.
c.SelectorturnonUseAutoPlayforallmediaanddevices.
2.Insertarecordablediscintotheopticaldrivethatsupportsrecording.TheAutoPlaywindowopens.
3.Followtheinstructionsonthescreen.
18ThinkStationP310UserGuide

•BurnadiscusingWindowsMedia®Player.
1.Insertarecordablediscintotheopticaldrivethatsupportsrecording.
2.OpenWindowsMediaPlayer.See“Accessingaprogramonyourcomputer”onpage13.
3.Followtheinstructionsonthescreen.
•BurnadiscfromanISOfile.
1.Insertarecordablediscintotheopticaldrivethatsupportsrecording.
2.Double-clicktheISOfile.
3.Followtheinstructionsonthescreen.
Recordingadiscusingpreinstalledprograms
Torecordadiscusingpreinstalledprograms,dothefollowing:
1.Insertarecordablediscintotheopticaldrivethatsupportsrecording.
2.OpenthePowerDVDCreate,PowerProducer,orPower2Goprogram.See“Accessingaprogramon
yourcomputer”onpage13.
3.Followtheinstructionsonthescreen.
Connectingtoanetwork
Thissectionprovidesinformationaboutconnectingtoanetwork.Ifyoucannotconnectyourcomputertoa
network,see“Networkingproblems”onpage49.
ConnectingtoanEthernetLAN
YoucanconnectyourcomputertoanEthernetLANbyconnectinganEthernetcabletotheEthernet
connector.
DANGER
Toavoidtheriskofelectricalshock,donotconnectthetelephonecabletotheEthernetconnector.
ConnectingtoawirelessLAN
YoucanconnectyourcomputertoawirelessLANwithouttheuseofanEthernetcablebutbymeansof
radiowavesonly.
Note:ThewirelessLANfeatureissupportedonlyonsomemodels.
Toestablishawireless-LANconnection,dothefollowing:
1.EnsurethatawirelessLANisavailableandthewirelessLANfeatureonyourcomputerisworking.
2.Clickthewireless-network-connection-statusiconintheWindowsnotificationareatodisplayavailable
wirelessnetworks.
Note:Ifthewireless-network-connection-statusiconisnotdisplayedintheWindowsnotificationarea,
addtheicontothenotificationarea.SeetheWindowshelpsystem.
3.ClickawirelessLAN,andthenclickConnecttoconnectyourcomputertoit.Providerequired
informationifneeded.
Chapter2.Usingyourcomputer19

ConnectingtoaBluetooth-enableddevice
Bluetoothisashort-rangewirelesscommunicationstechnology.UseBluetoothtoestablishawireless
connectionbetweenyourcomputerandanotherBluetooth-enableddevicewithinadistanceofabout10
m(32.8ft).
Note:TheBluetoothfeatureissupportedonlyonsomemodels.
ToconnecttoaBluetooth-enableddevice,dothefollowing:
1.EnsurethattheBluetoothfeatureonyourcomputerisworkingandtheBluetooth-enableddeviceis
locatedwithinadistanceofabout10m(32.8ft)fromyourcomputer.
2.ClicktheBluetoothiconintheWindowsnotificationareaonthetaskbar.Then,clickAddaDeviceand
followtheinstructionsonthescreen.
Note:IftheBluetoothiconisnotdisplayedintheWindowsnotificationarea,addtheicontothe
notificationarea.SeetheWindowshelpsystem.
20ThinkStationP310UserGuide

Chapter3.Youandyourcomputer
Thischaptercontainsthefollowingtopics:
•“Arrangingyourworkspace”onpage21
•“Accessibilityinformation”onpage22
•“Cleaningyourcomputer”onpage25
•“Maintenance”onpage25
•“Movingyourcomputer”onpage27
Arrangingyourworkspace
Arrangeyourworkspacetosuityourneedsandthekindofworkyoudo.Thissectionprovidesinformation
aboutthefactorsthataffectthewayyouarrangeyourworkspace.
Glareandlighting
Positionthemonitortominimizeglareandreflectionsfromoverheadlights,windows,andotherlightsources.
Reflectedlightfromshinysurfacescancauseannoyingreflectionsonyourscreen.Whenpossible,place
themonitoratrightanglestowindowsandotherlightsources.Ifnecessary,reduceoverheadlighting
byturningofflightsorusinglowerwattagebulbs.Ifyouinstallthemonitornearawindow,usecurtains
orblindstoblockthesunlight.Youcanadjustthebrightnessandcontrastcontrolsonthemonitorasthe
roomlightingchangesthroughouttheday.
Whereitisimpossibletoavoidreflectionsortoadjustthelighting,anantiglarefilterplacedoverthescreen
mightbehelpful.However,thesefiltersmightaffecttheclarityoftheimageonthescreen;trythemonlyafter
youhaveexhaustedothermethodsofreducingglare.
Aircirculation
Yourcomputerproducesheat.Thecomputerhasafanthatpullsinfreshairandforcesouthotairthrough
theairvents.Blockingtheairventscancauseoverheating,whichmightresultinamalfunctionordamage.
Positionthecomputersothatnothingblockstheairvents;usually,51mm(2inches)ofairspaceissufficient.
Ensurethattheventedairisnotblowingonpeople.
Electricaloutletlocationsandcablelengths
Thefollowingfactorsmightdeterminethefinalplacementofyourcomputer:
•Locationsofelectricaloutlets
•Lengthofpowercordsorpoweradapters
•Lengthofthecablesthatareconnectedtootherdevices
Formoreinformationaboutpowercordsorpoweradapters,see“Powercordsandpoweradapters”on
pagevi.
Comfort
Althoughnosingleworkingpositionisidealforeveryone,hereareafewguidelinestohelpyoufindaposition
thatsuitsyoubest.Thefollowingfiguresetsanexampleforyourreference.
©CopyrightLenovo201621
•Screenposition:Keepthescreenatacomfortableviewingdistance,usually51–61cm(20–24inches).
Then,adjustthescreensothatthetopofthescreenisatorslightlybeloweyelevelandyoucanviewit
withouttwistingyourbody.
•Chairposition:Useachairthatgivesyougoodbacksupportandseatheightadjustment.Usechair
adjustmentstobestsuityourdesiredposture.
•Headposition:Keepyourheadandneckinacomfortableandneutral(verticalorupright)position.
•Armandhandpositions:Keepyourforearms,wrists,andhandsinarelaxedandneutral(horizontal)
position.Typewithasofttouchwithoutpoundingthekeys.
•Legposition:Keepyourthighsparalleltothefloorandyourfeetflatonthefloororonafootrest.
Makeminormodificationsinyourworkingposturetodetertheonsetofdiscomfortcausedbylongperiods
ofworkinginthesameposition.Frequentshortbreaksfromyourworkalsohelptopreventminordiscomfort
associatedwithyourworkingposture.
Accessibilityinformation
Lenovoiscommittedtoprovidinguserswhohavehearing,vision,andmobilitylimitationswithgreater
accesstoinformationandtechnology.Thissectionprovidesinformationaboutthewaystheseuserscanget
themostoutoftheircomputerexperience.Youalsocangetthemostup-to-dateaccessibilityinformation
fromthefollowingWebsite:
http://www.lenovo.com/accessibility
Keyboardshortcuts
Thefollowingtablecontainskeyboardshortcutsthatcanhelpmakeyourcomputereasiertouse.
Note:Dependingonyourkeyboard,someofthefollowingkeyboardshortcutsmightnotbeavailable.
KeyboardshortcutFunction
Windowslogokey+UOpenEaseofAccessCenter
RightShiftforeightsecondsTurnonorturnoffFilterKeys
ShiftfivetimesTurnonorturnoffStickyKeys
NumLockforfivesecondsTurnonorturnoffToggleKeys
LeftAlt+LeftShift+NumLockTurnonorturnoffMouseKeys
LeftAlt+LeftShift+PrtScn(orPrtSc)TurnonorturnoffHighContrast
Formoreinformation,gotohttp://windows.microsoft.com/,andthenperformasearchusinganyofthe
followingkeywords:keyboardshortcuts,keycombinations,shortcutkeys.
22ThinkStationP310UserGuide

EaseofAccessCenter
EaseofAccessCenterontheWindowsoperatingsystemenablesuserstoconfiguretheircomputersto
suittheirphysicalandcognitiveneeds.
TouseEaseofAccessCenter,dothefollowing:
1.ClicktheStartbuttontoopentheStartmenu.
2.DependingonyourWindowsversion,dooneofthefollowing:
•ForWindows7:ClickControlPanel.ViewControlPanelbyLargeiconsorSmallicons,andthen
clickEaseofAccessCenter.
•ForWindows10:ClickSettings➙EaseofAccess.
3.Choosetheappropriatetoolbyfollowingtheinstructionsonthescreen.
EaseofAccessCentermainlyincludesthefollowingtools:
•Magnifier
Magnifierisausefulutilitythatenlargestheentirescreenorpartofthescreensothatyoucansee
theitemsbetter.
•Narrator
Narratorisascreenreaderthatreadsaloudwhatisdisplayedonthescreenanddescribeseventssuchas
errormessages.
•On-ScreenKeyboard
Ifyouprefertotypeorenterdataintoyourcomputerusingamouse,joystick,orotherpointingdevice
insteadofaphysicalkeyboard,youcanuseOn-ScreenKeyboard.On-ScreenKeyboarddisplaysavisual
keyboardwithallthestandardkeys.
•HighContrast
HighContrastisafeaturethatheightensthecolorcontrastofsometextandimagesonyourscreen.Asa
result,thoseitemsaremoredistinctandeasiertoidentify.
•Personalizedkeyboard
Adjustkeyboardsettingstomakeyourkeyboardeasiertouse.Forexample,youcanuseyourkeyboard
tocontrolthepointerandtypecertainkeycombinationseasier.
•Personalizedmouse
Adjustmousesettingstomakeyourmouseeasiertouse.Forexample,youcanchangethepointer
appearanceandmakeiteasiertomanagewindowswiththemouse.
SpeechRecognition
SpeechRecognitionenablesyoutocontrolyourcomputerbyvoice.
Usingonlyyourvoice,youcanstartprograms,openmenus,clickobjectsonthescreen,dictatetextinto
documents,andwriteandsende-mails.Everythingyoudowiththekeyboardandmousecanbedonewith
onlyyourvoice.
TouseSpeechRecognition,dothefollowing:
1.DependingonyourWindowsversion,dooneofthefollowing:
•ForWindows7:ClicktheStartbuttontoopentheStartmenu.
•ForWindows10:Right-clicktheStartbuttontoopentheStartcontextmenu.
2.ClickControlPanel.ViewControlPanelbyLargeiconsorSmallicons,andthenclickSpeech
Recognition.
Chapter3.Youandyourcomputer23

3.Followtheinstructionsonthescreen.
Screen-readertechnologies
Screen-readertechnologiesareprimarilyfocusedonsoftwareprograminterfaces,helpinformationsystems,
andvariousonlinedocuments.Foradditionalinformationaboutscreenreaders,seethefollowing:
•UsingPDFswithscreenreaders:
http://www.adobe.com/accessibility.html?promoid=DJGVE
•UsingtheJAWSscreenreader:
http://www.freedomscientific.com/jaws-hq.asp
•UsingtheNVDAscreenreader:
http://www.nvaccess.org/
Screenresolution
Youcanmakethetextandimagesonyourscreeneasiertoreadbyadjustingthescreenresolutionofyour
computer.
Toadjustthescreenresolution,dothefollowing:
1.Right-clickablankareaonthedesktop.
2.DependingonyourWindowsversion,dooneofthefollowing:
•ForWindows7:ClickScreenresolution.
•ForWindows10:ClickDisplaysettings.OntheDisplaytab,clickAdvanceddisplaysettings.
3.Followtheinstructionsonthescreen.
Note:Settingtheresolutiontoolowmightpreventsomeitemsfromfittingonthescreen.
Customizableitemsize
Youcanmaketheitemsonyourscreeneasiertoreadbychangingtheitemsize.
•Tochangetheitemsizetemporarily,usetheMagnifiertoolinEaseofAccessCenter.See“Easeof
AccessCenter”onpage23.
•Tochangetheitemsizepermanently,dothefollowing:
–Changethesizeofalltheitemsonyourscreen.
1.Right-clickablankareaonthedesktop.
2.DependingonyourWindowsversion,dooneofthefollowing:
–ForWindows7:ClickScreenresolution➙Maketextandotheritemslargerorsmaller.
–ForWindows10:ClickDisplaysettings.
3.Changetheitemsizebyfollowingtheinstructionsonthescreen.
4.ClickApply.Thischangewilltakeeffectthenexttimeyoulogintotheoperatingsystem.
–ChangethesizeoftheitemsonaWebpage.
PressandholdCtrl,andthenpresstheplus-signkey(+)toenlargeortheminus-signkey(-)to
reducethetextsize.
–Changethesizeoftheitemsonthedesktoporawindow.
Note:Thisfunctionmightnotworkonsomewindows.
Ifyourmousehasawheel,pressandholdCtrl,andthenscrollthewheeltochangetheitemsize.
24ThinkStationP310UserGuide

Industry-standardconnectors
Yourcomputerprovidesindustry-standardconnectorsthatenableyoutoconnectassistivedevices.
Formoreinformationaboutthelocationandfunctionofeachconnector,see“Hardwarelocations”onpage1.
TTY/TDDconversionmodem
Yourcomputersupportstheuseofatexttelephone(TTY)orthetelecommunicationsdeviceforthedeaf
(TDD)conversionmodem.ThemodemmustbeconnectedbetweenyourcomputerandaTTY/TDD
telephone.Then,youcantypeamessageonyourcomputerandsendittothetelephone.
Documentationinaccessibleformats
Lenovoprovideselectronicdocumentationinaccessibleformats,suchasproperlytaggedPDFfilesor
HyperTextMarkupLanguage(HTML)files.Lenovoelectronicdocumentationisdevelopedtoensure
thatvisuallyimpaireduserscanreadthedocumentationthroughascreenreader.Eachimageinthe
documentationalsoincludesadequatealternativetextsothatvisuallyimpaireduserscanunderstandthe
imagewhentheyuseascreenreader.
Cleaningyourcomputer
CAUTION:
Removeanymediafromthedrivesandturnoffallconnecteddevicesandthecomputer.Then,
disconnectallpowercordsfromelectricaloutletsanddisconnectallcablesthatareconnected
tothecomputer.
Itisagoodpracticetocleanyourcomputerperiodicallytoprotectthesurfacesandensuretrouble-free
operation.Useonlymildcleaningsolutionsandadampclothtocleanthepaintedsurfacesofthecomputer.
Dustbuildupcompoundsproblemsassociatedwithglare,soremembertocleanthescreenperiodically.
Wipethescreensurfacegentlywithasoft,drycloth,orblowonthescreentoremovegritandotherloose
particles.Dependingonthetypeofthescreen,moistenasoft,lint-freeclothwithanLCDcleanerorliquid
glasscleanerandthenwipethescreensurface.
Maintenance
Withappropriatecareandmaintenance,yourcomputerwillserveyoureliably.Thissectionprovides
informationaboutmaintainingyourcomputersothatitcankeepworkinginbettercondition.
Basicmaintenancetips
Herearesomebasicpointsaboutkeepingyourcomputerfunctioningproperly:
•Keepyourcomputerinaclean,dryenvironment.Ensurethatthecomputerrestsonaflat,steadysurface.
•Donotcoveranyofairvents.Theseairventsprovideairflowtokeepyourcomputerfromoverheating.
•Keepfoodanddrinksawayfromallpartsofyourcomputer.Foodparticlesandspillsmightmakethe
keyboardandmousestickandunusable.
•Donotgetthepowerswitchesorothercontrolswet.Moisturecandamagethesepartsandcausean
electricalhazard.
•Alwaysdisconnectapowercordbygraspingthepluginsteadofthecord.
Goodmaintenancepractices
Byperformingafewgoodmaintenancepractices,youcanmaintaingoodcomputerperformance,protect
yourdata,andbepreparedincaseofacomputerfailure.
Chapter3.Youandyourcomputer25

•Emptyyourrecyclebinonaregularbasis.
•Usethediskdefragmentationordiskoptimizationfeatureofyouroperatingsystemoccasionallyto
preventperformanceproblemscausedbyanexcessivenumberoffragmentedfiles.
•CleanoutyourInbox,SentItems,andDeletedItemsfoldersinyoure-mailapplicationonaregularbasis.
•Backupcriticaldataregularlyonremovablemediamemory,suchasdiscsandUSBstoragedevices,
andstoretheremovablemediainasafelocation.Thefrequencyofmakingbackupcopiesdependson
howcriticalthedataistoyouoryourbusiness.
•Backupyourdataonthestoragedriveregularly.See“Recoveryinformation”onpage53.
•Keepyourcomputersoftware,devicedrivers,andoperatingsystemup-to-date.See“Keepingyour
computercurrent”onpage26.
•Keepalogbook.Entriesmightincludemajorsoftwareorhardwarechanges,device-driverupdates,
intermittentproblemsandwhatyoudidtoresolvethem,andotherissuesyoumighthaveexperienced.
Thecauseofaproblemmightbechangeinhardware,changeinsoftware,oranyotheractionsthatmight
havetakenplace.AlogbookcanhelpyouoraLenovotechniciandeterminesthecauseofaproblem.
•CreateProductRecoverydiscs.See“Recoveryinformation”onpage53formoreinformationaboutusing
ProductRecoverydiscstorestoretheharddiskdrivetothefactory-defaultsettings.
•CreaterescuemediausingdiscsorUSBstoragedevicesasearlyaspossible.Youcanusearescue
mediumtorecoverfromfailuresthatpreventyoufromgainingaccesstotheWindowsenvironmentorthe
RescueandRecoveryworkspaceonyourharddiskdrive.
Keepingyourcomputercurrent
Inmostcases,itisagoodpracticetohavethemostup-to-dateoperatingsystemupdatepatches,software
programs,anddevicedrivers.Thissectionprovidesinformationabouthowtogetthelatestupdatesforyour
computer.
Gettingthelatestsystemupdates
Togetthelatestsystemupdatesforyourcomputer,ensurethatyourcomputerisconnectedtotheInternet
anddooneofthefollowing:
•UsethecorrespondingLenovoprogramtogetthesystemupdates,suchasdevicedriverupdates,
softwareupdates,andBIOSupdates:
–ForWindows7:UsetheSystemUpdateprogram.
–ForWindows10:UsetheLenovoCompanionprogram.
ToopentheSystemUpdateorLenovoCompanionprogram,see“Accessingaprogramonyourcomputer”
onpage13.Formoreinformationaboutusingtheprogram,refertothehelpsystemoftheprogram.
•UseWindowsUpdatetogetthesystemupdates,suchassecurityfixes,newversionsofWindows
components,anddevicedriverupdates.
1.ClicktheStartbuttontoopentheStartmenu.
2.DependingonyourWindowsversion,dooneofthefollowing:
–ForWindows7:ClickControlPanel.ViewControlPanelbyLargeiconsorSmallicons,and
thenclickWindowsUpdate.
–ForWindows10:ClickSettings➙Update&security➙WindowsUpdate.
3.Followtheinstructionsonthescreen.
Note:ThedevicedriversprovidedbyWindowsUpdatemightnotbetestedbyLenovo.Itis
recommendedthatyougetdevicedriversbyusingLenovoprogramsorfromtheLenovoWebsiteat
http://www.lenovo.com/drivers.
26ThinkStationP310UserGuide

Movingyourcomputer
Beforemovingyourcomputer,takethefollowingprecautions:
1.Backupyourdataonthestoragedrive.See“Goodmaintenancepractices”onpage25.
2.Removeanymediafromthedrivesandturnoffallconnecteddevicesandthecomputer.Then,
disconnectallpowercordsfromelectricaloutletsanddisconnectallcablesthatareconnectedtothe
computer.
3.Ifyousavedtheoriginalshippingcartonsandpackingmaterials,usethemtopacktheunits.Ifyouare
usingdifferentcartons,cushiontheunitstoavoiddamage.
Movingyourcomputertoanothercountryorregion
Whenyoumoveyourcomputertoanothercountryorregion,youmusttakelocalelectricalstandardsinto
consideration.Ifthelocalelectricaloutletstyleisdifferentfromthetypeyouarecurrentlyusing,contactthe
LenovoCustomerSupportCentertopurchaseeitheranelectricalplugadapteroranewpowercord.Fora
listofLenovoSupportphonenumbers,gotohttp://www.lenovo.com/support/phone.Ifyoucannotfindthe
supporttelephonenumberforyourcountryorregion,contactyourLenovoreseller.
Chapter3.Youandyourcomputer27

28ThinkStationP310UserGuide
Chapter4.Security
Thischaptercontainsthefollowingtopics:
•“Lockingyourcomputer”onpage29
•“ViewingandchangingsecuritysettingsintheSetupUtilityprogram”onpage31
•“UsingpasswordsandWindowsaccounts”onpage31
•“Usingfingerprintauthentication”onpage32
•“Usingfirewalls”onpage32
•“Protectingdataagainstviruses”onpage32
•“ComputraceAgentsoftwareembeddedinfirmware”onpage33
•“TrustedPlatformModule(TPM)”onpage33
Lockingyourcomputer
Thissectionprovidesinformationaboutlockingyourcomputerwiththelockingdevicestokeepyour
computersafe.
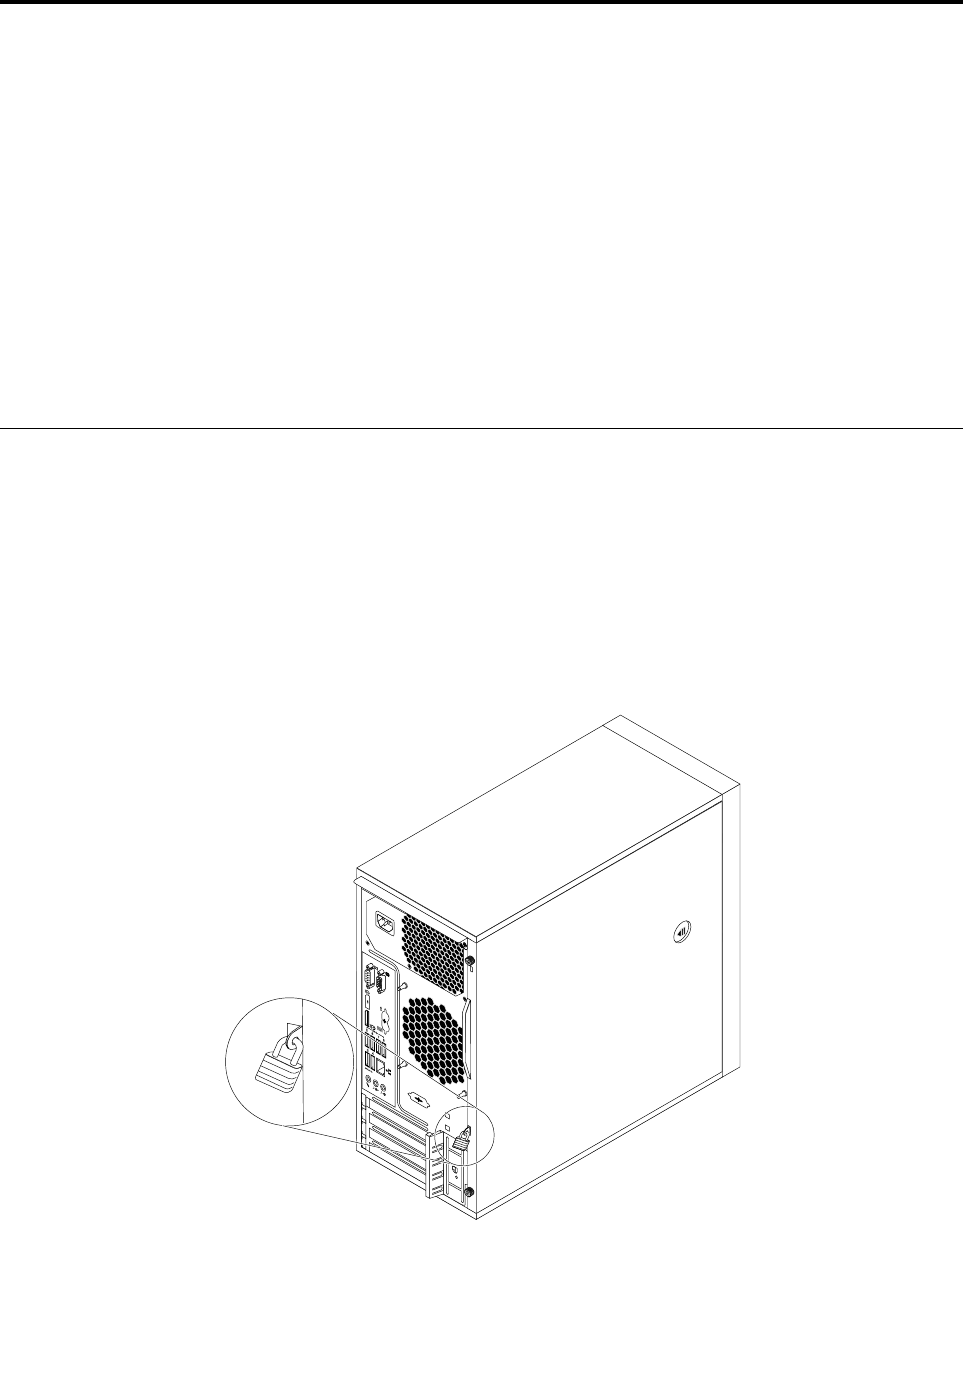
Attachingapadlock
Lockingthecomputercoverhelpspreventunauthorizedpeoplefromgainingaccesstotheinsideofyour
computer.Yourcomputercomeswithapadlockloopsothatthecomputercovercannotberemoved
whenapadlockisinstalled.
Figure7.Installingapadlock
©CopyrightLenovo201629
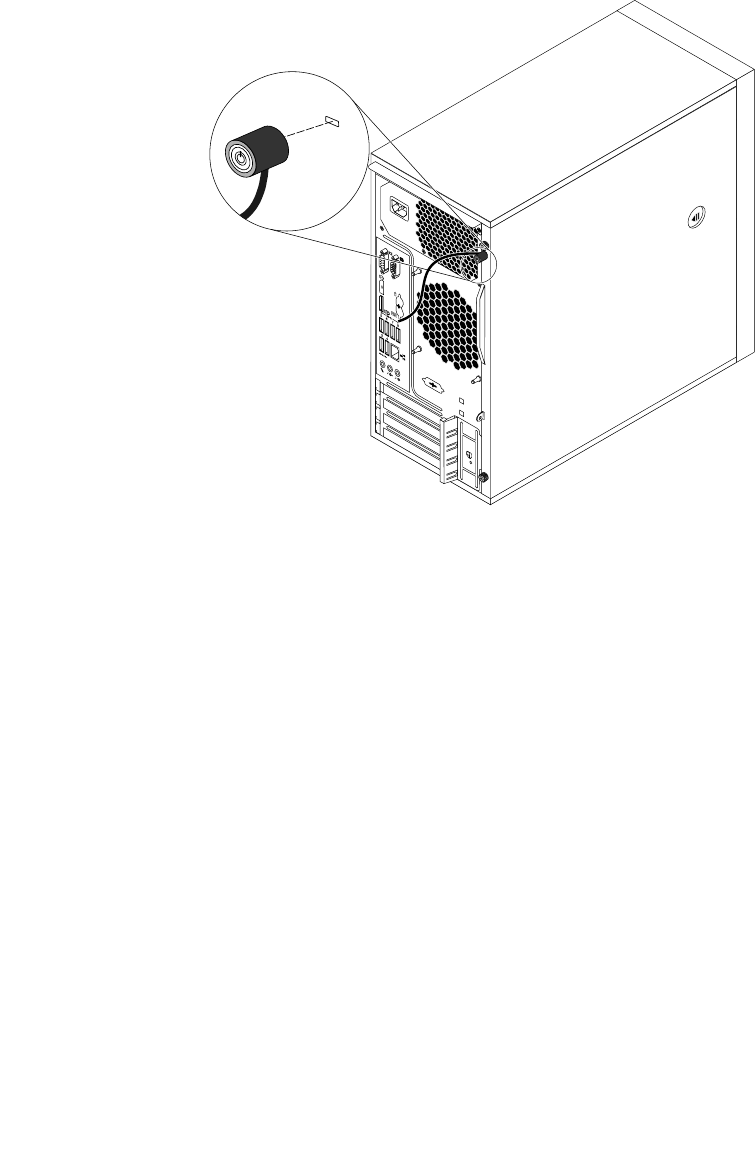
AttachingaKensington-stylecablelock
YoucanuseaKensington-stylecablelocktosecureyourcomputertoadesk,table,orothernon-permanent
fixture.Thecablelockattachestothesecurity-lockslotattherearofyourcomputerandisoperatedwitha
keyorcombinationdependingonthetypeselected.Thecablelockalsolocksthebuttonsthatareusedto
openthecomputercover.Thisisthesametypeoflockusedwithmanynotebookcomputers.Youcanorder
suchacablelockdirectlyfromLenovobysearchingforKensingtonat:
http://www.lenovo.com/support
Figure8.Kensington-stylecablelock
30ThinkStationP310UserGuide
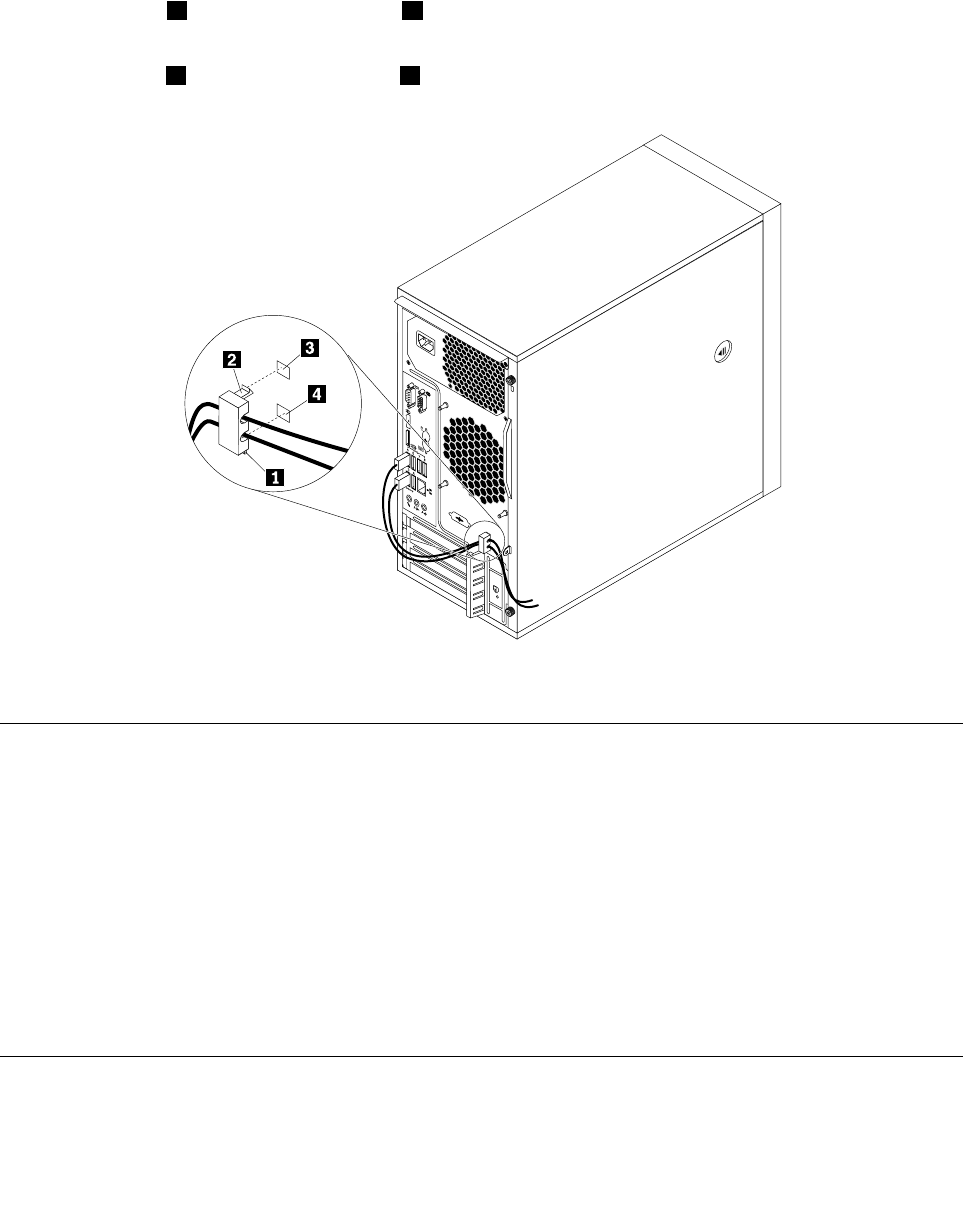
Attachingacablelock
Acablelockcanbeusedtosecuredevices,suchasthekeyboardandthemouse,bylockingthedevice
cablestoyourcomputer.Thecablelockattachestothecable-lockslotsontherearofyourcomputer.
See“Rearview”onpage3.
Toattachacablelock,dothefollowing:
1.Inserttheclip1intothecable-lockslot4.
2.Pullthecablesyouwanttolockthroughthedentsinthecablelock.
3.Presstheclip2intothecable-lockslot3untilitsnapsintoposition.
Figure9.Installingacablelock
ViewingandchangingsecuritysettingsintheSetupUtilityprogram
ToviewandchangesecuritysettingsintheSetupUtilityprogram,dothefollowing:
1.StarttheSetupUtilityprogram.See“StartingtheSetupUtilityprogram”onpage35.
2.SelectSecurity.
3.Followtheinstructionsontherightsideofthescreentoviewandchangesecuritysettings.Youcan
referto“UsingtheSetupUtilityprogram”onpage35togetbasicinformationaboutsomemajor
securitysettings.
4.TosavesettingsandexittheSetupUtilityprogram,pressF10,selectYesinthewindowdisplayed,
andpressEnter.
Note:Forsomekeyboards,youmightneedtopressFn+F10toexittheSetupUtilityprogram.
UsingpasswordsandWindowsaccounts
YoucanuseBIOSpasswordsandWindowsaccountstopreventunauthorizedaccesstoyourcomputerand
data.
Chapter4.Security31

•TouseBIOSpasswords,see“UsingBIOSpasswords”onpage38.
•TouseWindowsaccounts,dothefollowing:
1.ClicktheStartbuttontoopentheStartmenu.
2.DependingonyourWindowsversion,dooneofthefollowing:
–ForWindows7:ClickControlPanel➙UserAccounts.
–ForWindows10:ClickSettings➙Accounts.
3.Followtheinstructionsonthescreen.
Usingfingerprintauthentication
Ifyourkeyboardhasafingerprintreader,youcanusefingerprintauthenticationtoreplacepasswordsfor
simpleandsecureuseraccess.Tousefingerprintauthentication,firstenrollyourfingerprintsandassociate
themwithyourpasswords(suchasthepower-onpassword,harddiskpassword,andWindowspassword).
Usethefingerprintreaderandthefingerprintprogramtocompletethisprocedure.
Tousefingerprintauthentication,dooneofthefollowing:
•ForWindows7:UsetheFingerprintManagerProorThinkVantageFingerprintSoftwareprogramprovided
byLenovo.Toopentheprogram,see“Accessingaprogramonyourcomputer”onpage13.Formore
informationaboutusingtheprogram,refertothehelpsystemoftheprogram.
•ForWindows10:UsethefingerprinttoolprovidedbytheWindowsoperatingsystem.ClicktheStart
buttontoopentheStartmenu,andthenclickSettings➙Accounts➙Sign-inoptions.Followthe
instructionsonthescreen.
Tousethefingerprintreader,refertothedocumentationshippedwiththefingerprintkeyboardorlocatedon
theLenovoSupportWebsiteathttp://www.lenovo.com/support/keyboards.
Usingfirewalls
Afirewallcanbehardware,software,oracombinationofbothdependingonthelevelofsecurityrequired.
Firewallsworkonasetofrulestodeterminewhichinboundandoutboundconnectionsareauthorized.If
yourcomputerispreinstalledwithafirewallprogram,ithelpsprotectagainstcomputerInternetsecurity
threats,unauthorizedaccess,intrusions,andInternetattacks.Italsoprotectsyourprivacy.Formore
informationabouthowtousethefirewallprogram,refertothehelpsystemofyourfirewallprogram.
TouseWindowsFirewall,dothefollowing
1.DependingonyourWindowsversion,dooneofthefollowing:
•ForWindows7:ClicktheStartbuttontoopentheStartmenu.
•ForWindows10:Right-clicktheStartbuttontoopentheStartcontextmenu.
2.ClickControlPanel.ViewControlPanelbyLargeiconsorSmallicons,andthenclickWindows
Firewall.
3.Followtheinstructionsonthescreen.
Protectingdataagainstviruses
Yourcomputerispreinstalledwithanantivirusprogramtohelpyouguardagainst,detect,andeliminate
viruses.
Lenovoprovidesafullversionofantivirussoftwareonyourcomputerwithafree30-daysubscription.After
30days,youmustrenewthelicensetocontinuereceivingtheantivirussoftwareupdates.
32ThinkStationP310UserGuide

Note:Virusdefinitionfilesmustbekeptup-to-datetoguardagainstnewviruses.
Formoreinformationabouthowtouseyourantivirussoftware,refertothehelpsystemofyourantivirus
software.
ComputraceAgentsoftwareembeddedinfirmware
TheComputraceAgentsoftwareisanITassetmanagementandcomputertheftrecoverysolution.The
softwaredetectsifchangeshavebeenmadeonthecomputer,suchashardware,software,orthecomputer
call-inlocation.YoumighthavetopurchaseasubscriptiontoactivatetheComputraceAgentsoftware.
TrustedPlatformModule(TPM)
TPMisasecurecryptoprocessorthatstorescryptographickeys,whichinturnprotectsinformationstored
inyourcomputer.
Chapter4.Security33

34ThinkStationP310UserGuide

Chapter5.Advancedconfiguration
Thischaptercontainsthefollowingtopics:
•“UsingtheSetupUtilityprogram”onpage35
•“ConfiguringRAID”onpage41
•“UpdatingandrecoveringtheBIOS”onpage43
UsingtheSetupUtilityprogram
TheSetupUtilityprogramisusedtoviewandchangetheconfigurationsettingsofyourcomputer.This
sectionprovidesinformationaboutonlythemajorconfigurationsettingsavailableintheprogram.
Note:TheoperatingsystemsettingsmightoverrideanysimilarsettingsintheSetupUtilityprogram.
StartingtheSetupUtilityprogram
TostarttheSetupUtilityprogram,dothefollowing:
1.Turnonorrestartyourcomputer.
2.BeforeWindowsstartsup,repeatedlypressandreleasetheF1keyuntiltheSetupUtilityprogram
opens.IfaBIOSpasswordhasbeenset,theSetupUtilityprogramwillnotopenuntilyouenterthe
correctpassword.Formoreinformation,see“UsingBIOSpasswords”onpage38.
Note:Forsomekeyboards,youmightneedtopressFn+F1toopentheSetupUtilityprogram.
Toviewandchangetheconfigurationsettings,followtheinstructionsontherightsideofthescreen.The
keysusedtoperformvarioustasksaredisplayedatthebottomofthescreen.
Enablingordisablingadevice
Thissectionprovidesinformationabouthowtoenableordisableuseraccesstohardwaredevices(such
asUSBconnectorsorstoragedrives).
Toenableordisableadevice,dothefollowing:
1.StarttheSetupUtilityprogram.See“StartingtheSetupUtilityprogram”onpage35.
2.SelectDevices.
3.SelectthedeviceyouwanttoenableordisableandpressEnter.
4.SelectthedesiredsettingandpressEnter.
5.TosavesettingsandexittheSetupUtilityprogram,pressF10,selectYesinthewindowdisplayed,
andpressEnter.
Note:Forsomekeyboards,youmightneedtopressFn+F10toexittheSetupUtilityprogram.
Enablingordisablingtheautomaticpower-onofyourcomputer
TheAutomaticPowerOnitemintheSetupUtilityprogramprovidesvariousoptionsforyoutomakeyour
computerstartupautomatically.
ToenableordisabletheAutomaticPowerOnfeatures,dothefollowing:
1.StarttheSetupUtilityprogram.See“StartingtheSetupUtilityprogram”onpage35.
2.SelectPower➙AutomaticPowerOnandpressEnter.
©CopyrightLenovo201635

3.SelectthefeatureyouwanttoenableordisableandpressEnter.
4.SelectthedesiredsettingandpressEnter.
5.TosavesettingsandexittheSetupUtilityprogram,pressF10,selectYesinthewindowdisplayed,
andpressEnter.
Note:Forsomekeyboards,youmightneedtopressFn+F10toexittheSetupUtilityprogram.
EnablingordisablingtheErPLPScompliancemode
Lenovocomputersmeettheeco-designrequirementsoftheErPLot3regulation.Formoreinformation,go
to:
http://www.lenovo.com/ecodeclaration
YoucanenabletheErPLPScompliancemodeintheSetupUtilityprogramtoreducetheconsumptionof
electricitywhenyourcomputerisofforinsleepmode.
ToenableordisabletheErPLPScompliancemode,dothefollowing:
1.StarttheSetupUtilityprogram.See“StartingtheSetupUtilityprogram”onpage35.
2.SelectPower➙EnhancedPowerSavingModeandpressEnter.
3.SelectEnabledorDisableddependingonyourneeds,andthenpressEnter.IfyouselectEnabled,you
alsoneedtodisabletheWakeonLANfeature.See“Enablingordisablingtheautomaticpower-onof
yourcomputer”onpage35.
4.TosavesettingsandexittheSetupUtilityprogram,pressF10,selectYesinthewindowdisplayed,
andpressEnter.
Note:Forsomekeyboards,youmightneedtopressFn+F10toexittheSetupUtilityprogram.
WhentheErPLPScompliancemodeisenabled,youcanwakeupyourcomputerbydoingoneofthe
following:
•Pressthepowerbutton.
•EnabletheWakeUponAlarmfeaturetomakeyourcomputerwakeupatasettime.See“Enablingor
disablingtheautomaticpower-onofyourcomputer”onpage35.
•EnabletheAfterPowerLossfeaturetomakeyourcomputerwakeupwhenthepowersupplyresumes
afterasuddenlossofelectricity.
ToenabletheAfterPowerLossfeature,dothefollowing:
1.StarttheSetupUtilityprogram.See“StartingtheSetupUtilityprogram”onpage35.
2.SelectPower➙AfterPowerLossandpressEnter.
3.SelectPowerOnandpressEnter.
4.TosavesettingsandexittheSetupUtilityprogram,pressF10,selectYesinthewindowdisplayed,
andpressEnter.
Note:Forsomekeyboards,youmightneedtopressFn+F10toexittheSetupUtilityprogram.
Switchingbetweenbetteracousticandbetterthermalperformance
YoucanadjusttheacousticandthermalperformanceofyourcomputerthroughtheICEPerformance
Modemenu.Twochoicesareavailable:
•BetterAcousticPerformance(defaultsetting):Thiscomputerworkswithlessnoiseatanormalthermal
level.
36ThinkStationP310UserGuide

•BetterThermalPerformance:Thecomputerworksatabetterthermallevelwithnormalacoustic
performance.
Toswitchbetweenbetteracousticperformanceandbetterthermalperformance,dothefollowing:
1.StarttheSetupUtilityprogram.See“StartingtheSetupUtilityprogram”onpage35.
2.SelectPower➙IntelligentCoolingEngine(ICE)andpressEnter.
3.SelectICEPerformanceModeandpressEnter.
4.SelectBetterAcousticPerformanceorBetterThermalPerformanceasdesiredandpressEnter.
5.TosavesettingsandexittheSetupUtilityprogram,pressF10,selectYesinthewindowdisplayed,
andpressEnter.
Note:Forsomekeyboards,youmightneedtopressFn+F10toexittheSetupUtilityprogram.
Enablingordisablingthesystemtorecordthermalalertlogs
WhentheICEthermalalertfeatureisenabled,ifacriticalthermalsituationoccurs,analertlogiswritteninto
theWindowssystemlog.Thealertlogcanhelpyouidentifythermalproblems,suchasmalfunctioningfans,
abnormallyhightemperature,orpoorcoolingperformances.
Toenableordisablethesystemtorecordthermalalertlogs,dothefollowing:
1.StarttheSetupUtilityprogram.See“StartingtheSetupUtilityprogram”onpage35.
2.SelectPower➙IntelligentCoolingEngine(ICE)andpressEnter.
3.SelectICEThermalAlertandpressEnter.
4.SelectthedesiredsettingandpressEnter.
5.TosavesettingsandexittheSetupUtilityprogram,pressF10,selectYesinthewindowdisplayed,
andpressEnter.
Note:Forsomekeyboards,youmightneedtopressFn+F10toexittheSetupUtilityprogram.
Enablingordisablingtheconfigurationchangedetection
Whentheconfigurationchangedetectionisenabled,ifthePOSTdetectsconfigurationchangesofsome
hardwaredevices(suchasstoragedrivesormemorymodules),anerrormessageisdisplayed.
Toenableordisabletheconfigurationchangedetection,dothefollowing:
1.StarttheSetupUtilityprogram.See“StartingtheSetupUtilityprogram”onpage35.
2.SelectSecurity➙ConfigurationChangeDetectionandpressEnter.
3.SelectthedesiredsettingandpressEnter.
4.TosavesettingsandexittheSetupUtilityprogram,pressF10,selectYesinthewindowdisplayed,
andpressEnter.
Note:Forsomekeyboards,youmightneedtopressFn+F10toexittheSetupUtilityprogram.
Tobypasstheerrormessageandlogintotheoperatingsystem,dooneofthefollowing:
•PresstheF2key.
Note:Forsomekeyboards,youmightneedtopressFn+F2tobypasstheerrormessage.
•StartandthenexittheSetupUtilityprogram.See“StartingtheSetupUtilityprogram”onpage35and
“ExitingtheSetupUtilityprogram”onpage41.
Chapter5.Advancedconfiguration37

ChangingtheBIOSsettingsbeforeinstallinganewoperatingsystem
BIOSsettingsvarybyoperatingsystem.ChangetheBIOSsettingsbeforeinstallinganewoperatingsystem.
TochangetheBIOSsettings,dothefollowing:
1.StarttheSetupUtilityprogram.See“StartingtheSetupUtilityprogram”onpage35.
2.FromtheSetupUtilityprogrammainmenu,selectExit➙OSOptimizedDefault.
3.Dependingontheoperatingsystemtobeinstalled,dooneofthefollowing:
•ToinstalltheWindows10(64-bit)operatingsystem,selectEnabled.
•ToinstallanoperatingsystemotherthanWindows10(64-bit),selectDisabled.
4.SelectYesinthewindowdisplayedandpressEntertoconfirmyourselection.
5.TosavesettingandexittheSetupUtilityprogram,pressF10,selectY esinthewindowdisplayed,
andpressEnter.
Note:Forsomekeyboards,youmightneedtopressFn+F10toexittheSetupUtilityprogram.
Usingthecoverpresenceswitch
Thecoverpresenceswitchpreventsyourcomputerfromloggingintotheoperatingsystemwhenthe
computercoverisnotproperlyinstalledorclosed.
Tousethecoverpresenceswitch,enablethecover-presence-switchconnectoronthesystemboard
first.Toachievethis,dothefollowing:
1.StarttheSetupUtilityprogram.See“StartingtheSetupUtilityprogram”onpage35.
2.SelectSecurity➙ChassisIntrusionDetectionandpressEnter.
3.SelectEnabledandpressEnter.
4.TosavesettingsandexittheSetupUtilityprogram,pressF10,selectYesinthewindowdisplayed,and
pressEnter.Thecover-presence-switchconnectoronthesystemboardisenabled.
Note:Forsomekeyboards,youmightneedtopressFn+F10toexittheSetupUtilityprogram.
Thecoverpresenceswitchstartsfunctioning.Iftheswitchdetectsthatthecomputercoverisnotcorrectly
installedorclosed,anerrormessagewillbedisplayedwhenyouturnonthecomputer.Tofixtheerrorand
logintotheoperatingsystem,dothefollowing:
1.Properlyinstallorcloseyourcomputercover.SeeChapter7“Installingorreplacinghardware”on
page57.
2.StartandthenexittheSetupUtilityprogram.See“StartingtheSetupUtilityprogram”onpage35and
“ExitingtheSetupUtilityprogram”onpage41.
UsingBIOSpasswords
ByusingtheSetupUtilityprogram,youcansetpasswordstopreventunauthorizedaccesstoyourcomputer
anddata.
Youdonothavetosetanypasswordstouseyourcomputer.However,usingpasswordsimprovescomputer
security.Ifyoudecidetosetanypasswords,readthefollowingtopics.
Passwordtypes
ThefollowingtypesofpasswordsareavailableintheSetupUtilityprogram:
38ThinkStationP310UserGuide

•Power-onpassword
Whenapower-onpasswordisset,youarepromptedtoenteravalidpasswordeachtimethecomputeris
turnedon.Thecomputercannotbeuseduntilthevalidpasswordisentered.
•Administratorpassword
Settinganadministratorpassworddetersunauthorizedusersfromchangingconfigurationsettings.Ifyou
areresponsibleformaintainingtheconfigurationsettingsofseveralcomputers,youmightwanttoset
anadministratorpassword.
Whenanadministratorpasswordisset,youarepromptedtoenteravalidpasswordeachtimeyou
trytoaccesstheSetupUtilityprogram.TheSetupUtilityprogramcannotbeaccesseduntilavalid
passwordisentered.
Ifboththepower-onpasswordandadministratorpasswordareset,youcanentereitherpassword.
However,youmustuseyouradministratorpasswordtochangeanyconfigurationsettings.
•Harddiskpassword
Settingaharddiskpasswordpreventsunauthorizedaccesstothedataontheinternalstoragedrive(such
asaharddiskdrive).Whenaharddiskpasswordisset,youarepromptedtoenteravalidpasswordeach
timeyoutrytoaccessthestoragedrive.
Notes:
–Afteryousetaharddiskpassword,yourdataonthestoragedriveisprotectedevenifthestoragedrive
isremovedfromonecomputerandinstalledinanother.
–Iftheharddiskpasswordisforgotten,thereisnowaytoresetthepasswordorrecoverdatafrom
thestoragedrive.
Passwordconsiderations
Apasswordcanbeanycombinationofupto64alphabeticandnumericcharacters.Forsecurityreasons,it
isrecommendedtouseastrongpasswordthatcannotbeeasilycompromised.
Note:TheSetupUtilityprogrampasswordsarenotcasesensitive.
Tosetastrongpassword,considerthefollowingguidelines:
•Haveatleasteightcharactersinlength
•Containatleastonealphabeticcharacterandonenumericcharacter
•Notbeyournameoryourusername
•Notbeacommonwordoracommonname
•Besignificantlydifferentfromyourpreviouspasswords
Setting,changing,anddeletingapassword
Toset,change,ordeleteapassword,dothefollowing:
1.StarttheSetupUtilityprogram.See“StartingtheSetupUtilityprogram”onpage35.
2.SelectSecurity.
3.Dependingonthepasswordtype,selectSetPower-OnPassword,SetAdministratorPassword,or
HardDiskPasswordandpressEnter.
4.Followtheinstructionsontherightsideofthescreentoset,change,ordeleteapassword.
Note:Apasswordcanbeanycombinationofupto64alphabeticandnumericcharacters.Formore
information,see“Passwordconsiderations”onpage39.
5.TosavesettingsandexittheSetupUtilityprogram,pressF10,selectYesinthewindowdisplayed,
andpressEnter.
Note:Forsomekeyboards,youmightneedtopressFn+F10toexittheSetupUtilityprogram.
Chapter5.Advancedconfiguration39

Erasinglostorforgottenpasswords(clearingCMOS)
Thissectionprovidesinstructionsonhowtoeraselostorforgottenpasswords,suchasauserpassword.
Toerasealostorforgottenpassword,dothefollowing:
1.Removeanymediafromthedrivesandturnoffallconnecteddevicesandthecomputer.Then,
disconnectallpowercordsfromelectricaloutletsanddisconnectallcablesthatareconnectedtothe
computer.
2.Removethecomputercover.SeeChapter7“Installingorreplacinghardware”onpage57.
3.LocatetheClearCMOS/Recoveryjumperonthesystemboard.See“Hardwarelocations”onpage1.
4.Movethejumperfromthestandardposition(pin1andpin2)tothemaintenanceposition(pin2and
pin3).
5.Reinstallthecomputercoverandconnectthepowercord.SeeChapter7“Installingorreplacing
hardware”onpage57.
6.Turnonthecomputerandleaveitonforapproximately10seconds.Then,turnoffthecomputerby
holdingthepowerbuttonforapproximatelyfiveseconds.
7.Repeatstep1andstep2.
8.MovetheClearCMOS/Recoveryjumperbacktothestandardposition(pin1andpin2).
9.Reinstallthecomputercoverandconnectthepowercord.
Selectingastartupdevice
Ifyourcomputerdoesnotstartupfromadeviceasexpected,youcanchoosetochangethestartupdevice
sequencepermanentlyorselectatemporarystartupdevice.
Changingthestartupdevicesequencepermanently
Tochangethestartupdevicesequencepermanently,dothefollowing:
1.Dependingonthetypeofthestoragedevice,dooneofthefollowing:
•Ifthestoragedeviceisinternal,gotostep2.
•Ifthestoragedeviceisadisc,ensurethatyourcomputeristurnedon.Then,insertthediscinto
theopticaldrive.
•Ifthestoragedeviceisanexternaldeviceotherthanadisc,connectthestoragedevicetothe
computer.
2.StarttheSetupUtilityprogram.See“StartingtheSetupUtilityprogram”onpage35.
3.SelectStartup.
4.Followtheinstructionsontherightsideofthescreentochangethestartupdevicesequence.
5.TosavesettingsandexittheSetupUtilityprogram,pressF10,selectYesinthewindowdisplayed,
andpressEnter.
Note:Forsomekeyboards,youmightneedtopressFn+F10toexittheSetupUtilityprogram.
Selectingatemporarystartupdevice
Note:Notalldiscsandstoragedrivesarebootable.
Toselectatemporarystartupdevice,dothefollowing:
1.Dependingonthetypeofthestoragedevice,dooneofthefollowing:
•Ifthestoragedeviceisinternal,gotostep2.
•Ifthestoragedeviceisadisc,ensurethatyourcomputeristurnedon.Then,insertthediscinto
theopticaldrive.
40ThinkStationP310UserGuide

•Ifthestoragedeviceisanexternaldeviceotherthanadisc,connectthestoragedevicetothe
computer.
2.Turnonorrestartthecomputer.BeforeWindowsstartsup,repeatedlypressandreleasetheF12key
untilStartupDeviceMenuisdisplayed.
Note:Forsomekeyboards,youmightneedtopressFn+F12todisplayStartupDeviceMenu.
3.SelectthedesiredstoragedeviceandpressEnter.Thecomputerthenstartsupfromthedeviceyou
select.
Ifyouwanttoselectapermanentstartupdevice,selectEnterSetuponStartupDeviceMenuandpress
EntertostarttheSetupUtilityprogram.Formoreinformationabouthowtoselectapermanentstartup
device,see“Changingthestartupdevicesequencepermanently”onpage40.
ExitingtheSetupUtilityprogram
ToexittheSetupUtilityprogram,dooneofthefollowing:
•Ifyouwanttosavethenewsettings,presstheF10key.Then,selectYesinthewindowdisplayed
andpressEnter.
Note:Forsomekeyboards,youmightneedtopressFn+F10toexittheSetupUtilityprogram.
•Ifyoudonotwanttosavethenewsettings,selectExit➙DiscardChangesandExitandpressEnter.
Then,selectYesinthewindowdisplayedandpressEnter.
ConfiguringRAID
ThischapterprovidesinformationabouthowtoconfigureRedundantArrayofIndependentDisks(RAID)
foryourcomputer.
Note:TheinformationaboutconfiguringRAIDinthischapterisapplicableonlyforaWindowsenvironment.
ForinformationaboutconfiguringRAIDinaLinux®environment,contactyourLinuxsoftwareprovider.
RAIDLevel
YourcomputermusthavetheminimumnumberofSATAharddiskdrivesinstalledforthesupportedlevelof
RAIDbelow:
•RAIDLevel0–Stripeddiskarray
–Twoharddiskdrivesminimum
–Betterperformancewithoutfaulttolerance
•RAIDLevel1–Mirroreddiskarray
–Twoharddiskdrivesminimum
–Improvedreadperformanceand100%redundancy
Toinstallasecondaryharddiskdrive,referto“Replacingthesecondaryharddiskdrive”onpage92.
ConfiguringthesystemBIOStoenableSATARAIDfunctionality
Note:Usethearrowkeysonthekeyboardtomakeselections.
ToenableSATARAIDfunctionality,dothefollowing:
1.StarttheSetupUtilityprogram.See“StartingtheSetupUtilityprogram”onpage35.
2.SelectDevices➙ATADriveSetup.
Chapter5.Advancedconfiguration41

3.SelectConfigureSATAasandpressEnter.
4.SelectRAIDModeandpressEnter.
5.TosavesettingsandexittheSetupUtilityprogram,pressF10,selectYesinthewindowdisplayed,
andpressEnter.
Note:Forsomekeyboards,youmightneedtopressFn+F10toexittheSetupUtilityprogram.
CreatingRAIDvolumes
TocreateRAIDvolumes,dothefollowing:
1.PressCtrl+IwhenpromptedtoentertheIntelMatrixStorageManageroptionROMconfigurationutility
duringthecomputerstartup.
2.UsetheupanddownarrowkeystoselectCreateRAIDVolumeandpressEnter.
3.TypeaproperRAIDVolumenameintheNamefieldandpressTab.
4.UsethearrowkeystoselectaRAIDlevelintheRAIDLevelfieldandpressTab.
5.Ifappropriate,usethearrowkeystoselectaStripeSizeintheStripeSizefieldandpressTab.
6.TypeavolumesizeintheCapacityfieldandpressTab.
7.PressEntertoinitiatevolumecreation.
8.Whenprompted,pressYtoacceptthewarningmessageandcreatethevolume.
9.Returntostep2tocreateadditionalRAIDvolumes,orselectExitandpressEnter.
10.PressYwhenpromptedtoconfirmtheexit.
DeletingRAIDvolumes
TodeleteRAIDvolumes,dothefollowing:
1.PressCtrl+IwhenpromptedtoentertheIntelMatrixStorageManageroptionROMconfigurationutility
duringthecomputerstartup.
2.UsetheupanddownarrowkeystoselectDeleteRAIDVolumeandpressEnter.
3.UsethearrowkeystoselecttheRAIDvolumetobedeletedandpressDelete.
4.Whenprompted,pressYtoconfirmthedeletionoftheselectedRAIDvolume.DeletingaRAIDvolume
willresettheharddiskdrivestonon-RAID.
5.AfterdeletingaRAIDvolume,youcan:
•Returntostep2todeleteadditionalRAIDvolumes.
•See“CreatingRAIDvolumes”onpage42forRAIDvolumecreation.
•UsetheupanddownarrowkeystoselectExitandpressEnter.
Resettingdiskstonon-RAID
Toresetyourharddiskdrivestonon-RAID,dothefollowing:
1.PressCtrl+IwhenpromptedtoentertheIntelMatrixStorageManageroptionROMconfigurationutility
duringthecomputerstartup.
2.UsetheupanddownarrowkeystoselectResetDiskstoNon-RAIDandpressEnter.
3.Usethearrowkeysandthespacekeytomarkindividualphysicalharddiskdrivestobereset,andthen
pressEntertocompletetheselection.
4.Whenprompted,pressYtoconfirmtheresetaction.
5.Afterresettingyourharddiskdrivestonon-RAID,youcan:
•See“DeletingRAIDvolumes”onpage42forRAIDvolumedeletion.
•See“CreatingRAIDvolumes”onpage42forRAIDvolumecreation.
42ThinkStationP310UserGuide

•UsetheupanddownarrowkeystoselectExitandpressEnter.
UpdatingandrecoveringtheBIOS
TheBIOSisthefirstprogramthatthecomputerrunswhenyouturnonthecomputer.TheBIOSinitializesthe
hardwarecomponentsandloadstheoperatingsystemandotherprograms.
UpdatingtheBIOS
Whenyouinstallanewprogram,hardwaredevice,ordevicedriver,youmightbeinformedtoupdate
theBIOS.YoucanupdatetheBIOSfromyouroperatingsystemoraflashupdatedisc(supportedonly
onsomemodels).
ToupdatetheBIOS,dothefollowing:
1.Gotohttp://www.lenovo.com/drivers.
2.ToupdatetheBIOSfromyouroperatingsystem,downloadtheflashBIOSupdatedriveraccordingto
youroperatingsystemversion.ToupdatetheBIOSfromaflashupdatedisc,downloadtheISOimage
version(usedtocreateaflashupdatedisc).Then,downloadtheinstallationinstructionsfortheflash
BIOSupdatedriver.
3.PrinttheinstallationinstructionsyoudownloadandfollowtheinstructionstoupdatetheBIOS.
Note:IfyouwanttoupdatetheBIOSfromaflashupdatedisc,theinstallationinstructionsmightnotprovide
theinformationabouthowtorecordtheupdatedisc.See“Recordingadisc”onpage18.
RecoveringfromaBIOSupdatefailure
TorecoverfromaBIOSupdatefailure,dothefollowing:
1.Removeanymediafromthedrivesandturnoffallconnecteddevicesandthecomputer.Then,
disconnectallpowercordsfromelectricaloutletsanddisconnectallcablesthatareconnectedtothe
computer.
2.Removethecomputercover.SeeChapter7“Installingorreplacinghardware”onpage57.
3.LocatetheClearCMOS/Recoveryjumperonthesystemboard.See“Hardwarelocations”onpage1.
4.RemoveanypartsandcablesthatimpedeyouraccesstotheClearCMOS/Recoveryjumper.
5.Movethejumperfromthestandardposition(pin1andpin2)tothemaintenanceposition(pin2and
pin3).
6.Reinstallthepartsandcablesthatwereremoved.
7.Reinstallthecomputercoverandreconnectanycablesthatweredisconnected.SeeChapter7
“Installingorreplacinghardware”onpage57.
8.TurnonthecomputerandinserttheBIOSupdatediscintotheopticaldrive.Waitafewminutes.The
recoveryprocessbegins.Aftertherecoveryprocessiscompleted,yourcomputerwillshutdown
automatically.
Note:Ifthecomputerdoesnotstartupfromthedisc,selectthediscasthestartupdevice.See
“Selectingatemporarystartupdevice”onpage40.
9.Repeatsteps1–4.
10.MovetheClearCMOS/Recoveryjumperbacktothestandardposition(pin1andpin2).
11.Repeatstep6andstep7.Then,turnonyourcomputer.
Chapter5.Advancedconfiguration43

44ThinkStationP310UserGuide

Chapter6.Troubleshooting,diagnostics,andrecovery
Thischapterprovidessolutionstoresolveyourcomputerproblems.Followthestepsinthebasicprocedure
forresolvingcomputerproblems,whichhelpsyoumakegooduseofthetroubleshooting,diagnostics,
andrecoveryinformation.
•“Basicprocedureforresolvingcomputerproblems”onpage45
•“Troubleshooting”onpage45
•“Diagnostics”onpage53
•“Recoveryinformation”onpage53
Basicprocedureforresolvingcomputerproblems
Itisrecommendedthatyouusethefollowingproceduretoresolvecomputerproblemsyouareexperiencing:
1.Ensurethat:
a.Thecablesforallconnecteddevicesareconnectedcorrectlyandsecurely.
b.Allconnecteddevicesthatrequireacpowerareconnectedtoproperlygrounded,functioning
electricaloutlets.
c.AllconnecteddevicesareenabledintheBIOSsettingsofyourcomputer.See“Enablingordisabling
adevice”onpage35.
Iftheseactionsdonotresolveyourproblem,continuewiththenextstep.
2.Useanantivirusprogramtoseeifyourcomputerhasbeeninfectedbyavirus.Iftheprogramdetects
avirus,removethevirus.Iftheantivirusprogramdoesnotresolveyourproblem,continuewiththe
nextstep.
3.Goto“Troubleshooting”onpage45andfollowtheinstructionsforthetypeofproblemyouare
experiencing.Ifthesetroubleshootinginstructionsdonotresolveyourproblem,continuewiththe
nextstep.
4.Runthediagnosticprogram.See“Diagnostics”onpage53.Ifthediagnosticprogramdoesnotresolve
yourproblem,continuewiththenextstep.
5.Recoveryouroperatingsystem.See“Recoveryinformation”onpage53.
6.Ifnoneoftheseactionssolveyourproblem,contacttheLenovoCustomerSupportCenter.Foralistof
LenovoSupportphonenumbers,gotohttp://www.lenovo.com/support/phone.Formoreinformation
abouthelp,service,andtechnicalassistance,seeChapter8“Gettinginformation,help,andservice”on
page107.
Troubleshooting
Attention:Donotopenyourcomputerorattemptanyrepairbeforereadingandunderstandingthe“Read
thisfirst:Importantsafetyinformation”onpagev.
Usethetroubleshootinginformationtofindsolutionstoproblemsthathavedefinitesymptoms.
Startupproblems
Thissectionprovidessolutionstostartup-relatedproblems.
Thecomputerdoesnotstartupwhenyoupressthepowerbutton
Solutions:Ensurethat:
•Thepowercordiscorrectlyconnectedtotherearofthecomputerandtoaworkingelectricaloutlet.
©CopyrightLenovo201645

•Ifyourcomputerhasasecondarypowerswitchontherearofthecomputer,ensurethatitisswitchedon.
•Thepowerindicatoronthefrontofthecomputerison.
•Thecomputervoltagematchesthevoltageavailableattheelectricaloutletforyourcountryorregion.
Theoperatingsystemfailstostartup
Solution:Ensurethatthestartupsequenceincludesthedevicewheretheoperatingsystemresides.Usually,
theoperatingsystemisontheinternalstoragedrive.Formoreinformation,see“Changingthestartup
devicesequencepermanently”onpage40.
InstallationoftheWindows7operatingsystemfromanexternalopticaldriveoran
externalUSBdevicefails
Solution:Gotohttps://support.lenovo.com/us/en/documents/ht104142formoreinformation.
Thecomputerbeepsmultipletimesbeforetheoperatingsystemstartsup
Solution:Ensurethatnokeysarestuck.
Audioproblems
Thissectionprovidessolutionstoaudio-relatedproblems.
NoaudioinWindows
Solutions:
•IfyouareusingpoweredexternalspeakersthathaveanOn/Offcontrol,ensurethat:
–TheOn/OffcontrolissettotheOnposition.
–Thespeakerpowercableisconnectedtoaproperlygrounded,functionalacelectricaloutlet.
•Ifyourexternalspeakershaveavolumecontrol,ensurethatthevolumeisnotsettoolow.
•ClickthevolumeiconintheWindowsnotificationareaonthetaskbar.Ensurethatthemutespeakers
settingsarenotselectedandnoneofthevolumesettingsissettoolow.
Note:IfthevolumeiconisnotdisplayedintheWindowsnotificationarea,addtheicontothenotification
area.SeetheWindowshelpsystem.
•Somemodelshaveafrontaudiopanelyoucanusetoadjustvolume.Ifyourcomputerhasafrontaudio
panel,ensurethatthevolumeisnotsettoolow.
•Ensurethatyourexternalspeakers(andheadphones,ifused)areconnectedtothecorrectaudio
connectoronthecomputer.Mostspeakercablesarecolor-codedtomatchtheconnector.
Note:Whenexternal-speakerorheadphonecablesareconnectedtotheaudioconnector,theinternal
speaker,ifpresent,isdisabled.Inmostcases,ifanaudioadapterisinstalledinoneoftheexpansion
slots,theaudiofunctionbuiltintothesystemboardisdisabled.Therefore,youmustusetheaudio
connectorsontheaudioadapter.
•EnsurethattheprogramyouarerunningisdesignedforuseintheMicrosoft®Windows®operating
system.IftheprogramisdesignedtoruninDOS,theprogramdoesnotusetheWindowssoundfeature.
TheprogrammustbeconfiguredtouseSoundBlasterProorSoundBlasteremulation.
•Ensurethattheaudiodevicedriversarecorrectlyinstalled.
Soundcomesonlyfromoneexternalspeaker
Solutions:
•Ensurethatthespeakercableisinsertedcompletelyintotheconnectoronthecomputer.
•Ensurethatthecablethatconnectstheleftspeakertotherightspeakerissecurelyconnected.
46ThinkStationP310UserGuide

•ClickthevolumeiconintheWindowsnotificationareaonthetaskbar.Then,clickthespeakericonontop
ofthevolumecontrol.ClicktheLevelstabandensurethattheBalancesettingsaresetcorrectly.
Note:IfthevolumeiconisnotdisplayedintheWindowsnotificationarea,addtheicontothenotification
area.SeetheWindowshelpsystem.
CDorDVDproblems
ThissectionprovidessolutionstoDVD-relatedproblems.
ACDorDVDdoesnotwork
Solutions:
•IfyouhavemultipleCDorDVDdrivesinstalled(oracombinationofCDandDVDdrives),tryinsertingthe
discintotheotherdrive.Insomecases,onlyoneofthedrivesisconnectedtotheaudiosubsystem.
•Ensurethatthediscisinsertedcorrectly,withitslabelup.
•Ensurethatthediscyouareusingisclean.Toremovedustorfingerprints,wipethedisccleanwithasoft
clothfromthecentertotheoutside.Wipingadiscinacircularmotionmightcauselossofdata.
•Ensurethatthediscyouareusingisnotscratchedordamaged.Tryinsertinganotherdiscthatyou
knowisgood.Ifyoucannotreadfromaknown-gooddisc,youmighthaveaproblemwithyouroptical
driveorthecablingtoyouropticaldrive.Ensurethatthepowercableandsignalcablearesecurely
connectedtothedrive.
Unabletouseabootablerecoverymedium,suchastheProductRecoveryCD,to
startyourcomputer
Solution:EnsurethattheCDorDVDdriveisinthestartupsequencebeforethestoragedrive.Referto
“Selectingatemporarystartupdevice”onpage40forinformationonviewingandchangingthestartup
sequence.Notethatonsomemodelsthestartupsequenceispermanentlysetandcannotbechanged.
BlackscreeninsteadofDVDvideo
Solutions:
•RestarttheDVDplayerprogram.
•Tryalowerscreenresolutionorcolordepth.
•Closeanyopenfiles,andthenrestartthecomputer.
DVDmoviedoesnotplay
Solutions:
•Ensurethatthediscsurfaceiscleanandnotscratched.
•Checkthediscorpackageforregionalcoding.Youmightneedtopurchaseadiscwithcodingfor
theregionwhereyouareusingyourcomputer.
NoaudioorintermittentaudiowhileplayingaDVDmovie
Solutions:
•Checkthevolumecontrolsettingsonyourcomputerandonyourspeakers.
•Ensurethatthediscsurfaceiscleanandnotscratched.
•Checkallcableconnectionstoandfromthespeakers.
•UsetheDVDmenuforthevideotoselectadifferentaudiotrack.
Chapter6.Troubleshooting,diagnostics,andrecovery47

Playbackissloworchoppy
Solutions:
•Disableanybackgroundprograms,suchasAntiVirusorDesktopThemes.
•Ensurethatvideoresolutionissettolessthan1152x864pixels.
Invaliddiscornodiscfoundmessage
Solutions:
•EnsurethataDVDdiscisinthedrivewiththeshinysideofthediscfacingdown.
•Ensurethatvideoresolutionissettolessthan1152x864pixels.
•OncomputersthathaveaCD-ROMorCD-RWdriveinadditiontoaDVD-ROMdrive,ensurethatthe
DVDdiscisinthedrivelabeled“DVD”.
Intermittentproblems
Someproblemsoccuronlyoccasionallyandaredifficulttorepeat.
Solutions:
•Ensurethatallcablesandcordsaresecurelyconnectedtothecomputerandconnecteddevices.
•Ensurethatwhenthecomputerison,thefangrillisnotblocked(thereisairflowaroundthegrill),andthe
fansareworking.Ifairflowisblockedorthefansarenotworking,thecomputermightoverheat.
•IfSmallComputerSystemInterface(SCSI)devicesareinstalled,ensurethatthelastexternaldevicein
eachSCSIchainisterminatedcorrectly.Formoreinformation,seeyourSCSIdocumentation.
Storagedriveproblems
Selectyoursymptomfromthefollowinglist:
•“SomeorallstoragedrivesmissingfromtheSetupUtilityprogram”onpage48
•“Systemnotstartingupfromthecorrectstoragedriveor"NoOperatingSystemFound"message”
onpage48
SomeorallstoragedrivesmissingfromtheSetupUtilityprogram
Solutions:
•Ensurethatallstoragedrivesignalcablesandpowercablesareconnectedcorrectly.
•Ensurethatyourcomputerisconfiguredcorrectlytosupportthestoragedrives.
–IfyourcomputerisinstalledwithfiveSATAstoragedrives,ensurethattheSATAstoragedrive
enablementmodule(onetofivestoragedrives)isinstalled.
–IfyourcomputerisinstalledwithSASstoragedrives,ensurethattheSASstoragedriveenablement
module(onetofivestoragedrives)ortheLSIMegaRAIDSASadapterisinstalled.
Systemnotstartingupfromthecorrectstoragedriveor"NoOperatingSystem
Found"message
Solutions:
•Ensurethatallstoragedrivesignalcablesandpowercablesareconnectedcorrectly.
•EnsurethatthestoragedriveyourcomputerstartsupfromislistedasthefirststartupdeviceintheSetup
Utilityprogram.Referto“Changingthestartupdevicesequencepermanently”onpage40.
Note:Inrarecases,thestoragedrivewiththeoperatingsystemmightgetcorruptedordamaged.Insuch
cases,replacethestoragedrive.RefertoChapter7“Installingorreplacinghardware”onpage57.
48ThinkStationP310UserGuide

Networkingproblems
Thissectionprovidessolutionstonetworking-relatedproblems.
EthernetLANproblems
MycomputercannotbeconnectedtoanEthernetLAN
Solutions:
•ConnectthecablefromtheEthernetconnectortotheRJ45connectorofthehub.
•EnabletheEthernetLANfeatureintheSetupUtilityprogram.See“StartingtheSetupUtilityprogram”on
page35.Then,followtheinstructionsonthescreen.
•EnabletheEthernetLANadapter.
1.DependingonyourWindowsversion,dooneofthefollowing:
–ForWindows7:ClicktheStartbuttontoopentheStartmenu.
–ForWindows10:Right-clicktheStartbuttontoopentheStartcontextmenu.
2.ClickControlPanel.ViewControlPanelbyLargeiconsorSmallicons,andthenclickNetworkand
SharingCenter➙Changeadaptersettings.
3.Right-clicktheEthernetLANadaptericonandclickEnable.
•UpdateorreinstalltheEthernetLANdriver.See“Keepingyourcomputercurrent”onpage26.
•Installallnetworkingsoftwarethatisnecessaryforyournetworkenvironment.CheckwithyourLAN
administratorforthenecessarynetworkingsoftware.
•Setthesameduplexfortheswitchportandtheadapter.Ifyouconfiguredtheadapterforfullduplex,
ensurethattheswitchportisalsoconfiguredforfullduplex.Settingthewrongduplexmodemight
degradeperformance,causedataloss,orresultinlostconnections.
MycomputerisaGigabitEthernetmodelandIuseaspeedof1000Mbps,buttheconnectionfails
orerrorsoccur
Solution:ConnectthenetworkcabletotheEthernetconnectorusingCategory5wiringanda100BASE-T
hub/switch(not100BASE-X).
MycomputerisaGigabitEthernetmodel,butitcannotbeconnectedtothenetworkat1000Mbps,
butatonly100Mbps
Solutions:
•Tryanothercable.
•Setthelinkpartnertoauto-negotiate.
•Settheswitchtobe802.3ab-compliant(gigabitovercopper).
TheWakeOnLANfeaturedoesnotwork
Solution:EnabletheWakeOnLAN(WOL)featureintheSetupUtilityprogram.See“StartingtheSetupUtility
program”onpage35.Then,followtheinstructionsonthescreen.
WirelessLANproblem
Note:ThewirelessLANfeatureissupportedonlyonsomemodels.
ThewirelessLANfeaturedoesnotwork
Solutions:
•EnablethewirelessLANfeatureintheSetupUtilityprogram.See“StartingtheSetupUtilityprogram”on
page35.Then,followtheinstructionsonthescreen.
Chapter6.Troubleshooting,diagnostics,andrecovery49

•ForWindows10,enablethewirelessLANfeatureinWindowsSettings.ClicktheStartbuttontoopenthe
Startmenu,andthenclickSettings➙Network&Internet➙Wi-Fi.TurnontheWi-Fifeature.
•EnablethewirelessLANadapter.
1.DependingonyourWindowsversion,dooneofthefollowing:
–ForWindows7:ClicktheStartbuttontoopentheStartmenu.
–ForWindows10:Right-clicktheStartbuttontoopentheStartcontextmenu.
2.ClickControlPanel.ViewControlPanelbyLargeiconsorSmallicons,andthenclickNetworkand
SharingCenter➙Changeadaptersettings.
3.Right-clickthewirelessLANadaptericonandclickEnable.
•UpdateorreinstallthewirelessLANdriver.See“Keepingyourcomputercurrent”onpage26.
Bluetoothproblems
Note:TheBluetoothfeatureissupportedonlyonsomemodels.
TheBluetoothfeaturedoesnotwork
Solutions:
•EnabletheBluetoothfeatureintheSetupUtilityprogram.See“StartingtheSetupUtilityprogram”on
page35.Then,followtheinstructionsonthescreen.
•TurnontheBluetoothradios.
1.DependingonyourWindowsversion,dooneofthefollowing:
–ForWindows7:ClicktheStartbuttontoopentheStartmenu.Right-clickComputer,andthen
clickProperties.
–ForWindows10:Right-clicktheStartbuttontoopentheStartcontextmenu.
2.ClickDeviceManager.Typetheadministratorpasswordorprovideconfirmationifprompted.
3.Right-clicktheBluetoothradiosunderBluetoothRadiosandclickEnable.
•EnabletheBluetoothadapter.
1.DependingonyourWindowsversion,dooneofthefollowing:
–ForWindows7:ClicktheStartbuttontoopentheStartmenu.
–ForWindows10:Right-clicktheStartbuttontoopentheStartcontextmenu.
2.ClickControlPanel.ViewControlPanelbyLargeiconsorSmallicons,andthenclickNetworkand
SharingCenter➙Changeadaptersettings.
3.Right-clicktheBluetoothadaptericonandclickEnable.
•UpdateorreinstalltheBluetoothdriver.See“Keepingyourcomputercurrent”onpage26.
SounddoesnotcomefromtheBluetoothheadsetorheadphones
Solution:SettheBluetoothheadsetorheadphonesasthedefaultdevice.
1.Exittheapplicationthatusesthesounddevice(forexample,WindowsMediaPlayer).
2.Right-clickthevolumeiconintheWindowsnotificationareaonthetaskbar.
Note:IfthevolumeiconisnotdisplayedintheWindowsnotificationarea,addtheicontothe
notificationarea.SeeWindowhelpsystem.
3.ClickPlaybackdevices.
4.IfyouareusingtheHeadsetprofile,selectBluetoothHands-freeAudio,andthenclickSetDefault.If
youareusingtheAVprofile,selectStereoAudio,andthenclickSetDefault.
5.ClickOK.
50ThinkStationP310UserGuide

Performanceproblems
Thissectionprovidessolutionstoperformance-relatedproblemsofyourcomputer.
Excessivenumberoffragmentedfiles
Solution:UsetheWindowsdiskdefragmentationordiskoptimizationfeaturetocleanupthefiles.
Note:Dependingonthevolumeofthestoragedrivesandamountofdatastoredonthestoragedrives,the
disk-defragmentationprocessmighttakeuptoseveralhours.
1.Closeanyopenprogramsandwindows.
2.ClicktheStartbuttontoopentheStartmenu.
3.DependingonyourWindowsversion,dooneofthefollowing:
•ForWindows7:ClickComputer.
•ForWindows10:ClickFileExplorer➙ThisPC.
4.Right-clickyourCdriveandthenclickProperties.
5.ClicktheToolstab.
6.DependingonyourWindowsversion,dooneofthefollowing:
•ForWindows7:ClickDefragmentnow.
•ForWindows10:ClickOptimize.SelectthedesireddriveandthenclickOptimize.
7.Followtheinstructionsonthescreen.
Insufficientfreestoragedrivespace
Solutions:Freeupstoragedrivespace.
•CleanoutyourInbox,SentItems,andDeletedItemsfoldersfromyoure-mailapplication.
•CleanupyourCdrive.
1.ClicktheStartbuttontoopentheStartmenu.
2.DependingonyourWindowsversion,dooneofthefollowing:
–ForWindows7:ClickComputer.
–ForWindows10:ClickFileExplorer➙ThisPC.
3.Right-clickyourCdriveandthenclickProperties.
4.Checktheamountoffreespace,andthenclickDiskCleanup.
5.Alistofunnecessaryfilecategoriesisdisplayed.Selecteachfilecategoryyouwanttodelete,
andthenclickOK.
•TurnsomeWindowsfeaturesofforremovesomeunnecessaryprograms.
1.DependingonyourWindowsversion,dooneofthefollowing:
–ForWindows7:ClicktheStartbuttontoopentheStartmenu.
–ForWindows10:Right-clicktheStartbuttontoopentheStartcontextmenu.
2.ClickControlPanel.ViewControlPanelbyLargeiconsorSmallicons,andthenclickPrograms
andFeatures.
3.Dooneofthefollowing:
–ToturnsomeWindowsfeaturesoff,clickTurnWindowsfeaturesonoroff.Followthe
instructionsonthescreen.
–Toremovesomeunnecessaryprograms,selecttheprogramyouwanttoremove,andthenclick
Uninstall/ChangeorUninstall.
Chapter6.Troubleshooting,diagnostics,andrecovery51

Insufficientfreememoryspace
Solutions:
•Right-clickablankareaonthetaskbarandopenTaskManager.Then,endsometasksyouarenot
performing.
•Installadditionalmemorymodules.SeeChapter7“Installingorreplacinghardware”onpage57.To
purchasememorymodules,goto:
http://www.lenovo.com
Serialconnectorcannotbeaccessed
Solutions:
•Connecttheserialcabletotheserialconnectoronthecomputerandtotheserialdevice.Iftheserial
devicehasitsownpowercord,connectthepowercordtoagroundedelectricaloutlet.
•Turnontheserialdeviceandkeepthedeviceonline.
•Installanyapplicationprogramssuppliedwiththeserialdevice.Refertothedocumentationthatcomes
withtheserialdeviceformoreinformation.
•Ifyouaddedoneserial-connectoradapter,installtheadaptercorrectly.
MyUSBconnectorscannotbeaccessed
Solutions:
•ConnecttheUSBcablefromtheUSBconnectortotheUSBdevice.IftheUSBdevicehasitsownpower
cord,connectthepowercordtoagroundedelectricaloutlet.
•TurnontheUSBdeviceandkeepthedeviceonline.
•InstallanydevicedriversorapplicationprogramssuppliedwiththeUSBdevice.Refertothe
documentationthatcomeswiththeUSBdeviceformoreinformation.
•DetachandreconnecttheUSBconnectortoresettheUSBdevice.
Softwareanddriverproblems
Thissectionprovidessolutionstosoftware-anddriver-relatedproblems.
Forsomeprograms,datescannotbesortedincorrectorder
Solution:Someprogramsdevelopedbeforetheyear2000useonlythelasttwodigitsofayeartosortdates,
assumingthefirsttwodigitsare19.Consequently,datescannotbesortedincorrectordernowadays.
Checkwithyoursoftwaremanufacturertoseeifanyupdatesareavailable.Manysoftwaremanufacturers
makeupdatesavailablefromtheWorldWideWeb.
Someapplicationprogramsdonotworkasexpected
Solutions:
1.Checkwhethertheproblemiscausedbyanapplicationprogram.
a.Ensurethatthesoftwareiscompatiblewithyourcomputer.Refertotheinformationsuppliedwith
thesoftwareformoreinformation.
b.Verifythatothersoftwareworkscorrectlyonyourcomputer.
c.Verifythatthesoftwareyouareusingworksonanothercomputer.
2.Iftheproblemiscausedbyanapplicationprogram:
•Refertotheprinteddocumentationthatcomeswiththeprogramorthehelpsystemoftheprogram.
•Updatetheprogram.See“Keepingyourcomputercurrent”onpage26.
52ThinkStationP310UserGuide

•Uninstalltheprogramandthenreinstallit.Todownloadaprogramthatispreinstalledonyour
computer,gotohttp://www.lenovo.com/supportandfollowtheinstructionsonthescreen.
Adevicedoesnotworknormallyduetodevicedriverproblems
Solution:Updatethedevicedriver.See“Keepingyourcomputercurrent”onpage26.
Diagnostics
Note:IfyouareusingaWindowsoperatingsystemotherthanWindows7orWindows10,goto
http://www.lenovo.com/diagsforthediagnosticsinformationforyourcomputer.
Thediagnosticprogramisusedtotesthardwarecomponentsofyourcomputer.Thediagnosticprogramalso
canreportoperating-system-controlledsettingsthatinterferewiththecorrectoperationofyourcomputer.
LenovoSolutionCenter
TheLenovoSolutionCenterprogramisthediagnosticprogrampreinstalledonyourcomputer.Theprogram
enablesyoutotroubleshootandresolvecomputerproblems.Itcombinesdiagnostictests,system
informationcollection,securitystatus,andsupportinformation,alongwithhintsandtipsformaximum
systemperformance.
ToopentheLenovoSolutionCenterprogram,see“Accessingaprogramonyourcomputer”onpage13.For
moreinformationaboutusingtheprogram,refertothehelpsystemoftheprogram.
IfyouareunabletoisolateandrepairtheproblemyourselfafterrunningLenovoSolutionCenter,save
andprintthelogfilescreatedbytheprogram.YoumightneedthelogfileswhenyouspeaktoaLenovo
technicalsupportrepresentative.
Recoveryinformation
Thissectionprovidesinstructionsonhowtorecoveryouroperatingsystem.
Note:Ifadevicedoesnotworknormallyafterrecoveringtheoperatingsystem,updatethedevicedriver.
See“Keepingyourcomputercurrent”onpage26.
RecoveryinformationforWindows7
TorecoveryourWindows7operatingsystem,usethefollowingsolutions:
•UseWindowsrecoverysolutions.
–UseSystemRestoretorestoresystemfilesandsettingstoanearlierpoint.
1.ClicktheStartbuttontoopentheStartmenu.
2.ClickControlPanel.ViewControlPanelbyLargeiconsorSmallicons,andthenclickRecovery
➙OpenSystemRestore.
3.Followtheinstructionsonthescreen.
–UsetheWindowsrecoveryenvironmentbydoingoneofthefollowing:
–Afterseveralconsecutivefailedbootattempts,theWindowsrecoveryenvironmentmightstart
automatically.Followtheinstructionsonthescreentochoosetheappropriaterecoverysolution.
–Turnonorrestartyourcomputer.Then,repeatedlypressandreleasetheF8keyuntiltheAdvanced
BootOptionswindowopens.SelectRepairYourComputer,pressEnter,andfollowtheinstructions
onthescreentochoosetheappropriaterecoverysolution.
Chapter6.Troubleshooting,diagnostics,andrecovery53

Note:Forsomekeyboards,youmightneedtopressFn+F8toopentheAdvancedBootOptions
window.
•UsetheRescueandRecoveryprogramtorestorethestoragedrivefromabackup,orrestoretheC
drivetothefactory-defaultsettings.
Notes:
–Dependingonyourcomputermodel,theRescueandRecoveryprogrammightnotbeavailableunless
youinstalleditmanuallyearlier.
–IfyouusetheRescueandRecoveryprogramtorestorethestoragedrivefromabackup,ensurethat
youbackedupyourdataearlierwiththeprogram.
TousetheRescueandRecoveryprogram,dooneofthefollowing:
–OpentheRescueandRecoveryprogram.See“Accessingaprogramonyourcomputer”onpage13.
Formoreinformationaboutusingtheprogram,refertothehelpsystemoftheprogram.
–OpentheRescueandRecoveryworkspace.
1.Turnoffyourcomputer.PressandholdtheEnterkeyandthenturnonthecomputer.Release
theEnterkeywhenStartupInterruptMenuisdisplayed.Then,pressF11toopentheRescue
andRecoveryworkspace.
2.IftheRescueandRecoveryworkspacefailstoopen,usetherescuemediumyoucreatedearlierto
resolvetheproblem.Selecttherescuemediumasthestartupdevice.See“Selectingatemporary
startupdevice”onpage40.Whentherescuemediumstarts,theRescueandRecoveryworkspace
opens.Followtheinstructionsonthescreen.
•UsetherecoverymediumyoucreatedearlierwiththeCreateRecoveryMediaprogramtorestoreonly
theCdriveortheentirestoragedrivetothefactory-defaultsettings.
Note:Tocreatearecoverymedium,see“Goodmaintenancepractices”onpage25.
1.Selecttherecoverymediumasthestartupdevice.See“Selectingatemporarystartupdevice”
onpage40.
2.Followtheinstructionsonthescreentochoosetheappropriaterecoverysolution.
•UsetherecoverydiscsetprovidedbyLenovotorestoretheentirestoragedrivetothefactory-default
settings.
–Ifyourcomputercomeswiththerecoverydiscset,followtheinstructionsshippedwiththediscset.
–Ifyourcomputerdoesnotcomewiththerecoverydiscset,contacttheLenovoCustomer
SupportCentertoorderarecoverydiscset.ForalistofLenovoSupportphonenumbers,goto
http://www.lenovo.com/support/phone.Ifyoucannotfindthesupporttelephonenumberforyour
countryorregion,contactyourLenovoreseller.
RecoveryinformationforWindows10
TorecoveryourWindows10operatingsystem,usethefollowingsolutions:
•UseWindowsrecoverysolutions.
–UserecoverysolutionsinWindowsSettings.
1.ClicktheStartbuttontoopentheStartmenu.
2.ClickSettings➙Update&security➙Recovery.
3.Choosetheappropriaterecoverysolutionbyfollowingtheinstructionsonthescreen.
–UseSystemRestoretorestoresystemfilesandsettingstoanearlierpoint.
1.Right-clicktheStartbuttontoopentheStartcontextmenu.
54ThinkStationP310UserGuide

2.ClickControlPanel.ViewControlPanelbyLargeiconsorSmallicons,andthenclickRecovery
➙OpenSystemRestore.
3.Followtheinstructionsonthescreen.
–UsetheFileHistorytooltorestoreyourfilesfromabackup.
Note:IfyouusetheFileHistorytooltorestoreyourfilesfromabackup,ensurethatyoubackedup
yourdataearlierwiththetool.
1.Right-clicktheStartbuttontoopentheStartcontextmenu.
2.ClickControlPanel.ViewControlPanelbyLargeiconsorSmallicons,andthenclickFileHistory
➙Restorepersonalfiles.
3.Followtheinstructionsonthescreen.
–UsetheWindowsrecoveryenvironmentbydoingoneofthefollowing:
–Afterseveralconsecutivefailedbootattempts,theWindowsrecoveryenvironmentmightstart
automatically.Followtheinstructionsonthescreentochoosetheappropriaterecoverysolution.
–SelecttherecoverymediumyoucreatedearlierwiththeWindowstoolasthestartupdevice.See
“Selectingatemporarystartupdevice”onpage40.Then,followtheinstructionsonthescreen
tochoosetheappropriaterecoverysolution.
Note:Tocreatearecoverymedium,see“Goodmaintenancepractices”onpage25.
•UsetherecoveryUSBkeyprovidedbyLenovotorestoretheentirestoragedrivetothefactory-default
settings.
–IfyourcomputercomeswiththerecoveryUSBkey,followtheinstructionsshippedwiththeUSBkey.
–IfyourcomputerdoesnotcomewiththerecoveryUSBkey,contacttheLenovoCustomer
SupportCentertoorderarecoveryUSBkey.ForalistofLenovoSupportphonenumbers,goto
http://www.lenovo.com/support/phone.Ifyoucannotfindthesupporttelephonenumberforyour
countryorregion,contactyourLenovoreseller.
Chapter6.Troubleshooting,diagnostics,andrecovery55

56ThinkStationP310UserGuide

Chapter7.Installingorreplacinghardware
Thischaptercontainsthefollowingtopics:
•“Handlingstatic-sensitivedevices”onpage57
•“Installingorreplacinghardware”onpage57
Handlingstatic-sensitivedevices
Donotopenthestatic-protectivepackagecontainingthenewpartuntilthedefectiveparthasbeenremoved
andyouarereadytoinstallthenewpart.Staticelectricity,althoughharmlesstoyou,canseriouslydamage
computercomponentsandoptions.
Whenyouhandleoptionsandothercomputercomponents,taketheseprecautionstoavoidstatic-electricity
damage:
•Limityourmovement.Movementcancausestaticelectricitytobuilduparoundyou.
•Alwayshandleoptionsandothercomputercomponentscarefully.HandlePCI/PCI-Expresscards,
memorymodules,systemboards,andmicroprocessorsbytheedges.Nevertouchanyexposedcircuitry.
•Preventothersfromtouchingtheoptionsandothercomputercomponents.
•Touchthestatic-protectivepackagecontainingtheparttoametalexpansion-slotcoverorother
unpaintedmetalsurfaceonthecomputerforatleasttwoseconds.Thisreducesstaticelectricityfrom
thepackageandyourbodybeforeyouinstallorreplaceanewpart.
•Whenpossible,removethenewpartfromthestatic-protectivepackage,andinstallitdirectlyinthe
computerwithoutsettingthepartdown.Whenthisisnotpossible,placethestatic-protectivepackageon
asmooth,levelsurfaceandplacethepartonthepackage.
•Donotplacethepartonthecomputercoverorothermetalsurface.
Installingorreplacinghardware
Thissectionprovidesinstructionsonhowtoinstallorreplacehardwareforyourcomputer.Youcanexpand
thecapabilitiesofyourcomputerandmaintainyourcomputerbyinstallingorreplacinghardware.
Attention:Donotopenyourcomputerorattemptanyrepairbeforereadingandunderstandingthe“Read
thisfirst:Importantsafetyinformation”onpagev.
Notes:
•Dependingonyourcomputermodel,someofthehardwarepartsinthissectionmightnotbeavailable.
•UsecomputerpartsprovidedonlybyLenovo.
•Wheninstallingorreplacinganoption,usetheappropriateinstructionsinthissectionalongwiththe
instructionsthatcomewiththeoption.
•Inmostareasoftheworld,LenovorequiresthereturnofthedefectiveCRU.Informationaboutthiswill
comewiththeCRUorwillcomeafewdaysaftertheCRUarrives.
Installingexternaloptions
Youcanconnectexternaloptionstoyourcomputer,suchasexternalspeakers,aprinter,orascanner.For
someexternaloptions,youmustinstalladditionalsoftwareinadditiontomakingthephysicalconnection.
Wheninstallinganexternaloption,see“Frontview”onpage1and“Rearview”onpage3toidentifythe
©CopyrightLenovo201657
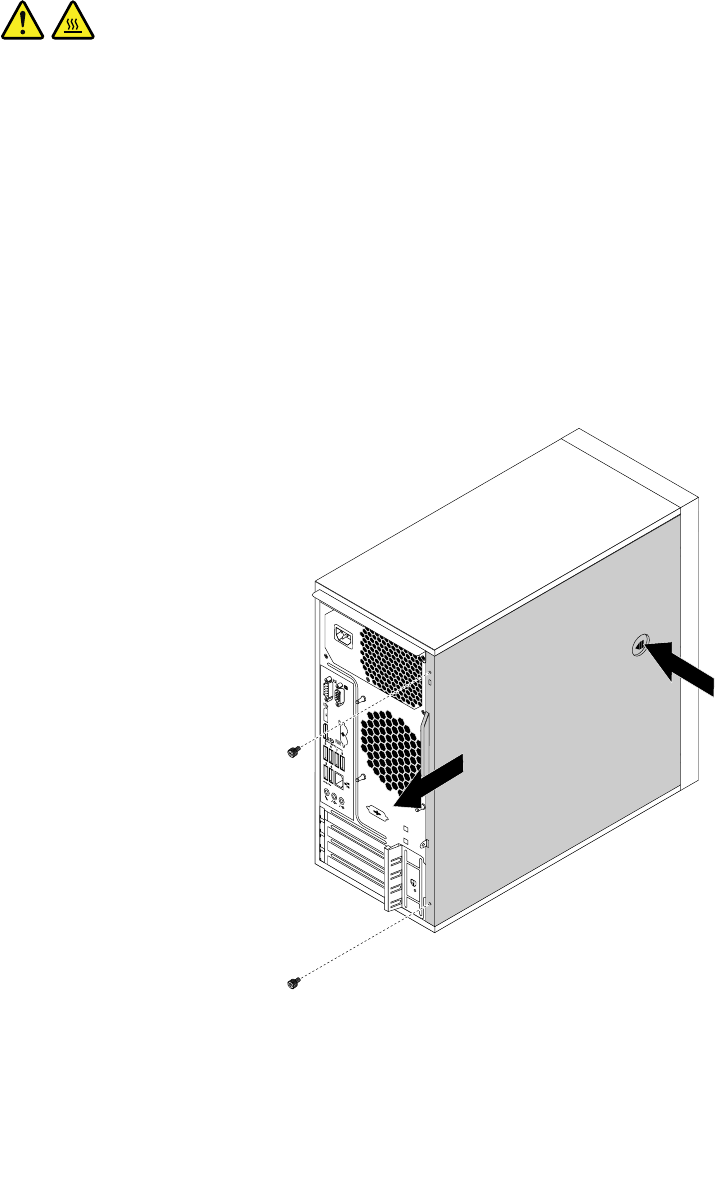
requiredconnector.Then,usetheinstructionsthatcomewiththeoptiontohelpyoumaketheconnection
andinstallanysoftwareordevicedriversthatarerequiredfortheoption.
Removingthecomputercover
Attention:Donotopenyourcomputerorattemptanyrepairbeforereadingandunderstandingthe“Read
thisfirst:Importantsafetyinformation”onpagev.
CAUTION:
Beforeyouopenthecomputercover,turnoffthecomputerandwaitseveralminutesuntilthe
computeriscool.
Toremovethecomputercover,dothefollowing:
1.Removeanymediafromthedrivesandturnoffallattacheddevicesandthecomputer.
2.Disconnectallpowercordsfromelectricaloutlets.
3.Disconnectthepowercord,Input/Outputcables,andanyothercablesthatareconnectedtothe
computer.See“Frontview”onpage1and“Rearview”onpage3.
4.Unlockanylockingdevicethatsecuresthecomputercover.See“Attachingapadlock”onpage29.
5.Removethetwoscrewsthatsecurethecomputercover.
6.Pressthecover-releasebuttononthesideofthecomputerandslidethecovertotherearofthe
computertoremovethecover.
Figure10.Removingthecomputercover
58ThinkStationP310UserGuide

Removingandreinstallingthefrontbezel
Attention:Donotopenyourcomputerorattemptanyrepairbeforereadingandunderstandingthe“Read
thisfirst:Importantsafetyinformation”onpagev.
Toremoveandreinstallthefrontbezel,dothefollowing:
1.Removeanymediafromthedrivesandturnoffallconnecteddevicesandthecomputer.Then,
disconnectallpowercordsfromelectricaloutletsanddisconnectallcablesthatareconnectedtothe
computer.
2.Removethecomputercover.See“Removingthecomputercover”onpage58.
3.Releasethethreeplastictabsontheleftsideandpivotthefrontbezeloutwardtoremoveitfromthe
computer.
Figure11.Removingthefrontbezel
4.Toreinstallthefrontbezel,alignthethreeplastictabsontherightsideofthefrontbezelwiththe
correspondingholesinthechassis.Thenpivotthefrontbezelinwardsuntilitsnapsintoposition
ontheleftside.
Whattodonext:
•Toworkwithanotherpieceofhardware,gototheappropriatesection.
•Tocompletetheinstallationorreplacement,goto“Completingthepartsreplacement”onpage105.
InstallingorreplacingaPCIcard
Attention:Donotopenyourcomputerorattemptanyrepairbeforereadingandunderstandingthe“Read
thisfirst:Importantsafetyinformation”onpagev.
YourcomputerhastwoPCIExpressx1cardslots,onePCIExpressx16cardslot(negotiablelinkwidthx4,
x1),andonePCIExpressx16graphicscardslot(graphicscardavailableonsomemodels).
ToinstallorreplaceaPCIcard,dothefollowing:
Chapter7.Installingorreplacinghardware59
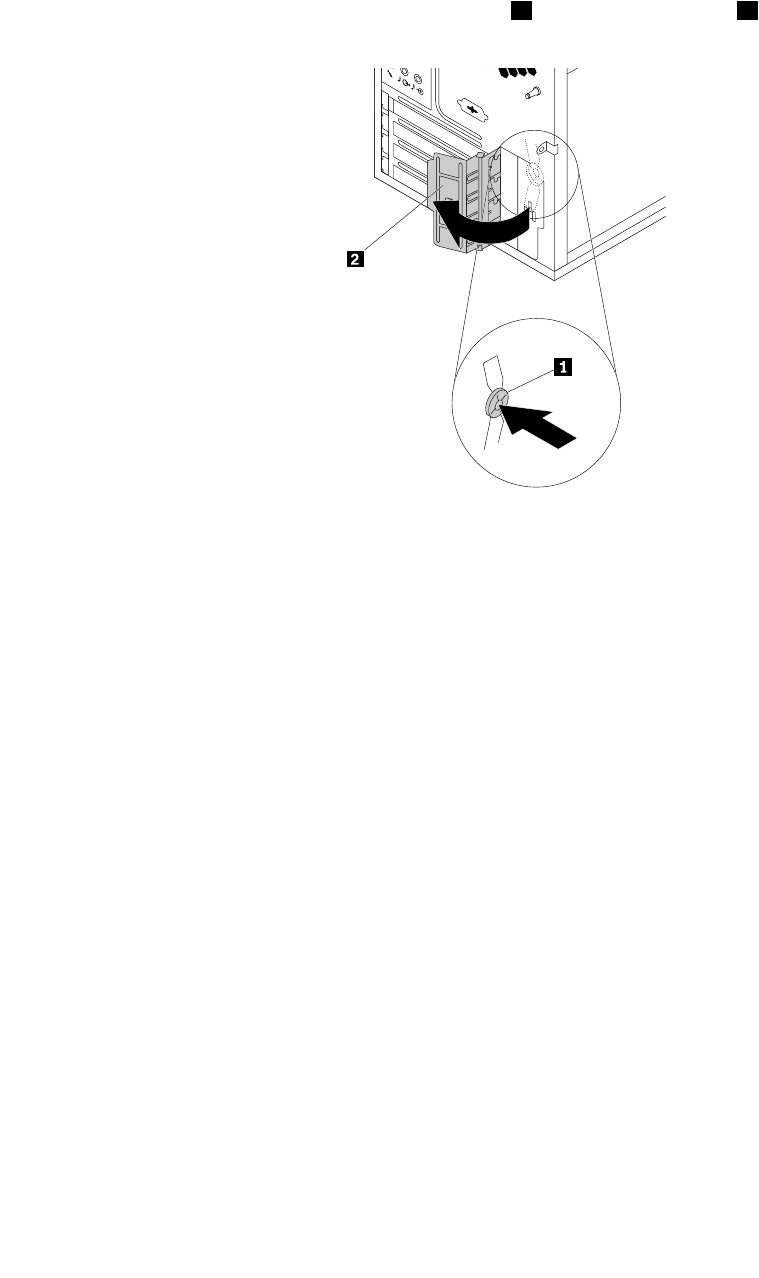
1.Removeanymediafromthedrivesandturnoffallconnecteddevicesandthecomputer.Then,
disconnectallpowercordsfromelectricaloutletsanddisconnectallcablesthatareconnectedtothe
computer.
2.Removethecomputercover.See“Removingthecomputercover”onpage58.
3.Attherearofthecomputer,pressthereleasebutton1toopenthecardlatch2.
Figure12.OpeningthePCIcardlatch
60ThinkStationP310UserGuide
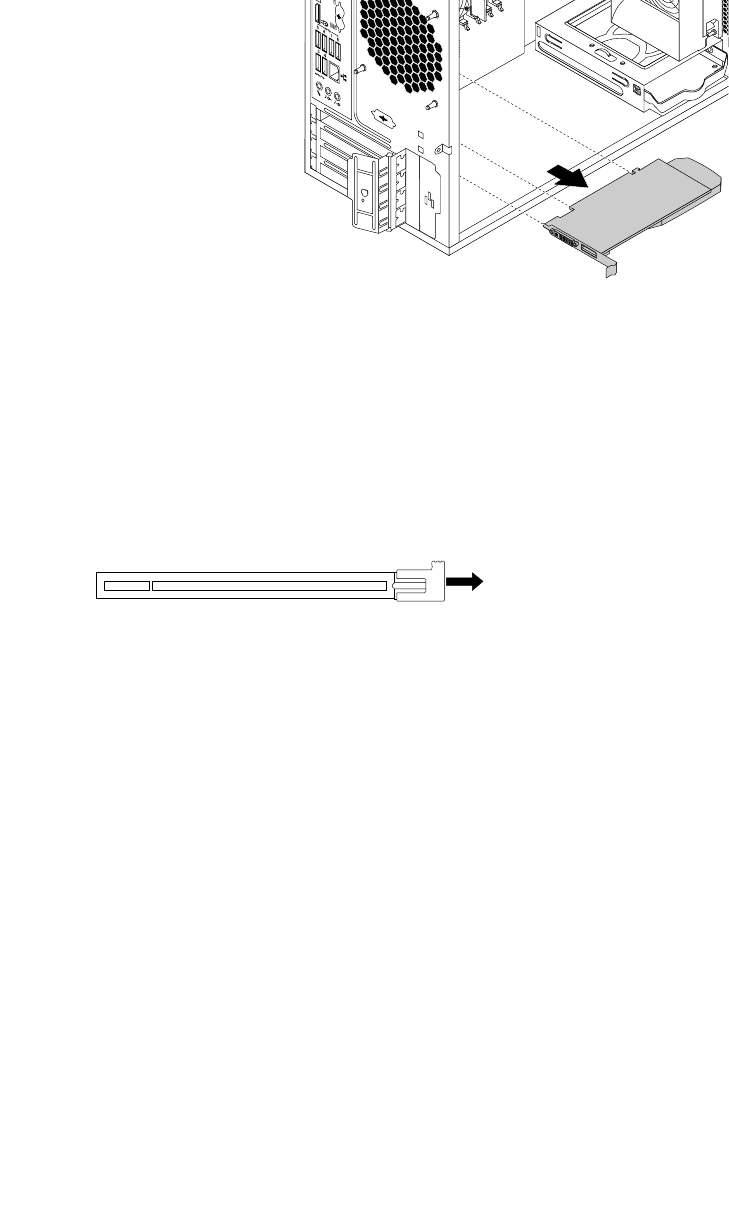
4.DependingonwhetheryouareinstallingorreplacingaPCIcard,dooneofthefollowing:
•IfyouareinstallingaPCIcard,removetheappropriatemetalslotcover.
•IfyouarereplacinganoldPCIcard,grasptheoldcardthatiscurrentlyinstalledandgentlypullit
outoftheslot.
Figure13.RemovingaPCIcard
Notes:
a.Thecardfitstightlyintotheslot.Ifnecessary,alternatelymoveeachsideofthecardasmall
amountuntilthecardisremovedfromtheslot.
b.Ifthecardisheldinplacebyaretaininglatch,disengagethecardretaininglatchonthePCIcard
slot.Thengraspthecardandgentlypullitoutoftheslot.
Figure14.Disengagingthecardretaininglatch
5.RemovethenewPCIcardfromitsstatic-protectivepackage.
6.Installthenewcardintotheappropriateslotonthesystemboard.See“Partsonthesystemboard”
onpage7.
Note:IfyouareinstallingaPCIExpressx16graphicscard,ensurethatthememory-slotretainingclips
areclosedbeforeyouinstallthecardtoavoidanyinterferenceduringtheinstallation.
Chapter7.Installingorreplacinghardware61
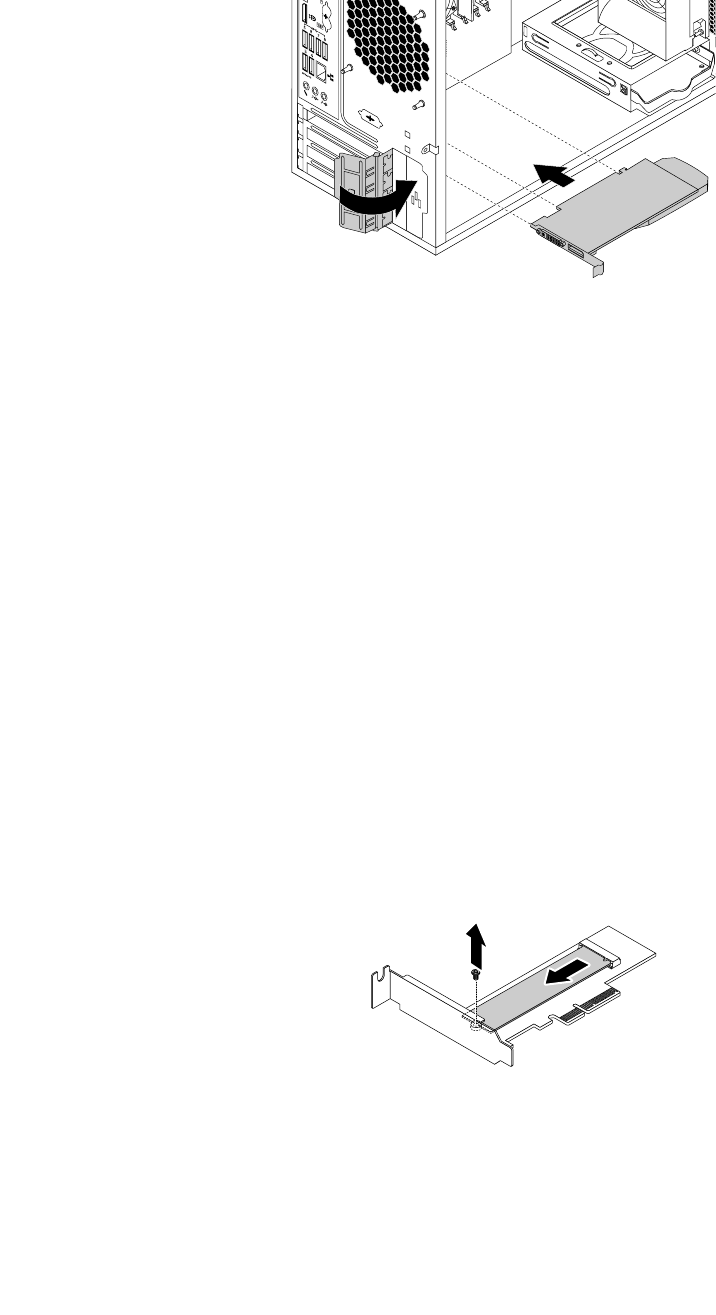
7.PivotthecardlatchtotheclosedpositiontosecurethePCIcard.
Figure15.InstallingaPCIcard
Whattodonext:
•Toworkwithanotherpieceofhardware,gototheappropriatesection.
•Tocompletetheinstallationorreplacement,goto“Completingthepartsreplacement”onpage105.
InstallingorreplacinganM.2solid-statedrive
Attention:Donotopenyourcomputerorattemptanyrepairbeforereadingandunderstandingthe“Read
thisfirst:Importantsafetyinformation”onpagev.
ToinstallorreplaceanM.2solid-statedrive,dothefollowing:
1.Removeanymediafromthedrivesandturnoffallconnecteddevicesandthecomputer.Then,
disconnectallpowercordsfromelectricaloutletsanddisconnectallcablesthatareconnectedtothe
computer.
2.Removethecomputercover.See“Removingthecomputercover”onpage58.
3.Laythecomputeronitssideforeasieraccesstothesystemboard.
4.DependingonwhetheryouareinstallingorreplacinganM.2solid-statedrive,dooneofthefollowing:
•IfyouarereplacinganM.2solid-statedrive,locateandremovetheM.2solid-statedriveadapter.
See“InstallingorreplacingaPCIcard”onpage59.RemovethescrewthatsecurestheoldM.2
solid-statedrive.Then,gentlypullthesolid-statedriveoutoftheM.2slot.
Figure16.RemovingtheM.2solid-statedrive
•IfyouareinstallinganM.2solid-statedrive,removethescrewthatisalignedwiththeM.2slot.
62ThinkStationP310UserGuide
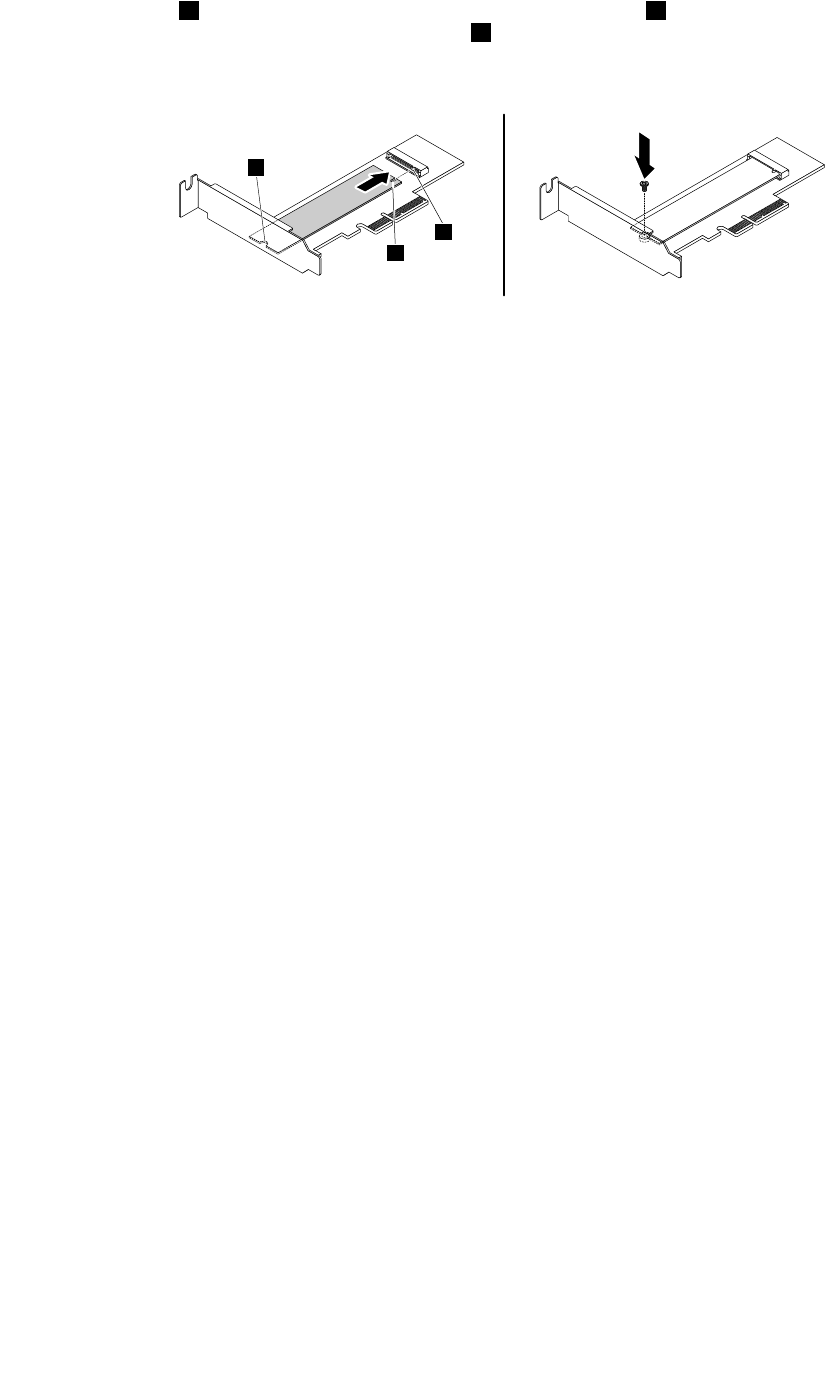
5.Alignthenotch1onthenewM.2solid-statedrivewiththeslotkey2intheM.2slot.Then,insertthe
solid-statedriveintotheM.2slotuntilthenotch3isalignedwiththecorrespondingscrewholeinthe
driveadapter.Installthescrewtosecurethenewsolid-statedrive.
2
1
3
Figure17.InstallingtheM.2solid-statedrive
6.InstalltheM.2solid-statedriveadapterintotheappropriatePCIExpresscardslotonthesystemboard.
See“InstallingorreplacingaPCIcard”onpage59.
Note:ItisrecommendedthatyouinstalltheM.2solid-statedriveadapterintothePCIExpressx16card
slot.See“Partsonthesystemboard”onpage7.
Whattodonext:
•Toworkwithanotherpieceofhardware,gototheappropriatesection.
•Tocompletetheinstallationorreplacement,goto“Completingthepartsreplacement”onpage105.
Installingorreplacingamemorymodule
Attention:Donotopenyourcomputerorattemptanyrepairbeforereadingandunderstandingthe“Read
thisfirst:Importantsafetyinformation”onpagev.
YourcomputerhasfourmemoryslotsforinstallingorreplacingDDR4UDIMMsthatprovideuptoa
maximumof32GBsystemmemory.Wheninstallingorreplacingamemorymodule,use4GB,8GB,or
16GBDDR4UDIMMsinanycombinationuptoamaximumof64GB.DonotmixECCUDIMMsand
non-ECCUDIMMswithinthesamesystem.
Chapter7.Installingorreplacinghardware63

Installmemorymodulesinthenumericalorderasshown.Thenumbers1,2,3,and4indicatetheinstallation
sequence.
Figure18.Memorymoduleinstallation–order
Toinstallorreplaceamemorymodule,dothefollowing:
1.Removeanymediafromthedrivesandturnoffallconnecteddevicesandthecomputer.Then,
disconnectallpowercordsfromelectricaloutletsanddisconnectallcablesthatareconnectedtothe
computer.
2.Removethecomputercover.See“Removingthecomputercover”onpage58.
3.Laythecomputeronitssideforeasieraccesstothesystemboard.
4.Locatethememoryslots.See“Partsonthesystemboard”onpage7.
5.Removeanypartsthatmightpreventyouraccesstothememoryslots.Dependingonyourcomputer
model,youmightneedtoremovethePCIExpressx16graphicscardforeasieraccesstothememory
slots.See“InstallingorreplacingaPCIcard”onpage59.
6.Dependingonwhetheryouareinstallingorreplacingamemorymodule,dooneofthefollowing:
64ThinkStationP310UserGuide
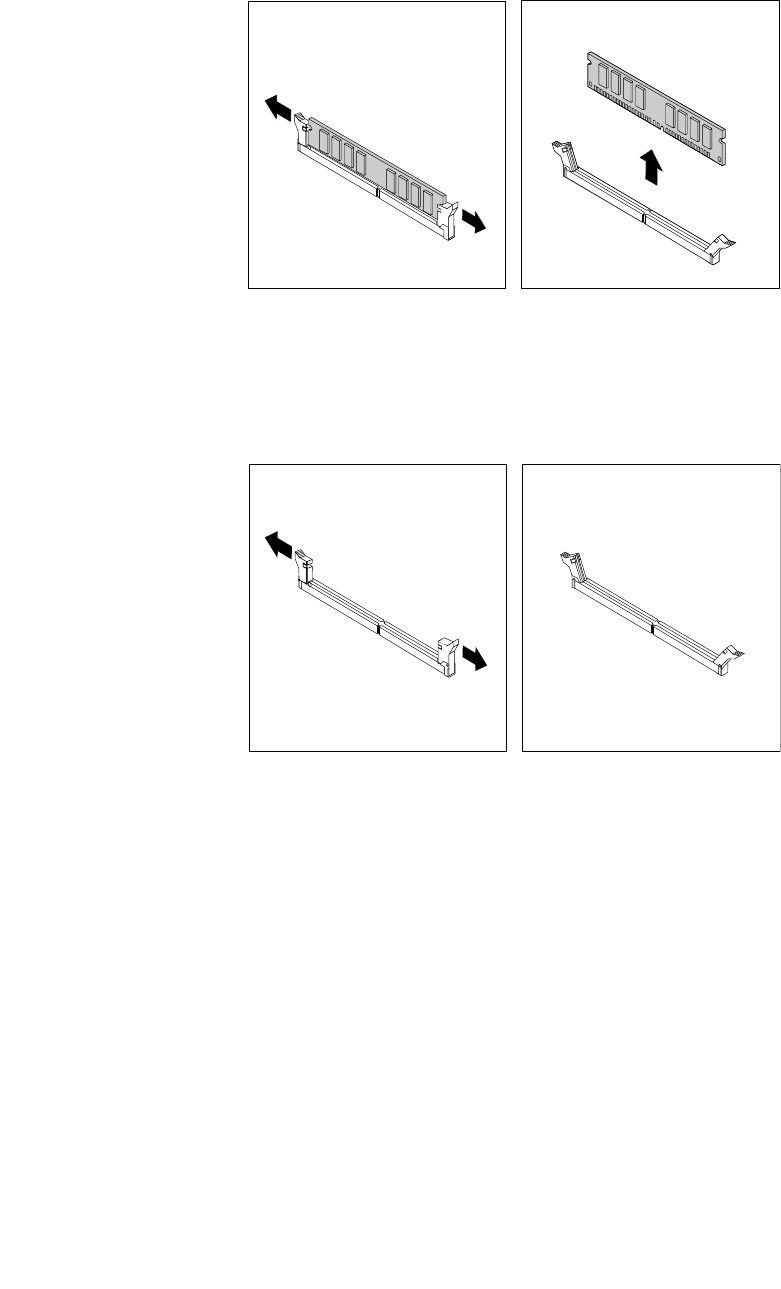
•Ifyouarereplacinganoldmemorymodule,opentheretainingclipsandgentlypullthememory
moduleoutofthememoryslot.
Figure19.Removingamemorymodule
•Ifyouareinstallingamemorymodule,opentheretainingclipsofthememoryslotintowhichyou
wanttoinstallthememorymodule.
Figure20.Openingtheretainingclips
Chapter7.Installingorreplacinghardware65
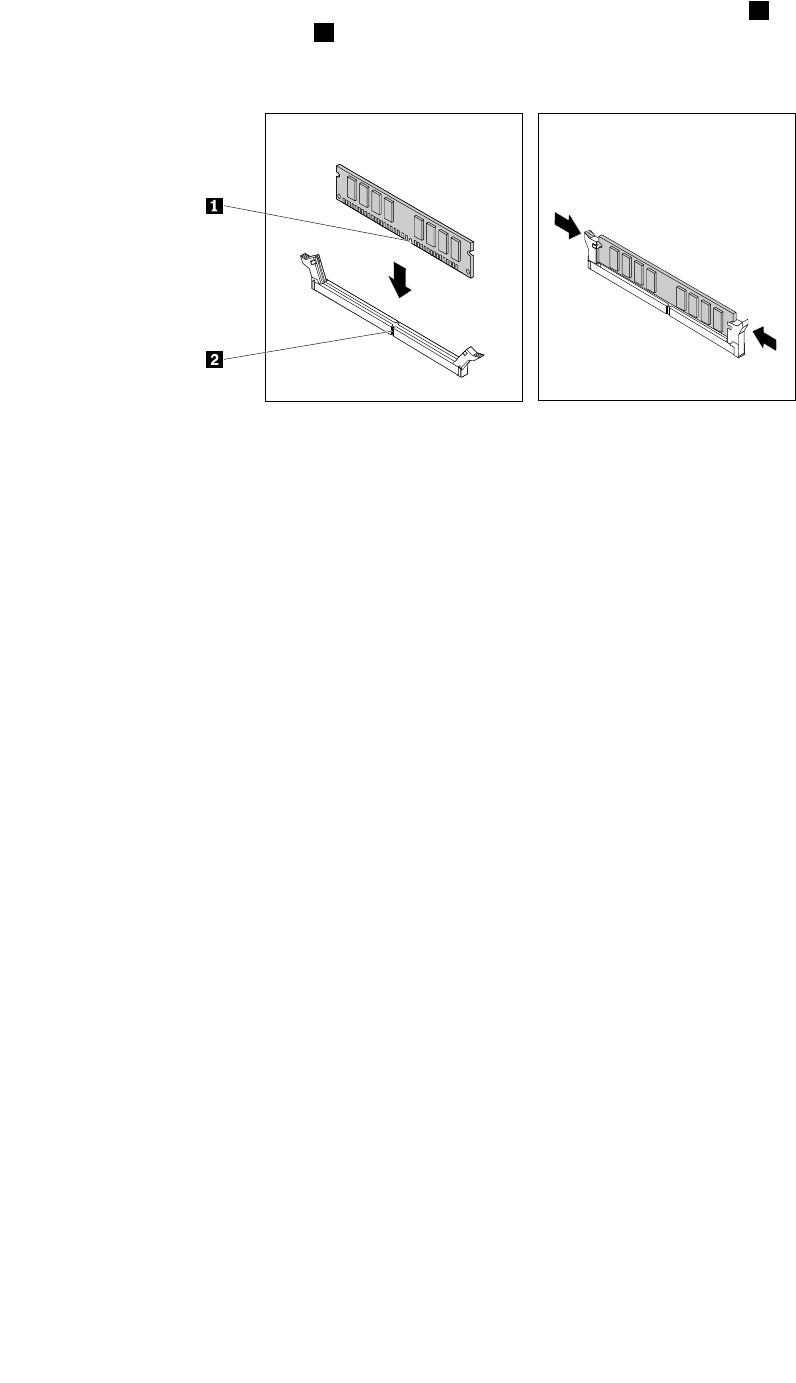
7.Positionthenewmemorymoduleoverthememoryslot.Ensurethatthenotch1onthememory
moduleisalignedwiththekey2intheslot.Pushthememorymodulestraightdownintotheslotuntil
theretainingclipscompletelyclose.
Figure21.Installingamemorymodule
8.ReinstallthePCIExpressx16graphicscardifyouhaveremovedit.
Whattodonext:
•Toworkwithanotherpieceofhardware,gototheappropriatesection.
•Tocompletetheinstallationorreplacement,goto“Completingthepartsreplacement”onpage105.
Installingorreplacinganopticaldrive
Attention:Donotopenyourcomputerorattemptanyrepairbeforereadingandunderstandingthe“Read
thisfirst:Importantsafetyinformation”onpagev.
Note:Forsomecomputermodels,theopticaldrivebaymightbeinstalledwithadevicesuchasan
opticaldrive,a5.25-inchflexmodule,aflexstorageenclosure,afront-accessstorageenclosure,oran
optical/storagecombinationenclosure.
Toinstallorreplaceanopticaldrive,dothefollowing:
1.Removeanymediafromthedrivesandturnoffallconnecteddevicesandthecomputer.Then,
disconnectallpowercordsfromelectricaloutletsanddisconnectallcablesthatareconnectedtothe
computer.
2.Removethecomputercover.See“Removingthecomputercover”onpage58.
3.Removethefrontbezel.See“Removingandreinstallingthefrontbezel”onpage59.
4.Ifyouareinstallinganopticaldrive,dothefollowing:
a.Removethemetalstaticshieldfromthedesireddrivebay.
66ThinkStationP310UserGuide
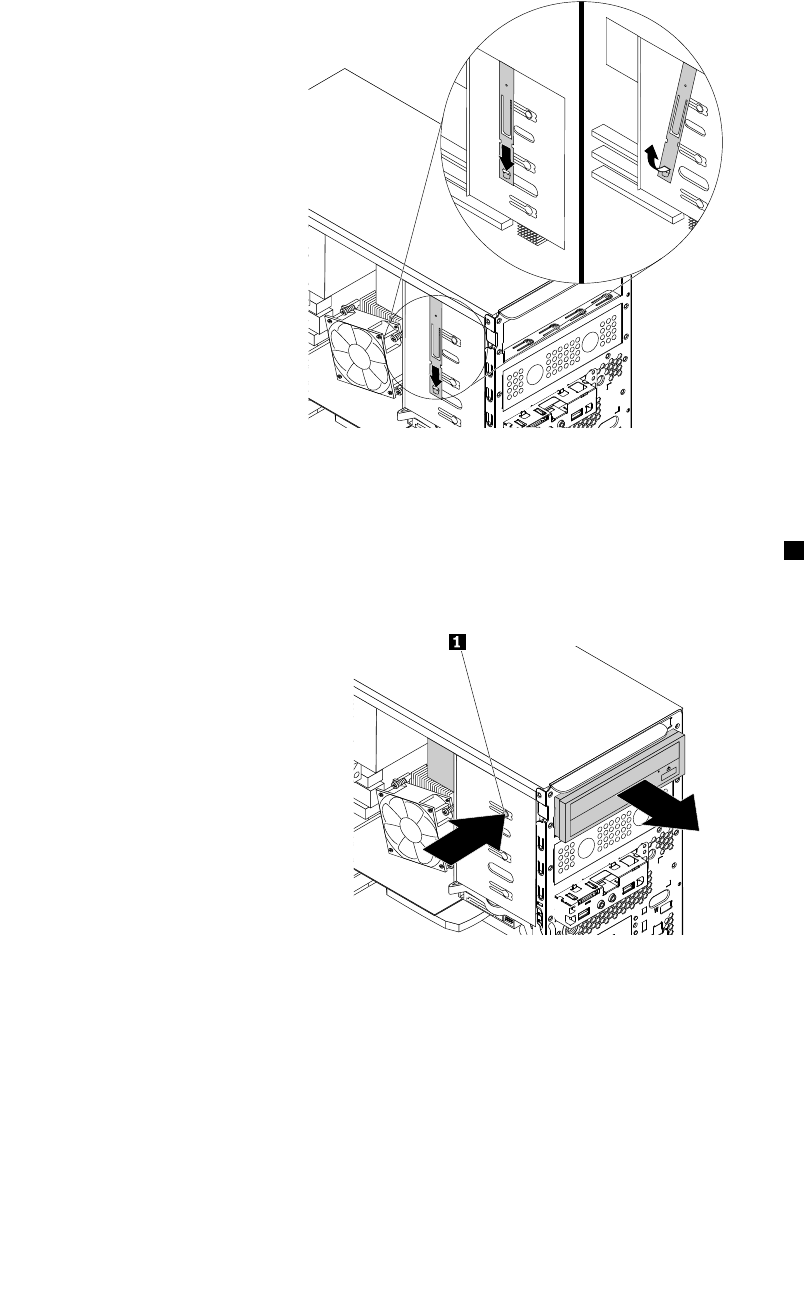
b.Locatetheopticaldriveretainerfromtheleftsideofthecomputer.Pushtheretainerdownwards
tounlocktheretainer.Thenlifttheretaineroutofthechassis.
Figure22.Removingtheopticaldriveretainerfromthecomputer
•Ifyouarereplacinganopticaldrive,dothefollowing:
a.Disconnectcablesfromtherearoftheopticaldrive,pressthereleasebutton1,andthenslide
theopticaldriveoutofthechassis.
Figure23.Removingtheopticaldrive
b.Removetheopticaldriveretainerfromtheleftsideoftheopticaldrive.
Chapter7.Installingorreplacinghardware67
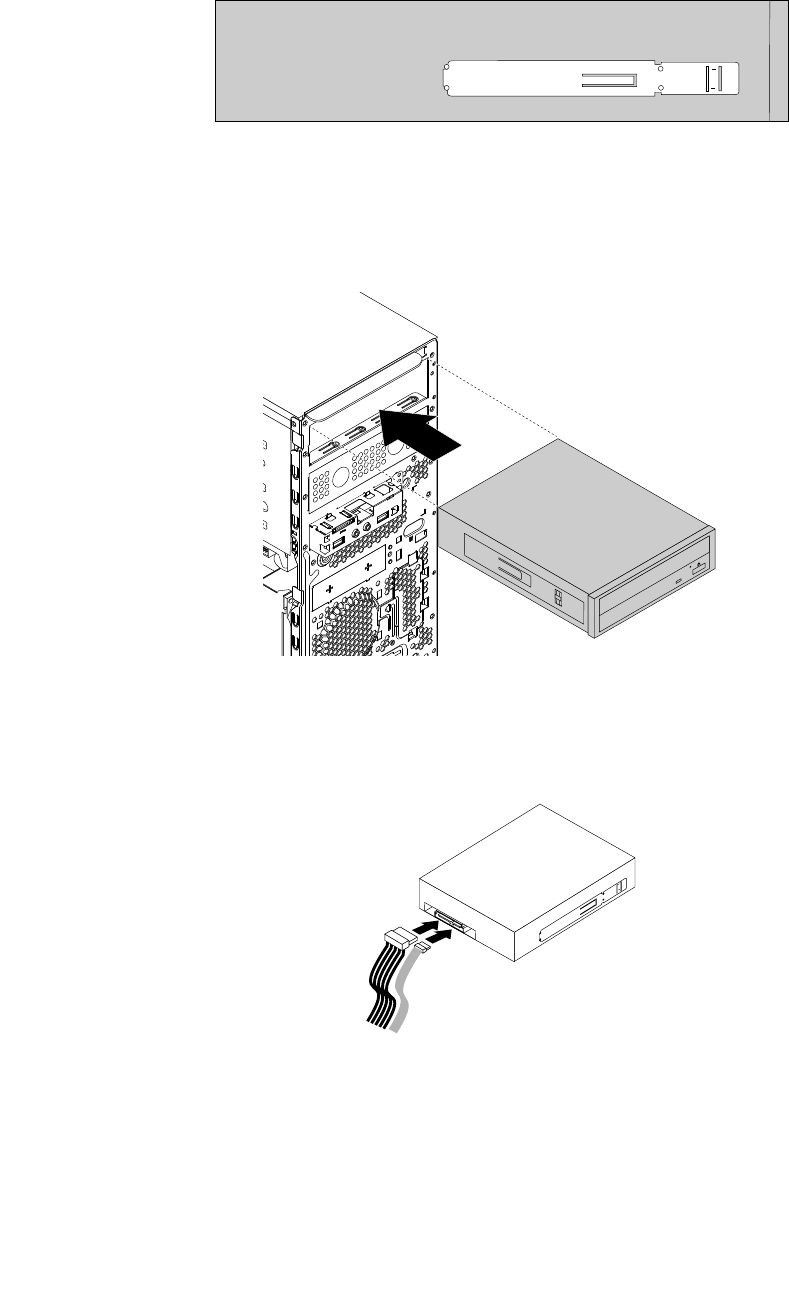
5.Installtheopticaldriveretainerontotheleftsideofthenewopticaldrive.
Figure24.Installingtheopticaldriveretainer
6.Slidethenewopticaldriveintothedrivebayfromthefrontofthecomputeruntiltheopticaldrive
snapsintoposition.
Figure25.Installingtheopticaldrive
7.Connectthecablestotherearofthenewopticaldrive.
Figure26.Connectingthecablestotherearofthenewopticaldrive
8.Ifyouareinstallinganewopticaldrive,removetheplasticpanelinthefrontbezelforthedesired
drivebay.
Whattodonext:
•Toworkwithanotherpieceofhardware,gototheappropriatesection.
68ThinkStationP310UserGuide
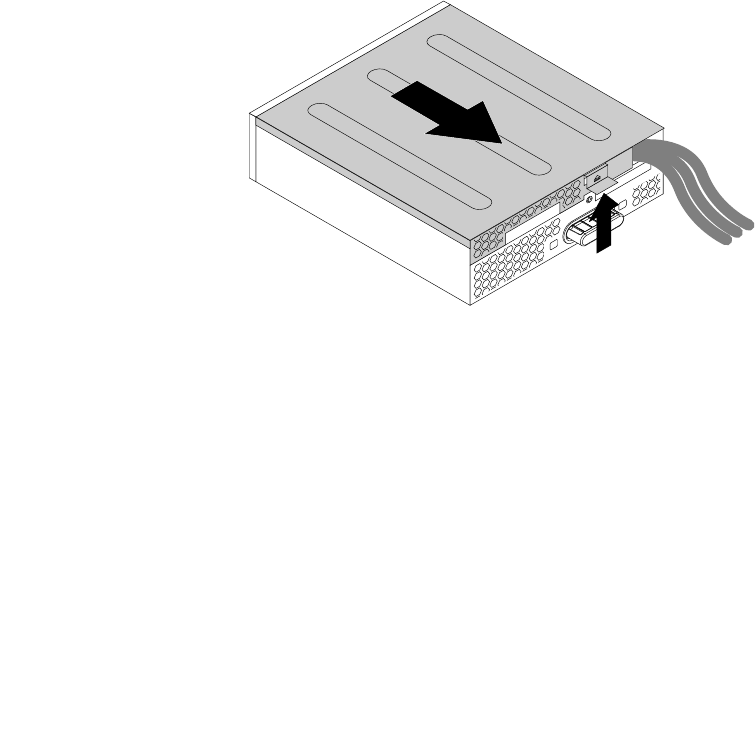
•Tocompletetheinstallationorreplacement,goto“Completingthepartsreplacement”onpage105.
Installingorreplacingadeviceinthe5.25-inchflexmodule
Attention:Donotopenyourcomputerorattemptanyrepairbeforereadingandunderstandingthe“Read
thisfirst:Importantsafetyinformation”onpagev.
A5.25-inchflexmodulemightbeequippedwithsomeorallofthefollowingcomponents:
•Slimopticaldrive
•Cardreader
•eSATAconnector
•IEEE1394connector
Installingorreplacingadeviceinthe5.25-inchflexmoduleinvolvesthefollowingoperations:
•“Installingorreplacingaslimopticaldriveintheflexmodule”onpage69
•“Installingorreplacingacardreaderintheflexmodule”onpage72
•“InstallingorreplacinganeSATAconnectororIEEE1394connectorintheflexmodule”onpage74
Installingorreplacingaslimopticaldriveintheflexmodule
Toinstallorreplaceaslimopticaldriveintheflexmodule,dothefollowing:
1.Removetheflexmoduleoutofthechassis.See“Installingorreplacinganopticaldrive”onpage66.
2.Lifttheclipontherearoftheflexmoduleandslidetheflexmodulecovertothereartoremovethecover.
Figure27.Removingtheflexmodulecover
Chapter7.Installingorreplacinghardware69
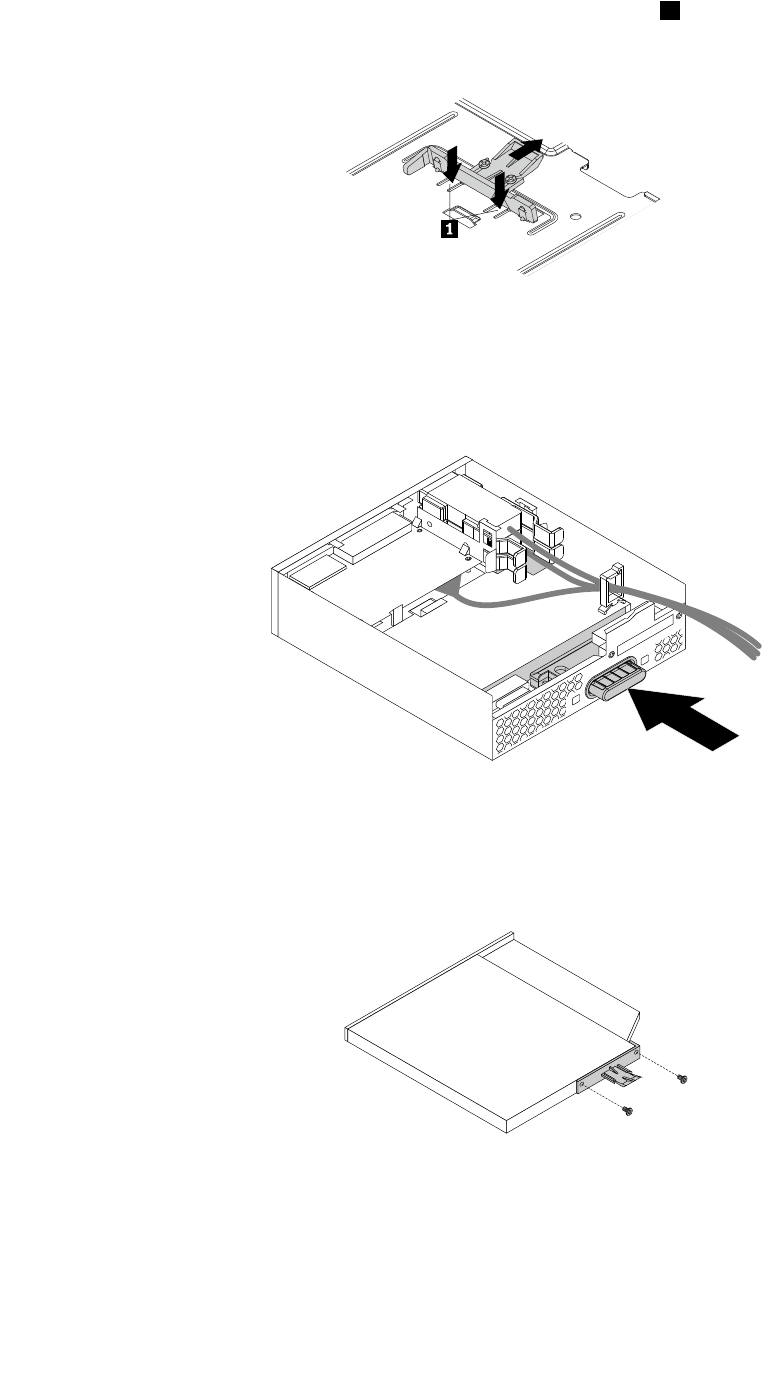
3.Ifyouareinstallinganewslimopticaldrive,pressthetwometalclips1toremovetheplasticclipwith
thetwoscrewsasshown.Removethetwoscrewsandthengotostep4.
Figure28.Removingtheplasticclipwiththetwoscrews
Ifyouarereplacinganoldslimopticaldrive,dothefollowing:
a.Pressthebuttonasshowntoremovetheslimopticaldrivefromtheflexmodule.
Figure29.Removingtheslimopticaldrivefromtheflexmodule
b.Removethetwoscrewsthatsecurethecliptoremovetheplasticclipfromtherearoftheslim
opticaldrive.
Figure30.Removingtheplasticclipfromtheslimopticaldrive
70ThinkStationP310UserGuide
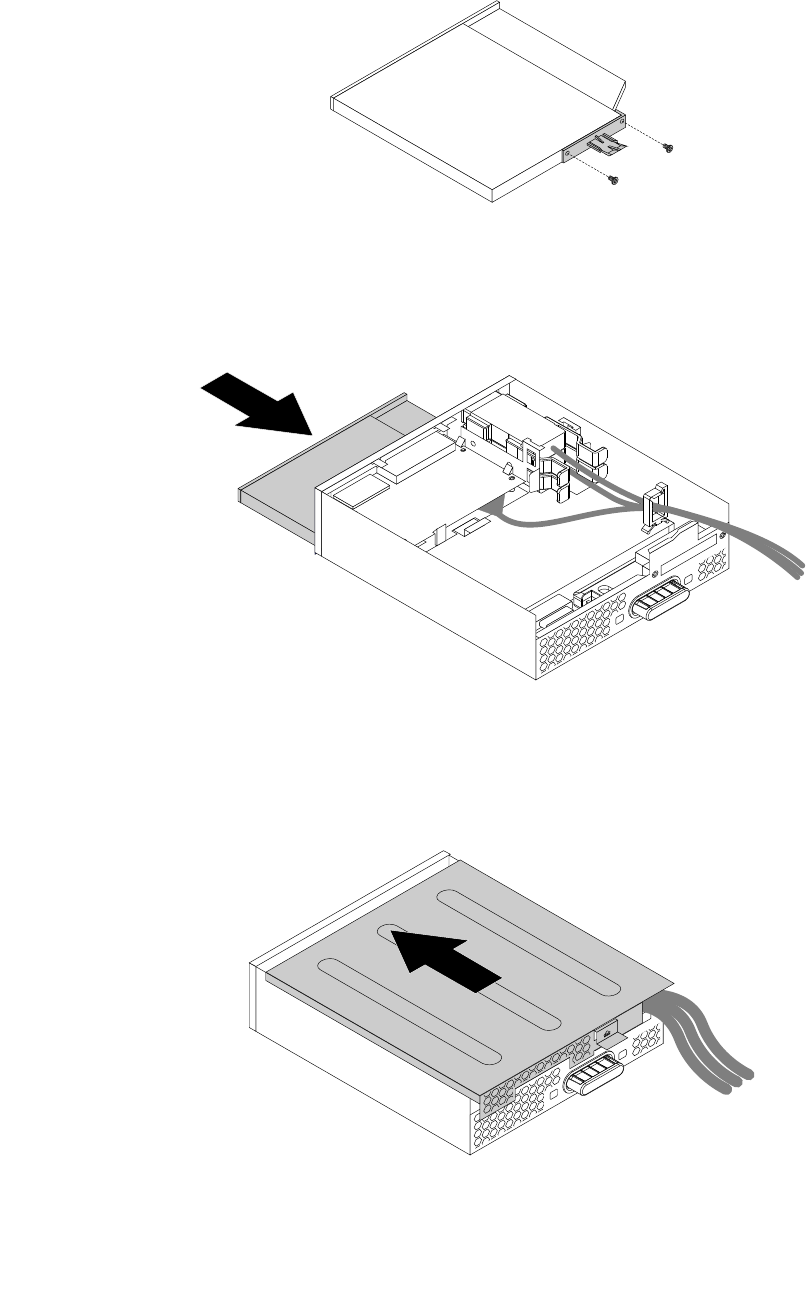
4.Installthetwoscrewstosecuretheplasticclipontherearofthenewslimopticaldrive.
Figure31.Installingtheplasticcliptotheslimopticaldrive
5.Slidethenewslimopticaldrivewiththeplasticclipintotheflexmoduleuntiltheslimopticaldrive
snapsintoposition.
Figure32.Installingtheslimopticaldriveintheflexmodule
6.Positiontheflexmodulecoverontheflexmodule.Ensurethattherailguidesonthebottomofthecover
engagetherailsontheflexmodule.Then,pushthecovertothefrontuntilitsnapsintoposition.
Figure33.Reinstallingtheflexmodulecover
Chapter7.Installingorreplacinghardware71
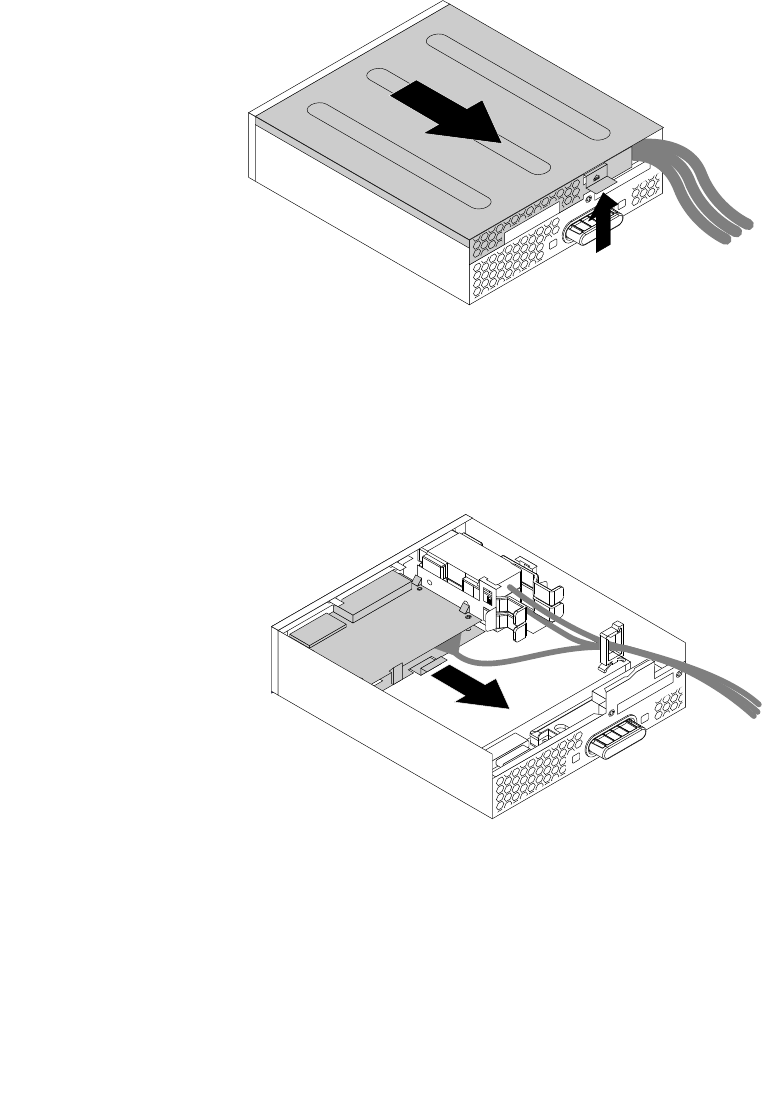
Whattodonext:
•Toworkwithanotherpieceofhardware,gototheappropriatesection.
•Tocompletetheinstallationorreplacement,goto“Completingthepartsreplacement”onpage105.
Installingorreplacingacardreaderintheflexmodule
Toinstallorreplaceacardreaderintheflexmodule,dothefollowing:
1.Removetheflexmoduleoutofthechassis.See“Installingorreplacinganopticaldrive”onpage66.
2.Lifttheclipontherearoftheflexmoduleandslidetheflexmodulecovertothereartoremovethecover.
Figure34.Removingtheflexmodulecover
3.Ifyouarereplacingacardreader,dothefollowing:
a.Disconnectthecardreadercablefromthesystemboard.See“Partsonthesystemboard”onpage7.
b.Pulltheclipasshowntoremovethecardreaderwithitsretainingbracketoutoftheflexmodule.
Figure35.Removingthecardreaderfromtheflexmodule
72ThinkStationP310UserGuide
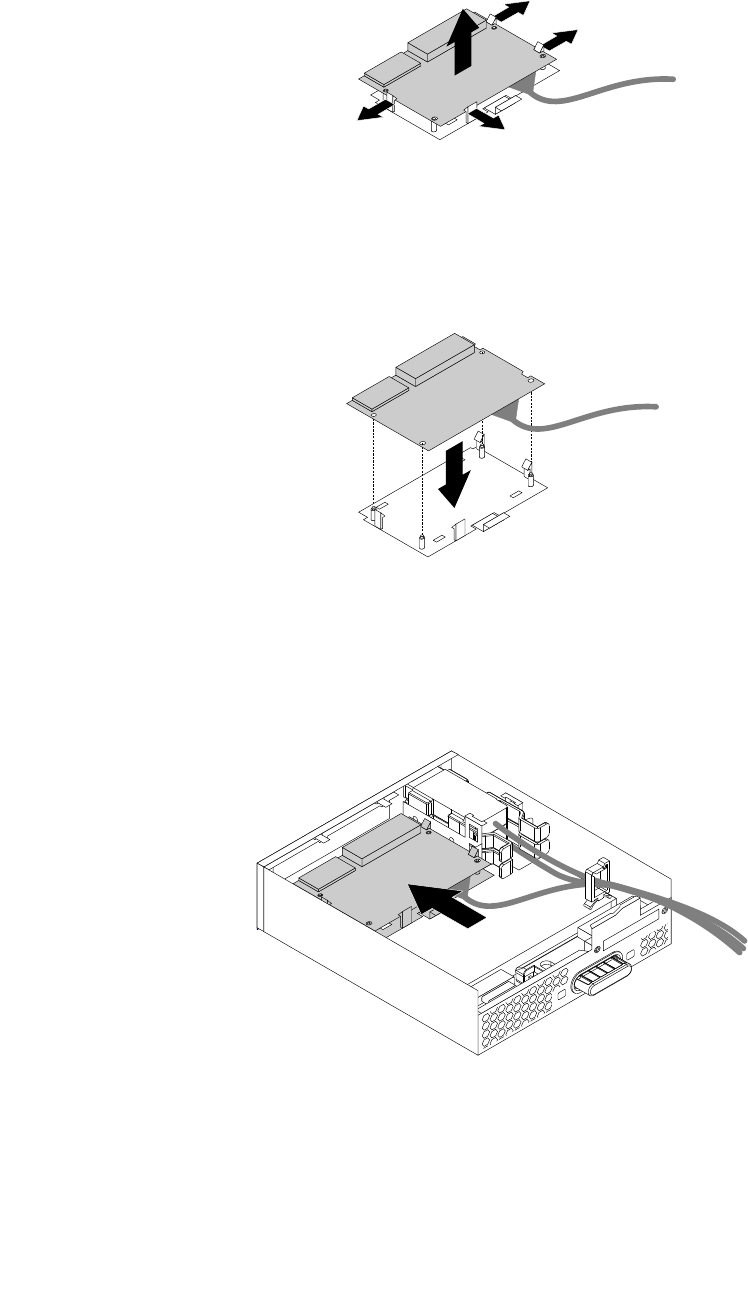
c.Flexthefourclipsonthesidesofthecard-readerretainingbrackettoremovethecardreader
fromthebracket.
Figure36.Removingthecardreaderfromthecard-readerretainingbracket
4.Toinstallanewcardreaderintothecard-readerretainingbracket,alignthefourholesinthecard
readerwiththecorrespondingstudsonthebracket.Pressthenewcardreaderdownwarduntil
itsnapsintoposition.
Figure37.Installingthecardreaderintothecard-readerretainingbracket
5.Notetheorientationofthenewcardreaderandroutethecardreadercableintothecableclip.Hold
thecliponthecard-readerretainingbrackettoinsertthenewcardreaderintothecard-readerslotin
theflexmodule.Ensurethatthecardreadersnapsintoposition.
Figure38.Installingthecardreaderintheflexmodule
Chapter7.Installingorreplacinghardware73
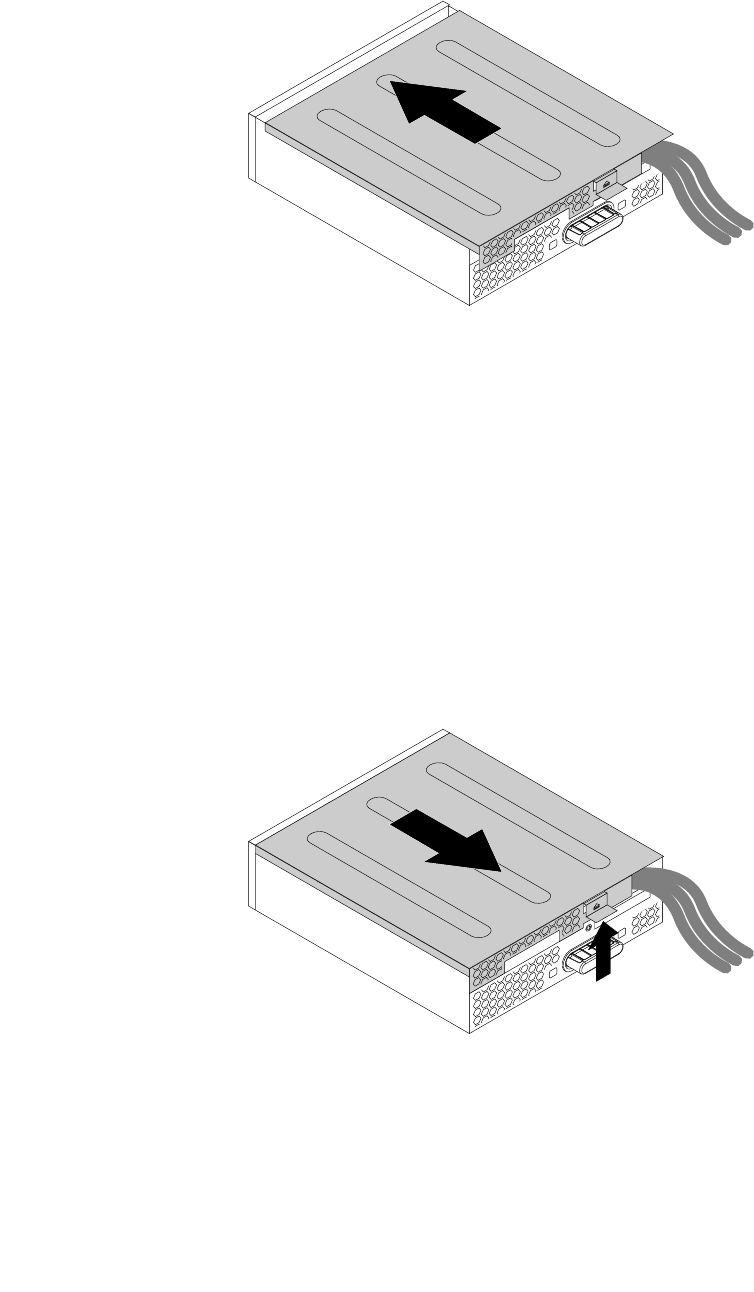
6.Positiontheflexmodulecoverontheflexmodule.Ensurethatgtherailguidesonthebottomofthe
coverengagetherailsontheflexmodule.Then,pushthecovertothefrontuntilitsnapsintoposition.
Figure39.Reinstallingtheflexmodulecover
7.ConnectthecardreadercabletotheUSB2.0connectoronthesystemboard.See“Partsonthe
systemboard”onpage7.
Whattodonext:
•Toworkwithanotherpieceofhardware,gototheappropriatesection.
•Tocompletetheinstallationorreplacement,goto“Completingthepartsreplacement”onpage105.
InstallingorreplacinganeSATAconnectororIEEE1394connectorintheflexmodule
ToinstallorreplaceaneSATAconnectororIEEE1394connectorintheflexmodule,dothefollowing:
1.Removetheflexmoduleoutofthechassis.See“Installingorreplacinganopticaldrive”onpage66.
2.Lifttheclipontherearoftheflexmoduleandslidetheflexmodulecovertothereartoremovethecover.
Figure40.Removingtheflexmodulecover
3.IfyouarereplacinganeSATAconnectororIEEE1394connector,dothefollowing:
a.DisconnecttheeSATAconnectororIEEE1394connectorcablefromthesystemboard.See“Parts
onthesystemboard”onpage7.
74ThinkStationP310UserGuide
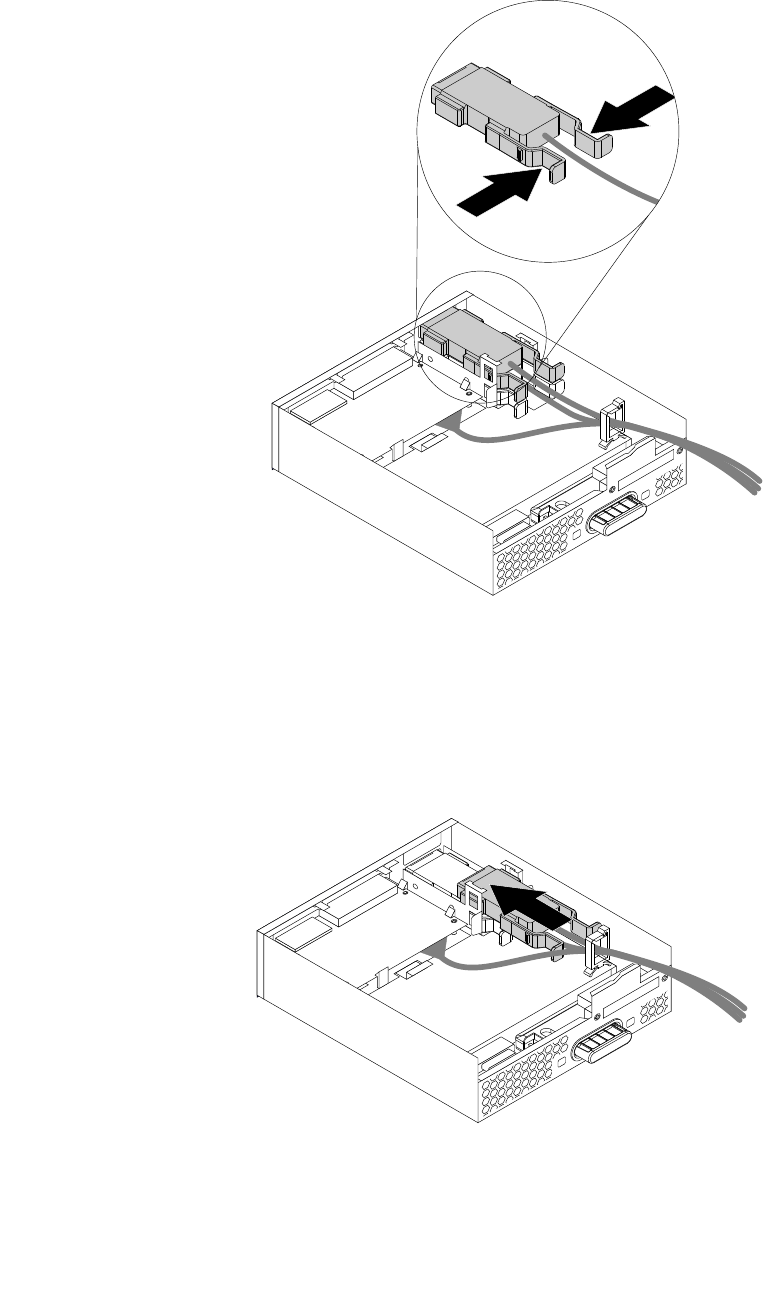
b.PressthetwoclipstowardeachotherasshownandthenpulltheeSATAconnectororIEEE1394
connectoroutoftheflexmodule.
Figure41.RemovingtheeSATAconnectororIEEE1394connectorfromtheflexmodule
4.NotetheorientationoftheeSATAconnectororIEEE1394connectorandroutetheeSATAconnectoror
IEEE1394connectorcableintothecableclip.
5.PlacetheeSATAconnectororIEEE1394connectorintothemetalretainer.TheninserttheeSATA
connectororIEEE1394connectorintothecorrespondingslotintheflexmoduleasshown.
Figure42.InstallingtheeSATAconnectororIEEE1394connectorintheflexmodule
Chapter7.Installingorreplacinghardware75
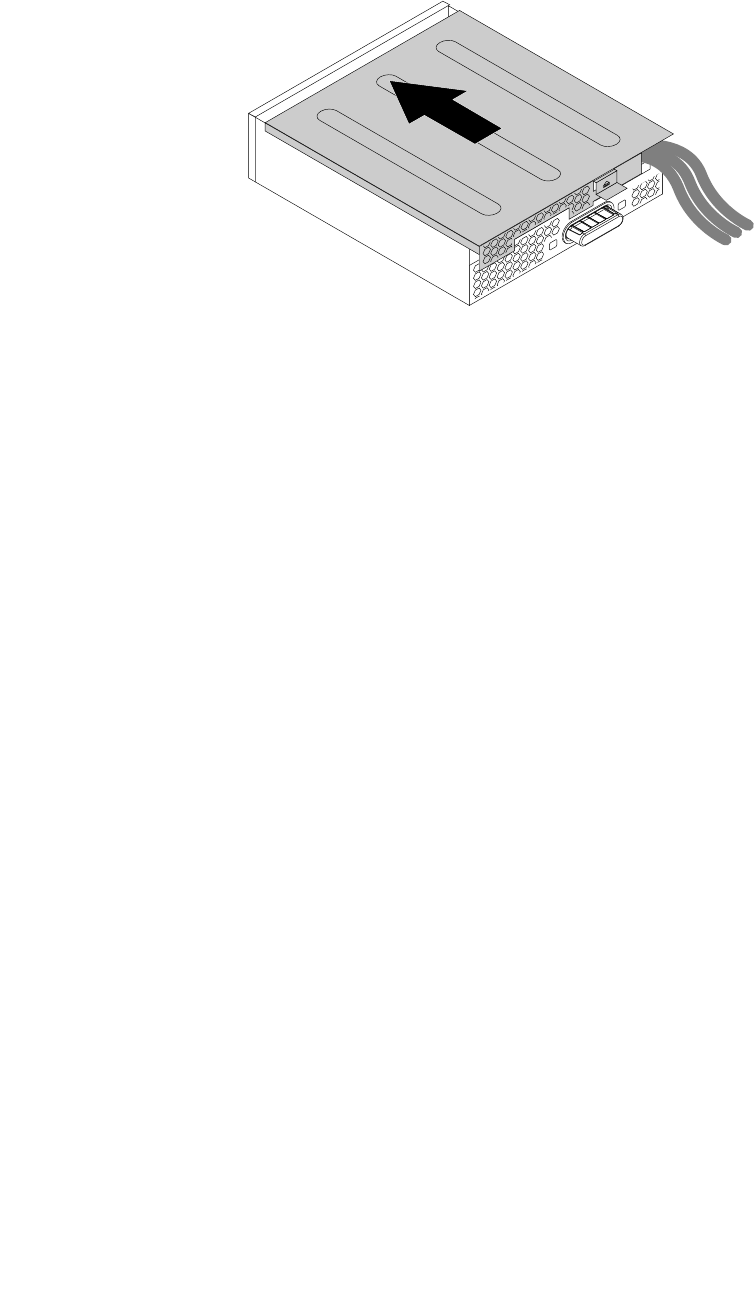
6.Positiontheflexmodulecoverontheflexmodulesothattherailguidesonthebottomofthecover
engagetherailsontheflexmodule.Then,pushthecovertothefrontuntilitsnapsintoposition.
Figure43.Reinstallingtheflexmodulecover
7.ConnecttheeSATAconnectororIEEE1394connectorcabletothecorrespondingconnectoronthe
systemboard.See“Partsonthesystemboard”onpage7.
Whattodonext:
•Toworkwithanotherpieceofhardware,gototheappropriatesection.
•Tocompletetheinstallationorreplacement,goto“Completingthepartsreplacement”onpage105.
Installingorreplacingaharddiskdriveinthefront-accessstorage
enclosure
Attention:Donotopenyourcomputerorattemptanyrepairbeforereadingandunderstandingthe“Read
thisfirst:Importantsafetyinformation”onpagev.
Youcaninstallorreplaceaharddiskdriveinthefront-accessstorageenclosure.Theharddiskdrivealso
canbehot-swappable,whichmeansthatyoucaninstallorreplacethedrivewithouteventurningoffyour
computer.
Theharddiskdriveinthefront-accessstorageenclosureishot-swappableonlywhenthefollowing
requirementsaremet:
•TheSATAcableofthefront-accessstorageenclosureisconnectedtotheeSATAconnectoronthesystem
board.Toverifythecableconnection,see“Removingthecomputercover”onpage58and“Partsonthe
systemboard”onpage7formoreinformation.
•Theoperatingsystemofyourcomputerdoesnotresideontheharddiskdriveinstalledinthefront-access
storageenclosure.
Attention:Ifanyoftheaboverequirementsarenotmet,donotinstallorreplacetheharddiskdrivewhen
thecomputeristurnedon.Otherwise,dataontheharddiskdrivemightgetdamaged.
Toinstallorreplaceaharddiskdriveinthefront-accessstorageenclosure,dothefollowing:
1.Beforereplacinganoldharddiskdrive,safelyejecttheoldharddiskdrivefromtheoperatingsystem
first.Formoreinformation,seetheWindowshelpsystem.
76ThinkStationP310UserGuide
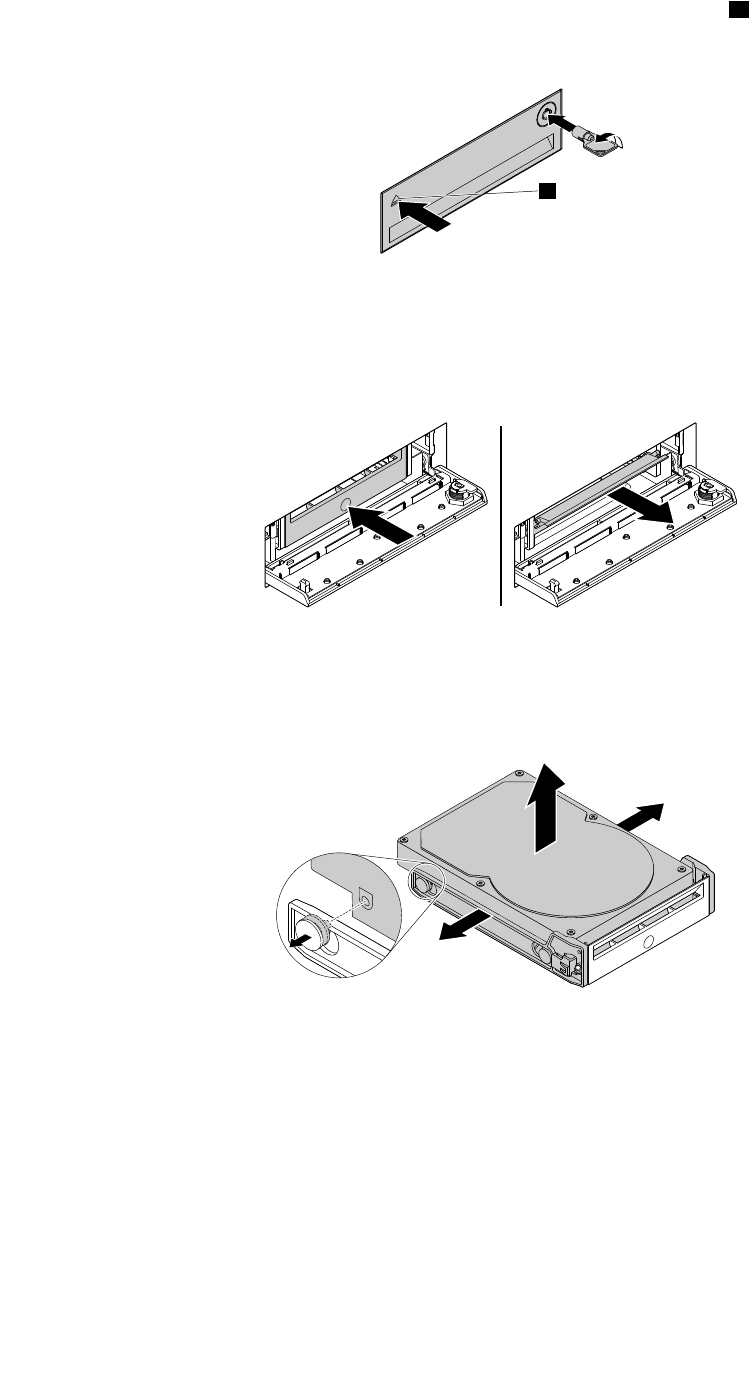
2.Unlocktheenclosurecoverwiththeprovidedkeyasshown.Pressthenotchatoopentheenclosure
cover.
a
Figure44.Openingthefront-accessstorageenclosurecover
3.Pressthepitonthebracketcover,andthengraspthetiltedcovertopullthebracketoutofthe
front-accessstorageenclosure.
Figure45.Removingtheharddiskdrivefromthefront-accessstorageenclosure
4.Flexbothsidesofthebrackettoremovetheharddiskdrivefromthebracket.
Figure46.Removingtheharddiskdrivefromthebracket
Chapter7.Installingorreplacinghardware77
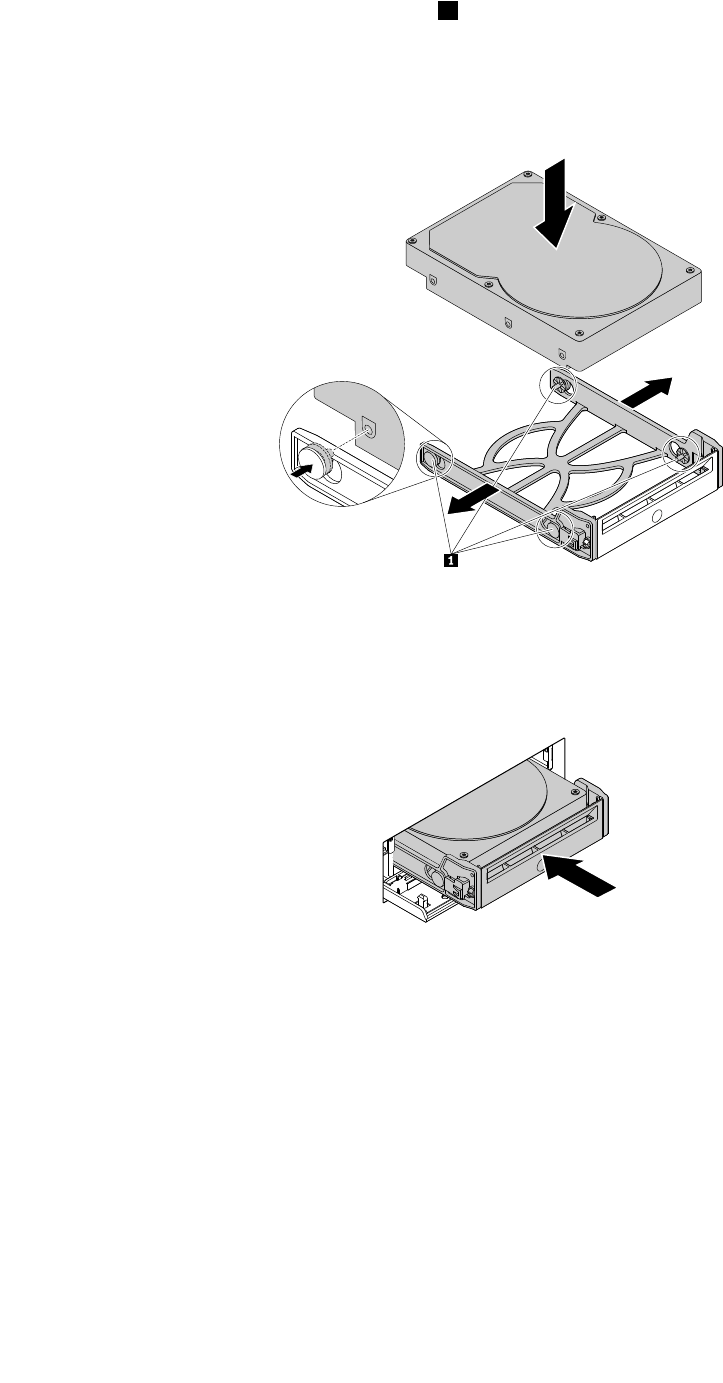
5.Flexbothsidesofthebracketandalignpins1onthebracketwiththecorrespondingholesinthenew
harddiskdrive.Donottouchthecircuitboardontheharddiskdrive.
Note:Ensurethatthecircuitboardfacesdownwardandtheconnectorsfacetowardtherearofthe
bracket.
Figure47.Installingtheharddiskdriveintothebracket
6.Slidethebracketwiththenewharddiskdriveintothefront-accessstorageenclosureuntilitsnapsinto
position.Pressthenotchtosecuretheenclosurecoverandlocktheenclosurecoverwiththekey.
Figure48.Installingthehard-disk-drivebracket
Whattodonext:
•Toworkwithanotherpieceofhardware,gototheappropriatesection.
•Tocompletetheinstallationorreplacement,goto“Completingthepartsreplacement”onpage105.
Installingorreplacingadeviceintheoptical/storagecombination
enclosure
Attention:Donotopenyourcomputerorattemptanyrepairbeforereadingandunderstandingthe“Read
thisfirst:Importantsafetyinformation”onpagev.
Anoptical/storagecombinationenclosuremightbeequippedwithoneorbothofthefollowingcomponents:
•Slimopticaldrive
78ThinkStationP310UserGuide
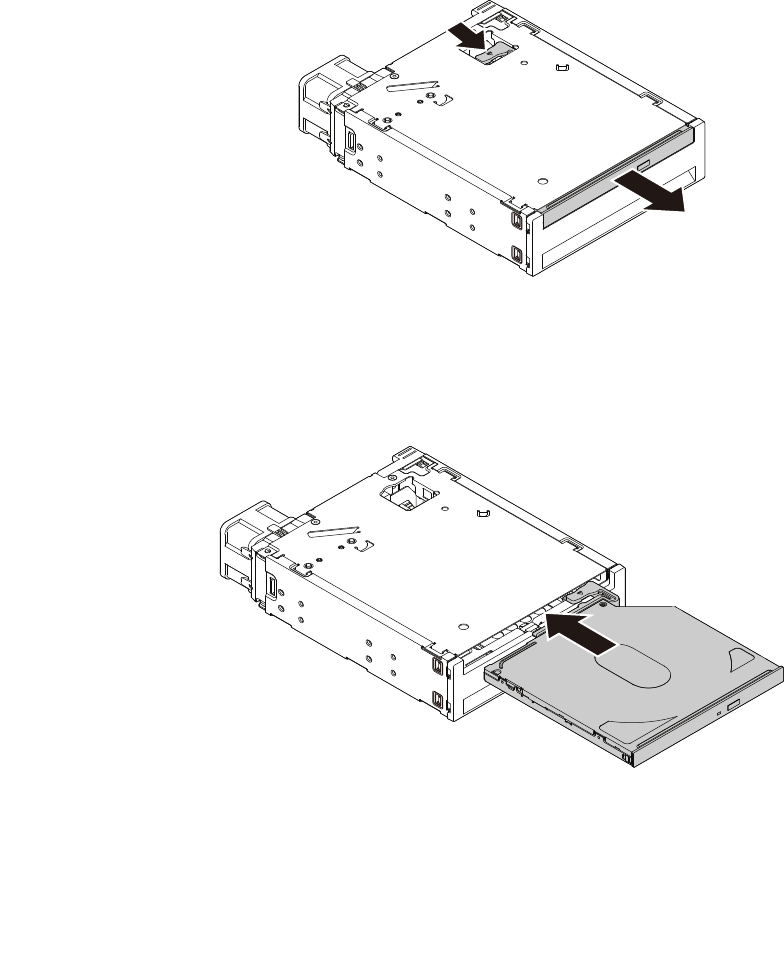
•Harddiskdrive
Installingorreplacingadeviceintheoptical/storagecombinationenclosureinvolvesthefollowingoperations:
•“Installingorreplacingaslimopticaldriveintheoptical/storagecombinationenclosure”onpage79
•“Installingorreplacingaharddiskdriveintheoptical/storagecombinationenclosure”onpage80
Note:Foraflexstorageenclosure,theinformationaboutinstallingorreplacingaharddiskdrivealsoapplies.
Installingorreplacingaslimopticaldriveintheoptical/storagecombination
enclosure
Toinstallorreplaceaslimopticaldriveintheoptical/storagecombinationenclosure,dothefollowing:
1.Slidetheenclosureoutofthechassis.See“Installingorreplacinganopticaldrive”onpage66.
2.Ifyouarereplacinganoldslimopticaldrive,presstheclipthroughtheholeinthetopoftheenclosure
asshownandpushforwardtheslimopticaldrive.Then,slidetheslimopticaldriveoutoftheenclosure.
Figure49.Removingtheslimopticaldrivefromtheenclosure
3.Insertanewslimopticaldriveintotheenclosureuntilyouhearaclick.Theslimopticaldriveissecured
inplace.
Figure50.Installingtheslimopticaldriveintheenclosure
Whattodonext:
•Toworkwithanotherpieceofhardware,gototheappropriatesection.
Chapter7.Installingorreplacinghardware79
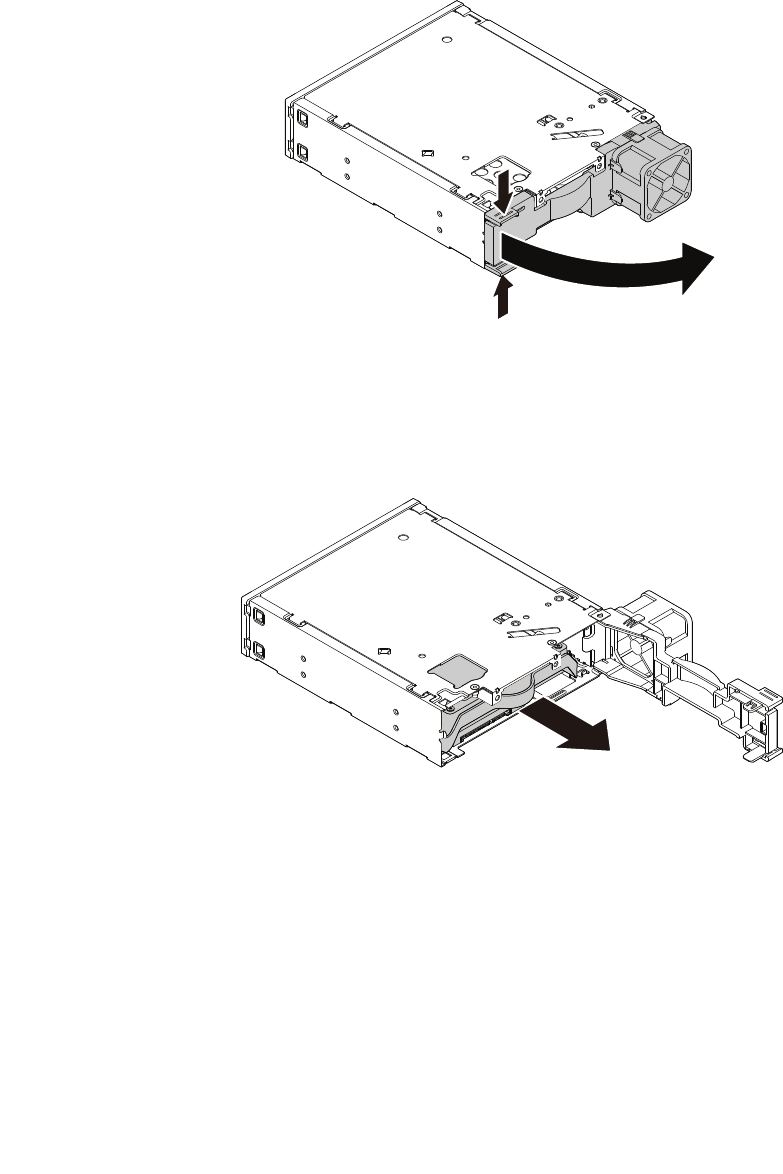
•Tocompletetheinstallationorreplacement,goto“Completingthepartsreplacement”onpage105.
Installingorreplacingaharddiskdriveintheoptical/storagecombinationenclosure
Toinstallorreplaceaharddiskdriveintheoptical/storagecombinationenclosure,dothefollowing:
1.Slidetheenclosureoutofthechassis.See“Installingorreplacinganopticaldrive”onpage66.
2.Pinchthetwoclipstowardeachotherasshowntoopentherearcoveroftheenclosure.
Figure51.Openingtheenclosurefromtherear
3.Ifyouarereplacinganoldharddiskdrive,dothefollowing:
a.Slidetheharddiskdriveoutoftherearoftheenclosure.
Figure52.Removingtheharddiskdrivefromtherear
b.Flextwosidesofthebluebrackettoremovetheharddiskdrivefromthebracket.
80ThinkStationP310UserGuide
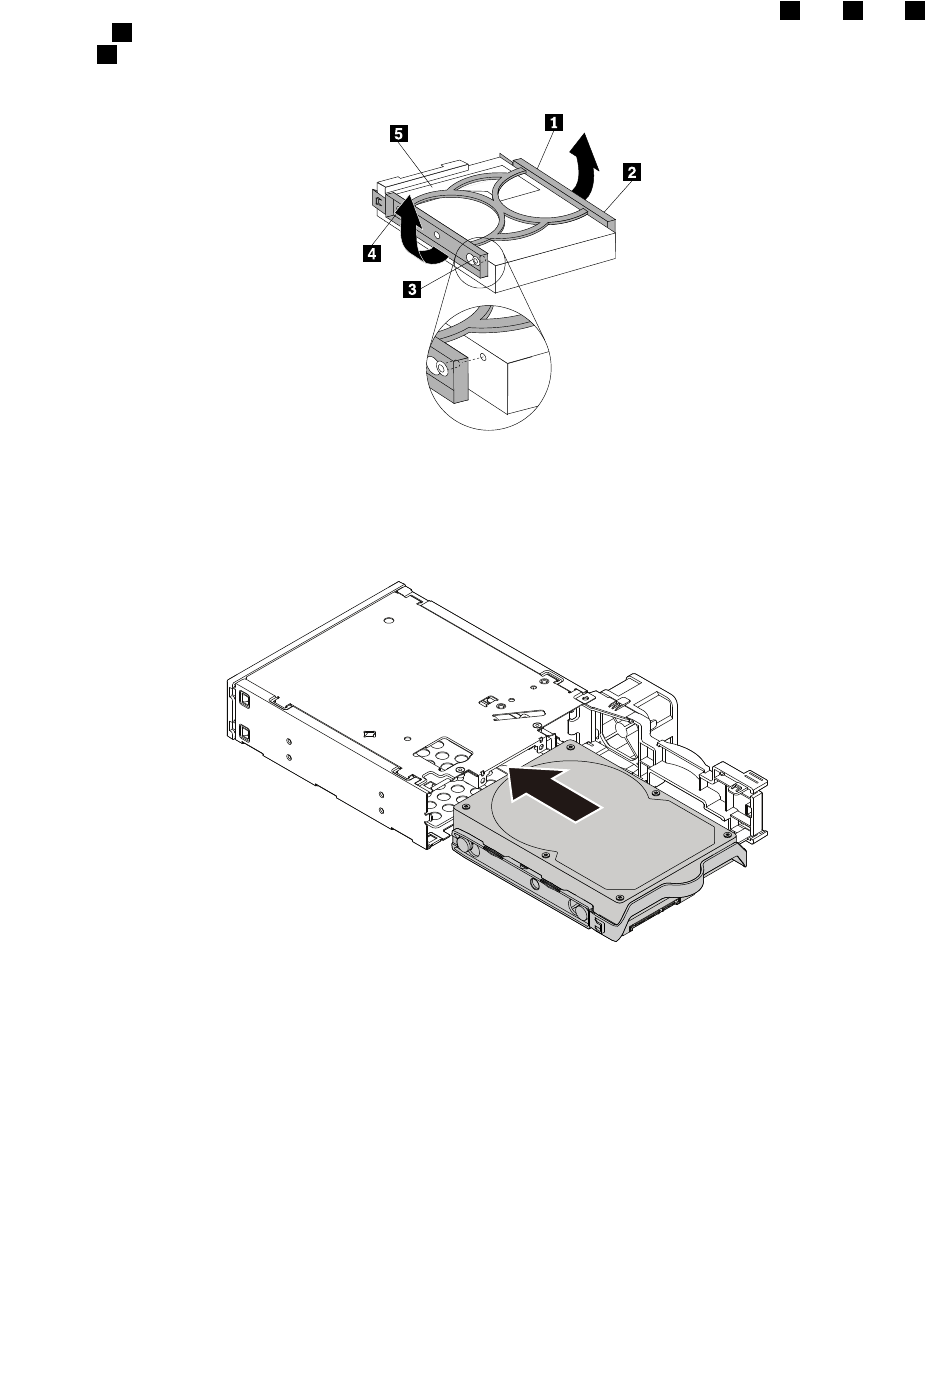
4.Toinstallanewharddiskdriveintothebluebracket,flexthebracketandalignpin1,pin2,pin3,
andpin4onthebracketwiththecorrespondingholesintheharddiskdrive.Donottouchthecircuit
board5onthebottomoftheharddiskdrive.
Figure53.Installingtheharddiskdriveintothebracket
5.Slidethenewharddiskdriveintotheenclosurefromtherearuntilitsnapsintoposition.
Figure54.Installingtheharddiskdriveintotheenclosure
Chapter7.Installingorreplacinghardware81
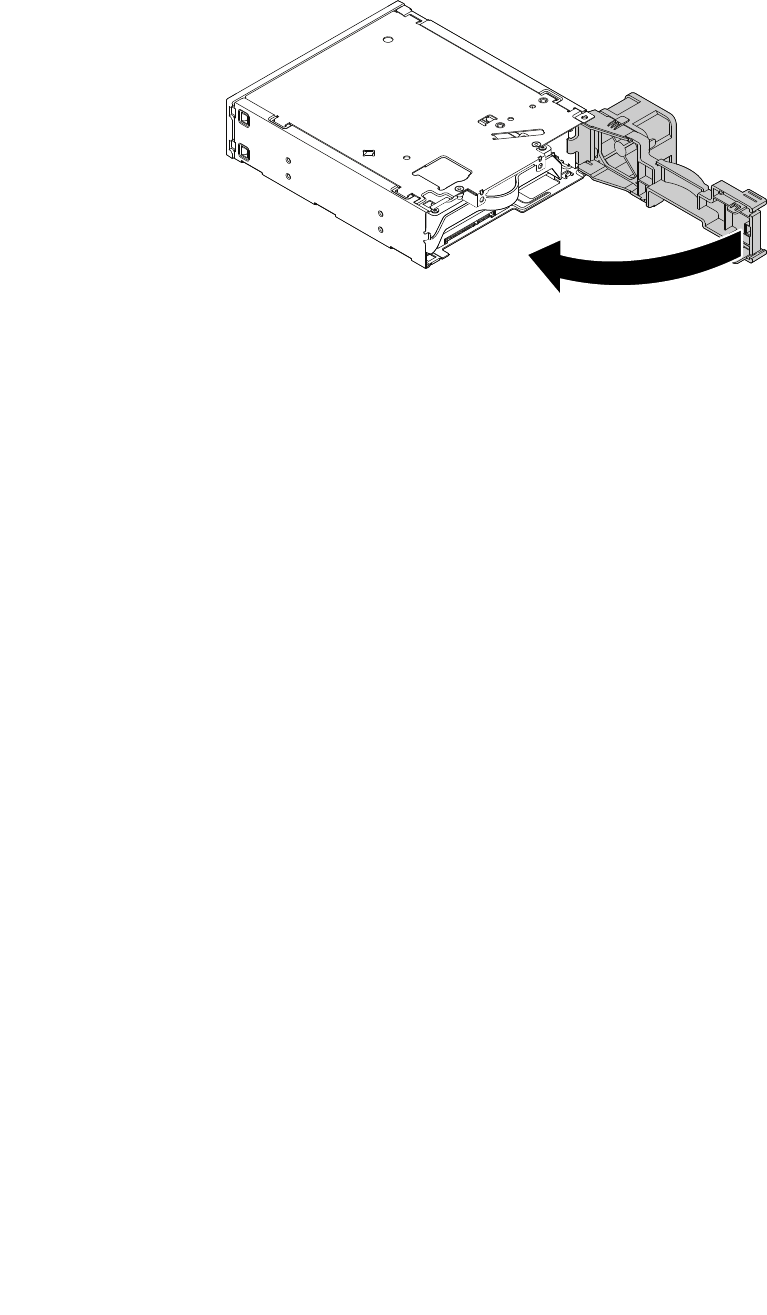
6.Pivottherearcoveroftheenclosureinwarduntilyouhearaclick.Therearcoverissecuredinplace.
Figure55.Pivotingtherearcoverinward
Whattodonext:
•Toworkwithanotherpieceofhardware,gototheappropriatesection.
•Tocompletetheinstallationorreplacement,goto“Completingthepartsreplacement”onpage105.
Replacingthebattery
Attention:Donotopenyourcomputerorattemptanyrepairbeforereadingandunderstandingthe“Read
thisfirst:Importantsafetyinformation”onpagev.
Yourcomputerhasaspecialtypeofmemorythatmaintainsthedate,time,andsettingsforbuilt-infeatures.
Abatterykeepsthisinformationactivewhenyouturnoffthecomputer.
Thebatterynormallyrequiresnochargingormaintenancethroughoutitslife;however,nobatterylasts
forever.Ifthebatteryfails,thedate,time,andconfigurationinformation(includingpasswords)arelost.An
errormessageisdisplayedwhenyouturnonthecomputer.
Refertothe“Lithiumcoincellbatterynotice”intheSafety,Warranty,andSetupGuideforinformationabout
replacinganddisposingofthebattery.
Toreplacethebattery,dothefollowing:
1.Removeanymediafromthedrivesandturnoffallconnecteddevicesandthecomputer.Then,
disconnectallpowercordsfromelectricaloutletsanddisconnectallcablesthatareconnectedtothe
computer.
2.Removethecomputercover.See“Removingthecomputercover”onpage58.
3.Locatethebattery.See“Partsonthesystemboard”onpage7.
82ThinkStationP310UserGuide
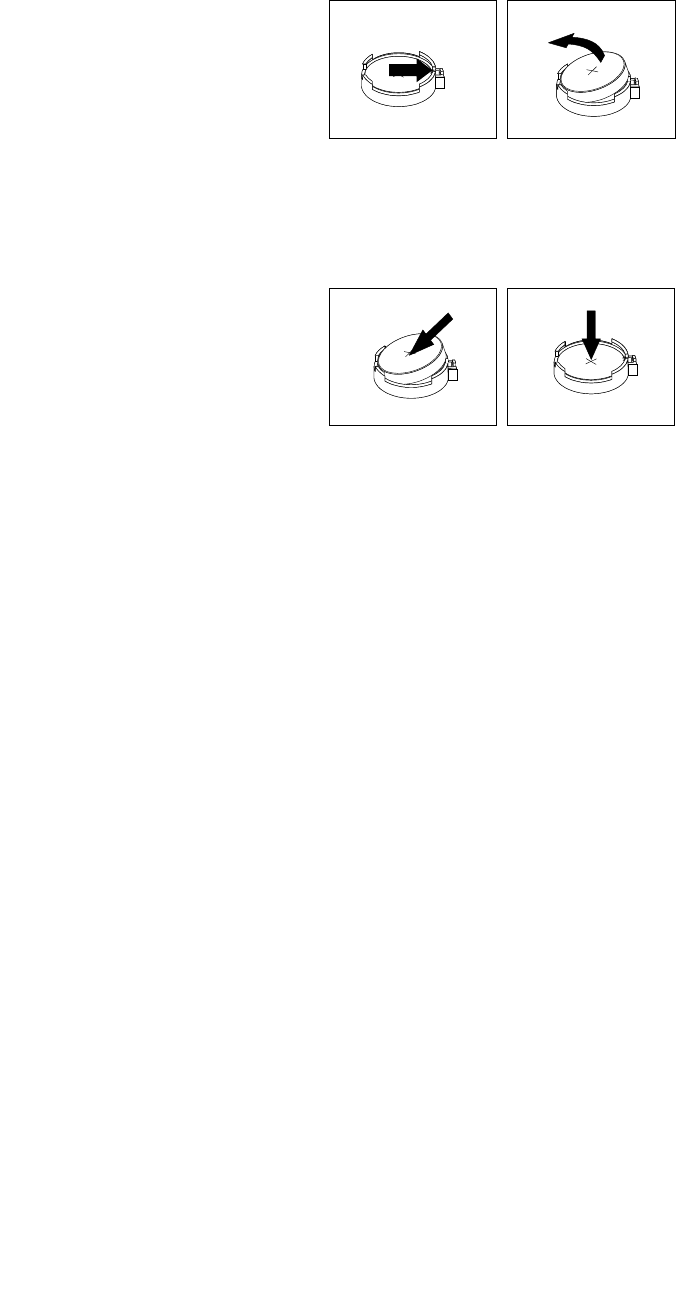
4.Removetheoldbattery.
Figure56.Removingtheoldbattery
5.Installanewbattery.
Figure57.Installinganewbattery
6.Reinstallthecomputercoverandconnectthecables.See“Completingthepartsreplacement”on
page105.
Note:Whenthecomputeristurnedonforthefirsttimeafterreplacingthebattery,anerrormessage
mightbedisplayed.Thisisnormalafterreplacingthebattery.
7.Turnonthecomputerandallattacheddevices.
8.UsetheSetupUtilityprogramtosetthedate,time,andanypasswords.See“UsingtheSetupUtility
program”onpage35.
Whattodonext:
•Toworkwithanotherpieceofhardware,gototheappropriatesection.
•Tocompletetheinstallationorreplacement,goto“Completingthepartsreplacement”onpage105.
Replacingthepowersupplyassembly
Attention:Donotopenyourcomputerorattemptanyrepairbeforereadingandunderstandingthe“Read
thisfirst:Importantsafetyinformation”onpagev.
Althoughtherearenomovingpartsinyourcomputerafterthepowercordhasbeendisconnected,the
followingwarningsarerequiredforyoursafetyandproperUnderwritersLaboratories(UL)certification.
Chapter7.Installingorreplacinghardware83

CAUTION:
Hazardousmovingparts.Keepfingersandotherbodypartsaway.
CAUTION:
Neverremovethecoveronapowersupplyoranypartthathasthefollowinglabelattached.
Hazardousvoltage,current,andenergylevelsarepresentinsideanycomponentthathasthislabel
attached.Therearenoserviceablepartsinsidethesecomponents.Ifyoususpectaproblemwith
oneoftheseparts,contactaservicetechnician.
Toreplacethepowersupplyassembly,dothefollowing:
1.Removeanymediafromthedrivesandturnoffallconnecteddevicesandthecomputer.Then,
disconnectallpowercordsfromelectricaloutletsanddisconnectallcablesthatareconnectedtothe
computer.
2.Removethecomputercover.See“Removingthecomputercover”onpage58.
3.Disconnectthepowersupplyassemblycablesfromthesystemboardandalldrives.See“Partson
thesystemboard”onpage7.
4.Releasethepowersupplyassemblycablesfromthecableclipsandties.
84ThinkStationP310UserGuide
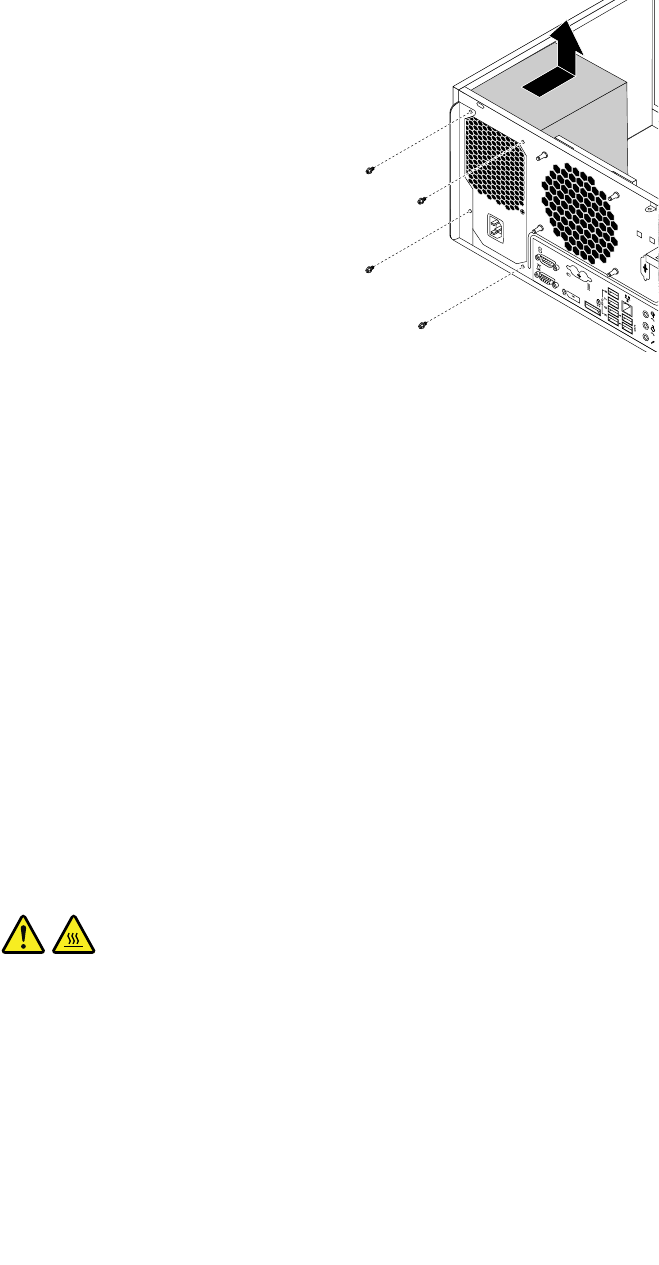
5.Laythecomputeronitssideandremovethefourscrewsattherearofthechassisthatsecurethe
powersupplyassembly.Thenslidethepowersupplyassemblytothefrontofthecomputerandthenlift
itoutofthechassis.
Figure58.Removingthescrewsforthepowersupplyassembly
6.Ensurethatthenewpowersupplyassemblyisthecorrectreplacement.
7.Installthenewpowersupplyassemblyintothechassissothatthescrewholesinthepowersupply
assemblyalignwiththoseinthechassis.
8.Installandtightenthefourscrewstosecurethepowersupplyassembly.
Note:UseonlyscrewsprovidedbyLenovo.
9.Connectthepowersupplyassemblycablestothesystemboardandeachofthedrives.
10.Securethepowersupplyassemblycableswiththecableclipsandtiesinthechassis.
Whattodonext:
•Toworkwithanotherpieceofhardware,gototheappropriatesection.
•Tocompletetheinstallationorreplacement,goto“Completingthepartsreplacement”onpage105.
Replacingtheheatsinkandfanassembly
Attention:Donotopenyourcomputerorattemptanyrepairbeforereadingandunderstandingthe“Read
thisfirst:Importantsafetyinformation”onpagev.
CAUTION:
Theheatsinkandfanassemblymightbeveryhot.Beforeyouopenthecomputercover,turnoffthe
computerandwaitseveralminutesuntilthecomputeriscool.
Toreplacetheheatsinkandfanassembly,dothefollowing:
1.Removeanymediafromthedrivesandturnoffallconnecteddevicesandthecomputer.Then,
disconnectallpowercordsfromelectricaloutletsanddisconnectallcablesthatareconnectedtothe
computer.
2.Removethecomputercover.See“Removingthecomputercover”onpage58.
3.Laythecomputeronitssideforeasieraccesstothesystemboard.
Chapter7.Installingorreplacinghardware85
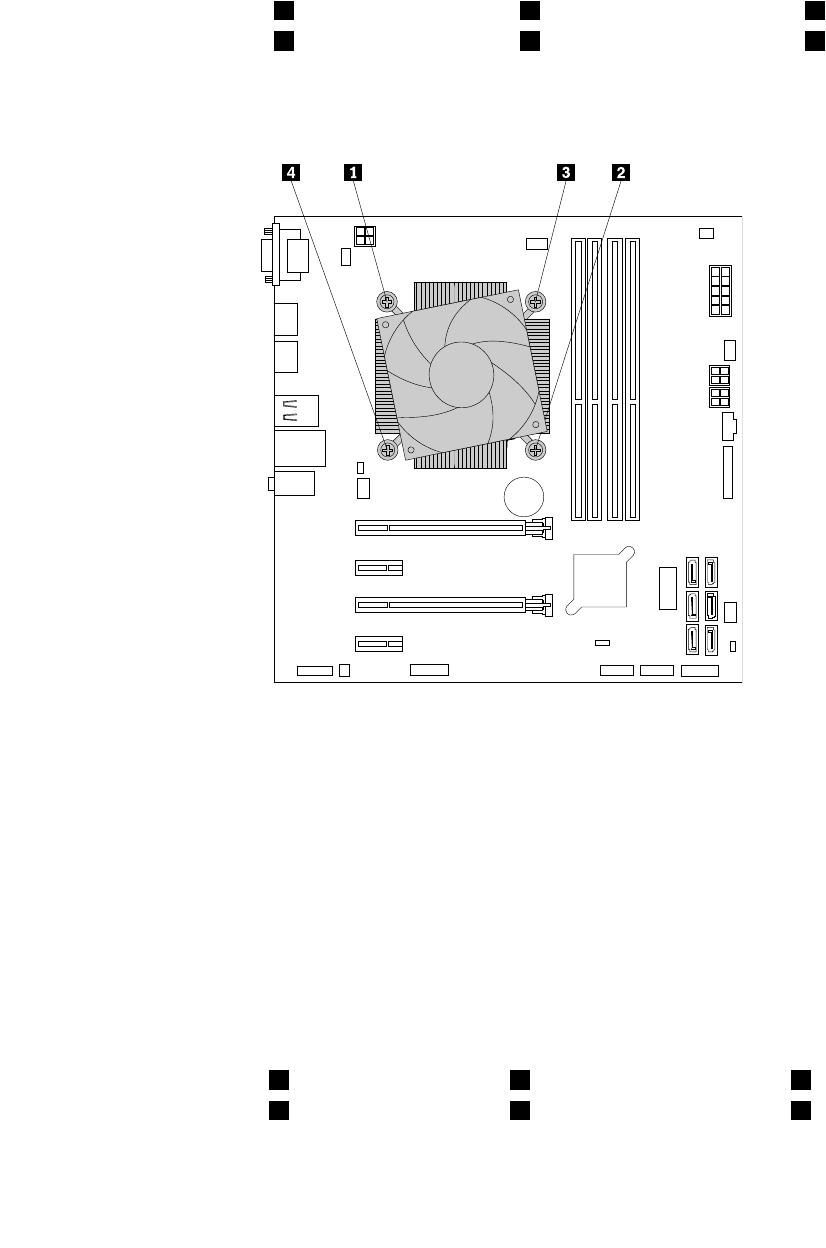
4.Locatetheheatsinkandfanassembly.See“Partsonthesystemboard”onpage7.
5.Disconnecttheheatsinkandfanassemblycablefromthemicroprocessorfanconnectoronthesystem
board.See“Partsonthesystemboard”onpage7.
6.Followthefollowingsequencetoremovethefourscrewsthatsecuretheheatsinkandfanassembly
tothesystemboard:
a.Partiallyremovescrew1,thenfullyremovescrew2,andthenfullyremovescrew1.
b.Partiallyremovescrew3,thenfullyremovescrew4,andthenfullyremovescrew3.
Note:Carefullyremovethefourscrewstoavoidanypossibledamagetothesystemboard.Thefour
screwscannotberemovedfromtheheatsinkandfanassembly.
Figure59.Removingtheheatsinkandfanassembly
7.Liftthefailingheatsinkandfanassemblyoffthesystemboard.
Notes:
•Youmighthavetogentlytwisttheheatsinkandfanassemblytofreeitfromthemicroprocessor.
•Donottouchthethermalgreasewhilehandlingtheheatsinkandfanassembly.
8.Positionthenewheatsinkandfanassemblyonthesystemboard.Ensurethefourscrewsarealigned
withtheholesinthesystemboard.
Note:Ensurethattheheatsinkandfanassemblycableistowardthemicroprocessorfanconnector
onthesystemboard.
9.Followthefollowingsequencetoinstallthefourscrewstosecurethenewheatsinkandfanassembly.
Donotover-tightenthescrews.
a.Partiallytightenscrew1,thenfullytightenscrew2,andthenfullytightenscrew1.
b.Partiallytightenscrew3,thenfullytightenscrew4,andthenfullytightenscrew3.
10.Connecttheheatsinkandfanassemblycabletothemicroprocessorfanconnectoronthesystem
board.See“Partsonthesystemboard”onpage7.
86ThinkStationP310UserGuide
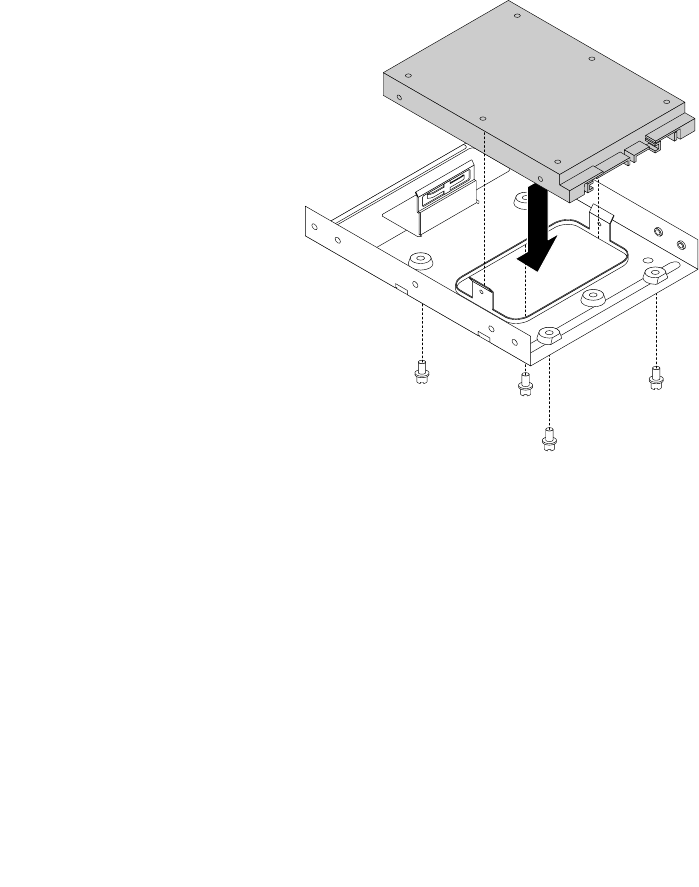
Whattodonext:
•Toworkwithanotherpieceofhardware,gototheappropriatesection.
•Tocompletetheinstallationorreplacement,goto“Completingthepartsreplacement”onpage105.
Installingorreplacingthesolid-statedrive
Thesolid-statedriveisonlyavailableonsomemodels.Thissectionprovidesthefollowinginstructions:
•“Installingthesolid-statedrive”onpage87
•“Replacingthesolid-statedrive”onpage88
Installingthesolid-statedrive
Attention:Donotopenyourcomputerorattemptanyrepairbeforereadingandunderstandingthe“Read
thisfirst:Importantsafetyinformation”onpagev.
Toinstallthesolid-statedrive,dothefollowing:
1.Installthesolid-statedriveintothestorageconvertershippedwiththesolid-statedrive.Theninstallthe
fourscrewstosecurethesolid-statedrivetothestorageconverter.
Figure60.Installingthesolid-statedriveintothestorageconverter
Chapter7.Installingorreplacinghardware87
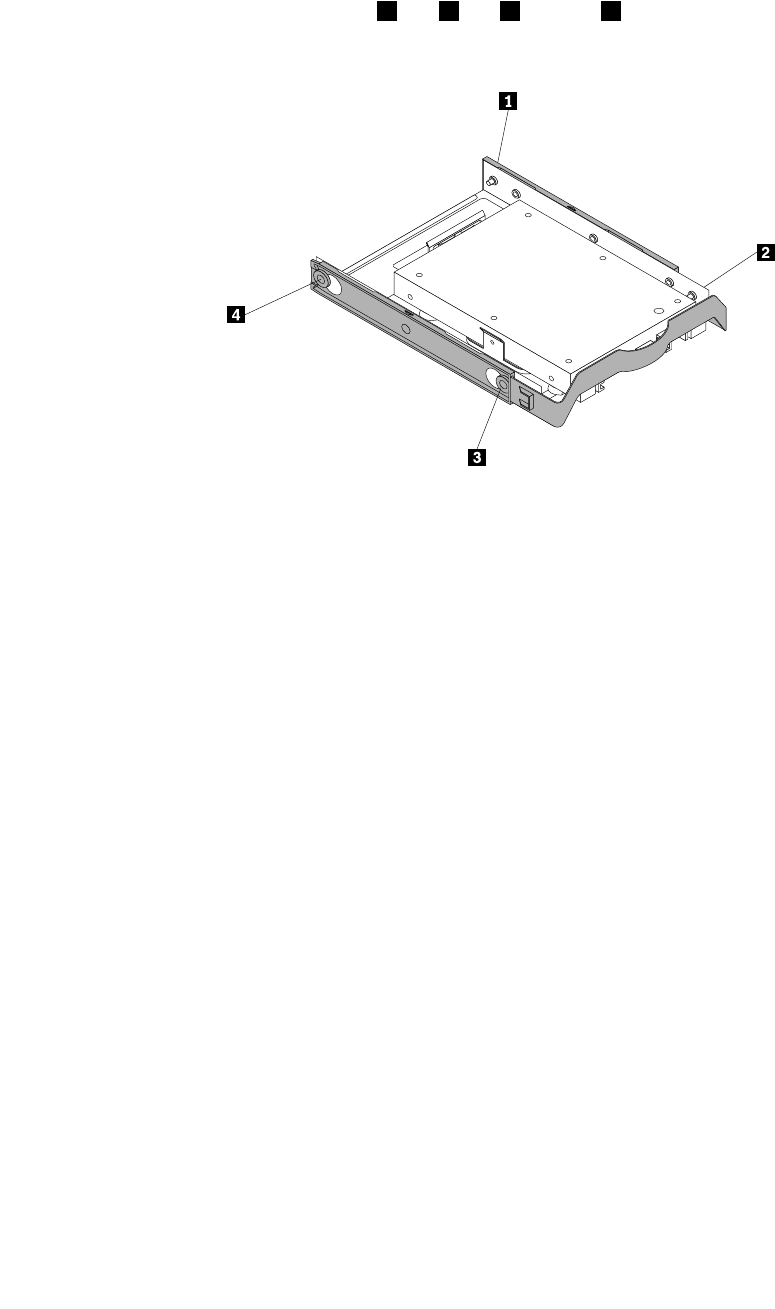
2.Removethe3.5-inchhard-disk-drivebracketoutofthechassis.See“Installingorreplacinganoptical
drive”onpage66.
3.Toinstallthestorageconvertertogetherwiththesolid-statedriveintothe3.5-inchhard-disk-drive
bracket,flexthebracketandalignpin1,pin2,pin3,andpin4onthebracketwiththecorresponding
holesinthestorageconverter.
Figure61.Installingthestorageconvertertogetherwiththesolid-statedriveintothehard-disk-drivebracket
4.Installthestorageconverterwiththebracketintothedesiredhard-disk-drivebay.See“Replacingthe
primaryharddiskdrive”onpage91or“Replacingthesecondaryharddiskdrive”onpage92.
5.Connectthesignalcableandthepowercabletothesolid-statedrive.
Whattodonext:
•Toworkwithanotherpieceofhardware,gototheappropriatesection.
•Tocompletetheinstallationorreplacement,goto“Completingthepartsreplacement”onpage105.
Replacingthesolid-statedrive
Attention:Donotopenyourcomputerorattemptanyrepairbeforereadingandunderstandingthe“Read
thisfirst:Importantsafetyinformation”onpagev.
Toreplacethesolid-statedrive,dothefollowing:
1.Removeanymediafromthedrivesandturnoffallconnecteddevicesandthecomputer.Then,
disconnectallpowercordsfromelectricaloutletsanddisconnectallcablesthatareconnectedtothe
computer.
2.Removethecomputercover.See“Removingthecomputercover”onpage58.
3.Locatethedesiredhark-disk-drivebay.See“Internaldrives”onpage8.
4.Disconnectthesignalcableandpowercablefromthesolid-statedrive.
5.Removethestorageconverterwiththesolid-statedrivefromthehard-disk-drivebay.See“Replacing
theprimaryharddiskdrive”onpage91or“Replacingthesecondaryharddiskdrive”onpage92.
88ThinkStationP310UserGuide
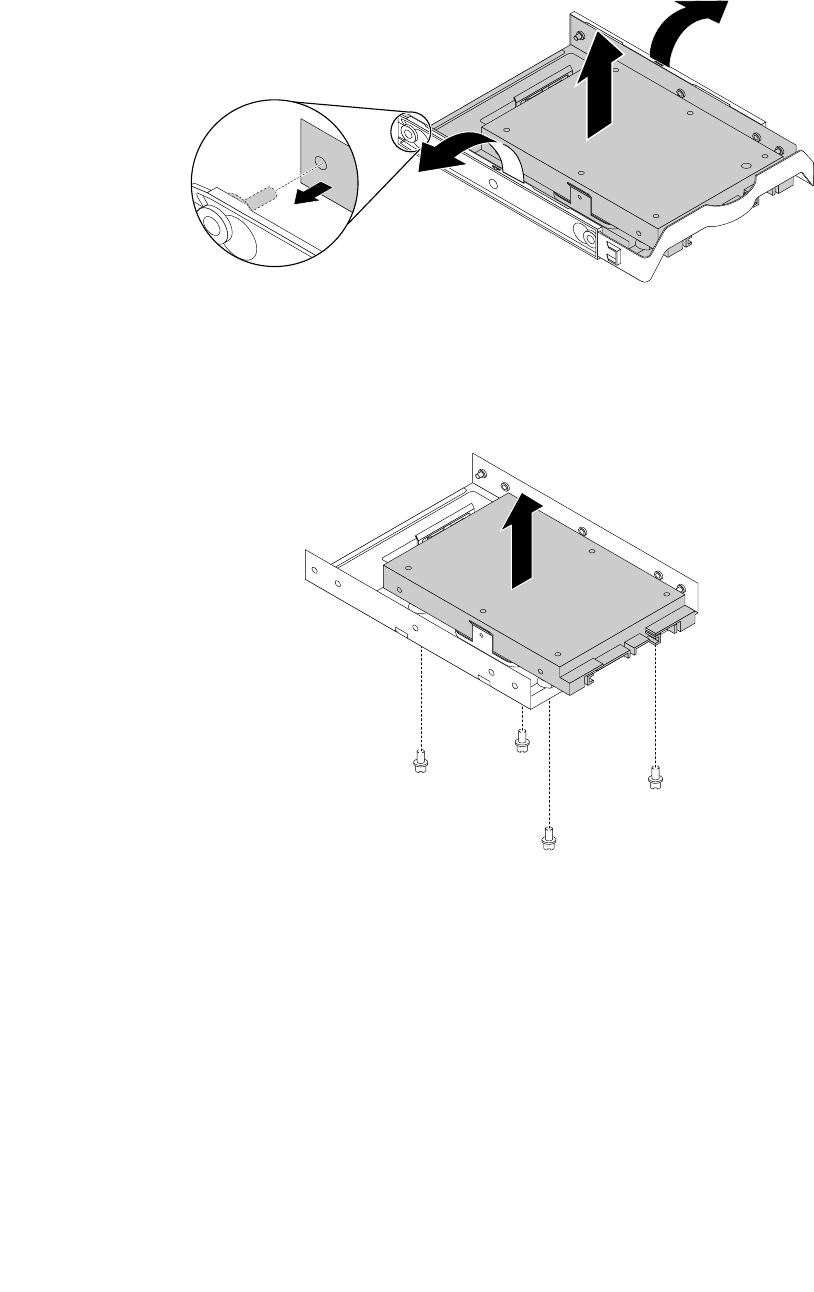
6.Flexthesidesoftheplastic3.5–inchhard-disk-drivebrackettoremovethestorageconverterfrom
thebracket.
Figure62.Removingthestorageconverterfromthe3.5–inchhard-disk-drivebracket
7.Removethefourscrewsthatsecurethesolid-statedrive.Thenliftthesolid-statedriveoutofthe
storageconverter.
Figure63.Removingthesolid-statedrivefromthestorageconverter
Chapter7.Installingorreplacinghardware89

8.Installanewsolid-statedriveintothestorageconverter.Theninstallthefourscrewstosecurethe
newsolid-statedrivetothestorageconverter.
Figure64.Installingthenewsolid-statedriveintothestorageconverter
9.Toinstallthestorageconverterintothe3.5-inchhard-disk-drivebracket,flexthebracketandalignpin
1,pin2,pin3,andpin4onthebracketwiththecorrespondingholesinthestorageconverter.
Figure65.Installingthestorageconverterwiththenewsolid-statedriveintothehard-disk-drivebracket
10.Installthestorageconverterwiththebracketintothehard-disk-drivebay.See“Replacingtheprimary
harddiskdrive”onpage91or“Replacingthesecondaryharddiskdrive”onpage92.
11.Connectthesignalcableandthepowercabletothesolid-statedrive.
Whattodonext:
•Toworkwithanotherpieceofhardware,gototheappropriatesection.
90ThinkStationP310UserGuide
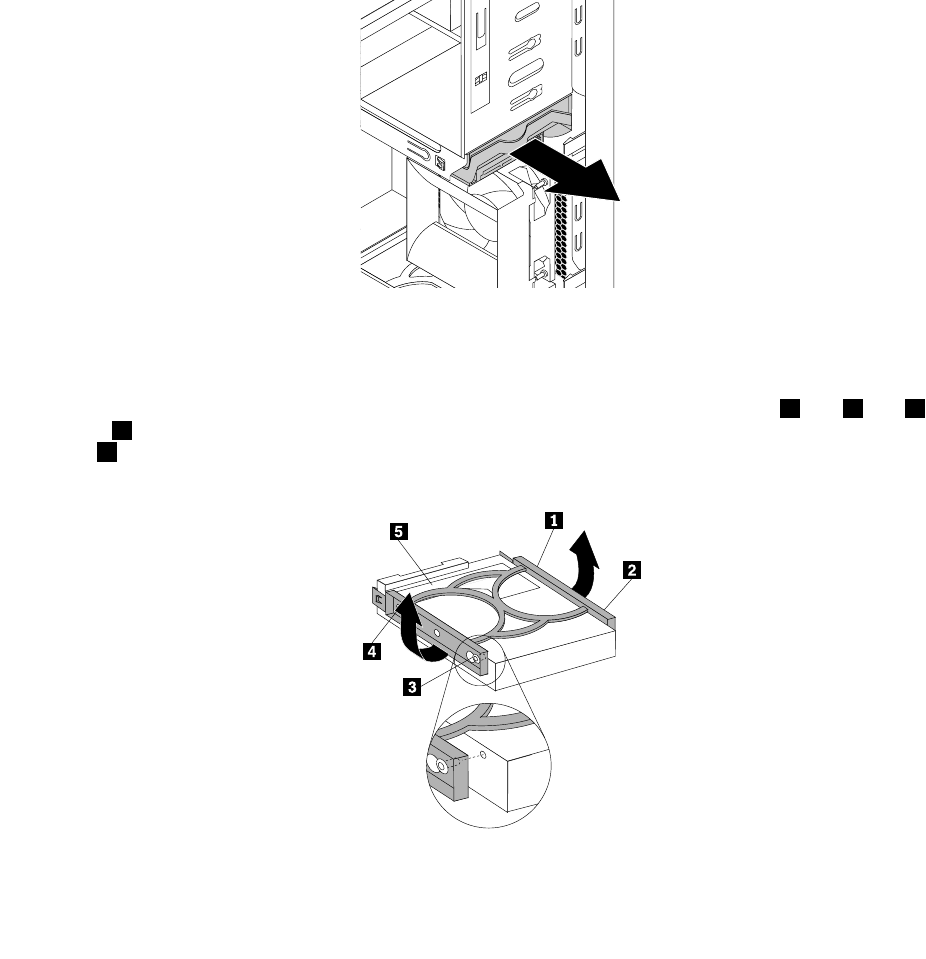
•Tocompletetheinstallationorreplacement,goto“Completingthepartsreplacement”onpage105.
Replacingtheprimaryharddiskdrive
Attention:Donotopenyourcomputerorattemptanyrepairbeforereadingandunderstandingthe“Read
thisfirst:Importantsafetyinformation”onpagev.
Toreplacetheprimaryharddiskdrive,dothefollowing:
1.Removeanymediafromthedrivesandturnoffallconnecteddevicesandthecomputer.Then,
disconnectallpowercordsfromelectricaloutletsanddisconnectallcablesthatareconnectedtothe
computer.
2.Removethecomputercover.See“Removingthecomputercover”onpage58.
3.Locatetheprimaryharddiskdrive.See“Computercomponents”onpage6.
4.Disconnectthesignalcableandthepowercablefromtheharddiskdrive.
5.Pullthebluehandletoreleaseandremovetheharddiskdrivefromthedrivecage.
Figure66.Removingtheprimaryharddiskdrive
6.Flexthesidesofthebluebrackettoremovetheharddiskdrivefromthebracket.
7.Toinstallanewharddiskdriveintothebluebracket,flexthebracketandalignpin1,pin2,pin3,
andpin4onthebracketwiththecorrespondingholesintheharddiskdrive.Donottouchthecircuit
board5onthebottomoftheharddiskdrive.
Figure67.Installingtheharddiskdriveintothebracket
Chapter7.Installingorreplacinghardware91
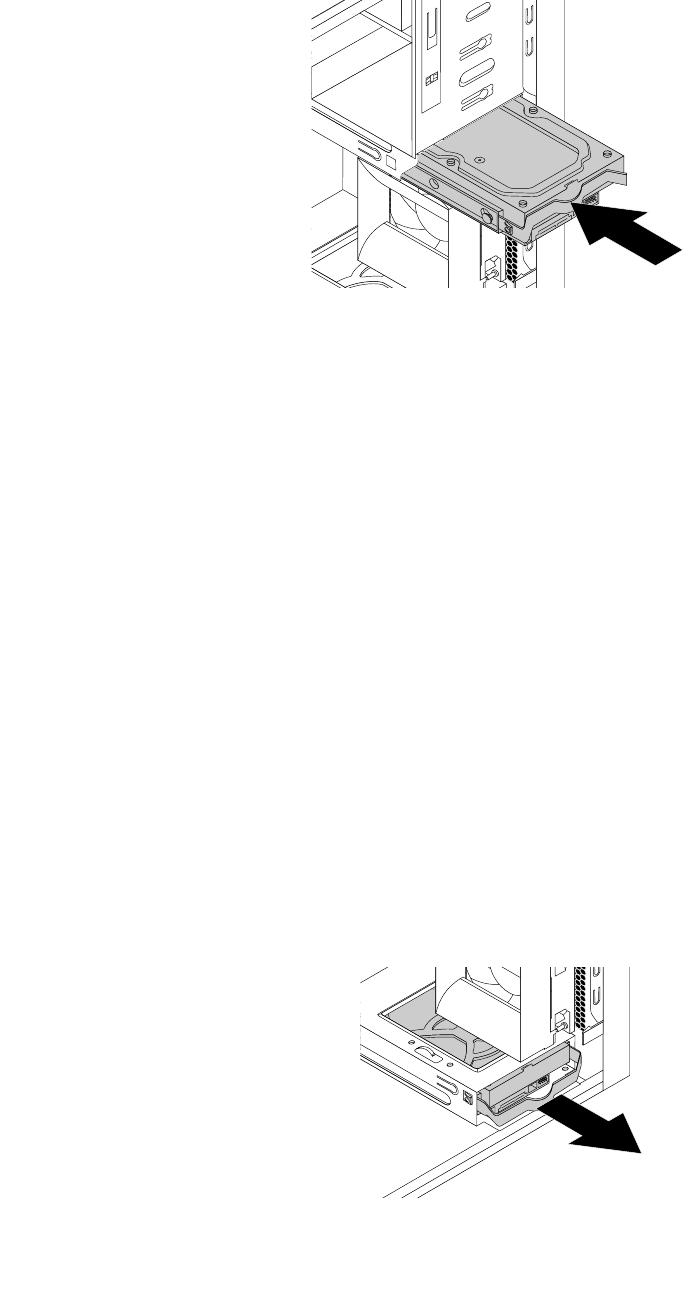
8.Slidethenewharddiskdriveintothedrivecageuntilitsnapsintoposition.
Figure68.Installingtheprimaryharddiskdrive
9.Connectthesignalcableandthepowercabletothenewharddiskdrive.
Whattodonext:
•Toworkwithanotherpieceofhardware,gototheappropriatesection.
•Tocompletetheinstallationorreplacement,goto“Completingthepartsreplacement”onpage105.
Replacingthesecondaryharddiskdrive
Attention:Donotopenyourcomputerorattemptanyrepairbeforereadingandunderstandingthe“Read
thisfirst:Importantsafetyinformation”onpagev.
Note:Yourcomputercomeswithasecondaryhard-disk-drivebayforinstallingorreplacingasecondary
3.5-inchharddiskdriveora2.5-inchsolid-statedrive.
Toreplacethesecondaryharddiskdrive,dothefollowing:
1.Removeanymediafromthedrivesandturnoffallconnecteddevicesandthecomputer.Then,
disconnectallpowercordsfromelectricaloutletsanddisconnectallcablesthatareconnectedtothe
computer.
2.Removethecomputercover.See“Removingthecomputercover”onpage58.
3.Locatethesecondaryharddiskdrive.See“Computercomponents”onpage6.
4.Disconnectthesignalcableandthepowercablefromtheharddiskdrive.
5.Pullthebluehandletoreleaseandremovetheharddiskdrivefromthehard-disk-drivecage.
Figure69.Removingthesecondaryharddiskdrive
92ThinkStationP310UserGuide
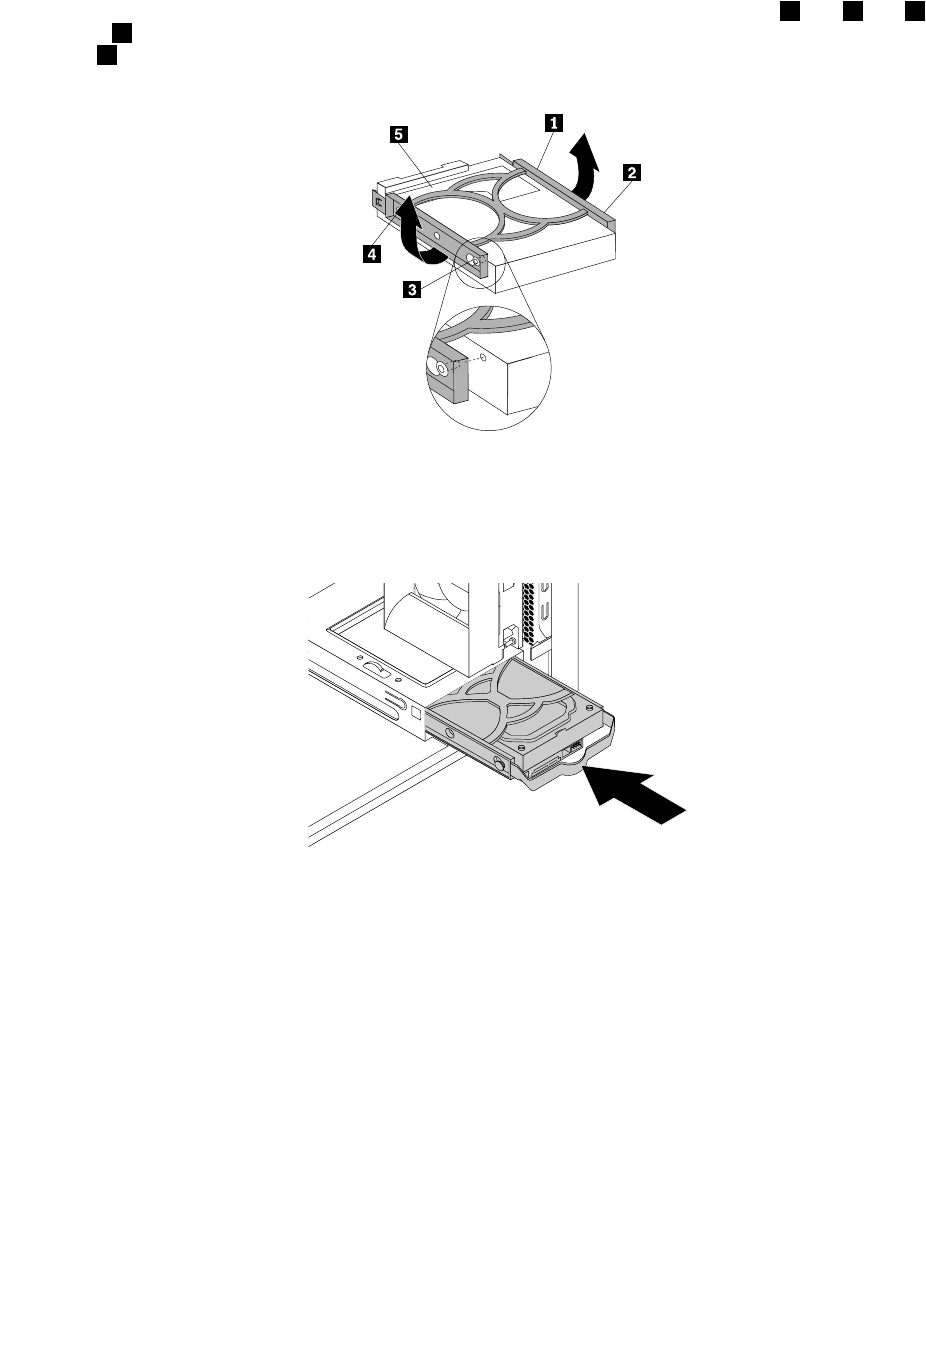
6.Flexthesidesofthebluebrackettoremovetheharddiskdrivefromthebracket.
7.Toinstallanewharddiskdriveintothebluebracket,flexthebracketandalignpin1,pin2,pin3,
andpin4onthebracketwiththecorrespondingholesintheharddiskdrive.Donottouchthecircuit
board5onthebottomoftheharddiskdrive.
Figure70.Installingtheharddiskdriveintothebracket
8.Slidethenewharddiskdriveintothedrivecageuntilitsnapsintoposition.
Figure71.Installingthesecondaryharddiskdrive
9.Connectthesignalcableandthepowercabletothenewharddiskdrive.
Whattodonext:
•Toworkwithanotherpieceofhardware,gototheappropriatesection.
•Tocompletetheinstallationorreplacement,goto“Completingthepartsreplacement”onpage105.
Installingthetertiaryharddiskdrive
Attention:Donotopenyourcomputerorattemptanyrepairbeforereadingandunderstandingthe“Read
thisfirst:Importantsafetyinformation”onpagev.
Note:Youcaninstallatertiary3.5-inchharddiskdriveora2.5-inchsolid-statedriveintothesecondary
optical-drivebayinyourcomputer.
Chapter7.Installingorreplacinghardware93
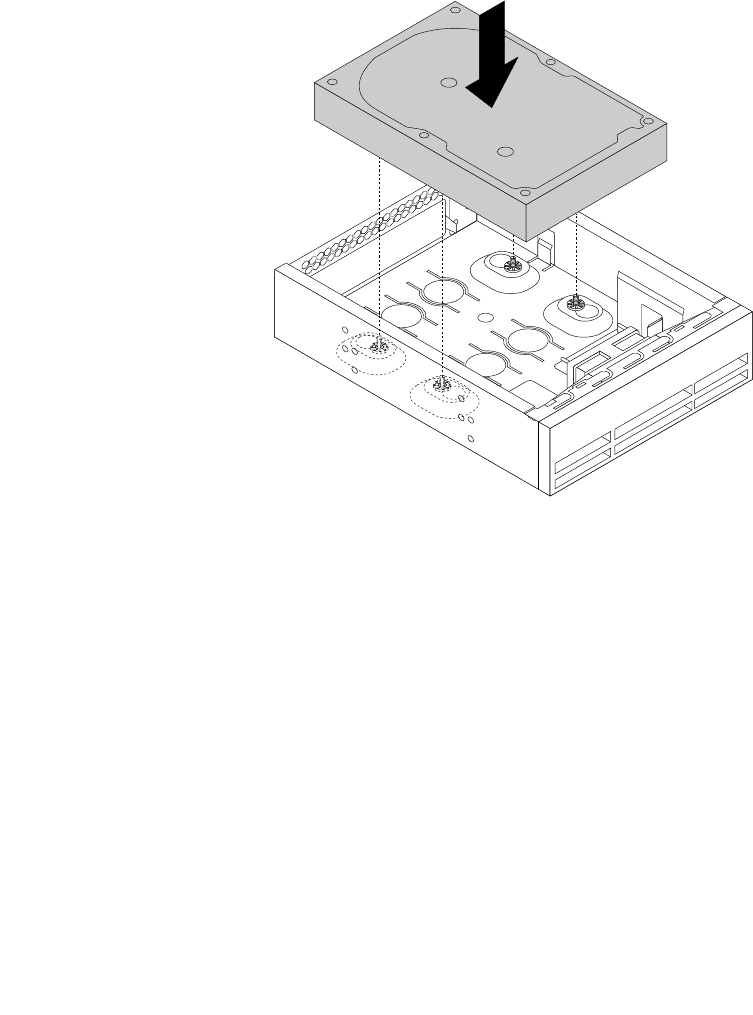
Toinstallatertiary3.5-inchharddiskdriveora2.5-inchsolid-statedrive,dothefollowing:
1.Removeanymediafromthedrivesandturnoffallconnecteddevicesandthecomputer.Then,
disconnectallpowercordsfromelectricaloutletsanddisconnectallcablesthatareconnectedtothe
computer.
2.Removethecomputercover.See“Removingthecomputercover”onpage58.
3.Removethefrontbezel.See“Removingandreinstallingthefrontbezel”onpage59.
4.Removetheplasticpanelinthefrontbezelforthedrivebayyouwanttouse.Ifthereisametalstatic
shieldinstalledinthedrivebay,removethemetalstaticshield.
5.Dependingonwhetheryouareinstallingatertiary3.5-inchharddiskdriveora2.5-inchsolid-state
drive,dooneofthefollowing:
•Installtheharddiskdriveintothe5.25-inchopticaldrivebracket.Then,fullytightenthefourscrews
tosecuretheharddiskdrivetothe5.25-inchopticaldrivebracket.
Figure72.Installingthetertiaryharddiskdrive
•Installthesolid-statedriveintothe5.25-inchopticaldrivebracket.Toinstallthesolid-statedriveinto
the5.25-inchopticaldrivebracket,dothefollowing:
94ThinkStationP310UserGuide
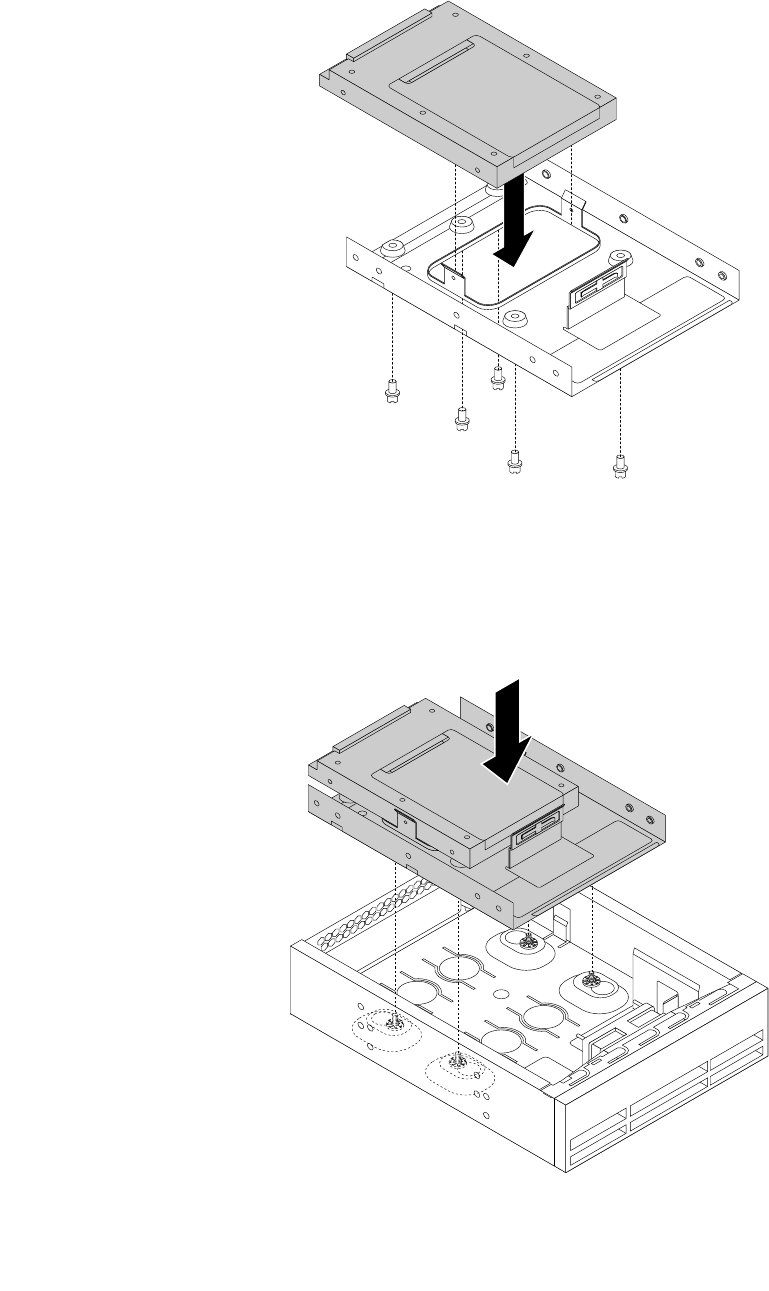
a.Installthesolid-statedriveintothestorageconverter.Then,installthefivescrewstosecure
thesolid-statedrivetothestorageconverter.
Figure73.Installingthesolid-statedriveintothestorageconverter
b.Installthesolid-statedrivewiththestorageconverterintothe5.25-inchopticaldrivebracket.
Then,fullytightenthefourscrewstosecurethesolid-statedrivewiththestorageconverterto
the5.25-inchopticaldrivebracket.
Figure74.Installingthesolid-statedrivewiththestorageconverter
Chapter7.Installingorreplacinghardware95
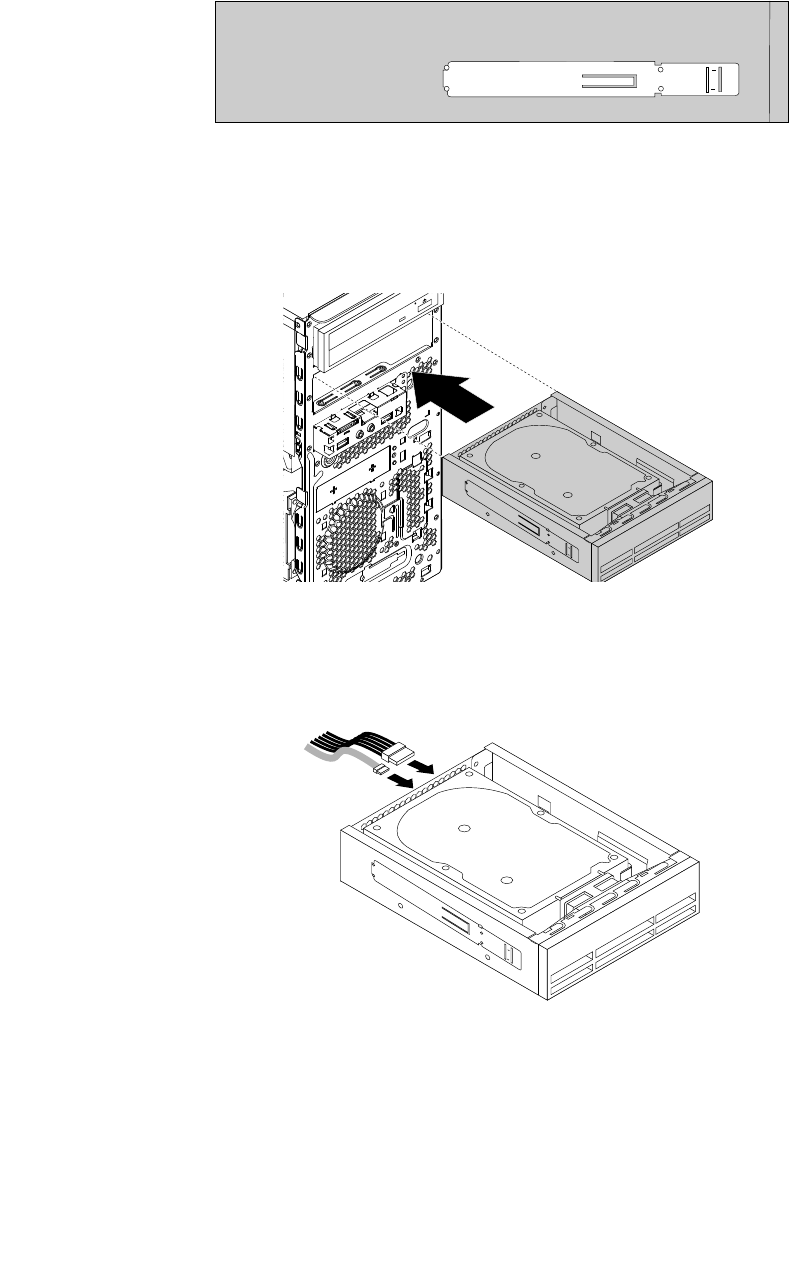
6.Installtheopticaldriveretaineronthesideoftheopticaldrivebracket.Forinformationaboutinstructions
onhowtoremovetheopticaldriveretainerfromthecomputer,see“Installingorreplacinganoptical
drive”onpage66.
Figure75.Installingtheopticaldriveretainer
7.Slidetheopticaldrivebracketintothesecondaryoptical-drivebayfromthefrontofthecomputer
untiltheopticaldrivebracketsnapsintoposition.
Figure76.Installingtheopticaldrivebracket
8.Connectthesignalcableandthepowercabletothenewharddiskdriveorsolid-statedrive.
Figure77.Connectingtheharddiskdriveorsolid-statedrive
Whattodonext:
•Toworkwithanotherpieceofhardware,gototheappropriatesection.
•Tocompletetheinstallationorreplacement,goto“Completingthepartsreplacement”onpage105.
96ThinkStationP310UserGuide
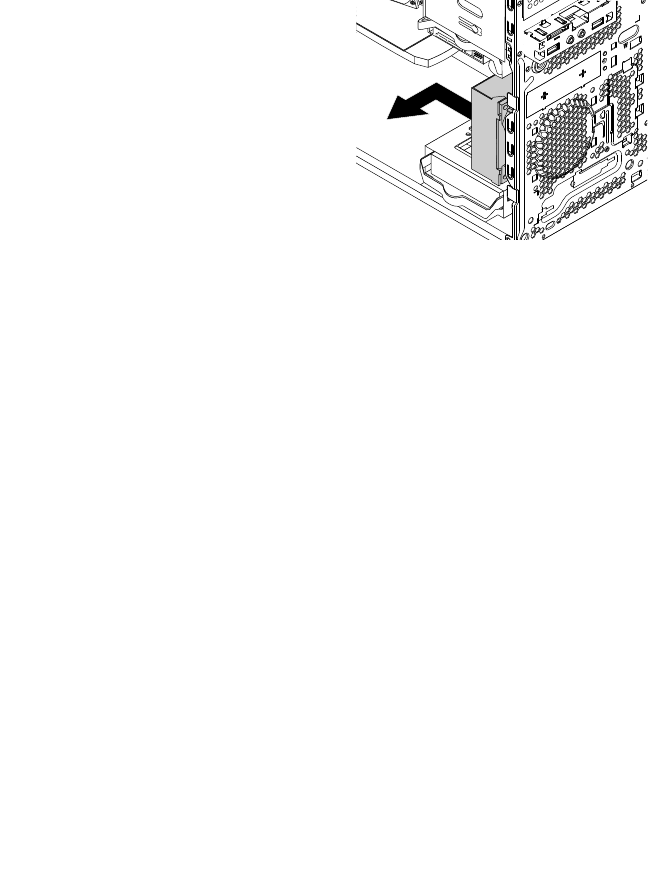
Replacingthefrontfanassembly
Attention:Donotopenyourcomputerorattemptanyrepairbeforereadingandunderstandingthe“Read
thisfirst:Importantsafetyinformation”onpagev.
Note:Thefrontfanassemblyisonlyavailableonsomemodels.
Toreplacethefrontfanassembly,dothefollowing:
1.Removeanymediafromthedrivesandturnoffallconnecteddevicesandthecomputer.Then,
disconnectallpowercordsfromelectricaloutletsanddisconnectallcablesthatareconnectedtothe
computer.
2.Removethecomputercover.See“Removingthecomputercover”onpage58.
3.Removethefrontbezel.See“Removingandreinstallingthefrontbezel”onpage59.
4.Disconnectthefrontfanassemblycablefromthepowerfanconnectoronthesystemboard.See
“Partsonthesystemboard”onpage7.
5.Thefrontfanassemblyisattachedtothechassisbyfourrubbermounts.Removethefrontfanassembly
bybreakingorcuttingtherubbermountsandgentlypullingthefrontfanassemblyoutofthechassis.
Note:Thenewfrontfanassemblycomeswithfournewrubbermountsattached.
Figure78.Removingthefrontfanassembly
6.Installthenewfrontfanassemblybyaligningthenewrubbermountswiththecorrespondingholesin
thechassisandpushtherubbermountsthroughtheholes.
Chapter7.Installingorreplacinghardware97
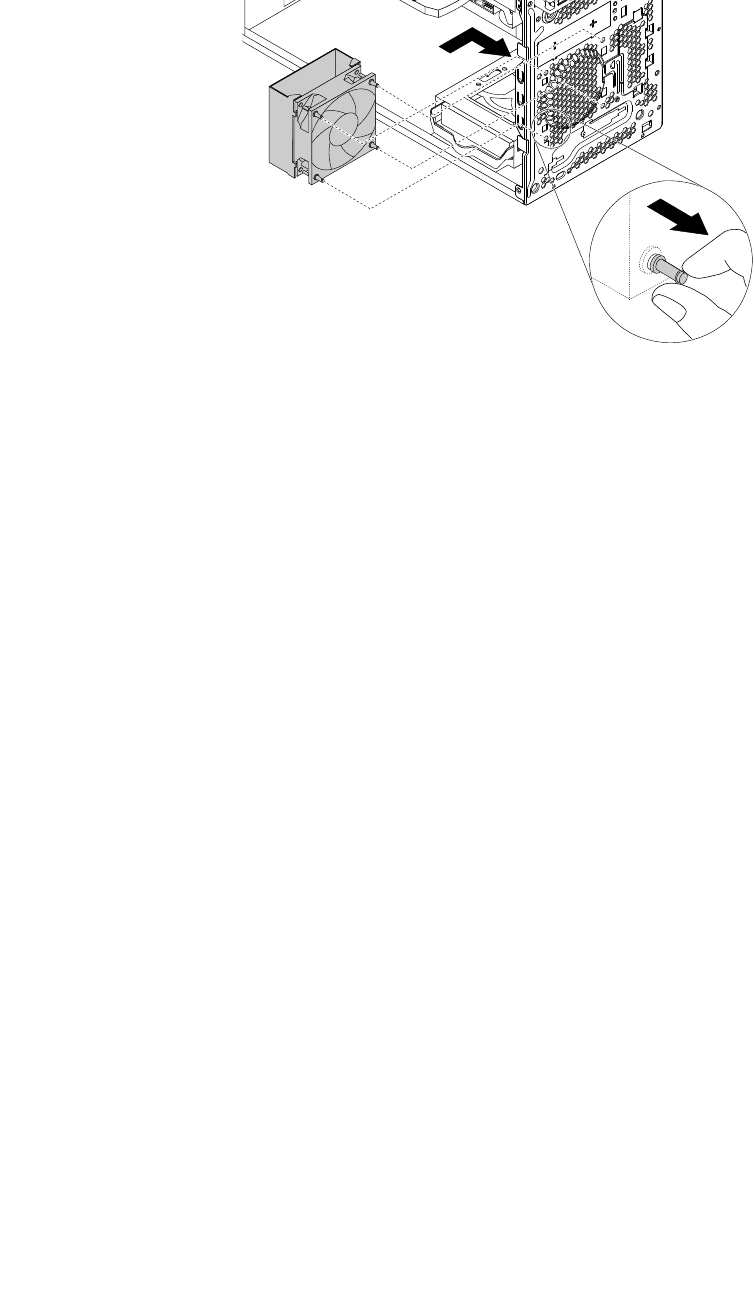
7.Pullthetipsoftherubbermountsuntilthefrontfanassemblyissecuredinplace.
Figure79.Installingthefrontfanassembly
8.Connectthefrontfanassemblycabletothepowerfanconnectoronthesystemboard.
Whattodonext:
•Toworkwithanotherpieceofhardware,gototheappropriatesection.
•Tocompletetheinstallationorreplacement,goto“Completingthepartsreplacement”onpage105.
Replacingtherearfanassembly
Attention:Donotopenyourcomputerorattemptanyrepairbeforereadingandunderstandingthe“Read
thisfirst:Importantsafetyinformation”onpagev.
Toreplacetherearfanassembly,dothefollowing:
1.Removeanymediafromthedrivesandturnoffallconnecteddevicesandthecomputer.Then,
disconnectallpowercordsfromelectricaloutletsanddisconnectallcablesthatareconnectedtothe
computer.
2.Removethecomputercover.See“Removingthecomputercover”onpage58.
3.Locatetherearfanassembly.See“Computercomponents”onpage6.
4.Disconnecttherearfanassemblycablefromthesystemfanconnectoronthesystemboard.See
“Partsonthesystemboard”onpage7.
98ThinkStationP310UserGuide
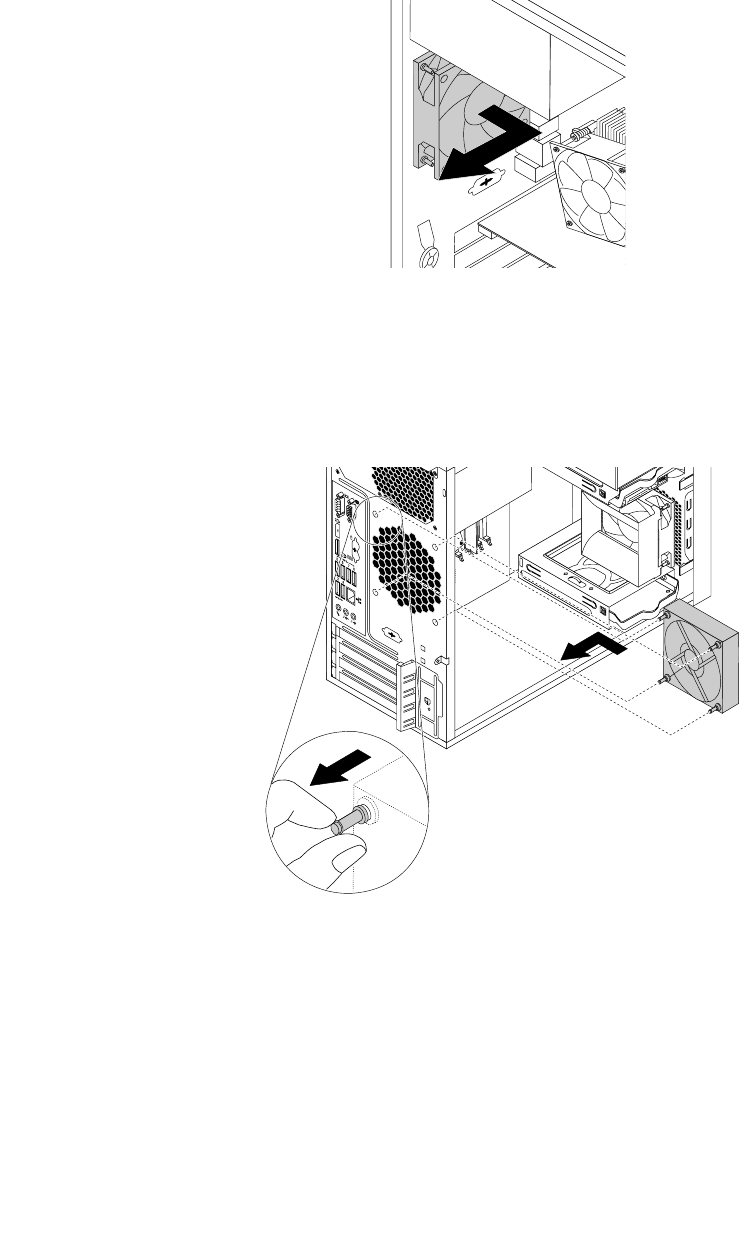
5.Therearfanassemblyisattachedtothechassisbyfourrubbermounts.Removetherearfanassembly
bybreakingorcuttingtherubbermountsandgentlypullingtherearfanassemblyoutofthechassis.
Note:Thenewrearfanassemblycomeswithfournewrubbermountsattached.
Figure80.Removingtherearfanassembly
6.Installthenewrearfanassemblybyaligningthenewrubbermountswiththecorrespondingholesinthe
chassis.Pushtherubbermountsthroughtheholes.
7.Pullonthetipsoftherubbermountsuntiltherearfanassemblyissecuredinplace.
Figure81.Installingtherearfanassembly
8.Connecttherearfanassemblycabletothesystemfanconnectoronthesystemboard.
Whattodonext:
•Toworkwithanotherpieceofhardware,gototheappropriatesection.
•Tocompletetheinstallationorreplacement,goto“Completingthepartsreplacement”onpage105.
Chapter7.Installingorreplacinghardware99
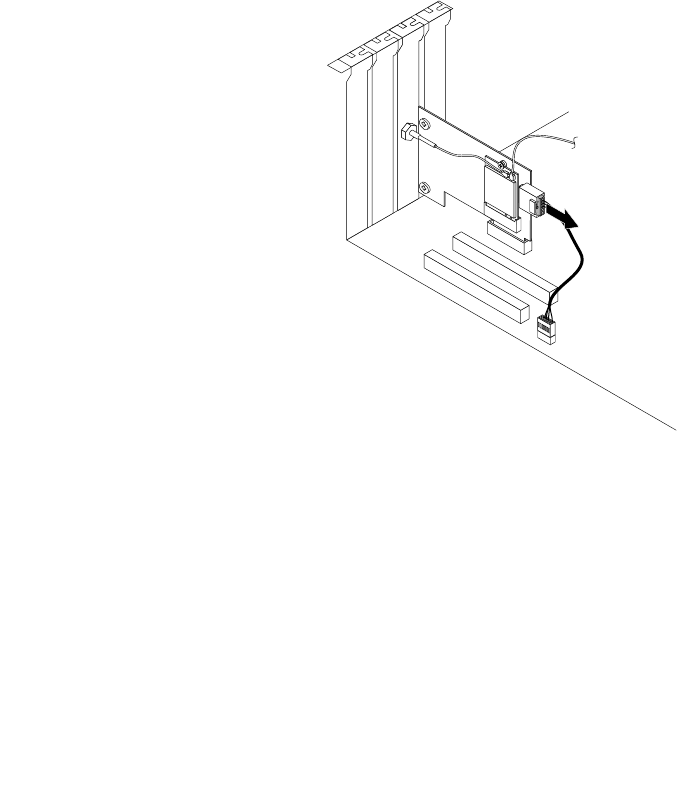
ReplacingtheWi-Fiunits
Attention:Donotopenyourcomputerorattemptanyrepairbeforereadingandunderstandingthe“Read
thisfirst:Importantsafetyinformation”onpagev.
ThissectionprovidesinstructionsonhowtoreplacetheWi-Fiunits.TheWi-FiunitsincludeaWi-Fiadapter
card,aWi-Ficardmodule,andarearWi-Fiantennacable.
ReplacingtheWi-Fiunitsinvolvesthefollowingoperations:
•“RemovingtheWi-Fiadaptercard”onpage100
•“RemovingtheWi-Ficardmodule”onpage101
•“InstallingtheWi-Fiunits”onpage103
RemovingtheWi-Fiadaptercard
ToremoveaWi-Fiadaptercard,dothefollowing:
1.Removeanymediafromthedrivesandturnoffallconnecteddevicesandthecomputer.Then,
disconnectallpowercordsfromelectricaloutletsanddisconnectallcablesthatareconnectedtothe
computer.
2.Removethecomputercover.See“Removingthecomputercover”onpage58.
3.IfyourcomputercomeswithaWi-FicardmodulethatsupportstheBluetoothfunction,disconnect
theBluetoothcablefromtheWi-Fiadaptercard.
Figure82.DisconnectingtheBluetoothcable
Note:TheBluetoothcableconnectstheBluetoothconnectorontheWi-FiadaptercardtotheUSB
2.0connectoronthesystemboard.
100ThinkStationP310UserGuide
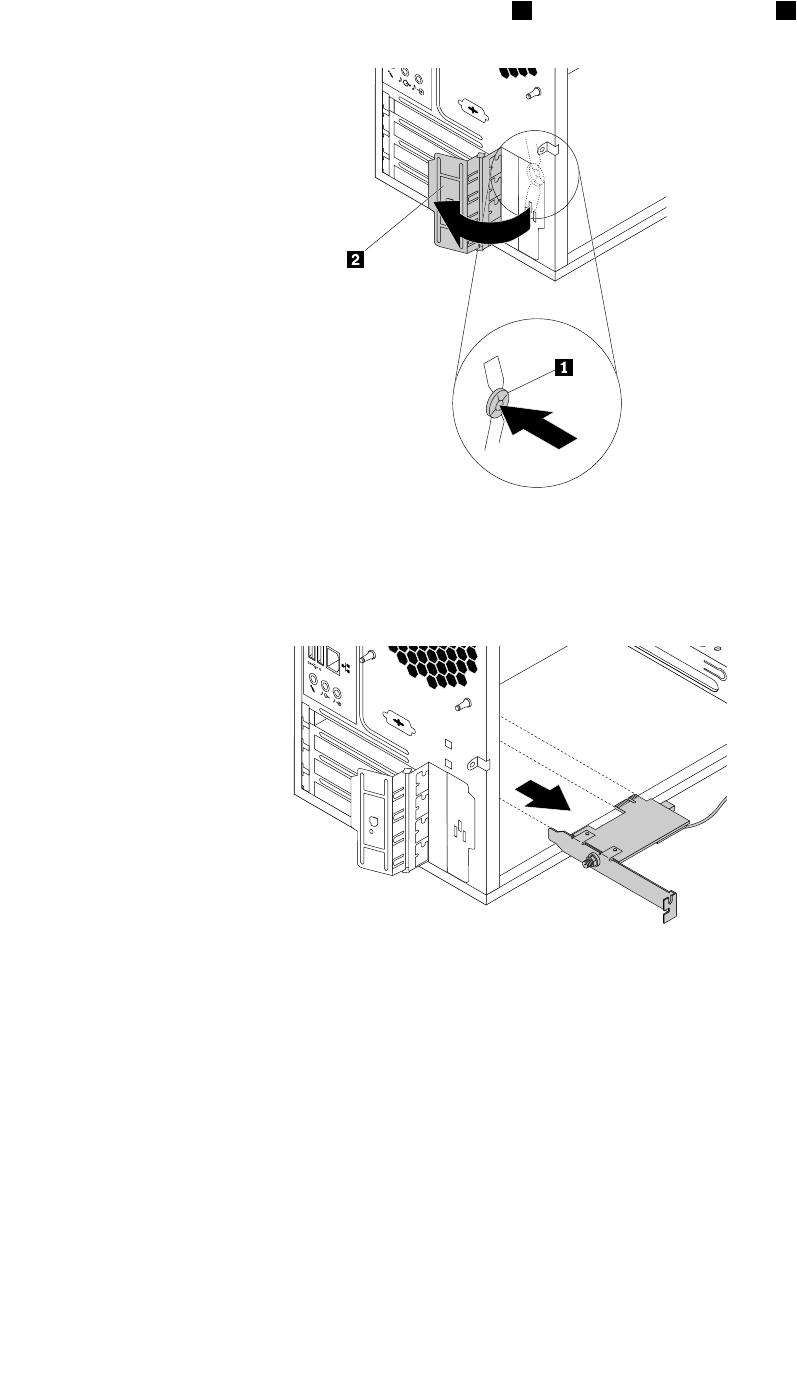
4.Attherearofthecomputer,pressthereleasebutton1toopenthePCIcardlatch2.
Figure83.OpeningthePCIcardlatch
5.GrasptheWi-Fiadaptercardthatiscurrentlyinstalledandgentlypullitoutoftheslot.
Figure84.RemovingtheWi-Fiadaptercard
Note:Thecardfitstightlyintotheslot.Ifnecessary,alternatelymoveeachsideofthecardasmall
amountuntilthecardisremovedfromtheslot.
RemovingtheWi-Ficardmodule
ToremovetheWi-Ficardmodule,dothefollowing:
Chapter7.Installingorreplacinghardware101
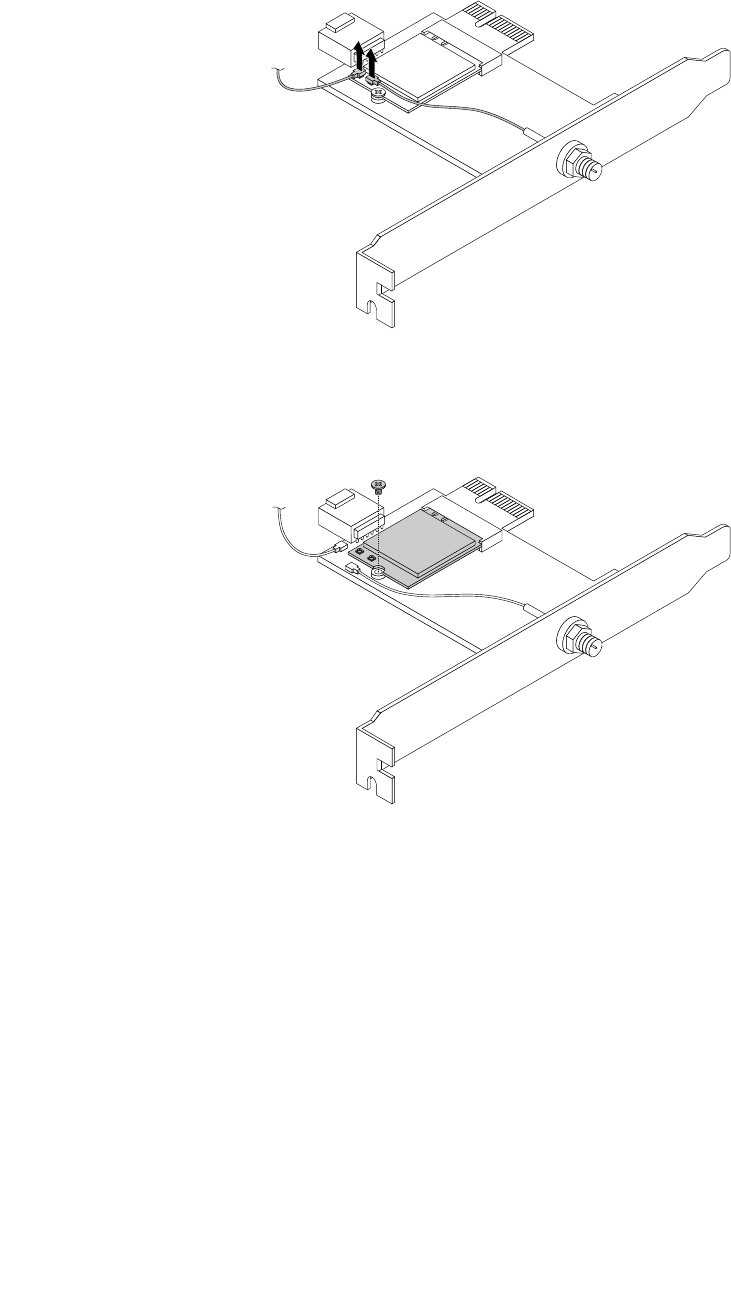
1.RemovetheWi-Fiadaptercardfromthecomputer,andthendisconnectthefrontandrearWi-Fiantenna
cablesfromtheWi-Ficardmodule.
Figure85.DisconnectingtheWi-Fiantennacables
2.RemovethescrewthatsecurestheWi-FicardmoduletotheWi-Fiadaptercard.
Figure86.RemovingthescrewthatsecurestheWi-Ficardmodule
102ThinkStationP310UserGuide
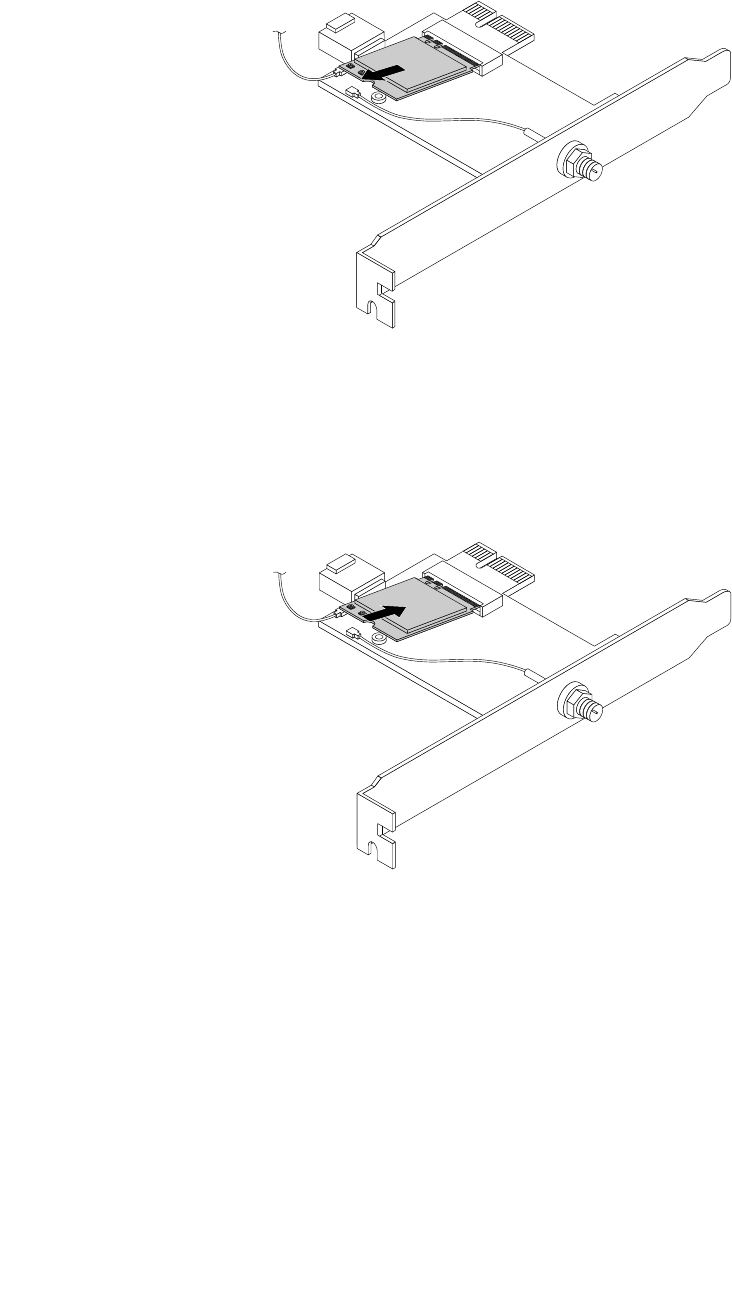
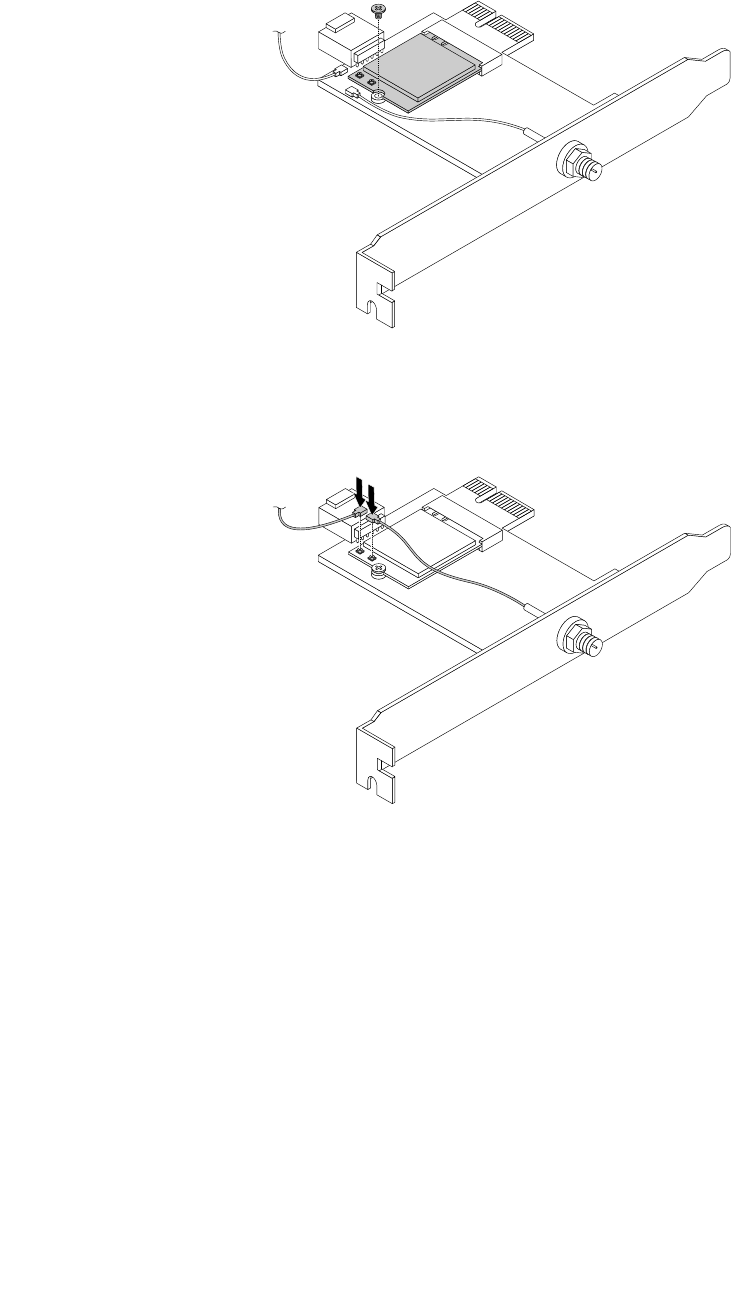
2.InstallascrewtosecuretheWi-FicardmoduletotheWi-Fiadaptercard.
Figure89.InstallingascrewtosecuretheWi-Ficardmodule
3.ConnectthefrontantennacableandrearantennacabletotheWi-Ficardmodule.
Figure90.InstallingtheWi-Fiantennacables
4.InstalltheWi-FiadaptercardintothePCIExpressx1slotonthesystemboard.See“Partsonthe
systemboard”onpage7.
5.IftheinstalledWi-FicardmodulesupportstheBluetoothfunction,connectaBluetoothcablefromthe
BluetoothconnectorontheWi-FiadaptercardtotheUSB2.0connectoronthesystemboard.
104ThinkStationP310UserGuide
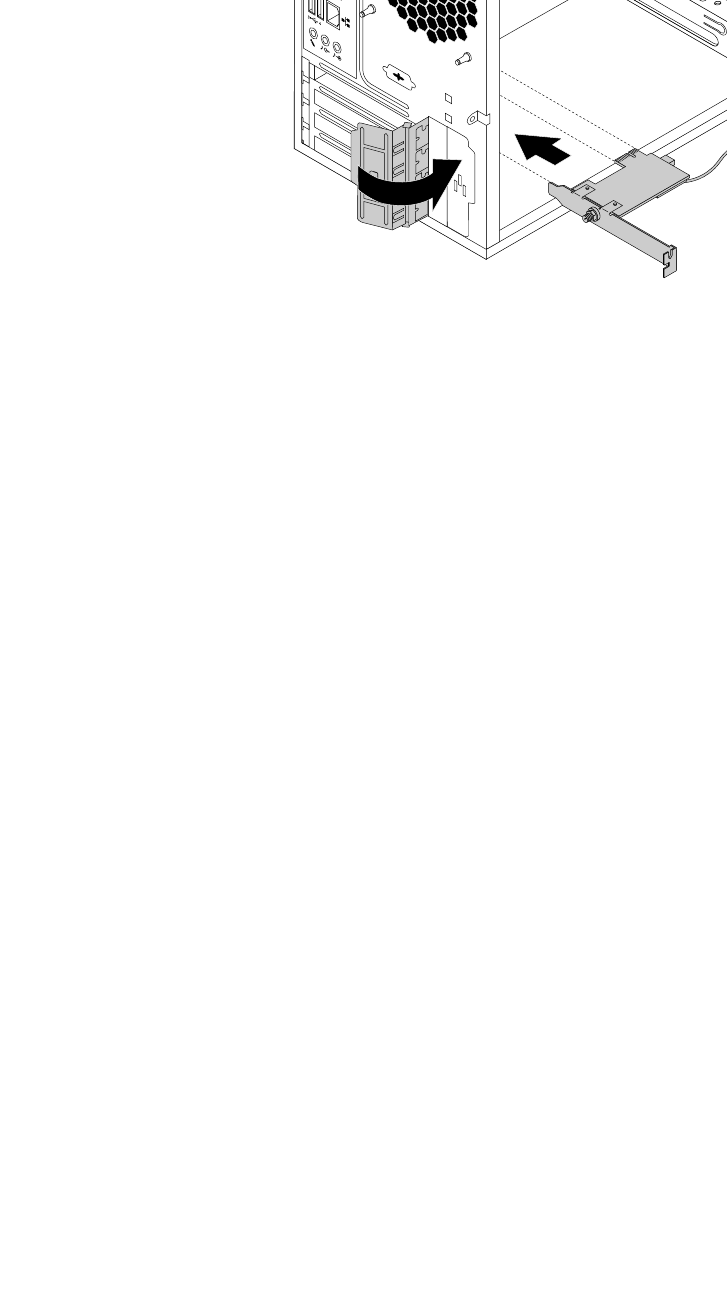
6.PivotthecardlatchtotheclosedpositiontosecuretheWi-Fiadaptercard.
Figure91.InstallingtheWi-Fiadaptercard
Whattodonext:
•Toworkwithanotherpieceofhardware,gototheappropriatesection.
•Tocompletetheinstallationorreplacement,goto“Completingthepartsreplacement”onpage105.
Completingthepartsreplacement
Aftercompletingtheinstallationorreplacementforallparts,reinstallthecomputercoverandreconnect
cables.Dependingonthepartsyouinstalledorreplaced,youmightneedtoconfirmtheupdatedinformation
intheSetupUtilityprogram.Referto“UsingtheSetupUtilityprogram”onpage35.
Toreinstallthecomputercoverandreconnectcablestoyourcomputer,dothefollowing:
1.Ensurethatallcomponentshavebeenreassembledcorrectlyandthatnotoolsorloosescrewsareleft
insideyourcomputer.See“Computercomponents”onpage6forthelocationsofvariouscomponents
inyourcomputer.
2.Ensurethatthecablesareroutedcorrectlybeforereinstallingthecomputercover.Keepcablesclearof
thehingesandsidesofthecomputerchassistoavoidinterferencewithreinstallingthecomputercover.
Chapter7.Installingorreplacinghardware105
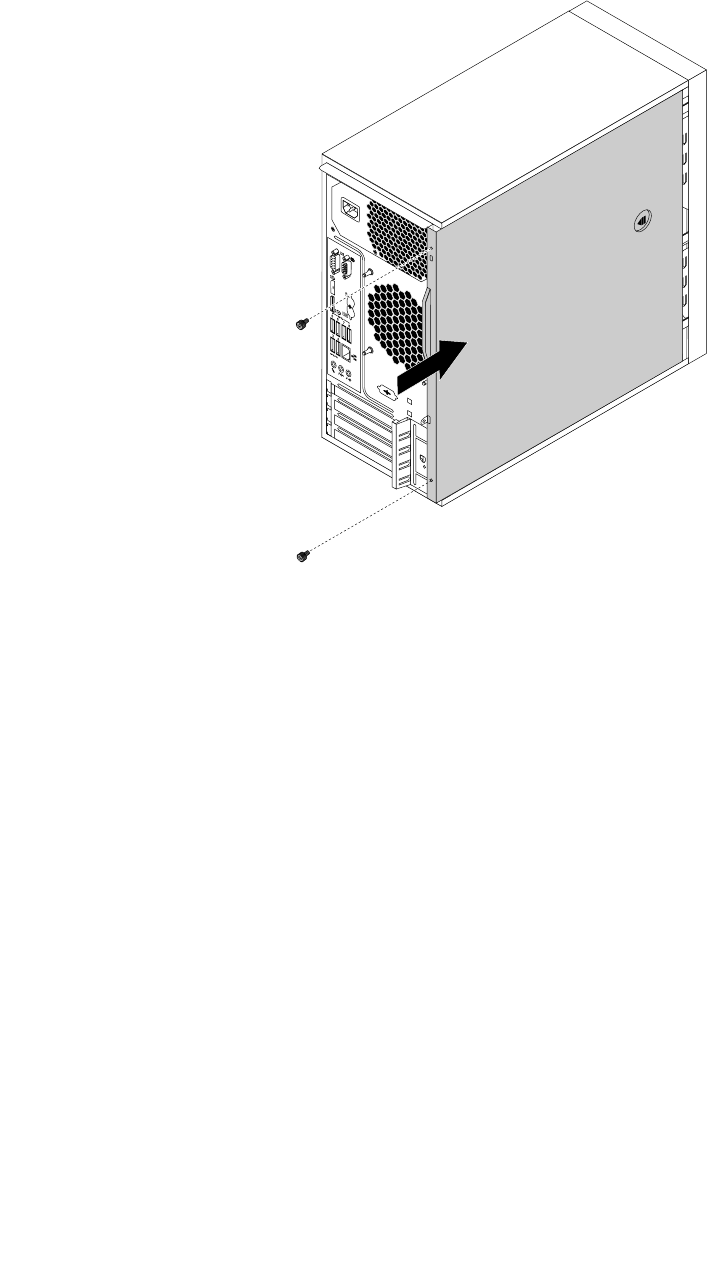
3.Positionthecomputercoveronthechassissothattherailguidesonthebottomofthecomputer
coverengagetherailsonthechassis.Then,pushthecovertothefrontofthecomputeruntilitsnaps
intoposition.
Figure92.Reinstallingthecomputercover
4.Installthescrewstosecurethecomputercover.
5.Placethecomputerinanuprightposition.
6.Ifthereisanylockingdeviceavailable,lockthecomputercover.See“Attachingapadlock”onpage29.
7.Reconnecttheexternalcablesandpowercordstothecorrespondingconnectorsonthecomputer.
See“Hardwarelocations”onpage1.
8.Updatetheconfigurationofyourcomputerifnecessary.See“UsingtheSetupUtilityprogram”on
page35.
9.Ifanewlyinstalledhardwarecomponentdoesnotworknormally,updatethedevicedriver.See
“Keepingyourcomputercurrent”onpage26.
106ThinkStationP310UserGuide

Chapter8.Gettinginformation,help,andservice
Thischaptercontainsthefollowingtopics:
•“Informationresources”onpage107
•“Helpandservice”onpage108
Informationresources
Youcanusetheinformationinthissectiontoaccessusefulresourcesrelatingtoyourcomputingneeds.
Accessingtheuserguideinvariouslanguages
Toaccesstheuserguideinvariouslanguages,goto:
http://www.lenovo.com/UserManuals
Windowshelpsystem
TheWindowshelpsystemprovidesyouwithdetailedinformationaboutusingtheWindowsoperatingsystem.
ToaccesstheWindowshelpsystem,dothefollowing:
1.ClicktheStartbuttontoopentheStartmenu.
2.DependingonyourWindowsversion,dooneofthefollowing:
•ForWindows7:ClickHelpandSupport.Youcanchoosetousetheonlineorofflinehelpatthe
bottomofthescreen.
•ForWindows10:ClickGetstarted.
Note:UsingonlinehelpforWindows7orthehelpforWindows10requiresanactiveInternetconnection.
Safetyandwarranty
TheSafety,Warranty,andSetupGuideprovidedwithyourcomputercontainsimportantsafetyinformation,
productwarrantyterms,initialsetupprocedure,andlegalnotices.Ensurethatyoureadandunderstandall
safetyinformationintheSafety,Warranty,andSetupGuidebeforeusingyourcomputer.
Inaddition,readandunderstand“Readthisfirst:Importantsafetyinformation”onpagevbeforeusingyour
computer.Thisprefaceprovidesadditionalsafetyinformationthatappliestotopicsandtasksdescribedin
thisUserGuide.
LenovoWebsite
TheLenovoWebsite(http://www.lenovo.com)providesup-to-dateinformationandservicestohelpyoubuy,
upgrade,andmaintainyourcomputer.Youalsocandothefollowing:
•Shopfordesktopandnotebookcomputers,monitors,projectors,upgrades,andaccessoriesforyour
computer,andspecialoffers.
•Purchaseadditionalservices,suchassupportforhardware,operatingsystems,applicationprograms,
networksetupandconfiguration,andcustominstallations.
•Purchaseupgradesandextendedhardwarerepairservices.
•Accesstroubleshootingandsupportinformationforyourcomputermodelandothersupportedproducts.
•FindaServiceProviderlocatednearyou.
©CopyrightLenovo2016107

LenovoSupportWebsite
TechnicalsupportinformationisavailableontheLenovoSupportWebsiteat:
http://www.lenovo.com/support
ThisWebsiteisupdatedwiththelatestsupportinformationsuchasthefollowing:
•Driversandsoftware
•Diagnosticsolutions
•Productandservicewarranty
•Productandpartsdetails
•Userguidesandmanuals
•Knowledgebaseandfrequentlyaskedquestions
•LenovoSupportphonenumbers
Frequentlyaskedquestions
Fortheanswerstofrequentlyaskedquestionsaboutyourcomputer,goto:
http://www.lenovo.com/support/faq
Helpandservice
Thissectionprovidesinformationaboutobtaininghelpandservice.
Callingforservice
Duringthewarrantyperiod,youcangethelpandinformationbytelephonethroughtheCustomerSupport
Center.Forthewarrantyperiodofyourcomputer,gotohttp://www.lenovo.com/warranty-status.Foralistof
LenovoSupportphonenumbers,gotohttp://www.lenovo.com/support/phone.
Note:Phonenumbersaresubjecttochangewithoutnotice.Ifthenumberforyourcountryorregionisnot
provided,contactyourLenovoresellerorLenovomarketingrepresentative.
Thefollowingservicesareavailableduringthewarrantyperiod:
•Problemdetermination-Trainedservicepersonnelareavailabletoassistyouwithdetermininga
hardwareproblemanddecidingwhatactionisnecessarytofixtheproblem.
•Hardwarerepair-Iftheproblemiscausedbyhardwareunderwarranty,trainedservicepersonnelare
availabletoprovidetheapplicablelevelofservice.
•EngineeringChangemanagement-Theremightbechangesthatarerequiredafteraproducthas
beensold.LenovooryourresellerwillmakeselectedEngineeringChanges(ECs)thatapplytoyour
hardwareavailable.
Theseitemsarenotcoveredbythewarranty:
•ReplacementoruseofpartsnotmanufacturedfororbyLenovoornon-warrantedLenovoparts
•Identificationofsoftwareproblemsources
•ConfigurationofBIOSaspartofaninstallationorupgrade
•Changes,modifications,orupgradestodevicedrivers
•Installationandmaintenanceofnetworkoperatingsystems(NOS)
•Installationandmaintenanceofapplicationprograms
Ifpossible,beatyourcomputerwhenyoucall.Havethefollowinginformationavailable:
•Machinetypeandmodel
•Serialnumbersofyourhardwareproducts
108ThinkStationP310UserGuide

•Descriptionoftheproblem
•Exactwordingofanyerrormessages
•Hardwareandsoftwareconfigurationinformation
Usingotherservices
Youmighttravelwithyourcomputerorrelocateittoacountryorregionwherethemachinetypeforyour
desktopornotebookcomputerissold.Insuchasituation,yourcomputermightbeeligibleforInternational
WarrantyService,whichautomaticallyentitlesyoutoobtainwarrantyservicethroughoutthewarrantyperiod.
Servicewillbeperformedbyserviceprovidersauthorizedtoperformwarrantyservice.
Servicemethodsandproceduresvarybycountry,andsomeservicesmightnotbeavailableinallcountries.
InternationalWarrantyServiceisdeliveredthroughthemethodofservice(suchasdepot,carry-in,or
on-siteservice)thatisprovidedintheservicingcountry.Servicecentersincertaincountriesmightnotbe
abletoserviceallmodelsofaparticularmachinetype.Insomecountries,feesandrestrictionsmight
applyatthetimeofservice.
TodeterminewhetheryourcomputeriseligibleforInternationalWarrantyServiceandtoviewalistofthe
countriesorregionswhereserviceisavailable,gotohttp://www.lenovo.com/support.
FortechnicalassistancewiththeinstallationoforquestionsrelatedtoServicePacksforyourpreinstalled
MicrosoftWindowsproduct,gototheMicrosoftProductSupportWebsiteathttp://support.microsoft.com.
YoualsocancontacttheLenovoCustomerSupportCenterforhelp.Somefeesmightapply.
Purchasingadditionalservices
Duringandafterthewarrantyperiod,youcanpurchaseadditionalservices.Examplesoftheseadditional
servicesinclude:
•Supportforhardware,operatingsystems,andapplicationprograms
•Networksetupandconfigurationservices
•Upgradedorextendedhardwarerepairservices
•Custominstallationservices
Serviceavailabilityandservicenamemightvarybycountryorregion.Formoreinformationaboutthese
services,gototheLenovoWebsiteat:
http://www.lenovo.com
Chapter8.Gettinginformation,help,andservice109

110ThinkStationP310UserGuide

AppendixA.Systemmemoryspeed
TheIntelmicroprocessorfamiliesthatarecompatiblewiththisThinkStation®computerfeatureanintegrated
memorycontroller,whichprovidesthemicroprocessorwithdirectaccesstothesystemmemory.Because
ofthisdesign,thesystemmemoryspeedwillbedeterminedbyanumberoffactors,includingthe
microprocessormodelandthetype,speed,size(capacity),andnumberofDIMMsinstalled.Refertothe
followingtablefortheinformationonthesupportedsystemmemoryspeedforyourowncomputermodel.
Note:OnlytheIntelXeon®microprocessorssupportECCUDIMMmemorymodules.
Table1.:DIMMtypeandspeed:UDIMMPC4-2133(1.2V)
MicroprocessormodelMemoryfrequency
Inteli3-6100,i3-6300,i-36320,i5-6400,i5-6500,i5-6600,
i7-6700,IntelXeonE3-1220V5,E3-1225V5,E3-1230V5,
E3-1240V5,E3-1245V5,E3-1270V5,E3-1275V5,
E3-1280V5
2133MHz
©CopyrightLenovo2016111

112ThinkStationP310UserGuide

AppendixB.Regulatoryinformation
Thelatestcomplianceinformationisavailableat
http://www.lenovo.com/compliance.
Exportclassificationnotice
ThisproductissubjecttotheUnitedStatesExportAdministrationRegulations(EAR)andhasanExport
ClassificationControlNumber(ECCN)of5A992.c.Itcanbere-exportedexcepttoanyoftheembargoed
countriesintheEARE1countrylist.
Electronicemissionsnotices
ThefollowinginformationreferstoLenovopersonalcomputermachinetypes30AS,30AT,30AY,and30B0.
FederalCommunicationsCommissionDeclarationofConformity
ThisequipmenthasbeentestedandfoundtocomplywiththelimitsforaClassBdigitaldevice,pursuant
toPart15oftheFCCRules.Theselimitsaredesignedtoprovidereasonableprotectionagainstharmful
interferenceinaresidentialinstallation.Thisequipmentgenerates,uses,andcanradiateradiofrequency
energyand,ifnotinstalledandusedinaccordancewiththeinstructions,maycauseharmfulinterference
toradiocommunications.However,thereisnoguaranteethatinterferencewillnotoccurinaparticular
installation.Ifthisequipmentdoescauseharmfulinterferencetoradioortelevisionreception,whichcanbe
determinedbyturningtheequipmentoffandon,theuserisencouragedtotrytocorrecttheinterferenceby
oneormoreofthefollowingmeasures:
•Reorientorrelocatethereceivingantenna.
•Increasetheseparationbetweentheequipmentandreceiver.
•Connecttheequipmentintoanoutletonacircuitdifferentfromthattowhichthereceiverisconnected.
•Consultanauthorizeddealerorservicerepresentativeforhelp.
Lenovoisnotresponsibleforanyradioortelevisioninterferencecausedbyusingotherthanspecifiedor
recommendedcablesandconnectorsorbyunauthorizedchangesormodificationstothisequipment.
Unauthorizedchangesormodificationscouldvoidtheuser'sauthoritytooperatetheequipment.
ThisdevicecomplieswithPart15oftheFCCRules.Operationissubjecttothefollowingtwoconditions:(1)
thisdevicemaynotcauseharmfulinterference,and(2)thisdevicemustacceptanyinterferencereceived,
includinginterferencethatmaycauseundesiredoperation.
ResponsibleParty:
Lenovo(UnitedStates)Incorporated
1009ThinkPlace-BuildingOne
Morrisville,NC27560
PhoneNumber:919-294-5900
IndustryCanadaClassBemissioncompliancestatement
CANICES-3(B)/NMB-3(B)
©CopyrightLenovo2016113

European Union - Compliance to the Electromagnetic Compatibility (EMC) Directive or Radio
Equipment Directive
Models without a radio dev ice: This product is in conformity with the protection requirements of EU
Council Directive 2004/108/EC (until 19 April, 2016) and Council Directive 2014/30/EU (from 20 April, 2016)
on the approximation of the laws of the Member States relating to electromagnetic compatibility.
Models with a radio dev ice: This product is in conformity with all the requirements and essential norms
that apply to EU Council R&TTE Directive 1999/5/EC on the approximation of the laws of the Member
States relating to radio equipment.
Lenovo cannot accept responsibility for any failure to satisfy the protection requirements resulting from
a non-recommended modification of the product, including the installation of option cards from other
manufacturers. This product has been tested and found to comply with the limits for Class B equipment
according to European Standards harmonized in the Directives in compliance. The limits for Class B
equipment were derived for typical residential environments to provide reasonable protection against
interference with licensed communication devices.
Lenovo, Einsteinova 21, 851 01 Bratislava, Slovakia
German Class B compliance statement
Deutschsprachiger EU Hinweis:
Hinweis für Geräte der Klasse B EU-Richtlinie zur Elektromagnetischen Verträglichkeit
Dieses Produkt entspricht den Schutzanforderungen der EU-Richtlinie 2014/30/EU (früher 2004/108/EC) zur
Angleichung der Rechtsvorschriften über die elektromagnetische Verträglichkeit in den EU-Mitgliedsstaaten
und hält die Grenzwerte der Klasse B der Norm gemäß Richtlinie.
Um dieses sicherzustellen, sind die Geräte wie in den Handbüchern beschrieben zu installieren und zu
betreiben. Des Weiteren dürfen auch nur von der Lenovo empfohlene Kabel angeschlossen werden.
Lenovo übernimmt keine Verantwortung für die Einhaltung der Schutzanforderungen, wenn das Produkt
ohne Zustimmung der Lenovo verändert bzw. wenn Erweiterungskomponenten von Fremdherstellern ohne
Empfehlung der Lenovo gesteckt/eingebaut werden.
Deutschland:
Zulassungsbescheinigung laut dem Deutschen Gesetz über die elektromagnetische Verträglichkeit
von Betriebsmitteln, EMVG v om 20. Juli 2007 (früher Gesetz über die elektromagnetische
Verträglichkeit von Geräten), bzw. der EMV EU Richtlinie 2014/30/EU (früher 2004/108/EC), für Geräte
der Klasse B.
Dieses Gerät ist berechtigt, in Übereinstimmung mit dem Deutschen EMVG das EG-Konformitätszeichen
- CE - zu führen. Verantwortlich für die Konformitätserklärung nach Paragraf 5 des EMVG ist die Lenovo
(Deutschland) GmbH, Meitnerstr. 9, D-70563 Stuttgart.
114 ThinkStation P310 User Guide
EinhaltungdesGesetzesüberdieelektromagnetischeVerträglichkeitvonBetriebsmitteln
DiesesProduktentsprichtdem„GesetzüberdieelektromagnetischeVerträglichkeitvonBetriebsmitteln“
EMVG(früher„GesetzüberdieelektromagnetischeVerträglichkeitvonGeräten“).DiesistdieUmsetzungder
EMVEU-Richtlinie2014/30/EU(früher2004/108/EWG)inderBundesrepublikDeutschland.
InformationeninHinsichtEMVGParagraf4Abs.(1)4:
DasGeräterfülltdieSchutzanforderungennachEN55024undEN55022KlasseB.
KoreaClassBcompliancestatement
JapanVCCIClassBcompliancestatement
Japancompliancestatementforproductswhichconnecttothepowermainswithratedcurrent
lessthanorequalto20Aperphase
Japannoticeforacpowercord
Theacpowercordshippedwithyourproductcanbeusedonlyforthisspecificproduct.Donotusetheac
powercordforotherdevices.
LenovoproductserviceinformationforTaiwan
KeyboardandmousecompliancestatementforTaiwan
Eurasiancompliancemark
Brazilaudionotice
Ouvirsonscommaisde85decibéisporlongosperíodospodeprovocardanosaosistemaauditivo.
Mexicowireless-radiocomplianceinformation
Advertencia:EnMexicolaoperacióndeesteequipoestásujetaalassiguientesdoscondiciones:(1)es
posiblequeesteequipoodispositivonocauseinterferenciaperjudicialy(2)esteequipoodispositivodebe
aceptarcualquierinterferencia,incluyendolaquepuedacausarsuoperaciónnodeseada.
AppendixB.Regulatoryinformation115

Additionalregulatoryinformation
Foradditionalregulatoryinformation,refertotheRegulatoryNoticeshippedwithyourcomputer.Depending
ontheconfigurationofyourcomputerandthecountryorregionwherethecomputerwaspurchased,
youmighthavereceivedadditionalprintedregulatorynotices.Allregulatorynoticesareavailableonthe
LenovoSupportWebsiteinelectronicformat.Toaccesselectroniccopiesofthedocumentation,goto
http://www.lenovo.com/UserManuals.
116ThinkStationP310UserGuide

AppendixC.WEEEandrecyclinginformation
Lenovoencouragesownersofinformationtechnology(IT)equipmenttoresponsiblyrecycletheirequipment
whenitisnolongerneeded.Lenovooffersvariousprogramsandservicestoassistequipmentownersin
recyclingtheirITproducts.Thelatestenvironmentalinformationisavailableat
http://www.lenovo.com/ecodeclaration.
ImportantWEEEinformation
TheWEEEmarkingonLenovoproductsappliestocountrieswithWEEEande-wasteregulations(for
example,theEuropeanWEEEDirective,IndiaE-WasteManagement&HandlingRules,2011).Appliancesare
labeledinaccordancewithlocalregulationsconcerningwasteelectricalandelectronicequipment(WEEE).
Theseregulationsdeterminetheframeworkforthereturnandrecyclingofusedappliancesasapplicable
withineachgeography.Thislabelisappliedtovariousproductstoindicatethattheproductisnottobe
thrownaway,butratherputintheestablishedcollectionsystemsforreclaimingtheseendoflifeproducts.
Usersofelectricalandelectronicequipment(EEE)withtheWEEEmarkingmustnotdisposeofendoflife
EEEasunsortedmunicipalwaste,butusethecollectionframeworkavailabletothemforthereturn,recycle,
andrecoveryofWEEEandtominimizeanypotentialeffectsofEEEontheenvironmentandhumanhealth
duetothepresenceofhazardoussubstances.ForadditionalWEEEinformation,goto:
http://www.lenovo.com/recycling
RecyclinginformationforJapan
CollectingandrecyclingadisusedLenovocomputerormonitor
IfyouareacompanyemployeeandneedtodisposeofaLenovocomputerormonitorthatistheproperty
ofthecompany,youmustdosoinaccordancewiththeLawforPromotionofEffectiveUtilizationof
Resources.Computersandmonitorsarecategorizedasindustrialwasteandshouldbeproperlydisposed
ofbyanindustrialwastedisposalcontractorcertifiedbyalocalgovernment.InaccordancewiththeLaw
forPromotionofEffectiveUtilizationofResources,LenovoJapanprovides,throughitsPCCollecting
andRecyclingServices,forthecollecting,reuse,andrecyclingofdisusedcomputersandmonitors.For
details,visittheLenovoWebsiteathttp://www.lenovo.com/recycling/japan.PursuanttotheLawfor
PromotionofEffectiveUtilizationofResources,thecollectingandrecyclingofhome-usedcomputers
andmonitorsbythemanufacturerwasbegunonOctober1,2003.Thisserviceisprovidedfreeof
chargeforhome-usedcomputerssoldafterOctober1,2003.Fordetails,visittheLenovoWebsiteat
http://www.lenovo.com/recycling/japan.
©CopyrightLenovo2016117
DisposingofLenovocomputercomponents
SomeLenovocomputerproductssoldinJapanmayhavecomponentsthatcontainheavymetalsorother
environmentalsensitivesubstances.Toproperlydisposeofdisusedcomponents,suchasaprintedcircuit
boardordrive,usethemethodsdescribedaboveforcollectingandrecyclingadisusedcomputerormonitor.
DisposingofdisusedlithiumbatteriesfromLenovocomputers
Abutton-shapedlithiumbatteryisinstalledinsideyourLenovocomputertoprovidepowertothecomputer
clockwhilethecomputerisoffordisconnectedfromthemainpowersource.Ifyouneedtoreplaceitwitha
newone,contactyourplaceofpurchaseorcontactLenovoforservice.Ifyouneedtodisposeofadisused
lithiumbattery,insulateitwithvinyltape,contactyourplaceofpurchaseoranindustrial-waste-disposal
operator,andfollowtheirinstructions.Disposalofalithiumbatterymustcomplywithlocalordinances
andregulations.
RecyclinginformationforBrazil
DeclaraçõesdeReciclagemnoBrasil
DescartedeumProdutoLenovoForadeUso
Equipamentoselétricoseeletrônicosnãodevemserdescartadosemlixocomum,masenviadosàpontosde
coleta,autorizadospelofabricantedoprodutoparaquesejamencaminhadoseprocessadosporempresas
especializadasnomanuseioderesíduosindustriais,devidamentecertificadaspelosorgãosambientais,de
acordocomalegislaçãolocal.
ALenovopossuiumcanalespecíficoparaauxiliá-lonodescartedessesprodutos.Casovocêpossua
umprodutoLenovoemsituaçãodedescarte,ligueparaonossoSACouencaminheume-mailpara:
reciclar@lenovo.com,informandoomodelo,númerodesérieecidade,afimdeenviarmosasinstruções
paraocorretodescartedoseuprodutoLenovo.
BatteryrecyclinginformationforTaiwan
BatteryrecyclinginformationfortheEuropeanUnion
Notice:ThismarkappliesonlytocountrieswithintheEuropeanUnion(EU).
118ThinkStationP310UserGuide

BatteriesorpackagingforbatteriesarelabeledinaccordancewithEuropeanDirective2006/66/EC
concerningbatteriesandaccumulatorsandwastebatteriesandaccumulators.TheDirectivedeterminesthe
frameworkforthereturnandrecyclingofusedbatteriesandaccumulatorsasapplicablethroughoutthe
EuropeanUnion.Thislabelisappliedtovariousbatteriestoindicatethatthebatteryisnottobethrown
away,butratherreclaimeduponendoflifeperthisDirective.
InaccordancewiththeEuropeanDirective2006/66/EC,batteriesandaccumulatorsarelabeledtoindicate
thattheyaretobecollectedseparatelyandrecycledatendoflife.Thelabelonthebatterymayalso
includeachemicalsymbolforthemetalconcernedinthebattery(Pbforlead,Hgformercury,andCdfor
cadmium).Usersofbatteriesandaccumulatorsmustnotdisposeofbatteriesandaccumulatorsasunsorted
municipalwaste,butusethecollectionframeworkavailabletocustomersforthereturn,recycling,and
treatmentofbatteriesandaccumulators.Customerparticipationisimportanttominimizeanypotential
effectsofbatteriesandaccumulatorsontheenvironmentandhumanhealthduetothepotentialpresenceof
hazardoussubstances.Forpropercollectionandtreatment,goto:
http://www.lenovo.com/recycling
AppendixC.WEEEandrecyclinginformation119

120ThinkStationP310UserGuide
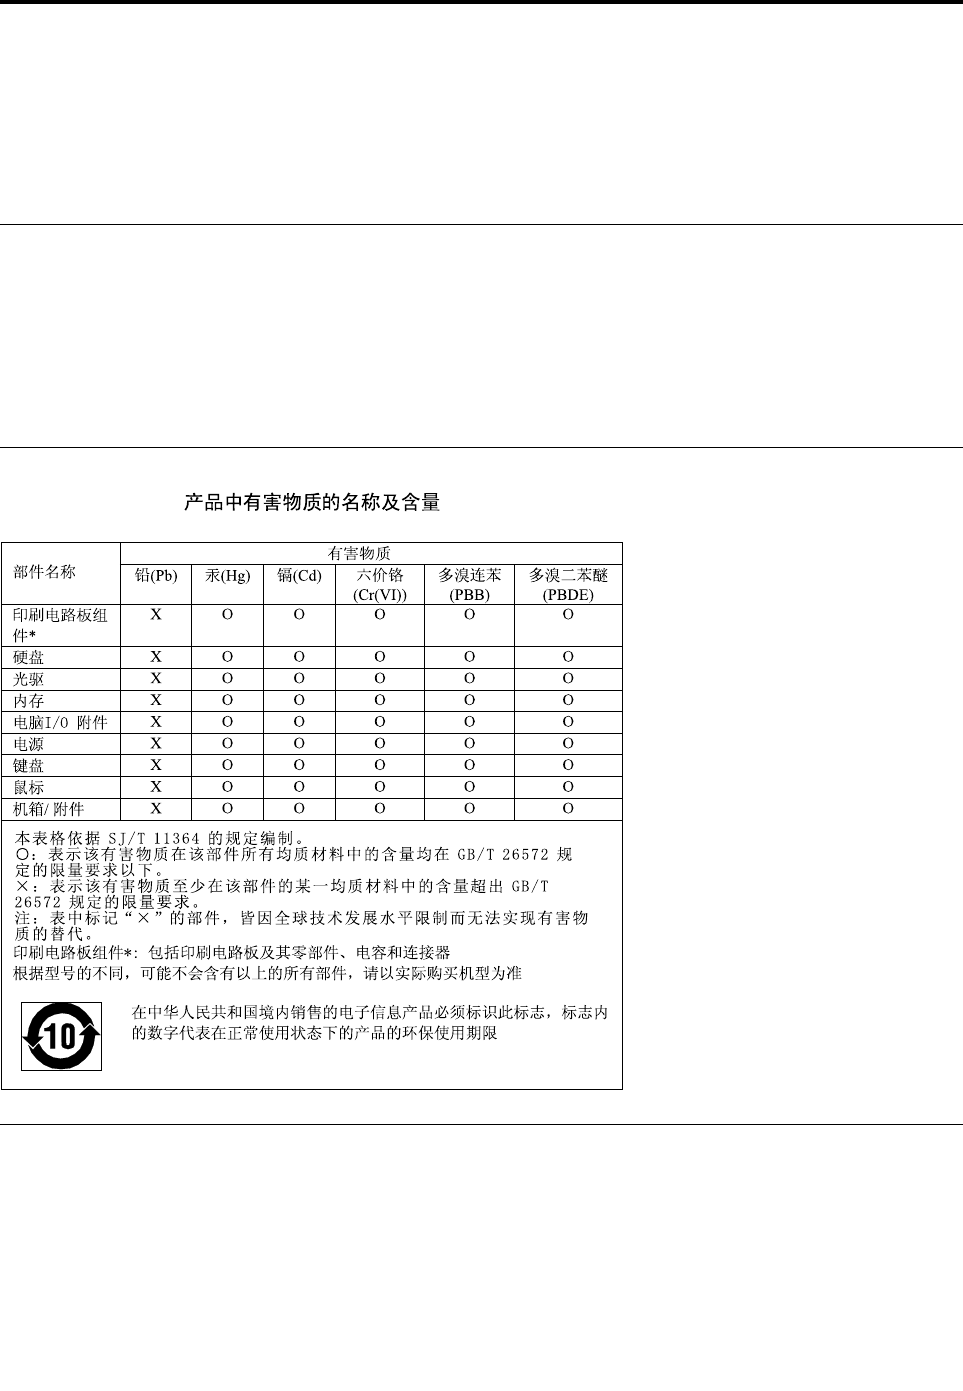
AppendixD.RestrictionofHazardousSubstancesDirective
(RoHS)
Thelatestenvironmentalinformationisavailableat
http://www.lenovo.com/ecodeclaration.
EuropeanUnionRoHS
ThisLenovoproduct,withincludedparts(cables,cords,andsoon)meetstherequirementsofDirective
2011/65/EUontherestrictionoftheuseofcertainhazardoussubstancesinelectricalandelectronic
equipment(“RoHSrecast”or“RoHS2”).
FormoreinformationaboutLenovoworldwidecomplianceonRoHS,goto:
http://www.lenovo.com/social_responsibility/us/en/RoHS_Communication.pdf
ChinaRoHS
TurkishRoHS
TheLenovoproductmeetstherequirementsoftheRepublicofTurkeyDirectiveontheRestrictionoftheUse
ofCertainHazardousSubstancesinWasteElectricalandElectronicEquipment(WEEE).
©CopyrightLenovo2016121

UkraineRoHS
IndiaRoHS
RoHScompliantasperE-Waste(Management&Handling)Rules,2011.
122ThinkStationP310UserGuide

AppendixE.ENERGYSTARmodelinformation
ENERGYSTAR®isajointprogramoftheU.S.EnvironmentalProtectionAgencyandtheU.S.Department
ofEnergyaimedatsavingmoneyandprotectingtheenvironmentthroughenergyefficientproductsand
practices.
LenovoisproudtoofferourcustomersproductswithanENERGYSTARcompliantdesignation.Some
modelsofthefollowingmachinetypeshavebeendesignedandtestedtoconformtotheENERGYSTAR
programrequirementforcomputersatthetimeofmanufacture:30AS,30AT,30AY,and30B0.Formore
informationaboutENERGYSTARratingsforLenovocomputers,goto:
http://www.lenovo.com
ByusingENERGYSTARcompliantproductsandtakingadvantageofthepower-managementfeaturesof
yourcomputer,youreducetheconsumptionofelectricity.Reducedelectricalconsumptioncontributesto
potentialfinancialsavings,acleanerenvironment,andthereductionofgreenhousegasemissions.
FormoreinformationaboutENERGYSTAR,goto:
http://www.energystar.gov
Lenovoencouragesyoutomakeefficientuseofenergyanintegralpartofyourday-to-dayoperations.To
helpinthisendeavor,setthefollowingpower-managementfeaturestotakeeffectwhenyourcomputerhas
beeninactiveforaspecifiedduration:
Table2.ENERGYSTARpower-managementfeatures
Windows7orWindows10operatingsystem
Powerplan:Default
•Turnoffthedisplay:After10minutes
•Putthecomputertosleep:After25minutes
•Advancedpowersettings:
–Turnoffharddiskdrives:After20minutes
–Hibernate:Never
ToawakenyourcomputerfromaSleepmode,pressanykeyonyourkeyboard.
Tochangepowersettings,dothefollowing:
1.OpenControlPanelbydoingoneofthefollowing:
•ForWindows7:ClicktheStartbuttontoopentheStartmenu.
•ForWindows10:Right-clicktheStartbuttontoopentheStartcontextmenu.
2.ClickControlPanel.ViewControlPanelbyLargeiconsorSmallicons,andthenclickPowerOptions.
3.Followtheinstructionsonthescreen.
©CopyrightLenovo2016123

124ThinkStationP310UserGuide

AppendixF.Notices
Lenovomaynotoffertheproducts,services,orfeaturesdiscussedinthisdocumentinallcountries.Consult
yourlocalLenovorepresentativeforinformationontheproductsandservicescurrentlyavailableinyour
area.AnyreferencetoaLenovoproduct,program,orserviceisnotintendedtostateorimplythatonlythat
Lenovoproduct,program,orservicemaybeused.Anyfunctionallyequivalentproduct,program,orservice
thatdoesnotinfringeanyLenovointellectualpropertyrightmaybeusedinstead.However,itistheuser's
responsibilitytoevaluateandverifytheoperationofanyotherproduct,program,orservice.
Lenovomayhavepatentsorpendingpatentapplicationscoveringsubjectmatterdescribedinthis
document.Thefurnishingofthisdocumentdoesnotgiveyouanylicensetothesepatents.Youcansend
licenseinquiries,inwriting,to:
Lenovo(UnitedStates),Inc.
1009ThinkPlace-BuildingOne
Morrisville,NC27560
U.S.A.
Attention:LenovoDirectorofLicensing
LENOVOPROVIDESTHISPUBLICATION“ASIS”WITHOUTWARRANTYOFANYKIND,EITHEREXPRESS
ORIMPLIED,INCLUDING,BUTNOTLIMITEDTO,THEIMPLIEDWARRANTIESOFNON-INFRINGEMENT,
MERCHANTABILITYORFITNESSFORAPARTICULARPURPOSE.Somejurisdictionsdonotallow
disclaimerofexpressorimpliedwarrantiesincertaintransactions,therefore,thisstatementmaynotapply
toyou.
Thisinformationcouldincludetechnicalinaccuraciesortypographicalerrors.Changesareperiodically
madetotheinformationherein;thesechangeswillbeincorporatedinneweditionsofthepublication.
Lenovomaymakeimprovementsand/orchangesintheproductsand/ortheprogramsdescribedinthis
publicationatanytimewithoutnotice.
Theproductsdescribedinthisdocumentarenotintendedforuseinimplantationorotherlifesupport
applicationswheremalfunctionmayresultininjuryordeathtopersons.Theinformationcontainedinthis
documentdoesnotaffectorchangeLenovoproductspecificationsorwarranties.Nothinginthisdocument
shalloperateasanexpressorimpliedlicenseorindemnityundertheintellectualpropertyrightsofLenovo
orthirdparties.Allinformationcontainedinthisdocumentwasobtainedinspecificenvironmentsandis
presentedasanillustration.Theresultobtainedinotheroperatingenvironmentsmayvary.
Lenovomayuseordistributeanyoftheinformationyousupplyinanywayitbelievesappropriatewithout
incurringanyobligationtoyou.
Anyreferencesinthispublicationtonon-LenovoWebsitesareprovidedforconvenienceonlyanddonotin
anymannerserveasanendorsementofthoseWebsites.ThematerialsatthoseWebsitesarenotpartof
thematerialsforthisLenovoproduct,anduseofthoseWebsitesisatyourownrisk.
Anyperformancedatacontainedhereinwasdeterminedinacontrolledenvironment.Therefore,theresult
obtainedinotheroperatingenvironmentsmayvarysignificantly.Somemeasurementsmayhavebeen
madeondevelopment-levelsystemsandthereisnoguaranteethatthesemeasurementswillbethesame
ongenerallyavailablesystems.Furthermore,somemeasurementsmayhavebeenestimatedthrough
extrapolation.Actualresultsmayvary.Usersofthisdocumentshouldverifytheapplicabledatafortheir
specificenvironment.
©CopyrightLenovo2016125

Trademarks
ThefollowingtermsaretrademarksofLenovointheUnitedStates,othercountries,orboth:
Lenovo
TheLenovologo
ThinkStation
TheThinkStationlogo
RescueandRecovery
ThinkVantage
Microsoft,Windows,andWindowsMediaaretrademarksoftheMicrosoftgroupofcompanies.
Intel,Thunderbolt,andXeonaretrademarksofIntelCorporationintheU.S.and/orothercountries.
LinuxisaregisteredtrademarkofLinusTorvalds.
DisplayPortisatrademarkoftheVideoElectronicsStandardsAssociation.
Othercompany,product,orservicenamesmaybetrademarksorservicemarksofothers.
126ThinkStationP310UserGuide