Lenovo S20 Hmm User Manual Hardware Maintenance D20 Workstation (Think Station)
Lenovo-Personal-Computer-4105-Users-Manual-329761 lenovo-personal-computer-4105-users-manual-329761
2012-04-09
User Manual: Lenovo S20 Hmm Hardware Maintenance Manual D20 Workstation (ThinkStation) ThinkStation D20
Open the PDF directly: View PDF ![]() .
.
Page Count: 270 [warning: Documents this large are best viewed by clicking the View PDF Link!]
- Chapter 1. About this manual
- Chapter 2. Safety information
- Chapter 3. General information
- Chapter 4. General Checkout
- Chapter 5. Diagnostics
- Chapter 6. Using the Setup Utility
- Chapter 7. Installing hard disk drives and configuring RAID (types 4105, 4157, 4217)
- Installing SATA hard disk drives and configuring RAID
- Installing SAS hard disk drives and configuring RAID
- Installing SAS hard disk drives
- Entering the Marvell BIOS Setup to configure SAS RAID
- Configuring the Marvell BIOS Setup to enable SAS RAID 0, 1, or 5 functionality
- Configuring the Marvell BIOS Setup to set an optional hot spare hard disk drive
- Configuring the Marvell BIOS Setup to delete an optional hot spare hard disk drive
- Configuring the Marvell BIOS Setup to delete an array
- Chapter 8. Installing hard disk drives and configuring RAID (types: 4155, 4158, 4218)
- Installing SATA or SAS hard disk drives and configuring RAID
- Installing SATA or SAS hard disk drives
- Entering the Marvell BIOS Setup to configure SATA or SAS RAID
- Configuring the Marvell BIOS Setup to enable SATA or SAS RAID 0, 1, 5, or 10 functionality
- Configuring the Marvell BIOS Setup to set an optional hot spare hard disk drive
- Configuring the Marvell BIOS Setup to delete an optional hot spare hard disk drive
- Configuring the Marvell BIOS Setup to delete an array
- Installing SATA or SAS hard disk drives and configuring RAID
- Chapter 9. Symptom-to-FRU Index
- Chapter 10. Replacing FRUs (Type 4105, 4157, 4217)
- Locating controls and connectors on the front of your computer
- Rear connectors
- Removing the cover
- Locations
- Locating parts on the system board
- Removing the front bezel
- Replacing the power supply
- Replacing a memory module
- Replacing a PCI adapter card
- Replacing the heat sink
- Replacing the microprocessor
- Replacing the system board
- Replacing a hard disk drive
- Replacing the hard disk drive fan assembly
- Replacing an optical drive
- Replacing the diskette drive or card reader
- Replacing the front and rear fan assemblies
- Replacing the front panel connectors assembly
- Replacing the power switch/LED assembly
- Replacing the battery
- Replacing the internal speaker
- Completing the FRU replacement
- Chapter 11. Replacing FRUs (Type 4155, 4158, 4218)
- Locating controls and connectors on the front of your computer
- Rear connectors
- Removing the cover
- Locations
- Locating parts on the system board
- Removing the front bezel
- Replacing the power supply
- Installing or replacing a memory module
- Replacing a PCI adapter card
- Replacing the heat sink
- Replacing the microprocessor
- Replacing the system board
- Replacing a hard disk drive
- Replacing the hard disk drive fan assembly
- Replacing an optical drive
- Replacing the diskette drive or card reader
- Replacing the front and rear fan assemblies
- Replacing the front panel connectors assembly
- Replacing the power switch/LED assembly
- Replacing the battery
- Replacing the internal speaker
- Completing the FRU replacement
- Chapter 12. FRU lists
- Chapter 13. Additional Service Information
- Appendix A. Notices
- Appendix B. System memory speed
- Index

ThinkStation
HardwareMaintenanceManual
MachineType:4105,4155,4157,4158,4217,4218

ThinkStation
HardwareMaintenanceManual
MachineType:4105,4155,4157,4158,4217,4218

Note:Beforeusingthisinformationandtheproductitsupports,besuretoreadtheinformationunderAppendixA
“Notices”onpage255.
TwelfthEdition(March2012)
©CopyrightLenovo2008,2012.
LIMITEDANDRESTRICTEDRIGHTSNOTICE:IfdataorsoftwarearedeliveredpursuantaGeneralServices
Administration“GSA”contract,use,reproduction,ordisclosureissubjecttorestrictionssetforthinContractNo.
GS-35F-05925.

Contents
Chapter1.Aboutthismanual......1
ImportantSafetyInformation..........1
ImportantinformationaboutreplacingRoHS
compliantFRUs...............1
Chapter2.Safetyinformation......3
Generalsafety................3
Electricalsafety...............3
Voltage-selectionswitch............5
Safetyinspectionguide............5
Handlingelectrostaticdischarge-sensitive
devices..................6
Groundingrequirements............6
Safetynotices(multi-lingualtranslations).....6
Chapter3.Generalinformation....29
LenovoWelcomeCenter...........29
LenovoSolutionCenter...........29
SimpleTap................29
Additionalinformationresources.......29
Specications...............29
Chapter4.GeneralCheckout.....33
Problemdeterminationtips..........33
Chapter5.Diagnostics........35
LenovoThinkVantageTools.........35
LenovoSolutionCenter...........35
PC-DoctorforWindowsPE..........36
RunningdiagnosticsfromtheRescueand
Recoveryworkspace..........36
PC-DoctorforDOS.............36
CreatingadiagnosticCD/DVDimage....36
Runningdiagnosticsfromthedisc.....36
RunningdiagnosticsfromtheRescueand
Recoveryworkspace..........37
Navigatingthroughthediagnostics
programs...............37
Runningtests.............37
Viewingthetestlog...........39
Chapter6.UsingtheSetupUtility...41
StartingtheSetupUtilityprogram.......41
Viewingandchangingsettings........41
Usingpasswords..............41
Passwordconsiderations.........41
UserPassword.............42
AdministratorPassword.........42
Setting,changing,anddeletingapassword.42
Enablingordisablingadevice........42
Selectingastartupdevice..........43
Selectingatemporarystartupdevice....43
Selectingorchangingthestartupdevice
sequence...............43
Advancedsettings.............43
ExitingfromtheSetupUtilityprogram.....44
Chapter7.Installingharddiskdrives
andconguringRAID(types4105,
4157,4217)..............45
InstallingSATAharddiskdrivesandconguring
RAID..................45
InstallingSATAharddiskdrives......45
ConguringthesystemBIOStoenableSATA
RAIDfunctionality............45
CreatingRAIDvolumes.........46
DeletingRAIDvolumes.........46
InstallingSASharddiskdrivesandconguring
RAID..................46
InstallingSASharddiskdrives.......46
EnteringtheMarvellBIOSSetuptocongure
SASRAID...............47
ConguringtheMarvellBIOSSetuptoenable
SASRAID0,1,or5functionality......47
ConguringtheMarvellBIOSSetuptosetan
optionalhotspareharddiskdrive.....48
ConguringtheMarvellBIOSSetuptodelete
anoptionalhotspareharddiskdrive....48
ConguringtheMarvellBIOSSetuptodelete
anarray...............48
Chapter8.Installingharddiskdrives
andconguringRAID(types:4155,
4158,4218)..............49
InstallingSATAorSASharddiskdrivesand
conguringRAID..............49
InstallingSATAorSASharddiskdrives...49
EnteringtheMarvellBIOSSetuptocongure
SATAorSASRAID...........49
ConguringtheMarvellBIOSSetuptoenable
SATAorSASRAID0,1,5,or10functionality.50
ConguringtheMarvellBIOSSetuptosetan
optionalhotspareharddiskdrive.....50
ConguringtheMarvellBIOSSetuptodelete
anoptionalhotspareharddiskdrive....50
ConguringtheMarvellBIOSSetuptodelete
anarray...............50
©CopyrightLenovo2008,2012iii

Chapter9.Symptom-to-FRUIndex..53
Harddiskdrivebooterror..........53
PowerSupplyProblems...........53
Diagnosticerrorcodes...........54
Beepsymptoms..............71
POSTerrorcodes.............72
Miscellaneouserrormessages........73
Undeterminedproblems...........75
Chapter10.ReplacingFRUs(Type
4105,4157,4217)...........77
Locatingcontrolsandconnectorsonthefrontof
yourcomputer...............77
Rearconnectors..............77
Removingthecover............78
Locations.................79
Locatingpartsonthesystemboard......81
Removingthefrontbezel..........82
Replacingthepowersupply.........82
Replacingamemorymodule.........84
ReplacingaPCIadaptercard.........86
Replacingtheheatsink...........90
Replacingthemicroprocessor........92
Replacingthesystemboard.........94
Replacingaharddiskdrive..........97
Replacingtheharddiskdrivefanassembly...100
Replacinganopticaldrive..........101
Replacingthediskettedriveorcardreader...102
Replacingthefrontandrearfanassemblies...104
Replacingthefrontpanelconnectorsassembly..105
Replacingthepowerswitch/LEDassembly...106
Replacingthebattery............106
Replacingtheinternalspeaker........107
CompletingtheFRUreplacement.......108
Chapter11.ReplacingFRUs(Type
4155,4158,4218)..........109
Locatingcontrolsandconnectorsonthefrontof
yourcomputer...............109
Rearconnectors..............109
Removingthecover............110
Locations.................111
Locatingpartsonthesystemboard......113
Removingthefrontbezel..........114
Replacingthepowersupply.........114
Installingorreplacingamemorymodule....116
ReplacingaPCIadaptercard.........118
Replacingtheheatsink...........121
Replacingthemicroprocessor........122
Replacingthesystemboard.........124
Replacingaharddiskdrive..........127
Replacingtheharddiskdrivefanassembly...130
Replacinganopticaldrive..........131
Replacingthediskettedriveorcardreader...132
Replacingthefrontandrearfanassemblies...133
Replacingthefrontpanelconnectorsassembly..134
Replacingthepowerswitch/LEDassembly...135
Replacingthebattery............136
Replacingtheinternalspeaker........137
CompletingtheFRUreplacement.......138
Chapter12.FRUlists........139
Overall:MT4105,4157and4217.......139
MechanicalFRUs.............153
KeyboardandMouse............156
AdaptersandmiscellaneousFRUs.......175
PowerCords...............178
Recoverydiscs..............182
WindowsXPProfessional64MonoRecovery
CD.................182
WindowsVistaBusiness32RecoveryCD..183
WindowsVistaBusiness64RecoveryCD..186
Windows7Professional64SP1Recovery
CD.................190
Windows7Ultimate64SP1RecoveryCD..194
Overall:MT4155,4158,and4218.......194
MechanicalFRUs.............210
KeyboardandMouse............212
AdaptersandmiscellaneousFRUs.......230
PowerCords...............234
Recoverydiscs..............238
WindowsXPProfessional64MonoRecovery
CD.................238
WindowsVistaBusiness32RecoveryCD..239
WindowsVistaBusiness64RecoveryCD..242
Windows7Professional64SP1Recovery
CD.................246
Windows7Ultimate64SP1RecoveryCD..249
Chapter13.AdditionalService
Information.............251
Securityfeatures..............251
HardwarecontrolledPasswords......251
Operatingsystempassword.......251
Vitalproductdata............251
BIOSlevels................251
Flashupdateprocedures..........251
Updating(ashing)BIOSfromadisc....252
Updating(ashing)BIOSfromtheoperating
system..................252
RecoveringfromaPOST/BIOSupdatefailure..252
Powermanagement............253
ivThinkStationHardwareMaintenanceManual


viThinkStationHardwareMaintenanceManual
Chapter1.Aboutthismanual
ThismanualcontainsserviceandreferenceinformationforThinkStation™computerslistedonthecover.It
isintendedonlyfortrainedservicerswhoarefamiliarwithLenovo®computerproducts.
BeforeservicingaLenovoproduct,besuretoreadtheSafetyInformation.SeeChapter2“Safety
information”onpage3.
TheSymptom-to-FRUIndexandAdditionalServiceInformationchaptersarenotspecictoanymachine
typeandareapplicabletoallThinkStationcomputers.
ThismanualincludesacompleteFRUpartnumberlistingforeachmachinetypeandmodellistedonthe
cover.Ifyouhaveinternetaccess,FRUpartnumbersarealsoavailableat:
http:/www.lenovo.com/support
ImportantSafetyInformation
Besuretoreadallcautionanddangerstatementsinthisbookbeforeperforminganyoftheinstructions.
VeuillezliretouteslesconsignesdetypeDANGERetATTENTIONduprésentdocumentavantd'exécuter
lesinstructions.
LesenSieunbedingtalleHinweisevomTyp"ACHTUNG"oder"VORSICHT"indieserDokumentation,bevor
SieirgendwelcheVorgängedurchführen
LeggereleistruzioniintrodottedaATTENZIONEePERICOLOpresentinelmanualeprimadieseguireuna
qualsiasidelleistruzioni
Certique-sedelertodasasinstruçõesdecuidadoeperigonestemanualantesdeexecutarqualquer
umadasinstruções
Esimportantequeleatodaslasdeclaracionesdeprecauciónydepeligrodeestemanualantesdeseguir
lasinstrucciones.
ImportantinformationaboutreplacingRoHScompliantFRUs
RoHS,TheRestrictionofHazardousSubstancesinElectricalandElectronicEquipmentDirective
(2002/95/EC)isaEuropeanUnionlegalrequirementaffectingtheglobalelectronicsindustry.RoHS
requirementsmustbeimplementedonLenovoproductsplacedonthemarketandsoldinthe
EuropeanUnionafterJune2006.ProductsonthemarketbeforeJune2006arenotrequiredto
haveRoHScompliantparts.Ifthepartsarenotcompliantoriginally,replacementpartscanalso
©CopyrightLenovo2008,20121
benoncompliant,butinallcases,ifthepartsarecompliant,thereplacementpartsmustalsobe
compliant.
Note:RoHSandnon-RoHSFRUpartnumberswiththesametandfunctionareidentiedwithunique
FRUpartnumbers.
LenovoplanstotransitiontoRoHScompliancewellbeforetheimplementationdateandexpectsitssuppliers
tobereadytosupportLenovo'srequirementsandscheduleintheEU.Productssoldin2005,willcontain
someRoHScompliantFRUs.ThefollowingstatementpertainstotheseproductsandanyproductLenovo
producescontainingRoHScompliantparts.
RoHScompliantThinkCentrepartshaveuniqueFRUpartnumbers.BeforeorafterJune,2006,failedRoHS
compliantpartsmustalwaysbereplacedusingRoHScompliantFRUs,soonlytheFRUsidentiedas
compliantinthesystemHMMordirectsubstitutionsforthoseFRUscanbeused.
ProductsmarketedbeforeJune2006ProductsmarketedafterJune2006
CurrentororiginalpartReplacementFRUCurrentororiginalpartReplacementFRU
Non-RoHSCanbeNon-RoHS
Non-RoHSCanbeRoHS
Non-RoHSCansubtoRoHS
RoHSMustbeRoHS
MustbeRoHSMustbeRoHS
Note:AdirectsubstitutionisapartwithadifferentFRUpartnumberthatisautomaticallyshippedbythe
distributioncenteratthetimeoforder.
2ThinkStationHardwareMaintenanceManual

Chapter2.Safetyinformation
Thischaptercontainsthesafetyinformationthatyouneedtobefamiliarwithbeforeservicingacomputer.
Generalsafety
Followtheserulestoensuregeneralsafety:
•Observegoodhousekeepingintheareaofthemachinesduringandaftermaintenance.
•Whenliftinganyheavyobject:
1.Ensureyoucanstandsafelywithoutslipping.
2.Distributetheweightoftheobjectequallybetweenyourfeet.
3.Useaslowliftingforce.Nevermovesuddenlyortwistwhenyouattempttolift.
4.Liftbystandingorbypushingupwithyourlegmuscles;thisactionremovesthestrainfromthe
musclesinyourback.Donotattempttoliftanyobjectsthatweighmorethan16kg(35lb)orobjects
thatyouthinkaretooheavyforyou.
•Donotperformanyactionthatcauseshazardstothecustomer,orthatmakestheequipmentunsafe.
•Beforeyoustartthemachine,ensurethatotherservicerepresentativesandthecustomer'spersonnelare
notinahazardousposition.
•Placeremovedcoversandotherpartsinasafeplace,awayfromallpersonnel,whileyouareservicing
themachine.
•Keepyourtoolcaseawayfromwalkareassothatotherpeoplewillnottripoverit.
•Donotwearlooseclothingthatcanbetrappedinthemovingpartsofamachine.Ensurethatyoursleeves
arefastenedorrolledupaboveyourelbows.Ifyourhairislong,fastenit.
•Inserttheendsofyournecktieorscarfinsideclothingorfastenitwithanonconductiveclip,approximately
8centimeters(3inches)fromtheend.
•Donotwearjewelry,chains,metal-frameeyeglasses,ormetalfastenersforyourclothing.
Remember:Metalobjectsaregoodelectricalconductors.
•Wearsafetyglasseswhenyouare:hammering,drilling,soldering,cuttingwire,attachingsprings,using
solvents,orworkinginanyotherconditionsthatmightbehazardoustoyoureyes.
•Afterservice,reinstallallsafetyshields,guards,labels,andgroundwires.Replaceanysafetydevice
thatiswornordefective.
•Reinstallallcoverscorrectlybeforereturningthemachinetothecustomer.
Electricalsafety
CAUTION:
Electricalcurrentfrompower,telephone,andcommunicationcablescanbehazardous.Toavoid
personalinjuryorequipmentdamage,disconnecttheattachedpowercords,telecommunication
systems,networks,andmodemsbeforeyouopentheserver/workstationcovers,unlessinstructed
otherwiseintheinstallationandcongurationprocedures.
Observethefollowingruleswhenworkingonelectricalequipment.
©CopyrightLenovo2008,20123

Important:Useonlyapprovedtoolsandtestequipment.Somehandtoolshavehandlescoveredwithasoft
materialthatdoesnotinsulateyouwhenworkingwithliveelectricalcurrents.Manycustomershave,near
theirequipment,rubberoormatsthatcontainsmallconductiveberstodecreaseelectrostaticdischarges.
Donotusethistypeofmattoprotectyourselffromelectricalshock.
•Findtheroomemergencypower-off(EPO)switch,disconnectingswitch,orelectricaloutlet.Ifanelectrical
accidentoccurs,youcanthenoperatetheswitchorunplugthepowercordquickly.
•Donotworkaloneunderhazardousconditionsornearequipmentthathashazardousvoltages.
•Disconnectallpowerbefore:
–Performingamechanicalinspection
–Workingnearpowersupplies
–RemovingorinstallingFieldReplaceableUnits
•Beforeyoustarttoworkonthemachine,unplugthepowercord.Ifyoucannotunplugit,askthecustomer
topower-offthewallboxthatsuppliespowertothemachineandtolockthewallboxintheoffposition.
•Ifyouneedtoworkonamachinethathasexposedelectricalcircuits,observethefollowingprecautions:
–Ensurethatanotherperson,familiarwiththepower-offcontrols,isnearyou.
Remember:Anotherpersonmustbetheretoswitchoffthepower,ifnecessary.
–Useonlyonehandwhenworkingwithpowered-onelectricalequipment;keeptheotherhandinyour
pocketorbehindyourback.
Remember:Theremustbeacompletecircuittocauseelectricalshock.Byobservingtheaboverule,
youmaypreventacurrentfrompassingthroughyourbody.
–Whenusingtesters,setthecontrolscorrectlyandusetheapprovedprobeleadsandaccessoriesfor
thattester.
–Standonsuitablerubbermats(obtainedlocally,ifnecessary)toinsulateyoufromgroundssuchas
metaloorstripsandmachineframes.
Observethespecialsafetyprecautionswhenyouworkwithveryhighvoltages;theseinstructionsarein
thesafetysectionsofmaintenanceinformation.Useextremecarewhenmeasuringhighvoltages.
•Regularlyinspectandmaintainyourelectricalhandtoolsforsafeoperationalcondition.
•Donotusewornorbrokentoolsandtesters.
•Neverassumethatpowerhasbeendisconnectedfromacircuit.First,checkthatithasbeenpowered-off.
•Alwayslookcarefullyforpossiblehazardsinyourworkarea.Examplesofthesehazardsaremoistoors,
nongroundedpowerextensioncables,powersurges,andmissingsafetygrounds.
•Donottouchliveelectricalcircuitswiththereectivesurfaceofaplasticdentalmirror.Thesurfaceis
conductive;suchtouchingcancausepersonalinjuryandmachinedamage.
•Donotservicethefollowingpartswiththepoweronwhentheyareremovedfromtheirnormaloperating
placesinamachine:
–Powersupplyunits
–Pumps
–Blowersandfans
–Motorgenerators
andsimilarunits.(Thispracticeensurescorrectgroundingoftheunits.)
•Ifanelectricalaccidentoccurs:
–Usecaution;donotbecomeavictimyourself.
–Switchoffpower.
–Sendanotherpersontogetmedicalaid.
4ThinkStationHardwareMaintenanceManual

Voltage-selectionswitch
Somecomputersareequippedwithavoltage-selectionswitchlocatednearthepower-cordconnection
pointonthecomputer.Ifyourcomputerhasavoltage-selectionswitch,ensurethatyousettheswitchto
matchthevoltageavailableatyourelectricaloutlet.Settingthevoltage-selectionswitchincorrectlycan
causepermanentdamagetothecomputer.
Ifyourcomputerdoesnothaveavoltage-selectionswitch,yourcomputerisdesignedtooperateonlyatthe
voltageprovidedinthecountryorregionwherethecomputerwasoriginallypurchased.
Ifyourelocateyourcomputertoanothercountry,beawareofthefollowing:
•Ifyourcomputerdoesnothaveavoltage-selectionswitch,donotconnectthecomputertoanelectrical
outletuntilyouhaveveriedthatthevoltageprovidedisthesameasitwasinthecountryorregion
wherethecomputerwasoriginallypurchased.
•Ifyourcomputerhasavoltageselectionswitch,donotconnectthecomputertoanelectricaloutletuntil
youhaveveriedthatthevoltage-selectionswitchissettomatchthevoltageprovidedinthatcountry
orregion.
Ifyouarenotsureofthevoltageprovidedatyourelectricaloutlet,contactyourlocalelectriccompanyor
refertoofcialWebsitesorotherliteraturefortravelerstothecountryorregionwhereyouarelocated.
Safetyinspectionguide
Theintentofthisinspectionguideistoassistyouinidentifyingpotentiallyunsafeconditionsonthese
products.Eachmachine,asitwasdesignedandbuilt,hadrequiredsafetyitemsinstalledtoprotectusers
andservicepersonnelfrominjury.Thisguideaddressesonlythoseitems.However,goodjudgmentshould
beusedtoidentifypotentialsafetyhazardsduetoattachmentoffeaturesoroptionsnotcoveredbythis
inspectionguide.
Ifanyunsafeconditionsarepresent,youmustdeterminehowserioustheapparenthazardcouldbeand
whetheryoucancontinuewithoutrstcorrectingtheproblem.
Considertheseconditionsandthesafetyhazardstheypresent:
•Electricalhazards,especiallyprimarypower(primaryvoltageontheframecancauseseriousorfatal
electricalshock).
•Explosivehazards,suchasadamagedCRTfaceorbulgingcapacitor
•Mechanicalhazards,suchaslooseormissinghardware
Theguideconsistsofaseriesofstepspresentedinachecklist.Beginthecheckswiththepoweroff,and
thepowercorddisconnected.
Checklist:
1.Checkexteriorcoversfordamage(loose,broken,orsharpedges).
2.Power-offthecomputer.Disconnectthepowercord.
3.Checkthepowercordfor:
a.Athird-wiregroundconnectoringoodcondition.Useametertomeasurethird-wireground
continuityfor0.1ohmorlessbetweentheexternalgroundpinandframeground.
b.Thepowercordshouldbetheappropriatetypeasspeciedinthepartslistings.
c.Insulationmustnotbefrayedorworn.
4.Removethecover.
Chapter2.Safetyinformation5

5.Checkforanyobviousalterations.Usegoodjudgmentastothesafetyofanyalterations.
6.Checkinsidetheunitforanyobviousunsafeconditions,suchasmetallings,contamination,wateror
otherliquids,orsignsofreorsmokedamage.
7.Checkforworn,frayed,orpinchedcables.
8.Checkthatthepower-supplycoverfasteners(screwsorrivets)havenotbeenremovedortamperedwith.
Handlingelectrostaticdischarge-sensitivedevices
Anycomputerpartcontainingtransistorsorintegratedcircuits(ICs)shouldbeconsideredsensitiveto
electrostaticdischarge(ESD).ESDdamagecanoccurwhenthereisadifferenceinchargebetweenobjects.
ProtectagainstESDdamagebyequalizingthechargesothatthemachine,thepart,theworkmat,andthe
personhandlingthepartareallatthesamecharge.
Notes:
1.Useproduct-specicESDprocedureswhentheyexceedtherequirementsnotedhere.
2.MakesurethattheESDprotectivedevicesyouusehavebeencertied(ISO9000)asfullyeffective.
WhenhandlingESD-sensitiveparts:
•Keepthepartsinprotectivepackagesuntiltheyareinsertedintotheproduct.
•Avoidcontactwithotherpeoplewhilehandlingthepart.
•Wearagroundedwriststrapagainstyourskintoeliminatestaticonyourbody.
•Preventthepartfromtouchingyourclothing.Mostclothingisinsulativeandretainsachargeevenwhen
youarewearingawriststrap.
•Usetheblacksideofagroundedworkmattoprovideastatic-freeworksurface.Thematisespecially
usefulwhenhandlingESD-sensitivedevices.
•Selectagroundingsystem,suchasthoselistedbelow,toprovideprotectionthatmeetsthespecic
servicerequirement.
Note:TheuseofagroundingsystemisdesirablebutnotrequiredtoprotectagainstESDdamage.
–AttachtheESDgroundcliptoanyframeground,groundbraid,orgreen-wireground.
–UseanESDcommongroundorreferencepointwhenworkingonadouble-insulatedor
battery-operatedsystem.Youcanusecoaxorconnector-outsideshellsonthesesystems.
–Usetheroundground-prongoftheacplugonac-operatedcomputers.
Groundingrequirements
Electricalgroundingofthecomputerisrequiredforoperatorsafetyandcorrectsystemfunction.Proper
groundingoftheelectricaloutletcanbeveriedbyacertiedelectrician.
Safetynotices(multi-lingualtranslations)
Thecautionanddangersafetynoticesinthissectionareprovidedinthefollowinglanguages:
•English
•Arabic
•Brazilian/Portuguese
•Chinese(simplied)
•Chinese(traditional)
6ThinkStationHardwareMaintenanceManual
•French
•German
•Hebrew
•Italian
•Korean
•Spanish
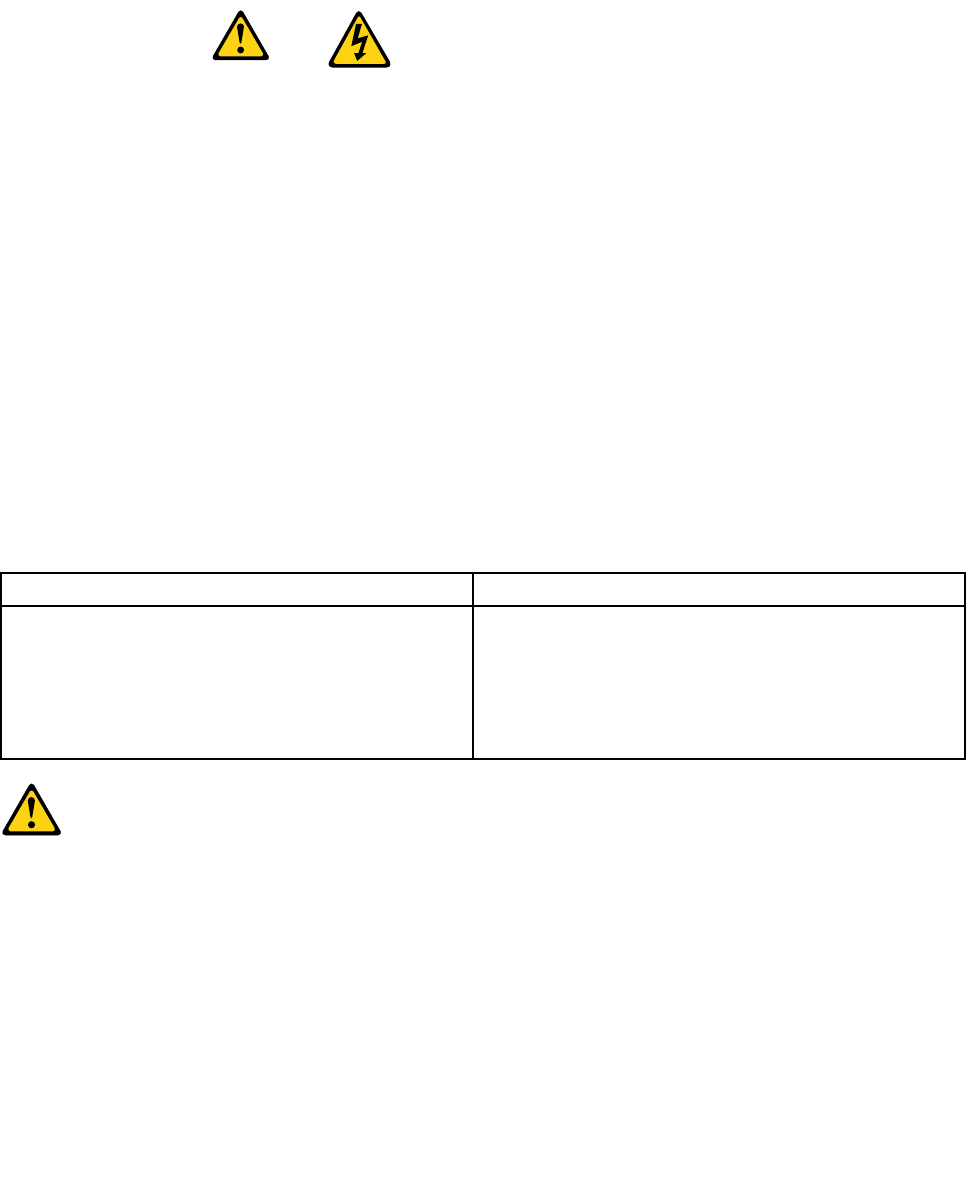
DANGER
Electricalcurrentfrompower,telephoneandcommunicationcablesishazardous.
Toavoidashockhazard:
•Donotconnectordisconnectanycablesorperforminstallation,maintenance,orreconguration
ofthisproductduringanelectricalstorm.
•Connectallpowercordstoaproperlywiredandgroundedelectricaloutlet.
•Connecttoproperlywiredoutletsanyequipmentthatwillbeattachedtothisproduct.
•Whenpossible,useonehandonlytoconnectordisconnectsignalcables.
•Neverturnonanyequipmentwhenthereisevidenceofre,water,orstructuraldamage.
•Disconnecttheattachedpowercords,telecommunicationssystems,networks,andmodems
beforeyouopenthedevicecovers,unlessinstructedotherwiseintheinstallationandconguration
procedures.
•Connectanddisconnectcablesasdescribedinthefollowingtableswheninstalling,moving,or
openingcoversonthisproductorattacheddevices.
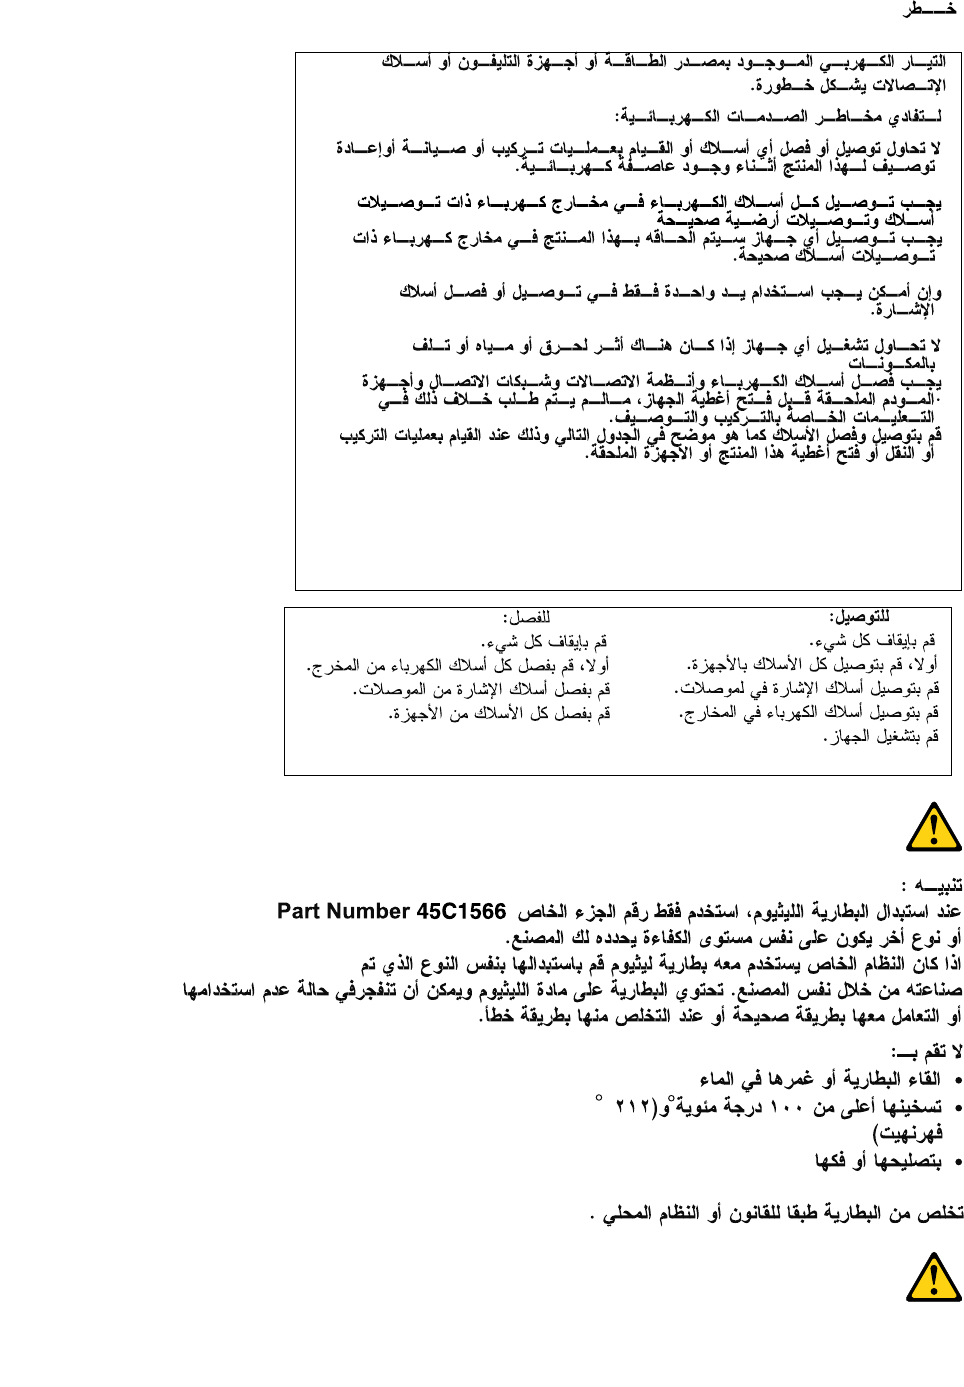
ToConnectToDisconnect
1.TurneverythingOFF.
2.First,attachallcablestodevices.
3.Attachsignalcablestoconnectors.
4.Attachpowercordstooutlet.
5.TurndeviceON.
1.TurneverythingOFF.
2.First,removepowercordsfromoutlet.
3.Removesignalcablesfromconnectors.
4.Removeallcablesfromdevices.
CAUTION:
Whenreplacingthelithiumbattery,useonlyPartNumber45C1566oranequivalenttypebattery
recommendedbythemanufacturer.Ifyoursystemhasamodulecontainingalithiumbattery,replace
itonlywiththesamemoduletypemadebythesamemanufacturer.Thebatterycontainslithiumand
canexplodeifnotproperlyused,handled,ordisposedof.Donot:
•Throworimmerseintowater
•Heattomorethan100°C(212°F)
•Repairordisassemble
Disposeofthebatteryasrequiredbylocalordinancesorregulations.
Chapter2.Safetyinformation7
CAUTION:
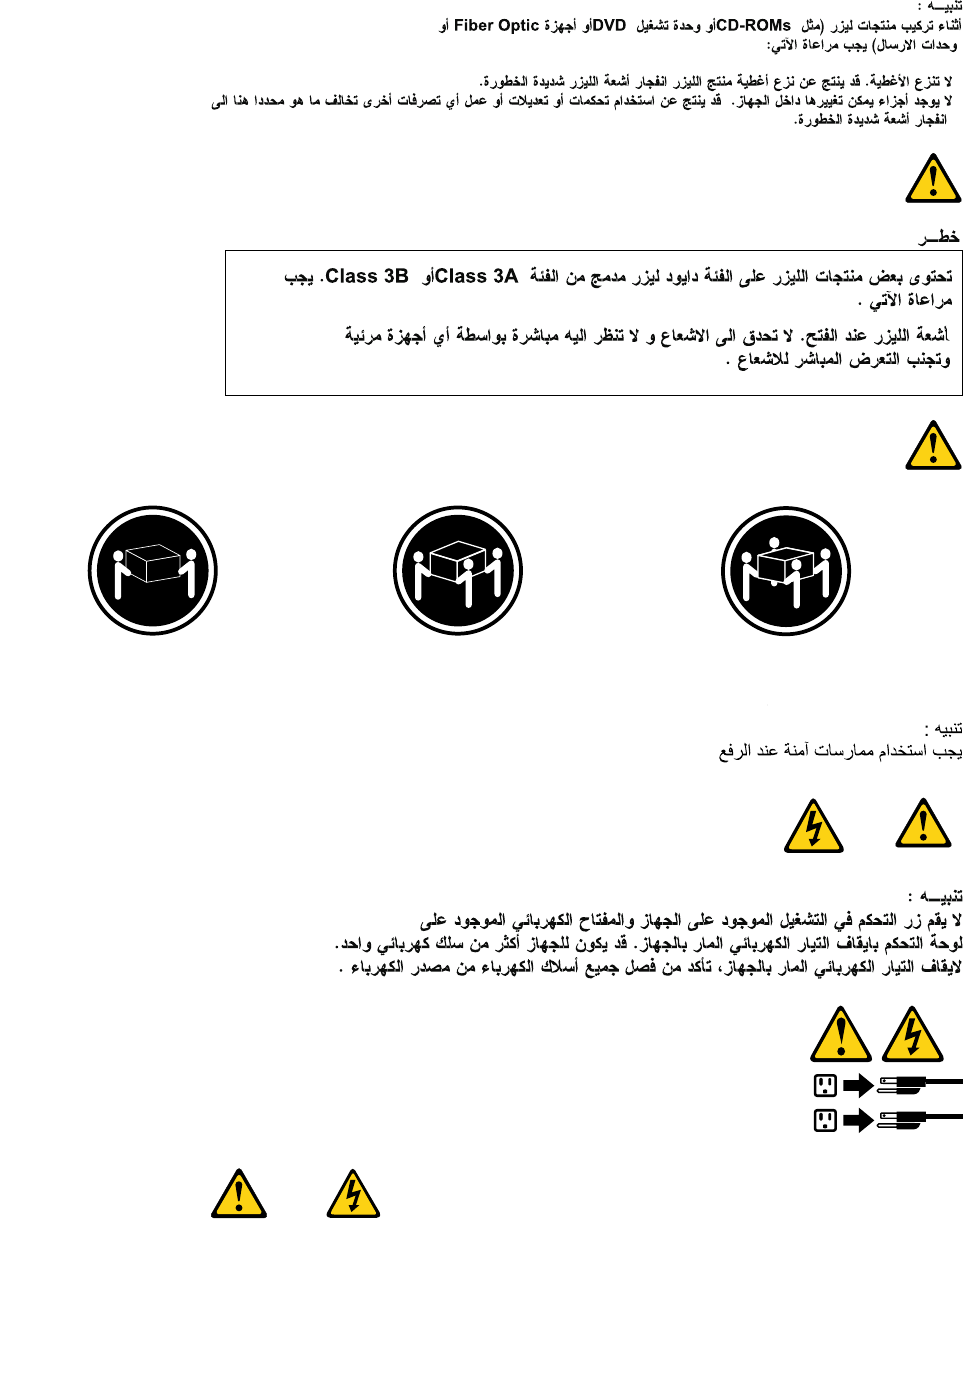
Whenlaserproducts(suchasCD-ROMs,DVD-ROMdrives,beropticdevices,ortransmitters)are
installed,notethefollowing:
•Donotremovethecovers.Removingthecoversofthelaserproductcouldresultinexposureto
hazardouslaserradiation.Therearenoserviceablepartsinsidethedevice.
•Useofcontrolsoradjustmentsorperformanceofproceduresotherthanthosespeciedherein
mightresultinhazardousradiationexposure.
DANGER
SomelaserproductscontainanembeddedClass3AorClass3Blaserdiode.Notethefollowing:
Laserradiationwhenopen.Donotstareintothebeam,donotviewdirectlywithoptical
instruments,andavoiddirectexposuretothebeam.
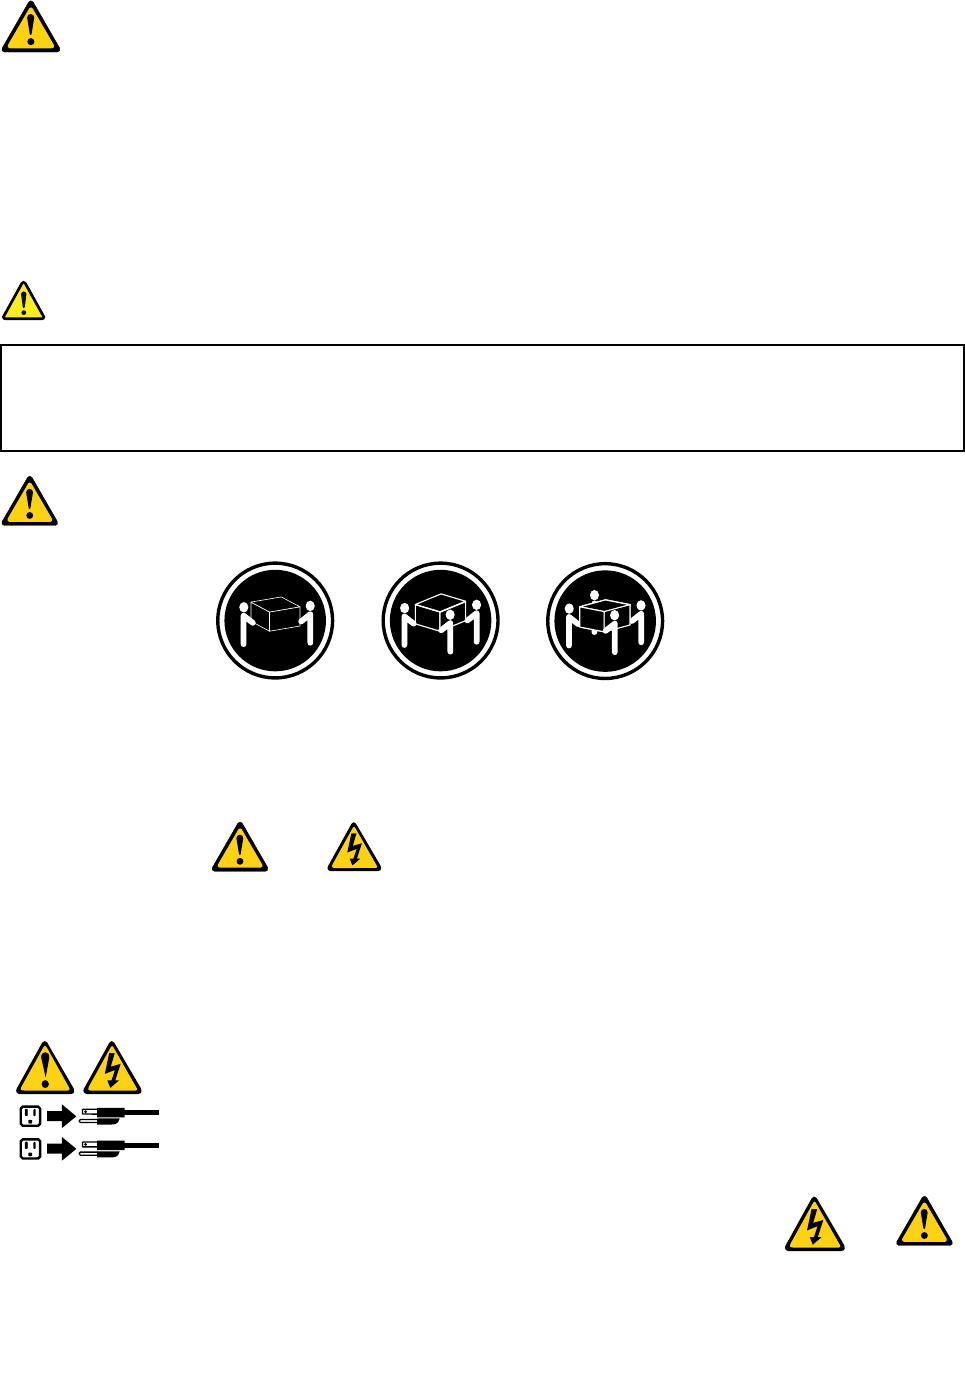
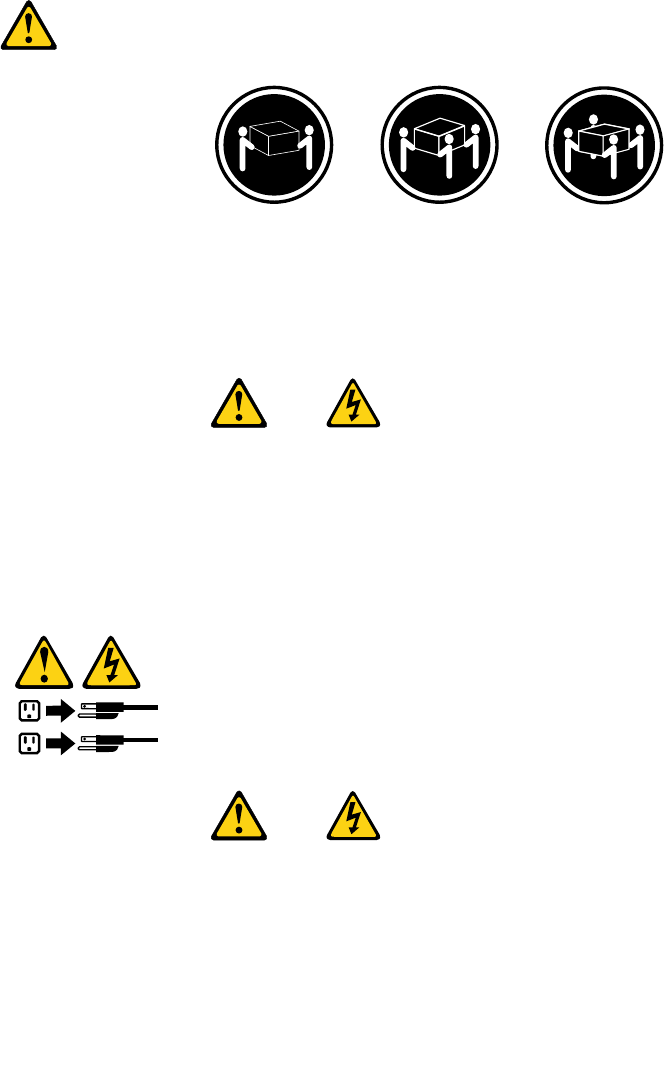
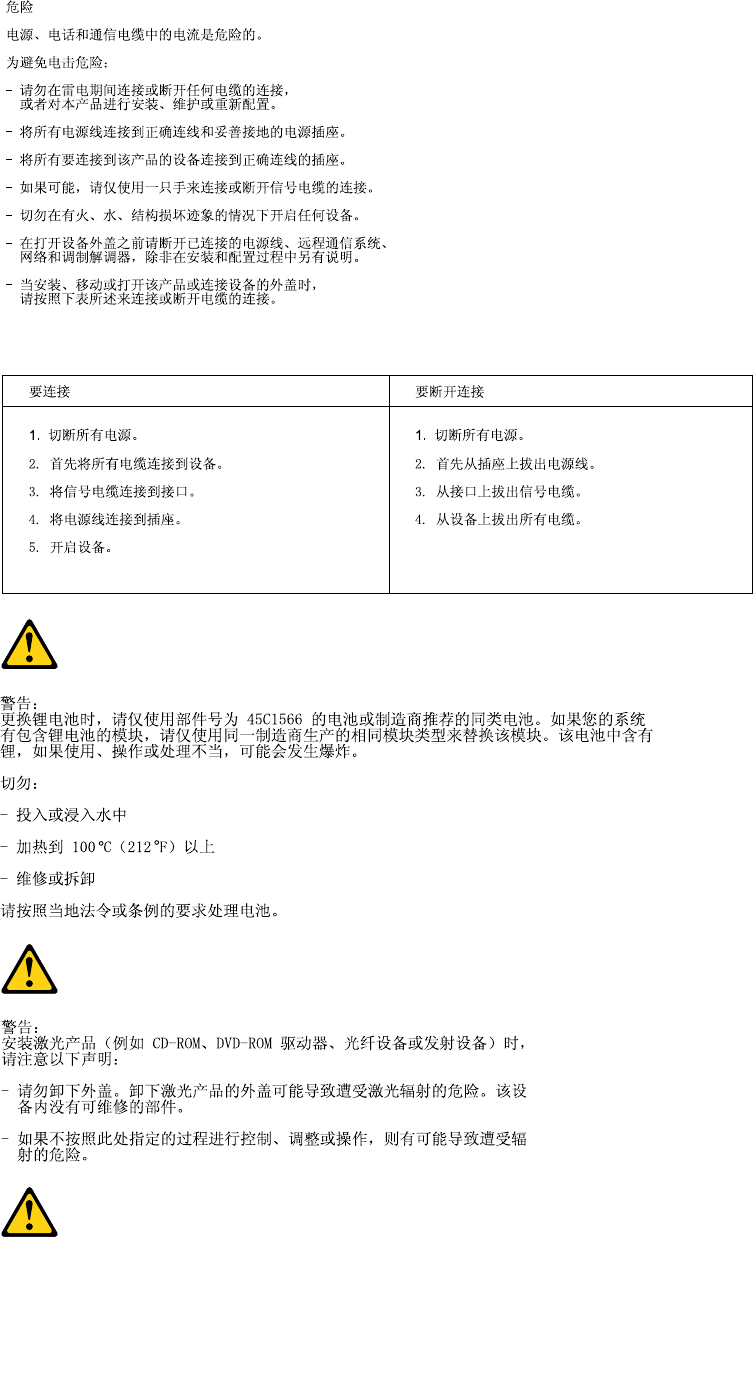
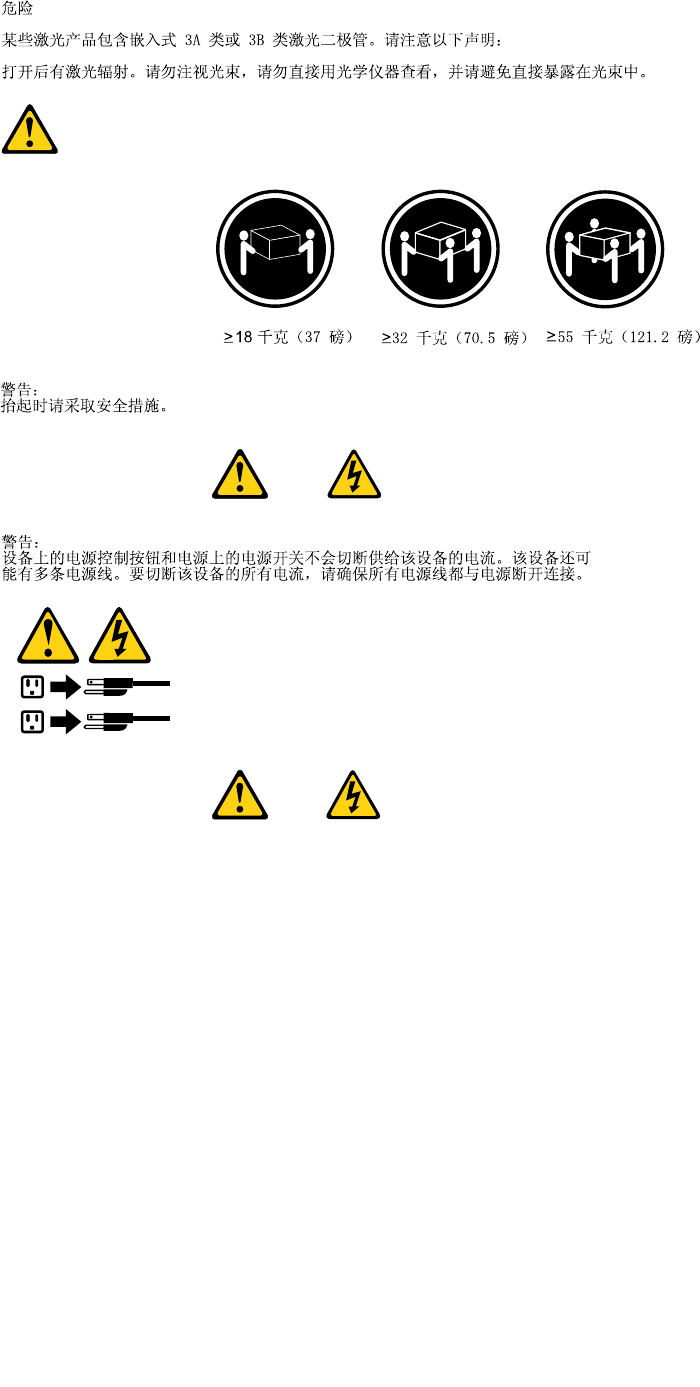
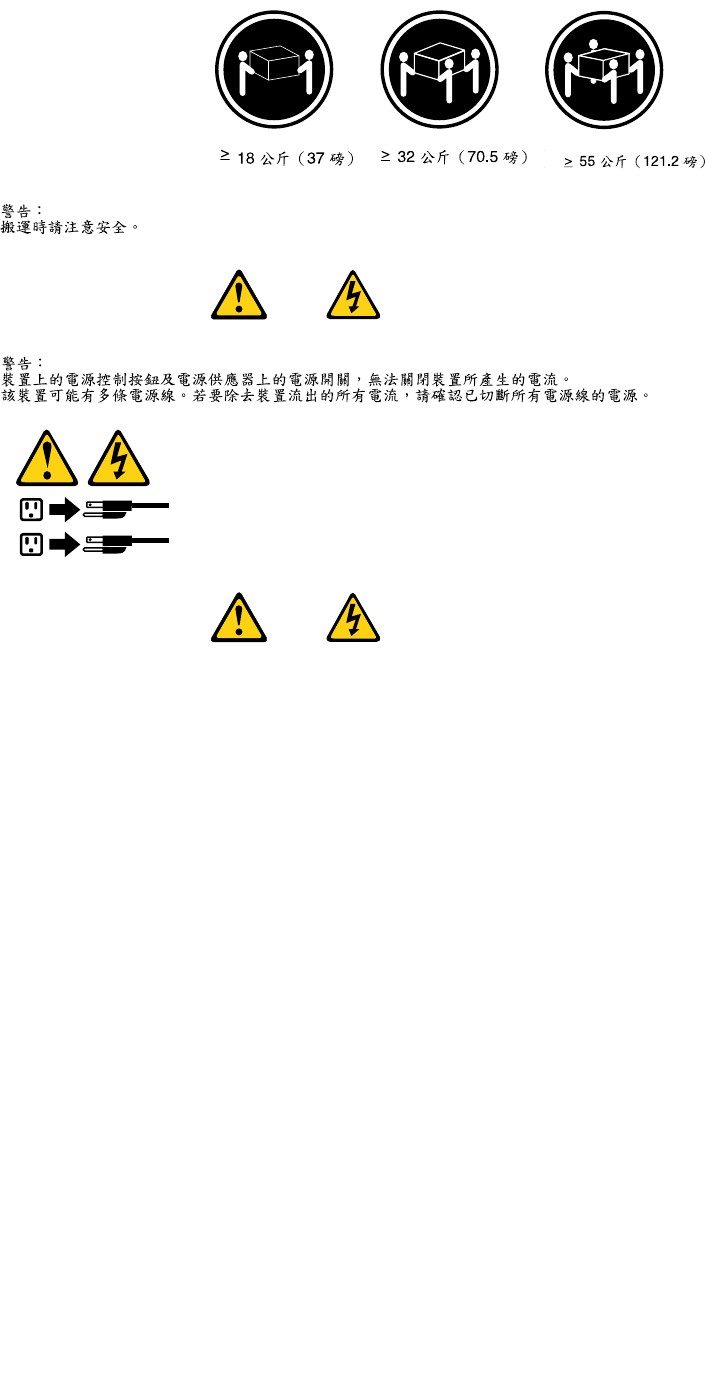
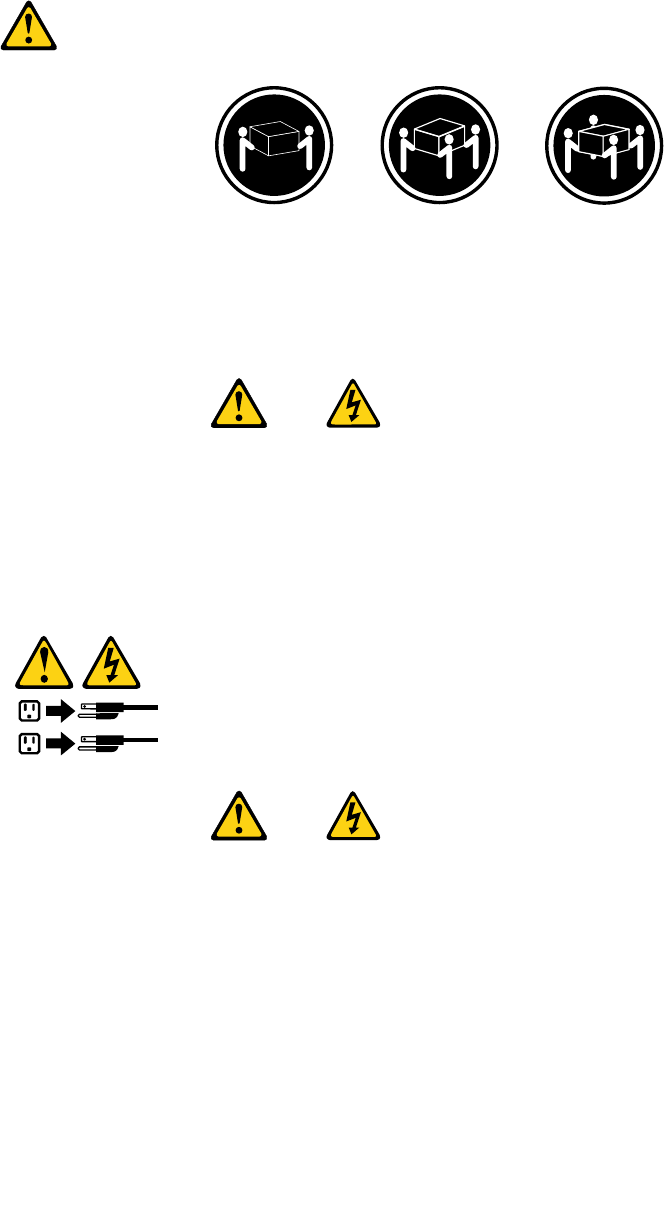
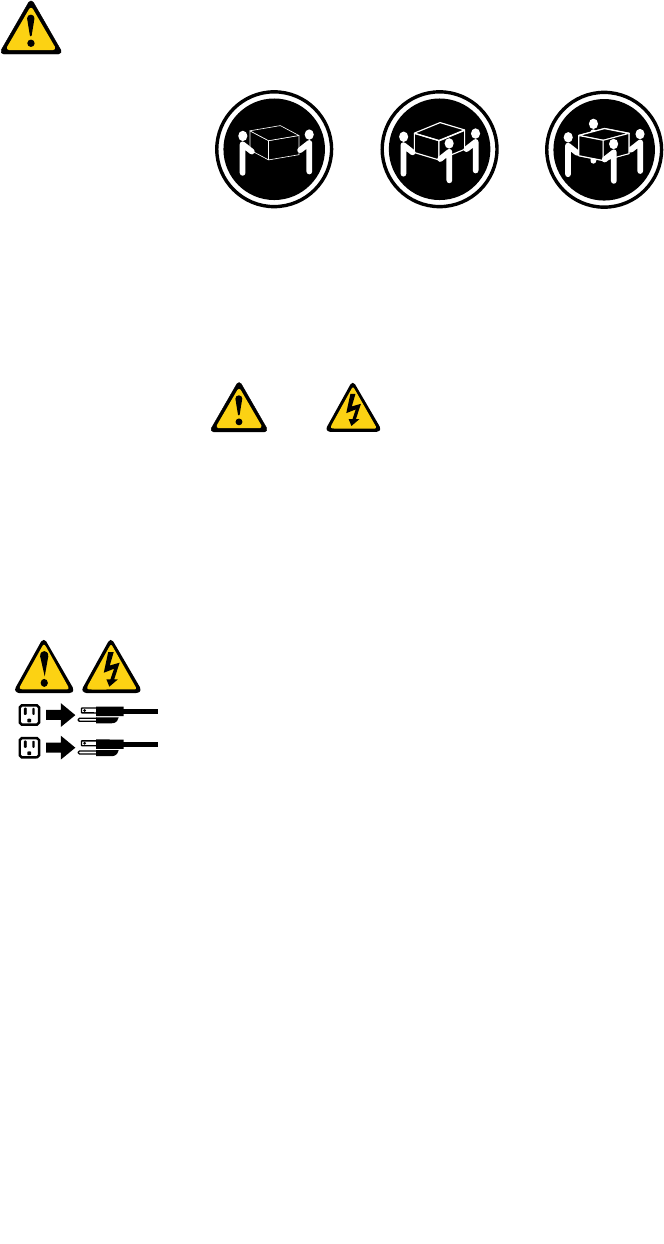
≥18kg(37lbs)≥32kg(70.5lbs)≥55kg(121.2lbs)
CAUTION:
Usesafepracticeswhenlifting.
CAUTION:
Thepowercontrolbuttononthedeviceandthepowerswitchonthepowersupplydonotturnoff
theelectricalcurrentsuppliedtothedevice.Thedevicealsomighthavemorethanonepower
cord.Toremoveallelectricalcurrentfromthedevice,ensurethatallpowercordsaredisconnected
fromthepowersource.
1
2
8ThinkStationHardwareMaintenanceManual
Chapter2.Safetyinformation9
≥18kg(37lbs)≥32kg(70.5lbs)≥55kg(121.2lbs)
1
2
PERIGO
10ThinkStationHardwareMaintenanceManual
Acorrenteelétricaprovenientedecabosdealimentação,detelefoneedecomunicaçõeséperigosa.
Paraevitarriscodechoqueelétrico:
•Nãoconectenemdesconectenenhumcaboouexecuteinstalação,manutençãooureconguração
desteprodutoduranteumatempestadecomraios.
•Conectetodososcabosdealimentaçãoatomadaselétricascorretamenteinstaladaseaterradas.
•Todoequipamentoqueforconectadoaesteprodutodeveserconectadoatomadascorretamente
instaladas.
•Quandopossível,utilizeapenasumadasmãosparaconectaroudesconectarcabosdesinal.
•Nuncaliguenenhumequipamentoquandohouverevidênciadefogo,águaoudanosestruturais.
•Antesdeabrirtampasdedispositivos,desconectecabosdealimentação,sistemasdetelecomunicação,
redesemodemsconectados,amenosqueespecicadodemaneiradiferentenosprocedimentosde
instalaçãoeconguração.
•Conecteedesconecteoscabosconformedescritonatabelaapresentadaaseguiraoinstalar,moverou
abrirtampasdesteprodutooudedispositivosconectados.
ParaConectar:ParaDesconectar:
1.DESLIGUETudo.
2.Primeiramente,conectetodososcabosaos
dispositivos.
3.Conecteoscabosdesinalaosconectores.
4.Conecteoscabosdealimentaçãoàstomadas.
5.LIGUEosdispositivos.
1.DESLIGUETudo.
2.Primeiramente,removaoscabosdealimentaçãodas
tomadas.
3.Removaoscabosdesinaldosconectores.
4.Removatodososcabosdosdispositivos.
CUIDADO:
Aosubstituirabateriadelítio,utilizeapenasumabateriacomNúmerodePeça45C1566ouumtipo
debateriaequivalenterecomendadopeloSeoseusistemapossuiummódulocomumabateriade
lítio,substitua-oapenasporummódulodomesmotipoedomesmofabricante.Abateriacontémlítio
epodeexplodirsenãoforutilizada,manuseadaoudescartadademaneiracorreta.
Não:
•Jogueoucoloquenaágua
•Aqueçaamaisde100°C(212°F)
•Consertenemdesmonte
Descarteabateriaconformerequeridopelasleisouregulamentoslocais.
PRECAUCIÓN:
Quandoprodutosalaser(comounidadesdeCD-ROMs,unidadesdeDVD-ROM,dispositivosdebraótica
outransmissores)estivereminstalados,observeoseguinte:
Chapter2.Safetyinformation11
•Nãoremovaastampas.Aremoçãodastampasdeumprodutoalaserpoderesultaremexposição
prejudicialàradiaçãodelaser.Nãoexistempeçasquepodemserconsertadasnointeriordodispositivo.
•Autilizaçãodecontrolesouajustesouaexecuçãodeprocedimentosdiferentesdosespecicadosaqui
poderesultaremexposiçãoprejudicialàradiação.
PERIGO
AlgunsprodutosalasercontêmdiododelaserintegradodaClasse3AoudaClasse3B.Observeoseguinte:
Radiaçãoalaserquandoaberto.Nãoolhediretamenteparaofeixeaolhonuoucominstrumentosópticose
eviteexposiçãodiretaaofeixe.
≥18kg(37lbs)≥32kg(70.5lbs)≥55kg(121.2lbs)
CUIDADO:
Utilizeprocedimentosdesegurançaparalevantarequipamentos.
CUIDADO:
Obotãodecontroledealimentaçãododispositivoeobotãoparaligar/desligardafontedealimentação
nãodesligamacorrenteelétricafornecidaaodispositivo.Odispositivotambémpodetermaisdeumcabo
dealimentação.Pararemovertodaacorrenteelétricadodispositivo,assegurequetodososcabosde
alimentaçãoestejamdesconectadosdafontedealimentação.
1
2
12ThinkStationHardwareMaintenanceManual
Chapter2.Safetyinformation13
1
2
14ThinkStationHardwareMaintenanceManual
Chapter2.Safetyinformation15
1
2
DANGER
Lecourantélectriqueprovenantdel'alimentation,dutéléphoneetdescâblesdetransmissionpeutprésenter
undanger.
Pourévitertoutrisquedechocélectrique:
•Nemanipulezaucuncâbleetn'effectuezaucuneopérationd'installation,d'entretienoudereconguration
deceproduitaucoursd'unorage.
•Brancheztouslescordonsd'alimentationsurunsocledeprisedecourantcorrectementcâbléetmisàla
terre.
•Branchezsurdessoclesdeprisedecourantcorrectementcâbléstoutéquipementconnectéàceproduit.
•Lorsquecelaestpossible,n'utilisezqu'uneseulemainpourconnecteroudéconnecterlescâbles
d'interface.
•Nemettezjamaisunéquipementsoustensionencasd'incendieoud'inondation,ouenprésencede
dommagesmatériels.
•Avantderetirerlescartersdel'unité,mettezcelle-cihorstensionetdéconnectezsescordons
d'alimentation,ainsiquelescâblesquilarelientauxréseaux,auxsystèmesdetélécommunicationetaux
modems(saufinstructioncontrairementionnéedanslesprocéduresd'installationetdeconguration).
•Lorsquevousinstallez,quevousdéplacez,ouquevousmanipulezleprésentproduitoudespériphériques
quiluisontraccordés,reportez-vousauxinstructionsci-dessouspourconnecteretdéconnecterles
différentscordons.
16ThinkStationHardwareMaintenanceManual
ConnexionDéconnexion
1.MettezlesunitésHORSTENSION.
2.Commencezparbranchertouslescordonssurles
unités.
3.Branchezlescâblesd'interfacesurdesconnecteurs.
4.Branchezlescordonsd'alimentationsurdesprises.
5.MettezlesunitésSOUSTENSION.
1.MettezlesunitésHORSTENSION.
2.Débranchezlescordonsd'alimentationdesprises.
3.Débranchezlescâblesd'interfacedesconnecteurs.
4.Débrancheztouslescâblesdesunités.
ATTENTION:
Remplacerlapileaulithiumusagéeparunepilederéférenceidentiqueexclusivement,(référence
45C1566),ousuivrelesinstructionsdufabricantquiendénitleséquivalences.Sivotresystèmeest
dotéd'unmodulecontenantunepileaulithium,vousdevezleremplaceruniquementparunmodule
identique,produitparlemêmefabricant.Lapilecontientdulithiumetpeutexploserencasde
mauvaiseutilisation,demauvaisemanipulationoudemiseaurebutinappropriée.
Nepas:
•lajeteràl'eau,
•l'exposeràdestempératuressupérieuresà100°C,
•chercheràlaréparerouàladémonter.
Nepasmettrelapileàlapoubelle.Pourlamiseaurebut,sereporteràlaréglementationenvigueur.
ATTENTION:
Sidesproduitsàlaser(telsquedesunitésdeCD-ROM,deDVD-ROM,desunitésàbresoptiques,ou
desémetteurs)sontinstallés,prenezconnaissancedesinformationssuivantes:
•Neretirezpaslecarter.Enouvrantl'unitédeCD-ROMoudeDVD-ROM,vousvousexposezau
rayonnementdangereuxdulaser.Aucunepiècedel'unitén'estréparable.
•Pourévitertoutrisqued'expositionaurayonlaser,respectezlesconsignesderéglageet
d'utilisationdescommandes,ainsiquelesprocéduresdécritesdansleprésentmanuel.
DANGER
Certainsproduitsàlasercontiennentunediodeàlaserintégréedeclasse3Aou3B.Prenez
connaissancedesinformationssuivantes:
Rayonnementlaserlorsquelecarterestouvert.Eviteztouteexpositiondirecteaurayonlaser.Evitez
deregarderxementlefaisceauoudel'observeràl'aided'instrumentsoptiques.
Chapter2.Safetyinformation17
≥18kg(37lbs)≥32kg(70.5lbs)≥55kg(121.2lbs)
ATTENTION:
Soulevezlamachineavecprécaution.
ATTENTION:
L'interrupteurdecontrôled'alimentationdel'unitéetl'interrupteurdublocd'alimentationnecoupent
paslecourantélectriquealimentantl'unité.Enoutre,lesystèmepeutêtreéquipédeplusieurs
cordonsd'alimentation.Pourmettrel'unitéhorstension,vousdevezdéconnectertouslescordons
delasourced'alimentation.
1
2
VORSICHT
AnNetz-,Telefon-undDatenleitungenkönnengefährlicheSpannungenanliegen.
AusSicherheitsgründen:
•BeiGewitterandiesemGerätkeineKabelanschließenoderlösen.FernerkeineInstallations-,
Wartungs-oderRekongurationsarbeitendurchführen.
•GerätnuraneineSchutzkontaktsteckdosemitordnungsgemäßgeerdetemSchutzkontakt
anschließen.
•AlleangeschlossenenGeräteebenfallsanSchutzkontaktsteckdosenmitordnungsgemäß
geerdetemSchutzkontaktanschließen.
•DieSignalkabelnachMöglichkeiteinhändiganschließenoderlösen,umeinenStromschlagdurch
BerührenvonOberächenmitunterschiedlichemelektrischemPotenzialzuvermeiden.
•Geräteniemalseinschalten,wennHinweiseaufFeuer,WasseroderGebäudeschädenvorliegen.
18ThinkStationHardwareMaintenanceManual

•DieVerbindungzudenangeschlossenenNetzkabeln,Telekommunikationssystemen,Netzwerken
undModemsistvordemÖffnendesGehäuseszuunterbrechen,sofernindenInstallations-und
KongurationsprozedurenkeineanderslautendenAnweisungenenthaltensind.
•ZumInstallieren,TransportierenundÖffnenderAbdeckungendesComputersoderder
angeschlossenenEinheitendieKabelgemäßderfolgendenTabelleanschließenundabziehen.
ZumAnschließenderKabelgehenSiewiefolgtvorZumAbziehenderKabelgehenSiewiefolgtvor
1.SchaltenSiealleEinheitenAUS.
2.SchließenSieerstalleKabelandieEinheitenan.
3.SchließenSiedieSignalkabelandieBuchsenan.
4.SchließenSiedieNetzkabelandieSteckdosean.
5.SchaltenSiedieEinheitEIN.
1.SchaltenSiealleEinheitenAUS.
2.ZiehenSiezuerstalleNetzkabelausden
Netzsteckdosen.
3.ZiehenSiedieSignalkabelausdenBuchsen.
4.ZiehenSiealleKabelvondenEinheitenab.
CAUTION:
EineverbrauchteLithiumbatterienurdurcheineBatteriemitderTeilenummer45C1566odereine
gleichwertige,vomHerstellerempfohleneBatterieersetzen.EnthältdasSystemeinModulmiteiner
Lithiumbatterie,diesesnurdurcheinModuldesselbenTypsundvondemselbenHerstellerersetzen.
DieBatterieenthältLithiumundkannbeiunsachgemäßerVerwendung,HandhabungoderEntsorgung
explodieren.
DieBatterienicht:
•mitWasserinBerührungbringen.
•über100Cerhitzen.
•reparierenoderzerlegen.
DieörtlichenBestimmungenfürdieEntsorgungvonSondermüllbeachten.
ACHTUNG:
BeiderInstallationvonLasergeräten(wieCD-ROM-Laufwerken,DVD-aufwerken,Einheitenmit
LichtwellenleitertechnikoderSendern)Folgendesbeachten:
•DieAbdeckungennichtentfernen.DurchEntfernenderAbdeckungendesLasergerätskönnen
gefährlicheLaserstrahlungenfreigesetztwerden.DasGerätenthältkeinezuwartendenTeile.
•WerdenSteuerelemente,EinstellungenoderDurchführungenvonProzedurenandersalshier
angegebenverwendet,kanngefährlicheLaserstrahlungauftreten.
VORSICHT
EinigeLasergeräteenthalteneineLaserdiodederKlasse3Aoder3B.BeachtenSieFolgendes:
Chapter2.Safetyinformation19

LaserstrahlungbeigeöffneterVerkleidung.NichtindenStrahlblicken.KeineLupenoderSpiegel
verwenden.Strahlungsbereichmeiden.
≥18kg(37lbs)≥32kg(70.5lbs)≥55kg(121.2lbs)
ACHTUNG:
ArbeitsschutzrichtlinienbeimAnhebenderMaschinebeachten.
ACHTUNG:
MitdemNetzschalteranderEinheitundamNetzteilwirddieStromversorgungfürdieEinheit
nichtunterbrochen.DieEinheitkannauchmitmehrerenNetzkabelnausgestattetsein.Umdie
StromversorgungfürdieEinheitvollständigzuunterbrechen,müssenallezumGerätführenden
NetzkabelvomNetzgetrenntwerden.
1
2
20ThinkStationHardwareMaintenanceManual
Chapter2.Safetyinformation21
1
2
PERICOLO
Lacorrenteelettricaprovenientedaicavidialimentazione,deltelefonoedicomunicazionepuòessere
pericolosa.
Perevitareilrischiodiscosseelettriche:
•Noncollegareoscollegarequalsiasicavooppureeffettuarel'installazione,lamanutenzioneola
ricongurazionedelprodottoduranteuntemporale.
•Collegaretuttiilielettriciaunapresadialimentazionecorrettamentecablataedotatadimessaa
terra.
•Collegareallepreseelettricheappropriatetutteleapparecchiaturecheverrannoutilizzateper
questoprodotto.
22ThinkStationHardwareMaintenanceManual

•Sepossibile,utilizzaresolounamanopercollegareoscollegareicavidisegnale.
•Nonaccendereassolutamenteapparecchiatureinpresenzadiincendi,perdited'acquaodanno
strutturale.
•Scollegareicavidialimentazione,isistemiditelecomunicazione,leretieilmodemprimadi
aprireicoperchideldispositivo,salvoistruzionicontrarierelativealleprocedurediinstallazionee
congurazione.
•Collegareescollegareicavicomedescrittonellaseguentetabellaquandovengonoeffettuate
operazionidiinstallazione,spostamentooaperturadeicoperchidiquestoprodottoodelleunità
collegate.
PercollegarsiPerscollegarsi
1.SPEGNEREleapparecchiature.
2.Innanzitutto,collegaretuttiicavialleunità.
3.Collegareicavidisegnaleaiconnettori.
4.Collegareicavidialimentazioneallapresa.
5.Accenderel'unità.
1.SPEGNEREleapparecchiature.
2.Innanzitutto,rimuovereicavidialimentazionedalla
presa.
3.Rimuovereicavidisegnaledaiconnettori.
4.Rimuoveretuttiicavidalleunità.
ATTENZIONE:
Quandosisostituiscelabatteriaallitio,utilizzaresoloilNumeroparte45C1566ountipodibatteria
equivalenteconsigliatodalproduttore.Sesulsistemaèpresenteunmodulochecontieneunabatteria
allitio,sostituirlosoloconuntipodimodulodellostessotipodellastessacasadiproduzione.La
batteriacontienelitioepuòesplodereseusata,maneggiataosmaltitainmodononcorretto.
Non:
•Gettareoimmergerelabatterianell'acqua
•Riscaldarlaadunatemperaturasuperioreai100gradiC(212gradiF)
•Smontarla,ricaricarlaotentarediripararla
Lebatterieusatevannosmaltiteinaccordoallanormativainvigore(DPR915/82esuccessive
disposizioniedisposizionilocali).
ATTENZIONE:
Quandovengonoinstallatiprodottilaser(qualiCD-ROM,unitàDVD-ROM,unitàabreotticheo
trasmittenti),tenerpresentequantosegue:
•Nonrimuovereglisportelli.L'aperturadiun'unitàlaserpuòdeterminarel'esposizionearadiazioni
laserpericolose.All'internodell'unitànonvisonopartisucuieffettuarel'assistenzatecnica.
•L'utilizzodicontrolli,regolazioniol'esecuzionediprocedurenondescrittinelpresentemanuale
possonoprovocarel'esposizionearadiazionipericolose.
Chapter2.Safetyinformation23
PERICOLO
AlcuneunitàlasercontengonoundiodolaserdiClasse3AoClasse3B.Tenerpresentequantosegue:
Aprendol'unitàvengonoemesseradiazionilaser.Nonssareilfascio,nonguardarlodirettamente
construmentiotticiedevitarel'esposizionealfascio.
≥18kg(37lbs)≥32kg(70.5lbs)≥55kg(121.2lbs)
ATTENZIONE:
Prestareattenzionenelsollevarel'apparecchiatura.
ATTENZIONE:
Ilpulsantedicontrollodell'alimentazionepresentesull'unitàel'interruttoredell'alimentatorenon
disattivanol'alimentazionecorrentefornitaall'unità.E'possibilechel'unitàdispongadipiùcavidi
alimentazione.Perdisattivarel'alimentazionedall'unità,accertarsichetuttiicavidialimentazione
sianoscollegatidallafontedialimentazione.
1
2
24ThinkStationHardwareMaintenanceManual
Chapter2.Safetyinformation25

1
2
PELIGRO
Lacorrienteeléctricaprocedentedecablesdealimentación,teléfonosycablesdecomunicaciónpuede
serpeligrosa.
Paraevitarelriesgodedescargaeléctrica:
•Noconectenidesconecteloscablesnirealiceningunatareadeinstalación,mantenimientoo
reconguracióndeesteproductoduranteunatormentaeléctrica.
•Conectetodosloscablesdealimentaciónatomasdecorrientedebidamentecableadasy
conectadasatierra.
•Cualquierequipoqueseconecteaesteproductotambiéndebeconectarseatomasdecorriente
debidamentecableadas.
•Siemprequeseaposible,utiliceunasolamanoparaconectarodesconectarloscablesdeseñal.
•Noenciendanuncaunequipocuandohayseñalesdefuego,aguaodañosestructurales.
26ThinkStationHardwareMaintenanceManual
•Desconecteloscablesdealimentación,lossistemasdetelecomunicaciones,lasredesylos
módemsconectadosantesdeabrirlascubiertasdelosdispositivos,amenosqueseindiquelo
contrarioenlosprocedimientosdeinstalaciónyconguración.
•Conecteydesconecteloscables,comosedescribeenlatablasiguiente,cuandoinstale,muevao
abralascubiertasdeesteproductoodelosdispositivosconectados.
ParaconectarParadesconectar
1.APÁGUELOtodo.
2.Enprimerlugar,conectetodosloscablesalos
dispositivos.
3.Conecteloscablesdeseñalalosconectores.
4.Enchufeloscablesdealimentaciónalastomasde
corriente.
5.Enciendaeldispositivo.
1.APÁGUELOtodo.
2.Enprimerlugar,desenchufeloscablesdealimentación
delastomasdecorriente.
3.Desconecteloscablesdeseñaldelosconectores.
4.Desconectetodosloscablesdelosdispositivos.
PRECAUCIÓN:
Cuandosustituyaunabateríadelitio,utilicesolamenteunabateríanúmerodepieza45C1566uotra
detipoequivalenterecomendadaporelfabricante.Sisusistemadisponedeunmóduloquecontiene
unabateríadelitio,reemplácelosóloconelmismotipodemódulo,delmismofabricante.Labatería
contienelitioypuedeexplotarsinoseutiliza,manipulaodesechacorrectamente.
Nodebe:
•Arrojarlaalaguaosumergirlaenella
•Exponerlaatemperaturassuperioresa100°C(212°F)
•Repararlaodesmontarla
Deshágasedelabateríasegúnespeciquenlasleyesonormaslocales.
PRECAUCIÓN:
Cuandohayaproductosláser(comounidadesdeCD-ROM,unidadesdeDVD,dispositivosdebra
ópticaotransmisores)instalados,tengaencuentalosiguiente:
•Noquitelascubiertas.Siquitalascubiertasdelproductoláser,podríaquedarexpuestoaradiación
láserpeligrosa.Dentrodeldispositivonoexisteningunapiezaquerequieraserviciotécnico.
•Siusacontrolesoajustesorealizaprocedimientosquenoseanlosespecicadosaquí,podría
exponersearadiacionespeligrosas.
PELIGRO
Chapter2.Safetyinformation27
Algunosproductoslásertienenincorporadoundiodoláserdeclase3Aoclase3B.Tengaencuentalo
siguiente:
Cuandoseabre,quedaexpuestoaradiaciónláser.Nomiredirectamentealrayoláser,nisiquieracon
instrumentosópticos,yeviteexponersedirectamentealrayoláser.
≥18kg(37lbs)≥32kg(70.5lbs)≥55kg(121.2lbs)
PRECAUCIÓN:
Adopteprocedimientossegurosallevantarelequipo.
PRECAUCIÓN:
Elbotóndecontroldealimentacióndeldispositivoyelinterruptordealimentacióndelafuentede
alimentaciónnodesconectanlacorrienteeléctricasuministradaaldispositivo.Además,eldispositivo
podríatenermásdeuncabledealimentación.Parasuprimirtodalacorrienteeléctricadeldispositivo,
asegúresedequetodosloscablesdealimentaciónesténdesconectadosdelatomadecorriente.
1
2
28ThinkStationHardwareMaintenanceManual

Chapter3.Generalinformation
Thischapterprovidesgeneralinformationthatappliestoallmachinetypessupportedbythispublication.
LenovoWelcomeCenter
TheLenovoWelcomeprogramintroducesyoutosomeinnovativebuilt-infeaturesofLenovoandguidesyou
throughafewimportantsetuptaskstohelpyoumakethemostofyourcomputer.
LenovoSolutionCenter
TheLenovoSolutionCenterprogramenablesyoutotroubleshootandresolvecomputerproblems.It
combinesdiagnostictests,systeminformationcollection,securitystatus,andsupportinformation,along
withhintsandtipsformaximumsystemperformance.See“LenovoSolutionCenter”onpage35fordetailed
information.
SimpleTap
TheSimpleTapprogramprovidesyouwithaquickwaytocustomizesomebasiccomputersettingssuchas
mutingthespeakers,adjustingthevolume,lockingthecomputeroperatingsystem,launchingaprogram,
openingaWebpage,openingale,andsoon.YoualsocanusetheSimpleTapprogramtoaccessthe
LenovoAppShop,fromwhichyoucandownloadvariousapplicationsandcomputersoftware.
TostarttheSimpleTapprograminaquickway,doanyofthefollowing:
•ClicktheredSimpleTaplaunchpointonthedesktop.Theredlaunchpointisavailableonthedesktop
afteryouhavelaunchedtheSimpleTapprogramforthersttime.
•PresstheblueThinkVantagebuttonifyourkeyboardhasone.
Note:TheSimpleTapprogramisonlyavailableoncertainmodelspreinstalledwiththeWindows7operating
system.IfyourWindows7modelisnotpreinstalledwiththeSimpleTapprogram,youcandownloadit
fromhttp://www.lenovo.com/support.
Additionalinformationresources
IfyouhaveInternetaccess,themostup-to-dateinformationforyourcomputerisavailablefromtheWorld
WideWeb.
Youcanndthefollowinginformation:
•CRUremovalandinstallationinstructions
•Publications
•Troubleshootinginformation
•Partsinformation
•Downloadsanddrivers
•Linkstootherusefulsourcesofinformation
Toaccessthisinformation,pointyourbrowsertohttp://www.lenovo.com/support.
Specications
ThissectionliststhephysicalspecicationsforyourThinkStationcomputer.
©CopyrightLenovo2008,201229

Formachinetypes4105,4157,and4217.
Thissectionliststhephysicalspecicationsforyourcomputer.
Dimensions
Width:175mm(6.9inches)
Height:478mm(18.8inches)oortotopofhandle
Depth:460mm(18.1inches)
Weight
Maximumconguration:16.33kg(36lbs)
Dimensionsrackmounted:
Width:427mm(16.8inches)
Height:210mm(8.0inches)
Depth:579mm(22.8inches)
Environment
•Airtemperature:
Operatingat0-3000ft(914.4m):10°to35°C(50°to95°F)
Non-operating:-10°to60°C(14°to140°F)
•Humidity:
Operating:10%to80%
Non-operating:10%to90%
Transit:10%to90%
•Maximumaltitude:7000ft(2133.6m)
Electricalinput
•Inputvoltage:
–Range100V-240V
–Inputkilovolt-amperes(kVA)(approximate)
Minimumcongurationasshipped:0.17kVA
Maximumconguration:0.8kVA
Formachinetypes4155,4158,and4218.
Dimensions
Width:210mm(8.3inches)
Height:485mm(19.1inches)oortotopofhandle
Depth:602mm(23.7inches)
Weight
Maximumconguration:26.00kg(57lbs)
Rackmounteddimensions:
Width:427mm(16.8inches)
Height:210mm(8.3inches)
Depth:602mm(23.7inches)
Environment
30ThinkStationHardwareMaintenanceManual

•Airtemperature:
Operatingat0-3000ft(914.4m):10°to35°C(50°to95°F)
Non-operating:-10°to60°C(14°to140°F)
•Humidity:
Operating:10%to80%(10%perhour)
Non-operating:10%to90%(10%perhour)
Transit:10%to90%(10%perhour)
•Maximumaltitude:7000ft(2133.6m)
Electricalinput
•Inputvoltage:
–Range100V-240V
–Inputkilovolt-amperes(kVA)(approximate)
Minimumcongurationasshipped:0.17kVA
Maximumconguration:1.2kVA
Chapter3.Generalinformation31

32ThinkStationHardwareMaintenanceManual

Chapter4.GeneralCheckout
Attention
Thedrivesinthecomputeryouareservicingmighthavebeenrearrangedorthedrivestartupsequence
changed.Beextremelycarefulduringwriteoperationssuchascopying,saving,orformatting.Dataor
programscanbeoverwrittenifyouselectanincorrectdrive.
Generalerrormessagesappearifaproblemorconictisfoundbyanapplicationprogram,theoperating
system,orboth.Foranexplanationofthesemessages,refertotheinformationsuppliedwiththatsoftware
package.
BeforereplacinganyFRUs,ensurethatthelatestlevelofBIOSisinstalledonthesystem.Adown-levelBIOS
mightcausefalseerrorsandunnecessaryreplacementofthesystemboard.Formoreinformationonhowto
determineandobtainthelatestlevelBIOS,see“BIOSlevels”onpage251.
Usethefollowingproceduretohelpdeterminethecauseoftheproblem:
1.Power-offthecomputerandallexternaldevices.
2.Checkallcablesandpowercords.
3.Setalldisplaycontrolstothemiddleposition.
4.Power-onallexternaldevices.
5.Power-onthecomputer.
•Lookfordisplayederrorcodes
•Listenforbeepcodes
•Lookforreadableinstructionsoramainmenuonthedisplay.
Ifyoudidnotreceivethecorrectresponse,proceedtostep6onpage33.
Ifyoudoreceivethecorrectresponse,proceedtostep7onpage33.
6.Lookatthefollowingconditionsandfollowtheinstructions:
•IfyouhearbeepcodesduringPOST,goto“Beepsymptoms”onpage71.
•IfthecomputerdisplaysaPOSTerror,goto“POSTerrorcodes”onpage72.
•Ifthecomputerhangsandnoerrorisdisplayed,continueatstep7onpage33.
7.RuntheDiagnosticprograms.SeeChapter5“Diagnostics”onpage35.
•Ifyoureceiveanerror,replacethepartthatthediagnosticprogramcallsoutorgoto“Diagnostic
errorcodes”onpage54.
•Iftheteststopsandyoucannotcontinue,replacethelastdevicetested.
Problemdeterminationtips
Duetothevarietyofhardwareandsoftwarecombinationsthatcanbeencountered,usethefollowing
informationtoassistyouinproblemdetermination.Ifpossible,havethisinformationavailablewhen
requestingassistancefromServiceSupportandEngineeringfunctions.
•Machinetypeandmodel
•Processororharddiskupgrades
•Failuresymptom
–Dodiagnosticsindicateafailure?
–What,when,where,single,ormultiplesystems?
–Isthefailurerepeatable?
©CopyrightLenovo2008,201233

–Hasthiscongurationeverworked?
–Ifithasbeenworking,whatchangesweremadepriortoitfailing?
–Isthistheoriginalreportedfailure?
•Diagnosticsversion
–Typeandversionlevel
•Hardwareconguration
–Print(printscreen)congurationcurrentlyinuse
–BIOSlevel
•Operatingsystemsoftware
–Typeandversionlevel
Notes:Toeliminateconfusion,identicalsystemsareconsideredidenticalonlyifthey:
1.Aretheexactmachinetypeandmodels
2.HavethesameBIOSlevel
3.Havethesameadapters/attachmentsinthesamelocations
4.Havethesameaddressjumpers/terminators/cabling
5.Havethesamesoftwareversionsandlevels
6.HavethesameDiagnosticDiskettes(version)
7.Havethesamecongurationoptionssetinthesystem
8.Havethesamesetupfortheoperatingsystemcontrolles
Comparingthecongurationandsoftwareset-upbetween“workingandnon-working”systemswilloften
leadtoproblemresolution.
34ThinkStationHardwareMaintenanceManual

Chapter5.Diagnostics
Diagnosticprogramsareusedtotesthardwarecomponentsofyourcomputer.Diagnosticprogramscan
alsoreportoperating-system-controlledsettingsthatinterferewiththecorrectoperationofyoursystem.
Youcanusethepreinstalleddiagnosticprogramtodiagnosecomputerproblems,ifyourcomputeris
runningintheWindows®operatingsystem.
Notes:
1.Dependingonthedatewhenyourcomputerwasmanufactured,yourcomputerispreinstalledwith
eithertheLenovoSolutionCenterprogramortheLenovoThinkVantageToolboxprogramfordiagnostic
purposes.FormoreinformationabouttheLenovoThinkVantageToolboxprogram,see“Lenovo
ThinkVantageTools”onpage35.FormoreinformationabouttheLenovoSolutionCenterprogram,see
“LenovoSolutionCenter”onpage35.
2.UsePC-DoctorforWindowsPEwhenyourWindowsoperatingsystemdoesnotstart.
3.YoucanalsodownloadthePC-DoctorforDOSdiagnosticprogramfromhttp://www.lenovo.com/support.
See“PC-DoctorforDOS”onpage36fordetailedinformation.
4.Ifyouareunabletoisolateandrepairtheproblemyourselfafterrunningtheprograms,saveandprint
theloglescreatedbytheprograms.YouwillneedthelogleswhenyouspeaktoaLenovotechnical
supportrepresentative.
LenovoThinkVantageTools
TheLenovoThinkVantageToolsprogramguidesyoutoahostofinformationsourcesandprovideseasy
accesstovarioustoolstohelpyouworkmoreeasilyandsecurely.
Note:TheLenovoThinkVantageToolsprogramisonlyavailableoncomputerspreinstalledwithWindows7
fromLenovo.
LenovoSolutionCenter
TheLenovoSolutionCenterprogramenablesyoutotroubleshootandresolvecomputerproblems.It
combinesdiagnostictests,systeminformationcollection,securitystatus,andsupportinformation,along
withhintsandtipsformaximumsystemperformance.
Notes:
•TheLenovoSolutionCenterprogramisavailableonlyonmodelspreinstalledwiththeWindows7
operatingsystem.IfyourWindows7modelisnotpreinstalledwiththeprogram,youcandownloadit
fromhttp://www.lenovo.com/diagnose.
•IfyouareusingtheWindowsVistaorWindowsXPoperatingsystem,goto
http://www.lenovo.com/diagnoseforthelatestinformationondiagnosticsforyour
computer.
ToruntheLenovoSolutionCenterprogramontheWindows7operatingsystem,clickStart➙AllPrograms
➙LenovoThinkVantageTools➙SystemHealthandDiagnostics.Followtheinstructionsonthescreen.
Foradditionalinformation,refertotheLenovoSolutionCenterhelpsystem.
Note:Ifyouareunabletoisolateandrepairtheproblemyourselfafterrunningtheprogram,saveandprint
theloglescreatedbytheprogram.YouwillneedthelogleswhenyouspeaktoaLenovotechnical
supportrepresentative.
©CopyrightLenovo2008,201235

PC-DoctorforWindowsPE
ThePC-DoctorforWindowsPEdiagnosticprogramispartoftheRescueandRecoveryworkspaceoneach
Lenovocomputer.UsePC-DoctorforWindowsPEifyouareunabletostarttheWindowsoperatingsystem
orifLenovoThinkVantageToolboxhasnotbeensuccessfulinisolatingapossibleproblem.
RunningdiagnosticsfromtheRescueandRecoveryworkspace
YoucanrunthePC-DoctorforWindowsPEdiagnosticprogramfromtheRescueandRecoveryworkspace.
TorundiagnosticsfromtheRescueandRecoveryworkspace,usethefollowingprocedure:
1.Shutdowntheoperatingsystemandturnoffthecomputer.
2.RepeatedlypressandreleasetheF11keywhenyouturnonthecomputer.
3.Whenyouhearbeepsorseealogoscreen,stoppressingtheF11key.TheRescueandRecovery
workspaceopens.
4.FromtheRescueandRecoveryworkspace,selectLaunchAdvancedRescueandRecovery®
Diagnosehardware.
5.Thediagnosticprogramopensautomatically.Selectthediagnostictestyouwanttorun.PresstheF1
keyforadditionalhelp.
6.Followtheinstructionsonthescreen.
Note:RescuemediaincludesPC-DoctorforWindowsPE.
PC-DoctorforDOS
UsePC-DoctorforDOS,ifyouareunabletostarttheWindowsoperatingsystemorifPC-Doctorfor
Windowshasnotbeensuccessfulinisolatingapossibleproblem.YoucanrunPC-DoctorforDOSfroma
diagnosticCDimageordiagnosticdiskettesthathavebeencreated.
Note:ItisimportanttocreateadiagnosticCDimageordiagnosticdiskettesincasePC-DoctorforWindows
PEcannotberunfromtheRescueandRecoveryworkspace.
YoucanalsodownloadthelatestversionofthePC-DoctorforDOSdiagnosticprogramfrom:
http://www.lenovo.com/support.ThePC-DoctorforDOSdiagnosticprogramispartoftheRescueand
RecoveryworkspaceandrunsindependentlyoftheWindowsoperatingsystem.UsePC-DoctorforDOS,if
youareunabletostarttheWindowsoperatingsystemorifLenovoThinkVantageToolboxandPC-Doctorfor
WindowsPEhavenotbeensuccessfulinisolatingapossibleproblem.YoucanrunPC-DoctorforDOSfrom
adiagnosticCD/DVDimagethatyoucreate.YoucanalsorunPC-DoctorforDOSfromtheRescueand
Recoveryworkspace.
Note:ItisimportanttocreateadiagnosticCD/DVDimageincasePC-DoctorforDOScannotberunfrom
theRescueandRecoveryworkspace.
CreatingadiagnosticCD/DVDimage
TocreateadiagnosticCD/DVDimage,downloadaself-startingbootableCD/DVDimage(knownasanISO
image)ofthediagnosticprogramfromhttp://www.lenovo.com/support.Afteryoudownloadtheimage,you
cancreatetheCD/DVDusinganyCD/DVDburningsoftware.
Runningdiagnosticsfromthedisc
TorundiagnosticsfromthediagnosticCD/DVDimagethatyoucreated,usethefollowingprocedure:
1.Makesurethecomputeristurnedoff.
36ThinkStationHardwareMaintenanceManual

2.Insertthediscintotheopticaldrive.
3.Restartthecomputer.
Note:Ifthediagnosticprogramdoesnotstart,youmightnothaveyouropticaldrivesetasastartable
device.See“Selectingastartupdevice”onpage43forinstructionsonhowtochangethestartup
device.
4.Whenthediagnosticsprogramopens,followtheinstructionsonthescreen.
5.Whentheprogramnishes,besuretoremovethediscfromthedrive.
6.Selectthediagnostictestyouwanttorun.PresstheF1keyforadditionalhelp.
RunningdiagnosticsfromtheRescueandRecoveryworkspace
TorundiagnosticsfromtheRescueandRecoveryworkspace,usethefollowingprocedure:
Note:IfyoudidnotcreateadiagnosticCD/DVDimage,youcanrunthePC-DoctorforDOSdiagnostic
programfromtheRescueandRecoveryworkspace.
1.Shutdowntheoperatingsystemandturnoffthecomputer.
2.RepeatedlypressandreleasetheF11keywhenyouturnonthecomputer.
3.Whenyouhearbeepsorseealogoscreen,stoppressingtheF11key.TheRescueandRecovery
workspaceopens.
Note:Forsomemodels,presstheEsckeytoentertheRescueandRecovery.
4.FromtheRescueandRecoveryworkspace,selectLaunchAdvancedRescueandRecovery®
Diagnosehardware.
5.Followthepromptsonthescreen.Thecomputerwillrestart.
6.Whenthecomputerrestarts,thediagnosticprogramopensautomatically.Selectthediagnostictestyou
wanttorun.PresstheF1keyforadditionalhelp.
Navigatingthroughthediagnosticsprograms
Usethecursormovementkeystonavigatewithinthemenus.
•TheEnterkeyisusedtoselectamenuitem.
•TheEsckeyisusedtobackuptothepreviousmenu.
•ForonlinehelpselectF1.
Runningtests
Therearefourwaystorunthediagnostictests.
•Usingthecursormovementkeys,highlightRunNormalTestorRunQuickTestfromtheDiagnostics
menuandthenpressEnter.Thisautomaticallyrunsapre-denedgroupoftestsfromeachtestcategory.
RunNormalTestrunsamoreextensivesetofteststhandoesRunQuickTestandtakeslongerto
complete.
•PressF5toautomaticallyrunallselectedtestsinallcategories.
•Fromwithinatestcategory,pressCtrl-Entertoautomaticallyrunonlytheselectedtestsinthatcategory.
•Usingthecursormovementkeys,highlightasingletestwithinatestcategory,andthenpressEnter.
Thisrunsonlythattest.
PressEscatanytimetostopthetestingprocess.
Chapter5.Diagnostics37

Testresults(N/A,PASSED,FAILED,ABORTED)aredisplayedintheeldbesidethetestdescriptionandin
thetestlog.See“Viewingthetestlog”onpage39.
Toselectoneormoretests,usethefollowingprocedure.
1.Openthecorrespondingtestcategory.
2.Usingthecursormovementkeys,highlightthedesiredtest.
3.Pressthespacebar.Aselectedtestismarkedby>>.Pressingthespacebaragainde-selectsatest
andremovesthe>>.
4.Repeatsteps2and3abovetoselectalldesiredtests.
Testresults
Diagnosticstestresultsproducethefollowingerrorcodeformat:
FunctionCodeFailureTypeDeviceIDDateChkDigitsText
•FunctionCode:
RepresentsthefeatureorfunctionwithinthePC.
•FailureType:
Representsthetypeoferrorencountered.
•DeviceID:
Containsthecomponent'sunit-IDwhichcorrespondstoeitheraxeddiskdrive,removablemediadrive,
serialorparallelport,processor,specicRIMM,oradeviceonthePCIbus.
•Date:
Containsthedatewhenthediagnostictestwasrun.ThedateisretrievedfromCMOSanddisplayed
usingtheYYYYMMDDformat.
•ChkDigits:
Containsa2-digitcheck-digitvaluetoensurethefollowing:
–Diagnosticswererunonthespecieddate.
–Diagnosticswererunonthespeciedcomputer.
–Thediagnosticerrorcodeisrecordedcorrectly.
•Text:
Descriptionoftheerror.
Note:See“Diagnosticerrorcodes”onpage54forerrorcodelistings.
QuickandFullerase-harddrive
Thediagnosticsprogramofferstwoharddriveformatutilities:
•QuickEraseHardDrive
•FullEraseHardDrive
TheQuickEraseHardDriveprovidesaDOSutilitythatperformsthefollowing:
•DestroystheMasterBootRecord(MBR)ontheharddrive.
•DestroysallcopiesoftheFATTableonallpartitions(boththemasterandbackup).
•Destroysthepartitiontable.
•Providesmessagesthatwarntheuserthatthisisanon-recoverableprocess.
TheFullEraseHardDriveprovidesaDOSutilitythatperformsthefollowing:
38ThinkStationHardwareMaintenanceManual

•PerformsallthestepsinQuickErase.
•ProvidesaDOSutilitythatwritesrandomdatatoallsectorsoftheharddrive.
•Providesanestimateoftimetocompletionalongwithavisualrepresentationofcompletionstatus.
•Providesmessagesthatwarntheuseraboutnon-recoverableprocess.
Important:MakesurethatalldataisbackedupbeforeusingtheQuickorFullErasefunctions.
ToselecttheQuickEraseorFullEraseHardDriveutility,usethefollowingprocedure:
1.SelecttheUTILITYoptiononthetoolbarandpressEnter.
2.SelecteithertheQUICKERASEorFULLERASEHARDDISKoptionandfollowtheinstructions.
Viewingthetestlog
Errorsreportedbythediagnostictestwillbedisplayedbytheprogramasafailedtest.
Toviewdetailsofafailureortoviewalistoftestresults,usethefollowingprocedurefromanytestcategory
screen:
1.PressF3toactivatethelogle.
2.PressF3againtosavetheletodisketteorpressF2toprintthele.
Chapter5.Diagnostics39

40ThinkStationHardwareMaintenanceManual

Chapter6.UsingtheSetupUtility
TheSetupUtilityprogramisusedtoviewandchangethecongurationsettingsofyourcomputer,regardless
ofwhichoperatingsystemyouareusing.However,theoperating-systemsettingsmightoverrideanysimilar
settingsintheSetupUtilityprogram.
StartingtheSetupUtilityprogram
TostarttheSetupUtilityprogram,dothefollowing:
1.Ifyourcomputeristurnedonwhenyoustartthisprocedure,shutdowntheoperatingsystemand
turnoffthecomputer.
2.PressandholdtheF1keythenturnonthecomputer.Whenyouhearmultiplebeeps,releasetheF1key.
Notes:
a.IfyouareusingaUSBkeyboardandtheSetupUtilityprogramdoesnotdisplayusingthismethod,
repeatedlypressandreleasetheF1keyratherthanleavingitpressedwhenturningonthecomputer.
b.Ifauserpasswordoranadministratorpasswordhasbeenset,theSetupUtilityprogrammenuisnot
displayeduntilyoutypeyourpassword.Formoreinformation,see“Usingpasswords”onpage41.
TheSetupUtilityprogrammightstartautomaticallywhenPOSTdetectsthathardwarehasbeenremovedor
newhardwarehasbeeninstalledinyourcomputer.
Viewingandchangingsettings
TheSetupUtilityprogrammenulistsitemsthatidentifysystemcongurationtopics.Tovieworchange
settings,see“StartingtheSetupUtilityprogram”onpage41.
WhenworkingwiththeSetupUtilityprogrammenu,youmustusethekeyboard.Thekeysusedtoperform
varioustasksaredisplayedatthebottomofeachscreen.
Usingpasswords
ByusingtheSetupUtilityprogram,youcansetpasswordstopreventunauthorizedpersonsfromgaining
accesstoyourcomputeranddata.See“StartingtheSetupUtilityprogram”onpage41.Thefollowing
typesofpasswordsareavailable:
•UserPassword
•AdministratorPassword
Youdonothavetosetanypasswordstouseyourcomputer.However,ifyoudecidetosetanypasswords,
readthefollowingsections.
Passwordconsiderations
Apasswordcanbeanycombinationofupto12alphabeticandnumericcharacters(a-zand0-9).For
securityreasons,itisagoodideatouseastrongpasswordthatcannotbeeasilycompromised.Passwords
shouldadheretothefollowingrules:
•Tosetastrongpassword,haveatleasteightcharactersinlengthandcontainatleastonealphabetic
characterandonenumericcharacter
•SetupUtilityprogramandharddiskdrivepasswordsarenotcasesensitive
©CopyrightLenovo2008,201241

•Notbeyournameoryourusername
•Notbeacommonwordoracommonname
•Besignicantlydifferentfromyourpreviouspassword
UserPassword
WhenaUserPasswordisset,thecomputercannotbeuseduntilavalidpasswordistypedfromthe
keyboard.
AdministratorPassword
WhenanAdministratorPasswordisset,itdetersunauthorizedpersonsfromchangingconguration
settings.Ifyouareresponsibleformaintainingthesettingsofseveralcomputers,youmightwanttosetan
AdministratorPassword.
AfteryousetanAdministratorPassword,apasswordpromptisdisplayedeachtimeyoutrytoaccessthe
SetupUtilityprogram.
Ifboththeuserandadministratorpasswordsareset,youcantypeeitherpassword.However,tochange
anycongurationsettings,youmustuseyouradministratorpassword.
Setting,changing,anddeletingapassword
Toset,change,ordeleteapassword,dothefollowing:
Note:Apasswordcanbeanycombinationofupto12alphabeticandnumericcharacters.Formore
information,see“Passwordconsiderations”onpage41.
1.StarttheSetupUtilityprogram(seeChapter6“UsingtheSetupUtility”onpage41).
2.FromtheSetupUtilityprogrammenu,selectSecurity®SetPasswords.
3.SelectSetUserPasswordorSetAdministratorPassword.
4.Readtheinformationdisplayedontherightsideofthescreen.
Enablingordisablingadevice
Youcanenableordisableuseraccesstoadevice.
ICHSATAControllerWhenthisfeatureissettoDisabled,anyopticaldrivesoreSATAdevicesaredisabled
andwillnotbedisplayedinthesystemconguration.
MarvellSATA/SAS
Controller
WhenthisfeatureissettoDisabled,allinternalharddiskdrivesaredisabledand
willnotbedisplayedinthesystemconguration.Whendisablingthisfeature,make
sureyoursystemhasanalternatebootmethod,suchasLANPXEboot,orabootable
oppydiskette,memorykey,oropticaldisc.
LegacydisketteAWhenthisfeatureissettoDisabled,thediskettedrivecannotbeaccessed.
TosettheICHSATAControllerorMarvellSATA/SASController,dothefollowing:
1.StarttheSetupUtilityprogram(see“StartingtheSetupUtilityprogram”onpage41).
2.Dependingonwhichdeviceyouwanttoset,selecteitherDevices®SAS/SATADriveSetup®ICH
SATAControllerorDevices®SAS/SATADriveSetup®MarvellSATA/SASControllerfromthe
SetupUtilityprogrammenu.
3.SelectthedesiredsettingsandpressEnter.
4.ReturntotheSetupUtilityprogrammenuandselectExit®SaveandexittheSetupUtility.
42ThinkStationHardwareMaintenanceManual

Note:Ifyoudonotwanttosavethesettings,selectExittheSetupUtilitywithoutsaving.
TosettheLegacydisketteA,dothefollowing:
1.StarttheSetupUtilityprogram(see“StartingtheSetupUtilityprogram”onpage41).
2.FromtheSetupUtilityprogrammenu,selectDevices®LegacydisketteA.
3.SelectthedesiredsettingsandpressEnter.
4.ReturntotheSetupUtilityprogrammenuandselectExit®SaveandexittheSetupUtility.
Note:Ifyoudonotwanttosavethesettings,selectExittheSetupUtilitywithoutsaving.
Selectingastartupdevice
Ifyourcomputerdoesnotstartup(boot)fromadevicesuchasthedisc,diskette,orharddiskdriveas
expected,useoneofthefollowingprocedurestoselectastartupdevice.
Selectingatemporarystartupdevice
Usethisproceduretostartupfromanybootdevice.
Note:Notalldiscs,harddiskdrives,anddiskettesarebootable.
1.Turnoffyourcomputer.
2.PressandholdtheF12keythenturnonthecomputer.WhentheStartupDeviceMenuappears,release
theF12key.
Note:IfyouareusingaUSBkeyboardandtheStartupDeviceMenudoesnotdisplayusingthismethod,
repeatedlypressandreleasetheF12keyratherthanleavingitpressedwhenturningonthecomputer.
3.SelectthedesiredstartupdevicefromtheStartupDeviceMenuandpressEntertobegin.
Note:SelectingastartupdevicefromtheStartupDeviceMenudoesnotpermanentlychangethestartup
sequence.
Selectingorchangingthestartupdevicesequence
Tovieworpermanentlychangetheconguredstartupdevicesequence,dothefollowing:
1.StarttheSetupUtilityprogram(see“StartingtheSetupUtilityprogram”onpage41).
2.SelectStartup®StartupSequence,andseetheinformationdisplayedontherightsideofthescreen.
3.SelectthedevicesforthePrimaryStartupSequence,theAutomaticStartupSequence,andtheError
StartupSequence.
4.SelectExitfromtheSetupUtilitymenuandthenSaveSettingsorSaveandexittheSetupUtility.
Ifyouhavechangedthesesettingsandwanttoreturntothedefaultsettings,selectLoadDefaultSettings
ontheExitmenu.
Advancedsettings
Onsomecomputermodels,theAdvancedsettingsmenuincludesasettingtoenableordisable
HyperThreading.ThisfeatureworksonlywithHyperThreading-awareoperatingsystems,suchasWindows
Vista.ThedefaultsettingforHyperThreadingisEnabled.However,ifyouselectSetDefaultsandareusing
anoperatingsystemotherthanWindowsVista,yourcomputerperformancemightbedegraded.Therefore,
youshouldalwayssetHyperThreadingtoDisabledunlessyouaresureyouroperatingsystemsupports
HyperThreading.
Chapter6.UsingtheSetupUtility43

ExitingfromtheSetupUtilityprogram
Afteryounishviewingorchangingsettings,pressEsctoreturntotheSetupUtilityprogrammenu(you
mighthavetopressEscseveraltimes).Ifyouwanttosavethenewsettings,selectSaveSettingsorSave
andexittheSetupUtility.Otherwise,yourchangeswillnotbesaved.
44ThinkStationHardwareMaintenanceManual

Chapter7.InstallingharddiskdrivesandconguringRAID
(types4105,4157,4217)
ThischaptercontainsinformationaboutinstallingharddiskdrivesandconguringRedundantArrayof
IndependentDisks(RAID)forthisproduct.
Note:TheinformationaboutconguringRAIDinthischapterisapplicableonlyforaWindowsenvironment.
ForinformationaboutconguringRAIDinaLinuxenvironment,contactyourLinuxsoftwareprovider.
InstallingSATAharddiskdrivesandconguringRAID
ThissectioncontainsinformationabouttherequirednumberofSATAharddiskdrivesforthesupportedlevel
ofRAIDandSATARAIDconguration.
InstallingSATAharddiskdrives
YourcomputermusthavetheminimumnumberofSATAharddiskdrivesinstalledforthesupportedlevelof
RAIDbelow:
•RAIDLevel0–Stripeddiskarray
–Twoharddiskdrivesminimum
–Betterperformancewithoutfaulttolerance
•RAIDLevel1–Mirroreddiskarray
–Twoharddiskdrivesminimum
–Improvedreadperformanceand100%redundancy
•RAIDLevel5–Block-levelstripeddiskarraywithdistributedparity
–Threeharddiskdrivesminimum
–Datastripedatthebytelevel
–Stripeerrorcorrectioninformation
–Betterperformanceandfaulttolerance
ToinstallanewSATAharddiskdrive,refertotheinstallationprocedurein“Replacingaharddiskdrive”in
theThinkStationHardwareInstallationandReplacementGuide.
ConguringthesystemBIOStoenableSATARAIDfunctionality
ThissectiondescribeshowtocongurethesystemBIOStoenableSATARAIDfunctionality.
Note:Usethearrowkeysonthekeyboardtomakeselections.
1.PressF1toenterthesystemBIOSsetup.See“StartingtheSetupUtilityprogram”onpage41.
2.SelectDevices®IDEDrivesSetupandpressEnter.
3.SelectSATARAIDEnableandpressEnter.
4.SelectEnabledandpressEnter.
5.PressF10tosavethenewsettingsandexit.
©CopyrightLenovo2008,201245

CreatingRAIDvolumes
ThissectiondescribeshowtousetheIntelMatrixStorageManageroptionROMcongurationutilityto
createRAIDvolumes.
1.PressCtrl+IwhenpromptedtoentertheIntelMatrixStorageManageroptionROMcongurationutility.
Note:TomakeenoughphysicalharddiskdrivesavailabletocreateaRAIDvolume.
2.UsetheupanddownarrowkeystoselectCreateRAIDVolumeandpressEnter.
3.TypeaproperRAIDVolumenameintheNameeldandpressTab.
4.UsethearrowkeystoselectaRAIDlevelintheRAIDLeveleldandpressTab.
5.Ifappropriate,usethearrowkeystoselectaStripeSizeintheStripeSizeeldandpressTab.
6.TypeavolumesizeintheCapacityeldandpressTab.
7.PressEntertoinitiatevolumecreation.
8.Whenprompted,pressYtoacceptthewarningmessageandcreatethevolume.
9.Returntostep2onpage46tocreateadditionalRAIDvolumes,orselectExitandpressEnter.
10.PressYwhenpromptedtoconrmtheexit.
DeletingRAIDvolumes
ThissectiondescribeshowtousetheIntelMatrixStorageManageroptionROMcongurationutilityto
deleteRAIDvolumes.
1.PressCtrl+IwhenpromptedtoentertheIntelMatrixStorageManageroptionROMcongurationutility.
2.UsetheupanddownarrowkeystoselectDeleteRAIDVolumeandpressEnter.
3.UsethearrowkeystoselecttheRAIDvolumetobedeletedandpressDelete.
4.Whenprompted,pressYtoconrmthedeletionoftheselectedRAIDvolume.DeletingaRAIDvolume
willresettheharddiskdrivestonon-RAID.
5.AfterdeletingaRAIDvolume,youcan:
•Returntostep2todeleteadditionalRAIDvolumes.
•See“CreatingRAIDvolumes”onpage46forRAIDvolumecreation.
•UsetheupanddownarrowkeystoselectExitandpressEnter.
•UsetheupanddownarrowkeystoselectResetDiskstoNon-RAIDandpressEnter.
a.Usethearrowkeysandthespacekeytomarkindividualphysicalharddiskdrivestobereset,and
thenpressEntertocompletetheselection.
b.Whenprompted,pressYtoconrmtheresetaction.
c.AftercompletingtheResetDiskstoNon-RAIDfunction,youcan:
–Returntostep2todeleteadditionalRAIDvolumes.
–See“CreatingRAIDvolumes”onpage46forRAIDvolumecreation.
–UsetheupanddownarrowkeystoselectExitandpressEnter.
InstallingSASharddiskdrivesandconguringRAID
ThissectioncontainsinformationabouttherequirednumberofSASharddiskdrivesforthesupportedlevel
ofRAIDandSASRAIDconguration.
InstallingSASharddiskdrives
YourcomputermusthavetheminimumnumberofSASharddiskdrivesinstalledforthesupportedlevelof
RAIDbelow:
46ThinkStationHardwareMaintenanceManual

•RAIDLevel0–Stripeddiskarray
–Twoharddiskdrivesminimum
–Betterperformancewithoutfaulttolerance
•RAIDLevel1–Mirroreddiskarray
–Twoharddiskdrivesminimum
–Improvedreadperformanceand100%redundancy
•RAIDLevel5–Block-levelstripeddiskarraywithdistributedparity
–Threeharddiskdrivesminimum
–Datastripedatthebytelevel
–Stripeerrorcorrectioninformation
–Betterperformanceandfaulttolerance
ToinstallanewSASharddiskdrive,refertotheinstallationprocedurein“Replacingaharddiskdrive”inthe
ThinkStationHardwareInstallationandReplacementGuide.
EnteringtheMarvellBIOSSetuptocongureSASRAID
ThissectiondescribeshowtoentertheMarvellBIOSSetuptocongureSASRAID.
1.YourcomputermusthaveaMarvellSASadaptercard(MarvellSAScontroller)installedtocongure
SASRAID.ForinstallingorreplacingaMarvellSASadaptercard,referto“Replacinganadaptercard”
intheThinkStationHardwareInstallationandReplacementGuide.
2.TurnonthecomputerafteryouhaveinstalledtherequirednumberofSASharddiskdrivesandthe
MarvellSASadaptercard.
3.PressCtrl+MwhenpromptedtoentertheMarvellBIOSSetuptocongureSASRAID.
ConguringtheMarvellBIOSSetuptoenableSASRAID0,1,or5
functionality
ToenableSASRAID0,1,or5functionality,usetheMarvellBIOSSetupcongurationutilityastheSAS
congurationutility.Thisutilityassumesthatthesystemhastherequirednumberofharddiskdrives.
1.TurnonyourcomputerandpressCtrl+MwhenpromptedtoentertheMarvellBIOSSetup.
2.OntheMarvellBIOSSetupscreen,usethearrowkeystoselectRAIDCongandpressEnter.The
RAIDCongmenuopens.
3.FromtheRAIDCongmenu,selectCreatearray.
4.UsethearrowkeysandtheEnterkeytoselecteachfreeharddiskdrivethatyouwanttoinclude
inthearray.
5.SelectNextandpressEnter.
6.FromtheCreatearraymenu,selectRAIDlevelandpressEnter.
Note:OnlythevalidRAIDlevelswillbeactive.
7.SelecttheSASRAIDlevelyouwant(RAID0,RAID1,orRAID5)andpressEnter.
8.FromtheStripesizemenu,youcanchangethestripesizeorkeepitasdefault.
9.TypeaproperarraynameintheArraynameeld.
10.SelectNextandpressEnter.Whenprompted,pressYtocompletethearraycreationandRAID
conguration.
Chapter7.InstallingharddiskdrivesandconguringRAID(types4105,4157,4217)47

ConguringtheMarvellBIOSSetuptosetanoptionalhotsparehard
diskdrive
ToconguretheMarvellBIOSSetuptosetanoptionalhotspareharddiskdrive:
1.TurnonyourcomputerandpressCtrl+MwhenpromptedtoentertheMarvellBIOSSetup.
2.OntheMarvellBIOSSetupscreen,usethearrowkeystoselectRAIDCongandpressEnter.The
RAIDCongmenuopens.
3.FromtheRAIDCongmenu,selectSpareManagement.
4.Usethearrowkeystoselecttheharddiskdriveyouwanttosetasanoptionalhotspareharddiskdrive.
5.UsethearrowkeystoselectNextandpressEnter.
6.PressYwhenpromptedtosettheoptionalhotspareharddiskdrive.
ConguringtheMarvellBIOSSetuptodeleteanoptionalhotspare
harddiskdrive
ToconguretheMarvellBIOSSetuptodeleteanoptionalhotspareharddiskdrive:
1.TurnonyourcomputerandpressCtrl+MwhenpromptedtoentertheMarvellBIOSSetup.
2.OntheMarvellBIOSSetupscreen,usethearrowkeystoselectRAIDCongandpressEnter.The
RAIDCongmenuopens.
3.FromtheRAIDCongmenu,selectSpareManagement.
4.Usethearrowkeystoselecttheoptionalhotspareharddiskdriveyouwanttodelete.
5.UsethearrowkeystoselectNextandpressEnter.
6.PressYwhenpromptedtodeletetheoptionalhotspareharddiskdrive.
ConguringtheMarvellBIOSSetuptodeleteanarray
ToconguretheMarvellBIOSSetuptodeleteanarray:
1.TurnonyourcomputerandpressCtrl+MwhenpromptedtoentertheMarvellBIOSSetup.
2.OntheMarvellBIOSSetupscreen,usethearrowkeystoselectRAIDCongandpressEnter.The
RAIDCongmenuopens.
3.FromtheRAIDCongmenu,selectDeletearray.
4.UsethearrowkeysandtheEnterkeytoselectthearrayyouwanttodeletefromthelist.
5.UsethearrowkeystoselectNextandpressEnter.
6.PressYwhenpromptedtocompletethedeletion.
48ThinkStationHardwareMaintenanceManual

Chapter8.InstallingharddiskdrivesandconguringRAID
(types:4155,4158,4218)
ThischaptercontainsinformationaboutinstallingharddiskdrivesandconguringRedundantArrayof
IndependentDisks(RAID)forthisproduct.
Note:TheinformationaboutconguringRAIDinthischapteronlyappliesforaWindowsenvironment.For
informationaboutconguringRAIDinaLinuxenvironment,contactyourLinuxsoftwareprovider.
InstallingSATAorSASharddiskdrivesandconguringRAID
ThissectioncontainsinformationabouttherequirednumberofSATAorSASharddiskdrivesforthe
supportedlevelofRAIDconguration.
Note:YourcomputermusthaveeitherallSATAharddiskdrivesorallSASharddiskdrivesinstalled.
However,besurethatyoudonotinstallboththeSATAandSASharddiskdrivesintothesamecomputer.
InstallingSATAorSASharddiskdrives
YourcomputermusthavetheminimumnumberofSATAorSASharddiskdrivesinstalledforthesupported
levelofRAIDbelow:
•RAIDLevel0–Stripeddiskarray
–Twoharddiskdrivesminimum
–Betterperformancewithoutfaulttolerance
•RAIDLevel1–Mirroreddiskarray
–Twoharddiskdrivesminimum
–Improvedreadperformanceand100%redundancy
•RAIDLevel5–Block-levelstripeddiskarraywithdistributedparity
–Threeharddiskdrivesminimum
–Datastripedatthebytelevel
–Stripeerrorcorrectioninformation
–Betterperformanceandfaulttolerance
•RAIDLevel10–CombiningfeaturesofRAID0andRAID1
–Fourharddiskdrivesminimum
–Veryhighreliabilitycombinedwithhighperformance
–Faulttolerance
ToinstallanewSATAorSASharddiskdrive,refertotheinstallationprocedurein“Replacingaharddisk
drive”intheThinkStationHardwareInstallationandReplacementGuide.
EnteringtheMarvellBIOSSetuptocongureSATAorSASRAID
ThissectiondescribeshowtoentertheMarvellBIOSSetuptocongureaSATAorSASRAID.
1.TurnonthecomputerafteryouhaveinstalledtherequirednumberofSATAorSASharddiskdrives.
2.PressCtrl+MwhenpromptedtoentertheMarvellBIOSSetuptocongureSATA/SASRAID.
©CopyrightLenovo2008,201249

ConguringtheMarvellBIOSSetuptoenableSATAorSASRAID0,1,
5,or10functionality
ToenableSATA/SASRAIDfunctionality,usetheMarvellBIOSSetupcongurationutilityastheSATA/SAS
congurationutility.Thisutilityassumesthatthesystemhastherequirednumberofharddiskdrives.
1.TurnonyourcomputerandpressCtrl+MwhenpromptedtoentertheMarvellBIOSSetup.
2.OntheMarvellBIOSSetupscreen,usethearrowkeystoselectRAIDCongandpressEnter.The
RAIDCongmenuopens.
3.FromtheRAIDCongmenu,selectCreatearray.
4.UsethearrowkeysandtheEnterkeytoselecteachfreeharddiskdrivethatyouwanttoinclude
inthearray.
5.SelectNextandpressEnter.
6.FromtheCreatearraymenu,selectRAIDlevelandpressEnter.
Note:OnlythevalidRAIDlevelswillbeactive.
7.SelectyourdesiredRAIDlevel(RAID0,RAID1,RAID5,orRAID10)andpressEnter.
8.FromtheStripesizemenu,youcanchangethestripesizeorkeepitasdefault.
9.TypeaproperarraynameintheArraynameeld.
10.SelectNextandpressEnter.
11.Whenprompted,pressYtocompletethearraycreationandRAIDconguration.
ConguringtheMarvellBIOSSetuptosetanoptionalhotsparehard
diskdrive
ToconguretheMarvellBIOSSetuptosetanoptionalhotspareharddiskdrive:
1.TurnonyourcomputerandpressCtrl+MwhenpromptedtoentertheMarvellBIOSSetup.
2.OntheMarvellBIOSSetupscreen,usethearrowkeystoselectRAIDCongandpressEnter.The
RAIDCongmenuopens.
3.FromtheRAIDCongmenu,selectSpareManagement.
4.Usethearrowkeystoselecttheharddiskdriveyouwanttosetasanoptionalhotspareharddiskdrive.
5.UsethearrowkeystoselectNextandpressEnter.
6.PressYwhenpromptedtosettheoptionalhotspareharddiskdrive.
ConguringtheMarvellBIOSSetuptodeleteanoptionalhotspare
harddiskdrive
ToconguretheMarvellBIOSSetuptodeleteanoptionalhotspareharddiskdrive:
1.TurnonyourcomputerandpressCtrl+MwhenpromptedtoentertheMarvellBIOSSetup.
2.OntheMarvellBIOSSetupscreen,usethearrowkeystoselectRAIDCongandpressEnter.The
RAIDCongmenuopens.
3.FromtheRAIDCongmenu,selectSpareManagement.
4.Usethearrowkeystoselecttheoptionalhotspareharddiskdriveyouwanttodelete.
5.UsethearrowkeystoselectNextandpressEnter.
6.PressYwhenpromptedtodeletetheoptionalhotspareharddiskdrive.
ConguringtheMarvellBIOSSetuptodeleteanarray
ToconguretheMarvellBIOSSetuptodeleteanarray:
1.TurnonyourcomputerandpressCtrl+MwhenpromptedtoentertheMarvellBIOSSetup.
50ThinkStationHardwareMaintenanceManual

2.OntheMarvellBIOSSetupscreen,usethearrowkeystoselectRAIDCongandpressEnter.The
RAIDCongmenuopens.
3.FromtheRAIDCongmenu,selectDeletearray.
4.UsethearrowkeysandtheEnterkeytoselectthearrayyouwanttodeletefromthelist.
5.UsethearrowkeystoselectNextandpressEnter.
6.PressYwhenpromptedtocompletethedeletion.
Chapter8.InstallingharddiskdrivesandconguringRAID(types:4155,4158,4218)51

52ThinkStationHardwareMaintenanceManual

Chapter9.Symptom-to-FRUIndex
TheSymptom-to-FRUindexlistserrorsymptomsandpossiblecauses.Themostlikelycauseislistedrst.
AlwaysbeginwithChapter4“GeneralCheckout”onpage33.Thisindexcanalsobeusedtohelpyou
decidewhichFRUstohaveavailablewhenservicingacomputer.Ifyouareunabletocorrecttheproblem
usingthisindex,goto“Undeterminedproblems”onpage75.
Notes:
•Ifyouhavebothanerrormessageandanincorrectaudioresponse,diagnosetheerrormessagerst.
•Ifyoucannotrunthediagnostictestsoryougetadiagnosticerrorcodewhenrunningatest,butdidreceivea
POSTerrormessage,diagnosethePOSTerrormessagerst.
•Ifyoudidnotreceiveanyerrormessage,lookforadescriptionofyourerrorsymptomsintherstpartofthisindex.
Harddiskdrivebooterror
Aharddiskdrivebooterrorcanhavethefollowingcauses.
ErrorFRU/Action
Thestart-updriveisnotinthebootsequencein
conguration.
Checkthecongurationandensurethestart-updriveis
inthebootsequence.
Nooperatingsysteminstalledonthebootdrive.Installanoperatingsystemonthebootdrive.
Thebootsectoronthestart-updriveiscorrupted.Thedrivemustbeformatted,dothefollowing:
1.Attempttoback-upthedataonthefailingharddisk
drive.
2.Usingtheoperatingsystemsprograms,formatthe
harddiskdrive.
Thedriveisdefective.Replacetheharddiskdrive.
PowerSupplyProblems
Ifyoususpectapowerproblem,usethefollowingprocedures.
Check/VerifyFRU/Action
Checkthefollowingforproperinstallation.
•PowerCord
•On/OffSwitchconnector
•On/OffSwitchPowerSupplyconnector
•SystemBoardPowerSupplyconnectors
•Microprocessor(s)connection
Reseatconnectors
Checkthepowercordforcontinuity.PowerCord
Checkthepower-onswitchforcontinuity.Power-onSwitch
©CopyrightLenovo2008,201253

Diagnosticerrorcodes
Refertothefollowingdiagnosticerrorcodeswhenusingthediagnostictests.See“Runningtests”onpage
37forthespecictypeforinformationabouttheDiagnosticprograms.
Inthefollowingindex,Xcanrepresentanynumber.
DiagnosticErrorCodeFRU/Action
000-000-XXXBIOSTestPassedNoaction
000-002-XXXBIOSTimeout1.Flashthesystem.See“Flashupdateprocedures”
onpage251
2.Systemboard
000-024-XXXBIOSAddressingtestfailure1.Flashthesystem.See“Flashupdateprocedures”
onpage251
2.Systemboard
000-025-XXXBIOSChecksumValueerror1.Flashthesystem.See“Flashupdateprocedures”
onpage251
2.Systemboard
000-026-XXXFLASHdataerror1.Flashthesystem.See“Flashupdateprocedures”
onpage251
2.Systemboard
000-027-XXXBIOSConguration/Setuperror1.RunSetup
2.Flashthesystem.See“Flashupdateprocedures”
onpage251
3.Systemboard
000-034-XXXBIOSBufferAllocationfailure1.Rebootthesystem
2.Flashthesystem.See“Flashupdateprocedures”
onpage251
3.Runmemorytest
4.Systemboard
000-035-XXXBIOSResetConditiondetected1.Flashthesystem.See“Flashupdateprocedures”
onpage251
2.Systemboard
000-036-XXXBIOSRegistererror1.Flashthesystem.See“Flashupdateprocedures”
onpage251
2.Systemboard
000-038-XXXBIOSExtensionfailure1.Flashthesystem.See“Flashupdateprocedures”
onpage251
2.Adaptercard
3.Systemboard
000-039-XXXBIOSDMIdataerror1.Flashthesystem.See“Flashupdateprocedures”
onpage251
2.Systemboard
000-195-XXXBIOSTestabortedbyuserInformationonlyRe-startthetest,ifnecessary
000-196-XXXBIOStesthalt,errorthresholdexceeded1.PressF3toreviewthelogle
2.Re-startthetesttoresetthelogle
54ThinkStationHardwareMaintenanceManual

DiagnosticErrorCodeFRU/Action
000-197-XXXBIOStestwarning1.Makesurethecomponentthatiscalledoutis
connectedand/orenabled.SeeChapter6“Using
theSetupUtility”onpage41
2.Re-runtest
3.Replacethecomponentthatiscalledoutinwarning
statement
4.Replacethecomponentundertest
000-198-XXXBIOStestaborted1.Makesurethecomponentthatiscalledoutis
connectedand/orenabled.SeeChapter6“Using
theSetupUtility”onpage41
2.Flashthesystemandretest.See“Flashupdate
procedures”onpage251
3.Goto“Undeterminedproblems”onpage75
000-199-XXXBIOStestfailed,causeunknown1.Goto“Undeterminedproblems”onpage75
2.Flashthesystemandre-test
3.Replacecomponentunderfunctiontest
000-250-XXXBIOSAPMfailure1.Flashthesystem.See“Flashupdateprocedures”
onpage251
2.Systemboard
000-270-XXXBIOSACPIfailure1.Flashthesystem.See“Flashupdateprocedures”
onpage251
2.Systemboard
001-000-XXXSystemTestPassedNoaction
001-00X-XXXSystemErrorSystemboard
001-01X-XXXSystemErrorSystemboard
001-024-XXXSystemAddressingtestfailureSystemboard
001-025-XXXSystemChecksumValueerror1.Flashthesystem.See“Flashupdateprocedures”
onpage251
2.Systemboard
001-026-XXXSystemFLASHdataerror1.Flashthesystem.See“Flashupdateprocedures”
onpage251
2.Systemboard
001-027-XXXSystemConguration/Setuperror1.RunSetup
2.Flashthesystem.See“Flashupdateprocedures”
onpage251
3.Systemboard
001-032-XXXSystemDeviceControllerfailureSystemboard
001-034-XXXSystemDeviceBufferAllocationfailure1.Rebootthesystem
2.Flashthesystem.See“Flashupdateprocedures”
onpage251
3.Runmemorytest
4.Systemboard
001-035-XXXSystemDeviceResetconditiondetectedSystemboard
001-036-XXXSystemRegistererrorSystemboard
Chapter9.Symptom-to-FRUIndex55

DiagnosticErrorCodeFRU/Action
001-038-XXXSystemExtensionfailure1.Adaptercard
2.Systemboard
001-039-XXXSystemDMIdatastructureerror1.Flashthesystem.See“Flashupdateprocedures”
onpage251
2.Systemboard
001-040-XXXSystemIRQfailure1.Power-off/onsystemandre-test
2.Systemboard
001-041-XXXSystemDMAfailure1.Power-off/onsystemandre-test
2.Systemboard
001-195-XXXSystemTestabortedbyuserInformationonlyRe-startthetest,ifnecessary
001-196-XXXSystemtesthalt,errorthresholdexceeded1.PressF3toreviewthelogle
2.Re-startthetesttoresetthelogle
001-197-XXXSystemtestwarning1.Makesurethecomponentthatiscalledoutis
connectedand/orenabled.SeeChapter6“Using
theSetupUtility”onpage41
2.Re-runtest
3.Replacethecomponentthatiscalledoutinwarning
statement
4.Replacethecomponentundertest
001-198-XXXSystemtestaborted1.Ifacomponentiscalledout,makesureitis
connectedand/orenabled.SeeChapter6“Using
theSetupUtility”onpage41
2.Flashthesystemandretest.See“Flashupdate
procedures”onpage251
3.Goto“Undeterminedproblems”onpage75
001-199-XXXSystemtestfailed,causeunknown1.Goto“Undeterminedproblems”onpage75
2.Flashthesystemandre-test
3.Replacecomponentunderfunctiontest
001-250-XXXSystemECCerrorSystemboard
001-254-XXX001-255-XXX001-256-XXX001-257-XXX
SystemDMAerror
Systemboard
001-260-XXX001-264-XXXSystemIRQerrorSystemboard
001-268-XXXSystemIRQ1failure1.DeviceonIRQ1
2.Systemboard
001-269-XXXSystemIRQ2failure1.DeviceonIRQ2
2.Systemboard
001-270-XXXSystemIRQ3failure1.DeviceonIRQ3
2.Systemboard
001-271-XXXSystemIRQ4failure1.DeviceonIRQ4
2.Systemboard
001-272-XXXSystemIRQ5failure1.DeviceonIRQ5
2.Systemboard
56ThinkStationHardwareMaintenanceManual

DiagnosticErrorCodeFRU/Action
001-273-XXXSystemIRQ6(diskettedrive)failure1.DisketteCable
2.Diskettedrive
3.Systemboard
001-274-XXXSystemIRQ7failure1.DeviceonIRQ7
2.Systemboard
001-275-XXXSystemIRQ8failure1.DeviceonIRQ8
2.Systemboard
001-276-XXXSystemIRQ9failure1.DeviceonIRQ9
2.Systemboard
001-277-XXXSystemIRQ10failure1.DeviceonIRQ10
2.Systemboard
001-278-XXXSystemIRQ11failure1.DeviceonIRQ11
2.Systemboard
001-279-XXXSystemIRQ12failure1.DeviceonIRQ12
2.Systemboard
001-280-XXXSystemIRQ13failure1.DeviceonIRQ13
2.Systemboard
001-281-XXXSystemIRQ14(harddiskdrive)failure1.Harddiskdrivecable
2.Harddiskdrive
3.Systemboard
001-282-XXXSystemIRQ15failure1.DeviceonIRQ15
2.Systemboard
001-286-XXX001-287-XXX001-288-XXXSystemTimer
failure
Systemboard
001-292-XXXSystemCMOSRAMerror1.RunSetupandre-test
2.Systemboard
001-293-XXXSystemCMOSBattery1.CMOSBattery
2.Systemboard
001-298-XXXSystemRTCdate/timeupdatefailure1.Flashthesystem.See“Flashupdateprocedures”
onpage251
2.Systemboard
001-299-XXXSystemRTCperiodicinterruptfailureSystemboard
001-300-XXXSystemRTCAlarmfailureSystemboard
001-301-XXXSystemRTCCenturybyteerror1.Flashthesystem.See“Flashupdateprocedures”
onpage251
2.Systemboard
005-000-XXXVideoTestPassedNoaction
005-00X-XXXVideoerror1.Videocard,ifinstalled
2.Systemboard
005-010-XXX005-011-XXX005-012-XXX005-013-XXX
VideoSignalfailure
1.Videocard,ifinstalled
2.Systemboard
Chapter9.Symptom-to-FRUIndex57

DiagnosticErrorCodeFRU/Action
005-016-XXXVideoSimplePatterntestfailure1.VideoRam
2.Videocard,ifinstalled
3.Systemboard
005-024-XXXVideoAddressingtestfailure1.Videocard,ifinstalled
2.Systemboard
005-025-XXXVideoChecksumValueerror1.Videocard,ifinstalled
2.Systemboard
005-027-XXXVideoConguration/Setuperror1.RunSetup
2.Videodriversupdate
3.Videocard,ifinstalled
4.Systemboard
005-031-XXXVideoDeviceCablefailure1.Videocable
2.Monitor
3.Videocard,ifinstalled
4.Systemboard
005-032-XXXVideoDeviceControllerfailure1.Videocard,ifinstalled
2.Systemboard
005-036-XXXVideoRegistererror1.Videocard,ifinstalled
2.Systemboard
005-038-XXXSystemBIOSextensionfailure1.Videocard,ifinstalled
2.Systemboard
005-040-XXXVideoIRQfailure1.Videocard,ifinstalled
2.Systemboard
005-195-XXXVideoTestabortedbyuserInformationonlyRe-startthetest,ifnecessary
005-196-XXXVideotesthalt,errorthresholdexceeded1.PressF3toreviewthelogle
2.Re-startthetesttoresetthelogle
005-197-XXXVideotestwarning1.Makesurethecomponentthatiscalledoutis
connectedand/orenabled.SeeChapter6“Using
theSetupUtility”onpage41
2.Re-runtest
3.Replacethecomponentcalledoutinwarning
statement
4.Replacethecomponentundertest
005-198-XXXVideotestaborted1.Ifacomponentiscalledout,makesureitis
connectedand/orenabled.SeeChapter6“Using
theSetupUtility”onpage41
2.Flashthesystemandre-test.See“Flashupdate
procedures”onpage251
3.Goto“Undeterminedproblems”onpage75
005-199-XXXVideotestfailed,causeunknown1.Goto“Undeterminedproblems”onpage75
2.Flashthesystemandre-test.See“Flashupdate
procedures”onpage251
3.Replacecomponentunderfunctiontest
58ThinkStationHardwareMaintenanceManual

DiagnosticErrorCodeFRU/Action
005-2XX-XXX005-3XX-XXXVideosubsystemerror1.Videocard,ifinstalled
2.Systemboard
006-000-XXXDisketteinterfaceTestPassedNoaction
006-0XX-XXXDisketteinterfaceerror1.DiskettedriveCable
2.Diskettedrive
3.Systemboard
006-195-XXXDisketteinterfaceTestabortedbyuserInformationonlyRe-startthetest,ifnecessary
006-196-XXXDisketteinterfacetesthalt,errorthreshold
exceeded
1.PressF3toreviewthelogle
2.Re-startthetesttoresetthelogle
006-197-XXXDisketteinterfacetestwarning1.Ifacomponentiscalledout,makesureitis
connectedand/orenabled
2.Re-runtest
3.Replacethecomponentthatiscalledoutinwarning
statement
4.Replacethecomponentundertest
006-198-XXXDisketteinterfacetestaborted1.Ifacomponentiscalledout,makesureitis
connectedand/orenabled
2.Flashthesystemandre-test.See“Flashupdate
procedures”onpage251
3.Goto“Undeterminedproblems”onpage75
006-199-XXXDisketteinterfacetestfailed,cause
unknown
1.Goto“Undeterminedproblems”onpage75
2.Flashthesystemandre-test
3.Replacecomponentunderfunctiontest
006-25X-XXXDisketteinterfaceError1.Diskettedrivecable
2.Diskettedrive
3.Systemboard
011-000-XXXSerialportInterfaceTestPassedNoaction
011-001-XXXSerialportPresence1.Removeexternalserialdevice,ifpresent
2.Runsetup,enableport
3.Systemboard
011-002-XXX011-003-XXXSerialportTimeout/Parity
error
Systemboard
011-013-XXX011-014-XXXSerialportControl
Signal/Loopbacktestfailure
Systemboard
011-015-XXXSerialportExternalLoopbackfailure1.Wrapplug
2.Systemboard
011-027-XXXSerialportConguration/Setuperror1.RunSetup,enableport
2.Flashthesystem.See“Flashupdateprocedures”
onpage251
3.Systemboard
011-03X-XXX011-04X-XXXSerialportfailureSystemboard
011-195-XXXSerialportTestabortedbyuserInformationonlyRe-startthetest,ifnecessary
Chapter9.Symptom-to-FRUIndex59

DiagnosticErrorCodeFRU/Action
011-196-XXXSerialporttesthalt,errorthreshold
exceeded
1.PressF3toreviewthelogle
2.Re-startthetesttoresetthelogle
011-197-XXXSerialporttestwarning1.Makesurethecomponentthatiscalledoutis
connectedand/orenabled.SeeChapter6“Using
theSetupUtility”onpage41
2.Re-runtest
3.Replacethecomponentthatiscalledoutinwarning
statement
4.Replacethecomponentundertest
011-198-XXXSerialporttestaborted1.Ifacomponentiscalledout,makesureitis
connectedand/orenabled.SeeChapter6“Using
theSetupUtility”onpage41
2.Flashthesystemandre-test.See“Flashupdate
procedures”onpage251
3.Goto“Undeterminedproblems”onpage75
011-199-XXXSerialporttestfailed,causeunknown1.Goto“Undeterminedproblems”onpage75
2.Flashthesystemandre-test.See“Flashupdate
procedures”onpage251
3.Replacecomponentunderfunctiontest
011-2XX-XXXSerialportsignalfailure1.Externalserialdevice
2.Systemboard
014-000-XXXParallelportInterfaceTestPassedNoaction
014-001-XXXParallelportPresence1.Removeexternalparalleldevice,ifpresent
2.Runsetup,enableport
3.Systemboard
014-002-XXX014-003-XXXParallelportTimeout/Parity
error
Systemboard
014-013-XXX014-014-XXXParallelportControl
Signal/Loopbacktestfailure
Systemboard
014-015-XXXParallelportExternalLoopbackfailure1.Wrapplug
2.Systemboard
014-027-XXXParallelportConguration/Setuperror1.RunSetup,enableport
2.Flashthesystem.See“Flashupdateprocedures”
onpage251
3.Systemboard
014-03X-XXX014-04X-XXXParallelportfailureSystemboard
014-195-XXXParallelportTestabortedbyuserInformationonlyRe-startthetest,ifnecessary
014-196-XXXParallelporttesthalt,errorthreshold
exceeded
1.PressF3toreviewthelogle
2.Re-startthetesttoresetthelogle
60ThinkStationHardwareMaintenanceManual

DiagnosticErrorCodeFRU/Action
014-197-XXXParallelporttestwarning1.Makesurethecomponentthatiscalledoutis
connectedand/orenabled.SeeChapter6“Using
theSetupUtility”onpage41
2.Re-runtest
3.Replacethecomponentthatiscalledoutinwarning
statement
4.Replacethecomponentundertest
014-198-XXXParallelporttestaborted1.Ifacomponentiscalledout,makesureitis
connectedand/orenabled
2.Flashthesystemandre-test.See“Flashupdate
procedures”onpage251
3.Goto“Undeterminedproblems”onpage75
014-199-XXXParallelporttestfailed,causeunknown1.Goto“Undeterminedproblems”onpage75
2.Flashthesystemandre-test.See“Flashupdate
procedures”onpage251
3.Replacecomponentunderfunctiontest
014-2XX-XXX014-3XX-XXXParallelportfailure1.Externalparalleldevice
2.Systemboard
015-000-XXXUSBportInterfaceTestPassedNoaction
015-001-XXXUSBportPresence1.RemoveUSBdevice(s)andre-test
2.Systemboard
015-002-XXXUSBportTimeout1.RemoveUSBdevice(s)andre-test
2.Systemboard
015-015-XXXUSBportExternalLoopbackfailure1.RemoveUSBdevice(s)andre-test
2.Systemboard
015-027-XXXUSBportConguration/Setuperror1.Flashthesystem.See“Flashupdateprocedures”
onpage251
2.Systemboard
015-032-XXXUSBportDeviceControllerfailureSystemboard
015-034-XXXUSBportbufferallocationfailure1.Rebootthesystem
2.Flashthesystemandre-test.See“Flashupdate
procedures”onpage251
3.Runmemorytest
4.Systemboard
015-035-XXXUSBportResetconditiondetected1.RemoveUSBdevice(s)andre-test
2.Systemboard
015-036-XXXUSBportRegistererrorSystemboard
015-040-XXXUSBportIRQfailure1.Runsetupandcheckforconicts
2.Flashthesystem.See“Flashupdateprocedures”
onpage251
3.Systemboard
015-195-XXXUSBportTestabortedbyuserInformationonlyRe-startthetest,ifnecessary
Chapter9.Symptom-to-FRUIndex61

DiagnosticErrorCodeFRU/Action
015-196-XXXUSBporttesthalt,errorthresholdexceeded1.PressF3toreviewthelogle
2.Re-startthetesttoresetthelogle
015-197-XXXUSBporttestwarning1.Makesurethecomponentthatiscalledoutis
connectedand/orenabled.SeeChapter6“Using
theSetupUtility”onpage41
2.Re-runtest
3.Replacethecomponentthatiscalledoutinwarning
statement
4.Replacethecomponentundertest
015-198-XXXUSBporttestaborted1.Ifacomponentiscalledout,makesureitis
connectedand/orenabled.SeeChapter6“Using
theSetupUtility”onpage41
2.Flashthesystemandre-test.See“Flashupdate
procedures”onpage251
3.Goto“Undeterminedproblems”onpage75
015-199-XXXUSBporttestfailed,causeunknown1.Goto“Undeterminedproblems”onpage75
2.Flashthesystemandre-test.See“Flashupdate
procedures”onpage251
3.Replacecomponentunderfunctiontest
018-000-XXXPCICardTestPassedNoaction
018-0XX-XXXPCICardFailure1.Risercard,ifinstalled
2.Systemboard
018-195-XXXPCICardTestabortedbyuser1.PCIcard
2.InformationonlyRe-startthetest,ifnecessary
018-196-XXXPCICardtesthalt,errorthresholdexceeded1.PressF3toreviewthelogle
2.Re-startthetesttoresetthelogle
018-197-XXXPCICardtestwarning1.Makesurethecomponentthatiscalledoutis
connectedand/orenabled.SeeChapter6“Using
theSetupUtility”onpage41
2.Re-runtest
3.Replacethecomponentthatiscalledoutinwarning
statement
4.Replacethecomponentundertest
018-198-XXXPCICardtestaborted1.Ifacomponentiscalledout,makesureitis
connectedand/orenabled.SeeChapter6“Using
theSetupUtility”onpage41
2.Flashthesystemandre-test.See“Flashupdate
procedures”onpage251
3.Goto“Undeterminedproblems”onpage75
018-199-XXXPCICardtestfailed,causeunknown1.Goto“Undeterminedproblems”onpage75
2.Flashthesystemandre-test.See“Flashupdate
procedures”onpage251
3.Replacecomponentunderfunctiontest
62ThinkStationHardwareMaintenanceManual

DiagnosticErrorCodeFRU/Action
018-250-XXXPCICardServiceserror1.PCIcard
2.Risercard,ifinstalled
3.Systemboard
020-000-XXXPCIInterfaceTestPassedNoaction
020-0XX-XXXPCIInterfaceerror1.PCIcard
2.Risercard,ifinstalled
3.Systemboard
020-195-XXXPCITestabortedbyuserInformationonlyRe-startthetest,ifnecessary
020-196-XXXPCItesthalt,errorthresholdexceeded1.PressF3toreviewthelogle
2.Re-startthetesttoresetthelogle
020-197-XXXPCItestwarning1.Makesurethecomponentthatiscalledoutis
connectedand/orenabled.SeeChapter6“Using
theSetupUtility”onpage41
2.Re-runtest
3.Replacethecomponentthatiscalledoutinwarning
statement
4.Replacethecomponentundertest
020-198-XXXPCItestaborted1.Ifacomponentiscalledout,makesureitis
connectedand/orenabled.SeeChapter6“Using
theSetupUtility”onpage41
2.Flashthesystemandre-test.See“Flashupdate
procedures”onpage251
3.Goto“Undeterminedproblems”onpage75
020-199-XXXPCItestfailed,causeunknown1.Goto“Undeterminedproblems”onpage75
2.Flashthesystemandre-test.See“Flashupdate
procedures”onpage251
3.Replacecomponentunderfunctiontest
020-262-XXXPCIsystemerror1.PCIcard
2.Risercard,ifinstalled
3.Systemboard
025-000-XXXIDEinterfaceTestPassedNoaction
025-00X-XXX025-01X-XXXIDEinterfacefailure1.IDEsignalcable
2.Checkpowersupplyvoltages
3.ReseatIDEsignalcable
4.IDEdevice
5.Systemboard
025-027-XXXIDEinterfaceConguration/Setuperror1.IDEsignalcable
2.Flashthesystem.See“Flashupdateprocedures”
onpage251
3.ReseatIDEsignalcable
4.IDEdevice
5.Systemboard
Chapter9.Symptom-to-FRUIndex63

DiagnosticErrorCodeFRU/Action
025-02X-XXX025-03X-XXX025-04X-XXXIDEInterface
failure
1.IDEsignalcable
2.Checkpowersupply
3.ReseatIDEsignalcable
4.IDEdevice
5.Systemboard
025-195-XXXIDEinterfaceTestabortedbyuserInformationonlyRe-startthetest,ifnecessary
025-196-XXXIDEinterfacetesthalt,errorthreshold
exceeded
1.PressF3toreviewthelogle
2.Re-startthetesttoresetthelogle
025-197-XXXIDEinterfacetestwarning1.Makesurethecomponentthatiscalledoutis
connectedand/orenabled.SeeChapter6“Using
theSetupUtility”onpage41
2.Re-runtest
3.Replacethecomponentthatiscalledoutinwarning
statement
4.Replacethecomponentundertest
025-198-XXXIDEinterfacetestaborted1.Ifacomponentiscalledout,makesureitis
connectedand/orenabled.SeeChapter6“Using
theSetupUtility”onpage41
2.Flashthesystemandre-test.See“Flashupdate
procedures”onpage251
3.Goto“Undeterminedproblems”onpage75
025-199-XXXIDEinterfacetestfailed,causeunknown1.Goto“Undeterminedproblems”onpage75
2.Flashthesystemandre-test.See“Flashupdate
procedures”onpage251
3.Replacecomponentunderfunctiontest
030-000-XXXSCSIinterfaceTestPassedNoaction
030-00X-XXX030-01X-XXXSCSIinterfacefailure1.SCSIsignalcable
2.Checkpowersupply
3.SCSIdevice
4.SCSIadaptercard,ifinstalled
5.Systemboard
030-027-XXXSCSIinterfaceConguration/Setuperror1.SCSIsignalcable
2.Flashthesystem.See“Flashupdateprocedures”
onpage251
3.SCSIdevice
4.SCSIadaptercard,ifinstalled
5.Systemboard
030-03X-XXX030-04X-XXXSCSIinterfaceerror1.SCSIsignalcable
2.Checkpowersupply
3.SCSIdevice
4.SCSIadaptercard,ifinstalled
5.Systemboard
030-195-XXXSCSIinterfaceTestabortedbyuserInformationonlyRe-startthetest,ifnecessary
64ThinkStationHardwareMaintenanceManual

DiagnosticErrorCodeFRU/Action
030-196-XXXSCSIinterfacetesthalt,errorthreshold
exceeded
1.PressF3toreviewthelogle
2.Re-startthetesttoresetthelogle
030-197-XXXSCSIinterfacetestwarning1.Makesurethecomponentthatiscalledoutis
connectedand/orenabled.SeeChapter6“Using
theSetupUtility”onpage41
2.Re-runtest
3.Replacethecomponentthatiscalledoutinwarning
statement
4.Replacethecomponentundertest
030-198-XXXSCSIinterfacetestaborted1.Ifacomponentiscalledout,makesureitis
connectedand/orenabled.SeeChapter6“Using
theSetupUtility”onpage41
2.Flashthesystemandre-test.See“Flashupdate
procedures”onpage251
3.Goto“Undeterminedproblems”onpage75
030-199-XXXSCSIinterfacetestfailed,causeunknown1.Goto“Undeterminedproblems”onpage75
2.Flashthesystemandre-test.See“Flashupdate
procedures”onpage251
3.Replacecomponentunderfunctiontest
035-000-XXXRAIDinterfaceTestPassedNoaction
035-0XX-XXXRAIDinterfaceFailure1.RAIDsignalcable
2.RAIDdevice
3.RAIDadaptercard,ifinstalled
4.Systemboard
035-195-XXXRAIDinterfaceTestabortedbyuserInformationonlyRe-startthetest,ifnecessary
035-196-XXXRAIDinterfacetesthalt,errorthreshold
exceeded
1.PressF3toreviewthelogle
2.Re-startthetesttoresetthelogle
035-197-XXXRAIDinterfacetestwarning1.Makesurethecomponentthatiscalledoutis
connectedand/orenabled.SeeChapter6“Using
theSetupUtility”onpage41
2.Re-runtest
3.Replacethecomponentthatiscalledoutinwarning
statement
4.Replacethecomponentundertest
035-198-XXXRAIDinterfacetestaborted1.Ifacomponentiscalledout,makesureitis
connectedand/orenabled.SeeChapter6“Using
theSetupUtility”onpage41
2.Flashthesystemandre-test.See“Flashupdate
procedures”onpage251
3.Goto“Undeterminedproblems”onpage75
035-199-XXXRAIDinterfacetestfailed,causeunknown1.See“Undeterminedproblems”onpage75
2.Flashthesystemandre-test.See“Flashupdate
procedures”onpage251
3.Replacecomponentunderfunctiontest
071-000-XXXAudioportInterfaceTestPassedNoaction
Chapter9.Symptom-to-FRUIndex65

DiagnosticErrorCodeFRU/Action
071-00X-XXX071-01X-XXX071-02X-XXXAudioport
error
1.RunSetup
2.Flashthesystem.See“Flashupdateprocedures”
onpage251
3.Systemboard
071-03X-XXXAudioportfailure1.Speakers
2.Microphone
3.Audiocard,ifinstalled
4.Systemboard
071-04X-XXXAudioportfailure1.RunSetup
2.Audiocard,ifinstalled
3.Systemboard
071-195-XXXAudioportTestabortedbyuserInformationonlyRe-startthetest,ifnecessary
071-196-XXXAudioporttesthalt,errorthreshold
exceeded
1.PressF3toreviewthelogle
2.Re-startthetesttoresetthelogle
071-197-XXXAudioporttestwarning1.Makesurethecomponentthatiscalledoutis
connectedand/orenabled.SeeChapter6“Using
theSetupUtility”onpage41
2.Re-runtest
3.Replacethecomponentthatiscalledoutinwarning
statement
4.Replacethecomponentundertest
071-198-XXXAudioporttestaborted1.Ifacomponentiscalledout,makesureitis
connectedand/orenabled.SeeChapter6“Using
theSetupUtility”onpage41
2.Flashthesystemandre-test.See“Flashupdate
procedures”onpage251
3.Goto“Undeterminedproblems”onpage75
071-199-XXXAudioporttestfailed,causeunknown1.See“Undeterminedproblems”onpage75
2.Flashthesystemandre-test.See“Flashupdate
procedures”onpage251
3.Replacecomponentunderfunctiontest
071-25X-XXXAudioportfailure1.Speakers
2.Audiocard,ifinstalled
3.Systemboard
080-000-XXXGamePortinterfaceTestPassedNoaction
080-XXX-XXXGamePortinterfaceError1.Removethegameportdeviceandre-testthe
system
080-195-XXXGamePortinterfaceTestabortedbyuserInformationonlyRe-startthetest,ifnecessary
080-196-XXXGamePortinterfacetesthalt,error
thresholdexceeded
1.PressF3toreviewthelogle
2.Re-startthetesttoresetthelogle
66ThinkStationHardwareMaintenanceManual

DiagnosticErrorCodeFRU/Action
080-197-XXXGamePortinterfacetestwarning1.Makesurethecomponentthatiscalledoutis
connectedand/orenabled.SeeChapter6“Using
theSetupUtility”onpage41
2.Re-runtest
3.Replacethecomponentthatiscalledoutinwarning
statement
4.Replacethecomponentundertest
080-198-XXXGamePortinterfacetestaborted1.Ifacomponentiscalledout,makesureitis
connectedand/orenabled.SeeChapter6“Using
theSetupUtility”onpage41
2.Flashthesystemandre-test.See“Flashupdate
procedures”onpage251
3.Goto“Undeterminedproblems”onpage75
080-199-XXXGamePortinterfacetestfailed,cause
unknown
1.See“Undeterminedproblems”onpage75
2.Flashthesystemandre-test.See“Flashupdate
procedures”onpage251
3.Replacecomponentunderfunctiontest
086-000-XXXMousePortinterfaceTestPassedNoaction
086-001-XXXMousePortinterfacePresence1.Mouse
2.Systemboard
086-032-XXXMousePortinterfaceDevicecontroller
failure
1.Mouse
2.Systemboard
086-035-XXXMousePortinterfaceReset1.Mouse
2.Systemboard
086-040-XXXMousePortinterfaceIRQfailure1.RunSetup
2.Mouse
3.Systemboard
086-195-XXXMousePortinterfaceTestabortedbyuserInformationonlyRe-startthetest,ifnecessary
086-196-XXXMousePortinterfacetesthalt,error
thresholdexceeded
1.PressF3toreviewthelogle
2.Re-startthetesttoresetthelogle
086-197-XXXMousePortinterfacetestwarning1.Makesurethecomponentthatiscalledoutis
connectedand/orenabled.SeeChapter6“Using
theSetupUtility”onpage41
2.Re-runtest
3.Replacethecomponentthatiscalledoutinwarning
statement
4.Replacethecomponentundertest
086-198-XXXMousePortinterfacetestaborted1.Ifacomponentiscalledout,makesureitis
connectedand/orenabled.SeeChapter6“Using
theSetupUtility”onpage41
2.Flashthesystemandre-test.See“Flashupdate
procedures”onpage251
3.Goto“Undeterminedproblems”onpage75
Chapter9.Symptom-to-FRUIndex67

DiagnosticErrorCodeFRU/Action
086-199-XXXMousePortinterfacetestfailed,cause
unknown
1.See“Undeterminedproblems”onpage75
2.Flashthesystemandre-test.See“Flashupdate
procedures”onpage251
3.Replacecomponentunderfunctiontest
089-000-XXXMicroprocessorTestPassedNoaction
089-XXX-XXXMicroprocessorfailure1.Microprocessor(s)
2.Systemboard
089-195-XXXMicroprocessorTestabortedbyuserInformationonlyRe-startthetest,ifnecessary
089-196-XXXMicroprocessortesthalt,errorthreshold
exceeded
1.PressF3toreviewthelogle
2.Re-startthetesttoresetthelogle
089-197-XXXMicroprocessortestwarning1.Makesurethecomponentthatiscalledoutis
connectedand/orenabled.SeeChapter6“Using
theSetupUtility”onpage41
2.Re-runtest
3.Replacethecomponentthatiscalledoutinwarning
statement
4.Replacethecomponentundertest
089-198-XXXMicroprocessortestaborted1.Flashthesystem.See“Flashupdateprocedures”
onpage251
2.Goto“Undeterminedproblems”onpage75
089-199-XXXMicroprocessortestfailed,causeunknown1.See“Undeterminedproblems”onpage75
2.Flashthesystemandre-test.See“Flashupdate
procedures”onpage251
3.Replacecomponentunderfunctiontest
170-000-XXXVoltageSensor(s)TestPassedNoaction
170-0XX-XXXVoltageSensor(s)failure1.Flashsystem
2.Systemboard
170-195-XXXVoltageSensor(s)TestabortedbyuserInformationonlyRe-startthetest,ifnecessary
170-196-XXXVoltageSensor(s)testhalt,errorthreshold
exceeded
1.PressF3toreviewthelogle
2.Re-startthetesttoresetthelogle
170-197-XXXVoltageSensor(s)testwarning1.Makesurethecomponentthatiscalledoutis
connectedand/orenabled.SeeChapter6“Using
theSetupUtility”onpage41
2.Re-runtest
3.Replacethecomponentthatiscalledoutinwarning
statement
4.Replacethecomponentundertest
170-198-XXXVoltageSensor(s)testaborted1.Ifacomponentiscalledout,makesureitis
connectedand/orenabled.SeeChapter6“Using
theSetupUtility”onpage41
2.Flashthesystemandre-test.See“Flashupdate
procedures”onpage251
3.Goto“Undeterminedproblems”onpage75
68ThinkStationHardwareMaintenanceManual

DiagnosticErrorCodeFRU/Action
170-199-XXXVoltageSensor(s)testfailed,cause
unknown
1.See“Undeterminedproblems”onpage75
2.Flashthesystemandre-test.See“Flashupdate
procedures”onpage251
3.Replacecomponentunderfunctiontest
170-250-XXX170-251-XXXVoltageSensor(s)Voltage
limiterror
1.Powersupply
2.Systemboard
170-254-XXXVoltageSensor(s)VoltageRegulator
Moduleerror
1.VoltageRegulatorModule(VRM)
2.Microprocessor
3.Systemboard
175-000-XXXThermalSensor(s)TestPassedNoaction
175-0XX-XXXThermalSensor(s)failure1.Flashsystem
2.Systemboard
175-195-XXXThermalSensor(s)TestabortedbyuserInformationonlyRe-startthetest,ifnecessary
175-196-XXXThermalSensor(s)testhalt,errorthreshold
exceeded
1.PressF3toreviewthelogle
2.Re-startthetesttoresetthelogle
175-197-XXXThermalSensor(s)testwarning1.Makesurethecomponentthatiscalledoutis
connectedand/orenabled.SeeChapter6“Using
theSetupUtility”onpage41
2.Re-runtest
3.Replacethecomponentthatiscalledoutinwarning
statement
4.Replacethecomponentundertest
175-198-XXXThermalSensor(s)testaborted1.Ifacomponentiscalledout,makesureitis
connectedand/orenabled
2.Flashthesystemandre-test.See“Flashupdate
procedures”onpage251
3.Goto“Undeterminedproblems”onpage75
175-199-XXXThermalSensor(s)testfailed,cause
unknown
1.See“Undeterminedproblems”onpage75
2.Flashthesystemandre-test.See“Flashupdate
procedures”onpage251
3.Replacecomponentunderfunctiontest
175-250-XXX175-251-XXXThermalSensor(s)limiterror1.Checkfans
2.CheckPowersupplyvoltages
3.Microprocessor
4.Systemboard
185-000-XXXAssetSecurityTestPassedNoaction
185-XXX-XXXAssetSecurityfailure1.Flashsystem
2.Systemboard
185-278-XXXAssetSecurityChassisIntrusion1.AssureAssetSecurityEnabled
2.C2CoverSwitch
3.Systemboard
201-000-XXXSystemMemoryTestPassedNoaction
Chapter9.Symptom-to-FRUIndex69

DiagnosticErrorCodeFRU/Action
201-XXX-XXXSystemMemoryerror1.Replacethememorymodulecalledoutbythetest
2.Systemboard
202-000-XXXSystemCacheTestPassedNoaction
202-XXX-XXXSystemCacheerror1.Cache,ifremovable
2.Systemboard
3.Microprocessor
206-000-XXXDisketteDriveTestPassedNoaction
206-XXX-XXXDisketteDriveerror1.DisketteDriveCable
2.Checkpowersupplyvoltages
3.Diskettedrive
4.Systemboard
215-000-XXXCD-ROMDriveTestPassedNoaction
215-XXX-XXXCD-ROMDriveerror1.CD-ROMDriveCable
2.Checkpowersupplyvoltages
3.CD-ROMdrive
4.Systemboard
217-000-XXXHardDiskDriveTestPassedNoaction
217-25X-XXX217-26X-XXXHardDiskDrive(IDE)error1.HardDiskDriveCable
2.Checkpowersupplyvoltages
3.Reseattheharddiskdrivecable
4.HardDiskdrive(IDE)
5.Systemboard
217-28X-XXX217-29X-XXXHardDiskDrive(SCSI)error1.HardDiskDriveCable
2.Checkpowersupplyvoltages
3.Reseattheharddiskdrivecable
4.HardDiskdrive(SCSI)
5.SCSIadaptercard
6.Systemboard
220-000-XXXHi-CapacityCartridgeDriveTestPassedNoaction
220-XXX-XXXHi-CapacityCartridgeDriveerror1.RemovetheHi-CapacityCartridgeDriveand
re-testthesystem
301-XXX-XXXKeyboarderror1.Keyboard
2.Checkandtestmouse
3.Systemboard
301-000-XXXKeyboardTestPassedNoaction
302-000-XXXMouseTestPassedNoaction
302-XXX-XXXMouseerror1.Mouse
2.CheckandtestKeyboard
3.Systemboard
303-000-XXXJoystickTestPassedNoaction
303-XXX-XXXJoystickerrorRemovetheJoystickandre-testthesystem
70ThinkStationHardwareMaintenanceManual

DiagnosticErrorCodeFRU/Action
305-000-XXXMonitorDDCTestPassedNoaction
305-250-XXXMonitorDDCselftestfailure1.RunSetuptoenableDDC
2.Cable
3.Monitor
4.Videocard
5.Systemboard
415-000-XXXModemTestPassedNoaction
415-XXX-XXXModemerrorRemovetheModemandre-testthesystem
Beepsymptoms
Beepsymptomsaretonesoraseriesoftonesseparatedbypauses(intervalswithoutsound)duringPOST.
Thefollowingtablesdescribesbeepsymptoms.
BeepSymptomFRU/Action
2shortbeepsCMOSsettingerrorPerformthefollowingactionsinorder.
1.StarttheSetupUtilityprogramandpressF10toSave
andexit.SeeChapter6“UsingtheSetupUtility”on
page41.
2.StarttheSetupUtilityprogramandpressF7toload
defaultsandthenpressF10toSaveandexit.
3.PerformaBootblockrecovery.See“Recovering
fromaPOST/BIOSupdatefailure”onpage252.
1longand2shortbeepsMonitororvideoadaptercard
error
Performthefollowingactionsinorder.
1.Makesurethemonitorisproperlyconnectedtothe
computer.
2.Replacethevideoadaptercard(ifpresent).
3.Replacethesystemboard.
1longand3shortbeepsKeyboarderrorPerformthefollowingactionsinorder.
1.Makesurethekeyboardisproperlyconnectedtothe
keyboardconnector.
2.Replacethekeyboard.
3.Replacethesystemboard.
1longand9shortbeepsBIOSROMerrorPerformthefollowingactionsinorder.
1.StarttheSetupUtilityprogramandpressF7toload
defaultsandthenpressF10toSaveandexit.See
Chapter6“UsingtheSetupUtility”onpage41.
2.PerformaBootblockrecovery.See“Recovering
fromaPOST/BIOSupdatefailure”onpage252.
3.Replacethesystemboard.
ContinuoslongbeepsDRAMmemoryerrorPerformthefollowingactionsinorder.
1.Makesurethememorymodule(s)areproperlyseated
intheconnector(s).
2.Replacethememorymodule(s).
3.Replacethesystemboard.
Chapter9.Symptom-to-FRUIndex71

POSTerrorcodes
Eachtimeyoupower-onthesystem,itperformsaseriesofteststhatchecktheoperationofthesystem
andsomeoptions.ThisseriesoftestsiscalledthePower-OnSelf-Test,orPOST.POSTdoesthefollowing
operations.
•Checkssomebasicsystem-boardoperations
•Checksthememoryoperation
•Startsthevideooperation
•Veriesthatthebootdriveisworking
IfthePOSTdetectsaproblem,anerrormessageappearsonthescreen.Asingleproblemcancauseseveral
errormessagestoappear.Whenyoucorrectthecauseofthersterrormessage,theothererrormessages
probablywillnotappearonthescreenthenexttimeyouturnonthesystem.
POSTErrorMessageDescription/Action
CMOSbatteryfailedTheCMOSbatteryisnolongerfunctional.
Replacethebattery.
CMOSchecksumerror-defaultsloadedChecksumofCMOSisincorrect.
Thecomputerloadsthedefaultcongurationsettings.
ThiserrormightindicatethatCMOShasbecomecorrupt
duetoaweakCMOSbattery.
CPUatnnnnnnnnistherunningspeedofthemicroprocessor.
PressEsctoskipmemorytestPressingEscskipsthefullmemorytest
HARDDISKINSTALLFAILURECannotndorinitializetheharddiskdrivecontrolleror
thedrive.
Makesuretheharddiskdriveiscorrectlyinstalled.
Ifnoharddiskdrivesareinstalled,makesurethehard
diskdriveselectioninSetupissettoNONE.
KeyboarderrorornokeyboardpresentCannotinitializethekeyboard.
Makesurethekeyboardisproperlyconnectedtothe
computerandthatnokeysareheldpressedduringPOST.
Topurposelycongurethecomputerwithoutakeyboard,
settheerrorhaltconditioninSetuptoHALTONALL,BUT
KEYBOARD.TheBIOSthenignoresthemissingkeyboard
duringPOST.
MemoryTest:Thismessagedisplaysduringafullmemorytest,counting
downthememoryareasbeingtested.
MemorytestfailIfPOSTdetectsanerrorduringmemorytesting,additional
informationappears.Thisinformationgivesspecics
aboutthetypeandlocationofthememoryerror.
72ThinkStationHardwareMaintenanceManual

POSTErrorMessageDescription/Action
PressTABtoshowPOSTscreenPressingtheTABkeypermitstheusertotogglebetween
thedefaultPOSTdisplayscreenandacustomPOST
displayscreen.
Error:Non-SystemdiskordiskerrorReplaceandpress
anykeywhenready
TheBIOSwasunabletondasuitablebootdevice.
Makesurethebootdriveisproperlyconnectedtothe
computer.
Makesureyouhavebootablemedia.
Miscellaneouserrormessages
Message/SymptomFRU/Action
ChangingdisplaycolorsDisplay/Monitor
Computerwillnotpower-off.See“Harddiskdriveboot
error”onpage53.
1.PowerSwitch
2.SystemBoard
3.Risercard,ifinstalled
ComputerwillnotRPLfromserver1.Ensurethatnetworkisinstartupsequenceas
rstdeviceorrstdeviceafterdiskette
2.EnsurethatnetworkadapterisenabledforRPL
3.Networkadapter(Advisenetworkadministratorof
newMACaddress)
ComputerwillnotperformaWakeOnLAN®(ifapplicable)1.Checkpowersupplyandsignalcableconnections
tonetworkadapter
2.Ensurethattheoperatingsystemsettingsaresetto
enableWakeonLAN
3.EnsureWakeOnLANfeatureisenabledin
Setup/Conguration(see“StartingtheSetupUtility
program”onpage41)
4.EnsurenetworkadministratorisusingcorrectMAC
address
5.EnsurenointerruptorI/Oaddressconicts
6.Networkadapter(advisenetworkadministratorof
newMACaddress)
Deadcomputer.See“Harddiskdrivebooterror”onpage
53.
1.PowerSupply
2.SystemBoard
Diskettedrivein-uselightremainsonordoesnotlight
whendriveisactive.
1.DisketteDrive
2.SystemBoard
3.DisketteDriveCable
Flashingcursorwithanotherwiseblankdisplay.1.SystemBoard
2.PrimaryHardDiskDrive
3.HardDiskDriveCable
IncorrectmemorysizeduringPOST1.RuntheMemorytests
2.MemoryModule
3.SystemBoard
Chapter9.Symptom-to-FRUIndex73

Message/SymptomFRU/Action
"InsertaDiskette"iconappearswithaknown-good
diagnosticsdisketteintherst3.5-inchdiskettedrive.
1.SystemBoard
2.DisketteDriveCable
3.NetworkAdapter
Intensityorcolorvariesfromlefttorightofcharacters
andcolorbars
1.Display
2.Videoadapter(ifpresent)
3.SystemBoard
Nopowerorfannotrunning1.See“Harddiskdrivebooterror”onpage53.
Non-systemdiskordiskerror-typemessagewitha
known-gooddiagnosticdiskette.
1.DisketteDrive
2.SystemBoard
3.DisketteDriveCable
Otherdisplaysymptomsnotlistedabove(includingblank
orillegibledisplay)
1.Display
2.SystemBoard
Power-onindicatororharddiskdrivein-uselightnoton,
butcomputerworkscorrectly
1.Powerswitch/LEDassembly
2.SystemBoard
Printerproblems1.Printer
2.SystemBoard
Programloadsfromtheharddiskwithaknown-good
diagnosticsdisketteintherst3.5-inchdiskettedrive
1.RunSetupandcheckStartupsequence.
2.DisketteDrive
3.DisketteDriveCable
4.SystemBoard
5.PowerSupply
RPLcomputercannotaccessprogramsfromitsownhard
disk.
1.IfnetworkadministratorisusingLCCMHybrid
RPL,checkstartupsequence:
a.Firstdevice-network
b.Seconddevice-harddisk
2.Harddiskdrive
RPLcomputerdoesnotRPLfromserver1.Checkstartupsequence
2.CheckthenetworkadapterLEDstatus
Serialorparallelportdevicefailure(systemboardport)1.ExternalDeviceSelf-TestOK?
2.ExternalDevice
3.Cable
4.SystemBoard
Serialorparallelportdevicefailure(adapterport)1.ExternalDeviceSelf-TestOK?
2.ExternalDevice
3.Cable
4.AlternateAdapter
5.SystemBoard
Someorallkeysonthekeyboarddonotwork1.Keyboard
2.KeyboardCable
3.SystemBoard
74ThinkStationHardwareMaintenanceManual

Undeterminedproblems
IfthiscomputerhasaparallelATAharddiskdrive,makesurethattheharddiskdriveisjumperedasa
masterandtheopticaldriveisjumperedasaslave.
1.Power-offthecomputer.
2.Removeordisconnectthefollowingcomponents(ifinstalled)oneatatime.
a.Externaldevices(modem,printer,ormouse)
b.Anyadapters
c.Memorymodules
d.Extendedvideomemory
e.ExternalCache
f.ExternalCacheRAM
g.Harddiskdrive
h.Diskettedrive
3.Power-onthecomputertore-testthesystem.
4.Repeatsteps1through3untilyoundthefailingdeviceoradapter.
Ifalldevicesandadaptershavebeenremoved,andtheproblemcontinues,replacethesystemboard.
Chapter9.Symptom-to-FRUIndex75

76ThinkStationHardwareMaintenanceManual
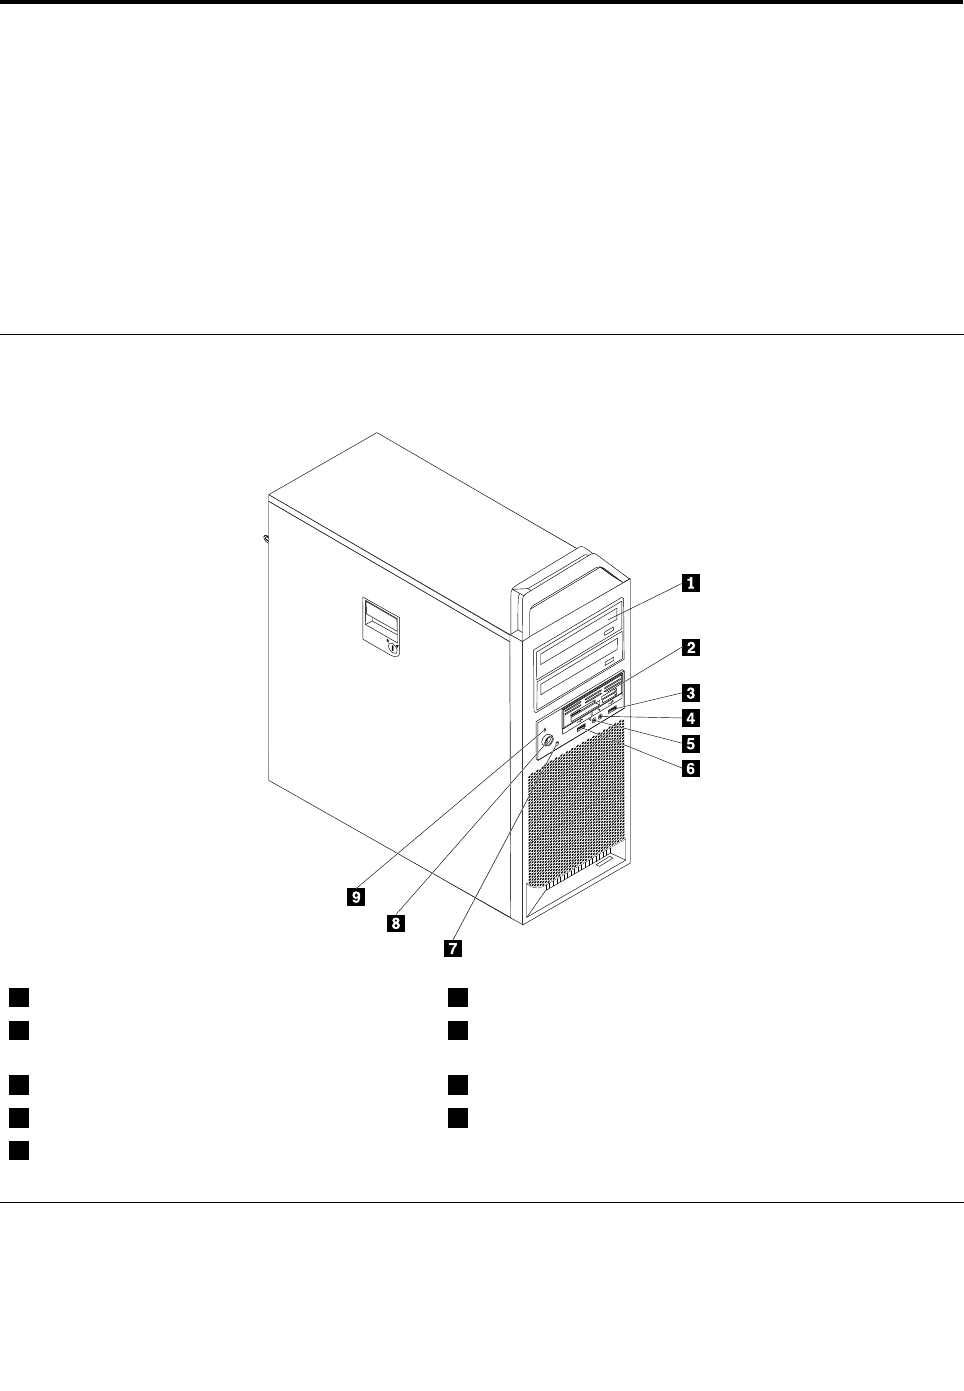
Chapter10.ReplacingFRUs(Type4105,4157,4217)
Important
BeforeyoureplaceanyFRU,readChapter2“Safetyinformation”onpage3.Theseprecautionsand
guidelineswillhelpyouworksafely.
FRUreplacementsaretobedonebytrainedservicetechniciansonly.
ThischapterdoesnotcontainaremoveandreplaceprocedureforallFRUs.OnlythemajorFRUsare
documented.
Locatingcontrolsandconnectorsonthefrontofyourcomputer
Thefollowingillustrationshowsthelocationofthecontrolsandconnectorsonthefrontofyourcomputer.
1Opticaldrive(somemodels)6USBconnector
23.5-inchdiskettedriveorcardreader(some
models)
7Harddiskdriveactivitylight
3USBconnector8Powerbutton
4Microphoneconnector9Power-onindicator
5Headphoneconnector
Rearconnectors
Thefollowingillustrationshowsthelocationsoftheconnectorsontherearofthecomputer.
©CopyrightLenovo2008,201277
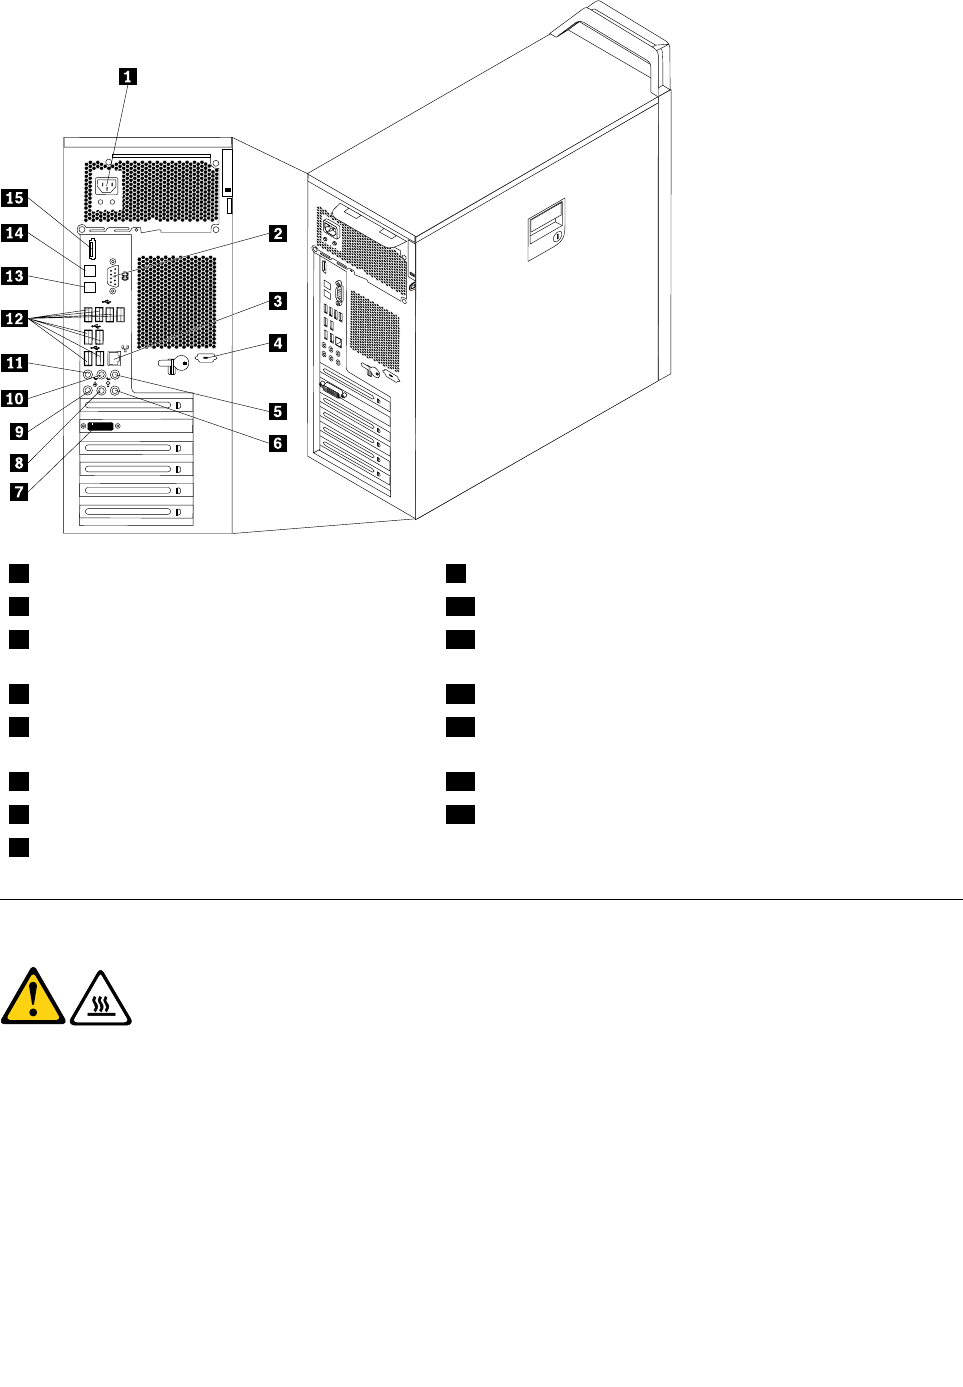
1Powercordconnector9Microphoneconnector
2Serialport10Audioline-outrearspeakersconnector
3Ethernetconnector11SPDIF(SonyPhilipsDigitalInterconnectFormat)out
connector
4Serialport(somemodels)12USBconnectors(8)
5Audioline-outsubwoofer/centerspeakers
connector
13OpticalSPDIFinconnector
6Audioline-inconnector14OpticalSPDIFoutconnector
7Videoconnector(somemodels)15eSATAconnector
8Audioline-outfrontspeakersconnector
Removingthecover
CAUTION:
Theheatsinkandmicroprocessormightbeveryhot.Turnoffthecomputerandwait
threetoveminutestoletthecomputercoolbeforeopeningthecomputercover.
Toremovethecomputercover:
1.Removeanymediafromthedrivesandshutdownyouroperatingsystem.Turnoffallattacheddevices.
Turnoffthecomputer.
2.Unplugallpowercordsfromelectricaloutlets.
3.Disconnectthecablesattachedtothecomputer.Thisincludespowercords,input/output(I/O)cables,
andanyothercablesthatareconnectedtothecomputer.See“Locatingcontrolsandconnectorsonthe
frontofyourcomputer”onpage77and“Rearconnectors”onpage77.
4.Removeanylockingdevices,suchasacablelockorpadlockthatsecuresthecomputercover.Open
thekeylockifitisinthelockedposition.
78ThinkStationHardwareMaintenanceManual
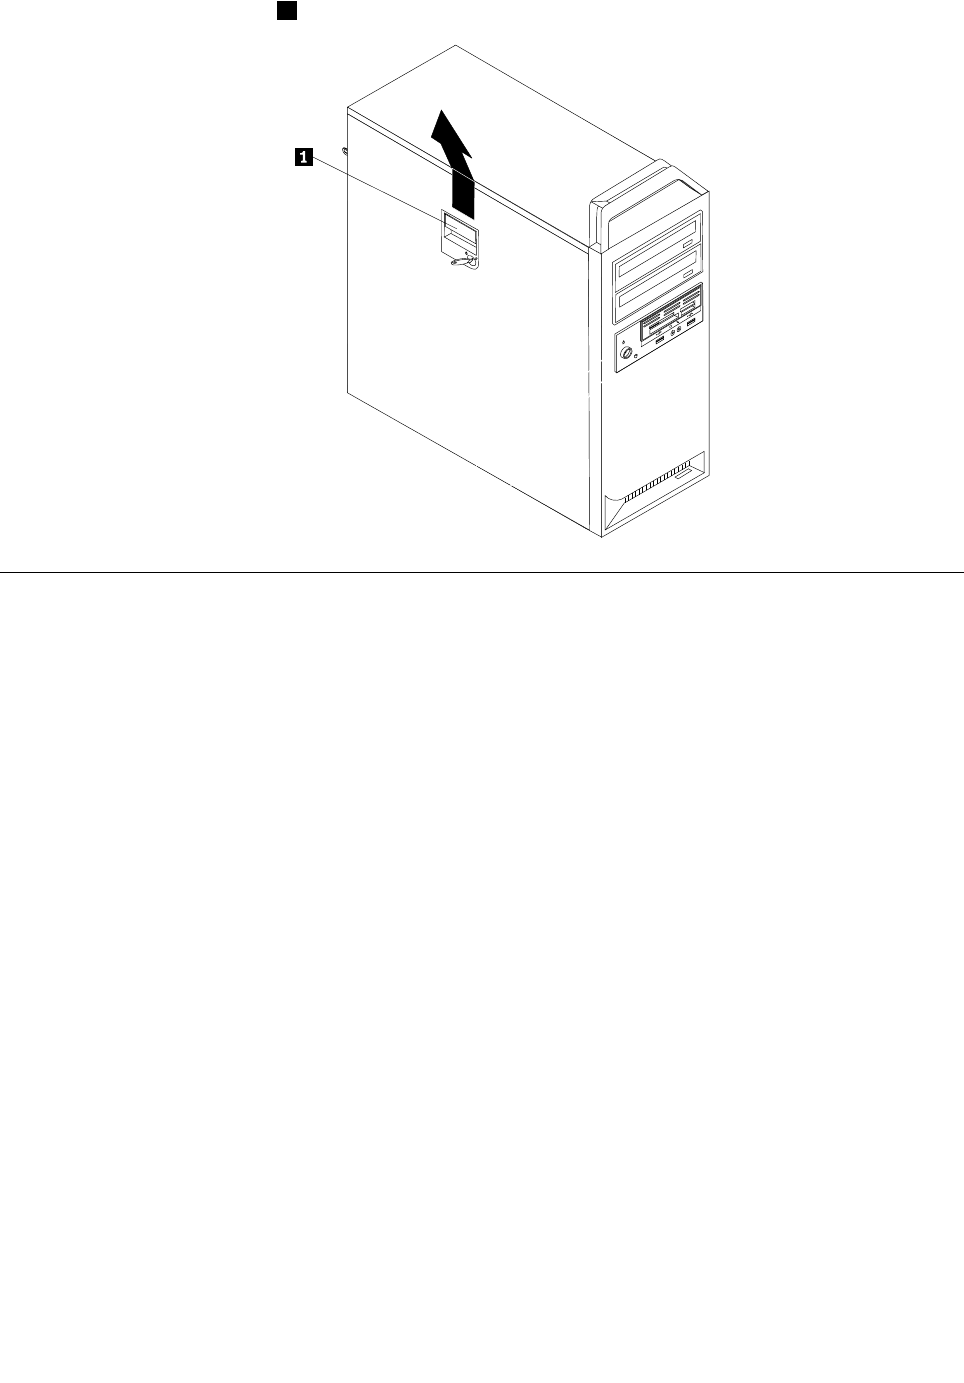
5.Disengagethecoverlatch1andremovethecover.Placethecoveronaatsurface.
Locations
ThefollowingillustrationwillhelpyoulocatethemajorFRUsinthecomputer.
Chapter10.ReplacingFRUs(Type4105,4157,4217)79
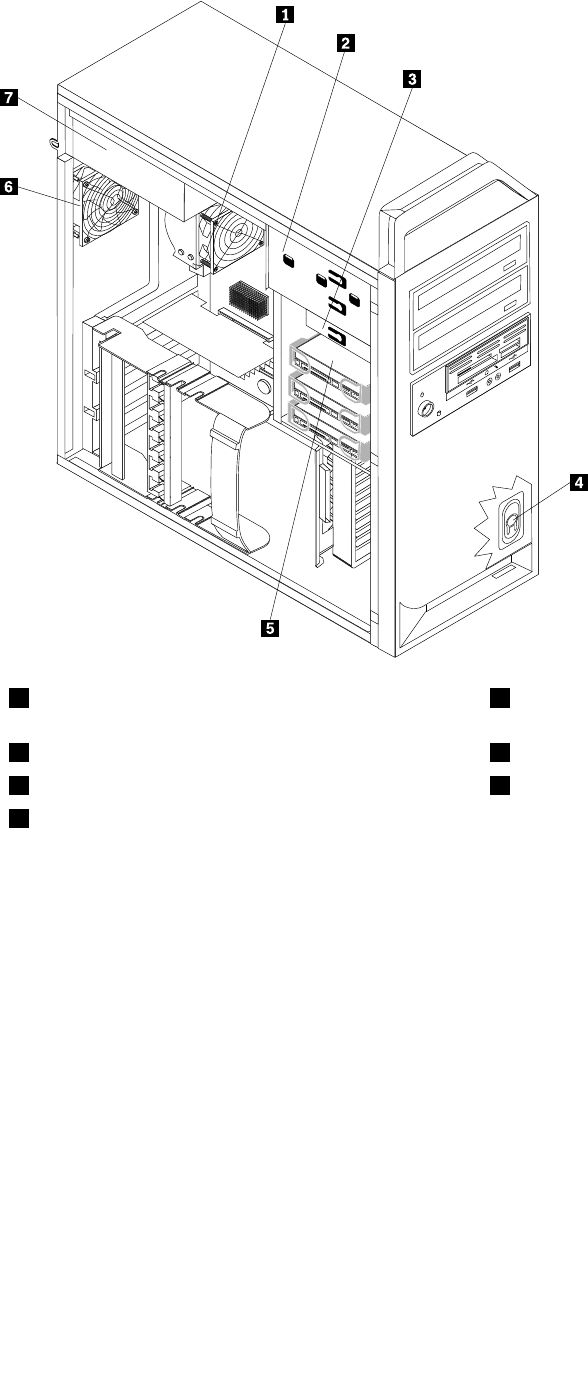
1Microprocessor,heatsink,andheatsinkfan
assembly
5Harddiskdrives
2Opticaldrive6Rearfanassembly
33.5-inchdiskettedriveorcardreader7Powersupply
4Internalspeaker
80ThinkStationHardwareMaintenanceManual
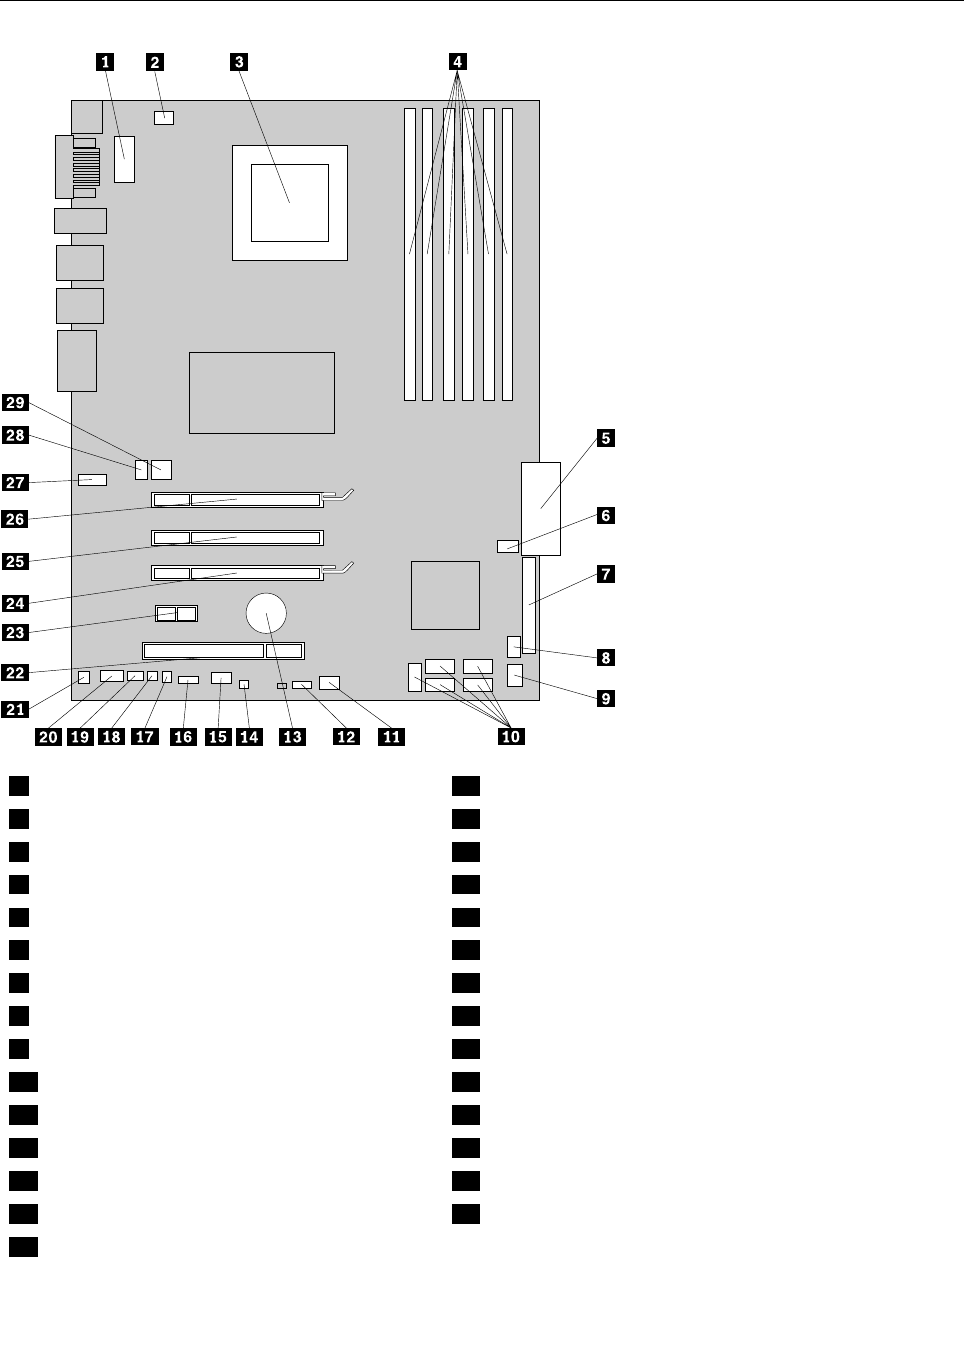
Locatingpartsonthesystemboard
1Microprocessor12Vpowerconnector16Frontpanelconnector
2Microprocessorfanconnector17Coverpresenceswitchconnector
3Microprocessor18Thermalsensorconnector
4Memoryslots(6)19PS/2connector
524-pinsystempowerconnector20Frontaudioconnector
6Harddiskdrivefanassemblyconnector21Internalspeakerconnector
7Diskettedriveconnector22PCIadaptercardslot
8Cardreaderconnector23PCIExpressx1adaptercardslot
9FrontUSBconnector24PCIExpressx16graphicsadaptercardslot
10SATAconnectors(5)25PCIExpressx4adaptercardslot
11Adaptercardfanconnector26PCIExpressx16graphicsadaptercardslot
12SAS(SerialAttachedSCSI)LEDconnector27SecondCOMportconnector
13Battery28Rearfanassemblyconnector
14ClearCMOS/Recoveryjumper29Auxiliary12Vpowerconnector
15AuxiliaryLEDconnector
Chapter10.ReplacingFRUs(Type4105,4157,4217)81
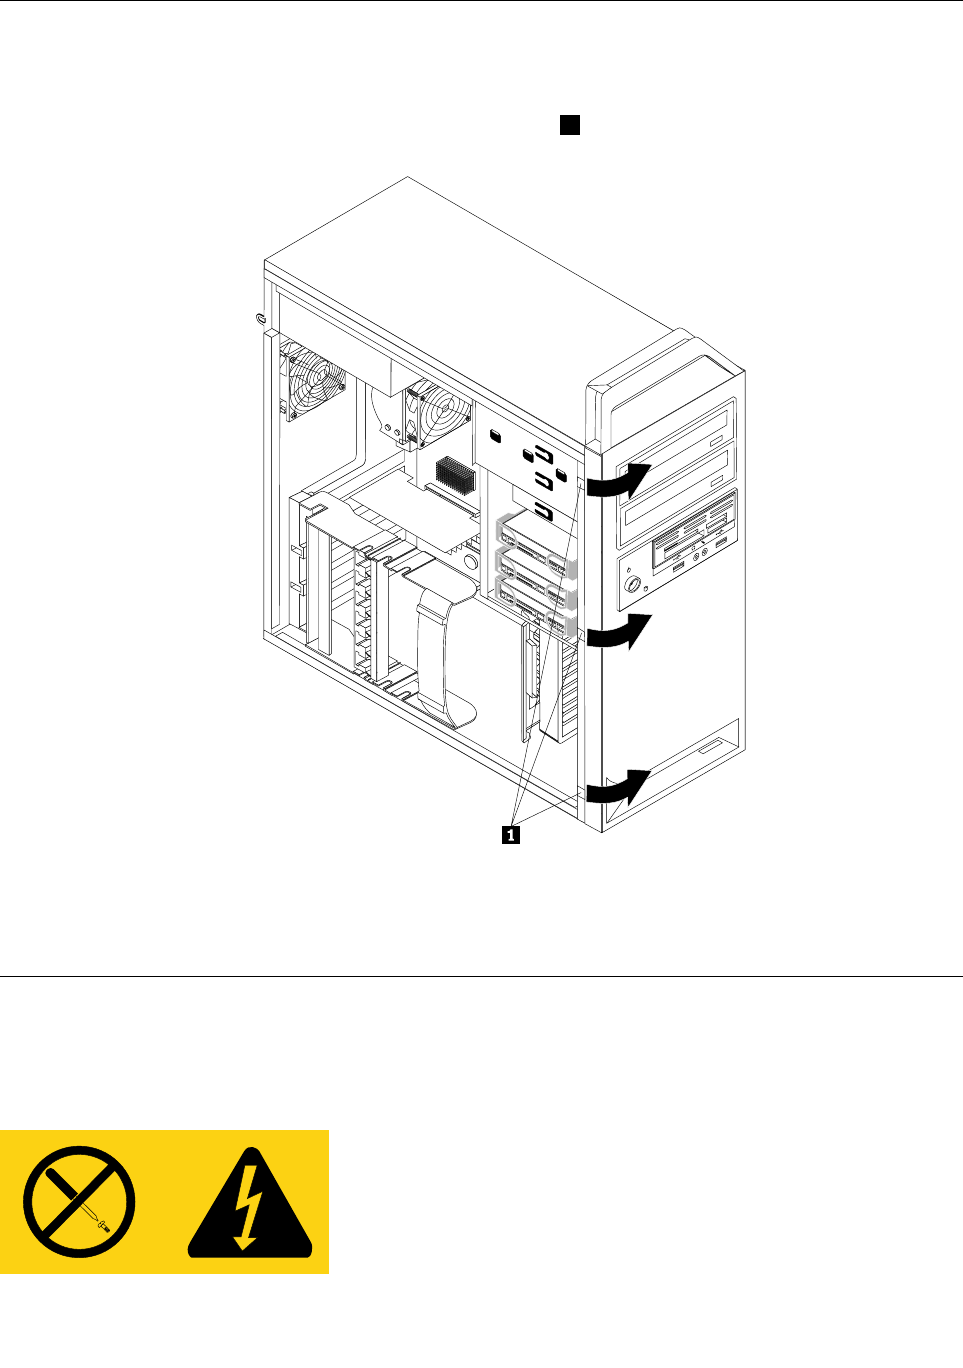
Removingthefrontbezel
Toremovethefrontbezel:
1.Removethecover.See“Removingthecover”onpage78.
2.Removethefrontbezelbyreleasingthethreeplastictabs1ontheleftsideandpivotingthebezel
outward.
3.Laythefrontbezelonaatsurface.
4.Toreinstallthebezel,aligntheplastictabsontherightsideofthebezelwiththecorrespondingholesin
thechassis,thenpivotthebezelinwarduntilitsnapsintopositionontheleftside.
Replacingthepowersupply
Attention
Neverremovethecoveronapowersupplyoranypartthathasthefollowinglabelattached.
82ThinkStationHardwareMaintenanceManual
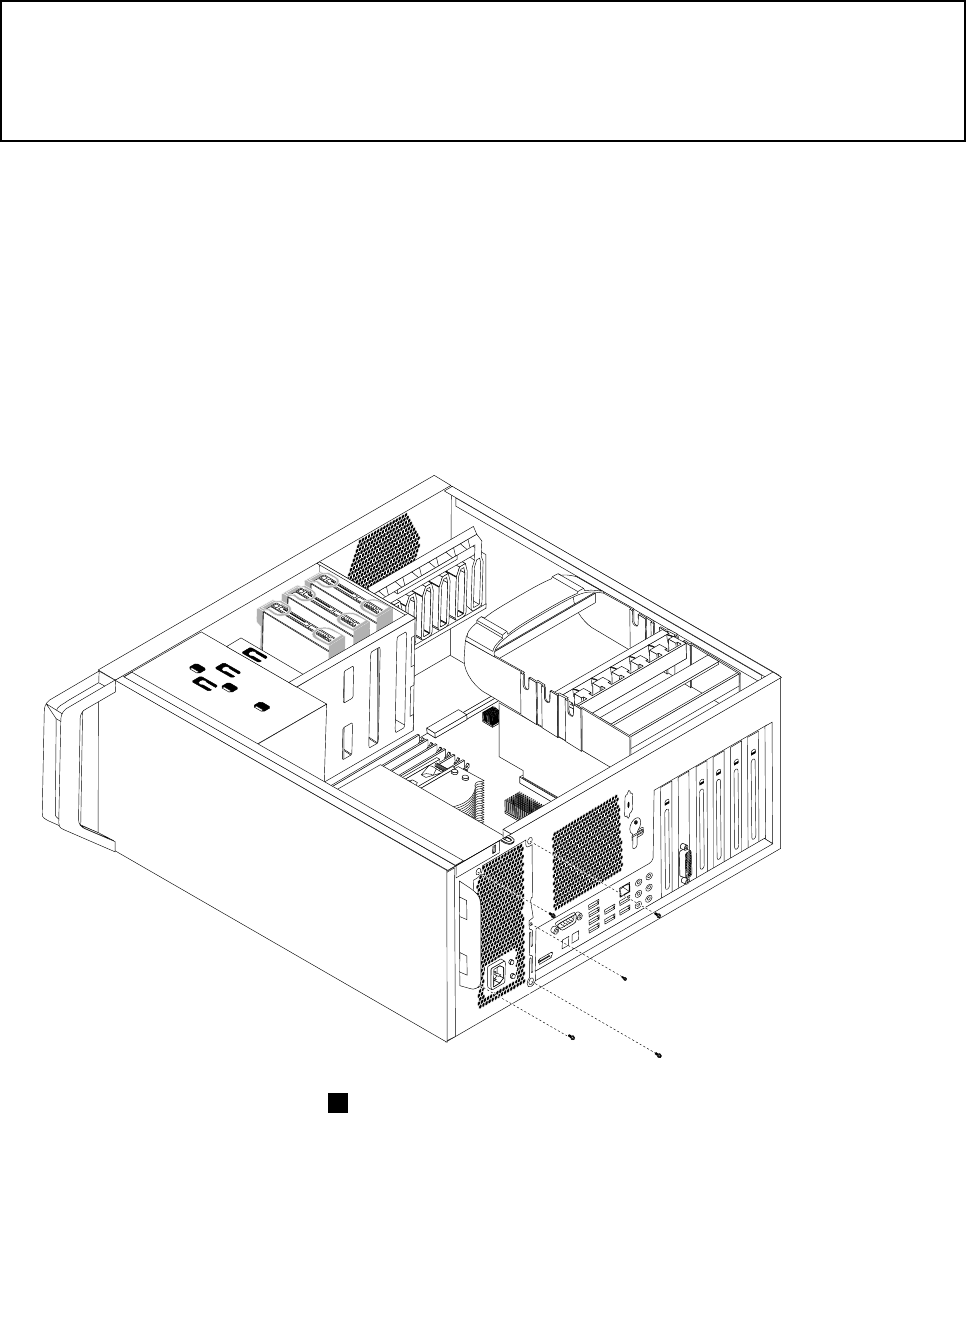
Hazardousvoltage,current,andenergylevelsarepresentinsideanycomponentthathasthislabelattached.
Therearenoservicablepartsinsidethesecomponents.
Attention
Donotopenyourcomputerorattemptanyrepairbeforereadingandunderstandingthe“Importantsafetyinformation”
intheThinkStationSafetyandWarrantyGuidethatcamewithyourcomputer.ToobtainacopyoftheThinkStation
SafetyandWarrantyGuide,goto:
http://www.lenovo.com/support.
Thissectionprovidesinformationonhowtoremoveorreplacethepowersupply.
Toreplacethepowersupply,dothefollowing:
1.Removethecomputercoverandthenlaythecomputeronitsside.See“Removingthecover”on
page78.
2.Locatethepowersupplyassembly.See“Locations”onpage79.
3.Disconnectthepowersupplycablesfromthesystemboardconnectors.Disconnectthepowersupply
cablesfromalladaptercards(somemodels)andfromalldrives.
4.Removethepowersupplycablesfromthecableclipsandties.
5.Removethevescrewsattherearofthechassisthatsecurethepowersupply.
6.Depressthepowersupplylatch1.Slidethepowersupplyassemblytowardthefrontofthecomputer
andremoveitfromthechassis.
Chapter10.ReplacingFRUs(Type4105,4157,4217)83
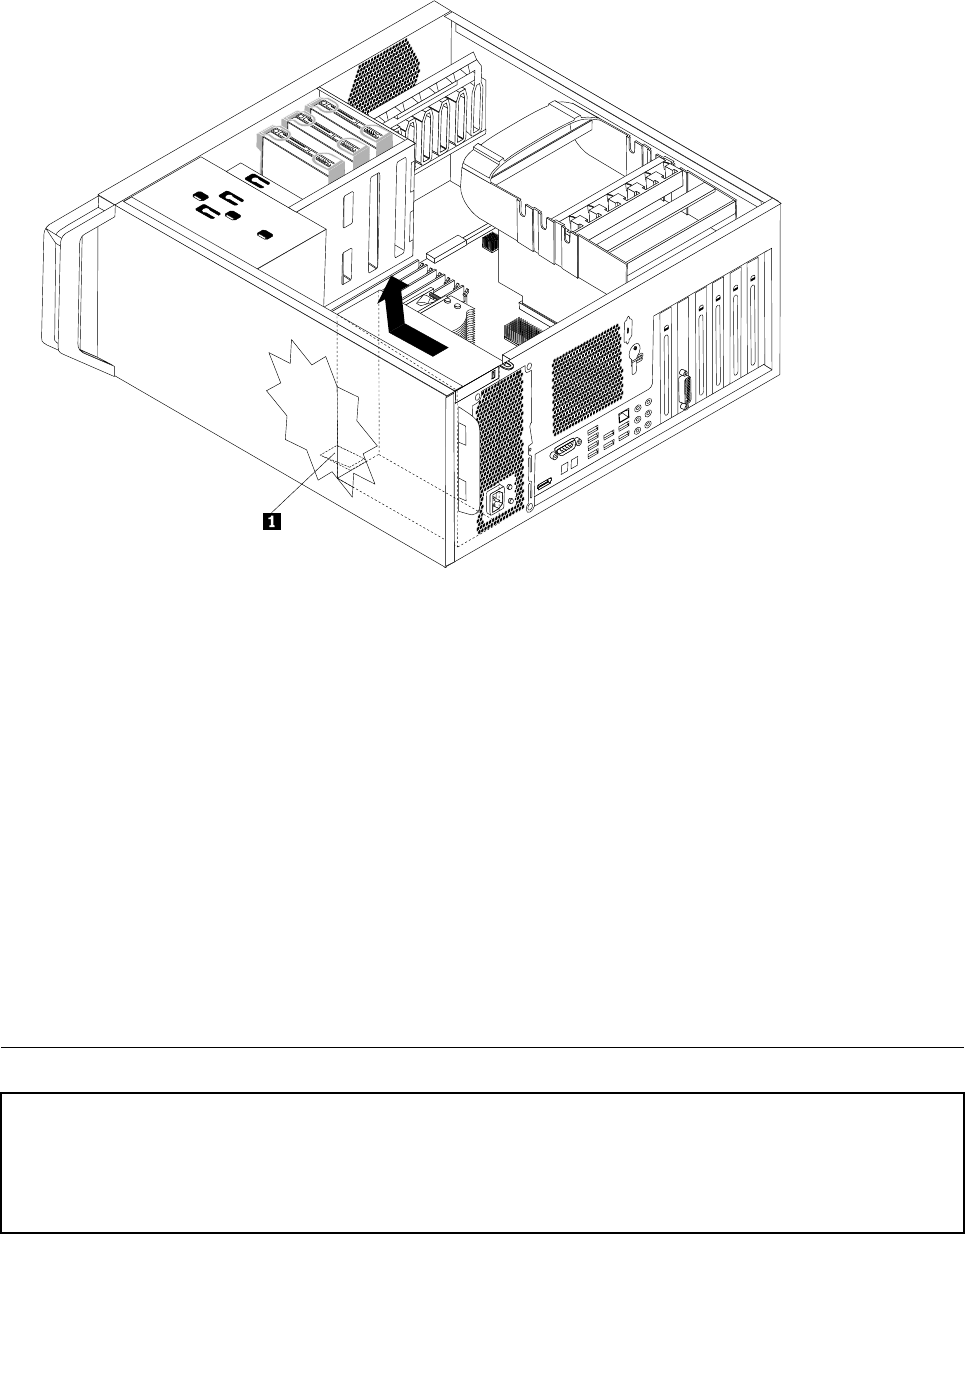
7.Ensurethatthenewpowersupplyisthecorrectreplacement.Somepowersuppliesautomatically
sensethevoltage,somepowersuppliesarevoltagespecic,andsomepowersupplieshavea
voltage-selectionswitch.Ifthereisavoltage-selectionswitch,useaballpointpentoslidetheswitch,if
necessary.
Note:Formodelsthathaveaswitch:
•Ifthevoltagesupplyrangeis100–127VAC,settheswitchto115V.
•Ifthevoltagesupplyrangeis200–240VAC,settheswitchto230V.
8.Installthenewpowersupplyintothechassissothatthescrewholesinthepowersupplyalignwith
thoseinthechassis.
Note:UseonlythescrewsprovidedbyLenovo.
9.Installandtightenthevescrewsattherearofthechassistosecurethepowersupply.Reconnectall
powersupplycablestothedrives,adaptercards,andthesystemboard.Makesuretoreconnectthe
powercabletothegraphicscardsthatrequireanadditionalcable.
10.Goto“CompletingtheFRUreplacement”onpage108.
Replacingamemorymodule
Attention
Donotopenyourcomputerorattemptanyrepairbeforereadingandunderstandingthe“Importantsafetyinformation”
intheThinkStationSafetyandWarrantyGuidethatcamewithyourcomputer.ToobtainacopyoftheThinkStation
SafetyandWarrantyGuide,goto:
http://www.lenovo.com/support.
84ThinkStationHardwareMaintenanceManual
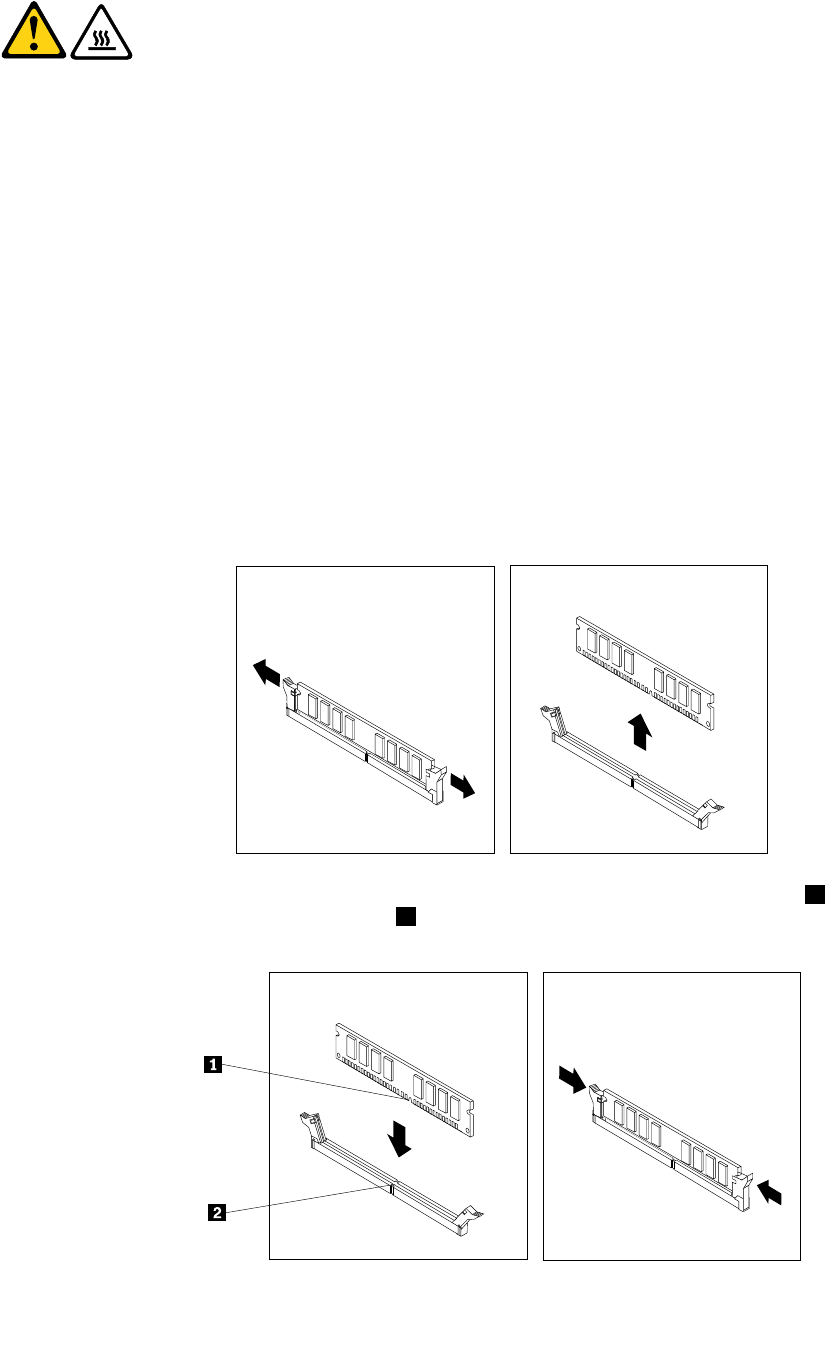
CAUTION:
Thememorymodulemightbeveryhot.Turnoffthecomputerandwaitthreetove
minutestoletthecomputercoolbeforeopeningthecomputercover.
Thissectionprovidesinstructionsonhowtoreplaceamemorymodule.
Yourcomputerhas6slotsforinstallingorreplacingDDR3UDIMMs(doubledatarate3errorcorrectioncode
unbuffereddualinlinememorymodules).
Wheninstallingorreplacingmemorymodules,usethefollowingguidelines:
•AlwaysinstallDIMMsinthenumericalorderprintedonthesystemboard(DIMM1,DIMM2,DIMM3,
andsoon).
•Installmemorymodulesintothebluememoryslotsrst.Installmemorymodulesintotheblackmemory
slotsonlyafterallthebluememoryslotsareoccupied.
•BesuretoinstallmemorymodulesstartingwiththememoryslotsadjacenttotheCPU.
Toremoveorreplacethememorymodule,dothefollowing:
1.Removethecomputercover.See“Removingthecover”onpage78.
2.Locatethememorymoduleslots.See“Locatingpartsonthesystemboard”onpage81.
3.Removethememorymodulebeingreplacedbyopeningtheretainingclips.
4.Positionthereplacementmemorymoduleoverthememoryslot.Makesurethenotch1onthememory
modulealignscorrectlywiththeslotkey2onthesystemboard.Pushthememorymodulestraightdown
intotheslotuntiltheretainingclipsclose.See“Installingorreplacingamemorymodule”onpage116.
Chapter10.ReplacingFRUs(Type4105,4157,4217)85
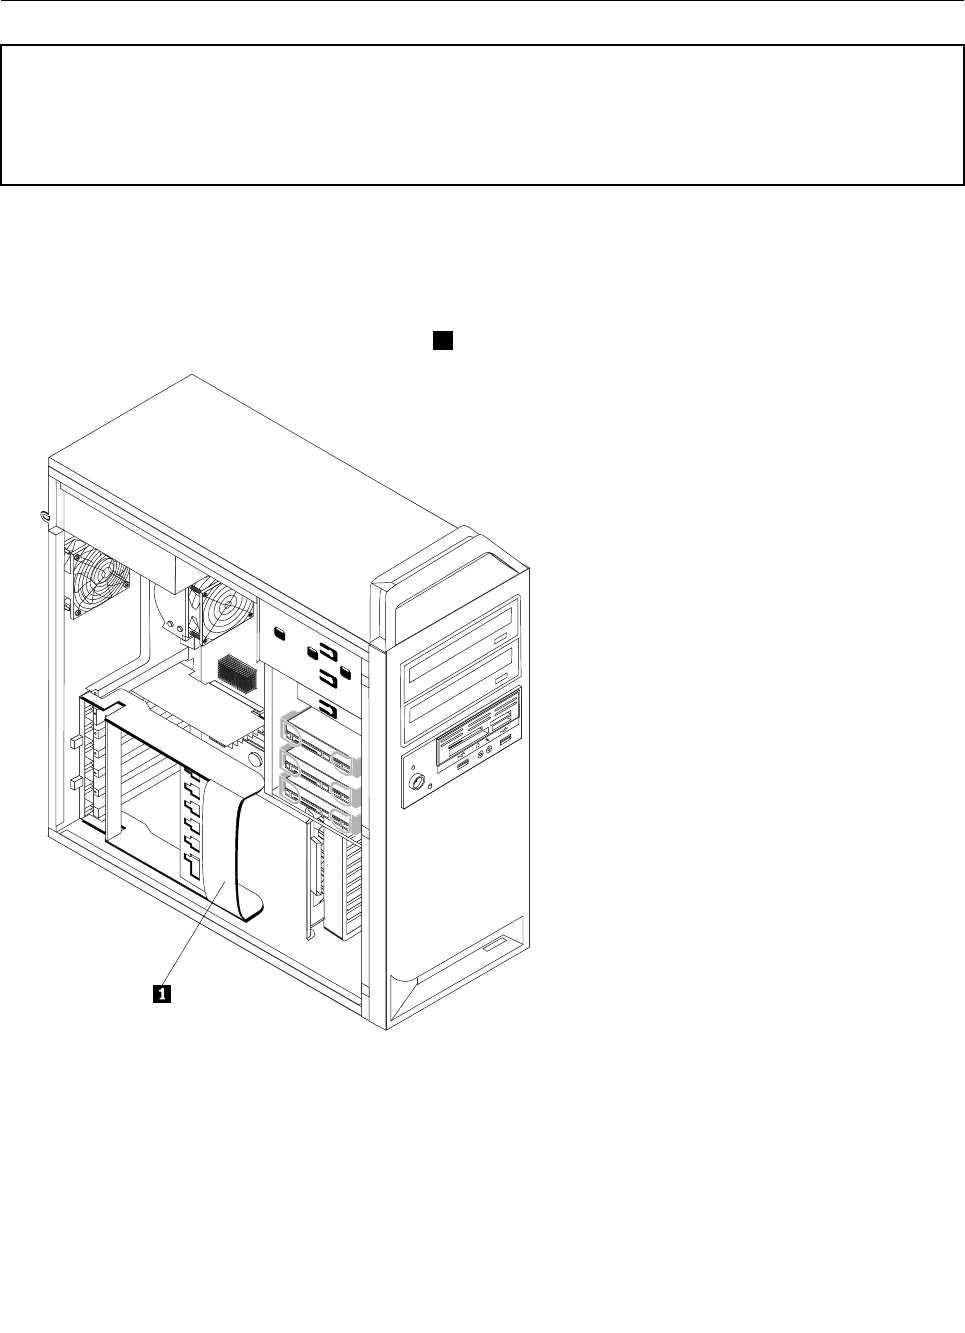
5.Goto“CompletingtheFRUreplacement”onpage108.
ReplacingaPCIadaptercard
Attention
Donotopenyourcomputerorattemptanyrepairbeforereadingandunderstandingthe“Importantsafetyinformation”
intheThinkStationSafetyandWarrantyGuidethatcamewithyourcomputer.ToobtainacopyoftheThinkStation
SafetyandWarrantyGuide,goto:
http://www.lenovo.com/support.
ThissectionprovidesinformationonhowtoremoveorreplaceaPCIadaptercard.
ToremoveorreplacethePCIadaptercard,dothefollowing:
1.Removethecomputercover.See“Removingthecover”onpage78.
2.Unlatchandopentheadaptercardretainer1.
3.Takenoteofthelocationofallcableconnectionsontheadaptercard.Itwillbenecessarytoreconnect
themproperlywheninstallinganewadaptercard.
4.Disconnectallcablesconnectedtotheadaptercard.See“Locatingpartsonthesystemboard”
onpage81.
5.Somemodelshave:
•Ascrewinstalledintheadapterbracket,removethisscrew.
•Anadditionalretentionfeaturelocatedonthecardguideend.Pushtheretentionfeaturetowardthe
frontofthechassisbeforeremovingtheadaptercard.
86ThinkStationHardwareMaintenanceManual
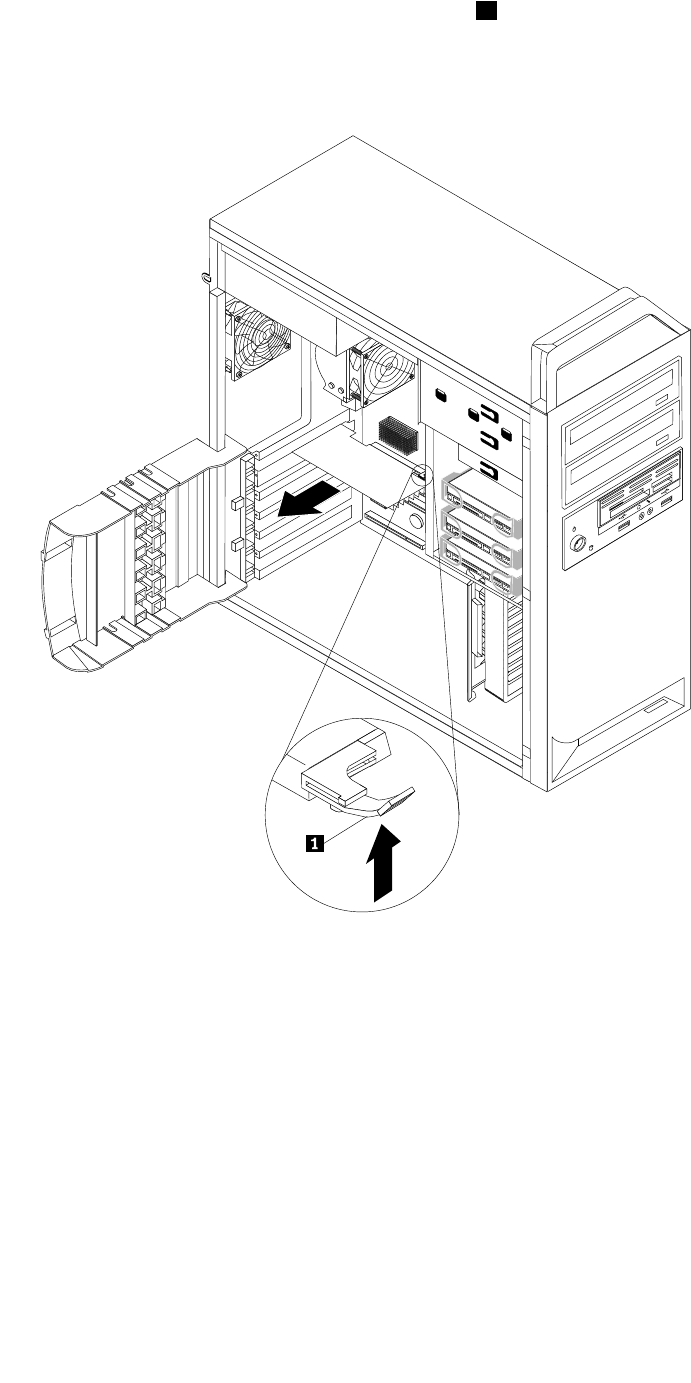
6.Releasetheadaptercardsupportretaininglatch1ifnecessary.Graspthefailingadaptercardand
pulltheadaptercardoutoftheslot.
Note:Theadaptercardtstightlyintothecardslot.Ifnecessary,alternatemovingeachsideofthe
adaptercardasmallamountuntilitisremovedfromtheadaptercardslot.
Chapter10.ReplacingFRUs(Type4105,4157,4217)87
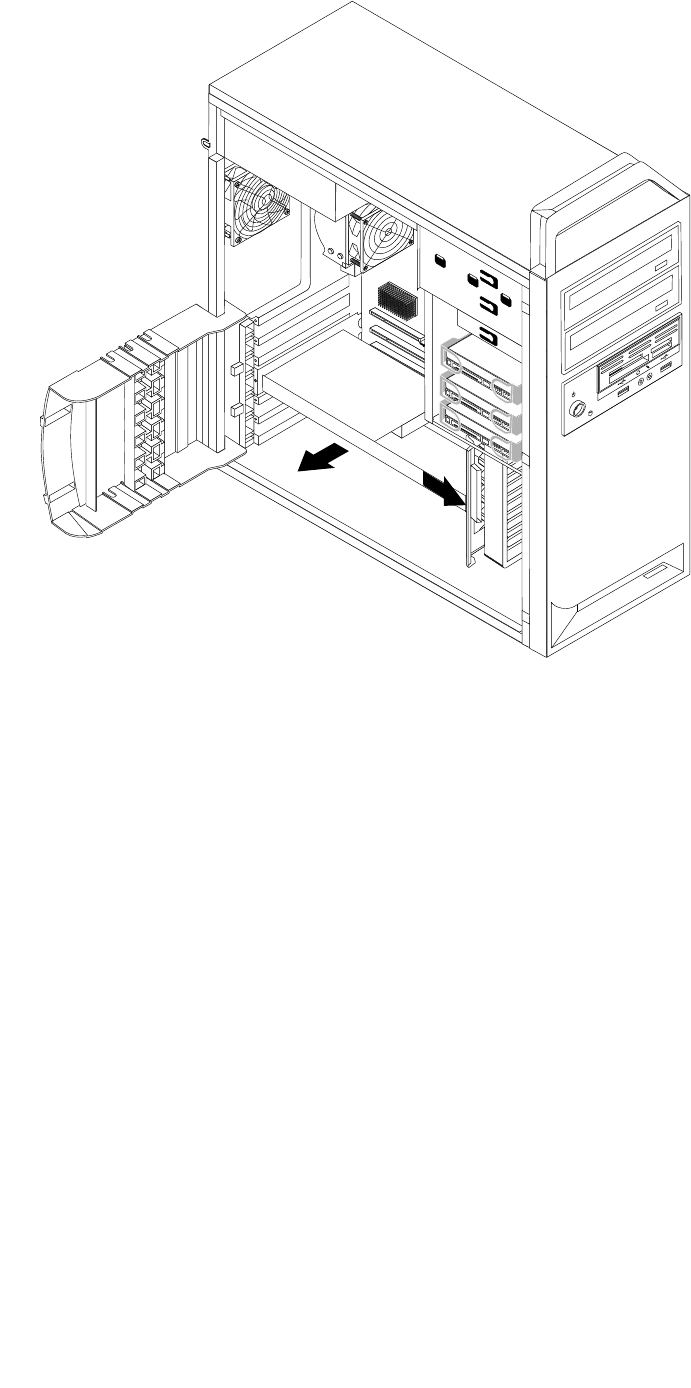
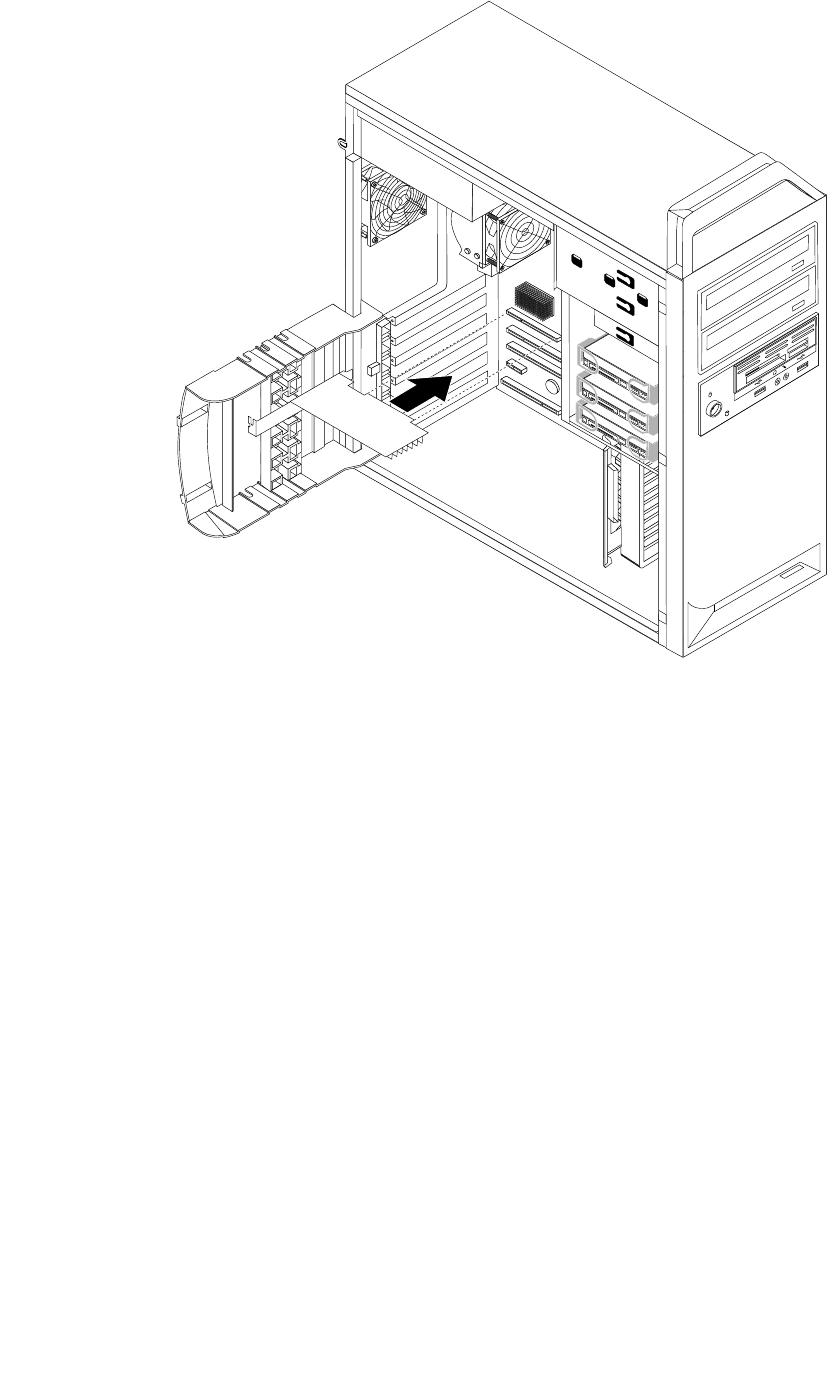
Chapter10.ReplacingFRUs(Type4105,4157,4217)89
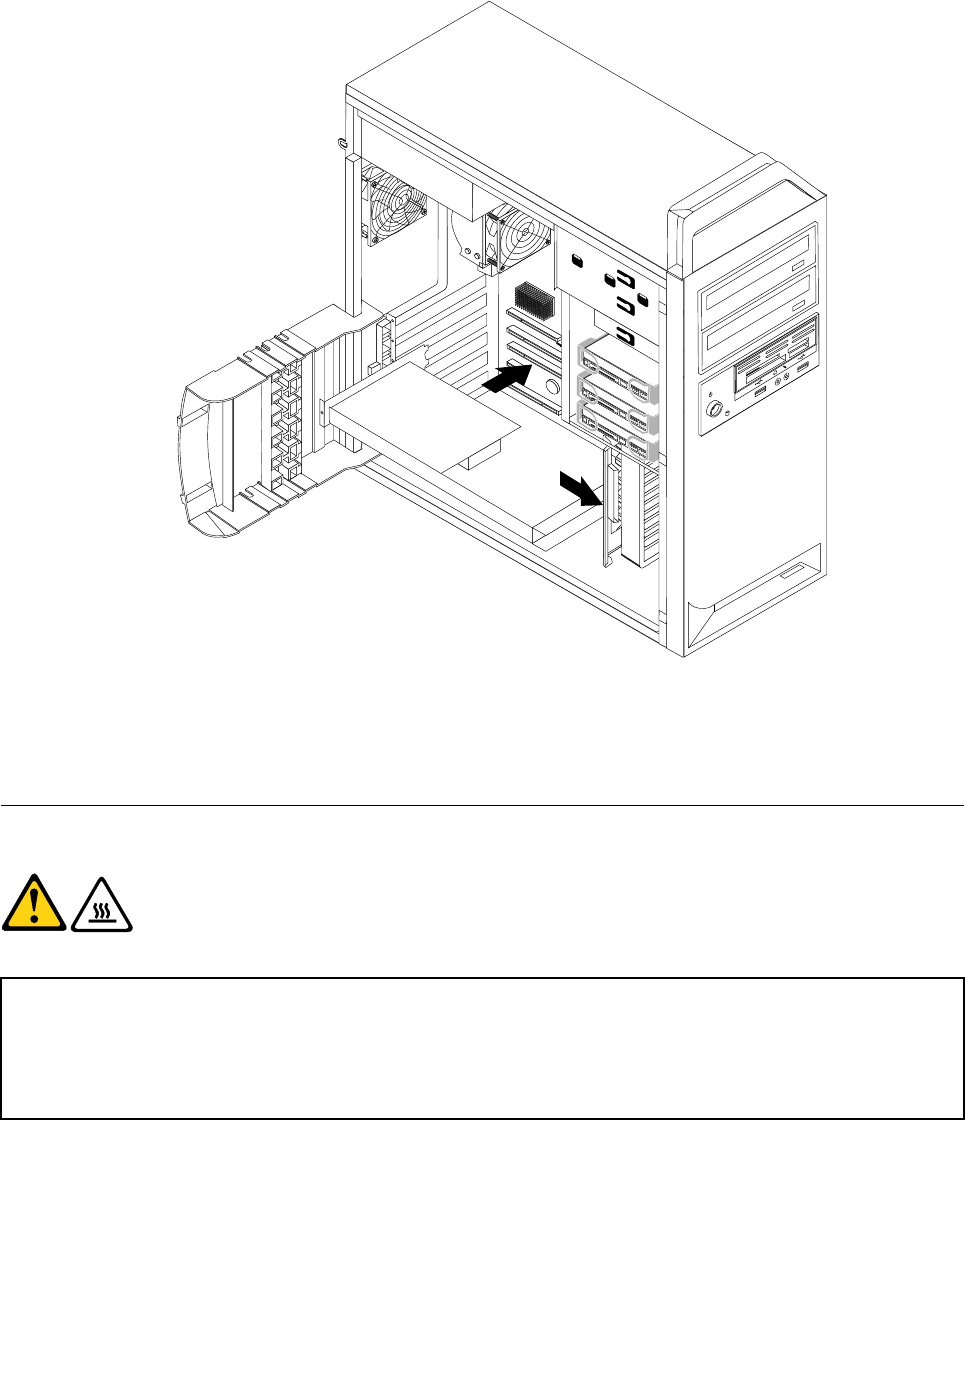
9.Connectanyadaptercardcablestothesystemboard.
10.Latchtheadaptercardretainer.
11.Goto“CompletingtheFRUreplacement”onpage108.
Replacingtheheatsink
CAUTION:
Theheatsinkandmicroprocessormightbeveryhot.Turnoffthecomputerandwait
threetoveminutestoletthecomputercoolbeforeopeningthecomputercover.
Attention
Donotopenyourcomputerorattemptanyrepairbeforereadingandunderstandingthe“Importantsafetyinformation”
intheThinkStationSafetyandWarrantyGuidethatcamewithyourcomputer.ToobtainacopyoftheThinkStation
SafetyandWarrantyGuide,goto:
http://www.lenovo.com/support.
Thissectionprovidesinstructionsonhowtoreplaceandinstalltheheatsink.
Toreplacetheheatsink:
1.Openthecomputercover.See“Removingthecover”onpage78.
2.Laythecomputeronitssideforeasieraccesstotheheatsink.
90ThinkStationHardwareMaintenanceManual
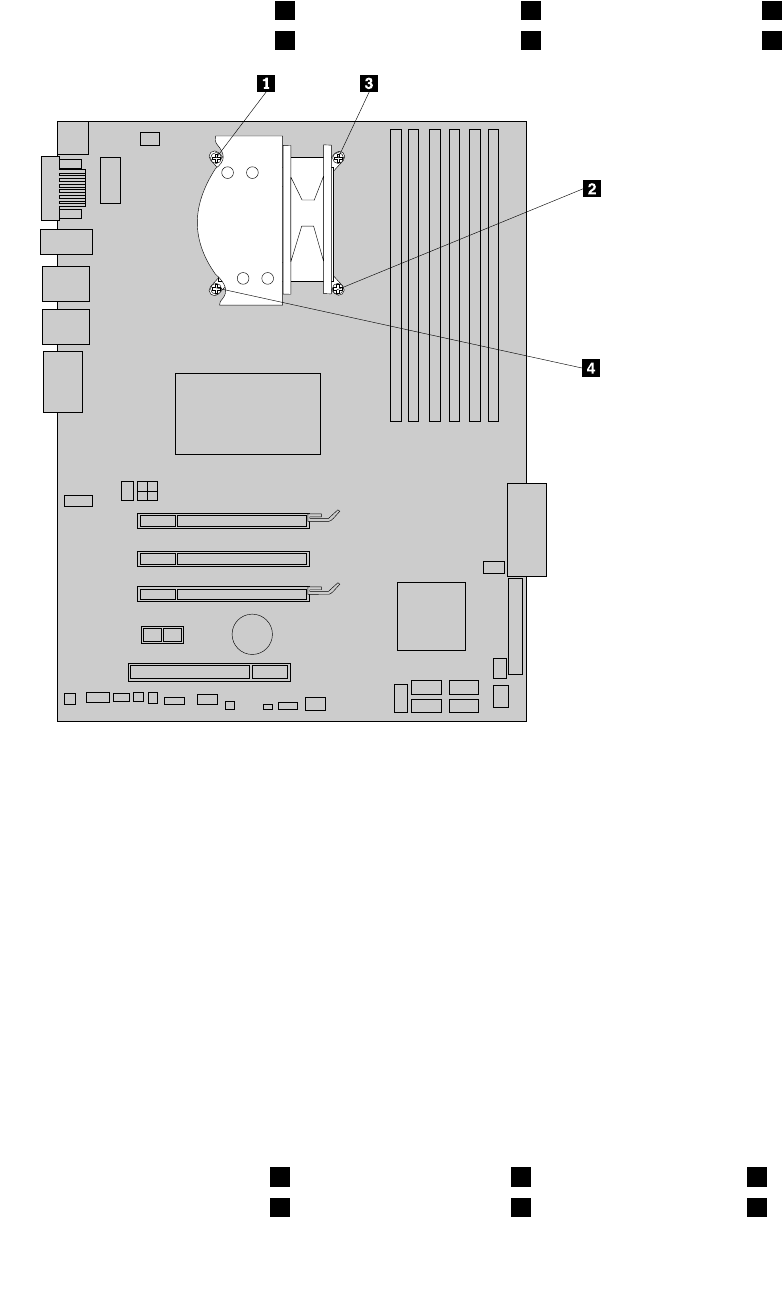
3.Removetheheatsinkandfanassemblycablefromthesystemboard.Notethecablelocation.See
“Locatingpartsonthesystemboard”onpage81.
4.Followthissequencetoremovetheheatsinkfromthesystemboard:
a.Partiallyremovescrew1,thenfullyremovescrew2,andfullyremovescrew1.
b.Partiallyremovescrew3,thenfullyremovescrew4,andfullyremovescrew3.
5.Carefullylifttheheatsinkoffofthesystemboard.
6.Removetheplasticcoverfromthebottomofthenewheatsinktoexposetheheatsinkgrease(this
coverprotectstheheatsinkgreasefromcontamination).
Notes:
a.Donotremovetheplasticcoveruntilyouarereadytoinstalltheheatsinkandfanassemblyonthe
microprocessor.Donottouchthegreaseontheheatsinkandfanassembly.Donotputtheheat
sinkandfanassemblyanywhereexceptonthemicroprocessoraftertheplasticcoverhasbeen
removedandthegreaseexposed.
b.Someheatsinkpartnumberswillhaveorientationlabelsshowing"FrontofSystem."HeatSinksthat
donothaveorientationlabelsshouldbeorientedsothefancableistowardtheboardconnector
labeled"CPUFan."
7.Placethenewheatsinkintoposition.
Important:Donottouchthethermalgreasewhilehandlingtheheatsink.
8.Alignthefourscrewsontheheatsinkwiththefourmountingstudsinthechassis.
9.Followthissequencetoinstallthescrews,notingthatfullytightis5in-lbs+/-0.5in-lbs:
a.Partiallytightenscrew1,thenfullytightenscrew2,andfullytightenscrew1.
b.Partiallytightenscrew3,thenfullytightenscrew4,andfullytightenscrew3.
Chapter10.ReplacingFRUs(Type4105,4157,4217)91
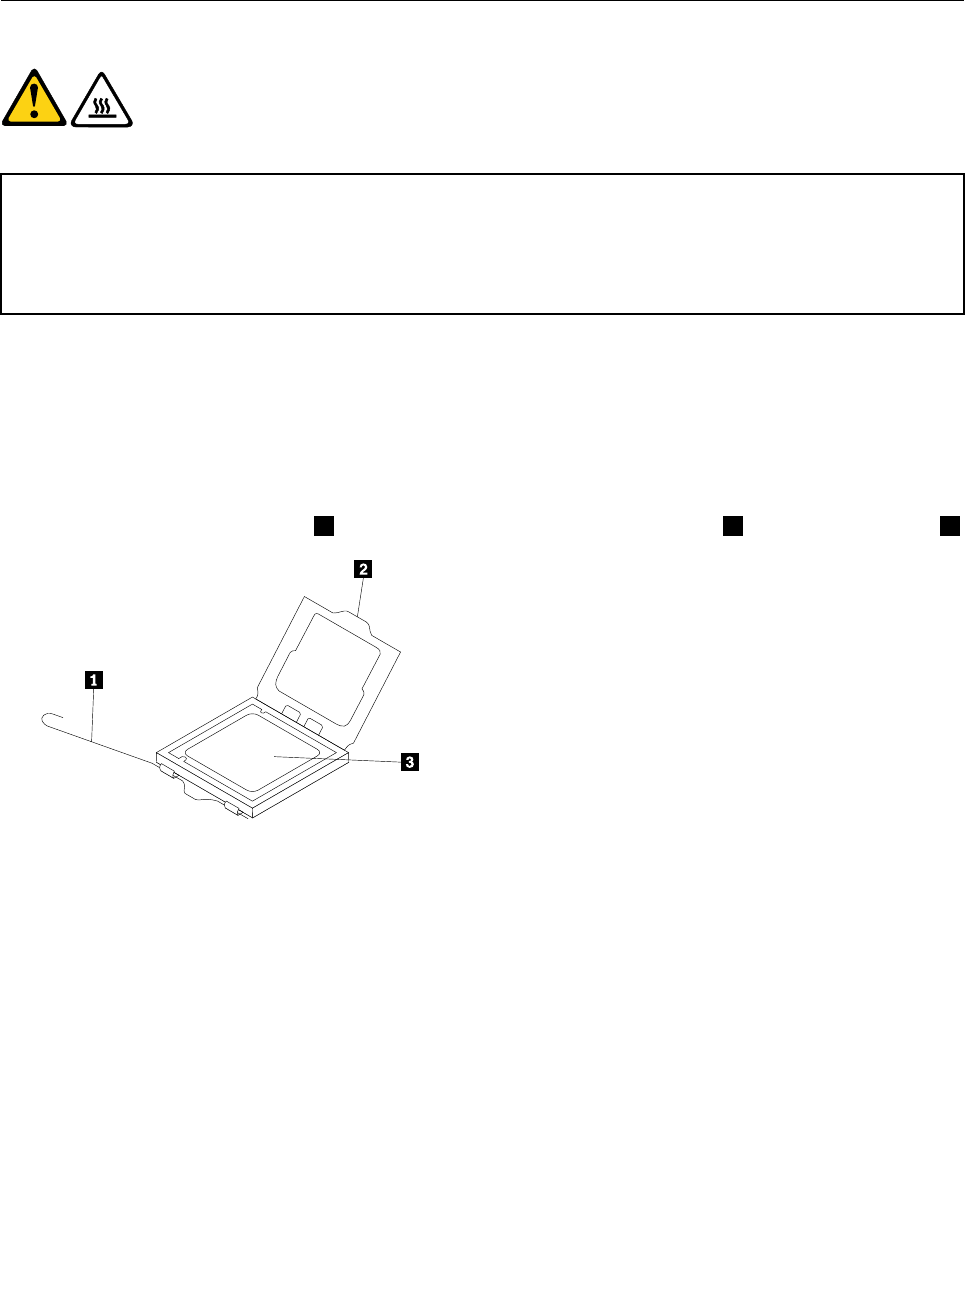
10.Reconnecttheheatsinkfancable.See“Locatingpartsonthesystemboard”onpage81.
11.Goto“CompletingtheFRUreplacement”onpage108.
Replacingthemicroprocessor
CAUTION:
Theheatsinkandmicroprocessormightbeveryhot.Turnoffthecomputerandwait
threetoveminutestoletthecomputercoolbeforeopeningthecomputercover.
Attention
Donotopenyourcomputerorattemptanyrepairbeforereadingandunderstandingthe“Importantsafetyinformation”
intheThinkStationSafetyandWarrantyGuidethatcamewithyourcomputer.ToobtainacopyoftheThinkStation
SafetyandWarrantyGuide,goto:
http://www.lenovo.com/support.
Thissectionprovidesinstructionsonhowtoreplacethemicroprocessor.
Toreplacethemicroprocessor:
1.Openthecomputercover.See“Removingthecover”onpage78.
2.Placethecomputeronitssidetohelpmakethesystemboardmoreaccessible.
3.Removetheheatsinkfromthesystemboard.See“Replacingtheheatsink”onpage90.
4.Toremovethemicroprocessor3fromthesystemboard,liftthesmallhandle1andopentheretainer2.
Important
Touchonlythesidesofthemicroprocessor.Donottouchthegoldcontactsonthebottom.
5.Liftthemicroprocessorstraightupandoutofthesocket.
92ThinkStationHardwareMaintenanceManual
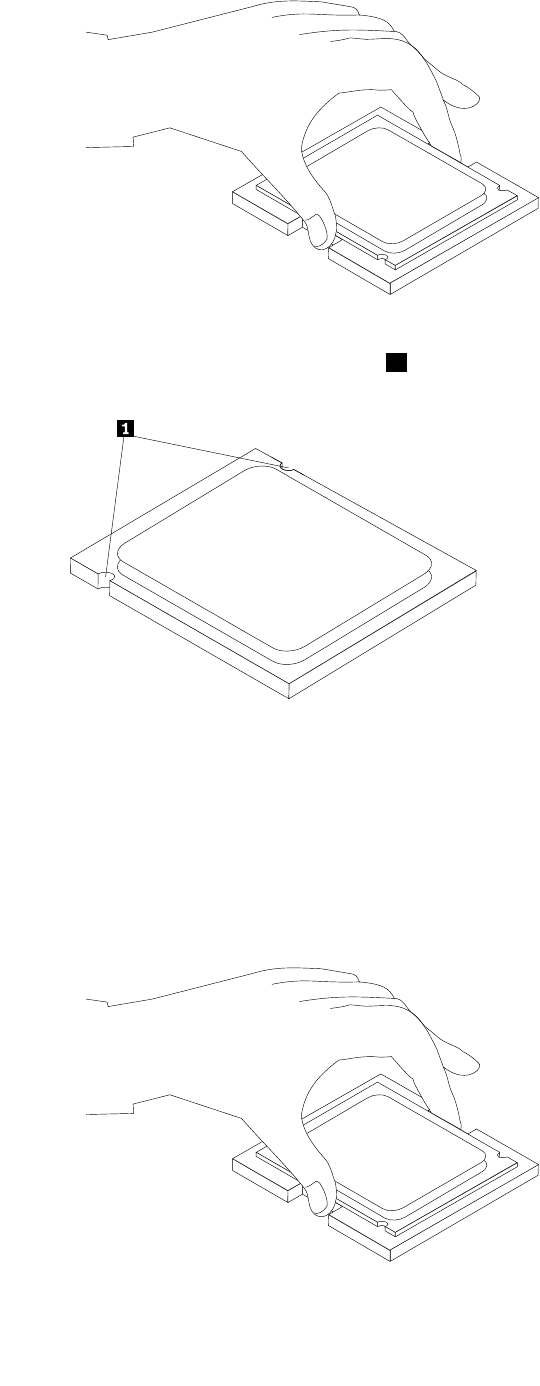
Notes:
a.Notetheorientationofthenotches1onthemicroprocessor.Thisisimportantwhenreinstalling
themicroprocessoronthenewsystemboard.
b.Donotdropanythingontothemicroprocessorsocketwhileitisexposed.Thesocketpinsmustbe
keptascleanaspossible.
6.Holdingthemicroprocessorwithyourngers,positionthemicroprocessorsothatthenotchesonthe
microprocessorarealignedwiththetabsinthemicroprocessorsocket.
Important
Toavoiddamagingthemicroprocessorcontacts,donottiltthemicroprocessorwheninstallingitinto
thesocket.
7.Lowerthemicroprocessorstraightdownintothemicroprocessorsocketofthesystemboard.
8.Closethemicroprocessorretainerandclampitwiththesmallhandle.
Chapter10.ReplacingFRUs(Type4105,4157,4217)93

9.Placetheheatsinkintopositionandreplacethe4screwstosecuretheheatsinktothesystemboard.
10.Reconnecttheheatsinkfancable.
11.Goto“CompletingtheFRUreplacement”onpage108.
Replacingthesystemboard
CAUTION:
Theheatsinkandmicroprocessormightbeveryhot.Turnoffthecomputerandwait
threetoveminutestoletthecomputercoolbeforeopeningthecomputercover.
Attention
Donotopenyourcomputerorattemptanyrepairbeforereadingandunderstandingthe“Importantsafetyinformation”
intheThinkStationSafetyandWarrantyGuidethatcamewithyourcomputer.ToobtainacopyoftheThinkStation
SafetyandWarrantyGuide,goto:
http://www.lenovo.com/support.
Note:Whenreplacingthesystemboardanewretentionmoduleforthemicroprocessorheatsinkisrequired.
Makesureyouhaveanewretentionmodulebeforebeginningthisprocedure.
Thissectionprovidesinstructionsonhowtoremoveandinstallthesystemboard.
Toreplacethesystemboard:
1.Openthecover.See“Removingthecover”onpage78.
2.Laythecomputeronitssideforeasieraccesstothesystemboard.
3.RemoveanyadaptercardsinstalledinthePCIconnectors.See“ReplacingaPCIadaptercard”on
page86.
4.Removetheharddiskdrivefan.See“Replacingtheharddiskdrivefanassembly”onpage100.
5.Removethememorymodulesfromthefailingsystemboard.
6.Removetheheatsinkfromthefailingsystemboard.See“Replacingtheheatsink”onpage90.
7.Notethelocationofallcableconnectionsonthesystemboardanddisconnectallcables.See“Locating
partsonthesystemboard”onpage81.
8.Removetheninescrewsthatsecurethesystemboardtothechassis,followingthesequenceshownin
thegure:
94ThinkStationHardwareMaintenanceManual
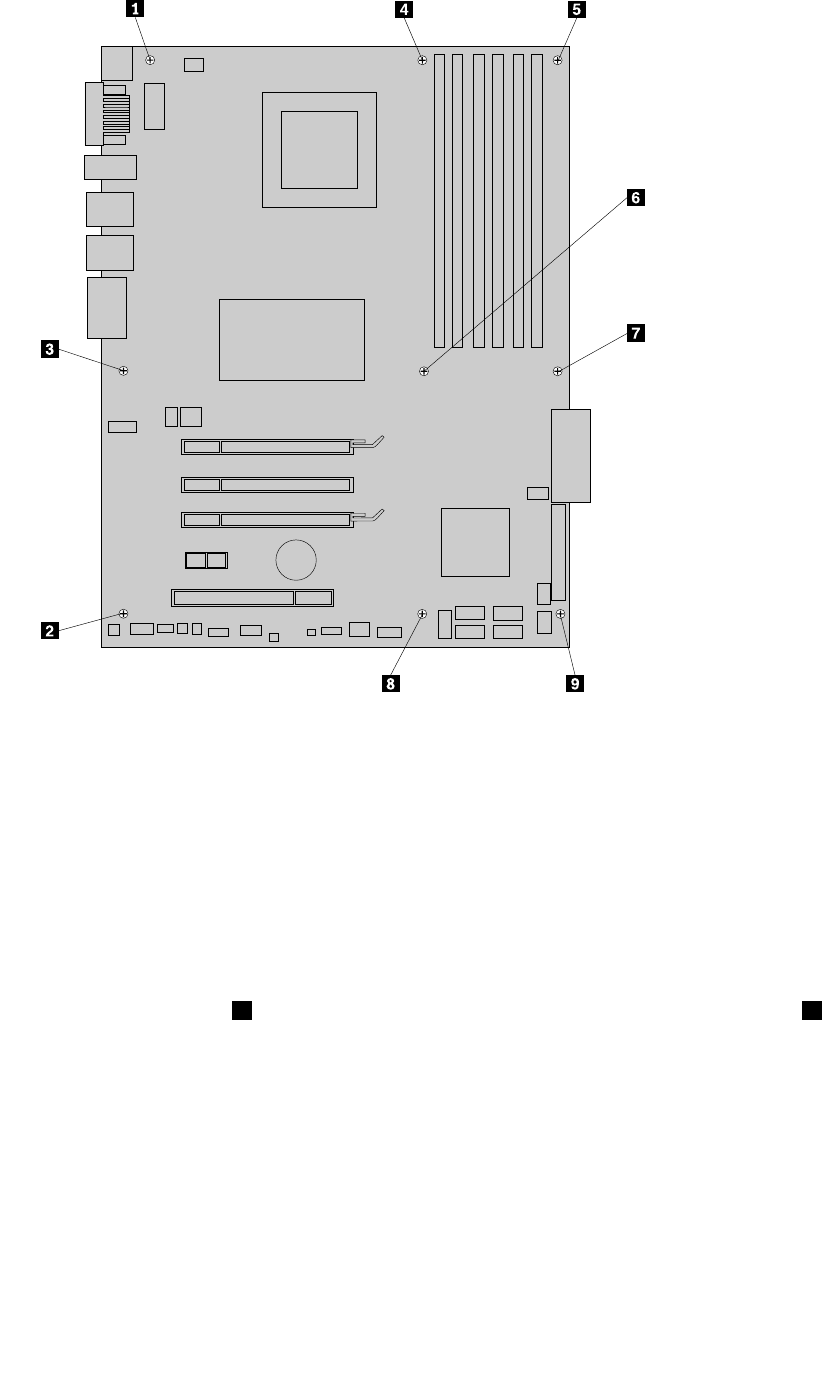
9.Carefullyliftthesystemboardoutofthechassis.
10.Removethemicroprocessorsocketcoverfromthenewsystemboard.
11.Removethemicroprocessorfromthefailingsystemboardandinstallitonthenewsystemboard.
See“Replacingthemicroprocessor”onpage92.
12.Thefailingsystemboardmustbereturnedwithamicroprocessorsocketcovertoprotectthepinsduring
shippingandhandling.Installthemicroprocessorsocketcoverremovedfromthenewsystemboardon
thefailingsystemboard.Toinstallthemicroprocessorsocketcover:
a.Releasetheleversecuringthemicroprocessorretainerandopentheretainertoaccessthe
microprocessor.
b.Graspthemicroprocessoronthesidesandliftitstraightupandoutofthesocket.Donottouchthe
contactsonthemicroprocessorsocket.
c.Alignthenotches1ofthemicroprocessorsocketcoverwiththealignmentkeys2ofthe
microprocessorsocket.Lowerthesocketcoverstraightdownintothemicroprocessorsocket
onthesystemboard.
Chapter10.ReplacingFRUs(Type4105,4157,4217)95

Note:Yourmicroprocessorsocketandcovermightlookslightlydifferentfromtheillustration.
d.Carefullypressthesocketcoverstraightdownwardsuntilitissecuredintothesocket.
e.Lowerthemicroprocessorretainerandthenlowerthelevertosecuretheretainer.Makesurethe
leverissecurelylockedintoposition.
f.Followanyadditionalinstructionsincludedwiththereplacementpartyoureceived.
13.Installthenewsystemboardintothechassisandalignthescrewholeswiththoseinthechassis.Insert
andtightenthescrewsthatsecurethesystemboardfollowingthesequenceshowninthegureabove.
14.Installthememorymodulesinthesamelocationonthenewsystemboard.
15.Installthemicroprocessoronthenewsystemboard.See“Replacingthemicroprocessor”onpage92
16.Installtheheatsinkandfanassemblyonthenewsystemboard.See“Replacingtheheatsink”
onpage90.
17.Connecttheheatsinkandfanassemblycabletothenewsystemboard.See“Locatingpartsonthe
systemboard”onpage81.
18.Installtheharddiskdrivefan.See“Replacingtheharddiskdrivefanassembly”onpage100.
19.Connectallcablestothesystemboard.Seethesystemboardillustrationforyourmachinetypeat
“Locatingpartsonthesystemboard”onpage81.
20.Goto“CompletingtheFRUreplacement”onpage108.
96ThinkStationHardwareMaintenanceManual
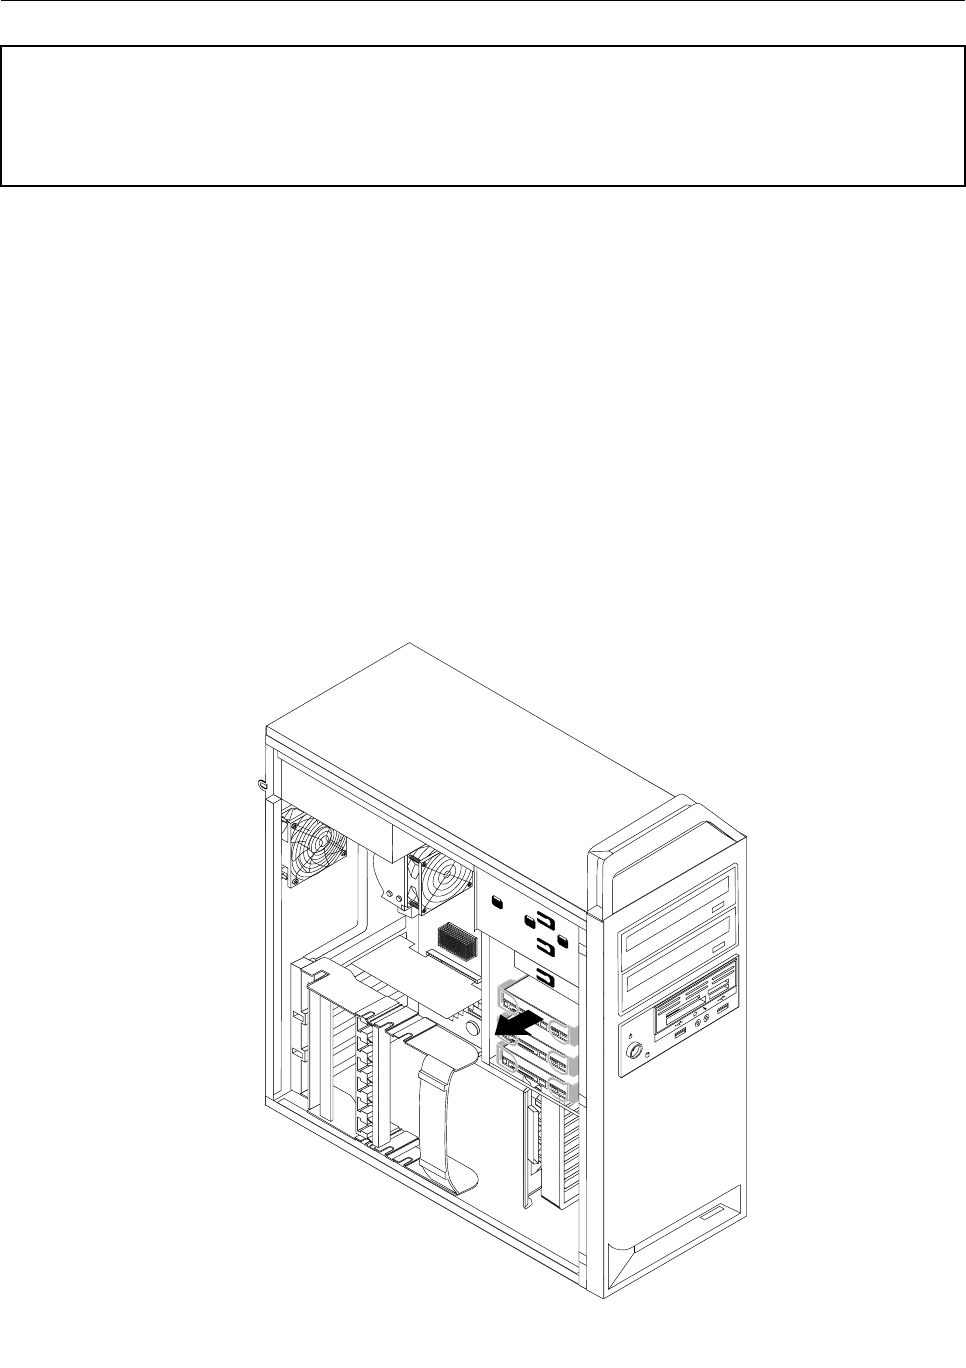
Replacingaharddiskdrive
Attention
Donotopenyourcomputerorattemptanyrepairbeforereadingandunderstandingthe“Importantsafetyinformation”
intheThinkStationSafetyandWarrantyGuidethatcamewithyourcomputer.ToobtainacopyoftheThinkStation
SafetyandWarrantyGuide,goto:
http://www.lenovo.com/support.
Thissectionprovidesinstructionsonhowtoreplaceaharddiskdrive.
Important
Whenyoureceiveanewharddiskdrive,youalsoreceiveasetofProductRecoverydiscs.Thesetof
ProductRecoverydiscswillenableyoutorestorethecontentsoftheharddiskdrivetothesamestate
aswhenyourcomputerwasoriginallyshippedfromthefactory.Formoreinformationonrecovering
factory-installedsoftware,referto“Recoveringsoftware”inyourThinkStationUserGuide.
Attention:YourcomputersupportsbothSASharddiskdrivesandSATAharddiskdrives.However,besure
thatyoudonotinstallboththeSASandSATAharddiskdrivesintothesamecomputer.
Toreplaceaharddiskdrive,dothefollowing:
1.Removethecomputercover.See“Removingthecover”onpage78.
2.Locatetheharddiskdrive.See“Locations”onpage79.
3.Disconnectthesignalandpowercablesfromtheharddiskdrive.
4.Pullthebrackethandleouttoremovetheharddiskdrivefromthechassis.
Chapter10.ReplacingFRUs(Type4105,4157,4217)97
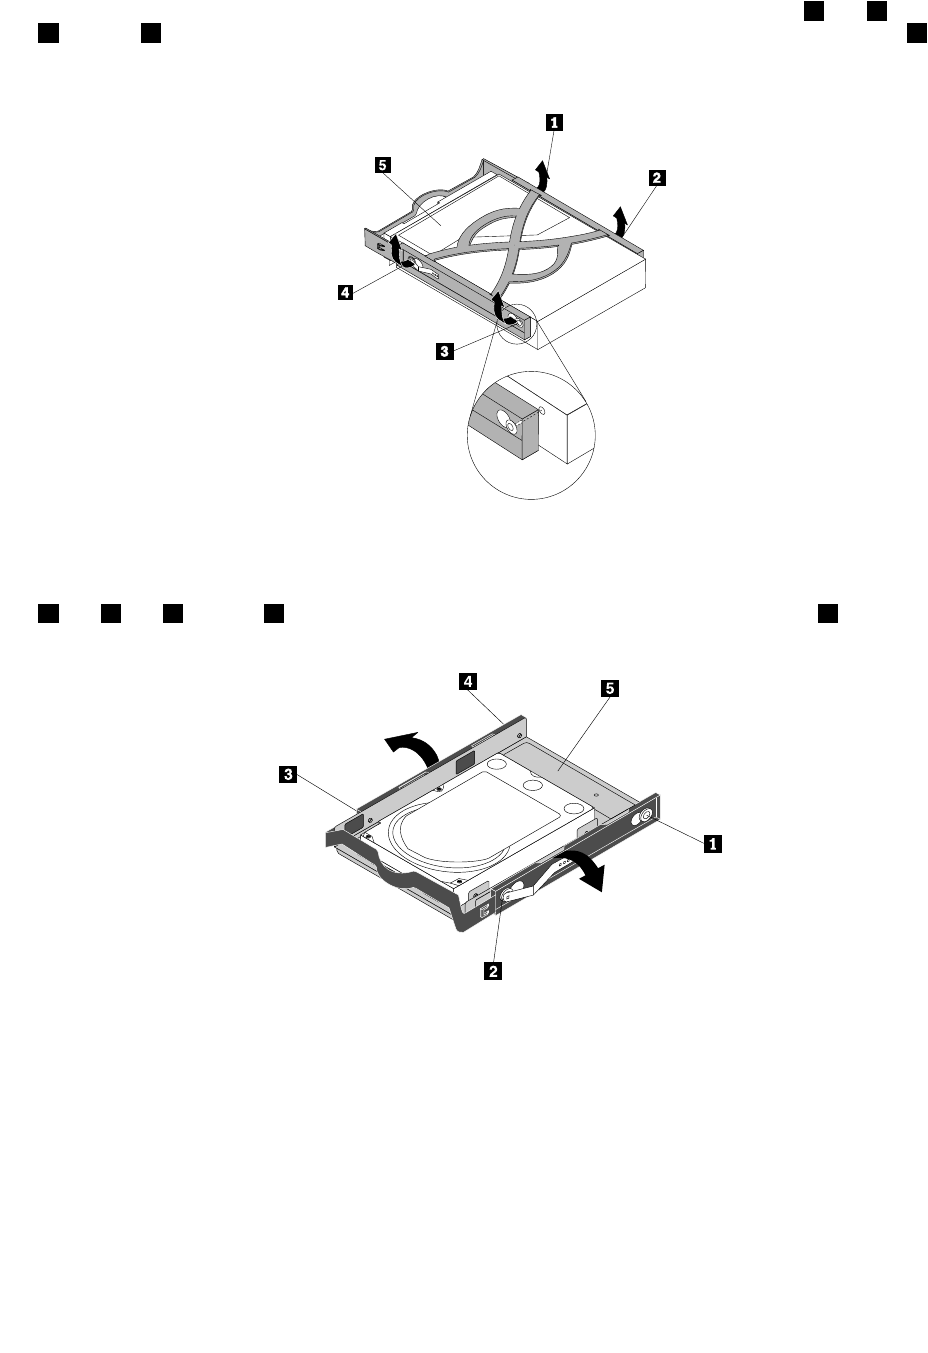
5.Removethefailingharddiskdrivefromthebracketbyexingthebracket.
6.Toinstallthenewharddiskdriveintothebracket,exthebracket,andthenalignpin1,pin2,pin
3,andpin4onthebracketwiththeholesintheharddiskdrive.Donottouchthecircuitboard5
onthebottomoftheharddiskdrive.
Figure1.Installinga3.5-inchharddiskdriveintothebracket
Note:Ifyouareinstallinga2.5-inchharddiskdriveintothebracket,exthebracket,andthenalignpin
1,pin2,pin3,andpin4onthebracketwiththeholesintheharddiskdriveadapter5.
Figure2.Installinga2.5-inchharddiskdriveintothebracket
7.Installtheharddiskdriveandbracketintothedrivebay.
8.Usingthesignalcablethatcamewiththenewdrive,connectoneendofthesignalcabletothedrive.
Locateoneoftheextrave-wirepowercablesandconnectittothedrive.
Note:ThesignalcablewillbedifferentdependingonwhetheryouareinstallingaSATAharddisk
driveoraSASharddiskdrive.
98ThinkStationHardwareMaintenanceManual


Replacingtheharddiskdrivefanassembly
Attention
Donotopenyourcomputerorattemptanyrepairbeforereadingandunderstandingthe“Importantsafetyinformation”
intheThinkStationSafetyandWarrantyGuidethatcamewithyourcomputer.ToobtainacopyoftheThinkStation
SafetyandWarrantyGuide,goto:
http://www.lenovo.com/support.
Yourcomputermighthaveaharddiskdrivefanassemblyinstalled.Toreplacetheharddiskdrivefan
assembly:
1.Removethecomputercover.See“Removingthecover”onpage78.
2.Locatetheharddiskdrivefanassembly.Theharddiskdrivefanassemblyisattachedtothesideof
theharddiskdrivebay.
3.Disconnecttheharddiskdrivefanassemblycablefromthesystemboard.See“Locatingpartsonthe
systemboard”onpage81.
4.Pressthetwolatchesontheharddiskdrivefanassemblybracketandthenslidethefanassembly
bracketfreefromthechassis.
5.Connectthenewharddiskdrivefanassemblycabletotheharddiskdrivefanassemblyconnector
onthesystemboard.
6.Installthenewharddiskdrivefanassemblybracketintothechassisbyaligningthefourlatches1on
thebracketwiththecorrespondingholesinthechassisandpushingthebracketinwarduntilitsnaps
intoposition.
100ThinkStationHardwareMaintenanceManual
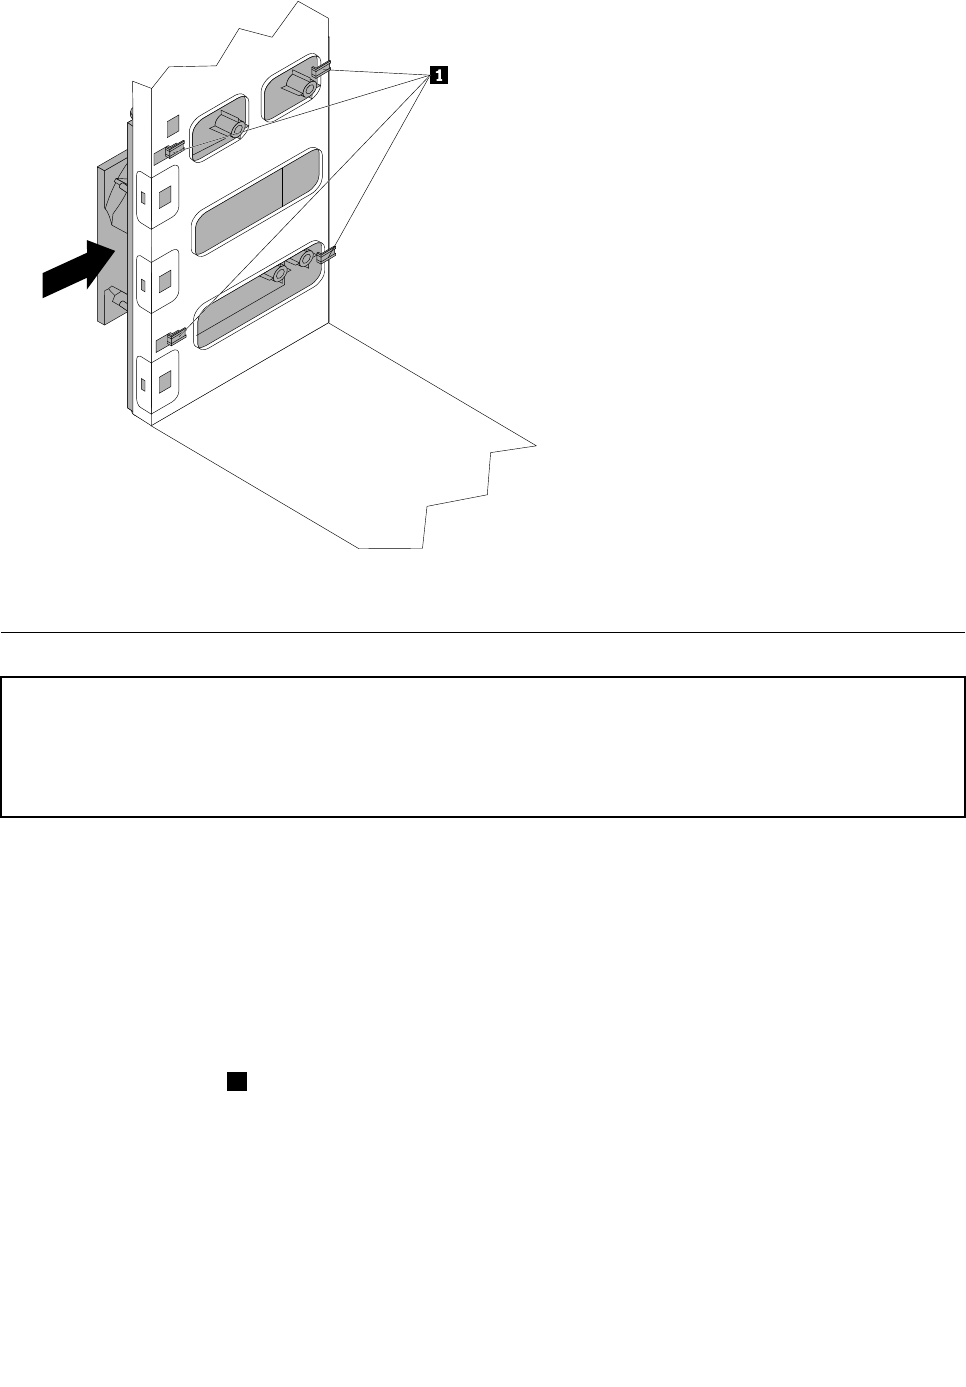
7.Goto“CompletingtheFRUreplacement”onpage108.
Replacinganopticaldrive
Attention
Donotopenyourcomputerorattemptanyrepairbeforereadingandunderstandingthe“Importantsafetyinformation”
intheThinkStationSafetyandWarrantyGuidethatcamewithyourcomputer.ToobtainacopyoftheThinkStation
SafetyandWarrantyGuide,goto:
http://www.lenovo.com/support.
Thissectionprovidesinstructionsonhowtoreplaceanopticaldrive.
Toremoveorreplacetheopticaldrive,dothefollowing:
1.Removethecomputercover.See“Removingthecover”onpage78.
2.Removethefrontbezel.See“Removingthefrontbezel”onpage82.
3.Locatetheopticaldrive.See“Locations”onpage79.
4.Notethelocationoftheopticaldrivecables.Disconnectthesignalandpowercablesfromtherearof
theopticaldrive.
5.Pressthedrivelatch1(forthedriveyouwanttoremove)andslidetheopticaldrivefromthechassis.
Chapter10.ReplacingFRUs(Type4105,4157,4217)101
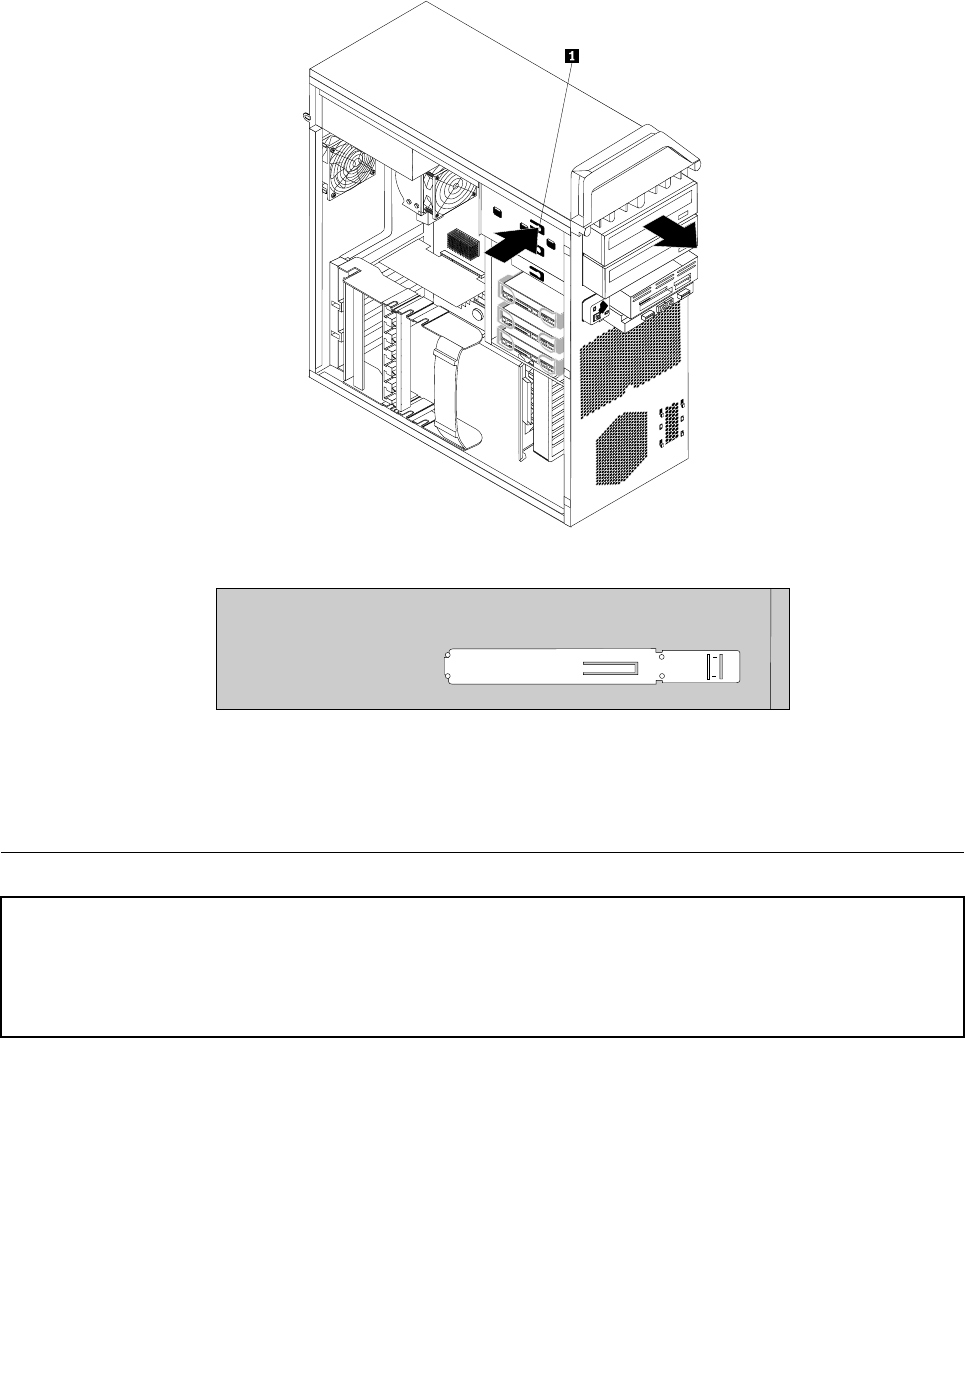
6.Removetheretainerbracketfromthedrivebeingreplacedandinstallitonthenewdrive.
7.Slidethenewopticaldriveintothebayfromthefrontuntilitsnapsintoposition.
8.Reconnectthesignalandpowercablestothenewdrive.
9.Goto“CompletingtheFRUreplacement”onpage108.
Replacingthediskettedriveorcardreader
Attention
Donotopenyourcomputerorattemptanyrepairbeforereadingandunderstandingthe“Importantsafetyinformation”
intheThinkStationSafetyandWarrantyGuidethatcamewithyourcomputer.ToobtainacopyoftheThinkStation
SafetyandWarrantyGuide,goto:
http://www.lenovo.com/support.
Thissectionprovidesinstructionsonhowtoreplacethediskettedriveorcardreader.
Toremoveorreplacethediskettedriveorcardreader,dothefollowing:
1.Removethecomputercover.See“Removingthecover”onpage78.
2.Removethefrontbezel.See“Removingthefrontbezel”onpage82.
3.Locatethediskettedriveorcardreader.See“Locations”onpage79.
4.Disconnectthesignalandpowercablesfromtherearofthediskettedrive.Ifyouarereplacinga
cardreader,disconnectthecardreadercablefromthesystemboard.See“Locatingpartsonthe
systemboard”onpage81.
102ThinkStationHardwareMaintenanceManual
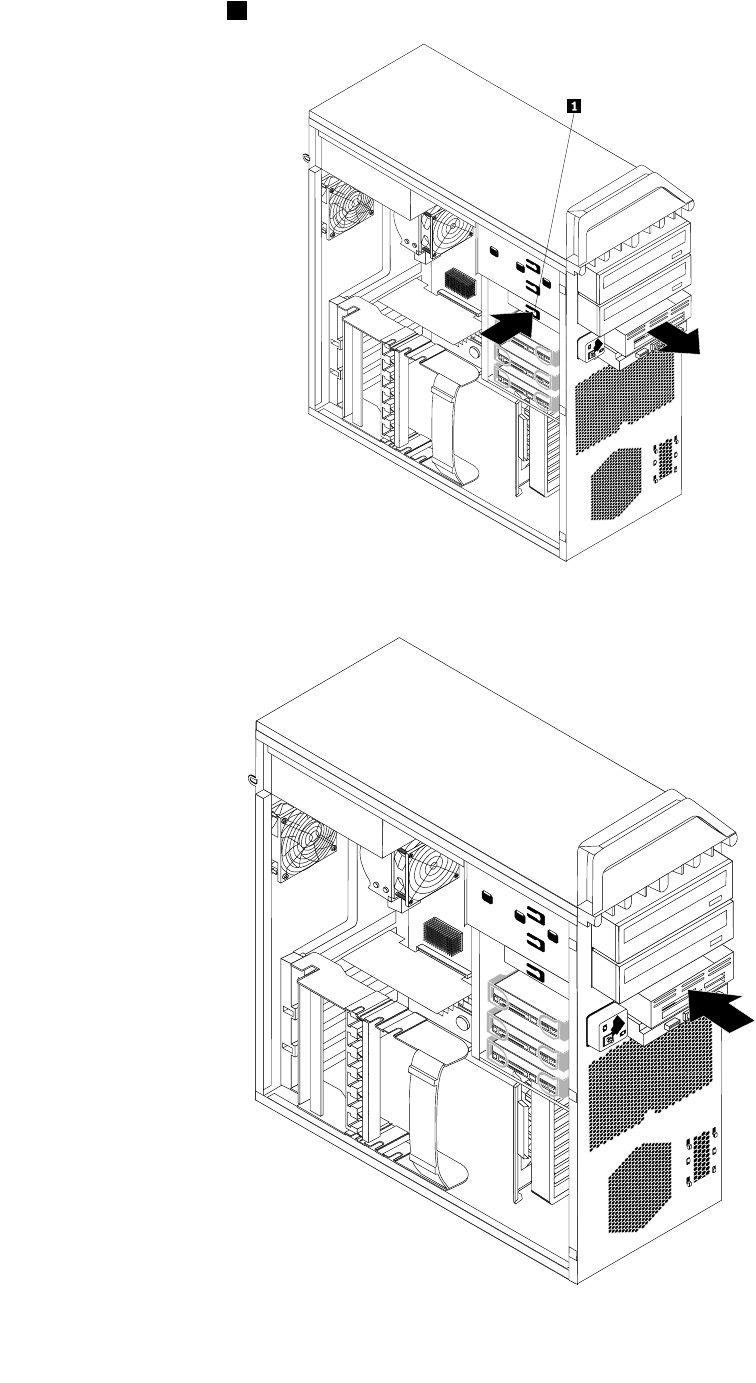
5.Pressthedrivelatch1andslidethedriveoutthefrontofthecomputer.
6.Slidethenewdiskettedriveorcardreaderintothedrivebayuntilitsnapsintoposition.
Chapter10.ReplacingFRUs(Type4105,4157,4217)103
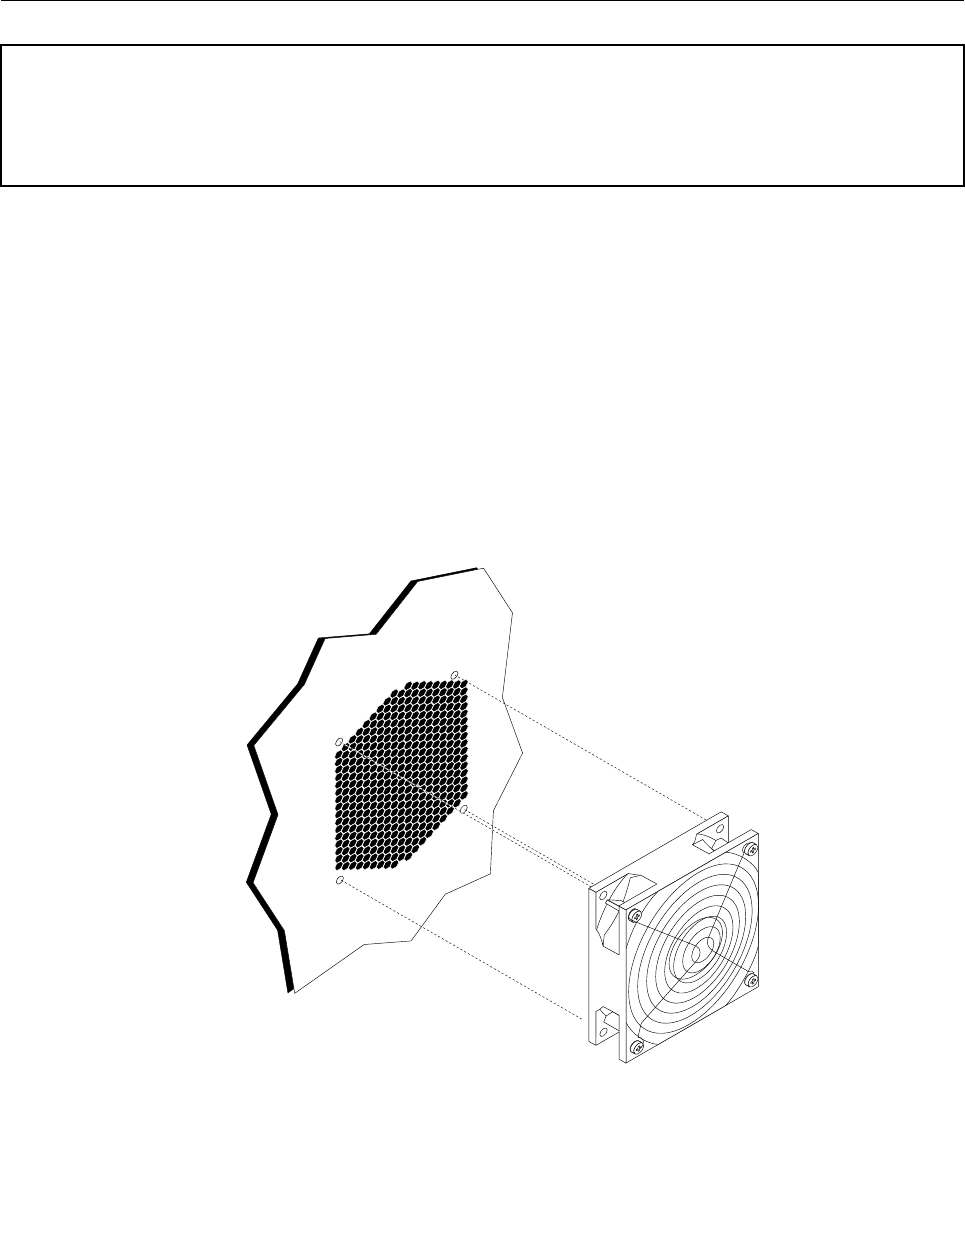
7.Connectthesignalcableandpowercabletothenewdiskettedrive.Ifyouareinstallingacardreader,
connectthecardreadercabletothecardreaderconnectoronthesystemboard.See“Locatingparts
onthesystemboard”onpage81.
8.Goto“CompletingtheFRUreplacement”onpage108.
Replacingthefrontandrearfanassemblies
Attention
Donotopenyourcomputerorattemptanyrepairbeforereadingandunderstandingthe“Importantsafetyinformation”
intheThinkStationSafetyandWarrantyGuidethatcamewithyourcomputer.ToobtainacopyoftheThinkStation
SafetyandWarrantyGuide,goto:
http://www.lenovo.com/support.
Thissectionprovidesinstructionsonhowtoreplacethefrontorrearfanassembly.
Toremoveorreplacethefrontorrearfanassembly,dothefollowing:
1.Removethecomputercover.See“Removingthecover”onpage78.
2.Locatethefanassemblythatyouwanttoreplace.Yourcomputerhasonefrontfanassemblyandone
rearfanassembly.See“Locations”onpage79.
3.Removethefrontbezelifyouarereplacingthefrontfanassembly.See“Removingthefrontbezel”
onpage82.
4.Disconnectthefanassemblycablefromthesystemboard.See“Locatingpartsonthesystemboard”
onpage81.
5.Thefanassemblyisattachedtothechassisbyfourrubbermounts.Carefullyremovethefourrubber
mountsbybreakingthemorcuttingthemwithscissorsandthenremovethefanassemblyoutof
thechassis.
6.Installthenewfanassemblybyaligningthefourrubbermountsofthefanassemblywiththeholeson
thechassisandpushtherubbermountsthroughtheholes.
7.Pullonthetipsoftherubbermountsuntilthefanassemblyisinplace.
104ThinkStationHardwareMaintenanceManual
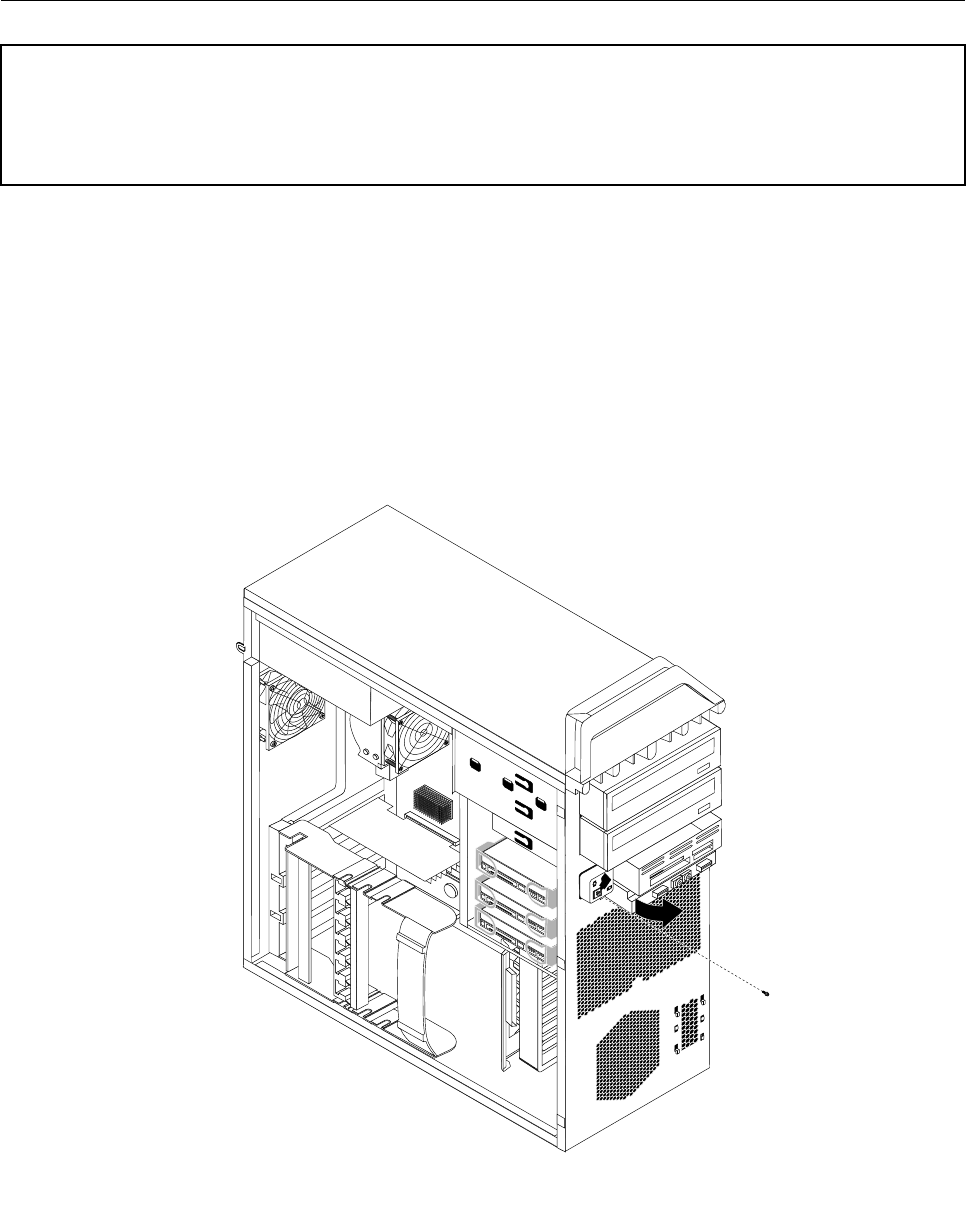
8.Dependingonwhichfanassemblyyouarereplacing,reconnectthefanassemblycabletotheadapter
cardfanassemblyconnectorortherearfanassemblyconnectoronthesystemboard.See“Locating
partsonthesystemboard”onpage81.
9.Ifyouareinstallingtheharddiskdrivefanassembly,reinstallthefrontbezel.
10.Goto“CompletingtheFRUreplacement”onpage108.
Replacingthefrontpanelconnectorsassembly
Attention
Donotopenyourcomputerorattemptanyrepairbeforereadingandunderstandingthe“Importantsafetyinformation”
intheThinkStationSafetyandWarrantyGuidethatcamewithyourcomputer.ToobtainacopyoftheThinkStation
SafetyandWarrantyGuide,goto:
http://www.lenovo.com/support.
Thissectionprovidesinstructionsonhowtoreplacethefrontpanelconnectorsassembly.
Toremoveorreplacethefrontpanelconnectorsassembly,dothefollowing:
1.Removethecomputercover.See“Removingthecover”onpage78.
2.Removethefrontbezel.See“Removingthefrontbezel”onpage82.
3.Locatethefrontpanelconnectorsassembly.
4.Disconnectthefrontaudio,frontUSB,andauxiliaryLEDcablesfromthesystemboardandnotethe
cablesrouting.See“Locatingpartsonthesystemboard”onpage81.
5.Removethescrewthatsecuresthefrontpanelconnectorsassemblytothechassis.Rotatethe
assemblytoreleaseitcompletelyfromthechassis.
Chapter10.ReplacingFRUs(Type4105,4157,4217)105

6.Installthenewfrontpanelconnectorsassemblyintothechassisandsecureitwiththescrew.
7.Reconnectthecablestothesystemboard.
8.Goto“CompletingtheFRUreplacement”onpage108.
Replacingthepowerswitch/LEDassembly
Attention
Donotopenyourcomputerorattemptanyrepairbeforereadingandunderstandingthe“Importantsafetyinformation”
intheThinkStationSafetyandWarrantyGuidethatcamewithyourcomputer.ToobtainacopyoftheThinkStation
SafetyandWarrantyGuide,goto:
http://www.lenovo.com/support.
Thisproceduredescribeshowtoremoveandreplacethepowerswitch/LEDassembly.
1.Removethecomputercover.See“Removingthecover”onpage78.
2.Removethefrontbezel.See“Removingthefrontbezel”onpage82.
3.Disconnectthepowerswitch/LEDassemblycablefromthesystemboard.See“Locatingpartsonthe
systemboard”onpage81.
4.Notethepowerswitch/LEDassemblycableroutingandthepositionofthetwoLEDs.
5.RemovetheswitchandtheLEDsfromthebezel.
6.Routethecableforthenewpowerswitch/LEDassemblythroughtheholeinthechassisandtothe
systemboard.
7.Installthenewpowerswitch/LEDassemblyintothebezel.MakesurethattheLEDsareinthecorrect
position.
8.Connectthepowerswitch/LEDcabletothesystemboard.
9.Reinstallthefrontbezel.
10.Goto“CompletingtheFRUreplacement”onpage138.
Replacingthebattery
Attention
Donotopenyourcomputerorattemptanyrepairbeforereadingandunderstandingthe“Importantsafetyinformation”
intheThinkStationSafetyandWarrantyGuidethatcamewithyourcomputer.ToobtainacopyoftheThinkStation
SafetyandWarrantyGuide,goto:
http://www.lenovo.com/support.
Yourcomputerhasaspecialtypeofmemorythatmaintainsthedate,time,andsettingsforbuilt-infeatures,
suchasserial-portassignments(conguration).Abatterykeepsthisinformationactivewhenyouturn
offthecomputer.
Thebatterynormallyrequiresnochargingormaintenancethroughoutitslife;however,nobatterylasts
forever.Ifthebatteryfails,thedate,time,andcongurationinformation(includingpasswords)arelost.An
errormessageisdisplayedwhenyouturnonthecomputer.
Thissectionprovidesinformationonhowtoreplacethebattery.
Tochangethebattery,dothefollowing:
1.Openthecomputercover.See“Removingthecover”onpage78.
2.Accessthesystemboard.
3.Locatethebattery.See“Locatingpartsonthesystemboard”onpage81.
106ThinkStationHardwareMaintenanceManual
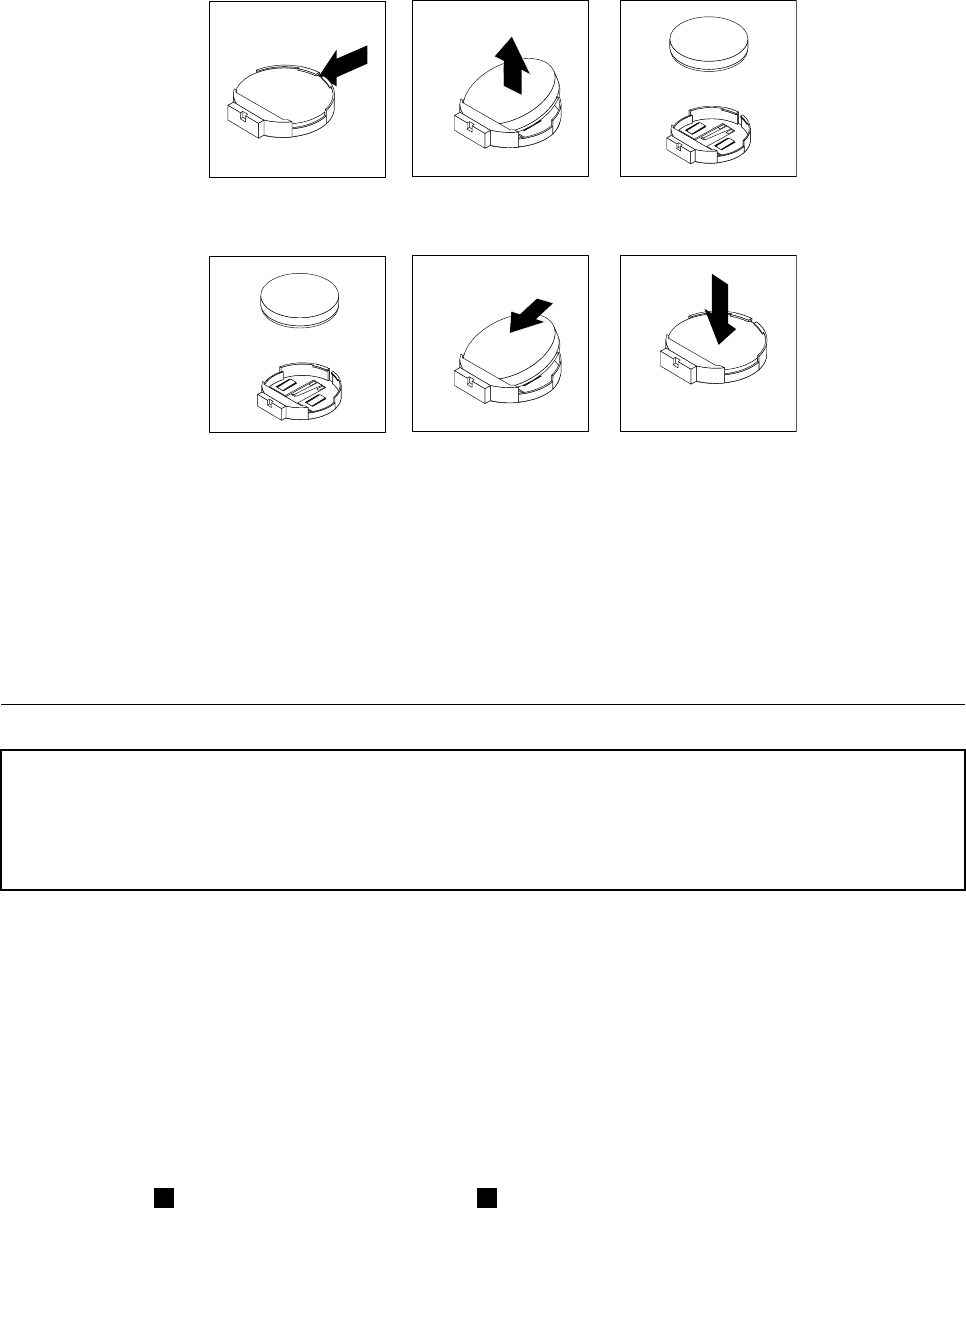
4.Removetheoldbattery.
5.Installthenewbattery.
6.Replacethecomputercoverandconnectthecables.See“CompletingtheFRUreplacement”on
page108.
Note:Whenthecomputeristurnedonforthersttimeafterbatteryreplacement,anerrormessage
mightbedisplayed.Thisisnormalafterreplacingthebattery.
7.Turnonthecomputerandallattacheddevices.
8.UsetheSetupUtilityprogramtosetthedateandtimeandanypasswords.
9.Goto“CompletingtheFRUreplacement”onpage108.
Replacingtheinternalspeaker
Attention
Donotopenyourcomputerorattemptanyrepairbeforereadingandunderstandingthe“Importantsafetyinformation”
intheThinkStationSafetyandWarrantyGuidethatcamewithyourcomputer.ToobtainacopyoftheThinkStation
SafetyandWarrantyGuide,goto:
http://www.lenovo.com/support.
Thissectionprovidesinstructionsonhowtoreplacetheinternalspeaker.
Toremoveorreplacetheinternalspeaker,dothefollowing:
1.Removethecomputercover.See“Removingthecover”onpage78.
2.Removethefrontbezel.See“Removingthefrontbezel”onpage82.
3.Locatetheinternalspeakerconnectoronthesystemboard.See“Locations”onpage79.
4.Notethelocationoftheinternalspeakercableconnection.Notetheroutingoftheinternalspeaker
cable.Disconnecttheinternalspeakercablefromthesystemboard.See“Locatingpartsonthe
systemboard”onpage81.
5.Useabluntinstrument(suchas,thetopofaballpointpen)todisengageoneoftheinternalspeaker
lockingtabs2andslidethatsideofthespeaker1upwardenoughtokeepthelockingtabdisengaged.
Thendisengagetheotherinternalspeakerlockingtabandslidetheinternalspeakerupwarduntil
thespeakerisreleased.
Chapter10.ReplacingFRUs(Type4105,4157,4217)107
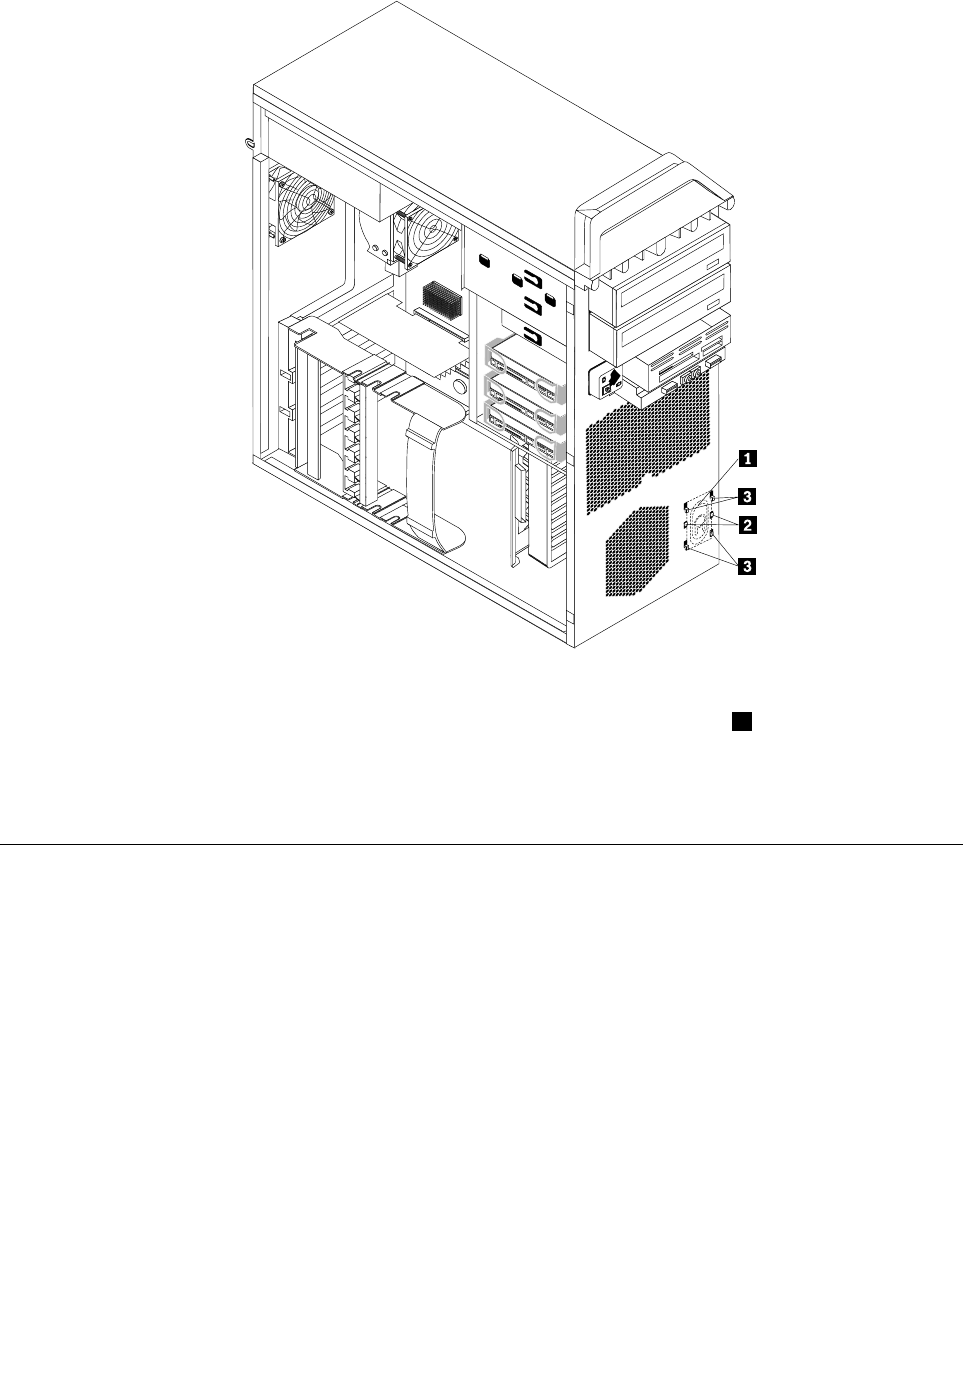
6.Removethespeakerandspeakercablefromthecomputer.
7.Routethenewspeakercableandthenpositionthenewinternalspeakertabs3intothemetalspeaker
slotsandthenpushtheinternalspeakerdownwarduntilthespeakerlockingtabssnapintoposition.
8.Connectthespeakercabletothesystemboard.See“Locatingpartsonthesystemboard”onpage81.
9.Goto“CompletingtheFRUreplacement”onpage108.
CompletingtheFRUreplacement
AfterreplacingFRUs,youneedtoinstallanyremovedparts,replacethecover,andreconnectanycables,
includingtelephonelinesandpowercords.Also,dependingontheFRUthatisreplaced,youmightneedto
conrmtheupdatedinformationintheSetupUtilityprogram.
Note:Whenthepowercordisrstpluggedin,thecomputermightappeartoturnonforafewsecondsand
thenturnoff.Thisisanormalsequencetoenablethecomputertoinitialize.
1.Ensurethatallcomponentshavebeenreassembledcorrectlyandthatnotoolsorloosescrewsareleft
insideyourcomputer.
2.Replacethecover.
3.Reconnecttheexternalcablesandpowercordstothecomputer.See“Rearconnectors”onpage109.
4.Ifyouhavereplacedthesystemboard,youmustupdate(ash)theBIOS.See“Flashupdate
procedures”onpage251.
5.SomeFRUreplacementsrequirethecongurationtobeupdated.SeeChapter6“UsingtheSetup
Utility”onpage41.
108ThinkStationHardwareMaintenanceManual
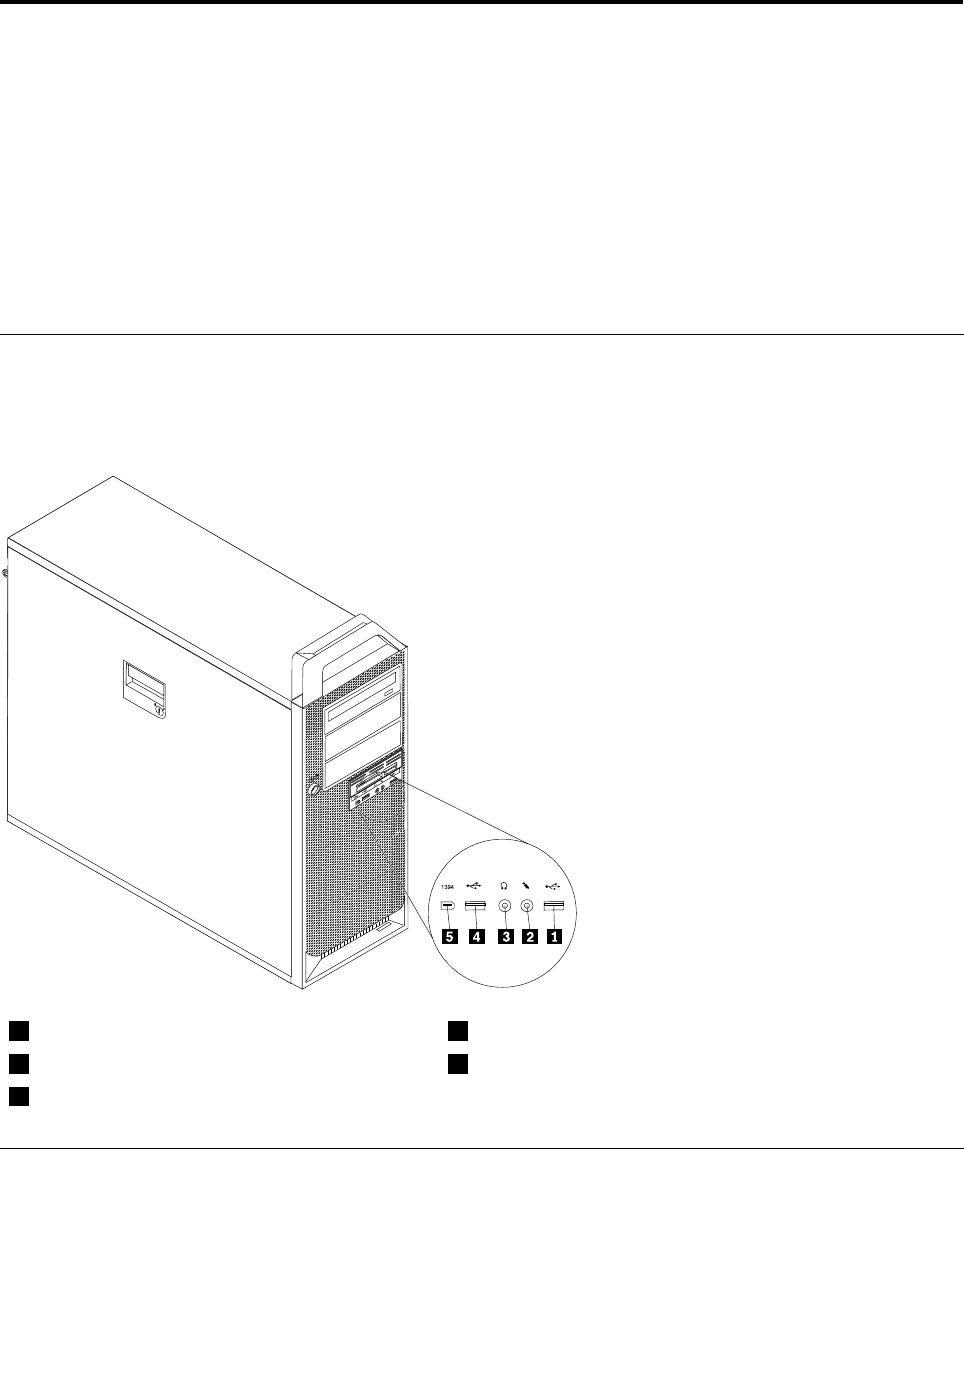
Chapter11.ReplacingFRUs(Type4155,4158,4218)
Important
BeforeyoureplaceanyFRU,readChapter2“Safetyinformation”onpage3.Theseprecautionsand
guidelineswillhelpyouworksafely.
FRUreplacementsaretobedonebytrainedservicetechniciansonly.
ThischapterdoesnotcontainaremoveandreplaceprocedureforallFRUs.OnlythemajorFRUsare
documented.
Locatingcontrolsandconnectorsonthefrontofyourcomputer
Thefollowingillustrationshowsthelocationofthecontrolsandconnectorsonthefrontofyourcomputer.
Note:Notallcomputermodelswillhavethefollowingcontrolsandconnections.
1USBconnector4USBconnector
2Microphoneconnector5IEEE1394connector
3Headphoneconnector
Rearconnectors
Thefollowingillustrationshowsthelocationsoftheconnectorsontherearofthecomputer.
©CopyrightLenovo2008,2012109
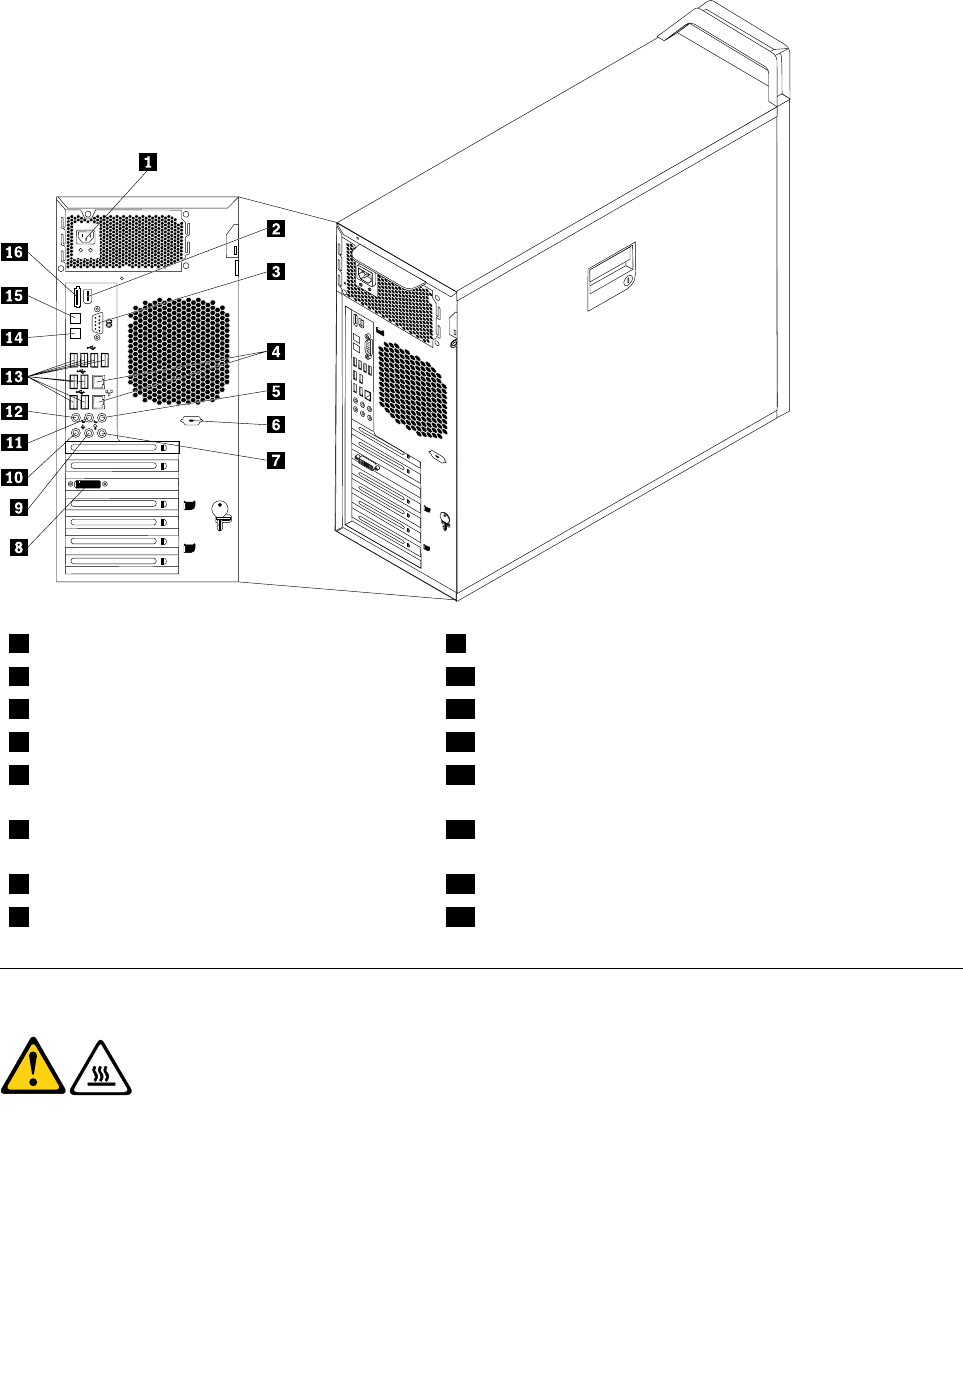
1Powercordconnector9Audioline-outfrontspeakersconnector
2IEEE1394connector10Microphoneconnector
3Serialport11Audioline-outrearspeakersconnector
4Ethernetconnectors(2)12Audioline-outsidespeakerconnector
5Audioline-outsubwoofer/centerspeakers
connector
13USBconnectors(8)
6Serialport(somemodels)14OpticalSPDIF(SonyPhilipsDigitalInterconnect
Format)outconnector
7Audioline-inconnector15OpticalSPDIFinconnector
8Videoconnector(somemodels)16eSATAconnector
Removingthecover
CAUTION:
Theheatsinkandmicroprocessormightbeveryhot.Turnoffthecomputerandwait
threetoveminutestoletthecomputercoolbeforeopeningthecomputercover.
Toremovethecomputercover:
1.Removeanymediafromthedrivesandshutdownyouroperatingsystem.Turnoffallattacheddevices.
Turnoffthecomputer.
2.Unplugallpowercordsfromelectricaloutlets.
110ThinkStationHardwareMaintenanceManual
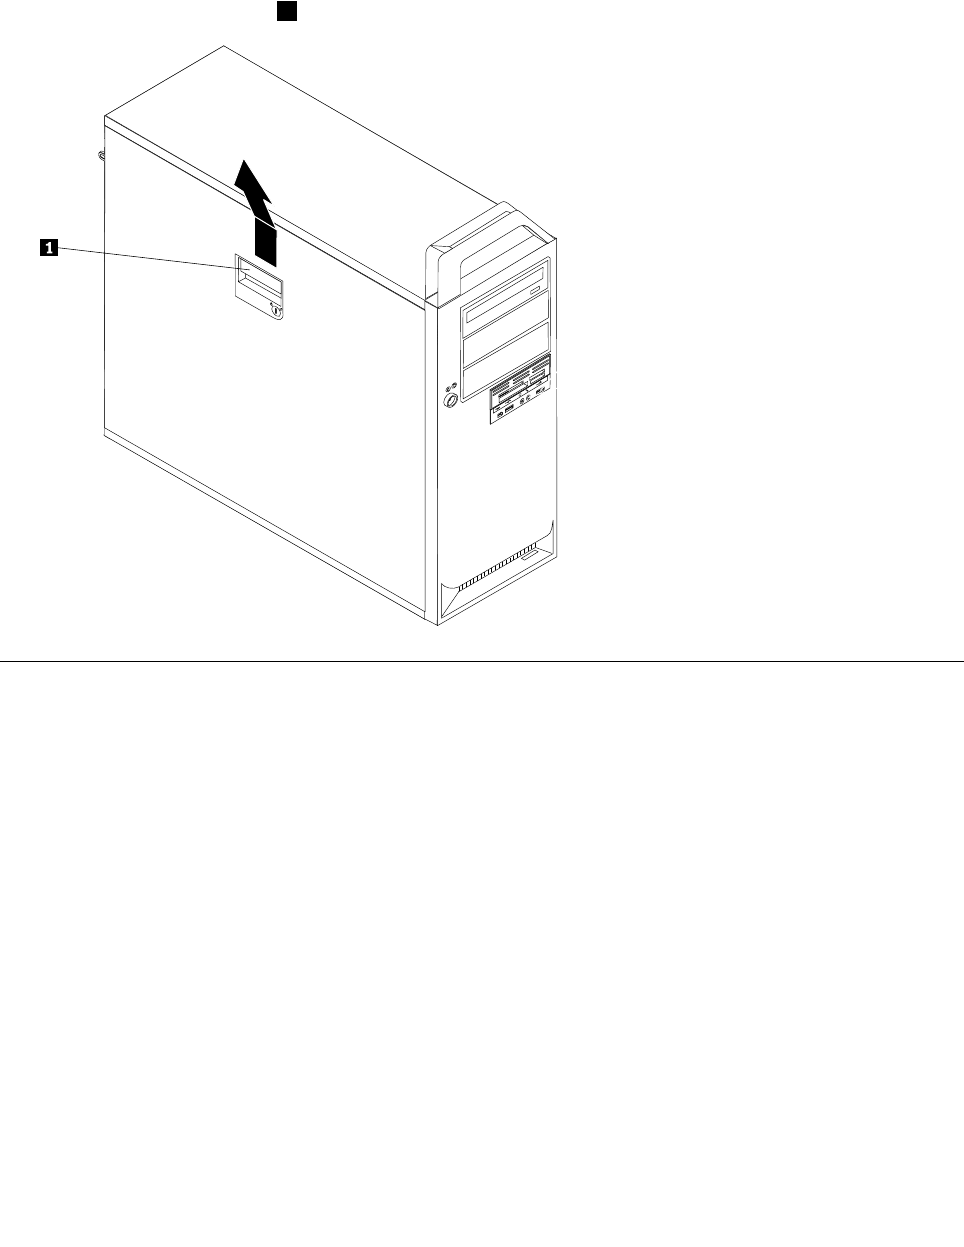
3.Disconnectthecablesattachedtothecomputer.Thisincludespowercords,input/output(I/O)cables,
andanyothercablesthatareconnectedtothecomputer.See“Locatingcontrolsandconnectorsonthe
frontofyourcomputer”onpage77and“Rearconnectors”onpage109.
4.Removeanylockingdevices,suchasacablelockorpadlockthatsecuresthecomputercover.Open
thekeylockifitisinthelockedposition.
5.Disengagethecoverlatch1andremovethecover.Placethecoveronaatsurface.
Locations
ThefollowingillustrationwillhelpyoulocatethemajorFRUsinthecomputer.
Chapter11.ReplacingFRUs(Type4155,4158,4218)111
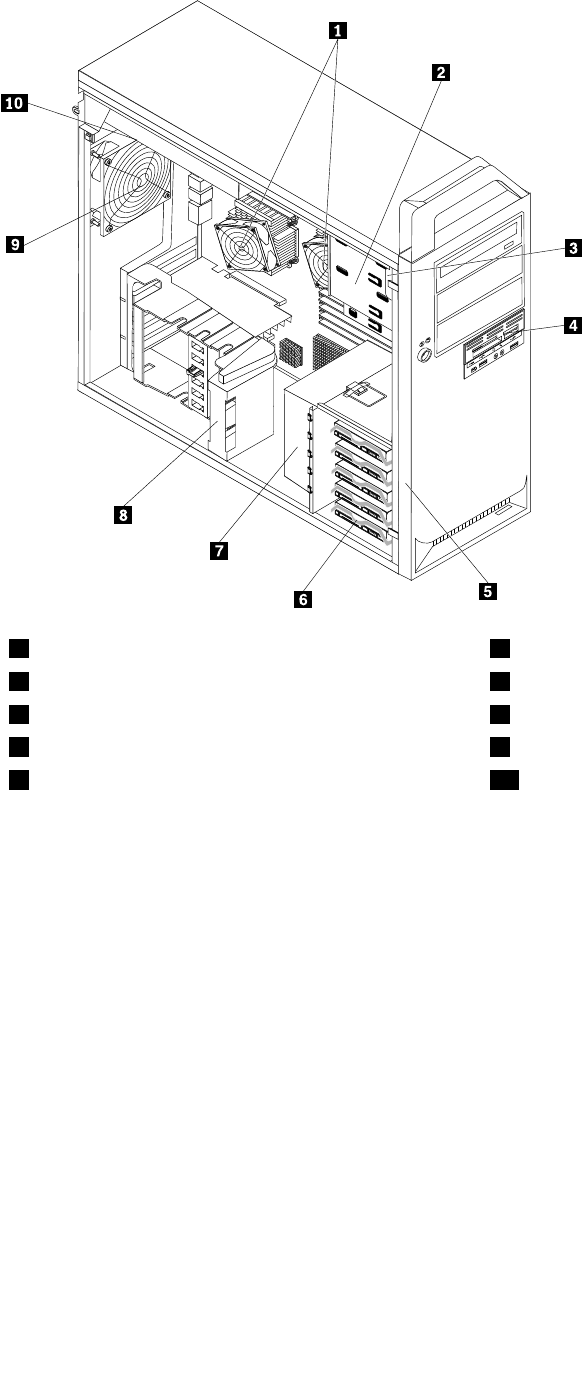
1Microprocessorsandheatsinks(2)6Harddiskdrivebays(5)
2Opticaldrivebays(3)7Harddiskdrivefanassembly
3Internalspeaker8Adaptercardretainer
43.5-inchdiskettedriveorcardreader9Rearfanassembly
5Frontbezel10Powersupplyassembly
112ThinkStationHardwareMaintenanceManual
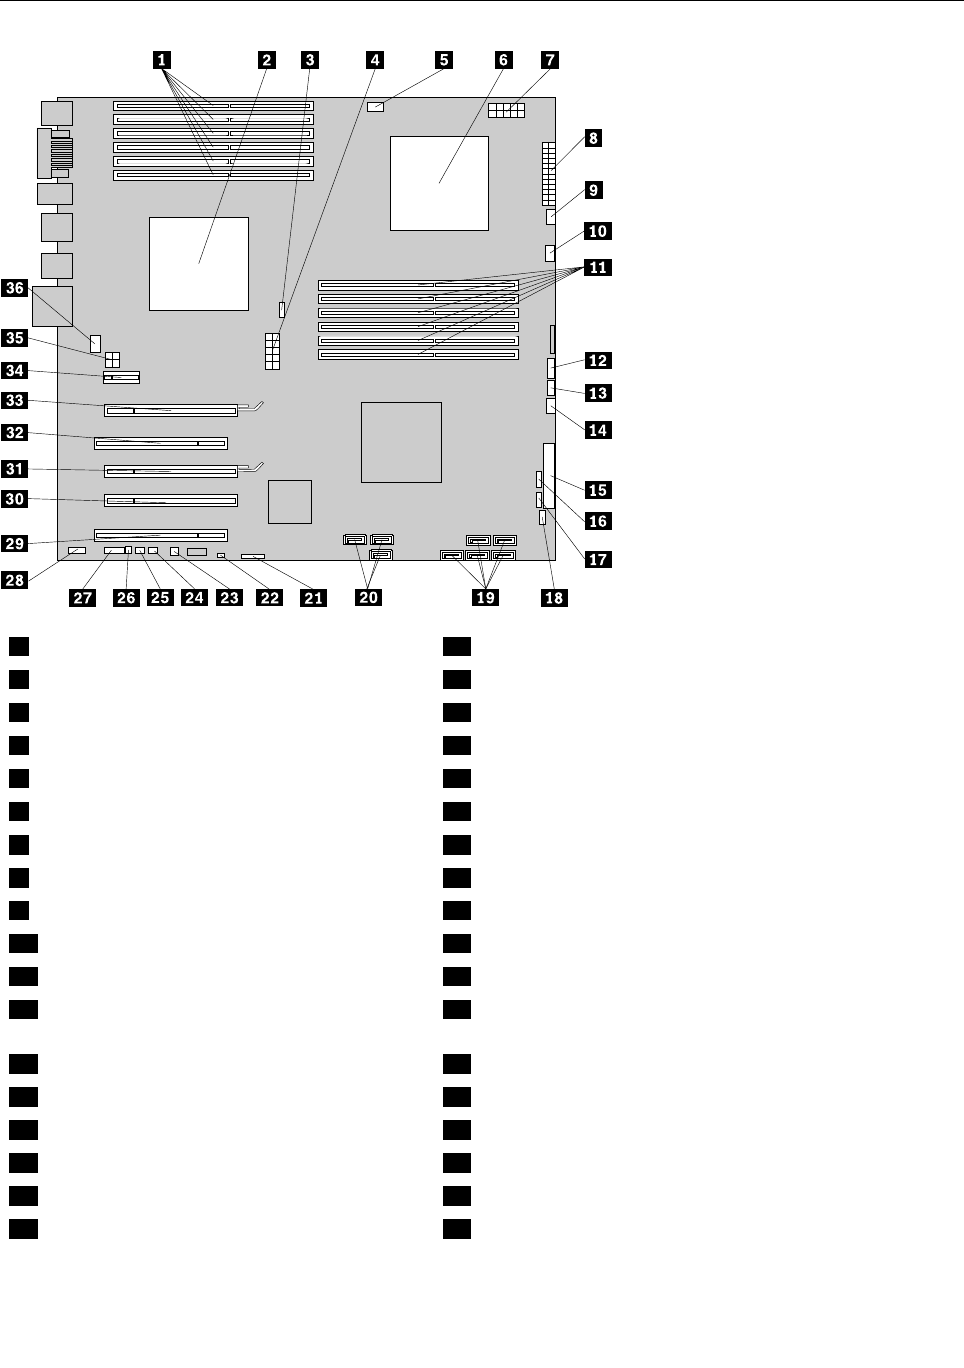
Locatingpartsonthesystemboard
1CPU1memoryslots(6)19Harddiskdriveconnectors(5)
2Microprocessorandheatsink120Opticaldriveconnectors(3)
3CPU1fanconnector21Battery
4CPU112Vpowerconnector22ClearCMOS/Recoveryjumper
5CPU1memoryfanconnector23Thermalsensorconnector
6Microprocessorandheatsink224Coverpresenceswitchconnector
7CPU212Vpowerconnector25PS/2keyboardandmouseconnector
824-pinpowerconnector26Internalspeakerconnector
9CPU2fanconnector27COM2connector
10CPU2memoryfanconnector28Frontaudioconnector
11CPU2memoryslots(6)29PCIadaptercardslot
12Powerswitch/LEDsconnector30PCIExpressx4graphicsadaptercardslot(x16
mechanical)
13AuxiliaryLEDconnector31PCIExpressx16graphicsadaptercardslot
14Harddiskdrivefanconnector32PCIadaptercardslot
15Diskettedriveconnector33PCIExpressx16graphicsadaptercardslot
16Cardreaderconnector34PCIExpressx1adaptercardslot
17FrontUSBconnector35Graphiccardpowerconnector
18FrontIEEE1394connector36Rearfanconnector
Chapter11.ReplacingFRUs(Type4155,4158,4218)113
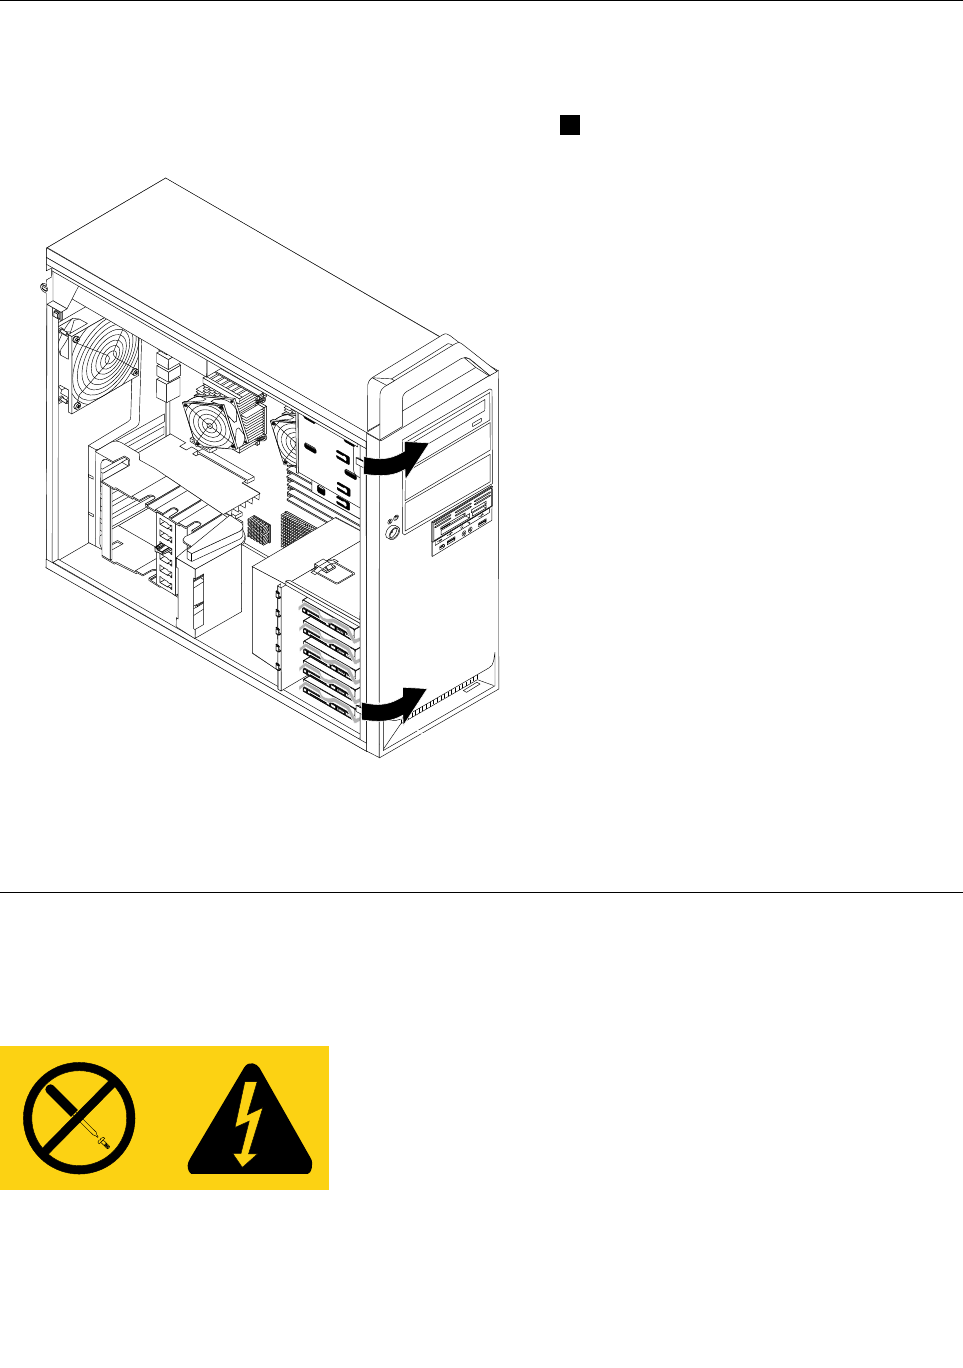
Removingthefrontbezel
Toremovethefrontbezel:
1.Removethecover.See“Removingthecover”onpage78.
2.Removethefrontbezelbyreleasingthethreeplastictabs1ontheleftsideandpivotingthebezel
outward.
3.Laythefrontbezelonaatsurface.
4.Toreinstallthebezel,aligntheplastictabsontherightsideofthebezelwiththecorrespondingholesin
thechassis,thenpivotthebezelinwarduntilitsnapsintopositionontheleftside.
Replacingthepowersupply
Attention
Neverremovethecoveronapowersupplyoranypartthathasthefollowinglabelattached.
Hazardousvoltage,current,andenergylevelsarepresentinsideanycomponentthathasthislabelattached.
Therearenoservicablepartsinsidethesecomponents.
114ThinkStationHardwareMaintenanceManual
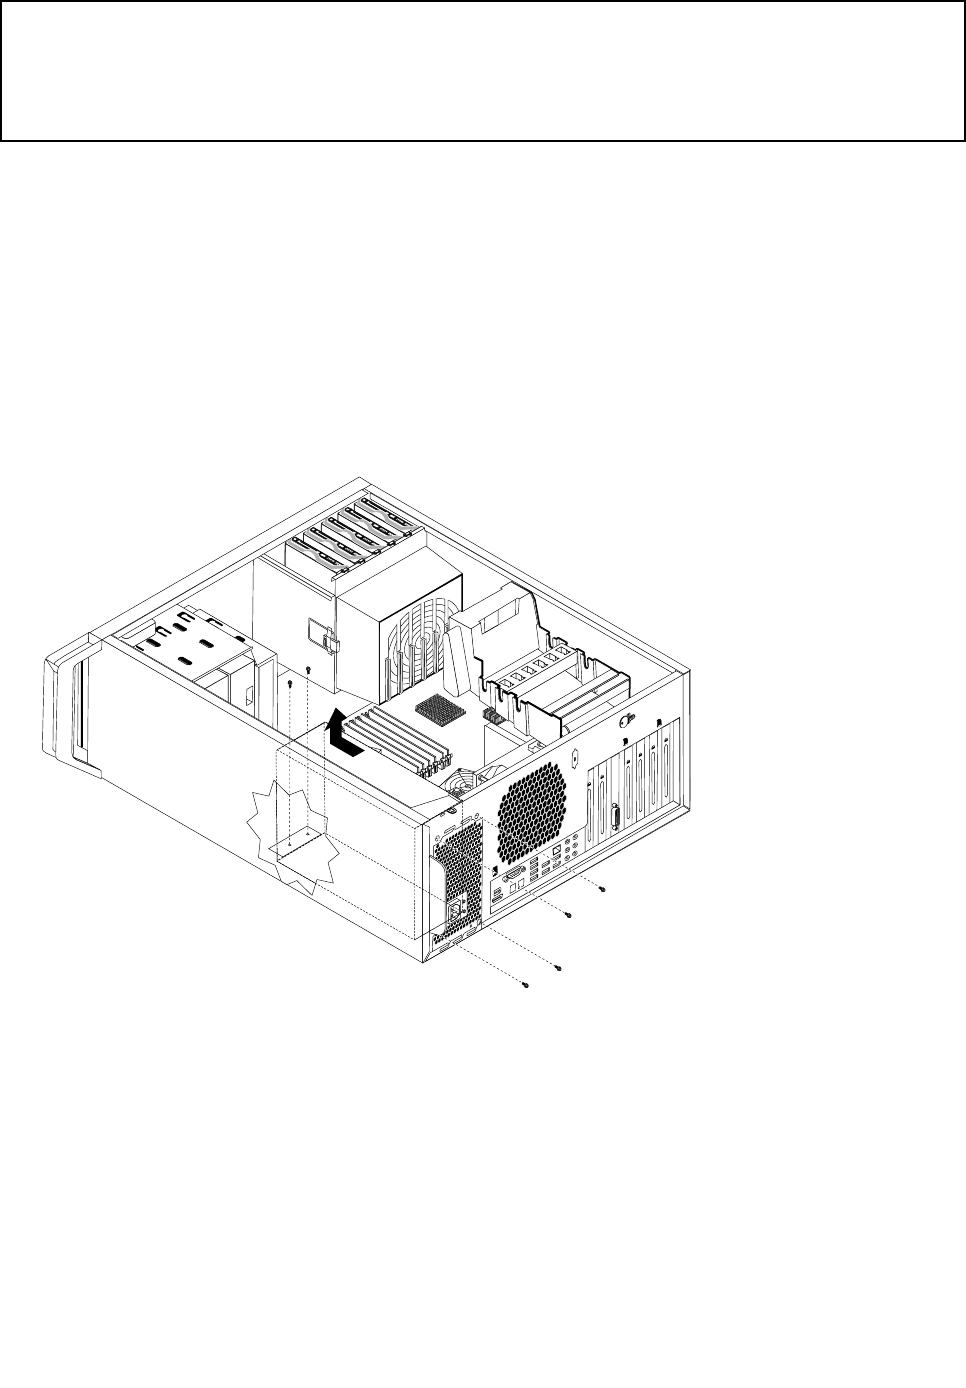
Attention
Donotopenyourcomputerorattemptanyrepairbeforereadingandunderstandingthe“Importantsafetyinformation”
intheThinkStationSafetyandWarrantyGuidethatcamewithyourcomputer.ToobtainacopyoftheThinkStation
SafetyandWarrantyGuide,goto:
http://www.lenovo.com/support.
Thissectionprovidesinformationabouthowtomoveandreplacethepowersupply.
Toreplacethepowersupply,dothefollowing:
1.Removethecomputercoverandthenlaythecomputeronitsside.See“Removingthecover”on
page78.
2.Locatethepowersupply.See“Locations”onpage79.
3.Disconnectthepowersupplycablesfromthesystemboardconnectors.Disconnectthepowersupply
cablesfromalladaptercards(somemodels)andfromalldrives.
4.Removethepowersupplycablesfromthecableclipsandties.
5.Removethesixpowersupplyretainingscrewsattherearofthechassisandinsidethechassis.
6.Slidethepowersupplyassemblytowardthefrontofthecomputerandliftitoutfromthechassis.
7.Ensurethatthenewpowersupplyisthecorrectreplacement.Somepowersuppliesautomatically
sensethevoltage,somepowersuppliesarevoltagespecic,andsomepowersupplieshavea
voltage-selectionswitch.Ifthereisavoltage-selectionswitch,useaballpointpentoslidetheswitch,if
necessary.
Note:Formodelsthathaveavoltage-selectionswitch:
•Ifthevoltagesupplyrangeis100–127VAC,settheswitchto115V.
•Ifthevoltagesupplyrangeis200–240VAC,settheswitchto230V.
8.Installthenewpowersupplyintothechassissothatthescrewholesinthepowersupplyalignwith
thoseinthechassis.
Chapter11.ReplacingFRUs(Type4155,4158,4218)115
Note:UseonlythescrewsprovidedbyLenovo.
9.Installandtightenthefourscrewsattherearofthechassistosecurethepowersupply.
10.Installandtightenthetwoscrewsthatsecurethepowersupplytotheinsideofthechassis.
11.Reconnectallpowersupplycablestothedrives,adaptercards,andthesystemboard.Makesureto
reconnectthepowercabletothegraphicscardsthatrequireanadditionalcable.
12.Goto“CompletingtheFRUreplacement”onpage108.
Installingorreplacingamemorymodule
Attention
Donotopenyourcomputerorattemptanyrepairbeforereadingandunderstandingthe“Importantsafetyinformation”
intheThinkStationSafetyandWarrantyGuidethatcamewithyourcomputer.ToobtainacopyoftheThinkStation
SafetyandWarrantyGuide,goto:
http://www.lenovo.com/support.
CAUTION:
Thememorymodulemightbeveryhot.Turnoffthecomputerandwaitthreetove
minutestoletthecomputercoolbeforeopeningthecomputercover.
Yourcomputerhas12slotsforinstallingorreplacingDDR3ECCUDIMMs(doubledatarate3errorcorrection
codeunbuffereddualin-linememorymodules)orDDR3ECCRDIMMs(doubledatarate3errorcorrection
coderegistereddualinlinememorymodules).
Wheninstallingorreplacingmemorymodules,usethefollowingguidelines:
•UseeitherDDR3ECCUDIMMsorDDR3ECCRDIMMsforyourcomputer.Donotinstallboththe
UDIMMsandRDIMMsintothesamecomputer.
•IfyourcomputerhasonlyoneCPUinstalled,besuretoinstallmemorymodulesonlyinthememory
slotsadjacenttothatCPU.
•IfyourcomputerhastwoCPUsinstalled,installequalnumbersofmemorymodulesinbothsetsof
CPUDIMMslotsformaximumperformance.Andthetotalamountofmemoryshouldbeevenly
balancedbetweenthe2banks.Forexample:Ifyouaretoinstallsix1GBDIMMsinadual-processor
system,threeofthe1GBDIMMsshouldbeinstalledintheCPU1slots,andtheotherthreeshouldbe
installedintheCPU2slots.
•Memorymustalwaysbeinstalledinthebluesocketsrst,startingwiththebluesocketclosesttoeach
respectiveCPU.Installintheblacksocketsonlyafterallbluesocketsareoccupied.
Toinstallorreplaceamemorymodule:
1.Removethecomputercover.See“Removingthecover”onpage78.
2.Laythecomputeronitsside.
3.Locatethememoryslots.See“Locatingpartsonthesystemboard”onpage113.
Note:Ifitisthersttimethatthememorymodulebeingreplaced,youmighthavetoremovetheblue
shippingclipbeforeremovingthememoryfanduct.Ifthecomputeristoberepackagedandshipped,
theshippingclipmustbereinstalled.
4.Forsomecomputermodels,youmightneedtoremovethememoryfanducttoaccessthememory
slots.Toremovethememoryfanduct,removetheblueshippingclip,disconnectthememoryfancable
fromthesystemboard,pressinwardonthetwotabs,pivotthefanduct,andthendisengagethe
otherendoftheduct.
116ThinkStationHardwareMaintenanceManual
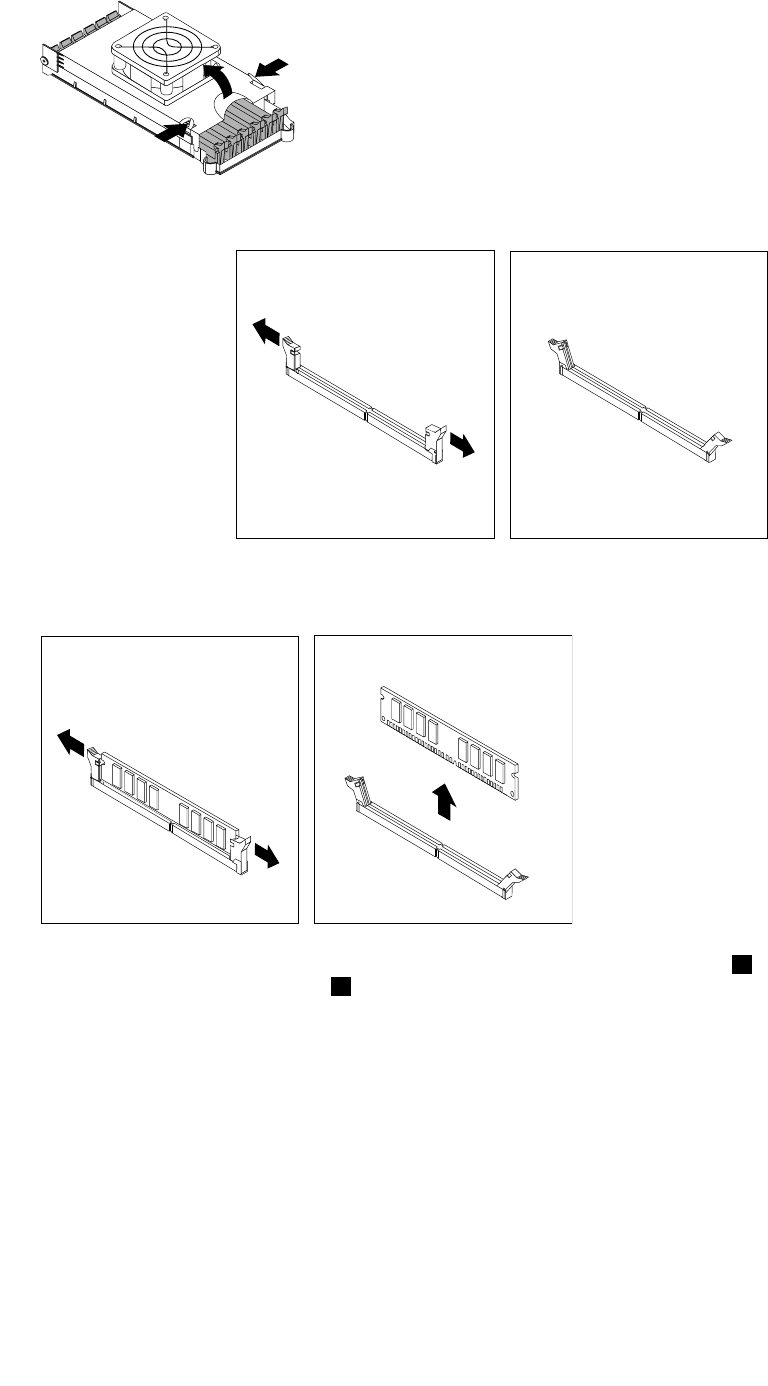
5.Opentheretainingclipsasshown.
Ifyouarereplacinganoldmemorymodule,opentheretainingclipsandremovethememorymodule
beingreplacedasshown.
6.Positionthenewmemorymoduleoverthememoryslot.Makesurethenotch1onthememorymodule
alignscorrectlywiththeslotkey2onthesystemboard.Pushthememorymodulestraightdowninto
theslotuntiltheretainingclipsclose.
Chapter11.ReplacingFRUs(Type4155,4158,4218)117
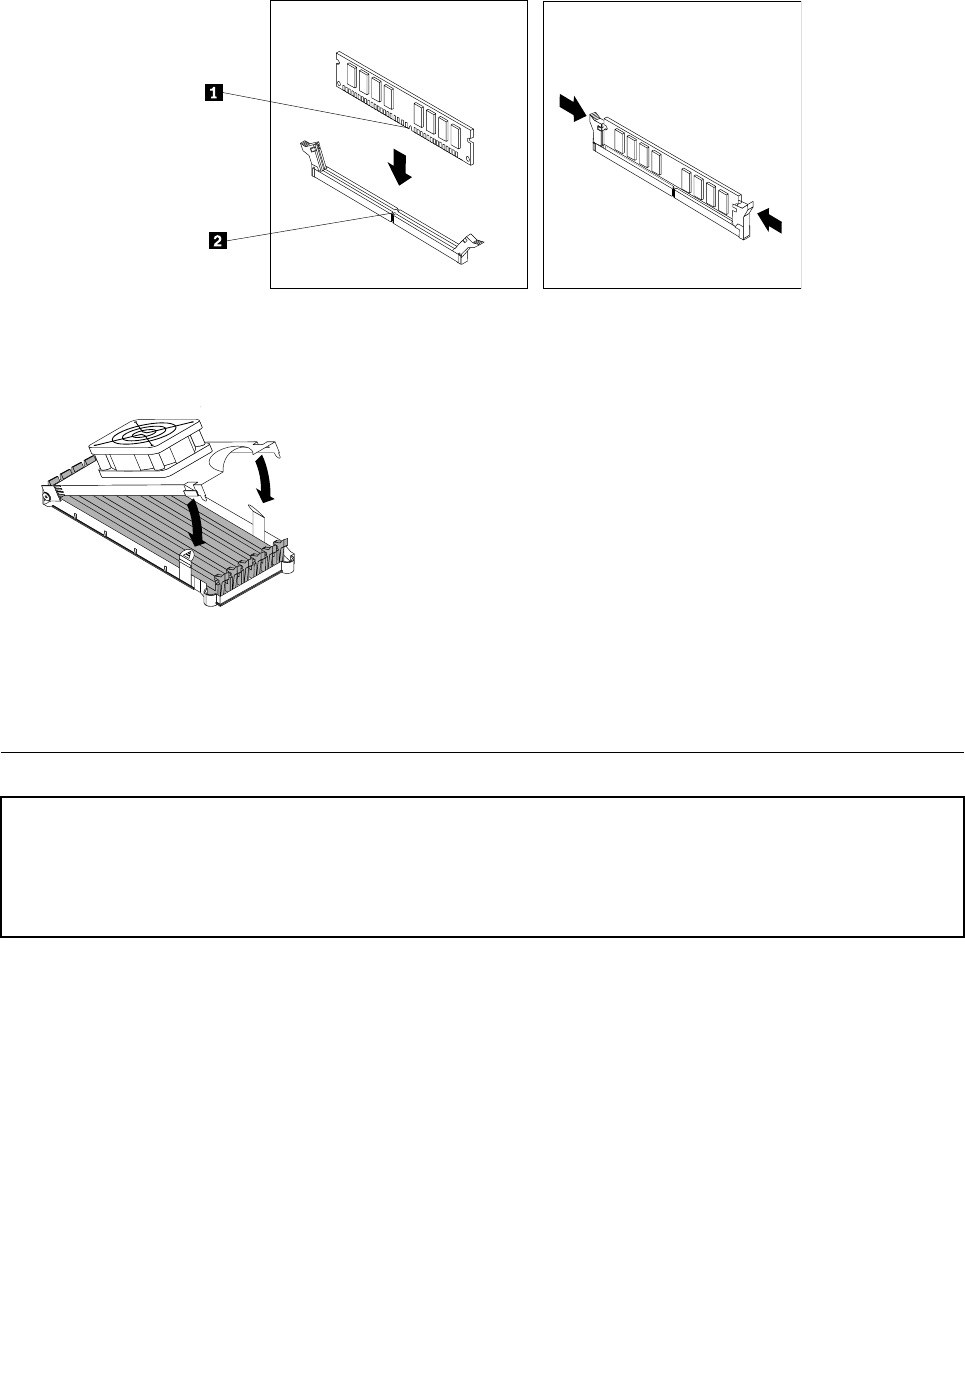
7.Toinstallthememoryfan,engagetherearoftheductwiththeretaineronthesystemboardand
thenpivottheductdownwardsuntiltheductsnapsintoposition.Reconnectthememoryfancable
tothesystemboard.
8.Goto“CompletingtheFRUreplacement”onpage108.
Note:Yoursystemmemoryspeedisdeterminedbyanumberoffactors,includingthemicroprocessor
modelandthetype,speed,size(capacity),andnumberofDIMMsinstalled.
ReplacingaPCIadaptercard
Attention
Donotopenyourcomputerorattemptanyrepairbeforereadingandunderstandingthe“Importantsafetyinformation”
intheThinkStationSafetyandWarrantyGuidethatcamewithyourcomputer.ToobtainacopyoftheThinkStation
SafetyandWarrantyGuide,goto:
http://www.lenovo.com/support.
ThissectionprovidesinformationabouthowtoreplaceaPCIadaptercard.
ToreplaceaPCIadaptercard,dothefollowing:
1.Removethecomputercover.See“Removingthecover”onpage78.
2.Unlatchandopenthecardretainer.
118ThinkStationHardwareMaintenanceManual
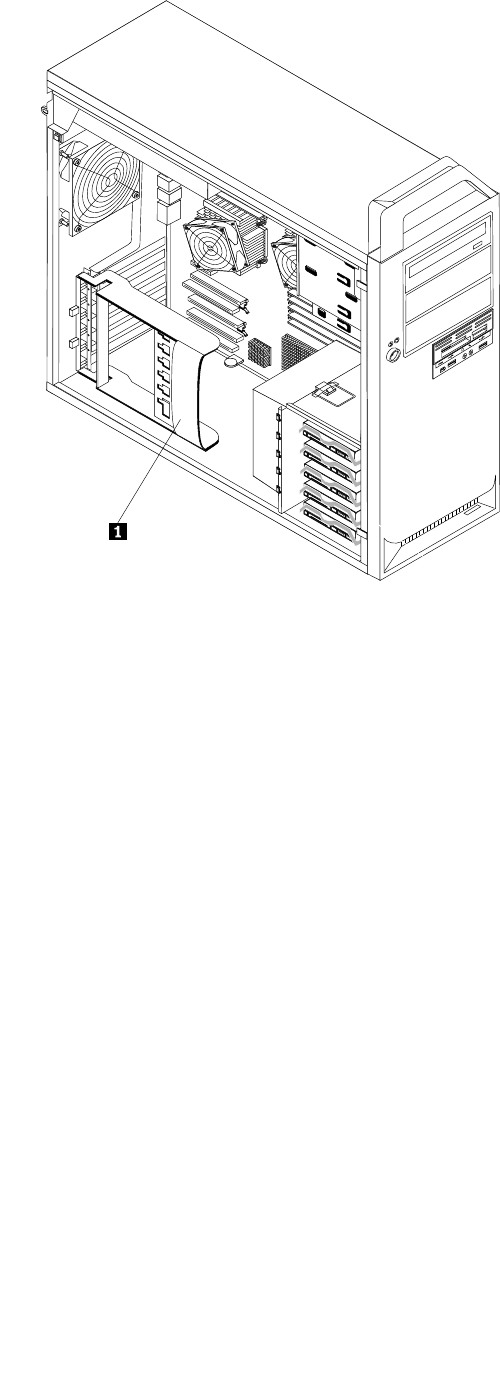
3.Takenoteofthelocationofallcableconnectionsontheadaptercard.Itwillbenecessarytoreconnect
themproperlywheninstallinganewcard.
4.Disconnectallcablesconnectedtotheadaptercard.See“Locatingpartsonthesystemboard”on
page113.
5.Somemodelshave:
•Ascrewinstalledintheadapterbracket,removethisscrew.
•Anadditionalretentionfeaturelocatedonthecardguideend.Pushtheretentionfeaturetowardthe
frontofthechassisbeforeremovingtheadaptercard.
6.Releasethecardsupportretaininglatches.Grasptheadaptercardandpullthecardoutoftheslot.
Note:Thecardisatightt,soitmightbenecessarytoremoveeachsidealittleatatimeuntilthe
cardisremovedfromthecardslot.
Chapter11.ReplacingFRUs(Type4155,4158,4218)119
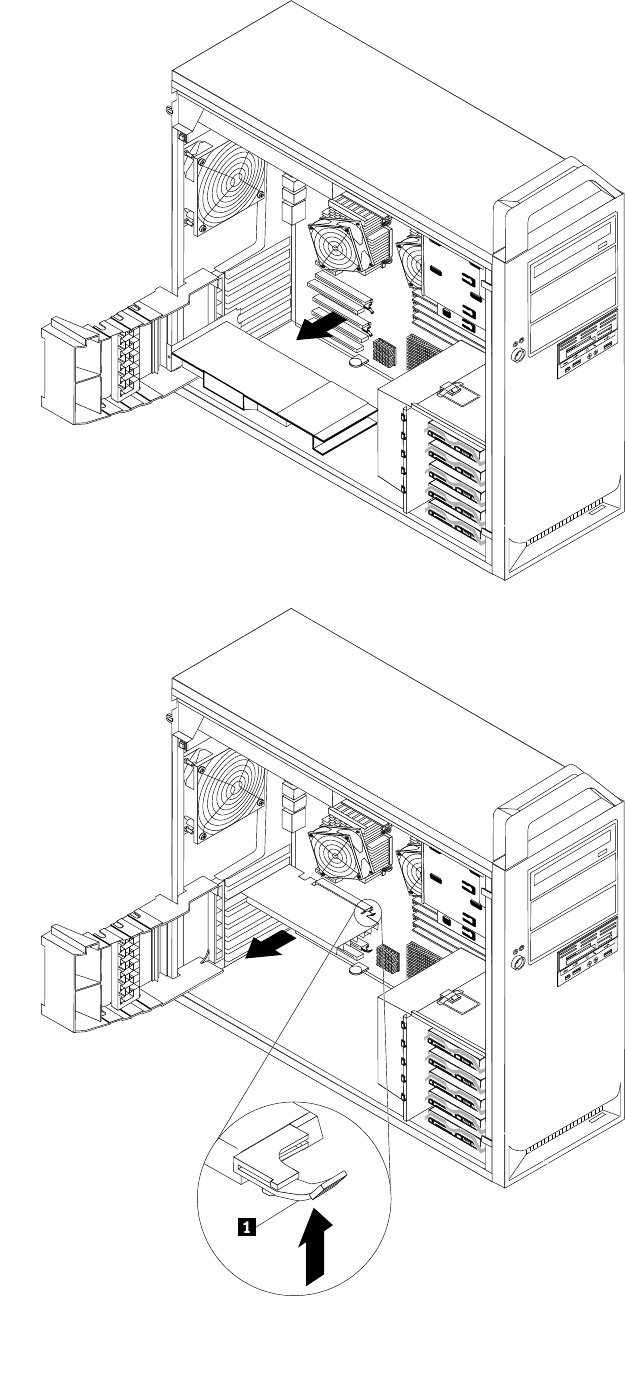
120ThinkStationHardwareMaintenanceManual

7.Reversethisproceduretoinstallthecard.
8.Goto“CompletingtheFRUreplacement”onpage108.
Replacingtheheatsink
CAUTION:
Theheatsinkandmicroprocessormightbeveryhot.Turnoffthecomputerandwait
threetoveminutestoletthecomputercoolbeforeopeningthecomputercover.
Attention
Donotopenyourcomputerorattemptanyrepairbeforereadingandunderstandingthe“Importantsafetyinformation”
intheThinkStationSafetyandWarrantyGuidethatcamewithyourcomputer.ToobtainacopyoftheThinkStation
SafetyandWarrantyGuide,goto:
http://www.lenovo.com/support.
Thissectionprovidesinstructionsonhowtoreplaceandinstalltheheatsink.
Toreplacetheheatsink:
1.Openthecomputercover.See“Removingthecover”onpage78.
2.Laythecomputeronitssideforeasieraccesstotheheatsink.
3.Removetheheatsinkandfanassemblycablesfromthesystemboard.Notethecablelocation.See
“Locatingpartsonthesystemboard”onpage113.
4.Followthissequencetoremovetheheatsinkfromthesystemboard:
a.Partiallyremovescrew1,thenfullyremovescrew2,andfullyremovescrew1.
b.Partiallyremovescrew3,thenfullyremovescrew4,andfullyremovescrew3.
5.Carefullylifttheheatsinkoffofthesystemboard.
6.Removetheplasticcoverfromthebottomofthenewheatsinktoexposetheheatsinkgrease(this
coverprotectstheheatsinkgreasefromcontamination).
Chapter11.ReplacingFRUs(Type4155,4158,4218)121
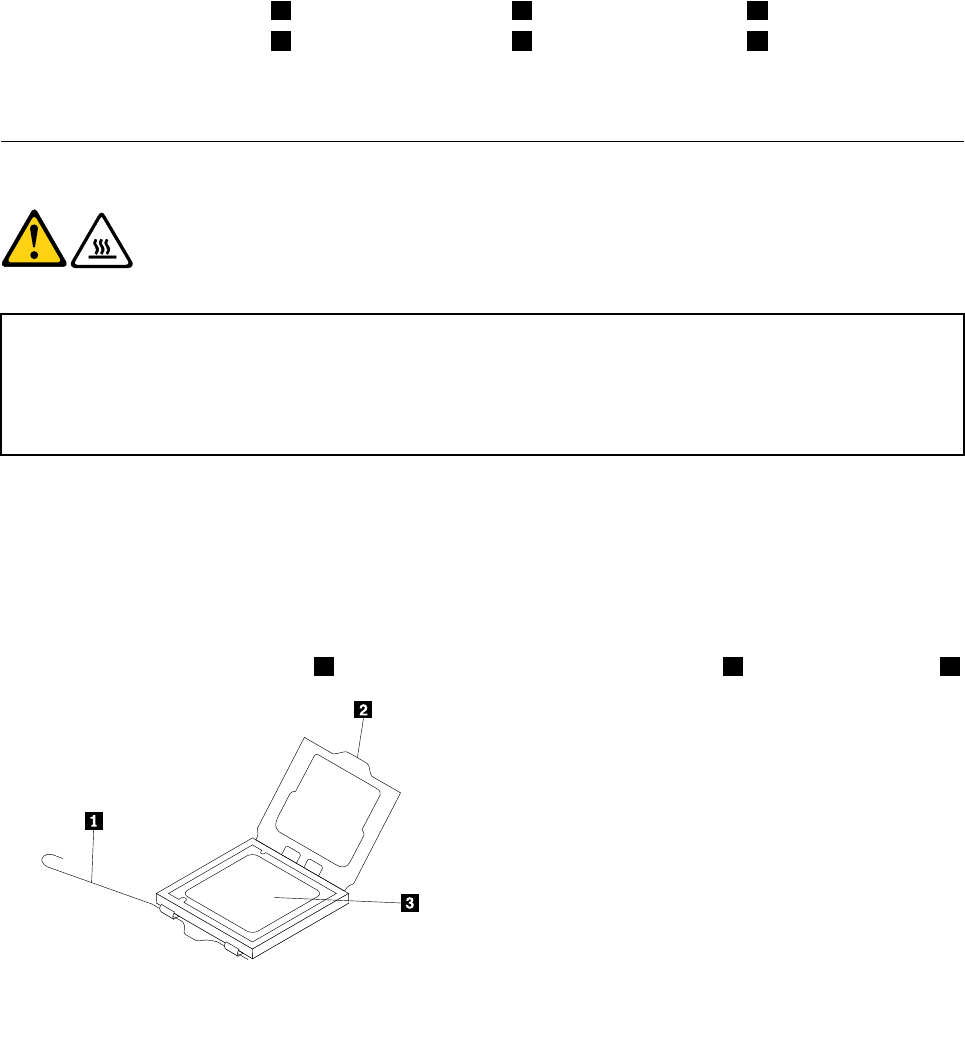
Notes:
a.Donotremovetheplasticcoveruntilyouarereadytoinstalltheheatsinkandfanassemblyonthe
microprocessor.Donottouchthegreaseontheheatsinkandfanassembly.Donotputtheheat
sinkandfanassemblyanywhereexceptonthemicroprocessoraftertheplasticcoverhasbeen
removedandthegreaseexposed.
b.Someheatsinkpartnumberswillhaveorientationlabelsshowing"FrontofSystem."HeatSinksthat
donothaveorientationlabelsshouldbeorientedsothefancableistowardtheboardconnector
labeled"CPUFan."
7.Placethenewheatsinkintoposition.
Important:Donottouchthethermalgreasewhilehandlingtheheatsink.
8.Alignthefourscrewsontheheatsinkwiththefourmountingstudsinthechassis.
9.Followthissequencetoinstallthescrews,notingthatfullytightis5in-lbs+/-0.5in-lbs:
a.Partiallytightenscrew1,thenfullytightenscrew2,andfullytightenscrew1.
b.Partiallytightenscrew3,thenfullytightenscrew4,andfullytightenscrew3.
10.Reconnecttheheatsinkfancable.See“Locatingpartsonthesystemboard”onpage113.
11.Goto“CompletingtheFRUreplacement”onpage108.
Replacingthemicroprocessor
CAUTION:
Theheatsinkandmicroprocessormightbeveryhot.Turnoffthecomputerandwait
threetoveminutestoletthecomputercoolbeforeopeningthecomputercover.
Attention
Donotopenyourcomputerorattemptanyrepairbeforereadingandunderstandingthe“Importantsafetyinformation”
intheThinkStationSafetyandWarrantyGuidethatcamewithyourcomputer.ToobtainacopyoftheThinkStation
SafetyandWarrantyGuide,goto:
http://www.lenovo.com/support.
Thissectionprovidesinstructionsonhowtoreplacethemicroprocessor.
Toreplacethemicroprocessor:
1.Openthecomputercover.See“Removingthecover”onpage78.
2.Placethecomputeronitssidetohelpmakethesystemboardmoreaccessible.
3.Removetheheatsinkfromthesystemboard.See“Replacingtheheatsink”onpage90.
4.Toremovethemicroprocessor3fromthesystemboard,liftthesmallhandle1andopentheretainer2.
122ThinkStationHardwareMaintenanceManual
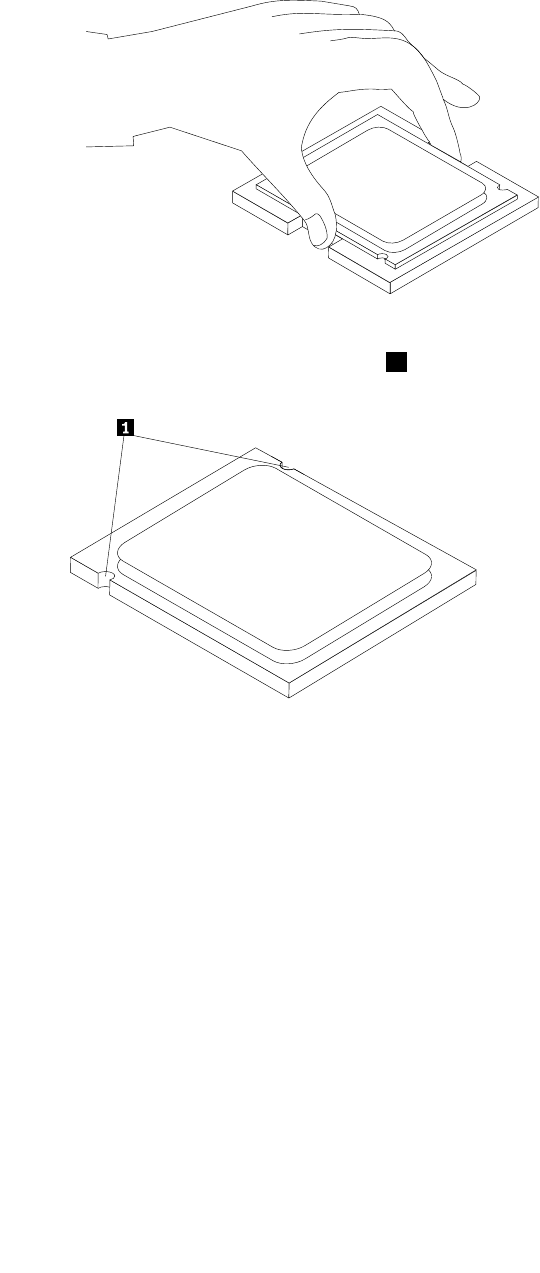
Important
Touchonlythesidesofthemicroprocessor.Donottouchthegoldcontactsonthebottom.
5.Liftthemicroprocessorstraightupandoutofthesocket.
Notes:
a.Notetheorientationofthenotches1onthemicroprocessor.Thisisimportantwhenreinstalling
themicroprocessoronthenewsystemboard.
b.Donotdropanythingontothemicroprocessorsocketwhileitisexposed.Thesocketpinsmustbe
keptascleanaspossible.
6.Holdingthemicroprocessorwithyourngers,positionthemicroprocessorsothatthenotchesonthe
microprocessorarealignedwiththetabsinthemicroprocessorsocket.
Important
Toavoiddamagingthemicroprocessorcontacts,donottiltthemicroprocessorwheninstallingitinto
thesocket.
7.Lowerthemicroprocessorstraightdownintothemicroprocessorsocketofthesystemboard.
Chapter11.ReplacingFRUs(Type4155,4158,4218)123
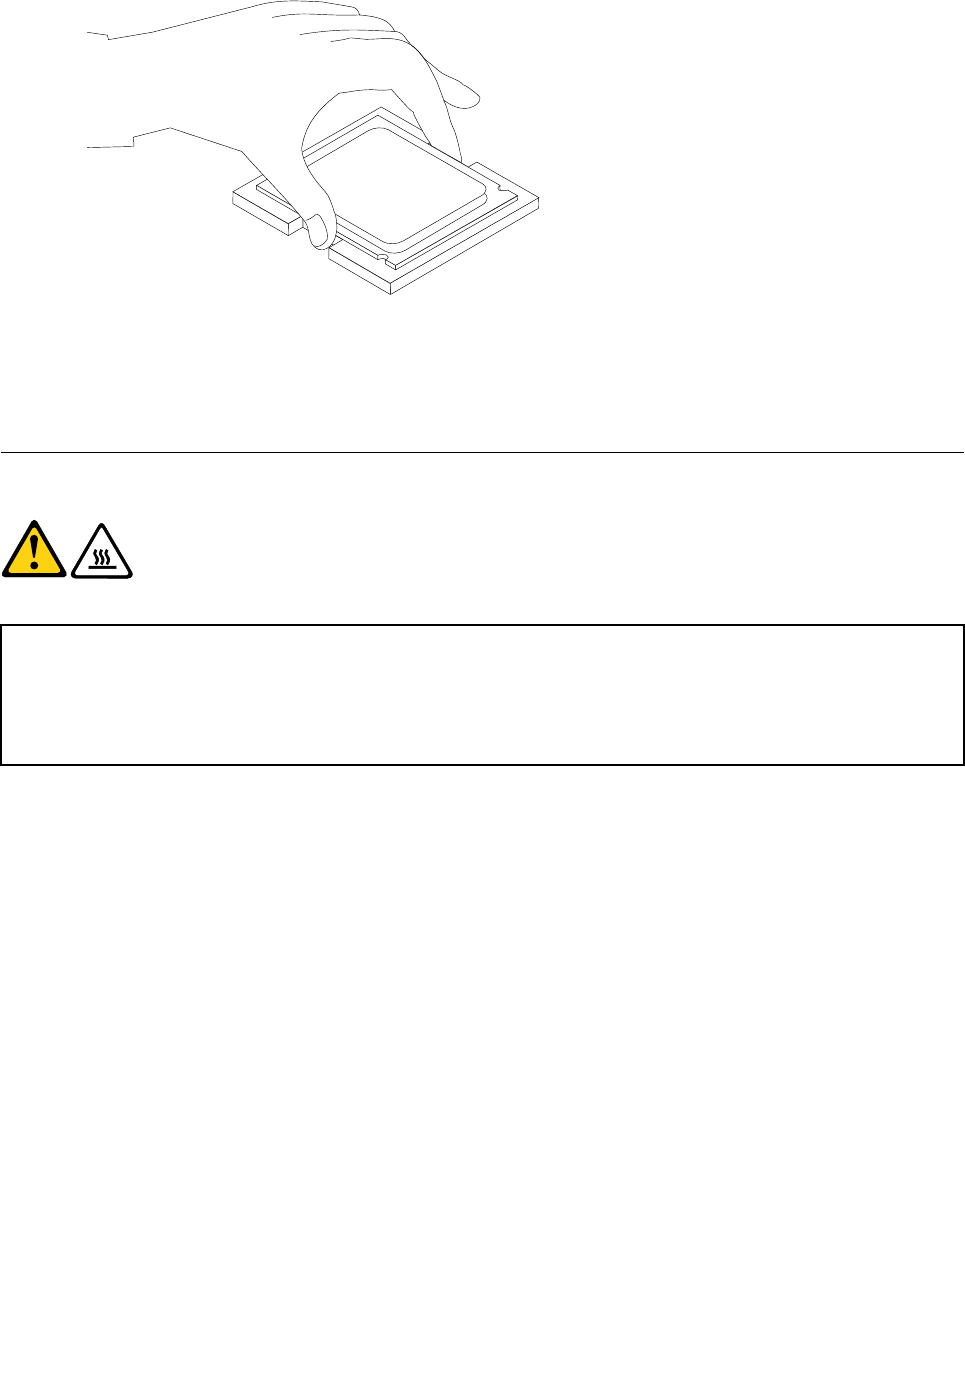
8.Closethemicroprocessorretainerandclampitwiththesmallhandle.
9.Placetheheatsinkintopositionandreplacethe4screwstosecuretheheatsinktothesystemboard.
10.Reconnecttheheatsinkfancable.
11.Goto“CompletingtheFRUreplacement”onpage108.
Replacingthesystemboard
CAUTION:
Theheatsink,microprocessor,andmemorymodulemightbeveryhot.Turnoffthe
computerandwaitthreetoveminutestoletthecomputercoolbeforeopeningthecomputercover.
Attention
Donotopenyourcomputerorattemptanyrepairbeforereadingandunderstandingthe“Importantsafetyinformation”
intheThinkStationSafetyandWarrantyGuidethatcamewithyourcomputer.ToobtainacopyoftheThinkStation
SafetyandWarrantyGuide,goto:
http://www.lenovo.com/support.
Note:Whenreplacingthesystemboardanewretentionmoduleforthemicroprocessorheatsinkisrequired.
Makesureyouhaveanewretentionmodulebeforebeginningthisprocedure.
Thissectionprovidesinstructionsonhowtoremoveandinstallthesystemboard.
Toreplacethesystemboard:
1.Openthecover.See“Removingthecover”onpage78.
2.Laythecomputeronitssideforeasieraccesstothesystemboard.
3.Removetheharddiskdrivefan.See“Replacingtheharddiskdrivefanassembly”onpage100.
4.RemoveanyadaptercardsinstalledinthePCIconnectors.See“ReplacingaPCIadaptercard”on
page86.
5.Removethememorymodulesfromthefailingsystemboard.
6.Removetheheatsinkfromthefailingsystemboard.See“Replacingtheheatsink”onpage90.
7.Notethelocationofallcableconnectionsonthesystemboardanddisconnectallcables.See“Locating
partsonthesystemboard”onpage113.
8.Removetheninescrewsthatsecurethesystemboardtothechassis,followingthesequenceshownin
thegure:
124ThinkStationHardwareMaintenanceManual
9.Carefullyliftthesystemboardoutofthechassis.
10.Removethemicroprocessorsocketcoverfromthenewsystemboard.
11.Removethemicroprocessorfromthefailingsystemboardandinstallitonthenewsystemboard.
See“Replacingthemicroprocessor”onpage92.
12.Thefailingsystemboardmustbereturnedwithamicroprocessorsocketcovertoprotectthepinsduring
shippingandhandling.Installthemicroprocessorsocketcoverremovedfromthenewsystemboard
onthefailingsystemboard.
Note:Themicroprocessorsocketcoverinstallationprocedureshouldbeperformedonbothprocessors.
Toinstallthemicroprocessorsocketcover:
a.Releasetheleversecuringthemicroprocessorretainerandopentheretainertoaccessthe
microprocessor.
b.Graspthemicroprocessoronthesidesandliftitstraightupandoutofthesocket.Donottouchthe
contactsonthemicroprocessorsocket.
c.Alignthenotches1ofthemicroprocessorsocketcoverwiththealignmentkeys2ofthe
microprocessorsocket.Lowerthesocketcoverstraightdownintothemicroprocessorsocket
onthesystemboard.
Chapter11.ReplacingFRUs(Type4155,4158,4218)125

Note:Yourmicroprocessorsocketandcovermightlookslightlydifferentfromtheillustration.
d.Carefullypressthesocketcoverstraightdownwardsuntilitissecuredintothesocket.
e.Lowerthemicroprocessorretainerandthenlowerthelevertosecuretheretainer.Makesurethe
leverissecurelylockedintoposition.
f.Followanyadditionalinstructionsincludedwiththereplacementpartyoureceived.
13.Installthenewsystemboardintothechassisandalignthescrewholeswiththoseinthechassis.Insert
andtightenthescrewsthatsecurethesystemboardfollowingthesequenceshowninthegureabove.
14.Installthememorymodulesinthesamelocationonthenewsystemboard.
15.Installthemicroprocessoronthenewsystemboard.See“Replacingthemicroprocessor”onpage92
16.Installtheheatsinkandfanassemblyonthenewsystemboard.See“Replacingtheheatsink”
onpage90.
17.Connecttheheatsinkandfanassemblycabletothenewsystemboard.See“Locatingpartsonthe
systemboard”onpage113.
18.Installtheharddiskdrivefan.See“Replacingtheharddiskdrivefanassembly”onpage100.
19.Connectallcablestothesystemboard.Seethesystemboardillustrationforyourmachinetypeat
“Locatingpartsonthesystemboard”onpage113.
20.Goto“CompletingtheFRUreplacement”onpage108.
126ThinkStationHardwareMaintenanceManual
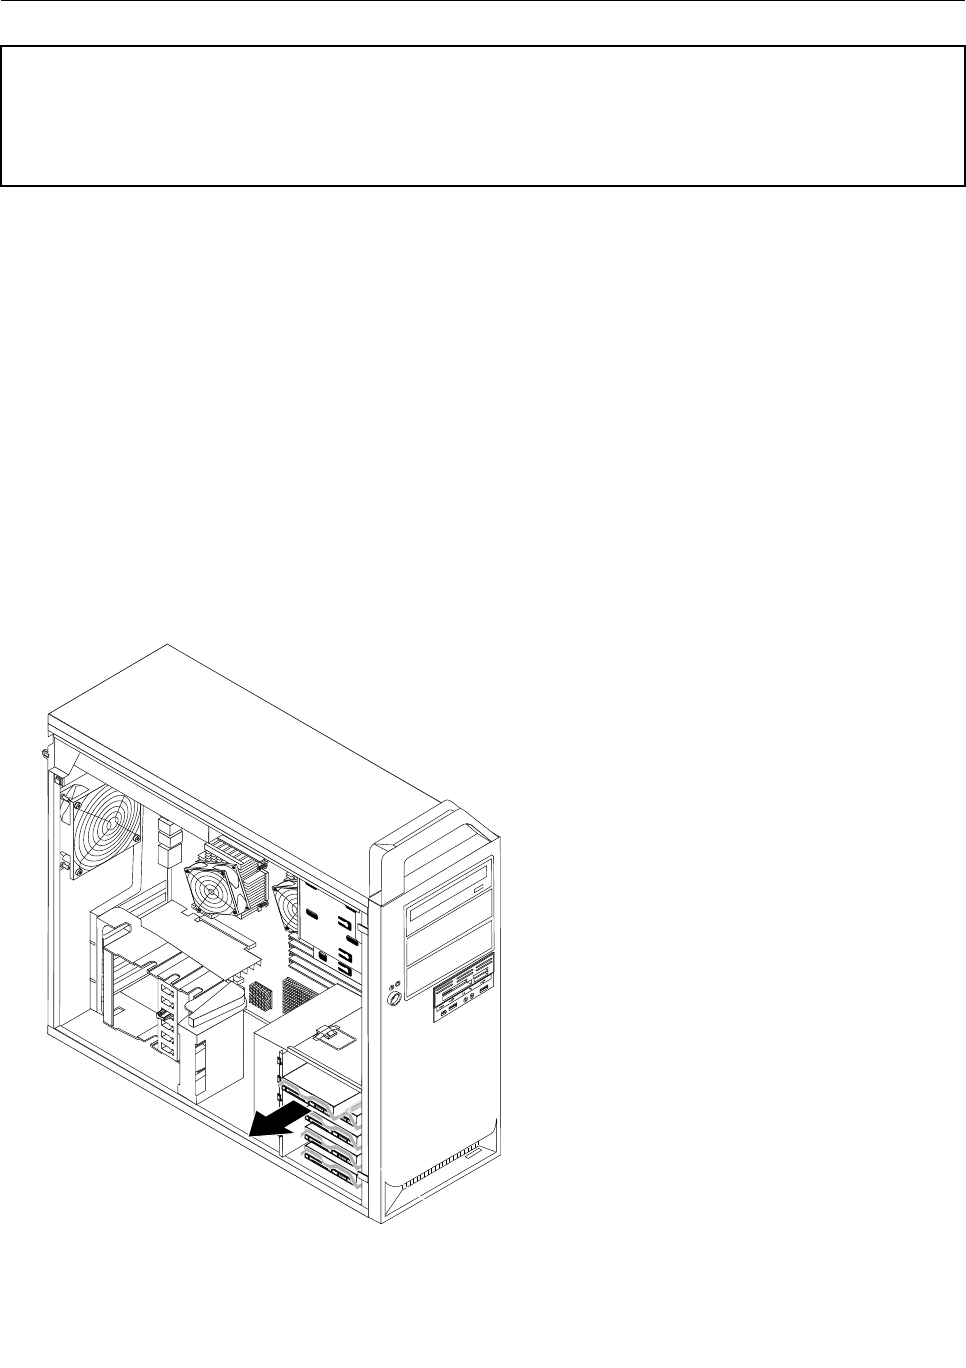
Replacingaharddiskdrive
Attention
Donotopenyourcomputerorattemptanyrepairbeforereadingandunderstandingthe“Importantsafetyinformation”
intheThinkStationSafetyandWarrantyGuidethatcamewithyourcomputer.ToobtainacopyoftheThinkStation
SafetyandWarrantyGuide,goto:
http://www.lenovo.com/support.
Thissectionprovidesinstructionsonhowtoreplacetheharddiskdrive.
Important
Whenyoureceiveanewharddiskdrive,youalsoreceiveasetofProductRecoverydiscs.Thesetof
ProductRecoverydiscswillenableyoutorestorethecontentsoftheharddiskdrivetothefactory-installed
state.Formoreinformationonrecoveringfactory-installedsoftware,referto“Recoveringsoftware”in
yourThinkStationUserGuide.
Attention:YourcomputersupportsbothSASharddiskdrivesandSATAharddiskdrives.However,besure
thatyoudonotinstallboththeSASandSATAharddiskdrivesintothesamecomputer.
Toreplaceaharddiskdrive:
1.Removethecomputercover.See“Removingthecover”onpage78.
2.Locatetheharddiskdrive.See“Locations”onpage79.
3.Disconnectthesignalandpowercablesfromtheharddiskdrive.
4.Pullthehandletoremovetheharddiskdrive.
5.Removethefailingharddiskdrivefromthebracketbyexingthebracket.
Chapter11.ReplacingFRUs(Type4155,4158,4218)127
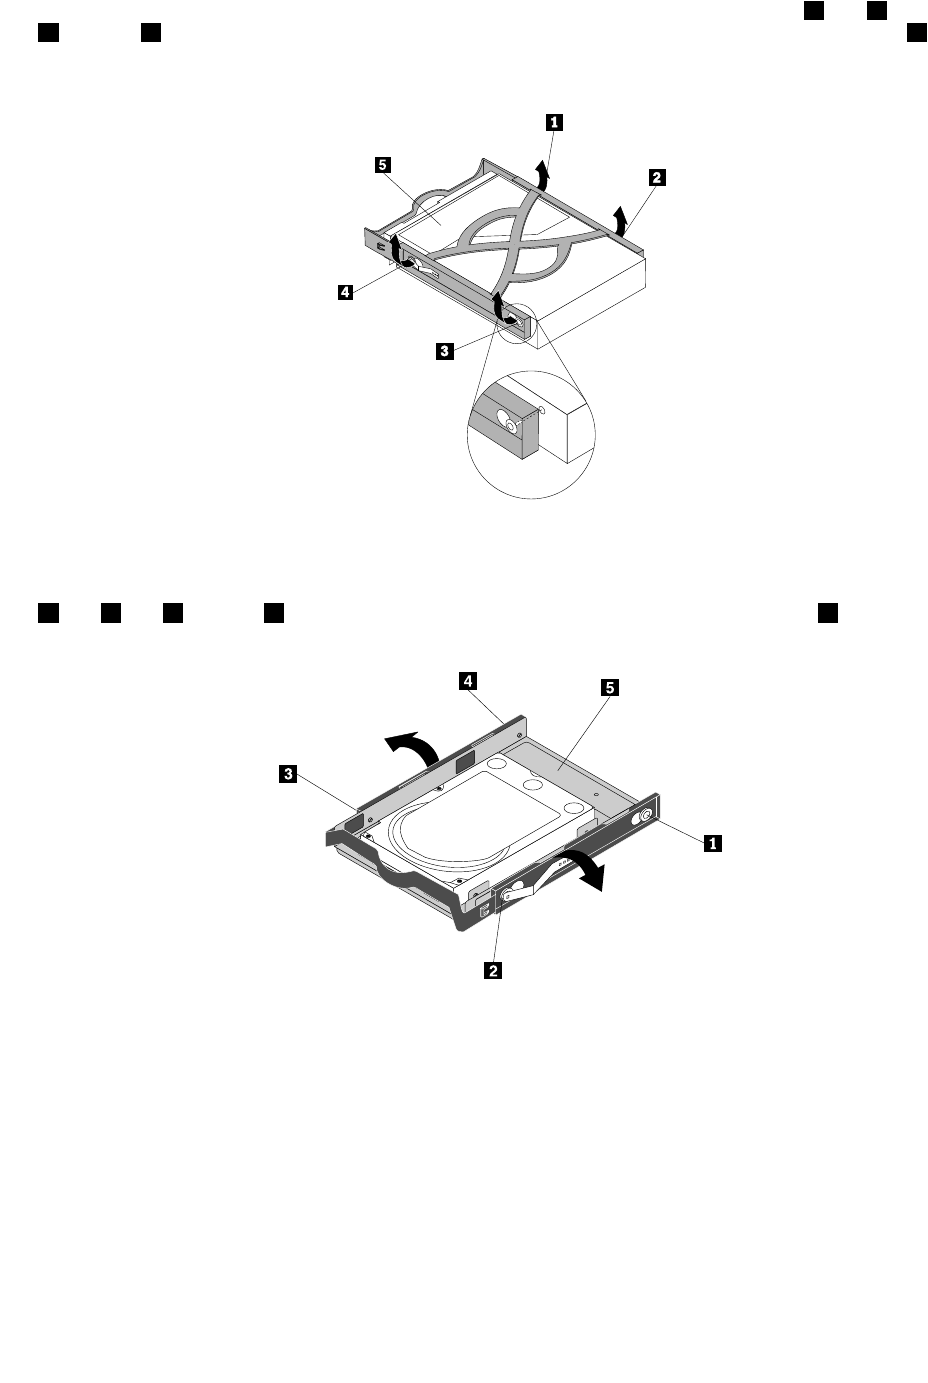
6.Toinstallthenewharddiskdriveintothebracket,exthebracket,andthenalignpin1,pin2,pin
3,andpin4onthebracketwiththeholesintheharddiskdrive.Donottouchthecircuitboard5
onthebottomoftheharddiskdrive.
Figure6.Installinga3.5-inchharddiskdriveintothebracket
Note:Ifyouareinstallinga2.5-inchharddiskdriveintothebracket,exthebracket,andthenalignpin
1,pin2,pin3,andpin4onthebracketwiththeholesintheharddiskdriveadapter5.
Figure7.Installinga2.5-inchharddiskdriveintothebracket
7.Installtheharddiskdriveandbracketintothedrivebay.
8.Usingthesignalcablethatcamewiththenewdrive,connectoneendofthesignalcabletothedrive.
Locateoneoftheextrave-wirepowercablesandconnectittothedrive.
Note:ThesignalcablewillbedifferentdependingonwhetheryouareinstallingaSATAharddisk
driveoraSASharddiskdrive.
128ThinkStationHardwareMaintenanceManual
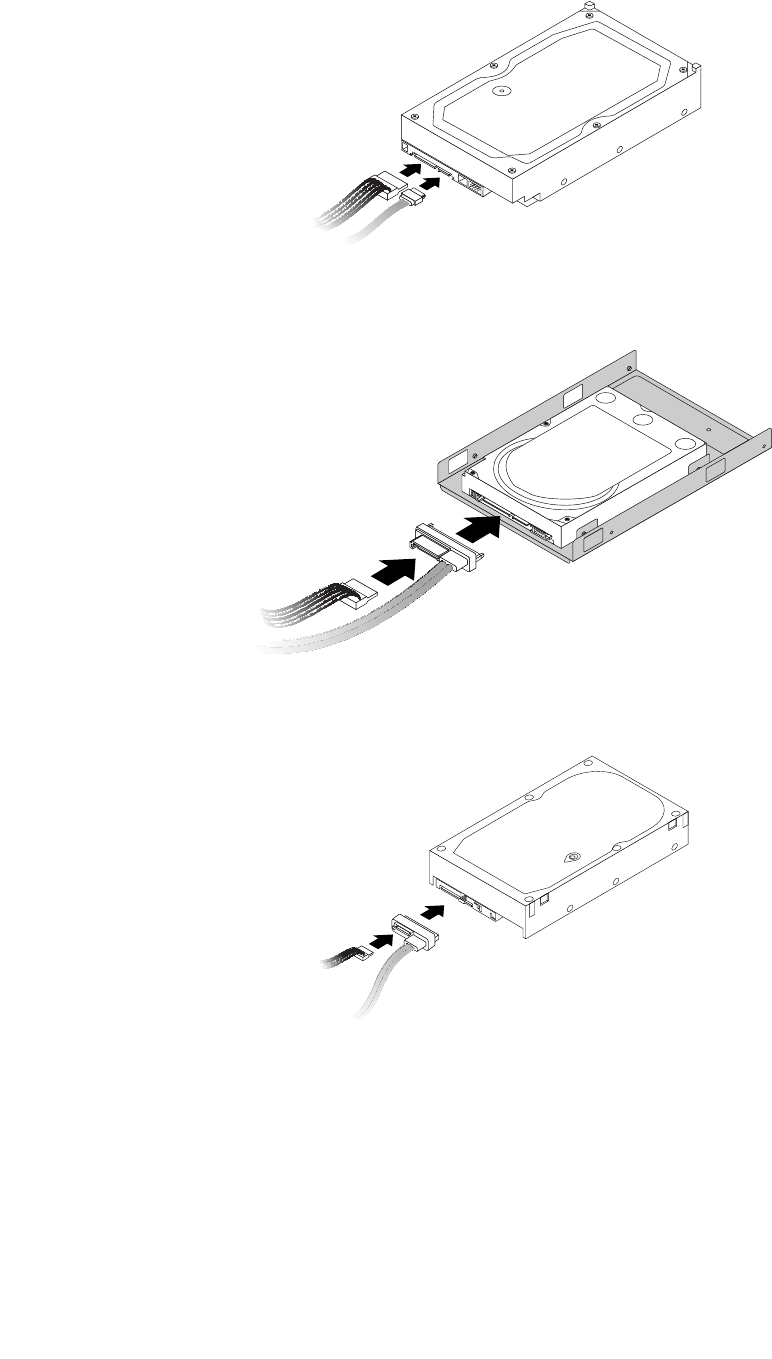
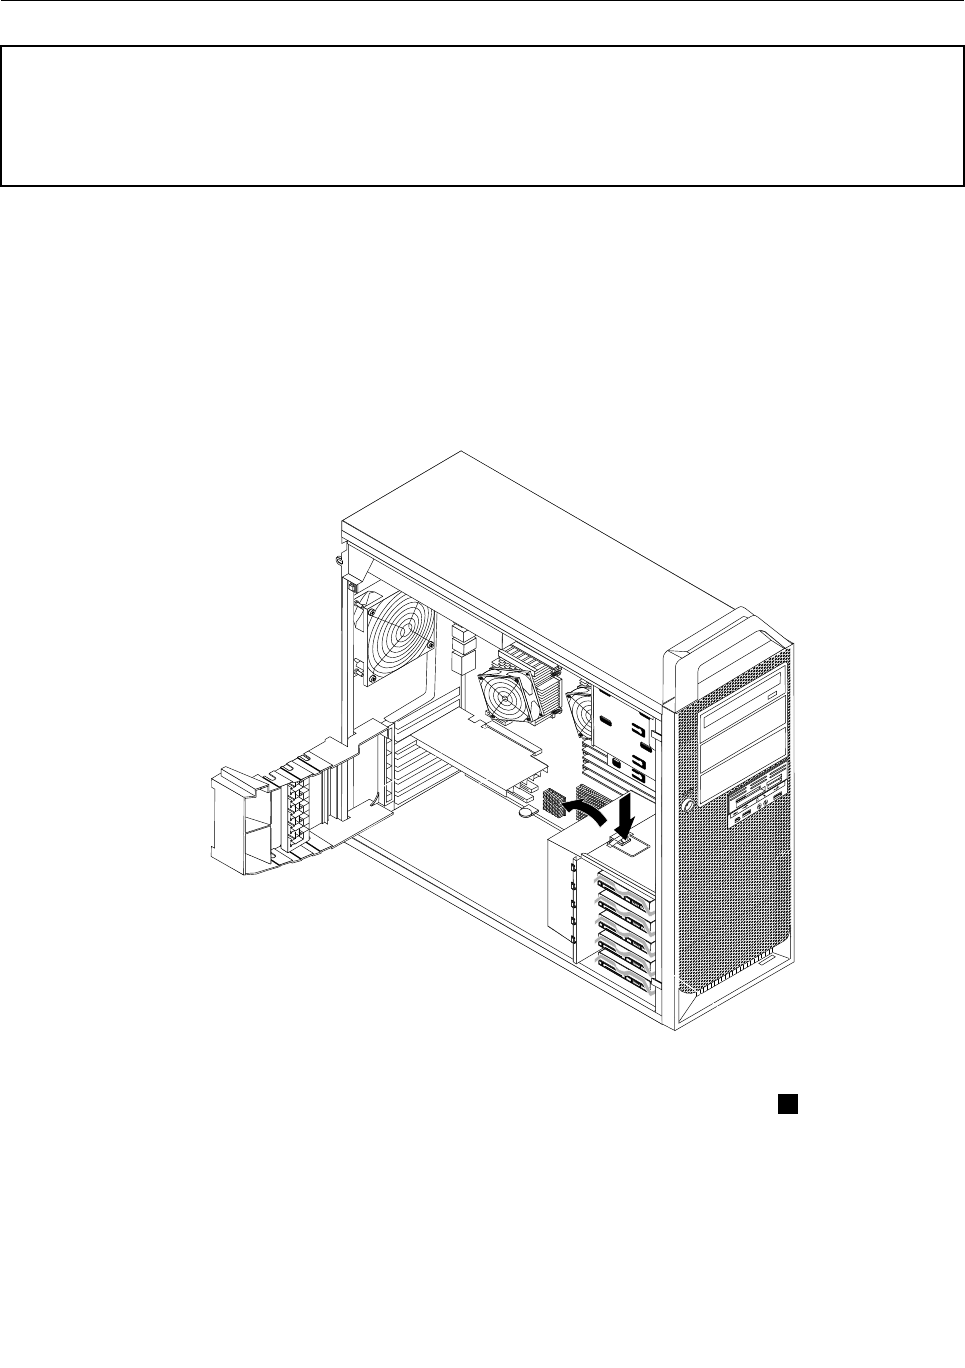
Replacingtheharddiskdrivefanassembly
Attention
Donotopenyourcomputerorattemptanyrepairbeforereadingandunderstandingthe“Importantsafetyinformation”
intheThinkStationSafetyandWarrantyGuidethatcamewithyourcomputer.ToobtainacopyoftheThinkStation
SafetyandWarrantyGuide,goto:
http://www.lenovo.com/support.
Thissectionprovidesinstructionsonhowtoreplacetheharddiskdrivefanassembly.
Toreplacetheharddiskdrivefanassembly:
1.Removethecomputercover.See“Removingthecover”onpage78.
2.Locatetheharddiskdrivefanassembly.See“Locations”onpage79.
3.Unlatchandopentheadaptercardretainer.
4.Presstheharddiskdrivefanassemblybracketlatchdownwardsandpivotthebrackettoremoveit
fromthechassis.
5.Disconnecttheharddiskdrivefanassemblycablefromthesystemboard.
6.Theharddiskdrivefanassemblyisattachedtothebracketbyfourrubbermounts1.Removethefan
assemblybygentlypullingitoutofthebracket.
130ThinkStationHardwareMaintenanceManual

7.Installthenewharddiskdrivefanassemblybyaligningtherubbermountsofthefanassemblywiththe
holesintheharddiskdrivefanassemblybracketandpushingtherubbermountsthroughtheholes.
8.Connecttheharddiskdrivefanassemblycabletothesystemboard,andtheninstallthebracket
andharddiskdrivefanassemblytothechassis.
9.Goto“CompletingtheFRUreplacement”onpage108.
Replacinganopticaldrive
Attention
Donotopenyourcomputerorattemptanyrepairbeforereadingandunderstandingthe“Importantsafetyinformation”
intheThinkStationSafetyandWarrantyGuidethatcamewithyourcomputer.ToobtainacopyoftheThinkStation
SafetyandWarrantyGuide,goto:
http://www.lenovo.com/support.
Thissectionprovidesinstructionsonhowtoreplaceanopticaldrive.
1.Removethecomputercover.See“Removingthecover”onpage78.
2.Removethefrontbezel.See“Removingthefrontbezel”onpage82.
3.Locatetheopticaldrive.See“Locations”onpage79.
4.Notethelocationoftheopticaldrivecables.Disconnectthesignalandpowercablesfromtherearof
theopticaldrive.
5.Pressthedrivelatch1(forthedriveyouwanttoremove)andslidetheopticaldrivefromthechassis.
Chapter11.ReplacingFRUs(Type4155,4158,4218)131
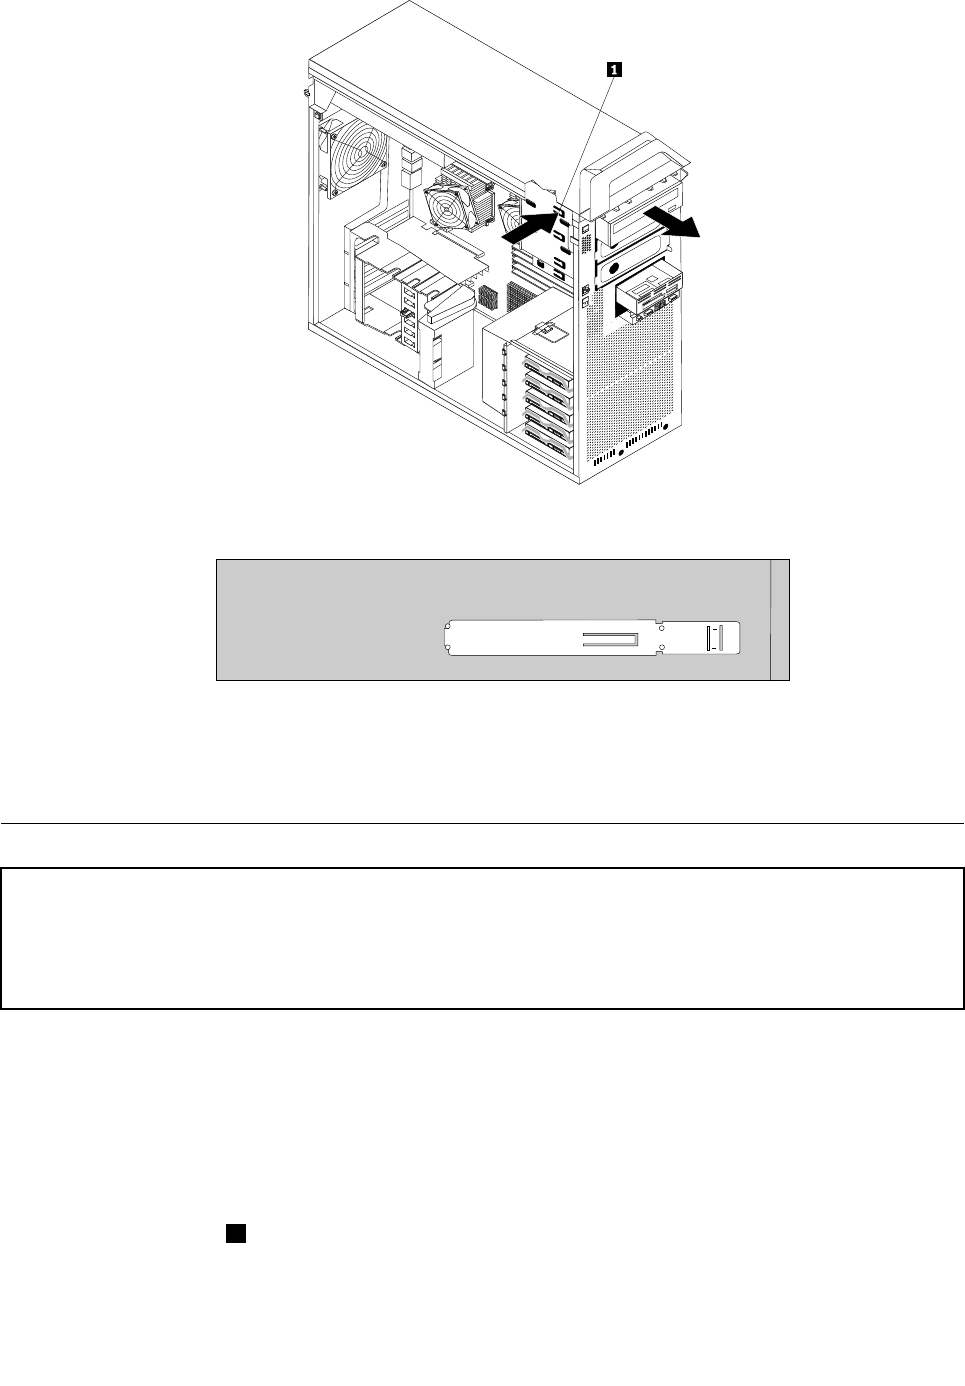
6.Removetheretainerbracketfromthedrivebeingreplacedandinstallitonthenewdrive.
7.Slidethenewopticaldriveintothebayfromthefrontuntilitsnapsintoposition.
8.Reconnectthesignalandpowercablestothenewdrive.
9.Goto“CompletingtheFRUreplacement”onpage108.
Replacingthediskettedriveorcardreader
Attention
Donotopenyourcomputerorattemptanyrepairbeforereadingandunderstandingthe“Importantsafetyinformation”
intheThinkStationSafetyandWarrantyGuidethatcamewithyourcomputer.ToobtainacopyoftheThinkStation
SafetyandWarrantyGuide,goto:
http://www.lenovo.com/support.
Thissectionprovidesinstructionsonhowtoreplacethediskettedriveorcardreader.
1.Removethecomputercover.See“Removingthecover”onpage78.
2.Removethefrontbezel.See“Removingthefrontbezel”onpage82.
3.Locatethediskettedriveorcardreader.See“Locations”onpage79.
4.Accesssystemboardcomponents.
5.Notetheroutingofthesignalcable.Disconnectthesignalcablefromthesystemboard.
6.Pressthedrivelatch1andslidethediskettedriveorcardreaderoutthefrontofthechassis.
132ThinkStationHardwareMaintenanceManual
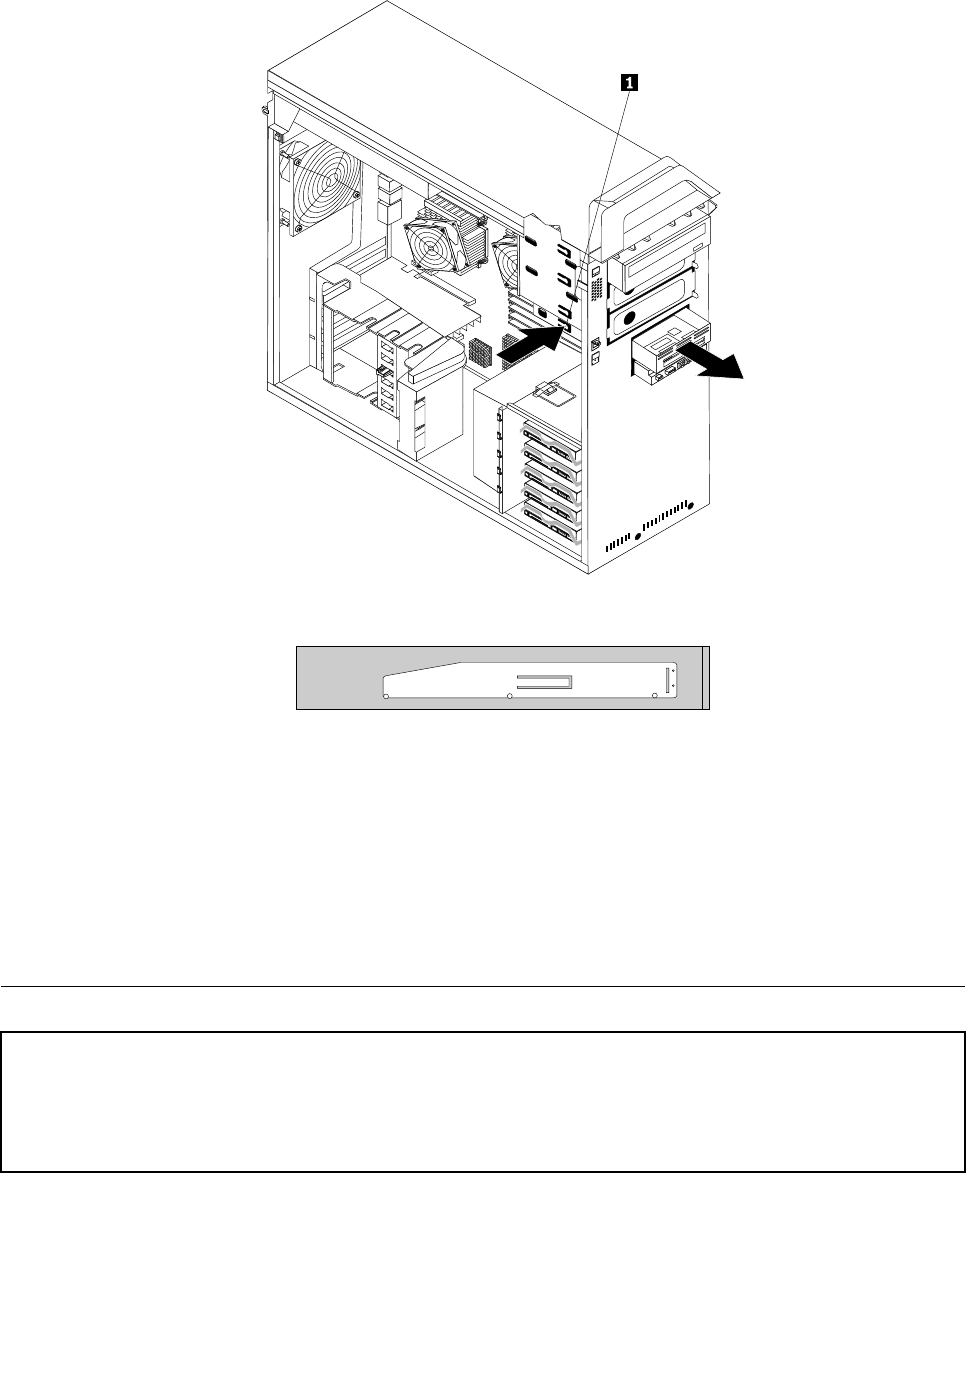
7.Installtheretainerbracketonthenewdiskettedriveorcardreader.
8.Disconnectthesignalcablefromthefailingdiskettedriveorcardreaderandconnectittothenewdrive.
9.Slidethenewdiskettedriveorcardreaderintothedrivebayuntilitsnapsintoposition.
10.Connectthediskettedrivecabletothediskettedriveconnectoronthesystemboard.Ifyouare
installingacardreader,connectittothecardreaderconnectoronthesystemboard.See“Locating
partsonthesystemboard”onpage113.
11.Reinstalltheharddiskdrivefanbracketifremoved.
12.Reinstallthefrontbezel.
13.Goto“CompletingtheFRUreplacement”onpage108.
Replacingthefrontandrearfanassemblies
Attention
Donotopenyourcomputerorattemptanyrepairbeforereadingandunderstandingthe“Importantsafetyinformation”
intheThinkStationSafetyandWarrantyGuidethatcamewithyourcomputer.ToobtainacopyoftheThinkStation
SafetyandWarrantyGuide,goto:
http://www.lenovo.com/support.
Thissectionprovidesinstructionsonhowtoreplacethefrontandrearfanassemblies.
1.Removethecomputercover.See“Removingthecover”onpage78.
2.Locatethefanassemblythatyouwanttoreplace.Yourcomputerhasonefrontfanassemblyandone
rearfanassembly.See“Locations”onpage79.
Chapter11.ReplacingFRUs(Type4155,4158,4218)133
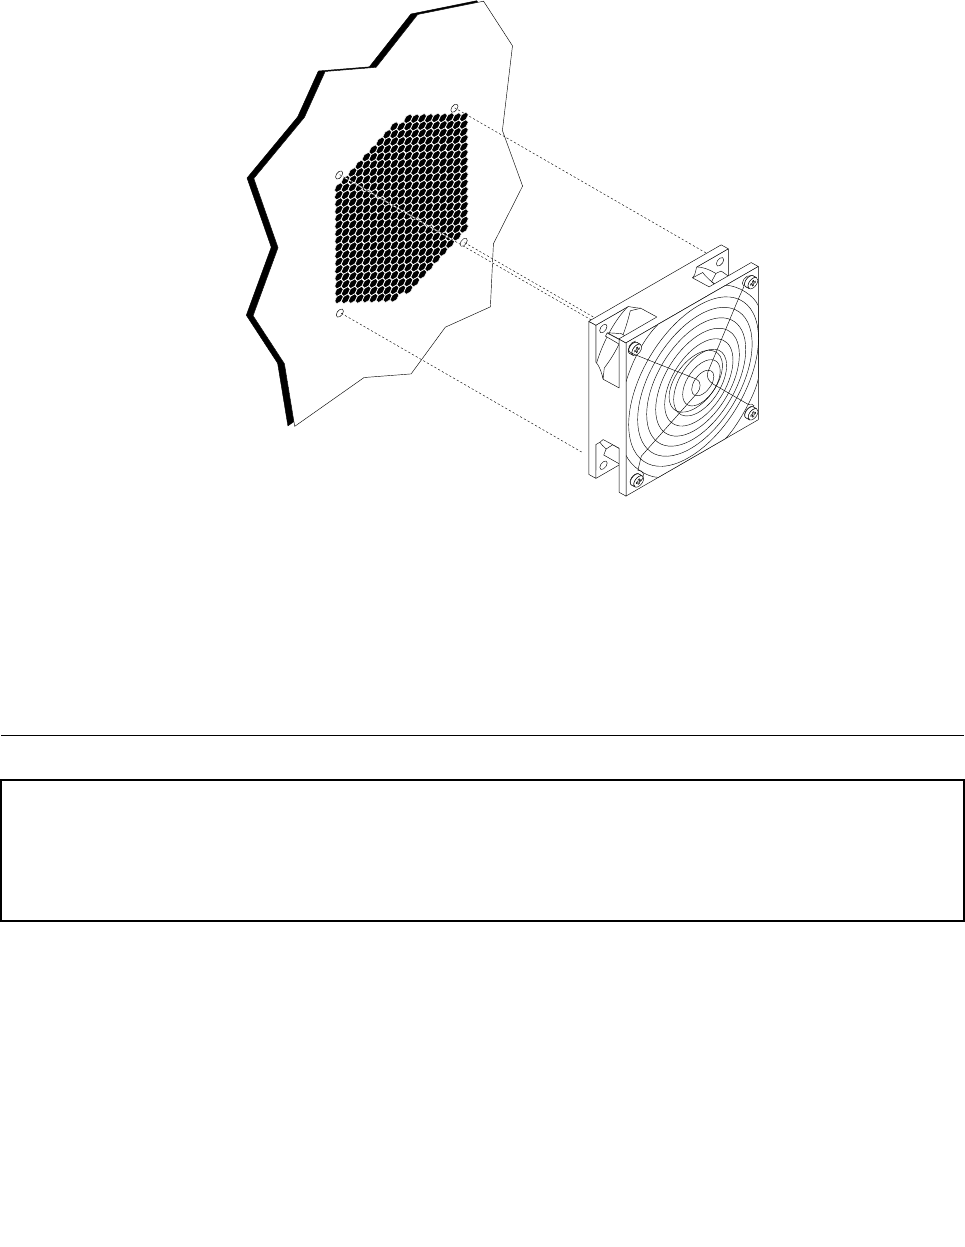
3.Disconnectthefanassemblycablefromthesystemboard.See“Locatingpartsonthesystemboard
”onpage113.
4.Thefanassemblyisattachedtothechassisbyfourrubbermounts.Carefullyremovethefourrubber
mountsbybreakingthemorcuttingthemwithscissorsandthenremovethefanassemblyoutof
thechassis.
5.Installthenewfanassemblybyaligningthefourrubbermountsofthefanassemblywiththeholeson
thechassisandpushtherubbermountsthroughtheholes.
6.Pullonthetipsoftherubbermountsuntilthefanassemblyisinplace.
7.Dependingonwhichfanassemblyyouarereplacing,reconnectthefanassemblycabletotheadapter
cardfanassemblyconnectorortherearfanassemblyconnectoronthesystemboard.See“Locating
partsonthesystemboard”onpage113.
8.Goto“CompletingtheFRUreplacement”onpage108.
Replacingthefrontpanelconnectorsassembly
Attention
Donotopenyourcomputerorattemptanyrepairbeforereadingandunderstandingthe“Importantsafetyinformation”
intheThinkStationSafetyandWarrantyGuidethatcamewithyourcomputer.ToobtainacopyoftheThinkStation
SafetyandWarrantyGuide,goto:
http://www.lenovo.com/support.
Thissectionprovidesinstructionsonhowtoreplacethefrontpanelconnectorsassembly.
1.Removethecomputercover.See“Removingthecover”onpage78.
2.Removethefrontbezel.See“Removingthefrontbezel”onpage82.
3.Locatethefrontpanelconnectorsassembly.
4.Accesssystemboardcomponents.
5.Disconnectthefrontaudio,frontUSB,auxiliaryLED,andIEEE1394cablesfromthesystemboard
andnotethecablesrouting.
134ThinkStationHardwareMaintenanceManual
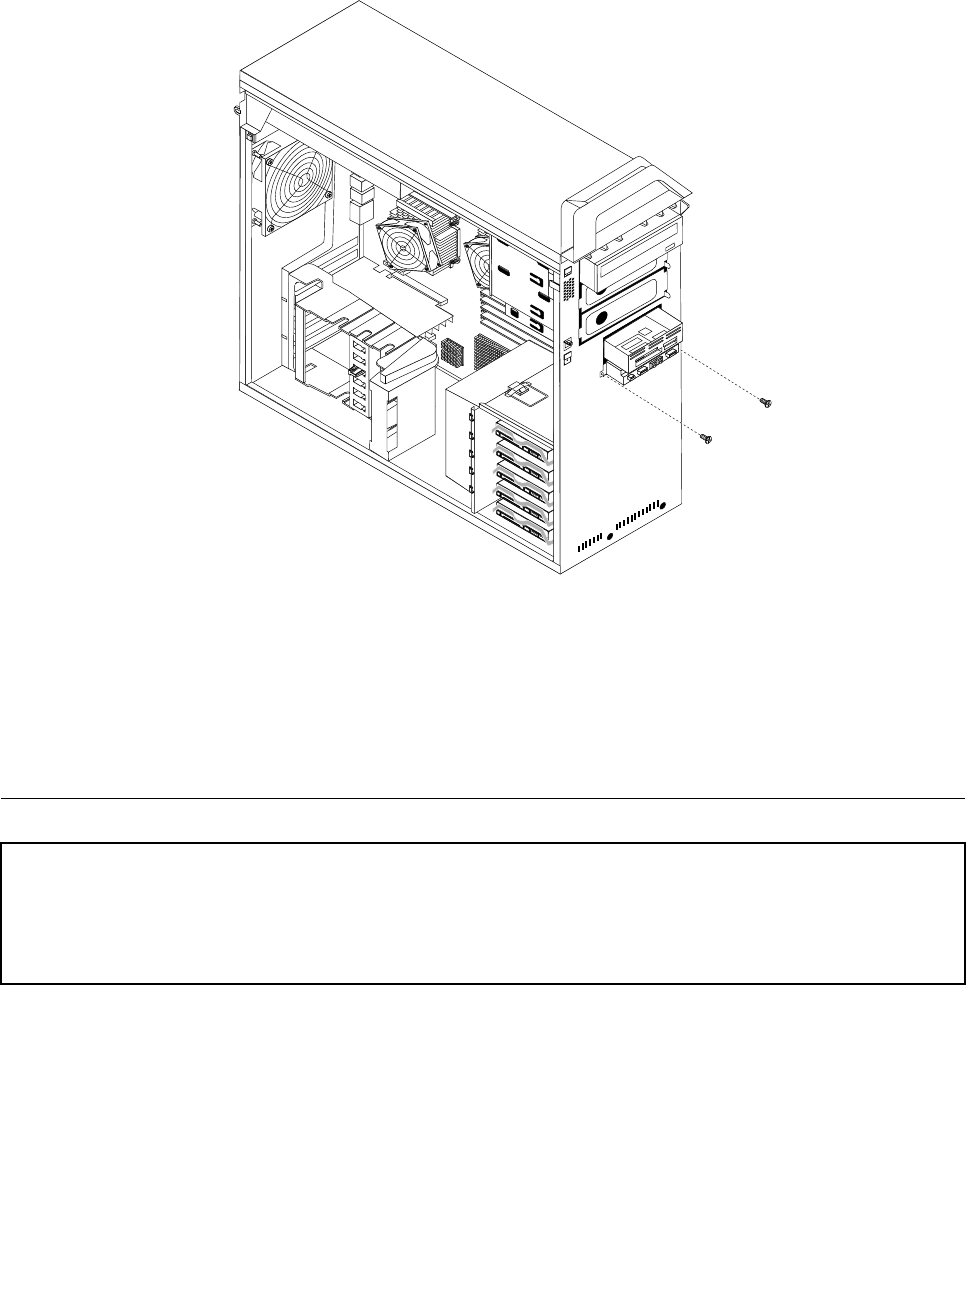
6.Removethetwoscrewsthatsecurethefrontpanelconnectorsassemblytothechassisandthenrelease
thefrontpanelconnectorsassemblyfromthechassis.
7.Alignthescrewholesinthenewfrontpanelconnectorsassemblywiththeholesinthechassis.Install
thetwoscrewstosecuretheassembly.
8.Reconnectallthecablestothesystemboard.See“Locatingpartsonthesystemboard”onpage113.
9.Reinstalltheharddiskdrivefanbracketifremoved.
10.Reinstallthefrontbezel.
11.Goto“CompletingtheFRUreplacement”onpage108.
Replacingthepowerswitch/LEDassembly
Attention
Donotopenyourcomputerorattemptanyrepairbeforereadingandunderstandingthe“Importantsafetyinformation”
intheThinkStationSafetyandWarrantyGuidethatcamewithyourcomputer.ToobtainacopyoftheThinkStation
SafetyandWarrantyGuide,goto:
http://www.lenovo.com/support.
Thisproceduredescribeshowtoremoveandreplacethepowerswitch/LEDassembly.
1.Removethecomputercover.See“Removingthecover”onpage110.
2.Removethefrontbezel.See“Removingthefrontbezel”onpage114
3.Disconnectthepowerswitch/LEDassemblycablefromthesystemboard.See“Removingthefront
bezel”onpage114.
4.Notethepowerswitch/LEDassemblycableroutingandthepositionofthetwoLEDs.
5.RemovetheswitchandtheLEDsfromthebezel.
Chapter11.ReplacingFRUs(Type4155,4158,4218)135
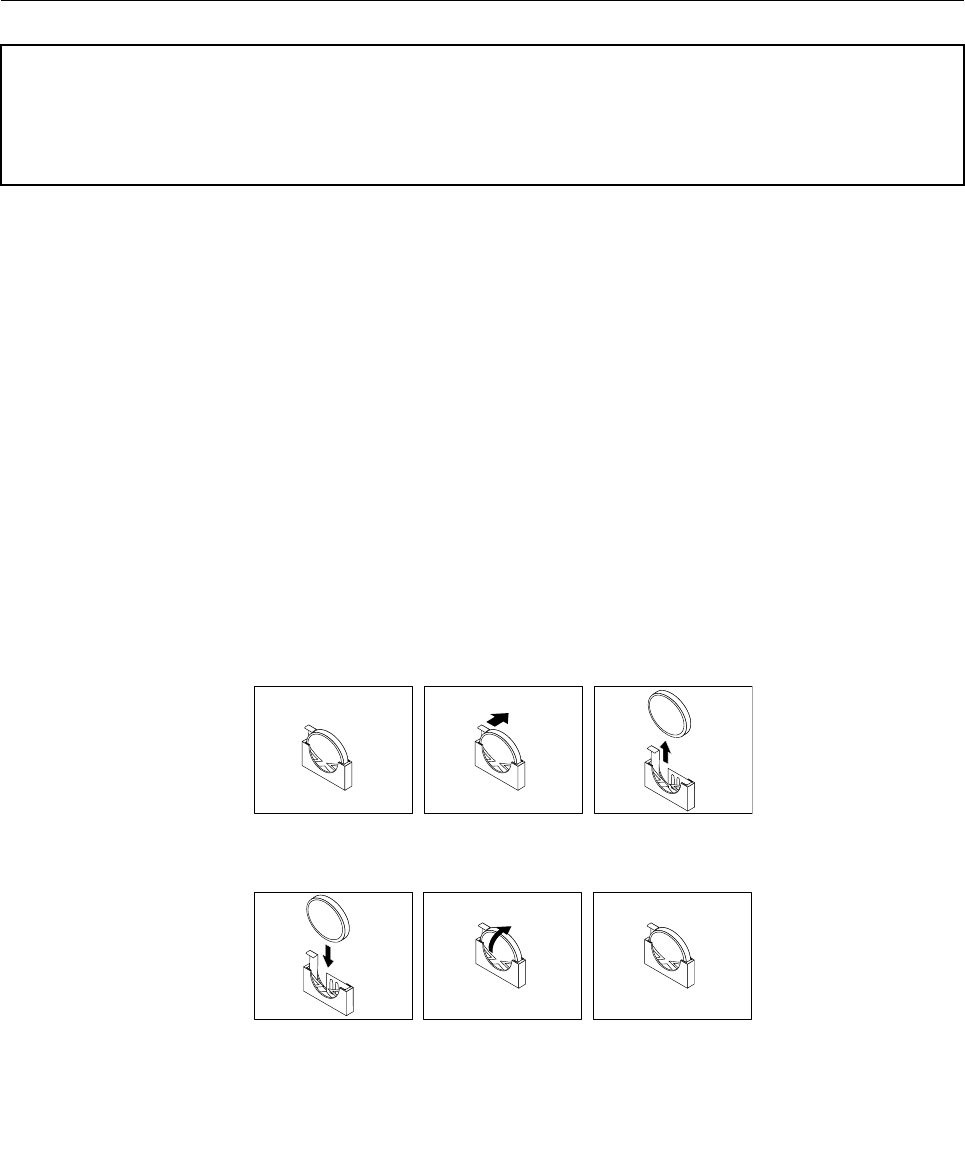
6.Routethecableforthenewpowerswitch/LEDassemblythroughtheholeinthechassisandtothe
systemboard.
7.Installthenewpowerswitch/LEDassemblyintothebezel.MakesurethattheLEDsareinthecorrect
position.
8.Connectthepowerswitch/LEDcabletothesystemboard.
9.Reinstallthefrontbezel.
10.Goto“CompletingtheFRUreplacement”onpage138.
Replacingthebattery
Attention
Donotopenyourcomputerorattemptanyrepairbeforereadingandunderstandingthe“Importantsafetyinformation”
intheThinkStationSafetyandWarrantyGuidethatcamewithyourcomputer.ToobtainacopyoftheThinkStation
SafetyandWarrantyGuide,goto:
http://www.lenovo.com/support.
Yourcomputerhasaspecialtypeofmemorythatmaintainsthedate,time,andsettingsforbuilt-infeatures,
suchasserial-portassignments(conguration).Abatterykeepsthisinformationactivewhenyouturn
offthecomputer.
Thebatterynormallyrequiresnochargingormaintenancethroughoutitslife;however,nobatterylasts
forever.Ifthebatteryfails,thedate,time,andcongurationinformation(includingpasswords)arelost.An
errormessageisdisplayedwhenyouturnonthecomputer.
Refertothe"Lithiumbatterynotice"intheThinkStationSafetyandWarrantyGuideforinformationabout
replacinganddisposingofthebattery.
Toreplacethebattery:
1.Turnoffthecomputeranddisconnectthepowercordfromtheelectricaloutletandfromthecomputer.
2.Openthecomputercover.See“Removingthecover”onpage78.
3.Accessthesystemboard.
4.Locatethebattery.See“Locatingpartsonthesystemboard”onpage113.
5.Removetheoldbattery.
6.Installthenewbattery.
7.Replaceanyadaptercardthatwasremoved.Replacethecomputercoverandconnectthecables.See
“CompletingtheFRUreplacement”onpage108.
136ThinkStationHardwareMaintenanceManual
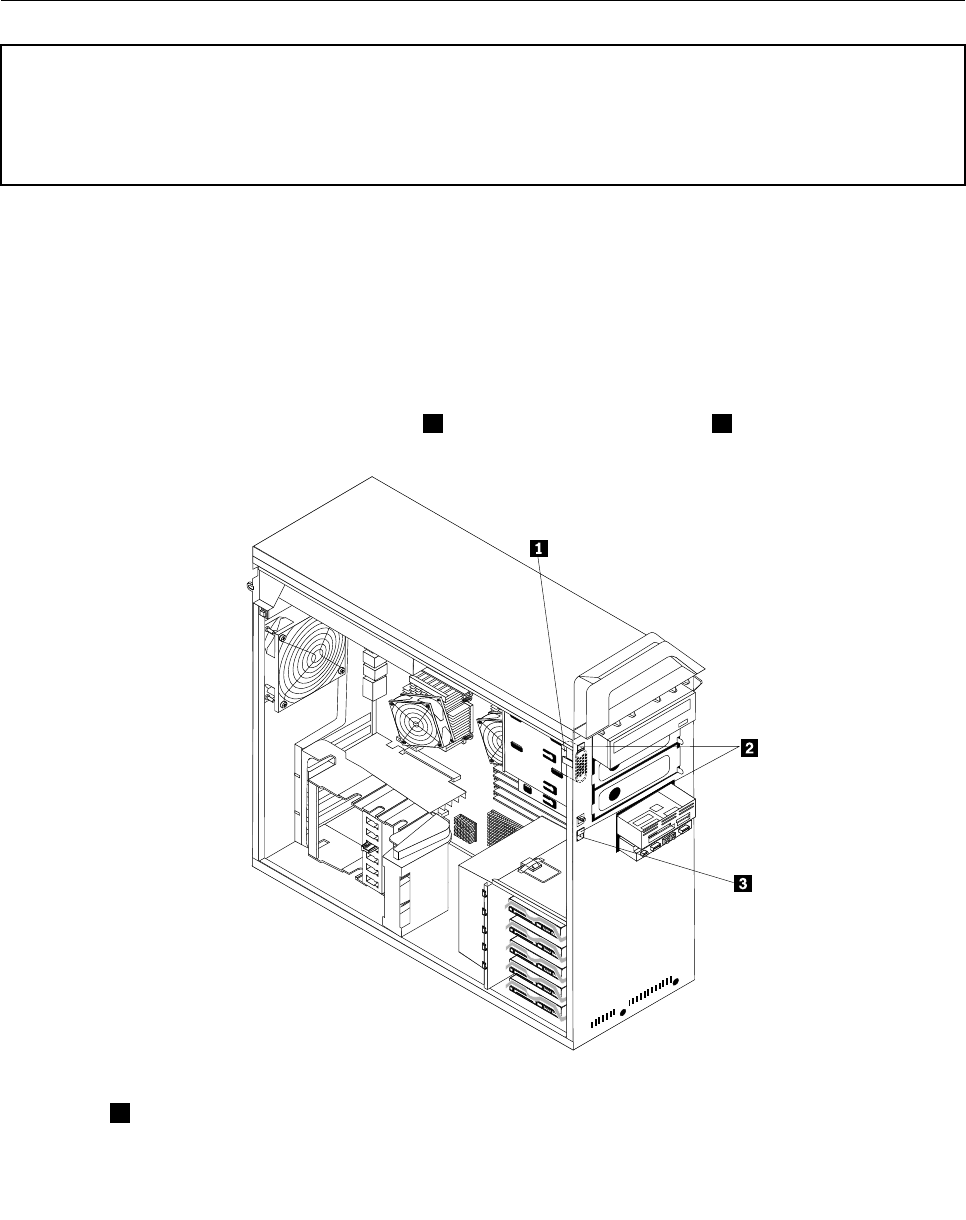
Note:Whenthecomputeristurnedonforthersttimeafterreplacingthebattery,anerrormessage
mightbedisplayed.Thisisnormalafterreplacingthebattery.
8.Turnonthecomputerandallattacheddevices.
9.UsetheSetupUtilityprogramtosetthedateandtimeandanypasswords.See"UsingtheSetup
Utility"intheThinkStationUserGuide.
Replacingtheinternalspeaker
Attention
Donotopenyourcomputerorattemptanyrepairbeforereadingandunderstandingthe“Importantsafetyinformation”
intheThinkStationSafetyandWarrantyGuidethatcamewithyourcomputer.ToobtainacopyoftheThinkStation
SafetyandWarrantyGuide,goto:
http://www.lenovo.com/support.
Thissectionprovidesinstructionsonhowtoreplacetheinternalspeaker.
1.Removethecomputercover.See“Removingthecover”onpage78.
2.Removethefrontbezel.See“Removingthefrontbezel”onpage82.
3.Locatetheinternalspeaker.See“Locations”onpage79.
4.Accesssystemboardcomponents.NotetheroutingoftheinternalspeakercableandpowerLED
cable,andthendisconnectthesecablesfromthesystemboard.See“Locatingpartsonthesystem
board”onpage113.
5.Disengagetheinternalspeakerlockingtab3andslidetheinternalspeaker1downwardstocompletely
removeitfromthechassis.
6.RoutethenewinternalspeakercableandpowerLEDcable,andthenpositionthetwointernalspeaker
latches2intothemetalslotsinthechassis,thenpushtheinternalspeakerupwardsuntilitsnaps
intoposition.
Chapter11.ReplacingFRUs(Type4155,4158,4218)137

7.ConnecttheinternalspeakercableandthepowerLEDcabletothesystemboard.See“Locatingparts
onthesystemboard”onpage113.
8.Reinstalltheharddiskdrivefanbracketifremoved.
9.Reinstallthefrontbezel.
10.Goto“CompletingtheFRUreplacement”onpage108.
CompletingtheFRUreplacement
AfterreplacingFRUs,youneedtoinstallanyremovedparts,replacethecover,andreconnectanycables,
includingtelephonelinesandpowercords.Also,dependingontheFRUthatisreplaced,youmightneedto
conrmtheupdatedinformationintheSetupUtilityprogram.
Note:Whenthepowercordisrstpluggedin,thecomputermightappeartoturnonforafewsecondsand
thenturnoff.Thisisanormalsequencetoenablethecomputertoinitialize.
1.Ensurethatallcomponentshavebeenreassembledcorrectlyandthatnotoolsorloosescrewsareleft
insideyourcomputer.
2.Replacethecover.
3.Reconnecttheexternalcablesandpowercordstothecomputer.See“Rearconnectors”onpage109.
4.Ifyouhavereplacedthesystemboard,youmustupdate(ash)theBIOS.See“Flashupdate
procedures”onpage251.
5.SomeFRUreplacementsrequirethecongurationtobeupdated.SeeChapter6“UsingtheSetup
Utility”onpage41.
138ThinkStationHardwareMaintenanceManual
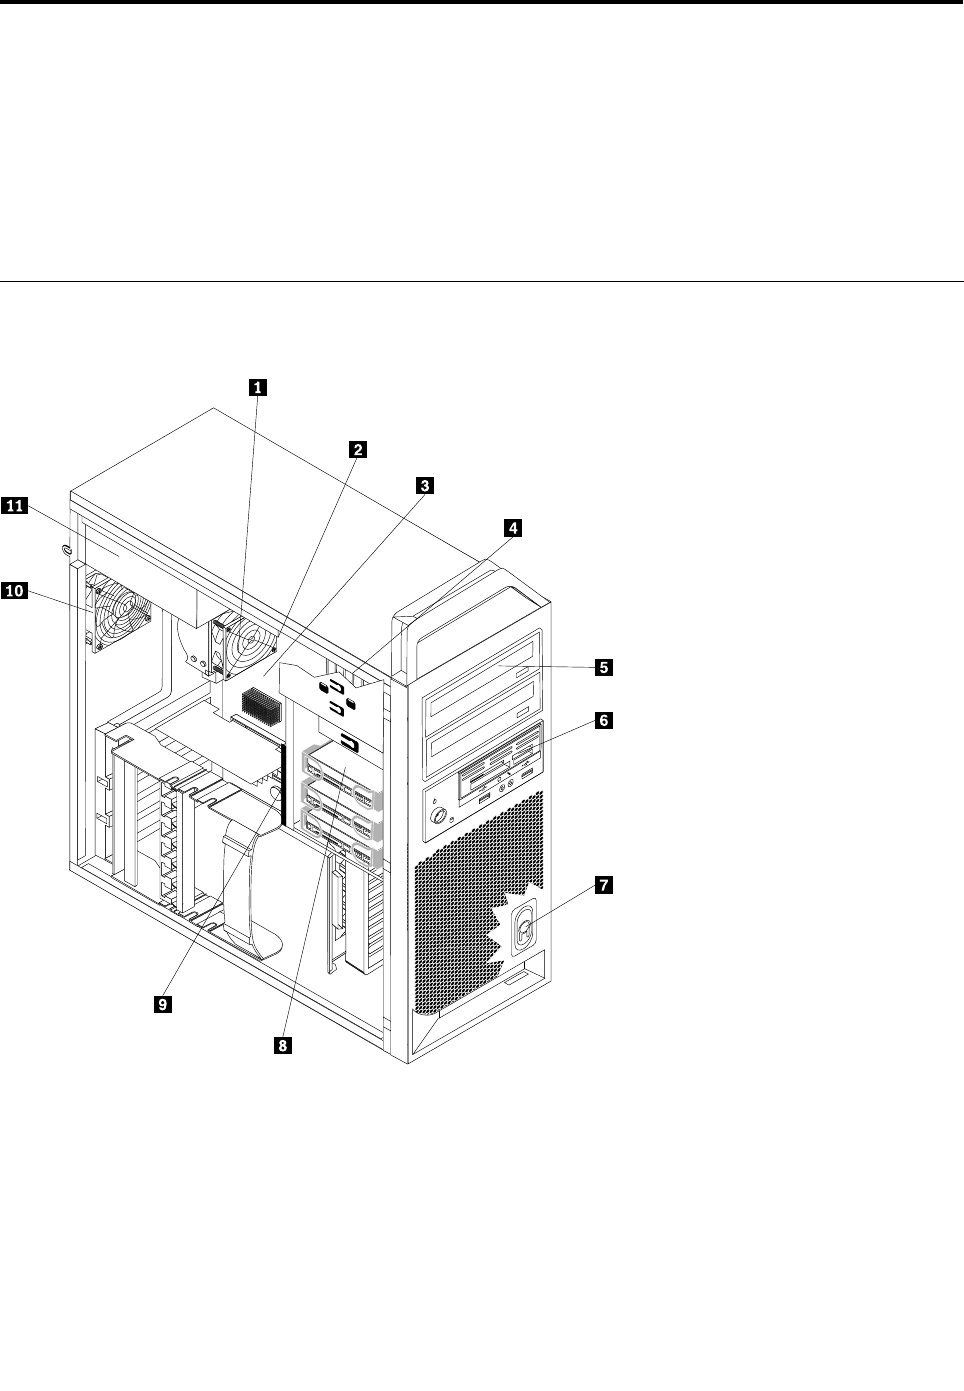
Chapter12.FRUlists
Attention:Read“ImportantinformationaboutreplacingRoHScompliantFRUs”onpage1beforereplacing
anyFRUs.
Note:Inthefollowingtables,aCRU(CustomerReplaceableUnit)isidentiedaseither"1","2",or"N"inthe
CRUcolumn."N"meansthatthepartisnotaCRU,"1"meansthatthepartisaSelf-serviceCRU,and"2"
meansthatthepartisanOptional-serviceCRU.
Overall:MT4105,4157and4217
Thefollowingreplaceablecomponentsareavailableforthe4105,4157and4217machinetypemodels.
©CopyrightLenovo2008,2012139

Item#FRUsFRU#CRU
1
Heatsink,Bloomeldperformance
•MT4105:allmodels
•MT4157:allmodels
•MT4217:allmodels
41R55782
1
Heatsink,Bloomeldworkstation
•MT4105:allmodels
•MT4157:allmodels
•MT4217:allmodels
41R55802
2
Microprocessor,IntelXeonW3520-2.66Ghz,QuadCore-4.8QPI,4MB
L2,DDR3-1066,Turbo,SMT,130W
•MT4105:CTO
•MT4157:CTO
•MT4217:CTO
46R6405N
2
Microprocessor,IntelXeonW3530-QuadCore-2.8GHz-4.8QPI,8MB
Cache,DDR3-1066,Turbo,HT,130W
•MT4105:CTO
•MT4157:CTO
•MT4217:CTO
71Y9027N
2
Microprocessor,IntelXeonW3540-2.93GHz,QuadCore-5.86QPI,
8MBL2,DDR3-1066,Turbo,SMT,130W
•MT4105:CTO
•MT4157:CTO
•MT4217:CTO
46R6406N
2
Microprocessor,IntelXeonW3570-3.20GHz,QuadCore-6.4QPI,8MB
L2,DDR3-1333,Turbo,SMT,130W
•MT4105:CTO
•MT4157:CTO
•MT4217:CTO
46R6407N
2
Microprocessor,IntelXeonW3550-QuadCore-3.06GHz-4.8QPI,
8MBCache,DDR3-1066,Turbo,SMT,130W
•MT4105:CTON5MJ6GJ7GP8MP9MO4GO5GO6GO7GR9U
R9FO1UO1F1CG1FC2MJ2NJ2OJ
•MT4157:F3GF4GG8GL9UL9FM6GM8MM9MN4UN4FN5U
N5F8AU8AF3BJ
•MT4217:CTO
64Y9827N
2
Microprocessor,IntelXeonW3580-QuadCore-3.33GHZ-6.4QPI,
8MBCache,DDR31333,Turbo,SMT,130W
•MT4105:CTO
•MT4157:CTO
•MT4217:CTO
64Y9829N
140ThinkStationHardwareMaintenanceManual

Item#FRUsFRU#CRU
2
Microprocessor,IntelXeonE5502-1.86GHz,DualCore4.8QPI,4MB
L2,DDR3-800,80W
•MT4105:CTO
•MT4157:CTO
•MT4217:CTO
46R6630N
2
Microprocessor,IntelXeonE5503-DualCore-2.00GHz-4.8QPI
DDR3-800-4MB80W
•MT4105:CTO
•MT4157:CTO
•MT4217:CTO
71Y9029N
2
Microprocessor,IntelXeonE5504-2.00GHz,QuadCore-4.8QPI,4MB
L2,DDR3-800,80W
•MT4105:CTO
•MT4157:CTO
•MT4217:CTO
46R6631N
2
Microprocessor,IntelXeonE5506-2.13GHz,QuadCore-4.8QPI,4MB
L2,DDR3-800,80W
•MT4105:CTO
•MT4157:CTO
•MT4217:CTO
46R6632N
2
Microprocessor,IntelXeonE5507-QuadCore-2.26GHz-4.8QPI
DDR3-800-4MB80W
•MT4105:CTO
•MT4157:CTO
•MT4217:CTO
71Y9031N
2
Microprocessor,IntelXeonE5520-2.26GHz,QuadCore5.86QPI,8MB
L2,DDR3-1066,Turbo,SMT,80W
•MT4105:CTO
•MT4157:CTOJ9M
•MT4217:CTO
46R6633N
2
Microprocessor,IIntelXeonE5530-2.40GHz,QuadCore-5.86QPI,
8MBL2,DDR3-1066,Turbo,SMT,80W
•MT4105:CTO
•MT4157:CTO
•MT4217:CTO
46R6634N
2
Microprocessor,IntelXeonE5620-QuadCore-2.40GHz-5.86QPI
DDR3-1066-12MBTurboSMT80W
•MT4105:CTOE6GF8AF8QF8TF8HF8VF8KF8R1GB1GH
•MT4157:CTOC3BC3HC3VB4GB5AB5QB5TB5KB5R
•MT4217:CTO
71Y9049N
Chapter12.FRUlists141

Item#FRUsFRU#CRU
2
Microprocessor,IntelXeonE5630-QuadCore-2.53GHz-5.86QPI
DDR3-1066-12MBTurboSMT80W
•MT4105:CTO
•MT4157:CTO
•MT4217:CTO
71Y9047N
2
Microprocessor,IntelXeonE5640-QuadCore-2.66GHz-5.86QPI
DDR3-1066-12MBTurboSMT80W
•MT4105:CTO
•MT4157:CTO
•MT4217:CTO
71Y9045N
2
Microprocessor,IntelXeonX5550-2.66GHz,QuadCore-6.4QPI,8MB
L2,DDR3-1333,Turbo,SMT,95W
•MT4105:CTO
•MT4157:CTO
•MT4217:CTO
46R6638N
2
Microprocessor,IntelXeonX5560-2.80GHz,QuadCore-6.4QPI,8MB
L2,DDR3-1333,Turbo,SMT,95W
•MT4105:CTO
•MT4157:CTO
•MT4217:CTO
46R6639N
2
Microprocessor,IntelXeonX5650-6Core-2.66GHz-6.4QPI
DDR3-1333-12MBTurboSMT95W
•MT4105:CTOE9GF5G
•MT4157:CTO
•MT4217:CTO
71Y9043N
2
Microprocessor,IntelXeonX5660-6Core-2.80GHz-6.4QPI
DDR3-1333-12MBTurboSMT95W
•MT4105:CTO
•MT4157:CTO
•MT4217:CTO
71Y9041N
2
Microprocessor,IntelXeonX5667-QuadCore-3.06GHz-6.4QPI
DDR3-1333-12MBTurboSMT95W
•MT4105:CTO
•MT4157:CTO
•MT4217:CTO
71Y9039N
2
Microprocessor,IntelXeonX5570-2.93GHz,QuadCore-6.4QPI,8MB
L2,DDR3-1333,Turbo,SMT,95W
•MT4105:CTO
•MT4157:CTO
•MT4217:CTO
46R6640N
142ThinkStationHardwareMaintenanceManual

Item#FRUsFRU#CRU
2
Microprocessor,IntelXeonX5680-6Cores-3.33GHz-6.4QPI
DDR3-1333-12MBTurboSMT130W
•MT4105:CTO
•MT4157:CTO
•MT4217:CTO
71Y9033N
2
Microprocessor,IntelXeonX5677-QuadCore-3.46GHz-6.4QPI
DDR3-1333-12MBTurboSMT130W
•MT4105:CTO
•MT4157:CTO
•MT4217:CTO
71Y9035N
2
Microprocessor,IntelXeonX5670-6Core-2.93GHz-6.4QPI
DDR3-1333-12MBTurboSMT95W
•MT4105:CTOF1GF4G
•MT4157:CTO
•MT4217:CTO
71Y9037N
2
Microprocessor,IntelXeonW5580-3.20GHz,QuadCore6.4QPI,8MB
L2,DDR3-1333,Turbo,SMT,130W
•MT4105:CTO16U16F
•MT4157:CTO
•MT4217:CTO
46R6641N
2
Microprocessor,IntelXeonW5590-QuadCore-3.33GHZ-6.4QPI,
8MBCache,DDR3-1333,Turbo,HT,130W
•MT4105:CTO
•MT4157:CTO
•MT4217:CTO
64Y9831N
2
Microprocessor,IntelXeonW3503-DualCore-2.4Ghz-4.8QPI,4MB
L2,DDR3-1066,130W
•MT4105:CTO96GM2GK7GK7C1EM2FU2FF3AU3AF
•MT4157:CTO9AU9AF
•MT4217:CTO
63Y9159N
2
Microprocessor,IntelXeonW3505-DualCore-2.53Ghz-4.8QPI,
4MBL2,DDR3-1066,130W
•MT4105:CTOO3UO3F
•MT4157:CTO
•MT4217:CTO
63Y9161N
2
Microprocessor,IntelXeonW3680-6Core-3.33GHz-6.4QPI
DDR3-1333-12MBTurboSMT130W
•MT4105:CTO
•MT4157:CTO
•MT4217:CTO
71Y9025N
Chapter12.FRUlists143

Item#FRUsFRU#CRU
2
Microprocessor,IntelXeonW3565-QuadCore-3.2GHz-4.8QPI,
8MBCache,DDR3-1066,130W
•MT4105:CTOD2GN7ML4HP1GP2G2AG2BG2CG2DG2KJ2LJ
3CG4CG5CU5CF6CU6CF8CG9CG4AG
•MT4157:CTO4BJ5BJ
•MT4217:CTO
71Y8842N
2
Microprocessor,IntelXeonE5603-QuadCore-1.6Ghz-4.8QPI,4MB
Cache,DDR3-1066,NoHT,NoTurbo,80W
•MT4105:CTO
•MT4157:CTOJ8MK2MF6GG6G1AG2AG6AG1BJ2BJ8BU8BF
9BU9BF1CU1CF2CU2CF2CS2CP2CL2CD2CY2CG2CM2CA
2CQ2CT2CC2CB2CH2CV2CK2CR2CE2CJ3CG
•MT4217:CTO
03T8032N
2
Microprocessor,IntelXeonE5606-QuadCore-2.13Ghz-4.8QPI,8MB
Cache,DDR3-1066,NoHT,NoTurbo,80W
•MT4105:CTO
•MT4157:CTON1UN1F
•MT4217:CTO
03T8031N
2
Microprocessor,IntelXeonE5607-QuadCore-2.26Ghz-4.8QPI,8MB
Cache,DDR3-1066,NoHT,NoTurbo,80W
•MT4105:CTO1KU1KF2EU2EF
•MT4157:CTO
•MT4217:CTO
03T8030N
2
Microprocessor,IntelXeonE5645-6Core-2.4Ghz-5.86QPI,12MB
Cache,DDR3-1333,Turbo,HT,80W
•MT4105:CTO2PH4BH
•MT4157:CTON2UN2F7AU7AF
•MT4217:CTO
03T8029N
2
Microprocessor,IntelXeonE5649-6Core-2.53Ghz-5.86QPI,12MB
Cache,DDR3-1333,Turbo,HT,80W
•MT4105:CTO3BH
•MT4157:CTO
•MT4217:CTO
03T8027N
2
Microprocessor,IntelXeonX5647-QuadCore-2.93Ghz-5.86QPI,
12MBCache,DDR3-1066,Turbo,HT,130W
•MT4105:CTO
•MT4157:CTO
•MT4217:CTO
03T8028N
2
Microprocessor,IntelXeonX5672-QuadCore-3.2Ghz-6.4QPI,12MB
Cache,DDR3-1333,Turbo,HT,95W
•MT4105:CTO
•MT4157:CTO
•MT4217:CTO
03T8026N
144ThinkStationHardwareMaintenanceManual

Item#FRUsFRU#CRU
2
Microprocessor,IntelXeonX5675-6Core-3.06Ghz-6.4QPI,12MB
Cache,DDR3-1333,Turbo,HT,95W
•MT4105:CTO2RH
•MT4157:CTO
•MT4217:CTO
03T8025N
2
Microprocessor,IntelXeonX5687-QuadCore-3.6Ghz-6.4QPI,12MB
Cache,DDR3-1333,Turbo,HT,130W
•MT4105:CTO
•MT4157:CTO
•MT4217:CTO
03T8024N
2
Microprocessor,IntelXeonX5690-6Core-3.46Ghz-6.4QPI,12MB
Cache,DDR3-1333,Turbo,HT,130W
•MT4105:CTO
•MT4157:CTO
•MT4217:CTO
03T8023N
2
Microprocessor,IntelXeonW3670-6Core-3.2Ghz-6.4QPI,12MB
Cache,DDR3-1333,Turbo,HT,130W
•MT4105:CTO
•MT4157:CTO
•MT4217:CTO
03T8021N
2
Microprocessor,IntelXeonW3690-6Core-3.46Ghz-6.4QPI,12MB
Cache,DDR3-1333,Turbo,HT,130W
•MT4105:CTO1LM2GJ2HJ2JJ7CM
•MT4157:CTO4BJ5BJ
•MT4217:CTO
03T8022N
2
Microprocessor,IntelXeonE5540-QuadCore-2.53GHz-5.86QPI,
8MBCache,DDR3-1066,Turbo,HT,80W
•MT4105:CTO
•MT4157:CTON7MN3UN3FN6UN6F3AG4AG5AG6BJ7BJ3DG
5CG
•MT4217:CTO
46R6635N
2
Microprocessor,IntelXeonL5630-QuadCore-2.13GHz-5.86QPI,
12MBCache,DDR3-1066,Turbo,HT,40W
•MT4105:CTO
•MT4157:CTO
•MT4217:CTO
03T8045N
Chapter12.FRUlists145

Item#FRUsFRU#CRU
3
Systemboard,Menorca-1PIntelLGA1366,Tylersburg36S,ICH10R
(v1.35,TPMenabled)
•MT4105:CTO96GD2GM2GN5MN7ML4HE6GE9GF1GF4G
F5GF8AF8QF8TF8HF8VF8KF8RJ6GJ7GK7GK7CP8MP9M
R1JP1GP2GO4GO5GO6GO7GR9UR9FO1UO1FO3UO3F1CG
1EM1FC1GB1GH1LM1KU1KF2AG2BG2CG2DG2EU2EF2FU
2FF2GJ2HJ2JJ2KJ2LJ2MJ2NJ2OJ2PH2RH3AU3AF3BH
•MT4157:CTOC3BC3HC3VB4GB5AB5QB5TB5KB5RJ8MJ9M
K2MF3GF4GF6GG6GG8GL9UL9FM6GM8MM9MN7MN1U
N1FN2UN2FN3UN3FN4UN4FN5UN5FN6UN6F1AG2AG3AG
4AG5AG6AG7AU7AF8AU8AF9AU9AF1BJ2BJ3BJ4BJ5BJ6BJ
7BJ8BU8BF9BU9BF1CU1CF2CU2CF2CS2CP2CL2CD2CY
2CG2CM2CA2CQ2CT2CC2CB2CH2CV2CK2CR2CE2CJ
•MT4217:CTO
71Y8819N
3
Systemboard,Menorca-1PIntelLGA1366,Tylersburg36S,ICH10R
(v1.35,TPMdisabled)
•MT4105:96GM2GE6GE9GF1GF4GF5GP1GP2GO6GO7G1CG
1GB2AG2BG2CG2DG
•MT4157:CTO1AG2AG3AG4AG5AG6AG2CG
•MT4217:CTO
71Y8823N
3
Systemboard,Menorca-1PIntelLGA1366,Tylersburg36S,ICH10R
(v1.45,TPMenabled)
•MT4105:CTO96GD2GM2GN5MN7ML4HE6GE9GF1GF4G
F5GF8AF8QF8TF8HF8VF8KF8RJ6GJ7GK7GK7CP8MP9M
R1JP1GP2GO4GO5GO6GO7GR9UR9FO1UO1FO3UO3F1CG
1EM1FC1GB1GH1LM1KU1KF2AG2BG2CG2DG2EU2EF2FU
2FF2GJ2HJ2JJ2KJ2LJ2MJ2NJ2OJ2PH2RH3AU3AF3BH
•MT4157:CTOC3BC3HC3VB4GB5AB5QB5TB5KB5RJ8MJ9M
K2MF3GF4GF6GG6GG8GL9UL9FM6GM8MM9MN7MN1U
N1FN2UN2FN3UN3FN4UN4FN5UN5FN6UN6F1AG2AG3AG
4AG5AG6AG7AU7AF8AU8AF9AU9AF1BJ2BJ3BJ4BJ5BJ6BJ
7BJ8BU8BF9BU9BF1CU1CF2CU2CF2CS2CP2CL2CD2CY
2CG2CM2CA2CQ2CT2CC2CB2CH2CV2CK2CR2CE2CJ
•MT4217:CTO
71Y8820N
3
Systemboard,Menorca-1PIntelLGA1366,Tylersburg36S,ICH10R
(v1.45,TPMdisabled)
•MT4105:96GM2GE6GE9GF1GF4GF5GP1GP2GO6GO7G1CG
1GB2AG2BG2CG2DG
•MT4157:CTO1AG2AG3AG4AG5AG6AG2CG
•MT4217:CTO
71Y8824N
146ThinkStationHardwareMaintenanceManual

Item#FRUsFRU#CRU
3
Systemboard,Menorca-1PIntelX58LGA1366,Tylersburg36S,
ICH10R
•MT4105:3CG4CG5CU5CF6CU6CF7CM8CG9CG4AG4BH
•MT4157:CTOC3BC3HC3VB4GB5AB5QB5TB5KB5RJ8M
J9MK2MF3GF4GF6GG6GG8GL9UL9FM6GM8MM9MN7M
N1UN1FN2UN2FN3UN3FN4UN4FN5UN5FN6UN6F1AG2AG
3AG4AG5AG6AG7AU7AF8AU8AF9AU9AF1BJ2BJ3BJ4BJ
5BJ6BJ7BJ8BU8BF9BU9BF1CU1CF2CU2CF2CS2CP2CL
2CD2CY2CG2CM2CA2CQ2CT2CC2CB2CH2CV2CK2CR
2CE2CJ3CG3DG5CG
•MT4217:CTO
46R4544N
3
Systemboard,Menorca-1PIntelLGA1366,Tylersburg36S,ICH10R
(Russiaonly)
•MT4105:96GM2GE6GE9GF1GF4GF5GP1GP2GO6GO7G1CG
1GB2AG2BG2CG2DG
•MT4157:CTO1AG2AG3AG4AG5AG6AG2CG
•MT4217:CTO
64Y6337N
3
Systemboard,Menorca-1PIntelLGA1366,Tylersburg36S,ICH10R
(NewSOVPlevel)
•MT4105:
•MT4157:CTOC3BC3HC3VB4GB5AB5QB5TB5KB5RJ8MJ9M
K2MF3GF4GF6GG6GG8GL9UL9FM6GM8MM9MN7MN1U
N1FN2UN2FN3UN3FN4UN4FN5UN5FN6UN6F1AG2AG3AG
4AG5AG6AG7AU7AF8AU8AF9AU9AF1BJ2BJ3BJ4BJ5BJ6BJ
7BJ8BU8BF9BU9BF1CU1CF2CU2CF2CS2CP2CL2CD2CY
2CG2CM2CA2CQ2CT2CC2CB2CH2CV2CK2CR2CE2CJ
•MT4217:CTO
64Y6590N
3
Systemboard,Menorca-1PIntelLGA1366,Tylersburg36S,ICH10R
•MT4105:CTO96GD2GM2GN5MN7ML4HE6GE9GF1GF4G
F5GF8AF8QF8TF8HF8VF8KF8RJ6GJ7GK7GK7CP8MP9M
R1JP1GP2GO4GO5GO6GO7GR9UR9FO1UO1FO3UO3F1CG
1EM1FC1GB1GH1LM1KU1KF2AG2BG2CG2DG2EU2EF2FU
2FF2GJ2HJ2JJ2KJ2LJ2MJ2NJ2OJ2PH2RH3AU3AF3BH
•MT4157:CTOC3BC3HC3VB4GB5AB5QB5TB5KB5RJ8MJ9M
K2MF3GF4GF6GG6GG8GL9UL9FM6GM8MM9MN7MN1U
N1FN2UN2FN3UN3FN4UN4FN5UN5FN6UN6F1AG2AG3AG
4AG5AG6AG7AU7AF8AU8AF9AU9AF1BJ2BJ3BJ4BJ5BJ6BJ
7BJ8BU8BF9BU9BF1CU1CF2CU2CF2CS2CP2CL2CD2CY
2CG2CM2CA2CQ2CT2CC2CB2CH2CV2CK2CR2CE2CJ
•MT4217:CTO
64Y7517N
4
Memorymodule,1GBDDR3ECCUDIMMPC3-10600(1333MHz)
•MT4105:CTO
•MT4157:CTOB5AB5QB5TB5KB5R
•MT4217:CTO
46R60261
Chapter12.FRUlists147

Item#FRUsFRU#CRU
4
Memorymodule,2GBDDR3ECCUDIMMPC3-10600(1333MHz)
•MT4105:CTOD2GM2GN5MN7ML4HE9GF1GF4GF5GJ6GJ7G
P8MP9MP1GP2GO4GO5GO6GO7GR9UR9FO1UO1FO3U
O3F1CG1EM1FC1GB1GH1LM1KU1KF2AG2BG2CG2DG2EU
2EF2FU2FF2GJ2HJ2JJ2KJ2LJ2MJ2NJ2OJ2PH3AU3AF3CG
4CG7CM8CG9CG4AG4BH
•MT4157:CTOJ8MJ9MK2MF3GF4GF6GG6GG8GL9UL9F
M6GM8MM9MN7MN1UN1FN2UN2FN3UN3FN4UN4FN5U
N5FN6UN6F1AG2AG3AG4AG5AG6AG7AU7AF8AU8AF9AU
9AF1BJ2BJ3BJ4BJ5BJ6BJ7BJ8BU8BF9BU9BF1CU1CF
2CU2CF2CS2CP2CL2CD2CY2CG2CM2CA2CQ2CT2CC2CB
2CH2CV2CK2CR2CE2CJ3CG3DG5CG
•MT4217:CTO
46R60271
4
Memorymodule,4GBDDR3ECCUDIMM(9-9-9)PC3-10600(1333MHz)
•MT4105:CTO2RH3BH5CU5CF6CU6CF
•MT4157:CTO
•MT4217:CTO
64Y95701
4
Memorymodule,1GBDDR3ECCUDIMMPC3-8500(1066MHz)
•MT4105:CTO
•MT4157:CTO
•MT4217:CTO
53Y61951
4
Memorymodule,2GBDDR3ECCUDIMMPC3-8500(1066MHz)
•MT4105:CTO96GE6GF8AF8QF8TF8HF8VF8KF8RK7GK7C
•MT4157:CTOC3BC3HC3VB4G
•MT4217:CTO
53Y61971
4
Memorymodule,8GBDDR3ECCUDIMM(9-9-9)PC3-10600(1333MHz)
•MT4105:CTO
•MT4157:CTO
•MT4217:CTO
03T84291
5
Opticaldrive,DVD-ROMdrive-16x/48x(SATA)-DOS/Linux
•MT4105:CTO
•MT4157:CTO
•MT4217:CTO
41N33251
5
Opticaldrive,DVD-ROMdrive-16x/48x(SATA)-DOS/Linux
•MT4105:CTO
•MT4157:CTO
•MT4217:CTO
71Y55431
148ThinkStationHardwareMaintenanceManual

Item#FRUsFRU#CRU
5
Opticaldrive,DVDburner/CD-RWRambo8(SATA)-DOS/Linux
•MT4105:CTO96GD2GM2GN5MN7ML4HE6GE9GF1GF4G
F5GF8AF8QF8TF8HF8VF8KF8RJ6GJ7GK7GK7CP8MP9M
P1GP2GO4GO5GO6GO7GR9UR9FO1UO1FO3UO3F1CG
1EM1FC1GB1GH1LM1KU1KF2AG2BG2CG2DG2EU2EF2FU
2FF2GJ2HJ2JJ2KJ2LJ2MJ2NJ2OJ2PH2RH3AU3AF3BH3CG
4CG5CU5CF6CU6CF7CM8CG9CG4AG4BH
•MT4157:CTOC3BC3HC3VB4GB5AB5QB5TB5KB5RJ8M
J9MK2MF3GF4GF6GG6GG8GL9UL9FM6GM8MM9MN7M
N1UN1FN2UN2FN3UN3FN4UN4FN5UN5FN6UN6F1AG2AG
3AG4AG5AG6AG7AU7AF8AU8AF9AU9AF1BJ2BJ3BJ4BJ
5BJ6BJ7BJ8BU8BF9BU9BF1CU1CF2CU2CF2CS2CP2CL
2CD2CY2CG2CM2CA2CQ2CT2CC2CB2CH2CV2CK2CR
2CE2CJ3CG3DG5CG
•MT4217:CTO
43C10421
5
Opticaldrive,DVDburner/CD-RWRambo8(SATA)-DOS/Linux
•MT4105:CTO96GD2GM2GN5MN7ML4HE6GE9GF1GF4G
F5GF8AF8QF8TF8HF8VF8KF8RJ6GJ7GK7GK7CP8MP9M
P1GP2GO4GO5GO6GO7GR9UR9FO1UO1FO3UO3F1CG
1EM1FC1GB1GH1LM1KU1KF2AG2BG2CG2DG2EU2EF2FU
2FF2GJ2HJ2JJ2KJ2LJ2MJ2NJ2OJ2PH2RH3AU3AF3BH3CG
4CG5CU5CF6CU6CF7CM8CG9CG4AG4BH
•MT4157:CTOC3BC3HC3VB4GB5AB5QB5TB5KB5RJ8M
J9MK2MF3GF4GF6GG6GG8GL9UL9FM6GM8MM9MN7M
N1UN1FN2UN2FN3UN3FN4UN4FN5UN5FN6UN6F1AG2AG
3AG4AG5AG6AG7AU7AF8AU8AF9AU9AF1BJ2BJ3BJ4BJ
5BJ6BJ7BJ8BU8BF9BU9BF1CU1CF2CU2CF2CS2CP2CL
2CD2CY2CG2CM2CA2CQ2CT2CC2CB2CH2CV2CK2CR
2CE2CJ3CG3DG5CG
•MT4217:CTO
71Y55451
5
Opticaldrive,Blu-raywithAACSbusencryption
•MT4105:
•MT4157:
•MT4217:CTO
03T84231
6
Diskettedrive,3.5"1.44MB2-ModeFDD-ALPS
•MT4105:CTO
•MT4157:CTO
•MT4217:CTO
40Y91051
6
Diskettedrive,3.5"1.44MB2-ModeFDD-SONY
•MT4105:CTO
•MT4157:CTO
•MT4217:CTO
40Y91071
7
FRU,powerswitch,LEDcableandpowerbuttonkit
•MT4105:allmodels
•MT4157:allmodels
•MT4217:allmodels
41R56512
Chapter12.FRUlists149

Item#FRUsFRU#CRU
8
Harddiskdrive,250GBSATA-7200rpm,8MBcache,3.5"
•MT4105:CTOM2G
•MT4157:CTO
•MT4217:CTO
46R60291
8
Harddiskdrive,500GBSATA-7200rpm,3Gb/s,16MBcache,3.5"
•MT4105:CTO96GD2GN5MN7ML4HF1GF8AF8QF8TF8HF8V
F8KF8RJ6GK7GK7CO4GO5GR9UR9FO1UO1FO3UO3F1EM
1FC1GB1GH1KU1KF2EU2EF2FU2FF2GJ2HJ2KJ2MJ2NJ
2OJ3AU3AF5CU5CF7CM8CG9CG4AG4BH
•MT4157:CTOC3BC3HC3VB4GB5AB5QB5TB5KB5RJ8MJ9M
K2MF3GF4GF6GG6GG8GL9UL9FM9MN1UN1FN2UN2F
N3UN3F7AU7AF8AU8AF9AU9AF1BJ3BJ4BJ8BU8BF9BU
9BF1CU1CF3DG5CG
•MT4217:CTO
46R60301
8
Harddiskdrive,750GBSATA-7200rpm,3Gb/s,16MBcache,3.5"
•MT4105:CTO
•MT4157:CTO
•MT4217:CTO
43C36711
8
Harddiskdrive,1TBSATA-7200rpm,3Gb/s,32MBcache,3.5"
•MT4105:CTOP1G1LM2AG2BG2CG2DG2PH2RH3BH
•MT4157:CTO3AG5AG
•MT4217:CTO
46R60311
8
Harddiskdrive,74GBSATA-10000rpm,3Gb/s,16MBcache,2.5"
•MT4105:CTO
•MT4157:CTO
•MT4217:CTO
46R60322
8
Harddiskdrive,150GBSATA-10000rpm,3Gb/s,16MBcache,2.5"
•MT4105:CTOF4GF5GJ7GP2GO6GO7G
•MT4157:CTO
•MT4217:CTO
46R64002
8
Harddiskdrive,300GBSATA-10000rpm,3Gb/s,16MBcache,2.5"
•MT4105:CTO
•MT4157:
•MT4217:CTO
46R64012
8
Harddiskdrive,147GBSAS-15000rpm,3Gb/s,32MBcache,3.5"
•MT4105:CTO
•MT4157:CTO
•MT4217:CTO
46R60331
8
Harddiskdrive,147GBSAS-15000rpm,3Gb/s,32MBcache,3.5"
•MT4105:CTO
•MT4157:CTO
•MT4217:CTO
45K06081
150ThinkStationHardwareMaintenanceManual

Item#FRUsFRU#CRU
8
Harddiskdrive,300GBSAS-15000rpm,3Gb/s,32MBcache,3.5"
•MT4105:CTO1CG2DG
•MT4157:CTOM6GM8MN4UN4FN5UN5FN6UN6F2BJ5BJ6BJ
•MT4217:CTO
43C69691
8
Harddiskdrive,300GBSAS-15000rpm,3Gb/s,32MBcache,3.5"
•MT4105:CTO1CG2DG
•MT4157:CTOM6GM8MN4UN4FN5UN5FN6UN6F2BJ5BJ6BJ
•MT4217:CTO
45K06091
8
Harddiskdrive,300GBSAS-15000rpm,6Gb/s,32MBcache,3.5"
•MT4105:CTO1CG2DG
•MT4157:CTOM6GM8MN4UN4FN5UN5FN6UN6F2BJ5BJ6BJ
•MT4217:CTO
03X36211
8
Harddiskdrive,450GBSAS-15000rpm,3Gb/s,32MBcache,3.5"
•MT4105:CTO6CU6CF
•MT4157:CTON7M1AG4AG2CU2CF2CS2CP2CL2CD2CY2CG
2CM2CA2CQ2CT2CC2CB2CH2CV2CK2CR2CE2CJ
•MT4217:CTO
45J48991
8
Harddiskdrive,450GBSAS-15000rpm,32MBcache,3.5"
•MT4105:CTO6CU6CF
•MT4157:CTON7M1AG4AG2CU2CF2CS2CP2CL2CD2CY2CG
2CM2CA2CQ2CT2CC2CB2CH2CV2CK2CR2CE2CJ
•MT4217:CTO
03X36221
8
Harddiskdrive,128GBSATAsolidstatedrive(SSD)-MLC,1.8"
•MT4105:CTO
•MT4157:CTOM6G
•MT4217:CTO
45N79531
8
Harddiskdrive,128GBSATAsolidstatedrive(SSD)-MLC,1.8"
•MT4105:CTO
•MT4157:CTOM6G
•MT4217:CTO
45N82031
8
Harddiskdrive,256GBSATAsolidstatedrive(SSD)-MLC,1.8"
•MT4105:CTO
•MT4157:CTO
•MT4217:CTO
45N79591
8
Harddiskdrive,256GBSATAsolidstatedrive(SSD)-MLC,1.8"
•MT4105:CTO
•MT4157:CTO
•MT4217:CTO
45N82071
Chapter12.FRUlists151

Item#FRUsFRU#CRU
8
Harddiskdrive,160GBSATAsolidstatedrive(SSD)-MLC,1.8"
•MT4105:CTOP8MP9M
•MT4157:CTO2AG
•MT4217:CTO
45N79631
8
Harddiskdrive,160GBSATAsolidstatedrive(SSD)-MLC,1.8"
•MT4105:CTOP8MP9M
•MT4157:CTO2AG
•MT4217:CTO
45N80191
8
Harddiskdrive,2TBSATA-7200rpm,3Gb/s,32MBcache,3.5"
•MT4105:CTO
•MT4157:CTO
•MT4217:CTO
45K06101
8
Harddiskdrive,1TBSATA-7200rpm,3Gb/s,32MBcache,3.5"
•MT4105:CTO1LM2AG2BG2CG2DG2PH2RH3BH
•MT4157:CTO3AG5AG
•MT4217:CTO
45K04121
8
Harddiskdrive,128GBSATAsolidstatedrive(SSD),2.5"
•MT4105:CTO
•MT4157:CTO
•MT4217:CTO
45K06171
8
Harddiskdrive,256GBSATAsolidstatedrive(SSD),2.5"
•MT4105:CTO4CG
•MT4157:CTO3CG
•MT4217:CTO
45K06181
8
Harddiskdrive,160GBSATAsolidstatedrive(SSD)-MLC-SM160,2.5"
•MT4105:CTO2JJ2LJ3CG
•MT4157:CTO2AG7BJ
•MT4217:CTO
03T70261
8
Harddiskdrive,160GBSATAsolidstatedrive(SSD)-MLC-SM160,2.5"
•MT4105:CTO2JJ2LJ3CG
•MT4157:CTO2AG7BJ
•MT4217:CTO
45K06161
8
Harddiskdrive,600GBSATA-10000rpm,16MBcache,2.5"
•MT4105:CTO
•MT4157:CTO
•MT4217:CTO
91Y16581
8
Harddiskdrive,600GBSAS-15000rpm,3.5"
•MT4105:CTO
•MT4157:CTO
•MT4217:CTO
03X36161
152ThinkStationHardwareMaintenanceManual

Item#FRUsFRU#CRU
8
Harddiskdrive,600GBSAS-15000rpm,3.5"
•MT4105:CTO
•MT4157:CTO
•MT4217:CTO
03X36231
8
Harddiskdrive,250GBSATA-7200rpm,3.5"
•MT4105:CTO
•MT4157:CTO
•MT4217:CTO
03T70391
8
Harddiskdrive,500GBSATA-7200rpm,3.5"
•MT4105:CTO5CU5CF7CM8CG9CG4AG4BH
•MT4157:CTO3DG5CG
•MT4217:CTO
03T70411
8
Harddiskdrive,1TBSATA-7200rpm,3.5"
•MT4105:CTO
•MT4157:CTO
•MT4217:CTO
03T70421
10
Rearfan,exhaustfanassembly
•MT4105:allmodels
•MT4157:allmodels
•MT4217:allmodels
41R55832
11
Powersupply,625Wattpowersupply
•MT4105:CTO96GD2GM2GN5MN7ML4HE6GE9GF1GF4G
F5GF8AF8QF8TF8HF8VF8KF8RJ6GJ7GK7GK7CP8MP9M
R1JP1GP2GO4GO5GO6GO7GR9UR9FO1UO1FO3UO3F1CG
1EM1FC1GB1GH1LM1KU1KF2AG2BG2CG2DG2EU2EF2FU
2FF2GJ2HJ2JJ2KJ2LJ2MJ2NJ2OJ2PH2RH3AU3AF3BH3CG
4CG5CU5CF6CU6CF7CM8CG9CG4AG4BH
•MT4157:CTOC3BC3HC3VB4GB5AB5QB5TB5KB5RJ8M
J9MK2MF3GF4GF6GG6GG8GL9UL9FM6GM8MM9MN7M
N1UN1FN2UN2FN3UN3FN4UN4FN5UN5FN6UN6F1AG2AG
3AG4AG5AG6AG7AU7AF8AU8AF9AU9AF1BJ2BJ3BJ4BJ
5BJ6BJ7BJ8BU8BF9BU9BF1CU1CF2CU2CF2CS2CP2CL
2CD2CY2CG2CM2CA2CQ2CT2CC2CB2CH2CV2CK2CR
2CE2CJ3CG3DG5CG
•MT4217:CTO
41A97582
MechanicalFRUs
TheFRUslistedinthefollowingtablesarenotillustrated.
Chapter12.FRUlists153

FRUsFRU#CRU
FRU,PS2keyboard/mousecardandcableassembly
•MT4105:allmodels
•MT4157:allmodels
•MT4217:allmodels
41R56042
FRU,adapterbracket,2.5to3.5harddiskdrive
•MT4105:allmodels
•MT4157:allmodels
•MT4217:allmodels
41R56252
FRU,EMCshieldassembly
•MT4105:allmodels
•MT4157:allmodels
•MT4217:allmodels
41R56212
FRU,label,Martell2/MenorcaInformation
•MT4105:allmodels
•MT4157:allmodels
•MT4217:allmodels
41R56261
FRU,FDDcable-Martell-2
•MT4105:allmodels
•MT4157:allmodels
•MT4217:allmodels
41N82942
FRU,RMassembly
•MT4105:allmodels
•MT4157:allmodels
•MT4217:allmodels
41R55922
FRU,cableassembly,SASLEDwithdiodes
•MT4105:allmodels
•MT4157:allmodels
•MT4217:allmodels
41R56962
FRU,handlewithscrews
•MT4105:allmodels
•MT4157:allmodels
•MT4217:allmodels
41R54901
FRU,cableassembly,harddiskdriveSATA,Martell
•MT4105:allmodels
•MT4157:allmodels
•MT4217:allmodels
41N82982
FRU,cableassembly,SASharddiskdrive
•MT4105:allmodels
•MT4157:allmodels
•MT4217:allmodels
41R54822
154ThinkStationHardwareMaintenanceManual

FRUsFRU#CRU
FRU,Martellaccesscoverassemblywithtape
•MT4105:allmodels
•MT4157:allmodels
•MT4217:allmodels
41R56702
FRU,speakercableassembly
•MT4105:allmodels
•MT4157:allmodels
•MT4217:allmodels
41R54942
FRU,thermalsensecable
•MT4105:allmodels
•MT4157:allmodels
•MT4217:allmodels
41R25112
FRU,systemboardscrewkit
•MT4105:allmodels
•MT4157:allmodels
•MT4217:allmodels
41R55472
FRU,cableassembly,SATAopticaldrive
•MT4105:allmodels
•MT4157:allmodels
•MT4217:allmodels
41R55172
FRU,Martell2FPIOcableandbezelassemblykit(no1394)
•MT4105:allmodels
•MT4157:allmodels
•MT4217:allmodels
41R56902
FRU,mechanicalshellkit,Martell2,no1394
•MT4105:allmodels
•MT4157:allmodels
•MT4217:allmodels
41R56912
FRU,PS/2cardandbracketassembly
•MT4105:allmodels
•MT4157:allmodels
•MT4217:allmodels
41R56942
FRU,PS/2cableassembly
•MT4105:allmodels
•MT4157:allmodels
•MT4217:allmodels
41R56042
FRU,SASharddiskdriveller
•MT4105:allmodels
•MT4157:allmodels
•MT4217:allmodels
41R55522
Chapter12.FRUlists155

FRUsFRU#CRU
FRU,handlellerwithscrews
•MT4105:allmodels
•MT4157:allmodels
•MT4217:allmodels
41R56992
FRU,retainer,3.5"device
•MT4105:allmodels
•MT4157:allmodels
•MT4217:allmodels
41R56142
FRU,SSDmountingkit
•MT4105:allmodels
•MT4157:allmodels
•MT4217:allmodels
43N95932
FRU,harddiskdriveSATAcable-Camus
•MT4105:allmodels
•MT4157:allmodels
•MT4217:allmodels
43N91342
FRU,secondserialportcable
•MT4105:allmodels
•MT4157:allmodels
•MT4217:allmodels
41R55442
KeyboardandMouse
Keyboard-USBPreferredProFullsizeFRU#CRU
USEnglish
•MT4105:CTO96GD2GM2GN5MN7ML4HE6GE9GF1GF4GF5GF8A
F8QF8HF8RJ6GJ7GK7GP8MP9MP1GP2GO4GO5GO6GO7GR9U
O1UO3U1CG1EM1GH1LM1KU2EU2FU2PH2RH3AU3BH7CM5CU
6CU4BH3CG4CG8CG9CG4AG
•MT4157:CTOC3HB4GB5AB5QB5RJ8MJ9MK2MF3GF4GF6GG6GG8G
L9UM6GM8MM9MN7MN1UN2UN3UN4UN5UN6U7AU8AU9AU8BU
9BU1CU2CU2CL2CM2CA2CQ2CH2CR2CE2CH3CG3DG5CG
•MT4217:CTO
41A52891
Arabic
•MT4105:CTO96GD2GM2GE6GE9GF1GF4GF5GJ6GJ7GK7GP1GP2G
O4GO5GO6GO7G1CG2AG2BG2CG2DG3CG4CG8CG9CG4AG
•MT4157:CTOB4GF3GF4GF6GG6GG8GM6G1AG2AG3AG4AG5AG
6AG2CG3CG3DG5CG
•MT4217:CTO
41A52901
Arabic/French
•MT4105:CTO
•MT4157:CTO
•MT4217:CTO
41A52911
156ThinkStationHardwareMaintenanceManual

Keyboard-USBPreferredProFullsizeFRU#CRU
Belgian/French
•MT4105:CTO96GD2GM2GE6GE9GF1GF4GF5GJ6GJ7GK7GP1GP2G
O4GO5GO6GO7G1CG2AG2BG2CG2DG3CG4CG8CG9CG4AG
•MT4157:CTOB4GF3GF4GF6GG6GG8GM6G1AG2AG3AG4AG5AG
6AG2CG3CG3DG5CG
•MT4217:CTO
41A52921
Belgian/UK
•MT4105:CTO96GD2GM2GE6GE9GF1GF4GF5GJ6GJ7GK7GP1GP2G
O4GO5GO6GO7G1CG2AG2BG2CG2DG3CG4CG8CG9CG4AG
•MT4157:CTOB4GF3GF4GF6GG6GG8GM6G1AG2AG3AG4AG5AG
6AG2CG3CG3DG5CG
•MT4217:CTO
41A52931
Brazilian
•MT4105:CTO
•MT4157:CTOB4GF3GF4GF6GG6GG8GM6G1AG2AG3AG4AG5AG
6AG2CG3CG3DG5CG
•MT4217:CTO
41A52941
Bulgarian
•MT4105:CTO96GD2GM2GE6GE9GF1GF4GF5GJ6GJ7GK7GP1GP2G
O4GO5GO6GO7G1CG2AG2BG2CG2DG3CG4CG8CG9CG4AG
•MT4157:CTOB4GF3GF4GF6GG6GG8GM6G1AG2AG3AG4AG5AG
6AG2CG3CG3DG5CG
•MT4217:CTO
41A52951
HongKong/Taiwan
•MT4105:
•MT4157:CTO2CB2CV
•MT4217:CTO
41A52961
Czech
•MT4105:CTO96GD2GM2GE6GE9GF1GF4GF5GJ6GJ7GK7GP1GP2G
O4GO5GO6GO7G1CG2AG2BG2CG2DG3CG4CG8CG9CG4AG
•MT4157:CTOB4GF3GF4GF6GG6GG8GM6G1AG2AG3AG4AG5AG
6AG2CG3CG3DG5CG
•MT4217:CTO
41A52971
Danish
•MT4105:CTO96GD2GM2GE6GE9GF1GF4GF5GJ6GJ7GK7GP1GP2G
O4GO5GO6GO7G1CG2AG2BG2CG2DG3CG4CG8CG9CG4AG
•MT4157:CTOB4GF3GF4GF6GG6GG8GM6G1AG2AG3AG4AG5AG
6AG2CG3CG3DG5CG
•MT4217:CTO
41A52981
Dutch
•MT4105:CTO96GD2GM2GE6GE9GF1GF4GF5GJ6GJ7GK7GP1GP2G
O4GO5GO6GO7G1CG2AG2BG2CG2DG3CG4CG8CG9CG4AG
•MT4157:CTOB4GF3GF4GF6GG6GG8GM6G1AG2AG3AG4AG5AG
6AG2CG3CG3DG5CG
•MT4217:CTO
41A52991
Chapter12.FRUlists157

Keyboard-USBPreferredProFullsizeFRU#CRU
French
•MT4105:CTO96GD2GM2GE6GE9GF1GF4GF5GJ6GJ7GJ8GK7GP1G
P2GO4GO5GO6GO7G1CG2AG2BG2CG2DG3CG4CG8CG9CG4AG
•MT4157:CTOB4GF3GF4GF6GG6GG8GM6G1AG2AG3AG4AG5AG
6AG2CG3CG3DG5CG
•MT4217:CTO
41A53001
FrenchCanadian
•MT4105:R9FO1FO3F1KF2EF2FF3AF5CF6CF
•MT4157:CTOL9FN1FN2FN3FN4FN5FN6F7AF8AF9AF8BF9BF1CF2CF
•MT4217:CTO
41A53011
FrenchCanadian
•MT4105:R9FO1FO3F1KF2EF2FF3AF5CF6CF
•MT4157:CTOL9FN1FN2FN3FN4FN5FN6F7AF8AF9AF8BF9BF1CF2CF
41A53021
German
•MT4105:CTO96GD2GM2GE6GE9GF1GF4GF5GJ6GJ7GK7GP1GP2G
O4GO5GO6GO7G1CG2AG2BG2CG2DG3CG4CG8CG9CG4AG
•MT4157:CTOB4GF3GF4GF6GG6GG8GM6G1AG2AG3AG4AG5AG
6AG2CG3CG3DG5CG
•MT4217:CTO
41A53031
Greek
•MT4105:CTO96GD2GM2GE6GE9GF1GF4GF5GJ6GJ7GK7GP1GP2G
O4GO5GO6GO7G1CG2AG2BG2CG2DG3CG4CG8CG9CG4AG
•MT4157:CTOB4GF3GF4GF6GG6GG8GM6G1AG2AG3AG4AG5AG
6AG2CG3CG3DG5CG
•MT4217:CTO
41A53041
Greek/US
•MT4105:CTO96GD2GM2GE6GE9GF1GF4GF5GJ6GJ7GK7GP1GP2G
O4GO5GO6GO7G1CG2AG2BG2CG2DG3CG4CG8CG9CG4AG
•MT4157:CTOB4GF3GF4GF6GG6GG8GM6G1AG2AG3AG4AG5AG
6AG2CG3CG3DG5CG
•MT4217:CTO
41A53051
Hebrew
•MT4105:CTO96GD2GM2GE6GE9GF1GF4GF5GJ6GJ7GK7GP1GP2G
O4GO5GO6GO7G1CG2AG2BG2CG2DG3CG4CG8CG9CG4AG
•MT4157:CTOB4GF3GF4GF6GG6GG8GM6G1AG2AG3AG4AG5AG
6AG2CG3CG3DG5CG
•MT4217:CTO
41A53061
Hungarian
•MT4105:CTO96GD2GM2GE6GE9GF1GF4GF5GJ6GJ7GK7GP1GP2G
O4GO5GO6GO7G1CG2AG2BG2CG2DG3CG4CG8CG9CG4AG
•MT4157:CTOB4GF3GF4GF6GG6GG8GM6G1AG2AG3AG4AG5AG
6AG2CG3CG3DG5CG
•MT4217:CTO
41A53071
158ThinkStationHardwareMaintenanceManual

Keyboard-USBPreferredProFullsizeFRU#CRU
Iceland
•MT4105:CTO96GD2GM2GE6GE9GF1GF4GF5GJ6GJ7GK7GP1GP2G
O4GO5GO6GO7G1CG2AG2BG2CG2DG3CG4CG8CG9CG4AG
•MT4157:CTOB4GF3GF4GF6GG6GG8GM6G1AG2AG3AG4AG5AG
6AG2CG3CG3DG5CG
•MT4217:CTO
41A53081
Italy
•MT4105:CTO96GD2GM2GE6GE9GF1GF4GF5GJ6GJ7GK7GP1GP2G
O4GO5GO6GO7G1CG2AG2BG2CG2DG3CG4CG8CG9CG4AG
•MT4157:CTOB4GF3GF4GF6GG6GG8GM6G1AG2AG3AG4AG5AG
6AG2CG3CG3DG5CG
•MT4217:CTO
41A53091
Japanese
•MT4105:CTO2GJ2HJ2JJ2KJ2LJ2MJ2NJ2OJ
•MT4157:CTO1BJ2BJ3BJ4BJ5BJ6BJ7BJ2CJ
•MT4217:CTO
41A53101
Korean
•MT4105:CTOF8K
•MT4157:CTOB5K2CK
•MT4217:CTO
41A53111
LASpanish
•MT4105:CTO
•MT4157:CTO2CS2CD2CY
•MT4217:CTO
41A53121
Norwegian
•MT4105:CTO96GD2GM2GE6GE9GF1GF4GF5GJ6GJ7GK7GP1GP2G
O4GO5GO6GO7G1CG2AG2BG2CG2DG3CG4CG8CG9CG4AG
•MT4157:CTOB4GF3GF4GF6GG6GG8GM6G1AG2AG3AG4AG5AG
6AG2CG3CG3DG5CG
•MT4217:CTO
41A53131
Polish
•MT4105:CTO96GD2GM2GE6GE9GF1GF4GF5GJ6GJ7GK7GP1GP2G
O4GO5GO6GO7G1CG2AG2BG2CG2DG3CG4CG8CG9CG4AG
•MT4157:CTOB4GF3GF4GF6GG6GG8GM6G1AG2AG3AG4AG5AG
6AG2CG3CG3DG5CG
•MT4217:CTO
41A53141
Portuguese
•MT4105:CTO96GD2GM2GE6GE9GF1GF4GF5GJ6GJ7GK7GP1GP2G
O4GO5GO6GO7G1CG2AG2BG2CG2DG3CG4CG8CG9CG4AG
•MT4157:CTOB4GF3GF4GF6GG6GG8GM6G1AG2AG3AG4AG5AG
6AG2CG3CG3DG5CG
•MT4217:CTO
41A53151
Chapter12.FRUlists159

Keyboard-USBPreferredProFullsizeFRU#CRU
Romanian
•MT4105:CTO96GD2GM2GE6GE9GF1GF4GF5GJ6GJ7GK7GP1GP2G
O4GO5GO6GO7G1CG2AG2BG2CG2DG3CG4CG8CG9CG4AG
•MT4157:CTOB4GF3GF4GF6GG6GG8GM6G1AG2AG3AG4AG5AG
6AG2CG3CG3DG5CG
•MT4217:CTO
41A53171
Romanian
•MT4105:CTO96GD2GM2GE6GE9GF1GF4GF5GJ6GJ7GK7GP1GP2G
O4GO5GO6GO7G1CG2AG2BG2CG2DG3CG4CG8CG9CG4AG
•MT4157:CTOB4GF3GF4GF6GG6GG8GM6G1AG2AG3AG4AG5AG
6AG2CG3CG3DG5CG
•MT4217:CTO
41A53161
Russian/Cyrillic
•MT4105:CTO96GD2GM2GE6GE9GF1GF4GF5GJ6GJ7GK7GP1GP2G
O4GO5GO6GO7G1CG2AG2BG2CG2DG3CG4CG8CG9CG4AG
•MT4157:CTOB4GF3GF4GF6GG6GG8GM6G1AG2AG3AG4AG5AG
6AG2CG3CG3DG5CG
•MT4217:CTO
41A53181
Serbian/Cyrillic
•MT4105:CTO96GD2GM2GE6GE9GF1GF4GF5GJ6GJ7GK7GP1GP2G
O4GO5GO6GO7G1CG2AG2BG2CG2DG3CG4CG8CG9CG4AG
•MT4157:CTOB4GF3GF4GF6GG6GG8GM6G1AG2AG3AG4AG5AG
6AG2CG3CG3DG5CG
•MT4217:CTO
41A53191
Slovak
•MT4105:CTO96GD2GM2GE6GE9GF1GF4GF5GJ6GJ7GK7GP1GP2G
O4GO5GO6GO7G1CG2AG2BG2CG2DG3CG4CG8CG9CG4AG
•MT4157:CTOB4GF3GF4GF6GG6GG8GM6G1AG2AG3AG4AG5AG
6AG2CG3CG3DG5CG
•MT4217:CTO
41A53201
Spanish
•MT4105:CTO96GD2GM2GE6GE9GF1GF4GF5GJ6GJ7GK7GP1GP2G
O4GO5GO6GO7G1CG2AG2BG2CG2DG3CG4CG8CG9CG4AG
•MT4157:CTOB4GF3GF4GF6GG6GG8GM6G1AG2AG3AG4AG5AG
6AG2CG3CG3DG5CG
•MT4217:CTO
41A53211
Swedish/Finnish
•MT4105:CTO96GD2GM2GE6GE9GF1GF4GF5GJ6GJ7GK7GP1GP2G
O4GO5GO6GO7G1CG2AG2BG2CG2DG3CG4CG8CG9CG4AG
•MT4157:CTOB4GF3GF4GF6GG6GG8GM6G1AG2AG3AG4AG5AG
6AG2CG3CG3DG5CG
•MT4217:CTO
41A53221
160ThinkStationHardwareMaintenanceManual

Keyboard-USBPreferredProFullsizeFRU#CRU
SwissFrench/German
•MT4105:CTO96GD2GM2GE6GE9GF1GF4GF5GJ6GJ7GK7GP1GP2G
O4GO5GO6GO7G1CG2AG2BG2CG2DG3CG4CG8CG9CG4AG
•MT4157:CTOB4GF3GF4GF6GG6GG8GM6G1AG2AG3AG4AG5AG
6AG2CG3CG3DG5CG
•MT4217:CTO
41A53231
Thailand
•MT4105:CTOF8T
•MT4157:CTOB5T2CT
•MT4217:CTO
41A53241
Turkish
•MT4105:CTO96GD2GM2GE6GE9GF1GF4GF5GJ6GJ7GK7GP1GP2G
O4GO5GO6GO7G1CG2AG2BG2CG2DG3CG4CG8CG9CG4AG
•MT4157:CTOB4GF3GF4GF6GG6GG8GM6G1AG2AG3AG4AG5AG
6AG2CG3CG3DG5CG
•MT4217:CTO
41A53251
Turkish
•MT4105:CTO96GD2GM2GE6GE9GF1GF4GF5GJ6GJ7GK7GP1GP2G
O4GO5GO6GO7G1CG2AG2BG2CG2DG3CG4CG8CG9CG4AG
•MT4157:CTOB4GF3GF4GF6GG6GG8GM6G1AG2AG3AG4AG5AG
6AG2CG3CG3DG5CG
•MT4217:CTO
41A53261
UKEnglish
•MT4105:CTO96GD2GM2GE6GE9GF1GF4GF5GJ6GJ7GK7GP1GP2G
O4GO5GO6GO7G1CG2AG2BG2CG2DG3CG4CG8CG9CG4AG
•MT4157:CTOB4GF3GF4GF6GG6GG8GM6G1AG2AG3AG4AG5AG
6AG2CG3CG3DG5CG
•MT4217:CTO
41A53271
USEuropean
•MT4105:CTO96GD2GM2GE6GE9GF1GF4GF5GJ6GJ7GK7GP1GP2G
O4GO5GO6GO7G1CG2AG2BG2CG2DG3CG4CG8CG9CG4AG
•MT4157:CTOB4GF3GF4GF6GG6GG8GM6G1AG2AG3AG4AG5AG
6AG2CG3CG3DG5CG
•MT4217:CTO
41A53281
Slovenian
•MT4105:CTO96GD2GM2GE6GE9GF1GF4GF5GJ6GJ7GK7GP1GP2G
O4GO5GO6GO7G1CG2AG2BG2CG2DG3CG4CG8CG9CG4AG
•MT4157:CTOB4GF3GF4GF6GG6GG8GM6G1AG2AG3AG4AG5AG
6AG2CG3CG3DG5CG
•MT4217:CTO
41A53291
Chapter12.FRUlists161

Keyboard-FullSizePS/2FRU#CRU
USEnglish
•MT4105:
•MT4157:
•MT4217:
41A50391
Arabic
•MT4105:
•MT4157:
•MT4217:
41A50401
Arabic/French
•MT4105:
•MT4157:
•MT4217:
41A50411
Belgian/French
•MT4105:
•MT4157:
•MT4217:
41A50421
Belgian/UK
•MT4105:
•MT4157:
•MT4217:
41A50431
Brazilian
•MT4105:
•MT4157:
•MT4217:
41A50441
Bulgarian
•MT4105:
•MT4157:
•MT4217:
41A50451
HongKong/Taiwan
•MT4105:
•MT4157:
•MT4217:
41A50461
Czech
•MT4105:
•MT4157:
•MT4217:
41A50471
Danish
•MT4105:
•MT4157:
•MT4217:
41A50481
162ThinkStationHardwareMaintenanceManual

Keyboard-FullSizePS/2FRU#CRU
Dutch
•MT4105:
•MT4157:
•MT4217:
41A50491
French
•MT4105:
•MT4157:
•MT4217:
41A50501
FrenchCanadian
•MT4105:
•MT4157:
•MT4217:
41A50511
FrenchCanadian
•MT4105:
•MT4157:
•MT4217:
41A50521
German
•MT4105:
•MT4157:
•MT4217:
41A50531
Greek
•MT4105:
•MT4157:
•MT4217:
41A50541
Greek/US
•MT4105:
•MT4157:
•MT4217:
41A50801
Hebrew
•MT4105:
•MT4157:
•MT4217:
41A50551
Hungarian
•MT4105:
•MT4157:
•MT4217:
41A50561
Iceland
•MT4105:
•MT4157:
•MT4217:
41A50571
Chapter12.FRUlists163

Keyboard-FullSizePS/2FRU#CRU
Italy
•MT4105:
•MT4157:
•MT4217:
41A50581
Japanese
•MT4105:
•MT4157:
•MT4217:
41A50591
Korean
•MT4105:
•MT4157:
•MT4217:
41A50601
LASpanish
•MT4105:
•MT4157:
•MT4217:
41A50611
Norwegian
•MT4105:
•MT4157:
•MT4217:
41A50621
Polish
•MT4105:
•MT4157:
•MT4217:
41A50631
Portuguese
•MT4105:
•MT4157:
•MT4217:
41A50641
Romanian
•MT4105:
•MT4157:
•MT4217:
41A50651
Russian/Cyrillic
•MT4105:
•MT4157:
•MT4217:
41A50661
Serbian/Cyrillic
•MT4105:
•MT4157:
•MT4217:
41A50671
164ThinkStationHardwareMaintenanceManual

Keyboard-FullSizePS/2FRU#CRU
Slovak
•MT4105:
•MT4157:
•MT4217:
41A50681
Spanish
•MT4105:
•MT4157:
•MT4217:
41A50691
Swedish/Finnish
•MT4105:
•MT4157:
•MT4217:
41A50701
SwissFrench/German
•MT4105:
•MT4157:
•MT4217:
41A50711
Thailand
•MT4105:
•MT4157:
•MT4217:
41A50721
Turkish
•MT4105:
•MT4157:
•MT4217:
41A50731
Turkish
•MT4105:
•MT4157:
•MT4217:
41A50741
UKEnglish
•MT4105:
•MT4157:
•MT4217:
41A50751
USEuropean
•MT4105:
•MT4157:
•MT4217:
41A50761
Slovenian
•MT4105:
•MT4157:
•MT4217:
41A50771
Chapter12.FRUlists165

Keyboard-EnhancedPerformanceFRU#CRU
USEnglish
•MT4105:
•MT4157:
•MT4217:
41A49611
Arabic
•MT4105:
•MT4157:
•MT4217:
41A49621
Arabic/French
•MT4105:
•MT4157:
•MT4217:
41A49631
Belgian/French
•MT4105:
•MT4157:
•MT4217:
41A49641
Belgian/UK
•MT4105:
•MT4157:
•MT4217:
41A49651
Brazilian
•MT4105:
•MT4157:
•MT4217:
41A49661
Bulgarian
•MT4105:
•MT4157:
•MT4217:
41A49671
HongKong/Taiwan
•MT4105:
•MT4157:
•MT4217:
41A49681
Czech
•MT4105:
•MT4157:
•MT4217:
41A49691
Danish
•MT4105:
•MT4157:
•MT4217:
41A49701
166ThinkStationHardwareMaintenanceManual

Keyboard-EnhancedPerformanceFRU#CRU
Dutch
•MT4105:
•MT4157:
•MT4217:
41A49711
French
•MT4105:
•MT4157:
•MT4217:
41A49721
FrenchCanadian
•MT4105:
•MT4157:
•MT4217:
41A49731
FrenchCanadian
•MT4105:
•MT4157:
•MT4217:
41A49741
German
•MT4105:
•MT4157:
•MT4217:
41A49751
Greek
•MT4105:
•MT4157:
•MT4217:
41A49761
Greek/US
•MT4105:
•MT4157:
•MT4217:
41A50781
Hebrew
•MT4105:
•MT4157:
•MT4217:
41A49771
Hungarian
•MT4105:
•MT4157:
•MT4217:
41A49781
Iceland
•MT4105:
•MT4157:
•MT4217:
41A49791
Chapter12.FRUlists167

Keyboard-EnhancedPerformanceFRU#CRU
Italy
•MT4105:
•MT4157:
•MT4217:
41A49801
Japanese
•MT4105:
•MT4157:
•MT4217:
41A49811
Korean
•MT4105:
•MT4157:
•MT4217:
41A49821
LASpanish
•MT4105:
•MT4157:
•MT4217:
41A49831
Norwegian
•MT4105:
•MT4157:
•MT4217:
41A49841
Polish
•MT4105:
•MT4157:
•MT4217:
41A49851
Portuguese
•MT4105:
•MT4157:
•MT4217:
41A49861
Romanian
•MT4105:
•MT4157:
•MT4217:
41A49871
Russian/Cyrillic
•MT4105:
•MT4157:
•MT4217:
41A49881
Serbian/Cyrillic
•MT4105:
•MT4157:
•MT4217:
41A49891
168ThinkStationHardwareMaintenanceManual

Keyboard-EnhancedPerformanceFRU#CRU
Slovak
•MT4105:
•MT4157:
•MT4217:
41A49901
Spanish
•MT4105:
•MT4157:
•MT4217:
41A49911
Swedish/Finnish
•MT4105:
•MT4157:
•MT4217:
41A49921
SwissFrench/German
•MT4105:
•MT4157:
•MT4217:
41A49931
Thailand
•MT4105:
•MT4157:
•MT4217:
41A49941
Turkish
•MT4105:
•MT4157:
•MT4217:
41A49951
Turkish
•MT4105:
•MT4157:
•MT4217:
41A49961
UKEnglish
•MT4105:
•MT4157:
•MT4217:
41A49971
USEuropean
•MT4105:
•MT4157:
•MT4217:
41A49981
Slovenian
•MT4105:
•MT4157:
•MT4217:
41A49991
Chapter12.FRUlists169

Keyboard-USBPreferredProFingerprintKeyboardFRU#CRU
USEnglish
•MT4105:CTO
•MT4157:CTO
•MT4217:CTO
41R00381
Arabic
•MT4105:CTO
•MT4157:CTO
•MT4217:CTO
41R00391
Arabic/French
•MT4105:CTO
•MT4157:CTO
•MT4217:CTO
41R00401
BelgiumFrench
•MT4105:CTO
•MT4157:CTO
•MT4217:CTO
41R00411
BelgiumEnglish
•MT4105:CTO
•MT4157:CTO
•MT4217:CTO
41R00421
BrazilianPortuguese
•MT4105:CTO
•MT4157:CTO
•MT4217:CTO
41R00431
Bulgarian
•MT4105:CTO
•MT4157:CTO
•MT4217:CTO
41R00441
Chinese/US
•MT4105:CTO
•MT4157:CTO
•MT4217:CTO
41R00451
Czech(ABB)
•MT4105:CTO
•MT4157:CTO
•MT4217:CTO
41R00461
Danish
•MT4105:CTO
•MT4157:CTO
•MT4217:CTO
41R00471
170ThinkStationHardwareMaintenanceManual

Keyboard-USBPreferredProFingerprintKeyboardFRU#CRU
Dutch
•MT4105:CTO
•MT4157:CTO
•MT4217:CTO
41R00481
French
•MT4105:CTO
•MT4157:CTO
•MT4217:CTO
41R00491
FrenchCanadian
•MT4105:CTO
•MT4157:CTO
•MT4217:CTO
41R00501
FrenchCanadian
•MT4105:CTO
•MT4157:CTO
•MT4217:CTO
41R00511
German
•MT4105:CTO
•MT4157:CTO
•MT4217:CTO
41R00521
Greek
•MT4105:CTO
•MT4157:CTO
•MT4217:CTO
41R00531
Greek/US
•MT4105:CTO
•MT4157:CTO
•MT4217:CTO
41R00541
Hebrew
•MT4105:CTO
•MT4157:CTO
•MT4217:CTO
41R00551
Hungarian
•MT4105:CTO
•MT4157:CTO
•MT4217:CTO
41R00561
Iceland
•MT4105:CTO
•MT4157:CTO
•MT4217:CTO
41R00571
Chapter12.FRUlists171

Keyboard-USBPreferredProFingerprintKeyboardFRU#CRU
Italy
•MT4105:CTO
•MT4157:CTO
•MT4217:CTO
41R00581
Japanese
•MT4105:CTO
•MT4157:CTO
•MT4217:CTO
41R00591
Korean
•MT4105:CTO
•MT4157:CTO
•MT4217:CTO
41R00601
LASpanish
•MT4105:CTO
•MT4157:CTO
•MT4217:CTO
41R00611
Norwegian
•MT4105:CTO
•MT4157:CTO
•MT4217:CTO
41R00621
Polish
•MT4105:CTO
•MT4157:CTO
•MT4217:CTO
41R00631
Portuguese
•MT4105:CTO
•MT4157:CTO
•MT4217:CTO
41R00641
Romanian
•MT4105:CTO
•MT4157:CTO
•MT4217:CTO
41R00651
Romanian
•MT4105:CTO
•MT4157:CTO
•MT4217:CTO
41R00661
Russian/Cyrillic
•MT4105:CTO
•MT4157:CTO
•MT4217:CTO
41R00671
172ThinkStationHardwareMaintenanceManual

Keyboard-USBPreferredProFingerprintKeyboardFRU#CRU
Serbian/Cyrillic
•MT4105:CTO
•MT4157:CTO
•MT4217:CTO
41R00681
Slovak
•MT4105:CTO
•MT4157:CTO
•MT4217:CTO
41R00691
Spanish
•MT4105:CTO
•MT4157:CTO
•MT4217:CTO
41R00701
Swedish/Finnish
•MT4105:CTO
•MT4157:CTO
•MT4217:CTO
41R00711
SwissFrench/German
•MT4105:CTO
•MT4157:CTO
•MT4217:CTO
41R00721
Thailand
•MT4105:CTO
•MT4157:CTO
•MT4217:CTO
41R00731
Turkish
•MT4105:CTO
•MT4157:CTO
•MT4217:CTO
41R00741
Turkish
•MT4105:CTO
•MT4157:CTO
•MT4217:CTO
41R00751
UKEnglish
•MT4105:CTO
•MT4157:CTO
•MT4217:CTO
41R00761
Chapter12.FRUlists173

Keyboard-USBPreferredProFingerprintKeyboardFRU#CRU
USEuropean
•MT4105:CTO
•MT4157:CTO
•MT4217:CTO
41R00771
Slovenian
•MT4105:CTO
•MT4157:CTO
•MT4217:CTO
41R00781
MiceFRU#CRU
Opticalwheelmouse(400DPI),USB-redwheel(Primary)
•MT4105:CTO96GD2GM2GN5MN7ML4HE6GE9GF1GF4GF5GF8AF8Q
F8TF8HF8VF8KF8RJ6GJ7GK7GK7CP8MP9MP1GP2GO4GO5GO6G
O7GR9UR9FO1UO1FO3UO3F1CG1EM1FC1GB1GH1LM1KU1KF2AG
2BG2CG2DG2EU2EF2FU2FF2GJ2HJ2JJ2KJ2LJ2MJ2NJ2OJ2PH2RH
3AU3AF3BH3CG4CG5CU5CF6CU6CF7CM8CG9CG4AG4BH
•MT4157:CTOC3BC3HC3VB4GB5AB5QB5TB5KB5RJ8MJ9MK2MF3G
F4GF6GG6GG8GL9UL9FM6GM8MM9MN7MN1UN1FN2UN2FN3U
N3FN4UN4FN5UN5FN6UN6F1AG2AG3AG4AG5AG6AG7AU7AF8AU
8AF9AU9AF1BJ2BJ3BJ4BJ5BJ6BJ7BJ8BU8BF9BU9BF1CU1CF
2CU2CF2CS2CP2CL2CD2CY2CG2CM2CA2CQ2CT2CC2CB2CH
2CV2CK2CR2CE2CJ
•MT4217:CTO
41U30131
Opticalwheelmouse(400DPI),USB-redwheel(Secondary)
•MT4105:CTO96GD2GM2GN5MN7ML4HE6GE9GF1GF4GF5GF8AF8Q
F8TF8HF8VF8KF8RJ6GJ7GK7GK7CP8MP9MP1GP2GO4GO5GO6G
O7GR9UR9FO1UO1FO3UO3F1CG1EM1FC1GB1GH1LM1KU1KF2AG
2BG2CG2DG2EU2EF2FU2FF2GJ2HJ2JJ2KJ2LJ2MJ2NJ2OJ2PH2RH
3AU3AF3BH3CG4CG5CU5CF6CU6CF7CM8CG9CG4AG4BH
•MT4157:CTOC3BC3HC3VB4GB5AB5QB5TB5KB5RJ8MJ9MK2MF3G
F4GF6GG6GG8GL9UL9FM6GM8MM9MN7MN1UN1FN2UN2FN3U
N3FN4UN4FN5UN5FN6UN6F1AG2AG3AG4AG5AG6AG7AU7AF8AU
8AF9AU9AF1BJ2BJ3BJ4BJ5BJ6BJ7BJ8BU8BF9BU9BF1CU1CF
2CU2CF2CS2CP2CL2CD2CY2CG2CM2CA2CQ2CT2CC2CB2CH
2CV2CK2CR2CE2CJ
•MT4217:CTO
41U30301
3buttonlasermouse(1600DPI),USB
•MT4105:CTO
•MT4157:CTO
•MT4217:CTO
41U30781
Opticalwheelmouse(800DPI),USB-redwheel
•MT4105:CTO3CG4CG5CU5CF6CU6CF7CM8CG9CG4AG4BH
•MT4157:CTO
•MT4217:CTO
45J48891
174ThinkStationHardwareMaintenanceManual

AdaptersandmiscellaneousFRUs
AdaptersandmiscellaneousFRUsFRU#CRU
3.5"20-in-1mediacardreader(withGPIOdetect)
•MT4105:CTO96G
•MT4157:CTO
•MT4217:CTO
45R81391
L1IEEE1394PCIadapter
•MT4105:CTO
•MT4157:CTO
•MT4217:CTO
41D27811
Speakers(2-piece)LenovoLogo(Secondary)
•MT4105:CTO
•MT4157:CTO
•MT4217:CTO
41A53341
Lenovo3piecesspeakers(Chinaonly)
•MT4105:CTO
•MT4157:CTO
•MT4217:CTO
45C86401
Lenovo2piecesspeakers(Chinaonly)
•MT4105:CTO
•MT4157:CTO
•MT4217:CTO
45C86411
Speakerpowerbrick
•MT4105:CTO
•MT4157:CTO
•MT4217:CTO
89P85711
256MBNVIDIANVS290(DMS59connector)-Quasar
•MT4105:CTO
•MT4157:CTO
•MT4217:CTO
42Y63291
256MBNVIDIAFX380(DVI+DP)(Hardfrom46R2784)
•MT4105:CTO
•MT4157:CTO
•MT4217:CTO
71Y68631
512MBNVIDIAFX580(DVI+DP+DP)
•MT4105:CTOK7GK7C
•MT4157:CTO
•MT4217:CTO
46R27861
Chapter12.FRUlists175

AdaptersandmiscellaneousFRUsFRU#CRU
768MBNVIDIAFX1800(DVI+DP+DP)
•MT4105:CTO
•MT4157:CTO
•MT4217:CTO
46R27881
1.5GBNVIDIAFX4800(DVI+DP+DP+ST),2x3powerconnector.
•MT4105:CTO
•MT4157:CTO
•MT4217:CTO
46R27921
256MBNVIDIANVS295(dualDP)
•MT4105:CTO
•MT4157:CTOC3BC3HC3VB5AB5QB5TB5KB5R
•MT4217:CTO
46R27821
1GBNVIDIAFX3800(DVI+DP+ST),2x3powerconnector.
•MT4105:CTO
•MT4157:CTO
•MT4217:CTO
89Y04291
4GBNVIDIAFX5800(DVI+DVI+DP+ST),2*2X3powerconnector
•MT4105:CTO
•MT4157:CTO
•MT4217:CTO
46R27941
256MBATIFireProV3700(DualDVI)
•MT4105:CTO
•MT4157:CTO
•MT4217:CTO
53Y85691
512MBATIFireProV5700(DP+DP+DVI)
•MT4105:CTO
•MT4157:CTO
•MT4217:CTO
53Y85711
1GBATIFireProV7700(DP+DP+DVI)
•MT4105:CTO
•MT4157:CTO
•MT4217:CTO
53Y85731
SoftmodemV.90/V.44
•MT4105:CTO
•MT4157:CTO
•MT4217:CTO
29R97291
Donglecable(DMS59todualDVI)
•MT4105:CTO
•MT4157:CTO
•MT4217:CTO
41X63981
176ThinkStationHardwareMaintenanceManual

AdaptersandmiscellaneousFRUsFRU#CRU
NvidiaTeslaC1060computecard(computeradapter)
•MT4105:CTO
•MT4157:CTO
•MT4217:CTO
46R60411
SAScontrollercard-3Gb/s,4-porthostbusadapter
•MT4105:CTO
•MT4157:CTO
•MT4217:CTO
46R34601
SoundBlasterTitaniumaudiocard(PCIe)
•MT4105:CTO
•MT4157:CTO
•MT4217:CTO
46T04071
Modemphonecable
•MT4105:CTO
•MT4157:CTO
•MT4217:CTO
39K51201
DVItoVGAdongle
•MT4105:CTO
•MT4157:CTO
•MT4217:CTO
45C78161
DPtoDVIdongle200mm
•MT4105:CTO
•MT4157:CTO
•MT4217:CTO
43N91601
512MBNVIDIAQuadroNVS450GDDR3(DP+DP+DP+DP)
•MT4105:CTO2NJ
•MT4157:CTO
•MT4217:CTO
64Y98951
NvidiaQuadro2000,DuallinkDVI,DP,DP,1GBGDDR5
•MT4105:CTON5MN7ML4HP8MP9MO4GO7GR9UR9F1LM2CG2HJ
2JJ2KJ2LJ2PH2RH3BH
•MT4157:CTO8MJ9MF3GM6GM8MN1UN1FN3UN3FN5UN5F1AG
1BJ2BJ3BJ4BJ1CU1CF
•MT4217:CTO
89Y88561
NvidiaQuadro4000,DuallinkDVI,DP ,DP ,Stereo3D2GBGDDR5
•MT4105:CTOO5GO6G1FC2GJ
•MT4157:CTOK2MF4GF6GG6GG8GN7MN3UN3FN6UN6F5AG6BJ7BJ
2CU2CF2CS2CP2CL2CD2CY2CG2CM2CA2CQ2CT2CC2CB2CH
2CV2CK2CR2CE2CJ
•MT4217:CTO
89Y86271
Chapter12.FRUlists177

AdaptersandmiscellaneousFRUsFRU#CRU
NvidiaQuadro5000,duallinkDVI,DP,DP ,Stereo3D2.5GBGDDR5
•MT4105:CTO
•MT4157:CTO
•MT4217:CTO
89Y86281
NvidiaQuadro6000,duallinkDVI,DP ,DP,Stereo3D6GBGDDR5
•MT4105:CTO
•MT4157:CTO
•MT4217:CTO
89Y86291
NvidiaTelsa2050,3GBGDDR5
•MT4105:CTO
•MT4157:CTO
•MT4217:CTO
89Y86301
NvidiaQuadro600,DuallinkDVI,DP,1GBGDDR3
•MT4105:CTOO3UO3F1EM1GB1GH2BG2MJ3AU3AF
•MT4157:CTOL9UL9FM9MN2UN2F9BU9BF
•MT4217:CTO
03T80091
512MBNvidiaNVS300(DMS59connectortodualDVI)
•MT4105:CTO
•MT4157:CTO
•MT4217:CTO
03T81521
512MBNvidiaNVS300,PCIex1(DMS59connectortocualDVI)
•MT4105:CTO
•MT4157:CTO
•MT4217:CTO
03T80391
NvidiaQuadro400,DVIandDPonly,512MB
•MT4105:CTO2EU2EF2FU2FF
•MT4157:CTO7AU7AF8AU8AF9AU9AF8BU8BF
•MT4217:CTO
03T80401
NvidiaQuadro2000DDualDVI1GBGDDR5
•MT4105:CTO
•MT4157:CTO
•MT4217:CTO
03T84181
PowerCords
PowerCordsFRU#CRU
LineCord-US
•MT4105:CTOF8AF8TR9UR9FO1UO1FO3UO3F1KU1KF2EU2EF2FU
2FF3AU3AF5CU5CF6CU6CF
•MT4157:CTOB5AB5TL9UL9FN1UN1FN2UN2FN3UN3FN4UN4FN5U
N5FN6UN6F7AU7AF8AU8AF9AU9AF8BU8BF9BU9BF1CU1CF2CU
2CF2CS2CL2CD2CA2CT
41R31841
178ThinkStationHardwareMaintenanceManual

PowerCordsFRU#CRU
•MT4217:CTO
LineCord-China
•MT4105:CTOK7C1FC
•MT4157:CTO2CC
•MT4217:CTO
41R32561
LineCord-JapanandJapaneseEnglish
•MT4105:CTO2GJ2HJ2JJ2KJ2LJ2MJ2NJ2OJ
•MT4157:CTO1BJ2BJ3BJ4BJ5BJ6BJ7BJ2CE2CJ
•MT4217:CTO
41R32481
LineCord-Brazil(Portuguese)
•MT4105:CTO
•MT4157:CTO2CP
•MT4217:CTO
41R32701
LineCord-LAhighvolt(APU)
•MT4105:CTO
•MT4157:CTO2CY2CL
•MT4217:CTO
41R31761
LineCord-Australia/NewZealand
•MT4105:CTON5MN7MP8MP9M1EM1LM7CM
•MT4157:CTOJ8MJ9MK2MM8MM9MN7M2CM
•MT4217:CTO
41R31961
LineCord-Korea
•MT4105:CTOF8KF8R
•MT4157:CTOB5KB5R2CK2CR
•MT4217:CTO
41R32601
LineCord-HongKong,UK,Ireland,Singapore,Malaysia,Brunei,HongKong
•MT4105:CTOL4HF8AF8H1GB1GH2AG2BG2CG2DG2PH2RH3BH
4BH3CG4CG8CG9CG4AG
•MT4157:CTOC3BC3HB5AF3GF4GF6GG6GG8GM6G1AG2AG3AG4AG
5AG6AG2CG2CA2CB2CH3CG3DG5CG
41R32241
LineCord-Taiwan
•MT4105:CTOF8V
•MT4157:CTOF1VC3VE6VG9VH1VH2VH3VH4VH5VH6VH7VH8VH9V
M1VM2VM3VM4VM5V2CV
•MT4217:CTO
41R32781
LineCord-Italy
•MT4105:CTO96GD2GM2GE6GE9GF1GF4GF5GJ6GJ7GK7GP1GP2G
O4GO5GO6GO7G1CG2AG2BG2CG2DG3CG4CG8CG9CG4AG
•MT4157:CTOF3GF4GF6GG6GG8GM6G1AG2AG3AG4AG5AG6AG
2CL2CG3CG3DG5CG
•MT4217:CTO
41R32321
Chapter12.FRUlists179

PowerCordsFRU#CRU
LineCord-Amodels
•MT4105:CTOF8A
•MT4157:CTO2CA
•MT4217:CTO
41R32081
LineCord-Denmark
•MT4105:CTO96GD2GM2GE6GE9GF1GF4GF5GJ6GJ7GK7GP1GP2G
O4GO5GO6GO7G1CG2AG2BG2CG2DG3CG4CG8CG9CG4AG
•MT4157:CTOB4GF3GF4GF6GG6GG8GM6G1AG2AG3AG4AG5AG
6AG2CG3CG3DG5CG
41R32121
LineCord-Switzerland
•MT4105:CTO96GD2GM2GE6GE9GF1GF4GF5GJ6GJ7GK7GP1GP2G
O4GO5GO6GO7G1CG2AG2BG2CG2DG3CG4CG8CG9CG4AG
•MT4157:CTOB4GF3GF4GF6GG6GG8GM6G1AG2AG3AG4AG5AG
6AG2CG3CG3DG5CG
41R32281
LineCord-Israel
•MT4105:CTO96GD2GM2GE6GE9GF1GF4GF5GJ6GJ7GK7GP1GP2G
O4GO5GO6GO7G1CG2AG2BG2CG2DG3CG4CG8CG9CG4AG
•MT4157:CTOB4GF3GF4GF6GG6GG8GM6G1AG2AG3AG4AG5AG
6AG2CG3CG3DG5CG
41R32361
LineCord-SouthAfrica
•MT4105:CTO96GD2GM2GE6GE9GF1GF4GF5GJ6GJ7GK7GP1GP2G
O4GO5GO6GO7G1CG2AG2BG2CG2DG7CM3CG4CG8CG9CG4AG
•MT4157:CTOB4GB5AJ8MJ9MK2MF3GF4GF6GG6GG8GM6GM8M
M9MN7M1AG2AG3AG4AG5AG6AG2CG2CM2CA3CG3DG5CG
41R32201
LineCord-India
•MT4105:CTOF8Q
•MT4157:CTOB5Q2CQ
•MT4217:CTO
41R33411
LineCord-JapanandJapaneseEnglish
•MT4105:CTO2GJ2HJ2JJ2KJ2LJ2MJ2NJ2OJ
•MT4157:CTO1BJ2BJ3BJ4BJ5BJ6BJ7BJ2CE2CJ
•MT4217:CTO
43N90571
LineCord-US,2Psystemsonly
•MT4105:CTO
•MT4157:CTO
•MT4217:CTO
45J95021
180ThinkStationHardwareMaintenanceManual

PowerCords-SecondaryFRU#CRU
LineCord-US
•MT4105:CTOF8AF8TR9UR9FO1UO1FO3UO3F1KU1KF2EU2EF2FU
2FF3AU3AF5CU5CF6CU6CF
•MT4157:CTOB5AB5TL9UL9FN1UN1FN2UN2FN3UN3FN4UN4FN5U
N5FN6UN6F7AU7AF8AU8AF9AU9AF8BU8BF9BU9BF1CU1CF2CU
2CF2CS2CL2CD2CA2CT
•MT4217:CTO
41R31851
LineCord-China
•MT4105:CTOK7C1FC
•MT4157:CTO2CC
•MT4217:CTO
41R32571
LineCord-JapanandJapaneseEnglish
•MT4105:CTO2GJ2HJ2JJ2KJ2LJ2MJ2NJ2OJ
•MT4157:CTO1BJ2BJ3BJ4BJ5BJ6BJ7BJ2CE2CJ
•MT4217:CTO
41R32491
LineCord-Brazil(Portuguese)
•MT4105:CTO
•MT4157:CTO2CP
•MT4217:CTO
41R32711
LineCord-LAHighVolt(APU)
•MT4105:CTO
•MT4157:CTO2CY2CL
•MT4217:CTO
41R31771
LineCord-Australia/NewZealand
•MT4105:CTON5MN7MP8MP9M1EM1LM7CM
•MT4157:CTOJ8MJ9MK2MM8MM9MN7M2CM
•MT4217:CTO
41R31971
LineCord-Korea
•MT4105:CTOF8KF8R
•MT4157:CTOB5KB5R2CK2CR
•MT4217:CTO
41R32611
LineCord-HongKong,UK,Ireland,Singapore,Malaysia,Brunei,HongKong
•MT4105:CTOL4HF8AF8H1GB1GH2AG2BG2CG2DG2PH2RH3BH
4BH3CG4CG8CG9CG4AG
•MT4157:CTOC3BC3HB5AF3GF4GF6GG6GG8GM6G1AG2AG3AG4AG
5AG6AG2CG2CA2CB2CH3CG3DG5CG
41R32251
LineCord-Taiwan
•MT4105:CTOF8V
•MT4157:CTOF1VC3VE6VG9VH1VH2VH3VH4VH5VH6VH7VH8VH9V
M1VM2VM3VM4VM5V2CV
•MT4217:CTO
41R32791
Chapter12.FRUlists181

PowerCords-SecondaryFRU#CRU
LineCord-Italy
•MT4105:CTO96GD2GM2GE6GE9GF1GF4GF5GJ6GJ7GK7GP1GP2G
O4GO5GO6GO7G1CG2AG2BG2CG2DG3CG4CG8CG9CG4AG
•MT4157:CTOF3GF4GF6GG6GG8GM6G1AG2AG3AG4AG5AG6AG
2CL2CG3CG3DG5CG
•MT4217:CTO
41R32331
LineCord-Amodels
•MT4105:CTOF8A
•MT4157:CTO2CA
•MT4217:CTO
41R32091
LineCord-Denmark
•MT4105:CTO96GD2GM2GE6GE9GF1GF4GF5GJ6GJ7GK7GP1GP2G
O4GO5GO6GO7G1CG2AG2BG2CG2DG3CG4CG8CG9CG4AG
•MT4157:CTOB4GF3GF4GF6GG6GG8GM6G1AG2AG3AG4AG5AG
6AG2CG3CG3DG5CG
41R32131
LineCord-Switzerland
•MT4105:CTO96GD2GM2GE6GE9GF1GF4GF5GJ6GJ7GK7GP1GP2G
O4GO5GO6GO7G1CG2AG2BG2CG2DG3CG4CG8CG9CG4AG
•MT4157:CTOB4GF3GF4GF6GG6GG8GM6G1AG2AG3AG4AG5AG
6AG2CG3CG3DG5CG
41R32291
LineCord-Israel
•MT4105:CTO96GD2GM2GE6GE9GF1GF4GF5GJ6GJ7GK7GP1GP2G
O4GO5GO6GO7G1CG2AG2BG2CG2DG3CG4CG8CG9CG4AG
•MT4157:CTOB4GF3GF4GF6GG6GG8GM6G1AG2AG3AG4AG5AG
6AG2CG3CG3DG5CG
41R32371
LineCord-SouthAfrica
•MT4105:CTO96GD2GM2GE6GE9GF1GF4GF5GJ6GJ7GK7GP1GP2G
O4GO5GO6GO7G1CG2AG2BG2CG2DG3CG4CG8CG9CG4AG
•MT4157:CTOB4GB5AJ8MJ9MK2MF3GF4GF6GG6GG8GM6GM8M
M9MN7M1AG2AG3AG4AG5AG6AG2CG2CM2CA3CG3DG5CG
41R32211
LineCord-India
•MT4105:CTOF8Q
•MT4157:CTOB5Q2CQ
•MT4217:CTO
41R31751
LineCord-JapanandJapaneseEnglish
•MT4105:CTO2GJ2HJ2JJ2KJ2LJ2MJ2NJ2OJ
•MT4157:CTO1BJ2BJ3BJ4BJ5BJ6BJ7BJ2CE2CJ
•MT4217:CTO
43N90581
Recoverydiscs
WindowsXPProfessional64MonoRecoveryCD
Note:TheWindowsXPProfessionalrecoveryDVDsareavailableonlyformodelswithavalidMicrosoft
WindowsXPProfessionalcerticateofauthenticity(COA)afxedtothesystem.DuetoaMicrosoftlicensing
182ThinkStationHardwareMaintenanceManual

limitation,ifamodelcamewithWindowsXPProfessionalpreinstalledfromthefactory,buthaseithera
Windows7orWindowsVistaCOAafxedtothesystem,thatmodeliseligibleonlyforrecoveryDVDsthat
matchtheoperatingsystemspeciedontheCOA.
WindowsXPProfessional64MonoRecoveryCDFRU#CRU
USEnglish
•MT4105:CTO
•MT4157:CTO
•MT4217:CTO03W28221
Japanese
•MT4105:CTO
•MT4157:CTO
•MT4217:CTO03W28231
WindowsVistaBusiness32RecoveryCD
Note:TheWindowsVistarecoveryDVDsareavailableonlyformodelswithavalidMicrosoftWindowsVista
certicateofauthenticity(COA)afxedtothesystem.DuetoaMicrosoftlicensinglimitation,ifamodelcame
withWindowsVistaBusinessorWindowsVistaUltimatepreinstalledfromthefactory,buthasaWindows7
COAafxedtothesystem,thatmodeliseligibleonlyforrecoveryDVDsthatmatchtheoperatingsystem
speciedontheCOA.
VistaBussiness32FRU#CRU
English
•MT4105:CTO
•MT4157:CTO
•MT4217:CTO
64Y56611
RussianEnglish
•MT4105:CTO
•MT4157:CTO
•MT4217:CTO
64Y36721
French
•MT4105:CTO
•MT4157:CTO
•MT4217:CTO
64Y36731
German
•MT4105:CTO
•MT4157:CTO
•MT4217:CTO
64Y36741
Spanish
•MT4105:CTO
•MT4157:CTO
•MT4217:CTO
64Y36751
Chapter12.FRUlists183

VistaBussiness32FRU#CRU
Brazilian
•MT4105:CTO
•MT4157:CTO
•MT4217:CTO
64Y36761
Italian
•MT4105:CTO
•MT4157:CTO
•MT4217:CTO
64Y36771
Japanese
•MT4105:CTO
•MT4157:CTO
•MT4217:CTO
64Y56621
Norwegian
•MT4105:CTO
•MT4157:CTO
•MT4217:CTO
64Y36991
Swedish
•MT4105:CTO
•MT4157:CTO
•MT4217:CTO
64Y37001
Danish
•MT4105:CTO
•MT4157:CTO
•MT4217:CTO
64Y36971
Dutch
•MT4105:CTO
•MT4157:CTO
•MT4217:CTO
64Y36911
Czech
•MT4105:CTO
•MT4157:CTO
•MT4217:CTO
64Y36781
Finnish
•MT4105:CTO
•MT4157:CTO
•MT4217:CTO
64Y36981
Polish
•MT4105:CTO
•MT4157:CTO
•MT4217:CTO
64Y36791
184ThinkStationHardwareMaintenanceManual

VistaBussiness32FRU#CRU
Russian
•MT4105:CTO
•MT4157:CTO
•MT4217:CTO
64Y36801
Turkish
•MT4105:CTO
•MT4157:CTO
•MT4217:CTO
64Y36811
Hungarian
•MT4105:CTO
•MT4157:CTO
•MT4217:CTO
64Y36821
Greek
•MT4105:CTO
•MT4157:CTO
•MT4217:CTO
64Y36831
SimpliedChinese
•MT4105:CTO
•MT4157:CTO
•MT4217:CTO
64Y56631
TraditionalChinese
•MT4105:CTO
•MT4157:CTO
•MT4217:CTO
64Y36861
TraditionalChinese-HongKong
•MT4105:CTO
•MT4157:CTO
•MT4217:CTO
64Y36871
Korean
•MT4105:CTO
•MT4157:CTO
•MT4217:CTO
64Y36881
Slovenian
•MT4105:CTO
•MT4157:CTO
•MT4217:CTO
64Y36891
Romanian
•MT4105:CTO
•MT4157:CTO
•MT4217:CTO
64Y36931
Chapter12.FRUlists185

VistaBussiness32FRU#CRU
Portuguese
•MT4105:CTO
•MT4157:CTO
•MT4217:CTO
64Y36941
Serbian-Latin
•MT4105:CTO
•MT4157:CTO
•MT4217:CTO
64Y36951
Slovakian
•MT4105:CTO
•MT4157:CTO
•MT4217:CTO
64Y36961
ArabicLocalized
•MT4105:CTO
•MT4157:CTO
•MT4217:CTO
64Y36901
Hebrew
•MT4105:CTO
•MT4157:CTO
•MT4217:CTO
64Y36921
C&LNordics(ENDKFINOSV)
•MT4105:CTO
•MT4157:CTO
•MT4217:CTO
64Y37011
C&LSwitzerland(ENFRGRIT)
•MT4105:CTO
•MT4157:CTO
•MT4217:CTO
64Y37021
C&LBelLux(ENFRGRNL)
•MT4105:CTO
•MT4157:CTO
•MT4217:CTO
64Y37031
EnglishforIndia
•MT4105:CTO
•MT4157:CTO
•MT4217:CTO
71Y36201
WindowsVistaBusiness64RecoveryCD
Note:TheWindowsVistarecoveryDVDsareavailableonlyformodelswithavalidMicrosoftWindowsVista
certicateofauthenticity(COA)afxedtothesystem.DuetoaMicrosoftlicensinglimitation,ifamodelcame
withWindowsVistaBusinessorWindowsVistaUltimatepreinstalledfromthefactory,buthasaWindows7
186ThinkStationHardwareMaintenanceManual

COAafxedtothesystem,thatmodeliseligibleonlyforrecoveryDVDsthatmatchtheoperatingsystem
speciedontheCOA.
WindowsVistaBusiness64RecoveryCDFRU#CRU
English
•MT4105:CTO
•MT4157:CTO
•MT4217:CTO
64Y56641
RussianEnglish
•MT4105:CTO
•MT4157:CTO
•MT4217:CTO
64Y37711
French
•MT4105:CTO
•MT4157:CTO
•MT4217:CTO
64Y37721
German
•MT4105:CTO
•MT4157:CTO
•MT4217:CTO
64Y37731
Spanish
•MT4105:CTO
•MT4157:CTO
•MT4217:CTO
64Y37741
Brazilian
•MT4105:CTO
•MT4157:CTO
•MT4217:CTO
64Y37751
Italian
•MT4105:CTO
•MT4157:CTO
•MT4217:CTO
64Y37761
Japanese
•MT4105:CTO
•MT4157:CTO
•MT4217:CTO
64Y56651
Norwegian
•MT4105:CTO
•MT4157:CTO
•MT4217:CTO
64Y37961
Chapter12.FRUlists187

WindowsVistaBusiness64RecoveryCDFRU#CRU
Swedish
•MT4105:CTO
•MT4157:CTO
•MT4217:CTO
64Y37971
Danish
•MT4105:CTO
•MT4157:CTO
•MT4217:CTO
64Y37941
Dutch
•MT4105:CTO
•MT4157:CTO
•MT4217:CTO
64Y37901
Czech
•MT4105:CTO
•MT4157:CTO
•MT4217:CTO
64Y37771
Finnish
•MT4105:CTO
•MT4157:CTO
•MT4217:CTO
64Y37951
Polish
•MT4105:CTO
•MT4157:CTO
•MT4217:CTO
64Y37781
Russian
•MT4105:CTO
•MT4157:CTO
•MT4217:CTO
64Y37791
Turkish
•MT4105:CTO
•MT4157:CTO
•MT4217:CTO
64Y37801
Hungarian
•MT4105:CTO
•MT4157:CTO
•MT4217:CTO
64Y37811
Greek
•MT4105:CTO
•MT4157:CTO
•MT4217:CTO
64Y37821
188ThinkStationHardwareMaintenanceManual

WindowsVistaBusiness64RecoveryCDFRU#CRU
SimpliedChinese
•MT4105:CTO
•MT4157:CTO
•MT4217:CTO
64Y56661
TraditionalChinese
•MT4105:CTO
•MT4157:CTO
•MT4217:CTO
64Y37851
TraditionalChinese-HongKong
•MT4105:CTO
•MT4157:CTO
•MT4217:CTO
64Y37861
Korean
•MT4105:CTO
•MT4157:CTO
•MT4217:CTO
64Y37871
Slovenian
•MT4105:CTO
•MT4157:CTO
•MT4217:CTO
64Y37881
Portuguese
•MT4105:CTO
•MT4157:CTO
•MT4217:CTO
64Y37921
Slovakian
•MT4105:CTO
•MT4157:CTO
•MT4217:CTO
64Y37931
ArabicLocalized
•MT4105:CTO
•MT4157:CTO
•MT4217:CTO
64Y37891
Hebrew
•MT4105:CTO
•MT4157:CTO
•MT4217:CTO
64Y37911
C&LNordics(ENDKFINOSV)
•MT4105:CTO
•MT4157:CTO
•MT4217:CTO
64Y37981
Chapter12.FRUlists189

WindowsVistaBusiness64RecoveryCDFRU#CRU
C&L2Switzerland(ENFRGRIT)
•MT4105:CTO
•MT4157:CTO
•MT4217:CTO
64Y37991
C&LBelLux(ENFRGRNL)
•MT4105:CTO
•MT4157:CTO
•MT4217:CTO
64Y38001
Windows7Professional64SP1RecoveryCD
Windows7Professional64SP1RecoveryCDFRU#CRU
USEnglish
•MT4105:CTOM2GN5MN7ML4HF8AF8QF8HF8RJ6GJ7GK7GP8MP9M
P1GP2GO4GO5GO6GO7GR9UO1U1EM1GH1LM1KU2AG2BG2CG
2DG2EU2FU2PH2RH3AU3BH3CG4CG5CU6CU7CM8CG9CG4AG4BH
•MT4157:CTOC3HB4GB5AB5QB5RJ8MJ9MK2MF3GF4GF6GG6GG8G
L9UM6GM8MM9MN7MN1UN2UN3UN4UN5UN6U1AG2AG3AG4AG
5AG6AG7AU8AU9AU8BU9BU1CU2CU2CL2CG2CM2CA2CQ2CT
2CH2CR2CE3CG3DG5CG
•MT4217:CTO
03W29081
French
•MT4105:CTO96GD2GM2GJ6GJ7GK7GP1GP2GO4GO5GO6GO7G
R9FO1FO3F1KF2AG2BG2CG2DG2EF2FF3AF5CF6CF3CG4CG8CG
9CG4AG
•MT4157:CTOF3GF4GF6GG6GG8GL9FM6GN1FN2FN3FN4FN5FN6F
1AG2AG3AG4AG5AG6AG7AF8AF9AF8BF9BF1CF2CF2CG3CG3DG
5CG
•MT4217:CTO
03W28901
German
•MT4105:CTO96GD2GM2GJ6GJ7GK7GP1GP2GO4GO5GO6GO7G2AG
2BG2CG2DG3CG4CG8CG9CG4AG
•MT4157:CTOB4GF3GF4GF6GG6GG8GM6G1AG2AG3AG4AG5AG
6AG2CG3CG3DG5CG
•MT4217:CTO
03W28921
Czech
•MT4105:CTO96GD2GM2GJ6GJ7GK7GP1GP2GO4GO5GO6GO7G2AG
2BG2CG2DG3CG4CG8CG9CG4AG
•MT4157:CTOB4GF3GF4GF6GG6GG8GM6G1AG2AG3AG4AG5AG
6AG2CG3CG3DG5CG
•MT4217:CTO
03W28881
190ThinkStationHardwareMaintenanceManual

Windows7Professional64SP1RecoveryCDFRU#CRU
Polish
•MT4105:CTO96GD2GM2GJ6GJ7GK7GP1GP2GO4GO5GO6GO7G2AG
2BG2CG2DG3CG4CG8CG9CG4AG
•MT4157:CTOB4GF3GF4GF6GG6GG8GM6G1AG2AG3AG4AG5AG
6AG2CG3CG3DG5CG
•MT4217:CTO
03W28981
Turkish
•MT4105:CTO96GD2GM2GJ6GJ7GK7GP1GP2GO4GO5GO6GO7G2AG
2BG2CG2DG3CG4CG8CG9CG4AG
•MT4157:CTOB4GF3GF4GF6GG6GG8GM6G1AG2AG3AG4AG5AG
6AG2CG3CG3DG5CG
•MT4217:CTO
03W29071
Greek
•MT4105:CTO96GD2GM2GJ6GJ7GK7GP1GP2GO4GO5GO6GO7G2AG
2BG2CG2DG3CG4CG8CG9CG4AG
•MT4157:CTOB4GF3GF4GF6GG6GG8GM6G1AG2AG3AG4AG5AG
6AG2CG3CG3DG5CG
•MT4217:CTO
03W28911
Korean
•MT4105:CTOF8K
•MT4157:CTO2CK
•MT4217:CTO
03W28971
Slovenian
•MT4105:CTO96GD2GM2GJ6GJ7GK7GP1GP2GO4GO5GO6GO7G2AG
2BG2CG2DG3CG4CG8CG9CG4AG
•MT4157:CTOB4GF3GF4GF6GG6GG8GM6G1AG2AG3AG4AG5AG
6AG2CG3CG3DG5CG
•MT4217:CTO
03W29041
RussianEnglish
•MT4105:CTO96GD2GM2GJ6GJ7GK7GP1GP2GO4GO5GO6GO7G2AG
2BG2CG2DG3CG4CG8CG9CG4AG
•MT4157:CTOB4GF3GF4GF6GG6GG8GM6G1AG2AG3AG4AG5AG
6AG2CG3CG3DG5CG
•MT4217:CTO
03W29001
Slovakian
•MT4105:CTO96GD2GM2GJ6GJ7GK7GP1GP2GO4GO5GO6GO7G2AG
2BG2CG2DG3CG4CG8CG9CG4AG
•MT4157:CTOB4GF3GF4GF6GG6GG8GM6G1AG2AG3AG4AG5AG
6AG2CG3CG3DG5CG
•MT4217:CTO
03W29031
Chapter12.FRUlists191

Windows7Professional64SP1RecoveryCDFRU#CRU
ArabicLocalized
•MT4105:CTO96GD2GM2GJ6GJ7GK7GP1GP2GO4GO5GO6GO7G2AG
2BG2CG2DG3CG4CG8CG9CG4AG
•MT4157:CTOB4GF3GF4GF6GG6GG8GM6G1AG2AG3AG4AG5AG
6AG2CG3CG3DG5CG
•MT4217:CTO
03W28841
SimpliedChinese
•MT4105:CTOK7C1FC
•MT4157:CTO2CC
•MT4217:CTO
03W28861
TraditionalChinese
•MT4105:CTOF8V1GB
•MT4157:CTOC3BC3H2CB2CV
•MT4217:CTO
03W28871
IndiaEnglish
•MT4105:CTO
•MT4157:CTO2CQ
•MT4217:CTO
03W28891
HongKong
•MT4105:CTO
•MT4157:CTOE6BG9BH1BH2BH3BH4BH5BH6BH7BH8BH9BM1BM2B
M3BM4BM5B2CB
•MT4217:CTO
03W28931
Italian
•MT4105:CTO96GD2GM2GJ6GJ7GK7GP1GP2GO4GO5GO6GO7G2AG
2BG2CG2DG3CG4CG8CG9CG4AG
•MT4157:CTOB4GF3GF4GF6GG6GG8GM6G1AG2AG3AG4AG5AG
6AG2CG3CG3DG5CG
•MT4217:CTO
03W28951
Russian
•MT4105:CTO96GD2GM2GJ6GJ7GK7GP1GP2GO4GO5GO6GO7G2AG
2BG2CG2DG3CG4CG8CG9CG4AG
•MT4157:CTOB4GF3GF4GF6GG6GG8GM6G1AG2AG3AG4AG5AG
6AG2CG3CG3DG5CG
•MT4217:CTO
03W29021
Spanish
•MT4105:CTO96GD2GM2GJ6GJ7GK7GP1GP2GO4GO5GO6GO7G2AG
2BG2CG2DG3CG4CG8CG9CG4AG
•MT4157:CTOB4GF3GF4GF6GG6GG8GM6G1AG2AG3AG4AG5AG
6AG2CG3CG3DG5CG
•MT4217:CTO
03W29051
192ThinkStationHardwareMaintenanceManual

Windows7Professional64SP1RecoveryCDFRU#CRU
C&LBelLux(ENFRGRNL)
•MT4105:CTO96GD2GM2GJ6GJ7GK7GP1GP2GO4GO5GO6GO7G2AG
2BG2CG2DG3CG4CG8CG9CG4AG
•MT4157:CTOB4GF3GF4GF6GG6GG8GM6G1AG2AG3AG4AG5AG
6AG2CG3CG3DG5CG
•MT4217:CTO
03W29091
C&LNordics(ENDKFINOSV)
•MT4105:CTO96GD2GM2GJ6GJ7GK7GP1GP2GO4GO5GO6GO7G2AG
2BG2CG2DG3CG4CG8CG9CG4AG
•MT4157:CTOB4GF3GF4GF6GG6GG8GM6G1AG2AG3AG4AG5AG
6AG2CG3CG3DG5CG
•MT4217:CTO
03W29101
C&LSwitzerland(ENFRGRIT)
•MT4105:CTO96GD2GM2GJ6GJ7GK7GP1GP2GO4GO5GO6GO7G2AG
2BG2CG2DG3CG4CG8CG9CG4AG
•MT4157:CTOB4GF3GF4GF6GG6GG8GM6G1AG2AG3AG4AG5AG
6AG2CG3CG3DG5CG
•MT4217:CTO
03W29111
Portuguese
•MT4105:CTO96GD2GM2GJ6GJ7GK7GP1GP2GO4GO5GO6GO7G2AG
2BG2CG2DG3CG4CG8CG9CG4AG
03W28991
BrazilianPortuguese
•MT4105:CTO
•MT4157:2CP
•MT4217:CTO
03W28851
Hungary
•MT4105:CTO96GD2GM2GJ6GJ7GK7GP1GP2GO4GO5GO6GO7G2AG
2BG2CG2DG3CG4CG8CG9CG4AG
•MT4157:CTOB4GF3GF4GF6GG6GG8GM6G1AG2AG3AG4AG5AG
6AG2CG3CG3DG5CG
•MT4217:CTO
03W28941
Romanian
•MT4105:CTO96GD2GM2GJ6GJ7GK7GP1GP2GO4GO5GO6GO7G2AG
2BG2CG2DG3CG4CG8CG9CG4AG
•MT4157:CTOB4GF3GF4GF6GG6GG8GM6G1AG2AG3AG4AG5AG
6AG2CG3CG3DG5CG
•MT4217:CTO
03W29011
Chapter12.FRUlists193

Windows7Professional64SP1RecoveryCDFRU#CRU
Serbian-Latin
•MT4105:CTO96GD2GM2GJ6GJ7GK7GP1GP2GO4GO5GO6GO7G2AG
2BG2CG2DG3CG4CG8CG9CG4AG
•MT4157:CTOB4GF3GF4GF6GG6GG8GM6G1AG2AG3AG4AG5AG
6AG2CG3CG3DG5CG
•MT4217:CTO
03W29061
Japanese
•MT4105:CTO2GJ2HJ2JJ2KJ2LJ2MJ2NJ2OJ
•MT4157:CTO1BJ2BJ3BJ4BJ5BJ6BJ7BJ2CJ
•MT4217:CTO
03W28961
Windows7Ultimate64SP1RecoveryCD
Windows7Ultimate64SP1RecoveryCDFRU#CRU
USEnglish
•MT4105:CTO
•MT4157:CTO
•MT4217:CTO
03W28831
Overall:MT4155,4158,and4218
Thefollowingreplaceablecomponentsareavailableforthe4155,4158,and4218machinetypemodels.
194ThinkStationHardwareMaintenanceManual

Item#FRUsFRU#CRU
1
Powersupply,1060Wattpowersupply
•MT4155:CTOD1GD4GE7ME1UE1FD7CA4HA4V93G88G
89G99A99Q99T99K99RA2AA2QA2TF3JF9CE9UE9FF1U
F1FG2MG3GG4GG5GG7UG7FG8UG8FG9MH1MH2MH3J
H4JH5JH6JH7JH8JH9UH9FJ1JJ2JJ3JJ4JJ5JJ6JJ7JJ8J
K1GK2GK3GK4UK4FK5MK6GK7G
•MT4158:CTOD6UD6FD6SD6LD6DD6YD6GD6MD6AD6Q
D6TD6CD6BD6HD6VD6KD6RD6EF3MF4MF6MC2GC3G
C5GC7GC8GD2GC6CF9UF9FG7UG7FH1UH1FH5MH6M
H8GH9GJ1GJ2UJ2FJ3UJ3FJ4UJ4FJ5UJ5FJ6UJ6FJ7U
J7FJ8UJ8FJ9UJ9FK1UK1FK2MK3MK4MK5MK6MK7M
K8ML5GL6GL7GL8GL9GM1GM2GM3UM3FM4UM4FM5J
M6JM7JM8JM9JN1UN1FN1SN1PN1LN1DN1YN1GN1M
N1AN1QN1TN1CN1BN1HN1VN1KN1RN1EN1JN2UN2F
N3UN3FN3SN3PN3LN3DN3YN3GN3MN3AN3QN3TN3C
N3BN3HN3VN3KN3RN3EN3JN4UN4FN5UN5FN6MN7M
N8MN9GO1GO2GO3GO4GO5GO6G
•MT4218:
41A97612
2
Fan,memorycooling
•MT4155:allmodels
•MT4158:allmodels
•MT4218:allmodels
45J96072
Chapter12.FRUlists195

Item#FRUsFRU#CRU
2
Heatsink-performancemicroprocessors(80W/95W)
•MT4155:allmodels
•MT4158:allmodels
•MT4218:allmodels
41R55782
2
Heatsink-workstationmicroprocessors(130W)
•MT4155:allmodels
•MT4158:allmodels
•MT4218:allmodels
41R55802
3
Memorymodule,1GBDDR3ECCUDIMMPC3-10600(1333MHz)
•MT4155:CTO
•MT4158:CTO
•MT4218:
46R60261
3
Memorymodule,2GBDDR3ECCUDIMMPC3-10600(1333MHz)
•MT4155:CTOD1GD4GE7ME1UE1FD7C88GA2AA2QA2T
F9CE9UE9FF1UF1FG2MG3GG4GG5GG7UG7FG8UG8F
G9MH1MH9UH9FJ4JJ5JJ6JK1GK2GK3GK4UK4FK5M
K6GK7G
•MT4158:CTOD6UD6FD6SD6LD6DD6YD6GD6MD6AD6Q
D6TD6CD6BD6HD6VD6KD6RD6EF3MF4MF6MC2GC3G
C5GC7GC8GD2GC6CF9UF9FG7UG7FH1UH1FH5MH6M
H8GH9GJ1GJ2UJ2FJ3UJ3FJ4UJ4FJ5UJ5FJ6UJ6FJ7U
J7FJ8UJ8FJ9UJ9FK1UK1FK2MK3MK4MK5MK6MK7M
K8ML5GL6GL7GL8GL9GM1GM2GM3UM3FM4UM4FM6J
M7JN1UN1FN1SN1PN1LN1DN1YN1GN1MN1AN1QN1T
N1CN1BN1HN1VN1KN1RN1EN1JN2UN2FN3UN3FN3S
N3PN3LN3DN3YN3GN3MN3AN3QN3TN3CN3BN3HN3V
N3KN3RN3EN3JN4UN4FN5UN5FN6MN7MN8MN9GO1G
O2GO3GO4GO5GO6G
•MT4218:
46R60271
3
Memorymodule,4GBDDR3ECCUDIMM(9-9-9)PC3-10600
(1333MHz)
•MT4155:CTOJ1JJ2JJ3JJ7JJ8JJ9H
•MT4158:CTOM5JM8JM9J
•MT4218:
64Y95701
3
Memorymodule,1GBDDR31RX8RDIMMPC3-8500(1066MHz)
•MT4155:CTO
•MT4158:CTO
•MT4218:
46R60221
3
Memorymodule,2GBDDR32RX8RDIMMPC3-8500(1066MHz)
•MT4155:CTOA4HA4V
•MT4158:CTO
•MT4218:
46R60231
196ThinkStationHardwareMaintenanceManual

Item#FRUsFRU#CRU
3
Memorymodule,4GBDDR32RX4RDIMMPC3-8500(1066MHz)
•MT4155:CTO
•MT4158:CTO
•MT4218:
46R60241
3
Memorymodule,8GBDDR34RX4RDIMMPC3-8500(1066MHz)
•MT4155:CTO
•MT4158:CTO
•MT4218:
46R60251
3
Memorymodule,1GBDDR3ECCUDIMMPC3-8500(1066MHz)
•MT4155:CTO
•MT4158:CTO
•MT4218:
53Y61951
3
Memorymodule,2GBDDR3ECCUDIMMPC3-8500(1066MHz)
•MT4155:CTO93G89G
•MT4158:CTO
•MT4218:
53Y61971
3
Memorymodule,1GBDDR31RX8RDIMMx72PC3-10600R
(1333MHz)
•MT4155:CTO
•MT4158:CTO
•MT4218:
89Y12891
3
Memorymodule,2GBDDR32RX8RDIMMx72PC3-10600R
(1333MHz)
•MT4155:CTOK5MK6GK7G
•MT4158:CTON6MN7MN8MN9GO1GO2GO3GO4GO5GO6G
•MT4218:
89Y12901
3
Memorymodule,4GBDDR32RX4RDIMMx72PC3-10600R
(1333MHz)
•MT4155:CTO
•MT4158:CTO
•MT4218:
89Y12911
3
Memorymodule,8GBDDR32RX4RDIMMx72PC3-10600R
(1333MHz)
•MT4155:CTO
•MT4158:CTO
•MT4218:
89Y12921
3
Memorymodule,16GBDDR34RX4RDIMMPC3-8500R(1066MHz)
•MT4155:CTO
•MT4158:CTO
•MT4218:CTO
03T80371
Chapter12.FRUlists197

Item#FRUsFRU#CRU
3
Memorymodule,8GBDDR3ECCUDIMM(9-9-9)PC3-10600
(1333MHz)
•MT4155:CTO
•MT4158:CTO
•MT4218:CTO
03T84291
4
Opticaldrive,DVD-ROMdrive-16x/48x(SATA)-DOS/Linux
•MT4155:CTO
•MT4158:CTOM6J
•MT4218:
41N33251
4
Opticaldrive,DVD-ROMdrive-16x/48x(SATA)-DOS/Linux
•MT4155:CTO
•MT4158:CTOM6J
•MT4218:
71Y55431
4
Opticaldrive,DVDburner/CD-RWrambo8(SATA)-DOS/Linux
•MT4155:CTOD1GD4GE1UE1FD7CA4HA4V93G88G89G
A2AA2QA2TF9CE9UE9FF1UF1FG2MG3GG4GG5GG7U
G7FG8UG8FG9MH1MH2MH9UH9FJ1JJ2JJ3JJ4JJ5JJ6J
J7JJ8JJ9HK1GK2GK3GK4UK4FK5MK6GK7G
•MT4158:CTOD6UD6FD6SD6LD6DD6YD6GD6MD6AD6Q
D6TD6CD6BD6HD6VD6KD6RD6EF3MF4MF6MC2GC3G
C5GC7GC8GD2GF9UF9FG7UG7FH1UH1FH5MH6MH8G
H9GJ1GJ2UJ2FJ3UJ3FJ4UJ4FJ5UJ5FJ6UJ6FJ7UJ7F
J8UJ8FJ9UJ9FK1UK1FK2MK3MK4MK5MK6MK7MK8M
L5GL6GL7GL8GL9GM1GM2GM3UM3FM4UM4FM5JM7J
M8JM9JN1UN1FN1SN1PN1LN1DN1YN1GN1MN1AN1Q
N1TN1CN1BN1HN1VN1KN1RN1EN1JN2UN2FN3UN3F
N3SN3PN3LN3DN3YN3GN3MN3AN3QN3TN3CN3BN3H
N3VN3KN3RN3EN3JN4UN4FN5UN5FN7MN8MN9GO1G
O2GO3GO4GO5GO6G
•MT4218:
43C10421
4
Opticaldrive,DVDburner/CD-RWrambo8(SATA)-DOS/Linux
•MT4155:CTOD1GD4GE1UE1FD7CA4HA4V93G88G89G
A2AA2QA2TF9CE9UE9FF1UF1FG2MG3GG4GG5GG7U
G7FG8UG8FG9MH1MH2MH9UH9FJ1JJ2JJ3JJ4JJ5JJ6J
J7JJ8JJ9HK1GK2GK3GK4UK4FK5MK6GK7G
•MT4158:CTO
•MT4218:CTO
71Y55451
4
Opticaldrive,Blu-RaywithAACSbusencryption
•MT4155:CTO
•MT4158:CTO
•MT4218:CTO
03T84231
5
Powerswitch,speaker,LED,andbracketassembly
•MT4155:allmodels
•MT4158:allmodels
•MT4218:allmodels
41R55322
198ThinkStationHardwareMaintenanceManual

Item#FRUsFRU#CRU
6
Diskettedrive,3.5"1.44MB2-ModeFDD
•MT4155:CTO
•MT4158:CTO
•MT4218:
40Y91051
6
Diskettedrive,3.5"1.44MB2-ModeFDD
•MT4155:CTO
•MT4158:CTO
•MT4218:
40Y91071
7
FRU,frontpanelcableassembly(USB,audio,1394),Remy
•MT4155:allmodels
•MT4158:allmodels
•MT4218:allmodels
41R56572
8
Harddiskdrive,250GBSATA-7200rpm,8MBcache,3.5"
•MT4155:CTOJ4J
•MT4158:CTO
•MT4218:CTO
46R60291
8
Harddiskdrive,500GBSATA-7200rpm,3Gb/s,16MBcache,3.5"
•MT4155:CTOD4GE7ME1UE1F93GE9UE9FF1UF1FG2M
G3GG4GG5GG7UG7FG8UG8FG9MH9UH9FJ2JJ3JJ5J
J7JJ8JK4UK4FK5MK6GK7G
•MT4158:CTOF4MF6MC2GC3GC5GD2GF9UF9FH5MH6M
H8GH9GJ2UJ2FJ7UJ7FJ9UJ9FK3MM3UM3FM4UM4F
M5JM6JM8JM9JN2UN2FN3UN3FN3SN3PN3LN3DN3Y
N3GN3MN3AN3QN3TN3CN3BN3HN3VN3KN3RN3EN3J
N5UN5FN6MN7MN8MN9GO1GO2GO3GO4GO5GO6G
•MT4218:
46R60301
8
Harddiskdrive,750GBSATA-7200rpm,3Gb/s,16MBcache,3.5"
•MT4155:CTO
•MT4158:CTO
•MT4218:CTO
43C36711
8
Harddiskdrive,1TBSATA-7200rpm,3Gb/s,32MBcache,3.5"
•MT4155:CTOH2MJ9HK2GK3G
•MT4158:CTOK2MK4MK6ML5GL6GL7GL8GL9GM1GM2G
•MT4218:CTO
46R60311
8
Harddiskdrive,74GBSATA-10000rpm,3Gb/s,16MBcache,2.5"
•MT4155:CTO
•MT4158:CTO
•MT4218:CTO
46R60322
8
Harddiskdrive,150GBSATA-10000rpm,3Gb/s,16MBcache,2.5"
•MT4155:CTO88G
•MT4158:CTO
•MT4218:CTO
46R64002
Chapter12.FRUlists199

Item#FRUsFRU#CRU
8
Harddiskdrive,300GBSATA-10000rpm,3Gb/s,16MBcache,2.5"
•MT4155:CTO
•MT4158:CTOJ1GJ3UJ3FJ4UJ4F
•MT4218:CTO
46R64012
8
Harddiskdrive,147GBSAS-15000rpm,3Gb/s,32MBcache,3.5"
•MT4155:CTO
•MT4158:CTO
•MT4218:CTO
46R60331
8
Harddiskdrive,147GBSAS-15000rpm,3Gb/s,32MBcache,3.5"
•MT4155:CTO
•MT4158:CTO
•MT4218:CTO
45K06081
8
Harddiskdrive,300GBSAS-15000rpm,3Gb/s,32MBcache,3.5"
•MT4155:CTOD1GD7CA4HA4VA2AA2QA2TF9CG9MH1M
H2MH1M
•MT4158:CTOF3MC7GJ5UJ5FJ6UJ6FJ8UJ8FK1UK1F
K5MK7M
•MT4218:
43C69691
8
Harddiskdrive,300GBSAS-15000rpm,3Gb/s,32MBcache,3.5"
•MT4155:CTOD1GD7CA4HA4VA2AA2QA2TF9CG9MH1M
H2MH1M
•MT4158:CTOF3MC7GC6CJ5UJ5FJ6UJ6FJ8UJ8FK1U
K1FK5MK7M
•MT4218:
45K06091
8
Harddiskdrive,300GBSAS-15000rpm,6Gb/s,32MBcache,3.5"
•MT4155:CTOD1GD7CA4HA4VA2AA2QA2TF9CG9MH1M
H2MH1M
•MT4158:CTOF3MC7GC6CJ5UJ5FJ6UJ6FJ8UJ8FK1U
K1FK5MK7M
•MT4218:
03X36211
8
Harddiskdrive,450GBSAS-15000rpm,3Gb/s,32MBcache,3.5"
•MT4155:CTO
•MT4158:CTOM7JN1UN1FN1SN1PN1LN1DN1YN1GN1M
N1AN1QN1TN1CN1BN1HN1VN1KN1RN1EN1JN4UN4F
•MT4218:CTO
45J48991
8
Harddiskdrive,128GBSATASolidStateDrive(SSD)-MLC,1.8"
•MT4155:CTO
•MT4158:CTO
•MT4218:CTO
45N79531
8
Harddiskdrive,128GBSATASolidStateDrive(SSD)-MLC,1.8"
•MT4155:CTO
•MT4158:CTO
•MT4218:CTO
45N82031
200ThinkStationHardwareMaintenanceManual

Item#FRUsFRU#CRU
8
Harddiskdrive,256GBSATASolidStateDrive(SSD)-MLC,1.8"
•MT4155:CTO
•MT4158:CTO
•MT4218:CTO
45N79591
8
Harddiskdrive,256GBSATASolidStateDrive(SSD)-MLC,1.8"
•MT4155:CTO
•MT4158:CTO
•MT4218:CTO
45N82071
8
Harddiskdrive,160GBSATASolidStateDrive(SSD)-MLC,1.8"
•MT4155:CTO
•MT4158:CTO
45N79631
8
Harddiskdrive,160GBSATASolidStateDrive(SSD)-MLC,1.8"
•MT4155:CTO
•MT4158:CTO
45N80191
8
Harddiskdrive,2TBSATA-7200rpm,3Gb/s,32MBcache,3.5"
•MT4155:CTOK1G
•MT4158:CTO
•MT4218:CTO
45K06101
8
Harddiskdrive,1TBSATA-7200rpm,3Gb/s,32MBcache,3.5"
•MT4155:CTOH2MJ9HK2GK3G
•MT4158:CTOK2MK4MK6ML5GL6GL7GL8GL9GM1GM2G
•MT4218:CTO
45K04121
8
Harddiskdrive,128GBSATASolidStateDrive(SSD),2.5"
•MT4155:CTO
•MT4158:CTO
•MT4218:CTO
45K06171
8
Harddiskdrive,256GBSATASolidStateDrive(SSD),2.5"
•MT4155:CTO
•MT4158:CTOK8M
•MT4218:CTO
45K06181
8
Harddiskdrive,160GBSATASolidStateDrive(SSD)-MLC-SM160,
2.5"
•MT4155:CTOJ1JJ6J
•MT4158:CTO
•MT4218:CTO
45K06161
8
Harddiskdrive,160GBSATASolidStateDrive(SSD)-MLC-SM160,
2.5"
•MT4155:CTOJ1JJ6J
•MT4158:CTO
•MT4218:CTO
03T70261
Chapter12.FRUlists201

Item#FRUsFRU#CRU
8
Harddiskdrive,600GBSATA-10000rpm,16MBcache,2.5"
•MT4155:CTO
•MT4158:CTO
•MT4218:CTO
91Y16581
8
Harddiskdrive,600GBSAS-15000rpm,3.5"
•MT4155:CTO
•MT4158:CTO
•MT4218:CTO
03X36161
8
Harddiskdrive,600GBSAS-15000rpm,3.5"
•MT4155:CTO
•MT4158:CTO
•MT4218:CTO
03X36231
8
Harddiskdrive,250GBSATA-7200rpm,3.5"
•MT4155:CTO
•MT4158:CTO
•MT4218:CTO
03T70391
8
Harddiskdrive,500GBSATA-7200rpm,3.5"
•MT4155:CTOK5MK6GK7G
•MT4158:CTON5UN5FN6MN7MN8MN9GO1GO2GO3G
O4GO5GO6G
•MT4218:CTO
03T70411
8
Harddiskdrive,1TBSATA-7200rpm,3.5"
•MT4155:CTO
•MT4158:CTO
•MT4218:CTO
03T70421
9
Frontfan,120mm(HDD/PCI)withgrommets
•MT4155:allmodels
•MT4158:allmodels
•MT4218:allmodels
45J96062
10
Microprocessor,IntelXeonE5502-1.86GHz,DualCore4.8QPI,4MB
L2,DDR3-800,80W
•MT4155:CTO
•MT4158:CTO
•MT4218:
46R6630N
10
Microprocessor,IntelXeonE5503-DualCore-2.00GHz-4.8QPI
DDR3-800-4MB80W
•MT4155:CTO
•MT4158:CTO
•MT4218:
71Y9029N
202ThinkStationHardwareMaintenanceManual

Item#FRUsFRU#CRU
10
Microprocessor,IntelXeonE5504-2.00GHz,QuadCore-4.8QPI,
4MBL2,DDR3-800,80W
•MT4155:CTO
•MT4158:CTO
•MT4218:
46R6631N
10
Microprocessor,IntelXeonE5506-2.13GHz,QuadCore-4.8QPI,
4MBL2,DDR3-800,80W
•MT4155:CTO
•MT4158:CTO
•MT4218:
46R6632N
10
Microprocessor,IntelXeonE5507-QuadCore-2.26GHz-4.8QPI
DDR3-800-4MB80W
•MT4155:CTO
•MT4158:CTO
•MT4218:
71Y9031N
10
Microprocessor,IntelXeonE5520-2.26GHz,QuadCore5.86QPI,
8MBL2,DDR3-1066,Turbo,SMT,80W
•MT4155:CTO
•MT4158:CTO
•MT4218:
46R6633N
10
Microprocessor,IIntelXeonE5530-2.40GHz,QuadCore-5.86QPI,
8MBL2,DDR3-1066,Turbo,SMT,80W
•MT4155:CTO
•MT4158:CTO
•MT4218:
46R6634N
10
Microprocessor,IntelXeonE5540-2.53GHz,QuadCore5.86QPI,
8MBL2,DDR3-1066,Turbo,SMT,80W
•MT4155:CTO
•MT4158:CTO
•MT4218:
46R6635N
10
Microprocessor,IntelXeonE5620-QuadCore-2.40GHz-5.86QPI
DDR3-1066-12MBTurboSMT80W
•MT4155:CTOD1GD4GE1UE1FA4HA4V93G89GE9UE9F
G2MK3GK7G
•MT4158:CTOD6UD6FD6SD6LD6DD6YD6GD6MD6AD6Q
D6TD6CD6BD6HD6VD6KD6RD6EF9UF9FG7UG7FH1U
H1FK2MK3MN6M
•MT4218:
71Y9049N
10
Microprocessor,IntelXeonE5630-QuadCore-2.53GHz-5.86QPI
DDR3-1066-12MBTurboSMT80W
•MT4155:
•MT4158:CTO
•MT4218:
71Y9047N
Chapter12.FRUlists203

Item#FRUsFRU#CRU
10
Microprocessor,IntelXeonE5640-QuadCore-2.66GHz-5.86QPI
DDR3-1066-12MBTurboSMT80W
•MT4155:
•MT4158:CTO
•MT4218:
71Y9045N
10
Microprocessor,IntelXeonX5550-2.66GHz,QuadCore-6.4QPI,
8MBL2,DDR3-1333,Turbo,SMT,95W
•MT4155:CTO
•MT4158:CTOF3MF4MK6M
•MT4218:
46R6638N
10
Microprocessor,IntelXeonX5560-2.80GHz,QuadCore-6.4QPI,
8MBL2,DDR3-1333,Turbo,SMT,95W
•MT4155:CTO88G
•MT4158:CTO
•MT4218:
46R6639N
10
Microprocessor,IntelXeonX5650-6Core-2.66GHz-6.4QPI
DDR3-1333-12MBTurboSMT95W
•MT4155:D7CA2AA2QA2TF9CF1UF1FH1MK4UK4F
•MT4158:CTOC2GD2GC6CH5MH6MM3UM3FN3UN3FN3S
N3PN3LN3DN3YN3GN3MN3AN3QN3TN3CN3BN3HN3V
N3KN3RN3EN3JN5UN5FN8M
•MT4218:
71Y9043N
10
Microprocessor,IntelXeonX5660-6Core-2.80GHz-6.4QPI
DDR3-1333-12MBTurboSMT95W
•MT4155:CTO
•MT4158:CTOH1UH1FM5JN2UN2FN4UN4F
•MT4218:
71Y9041N
10
Microprocessor,IntelXeonX5667-QuadCore-3.06GHz-6.4QPI
DDR3-1333-12MBTurboSMT95W
•MT4155:CTO
•MT4158:CTO
•MT4218:
71Y9039N
10
Microprocessor,IntelXeonX5570-2.93GHz,QuadCore-6.4QPI,
8MBL2,DDR3-1333,Turbo,SMT,95W
•MT4155:CTO
•MT4158:CTO
•MT4218:
46R6640N
10
Microprocessor,IntelXeonX5680-6Cores-3.33GHz-6.4QPI
DDR3-1333-12MBTurboSMT130W
•MT4155:CTO
•MT4158:CTO
•MT4218:
71Y9033N
204ThinkStationHardwareMaintenanceManual

Item#FRUsFRU#CRU
10
Microprocessor,IntelXeonX5677-QuadCore-3.46GHz-6.4QPI
DDR3-1333-12MBTurboSMT130W
•MT4155:CTO
•MT4158:CTO
•MT4218:
71Y9035N
10
Microprocessor,IntelXeonX5670-6Core-2.93GHz-6.4QPI
DDR3-1333-12MBTurboSMT95W
•MT4155:
•MT4158:CTO
•MT4218:
71Y9037N
10
Microprocessor,IntelXeonW5580-3.20GHz,QuadCore6.4QPI,
8MBL2,DDR3-1333,Turbo,SMT,130W
•MT4155:CTO
•MT4158:CTO
•MT4218:
46R6641N
10
Microprocessor,IntelXeonW5590-QuadCore-3.33GHZ-6.4QPI,
8MBCache,DDR3-1333,Turbo,HT,130W
•MT4155:CTO
•MT4158:CTO
•MT4218:
64Y9831N
10
Microprocessor,IntelXeonE5603-QuadCore-1.6Ghz-4.8QPI,
4MBCache,DDR3-1066,NoHT,NoTurbo,80W
•MT4155:CTOH9UH9F
•MT4158:CTOJ2UJ2FM4UM4F
•MT4218:CTO
03T8032N
10
Microprocessor,IntelXeonE5606-QuadCore-2.13Ghz-4.8QPI,
8MBCache,DDR3-1066,NoHT,NoTurbo,80W
•MT4155:CTOG4G
•MT4158:CTO
•MT4218:CTO
03T8031N
10
Microprocessor,IntelXeonE5607-QuadCore-2.26Ghz-4.8QPI,
8MBCache,DDR3-1066,NoHT,NoTurbo,80W
•MT4155:CTOG3GG7UG7FK2GK6G
•MT4158:CTOJ6UJ6F
•MT4218:CTO
03T8030N
10
Microprocessor,IntelXeonE5645-6Core-2.4Ghz-5.86QPI,12MB
Cache,DDR3-1333,Turbo,HT,80W
•MT4155:CTOG5GG8UG8FJ4JJ5JK1G
•MT4158:CTOH8GJ7UJ7FL5GL9GM6JN9GO4G
•MT4218:CTO
03T8029N
Chapter12.FRUlists205

Item#FRUsFRU#CRU
10
Microprocessor,IntelXeonE5649-6Core-2.53Ghz-5.86QPI,
12MBCache,DDR3-1333,Turbo,HT,80W
•MT4155:CTOG9M
•MT4158:CTOH9GK4MK5ML6GN7MO1G
•MT4218:CTO
03T8027N
10
Microprocessor,IntelXeonX5647-QuadCore-2.93Ghz-5.86QPI,
12MBCache,DDR3-1066,Turbo,HT,130W
•MT4155:CTO
•MT4158:CTOJ3UJ3FJ5UJ5FJ8UJ8FJ9UJ9FL7GO2G
•MT4218:CTO
03T8028N
10
Microprocessor,IntelXeonX5672-QuadCore-3.2Ghz-6.4QPI,
12MBCache,DDR3-1333,Turbo,HT,95W
•MT4155:CTO
•MT4158:CTOM2GO6G
•MT4218:CTO
03T8026N
10
Microprocessor,IntelXeonX5675-6Core-3.06Ghz-6.4QPI,12MB
Cache,DDR3-1333,Turbo,HT,95W
•MT4155:CTOH2MJ1JJ2JJ3JJ6JJ9HK5M
•MT4158:CTOM7JM9J
•MT4218:CTO
03T8025N
10
Microprocessor,IntelXeonX5687-QuadCore-3.6Ghz-6.4QPI,
12MBCache,DDR3-1333,Turbo,HT,130W
•MT4155:CTO
•MT4158:CTOJ1GJ4UJ4FM1GN1UN1FN1SN1PN1LN1D
N1YN1GN1MN1AN1QN1TN1CN1BN1HN1VN1KN1RN1E
N1JO5G
•MT4218:CTO
03T8024N
10
Microprocessor,IntelXeonX5690-6Core-3.46Ghz-6.4QPI,12MB
Cache,DDR3-1333,Turbo,HT,130W
•MT4155:CTOJ7JJ8J
•MT4158:CTOK1UK1FK7MK8ML8GM8JO3G
•MT4218:CTO
03T8023N
10
Microprocessor,IntelXeonL5630-QuadCore-2.13GHz-5.86QPI,
12MBCache,DDR3-1066,Turbo,HT,40W
•MT4155:CTO
•MT4158:CTO
•MT4218:CTO
03T8045N
206ThinkStationHardwareMaintenanceManual

Item#FRUsFRU#CRU
11
Systemboard,Ibiza-2PIntelLGA1366,Tylersburg36D,ICH10(GA
levelv1.7,TPMenabled)
•MT4155:CTOD1GD4GE7ME1UE1FD7CA4HA4V93G88G
89G91GA2AA2QA2TF9CE9UE9FF1UF1FG2MG3GG4G
G5GG7UG7FG8UG8FG9MH1MH2MH9UH9FJ1JJ2JJ3J
J4JJ5JJ6JJ7JJ8JJ9HK1GK2GK3GK4UK4FK5MK6GK7G
•MT4158:CTOD6UD6FD6SD6LD6DD6YD6GD6MD6AD6Q
D6TD6CD6BD6HD6VD6KD6RD6EF3MF4MF6MC2GC3G
C5GC7GC8GD2GC6CF9UF9FG7UG7FH1UH1FH5MH6M
H8GH9GJ1GJ2UJ2FJ3UJ3FJ4UJ4FJ5UJ5FJ6UJ6FJ7U
J7FJ8UJ8FJ9UJ9FK1UK1FK2MK3MK4MK5MK6MK7M
K8ML5GL6GL7GL8GL9GM1GM2GM3UM3FM4UM4FM5J
M6JM7JM8JM9JN1UN1FN1SN1PN1LN1DN1YN1GN1M
N1AN1QN1TN1CN1BN1HN1VN1KN1RN1EN1JN2UN2F
N3UN3FN3SN3PN3LN3DN3YN3GN3MN3AN3QN3TN3C
N3BN3HN3VN3KN3RN3EN3JN4UN4FN5UN5FN6MN7M
N8MN9GO1GO2GO3GO4GO5GO6G
•MT4218:
71Y8826N
11
Systemboard,Ibiza-2PIntelLGA1366,Tylersburg36D,ICH10(GA
Levelv1.7,TPMdisabled)
•MT4155:D1GD4G93G88G89GG3GG4GG5GK1GK2GK3G
K6GK7G
•MT4158:D6GC2GC3GC5GC7GC8GD2GH8GH9GJ1GL5G
L6GL7GL8GL9GM1GM2GN1GN3GN9GO1GO2GO3GO4G
O5GO6G
•MT4218:
71Y8828N
11
Systemboard,Ibiza-2PIntelLGA1366,Tylersburg36D,ICH10
(TPMenabled)
•MT4155:CTOD1GD4GE7ME1UE1FD7CA4HA4V93G88G
89GA2AA2QA2TF9CE9UE9FF1UF1FG2MG3GG4GG5G
G7UG7FG8UG8FG9MH1MH2MH9UH9FJ1JJ2JJ3JJ4JJ5J
J6JJ7JJ8JJ9HK1GK2GK3GK4UK4FK5MK6GK7G
•MT4158:CTOD6UD6FD6SD6LD6DD6YD6GD6MD6AD6Q
D6TD6CD6BD6HD6VD6KD6RD6EF3MF4MF6MC2GC3G
C5GC7GC8GD2GC6CF9UF9FG7UG7FH1UH1FH5MH6M
H8GH9GJ1GJ2UJ2FJ3UJ3FJ4UJ4FJ5UJ5FJ6UJ6FJ7U
J7FJ8UJ8FJ9UJ9FK1UK1FK2MK3MK4MK5MK6MK7M
K8ML5GL6GL7GL8GL9GM1GM2GM3UM3FM4UM4FM5J
M6JM7JM8JM9JN1UN1FN1SN1PN1LN1DN1YN1GN1M
N1AN1QN1TN1CN1BN1HN1VN1KN1RN1EN1JN2UN2F
N3UN3FN3SN3PN3LN3DN3YN3GN3MN3AN3QN3TN3C
N3BN3HN3VN3KN3RN3EN3JN4UN4FN5UN5FN6MN7M
N8MN9GO1GO2GO3GO4GO5GO6G
•MT4218:
03T8043N
11
Systemboard,Ibiza-2PIntelLGA1366,Tylersburg36D,ICH10(
TPMdisabled)
•MT4155:D1GD4G93G88G89GG3GG4GG5GK1GK2GK3G
K6GK7G
•MT4158:D6GC2GC3GC5GC7GC8GD2GH8GH9GJ1GL5G
L6GL7GL8GL9GM1GM2GN1GN3GN9GO1GO2GO3GO4G
O5GO6G
•MT4218:
03T8044N
Chapter12.FRUlists207

Item#FRUsFRU#CRU
11
Systemboard,Ibiza-2PIntelLGA1366,Tylersburg36D,ICH10
(Change5VUSBresistors+Marvell3.1.0.21FW)
•MT4155:J1JJ2JJ3JJ4JJ5JJ6JJ7JJ8JJ9HK1GK2GK3G
K4UK4FK6GK7G
•MT4158:CTOD6UD6FD6SD6LD6DD6YD6GD6MD6AD6Q
D6TD6CD6BD6HD6VD6KD6RD6EF3MF4MF6MC2GC3G
C5GC7GC8GD2GC6CF9UF9FG7UG7FH1UH1FH5MH6M
H8GH9GJ1GJ2UJ2FJ3UJ3FJ4UJ4FJ5UJ5FJ6UJ6FJ7U
J7FJ8UJ8FJ9UJ9FK1UK1FK2MK3MK4MK5MK6MK7M
K8ML5GL6GL7GL8GL9GM1GM2GM3UM3FM4UM4FM5J
M6JM7JM8JM9JN5UN5FN6MN7MN8MN9GO1GO2GO3G
O4GO5GO6G
•MT4218:
46R4545N
11
Systemboard,Ibiza-2PIntelLGA1366,Tylersburg36D,ICH10
(RussiaonlyPlanar)TPMdisabled
•MT4155:D1GD4G93G88G89GG3GG4GG5GK1GK2GK3G
K6GK7G
•MT4158:CTOD6UD6FD6SD6LD6DD6YD6GD6MD6AD6Q
D6TD6CD6BD6HD6VD6KD6RD6EF3MF4MF6MC2GC3G
C5GC7GC8GD2GC6CF9UF9FG7UG7FH1UH1FH5MH6M
H8GH9GJ1GJ2UJ2FJ3UJ3FJ4UJ4FJ5UJ5FJ6UJ6FJ7U
J7FJ8UJ8FJ9UJ9FK1UK1FK2MK3MK4MK5MK6MK7M
K8ML5GL6GL7GL8GL9GM1GM2GM3UM3FM4UM4FM5J
M6JM7JM8JM9JN1UN1FN1SN1PN1LN1DN1YN1GN1M
N1AN1QN1TN1CN1BN1HN1VN1KN1RN1EN1JN2UN2F
N3UN3FN3SN3PN3LN3DN3YN3GN3MN3AN3QN3TN3C
N3BN3HN3VN3KN3RN3EN3JN4UN4FN5UN5FN6MN7M
N8MN9GO1GO2GO3GO4GO5GO6G
•MT4218:
64Y6338N
11
Systemboard,Ibiza-2PIntelLGA1366,Tylersburg36D,ICH10
(capacitorupdateforshutdownissue)
•MT4155:J1JJ2JJ3JJ4JJ5JJ6JJ7JJ8JJ9HK1GK2GK3G
K4UK4FK6GK7G
•MT4158:CTOD6UD6FD6SD6LD6DD6YD6GD6MD6AD6Q
D6TD6CD6BD6HD6VD6KD6RD6EF3MF4MF6MC2GC3G
C5GC7GC8GD2GF9UF9FG7UG7FH1UH1FH5MH6MH8G
H9GJ1GJ2UJ2FJ3UJ3FJ4UJ4FJ5UJ5FJ6UJ6FJ7UJ7F
J8UJ8FJ9UJ9FK1UK1FK2MK3MK4MK5MK6MK7MK8M
L5GL6GL7GL8GL9GM1GM2GM3UM3FM4UM4FM5JM6J
M7JM8JM9JN1UN1FN1SN1PN1LN1DN1YN1GN1MN1A
N1QN1TN1CN1BN1HN1VN1KN1RN1EN1JN2UN2FN3U
N3FN3SN3PN3LN3DN3YN3GN3MN3AN3QN3TN3CN3B
N3HN3VN3KN3RN3EN3JN4UN4FN5UN5FN6MN7MN8M
N9GO1GO2GO3GO4GO5GO6G
•MT4218:
71Y7060N
208ThinkStationHardwareMaintenanceManual

Item#FRUsFRU#CRU
11
Systemboard,Ibiza-2PIntelLGA1366,Tylersburg36D,ICH10(PCI
2.3compliancerework)
•MT4155:J1JJ2JJ3JJ4JJ5JJ6JJ7JJ8JJ9HK1GK2GK3G
K4UK4FK6GK7G
•MT4158:D6GC2GC3GC5GC7GC8GD2GH8GH9GJ1GL5G
L6GL7GL8GL9GM1GM2GN1GN3GN9GO1GO2GO3GO4G
O5GO6G
•MT4218:
64Y9118N
11
Systemboard,Ibiza-2PIntelLGA1366,Tylersburg36D,ICH10(TPM
disabled/originalIOHheatsink)
•MT4155:D1GD4G93G88G89GG3GG4GG5GK1GK2GK3G
K6GK7G
•MT4158:CTOD6UD6FD6SD6LD6DD6YD6GD6MD6AD6Q
D6TD6CD6BD6HD6VD6KD6RD6EC2GC3GC5GC7GC8G
D2GC6CF9UF9FG7UG7FH1UH1FH5MH6MH8GH9GJ1G
J2UJ2FJ3UJ3FJ4UJ4FJ5UJ5FJ6UJ6FJ7UJ7FJ8UJ8F
J9UJ9FK1UK1FK2MK3MK4MK5MK6MK7MK8ML5GL6G
L7GL8GL9GM1GM2GM3UM3FM4UM4FM5JM6JM7JM8J
M9JN1UN1FN1SN1PN1LN1DN1YN1GN1MN1AN1QN1T
N1CN1BN1HN1VN1KN1RN1EN1JN2UN2FN3UN3FN3S
N3PN3LN3DN3YN3GN3MN3AN3QN3TN3CN3BN3HN3V
N3KN3RN3EN3JN4UN4FN5UN5FN6MN7MN8MN9GO1G
O2GO3GO4GO5GO6G
•MT4218:
64Y9121N
11
Systemboard,Ibiza-2PIntelLGA1366,Tylersburg36D,ICH10
(EmbeddedPCI2.3compliancerework)
•MT4155:J1JJ2JJ3JJ4JJ5JJ6JJ7JJ8JJ9HK1GK2GK3G
K4UK4FK6GK7G
•MT4158:CTOD6UD6FD6SD6LD6DD6YD6GD6MD6AD6Q
D6TD6CD6BD6HD6VD6KD6RD6EC2GC3GC5GC7GC8G
D2GC6CF9UF9FG7UG7FH1UH1FH5MH6MH8GH9GJ1G
J2UJ2FJ3UJ3FJ4UJ4FJ5UJ5FJ6UJ6FJ7UJ7FJ8UJ8F
J9UJ9FK1UK1FK2MK3MK4MK5MK6MK7MK8ML5GL6G
L7GL8GL9GM1GM2GM3UM3FM4UM4FM5JM6JM7JM8J
M9JN1UN1FN1SN1PN1LN1DN1YN1GN1MN1AN1QN1T
N1CN1BN1HN1VN1KN1RN1EN1JN2UN2FN3UN3FN3S
N3PN3LN3DN3YN3GN3MN3AN3QN3TN3CN3BN3HN3V
N3KN3RN3EN3JN4UN4FN5UN5FN6MN7MN8MN9GO1G
O2GO3GO4GO5GO6G
•MT4218:
71Y4934N
11
Systemboard,Ibiza-2PIntelLGA1366,Tylersburg36D,ICH10(PCB
V1.4TPMenabled)
•MT4155:CTOD1GD4GE7ME1UE1FD7CJ1JJ2JJ3JJ4JJ5J
J6JJ7JJ8JJ9HK1GK2GK3GK4UK4FK5MK6GK7G
•MT4158:CTOD6UD6FD6SD6LD6DD6YD6GD6MD6AD6Q
D6TD6CD6BD6HD6VD6KD6RD6EC2GC3GC5GC7GC8G
D2GC6CF9UF9FG7UG7FH1UH1FH5MH6MH8GH9GJ1G
J2UJ2FJ3UJ3FJ4UJ4FJ5UJ5FJ6UJ6FJ7UJ7FJ8UJ8F
J9UJ9FK1UK1FK2MK3MK4MK5MK6MK7MK8ML5GL6G
L7GL8GL9GM1GM2GM3UM3FM4UM4FM5JM6JM7JM8J
M9JN1UN1FN1SN1PN1LN1DN1YN1GN1MN1AN1QN1T
N1CN1BN1HN1VN1KN1RN1EN1JN2UN2FN3UN3FN3S
N3PN3LN3DN3YN3GN3MN3AN3QN3TN3CN3BN3HN3V
71Y7061N
Chapter12.FRUlists209

Item#FRUsFRU#CRU
N3KN3RN3EN3JN4UN4FN5UN5FN6MN7MN8MN9GO1G
O2GO3GO4GO5GO6G
•MT4218:
12
Rearfan,120mmsystemexhaust
•MT4155:allmodels
•MT4158:allmodels
•MT4218:allmodels
45J96052
MechanicalFRUs
TheFRUslistedinthefollowingtablesarenotillustrated.
FRUsFRU#CRU
FRU,FDDcable
•MT4155:allmodels
•MT4158:allmodels
•MT4218:allmodels
41N82942
FRU,handlewithscrews
•MT4155:allmodels
•MT4158:allmodels
•MT4218:allmodels
41R55261
FRU,miscellaneouspartskit
•MT4155:allmodels
•MT4158:allmodels
•MT4218:allmodels
41R56302
FRU,thermalsensecable
•MT4155:allmodels
•MT4158:allmodels
•MT4218:allmodels
41R25112
FRU,systemboardscrewkit
•MT4155:allmodels
•MT4158:allmodels
•MT4218:allmodels
41R55472
FRU,railkit,Remywithller
•MT4155:allmodels
•MT4158:allmodels
•MT4218:allmodels
41R55972
FRU,llerplate,Remy
•MT4155:allmodels
•MT4158:allmodels
•MT4218:allmodels
41R56361
210ThinkStationHardwareMaintenanceManual

FRUsFRU#CRU
FRU,coverassembly(accesspanel),Remy
•MT4155:allmodels
•MT4158:allmodels
•MT4218:allmodels
41R56541
FRU,labelkit,Remy
•MT4155:allmodels
•MT4158:allmodels
•MT4218:allmodels
41R56561
FRU,mechanicalshellkit,Remy
•MT4155:allmodels
•MT4158:allmodels
•MT4218:allmodels
41R5658N
FRU,systemboard_shield
•MT4155:allmodels
•MT4158:allmodels
•MT4218:allmodels
45K22562
FRU,cable,SATAharddiskdrive
•MT4155:allmodels
•MT4158:allmodels
•MT4218:allmodels
26K11862
FRU,1.8SSDto3.5harddiskdriveconversionkitwithPCB
•MT4155:allmodels
•MT4158:allmodels
•MT4218:allmodels
43N95932
FRU,memorychillerassembly
•MT4155:allmodels
•MT4158:allmodels
•MT4218:allmodels
41R56552
FRU,bezelkit
•MT4155:allmodels
•MT4158:allmodels
•MT4218:allmodels
45K22682
FRU,cable,signal,SLIbridge
•MT4155:allmodels
•MT4158:allmodels
•MT4218:allmodels
63Y91632
Enhancedcardandbracketassembly
•MT4155:allmodels
•MT4158:allmodels
•MT4218:allmodels
41R56942
Chapter12.FRUlists211

FRUsFRU#CRU
Enhancedcableassembly
•MT4155:allmodels
•MT4158:allmodels
•MT4218:allmodels
41R56042
HeatsinkRMbracket
•MT4155:allmodels
•MT4158:allmodels
•MT4218:allmodels
41R55922
2.5"harddiskdrivemountingkit(tsintoexistingharddiskdrivecaddy)
•MT4155:allmodels
•MT4158:allmodels
•MT4218:allmodels
41R56252
FRU,miscellaneouspartskit
•MT4155:allmodels
•MT4158:allmodels
•MT4218:allmodels
41R56282
FRU,secondserialportcable
•MT4155:allmodels
•MT4158:allmodels
•MT4218:allmodels
41R55442
KeyboardandMouse
Keyboard-PreferredProFullsizeFRU#CRU
USEnglish
•MT4155:CTOD1GD4GE7ME1UA4HA4V93G88G89GA2AA2QE9UF1U
G1UG2MG6UG7UG8UG9MH1MH2MH9UJ9HK1GK2GK3GK4UK5M
•MT4158:CTOD6UD6LD6GD6MD6AD6QD6HD6RD6EF3MF4MF6MC2G
C3GD2GF9UG7UH1UH5MH6MJ2UJ3UJ4UJ5UJ6UJ7UJ8UJ9UK1U
K2MK3MK4MK5MK6MK7MK8MM3UM4UN1UN2UN3UN4UN1LN3L
N1MN3MN1AN3AN1QN3QN1HN3HN1RN3RN1EN3EN5UN6MN7M
N8MN9GO1GO2GO3GO4GO5GO6G
•MT4218:
41A52891
Arabic
•MT4155:CTOD1GD4G93G88G89GG3GG4GG5GK1GK2GK3GK6GK7G
•MT4158:CTOC2GC3GC5GC7GC8GD2GH8GH9GJ1GL5GL6GL7GL8G
L9GM1GM2GN1GN3GN9GO1GO2GO3GO4GO5GO6G
•MT4218:
41A52901
Arabic/French
•MT4155:CTO
•MT4158:CTO
•MT4218:
41A52911
212ThinkStationHardwareMaintenanceManual

Keyboard-PreferredProFullsizeFRU#CRU
Belgian/French
•MT4155:CTOD1GD4G93G88G89GG3GG4GG5GK1GK2GK3GK6GK7G
•MT4158:CTOC2GC3GC5GC7GC8GD2GH8GH9GJ1GL5GL6GL7GL8G
L9GM1GM2GN1GN3GN9GO1GO2GO3GO4GO5GO6G
•MT4218:
41A52921
Belgian/UK
•MT4155:CTOD1GD4G93G88G89GG3GG4GG5GK1GK2GK3GK6GK7G
•MT4158:CTOC2GC3GC5GC7GC8GD2GH8GH9GJ1GL5GL6GL7GL8G
L9GM1GM2GN1GN3GN9GO1GO2GO3GO4GO5GO6G
•MT4218:
41A52931
Brazilian
•MT4155:CTO
•MT4158:CTO
•MT4218:
41A52941
Bulgarian
•MT4155:CTOD1GD4G93G88G89GG3GG4GG5GK1GK2GK3GK6GK7G
•MT4158:CTOC2GC3GC5GC7GC8GD2GH8GH9GJ1GL5GL6GL7GL8G
L9GM1GM2GN1GN3GN9GO1GO2GO3GO4GO5GO6G
•MT4218:
41A52951
HongKong/Taiwan
•MT4155:CTO
•MT4158:D6CD6BD6VN1BN3BN1VN3V
•MT4218:
41A52961
Czech
•MT4155:CTOD1GD4G93G88G89GG3GG4GG5GK1GK2GK3GK6GK7G
•MT4158:CTOC2GC3GC5GC7GC8GD2GH8GH9GJ1GL5GL6GL7GL8G
L9GM1GM2GN1GN3GN9GO1GO2GO3GO4GO5GO6G
•MT4218:
41A52971
Danish
•MT4155:CTOD1GD4G93G88G89GG3GG4GG5GK1GK2GK3GK6GK7G
•MT4158:CTOC2GC3GC5GC7GC8GD2GH8GH9GJ1GL5GL6GL7GL8G
L9GM1GM2GN1GN3GN9GO1GO2GO3GO4GO5GO6G
•MT4218:
41A52981
Dutch
•MT4155:CTOD1GD4G93G88G89GG3GG4GG5GK1GK2GK3GK6GK7G
•MT4158:CTOC2GC3GC5GC7GC8GD2GH8GH9GJ1GL5GL6GL7GL8G
L9GM1GM2GN1GN3GN9GO1GO2GO3GO4GO5GO6G
•MT4218:
41A52991
French
•MT4155:CTOD1GD4G93G88G89GG3GG4GG5GK1GK2GK3GK6GK7G
•MT4158:CTOC2GC3GC5GC7GC8GD2GH8GH9GJ1GL5GL6GL7GL8G
L9GM1GM2GN1GN3GN9GO1GO2GO3GO4GO5GO6G
•MT4218:
41A53001
Chapter12.FRUlists213

Keyboard-PreferredProFullsizeFRU#CRU
FrenchCanadian
•MT4155:CTOE1FE9FF1FG7FG8FH9FK4F
•MT4158:CTOD6FF9FG7FH1FJ2FJ3FJ4FJ5FJ6FJ7FJ8FJ9FK1FM3F
M4FN1FN2FN3FN4FN5F
41A53011
FrenchCanadian
•MT4155:CTOE1FE9FF1FG7FG8FH9FK4F
•MT4158:CTOD6FF9FG7FH1FJ2FJ3FJ4FJ5FJ6FJ7FJ8FJ9FK1F
M3FM4FN1FN2FN3FN4FN5F
•MT4218:
41A53021
German
•MT4155:CTOD1GD4G93G88G89GG3GG4GG5GK1GK2GK3GK6GK7G
•MT4158:CTOC2GC3GC5GC7GC8GD2GH8GH9GJ1GL5GL6GL7GL8G
L9GM1GM2GN1GN3GN9GO1GO2GO3GO4GO5GO6G
•MT4218:
41A53031
Greek
•MT4155:CTOD1GD4G93G88G89GG3GG4GG5GK1GK2GK3GK6GK7G
•MT4158:CTOC2GC3GC5GC7GC8GD2GH8GH9GJ1GL5GL6GL7GL8G
L9GM1GM2GN1GN3GN9GO1GO2GO3GO4GO5GO6G
•MT4218:
41A53041
Greek/US
•MT4155:CTOD1GD4G93G88G89GG3GG4GG5GK1GK2GK3GK6GK7G
•MT4158:CTOC2GC3GC5GC7GC8GD2GH8GH9GJ1GL5GL6GL7GL8G
L9GM1GM2GN1GN3GN9GO1GO2GO3GO4GO5GO6G
•MT4218:
41A53051
Hebrew
•MT4155:CTOD1GD4G93G88G89GG3GG4GG5GK1GK2GK3GK6GK7G
•MT4158:CTOC2GC3GC5GC7GC8GD2GH8GH9GJ1GL5GL6GL7GL8G
L9GM1GM2GN1GN3GN9GO1GO2GO3GO4GO5GO6G
•MT4218:
41A53061
Hungarian
•MT4155:CTOD1GD4G93G88G89GG3GG4GG5GK1GK2GK3GK6GK7G
•MT4158:CTOC2GC3GC5GC7GC8GD2GH8GH9GJ1GL5GL6GL7GL8G
L9GM1GM2GN1GN3GN9GO1GO2GO3GO4GO5GO6G
•MT4218:
41A53071
Iceland
•MT4155:CTOD1GD4G93G88G89GG3GG4GG5GK1GK2GK3GK6GK7G
•MT4158:CTOC2GC3GC5GC7GC8GD2GH8GH9GJ1GL5GL6GL7GL8G
L9GM1GM2GN1GN3GN9GO1GO2GO3GO4GO5GO6G
•MT4218:
41A53081
214ThinkStationHardwareMaintenanceManual

Keyboard-PreferredProFullsizeFRU#CRU
Italy
•MT4155:CTOD1GD4G93G88G89GG3GG4GG5GK1GK2GK3GK6GK7G
•MT4158:CTOC2GC3GC5GC7GC8GD2GH8GH9GJ1GL5GL6GL7GL8G
L9GM1GM2GN1GN3GN9GO1GO2GO3GO4GO5GO6G
•MT4218:
41A53091
Japanese
•MT4155:CTOJ1JJ2JJ3JJ4JJ5JJ6JJ7JJ8J
•MT4158:CTOM5JM6JM7JM8JM9JN1JN3J
•MT4218:
41A53101
Korean
•MT4155:CTO
•MT4158:CTOD6KN1KN3K
•MT4218:
41A53111
LASpanish
•MT4155:CTO
•MT4158:CTOD6SD6DD6YN1SN3SN1DN3DN1YN3Y
•MT4218:
41A53121
Norwegian
•MT4155:CTOD1GD4G93G88G89GG3GG4GG5GK1GK2GK3GK6GK7G
•MT4158:CTOC2GC3GC5GC7GC8GD2GH8GH9GJ1GL5GL6GL7GL8G
L9GM1GM2GN1GN3GN9GO1GO2GO3GO4GO5GO6G
•MT4218:
41A53131
Polish
•MT4155:CTOD1GD4G93G88G89GG3GG4GG5GK1GK2GK3GK6GK7G
•MT4158:CTOC2GC3GC5GC7GC8GD2GH8GH9GJ1GL5GL6GL7GL8G
L9GM1GM2GN1GN3GN9GO1GO2GO3GO4GO5GO6G
•MT4218:
41A53141
Portuguese
•MT4155:CTOD1GD4G93G88G89GG3GG4GG5GK1GK2GK3GK6GK7G
•MT4158:CTOC2GC3GC5GC7GC8GD2GH8GH9GJ1GL5GL6GL7GL8G
L9GM1GM2GN1GN3GN9GO1GO2GO3GO4GO5GO6G
•MT4218:
41A53151
Romanian
•MT4155:CTOD1GD4G93G88G89GG3GG4GG5GK1GK2GK3GK6GK7G
•MT4158:CTOC2GC3GC5GC7GC8GD2GH8GH9GJ1GL5GL6GL7GL8G
L9GM1GM2GN1GN3GN9GO1GO2GO3GO4GO5GO6G
•MT4218:
41A53171
Romanian
•MT4155:CTOD1GD4G93G88G89GG3GG4GG5GK1GK2GK3GK6GK7G
•MT4158:CTOC2GC3GC5GC7GC8GD2GH8GH9GJ1GL5GL6GL7GL8G
L9GM1GM2GN1GN3GN9GO1GO2GO3GO4GO5GO6G
•MT4218:
41A53161
Chapter12.FRUlists215

Keyboard-PreferredProFullsizeFRU#CRU
Russian/Cyrillic
•MT4155:CTOD1GD4G93G88G89GG3GG4GG5GK1GK2GK3GK6GK7G
•MT4158:CTOC2GC3GC5GC7GC8GD2GH8GH9GJ1GL5GL6GL7GL8G
L9GM1GM2GN1GN3GN9GO1GO2GO3GO4GO5GO6G
•MT4218:
41A53181
Serbian/Cyrillic
•MT4155:CTOD1GD4G93G88G89GG3GG4GG5GK1GK2GK3GK6GK7G
•MT4158:CTOC2GC3GC5GC7GC8GD2GH8GH9GJ1GL5GL6GL7GL8G
L9GM1GM2GN1GN3GN9GO1GO2GO3GO4GO5GO6G
•MT4218:
41A53191
Slovak
•MT4155:CTOD1GD4G93G88G89GG3GG4GG5GK1GK2GK3GK6GK7G
•MT4158:CTOC2GC3GC5GC7GC8GD2GH8GH9GJ1GL5GL6GL7GL8G
L9GM1GM2GN1GN3GN9GO1GO2GO3GO4GO5GO6G
•MT4218:
41A53201
Spanish
•MT4155:CTOD1GD4G93G88G89GG3GG4GG5GK1GK2GK3GK6GK7G
•MT4158:CTOC2GC3GC5GC7GC8GD2GH8GH9GJ1GL5GL6GL7GL8G
L9GM1GM2GN1GN3GN9GO1GO2GO3GO4GO5GO6G
•MT4218:
41A53211
Swedish/Finnish
•MT4155:CTOD1GD4G93G88G89GG3GG4GG5GK1GK2GK3GK6GK7G
•MT4158:CTOC2GC3GC5GC7GC8GD2GH8GH9GJ1GL5GL6GL7GL8G
L9GM1GM2GN1GN3GN9GO1GO2GO3GO4GO5GO6G
•MT4218:
41A53221
SwissFrench/German
•MT4155:CTOD1GD4G93G88G89GG3GG4GG5GK1GK2GK3GK6GK7G
•MT4158:CTOC2GC3GC5GC7GC8GD2GH8GH9GJ1GL5GL6GL7GL8G
L9GM1GM2GN1GN3GN9GO1GO2GO3GO4GO5GO6G
•MT4218:
41A53231
Thailand
•MT4155:A2T
•MT4158:CTOD6TN1TN3T
•MT4218:
41A53241
Turkish
•MT4155:CTOD1GD4G93G88G89GG3GG4GG5GK1GK2GK3GK6GK7G
•MT4158:CTOC2GC3GC5GC7GC8GD2GH8GH9GJ1GL5GL6GL7GL8G
L9GM1GM2GN1GN3GN9GO1GO2GO3GO4GO5GO6G
•MT4218:
41A53251
216ThinkStationHardwareMaintenanceManual

Keyboard-PreferredProFullsizeFRU#CRU
Turkish
•MT4155:CTOD1GD4G93G88G89GG3GG4GG5GK1GK2GK3GK6GK7G
•MT4158:CTOC2GC3GC5GC7GC8GD2GH8GH9GJ1GL5GL6GL7GL8G
L9GM1GM2GN1GN3GN9GO1GO2GO3GO4GO5GO6G
•MT4218:
41A53261
UKEnglish
•MT4155:CTOD1GD4G93G88G89GG3GG4GG5GK1GK2GK3GK6GK7G
•MT4158:CTOC2GC3GC5GC7GC8GD2GH8GH9GJ1GL5GL6GL7GL8G
L9GM1GM2GN1GN3GN9GO1GO2GO3GO4GO5GO6G
•MT4218:
41A53271
USEuropean
•MT4155:CTOD1GD4G93G88G89GG3GG4GG5GK1GK2GK3GK6GK7G
•MT4158:CTOC2GC3GC5GC7GC8GD2GH8GH9GJ1GL5GL6GL7GL8G
L9GM1GM2GN1GN3GN9GO1GO2GO3GO4GO5GO6G
•MT4218:
41A53281
Slovenian
•MT4155:CTOD1GD4G93G88G89GG3GG4GG5GK1GK2GK3GK6GK7G
•MT4158:CTOC2GC3GC5GC7GC8GD2GH8GH9GJ1GL5GL6GL7GL8G
L9GM1GM2GN1GN3GN9GO1GO2GO3GO4GO5GO6G
•MT4218:
41A53291
Keyboard-FullSizePS/2FRU#CRU
USEnglish
•MT4155:
•MT4158:
•MT4218:
41A50391
Arabic
•MT4155:
•MT4158:
•MT4218:
41A50401
Arabic/French
•MT4155:
•MT4158:
•MT4218:
41A50411
Belgian/French
•MT4155:
•MT4158:
•MT4218:
41A50421
Belgian/UK
•MT4155:
•MT4158:
•MT4218:
41A50431
Chapter12.FRUlists217

Keyboard-FullSizePS/2FRU#CRU
Brazilian
•MT4155:
•MT4158:
•MT4218:
41A50441
Bulgarian
•MT4155:
•MT4158:
•MT4218:
41A50451
HongKong/Taiwan
•MT4155:
•MT4158:
•MT4218:
41A50461
Czech
•MT4155:
•MT4158:
•MT4218:
41A50471
Danish
•MT4155:
•MT4158:
•MT4218:
41A50481
Dutch
•MT4155:
•MT4158:
•MT4218:
41A50491
French
•MT4155:
•MT4158:
•MT4218:
41A50501
FrenchCanadian
•MT4155:
•MT4158:
•MT4218:
41A50511
FrenchCanadian
•MT4155:
•MT4158:
•MT4218:
41A50521
German
•MT4155:
•MT4158:
•MT4218:
41A50531
218ThinkStationHardwareMaintenanceManual

Keyboard-FullSizePS/2FRU#CRU
Greek
•MT4155:
•MT4158:
•MT4218:
41A50541
Greek/US
•MT4155:
•MT4158:
•MT4218:
41A50801
Hebrew
•MT4155:
•MT4158:
•MT4218:
41A50551
Hungarian
•MT4155:
•MT4158:
•MT4218:
41A50561
Iceland
•MT4155:
•MT4158:
•MT4218:
41A50571
Italy
•MT4155:
•MT4158:
•MT4218:
41A50581
Japanese
•MT4155:
•MT4158:
•MT4218:
41A50591
Korean
•MT4155:
•MT4158:
•MT4218:
41A50601
LASpanish
•MT4155:
•MT4158:
•MT4218:
41A50611
Norwegian
•MT4155:
•MT4158:
•MT4218:
41A50621
Chapter12.FRUlists219

Keyboard-FullSizePS/2FRU#CRU
Polish
•MT4155:
•MT4158:
•MT4218:
41A50631
Portuguese
•MT4155:
•MT4158:
•MT4218:
41A50641
Romanian
•MT4155:
•MT4158:
•MT4218:
41A50651
Russian/Cyrillic
•MT4155:
•MT4158:
•MT4218:
41A50661
Serbian/Cyrillic
•MT4155:
•MT4158:
•MT4218:
41A50671
Slovak
•MT4155:
•MT4158:
•MT4218:
41A50681
Spanish
•MT4155:
•MT4158:
•MT4218:
41A50691
Swedish/Finnish
•MT4155:
•MT4158:
•MT4218:
41A50701
SwissFrench/German
•MT4155:
•MT4158:
•MT4218:
41A50711
Thailand
•MT4155:
•MT4158:
•MT4218:
41A50721
220ThinkStationHardwareMaintenanceManual

Keyboard-FullSizePS/2FRU#CRU
Turkish
•MT4155:
•MT4158:
•MT4218:
41A50731
Turkish
•MT4155:
•MT4158:
•MT4218:
41A50741
UKEnglish
•MT4155:
•MT4158:
•MT4218:
41A50751
USEuropean
•MT4155:
•MT4158:
•MT4218:
41A50761
Slovenian
•MT4155:
•MT4158:
•MT4218:
41A50771
Keyboard-EnhancedPerformanceFRU#CRU
USEnglish
•MT4155:
•MT4158:
•MT4218:
41A49611
Arabic
•MT4155:
•MT4158:
•MT4218:
41A49621
Arabic/French
•MT4155:
•MT4158:
•MT4218:
41A49631
Belgian/French
•MT4155:
•MT4158:
•MT4218:
41A49641
Chapter12.FRUlists221

Keyboard-EnhancedPerformanceFRU#CRU
Belgian/UK
•MT4155:
•MT4158:
•MT4218:
41A49651
Brazilian
•MT4155:
•MT4158:
•MT4218:
41A49661
Bulgarian
•MT4155:
•MT4158:
•MT4218:
41A49671
HongKong/Taiwan
•MT4155:
•MT4158:
•MT4218:
41A49681
Czech
•MT4155:
•MT4158:
•MT4218:
41A49691
Danish
•MT4155:
•MT4158:
•MT4218:
41A49701
Dutch
•MT4155:
•MT4158:
•MT4218:
41A49711
French
•MT4155:
•MT4158:
•MT4218:
41A49721
FrenchCanadian
•MT4155:
•MT4158:
•MT4218:
41A49731
FrenchCanadian
•MT4155:
•MT4158:
•MT4218:
41A49741
222ThinkStationHardwareMaintenanceManual

Keyboard-EnhancedPerformanceFRU#CRU
German
•MT4155:
•MT4158:
•MT4218:
41A49751
Greek
•MT4155:
•MT4158:
•MT4218:
41A49761
Greek/US
•MT4155:
•MT4158:
•MT4218:
41A50781
Hebrew
•MT4155:
•MT4158:
•MT4218:
41A49771
Hungarian
•MT4155:
•MT4158:
•MT4218:
41A49781
Iceland
•MT4155:
•MT4158:
•MT4218:
41A49791
Italy
•MT4155:
•MT4158:
•MT4218:
41A49801
Japanese
•MT4155:
•MT4158:
•MT4218:
41A49811
Korean
•MT4155:
•MT4158:
•MT4218:
41A49821
LASpanish
•MT4155:
•MT4158:
•MT4218:
41A49831
Chapter12.FRUlists223

Keyboard-EnhancedPerformanceFRU#CRU
Norwegian
•MT4155:
•MT4158:
•MT4218:
41A49841
Polish
•MT4155:
•MT4158:
•MT4218:
41A49851
Portuguese
•MT4155:
•MT4158:
•MT4218:
41A49861
Romanian
•MT4155:
•MT4158:
•MT4218:
41A49871
Russian/Cyrillic
•MT4155:
•MT4158:
•MT4218:
41A49881
Serbian/Cyrillic
•MT4155:
•MT4158:
•MT4218:
41A49891
Slovak
•MT4155:
•MT4158:
•MT4218:
41A49901
Spanish
•MT4155:
•MT4158:
•MT4218:
41A49911
Swedish/Finnish
•MT4155:
•MT4158:
•MT4218:
41A49921
French/German
•MT4155:
•MT4158:
•MT4218:
41A49931
224ThinkStationHardwareMaintenanceManual

Keyboard-EnhancedPerformanceFRU#CRU
Thailand
•MT4155:
•MT4158:
•MT4218:
41A49941
Turkish
•MT4155:
•MT4158:
•MT4218:
41A49951
Turkish
•MT4155:
•MT4158:
•MT4218:
41A49961
UKEnglish
•MT4155:
•MT4158:
•MT4218:
41A49971
USEuropean
•MT4155:
•MT4158:
•MT4218:
41A49981
Slovenian
•MT4155:
•MT4158:
•MT4218:
41A49991
Keyboard-USBPreferredProFingerprintFRU#CRU
USEnglish
•MT4155:CTO
•MT4158:CTO
•MT4218:
41R00381
Arabic
•MT4155:CTO
•MT4158:CTO
•MT4218:
41R00391
Arabic/French
•MT4155:CTO
•MT4158:CTO
•MT4218:
41R00401
Chapter12.FRUlists225

Keyboard-USBPreferredProFingerprintFRU#CRU
BelgiumFrench
•MT4155:CTO
•MT4158:CTO
•MT4218:
41R00411
BelgiumEnglish
•MT4155:CTO
•MT4158:CTO
•MT4218:
41R00421
BrazilianPortuguese
•MT4155:CTO
•MT4158:CTO
•MT4218:
41R00431
Bulgarian
•MT4155:CTO
•MT4158:CTO
•MT4218:
41R00441
Chinese/US
•MT4155:CTO
•MT4158:CTO
•MT4218:
41R00451
Czech(ABB)
•MT4155:CTO
•MT4158:CTO
•MT4218:
41R00461
Danish
•MT4155:CTO
•MT4158:CTO
•MT4218:
41R00471
Dutch
•MT4155:CTO
•MT4158:CTO
•MT4218:
41R00481
French
•MT4155:CTO
•MT4158:CTO
•MT4218:
41R00491
FrenchCanadian
•MT4155:CTO
•MT4158:CTO
•MT4218:
41R00501
226ThinkStationHardwareMaintenanceManual

Keyboard-USBPreferredProFingerprintFRU#CRU
FrenchCanadian
•MT4155:CTO
•MT4158:CTO
•MT4218:
41R00511
German
•MT4155:CTO
•MT4158:CTO
•MT4218:
41R00521
Greek
•MT4155:CTO
•MT4158:CTO
•MT4218:
41R00531
Greek/US
•MT4155:CTO
•MT4158:CTO
•MT4218:
41R00541
Hebrew
•MT4155:CTO
•MT4158:CTO
•MT4218:
41R00551
Hungarian
•MT4155:CTO
•MT4158:CTO
•MT4218:
41R00561
Iceland
•MT4155:CTO
•MT4158:CTO
•MT4218:
41R00571
Italy
•MT4155:CTO
•MT4158:CTO
•MT4218:
41R00581
Japanese
•MT4155:CTO
•MT4158:CTO
•MT4218:
41R00591
Korean
•MT4155:CTO
•MT4158:CTO
•MT4218:
41R00601
Chapter12.FRUlists227

Keyboard-USBPreferredProFingerprintFRU#CRU
LASpanish
•MT4155:CTO
•MT4158:CTO
•MT4218:
41R00611
Norwegian
•MT4155:CTO
•MT4158:CTO
•MT4218:
41R00621
Polish
•MT4155:CTO
•MT4158:CTO
•MT4218:
41R00631
Portuguese
•MT4155:CTO
•MT4158:CTO
•MT4218:
41R00641
Romanian
•MT4155:CTO
•MT4158:CTO
•MT4218:
41R00651
Romanian
•MT4155:CTO
•MT4158:CTO
•MT4218:
41R00661
Russian/Cyrillic
•MT4155:CTO
•MT4158:CTO
•MT4218:
41R00671
Serbian/Cyrillic
•MT4155:CTO
•MT4158:CTO
•MT4218:
41R00681
Slovak
•MT4155:CTO
•MT4158:CTO
•MT4218:
41R00691
Spanish
•MT4155:CTO
•MT4158:CTO
•MT4218:
41R00701
228ThinkStationHardwareMaintenanceManual

Keyboard-USBPreferredProFingerprintFRU#CRU
Swedish/Finnish
•MT4155:CTO
•MT4158:CTO
•MT4218:
41R00711
SwissFrench/German
•MT4155:CTO
•MT4158:CTO
•MT4218:
41R00721
Thailand
•MT4155:CTO
•MT4158:CTO
•MT4218:
41R00731
Turkish
•MT4155:CTO
•MT4158:CTO
•MT4218:
41R00741
Turkish
•MT4155:CTO
•MT4158:CTO
•MT4218:
41R00751
UKEnglish
•MT4155:CTO
•MT4158:CTO
•MT4218:
41R00761
USEuropean
•MT4155:CTO
•MT4158:CTO
•MT4218:
41R00771
Slovenian
•MT4155:CTO
•MT4158:CTO
•MT4218:
41R00781
MiceFRU#CRU
Opticalmouse(400DPI),USB-redwheel(Primary)
•MT4155:CTOD1GD4GE7ME1UE1F93G88G89GA2AA2QA2TF9CE9U
E9FF1UF1FG2MG3GG4GG5GG7UG7FG8UG8FG9MH1MH2MH9UH9F
J1JJ2JJ3JJ4JJ5JJ6JJ7JJ8JJ9HK1GK2GK3GK4UK4FK5MK6GK7G
•MT4158:CTOD6UD6FD6SD6LD6DD6YD6GD6MD6AD6QD6TD6CD6B
D6HD6VD6KD6RD6EF3MF4MF6MC2GC3GC5GC7GC8GD2GC6CF9U
F9FH1UH1FH5MH6MH8GH9GJ1GJ2UJ2FJ3UJ3FJ4UJ4FJ5UJ5FJ6U
J6FJ7UJ7FJ8UJ8FJ9UJ9FK1UK1FK2MK3MK4MK5MK6MK7MK8M
L5GL6GL7GL8GL9GM1GM2GM3UM3FM4UM4FM5JM6JM7JM8JM9J
41U30131
Chapter12.FRUlists229

MiceFRU#CRU
N1UN1FN1SN1PN1LN1DN1YN1GN1MN1AN1QN1TN1CN1BN1HN1V
N1KN1RN1EN1JN2UN2FN3UN3FN3SN3PN3LN3DN3YN3GN3MN3A
N3QN3TN3CN3BN3HN3VN3KN3RN3EN3JN4UN4FN5UN5FN6MN7M
N8MN9GO1GO2GO3GO4GO5GO6G
•MT4218:
Opticalmouse(400DPI),USB-redwheel(Secondary)
•MT4155:CTOD1GD4GE7ME1UE1F93G88G89GA2AA2QA2TF9CE9U
E9FF1UF1FG2MG3GG4GG5GG7UG7FG8UG8FG9MH1MH2MH9UH9F
J1JJ2JJ3JJ4JJ5JJ6JJ7JJ8JJ9HK1GK2GK3GK4UK4FK5MK6GK7G
•MT4158:CTOD6UD6FD6SD6LD6DD6YD6GD6MD6AD6QD6TD6CD6B
D6HD6VD6KD6RD6EF3MF4MF6MC2GC3GC5GC7GC8GD2GC6CF9U
F9FH1UH1FH5MH6MH8GH9GJ1GJ2UJ2FJ3UJ3FJ4UJ4FJ5UJ5FJ6U
J6FJ7UJ7FJ8UJ8FJ9UJ9FK1UK1FK2MK3MK4MK5MK6MK7MK8M
L5GL6GL7GL8GL9GM1GM2GM3UM3FM4UM4FM5JM6JM7JM8JM9J
N1UN1FN1SN1PN1LN1DN1YN1GN1MN1AN1QN1TN1CN1BN1HN1V
N1KN1RN1EN1JN2UN2FN3UN3FN3SN3PN3LN3DN3YN3GN3MN3A
N3QN3TN3CN3BN3HN3VN3KN3RN3EN3JN4UN4FN5UN5FN6MN7M
N8MN9GO1GO2GO3GO4GO5GO6G
•MT4218:
41U30301
3Buttonlasermouse(1600DPI),USB
•MT4155:CTO
•MT4158:CTO
•MT4218:
41U30781
Opticalwheelmouse(800DPI),USB-redwheel
•MT4155:CTOK5MK6GK7G
•MT4158:CTON5UN5FN6MN7MN8MN9GO1GO2GO3GO4GO5GO6G
•MT4218:CTO
45J48891
AdaptersandmiscellaneousFRUs
AdaptersandmiscellaneousFRUsFRU#CRU
3.5"20-in-1mediacardreader(w/GPIOdetect)
•MT4155:CTO
•MT4158:CTO
•MT4218:
45R81391
L1IEEE1394PCIadapter
•MT4155:CTO
•MT4158:CTO
•MT4218:
41D27811
Speakers(2-piece)LenovoLogo(Secondary)
•MT4155:CTO
•MT4158:CTO
•MT4218:
41A53341
230ThinkStationHardwareMaintenanceManual

AdaptersandmiscellaneousFRUsFRU#CRU
Lenovo3piecesspeakers(Chinaonly)
•MT4155:CTO
•MT4158:CTO
•MT4218:
45C86401
Lenovo2piecesspeakers(Chinaonly)
•MT4155:CTO
•MT4158:CTO
•MT4218:
45C86411
Speakerpowerbrick
•MT4155:CTO
•MT4158:CTO
•MT4218:
89P85711
256MBNVIDIANVS290(DMS59connector)-Quasar
•MT4155:CTO
•MT4158:CTO
•MT4218:
42Y63291
256MBNVIDIAFX380(DVI+DP)(Hardfrom46R2784)
•MT4155:CTO
•MT4158:CTO
•MT4218:
71Y68631
512MBNVIDIAFX580(DVI+DP+DP)
•MT4155:CTO
•MT4158:CTO
•MT4218:
46R27861
768MBNVIDIAFX1800(DVI+DP+DP)
•MT4155:CTO
•MT4158:CTO
•MT4218:
46R27881
1.5GBNVIDIAFX4800(DVI+DP+DP+ST),2x3powerconnector.
•MT4155:CTO
•MT4158:CTO
•MT4218:
46R27921
DualFX4800SLIenabled
•MT4155:CTO
•MT4158:CTO
•MT4218:
46R27921
SLIcable
•MT4155:CTO
•MT4158:CTO
•MT4218:
63Y91632
Chapter12.FRUlists231

AdaptersandmiscellaneousFRUsFRU#CRU
256MBNVIDIANVS295(dualDP)
•MT4155:CTO
•MT4158:CTOJ2UJ2F
•MT4218:
46R27821
1GBNVIDIAFX3800(DVI+DP+ST),2x3powerconnector
•MT4155:CTO
•MT4158:CTO
•MT4218:
89Y04291
4GBNVIDIAFX5800(DVI+DVI+DP+ST),2*2X3powerconnector
•MT4155:CTO
•MT4158:CTO
•MT4218:
46R27941
DualFX5800SLIenabled
•MT4155:CTO
•MT4158:CTO
•MT4218:
46R27941
256MBATIFireProV3700(dualDVI)
•MT4155:CTO
•MT4158:CTO
•MT4218:
53Y85691
512MBATIFireProV5700(DP+DP+DVI)
•MT4155:
•MT4158:CTO
•MT4218:
53Y85711
1GBATIFireProV7700(DP+DP+DVI)
•MT4155:CTO
•MT4158:CTO
•MT4218:
53Y85731
SoftmodemV.90/V.44
•MT4155:CTO
•MT4158:CTO
•MT4218:
29R97291
Donglecable(DMS59todualDVI)
•MT4155:CTO
•MT4158:CTO
•MT4218:
41X63981
NvidiaTeslaC1060computecard(computeradapter)
•MT4155:CTO
•MT4158:CTO
•MT4218:
46R60411
232ThinkStationHardwareMaintenanceManual

AdaptersandmiscellaneousFRUsFRU#CRU
SoundBlasterTitaniumaudiocard(PCIe)
•MT4155:CTO
•MT4158:CTO
•MT4218:
46T04071
Modemphonecable
•MT4155:CTO
•MT4158:CTO
•MT4218:
39K51201
DVItoVGAdongle
•MT4155:CTO
•MT4158:CTO
•MT4218:
45C78161
512MBNVIDIAQuadroNVS450GDDR3(DP+DP+DP+DP)
•MT4155:CTO
•MT4158:CTO
•MT4218:
64Y98951
NvidiaQuadro6000,DuallinkDVI,DP,DP,Stereo3D6GBGDDR5
•MT4155:CTO
•MT4158:CTO
•MT4218:
89Y86291
NvidiaTelsa2050,3GBGDDR5
•MT4155:CTO
•MT4158:CTO
•MT4218:
89Y86301
NvidiaQuadro2000,DuallinkDVI,DP,DP ,1GBGDDR5
•MT4155:E9UE9FG2MG9MJ5JJ9H
•MT4158:CTO
•MT4218:
89Y88561
NvidiaQuadro4000,DuallinkDVI,DP,DP,Stereo3D2GBGDDR5
•MT4155:D7CF9CF1UF1FH1MJ1JJ2JJ3JJ6J
•MT4158:CTOF4MF6MC3GC5GF9UF9FH5MH7MH8GJ6UJ6FJ7UJ7F
J9UJ9FK2MK3MK4MK5MK6MK9JL9GM1GM2GM6JN3UN3FN3SN3P
N3LN3DN3YN3GN3MN3AN3QN3TN3CN3BN3HN3VN3KN3RN3EN3J
•MT4218:
89Y86271
NvidiaQuadro5000,DuallinkDVI,DP,DP ,Stereo3D2.5GBGDDR5
•MT4155:CTOH2MJ8J
•MT4158:CTOC8GC6CH6MJ8UJ8FK7ML1JL8GM5JM7JM9JN2UN2F
N4UN4F
•MT4218:
89Y86281
Chapter12.FRUlists233

AdaptersandmiscellaneousFRUsFRU#CRU
DPtoDVIdongle200mm
•MT4155:CTO
•MT4158:CTOD2GH1UH1FJ5UJ5FK1UK1FK8MM8J
•MT4218:
43N91601
NvidiaQuadro600,DuallinkDVI,DP ,1GBGDDR3
•MT4155:CTOJ4JK4UK4F
•MT4158:CTO
•MT4218:
03T80091
512MBNvidiaNVS300(DMS59connectortodualDVI)
•MT4155:CTO
•MT4158:CTOG7UG7F
•MT4218:CTO
03T81521
512MBNvidiaNVS300,PCIex1(DMS59connectortodualDVI)
•MT4155:CTO
•MT4158:CTO
•MT4218:CTO
03T80391
NvidiaQuadro400,DVIandDPonly,512MB
•MT4155:CTOH9UH9F
•MT4158:CTOM4UM4F
•MT4218:CTO
03T80401
NvidiaQuadro2000DdualDVI1GBGDDR5
•MT4155:CTO
•MT4158:CTOM3UM3F
•MT4218:CTO
03T84181
NvidiaTeslaC2075(duallinkDVI)-6GBGDDR5
•MT4155:CTO
•MT4158:CTO
•MT4218:CTO
03T83651
PowerCords
PowerCordsFRU#CRU
LineCord-China
•MT4155:CTOD7CF9C
•MT4158:CTOD6CC6CN1CN3C
•MT4218:
41R32561
LineCord-JapanandJapaneseEnglish
•MT4155:CTOJ1JJ2JJ3JJ4JJ5JJ6JJ7JJ8J
•MT4158:CTOD6EM5JM6JM7JM8JM9JN1EN1JN3EN3J
•MT4218:
41R32481
234ThinkStationHardwareMaintenanceManual

PowerCordsFRU#CRU
LineCord-Brazil(Portuguese)
•MT4155:CTO
•MT4158:CTON1PN3P
•MT4218:
41R32701
LineCord-LAHighVolt(APU)
•MT4155:CTO
•MT4158:CTOD6YN1YN3YN1LN3L
•MT4218:
41R31761
LineCord-Australia/NewZealand
•MT4155:CTOE7MG2MG9MH1MH2MK5MK6GK7G
•MT4158:CTOF3MF4MF6MH5MH6MK2MK3MK4MK5MK6MK7MK8M
N1MN3MN6MN7MN8M
•MT4218:
41R31961
LineCord-Korea
•MT4155:CTO
•MT4158:CTON1KN1RN3KN3R
•MT4218:
41R32601
LineCord-HongKong,UK,Ireland,Singapore,Malaysia,Brunei,HongKong
•MT4155:CTOA4HG3GG4GG5GJ9HK1GK2GK3GK6GK7G
•MT4158:CTOD6GD6MC2GC3GC5GC7GC8GD2GH8GH9GJ1GL5G
L6GL7GL8GL9GM1GM2GN1GN3GN1AN3AN1BN3BN1HN3HN9G
O1GO2GO3GO4GO5GO6G
•MT4218:
41R32241
LineCord-Taiwan
•MT4155:CTOA4V
•MT4158:CTOD6BD6HD6VN1VN3V
•MT4218:
41R32781
LineCord-Italy
•MT4155:CTOK1GK2GK3GK6GK7G
•MT4158:CTOD6SD6YD6LD6GN1SN3SN1YN3YN1LN3LN1GN3GN9G
O1GO2GO3GO4GO5GO6G
•MT4218:
41R32321
LineCord-Amodels
•MT4155:CTO
•MT4158:CTOD6AN1AN3A
•MT4218:
41R32081
LineCord-Denmark
•MT4155:CTO93G88G89GG3GG4GG5GK1GK2GK3GK6GK7G
•MT4158:CTOD6GC2GC3GC5GC7GC8GD2GH8GH9GJ1GL5GL6GL7G
L8GL9GM1GM2GN1GN3GN9GO1GO2GO3GO4GO5GO6G
•MT4218:
41R32121
Chapter12.FRUlists235

PowerCordsFRU#CRU
LineCord-Switzerland
•MT4155:CTO93G88G89GG3GG4GG5GK1GK2GK3GK6GK7G
•MT4158:CTOD6GC2GC3GC5GC7GC8GD2GH8GH9GJ1GL5GL6GL7G
L8GL9GM1GM2GN1GN3GN9GO1GO2GO3GO4GO5GO6G
•MT4218:
41R32281
LineCord-Israel
•MT4155:CTO93G88G89GG3GG4GG5GK1GK2GK3GK6GK7G
•MT4158:CTOD6GC2GC3GC5GC7GC8GD2GH8GH9GJ1GL5GL6GL7G
L8GL9GM1GM2GN1GN3GN9GO1GO2GO3GO4GO5GO6G
•MT4218:
41R32361
LineCord-SouthAfrica
•MT4155:CTOE7M93GG2MG3GG4GG5GG9MH1MH2MK1GK2GK3G
K5MK6GK7G
•MT4158:CTOD6MD6GF3MF4MF6MH5MH6MH7MH8GH9GJ1GK2M
K3MK4MK5MK6MK7MK8ML5GL6GL7GL8GL9GM1GM2GN1GN3G
N1MN3MN1AN3AN6MN7MN8MN9GO1GO2GO3GO4GO5GO6G
•MT4218:
41R32201
LineCord-India
•MT4155:CTOA2Q
•MT4158:CTON1QN3Q
•MT4218:
41R33411
LineCord-US(foruseon2Psystemsonly)
•MT4155:CTOK4UK4F
•MT4158:CTOD6UD6FD6SD6LD6DD6AD6TF9UF9FG7UG7FH1UH1F
J2UJ2FJ3UJ3FJ4UJ4FJ5UJ5FJ6UJ6FJ7UJ7FJ8UJ8FJ9UJ9FK1UK1F
M3UM3FM4UM4FN1UN1FN1SN2UN2FN3UN3FN3SN4UN4FN1DN3D
N1LN3LN1AN3AN1TN3TN5UN5F
•MT4218:
45J95021
LineCord-JapanandJapaneseEnglish
•MT4155:CTOJ1JJ2JJ3JJ4JJ5JJ6JJ7JJ8J
•MT4158:CTOD6EM5JM6JM7JM8JM9JN1EN1JN3EN3J
•MT4218:
43N90571
Taiwan(foruseon2Psystemsonly)
•MT4155:CTO
•MT4158:CTOD6BD6HD6VN1VN3V
•MT4218:
45J95031
236ThinkStationHardwareMaintenanceManual

PowerCords-SecondaryFRU#CRU
LineCord-China
•MT4155:CTOD7CF9C
•MT4158:CTOD6CC6CN1CN3C
•MT4218:
41R32571
LineCord-JapanandJapaneseEnglish
•MT4155:CTOJ1JJ2JJ3JJ4JJ5JJ6JJ7JJ8J
•MT4158:CTOD6EM5JM6JM7JM8JM9JN1EN1JN3EN3J
•MT4218:
41R32491
LineCord-Brazil(Portuguese)
•MT4155:CTO
•MT4158:CTON1PN3P
•MT4218:
41R32711
LineCord-LAHighVolt(APU)
•MT4155:CTO
•MT4158:CTOD6YN1YN3YN1LN3L
•MT4218:
41R31771
LineCord-Australia/NewZealand
•MT4155:CTOE7MG2MG9MH1MH2MK5M
•MT4158:CTOF3MF4MF6MH5MH6MK2MK3MK4MK5MK6MK7MK8M
N1MN3MN6MN7MN8M
•MT4218:
41R31971
LineCord-Korea
•MT4155:CTO
•MT4158:CTON1KN1RN3KN3R
•MT4218:
41R32611
LineCord-HongKong,UK,Ireland,Singapore,Malaysia,Brunei,HongKong
•MT4155:CTOA4HG3GG4GG5GJ9HK1GK2GK3GK6GK7G
•MT4158:CTOD6GD6MC2GC3GC5GC7GC8GD2GH8GH9GJ1GL5G
L6GL7GL8GL9GM1GM2GN1GN3GN1AN3AN1BN3BN1HN3HN9G
O1GO2GO3GO4GO5GO6G
•MT4218:
41R32251
LineCord-Taiwan
•MT4155:CTOA4V
•MT4158:CTOD6BD6HD6VN1VN3V
•MT4218:
41R32791
LineCord-Italy
•MT4155:CTOK1GK2GK3GK6GK7G
•MT4158:CTOD6SD6YD6LD6GN1SN3SN1YN3YN1LN3LN1GN3GN9G
O1GO2GO3GO4GO5GO6G
•MT4218:
41R32331
Chapter12.FRUlists237

PowerCords-SecondaryFRU#CRU
LineCord-Amodels
•MT4155:CTO
•MT4158:CTOD6AN1AN3A
•MT4218:
41R32091
LineCord-Denmark
•MT4155:CTO93G88G89GG3GG4GG5GK1GK2GK3GK6GK7G
•MT4158:CTOD6GC2GC3GC5GC7GC8GD2GH8GH9GJ1GL5GL6GL7G
L8GL9GM1GM2GN1GN3GN9GO1GO2GO3GO4GO5GO6G
•MT4218:
41R32131
LineCord-Switzerland
•MT4155:CTO93G88G89GG3GG4GG5GK1GK2GK3GK6GK7G
•MT4158:CTOD6GC2GC3GC5GC7GC8GD2GH8GH9GJ1GL5GL6G
L7GL8GL9GM1GM2GN1GN3G
•MT4218:
41R32291
LineCord-Israel
•MT4155:CTO93G88G89GG3GG4GG5GK1GK2GK3GK6GK7G
•MT4158:CTOD6GC2GC3GC5GC7GC8GD2GH8GH9GJ1GL5GL6GL7G
L8GL9GM1GM2GN1GN3GN9GO1GO2GO3GO4GO5GO6G
•MT4218:
41R32371
LineCord-SouthAfrica
•MT4155:CTOE7M93GG2MG3GG4GG5GG9MH1MH2MK1GK2GK3G
K5MK6GK7G
•MT4158:CTOD6MD6GF3MF4MF6MH5MH6MH7MH8GH9GJ1GK2M
K3MK4MK5MK6MK7MK8ML5GL6GL7GL8GL9GM1GM2GN1GN3G
N1MN3MN1AN3AN6MN7MN8MN9GO1GO2GO3GO4GO5GO6G
•MT4218:
41R32211
LineCord-India
•MT4155:CTOA2Q
•MT4158:CTON1QN3Q
•MT4218:
41R31751
LineCord-JapanandJapaneseEnglish
•MT4155:CTOJ1JJ2JJ3JJ4JJ5JJ6JJ7JJ8J
•MT4158:CTOD6EM5JM6JM7JM8JM9JN1EN1JN3EN3J
•MT4218:
43N90581
Recoverydiscs
WindowsXPProfessional64MonoRecoveryCD
Note:TheWindowsXPProfessionalrecoveryDVDsareavailableonlyformodelswithavalidMicrosoft
WindowsXPProfessionalcerticateofauthenticity(COA)afxedtothesystem.DuetoaMicrosoftlicensing
limitation,ifamodelcamewithWindowsXPProfessionalpreinstalledfromthefactory,buthaseithera
Windows7orWindowsVistaCOAafxedtothesystem,thatmodeliseligibleonlyforrecoveryDVDsthat
matchtheoperatingsystemspeciedontheCOA.
238ThinkStationHardwareMaintenanceManual

WindowsXPProfessional64MonoFRU#CRU
USEnglish
•MT4155:CTO
•MT4158:CTO
•MT4218:CTO
03W28241
Japanese
•MT4155:CTO
•MT4158:CTO
•MT4218:CTO
03W28251
WindowsVistaBusiness32RecoveryCD
Note:TheWindowsVistarecoveryDVDsareavailableonlyformodelswithavalidMicrosoftWindowsVista
certicateofauthenticity(COA)afxedtothesystem.DuetoaMicrosoftlicensinglimitation,ifamodelcame
withWindowsVistaBusinessorWindowsVistaUltimatepreinstalledfromthefactory,buthasaWindows7
COAafxedtothesystem,thatmodeliseligibleonlyforrecoveryDVDsthatmatchtheoperatingsystem
speciedontheCOA.
WindowsVistaBusiness32FRU#CRU
English
•MT4155:CTO
•MT4158:CTO
•MT4218:
64Y56611
RussianEnglish
•MT4155:CTO
•MT4158:CTO
•MT4218:
64Y36721
French
•MT4155:CTO
•MT4158:CTO
•MT4218:
64Y36731
German
•MT4155:CTO
•MT4158:CTO
•MT4218:
64Y36741
Spanish
•MT4155:CTO
•MT4158:CTO
•MT4218:
64Y36751
Brazilian
•MT4155:CTO
•MT4158:CTO
•MT4218:
64Y36761
Chapter12.FRUlists239

WindowsVistaBusiness32FRU#CRU
Italian
•MT4155:CTO
•MT4158:CTO
•MT4218:
64Y36771
Japanese
•MT4155:CTO
•MT4158:CTO
•MT4218:
64Y56621
Norwegian
•MT4155:CTO
•MT4158:CTO
•MT4218:
64Y36991
Swedish
•MT4155:CTO
•MT4158:CTO
•MT4218:
64Y37001
Danish
•MT4155:CTO
•MT4158:CTO
•MT4218:
64Y36971
Dutch
•MT4155:CTO
•MT4158:CTO
•MT4218:
64Y36911
Czech
•MT4155:CTO
•MT4158:CTO
•MT4218:
64Y36781
Finnish
•MT4155:CTO
•MT4158:CTO
•MT4218:
64Y36981
Polish
•MT4155:CTO
•MT4158:CTO
•MT4218:
64Y36791
Russian
•MT4155:CTO
•MT4158:CTO
•MT4218:
64Y36801
240ThinkStationHardwareMaintenanceManual

WindowsVistaBusiness32FRU#CRU
Turkish
•MT4155:CTO
•MT4158:CTO
•MT4218:
64Y36811
Hungarian
•MT4155:CTO
•MT4158:CTO
•MT4218:
64Y36821
Greek
•MT4155:CTO
•MT4158:CTO
•MT4218:
64Y36831
SimpliedChinese
•MT4155:CTO
•MT4158:CTO
•MT4218:
64Y56631
TraditionalChinese
•MT4155:CTO
•MT4158:CTO
•MT4218:
64Y36861
TraditionalChinese-HongKong
•MT4155:CTO
•MT4158:CTO
•MT4218:
64Y36871
Korean
•MT4155:CTO
•MT4158:CTO
•MT4218:
64Y36881
Slovenian
•MT4155:CTO
•MT4158:CTO
•MT4218:
64Y36891
Romanian
•MT4155:CTO
•MT4158:CTO
•MT4218:
64Y36931
Portuguese
•MT4155:CTO
•MT4158:CTO
•MT4218:
64Y36941
Chapter12.FRUlists241

WindowsVistaBusiness32FRU#CRU
Serbian-Latin
•MT4155:CTO
•MT4158:CTO
•MT4218:
64Y36951
Slovakian
•MT4155:CTO
•MT4158:CTO
•MT4218:
64Y36961
ArabicLocalized
•MT4155:CTO
•MT4158:CTO
•MT4218:
64Y36901
Hebrew
•MT4155:CTO
•MT4158:CTO
•MT4218:
64Y36921
C&LNordics(ENDKFINOSV)
•MT4155:CTO
•MT4158:CTO
•MT4218:
64Y37011
C&LSwitzerland(ENFRGRIT)
•MT4155:CTO
•MT4158:CTO
•MT4218:
64Y37021
C&LBelLux(ENFRGRNL)
•MT4155:CTO
•MT4158:CTO
•MT4218:
64Y37031
EnglishforIndia
•MT4155:CTO
•MT4158:CTO
•MT4218:
71Y36201
WindowsVistaBusiness64RecoveryCD
Note:TheWindowsVistarecoveryDVDsareavailableonlyformodelswithavalidMicrosoftWindowsVista
certicateofauthenticity(COA)afxedtothesystem.DuetoaMicrosoftlicensinglimitation,ifamodelcame
withWindowsVistaBusinessorWindowsVistaUltimatepreinstalledfromthefactory,buthasaWindows7
COAafxedtothesystem,thatmodeliseligibleonlyforrecoveryDVDsthatmatchtheoperatingsystem
speciedontheCOA.
242ThinkStationHardwareMaintenanceManual

WindowsVistaBusiness64FRU#CRU
English
•MT4155:CTO
•MT4158:CTO
•MT4218:64Y56641
RussianEnglish
•MT4155:CTO
•MT4158:CTO
•MT4218:64Y37711
French
•MT4155:CTO
•MT4158:CTO
•MT4218:64Y37721
German
•MT4155:CTO
•MT4158:CTO
•MT4218:64Y37731
Spanish
•MT4155:CTO
•MT4158:CTO
•MT4218:64Y37741
Brazilian
•MT4155:CTO
•MT4158:CTO
•MT4218:64Y37751
Italian
•MT4155:CTO
•MT4158:CTO
•MT4218:64Y37761
Japanese
•MT4155:CTO
•MT4158:CTO
•MT4218:64Y56651
Norwegian
•MT4155:CTO
•MT4158:CTO
•MT4218:64Y37961
Swedish
•MT4155:CTO
•MT4158:CTO
•MT4218:64Y37971
Chapter12.FRUlists243

WindowsVistaBusiness64FRU#CRU
Danish
•MT4155:CTO
•MT4158:CTO
•MT4218:64Y37941
Dutch
•MT4155:CTO
•MT4158:CTO
•MT4218:64Y37901
Czech
•MT4155:CTO
•MT4158:CTO
•MT4218:64Y37771
Finnish
•MT4155:CTO
•MT4158:CTO
•MT4218:64Y37951
Polish
•MT4155:CTO
•MT4158:CTO
•MT4218:64Y37781
Russian
•MT4155:CTO
•MT4158:CTO
•MT4218:64Y37791
Turkish
•MT4155:CTO
•MT4158:CTO
•MT4218:64Y37801
Hungarian
•MT4155:CTO
•MT4158:CTO
•MT4218:64Y37811
Greek
•MT4155:CTO
•MT4158:CTO
•MT4218:64Y37821
SimpliedChinese
•MT4155:CTO
•MT4158:CTO
•MT4218:64Y56661
244ThinkStationHardwareMaintenanceManual

WindowsVistaBusiness64FRU#CRU
TraditionalChinese
•MT4155:CTO
•MT4158:CTO
•MT4218:64Y37851
TraditionalChinese-HongKong
•MT4155:CTO
•MT4158:CTO
•MT4218:64Y37861
Korean
•MT4155:CTO
•MT4158:CTO
•MT4218:64Y37871
Slovenian
•MT4155:CTO
•MT4158:CTO
•MT4218:64Y37881
Portuguese
•MT4155:CTO
•MT4158:CTO
•MT4218:64Y37921
Slovakian
•MT4155:CTO
•MT4158:CTO
•MT4218:64Y37931
ArabicLocalized
•MT4155:CTO
•MT4158:CTO
•MT4218:64Y37891
Hebrew
•MT4155:CTO
•MT4158:CTO
•MT4218:64Y37911
C&LNordics(ENDKFINOSV)
•MT4155:CTO
•MT4158:CTO
•MT4218:64Y37981
Chapter12.FRUlists245

WindowsVistaBusiness64FRU#CRU
C&LSwitzerland(ENFRGRIT)
•MT4155:CTO
•MT4158:CTO
•MT4218:64Y37991
C&LBelLux(ENFRGRNL)
•MT4155:CTO
•MT4158:CTO
•MT4218:64Y38001
Windows7Professional64SP1RecoveryCD
Windows7Professional64SP1FRU#CRU
USEnglish
•MT4155:CTOD1GD4GE7MA4H93G88G89GA2AA2QE9UF1UG2MG3G
G4GG5GG7UG8UG9MH1MH2MH9UJ9HK1GK2GK3GK4UK5MK6GK7G
•MT4158:CTOD6UD6GD6MD6AD6QD6HD6ED6JF3MF4MF6MC2GC3G
C5GC7GC8GD2GF9UG7UH1UH5MH6MH7MH8GH9GJ1GJ2UJ3UJ4U
J5UJ6UJ7UJ8UJ9UK1UK2MK3MK4MK5MK6MK7MK8ML5GL6GL7G
L8GL9GM1GM2GM3UM4UN1UN2UN3UN4UN1LN3LN1GN3GN1MN1A
N1QN3MN3AN3QN1TN3TN1HN3HN1RN1EN3RN3EN5UN6MN7MN8M
N9GO1GO2GO3GO4GO5GO6G
•MT4218:
03W29081
French
•MT4155:CTOD1GD4GE1F93G88G89GE9FF1FG1FG3GG4GG5GG7F
G8FH9FK1GK2GK3GK4FK6GK7G
•MT4158:CTOD6FG7FH1FH8GH9GJ1GJ2FJ3FJ4FJ5FJ6FJ7FJ8FJ9F
K1FL5GL6GL7GL8GL9GM1GM2GM3FM4FN1FN2FN3FN4FN1GN3G
N5FN9GO1GO2GO3GO4GO5G
•MT4218:
03W28901
German
•MT4155:CTOD1GD4G93G88G89GG3GG4GG5GK1GK2GK3GK6GK7G
•MT4158:CTOC2GC3GC5GC7GC8GD2GH8GH9GJ1GL5GL6GL7GL8G
L9GM1GM2GN1GN3GN9GO1GO2GO3GO4GO5G
•MT4218:
03W28921
Czech
•MT4155:CTOD1GD4G93G88G89GG3GG4GG5GK1GK2GK3GK6GK7G
•MT4158:CTOC2GC3GC5GC7GC8GD2GH8GH9GJ1GL5GL6GL7GL8G
L9GM1GM2GN1GN3GN9GO1GO2GO3GO4GO5G
•MT4218:
03W28881
Polish
•MT4155:CTOD1GD4G93G88G89GG3GG4GG5GK1GK2GK3GK6GK7G
•MT4158:CTOC2GC3GC5GC7GC8GD2GH8GH9GJ1GL5GL6GL7GL8G
L9GM1GM2GN1GN3GN9GO1GO2GO3GO4GO5G
•MT4218:
03W28981
246ThinkStationHardwareMaintenanceManual

Windows7Professional64SP1FRU#CRU
Turkish
•MT4155:CTOD1GD4G93G88G89GG3GG4GG5GK1GK2GK3GK6GK7G
•MT4158:CTOC2GC3GC5GC7GC8GD2GH8GH9GJ1GL5GL6GL7GL8G
L9GM1GM2GN1GN3GN9GO1GO2GO3GO4GO5G
•MT4218:
03W29071
Greek
•MT4155:CTOD1GD4G93G88G89GG3GG4GG5GK1GK2GK3GK6GK7G
•MT4158:CTOC2GC3GC5GC7GC8GD2GH8GH9GJ1GL5GL6GL7GL8G
L9GM1GM2GN1GN3GN9GO1GO2GO3GO4GO5G
•MT4218:
03W28911
Korean
•MT4155:CTO
•MT4158:CTOD6KN1KN3K
•MT4218:
03W28971
Slovenian
•MT4155:CTOD1GD4G93G88G89GG3GG4GG5GK1GK2GK3GK6GK7G
•MT4158:CTOC2GC3GC5GC7GC8GD2GH8GH9GJ1GL5GL6GL7GL8G
L9GM1GM2GN1GN3GN9GO1GO2GO3GO4GO5G
•MT4218:
03W29041
RussianEnglish
•MT4155:CTOD1GD4G93G88G89GG3GG4GG5GK1GK2GK3GK6GK7G
•MT4158:CTOC2GC3GC5GC7GC8GD2GH8GH9GJ1GL5GL6GL7GL8G
L9GM1GM2GN1GN3GN9GO1GO2GO3GO4GO5G
•MT4218:
03W29001
Slovakian
•MT4155:CTOD1GD4G93G88G89GG3GG4GG5GK1GK2GK3GK6GK7G
•MT4158:CTOC2GC3GC5GC7GC8GD2GH8GH9GJ1GL5GL6GL7GL8G
L9GM1GM2GN1GN3GN9GO1GO2GO3GO4GO5G
•MT4218:
03W29031
ArabicLocalized
•MT4155:CTOD1GD4G93G88G89GG3GG4GG5GK1GK2GK3GK6GK7G
•MT4158:CTOC2GC3GC5GC7GC8GD2GH8GH9GJ1GL5GL6GL7GL8G
L9GM1GM2GN1GN3GN9GO1GO2GO3GO4GO5G
•MT4218:
03W28841
SimpliedChinese
•MT4155:CTOD7CF9C
•MT4158:CTOB9CD6CD7CD8CD9CE1CE2CE3CE4CE5CC6C96C97C
B7CB8CH2CH3CN1CN3C
•MT4218:
03W28861
TraditionalChinese
•MT4155:CTOA4V
•MT4158:CTOD6VN1VN3V
•MT4218:
03W28871
Chapter12.FRUlists247

Windows7Professional64SP1FRU#CRU
IndiaEnglish
•MT4155:CTO
•MT4158:CTOD6QN1QN3Q
•MT4218:
03W28891
HongKong
•MT4155:CTOA4V
•MT4158:CTOD6BN1BN3B
•MT4218:
03W28931
Italian
•MT4155:CTOD1GD4G93G88G89GG3GG4GG5GK1GK2GK3GK6GK7G
•MT4158:CTOC2GC3GC5GC7GC8GD2GH8GH9GJ1GL5GL6GL7GL8G
L9GM1GM2GN1GN3GN9GO1GO2GO3GO4GO5G
•MT4218:
03W28951
Russian
•MT4155:CTOD1GD4G93G88G89GG3GG4GG5GK1GK2GK3GK6GK7G
•MT4158:CTOC2GC3GC5GC7GC8GD2GH8GH9GJ1GL5GL6GL7GL8G
L9GM1GM2GN1GN3GN9GO1GO2GO3GO4GO5G
•MT4218:
03W29021
Spanish
•MT4155:CTOD1GD4G93G88G89GG3GG4GG5GK1GK2GK3GK6GK7G
•MT4158:CTOC2GC3GC5GC7GC8GD2GH8GH9GJ1GL5GL6GL7GL8G
L9GM1GM2GN1GN3GN9GO1GO2GO3GO4GO5G
•MT4218:
03W29051
C&LBelLux(ENFRGRNL)
•MT4155:CTOD1GD4G93G88G89GG3GG4GG5GK1GK2GK3GK6GK7G
•MT4158:CTOC2GC3GC5GC7GC8GD2GH8GH9GJ1GL5GL6GL7GL8G
L9GM1GM2GN1GN3GN9GO1GO2GO3GO4GO5G
•MT4218:
03W29091
C&LNordics(ENDKFINOSV)
•MT4155:CTOD1GD4G93G88G89GG3GG4GG5GK1GK2GK3GK6GK7G
•MT4158:CTOC2GC3GC5GC7GC8GD2GH8GH9GJ1GL5GL6GL7GL8G
L9GM1GM2GN1GN3GN9GO1GO2GO3GO4GO5G
•MT4218:
03W29101
C&LSwitzerland(ENFRGRIT)
•MT4155:CTOD1GD4G93G88G89GG3GG4GG5GK1GK2GK3GK6GK7G
•MT4158:CTOC2GC3GC5GC7GC8GD2GH8GH9GJ1GL5GL6GL7GL8G
L9GM1GM2GN1GN3GN9GO1GO2GO3GO4GO5G
•MT4218:
03W29111
248ThinkStationHardwareMaintenanceManual

Windows7Professional64SP1FRU#CRU
Portuguese
•MT4155:CTOD1GD4G93G88G89GG3GG4GG5GK1GK2GK3GK6G
K7GK6GK7G
•MT4158:CTOC2GC3GC5GC7GC8GD2GH8GH9GJ1GL5GL6GL7GL8G
L9GM1GM2GN1GN3GN9GO1GO2GO3GO4GO5G
•MT4218:
03W28991
BrazilianPortuguese
•MT4155:CTO
•MT4158:CTON1PN3P
•MT4218:
03W28851
Hungary
•MT4155:CTOD1GD4G93G88G89GG3GG4GG5GK1GK2GK3GK6GK7G
•MT4158:CTOC2GC3GC5GC7GC8GD2GH8GH9GJ1GL5GL6GL7GL8G
L9GM1GM2GN1GN3GN9GO1GO2GO3GO4GO5G
•MT4218:
03W28941
Romanian
•MT4155:CTOD1GD4G93G88G89GG3GG4GG5GK1GK2GK3GK6GK7G
•MT4158:CTOC2GC3GC5GC7GC8GD2GH8GH9GJ1GL5GL6GL7GL8G
L9GM1GM2GN1GN3GN9GO1GO2GO3GO4GO5G
•MT4218:
03W29011
Serbian-Latin
•MT4155:CTOD1GD4G93G88G89GG3GG4GG5GK1GK2GK3GK6GK7G
•MT4158:CTOC2GC3GC5GC7GC8GD2GH8GH9GJ1GL5GL6GL7GL8G
L9GM1GM2GN1GN3GN9GO1GO2GO3GO4GO5G
•MT4218:
03W29061
Japanese
•MT4155:CTOJ1JJ2JJ3JJ4JJ5JJ6JJ7JJ8J
•MT4158:CTOM5JM6JM7JM8JM9JN1JN3J
•MT4218:
03W28961
Windows7Ultimate64SP1RecoveryCD
Windows7Ultimate64SP1FRU#CRU
USEnglish
•MT4155:CTO
•MT4158:CTO
•MT4218:CTO
03W28831
Chapter12.FRUlists249

250ThinkStationHardwareMaintenanceManual

Chapter13.AdditionalServiceInformation
Thischapterprovidesadditionalinformationthattheservicerepresentativemightndhelpful.
Securityfeatures
Securityfeaturesinthissectionincludethefollowing:
•Passwords
•VitalProductData
•ManagementInformationFormat(MIF)
HardwarecontrolledPasswords
HardwarecontrolledpasswordsaresetusingtheSetupUtilityprogram.Formoreinformationabout
passwords,see“Usingpasswords”onpage41.
Operatingsystempassword
Anoperatingsystempasswordisverysimilartoapower-onpasswordanddeniesaccesstothecomputer
byanunauthorizeduserwhenthepasswordisactivated.Thecomputerisunusableuntilthepasswordis
enteredandrecognizedbythecomputer.
Vitalproductdata
EachcomputerhasauniqueVitalProductData(VPD)codestoredinthenonvolatilememoryonthesystem
board.Afteryoureplacethesystemboard,theVPDmustbeupdated.ToupdatetheVPD,see“Flash
updateprocedures”onpage251.
BIOSlevels
AnincorrectlevelofBIOScancausefalseerrorsandunnecessaryFRUreplacement.Usethefollowing
informationtodeterminethecurrentlevelofBIOSinstalledinthecomputer,thelatestBIOSavailableforthe
computer,andwheretoobtainthelatestlevelofBIOS.
•TodeterminethecurrentLevelofBIOS:
–StarttheSetupUtility.
–SelectStandardCMOSFeatures.
•SourcesforobtainingthelatestlevelBIOSavailable
1.Lenovosupportwebsite:http://www.lenovo.com/support/
2.LenovoCustomerSupportCenter
3.Levels1and2Support
Toupdate(ash)theBIOS,see“Flashupdateprocedures”onpage251.
Flashupdateprocedures
Thissectiondetailshowtoash(update)theBIOS.
©CopyrightLenovo2008,2012251

Updating(ashing)BIOSfromadisc
Thissectionprovidesinstructionsonhowtoupdate(ash)BIOSfromadisc.Systemprogramupdatesare
availableat:http://www.lenovo.com/supportontheWorldWideWeb.
1.Makesuretheopticaldriveyouwanttouseissetastherstbootdeviceinthestartupdevicesequence.
2.Makesurethecomputeristurnedon.Insertthediscintotheopticaldrive.
3.Turnoffthecomputerandbackonagain.Theupdatebegins.
4.Whenpromptedtochangetheserialnumber,pressN.
Note:Ifyouwanttochangetheserialnumber,pressYwhenprompted.Typeintheserialnumber
andthenpressEnter.
5.Whenpromptedtochangethemachinetype/model,pressN.
Note:Ifyouwanttochangethemachinetype/model,pressYwhenprompted.Typeinthemachine
type/modelandthenpressEnter.
6.Followtheinstructionsonthescreentocompletetheupdate.
Updating(ashing)BIOSfromtheoperatingsystem
Note:BecauseLenovomakesconstantimprovementstotheWebsite,theWebpagecontentsaresubject
tochangewithoutnotice,includingthecontentsreferencedinthefollowingprocedure.
Toupdate(ash)BIOSfromyouroperatingsystem:
1.Gotohttp://www.lenovo.com/support.
2.Dothefollowingtolocatethedownloadablelesforyourmachinetype:
a.IntheEnteraproductnumbereld,typeyourmachinetypeandclickGo.
b.ClickDownloadsanddrivers.
c.SelectBIOSintheReneresultseldtoeasilylocatealltheBIOSrelatedlinks.
d.ClicktheBIOSupdatelink.
e.ClicktheTXTlethatcontainstheinstructionsforupdating(ashing)BIOSfromyouroperating
system.
3.Printtheseinstructions.Thisisveryimportantbecausetheyarenotonthescreenafterthedownload
begins.
4.Followtheprintedinstructionstodownload,extract,andinstalltheupdate.
RecoveringfromaPOST/BIOSupdatefailure
IfpowertoyourcomputerisinterruptedwhilePOST/BIOSisbeingupdated(ashupdate),yourcomputer
mightnotrestartcorrectly.Ifthishappens,performthefollowingprocedurecommonlycalledBoot-block
Recovery.
1.Turnoffthecomputerandanyattacheddevices,suchasprinters,monitors,andexternaldrives.
2.Unplugallpowercordsfromelectricaloutlets,andopenthecomputercover.See“Removingthe
cover”onpage78.
3.Accessthesystemboard.
4.LocatetheClearCMOS/Recoveryjumperonthesystemboard.See“Locatingpartsonthesystem
board”onpage113.
5.RemoveanycablesthatimpedeaccesstotheClearCMOS/Recoveryjumper.
6.Movethejumperfromthestandardposition(pins1and2)topins2and3.
7.Reinstalltheadaptercards(somemodels).
8.Closethecomputercoverandreconnectanycablesthatweredisconnected.
252ThinkStationHardwareMaintenanceManual

9.Reconnectthepowercordsforthecomputerandmonitortoelectricaloutlets.
10.InsertthePOST/BIOSupdate(ash)disketteintodriveA,andturnonthecomputerandthemonitor.
11.Therecoverysessionwilltaketwotothreeminutes.Duringthistimeyouwillhearaseriesofbeeps.
Aftertheupdatesessioniscompleted,therewillbenovideo,theseriesofbeepswillend,andthe
systemwillautomaticallyturnoff.Removethediskettefromthediskettedrive.
12.Repeatsteps2through5onpage252.
13.ReplacetheClearCMOS/Recoveryjumpertoitsoriginalposition.
14.Reinstalltheadaptercards(somemodels)ifremoved.
15.Closethecomputercoverandreconnectanycablesthatweredisconnected.
16.Turnonthecomputertorestarttheoperatingsystem.
Powermanagement
Powermanagementreducesthepowerconsumptionofcertaincomponentsofthecomputersuchasthe
systempowersupply,processor,harddiskdrives,andsomemonitors.
Automaticcongurationandpowerinterface(ACPI)BIOS
BeinganACPIBIOSsystem,theoperatingsystemisallowedtocontrolthepowermanagementfeatures
ofthecomputerandthesettingforAdvancedPowerManagement(APM)BIOSmodeisignored.Not
alloperatingsystemssupportACPIBIOSmode.
AutomaticPower-Onfeatures
TheAutomaticPower-OnfeatureswithinthePowerManagementmenuallowyoutoenableanddisable
featuresthatturnonthecomputerautomatically.
•SerialPortARingDetect:WiththisfeaturesettoEnabledandanexternalmodemconnectedtoserial
port(COM1),thecomputerwillturnonautomaticallywhenaringisdetectedonthemodem.
•PCIModemRingDetect:WiththisfeaturesettoEnabled,thecomputerwillturnonautomatically
whenaringisdetectedontheinternalmodem.
•PCIWakeUp:ThisfeatureallowsPCIcardsthatsupportthiscapabilitytowakethesystem.
•WakeUponAlarm:Youcanspecifyadateandtimeatwhichthecomputerwillbeturnedon
automatically.Thiscanbeeitherasingleeventoradailyevent.
•WakeonLAN:Ifthecomputerhasaproperlyconguredtoken-ringorEthernetLANadaptercardthatis
WakeonLAN-enabledandthereisremotenetworkmanagementsoftware,youcanusetheWakeonLAN
feature.WhenyousetWakeonLANtoEnabled,thecomputerwillturnonwhenitreceivesaspecic
signalfromanothercomputeronthelocalareanetwork(LAN).
Chapter13.AdditionalServiceInformation253

254ThinkStationHardwareMaintenanceManual

AppendixA.Notices
Lenovomaynotoffertheproducts,services,orfeaturesdiscussedinthisdocumentinallcountries.Consult
yourlocalLenovorepresentativeforinformationontheproductsandservicescurrentlyavailableinyour
area.AnyreferencetoaLenovoproduct,program,orserviceisnotintendedtostateorimplythatonlythat
Lenovoproduct,program,orservicemaybeused.Anyfunctionallyequivalentproduct,program,orservice
thatdoesnotinfringeanyLenovointellectualpropertyrightmaybeusedinstead.However,itistheuser's
responsibilitytoevaluateandverifytheoperationofanyotherproduct,program,orservice.
Lenovomayhavepatentsorpendingpatentapplicationscoveringsubjectmatterdescribedinthis
document.Thefurnishingofthisdocumentdoesnotgiveyouanylicensetothesepatents.Youcansend
licenseinquiries,inwriting,to:
Lenovo(UnitedStates),Inc.
1009ThinkPlace-BuildingOne
Morrisville,NC27560
U.S.A.
Attention:LenovoDirectorofLicensing
LENOVOPROVIDESTHISPUBLICATION“ASIS”WITHOUTWARRANTYOFANYKIND,EITHEREXPRESS
ORIMPLIED,INCLUDING,BUTNOTLIMITEDTO,THEIMPLIEDWARRANTIESOFNON-INFRINGEMENT,
MERCHANTABILITYORFITNESSFORAPARTICULARPURPOSE.Somejurisdictionsdonotallow
disclaimerofexpressorimpliedwarrantiesincertaintransactions,therefore,thisstatementmaynotapply
toyou.
Thisinformationcouldincludetechnicalinaccuraciesortypographicalerrors.Changesareperiodically
madetotheinformationherein;thesechangeswillbeincorporatedinneweditionsofthepublication.
Lenovomaymakeimprovementsand/orchangesintheproduct(s)and/ortheprogram(s)describedinthis
publicationatanytimewithoutnotice.
Theproductsdescribedinthisdocumentarenotintendedforuseinimplantationorotherlifesupport
applicationswheremalfunctionmayresultininjuryordeathtopersons.Theinformationcontainedinthis
documentdoesnotaffectorchangeLenovoproductspecicationsorwarranties.Nothinginthisdocument
shalloperateasanexpressorimpliedlicenseorindemnityundertheintellectualpropertyrightsofLenovo
orthirdparties.Allinformationcontainedinthisdocumentwasobtainedinspecicenvironmentsandis
presentedasanillustration.Theresultobtainedinotheroperatingenvironmentsmayvary.
Lenovomayuseordistributeanyoftheinformationyousupplyinanywayitbelievesappropriatewithout
incurringanyobligationtoyou.
Anyreferencesinthispublicationtonon-LenovoWebsitesareprovidedforconvenienceonlyanddonotin
anymannerserveasanendorsementofthoseWebsites.ThematerialsatthoseWebsitesarenotpartof
thematerialsforthisLenovoproduct,anduseofthoseWebsitesisatyourownrisk.
Anyperformancedatacontainedhereinwasdeterminedinacontrolledenvironment.Therefore,theresult
obtainedinotheroperatingenvironmentsmayvarysignicantly.Somemeasurementsmayhavebeen
madeondevelopment-levelsystemsandthereisnoguaranteethatthesemeasurementswillbethesame
ongenerallyavailablesystems.Furthermore,somemeasurementsmayhavebeenestimatedthrough
extrapolation.Actualresultsmayvary.Usersofthisdocumentshouldverifytheapplicabledatafortheir
specicenvironment.
©CopyrightLenovo2008,2012255

Televisionoutputnotice
Thefollowingnoticeappliestomodelsthathavethefactory-installedtelevision-outputfeature.
ThisproductincorporatescopyrightprotectiontechnologythatisprotectedbymethodclaimsofcertainU.S.
patentsandotherintellectualpropertyrightsownedbyMacrovisionCorporationandotherrightsowners.
UseofthiscopyrightprotectiontechnologymustbeauthorizedbyMacrovisionCorporation,andisintended
forhomeandotherlimitedviewingusesonlyunlessotherwiseauthorizedbyMacrovisionCorporation.
Reverseengineeringordisassemblyisprohibited.
Trademarks
ThefollowingtermsaretrademarksofLenovointheUnitedStates,othercountries,orboth:
Lenovo
TheLenovologo
ThinkStation
PS/2
RescueandRecovery
WakeonLANisatrademarksofInternationalBusinessMachinesCorporationintheUnitedStates,other
countries,orboth.
IntelandPentiumaretrademarksofIntelCorporationintheUnitedStates,othercountries,orboth.
Microsoft,Windows,andWindowsVistaaretrademarksoftheMicrosoftgroupofcompanies.
Othercompany,product,orservicenamesmaybetrademarksorservicemarksofothers.
256ThinkStationHardwareMaintenanceManual

AppendixB.Systemmemoryspeed
TheIntelXeonmicroprocessorfamiliescompatiblewiththisThinkStationcomputerfeatureanintegrated
memorycontroller,whichprovidesthemicroprocessorwithdirectaccesstothesystemmemory.Because
ofthisdesign,thesystemmemoryspeedwillbedeterminedbyanumberoffactors,includingthe
microprocessormodelandthetype,speed,size(capacity),andnumberofDIMMsinstalled.Refertothe
followingtablefortheinformationonthesupportedsystemmemoryspeedforyourowncomputermodel.
Table1.Systemmemoryspeed
DIMMTypeandSpeedPC3-10600UPC3-8500U
DIMMSize(Capacity)1GB,2GB,4GB1GB,2GB,4GB
NumberofDIMMsInstalled1to34to61to6
MicroprocessorModelIntelXeonE5502800MHz800MHz800MHz
IntelXeonE5503800MHz800MHz800MHz
IntelXeonE5504800MHz800MHz800MHz
IntelXeonE5506800MHz800MHz800MHz
IntelXeonE5507800MHz800MHz800MHz
IntelXeonE55201066MHz1066MHz1066MHz
IntelXeonE55301066MHz1066MHz1066MHz
IntelXeonE55401066MHz1066MHz1066MHz
IntelXeonE56201066MHz1066MHz1066MHz
IntelXeonE56301066MHz1066MHz1066MHz
IntelXeonE56401066MHz1066MHz1066MHz
IntelXeonX55501333MHz1066MHz1066MHz
IntelXeonX55601333MHz1066MHz1066MHz
IntelXeonX55701333MHz1066MHz1066MHz
IntelXeonX56501333MHz1333MHz1066MHz
IntelXeonX56601333MHz1333MHz1066MHz
IntelXeonX56671333MHz1333MHz1066MHz
IntelXeonX56701333MHz1333MHz1066MHz
IntelXeonX56771333MHz1333MHz1066MHz
IntelXeonX56801333MHz1333MHz1066MHz
IntelXeon
W35031066MHz1066MHz1066MHz
IntelXeon
W35051066MHz1066MHz1066MHz
IntelXeon
W35201066MHz1066MHz1066MHz
IntelXeon
W35301066MHz1066MHz1066MHz
IntelXeon
W35401066MHz1066MHz1066MHz
©CopyrightLenovo2008,2012257

Table1.Systemmemoryspeed(continued)
IntelXeon
W35501066MHz1066MHz1066MHz
IntelXeon
W35651066MHz1066MHz1066MHz
IntelXeon
W35701333MHz1066MHz1066MHz
IntelXeon
W35801333MHz1066MHz1066MHz
IntelXeon
W36801333MHz1333MHz1066MHz
IntelXeon
W55801333MHz1066MHz1066MHz
IntelXeon
W55901333MHz1066MHz1066MHz
258ThinkStationHardwareMaintenanceManual

Index
A
adaptercard,replacing86
adaptercards,replacing118
administrator,password42
advancedsettings43
B
battery,replacing106,136
C
cardreader,replacing102,132
changing
password42
startupdevicesequence43
connectors
front77,109
considerations,passwords41
cover
removing78,110
D
deletingpassword42
diagnostics
RescueandRecoveryworkspace37
diskettedrive,replacing102,132
E
enabling,disabling
device42
environment,operating30–31
exiting,SetupUtility44
F
fanassemblies,replacing104,133
frontconnectors77,109
frontpanelconnectorsassembly,replacing105,134
H
harddiskdrivefanassembly,replacing100,130
harddiskdrive,replacing97,127
I
installingoptions
memory116
internalspeaker,replacing107,137
L
LenovoSolutionCenter35
M
memorymodule,replacing85
memoryspeed257
O
opticaldrive,replacing101,131
P
password
administrator42
considerations41
setting,changing,deleting42
user42
passwords,using41
physicalspecications29
powersupply,replacing82,114
R
removingthecover78,110
replacing
adaptercard86
adaptercards118
battery106,136
harddiskdrive97,127
internalspeaker107,137
S
selecting
startupdevice43
temporarystartupdevice43
setting
password42
settings
advanced43
changing41
viewing41
SetupUtility41
SetupUtilityprogram,starting41
SetupUtility,exiting44
speed,memory257
startingtheSetupUtilityprogram41
startupdevice43
sequence,changing43
temporary,selecting43
systemboard
©CopyrightLenovo2008,2012259


PartNumber:53Y4348
PrintedinUSA
(1P)P/N:53Y4348
*53Y4348*
