Lenovo T440S Ug En ThinkPad User Guide Manual (English) Think Pad Laptop (Think Pad)
2014-11-20
User Manual: Lenovo T440S Ug En (English) User Guide - ThinkPad T440s T440s Laptop (ThinkPad) ThinkPad T440s
Open the PDF directly: View PDF ![]() .
.
Page Count: 187 [warning: Documents this large are best viewed by clicking the View PDF Link!]
- Read this first
- Chapter 1. Product overview
- Chapter 2. Using your computer
- Chapter 3. You and your computer
- Chapter 4. Security
- Chapter 5. Recovery overview
- Chapter 6. Replacing devices
- Static electricity prevention
- Disabling the built-in battery
- Installing or replacing the SIM card
- Replacing the external battery pack
- Replacing the base cover assembly
- Replacing the hard disk drive or solid-state drive
- Replacing a memory module
- Replacing the wireless LAN card
- Replacing the wireless WAN card
- Replacing the keyboard
- Replacing the coin-cell battery
- Chapter 7. Enhancing your computer
- Chapter 8. Advanced configuration
- Chapter 9. Preventing problems
- Chapter 10. Troubleshooting computer problems
- Diagnosing problems
- Troubleshooting
- Computer stops responding
- Spills on the keyboard
- Error messages
- Errors without messages
- Beep errors
- Memory module problems
- Networking problems
- Problems with the keyboard and other pointing devices
- Problems with the display and multimedia devices
- Fingerprint reader problems
- Battery and power problems
- Problems with drives and other storage devices
- A software problem
- Problems with ports and connectors
- Chapter 11. Getting support
- Appendix A. Regulatory Information
- Wireless related information
- Certification related information
- Export classification notice
- Electronic emission notices
- Federal Communications Commission Declaration of Conformity
- Industry Canada Class B emission compliance statement
- European Union - Compliance to the Electromagnetic Compatibility Directive
- German Class B compliance statement
- Korea Class B compliance statement
- Japan VCCI Class B compliance statement
- Japan compliance statement for products which connect to the power mains with rated current less than or equal to 20 A per phase
- Lenovo product service information for Taiwan
- Eurasian compliance mark
- Brazil regulatory notice
- Mexico regulatory notice
- Appendix B. WEEE and recycling statements
- Appendix C. Restriction of Hazardous Substances Directive (RoHS)
- Appendix D. ENERGY STAR model information
- Appendix E. Notices

UserGuide
ThinkPadT440s

Note:Beforeusingthisinformationandtheproductitsupports,besuretoreadandunderstandthefollowing:
•Safety,Warranty,andSetupGuide
•RegulatoryNotice
•“Importantsafetyinformation”onpagevi
•AppendixE“Notices”onpage167
ThelatestSafety,Warranty,andSetupGuideandtheRegulatoryNoticeareavailableontheLenovoSupport
Websiteat:
http://www.lenovo.com/UserManual
FourthEdition(October2014)
©CopyrightLenovo2013,2014.
LIMITEDANDRESTRICTEDRIGHTSNOTICE:IfdataorsoftwareisdeliveredpursuantaGeneralServicesAdministration
“GSA”contract,use,reproduction,ordisclosureissubjecttorestrictionssetforthinContractNo.GS-35F-05925.

Contents
Readthisfirst..............v
Importantsafetyinformation..........vi
Conditionsthatrequireimmediateaction..vii
Safetyguidelines............vii
Chapter1.Productoverview......1
Locatingcomputercontrols,connectors,and
indicators..................1
Frontview................1
Right-sideview..............3
Left-sideview..............5
Bottomview...............6
Statusindicators.............8
Locatingimportantproductinformation......9
Machinetypeandmodelinformation.....9
FCCIDandICCertificationinformation....9
CertificateofAuthenticityinformation....10
GenuineMicrosoftlabel.........11
Features.................11
Specifications...............13
Operatingenvironment...........13
Lenovoprograms.............14
AccessingLenovoprogramsontheWindows
7operatingsystem...........14
AccessingLenovoprogramsontheWindows
8orWindows8.1operatingsystem....15
Lenovoprogramsoverview........16
Chapter2.Usingyourcomputer...19
Registeringyourcomputer..........19
Frequentlyaskedquestions.........19
Usingthemulti-touchscreen.........21
Specialkeys...............24
Functionkeysandkeycombinations....24
Windowskey.............25
ThinkPadpointingdevice..........25
UsingtheThinkPadpointingdevice....26
Usingthetrackpadtouchgestures.....28
CustomizingtheThinkPadpointingdevice..29
Replacingthecapofpointingstick.....30
Powermanagement............30
Checkingthebatterystatus........30
Usingtheacpoweradapter........31
Chargingthebatteries..........32
Maximizingthebatterylife........32
Managingthebatterypower.......32
Power-savingmodes..........32
Handlingthebattery...........33
Connectingtothenetwork..........35
Ethernetconnections..........35
Wirelessconnections..........35
Presentationsandmultimedia.........39
Changingdisplaysettings........39
Connectingaprojectororanexternal
monitor................39
Settingupapresentation.........42
Usingdualdisplays...........42
Usingaudiofeatures............43
Usingthecamera.............43
Usingaflashmediacardorasmartcard....44
Chapter3.Youandyourcomputer..47
Accessibilityandcomfort..........47
Ergonomicinformation..........47
Comfort...............48
Accessibilityinformation.........48
Travelingwithyourcomputer.........49
Traveltips...............49
Travelaccessories...........50
Chapter4.Security..........51
Usingpasswords..............51
Typingpasswords...........51
Power-onpassword...........51
Supervisorpassword..........52
Harddiskpasswords..........53
Harddisksecurity.............55
Settingthesecuritychip...........56
Usingthefingerprintreader..........57
Noticeondeletingdatafromyourharddiskdrive
orsolid-statedrive.............60
Usingfirewalls...............61
Protectingdataagainstviruses........61
Chapter5.Recoveryoverview....63
RecoveryoverviewfortheWindows7operating
system..................63
Creatingandusingrecoverymedia.....63
Performingbackupandrecoveryoperations.64
UsingtheRescueandRecoveryworkspace.65
Creatingandusingarescuemedium....66
Reinstallingpreinstalledprogramsanddevice
drivers................66
Solvingrecoveryproblems........67
©CopyrightLenovo2013,2014i

RecoveryoverviewfortheWindows8and
Windows8.1operatingsystems........68
Refreshingyourcomputer........68
Resettingyourcomputertothefactorydefault
settings................68
Usingtheadvancedstartupoptions....69
RecoveringyouroperatingsystemifWindows
8orWindows8.1failstostart.......69
Creatingandusingrecoverymedia.....69
Chapter6.Replacingdevices.....73
Staticelectricityprevention..........73
Disablingthebuilt-inbattery.........73
InstallingorreplacingtheSIMcard.......74
Replacingtheexternalbatterypack......75
Replacingthebasecoverassembly......77
Replacingtheharddiskdriveorsolid-statedrive.78
Replacingamemorymodule.........81
ReplacingthewirelessLANcard.......82
ReplacingthewirelessWANcard.......85
Replacingthekeyboard...........87
Replacingthecoin-cellbattery........94
Chapter7.Enhancingyour
computer...............97
FindingThinkPadoptions..........97
ThinkPaddockingstations..........97
Locatingcontrolsandconnectorsonthe
ThinkPaddockingstations........97
AttachingaThinkPaddockingstation....102
DetachingaThinkPaddockingstation...103
Guidelinesonconnectingmultipleexternal
displaystoadockingstation.......104
Securityfeatures............105
Chapter8.Advanced
configuration............107
Installinganewoperatingsystem.......107
InstallingtheWindows7operatingsystem..107
InstallingtheWindows8orWindows8.1
operatingsystem............108
Installingdevicedrivers...........109
UsingtheThinkPadSetupprogram......109
Mainmenu..............110
Configmenu..............110
DateandTimemenu..........115
Securitymenu.............115
Startupmenu.............119
Restartmenu.............121
UpdatingtheUEFIBIOS.........121
Usingsystemmanagement..........121
Settingmanagementfeatures.......122
Chapter9.Preventingproblems..125
Generaltipsforpreventingproblems......125
Makingsuredevicedriversarecurrent.....126
Takingcareofyourcomputer.........127
Cleaningthecoverofyourcomputer....128
Chapter10.Troubleshooting
computerproblems.........131
Diagnosingproblems............131
Troubleshooting..............131
Computerstopsresponding.......131
Spillsonthekeyboard..........132
Errormessages............132
Errorswithoutmessages.........133
Beeperrors..............134
Memorymoduleproblems........135
Networkingproblems..........135
Problemswiththekeyboardandotherpointing
devices................137
Problemswiththedisplayandmultimedia
devices................138
Fingerprintreaderproblems........141
Batteryandpowerproblems.......141
Problemswithdrivesandotherstorage
devices................144
Asoftwareproblem...........144
Problemswithportsandconnectors....145
Chapter11.Gettingsupport....147
BeforeyoucontactLenovo..........147
Gettinghelpandservice...........147
Usingdiagnosticprograms........148
LenovoSupportWebsite.........148
CallingLenovo.............148
Purchasingadditionalservices........149
AppendixA.Regulatory
Information.............151
Wirelessrelatedinformation.........151
LocationsoftheUltraConnect™wireless
antennas...............152
Locatingwirelessregulatorynotices....153
Certificationrelatedinformation........153
Exportclassificationnotice..........153
Electronicemissionnotices..........153
FederalCommunicationsCommission
DeclarationofConformity........153
IndustryCanadaClassBemissioncompliance
statement...............154
EuropeanUnion-Compliancetothe
ElectromagneticCompatibilityDirective...154
GermanClassBcompliancestatement...154
iiUserGuide

KoreaClassBcompliancestatement....155
JapanVCCIClassBcompliancestatement..155
Japancompliancestatementforproducts
whichconnecttothepowermainswith
ratedcurrentlessthanorequalto20Aper
phase................155
Lenovoproductserviceinformationfor
Taiwan................155
Eurasiancompliancemark..........155
Brazilregulatorynotice...........155
Mexicoregulatorynotice...........155
AppendixB.WEEEandrecycling
statements.............157
ImportantWEEEinformation.........157
RecyclinginformationforChina........157
RecyclinginformationforJapan........157
BatteryrecyclinginformationforBrazil.....158
BatteryrecyclinginformationforTaiwan.....159
BatteryrecyclinginformationfortheEuropean
Union..................159
BatteryrecyclinginformationfortheUnitedStates
andCanada................159
AppendixC.RestrictionofHazardous
SubstancesDirective(RoHS)....161
EuropeanUnionRoHS...........161
ChinaRoHS................162
IndiaRoHS................162
TurkishRoHS...............163
UkraineRoHS...............163
AppendixD.ENERGYSTARmodel
information.............165
AppendixE.Notices.........167
Trademarks................168
©CopyrightLenovo2013,2014iii

ivUserGuide
Readthisfirst
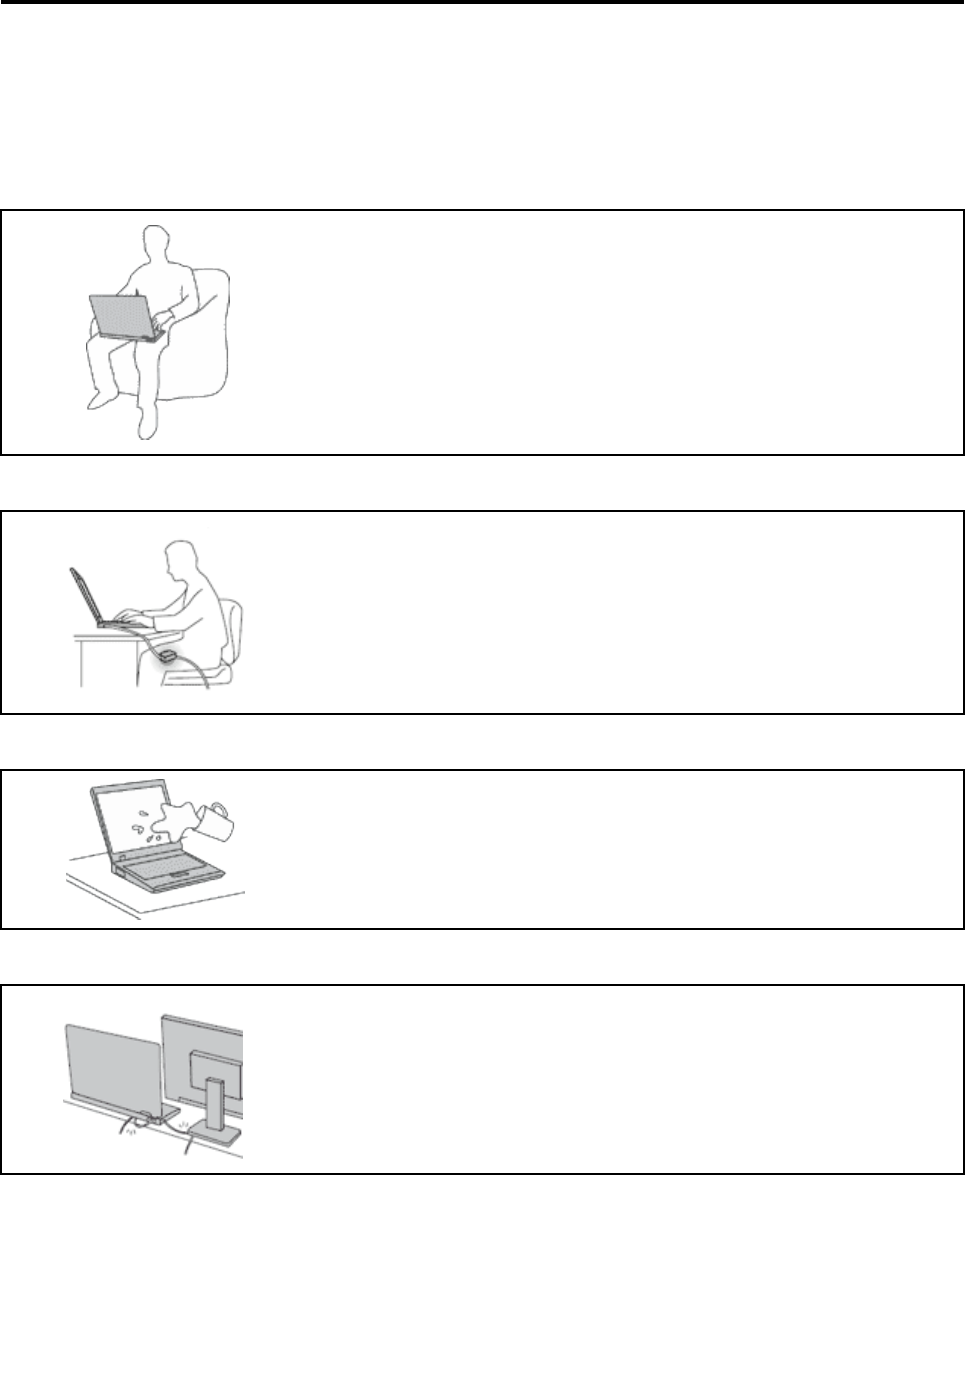
Besuretofollowtheimportanttipsgivenheretogetthemostuseandenjoymentoutofyourcomputer.
Failuretodosomightleadtodiscomfortorinjury,orcauseyourcomputertofail.
Protectyourselffromtheheatthatyourcomputergenerates.
Whenyourcomputeristurnedonorthebatteryischarging,thebase,thepalm
rest,andsomeotherpartsmaybecomehot.Thetemperaturetheyreach
dependsontheamountofsystemactivityandthelevelofchargeinthebattery.
Extendedcontactwithyourbody,eventhroughclothing,couldcause
discomfortorevenaskinburn.
•Avoidkeepingyourhands,yourlap,oranyotherpartofyourbodyin
contactwithahotsectionofthecomputerforanyextendedtime.
•Periodicallytakehandsfromusingthekeyboardbyliftingyourhandsfrom
thepalmrest.
Protectyourselffromtheheatgeneratedbytheacpoweradapter.
Whentheacpoweradapterisconnectedtoanelectricaloutletandyour
computer,itgeneratesheat.
Extendedcontactwithyourbody,eventhroughclothing,maycauseaskin
burn.
•Donotplacetheacpoweradapterincontactwithanypartofyourbody
whileitisinuse.
•Neveruseittowarmyourbody.
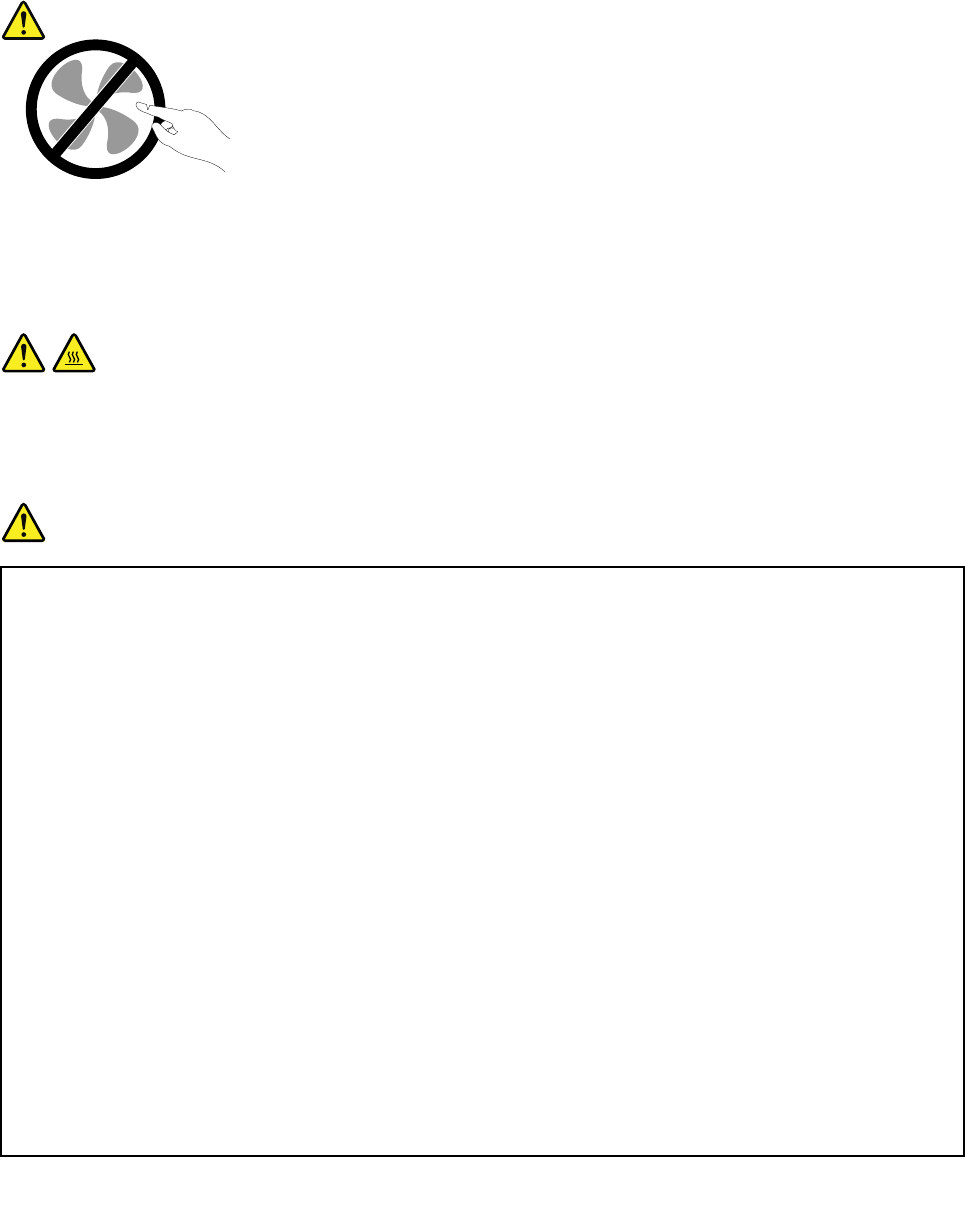
Preventyourcomputerfromgettingwet.
Toavoidspillsandthedangerofelectricalshock,keepliquidsawayfromyour
computer.
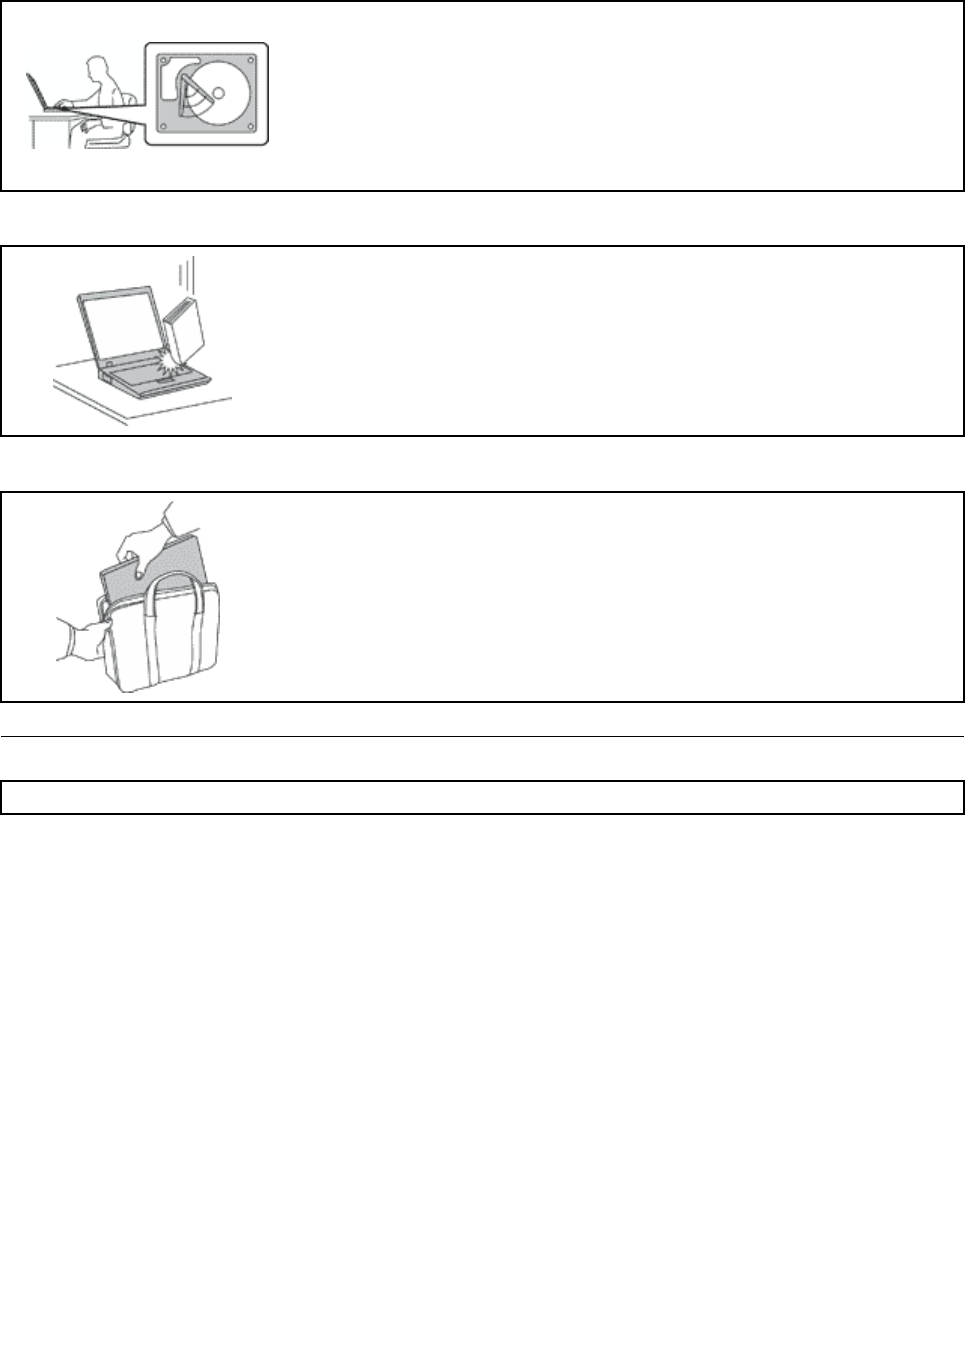
Protectthecablesfrombeingdamaged.
Applyingstrongforcetocablesmaydamageorbreakthem.
Routecommunicationlines,orthecablesofanacpoweradapter,amouse,a
keyboard,aprinter,oranyotherelectronicdevice,sothattheycannotbewalked
on,trippedover,pinchedbyyourcomputerorotherobjects,orinanyway
subjectedtotreatmentthatcouldinterferewiththeoperationofyourcomputer.
©CopyrightLenovo2013,2014v
Protectyourcomputeranddatawhenmovingit.
Beforemovingacomputerequippedwithaharddiskdrive,dooneofthe
following,andmakesurethatthepowerbuttonisofforisblinking:
•Turnitoff.
•Putitinsleepmode.
•Putitinhibernationmode.
Thiswillhelptopreventdamagetothecomputer,andpossiblelossofdata.
Handleyourcomputergently.
Donotdrop,bump,scratch,twist,hit,vibrate,push,orplaceheavyobjectson
yourcomputer,display,orexternaldevices.
Carryyourcomputercarefully.
•Useaqualitycarryingcasethatprovidesadequatecushioningandprotection.
•Donotpackyourcomputerinatightlypackedsuitcaseorbag.
•Beforeputtingyourcomputerinacarryingcase,makesurethatitisoff,insleep
mode,orinhibernationmode.Donotputacomputerinacarryingcasewhileit
isturnedon.
Importantsafetyinformation
Note:Readtheimportantsafetyinformationfirst.
Thisinformationcanhelpyousafelyuseyournotebookcomputer.Followandretainallinformationincluded
withyourcomputer.Theinformationinthisdocumentdoesnotalterthetermsofyourpurchaseagreement
ortheLenovo®LimitedWarranty.Formoreinformation,see“WarrantyInformation”intheSafety,Warranty,
andSetupGuidethatcomeswithyourcomputer.
Customersafetyisimportant.Ourproductsaredevelopedtobesafeandeffective.However,personal
computersareelectronicdevices.Powercords,poweradapters,andotherfeaturescancreatepotential
safetyrisksthatcanresultinphysicalinjuryorpropertydamage,especiallyifmisused.Toreducethese
risks,followtheinstructionsincludedwithyourproduct,observeallwarningsontheproductandinthe
operatinginstructions,andreviewtheinformationincludedinthisdocumentcarefully.Bycarefullyfollowing
theinformationcontainedinthisdocumentandprovidedwithyourproduct,youcanhelpprotectyourself
fromhazardsandcreateasafercomputerworkenvironment.
Note:Thisinformationincludesreferencestopoweradaptersandbatteries.Inadditiontonotebook
computers,someproducts(suchasspeakersandmonitors)shipwithexternalpoweradapters.Ifyouhave
suchaproduct,thisinformationappliestoyourproduct.Inaddition,computerproductscontainacoin-sized
internalbatterythatprovidespowertothesystemclockevenwhenthecomputerisunplugged,sothe
batterysafetyinformationappliestoallcomputerproducts.
viUserGuide

Conditionsthatrequireimmediateaction
Productscanbecomedamagedduetomisuseorneglect.Someproductdamageisseriousenough
thattheproductshouldnotbeusedagainuntilithasbeeninspectedand,ifnecessary,repairedby
anauthorizedservicer.
Aswithanyelectronicdevice,paycloseattentiontotheproductwhenitisturnedon.Onveryrare
occasions,youmightnoticeanodororseeapuffofsmokeorsparksventfromyourproduct.Oryou
mighthearsoundslikepopping,crackingorhissing.Theseconditionsmightmerelymeanthatan
internalelectroniccomponenthasfailedinasafeandcontrolledmanner.Or,theymightindicate
apotentialsafetyissue.However,donottakerisksorattempttodiagnosethesituationyourself.
ContacttheCustomerSupportCenterforfurtherguidance.ForalistofServiceandSupportphone
numbers,seethefollowingWebsite:
http://www.lenovo.com/support/phone
Frequentlyinspectyourcomputeranditscomponentsfordamageorwearorsignsofdanger.
Ifyouhaveanyquestionabouttheconditionofacomponent,donotusetheproduct.Contact
theCustomerSupportCenterortheproductmanufacturerforinstructionsonhowtoinspectthe
productandhaveitrepaired,ifnecessary.
Intheunlikelyeventthatyounoticeanyofthefollowingconditions,orifyouhaveanysafety
concernswithyourproduct,stopusingtheproductandunplugitfromthepowersourceand
telecommunicationlinesuntilyoucanspeaktotheCustomerSupportCenterforfurtherguidance.
•Powercords,plugs,poweradapters,extensioncords,surgeprotectors,orpowersuppliesthatare
cracked,broken,ordamaged.
•Signsofoverheating,smoke,sparks,orfire.
•Damagetoabattery(suchascracks,dents,orcreases),dischargefromabattery,orabuildupofforeign
substancesonthebattery.
•Acracking,hissingorpoppingsound,orstrongodorthatcomesfromtheproduct.
•Signsthatliquidhasbeenspilledoranobjecthasfallenontothecomputerproduct,thepowercordor
poweradapter.
•Thecomputerproduct,powercord,orpoweradapterhasbeenexposedtowater.
•Theproducthasbeendroppedordamagedinanyway.
•Theproductdoesnotoperatenormallywhenyoufollowtheoperatinginstructions.
Note:Ifyounoticetheseconditionswithaproduct(suchasanextensioncord)thatisnotmanufacturedfor
orbyLenovo,stopusingthatproductuntilyoucancontacttheproductmanufacturerforfurtherinstructions,
oruntilyougetasuitablereplacement.
Safetyguidelines
Alwaysobservethefollowingprecautionstoreducetheriskofinjuryandpropertydamage.
Serviceandupgrades
DonotattempttoserviceaproductyourselfunlessinstructedtodosobytheCustomerSupportCenteror
yourdocumentation.OnlyuseaServiceProviderwhoisapprovedtorepairyourparticularproduct.
Note:Somecomputerpartscanbeupgradedorreplacedbythecustomer.Upgradestypicallyare
referredtoasoptions.ReplacementpartsapprovedforcustomerinstallationarereferredtoasCustomer
ReplaceableUnits,orCRUs.Lenovoprovidesdocumentationwithinstructionswhenitisappropriatefor
customerstoinstalloptionsorreplaceCRUs.Youmustcloselyfollowallinstructionswheninstallingor
replacingparts.TheOffstateofapowerindicatordoesnotnecessarilymeanthatvoltagelevelsinsidea
©CopyrightLenovo2013,2014vii
productarezero.Beforeyouremovethecoversfromaproductequippedwithapowercord,alwaysmake
surethatthepoweristurnedoffandthattheproductisunpluggedfromanypowersource.Ifyouhave
anyquestionsorconcerns,contacttheCustomerSupportCenter.
Althoughtherearenomovingpartsinyourcomputerafterthepowercordhasbeendisconnected,the
followingwarningsarerequiredforyoursafety.
CAUTION:
Hazardousmovingparts.Keepfingersandotherbodypartsaway.
CAUTION:
BeforereplacinganyCRUs,turnoffthecomputerandwaitthreetofiveminutestoletthecomputer
coolbeforeopeningthecover.
Powercordsandpoweradapters
DANGER
Useonlythepowercordsandpoweradapterssuppliedbytheproductmanufacturer.
Thepowercordsshallbesafetyapproved.ForGermany,itshallbeH05VV-F,3G,0.75mm2,or
better.Forothercountries,thesuitabletypesshallbeusedaccordingly.
Neverwrapapowercordaroundapoweradapterorotherobject.Doingsocanstressthecordin
waysthatcancausethecordtofray,crack,orcrimp.Thiscanpresentasafetyhazard.
Alwaysroutepowercordssothattheywillnotbewalkedon,trippedover,orpinchedbyobjects.
Protectpowercordsandpoweradaptersfromliquids.Forinstance,donotleaveyourpowercord
orpoweradapternearsinks,tubs,toilets,oronfloorsthatarecleanedwithliquidcleansers.
Liquidscancauseashortcircuit,particularlyifthepowercordorpoweradapterhasbeenstressed
bymisuse.Liquidsalsocancausegradualcorrosionofpowercordterminalsand/ortheconnector
terminalsonapoweradapter,whichcaneventuallyresultinoverheating.
Alwaysconnectpowercordsandsignalcablesinthecorrectorderandensurethatallpowercord
connectorsaresecurelyandcompletelypluggedintoreceptacles.
Donotuseanypoweradapterthatshowscorrosionattheacinputpinsorshowssignsof
overheating(suchasdeformedplastic)attheacinputpinsoranywhereonthepoweradapter.
Donotuseanypowercordswheretheelectricalcontactsoneitherendshowsignsofcorrosionor
overheatingorwherethepowercordappearstohavebeendamagedinanyway.
viiiUserGuide

Topreventpossibleoverheating,donotcoverthepoweradapterwithclothingorotherobjects
whenthepoweradapterispluggedintoanelectricaloutlet.
Extensioncordsandrelateddevices
Ensurethatextensioncords,surgeprotectors,uninterruptiblepowersupplies,andpowerstripsthatyouuse
areratedtohandletheelectricalrequirementsoftheproduct.Neveroverloadthesedevices.Ifpowerstrips
areused,theloadshouldnotexceedthepowerstripinputrating.Consultanelectricianformoreinformation
ifyouhavequestionsaboutpowerloads,powerrequirements,andinputratings.
Plugsandoutlets
DANGER
Ifareceptacle(poweroutlet)thatyouintendtousewithyourcomputerequipmentappearstobe
damagedorcorroded,donotusetheoutletuntilitisreplacedbyaqualifiedelectrician.
Donotbendormodifytheplug.Iftheplugisdamaged,contactthemanufacturertoobtain
areplacement.
Donotshareanelectricaloutletwithotherhomeorcommercialappliancesthatdrawlargeamounts
ofelectricity;otherwise,unstablevoltagemightdamageyourcomputer,data,orattacheddevices.
Someproductsareequippedwithathree-prongedplug.Thisplugfitsonlyintoagrounded
electricaloutlet.Thisisasafetyfeature.Donotdefeatthissafetyfeaturebytryingtoinsertitinto
anon-groundedoutlet.Ifyoucannotinserttheplugintotheoutlet,contactanelectricianforan
approvedoutletadapterortoreplacetheoutletwithonethatenablesthissafetyfeature.Never
overloadanelectricaloutlet.Theoverallsystemloadshouldnotexceed80percentofthebranch
circuitrating.Consultanelectricianformoreinformationifyouhavequestionsaboutpowerloads
andbranchcircuitratings.
Besurethatthepoweroutletyouareusingisproperlywired,easilyaccessible,andlocatedclose
totheequipment.Donotfullyextendpowercordsinawaythatwillstressthecords.
Besurethatthepoweroutletprovidesthecorrectvoltageandcurrentfortheproductyouare
installing.
Carefullyconnectanddisconnecttheequipmentfromtheelectricaloutlet.
Powersupplystatement
DANGER
Neverremovethecoveronapowersupplyoranypartthathasthefollowinglabelattached.
©CopyrightLenovo2013,2014ix

Hazardousvoltage,current,andenergylevelsarepresentinsideanycomponentthathasthislabel
attached.Therearenoserviceablepartsinsidethesecomponents.Ifyoususpectaproblemwith
oneoftheseparts,contactaservicetechnician.
Externaldevices
CAUTION:
DonotconnectordisconnectanyexternaldevicecablesotherthanUSBcableswhilethecomputer
powerison;otherwise,youmightdamageyourcomputer.T oavoidpossibledamagetoattached
devices,waitatleastfivesecondsafterthecomputerisshutdowntodisconnectexternaldevices.
Generalbatterynotice
DANGER
PersonalcomputersmanufacturedbyLenovocontainareal-time-clock(RTC)batterytoprovide
powertothesystemclock.Inaddition,manymobileproducts,suchasnotebookcomputers,utilize
arechargeablebatterypacktoprovidesystempowerwheninportablemode.Batteriessuppliedby
Lenovoforusewithyourproducthavebeentestedforcompatibilityandshouldonlybereplaced
withapprovedparts.
Neverattempttoopenorserviceanybattery.Donotcrush,puncture,orincineratebatteriesor
shortcircuitthemetalcontacts.Donotexposethebatterytowaterorotherliquids.Onlyrecharge
thebatterypackstrictlyaccordingtoinstructionsincludedintheproductdocumentation.
Batteryabuseormishandlingcancausethebatterytooverheat,whichcancausegassesorflame
to“vent”fromthebatterypackorcoin-cellbattery.Ifyourbatteryisdamaged,orifyounoticeany
dischargefromyourbatteryorthebuildupofforeignmaterialsonthebatteryleads,stopusingthe
batteryandobtainareplacementfromthebatterymanufacturer.
Batteriescandegradewhentheyareleftunusedforlongperiodsoftime.Forsomerechargeable
batteries(particularlyLithiumIonbatteries),leavingabatteryunusedinadischargedstatecould
increasetheriskofabatteryshortcircuit,whichcouldshortenthelifeofthebatteryandalsocan
poseasafetyhazard.DonotletrechargeableLithium-Ionbatteriescompletelydischargeorstore
thesebatteriesinadischargedstate.
Rechargeablebatterynotice
DANGER
Donotattempttodisassembleormodifythebatterypack.Attemptingtodosocancausean
explosion,orliquidleakagefromthebatterypack.Abatterypackotherthantheonespecifiedby
Lenovo,oradisassembledormodifiedbatterypackisnotcoveredbythewarranty.
Iftherechargeablebatterypackisincorrectlyreplaced,thereisdangerofanexplosion.Thebattery
packcontainsasmallamountofharmfulsubstances.Toavoidpossibleinjury:
•ReplaceonlywithabatteryofthetyperecommendedbyLenovo.
•Keepthebatterypackawayfromfire.
•Donotexposeittowaterorrain.
•Donotattempttodisassembleit.
•Donotshort-circuitit.
xUserGuide

•Keepitawayfromchildren.
•Donotdropthebatterypack.
Donotputthebatterypackintrashthatisdisposedofinlandfills.Whendisposingofthebattery,
complywithlocalordinancesorregulations.
Thebatterypackshouldbestoredatroomtemperature,chargedtoapproximately30to50%
ofcapacity.Werecommendthatbatterypackbechargedaboutonceperyeartoprevent
overdischarge.
Noticeforlithiumcoin-cellbattery
DANGER
Dangerofexplosionifbatteryisincorrectlyreplaced.
Donot:
•Throworimmerseintowater
•Heattomorethan100°C(212°F)
•Repairordisassemble
Disposeofthebatteryasrequiredbylocalordinancesorregulations.
ThefollowingstatementappliestousersinthestateofCalifornia,U.S.A.
CaliforniaPerchlorateInformation:
ProductscontainingmanganesedioxidelithiumRTCbatteriesmaycontainperchlorate.
PerchlorateMaterial-specialhandlingmayapply,See
www.dtsc.ca.gov/hazardouswaste/perchlorate
Noticeforbuilt-inrechargeablebattery
DANGER
Donotattempttoreplacethebuilt-inrechargeablebattery.Replacementofthebatterymustbe
donebyaLenovo-authorizedrepairfacilityortechnician.
Onlyrechargethebatterystrictlyaccordingtoinstructionsincludedintheproductdocumentation.
TheLenovo-authorizedrepairfacilitiesortechniciansrecycleLenovobatteriesaccordingtolocal
lawsandregulations.
©CopyrightLenovo2013,2014xi

Heatandproductventilation
DANGER
Computers,acpoweradapters,andmanyaccessoriescangenerateheatwhenturnedonandwhen
batteriesarecharging.Notebookcomputerscangenerateasignificantamountofheatduetotheir
compactsize.Alwaysfollowthesebasicprecautions:
•Whenyourcomputeristurnedonorthebatteryischarging,thebase,thepalmrest,andsome
otherpartsmaybecomehot.Avoidkeepingyourhands,yourlap,oranyotherpartofyour
bodyincontactwithahotsectionofthecomputerforanyextendedlengthoftime.Whenyou
usethekeyboard,avoidkeepingyourpalmsonthepalmrestforaprolongedperiodoftime.
Yourcomputergeneratessomeheatduringnormaloperation.Theamountofheatdependson
theamountofsystemactivityandthebatterychargelevel.Extendedcontactwithyourbody,
eventhroughclothing,couldcausediscomfortorevenaskinburn.Periodicallytakebreaks
fromusingthekeyboardbyliftingyourhandsfromthepalmrest;andbecarefulnottouse
thekeyboardforanyextendedlengthoftime.
•Donotoperateyourcomputerorchargethebatterynearflammablematerialsorinexplosive
environments.
•Ventilationslots,fansand/orheatsinksareprovidedwiththeproductforsafety,comfort,and
reliableoperation.Thesefeaturesmightinadvertentlybecomeblockedbyplacingtheproducton
abed,sofa,carpet,orotherflexiblesurface.Neverblock,cover,ordisablethesefeatures.
•Whentheacpoweradapterisconnectedtoanelectricaloutletandyourcomputer,itgenerates
heat.Donotplacetheadapterincontactwithanypartofyourbodywhileusingit.Neverusethe
acpoweradaptertowarmyourbody.Extendedcontactwithyourbody,eventhroughclothing,
maycauseaskinburn.
Foryoursafety,alwaysfollowthesebasicprecautionswithyourcomputer:
•Keepthecoverclosedwheneverthecomputerispluggedin.
•Regularlyinspecttheoutsideofthecomputerfordustaccumulation.
•Removedustfromventsandanyperforationsinthebezel.Morefrequentcleaningsmightbe
requiredforcomputersindustyorhigh-trafficareas.
•Donotrestrictorblockanyventilationopenings.
•Donotoperateyourcomputerinsidefurniture,asthismightincreasetheriskofoverheating.
•Airflowtemperaturesintothecomputershouldnotexceed35°C(95°F).
Electricalcurrentsafetyinformation
DANGER
Electriccurrentfrompower,telephone,andcommunicationcablesishazardous.
Toavoidashockhazard:
•Donotuseyourcomputerduringalightningstorm.
•Donotconnectordisconnectanycablesorperforminstallation,maintenance,orreconfiguration
ofthisproductduringanelectricalstorm.
•Connectallpowercordstoaproperlywiredandgroundedelectricaloutlet.
•Connecttoproperlywiredoutletsanyequipmentthatwillbeattachedtothisproduct.
•Wheneverpossible,useonehandonlytoconnectordisconnectsignalcables.
xiiUserGuide

•Neverturnonanyequipmentwhenthereisevidenceoffire,water,orstructuraldamage.
•Donotuseyourcomputeruntilallinternalpartsenclosuresarefastenedintoplace.Neveruse
thecomputerwheninternalpartsandcircuitsareexposed.
DANGER
Connectanddisconnectcablesasdescribedinthefollowingprocedureswheninstalling,moving,
oropeningcoversonthisproductorattacheddevices.
Toconnect:
1.TurneverythingOFF .
2.First,attachallcablestodevices.
3.Attachsignalcablestoconnectors.
4.Attachpowercordstooutlets.
5.TurndevicesON.
Todisconnect:
1.TurneverythingOFF .
2.First,removepowercordsfromoutlets.
3.Removesignalcablesfromconnectors.
4.Removeallcablesfromdevices.
Thepowercordmustbedisconnectedfromthewalloutletorreceptaclebeforeinstallingallother
electricalcablesconnectedtothecomputer.
Thepowercordmaybereconnectedtothewalloutletorreceptacleonlyafterallotherelectrical
cableshavebeenconnectedtothecomputer.
Liquidcrystaldisplay(LCD)notice
CAUTION:
Theliquidcrystaldisplay(LCD)ismadeofglass,androughhandlingordroppingthecomputercan
causetheLCDtobreak.IftheLCDbreaksandtheinternalfluidgetsintoyoureyesoronyour
hands,immediatelywashtheaffectedareaswithwaterforatleast15minutes;ifanysymptomsare
presentafterwashing,getmedicalcare.
Note:Forproductswithmercury-containingfluorescentlamps(forexample,non-LED),thefluorescentlamp
intheliquidcrystaldisplay(LCD)containsmercury;disposeofaccordingtolocal,state,orfederallaws.
Usingheadphonesorearphones
Ifyourcomputerhasbothaheadphoneconnectorandanaudio-outconnector,alwaysusetheheadphone
connectorforheadphones(alsocalledaheadset)orearphones.
CAUTION:
Excessivesoundpressurefromearphonesandheadphonescancausehearingloss.Adjustmentof
theequalizertomaximumincreasestheearphoneandheadphoneoutputvoltageandthesound
pressurelevel.Therefore,toprotectyourhearing,adjusttheequalizertoanappropriatelevel.
Excessiveuseofheadphonesorearphonesforalongperiodoftimeathighvolumecanbedangerousifthe
outputoftheheadphoneorearphoneconnectorsdonotcomplywithspecificationsofEN50332-2.The
headphoneoutputconnectorofyourcomputercomplieswithEN50332-2Subclause7.Thisspecification
limitsthecomputer’smaximumwidebandtrueRMSoutputvoltageto150mV.Tohelpprotectagainst
hearingloss,ensurethattheheadphonesorearphonesyouusealsocomplywithEN50332-2(Clause7
limits)forawidebandcharacteristicvoltageof75mV.UsingheadphonesthatdonotcomplywithEN
50332-2canbedangerousduetoexcessivesoundpressurelevels.
IfyourLenovocomputercamewithheadphonesorearphonesinthepackage,asaset,thecombinationof
theheadphonesorearphonesandthecomputeralreadycomplieswiththespecificationsofEN50332-1.
Ifdifferentheadphonesorearphonesareused,ensurethattheycomplywithEN50332-1(Clause6.5
©CopyrightLenovo2013,2014xiii

LimitationValues).UsingheadphonesthatdonotcomplywithEN50332-1canbedangerousdueto
excessivesoundpressurelevels.
Additionalsafetyinformation
Plasticbagnotice
DANGER
Plasticbagscanbedangerous.Keepplasticbagsawayfrombabiesandchildrentoavoiddanger
ofsuffocation.
PolyvinylChloride(PVC)cableandcordnotice
Manypersonalcomputerproductsandaccessoriescontaincords,cablesorwires,suchaspowercordsor
cordstoconnecttheaccessorytoapersonalcomputer.Ifthisproducthassuchacord,cableorwire,then
thefollowingwarningapplies:
WARNING:Handlingthecordonthisproductorcordsassociatedwithaccessoriessoldwiththisproduct
willexposeyoutolead,achemicalknowntotheStateofCaliforniatocausecancer,andbirthdefectsor
otherreproductiveharm.Washhandsafterhandling.
Savetheseinstructions.
xivUserGuide
Chapter1.Productoverview
Thischapterprovidesinformationaboutthelocationsofconnectors,locationsofimportantproductlabels,
computerfeatures,specifications,operatingenvironment,andpreinstalledprograms.
•“Locatingcomputercontrols,connectors,andindicators”onpage1
•“Locatingimportantproductinformation”onpage9
•“Features”onpage11
•“Specifications”onpage13
•“Operatingenvironment”onpage13
•“Lenovoprograms”onpage14
Locatingcomputercontrols,connectors,andindicators
Thissectionintroducesthecomputerhardwarefeaturestogiveyouthebasicinformationyouwillneed
tostartusingthecomputer.
Frontview
Figure1.Frontview
1Camera(onsomemodels)5Pointingstick
2Microphones6NFClogo(onsomemodels)
3Powerbutton7Trackpad
4Fingerprintreader(onsomemodels)8Screen(multi-touchscreenonsomemodels)
1Camera(onsomemodels)
Usethecameratotakepicturesorholdavideoconference.Formoreinformation,see“Usingthecamera”
onpage43.
©CopyrightLenovo2013,20141

2Microphones
Thebuilt-inmicrophonescapturesoundandvoicewhenusedwithaprogramcapableofhandlingaudio.
3Powerbutton
Usethepowerbuttontoturnonthecomputer.
Toturnoffthecomputer,dothefollowing:
•ForMicrosoft®Windows®7operatingsystem,usetheStartmenushutdownoption
•FortheMicrosoftWindows8andWindows8.1operatingsystems,gotothedesktopandmovethe
pointertothetop-rightorbottom-rightcornerofthescreentodisplaythecharms.ThenclickSettings➙
Power➙Shutdown.
Ifyourcomputerstopsrespondingandyoucannotturnitoff,pressandholdthepowerbuttonforfour
secondsormore.Ifthecomputerstillisnotresponding,removetheacpoweradapterandusethe
emergency-resetholetoresetthecomputer.See“Bottomview”onpage6.
Youalsocanprogramthepowerbuttonsothatbypressingthepowerbuttonyoucanturnoffthecomputer
orputthecomputerintosleeporhibernationmode.Toachievethis,youneedtochangeyourpowerplan
settings.Toaccesspowerplansettings,dothefollowing:
•ForWindows7:StartthePowerManagerprogramandthenclickthePowerPlantab.Forinstructionson
howtostartthePowerManagerprogram,see“AccessingLenovoprogramsontheWindows7operating
system”onpage14.
•ForWindows8andWindows8.1:Clickthebattery-statusiconinthewindowsnotificationareaandclick
Morepoweroptions.ThenclickChoosewhatthepowerbuttondoes.
4Fingerprintreader(onsomemodels)
Fingerprintauthenticationtechnologyprovidesasimpleandsecureuseraccessbyassociatingyour
fingerprintwithpasswords.Formoreinformation,see“Usingthefingerprintreader”onpage57.
ThinkPad®pointingdevice
5Pointingstick
7Trackpad
ThekeyboardcontainstheLenovouniqueThinkPadpointingdevices.Pointing,selecting,anddraggingare
allpartofasingleprocessthatyoucanperformwithoutmovingyourfingersfromatypingposition.For
moreinformation,see“ThinkPadpointingdevice”onpage25.
6NFClogo(onsomemodels)
Ifthereisanearfieldcommunication(NFC)logoonthetrackpad,itindicatesthatyourcomputersupports
theNFCfeature.Formoreinformation,see“UsingtheNFCconnection”onpage38.
8Screen(multi-touchscreenonsomemodels)
Formoreinformation,see“Usingthemulti-touchscreen”onpage21.
2UserGuide
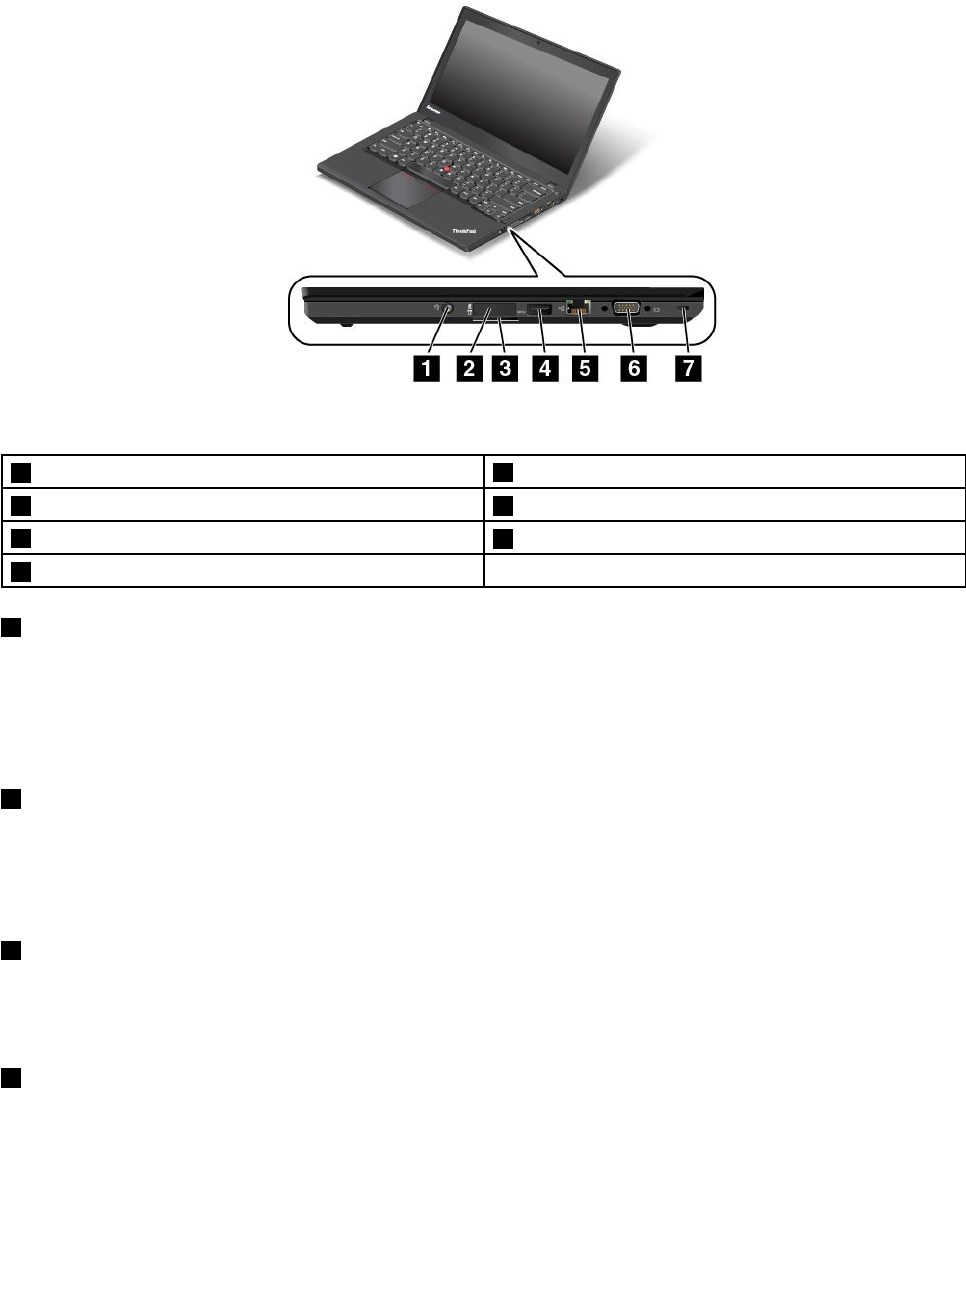
Right-sideview
Figure2.Right-sideview
1Comboaudioconnector5Ethernetconnector
2SIM-cardtray(onsomemodels)6Videographicsarray(VGA)connector
3Mediacardreaderslot7Security-lockslot
4USB3.0connector
1Comboaudioconnector
Connectheadphonesoraheadsettolistentothesoundfromthecomputer.Youalsocanconnecta
headsettorecordaudioormakecalls.
Note:Theaudioconnectordoesnotsupportaconventionalmicrophone.Formoreinformation,see“Using
audiofeatures”onpage43.
2SIM-cardtray(onsomemodels)
IfyourcomputerhasawirelessWideAreaNetwork(wirelessWAN)feature,aSubscriberIdentification
Module(SIM)cardmightberequiredtoestablishwirelessWANconnections.Dependingonthecountryof
delivery,theSIMcardmightbealreadyinstalledintheSIM-cardtray.Formoreinformation,see“Installing
orreplacingtheSIMcard”onpage74.
3Mediacardreaderslot
Yourcomputerhasamediacardreaderslot.Insertyourflashmediacardintothisslottoreadthedata
onthecard.Formoreinformationaboutthesupportedcards,see“Usingaflashmediacardorasmart
card”onpage44.
4USB3.0connector
TheUniversalSerialBus(USB)3.0connectorisusedforconnectingUSB-compatibledevices,suchasa
USBprinteroradigitalcamera.
Attention:WhenyouattachaUSBcabletotheUSB3.0connector,ensurethattheUSBmarkisfacing
upward.Otherwisetheconnectormightbedamaged.
Chapter1.Productoverview3

5Ethernetconnector
ConnectthecomputertoaLANwiththeEthernetconnector.
DANGER
Toavoidtheriskofelectricalshock,donotconnectthetelephonecabletotheEthernetconnector.
YoucanonlyconnectanEthernetcabletothisconnector.
TheEthernetconnectorhastwoindicatorsthatshowthestatusofthenetworkconnection.Whenthe
lower-leftindicatorissolidgreen,itindicatesthatthecomputerconnectstoaLANandasessionwiththe
networkisavailable.Whenthelower-rightindicatorblinksyellow,itindicatesthatdataisbeingtransmitted.
Note:Ifyouattachthecomputertoadockingstation,usetheEthernetconnectoronthedockingstationto
connecttoaLAN,nottheoneonthecomputer.
6VideoGraphicsArray(VGA)connector
UsetheVGAconnectortoconnectthecomputertoaVGA-compatiblevideodevice,suchasaVGAmonitor.
Note:Ifyouattachthecomputertoadockingstation,usetheVGAconnectoronthedockingstation,
nottheoneonthecomputer.
Formoreinformation,see“Usinganexternalmonitor”onpage39.
7Security-lockslot
Toprotectyourcomputerfromtheft,youcanpurchaseasecuritycablelockthatfitsthesecurity-lock
slottolockthecomputertoastationaryobject.
Note:Youareresponsibleforevaluating,selecting,andimplementingthelockingdeviceandsecurity
feature.Lenovomakesnocomments,judgments,orwarrantiesaboutthefunction,quality,orperformance
ofthelockingdeviceandsecurityfeature.
4UserGuide
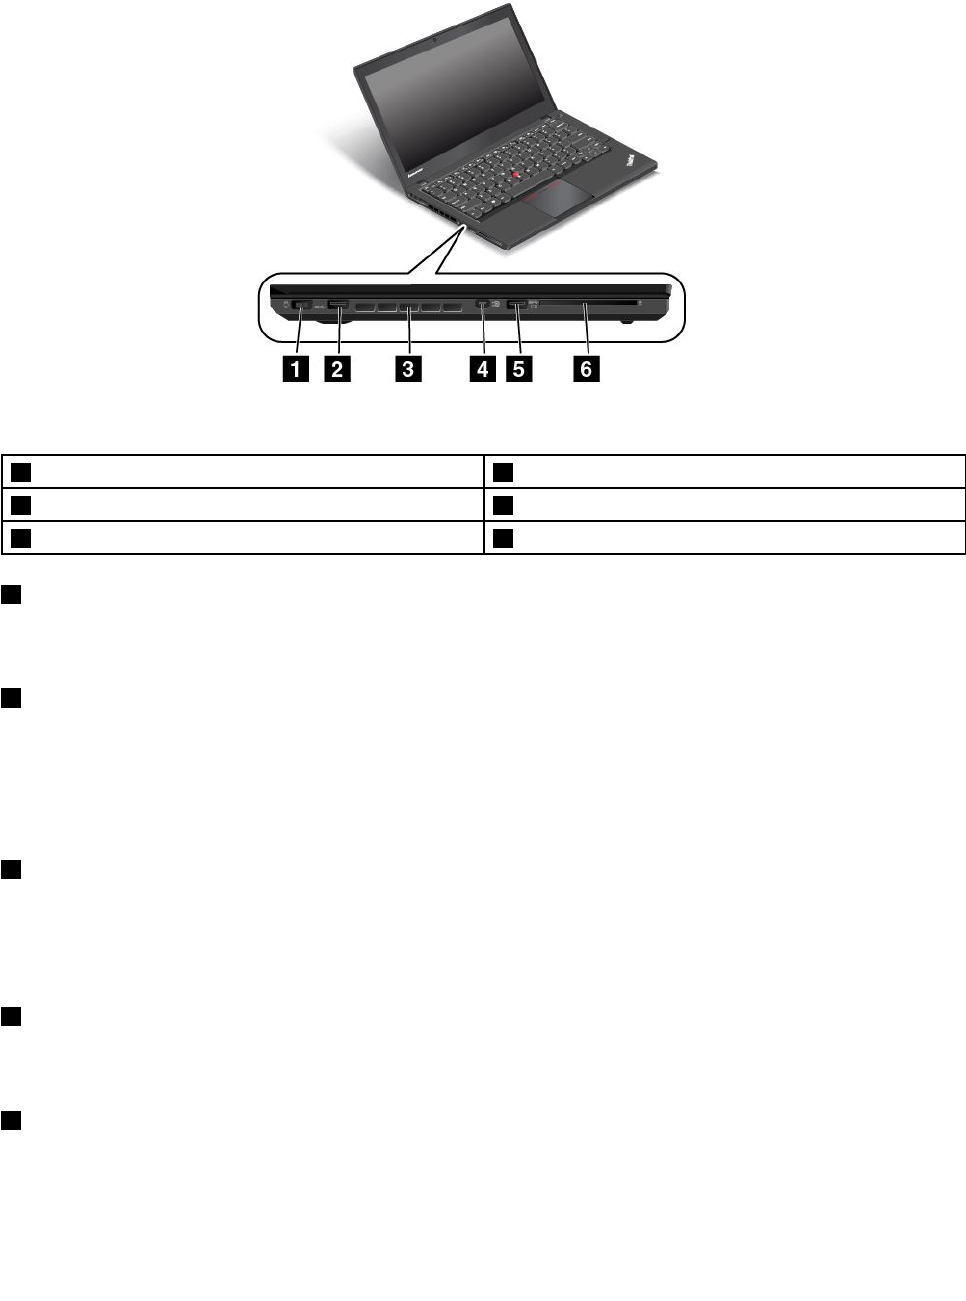
Left-sideview
Figure3.Left-sideview
1Powerconnector4MiniDisplayPort®connector
2USB3.0connector5Always-onUSBconnector
3Fanlouvers6Smartcardslot(onsomemodels)
1Powerconnector
Connecttheacpoweradaptertothepowerconnectortoprovideacpowertothecomputerandcharge
thebattery.
2USB3.0connector
TheUSB3.0connectorisusedforconnectingUSB-compatibledevices,suchasaUSBprinteroradigital
camera.
Attention:WhenyouattachaUSBcabletotheUSB3.0connector,ensurethattheUSBmarkisfacing
upward.Otherwisetheconnectormightbedamaged.
3Fanlouvers
Thefanlouversandinternalfanenableairtocirculateinthecomputerandtoensurepropercooling,
especiallythecoolingofthemicroprocessor.
Note:Toensureproperairflow,donotplaceanyobstaclesinfrontofthefanlouvers.
4MiniDisplayPortconnector
UsetheminiDisplayPortconnectortoconnectyourcomputertoacompatibleprojector,externalmonitor,or
high-definitiontelevision.Formoreinformation,see“UsingtheminiDisplayPortconnector”onpage42.
5Always-onUSBconnector
Bydefault,theAlways-onUniversalSerialBus(USB)connectorenablesyoutochargesomemobiledigital
devicesandsmartphoneswhenyourcomputerisinthefollowingsituation:
•Whenyourcomputerisonorinsleepmode
Chapter1.Productoverview5
•Whenyourcomputerisinhibernationmodeoristurnedoff,butconnectedtoacpower
Ifyouwanttochargethesedeviceswhenyourcomputerisinhibernationmode;orwhenyourcomputeris
turnedoffandnotconnectedtoacpower,dothefollowing:
•ForWindows7:StartthePowerManagerprogramandclicktheGlobalPowerSettingstab.Then
selecttheEnableUSBchargefromthecomputerbatteryevenwhenthecomputerisoffcheck
box,andclickOKorApply.
•ForWindows8andWindows8.1:PresstheWindowskeytogototheStartscreen.ClickLenovo
Settings➙Power.ThenselecttheEnableUSBchargefromthecomputerbatteryevenwhenthe
computerisoffcheckboxunderAlways-onUSB.
Attention:WhenyouattachaUSBcabletothisconnector,ensurethattheUSBmarkisfacingupward.
Otherwisetheconnectormightbedamaged.
6Smartcardslot(onsomemodels)
Yourcomputermighthaveasmartcardslot.Formoreinformation,see“Usingaflashmediacardora
smartcard”onpage44.
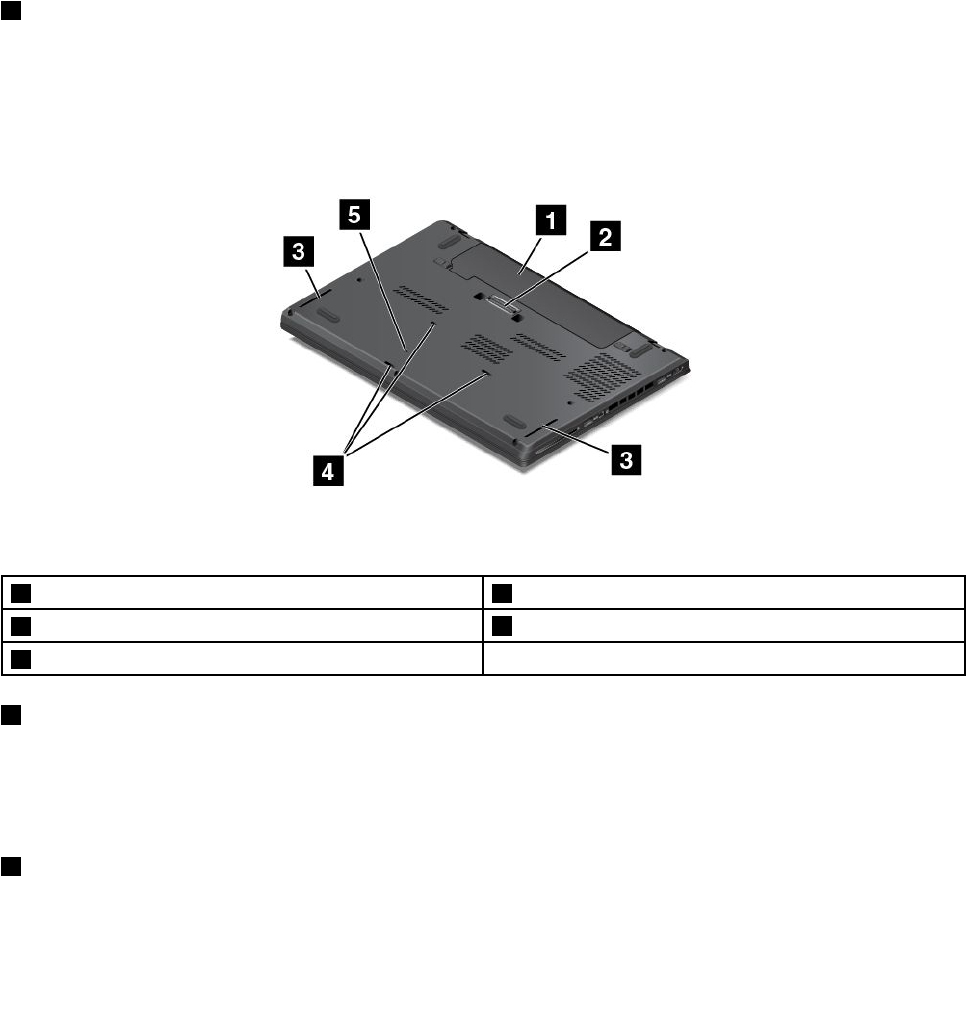
Bottomview
Figure4.Bottomview
1Externalbatterypack4Keyboarddrainageholes
2Dockingstationconnector(onsomemodels)5Emergency-resethole
3Speakers
1Externalbatterypack
Usethecomputerwiththebatterypowerwheneveracpowerisunavailable.
YoucanusethePowerManagerprogramtoadjustyourpowersettingsasneeded.Fordetailedinformation,
seethehelpinformationsystemofthePowerManagerprogram.
2Dockingstationconnector(onsomemodels)
Dependingonthemodel,thecomputermighthaveadockingstationconnector.Youcanusetheconnector
toconnectthecomputertoasupporteddockingstationtoextendthecomputercapabilitieswhenyou
6UserGuide

areattheofficeorathome.Formoreinformationaboutthesupporteddockingstations,see“ThinkPad
dockingstations”onpage97.
3Speakers
Yourcomputerisequippedwithapairofstereospeakers.
4Keyboarddrainageholes
Thekeyboarddrainageholescanhelpdrainoutliquidfromyourcomputerifyouaccidentallyspillwateror
drinkoverthekeyboard.
5Emergency-resethole
Ifthecomputerstopsrespondingandyoucannotturnitoffbypressingthepowerbutton,removetheac
poweradapterandinsertastraightenedpaperclipintotheemergency-resetholetoresetthecomputer.
Chapter1.Productoverview7
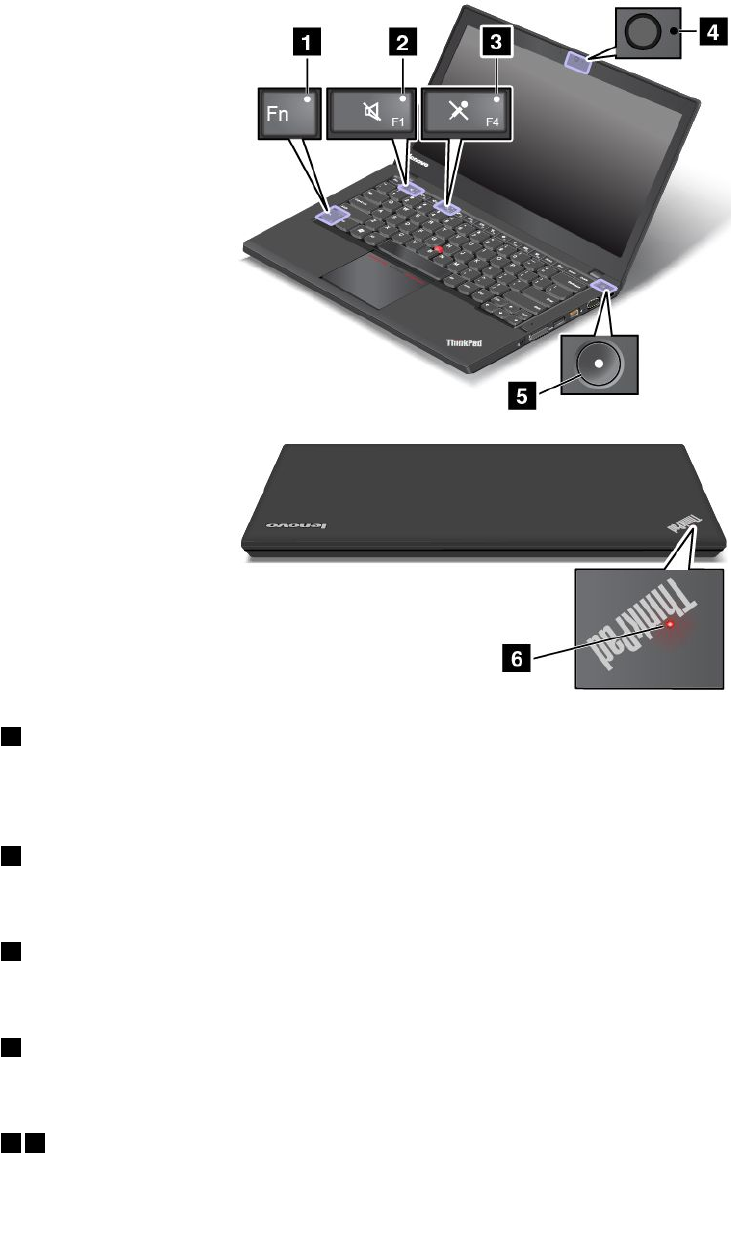
Statusindicators
Thestatusindicatorsshowthecurrentstatusofyourcomputer.
Note:Yourcomputermighthaveslightvariationsfromthefollowingillustrations.
1FnLockindicator
TheFnLockindicatorshowsthestatusofFnLockfunction.Formoreinformation,see“Specialkeys”
onpage24.
2Speakermuteindicator
Whenthespeakermuteindicatorison,thespeakersaremuted.
3Microphonemuteindicator
Whenthemicrophonemuteindicatorison,themicrophonesaremuted.
4Camera-statusindicator
Whenthecamera-statusindicatorison,thecameraisinuse.
56System-statusindicators
8UserGuide
TheindicatorintheThinkPadlogoandtheindicatorinthecenterofthepowerbuttonshowthesystem-status
ofthecomputer.
•Blinksforthreetimes:Thecomputerisinitiallyconnectedtopower.
•On:Thecomputerison(innormalmode).
•Blinksfast:Thecomputerisenteringsleeporhibernationmode.
•Blinksslowly:Thecomputerisinsleepmode.
•Off:Thecomputerisofforinhibernationmode.
Locatingimportantproductinformation
Thissectionprovidesinformationtohelpyoulocatethemachinetypeandmodellabel,theFCCIDandIC
Certificationlabel,theWindowsCertificateofAuthenticitylabel,andtheGenuineMicrosoftlabel.
Machinetypeandmodelinformation
Themachinetypeandmodellabelidentifiesyourcomputer.WhenyoucontactLenovoforhelp,themachine
typeandmodelinformationhelpssupporttechnicianstoidentifyyourcomputerandprovidefasterservice.
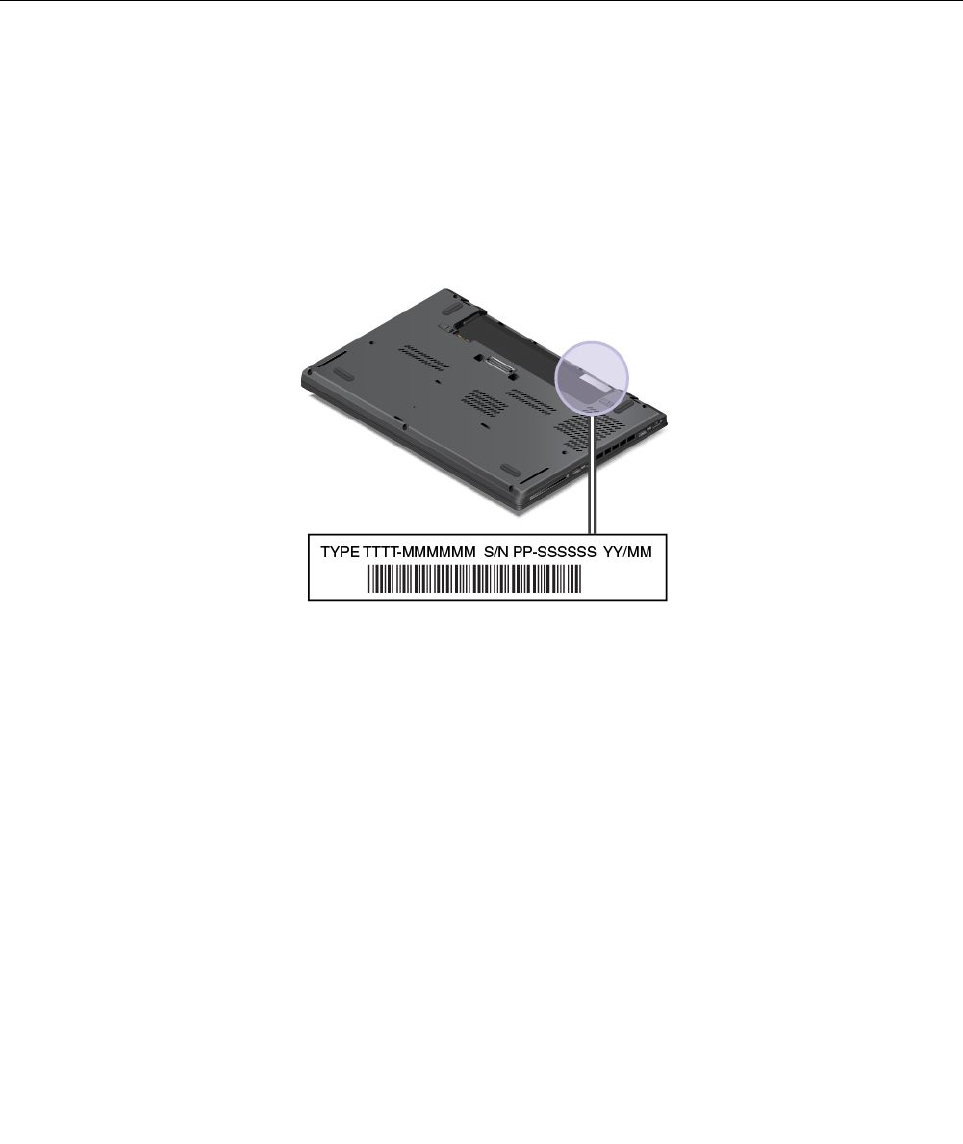
Thefollowingfigureshowsthelocationofthemachinetypeandmodelofyourcomputer:
FCCIDandICCertificationinformation
ThereisnoFCCIDorICCertificationnumberforthewirelesscommunicationcardsshownontheenclosure
ofthecomputer.Onsomemodels,LenovoprovidesyoutheinformationaboutthelocationoftheFCCID
andICCertificationnumberlabelonthecomputerbackcoverassembly.
ThefollowingfigureshowswhereyoucanfindthelocationinformationabouttheFCCIDandICCertification
numberlabelsofthecomputer.
Chapter1.Productoverview9
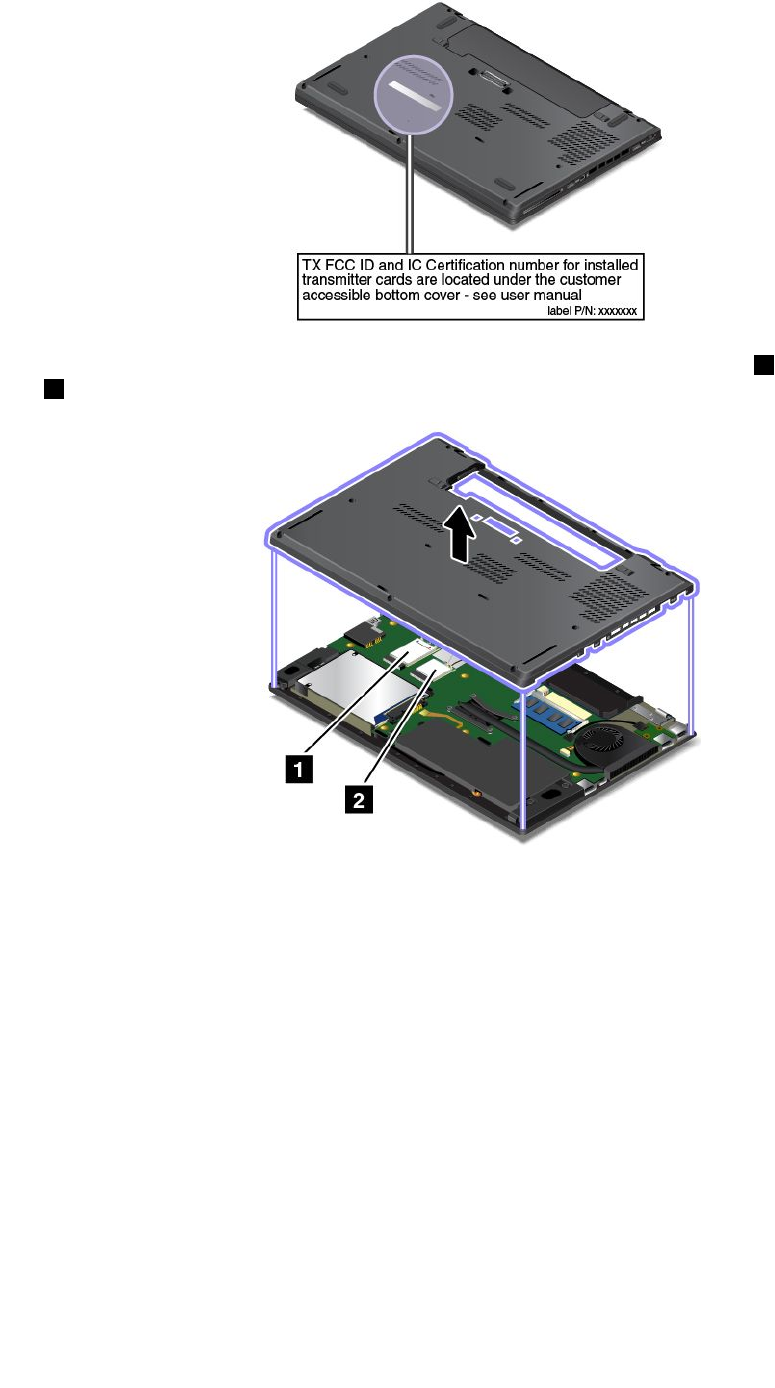
TheFCCIDandICCertificationnumberlabelsareaffixedonthewirelessWANcard1andwirelessLAN
card2installedinthewirelesscommunicationcardslotsofthecomputer.
ToremovethewirelessLANcardforrepairorreplacement,see“ReplacingthewirelessLANcard”on
page82.
ToremovethewirelessWANcardforrepairorreplacement,see“ReplacingthewirelessWANcard”
onpage85.
Note:UseonlyLenovo-authorizedwirelesscommunicationcardsforthecomputer.Ifyouinstallan
unauthorizedwirelesscommunicationcardthatisnotapprovedforuseinyourcomputer,anerrormessage
willbedisplayedandthecomputerwillbeepwhenyouturnonthecomputer.
CertificateofAuthenticityinformation
TheCertificateofAuthenticitylabelisprovidedonmodelsthatarelicensedtouseaWindows7
operatingsystem.ThelicensedWindowsversionandproductkeyassociatedwiththecomputerareprinted
onthislabel.Recordthisinformationandkeepitinasafeplace.Youmightneedthesenumberstostart
yourcomputerorreinstalltheWindows7operatingsystem.Dependingonthemodel,theCertificateof
Authenticitylabelcanbeonthecomputercover,undertheexternalbattery,oronthepoweradapter.
10UserGuide
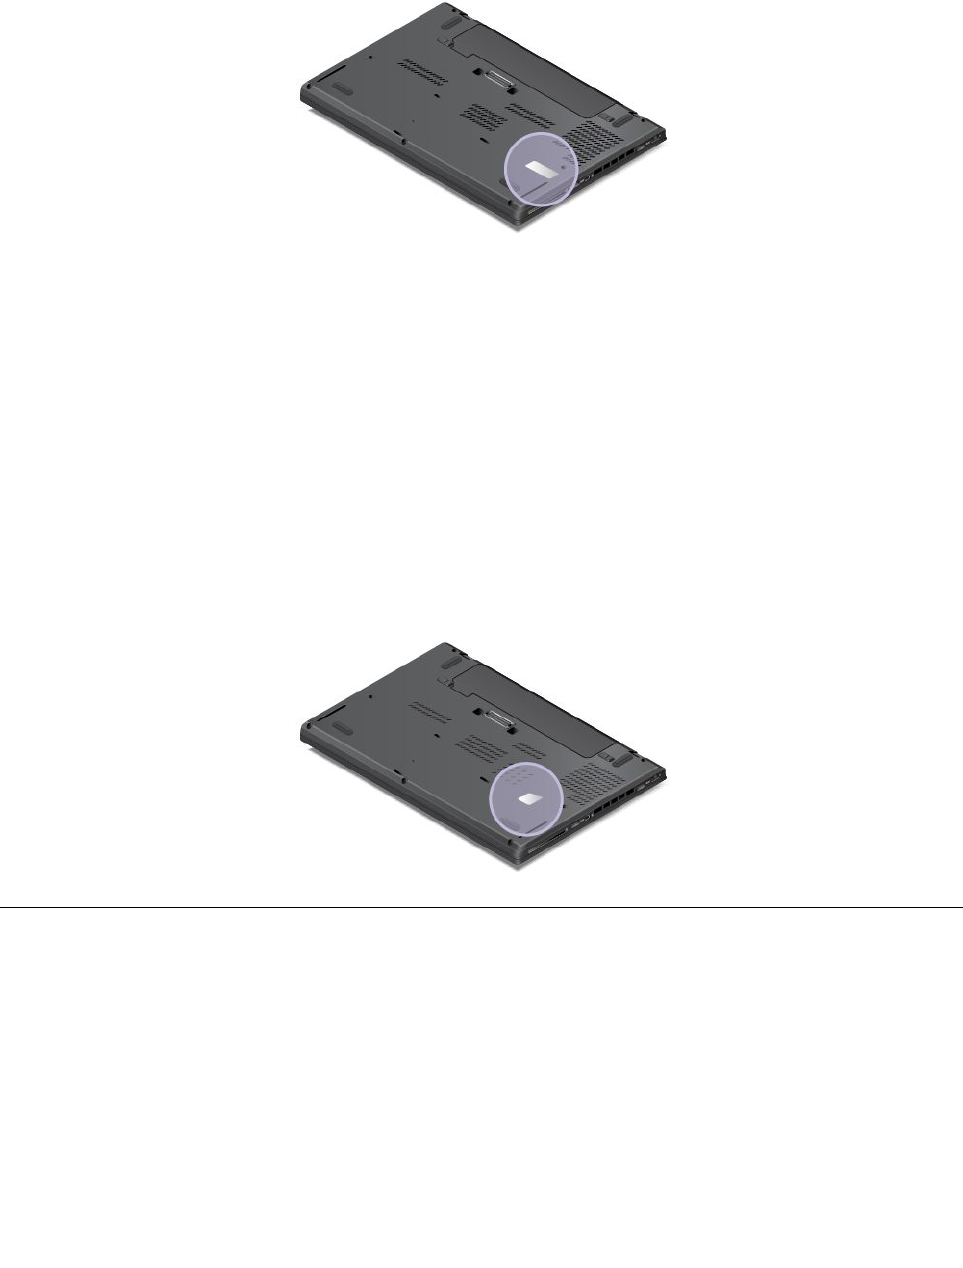
FormoreinformationabouttheCertificateofAuthenticitylabel,goto:
http://www.microsoft.com/en-us/howtotell/Hardware.aspx
ThefollowingfigureshowsthelocationoftheCertificateofAuthenticitylabelonthecomputercover:
GenuineMicrosoftlabel
TheGenuineMicrosoftlabelisprovidedonmodelsthatarelicensedtouseaWindows8orWindows8.1
operatingsystem.Theversionoftheoperatingsystemisprintedonthelabel.Ifyourcomputermodelis
licensedtousetheWindows8ProorWindows8.1Prooperatingsystem,thatlicensealsopermitsyouto
usetheWindows7ProfessionaloperatingsysteminplaceoftheWindows8ProorWindows8.1Pro
operatingsystemifyouprefer.LenovocomputersthatarelicensedforusewithaWindows8orWindows
8.1operatingsystemareshippedwiththeWindows8licensekeydigitallyencodedintothecomputer
hardware.Dependingonthecomputermodel,theGenuineMicrosoftlabelcanbeonthecomputercover,
underthebattery,oronthepoweradapter.
FormoreinformationabouttheGenuineMicrosoftlabel,goto:
http://www.microsoft.com/en-us/howtotell/Hardware.aspx
ThefollowingfigureshowsthelocationoftheGenuineMicrosoftlabelonthecomputercover:
Features
Thistopicprovidesinformationaboutthecomputerfeatures.
Microprocessor
•Toviewthemicroprocessorinformationofyourcomputer,dothefollowing:
–ForWindows7:ClickStart,right-clickComputer,andthenclickProperties.
–ForWindows8andWindows8.1:Movethepointertothetop-rightorbottom-rightcornerofthescreen
todisplaythecharms.ThenclickSettings➙PCinfo.
Memory
Chapter1.Productoverview11

•Doubledatarate3lowvoltagesynchronousdynamicrandomaccessmemory(DDR3LVSDRAM)
Storagedevice
Dependingonthemodel:
•2.5-inchformfactor,7-mmheightharddiskdrive
•2.5-inchformfactor,9.5-mmheightharddiskdrive
•2.5-inchformfactor,7-mmheightsolid-statedrive
•M.2solid-statedriveforcachingonly
Display
•Colordisplaywiththethin-filmtransistor(TFT)technology
•Displaysize:355.6mm(14inches)
•Displayresolution:1600-by-900
•Brightnesscontrol
•Integratedcamera(onsomemodels)
•Integratedmicrophones
•Multi-touchtechnology(onsomemodels)
Keyboard
•6-rowkeyboard(backlightfunctiononsomemodels)
•Fnkeyfunction
•ThinkPadtrackPointpointingdeviceandtrackpad
Interface
•4-in-1digitalmediacardreader
•Comboaudioconnector
•Dockingstationconnector(onsomemodels)
•Externalmonitorconnectors(VGAandMiniDisplayPort)
•OneAlways-onUSB3.0connector
•USB3.0connectors
•RJ45Ethernetconnector
•Smartcardreader(onsomemodels)
GPSandwirelessfeatures
•GlobalPositioningSystem(GPS)satellitereceiver(onmodelswithwirelessWAN)
•IntegratedBluetooth
•IntegratedwirelessLAN
•IntegratedwirelessWAN(onsomemodels)
•NFC(onsomemodels)
Securityfeature
•Fingerprintreader(onsomemodels)
12UserGuide

Specifications
Size
•Width:331mm(13inches)
•Depth:226mm(8.9inches)
•Height:20.65mm(0.8inch)
Heatoutput
•45W(154Btu/hr)maximum
•65W(222Btu/hr)maximum
Powersource(acpoweradapter)
•Sine-waveinputat50to60Hz
•Inputratingoftheacpoweradapter:100to240Vac,50to60Hz
Batterystatus
•Forthepercentageofremainingbatterypower,checkthebattery-statusiconintheWindowsnotification
area.
Operatingenvironment
Thissectionprovidesinformationabouttheoperatingenvironmentofthecomputer.
Environment
•Maximumaltitudewithoutpressurization:3048m(10000ft)
•Temperature
–Ataltitudesupto2438m(8000ft)
–Operating:5.0°Cto35.0°C(41°Fto95°F)
–Storage:5.0°Cto43.0°C(41°Fto109°F)
–Ataltitudesabove2438m(8000ft)
Maximumtemperaturewhenoperatingundertheunpressurizedcondition:31.3°C(88°F)
Note:Whenyouchargethebattery,itstemperaturemustbeatleast10°C(50°F).
•Relativehumidity:
–Operating:8%to95%atwetbulb:23℃(73℉)
–Storage:5%to95%atwetbulb:27℃(81℉)
Ifpossible,placeyourcomputerinawell-ventilatedanddryareawithoutdirectexposuretosunshine.
Attention:Keepelectricalappliancessuchasanelectricfan,radio,high-poweredspeakers,airconditioner,
andmicrowaveovenawayfromyourcomputer.Thestrongmagneticfieldsgeneratedbyelectrical
appliancescandamagethemotoranddataontheharddiskdriveorsolid-statedrive.
Donotplaceanybeveragesontopoforbesidethecomputerorotherattacheddevices.Ifliquidisspilledon
orinthecomputeroranattacheddevice,ashortcircuitorotherdamagemightoccur.
Donoteatorsmokeoveryourkeyboard.Particlesthatfallintoyourkeyboardcancausedamage.
Chapter1.Productoverview13

Lenovoprograms
YourcomputercomeswithLenovoprogramstohelpyouworkeasilyandsecurely.Theavailableprograms
mightvarydependingonthepreinstalledWindowsoperatingsystem.
TolearnmoreabouttheprogramsandothercomputingsolutionsofferedbyLenovo,goto:
http://www.lenovo.com/support.
AccessingLenovoprogramsontheWindows7operatingsystem
OntheWindows7operatingsystem,youcanaccessLenovoprogramsfromeithertheLenovo
ThinkVantage®ToolsprogramorfromControlPanel.
AccessingLenovoprogramsfromtheLenovoThinkVantageToolsprogram
ToaccessLenovoprogramsfromtheLenovoThinkVantageToolsprogram,clickStart➙AllPrograms➙
LenovoThinkVantageTools.Thendouble-clickaprogramicontoaccesstheprogram.
Note:IfaprogramiconisdimmedinthenavigationwindowoftheLenovoThinkVantageToolsprogram,it
indicatesthatyouneedtomanuallyinstalltheprogram.Tomanuallyinstalltheprogram,double-clickthe
programicon.Then,followtheinstructionsonthescreen.Whentheinstallationprocesscompletes,the
programiconwillbeactivated.
Thefollowingtableliststheprogramsandthecorrespondingiconnamesonthenavigationwindowofthe
LenovoThinkVantageToolsprogram.
Note:Dependingonyourcomputermodel,someoftheprogramsmightnotbeavailable.
Table1.ProgramsintheLenovoThinkVantageToolsprogram
ProgramIconname
AccessConnectionsInternetConnection
ActiveProtectionSystem™AirbagProtection
ClientSecuritySolutionEnhancedSecurity
CommunicationsUtilityWebConferencing
FingerprintManagerProFingerprintReader
LenovoQuickCastLenovoQuickCast
LenovoQuickControlLenovoQuickControl
LenovoSolutionCenterSystemHealthandDiagnostics
MobileBroadbandConnect3GMobileBroadband
PasswordManagerPasswordVault
PowerManagerPowerControls
RecoveryMediaFactoryRecoveryDisks
RescueandRecovery®EnhancedBackupandRestore
SystemUpdateUpdateandDrivers
AccessingLenovoprogramsfromControlPanel
ToaccessLenovoprogramsfromControlPanel,clickStart➙ControlPanel.Thendependingonthe
programyouwanttoaccess,clickthecorrespondingsectionandthenclickthecorrespondinggreentext.
14UserGuide

Note:IfyoucannotfindtheprogramyouneedinControlPanel,openthenavigationwindowoftheLenovo
ThinkVantageToolsprogramanddouble-clickthecorrespondingdimmedicontoinstalltheprogramyou
need.Then,followtheinstructionsonthescreen.Whentheinstallationprocesscompletes,theprogram
iconwillbeactivated,andyoucanfindtheprograminControlPanel.
ThefollowingtableliststheprogramsandthecorrespondingsectionsandgreentextsinControlPanel.
Notes:
•Dependingonthemodel,someoftheprogramsmightnotbeavailable.
•TheLenovoQuickCastprogramandtheLenovoQuickControlprogramarenotlistedinControlPanel.
UsetheLenovoThinkVantageToolsprogramtoaccessthem.
Table2.ProgramsinControlPanel
ProgramControlPanelsectionGreentextinControlPanel
AccessConnectionsNetworkandInternetLenovo-InternetConnection
ActiveProtectionSystemSystemandSecurity
HardwareandSound
Lenovo-AirbagProtection
ClientSecuritySolutionSystemandSecurityLenovo-EnhancedSecurity
CommunicationsUtilityHardwareandSoundLenovo-WebConferencing
FingerprintManagerProSystemandSecurity
HardwareandSound
Lenovo-FingerprintReader
or
Lenovo-NotebookFingerprint
Reader
LenovoSolutionCenterSystemandSecurityLenovo-SystemHealthand
Diagnostics
MessageCenterPlusProgramsMessagesfromLenovo
MobileBroadbandConnectNetworkandInternetLenovo-3GMobileBroadband
PasswordManagerSystemandSecurity
UserAccountsandFamilySafety
Lenovo-PasswordVault
PowerManagerHardwareandSound
SystemandSecurity
Lenovo-PowerControls
RecoveryMediaSystemandSecurityLenovo-FactoryRecoveryDisks
RescueandRecoverySystemandSecurityLenovo-EnhancedBackupand
Restore
SystemUpdateSystemandSecurityLenovo-UpdateandDrivers
AccessingLenovoprogramsontheWindows8orWindows8.1operating
system
IfyourcomputerispreinstalledwiththeWindows8orWindows8.1operatingsystem,toaccessLenovo
programs,presstheWindowskeytogototheStartscreenandthenclickaLenovoprogramtolaunchit.
Ifyoucannotfindtheprogramyouneed,movethepointertothetop-rightorbottom-rightcornerofthe
screentobringupthecharms.ThenclicktheSearchcharmtosearchforthedesiredprogram.
Chapter1.Productoverview15

YourcomputersupportsthefollowingLenovoprograms:
•ActiveProtectionSystem
•FingerprintManagerPro
•LenovoCompanion
•LenovoMobileAccess
•LenovoQuickCast
•LenovoQuickControl
•LenovoSettings
•LenovoSolutionCenter
•LenovoTools
•PasswordManager
•SystemUpdate
Note:ThePasswordManagerprogramisnotpreinstalledonWindows8orWindows8.1computers.You
candownloaditfromtheLenovoSupportWebsiteat:
http://www.lenovo.com/support
Lenovoprogramsoverview
ThistopicprovidesinformationaboutsomeLenovoprograms.
Note:Dependingonthemodel,someoftheprogramsmightnotbeavailable.
•AccessConnections(Windows7)
TheAccessConnectionsprogramisaconnectivityassistantprogramforcreatingandmanaginglocation
profiles.EachlocationprofilestoresallthenetworkandInternetconfigurationsettingsneededfor
connectingtoanetworkinfrastructurefromaspecificlocationsuchasahomeoranoffice.
Byswitchingbetweenlocationprofilesasyoumoveyourcomputerfromplacetoplace,youcanquickly
andeasilyconnecttoanetworkwithnoneedtomanuallyreconfigureyoursettingsandrestartthe
computereachtime.
•ClientSecuritySolution(Windows7)
TheClientSecuritySolutionprogramprotectsyourcomputerbysecuringclientdataanddeflecting
securitybreachattempts.Italsocanhelpmanageyourpasswords,recoveraforgottenpassword,
monitorsecuritysettingsonyourcomputer,andsuggesthowtoenhancethecomputersecurity.
•CommunicationsUtility(Windows7)
TheCommunicationsUtilityprogramenablesyoutoconfiguresettingsfortheintegratedcameraand
audiodevices.
•LenovoThinkVantageT ools(Windows7)
TheLenovoThinkVantageToolsprogramhelpsyouworkmoreeasilyandsecurelybyprovidingeasy
accesstovariousprogram,suchasLenovoFingerprintManager,LenovoSolutionCenter,andsoon.
•MessageCenterPlus(Windows7)
TheMessageCenterPlusprogramautomaticallydisplaysmessagestoinformyouaboutimportantnotices
fromLenovo,suchasalertsonsystemupdatesandalertsonconditionsthatrequireyourattention.
•MobileBroadbandConnect(Windows7)
TheMobileBroadbandConnectprogramenablesyoutoconnectthecomputertothemobilebroadband
networkthroughasupportedwirelessWANcard.
16UserGuide

•PowerManager(Windows7)
ThePowerManagerprogramprovidesconvenient,flexible,andcompletepowermanagementforthe
computer.Itenablesyoutoadjustyourcomputerpowersettingstoachievethebestbalancebetween
performanceandpowersaving.
•RecoveryMedia(Windows7)
TheRecoveryMediaprogramenablesyoutorestorethecontentsoftheharddiskdrivetothefactory
defaultsettings.
•RescueandRecovery(Windows7)
TheRescueandRecoveryprogramisaone-buttonrecoveryandrestoresolution.Itincludesasetof
self-recoverytoolstohelpyoudiagnosecomputerproblems,gethelp,andrecoverfromsystemcrashes,
evenifyoucannotstarttheWindowsoperatingsystem.
•LenovoCompanion(Windows8andWindows8.1)
Yoursystem’sbestfeaturesshouldbeeasytoaccessandunderstand.WithLenovoCompanion,they
are.UseLenovoCompaniontoregisteryourcomputer,accessyourusermanual,managesystemhealth
andupdate,checkthewarrantystatus,andseeaccessoriescustomizedforyourcomputer.Youalso
canreadhintsandtips,exploreLenovoforums,andstayup-to-dateontechnologynewswitharticles
andblogsfromtrustedsources.ThisappisfilledwithexclusiveLenovocontenttohelpyoulearnabout
yournewsystem.
•LenovoMobileAccess(Windows8andWindows8.1)
TheLenovoMobileAccessprogramenablesyoutomanageyourmobilebroadbandconnection.You
cancreateanaccount,addmoneytotheaccount,andpurchasemobilebroadbandsessionsusing
youraccount.
•LenovoSettings(Windows8andWindows8.1)
TheLenovoSettingsprogramenablesyoutoenhanceyourcomputingexperiencebyturningyour
computerintoaportablehotspot,configuringcameraandaudiosettings,optimizingyourpowersettings,
andcreatingandmanagingmultiplenetworkprofiles.
•LenovoT ools(Windows8andWindows8.1)
TheLenovoToolsprogramhelpsyouworkmoreeasilyandsecurelybyprovidingeasyaccesstovarious
program,suchasLenovoFingerprintManager,LenovoSolutionCenter,andsoon.
•ActiveProtectionSystem(Windows7,Windows8,andWindows8.1)
TheActiveProtectionSystemprogramprotectsyourharddiskdrivewhentheshocksensorinsideyour
computerdetectsaconditionthatcoulddamagethedrive,suchassystemtilt,excessivevibration,or
shock.Theharddiskdriveislessvulnerabletodamagewhenitisnotoperating.Thisisbecausewhen
theharddiskdriveisnotoperating,thesystemstopsitfromspinning,andmightalsomovetheread
andwriteheadsofthedrivetoareasthatdonotcontaindata.Assoonastheshocksensorsenses
thattheenvironmentisstableagain(minimalchangeinsystemtilt,vibration,orshock),itturnsonthe
harddiskdrive.
•FingerprintManagerPro(Windows7,Windows8,andWindows8.1)
Ifyourcomputercomeswithafingerprintreader,theFingerprintManagerProprogramenablesyou
toenrollyourfingerprintandassociateitwithyourWindowspassword.Asaresult,thefingerprint
authenticationcanreplaceyourpasswordandenablesimpleandsecureuseraccess.
•LenovoQuickCast(Windows7,Windows8,andWindows8.1)
TheLenovoQuickCastprogramprovidesyouwithaquickandeasywaytosendfilesanduniform
resourcelocators(URLs)betweentwodevices.
•LenovoQuickControl(Windows7,Windows8,andWindows8.1)
TheLenovoQuickControlprogramenablesyoutocontrolyourcomputerremotelyfromyoursmartphone.
Youcancontrolthemouse,entertext,controlmoviesandmusic,givepresentations,andmore.
Chapter1.Productoverview17

•LenovoSolutionCenter(Windows7,Windows8,andWindows8.1)
TheLenovoSolutionCenterprogramenablesyoutotroubleshootandresolvecomputerproblems.It
combinesdiagnostictests,systeminformationcollection,securitystatus,andsupportinformation,along
withhintsandtipsforoptimalsystemperformance.
•PasswordManager(Windows7,Windows8,andWindows8.1)
ThePasswordManagerprogramautomaticallycapturesandfillsinauthenticationinformationfor
WindowsprogramsandWebsites.
•SystemUpdate(Windows7,Windows8,andWindows8.1)
TheSystemUpdateprogramenablesyoutokeepthesoftwareonthecomputerup-to-dateby
downloadingandinstallingsoftwarepackages,includingThinkVantageprograms,devicedrivers,Unified
ExtensibleFirmwareInterface(UEFI)basicinput/outputsystem(BIOS)updates,andotherthird-party
programs.
18UserGuide

Chapter2.Usingyourcomputer
Thischapterprovidesinformationonusingsomeofthecomputercomponents.
•“Registeringyourcomputer”onpage19
•“Frequentlyaskedquestions”onpage19
•“Usingthemulti-touchscreen”onpage21
•“Specialkeys”onpage24
•“ThinkPadpointingdevice”onpage25
•“Powermanagement”onpage30
•“Connectingtothenetwork”onpage35
•“UsingtheNFCconnection”onpage38
•“Presentationsandmultimedia”onpage39
•“Usingaudiofeatures”onpage43
•“Usingthecamera”onpage43
•“Usingaflashmediacardorasmartcard”onpage44
Registeringyourcomputer
Whenyouregisteryourcomputer,informationisenteredintoadatabase,whichenablesLenovotocontact
youincaseofarecallorothersevereproblem.Inaddition,somelocationsofferextendedprivilegesand
servicestoregisteredusers.
WhenyouregisteryourcomputerwithLenovo,youalsowillreceivethefollowingbenefits:
•QuickerservicewhenyoucallLenovoforhelp
•Automaticnotificationoffreesoftwareandspecialpromotionaloffers
ToregisteryourcomputerwithLenovo,gotohttp://www.lenovo.com/registerandfollowtheinstructionson
thescreentoregisteryourcomputer.
IfyouareusingaWindows7operatingsystem,youalsocanregisteryourcomputerthroughthepreinstalled
LenovoProductRegistrationprogram.Theprogramlaunchesautomaticallyafteryouhaveusedyour
computerforaperiodoftime.Followtheinstructionsonthescreentoregisteryourcomputer.
Frequentlyaskedquestions
ThistopicprovidesafewtipsthatwillhelpyouoptimizetheuseofyourThinkPadnotebookcomputers.
Toensurethatyoureceivethebestperformancefromyourcomputer,browsethefollowingWebpagetofind
informationsuchasaidsfortroubleshootingandanswerstofrequentlyaskedquestions:
http://www.lenovo.com/support/faq
CanIgetmyuserguideinanotherlanguage?
•Todownloadtheuserguideinanotherlanguage,gotohttp://www.lenovo.com/support.Thenfollow
theinstructionsonthescreen.
©CopyrightLenovo2013,201419

HowdoIusebatterypowermoreeffectivelywhenIamonthego?
•Toconservepower,ortosuspendoperationwithoutexitingprogramsorsavingfiles,see“Power-saving
modes”onpage32.
•Toachievethebestbalancebetweenperformanceandpowersaving,changepowerplansettings.
See“Managingthebatterypower”onpage32.
•Ifyourcomputerwillbeturnedoffforanextendedperiodoftime,removetheexternalbatterypack,
andfollowtheinstructionsin“Disablingthebuilt-inbattery”onpage73todisabletheinternalbuilt-in
batterysoastopreventbatterypowerfromdraining.
HowdoIsecurelydisposeofdatastoredontheharddiskdriveorsolid-statedrive?
•StudyChapter4“Security”onpage51tofindouthowyoucanprotectyourcomputerfromtheftand
unauthorizeduse.
•UsethePasswordManagerprogramtoprotectthedatastoredonyourcomputer.Formoreinformation,
seethehelpinformationsystemoftheprogram.
•Beforeyoudisposeofthedataontheharddiskdriveorthesolid-statedrive,besuretoreadthetopic
“Noticeondeletingdatafromyourharddiskdriveorsolid-statedrive”onpage60.
HowdoIgetconnectedindifferentlocations?
•Totroubleshootawirelessnetworkingissue,gotohttp://www.lenovo.com/support/faq.
•TakeadvantageofthenetworkingfeaturesprovidedbytheAccessConnectionsprogram(onthe
Windows7operatingsystem)orLocationAwarenessintheLenovoSettingsprogram(ontheWindows8
andWindows8.1operatingsystems).
•Tolearnmoreaboutusingthewirelessfeaturesofyourcomputer,referto“Wirelessconnections”on
page35.
•Totravelmoreconfidently,besuretocheckthetipsin“Travelingwithyourcomputer”onpage49.
•PressF8toenableordisablethewirelessfeatures.
HowdoIgivepresentationsorattachanexternalmonitor?
•Ensurethatyoufollowtheprocedureinthetopic“Usinganexternalmonitor”onpage39.
•WiththeExtenddesktopfunction,youcandisplayoutputonboththecomputerdisplayandtheexternal
monitor.See“Usingdualdisplays”onpage42.
Ihavebeenusingthecomputerforsometimealready,anditisgettingslower.WhatshouldIdo?
•Followthe“Generaltipsforpreventingproblems”onpage125.
•Diagnoseproblemsyourselfbyusingthepreinstalleddiagnosticsoftware.See“Diagnosingproblems”on
page131.
•Arecoverytoolisprovidedonyourcomputerharddiskdriveorsolid-statedrive.Formoreinformation,
seeChapter5“Recoveryoverview”onpage63.
Printthefollowingsectionsandkeepthemwithyourcomputerincaseyouareunabletoaccessthis
onlinehelpwhennecessary.
•“Installinganewoperatingsystem”onpage107
•“Computerstopsresponding”onpage131
•“Powerproblems”onpage142
20UserGuide
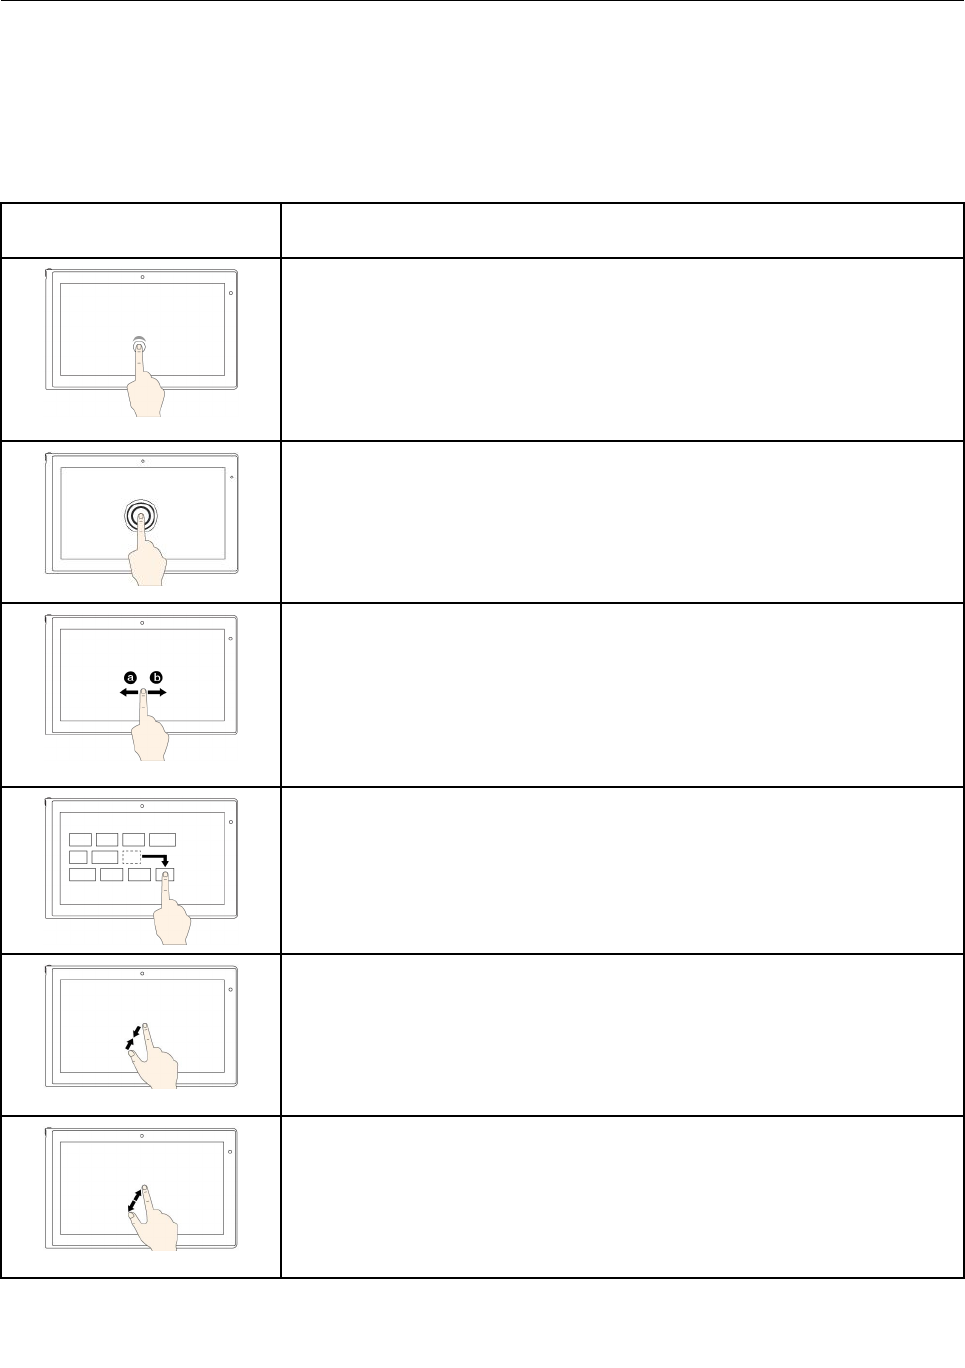
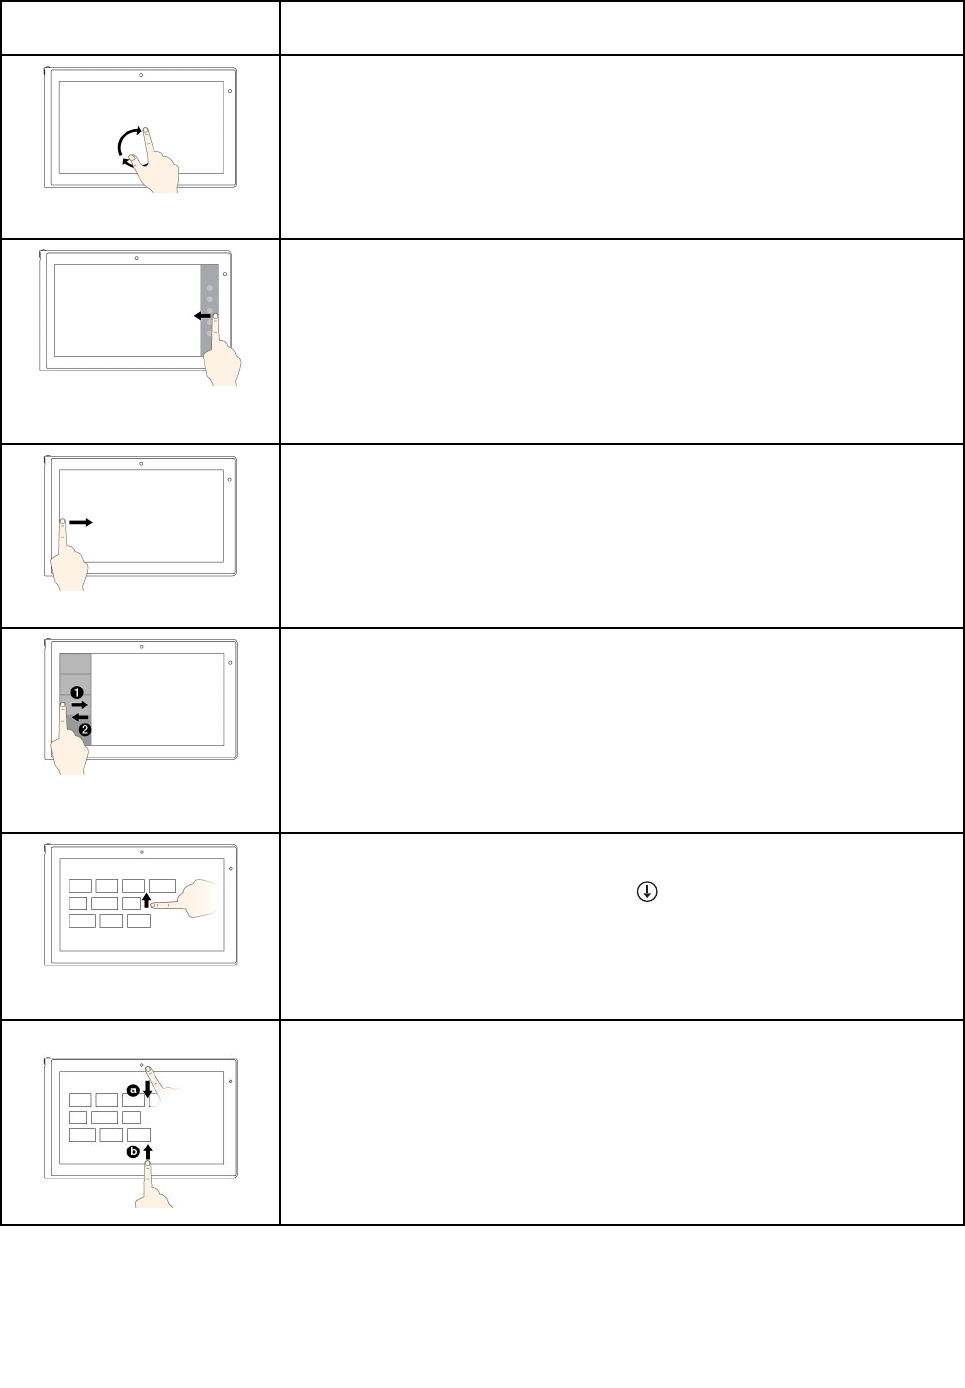
Usingthemulti-touchscreen
Thistopicprovidesinstructionsonhowtousethemulti-touchscreenthatisavailableonsomemodels.
Notes:
•Yourcomputerscreenmightlookdifferentfromthefollowingillustrations.
•Dependingontheappyouuse,somegesturesmightnotbeavailable.
Touchgesture(touchmodels
only)
Description
Touch:Tap.
Mouseaction:Click.
Function:Openanapporperformanactiononanopenapp,suchasCopy,
Save,andDelete,dependingontheapp.
Supportedoperatingsystems:Windows7andWindows8.1
Touch:Tapandhold.
Mouseaction:Right-click.
Function:Openamenuwithmultipleoptions.
Supportedoperatingsystems:Windows7andWindows8.1
Touch:Slide.
Mouseaction:Scrollthemousewheel,movethescrollbar,orclickthescroll
arrow.
Function:Scrollthroughitems,suchaslists,pages,andphotos.
Supportedoperatingsystems:Windows7andWindows8.1
Touch:Draganitemtothedesiredlocation.
Mouseaction:Click,hold,anddraganitem.
Function:Moveanobject.
Supportedoperatingsystems:Windows7andWindows8.1
Touch:Movetwofingersclosertogether.
Mouseaction:PresstheCtrlkeywhilescrollingthemousewheelbackward.
Function:Zoomout.
Supportedoperatingsystems:Windows7andWindows8.1
Touch:Movetwofingersfartherapart.
Mouseaction:PresstheCtrlkeywhilescrollingthemousewheelforward.
Function:Zoomin.
Supportedoperatingsystems:Windows7andWindows8.1
Chapter2.Usingyourcomputer21
Touchgesture(touchmodels
only)
Description
Touch:Puttwoormorefingersonanitemandthenrotateyourfingersclockwise
orcounterclockwise.
Mouseaction:Iftheappsupportsrotation,clicktherotationicon.
Function:Rotateanitem.
Supportedoperatingsystems:Windows7andWindows8.1
Touch:Swipeinfromtherightedge.
Mouseaction:Movethepointertothebottom-rightortop-rightcornerofyour
screen.
Function:Displaythecharmsthatcontainsystemcommands,suchasStart,
Settings,Search,Share,andDevices.
Supportedoperatingsystem:Windows8.1
Touch:Swipeinfromtheleftedge.
Mouseaction:Movethepointertothetop-leftcornerofyourscreen,andthen
click.Keepclickingtocyclethroughtheopenapps.
Function:Cyclethroughandswitchtoopenapps.
Supportedoperatingsystem:Windows8.1
Touch:Swipeinandoutontheleftedge.
Mouseaction:Movethepointertothetop-leftcornerofthescreen,andthen
movethepointerdownwardalongtheleftedge.Tomakeaselection,clickthe
desiredapp.
Function:Viewtherecentlyusedappsorselectanactiveappfromthelist.
Supportedoperatingsystem:Windows8.1
Touch:Swipeuptothetopedge.
Mouseaction:Clickthedownwardarrow()locatednearthebottom-leftcorner
oftheStartscreen.
Function:ViewallappsontheStartscreen.
Supportedoperatingsystem:Windows8.1
Touch:SwipeinfromthetoporbottomedgeoftheStartscreen,tapCustomize,
andthentapthedesiredicon.
Mouseaction:Right-clickablankareaontheStartscreen,clickCustomize,
andthenclickthedesiredicon.
Function:CustomizetilesontheStartscreen,oruninstallanapp.
Supportedoperatingsystem:Windows8.1
22UserGuide

Touchgesture(touchmodels
only)
Description
Touch:Swipeinfromthetoporbottomedgeofanopenapp.
Mouseaction:Right-clickanywhereonanopenapp.
Function:Viewtheappcommandsonanopenapp,suchasCopy,Save,and
Delete,dependingontheapp.
Supportedoperatingsystem:Windows8.1
Touch:Swipeinfromthetopedgetothebottomonanopenapp.
Mouseaction:Fromthetopedgeofthescreen,click,hold,andmovethepointer
tothebottomofthescreen.Then,releasethebutton.
Function:Closethecurrentapp.
Supportedoperatingsystem:Windows8.1
Tipsonusingthemulti-touchscreen
•Themulti-touchscreenisaglasspanelcoveredwithaplasticfilm.Donotapplypressureorplaceany
metallicobjectonthescreen,whichmightdamagethetouchpanelorcauseittomalfunction.
•Donotusefingernails,glovedfingers,orinanimateobjectsforinputonthescreen.
•Regularlycalibratetheaccuracyofthefingerinputtoavoidadiscrepancy.
Tipsoncleaningthemulti-touchscreen
•Turnoffthecomputerbeforecleaningthemulti-touchscreen.
•Useadry,soft,andlint-freeclothorapieceofabsorbentcottontoremovefingerprintsordustfromthe
multi-touchscreen.Donotapplysolventstothecloth.
•Gentlywipethescreenusingatop-downmotion.Donotapplyanypressureonthescreen.
Chapter2.Usingyourcomputer23
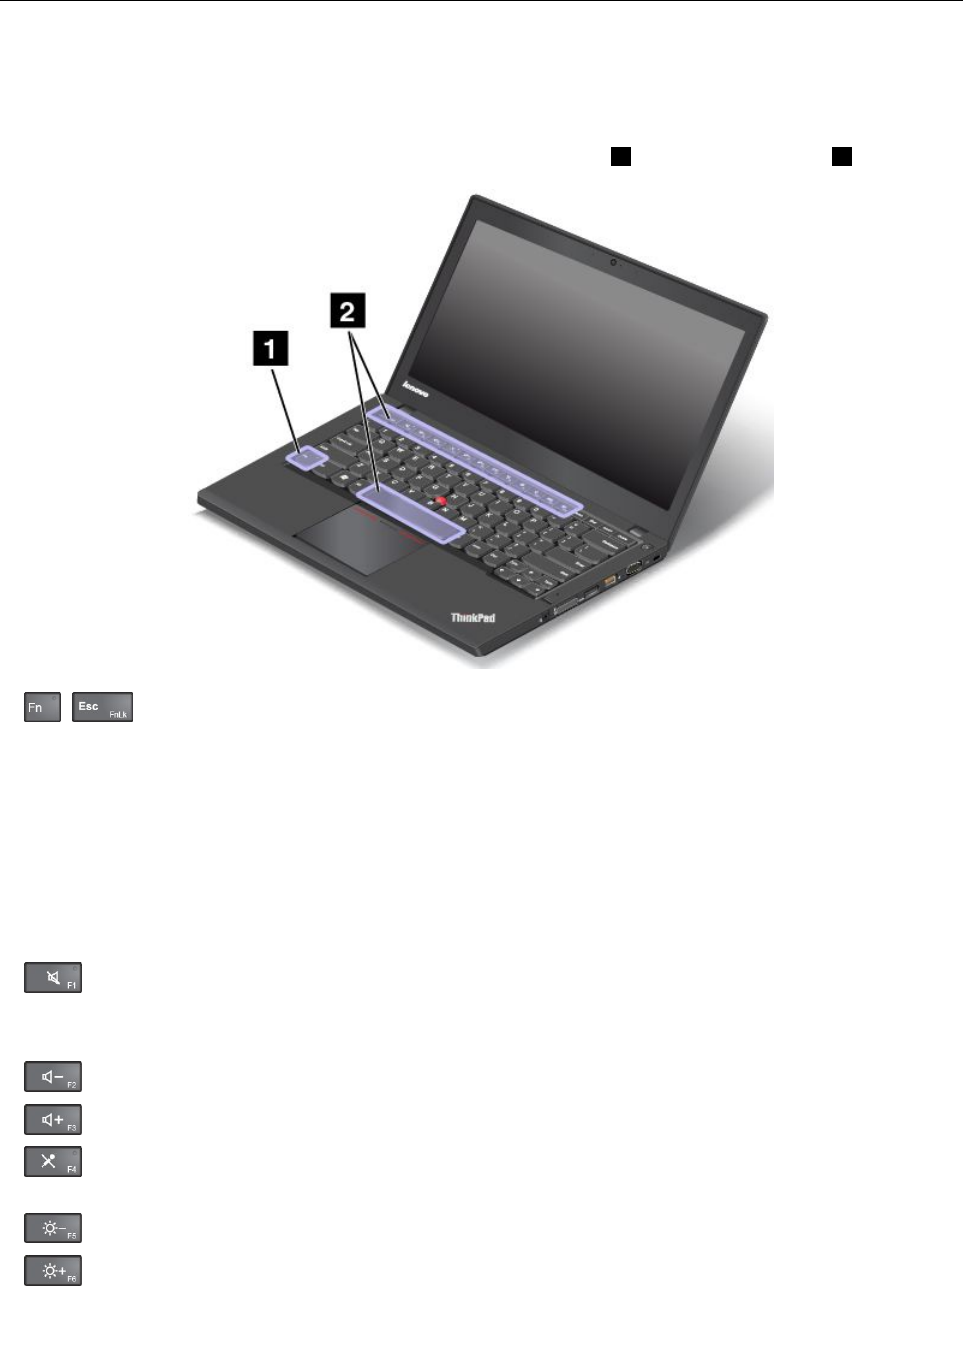
Specialkeys
Yourcomputerhasseveralspecialkeystohelpyouworkeasilyandeffectively.
Functionkeysandkeycombinations
Thekeyboardhasseveralfunctionkeys,whichconsistoftheFnkey1andthefunctionkeys2.
•+EnablesordisablestheFnLockfunction.
WhentheFnLockfunctionisdisabled:TheFnLockindicatorisoff.Toinitiatethespecialfunction
printedasanicononeachkey,pressthefunctionkeysdirectly.ToinputF1–F12,presstheFnkey
andthecorrespondingfunctionkey.
WhentheFnLockfunctionisenabled:TheFnLockindicatorison.ToinputF1–F12,pressthe
functionkeysdirectly.Toinitiatethespecialfunctionprintedasanicononeachkey,pressFnandthe
correspondingfunctionkey.
Note:Alternatively,youalsocandisableorenabletheFnlockfunctionintheKeyboardProperties
window.See“Personalizedkeyboard”onpage49.
•Mutesorunmutesthespeakers.Whenthespeakersaremuted,theindicatorontheF1keyison.
Ifyoumutethesoundandturnoffyourcomputer,thesoundwillremainmutedwhenyouturnonyour
computeragain.Toturnonthesound,pressF2orF3.
•Decreasesthespeakervolume.
•Increasesthespeakervolume.
•Mutesorunmutesthemicrophones.Whenthemicrophonesaremuted,theindicatorontheF4
keyison.
•Darkensthedisplay.
•Brightensthedisplay.
24UserGuide
•Switchesthedisplayoutputlocationbetweenthecomputerdisplayandanexternalmonitor.
•Enablesordisablesthewirelessfeatures.
•ForWindows7:OpensControlPanel.ForWindows8andWindows8.1:OpenstheSettings
charm.
•ForWindows7:OpensWindowsSearch.ForWindows8andWindows8.1:OpenstheSearch
charm.
•Viewsalltheprogramsthatyouhaveopened.
•ForWindows7:OpensComputer.ForWindows8andWindows8.1:Viewsalltheprograms.
•Fn+Spacebar:Controlsthekeyboardbacklight.
Therearethreemodesforthekeyboardbacklight:Off,Low,andHigh.PressFn+Spacebartochange
themodesofthekeyboardbacklight.
•Fn+B:HasthesamefunctionastheBreakkeyonaconventionalkeyboard.
•Fn+K:HasthesamefunctionastheScrLKkeyontheconventionalkeyboard.
•Fn+P:HasthesamefunctionasthePausekeyontheconventionalkeyboard.
•Fn+S:HasthesamefunctionastheSysRqkeyontheconventionalkeyboard.
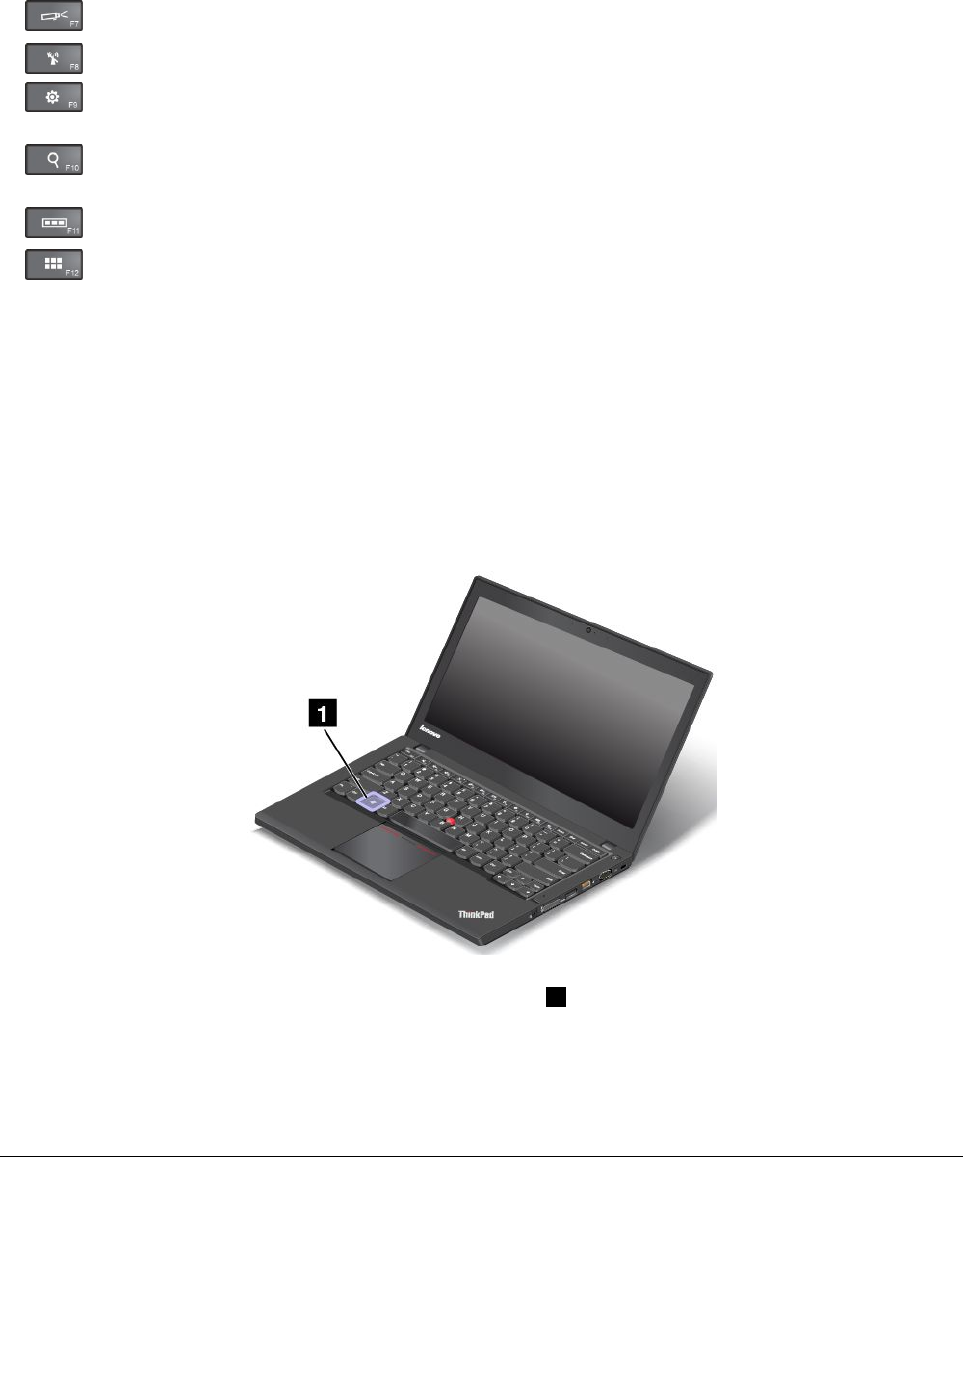
Windowskey
OntheWindows7operatingsystem,presstheWindowskey1toopentheStartmenu.OntheWindows8
andWindows8.1operatingsystems,presstheWindowskeytoswitchbetweenthecurrentworkspaceand
theStartscreen.
YoualsocanusetheWindowskeytogetherwithanotherkeytoachieveotherfunctions.Formore
information,refertothehelpinformationsystemoftheWindowsoperatingsystem.
ThinkPadpointingdevice
TheThinkPadpointingdeviceenablesyoutoperformallthefunctionsofatraditionalmouse,suchas
movingthepointer,left-clicking,right-clicking,andscrolling.WiththeThinkPadpointingdevice,youalso
canperformavarietyoftouchgestures,suchasrotatingandzoominginorout.
TheThinkPadpointingdeviceconsistsofthefollowingcomponents:
Chapter2.Usingyourcomputer25
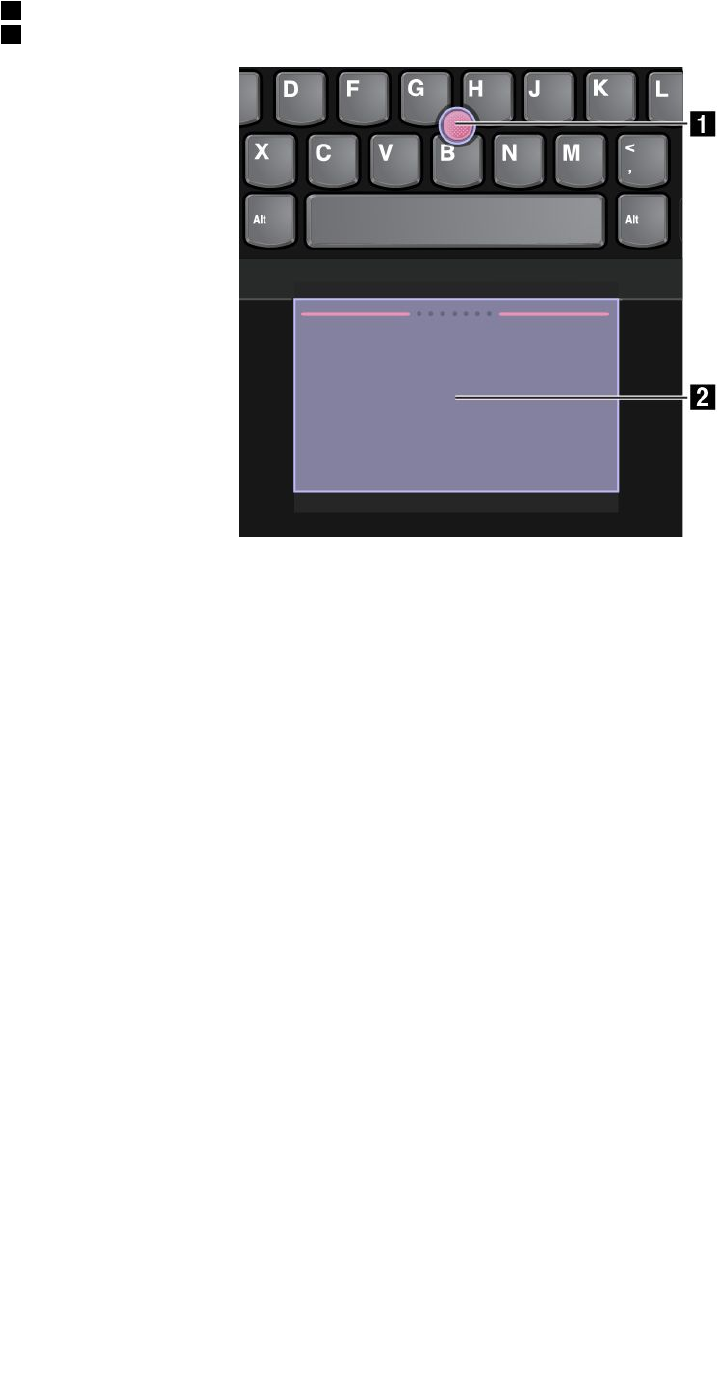
1Pointingstick
2Trackpad
UsingtheThinkPadpointingdevice
Dependingonyourpreference,youcanusetheThinkPadpointingdeviceinoneofthefollowingmodes:
•TrackPointmode
•Trackpadmode
•ClassicTrackPointmode
TochangeamodefortheThinkPadpointingdevice,see“CustomizingtheThinkPadpointingdevice”
onpage29.
Note:Bydefault,theTrackPointmodeandtheTrackpadmodearebothenabled.Youcanuseeither
oneofthem.
TrackPointmode
IntheTrackPointmode,usethepointingsticktomovethepointer,andusethetrackpadtoperformother
actionssuchasleft-click,right-click,andscroll.Youalsocanusethetrackpadtoperformavarietyof
touchgestures.
Forinformationaboutusingtouchgestures,see“Usingthetrackpadtouchgestures”onpage28.
26UserGuide
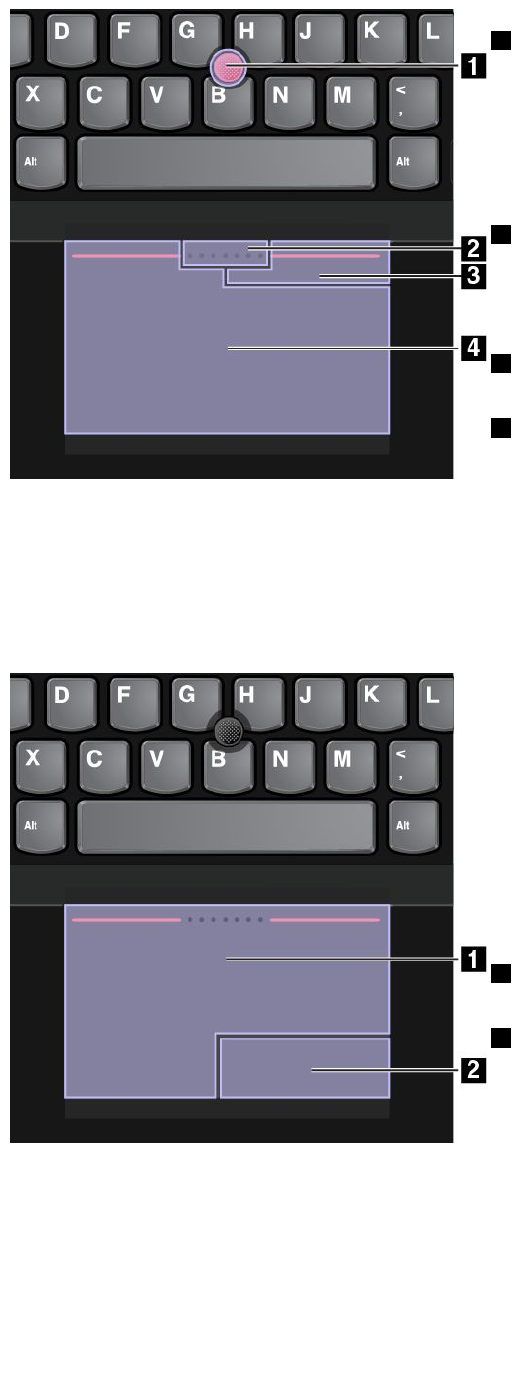
1Point
Usethepointingsticktomovethepointeronthescreen.
Tousethepointingstick,applypressuretothepointing
sticknonslipcapinanydirectionparalleltothekeyboard.
Thepointermovesaccordinglybutthepointingstickitself
doesnotmove.Thespeedatwhichthepointermoves
dependsontheamountofpressureyouapplytothe
pointingstick.
2Scroll
Pressandholdthedottedscrollingbarwhileapplying
pressuretothepointingstickintheverticalorhorizontal
direction.Thenyoucanscrollthroughthedocument,
Website,orapps.
3Right-click
Presstheright-clickzonetodisplayashortcutmenu.
4Left-click
Presstheleft-clickzonetoselectoropenanitem.
Trackpadmode
IntheTrackpadmode,usethetrackpadtoperformalltheactions,suchaspoint,left-click,right-click,and
scroll.Youalsocanusethetrackpadtoperformavarietyoftouchgestures.
Forinformationaboutusingtouchgestures,see“Usingthetrackpadtouchgestures”onpage28.
Point
Slideonefingeracrossthesurfaceofthetrackpadto
movethepointeraccordingly.
Scroll
Puttwofingersonthetrackpadandmovetheminthe
verticalorhorizontaldirection.Thenyoucanscroll
throughthedocument,Website,orapps.Ensurethatyou
positionyourtwofingersslightlyapartfromeachother.
1Left-click
Presstheleft-clickzonetoselectoropenanitem.
2Right-click
Presstheright-clickzonetodisplayashortcutmenu.
ClassicTrackPointmode
IntheClassicTrackPointmode,usethepointingsticktomovethepointer,andusethetrackpadtoperform
otheractionssuchasleft-click,right-click,andscroll.
Chapter2.Usingyourcomputer27
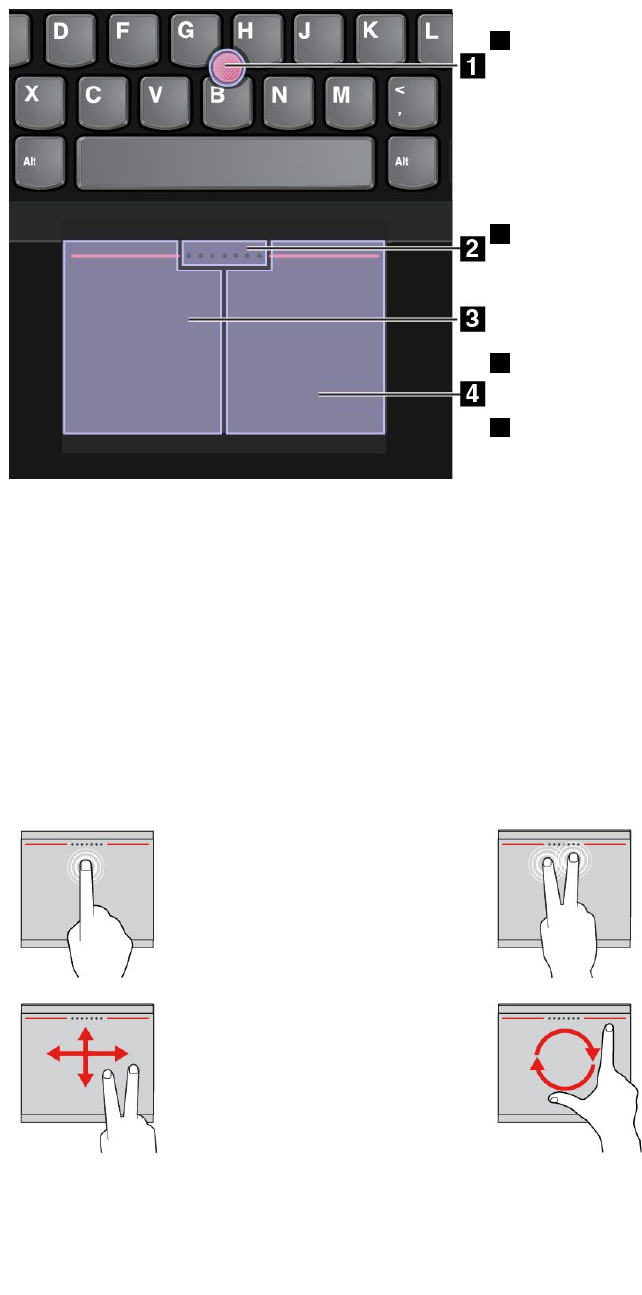
Note:ComparedwiththeTrackPointmode,theClassicTrackPointmodeenlargestheright-clickzoneso
thattheright-andleft-clickzonesonthetrackpadaredividedequally.However,thetouchgesturesare
disabledandcannotbeusedintheClassicTrackPointmode.
1Point
Usethepointingsticktomovethepointer.Tousethe
pointingstick,applypressuretothenonslipcaponthe
pointingstickinanydirectionparalleltothekeyboard.
Thepointermovesaccordinglybutthepointingstickitself
doesnotmove.Thespeedatwhichthepointermoves
dependsontheamountofpressureyouapplytothe
pointingstick.
2Scroll
Pressandholdthedottedscrollingbarwhileapplying
pressuretothepointingstickintheverticalorhorizontal
direction.Thenyoucanscrollthroughthedocument,
Website,orapps.
3Left-click
Presstheleft-clickzonetoselectoropenanitem.
4Right-click
Presstheright-clickzonetodisplayashortcutmenu.
Usingthetrackpadtouchgestures
Theentiretrackpadissensitivetofingertouchandmovement.Youcanusethetrackpadtoperformthe
samepointandclickactionsasyouwouldusingatraditionalmouse.Youalsocanusethetrackpad
toperformavarietyoftouchgestures.
Thistopicintroducesthefrequentlyusedtouchgesturessuchastap,drag,scroll,androtate.Formore
gestures,seethehelpinformationsystemfortheThinkPadpointingdevice.
Notes:
•SomegesturesareonlyavailableincertainappsandmodesoftheThinkPadpointingdevice.
•Whenusingtwoormorefingers,ensurethatyourfingersareslightlyapart.
Tap
Tapanywhereonthetrackpad
withonefingertoselectoropen
anitem.
Two-fingertap
Tapanywhereonthetrackpadwith
twofingerstodisplayashortcut
menu.
Two-fingerscroll
Puttwofingersonthetrackpad
andmovethemintheverticalor
horizontaldirection.Thisaction
enablesyoutoscrollthroughthe
document,Website,orapps.
Two-fingerrotate
Puttwofingersonthetrackpad
androtatethemclockwiseor
counterclockwisetorotateanitem.
28UserGuide
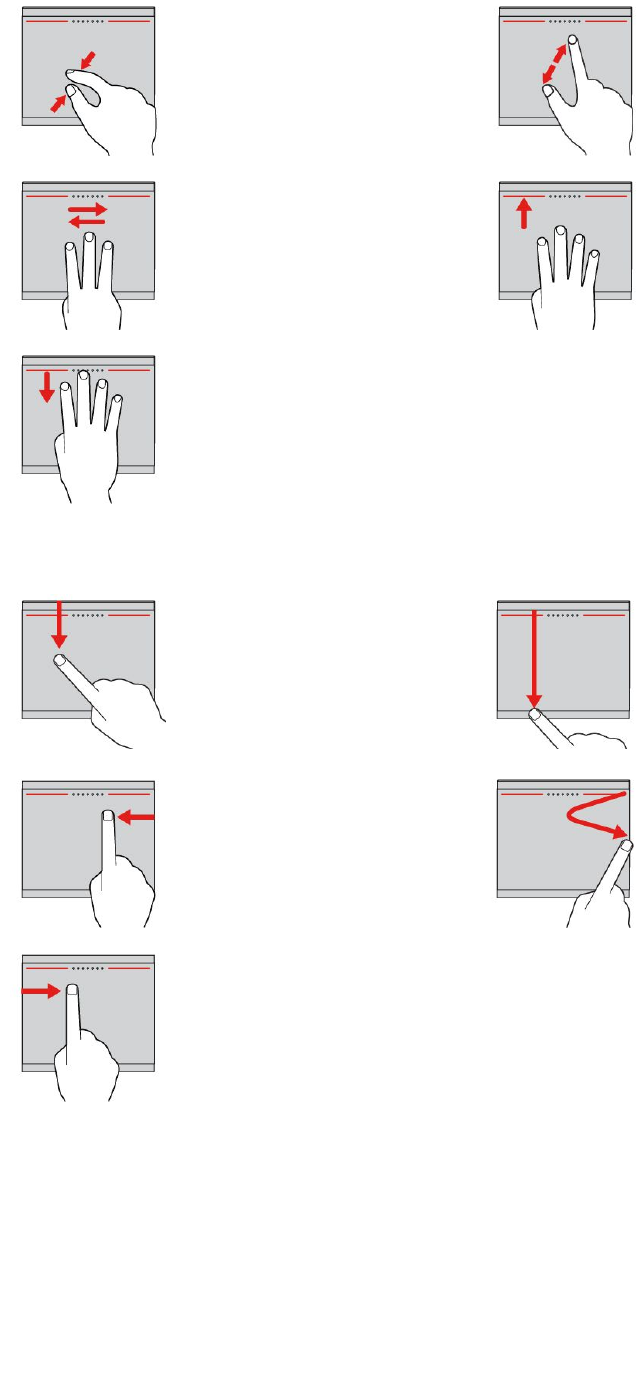
Two-fingerzoomout
Puttwofingersonthetrackpad
andmovethemclosertogether
tozoomout.
Two-fingerzoomin
Puttwofingersonthetrackpadand
movethemfartheraparttozoomin.
Three-fingerswipe
Putthreefingersonthetrackpad
andmovethemlefttoshowthe
nextitem.Movethemrightto
showthepreviousitem.
Four-fingerswipe
Putfourfingersonthetrackpad
andmovethemupwardtoviewand
choosefromopenedapps.
Four-fingerswipe
Putfourfingersonthetrackpad
andmovethemdownwardto
showthedesktop.
Note:ThefollowingtouchgesturesareavailableonlyontheWindows8.1operatingsystem.
Swipefromthetopedge
FromtheStartscreenorthe
currentapp,swipeinfrom
thetopedgeofthetrackpad
withonefingertodisplaythe
commandmenu.
Swipefromthetoptothebottom
edge
Swipefromthetoptothebottom
edgeofthetrackpadwithone
fingertoclosethecurrentapp.
Performingthisgestureonthe
desktopclosesthedesktopand
displaystheStartscreen.
Swipefromtherightedge
Swipeinfromtherightedgeof
thetrackpadwithonefingerto
displaythecharms.
Swipeinandout
Swipeinandoutfromtheright
edgeofthetrackpadwithone
fingertohidethecharms.
Swipefromtheleftedge
Swipeinfromtheleftedgeof
thetrackpadwithonefingerto
showthepreviouslyusedapp.
CustomizingtheThinkPadpointingdevice
YoucancustomizetheThinkPadpointingdevicesoyoucanuseitmorecomfortablyandefficiently.For
example,youcanchooseyourpreferredmodetousetheThinkPadpointingdevice.Youalsocanconfigure
thetouchgesturesintheTrackPointmodeortheTrackpadmodeaccordingtoyourneeds.
TocustomizetheThinkPadpointingdevice,dothefollowing:
Chapter2.Usingyourcomputer29
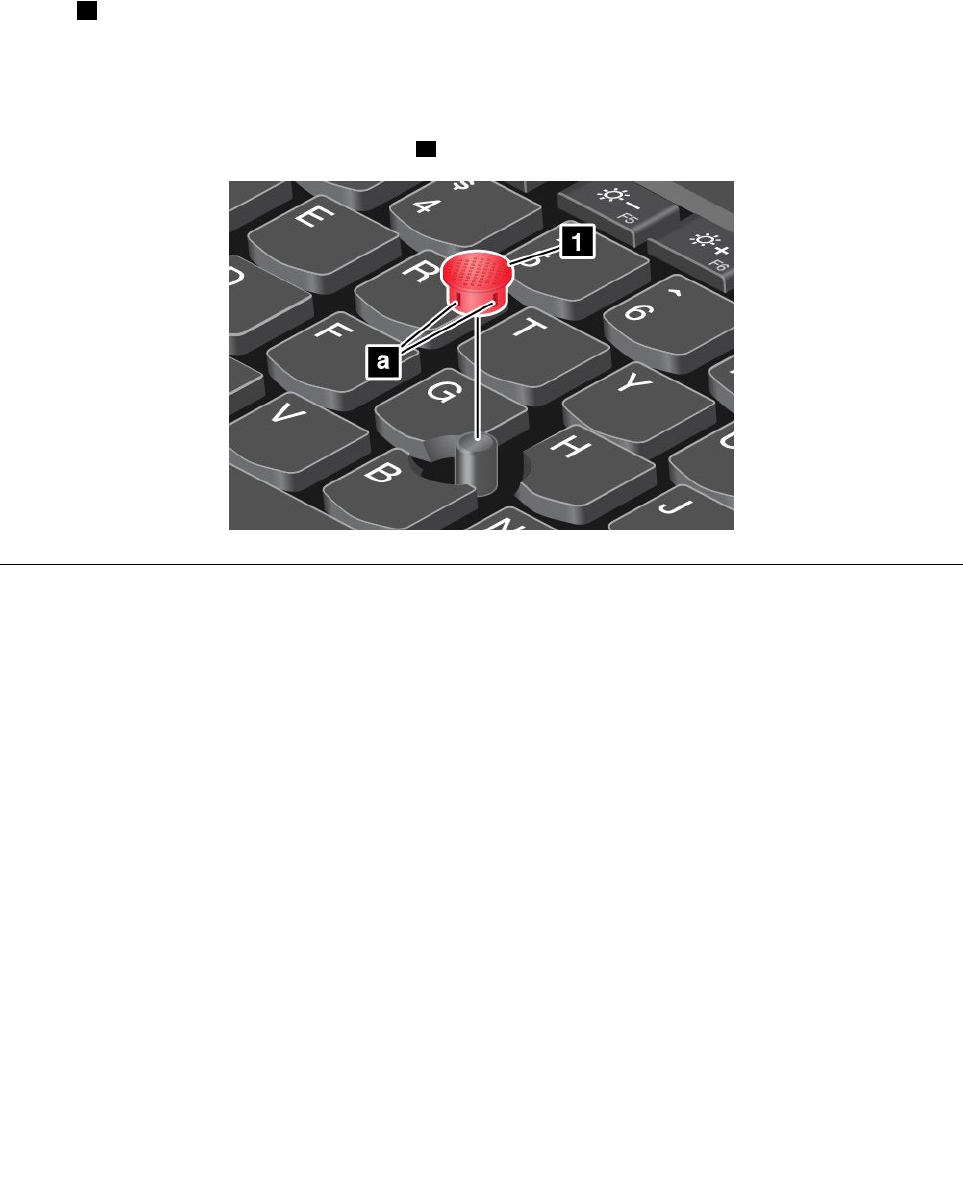
1.GotoControlPanel.
2.ClickHardwareandSound➙Mouse.TheMousePropertieswindowisdisplayed.
3.IntheMousePropertieswindow,selecttheThinkPadtab.
4.Followtheinstructionsonthescreen.
Replacingthecapofpointingstick
Thecap1ontheendofthepointingstickisremovable.Afteryouusethecapforaperiodoftime,you
mightconsiderreplacingthecapwithanewone.
Togetanewcap,contactLenovo.ForinformationaboutcontactingLenovo,seeChapter11“Getting
support”onpage147.
Note:Ensurethatyouuseacapwithgroovesaasshowninthefollowingillustration.
Powermanagement
Whenyouneedtouseyourcomputerawayfromelectricaloutlets,youdependonbatterypowertokeep
yourcomputerrunning.Differentcomputercomponentsconsumepoweratdifferentrates.Themoreyou
usethepower-intensivecomponents,thefasteryouconsumebatterypower.
SpendmoretimeunpluggedwithThinkPadbatteries.Mobilityhasrevolutionizedbusinessbyenabling
youtotakeyourworkwhereveryougo.WithThinkPadbatteries,youwillbeabletoworklongerwithout
beingtiedtoanelectricaloutlet.
Checkingthebatterystatus
Thebattery-statusiconintheWindowsnotificationareadisplaysthepercentageofbatterypowerremaining.
Therateatwhichyouusebatterypowerdetermineshowlongyoucanusethebatteryofyourcomputer
betweencharges.Becauseofdifferentuserhabitsandneeds,itisdifficulttopredicthowlongabattery
chargewilllast.Therearetwomainfactors:
•Howmuchenergyisstoredinthebatterywhenyoubegintowork.
•Thewayyouuseyourcomputer.Forexample:
–Howoftenyouaccesstheharddiskdriveorsolid-statedrive.
–Howbrightyoumakethecomputerdisplay.
30UserGuide

–Howoftenyouusethewirelessfeatures.
Tocheckfordetailedbatterystatusinformation,dothefollowing:
•ForWindows7:StartthePowerManagerprogramandclicktheBatterytab.
•ForWindows8andWindows8.1,StarttheLenovoSettingsprogramandclickPower.
EnablingthebatteryalarmontheWindows7operatingsystem
FortheWindows7operatingsystem,youcanprogramyourcomputersothatwhenthebatterypowerfalls
belowacertainlevel,threeeventsoccur:thealarmgoesoff,amessageisdisplayed,andtheLCDis
turnedoff.
Toenablethebatteryalarm,dothefollowing:
1.StartthePowerManagerprogram.
2.ClicktheGlobalPowerSettingstab.
3.ForLowbatteryalarmorCriticallylowbatteryalarm,setthepercentageofthepowerlevelandset
theaction.
Note:Ifyourcomputerenterssleeporhibernationmodewhenthebatteryislow,butthealarmmessage
hasnotyetbeendisplayed,themessagewillbedisplayedwhenthecomputerresumes.Toresumenormal
operation,whenthemessageisdisplayed,clickOK.
Usingtheacpoweradapter
Thepowertorunyourcomputercancomeeitherfromthelithium-ion(Li-ion)built-inbattery,orfromac
powerthroughtheacpoweradapter.Whileyouuseacpower,thebatterieschargeautomatically.
Theacpoweradapterthatcomeswithyourcomputerhastwobasiccomponents:
•Thetransformerpackthatconvertsacpowerforusewiththecomputer.
•Thepowercordthatplugsintotheacoutletandintothetransformerpack.
Attention:Usinganimproperpowercordmightcauseseveredamagetoyourcomputer.
Connectingtoacpower
Toconnectthecomputertoacpower,dothefollowing:
Attention:Usinganimproperpowercordmightcauseseveredamagetoyourcomputer.
Note:Ensurethatyouperformtheactionsintheorderinwhichtheyarelisted.
1.Connectthepowercordtotheacpoweradapter.
2.Connecttheacpoweradaptertothepowerconnectorofthecomputer.
3.Connectthepowercordintoanelectricaloutlet.
Tipsforusingtheacpoweradapter
•Whentheacpoweradapterisnotinuse,disconnectitfromtheelectricaloutlet.
•Donotbindthepowercordtightlyaroundtheacpoweradaptertransformerpackwhenitisconnectedto
thetransformer.
•Beforeyouchargethebatteries,makesurethattheirtemperatureisatleast10°C(50°F).
•Youcanchargethebatterieswhentheacpoweradapterisconnectedtothecomputer.Youneedto
chargethebatteriesinanyofthefollowingsituations:
Chapter2.Usingyourcomputer31

–WhenthebatteryiconintheWindowsnotificationareashowsalowpercentageofbatterypower
remaining.
–Whenthebatterieshavenotbeenusedforalongtime
Chargingthebatteries
Whenyoucheckbatterystatusandfindthatthepercentageofpowerremainingisloworwhenthepower
alarmalertsyouthattheremainingpowerislow,youneedtochargeyourbatteries.
Ifanacoutletisconvenient,plugtheacpoweradapterintotheoutlet,andthenplugitintoacpower
connectorofthecomputer.Thebatterieswillbefullychargedinaboutthreetosixhours.Thechargingtime
isaffectedbythebatterysizeandthephysicalenvironment.Youcancheckthebatterychargingstatusat
anytimethroughthebattery-statusiconintheWindowsnotificationarea.
Note:Tomaximizethelifeofthebatteries,thecomputerdoesnotstartrechargingthebatteriesifthe
remainingpowerisgreaterthan95%.
Maximizingthebatterylife
Tomaximizethelifeofthebattery,dothefollowing:
•Usethebatteriesuntilthechargeiscompletelydepleted.
•Rechargethebatteriescompletelybeforeusingit.Youcanseewhetherthebatteriesarefullycharged
fromthebattery-statusiconintheWindowsnotificationarea.
•Alwaysusepower-savingmodes,suchassleepmode,andhibernationmode.
Managingthebatterypower
Toachievethebestbalancebetweenperformanceandpowersaving,adjustyourpowerplansettings.
Toaccesspowerplansettings,dothefollowing:
•ForWindows7:StartthePowerManagerprogramandthenclickthePowerPlantab.Forinstructionson
howtostartthePowerManagerprogram,see“AccessingLenovoprogramsontheWindows7operating
system”onpage14.
•ForWindows8andWindows8.1:Gotothedesktopandright-clickthebattery-statusiconinthewindows
notificationareaandclickPowerOptions.ThenclickChangeplansettingsnexttoyourpowerplan.
Formoreinformation,refertothehelpinformationsystemoftheprogram.
Power-savingmodes
Thereareseveralmodesthatyoucanuseatanytimetoconservepower.Thissectionintroduceseach
modeandgivestipsontheeffectiveuseofbatterypower.
•Screenblankmode(forWindows7only)
Thecomputerdisplayrequiresconsiderablebatterypower.Toturnoffthepowertothedisplayandmake
thecomputerenterscreenblankmode,right-clickthebatterygaugeiconinthewindowsnotificationarea
andselectPoweroffdisplay.
•Sleepmode
Insleepmode,yourworkissavedtomemory,andthenthesolid-statedriveortheharddiskdriveandthe
computerdisplayareturnedoff.Whenyourcomputerwakesup,yourworkisrestoredwithinseconds.
Dependingonthemodel,yourcomputermightsupportthe30DayStandbyfunction.Whenthisfunction
isenabled,thecomputerconsumesevenlesspowerinsleepmodeandtakesonlysecondstoresume
normaloperationwhenyoupressthepowerbutton.Formoreinformationaboutthe30DayStandby
function,dothefollowing:
32UserGuide

–ForWindows7:RefertothehelpinformationsystemofthePowerManagerprogram.Forinstructions
onhowtostartthePowerManagerprogram,see“Lenovoprograms”onpage14.
–ForWindows8andWindows8.1:OpentheLenovoSettingsprogramandclickPower➙30Day
Standby.
Toputyourcomputerintosleepmode,dothefollowing:
–ForWindows7:UsetheStartmenushutdownoption.
–ForWindows8andWindows8.1:Movethepointertothebottomrightcornerofthescreentobringup
thecharms.ThenclickSettings➙Power➙Sleep.
•Hibernationmode
Byusingthismode,youcanturnoffyourcomputercompletelywithoutsavingfilesorexitingany
programsthatarerunning.Whenthecomputerentershibernationmode,allopenprograms,folders,and
filesaresavedtotheharddiskdriveorsolid-statedrive,andthenthecomputerturnsoff.
Ifyouputyourcomputerintohibernationmodewiththewake-upfunctiondisabled,thecomputerdoes
notconsumeanypower.Thewake-upfunctionisdisabledbydefault.Ifyouputyourcomputerinto
hibernationmodewiththewake-upfunctionenabled,thecomputerconsumesasmallamountofpower.
Toenablethewake-upfunction,dothefollowing:
1.GotoControlPanelandclickSystemandSecurity.
2.ClickAdministrativeTools.
3.ClickT askScheduler.Ifyouarepromptedforanadministratorpasswordorconfirmation,typethe
passwordorprovideconfirmation.
4.Fromtheleftpane,selectthetaskfolderforwhichyouwanttoenablethewake-upfunction.The
scheduledtasksaredisplayed.
5.Clickascheduledtask,andthenclicktheConditionstab.
6.UnderPower,selectthecheckboxforWakethecomputertorunthistask.
Toputthecomputerintohibernationmode,changeyourpowerplansettingsbydoingthefollowing:
–ForWindows7:StartthePowerManagerprogramandthenclickthePowerPlantab.Thenfollow
theinstructionsonthescreen.ForinstructionsonhowtostartthePowerManagerprogram,see
“Lenovoprograms”onpage14.
–ForWindows8andWindows8.1:Right-clickthebattery-statusiconinthewindowsnotification
areaandclickPowerOptions,clickChangeplansettingsthatisnexttoyourpowerplan,anthen
followtheinstructionsonthescreen.
•Wirelessoff
Whenyouarenotusingthewirelessfeatures,suchasBluetoothorwirelessLAN,turnthemoff.This
willhelpconservepower.Toturnoffthewirelessfeatures,pressF8.
Handlingthebattery
ThissystemsupportsonlybatteriesspeciallydesignedforthisspecificsystemandmanufacturedbyLenovo
oranauthorizedbuilder.Thesystemdoesnotsupportunauthorizedbatteriesorbatteriesdesignedforother
systems.Ifanunauthorizedbatteryorabatterydesignedforanothersystemisinstalled,thesystemwill
notcharge.
Attention:Lenovohasnoresponsibilityfortheperformanceorsafetyofunauthorizedbatteries,and
providesnowarrantiesforfailuresordamagearisingoutoftheiruse.
Chapter2.Usingyourcomputer33

DANGER
Donotattempttodisassembleormodifythebatterypack.
Attemptingtodosocancauseanexplosion,orliquidleakagefromthebatterypack.
AbatterypackotherthantheonespecifiedbyLenovo,oradisassembledormodifiedbattery
packisnotcoveredbythewarranty.
DANGER
Iftherechargeablebatterypackisincorrectlyreplaced,thereisdangerofanexplosion.Thebattery
packcontainsasmallamountofharmfulsubstances.Toavoidpossibleinjury:
•ReplaceonlywithabatteryofthetyperecommendedbyLenovo.
•Keepthebatterypackawayfromfire.
•Donotexposeittoexcessiveheat.
•Donotexposeittowaterorrain.
•Donotshort-circuitit.
•Storeitinacooldryplace.
•Keepitawayfromchildren.
Thebatterypackisaconsumablesupply.Ifyourbatterybeginstodischargetooquickly,replacethe
batterypackwithanewoneofthetyperecommendedbyLenovo.Formoreinformationonreplacingthe
batterypack,contactyourCustomerSupportCenter.
DANGER
Donotdrop,crush,puncture,orsubjecttostrongforces.Batteryabuseormishandlingcancause
thebatterytooverheat,whichcancausegassesorflameto“vent”fromthebatterypackor
coin-cellbattery.Ifyourbatteryisdamaged,orifyounoticeanydischargefromyourbatteryorthe
buildupofforeignmaterialsonthebatteryleads,stopusingthebatteryandobtainareplacement
fromthebatterymanufacturer.
DANGER
Onlyrechargethebatterypackstrictlyaccordingtoinstructionsincludedintheproduct
documentation.
DANGER
Donotputthebatterypackintrashthatisdisposedofinlandfills.Whendisposingofthebattery,
complywithlocalordinancesorregulationsandyourcompany'ssafetystandards.
34UserGuide

DANGER
Thereisadangerofanexplosionifthecoin-cellbatteryisincorrectlyplaced.Thelithiumbattery
containslithiumandcanexplodeifitisnotproperlyhandled,ordisposedof.Replaceonlywitha
batteryofthesametype.Toavoidpossibleinjuryordeath,donot:(1)throworimmerseintowater,
(2)allowittoheattomorethan100°C(212°F),or(3)attempttorepairordisassembleit.Disposeof
itasrequiredbylocalordinancesorregulationsandyourcompany'ssafetystandards.
Connectingtothenetwork
YourcomputerhasoneormorenetworkcardsthatenableyoutoconnectyourcomputertotheInternet
orothernetworkconnections.
Ethernetconnections
Youcanconnectyourcomputertoalocalnetworkorabroadbandconnectionbyusingthebuilt-inEthernet
featureofthecomputer.
DANGER
YourcomputerhasanEthernetconnector.Toavoidtheriskofelectricalshock,donotconnect
thetelephonecabletotheEthernetconnector.
Wirelessconnections
Wirelessconnectionisthetransferofdatawithouttheuseofcablesbutbymeansofradiowavesonly.
Attention:
•Ifyouwanttousethewirelessfeaturesonanairplane,checkthewirelessserviceswiththeairlinebefore
boardingtheairplane.
•Iftherearerestrictionsontheuseofcomputerwirelessfeaturesonanairplane,disablethewireless
featuresofyourcomputerbeforeboarding.
Dependingonthewirelessdevicesinstalledonyourcomputer,youmightbeabletousethefollowing
wirelessnetworks:
•WirelessLANconnection
•WirelessWANconnection
•Bluetoothconnection
•NFCconnection
UsingthewirelessLANconnection
Awirelesslocalareanetwork(LAN)coversarelativelysmallgeographicarea,suchasanofficebuildingora
house.Devicesbasedonthe802.11standardscanconnecttothistypeofnetwork.
Yourcomputercomeswithabuilt-inwirelessnetworkcardandaconfigurationutilitytohelpyouestablish
wirelessconnectionsandmonitortheconnectionstatus.Thisenablesyoutostayconnectedtoyournetwork
whileyouareattheoffice,inameetingroom,orathome,withnoneedforawiredconnection.
ToestablishawirelessLANconnection,dothefollowing:
•ForWindows7:
Chapter2.Usingyourcomputer35

1.PressF8andfollowtheinstructionsonthescreentoenablethewirelessfeature.
2.Clickthewireless-network-connection-statusiconintheWindowsnotificationarea.Alistofavailable
wirelessnetworksisdisplayed.
3.Double-clickanetworktoconnecttoit.Providerequiredinformationifneeded.
•ForWindows8andWindows8.1:
1.Gotothedesktopandclickthewireless-network-connection-statusiconintheWindowsnotification
area.Alistofavailablewirelessnetworksisdisplayed.
Note:Todisplaythelist,ensurethatairplanemode(flightmode)issettooff.
2.Double-clickanetworktoconnecttoit.Providerequiredinformationifneeded.
Ifyouneedtoconnecttodifferentwirelessnetworksindifferentlocations,usethefollowingsoftwareto
managemultiplenetworkprofilessothatthecomputerautomaticallyconnectstoanavailablenetworkwhen
thelocationchanges:
•ForWindows7:UsetheAccessConnectionsprogram.Formoreinformation,see“AccessingLenovo
programsontheWindows7operatingsystem”onpage14.
•ForWindows8andWindows8.1:OpentheLenovoSettingsprogramandclickLocationAwareness.
Formoreinformation,see“AccessingLenovoprogramsontheWindows8orWindows8.1operating
system”onpage15.
TipsforusingthewirelessLANfeature
Toachievethebestconnection,usethefollowingguidelines:
•PlaceyourcomputersothatthereareasfewobstaclesaspossiblebetweenthewirelessLANaccess
pointandthecomputer.
•Openyourcomputerlidtoanangleofslightlymorethan90degrees.
•Ifyouusethewirelessfeature(the802.11standards)ofyourcomputersimultaneouslywithaBluetooth
option,thedatatransmissionspeedcanbedelayedandtheperformanceofthewirelessfeaturecanbe
degraded.
Checkingthewireless-LANconnectionstatus
Youcancheckthewireless-LANconnectionstatusthroughthewireless-network-connection-statusiconin
theWindowsnotificationarea.Themorebarsencompassed,thebetterthesignalis.
FortheWindows7operatingsystem,youalsocanchecktheAccessConnectionsgauge,theAccess
Connectionsstatusicon,ortheAccessConnectionswirelessstatusiconintheWindowsnotificationarea.
AccessConnectionsgauge:
•Powertothewirelessradioisoffornosignal.
•Powertothewirelessradioison.Thesignalstrengthofthewirelessconnectionispoor.To
improvesignalstrength,moveyourcomputerclosertothewirelessaccesspoint.
•Powertothewirelessradioison.Thesignalstrengthofthewirelessconnection
ismarginal.
•Powertothewirelessradioison.Thesignalstrengthofthewirelessconnection
isexcellent.
AccessConnectionsstatusicon:
•Nolocationprofileisactiveornoneexists.
36UserGuide

•Currentlocationprofileisdisconnected.
•Currentlocationprofileisconnected.
AccessConnectionswirelessstatusicon:
•Powertothewirelessradioisoff.
•Powertothewirelessradioison.Noassociation.
•Powertothewirelessradioison.Nosignal.
•Powertothewirelessradioison.Thesignalstrengthofthewirelessconnectionisexcellent.
•Powertothewirelessradioison.Thesignalstrengthofthewirelessconnectionismarginal.
•Powertothewirelessradioison.Thesignalstrengthofthewirelessconnectionispoor.Toimprove
signalstrength,moveyourcomputerclosertothewirelessaccesspoint.
UsingthewirelessWANconnection
Wirelesswideareanetwork(WAN),whichusescellularnetworksfordatatransmission,enablesyou
toestablishwirelessconnectionsoverremotepublicorprivatenetworks.Theseconnectionscanbe
maintainedoveralargegeographicalarea,suchasacityoranentirecountry,byuseofmultipleantenna
sitesorsatellitesystemsmaintainedbywirelessserviceproviders.
SomeThinkPadnotebookcomputerscomewithabuilt-inwirelessWANcardintegratedwithsomewireless
WANtechnologies,suchas1xEV-DO,HSPA,3G,GPRS,orLTE.Byusingthebuilt-inwirelessWANcardand
theconfigurationutilitythatcomeswithyourcomputer,youcanestablishwirelessWANconnectionsand
monitortheconnectionstatus.
Note:ThewirelessWANserviceisprovidedbyauthorizedserviceprovidersinsomecountries.
TipsforusingthewirelessWANfeature
Toachievethebestconnection,usethefollowingguidelines:
•Keepyourcomputerawayfromyourbody.
•Placeyourcomputeronaflatsurfaceandopenyourcomputerlidtoanangleofslightlymorethan
90degrees.
•Placeyourcomputerawayfromconcreteorbrickwallsthatmightdampencellularsignals.
•Bestreceptionwillbeavailablenearwindowsandotherlocationswherecellularphonereceptionisthe
strongest.
Checkingthewireless-WANconnectionstatus
Youcancheckthewireless-WANconnectionstatusthroughthewireless-network-connection-statusiconin
theWindowsnotificationarea.Themorebarsencompassed,thebetterthesignalis.
FortheWindows7operatingsystem,youalsocanchecktheAccessConnectionsgauge,theAccess
Connectionsstatusicon,ortheAccessConnectionswirelessstatusiconintheWindowsnotificationarea.
AccessConnectionsgauge:
•Nosignal
•Weaksignal
•Mediumsignal
•Strongsignal
Chapter2.Usingyourcomputer37

AccessConnectionsstatusicon:
•Nolocationprofileisactiveornoneexists.
•Currentlocationprofileisdisconnected.
•Currentlocationprofileisconnected.
AccessConnectionswirelessstatusicon:
•PowertotheWANradioisoff
•Noassociation
•Nosignal
•Weaksignal
•Mediumsignal
•Strongsignal
UsingtheBluetoothconnection
Bluetoothcanconnectdevicesashortdistancefromoneanother,andiscommonlyusedforconnecting
peripheraldevicestoacomputer,transferringdatabetweenhand-helddevicesandapersonalcomputer,or
remotelycontrollingandcommunicatingwithdevicessuchasmobilephones.
Dependingonthemodel,yourcomputermightsupporttheBluetoothfeature.Totransferdatathrough
theBluetoothfeature,dothefollowing:
Note:Ifyouusethewirelessfeature(the802.11standards)ofyourcomputersimultaneouslywitha
Bluetoothoption,thedatatransmissionspeedcanbedelayedandtheperformanceofthewirelessfeature
canbedegraded.
•ForWindows7:
1.PressF8andthenfollowtheinstructionsonthescreentoenabletheBluetoothfeature.
2.Right-clickthedatathatyouwanttosend.
3.SelectSendTo➙BluetoothDevices.
4.SelectaBluetoothdevice,andthenfollowtheinstructionsonthescreen.
•ForWindows8andWindows8.1:
1.Gotothedesktop,andthenright-clickthedatathatyouwanttosend.
2.SelectSendTo➙BluetoothDevices.
3.SelectaBluetoothdevice,andthenfollowtheinstructionsonthescreen.
Formoreinformation,refertotheWindowshelpinformationsystemandtheBluetoothhelpinformation
system.
UsingtheNFCconnection
Nearfieldcommunicationisahigh-frequencyandshort-rangewirelesscommunicationstechnology.
Dependingonthemodel,yourcomputermightcomewiththeNFCfeature.ByusingtheNFCfeature,you
canestablishtheradiocommunicationsbetweenyourcomputerandanotherNFC-enableddeviceovera
distancenomorethanafewcentimeters.
Bydefault,theNFCfeatureisenabled.IftheNFCfeatureofyourcomputerisdisabled,dothefollowingto
enabletheNFCfeature:
•ForWindows7:
38UserGuide

1.StarttheThinkPadSetupprogram.See“UsingtheThinkPadSetupprogram”onpage109.
2.SelectSecurity➙I/OPortAccess.
3.SettheNFCdeviceoptiontoEnabled.
•ForWindows8andWindows8.1:
1.Movethepointertothetop-rightorbottom-rightcornerofthescreentobringupthecharms.
2.Dothefollowing:
–ForWindows8:ClickSettings➙ChangePCsettings➙Wireless.
–ForWindows8.1:ClickSettings➙ChangePCsettings➙Network➙Radiodevices.
3.SlidetheNFCswitchtotherighttoenabletheNFCfeature.
IfyoustillcannotenabletheNFCfeature,checktheNFCdevicesettingintheThinkPadSetupprogram
bydoingthefollowing:
1.StarttheThinkPadSetupprogram.See“UsingtheThinkPadSetupprogram”onpage109.
2.SelectSecurity➙I/OPortAccess.
3.SettheNFCdeviceoptiontoEnabled.
YoucanusetheNFCfeaturewithNFCsupportedprograms,suchastheLenovoQuickCastprogram
andtheLenovoQuickControlprogram.
Presentationsandmultimedia
Youcanconnectyourcomputertoaprojectortogivepresentationsoryoucanconnectyourcomputer
toanexternalmonitortoexpandyourworkspace.
Changingdisplaysettings
Youcanchangethedisplaysettings,suchasthedisplayresolution,fontsize,andsoon.
Tochangethedisplaysettings,dothefollowing:
1.OpenControlPanelandclickAppearanceandPersonalization.
2.ClickDisplayforfurtherconfiguration.
3.ClickApply.Thechangewilltakeeffectafteryoulogoff.
Connectingaprojectororanexternalmonitor
Thistopicprovidesinformationaboutconnectingaprojectororanexternalmonitor.
Usinganexternalmonitor
Note:Whenyouconnectanexternalmonitor,avideointerfacecablewithaferritecoreisrequired.
Yourcomputercansupportamaximumvideoresolutionofupto2048x1536(withanexternalmonitor
connectedtotheVGAconnector)orupto2560x1600(withanexternalmonitorconnectedtothemini
DisplayPortconnector),providedthattheexternalmonitoralsosupportsthatresolution.Formore
informationabouttheexternalmonitor,refertothemanualsprovidedwiththeexternalmonitor.
Youcansetanyresolutionforeitherthecomputerdisplayortheexternalmonitor.Whenyouusebothatthe
sametime,theresolutionofbothisthesame.Ifyousetahigherresolutionforthecomputerdisplay,you
canseeonlypartofthescreenatatime.YoucanseeotherpartsbymovingtheimagewiththeTrackPoint
pointingdeviceoranotherpointingdevice.
Chapter2.Usingyourcomputer39

IntheDisplaySettingswindow,youcanmovethedisplayoutputtothecomputerdisplay,theexternal
monitor,orboth.
Connectinganexternalmonitor
Toconnectanexternalmonitor,dothefollowing:
1.ConnecttheexternalmonitortotheVGAconnectorortheminiDisplayPortconnectorofyourcomputer.
2.Connecttheexternalmonitortoanelectricaloutlet.
3.Turnontheexternalmonitor.
4.ChangethedisplayoutputlocationbypressingtheF7key.Thisenablesyoutoswitchbetweenviewing
outputontheexternalmonitor,thecomputermonitor,orbothmonitors.
Note:Ifyourcomputercannotdetecttheexternalmonitor,right-clickonthedesktop,thenselectScreen
resolution.ClicktheDetectbutton.
Settingtheexternalmonitortype
Tosettheexternalmonitortype,dothefollowing:
1.Connecttheexternalmonitortoyourcomputer,andthenconnectthemonitortoanelectricaloutlet.
2.Turnontheexternalmonitor.
3.Right-clickonthedesktop,andclickScreenresolution.
Note:Ifyourcomputercannotdetecttheexternalmonitor,clicktheDetectbutton.
4.SelecttheexternalmonitorandsetResolution.
5.ClickAdvancedSettings.
6.ClicktheMonitortab.Checkthemonitorinformationtomakesurethatthemonitortypeiscorrect.Ifit
is,clickOKtoclosethewindow;otherwiseproceedwiththefollowingsteps.
7.Ifmorethantwomonitortypesaredisplayed,selectGenericPnPMonitororGenericNon-PnP
Monitor.
8.ClickProperties.Ifyouarepromptedforanadministratorpasswordorconfirmation,typethepassword
orprovideconfirmation.
9.ClicktheDrivertab.
10.ClickUpdateDriver.
11.ClickBrowsemycomputerfordriversoftware,andthenclickLetmepickfromalistofdevice
driversonmycomputer.
12.CleartheShowcompatiblehardwarecheckbox.
13.Selectthecorrectmanufacturerandmodelfortheexternalmonitor.Ifyoucannotfindyourmonitoron
thelist,stoptheinstallationofthisdriverandusethedrivershippedwithyourmonitor.
14.Afterupdatingthedriver,clickClose.
15.FortheWindows7operatingsystem,tochangethecolorsettings,right-clickonthedesktop,andclick
Screenresolution.ClickAdvancedSettings,selecttheMonitortab,thensetColors.
16.ClickOK.
Considerationsforconnectinganexternalmonitor
•Wheninstallinganoperatingsystem,youmustinstallthedisplaydriverforyourmonitorthatisprovided
withthecomputer,andthemonitorINFfilethatisprovidedwiththeexternalmonitor.
•Ifyousetaresolutionhigherthantheresolutionyouareusingonthecomputermonitor,andusean
externalmonitorthatdoesnotsupportthatresolution,takeadvantageofthevirtualscreenfunction,
whichenablesyoutodisplayonlyapartofthehigh-resolutionscreenimageyourcomputerproduces.
40UserGuide

YoucanseeotherpartsoftheimagebymovingthescreenwiththeTrackPointpointingdeviceoranother
pointingdevice.
•Iftheexternalmonitoryouareusingisoutdated,theresolutionandtherefreshratemightbelimited.
UsingaDVImonitor
Ifyourcomputerhasoneofthefollowingoptionaldockingstations,youcanuseaDigitalVisualInterface
(DVI)monitorthroughtheDVIconnectorofthatunit:
•ThinkPadProDock
•ThinkPadUltraDock
Notes:
•ThescreenmodethatcanbeuseddependsonthespecificationsoftheDVImonitor.
•BeforeyouconnectaDVImonitor,makesurethatthecomputerisconnectedtotheexpansionunitand
worksproperly.
ToconnectaDVImonitor,dothefollowing:
1.Turnoffthecomputer.
2.ConnectaDVImonitortotheDVIconnectoroftheexpansionunit,andthenconnectthemonitor
toanelectricaloutlet.
3.TurnontheDVImonitorandthecomputer.
IfthecomputeroutputdoesnotappearontheDVImonitor,dothefollowing:
•ForWindows7:
1.PressCtrl+Alt+F12.TheIntel®GraphicsandMediaControlPanelwindowopens.
2.SelectAdvancedModeandclickOK.
3.SelectMultipleDisplays.
4.IntheOperatingModefield,selectoneofthefollowingoptionsdependingonyourneedsandfollow
theinstructionsonthescreentocompleteotherconfigurations.
–SingleDisplay:Dependingonyourconfiguration,thecomputeroutputisdisplayedeitheronthe
computerdisplayortheDVImonitor.
–CloneDisplays:Thesamecomputeroutputisdisplayedonboththecomputerdisplayand
theDVImonitor.
–ExtendedDesktop:Differentcomputeroutputisdisplayedonthecomputerdisplayandthe
DVImonitor.
•ForWindows8andWindows8.1:
1.Movethepointertothetop-rightorbottom-rightcornerofthescreenandclicktheDevicescharm.
2.ClickSecondscreenandselectDuplicate,Extend,orSecondScreenOnly.
ConsiderationsforconnectingaDVImonitor
ConnectaDVImonitortotheexpansionunit,andturnonthemonitorbeforeyouturnonthecomputer.
Otherwisethesystemcannotrecognizethatthemonitorisconnected.IftheoptionforenablingtheDVI
monitorintheDisplayPropertieswindowisnotdisplayed,tryclosingthewindowandopeningitagain.Ifthe
optionstillisnotdisplayed,makesurethattheconnectorofthemonitorisattachedfirmly,andrepeatthe
procedureforconnectingthemonitor.
Chapter2.Usingyourcomputer41

UsingtheminiDisplayPortconnector
YourcomputerhasaminiDisplayPortconnector,whichisadigitaldisplayinterfaceforconnectionto
variousexternaldevices,suchasCathodeRayTube(CRT)monitors,LCDmonitors,projectors,oreven
high-definitiontelevisions.Thiscompactconnectorenablesaplug-and-playsetupandsupportsadapters
thatcanplugintoDVI,VGA,orHigh-DefinitionMultimediaInterface(HDMITM)connectors.
TheminiDisplayPortconnectorofyourcomputersupportsaudioaswellasvideostreaming.
Settingupapresentation
Todisplayinformationandmakepresentations,youcanconnectadataprojectortoyourcomputerthrough
theVGAconnectoronyourcomputer.
Note:Itmaytakeseveralsecondsbeforetheprojectordisplaystheimage.Ifyoudonotseeyourdesktop
displayedafter60seconds,trypressingtheF7keytoswitchbetweendifferentdisplayoutputlocations.
Yourprojectormighthaveoneormoreaudio-inputconnectors.Toprojectsound,youneedtoattach
thecomboaudioconnectoronyourcomputertotheseconnectors,usinganaudiocable(commercially
available).
Usingdualdisplays
ThissectionintroducestheDuplicateandExtenddesktopfunctionsthatenableyoutodisplayoutputon
boththecomputerdisplayandanexternalmonitor.
UsingtheDuplicateorExtenddesktopfunction
WiththeDuplicatedesktopfunction,youcandisplaythesameoutputonboththecomputerdisplayand
anexternaldisplay.YoualsocandisplaydifferentdesktopimagesoneachmonitorwiththeExtend
desktopfunction.
YoucanusetheDuplicateorExtenddesktopfunctionwithoutchanginganysettings.Ifthefunctiondoes
notwork,refertothefollowingtopiconhowtoenabletheDuplicateorExtenddesktopfunction.
EnablingtheDuplicateorExtenddesktopfunction
ToenabletheDuplicateorExtenddesktopfunction,dothefollowing:
1.Connecttheexternalmonitortoyourcomputer;andthenconnectthemonitortoanelectricaloutlet.
2.Turnontheexternalmonitor.
3.PressF7,thenselectDuplicateorExtend.
Tochangetheresolutionforeachmonitor,dothefollowing:
1.Right-clickonthedesktop,andclickScreenresolution.
2.ClicktheMonitor-1icon,whichisfortheprimarydisplay(thecomputerdisplaybydefault).
3.Settheresolutionfortheprimarydisplay.
4.ClicktheMonitor-2icon,whichisforthesecondarydisplay(theexternaldisplaybydefault).
5.Settheresolutionforthesecondarydisplay.
6.ClickAdvancedsettingsandsetupthecolorqualityontheMonitortab.
7.ClickOKtoapplythechanges.
ConsiderationsforusingtheExtenddesktopfunction
•InExtenddesktopmode,onlytheprimarydisplayshowsDOSfull-screen,andtheotherdisplayis
blackedout.
42UserGuide

•IfyourcomputerhastheIntelgraphicscard,youcandesignatetheprimarydisplaybydoingthefollowing:
1.Right-clickonthedesktopandselectScreenResolution.
2.ClickthedesireddisplayimageandselecttheMakethismymaindisplaycheckbox.
3.ClickOK.
•WhenanapplicationusingDirectDraworDirect3Disrunninginfull-screenmode,onlytheprimarydisplay
showstheoutput.
•YoucannotusethedisplayswitchingfunctionwhenyouareinExtenddesktopmode.
Usingaudiofeatures
Yourcomputerisequippedwiththefollowingitems:
•Built-inmicrophones
•Built-inspeakers
•Comboaudioconnector,3.5mm(0.14inch)indiameter
Yourcomputeralsohasanaudiochipthatenablesyoutoenjoyvariousmultimediaaudiofeatures,such
asthefollowing:
•PlaybackofMIDIandMP3files
•RecordingandplaybackofPCMandWAVfiles
•Recordingfromvarioussoundsources,suchasaheadsetattached
Thefollowingtableshowswhichfunctionsoftheaudiodevicesattachedtotheconnectorsonyourcomputer
ordockingstationaresupported.
Table3.Audiofeaturelist
ConnectorHeadsetwitha3.5mm
(0.14–inch)4-poleplug
ConventionalheadphoneConventionalmicrophone
ComboaudioconnectorHeadphoneand
microphonefunctions
supported
Headphonefunction
supported
Notsupported
Toconfigurethemicrophoneforoptimalsoundrecording,usetheRealtekHDAudioManagerprogram.To
starttheprogram,gotoControlPanelandclickHardwareandSound➙RealtekHDAudioManager.
Usingthecamera
Ifyourcomputerhasacamera,youcanusethecameratopreviewyourvideoimageandtakeasnapshot
ofyourcurrentimage.
Tostartthecamera,dothefollowing:
•ForWindows7:StarttheCommunicationsUtilityprogram.See“AccessingLenovoprogramsonthe
Windows7operatingsystem”onpage14.
•ForWindows8andWindows8.1:ClickCamerafromtheStartscreen.
Whenthecameraisstarted,thegreencamera-in-useindicatorturnson.
Youalsocanusetheintegratedcamerawithotherprogramsthatprovidefeaturessuchasphotographing,
videocapturing,andvideoconferencing.Tousetheintegratedcamerawithotherprograms,openoneofthe
programsandstartthephotographing,videocapturing,orvideoconferencingfunction.Then,thecamera
Chapter2.Usingyourcomputer43
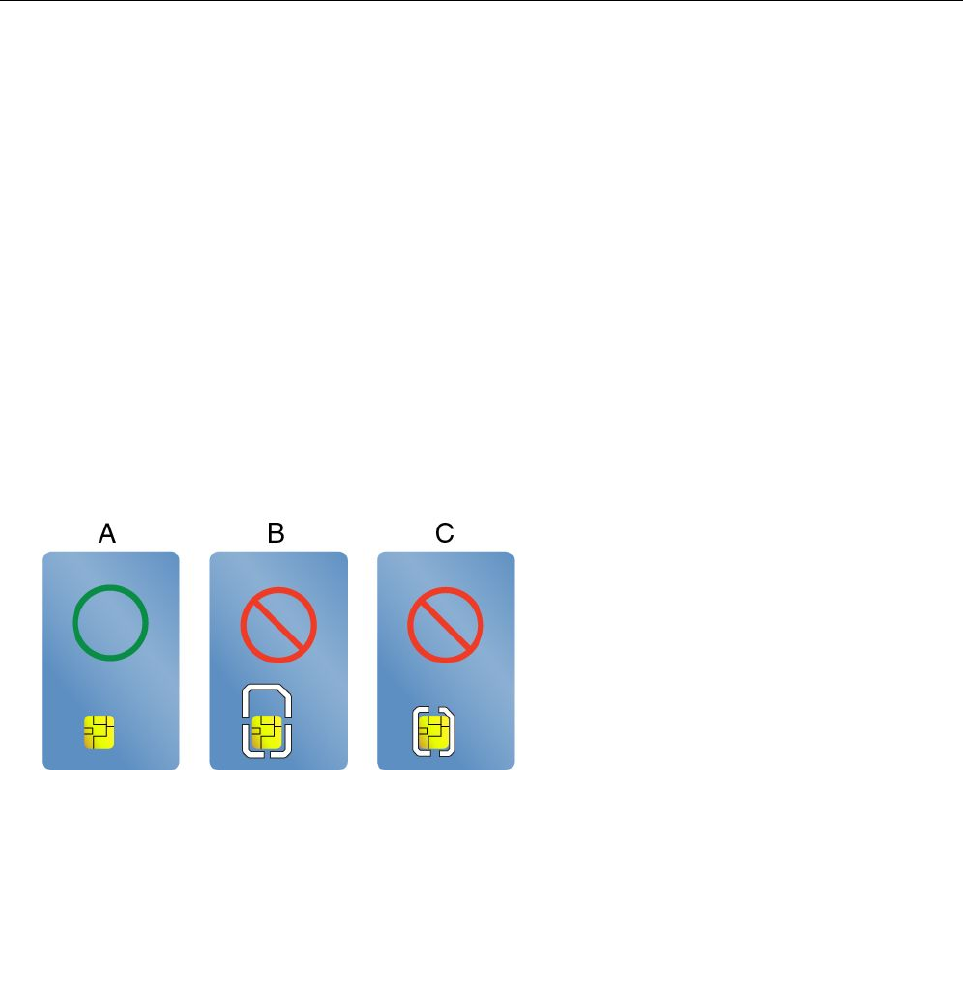
willstartautomaticallyandthegreencamera-in-useindicatorwillturnon.Formoreinformationaboutusing
thecamerawithaprogram,refertothehelpinformationsystemoftheprogram.
Configuringcamerasettings
Youcanconfigurethecamerasettingstomeetyourneeds,suchasadjustingthequalityofthevideooutput.
Toconfigurethecamerasettings,dothefollowing:
•ForWindows7:StarttheCommunicationsUtilityprogramandconfigurethecamerasettingsasdesired.
•ForWindows8andWindows8.1,dooneofthefollowing:
–Configurethecamerasettingsdirectlyfromtheprogramthatisusingthecamera.Formoreinformation,
seethehelpinformationsystemoftheprogram.
–ClickLenovoSettingsfromtheStartscreen.ThenclickCamera.Followtheinstructionsonthe
screentoconfigurethecamerasettingsasdesired.
Usingaflashmediacardorasmartcard
Yourcomputermighthaveamediacardreaderslotorasmartcardslot.Itsupportsthefollowingcards:
•MultiMediaCard(MMC)
•SecureDigitaleXtended-Capacity(SDXC)card
•SecureDigital(SD)card
•SecureDigitalHigh-Capacity(SDHC)card
Note:YourcomputerdoesnotsupporttheCPRMfeaturefortheSDcard.
Attention:
•Whiletransferringdatatoorfromaflashmediacard,suchasanSDcard,donotputyourcomputerinto
sleeporhibernationmodebeforethedatatransferiscompleted;otherwise,yourdatacouldbecome
damaged.
•Dependingonthemodel,thecomputermightalsohaveanintegratedsmart-cardreader.Ensurethat
youinsertacorrecttypeofsmartcard(asshowninfigureA)intothesmart-cardreader.Donotinsert
anon-supportcardoracardwithslits(asshowninfigureBandfigureC)intothesmart-cardreader.
Otherwise,thesmartcardreadermightgetdamaged.
Insertingaflashmediacard
Attention:Beforehandlingacard,touchametalobjecttoreduceanystaticelectricityfromyourbody.The
staticelectricitycoulddamagethecard.
Toinsertaflashmediacard,dothefollowing:
44UserGuide

1.Ensurethatthecardiscorrectlypositioned.
2.Insertthecardfirmlyintothe4-in-1mediacardreaderslotorsmartcardslot.
Iftheplug-and-playfeatureisnotenabledfortheinstalledflashmediacard,dothefollowingtoenable
thefeature:
1.OpenControlPanel.
2.ClickHardwareandSound.
3.ClickDeviceManager.Ifyouarepromptedforanadministratorpasswordorconfirmation,typethe
passwordorprovideconfirmation.
4.FromtheActionmenu,selectAddlegacyhardware.TheAddHardwareWizardstarts.
5.Followtheinstructionsonthescreen.
Removingaflashmediacard
Attention:
•Stopalltheactivitiesinvolvingthecardbeforeremovingit.Otherwise,dataonthecardmightbe
damagedorlost.
•Donotremoveacardwhilethecomputerisinsleepmodeorhibernationmode.Otherwise,thesystem
mightnotrespondwhenyoutrytoresumeoperation.
Toremoveaflashmediacard,dothefollowing:
1.ClickthetriangulariconintheWindowsnotificationareatoshowhiddenicons.Then,right-clickthe
SafelyRemoveHardwareandEjectMediaicon.
2.Selecttheitemyouwanttoremovetostopthecard.
3.Pressthecardtoejectitfromyourcomputer.
4.Removethecardandstoreitsafelyforfutureuse.
Note:IfyoudonotremovethecardfromyourcomputerafteryouejectthecardfromtheWindowsoperating
system,thecardcannolongerbeaccessed.Toaccessthecard,youmustremoveitfirst,theninsertitagain.
Chapter2.Usingyourcomputer45

46UserGuide
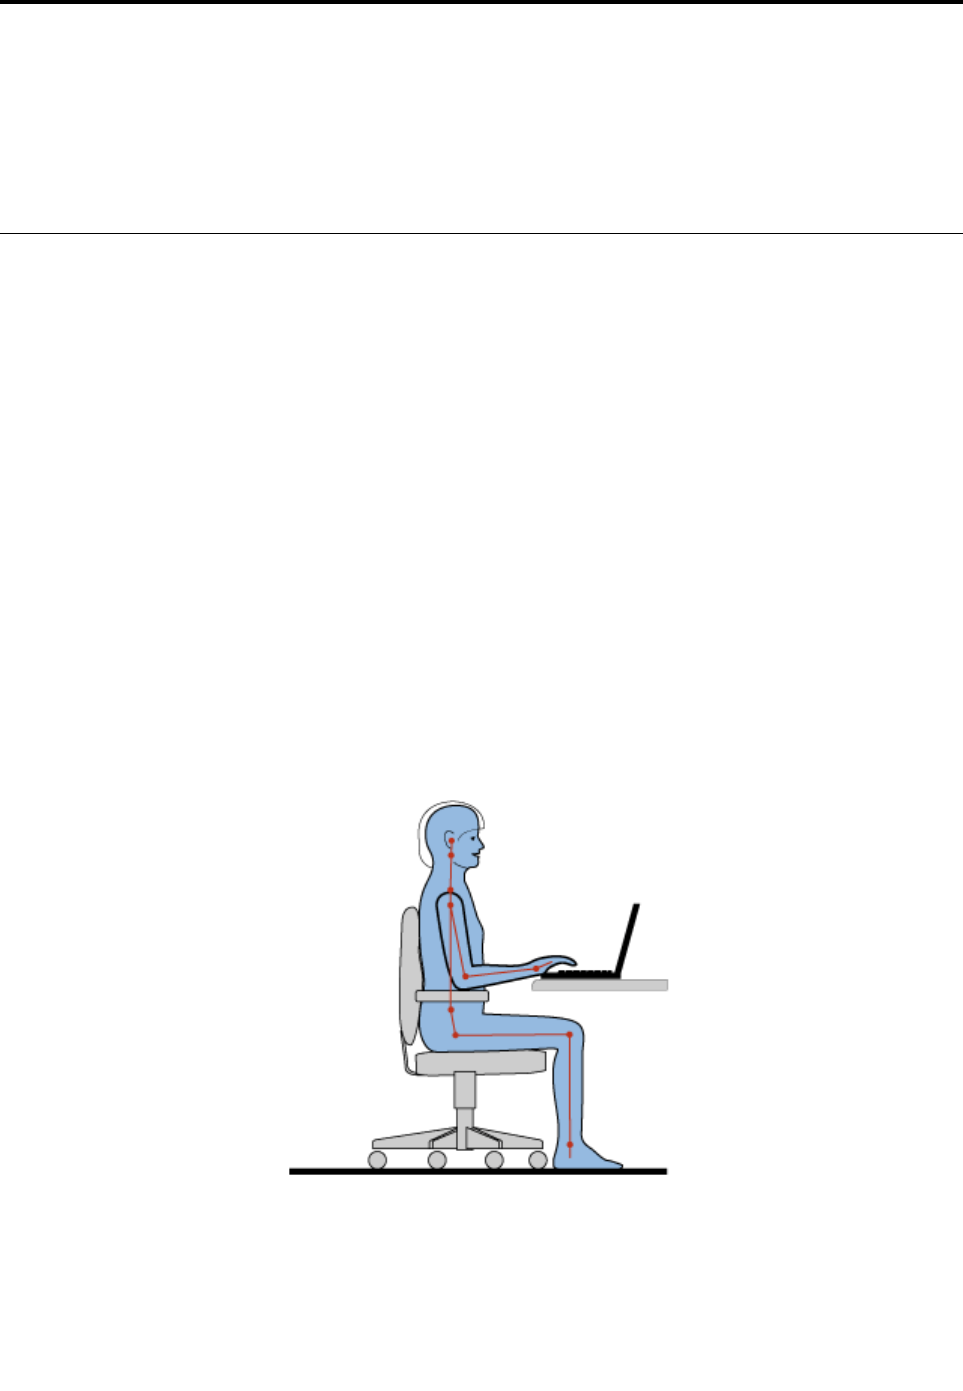
Chapter3.Youandyourcomputer
Thischapterprovidesinformationaboutaccessibility,comfort,andtravelingwithyourcomputer.
•“Accessibilityandcomfort”onpage47
•“Travelingwithyourcomputer”onpage49
Accessibilityandcomfort
Goodergonomicpracticeisimportanttogetthemostfromyourpersonalcomputerandtoavoiddiscomfort.
Arrangeyourworkplaceandtheequipmentyouusetosuityourindividualneedsandthekindofwork
thatyouperform.Inaddition,usehealthyworkhabitstomaximizeyourperformanceandcomfortwhile
usingyourcomputer.
Thefollowingtopicsprovideinformationaboutarrangingyourworkarea,settingupyourcomputer
equipment,andestablishinghealthyworkhabits.
Lenovoiscommittedtoprovidingthelatestinformationandtechnologytoourcustomerswithdisabilities.
Refertoouraccessibilityinformationwhichoutlinesoureffortsinthisarea.See“Accessibilityinformation”
onpage48.
Ergonomicinformation
Workinginthevirtualofficemightmeanadaptingtofrequentchangesinyourenvironment.Forexample,
adaptingtothesurroundinglightsources,properseating,andtheplacementofyourcomputerhardware,
canhelpyouimproveyourperformanceandachievegreatercomfort.
Thefollowingexampleshowssomeoneinaconventionalsetting.Evenwhennotinsuchasetting,youcan
followmanyofthesetips.Developgoodhabits,andtheywillserveyouwell.
Generalposture:Makeminormodificationsinyourworkingposturetodetertheonsetofdiscomfort
causedbylongperiodsofworkinginthesameposition.Frequent,shortbreaksfromyourworkalsohelp
topreventminordiscomfortassociatedwithyourworkingposture.
©CopyrightLenovo2013,201447

Display:Positionthedisplaytomaintainacomfortableviewingdistanceof510-760mm(20-30inches).
Avoidglareorreflectionsonthedisplayfromoverheadlightingoroutsidesourcesoflight.Keepthedisplay
screencleanandsetthebrightnesstolevelsthatenableyoutoseethescreenclearly.PressF5orF6
toadjustdisplaybrightness.
Headposition:Keepyourheadandneckinacomfortableandneutral(vertical,orupright)position.
Chair:Useachairthatgivesyougoodbacksupportandseatheightadjustment.Usechairadjustmentsto
bestsuityourdesiredposture.
Armandhandposition:Keepyourforearms,wrists,andhandsinarelaxedandneutral(horizontal)position.
Typewithasofttouchwithoutpoundingthekeys.
Legposition:Keepyourthighsparalleltothefloorandyourfeetflatonthefloororonafootrest.
Whatifyouaretraveling?
Itmightnotbepossibletoobservethebestergonomicpracticeswhenyouareusingyourcomputerwhile
onthemoveorinacasualsetting.Regardlessofthesetting,trytoobserveasmanyofthesetipsas
possible.Sittingproperlyandusingadequatelighting,forexample,willhelpyoumaintaindesirablelevels
ofcomfortandperformance.
Questionsaboutvision?
ThevisualdisplayscreensofThinkPadnotebookcomputersaredesignedtomeetthehigheststandards
andtoprovideyouwithclear,crispimagesandlarge,brightdisplaysthatareeasytosee,yeteasyonthe
eyes.Ofcourse,anyconcentratedandsustainedvisualactivitycanbetiring.Ifyouhavequestionsoneye
fatigueorvisualdiscomfort,consultavisioncarespecialistforadvice.
Comfort
Observethefollowingguidelinestoachievegreatercomfortandimproveperformance.
Activesittingandrestbreaks:Thelongeryousitandworkwithyourcomputer,themoreimportantitisto
observeyourworkingposture.Follow“Ergonomicinformation”onpage47andpractice“activesitting”to
avoiddiscomfortassociatedwithyourworkingpostures.Makingminorvoluntaryposturalchangesand
takingshortfrequentworkbreaksarethekeyingredientsforhealthycomputing.Yourcomputerislightand
mobile;youcaneasilyrepositionyourworkingsurfacetoaccommodatemanyposturemodifications.
Workareasetupoptions:Familiarizeyourselfwithallofyourofficefurnituresothatyouknowhowtoadjust
yourworksurface,seat,andotherworktoolstoaccommodateyourpreferencesforcomfort.Ifyourwork
areaisnotinanofficesetting,besuretotakespecialnoteofemployingactivesittingandtakingwork
breaks.ManyThinkPadproductsolutionsareavailabletohelpyoumodifyandexpandyourcomputerto
bestsuityourneeds.Youcanfindsomeoftheseoptionsathttp://www.lenovo.com/essentials.Exploreyour
optionsfordockingsolutionsandexternalproductsthatprovidetheadjustabilityandfeaturesthatyouwant.
Accessibilityinformation
Lenovoiscommittedtoprovidingpeoplewithdisabilitiesgreateraccesstoinformationandtechnology.
Asaresult,thefollowinginformationprovideswaystohelpusersthathavehearing,vision,andmobility
limitationsgetthemostoutoftheircomputerexperience.
Assistivetechnologiesenableuserstoaccessinformationinthemostappropriateway.Someofthese
technologiesarealreadyprovidedinyouroperatingsystem.Otherscanbepurchasedthroughvendors,or
accessedthroughtheWorldWideWebhttp://www.lenovo.com/healthycomputing.
48UserGuide

Assistivetechnologies
SomeaccessibilitytechnologiesareavailablethroughtheAccessibilityOptionsprogram.Depending
onyouroperatingsystem,thenumberofaccessibilityoptionsavailablevaries.Ingeneral,accessibility
optionsenhancethewayuserswithhearing,vision,ormobilitylimitationsnavigateandusetheircomputer.
Forexample,someusersmightnothavethefinemotorskillsrequiredtouseamouseorselectkey
combinations.Otherusersmightrequirelargerfontsorhigh-contrastdisplaymodes.Insomecases,
magnifiersandbuilt-inspeechsynthesizersareavailable.Fordetailedinformationabouteachofthese
features,consulttheMicrosofthelpinformationsystem.
TousetheAccessibilityOptionsprogram,gotoControlPanelandclickEaseofAccess➙Easeof
AccessCenter.
Screen-readertechnologies
Screen-readertechnologiesareprimarilyfocusedonsoftwareprograminterfaces,helpinformationsystems,
andavarietyofonlinedocuments.However,inthecasewhereascreenreadercannotreaddocuments,
thedocumentmustfirstgothroughaconversionprocess.OnesolutionconvertsAdobePDFfilesintoa
formatthatisreadbythescreen-readerprograms.ThissolutionisaWeb-basedserviceprovidedbyAdobe
SystemsIncorporated.Throughhttp://access.adobe.com,AdobePDFdocumentscanbeconvertedto
HTMLorplaintextinmanylanguages.OneconversionoptionconvertsPDFdocumentsontheInternet.A
secondoptionenablesuserstosubmittheURLofanAdobePDFfilethroughe-mailtoconvertittoHTMLor
ASCIItext.AdobePDFfilesonalocalharddiskdrive,localCD-ROM,orLANalsocanbeconvertedby
attachingtheAdobePDFfiletoane-mailmessage.
Personalizedkeyboard
Thetactilebumpsonthekeyboardprovideareferencepointfromwhichyoucaneasilylocateallkeyson
thekeyboardwithoutvisualassistance.
Toadjustyourkeyboardsettings,openControlPanel,clickEaseofAccess➙EaseofAccessCenter,
andthenclickMakethekeyboardeasiertouse.
TodisableorenabletheFnLockfunctionintheKeyboardPropertieswindow,ratherthanpressingthe
Fn+Esckeycombination,dothefollowing:
1.GotoControlPanel.ChangetheviewofControlPanelfromCategorytoLargeiconsorSmallicons.
2.ClickKeyboard.IntheKeyboardPropertieswindow,clicktheThinkPadF1-F12keystab.
3.Selecttheoptionofyourpreference:
•TodisabletheFnLockfunction,selectDefault.TheFnLockindicatorisoff.Toinitiatethespecial
functionprintedasanicononeachkey,pressthefunctionkeydirectly.ToinputF1-F12,press
theFnkeyandthecorrespondingfunctionkey.
•ToenabletheFnLockfunction,selectLegacy.TheFnLockindicatorturnson.ToinputF1-F12,
pressthefunctionkeysdirectly.Toinitiatethespecialfunctionprintedasanicononeachkey,press
theFnkeyandthecorrespondingfunctionkey.
Travelingwithyourcomputer
Thistopicprovidesinformationtohelpyouworkwithyourcomputerwhenyouaretraveling.
Traveltips
Usethefollowingtraveltipstotravelmoreconfidentlyandefficientlywithyourcomputer.
•Althoughitissafetoallowyourcomputertogothroughthex-raymachinesatairportsecuritystations,it
isimportanttokeepyoureyesonthecomputeratalltimestopreventtheft.
Chapter3.Youandyourcomputer49

•Considerbringinganelectricaladapterforuseinanairplaneorautomobile.
•Ifyoucarryanacpoweradapter,detachtheaccordfromittoavoiddamagingthecord.
Traveltipsonairplanes
Ifyoucarryyourcomputerintoanairplane,takenoteofthefollowingtips:
•Ifyouintendtouseyourcomputerorwirelessservices(suchasInternetandBluetooth),checkwiththe
airlineforrestrictionsandavailabilityofservicesbeforeboardingtheairplane.Iftherearerestrictions
ontheuseofcomputerswithwirelessfeaturesontheairplane,youmustabidebythoserestrictions.If
necessary,disablewirelessfeaturesbeforeboarding.
•Becarefulabouttheseatinfrontofyouonairplanes.Angleyourcomputerdisplaysothatitdoesnotget
caughtwhenthepersoninfrontofyouleansback.
•Whentakingoff,remembertoturnoffyourcomputerorputitintohibernationmode.
Travelaccessories
Thefollowingisachecklistofitemstoconsiderpackingwhenyouaregoingtotravel:
•ThinkPadacpoweradapter
•MiniDisplayPorttoHDMIadapter
•Externalmouse,ifyouareaccustomedtousingone
•Ethernetcable
•Aqualitycarryingcasethatprovidesadequatecushionandprotection
•Externalstoragedevice
Ifyouaretravelingtoanothercountry,youmightwanttoconsideranacpoweradapterforthecountryto
whichyouaretraveling.
Topurchasetravelaccessories,gotohttp://www.lenovo.com/accessories.
50UserGuide
Chapter4.Security
Thischapterprovidesinformationabouthowtoprotectyourcomputerfromtheftandunauthorizeduse.
•“Usingpasswords”onpage51
•“Harddisksecurity”onpage55
•“Settingthesecuritychip”onpage56
•“Usingthefingerprintreader”onpage57
•“Noticeondeletingdatafromyourharddiskdriveorsolid-statedrive”onpage60
•“Usingfirewalls”onpage61
•“Protectingdataagainstviruses”onpage61
Usingpasswords
Youcanhelppreventyourcomputerfromunauthorizedusebyusingpasswords.Onceyousetapassword,
apromptisdisplayedonthescreeneachtimeyouturnonthecomputer.Enteryourpasswordattheprompt.
Youcannotusethecomputerunlessyoutypethecorrectpassword.
Ifyouhavesetapower-onpassword,asupervisorpassword,oraharddiskpassword,itunlocks
automaticallywhenthecomputerresumesfromsleepmode.
Note:IfaWindowspasswordhasbeenset,youwillbepromptedtoenterit.
Typingpasswords
Whenthisiconisdisplayed,typeapower-onpasswordorasupervisorpassword.
Whenthisiconisdisplayed,typeauserharddiskpassword.Totypeamasterharddiskpassword,
pressF1.Whentheiconchangesto,typethemasterharddiskpassword
Note:Toreturntotheicon,pressF1again.
Power-onpassword
Youcansetapower-onpasswordtohelpprotectyourcomputeragainstaccessbyunauthorizedusers.
Ifyousetapower-onpassword,thepasswordpromptisdisplayedonthescreenwheneveryouturnonthe
computer.Youmustenterthecorrectpasswordtostartusingthecomputer.
Setting,changing,orremovingapower-onpassword
Beforeyoustart,printtheseinstructions.
Toset,change,orremoveapower-onpassword,dothefollowing:
1.Restartthecomputer.Whenthelogoscreenisdisplayed,pressF1tostarttheThinkPadSetupprogram.
2.SelectSecurity➙Password➙Power-onPasswordbyusingthedirectionalkeys.
©CopyrightLenovo2013,201451

3.Dependingonyourneed,dooneofthefollowing:
•Tosetapassword,dothefollowing:
a.IntheEnterNewPasswordfield,typeadesiredpasswordandpressEnter.
b.IntheConfirmNewPasswordfield,retypethepasswordandpressEnter.
•Tochangeapassword,dothefollowing:
a.IntheEnterCurrentPasswordfield,typethecurrentpower-onpasswordandpressEnter.
b.IntheEnterNewPasswordfield,typethenewpower-onpasswordandpressEnter;thenretype
thepasswordintheConfirmNewPasswordfieldandEnter.
•Toremoveapassword,dothefollowing:
a.IntheEnterCurrentPasswordfield,typethecurrentpower-onpasswordandpressEnter.
b.LeavetheEnterNewPasswordandConfirmNewPasswordfieldsblank.PressEntertwice.
4.ASetupNoticewindowisdisplayed.PressEntertocontinue.
5.PressF10.ASetupConfirmationwindowisdisplayed.SelectYestosavetheconfigurationchanges
andexittheThinkPadSetupprogram.
Note:Youmightwanttorecordyourpasswordandstoreitinasafeplace.Otherwise,ifyouforgetthe
password,youhavetotakeyourcomputertoaLenovoreselleroramarketingrepresentativetohave
thepasswordcanceled.
Supervisorpassword
ThesupervisorpasswordprotectsthesysteminformationstoredintheThinkPadSetupprogram.Ifyouhave
setasupervisorpassword,noonecanchangetheconfigurationofthecomputerwithoutthepassword.It
providesthefollowingsecurityfeatures:
•Ifonlyasupervisorpasswordisset,apasswordpromptisdisplayedwhenyoutrytostarttheThinkPad
Setupprogram.UnauthorizeduserscannotaccesstheThinkPadSetupprogramwithoutthepassword.
•Thesystemadministratorcanusethesupervisorpasswordtoaccessacomputereveniftheuserofthat
computerhassetapower-onpassword.Thesupervisorpasswordoverridesthepower-onpassword.
•Ifbothasupervisorpasswordandapower-onpasswordareset,youcandothefollowingonlyifyou
havethesupervisorpassword:
–Changingordeletingthepower-onpassword
–Changingordeletingthesupervisorpassword
–Changingdateandtime
–Specifyingtheminimumlengthforpower-onpasswordandharddiskpassword
–Changingthesettingforthesecuritychip
–Erasingthefingerprintdata
–Enablingordisablingthefollowingfeatures:
–WakeonLANandFlashoverLAN
–LockUEFIBIOSSettings
–Passwordatunattendedboot
–BootDeviceListF12Option
–BootOrderLock
–FlashBIOSUpdatingbyEnd-Users
–Internalnetworkdevice
52UserGuide

–Internalwirelessdevice
–InternalBluetoothdevice
–InternalNetworkOptionROM
–InternalwirelessWANdevice
–Securitymode
–Fingerprintreaderpriority
Notes:
•ThesystemadministratorcansetthesamesupervisorpasswordonmanyThinkPadnotebookcomputers
tomakeadministrationeasier.
•WhenLockUEFIBIOSSettingsoptionisenabled,allBIOSsettingscannotbechanged.Tochange
thesettings,asupervisorpasswordisrequired.
Setting,changing,orremovingasupervisorpassword
Beforeyoustart,printtheseinstructions.
Onlyasystemadministratorcanset,change,orremoveasupervisorpassword.Toset,change,orremovea
supervisorpassword,dothefollowing:
1.Restartthecomputer.Whenthelogoscreenisdisplayed,pressF1tostarttheThinkPadSetupprogram.
2.SelectSecurity➙Password➙SupervisorPasswordbyusingthedirectionalkeys.
3.Dependingonyourneeds,dooneofthefollowing:
•Tosetapassword,dothefollowing:
a.IntheEnterNewPasswordfield,typeadesiredpasswordandpressEnter.
b.IntheConfirmNewPasswordfield,retypethepasswordandpressEnter.
•Tochangeapassword,dothefollowing:
a.IntheEnterCurrentPasswordfield,typethecurrentsupervisorpasswordandpressEnter.
b.IntheEnterNewPasswordfield,typethenewsupervisorpasswordandpressEnter;thenretype
thepasswordintheConfirmNewPasswordfieldandpressEnter.
•Toremoveapassword,dothefollowing:
a.IntheEnterCurrentPasswordfield,typethecurrentsupervisorpasswordandpressEnter.
b.LeavetheEnterNewPasswordandConfirmNewPasswordfieldsblank.PressEntertwice.
4.ASetupNoticewindowisdisplayed.PressEntertocontinue.
5.PressF10.ASetupConfirmationwindowisdisplayed.SelectYestosavetheconfigurationchanges
andexittheThinkPadSetupprogram.
Note:Youmightwanttorecordyourpasswordandstoreitinasafeplace.Thenexttimeyouopenthe
ThinkPadSetupprogram,youwillbepromptedtotypeyoursupervisorpasswordtoproceed.Ifyouforget
yoursupervisorpassword,Lenovocannotresetyourpassword.YoumusttakeyourcomputertoaLenovo
reselleroraLenovomarketingrepresentativetohavethesystemboardreplaced.Proofofpurchaseis
required,andafeewillbechargedforpartsandservice.
Harddiskpasswords
Thefollowingtwotypesofharddiskpasswordscanhelpprotecttheinformationstoredontheharddiskdrive:
•Userharddiskpassword
Chapter4.Security53

Ifauserharddiskpasswordhasbeenset,butnomasterharddiskpasswordhasbeen,theusermust
entertheuserharddiskpasswordtoaccessfilesandapplicationsontheharddiskdrive.
•Masterharddiskpassword
Themasterharddiskpasswordalsorequiresauserharddiskpassword.Themasterharddiskpassword
isusuallysetandusedbyasystemadministrator.Itenablestheadministratortoaccessanyharddisk
driveinasystemlikeamasterkey.Theadministratorsetsthemasterpassword;thenassignsauser
passwordforeachcomputerinthenetwork.Theusercanthenchangetheuserpasswordasdesired,but
theadministratorstillcangetaccessbyusingthemasterpassword.
Whenamasterharddiskpasswordisset,onlytheadministratorcanremovetheuserharddiskpassword.
Settingaharddiskpassword
Beforeyoustart,printtheseinstructions.
Tosetaharddiskpassword,dothefollowing:
1.Restartthecomputer.Whenthelogoscreenisdisplayed,pressF1tostarttheThinkPadSetupprogram.
2.SelectSecurity➙Password➙HarddiskxPasswordbyusingthedirectionalkeys.
3.Apasswordwindowisdisplayed.YouarepromptedtoselectUserorUser+Master.SelectUserif
youwanttosetonlyoneharddiskpassword.SelectUser+Masterifyouwanttosetauserharddisk
passwordandamasterharddiskpassword,forexampleifyouareanadministratororasupervisor.
•IfyouselectUser,dothefollowing:
a.Whenawindowfortypingthenewpasswordopens,typeyournewpasswordintheEnterNew
PasswordfieldandpressEnter.
b.IntheConfirmNewPasswordfield,retypethepasswordyoujustenteredandpressEnter.
•IfyouselectUser+Master,dothefollowing:
a.First,setauserharddiskpassword.Whenamessagewindowpromptsyoutosettheuserhard
diskpassword,pressEntertocontinue.TypeyournewuserharddiskpasswordintheEnter
NewPasswordfieldandpressEnter.RetypethepasswordintheConfirmNewPassword
fieldandpressEnter.
b.Then,setamasterharddiskpassword.Whenamessagewindowpromptsyoutosetthemaster
harddiskpassword.PressEntertocontinue.Typeyournewmasterharddiskpasswordinthe
EnterNewPasswordfieldandpressEnter.RetypethepasswordintheConfirmNewPassword
fieldandpressEnter.
4.ASetupNoticewindowisdisplayed.PressEntertocontinue.
5.PressF10.ASetupConfirmationwindowisdisplayed.SelectYestosavetheconfigurationchanges
andexittheThinkPadSetupprogram.
Thenexttimeyouturnonyourcomputer,typetheuserormasterharddiskpasswordtostartyourcomputer
andaccesstheoperatingsystem.
Changingorremovingaharddiskpassword
Tochangeorremovetheharddiskpassword,dothefollowing:
•IfyouareinUser+Masterharddiskmode,youcanselecteitherUserHDPorMasterHDPtochange
thepassword,dependingonyourneeds.
–IfyouselectUserHDPmode,followthefollowingstepstochangetheuserharddiskpassword:
1.TypethecurrentuserharddiskpasswordintheEnterCurrentPasswordfieldandpressEnter.
2.TypethenewpasswordintheEnterNewPasswordfieldandpressEnter;thenretypethe
passwordintheConfirmNewPasswordfieldandpressEnter.
54UserGuide

3.ASetupNoticewindowisdisplayed.PressEnteragaintocontinue.Theuserharddiskpassword
ischanged.
Note:TheharddiskpasswordcannotberemovedinUserHDPmode.
–IfyouselectMasterHDPmode,followthefollowingstepstochangethemasterharddiskpassword:
1.TypethecurrentmasterharddiskpasswordintheEnterCurrentPasswordfieldandpressEnter.
2.TypethenewmasterharddiskpasswordintheEnterNewPasswordfieldandpressEnter;then
retypethenewpasswordyoujustenteredintheConfirmNewPasswordfieldandpressEnter.
3.ASetupNoticewindowisdisplayed.PressEntertocontinue.Themasterharddiskpasswordis
changed.
Note:IfyouleavetheEnterNewPasswordandConfirmNewPasswordfieldsblankandpressEnter
twice,boththeuserandmasterharddiskpasswordsareremoved.
•IfyouareinUserharddiskmode,followthefollowingstepstochangetheuserharddiskpassword:
1.Followsteps1through7in“Settingaharddiskpassword”onpage54,typingyourpasswordto
starttheThinkPadSetupprogram.
2.TypethecurrentuserharddiskpasswordintheEnterCurrentPasswordfieldandpressEnter.
3.TypethenewpasswordintheEnterNewPasswordfieldandpressEnter;thenretypethenew
passwordintheConfirmNewPasswordfieldandpressEnter.
4.ASetupNoticewindowisdisplayed.PressEnteragaintocontinue.Theuserharddiskpasswordis
changed.
Note:IfyouleavetheEnterNewPasswordandConfirmNewPasswordfieldsblankandpressEnter
twice,theuserharddiskpasswordisremoved.
Tipsonusingtheharddiskpasswords
•YoucansettheminimumlengthofaharddiskpasswordthroughtheSecuritymenu.
•Ifyousetaharddiskpasswordofoversevencharacters,theharddiskdrivecanbeusedonlywitha
computerthatcanrecognizeaharddiskpasswordofoversevencharacters.Ifyoutheninstallthe
harddiskdriveinacomputerthatcannotrecognizeaharddiskpasswordthatcontainsmorethan
sevencharacters,youcannotaccessthedrive.
•Recordyourpasswordandstoreitinasafeplace.Ifyouforgettheuserharddiskpassword,orbothuser
andmasterharddiskpasswords,Lenovocannotresetyourpasswordsorrecoverdatafromtheharddisk
drive.YoumusttakeyourcomputertoaLenovoreselleroramarketingrepresentativetohavethehard
diskdrivereplaced.Proofofpurchaseisrequired,andafeewillbechargedforpartsandservice.
Harddisksecurity
Toprotectpasswordsfromunauthorizedsecurityattacks,refertothefollowingtipstomaximizesecurity:
•Setapower-onpasswordaswellasaharddiskpasswordforyourinternalsolid-statedriveorharddisk
drive.Refertotheproceduresin“Power-onpassword”onpage51and“Harddiskpasswords”onpage
53.Forsecurity,alongerpasswordisrecommended.
•ToprovidereliablesecurityfortheUEFIBIOS,usethesecuritychipandasecurityapplicationwitha
TrustedPlatformModulemanagementfeature.Referto“Settingthesecuritychip”onpage56.
Note:TheWindows7,Windows8andWindows8.1operatingsystemssupporttheTPMmanagement
feature.
•IfaDiskEncryptionharddiskdriveandEncryptionsolid-statedriveisinstalledinyourcomputer,besure
toprotectthecontentsofyourcomputermemoryfromunauthorizedaccessesbyuseofdriveencryption
Chapter4.Security55

software,suchasMicrosoftWindowsBitLocker®DriveEncryption,whichissupportedintheUltimateand
EnterpriseeditionsoftheWindows7operatingsystem,Windows8operatingsystemandWindows8.1
operatingsystem.See“UsingWindowsBitLockerDriveEncryption”onpage56.
•Beforeyoudisposeof,sell,orhandoveryourcomputer,deletedatastoredonit.Formoreinformation,
referto“Noticeondeletingdatafromyourharddiskdriveorsolid-statedrive”onpage60.
TheharddiskdrivebuiltintoyourcomputercanbeprotectedbytheUEFIBIOS.
UsingWindowsBitLockerDriveEncryption
Tohelpprotectyourcomputeragainstunauthorizedaccess,usethedriveencryptionsoftware,suchas
WindowsBitLockerDriveEncryption.
WindowsBitLockerDriveEncryptionisanintegralsecurityfeatureofWindows7,Windows8andWindows
8.1operatingsystems.ItissupportedintheUltimateandEnterpriseeditionsoftheWindows7and
ProfessionalandEnterpriseeditionsoftheWindows8andWindows8.1operatingsystems.Itcanhelpyou
protecttheoperatingsystemanddatastoredonyourcomputer,evenifyourcomputerislostorstolen.
BitLockerworksbyencryptingalluserandsystemfiles,includingtheswapandhibernationfiles.
BitLockerusesaTrustedPlatformModuletoprovideenhancedprotectionforyourdataandtoensureearly
bootcomponentintegrity.AcompatibleTPMisdefinedasaV1.2TPM.
TochecktheBitLockerstatus,gotoControlPanel,andclickSystemandSecurity➙BitLockerDrive
Encryption.
FormoreinformationaboutWindowsBitLockerDriveEncryption,seethehelpinformationsystemofthe
Windowsoperatingsystem,orsearchfor“MicrosoftWindowsBitLockerDriveEncryptionStep-by-Step
Guide”ontheMicrosoftWebsite.
DiskEncryptionharddiskdriveandEncryptionsolid-statedrive
SomemodelscontaintheDiskEncryptionharddiskdriveorEncryptionsolid-statedrive.Thisfeaturehelps
toprotectyourcomputeragainstsecurityattacksonmedia,NANDflash,ordevicecontrollersbyuseofa
hardwareencryptionchip.Fortheefficientuseoftheencryptionfeature,setaharddiskpasswordforthe
internalstoragedevice.
Settingthesecuritychip
Strictsecurityrequirementsareimposedonnetworkclientcomputersthattransferconfidentialinformation
electronically.Dependingontheoptionsyouordered,yourcomputermighthaveanembeddedsecuritychip,
acryptographicmicroprocessor.WiththesecuritychipandClientSecuritySolution,youcandothefollowing:
•Protectyourdataandsystem
•Strengthenaccesscontrols
•Securecommunications
Settingthesecuritychip
ThechoicesofferedontheSecurityChipsubmenuundertheSecuritymenuofThinkPadSetupareas
follows:
•SecurityChipSelection:SelectDiscreteTPMorIntelPTT.
•SecurityChip:Activate,inactivate,ordisablethesecuritychip.
•SecurityReportingOptions:Enableordisableeachsecurityreportingoption.
•ClearSecurityChip:Cleartheencryptionkey.
56UserGuide

Beforeyoustart,printtheseinstructions.
TosetanitemontheSecurityChipsubmenu,dothefollowing:
1.Restartthecomputer.Whenthelogoscreenisdisplayed,pressF1tostarttheThinkPadSetupprogram.
2.SelectSecurity➙SecurityChipbyusingthedirectionalkeys.
3.PressEnter.TheSecurityChipsubmenuopens.
4.Movetoanitemyouwanttosetbyusingthedirectionalkeys.Whentheitemishighlighted,pressEnter.
5.Setotheritemsthatyouwanttoset.
6.PressF10.ASetupConfirmationwindowisdisplayed.SelectYestosavetheconfigurationchanges
andexittheThinkPadSetupprogram..
Tosetthesecuritychip,youhavetostartClientSecuritySolution,andfollowtheinstructionsonthescreen.
Note:IfClientSecuritySolutionisnotpreinstalledonyourcomputer,downloadandinstallitfrom
http://www.lenovo.com/support.Thenfollowtheinstructionsonthescreen.
Tipsonusingthesecuritychip
•EnsurethatthesupervisorpasswordhasbeensetinThinkPadSetup.Otherwiseanyonecanchangethe
settingsforthesecuritychip.
•IfyouareusingClientSecuritySolution,handlethesecuritychipbydoingthefollowing:
–Donotclearthesecuritychip.Ifyoudo,thefunctionsassignedtothekeyswillbeerased.
–Donotdisablethesecuritychip.Ifyoudo,ClientSecuritySolutionwillnotwork.
•Ifthesecuritychipisremovedorreplaced,oranewonehasbeenadded,thecomputerwillnotstart.You
willhearfourcyclesoffourbeepseach,oryouwillseeerrormessage0176or0192.
•Ifthesecuritychipisinactiveordisabled,theClearSecurityChipoptionwillnotbedisplayed.
•Whenyouclearthesecuritychip,turnoffyourcomputerandthenturnitonagainafteryousetthe
securitychiptoActive.Otherwise,theClearSecurityChipoptionisnotdisplayed.
Usingthefingerprintreader
Dependingonthemodel,yourcomputermighthaveafingerprintreader.Fingerprintauthenticationcan
replaceyourpasswords,suchastheWindowspassword,power-onpassword,andharddiskpassword.In
thisway,youcanlogontoyourcomputersimplyandsecurely.
Toenablefingerprintauthentication,enrollyourfingerprintsfirst.Duringtheenrollment,thefingerprintsare
associatedwiththeWindowspasswordautomatically.Toassociateyourfingerprintswithyourpower-on
passwordandharddiskpassword,manuallycreateaconnection.
Enrollingyourfingerprints
Toenrollyourfingerprints,dothefollowing:
1.StarttheFingerprintManagerProprogram.ForinstructionsonhowtostarttheFingerprintManagerPro
program,see“Lenovoprograms”onpage14.
2.EntertheWindowspasswordasrequired.
3.Clicktheiconforthefingerthatyouwanttoenroll,andconstantlyswipeyourcorrespondingfinger
acrossthefingerprintreaderuntiltheenrollmentcompletes.Formoreinformation,see“Swipingyour
fingeroverthefingerprintreader”onpage58.
4.ClickFinish.Yourfingerprintisenrolledsuccessfully.
Chapter4.Security57
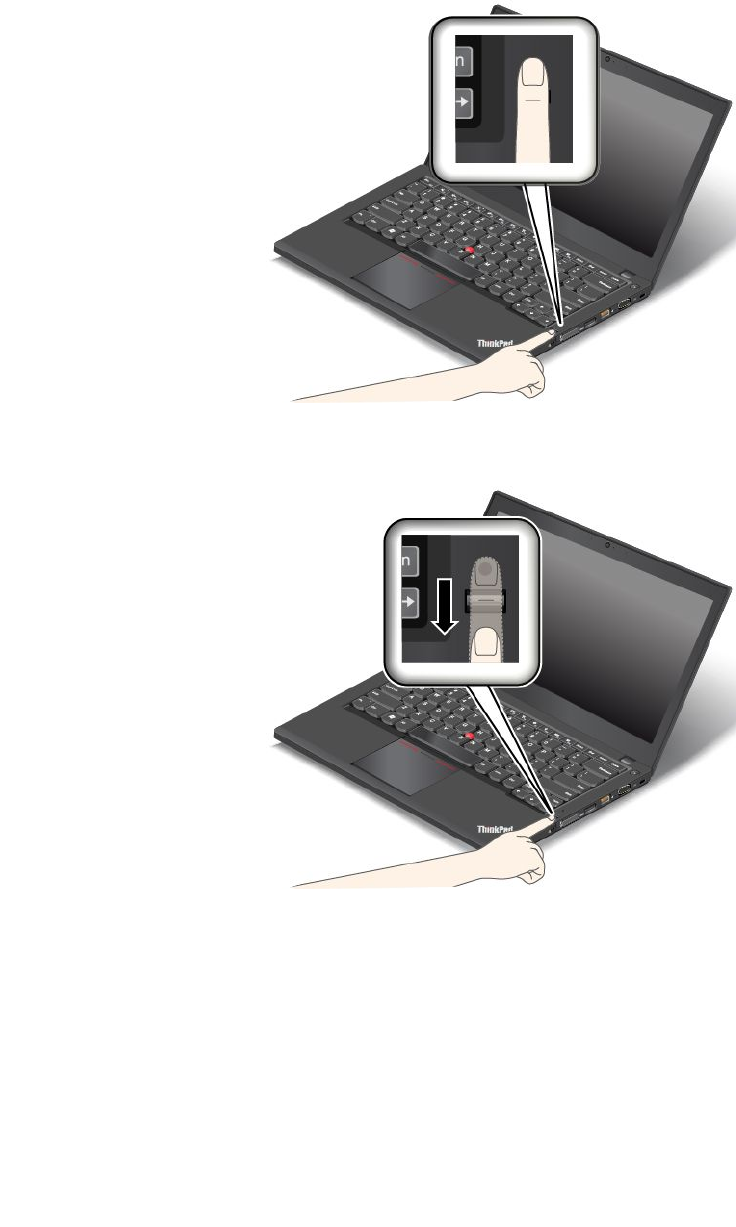
Note:Itisrecommendedthatyouenrollmorethanonefingerprintincaseofanyinjuriestoyourfingers.
Swipingyourfingeroverthefingerprintreader
Toswipeyourfingeroverthefingerprintreader,dothefollowing:
1.Placethetopjointofyourfingeronthesensor.
2.Applylightpressureandswipeyourfingertowardyouacrossthereaderinonesmoothmotion.Donot
liftyourfingerwhenyouareswipingit.
58UserGuide
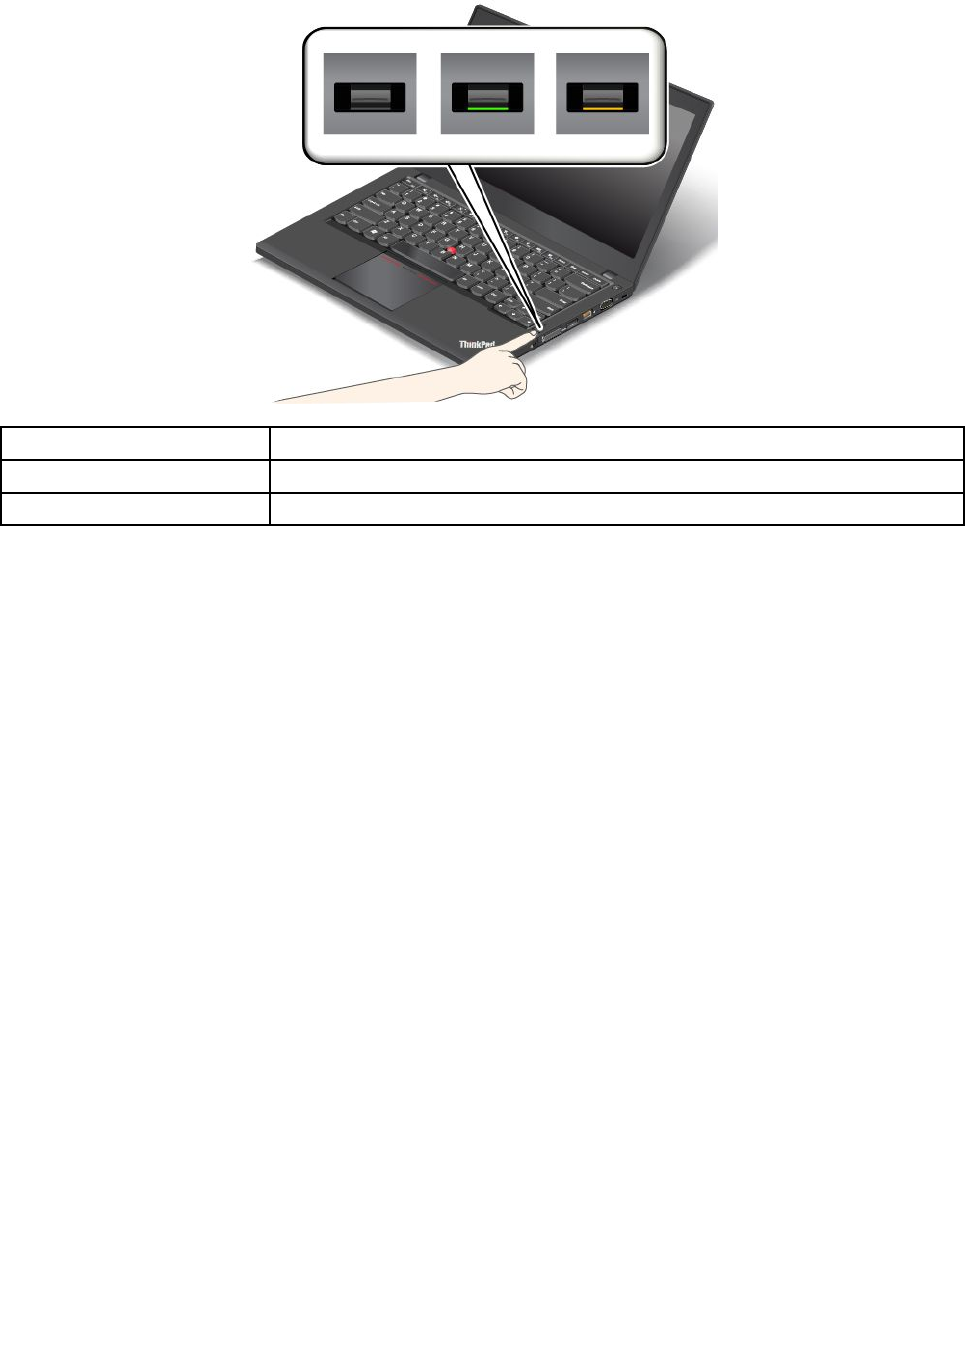
Indicatorbehaviorofthefingerprintreader
IndicatorbehaviorDescription
GreenThefingerprintreaderisreadyforswiping.
AmberThefingerprintcannotbeauthenticated.
Associatingyourfingerprintswithyourpower-onpasswordandharddiskpassword
Toassociateyourfingerprintswithyourpower-onpasswordandharddiskpassword,dothefollowing:
1.Turnoffandthenturnonthecomputer.
2.Whenprompted,swipeyourfingeroverthefingerprintreader.
3.Enteryourpower-onpassword,harddiskpassword,orbothasrequired.Theconnectioniscreated.
Whenyoustartthecomputeragain,youcanuseyourfingerprintstologontothecomputerwithnoneedto
enteryourWindowspassword,power-onpassword,andharddiskpassword.
Attention:Ifyoualwaysuseyourfingerprinttologontothecomputer,youmightforgetyourpasswords.
Writedownyourpasswords,andkeeptheminasafeplace.Ifyouforgetyourpower-onpassword,youmust
takeyourcomputertoaLenovoauthorizedserviceroramarketingrepresentativetohavethepassword
canceled.Ifyouforgetyourharddiskpassword,Lenovocannotresetyourpasswordorrecoverdata
fromtheharddiskdrive.YoumusttakeyourcomputertoaLenovoauthorizedserviceroramarketing
representativetohavetheharddiskdrivereplaced.Proofofpurchaseisrequired,andafeewillbecharged
forpartsandservice.
Settingthefingerprintreader
YoucansetthefingerprintreaderintheFingerprintManagerProprogram.Youalsocanchangesome
advancedsettingsintheThinkPadSetupprogram.
TochangethesettingsintheFingerprintManagerProprogram,clickSettingsontheprogrammain
interface.TochangethesettingsintheThinkPadSetupprogram,see“UsingtheThinkPadSetupprogram”
onpage109.
YoucansetthefollowingconfigurationsintheThinkPadSetupprogram:
•PredesktopAuthentication:Enablesordisablesfingerprintauthenticationbeforetheoperatingsystem
isloaded.
Chapter4.Security59

•ReaderPriority:Definesthepriorityforthefingerprintreadersifanexternalfingerprintreaderisattached.
•SecurityMode:Specifiesthesettingsofthesecuritymode.
•PasswordAuthentication:Enablesordisablesthepasswordauthentication.
Note:ThisitemisdisplayedonlyifHighsecuritymodeisenabled.
•ResetFingerprintData:Selectthisitemtoeraseallofthefingerprintdatastoredineithertheinternal
orexternalfingerprintreader.
Maintainingthefingerprintreader
Thefollowingactionscoulddamagethefingerprintreaderorcauseitnottoworkproperly:
•Scratchingthesurfaceofthereaderwithahard,pointedobject.
•Scrapingthesurfaceofthereaderwithyourfingernailoranythinghard.
•Usingortouchingthereaderwithadirtyfinger.
Ifyounoticeanyofthefollowingconditions,gentlycleanthesurfaceofthereaderwithadry,soft,lint-free
cloth:
•Thesurfaceofthereaderisdirtyorstained.
•Thesurfaceofthereaderiswet.
•Thereaderoftenfailstoenrollorauthenticateyourfingerprint.
Ifyourfingerhasanyofthefollowingconditions,youmightnotbeabletoregisterorauthenticateit:
•Yourfingeriswrinkled.
•Yourfingerisrough,dry,orinjured.
•Yourfingerisstainedwithdirt,mud,oroil.
•Thesurfaceofyourfingerisdifferentfromwhenyouenrolledyourfingerprint.
•Yourfingeriswet.
•Afingerisusedthathasnotbeenenrolled.
Toimprovethesituation,trythefollowing:
•Cleanorwipeyourhandstoremoveanyexcessdirtormoisturefromthefingers.
•Enrollanduseadifferentfingerforauthentication.
•Ifyourhandsaredry,applylotiontothem.
Formoreinformationonhowtousethefingerprintreader,refertothehelpsystemoftheFingerprint
ManagerProprogram.
Noticeondeletingdatafromyourharddiskdriveorsolid-statedrive
Someofthedatastoredontheharddiskdriveorsolid-statedrivemightbesensitive.Handingyour
computerovertosomeoneelsewithoutdeletingtheloadedsoftware,suchasoperatingsystemsand
applicationsoftware,mightevenviolatelicenseagreements.Besuretodeletedatastoredontheharddisk
driveorsolid-statedrivebeforeyoudisposeof,sell,orhandoveryourcomputer.
Youcanusethefollowingmethodstodeletedatafromtheharddiskdriveorsolid-statedrive:
•MovethedatatotheRecycleBin,andthenemptytheRecycleBin.
•Deletethedata.
60UserGuide

•Formatyourharddiskdriveorsolid-statedrive,usingthesoftwareforinitializingit.
•UsetherecoveryprogramprovidedbyLenovotobringtheharddiskdriveorsolid-statedrivebackto
thefactorydefaultsettings.
Theseoperations,however,onlychangethefilelocationofthedata;theydonotdeletethedataitself.In
otherwords,thedataretrievalprocessingisdisabledunderanoperatingsystemsuchasWindows.The
dataisstillthere,eventhoughitseemstobelost.Thus,itissometimespossibletoreadthedatabyuseof
specialsoftwarefordatarecovery.Thereisariskthatpeopleofbadfaithmightreadandmisusethecritical
dataonharddiskdrivesorsolid-statedrivesforunexpectedpurposes.
Topreventleakageofdata,itisimportantthatyoudeleteallthedatafromtheharddiskdrivewhenyou
disposeof,sell,orhandoveryourcomputer.Youcandestroythedataphysicallybysmashingtheharddisk
drivewithahammer,ormagneticallybymeansofstrongmagneticpower,thusmakingthedataunreadable.
Butitisrecommendedthatyouusethesoftware(payware)orservice(payservice)developedforthat
purpose.Theprocessmighttakeseveralhours.
Fordisposingofdataonthesolid-statedrive,LenovoprovidesDriveEraseUtilityforResettingthe
CryptographicKeyandErasingtheSolidStateDrivetool.Fordisposingofdataontheharddiskdrive,Lenovo
providestheSecureDataDisposalTMtool.Gotohttp://www.lenovo.com/supporttodownloadthesetools.
IfanEncryptionsolid-statedriveoraDiskEncryptionharddiskdriveissupportedandinstalledinyour
computer,youcanlogicallydisposeofallthedataonthedriveinashorttimebyerasingthecryptographic
key.Thedataencryptedwiththeoldkeyisnotphysicallyerasedbutremainsonthedrive;however,itcannot
bedecryptedwithouttheoldkey.ThisfeatureisalsoavailablewiththeDriveEraseUtilityforResettingthe
CryptographicKeyandErasingtheSolidStateDrivetool.
Usingfirewalls
Ifyoursystemispreinstalledwithafirewallprogram,itprotectsagainstcomputerInternetsecuritythreats,
unauthorizedaccesses,intrusions,andInternetattacks.Italsoprotectsyourprivacy.
Formoreinformationabouthowtousethefirewallprogram,refertothehelpinformationsystemthat
comeswiththeprogram.
Protectingdataagainstviruses
Yourcomputerispreinstalledwithanantivirusprogramsoyoucandetectandeliminateviruses.The
antivirusprogramisdesignedtohelpyoudetectandeliminateviruses.
Lenovoprovidesafullversionofantivirussoftwareonyourcomputerwithafree30-daysubscription.After
30days,youmustrenewthelicensetocontinuereceivingtheantivirussoftwareupdates.
Formoreinformationabouthowtouseyourantivirussoftware,refertothehelpinformationsystemof
yourantivirussoftware.
Chapter4.Security61

62UserGuide

Chapter5.Recoveryoverview
Thischapterprovidesinformationabouttherecoverysolutions.
•“RecoveryoverviewfortheWindows7operatingsystem”onpage63
•“RecoveryoverviewfortheWindows8andWindows8.1operatingsystems”onpage68
RecoveryoverviewfortheWindows7operatingsystem
ThissectionprovidesinformationabouttherecoverysolutionsprovidedbyLenovoontheWindows7
operatingsystem.
Notes:
•Thereareavarietyofmethodstochoosefromwhenconsideringhowtorecoverintheeventofa
software-relatedorhardware-relatedproblem.Somemethodsvarydependingonthetypeofyour
operatingsystem.
•Theproductontherecoverymediamightbeusedonlyforthefollowingpurposes:
–Restoretheproductpreinstalledonyourcomputer
–Reinstalltheproduct
–ModifytheproductusingtheAdditionalFiles
Topreventpotentialperformancerisksorunexpectedbehaviorthatmightbecausedbythenewharddisk
drivetechnology,itisrecommendedthatyouuseoneofthefollowingback-upsoftwareprograms:
•ThinkVantageRescueandRecoveryversion4.3orlater
•AcronisTrueImage2010orlater
•ParagonBackup&Recovery10Suiteorlater,ParagonBackup&Recovery10Homeorlater
Creatingandusingrecoverymedia
Youcanuserecoverymediatorestoretheharddiskdrivetothefactorydefaultsettings.Recoverymedia
areusefulifyoutransferthecomputertoanotherarea,sellthecomputer,recyclethecomputer,orputthe
computerinanoperationalstateafterallothermethodsofrecoveryhavefailed.Asaprecautionarymeasure,
itisimportanttocreaterecoverymediaasearlyaspossible.
Note:Therecoveryoperationsyoucanperformusingrecoverymediavarydependingontheoperating
systemfromwhichtherecoverymediawerecreated.Therecoverymediamightcontainabootmedium
andadatamedium.YourMicrosoftWindowslicensepermitsyoutocreateonlyonedatamedium,soitis
importantthatyoustoretherecoverymediainasafeplaceafteryouhavemadethem.
Creatingrecoverymedia
Thissectionprovidesinstructionsonhowtocreaterecoverymedia.
Note:OntheWindows7operatingsystem,youcancreaterecoverymediausingdiscsorexternalUSB
storagedevices.
TocreaterecoverymediaontheWindows7operatingsystem,clickStart➙AllPrograms➙Lenovo
ThinkVantageTools➙FactoryRecoveryDisks.Then,followtheinstructionsonthescreen.
©CopyrightLenovo2013,201463

Usingrecoverymedia
OntheWindows7operatingsystem,youcanuserecoverymediatorestorethecomputertothefactory
defaultsettingsonly.Youcanuserecoverymediatoputthecomputerinanoperationalstateafterall
othermethodsofrecoveryhavefailed.
Attention:Whenyouuserecoverymediatorestorethecomputertothefactorydefaultsettings,allthefiles
currentlyontheharddiskdrivewillbedeletedandreplacedbythefactorydefaultsettings.
TouserecoverymediaontheWindows7operatingsystem,dothefollowing:
1.Dependingonthetypeofyourrecoverymedia,connectthebootmedium(memorykeyorotherUSB
storagedevice)tothecomputer,orinsertthebootdiscintotheopticaldrive.
2.RepeatedlypressandreleasetheF12keywhenturningonthecomputer.WhentheBootMenuwindow
opens,releasetheF12key.
3.SelectthedesiredstartupdeviceandpressEnter.Therestoreprocessbegins.
4.Followtheinstructionsonthescreentocompletetheoperation.
Note:Afterrestoringyourcomputertothefactorydefaultsettings,youmighthavetoreinstalldevicedrivers
forsomedevices.See“Reinstallingpreinstalledprogramsanddevicedrivers”onpage66.
Performingbackupandrecoveryoperations
TheRescueandRecoveryprogramenablesyoutobackupallyourharddiskdrivecontentsincludingthe
operatingsystem,datafiles,softwareprograms,andpersonalsettings.Youcandesignatewherethe
RescueandRecoveryprogramstoresthebackup:
•Inaprotectedareaofyourharddiskdrive
•Onthesecondaryharddiskdriveifasecondaryharddiskdriveisinstalledinyourcomputer
•OnanattachedexternalUSBharddiskdrive
•Onanetworkdrive
•Onrecordablediscs(arecordableopticaldriveisrequiredforthisoption)
Afteryouhavebackedupthecontentsontheharddiskdrive,youcanrestorethecompletecontentsofthe
harddiskdrive,restoreonlytheselectedfiles,orrestoreonlytheWindowsoperatingsystemandprograms.
Performingabackupoperation
ToperformabackupoperationusingtheRescueandRecoveryprogramontheWindows7operating
system,dothefollowing:
1.FromtheWindowsdesktop,clickStart➙AllPrograms➙LenovoThinkVantageTools➙Enhanced
BackupandRestore.TheRescueandRecoveryprogramopens.
2.IntheRescueandRecoverymainwindow,clicktheLaunchadvancedRescueandRecoveryarrow.
3.ClickBackupyourharddriveandselectbackupoperationoptions.Then,followtheinstructionson
thescreentocompletethebackupoperation.
Performingarecoveryoperation
ToperformarecoveryoperationusingtheRescueandRecoveryprogramontheWindows7operating
system,dothefollowing:
1.FromtheWindowsdesktop,clickStart➙AllPrograms➙LenovoThinkVantageTools➙Enhanced
BackupandRestore.TheRescueandRecoveryprogramopens.
2.IntheRescueandRecoverymainwindow,clicktheLaunchadvancedRescueandRecoveryarrow.
3.ClicktheRestoreyoursystemfromabackupicon.
64UserGuide

4.Followtheinstructionsonthescreentocompletetherecoveryoperation.
FormoreinformationaboutperformingarecoveryoperationfromtheRescueandRecoveryworkspace,see
“UsingtheRescueandRecoveryworkspace”onpage65.
UsingtheRescueandRecoveryworkspace
TheRescueandRecoveryworkspaceresidesinaprotected,hiddenareaofyourharddiskdrivethat
operatesindependentlyfromtheWindowsoperatingsystem.Itenablesyoutoperformrecoveryoperations
evenifyoucannotstarttheWindowsoperatingsystem.Youcanperformthefollowingrecoveryoperations
fromtheRescueandRecoveryworkspace:
•Rescuefilesfromyourharddiskdriveorfromabackup
TheRescueandRecoveryworkspaceenablesyoutolocatefilesonyourharddiskdriveandtransfer
themtoanetworkdriveorotherrecordablemedia,suchasaUSBdeviceoradisc.Thissolutionis
availableevenifyoudidnotbackupyourfilesorifchangesweremadetothefilessinceyourlastbackup
operation.YoualsocanrescueindividualfilesfromaRescueandRecoverybackuplocatedonyourlocal
harddiskdrive,aUSBdevice,oranetworkdrive.
•RestoreyourharddiskdrivefromaRescueandRecoverybackup
IfyouhavebackedupyourharddiskdriveusingtheRescueandRecoveryprogram,youcanrestorethe
harddiskdrivefromaRescueandRecoverybackup,evenifyoucannotstarttheWindowsoperating
system.
•Restoreyourharddiskdrivetothefactorydefaultsettings
TheRescueandRecoveryworkspaceenablesyoutorestorethecompletecontentsofyourharddiskdrive
tothefactorydefaultsettings.Ifyouhavemultiplepartitionsonyourharddiskdrive,youhavetheoption
torestorethefactorydefaultsettingstotheC:partitionandleavetheotherpartitionsintact.Becausethe
RescueandRecoveryworkspaceoperatesindependentlyfromtheWindowsoperatingsystem,youcan
restorethefactorydefaultsettingsevenifyoucannotstarttheWindowsoperatingsystem.
Attention:IfyourestoretheharddiskdrivefromaRescueandRecoverybackuporrestoretheharddisk
drivetothefactorydefaultsettings,allfilesontheprimaryharddiskdrivepartition(usuallydriveC:)willbe
deletedintherecoveryprocess.Ifpossible,makecopiesofimportantfiles.Ifyouareunabletostartthe
Windowsoperatingsystem,youcanusetherescuefilesfeatureoftheRescueandRecoveryworkspaceto
copyfilesfromyourharddiskdrivetoothermedia.
TostarttheRescueandRecoveryworkspace,dothefollowing:
1.Makesurethatthecomputeristurnedoff.
2.RepeatedlypressandreleasetheF11keywhenturningonthecomputer.Whenyouhearbeepsor
seealogoscreen,releasetheF11key.
3.IfyouhavesetaRescueandRecoverypassword,typeyourpasswordwhenprompted.TheRescue
andRecoveryworkspaceopensafterashortdelay.
Note:IftheRescueandRecoveryworkspacefailstoopen,see“Solvingrecoveryproblems”onpage67.
4.Dooneofthefollowing:
•Torescuefilesfromyourharddiskdriveorfromabackup,clickRescuefilesandfollowthe
instructionsonthescreen.
•TorestoreyourharddiskdrivefromaRescueandRecoverybackuportorestoreyourharddiskdrive
tothefactorydefaultsettings,clickRestoreyoursystemandfollowtheinstructionsonthescreen.
FormoreinformationaboutthefeaturesoftheRescueandRecoveryworkspace,clickHelp.
Note:Afterrestoringyourharddiskdrivetothefactorydefaultsettings,youmighthavetoreinstalldevice
driversforsomedevices.See“Reinstallingpreinstalledprogramsanddevicedrivers”onpage66.
Chapter5.Recoveryoverview65

Creatingandusingarescuemedium
Witharescuemedium,suchasadiscoraUSBharddiskdrive,youcanrecoverthecomputerfromfailures
thatpreventyoufromgainingaccesstotheRescueandRecoveryworkspaceonyourharddiskdrive.
Notes:
1.Therecoveryoperationsyoucanperformusingarescuemediumvarydependingontheoperating
system.
2.Therescuedisccanbestartedinalltypesofopticaldrives.
Creatingarescuemedium
TocreatearescuemediumontheWindows7operatingsystem,dothefollowing:
1.FromtheWindowsdesktop,clickStart➙AllPrograms➙LenovoThinkVantageTools➙Enhanced
BackupandRestore.TheRescueandRecoveryprogramopens.
2.IntheRescueandRecoverymainwindow,clicktheLaunchadvancedRescueandRecoveryarrow.
3.ClicktheCreateRescueMediaicon.TheCreateRescueandRecoveryMediawindowopens.
4.IntheRescueMediaarea,selectthetypeoftherescuemediumyouwanttocreate.Youcancreatea
rescuemediumusingadisc,aUSBharddiskdrive,orasecondaryinternalharddiskdrive.
5.ClickOKandfollowtheinstructionsonthescreentocreatearescuemedium.
Usingarescuemedium
Thissectionprovidesinstructionsonhowtousetherescuemediumyouhavecreated.
•Ifyouhavecreatedarescuemediumusingadisc,usethefollowinginstructionstousetherescuemedium:
1.Turnoffyourcomputer.
2.RepeatedlypressandreleasetheF12keywhenturningonthecomputer.WhentheBootMenu
windowisdisplayed,releasetheF12key.
3.IntheBootMenuwindow,selectthedesiredopticaldriveasthefirstbootdevice.Then,insertthe
rescuediscintotheopticaldriveandpressEnter.Therescuemediumstarts.
•IfyouhavecreatedarescuemediumusingaUSBharddiskdrive,usethefollowinginstructionsto
usetherescuemedium:
1.AttachtheUSBharddiskdrivetooneoftheUSBconnectorsonyourcomputer.
2.RepeatedlypressandreleasetheF12keywhenturningonthecomputer.WhentheBootMenu
windowopens,releasetheF12key.
3.IntheBootMenuwindow,selecttheUSBharddiskdriveasthefirstbootdeviceandpressEnter.
Therescuemediumstarts.
•Ifyouhavecreatedarescuemediumusingthesecondaryinternalharddiskdrive,setthesecondary
internalharddiskdriveasthefirstbootdeviceinthestartupdevicesequencetostarttherescuemedium.
Whentherescuemediumstarts,theRescueandRecoveryworkspaceopens.Thehelpinformationfor
eachfeatureisavailablefromtheRescueandRecoveryworkspace.Followtheinstructionstocomplete
therecoveryprocess.
Reinstallingpreinstalledprogramsanddevicedrivers
Yourcomputerhasprovisionsthatenableyoutoreinstallselectedfactory-installedprogramsanddevice
drivers.
Reinstallingpreinstalledprograms
Toreinstallselectedprograms,dothefollowing:
66UserGuide

1.Turnonyourcomputer.
2.GototheC:\SWTOOLSdirectory.
3.OpentheAPPSfolder.Thefoldercontainsseveralsubfoldersnamedforthevariouspreinstalled
applications.
4.Openthesubfolderfortheprogramyouarereinstalling.
5.Double-clickSetup,andthenfollowtheon-screenstepstoreinstalltheprogram.
Reinstallingpreinstalleddevicedrivers
Attention:Whenyoureinstalldevicedrivers,youarechangingthecurrentconfigurationofyourcomputer.
Reinstalldevicedriversonlywhenitisnecessarytocorrectaproblemwithyourcomputer.
Toreinstalladevicedriverforafactory-installeddevice,dothefollowing:
1.Turnonyourcomputer.
2.GototheC:\SWTOOLSdirectory.
3.OpentheDRIVERSfolder.Thefoldercontainsseveralsubfoldersnamedforthevariousdevices
installedinyourcomputer(forexample,AUDIOandVIDEO).
4.Openthesubfolderforthedevice.
5.Reinstallthedevicedriverbyoneofthefollowingmethods:
•Inthesubfolderforthedevice,lookforatextfile(afilewiththeextension.txt).Thetextfilecontains
informationonhowtoreinstallthatdevicedriver.
•Ifthesubfolderforthedevicecontainsafileofsetupinformation(afilewiththeextension.inf),you
canusetheAddNewHardwareprogram(intheWindowsControlPanel)toreinstallthedevicedriver.
Notalldevicedriverscanbereinstalledbyuseofthisprogram.IntheAddNewHardwareprogram,
whenpromptedforthedevicedriveryouwanttoinstall,clickHaveDiskandBrowse.Thenselect
thedevicedriverfilefromthedevicesubfolder.
•Inthesubfolderforthedevice,lookfortheexecutablefile(afilewiththeextension.exe).Double-click
thefile,andfollowtheinstructionsonthescreen.
Attention:Ifyouneedupdateddevicedriversforyourcomputer,donotdownloadthemfromtheWindows
UpdateWebsite.ObtainthemfromLenovo.Formoreinformation,see“Makingsuredevicedriversare
current”onpage126.
Solvingrecoveryproblems
IfyouareunabletoaccesstheRescueandRecoveryworkspaceortheWindowsenvironment,doone
ofthefollowing:
•UsearescuemediumtostarttheRescueandRecoveryworkspace.See“Creatingandusingarescue
medium”onpage66.
•Userecoverymediaifallothermethodsofrecoveryhavefailedandyouneedtorestoretheharddisk
drivetothefactorydefaultsettings.See“Performingbackupandrecoveryoperations”onpage64.
Note:IfyouareunabletoaccesstheRescueandRecoveryworkspaceortheWindowsenvironmentfrom
arescuemediumorrecoverymedia,youmightnothavetherescuedevice(aninternalharddiskdrive,a
disc,aUSBharddiskdrive,orotherexternaldevices)setasthefirstbootdeviceinthestartupdevice
sequence.Youmustfirstmakesurethatyourrescuedeviceissetasthefirstbootdeviceinthestartup
devicesequenceintheSetupUtilityprogram.See“Startupmenu”onpage119fordetailedinformation
abouttemporarilyorpermanentlychangingthestartupdevicesequence.Formoreinformationaboutthe
SetupUtilityprogram,see“UsingtheThinkPadSetupprogram”onpage109.
Chapter5.Recoveryoverview67

Itisimportanttocreatearescuemediumandasetofrecoverymediaasearlyaspossibleandstorethem
inasafeplaceforfutureuse.
RecoveryoverviewfortheWindows8andWindows8.1operating
systems
ThissectionprovidesinformationabouttherecoverysolutionsfortheWindows8andWindows8.1
operatingsystems.
AWindowsrecoveryimageispreinstalledintherecoverypartitiononyourcomputer.TheWindowsrecovery
imageenablesyoutorefreshyourcomputer,orresetyourcomputertothefactorydefaultsettings.
YoucancreaterecoverymediaasbackupsorreplacementfortheWindowsrecoveryimage.Withthe
recoverymedia,youcantroubleshootandfixtheproblemsonyourcomputerevenifyoucannotstartthe
Windows8orWindows8.1operatingsystem.Itisrecommendedthatyoucreaterecoverymediaasearlyas
possible.Formoreinformation,see“Creatingandusingrecoverymedia”onpage69.
Refreshingyourcomputer
Ifyourcomputerdoesnotperformwellandtheproblemmightbecausedbyarecentlyinstalledprogram,
youcanrefreshyourcomputerwithoutlosingyourpersonalfilesorchangingyoursettings.
Attention:Ifyourefreshyourcomputer,theprogramsthatcamewithyourcomputerandtheprogramsthat
youinstalledfromWindowsStorewillbereinstalled,butallotherprogramswillberemoved.
Torefreshyourcomputer,dothefollowing:
1.Dependingontheoperatingsystem,dooneofthefollowing:
•ForWindows8:
Moveyourpointertothetop-rightorbottom-rightcornerofthescreentodisplaythecharms.Click
Settings➙ChangePCsettings➙General.
•ForWindows8.1:
Moveyourpointertothetop-rightorbottom-rightcornerofthescreentodisplaythecharms.Click
Settings➙ChangePCsettings➙Updateandrecovery➙Recovery.
2.IntheRefreshyourPCwithoutaffectingyourfilessection,clickGetstarted.
3.Followtheinstructionsonthescreentorefreshyourcomputer.
Resettingyourcomputertothefactorydefaultsettings
Ifyouwanttorecycleyourcomputerorjuststartover,youcanresetyourcomputertothefactorydefault
settings.Resettingthecomputerwillreinstalltheoperatingsystem,reinstallalltheprogramsthatcamewith
yourcomputer,andresetallthesettingstothefactorydefaultsettings.
Attention:Ifyouresetthecomputertothefactorydefaultsettings,allyourpersonalfilesandsettingswillbe
deleted.Toavoiddataloss,makeabackupcopyofallthedatathatyouwanttokeep.
Toresetyourcomputertothefactorydefaultsettings,dothefollowing:
1.Dependingontheoperatingsystem,dooneofthefollowing:
•ForWindows8:
Moveyourpointertothetop-rightorbottom-rightcornerofthescreentodisplaythecharms.Click
Settings➙ChangePCsettings➙General.
•ForWindows8.1:
68UserGuide

Moveyourpointertothetop-rightorbottom-rightcornerofthescreentodisplaythecharms.Click
Settings➙ChangePCsettings➙Updateandrecovery➙Recovery.
2.IntheRemoveeverythingandreinstallWindowssection,clickGetstarted.ThenclickNextto
confirmtheoperation.
3.Dependingonyourneeds,dooneofthefollowing:
•Toperformaquickformat,clickJustremovemyfilestostarttheprocess.Theprocesswilltake
severalminutes.
•Toperformacompleteformat,clickFullycleanthedrivetostarttheprocess.Theprocesswill
takeseveralhours.
4.Followtheinstructionsonthescreentoresetyourcomputertothefactorydefaultsettings.
Usingtheadvancedstartupoptions
Withtheadvancedstartupoptions,youcanchangethefirmwaresettingsofthecomputer,changethe
startupsettingsoftheWindowsoperatingsystem,startthecomputerfromanexternaldevice,orrestorethe
Windowsoperatingsystemfromasystemimage.
Tousetheadvancedstartupoptions,dothefollowing:
1.Dependingontheoperatingsystem,dooneofthefollowing:
•ForWindows8:
Moveyourpointertothetop-rightorbottom-rightcornerofthescreentodisplaythecharms.Click
Settings➙ChangePCsettings➙General.
•ForWindows8.1:
Moveyourpointertothetop-rightorbottom-rightcornerofthescreentodisplaythecharms.Click
Settings➙ChangePCsettings➙Updateandrecovery➙Recovery.
2.IntheAdvancedstartupsection,clickRestartnow➙Troubleshoot➙Advancedoptions.
3.Selectadesiredstartupoption,thenfollowtheinstructionsonthescreen.
RecoveringyouroperatingsystemifWindows8orWindows8.1fails
tostart
TheWindowsrecoveryenvironmentonyourcomputeriscapableofoperatingindependentlyfromthe
Windows8orWindows8.1operatingsystem.Thisenablesyoutorecoverorrepairtheoperatingsystem
eveniftheWindows8orWindows8.1operatingsystemfailstostart.
Aftertwoconsecutivefailedbootattempts,theWindowsrecoveryenvironmentstartsautomatically.Then
youcanchooserepairandrecoveryoptionsbyfollowingtheinstructionsonthescreen.
Note:Ensurethatyourcomputerisconnectedtoacpowerduringtherecoveryprocess.
Creatingandusingrecoverymedia
YoucancreaterecoverymediaasbackupsfortheWindowsrecoveryenvironmentandtheWindows
recoveryimage.Ifyoucannotstartthecomputer,youcanuserecoverymediatotroubleshootandfixthe
problemsonyourcomputer.
Itisrecommendedthatyoucreaterecoverymediaasearlyaspossible.Onceyoucreaterecoverymedia,
keeptheminasafeplaceanddonotusethemtostoreotherdata.
Chapter5.Recoveryoverview69

Creatingrecoverymedia
Tocreaterecoverymedia,youneedaUSBdrivewithatleast8GBofstorage.TherequiredUSBcapacity
dependsonthesizeoftherecoveryimage.
Attention:CreatingrecoverymediawilldeleteanythingstoredontheUSBdrive.Toavoiddataloss,makea
backupcopyofallthedatathatyouwanttokeep.
Tocreaterecoverymedia,dothefollowing:
Note:Ensurethatyourcomputerisconnectedtoacpower.
1.Moveyourpointertothetop-rightorbottom-rightcornerofthescreentodisplaythecharms,and
clickSearch.
2.Dependingontheoperatingsystem,dooneofthefollowing:
•ForWindows8:
TyperecoveryintheSearchfieldandclickSettings.ThenclickCreatearecoverydrive.
•ForWindows8.1:
TyperecoveryintheSearchfieldandclicktheSearchbutton.ThenclickCreatearecoverydrive.
3.ClickYesintheUserAccountControlwindowtoallowtheRecoveryMediaCreatorprogramtostart.
4.EnsurethatyouselecttheCopytherecoverypartitionfromthePCtotherecoverydrive.option.
ThenclickNext.
Important:IfyoucleartheCopytherecoverypartitionfromthePCtotherecoverydrive.option,
youwillcreaterecoverymediawithouttherecoverypartitioncontent.Youstillcanstartthecomputer
fromtherecoverymedia,butyoumightbeunabletorecoveryourcomputeriftherecoverypartitionon
yourcomputerisdamaged.
5.ConnectaproperUSBdrivethenclickNext.
6.ClickCreateintheRecoveryDrivewindow.Thecreationoftherecoverymediastarts.
7.Whenthecreationoftherecoverymediafinishes,dooneofthefollowing:
•Tokeeptherecoverypartitiononyourcomputer,clickFinish.
•Todeletetherecoverypartitiononyourcomputer,clickDeletetherecoverypartition.
Attention:Ifyoudeletetherecoverypartitiononyourcomputer,dokeeptherecoverymediaina
safeplace.TheWindowsrecoveryimagewillnotbestoredinyourcomputeranymore,andyouwill
needtherecoverymediatorefreshorresetyourcomputer.
8.RemovetheUSBdrive.Therecoverymediaarecreatedsuccessfully.
Usingrecoverymedia
Ifyoucannotstartyourcomputer,orifyoucannotstarttheWindowsrecoveryimageonyourcomputer,use
recoverymediatorecoveryourcomputer.
Touserecoverymedia,dothefollowing:
Note:Ensurethatyourcomputerisconnectedtoacpower.
1.Turnonorrestartthecomputer.BeforetheWindowsoperatingsystemstarts,repeatedlypresstheF12
key.TheBootMenuwindowopens.
2.Selecttherecoverydriveasthebootdevice.
3.Selectapreferredlanguageandthenselectapreferredkeyboardlayout.
4.ClickTroubleshoottodisplaytheoptionalrecoverysolutions.
70UserGuide

5.Selectacorrespondingrecoverysolutionaccordingtoyoursituation.Forexample,selectResetyour
PCifyouwanttoresetyourcomputertothefactorydefaultsettings.
FormoreinformationabouttherecoverysolutionsprovidedbytheWindows8andWindows8.1operating
systems,goto:
http://go.microsoft.com/fwlink/?LinkID=263800
Chapter5.Recoveryoverview71

72UserGuide

Chapter6.Replacingdevices
Thischaptercontainsthefollowingitems:
•“Staticelectricityprevention”onpage73
•“Disablingthebuilt-inbattery”onpage73
•“InstallingorreplacingtheSIMcard”onpage74
•“Replacingtheexternalbatterypack”onpage75
•“Replacingthebasecoverassembly”onpage77
•“Replacingtheharddiskdriveorsolid-statedrive”onpage78
•“Replacingamemorymodule”onpage81
•“ReplacingthewirelessLANcard”onpage82
•“ReplacingthewirelessWANcard”onpage85
•“Replacingthekeyboard”onpage87
•“Replacingthecoin-cellbattery”onpage94
Staticelectricityprevention
Staticelectricity,althoughharmlesstoyou,canseriouslydamagecomputercomponentsandoptions.
Improperhandlingofstatic-sensitivepartscancausedamagetothepart.Whenyouunpackanoptionor
aCRU,donotopenthestatic-protectivepackagethatcontainsthepartuntiltheinstructionsdirectyou
toinstallthepart.
WhenyouhandleoptionsorCRUs,orperformanyworkinsidethecomputer,takethefollowingprecautions
toavoidstatic-electricitydamage:
•Limityourmovement.Movementcancausestaticelectricitytobuilduparoundyou.
•Alwayshandlecomponentscarefully.Handleadapters,memorymodules,andothercircuitboardsbythe
edges.Nevertouchexposedcircuitry.
•Preventothersfromtouchingcomponents.
•Whenyouinstallastatic-sensitiveoptionorCRU,touchthestatic-protectivepackagethatcontainsthe
parttoametalexpansion-slotcoverorotherunpaintedmetalsurfaceonthecomputerforatleasttwo
seconds.Thisreducesstaticelectricityinthepackageandyourbody.
•Whenpossible,removethestatic-sensitivepartfromthestatic-protectivepackageandinstallthepart
withoutsettingitdown.Whenthisisnotpossible,placethestatic-protectivepackageonasmooth,
levelsurfaceandplacethepartonthepackage.
•Donotplacethepartonthecomputercoverorothermetalsurface.
Disablingthebuilt-inbattery
Beforereplacinganydevices,ensurethatyouhavedisabledthebuilt-inbatterybydoingthefollowing:
1.Disconnecttheacpoweradapterandallcablesfromthecomputer.
2.Restartthecomputer.WhentheThinkPadlogoisdisplayed,pressF1tostarttheThinkPadSetup
program.
3.GotoConfig➙Power➙DisableBuilt-inBattery.
4.PressEnter.ASetupConfirmationwindowisdisplayed.
©CopyrightLenovo2013,201473
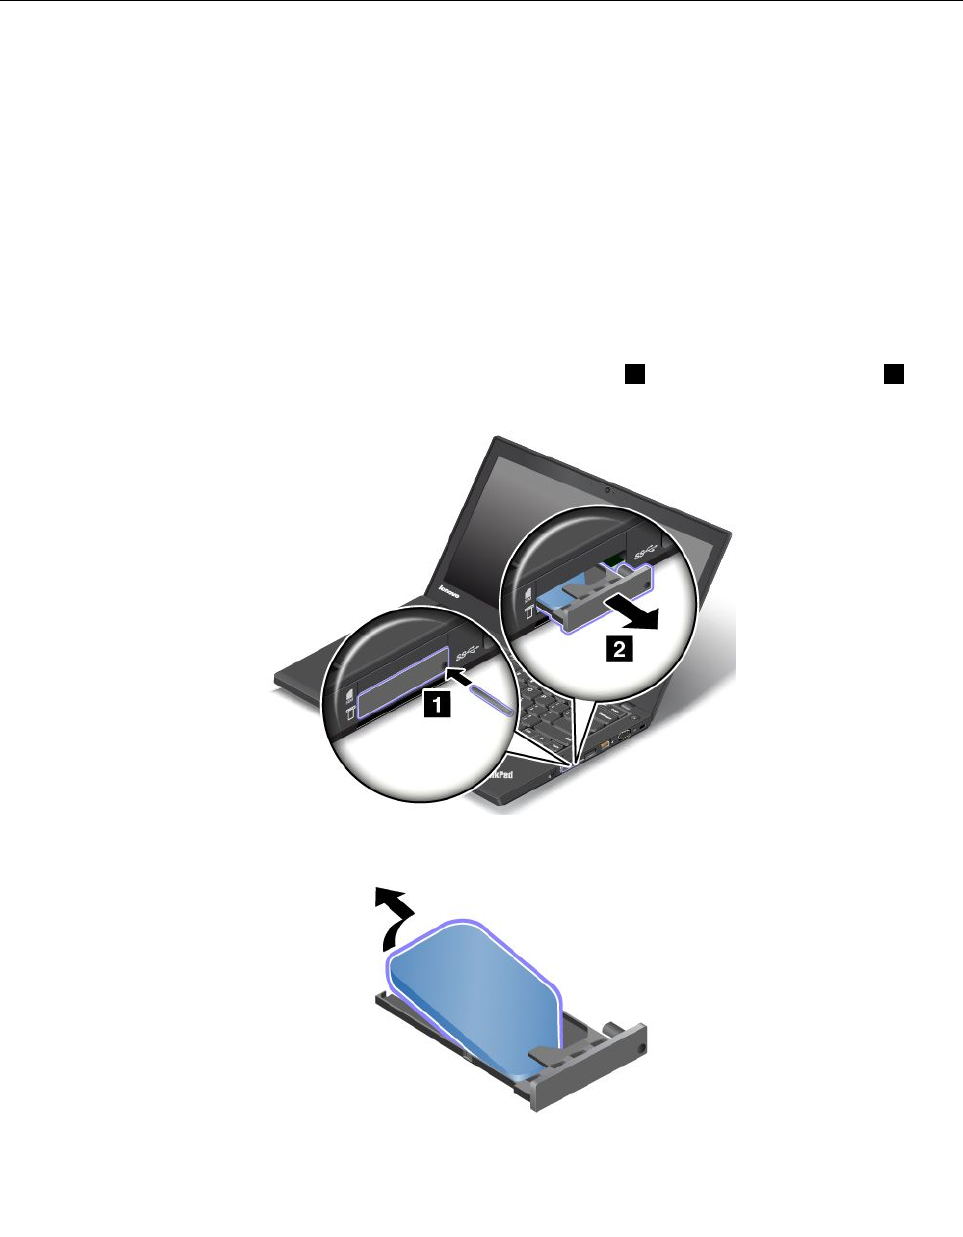
5.ClickYesintheSetupConfirmationwindow.Thebuilt-inbatteryisdisabledandthecomputerturnsoff.
Waitforafewminutestoletthecomputercool.
Thebuilt-inbatterywillbeautomaticallyenabledagainwhenthecomputerisconnectedtoanacpower
adapter.
InstallingorreplacingtheSIMcard
Beforeyoustart,printtheseinstructions.
SIMcardisasmallplasticcardwithIntegratedCircuit(IC)chipmountedononesideofthecard.
IfyourcomputersupportswirelessWANconnections,yourcomputermightrequireaSIMcardtoestablish
wirelessWANconnections.Dependingonthecountryorregionofdelivery,youmightneedtopurchase
aSIMcardoraSIMcardmightalreadybeinstalledinyourcomputerorispartoftheshippingcontents
thatcomewithyourcomputer.
ToinstallorreplacetheSIMcard,dothefollowing:
1.Disablethebuilt-inbattery.See“Disablingthebuilt-inbattery”onpage73.
2.LocatetheSIM-cardtrayattherightsideofthecomputer.
3.InsertastraightenedpaperclipintotheholeintheSIM-cardtray1.TheSIM-cardtrayejects2.
Then,slidetheSIM-cardtrayoutofthecomputer.
4.GentlytaketheSIMcardoutofthetray.
74UserGuide
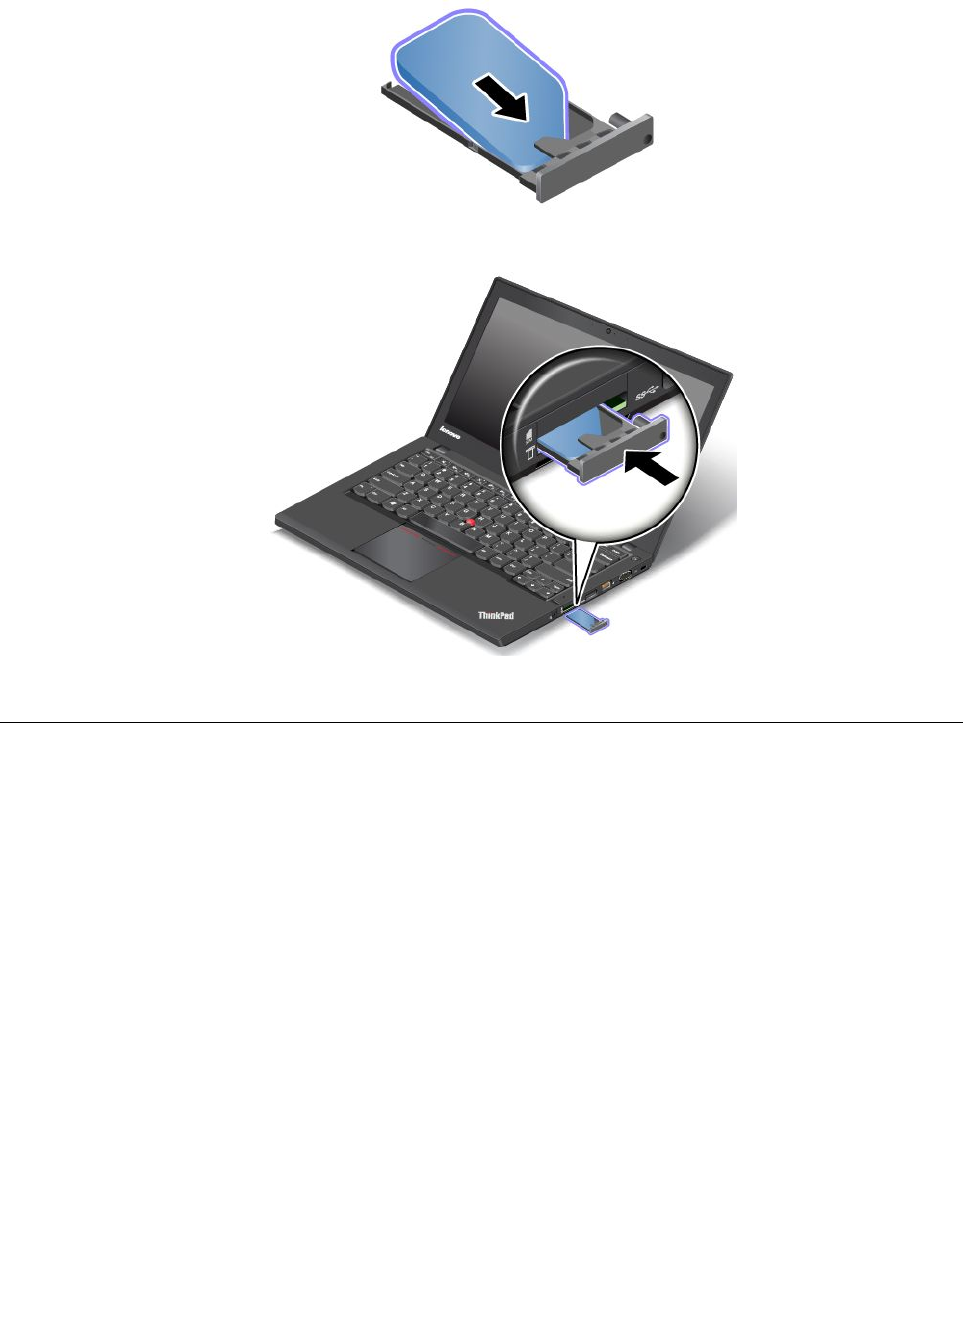
5.InstallanewSIMcardintothetray.
6.Insertthetrayintothecomputer.
7.Reconnecttheacpoweradapterandallcables.
Replacingtheexternalbatterypack
Beforeyoustart,printtheseinstructions.
ThissystemsupportsonlybatteriesspeciallydesignedforthisspecificsystemandmanufacturedbyLenovo
oranauthorizedbuilder.Thesystemdoesnotsupportunauthorizedbatteriesorbatteriesdesignedforother
systems.Ifanunauthorizedbatteryorabatterydesignedforanothersystemisinstalled,thesystemwill
notcharge.
Attention:Lenovohasnoresponsibilityfortheperformanceorsafetyofunauthorizedbatteries,and
providesnowarrantiesforfailuresordamagearisingoutoftheiruse.
Note:Ifanunauthorizedbatteryisinstalled,thefollowingmessagewillbedisplayed:
“Thebatteryinstalledisnotsupportedbythissystemandwillnotcharge.Pleasereplacethebattery
withthecorrectLenovobatteryforthissystem.”
Chapter6.Replacingdevices75
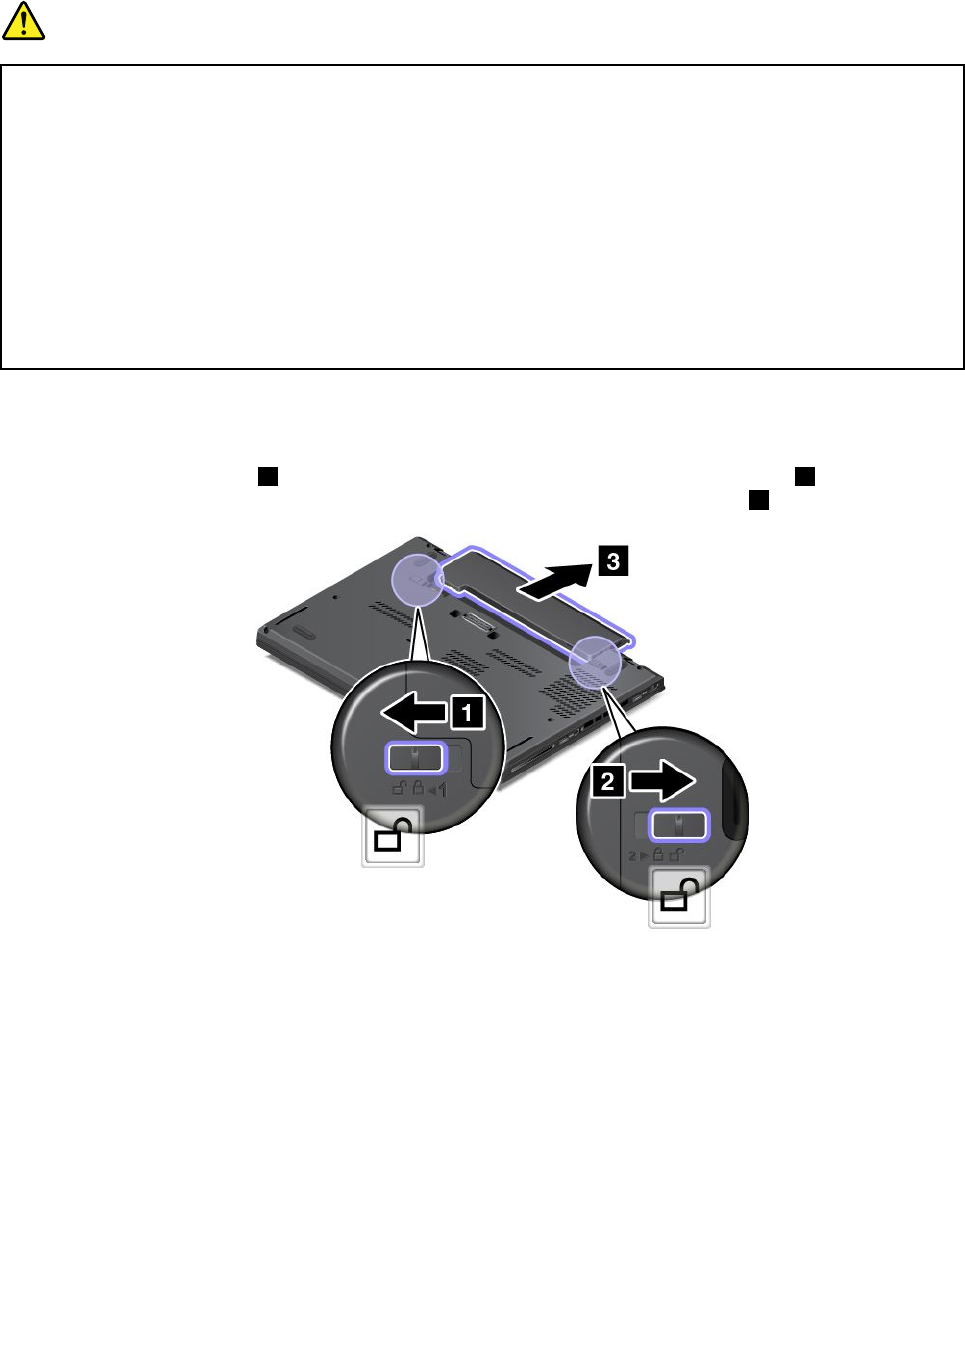
Prerequisitesfortheprocedure
DANGER
Iftherechargeablebatterypackisincorrectlyreplaced,thereisdangerofanexplosion.Thebattery
packcontainsasmallamountofharmfulsubstances.Toavoidpossibleinjury:
•ReplaceonlywithabatteryofthetyperecommendedbyLenovo.
•Keepthebatterypackawayfromfire.
•Donotexposeittoexcessiveheat.
•Donotexposeittowaterorrain.
•Donotshort-circuitit.
•Donotdrop,crush,puncture,orsubjecttostrongforces.Batteryabuseormishandlingcan
causethebatterytooverheat,whichcancausegassesorflameto“vent”fromthebattery
packorcoin-cellbattery.
Toreplacetheexternalbatterypack,dothefollowing:
1.Closethecomputerdisplay,andturnthecomputerover.
2.Unlockthebatterylatch1byslidingittotheunlockedposition.Thenslidethelatch2totheunlocked
positionandholditintheunlockedposition,andthenremovethebatterypack3.
76UserGuide
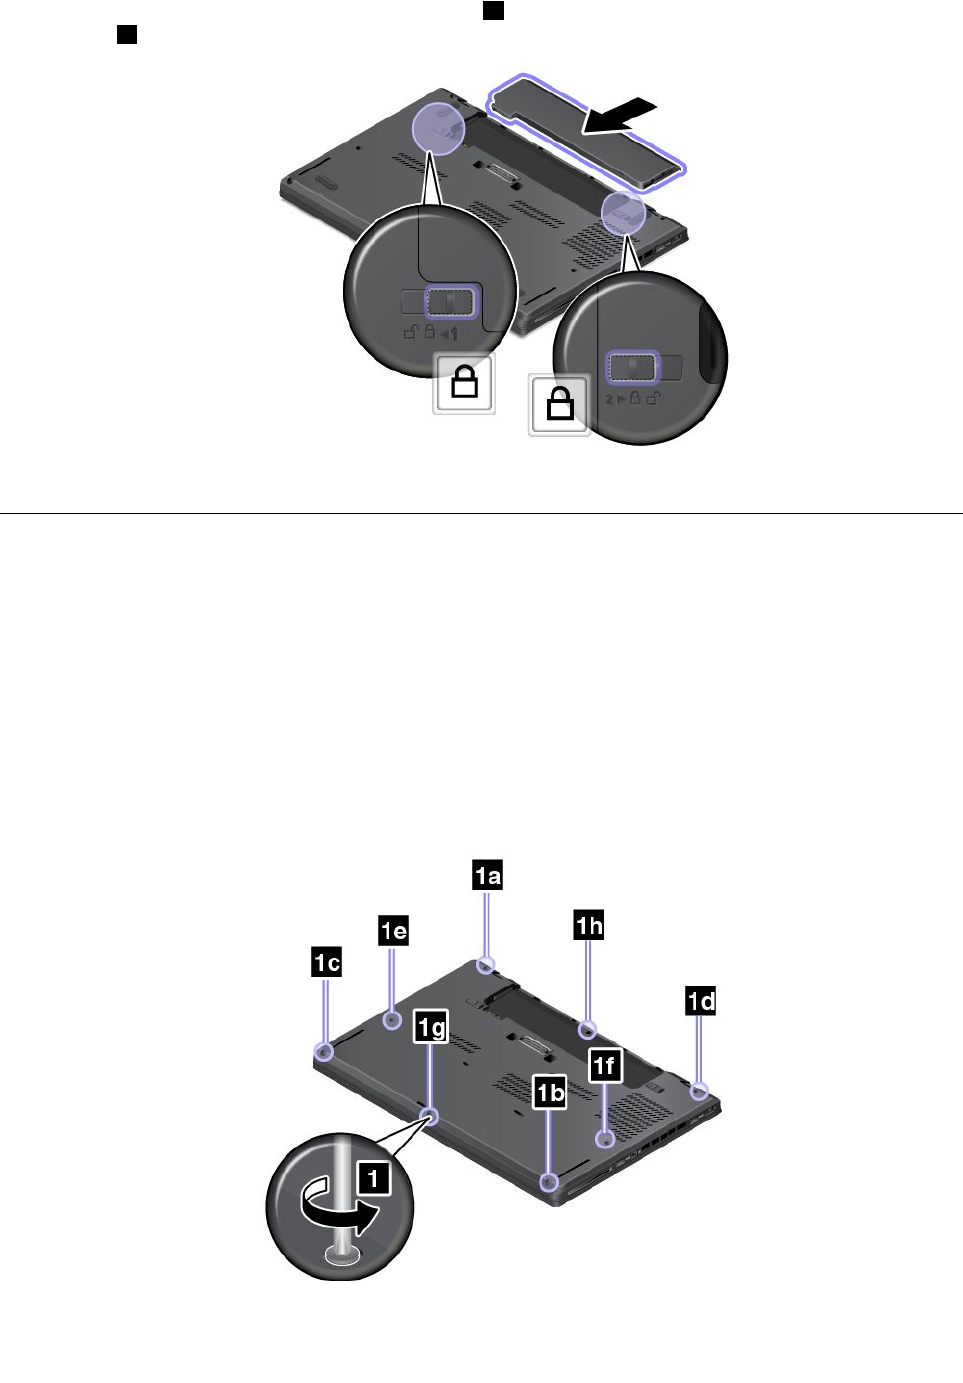
3.Insertanewbatterypackuntilitclicksintoplace1,andthenslidethebatterylatchtothelocked
position2.
4.Turnthecomputeroveragain.Connecttheacpoweradapterandallcablestothecomputer.
Replacingthebasecoverassembly
Beforeyoustart,printtheseinstructions.
Note:Dependingonthemodel,yourcomputermightlookslightlydifferentfromtheillustrationsinthistopic.
Toreplacethebasecoverassembly,dothefollowing:
1.Disablethebuilt-inbattery.See“Disablingthebuilt-inbattery”onpage73.
2.Closethecomputerdisplay,andturnthecomputerover.
3.Removetheexternalbatterypack.See“Replacingtheexternalbatterypack”onpage75.
4.Loosenthescrewsthatsecurethebasecoverassemblyinascendingalphabeticalorder(atoh)as
illustrated.
Chapter6.Replacingdevices77
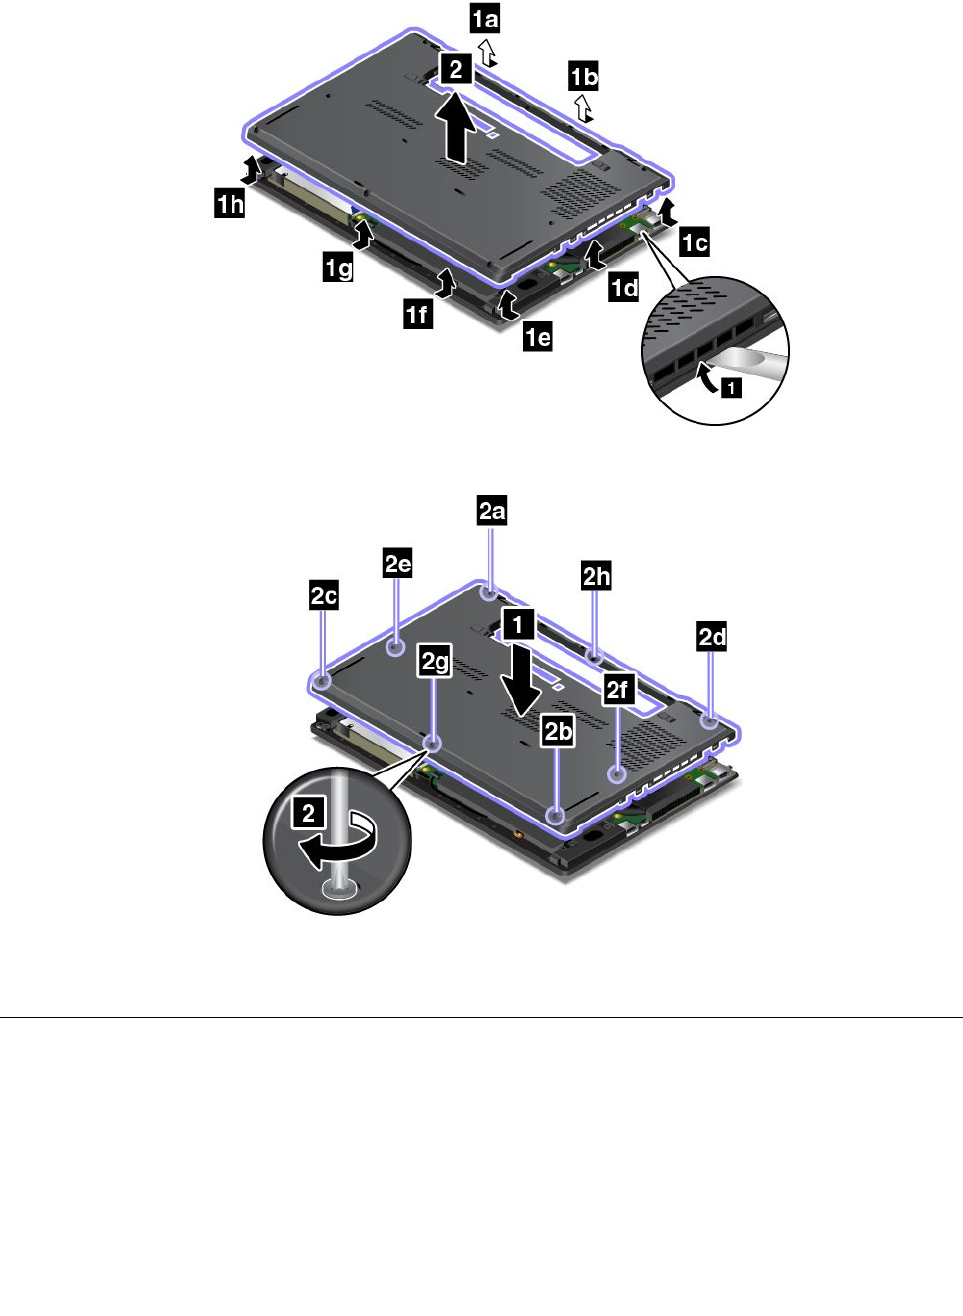
5.Pryupthelatchesinascendingalphabeticalorder(atoh)asillustrated,andthenremovethebase
coverassembly.
6.Reinstallthenewbasecoverassemblyandtightenthescrews.
7.Reinstalltheexternalbatterypackandturnthecomputeroveragain.Connecttheacpoweradapterand
allcables.
Replacingtheharddiskdriveorsolid-statedrive
Beforeyoustart,printtheseinstructions.
Attention:Theharddiskdriveorsolid-statedriveisverysensitive.Incorrecthandlingcancausedamage
andpermanentlossofdata.Observethefollowingguidelines:
•Replacetheharddiskdriveorsolid-statedriveonlyifyouupgradeitorhaveitrepaired.Theconnectors
andslotoftheharddiskdriveorsolid-statedrivearenotdesignedforfrequentchangesorreplacement.
78UserGuide
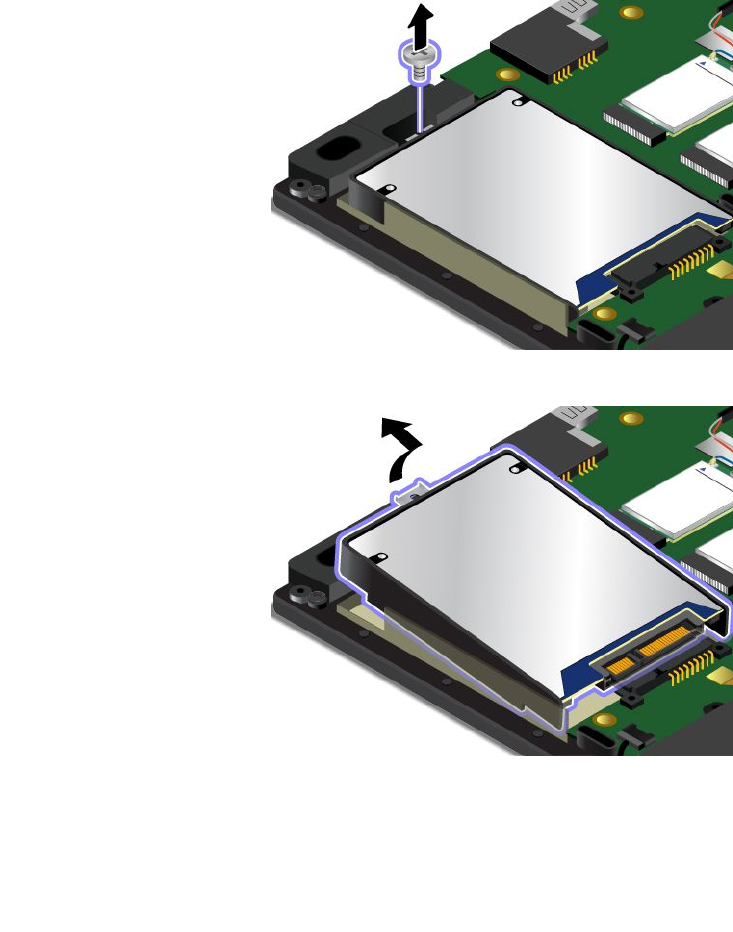
•Donotdroptheharddiskorsolid-statedriveorsubjectittophysicalshocks.Puttheharddiskdriveor
solid-statedriveonamaterial,suchassoftcloth,thatabsorbsanyphysicalshocks.
•Donotapplypressuretothecoveroftheharddiskdriveorsolid-statedrive.
•Donottouchtheconnector.
•Beforeremovingtheharddiskdriveorsolid-statedrive,makeabackupcopyofalltheinformation
onit,andthenturnoffthecomputer.
•Neverremovetheharddiskdriveorsolid-statedrivewhilethecomputerisoperating,insleepmode,
orinhibernationmode.
Toreplacetheharddiskdriveorsolid-statedrive,dothefollowing:
1.Disablethebuilt-inbattery.See“Disablingthebuilt-inbattery”onpage73.
2.Closethecomputerdisplay,andturnthecomputerover.
3.Removetheexternalbatterypack.See“Replacingtheexternalbatterypack”onpage75.
4.Removethebasecoverassembly.See“Replacingthebasecoverassembly”onpage77.
5.Removethescrewthatsecurestheharddiskdriveorsolid-statedrive.
6.Removetheharddiskdriveorsolid-statedrivewithbracket.
Chapter6.Replacingdevices79
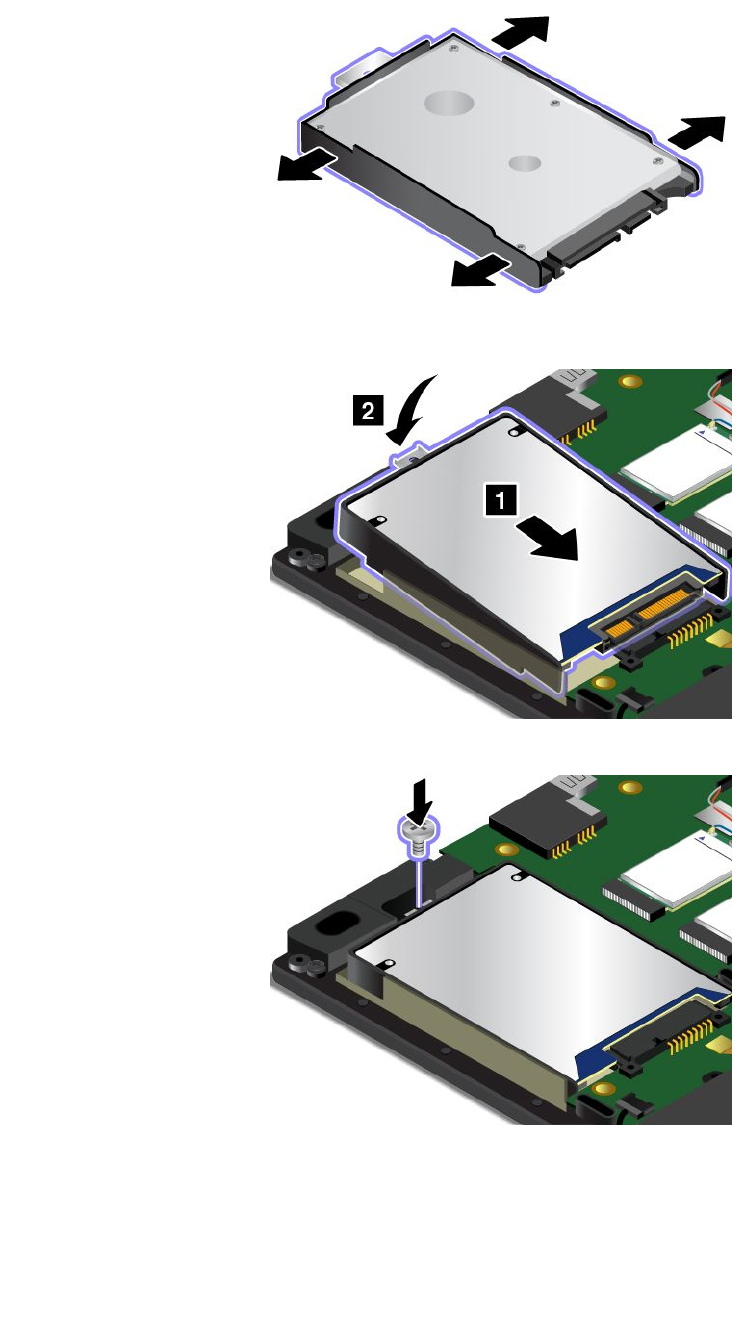
7.Detachthebracketfromtheharddiskdriveorsolid-statedrive.Thenattachthebrackettothenewhard
diskdriveorsolid-statedrive.
8.Installthenewharddiskdriveorsolid-statedrivewithbracket.
9.Installthescrewtosecuretheharddiskdriveorsolid-statedrive.
10.Reinstallthebasecoverassemblyandtheexternalbatterypack.
11.Turnoverthecomputerandconnecttheacpoweradapterandallcables.
80UserGuide
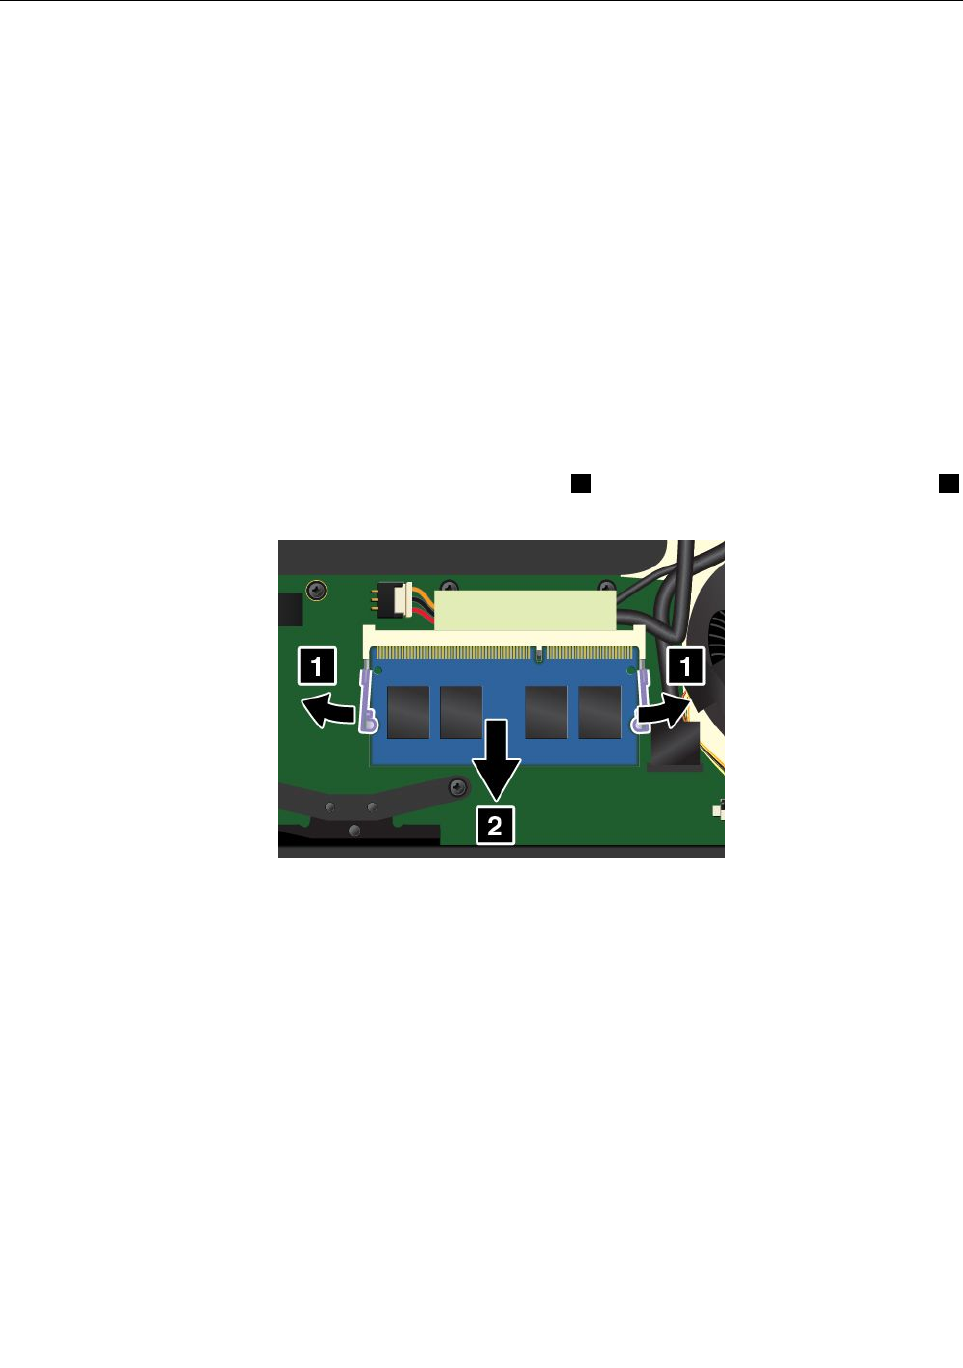
Replacingamemorymodule
Beforeyoustart,printtheseinstructions.
Increasingmemorycapacityisaneffectivewaytomakeprogramsrunfaster.Youcanincreasememory
capacitybyreplacingoraddingamemorymodule.
Note:Theoperatingspeedofthememorymodulehasdependencyonthesystemconfiguration.Insome
conditions,thememorymoduleinyourcomputermightnotbeabletooperateatthemaximumspeed.
Attention:Beforeyoustartinstallingamemorymodule,touchametaltableoragroundedmetalobject.This
actionreducesanystaticelectricityfromyourbody.Staticelectricitycoulddamagethememorymodule.
Toreplaceamemorymodule,dothefollowing:
1.Disablethebuilt-inbattery.See“Disablingthebuilt-inbattery”onpage73.
2.Closethecomputerdisplay,andturnthecomputerover.
3.Removetheexternalbatterypack.See“Replacingtheexternalbatterypack”onpage75.
4.Removethebasecoverassembly.See“Replacingthebasecoverassembly”onpage77.
5.Openthelatchesonbothsidesoftheslotatthesametime1,andthenremovethememorymodule2.
Savetheremovedmemorymoduleforfutureuse.
Chapter6.Replacingdevices81

6.Placethenotchedendofthenewmemorymoduletowardthecontactedgesideofthememoryslot,
andinsertthememorymodule1intotheslotatanangleofabout20degrees.Pivotthememory
moduledownwarduntilitsnapsintoplace2.Ensurethatthememorymoduleisfirmlyinstalledin
theslotandcannotbemovedeasily.
Attention:Donottouchthecontactedgeofthememorymodule.Otherwisethememorymodule
mightbedamaged.
7.Reinstallthebasecoverassemblyandtheexternalbatterypack.
8.Turnthecomputeroveragain.Connecttheacpoweradapterandallcables.
ReplacingthewirelessLANcard
Beforeyoustart,printtheseinstructions.
DANGER
Duringelectricalstorms,donotperformanyreplacementanddonotconnectthetelephonecable
toordisconnectitfromthetelephoneoutletonthewall.
DANGER
Electriccurrentfrompower,telephone,andcommunicationcablesishazardous.T oavoidshock
hazard,disconnectthecablesbeforeopeningthecoverofthisslot.
Attention:BeforeyoustartinstallingthewirelessLANcard,touchametaltableoragroundedmetalobject.
Thisactionreducesanystaticelectricityfromyourbody.Staticelectricitycoulddamagethecard.
ToreplacethewirelessLANcard,dothefollowing:
1.Disablethebuilt-inbattery.See“Disablingthebuilt-inbattery”onpage73.
2.Closethecomputerdisplay,andturnthecomputerover.
3.Removetheexternalbatterypack.See“Replacingtheexternalbatterypack”onpage75.
4.Removethebasecoverassembly.See“Replacingthebasecoverassembly”onpage77.
82UserGuide
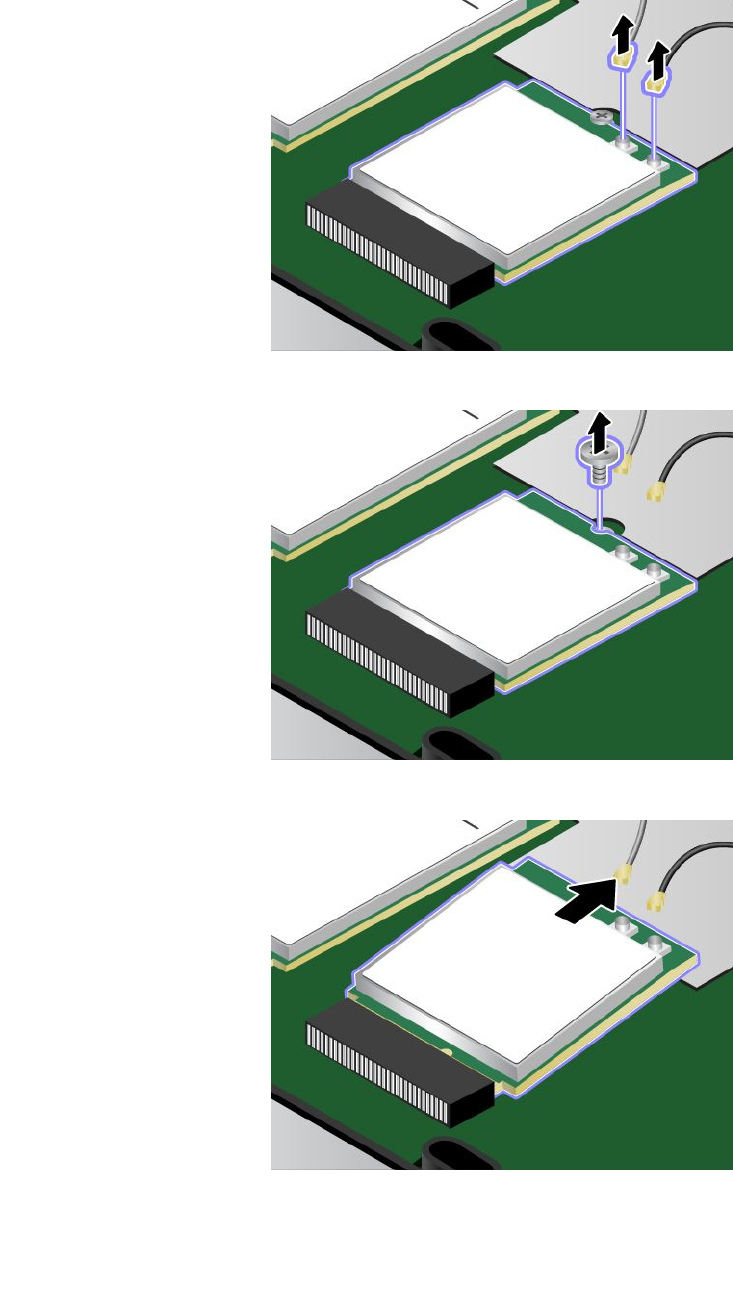
5.Ifatoolisprovidedwiththenewcardtohelpyoudisconnectcables,usethetooltodisconnectthe
cablesfromtheoldcard.Ifnosuchatoolisprovided,holdthecableconnectorwithyourfingersand
gentlydisconnecteachcablefromtheoldcard.
6.Removethescrew.Thecardisreleasedfromthesecuredpositionandpivotsupward.
7.CarefullyremovethewirelessLANcardoutoftheslot.
Chapter6.Replacingdevices83
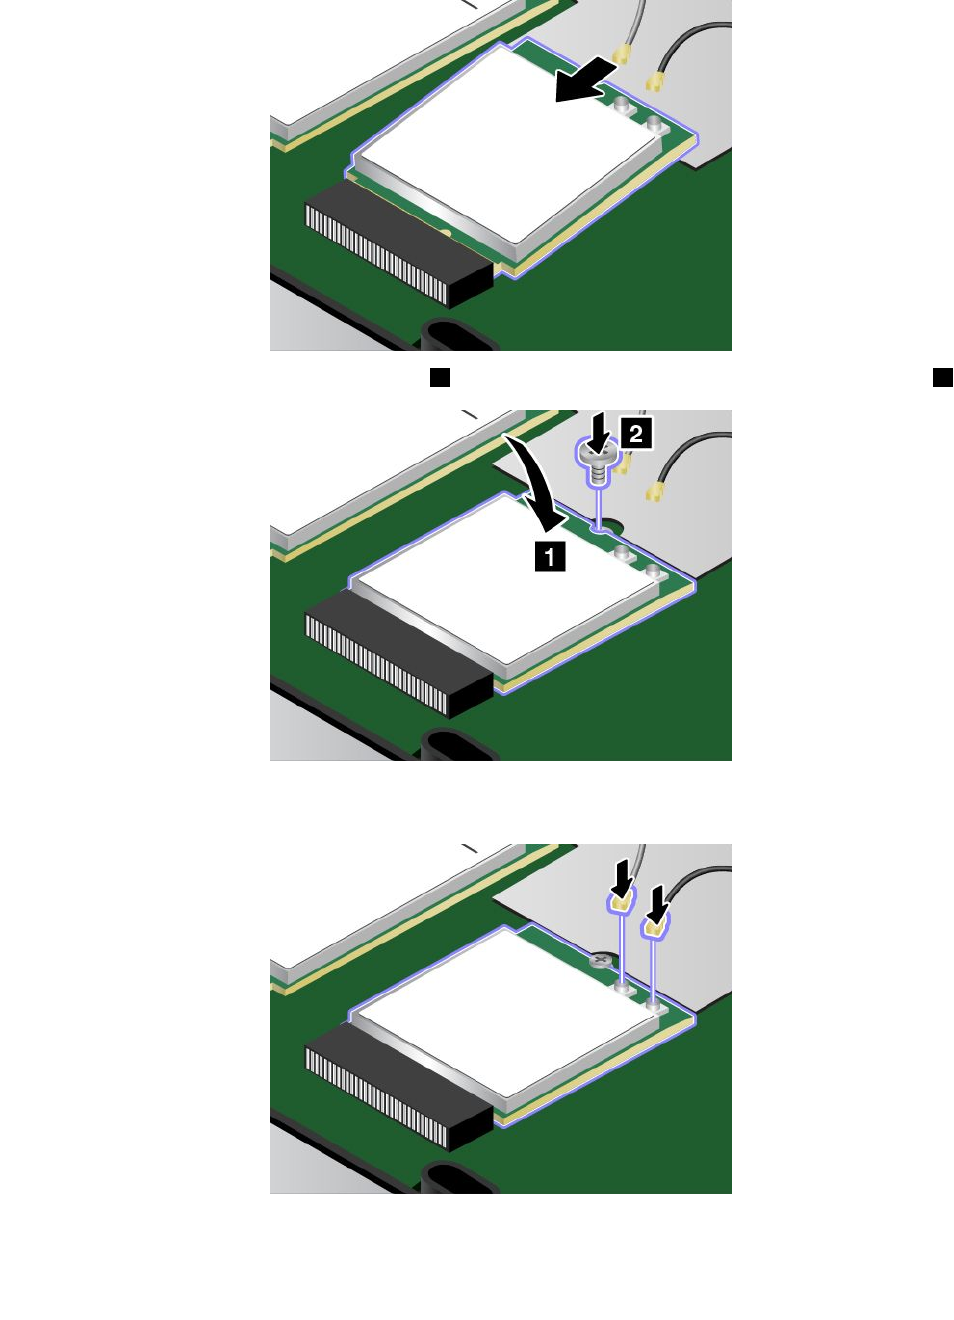
8.AlignthenotchededgeofthenewwirelessLANcardwiththekeyintheslot.Thencarefullyinsert
thecardintotheslot.
9.PivotthenewwirelessLANcarddownward1,andtheninstallthescrewtosecurethecardinplace2.
10.ConnecttheantennacablestothenewwirelessLANcard.Ensurethatyouattachthegraycabletothe
mainconnectoronthecard,andtheblackcabletotheauxiliaryconnectoronthecard.
11.Reinstallthebasecoverassemblyandtheexternalbatterypack.
84UserGuide

12.Turnthecomputeroveragain.Connecttheacpoweradapterandallcables.
ReplacingthewirelessWANcard
Beforeyoustart,printtheseinstructions.
DANGER
Duringelectricalstorms,donotperformanyreplacementanddonotconnectthetelephonecable
toordisconnectitfromthetelephoneoutletonthewall.
DANGER
Electriccurrentfrompower,telephone,andcommunicationcablesishazardous.T oavoidshock
hazard,disconnectthecablesbeforeopeningthecoverofthisslot.
Attention:BeforeyoustartinstallingthewirelessWANcard,touchametaltableoragroundedmetalobject.
Thisactionreducesanystaticelectricityfromyourbody.Staticelectricitycoulddamagethecard.
SomecomputersmightcomewiththewirelessWANcard.ToreplacethewirelessWANcard,dothe
following:
1.Disablethebuilt-inbattery.See“Disablingthebuilt-inbattery”onpage73.
2.Closethecomputerdisplay,andturnthecomputerover.
3.Removetheexternalbatterypack.See“Replacingtheexternalbatterypack”onpage75.
4.Removethebasecoverassembly.See“Replacingthebasecoverassembly”onpage77.
5.Ifatoolisprovidedwiththenewcardtohelpyoudisconnectcables,usethetooltodisconnectthe
cablesfromtheoldcard.Ifnosuchatoolisprovided,holdthecableconnectorwithyourfingersand
gentlydisconnecteachcablefromtheoldcard.
Chapter6.Replacingdevices85
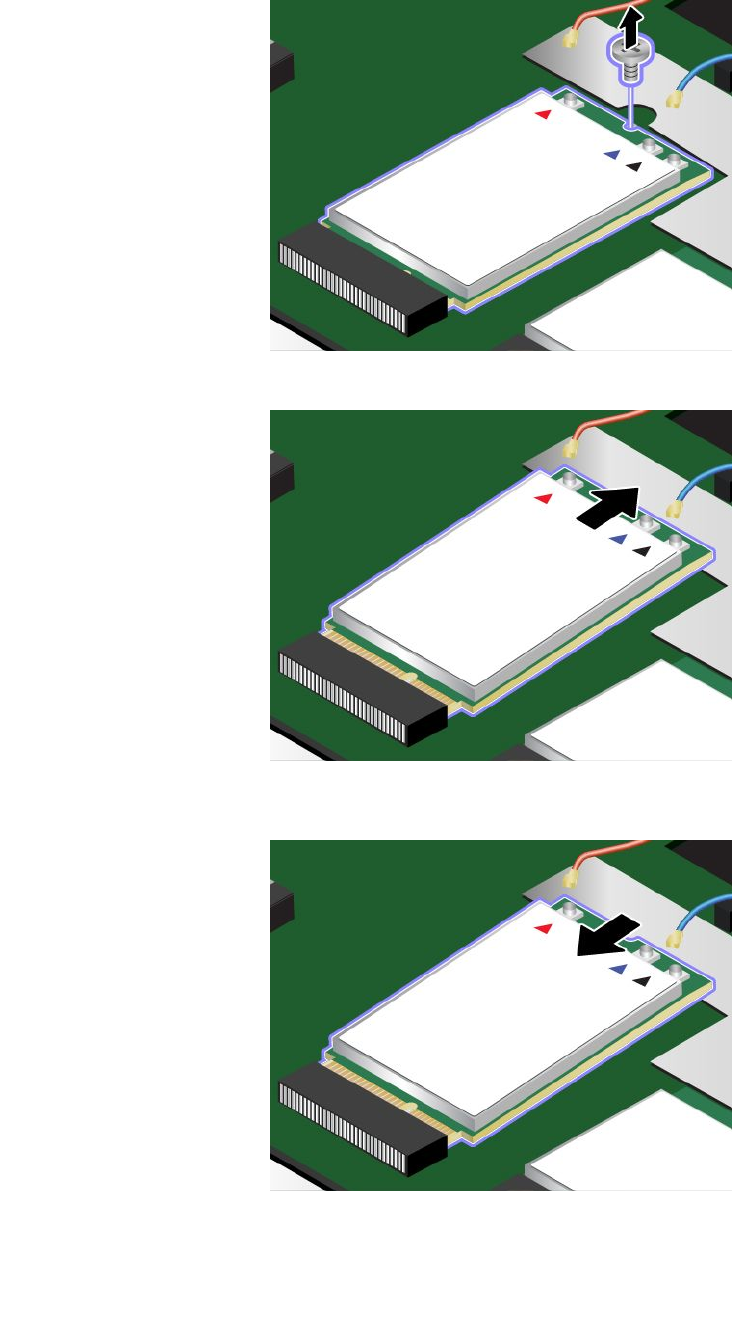
6.Removethescrew.Thecardisreleasedfromthesecuredpositionandpivotsupward.
7.CarefullyremovethewirelessWANcardoutoftheslot.
8.AlignthenotchededgeofthenewwirelessWANcardwiththekeyintheslot.Thencarefullyinsert
thecardintotheslot.
86UserGuide
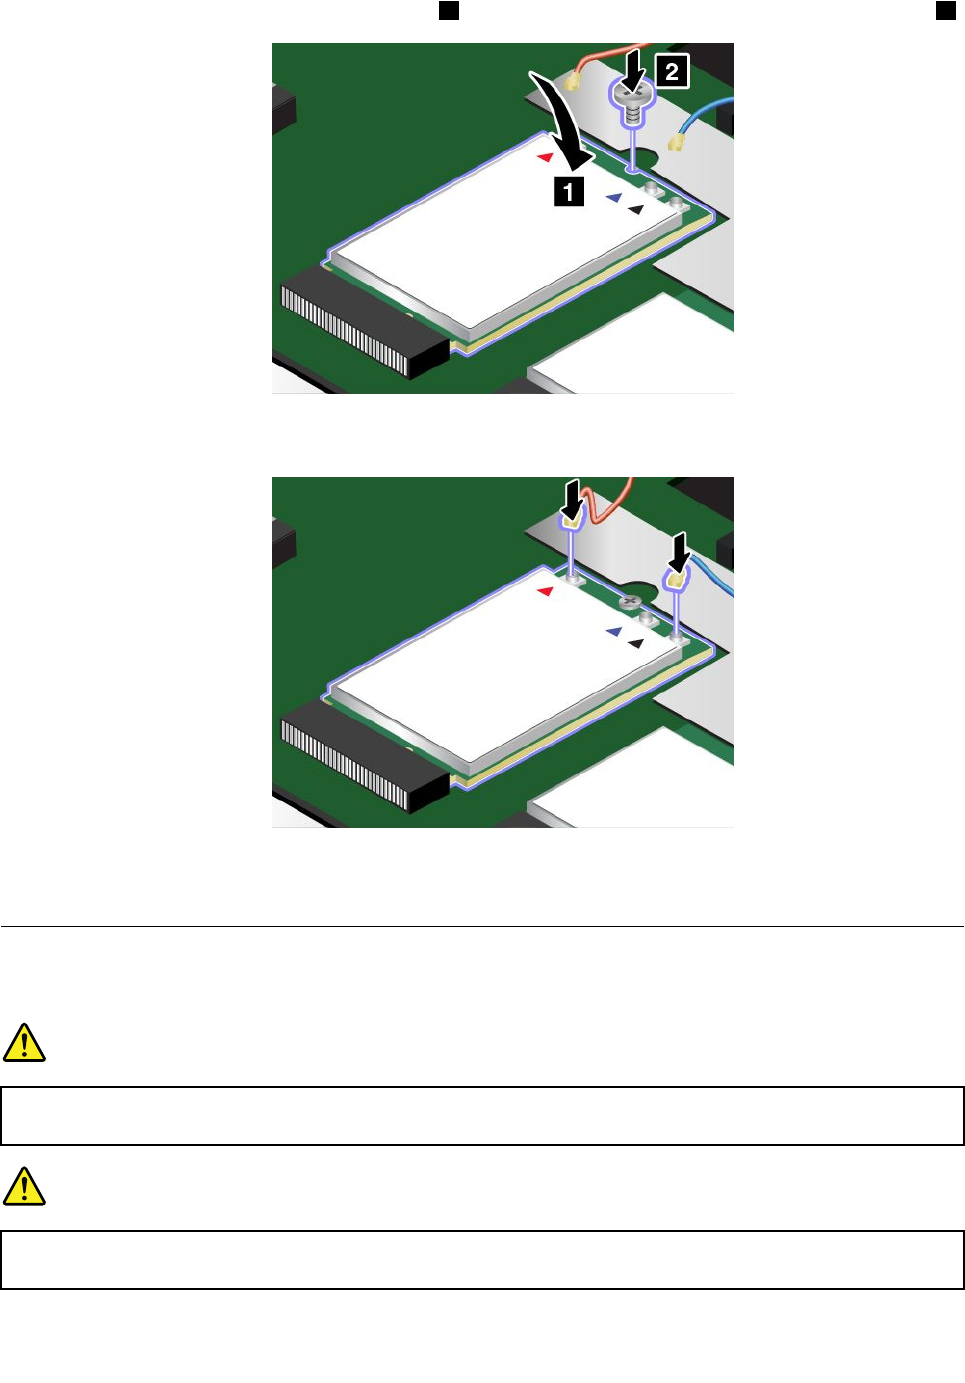
9.PivotthenewwirelessWANcarddownward1andtheninstallthescrewtosecurethecardinplace2.
10.ConnecttheantennacablestothenewwirelessWANcard.Ensurethatyouconnecttheredcableto
themainconnectoronthecard,andthebluecabletotheauxiliaryconnectoronthecard.
11.Reinstallthebasecoverassemblyandtheexternalbatterypack.
12.Turnthecomputeroveragain.Connecttheacpoweradapterandallcables.
Replacingthekeyboard
Beforeyoustart,printtheseinstructions.
DANGER
Duringelectricalstorms,donotperformanyreplacementanddonotconnectthetelephonecable
toordisconnectitfromthetelephoneoutletonthewall.
DANGER
Electriccurrentfrompower,telephone,andcommunicationcablesishazardous.T oavoidshock
hazard,disconnectthecablesbeforeopeningthecoverofthisslot.
Chapter6.Replacingdevices87
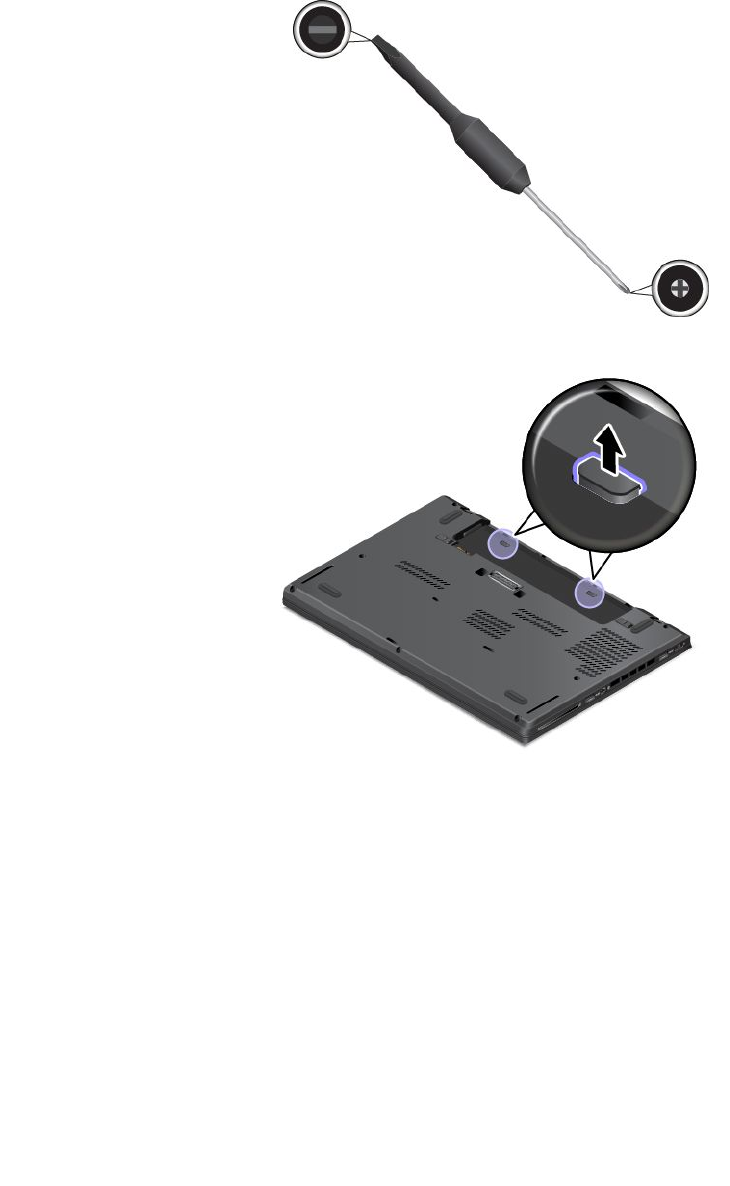
Toremovethekeyboard,dothefollowing:
1.Disablethebuilt-inbattery.See“Disablingthebuilt-inbattery”onpage73.
2.Closethecomputerdisplay,andturnthecomputerover.
3.Removetheexternalbatterypack.See“Replacingtheexternalbatterypack”onpage75.
4.Findthekeyboardmulti-toolintheshippingpackageofthenewkeyboard.Thefollowingillustration
showsakeyboardmulti-tool.
5.Removetherubberstoppers.Ifyourcomputerdoesnothavetherubberstoppers,ignorethisstep.
88UserGuide
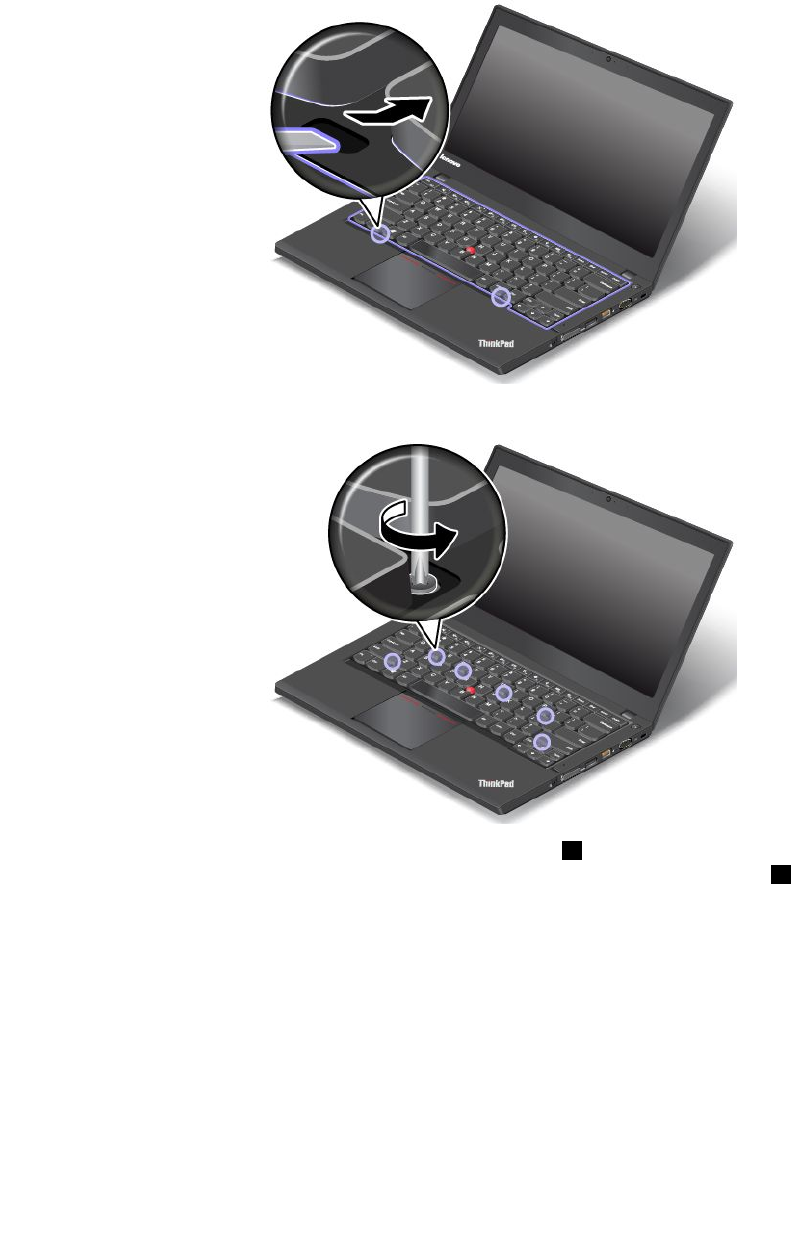
6.Torevealthescrewheadsbeneaththekeyboardframe,usetheflatendofthemulti-toolintheshipping
packageofthenewkeyboardtoslidethekeyboardforwardby2.5mm(0.1inch).
Note:Donotpressandholdthekeyswhileslidingthekeyboardframe,otherwisethekeyboardframe
cannotbemoved.
7.Usethecrossendofthemulti-tooltoloosenthescrews.
8.Pivotthekeyboardslightlyupwardasshownbythearrow1untilyoucanseetheconnectorsonthe
bottomsideofthekeyboard.Thenturnoverthekeyboardasshownbythearrow2.
Chapter6.Replacingdevices89
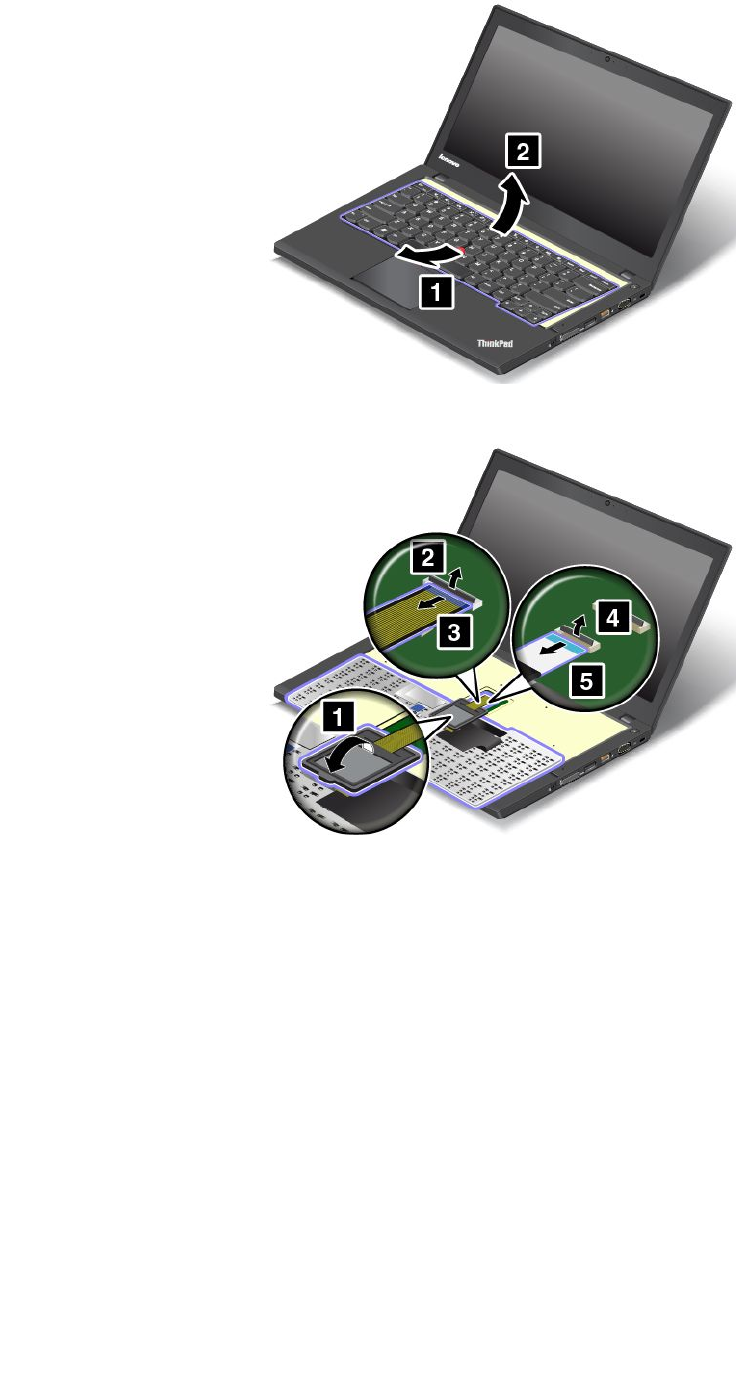
9.Putthekeyboardonthepalmrestanddetachtheconnectors.Thenremovethekeyboard.
Toinstallthenewkeyboard,dothefollowing:
90UserGuide


3.Ensurethatthescrewheadsareexposedcompletely.Otherwise,revealthescrewheadsbyslidingthe
keyboardframeforwardwiththeflatendofthekeyboardmulti-tool.
92UserGuide
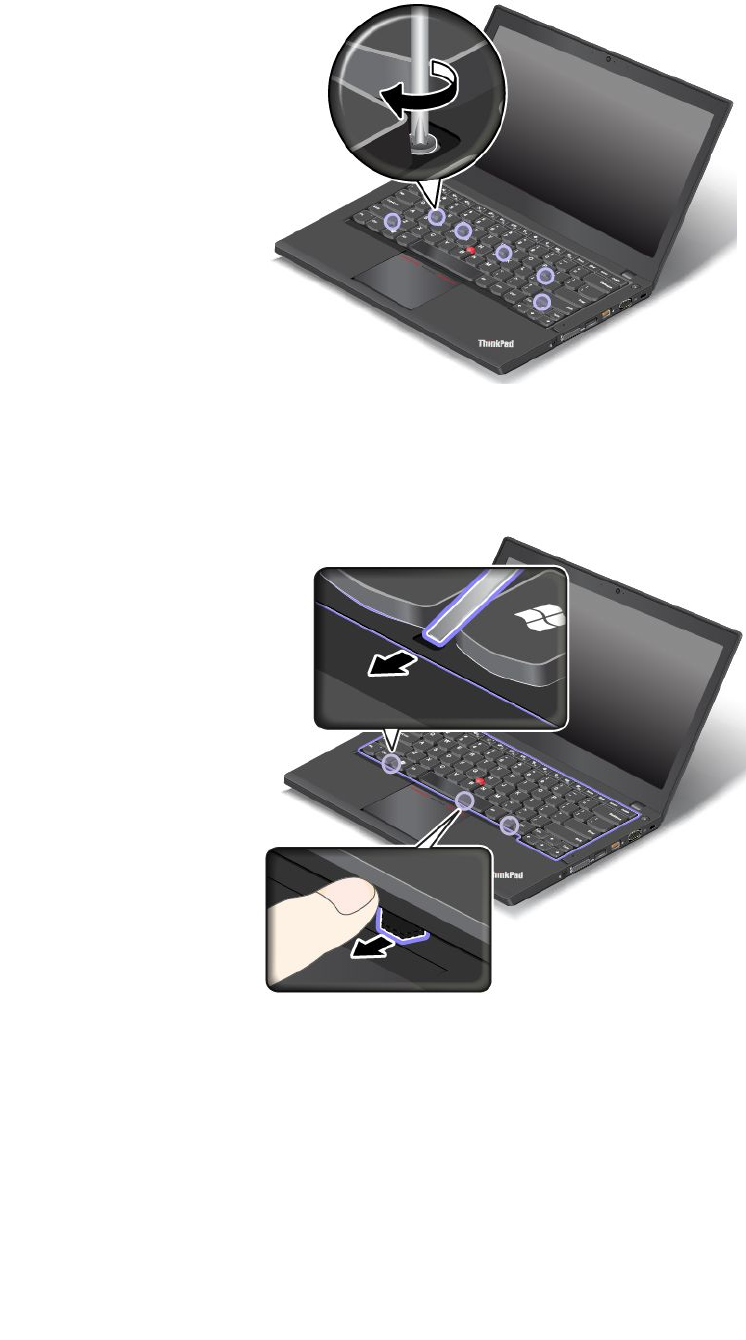
4.Tightenthescrewswiththecrossendofthekeyboardmulti-tooltosecurethekeyboardinplace.
5.Slidethekeyboardframebackwardby2.5mm(0.1inch)withtheflatendofthekeyboardmulti-toolto
hidethelatchesofthekeyboardframeunderthekeyboardbezel.
Note:Donotpressandholdthekeyswhileslidingthekeyboardframe,otherwisethekeyboardframe
cannotbemoved.
6.Inserttheflatendofthekeyboardmulti-toolintothesidesofthekeyboardasshowntopushthe
keyboardframebackward.Ensurethatthereisnogapbetweenthekeyboardframeandkeyboardbezel.
Note:Donotpressandholdthekeyswhileslidingthekeyboardframe,otherwisethekeyboardframe
cannotbemoved.
Chapter6.Replacingdevices93
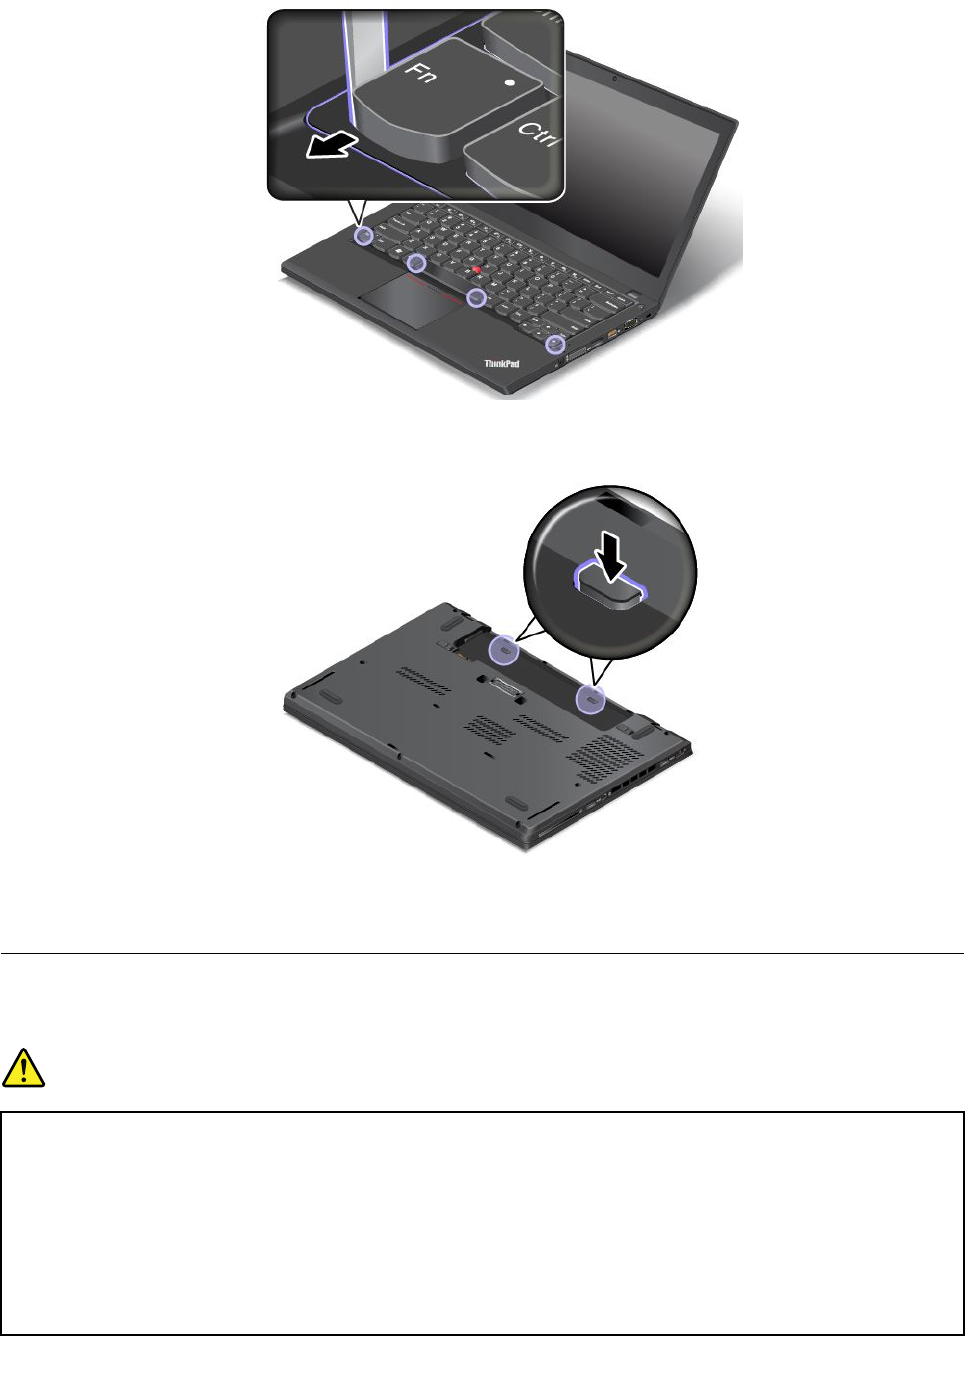
7.Turnthecomputeroverandinstalltherubberstoppers.Ifyourcomputerdoesnothavetherubber
stoppers,ignorethisstep.
8.Turnthecomputeroveragainandreinstalltheexternalbatterypack.Connecttheacpoweradapterand
allcables.
Replacingthecoin-cellbattery
Beforeyoustart,printtheseinstructions.
DANGER
Ifthecoin-cellbatteryisincorrectlyreplaced,thereisdangerofanexplosion.Thecoin-cellbattery
containsasmallamountofharmfulsubstances.Toavoidpossibleinjury:
•ReplaceonlywithabatteryofthetyperecommendedbyLenovo.
•Keepthebatterypackawayfromfire.
•Donotexposeittoexcessiveheat.
•Donotexposeittowaterorrain.
•Donotshort-circuitit.
94UserGuide

•Donotdrop,crush,puncture,orsubjecttostrongforces.Batteryabuseormishandlingcan
causethebatterytooverheat,whichcancausegassesorflameto“vent”fromthebattery
packorcoin-cellbattery.
Toreplacethecoin-cellbattery,dothefollowing:
1.Disablethebuilt-inbattery.See“Disablingthebuilt-inbattery”onpage73.
2.Closethecomputerdisplay,andturnthecomputerover.
3.Removetheexternalbatterypack.See“Replacingtheexternalbatterypack”onpage75.
4.Removethebasecoverassembly.See“Replacingthebasecoverassembly”onpage77.
5.Detachtheconnector1,andthenremovethecoin-cellbattery2.
6.Installthenewcoin-cellbattery1andattachtheconnector2.
7.Reinstallthebasecoverassembly.See“Replacingthebasecoverassembly”onpage77.
8.Reinstalltheexternalbatterypack,andturnthecomputeroveragain.Connecttheacpoweradapter
andallcables.
Chapter6.Replacingdevices95

96UserGuide

Chapter7.Enhancingyourcomputer
Thischapterprovidesinstructionsonhowtousehardwaredevicestoexpandyourcomputercapabilities.It
includesthefollowingtopics:
•“FindingThinkPadoptions”onpage97
•“ThinkPaddockingstations”onpage97
FindingThinkPadoptions
Ifyouwanttoexpandthecapabilitiesofyourcomputer,Lenovohasanumberofhardwareaccessoriesand
upgradestomeetyourneeds.Optionsincludememorymodules,storagedevices,networkcards,docking
stations,batteries,poweradapters,printers,scanners,keyboards,mice,andmore.
YoucanshopatLenovo24hoursaday,7daysaweekdirectlyovertheWorldWideWeb.Allyouneedisan
Internetconnectionandacreditcard.
ToshopatLenovo,goto
http://www.lenovo.com/essentials
ThinkPaddockingstations
Ifthereisadockingstationconnectoronthebottomofyourcomputer,youcanattachyourcomputertoa
supporteddockingstationtoexpandworkingcapability.Dependingonthemodel,yourcomputermight
supportthefollowingdockingstations:
•ThinkPadBasicDock
•ThinkPadProDock
•ThinkPadUltraDock
CAUTION:
Whenthecomputerisattachedtoadockingstation,neverpickuptheassemblybytakingholdofthe
computeralone.Alwaysholdthewholeassembly.
LocatingcontrolsandconnectorsontheThinkPaddockingstations
ThissectionintroducesthelocationsofcontrolsandconnectorsontheThinkPaddockingstations.
©CopyrightLenovo2013,201497
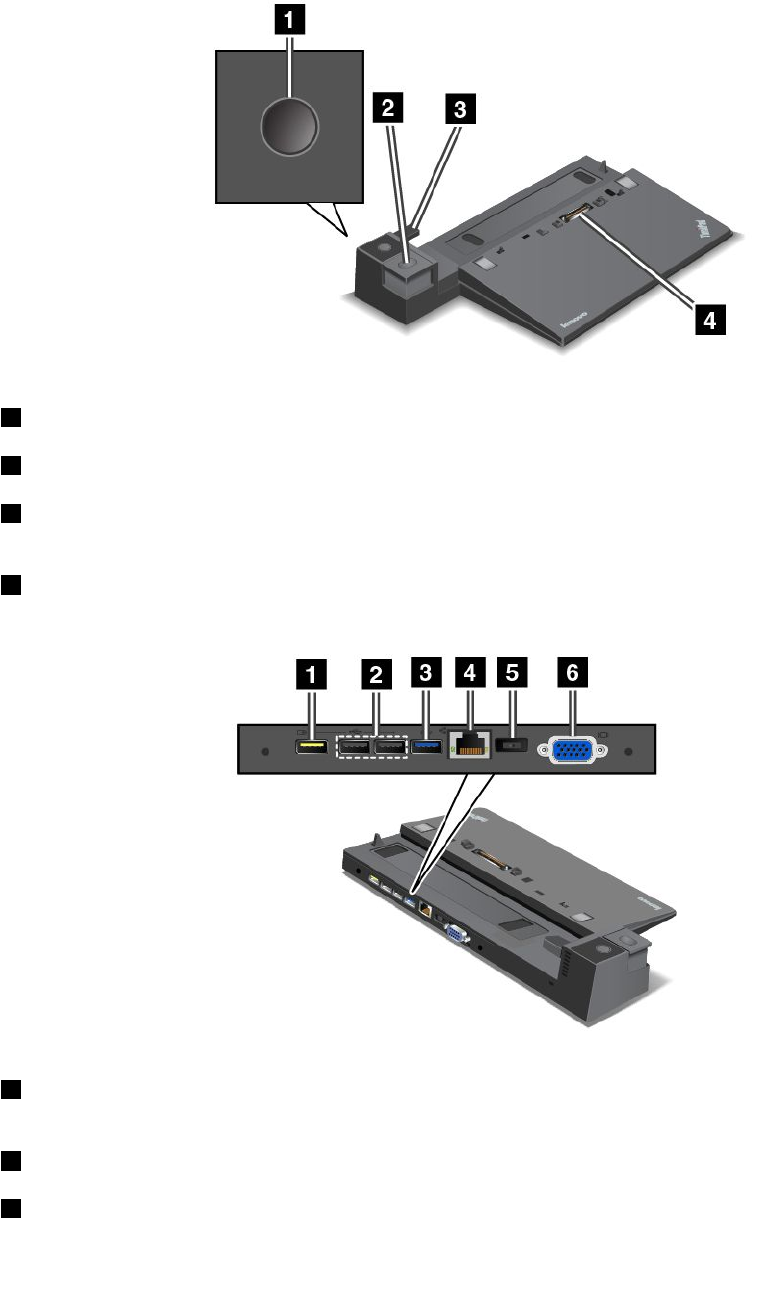
ThinkPadBasicDock
Frontview
1Powerbutton:Pressthepowerbuttontoturnonorturnoffthecomputer.
2Ejectbutton:Presstheejectbuttontoreleasethecomputerfromthedockingstation.
3Slidingadjuster:Usetheslidingadjusterasaguidetoalignthedockingstationconnectoronyour
computerwhenyouattachthedockingstation.
4Dockingstationconnector:Usedtoattachyourcomputer.
Rearview
1Always-onUSBconnector:UsedtoconnectdevicesthatarecompatiblewithUSB2.0orchargesome
mobiledigitaldevicesandsmartphoneswhenyourcomputerisinsleeporhibernationmode.
2USB2.0connectors:UsedtoconnectdevicesthatarecompatiblewithUSB2.0.
3USB3.0connector:UsedtoconnectdevicesthatarecompatiblewithUSB3.0.
98UserGuide
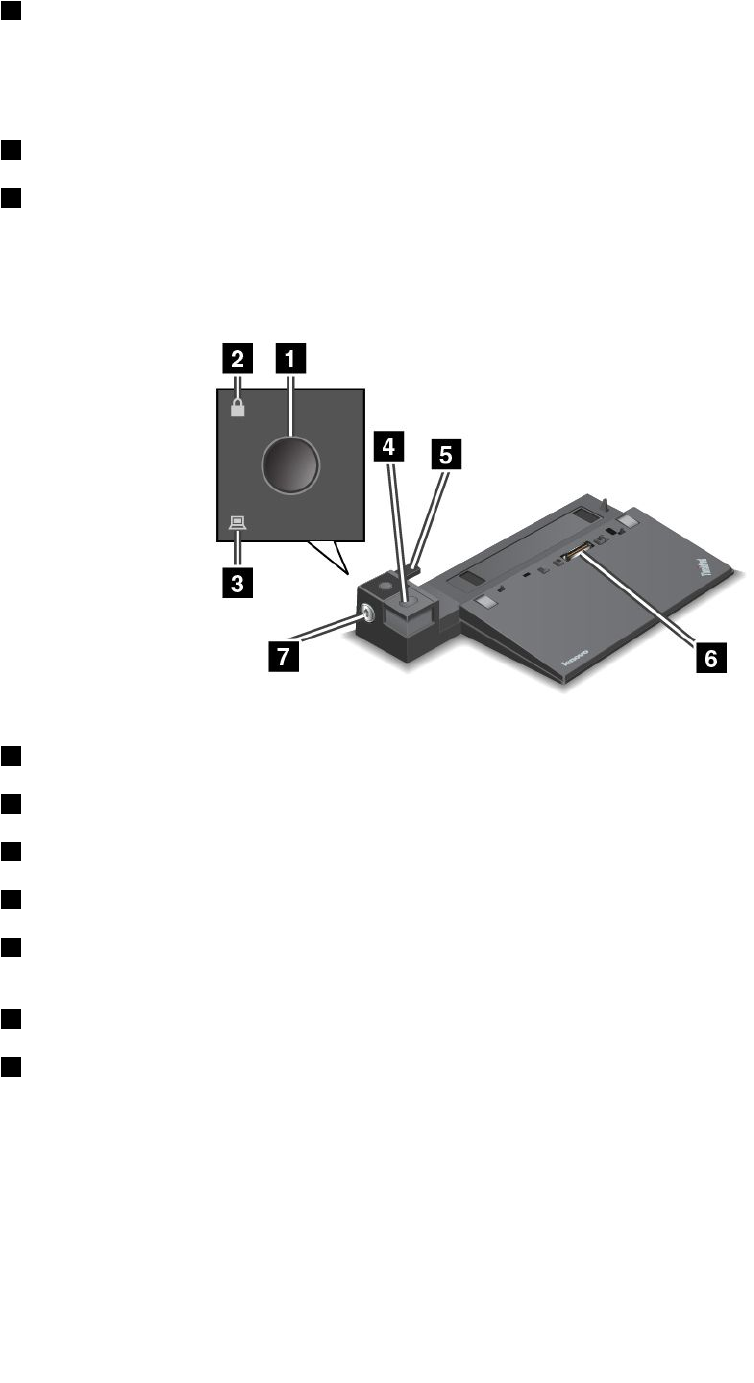
4Ethernetconnector:UsedtoconnectthedockingstationtoanEthernetLAN.
Note:IfyouneedtouseanEthernetconnectororanexternalmonitorconnectorwhenyourcomputeris
attachedtoadockingstation,usetheEthernetconnectorortheexternalmonitorconnectoronthedocking
station,insteadoftheoneonthecomputer.
5acpowerconnector:Usedtoconnecttheacpoweradapter.
6VGAconnector:UsedtoconnectthecomputertoaVGA-compatiblevideodevice,suchasaVGA
monitor.
ThinkPadProDock
Frontview
1Powerbutton:Pressthepowerbuttontoturnonorturnoffthecomputer.
2Keylockindicator:Thisindicatorturnsonwhenthesystemlockkeyisinthelockedposition.
3Dockingstatusindicator:Thisindicatorturnsonwhenyourcomputerisdocked.
4Ejectbutton:Presstheejectbuttontoreleasethecomputerfromthedockingstation.
5Slidingadjuster:Usetheslidingadjusterasaguidetoalignthedockingstationconnectoronyour
computerwhenyouattachthedockingstation.
6Dockingstationconnector:Usedtoattachyourcomputer.
7Systemlock:Usethesystemlockkeytolocktheejectbutton.Whenthesystemlockkeyisinthelocked
position,theejectbuttonofthedockingstationislocked;youcannotattachorremoveyourcomputer.
Chapter7.Enhancingyourcomputer99
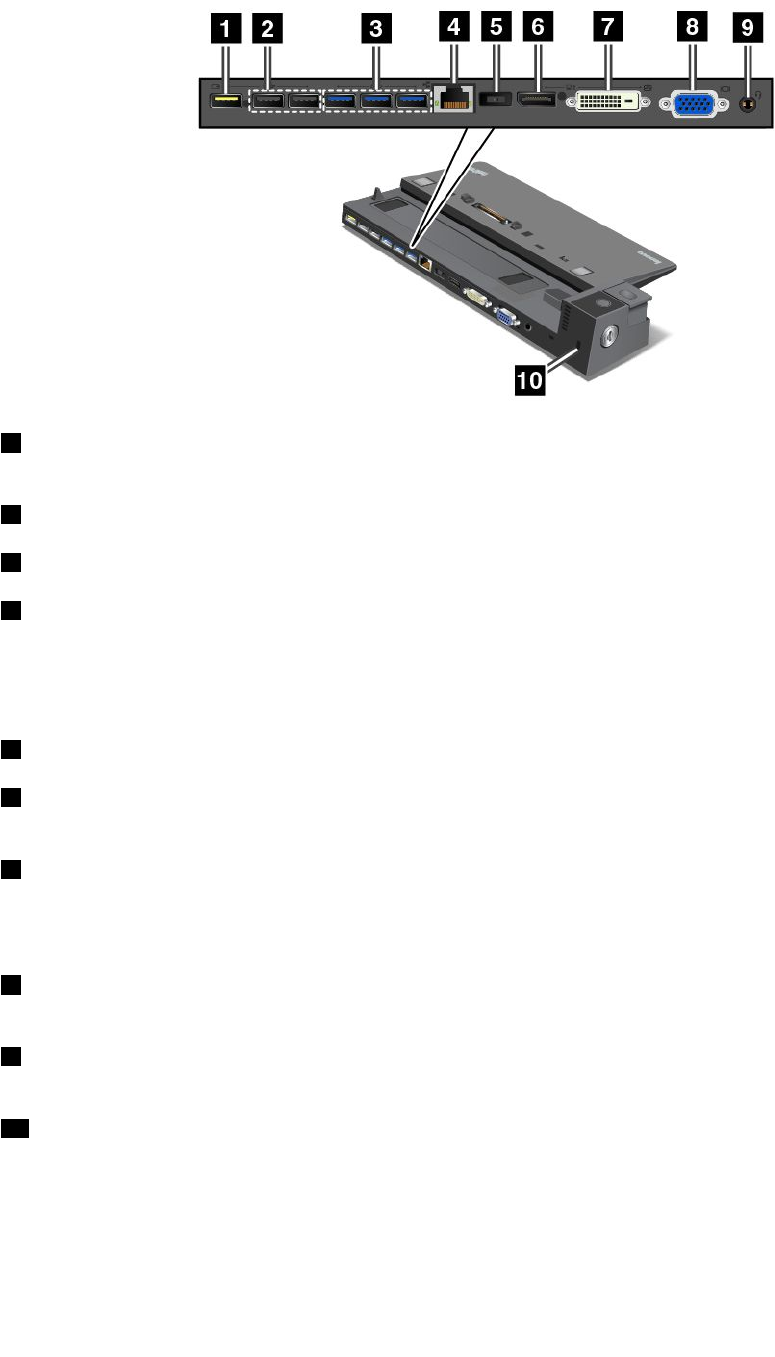
Rearview
1Always-onUSBconnector:UsedtoconnectdevicesthatarecompatiblewithUSB2.0orchargesome
mobiledigitaldevicesandsmartphoneswhenyourcomputerisinsleeporhibernationmode.
2USB2.0connectors:UsedtoconnectdevicesthatarecompatiblewithUSB2.0.
3USB3.0connectors:UsedtoconnectdevicesthatarecompatiblewithUSB3.0.
4Ethernetconnector:UsedtoconnectthedockingstationtoanEthernetLAN.
Note:IfyouneedtouseanEthernetconnectororanexternalmonitorconnectorwhenyourcomputeris
attachedtoadockingstation,usetheEthernetconnectorortheexternalmonitorconnectoronthedocking
station,insteadoftheoneonthecomputer.
5acpowerconnector:Usedtoconnecttheacpoweradapter.
6DisplayPortconnector:Usedtoattachahigh-performancemonitor,adirect-drivemonitor,orother
devicesthatuseaDisplayPortconnector.
7DVIconnector:UsedtoconnectamonitorthatsupportsDigitalVisualInterface(DVI)connection.
Note:TheDVIconnectorprovidesadigitalinterfaceonly.Thisconnectorcanonlybeusedwithacomputer
thatsupportsDVIconnection.
8VGAconnector:UsedtoconnectthecomputertoaVGA-compatiblevideodevice,suchasaVGA
monitor.
9Audioconnector:Usedtoconnectheadphonesoraheadsetthathasa3.5-mm(0.14-inch)4-poleplug
totheaudioconnectortolistentothesoundfromthecomputer.
10Security-lockslot:Toprotectyourdockingstationfromtheft,youcanuseasecuritycablelock,such
asaKensington-stylecablelock,thatfitsthissecurity-lockslottolockyourdockingstationtoadesk,
table,orothernon-permanentfixture.
100UserGuide
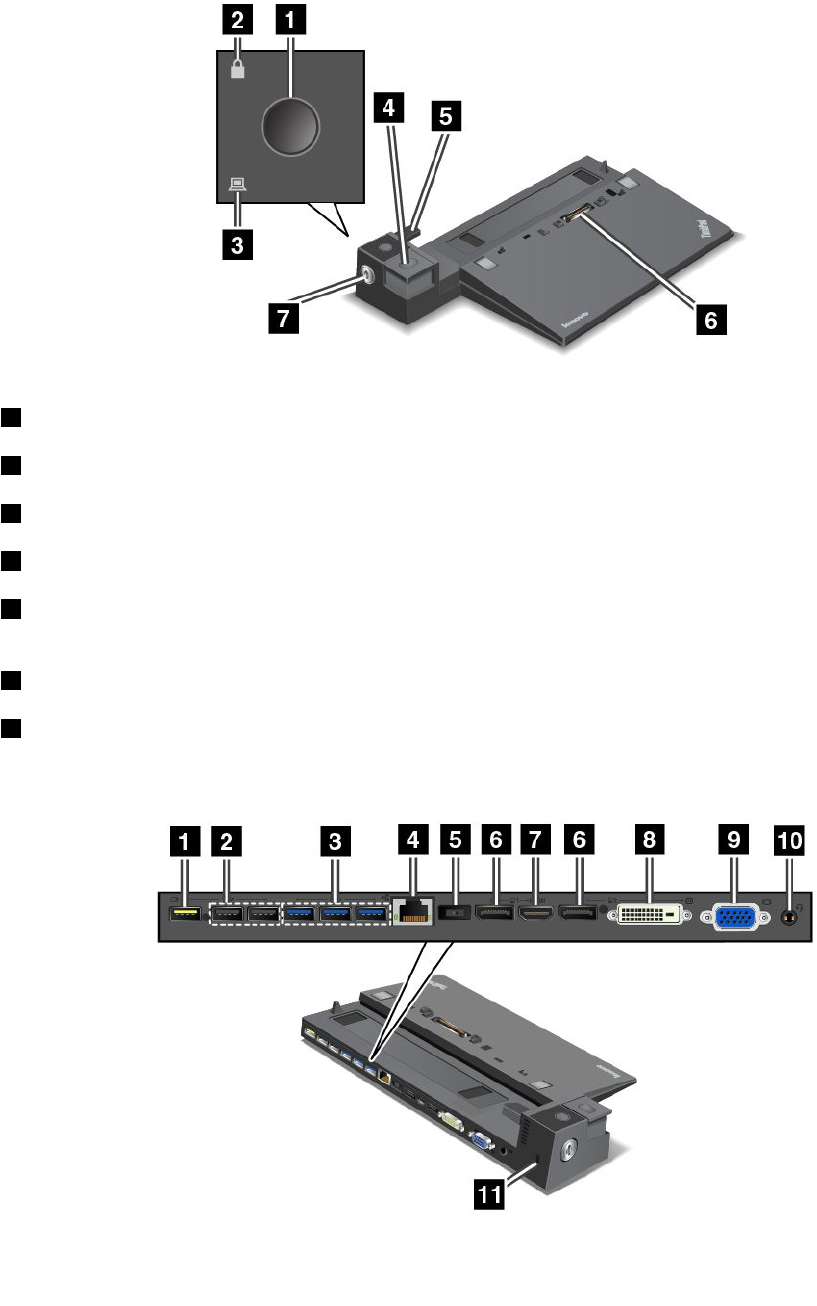
ThinkPadUltraDock
Frontview
1Powerbutton:Pressthepowerbuttontoturnonorturnoffthecomputer.
2Keylockindicator:Thisindicatorturnsonwhenthesystemlockkeyisinthelockedposition.
3Dockingstatusindicator:Thisindicatorturnsonwhenyourcomputerisdocked.
4Ejectbutton:Presstheejectbuttontoreleasethecomputerfromthedockingstation.
5Slidingadjuster:Usetheslidingadjusterasaguidetoalignthedockingstationconnectoronyour
computerwhenyouattachthedockingstation.
6Dockingstationconnector:Usedtoattachyourcomputer.
7Systemlock:Usethesystemlockkeytolocktheejectbutton.Whenthesystemlockkeyisinthelocked
position,theejectbuttonofthedockingstationislocked;youcannotattachorremoveyourcomputer.
Rearview
Chapter7.Enhancingyourcomputer101

1Always-onUSBconnector:UsedtoconnectdevicesthatarecompatiblewithUSB2.0orchargesome
mobiledigitaldevicesandsmartphoneswhenyourcomputerisinsleeporhibernationmode.
2USB2.0connectors:UsedtoconnectdevicesthatarecompatiblewithUSB2.0.
3USB3.0connectors:UsedtoconnectdevicesthatarecompatiblewithUSB3.0.
4Ethernetconnector:UsedtoconnectthedockingstationtoanEthernetLAN.
Note:IfyouneedtouseanEthernetconnectororanexternalmonitorconnectorwhenyourcomputeris
attachedtoadockingstation,usetheEthernetconnectorortheexternalmonitorconnectoronthedocking
station,insteadoftheoneonthecomputer.
5acpowerconnector:Usedtoconnecttheacpoweradapter.
6DisplayPortconnectors:Usedtoattachahigh-performancemonitor,adirect-drivemonitor,orother
devicesthatuseaDisplayPortconnector.
7HDMIconnector:Usedtoconnectahigh-definitiontelevision.
8DVIconnector:UsedtoconnectamonitorthatsupportsDigitalVisualInterface(DVI)connection.
Note:TheDVIconnectorprovidesadigitalinterfaceonly.Thisconnectorcanonlybeusedwithacomputer
thatsupportsDVIconnection.
9VGAconnector:UsedtoconnectthecomputertoaVGA-compatiblevideodevice,suchasaVGA
monitor.
10Audioconnector:Usedtoconnectheadphonesoraheadsetthathasa3.5-mm(0.14-inch)4-poleplug
totheaudioconnectortolistentothesoundfromthecomputer.
11Security-lockslot:Toprotectyourdockingstationfromtheft,youcanuseasecuritycablelock,such
asaKensington-stylecablelock,thatfitsthissecurity-lockslottolockyourdockingstationtoadesk,
table,orothernon-permanentfixture.
AttachingaThinkPaddockingstation
ToattachyourcomputertoasupportedThinkPaddockingstation,dothefollowing:
Note:TheThinkPadBasicDockdoesnothavethesystemlock.
1.Disconnectallcablesanddevicesfromthecomputer.
2.Ensurethatthesystemlockkeyisturnedtotheunlockedposition(horizontal).
102UserGuide
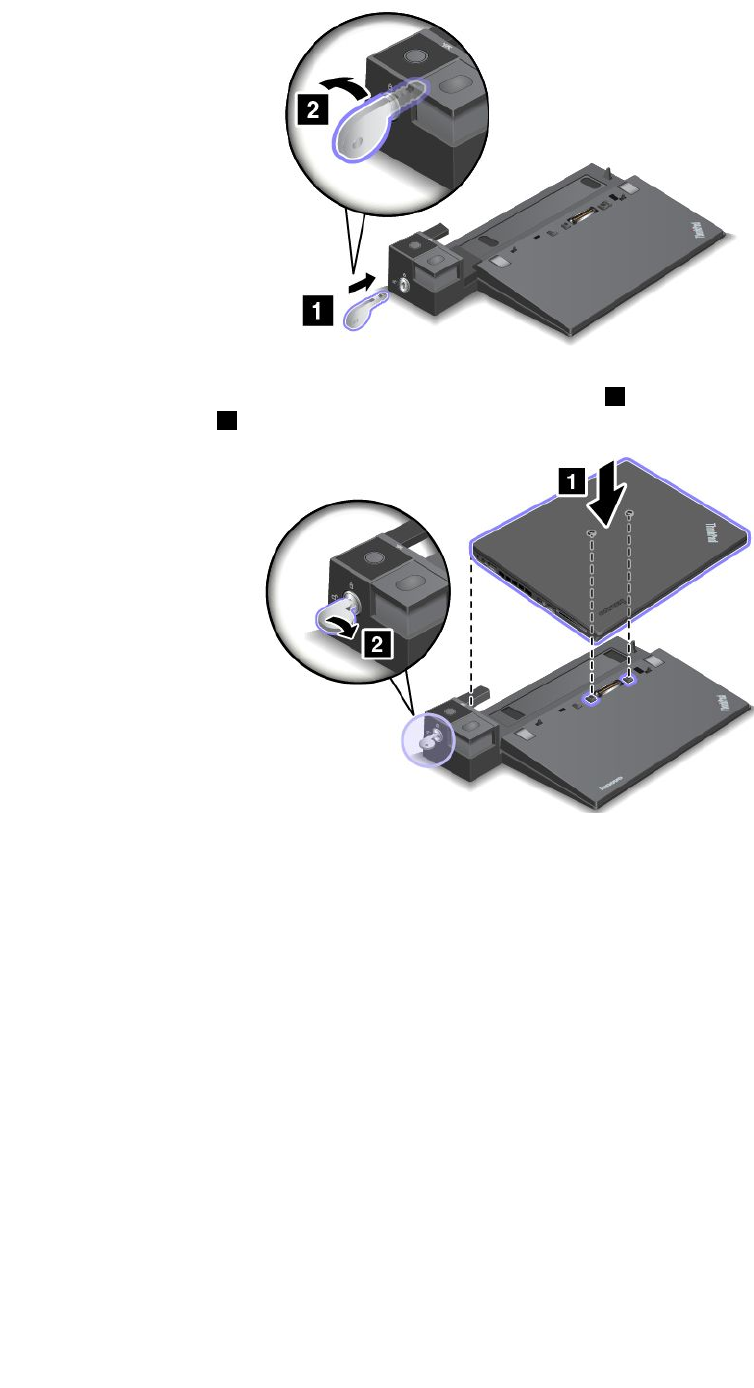
3.Alignthetop-leftcornerofthecomputerwiththepositionmarkofthedockingstation.Attachyour
computertothedockingstationverticallyuntilyouhearaclick1.Thenturnthesystemlockkeyto
thelockedposition2.
4.Checkthedockingstatusindicator.Ifthedockingstatusindicatorisnotturnedon,itindicatesthatyour
computerisnotcorrectlyattachedtothedockingstation.Checktheacpoweradapterofthedocking
station,ordisconnectandreattachtheacpoweradapter.
Note:Thecomputerwillbeinbatterymodeifyouattachittoadockingstationthatisnotconnectedto
acpower.
DetachingaThinkPaddockingstation
TodetachyourcomputerfromaThinkPaddockingstation,dothefollowing:
Note:TheThinkPadBasicDockdoesnothavethesystemlock.
1.Disconnectallcablesanddevicesfromthecomputer.
2.Ensurethatthesystemlockkeyisturnedtotheunlockedposition(horizontal).
Chapter7.Enhancingyourcomputer103
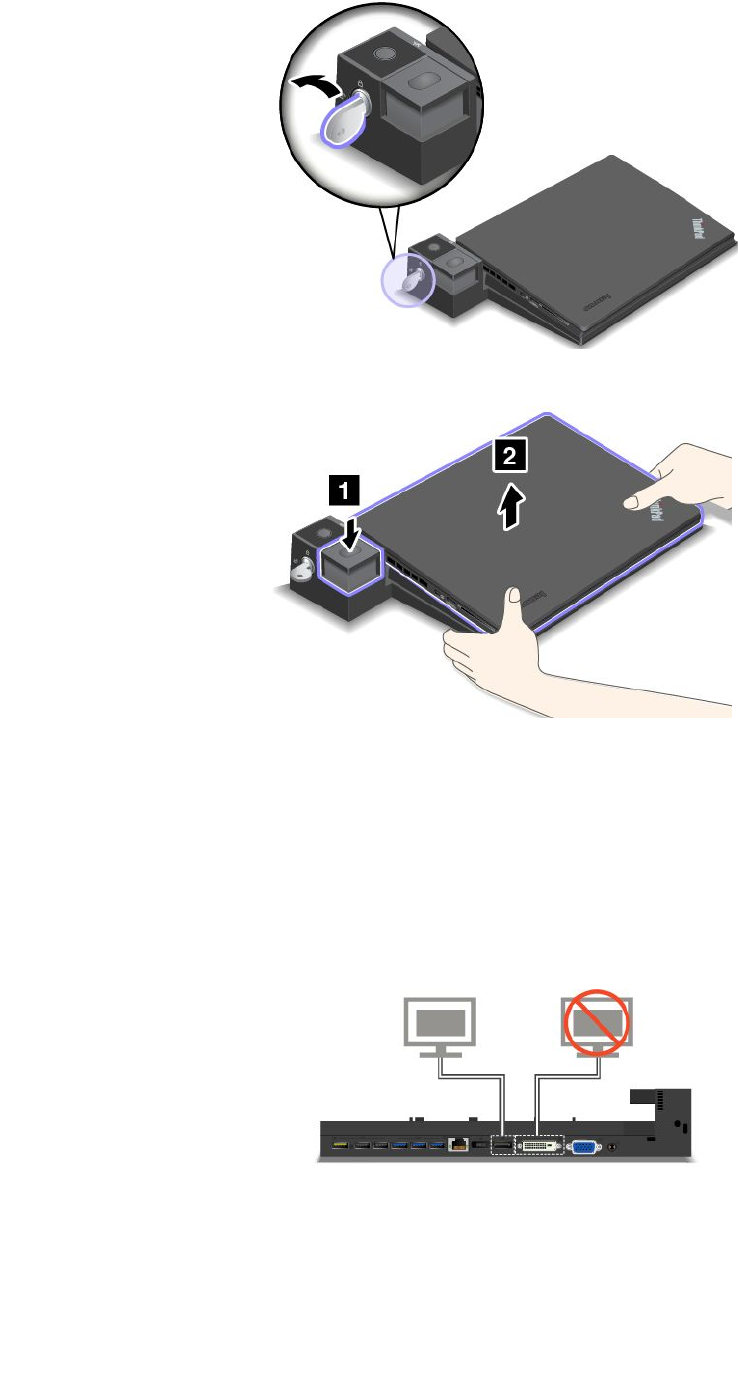
3.Presstheejectbuttonuntilthecomputermovesup.Then,graspbothsidesofthecomputertoremoveit.
Guidelinesonconnectingmultipleexternaldisplaystoadockingstation
YoucanconnectmultipleexternaldisplaystoasupportedThinkPaddockingstation.Toensurethatthe
multipledisplaysworkcorrectly,observethefollowingguidelinesandconnectthedisplaystoappropriate
connectors.
•Donotusetheconnectorsasshowninthefollowingillustrationsatthesametimeforconnectingmultiple
displays.Otherwise,oneofthedisplaysasshownwillnotwork.
–ThinkPadProDock
104UserGuide
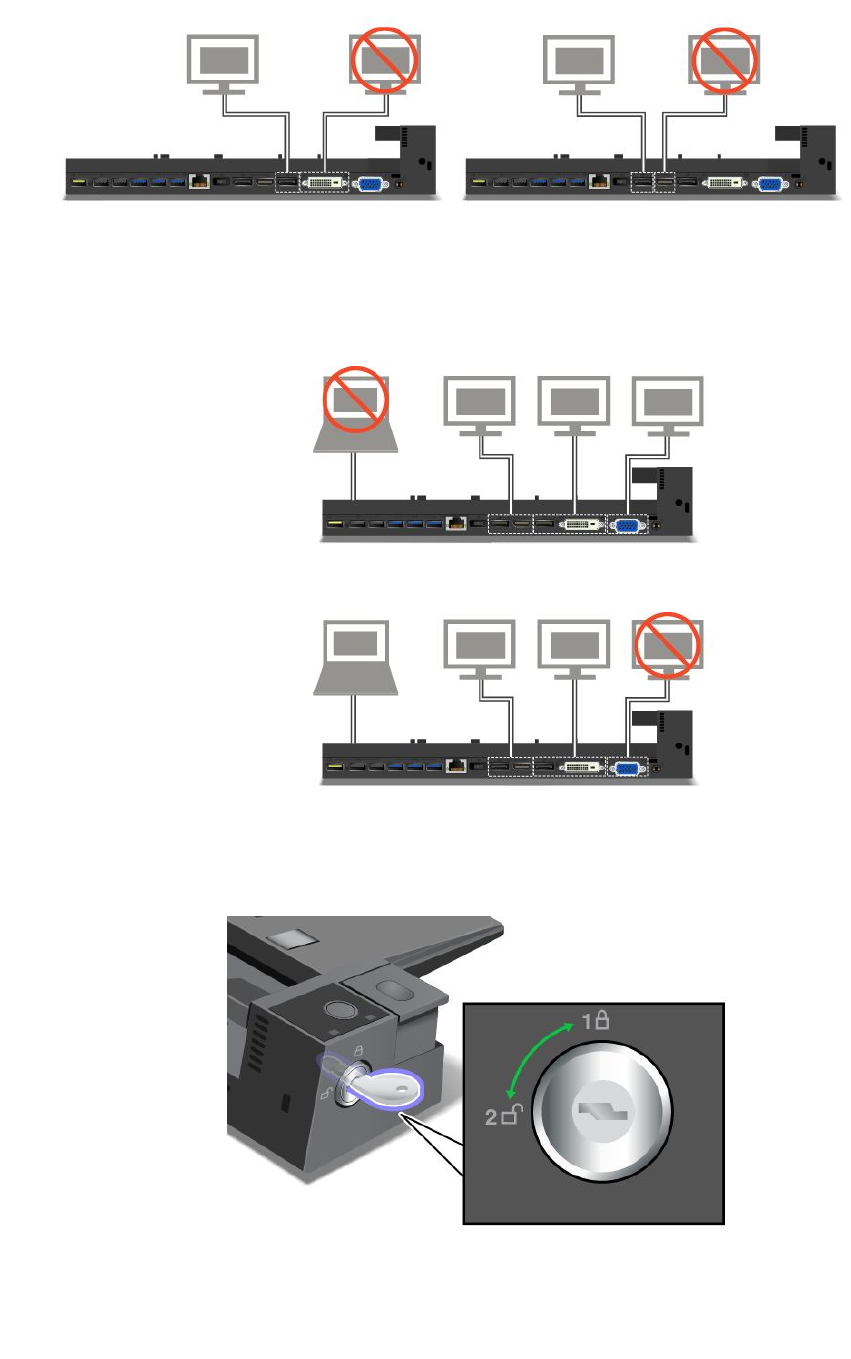
–ThinkPadUltraDock
•FortheThinkPadUltraDock,amaximumofthreedisplays(includingyourcomputerdisplay)canworkat
thesametime.Asaresult,ifyouconnectthreeexternaldisplaystotheThinkPadUltraDock,thedisplay
connectedtotheVGAconnectorwillnotworkwhenyourcomputerdisplayison.
–Whenthecomputerdisplayisoff:
–Whenthecomputerdisplayison:
Securityfeatures
Thesystemlockkeyhastwopositionsasshowninthedrawing.
Thesecurityfeatureisdifferentwhenthekeyisindifferentpositions:
Chapter7.Enhancingyourcomputer105

•Whenthekeyisinposition1,theejectbuttonofthedockingstationislocked,andyoucannotremove
yourcomputer.Thekeylockindicatorisonwhentheejectbuttonislocked.Thesecuritycableislocked.
•Whenthekeyisinposition2,theejectbuttonofthedockingstationisunlocked,andyoucanremoveyour
computer.Thekeylockindicatorisoffwhentheejectbuttonisunlocked.Thesecuritycableislocked.
106UserGuide

Chapter8.Advancedconfiguration
Thischapterprovidesthefollowinginformationtohelpyouconfigurethecomputer:
•“Installinganewoperatingsystem”onpage107
•“Installingdevicedrivers”onpage109
•“UsingtheThinkPadSetupprogram”onpage109
•“Usingsystemmanagement”onpage121
Installinganewoperatingsystem
Insomesituations,youmightneedtoinstallanewoperatingsystem.Thistopicprovidesinstructionson
howtoinstallanewoperatingsystem.
InstallingtheWindows7operatingsystem
Beforeyoustart,printtheseinstructions.
Attention:
•Theprocessofinstallinganewoperatingsystemdeletesallthedataonyourharddiskdriveorsolid-state
drive,includingthedatathatwerestoredinahiddenfolder.
•IfyourcomputerisequippedwithbothaharddiskdriveandanM.2solid-statedrive,donotusethe
M.2solid-statedriveasabootabledevice.TheM.2solid-statedriveisusedfor“cache”functionandto
supporttheIntelRapidStartTechnology.
ToinstalltheWindows7operatingsystem,dothefollowing:
1.CopyallthesubdirectoriesandfilesintheC:\SWTOOLSdirectorytoaremovablestoragedevice.
•ThesupplementfilesfortheWindows7operatingsystemareintheC:\SWTOOLS\OSFIXESdirectory.
•ThedevicedriversareintheC:\SWTOOLS\DRIVERSdirectory.
•ThepreinstalledprogramsareintheC:\SWTOOLS\APPSdirectory.
2.StarttheThinkPadSetupprogram.See“UsingtheThinkPadSetupprogram”onpage109.
3.SelectStartup➙UEFI/LegacyBoot.Thendooneofthefollowing:
•ToinstalltheWindows7(32-bit)operatingsystem,selectLegacyOnlyorBoth.
•ToinstalltheWindows7(64-bit)operatingsysteminLegacymode,selectLegacyOnly.
•ToinstalltheWindows7(64-bit)operatingsysteminUEFImode,selectUEFIOnly.
4.PressF10.ASetupConfirmationwindowisdisplayed.ClickYestosavetheconfigurationandexit
theThinkPadSetupprogram.
5.InserttheWindows7operatingsysteminstallationDVDintotheopticaldrive,andrestartthecomputer.
6.RestoretheC:\SWTOOLSdirectorythatyoubackedupbeforeinstallingtheWindows7operatingsystem.
7.Installthedevicedrivers.See“Installingdevicedrivers”onpage109.
8.InstalltheWindows7fixmodules.YoucanfindtheWindows7fixmodulesintheC:\SWTOOLS\OSFIXES\
directory.Formoreinformation,gototheMicrosoftKnowledgeBasehomepageat:
http://support.microsoft.com/
9.Installtheregistrypatches,forexampletheEnablingWakeonLANfromStandbyforENERGYSTAR
patch.Todownloadandinstalltheregistrypatches,gototheLenovoSupportWebsiteat:
http://www.lenovo.com/support
©CopyrightLenovo2013,2014107

Note:Afterinstallingtheoperatingsystem,donotchangetheinitialUEFI/LegacyBootsettinginthe
ThinkPadSetupprogram.Otherwisetheoperatingsystemwillnotstartcorrectly.
WhenyouinstalltheWindows7operatingsystem,youmightneedoneofthefollowingcountryorregion
codes:
CountryorregionCodeCountryorregionCode
ChinaSCNetherlandsNL
DenmarkDKNorwayNO
FinlandFISpainSP
FranceFRSwedenSV
GermanyGRTaiwanandHongKongTC
ItalyITUnitedStatesUS
JapanJP
InstallingtheWindows8orWindows8.1operatingsystem
Beforeyoustart,printtheseinstructions.
Attention:
•Theprocessofinstallinganewoperatingsystemdeletesallthedataonyourharddiskdriveorsolid-state
drive,includingthedatathatwerestoredinahiddenfolder.
•IfyourcomputerisequippedwithbothaharddiskdriveandanM.2solid-statedrive,donotusethe
M.2solid-statedriveasabootabledevice.TheM.2solid-statedriveisusedfor“cache”functionandto
supporttheIntelRapidStartTechnology.
ToinstalltheWindows8orWindows8.1operatingsystem,dothefollowing:
1.StarttheThinkPadSetupprogram.See“UsingtheThinkPadSetupprogram”onpage109.
2.SelectStartup➙BoottodisplaytheBootPriorityOrdersubmenu.
3.SelectthedrivethatcontainstheWindows8orWindows8.1operatingsysteminstallationprogram,
forexampleUSBHDD.
4.PressF10.ASetupConfirmationwindowisdisplayed.ClickYestosavetheconfigurationandexit
theThinkPadSetupprogram.
5.ConnectthedrivethatcontainstheWindows8orWindows8.1operatingsysteminstallationprogramto
thecomputer,andrestartthecomputer.
6.InstalltheWindows8orWindows8.1fixmodules.GototheMicrosoftKnowledgeBasehomepageat
http://support.microsoft.com/.Typethenumberofthefixmoduleinthesearchfield,thenclickSearch.
7.Installtheregistrypatches,forexampletheEnablingWakeonLANfromStandbyforENERGYSTAR
patch.Todownloadandinstalltheregistrypatches,gototheLenovoSupportWebsiteat:
http://www.lenovo.com/support
8.Installthedevicedrivers.See“Installingdevicedrivers”onpage109.
Note:Afterinstallingtheoperatingsystem,donotchangetheinitialUEFI/LegacyBootsettinginthe
ThinkPadSetupprogram.Otherwise,theoperatingsystemwillnotstartcorrectly.
WhenyouinstalltheWindows8orWindows8.1operatingsystem,youmightneedoneofthefollowing
countryorregioncodes:
108UserGuide

CountryorregionCodeCountryorregionCode
ChinaSCNetherlandsNL
DenmarkDKNorwayNO
FinlandFISpainSP
FranceFRSwedenSV
GermanyGRTaiwanandHongKongTC
ItalyITUnitedStatesUS
JapanJP
Installingdevicedrivers
Devicedriveristheprogramthatoperatesaparticularhardwaredeviceofthecomputer.Ifadevicedoes
notperformwelloryouinstallanewdevice,youneedtoinstallorupdatethecorrespondingdevicedriver.
Forexample,ifyouusetheWindows7operatingsystem,tousetheUSB3.0connector,youneedto
downloadandinstalltheUSB3.0driver.
Todownloadthelatestdevicedrivers,dothefollowing:
1.Gotohttp://www.lenovo.com/ThinkPadDrivers.
2.Selectyourproductnametoviewallthedevicedriversforyourcomputer.
3.Selectthedevicedriversyouthatyouneed,andfollowtheinstructionsonthescreen.
Attention:DonotdownloadthedevicedriversfromtheWindowsUpdateWeb.Alwaysdownloadthedevice
driversfrom:
http://www.lenovo.com/ThinkPadDrivers
IfyouusetheWindows7operatingsystem,youalsocanfindthedevicedriversintheC:\SWTOOLS\DRIVERS
directoryonyourharddiskdriveorsolid-statedrive.Formoreinformation,see“Reinstallingpreinstalled
programsanddevicedrivers”onpage66.
UsingtheThinkPadSetupprogram
TheThinkPadSetupprogramenablesyoutoselectvarioussetupconfigurationsforyourcomputerthrough
configuringtheBIOS.
ToconfiguretheBIOSofyourcomputer,dothefollowing:
1.Restartthecomputer.WhentheThinkPadlogoisdisplayed,pressF1tostarttheThinkPadSetup
program.
Note:Ifyouarerequiredtoenterthesupervisorpassword,enterthecorrectpassword.Youalsocan
pressEntertoskipthepasswordpromptandstarttheThinkPadSetupprogram.Ifyoudonotenterthe
password,youcannotchangetheconfigurationsthatareprotectedbythesupervisorpassword.For
moreinformation,referto“Usingpasswords”onpage51.
2.Usethecursorkeystoselectatab;orusethecursorkeystolocateanitemandpressEntertoselectit.
Thenasubmenuisdisplayed.
Note:Somemenuitemsaredisplayedonlyifthecomputersupportsthecorrespondingfeatures.
3.Setthevalueofanitembydoingoneofthefollowing:
•PressF6tochangetoahighervalue.
•PressF5tochangetoalowervalue.
Chapter8.Advancedconfiguration109

Note:Defaultvaluesareinboldface.
4.Tochangeotherconfigurations,presstheEsckeytoexitthesubmenuandreturntotheparentmenu.
5.Whenyoucompletetheconfiguration,pressF10.ASetupConfirmationwindowisdisplayed.ClickYes
tosavetheconfigurationandexittheThinkPadSetupprogram.YoualsocanselecttheRestarttabin
theThinkPadSetupmenu,andrestartyourcomputerwithoneoftheprovidedoptions.
Note:YoucanpressF9torestoretothedefaultsettings.
Mainmenu
WhenyouentertheThinkPadSetupprogram,youwillfirstseetheMainmenuasfollows:
•UEFIBIOSVersion
•UEFIBIOSDate
•EmbeddedControllerVersion
•MEFirmwareVersion
•MachineTypeModel
•System-unitserialnumber
•Systemboardserialnumber
•AssetTag
•CPUType
•CPUSpeed
•Installedmemory
•UUID
•MACAddress(InternalLAN)
•Preinstalledoperatingsystemlicense
•UEFISecureBoot
Configmenu
Tochangetheconfigurationofyourcomputer,selecttheConfigtabfromtheThinkPadSetupmenu.
ThefollowingtableliststheConfigmenuitems.Defaultvaluesareinboldface.
Attention:Thedefaultconfigurationsarealreadyoptimizedforyou.Improperchangeoftheconfigurations
mightcauseunexpectedresults.
Table4.Configmenuitems
MenuitemSubmenuitemValueComments
WakeOnLAN•Disabled
•AConly
•ACandBattery
Enablethecomputer
topoweronwhenthe
Ethernetcontrollerreceives
amagicpacket(aspecial
networkmessage).
IfyouselectACOnly,Wake
onLANfunctionisenabled
onlywhentheacpower
adapterisattached.
Network
110UserGuide

Table4.Configmenuitems(continued)
MenuitemSubmenuitemValueComments
IfyouselectACand
Battery,WakeonLAN
functionisenabledwithany
powersources.
Notes:
•Themagicpackettype
WakeonLANrequires
acpower.
•TheWakeonLAN
functiondoesnot
workwhenaharddisk
passwordisset.
EthernetLANOptionROM
(forLegacyOnlyboot
modeorBothwithLegacy
first)
•Disabled
•Enabled
LoadtheEthernetLAN
OptionROMtoenable
startupfromanintegrated
networkdevice.
UEFIIPv4NetworkStack
(forUEFIOnlybootmode
orBothwithUEFIfirst)
•Disabled
•Enabled
EnableordisableInternet
ProtocolVersion4(IPv4)
networkstackforUEFI
environment.
UEFIIPv6NetworkStack
(forUEFIOnlybootmode
orBothwithUEFIfirst)
•Disabled
•Enabled
EnableordisableInternet
ProtocolVersion6(IPv6)
networkstackforUEFI
environment.
UEFIPXEBootPriority
(forBothwithUEFIfirst
bootmode,andIPv6
andIPv4stacksareboth
enabled.)
•IPv6First
•IPv4First
Selectnetworkstack
priorityforUEFIPXEboot.
USBUEFIBIOSSupport•Disabled
•Enabled
Enableordisableboot
supportforUSBstorage
devices.
Always-onUSB•Disabled
•Enabled
IfyouselectEnabled,the
externalUSBdevicescan
bechargedthroughUSB
connectorsevenwhenthe
computerisinlow-power
mode(sleep,hibernate,or
power-off).
-ChargeinBatteryMode•Disabled
•Enabled
IfyouselectEnabled,
externalUSBdevicescan
bechargedthroughUSB
connectorsevenwhenthe
systemisinhibernation
mode,orispower-offand
inbatteryoperation.
USB
USB3.0Mode•Disabled
•Enabled
SettheUSB3.0controller
modefortheportsshared
betweenUSB2.0andUSB
3.0controllers.
Chapter8.Advancedconfiguration111

Table4.Configmenuitems(continued)
MenuitemSubmenuitemValueComments
•AutoIfyouselectAuto,it
enablesyoutoconnectand
routeappropriateUSB3.0
orUSB2.0connectors.
IfyouselectEnabled,it
enablesUSB3.0mode
andallowsUSB3.0tobe
supportedintheoperating
system.
IfyouselectDisabled,it
disablesandhidestheUSB
3.0controller,andUSB3.0
connectorswillworkas
USB2.0connectors.
TrackPoint•Disabled
•Enabled
Enableordisablethe
built-inTrackPointpointing
device.
Note:Ifyouwanttouse
anexternalmouse,select
Disabled.
Trackpad•Disabled
•Enabled
Enableordisablethe
built-intrackpad.
Note:Ifyouwanttouse
anexternalmouse,select
Disabled.
Keyboard/Mouse
FnandCtrlKeyswap•Disabled
•Enabled
IfyouselectEnabled,the
FnkeyworksastheCtrl
key,andtheCtrlkeyworks
astheFnkey.
Note:EvenwhenEnabled
isselected,youneedto
pressFntoresumethe
computerfromsleepmode
tonormaloperation.
DisplayBootDisplayDevice•ThinkPadLCD
•Analog(VGA)
•DigitalonThinkPad
•Displayondock
Selectthedisplaydevice
thatistobeactivatedat
boottime.Thisselection
iseffectiveforboottime,
passwordprompt,and
ThinkPadSetup.
DigitalonThinkPadisthe
MiniDisplayPortconnector
onyourcomputer.
Displayondockis
DisplayPort,DVIorVGA
112UserGuide

Table4.Configmenuitems(continued)
MenuitemSubmenuitemValueComments
connectorsonadocking
station.
IntelSpeedStep®
technology
•Disabled
•Enabled
ModeforAC
•MaximumPerformance
•BatteryOptimized
ModeforBattery
•MaximumPerformance
•BatteryOptimized
SelectthemodeofIntel
SpeedSteptechnologyat
runtime.
MaximumPerformance:
Alwaysthehighestspeed.
BatteryOptimized:Always
thelowestspeed.
Disabled:Thehighest
speed,andruntimeisnot
supported.
AdaptiveThermal
Management
SchemeforAC
•MaximizePerformance
•Balanced
SchemeforBattery
•MaximizePerformance
•Balanced
Selectathermal
managementscheme
touse.
MaximizePerformance:
Reducemicroprocessor
throttling.
Balanced:Balance
sound,temperature,and
performance.
Note:Eachschemeaffects
fansound,temperature,
andperformance.
CPUPowerManagement•Disabled
•Enabled
Enableordisablethe
power-savingfeaturethat
stopsthemicroprocessor
clockautomaticallywhen
therearenosystem
activities.Normally,it
isnotnecessarytochange
thesetting.
PowerOnwithACAttach•Disabled
•Enabled
Enableordisablethe
featurethatpowersonthe
systemwhentheacpower
adapterisattached.
IfyouselectEnabled,the
systemispoweredonwhen
theacpoweradapteris
attached.Ifthesystemisin
hibernatestate,thesystem
resumesnormaloperation.
IfyouselectDisabled,the
systemisnotpoweredon
norresumedwhentheac
poweradapterisattached.
Power
Chapter8.Advancedconfiguration113

Table4.Configmenuitems(continued)
MenuitemSubmenuitemValueComments
IntelRapidStart
Technology
•Disabled
•Enabled
Enterafter:
•Immediately
•1minute
•2minutes
•5minutes
•10minutes
•15minutes
•30minutes
•1hour
•2hours
•3hours
Tousethisfeature,aspecial
partitiononthesolid-state
driveisrequired.
Whenenabled,the
computerentersalower
powerstateafterthe
specifiedtimeinsleep
state.Andittakesonly
secondstoresumenormal
operation.
DisableBuilt-inBattery•Yes
•No
Temporarilydisable
thebuilt-inbatteryfor
servicingthecomputer.
Afterselectingthisitem,
thecomputerwillbe
automaticallypoweredoff.
Note:Thebatterywillbe
automaticallyre-enabled
whentheacpoweradapter
isreconnectedtothe
computer.
PasswordBeep•Disabled
•Enabled
Enablethisoptiontohave
abeepsoundwhenthe
systemiswaitingfora
power-on,harddisk,or
supervisorpassword.
Differentbeepswillsound
whentheenteredpassword
matchesordoesnotmatch
theconfiguredpassword.
BeepandAlarm
KeyboardBeep•Enabled
•Disabled
Enableordisablekeyboard
beepwhenunmanageable
keycombinationsare
pressed.
IntelAMTControl•Disabled
•Enabled
•PermanentlyDisabled
IfyouselectEnabled,
IntelActiveManagement
Technology(AMT)is
configuredandadditional
setupitemsareprovidedin
ManagementEngineBIOS
Extension(MEBx)Setup.
IfyouselectPermanently
Disabled,youwillneverbe
abletoenableitagain.Be
cautiouswhenyouwantto
usethisoption.
Note:Youcanenterthe
MEBxSetupmenuby
pressingtheCtrl+Pkey
IntelAMT
114UserGuide

Table4.Configmenuitems(continued)
MenuitemSubmenuitemValueComments
combinationintheStartup
InterruptMenuwindow.
TodisplaytheStartup
InterruptMenuwindow,
presstheblackbutton
orEnterkeyduringthe
power-onself-test(POST).
CIRATimeout0-255
Note:Thedefaultvalueis
60seconds.
Setthetimeoutoptionfor
CIRAconnectiontobe
established.Selectable
secondvaluesarefrom1to
254.
Ifyouselect0,use60
secondsasthedefault
timeoutvalue.
Ifyouselect255,the
waitingtimeforestablishing
aconnectionisunlimited.
ConsoleType•PCANSI
•VT100+
•PC-ANSI
•VT-UTF8
Selecttheconsoletypefor
AMT.
Note:Thisconsoletype
shouldmatchtheIntelAMT
remoteconsole.
DateandTimemenu
Tochangethedateortimeofyourcomputer,selecttheDate/TimetabfromtheThinkPadSetupmenu.
Thendothefollowing:
1.UsethecursorkeystoselectSystemDateorSystemTime.
2.Typeadateortime.
Securitymenu
Tochangethesecuritysettingsofyourcomputer,selecttheSecuritytabfromtheThinkPadSetupmenu.
ThefollowingtableliststheSecuritymenuitems.Defaultvaluesareinboldface.
Attention:Thedefaultconfigurationsarealreadyoptimizedforyou.Improperchangeoftheconfigurations
mightcauseunexpectedresults.
Table5.Securitymenuitems
MenuitemSubmenuitemValueComments
HardwarePassword
Manager
•Disabled
•Enabled
Manageyourpower-onpassword,supervisor
password,andyourharddiskpasswords.
Supervisor
Password
•Disabled
•Enabled
Formoreinformation,see“Supervisor
password”onpage52.
LockUEFIBIOS
Settings
•Disabled
•Enabled
Enableordisablethefunctionthatprotects
itemsinThinkPadSetupfrombeingchanged
byauserwhodoesnothavethesupervisor
Password
Chapter8.Advancedconfiguration115

Table5.Securitymenuitems(continued)
MenuitemSubmenuitemValueComments
password.Bydefault,thisissettoDisabled.
Ifyousetthesupervisorpasswordandenable
thisfunction,noonebutyoucanchangethe
itemsinThinkPadSetup.
Passwordat
unattendedboot
•Disabled
•Enabled
IfyouselectandenablePasswordat
unattendedboot,apasswordpromptis
displayedwhenthecomputeristurnedon,from
eitherapower-offstateorhibernationstate,by
anunattendedeventsuchasaWakeonLAN
attempt.IfyouselectDisabled,nopassword
promptisdisplayed;thecomputergoesahead
andloadstheoperatingsystem.Toprevent
unauthorizedaccess,settheuserauthentication
ontheoperatingsystem.
Passwordatrestart•Disabled
•Enabled
IfyouselectandenablePasswordatrestart,
apasswordpromptisdisplayedwhenyou
restartthecomputer.IfyouselectDisabled,no
passwordpromptisdisplayed;thecomputer
goesaheadandloadstheoperatingsystem.
Topreventunauthorizedaccess,settheuser
authenticationontheoperatingsystem.
SetMinimumLength•Disabled
•xcharacters
(4≤x≤12)
Specifyaminimumlengthforpower-on
passwordsandharddiskpasswords.Ifyou
setthesupervisorpasswordandspecifya
minimumlengthforpasswords,noonebutyou
canchangethelength.
Power-OnPassword•Disabled
•Enabled
Formoreinformation,see“Power-onpassword”
onpage51.
HardDiskx
Password
•Disabled
•Enabled
Formoreinformation,see“Harddisk
passwords”onpage53.
Note:HardDisk1meanstheharddiskdriveis
builtintoyourcomputer.
Predesktop
Authentication
•Disabled
•Enabled
Enableordisablefingerprintauthentication
beforetheoperatingsystemisloaded.
ReaderPriority•External➙
Internal
•InternalOnly
IfExternal➙Internalisselected,anexternal
fingerprintreaderisusedifattached.Otherwise,
aninternalfingerprintreaderisused.IfInternal
Onlyisselected,aninternalfingerprintreader
isused.
SecurityMode•Normal
•High
Iffingerprintauthenticationfails,youstillcan
startthecomputerbyenteringapassword.If
youhaveselectedNormal,enterapower-on
passwordorasupervisorpassword;ifyouhave
selectedHigh,enterasupervisorpassword.
Password
Authentication
•Disabled
•Enabled
Enableordisablepasswordauthentication.This
itemisavailablewhenhighsecuritymodeis
selected.
Fingerprint
ResetFingerprint
Data
•EnterThisoptionisusedtoeraseallfingerprintdata
storedinthefingerprintreaderandresetsettings
tothefactorystate.Asaresult,anypower-on
securityfeaturespreviouslyenabledwillnotbe
116UserGuide

Table5.Securitymenuitems(continued)
MenuitemSubmenuitemValueComments
abletoworkuntiltheyarere-enabledinthe
fingerprintsoftware.
SecurityChip
Selection
•DiscreteTPM
•IntelPPT
IfyouselectDiscreteTPM,youcanusea
discreteTPMchipwithTPM1.2mode.Ifyou
selectIntelPTT,youcanuseIntelPlatform
Trustedtechnology(PTT)withTPM2.0mode.
Note:
IntelPTTcanbeusedwithWindows8orlater
operatingsystem.
SecurityChip•Active
•Inactive
•Disabled
IfyouselectActive,thesecuritychipis
functional.IfyouselectInactive,theSecurity
Chipoptionisvisible,butthesecuritychip
isnotfunctional.IfyouselectDisabled,the
SecurityChipoptionishiddenandthesecurity
chipisnotfunctional.
SecurityReporting
Options
ThisoptionisavailablewhenSecurityChip
isactive.Itisusedtoenableordisablethe
followingSecurityReportingOptions:
•BIOSROMStringReporting(Windows7)
orUEFIROMStringReporting(Windows8
andWindows8.1):BIOStextstring
•CMOSReporting:CMOSdata
•NVRAMReporting:Securitydatastoredin
theAssetID
•SMBIOSReporting:SMBIOSdata
ClearSecurityChip•EnterCleartheencryptionkey.
Note:Thisitemisdisplayedonlyifyouhave
selectedActivefortheSecurityChipoption.
IntelTXTFeature•Disabled
•Enabled
EnableordisabletheIntelTrustedExecution
Technology.
Note:Thisitemisdisplayedonlyifyouhave
selectedActivefortheSecurityChipoption.
PhysicalPresence
forProvisioning
•Disabled
•Enabled
Enableordisabletheconfirmationmessage
whenyouchangethesettingsofthesecurity
chip.
SecurityChip
PhysicalPresence
forClear
•Disabled
•Enabled
Enableordisabletheconfirmationmessage
whenyouclearthesecuritychip.
FlashBIOSUpdating
byEnd-Users
•Disabled
•Enabled
IfyouselectEnabled,alluserscanupdatethe
UEFIBIOS.IfyouselectDisabled,onlythe
personwhoknowsthesupervisorpasswordcan
updatetheUEFIBIOS.
UEFIBIOSUpdate
Option
SecureRollBack
Prevention
•Disabled
•Enabled
IfyouselectDisabled,youcanflashtheolder
versionUEFIBIOS.
Chapter8.Advancedconfiguration117

Table5.Securitymenuitems(continued)
MenuitemSubmenuitemValueComments
MemoryProtectionExecution
Prevention
•Disabled
•Enabled
Somecomputervirusesandwormscause
memorybufferstooverflow.Byselecting
Enabledyoucanprotectyourcomputeragainst
attacksbysuchvirusesandworms.Ifafter
choosingEnabledyoufindthataprogramdoes
notruncorrectly,selectDisabledandresetthe
setting.
IntelVirtualization
Technology
•Disabled
•Enabled
IfyouselectEnabled,aVirtualMachineMonitor
(VMM)canutilizetheadditionalhardware
capabilitiesprovidedbyIntelVirtualization
Technology.
Virtualization
IntelVT-dFeature•Disabled
•Enabled
IntelVT-dstandsforIntelVirtualization
TechnologyforDirectedI/O.Whenenabled,a
VMMcanutilizetheplatforminfrastructurefor
I/Ovirtualization.
EthernetLAN•Disabled
•Enabled
IfyouselectEnabled,youcanusetheEthernet
LANdevice.
WirelessLAN•Disabled
•Enabled
IfyouselectEnabled,youcanusetheWireless
LANconnection.
WirelessWAN•Disabled
•Enabled
IfyouselectEnabled,youcanusethewireless
WANdevice.
Bluetooth•Disabled
•Enabled
IfyouselectEnabled,youcanuseBluetooth
devices.
USBPort•Disabled
•Enabled
IfyouselectEnabled,youcanusetheUSB
connectors.
MemoryCardSlot•Disabled
•Enabled
IfyouselectEnabled,youcanusethememory
cardslots.
SmartCardSlot•Disabled
•Enabled
IfyouselectEnabled,youcanusethesmart
cardslots.
IntegratedCamera•Disabled
•Enabled
IfyouselectEnabled,youcanusetheintegrated
camera.
Microphone•Disabled
•Enabled
IfyouselectEnabled,youcanusethe
microphones(internal,external,orline-in).
FingerprintReader•Disabled
•Enabled
IfyouselectEnabled,youcanusethe
fingerprintreader.
I/OPortAccess
NFCDevice•Disabled
•Enabled
IfyouselectEnabled,youcanusetheNFC
device.
InternalDevice
Access
BottomCover
TamperDetection
•Disabled
•Enabled
Enableordisablethetamperdetection.If
tamperisdetected,SupervisorPasswordis
requiredtobootthesystem.BottomCover
TamperDetectionwillnottakeeffectunless
SupervisorPasswordisenabled.
118UserGuide

Table5.Securitymenuitems(continued)
MenuitemSubmenuitemValueComments
IntelATModule
Activation
•Disabled
•Enabled
•Permanently
Disabled
EnableordisabletheUEFIBIOSinterfaceto
activatetheIntelATmodule,whichisanoptional
anti-theftservicefromIntel.
Note:IfyousettheIntelATmoduleactivation
toPermanentlyDisabled,youwillbeunableto
enablethissettingagain.
IntelATSuspend•EnterThisoptionisdisplayedonlywhentheanti-theft
functionisactivated.
TheIntelanti-theftsuspendscreenwillbe
displayedatnextboottoenterthesuspend
mode.
Anti-Theft
Computrace•Disabled
•Enabled
•Permanently
Disabled
EnableordisabletheUEFIBIOSinterfaceto
activatethecomputracemodule.Computrace
isanoptionalmonitoringservicefromAbsolute
Software.
Note:Ifyousetthecomputracemodule
activationtoPermanentlyDisabled,youwillbe
unabletoenablethissettingagain.
SecureBoot•Disabled
•Enabled
EnableordisabletheUEFISecureBootfeature.
SelectEnabletopreventunauthorizedoperating
systemsfromrunningatboottime.Select
Disabledtoallowanyoperatingsystemstorun
atboottime.
PlatformMode•SetupMode
•UserMode
Specifythesystemoperatingmode.
SecureBootMode•StandardMode
•CustomMode
SpecifytheSecureBootmode.
ResettoSetupModeThisoptionisusedtoclearthecurrentplatform
keyandputthesystemintoSetupMode.You
caninstallyourownplatformkeyandcustomize
theSecureBootsignaturedatabasesinSetup
Mode.
SecureBootmodewillbesettoCustomMode.
SecureBoot
RestoreFactory
Keys
Thisoptionisusedtorestoreallkeysand
certificatesinSecureBootdatabasestofactory
defaults.AnycustomizedSecureBootsettings
willbeerased,andthedefaultplatformkey
willbere-establishedalongwiththeoriginal
signaturedatabasesincludingcertificatefor
Windows8orWindows8.1operatingsystem.
Startupmenu
Tochangethestartupsettingsofyourcomputer,selecttheStartuptabfromtheThinkPadSetupmenu.
Attention:
•Afteryouchangethestartupsequence,ensurethatyouselectacorrectdeviceduringacopy,asave,ora
formatoperation.Otherwiseyourdatamightbeerasedoroverwritten.
Chapter8.Advancedconfiguration119

•IfyouareusingtheBitLockerdriveencryption,donotchangethestartupsequence.BitLockerdrive
encryptionlocksthecomputerfromstartingoncedetectsthechangeofstartupsequence.
Tochangethestartupsequencetemporarilysothatthecomputerstartsfromadesireddrive,dothefollowing:
1.Turnoffthecomputer.
2.Turnonthecomputer.WhentheThinkPadlogoisdisplayed,pressF12.
3.Selectthedevicethatyouwantthecomputertostartfrom.
Note:TheBootmenuwillbedisplayedifthecomputercannotstartfromanydevices,ortheoperating
systemcannotbefound.
ThefollowingtableliststheStartupmenuitems.Defaultvaluesareinboldface.
Note:Someitemsaredisplayedonthemenuonlyifthecomputersupportsthecorrespondingfeatures.
Table6.Startupmenuitems
MenuitemValueComments
BootSelectthebootdevicewhenyou
pressthepowerbuttontoturnonthe
computer.
NetworkBootSelectthebootdevicewhenthesystem
wakesfromLAN.IfWakeOnLANis
enabled,thenetworkadministratorcan
turnonallofthecomputersinaLAN
remotelybyuseofnetworkmanagement
software.
UEFI/LegacyBoot•Both
–UEFI/LegacyBootPriority
–UEFIFirst
–LegacyFirst
•UEFIOnly
•LegacyOnly
CSMSupport(forUEFIOnly)
•Yes
•No
Selectsystembootcapability.
•Both:Selectpriorityofbootoptions
betweenUEFIandLegacy.
•UEFIOnly:Thesystemwillbootfrom
theUEFIenabledoperatingsystem.
•LegacyOnly:Thesystemwillboot
fromanyoperatingsystemotherthan
theUEFIenabledone.
Note:IfyouselectUEFIOnly,the
systemcannotbootfromthebootable
devicesthatdonothavetheUEFI
enabledoperatingsystem.
CompatibilitySupportModule(CSM)is
requiredforbootingthelegacyoperating
system.IfyouselectUEFIOnly,CSM
Supportisselectable.ForBothor
LegacyOnlymood,CSMSupportis
notselectable.
120UserGuide

Table6.Startupmenuitems(continued)
MenuitemValueComments
BootMode•Quick
•Diagnostics
ScreenduringthePOST:
•Quick:TheThinkPadLogoscreenis
displayed.
•Diagnostics:Textmessagesare
displayed.
Note:YoualsocanenterDiagnostic
modebypressingEscduringthePOST.
OptionKeysdisplay•Disabled
•Enabled
IfyouselectDisabled,the“Tointerrupt
normalstartup,pressEnter.”messageis
notdisplayedduringthePOST.
BootDeviceListF12Option•Disabled
•Enabled
IfyouselectEnabled,theF12keyis
recognizedandtheBootMenuwindow
isdisplayed.
BootOrderLock•Disabled
•Enabled
IfyouselectEnabled,thebootpriority
orderislockedforyourfutureuse.
Restartmenu
ToexittheThinkPadSetupprogramandrestartthecomputer,selectRestartfromtheThinkPadSetupmenu.
Thefollowingsubmenuitemsaredisplayed:
•ExitSavingChanges:Savethechangesandrestartthecomputer.
•ExitDiscardingChanges:Discardthechangesandrestartthecomputer.
•LoadSetupDefaults:Restoretothefactorydefaultsettings.
Note:EnableOSOptimizedDefaultstomeettheWindows8orWindows8.1certificationrequirements.
Whenyouchangethissetting,someothersettingsarechangedautomatically,suchasCSMSupport,
UEFI/LegacyBoot,SecureBoot,andSecureRollBackPrevention.
•DiscardChanges:Discardthechanges.
•SaveChanges:Savethechanges.
UpdatingtheUEFIBIOS
TheUEFIBIOSisthefirstprogramthatthecomputerrunswhenthecomputeristurnedon.TheUEFIBIOS
initializesthehardwarecomponents,andloadstheoperatingsystemandotherprograms.
YoucanupdatetheUEFIBIOSbystartingyourcomputerfromaflashupdateopticaldiscoraflashupdate
programrunningintheWindowsenvironment.Whenyouinstallanewprogram,adevicedriver,orhardware,
youmightbeinformedtoupdatetheUEFIBIOS.
ForinstructionsonhowtoupdatetheUEFIBIOS,goto:
http://www.lenovo.com/ThinkPadDrivers
Usingsystemmanagement
Thistopicisprimarilyintendedforthenetworkadministrators.
Chapter8.Advancedconfiguration121

Yourcomputerisdesignedformanageability,sothatyoucanredirectmoreresourcestobettermeet
yourbusinessobjectives.
Thismanageability,knownasTotalCostofOwnership(TCO),enablesyoutoremotelyoperateclient
computersinthesamewayasyouoperateyourowncomputer,suchasturningonaclientcomputer,
formattingaharddiskdrive,andinstallingaprogram.
Oncethecomputerisconfiguredandoperational,youcanmanageitbyusingthesoftwareandthe
manageabilityfeaturesthatarealreadyintegratedintotheclientcomputerandthenetwork.
DesktopManagementInterface
TheUEFIBIOSofyourcomputersupportsaninterfacecalledSystemManagementBIOS(SMBIOS)
ReferenceSpecification,version2.7.1.SMBIOSprovidesinformationaboutthehardwarecomponentsof
yourcomputer.ItistheresponsibilityoftheUEFIBIOStoprovideinformationaboutitselfandthedeviceson
thesystemboard.ThisspecificationdocumentsthestandardsforgettingaccesstothisBIOSinformation.
PrebooteXecutionEnvironment
ThePrebooteXecutionEnvironment(PXE)technologymakesthecomputermoremanageablebyenabling
thecomputertostartfromaserver.YourcomputersupportsthepersonalcomputerfunctionsthatPXE
requires.Forexample,withtheappropriateLANcard,yourcomputercanbestartedfromthePXEserver.
Note:TheRemoteInitialProgramLoad(RIPLorRPL)functioncannotbeusedwithyourcomputer.
WakeonLAN
ThenetworkadministratorcanturnonacomputerfromamanagementconsolebyusingtheWakeon
LANfeature.
WhentheWakeonLANfeatureisenabled,manyoperations,suchasdatatransfer,softwareupdates,and
FlashupdatesoftheUEFIBIOS,canbedoneremotelywithoutremoteattendance.Theupdatingprocess
canperformafternormalworkinghoursandonweekends,sothattheusersarenotinterruptedduringwork,
andtheLANtrafficiskepttoaminimum.Itsavestimeandincreasesproductivity.
Note:IfthecomputeristurnedonthroughWakeonLAN,thecomputerstartsfollowtheNetworkBoot
sequence.
AssetIDEEPROM
TheAssetIDEEPROMcontainsinformationaboutthecomputerconfigurationandtheserialnumbersof
thekeycomponents.Italsoincludesanumberofblankfieldswhereyoucanrecordinformationabout
theendusersinyournetwork.
Settingmanagementfeatures
Toenableanetworkadministratortoremotelycontrolyourcomputer,setthefollowingsystem-management
featuresintheThinkPadSetupprogram:
•WakeonLAN
•NetworkBootsequence
•Flashupdate
Note:Ifasupervisorpasswordhasbeenset,youwillberequiredtoenterthesupervisorpasswordwhen
youstarttheThinkPadSetupprogram.
122UserGuide

EnablingordisablingtheWakeonLANfeature
WhentheWakeonLANfeatureisenabledandthecomputerisconnectedtoaLAN,thenetworkadministrator
canstartthecomputerremotelyfromamanagementconsole,usingaremotenetwork-managementprogram.
ToenableordisabletheWakeonLANfeature,dothefollowing:
1.StarttheThinkPadSetupprogram.See“UsingtheThinkPadSetupprogram”onpage109.
2.SelectConfig➙Network.TheNetworksubmenuisdisplayed.
3.SelectacorrespondingoptionfortheWakeonLANfeature.
4.PressF10.ASetupConfirmationwindowisdisplayed.ClickYestosavetheconfigurationandexit
theThinkPadSetupprogram.
DefiningaNetworkBootsequence
WhenthecomputerwakesonLAN,thecomputerbootsfromthedeviceasspecifiedontheNetworkBoot
menu,andthenfollowthebootorderlistontheBootmenu.
TodefineaNetworkBootsequence,dothefollowing:
1.StarttheThinkPadSetupprogram.See“UsingtheThinkPadSetupprogram”onpage109.
2.SelectStartup➙NetworkBoot.Thebootdevicelistisdisplayed.
3.Selectabootdevicetomakeitasthetopbootpriority.
4.PressF10.ASetupConfirmationwindowisdisplayed.ClickYestosavetheconfigurationandexit
theThinkPadSetupprogram.
Note:YoucanpressF9torestoretothefactorydefaultsettings.
Checkingtherequirementsforflashupdates
Anetworkadministratorcanupdatetheprogramsonyourcomputerfromamanagementconsole,ifthe
followingrequirementsaremet:
•ThecomputermustbestartedoverLAN.
•ThecomputermustbeengagedinthePrebooteXecutionEnvironment(PXE).
•Anetwork-managementprogrammustbeinstalledonthecomputerofthenetworkadministrator.
Chapter8.Advancedconfiguration123

124UserGuide

Chapter9.Preventingproblems
AnimportantpartofowningaThinkPadnotebookcomputerismaintenance.Withpropercare,you
canavoidcommonproblems.Thischapterprovidesinformationthatcanhelpyoukeepyourcomputer
runningsmoothly.
•“Generaltipsforpreventingproblems”onpage125
•“Makingsuredevicedriversarecurrent”onpage126
•“Takingcareofyourcomputer”onpage127
Generaltipsforpreventingproblems
Thistopicprovidesthefollowingtipstohelpyoupreventcomputingproblems:
•IfyourcomputerisequippedwithbothaharddiskdriveandanM.2solid-statedrive,youarenot
recommendedtousetheM.2solid-statedriveasabootabledevice.TheM.2solid-statedriveisdesigned
anddevelopedforthe“cache”functionpurposeonly.IfyouusetheM.2solid-statedriveasabootable
device,itsreliabilityisnotguaranteed.
•Checkthecapacityofyourharddiskdrivefromtimetotime.Iftheharddiskdrivegetstoofull,the
Windowsoperatingsystemwillslowdownandmightproduceerrors.
Tochecktheharddiskdrivecapacity,dothefollowing:
–Windows7:ClickStart➙Computer.
–Windows8andWindows8.1:OpentheFileExplorerandclickComputer.
•Emptyyourrecyclebinonaregularbasis.
•Usediskdefragmenttoolregularlyonyourharddiskdrivetoimprovedataseekandreadtimes.
•Tofreeupdiskspace,uninstallunusedprograms.
Note:Youalsomightwanttolookforprogramduplicationoroverlappingversions.
•CleanoutyourInbox,Sent,andTrashfoldersfromyoure-mailclientprogram.
•Backupyourdataatleastonceaweek.Ifcriticaldataispresent,itisagoodideatoperformadaily
backupoperation.Lenovohasmanybackupoptionsavailableforyourcomputer.Rewritableoptical
drivesareavailableformostmachinesandareeasilyinstalled.
•Schedulesystemrestoreoperationstotakeasystemsnapshotperiodically.Formoreinformationabout
systemrestore,seeChapter5“Recoveryoverview”onpage63.
•UpdatedevicedriversandUEFIBIOSwhenneeded.
•Profileyourmachineathttp://www.lenovo.com/supporttokeepuptodatewithcurrentdriversand
revisions.
•Keepuptodatefordevicedriversonothernon-Lenovohardware.Youmightwanttoreadthedevice
driverinformationreleasenotespriortoupdatingforcompatibilityorknownissues.
•Keepalogbook.Entriesmightincludemajorhardwareorsoftwarechanges,driverupdates,minorissues
youhaveexperienced,andhowyouresolvedtheminorissues.
•Ifyoueverneedtorunarecoveryonyourcomputertoreturnthepreinstalledcontentsontothemachine,
thefollowingtipsmighthelpalongtheway:
–Removeallexternaldevicessuchastheprinter,keyboard,andsoon.
–Makesurethatyourbatterypacksarechargedandyourcomputerhastheacpowerconnected.
–AccessThinkPadSetupandloadthedefaultsettings.
©CopyrightLenovo2013,2014125

–Restartthecomputerandstarttherecoveryoperation.
–Ifyourcomputerusesdiscsastherecoverymedia,donotremovethediscfromthedriveuntil
promptedtodoso.
•Forsuspectedharddiskdriveissues,referto“Diagnosingproblems”onpage131andrunadiagnostic
testforthedrivebeforeyoucalltheCustomerSupportCenter.Ifyourcomputerdoesnotstartup,
downloadthefilestocreateabootableself-testmediumfromhttp://www.lenovo.com/hddtest.Runthe
testandrecordanymessagesorerrorcodes.Ifthetestreturnsanyfailingerrorcodesormessages,
calltheCustomerSupportCenterwiththecodesormessagesandthecomputerinfrontofyou.A
technicianwillassistyoufurther.
•Ifrequired,youcanfindthecontactinformationabouttheCustomerSupportCenterforyourcountry
orregionathttp://www.lenovo.com/support/phone.WhencallingtheCustomerSupportCenter,make
surethatyouhaveyourmachinemodeltype,serialnumber,andthecomputerinfrontofyou.Also,ifthe
computerisproducingerrorcodes,itishelpfultohavetheerrorscreenonorthemessageswrittendown.
Makingsuredevicedriversarecurrent
Devicedriversareprogramsthatcontaininstructionsfortheoperatingsystemabouthowtooperateor
“drive”acertainpieceofhardware.Eachhardwarecomponentonyourcomputerhasitsownspecificdriver.
Ifyouaddanewcomponent,theoperatingsystemneedstobeinstructedonhowtooperatethatpiece
ofhardware.Afteryouinstallthedriver,theoperatingsystemcanrecognizethehardwarecomponent
andunderstandhowtouseit.
Note:Becausedriversareprograms,likeanyotherfileonyourcomputer,theyaresusceptibletocorruption
andmightnotperformcorrectlyifcorruptionoccurs.
Itisnotalwaysnecessarytodownloadthelatestdrivers.However,youshoulddownloadthelatestdriver
foracomponentifyounoticepoorperformancefromthatcomponentorifyouaddedanewcomponent.
Thismighteliminatethedriverasthepotentialcauseofaproblem.
GettingthelatestdriversfromtheWebsite
YoucandownloadandinstallupdateddevicedriversfromtheLenovoWebsitebydoingthefollowing:
1.Gotohttp://www.lenovo.com/ThinkPadDrivers.
2.Selecttheentryforyourcomputerandthenfollowtheinstructionsonthescreentodownloadand
installnecessarysoftware.
GettingthelatestdriversusingSystemUpdate
TheSystemUpdateprogramhelpsyoukeepthesoftwareonyourcomputerup-to-date.Updatepackages
arestoredonLenovoserversandcanbedownloadedfromtheLenovoSupportWebsite.Updatepackages
cancontainapplications,devicedrivers,UEFIBIOSflashes,orsoftwareupdates.WhentheSystemUpdate
programconnectstotheLenovoSupportWebsite,theSystemUpdateprogramautomaticallyrecognizes
themachinetypeandmodelofyourcomputer,theinstalledoperatingsystem,andthelanguageofthe
operatingsystemtodeterminewhatupdatesareavailableforyourcomputer.TheSystemUpdateprogram
thendisplaysalistofupdatepackagesandcategorizeseachupdateascritical,recommended,oroptionalto
helpyouunderstandtheimportance.Youhavecompletecontrolofwhichupdatestodownloadandinstall.
Afteryouselecttheupdatepackagesyouwant,theSystemUpdateprogramautomaticallydownloadsand
installstheupdateswithoutanyfurtherinterventionfromyou.
TheSystemUpdateprogramispreinstalledonyourcomputerandisreadytorun.Theonlyprerequisiteis
anactiveInternetconnection.Youcanstarttheprogrammanually,oryoucanusetheschedulefeature
toenabletheprogramtosearchforupdatesautomaticallyatspecifiedintervals.Youalsocanpredefine
scheduledupdatestosearchbyseverity(criticalupdates,criticalandrecommendedupdates,orallupdates)
sothelistyouchoosefromcontainsonlythoseupdatetypesthatareofinteresttoyou.
126UserGuide

FormoreinformationabouthowtousetheSystemUpdateprogram,refertothehelpinformationsystem
oftheprogram.
Takingcareofyourcomputer
Althoughyourcomputerisdesignedtofunctionreliablyinnormalworkenvironments,youneedtouse
commonsenseinhandlingit.Byfollowingtheimportanttipsinthistopic,youwillgetthemostuseand
enjoymentoutofyourcomputer.
Becarefulaboutwhereandhowyouwork
•Storepackingmaterialssafelyoutofthereachofchildrentopreventtheriskofsuffocationfromplastic
bags.
•Keepyourcomputerawayfrommagnets,activatedcellularphones,electricalappliances,orspeakers
(morethan13cmor5inches).
•Avoidsubjectingyourcomputertoextremetemperatures(below5°C/41°Forabove35°C/95°F).
•Someappliances,suchascertainportabledesktopfansorairpurifiers,canproducenegativeions.Ifa
computerisclosetosuchanappliance,andisexposedforanextendedtimetoaircontainingnegative
ions,itmightbecomeelectrostaticallycharged.Suchachargemightbedischargedthroughyourhands
whenyoutouchthekeyboardorotherpartsofthecomputer,orthroughconnectorsonI/Odevices
connectedtothecomputer.Eventhoughthiskindofelectrostaticdischarge(ESD)istheoppositeofa
dischargefromyourbodyorclothingtothecomputer,itposesthesameriskofacomputermalfunction.
Yourcomputerisdesignedandmanufacturedtominimizeanyeffectsofelectrostaticcharge.Anelectrostatic
chargeaboveacertainlimit,however,canincreasetheriskofESD.Therefore,whenusingthecomputer
closetoanappliancethatcanproducenegativeions,givespecialattentiontothefollowing:
•Avoiddirectlyexposingyourcomputertotheairfromanappliancethatcanproducenegativeions.
•Keepyourcomputerandperipheralsasfaraspossiblefromsuchanappliance.
•Whereverpossible,groundyourcomputertofacilitatesafeelectrostaticdischarge.
Note:Notallsuchappliancescauseasignificantelectrostaticcharge.
Begentlewithyourcomputer
•Avoidplacinganyobjects(includingpaper)betweenthedisplayandthekeyboardorthepalmrest.
•Yourcomputerdisplayisdesignedtobeopenedandusedatanangleslightlygreaterthan90degrees.
Donotopenthedisplaybeyond180degrees,asthismightdamagethecomputerhinge.
•Donotturnyourcomputeroverwhiletheacpoweradapterispluggedin.Thiscouldbreaktheadapter
plug.
Carryyourcomputerproperly
•Beforemovingyourcomputer,besuretoremoveanymedia,turnoffattacheddevices,anddisconnect
cordsandcables.
•Whenpickingupyouropencomputer,holditbythebottom.Donotpickuporholdyourcomputerby
thedisplay.
Handlestoragemediaanddrivesproperly
•Wheninstallingtheharddiskdrive,orsolid-statedrive,followtheinstructionsshippedwithyourhardware,
andapplypressureonlywhereneededonthedevice.
•Turnoffyourcomputerbeforeyoureplacetheharddiskdriveorsolid-statedrive.
•Afteryoureplacetheprimaryharddiskdriveorsolid-statedrive,reattachthecoverofthedriveslot.
Chapter9.Preventingproblems127

•Storeyourexternalandremovableharddiskdriveoropticaldrivesintheappropriatecontainersor
packagingwhentheyarenotbeingused.
•BeforeyouinstallamemorycardsuchasanSDcard,SDHCcard,SDXCcard,andaMultiMediaCard,
touchametaltableoragroundedmetalobject.Thisactionreducesanystaticelectricityfromyourbody.
Thestaticelectricitycoulddamagethedevice.
•Whiletransferringdatatoorfromaflashmediacard,suchasanSDcard,donotputyourcomputerinto
sleeporhibernationmodebeforethedatatransferiscomplete;otherwise,yourdatacouldbecome
damaged.
Takecareinsettingpasswords
•Rememberyourpasswords.Ifyouforgetasupervisororharddiskpassword,Lenovowillnotresetit,and
youmighthavetoreplaceyoursystemboard,orharddiskdriveorsolid-statedrive.
Takingcareofthefingerprintreader
Thefollowingactionscoulddamagethefingerprintreaderorcauseitnottoworkproperly:
•Scratchingthesurfaceofthefingerprintreaderwithahard,pointedobject.
•Scrapingthesurfaceofthefingerprintreaderwithyourfingernailoranythinghard.
•Usingortouchingthefingerprintreaderwithadirtyfinger.
Ifyounoticeanyofthefollowingconditions,gentlycleanthesurfaceofthefingerprintreaderwithadry,
soft,lint-freecloth:
•Thesurfaceofthefingerprintreaderisdirtyorstained.
•Thesurfaceofthefingerprintreaderiswet.
•Thefingerprintreaderoftenfailstoenrollorauthenticateyourfingerprint.
Registeryourcomputer
•RegisteryourThinkPadcomputerwithLenovoathttp://www.lenovo.com/register.Formoreinformation,
see“Registeringyourcomputer”onpage19.
Besurenottomodifyyourcomputer
•OnlyanauthorizedThinkPadrepairtechnicianshoulddisassembleandrepairyourcomputer.
•Donotmodifyortapethelatchestokeepthedisplayopenorclosed.
Cleaningthecoverofyourcomputer
Occasionallycleanyourcomputerbydoingthefollowing:
1.Prepareamixtureofagentlekitchen-usedetergent.Thedetergentmustnotcontainabrasivepowderor
strongchemicalssuchasacidoralkaline.Usefivepartswatertoonepartdetergent.
2.Absorbthediluteddetergentintoasponge.
3.Squeezeexcessliquidfromthesponge.
4.Wipethecoverwiththesponge,usingacircularmotionandtakingcarenottoletanyexcessliquiddrip.
5.Wipethesurfacetoremovethedetergent.
6.Rinsethespongewithcleanrunningwater.
7.Wipethecoverwiththecleansponge.
8.Wipethesurfaceagainwithadry,soft,lint-freecloth.
9.Waitforthesurfacetodrycompletelyandremoveanyfibersfromthecloth.
128UserGuide

Cleaningyourcomputerkeyboard
Tocleanthecomputerkeyboard,dothefollowing:
1.Applysomeisopropylrubbingalcoholtoasoft,dust-freecloth.
Note:Avoidsprayingcleanerdirectlyontothekeyboard.
2.Wipeeachkeytopsurfacewiththecloth.Wipethekeysonebyone;ifyouwipeseveralkeysatatime,
theclothmighthookontoanadjacentkeyandpossiblydamageit.Makesurethatnoliquiddripsonto
orbetweenthekeys.
3.Allowtodry.
4.Toremoveanycrumbsordustfrombeneaththekeys,youcanuseacamerablowerwithabrush
orcoolairfromahairdryer.
Cleaningyourcomputerdisplay
Tocleanthecomputerdisplay,dothefollowing:
1.Gentlywipethedisplaywithadry,softlint-freecloth.Ifyouseeascratchlikemarkonyourdisplay,it
mightbeastaintransferredfromthekeyboardortheTrackPointpointingstickwhenthecoverwas
pressedfromtheoutside.
2.Wipeordustthestaingentlywithasoft,drycloth.
3.Ifthestainremains,moistenasoft,lint-freeclothwithwaterora50-50mixtureofisopropylalcoholand
waterthatdoesnotcontainimpurities.
Note:Avoidsprayingcleanerdirectlyontothekeyboard.
4.Wringoutasmuchoftheliquidasyoucan.
5.Wipethedisplayagain;donotletanyliquiddripintothecomputer.
6.Besuretodrythedisplaybeforeclosingit.
Chapter9.Preventingproblems129

130UserGuide

Chapter10.Troubleshootingcomputerproblems
Thischapterprovidesinformationonwhattodoifyouexperienceaproblemwithyourcomputer.
•“Diagnosingproblems”onpage131
•“Troubleshooting”onpage131
Diagnosingproblems
Ifyouexperienceproblemswithyourcomputer,usetheLenovoSolutionCenterprogramasastarting
pointforsolvingthem.
TheLenovoSolutionCenterprogramenablesyoutotroubleshootandresolvecomputerproblems.It
combinesdiagnostictests,systeminformationcollection,securitystatus,andsupportinformation,along
withhintsandtipsformaximumsystemperformance.
Notes:
•TheLenovoSolutionCenterprogramalsoisavailablefordownloadedat:
http://www.lenovo.com/diags.
•IfyouareusingotherWindowsoperatingsystemratherthanWindows7,Windows8andWindows8.1,
youcanfindthelatestinformationaboutdiagnosticsforyourcomputerat:
http://www.lenovo.com/diagnose
IfyourcomputerisinstalledwiththeWindows7operatingsystem,whenyouaresettingupyourcomputer,
theLenovoSolutionCenterprogrampromptsyoutocreaterecoverymedia,whichyoucanusetorestorethe
harddiskdrivetothefactorydefaultstate.Formoreinformation,see“Performingbackupandrecovery
operations”onpage64.
ToruntheLenovoSolutionCenterprogram,see“Lenovoprograms”onpage14.
Foradditionalinformation,refertotheLenovoSolutionCenterhelpsystem.
Note:IfyouareunabletoisolateandrepairtheproblemyourselfafterrunningLenovoSolutionCenter
program,saveandprintthelogfilescreatedbytheprogram.Youwillneedthelogfileswhenyouspeaktoa
Lenovotechnicalsupportrepresentative.
Troubleshooting
Ifyourcomputerhasanerror,ittypicallydisplaysamessageoranerrorcode,orabeepsoundswhen
youturniton.Whenyouexperienceaproblem,refertothecorrespondingsectionsinthistopictotryto
solvetheproblembyyourself.
Computerstopsresponding
Printtheseinstructionsnowandkeeptheinstructionswithyourcomputerforreferencelater.
Ifyourcomputeriscompletelyunresponsive(youcannotusetheTrackPointpointingdeviceorthe
keyboard),dothefollowing:
1.Pressandholdthepowerbuttonforfoursecondsormoretoturnoffthecomputer.
•Ifthecomputeristurnedoff,restartthecomputerbypressingthepowerbutton.Ifthecomputer
doesnotturnon,continuewithstep2.
©CopyrightLenovo2013,2014131

•Ifyoucannotturnoffyourcomputerbypressingandholdingthepowerbutton,removeallsources
ofpowerfromthecomputerandresetthesystembyinsertingastraightenedpaperclipintothe
emergency-resethole.Tolocatetheresethole,referto“Bottomview”onpage6.Afterthecomputer
isoff,restartthecomputerbypressingthepowerbutton.Ifthecomputerdoesnotturnon,continue
withstep3.
2.Whilethecomputerisoff,removeallsourcesofpower(theexternalbatterypackandtheacpower
adapter)fromthecomputerandresetthesystembyinsertingastraightenedpaperclipintothe
emergency-resethole.Reattachtheacpoweradapterbutdonotinstalltheexternalbatterypack.
Restartthecomputer.Ifthecomputerdoesnotturnbackon,continuewithstep3.
Note:IfthecomputerstartsupandenterstheWindowsenvironment,usethepropershutdown
proceduretoturnoffthecomputer.Oncethecomputerisoff,intalltheexternalbatterypackandrestart
thecomputer.Ifthecomputerdoesnotstartwiththeexternalbatterypackinstalled,removethe
externalbatterypackandrepeatstep2.Ifthecomputerstartswithacpowerbutdoesnotstartwhenac
powerisremoved,calltheCustomerSupportCenterforsupport.
3.Removeallexternaldevicesthatareattachedtoyourcomputer(keyboard,mouse,printer,scanner,and
soon).Repeatstep2.Ifstep2isunsuccessful,calltheCustomerSupportCenterandaCustomer
SupportSpecialistwillassistyou.
Spillsonthekeyboard
Withamobilecomputer,thereareincreasedchancesofspillingliquidsonthekeyboard.Becausemost
liquidsconductelectricity,liquidspilledonthekeyboardcouldcreatenumerousshortcircuits,potentially
causingirreparabledamagetoyourcomputer.
Ifyouspillsomethingonyourcomputer:
Attention:Besurethatnoliquidcreatesashortcircuitbetweenyouandtheacpoweradapter(ifinuse).
Althoughyoumightlosesomedataorworkbyturningoffthecomputerimmediately,leavingthecomputer
onmightmakeyourcomputerunusable.
1.Carefullyunplugtheacpoweradapterimmediately.
2.Turnoffthecomputerimmediately.Ifthecomputerdoesnotturnoff,resetthesystembyinsertingone
endofaneedleorastraightenedpaperclipintotheemergency-resethole.Tolocatetheresethole,
referto“Bottomview”onpage6.Themorequicklyyoustopthecurrentfrompassingthroughthe
computerthemorelikelyyouwillreducedamagefromshortcircuits.
3.Waituntilyouarecertainthatalltheliquidisdrybeforeturningonyourcomputer.
Note:Ifyouwanttoreplaceyourkeyboard,youcanpurchaseanewone.
Errormessages
•Message:0177:BadSVPdata,stopPOSTtask.
Solution:ChecksumofthesupervisorpasswordintheEEPROMisnotcorrect.Thesystemboard
shouldbereplaced.Havethecomputerserviced.
•Message:0183:BadCRCofSecuritySettingsinEFIVariable.EnterThinkPadSetup.
Solution:ChecksumoftheSecuritysettingsintheEFIVariableisnotcorrect.EnterThinkPadSetup
tochecksecuritysettings,PressF10,andthenpressEntertorestartthesystem.Ifyoustillhavea
problem,havethecomputerserviced.
•Message:0187:EAIAdataaccesserror
Solution:TheaccesstoEEPROMisfailed.Havethecomputerserviced.
•Message:0188:InvalidRFIDSerializationInformationArea
132UserGuide

Solution:TheEEPROMchecksumisnotcorrect(block#0and1).Thesystemboardshouldbereplaced,
andtheboxserialnumberneedstobereinstalled.Havethecomputerserviced.
•Message:0189:InvalidRFIDconfigurationinformationarea
Solution:TheEEPROMchecksumisnotcorrect(block#4and5).Thesystemboardshouldbereplace,
andtheUUIDneedstobereinstalled.Havethecomputerserviced.
•Message:0190:Criticallow-batteryerror
Solution:Thecomputerturnedoff,becausethebatteryislow.Connecttheacpoweradaptertothe
computerandchargethebattery.
•Message:0191:SystemSecurity-Invalidremotechangerequested
Solution:Thesystemconfigurationchangehasfailed.Confirmtheoperationandtryagain.Toclearthe
error,enterThinkPadSetup.
•Message:0199:SystemSecurity-Securitypasswordretrycountexceeded.
Solution:Thismessageisdisplayedifyouenterawrongsupervisorpasswordmorethanthreetimes.
Confirmthesupervisorpasswordandtryagain.Tocleartheerror,enterThinkPadSetup.
•Message:1802:Unauthorizednetworkcardispluggedin-Poweroffandremovethenetworkcard.
Solution:Thewirelessnetworkcardisnotsupportedonthiscomputer.Removeit.
•Message:1820:Morethanoneexternalfingerprintreadersareattached.
Solution:Poweroffandremoveallbutthereaderthatyousetupwithinyourmainoperatingsystem.
•Message:2100:DetectionerroronHDD0(MainHDD)
Solution:Theharddiskisnotworking.Havetheharddiskserviced.
•Message:2101:DetectionerroronSSD1(M.2)
Solution:TheM.2SSDdeviceisnotworking.HavetheM.2SSDdeviceserviced.
•Message:2102:DetectionerroronSSD2(M.2)
Solution:TheM.2SSDdeviceisnotworking.HavetheM.2SSDdeviceserviced.
•Message:2110:ReaderroronHDD0(MainHDD)
Solution:Theharddiskisnotworking.Havetheharddiskserviced.
•Message:2111:ReaderroronSSD1(M.2)
Solution:TheM.2SSDdeviceisnotworking.HavetheM.2SSDdeviceserviced.
•Message:2112:ReaderroronSSD2(M.2)
Solution:TheM.2SSDdeviceisnotworking.HavetheM.2SSDdeviceserviced.
•Message:2200:MachineTypeandSerialNumberareinvalid.
Solution:MachineTypeandSerialNumberareinvalid.Havethecomputerserviced.
•Message:2201:MachineUUIDisinvalid.
Solution:MachineUUIDisinvalid.Havethecomputerserviced.
•Message:Fanerror
Solution:Coolingfanhasfailed.Shutdownthecomputerimmediatelyandhavethecomputerserviced.
•Message:Thermalsensingerror
Solution:Thethermalsensorhasproblem.Shutdownthecomputerimmediatelyandhavethecomputer
serviced.
Errorswithoutmessages
•Problem:MyscreenkeepsblankingwhenIdonotwantitto.
Chapter10.Troubleshootingcomputerproblems133

Solution:IfyourcomputerispreinstalledwiththeWindows7operatingsystem,youcandisableany
systemtimers,suchastheLCDturn-offtimerortheblanktimerbydoingthefollowing:
1.StartPowerManager.
2.ClickthePowerplantab,andthenselectMaximumPerformancefromthepredefinedpowerplans.
•Problem:WhenIturnonthecomputer,nothingisdisplayedonthescreenandthecomputerdoesnot
beepwhilestartingup.
Note:Ifyouarenotsurewhetheryouheardanybeeps,turnoffthecomputerbypressingandholdingthe
powerbuttonforfoursecondsormore.Thenturnonthecomputerandlistenagain.
Solution:Makesurethat:
–Theacpoweradapterisconnectedtothecomputerandthepowercordispluggedintoaworking
electricaloutlet.
–Thecomputeristurnedon.(Pressthepowerbuttonagainforconfirmation.)
–Thebrightnesslevelofthescreenisappropriatelyset.
Ifapower-onpasswordisset,pressanykeytodisplaythepromptforthepower-onpasswordand
thentypethecorrectpasswordandpressEnter.
Iftheseitemsarecorrectlyset,andthescreenremainsblank,havethecomputerserviced.
•Problem:WhenIturnonthecomputer,onlyawhitepointerisdisplayedonablankscreen.
Solution:Ifyouhavemodifiedapartitiononyourharddiskdrivebyusingpartitionsoftware,information
aboutthatpartition,orthemasterbootrecordmighthavebeendestroyed.
Dothefollowingtotrytosolvetheproblem:
1.Turnoffthecomputer,andthenturnitonagain.
2.Ifyoustillseeonlythepointeronthescreen,dothefollowing:
–Ifyouhaveusedpartitionsoftware,examinethepartitionontheharddiskdrivebyusingthe
software,andrecoverthepartitionifrequired.
–Usetherecoverysolutionstorestorethesystemtothefactorydefaultstate.
Iftheproblempersists,havethecomputerserviced.
•Problem:Myscreengoesblankwhilethecomputerison.
Solution:Yourscreensaverorpowermanagementmighthavebeenenabled.Dooneofthefollowing:
–TouchtheTrackPointpointingdeviceorthetrackpad,orpressakeytoexitthescreensaver.
–Pressthepowerbuttontoresumethecomputerfromsleeporhibernationmode.
Beeperrors
Table7.Beeperrors
ProblemSolution
Oneshortbeep,pause,threeshortbeeps,pause,three
moreshortbeeps,andoneshortbeep
Havethecomputerserviced.
OnelongandtwoshortbeepsThevideofunctionhasaproblem.Havethecomputer
serviced.
134UserGuide

Table7.Beeperrors(continued)
ProblemSolution
FourcyclesoffourshortbeepsShutdownthecomputerimmediatelyandhavethe
computerserviced.
FiveshortbeepsThesystemboardhasaproblem.Havethecomputer
serviced.
Memorymoduleproblems
Printtheseinstructionsnowandkeeptheinstructionswithyourcomputerforreferencelater.
Ifyourmemorymoduleisnotoperatingproperly,checkthefollowingitems:
1.Verifythatthememorymoduleisinstalledandseatedcorrectlyinyourcomputer.
Itmightbenecessarytoremovealladdedmemorymodulestotestthecomputerwithonlythe
factory-installedmemorymodules,andthenreinstallthememorymoduleoneatatimetoensure
aproperconnection.
2.Checkforerrormessagesduringstartup.
Followtheappropriatecorrectiveactionsforpower-onself-test(POST).See“Errormessages”on
page132.
3.VerifythatthelatestUEFIforyourmodelhasbeeninstalled.
4.Verifythepropermemoryconfigurationandcompatibilityincludingthemaximummemorysizeandthe
memoryspeed.
5.Rundiagnosticprograms.See“Diagnosingproblems”onpage131.
Networkingproblems
Thefollowingarethemostcommonnetworkingproblems.
Ethernetproblems
•Problem:Thecomputercannotconnecttothenetwork.
Solution:Makesurethat:
–Thecableisinstalledcorrectly.
ThenetworkcablemustbesecurelyconnectedbothtotheEthernetconnectorofyourcomputerand
totheRJ45connectorofthehub.Themaximumallowabledistancefromthecomputertohubis
100meters.Ifthecableisconnectedandthedistanceiswithinacceptablelimitsbuttheproblem
persists,tryadifferentcable.
–Youareusingthecorrectdevicedriver.Toinstallthecorrectdriver,dothefollowing:
1.OpenControlPanelandclickHardwareandSound➙DeviceManager.Ifyouarepromptedfor
anadministratorpasswordorconfirmation,typethepasswordorprovideconfirmation.
2.Iftheexclamationmark!isdisplayednexttotheadapternameunderNetworkadapters,you
mightnotbeusingthecorrectdriverorthedrivermighthavebeendisabled.Toupdatethedriver,
right-clickthehighlightedadapter.
3.ClickUpdateDriverSoftware,andthenfollowtheinstructionsonthescreen.
–Theswitchportandtheadapterhavethesameduplexsetting.
Ifyouconfiguredtheadapterforfullduplex,makesurethattheswitchportalsoisconfiguredforfull
duplex.Settingwrongduplexmodecandegradeperformance,causedataloss,orresultinlost
connections.
Chapter10.Troubleshootingcomputerproblems135

–Youhaveinstalledallnetworkingsoftwarethatisnecessaryforyournetworkenvironment.
CheckwithyourLANadministratorforthenecessarynetworkingsoftware.
•Problem:Theadapterstopsworkingfornoapparentreason.
Solution:Thenetworkdriverfilesmightbecorruptormissing.Updatethedriverbyreferringtothe
previoussolutionfortheproceduretomakesurethatthecorrectdevicedriverisinstalled.
•Problem:MycomputerisaGigabitEthernetmodelandIuseaspeedof1000Mbps,buttheconnection
failsorerrorsoccur.
Solution:
–UseCategory5wiringandmakesurethatthenetworkcableissecurelyconnected.
–Connecttoa1000BASE-Thub/switch(not1000BASE-X).
•Problem:TheWakeOnLANfeatureisnotworking.
Solution:EnsurethatWakeOnLANisenabledinThinkPadSetup.Ifitis,checkwithyourLAN
administratorforthenecessarysettings.
•Problem:MycomputerisaGigabitEthernetmodel,butthecomputercannotconnecttothenetworkat
1000Mbps.Instead,itconnectsat100Mbps.
Solution:
–Tryanothercable.
–Makesurethatthelinkpartnerissettoauto-negotiate.
–Makesurethattheswitchis802.3ab-compliant(gigabitovercopper).
AwirelessLANproblem
Problem:Icannotconnecttothenetworkusingthebuilt-inwirelessnetworkcard.
Solution:Makesurethat:
•YourwirelessLANdriveristhelatestversion.
•Yourcomputeriswithinrangeofawirelessaccesspoint.
•Thewirelessradioisenabled.
Note:IfyouareusingtheWindows7operatingsystem,clickShowhiddeniconsonthetaskbar.The
AccessConnectionsiconisdisplayed.Formoreinformationabouttheicon,refertotheAccessConnections
helpinformationsystem.
FortheWindows7operatingsystem,checktheNetworkName(SSID)andyourencryptioninformation.Use
theAccessConnectionsprogramtoverifythiscase-sensitiveinformation.
AwirelessWANproblem
Problem:AmessageisdisplayedindicatingthatanunauthorizedWANcardisinstalled.
Solution:TheWANcardisnotsupportedonthiscomputer.RemovetheWANcard.
Note:SomemodelsdonothaveawirelessWANcard.
Bluetoothproblems
Note:CheckyourconnectionanytimeandmakesurethatnootherBluetooth-enableddeviceissearchingfor
thedevicetowhichyouwanttoconnect.SimultaneoussearchingisnotallowedintheBluetoothconnection.
136UserGuide

•Problem:SounddoesnotcomefromtheBluetoothheadset/headphonebutcomesfromthelocal
speakereventhoughtheBluetoothheadset/headphoneisconnectedusingaHeadsetprofileorAVprofile.
Solution:Dothefollowing:
1.Exittheapplicationthatusesthesounddevice(forexample,WindowsMediaPlayer).
2.OpenControlPanelandclickHardwareandSound➙Sound➙Playback.
3.IfyouareusingaHeadsetprofile,selectBluetoothHands-freeAudioandclicktheSetDefault
button.IfyouareusinganAVprofile,selectStereoAudioandclicktheSetDefaultbutton.
4.ClickOKtoclosetheSoundwindow.
•Problem:PIMitemssentfromtheWindows7operatingsystemscannotbereceivedcorrectlyintothe
addressbookofanyotherBluetooth-enableddevice.
Solution:TheWindows7operatingsystemsendsPIMitemsinXMLformat,butmostBluetooth-enabled
deviceshandlePIMitemsinvCardformat.IfanotherBluetooth-enableddevicecanreceiveafilethrough
Bluetooth,aPIMitemsentfromtheWindows7mightbesavedasafilewiththeextension.contact.
Problemswiththekeyboardandotherpointingdevices
Thefollowingarethemostcommonproblemswithkeyboardsandotherpointingdevices.
TrackPointpointingdeviceproblems
•Problem:Thepointerdriftswhenthecomputeristurnedonorafteritresumesnormaloperation.
Solution:ThepointermightdriftwhenyouarenotusingtheTrackPointpointingdeviceduringnormal
operation.ThisisanormalcharacteristicoftheTrackPointpointingdeviceandisnotadefect.Pointer
driftingmightoccurforseveralsecondsunderthefollowingconditions:
–Whenthecomputeristurnedon
–Whenthecomputerresumesnormaloperation
–WhentheTrackPointpointingdeviceiskeptpressedforalongtime
–Whenthetemperaturechanges
•Problem:TheTrackPointpointingdeviceortrackpaddoesnotwork.
Solution:EnsurethattheTrackPointpointingdeviceortrackpadisenabledintheMouseProperties
window.
Keyboardproblems
•Problem:Allorsomekeysonthekeyboarddonotwork.
Solution:Ifanexternalnumerickeypadisconnected:
1.Turnoffthecomputer.
2.Removetheexternalnumerickeypad.
3.Turnonthecomputerandtryusingthekeyboardagain.
Ifthekeyboardproblemisresolved,carefullyreconnecttheexternalnumerickeypadandtheexternal
keyboard.Makesurethatyouhaveseatedtheconnectorscorrectly.
Iftheproblempersists,makesurethatthecorrectdevicedriverisinstalledbydoingthefollowing:
1.OpenControlPanel.ChangetheviewofControlPanelfromCategorytoLargeiconsorSmallicons.
2.ClickKeyboard.
3.SelecttheHardwaretab.IntheDevicePropertiespane,makesurethatyouseethismessage:
DeviceStatus:Thisdeviceisworkingproperly.
Ifkeysonthekeyboardstilldonotwork,havethecomputerserviced.
Chapter10.Troubleshootingcomputerproblems137

•Problem:Allorsomekeysontheexternalnumerickeypaddonotwork.
Solution:Makesurethattheexternalnumerickeypadiscorrectlyconnectedtothecomputer.
Problemswiththedisplayandmultimediadevices
Thistopicincludesthemostcommonproblemswithdisplaysandmultimediadevices,includingthe
computerdisplay,theexternalmonitor,audiodevices,andtheopticaldrive.
Computerscreenproblems
•Problem:Thescreenisblank.
Solution:Dothefollowing:
–PressF7tobringuptheimage.
–Ifyouareusingtheacpoweradapter,orusingthebatteriesandthebatterygaugeshowsthatthe
batteriesarenotdepleted,pressF6tomakethescreenbrighter.
–Ifyourcomputerisinsleepmode,presspowerbuttontoresumefromthesleepmode.
–Iftheproblempersists,followthesolutionforthefollowingproblem.
•Problem:Thescreenisunreadableordistorted.
Solution:Makesurethat:
–Thedisplaydevicedriverisinstalledcorrectly.
–Thescreenresolutionandcolorqualityarecorrectlyset.
–Themonitortypeiscorrect.
Tocheckthesesettings,dothefollowing:
1.Right-clickanywhereonthedesktop,andclickScreenresolution.
2.ClickAdvancedSettings.
3.ClicktheAdaptertabtoensurethatthecorrectdevicedrivernameisshownintheAdapter
Informationwindow.ThenclickthePropertiesbutton.Ifyouarepromptedforanadministrator
passwordorconfirmation,typethepasswordorprovideconfirmation.ChecktheDevicestatusbox
andmakesurethatthedeviceisworkingcorrectly.Ifthedeviceisnotworkingcorrectly,clickthe
Troubleshootbuttonandfollowtheinstructionsonthescreen.
Note:Thedevicedrivernamedependsonthevideochipthathasbeeninstalledonyourcomputer.
4.ClicktheMonitortabtoensurethatthecorrectmonitortypeisshownintheMonitorTypewindow.
ThenclickthePropertiesbutton.Ifyouarepromptedforanadministratorpasswordorconfirmation,
typethepasswordorprovideconfirmation.ChecktheDevicestatusboxandmakesurethatthe
deviceisworkingcorrectly.Ifthedeviceisnotworkingcorrectly,clicktheTroubleshootbuttonand
followtheinstructionsonthescreen.
Note:Thedevicedrivernamedependsonthevideochipthathasbeeninstalledonyourcomputer.
5.ClicktheColourManagementtab,andthenclicktheColourManagementbutton.Inthedisplayed
ColourManagementwindow,clicktheAdvancedtabandensurethatthesettingsintheWindows
ColourSystemDefaultsareaaresetasdesired.Ifyouarepromptedforanadministratorpassword
orconfirmation,typethepasswordorprovideconfirmation.
•Problem:Incorrectcharactersaredisplayedonthescreen.
Solution:Didyouinstalltheoperatingsystemorprogramcorrectly?Iftheyareinstalledandconfigured
correctly,havethecomputerserviced.
•Problem:Thescreenstaysonevenafteryouturnoffyourcomputer.
138UserGuide

Solution:Pressandholdthepowerbuttonforfoursecondsormoretoturnoffyourcomputer;then
turnitonagain.
•Problem:Missing,discolored,orbrightdotsappearonthescreeneverytimeyouturnonyourcomputer.
Solution:ThisisanintrinsiccharacteristicoftheTFTtechnology.Yourcomputerdisplaycontains
multiplethin-filmtransistors(TFTs).Asmallnumberofmissing,discolored,orbrightdotsonthescreen
mightexistallthetime.
Externalmonitorproblems
•Problem:Theexternalmonitorisblank.
Solution:Tobringuptheimage,pressF7andselectthedesiredmonitor.Iftheproblempersists,do
thefollowing:
1.Connecttheexternalmonitortoanothercomputertomakesurethatitworks.
2.Reconnecttheexternalmonitortoyourcomputer.
3.Refertothemanualshippedwiththeexternalmonitortochecktheresolutionsandrefreshratesthat
aresupported.
–Iftheexternalmonitorsupportsthesameresolutionasthecomputerdisplayorahigherresolution,
viewoutputontheexternalmonitororonboththeexternalmonitorandthecomputerdisplay.
–Iftheexternalmonitorsupportsalowerresolutionthanthecomputerdisplay,viewoutputonthe
externalmonitoronly.(Ifyouviewoutputonboththecomputerdisplayandtheexternalmonitor,
theexternalmonitorscreenwillbeblankordistorted.)
•Problem:Youcannotsetahigherresolutionthanthepresentoneonyourexternalmonitor.
Solution:Makesurethatthemonitortypeandotherinformationiscorrect.Ifnecessary,updatethe
monitordriver.See“Settingtheexternalmonitortype”onpage40.
•Problem:Thescreenisunreadableordistorted.
Solution:Makesurethat:
–Themonitorinformationiscorrectandtheappropriatemonitortypeisselected.Refertothesolution
totheaboveproblem.
–Makesurethatanappropriaterefreshrateisselectedbydoingthefollowing:
1.Connecttheexternalmonitortothemonitorconnector,andthenconnectthemonitortoan
electricaloutlet.
2.Turnontheexternalmonitorandthecomputer.
3.Right-clickonthedesktop,andclickScreenresolution.
Note:Ifyourcomputercannotdetecttheexternalmonitor,clicktheDetectbutton.
4.Clicktheiconforthedesiredmonitor(theMonitor-2iconisfortheexternalmonitor).
5.ClickAdvancedSettings.
6.ClicktheMonitortab.
7.Selectthecorrectscreenrefreshrate.
•Problem:Wrongcharactersaredisplayedonthescreen.
Solution:Didyoufollowthecorrectprocedurewheninstallingtheoperatingsystemorprogram?Ifyou
did,havetheexternalmonitorserviced.
•Problem:TheExtenddesktopfunctiondoesnotwork.
Solution:EnabletheExtenddesktopfunction.See“Usingdualdisplays”onpage42.
Chapter10.Troubleshootingcomputerproblems139

•Problem:IfyouusetheExtenddesktopfunction,youcannotsetahigherresolutionorhigherrefresh
rateonthesecondarydisplay.
Solution:Changetheresolutionandthecolordepthtolowersettingsfortheprimarydisplay.
•Problem:Displayswitchingdoesnotwork.
Solution:IfyouusetheExtenddesktopfunction,disableit,andchangethedisplayoutputlocation.If
aDVDmovieoravideoclipisplaying,stoptheplayback,closetheprogram,andthenchangethe
displayoutputlocation.
•Problem:Thescreenpositionontheexternalmonitorisincorrectwhenthatmonitorissetforahigh
resolution.
Solution:Sometimes,whenyouuseahighresolutionsuchas1600x1200,theimageisshiftedtoleftor
rightonthescreen.Tocorrectthis,firstmakesurethatyourexternalmonitorsupportsthedisplaymode
(theresolutionandtherefreshrate)thatyouhaveset.Ifitdoesnot,setadisplaymodethatthemonitor
supports.Ifitdoessupportthedisplaymodeyouhaveset,gotothesetupmenuforthemonitoritself
andadjustthesettingsthere.Usuallytheexternalmonitorhasbuttonsforaccesstothesetupmenu.For
moreinformation,seethedocumentationthatcomeswiththemonitor.
Audioproblems
•Problem:WaveorMIDIsounddoesnotplaycorrectly.
Solution:Makesurethatthebuilt-inaudiodeviceisconfiguredcorrectly.
1.OpenControlPanel.
2.ClickHardwareandSound.
3.ClickDeviceManager.Ifyouarepromptedforanadministratorpasswordorconfirmation,typethe
passwordorprovideconfirmation.
4.Double-clickSound,videoandgamecontrollers.
5.MakesurethattheRealtekHDAudiodriverisenabledandconfiguredcorrectly:
•Problem:Sounddoesnotcomefromaheadphoneoraspeaker,oryourcomputercannotrecordsounds.
Solution:Toswitchfromonedevicetoanother(forexample,fromaspeakertoaheadphone,orfrom
anexternalmicrophonetoabuilt-inmicrophone),dothefollowing:
1.OpenControlPanelandclickHardwareandSound.
2.ClicktheRealtekHDManagericon.
3.MakesurethatyouareinMULTI-STREAMmodeintheDeviceadvancedsettingswindow.
4.IntheVolumeMixerwindow,selectthedeviceyouwant-forexample,speakers.
5.Playanysoundviaamusicprogram(forexample,WindowsMediaPlayer).Makesurethatsound
comesfromspeakersnow.
6.Then,ifyouwouldliketoswitchtoaheadphone,closethemusicprogram.
7.GototheVolumeMixerwindow.Thenselectanotherdevice,whichisnowtheheadphone.
8.Playanysoundviathemusicprogram.Makesurethatsoundcomesfromaheadphoneattached
directlytothesystem.
Formoreinformation,refertothehelpinformationsystemofRealtekHDManager.
Note:IntheVolumeMixerwindowofRealtekHDManager,acheckmarkbytheentryforadevice,
suchasspeakersforaplaybackdevice,orabuilt-inmicrophoneforarecordingdevice,showsthat
thedevicehasbeenselected.
•Problem:Recordingsmadeusingthemicrophoneinputarenotloudenough.
Solution:MakesurethattheMicrophoneBoostfunctionisturnedonandsetbydoingthefollowing:
1.OpenControlPanelandclickHardwareandSound.
140UserGuide

2.ClickSound.
3.ClicktheRecordingtabintheSoundwindow.
4.SelectMicrophone,andclickthePropertiesbutton.
5.ClicktheLevelstab,andmovetheMicrophoneBoostsliderupwards.
6.ClickOK.
Note:Formoreinformationaboutcontrollingvolume,seetheWindowsonlinehelp.
•Problem:Avolumeorbalanceslidercannotbemoved.
Solution:Theslidermightbegrayedout.Thismeansthatitspositionisfixedbythehardwareand
cannotbechanged.
•Problem:Thevolumeslidersdonotstayinplacewhensomeaudioprogramsareused.
Solution:Itisnormalforthesliderstochangepositionwhencertainsoundprogramsareused.The
programsareawareofthesettingsintheVolumeMixerwindowandareallowedtochangethesettings
themselves.AnexampleistheWindowsMediaPlayer.Usuallytheprogramhasslidersavailableto
controlthesoundfromwithintheprogram.
•Problem:Thebalanceslidercannotcompletelymuteonechannel.
Solution:Thecontrolisdesignedtocompensateforminordifferencesinbalanceanddoesnot
completelymuteeitherchannel.
•Problem:ThesoundcannotbeturnedoffcompletelyevenifyousettheMastervolumecontrolat
minimum.
Solution:YoustillcanhearsomesoundeventhoughyouhavesettheVolumeMixercontrolatminimum.
Toturnoffthesoundcompletely,pressthespeakermutebutton.
•Problem:Whenyouconnectaheadphonetoyourcomputerwhileplayingsound,aspeakerdoesnot
producesound.
Solution:Oncetheheadphoneisattached,thestreamingisautomaticallyredirectedtoit.Ifyouwantto
listentosoundfromthespeakersagain,besuretosetthosespeakersasthedefaultdevice.Formore
information,seethehelpinformationsystemforRealtekHDAudio.
Fingerprintreaderproblems
•Problem:Thesurfaceofthereaderisdirty,stained,orwet.
Solution:Gentlycleanthesurfaceofthereaderwithadry,soft,lint-freecloth.
•Problem:Thereaderoftenfailstoenrollorauthenticateyourfingerprint.
Solution:Ifthesurfaceofthereaderisdirty,stained,orwet,gentlycleanthesurfaceofthereader
withadry,soft,lint-freecloth.
Fortipsonhowtomaintainthefingerprintreader,see“Usingthefingerprintreader”onpage57.
Batteryandpowerproblems
Thistopiccontainsinstructionsontroubleshootingbatteriesandpowerproblems.
Batteryproblems
•Problem:Thebatteriescannotbefullychargedinthestandardchargetimewhenthecomputeris
poweredoff.
Solution:Thebatteriesmightbeover-discharged.Dothefollowing:
1.Turnoffthecomputer.
2.Connecttheacpoweradaptertothecomputerandletitcharge.
Chapter10.Troubleshootingcomputerproblems141

Ifaquickchargerisavailable,useittochargetheover-dischargedbatteries.
Ifthebatteriescannotbefullychargedin24hours,callLenovoCustomerServiceCentertohave
itserviced.
•Problem:Yourcomputershutsdownbeforethebattery-statusiconshowsempty,oryourcomputer
operatesafterthebattery-statusiconshowsempty.
Solution:Dischargeandrechargethebatteries.
•Problem:Theoperatingtimeforfullychargedbatteriesisshort.
Solution:Dischargeandrechargethebatteries.Ifyourbatteryoperatingtimeisstillshort,callLenovo
CustomerServiceCentertohaveitserviced.
•Problem:Thecomputerdoesnotoperatewithfullychargedbatteries.
Solution:Thesurgeprotectorinthebatteriesmightbeactive.Turnoffthecomputerforoneminuteto
resettheprotector;thenturnonthecomputeragain.
•Problem:Thebatteriescannotbecharged.
Solution:Youcannotchargethebatterieswhentheyaretoohot.Turnoffthecomputerandallowthemto
cooltoroomtemperature.Aftertheycool,rechargethebatteries.Iftheystillcannotbecharged,call
LenovoCustomerServiceCentertohavethemserviced.
Anacpoweradapterproblem
Problem:Theacpoweradapterisconnectedtothecomputerandtheworkingelectricaloutlet,butthe
poweradapter(powerplug)iconisnotdisplayedintheWindowsnotificationarea.
Solution:Dothefollowing:
1.Makesurethattheconnectionoftheacpoweradapteriscorrect.Forinstructionsonconnectingtheac
poweradapter,seeSafety,Warranty,andSetupGuidethatcomeswithyourcomputer.
2.Iftheconnectionoftheacpoweradapteriscorrect,turnoffthecomputer,thendisconnecttheac
poweradapter.
3.Reconnecttheacpoweradapter,thenturnonthecomputer.
4.IfthepoweradaptericonstillisnotdisplayedintheWindowsnotificationarea,havetheacpower
adapterandyourcomputerserviced.
Powerproblems
Printtheseinstructionsnowandkeepitwithyourcomputerforreferencelater.
Ifyourcomputerisgettingnopoweratall,checkthefollowingitems:
1.Verifythepowerbutton.Referto“Statusindicators”onpage8.Thepowerbuttonisilluminated
wheneverthecomputerison.
2.Checkallpowerconnections.Removeanypowerstripsandsurgeprotectorstoconnecttheacpower
adapterdirectlytotheacpoweroutlet.
3.Inspecttheacpoweradapter.Checkforanyphysicaldamage,andensurethatthepowercableisfirmly
attachedtotheadapterbrickandthecomputer.
4.Verifytheacpowersourceisworkingbyattachinganotherdevicetotheoutlet.
Ifyourcomputerdoesnotrunonbatterypower,checkthefollowingitems:
1.Ifthebatteriesrunoutofpower,attachacpoweradaptertorechargethebattery.
2.Ifthebatteriesarechargedbutthecomputerdoesnotrun,callLenovoCustomerServiceCenterto
haveitserviced.
142UserGuide

Apowerbuttonproblem
Problem:Thesystemdoesnotrespond,andyoucannotturnoffthecomputer.
Solution:Turnoffthecomputerbypressingandholdingthepowerbuttonforfoursecondsormore.Ifthe
systemisstillnotreset,removetheacpoweradapterandresetthesystembyinsertingoneendofaneedle
orastraightenedpaperclipintotheemergency-resethole.Tolocatetheemergency-resethole,refer
to“Bottomview”onpage6.
Bootproblems
Printtheseinstructionsnowandkeepthemwithyourcomputerforreferencelater.
Ifyoureceiveanerrormessagebeforetheoperatingsystemloads,followtheappropriatecorrectiveactions
forpower-onself-test(POST)errormessages.See“Errormessages”onpage132.
Ifyoureceiveanerrormessagewhiletheoperatingsystemisloadingthedesktopconfigurationafterthe
POSTiscompleted,checkthefollowingitems:
1.GototheLenovoSupportWebsiteathttp://www.lenovo.com/supportandsearchfortheerrormessage.
2.GototheMicrosoftKnowledgeBasehomepageathttp://support.microsoft.com/andsearchforthe
errormessage.
Sleepandhibernationproblems
•Problem:Thecomputerenterssleepmodeunexpectedly.
Solution:Ifthemicroprocessoroverheats,thecomputerautomaticallyenterssleepmodetoallowthe
computertocoolandtoprotectthemicroprocessorandotherinternalcomponents.Checkthesettings
forsleepmode.
•Problem:Thecomputerenterssleepmodeimmediatelyafterthepower-onself-test.
Solution:Ensurethat:
–Thebatteriesarecharged.
–Theoperatingtemperatureiswithintheacceptablerange.Referto“Operatingenvironment”onpage
13.
Ifthebatteriesarechargedandthetemperatureiswithinrange,havethecomputerserviced.
•Problem:Acriticallow-batteryerroroccurs,andthecomputerimmediatelyturnsoff.
Solution:Thebatterypowerisgettinglow.Connecttheacpoweradaptertothecomputerandplugit
intoanelectricaloutlet.
•Problem:ThecomputerdisplayremainsblankafteryoupressFntoreturnfromsleepmode.
Solution:Checkwhetheranexternalmonitorwasdisconnectedorturnedoffwhilethecomputerwas
insleepmode.Ifyoudisconnectedorturnedofftheexternalmonitor,connectitorturnitonbefore
resumingthecomputerfromthesleepmode.Whenresumingthecomputerfromthesleepmode
withoutattachingtheexternalmonitororturningiton,andthecomputerdisplayremainsblank,press
F6tobringupthecomputerdisplay.
•Problem:Thecomputerdoesnotreturnfromsleepmode,orthesystem-statusindicator(illuminated
ThinkPadlogo)blinksslowlyandthecomputerdoesnotwork.
Solution:Ifthesystemdoesnotreturnfromsleepmode,itmighthaveenteredsleeporhibernation
modeautomaticallybecausethebatteriesaredepleted.Checkthesystem-statusindicator(illuminated
ThinkPadlogo).
–Ifthesystem-statusindicator(illuminatedThinkPadlogo)blinksslowly,yourcomputerisinsleepmode.
Connecttheacpoweradaptertothecomputer;thenpressFn.
Chapter10.Troubleshootingcomputerproblems143

–Ifthesystem-statusindicator(illuminatedThinkPadlogo)isoff,yourcomputerisinpower-offstateor
inhibernationmode.Connecttheacpoweradaptertothecomputer;thenpressthepowerbutton
toresumeoperation.
Ifthesystemstilldoesnotreturnfromsleepmode,yoursystemmightstoprespondingandyoumightnot
beabletoturnoffthecomputer.Inthiscase,youneedtoresetthecomputer.Ifyouhavenotsaved
yourdata,itmightbelost.Toresetthecomputer,pressandholdthepowerbuttonforfoursecondsor
more.Ifthesystemisstillnotreset,removetheacpoweradapterandresetthesystembyinsertinga
straightenedpaperclipintotheemergency-resethole.Tolocatetheemergency-resethole,referto
“Bottomview”onpage6.
•Problem:Yourcomputerdoesnotentersleeporhibernationmode.
Solution:Checkwhetheranyoptionhasbeenselectedtodisableyourcomputerfromenteringsleep
orhibernationmode.
Ifyourcomputertriestoentersleepmodebuttherequestisrejected,thedeviceattachedtotheUSB
connectormighthavebeendisabled.Ifthisoccurs,doahot-unplug-and-plugoperationfortheUSB
device.
•Problem:Thebatteriesdischargeslightlywhilethecomputerisinhibernationmode.
Solution:Ifthewakeupfunctionisenabled,thecomputerconsumessmallamountofpower.Thisisnota
defect.Formoreinformation,see“Power-savingmodes”onpage32.
Problemswithdrivesandotherstoragedevices
Thissectionincludesharddiskdriveproblemsandsolid-statedriveproblems.
Harddiskdriveproblems
•Problem:Theharddiskdrivemakesarattlingnoiseintermittently.
Solution:Therattlingnoisemightbeheard:
–Whentheharddiskdrivebeginsorfinishesgettingaccesstodata.
–Whenyoucarrytheharddiskdrive.
–Whenyoucarryyourcomputer.
Thisisanormalcharacteristicofaharddiskdriveandisnotadefect.
•Problem:Theharddiskdrivedoesnotwork.
Solution:OntheStartupmenuofThinkPadSetup,makesurethattheharddiskdriveisontheBoot
priorityorderlist.IfitisontheExcludedfrombootorderlist,itisdisabled.Selecttheentryforitonthe
listandpressShift+1tomoveitbacktotheBootpriorityorderlist.
•Problem:Aftersettingaharddiskpasswordontheharddiskdriveofthecomputer,youmovedthedrive
toanothercomputer.Nowyoucannotunlocktheharddiskpassword.
Solution:Yourcomputersupportsanenhancedpasswordalgorithm.Computersolderthanyoursmight
notsupportsuchasecurityfunction.
Asolid-statedriveproblem
Problem:WhenyoucompressfilesorfoldersbyuseofthedatacompressionfunctioninWindows,and
thendecompressthem,theprocessofwritingtoorreadingfromthefilesorfoldersisslow.
Solution:ApplythediskdefragmentationtoolinWindowsforfasteraccesstothedata.
Asoftwareproblem
Problem:Anapplicationdoesnotruncorrectly.
144UserGuide

Solution:Makesurethattheproblemisnotbeingcausedbytheapplication.
Checkthatyourcomputerhastheminimumrequiredmemorytoruntheapplication.Refertothemanuals
suppliedwiththeapplication.
Checkthefollowing:
•Theapplicationisdesignedtooperatewithyouroperatingsystem.
•Otherapplicationsruncorrectlyonyourcomputer.
•Thenecessarydevicedriversareinstalled.
•Theapplicationworkswhenitisrunonsomeothercomputer.
Ifanerrormessageisdisplayedwhileyouareusingtheapplicationprogram,refertothemanualssupplied
withtheapplication.
Iftheapplicationstilldoesnotruncorrectly,contactyourplaceofpurchaseoraservicerepresentative
forhelp.
Problemswithportsandconnectors
Thefollowingarethemostcommonproblemswithportsandconnectors.
AUSBproblem
Problem:AdeviceconnectedtotheUSBconnectordoesnotwork.
Solution:OpentheDeviceManagerwindow.MakesurethattheUSBdevicesetupiscorrect,andthatthe
assignmentofcomputerresourceandtheinstallationofthedevicedriverarecorrect.ToopentheDevice
Managerwindow,gotoControlPanelandclickHardwareandSound➙DeviceManager.Ifyouare
promptedforanadministratorpasswordorconfirmation,typethepasswordorprovideconfirmation.
Referto“Diagnosingproblems”onpage131andrunadiagnostictestoftheUSBconnector.
Adockingstationproblem
Problem:Thecomputerdoesnotstartwhenyoutrytoturniton,anddoesnotrespondwhenyoutryto
resumeoperation.
Solution:Makesurethat:
•Theacpoweradapterisconnectedtothedockingstation.
•Thecomputerissecurelyattachedtothedockingstation.
Chapter10.Troubleshootingcomputerproblems145

146UserGuide

Chapter11.Gettingsupport
ThischapterprovidesinformationaboutgettinghelpandsupportfromLenovo.
•“BeforeyoucontactLenovo”onpage147
•“Gettinghelpandservice”onpage147
•“Purchasingadditionalservices”onpage149
BeforeyoucontactLenovo
Often,youcansolveyourcomputerproblemsbyreferringtotheinformationintheexplanationsoferror
codes,runningdiagnosticprograms,orbyconsultingtheLenovoWebsite.
Registeringyourcomputer
RegisteryourcomputerwithLenovo.Formoreinformation,see“Registeringyourcomputer”onpage19.
Downloadingsystemupdates
Downloadingupdatedsoftwaremightresolveproblemsyouexperiencewithyourcomputer.
Todownloadupdatedsoftware,gotothefollowingWebsiteandfollowtheinstructionsonthescreen:
http://www.lenovo.com/support
Recordinginformation
BeforeyoutalktoaLenovorepresentative,recordthefollowingimportantinformationaboutyourcomputer.
Recordingproblemsymptomsanddetails
Collecttheanswerstothequestionsbelowbeforeyoucallforhelp.Then,youwillbeabletogethelp
asquicklyaspossible.
•Whatistheproblem?Isitcontinuousorintermittent?
•Isthereanerrormessage?Whatistheerrorcode,ifany?
•Whatoperatingsystemareyouusing?Whichversion?
•Whichsoftwareprogramswererunningatthetimeoftheproblem?
•Cantheproblembereproduced?Ifso,how?
Recordingsysteminformation
Theserialnumberlabelisonthebottomofyourcomputer.Recordthemachinetypeandtheserialnumber.
•WhatisthenameofyourLenovoproduct?
•Whatisthemachinetype?
•Whatistheserialnumber?
Gettinghelpandservice
Ifyouneedhelp,service,technicalassistance,orjustwantmoreinformationaboutLenovoproducts,you
willfindawidevarietyofsourcesavailablefromLenovotoassistyou.Thissectioncontainsinformation
aboutwheretogoforadditionalinformationaboutLenovoandourproducts,whattodoifyouexperiencea
problemwithyourcomputer,andwhomtocallforserviceshoulditbenecessary.
©CopyrightLenovo2013,2014147

Informationaboutyourcomputerandpreinstalledsoftware,ifany,isavailableinthedocumentationthat
comeswithyourcomputer.Thatdocumentationincludesprintedbooks,onlinebooks,readmefiles,and
helpfiles.Inaddition,informationaboutLenovoproductsisavailableontheWorldWideWeb.
MicrosoftServicePacksarethelatestsoftwaresourceforWindowsproductupdates.Theyareavailable
throughWebdownload(connectionchargesmightapply)orthroughdisc.Formorespecificinformationand
links,gotohttp://www.microsoft.com.Lenovoofferstechnicalassistancewithinstallationof,orquestions
relatedto,ServicePacksforyourLenovo-preloadedMicrosoftWindowsproduct.Forinformation,contact
theCustomerSupportCenter.
Usingdiagnosticprograms
Manycomputerproblemscanbesolvedwithoutoutsideassistance.Ifyouexperienceaproblemwithyour
computer,thefirstplacetostartisthetroubleshootinginformationofyourcomputerdocumentation.Ifyou
suspectasoftwareproblem,seethedocumentation,includingreadmefilesandhelpinformationsystems,
thatcomeswiththeoperatingsystemorapplicationprogram.
ThinkPadnotebookcomputerscomewithasetofdiagnosticprogramsthatyoucanusetohelpyouidentify
hardwareproblems.See“Diagnosingproblems”onpage131forinstructionsonusingthediagnostic
programs.
Thetroubleshootinginformationorthediagnosticprogramsmighttellyouthatyouneedadditionalor
updateddevicedriversorothersoftware.Youcangetthelatesttechnicalinformationanddownloaddevice
driversandupdatesfromtheLenovoWebsiteathttp://www.lenovo.com/support.
LenovoSupportWebsite
TechnicalsupportinformationisavailableontheLenovoSupportWebsiteat:
http://www.lenovo.com/support
ThisWebsiteisupdatedwiththelatestsupportinformationsuchasthefollowing:
•Driversandsoftware
•Diagnosticsolutions
•Productandservicewarranty
•Productandpartsdetails
•Userguidesandmanuals
•Knowledgebaseandfrequentlyaskedquestions
CallingLenovo
Ifyouhavetriedtocorrecttheproblemyourselfandstillneedhelp,duringthewarrantyperiod,youcan
gethelpandinformationbytelephonethroughtheCustomerSupportCenter.Thefollowingservicesare
availableduringthewarrantyperiod:
•Problemdetermination-Trainedpersonnelareavailabletoassistyouwithdeterminingifyouhavea
hardwareproblemanddecidingwhatactionisnecessarytofixtheproblem.
•Lenovohardwarerepair-IftheproblemisdeterminedtobecausedbyLenovohardwareunderwarranty,
trainedservicepersonnelareavailabletoprovidetheapplicablelevelofservice.
•Engineeringchangemanagement-Occasionally,theremightbechangesthatarerequiredafteraproduct
hasbeensold.Lenovooryourreseller,ifauthorizedbyLenovo,willmakeselectedEngineeringChanges
(ECs)thatapplytoyourhardwareavailable.
Thefollowingitemsarenotcovered:
148UserGuide

•ReplacementoruseofpartsnotmanufacturedfororbyLenovoornonwarrantedparts
•Identificationofsoftwareproblemsources
•ConfigurationoftheUEFIBIOSaspartofaninstallationorupgrade
•Changes,modifications,orupgradestodevicedrivers
•Installationandmaintenanceofnetworkoperatingsystems(NOS)
•Installationandmaintenanceofapplicationprograms
ForthetermsandconditionsoftheLenovoLimitedWarrantythatappliestoyourLenovohardwareproduct,
see“Warrantyinformation”intheSafety,Warranty,andSetupGuidethatcomeswithyourcomputer.
Ifpossible,benearyourcomputerwhenyoumakeyourcallincasethetechnicalassistancerepresentative
needstohelpyouresolveacomputerproblem.Ensurethatyouhavedownloadedthemostcurrentdrivers
andsystemupdates,rundiagnostics,andrecordedinformationbeforeyoucall.Whencallingfortechnical
assistance,havethefollowinginformationavailable:
•Machinetypeandmodel
•Serialnumbersofyourcomputer,monitor,andothercomponents,oryourproofofpurchase
•Descriptionoftheproblem
•Exactwordingofanyerrormessages
•Hardwareandsoftwareconfigurationinformationforyoursystem
Telephonenumbers
ForalistoftheLenovoSupportphonenumbersforyourcountryorregion,goto
http://www.lenovo.com/support/phoneorrefertotheSafety,Warranty,andSetupGuidethatcomeswith
yourcomputer.
Note:Phonenumbersaresubjecttochangewithoutnotice.Thelatestphonenumbersareavailableat
http://www.lenovo.com/support/phone.Ifthenumberforyourcountryorregionisnotprovided,contact
yourLenovoresellerorLenovomarketingrepresentative.
Purchasingadditionalservices
Duringandafterthewarrantyperiod,youcanpurchaseadditionalservices,suchassupportforLenovo
andnon-Lenovohardware,operatingsystems,andapplicationprograms;networksetupandconfiguration
services;upgradedorextendedhardwarerepairservices;andcustominstallationsservices.Service
availabilityandservicenamemightvarybycountry.
Formoreinformationabouttheseservices,goto:
http://www.lenovo.com/essentials
Chapter11.Gettingsupport149

150UserGuide

AppendixA.RegulatoryInformation
Wirelessrelatedinformation
Wirelessinteroperability
TheM.2wirelessLANcardisdesignedtobeinteroperablewithanywirelessLANproductthatisbased
onDirectSequenceSpreadSpectrum(DSSS),ComplementaryCodeKeying(CCK),and/orOrthogonal
FrequencyDivisionMultiplexing(OFDM)radiotechnology,andiscompliantto:
•The802.11b/gStandard,802.11a/b/gor802.11ndraft2.0onWirelessLANs,asdefinedandapprovedby
theInstituteofElectricalandElectronicsEngineers.
•TheWirelessFidelity(WiFi)certificationasdefinedbytheWi-FiAlliance.
YourBluetoothcardiscompliantwithBluetoothSpecification4.0asdefinedbytheBluetoothSpecial
InterestGroupSIG.Itsupportsthefollowingprofiles:
•AdvancedAudioDistributionProfile(A2DP)
•Audio/VideoControlTransportProtocol(AVCTP)
•Audio/VideoDistributionTransportProtocol(AVDTP)
•A/VRemoteControlProfile(AVRCP)
•BasicImagingProfile(BIP)
•BasicPrintingProfile(BPP)
•Dial-UpNetworkingProfile(DUN)
•FileTransferProfile(FTP)
•GenericAccessProfile(GAP)
•GenericA/VDistributionProfile(GAVDP)
•HardcopyCableReplacementProfile(HCRP)
•HeadsetProfile(HSP)
•Hands-FreeProfile(HFP)
•HumanInterfaceDeviceProfile(HID)
•MessageAccessProfile(MAP)
•ObjectExchangeProtocol(OBEX)
•ObjectPushProfile(OPP)
•PersonalAreaNetworkingProfile(PAN)
•PhoneBookAccessProfile(PBAP)
•ServiceDiscoveryProtocol(SDP)
•SynchronizationProfile(SYNC)
•VideoDistributionProfile(VDP)
•GenericAttributeProfile(GATT)
•ProximityProfile
•FindMeProfile
•ImmediateAlertProfile
©CopyrightLenovo2013,2014151
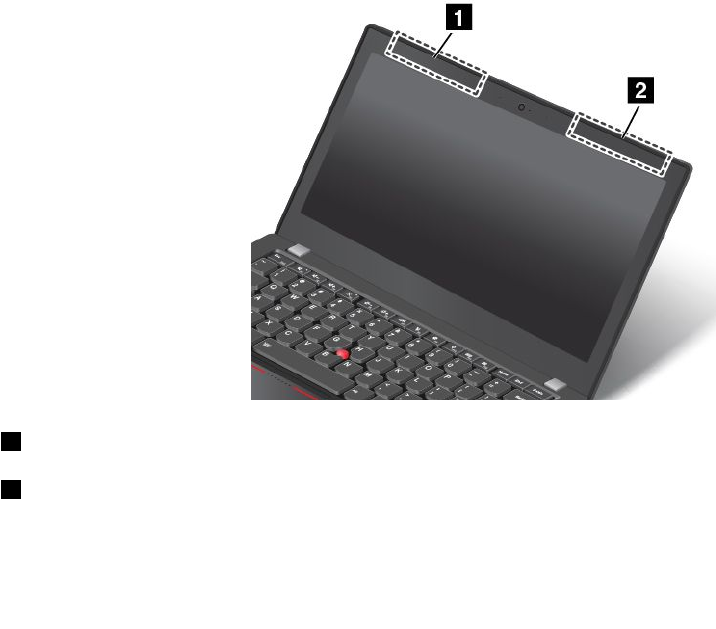
•BatteryStatusProfile
Usageenvironmentandyourhealth
Integratedwirelesscardsemitradiofrequencyelectromagneticenergylikeotherradiodevices.However,the
levelofenergyemittedisfarmuchlessthantheelectromagneticenergyemittedbywirelessdeviceslike
forexamplemobilephones.
Duetothefactthatintegratedwirelesscardsoperatewithintheguidelinesfoundinradiofrequencysafety
standardsandrecommendations,Lenovobelievestheyaresafeforusebyconsumers.Thesestandardsand
recommendationsreflecttheconsensusofthescientificcommunityandresultfromdeliberationsofpanels
andcommitteesofscientistswhocontinuallyreviewandinterprettheextensiveresearchliterature.
Insomesituationorenvironment,theuseofintegratedwirelesscardsmightberestrictedbytheproprietor
ofthebuildingorresponsiblerepresentativesoftheorganization.Thesesituationsandareasmightfor
exampleinclude:
•Usingtheintegratedwirelesscardsonboardofairplanes,inhospitalsornearpetrolstations,blasting
areas(withelectro-explosivedevices),medicalimplantsorbody-wornelectronicmedicaldevices,such
aspacemakers.
•Inanyotherenvironmentwheretheriskofinterferencetootherdevicesorservicesisperceivedor
identifiedasharmful.
Ifyouareuncertainofthepolicythatappliestotheuseofwirelessdevicesinaspecificorganization(suchas
airportorhospital),youareencouragedtoaskforauthorizationtouseintegratedwirelesscardspriorto
turningonthecomputer.
LocationsoftheUltraConnect™wirelessantennas
ThinkPadmodelsfeatureadiversifiedantennasystembuiltintothedisplayforoptimalreception,which
enableswirelesscommunicationwhereveryouare.
1WirelessLANantenna(auxiliary)andWirelessWANantenna(auxiliary)
2WirelessWANantenna(main)andWirelessLANantenna(main)
152UserGuide

Locatingwirelessregulatorynotices
Formoreinformationaboutthewirelessregulatorynotices,refertotheRegulatoryNoticeshippedwiththe
computer.
IfthecomputerisshippedwithouttheRegulatoryNotice,youcanfinditontheWebsiteat:
http://www.lenovo.com/UserManual
Certificationrelatedinformation
Thefollowingtablecontainsinformationoftheproductname,complianceID,andmachinetypes.
ProductnameComplianceIDMachinetypes
ThinkPadT440sTP00049A20AQand20AR
Exportclassificationnotice
ThisproductissubjecttotheUnitedStatesExportAdministrationRegulations(EAR)andhasanExport
ClassificationControlNumber(ECCN)of4A994.b.Itcanbere-exportedexcepttoanyoftheembargoed
countriesintheEARE1countrylist.
Electronicemissionnotices
FederalCommunicationsCommissionDeclarationofConformity
ThefollowinginformationreferstotheThinkPadT440scomputer,machinetypes20AQand20AR.
ThisequipmenthasbeentestedandfoundtocomplywiththelimitsforaClassBdigitaldevice,pursuant
toPart15oftheFCCRules.Theselimitsaredesignedtoprovidereasonableprotectionagainstharmful
interferenceinaresidentialinstallation.Thisequipmentgenerates,uses,andcanradiateradiofrequency
energyand,ifnotinstalledandusedinaccordancewiththeinstructions,maycauseharmfulinterference
toradiocommunications.However,thereisnoguaranteethatinterferencewillnotoccurinaparticular
installation.Ifthisequipmentdoescauseharmfulinterferencetoradioortelevisionreception,whichcanbe
determinedbyturningtheequipmentoffandon,theuserisencouragedtotrytocorrecttheinterferenceby
oneormoreofthefollowingmeasures:
•Reorientorrelocatethereceivingantenna.
•Increasetheseparationbetweentheequipmentandreceiver.
•Connecttheequipmentintoanoutletonacircuitdifferentfromthattowhichthereceiverisconnected.
•Consultanauthorizeddealerorservicerepresentativeforhelp.
Lenovoisnotresponsibleforanyradioortelevisioninterferencecausedbyusingotherthanspecifiedor
recommendedcablesandconnectorsorbyunauthorizedchangesormodificationstothisequipment.
Unauthorizedchangesormodificationscouldvoidtheuser'sauthoritytooperatetheequipment.
ThisdevicecomplieswithPart15oftheFCCRules.Operationissubjecttothefollowingtwoconditions:(1)
thisdevicemaynotcauseharmfulinterference,and(2)thisdevicemustacceptanyinterferencereceived,
includinginterferencethatmaycauseundesiredoperation.
ResponsibleParty:
Lenovo(UnitedStates)Incorporated
1009ThinkPlace-BuildingOne
Morrisville,NC27560
PhoneNumber:919-294-5900
AppendixA.RegulatoryInformation153

IndustryCanadaClassBemissioncompliancestatement
CANICES-3(B)/NMB-3(B)
EuropeanUnion-CompliancetotheElectromagneticCompatibility
Directive
ThisproductisinconformitywiththeprotectionrequirementsofEUCouncilDirective2004/108/EConthe
approximationofthelawsoftheMemberStatesrelatingtoelectromagneticcompatibility.Lenovocannot
acceptresponsibilityforanyfailuretosatisfytheprotectionrequirementsresultingfromanon-recommended
modificationoftheproduct,includingtheinstallationofoptioncardsfromothermanufacturers.
ThisproducthasbeentestedandfoundtocomplywiththelimitsforClassBInformationTechnology
EquipmentaccordingtoEuropeanStandardEN55022.ThelimitsforClassBequipmentwerederived
fortypicalresidentialenvironmentstoprovidereasonableprotectionagainstinterferencewithlicensed
communicationdevices.
EUcontact:Lenovo,Einsteinova21,85101Bratislava,Slovakia
GermanClassBcompliancestatement
DeutschsprachigerEUHinweis:
HinweisfürGerätederKlasseBEU-RichtliniezurElektromagnetischenVerträglichkeit
DiesesProduktentsprichtdenSchutzanforderungenderEU-Richtlinie2004/108/EG(früher89/336/EWG)zur
AngleichungderRechtsvorschriftenüberdieelektromagnetischeVerträglichkeitindenEU-Mitgliedsstaaten
undhältdieGrenzwertederEN55022KlasseBein.
Umdiesessicherzustellen,sinddieGerätewieindenHandbüchernbeschriebenzuinstallierenundzu
betreiben.DesWeiterendürfenauchnurvonderLenovoempfohleneKabelangeschlossenwerden.
LenovoübernimmtkeineVerantwortungfürdieEinhaltungderSchutzanforderungen,wenndasProdukt
ohneZustimmungderLenovoverändertbzw.wennErweiterungskomponentenvonFremdherstellernohne
EmpfehlungderLenovogesteckt/eingebautwerden.
Deutschland:
EinhaltungdesGesetzesüberdieelektromagnetischeVerträglichkeitvonBetriebsmitteln
DiesesProduktentsprichtdem„GesetzüberdieelektromagnetischeVerträglichkeitvonBetriebsmitteln“
EMVG(früher„GesetzüberdieelektromagnetischeVerträglichkeitvonGeräten“).DiesistdieUmsetzungder
EU-Richtlinie2004/108/EG(früher89/336/EWG)inderBundesrepublikDeutschland.
ZulassungsbescheinigunglautdemDeutschenGesetzüberdieelektromagnetischeVerträglichkeit
vonBetriebsmitteln,EMVGvom20.Juli2007(früherGesetzüberdieelektromagnetische
VerträglichkeitvonGeräten),bzw.derEMVEGRichtlinie2004/108/EC(früher89/336/EWG),für
GerätederKlasseB.
154UserGuide
DiesesGerätistberechtigt,inÜbereinstimmungmitdemDeutschenEMVGdasEG-Konformitätszeichen
-CE-zuführen.VerantwortlichfürdieKonformitätserklärungnachParagraf5desEMVGistdieLenovo
(Deutschland)GmbH,Gropiusplatz10,D-70563Stuttgart.
InformationeninHinsichtEMVGParagraf4Abs.(1)4:
DasGeräterfülltdieSchutzanforderungennachEN55024undEN55022KlasseB.
KoreaClassBcompliancestatement
JapanVCCIClassBcompliancestatement
Japancompliancestatementforproductswhichconnecttothepower
mainswithratedcurrentlessthanorequalto20Aperphase
LenovoproductserviceinformationforTaiwan
Eurasiancompliancemark
Brazilregulatorynotice
Ouvirsonscommaisde85decibéisporlongosperíodospodeprovocardanosaosistemaauditivo.
Mexicoregulatorynotice
Advertencia:EnMexicolaoperacióndeesteequipoestásujetaalassiguientesdoscondiciones:(1)es
posiblequeesteequipoodispositivonocauseinterferenciaperjudicialy(2)esteequipoodispositivodebe
aceptarcualquierinterferencia,incluyendolaquepuedacausarsuoperaciónnodeseada.
AppendixA.RegulatoryInformation155

156UserGuide

AppendixB.WEEEandrecyclingstatements
Lenovoencouragesownersofinformationtechnology(IT)equipmenttoresponsiblyrecycletheirequipment
whenitisnolongerneeded.Lenovooffersavarietyofprogramsandservicestoassistequipmentownersin
recyclingtheirITproducts.ForinformationonrecyclingLenovoproducts,goto:
http://www.lenovo.com/recycling
ImportantWEEEinformation
TheWEEEmarkingonLenovoproductsappliestocountrieswithWEEEande-wasteregulations(for
example,theEuropeanWEEEDirective,IndiaE-WasteManagement&HandlingRules,2011).Appliancesare
labeledinaccordancewithlocalregulationsconcerningwasteelectricalandelectronicequipment(WEEE).
Theseregulationsdeterminetheframeworkforthereturnandrecyclingofusedappliancesasapplicable
withineachgeography.Thislabelisappliedtovariousproductstoindicatethattheproductisnottobe
thrownaway,butratherputintheestablishedcollectionsystemsforreclaimingtheseendoflifeproducts.
Usersofelectricalandelectronicequipment(EEE)withtheWEEEmarkingmustnotdisposeofendoflife
EEEasunsortedmunicipalwaste,butusethecollectionframeworkavailabletothemforthereturn,recycle,
andrecoveryofWEEEandtominimizeanypotentialeffectsofEEEontheenvironmentandhumanhealth
duetothepresenceofhazardoussubstances.ForadditionalWEEEinformationgoto:
http://www.lenovo.com/recycling
RecyclinginformationforChina
http://support.lenovo.com.cn/activity/551.htm
RecyclinginformationforJapan
CollectingandrecyclingadisusedLenovocomputerormonitor
IfyouareacompanyemployeeandneedtodisposeofaLenovocomputerormonitorthatistheproperty
ofthecompany,youmustdosoinaccordancewiththeLawforPromotionofEffectiveUtilizationof
Resources.Computersandmonitorsarecategorizedasindustrialwasteandshouldbeproperlydisposed
ofbyanindustrialwastedisposalcontractorcertifiedbyalocalgovernment.InaccordancewiththeLaw
©CopyrightLenovo2013,2014157

forPromotionofEffectiveUtilizationofResources,LenovoJapanprovides,throughitsPCCollectingand
RecyclingServices,forthecollecting,reuse,andrecyclingofdisusedcomputersandmonitors.Fordetails,
visittheLenovoWebsiteathttp://www.lenovo.com/recycling/japan.
PursuanttotheLawforPromotionofEffectiveUtilizationofResources,thecollectingandrecyclingof
home-usedcomputersandmonitorsbythemanufacturerwasbegunonOctober1,2003.Thisservice
isprovidedfreeofchargeforhome-usedcomputerssoldafterOctober1,2003.Fordetails,goto
http://www.lenovo.com/recycling/japan.
DisposingofLenovocomputercomponents
SomeLenovocomputerproductssoldinJapanmayhavecomponentsthatcontainheavymetalsorother
environmentalsensitivesubstances.Toproperlydisposeofdisusedcomponents,suchasaprintedcircuit
boardordrive,usethemethodsdescribedaboveforcollectingandrecyclingadisusedcomputerormonitor.
DisposingofdisusedlithiumbatteriesfromLenovocomputers
Abutton-shapedlithiumbatteryisinstalledinsideyourLenovocomputertoprovidepowertothecomputer
clockwhilethecomputerisoffordisconnectedfromthemainpowersource.Ifyouneedtoreplaceitwitha
newone,contactyourplaceofpurchaseorcontactLenovoforservice.Ifyouneedtodisposeofadisused
lithiumbattery,insulateitwithvinyltape,contactyourplaceofpurchaseoranindustrial-waste-disposal
operator,andfollowtheirinstructions.
Disposalofalithiumbatterymustcomplywithlocalordinancesandregulations.
DisposingofadisusedbatterypackfromLenovonotebookcomputers
YourLenovonotebookcomputerhasalithiumionbatterypackoranickelmetalhydridebatterypack.Ifyou
areacompanyemployeewhousesaLenovonotebookcomputerandneedtodisposeofabatterypack,
contacttheproperpersoninLenovosales,service,ormarketing,andfollowthatperson'sinstructions.You
alsocanrefertotheinstructionsathttp://www.lenovo.com/jp/ja/environment/recycle/battery/.
IfyouuseaLenovonotebookcomputerathomeandneedtodisposeofabatterypack,you
mustcomplywithlocalordinancesandregulations.Youalsocanrefertotheinstructionsat
http://www.lenovo.com/jp/ja/environment/recycle/battery/.
BatteryrecyclinginformationforBrazil
DeclaraçõesdeReciclagemnoBrasil
DescartedeumProdutoLenovoForadeUso
Equipamentoselétricoseeletrônicosnãodevemserdescartadosemlixocomum,masenviadosàpontosde
coleta,autorizadospelofabricantedoprodutoparaquesejamencaminhadoseprocessadosporempresas
especializadasnomanuseioderesíduosindustriais,devidamentecertificadaspelosorgãosambientais,de
acordocomalegislaçãolocal.
ALenovopossuiumcanalespecíficoparaauxiliá-lonodescartedessesprodutos.Casovocêpossua
umprodutoLenovoemsituaçãodedescarte,ligueparaonossoSACouencaminheume-mailpara:
reciclar@lenovo.com,informandoomodelo,númerodesérieecidade,afimdeenviarmosasinstruções
paraocorretodescartedoseuprodutoLenovo.
158UserGuide

BatteryrecyclinginformationforTaiwan
BatteryrecyclinginformationfortheEuropeanUnion
Notice:ThismarkappliesonlytocountrieswithintheEuropeanUnion(EU).
BatteriesorpackagingforbatteriesarelabeledinaccordancewithEuropeanDirective2006/66/EC
concerningbatteriesandaccumulatorsandwastebatteriesandaccumulators.TheDirectivedeterminesthe
frameworkforthereturnandrecyclingofusedbatteriesandaccumulatorsasapplicablethroughoutthe
EuropeanUnion.Thislabelisappliedtovariousbatteriestoindicatethatthebatteryisnottobethrown
away,butratherreclaimeduponendoflifeperthisDirective.
InaccordancewiththeEuropeanDirective2006/66/EC,batteriesandaccumulatorsarelabeledtoindicate
thattheyaretobecollectedseparatelyandrecycledatendoflife.Thelabelonthebatterymayalso
includeachemicalsymbolforthemetalconcernedinthebattery(Pbforlead,Hgformercury,andCdfor
cadmium).Usersofbatteriesandaccumulatorsmustnotdisposeofbatteriesandaccumulatorsasunsorted
municipalwaste,butusethecollectionframeworkavailabletocustomersforthereturn,recycling,and
treatmentofbatteriesandaccumulators.Customerparticipationisimportanttominimizeanypotential
effectsofbatteriesandaccumulatorsontheenvironmentandhumanhealthduetothepotentialpresenceof
hazardoussubstances.Forpropercollectionandtreatment,goto:
http://www.lenovo.com/lenovo/environment
BatteryrecyclinginformationfortheUnitedStatesandCanada
AppendixB.WEEEandrecyclingstatements159

160UserGuide

AppendixC.RestrictionofHazardousSubstancesDirective
(RoHS)
EuropeanUnionRoHS
LenovoproductssoldintheEuropeanUnion,onorafter3January2013meettherequirementsofDirective
2011/65/EUontherestrictionoftheuseofcertainhazardoussubstancesinelectricalandelectronic
equipment(“RoHSrecast”or“RoHS2”).
FormoreinformationaboutLenovoprogressonRoHS,goto:
http://www.lenovo.com/social_responsibility/us/en/RoHS_Communication.pdf
©CopyrightLenovo2013,2014161
ChinaRoHS
IndiaRoHS
RoHScompliantasperE-Waste(Management&Handling)Rules,2011.
162UserGuide


164UserGuide

AppendixD.ENERGYSTARmodelinformation
ENERGYSTAR®isajointprogramoftheU.S.EnvironmentalProtectionAgencyandtheU.S.Department
ofEnergyaimedatsavingmoneyandprotectingtheenvironmentthroughenergyefficientproductsand
practices.
LenovoisproudtoofferourcustomersproductswiththeENERGYSTARqualifieddesignation.Lenovo
computersofthefollowingmachinetype,iftheENERGYSTARmarkisaffixed,hasbeendesignedand
testedtoconformtotheENERGYSTARprogramrequirementsforcomputers.
20AQand20AR
ByusingENERGYSTARqualifiedproductsandtakingadvantageofthepower-managementfeatures
ofthecomputer,youcanhelpreducetheconsumptionofelectricity.Reducedelectricalconsumption
cancontributetopotentialfinancialsavings,acleanerenvironment,andthereductionofgreenhousegas
emissions.
FormoreinformationaboutENERGYSTAR,goto:
http://www.energystar.gov
Lenovoencouragesyoutomakeefficientuseofenergyanintegralpartofyourday-to-dayoperations.To
helpinthisendeavor,Lenovohaspresetthefollowingpower-managementfeaturestotakeeffectwhenthe
computerhasbeeninactiveforaspecifiedlengthoftime:
Powerplan:EnergySaver(settingswhenpluggedintoacpower)
•Turnoffthedisplay:After10minutes
•Putthecomputerintosleep:After20minutes
•Advancedpowersettings:
–Turnoffharddisks:After15minutes
–Hibernate:Never
Toawakenthecomputerfromsleepmode,presstheFnkeyonyourkeyboard.Formoreinformationabout
thesesettings,seetheWindowsHelpandSupportinformationonthecomputer.
TheWakeonLANfunctionisenabledwhenyourLenovocomputerisshippedfromthefactory,andthe
settingremainsvalidevenwhenthecomputerisinsleepmode.IfyoudonotneedtohaveWakeonLAN
enabledwhilethecomputerisinsleepmode,youcanreducethepowerconsumptionandprolongthetime
insleepmode,bydisablingthesettingofWakeonLANforsleepmode.
TodisablethesettingofWakeonLANforsleepmode,dothefollowing:
1.ClickStart➙Controlpanel.
2.ClickHardwareandSound➙DeviceManager.
©CopyrightLenovo2013,2014165

3.IntheDeviceManagerwindow,expandNetworkadapters.
4.Right-clickyournetworkadapterdevice,andclickProperties.
5.ClickthePowerManagementtab.
6.CleartheAllowthisdevicetowakethecomputercheckbox.
7.ClickOK.
166UserGuide

AppendixE.Notices
Lenovomaynotoffertheproducts,services,orfeaturesdiscussedinthisdocumentinallcountries.Consult
yourlocalLenovorepresentativeforinformationontheproductsandservicescurrentlyavailableinyour
area.AnyreferencetoaLenovoproduct,program,orserviceisnotintendedtostateorimplythatonlythat
Lenovoproduct,program,orservicemaybeused.Anyfunctionallyequivalentproduct,program,orservice
thatdoesnotinfringeanyLenovointellectualpropertyrightmaybeusedinstead.However,itistheuser's
responsibilitytoevaluateandverifytheoperationofanyotherproduct,program,orservice.
Lenovomayhavepatentsorpendingpatentapplicationscoveringsubjectmatterdescribedinthis
document.Thefurnishingofthisdocumentdoesnotgiveyouanylicensetothesepatents.Youcansend
licenseinquiries,inwriting,to:
Lenovo(UnitedStates),Inc.
1009ThinkPlace-BuildingOne
Morrisville,NC27560
U.S.A.
Attention:LenovoDirectorofLicensing
LENOVOPROVIDESTHISPUBLICATION“ASIS”WITHOUTWARRANTYOFANYKIND,EITHEREXPRESS
ORIMPLIED,INCLUDING,BUTNOTLIMITEDTO,THEIMPLIEDWARRANTIESOFNON-INFRINGEMENT,
MERCHANTABILITYORFITNESSFORAPARTICULARPURPOSE.Somejurisdictionsdonotallow
disclaimerofexpressorimpliedwarrantiesincertaintransactions,therefore,thisstatementmaynotapply
toyou.
Thisinformationcouldincludetechnicalinaccuraciesortypographicalerrors.Changesareperiodically
madetotheinformationherein;thesechangeswillbeincorporatedinneweditionsofthepublication.
Lenovomaymakeimprovementsand/orchangesintheproduct(s)and/ortheprogram(s)describedinthis
publicationatanytimewithoutnotice.
Theproductsdescribedinthisdocumentarenotintendedforuseinimplantationorotherlifesupport
applicationswheremalfunctionmayresultininjuryordeathtopersons.Theinformationcontainedinthis
documentdoesnotaffectorchangeLenovoproductspecificationsorwarranties.Nothinginthisdocument
shalloperateasanexpressorimpliedlicenseorindemnityundertheintellectualpropertyrightsofLenovo
orthirdparties.Allinformationcontainedinthisdocumentwasobtainedinspecificenvironmentsandis
presentedasanillustration.Theresultobtainedinotheroperatingenvironmentsmayvary.
Lenovomayuseordistributeanyoftheinformationyousupplyinanywayitbelievesappropriatewithout
incurringanyobligationtoyou.
Anyreferencesinthispublicationtonon-LenovoWebsitesareprovidedforconvenienceonlyanddonotin
anymannerserveasanendorsementofthoseWebsites.ThematerialsatthoseWebsitesarenotpartof
thematerialsforthisLenovoproduct,anduseofthoseWebsitesisatyourownrisk.
Anyperformancedatacontainedhereinwasdeterminedinacontrolledenvironment.Therefore,theresult
obtainedinotheroperatingenvironmentsmayvarysignificantly.Somemeasurementsmayhavebeen
madeondevelopment-levelsystemsandthereisnoguaranteethatthesemeasurementswillbethesame
ongenerallyavailablesystems.Furthermore,somemeasurementsmayhavebeenestimatedthrough
extrapolation.Actualresultsmayvary.Usersofthisdocumentshouldverifytheapplicabledatafortheir
specificenvironment.
©CopyrightLenovo2013,2014167

Trademarks
ThefollowingtermsaretrademarksofLenovointheUnitedStates,othercountries,orboth:
Lenovo
AccessConnections
ActiveProtectionSystem
RescueandRecovery
SecureDataDisposal
ThinkPad
ThinkVantage
TrackPoint
UltraConnect
MiniDisplayPort(mDP)isaTrademarkoftheVideoElectronicsStandardsAssociation.
ThetermsHDMIandHDMIHigh-DefinitionMultimediaInterfacearetrademarksorregisteredtrademarksof
HDMILicensingLLCintheUnitedStatesandothercountries.
IntelandIntelSpeedSteparetrademarksofIntelCorporationintheU.S.and/orothercountries.
Microsoft,Windows,andBitLockeraretrademarksoftheMicrosoftgroupofcompanies.
Othercompany,product,andservicenamesmaybetrademarksorservicemarksofothers.
168UserGuide