Lenovo T530 T530I W530 Ug En User Manual (English) Guide Laptop (Think Pad) Type 2429
2012-06-05
User Manual: Lenovo T530 T530I W530 Ug En (English) User Guide T530i Laptop (ThinkPad) - Type 2429 ThinkPad T530i,2429
Open the PDF directly: View PDF ![]() .
.
Page Count: 195 [warning: Documents this large are best viewed by clicking the View PDF Link!]
- Read this first
- Chapter 1. Product overview
- Chapter 2. Using your computer
- Registering your computer
- Frequently asked questions
- Special keys and buttons
- Using the UltraNav pointing device
- Power management
- Connecting to the network
- Presentations and multimedia
- Using the NVIDIA Optimus Graphics feature
- Using the color sensor
- Using audio features
- Using the integrated camera
- Using the optical drive
- Using an ExpressCard, a flash media card, or a smart card
- Chapter 3. You and your computer
- Chapter 4. Security
- Chapter 5. Recovery overview
- Chapter 6. Replacing devices
- Static electricity prevention
- Replacing the Ultrabay device
- Replacing the battery
- Replacing the SIM card
- Replacing the hard disk drive or solid-state drive
- Replacing the keyboard
- Replacing and installing a memory module
- Replacing the wireless LAN card
- Installing and replacing the wireless WAN card
- Replacing the backup battery
- Chapter 7. Enhancing your computer
- Chapter 8. Advanced configuration
- Chapter 9. Preventing problems
- Chapter 10. Troubleshooting computer problems
- Diagnosing problems
- Troubleshooting
- Computer stops responding
- Spills on the keyboard
- Error messages
- Errors without messages
- Beep errors
- Memory module problems
- Networking problems
- Problems with the keyboard and other pointing devices
- Problems with the display and multimedia devices
- Fingerprint reader problems
- Battery and power problems
- Problems with drives and other storage devices
- A software problem
- Problems with ports and connectors
- Chapter 11. Getting support
- Appendix A. Regulatory information
- Wireless related information
- Export classification notice
- Electronic emissions notices
- Federal Communications Commission Declaration of Conformity
- Industry Canada Class B emission compliance statement
- European Union - Compliance to the Electromagnetic Compatibility Directive
- German Class B compliance statement
- Korea Class B compliance statement
- Japan VCCI Class B compliance statement
- Japan compliance statement for products which connect to the power mains with rated current less than or equal to 20 A per phase
- Lenovo product service information for Taiwan
- Appendix B. WEEE and recycling statements
- Appendix C. ENERGY STAR model information
- Appendix D. Restriction of Hazardous Substances Directive (RoHS)
- Appendix E. Notices

UserGuide
ThinkPadT530,T530i,andW530

Notes:Beforeusingthisinformationandtheproductitsupports,besuretoreadandunderstandthe
following:
•Safety,Warranty,andSetupGuide
•RegulatoryNotice
•“Importantsafetyinformation”onpagevi
•AppendixE“Notices”onpage175
TheSafety,Warranty,andSetupGuideandtheRegulatoryNoticehavebeenuploadedtotheWebsite.
Torefertothem,gotohttp://www.lenovo.com/ThinkPadUserGuides.
LIMITEDANDRESTRICTEDRIGHTSNOTICE:IfdataorsoftwareisdeliveredpursuantaGeneralServicesAdministration
“GSA”contract,use,reproduction,ordisclosureissubjecttorestrictionssetforthinContractNo.GS-35F-05925.
SixthEdition(January2014)
©CopyrightLenovo2012,2014.

Contents
Readthisrst..............v
Importantsafetyinformation..........vi
Conditionsthatrequireimmediateaction..vii
Safetyguidelines............vii
Chapter1.Productoverview......1
Locatingcomputercontrols,connectors,and
indicators..................1
Frontview................1
Right-sideview..............4
Left-sideview..............5
Bottomview...............7
Rearview................8
Statusindicators.............8
Locatingimportantproductinformation.....10
Machinetypeandmodellabel.......11
FCCIDandICCerticationnumberlabel..11
CerticateofAuthenticitylabel......12
Features.................12
Specications...............14
Operatingenvironment...........14
Lenovoprograms.............15
AccessingLenovoprogramsontheWindows
7operatingsystem...........15
AccessingLenovoprogramsontheWindows
8operatingsystem...........17
AnintroductiontoLenovoprograms....17
Chapter2.Usingyourcomputer...21
Registeringyourcomputer..........21
Frequentlyaskedquestions.........21
Specialkeysandbuttons..........23
Functionkeycombinations........23
Volumeandmutebuttons........24
Windowskey.............26
UsingtheUltraNavpointingdevice.......26
UsingtheTrackPointpointingdevice....27
Usingthetouchpad...........28
DisablingtheUltraNavpointingdeviceand
usinganexternalmouse.........28
AddingtheUltraNavicontothesystemtray.29
Powermanagement............29
Checkingbatterystatus.........29
Usingtheacpoweradapter........29
Chargingthebattery..........30
Maximizingbatterylife..........30
Managingyourbatterypower.......31
Power-savingmodes..........31
Handlingthebattery...........32
Connectingtothenetwork..........33
Ethernetconnections..........34
Wirelessconnections..........34
Presentationsandmultimedia.........37
Changingdisplaysettings........37
Connectingaprojectororexternaldisplay..38
Settingupapresentation.........40
UsingtheExtenddesktopfunction.....41
UsingtheNVIDIAOptimusGraphicsfeature...41
Usingthecolorsensor...........41
Usingaudiofeatures............42
Usingtheintegratedcamera.........43
Usingtheopticaldrive...........43
UsinganExpressCard,aashmediacard,ora
smartcard................43
Chapter3.Youandyourcomputer..47
Accessibilityandcomfort..........47
Ergonomicinformation..........47
Comfort...............48
Accessibilityinformation.........48
Travelingwithyourcomputer.........49
Traveltips...............49
Travelaccessories...........49
Chapter4.Security..........51
Attachingamechanicallock.........51
Usingpasswords..............51
Passwordsandsleepmode........51
Typingpasswords...........51
Power-onpassword...........52
Harddiskpasswords..........52
Supervisorpassword..........54
Harddisksecurity.............56
Settingthesecuritychip...........57
Usingthengerprintreader..........58
Noticeondeletingdatafromyourharddiskdrive
orsolid-statedrive.............61
Usingandunderstandingrewalls.......62
Protectingdataagainstviruses........62
Chapter5.Recoveryoverview....63
RecoveryoverviewfortheWindows7operating
system..................63
Creatingandusingarecoverymedia....63
©CopyrightLenovo2012i

Performingbackupandrecoveryoperations.64
UsingtheRescueandRecoveryworkspace.65
Creatingandusingarescuemedium....66
Reinstallingpreinstalledprogramsanddevice
drivers................67
Solvingrecoveryproblems........68
RecoveryoverviewfortheWindows8operating
system..................68
Chapter6.Replacingdevices.....71
Staticelectricityprevention..........71
ReplacingtheUltrabaydevice........71
Replacingthebattery............72
ReplacingtheSIMcard...........74
Replacingtheharddiskdriveorsolid-statedrive.75
Replacingthekeyboard...........78
Replacingandinstallingamemorymodule...82
ReplacingthewirelessLANcard.......86
InstallingandreplacingthewirelessWANcard..89
Replacingthebackupbattery.........92
Chapter7.Enhancingyour
computer...............95
FindingThinkPadoptions..........95
UsingtheSerialUltrabayEnhancedfeature...95
Performingahotorawarmswap.....95
Installingasecondaryharddiskdrive....96
Usingtheextendedlifebattery........100
ThinkPadportreplicatorsanddockingstations..102
Frontview...............103
Rearview...............105
AttachingaThinkPadportreplicatoror
dockingstation.............107
DetachingaThinkPadportreplicatoror
dockingstation.............109
Securityfeature............110
Usingthesystemlockkey........110
Chapter8.Advanced
conguration............111
Installinganewoperatingsystem.......111
Beforeyoubegin............111
InstallingtheWindows7operatingsystem..112
InstallingtheWindows8operatingsystem..113
Installingdevicedrivers...........113
ThinkPadSetup..............114
Mainmenu..............115
Congmenu..............115
Dateandtimemenu...........122
Securitymenu.............122
Startupmenu.............126
Restartmenu.............128
UpdatingyoursystemUEFIBIOS.....129
Usingsystemmanagement..........129
Systemmanagement..........129
Settingmanagementfeatures.......130
Chapter9.Preventingproblems..133
Generaltipsforpreventingproblems......133
Makingsuredevicedriversarecurrent.....134
Takingcareofyourcomputer.........135
Cleaningthecoverofyourcomputer....136
Chapter10.Troubleshooting
computerproblems.........139
Diagnosingproblems............139
Troubleshooting..............139
Computerstopsresponding.......139
Spillsonthekeyboard..........140
Errormessages............140
Errorswithoutmessages.........142
Beeperrors..............143
Memorymoduleproblems........143
Networkingproblems..........143
Problemswiththekeyboardandotherpointing
devices................145
Problemswiththedisplayandmultimedia
devices................146
Fingerprintreaderproblems........149
Batteryandpowerproblems.......150
Problemswithdrivesandotherstorage
devices................153
Asoftwareproblem...........154
Problemswithportsandconnectors....154
Chapter11.Gettingsupport....157
BeforeyoucontactLenovo..........157
Gettinghelpandservice...........157
Usingdiagnosticprograms........158
LenovosupportWebsite.........158
CallingLenovo.............158
Purchasingadditionalservices........159
AppendixA.Regulatory
information.............161
Wirelessrelatedinformation.........161
LocationoftheUltraConnectwireless
antennas...............162
Locatingwirelessregulatorynotices....163
Exportclassicationnotice..........163
Electronicemissionsnotices.........163
FederalCommunicationsCommission
DeclarationofConformity........163
iiUserGuide

IndustryCanadaClassBemissioncompliance
statement...............163
EuropeanUnion-Compliancetothe
ElectromagneticCompatibilityDirective...164
GermanClassBcompliancestatement...164
KoreaClassBcompliancestatement....165
JapanVCCIClassBcompliancestatement..165
Japancompliancestatementforproducts
whichconnecttothepowermainswith
ratedcurrentlessthanorequalto20Aper
phase................165
Lenovoproductserviceinformationfor
Taiwan................165
AppendixB.WEEEandrecycling
statements.............167
ImportantWEEEinformation.........167
BatteryrecyclinginformationforJapan.....167
BatteryrecyclinginformationforBrazil.....168
BatteryrecyclinginformationforTaiwan.....168
BatteryrecyclinginformationforEuropean
Union..................168
BatteryrecyclinginformationforUnitedStatesand
Canada.................169
AppendixC.ENERGYSTARmodel
information.............171
AppendixD.RestrictionofHazardous
SubstancesDirective(RoHS)....173
ChinaRoHS................173
TurkishRoHS...............173
UkraineRoHS...............173
IndiaRoHS................174
AppendixE.Notices.........175
Trademarks................176
©CopyrightLenovo2012iii

ivUserGuide
Readthisrst
Besuretofollowtheimportanttipsgivenheretogetthemostuseandenjoymentoutofyourcomputer.
Failuretodosomightleadtodiscomfortorinjury,orcauseyourcomputertofail.
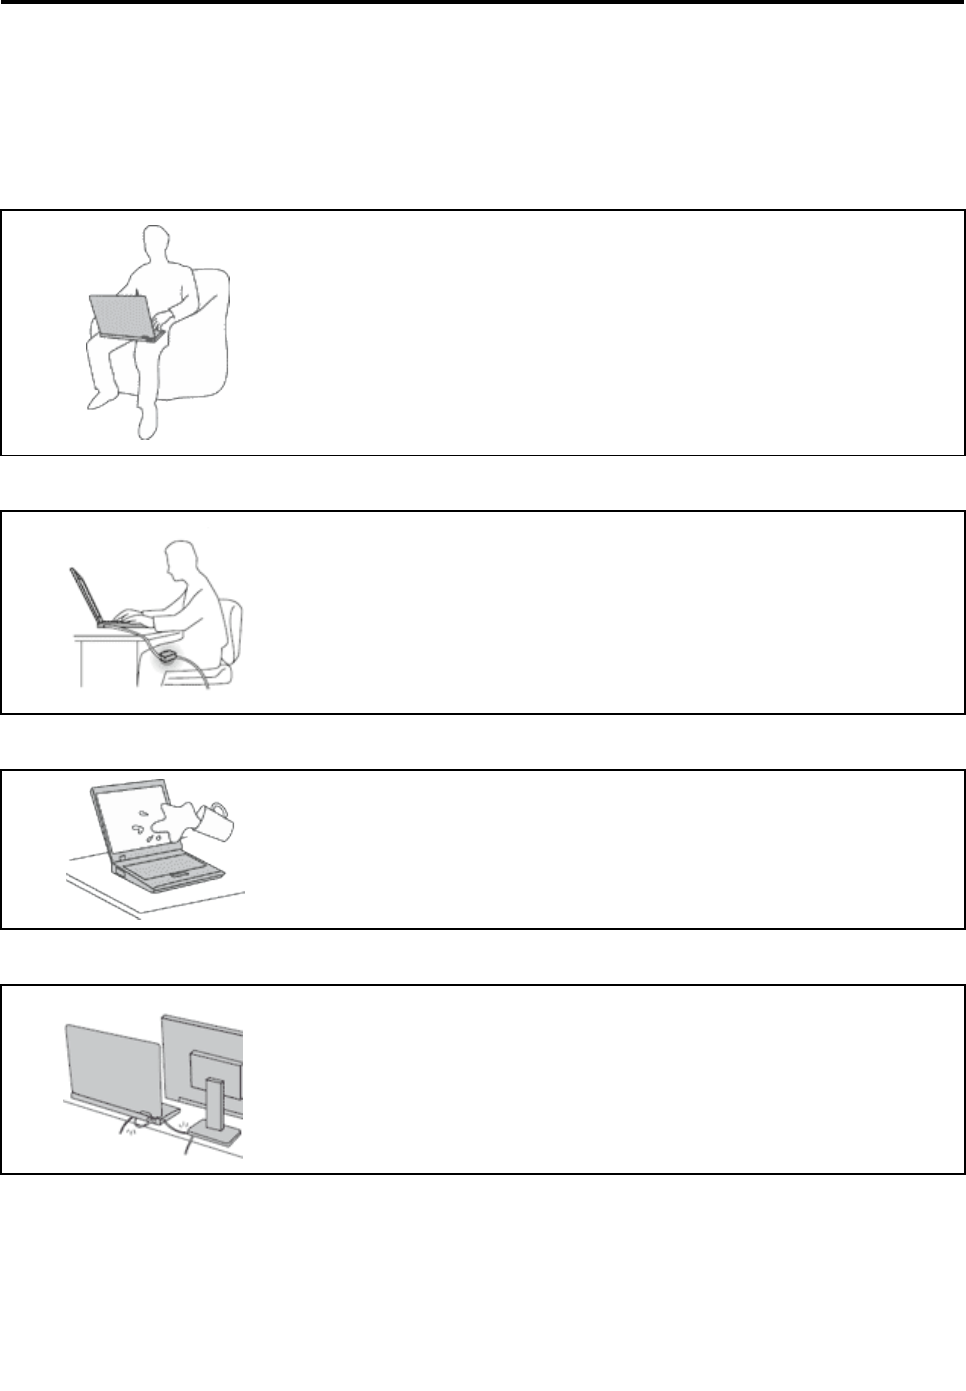
Protectyourselffromtheheatthatyourcomputergenerates.
Whenyourcomputeristurnedonorthebatteryischarging,thebase,thepalm
rest,andsomeotherpartsmaybecomehot.Thetemperaturetheyreach
dependsontheamountofsystemactivityandthelevelofchargeinthebattery.
Extendedcontactwithyourbody,eventhroughclothing,couldcause
discomfortorevenaskinburn.
•Avoidkeepingyourhands,yourlap,oranyotherpartofyourbodyin
contactwithahotsectionofthecomputerforanyextendedtime.
•Periodicallytakehandsfromusingthekeyboardbyliftingyourhandsfrom
thepalmrest.
Protectyourselffromtheheatgeneratedbytheacpoweradapter.
Whentheacpoweradapterisconnectedtoanelectricaloutletandyour
computer,itgeneratesheat.
Extendedcontactwithyourbody,eventhroughclothing,maycauseaskin
burn.
•Donotplacetheacpoweradapterincontactwithanypartofyourbody
whileitisinuse.
•Neveruseittowarmyourbody.
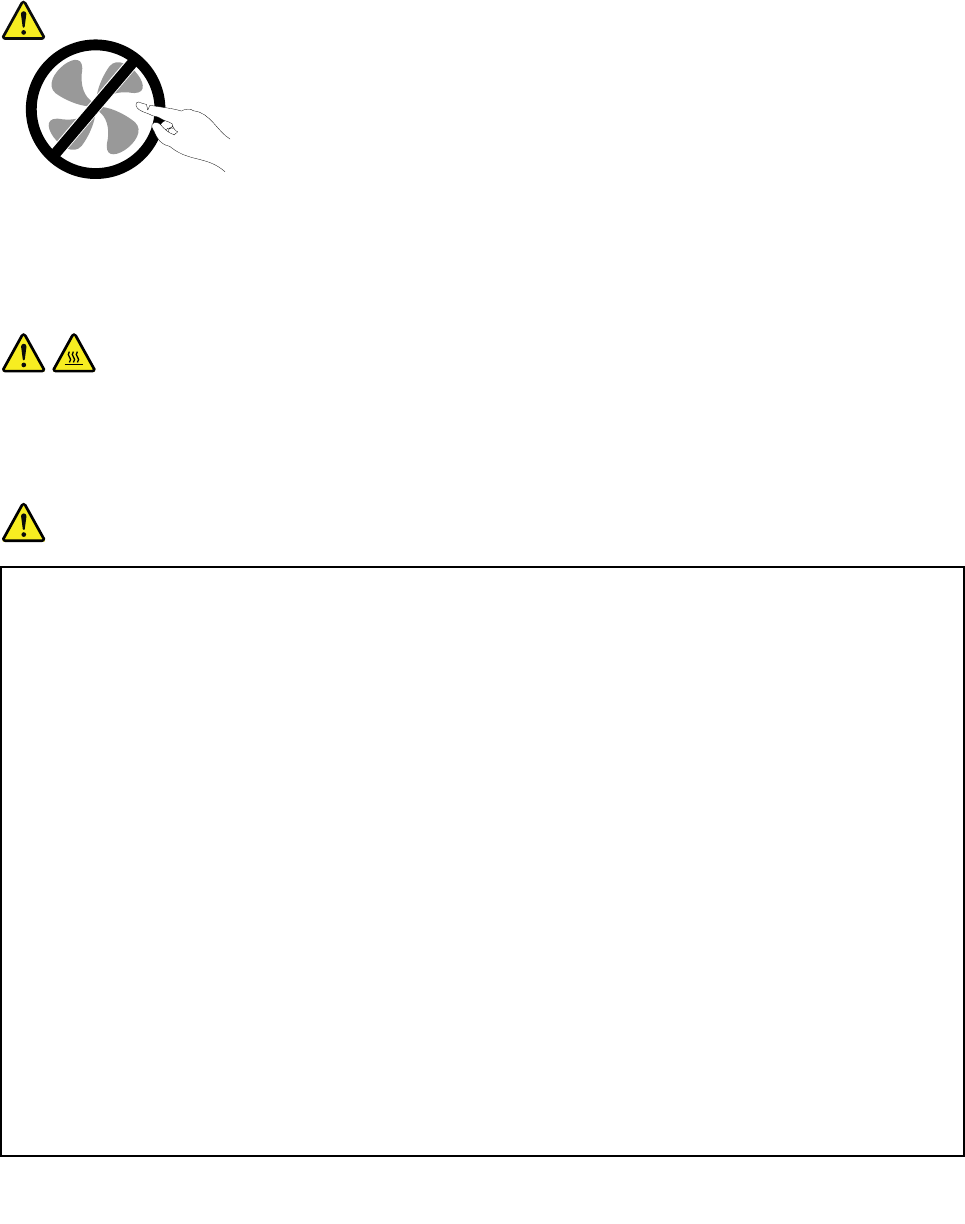
Preventyourcomputerfromgettingwet.
Toavoidspillsandthedangerofelectricalshock,keepliquidsawayfromyour
computer.
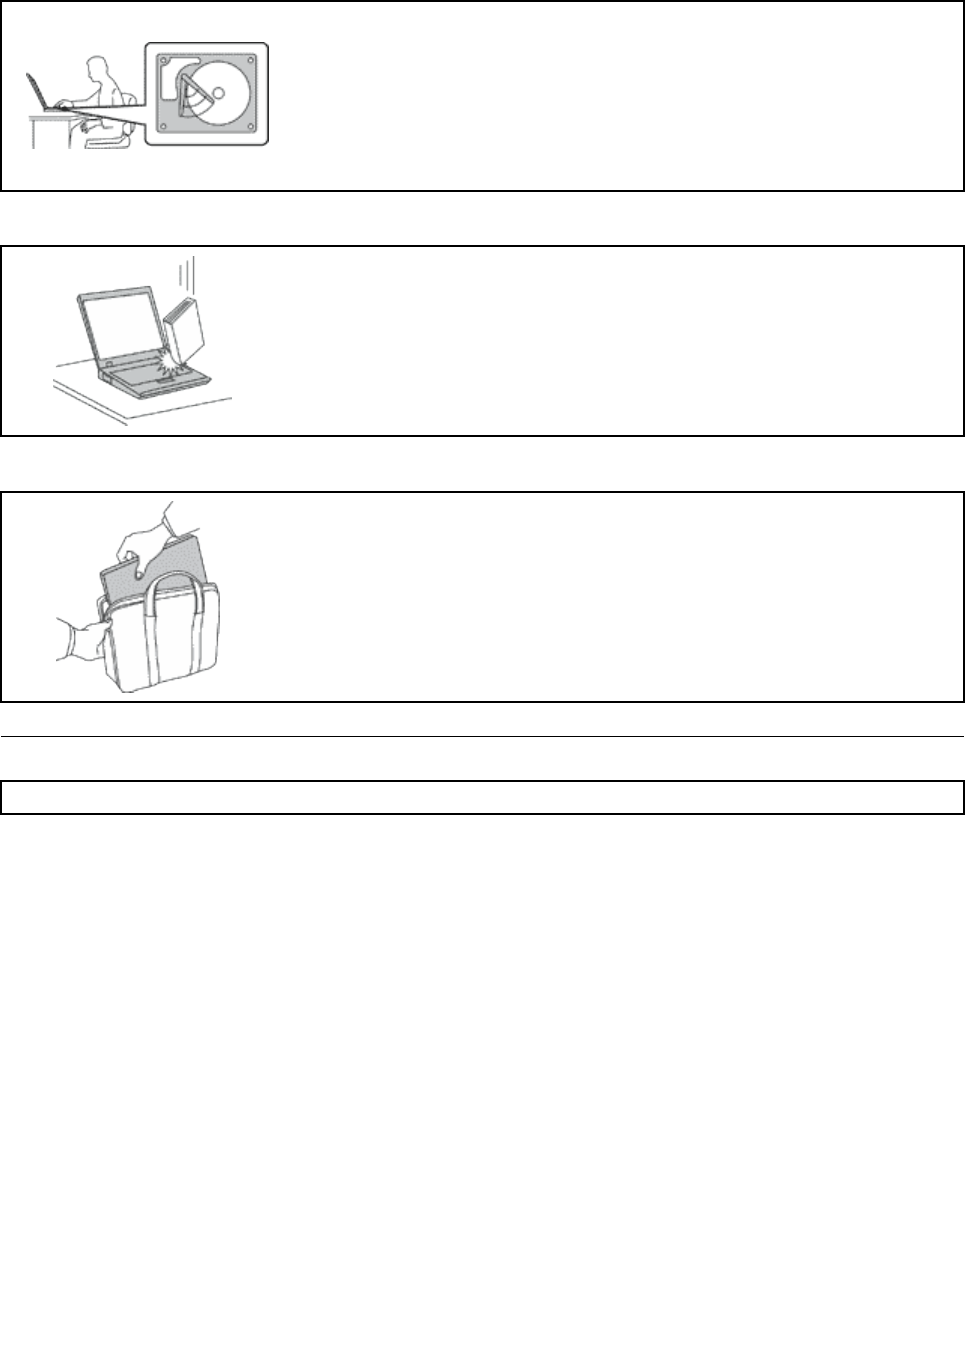
Protectthecablesfrombeingdamaged.
Applyingstrongforcetocablesmaydamageorbreakthem.
Routecommunicationlines,orthecablesofanacpoweradapter,amouse,a
keyboard,aprinter,oranyotherelectronicdevice,sothattheycannotbewalked
on,trippedover,pinchedbyyourcomputerorotherobjects,orinanyway
subjectedtotreatmentthatcouldinterferewiththeoperationofyourcomputer.
©CopyrightLenovo2012v
Protectyourcomputeranddatawhenmovingit.
Beforemovingacomputerequippedwithaharddiskdrive,dooneofthe
following,andmakesurethatthepowerbuttonisofforisblinking:
•Turnitoff.
•Putitinsleepmode.
•Putitinhibernationmode.
Thiswillhelptopreventdamagetothecomputer,andpossiblelossofdata.
Handleyourcomputergently.
Donotdrop,bump,scratch,twist,hit,vibrate,push,orplaceheavyobjectson
yourcomputer,display,orexternaldevices.
Carryyourcomputercarefully.
•Useaqualitycarryingcasethatprovidesadequatecushioningandprotection.
•Donotpackyourcomputerinatightlypackedsuitcaseorbag.
•Beforeputtingyourcomputerinacarryingcase,makesurethatitisoff,insleep
mode,orinhibernationmode.Donotputacomputerinacarryingcasewhileit
isturnedon.
Importantsafetyinformation
Note:Readtheimportantsafetyinformationrst.
Thisinformationcanhelpyousafelyuseyournotebookcomputer.Followandretainallinformationincluded
withyourcomputer.Theinformationinthisdocumentdoesnotalterthetermsofyourpurchaseagreement
ortheLenovo®LimitedWarranty.Formoreinformation,see“WarrantyInformation”intheSafety,Warranty,
andSetupGuidethatcomeswithyourcomputer.
Customersafetyisimportant.Ourproductsaredevelopedtobesafeandeffective.However,personal
computersareelectronicdevices.Powercords,poweradapters,andotherfeaturescancreatepotential
safetyrisksthatcanresultinphysicalinjuryorpropertydamage,especiallyifmisused.Toreducethese
risks,followtheinstructionsincludedwithyourproduct,observeallwarningsontheproductandinthe
operatinginstructions,andreviewtheinformationincludedinthisdocumentcarefully.Bycarefullyfollowing
theinformationcontainedinthisdocumentandprovidedwithyourproduct,youcanhelpprotectyourself
fromhazardsandcreateasafercomputerworkenvironment.
Note:Thisinformationincludesreferencestopoweradaptersandbatteries.Inadditiontonotebook
computers,someproducts(suchasspeakersandmonitors)shipwithexternalpoweradapters.Ifyouhave
suchaproduct,thisinformationappliestoyourproduct.Inaddition,computerproductscontainacoin-sized
internalbatterythatprovidespowertothesystemclockevenwhenthecomputerisunplugged,sothe
batterysafetyinformationappliestoallcomputerproducts.
viUserGuide

Conditionsthatrequireimmediateaction
Productscanbecomedamagedduetomisuseorneglect.Someproductdamageisseriousenough
thattheproductshouldnotbeusedagainuntilithasbeeninspectedand,ifnecessary,repairedby
anauthorizedservicer.
Aswithanyelectronicdevice,paycloseattentiontotheproductwhenitisturnedon.Onveryrare
occasions,youmightnoticeanodororseeapuffofsmokeorsparksventfromyourproduct.Oryou
mighthearsoundslikepopping,crackingorhissing.Theseconditionsmightmerelymeanthatan
internalelectroniccomponenthasfailedinasafeandcontrolledmanner.Or,theymightindicate
apotentialsafetyissue.However,donottakerisksorattempttodiagnosethesituationyourself.
ContacttheCustomerSupportCenterforfurtherguidance.ForalistofServiceandSupportphone
numbers,seethefollowingWebsite:
http://www.lenovo.com/support/phone
Frequentlyinspectyourcomputeranditscomponentsfordamageorwearorsignsofdanger.Ifyou
haveanyquestionabouttheconditionofacomponent,donotusetheproduct.ContacttheCustomer
SupportCenterortheproductmanufacturerforinstructionsonhowtoinspecttheproductand
haveitrepaired,ifnecessary.
Intheunlikelyeventthatyounoticeanyofthefollowingconditions,orifyouhaveanysafetyconcerns
withyourproduct,stopusingtheproductandunplugitfromthepowersourceandtelecommunication
linesuntilyoucanspeaktotheCustomerSupportCenterforfurtherguidance.
•Powercords,plugs,poweradapters,extensioncords,surgeprotectors,orpowersuppliesthatare
cracked,broken,ordamaged.
•Signsofoverheating,smoke,sparks,orre.
•Damagetoabattery(suchascracks,dents,orcreases),dischargefromabattery,orabuildupofforeign
substancesonthebattery.
•Acracking,hissingorpoppingsound,orstrongodorthatcomesfromtheproduct.
•Signsthatliquidhasbeenspilledoranobjecthasfallenontothecomputerproduct,thepowercordor
poweradapter.
•Thecomputerproduct,powercord,orpoweradapterhasbeenexposedtowater.
•Theproducthasbeendroppedordamagedinanyway.
•Theproductdoesnotoperatenormallywhenyoufollowtheoperatinginstructions.
Note:Ifyounoticetheseconditionswithaproduct(suchasanextensioncord)thatisnotmanufacturedfor
orbyLenovo,stopusingthatproductuntilyoucancontacttheproductmanufacturerforfurtherinstructions,
oruntilyougetasuitablereplacement.
Safetyguidelines
Alwaysobservethefollowingprecautionstoreducetheriskofinjuryandpropertydamage.
Serviceandupgrades
DonotattempttoserviceaproductyourselfunlessinstructedtodosobytheCustomerSupportCenteror
yourdocumentation.OnlyuseaServiceProviderwhoisapprovedtorepairyourparticularproduct.
Note:Somecomputerpartscanbeupgradedorreplacedbythecustomer.Upgradestypicallyare
referredtoasoptions.ReplacementpartsapprovedforcustomerinstallationarereferredtoasCustomer
ReplaceableUnits,orCRUs.Lenovoprovidesdocumentationwithinstructionswhenitisappropriatefor
customerstoinstalloptionsorreplaceCRUs.Youmustcloselyfollowallinstructionswheninstallingor
replacingparts.TheOffstateofapowerindicatordoesnotnecessarilymeanthatvoltagelevelsinsidea
©CopyrightLenovo2012vii
productarezero.Beforeyouremovethecoversfromaproductequippedwithapowercord,alwaysmake
surethatthepoweristurnedoffandthattheproductisunpluggedfromanypowersource.Ifyouhave
anyquestionsorconcerns,contacttheCustomerSupportCenter.
Althoughtherearenomovingpartsinyourcomputerafterthepowercordhasbeendisconnected,the
followingwarningsarerequiredforyoursafety.
CAUTION:
Hazardousmovingparts.Keepngersandotherbodypartsaway.
CAUTION:
BeforereplacinganyCRUs,turnoffthecomputerandwaitthreetoveminutestoletthecomputer
coolbeforeopeningthecover.
Powercordsandpoweradapters
DANGER
Useonlythepowercordsandpoweradapterssuppliedbytheproductmanufacturer.
Thepowercordsshallbesafetyapproved.ForGermany,itshallbeH05VV-F,3G,0.75mm2,or
better.Forothercountries,thesuitabletypesshallbeusedaccordingly.
Neverwrapapowercordaroundapoweradapterorotherobject.Doingsocanstressthecordin
waysthatcancausethecordtofray,crack,orcrimp.Thiscanpresentasafetyhazard.
Alwaysroutepowercordssothattheywillnotbewalkedon,trippedover,orpinchedbyobjects.
Protectpowercordsandpoweradaptersfromliquids.Forinstance,donotleaveyourpowercord
orpoweradapternearsinks,tubs,toilets,oronoorsthatarecleanedwithliquidcleansers.
Liquidscancauseashortcircuit,particularlyifthepowercordorpoweradapterhasbeenstressed
bymisuse.Liquidsalsocancausegradualcorrosionofpowercordterminalsand/ortheconnector
terminalsonapoweradapter,whichcaneventuallyresultinoverheating.
Alwaysconnectpowercordsandsignalcablesinthecorrectorderandensurethatallpowercord
connectorsaresecurelyandcompletelypluggedintoreceptacles.
Donotuseanypoweradapterthatshowscorrosionattheacinputpinsorshowssignsof
overheating(suchasdeformedplastic)attheacinputpinsoranywhereonthepoweradapter.
Donotuseanypowercordswheretheelectricalcontactsoneitherendshowsignsofcorrosionor
overheatingorwherethepowercordappearstohavebeendamagedinanyway.
viiiUserGuide
Topreventpossibleoverheating,donotcoverthepoweradapterwithclothingorotherobjects
whenthepoweradapterispluggedintoanelectricaloutlet.
Extensioncordsandrelateddevices
Ensurethatextensioncords,surgeprotectors,uninterruptiblepowersupplies,andpowerstripsthatyouuse
areratedtohandletheelectricalrequirementsoftheproduct.Neveroverloadthesedevices.Ifpowerstrips
areused,theloadshouldnotexceedthepowerstripinputrating.Consultanelectricianformoreinformation
ifyouhavequestionsaboutpowerloads,powerrequirements,andinputratings.
Plugsandoutlets
DANGER
Ifareceptacle(poweroutlet)thatyouintendtousewithyourcomputerequipmentappearstobe
damagedorcorroded,donotusetheoutletuntilitisreplacedbyaqualiedelectrician.
Donotbendormodifytheplug.Iftheplugisdamaged,contactthemanufacturertoobtain
areplacement.
Donotshareanelectricaloutletwithotherhomeorcommercialappliancesthatdrawlargeamounts
ofelectricity;otherwise,unstablevoltagemightdamageyourcomputer,data,orattacheddevices.
Someproductsareequippedwithathree-prongedplug.Thisplugtsonlyintoagrounded
electricaloutlet.Thisisasafetyfeature.Donotdefeatthissafetyfeaturebytryingtoinsertitinto
anon-groundedoutlet.Ifyoucannotinserttheplugintotheoutlet,contactanelectricianforan
approvedoutletadapterortoreplacetheoutletwithonethatenablesthissafetyfeature.Never
overloadanelectricaloutlet.Theoverallsystemloadshouldnotexceed80percentofthebranch
circuitrating.Consultanelectricianformoreinformationifyouhavequestionsaboutpowerloads
andbranchcircuitratings.
Besurethatthepoweroutletyouareusingisproperlywired,easilyaccessible,andlocatedclose
totheequipment.Donotfullyextendpowercordsinawaythatwillstressthecords.
Besurethatthepoweroutletprovidesthecorrectvoltageandcurrentfortheproductyouare
installing.
Carefullyconnectanddisconnecttheequipmentfromtheelectricaloutlet.
Powersupplystatement
DANGER
Neverremovethecoveronapowersupplyoranypartthathasthefollowinglabelattached.
©CopyrightLenovo2012ix

Hazardousvoltage,current,andenergylevelsarepresentinsideanycomponentthathasthislabel
attached.Therearenoserviceablepartsinsidethesecomponents.Ifyoususpectaproblemwith
oneoftheseparts,contactaservicetechnician.
Externaldevices
CAUTION:
DonotconnectordisconnectanyexternaldevicecablesotherthanUSBcableswhilethecomputer
powerison;otherwise,youmightdamageyourcomputer.Toavoidpossibledamagetoattached
devices,waitatleastvesecondsafterthecomputerisshutdowntodisconnectexternaldevices.
Generalbatterynotice
DANGER
PersonalcomputersmanufacturedbyLenovocontainacoincellbatterytoprovidepowerto
thesystemclock.Inaddition,manymobileproducts,suchasnotebookcomputers,utilizea
rechargeablebatterypacktoprovidesystempowerwheninportablemode.Batteriessuppliedby
Lenovoforusewithyourproducthavebeentestedforcompatibilityandshouldonlybereplaced
withapprovedparts.
Neverattempttoopenorserviceanybattery.Donotcrush,puncture,orincineratebatteriesor
shortcircuitthemetalcontacts.Donotexposethebatterytowaterorotherliquids.Onlyrecharge
thebatterypackstrictlyaccordingtoinstructionsincludedintheproductdocumentation.
Batteryabuseormishandlingcancausethebatterytooverheat,whichcancausegassesorame
to“vent”fromthebatterypackorcoincell.Ifyourbatteryisdamaged,orifyounoticeany
dischargefromyourbatteryorthebuildupofforeignmaterialsonthebatteryleads,stopusingthe
batteryandobtainareplacementfromthebatterymanufacturer.
Batteriescandegradewhentheyareleftunusedforlongperiodsoftime.Forsomerechargeable
batteries(particularlyLithiumIonbatteries),leavingabatteryunusedinadischargedstatecould
increasetheriskofabatteryshortcircuit,whichcouldshortenthelifeofthebatteryandalsocan
poseasafetyhazard.DonotletrechargeableLithium-Ionbatteriescompletelydischargeorstore
thesebatteriesinadischargedstate.
Rechargeablebatterynotice
DANGER
Donotattempttodisassembleormodifythebatterypack.Attemptingtodosocancausean
explosion,orliquidleakagefromthebatterypack.Abatterypackotherthantheonespeciedby
Lenovo,oradisassembledormodiedbatterypackisnotcoveredbythewarranty.
Iftherechargeablebatterypackisincorrectlyreplaced,thereisdangerofanexplosion.Thebattery
packcontainsasmallamountofharmfulsubstances.Toavoidpossibleinjury:
•ReplaceonlywithabatteryofthetyperecommendedbyLenovo.
•Keepthebatterypackawayfromre.
•Donotexposeittowaterorrain.
•Donotattempttodisassembleit.
•Donotshort-circuitit.
xUserGuide

•Keepitawayfromchildren.
•Donotdropthebatterypack.
Donotputthebatterypackintrashthatisdisposedofinlandlls.Whendisposingofthebattery,
complywithlocalordinancesorregulations.
Thebatterypackshouldbestoredatroomtemperature,chargedtoapproximately30to50%
ofcapacity.Werecommendthatbatterypackbechargedaboutonceperyeartoprevent
overdischarge.
Lithiumcoincellbatterynotice
DANGER
Dangerofexplosionifbatteryisincorrectlyreplaced.
Whenreplacingthelithiumcoincellbattery,useonlythesameoranequivalenttypethatis
recommendedbythemanufacturer.Thebatterycontainslithiumandcanexplodeifnotproperly
used,handled,ordisposedof.
Donot:
•Throworimmerseintowater
•Heattomorethan100°C(212°F)
•Repairordisassemble
Disposeofthebatteryasrequiredbylocalordinancesorregulations.
ThefollowingstatementappliestousersinthestateofCalifornia,U.S.A.
CaliforniaPerchlorateInformation:
Productscontainingmanganesedioxidelithiumcoincellbatteriesmaycontainperchlorate.
PerchlorateMaterial-specialhandlingmayapply,See
www.dtsc.ca.gov/hazardouswaste/perchlorate
Heatandproductventilation
DANGER
Computers,acpoweradapters,andmanyaccessoriescangenerateheatwhenturnedonandwhen
batteriesarecharging.Notebookcomputerscangenerateasignicantamountofheatduetotheir
compactsize.Alwaysfollowthesebasicprecautions:
•Whenyourcomputeristurnedonorthebatteryischarging,thebase,thepalmrest,andsome
otherpartsmaybecomehot.Avoidkeepingyourhands,yourlap,oranyotherpartofyour
bodyincontactwithahotsectionofthecomputerforanyextendedlengthoftime.Whenyou
usethekeyboard,avoidkeepingyourpalmsonthepalmrestforaprolongedperiodoftime.
Yourcomputergeneratessomeheatduringnormaloperation.Theamountofheatdependson
theamountofsystemactivityandthebatterychargelevel.Extendedcontactwithyourbody,
eventhroughclothing,couldcausediscomfortorevenaskinburn.Periodicallytakebreaks
©CopyrightLenovo2012xi

fromusingthekeyboardbyliftingyourhandsfromthepalmrest;andbecarefulnottouse
thekeyboardforanyextendedlengthoftime.
•Donotoperateyourcomputerorchargethebatterynearammablematerialsorinexplosive
environments.
•Ventilationslots,fansand/orheatsinksareprovidedwiththeproductforsafety,comfort,and
reliableoperation.Thesefeaturesmightinadvertentlybecomeblockedbyplacingtheproducton
abed,sofa,carpet,orotherexiblesurface.Neverblock,cover,ordisablethesefeatures.
•Whentheacpoweradapterisconnectedtoanelectricaloutletandyourcomputer,itgenerates
heat.Donotplacetheadapterincontactwithanypartofyourbodywhileusingit.Neverusethe
acpoweradaptertowarmyourbody.Extendedcontactwithyourbody,eventhroughclothing,
maycauseaskinburn.
Foryoursafety,alwaysfollowthesebasicprecautionswithyourcomputer:
•Keepthecoverclosedwheneverthecomputerispluggedin.
•Regularlyinspecttheoutsideofthecomputerfordustaccumulation.
•Removedustfromventsandanyperforationsinthebezel.Morefrequentcleaningsmightbe
requiredforcomputersindustyorhigh-trafcareas.
•Donotrestrictorblockanyventilationopenings.
•Donotoperateyourcomputerinsidefurniture,asthismightincreasetheriskofoverheating.
•Airowtemperaturesintothecomputershouldnotexceed35°C(95°F).
Electricalcurrentsafetyinformation
DANGER
Electriccurrentfrompower,telephone,andcommunicationcablesishazardous.
Toavoidashockhazard:
•Donotuseyourcomputerduringalightningstorm.
•Donotconnectordisconnectanycablesorperforminstallation,maintenance,orreconguration
ofthisproductduringanelectricalstorm.
•Connectallpowercordstoaproperlywiredandgroundedelectricaloutlet.
•Connecttoproperlywiredoutletsanyequipmentthatwillbeattachedtothisproduct.
•Wheneverpossible,useonehandonlytoconnectordisconnectsignalcables.
•Neverturnonanyequipmentwhenthereisevidenceofre,water,orstructuraldamage.
•Disconnecttheattachedpowercords,batterypack,andallthecablesbeforeyouopenthe
devicecovers,unlessinstructedotherwiseintheinstallationandcongurationprocedures.
•Donotuseyourcomputeruntilallinternalpartsenclosuresarefastenedintoplace.Neveruse
thecomputerwheninternalpartsandcircuitsareexposed.
xiiUserGuide

DANGER
Connectanddisconnectcablesasdescribedinthefollowingprocedureswheninstalling,moving,
oropeningcoversonthisproductorattacheddevices.
Toconnect:
1.TurneverythingOFF.
2.First,attachallcablestodevices.
3.Attachsignalcablestoconnectors.
4.Attachpowercordstooutlets.
5.TurndevicesON.
Todisconnect:
1.TurneverythingOFF.
2.First,removepowercordsfromoutlets.
3.Removesignalcablesfromconnectors.
4.Removeallcablesfromdevices.
Thepowercordmustbedisconnectedfromthewalloutletorreceptaclebeforeinstallingallother
electricalcablesconnectedtothecomputer.
Thepowercordmaybereconnectedtothewalloutletorreceptacleonlyafterallotherelectrical
cableshavebeenconnectedtothecomputer.
Lasercompliancestatement
CAUTION:
Whenlaserproducts(suchasCD-ROMs,DVDdrives,beropticdevices,ortransmitters)are
installed,notethefollowing:
•Donotremovethecovers.Removingthecoversofthelaserproductcouldresultinexposureto
hazardouslaserradiation.Therearenoserviceablepartsinsidethedevice.
•Useofcontrolsoradjustmentsorperformanceofproceduresotherthanthosespeciedherein
mightresultinhazardousradiationexposure.
DANGER
SomelaserproductscontainanembeddedClass3AorClass3Blaserdiode.Notethefollowing:
Laserradiationwhenopen.Donotstareintothebeam,donotviewdirectlywithoptical
instruments,andavoiddirectexposuretothebeam.
Liquidcrystaldisplay(LCD)notice
CAUTION:
TheLCDismadeofglass,androughhandlingordroppingthecomputercancausetheLCDtobreak.
IftheLCDbreaksandtheinternaluidgetsintoyoureyesoronyourhands,immediatelywashthe
affectedareaswithwaterforatleast15minutes;ifanysymptomsarepresentafterwashing,get
medicalcare.
Note:Forproductswithmercury-containinguorescentlamps(forexample,non-LED),theuorescentlamp
intheliquidcrystaldisplay(LCD)containsmercury;disposeofaccordingtolocal,state,orfederallaws.
Usingheadphonesorearphones
CAUTION:
Excessivesoundpressurefromearphonesandheadphonescancausehearingloss.Adjustmentof
©CopyrightLenovo2012xiii

theequalizertomaximumincreasestheearphoneandheadphoneoutputvoltageandthesound
pressurelevel.Therefore,toprotectyourhearing,adjusttheequalizertoanappropriatelevel.
Excessiveuseofheadphonesorearphonesforalongperiodoftimeathighvolumecanbedangerousifthe
outputoftheheadphoneorearphoneconnectorsdonotcomplywithspecicationsofEN50332-2.The
headphoneoutputconnectorofyourcomputercomplieswithEN50332-2Subclause7.Thisspecication
limitsthecomputer’smaximumwidebandtrueRMSoutputvoltageto150mV.Tohelpprotectagainst
hearingloss,ensurethattheheadphonesorearphonesyouusealsocomplywithEN50332-2(Clause7
limits)forawidebandcharacteristicvoltageof75mV.UsingheadphonesthatdonotcomplywithEN
50332-2canbedangerousduetoexcessivesoundpressurelevels.
IfyourLenovocomputercamewithheadphonesorearphonesinthepackage,asaset,thecombinationof
theheadphonesorearphonesandthecomputeralreadycomplieswiththespecicationsofEN50332-1.
Ifdifferentheadphonesorearphonesareused,ensurethattheycomplywithEN50332-1(Clause6.5
LimitationValues).UsingheadphonesthatdonotcomplywithEN50332-1canbedangerousdueto
excessivesoundpressurelevels.
Additionalsafetyinformation
DANGER
Plasticbagscanbedangerous.Keepplasticbagsawayfrombabiesandchildrentoavoiddanger
ofsuffocation.
NoticeforusersintheU.S.A.
Manypersonalcomputerproductsandaccessoriescontaincords,cablesorwires,suchaspowercordsor
cordstoconnecttheaccessorytoapersonalcomputer.Ifthisproducthassuchacord,cableorwire,then
thefollowingwarningapplies:
WARNING:Handlingthecordonthisproductorcordsassociatedwithaccessoriessoldwiththisproduct
willexposeyoutolead,achemicalknowntotheStateofCaliforniatocausecancer,andbirthdefectsor
otherreproductiveharm.Washhandsafterhandling.
Savetheseinstructions.
xivUserGuide
Chapter1.Productoverview
Thischapterprovidesinformationaboutthelocationsofconnectors,locationsofimportantproductlabels,
computerfeatures,specications,operatingenvironment,andpreinstalledprograms.
•“Locatingcomputercontrols,connectors,andindicators”onpage1
•“Locatingimportantproductinformation”onpage10
•“Features”onpage12
•“Specications”onpage14
•“Operatingenvironment”onpage14
•“Lenovoprograms”onpage15
Locatingcomputercontrols,connectors,andindicators
Thissectionintroducesthecomputerhardwarefeaturestogiveyouthebasicinformationyouwillneed
tostartusingthecomputer.
Frontview
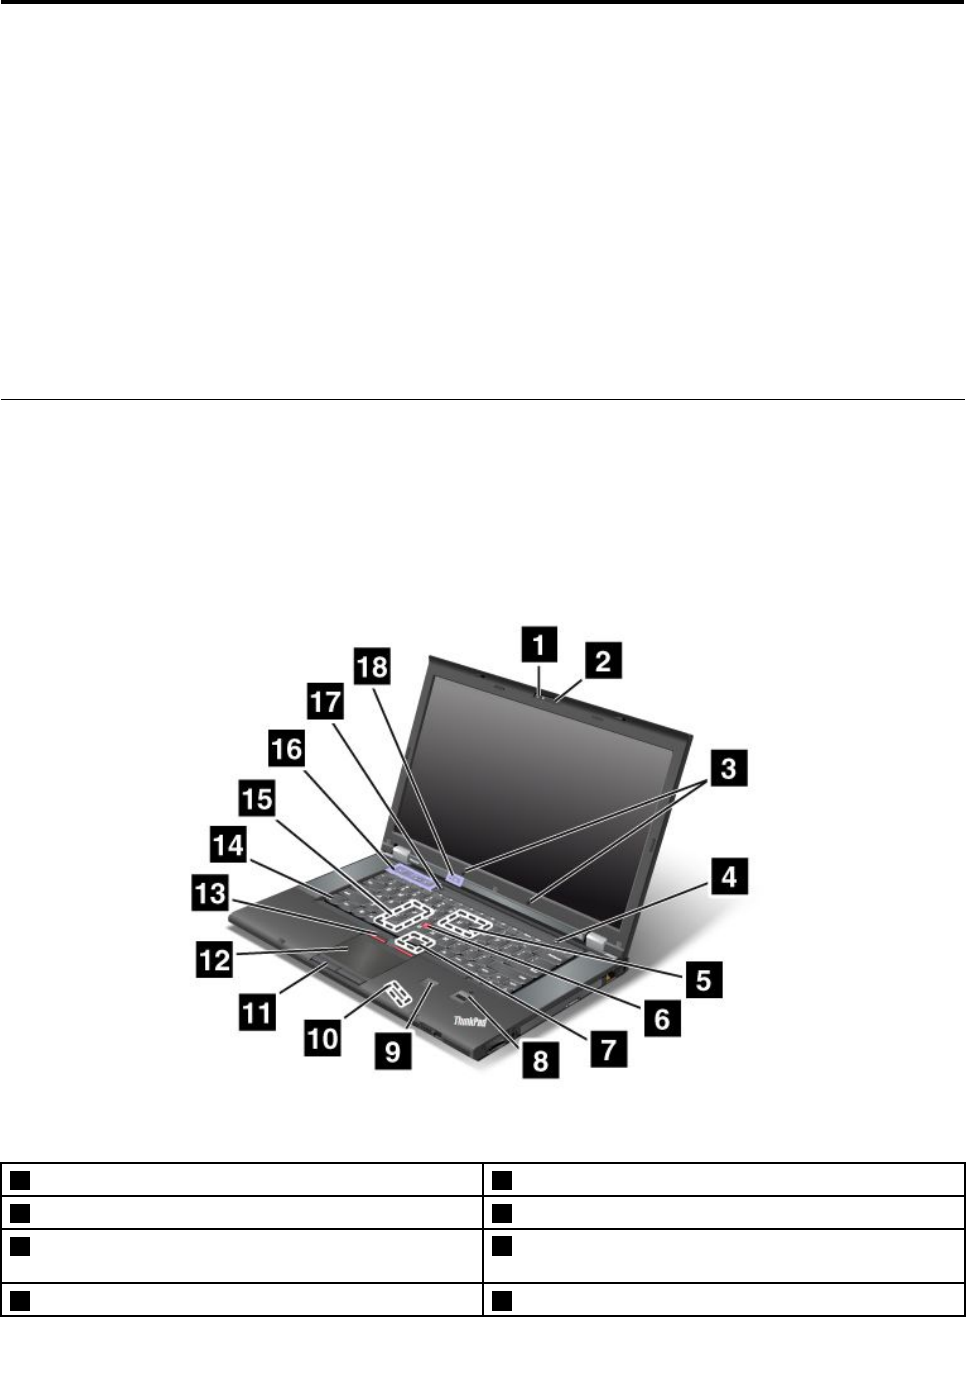
Figure1.ThinkPadT530,T530i,andW530frontview
1Integratedcamera(onsomemodels)2ThinkLight®light
3Built-inmicrophones4Powerbutton
5PCIExpressMiniCardslotforwirelessWANcardor
mSATAsolid-statedrive
6TrackPoint®pointingstick
7PCIExpressMiniCardslotforwirelessLANcard8Fingerprintreader(onsomemodels)
©CopyrightLenovo20121

9Colorsensor(onsomemodels)10Bluetoothcard(onsomemodels)
11Touchpadbuttons12Touchpad
13TrackPointbuttons14Fnkey
15Memory-upgradeslot16Volumecontrolbuttons
17Blackbutton18Statusindicators
1Integratedcamera(onsomemodels)
Somemodelshaveanintegratedcamera.Usethecameratotakepicturesorholdavideoconference.For
moreinformation,see“Usingtheintegratedcamera”onpage43.
2ThinkLightlight
TheThinkLightlightenablesyoutouseyourcomputerwhenthelightingconditionisnotideal.Toturnonthe
ThinkLightlight,presstheFnkeyandthespacekeytogether.Toturnitoff,pressthecombinationagain.
CAUTION:
Avoidusingyourcomputerindarkconditionsforprolongedperiods.Itisbadforyoureyes.
3Built-inmicrophones
Thebuilt-inmicrophonescapturesoundandvoicewhenusedwithaprogramcapableofhandlingaudio.
4Powerbutton
Usethepowerbuttontoturnonthecomputer.
Toturnoffthecomputer,usetheStartmenushutdownoptionontheWindows®7operatingsystem.For
theWindows8operatingsystem,movethecursortothetop-rightorbottom-rightcornerofthescreento
displaythecharms.ThenclickSettings➙Power➙Shutdown.
Ifyourcomputerstopsrespondingandyoucannotturnitoff,pressandholdthepowerbuttonforfour
secondsormore.Ifthecomputerstillisnotresponding,removetheacpoweradapterandthebattery
toresetthecomputer.
Youalsocanprogramthepowerbuttonsothatbypressingthepowerbuttonyoucanshutdownthe
computerorputitintosleeporhibernationmode.Toachievethis,youneedtochangeyourpowerplan
settings.Toaccesspowerplansettings,dothefollowing:
•ForWindows7:StartthePowerManagerprogramandthenclickthePowerPlantab.Forinstructionson
howtostartthePowerManagerprogram,see“AccessingLenovoprogramsontheWindows7operating
system”onpage15.
•ForWindows8:ClickthebatterystatusiconfromtheWindowsnoticationareaandclickMorepower
options.ThenclickChoosewhatthepowerbuttonsdo.
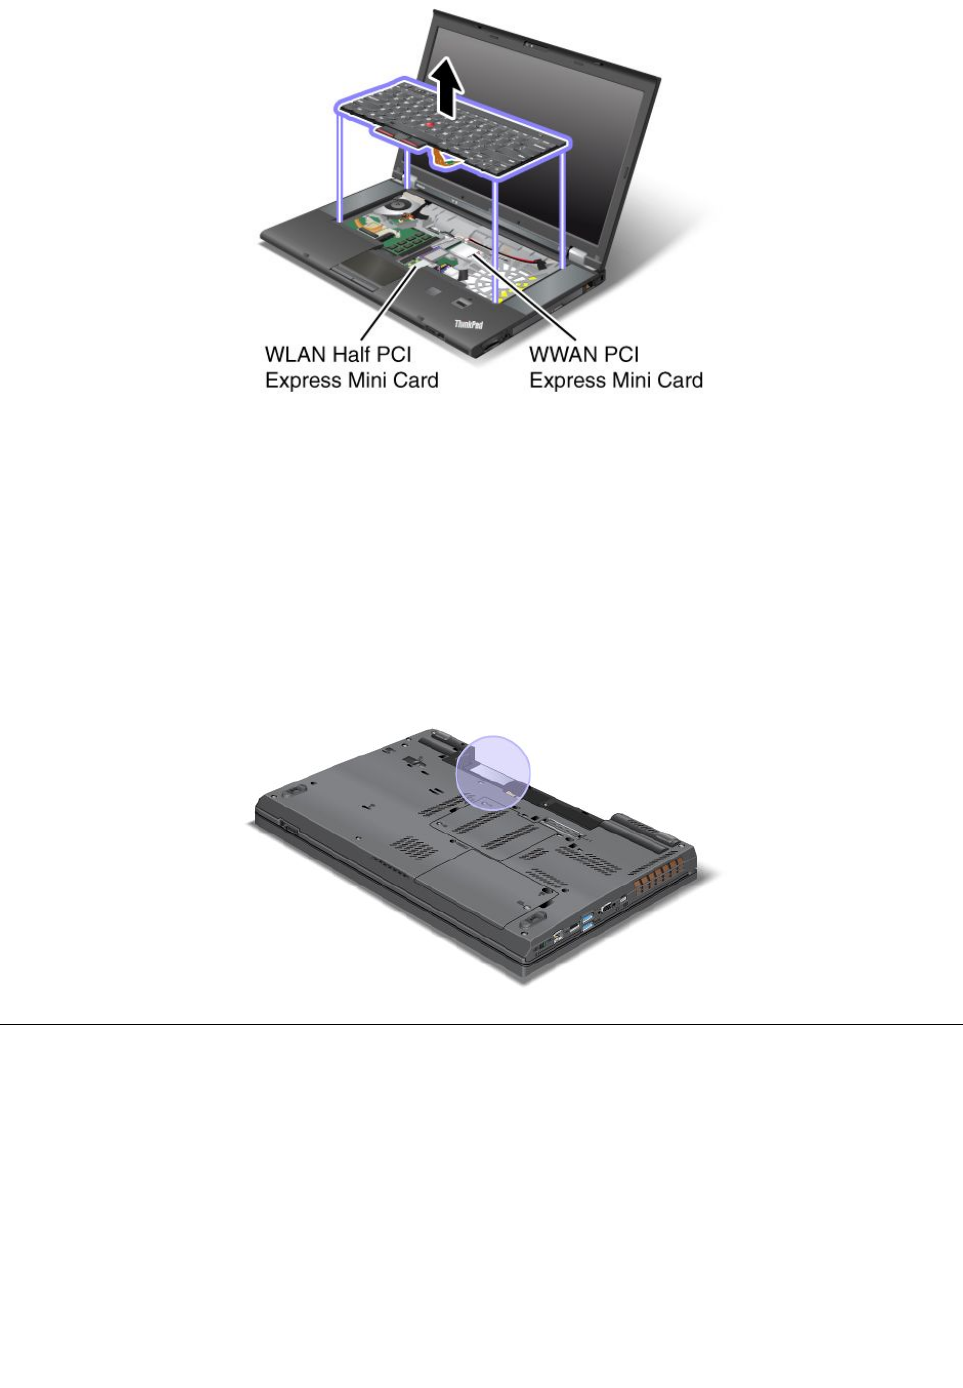
5PCIExpressMiniCardslotforwirelessWANcardormSATAsolid-statedrive
Yourcomputermighthaveawirelesswideareanetwork(WAN)cardinstalledinthePCIExpressMini
CardslotforwirelessWANconnections.
Forsomemodels,anmSATAsolid-statedrivemightbeinstalledinsteadofthewirelessWANcard.
UltraNav®pointingdevice
6TrackPointpointingstick
13TrackPointbuttons
2UserGuide

12Touchpad
11Touchpadbuttons
ThekeyboardcontainstheLenovouniqueUltraNavpointingdevice.Pointing,selecting,anddraggingare
allpartofasingleprocessthatyoucanperformwithoutmovingyourngersfromatypingposition.For
moreinformation,see“UsingtheUltraNavpointingdevice”onpage26.
7PCIExpressMiniCardslotforwirelessLANcard
Yourcomputermightincludeawirelesslocalareanetwork(LAN)cardinthePCIExpressMiniCardslotfor
youtoestablishwirelessLANconnections.
8Fingerprintreader(onsomemodels)
Somemodelshaveangerprintreader.Thengerprintauthenticationtechnologyenablesyoutouseyour
ngerprinttostartthecomputer,entertheThinkPadSetupprogram,orentertheWindowsoperatingsystem.
Fordetails,see“Usingthengerprintreader”onpage58.
9Colorsensor(onsomemodels)
Somemodelsareequippedwithacolorsensor.Thecolorsensorallowsyoutomeasureandadjustthecolor
accuracyofyourdisplays.Formoreinformation,see“Usingthecolorsensor”onpage41.
10Bluetoothcard(onsomemodels)
IfyourcomputerisequippedwithaBluetoothcard,usetheBluetoothfeaturetoconnectperipheraldevicesto
yourcomputerfordatatransferorotheroperation.Formoreinformation,see“UsingBluetooth”onpage35.
14Fnkey
UsetheFnkeytotakeadvantageofThinkPad®functionkeys,suchasturningontheThinkLightlight,
lockingthecomputer,managingthewirelessconnections,andsoon.Formoreinformation,see“Function
keycombinations”onpage23.
15Memory-upgradeslot
Youcanincreasetheamountofmemoryinyourcomputerbyinstallingamemorymoduleinthe
memory-upgradeslot.MemorymodulesareavailableasoptionsfromLenovo.Formoreinformation,see
“Replacingandinstallingamemorymodule”onpage82.
16Volumecontrolbuttons
Thevolumecontrolbuttonsenableyoutoquicklyadjustthesoundvolume,mutethespeakers,ormutethe
microphonesofyourcomputer.Formoreinformation,see“Volumeandmutebuttons”onpage24.
17Blackbutton
Whentheoperatingsystemisworkingnormally,pressingtheblackbuttonlaunchestheSimpleTapprogram
ontheWindows7operatingsystemortheLenovoPCDeviceExperienceprogramontheWindows8
operatingsystem.
OntheWindows7operatingsystem,youalsocanusetheblackbuttontointerruptthestartupsequence
ofyourcomputertostarttheRescueandRecovery®workspace.ToaccesstheRescueandRecovery
workspace,turnonyourcomputerandpresstheblackbuttonwhentheThinkPadlogoisdisplayedon
thescreen.FormoreinformationabouttheRescueandRecoveryWorkspace,see“UsingtheRescue
andRecoveryworkspace”onpage65.
18Statusindicators
Yourcomputerhasseveralstatusindicators.Forthedetailedinformationaboutthelocationandmeaningof
eachindicator,see“Statusindicators”onpage8.
Chapter1.Productoverview3
Right-sideview
Figure2.ThinkPadT530,T530i,andW530right-sideview
1Securitykeyhole2Ethernetconnector
3SerialUltrabay™Enhancedbay4Comboaudiojack
5Mediacardreaderslot6ExpressCardslot
1Securitykeyhole
Purchaseasecuritycablelockthattsthiskeyholetolockyourcomputertoastationaryobjecttoprotect
yourcomputerfromtheft.
2Ethernetconnector
ConnectyourcomputertoaLANwiththeEthernetconnector.
DANGER
Toavoidtheriskofelectricalshock,donotconnectthetelephonecabletotheEthernetconnector.
YoucanonlyconnectanEthernetcabletothisconnector.
Twoindicators,totheupperrightandleftoftheconnector,showthestatusofthenetworkconnection.
WhenyourcomputerconnectstoaLANandasessionwiththenetworkisavailable,theupperleftindicator
issteadygreen.Whiledataisbeingtransmitted,theupperrightindicatorblinksyellow.
Note:Ifyouattachyourcomputertoaportreplicatorordockingstation,usetheEthernetconnectoronthe
portreplicatorordockingstationtoconnecttoaLAN,nottheoneonthecomputer.
3SerialUltrabayEnhancedbay
YourcomputerhasabayforSerialUltrabayEnhanceddevices.Somemodelshaveanopticaldiskdrive
installedinthebay.Forcertainmodels,asecondaryharddiskdriveisinstalled.
FormoreinformationabouttheSerialUltrabayEnhancedfeature,see“UsingtheSerialUltrabayEnhanced
feature”onpage95.
4UserGuide
4Comboaudiojack
Tolistentothesoundfromyourcomputer,connectaheadphoneoraheadsetthathasa3.5mm4-pole
plugtothecomboaudiojack.
Notes:
•Ifyouareusingaheadsetwithafunctionswitch,forexample,aheadsetforaniPhone®mobiledigital
device,donotpressthisswitchwhileusingtheheadset.Ifyoupressit,theheadsetmicrophonewillbe
disabled,andtheintegratedmicrophonesonthecomputerwillbeenabledinstead.
•Thecomboaudiojackdoesnotsupportaconventionalmicrophone.Formoreinformation,see“Using
audiofeatures”onpage42.
5Mediacardreaderslot
Dependingonthemodel,yourcomputermighthaveamediacardreaderslot.Formoreinformationabout
thesupportedcards,see“UsinganExpressCard,aashmediacard,orasmartcard”onpage43.
6ExpressCardslot
YourcomputerhasanExpressCardslotfora34mm-wideExpressCard.See“UsinganExpressCard,
aashmediacard,orasmartcard”onpage43.
Left-sideview
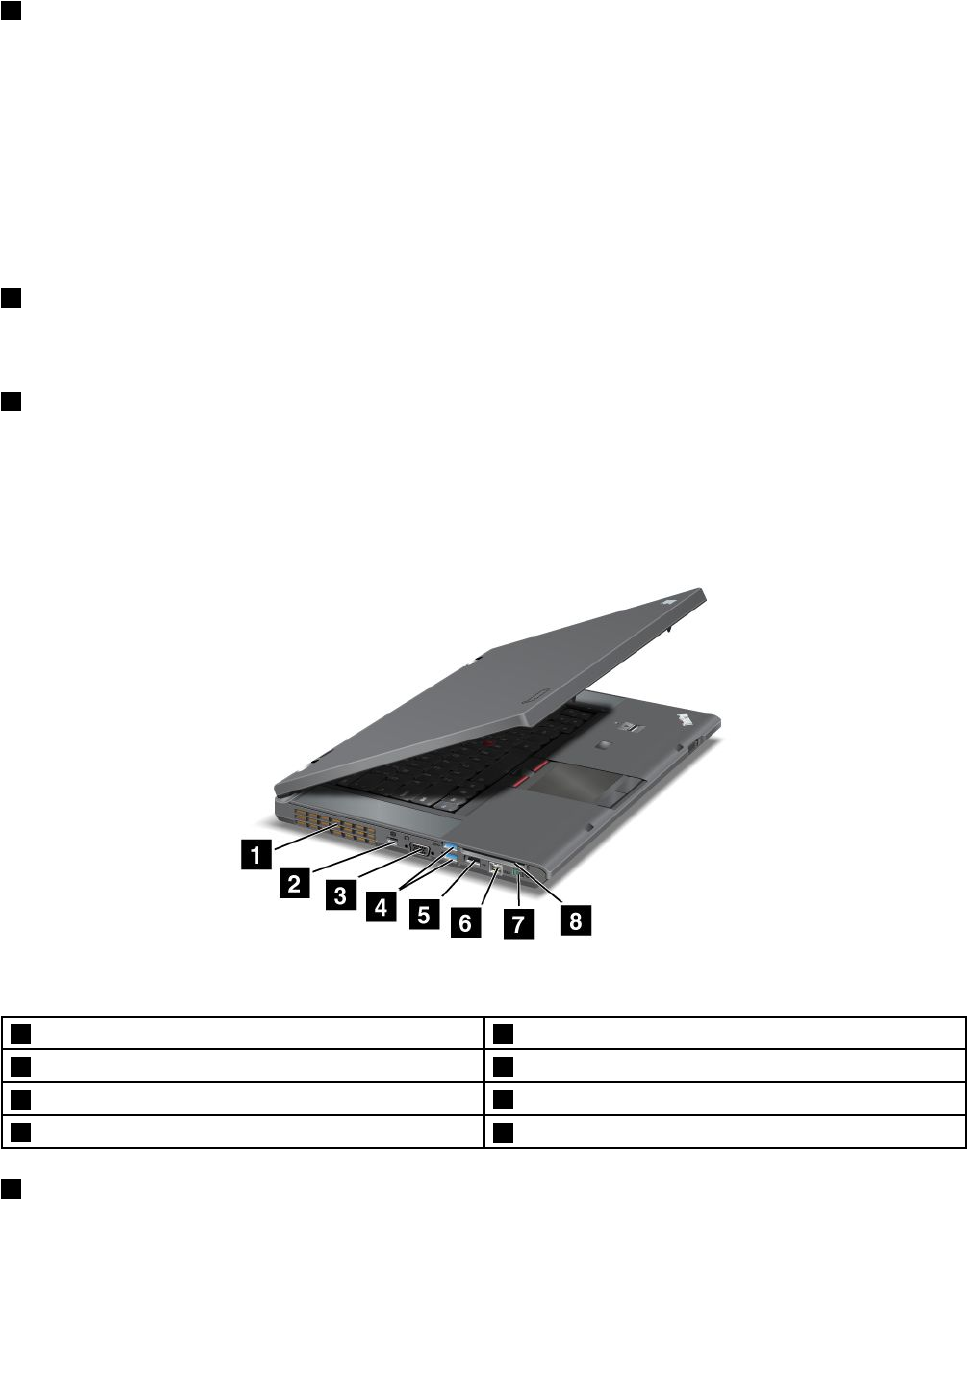
Figure3.ThinkPadT530,T530i,andW530left-sideview
1Fanlouvers2MiniDisplayPortconnector
3Videographicsarray(VGA)connector4USB3.0connectors
5USB2.0connector6IEEE1394connector
7Wirelessradioswitch8Smartcardslot(onsomemodels)
1Fanlouvers
Theinternalfanandlouversenableairtocirculateinthecomputerandcoolthecentralprocessor.
Note:Toavoidimpedingairow,donotplaceanyobstacleinfrontofthefan.
Chapter1.Productoverview5

2MiniDisplayPortconnector
UsetheminiDisplayPortconnectortoconnectyourcomputertoacompatibleprojector,externalmonitor,or
high-denitiontelevision.
3Videographicsarray(VGA)connector
AttachaVGAcompatiblemonitororprojectortoyourcomputertodisplaythecomputeroutput.
Note:Ifyouattachyourcomputertoaportreplicatorordockingstation,usetheVGAconnectorontheport
replicatorordockingstation,nottheoneonthecomputer.
Fordetails,see“Attachinganexternalmonitor”onpage38.
4USB3.0connectors
TheUniversalSerialBus(USB)3.0connectorsareusedforconnectingdevicescompatiblewithaUSB
interface,suchasaUSBprinteroradigitalcamera.
Note:WhenyouattachaUSBcabletotheconnector,makesurethattheUSBmarkisfacingupward.
Otherwisetheconnectormightbedamaged.
5USB2.0connector
TheUSB2.0connectorisusedforconnectingdevicescompatiblewithaUSBinterface,suchasaUSB
printeroradigitalcamera.
Note:WhenyouattachaUSBcabletotheconnector,makesurethattheUSBmarkisfacingupward.
Otherwisetheconnectormightbedamaged.
6IEEE1394connector
SomemodelshaveanIEEE1394connector,whichisusedforconnectingdevicesthatarecompatiblewith
theIEEE1394interface,suchasdigitalvideocamerasandexternalharddiskdrives.
7Wirelessradioswitch
Usethisswitchtoquicklyturnonorturnoffallwirelessconnections.
8Smartcardslot(onsomemodels)
Somemodelshaveasmartcardslot.See“UsinganExpressCard,aashmediacard,orasmartcard”
onpage43.
6UserGuide

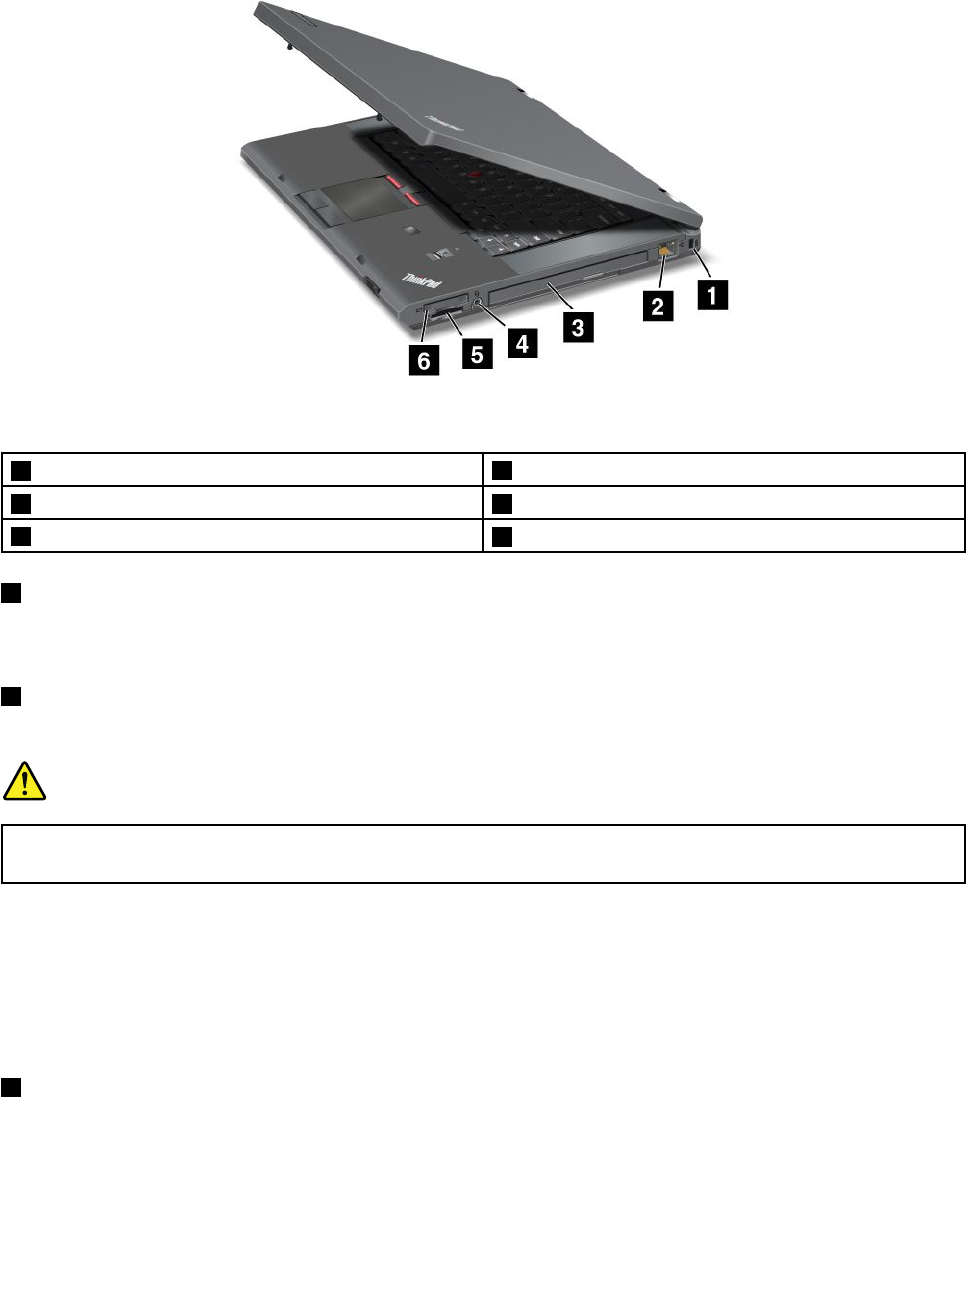
Bottomview
Figure4.ThinkPadT530,T530i,andW530bottomview
1SIMcardslot2Battery
3Dockingstationconnector4Memory-upgradeslot
5Harddiskdriveorsolid-statedrive
1SIMcardslot
IfyourcomputerhasawirelessWANfeature,itmightrequireaSubscriberIdenticationModule(SIM)card
toestablishwirelessWANconnections.Dependingonthecountryofdelivery,theSIMcardmightalreadybe
installedintheSIMcardslot.
2Battery
Useyourcomputerwithbatterypowerwheneveracpowerisunavailable.
3Dockingstationconnector
Connectyourcomputertoasupportedportreplicatorordockingstationthroughthisconnectortoextend
thecomputercapabilitieswhenyouareinyourofceorathome.Formoreinformationaboutthesupported
dockingstations,see“ThinkPadportreplicatorsanddockingstations”onpage102.
4Memory-upgradeslot
Youcanincreasetheamountofmemoryinyourcomputerbyinstallingamemorymoduleinthe
memory-upgradeslot.MemorymodulesareavailableasoptionsfromLenovo.
Formoreinformation,see“Replacingandinstallingamemorymodule”onpage82.
5Harddiskdriveorsolid-statedrive
Dependingonthemodel,yourcomputermighthavealarge-capacity,customer-upgradableharddisk
drivethatcanmeetavarietyofstoragedemands.
Ifyouwish,youcanpurchaseanotherharddiskdriveandinstallitintheSerialUltrabayEnhancedbay.
Fordetails,see“Installingasecondaryharddiskdrive”onpage96.
Somemodelsareequippedwithasolid-statedrivefordatastorage,makingyourcomputerlighter,smaller,
andfaster.
Chapter1.Productoverview7
Note:Thehiddenservicepartitionisthereasonwhythereislessfreespacethanexpectedonyourhard
diskdriveorsolid-statedrive.Thisreductionismorenoticeableonthesolid-statedrivebecauseofits
smallercapacity.
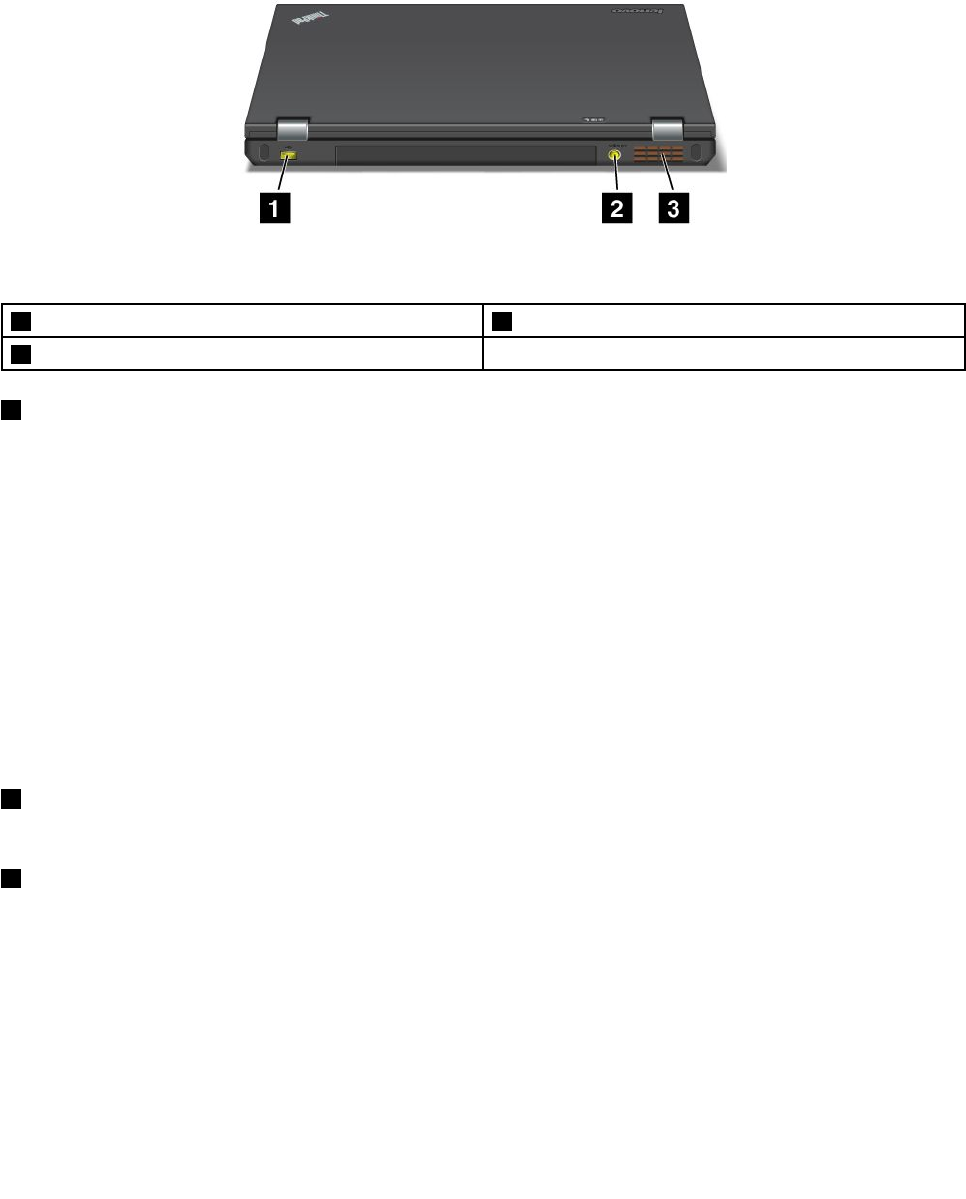
Rearview
Figure5.ThinkPadT530,T530i,andW530rearview
1AlwaysOnUSBconnector2Powerjack
3Fanlouvers
1AlwaysOnUSBconnector
Bydefault,theAlwaysOnUSBconnectorenablesyoutochargesomemobiledigitaldevicesand
smartphoneswhenyourcomputerisinsleeporhibernationmode.
Ifyouwanttochargethesedeviceswhenyourcomputeristurnedoff,dothefollowing:
1.Connectthecomputertoanacpowersupply.
2.GotoThinkPadSetupandenableAlwaysOnUSBChargeinoffmode.Formoreinformation,see
“Congmenu”onpage115.
3.Dooneofthefollowing:
•ForWindows7:StartthePowerManagerprogramandclicktheGlobalPowerSettingstab.Then
selecttheEnableAlwaysOnUSBcheckbox.
•ForWindows8:PresstheWindowskeytogototheStartscreen.ClickLenovoSettings➙Power.
ThenselecttheEnablewhenthecomputerisoffcheckbox.
2Powerjack
Connecttheacpoweradaptertothepowerjacktoprovideacpowertothecomputerandchargethebattery.
3Fanlouvers
Theinternalfanandlouversenableairtocirculateinthecomputerandcoolthecentralprocessor.
Note:Toavoidimpedingairow,donotplaceanyobstacleinfrontofthefan.
Statusindicators
Yourcomputerhassystem-statusindicatorsandpower-statusindicators.Thestatusindicatorsshowthe
currentstatusofyourcomputer.
8UserGuide
System-statusindicators
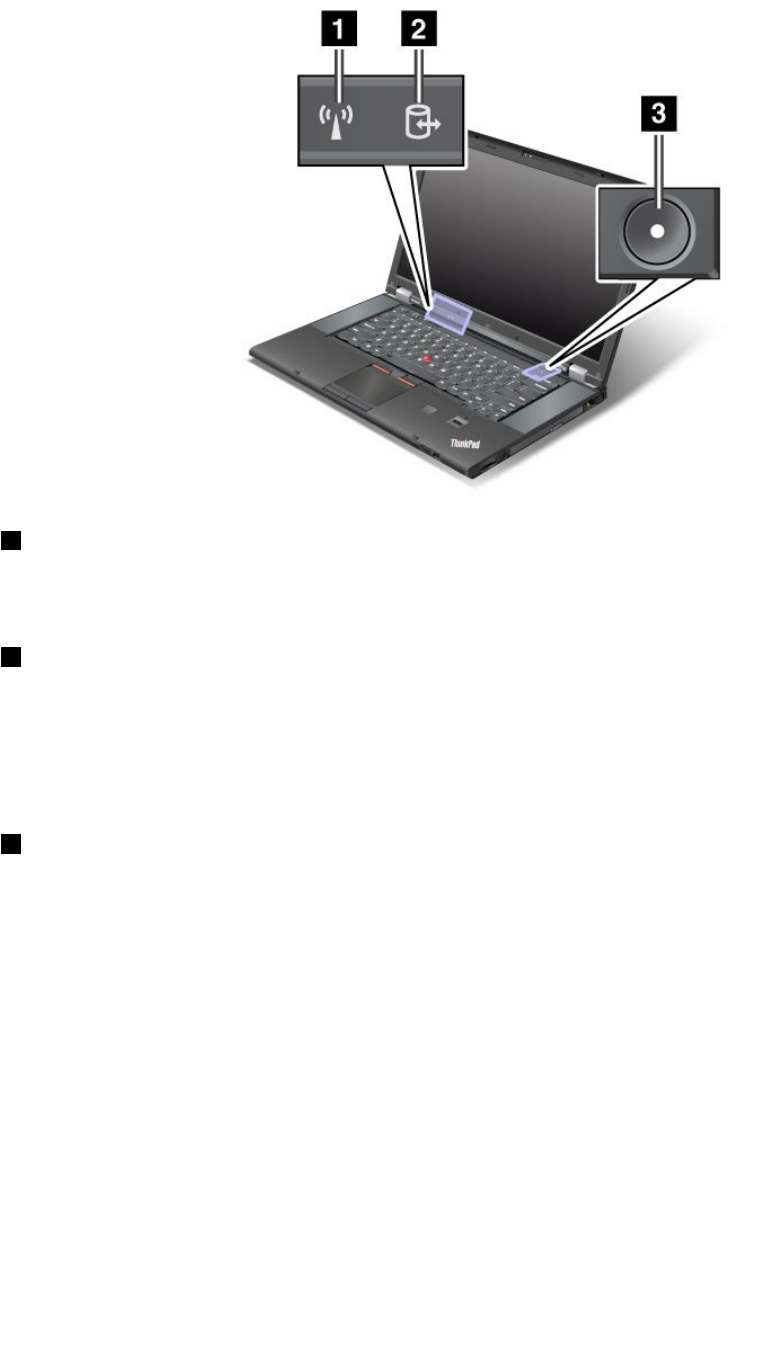
1WirelessLAN/WAN/Bluetoothstatusindicator
•Green:ThewirelessLAN,WAN,orBluetoothfeatureison.
•Off:Wirelessnetworkdevicesaredisabledorthewirelessradioisturnedoff.
2Deviceaccessstatusindicator
Theharddiskdrive,solid-statedrive,mSATAsolid-statedrive,orthesecondharddiskdriveintheSerial
UltrabayEnhancedbayisreadingorwritingdata.
Note:Whenthisindicatorisblinking,donotputthecomputerintosleepmode,removethedrive,orturn
offthecomputer.
3Poweronstatusindicator
Thepowerbuttonstayslitwheneverthecomputerison,blinkswhenthecomputerisinsleepmode,and
isoffwhenthecomputeristurnedoff.
Powerstatusindicators
Thecomputerhaspowerstatusindicatorsthatshowthepowermode(sleeporhibernation),acpower
status,andbatterystatus.Thefollowingshowsthelocationandthemeaningoftheindicators.
Chapter1.Productoverview9
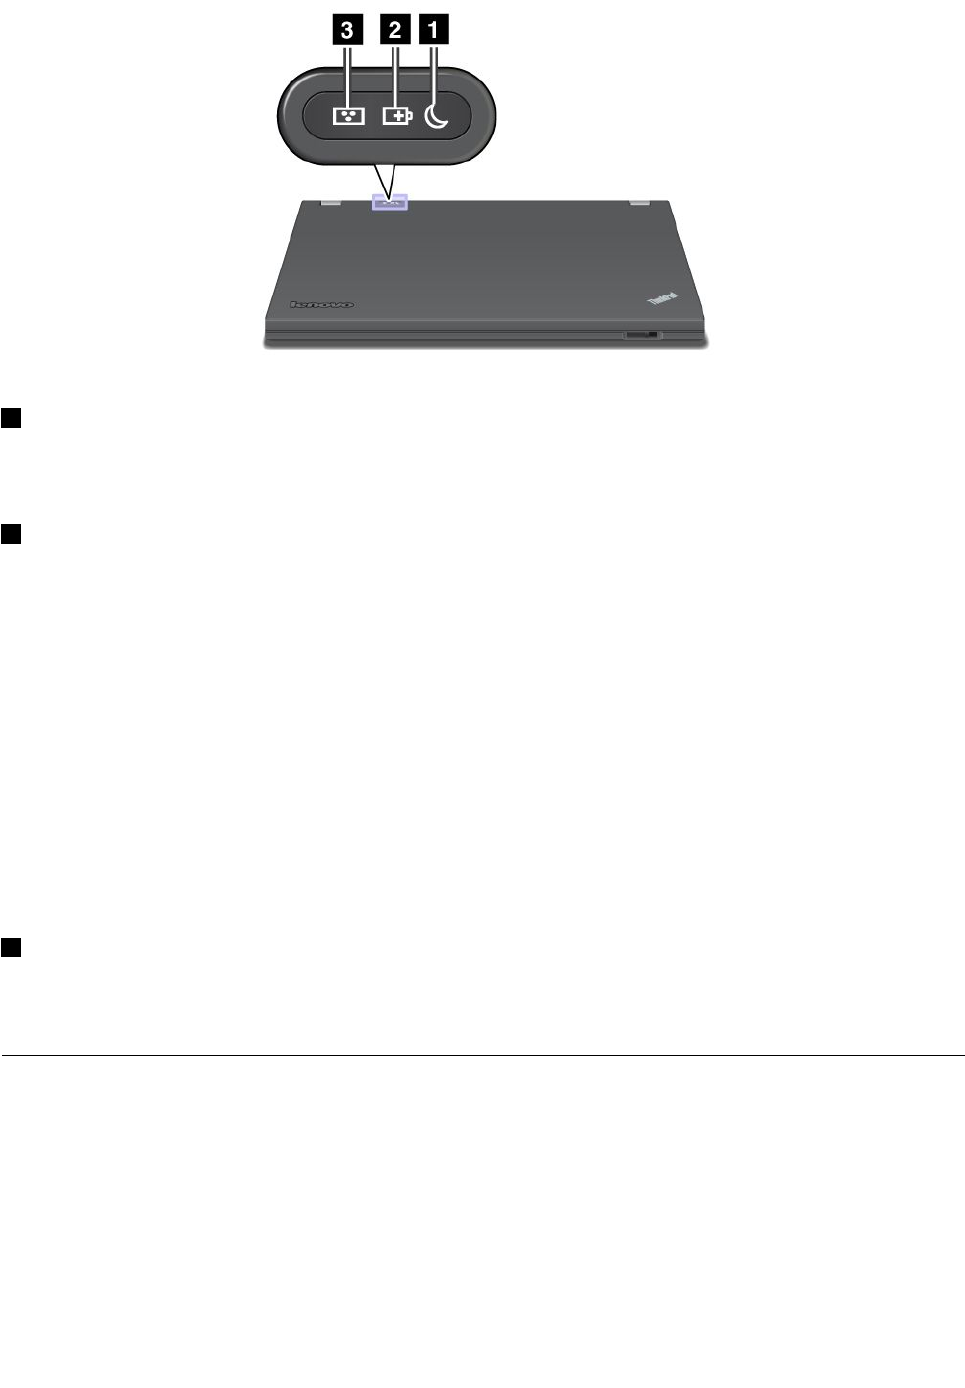
1Sleepstatusindicator
•Green:Thecomputerisinsleepmode.
•Blinkinggreen:Thecomputerisenteringsleeporhibernationmode,orisresumingnormaloperation.
2Batterystatusindicator
•Green:Thebatterychargelevelis20%ormore.
•Orange:Thebatterychargelevelisbetween5%and20%.
•Fastblinkingorange:Thebatterychargelevelis5%orless.
•Slowblinkingorange:Thebatteryisbeingcharged.Whenthechargelevelreaches20%,theblinking
colorchangestogreen.
•Slowblinkinggreen:Thebatterychargelevelisbetween20%and80%,andchargingiscontinuing.
Whenthebatterychargelevelreaches80%,thebatterystatusindicatorstopsblinking,butthecharging
mightcontinueuntilthebatteryis100%charged.
•Quickblinkingorange:Anerrorhasoccurredwiththebattery.
•Off:Thebatteryisdetachedorthecomputerispoweredoff.
Note:Ifthecomputerisoperatingonbatterypower,thebatterystatusindicatordoesnotworkwhilethe
computeristurnedofforisinsleepmodeorhibernationmode.
3Colorsensorstatusindicator(forsomemodels)
•Green:Displaycolorcalibrationhascompleted.Whenthecomputerlidisopened,theindicatorturnsoff.
•Blinkinggreen:Displaycolorsarebeingcalibrated.
Locatingimportantproductinformation
Thissectionprovidesinformationtohelpyoulocateyourmachinetypeandmodellabel,FCCIDandIC
Certicationlabel,andtheMicrosoft®CerticateofAuthenticity(COA)label.
10UserGuide
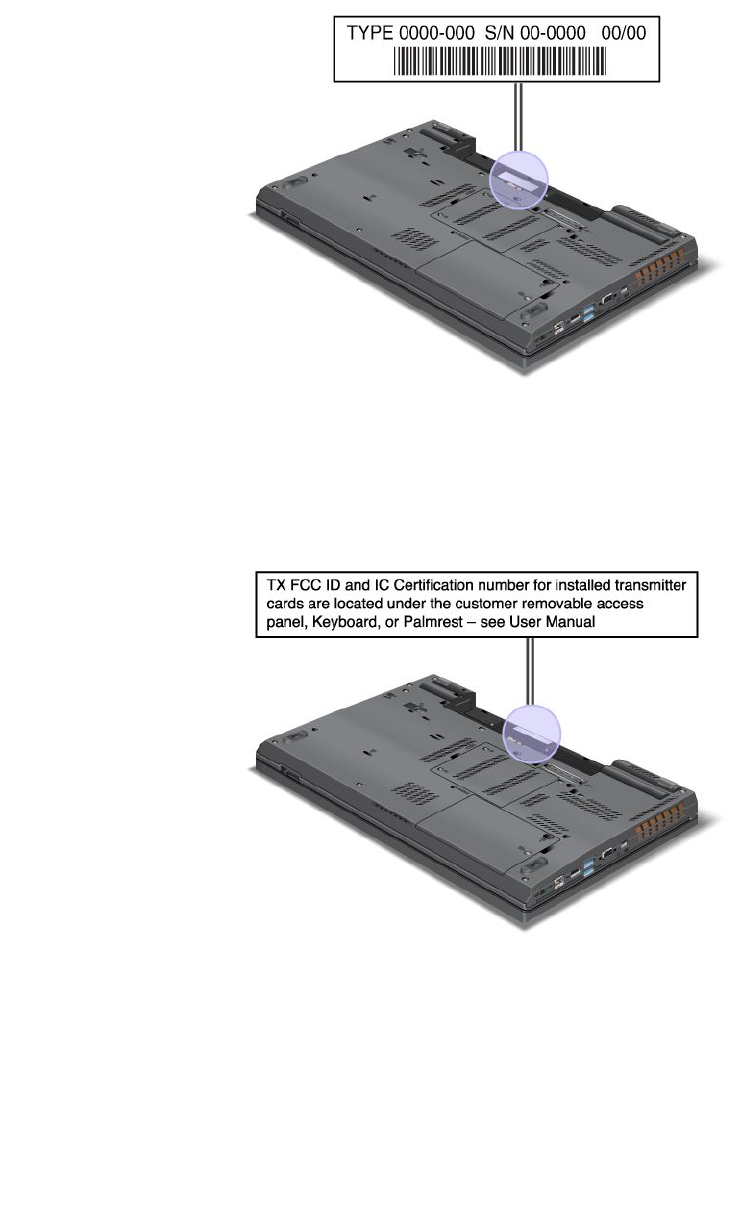
Machinetypeandmodellabel
Themachinetypeandmodellabelidentiesyourcomputer.IfyoucontactLenovoforhelp,themachine
typeandmodelnumberwillhelpsupporttechniciansidentifyyourcomputerandprovidethehighestlevel
ofservice.
Youcanndthemachinetypeandmodelofyourcomputerinthelabelasshownbelow:
FCCIDandICCerticationnumberlabel
ThereisnoFCCIDorICCerticationnumberforthePCIExpressMiniCardshownontheenclosureof
yourcomputer.TheFCCIDandICCerticationnumberlabelisafxedonthecardinstalledinthePCI
ExpressMiniCardslotofyourcomputer.
Chapter1.Productoverview11
CerticateofAuthenticitylabel
TheMicrosoft®CerticateofAuthenticitylabelforthepreinstalledoperatingsystemisattached.Printedon
thislabelaretheproductIDandtheproductkeyinformationforyourcomputer.Recordthisinformation
andkeepitinasafeplace.Youmightneedthesenumberstostartyourcomputerorreinstalltheoperating
system.
Note:TheCerticateofAuthenticitylabelappliesonlytocomputerspreinstalledwiththeWindows7
operatingsystem.
TheWindowsCerticateofAuthenticityofyourcomputerisshownasbelow:
Features
Processor
•Toviewtheprocessorinformationofyourcomputer,dothefollowing:
–ForWindows7:ClickStart,right-clickComputer.ThenclickProperties.
–ForWindows8:Movethecursortothetop-rightorbottom-rightcornerofthescreentodisplaythe
charms.ThenclickSettings➙PCinfo.
Memory
•Doubledatarate3(DDR3)synchronousdynamicrandomaccessmemory(SDRAM)
12UserGuide

–ThinkPadT530andT530i:2slots
–ThinkPadW530:4slots
Storagedevice
Dependingonthemodel:
•2.5-inch(7mmheightor9.5mmheight)harddiskdrive
•2.5-inch(7mmheight)solid-statedrive
Systemperformancefeature
•mSATAsolid-statedrive
LCDunit
•ThecolordisplayusestheTFTtechnology.
•Displaysize:15.6inches(396mm)
•Displayresolution:1920-by-1080,1600-by-900,or1366-by-768(dependingonthemodel)
•ThinkLightlight
•Integratedcamera(onsomemodels)
•Colorsensor(onsomemodels)
•Built-inmicrophones(onsomemodels)
Keyboard
•6-rowstandardkeyboardor6-rowbacklitkeyboard(dependingonthemodel)
•UltraNavpointingdevice
•Fnkeyfunction
•Blackbutton
•Volumecontrolbuttons
•Speakermutebutton
•Microphonemutebutton
Interface
•Externalmonitorconnectors(VGAandMiniDisplayPort)
•Comboaudiojack
•TwoUSB3.0connectors
•OneUSB2.0connector
•OneAlwaysOnUSBconnector
•IEEE1394connector(onsomemodels)
•RJ45Ethernetconnector
•SerialUltrabayEnhancedbay
•ExpressCard(34mm)slot
•Mediacardreaderslot
•Smartcardreaderslot(onsomemodels)
•Dockingstationconnector
Opticaldrive
Chapter1.Productoverview13

•MultiBurnerdriveorDVD-ROMdrive(dependingonthemodel)
Wirelessfeatures
•IntegratedwirelessLAN
•IntegratedBluetooth(onsomemodels)
•IntegratedwirelessWAN(onsomemodels)
Security
•Fingerprintreader(onsomemodels)
Specications
Thissectionliststhephysicalspecicationsforyourcomputer.
Size
•Width:372.8mm(14.68inches)
•Depth:245.1mm(9.65inches)
•Height:31.8to35.6mm(1.25inchesto1.40inches)
Heatoutput
•65W(222Btu/hr)maximum,90W(307Btu/hr)maximum,135W(460Btu/hr)maximum,or170W
(580Btu/hr)maximum(dependingonthemodel)
Powersource(acpoweradapter)
•Sine-waveinputat50to60Hz
•Inputratingoftheacpoweradapter:100to240Vac,50to60Hz
Batterypack
•Lithium-ion(Li-Ion)batterypack
Batterylife
•Forthepercentageofremainingbatterypower,checkthebatterystatusiconintheWindowsnotication
area.
Operatingenvironment
Thissectionprovidesinformationaboutyourcomputeroperatingenvironment.
Environment:
•Maximumaltitudewithoutpressurization:3048m(10000ft)
•Temperature
–Ataltitudesupto2438m(8000ft)
–Operating:5.0°Cto35.0°C(41°Fto95°F)
–Storage:5.0°Cto43.0°C(41°Fto109°F)
–Ataltitudesabove2438m(8000ft)
–Maximumtemperaturewhenoperatingundertheunpressurizedcondition:31.3°C(88°F)
14UserGuide

Note:Whenyouchargethebatterypack,itstemperaturemustbeatleast10°C(50°F).
•Relativehumidity:
–Operating:8%to80%
–Storage:5%to95%
Ifpossible,placeyourcomputerinawell-ventilatedanddryareawithoutdirectexposuretosunshine.
Keepelectricalappliancessuchasanelectricfan,radio,airconditioner,andmicrowaveovenawayfrom
yourcomputerbecausethestrongmagneticeldsgeneratedbytheseappliancescandamagethemonitor
anddataontheharddiskdrive.
Donotplaceanybeveragesontopoforbesidethecomputerorotherattacheddevices.Ifliquidisspilledon
orinthecomputeroranattacheddevice,ashortcircuitorotherdamagemightoccur.
Donoteatorsmokeoveryourkeyboard.Particlesthatfallintoyourkeyboardcancausedamage.
Lenovoprograms
YourcomputercomeswithLenovoprogramstohelpyouworkmoreeasilyandsecurely.Dependingon
theWindowsoperatingsystempreinstalled,theprogramsmightvary.
TolearnmoreabouttheprogramsandothercomputingsolutionsofferedbyLenovo,goto
http://www.lenovo.com/support.
AccessingLenovoprogramsontheWindows7operatingsystem
OntheWindows7operatingsystem,youcanaccessLenovoprogramsfromeithertheLenovoThinkVantage
ToolsprogramorfromControlPanel.
AccessingLenovoprogramsfromtheLenovoThinkVantageToolsprogram
ToaccessLenovoprogramsfromtheLenovoThinkVantageToolsprogram,clickStart➙AllPrograms➙
LenovoThinkVantageTools.Thendouble-clickaprogramicontoaccesstheprogram.
Note:IfaprogramiconintheLenovoThinkVantageToolsprogramnavigationwindowisdimmed,it
indicatesthatyouneedtoinstalltheprogrammanually.Toinstalltheprogrammanually,double-clickthe
programicon.Then,followtheinstructionsonthescreen.Whentheinstallationprocesscompletes,the
programiconwillbeactivated.
Table1.ProgramsintheLenovoThinkVantageToolsprogram
ProgramIconname
AccessConnections™InternetConnection
ActiveProtectionSystem™AirbagProtection
ClientSecuritySolutionEnhancedSecurity
CommunicationsUtilityWebConferencing
FingerprintSoftwareFingerprintReader
GPSEnablerGPS
LenovoSolutionCenterSystemHealthandDiagnostics
MobileBroadbandConnect3GMobileBroadband
PasswordManagerPasswordVault
Chapter1.Productoverview15

Table1.ProgramsintheLenovoThinkVantageT oolsprogram(continued)
ProgramIconname
PowerManagerPowerControls
RecoveryMediaFactoryRecoveryDisks
RescueandRecovery®EnhancedBackupandRestore
SimpleTapSimpleTap
SystemUpdateUpdateandDrivers
Note:Dependingonyourcomputermodel,someoftheprogramsmightnotbeavailable.
AccessingLenovoprogramsfromControlPanel
ToaccessLenovoprogramsfromControlPanel,clickStart➙ControlPanel.Thendependingonthe
programyouwanttoaccess,clickthecorrespondingsectionandthenclickthecorrespondinggreentext.
Note:IfyoudonotndtheprogramyouneedinControlPanel,opentheLenovoThinkVantageTools
programnavigationwindowanddouble-clickthedimmedicontoinstalltheprogramyouneed.Then,
followtheinstructionsonthescreen.Whentheinstallationprocesscompletes,theprogramiconwillbe
activated,andyoucanndtheprograminControlPanel.
TheprogramsandthecorrespondingsectionsandgreentextsinControlPanelarelistedinthefollowing
table.
Table2.ProgramsinControlPanel
ProgramControlPanelsectionGreentextinControlPanel
AccessConnectionsNetworkandInternetLenovo-InternetConnection
ActiveProtectionSystemSystemandSecurity
HardwareandSound
Lenovo-AirbagProtection
ClientSecuritySolutionSystemandSecurityLenovo-EnhancedSecurity
CommunicationsUtilityHardwareandSoundLenovo-WebConferencing
FingerprintSoftwareSystemandSecurity
HardwareandSound
Lenovo-FingerprintReader
or
Lenovo-NotebookFingerprint
Reader
GPSEnablerNetworkandInternetLenovo-GPS
LenovoSolutionCenterSystemandSecurityLenovo-SystemHealthand
Diagnostics
MessageCenterPlusProgramsMessagesfromLenovo
MobileBroadbandConnectNetworkandInternetLenovo-3GMobileBroadband
PasswordManagerSystemandSecurity
UserAccountsandFamilySafety
Lenovo-PasswordVault
PowerManagerHardwareandSound
SystemandSecurity
Lenovo-PowerControls
RecoveryMediaSystemandSecurityLenovo-FactoryRecoveryDisks
SimpleTapProgramsLenovo-SimpleTap
16UserGuide

Table2.ProgramsinControlPanel(continued)
ProgramControlPanelsectionGreentextinControlPanel
SystemUpdateSystemandSecurityLenovo-UpdateandDrivers
RescueandRecoverySystemandSecurityLenovo-EnhancedBackupand
Restore
Note:Dependingonyourcomputermodel,someoftheprogramsmightnotbeavailable.
AccessingLenovoprogramsontheWindows8operatingsystem
IfyourcomputerispreinstalledwiththeWindows8operatingsystem,youcanaccessLenovoprogramsby
doingeitherofthefollowing:
•ClicktheLenovoQuickLaunchiconfromthetaskbar.Alistofprogramsisdisplayed.Double-clicka
Lenovoprogramtolaunchit.Ifadesiredprogramisnotinthelist,clicktheplusicon+.
•PresstheWindowskeytogototheStartscreen.ClickaLenovoprogramtolaunchit.Ifyoucannotnd
theprogramyouneed,movethecursortothetop-rightorbottom-rightcornerofthescreentodisplaythe
charms.ThenclicktheSearchcharmtosearchforthedesiredprogram.
YourcomputersupportsthefollowingLenovoprograms:
•ActiveProtectionSystem
•FingerprintSoftware
•LenovoCompanion
•LenovoMobileAccess
•LenovoQuickLaunch
•LenovoSettings
•LenovoSolutionCenter
•LenovoSupport
•LenovoThinkVantageTools
•PasswordManager
•SystemUpdate
Note:ThePasswordManagerprogramisnotpreinstalledonyourWindows8computers.Youcandownload
itfromtheLenovoSupportWebsitehttp://www.lenovo.com/support.
Foranintroductiontotheseprograms,see“AnintroductiontoLenovoprograms”onpage17.
AnintroductiontoLenovoprograms
ThistopicprovidesabriefintroductiontosomeLenovoprograms.
Note:Dependingonyourcomputermodel,someoftheprogramsmightnotbeavailable.
•AccessConnections
TheAccessConnectionsprogramisaconnectivityassistantprogramforcreatingandmanaginglocation
proles.EachlocationprolestoresallthenetworkandInternetcongurationsettingsneededfor
connectingtoanetworkinfrastructurefromaspeciclocationsuchasahomeoranofce.
Byswitchingbetweenlocationprolesasyoumoveyourcomputerfromplacetoplace,youcanquickly
andeasilyconnecttoanetworkwithnoneedtorecongureyoursettingsmanuallyandrestartthe
computereachtime.
Chapter1.Productoverview17

•ActiveProtectionSystem
TheActiveProtectionSystemprogramprotectsyourharddiskdrivewhentheshocksensorinsideyour
computerdetectsaconditionthatcoulddamagethedrive,suchassystemtilt,excessivevibration,or
shock.Theharddiskdriveislessvulnerabletodamagewhenitisnotoperating.Thisisbecausewhen
theharddiskdriveisnotoperating,thesystemstopsitfromspinning,andmightalsomovetheread
andwriteheadsofthedrivetoareasthatdonotcontaindata.Assoonastheshocksensorsenses
thattheenvironmentisstableagain(minimalchangeinsystemtilt,vibration,orshock),itturnsthe
harddiskdriveon.
•ClientSecuritySolution
TheClientSecuritySolutionprogramprotectsyourcomputerbysecuringclientdataanddeecting
securitybreachattempts.Italsocanhelpmanageyourpasswords,recoveraforgottenpassword,
monitorsecuritysettingsonyourcomputer,andsuggesthowtoenhanceyourcomputersecurity.
•CommunicationsUtility
UsetheCommunicationsUtilityprogramtoconguresettingsfortheintegratedcameraandaudiodevices.
•FingerprintSoftware
Ifyoursystemcomeswithangerprintreader,theFingerprintSoftwareprogramenablesyoutoenroll
yourngerprintandassociateitwithyourWindowspassword.Asaresult,thengerprintauthentication
canreplaceyourpasswordandenablesimpleandsecureuseraccess.
•GPSEnabler
IfthePCIExpressMiniCardinstalledinyourcomputersupportsGPS,yourcomputercanreceivesignals
fromGPSsatellitesanddetermineitslocation.IfyourcomputerisconnectedtotheInternet,youcannd
yourlocationonareal-timemapprovidedbyGoogleMapsorMicrosoftBing™Maps.
•LenovoCompanion
ThroughtheLenovoCompanionprogram,youcangettheinformationabouttheaccessoriesforyour
computer,viewbolgsandarticlesaboutyourcomputer,andcheckforotherrecommendedprograms.
•LenovoMobileAccess
TheLenovoMobileAccessprogramenablesyoutomanageyourmobilebroadbandconnection.You
cancreateanaccount,addmoneytotheaccount,andpurchasemobilebroadbandsessionsusing
youraccount.
•LenovoQuickLaunch
TheLenovoQuickLaunchprogramprovidesyouwithquickaccesstoprogramsinstalledonyour
computer,includingLenovoprograms,Microsoftprograms,andotherthirdpartyprograms.
•LenovoSettings
UsetheLenovoSettingsprogramtoenhanceyourcomputingexperiencebyturningyourcomputerintoa
portablehotspot,conguringcameraandaudiosettings,optimizingyourpowersettings,andcreating
andmanagingmultiplenetworkproles.
•LenovoSolutionCenter
TheLenovoSolutionCenterprogramenablesyoutotroubleshootandresolvecomputerproblems.It
combinesdiagnostictests,systeminformationcollection,securitystatus,andsupportinformation,along
withhintsandtipsformaximumsystemperformance.
•LenovoSupport
TheLenovoSupportprogramenablesyoutoregisteryourcomputerwithLenovo,checkthecomputer
healthconditionandbatterystatus,downloadandviewusermanualsforyourcomputer,getthewarranty
informationofyourcomputer,andexplorehelpandsupportinformation.
•LenovoThinkVantageT ools
TheLenovoThinkVantageToolsprogramhelpsyouworkmoreeasilyandsecurelybyprovidingeasy
accesstovariousprograms,suchasFingerprintSoftware,LenovoSolutionCenter,andsoon.
18UserGuide

•MessageCenterPlus
TheMessageCenterPlusprogramautomaticallydisplaysmessagestoinformyouaboutimportantnotices
fromLenovo,suchasalertsonsystemupdatesandalertsonconditionsthatrequireyourattention.
•MobileBroadbandConnect
TheMobileBroadbandConnectprogramenablesyourcomputertoconnecttothemobilebroadband
(3G)networkthroughasupportedwirelessWANcard.
•PasswordManager
ThePasswordManagerprogramautomaticallycapturesandllsinauthenticationinformationfor
WindowsprogramsandWebsites.
•PowerManager
ThePowerManagerprogramprovidesconvenient,exible,andcompletepowermanagementforyour
computer.Itenablesyoutoadjustyourcomputerpowersettingstoachievethebestbalancebetween
performanceandpowersaving.
•RecoveryMedia
TheRecoveryMediaprogramenablesyoutorestorethecontentsoftheharddiskdrivetothefactory
defaultsettings.
•RescueandRecovery
TheRescueandRecoveryprogramisaone-buttonrecoveryandrestoresolutionthatincludesasetof
self-recoverytoolstohelpyoudiagnosecomputerproblems,gethelp,andrecoverfromsystemcrashes,
evenifyoucannotstarttheWindowsoperatingsystem.
•SimpleTap
TheSimpleTapprogramprovidesyouwithaquickwaytocustomizesomebasiccomputersettingssuch
asmutingthespeakers,adjustingthevolume,lockingthecomputeroperatingsystem,launchinga
program,openingaWebpage,openingale,andsoon.YoualsocanusetheSimpleTapprogramto
accesstheLenovoAppShop,fromwhichyoucandownloadvariousprogramsandcomputersoftware.
TostarttheSimpleTapprograminaquickway,doanyofthefollowing:
–ClicktheredSimpleTaplaunchpointonthedesktop.Theredlaunchpointisavailableonthedesktop
afteryouhavelaunchedtheSimpleTapprogramforthersttime.
–Presstheblackbuttononthekeyboard(nexttothevolumecontrolbuttons).
Note:TheSimpleTapprogramisonlyavailableoncertainmodelspreinstalledwiththeWindows7
operatingsystem.IfyourWindows7modelisnotpreinstalledwiththeSimpleTapprogram,youcan
downloaditfromhttp://www.lenovo.com/support.
•SystemUpdate
TheSystemUpdateprogramhelpsyoukeepthesoftwareonyourcomputerup-to-datebydownloading
andinstallingsoftwareupdatepackages(Lenovoprograms,devicedrivers,UEFIBIOSupdates,and
otherthirdpartyprograms).
Chapter1.Productoverview19

20UserGuide

Chapter2.Usingyourcomputer
Thischapterprovidesinformationonusingsomeofthecomputercomponents.
•“Registeringyourcomputer”onpage21
•“Frequentlyaskedquestions”onpage21
•“Specialkeysandbuttons”onpage23
•“UsingtheUltraNavpointingdevice”onpage26
•“Powermanagement”onpage29
•“Connectingtothenetwork”onpage33
•“Presentationsandmultimedia”onpage37
•“UsingtheNVIDIAOptimusGraphicsfeature”onpage41
•“Usingthecolorsensor”onpage41
•“Usingaudiofeatures”onpage42
•“Usingtheintegratedcamera”onpage43
•“Usingtheopticaldrive”onpage43
•“UsinganExpressCard,aashmediacard,orasmartcard”onpage43
Registeringyourcomputer
Whenyouregisteryourcomputer,informationisenteredintoadatabase,whichenablesLenovotocontact
youincaseofarecallorothersevereproblem.AfteryouregisteredyourcomputerwithLenovo,youwill
alsoreceivequickerservicewhenyoucallLenovoforhelp.Inaddition,somelocationsofferextended
privilegesandservicestoregisteredusers.
ToregisteryourcomputerwithLenovo,dooneofthefollowing:
•Gotohttp://www.lenovo.com/registerandfollowtheinstructionsonthescreentoregisteryourcomputer.
•ConnectyourcomputertotheInternetandregisteryourcomputerthroughapreinstalledregistration
program:
–ForWindows7:ThepreinstalledLenovoProductRegistrationprogramlaunchesautomaticallyafteryou
haveusedyourcomputerforatime.Followtheinstructionsonthescreentoregisteryourcomputer.
–ForWindows8:OpentheLenovoSupportprogram.ThenclickRegistrationandfollowtheinstructions
onthescreentoregisteryourcomputer.
Frequentlyaskedquestions
HereareafewtipsthatwillhelpyouoptimizetheuseofThinkPadnotebook.
Toensurethatyoureceivethebestperformancefromyourcomputer,browsethefollowingWebpagetond
informationsuchasaidsfortroubleshootingandanswerstofrequentlyaskedquestions:
http://www.lenovo.com/support/faq.
CanIgetmyuserguideinanotherlanguage?
•Todownloadtheuserguideinanotherlanguage,gotohttp://www.lenovo.com/support.Thenfollow
theinstructionsonthescreen.
©CopyrightLenovo201221

Onthegoandneedtousebatterypowermoreeffectively?
•Toconservepower,ortosuspendoperationwithoutexitingprogramsorsavingles,see“Power-saving
modes”onpage31.
•Toachievethebestbalancebetweenperformanceandpowersaving,changepowerplansettings.
See“Managingyourbatterypower”onpage31.
•Ifyourcomputerwillbeturnedoffforanextendedperiodoftime,youcanpreventbatterypowerfrom
drainingbyremovingthebattery.Formoreinformation,see“Powermanagement”onpage29.
Concernedaboutsecurityorneedtosecurelydisposeofdatastoredonyourharddiskorsolid-state
drive?
•StudyChapter4“Security”onpage51sectiontondouthowyoucanprotectyourcomputerfrom
theftandunauthorizeduse.
•UsethePasswordManagerprogramtoprotectthedatastoredonyourcomputer.Fordetails,seethe
helpinformationsystemoftheprogram.
•Beforeyoudisposeofthedataontheharddiskdriveorthesolid-statedrive,besuretoreadthetopic
“Noticeondeletingdatafromyourharddiskdriveorsolid-statedrive”onpage61.
Gettingconnectedindifferentlocationsisachallenge?
•Totroubleshootawirelessnetworkingissue,gotohttp://www.lenovo.com/support/faq.
•TakeadvantageofthenetworkingfeaturesprovidedbytheAccessConnectionsprogram(onthe
Windows7operatingsystem)orLocationAwarenessintheLenovoSettingsprogram(ontheWindows8
operatingsystem).
•Tolearnmoreaboutusingthewirelessfeaturesofyourcomputer,see“Wirelessconnections”onpage34.
•Totravelmorecondently,besuretocheckthetipsin“Travelingwithyourcomputer”onpage49.
•PressFn+F5orusethewirelessradioswitchtoenableordisablethewirelessfeatures.
Needtogivepresentationsorattachanexternalmonitoroften?
•Makesurethatyoufollowtheprocedureinthetopic“Attachinganexternalmonitor”onpage38.
•WiththeExtenddesktopfunction,youcandisplayoutputonboththecomputerdisplayandtheexternal
monitor.See“UsingtheExtenddesktopfunction”onpage41.
Needtoattachorreplaceadevice?
•SeeChapter6“Replacingdevices”onpage71formoreinformationaboutreplacingthedevicesof
yourcomputer.
•SeeChapter7“Enhancingyourcomputer”onpage95formoreinformationaboutenhancingthefeatures
ofyourcomputer.
Youhavebeenusingyourcomputerforsometimealready,anditisgettingslower?
•Readthetopic“Generaltipsforpreventingproblems”onpage133.
•Diagnoseproblemsyourselfbyusingthepreinstalleddiagnosticsoftware.See“Diagnosingproblems”on
page139.
•Alsorecoverytoolisprovidedonyourcomputerharddiskorsolid-statedrive.Formoreinformation,
seeChapter5“Recoveryoverview”onpage63.
Printthefollowingsectionsandkeepthemwithyourcomputerincaseyouareunabletoaccessthis
onlinehelpwhennecessary.
•“Installinganewoperatingsystem”onpage111
22UserGuide
•“Computerstopsresponding”onpage139
•“Powerproblems”onpage151
Specialkeysandbuttons
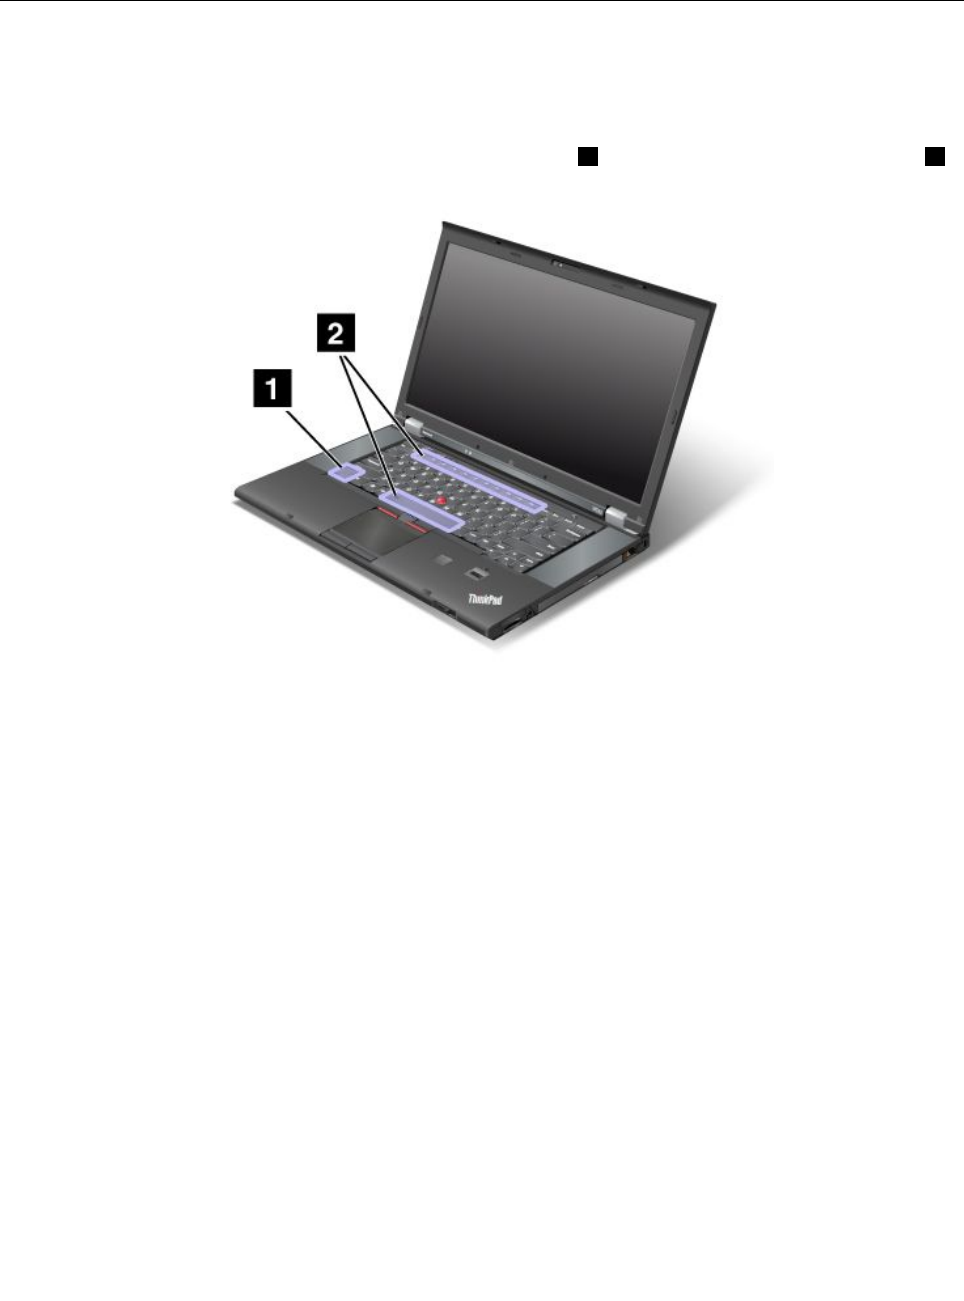
Yourcomputerhasseveralspecialkeysandbuttonstohelpyouworkmoreeasilyandeffectively.
Functionkeycombinations
Tousethefunctionkeycombinations,pressandholdtheFnkey1,thenpressoneofthefunctionkeys2.
Powerconservation
Fn+F4
Putyourcomputerintosleepmode.Toreturntonormaloperation,presstheFnkeyonly.
Ifyouwanttousethecombinationtoputthecomputerintohibernationmode,youneedtochangeyour
powerplansettings.Toaccesspowerplansettings,dothefollowing:
•ForWindows7:StartthePowerManagerprogramandthenclickthePowerPlantab.Forinstructionson
howtostartthePowerManagerprogram,see“AccessingLenovoprogramsontheWindows7operating
system”onpage15.
•ForWindows8:Right-clickthebatterystatusiconfromtheWindowsnoticationareaandclickPower
Options.ThenclickChangeplansettingsthatisnexttoyourpowerplan.
Switchingadisplayoutputlocation
•Fn+F7
Switchthedisplayoutputlocationbetweenthecomputerdisplayandanexternalmonitorbyselecting
oneofthefollowingoptions:
–Computerdisplayonly
–Computerdisplayandexternalmonitor(sameimage)
Chapter2.Usingyourcomputer23

–Computerdisplayandexternalmonitor(theExtenddesktopfunction)
–Externalmonitoronly
Note:TheWindows+PkeycombinationhasthesamefunctionalityasFn+F7.
Enablingordisablingthewirelessfeatures
•Fn+F5
Enableordisablethebuilt-inwirelessnetworkingfeatures.
Changingthecameraandaudiosettings
•Fn+F6
–ForWindows7:OpentheCommunicationssettingswindow,inwhichyoucanpreviewyourvideo
image,takeasnapshotofyourcurrentimage,andchangethecameraandaudiosettings.
–ForWindows8:StarttheLenovoSettingsprogram.Tousethecameraorchangethecamerasettings,
clickCamera.Toadjusttheaudiosettings,clickAudio.
Adjustingthebrightnesslevelofthecomputerdisplay
•Fn+F8:Thecomputerdisplaybecomesdimmer.
•Fn+F9:Thecomputerdisplaybecomesbrighter.
Thisfunctionchangesthebrightnessleveltemporarily.Tochangethedefaultbrightnesslevel,change
thesettingsthroughthePowerManagerprogram.
Multimediacontrols
•Fn+F10:Previoustrack/scene
•Fn+F11:Playorpause
•Fn+F12:Nexttrack/scene
Otherfunctions
•Fn+Spacebar:ControlthekeyboardbacklightandtheThinkLightlight.
–Pressonce:Turnonthekeyboardbacklighttolowbrightnesslevel.
–Pressagain:Adjustthekeyboardbacklighttohighbrightnesslevel.
–Pressthethirdtime:TurnoffthekeyboardbacklightandturnontheThinkLightlight.
–Pressthefourthtime:TurnofftheThinkLightlight.
Note:Ifyourcomputerdoesnothaveabacklitkeyboard,theFn+Spacebarcombinationcontrolsonlythe
ThinkLightlight.
Tochangethefunctionalityofthiscombination,see“Congmenu”onpage115.
•Fn+F3:Lockyourcomputer.
•Fn+B:HavethesamefunctionastheBreakkeyonaconventionalkeyboard.
•Fn+P:HavethesamefunctionasthePausekeyonaconventionalkeyboard.
•Fn+S:HavethesamefunctionastheSysRqkeyonaconventionalkeyboard.
•Fn+K:HavethesamefunctionastheScrLKkeyonaconventionalkeyboard.
Volumeandmutebuttons
Adjustthesoundvolumelevelofthebuilt-inspeakersbyusingthefollowingthreebuttons:
24UserGuide
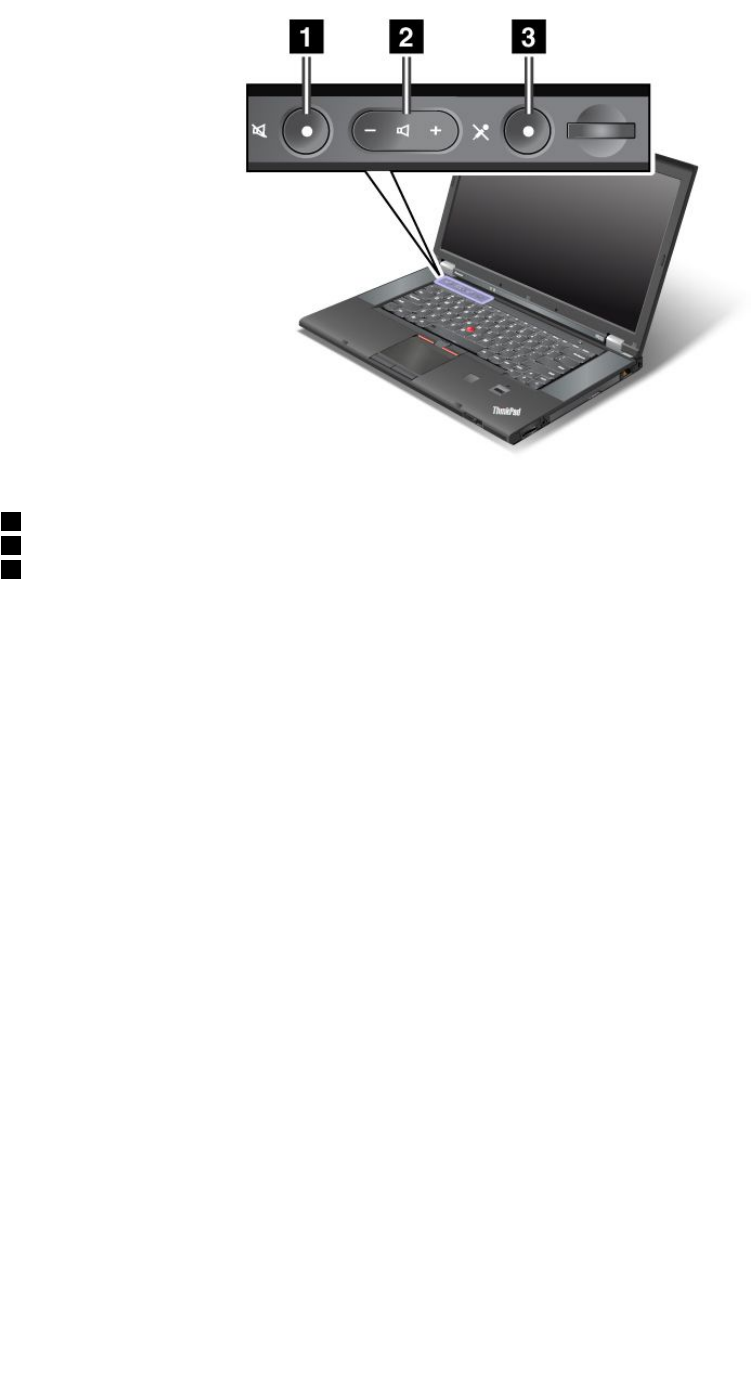
1Speakermutebutton
2Volumecontrolbutton
3Microphonemutebutton
Ifyoumutethesoundandthenturnoffyourcomputer,thesoundwillremainmutedwhenyouturnonyour
computeragain.Toturnonthesound,pressthespeakermutebuttonagainorpressthevolumecontrol
button.
Settingthevolume
Toadjusttheoutputvolumeortherecordingvolume,dothefollowing:
1.GotoControlPanelandclickHardwareandSound➙Sound.TheSoundwindowopens.
2.ClickthePlaybacktaborRecordingtab,andthenclickadevicethatyouwanttocustomize.
3.ClickthePropertiesbutton.
4.ClicktheLevelstab,andthenchangethevolumebymovingtheslider.
YoualsocangetaccesstothedesktopvolumecontrolbyclickingthevolumeiconintheWindows
noticationarea.Fordetailsaboutcontrollingvolume,refertoyourWindowshelpinformationsystem.
SettingthemicrophonemutebuttonontheWindows7operatingsystem
Bydefault,whenyoupressthemicrophonemutebutton,alloftherecordingdevicesaresetonmute
orunmute.
Ifyouwanttocontrolonlyoneoftherecordingdevicesusingthemicrophonemutebutton,dothefollowing:
1.PressFn+F6.TheCommunicationssettingswindowopens.
2.ClicktheManageSettingsbutton.TheCommunicationsUtilitywindowopens.
3.OntheVoIPCallSettingstab,clickMicrophonemutebuttonsettings.TheSettingforMicrophone
Mutewindowopens.
4.SelectOnlytherecordingdeviceselectedbelow:.Thenselecttherecordingdevicefromthe
drop-downlistbox.
5.ClickOK.
Chapter2.Usingyourcomputer25
Windowskey
OntheWindows7operatingsystem,presstheWindowskeytoopentheStartmenu.OntheWindows8
operatingsystem,presstheWindowskeytoswitchbetweenthecurrentworkspaceandtheStartscreen.
YoualsocanusetheWindowskeytogetherwithanotherkeytoachieveotherfunctions.Fordetails,referto
thehelpinformationsystemoftheWindowsoperatingsystem.
UsingtheUltraNavpointingdevice
YourcomputercomeswiththeUltraNavpointingdevice.TheUltraNavpointingdeviceconsistsofthe
TrackPointpointingdeviceandthetouchpad,eachofwhichisitselfapointingdevicewithbothbasicand
extendedfunctions.Youcancongurebothdevicesbychoosingthesettingsyouprefer.
•SetboththeTrackPointpointingdeviceandthetouchpadaspointingdevices.
ThissettingenablestheuseofallthebasicandextendedfunctionsoftheTrackPointpointingdevice
andthetouchpad.
•SettheTrackPointpointingdeviceasthemainpointingdeviceandthetouchpadforextended
functionsonly.
ThissettingenablestheuseofallbasicandextendedfunctionswiththeTrackPointpointingdevicewhile
limitingtheuseofthetouchpadtoscrolling,tapzones,orslow-motioncursorfunctions.
•SettheTrackPointpointingdeviceasthemainpointingdevice,anddisablethetouchpad.
•Setthetouchpadasthemainpointingdevice,anddisabletheTrackPointpointingdevice.
ChangingtheUltraNavpointingdevicesettings
TochangeyourUltraNavpointingdevicesettings,gotoControlPanelandclickHardwareandSound➙
Mouse➙UltraNav.Thenchangethesettingsasdesired.
26UserGuide
UsingtheTrackPointpointingdevice
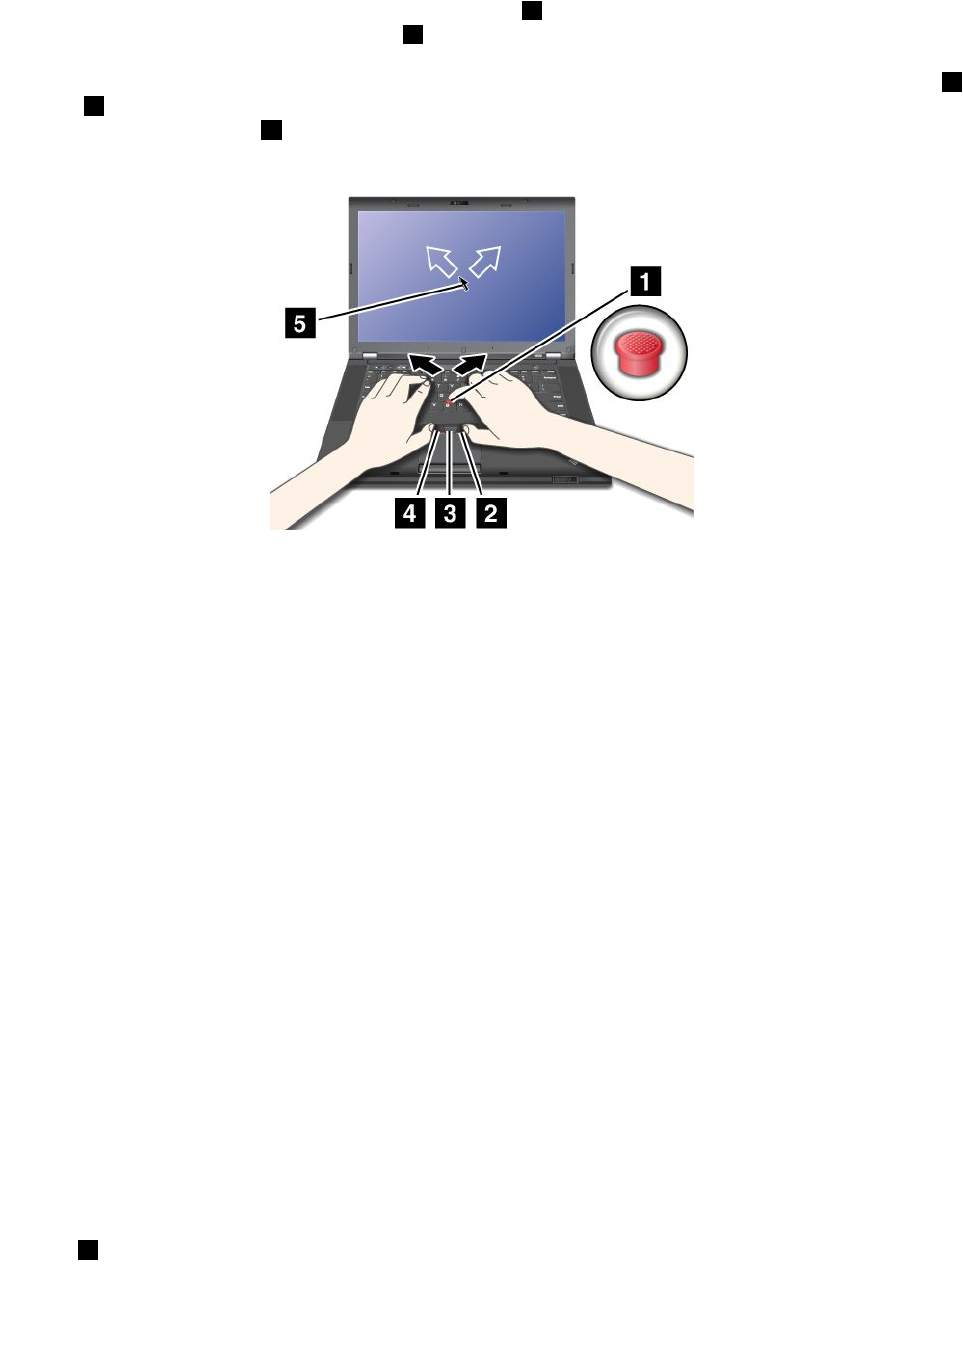
TheTrackPointpointingdeviceconsistsofapointingstick1onthekeyboardandthreeclickbuttonsatthe
bottomofthekeyboard.Tomovethecursor5onthescreen,applypressuretothenonslipcaponthe
pointingstickinanydirectionparalleltothekeyboard;thepointingstickitselfdoesnotmove.Thespeedat
whichthecursormovesdependsonthepressureyouapplytothepointingstick.Thefunctionsoftheleft4
andright2clickbuttonscorrespondtothoseoftheleftandrightmousebuttonsonaconventionalmouse.
TheTrackPointcenterbutton3,calledthescrollbar,enablesyoutoscrollWebpagesordocumentsinany
directionwithnoneedtousethegraphicscrollbarsonthesideofthewindow.
IfyouarenotfamiliarwiththeTrackPoint,theseinstructionswillhelpyougetstarted:
1.Placeyourhandsinthetypingposition,andpressgentlywitheitherindexngeronthepointingstickin
thedirectioninwhichyouwantthecursortomove.
Tomovethecursor,pressthepointingstickawayfromyoutomoveitup,towardyoutomoveitdown,
toonesideortheothertomoveitsideways.
Note:Thecursormightdrift.Thisisnotadefect.StopusingtheTrackPointpointingdevicefora
fewseconds,thenthecursorwillstopmoving.
2.Toselectanddragasrequiredbyyoursoftware,presstheleftorrightclickbuttonwitheitherthumb
andmovetheTrackPointpointingstick.
ByenablingPress-to-Select,youcanmaketheTrackPointpointingstickfunctionthesameasthe
leftorrightclickbutton.
CustomizingthesettingsoftheTrackPointpointingdevice
YoucancustomizetheTrackPointpointingdeviceanditsbuttonsasfollows:
•Switchthefunctionsoftheleftandrightbuttons.
•ChangethesensitivityoftheTrackPointpointingdevice.
•EnablethePress-to-Selectfunction.
•EnabletheTrackPointScrollingTips.
TocustomizethesettingsoftheTrackPointpointingdevice,dothefollowing:
1.GotoControlPanelandclickHardwareandSound➙Mouse➙UltraNav.
2.UnderTrackPoint,proceedtochangingthesettings.
Changingthecap
Thecap1ontheendoftheTrackPointpointingstickisremovable.Youcanreplaceitasshownin
thedrawing.
Chapter2.Usingyourcomputer27
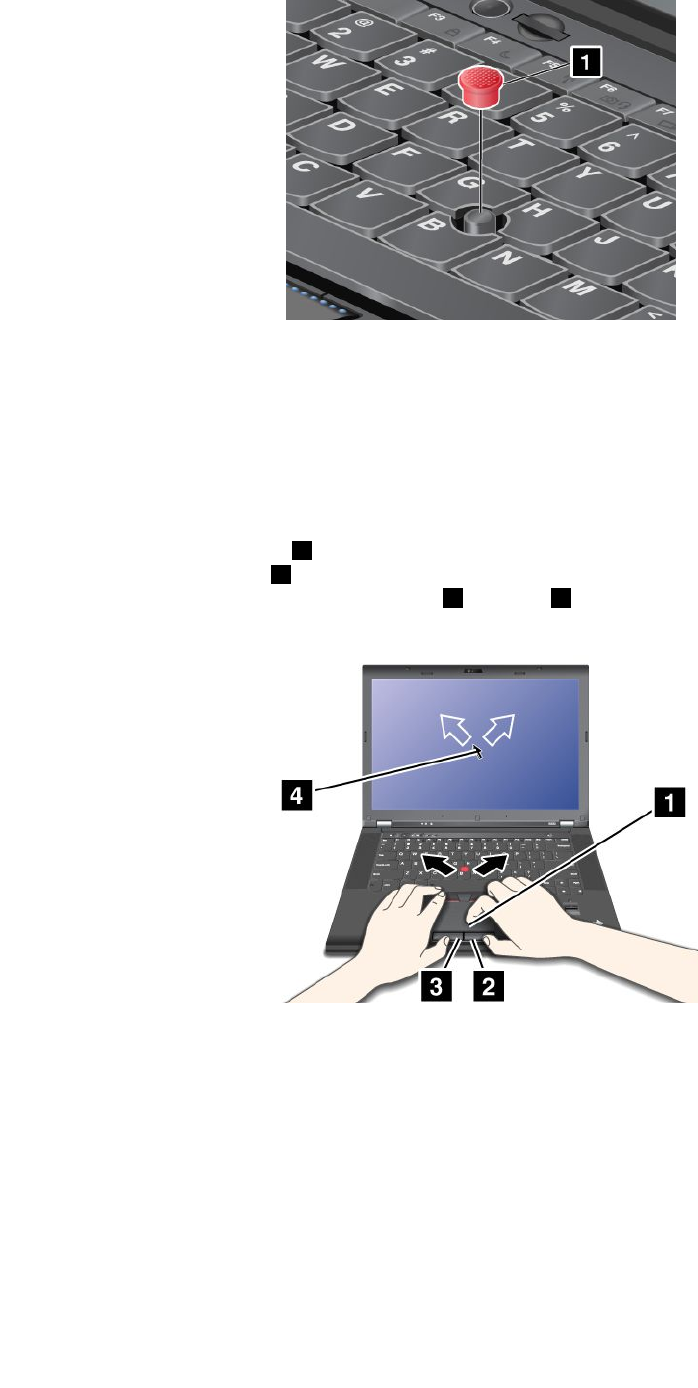
Note:Ifyoureplacethekeyboard,anewkeyboardisshippedwiththedefaultcap.Ifyouwish,youcan
keepthecapfromyouroldkeyboardanduseitonthenewone.
Usingthetouchpad
Thetouchpadofyourcomputersupportsmulti-touchwithwhichyoucanzoomin,zoomout,scrollorrotate
onthescreenwhilebrowsingtheInternetorreadingoreditingadocument.
Thetouchpadconsistsofapad1andtwoclickbuttonsbelowtheTrackPointbuttonsatthebottomofthe
keyboard.Tomovethecursor4onthescreen,slideyourngertipoverthepadinthedirectioninwhichyou
wantthecursortomove.Thefunctionsoftheleft3andright2clickbuttonscorrespondtothoseoftheleft
andrightmousebuttonsonaconventionalmouse.
Customizingthetouchpad
Tocustomizethetouchpad,dothefollowing:
1.GotoControlPanelandclickHardwareandSound➙Mouse➙UltraNav.
2.UnderTouchPad,proceedtochangingthesettings.
DisablingtheUltraNavpointingdeviceandusinganexternalmouse
IfyouattachanexternalmousetoaUSBconnector,youcanusetheexternalmousesimultaneouslywith
theTrackPointpointingdeviceandthetouchpad.
28UserGuide

DisablingtheTrackPointpointingdeviceorthetouchpad
TodisabletheTrackPointpointingdeviceorthetouchpad,dothefollowing:
1.GotoControlPanelandclickHardwareandSound➙Mouse➙UltraNav.
2.TodisabletheTrackPointpointingdevice,clearthecheckboxforEnableTrackPoint.Todisablethe
touchpad,clearthecheckboxforEnableTouchPad.
3.ClickOK.
AddingtheUltraNavicontothesystemtray
ForeasyaccesstotheUltraNavproperties,youcanenablethedisplayoftheUltraNaviconintheWindows
noticationarea.
ToenablethedisplayoftheUltraNaviconintheWindowsnoticationarea,dothefollowing:
1.GotoControlPanelandclickHardwareandSound➙Mouse➙UltraNav.
2.SelectthecheckboxforShowUltraNavicononthesystemtray.
3.ClickOK.YoucannowchangethepropertiesoftheUltraNavpointingdevicebyclickingtheUltraNav
iconintheWindowsnoticationarea.
Note:IfyoucannotseetheUltraNavicon,clickthetriangulariconintheWindowsnoticationarea
toshowhiddenicons.
Powermanagement
Whenyouneedtouseyourcomputerawayfromelectricaloutlets,youdependonbatterypowertokeep
yourcomputerrunning.Differentcomputercomponentsconsumepoweratdifferentrates.Themoreyou
usethepower-intensivecomponents,thefasteryouconsumebatterypower.
Checkingbatterystatus
ThebatteryiconintheWindowsnoticationareadisplaysthepercentageofbatterypowerremaining.
Therateatwhichyouusebatterypowerwilldeterminehowlongyoucanusethebatteryofyourcomputer
betweencharges.Becauseeachcomputeruserhasdifferenthabitsandneeds,itisdifculttopredicthow
longabatterychargewilllast.Therearetwomainfactors:
•Howmuchenergyisstoredinthebatterywhenyoubegintowork.
•Thewayyouuseyourcomputer.Forexample:
–Howoftenyouaccesstheharddiskdrive.
–Howbrightyoumakethecomputerdisplay.
–Howoftenyouusethewirelessfeatures.
Tocheckfordetailedbatterystatusinformation,dothefollowing:
•ForWindows7:OpenthePowerManagerprogramandclicktheBatterytab.
•ForWindows8:OpentheLenovoSupportprogramandclickBatteryHealth,oropentheLenovo
SettingsprogramandclickPower.
Usingtheacpoweradapter
Thepowertorunyourcomputercancomeeitherfromthelithium-ion(Li-ion)batterypack,orfromacpower
throughtheacpoweradapter.Whileyouuseacpower,thebatterychargesautomatically.
Chapter2.Usingyourcomputer29

Theacpoweradapterthatcomeswithyourcomputerhastwobasiccomponents:
•Thetransformerpackthatconvertsacpowerforusewiththecomputer.
•Thepowercordthatplugsintotheacoutletandintothetransformerpack.
Attention:Usinganimproperpowercordmightcauseseveredamagetoyourcomputer.
Connectingtheacpoweradapter
Tousetheacpoweradapter,dothefollowing.Besuretotakethesestepsintheorderinwhichtheyare
givenhere.
1.Plugtheacpoweradapterintoanacoutlet.
2.Connectthepowercordtothetransformerpack.
3.Insertthepowerjackintothecomputer.
Tipsonusingtheacpoweradapter
•Whentheacpoweradapterisnotinuse,disconnectitfromtheelectricaloutlet.
•Donotbindthepowercordtightlyaroundtheacpoweradaptertransformerpackwhenitisconnectedto
thetransformer.
•Beforeyouusetheacpoweradaptertochargethebattery,makesurethatthebatterytemperature
isatleast10°C(50°F).
•Youcanchargethebatterywhentheacpoweradapterisconnectedtothecomputerandthebatteryis
installed.Youneedtochargeitinanyofthefollowingconditions:
–Whenyoupurchaseanewbattery
–Ifthebatterystatusindicatorstartsblinking
–Ifthebatteryhasnotbeenusedforalongtime
Chargingthebattery
Whenyoucheckbatterystatusandndthatthepercentageofpowerremainingisloworwhenthepower
alarmalertsyouthattheremainingpowerislow,youneedtochargeyourbatteryorreplaceitwitha
chargedbattery.
Ifanacoutletisconvenient,plugtheacpoweradapterintoit,andtheninsertthejackintothecomputer.
Thebatterywillbefullychargedinabout3to6hours.Thechargingtimeisaffectedbythebatterysize
andthephysicalenvironment.Youcancheckthebatterychargingstatusatanytimebylookingatthe
batterymetericonintheWindowsnoticationarea.
Note:Toincreasethelifeofthebattery,thecomputerdoesnotstartrechargingthebatteryiftheremaining
powerisgreaterthan95%.
Maximizingbatterylife
Tomaximizethelifeofthebattery,dothefollowing:
•Usethebatteryuntilthechargeiscompletelydepleted,thatis,usethebatteryuntilthebatterystatus
indicatorstartsblinkingorange.
•Rechargethebatterycompletelybeforeusingit.Thebatteryisfullychargedifthebatteryindicatorshows
greenwhentheacpoweradapterispluggedin.
•Alwaysusepower-savingmodes,suchasscreenblank,sleep,andhibernation.
30UserGuide

Managingyourbatterypower
Toachievethebestbalancebetweenperformanceandpowersaving,adjustyourpowerplansettings.
Toaccesspowerplansettings,dothefollowing:
•ForWindows7:StartthePowerManagerprogramandthenclickthePowerPlantab.Forinstructionson
howtostartthePowerManagerprogram,see“AccessingLenovoprogramsontheWindows7operating
system”onpage15.
•ForWindows8:Right-clickthebatterystatusiconfromtheWindowsnoticationareaandclickPower
Options.ThenclickChangeplansettingsthatisnexttoyourpowerplan.
Formoreinformation,refertothehelpinformationsystemoftheprogram.
Power-savingmodes
Thereareseveralmodesthatyoucanuseatanytimetoconservepower.Thissectionintroduceseach
modeandgivestipsontheeffectiveuseofthebatterypower.
Understandingthepower-savingmodes
•Screenblank(fortheWindows7operatingsystemonly)
Thecomputerdisplayrequiresconsiderablebatterypower.Toturnoffpowertothedisplay,right-clickthe
batterygaugeiconfromtheWindowsnoticationareaandselectPoweroffdisplay.
•Sleep
Insleepmode,yourworkissavedtomemory,andthenthesolid-statedriveortheharddiskdriveandthe
computerdisplayareturnedoff.Whenyourcomputerwakesup,yourworkisrestoredwithinseconds.
Toputyourcomputerintosleepmode,pressFn+F4.Toreturnfromsleepmode,presstheFnkey.
Dependingonthecomputermodel,yourcomputermightsupportthe30DayStandbyfunction.Whenthis
functionisenabled,thecomputerconsumesevenlesspowerinsleepmodeandtakesonlyseconds
toresumenormaloperationwhenyoupressthepowerbutton.Formoreinformationaboutthe30Day
Standbyfunction,dothefollowing:
–ForWindows7:RefertothehelpinformationsystemofthePowerManagerprogram.Forinstructions
onhowtostartthePowerManagerprogram,see“AccessingLenovoprogramsontheWindows7
operatingsystem”onpage15.
–ForWindows8:OpentheLenovoSettingsprogramandclickPower.
•Hibernation
Byusingthismode,youcanturnoffyourcomputercompletelywithoutsavinglesorexitingfromany
programsthatarerunning.Whenthecomputerentershibernation,allopenprograms,folders,andles
aresavedtotheharddisk,andthenthecomputerturnsoff.
Toputthecomputerintohibernationmode,changeyourpowerplansettings.Toaccesspowerplan
settings,dothefollowing:
–ForWindows7:StartthePowerManagerprogramandthenclickthePowerPlantab.Forinstructions
onhowtostartthePowerManagerprogram,see“AccessingLenovoprogramsontheWindows7
operatingsystem”onpage15.
–ForWindows8:Right-clickthebatterystatusiconfromtheWindowsnoticationareaandclickPower
Options.ThenclickChangeplansettingsthatisnexttoyourpowerplan.
•Wirelessoff
Whenyouarenotusingthewirelessfeatures,suchasBluetoothorwirelessLAN,turnthemoff.Thiswill
helpconservepower.Toturnoffthewirelessfeatures,pressFn+F5orusethewirelessradioswitch.
Chapter2.Usingyourcomputer31

Enablingthewakeupfunction
Ifyouputyourcomputerintohibernationmode,andthewakeupfunctionisdisabled(thisisthedefault
setting),thecomputerdoesnotconsumeanypower.Ifthewakeupfunctionisenabled,itconsumesasmall
amountofpower.Toenablethewakeupfunction,dothefollowing:
1.GotoControlPanelandclickSystemandSecurity➙AdministrativeT ools.
2.Double-clickTaskScheduler.Ifyouarepromptedforanadministratorpasswordorconrmation,type
thepasswordorprovideconrmation.
3.Fromtheleftpane,selectthetaskfolderforwhichyouwanttoenablethewakeupfunction.The
scheduledtasksaredisplayed.
4.Clickascheduledtask,andthenclicktheConditionstab.
5.UnderPower,selectthecheckboxforWakethecomputertorunthistask.
EnablingthebatteryalarmontheWindows7operatingsystem
FortheWindows7operatingsystem,youcanprogramyourcomputersothatwhenthebatterypowerfalls
belowacertainlevel,threeeventsoccur:
•Thealarmgoesoff.
•Awarningmessageisdisplayed.
•TheLCDisturnedoff.
Toenablethebatteryalarm,dothefollowing:
1.StartthePowerManagerprogram.
2.ClicktheGlobalPowerSettingstab.
3.ForLowbatteryalarmorCriticallylowbatteryalarm,setthepercentageofthepowerlevelandset
theaction.
Note:Ifyourcomputerenterssleeporhibernationmodewhenthebatteryislow,butthealarmmessage
hasnotyetbeendisplayed,themessagewillbedisplayedwhenthecomputerresumes.Toresumenormal
operation,clickOK.
Handlingthebattery
ThissystemsupportsonlybatteriesspeciallydesignedforthisspecicsystemandmanufacturedbyLenovo
oranauthorizedbuilder.Thesystemdoesnotsupportunauthorizedbatteriesorbatteriesdesignedforother
systems.Ifanunauthorizedbatteryorabatterydesignedforanothersystemisinstalled,thesystemwill
notcharge.
Attention:Lenovohasnoresponsibilityfortheperformanceorsafetyofunauthorizedbatteries,and
providesnowarrantiesforfailuresordamagearisingoutoftheiruse.
DANGER
Donotattempttodisassembleormodifythebatterypack.
Attemptingtodosocancauseanexplosion,orliquidleakagefromthebatterypack.
AbatterypackotherthantheonespeciedbyLenovo,oradisassembledormodiedbattery
packisnotcoveredbythewarranty.
32UserGuide

DANGER
Iftherechargeablebatterypackisincorrectlyreplaced,thereisdangerofanexplosion.Thebattery
packcontainsasmallamountofharmfulsubstances.Toavoidpossibleinjury:
•ReplaceonlywithabatteryofthetyperecommendedbyLenovo.
•Keepthebatterypackawayfromre.
•Donotexposeittoexcessiveheat.
•Donotexposeittowaterorrain.
•Donotshort-circuitit.
•Storeitinacooldryplace.
•Keepitawayfromchildren.
Thebatterypackisaconsumablesupply.Ifyourbatterybeginstodischargetooquickly,replacethe
batterypackwithanewoneofthetyperecommendedbyLenovo.Formoreinformationonreplacingthe
batterypack,contactyourCustomerSupportCenter.
DANGER
Donotdrop,crush,puncture,orsubjecttostrongforces.Batteryabuseormishandlingcancause
thebatterytooverheat,whichcancausegassesorameto“vent”fromthebatterypackorcoin
cell.Ifyourbatteryisdamaged,orifyounoticeanydischargefromyourbatteryorthebuildup
offoreignmaterialsonthebatteryleads,stopusingthebatteryandobtainareplacementfrom
thebatterymanufacturer.
DANGER
Onlyrechargethebatterypackstrictlyaccordingtoinstructionsincludedintheproduct
documentation.
DANGER
Donotputthebatterypackintrashthatisdisposedofinlandlls.Whendisposingofthebattery,
complywithlocalordinancesorregulationsandyourcompany'ssafetystandards.
DANGER
Thereisadangerofanexplosionifthebackupbatteryisincorrectlyplaced.Thelithiumbattery
containslithiumandcanexplodeifitisnotproperlyhandled,ordisposedof.Replaceonlywitha
batteryofthesametype.Toavoidpossibleinjuryordeath,donot:(1)throworimmerseintowater,
(2)allowittoheattomorethan100°C(212°F),or(3)attempttorepairordisassembleit.Disposeof
itasrequiredbylocalordinancesorregulationsandyourcompany'ssafetystandards.
Connectingtothenetwork
YourcomputerhasoneormorenetworkcardsforconnectingtotheInternetandtoyourcompany'swired
LANorwirelessLANnetwork.
Chapter2.Usingyourcomputer33

Note:Somemodelscomewithabuilt-inwirelessWANcardenablingyoutoestablishwirelessconnections
overremotepublicorprivatenetworks.
Ethernetconnections
YoucanconnecttoyourlocalnetworkorabroadbandconnectionbyuseoftheEthernetfeaturebuiltinto
yourcomputer.IfyouareusingtheWindows7operatingsystem,theAccessConnectionsprogramalso
enablesyoutomanageyourlocationproles.Formoreinformation,see“AccessingLenovoprograms
ontheWindows7operatingsystem”onpage15.
DANGER
YourcomputerhasanEthernetconnector.Toavoidtheriskofelectricalshock,donotconnect
thetelephonecabletotheEthernetconnector.
Wirelessconnections
Wirelesscommunicationisthetransferofdatawithouttheuseofcablesbutbymeansofradiowavesonly.
Dependingonthewirelessdeviceusedinyourcomputer,youmightbeabletoconnecttothefollowing
categoriesofwirelessnetworks.
WirelessLAN
Awirelesslocalareanetwork(LAN)coversarelativelysmallgeographicarea,suchasanofcebuildingora
house.Devicesbasedonthe802.11standardscanconnecttothisnetwork.
Yourcomputercomeswithabuilt-inwirelessnetworkcardandacongurationutilitytohelpyoumake
wirelessconnectionsandmonitorthestatusofyourconnection,sothatyoucanstayconnectedtoyour
networkwhileyouareintheofce,inameetingroom,orathome,withnoneedforawiredconnection.
TipsforusingthewirelessLANfeature
Toachievethebestconnection,usethefollowingguidelines:
•PlaceyourcomputersothatthereareasfewobstaclesaspossiblebetweenthewirelessLANaccess
pointandthecomputer.
•Openyourcomputerdisplaytoanangleofslightlymorethan90degrees.
•Ifyouusethewirelessfeature(the802.11standard)ofyourcomputersimultaneouslywithaBluetooth
option,thedatatransmissionspeedcanbedelayedandtheperformanceofthewirelessfeaturecanbe
degraded.
WirelessWAN
WirelessWideAreaNetwork(wirelessWAN),usingcellularnetworksfordatatransmission,enablesyou
toestablishwirelessconnectionsoverremotepublicorprivatenetworks.Theseconnectionscanbe
maintainedoveralargegeographicalarea,suchasacityoranentirecountry,byuseofmultipleantenna
sitesorsatellitesystemsmaintainedbywirelessserviceproviders.
SomeThinkPadnotebookcomputerscomewithabuilt-inwirelessWANcardintegratingsomewireless
WANtechnologies,suchas1xEV-DO,HSPA,3G,GPRSorLTE.Byusingthebuilt-inwirelessWANcardand
thecongurationutilitythatcomeswithyourcomputer,youcanestablishwirelessWANconnectionsand
monitorthestatusofyourconnection.
Note:WirelessWANserviceisprovidedbyauthorizedserviceprovidersinsomecountries.
34UserGuide

TipsforusingthewirelessWANfeature
Toachievethebestconnection,usethefollowingguidelines:
•Keepyourcomputerawayfromyourbody.
•Placeyourcomputeronaatsurfaceandopenyourcomputerdisplaytoanangelofslightlymore
than90degrees.
•Placeyourcomputerawayfromconcreteorbrickwallsthatmightdampencellularsignals.
•Bestreceptionwillbeavailablenearwindowsandotherlocationswherecellularphonereceptionisthe
strongest.
Bluetooth
Bluetoothisoneofanumberoftechnologiesusedtocreateawirelesspersonalareanetwork.Bluetooth
canconnectdevicesashortdistancefromoneanother,andiscommonlyusedforconnectingperipheral
devicestoacomputer,transferringdatabetweenhand-helddevicesandapersonalcomputer,orremotely
controllingandcommunicatingwithdevicessuchasmobilephones.
Establishingawirelessconnection
Toestablishawirelessconnection,dothefollowing:
1.PressFn+F5toturnonthewirelessfeature.
2.ClickthewirelessnetworkconnectionstatusiconintheWindowsnoticationarea.Alistofavailable
wirelessnetworksisdisplayed.
3.Double-clickanetworktoconnecttoit.Providerequiredinformationifneeded.
Ifyouneedtoconnecttodifferentwirelessnetworksindifferentlocations,usethefollowingsoftwareto
managemultiplenetworkprolessothatthecomputerconnectstoanavailablenetworkautomaticallywhen
thelocationchanges:
•ForWindows7:UsetheAccessConnectionsprogram.ForinstructionsonhowtostarttheAccess
Connectionsprogram,see“AccessingLenovoprogramsontheWindows7operatingsystem”onpage15.
•ForWindows8:OpentheLenovoSettingsprogramandclickLocationAwareness.See“Accessing
LenovoprogramsontheWindows8operatingsystem”onpage17.
Attention:
•Ifyouwanttousethewirelessfeaturesonanairplane,checkthewirelessserviceswiththeairlinebefore
boardingtheairplane.
•Iftherearerestrictionsontheuseofcomputerwirelessfeaturesonanairplane,youneedtodisableyour
computerwirelessfeaturesbeforeboarding.Todisablethewirelessfeatures,see“Enablingordisabling
thewirelessfeatures”onpage37.
UsingBluetooth
SomemodelsareequippedwithaBluetoothcardthatiscompliantwithBluetoothSpecication4.0.
ToenabletheBluetoothfeatureontheWindows7operatingsystem,pressFn+F5toopenthewireless
radioswitchboard.ThenturnontheBluetoothradio.FortheWindows8operatingsystem,theBluetooth
featureisonbydefault.
SendingdatatoaBluetooth-enableddevice
TosenddatatoaBluetooth-enableddevice,dothefollowing:
1.EnabletheBluetoothfeature.
2.Right-clickthedatathatyouwanttosend.
Chapter2.Usingyourcomputer35

3.SelectSendTo➙BluetoothDevices.
4.SelectaBluetoothdeviceandthenfollowtheinstructionsonthescreen.
Note:Ifyouusethewirelessfeature(the802.11standard)ofyourcomputersimultaneouslywithaBluetooth
option,thedatatransmissionspeedcanbedelayedandtheperformanceofthewirelessfeaturecanbe
degraded.
FormoreinformationaboutusingtheBluetoothfeature,refertotheWindowshelpinformationsystemand
theBluetoothhelpinformationsystem.
Checkingthewirelessnetworkconnectionstatus
Youcancheckyourcomputerwirelessnetworkconnectionstatusandwirelesssignalstrengththroughthe
wirelessnetworkconnectionstatusiconintheWindowsnoticationarea.Themorebarsencompassed,the
betterthesignal.
FortheWindows7operatingsystem,youalsocanchecktheAccessConnectionsgauge,theAccess
Connectionsstatusicon,ortheAccessConnectionswirelessnetworkconnectionstatusiconinthe
Windowsnoticationarea.
AccessConnectionsgauge
OntheWindows7operatingsystem,theAccessConnectionsgaugeintheWindowsnoticationarea
displaysthestatusandsignalstrengthofyourwirelessconnection.
Youcanndmoredetailedinformationaboutthestatusandsignalstrengthofyourwirelessconnection
byopeningtheAccessConnectionsprogramorbyright-clickingtheAccessConnectionsgaugeinthe
WindowsnoticationareaandselectingViewStatusofWirelessConnection.
•AccessConnectionsgaugestates:wirelessLAN
–Powertothewirelessradioisoffornosignal.
–Powertothewirelessradioison.Thesignalstrengthofthewirelessconnectionispoor.To
improvethesignalstrength,moveyourcomputerclosertothewirelessaccesspoint.
–Powertothewirelessradioison.Thesignalstrengthofthewirelessconnection
ismarginal.
–Powertothewirelessradioison.Thesignalstrengthofthewirelessconnectionis
excellent.
•AccessConnectionsgaugestates:wirelessWAN
–Nosignal
–Signallevel1
–Signallevel2
–Signallevel3
AccessConnectionsstatusicon
TheAccessConnectionsstatusicondisplaysgeneralconnectionstatus.
•AccessConnectionsstatusiconstates
–Nolocationproleisactiveornoneexists.
–Currentlocationproleisdisconnected.
36UserGuide

–Currentlocationproleisconnected.
AccessConnectionswirelessstatusicon
TheAccessConnectionswirelessstatusicondisplaysthestatusandsignalstrengthofyourwireless
connection.
Youcanndmoredetailedinformationaboutthestatusandsignalstrengthofyourwirelessconnection
eitherbyopeningtheAccessConnectionsprogramorbydouble-clickingtheAccessConnectionswireless
statusiconintheWindowsnoticationarea.
•Wirelessstatusiconstates:wirelessLAN
–Powertothewirelessradioisoff.
–Powertothewirelessradioison.Noassociation.
–Powertothewirelessradioison.Nosignal.
–Powertothewirelessradioison.Thesignalstrengthofthewirelessconnectionisexcellent.
–Powertothewirelessradioison.Thesignalstrengthofthewirelessconnectionismarginal.
–Powertothewirelessradioison.Thesignalstrengthofthewirelessconnectionispoor.Toimprove
thesignalstrength,moveyourcomputerclosertothewirelessaccesspoint.
•Wirelessstatusiconstates:wirelessWAN
–Powertothewirelessradioisoff.
–Noassociation
–Nosignal
–Signallevel1
–Signallevel2
–Signallevel3
Note:Ifyouhavetroubleinmakingaconnection,trymovingyourcomputerclosertoyourwirelessaccess
point.
Enablingordisablingthewirelessfeatures
Toenableordisablethewirelessfeatures,dooneofthefollowing:
•ForWindows7:PressFn+F5toopenthewirelessradioswitchboard.Turnonorturnoffthewireless
featureasdesired.
•ForWindows8:PressFn+F5toenableordisabletheAirplanemode.WhentheAirplanemodeisenabled,
allofyourwirelessdevicesareturnedoff.
Youalsocanusethewirelessradioswitchtoturnonorturnoffthewirelessradiosofallthewirelessdevices
onyourcomputer.
Presentationsandmultimedia
Youcanconnectyourcomputertoaprojectortogivepresentationsoryoucanconnectyourcomputer
toanexternalmonitortoexpandyourworkspace.
Changingdisplaysettings
Youcanchangethedisplaysettings,suchasthedisplayresolution,fontsize,andsoon.
Chapter2.Usingyourcomputer37

Tochangethedisplaysettings,dothefollowing:
1.OpenControlPanelandclickAppearanceandPersonalization.
2.ClickDisplayforfurtherconguration.
Connectingaprojectororexternaldisplay
Thistopicprovidesinformationaboutconnectingaprojectororanexternalmonitor.
Attachinganexternalmonitor
Note:Ifyouattachanexternalmonitor,avideointerfacecablewithaferritecoreinstalledonthecable
isrequired.
Yourcomputercansupportamaximumvideoresolutionofupto2048x1536(withanexternalmonitor
attachedtotheVGAconnector)orupto2560x1600(withanexternalmonitorattachedtotheMini
DisplayPortconnector),providedthattheexternalmonitoralsosupportsthatresolution.Formoredetails,
refertothemanualsprovidedwithyourmonitor.
Note:AsforThinkPadW530models,theVGAconnectordoesnotworkforCRTorLCDmonitorintheDOS
environmentinNVIDIAOptimusGraphicsmodeorIntegratedGraphicsmode;thusyouneedtochangeto
DiscreteGraphicsmodetousetheCRTorLCDmonitor.Ifnodisplayisavailableforyoutochangethe
graphicsmodethroughThinkPadSetup,pressF7toswitchtothediscretegraphicsmoderightafterthe
computeristurnedon.
Youcansetanyresolutionforeitherthecomputerdisplayortheexternalmonitor.Whenyouusebothatthe
sametime,theresolutionofbothisthesame.Ifyousetahigherresolutionforthecomputerdisplay,you
canseeonlypartofthescreenatatime.YoucanseeotherpartsbymovingtheimagewiththeTrackPoint
pointingdeviceoranotherpointingdevice.
Youcanmovethedisplayoutputtothecomputerdisplay,theexternalmonitor,orbothbypressingFn+F7.
Connectinganexternalmonitor
Toattachanexternalmonitor,dothefollowing:
1.ConnecttheexternalmonitortotheVGAconnectorortheMiniDisplayPortconnector.
2.Connectthemonitortoanelectricaloutlet.
3.Turnontheexternalmonitor.
4.ChangethedisplayoutputlocationbypressingFn+F7.Thisenablesyoutoswitchbetweenviewing
outputontheexternalmonitor,thecomputermonitor,andbothmonitors.
Note:Ifyourcomputercannotdetecttheexternalmonitor,right-clickonthedesktop,thenselectScreen
resolution.ClicktheDetectbutton.
Settingtheexternalmonitortype
Tosettheexternalmonitortype,dothefollowing:
1.Connecttheexternalmonitortothemonitorconnector,andthenconnectthemonitortoanelectrical
outlet.
2.Turnontheexternalmonitor.
3.Right-clickonthedesktop,andclickScreenresolution.
Note:Ifyourcomputercannotdetecttheexternalmonitor,clicktheDetectbutton.
4.SelecttheexternalmonitorandsetResolution.
5.ClickAdvancedSettings.
38UserGuide

6.ClicktheMonitortab.Checkthemonitorinformationtomakesurethatthemonitortypeiscorrect.Ifit
is,clickOKtoclosethewindow;otherwiseproceedwiththefollowingsteps.
7.Ifmorethantwomonitortypesaredisplayed,selectGenericPnPMonitororGenericNon-PnP
Monitor.
8.ClickProperties.Ifyouarepromptedforanadministratorpasswordorconrmation,typethepassword
orprovideconrmation.
9.ClicktheDrivertab.
10.ClickUpdateDriver.
11.ClickBrowsemycomputerfordriversoftware,andthenclickLetmepickfromalistofdevice
driversonmycomputer.
12.CleartheShowcompatiblehardwarecheckbox.
13.Selectthecorrectmanufacturerandmodelfortheexternalmonitor.Ifyoucannotndyourmonitoron
thelist,stoptheinstallationofthisdriverandusethedrivershippedwithyourmonitor.
14.Afterupdatingthedriver,clickClose.
15.FortheWindows7operatingsystem,tochangethecolorsettings,right-clickonthedesktop,andclick
Screenresolution.ClickAdvancedSettings,selecttheMonitortab,thensetColors.
16.ClickOK.
Considerationsforattachinganexternalmonitor
•Wheninstallinganoperatingsystem,youmustinstallthedisplaydriverforyourmonitorthatissupplied
withthecomputer,andthemonitorINFlethatissuppliedwiththeexternalmonitor.
•Ifyousetaresolutionhigherthantheresolutionyouareusingonthecomputermonitor,andusean
externalmonitorthatdoesnotsupportthatresolution,takeadvantageofthevirtualscreenfunction,
whichenablesyoutodisplayonlyapartofthehigh-resolutionscreenimageyourcomputerproduces.
YoucanseeotherpartsoftheimagebymovingthescreenwiththeTrackPointpointingdeviceoranother
pointingdevice.
•Iftheexternalmonitoryouareusingisoutdated,theresolutionandtherefreshratemightbelimited.
UsingtheDVImonitor
Ifyourcomputerisattachedtooneofthefollowingoptionalexpansionunits,youcanconnectadigitalvisual
interface(DVI)monitortoyourcomputerthroughtheDVIconnectorofthatunit:
•ThinkPadMiniDockSeries3
•ThinkPadMiniDockSeries3withUSB3.0
•ThinkPadMiniDockPlusSeries3
•ThinkPadMiniDockPlusSeries3withUSB3.0
Notes:
•ThescreenmodethatcanbeuseddependsonthespecicationsoftheDVImonitor.
•BeforeyouattachtheDVImonitor,makesurethatthecomputerisattachedtotheexpansionunitand
thesystemworkscorrectly.
ToattachtheDVImonitor,dothefollowing:
1.Turnoffthecomputer.
2.ConnecttheDVImonitortotheDVIconnectoroftheexpansionunit,andthenconnectthemonitor
toanelectricaloutlet.
3.TurnontheDVImonitorandthecomputer.
Chapter2.Usingyourcomputer39

IfthecomputeroutputdoesnotappearontheDVImonitor,dothefollowing:
•ForacomputerthatsupportsNVIDIAOptimusGraphics:
1.Right-clickonthedesktopandselectNVIDIAControlPanel.TheNVIDIAControlPanelwindow
opens.
2.IntheSelectaTasknavigationpaneatleftunderDisplay,clickSetupmultipledisplays.
3.Right-clickVerifyyourdisplayconguration,andthenright-clickthemonitoriconandselect
eitherCloneModeorExtendedMode.
4.ClickOK.
•ForacomputerthatsupportstheIntel®graphicscard:
–ForWindows7:
1.PressCtrl+Alt+F12.TheIntelGraphicsandMediaControlPanelwindowopens.
2.SelectAdvancedModeandclickOK.
3.SelectMultipleDisplays.
4.IntheOperatingModeeld,selectanyofthefollowingoptions.
–SingleDisplay:Dependingonyourconguration,thecomputeroutputisdisplayedoneither
thecomputerdisplayortheDVImonitor.
–CloneDisplays:Thesamecomputeroutputisdisplayedonboththecomputerdisplayand
theDVImonitor.
–ExtendedDesktop:Differentcomputeroutputisdisplayedonthecomputerdisplayand
theDVImonitor.
–ForWindows8:
1.Movethecursortothetop-rightorbottom-rightcornerofthescreenandclicktheDevicescharm.
2.ClickSecondscreenandselectDuplicate,Extend,orSecondScreenOnly.
ConsiderationsforattachingaDVImonitor
ConnecttheDVImonitortotheexpansionunit,andturnitonbeforeyouturnonthecomputer.Otherwisethe
systemcannotrecognizetheDVImonitor.IftheoptionforenablingtheDVImonitorintheDisplayProperties
windowisnotdisplayed,tryclosingthewindowandopeningitagain.Iftheoptionstillisnotdisplayed,make
surethattheconnectorofthemonitorisattachedrmly,andrepeattheprocedureforattachingthemonitor.
UsingtheMiniDisplayPortconnector
YourcomputerhasaMiniDisplayPortconnector,adigitaldisplayinterfaceforconnectiontovarious
externaldevices,suchasCRTmonitors,LCDmonitors,projectors,orevenhigh-denitiontelevisions.This
compactconnectorenablesaplug-and-playsetupandsupportsadaptersthatcanplugintoDVI,VGA,or
HDMIconnectors.
TheMiniDisplayPortconnectorofyourcomputersupportsaudioaswellasvideostreaming.
Settingupapresentation
Todisplayinformationandmakepresentations,youcanattachadataprojectortoyourcomputerthrough
theVGAconnectoronyourcomputer.
Note:Itmaytakeseveralsecondsbeforetheprojectordisplaystheimage.Ifyoudonotseeyourdesktop
displayedafter60seconds,trypressingFn+F7toswitchbetweendifferentdisplayoutputlocations.
Yourprojectormighthaveoneormoreaudio-inputconnectors.Toprojectsound,youwillneedtoattachthe
comboaudiojackonyourcomputertotheseconnectors,usinganaudiocable(commerciallyavailable).
40UserGuide

UsingtheExtenddesktopfunction
YourcomputersupportsafunctionnamedtheExtenddesktopfunction.WiththeExtenddesktopfunction,
youcandisplayoutputonboththecomputerdisplayandanexternalmonitor.Youalsocandisplaydifferent
desktopimagesoneachmonitor.
ConsiderationsforusingtheExtenddesktopfunction
•WhenaprogramusingDirectDraworDirect3Displayedinfull-screenmode,itisshownonlyonthe
primarydisplay.
•IfyouwanttoshowDOSfull-screenwhileintheExtenddesktopmode,onlytheprimarydisplayshows
DOS;theotherdisplayisblackedout.
•IfyourcomputerhastheIntelgraphicscard,youcandesignatetheotherdisplayastheprimarydisplay
bydoingthefollowing:
1.Right-clickonthedesktopandselectScreenResolution.
2.ClickthedesireddisplayimageandselecttheMakethismymaindisplaycheckbox.
3.ClickOK.
EnablingtheExtenddesktopfunction
ToenabletheExtenddesktopfunction,dothefollowing:
1.Connecttheexternalmonitortothemonitorconnector;thenconnectthemonitortoanelectricaloutlet.
2.Turnontheexternalmonitor.
3.PressFn+F7,thenselectExtend.
Tochangetheresolutionandcolorqualityforeachmonitor,dothefollowing:
1.Right-clickonthedesktop,andclickScreenresolution.
2.Clickthemonitor-1icon(fortheprimarydisplay,thecomputerdisplay).
3.Settheresolutionfortheprimarydisplay.
4.Clickthemonitor-2icon(forthesecondarydisplay,theexternaldisplay).
5.Settheresolutionforthesecondarydisplay.
6.ClickAdvancedsettingsandsetupthecolorqualityontheMonitortab.
7.ClickOKtoapplythechanges.
UsingtheNVIDIAOptimusGraphicsfeature
SomeThinkPadnotebookcomputerssupporttheNVIDIAOptimusGraphicsfeature.
Toachievethebestbalancebetweenthecomputerperformanceandalongbatterylife,dependingonthe
graphicsqualitydemandoftherunningprogramandthesettingsofthepowerplanthatyouuse,theNVIDIA
OptimusGraphicsfeatureautomaticallyswitchesbetweenHighPerformanceGraphicsandEnergySaving
Graphics,withnoneedtorestartyourcomputer,closeprograms,orintervenemanually.
Usingthecolorsensor
Somemodelsareequippedwithacolorsensor.Thecolorsensorenablesyoutomeasureandadjustthe
coloraccuracyofyourdisplays.
Tousethecolorsensor,dothefollowing:
•ForWindows7:ClickStart➙AllPrograms➙X-Rite➙ColorCalibrator➙PANTONEColorCalibrator.
Chapter2.Usingyourcomputer41

•ForWindows8:Movethecursortothetop-rightorbottom-rightcornerofthescreentodisplaythe
charms.ClicktheSearchcharmandsearchX-Rite.
Ifyourcomputercomeswithacolorsensor,thedisplayprovidesacolorprolethatcanworkwiththe
MicrosoftImageColorManagement(ICM)function.Ifthegraphicssoftwareyouareusingiscompatible
withICM,youcandisplayacolorimageonyourmonitorandmatchitwiththesamequalityoneonanother
device,suchasascanneroraprinter.
FordetailsonMicrosoftICM,refertotheWindowshelpinformationsystem.
Important:Afteryouusethecolorsensorforthersttime,acalibrationproleECCM2SensorData.datis
generatedandsavedinthedirectoryC:\ProgramData\X-Rite\ECCM-2.Backupthiscalibrationproleonan
externalmediadeviceincaseboththecolorsensorandtheharddiskdrive(orsolid-statedrive)needto
bereplaced.
Note:ThecolorproleforThinkPadLCDhasbeenpreinstalledonyourcomputeralready.Ifyouneedto
installadifferentcolorprole,see“InstallingtheThinkPadmonitorleforWindows2000/XP/Vista/7/8onthe
Windows7operatingsystem”onpage114.Ifyouhavemeasuredandadjustedthecoloraccuracyofyour
displaybyuseofacolorsensor,youmightalsousethecolorprolecreatedduringthatprocess.
Usingaudiofeatures
Yourcomputerisequippedwiththefollowing:
•Comboaudiojack,1/8inch(3.5mm)indiameter
•Built-inspeakers
•Built-inmicrophones
Yourcomputeralsohasanaudiochipthatenablesyoutoenjoyvariousmultimediaaudiofeatures,such
asthefollowing:
•RecordingandplaybackofPCMandWAVles
•PlaybackofMIDIandMP3les
•Recordingfromvarioussoundsources,suchasaheadsetattached
Thefollowingtableshowswhichfunctionsoftheaudiodevicesattachedtothejacksonyourcomputeror
dockingstationaresupported.
Table3.Audiofeaturelist
JackHeadsetwitha3.5mm
4-poleplug
ConventionalheadphoneConventionalmicrophone
ComboaudiojackHeadphoneand
microphonefunctions
supported
Headphonefunction
supported
Notsupported
Headphonejackofthe
dockingstation
Onlyheadphonefunction
supported
Microphonefunctionnot
supported
Headphonefunction
supported
Notsupported
Microphonejackofthe
dockingstation
NotsupportedNotsupportedMicrophonefunction
supported
Tocongurethemicrophoneforoptimizedsoundrecording,usetheRealtekHDAudioManagerprogram.To
starttheprogram,gotoControlPanelandclickHardwareandSound➙RealtekHDAudioManager.
42UserGuide

Usingtheintegratedcamera
Ifyourcomputerhasanintegratedcamera,youcanusethecameratopreviewyourvideoimageand
takeasnapshotofyourcurrentimage.
Tostartthecamera,dothefollowing:
•ForWindows7:PressFn+F6toopentheCommunicationssettingswindow.
•ForWindows8:PressFn+F6tostarttheLenovoSettingsprogram.ThenclickCamera.
Whenthecameraisstarted,thegreencamera-in-useindicatorturnson.
Youalsocanusetheintegratedcamerawithotherprogramsthatprovidefeaturessuchasphotographing,
videocapturing,andvideoconferencing.Tousetheintegratedcamerawithotherprograms,openoneofthe
programsandstartthephotographing,videocapturing,orvideoconferencingfunction.Then,thecamera
willstartautomaticallyandthegreencamera-in-useindicatorwillturnon.Formoreinformationaboutusing
thecamerawithaprogram,refertothehelpinformationsystemoftheprogram.
Conguringcamerasettings
Youcancongurethecamerasettingstomeetyourneeds,suchasadjustingthequalityofthevideooutput.
Tocongurethecamerasettings,dothefollowing:
•ForWindows7:PressFn+F6.TheCommunicationssettingswindowopens.ClicktheManageSettings
buttonandcongurethecamerasettingsasdesired.
•ForWindows8,dooneofthefollowing:
–Congurethecamerasettingsdirectlyfromtheprogramthatisusingthecamera.Fordetails,seethe
helpinformationsystemoftheprogram.
–ClickLenovoSettingsfromtheStartscreen.ThenclickCamera.Followtheinstructionsonthe
screentocongurethecamerasettingsasdesired.
Usingtheopticaldrive
YourcomputersupportsDVD-ROMDriveandMultiBurnerDrive.
DVD-ROMDrive
ThisdrivecanreadDVD-ROMdiscsandalltypesofCDs,suchasCD-ROMdiscs,CD-RWdiscs,CD-R
discs,andaudioCDs.Thisdrivehasnorecordingcapability.
MultiBurnerdrive
ThisdrivecanreadDVD-ROMdiscs,DVD-Rdiscs,DVD-RAMdiscs,DVD-RWdiscs,andalltypesofCDs,
suchasCD-ROMdiscs,CD-RWdiscs,CD-Rdiscs,andaudioCDs.Inaddition,itcanrecordonDVD-R
discs,DVD-RWdiscs,typeIIDVD-RAMdiscs,CD-RWstandardandhighspeeddiscs,andCD-Rdiscs.
UsinganExpressCard,aashmediacard,orasmartcard
Dependingonthemodel,yourcomputermighthaveanExpressCardslotfora34mm-widecard,amedia
cardreaderslot,orasmartcardreaderslot.
Ifyourcomputerhasamediacardreaderslot,itsupportsthefollowingcards:
•SecureDigital(SD)card
•SecureDigitalHigh-Capacity(SDHC)card
Chapter2.Usingyourcomputer43

•SecureDigitaleXtended-Capacity(SDXC)card
•MultiMediaCard(MMC)
Notes:
•YourcomputerdoesnotsupporttheCPRMfeaturefortheSDcard.
•Whiletransferringdatatoorfromaashmediacard,suchasanSDcard,donotputyourcomputerinto
sleeporhibernationmodebeforethedatatransferiscomplete;otherwise,yourdatacouldbecome
damaged.
InstallinganExpressCard,aashmediacard,orasmartcard
Attention:
•Beforeyoustartinstallingacard,touchametaltableoragroundedmetalobject.Thisactionreducesany
staticelectricityfromyourbody.Thestaticelectricitycoulddamagethecard.
•DonotinsertanExpressCardwhilethecomputerisinsleepmodeorhibernationmode.Otherwise,the
computermightnotrespondwhenyoutrytoresumeusingit.
Toinstallacard,dothefollowing:
1.Locatetheappropriatetypeofslotforyourcard.See“Locatingcomputercontrols,connectors,
andindicators”onpage1.
2.Makesurethatthecardiscorrectlyoriented:
•ForExpressCard:Thenotchededgeofthecardisfacingupwardandpointingtowardtothecardslot.
•Forashmediacard:Themetalcontactsarefacingdownandpointingtowardthecardslot.
•Forsmartcard:Themetalcontactsarefacingupwardandpointingtowardthecardslot.
3.Pressthecardrmlyintothecardslot.
Iftheplug-and-playfeatureisnotenabledfortheinstalledExpressCard,ashmediacard,orsmartcard,
dothefollowingtoenablethefeature:
1.OpenControlPanel.
2.ClickHardwareandSound.
3.ClickDeviceManager.Ifyouarepromptedforanadministratorpasswordorconrmation,typethe
passwordorprovideconrmation.
4.FromtheActionmenu,selectAddlegacyhardware.TheAddHardwareWizardstarts.
5.Followtheinstructionsonthescreen.
RemovinganExpressCard,aashmediacard,orasmartcard
Attention:
•Beforeremovingacard,stopthecardrst.Otherwise,dataonthecardmightbecorruptedorlost.
•Donotremoveacardwhilethecomputerisinsleepmodeorhibernationmode.Otherwise,thesystem
mightnotrespondwhenyoutrytoresumeoperation.
Toremoveacard,dothefollowing:
1.ClickthetriangulariconintheWindowsnoticationareatoshowhiddenicons.Then,right-clickthe
SafelyRemoveHardwareandEjectMediaicon.
2.Selecttheitemyouwanttoremovetostopthecard.
3.Pressthecardtoejectitfromyourcomputer.
4.Removethecardandstoreitsafelyforfutureuse.
44UserGuide

Note:IfyoudonotremovethecardfromyourcomputerafteryouejectthecardfromtheWindowsoperating
system,thecardcannolongerbeaccessed.Toaccessthecard,youmustremoveitrst,theninsertitagain.
Chapter2.Usingyourcomputer45

46UserGuide
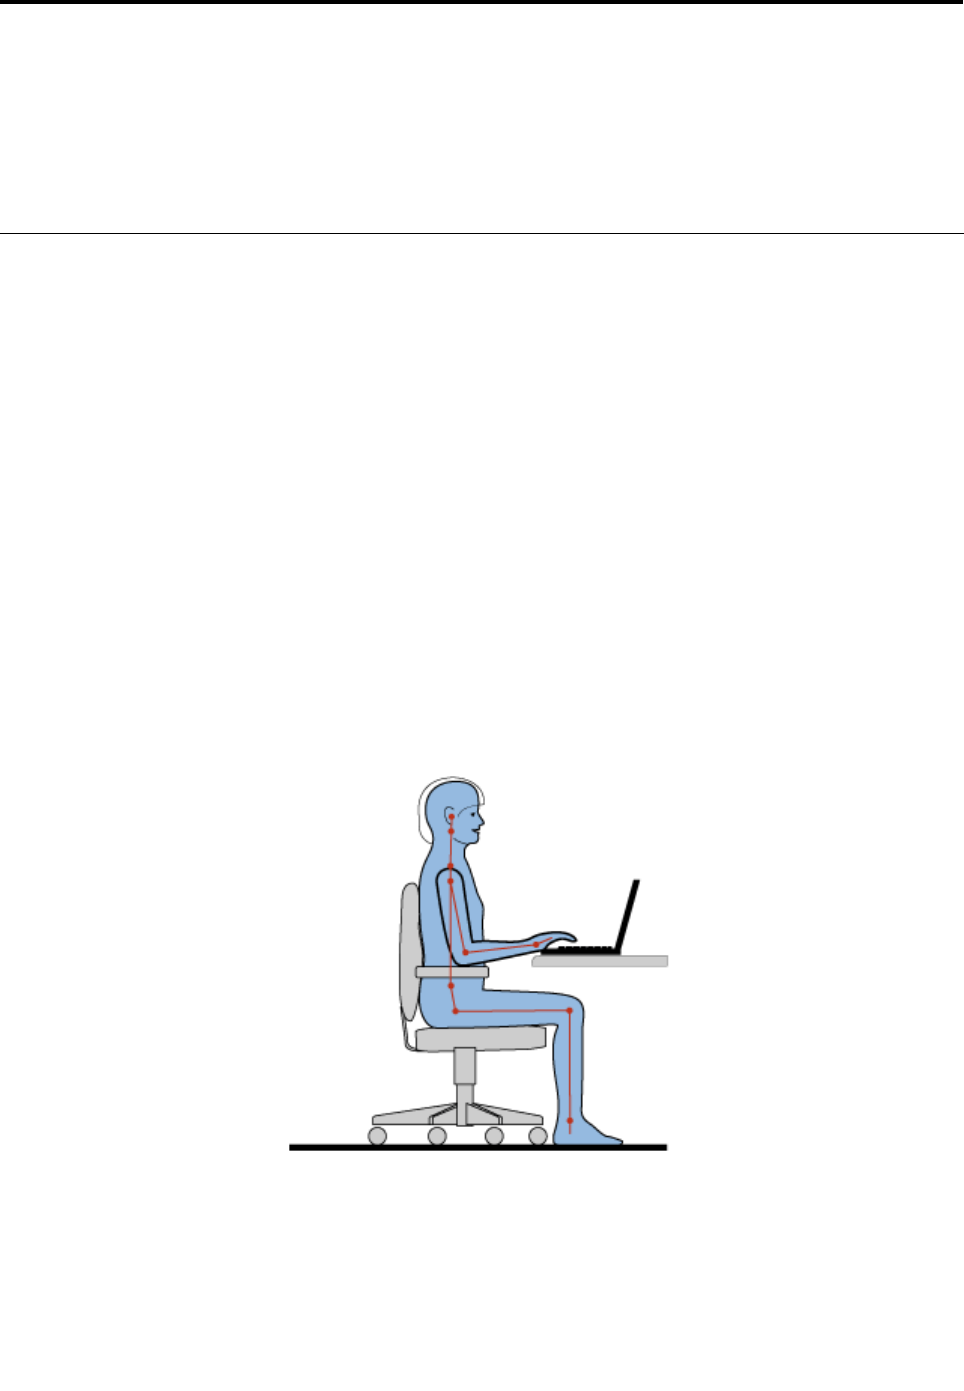
Chapter3.Youandyourcomputer
Thischapterprovidesinformationaboutaccessibility,comfort,andtravelingwithyourcomputer.
•“Accessibilityandcomfort”onpage47
•“Travelingwithyourcomputer”onpage49
Accessibilityandcomfort
Goodergonomicpracticeisimportanttogetthemostfromyourpersonalcomputerandtoavoiddiscomfort.
Arrangeyourworkplaceandtheequipmentyouusetosuityourindividualneedsandthekindofwork
thatyouperform.Inaddition,usehealthyworkhabitstomaximizeyourperformanceandcomfortwhile
usingyourcomputer.
Thefollowingtopicsprovideinformationaboutarrangingyourworkarea,settingupyourcomputer
equipment,andestablishinghealthyworkhabits.
Lenovoiscommittedtoprovidingthelatestinformationandtechnologytoourcustomerswithdisabilities.
Refertoouraccessibilityinformationwhichoutlinesoureffortsinthisarea.
Ergonomicinformation
Workinginthevirtualofcemightmeanadaptingtofrequentchangesinyourenvironment.Forexample,
adaptingtothesurroundinglightsources,properseating,andtheplacementofyourcomputerhardware
canhelpyouimproveyourperformanceandachievegreatercomfort.
Thisexampleshowssomeoneinaconventionalsetting.Evenwhennotinsuchasetting,youcanfollow
manyofthesetips.Developgoodhabits,andtheywillserveyouwell.
Generalposture:Makeminormodicationsinyourworkingposturetodetertheonsetofdiscomfortcaused
bylongperiodsofworkinginthesameposition.Frequent,shortbreaksfromyourworkalsohelptoprevent
minordiscomfortassociatedwithyourworkingposture.
Display:Positionthedisplaytomaintainacomfortableviewingdistanceof510-760mm(20-30inches).
Avoidglareorreectionsonthedisplayfromoverheadlightingoroutsidesourcesoflight.Keepthedisplay
©CopyrightLenovo201247

screencleanandsetthebrightnesstolevelsthatenableyoutoseethescreenclearly.PressFn+F8
orFn+F9toadjustdisplaybrightness.
Headposition:Keepyourheadandneckinacomfortableandneutral(vertical,orupright)position.
Chair:Useachairthatgivesyougoodbacksupportandseatheightadjustment.Usechairadjustmentsto
bestsuityourdesiredposture.
Armandhandposition:Ifavailable,usechairarmrestsoranareaonyourworkingsurfacetoprovide
weightsupportforyourarms.Keepyourforearms,wrists,andhandsinarelaxedandneutral(horizontal)
position.Typewithasofttouchwithoutpoundingthekeys.
Legposition:Keepyourthighsparalleltotheoorandyourfeetatontheoororonafootrest.
Whatifyouaretraveling?
Itmightnotbepossibletoobservethebestergonomicpracticeswhenyouareusingyourcomputer
whileonthemoveorinacasualsetting.Regardlessofthesetting,trytoobserveasmanyofthetipsas
possible.Sittingproperlyandusingadequatelighting,forexample,willhelpyoumaintaindesirablelevels
ofcomfortandperformance.
Questionsaboutvision?
ThevisualdisplayscreensofThinkPadnotebookcomputersaredesignedtomeetthehigheststandards
andtoprovideyouwithclear,crispimagesandlarge,brightdisplaysthatareeasytosee,yeteasyonthe
eyes.Ofcourse,anyconcentratedandsustainedvisualactivitycanbetiring.Ifyouhavequestionsoneye
fatigueorvisualdiscomfort,consultavisioncarespecialistforadvice.
Comfort
Observethefollowingguidelinestoachievegreatercomfortandimproveperformance.
Activesittingandrestbreaks:Thelongeryousitandworkwithyourcomputer,themoreimportantitisto
observeyourworkingposture.Follow“Ergonomicinformation”onpage47andpractice“activesitting”to
avoiddiscomfortassociatedwithyourworkingpostures.Makingminorvoluntaryposturalchangesand
takingshortfrequentworkbreaksarethekeyingredientsforhealthycomputing.Yourcomputerislightand
mobile;youcaneasilyrepositionyourworkingsurfacetoaccommodatemanyposturemodications.
Workareasetupoptions:Familiarizeyourselfwithallofyourofcefurnituresothatyouknowhowto
adjustyourworksurface,seat,andotherworktoolstoaccommodateyourpreferencesforcomfort.
Ifyourworkareaisnotinanofcesetting,besuretotakespecialnoteofemployingactivesitting
andtakingworkbreaks.ManyThinkPadproductsolutionsareavailabletohelpyoumodifyandexpand
yourcomputertobestsuityourneeds.AccessthefollowingWebsitetoviewsomeoftheseoptions:
http://www.lenovo.com/accessories/services/index.html.Exploreyouroptionsfordockingsolutionsand
externalproductsthatprovidetheadjustabilityandfeaturesthatyouwant.
Accessibilityinformation
Lenovoiscommittedtoprovidingpeoplewithdisabilitiesgreateraccesstoinformationandtechnology.
Asaresult,thefollowinginformationprovideswaystohelpusersthathavehearing,vision,andmobility
limitationsgetthemostoutoftheircomputerexperience.
Assistivetechnologiesenableuserstoaccessinformationinthemostappropriateway.Someofthese
technologiesarealreadyprovidedinyouroperatingsystem.Otherscanbepurchasedthroughvendors,or
accessedthroughtheWorldWideWebhttp://www.lenovo.com/healthycomputing.
48UserGuide

Assistivetechnologies
SomeaccessibilitytechnologiesareavailablethroughtheAccessibilityOptionsprogram.Depending
onyouroperatingsystem,thenumberofaccessibilityoptionsavailablevaries.Ingeneral,accessibility
optionsenhancethewayuserswithhearing,vision,ormobilitylimitationsnavigateandusetheircomputer.
Forexample,someusersmightnothavethenemotorskillsrequiredtouseamouseorselectkey
combinations.Otherusersmightrequirelargerfontsorhigh-contrastdisplaymodes.Insomecases,
magniersandbuilt-inspeechsynthesizersareavailable.Fordetailedinformationabouteachofthese
features,consulttheMicrosofthelpinformationsystem.
TousetheAccessibilityOptionsprogram,openControlPanelandclickEaseofAccess➙Easeof
AccessCenter.
Screen-readertechnologies
Screen-readertechnologiesareprimarilyfocusedonsoftwareprograminterfaces,helpinformationsystems,
andavarietyofonlinedocuments.However,inthecasewhereascreenreadercannotreaddocuments,
thedocumentmustrstgothroughaconversionprocess.OnesolutionconvertsAdobePDFlesintoa
formatthatisreadbythescreen-readerprograms.ThissolutionisaWeb-basedserviceprovidedbyAdobe
SystemsIncorporated.Throughhttp://access.adobe.com,AdobePDFdocumentscanbeconvertedto
HTMLorplaintextinmanylanguages.OneconversionoptionconvertsPDFdocumentsontheInternet.A
secondoptionenablesuserstosubmittheURLofanAdobePDFlethroughe-mailtoconvertittoHTMLor
ASCIItext.AdobePDFlesonalocalharddiskdrive,localCD-ROM,orLANalsocanbeconvertedby
attachingtheAdobePDFletoane-mailmessage.
Travelingwithyourcomputer
Thistopicprovidesinformationtohelpyouworkwithyourcomputerwhenyouaretraveling.
Traveltips
Usethefollowingtraveltipstotravelmorecondentlyandefcientlywithyourcomputer.
•Althoughitissafetoallowyourcomputertogothroughthex-raymachinesatairportsecuritystations,it
isimportanttokeepyoureyesonthecomputeratalltimestopreventtheft.
•Considerbringinganelectricaladapterforuseinanairplaneorautomobile.
•Ifyoucarryanacpoweradapter,detachtheaccordfromittoavoiddamagingthecord.
Traveltipsonairplanes
Ifyoucarryyourcomputerintoanairplane,takenoteofthefollowingtips:
•Ifyouintendtouseyourcomputerorwirelessservices(suchasInternetandBluetooth),checkwiththe
airlineforrestrictionsandavailabilityofservicesbeforeboardingtheairplane.Iftherearerestrictions
ontheuseofcomputerswithwirelessfeaturesontheairplane,youmustabidebythoserestrictions.If
necessary,disablewirelessfeaturesbeforeboarding.
•Becarefulabouttheseatinfrontofyouonairplanes.Angleyourcomputerdisplaysothatitdoesnotget
caughtwhenthepersoninfrontofyouleansback.
•Whentakingoff,remembertoturnoffyourcomputerorputitintohibernationmode.
Travelaccessories
Thefollowingisachecklistofitemstoconsiderpackingwhenyouaregoingtotravel:
•ThinkPadacpoweradapter
•ThinkPadAC/DCComboAdapter
Chapter3.Youandyourcomputer49

•Externalmouse,ifyouareaccustomedtousingone
•Ethernetcable
•Extrabattery,charged
•Aqualitycarryingcasethatprovidesadequatecushionandprotection
•Externalstoragedevice
Ifyouaretravelingtoanothercountry,youmightwanttoconsideranacpoweradapterforthecountryto
whichyouaretraveling.
Topurchasetravelaccessories,gotohttp://www.lenovo.com/accessories.
50UserGuide

Chapter4.Security
Thischapterprovidesinformationabouthowtoprotectyourcomputerfromtheftandunauthorizeduse.
•“Attachingamechanicallock”onpage51
•“Usingpasswords”onpage51
•“Harddisksecurity”onpage56
•“Settingthesecuritychip”onpage57
•“Usingthengerprintreader”onpage58
•“Noticeondeletingdatafromyourharddiskdriveorsolid-statedrive”onpage61
•“Usingandunderstandingrewalls”onpage62
•“Protectingdataagainstviruses”onpage62
Attachingamechanicallock
Youcanattachamechanicallocktoyourcomputertohelppreventitfrombeingremovedwithoutyour
permission.
Attachamechanicallocktothekeyholeofthecomputer;thensecurethechainonthelocktoastationary
object.Refertotheinstructionsshippedwiththemechanicallock.
Note:Youareresponsibleforevaluating,selecting,andimplementingthelockingdeviceandsecurity
feature.Lenovomakesnocomments,judgments,orwarrantiesaboutthefunction,quality,orperformance
ofthelockingdeviceandsecurityfeature.
Usingpasswords
Byusingpasswords,youcanhelppreventyourcomputerfrombeingusedbyothers.Onceyouseta
password,apromptisdisplayedonthescreeneachtimeyouturnonthecomputer.Enteryourpasswordat
theprompt.Youcannotusethecomputerunlessyoutypethecorrectpassword.
Passwordsandsleepmode
IfyouhavesetaWindowspasswordandyouputyourcomputerintosleepmodebypressingFn+F4,you
willbepromptedtoenterthepasswordwhenresumingoperation.
Ifanyharddiskdriveorsolid-statedrivealsohasapassword,itisunlockedautomaticallywhenyouresume
operation.
Typingpasswords
Ifthisiconisdisplayed,typeapower-onpasswordorasupervisorpassword.
Ifthisiconisdisplayed,typeauserharddiskpassword.Ifyouwanttotypeamasterharddisk
password,dothefollowing:
1.PressF1.Theiconchangestothis:
©CopyrightLenovo201251

2.Typethemasterharddiskpassword.
Note:Toreturntotheicon,pressF1again.
Note:PresstheBackspacekeyifyouenterawrongpasswordwhileyouaretypingyourpassword.
Power-onpassword
Youcansetapower-onpasswordtohelpprotectyourcomputeragainstaccessbyunauthorizedusers.
Ifyousetapower-onpassword,thepasswordpromptisdisplayedonthescreenwheneveryouturnonthe
computer.Youmustenterthecorrectpasswordtostartusingthecomputer.
Settingapower-onpassword
1.Printtheseinstructions.
2.Saveallopenles,andexitallprograms.
3.Turnyourcomputeroffandthenturnitonagain.
4.Whenthelogoscreenisdisplayed,pressF1.TheThinkPadSetupprogrammainmenuopens.
5.SelectSecurity,usingthecursordirectionalkeystomovedownthemenu.
6.SelectPassword.
7.SelectPower-onPassword.
8.IntheEnterNewPasswordeld,typeadesiredpassword,andpressEnter.
9.IntheConrmNewPasswordeld,retypethepasswordandpressEnter.
Note:Youmightwanttonotedownyourpower-onpasswordinasafeplace.Otherwise,ifyou
forgetit,youhavetotakeyourcomputertoaLenovoreselleroramarketingrepresentativetohave
thepasswordcanceled.
10.IntheSetupNoticewindowthatisdisplayed,pressEntertocontinue.
11.PressF10.TheSetupConrmationwindowopens.SelectYestosavecongurationchangesandexit.
Changingorremovingthepower-onpassword
Tochangethepower-onpassword,followsteps1through7asintroducedabove.Enteryourcurrent
password.WhentheEnterNewPasswordeldisdisplayed,typeanewpasswordintheeldandthen
retypeittoverify.Toremovethepassword,followsteps1through7.Typeyourcurrentpassword.Whenthe
EnterNewPasswordeldisdisplayed,leaveitblankandpressEntertwice.
Harddiskpasswords
Twotypesofharddiskpasswordshelpprotecttheinformationstoredontheharddiskdriveorsolid-state
drive:
•Userharddiskpassword
•Masterharddiskpassword,whichrequiresauserharddiskpassword
Ifauserharddiskpasswordhasbeenset,butnomasterharddiskpasswordhasbeen,theusermustenter
theuserharddiskpasswordinordertogainaccesstolesandprogramsontheharddiskdrive.
Themasterpasswordcanbesetandusedonlybyasystemadministrator.Likeamasterkey,itenablesthe
administratortogetaccesstoanyharddiskdriveinasystem.Theadministratorsetsthemasterpassword;
nooneelseknowsit.Thentheadministratorsetsauserpasswordforeachcomputerinthenetwork,and
52UserGuide

tellseachuserthepasswordforhisorhercomputer.Theusercanthenchangetheuserpasswordas
desired,buttheadministratorstillcangetaccessbyusingthemasterpassword.
Note:Whenamasterharddiskpasswordisset,onlytheadministratorcanremovetheuserharddisk
password.
Settingaharddiskpassword
1.Printtheseinstructions.
2.Saveallopenles,andexitallprograms.
3.Turnoffyourcomputerandthenturnonagain.
4.Whenthelogoscreenisdisplayed,pressF1.TheThinkPadSetupprogrammainmenuopens.
5.SelectSecurity,usingthecursordirectionalkeystomovedownthemenu.
6.SelectPassword.
7.SelectHardDisk1Password.
8.Apasswordwindowopens.YouarepromptedtoselectUserorUser+Master.SelectUserifyouwant
tosetonlyoneharddiskpassword.Ifyouareanadministratororsupervisor,selectUser+Mastertoset
twopasswords.(Theusercanchangetheuserpasswordlater.)
•IfyouselectUseronly,dothefollowing:
a.Whenawindowfortypingthenewpasswordopens,typeyournewpasswordintheEnterNew
Passwordeld.PressEnter.
Notes:
–YoucansettheminimumlengthofaharddiskpasswordthroughSetMinimumLengthon
theSecuritymenu.
–Ifyousetaharddiskpasswordofoversevencharacters,theharddiskdrivecanbeusedonly
withacomputerthatcanrecognizeaharddiskpasswordofoversevencharacters.Ifyouthen
installtheharddiskdriveinacomputerthatcannotrecognizeaharddiskpasswordthat
containsmorethansevencharacters,youcannotgetaccesstothedrive.
b.IntheConrmNewPasswordeld,retypethepasswordyoujustenteredtoverifyit.PressEnter.
•IfyouselectUser+Master,dothefollowing:
a.Whenawindowfortypingthenewuserharddiskpasswordopens,typeyournewpasswordin
theEnterNewPasswordeld.PressEnter.
b.IntheConrmNewPasswordeld,retypethepasswordyoujustenteredtoverifyit.PressEnter.
c.Amessagewindowopensandpromptsyoutosetthemasterharddiskpassword.PressEnterto
continue.
d.Awindowfortypingthenewmasterharddiskpasswordopens.Typeyournewpasswordin
theEnterNewPasswordeld.PressEnter.
e.IntheConrmNewPasswordeld,retypethepasswordyoujustenteredtoverifyit.PressEnter.
Attention:Youmightwanttonotedownyourpasswordsandkeeptheminasafeplace.Otherwise,if
youforgettheuserpassword,orbothuserandmasterpasswords,Lenovocannotresetyourpasswords
orrecoverdatafromtheharddiskdrive.YoumusttakeyourcomputertoaLenovoresellerora
marketingrepresentativetohavetheharddiskdrivereplaced.Proofofpurchaseisrequired,andafee
willbechargedforpartsandservice.
9.IntheSetupNoticewindowthatisdisplayed,pressEntertocontinue.
10.PressF10.TheSetupConrmationwindowopens.SelectYestosavecongurationchangesandexit.
Chapter4.Security53

Thenexttimeyouturnonyourcomputer,youwillhavetotypetheuserormasterharddiskpasswordin
ordertostartyourcomputerandgetaccesstoyouroperatingsystem.
Changingorremovingaharddiskpassword
Tochangeorremovetheuserharddiskpassword,dothefollowing:
1.Followsteps1through7in“Settingaharddiskpassword”onpage53.
Note:YouneedtotypeyourpasswordtogetaccesstotheThinkPadSetupprogram.
2.SelectUserHDPandthendoeitherofthefollowing:
•Tochangetheuserharddiskpassword,typethecurrentpasswordintheEnterCurrentPassword
eld.ThentypethenewpasswordintheEnterNewPasswordeld,andretypethepassword
youjustenteredtoverifyitintheConrmNewPasswordeld.PressEnter,andaSetupNotice
windowisdisplayed.PressF10toexitfromtheSetupNoticewindow.Theuserharddiskpassword
willbechanged.
•Toremovetheuserharddiskpassword,typethecurrentpasswordintheEnterCurrentPassword
eld.ThenleavetheEnterNewPasswordandConrmNewPasswordeldsblank,andpress
Enter.ASetupNoticewindowisdisplayed.PressF10toexitfromtheSetupNoticewindow.The
userharddiskpasswordwillberemoved.
Tochangeorremovethemasterharddiskpasswords,dothefollowing:
1.Followsteps1through7in“Settingaharddiskpassword”onpage53.
Note:YouneedtotypeyourpasswordtogetaccesstotheThinkPadSetupprogram.
2.SelectMasterHDPandthendoeitherofthefollowing:
•Tochangethemasterharddiskpassword,typethecurrentmasterharddiskpasswordintheEnter
CurrentPasswordeld.ThentypethenewmasterharddiskpasswordintheEnterNewPassword
eld,andretypethepasswordyoujustenteredtoverifyitintheConrmNewPasswordeld.Press
Enter,andaSetupNoticewindowisdisplayed.PressF10toexitfromtheSetupNoticewindow.The
masterharddiskpasswordischanged.
•Toremovethemasterharddiskpassword,typethecurrentmasterharddiskpasswordintheEnter
CurrentPasswordeld.ThenleavetheEnterNewPasswordandConrmNewPasswordelds
blank,andpressEnter.ASetupNoticewindowisdisplayed.PressF10toexitfromtheSetupNotice
window.Boththeuserandmasterharddiskpasswordswillberemoved.
Supervisorpassword
ThesupervisorpasswordprotectsthesysteminformationstoredinThinkPadSetup.Noonecanchangethe
computercongurationwithoutthesupervisorpassword.Itprovidesthefollowingsecurityfeatures:
•Ifasupervisorpasswordisset,apasswordpromptisdisplayedwhenyoutrytostarttheThinkPadSetup
program.Unauthorizeduserscannotgetaccesstocongurationdata.
•Thesystemadministratorcanusethesupervisorpasswordtogetaccesstoacomputereveniftheuserof
thatcomputerhassetapower-onpassword.Thesupervisorpasswordoverridesthepower-onpassword.
•Ifbothasupervisorpasswordandapower-onpasswordareset,youcandothefollowingonlyifyou
havethesupervisorpassword:
–Deletingthepower-onpassword
–Changingordeletingthesupervisorpassword
–EnablingordisablingtheWakeonLANfeature
–EnablingordisablingtheInternalNetworkOptionROMfeature
–Changingdateandtime
54UserGuide

–EnablingordisablingtheLockUEFIBIOSSettingsfeature
–EnablingordisablingthePasswordatunattendedbootfeature
–Specifyingtheminimumlengthforpower-onpasswordsandharddiskpasswords
–Changingthesettingforthesecuritychip
–EnablingordisablingtheBootDeviceListF12Optionfeature
–EnablingordisablingtheBootOrderLockfeature
–EnablingordisablingtheFlashBIOSUpdatingbyEnd-Usersfeature
–Enablingordisablingtheinternalnetworkdevice
–Enablingordisablingtheinternalwirelessdevice
–EnablingordisablingtheinternalBluetoothdevice
–EnablingordisablingtheinternalwirelessWANdevice
–EnablingordisablingtheSecuritymode
–Enablingordisablingthengerprintreaderpriority
–Erasingthengerprintdata
Notes:
•ThesystemadministratorcansetthesamesupervisorpasswordonmanyThinkPadnotebookcomputers
tomakeadministrationeasier.
•ByenablingtheLockUEFIBIOSSettingsfeatureonthePasswordmenuandsettingthesupervisor
password,youmakeitimpossibleforanyonebutyoutomakecongurationchanges.
Setting,changing,orremovingasupervisorpassword
Onlyasystemadministratorcanset,change,orremoveasupervisorpassword.
Toset,change,orremoveasupervisorpassword,dothefollowing:
1.Printtheseinstructions.
2.Saveallopenles,andexitallprograms.
3.Turnyourcomputeroffandthenturnitonagain.
4.Whenthelogoscreenisdisplayed,pressF1.TheThinkPadSetupprogrammainmenuopens.
5.SelectSecurity,usingthecursordirectionalkeystomovedownthemenu.
6.SelectPassword.
7.SelectSupervisorPassword.
8.Awindowopens,promptingyoutoenteranewpassword.Dependingonyourneeds,dooneofthe
following:
•Tosetapassword,dothefollowing:
a.IntheEnterNewPasswordeld,typeadesiredpasswordandpressEnter.
b.IntheConrmNewPasswordeld,retypethepasswordandpressEnter.
•Tochangeapassword,dothefollowing:
a.IntheEnterCurrentPasswordeld,typethecurrentsupervisorpasswordandpressEnter.
b.IntheEnterNewPasswordeld,typethenewsupervisorpassword;thenretypethepassword
youjustenteredtoverifyitintheConrmNewPasswordeld.
•Toremoveapassword,dothefollowing:
a.IntheEnterCurrentPasswordeld,typethecurrentsupervisorpasswordandpressEnter.
Chapter4.Security55

b.LeavetheEnterNewPasswordandConrmNewPasswordeldsblank.PressEnter.
Attention:Youmightwanttonotedownyourpasswordandkeepitinasafeplace.Ifyouforget
yoursupervisorpassword,Lenovocannotresetyourpassword.Youmusttakeyourcomputertoa
LenovoreselleroraLenovomarketingrepresentativetohavethesystemboardreplaced.Proofof
purchaseisrequired,andafeewillbechargedforpartsandservice.
9.IntheSetupNoticewindowthatisdisplayed,pressEntertocontinue.
10.PressF10.TheSetupConrmationwindowopens.SelectYestosavecongurationchangesandexit.
ThenexttimeyouopentheThinkPadSetupprogram,youwillbepromptedtotypeyourpasswordtoproceed.
Harddisksecurity
Toprotectpasswordsfromunauthorizedsecurityattacks,severalofthelatesttechnologiesandalgorithms
areintegratedintoUEFIBIOSandhardwaredesignofThinkPadnotebookcomputers.
Tomaximizesecurity,dothefollowing:
1.Setapower-onpasswordaswellasaharddiskpasswordforyourinternalsolid-statedriveorharddisk
drive.Refertotheproceduresin“Usingpasswords”onpage51.Forsecurity,alongerpasswordis
recommended.
2.ToprovidereliablesecurityforUEFIBIOS,usethesecuritychipandasecurityprogramwithaTrusted
PlatformModulemanagementfeature.Referto“Settingthesecuritychip”onpage57.
Note:TheMicrosoftWindows7andWindows8operatingsystemsupporttheTPMmanagement
feature.
3.IfaDiskEncryptionharddiskdriveandEncryptionsolid-statedriveisinstalledinyourcomputer,
besuretoprotectthecontentsofyourcomputermemoryfromunauthorizedaccessbyuseofdrive
encryptionsoftware,suchasMicrosoftWindowsBitLocker®DriveEncryption,whichissupportedinthe
UltimateandEnterpriseeditionsoftheWindows7operatingsystemandWindows8operatingsystem.
See“UsingWindowsBitLockerDriveEncryption”onpage56.
4.Beforeyoudisposeof,sell,orhandoveryourcomputer,besuretodeletedatastoredonit.See“Notice
ondeletingdatafromyourharddiskdriveorsolid-statedrive”onpage61.
Notes:ThefollowingdrivescanbeprotectedbyUEFIBIOS:
•Theharddiskdrivebuiltintoyourcomputer.
•TheharddiskdriveinstalledinaSerialUltrabayEnhancedbay.
UsingWindowsBitLockerDriveEncryption
Tohelpprotectyourcomputeragainstunauthorizedaccess,besuretousedriveencryptionsoftware,such
asWindowsBitLockerDriveEncryption.
WindowsBitLockerDriveEncryptionisanintegralsecurityfeatureofWindows7andandWindows8
operatingsystems.ItissupportedintheUltimateandEnterpriseeditionsoftheWindows7operating
systemandWindows8operatingsystem.Itcanhelpyouprotecttheoperatingsystemanddatastored
onyourcomputer,evenifyourcomputerislostorstolen.BitLockerworksbyencryptingalluserand
systemles,includingtheswapandhibernationles.
BitLockerusesaTrustedPlatformModuletoprovideenhancedprotectionforyourdataandtoensureearly
bootcomponentintegrity.AcompatibleTPMisdenedasaV1.2TPM.
TochecktheBitLockerstatus,gotoControlPanelandclickSystemandSecurity➙BitLockerDrive
Encryption.
56UserGuide

FordetailsaboutWindowsBitLockerDriveEncryption,seethehelpinformationsystemoftheWindows
operatingsystem,orsearchfor“MicrosoftWindowsBitLockerDriveEncryptionStep-by-StepGuide”on
theMicrosoftWebsite.
DiskEncryptionharddiskdriveandEncryptionsolid-statedrive
SomemodelscontaintheDiskEncryptionharddiskdriveorEncryptionsolid-statedrive.Thisfeature
helpstoprotectyourcomputeragainstsecurityattacksonmedia,NANDashordevicecontrollersbyuse
ofahardwareencryptionchip.Fortheefcientuseoftheencryptionfeature,besuretosetaharddisk
passwordfortheinternalstoragedevice.
Settingthesecuritychip
Strictsecurityrequirementsareimposedonnetworkclientcomputersthattransfercondentialinformation
electronically.Dependingontheoptionsyouordered,yourcomputermighthaveanembeddedsecuritychip,
acryptographicmicroprocessor.WiththesecuritychipandClientSecuritySolution,youcandothefollowing:
•Protectyourdataandsystem
•Strengthenaccesscontrols
•Securecommunications
Settingthesecuritychip
ThechoicesofferedontheSecurityChipsubmenuundertheSecuritymenuofThinkPadSetupareas
follows:
•SecurityChip:activate,inactivate,ordisablethesecuritychip.
•SecurityReportingOptions:enableordisableeachsecurityreportingoption.
•ClearSecurityChip:cleartheencryptionkey.
Notes:
•BesurethatthesupervisorpasswordhasbeensetinThinkPadSetup.Otherwiseanyonecanchangethe
settingsforthesecuritychip.
•IfyouareusingClientSecuritySolution,handlethesecuritychipbydoingthefollowing:
–Donotclearthesecuritychip.Ifyoudo,thefunctionsassignedtothekeyswillbeerased.
–Donotdisablethesecuritychip.Ifyoudo,ClientSecuritySolutionwillnotwork.
•Ifthesecuritychipisremovedorreplaced,oranewonehasbeenadded,thecomputerwillnotstart.You
willhearfourcyclesoffourbeepseach.
•Ifthesecuritychipisinactiveordisabled,theClearSecurityChipoptionwillnotbedisplayed.
•Whenyouclearthesecuritychip,besuretoturnyourcomputeroffandthenturnitonagainafteryouset
thesecuritychiptoActive.Otherwise,theClearSecurityChipoptionisnotdisplayed.
TosetanitemontheSecurityChipsubmenu,dothefollowing:
1.Printtheseinstructions.
2.Saveallopenles,andexitallprograms.
3.Turnyourcomputeroffandthenturnitonagain.
4.Whenthelogoscreenisdisplayed,pressF1.TheThinkPadSetupprogrammainmenuopens.
5.Usingthecursorkeys,movetoSecurity.TheSecuritymenuopens.
6.Usingthecursorkeys,movetoSecurityChip,andpressEnter.TheSecurityChipsubmenuopens.
7.Usingthecursorkeys,movetoanitemyouwanttoset.Whentheitemishighlighted,pressEnter.
Chapter4.Security57
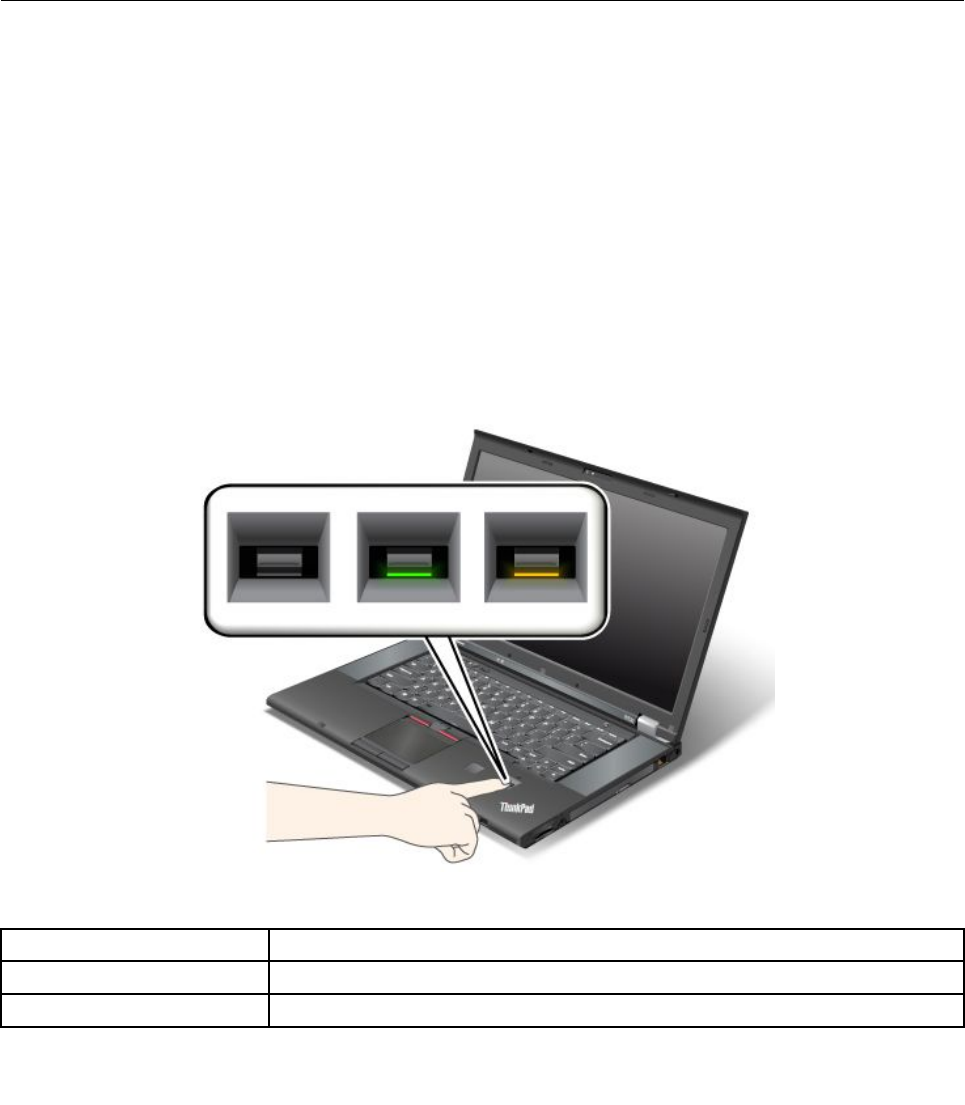
8.Setotheritemsthatyouwanttoset.
9.PressF10tosavechangesandexit.
10.PressEnterintheSetupConrmationwindowtoconrmtheexit.
Tosetthesecuritychip,youhavetostartClientSecuritySolution,andfollowtheinstructionsonthescreen.
Note:ClientSecuritySolutionisnotpreinstalledonWindows7andWindows8models.Tocongure
thesecuritychip,youneedtodownloadthelatestversionofClientSecuritySolutionfromtheLenovo
Website.TodownloadClientSecuritySolution,gotohttp://www.lenovo.com/support.Thenfollowthe
instructionsonthescreen.
Usingthengerprintreader
Dependingontheoptionsyouordered,yourcomputermighthaveanintegratedngerprintreader.By
enrollingyourngerprintandassociatingitwithapower-onpassword,aharddiskpassword,orboth
passwordsbeforehand,youcanstartthecomputer,logontothesystem,andentertheThinkPadSetupby
swipingyourngeroverthereader,withouttypingapassword.Thusngerprintauthenticationcanreplace
passwordsandenablesimpleandsecureuseraccess.
Enrollingyourngerprint
1.Turnonyourcomputer.
2.TostartLenovoFingerprintsoftware,referto“Lenovoprograms”onpage15.
3.Followtheinstructionsonthescreentoenrollyourngerprint.Fordetails,refertothehelpinformation
systemoftheprogram.
LEDbehaviorofthengerprintreader
Table4.LEDbehaviorlist_ngerprintreader
LEDbehaviorDescription
SteadygreenThengerprintreaderisreadytoswipe.
BlinkinggreenonceThengerprintisbeingauthenticatedorhasbeenauthenticated.
58UserGuide
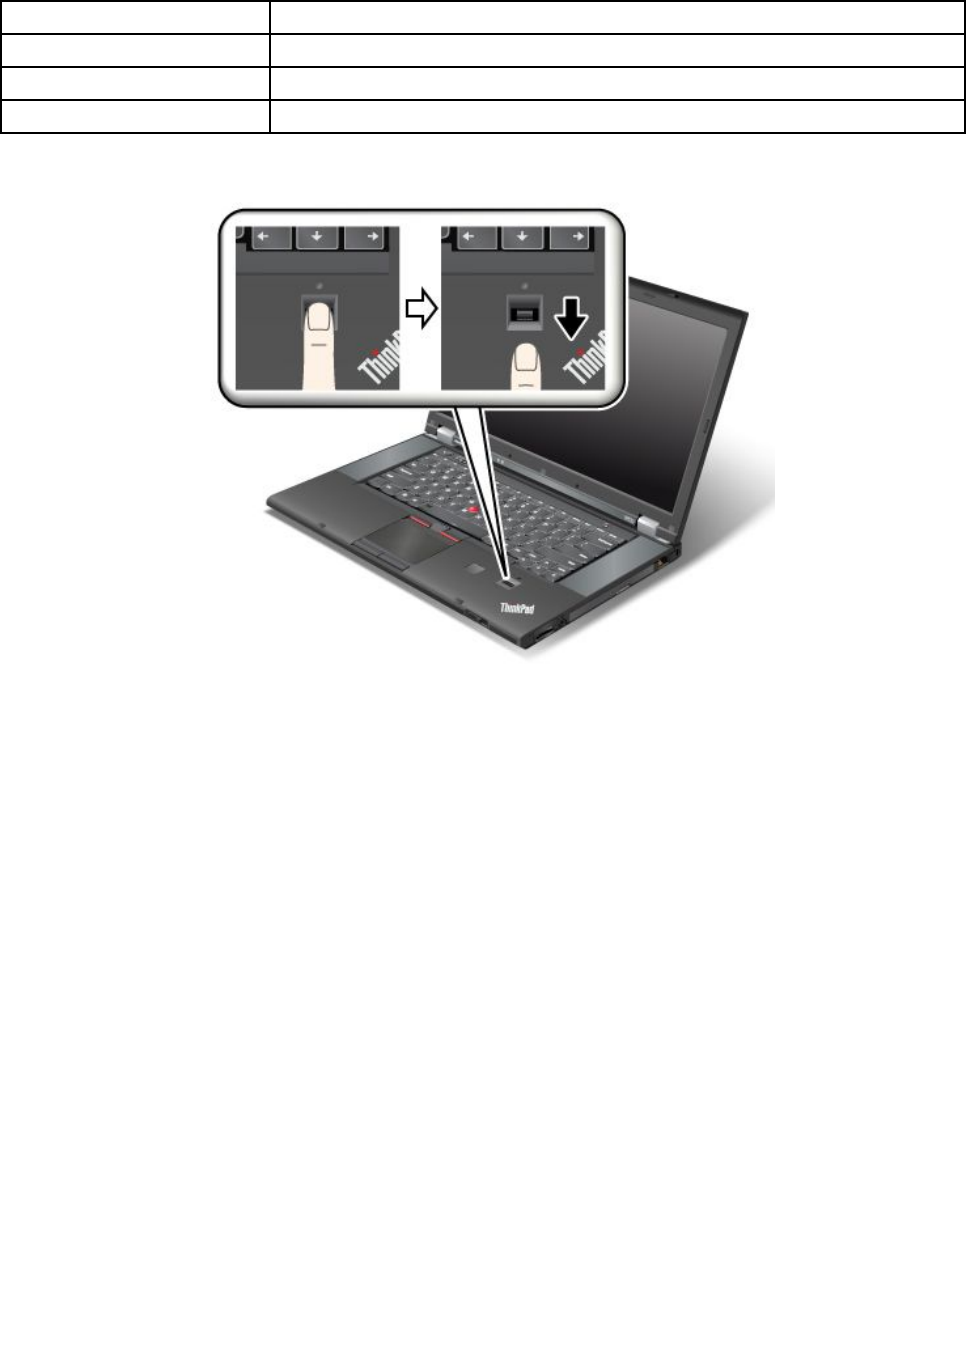
Table4.LEDbehaviorlist_ngerprintreader(continued)
LEDbehaviorDescription
BlinkinggreenThengerprintreaderisreadytoswipeinpower-onauthenticationstate.
BlinkingamberThengerprintcouldnotbeauthenticated.
Steadyamberfor15secondsThepower-onauthenticationfeatureisdisabledafterthreebadngerprintswipes.
Swipingyourngeroverthereader
Toswipeyourngeroverthereader,placetheballofyournger,thatis,thecentralpartofthengerprint,on
thesmallcircleabovethereader.Makesurethattheentiretopjointofthengerisonthereader.ThenApply
lightpressureandswipeyourngeracrossthereaderinonesmoothmotion.
Loggingontothesystem
Afteryouenrollyourngerprint,logontothesystembydoingthefollowing:
1.Setapower-onpasswordoraharddiskpassword,orboth.
2.Turnyourcomputeroffandthenonagain.
3.Whenprompted,swipeyourngeroverthereader.
4.Onrequest,typeyourpower-onpassword,yourharddiskpassword,orboth.Theenrolledngerprintis
nowassociatedwithyourpower-onpassword,yourharddiskpassword,orboth.
Thenexttimeyoustartthecomputer,youcanlogontothesystembyswipingyourngeroverthe
readeronce.
Attention:Ifyoualwaysuseyourngerprinttologontothesystem,youmightforgetyourpassword.Write
downyourpassword,andkeepitinasafeplace.Ifyouforgetitandforsomereasonyoucannotswipe
yourngeracrossthereader,forexample,ifyouinjurethatnger,youcannotstartthecomputerorchange
thepassword.Ifyouforgetyourpower-onpassword,youmusttakeyourcomputertoaLenovoauthorized
serviceroramarketingrepresentativetohavethepasswordcanceled.
Chapter4.Security59

Ifyouforgetyourharddiskpassword,Lenovocannotresetyourpasswordorrecoverdatafromthehard
disk.YoumusttakeyourcomputertoaLenovoauthorizedserviceroramarketingrepresentativetohavethe
harddiskdrivereplaced.Proofofpurchaseisrequired,andafeewillbechargedforpartsandservice.
Settingthengerprintreader
Ifyouwanttochangethesettingsofthengerprintreader,followtheprocedurebelow.
ThengerprintsubmenuundertheSecuritymenuoftheThinkPadSetupoffersthefollowingchoices:
•PredesktopAuthentication:Enableordisablengerprintauthenticationbeforetheoperatingsystem
isloaded.
•ReaderPriority:Denethepriorityforngerprintreadersifanexternalngerprintreaderisattached.
•SecurityMode:Specifythesettingsofthesecuritymode.
•PasswordAuthentication:Enableordisablepasswordauthentication.
Note:ThisitemappearsifHighsecuritymodeisselected.
•ResetFingerprintData:Bychoosingthisitem,youcaneraseallofthengerprintdatastoredineither
theinternalorexternalngerprintreader.
Tosetaniteminthengerprintsubmenu:
1.Printtheseinstructions.Tocongurethengerprintreader,youmustturnyourcomputeroffand
thenonagain.
2.Saveallopenles,andexitallprograms.
3.Turnyourcomputeroffandthenonagain.
4.Whenthelogoscreenisdisplayed,pressF1.TheThinkPadSetupprogrammainmenuopens.
5.Usingthecursorkeys,movetoSecurity,andpressEnter.TheSecuritymenuopens.
6.Usingthecursorkeys,movetoFingerprint,andpressEnter.TheFingerprintsubmenuopens.
7.Usingthecursorkeys,movetoanitemyouwanttoset.Whenthatitemishighlighted,pressEnter.
8.Settheitemsyouwanttoset.
9.PressF10toexit.
10.IntheSetupConrmationwindow,selectYes.
Careforthengerprintreader
Thefollowingactionscoulddamagethengerprintreaderorcauseitnottoworkproperly:
•Scratchingthesurfaceofthereaderwithahard,pointedobject.
•Scrapingthesurfaceofthereaderwithyourngernailoranythinghard.
•Usingortouchingthereaderwithadirtynger.
Ifyounoticeanyofthefollowingconditions,gentlycleanthesurfaceofthereaderwithadry,soft,lint-free
cloth:
•Thesurfaceofthereaderisdirtyorstained.
•Thesurfaceofthereaderiswet.
•Thereaderoftenfailstoenrollorauthenticateyourngerprint.
Ifyourngerhasanyofthefollowingconditions,youmightnotbeabletoregisterorauthenticateit:
•Yourngeriswrinkled.
•Yourngerisrough,dry,orinjured.
60UserGuide

•Yourngerisverydry.
•Yourngerisstainedwithdirt,mud,oroil.
•Thesurfaceofyourngerisverydifferentfromwhenyouenrolledyourngerprint.
•Yourngeriswet.
•Angerisusedthathasnotbeenenrolled.
Toimprovethesituation,trythefollowing:
•Cleanorwipeyourhandstoremoveanyexcessdirtormoisturefromthengers.
•Enrollanduseadifferentngerforauthentication.
•Ifyourhandsaretoodry,applylotiontothem.
Noticeondeletingdatafromyourharddiskdriveorsolid-statedrive
Ascomputersspreadintoeverycorneroflife,theyprocessmoreandmoreinformation.Thedataonyour
computer,someofwhichmightbesensitive,isstoredonaharddiskdrive.Beforeyoudisposeof,sell,or
handoveryourcomputer,besuretodeletedatastoredonit.
Handingyourcomputerovertosomeoneelsewithoutdeletingtheloadedsoftware,suchasoperating
systemsandprogramsoftware,mightevenviolatelicenseagreements.Youareadvisedtocheckthe
termsandconditionsofthoselicenseagreements.
Therearemethodsthatseemtodeletethedata:
•Movethedatatotherecyclebin,andthenclickEmptyrecyclebin.
•UsetheDeleteoption.
•Formatyourharddiskdrive,usingthesoftwareforinitializingit.
•Usingtherecoveryprogramtosettheharddiskdrivebacktothefactorydefaultsettings.
Theseoperations,however,onlychangetheleallocationofthedata,theydonotdeletethedataitself.In
otherwords,thedataretrievalprocessingisdisabledunderanoperatingsystemsuchasWindows.The
dataisstillthere,eventhoughitseemstobelost.Thus,itissometimespossibletoreadthedatabyuseof
specialsoftwarefordatarecovery.Thereisariskthatpeopleofbadfaithmightreadandmisusethecritical
dataonharddiskdrivesforunexpectedpurposes.
Topreventleakageofdata,itbecomesveryimportantthatyoutakeresponsibilityfordeletingallthedata
fromtheharddiskdrivewhenyoudisposeof,sell,orhandoveryourcomputer.Youcandestroythedata
physicallybysmashingtheharddiskdrivewithahammer,ormagneticallybymeansofstrongmagnetic
power,thusmakingthedataunreadable.Butwerecommendthatyoumakeuseofthesoftware(payware)or
service(payservice)specicallydevelopedforthepurpose.
Fordisposingofdataontheharddiskdrive,LenovoprovidestheSecureDataDisposal™tool.Todownload
eitherprogram,gotohttp://www.lenovo.com/support.
Note:Runningtheprogramwilltakeacoupleofhours.
IfanEncryptionsolid-statedriveoraDiskEncryptionharddiskdriveissupportedandinstalledinyour
computer,youcanlogicallydisposeofallthedataonthedriveinaveryshorttimebyerasingthe
cryptographickey.Thedataencryptedwiththeoldkeyisnotphysicallyerasedbutremainsonthedrive;
however,itcannotbedecryptedwithouttheoldkey.ThisfeatureisenabledbyThinkPadSetupMenu
ExtensionUtilityandisavailableasamenuiteminThinkPadSetup.
Chapter4.Security61

Usingandunderstandingrewalls
Ifyoursystemispreinstalledwitharewallprogram,itprotectsagainstcomputerInternetsecuritythreats,
unauthorizedaccesses,intrusions,andInternetattacks.Italsoprotectsyourprivacy.
Formoreinformationabouthowtousetherewallprogram,refertothehelpinformationsystemthat
comeswiththeprogram.
Protectingdataagainstviruses
Yourcomputerispreinstalledwithanantivirusprogramsoyoucandetectandeliminateviruses.The
antivirusprogramisdesignedtohelpyoudetectandeliminateviruses.
Lenovoprovidesafullversionofantivirussoftwareonyourcomputerwithafree30-daysubscription.After
30days,youmustrenewthelicensetocontinuereceivingtheantivirussoftwareupdates.
Formoreinformationabouthowtouseyourantivirussoftware,refertothehelpinformationsystemof
yourantivirussoftware.
62UserGuide

Chapter5.Recoveryoverview
ThischapterprovidesinformationabouttherecoverysolutionsprovidedbyLenovoontheWindows7
operatingsystemandthePushButtonResetprogramontheWindows8operatingsystem.
•“RecoveryoverviewfortheWindows7operatingsystem”onpage63
•“RecoveryoverviewfortheWindows8operatingsystem”onpage68
RecoveryoverviewfortheWindows7operatingsystem
ThissectionprovidesinformationabouttherecoverysolutionsprovidedbyLenovoontheWindows7
operatingsystem.
Notes:
•Thereareavarietyofmethodstochoosefromwhenconsideringhowtorecoverintheeventofasoftware-
orhardware-relatedproblem.Somemethodsvarydependingonthetypeofyouroperatingsystem.
•Theproductontherecoverymediamightbeusedonlyforthefollowingpurposes:
–Restoretheproductpreinstalledonyourcomputer
–Reinstalltheproduct
–ModifytheproductusingtheAdditionalFiles
Notes:Topreventpotentialperformancerisksorunexpectedbehaviorthatmightbecausedbythenew
harddiskdrivetechnology,itisrecommendedthatyouuseoneofthefollowingback-upsoftwareprograms:
•ThinkVantageRescueandRecoveryversion4.3orlater
•SymantecNortonGhostversion15orlater
Notes:Tousethisprogram,dothefollowing:
1.ClickStart➙Run.TheRunwindowopens.
2.Typecmdintheeld.ThenclickOK.
3.Typeghost-align=1mbandpressEnter.
•AcronisTrueImage2010orlater
•ParagonBackup&Recovery10Suiteorlater,ParagonBackup&Recovery10Homeorlater
Creatingandusingarecoverymedia
Youcanuserecoverymediatorestoretheharddiskdrivetothefactorydefaultsettings.Recoverymedia
areusefulifyoutransferthecomputertoanotherarea,sellthecomputer,recyclethecomputer,orputthe
computerinanoperationalstateafterallothermethodsofrecoveryhavefailed.Asaprecautionarymeasure,
itisimportanttocreaterecoverymediaasearlyaspossible.
Note:Therecoveryoperationsyoucanperformusingrecoverymediavarydependingontheoperating
systemfromwhichtherecoverymediawerecreated.Therecoverymediamightcontainabootmedium
andadatamedium.YourMicrosoftWindowslicensepermitsyoutocreateonlyonedatamedium,soitis
importantthatyoustoretherecoverymediainasafeplaceafteryouhavemadethem.
Creatingrecoverymedia
Note:OntheWindows7operatingsystem,youcancreaterecoverymediausingdiscsorexternalUSB
storagedevices.
©CopyrightLenovo201263

TocreaterecoverymediaontheWindows7operatingsystem,clickStart➙AllPrograms➙Lenovo
ThinkVantageTools➙FactoryRecoveryDisks.Then,followtheinstructionsonthescreen.
Usingrecoverymedia
OntheWindows7operatingsystemoperatingsystem,youcanuserecoverymediatorestorethecomputer
tothefactorydefaultsettingsonly.
Attention:Whenyouuserecoverymediatorestorethecomputertothefactorydefaultsettings,alltheles
currentlyontheharddiskdrivewillbedeletedandreplacedbythefactorydefaultsettings.
TouserecoverymediaontheWindows7operatingsystemoperatingsystem,dothefollowing:
1.Dependingonthetypeofyourrecoverymedia,connectthebootmedium(memorykeyorotherUSB
storagedevice)tothecomputer,orinsertthebootdiscintotheopticaldrive.
2.Turnoffthecomputerandthenturniton.
3.WhenThinkPadlogoisdisplayed,repeatedlypressandreleasetheF12key.WhentheBootMenu
windowopens,releasetheF12key.
4.SelectthedesiredstartupdeviceandpressEnter.Therestoreprocessbegins.
5.Followtheinstructionsonthescreentocompletetheoperation.
Notes:
1.Afterrestoringyourcomputertothefactorydefaultsettings,youmighthavetoreinstalldevicedrivers
forsomedevices.See“Reinstallingpreinstalledprogramsanddevicedrivers”onpage67.
2.SomecomputerscomewithMicrosoftOfceorMicrosoftWorkspreinstalled.Ifyouneedtorecover
orreinstallyourMicrosoftOfceorMicrosoftWorksprograms,youmustusetheMicrosoftOfceCD
orMicrosoftWorksCD.ThesediscsareprovidedonlywithcomputerspreinstalledwithMicrosoft
OfceorMicrosoftWorks.
Performingbackupandrecoveryoperations
UsetheRescueandRecoveryprogramtobackupallyourharddiskdrivecontentsincludingtheoperating
system,datales,softwareprograms,andpersonalsettings.YoucandesignatewheretheRescueand
Recoveryprogramstoresthebackup:
•Inaprotectedareaofyourharddiskdrive
•Onthesecondaryharddiskdriveifasecondaryharddiskdriveisinstalledinyourcomputer
•OnanattachedexternalUSBharddiskdrive
•Onanetworkdrive
•Onrecordablediscs(arecordableopticaldriveisrequiredforthisoption)
Afteryouhavebackedupthecontentsontheharddiskdrive,youcanrestorethecompletecontentsofthe
harddiskdrive,restoreonlytheselectedles,orrestoreonlytheWindowsoperatingsystemandprograms.
Performingabackupoperation
ToperformabackupoperationusingtheRescueandRecoveryprogramontheWindows7operating
system,dothefollowing:
1.FromtheWindowsdesktop,clickStart➙AllPrograms➙LenovoThinkVantageTools➙Enhanced
BackupandRestore.TheRescueandRecoveryprogramopens.
2.IntheRescueandRecoverymainwindow,clicktheLaunchadvancedRescueandRecoveryarrow.
3.ClickBackupyourharddriveandselectbackupoperationoptions.Then,followtheinstructionson
thescreentocompletethebackupoperation.
64UserGuide

Performingarecoveryoperation
ToperformarecoveryoperationusingtheRescueandRecoveryprogramontheWindows7operating
system,dothefollowing:
1.FromtheWindowsdesktop,clickStart➙AllPrograms➙LenovoThinkVantageTools➙Enhanced
BackupandRestore.TheRescueandRecoveryprogramopens.
2.IntheRescueandRecoverymainwindow,clicktheLaunchadvancedRescueandRecoveryarrow.
3.ClicktheRestoreyoursystemfromabackupicon.
4.Followtheinstructionsonthescreentocompletetherecoveryoperation.
FormoreinformationaboutperformingarecoveryoperationfromtheRescueandRecoveryworkspace,see
“UsingtheRescueandRecoveryworkspace”onpage65.
UsingtheRescueandRecoveryworkspace
TheRescueandRecoveryworkspaceresidesinaprotected,hiddenareaofyourharddiskdrivethat
operatesindependentlyfromtheWindowsoperatingsystem.Itenablesyoutoperformrecoveryoperations
evenifyoucannotstarttheWindowsoperatingsystem.Youcanperformthefollowingrecoveryoperations
fromtheRescueandRecoveryworkspace:
•Rescuelesfromyourharddiskdriveorfromabackup
TheRescueandRecoveryworkspaceenablesyoutolocatelesonyourharddiskdriveandtransfer
themtoanetworkdriveorotherrecordablemedia,suchasaUSBdeviceoradisc.Thissolutionis
availableevenifyoudidnotbackupyourlesorifchangesweremadetothelessinceyourlastbackup
operation.YoualsocanrescueindividuallesfromaRescueandRecoverybackuplocatedonyourlocal
harddiskdrive,aUSBdevice,oranetworkdrive.
•RestoreyourharddiskdrivefromaRescueandRecoverybackup
IfyouhavebackedupyourharddiskdriveusingtheRescueandRecoveryprogram,youcanrestorethe
harddiskdrivefromaRescueandRecoverybackup,evenifyoucannotstarttheWindowsoperating
system.
•Restoreyourharddiskdrivetothefactorydefaultsettings
TheRescueandRecoveryworkspaceenablesyoutorestorethecompletecontentsofyourharddiskdrive
tothefactorydefaultsettings.Ifyouhavemultiplepartitionsonyourharddiskdrive,youhavetheoption
torestorethefactorydefaultsettingstotheC:partitionandleavetheotherpartitionsintact.Becausethe
RescueandRecoveryworkspaceoperatesindependentlyfromtheWindowsoperatingsystem,youcan
restorethefactorydefaultsettingsevenifyoucannotstarttheWindowsoperatingsystem.
Attention:IfyourestoretheharddiskdrivefromaRescueandRecoverybackuporrestoretheharddisk
drivetothefactorydefaultsettings,alllesontheprimaryharddiskdrivepartition(usuallydriveC:)willbe
deletedintherecoveryprocess.Ifpossible,makecopiesofimportantles.Ifyouareunabletostartthe
Windowsoperatingsystem,youcanusetherescuelesfeatureoftheRescueandRecoveryworkspaceto
copylesfromyourharddiskdrivetoothermedia.
TostarttheRescueandRecoveryworkspace,dothefollowing:
1.Turnoffthecomputerandthenturniton.
2.WhentheThinkPadlogoisdisplayed,presstheblackbuttonorrepeatedlypressandreleasetheF11key.
3.IfyouhavesetaRescueandRecoverypassword,typeyourpasswordwhenprompted.TheRescue
andRecoveryworkspaceopensafterashortdelay.
Note:IftheRescueandRecoveryworkspacefailstoopen,see“Solvingrecoveryproblems”onpage68.
4.Dooneofthefollowing:
Chapter5.Recoveryoverview65

•Torescuelesfromyourharddiskdriveorfromabackup,clickRescuelesandfollowthe
instructionsonthescreen.
•TorestoreyourharddiskdrivefromaRescueandRecoverybackuportorestoreyourharddiskdrive
tothefactorydefaultsettings,clickRestoreyoursystemandfollowtheinstructionsonthescreen.
FormoreinformationaboutthefeaturesoftheRescueandRecoveryworkspace,clickHelp.
Notes:
1.Afterrestoringyourharddiskdrivetothefactorydefaultsettings,youmighthavetoreinstalldevice
driversforsomedevices.See“Reinstallingpreinstalledprogramsanddevicedrivers”onpage67.
2.SomecomputerscomewithMicrosoftOfceorMicrosoftWorkspreinstalled.Ifyouneedtorecover
orreinstallyourMicrosoftOfceorMicrosoftWorksprograms,youmustusetheMicrosoftOfceCD
orMicrosoftWorksCD.ThesediscsareprovidedonlywithcomputerspreinstalledwithMicrosoft
OfceorMicrosoftWorks.
Creatingandusingarescuemedium
Witharescuemedium,suchasadiscoraUSBharddiskdrive,youcanrecoverthecomputerfromfailures
thatpreventyoufromgainingaccesstotheRescueandRecoveryworkspaceonyourharddiskdrive.
Notes:
1.Therecoveryoperationsyoucanperformusingarescuemediumvarydependingontheoperating
system.
2.Therescuedisccanbestartedinalltypesofopticaldrives.
Creatingarescuemedium
TocreatearescuemediumontheWindows7operatingsystem,dothefollowing:
1.FromtheWindowsdesktop,clickStart➙AllPrograms➙LenovoThinkVantageTools➙Enhanced
BackupandRestore.TheRescueandRecoveryprogramopens.
2.IntheRescueandRecoverymainwindow,clicktheLaunchadvancedRescueandRecoveryarrow.
3.ClicktheCreateRescueMediaicon.TheCreateRescueandRecoveryMediawindowopens.
4.IntheRescueMediaarea,selectthetypeoftherescuemediumyouwanttocreate.Youcancreatea
rescuemediumusingadisc,aUSBharddiskdrive,orasecondaryinternalharddiskdrive.
5.ClickOKandfollowtheinstructionsonthescreentocreatearescuemedium.
Usingarescuemedium
Thissectionprovidesinstructionsonhowtousetherescuemediumyouhavecreated.
•Ifyouhavecreatedarescuemediumusingadisc,usethefollowinginstructionstousetherescuemedium:
1.Turnoffyourcomputer.
2.RepeatedlypressandreleasetheF12keywhenturningonthecomputer.WhentheBootMenu
windowisdisplayed,releasetheF12key.
3.IntheBootMenuwindow,selectthedesiredopticaldriveastherstbootdevice.Then,insertthe
rescuediscintotheopticaldriveandpressEnter.Therescuemediumstarts.
•IfyouhavecreatedarescuemediumusingaUSBharddiskdrive,usethefollowinginstructionsto
usetherescuemedium:
1.AttachtheUSBharddiskdrivetooneoftheUSBconnectorsonyourcomputer.
2.RepeatedlypressandreleasetheF12keywhenturningonthecomputer.WhentheBootMenu
windowopens,releasetheF12key.
66UserGuide

3.IntheBootMenuwindow,selecttheUSBharddiskdriveastherstbootdeviceandpressEnter.
Therescuemediumstarts.
•Ifyouhavecreatedarescuemediumusingthesecondaryinternalharddiskdrive,setthesecondary
internalharddiskdriveastherstbootdeviceinthestartupdevicesequencetostarttherescuemedium.
Note:Ifyouwanttoinstallasecondaryharddiskdrive,see“UsingtheSerialUltrabayEnhancedfeature”
onpage95.
Whentherescuemediumstarts,theRescueandRecoveryworkspaceopens.Thehelpinformationfor
eachfeatureisavailablefromtheRescueandRecoveryworkspace.Followtheinstructionstocomplete
therecoveryprocess.
Reinstallingpreinstalledprogramsanddevicedrivers
Yourcomputerhasprovisionsthatenableyoutoreinstallselectedfactory-installedprogramsanddevice
drivers.
Reinstallingpreinstalledprograms
Toreinstallselectedprograms,dothefollowing:
1.Turnonyourcomputer.
2.GototheC:\SWTOOLSdirectory.
3.OpentheAPPSfolder.Initareseveralsubfoldersnamedforthevariouspreinstalledprograms.
4.Openthesubfolderfortheprogramyouarereinstalling.
5.Double-clickSetup,andthenfollowtheon-screenstepstoreinstalltheprogram.
Reinstallingpreinstalleddevicedrivers
Attention:Whenyoureinstalldevicedrivers,youarechangingthecurrentcongurationofyourcomputer.
Reinstalldevicedriversonlywhenitisnecessarytocorrectaproblemwithyourcomputer.
Toreinstalladevicedriverforafactory-installeddevice,dothefollowing:
1.Turnonyourcomputer.
2.GototheC:\SWTOOLSdirectory.
3.OpentheDRIVERSfolder.WithintheDRIVERSfolderareseveralsubfoldersnamedforthevarious
devicesinstalledinyourcomputer(forexample,AUDIOandVIDEO).
4.Openthesubfolderforthedevice.
5.Reinstallthedevicedriverbyoneofthefollowingmethods:
•Inthesubfolderforthedevice,lookforatextle(alewiththeextension.txt).Thetextlecontains
informationonhowtoreinstallthatdevicedriver.
•Ifthesubfolderforthedevicecontainsaleofsetupinformation(alewiththeextension.inf),you
canusetheAddNewHardwareprogram(intheWindowsControlPanel)toreinstallthedevicedriver.
Notalldevicedriverscanbereinstalledbyuseofthisprogram.IntheAddNewHardwareprogram,
whenpromptedforthedevicedriveryouwanttoinstall,clickHaveDiskandBrowse.Thenselect
thedevicedriverlefromthedevicesubfolder.
•Inthesubfolderforthedevice,lookfortheexecutablele(alewiththeextension.exe).Double-click
thele,andfollowtheinstructionsonthescreen.
Attention:Ifyouneedupdateddevicedrivers,donotdownloadthemfromtheWindowsUpdateWebsite.
ObtainthemfromLenovo.Formoreinformation,see“Makingsuredevicedriversarecurrent”onpage134.
Chapter5.Recoveryoverview67

Solvingrecoveryproblems
IfyouareunabletoaccesstheRescueandRecoveryworkspaceortheWindowsenvironment,doone
ofthefollowing:
•UsearescuemediumtostarttheRescueandRecoveryworkspace.See“Creatingandusingarescue
medium”onpage66.
•Userecoverymediaifallothermethodsofrecoveryhavefailedandyouneedtorestoretheharddisk
drivetothefactorydefaultsettings.See“Creatingandusingarecoverymedia”onpage63.
Note:IfyouareunabletoaccesstheRescueandRecoveryworkspaceortheWindowsenvironmentfrom
arescuemediumorrecoverymedia,youmightnothavetherescuedevice(aninternalharddiskdrive,a
disc,aUSBharddiskdrive,orotherexternaldevices)setastherstbootdeviceinthestartupdevice
sequence.Youmustrstmakesurethatyourrescuedeviceissetastherstbootdeviceinthestartup
devicesequenceintheThinkPadSetupprogram.Fordetailsonhowtotemporarilyorpermanentlychange
thestartupdevicesequence,see“Startupmenu”onpage126.
Itisimportanttocreatearescuemediumandasetofrecoverymediaasearlyaspossibleandstorethem
inasafeplaceforfutureuse.
RecoveryoverviewfortheWindows8operatingsystem
Thissectionprovidesinformationabouttherecoverysolutionsprovidedoncomputerspreinstalledwiththe
Windows8operatingsystem.
Refreshingyourcomputer
Ifyourcomputerdoesnotperformwellandtheproblemmightbecausedbyarecentlyinstalledprogram,
youcanrefreshyourcomputerwithoutlosingyourpersonallesorchangingyoursettings.
Attention:Ifyourefreshyourcomputer,theprogramsthatcamewithyourcomputerandtheprogramsthat
youinstalledfromWindowsStorewillbereinstalled,butallotherprogramswillberemoved.
Torefreshyourcomputer,dothefollowing:
1.Moveyourcursortothetop-rightorbottom-rightcornerofthescreentodisplaythecharms.Click
Settings➙ChangePCsettings➙General.
2.IntheRefreshyourPCwithoutaffectingyourlessection,clickGetstarted.
Resettingyourcomputertothefactorydefaultsettings
Youcanresetyourcomputertothefactorydefaultsettings.Resettingthecomputerwillreinstallthe
operatingsystem,andreinstallalltheprogramsandsettingsthatcamewithyourcomputer.
Attention:Ifyouresetyourcomputer,allyourpersonallesandsettingswillbedeleted.Toavoiddataloss,
makeabackupcopyofallthedatathatyouwanttokeep.
Toresetyourcomputer,dothefollowing:
1.Moveyourcursortothetop-rightorbottom-rightcornerofthescreentodisplaythecharms.Click
Settings➙ChangePCsettings➙General.
2.IntheRemoveeverythingandreinstallWindowssection,clickGetstarted.
Advancedstartupoptions
AdvancedstartupoptionsenableyoutochangethestartupsettingsofyourWindowsoperatingsystem,
startthecomputerfromanexternaldevice,orrestoretheWindowsoperatingsystemfromasystemimage.
Tousetheadvancedstartupoptions,dothefollowing:
68UserGuide

1.Moveyourcursortothetop-rightorbottom-rightcornerofthescreentodisplaythecharms.Click
Settings➙ChangePCsettings➙General.
2.IntheAdvancedstartupsection,clickRestartnow➙Troubleshoot➙Advancedoptions.
3.Restartyourcomputerfollowingtheinstructionsonthescreen.
FormoredetailsabouttherecoverysolutionsprovidedoncomputerspreinstalledwiththeWindows8
operatingsystem,refertothehelpinformationsystemoftheWindows8operatingsystem.
Chapter5.Recoveryoverview69

70UserGuide

Chapter6.Replacingdevices
Thischapterprovidesinstructionsonhowtoinstallorreplacesomehardwareforyourcomputer.
•“Staticelectricityprevention”onpage71
•“ReplacingtheUltrabaydevice”onpage71
•“Replacingthebattery”onpage72
•“ReplacingtheSIMcard”onpage74
•“Replacingtheharddiskdriveorsolid-statedrive”onpage75
•“Replacingthekeyboard”onpage78
•“Replacingandinstallingamemorymodule”onpage82
•“ReplacingthewirelessLANcard”onpage86
•“InstallingandreplacingthewirelessWANcard”onpage89
•“Replacingthebackupbattery”onpage92
Staticelectricityprevention
Staticelectricity,althoughharmlesstoyou,canseriouslydamagecomputercomponentsandoptions.
Improperhandlingofstatic-sensitivepartscancausedamagetothepart.Whenyouunpackanoptionor
acustomerreplaceableunit(CRU),donotopenthestatic-protectivepackagecontainingthepartuntil
theinstructionsdirectyoutoinstallit.
WhenyouhandleoptionsorCRUs,orperformanyworkinsidethecomputer,takethefollowingprecautions
toavoidstatic-electricitydamage:
•Limityourmovement.Movementcancausestaticelectricitytobuilduparoundyou.
•Alwayshandlecomponentscarefully.Handleadapters,memorymodules,andothercircuitboardsbythe
edges.Nevertouchexposedcircuitry.
•Preventothersfromtouchingcomponents.
•Whenyouinstallastatic-sensitiveoptionorCRU,touchthestatic-protectivepackagecontainingthe
parttoametalexpansion-slotcoverorotherunpaintedmetalsurfaceonthecomputerforatleasttwo
seconds.Thisreducesstaticelectricityfromthepackageandyourbody.
•Whenpossible,removethestatic-sensitivepartfromthestatic-protectivepackagingandinstallthepart
withoutsettingitdown.Whenthisisnotpossible,placethestatic-protectivepackagingonasmooth,
levelsurfaceandplacethepartonit.
•Donotplacethepartonthecomputercoverorothermetalsurface.
ReplacingtheUltrabaydevice
Beforeyoustart,printtheseinstructions.
ToreplacetheUltrabaydevice,dothefollowing.
1.Turnoffthecomputer,thendisconnecttheacpoweradapterandallcablesfromthecomputer.
©CopyrightLenovo201271
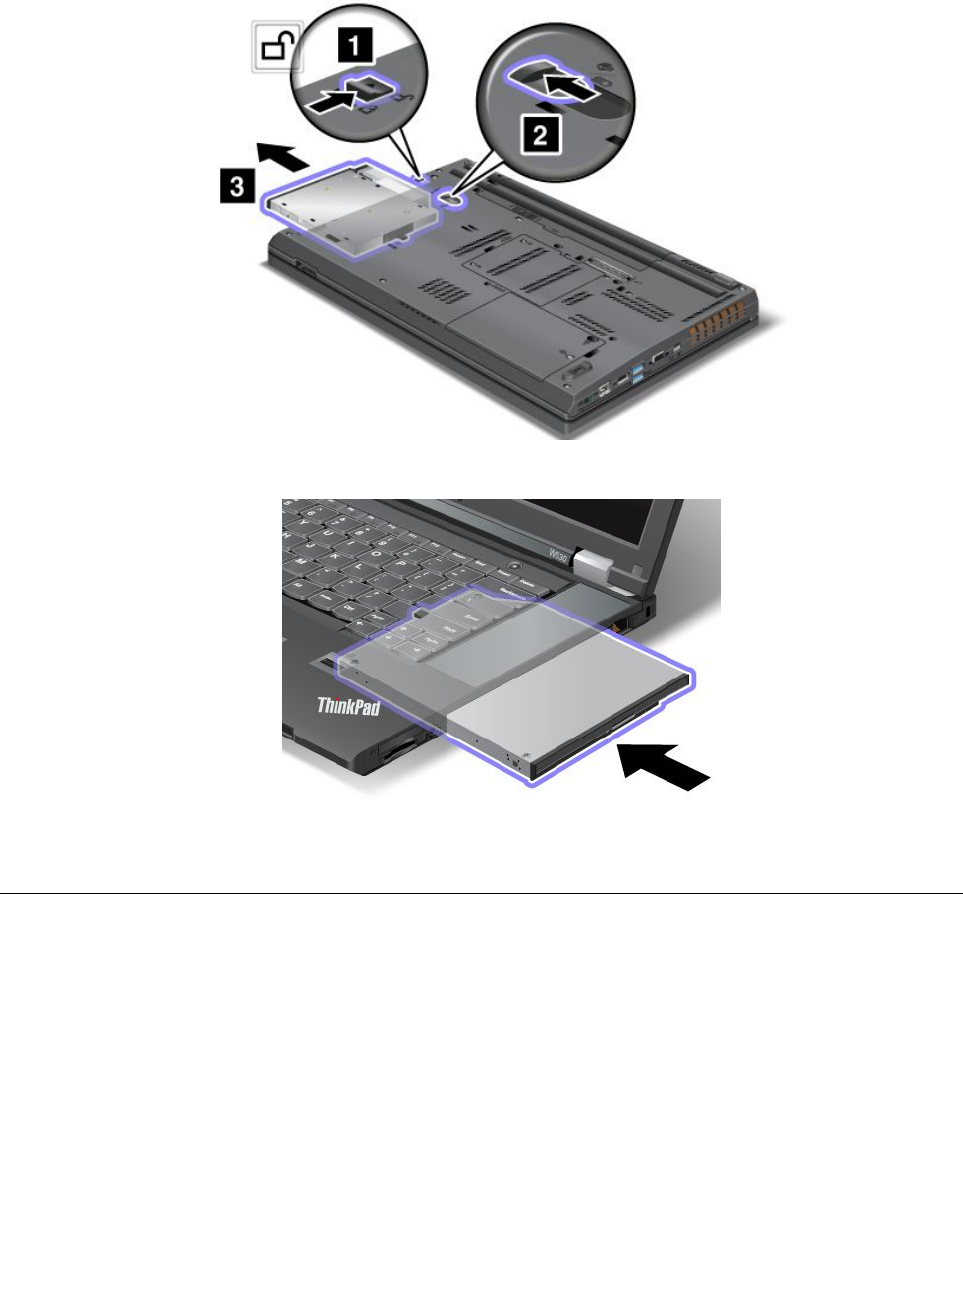
2.Unlockthebaylocklatchandholditintheunlockedposition.Then,slidethebayejectlatchinthe
directionshownbythearrow,thenpullouttheUltrabaydevice.
3.Insertthenewdevicermlyintothebay.
Replacingthebattery
Beforeyoustart,printtheseinstructions.
ThissystemsupportsonlybatteriesspeciallydesignedforthisspecicsystemandmanufacturedbyLenovo
oranauthorizedbuilder.Thesystemdoesnotsupportunauthorizedbatteriesorbatteriesdesignedforother
systems.Ifanunauthorizedbatteryorabatterydesignedforanothersystemisinstalled,thesystemwill
notcharge.
Attention:Lenovohasnoresponsibilityfortheperformanceorsafetyofunauthorizedbatteries,and
providesnowarrantiesforfailuresordamagearisingoutoftheiruse.
72UserGuide
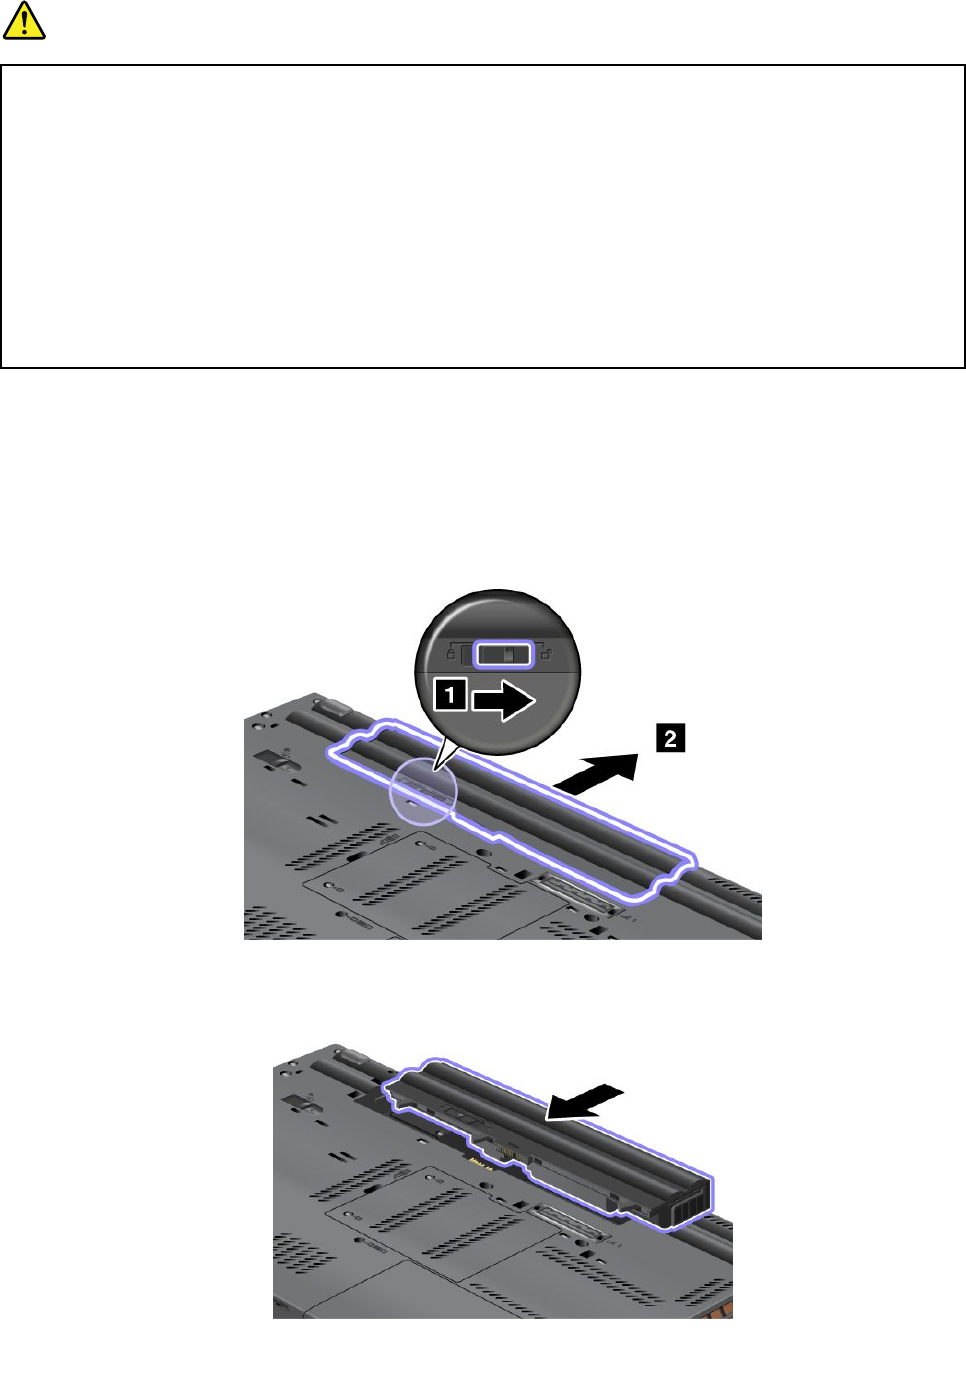
DANGER
Iftherechargeablebatterypackisincorrectlyreplaced,thereisdangerofanexplosion.Thebattery
packcontainsasmallamountofharmfulsubstances.Toavoidpossibleinjury:
•ReplaceonlywithabatteryofthetyperecommendedbyLenovo.
•Keepthebatterypackawayfromre.
•Donotexposeittoexcessiveheat.
•Donotexposeittowaterorrain.
•Donotshort-circuitit.
•Donotdrop,crush,puncture,orsubjecttostrongforces.Batteryabuseormishandlingcan
causethebatterytooverheat,whichcancausegassesorameto“vent”fromthebattery
packorcoincell.
Toreplacethebattery,dothefollowing:
1.Turnoffthecomputer.Thendisconnecttheacpoweradapterandallcablesfromthecomputer.
2.Closethecomputerdisplay,andturnthecomputerover.
3.Unlockthebatterylatchbyslidingittotheunlockedposition.Holdthelatchintheunlockedposition,
thenremovethebattery.
4.Slidethenewbatteryintothecomputer.
Chapter6.Replacingdevices73
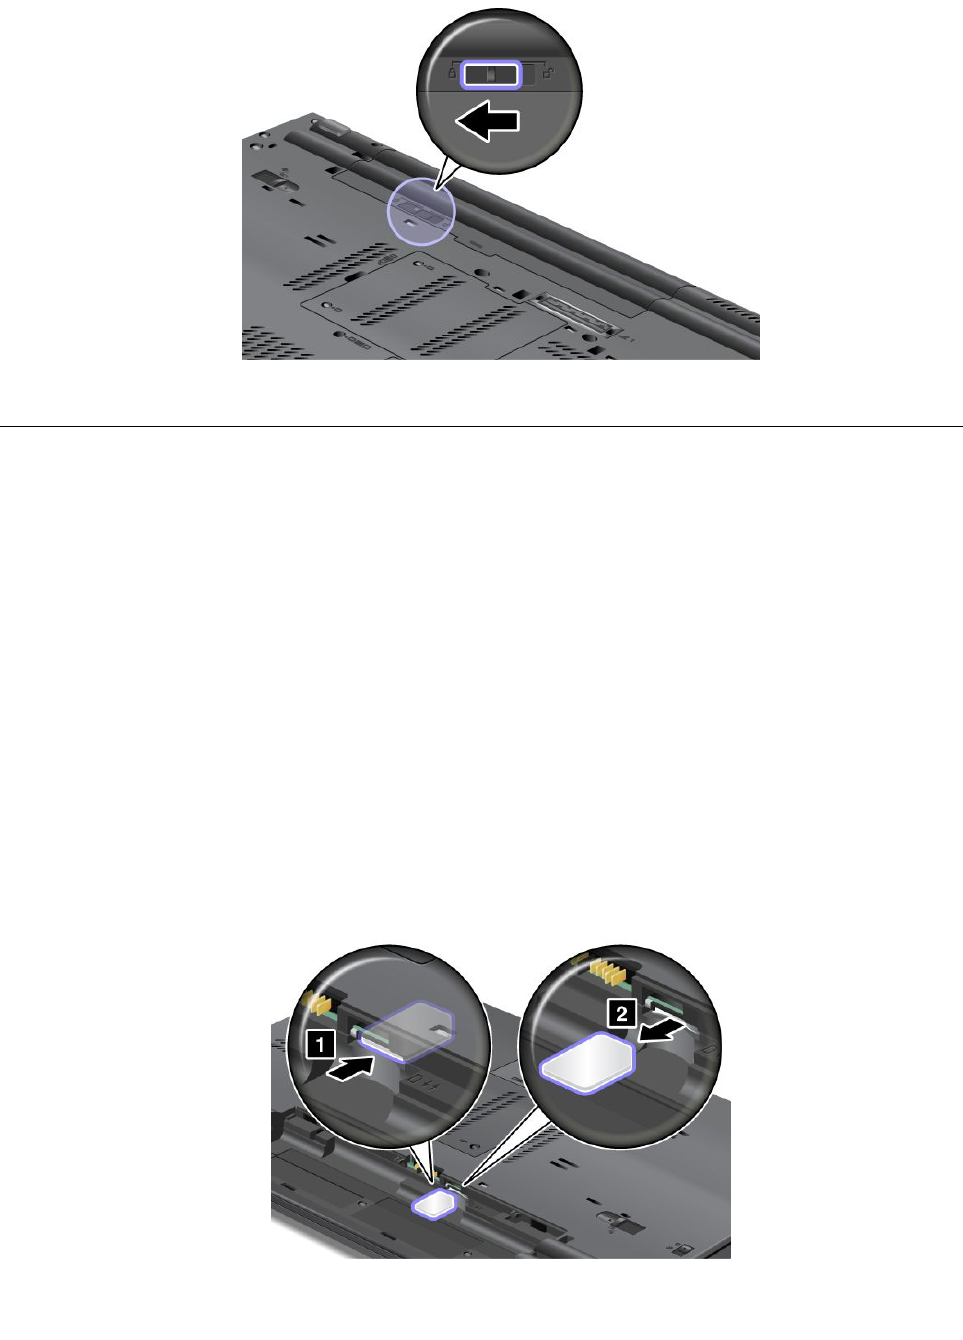
5.Slidethebatterylatchtothelockedposition.
6.Turnthecomputeroveragain.Connecttheacpoweradapterandallcables.
ReplacingtheSIMcard
Beforeyoustart,printtheseinstructions.
YourcomputermightrequireaSIMcardtoestablishwirelessWANconnections.Dependingonthecountry
ofdelivery,youmightneedtopurchaseaSIMcardoraSIMcardmightalreadybeinstalledinyourcomputer
orispartoftheshippingcontentsthatcomewithyourcomputer.
IfyoundaSIMcardincludedintheshippingcontents,adummycardisinstalledintheSIMcardslot.Then
proceedwiththefollowinginstructions.
Note:TheSIMcardisidentiedbytheICchipmountedononesideofthecard.
ToreplacetheSIMcard,dothefollowing:
1.Turnoffthecomputer,thendisconnecttheacpoweradapterandallcablesfromthecomputer.
2.Closethecomputerdisplay,andturnitover.
3.Removethebattery.See“Replacingthebattery”onpage72.
4.LocatetheSIMcardslotinsidethebatterycompartment.Gentlypushthecardtoremoveitfromthe
computer.
74UserGuide
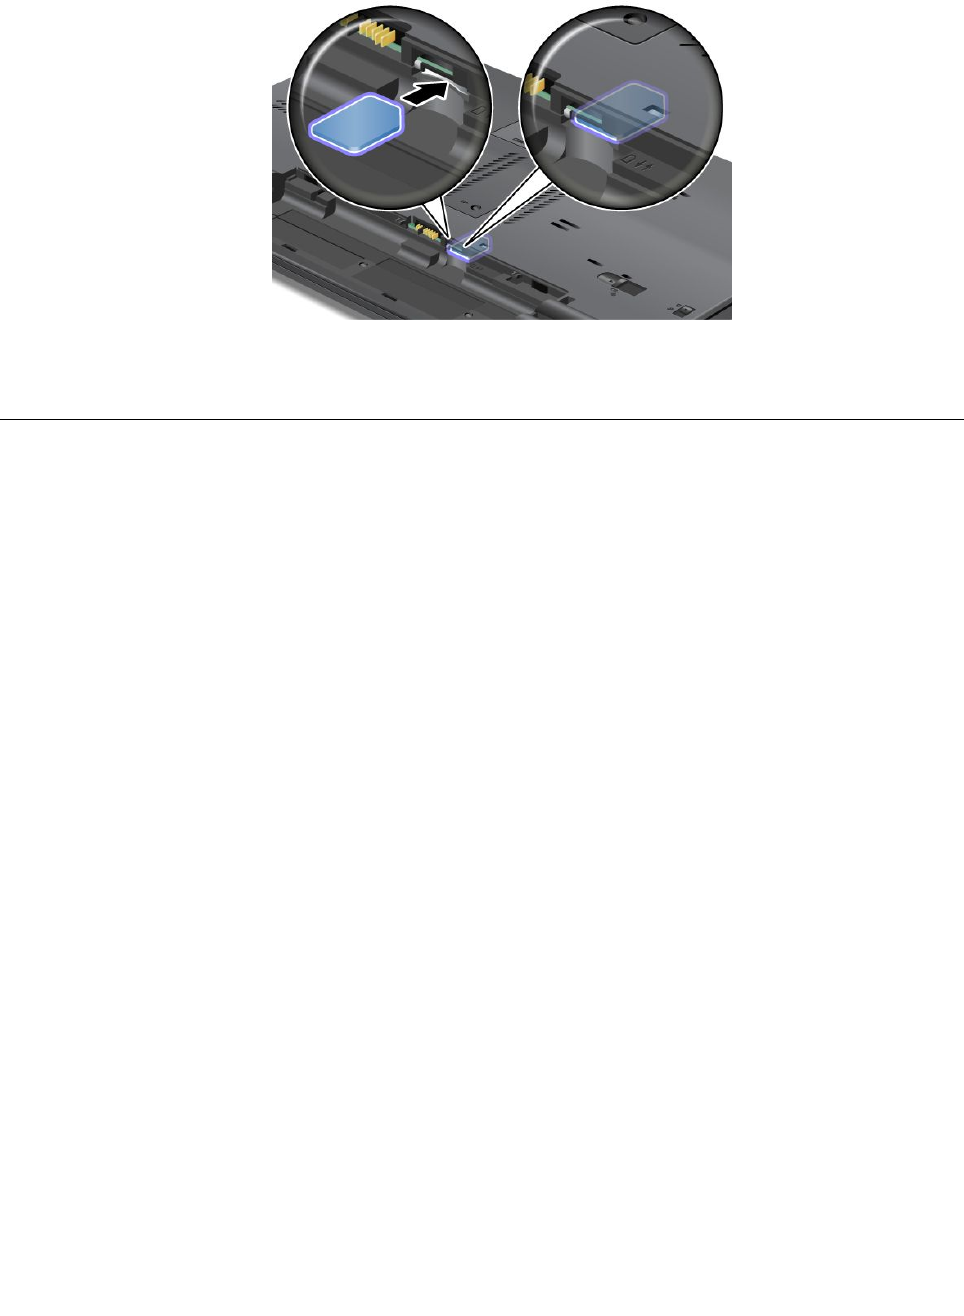
5.Holdthenewcardwiththemetalcontactfacingupward,andinsertthecardrmlyintotheslotuntil
youhearaclick.
6.Reinstallthebatterybackinplace.See“Replacingthebattery”onpage72.
7.Turnthecomputeroveragain.Connecttheacpoweradapterandallcables.
Replacingtheharddiskdriveorsolid-statedrive
Beforeyoustart,printtheseinstructions.
Whenreplacingthedrive,besuretofollowtheprecautions.
Attention:Theharddiskdriveorsolid-statedriveisverysensitive.Incorrecthandlingcancausedamage
andpermanentlossofdata.Observethefollowingguidelines:
•Replacetheharddiskdriveorsolid-statedriveonlyifyouupgradeitorhaveitrepaired.Theconnectors
andslotoftheharddiskdriveorsolid-statedrivearenotdesignedforfrequentchanges,ordrive
swapping.
•Donotdropthedriveorsubjectittophysicalshocks.Putthedriveonamaterial,suchassoftcloth,that
absorbsanyphysicalshocks.
•Donotapplypressuretothecoverofthedrive.
•Donottouchtheconnector.
•Beforeremovingtheharddiskdrive,makeabackupcopyofalltheinformationonit,andthenturn
thecomputeroff.
•Neverremovethedrivewhilethecomputerisoperating,insleepmode,orinhibernationmode.
Toreplacetheharddiskdriveorsolid-statedrive,dothefollowing:
1.Turnoffthecomputer,thendisconnecttheacpoweradapterandallcablesfromthecomputer.
2.Closethecomputerdisplay,andturnthecomputerover.
3.Removethebattery.See“Replacingthebattery”onpage72.
Chapter6.Replacingdevices75
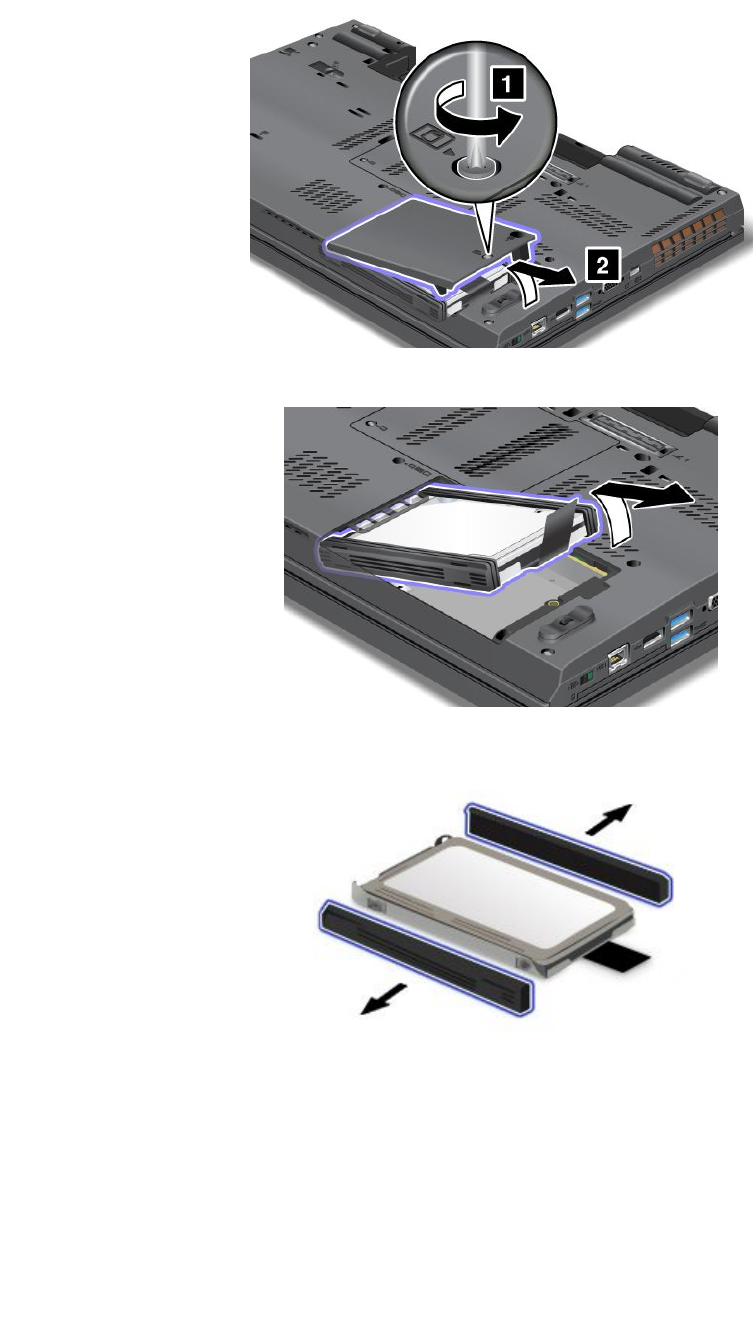
4.Loosenthescrewthatsecuresthecoveroftheslot,andthenremovethecover.
5.Removetheharddiskdriveorsolid-statedrivebypullingoutthetab.
6.Detachthesiderubberrailsfromtheharddiskdriveorthesidespacerrailsfromthesolid-statedrive.
76UserGuide
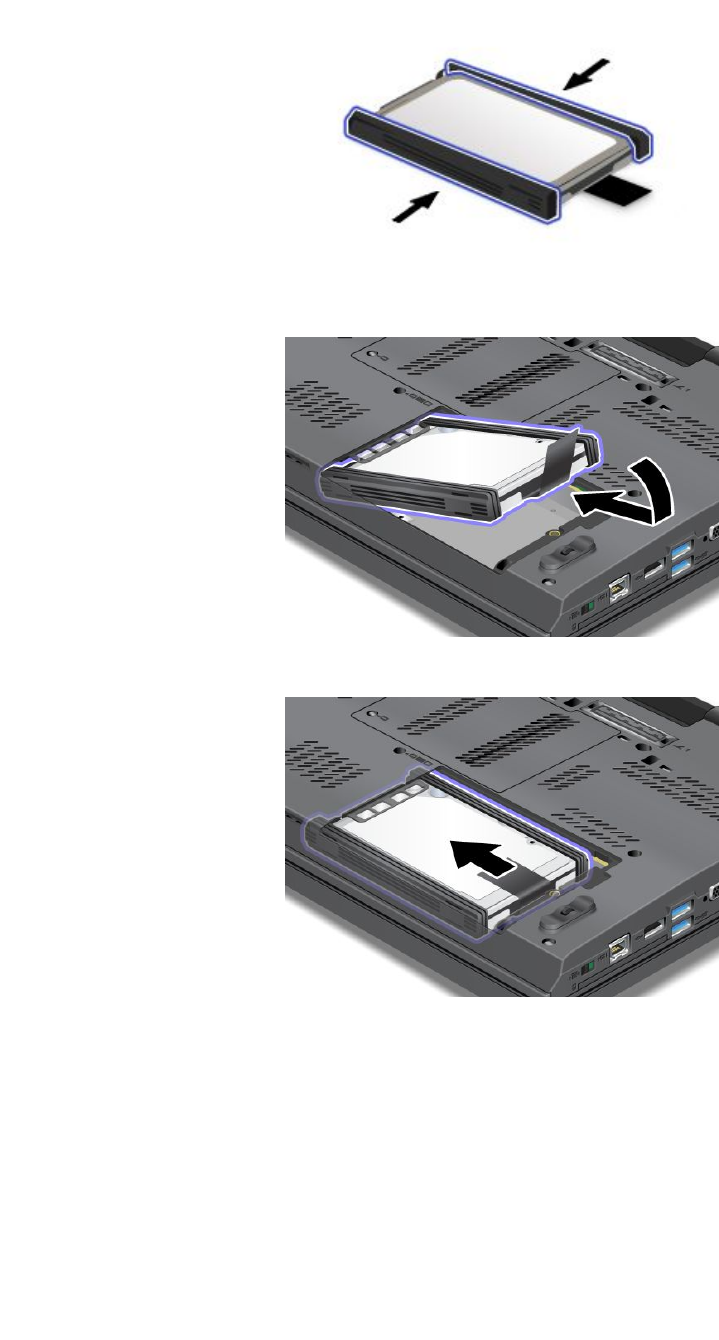
7.Attachthesiderubberrailstothenewharddiskdriveorthesidespacerrailstothenewsolid-statedrive.
8.Inserttheharddiskdriveorsolid-statedriveintotheslot.
9.Slidetheharddiskdriveorsolid-statedrivermlyintoplace.
Chapter6.Replacingdevices77
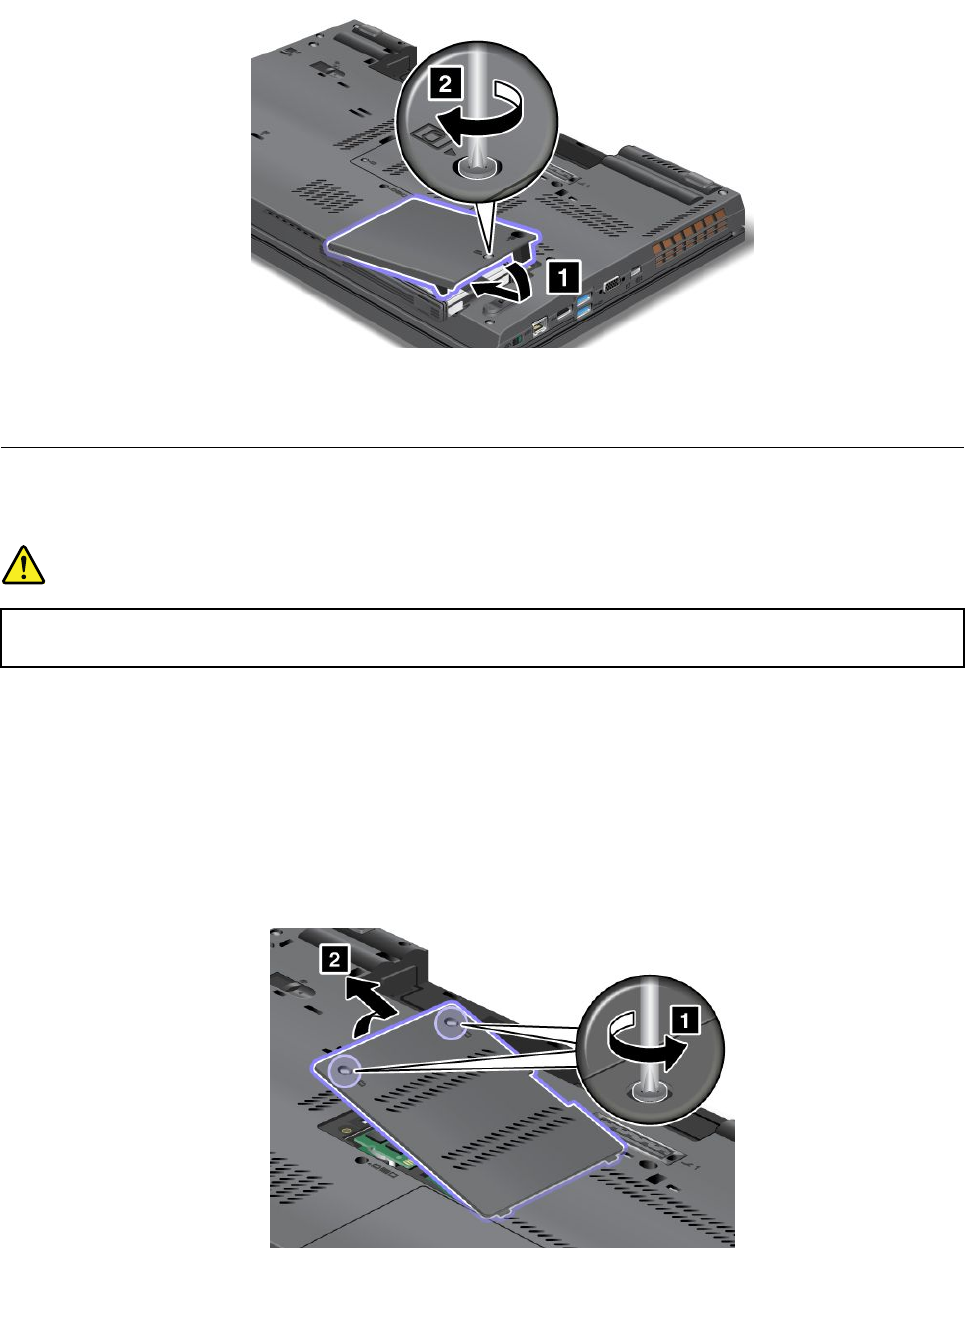
10.Reinstallthecoveroftheslot,andtightenthescrew.
11.Reinstallthebattery.See“Replacingthebattery”onpage72.
12.Turnthecomputeroveragain.Connecttheacpoweradapterandallcables.
Replacingthekeyboard
Beforeyoustart,printtheseinstructions.
DANGER
Electriccurrentfrompowerandcommunicationcablesishazardous.Toavoidshockhazard,
disconnectthecablesbeforeopeningthecoverofthisslot.
Removingthekeyboard
Toremovethekeyboard,dothefollowing:
1.Turnoffthecomputer,thendisconnecttheacpoweradapterandallcablesfromthecomputer.Wait
threetoveminutestoletthecomputercool.
2.Closethecomputerdisplay,andturnthecomputerover.
3.Removethebattery.See“Replacingthebattery”onpage72.
4.Loosenthescrewsonthememoryslotcover,thenremovethecover.
78UserGuide
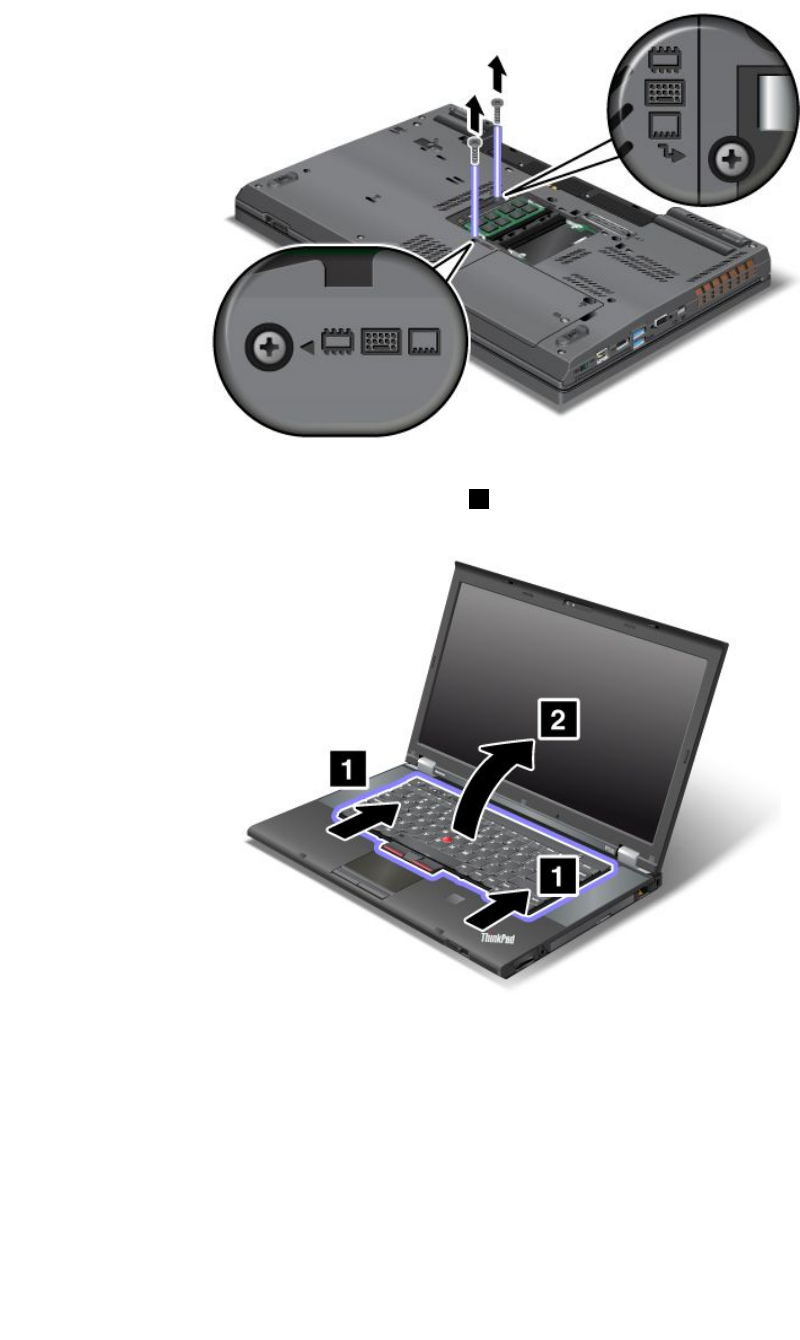
5.Removethescrewsthatsecurethekeyboard.
6.Turnthecomputeroverandopenthedisplay.
7.Pushhardinthedirectionshownbythearrows1tounlatchthefrontsideofthekeyboard.The
keyboardwillbedetachedslightly.
Chapter6.Replacingdevices79
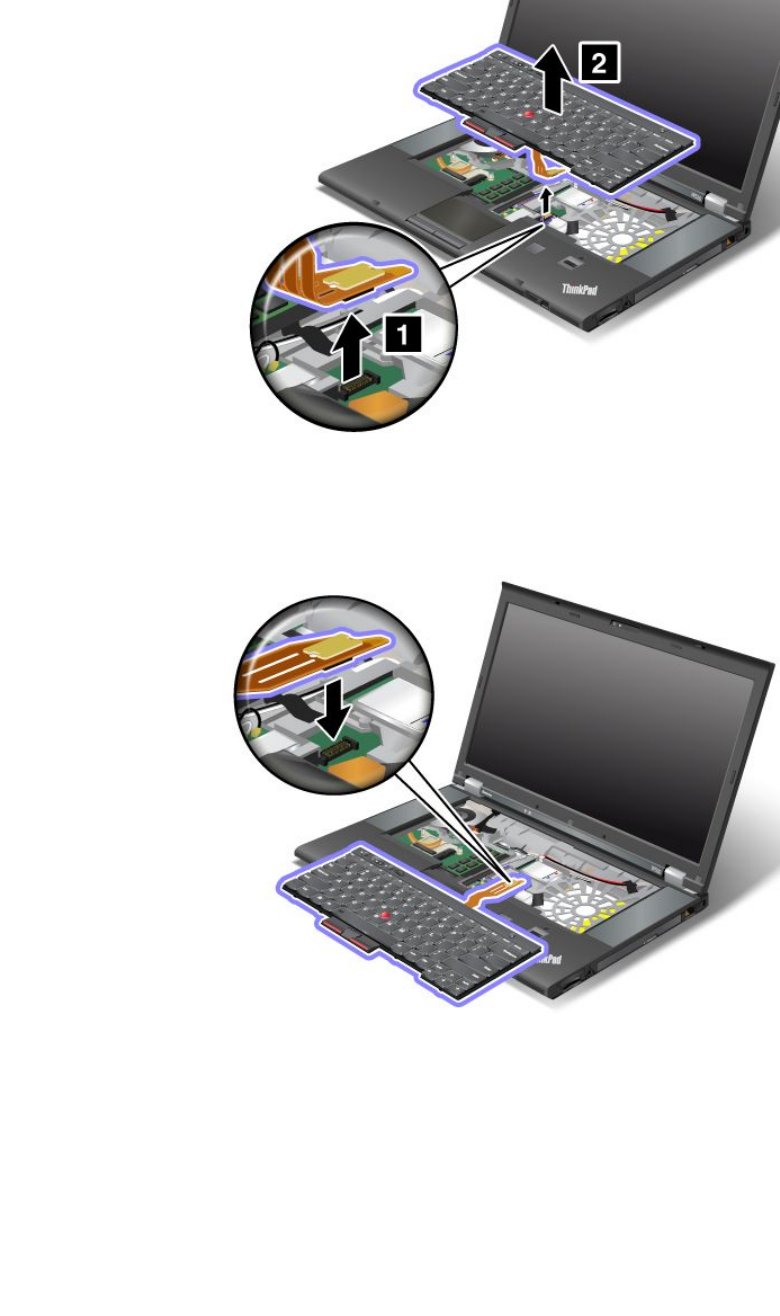
8.Carefullyliftthekeyboarduntilyoucanseehowitisconnected.Holdthekeyboardabovethecomputer,
andthendetachtheconnector.Removethekeyboard.
Installingthekeyboard
Toinstallthekeyboard,dothefollowing:
1.Attachtheconnector.
80UserGuide

2.Insertthenewkeyboard.Makesurethattherearedgesofthekeyboardareundertheframe.
3.Pushdownthekeyboardrmlyandthenslidethekeyboardinthedirectionshownbythearrows.
Chapter6.Replacingdevices81
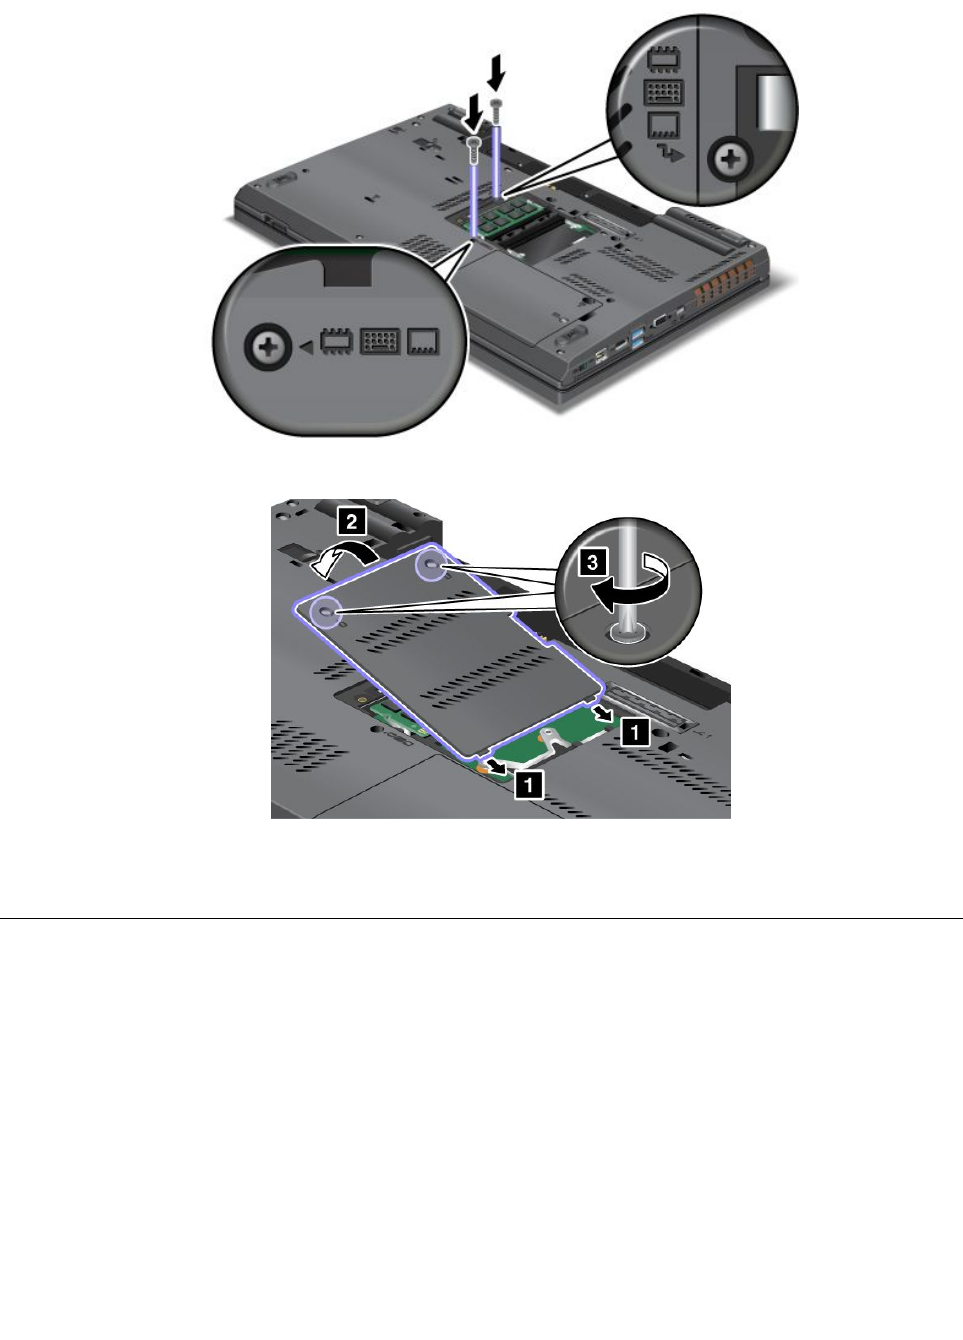
4.Closethecomputerdisplay,andturnthecomputerover.Reinstallthescrews.
5.Reinstallthememoryslotcoverbackinplace.
6.Reinstallthebattery.See“Replacingthebattery”onpage72.
7.Turnthecomputeroveragain.Connecttheacpoweradapterandallcables.
Replacingandinstallingamemorymodule
Increasingmemorycapacityisaneffectivewaytomakeprogramsrunfaster.Youcanincreasetheamount
ofmemoryinyourcomputerbyinstallingadoubledataratethree(DDR3)synchronousdynamicrandom
accessmemory(SDRAM)unbufferedsmalloutlinedualinlinememorymodule(SO-DIMM),availableasan
option,inthememoryslotofthecomputer.
Wheninstallingorreplacingamemorymodule,besuretofollowtheprecautions.
Note:Theoperatingspeedofthememorymodulehasdependencyonthesystemconguration.Insome
conditions,thememoryinyourcomputermightnotbeabletooperateatthemaximumspeed.
Attention:Beforeyoustartinstallingamemorymodule,touchametaltableoragroundedmetalobject.This
actionreducesanystaticelectricityfromyourbody.Thestaticelectricitycoulddamagethememorymodule.
82UserGuide
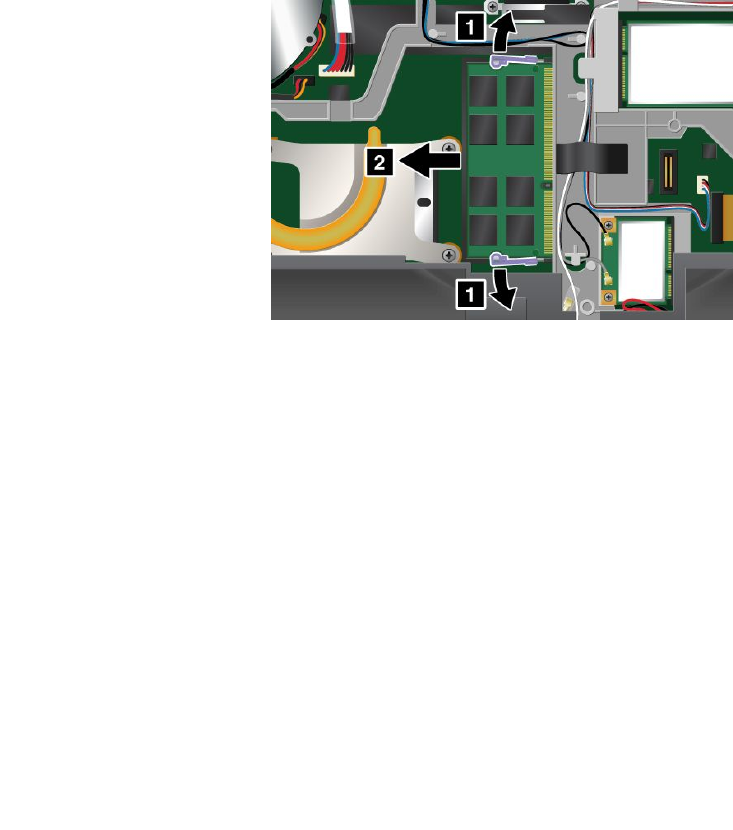
•UseeitheraPC3-10600oraPC3-12800DDR3SDRAMmemorymoduleinyourcomputer.Ifyouinstall
amemorymodulethatisnotsupportedbyyourcomputer,thecomputermightbeep,andthesystem
mightnotstartormightnotworkproperly.Youcanpurchasetheappropriatememoryoptionfrom
yourLenovoreselleroramarketingrepresentative.
•ThinkPadT530andT530ihavetwomemoryslots,oneunderthekeyboardandtheotherunderthe
memoryslotcoveratthebottomsideofthecomputer.
•ThinkPadW530hasfourmemoryslots,twounderthekeyboardandtheothertwounderthememory
slotcoveratthebottomsideofthecomputer.
•Ifyourcomputerisadual-coreprocessormodel,twodummycardsarepreinstalledintheslotsunderthe
keyboard.Donotreplacethedummycardswithmemorymodules.Youcanaddmemorymodulesto
theslotsatthebottomside.
Toreplaceorinstalltheamemorymoduleunderthekeyboard,dothefollowing:
1.Turnoffthecomputer,thendisconnecttheacpoweradapterandallcablesfromthecomputer.
2.Closethecomputerdisplay,andturnitover.
3.Removethebattery.See“Replacingthebattery”onpage72.
4.Removethekeyboard.See“Replacingthekeyboard”onpage78.
5.Ifamemorymodulealreadyisinstalledinthememoryslot,pressoutonthelatchesonbothedgesof
thesocketatthesametime.Thenremoveitandsaveitforfutureuse.
6.Findthenotchonthecontactedgesideofthenewmemorymoduleyouareinstalling.
Attention:Toavoiddamagingthememorymodule,donottouchitscontactedge.
7.Makesurethatthenotchonthememorymodulealignscorrectlywiththekeyinthememoryslot,then
insertthememorymoduleintothesocketatanangleofabout20degrees.Pressitinrmly.
Chapter6.Replacingdevices83
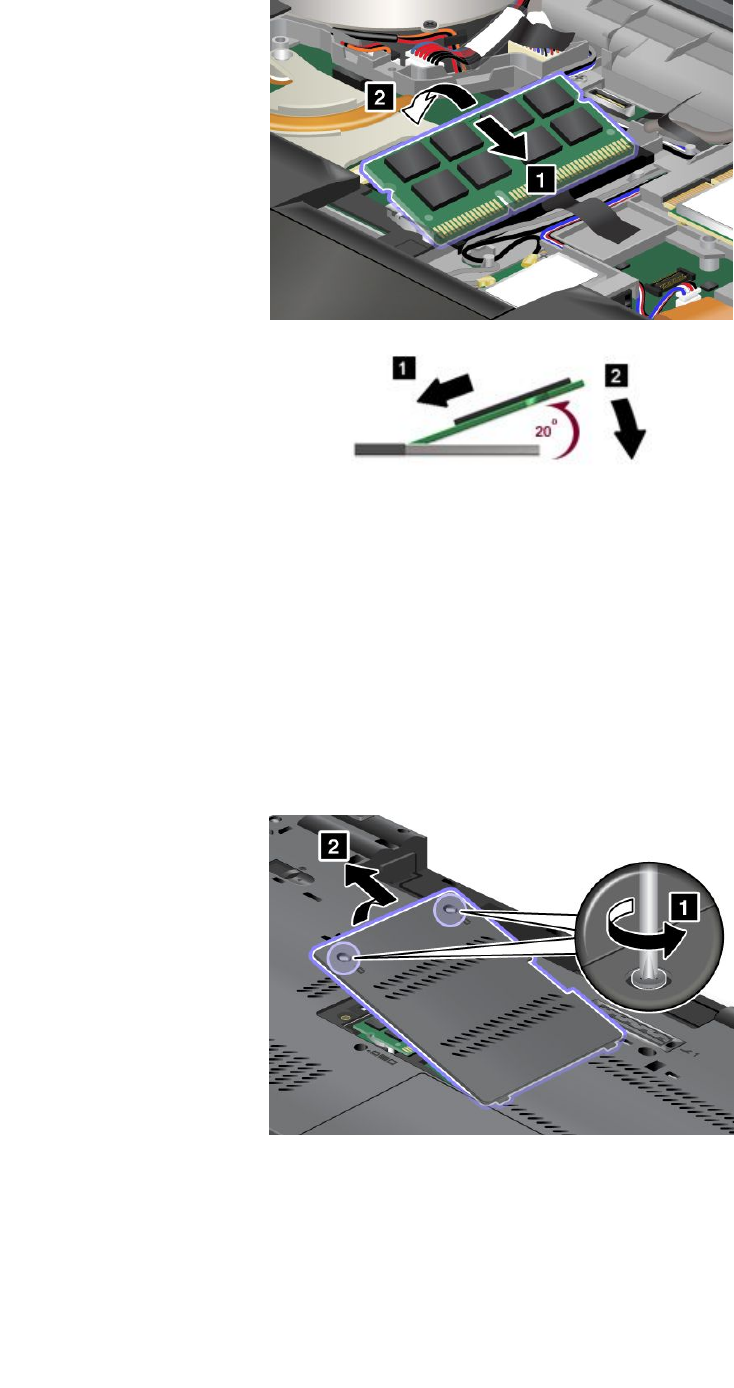
8.Pivotthememorymoduledownwarduntilitsnapsintoplace.
9.Makesurethatthememorymoduleisrmlyxedintheslotandcannotbemovedeasily.
10.Reinstallthekeyboard.See“Replacingthekeyboard”onpage78.
11.Reinstallthebattery.See“Replacingthebattery”onpage72.
Toreplacethememorymoduleunderthememoryslotcover,dothefollowing:
1.Turnoffthecomputer,thendisconnecttheacpoweradapterandallcablesfromthecomputer.
2.Closethecomputerdisplay,andturnitover.
3.Removethebattery.See“Replacingthebattery”onpage72.
4.Loosenthetwoscrewsonthememoryslotcover,andthenremovethecover.
5.Ifamemorymodulealreadyisinstalledinthememoryslot,pressoutonthelatchesonbothedgesof
thesocketatthesametime.Thenremovethememorymoduleandsaveitforfutureuse.
84UserGuide
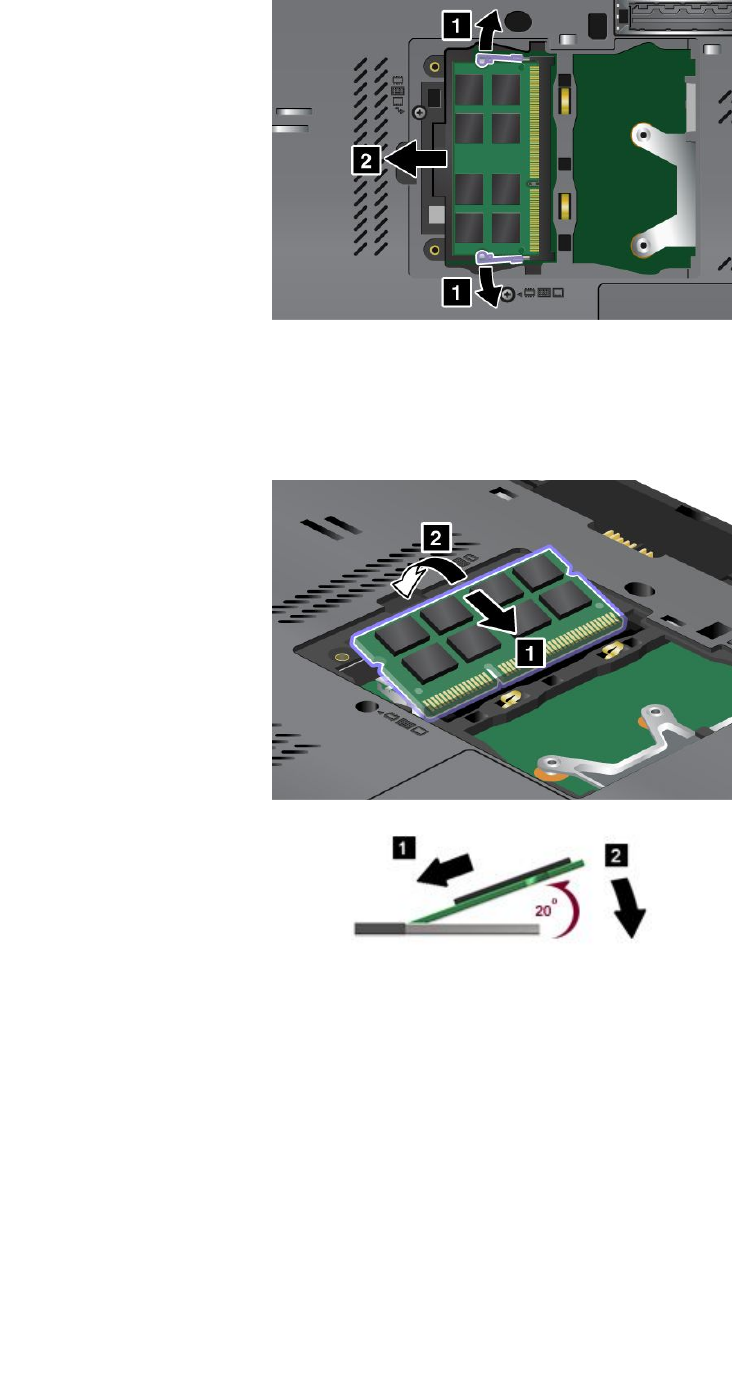
6.Findthenotchonthecontactedgesideofthenewmemorymoduleyouareinstalling.
Attention:Toavoiddamagingthememorymodule,donottouchitscontactedge.
7.Makesurethatthenotchonthememorymodulealignscorrectlywiththekeyinthememoryslot,then
insertthememorymoduleintothesocketatanangleofabout20degrees.Pressitinrmly.
8.Pivotthememorymoduledownwarduntilitsnapsintoplace.
9.Makesurethatthememorymoduleisrmlyinstalledintheslotandcannotbemovedeasily.
10.Reinstallthememoryslotcoverbackinplace.
Chapter6.Replacingdevices85
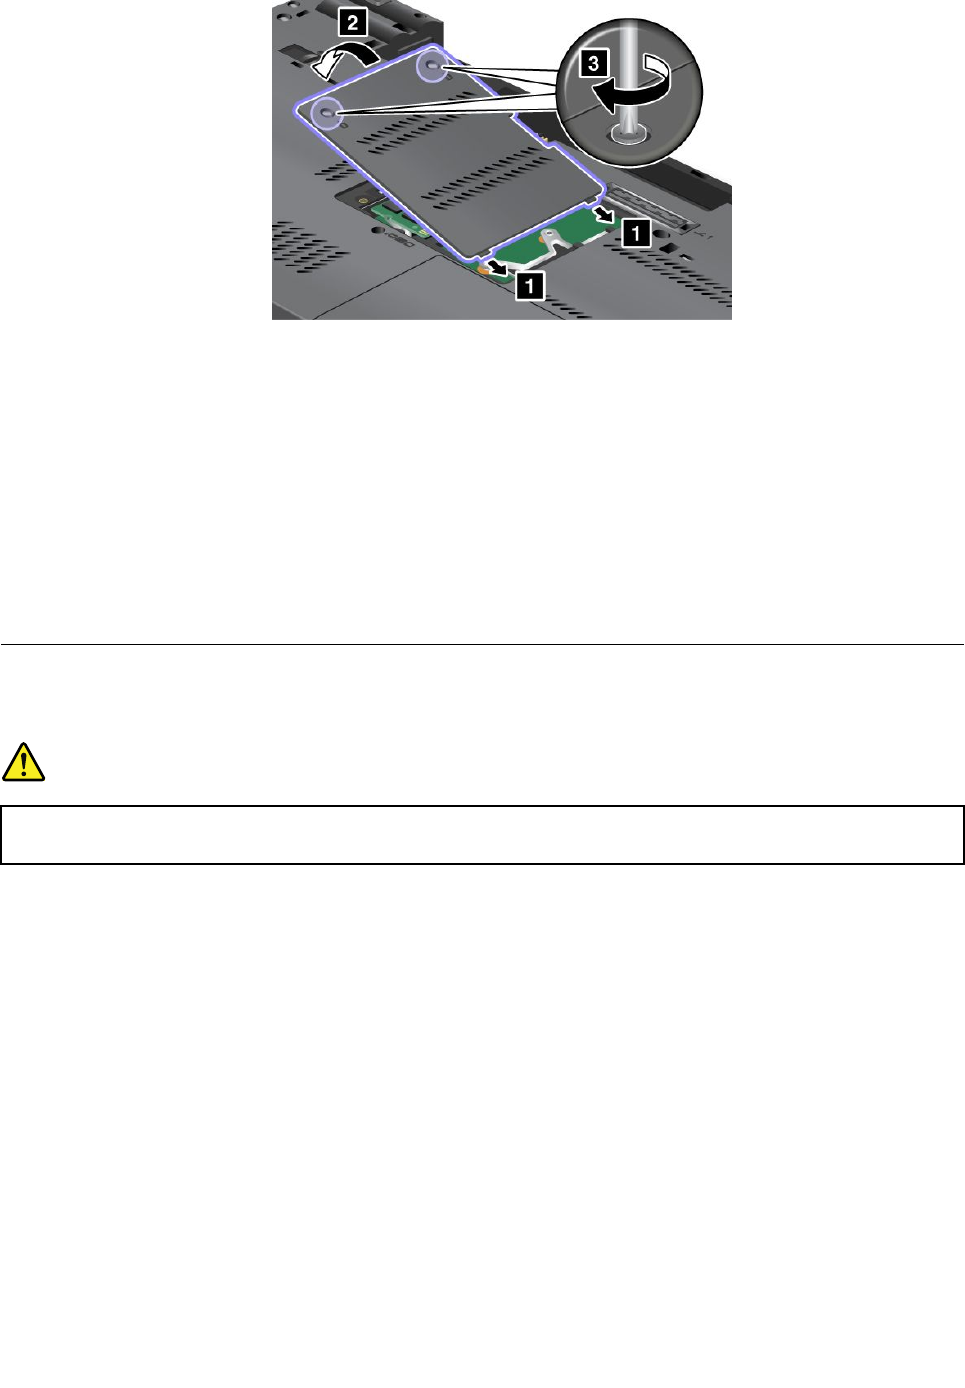
11.Reinstallthebattery.See“Replacingthebattery”onpage72.
12.Turnthecomputeroveragain.Connecttheacpoweradapterandallcables.
Checkingthetotalamountofmemoryinstalledinyourcomputer
Tomakesurethatthememorymodulesareinstalledcorrectly,dothefollowing:
1.Turnthecomputeron.
2.Whenthelogoscreenisdisplayed,pressF1.TheThinkPadSetupprogrammainmenuopens.The
Installedmemoryitemshowsthetotalamountofmemoryinstalledinyourcomputer.
3.IftheInstalledmemoryitemshowsadifferentamountofmemoryfromwhatyouinstalled,check
whetheryouhavecorrectlyfollowedtheinstructionsinthissection.
ReplacingthewirelessLANcard
Beforeyoustart,printtheseinstructions.
DANGER
Electriccurrentfrompowerandcommunicationcablesishazardous.Toavoidshockhazard,
disconnectthecablesbeforeopeningthecoverofthisslot.
Attention:BeforeyoustartinstallingawirelessLANcard,touchametaltableoragroundedmetalobject.
Thisactionreducesanystaticelectricityfromyourbody.Thestaticelectricitycoulddamagethecard.
ToreplacethewirelessLANcard,dothefollowing:
1.Turnoffthecomputer,thendisconnecttheacpoweradapterandallcablesfromthecomputer.Wait
threetoveminutestoletthecomputercool.
2.Closethecomputerdisplay,andturnthecomputerover.
3.Removethebattery.See“Replacingthebattery”onpage72.
4.Removethekeyboard.See“Replacingthekeyboard”onpage78.
86UserGuide
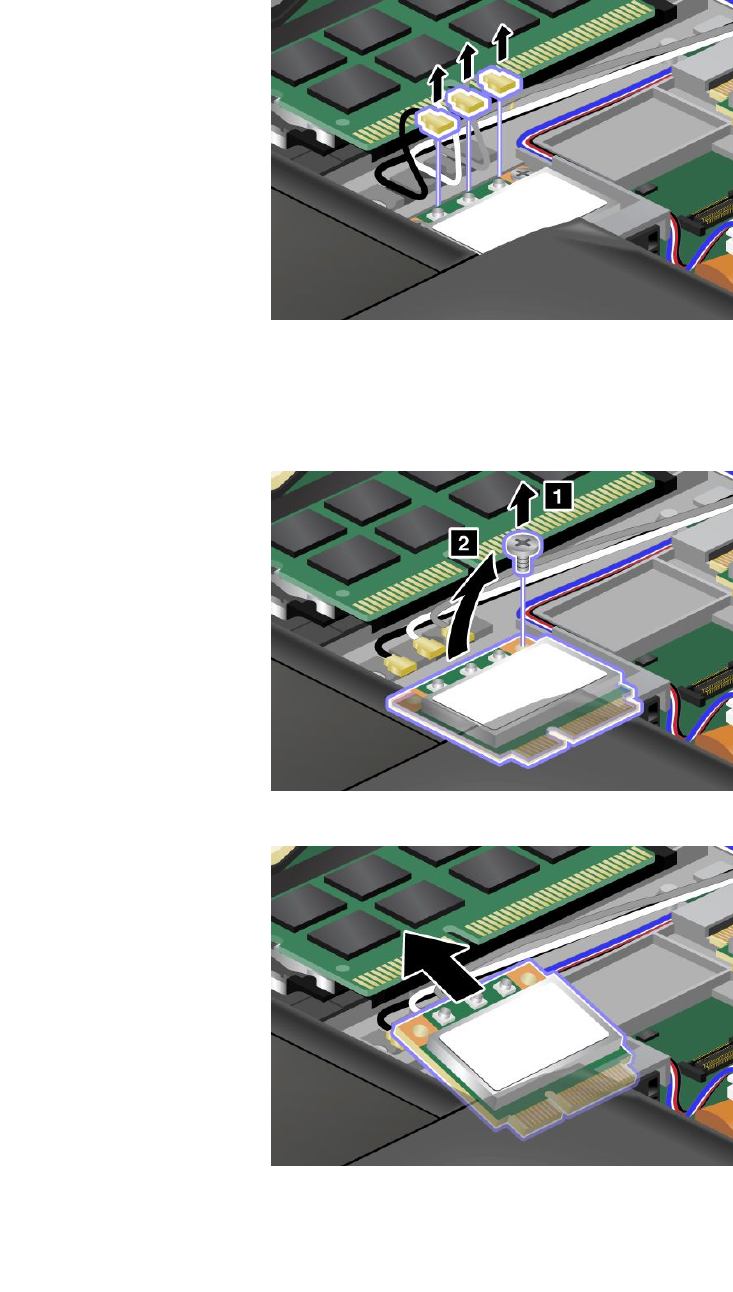
5.Ifatoolforremovingconnectorsisincludedinthepackagewiththenewcard,useittodisconnectthe
cablesfromthecard.Ifnosuchtoolisincluded,disconnectthecablesbypickinguptheconnectors
withyourngersandgentlyunpluggingthem.
Note:Dependingonthemodel,ifyourcomputerhastheMultipleInputMultipleOutput(MIMO)feature,
thewirelessLANcardhasthreeconnectorsasshownintheabovegure.Ifyourcomputerdoesnot
havetheMIMOfeature,thewirelessLANcardmighthaveonlytwoconnectors.
6.Removethescrew.Thecardpopsup.
7.Removethecard.
Chapter6.Replacingdevices87
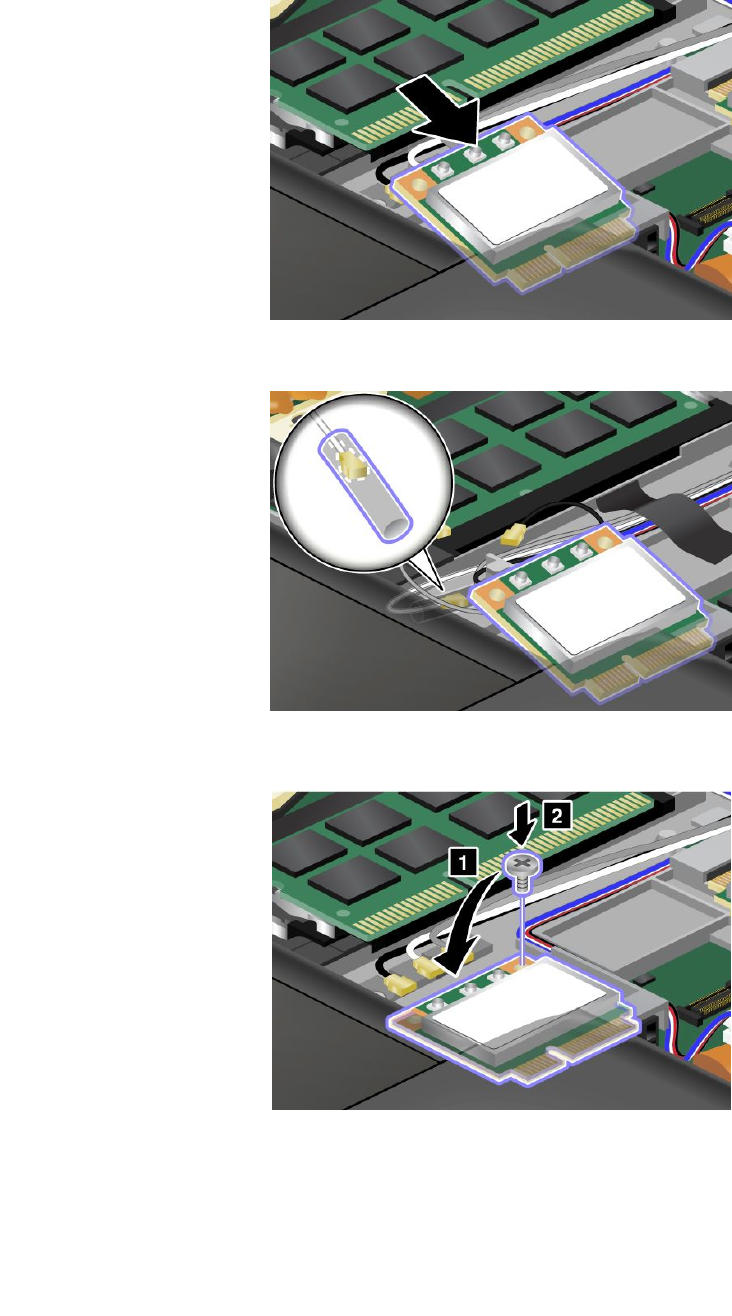
8.AlignthecontactedgeofthenewPCIExpressMiniCardwiththecorrespondingsocketcontactofthe
computer.
Note:IfthenewwirelessLANcardhastwoconnectors,putthewhitecableinthecableprotectiontube.
9.Pivotthecarduntilyoucansnapitintoplacebypressingtheuppersideoftheconnectors,andsecure
thecardwiththescrew.
88UserGuide
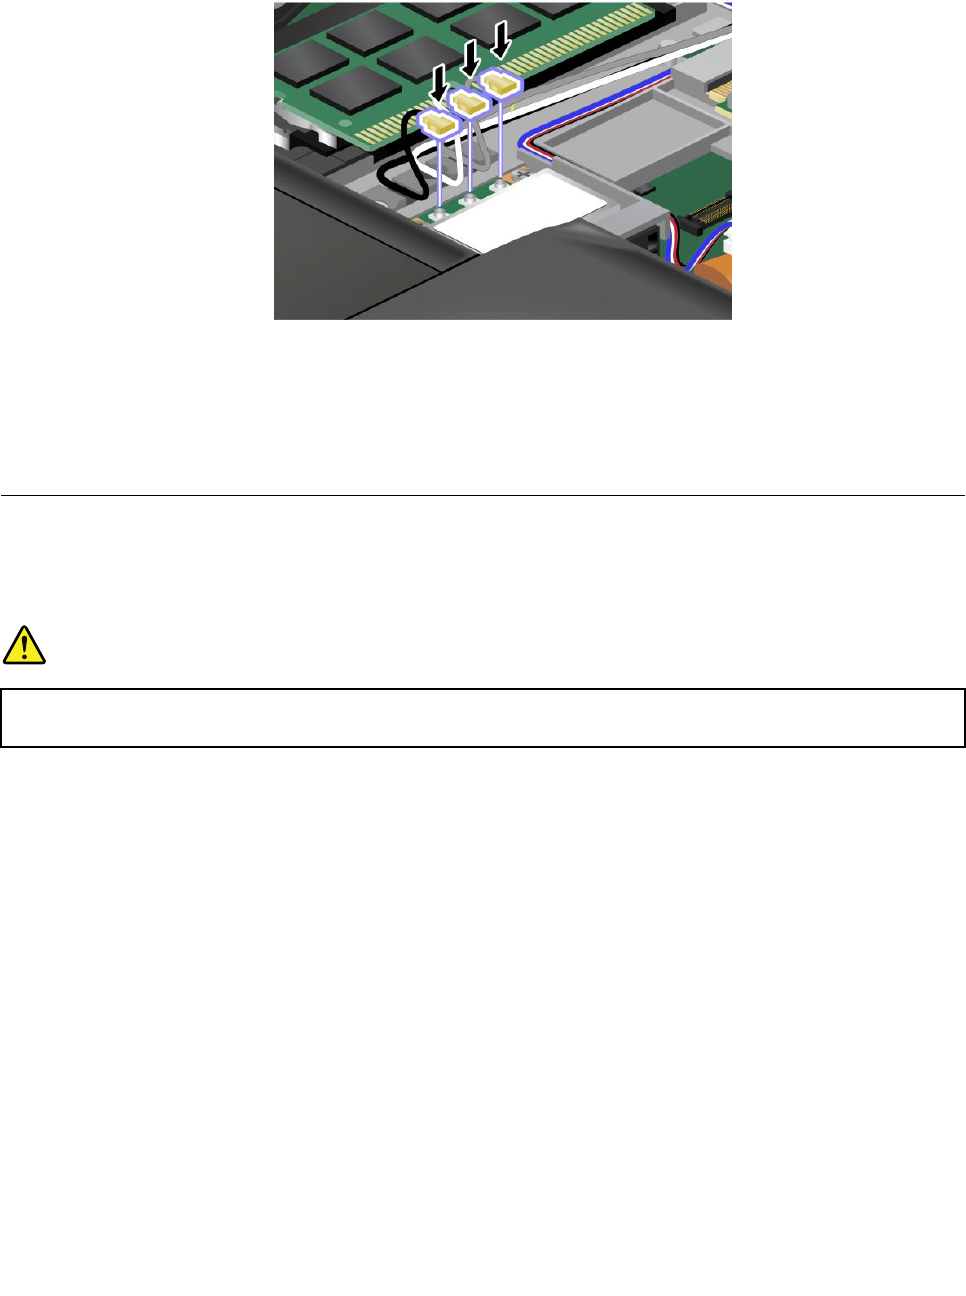
10.ConnectthecablestothenewwirelessLANcard.Besuretoattachthegraycabletotheconnector
markedTR1orMainonthecard,thewhitecabletotheconnectormarkedROorTR3(center),andthe
blackcabletotheconnectormarkedTR2orAux.
Note:IfthenewwirelessLANcardhastwoconnectors,putthewhitecableinthecableprotectiontube.
11.Reinstallthekeyboard.See“Replacingthekeyboard”onpage78.
12.Reinstallthebattery.See“Replacingthebattery”onpage72.
13.Turnthecomputeroveragain.Connecttheacpoweradapterandallcables.
InstallingandreplacingthewirelessWANcard
Beforeyoustart,printtheseinstructions.
PrerequisitesforreplacingorinstallingthewirelessWANcard
DANGER
Electriccurrentfrompower,telephone,andcommunicationcablesishazardous.Toavoidshock
hazard,disconnectthecablesbeforeopeningthecoverofthisslot.
Attention:BeforeyoustartinstallingawirelessWANcard,touchametaltableoragroundedmetalobject.
Thisactionreducesanystaticelectricityfromyourbody.Thestaticelectricitycoulddamagethecard.
ToreplaceorinstallthewirelessWANcard,dothefollowing:
1.Turnoffthecomputer,thendisconnecttheacpoweradapterandallcablesfromthecomputer.Wait
threetoveminutestoletthecomputercool.
2.Closethecomputerdisplay,andturnthecomputerover.
3.Removethebattery.See“Replacingthebattery”onpage72.
4.Removethekeyboard.See“Replacingthekeyboard”onpage78.
Chapter6.Replacingdevices89
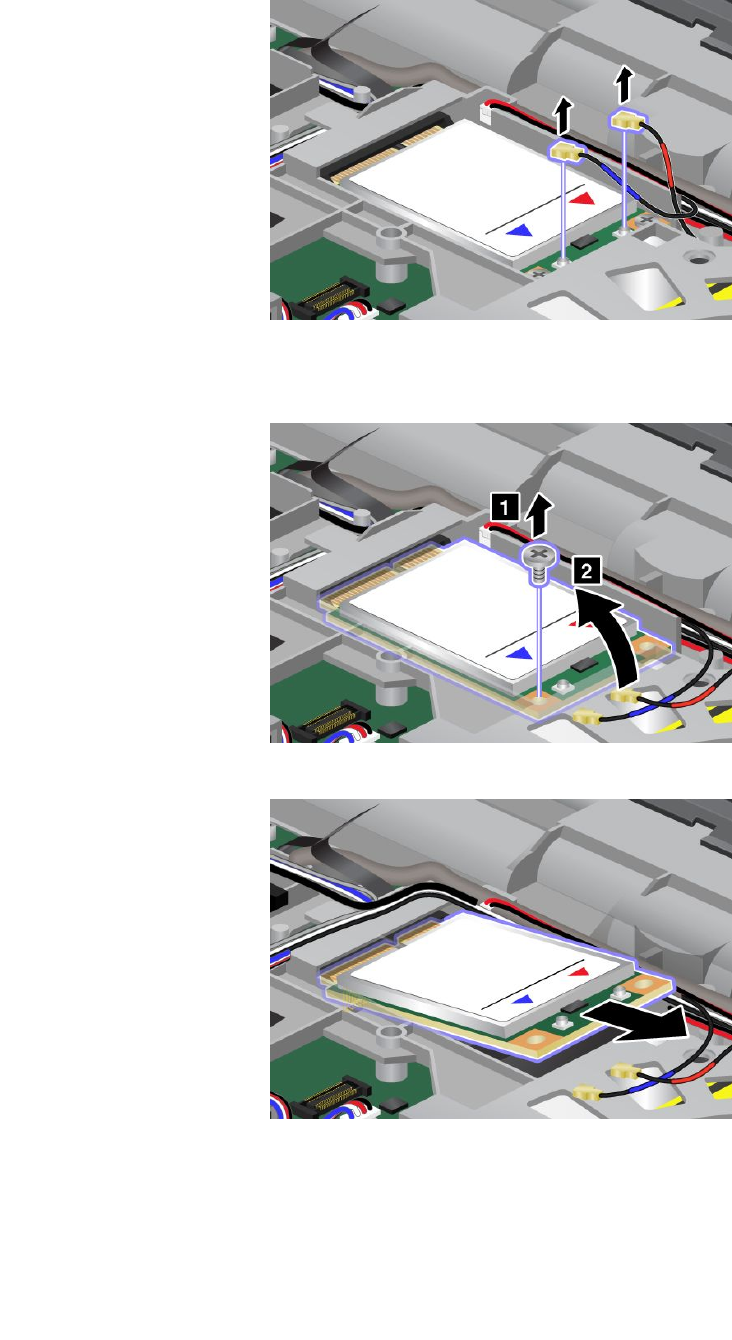
5.IfawirelessWANcardisalreadyinstalled,disconnectthecables.
Note:Dependingonthesystemcongurationofyourcomputer,thecardmighthaveonlyoneconnector.
6.Removethescrew.Thecardpopsup.
7.Removethecard.
90UserGuide
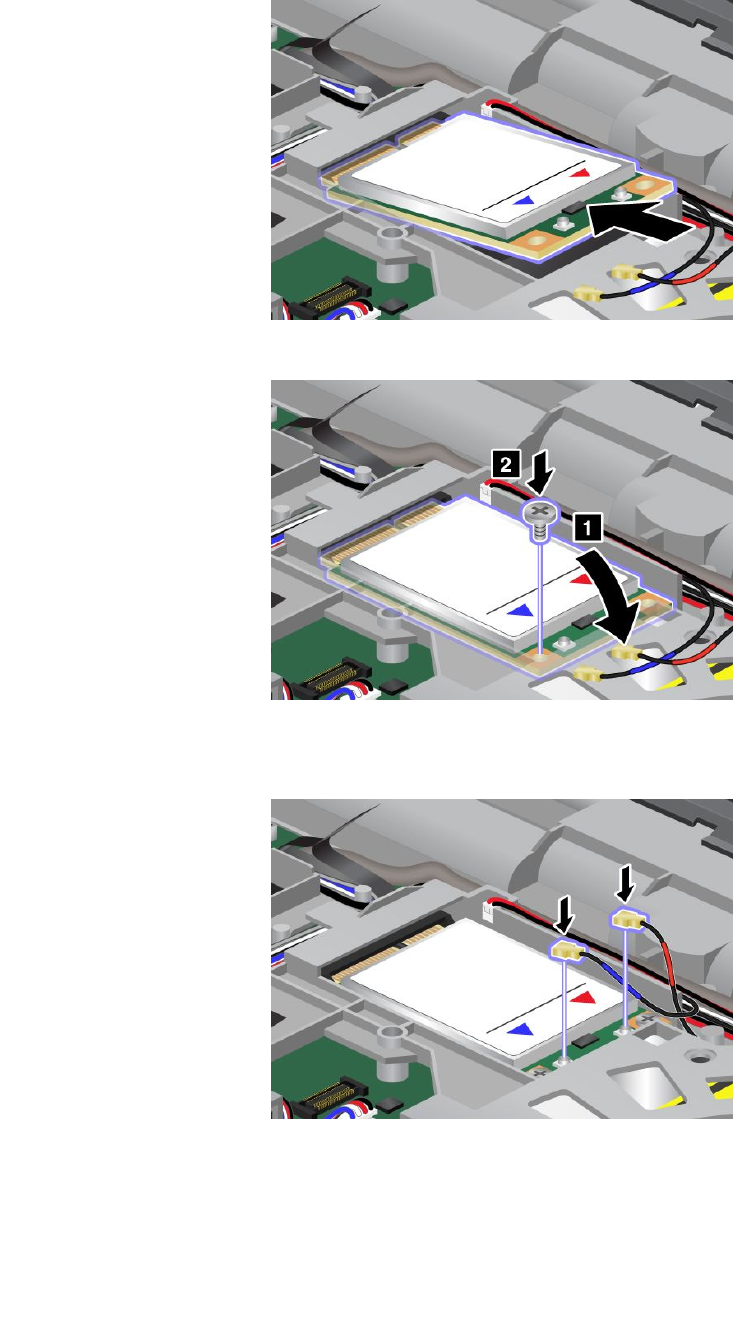
8.AlignthecontactedgeofthenewwirelessWANcardwiththecorrespondingsocket.
9.Pivotthecarduntilyousnapitintoplace.Securethecardwiththescrew.
Note:Dependingonthesystemcongurationofyourcomputer,thecardmighthaveonlyoneconnector.
10.ConnectthecablestothenewwirelessWANcard.
Note:Dependingonthemodel,themarkingfortheconnectorsonyourcardmightlookdifferentfrom
theoneshownintheillustrationabove.BesuretoattachtheredcabletotheMAINorMconnector,
andthebluecabletotheAUXorAconnector.
11.Reinstallthekeyboard.See“Replacingthekeyboard”onpage78.
12.Reinstallthebattery.See“Replacingthebattery”onpage72.
Chapter6.Replacingdevices91
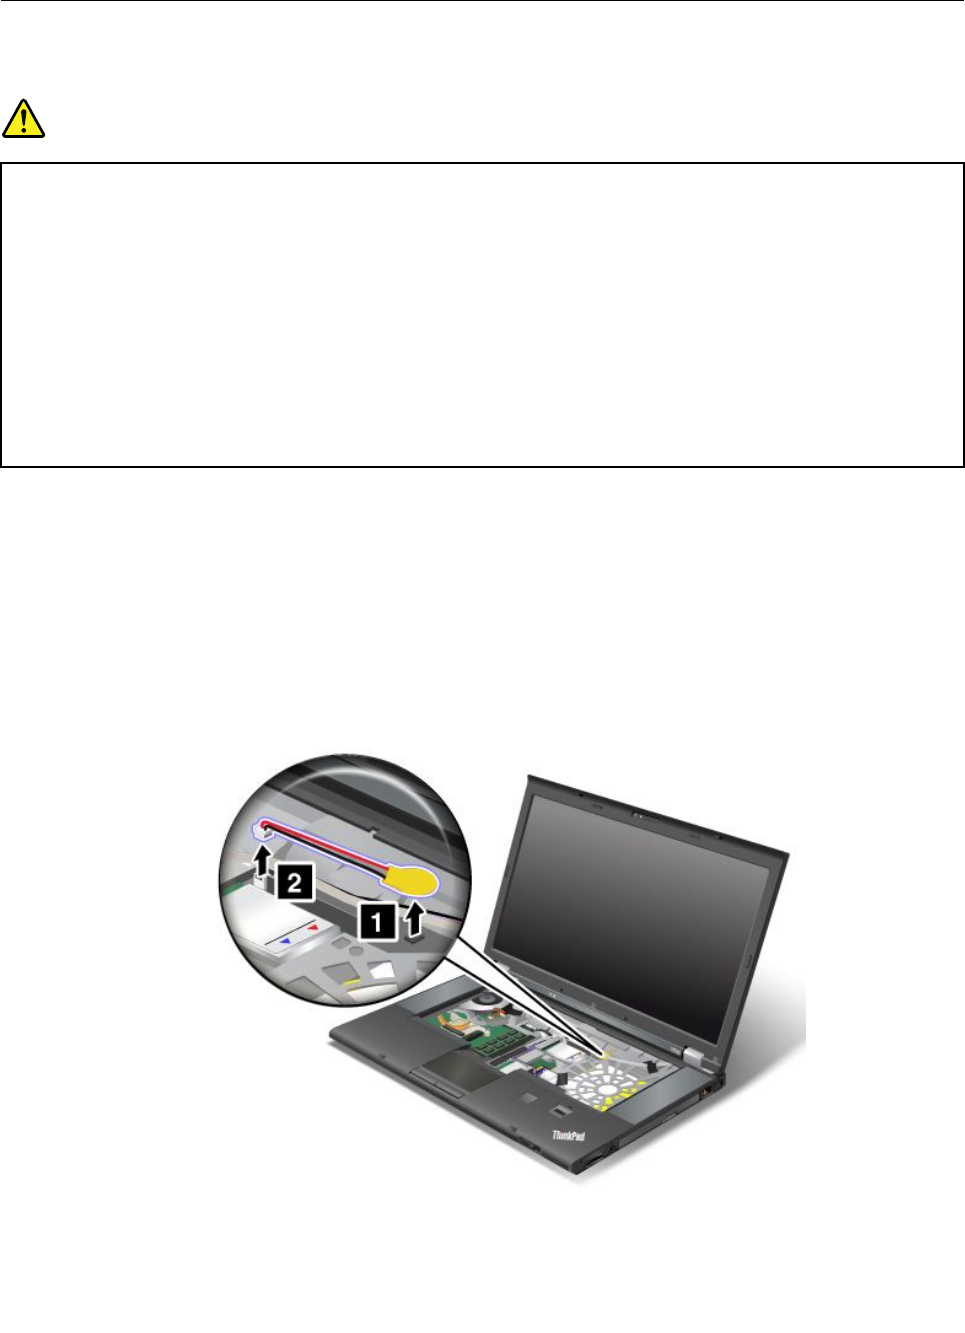
13.Turnthecomputeroveragain.Connecttheacpoweradapterandallcables.
Replacingthebackupbattery
Beforeyoustart,printtheseinstructions.
DANGER
Ifthebackupbatteryisincorrectlyreplaced,thereisdangerofanexplosion.Thebackupbattery
containsasmallamountofharmfulsubstances.Toavoidpossibleinjury:
•ReplaceonlywithabatteryofthetyperecommendedbyLenovo.
•Keepthebatterypackawayfromre.
•Donotexposeittoexcessiveheat.
•Donotexposeittowaterorrain.
•Donotshort-circuitit.
•Donotdrop,crush,puncture,orsubjecttostrongforces.Batteryabuseormishandlingcan
causethebatterytooverheat,whichcancausegassesorameto“vent”fromthebattery
packorcoincell.
Toreplacethebackupbattery,dothefollowing:
1.Turnoffthecomputer,thendisconnecttheacpoweradapterandallcablesfromthecomputer.Wait
threetoveminutestoletthecomputercool.
2.Closethecomputerdisplay,andturnthecomputerover.
3.Removethebattery.See“Replacingthebattery”onpage72.
4.Removethekeyboard.See“Replacingthekeyboard”onpage78.
5.Detachtheconnector.Thenremovethebackupbattery.
6.Installthenewbackupbatteryandattachtheconnector.
92UserGuide
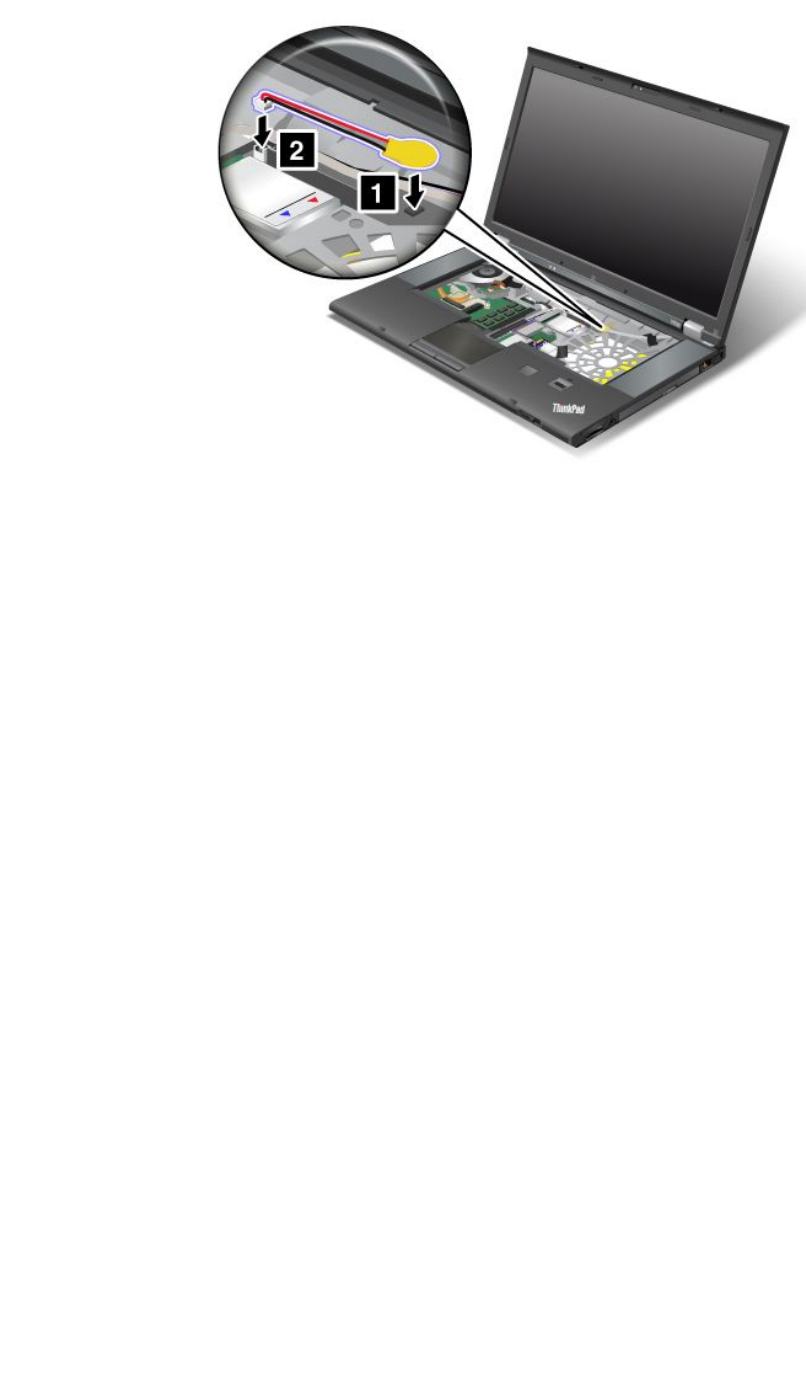

94UserGuide

Chapter7.Enhancingyourcomputer
Thischapterprovidesinstructionsoninstallinghardwaredevicestoexpandyourcomputercapabilities.
•“FindingThinkPadoptions”onpage95
•“UsingtheSerialUltrabayEnhancedfeature”onpage95
•“Usingtheextendedlifebattery”onpage100
•“ThinkPadportreplicatorsanddockingstations”onpage102
FindingThinkPadoptions
Ifyouwanttoexpandthecapabilitiesofyourcomputer,Lenovohasanumberofhardwareaccessories
andupgradestomeetyourneeds.Optionsincludememorymodules,storagedevices,networkcards,port
replicatorsordockingstations,batteries,poweradapters,printers,scanners,keyboards,mice,andmore.
YoucanshopatLenovo24hoursaday,7daysaweekdirectlyovertheWorldWideWeb.Allyouneedisan
Internetconnectionandacreditcard.
ToshopatLenovo,gotohttp://www.lenovo.com/accessories/services/index.html.
UsingtheSerialUltrabayEnhancedfeature
UsetheSerialUltrabayEnhancedbayforinstallingdevices,suchasaMultiBurnerdrive,aDVD-ROM
drive,andaharddiskdrive.VariousSerialUltrabayEnhanceddevicesareavailableasoptionsat
http://www.lenovo.com/accessories.
Notes:
•Dependingonyourcomputermodel,theSerialUltrabayEnhancedbayofyourcomputersupports:
–9.5-mm-thickSerialUltrabaySlimdevice
–12.7-mm-thickSerialUltrabayEnhanceddevice
•YoucaninserteitheroftheabovedevicesintotheSerialUltrabayEnhancedbayofyourcomputerinone
ofthefollowingconditions:
–Thecomputeristurnedoff.See“ReplacingtheUltrabaydevice”onpage71.
–Thecomputerisworkingorinsleepmode.See“Performingahotorawarmswap”onpage95.
Performingahotorawarmswap
YourcomputersupportsbothhotswapandwarmswapfortheUltrabaydevices.
Performingahotswap
Todoahotswapistoconnect,remove,orreconnectadevicewhilethecomputerisoperating.
Notes:
•Hot-swapisnotsupportedwhenyourcomputerisdockedorwhentheextendedlifebatteryisinstalled.
•Ifaharddiskpasswordisset,youcannothot-swapthedrive.Firstremovetheharddiskpassword,and
thendothehotswap.
Tohot-swaptheUltrabaydevice,dothefollowing:
©CopyrightLenovo201295

1.ClickthetriangulariconintheWindowsnoticationareatoshowhiddenicons,thenclicktheSafely
RemoveHardwareandEjectMediaicon,andthenstopthedevice.
2.RemoveandinserttheUltrabaydeviceasintroducedin“ReplacingtheUltrabaydevice”onpage71.
Performingawarmswap
Todoawarmswapistoconnect,remove,orreconnectadevicewhilethecomputerisinsleepmode.
Towarm-swaptheUltrabaydevice,dothefollowing:
1.PressFn+F4toputthecomputerintosleepmode.
2.RemoveandinserttheUltrabaydeviceasintroducedin“ReplacingtheUltrabaydevice”onpage71.
3.PresstheFnkeytoreturnfromsleepmode.
Installingasecondaryharddiskdrive
YoucanupgradethecapacityofyourcomputerbyinstallingasecondaryharddiskdriveusingaThinkPad
harddiskdrivebayadapter.
Note:ForRAIDmodels,thesecondaryharddiskdriveisbuiltinyourcomputerthroughtheadapterfor
RAIDmodel.
Thefollowingtableshowssupportedadaptersfornon-RAIDmodelsandRAIDmodels.
Table5.Supportedharddiskdrivebayadapter
HarddiskdrivebayadapterT530,T530i,W530non-RAIDmodelW530RAIDmodel
ThinkPadSerialATAHardDriveBayAdapterIII(P/N
43N3428)
SupportasoptiononlyNotsupport
ThinkPad12.7mmSerialATAHardDriveBayAdapter
III(P/N0B55883)
SupportasoptiononlyNotsupport
HardDriveBayAdapterforRAIDmodelNotsupportSupport(builtin)
TheThinkPadSerialHardDriveBayAdapterIIIsupportsonly2.5-inch(7mmheight)harddiskdrive.
TheThinkPad12.7mmSerialATAHardDriveBayAdapterIIIsupportsthefollowingdrives:
•2.5-inchharddiskdrive(9.5mmheightor7mmheight)
•2.5-inchsolid-statedrive(7mmheight)
InstallasecondaryharddiskdrivethroughtheThinkPadSerialATAHardDriveBayAdapterIII
ToinstallasecondaryharddiskdrivethroughtheThinkPadSerialATAHardDriveBayAdapterIII,do
thefollowing:
Attention:Replaceaharddiskdriveonlyifyouareupgradingitorhavingitrepaired.Frequentreplacement
oftheharddiskdrivemightdamagethedriveandbay.
1.RemovetheSerialUltrabaySlimdeviceorSerialUltrabayEnhanceddevicefromyourcomputer.See
“ReplacingtheUltrabaydevice”onpage71.
2.Opentheharddiskdrivestopper.
96UserGuide
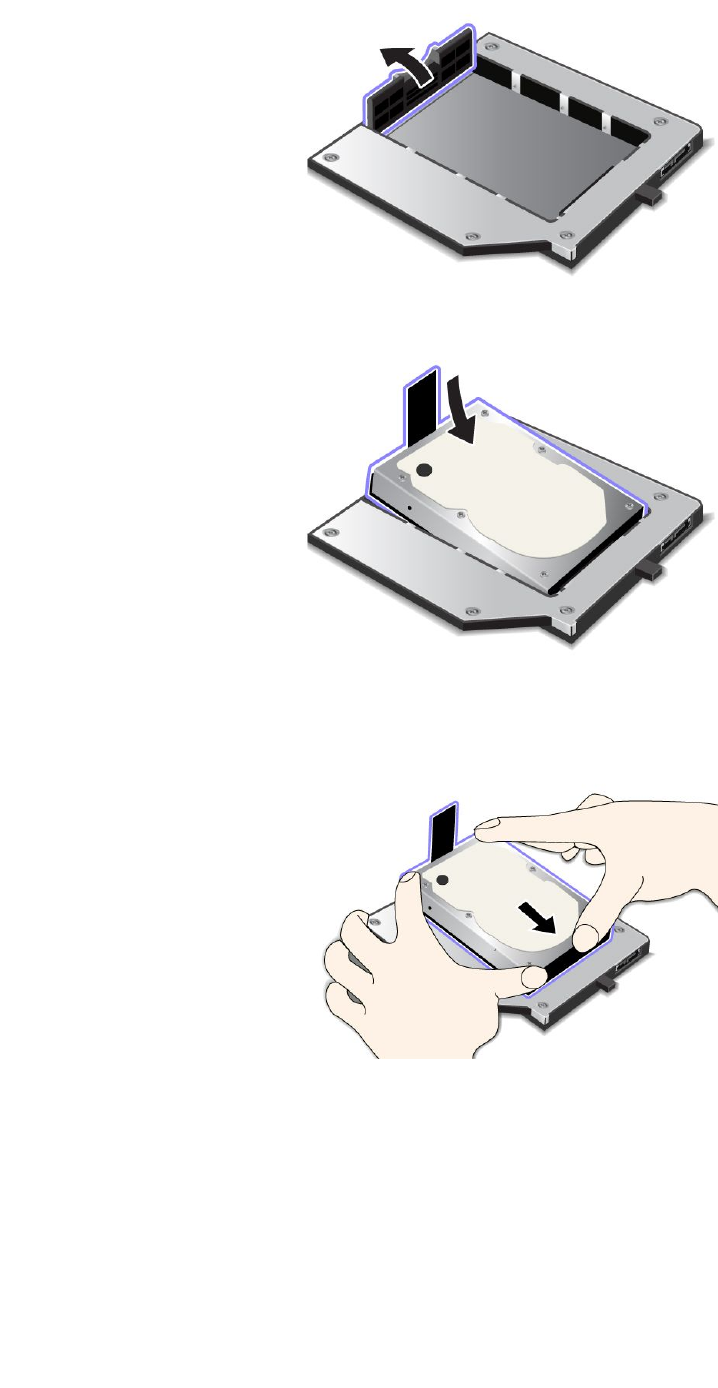
3.Inserttheharddiskdrivewiththelabelfacingupwardasshown:
Note:Ifyourharddiskdrivehasastrap,besurenottoleaveitunderthedrive.
4.Connecttheharddiskdrivetoitsconnector.
5.Closetheharddiskdrivestopper.
Chapter7.Enhancingyourcomputer97
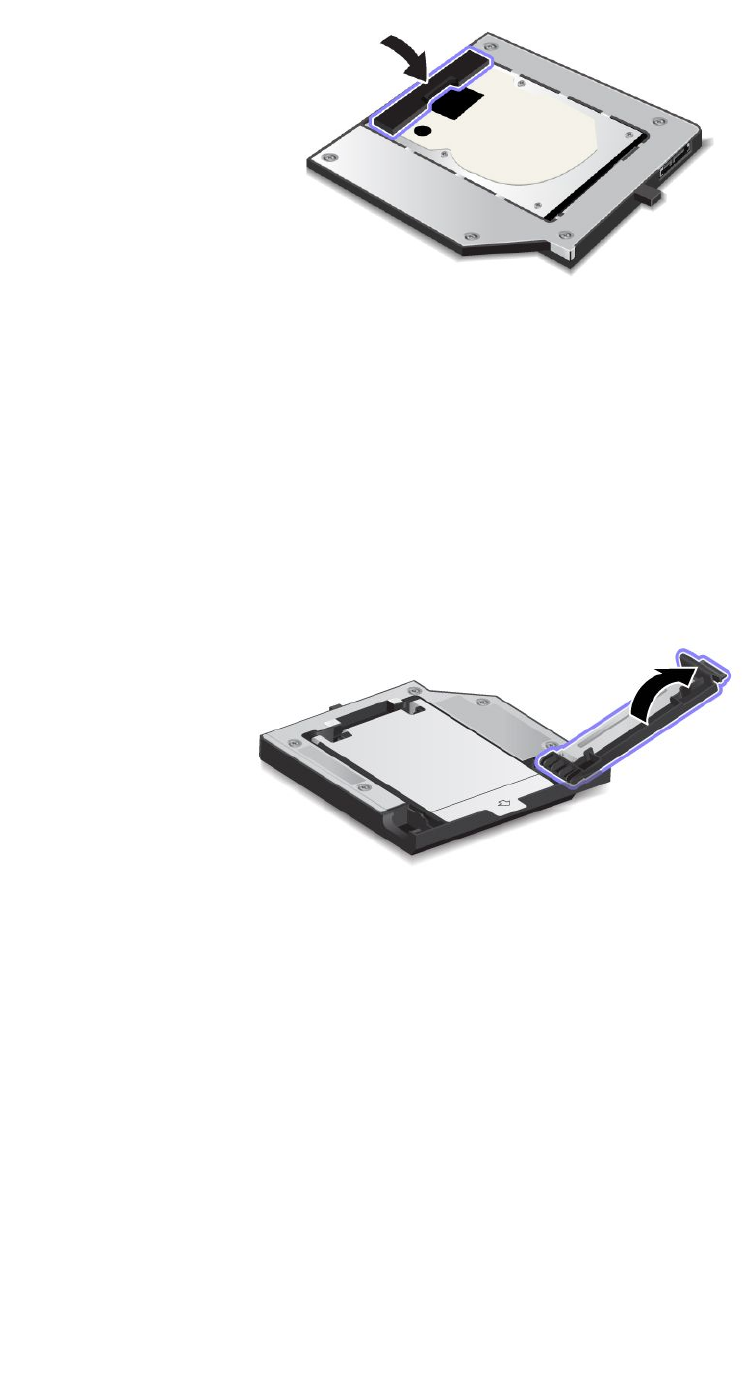
6.InserttheThinkPadSerialHardDriveBayAdapterIIIintotheSerialUltrabayEnhancedbay.
InstallasecondaryharddiskdrivethroughtheThinkPad12.7mmSerialATAHardDriveBayAdapterIII
ToinstallasecondaryharddiskdrivethroughtheThinkPad12.7mmSerialATAHardDriveBayAdapterIII,
dothefollowing:
Attention:Replaceaharddiskdriveonlyifyouareupgradingitorhavingitrepaired.Frequentreplacement
oftheharddiskdrivemightdamagethedriveandbay.
1.RemovetheSerialUltrabaySlimdeviceorSerialUltrabayEnhanceddevicefromyourcomputer.See
“ReplacingtheUltrabaydevice”onpage71.
2.OpentheharddiskdrivestopperontheThinkPad12.7mmSerialATAHardDriveBayAdapterIII.
3.Liftupthecoverlmandinserttheharddiskdrivewiththelabelfacingupward.
98UserGuide
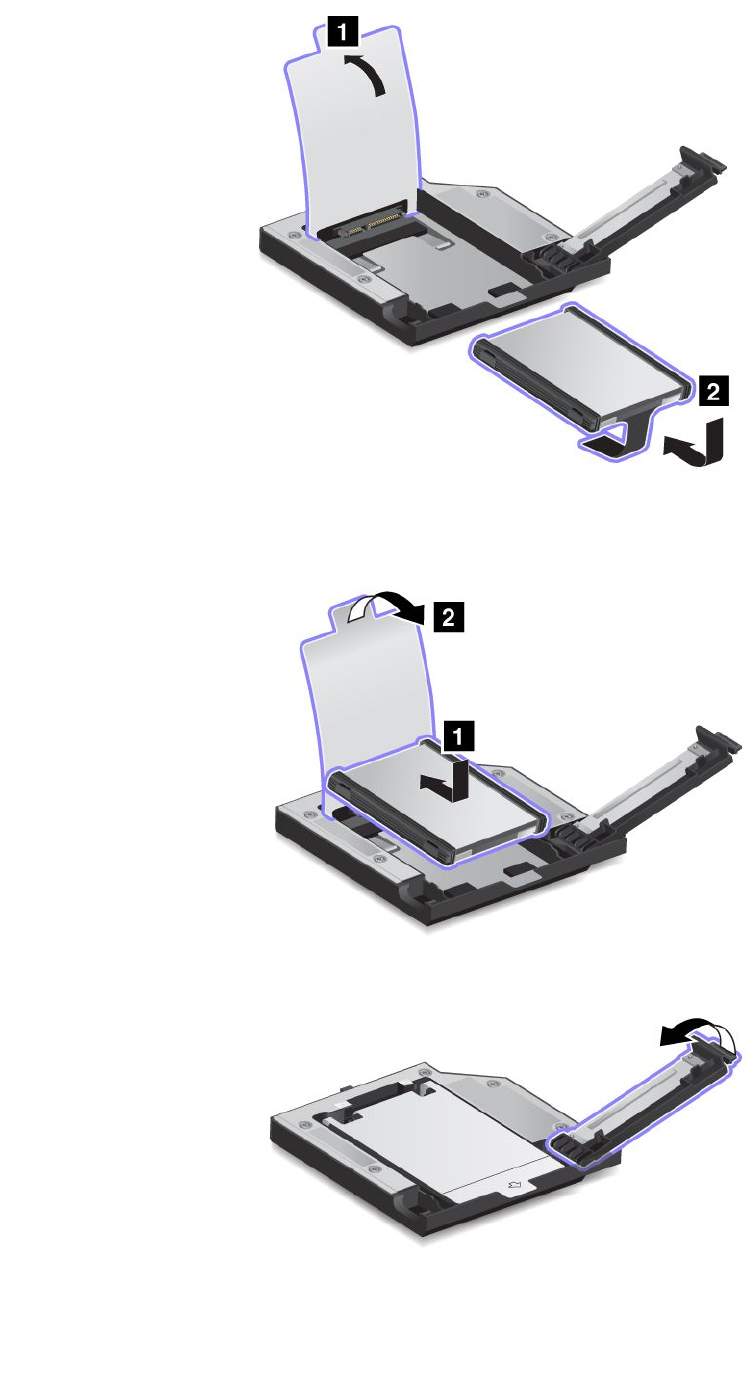
Note:Ifyourharddiskdrivehasastrap,besurenottoleaveitunderthedrive.
4.Ensurethattheharddiskdriveisconnectedrmly.Thenputthecoverlmbacktoplace.
5.Closetheharddiskdrivestopper.
6.InserttheThinkPad12.7mmSerialATAHardDriveBayAdapterIIIintotheSerialUltrabayEnhancedbay.
Chapter7.Enhancingyourcomputer99
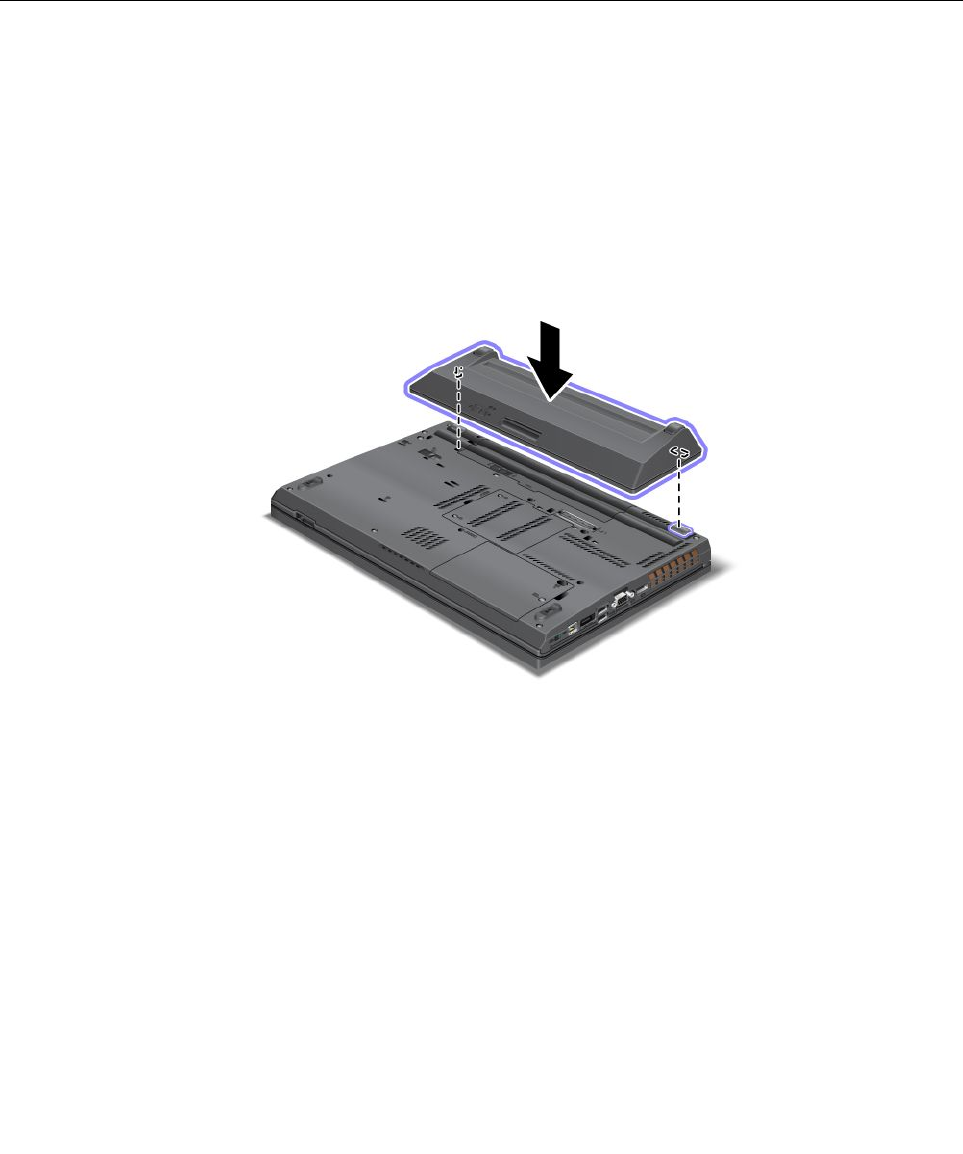
Notes:Ifyouinstallthesecondaryharddiskdriveusinghotswaporwarmswap,andtheharddiskdriveis
protectedbyapassword,youcannotgetaccesstothedriverightafterinsertingtheadapterintothe
bay.Togetaccesstoit,dothefollowing:
1.Putyourcomputerintohibernationmode.Youmighthavetowaitforawhiletillthecomputerenters
hibernationmode.
2.Pressthepowerbuttontoreturntonormaloperation.Theharddiskpasswordiconisdisplayedon
thescreen.
3.Typethepassword.Thenyoucangetaccesstotheharddiskdrive.
Usingtheextendedlifebattery
Toextendthebatterylifeofyourcomputer,youcanpurchaseanextendedlifebattery,ThinkPadBattery
28++,fromLenovoandattachittoyourcomputerthroughthedockingstationconnector.
Toattachtheextendedlifebattery,dothefollowing:
1.Turnoffthecomputer,orenterhibernationmode.Thendisconnecttheacpoweradapterandallcables
fromthecomputer.
2.Closethecomputerdisplay,andturnthecomputerover.
3.Aligntheconnectoroftheextendedlifebatterywiththedockingstationconnectoratthebottomofthe
computer.Firmlyattachthebattery.
4.Slidethebatterylatchtothelockedposition.
100UserGuide
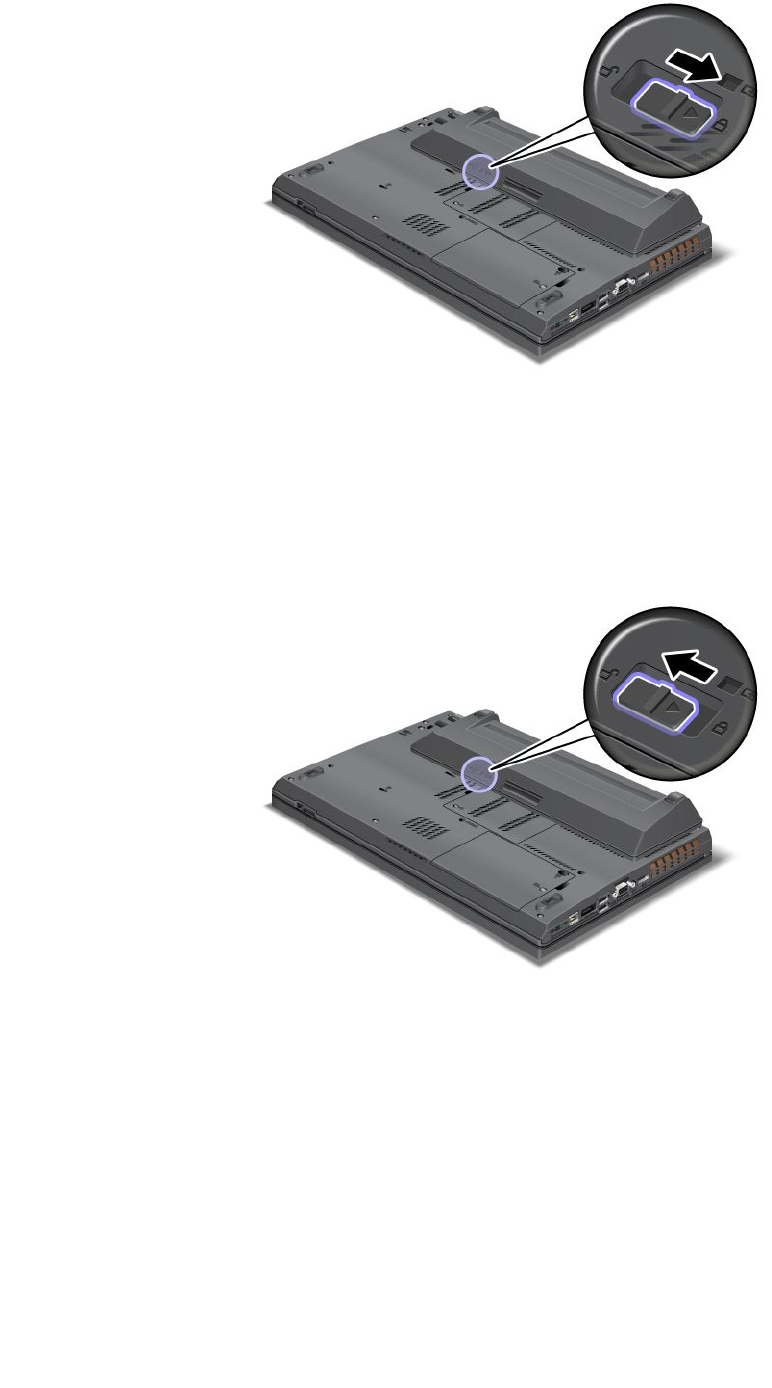
5.Turnthecomputeroveragain.Connecttheacpoweradapterandthecablestothecomputer.
Toremovetheextendedlifebattery,dothefollowing:
1.Turnoffthecomputer,orenterhibernationmode.Thendisconnecttheacpoweradapterandallcables
fromthecomputer.
2.Closethecomputerdisplay,andturnthecomputerover.
3.Unlockthebatterylatch.
4.Pressthelatchasshownintheillustrationbelowanddetachthebattery.
Chapter7.Enhancingyourcomputer101
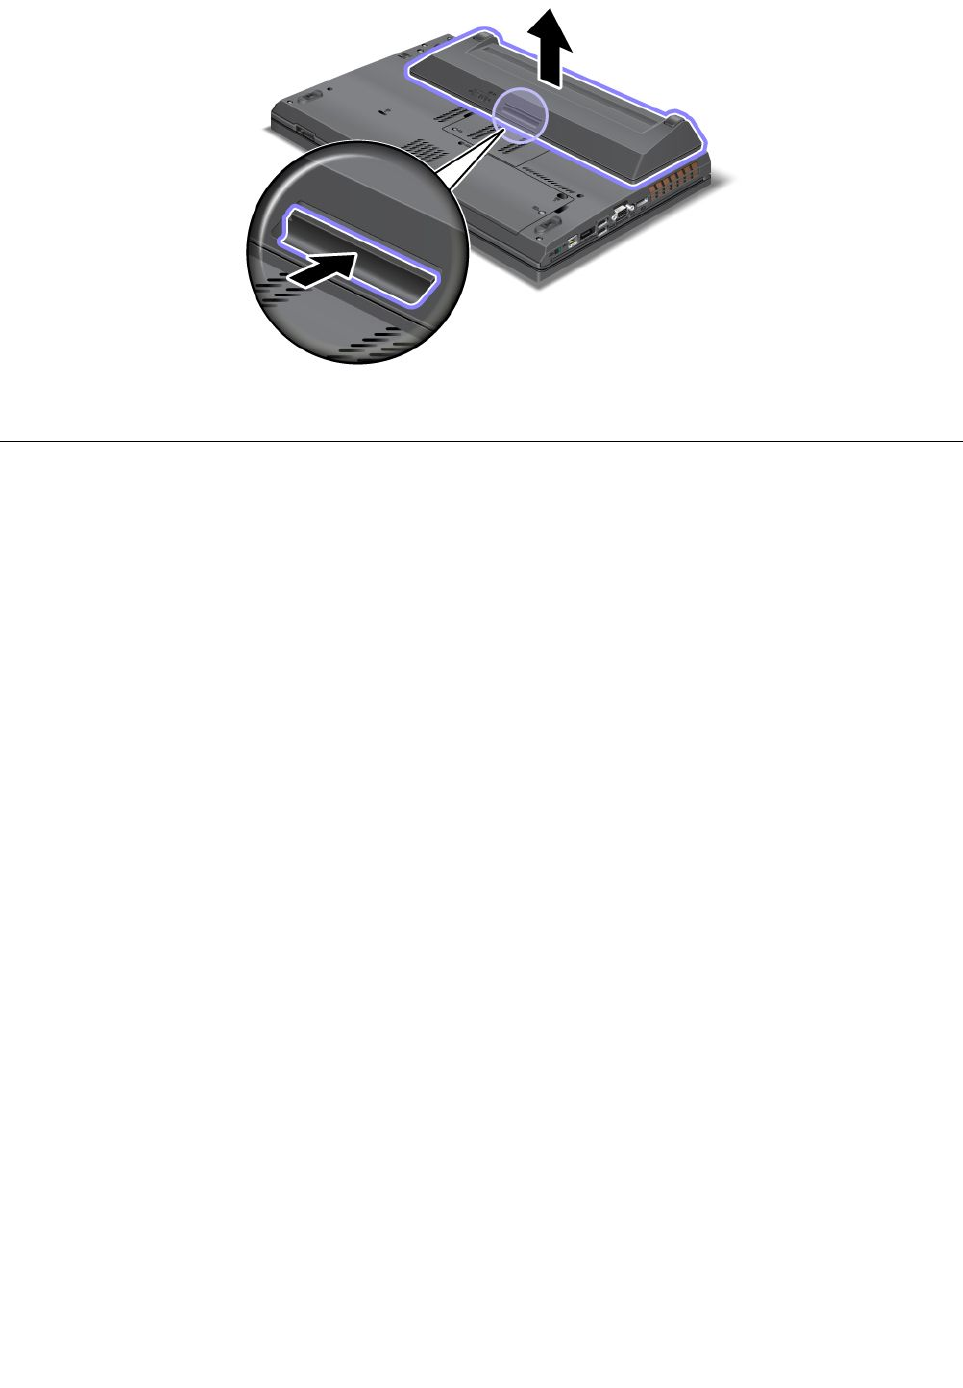
5.Turnthecomputeroveragain.Connecttheacpoweradapterandthecablestothecomputer.
ThinkPadportreplicatorsanddockingstations
Dependingonthemodel,yourcomputermightsupportthefollowingportreplicatorsordockingstations:
•ThinkPadPortReplicatorSeries3
•ThinkPadPortReplicatorSeries3withUSB3.0
•ThinkPadMiniDockSeries3
•ThinkPadMiniDockSeries3withUSB3.0
•ThinkPadMiniDockPlusSeries3
•ThinkPadMiniDockPlusSeries3withUSB3.0
Attachyourcomputertooneoftheportreplicatorsordockingstationstoexpandtheworkingcapability.
Whenthecomputerisattachedtoaportreplicatorordockingstation,neverpickuptheassemblybytaking
holdofthecomputeralone.Alwaysholdthewholeassembly.
102UserGuide
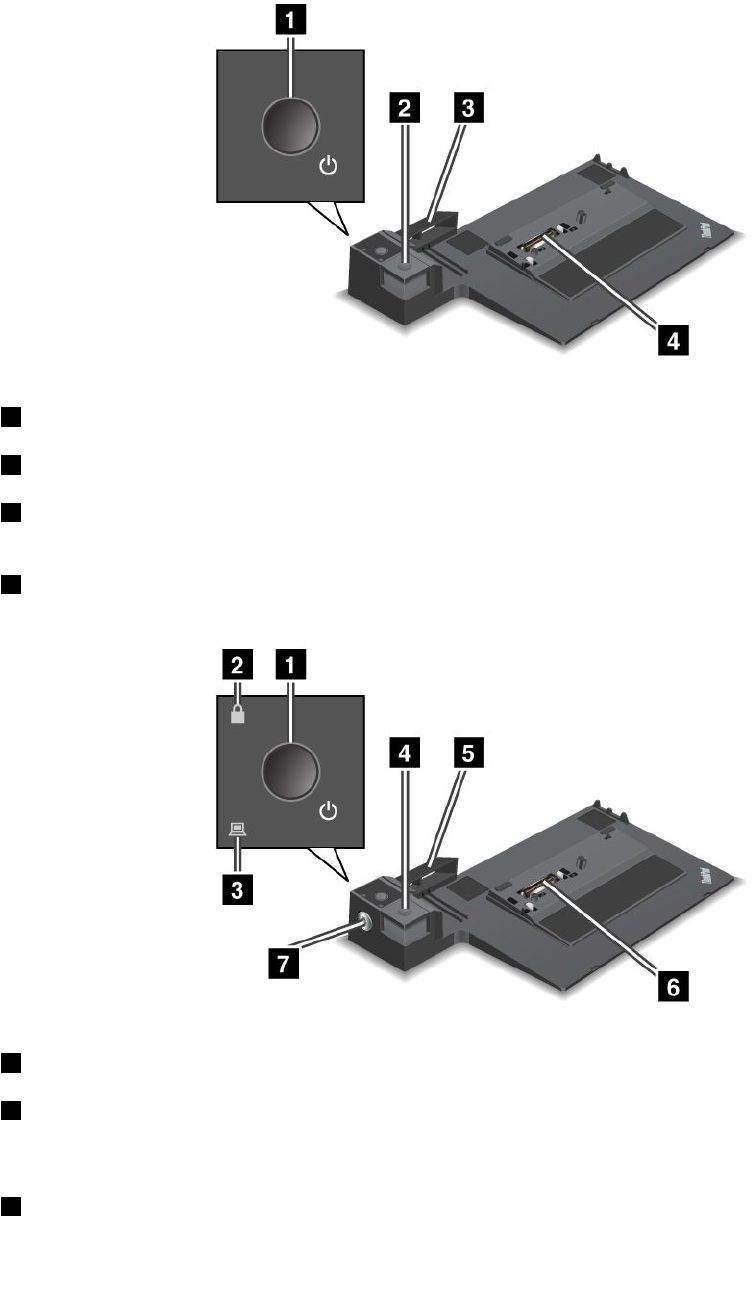
Frontview
ThinkPadPortReplicatorSeries3andThinkPadPortReplicatorSeries3withUSB3.0
1Powerbutton:Pressthepowerbuttontoturnthecomputeronoroff.
2Ejectbutton:Presstheejectbuttontoreleasethecomputerfromtheportreplicator.
3Slidingadjuster:Usetheslidingadjusterasaguidetoalignthedockingstationconnectoronyour
computerasyouattachtheportreplicator.
4Dockingstationconnector:Thisiswhereyouattachyourcomputer.
ThinkPadMiniDockSeries3andThinkPadMiniDockSeries3withUSB3.0
1Powerbutton:Pressthepowerbuttontoturnthecomputeronoroff.
2Keylockindicator:Thisindicatorlightswhenthesystemlockkeyisinthelockedposition.Whenthe
systemlockkeyisinthelockedposition,theejectbuttonofthedockingstationislocked;youcannot
attachorremoveyourcomputer.
3Dockingstationindicator:Thisindicatorlightswhenyourcomputerisdocked.
Chapter7.Enhancingyourcomputer103
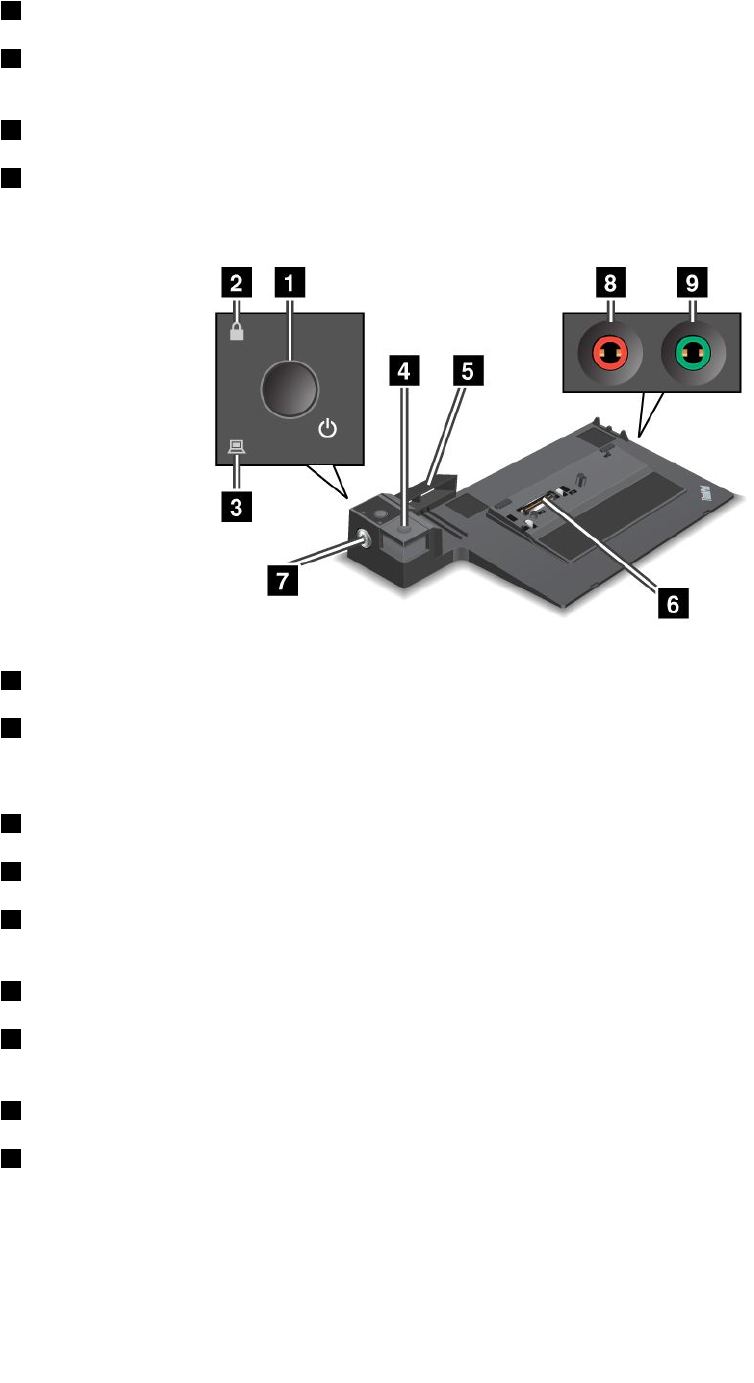
4Ejectbutton:Presstheejectbuttontoreleasethecomputerfromthedockingstation.
5Slidingadjuster:Usetheslidingadjusterasaguidetoalignthedockingstationconnectoronyour
computerasyouattachthedockingstation.
6Dockingstationconnector:Thisiswhereyouattachyourcomputer.
7Systemlockkey:Usethesystemlockkeytolocktheejectbutton.Whentheejectbuttonislocked,you
cannotattachorremoveyourcomputer.
ThinkPadMiniDockPlusSeries3andThinkPadMiniDockPlusSeries3withUSB3.0
1Powerbutton:Pressthepowerbuttontoturnthecomputeronoroff.
2Keylockindicator:Thisindicatorlightswhenthesystemlockkeyisinthelockedposition.Whenthe
systemlockkeyisinthelockedposition,theejectbuttonofthedockingstationislocked;youcannot
attachorremoveyourcomputer.
3Dockingstationindicator:Thisindicatorlightswhenyourcomputerisdocked.
4Ejectbutton:Presstheejectbuttontoreleasethecomputerfromthedockingstation.
5Slidingadjuster:Usetheslidingadjusterasaguidetoalignthedockingstationconnectoronyour
computerasyouattachthedockingstation.
6Dockingstationconnector:Thisiswhereyouattachyourcomputer.
7Systemlockkey:Usethesystemlockkeytolocktheejectbutton.Whentheejectbuttonislocked,you
cannotattachorremoveyourcomputer.
8Microphonejack:1/8inch(3.5mm)indiameter.Useittoconnectanexternalmicrophone.
9Headphonejack:1/8inch(3.5mm)indiameter.Useittoconnectanexternalheadphone.
104UserGuide
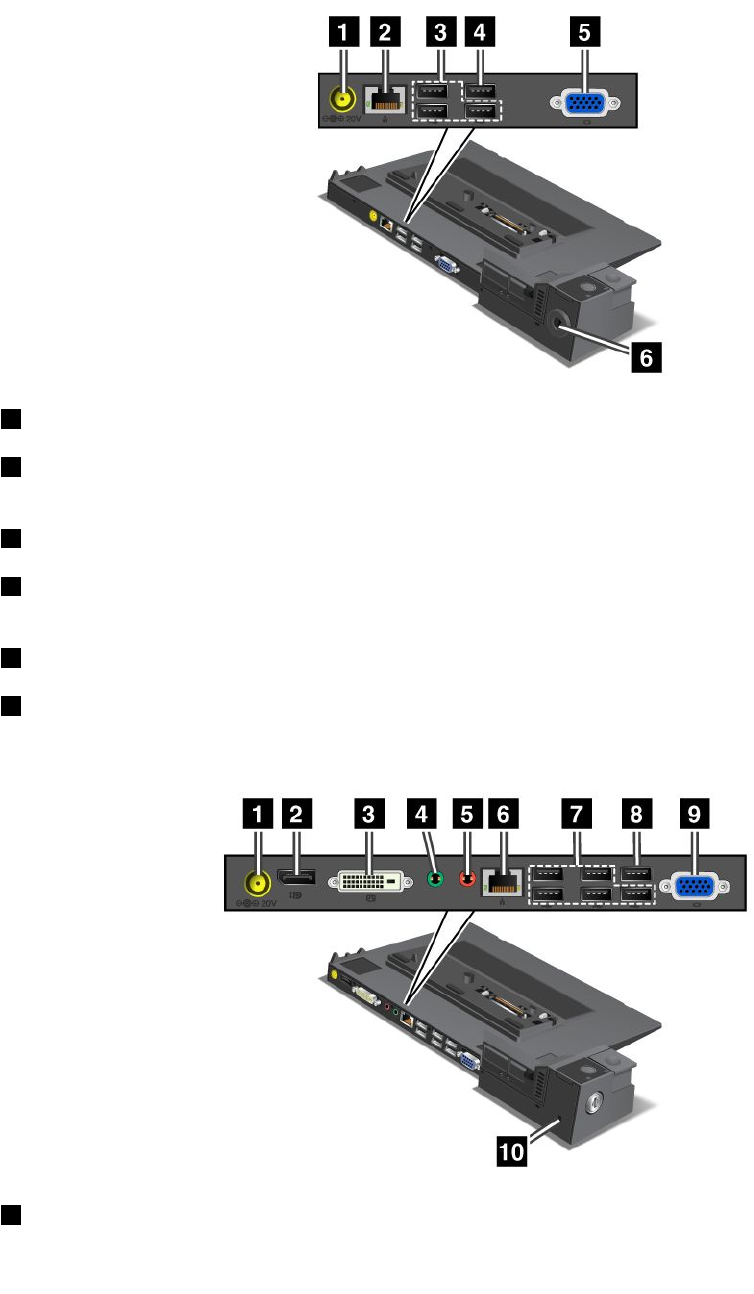
Rearview
ThinkPadPortReplicatorSeries3andThinkPadPortReplicatorSeries3withUSB3.0
1Powerjack:Connecttheacpoweradapter.
2Ethernetconnector:ConnecttheportreplicatortoanEthernetLAN.Theindicatorontheconnector
isthesameasthatonthecomputer.
3USB2.0connectors:ConnectUSB2.0compatibledevices.
4USB2.0connector(ontheThinkPadPortReplicatorSeries3)orUSB3.0connector(ontheThinkPad
PortReplicatorSeries3withUSB3.0):ConnectcompatibleUSBdevices.
5Externalmonitorconnector:Connectanexternalmonitor.
6Securitykeyhole:Useasecuritycablelockthattsthiskeyholetolockyourportreplicatortoa
stationaryobjecttoprotectitfromtheft.
ThinkPadMiniDockSeries3andThinkPadMiniDockSeries3withUSB3.0
1Powerjack:Connecttheacpoweradapter.
Chapter7.Enhancingyourcomputer105
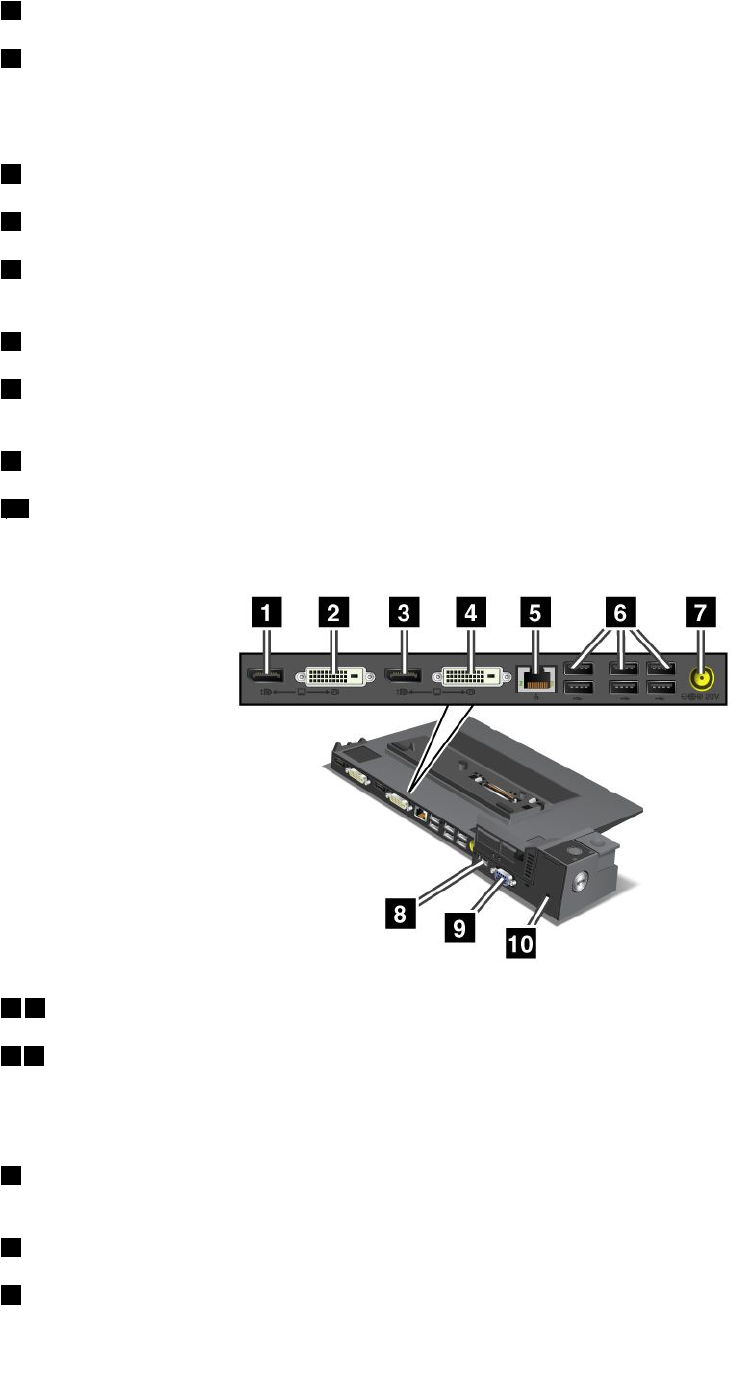
2DisplayPortconnector:Connectadisplaydevice.
3DVIconnector:ConnectamonitorthatsupportsSingle-LinkDVI.
Note:TheDVIconnectorprovidesadigitalinterfaceonly.Thisconnectorcanonlybeusedwithacomputer
thatsupportsDVIconnectionestablishedthroughdockingstations.
4Headphonejack:1/8inch(3.5mm)indiameter.Useittoconnectanexternalheadphone.
5Microphonejack:1/8inch(3.5mm)indiameter.Useittoconnectanexternalmicrophone.
6Ethernetconnector:ConnecttheportreplicatortoanEthernetLAN.Theindicatorontheconnector
isthesameasthatonthecomputer.
7USB2.0connectors:ConnectUSB2.0compatibledevices.
8USB2.0connector(ontheThinkPadMiniDockSeries3)orUSB3.0connector(ontheThinkPadMini
DockSeries3withUSB3.0):ConnectcompatibleUSBdevices.
9Externalmonitorconnector:Connectanexternalmonitor.
10Securitykeyhole:Useasecuritycablelockthattsthiskeyholetolockyourdockingstationtoa
stationaryobjecttoprotectitfromtheft.
ThinkPadMiniDockPlusSeries3andThinkPadMiniDockPlusSeries3withUSB3.0
13DisplayPortconnector:Connectadisplaydevice.
24DVIconnector:ConnectamonitorthatsupportsSingle-LinkDVI.
Note:TheDVIconnectorprovidesadigitalinterfaceonly.Thisconnectorcanonlybeusedwithacomputer
thatsupportsDVIconnectionestablishedthroughdockingstations.
5Ethernetconnector:ConnecttheportreplicatortoanEthernetLAN.Theindicatorontheconnector
isthesameasthatonthecomputer.
6USB2.0connectors:ConnectUSB2.0compatibledevices.
7Powerjack:Connecttheacpoweradapter.
106UserGuide
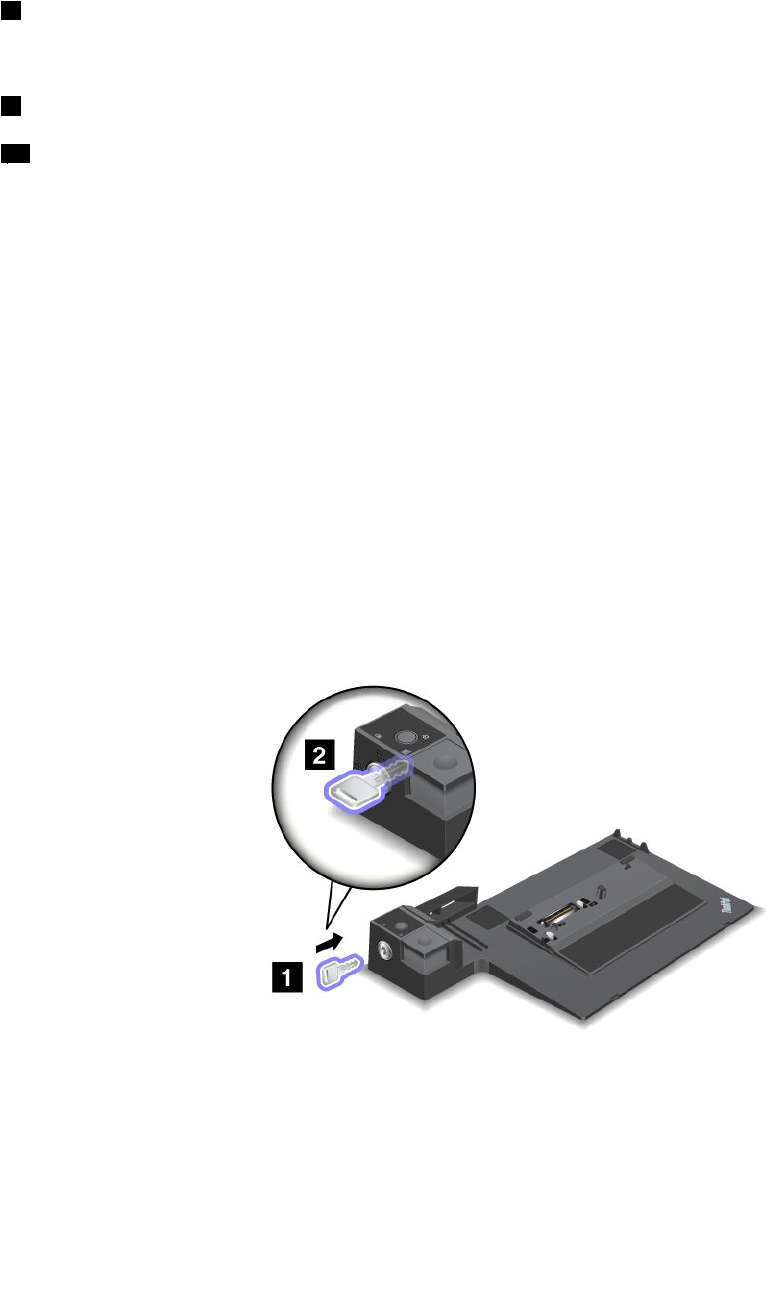
Note:FortheThinkPadMiniDockPlusSeries3(170W)andThinkPadMiniDockPlusSeries3withUSB
3.0(170W),usetheacpoweradaptershippedwithyourcomputer.
8eSATAconnectororUSB3.0connector:FortheThinkPadMiniDockPlusSeries3,thisisaneSATA
connectorforconnectinganeSATAdevice.FortheThinkPadMiniDockPlusSeries3withUSB3.0,this
isaUSB3.0connectorforconnectingaUSBcompatibledevices.
9Externalmonitorconnector:Connectanexternalmonitor.
10Securitykeyhole:Useasecuritycablelockthattsthiskeyholetolockyourdockingstationtoa
stationaryobjecttoprotectitfromtheft.
Note:IfyouattachyourcomputertoaportreplicatorordockingstationanduseanEthernetconnectoror
anexternalmonitorconnector,usetheEthernetconnectorortheexternalmonitorconnectorontheport
replicatorordockingstation,nottheoneonthecomputer.
AttachingaThinkPadportreplicatorordockingstation
ToattachyourcomputertoasupportedThinkPadportreplicatorordockingstation,dothefollowing:
Notes:
•BeforeyouattachthecomputertoasupportedThinkPadportreplicatorordockingstation,disconnect
theacpoweradapterfromthecomputer.
•Ifyourcomputerisoperating,makesurethatithasnishedanyoperationsinvolvingdevicesthatare
connectedtoaUSBconnector.AlsomakesurethatanyconnectiontoanEthernetconnectorhas
beendisconnected.
•ThefollowingillustrationsarefortheThinkPadMiniDockSeries3.Theprocedureisthesameforother
dockingstations.Forportreplicators,startwithstep2.
1.Makesurethatthesystemlockkeyisinplaceandintheunlocked(horizontal)position.
Chapter7.Enhancingyourcomputer107
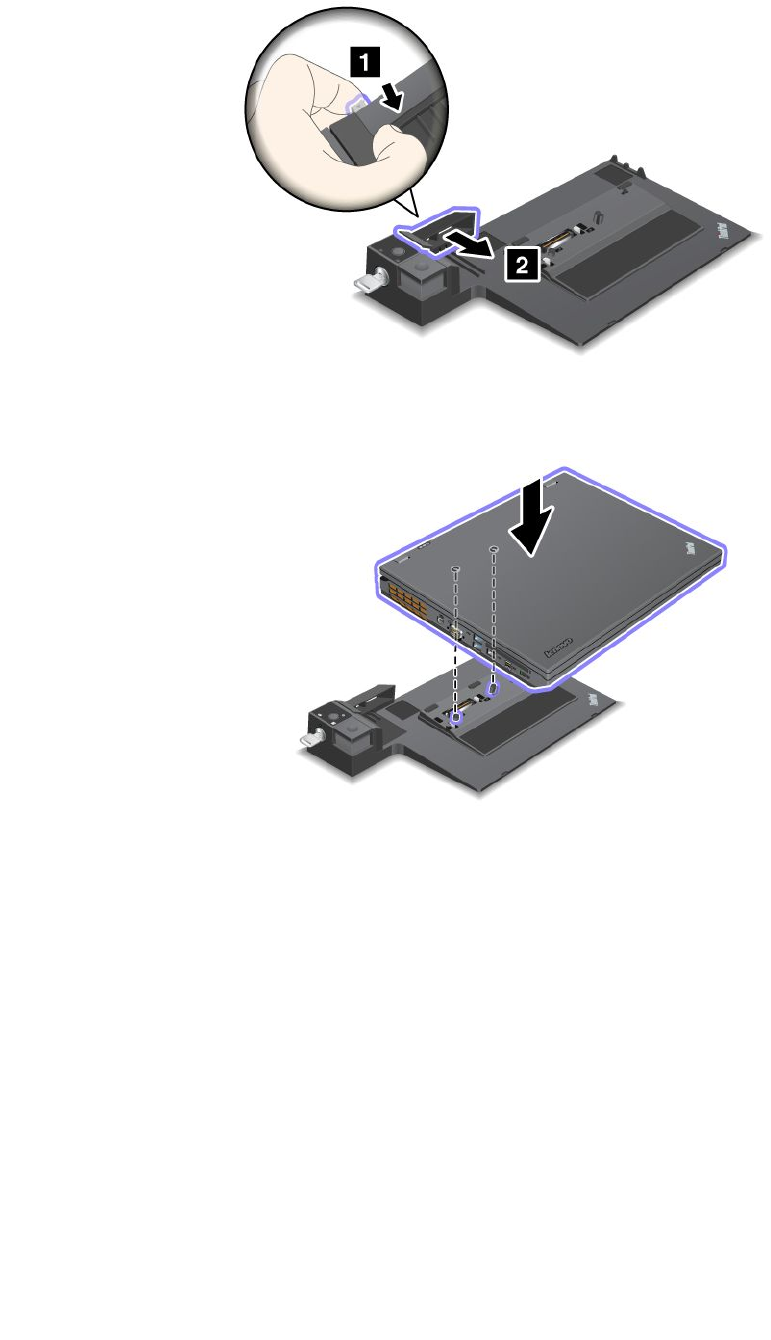
2.Pressandpulltheslidingadjusterasshown.
3.Putyourcomputerontheplatformofthedockingstation,makingsurethatthetop-leftcornerofthe
computerisalignedtotheguideplate.
4.Insertyourcomputerintothedockingstationuntilyouhearaclick.Thecomputerisattachedtothe
dockingstation.
Note:Ifthedockingstationindicatorisnotlightedafteryouattachthedockingstation,yourcomputer
isnotcorrectlyconnected.Checktheacpoweradapterofthedockingstation,ordisconnectand
re-attachtheacpoweradapter.Thenattachyourcomputertothedockingstation.
Notes:
•Ifyouattachtheportreplicatorordockingstationtoyourcomputer,butdonotconnecttheacpower
adapterofthatattachmenttothepowerjack,yourcomputergoesintobatterymode.
•Ifyourcomputerandtheportreplicatorordockingstationareconnectedtoseparateacpoweradapters,
yourcomputergoesintobatterymoderst,andthenshiftsintoacpowermode.
•Ifineitheroftheabovetwoprecedingsituationsthebatteryofyourcomputerisdetached,orhasno
batterycharge,yourcomputershutsdown.
108UserGuide
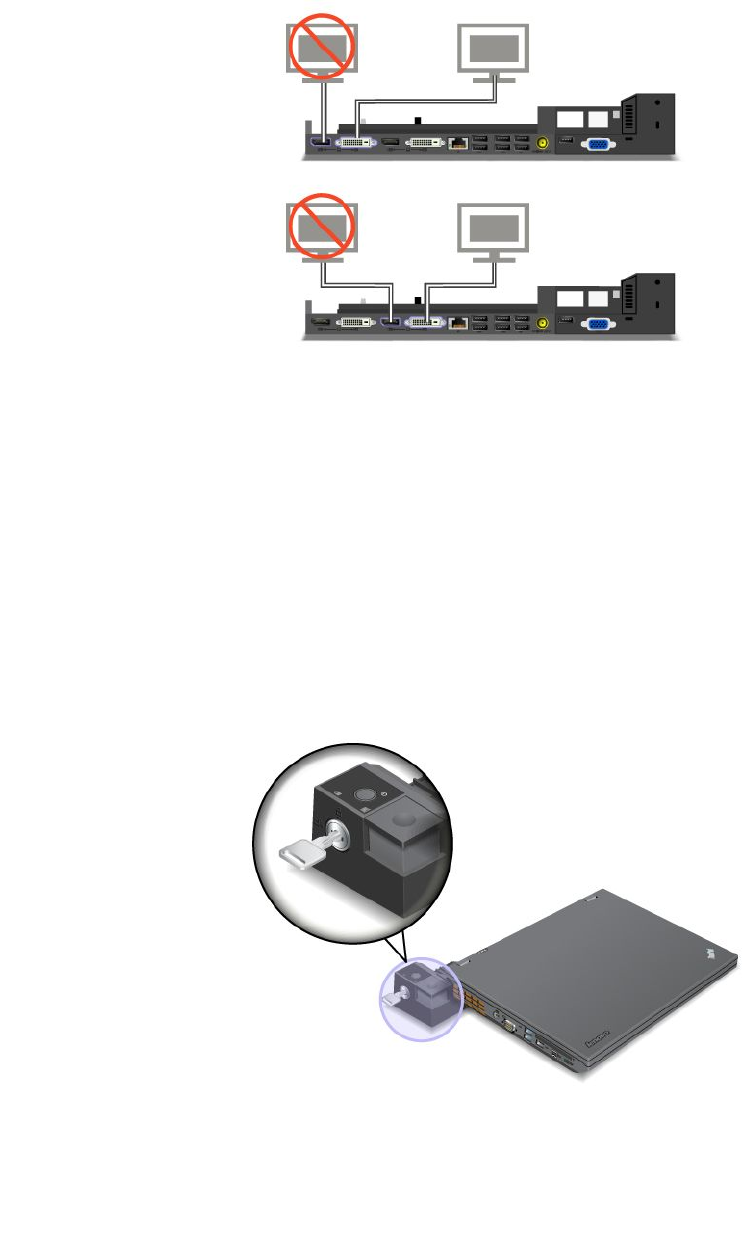
ConnectinganexternaldisplaytotheThinkPadMiniDockPlusSeries3andtheThinkPadMiniDock
PlusSeries3withUSB3.0
Group1(topgure)andGroup2(lowergure)areindependentofeachother.EachhasaDisplayPort
connectorandaDVIconnector.IfyouconnectadisplaytoaDisplayPortconnectorandaDVIconnector
thatareinthesamegroup,theDisplayPortconnectorisinactive.
DetachingaThinkPadportreplicatorordockingstation
Todetachyourcomputerfromtheportreplicatorordockingstation,dothefollowing:
1.Ensurethat:
•ThedevicesconnectedtoUSBconnectorsarenotinuse.
•TheconnectiontoanEthernetconnectorhasbeenended.
•Thesystemlockkeyofthedockingstationisinplaceandintheunlocked(horizontal)positionfor:
–ThinkPadMiniDockSeries3
–ThinkPadMiniDockSeries3withUSB3.0
–ThinkPadMiniDockPlusSeries3
–ThinkPadMiniDockPlusSeries3withUSB3.0
2.Presstheejectbuttonuntilthecomputermovesup.Then,graspbothsides,andremovethecomputer.
Chapter7.Enhancingyourcomputer109
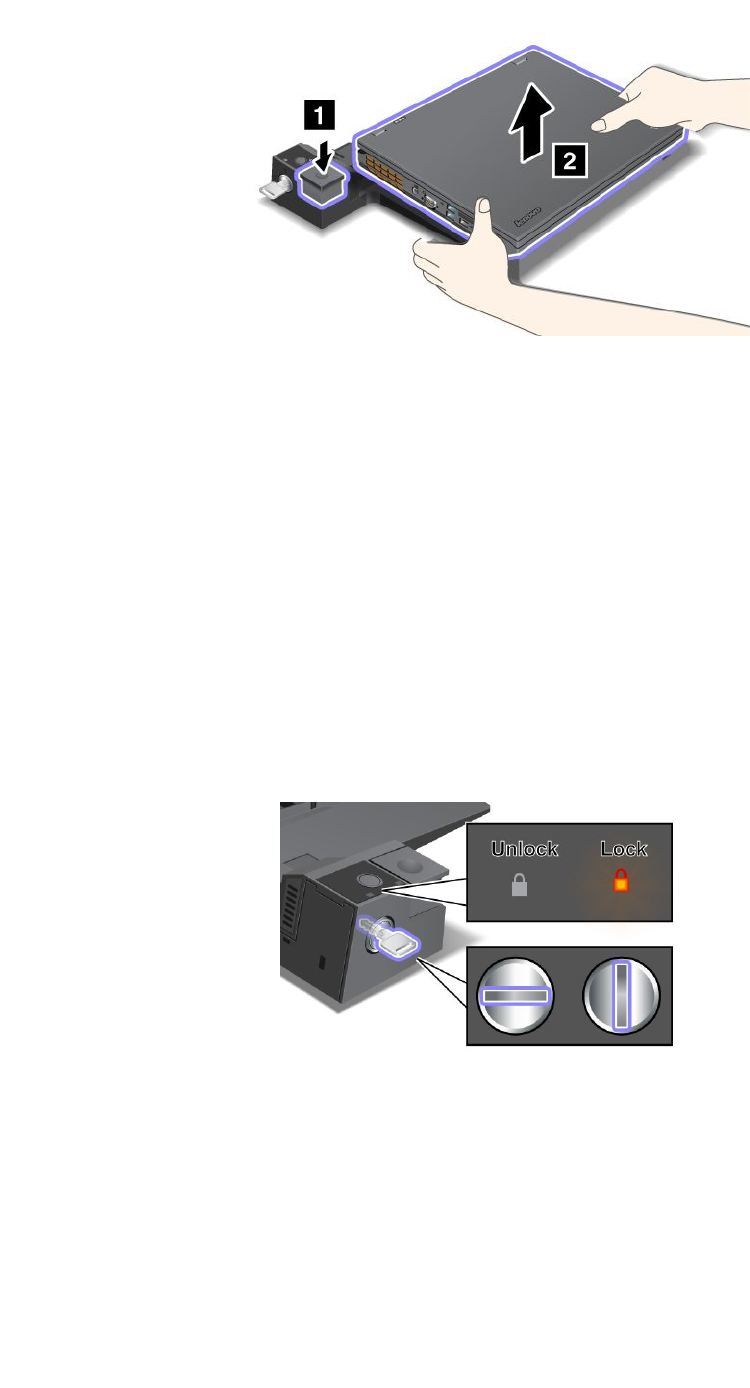
Securityfeature
UsethesecuritykeyholeontheThinkPadportreplicatorordockingstationtoattachamechanicallock.By
attachingamechanicallock,youcansecuretheportreplicatorordockingstationtoastationaryobject,
suchasadesk,toprotectyourportreplicatorordockingstationfromtheft.Mechanicallocksindifferent
sizesareavailablefromLenovoasoptions.
Note:Youareresponsibleforevaluating,selecting,andimplementingthelockingdeviceandsecurity
feature.Lenovomakesnocomments,judgments,orwarrantiesaboutthefunction,quality,orperformance
ofthelockingdeviceorsecurityfeature.
FortheThinkPaddockingstations,inadditiontoattachingamechanicallocktothedockingstation,youalso
canusethesystemlockkeytolocktheejectbutton.Whentheejectbuttonislocked,thecomputercannot
bedetachedfromthedockingstation.Formoreinformation,see“Usingthesystemlockkey”onpage110.
Usingthesystemlockkey
Thesystemlockkeyhastwopositions,unlockedandlocked.
Whenthekeyisinthelockedposition,theejectbuttonofthedockingstationislocked,andyoucannot
removeyourcomputer.Thekeylockindicatorlightswhentheejectbuttonislocked.
110UserGuide

Chapter8.Advancedconguration
Whileitisimportanttoprotectles,data,andsettingsthatareontheharddiskdrive,youalsomight
needtoinstallanewoperatingsystem,installnewdevicedrivers,updateyoursystemUEFIBIOS,or
recoverpreinstalledsoftware.Thistopicwillhelpyouhandleyourcomputerwithpropercareandkeepit
intopworkingshape.
•“Installinganewoperatingsystem”onpage111
•“Installingdevicedrivers”onpage113
•“ThinkPadSetup”onpage114
•“Usingsystemmanagement”onpage129
Installinganewoperatingsystem
Ifyouinstallanewoperatingsystemonyourcomputer,youneedtoinstallthesupplementlesand
ThinkPaddevicedriversforitatthesametime.
•IfyouinstallanewWindows7operatingsystem,thenecessarylesarelocatedinthefollowingdirectories
onyoursolid-statedriveorharddiskdrive:
–ThesupplementlesfortheoperatingsystemsupportedareintheC:\SWTOOLS\OSFIXESdirectory.
–ThedevicedriversfortheoperatingsystemsupportedareintheC:\SWTOOLS\DRIVERSdirectory.
–ThepreloadedsoftwareprogramsareintheC:\SWTOOLS\APPSdirectory.
Note:Ifyoucannotndthesupplementles,thedevicedrivers,andprogramsoftwareyouneedon
yourharddiskdrive,orifyouwanttoreceiveupdatesandthelatestinformationaboutthem,goto
http://www.lenovo.com/ThinkPadDrivers.
•IfyouinstallanewWindows8operatingsystem,gotohttp://www.lenovo.com/ThinkPadDriversto
downloadandinstallthelatestdevicedrivers.
Note:Theprocessofinstallingthenewoperatingsystemdeletesallthedataonyourharddiskdrive,
includingbackupsorimagesthatwerestoredinahiddenfolderbyuseoftheRescueandRecoveryprogram.
Beforeyoubegin
Note:IfyourcomputerisequippedwithbothaharddiskdriveandanmSATAsolid-statedrive,youarenot
recommendedtousethemSATAsolid-statedriveasabootabledevice.ThemSATAsolid-statedriveis
designedanddevelopedfor“cache”functionpurposeonly.IfyouusethemSATAsolid-statedriveasa
bootabledevice,itsreliabilityisnotguaranteed.
Beforeyouinstalltheoperatingsystem,dothefollowing:
•IfyouaregoingtoinstallanewWindows7operatingsystem,copyallthesubdirectoriesandlesinthe
C:\SWTOOLSdirectorytoaremovablestoragedevice,toavoidlosinglesduringtheinstallation.
•Printtheinstructionsyouwilluse.Gotothesectionfortheoperatingsystemyouareusing:
–“InstallingtheWindows7operatingsystem”onpage112
–“InstallingtheWindows8operatingsystem”onpage113
Notes:
–TheUEFIBIOSfeaturesaresupportedontheWindows7operatingsystem(64-bit)andtheWindows8
operatingsystem(64-bit).EnsurethattheUEFI/LegacyBootsettinginThinkPadSetupissettoyour
preferencetobootthedesiredoperatingsystem.
©CopyrightLenovo2012111

–Afterinstallingtheoperatingsystem,youshouldnotchangetheinitialUEFI/LegacyBootsettingin
ThinkPadSetup.TheUEFI/LegacyBootsettingmustbethesameasitwaswhentheWindows
operatingsystemimagewasinstalled.Otherwise,theoperatingsystemwillnotbootcorrectly.
Forthecountryorregioncoderequiredintheinstallation,useoneofthefollowing:
Countryorregion:Code
China:SC
Denmark:DK
Finland:FI
France:FR
Germany:GR
Italy:IT
Japan:JP
Netherlands:NL
Norway:NO
Spain:SP
Sweden:SV
TaiwanandHongKong:TC
UnitedStates:US
InstallingtheWindows7operatingsystem
Beforeyoustart,printtheseinstructions.
ToinstalltheWindows7operatingsystemanditsrelatedsoftwareonyourcomputer,dothefollowing:
1.StartThinkPadSetup.
2.SelectStartup.
3.SelectUEFI/LegacyBoot.
4.Dooneofthefollowing:
•IfyouwanttoinstalltheWindows7(32–bit)operatingsystem,selectLegacyOnlyorBoth.
•IfyouwanttoinstalltheWindows7(64–bit)operatingsysteminLegacymode,selectLegacyOnly.
•IfyouwanttoinstalltheWindows7(64–bit)operatingsysteminUEFImode,selectUEFIOnly.
5.PressF10.
6.InserttheWindows7operatingsysteminstallationDVDintotheDVDdrive,andrestartthecomputer.
7.RestoreC:\SWTOOLSfromthebackupcopyyoumadebeforestartingtheinstallation.
8.InstalltheIntelChipsetSupportforWindows2000/XP/Vista/7/8.Todothis,runSETUP.exein
C:\SWTOOLS\DRIVERS\INTELINF\innst_autol.
9.Installdevicedrivers.See“Installingdevicedrivers”onpage113.
InstallingtheregistrypatchesforWindows7
Gotohttp://www.lenovo.com/supportandinstallthefollowingregistrypatches:
•RegistrypatchenablingWakeUponLANfromStandbyforEnergyStar
•FixforIssueofHDDwithHDDetection
InstallingtheWindows7xmodules
TheWindows7xmodulesareinthefollowingdirectory:
C:\SWTOOLS\OSFIXES\
112UserGuide

Thenameofeachsubfolderisthenumberofaxmodule.Forinformationabouteachxmodule,goto
theMicrosoftKnowledgeBasehomepageathttp://support.microsoft.com/,typethenumberofthex
moduleyouneedinthesearcheld,andclickSearch.
Toinstallaxmodule,runtheEXEleinasubfolderandfollowtheinstructionsonthescreen.
Note:Ifyouremovetheharddiskdrivefromthecomputerwithasingle-coreprocessorandinstallitona
computerwithadual-coreprocessor,youcangetaccesstotheharddiskdrive.Theopposite,however,is
nottrue:Ifyouremovetheharddiskdrivefromacomputerwithadual-coreprocessorandinstallitona
computerwithasingle-coreprocessor,youcannotgetaccesstotheharddiskdrive.
InstallingtheWindows8operatingsystem
Beforeyoustart,printtheseinstructions.
ToinstalltheWindows8operatingsystemanditsrelatedsoftwareonyourcomputer,dothefollowing:
1.StartThinkPadSetup.
2.SelectStartup➙Boot.
3.ChangethebootpriorityordertobootyourcomputerfromthedrivethatcontainstheWindows
8operatingsysteminstaller.
4.PressF10.
5.ConnectthedrivethatcontainstheWindows8operatingsysteminstallertoyourcomputer,and
restartthecomputer.
6.InstalltheIntelChipsetSupportforWindows2000/XP/Vista/7/8.
7.Installdevicedrivers.See“Installingdevicedrivers”onpage113.
InstallingtheWindows8xmodules
TodownloadandinstallaWindows8xmodule,gototheMicrosoftKnowledgeBasehomepageat
http://support.microsoft.com/,typethenumberofthexmoduleyouneedinthesearcheld,andclick
Search.
Installingdevicedrivers
Thedevicedriversareavailableathttp://www.lenovo.com/ThinkPadDrivers.Clickyourcomputerproduct
nametoviewallthedevicedriversforyourcomputer.
Attention:Alwaysgotohttp://www.lenovo.com/ThinkPadDriversforthelatestdevicedrivers.Donot
downloadthemfromtheWindowsUpdateWebsite.
Installingthedriverforthe4-in-1mediacardreader
Tousethe4-in-1mediacardreader,youneedtodownloadandinstalltheRicohMultiCardReaderDriver
fromtheLenovoSupportWebsiteat:
http://www.lenovo.com/support
InstallingthedriverforUSB3.0ontheWindows7operatingsystem
IfyourcomputerisinstalledwiththeWindows7operatingsystem,itsupportsUSB3.0functions.Touse
theUSB3.0connectors,youneedtodownloadandinstalltheUSB3.0driverafteryoureinstalledthe
Windows7operatingsystembydoingthefollowing:
1.Gotohttp://www.lenovo.com/support.Findyourmodelanddisplaythedriverlinks.
2.SelecttheUSB3.0driverforthe32-bitor64-bitoperatingsystemandextractittoyourlocalhard
diskdrive.
Chapter8.Advancedconguration113

3.Double-clicktheSetup.exeleintheC:\DRIVERS\WIN\USB3.0\directory.
4.ClickNext.Ifthedevicedriverisalreadyinstalled,clickCancel.Followtheinstructionsonthescreen
untiltheinstallationisnished.
InstallingtheThinkPadmonitorleforWindows2000/XP/Vista/7/8ontheWindows7operatingsystem
TheThinkPadmonitorleforWindows2000/XP/Vista/7/8isinthefollowingdirectory:
C:\SWTOOLS\DRIVERS\MONITOR
Note:Ifyoucannotndthisdirectoryonyourharddiskdriveorsolid-statedrive,downloadtheThinkPad
monitorleforWindows2000/XP/Vista/7/8fromtheThinkPadWebsiteat:
http://www.lenovo.com/ThinkPadDrivers
Note:Beforeyouinstallthisle,makesurethatthecorrectvideodriverhasbeeninstalled.
Toinstallthecorrectvideodriver,dothefollowing:
1.Right-clickonthedesktop,andclickPersonalize.
2.ClickDisplayattheleft.
3.ClickChangedisplaysettings.
4.ClickAdvancedSettings.
5.ClicktheMonitortab.
6.ClickProperties.
7.ClicktheDrivertab.
8.ClickUpdateDriver.
9.SelectBrowsemycomputerfordriversoftware,andthenclickLetmepickfromalistofdevice
driversonmycomputer.
10.ClickHaveDisk.
11.SpecifypathC:\SWTOOLS\DRIVERS\MONITORtothismonitorINFle.Then,clickOpen.
12.ClickOK.
13.Conrmthecorrectdisplaytype,thenclickNext.
14.Wheninstallationcompletes,clickClose.
15.ClickClosetoclosetheDisplayPropertieswindow.
16.ClickOKontheMonitortab.
17.ClickOKandclosetheDisplaySettingswindow.
InstallingotherdevicedriversandsoftwareontheWindows7operatingsystem
ThedevicedriversareprovidedintheC:\SWTOOLS\DRIVERSdirectoryonyourharddiskdrive.Youwillalso
needtoinstallprogramsoftware,whichisprovidedintheC:\SWTOOLS\APPSdirectoryonyourharddiskdrive.
Todothis,refertotheinstructionsin“Reinstallingpreinstalledprogramsanddevicedrivers”onpage67.
Note:IfyoucannotndtheSupplementles,devicedrivers,andprogramsoftwareyouneedon
yourharddiskdrive,orifyouwanttoreceiveupdatesandthelatestinformationaboutthem,goto
http://www.lenovo.com/ThinkPadDrivers.
ThinkPadSetup
YourcomputercomeswiththeThinkPadSetupprogramtoenableyoutoselectvarioussetupparameters.
TostartThinkPadSetup,dothefollowing:
114UserGuide

1.Turnonthecomputer.Whenthelogoscreenisdisplayed,presstheF1key.TheThinkPadSetup
programmainmenuopens.
Note:Ifyouhavesetasupervisorpassword,theThinkPadSetupprogrammainmenuwillbedisplayed
afteryouenterthepassword.YoucanstartThinkPadSetupbypressingEnterinsteadofenteringthe
supervisorpassword.However,youcannotchangetheparametersthatareprotectedbythesupervisor
password.Formoreinformation,referto“Usingpasswords”onpage51.
2.Usethecursorkeystomovetoanitemyouwanttochange.Whentheitemishighlighted,press
Enter.Asubmenuisdisplayed.
3.Changetheitemsyouwishtochange.Tochangethevalueofanitem,pressthefollowingkeys:
•F6orthecombinationofShiftand+:Changetoahighervalue.
•F5or–:Changetoalowervalue.
Iftheitemhasasubmenu,pressEntertodisplayit.
4.PressEsctoexitfromthesubmenu.
5.Ifyouareonanestedsubmenu,pressEscrepeatedlyuntilyoureachtheThinkPadSetupprogram
mainmenu.
Note:Ifyouneedtorestorethesettingstotheiroriginalstateasofthetimeofpurchase,pressF9to
loadthedefaultsettings.YoualsocanselectanoptionontheRestartsubmenutoloadthedefault
settingsordiscardthechanges.
6.SelectRestart.Movethecursortotheoptionyouwantforrestartingyourcomputer,thenpressEnter.
Yourcomputerrestarts.
Note:Dependingontheoperatingsystemyouareusing,somemenuitemslistedinthischaptermightnot
beavailableonyourcomputer,andsomemenuitemsmightbeslightlydifferentfromtheactualmenuitems
displayedonyourcomputer.
Mainmenu
TheMainmenuistherstinterfaceyouseeafteryouenterThinkPadSetup.Itdisplaysthefollowing
congurationofyourcomputer:
•UEFIversion
•UEFIdate
•Embeddedcontrollerversion
•Machinetypemodel
•System-unitserialnumber
•Systemboardserialnumber
•Assettag
•CPUtype
•CPUspeed
•Installedmemory
•UUID
•MACaddress(InternalLAN)
•Preinstalledoperatingsystemlicense
•UEFISecureBoot
Congmenu
Ifyouneedtochangethecongurationofyourcomputer,selectCongfromtheThinkPadSetupmenu.
Chapter8.Advancedconguration115

ThefollowingtableliststheCongmenuitems.
Notes:
•Defaultvaluesareinboldface.Thedefaultsettingsarealreadyoptimizedforyou.Ifyouconsider
changingthecomputerconguration,proceedwithextremecaution.Settingthecongurationincorrectly
mightcauseunexpectedresults.
•Oneachsubmenu,presstheEnterkeytoshowselectableoptionsandselectadesiredoption,ortype
desiredvaluesfromthekeyboarddirectly.
•Someitemsaredisplayedonthemenuonlyifthecomputersupportsthecorrespondingfeatures.
Table6.Congmenuitems
MenuitemSubmenuitemValueComments
WakeOnLAN•Disabled
•AConly
•ACandBattery
Enablethesystemtopower
onwhentheEthernet
controllerreceivesamagic
packet(aspecialnetwork
message).
IfyouselectACOnly,
WakeonLANisenabled
onlywhentheacpower
adapterisattached.
IfyouselectACand
Battery,WakeonLANis
enabledwithanypower
sources.
Notes:
•Themagicpackettype
WakeonLANrequires
acpower.
•TheWakeonLAN
functiondoesnot
workwhenaharddisk
passwordisset.
EthernetLANOptionROM
(forLegacyOnlyboot
modeorBothwithLegacy
rst)
•Disabled
•Enabled
LoadtheEthernetLAN
OptionROMtoenable
startupfromanintegrated
networkdevice.
UEFIIPv4NetworkStack
(forUEFIOnlybootmode
orBothwithUEFIrst)
•Disabled
•Enabled
EnableordisableInternet
ProtocolVersion4(IPv4)
networkstackfortheUEFI
environment.
UEFIIPv6NetworkStack
(forUEFIOnlybootmode
orBothwithUEFIrst)
•Disabled
•Enabled
EnableordisableInternet
ProtocolVersion6(IPv6)
networkstackforUEFI
environment.
Network
UEFIPXEBootPriority
(forBothwithUEFIrst
bootmode,andIPv6
andIPv4stacksareboth
enabled.)
•IPv6First
•IPv4First
Selectnetworkstack
priorityforUEFIPXEboot.
116UserGuide

Table6.Congmenuitems(continued)
MenuitemSubmenuitemValueComments
USBUEFIBIOSSupport
(Windows7)
USBUEFISupport
(Windows8)
•Disabled
•Enabled
Enableordisableboot
supportforUSBstorage
devices.
AlwaysOnUSB•Disabled
•Enabled
IfyouselectEnabled,the
externalUSBdevicescan
bechargedthroughUSB
connectorsevenwhenthe
systemisinlowpower
mode(sleep,hibernate,or
power-off).
AlwaysOnUSBChargein
offmode
•Disabled
•Enabled
IfyouselectEnabled,the
AlwaysOnUSBconnector
enablesyoutochargesome
devices,suchasiPod,
iPhone,andBlackBerry
smartphoneswhenthe
computeristurnedoff.
USB
USB3.0Mode•Disabled
•Enabled
•Auto
SettheUSB3.0controller
modefortheportsshared
betweenUSB2.0andUSB
3.0controllers.
IfyouselectAuto,it
enablesyoutoconnectand
routeappropriateUSB3.0
orUSB2.0connectors.
IfyouselectEnabled,it
enablesUSB3.0mode
andallowsUSB3.0tobe
supportedintheoperating
system.
IfyouselectDisabled,it
disablesandhidestheUSB
3.0controller,andUSB3.0
connectorswillworkas
USB2.0connectors.
TrackPoint•Disabled
•Enabled
Enableordisablethe
built-inTrackPointpointing
device.
Note:Ifyouwanttouse
anexternalmouse,select
Disabled.
TouchPad•Disabled
•Enabled
Enableordisablethe
built-intouchpad.
Note:Ifyouwanttouse
anexternalmouse,select
Disabled.
Keyboard/Mouse
Chapter8.Advancedconguration117

Table6.Congmenuitems(continued)
MenuitemSubmenuitemValueComments
FnandCtrlKeyswap•Disabled
•Enabled
IfyouselectEnabled,the
FnkeyworksastheCtrl
key,andtheCtrlkeyworks
astheFnkey.
Note:EvenwhenEnabled
isselected,youneedto
presstheFnkeytoresume
thecomputerfromsleep
modetonormaloperation.
FnKeyLock•Disabled
•Enabled
IfyouselectEnabled,
youcanpresstheFnkey
oncetoactivatetheFn
keyfunction,asifthe
keyiskeptinapressed
condition,andthenpress
thedesiredfunctionkey.
Theactionisequivalentto
pressingtheFnkeyand
thedesiredfunctionkey
simultaneously.Ifyoupress
theFnkeytwice,theFn
keyiskeptinapressed
conditionuntilyoupress
theFnkeyagain.
KeyboardIllumination
Control
•ThinkLightOnly
•KeyboardbacklightOnly
•Both
EnabletheThinkLight
lightfeature,thekeyboard
backlightfeature,orboth.
Afteryoumakeaselection,
youcanactivatethe
correspondingfeature(s)by
pressingFn+Space.
BootDisplayDevice•ThinkPadLCD
•Analog(VGA)
•DigitalonThinkPad
•Digital1ondock
•Digital2ondock
Selectthedisplaydevice
thatistobeactivatedat
boottime.Thisselection
iseffectiveforboottime,
passwordprompt,and
ThinkPadSetup.
DigitalonThinkPadisthe
MiniDisplayPortonyour
computer.
Digital1ondockand
Digital2ondock
areDisplayPortorDVI
connectorsonadocking
station.
GraphicsDevice•IntegratedGraphics
•DiscreteGraphics
•NVIDIAOptimus
TheIntegratedGraphics
modewillachievelonger
batterylife.TheDiscrete
Graphicsmodeenhances
graphicsperformance.
WhenNVIDIAOptimus
isselected,thesystem
automaticallyswitches
Display
118UserGuide

Table6.Congmenuitems(continued)
MenuitemSubmenuitemValueComments
betweendiscretegraphics
modeandtheintegrated
graphicsmodedepending
ontherunningprogram.
Note:NVIDIAOptimus
shouldbeselectedonlyif
youareusingaWindows7
model.
OSDetectionforNVIDIA
Optimus
•Disabled
•Enabled
ThesystemBIOS
automaticallyswitches
theGraphicsDevice
settingtoNVIDIAOptimus
iftheoperatingsystem
supportsthefeature,and
toDiscreteGraphicsifthe
operatingsystemdoesnot
supportit.
IntelSpeedStep®
technology
(IntelSpeedStepmounted
modelsonly)
•Disabled
•Enabled
ModeforAC
•MaximumPerformance
•BatteryOptimized
ModeforBattery
•MaximumPerformance
•BatteryOptimized
SelectthemodeofIntel
SpeedSteptechnologyat
runtime.
MaximumPerformance:
Alwayshighestspeed
BatteryOptimized:Always
lowestspeed
Disabled:Noruntime
support,lowestspeed
AdaptiveThermal
Management
SchemeforAC
•MaximizePerformance
•Balanced
SchemeforBattery
•MaximizePerformance
•Balanced
Selectathermal
managementscheme
touse.
MaximizePerformance:
ReduceCPUthrottling
Balanced:Balance
sound,temperature,and
performance
Note:Eachschemeaffects
fansound,temperature,
andperformance.
OpticalDriveSpeed•HighPerformance
•Normal
•Silent
Setthespeedofthe
opticaldrivetothedesired
performance.
CPUPowerManagement•Disabled
•Enabled
Enableordisablethepower
savingfeaturethatstops
themicroprocessorclock
automaticallywhenthere
arenosystemactivities.
Normally,itisnotnecessary
tochangethesetting.
Power
Chapter8.Advancedconguration119

Table6.Congmenuitems(continued)
MenuitemSubmenuitemValueComments
PCIExpressPower
Management
•Disabled
•Enabled
Enableordisableafeature
thatautomaticallyadjusts
powermanagementwhen
thereisnoPCIExpress
activity.Normally,itisnot
necessarytochangethe
setting.
ExpressCardSpeed•Generation1
•Automatic
Setthetransferspeedofthe
ExpressCardtothedesired
levelofperformance.
TheAutomaticoption
enablestheExpressCardto
specifythetransferspeedit
supports.
PowerOnwithACAttach•Disabled
•Enabled
Enableordisableafeature
thatpowersonthesystem
whentheacpoweradapter
isattached.
IfyouselectEnabled,the
systemispoweredonwhen
theacpoweradapteris
attached.Whenthesystem
isinhibernatestate,the
systemresumes.
IfyouselectDisabled,the
systemisnotpoweredon
norresumedwhentheac
poweradapterisattached.
Intel(R)RapidStart
Technology
•Disabled
•Enabled
Enterafter:
•Immediately
•1minute
•2minutes
•5minutes
•10minutes
•15minutes
•30minutes
•1hour
•2hours
•3hours
Tousethisfeature,aspecial
partitiononthesolid-state
driveisrequired.
Whenenabled,the
computerentersalower
powerstateafterthe
speciedtimeinsleep
state.Andittakesonly
secondstoresumenormal
operation.
120UserGuide

Table6.Congmenuitems(continued)
MenuitemSubmenuitemValueComments
PasswordBeep•Disabled
•Enabled
Enablethisoptiontohave
abeepsoundwhenthe
systemiswaitingfora
power-on,harddisk,or
supervisorpassword.
Differentbeepswillsound
whentheenteredpassword
matchesordoesnotmatch
theconguredpassword.
BeepandAlarm
KeyboardBeep•Enabled
•Disabled
Enableordisablekeyboard
beepwhenunmanageable
keycombinationsare
pressed.
SerialATA(SATA)SATAControllerMode
Option
•Compatibility
•AHCI
•RAID(forRAIDmodels
only)
SelectSATAcontroller
operationmode.
Note:ForRAIDmodels,
theoptionRAIDisenabled
bydefault.
CoreMulti-Processing•Disabled
•Enabled
Enableordisableadditional
executioncoreunitswithin
aCPU.
Note:Ifyouareusinga
computerwithasingle-core
processor,thisitemisnot
available.
CPU
IntelHyper-Threading
Technology
•Disabled
•Enabled
Enableordisableadditional
logicalprocessorswithina
processorcore.
IntelAMTControl•Disabled
•Enabled
•PermanentlyDisabled
IfyouselectEnabled,Intel
AMT(ActiveManagement
Technology)iscongured
andadditionalsetupitems
areprovidedinMEBx
(ManagementEngineBIOS
Extension)Setup.
IfyouselectPermanently
Disabled,youwillneverbe
abletoenableitagain.Be
cautiouswhenyouwantto
usethisoption.
Note:Youcanenterthe
MEBxSetupmenuby
pressingtheCtrl+Pkey
combinationintheStartup
InterruptMenuwindow.
TodisplaytheStartup
InterruptMenuwindow,
presstheblackbutton
orEnterkeyduringthe
power-onself-test(POST).
IntelAMT
Chapter8.Advancedconguration121

Table6.Congmenuitems(continued)
MenuitemSubmenuitemValueComments
CIRATimeout0-255
Note:Thedefaultvalueis
60seconds.
Setthetimeoutoptionfor
CIRAconnectiontobe
established.1though254
secondsareselectable.
Ifyouselect0,use60
secondsasthedefault
timeoutvalue.
Ifyouselect255,the
waitingtimeforestablishing
aconnectionisunlimited.
ConsoleType•PCANSI
•VT100+
•PC-ANSI
•VT-UTF8
Selecttheconsoletypefor
AMT.
Note:Thisconsoletype
shouldmatchtheIntelAMT
remoteconsole.
Dateandtimemenu
Ifyouneedtosetthecurrentdateandtimeofyourcomputer,selectDate/TimefromtheThinkPadSetup
menu.Thefollowingsubmenuisdisplayed:
•SystemDate
•SystemTime
Tochangethedateandtime,dothefollowing:
1.Usingtheupanddownarrowkeystoselecttheitemtochangethedateortime.
2.PressTab,ShiftTab,orEntertoselectaeld.
3.Typethedateortime.
Securitymenu
Ifyouneedtosetthesecurityfeaturesofyourcomputer,selectSecurityfromtheThinkPadSetupmenu.
ThefollowingtableliststheSecuritymenuitems.
Notes:
•Defaultvaluesareinboldface.Thedefaultsettingsarealreadyoptimizedforyou.Ifyouconsider
changingthecomputerconguration,proceedwithextremecaution.Settingthecongurationincorrectly
mightcauseunexpectedresults.
•Oneachsubmenu,presstheEnterkeytoshowselectableoptionsandselectadesiredoption,ortype
desiredvaluesfromthekeyboarddirectly.
•Someitemsaredisplayedonthemenuonlyifthecomputersupportsthecorrespondingfeatures.
122UserGuide

Table7.Securitymenuitems
MenuitemSubmenuitemValueComments
HardwarePassword
Manager
•Disabled
•Enabled
Manageyourpower-onpassword,supervisor
password,andyourharddiskpasswords.
SupervisorPassword•Disabled
•Enabled
See“Supervisorpassword”onpage54.
LockUEFIBIOS
Settings(Windows
7)
LockUEFISettings
(Windows8)
•Disabled
•Enabled
Enableordisablethefunctionthatprotectsitems
inThinkPadSetupfrombeingchangedbyauser
whodoesnothavethesupervisorpassword.By
default,thisissettoDisabled.Ifyousetthe
supervisorpasswordandenablethisfunction,no
onebutyoucanchangeanyitemsinThinkPad
Setup.
Passwordat
unattendedboot
•Disabled
•Enabled
IfyouselectandenablePasswordatunattended
boot,apasswordpromptisdisplayedwhenthe
computeristurnedon,fromeitherapower-off
stateorhibernationstate,byanunattendedevent
suchasaWakeonLANattempt.Ifyouselect
Disabled,nopasswordpromptisdisplayed;the
computergoesaheadandloadstheoperating
system.Topreventunauthorizedaccess,setthe
userauthenticationontheoperatingsystem.
Passwordatrestart•Disabled
•Enabled
IfyouselectandenablePasswordatrestart,
apasswordpromptisdisplayedwhenyou
restartthecomputer.IfyouselectDisabled,no
passwordpromptisdisplayed;thecomputer
goesaheadandloadstheoperatingsystem.
Topreventunauthorizedaccess,settheuser
authenticationontheoperatingsystem.
SetMinimumLength•Disabled
•xcharacters
(4≤x≤12)
Specifyaminimumlengthforpower-on
passwordsandharddiskpasswords.Ifyouset
thesupervisorpasswordandspecifyaminimum
lengthforpasswords,noonebutyoucanchange
thelength.
Power-OnPassword•Disabled
•Enabled
See“Power-onpassword”onpage52.
Password
HardDiskxPassword•Disabled
•Enabled
See“Harddiskpasswords”onpage52.
Notes:
•HardDisk1meanstheharddiskdrivebuilt
intoyourcomputer.
•HardDisk2isdisplayedonthePassword
submenuonlyifasecondaryharddiskdriveis
installedintheSerialUltrabayEnhancedbay.
Chapter8.Advancedconguration123

Table7.Securitymenuitems(continued)
MenuitemSubmenuitemValueComments
Predesktop
Authentication
•Disabled
•Enabled
Enableordisablengerprintauthentication
beforetheoperatingsystemisloaded.
ReaderPriority•External➙
Internal
•InternalOnly
IfExternal➙Internalisselected,anexternal
ngerprintreaderisusedifattached.Otherwise,
aninternalngerprintreaderisused.IfInternal
Onlyisselected,aninternalngerprintreaderis
used.
SecurityMode•Normal
•High
Ifngerprintauthenticationfails,youstillcanstart
thecomputerbyenteringapassword.Ifyouhave
selectedNormal,enterapower-onpassword
orasupervisorpassword;ifyouhaveselected
High,enterasupervisorpassword.
Password
Authentication
•Disabled
•Enabled
Enableordisablepasswordauthentication.
Ifhighsecuritymodeisselected,thisitemis
displayed.
Fingerprint
ResetFingerprintData•EnterThisoptionisusedtoeraseallngerprintdata
storedinthengerprintreaderandresetsettings
tothefactorystate.Asaresult,anypower-on
securityfeaturespreviouslyenabledwillnotbe
abletoworkuntiltheyarere-enabledinthe
ngerprintsoftware.
SecurityChip•Active
•Inactive
•Disabled
IfyouselectActive,thesecuritychipisfunctional.
IfyouselectInactive,theSecurityChipoption
isvisible,butthesecuritychipisnotfunctional.If
youselectDisabled,theSecurityChipoptionis
hiddenandthesecuritychipisnotfunctional.
SecurityReporting
Options
EnableordisablethefollowingSecurityReporting
Options:
•BIOSROMStringReporting(Windows7)or
UEFIROMStringReporting(Windows8):
BIOStextstring
•CMOSReporting:CMOSdata
•NVRAMReporting:Securitydatastoredin
theAssetID
•SMBIOSReporting:SMBIOSdata
ClearSecurityChip•EnterCleartheencryptionkey.
Note:Thisitemisdisplayedonlyifyouhave
selectedActivefortheSecurityChipoption.
IntelTXTFeature•Disabled
•Enabled
EnableordisableIntelTrustedExecution
Technology.
PhysicalPresencefor
Provisioning
•Disabled
•Enabled
Thisoptionenablesordisablestheconrmation
messagewhenyouchangethesettingsofthe
securitychip.
SecurityChip
PhysicalPresencefor
Clear
•Disabled
•Enabled
Thisoptionenablesordisablestheconrmation
messagewhenyouclearthesecuritychip.
124UserGuide

Table7.Securitymenuitems(continued)
MenuitemSubmenuitemValueComments
FlashBIOSUpdatingby
End-Users(Windows7)
FlashFirmware
UpdatingbyEnd-Users
•Disabled
•Enabled
IfyouselectEnabled,alluserscanupdatethe
UEFIBIOS.IfyouselectDisabled,onlythe
personwhoknowsthesupervisorpasswordcan
updatetheUEFIBIOS.
UEFIBIOS
UpdateOptionor
UEFIFirmware
UpdateOption
SecureRollBack
Prevention
•Disabled
•Enabled
IfyouselectDisabled,youcanashtheolder
versionUEFIBIOS.
Memory
Protection
ExecutionPrevention•Disabled
•Enabled
Somecomputervirusesandwormscause
memorybufferstooverow.Byselecting
Enabled,youcanprotectyourcomputeragainst
attacksbysuchvirusesandworms.Ifafter
choosingEnabledyoundthataprogramdoes
notruncorrectly,selectDisabledandresetthe
setting.
IntelVirtualization
Technology
•Disabled
•Enabled
IfyouselectEnabled,aVirtualMachineMonitor
(VMM)canutilizetheadditionalhardware
capabilitiesprovidedbyIntelVirtualization
Technology.
Virtualization
IntelVT-dFeature•Disabled
•Enabled
IntelVT-dstandsforIntelVirtualization
TechnologyforDirectedI/O.Whenenabled,a
VMMcanutilizetheplatforminfrastructureforI/O
virtualization.
EthernetLAN•Disabled
•Enabled
IfyouselectEnabled,youcanusetheEthernet
LANdevice.
WirelessLAN•Disabled
•Enabled
IfyouselectEnabled,youcanusethewireless
LANdevice.
WirelessWAN•Disabled
•Enabled
IfyouselectEnabled,youcanusethewireless
WANdevice.
Bluetooth•Disabled
•Enabled
IfyouselectEnabled,youcanuseBluetooth
devices.
USBPort•Disabled
•Enabled
IfyouselectEnabled,youcanuseUSB
connectors.
ExpressCardSlot•Disabled
•Enabled
IfyouselectEnabled,youcanusethe
ExpressCardslot.
Ultrabay(HDD/Optical)•Disabled
•Enabled
IfyouselectEnabled,youcanuseUltrabay
Enhanceddevices.
MemoryCardSlot•Disabled
•Enabled
IfyouselectEnabled,youcanusethememory
cardslots.
SmartCardSlot•Disabled
•Enabled
IfyouselectEnabled,youcanusethesmart
cardslot.
IntegratedCamera•Disabled
•Enabled
IfyouselectEnabled,youcanusetheintegrated
camera.
Microphone•Disabled
•Enabled
IfyouselectEnabled,youcanusethe
microphones(internal,external,orline-in).
I/OPortAccess
Chapter8.Advancedconguration125

Table7.Securitymenuitems(continued)
MenuitemSubmenuitemValueComments
FingerprintReader•Disabled
•Enabled
IfyouselectEnabled,youcanusethengerprint
reader.
IntelATModule
Activation
•Disabled
•Enabled
•Permanently
Disabled
EnableordisabletheUEFIBIOSinterfaceto
activatetheIntelATmodule,whichisanoptional
anti-theftservicefromIntel.
Note:IfyousettheIntelATmoduleactivation
toPermanentlyDisabled,youwillbeunableto
enablethissettingagain.
IntelATSuspend•EnterThisoptionisdisplayedonlywhentheanti-theft
functionisactivated.
TheIntelanti-theftsuspendscreenwillbe
displayedatnextboottoenterthesuspend
mode.
Anti-Theft
Computrace•Disabled
•Enabled
•Permanently
Disabled
EnableordisabletheUEFIBIOSinterfaceto
activatethecomputracemodule.Computrace
isanoptionalmonitoringservicefromAbsolute
Software.
Note:Ifyousetthecomputracemodule
activationtoPermanentlyDisabled,youwillbe
unabletoenablethissettingagain.
SecureBoot•Disabled
•Enabled
EnableordisabletheUEFISecureBootfeature.
SelectEnabletopreventunauthorizedoperating
systemsfromrunningatboottime.Select
Disabledtoallowanyoperatingsystemstorun
atboottime.
PlatformMode•SetupMode
•UserMode
Specifythesystemoperatingmode.
SecureBootMode•StandardMode
•CustomMode
SpecifytheSecureBootmode.
ResettoSetupModeThisoptionisusedtoclearthecurrentplatform
keyandputthesystemintoSetupMode.You
caninstallyourownplatformkeyandcustomize
theSecureBootsignaturedatabasesinSetup
Mode.
SecureBootmodewillbesettoCustomMode.
SecureBoot
RestoreFactoryKeysThisoptionisusedtorestoreallkeysand
certicatesinSecureBootdatabasestofactory
defaults.AnycustomizedSecureBootsettings
willbeerased,andthedefaultplatformkeywill
bere-establishedalongwiththeoriginalsignature
databasesincludingcerticateforWindows8
operatingsystem.
Startupmenu
Tochangethecomputerstartupsettings,selectStartupfromtheThinkPadSetupmainmenu.
Attention:
126UserGuide

•Afteryouchangeyourstartupsequence,youmustbeextremelycarefulnottospecifyawrongdevice
duringacopy,asave,oraformatoperation.Ifyouspecifyawrongdevice,yourdataandprograms
mightbeerasedoroverwritten.
•IfyouareusingtheBitLockerdriveencryption,youshouldnotchangethestartupsequence.BitLocker
driveencryptiondetectsthechangeofstartupsequenceandlocksthecomputerfrombooting.
Changingthestartupsequence
Tochangethestartupsequence,dothefollowing:
1.SelectBootorNetwork,thenpressEnter.Thedefaultbootlistisdisplayed,showingtheorderinwhich
deviceswillbestartedup.Evendevicesthatarenotattachedtoorinstalledonyourcomputerarelisted.
•UsetheBootsubmenutospecifythestartupsequencethatrunswhenyouturnonthepower.
•UsetheNetworksubmenutospecifythestartupsequencethatrunswhenWakeonLANisenabled.
WakeonLANiscommonlyusedbyLANadministratorsincorporatenetworkstogetremoteaccess
toyourcomputer.
2.Setthestartupsequencebyusingthefollowingkeys:
•Usecursorkeystoselectadevice.
•UseF6orthecombinationofShiftand+tomovethedeviceuptoahigherpriority.
•UseF5or–tomovethedevicedowntoalowerpriority.
•UsethecombinationofShiftand!toexcludeorincludeadevice.
3.PressF10tosavethechangesandrestartthesystem.
Tochangethestartupsequencetemporarilysothatthesystemstartsupfromadifferentdrive,dothe
following:
1.Turnoffthecomputer.
2.Turnonthecomputer;then,whiletheThinkPadlogoisdisplayed,pressF12.
3.Selectthedeviceyouwanttostartrst.
Note:TheBootmenuwillbedisplayedwhenthesystemcannotbootfromanydevicesortheoperating
systemcannotbefound.
ThefollowingtableliststheStartupmenuitems.
Notes:
•Defaultvaluesareinboldface.
•Oneachsubmenu,presstheEnterkeytoshowselectableoptionsandselectadesiredoption.
•Someitemsaredisplayedonthemenuonlyifthecomputersupportsthecorrespondingfeatures.
Table8.Startupmenuitems
MenuitemValueComments
BootSee“Changingthestartupsequence”on
page127.
NetworkBootSelectthebootdevicewhenthesystem
wakesfromLAN.IfWakeOnLANis
enabled,thenetworkadministratorcan
turnonallofthecomputersinaLAN
remotelybyuseofnetworkmanagement
software.
Chapter8.Advancedconguration127

Table8.Startupmenuitems(continued)
MenuitemValueComments
UEFI/LegacyBoot•Both
–UEFI/LegacyBootPriority
–UEFIFirst
–LegacyFirst
•UEFIOnly
•LegacyOnly
CSMSupport(forUEFIOnly)
•Y es
•No
Selectsystembootcapability.
•Both:Selectpriorityofbootoptions
betweenUEFIandLegacy.
•UEFIOnly:Thesystemwillbootfrom
theUEFIenabledoperatingsystem.
•LegacyOnly:Thesystemwillboot
fromanyoperatingsystemotherthan
theUEFIenabledone.
Note:IfyouselectUEFIOnly,the
systemcannotbootfromthebootable
devicesthatdonothavetheUEFI
enabledoperatingsystem.
CompatibilitySupportModule(CSM)is
requiredforbootingthelegacyoperating
system.IfyouselectUEFIOnly,CSM
Supportisselectable.ForBothor
LegacyOnlymood,CSMSupportis
notselectable.
BootMode•Quick
•Diagnostics
ScreenduringthePOST:
•Quick:TheThinkPadLogoscreenis
displayed.
•Diagnostics:Textmessagesare
displayed.
Note:YoualsocanenterDiagnostic
modebypressingEscduringthePOST.
OptionKeysdisplay•Disabled
•Enabled
IfyouselectDisabled,the“Tointerrupt
normalstartup,pressEnter.”messageis
notdisplayedduringthePOST.
BootDeviceListF12Option•Disabled
•Enabled
IfyouselectEnabled,theF12keyis
recognizedandtheBootMenuwindow
isdisplayed.
BootOrderLock•Disabled
•Enabled
IfyouselectEnabled,thebootpriority
orderislockedforyourfutureuse.
Restartmenu
IfyouneedtocloseThinkPadSetupandrestartthesystem,selectRestartfromtheThinkPadSetup
menu.Thefollowingsubmenuisdisplayed:
•ExitSavingChanges:Restartthesystemaftersavingthechanges.
•ExitDiscardingChanges:Restartthesystemwithoutsavingthechanges.
•LoadSetupDefaults:Loadthedefaultsettingthatwasineffectatthetimeofpurchase.
EnableOSOptimizedDefaultstomeettheMicrosoftWindows8certicationrequirements.Whenyou
changethissetting,someothersettingsarechangedautomatically.TheaffectedsettingsareCSM
Support,UEFI/LegacyBoot,SecureBoot,andSecureRollBackPrevention.
•DiscardChanges:Discardthechanges.
•SaveChanges:Savethechanges.
128UserGuide

UpdatingyoursystemUEFIBIOS
TheUniedExtensibleFirmwareInterface(UEFI)BIOSisapartofthesystemprogramsthatmakeupthe
basiclayerofsoftwarebuiltintoyourcomputer.TheUEFIBIOStranslatestheinstructionsfromother
softwarelayers.
YourcomputersystemboardhasamodulecalledEEPROM,alsoreferredtoasashmemory.Youcan
updatetheUEFIBIOSbystartingyourcomputerwithaashupdateopticaldiscorashupdateprogram
runningintheWindowsenvironment.
Insomeinstanceswhenyouaddsoftware,hardware,oradevicedriver,youmightbeinformedthatyou
needtoupdateyourUEFIBIOSinorderforthenewadditiontoworkproperly.
ToupdateyourUEFIBIOS,gotothefollowingWebsiteandfollowtheinstructionsonthescreen:
http://www.lenovo.com/ThinkPadDrivers
Usingsystemmanagement
Thissectionisintendedprimarilyfornetworkadministrators.
Yourcomputerisdesignedformanageability,sothatyoucanredirectmoreofyourresourcestobetter
meetyourbusinessobjectives.
Thismanageability,orsocalledasTotalCostofOwnership(TCO),enablesyoutoremotelyoperateclient
computersinthesamewayasyouoperateyourowncomputer,suchasturningonaclientcomputer,
formattingharddiskdrive,andinstallingsoftware.
Oncethecomputerisconguredandoperational,youcanmanageitbyuseofsoftwareandmanageability
featuresalreadyintegratedintotheclientsystemandthenetwork.
Systemmanagement
Readthistopictolearnmoreaboutfeaturesofsystemmanagement.
DesktopManagementInterface
ThesystemUEFIBIOSofyourcomputersupportsaninterfacecalledSystemManagementBIOSReference
Specication(SMBIOS)V2.6.1.SMBIOSprovidesinformationaboutthehardwarecomponentsofyour
system.ItistheresponsibilityoftheBIOStosupplythisdatabasewithinformationaboutitselfandthe
devicesonthesystemboard.ThisspecicationdocumentsthestandardsforgettingaccesstothisBIOS
information.
PrebooteXecutionEnvironment
ThePrebooteXecutionEnvironment(PXE)technologymakesyourcomputermoremanageable(itisPXE
2.1-compliant)byenablingittoboot(loadanoperatingsystemoranotherexecutableimage)froma
server.YourcomputersupportsthepersonalcomputerfunctionsthatPXErequires.Forexample,withthe
appropriateLANcard,yourcomputercanbebootedfromthePXEserver.
Note:TheRemoteInitialProgramLoad(RPL)functioncannotbeusedwithyourcomputer.
WakeonLAN
AnetworkadministratorcanuseWakeonLANtoturnonacomputerfromamanagementconsole.
WhenWakeonLANisusedwithnetworkmanagementsoftware,manyfunctions,suchasdatatransfer,
softwareupdates,andFlashupdatesofUEFIBIOS,canbeperformedremotelywithoutremoteattendance.
Chapter8.Advancedconguration129

Thisupdatingprocesscanbedoneafternormalworkinghoursandonweekends,tosavetimeandincrease
productivity.Usersarenotinterruptedduringnormalworkinghours,andLANtrafciskepttoaminimum.
IfacomputeristurnedonbytheWakeonLANfunction,theNetworkBootsequenceisused.
AssetIDEEPROM
TheAssetIDEEPROMcontainsinformationaboutthesystem,includingitscongurationandtheserial
numbersofkeycomponents.Italsoincludesanumberofblankeldsinwhichyoucanrecordinformation
abouttheendusersinyournetwork.
Settingmanagementfeatures
Toenablethenetworkadministratortocontrolyourcomputerremotely,youmustcongurethenetwork
interfacebysettingthesystem-managementfeaturesintheThinkPadSetupprogram.Youcancongure
thefollowingfunctionsintheprogram:
•WakeonLAN
•NetworkBootsequence
•Flashupdate
Ifanadministratorpassword(supervisorpassword)hasbeenset,youwillneedtospecifyitwhenyoustart
ThinkPadSetuptousethesefunctions.
WakeonLAN
WhentheWakeonLANfeatureisenabledonacomputerthatisconnectedtoaLAN,anetworkadministrator
canstartthecomputerremotelyfromamanagementconsole,usingremotenetwork-managementsoftware.
Whenyourcomputerisnotunderthenetworkadministrator'ssystemmanagement,youcandisableWake
onLAN.
ToenableordisableWakeonLAN,dothefollowing:
1.StartThinkPadSetup.
2.SelectCong.TheCongsubmenuisdisplayed.
3.SelectNetwork.TheNetworkitemsubmenuisdisplayed.
4.ForWakeOnLAN,selectoneofthefollowing:ACOnly,ACandBattery,orDisabled.
5.PressF10tosavechangesandexit.
NetworkBootsequence
Whenyourcomputeristurnedonremotely,thesystemwilltrytobootfromthedevicethatisspeciedinthe
NetworkBootsetting,andthenfollowthebootorderlistontheBootmenu.
Todeneasequence,dothefollowing:
1.OntheThinkPadSetupprogrammenu,selectStartup.Thesubmenuisdisplayed.
2.SelectNetworkBootandpresstheEnterkey.Thebootdevicelistisdisplayed.
3.Selectabootdevicefromthelisttomakeitasthetopbootpriority.
4.PressF10tosavechangesandexit.
Note:Ifyouwanttoinitializethesettingtoreturntothedefaultstartupsequence,pressF9.Thedefault
settingsareautomaticallyreloaded.
130UserGuide

Flashupdate
Yournetworkadministratorcanremotelyupdatethesystemprogramsonyourcomputerfromamanagement
console.Thefollowingrequirementsmustbemet:
•YourcomputermustbestartedovertheLAN.
•YourcomputermustbeengagedinaPrebooteXecutionEnvironment(PXE).
•Network-managementsoftwaremustbeinstalledontheremoteadministrator'scomputer.
Chapter8.Advancedconguration131

132UserGuide

Chapter9.Preventingproblems
AnimportantpartofowningaThinkPadnotebookcomputerismaintenance.Withpropercare,youcan
avoidcommonproblems.Thechapterprovidesinformationthatcanhelpyoukeepyourcomputerrunning
smoothly.
•“Generaltipsforpreventingproblems”onpage133
•“Makingsuredevicedriversarecurrent”onpage134
•“Takingcareofyourcomputer”onpage135
Generaltipsforpreventingproblems
•IfyourcomputerisequippedwithbothaharddiskdriveandanmSATAsolid-statedrive,youarenot
recommendedtousethemSATAsolid-statedriveasabootabledevice.ThemSATAsolid-statedriveis
designedanddevelopedfor“cache”functionpurposeonly.IfyouusethemSATAsolid-statedriveasa
bootabledevice,itsreliabilityisnotguaranteed.
•Checkthecapacityofyourharddiskdrivefromtimetotime.Iftheharddiskdrivegetstoofull,the
Windowsoperatingsystemwillslowdownandmightproduceerrors.
Tochecktheharddiskdrivecapacity,clickStart➙ComputerontheWindows7operatingsystem.For
theWindows8operatingsystem,opentheWindowsExplorerandclickComputer.
•Emptyyourrecyclebinonaregularbasis.
•Usediskdefragmenttoolregularlyonyourharddiskdrivetoimprovedataseekandreadtimes.
•Tofreeupdiskspace,uninstallunusedprograms.
Note:Youalsomightwanttolookforprogramduplicationoroverlappingversions.
•CleanoutyourInbox,Sent,andTrashfoldersfromyoure-mailclientprogram.
•Backupyourdataatleastonceaweek.Ifcriticaldataispresent,itisagoodideatoperformadaily
backupoperation.Lenovohasmanybackupoptionsavailableforyourcomputer.Rewritableoptical
drivesareavailableformostmachinesandareeasilyinstalled.
•Schedulesystemrestoreoperationstotakeasystemsnapshotperiodically.Formoreinformationabout
systemrestore,seeChapter5“Recoveryoverview”onpage63.
•UpdatedevicedriversandUEFIBIOSwhenneeded.
•Proleyourmachineathttp://www.lenovo.com/supporttokeepuptodatewithcurrentdriversand
revisions.
•Ensuredevicedriversfornon-Lenovoperipheraldevicesarekeptuptodate.Youmightwanttoreadthe
devicedriverinformationreleasenotespriortoupdatingforcompatibilityorknownissues.
•Keepalogbook.Entriesmightincludemajorhardwareorsoftwarechanges,driverupdates,minorissues
youhaveexperienced,andhowyouresolvedtheminorissues.
•Ifyoueverneedtorunarecoveryonyourcomputertoreturnthepreloadontothemachine,thefollowing
tipsmighthelpalongtheway:
–Removeallexternaldevicessuchastheprinter,keyboard,andsoon.
–Makesurethatyourbatteryischargedandthatyouhavetheacpowerconnected.
–BootintoThinkPadSetupandloadthedefaultsettings.
–Restartthecomputerandstarttherecoveryoperation.
–Ifyourcomputerusesdiscsastherecoverymedia,donotremovethediscfromthedriveuntil
promptedtodoso.
©CopyrightLenovo2012133

•Forsuspectedharddiskdriveissues,referto“Diagnosingproblems”onpage139priortocallingthe
CustomerSupportCenter.Ifyourcomputerdoesnotstartup,downloadthelestocreateabootable
self-testmediafromthefollowingWebsite:http://www.lenovo.com/hddtest.Runthetestandrecordany
messagesorerrorcodes.Ifthetestreturnsanyfailingerrorcodesormessages,calltheCustomerSupport
Centerwiththecodesormessagesandthecomputerinfrontofyou.Atechnicianwillassistyoufurther.
•Ifrequired,youcanndyourcountry'sCustomerSupportCenteratthefollowingWebaddress:
http://www.lenovo.com/support/phone.WhencallingtheCustomerSupportCenter,makesurethatyou
haveyourmachinemodeltype,serialnumber,andthecomputerinfrontofyou.Also,ifthecomputeris
producingerrorcodes,itishelpfultohavetheerrorscreenonorthemessagewrittendown.
Makingsuredevicedriversarecurrent
Devicedriversareprogramsthatcontaininstructionsfortheoperatingsystemabouthowtooperateordrive
acertainpieceofhardware.Eachhardwarecomponentonyourcomputerhasitsownspecicdriver.If
youaddanewcomponent,theoperatingsystemneedstobeinstructedonhowtooperatethatpieceof
hardware.Afteryouinstallthedriver,theoperatingsystemcanrecognizethehardwarecomponentand
understandhowtouseit.
Note:Becausedriversareprograms,likeanyotherleonyourcomputer,theyaresusceptibletocorruption
andmightnotperformcorrectlyifcorruptionoccurs.
Itisnotalwaysnecessarytodownloadthelatestdrivers.However,youshoulddownloadthelatestdriver
foracomponentifyounoticepoorperformancefromthatcomponentorifyouaddedanewcomponent.
Thismighteliminatethedriverasthepotentialcauseoftheproblem.
GettingthelatestdriversfromtheWebsite
YoucandownloadandinstallupdateddevicedriversfromtheLenovoWebsitebydoingthefollowing:
1.Gotohttp://www.lenovo.com/ThinkPadDrivers.
2.Selecttheentryforyourcomputerandthenfollowtheinstructionsonthescreentoinstallorupdate
necessarysoftware.
GettingthelatestdriversusingSystemUpdate
TheSystemUpdateprogramhelpsyoukeepthesoftwareonyoursystemup-to-date.Updatepackagesare
storedonLenovoserversandcanbedownloadedfromtheLenovoSupportWebsite.Updatepackages
cancontainprograms,devicedrivers,UEFIBIOSashes,orsoftwareupdates.WhentheSystemUpdate
programconnectstotheLenovoSupportWebsite,theSystemUpdateprogramautomaticallyrecognizes
themachinetypeandmodelofyourcomputer,theinstalledoperatingsystem,andthelanguageofthe
operatingsystemtodeterminewhatupdatesareavailableforyourcomputer.TheSystemUpdateprogram
thendisplaysalistofupdatepackagesandcategorizeseachupdateascritical,recommended,oroptionalto
helpyouunderstandtheimportance.Youhavecompletecontrolofwhichupdatestodownloadandinstall.
Afteryouselecttheupdatepackagesyouwant,theSystemUpdateprogramautomaticallydownloadsand
installstheupdateswithoutanyfurtherinterventionfromyou.
TheSystemUpdateprogramispreinstalledonyourcomputerandisreadytorun.Theonlyprerequisiteis
anactiveInternetconnection.Youcanstarttheprogrammanually,oryoucanusetheschedulefeature
toenabletheprogramtosearchforupdatesautomaticallyatspeciedintervals.Youalsocanpredene
scheduledupdatestosearchbyseverity(criticalupdates,criticalandrecommendedupdates,orallupdates)
sothelistyouchoosefromcontainsonlythoseupdatetypesthatareofinteresttoyou.
FormoreinformationabouthowtousetheSystemUpdateprogram,refertothehelpinformationsystem
oftheprogram.
134UserGuide

Takingcareofyourcomputer
Althoughyourcomputerisdesignedtofunctionreliablyinnormalworkenvironments,youneedtouse
commonsenseinhandlingit.Byfollowingtheseimportanttips,youwillgetthemostuseandenjoyment
outofyourcomputer.
Becarefulaboutwhereandhowyouwork
•Storepackingmaterialssafelyoutofthereachofchildrentopreventtheriskofsuffocationfromplastic
bags.
•Keepyourcomputerawayfrommagnets,activatedcellularphones,electricalappliances,orspeakers
(morethan13cmor5inches).
•Avoidsubjectingyourcomputertoextremetemperatures(below5°C/41°Forabove35°C/95°F).
•Someappliances,suchascertainportabledesktopfansorairpuriers,canproducenegativeions.Ifa
computerisclosetosuchanappliance,andisexposedforanextendedtimetoaircontainingnegative
ions,itmightbecomeelectrostaticallycharged.Suchachargemightbedischargedthroughyourhands
whenyoutouchthekeyboardorotherpartsofthecomputer,orthroughconnectorsonI/Odevices
connectedtoit.Eventhoughthiskindofelectrostaticdischarge(ESD)istheoppositeofadischargefrom
yourbodyorclothingtothecomputer,itposesthesameriskofacomputermalfunction.
Yourcomputerisdesignedandmanufacturedtominimizeanyeffectsofelectrostaticcharge.Anelectrostatic
chargeaboveacertainlimit,however,canincreasetheriskofESD.Therefore,whenusingthecomputer
closetoanappliancethatcanproducenegativeions,givespecialattentiontothefollowing:
•Avoiddirectlyexposingyourcomputertotheairfromanappliancethatcanproducenegativeions.
•Keepyourcomputerandperipheralsasfaraspossiblefromsuchanappliance.
•Whereverpossible,groundyourcomputertofacilitatesafeelectrostaticdischarge.
Note:Notallsuchappliancescauseasignicantelectrostaticcharge.
Begentlewithyourcomputer
•Avoidplacinganyobjects(includingpaper)betweenthedisplayandthekeyboardorthepalmrest.
•Yourcomputerdisplayisdesignedtobeopenedandusedatanangleslightlygreaterthan90degrees.
Donotopenthedisplaybeyond180degrees,asthismightdamagethecomputerhinge.
•Donotturnyourcomputeroverwhiletheacpoweradapterispluggedin.Thiscouldbreaktheadapter
plug.
Carryyourcomputerproperly
•Beforemovingyourcomputer,besuretoremoveanymedia,turnoffattacheddevices,anddisconnect
cordsandcables.
•Whenpickingupyouropencomputer,holditbythebottom.Donotpickuporholdyourcomputerby
thedisplay.
Handlestoragemediaanddrivesproperly
•Ifyourcomputercomeswithanopticaldrive,donottouchthesurfaceofadiscorthelensonthetray.
•WaituntilyouheartheCDorDVDclickintothecenterpivotofthedrivebeforeclosingthetray.
•Onyourcomputer,useonlyopticaldrivesdesignedforusewiththeSerialUltrabayEnhancedbay.
Note:Youcaninstalla9.5-mm-thickSerialUltrabaySlimdeviceora12.7-mm-thickSerialUltrabay
EnhanceddeviceintheSerialUltrabayEnhancedbay.
Chapter9.Preventingproblems135

•Wheninstallingtheharddiskdrive,solid-statedrive,oropticaldrive,followtheinstructionsshippedwith
yourhardware,andapplypressureonlywhereneededonthedevice.
•Turnoffyourcomputerifyouarereplacingtheharddiskdriveorsolid-statedrive.
•Whenreplacingtheprimaryharddiskdriveorsolid-statedrive,reattachthecoverofthedriveslot.
•Storeyourexternalandremovableharddiskdriveoropticaldrivesintheappropriatecontainersor
packagingwhentheyarenotbeingused.
•Beforeyouinstallanyofthefollowingdevices,touchametaltableoragroundedmetalobject.Thisaction
reducesanystaticelectricityfromyourbody.Thestaticelectricitycoulddamagethedevice.
–Memorymodules
–Mini-PCIcards
–ExpressCards
–Smartcards
–Memorycards,suchasSDcards,SDHCcards,SDXCcards,andMultiMediaCards
Note:Notalllisteddevicesareincludedinyourcomputer.
Thisactionreducesanystaticelectricityfromyourbody.Thestaticelectricitycoulddamagethedevice.
•Whiletransferringdatatoorfromaashmediacard,suchasanSDcard,donotputyourcomputerinto
sleeporhibernationmodebeforethedatatransferiscomplete;otherwise,yourdatacouldbecome
damaged.
Takecareinsettingpasswords
•Rememberyourpasswords.Ifyouforgetasupervisororharddiskpassword,Lenovowillnotresetit,and
youmighthavetoreplaceyoursystemboard,orharddiskdriveorsolid-statedrive.
Careforthengerprintreader
Thefollowingactionscoulddamagethengerprintreaderorcauseitnottoworkproperly:
•Scratchingthesurfaceofthereaderwithahard,pointedobject.
•Scrapingthesurfaceofthereaderwithyourngernailoranythinghard.
•Usingortouchingthereaderwithadirtynger.
Ifyounoticeanyofthefollowingconditions,gentlycleanthesurfaceofthereaderwithadry,soft,lint-free
cloth:
•Thesurfaceofthereaderisdirtyorstained.
•Thesurfaceofthereaderiswet.
•Thereaderoftenfailstoenrollorauthenticateyourngerprint.
Registeryourcomputer
•RegisteryourThinkPadcomputerwithLenovo.Formoreinformation,see“Registeringyourcomputer”
onpage21.
Besurenottomodifyyourcomputer
•OnlyanauthorizedThinkPadrepairtechnicianshoulddisassembleandrepairyourcomputer.
•Donotmodifyortapethelatchestokeepthedisplayopenorclosed.
Cleaningthecoverofyourcomputer
Occasionallycleanyourcomputerbydoingthefollowing:
136UserGuide

1.Prepareamixtureofagentlekitchen-usedetergent(onethatdoesnotcontainabrasivepowderor
strongchemicalssuchasacidoralkaline).Use5partswaterto1partdetergent.
2.Absorbthediluteddetergentintoasponge.
3.Squeezeexcessliquidfromthesponge.
4.Wipethecoverwiththesponge,usingacircularmotionandtakingcarenottoletanyexcessliquiddrip.
5.Wipethesurfacetoremovethedetergent.
6.Rinsethespongewithcleanrunningwater.
7.Wipethecoverwiththecleansponge.
8.Wipethesurfaceagainwithadry,soft,lint-freecloth.
9.Waitforthesurfacetodrycompletelyandremoveanybersfromthecloth.
Cleaningyourcomputerkeyboard
Tocleanthecomputerkeyboard,dothefollowing:
1.Applysomeisopropylrubbingalcoholtoasoft,dust-freecloth.
2.Wipeeachkeytopsurfacewiththecloth.Wipethekeysonebyone;ifyouwipeseveralkeysatatime,
theclothmighthookontoanadjacentkeyandpossiblydamageit.Makesurethatnoliquiddripsonto
orbetweenthekeys.
3.Allowtodry.
4.Toremoveanycrumbsordustfrombeneaththekeys,youcanuseacamerablowerwithabrush
orcoolairfromahairdryer.
Note:Avoidsprayingcleanerdirectlyontothedisplayorthekeyboard.
Cleaningyourcomputerdisplay
Tocleanthecomputerdisplay,dothefollowing:
1.Gentlywipethedisplaywithadry,softlint-freecloth.Ifyouseeascratchlikemarkonyourdisplay,
itmightbeastaintransferredfromthekeyboardortheTrackPointpointingstickwhenthecoverwas
pressedfromtheoutside.
2.Wipeordustthestaingentlywithasoft,drycloth.
3.Ifthestainremains,moistenasoft,lint-freeclothwithwaterora50-50mixtureofisopropylalcoholand
waterthatdoesnotcontainimpurities.
4.Wringoutasmuchoftheliquidasyoucan.
5.Wipethedisplayagain;donotletanyliquiddripintothecomputer.
6.Besuretodrythedisplaybeforeclosingit.
Chapter9.Preventingproblems137

138UserGuide

Chapter10.Troubleshootingcomputerproblems
Thischapterprovidesinformationonwhattodoifyouexperienceaproblemwithyourcomputer.
•“Diagnosingproblems”onpage139
•“Troubleshooting”onpage139
Diagnosingproblems
Ifyouexperienceproblemswithyourcomputer,usetheLenovoSolutionCenterprogramasastarting
pointforsolvingthem.
TheLenovoSolutionCenterprogramenablesyoutotroubleshootandresolvecomputerproblems.It
combinesdiagnostictests,systeminformationcollection,securitystatus,andsupportinformation,along
withhintsandtipsformaximumsystemperformance.
Notes:
•TheLenovoSolutionCenterprogramcanbedownloadedfromhttp://www.lenovo.com/diags.
•IfyouareusingotherWindowsoperatingsystemratherthanWindows7andWindows8,goto
http://www.lenovo.com/diagnoseforthelatestinformationondiagnosticsforyourcomputer.
IfyourcomputerisinstalledwiththeWindows7operatingsystem,whenyouaresettingupyourcomputer,
theLenovoSolutionCenterprogrampromptsyoutocreaterecoverymedia,whichyoucanusetorestore
theharddiskdrivetothefactorydefaultstate.Formoreinformation,see“Creatingandusingarecovery
media”onpage63.
ToruntheLenovoSolutionCenterprogram,see“Lenovoprograms”onpage15.
Foradditionalinformation,refertotheLenovoSolutionCenterhelpsystem.
Note:Ifyouareunabletoisolateandrepairtheproblemyourselfafterrunningtheprogram,saveandprint
thelogles.YouwillneedthelogleswhenyouspeaktoaLenovotechnicalsupportrepresentative.
Troubleshooting
Ifyourcomputerhasanerror,ittypicallydisplaysamessageoranerrorcode,orabeepsoundswhen
youturniton.Whenyouexperienceaproblem,refertothecorrespondingsectionsinthistopictotryto
solvetheproblembyyourself.
Computerstopsresponding
Printtheseinstructionsnowandkeepitwithyourcomputerforreferencelater.
Ifyourcomputeriscompletelyunresponsive(youcannotusetheUltraNavpointingdeviceorthekeyboard),
dothefollowing:
1.Pressandholdthepowerbuttonuntilthecomputerturnsoff.Afterthecomputeristurnedoff,restartby
pressingthepowerbutton.Ifthecomputerdoesnotturnon,continuewithstep2.
Note:Donotremovethebatteryandtheacpoweradaptertoresetthecomputer.
©CopyrightLenovo2012139

2.Whilethecomputeristurnedoff,removeallpowersourcesfromthecomputer(batteryandtheacpower
adapter).Holddownthepowerbuttonfor10seconds.Plugintheacpoweradapterwhilekeepingthe
batteryoutofthecomputer.Ifthecomputerdoesnotturnbackon,continuewithstep3.
Note:OncethecomputerstartsupandenterstheWindowsenvironment,usethepropershutdown
proceduretoturnthecomputeroff.Oncethecomputerisoff,reattachthebatteryandrestartthe
computer.Ifthecomputerdoesnotstartwiththebatteryreattached,removethebatteryandagain
startwithstep2.Ifthecomputerstartswithacpowerbutdoesnotstartwhenthebatteryisattached,
calltheCustomerSupportCenterforsupport.
3.Whilethecomputerisoff,removeallsourcesofpower(batteryandtheacpoweradapter).Removeall
externaldevicesthatareattachedtoyourcomputer(keyboard,mouse,printer,scanner,andsoon).
Repeatstep2.Ifstep2isunsuccessful,continuewithstep4.
Note:Thefollowingstepsinvolveremovingstaticsensitivecomponentsfromyourcomputer.Makesure
thatyouareproperlygroundedandremoveallsourcesofpowerattachedtothecomputer.Ifyouare
uncomfortableorunsureaboutremovingcomponentspleasecalltheCustomerSupportCenterfor
assistance.
4.Whilethecomputerisoff,removeallsourcesofpowerandexternalhardware.Removeanynon-original
memorymoduleaddedtoyourcomputer.Afterremovingtheextramemorymoduleandreseatingthe
originalmemorymodule,repeatstep2.Ifthecomputerstilldoesnotturnon,consulttheusermanual
forothercustomer-replaceablecomponentsthatareattachedtoyourcomputer.
Ifthecomputerstilldoesnotstartup,calltheCustomerSupportCenterandaCustomerSupportSpecialist
willassistyou.
Spillsonthekeyboard
Withamobilecomputer,thereareincreasedchancesofspillingliquidsonthekeyboard.Becausemost
liquidsconductelectricity,liquidspilledonthekeyboardcouldcreatenumerousshortcircuits,potentially
causingirreparabledamagetoyourcomputer.
Ifyouspillsomethingonyourcomputer:
Attention:Besurethatnoliquidcreatesashortcircuitbetweenyouandtheacpoweradapter(ifinuse).
Althoughyoumightlosesomedataorworkbyturningoffthecomputerimmediately,leavingthecomputer
onmightmakeyourcomputerunusable.
1.Carefullyunplugtheacpoweradapterimmediately.
2.Turnoffthecomputerimmediately.Ifthecomputerdoesnotturnoff,removethebattery.Themore
quicklyyoustopthecurrentfrompassingthroughthecomputerthemorelikelyyouwillreducedamage
fromshortcircuits.
3.Waituntilyouarecertainthatalltheliquidisdrybeforeturningonyourcomputer.
Note:Ifyouwanttoreplaceyourkeyboard,purchaseanewone.
Errormessages
•Message:0177:BadSVPdata,stopPOSTtask.
Solution:ChecksumofthesupervisorpasswordintheEEPROMisnotcorrect.Thesystemboard
shouldbereplaced.Havethecomputerserviced.
•Message:0183:BadCRCofSecuritySettingsinEFIVariable.EnterThinkPadSetup.
Solution:ChecksumoftheSecuritysettingsintheEFIVariableisnotcorrect.EnterThinkPadSetup
tochecksecuritysettings,PressF10andthenpressEntertorestartthesystem.Ifyoustillhavea
problem,havethecomputerserviced.
140UserGuide

•Message:0187:EAIAdataaccesserror
Solution:TheaccesstoEEPROMisfailed.Havethecomputerserviced.
•Message:0188:InvalidRFIDSerializationInformationArea
Solution:TheEEPROMchecksumisnotcorrect(block#0and1).Thesystemboardshouldbereplaced,
andtheboxserialnumberneedstobereinstalled.Havethecomputerserviced.
•Message:0189:InvalidRFIDcongurationinformationarea
Solution:TheEEPROMchecksumisnotcorrect(block#4and5).Thesystemboardshouldbereplace,
andtheUUIDneedstobereinstalled.Havethecomputerserviced.
•Message:0190:Criticallow-batteryerror
Solution:Thecomputerturnedoff,becausethebatteryislow.Connecttheacpoweradaptertothe
computerandchargethebattery,orreplacethebatterywithafullychargedone.
•Message:0191:SystemSecurity-Invalidremotechangerequested
Solution:Thesystemcongurationchangehasfailed.Conrmtheoperationandtryagain.Toclearthe
error,enterThinkPadSetup.
•Message:0199:SystemSecurity-Securitypasswordretrycountexceeded.
Solution:Thismessageisdisplayedifyouenterawrongsupervisorpasswordmorethanthreetimes.
Conrmthesupervisorpasswordandtryagain.Tocleartheerror,enterThinkPadSetup.
•Message:1802:Unauthorizednetworkcardispluggedin-Poweroffandremovethenetworkcard.
Solution:TheminiPCIExpressnetworkcardisnotsupportedonthiscomputer.Removeit.
•Message:1820:Morethanoneexternalngerprintreadersareattached.
Solution:Poweroffandremoveallbutthereaderthatyousetupwithinyourmainoperatingsystem.
•Message:2000:ThinkVantageActiveProtectionsensordiagnosticsfailed.
Solution:ThinkVantageActiveProtectionsensorisnotworkingcorrectly.Havethecomputerserviced.
•Message:2100:DetectionerroronHDD0(MainHDD)
Solution:Theharddiskisnotworking.Havetheharddiskserviced.
•Message:2101:DetectionerroronHDD1(UltrabayHDD)
Solution:Theharddiskisnotworking.Havetheharddiskserviced.
•Message:2102:DetectionerroronHDD2(MiniSATA)
Solution:TheMiniSATAdeviceisnotworking.HavetheMiniSATAdeviceserviced.
•Message:2110:ReaderroronHDD0(MainHDD)
Solution:Theharddiskisnotworking.Havetheharddiskserviced.
•Message:2111:ReaderroronHDD1(UltrabayHDD)
Solution:Theharddiskisnotworking.Havetheharddiskserviced.
•Message:2112:ReaderroronHDD2(MiniSATA)
Solution:TheMiniSATAdeviceisnotworking.HavetheMiniSATAdeviceserviced.
•Message:2200:MachineTypeandSerialNumberareinvalid.
Solution:MachineTypeandSerialNumberareinvalid.Havethecomputerserviced.
•Message:2201:MachineUUIDisinvalid.
Solution:MachineUUIDisinvalid.Havethecomputerserviced.
•Message:Fanerror
Solution:Coolingfanhasfailed.Shutdownthecomputerimmediatelyandhavethecomputerserviced.
•Message:Thermalsensingerror
Chapter10.Troubleshootingcomputerproblems141

Solution:Thethermalsensorhasproblem.Shutdownthecomputerimmediatelyandhavethecomputer
serviced.
•Message:Thissystemsupportsonlybatteriesspeciallydesignedforthisspecicsystemand
manufacturedbyLenovooranauthorizedbuilder.Thesystemdoesnotsupportunauthorizedbatteriesor
batteriesdesignedforothersystems.Ifanunauthorizedbatteryorabatterydesignedforanothersystem
isinstalled,thesystemwillnotcharge.PresstheESCkeytocontinue.
Attention:Lenovohasnoresponsibilityfortheperformanceorsafetyofunauthorizedbatteries,and
providesnowarrantiesforfailuresordamagearisingoutoftheiruse.
Solution:ReplacethebatterywiththecorrectLenovobatteryforthissystem.Ifyoustillseethesame
errormessage,contactwithLenovoservicetohavethecomputerserviced.
•Message:Thebatteryinstalledisnotsupportedbythissystemandwillnotcharge.Pleasereplacethe
batterywiththecorrectLenovobatteryforthissystem.PresstheESCkeytocontinue.
Solution:ReplacethebatterywiththecorrectLenovobatteryforthissystem.Ifyoustillseethesame
errormessage,contactwithLenovoservicetohavethecomputerserviced.
Errorswithoutmessages
•Problem:MyscreenkeepsblankingwhenIdonotwantitto.
Solution:IfyousystemispreinstalledwiththeWindows7operatingsystem,youcandisableanysystem
timers,suchastheLCDturn-offtimerortheblanktimerbydoingthefollowing:
1.StartPowerManager.
2.ClickthePowerplantab,andthenselectMaximumPerformancefromthepredenedpowerplans.
•Problem:WhenIturnonthecomputer,nothingisdisplayedonthescreenandthecomputerdoesnot
beepwhilestartingup.
Note:Ifyouarenotsurewhetheryouheardanybeeps,turnoffthecomputerbypressingandholdingthe
powerbuttonforfoursecondsormore.Turnitonandlistenagain.
Solution:Makesurethat:
–Thebatteryisinstalledcorrectly.
–Theacpoweradapterisconnectedtothecomputerandthepowercordispluggedintoaworking
electricaloutlet.
–Thecomputeristurnedon.
–Thebrightnesslevelofthescreenisappropriatelyset.
Ifapower-onpasswordisset:
–Pressanykeytodisplaythepromptforthepower-onpassword.
–TypethecorrectpasswordandpressEnter.
Iftheseitemsarecorrectlyset,andthescreenremainsblank,havethecomputerserviced.
•Problem:WhenIturnonthecomputer,onlyawhitecursorisdisplayedonablankscreen.
Solution:Ifyouhavemodiedapartitiononyourharddiskdrivebyusingpartitionsoftware,information
aboutthatpartition,orthemasterbootrecordmighthavebeendestroyed.
1.Turnoffthecomputer,andthenturnitonagain.
2.Ifyoustillseeonlythecursoronthescreen,dothefollowing:
–Ifyouhaveusedthepartitionsoftware,examinethepartitionontheharddiskdrivebyusingthe
software,andrecoverthepartitionifrequired.
–UsetheRescueandRecoveryworkspace(forWindows7),thePushButtonResetprogram(for
Windows8),ortherecoverydiscstorestorethesystemtothefactorystate.
142UserGuide

Iftheproblempersists,havethecomputerserviced.
•Problem:Myscreengoesblankwhilethecomputerison.
Solution:Yourscreensaverorpowermanagementmighthavebeenenabled.Doeitherofthefollowing:
–TouchtheTrackPointpointingdeviceorthetouchpad,orpressakeytoexitthescreensaver.
–Pressthepowerbuttontoresumefromsleeporhibernation.
Beeperrors
Table9.Beeperrors
ProblemSolution
Oneshortbeep,pause,threeshortbeeps,pause,three
moreshortbeeps,andoneshortbeep
Makesurethatmemorymodulesareinstalledcorrectly.If
theyare,andyoustillhearthebeeps,havethecomputer
serviced.
Threeshortbeeps,pause,oneshortbeep,pause,one
moreshortbeep,andthreeshortbeeps
PCIresourceallocationfailure.Poweroffthecomputer
andremovethedevicefromtheExpressCardSlot.Ifthe
beepspersist,havethecomputerserviced.
OnelongandtwoshortbeepsThevideofunctionhasaproblem.Havethecomputer
serviced.
FourcyclesoffourshortbeepsShutdownthecomputerimmediatelyandhavethe
computerserviced.
FiveshortbeepsThesystemboardhasaproblem.Havethecomputer
serviced.
Memorymoduleproblems
Printtheseinstructionsnowandkeepitwithyourcomputerforreferencelater.
Ifyourmemorymoduleisnotoperatingproperly,checkthefollowingitems:
1.Verifythatthememorymoduleisinstalledandseatedcorrectlyinyourcomputer.
Itmightbenecessarytoremovealladdedmemorymodulestotestthecomputerwithonlythe
factory-installedmemorymodules,andthenreinstallthememorymoduleoneatatimetoensurea
properconnection.See“Replacingandinstallingamemorymodule”onpage82.
2.Checkforerrormessagesduringstartup.
Followtheappropriatecorrectiveactionsforpower-onself-test(POST)errormessages.See“Error
messages”onpage140.
3.VerifythatthelatestUEFIforyourmodelhasbeeninstalled.
4.Verifythepropermemorycongurationandcompatibilityincludingthemaximummemorysizeandthe
memoryspeed.See“Replacingandinstallingamemorymodule”onpage82.
5.Rundiagnosticprograms.See“Diagnosingproblems”onpage139.
Networkingproblems
Thefollowingarethemostcommonnetworkingproblems:
Ethernetproblems
•Problem:Yourcomputercannotconnecttothenetwork.
Solution:Makesurethat:
–Thecableisinstalledcorrectly.
Chapter10.Troubleshootingcomputerproblems143

ThenetworkcablemustbesecurelyconnectedbothtotheEthernetconnectorofyourcomputerand
totheRJ45connectorofthehub.Themaximumallowabledistancefromthecomputertohubis
100meters.Ifthecableisconnectedandthedistanceiswithinacceptablelimitsbuttheproblem
persists,tryadifferentcable.
–Youareusingthecorrectdevicedriver.Toinstallcorrectdriver,dothefollowing:
1.OpenControlPanelandclickHardwareandSound➙DeviceManager.Ifyouarepromptedfor
anadministratorpasswordorconrmation,typethepasswordorprovideconrmation.
2.Iftheexclamationmark!isdisplayednexttotheadapternameunderNetworkadapters,you
mightnotbeusingthecorrectdriverorthedrivermighthavebeendisabled.Toupdatethedriver,
right-clickthehighlightedadapter.
3.ClickUpdateDriverSoftware,andthenfollowtheinstructionsonthescreen.
–Theswitchportandtheadapterhavethesameduplexsetting.
Ifyouconguredtheadapterforfullduplex,makesurethattheswitchportalsoisconguredfor
fullduplex.Settingthewrongduplexmodecandegradeperformance,causedataloss,orresultin
lostconnections.
–Youhaveinstalledallnetworkingsoftwarethatisnecessaryforyournetworkenvironment.
CheckwithyourLANadministratorforthenecessarynetworkingsoftware.
•Problem:Theadapterstopsworkingfornoapparentreason.
Solution:Thenetworkdriverlesmightbecorruptormissing.Updatethedriverbyreferringtotheabove
solutionfortheproceduretomakesurethatthecorrectdevicedriverisinstalled.
•Problem:IfyourcomputerisaGigabitEthernetmodelandyouuseaspeedof1000Mbps,the
connectionfailsorerrorsoccur.
Solution:
–UseCategory5wiringandmakesurethatthenetworkcableissecurelyconnected.
–Connecttoa1000BASE-Thub/switch(not1000BASE-X).
•Problem:TheWakeonLANfeatureisnotworking.
Solution:MakesurethatWakeonLANisenabledinThinkPadSetup.Ifitis,checkwithyourLAN
administratorforthenecessarysettings.
•Problem:IfyourcomputerisaGigabitEthernetmodel,itcannotconnecttothenetworkat1000Mbps.
Instead,itconnectsat100Mbps.
Solution:
–Tryanothercable.
–Makesurethatthelinkpartnerissettoauto-negotiate.
–Makesurethattheswitchis802.3ab-compliant(gigabitovercopper).
AwirelessLANproblem
Problem:Youcannotconnecttothenetworkusingthebuilt-inwirelessnetworkcard.
Solution:Makesurethat:
•YourwirelessLANdriveristhelatestversion.
•yourcomputeriswithinrangeofawirelessaccesspoint.
•Thewirelessradioisenabled.
144UserGuide

Makesurethatthewirelessradioisenabledbydouble-clickingtheAccessConnectionsiconintheWindows
noticationarea.
ForWindows7operatingsystem,checktheNetworkName(SSID)andyourencryptioninformation.Usethe
AccessConnectionsprogramtoverifythiscase-sensitiveinformation.
AwirelessWANproblem
Problem:AmessageisdisplayedindicatingthatanunauthorizedWANcardisinstalled.
Solution:TheWANcardisnotsupportedonthiscomputer.Removeit.
Note:Dependingonyourcomputer,somemodelsdonothaveawirelessWANcard.
Bluetoothproblems
Note:CheckyourconnectionanytimeandmakesurethatnootherBluetooth-enableddeviceissearchingfor
thedevicetowhichyouwanttoconnect.SimultaneoussearchingisnotallowedintheBluetoothconnection.
•Problem:SounddoesnotcomefromtheBluetoothheadset/headphonebutcomesfromthelocal
speakereventhoughtheBluetoothheadset/headphoneisconnectedusingaHeadsetproleorAVprole.
Solution:Dothefollowing:
1.Exittheprogramthatusesthesounddevice(forexample,WindowsMediaPlayer).
2.OpenControlPanelandclickHardwareandSound➙Sound➙Playback.
3.IfyouareusingaHeadsetprole,selectBluetoothHands-freeAudioandclicktheSetDefault
button.IfyouareusinganAVprole,selectStereoAudioandclicktheSetDefaultbutton.
4.ClickOKtoclosetheSoundwindow.
•Problem:PIMitemssentfromtheWindows7operatingsystemcannotbereceivedcorrectlyintothe
addressbookofanyotherBluetooth-enableddevice.
Solution:TheWindows7operatingsystemsendsPIMitemsinXMLformat,butmostBluetooth-enabled
deviceshandlePIMitemsinvCardformat.IfanotherBluetooth-enableddevicecanreceivealethrough
Bluetooth,aPIMitemsentfromtheWindows7mightbesavedasalewiththeextension.contact.
Problemswiththekeyboardandotherpointingdevices
Thefollowingarethemostcommonproblemswithkeyboardsandotherpointingdevices.
UltraNavpointingdeviceproblems
•Problem:Thecursordriftswhenthecomputeristurnedonorafteritresumesnormaloperation.
Solution:ThecursormightdriftwhenyouarenotusingtheTrackPointpointingdeviceduringnormal
operation.ThisisanormalcharacteristicoftheTrackPointpointingdeviceandisnotadefect.Cursor
driftingmightoccurforseveralsecondsunderthefollowingconditions:
–Whenthecomputeristurnedon
–Whenthecomputerresumesnormaloperation
–WhentheTrackPointpointingdeviceiskeptpressedforalongtime
–Whenthetemperaturechanges
•Problem:TheTrackPointpointingdeviceortouchpaddoesnotwork.
Solution:MakesurethattheTrackPointpointingdeviceortouchpadisenabledintheUltraNavDevice
Settingwindow.
Chapter10.Troubleshootingcomputerproblems145

Keyboardproblems
•Problem:Allorsomekeysonthekeyboarddonotwork.
Solution:Ifanexternalnumerickeypadisconnected:
1.Turnoffthecomputer.
2.Removetheexternalnumerickeypad.
3.Turnonthecomputerandtryusingthekeyboardagain.
Ifthekeyboardproblemisresolved,carefullyreconnecttheexternalnumerickeypadandtheexternal
keyboard.Makesurethatyouhaveseatedtheconnectorscorrectly.
Iftheproblempersists,makesurethatthecorrectdevicedriverisinstalledbydoingthefollowing:
1.OpenControlPanel.ChangetheviewofControlPanelfromCategorytoLargeiconsorSmallicons.
2.ClickKeyboard.
3.SelecttheHardwaretab.IntheDevicePropertiespane,makesurethatyouseethismessage:
DeviceStatus:Thisdeviceisworkingproperly.
Ifkeysonthekeyboardstilldonotwork,havethecomputerserviced.
•Problem:Allorsomekeysontheexternalnumerickeypaddonotwork.
Solution:Makesurethattheexternalnumerickeypadiscorrectlyconnectedtothecomputer.
Problemswiththedisplayandmultimediadevices
Thistopicincludesthemostcommonproblemswithdisplaysandmultimediadevices,includingthe
computerdisplay,theexternalmonitor,audiodevices,andtheopticaldrive.
Computerscreenproblems
•Problem:Thescreenisblank.
Solution:Dothefollowing:
–PressFn+F7tobringuptheimage.
–Ifyouareusingtheacpoweradapter,orusingthebatteryandthebatterystatusindicatorison(is
green),pressFn+F9tomakethescreenbrighter.
–Ifthesleepstatusindicatorison(isgreen),pressFntoresumefromthesleepmode.
–Iftheproblempersists,followthesolutionforthefollowingproblem.
•Problem:Thescreenisunreadableordistorted.
Solution:Makesurethat:
–Thedisplaydevicedriverisinstalledcorrectly.
–Thescreenresolutionandcolorqualityarecorrectlyset.
–Themonitortypeiscorrect.
Tocheckthesesettings,dothefollowing:
1.Right-clickonthedesktop,andclickPersonalize.
2.ClickDisplayattheleft.
3.SelectChangedisplaysettings.Checkwhetherthescreenresolutioniscorrectlyset.
4.ClickAdvancedSettings.
5.ClicktheAdaptertab.Ensurethatthecorrectdevicedrivernameisshownintheadapterinformation
window.
Note:Thedevicedrivernamedependsonthevideochipthathasbeeninstalledonyourcomputer.
146UserGuide

6.ClicktheMonitortab.Ensurethatthecorrectdevicedrivernameisshownintheadapterinformation
window.
7.ClickthePropertiesbutton.Ifyouarepromptedforanadministratorpasswordorconrmation,type
thepasswordorprovideconrmation.ChecktheDevicestatusboxandmakesurethatthedevice
isworkingcorrectly.Ifnot,clicktheTroubleshootbuttonandfollowtheinstructionsonthescreen.
8.ClicktheColorManagementtab.Checkwhetherthecolorqualityiscorrectlyset,andensure
thattheotherinformationalsoiscorrect.Ifyouarepromptedforanadministratorpasswordor
conrmation,typethepasswordorprovideconrmation.ChecktheDevicestatusboxandensure
thatthedeviceisworkingcorrectly.Ifnot,clicktheTroubleshootbuttonandfollowtheinstructions
onthescreen.
•Problem:Incorrectcharactersaredisplayedonthescreen.
Solution:Didyouinstalltheoperatingsystemorprogramcorrectly?Iftheyareinstalledandcongured
correctly,havethecomputerserviced.
•Problem:Thescreenstaysonevenafteryouturnoffyourcomputer.
Solution:Pressandholdthepowerbuttonforfoursecondsormoretoturnoffyourcomputer;then
turnitonagain.
•Problem:Missing,discolored,orbrightdotsappearonthescreeneverytimeyouturnonyourcomputer.
Solution:ThisisanintrinsiccharacteristicoftheTFTtechnology.Yourcomputerdisplaycontains
multiplethin-lmtransistors(TFTs).Asmallnumberofmissing,discolored,orbrightdotsonthescreen
mightexistallthetime.
Externalmonitorproblems
•Problem:Theexternalmonitorisblank.
Solution:Tobringuptheimage,pressFn+F7andselectthedesiredmonitor.Iftheproblempersists,
dothefollowing:
1.Connecttheexternalmonitortoanothercomputertomakesurethatitworks.
2.Reconnecttheexternalmonitortoyourcomputer.
3.Refertothemanualshippedwiththeexternalmonitortochecktheresolutionsandrefreshratesthat
aresupported.
–Iftheexternalmonitorsupportsthesameresolutionasthecomputerdisplayorahigherresolution,
viewoutputontheexternalmonitororonboththeexternalmonitorandthecomputerdisplay.
–Iftheexternalmonitorsupportsalowerresolutionthanthecomputerdisplay,viewoutputonthe
externalmonitoronly.(Ifyouviewoutputonboththecomputerdisplayandtheexternalmonitor,
theexternalmonitorscreenwillbeblankordistorted.)
•Problem:Youcannotsetahigherresolutionthanthepresentoneonyourexternalmonitor.
Solution:Makesurethatthemonitortypeandotherinformationiscorrect.Ifnecessary,updatethe
monitordriver.See“Settingtheexternalmonitortype”onpage38.
•Problem:Thescreenisunreadableordistorted.
Solution:Makesurethat:
–Themonitorinformationiscorrectandtheappropriatemonitortypeisselected.Refertothesolution
totheaboveproblem.
–Makesurethatanappropriaterefreshrateisselectedbydoingthefollowing:
1.Connecttheexternalmonitortothemonitorconnector,andthenconnectthemonitortoan
electricaloutlet.
2.Turnontheexternalmonitorandthecomputer.
3.Right-clickonthedesktop,andclickScreenresolution.
Chapter10.Troubleshootingcomputerproblems147

Note:Ifyourcomputercannotdetecttheexternalmonitor,clicktheDetectbutton.
4.Clicktheiconforthedesiredmonitor(theMonitor-2iconisfortheexternalmonitor).
5.ClickAdvancedSettings.
6.ClicktheMonitortab.
7.Selectthecorrectscreenrefreshrate.
•Problem:Wrongcharactersaredisplayedonthescreen.
Solution:Didyoufollowthecorrectprocedurewheninstallingtheoperatingsystemorprogram?Ifyou
did,havetheexternalmonitorserviced.
•Problem:TheExtenddesktopfunctiondoesnotwork.
Solution:EnabletheExtenddesktopfunction.See“UsingtheExtenddesktopfunction”onpage41.
•Problem:IfyouusetheExtenddesktopfunction,youcannotsetahigherresolutionorhigherrefresh
rateonthesecondarydisplay.
Solution:Changetheresolutionandthecolordepthtolowersettingsfortheprimarydisplay.
•Problem:Displayswitchingdoesnotwork.
Solution:IfyouusetheExtenddesktopfunction,disableit,andchangethedisplayoutputlocation.If
aDVDmovieoravideoclipisplaying,stoptheplayback,closetheprogram,andthenchangethe
displayoutputlocation.
•Problem:Thescreenpositionontheexternalmonitorisincorrectwhenthatmonitorissetforahigh
resolution.
Solution:Sometimes,whenyouuseahighresolutionsuchas1600x1200,theimageisshiftedtoleftor
rightonthescreen.Tocorrectthis,rstmakesurethatyourexternalmonitorsupportsthedisplaymode
(theresolutionandtherefreshrate)thatyouhaveset.Ifitdoesnot,setadisplaymodethatthemonitor
supports.Ifitdoessupportthedisplaymodeyouhaveset,gotothesetupmenuforthemonitoritself
andadjustthesettingsthere.Usuallytheexternalmonitorhasbuttonsforaccesstothesetupmenu.For
details,seethedocumentationthatcomeswiththemonitor.
Audioproblems
•Problem:WaveorMIDIsounddoesnotplaycorrectly.
Solution:Makesurethatthebuilt-inaudiodeviceisconguredcorrectly.
1.OpenControlPanel.
2.ClickHardwareandSound.
3.ClickDeviceManager.Ifyouarepromptedforanadministratorpasswordorconrmation,typethe
passwordorprovideconrmation.
4.Double-clickSound,videoandgamecontrollers.
5.MakesurethattheRealtekHDAudiodriverisenabledandconguredcorrectly:
•Problem:Sounddoesnotcomefromaheadphoneoraspeaker,oryourcomputercannotrecordsounds.
Solution:Toswitchfromonedevicetoanother(forexample,fromaspeakertoaheadphone,orfrom
anexternalmicrophonetoabuilt-inmicrophone),dothefollowing:
1.OpenControlPanelandclickHardwareandSound.
2.ClicktheRealtekHDAudioManagericon.
3.MakesurethatyouareinMULTI-STREAMmodeintheDeviceadvancedsettingswindow.
4.IntheVolumeMixerwindow,selectthedeviceyouwant-forexample,speakers.
5.Playanysoundviaamusicprogram(forexample,WindowsMediaPlayer).Makesurethatsound
comesfromspeakersnow.
148UserGuide

6.Then,ifyouwouldliketoswitchtoaheadphone,closethemusicprogram.
7.GototheVolumeMixerwindow.Thenselectanotherdevice,whichisnowtheheadphone.
8.Playanysoundviathemusicprogram.Makesurethatsoundcomesfromaheadphoneattached
directlytothesystem.
Formoreinformation,refertothehelpinformationsystemofRealtekHDAudioManager.
Note:IntheVolumeMixerwindowofRealtekHDAudioManager,acheckmarkbytheentryforadevice,
suchasspeakersforaplaybackdevice,orabuilt-inmicrophoneforarecordingdevice,showsthat
thedevicehasbeenselected.
•Problem:Recordingsmadeusingthemicrophoneinputarenotloudenough.
Solution:MakesurethattheMicrophoneBoostfunctionisturnedonandsetbydoingthefollowing:
1.OpenControlPanelandclickHardwareandSound.
2.ClickSound.
3.ClicktheRecordingtabintheSoundwindow.
4.SelectMicrophone,andclickthePropertiesbutton.
5.ClicktheLevelstab,andmovetheMicrophoneBoostsliderupwards.
6.ClickOK.
Note:Fordetailsaboutcontrollingvolume,refertoyourWindowsonlinehelp.
•Problem:Avolumeorbalanceslidercannotbemoved.
Solution:Theslidermightbegrayedout.Thismeansthatitspositionisxedbythehardwareand
cannotbechanged.
•Problem:Thevolumeslidersdonotstayinplacewhensomeaudioprogramsareused.
Solution:Itisnormalforthesliderstochangepositionwhencertainsoundprogramsareused.The
programsareawareofthesettingsintheVolumeMixerwindowandareallowedtochangethesettings
themselves.AnexampleistheWindowsMediaPlayer.Usuallytheprogramhasslidersavailableto
controlthesoundfromwithintheprogram.
•Problem:Thebalanceslidercannotcompletelymuteonechannel.
Solution:Thecontrolisdesignedtocompensateforminordifferencesinbalanceanddoesnot
completelymuteeitherchannel.
•Problem:Thesoundcannotbeturnedoffcompletelyevenifyousetthevolumeatminimum.
Solution:YoustillcanhearsomesoundeventhoughyouhavesettheVolumeMixercontrolatminimum.
Toturnoffthesoundcompletely,pressthespeakermutebutton.
•Problem:Whenyouconnectaheadphonetoyourcomputerwhileplayingsound,aspeakerdoesnot
producesound.
Solution:Oncetheheadphoneisattached,thestreamingisautomaticallyredirectedtoit.Ifyouwantto
listentosoundfromthespeakersagain,besuretosetthosespeakersasthedefaultdevice.Fordetails,
refertothehelpinformationsystemforRealtekHDAudioManager.
Fingerprintreaderproblems
•Problem:Thesurfaceofthereaderisdirty,stained,orwet.
Solution:Gentlycleanthesurfaceofthereaderwithadry,soft,lint-freecloth.
•Problem:Thereaderoftenfailstoenrollorauthenticateyourngerprint.
Solution:Ifthesurfaceofthereaderisdirty,stained,orwet,gentlycleanthesurfaceofthereader
withadry,soft,lint-freecloth.
Fortipsonhowtomaintainthengerprintreader,see“Usingthengerprintreader”onpage58.
Chapter10.Troubleshootingcomputerproblems149

Batteryandpowerproblems
Thistopiccontainsinstructionsontroubleshootingbatteryandpowerproblems.
Batteryproblems
•Problem:Thebatterypackcannotbefullychargedinthestandardchargetimewhenthecomputeris
poweredoff.
Solution:Thebatterypackmightbeover-discharged.Dothefollowing:
1.Turnoffthecomputer.
2.Makesurethattheover-dischargedbatterypackisinthecomputer.
3.Connecttheacpoweradaptertothecomputerandletitcharge.
Ifaquickchargerisavailable,useittochargetheover-dischargedbatterypack.
Ifthebatterypackcannotbefullychargedin24hours,useanewbatterypack.
•Problem:Yourcomputershutsdownbeforethebatterystatusindicatorshowsempty,oryourcomputer
operatesafterthebatterystatusindicatorshowsempty.
Solution:Dischargeandrechargethebatterypack.
•Problem:Theoperatingtimeforafullychargedbatterypackisshort.
Solution:Dischargeandrechargethebatterypack.Ifyourbatteryoperatingtimeisstillshort,usea
newbatterypack.
•Problem:Thecomputerdoesnotoperatewithafullychargedbatterypack.
Solution:Thesurgeprotectorinthebatterypackmightbeactive.Turnoffthecomputerforoneminuteto
resettheprotector;thenturnonthecomputeragain.
•Problem:Thebatterypackcannotbecharged.
Solution:Youcannotchargethebatterywhenitistoohot.Ifthebatteryfeelshot,removeitfromthe
computerandallowittocooltoroomtemperature.Afteritcools,reinstallitandrechargethebattery.Ifit
stillcannotbecharged,haveitserviced.
Thissystemsupportsonlybatteriesspeciallydesignedforthisspecicsystemandmanufactured
byLenovooranauthorizedbuilder.Thesystemdoesnotsupportunauthorizedbatteriesorbatteries
designedforothersystems.Ifanunauthorizedbatteryorabatterydesignedforanothersystemis
installed,thesystemwillnotcharge.
Attention:Lenovohasnoresponsibilityfortheperformanceorsafetyofunauthorizedbatteries,and
providesnowarrantiesforfailuresordamagearisingoutoftheiruse.
Anacpoweradapterproblem
Problem:Theacpoweradapterisconnectedtothecomputerandtheworkingelectricaloutlet,butthe
poweradapter(powerplug)iconisnotdisplayedintheWindowsnoticationarea.Alsotheacpower
indicatordoesnotlightup.
Solution:Dothefollowing:
1.Makesurethattheconnectionoftheacpoweradapteriscorrect.Forinstructionsonconnectingtheac
poweradapter,seeSafety,Warranty,andSetupGuidethatcomeswithyourcomputer.
2.Iftheconnectionoftheacpoweradapteriscorrect,turnoffthecomputer,thendisconnecttheacpower
adapterandremovethemainbattery.
3.Reinstallthebatteryandreconnecttheacpoweradapter,thenturnonthecomputer.
4.IfthepoweradaptericonstillisnotdisplayedintheWindowsnoticationareaandtheacpower
indicatordoesnotlightup,havetheacpoweradapterandyourcomputerserviced.
150UserGuide

Powerproblems
Printtheseinstructionsnowandkeepitwithyourcomputerforreferencelater.
Ifyourcomputerisgettingnopoweratall,checkthefollowingitems:
1.VerifythepowerbuttonLED.Referto“Statusindicators”onpage8.Thepowerbuttonisilluminated
wheneverthecomputerison.
2.Checkallpowerconnections.Removeanypowerstripsandsurgeprotectorstoconnecttheacpower
adapterdirectlytotheacpoweroutlet.
3.Inspecttheacpoweradapter.Checkforanyphysicaldamage,andmakesurethatthepowercableis
rmlyattachedtotheadapterbrickandthecomputer.
4.Verifytheacpowersourceisworkingbyattachinganotherdevicetotheoutlet.
5.RemovethecomputerfromaThinkPadportreplicatorordockingstation.Referto“Detachinga
ThinkPadportreplicatorordockingstation”onpage109.
6.Removealldevicesandthentestforsystempowerwithminimaldevicesattached.
a.Disconnecttheacpoweradapterandallcablesfromthecomputer.
b.Closethecomputerdisplay,andturnthecomputerover.
c.Removethebattery,memorymodule,PCIExpressMiniCards,Ultrabaydevice,harddiskdriveor
solid-statedrive.SeeChapter6“Replacingdevices”onpage71.
d.Waitfor30seconds,andthenreinstallthememorymoduleandtheknowngoodbatteryortheac
poweradaptertotestthecomputerwithminimaldevicesattachedrst.
e.Reinstalleachdeviceoneatatimethatyouhaveremovedintheearliersteps.
Ifyourcomputerdoesnotrunonbatterypower,checkthefollowingitems:
1.Removeandreseatthebatterytomakesurethatitisproperlyconnected.See“Replacingthebattery”
onpage72.
2.Swapbatterieswithanothersimilarmodel,ifavailable.
IfanothersimilarThinkPadmodelisavailable,thenverifythatthebatterypackworksintheother
computerandthatthebatterypackfortheothermodelworksinthiscomputer.
3.Verifythebattery-statusindicator.Referto“Powerstatusindicators”onpage9.
Thebattery-statusindicatorisnormallyilluminatedwheneverthebatteryisinstalledandthecomputeris
on,ortheacpoweradapterisconnectedandthebatteryischarging.Thisindicatormightbeblinkingor
solidineitherorangeorgreencolordependingonthestatusofthebattery.
Apowerbuttonproblem
Problem:Thesystemdoesnotrespond,andyoucannotturnoffthecomputer.
Solution:Turnoffthecomputerbypressingandholdingthepowerbuttonfor4secondsormore.Ifthe
systemisstillnotreset,removetheacpoweradapterandthebattery.
Startupproblems
Printtheseinstructionsnowandkeepthemwithyourcomputerforreferencelater.
Ifyoureceiveanerrormessagebeforetheoperatingsystemloads,followtheappropriatecorrectiveactions
forpower-onself-test(POST)errormessages.See“Errormessages”onpage140.
Ifyoureceiveanerrormessagewhiletheoperatingsystemisloadingthedesktopcongurationafterthe
POSTiscompleted,checkthefollowingitems:
•GototheLenovoSupportWebsiteathttp://www.lenovo.com/supportandsearchfortheerrormessage.
Chapter10.Troubleshootingcomputerproblems151

•GototheMicrosoftKnowledgeBasehomepageathttp://support.microsoft.com/andsearchfortheerror
message.
Sleepandhibernationproblems
•Problem:Thecomputerenterssleepmodeunexpectedly.
Solution:Ifthemicroprocessoroverheats,thecomputerautomaticallyenterssleepmodetoallowthe
computertocoolandtoprotectthemicroprocessorandotherinternalcomponents.Checkthesettings
forsleepmode.
•Problem:Thecomputerenterssleepmode(thesleepindicatorturnson)immediatelyafterthepower-on
self-test.
Solution:Makesurethat:
–Thebatteryischarged.
–Theoperatingtemperatureiswithintheacceptablerange.Referto“Operatingenvironment”onpage
14.
Ifthebatteryischargedandthetemperatureiswithinrange,havethecomputerserviced.
•Problem:Acriticallow-batteryerroroccurs,andthecomputerimmediatelyturnsoff.
Solution:Thebatterypowerisgettinglow.Connecttheacpoweradaptertothecomputerandplugit
intoanelectricaloutlet,orreplacethebatterywithachargedone.
•Problem:ThecomputerdisplayremainsblankafteryoupressFntoreturnfromsleepmode.
Solution:Checkwhetheranexternalmonitorwasdisconnectedorturnedoffwhilethecomputerwas
insleepmode.Ifyoudisconnectedorturnedofftheexternalmonitor,connectitorturnitonbefore
resumingthecomputerfromthesleepmode.Whenresumingthecomputerfromthesleepmodewithout
attachingtheexternalmonitororturningiton,andthecomputerdisplayremainsblank,pressFn+F7to
bringupthecomputerdisplay.
•Problem:Thecomputerdoesnotreturnfromsleepmode,orthesleepindicatorstaysonandthe
computerdoesnotwork.
Solution:Ifthesystemdoesnotreturnfromsleepmode,itmighthaveenteredsleeporhibernationmode
automaticallybecausethebatteryisdepleted.Checkthesleepindicator.
–Ifthesleepindicatorison,yourcomputerisinsleepmode.Connecttheacpoweradaptertothe
computer;thenpressFn.
–Ifthesleepindicatorisoff,yourcomputerisinhibernationmodeorpower-offstate.Connecttheac
poweradaptertothecomputer;thenpressthepowerbuttontoresumeoperation.
Ifthesystemstilldoesnotreturnfromsleepmode,yoursystemmightstoprespondingandyoumightnot
beabletoturnoffthecomputer.Inthiscase,youneedtoresetthecomputer.Ifyouhavenotsavedyour
data,itmightbelost.Toresetthecomputer,pressandholdthepowerbuttonfor4secondsormore.If
thesystemisstillnotreset,removetheacpoweradapterandthebattery.
•Problem:Yourcomputerdoesnotentersleeporhibernationmode.
Solution:Checkwhetheranyoptionhasbeenselectedtodisableyourcomputerfromenteringsleep
orhibernationmode.
Ifyourcomputertriestoentersleepmodebuttherequestisrejected,thedeviceattachedtotheUSB
connectormighthavebeendisabled.Ifthisoccurs,doahot-unplug-and-plugoperationfortheUSB
device.
•Problem:Thebatterydischargesslightlywhilethecomputerisinhibernationmode.
Solution:Ifthewakeupfunctionisenabled,thecomputerconsumesasmallamountofpower.Thisisnot
adefect.Fordetails,referto“Power-savingmodes”onpage31.
152UserGuide

Problemswithdrivesandotherstoragedevices
Thissectionincludesthreedriveproblemswhichareharddiskdrive,solid-statedrive,andopticaldrive.
Harddiskdriveproblems
•Problem:Theharddiskdrivemakesarattlingnoiseintermittently.
Solution:Therattlingnoisemightbeheard:
–Whentheharddiskdrivebeginsornishesgettingaccesstodata.
–Whenyoucarrytheharddiskdrive.
–Whenyoucarryyourcomputer.
Thisisanormalcharacteristicofaharddiskdriveandisnotadefect.
•Problem:Theharddiskdrivedoesnotwork.
Solution:OntheBootmenuofThinkPadSetup,makesurethattheharddiskdriveisontheBootpriority
orderlist.IfitisontheExcludedfrombootorderlist,itisdisabled.Selecttheentryforitonthelist
andpressShift+1tomoveitbacktotheBootpriorityorderlist.
•Problem:Aftersettingaharddiskpasswordontheharddiskdriveofthecomputer,youmovedthedrive
toanothercomputer.Nowyoucannotunlocktheharddiskpassword.
Solution:Yourcomputersupportsanenhancedpasswordalgorithm.Computersolderthanyoursmight
notsupportsuchasecurityfunction.
Asolid-statedriveproblem
Problem:WhenyoucompresslesorfoldersbyuseofthedatacompressionfunctioninWindows,andthen
decompressthem,theprocessofwritingtoorreadingfromthelesorfoldersisslow.
Solution:ApplythediskdefragmentationtoolinWindowsforfasteraccesstothedata.
Opticaldriveproblems
•Problem:Theopticaldrive,suchasaCD,DVD,orCD-RWdrive,doesnotwork.
Solution:MakesurethatthecomputeristurnedonandaCD,DVD,orCD-RWisproperlyloadedonthe
centerpivotofthedrive.(Youshouldhearaclick.)
Makesurethatthedriveconnectorisrmlyconnectedtothecomputer.Ifyouuseanoptionthathasabay
forinstallingthedrive,makesurethattheoptionisrmlyconnectedtothecomputerandworksproperly.
Makesurethatthedrivetrayisrmlyclosed.
Makesurethatthedevicedriversarecorrectlyinstalled.
•Problem:YouhearanoisefromthedrivewhentheCD,DVD,orCD-RWdiscisspinning.
Solution:Ifthediscisnotcorrectlyloadedonthecenterpivotofthedrive,itmightrubagainstthedrive
coverandmakeanoise.Makesurethatthediscisloadedcorrectlyinthedrive.
•Problem:Thetraydoesnotopenevenifyoupresstheejectbutton.
Solution:Whenyourcomputerisnotturnedon,pressingtheejectbuttondoesnotcausethedrivetray
toopen.Makesurethatthecomputeristurnedonandthatthedriveconnectorisrmlyconnected
tothecomputer.
Ifthetraystilldoesnotopen,makesurethatthecomputerisrunning,andinserttheendofastraightened
paperclipintotheemergencyejecthole.Thetraywillopen.
•Problem:Anopticalmedium,suchasaCD,DVD,orCD-RWdisccannotberead.
Solution:MakesurethattheCD,DVD,orCD-RWdiscisnotdirty.Ifitis,cleanitwithacleanerkit.
TestanotherCD,DVD,orCD-RWdisc.Ifthecomputercanreadtheotherdisc,therstdiscmightbe
defective.
Chapter10.Troubleshootingcomputerproblems153

Makesurethatthediscisloadedonthecenterpivotofthedrivewiththelabelsideup.(Youshould
hearaclick.)
Makesurethatthediscisinoneofthefollowingformats:
–MusicCD
–CD-ROMorCD-ROMXA
–MultisessionphotoCD
–VideoCD
–DVD-ROM(DVD-video)
•Problem:ThecomputercannotplayaCD,orthesoundqualityisnotgood.
Solution:Besurethatthediscmeetsthestandardsforyourcountry.Usually,adiscthatmeetsthelocal
standardsismarkedwithaCDlogoonthelabel.Ifyouuseadiscthatdoesnotmeetthesestandards,we
cannotguaranteethatitwillplay,orthat,ifitdoesplay,thesoundqualitywillbegood.
•Problem:TheHDDVDtabintheWinDVD8programisdimmedandIcannotuseit.
Solution:YourcomputerdoesnotsupportanHDDVDdrive.
Asoftwareproblem
Problem:Aprogramdoesnotruncorrectly.
Solution:Makesurethattheproblemisnotbeingcausedbytheprogram.
Checkthatyourcomputerhastheminimumrequiredmemorytoruntheprogram.Refertothemanuals
suppliedwiththeprogram.
Checkthefollowing:
•Theprogramisdesignedtooperatewithyouroperatingsystem.
•Otherprogramsruncorrectlyonyourcomputer.
•Thenecessarydevicedriversareinstalled.
•Theprogramworkswhenitisrunonsomeothercomputer.
Ifanerrormessageisdisplayedwhileyouareusingtheprogram,refertothemanualssuppliedwiththe
program.
Iftheprogramstilldoesnotruncorrectly,contactyourplaceofpurchaseoraservicerepresentativeforhelp.
Problemswithportsandconnectors
Thefollowingarethemostcommonproblemswithportsandconnectors.
AUSBproblem
Problem:AdeviceconnectedtotheUSBconnectordoesnotwork.
Solution:OpentheDeviceManagerwindow.MakesurethattheUSBdevicesetupiscorrect,andthatthe
assignmentofcomputerresourceandtheinstallationofthedevicedriverarecorrect.ToopentheDevice
Managerwindow,gotoControlPanelandclickHardwareandSound➙DeviceManager.Ifyouare
promptedforanadministratorpasswordorconrmation,typethepasswordorprovideconrmation.
154UserGuide

Adockingstationorportreplicatorproblem
Problem:Thecomputerdoesnotstartwhenyoutrytoturniton,anddoesnotrespondwhenyoutryto
resumeoperation.
Solution:Makesurethat:
•Theacpoweradapterisconnectedtothedockingstationortheportreplicator.
•Theindicatorofthedockingstationison.
•Thecomputerissecurelyattachedtothedockingstationortheportreplicator.
Chapter10.Troubleshootingcomputerproblems155

156UserGuide

Chapter11.Gettingsupport
ThischapterprovidesinformationaboutgettinghelpandsupportfromLenovo.
•“BeforeyoucontactLenovo”onpage157
•“Gettinghelpandservice”onpage157
•“Purchasingadditionalservices”onpage159
BeforeyoucontactLenovo
Often,youcansolveyourcomputerproblemsbyreferringtotheinformationintheexplanationsoferror
codes,runningdiagnosticprograms,orbyconsultingtheLenovoWebsite.
Registeringyourcomputer
RegisteryourcomputerwithLenovo.Formoreinformation,see“Registeringyourcomputer”onpage21.
Downloadingsystemupdates
Downloadingupdatedsoftwaremightresolveproblemsyouexperiencewithyourcomputer.
Todownloadupdatedsoftware,gotothefollowingWebsiteandfollowtheinstructionsonthescreen:
http://www.lenovo.com/support
Recordinginformation
BeforeyoutalktoaLenovorepresentative,recordthefollowingimportantinformationaboutyourcomputer.
Recordingproblemsymptomsanddetails
Collecttheanswerstothequestionsbelowbeforeyoucallforhelp.Then,youwillbeabletogethelp
asquicklyaspossible.
•Whatistheproblem?Isitcontinuousorintermittent?
•Isthereanerrormessage?Whatistheerrorcode,ifany?
•Whatoperatingsystemareyouusing?Whichversion?
•Whichsoftwareprogramswererunningatthetimeoftheproblem?
•Cantheproblembereproduced?Ifso,how?
Recordingsysteminformation
Theserialnumberlabelisonthebottomofyourcomputer.Recordthemachinetypeandtheserialnumber.
•WhatisthenameofyourLenovoproduct?
•Whatisthemachinetype?
•Whatistheserialnumber?
Gettinghelpandservice
Ifyouneedhelp,service,technicalassistance,orjustwantmoreinformationaboutLenovoproducts,you
willndawidevarietyofsourcesavailablefromLenovotoassistyou.Thissectioncontainsinformation
aboutwheretogoforadditionalinformationaboutLenovoandourproducts,whattodoifyouexperiencea
problemwithyourcomputer,andwhomtocallforserviceshoulditbenecessary.
©CopyrightLenovo2012157

Informationaboutyourcomputerandpreinstalledsoftware,ifany,isavailableinthedocumentationthat
comeswithyourcomputer.Thatdocumentationincludesprintedbooks,onlinebooks,readmeles,and
helples.Inaddition,informationaboutLenovoproductsisavailableontheWorldWideWeb.
MicrosoftServicePacksarethelatestsoftwaresourceforWindowsproductupdates.Theyareavailable
throughWebdownload(connectionchargesmightapply)orthroughdisc.Formorespecicinformationand
links,gotohttp://www.microsoft.com.Lenovoofferstechnicalassistancewithinstallationof,orquestions
relatedto,ServicePacksforyourLenovo-preloadedMicrosoftWindowsproduct.Forinformation,contact
theCustomerSupportCenter.
Usingdiagnosticprograms
Manycomputerproblemscanbesolvedwithoutoutsideassistance.Ifyouexperienceaproblemwithyour
computer,therstplacetostartisthetroubleshootinginformationofyourcomputerdocumentation.Ifyou
suspectasoftwareproblem,seethedocumentation,includingreadmelesandhelpinformationsystems,
thatcomeswiththeoperatingsystemorprogram.
ThinkPadnotebookcomputerscomewithasetofdiagnosticprogramsthatyoucanusetohelpyouidentify
hardwareproblems.See“Diagnosingproblems”onpage139forinstructionsonusingthediagnostic
programs.
Thetroubleshootinginformationorthediagnosticprogramsmighttellyouthatyouneedadditionalor
updateddevicedriversorothersoftware.Youcangetthelatesttechnicalinformationanddownloaddevice
driversandupdatesfromtheLenovoWebsiteathttp://www.lenovo.com/support.
LenovosupportWebsite
TechnicalsupportinformationisavailableontheLenovoSupportWebsiteat:
http://www.lenovo.com/support
ThisWebsiteisupdatedwiththelatestsupportinformationsuchasthefollowing:
•Driversandsoftware
•Diagnosticsolutions
•Productandservicewarranty
•Productandpartsdetails
•Userguidesandmanuals
•Knowledgebaseandfrequentlyaskedquestions
CallingLenovo
Ifyouhavetriedtocorrecttheproblemyourselfandstillneedhelp,duringthewarrantyperiod,youcan
gethelpandinformationbytelephonethroughtheCustomerSupportCenter.Thefollowingservicesare
availableduringthewarrantyperiod:
•Problemdetermination-Trainedpersonnelareavailabletoassistyouwithdeterminingifyouhavea
hardwareproblemanddecidingwhatactionisnecessarytoxtheproblem.
•Lenovohardwarerepair-IftheproblemisdeterminedtobecausedbyLenovohardwareunderwarranty,
trainedservicepersonnelareavailabletoprovidetheapplicablelevelofservice.
•Engineeringchangemanagement-Occasionally,theremightbechangesthatarerequiredafteraproduct
hasbeensold.Lenovooryourreseller,ifauthorizedbyLenovo,willmakeselectedEngineeringChanges
(ECs)thatapplytoyourhardwareavailable.
Thefollowingitemsarenotcovered:
158UserGuide

•ReplacementoruseofpartsnotmanufacturedfororbyLenovoornon-warrantedparts
Note:Allwarrantedpartscontaina7-characteridenticationintheformatFRUXXXXXXX.
•Identicationofsoftwareproblemsources
•CongurationofUEFIBIOSaspartofaninstallationorupgrade
•Changes,modications,orupgradestodevicedrivers
•Installationandmaintenanceofnetworkoperatingsystems(NOS)
•Installationandmaintenanceofprograms
ForthetermsandconditionsoftheLenovoLimitedWarrantythatappliestoyourLenovohardwareproduct,
see“Warrantyinformation”intheSafety,Warranty,andSetupGuidethatcomeswithyourcomputer.
Ifpossible,benearyourcomputerwhenyoumakeyourcallincasethetechnicalassistancerepresentative
needstohelpyouresolveacomputerproblem.Ensurethatyouhavedownloadedthemostcurrentdrivers
andsystemupdates,rundiagnostics,andrecordedinformationbeforeyoucall.Whencallingfortechnical
assistance,havethefollowinginformationavailable:
•Machinetypeandmodel
•Serialnumbersofyourcomputer,monitor,andothercomponents,oryourproofofpurchase
•Descriptionoftheproblem
•Exactwordingofanyerrormessages
•Hardwareandsoftwarecongurationinformationforyoursystem
Telephonenumbers
ForalistoftheLenovoSupportphonenumbersforyourcountryorregion,goto
http://www.lenovo.com/support/phoneorrefertotheSafety,Warranty,andSetupGuidethatcomeswith
yourcomputer.
Note:Phonenumbersaresubjecttochangewithoutnotice.Thelatestphonenumbersareavailableat
http://www.lenovo.com/support/phone.Ifthenumberforyourcountryorregionisnotprovided,contact
yourLenovoresellerorLenovomarketingrepresentative.
Purchasingadditionalservices
Duringandafterthewarrantyperiod,youcanpurchaseadditionalservices,suchassupportforLenovo
andnon-Lenovohardware,operatingsystems,andprograms;networksetupandcongurationservices;
upgradedorextendedhardwarerepairservices;andcustominstallationsservices.Serviceavailability
andservicenamemightvarybycountry.
Formoreinformationabouttheseservices,goto:
http://www.lenovo.com/accessories/services/index.html
Chapter11.Gettingsupport159

160UserGuide

AppendixA.Regulatoryinformation
Wirelessrelatedinformation
Wirelessinteroperability
WirelessLANPCIExpressMiniCardisdesignedtobeinteroperablewithanywirelessLANproductthat
isbasedonDirectSequenceSpreadSpectrum(DSSS),ComplementaryCodeKeying(CCK),and/or
OrthogonalFrequencyDivisionMultiplexing(OFDM)radiotechnology,andiscompliantto:
•The802.11b/gStandard,802.11a/b/gor802.11ndraft2.0onWirelessLANs,asdenedandapprovedby
theInstituteofElectricalandElectronicsEngineers.
•TheWirelessFidelity(WiFi)certicationasdenedbytheWi-FiAlliance.
YourBluetoothcardiscompliantwithBluetoothSpecication4.0asdenedbytheBluetoothSpecial
InterestGroupSIG.Itsupportthefollowingproles:
•AdvancedAudioDistributionProle(A2DP)
•Audio/VideoControlTransportProtocol(AVCTP)
•Audio/VideoDistributionTransportProtocol(AVDTP)
•A/VRemoteControlProle(AVRCP)
•BasicImagingProle(BIP)
•BasicPrintingProle(BPP)
•Dial-UpNetworkingProle(DUN)
•FileTransferProle(FTP)
•GenericAccessProle(GAP)
•GenericA/VDistributionProle(GAVDP)
•HardcopyCableReplacementProle(HCRP)
•HeadsetProle(HSP)
•Hands-FreeProle(HFP)
•HumanInterfaceDeviceProle(HID)
•MessageAccessProle(MAP)
•ObjectExchangeProtocol(OBEX)
•ObjectPushProle(OPP)
•PersonalAreaNetworkingProle(PAN)
•PhoneBookAccessProle(PBAP)
•ServiceDiscoveryProtocol(SDP)
•SynchronizationProle(SYNC)
•VideoDistributionProle(VDP)
•GenericAttributeProle(GATT)
•ProximityProle
•FindMeProle
•ImmediateAlertProle
©CopyrightLenovo2012161
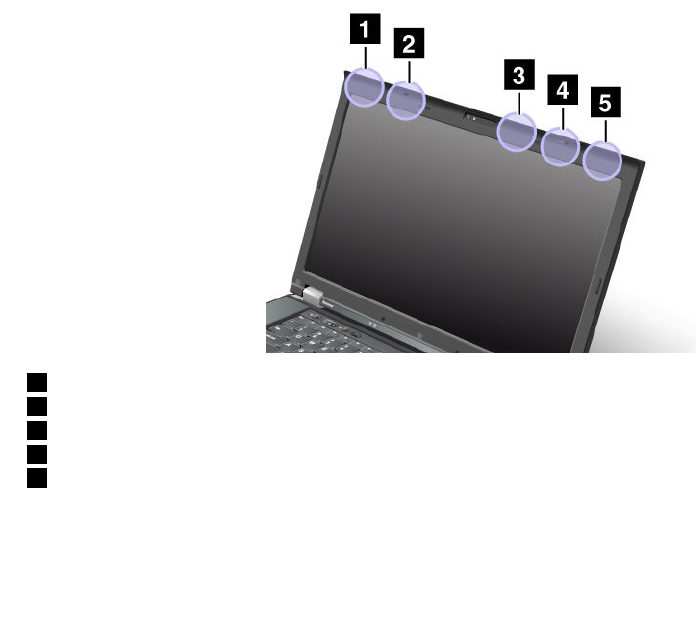
•BatteryStatusProle
Usageenvironmentandyourhealth
Integratedwirelesscardsemitradiofrequencyelectromagneticenergylikeotherradiodevices.However,the
levelofenergyemittedisfarmuchlessthantheelectromagneticenergyemittedbywirelessdeviceslike
forexamplemobilephones.
Duetothefactthatintegratedwirelesscardsoperatewithintheguidelinesfoundinradiofrequencysafety
standardsandrecommendations,Lenovobelievestheyaresafeforusebyconsumers.Thesestandardsand
recommendationsreecttheconsensusofthescienticcommunityandresultfromdeliberationsofpanels
andcommitteesofscientistswhocontinuallyreviewandinterprettheextensiveresearchliterature.
Insomesituationorenvironment,theuseofintegratedwirelesscardsmightberestrictedbytheproprietor
ofthebuildingorresponsiblerepresentativesoftheorganization.Thesesituationsandareasmightfor
exampleinclude:
•Usingtheintegratedwirelesscardsonboardofairplanes,inhospitalsornearpetrolstations,blasting
areas(withelectro-explosivedevices),medicalimplantsorbody-wornelectronicmedicaldevices,such
aspacemakers.
•Inanyotherenvironmentwheretheriskofinterferencetootherdevicesorservicesisperceivedor
identiedasharmful.
Ifyouareuncertainofthepolicythatappliestotheuseofwirelessdevicesinaspecicorganization(suchas
airportorhospital),youareencouragedtoaskforauthorizationtouseintegratedwirelesscardspriorto
turningonthecomputer.
LocationoftheUltraConnectwirelessantennas
ThinkPadmodelsfeatureanintegrateddiversityantennasystembuiltintothedisplayforoptimalreception,
enablingwirelesscommunicationwhereveryouare.
1WirelessWANantenna(Auxiliary)
2WirelessLANantenna(Auxiliary)
3WirelessLANantenna(MIMO)
4WirelessLANantenna(Main)
5WirelessWANantenna(Main)
162UserGuide

Locatingwirelessregulatorynotices
Formoreinformationaboutthewirelessregulatorynotices,refertotheRegulatoryNoticeshippedwithyour
computer.
IfyourcomputerisshippedwithouttheRegulatoryNotice,youcannditontheWebsiteat:
http://www.lenovo.com/ThinkPadUserGuides
Exportclassicationnotice
ThisproductissubjecttotheUnitedStatesExportAdministrationRegulations(EAR)andhasanExport
ClassicationControlNumber(ECCN)of4A994.b.Itcanbere-exportedexcepttoanyoftheembargoed
countriesintheEARE1countrylist.
Electronicemissionsnotices
ThefollowinginformationreferstoThinkPadT530,T530i,andW530,machinetype2359,2392,2393,2394,
2429,2430,2434,2436,2438,2439,2441,2447,2449,and2463.
FederalCommunicationsCommissionDeclarationofConformity
ThisequipmenthasbeentestedandfoundtocomplywiththelimitsforaClassBdigitaldevice,pursuant
toPart15oftheFCCRules.Theselimitsaredesignedtoprovidereasonableprotectionagainstharmful
interferenceinaresidentialinstallation.Thisequipmentgenerates,uses,andcanradiateradiofrequency
energyand,ifnotinstalledandusedinaccordancewiththeinstructions,mightcauseharmfulinterference
toradiocommunications.However,thereisnoguaranteethatinterferencewillnotoccurinaparticular
installation.Ifthisequipmentdoescauseharmfulinterferencetoradioortelevisionreception,whichcanbe
determinedbyturningtheequipmentoffandon,theuserisencouragedtotrytocorrecttheinterferenceby
oneormoreofthefollowingmeasures:
•Reorientorrelocatethereceivingantenna.
•Increasetheseparationbetweentheequipmentandreceiver.
•Connecttheequipmentintoanoutletonacircuitdifferentfromthattowhichthereceiverisconnected.
•Consultanauthorizeddealerorservicerepresentativeforhelp.
Lenovoisnotresponsibleforanyradioortelevisioninterferencecausedbyusingotherthanspeciedor
recommendedcablesandconnectorsorbyunauthorizedchangesormodicationstothisequipment.
Unauthorizedchangesormodicationscouldvoidtheuser'sauthoritytooperatetheequipment.
ThisdevicecomplieswithPart15oftheFCCRules.Operationissubjecttothefollowingtwoconditions:(1)
thisdevicemaynotcauseharmfulinterference,and(2)thisdevicemustacceptanyinterferencereceived,
includinginterferencethatmaycauseundesiredoperation.
ResponsibleParty:
Lenovo(UnitedStates)Incorporated
1009ThinkPlace-BuildingOne
Morrisville,NC27560
PhoneNumber:919-294-5900
IndustryCanadaClassBemissioncompliancestatement
ThisClassBdigitalapparatuscomplieswithCanadianICES-003.
AppendixA.Regulatoryinformation163

CetappareilnumériquedelaclasseBestconformeàlanormeNMB-003duCanada.
EuropeanUnion-CompliancetotheElectromagneticCompatibility
Directive
ThisproductisinconformitywiththeprotectionrequirementsofEUCouncilDirective2004/108/EConthe
approximationofthelawsoftheMemberStatesrelatingtoelectromagneticcompatibility.Lenovocannot
acceptresponsibilityforanyfailuretosatisfytheprotectionrequirementsresultingfromanon-recommended
modicationoftheproduct,includingtheinstallationofoptioncardsfromothermanufacturers.
ThisproducthasbeentestedandfoundtocomplywiththelimitsforClassBInformationTechnology
EquipmentaccordingtoEuropeanStandardEN55022.ThelimitsforClassBequipmentwerederived
fortypicalresidentialenvironmentstoprovidereasonableprotectionagainstinterferencewithlicensed
communicationdevices.
EUContact:Lenovo,Einsteinova21,85101Bratislava,Slovakia
GermanClassBcompliancestatement
DeutschsprachigerEUHinweis:
HinweisfürGerätederKlasseBEU-RichtliniezurElektromagnetischenVerträglichkeit
DiesesProduktentsprichtdenSchutzanforderungenderEU-Richtlinie2004/108/EG(früher89/336/EWG)zur
AngleichungderRechtsvorschriftenüberdieelektromagnetischeVerträglichkeitindenEU-Mitgliedsstaaten
undhältdieGrenzwertederEN55022KlasseBein.
Umdiesessicherzustellen,sinddieGerätewieindenHandbüchernbeschriebenzuinstallierenundzu
betreiben.DesWeiterendürfenauchnurvonderLenovoempfohleneKabelangeschlossenwerden.
LenovoübernimmtkeineVerantwortungfürdieEinhaltungderSchutzanforderungen,wenndasProdukt
ohneZustimmungderLenovoverändertbzw.wennErweiterungskomponentenvonFremdherstellernohne
EmpfehlungderLenovogesteckt/eingebautwerden.
Deutschland:
EinhaltungdesGesetzesüberdieelektromagnetischeVerträglichkeitvonBetriebsmitteln
DiesesProduktentsprichtdem„GesetzüberdieelektromagnetischeVerträglichkeitvonBetriebsmitteln“
EMVG(früher„GesetzüberdieelektromagnetischeVerträglichkeitvonGeräten“).DiesistdieUmsetzungder
EU-Richtlinie2004/108/EG(früher89/336/EWG)inderBundesrepublikDeutschland.
ZulassungsbescheinigunglautdemDeutschenGesetzüberdieelektromagnetischeVerträglichkeit
vonBetriebsmitteln,EMVGvom20.Juli2007(früherGesetzüberdieelektromagnetische
VerträglichkeitvonGeräten),bzw.derEMVEGRichtlinie2004/108/EC(früher89/336/EWG),für
GerätederKlasseB.
DiesesGerätistberechtigt,inÜbereinstimmungmitdemDeutschenEMVGdasEG-Konformitätszeichen
-CE-zuführen.VerantwortlichfürdieKonformitätserklärungnachParagraf5desEMVGistdieLenovo
(Deutschland)GmbH,Gropiusplatz10,D-70563Stuttgart.
InformationeninHinsichtEMVGParagraf4Abs.(1)4:
DasGeräterfülltdieSchutzanforderungennachEN55024undEN55022KlasseB.
164UserGuide

KoreaClassBcompliancestatement
JapanVCCIClassBcompliancestatement
Japancompliancestatementforproductswhichconnecttothepower
mainswithratedcurrentlessthanorequalto20Aperphase
LenovoproductserviceinformationforTaiwan
AppendixA.Regulatoryinformation165

166UserGuide

AppendixB.WEEEandrecyclingstatements
Lenovoencouragesownersofinformationtechnologyequipmenttoresponsiblyrecycletheirequipment
whenitisnolongerneeded.Lenovooffersavarietyofprogramsandservicestoassistequipmentownersin
recyclingtheirITproducts.InformationonproductrecyclingofferingscanbefoundonLenovo'sInternetsite
athttp://www.lenovo.com/social_responsibility/us/en/.
ImportantWEEEinformation
TheWEEEmarkingonLenovoproductsappliestocountrieswithWEEEande-wasteregulations(forexample,
EuropeanDirective2002/96/EC,IndiaE-WasteManagement&HandlingRules,2011).Appliancesare
labeledinaccordancewithlocalregulationsconcerningwasteelectricalandelectronicequipment(WEEE).
Theseregulationsdeterminetheframeworkforthereturnandrecyclingofusedappliancesasapplicable
withineachgeography.Thislabelisappliedtovariousproductstoindicatethattheproductisnottobe
thrownaway,butratherputintheestablishedcollectivesystemsforreclaimingtheseendoflifeproducts.
Usersofelectricalandelectronicequipment(EEE)withtheWEEEmarkingmustnotdisposeofendof
lifeEEEasunsortedmunicipalwaste,butusethecollectionframeworkavailabletothemforthereturn,
recycle,andrecoveryofWEEEandtominimizeanypotentialeffectsofEEEontheenvironmentand
humanhealthduetothepresenceofhazardoussubstances.ForadditionalWEEEinformationgoto:
http://www.lenovo.com/recycling
BatteryrecyclinginformationforJapan
CollectingandrecyclingadisusedLenovocomputerormonitor
IfyouareacompanyemployeeandneedtodisposeofaLenovocomputerormonitorthatistheproperty
ofthecompany,youmustdosoinaccordancewiththeLawforPromotionofEffectiveUtilizationof
Resources.Computersandmonitorsarecategorizedasindustrialwasteandshouldbeproperlydisposed
ofbyanindustrialwastedisposalcontractorcertiedbyalocalgovernment.InaccordancewiththeLaw
forPromotionofEffectiveUtilizationofResources,LenovoJapanprovides,throughitsPCCollectingand
RecyclingServices,forthecollecting,reuse,andrecyclingofdisusedcomputersandmonitors.Fordetails,
visittheLenovoWebsiteat:http://www.lenovo.com/services_warranty/jp/ja/recycle/pcrecycle/.
PursuanttotheLawforPromotionofEffectiveUtilizationofResources,thecollectingandrecyclingof
home-usedcomputersandmonitorsbythemanufacturerwasbegunonOctober1,2003.Thisservice
isprovidedfreeofchargeforhome-usedcomputerssoldafterOctober1,2003.Fordetails,goto
http://www.lenovo.com/services_warranty/jp/ja/recycle/personal/.
DisposingofLenovocomputercomponents
SomeLenovocomputerproductssoldinJapanmayhavecomponentsthatcontainheavymetalsorother
environmentalsensitivesubstances.Toproperlydisposeofdisusedcomponents,suchasaprintedcircuit
boardordrive,usethemethodsdescribedaboveforcollectingandrecyclingadisusedcomputerormonitor.
©CopyrightLenovo2012167
DisposingofdisusedlithiumbatteriesfromLenovocomputers
Abutton-shapedlithiumbatteryisinstalledonthesystemboardofyourLenovocomputertoprovidepower
tothecomputerclockwhilethecomputerisoffordisconnectedfromthemainpowersource.Ifyouwantto
replaceitwithanewone,contactyourplaceofpurchaseoraskforarepairserviceprovidedbyLenovo.If
youhavereplaceditbyyourselfandwanttodisposeofthedisusedlithiumbattery,insulateitwithvinyltape,
contactyourplaceofpurchase,andfollowtheirinstructions.IfyouuseaLenovocomputerathomeand
needtodisposeofalithiumbattery,youmustcomplywithlocalordinancesandregulations.
DisposingofdisusedbatterypacksfromLenovonotebookcomputers
YourLenovonotebookcomputerhasalithiumionbatterypackoranickelmetalhydridebatterypack.If
youareacompanyemployeewhousesaLenovonotebookcomputerandneedtodisposeofabattery
pack,contacttheproperpersoninLenovosales,service,ormarketing,andfollowthatperson'sinstructions.
Youalsocanrefertotheinstructionsathttp://www.lenovo.com/jp/ja/environment/recycle/battery/.
IfyouuseaLenovonotebookcomputerathomeandneedtodisposeofabatterypack,you
mustcomplywithlocalordinancesandregulations.Youalsocanrefertotheinstructionsat
http://www.lenovo.com/jp/ja/environment/recycle/battery/.
BatteryrecyclinginformationforBrazil
DeclaraçõesdeReciclagemnoBrasil
DescartedeumProdutoLenovoForadeUso
Equipamentoselétricoseeletrônicosnãodevemserdescartadosemlixocomum,masenviadosàpontosde
coleta,autorizadospelofabricantedoprodutoparaquesejamencaminhadoseprocessadosporempresas
especializadasnomanuseioderesíduosindustriais,devidamentecerticadaspelosorgãosambientais,de
acordocomalegislaçãolocal.
ALenovopossuiumcanalespecícoparaauxiliá-lonodescartedessesprodutos.Casovocêpossua
umprodutoLenovoemsituaçãodedescarte,ligueparaonossoSACouencaminheume-mailpara:
reciclar@lenovo.com,informandoomodelo,númerodesérieecidade,amdeenviarmosasinstruções
paraocorretodescartedoseuprodutoLenovo.
BatteryrecyclinginformationforTaiwan
BatteryrecyclinginformationforEuropeanUnion
168UserGuide

Notice:ThismarkappliesonlytocountrieswithintheEuropeanUnion(EU).
BatteriesorpackagingforbatteriesarelabeledinaccordancewithEuropeanDirective2006/66/EC
concerningbatteriesandaccumulatorsandwastebatteriesandaccumulators.TheDirectivedeterminesthe
frameworkforthereturnandrecyclingofusedbatteriesandaccumulatorsasapplicablethroughoutthe
EuropeanUnion.Thislabelisappliedtovariousbatteriestoindicatethatthebatteryisnottobethrown
away,butratherreclaimeduponendoflifeperthisDirective.
InaccordancewiththeEuropeanDirective2006/66/EC,batteriesandaccumulatorsarelabeledtoindicate
thattheyaretobecollectedseparatelyandrecycledatendoflife.Thelabelonthebatterymayalso
includeachemicalsymbolforthemetalconcernedinthebattery(Pbforlead,Hgformercury,andCdfor
cadmium).Usersofbatteriesandaccumulatorsmustnotdisposeofbatteriesandaccumulatorsasunsorted
municipalwaste,butusethecollectionframeworkavailabletocustomersforthereturn,recycling,and
treatmentofbatteriesandaccumulators.Customerparticipationisimportanttominimizeanypotential
effectsofbatteriesandaccumulatorsontheenvironmentandhumanhealthduetothepotentialpresenceof
hazardoussubstances.Forpropercollectionandtreatment,goto:
http://www.lenovo.com/recycling
BatteryrecyclinginformationforUnitedStatesandCanada
AppendixB.WEEEandrecyclingstatements169

170UserGuide

AppendixC.ENERGYSTARmodelinformation
ENERGYSTAR®isajointprogramoftheU.S.EnvironmentalProtectionAgencyandtheU.S.Department
ofEnergyaimedatsavingmoneyandprotectingtheenvironmentthroughenergyefcientproductsand
practices.
LenovoisproudtoofferourcustomersproductswiththeENERGYSTARqualieddesignation.Lenovo
computersofthefollowingmachinetypes,iftheENERGYSTARmarkisafxed,havebeendesignedand
testedtoconformtotheENERGYSTARprogramrequirementsforcomputers.
2359,2392,2393,2394,2429,2430,2434,2436,2438,2439,2441,2447,2449,and2463
ByusingENERGYSTARqualiedproductsandtakingadvantageofthepower-managementfeatures
ofyourcomputer,youcanhelpreducetheconsumptionofelectricity.Reducedelectricalconsumption
cancontributetopotentialnancialsavings,acleanerenvironment,andthereductionofgreenhousegas
emissions.
FormoreinformationaboutENERGYSTAR,goto:http://www.energystar.gov
Lenovoencouragesyoutomakeefcientuseofenergyanintegralpartofyourday-to-dayoperations.To
helpinthisendeavor,Lenovohaspresetthefollowingpower-managementfeaturestotakeeffectwhenyour
computerhasbeeninactiveforaspeciedlengthoftime:
Powerplan:EnergySaver(settingswhenpluggedintoacpower)
•Turnoffthedisplay:After10minutes
•Putthecomputerintosleep:After20minutes
•Advancedpowersettings:
–Turnoffharddisks:After15minutes
–Hibernate:Never
Toawakenyourcomputerfromsleepmode,presstheFnkeyonyourkeyboard.Formoreinformationabout
thesesettings,seetheWindowsHelpandSupportinformationonyourcomputer.
TheWakeonLANfunctionisenabledwhenyourLenovocomputerisshippedfromthefactory,andthe
settingremainsvalidevenwhenthecomputerisinsleepmode.IfyoudonotneedtohaveWakeonLAN
enabledwhileyourcomputerisinsleepmode,youcanreducethepowerconsumptionandprolongthe
timeinsleepmode,bydisablingthesettingofWakeonLANforsleepmode.Todisablethesettingof
WakeonLANforsleepmode,dothefollowing:
1.OpenControlPanel.
2.ClickHardwareandSound➙DeviceManager.
3.IntheDeviceManagerwindow,expandNetworkadapters.
4.Right-clickyournetworkadapterdevice,andclickProperties.
©CopyrightLenovo2012171

5.ClickthePowerManagementtab.
6.CleartheAllowthisdevicetowakethecomputercheckbox.
7.ClickOK.
172UserGuide
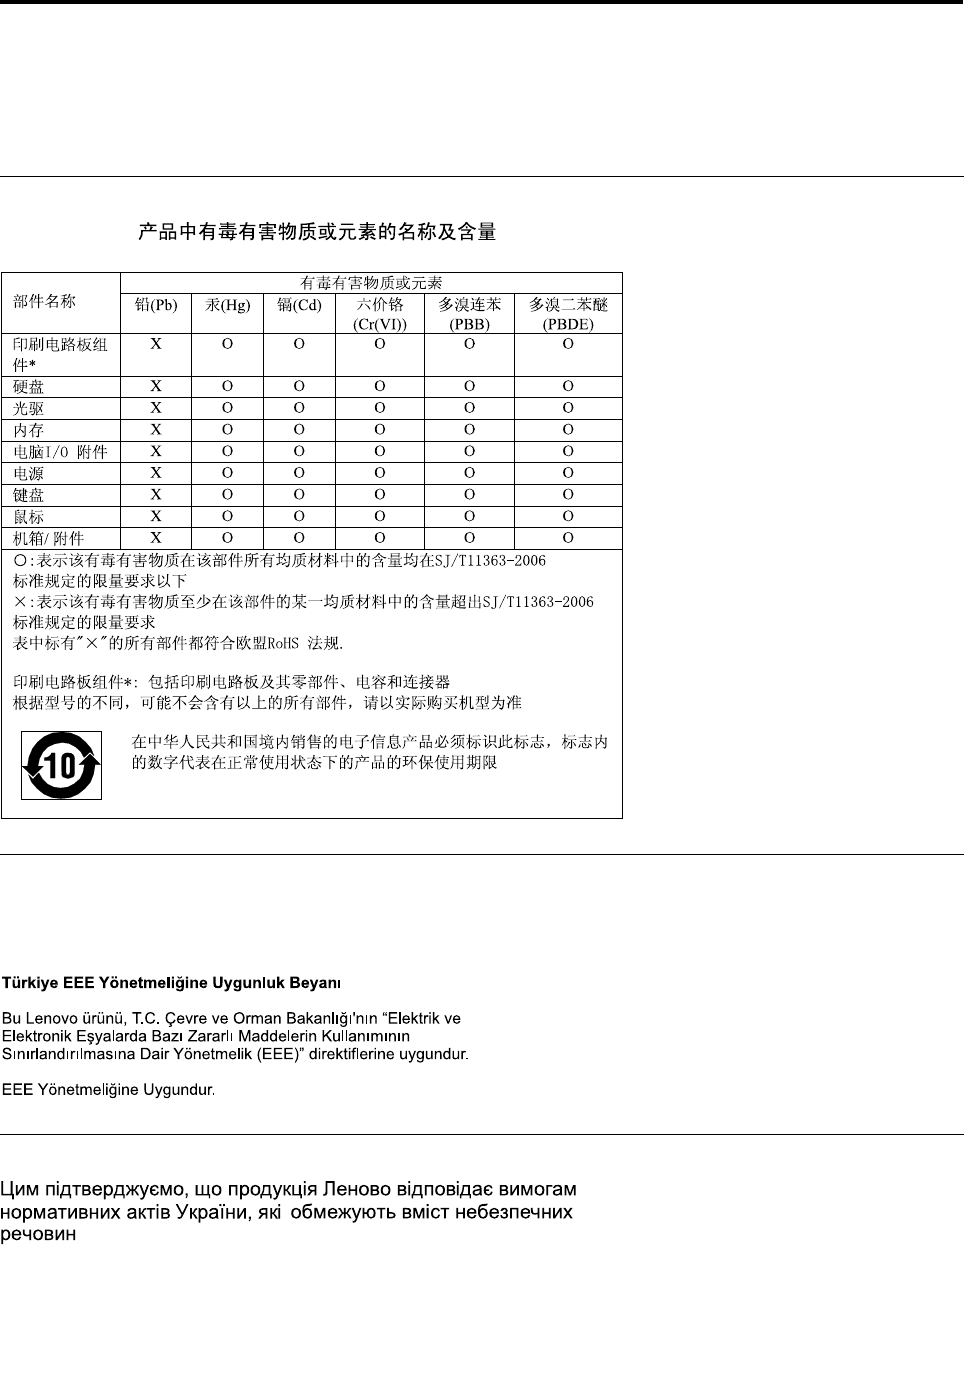
AppendixD.RestrictionofHazardousSubstancesDirective
(RoHS)
ChinaRoHS
TurkishRoHS
TheLenovoproductmeetstherequirementsoftheRepublicofTurkeyDirectiveontheRestrictionoftheUse
ofCertainHazardousSubstancesinElectricalandElectronicEquipment(EEE).
UkraineRoHS
©CopyrightLenovo2012173

IndiaRoHS
RoHScompliantasperE-Waste(Management&Handling)Rules,2011.
174UserGuide

AppendixE.Notices
Lenovomaynotoffertheproducts,services,orfeaturesdiscussedinthisdocumentinallcountries.Consult
yourlocalLenovorepresentativeforinformationontheproductsandservicescurrentlyavailableinyour
area.AnyreferencetoaLenovoproduct,program,orserviceisnotintendedtostateorimplythatonlythat
Lenovoproduct,program,orservicemaybeused.Anyfunctionallyequivalentproduct,program,orservice
thatdoesnotinfringeanyLenovointellectualpropertyrightmaybeusedinstead.However,itistheuser's
responsibilitytoevaluateandverifytheoperationofanyotherproduct,program,orservice.
Lenovomayhavepatentsorpendingpatentapplicationscoveringsubjectmatterdescribedinthis
document.Thefurnishingofthisdocumentdoesnotgiveyouanylicensetothesepatents.Youcansend
licenseinquiries,inwriting,to:
Lenovo(UnitedStates),Inc.
1009ThinkPlace-BuildingOne
Morrisville,NC27560
U.S.A.
Attention:LenovoDirectorofLicensing
LENOVOPROVIDESTHISPUBLICATION“ASIS”WITHOUTWARRANTYOFANYKIND,EITHEREXPRESS
ORIMPLIED,INCLUDING,BUTNOTLIMITEDTO,THEIMPLIEDWARRANTIESOFNON-INFRINGEMENT,
MERCHANTABILITYORFITNESSFORAPARTICULARPURPOSE.Somejurisdictionsdonotallow
disclaimerofexpressorimpliedwarrantiesincertaintransactions,therefore,thisstatementmaynotapply
toyou.
Thisinformationcouldincludetechnicalinaccuraciesortypographicalerrors.Changesareperiodically
madetotheinformationherein;thesechangeswillbeincorporatedinneweditionsofthepublication.
Lenovomaymakeimprovementsand/orchangesintheproduct(s)and/ortheprogram(s)describedinthis
publicationatanytimewithoutnotice.
Theproductsdescribedinthisdocumentarenotintendedforuseinimplantationorotherlifesupport
applicationswheremalfunctionmayresultininjuryordeathtopersons.Theinformationcontainedinthis
documentdoesnotaffectorchangeLenovoproductspecicationsorwarranties.Nothinginthisdocument
shalloperateasanexpressorimpliedlicenseorindemnityundertheintellectualpropertyrightsofLenovo
orthirdparties.Allinformationcontainedinthisdocumentwasobtainedinspecicenvironmentsandis
presentedasanillustration.Theresultobtainedinotheroperatingenvironmentsmayvary.
Lenovomayuseordistributeanyoftheinformationyousupplyinanywayitbelievesappropriatewithout
incurringanyobligationtoyou.
Anyreferencesinthispublicationtonon-LenovoWebsitesareprovidedforconvenienceonlyanddonotin
anymannerserveasanendorsementofthoseWebsites.ThematerialsatthoseWebsitesarenotpartof
thematerialsforthisLenovoproduct,anduseofthoseWebsitesisatyourownrisk.
Anyperformancedatacontainedhereinwasdeterminedinacontrolledenvironment.Therefore,theresult
obtainedinotheroperatingenvironmentsmayvarysignicantly.Somemeasurementsmayhavebeen
madeondevelopment-levelsystemsandthereisnoguaranteethatthesemeasurementswillbethesame
ongenerallyavailablesystems.Furthermore,somemeasurementsmayhavebeenestimatedthrough
extrapolation.Actualresultsmayvary.Usersofthisdocumentshouldverifytheapplicabledatafortheir
specicenvironment.
©CopyrightLenovo2012175

Trademarks
ThefollowingtermsaretrademarksofLenovointheUnitedStates,othercountries,orboth:
Lenovo
AccessConnections
ActiveProtectionSystem
RescueandRecovery
SecureDataDisposal
ThinkLight
ThinkPad
ThinkVantage
TrackPoint
Ultrabay
UltraConnect
UltraNav
IntelandIntelSpeedSteparetrademarksorregisteredtrademarksofIntelCorporationoritssubsidiariesin
theUnitedStatesandothercountries.
Microsoft,Windows,Bing,BitLocker,andInternetExploreraretrademarksoftheMicrosoftgroupof
companies.
BlackBerry®,RIM®,ResearchInMotion®,SureType®andrelatedtrademarks,namesandlogosarethe
propertyofResearchInMotionLimitedandareregisteredand/orusedintheU.S.andcountriesaroundthe
world.UsedunderlicensefromResearchInMotionLimited.
Othercompany,product,andservicenamesmaybetrademarksorservicemarksofothers.
176UserGuide

PartNumber:
Printedin
(1P)P/N:
*1P*
