Lenovo T550 W550S Hmm En Sp40G55010 02 User Manual (English) Hardware Maintenance Think Pad T550, Laptop (Think Pad)
2015-02-24
User Manual: Lenovo T550 W550S Hmm En Sp40G55010 02 (English) Hardware Maintenance Manual - ThinkPad T550, W550s W550s Laptop (ThinkPad) ThinkPad W550s
Open the PDF directly: View PDF ![]() .
.
Page Count: 114 [warning: Documents this large are best viewed by clicking the View PDF Link!]
- About this manual
- Chapter 1. Safety information
- Chapter 2. Important service information
- Chapter 3. General checkout
- Chapter 4. Related service information
- Chapter 5. Locations
- Chapter 6. FRU replacement notices
- Chapter 7. Removing or replacing a FRU
- General guidelines
- Before servicing the computer
- Removing a major FRU
- 1010 Removable battery
- 1020 Base cover assembly
- 1030 Keyboard
- 1040 Storage-drive stabilizer bar, internal storage drive, hard disk drive cable, and hard disk drive bracket
- 1050 Memory module
- 1060 Wireless LAN card
- 1070 Wireless WAN card
- 1080 M.2 solid-state drive
- 1090 Coin-cell battery
- 1110 dc-in bracket and dc-in cable assembly
- 1120 Built-in battery or dummy battery
- 1130 Thermal fan
- 1140 Speaker assembly
- 1150 Smart card assembly or dummy smart card
- 1160 Fingerprint reader assembly
- 1170 Board for the trackpad and TrackPoint buttons
- 1180 System board assembly
- 1190 LCD unit
- 1210 Power button board
- 1220 Keyboard assembly
- Removing an LCD FRU for models without touch panel
- Removing an LCD FRU for models with touch panel
- Appendix A. Notices

HardwareMaintenanceManual
ThinkPadT550andW550s

Note:Beforeusingthisinformationandtheproductitsupports,besuretoreadthegeneralinformation
underAppendixA“Notices”onpage105.
ThirdEdition(July2015)
©CopyrightLenovo2015.
LIMITEDANDRESTRICTEDRIGHTSNOTICE:IfdataorsoftwareisdeliveredpursuantaGeneralServicesAdministration
“GSA”contract,use,reproduction,ordisclosureissubjecttorestrictionssetforthinContractNo.GS-35F-05925.

Contents
Aboutthismanual...........iii
Chapter1.Safetyinformation......1
Generalsafety................1
Electricalsafety...............1
Safetyinspectionguide............2
Handlingdevicesthataresensitivetoelectrostatic
discharge..................3
Groundingrequirements............4
Safetynotices(multilingualtranslations)......4
Chapter2.Importantservice
information..............19
StrategyforreplacingFRUs.........19
Strategyforreplacingasolid-statedrive...19
Importantnoticeforreplacingasystem
board................20
Howtouseerrormessage........20
StrategyforreplacingFRUsforCTO,special-bid,
andstandardmodels............20
Productdefinition............20
FRUidentification............20
Chapter3.Generalcheckout.....23
Whattodofirst..............23
Checkoutguide..............24
LenovoSolutionCenter.........24
Quicktestprograms...........24
UEFIdiagnosticprogram.........25
Bootablediagnosticprograms.......25
Powersystemcheckout...........26
Checkingtheacpoweradapter......26
Checkingthebatteryandoperational
charging...............27
Checkingthecoin-cellbattery.......27
Chapter4.Relatedservice
information..............29
Restoringthefactorycontentsbyusingthe
productRecoveryDiscSet..........29
UsingtheWindowsrecoveryprogramsonthe
Windows8.1operatingsystem........30
RecoveryoverviewfortheWindows10operating
system..................32
Resettingyourcomputer.........32
Usingadvancedstartupoptions......33
RecoveringyouroperatingsystemifWindows
10failstostart.............33
CreatingandusingarecoveryUSBdrive..33
Passwords................34
Power-onpassword...........34
Harddiskpassword...........34
Supervisorpassword..........34
Howtoremovethepower-onpassword...35
Howtoremovetheharddiskpassword...35
Powermanagement............36
Screenblankmode(fortheWindows7
operatingsystemonly)..........36
Sleepmode..............36
Hibernationmode...........37
Symptom-to-FRUindex...........37
Numericerrorcodes..........38
Errormessages............39
Beepsymptoms............39
No-beepsymptoms...........39
LCD-relatedsymptoms.........40
Intermittentproblems..........40
Undeterminedproblems.........40
Chapter5.Locations.........43
Locatingcomputercontrols,connectors,and
indicators.................43
Frontview...............43
Left-sideview.............44
Bottomview..............44
LocatingFRUsandCRUs..........45
MajorFRUs..............46
LCDFRUs..............47
MiscellaneouspartsandotherFRUs....50
LookingupFRUinformation.........51
Chapter6.FRUreplacement
notices................53
Commonservicetools...........53
Screwnotices...............53
Retainingserialnumbers...........54
Restoringtheserialnumberofthesystem
unit.................54
RetainingtheUUID...........55
ReadingorwritingtheECAinformation...56
Chapter7.Removingorreplacinga
FRU..................57
Generalguidelines.............57
Beforeservicingthecomputer........58
Disablingthebuilt-inbattery.......58
©CopyrightLenovo2015i

RemovingthemicroSIMcard.......58
RemovingamajorFRU...........58
1010Removablebattery.........59
1020Basecoverassembly........59
1030Keyboard.............61
1040Storage-drivestabilizerbar,internal
storagedrive,harddiskdrivecable,andhard
diskdrivebracket............66
1050Memorymodule..........68
1060WirelessLANcard.........68
1070WirelessWANcard.........69
1080M.2solid-statedrive........70
1090Coin-cellbattery..........71
1110dc-inbracketanddc-incable
assembly...............72
1120Built-inbatteryordummybattery...73
1130Thermalfan............75
1140Speakerassembly.........77
1150Smartcardassemblyordummysmart
card.................78
1160Fingerprintreaderassembly.....79
1170BoardforthetrackpadandTrackPoint
buttons................80
1180Systemboardassembly.......81
1190LCDunit.............83
1210Powerbuttonboard........85
1220Keyboardassembly.........86
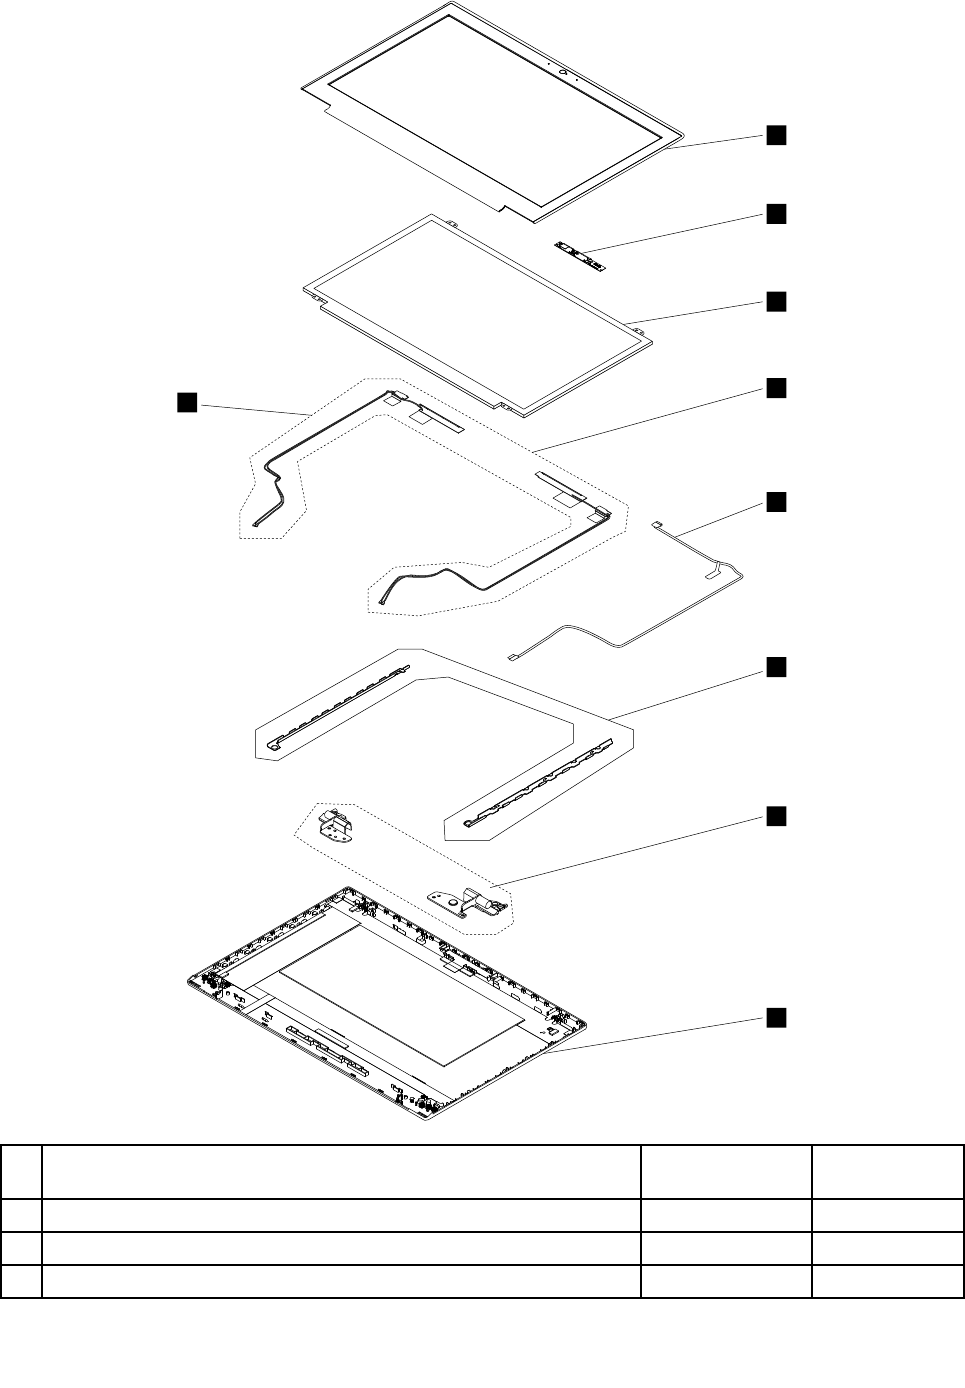
RemovinganLCDFRUformodelswithouttouch
panel..................86
2010LCDbezelassembly........87
2020LCDpanelandLCDcable......87
2030Hingesandhingebrackets......89
2040Camera/microphonecard......90
2050LEDcableassembly........91
2060AntennakitandLCDrearcover
assembly...............92
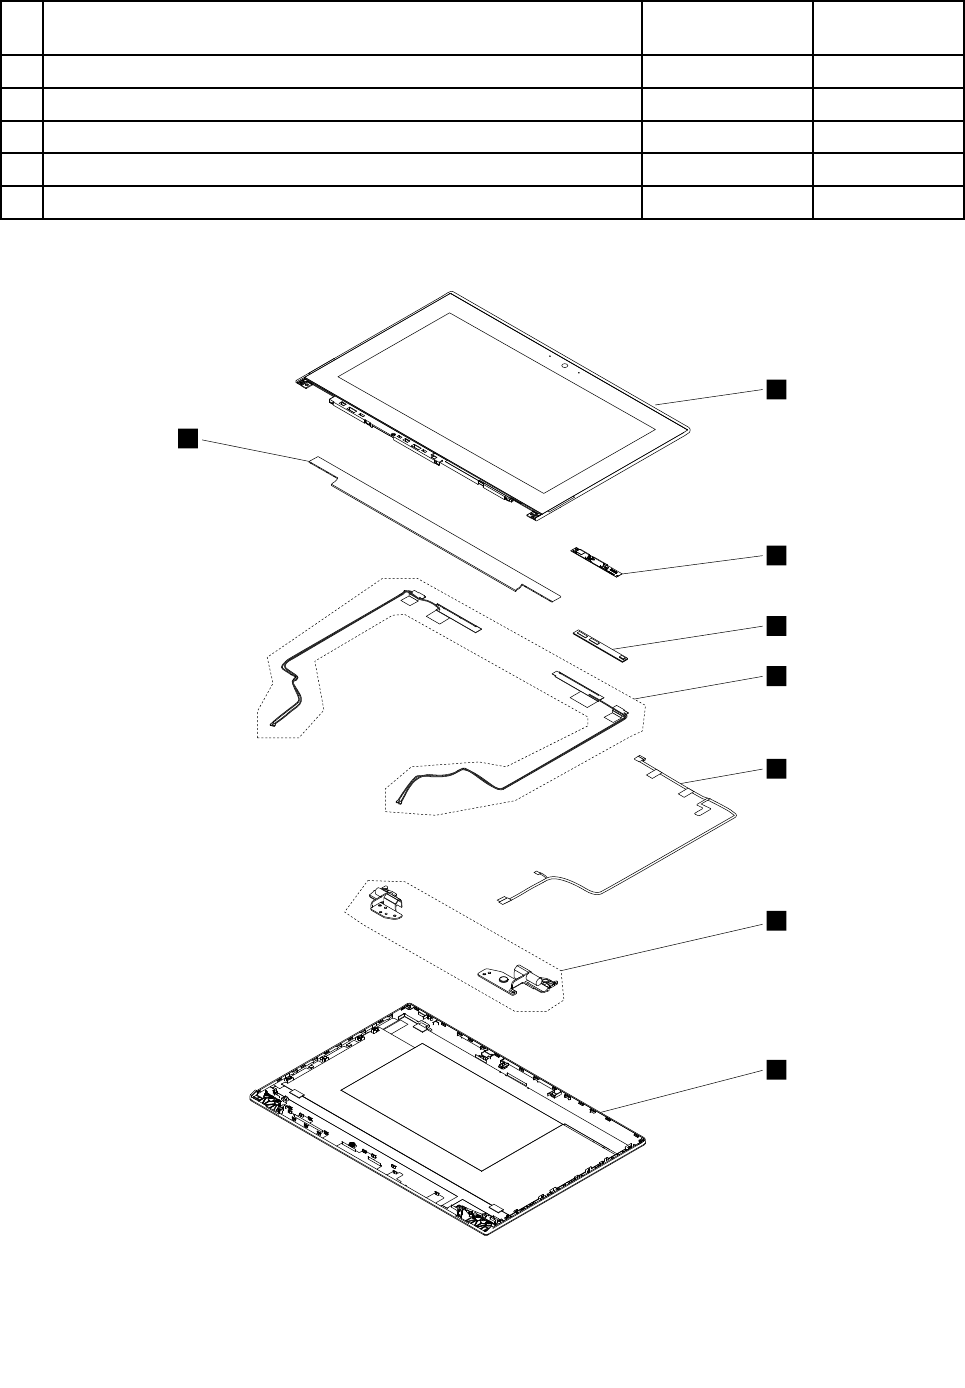
RemovinganLCDFRUformodelswithtouch
panel..................95
3010LCDfrontsheetbezel........95
3020LCDpanelassemblyandLCDcable..95
3030Hinges..............97
3040Camera/microphonecard......98
3050Touchsensorcard.........99
3060LEDcableassembly........100
3070AntennakitandLCDrearcover
assembly...............101
AppendixA.Notices.........105
Electronicemissionsnotices.........106
Trademarks................106
iiHardwareMaintenanceManual

Aboutthismanual
ThismanualcontainsserviceandreferenceinformationforthefollowingThinkPad®products.
ThinkPadT550Machinetypes(MT):20CJand20CK
ThinkPadW550sMT:20E1and20E2
Usethismanualalongwiththeadvanceddiagnosticteststotroubleshootproblems.
Important:ThismanualisintendedonlyfortrainedservicetechnicianswhoarefamiliarwithThinkPad
products.Usethismanualalongwiththeadvanceddiagnosticteststotroubleshootproblemseffectively.
BeforeservicingaThinkPadproduct,besuretoreadalltheinformationunderChapter1“Safetyinformation”
onpage1andChapter2“Importantserviceinformation”onpage19.
©CopyrightLenovo2015iii

ivHardwareMaintenanceManual

Chapter1.Safetyinformation
Thischapterpresentsfollowingsafetyinformationthatyoumustbefamiliarwithbeforeyouservicea
ThinkPadnotebookcomputer.
•“Generalsafety”onpage1
•“Electricalsafety”onpage1
•“Safetyinspectionguide”onpage2
•“Handlingdevicesthataresensitivetoelectrostaticdischarge”onpage3
•“Groundingrequirements”onpage4
•“Safetynotices(multilingualtranslations)”onpage4
Generalsafety
Followtheserulestoensuregeneralsafety:
•Observegoodhousekeepingintheareaofthemachinesduringandaftermaintenance.
•Whenliftinganyheavyobject:
1.Makesurethatyoucanstandsafelywithoutslipping.
2.Distributetheweightoftheobjectequallybetweenyourfeet.
3.Useaslowliftingforce.Nevermovesuddenlyortwistwhenyouattempttolift.
4.Liftbystandingorbypushingupwithyourlegmuscles;thisactionremovesthestrainfromthe
musclesinyourback.Donotattempttoliftanyobjectthatweighsmorethan16kg(35lb)orthat
youthinkistooheavyforyou.
•Donotperformanyactionthatcauseshazardstothecustomer,orthatmakestheequipmentunsafe.
•Beforeyoustartthemachine,makesurethatotherservicetechniciansandthecustomer'spersonnelare
notinahazardousposition.
•Placeremovedcoversandotherpartsinasafeplace,awayfromallpersonnel,whileyouareservicing
themachine.
•Keepyourtoolcaseawayfromwalkareassothatotherpeoplewillnottripoverit.
•Donotwearlooseclothingthatcanbetrappedinthemovingpartsofamachine.Makesurethatyour
sleevesarefastenedorrolledupaboveyourelbows.Ifyourhairislong,fastenit.
•Inserttheendsofyournecktieorscarfinsideclothingorfastenitwithanonconductiveclip,about8
centimeters(3inches)fromtheend.
•Donotwearjewelry,chains,metal-frameeyeglasses,ormetalfastenersforyourclothing.
Attention:Metalobjectsaregoodelectricalconductors.
•Wearsafetyglasseswhenyouarehammering,drilling,soldering,cuttingwire,attachingsprings,using
solvents,orworkinginanyotherconditionsthatmightbehazardoustoyoureyes.
•Afterservice,reinstallallsafetyshields,guards,labels,andgroundwires.Replaceanysafetydevice
thatiswornordefective.
•Reinstallallcoverscorrectlybeforereturningthemachinetothecustomer.
•Fanlouversonthemachinehelptopreventoverheatingofinternalcomponents.Donotobstructfan
louversorcoverthemwithlabelsorstickers.
Electricalsafety
Observethefollowingruleswhenworkingonelectricalequipment.
Important:Useonlyapprovedtoolsandtestequipment.Somehandtoolshavehandlescoveredwithasoft
materialthatdoesnotinsulateyouwhenworkingwithliveelectricalcurrents.Manycustomershave,near
theirequipment,rubberfloormatsthatcontainsmallconductivefiberstodecreaseelectrostaticdischarges.
Donotusethistypeofmattoprotectyourselffromelectricalshock.
©CopyrightLenovo20151

•Findtheroomemergencypower-off(EPO)switch,disconnectingswitch,orelectricaloutlet.Ifanelectrical
accidentoccurs,youcanthenoperatetheswitchorunplugthepowercordquickly.
•Donotworkaloneunderhazardousconditionsornearequipmentthathashazardousvoltages.
•Disconnectallpowerbefore:
–Performingamechanicalinspection
–Workingnearpowersupplies
–Removingorinstallingmainunits
•Beforeyoustarttoworkonthemachine,unplugthepowercord.Ifyoucannotunplugit,askthecustomer
topower-offthewallboxthatsuppliespowertothemachine,andtolockthewallboxintheoffposition.
•Ifyouhavetoworkonamachinethathasexposedelectricalcircuits,observethefollowingprecautions:
–Ensurethatanotherperson,familiarwiththepower-offcontrols,isnearyou.
Attention:Anotherpersonmustbetheretoswitchoffthepower,ifnecessary.
–Useonlyonehandwhenworkingwithpowered-onelectricalequipment;keeptheotherhandinyour
pocketorbehindyourback.
Attention:Anelectricalshockcanoccuronlywhenthereisacompletecircuit.Byobservingtheabove
rule,youmaypreventacurrentfrompassingthroughyourbody.
–Whenusingtesters,setthecontrolscorrectlyandusetheapprovedprobeleadsandaccessoriesfor
thattester.
–Standonsuitablerubbermats(obtainedlocally,ifnecessary)toinsulateyoufromgroundssuchas
metalfloorstripsandmachineframes.
Observethespecialsafetyprecautionswhenyouworkwithveryhighvoltages;Instructionsforthese
precautionsareinthesafetysectionsofmaintenanceinformation.Useextremecarewhenmeasuring
highvoltages.
•Regularlyinspectandmaintainyourelectricalhandtoolsforsafeoperationalcondition.
•Donotusewornorbrokentoolsandtesters.
•Neverassumethatpowerhasbeendisconnectedfromacircuit.First,checkthatithasbeenpoweredoff.
•Alwayslookcarefullyforpossiblehazardsinyourworkarea.Examplesofthesehazardsaremoistfloors,
nongroundedpowerextensioncables,powersurges,andmissingsafetygrounds.
•Donottouchliveelectricalcircuitswiththereflectivesurfaceofaplasticdentalmirror.Thesurfaceis
conductive;suchtouchingcancausepersonalinjuryandmachinedamage.
•Donotservicethefollowingpartswiththepoweronwhentheyareremovedfromtheirnormaloperating
placesinamachine:
–Powersupplyunits
–Pumps
–Blowersandfans
–Motorgenerators
–Similarunitsaslistedabove
Thispracticeensurescorrectgroundingoftheunits.
•Ifanelectricalaccidentoccurs:
–Usecaution;donotbecomeavictimyourself.
–Switchoffpower.
–Sendanotherpersontogetmedicalaid.
Safetyinspectionguide
Thepurposeofthisinspectionguideistoassistyouinidentifyingpotentiallyunsafeconditions.Aseach
machinewasdesignedandbuilt,requiredsafetyitemswereinstalledtoprotectusersandservicetechnicians
frominjury.Thisguideaddressesonlythoseitems.Y oushouldusegoodjudgmenttoidentifypotential
safetyhazardsduetoattachmentofnon-ThinkPadfeaturesoroptionsnotcoveredbythisinspectionguide.
Ifanyunsafeconditionsarepresent,youmustdeterminehowserioustheapparenthazardcouldbeand
whetheryoucancontinuewithoutfirstcorrectingtheproblem.
2HardwareMaintenanceManual

Considertheseconditionsandthesafetyhazardstheypresent:
•Electricalhazards,especiallyprimarypower(primaryvoltageontheframecancauseseriousorfatal
electricalshock)
•Explosivehazards,suchasadamagedCRTfaceorabulgingcapacitor
•Mechanicalhazards,suchaslooseormissinghardware
Todeterminewhetherthereareanypotentiallyunsafeconditions,usethefollowingchecklistatthebeginning
ofeveryservicetask.Beginthecheckswiththepoweroff,andthepowercorddisconnected.
Checklist:
1.Checkexteriorcoversfordamage(loose,broken,orsharpedges).
2.Poweroffthecomputer.Disconnectthepowercord.
3.Checkthepowercordfor:
a.Athird-wiregroundconnectoringoodcondition.Useametertomeasurethird-wireground
continuityfor0.1ohmorlessbetweentheexternalgroundpinandtheframeground.
b.Thepowercordshouldbetheauthorizedtypespecifiedforyourcomputer.Goto:
http://www.lenovo.com/serviceparts-lookup
c.Insulationmustnotbefrayedorworn.
4.Checkforcrackedorbulgingbatteries.
5.Removethecover.
6.Checkforanyobviousnon-ThinkPadalterations.Usegoodjudgmentastothesafetyofany
non-ThinkPadalterations.
7.Checkinsidetheunitforanyobviousunsafeconditions,suchasmetalfilings,contamination,wateror
otherliquids,orsignsoffireorsmokedamage.
8.Checkforworn,frayed,orpinchedcables.
9.Checkthatthepower-supplycoverfasteners(screwsorrivets)havenotbeenremovedortamperedwith.
Handlingdevicesthataresensitivetoelectrostaticdischarge
Anycomputerpartcontainingtransistorsorintegratedcircuits(ICs)shouldbeconsideredsensitiveto
electrostaticdischarge(ESD.)ESDdamagecanoccurwhenthereisadifferenceinchargebetweenobjects.
ProtectagainstESDdamagebyequalizingthechargesothatthemachine,thepart,theworkmat,andthe
personhandlingthepartareallatthesamecharge.
Notes:
1.Useproduct-specificESDprocedureswhentheyexceedtherequirementsnotedhere.
2.MakesurethattheESDprotectivedevicesyouusehavebeencertified(ISO9000)asfullyeffective.
WhenhandlingESD-sensitiveparts:
•Keepthepartsinprotectivepackagesuntiltheyareinsertedintotheproduct.
•Avoidcontactwithotherpeople.
•Wearagroundedwriststrapagainstyourskintoeliminatestaticonyourbody.
•Preventthepartfromtouchingyourclothing.Mostclothingisinsulativeandretainsachargeeven
whenyouarewearingawriststrap.
•Useagroundedworkmattoprovideastatic-freeworksurface.Thematisespeciallyusefulwhen
handlingESD-sensitivedevices.
•Selectagroundingsystem,suchasthoselistedbelow,toprovideprotectionthatmeetsthespecific
servicerequirement.
Note:TheuseofagroundingsystemtoguardagainstESDdamageisdesirablebutnotnecessary.
–AttachtheESDgroundcliptoanyframeground,groundbraid,orgreen-wireground.
Chapter1.Safetyinformation3
–Whenworkingonadouble-insulatedorbattery-operatedsystem,useanESDcommongroundor
referencepoint.Y oucanusecoaxorconnector-outsideshellsonthesesystems.
–Usetheroundgroundprongoftheacplugonac-operatedcomputers.
Groundingrequirements
Electricalgroundingofthecomputerisrequiredforoperatorsafetyandcorrectsystemfunction.Proper
groundingoftheelectricaloutletcanbeverifiedbyacertifiedelectrician.
Safetynotices(multilingualtranslations)
Thesafetynoticesinthissectionareprovidedinthefollowinglanguages:
•English
•Arabic
•BrazilianPortuguese
•French
•German
•Hebrew
•Japanese
•Korean
•Spanish
•TraditionalChinese
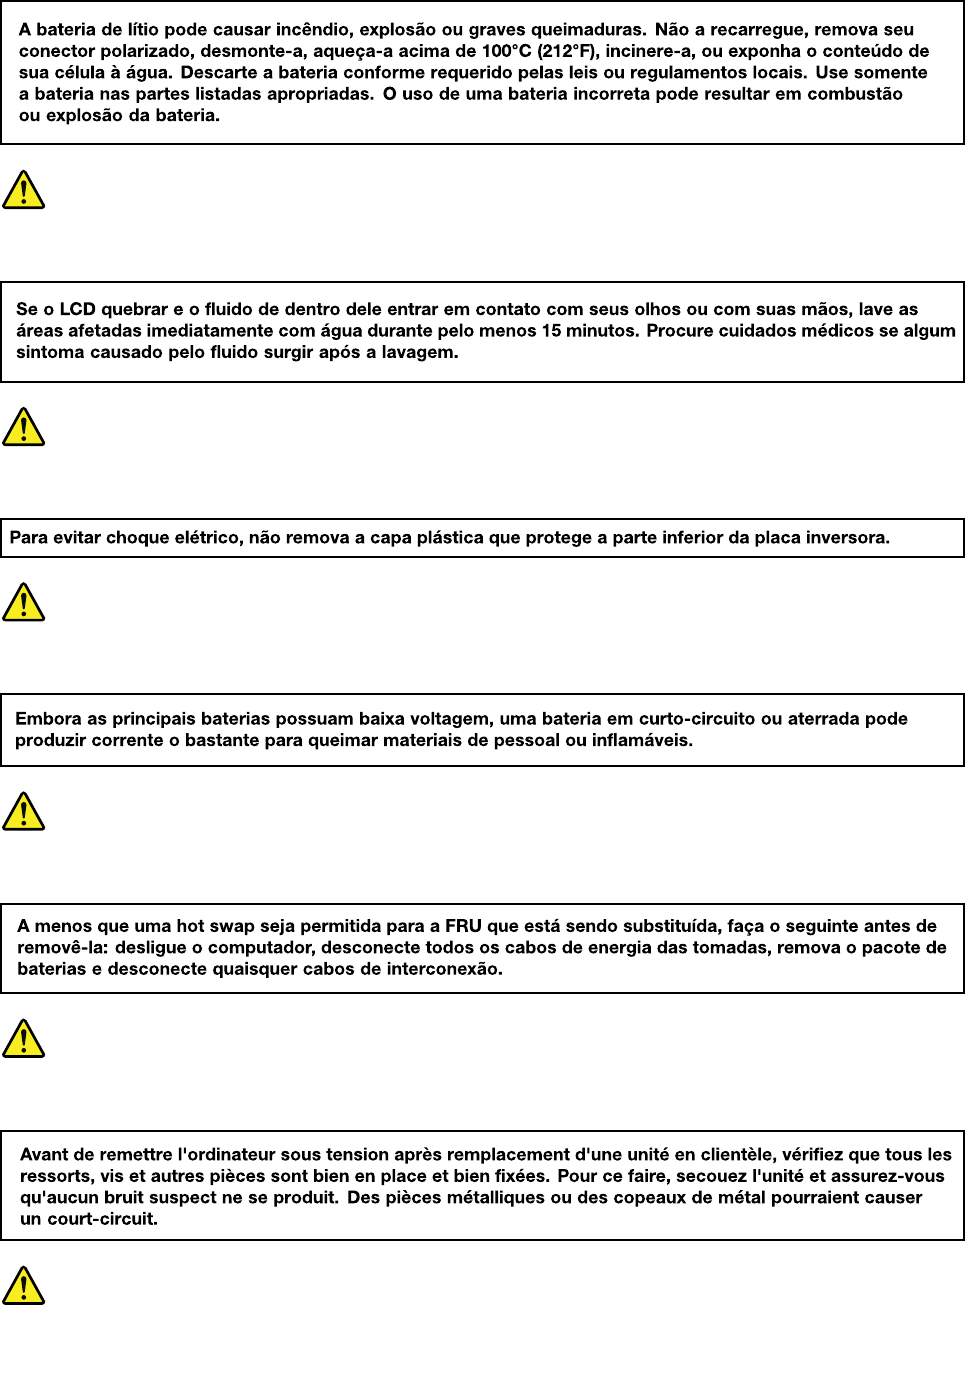
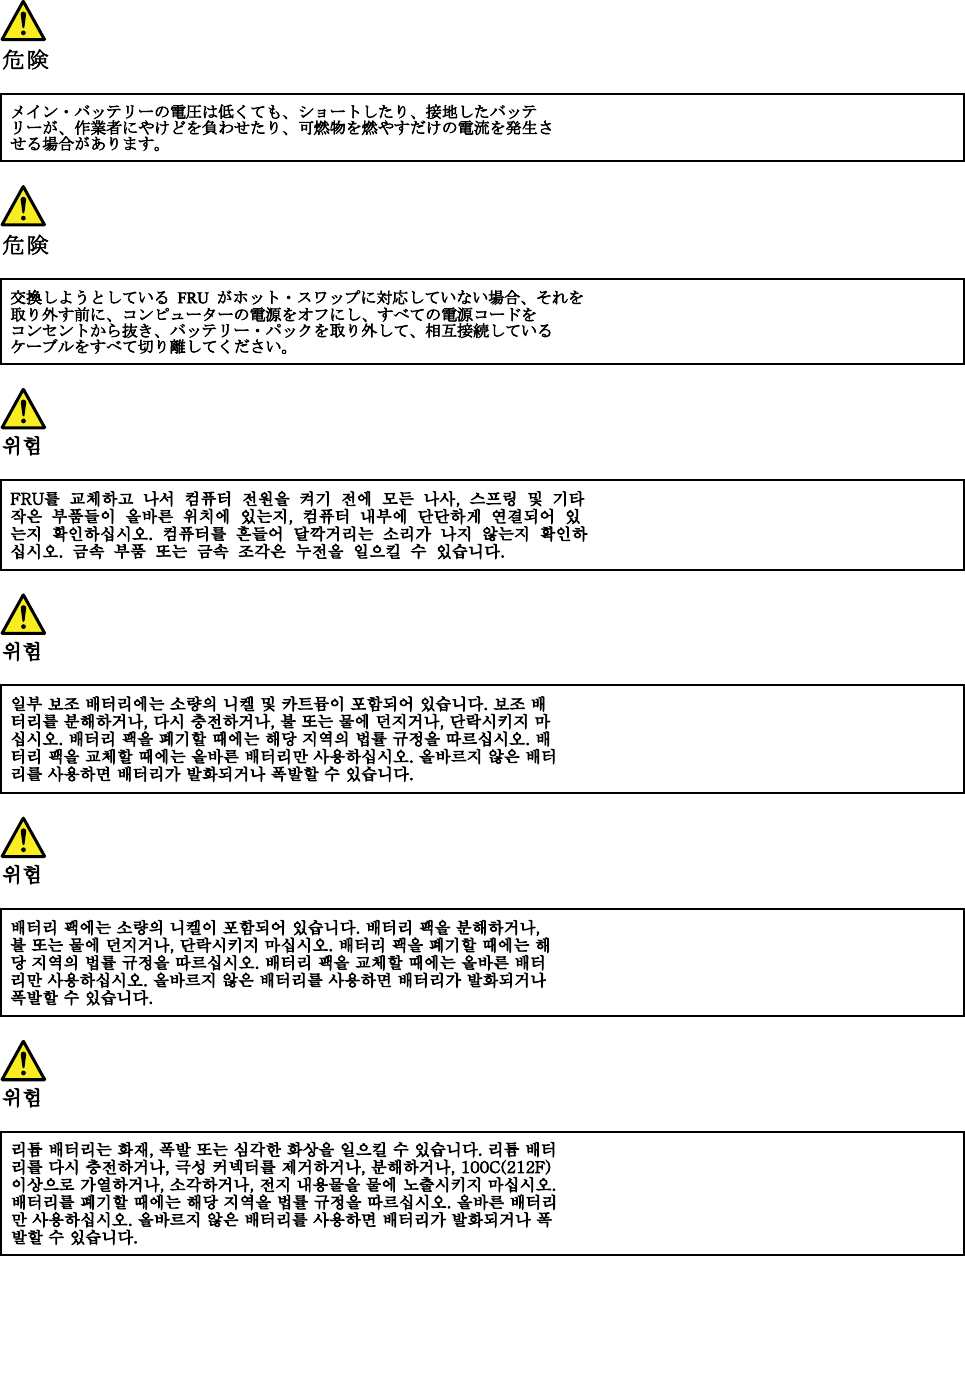
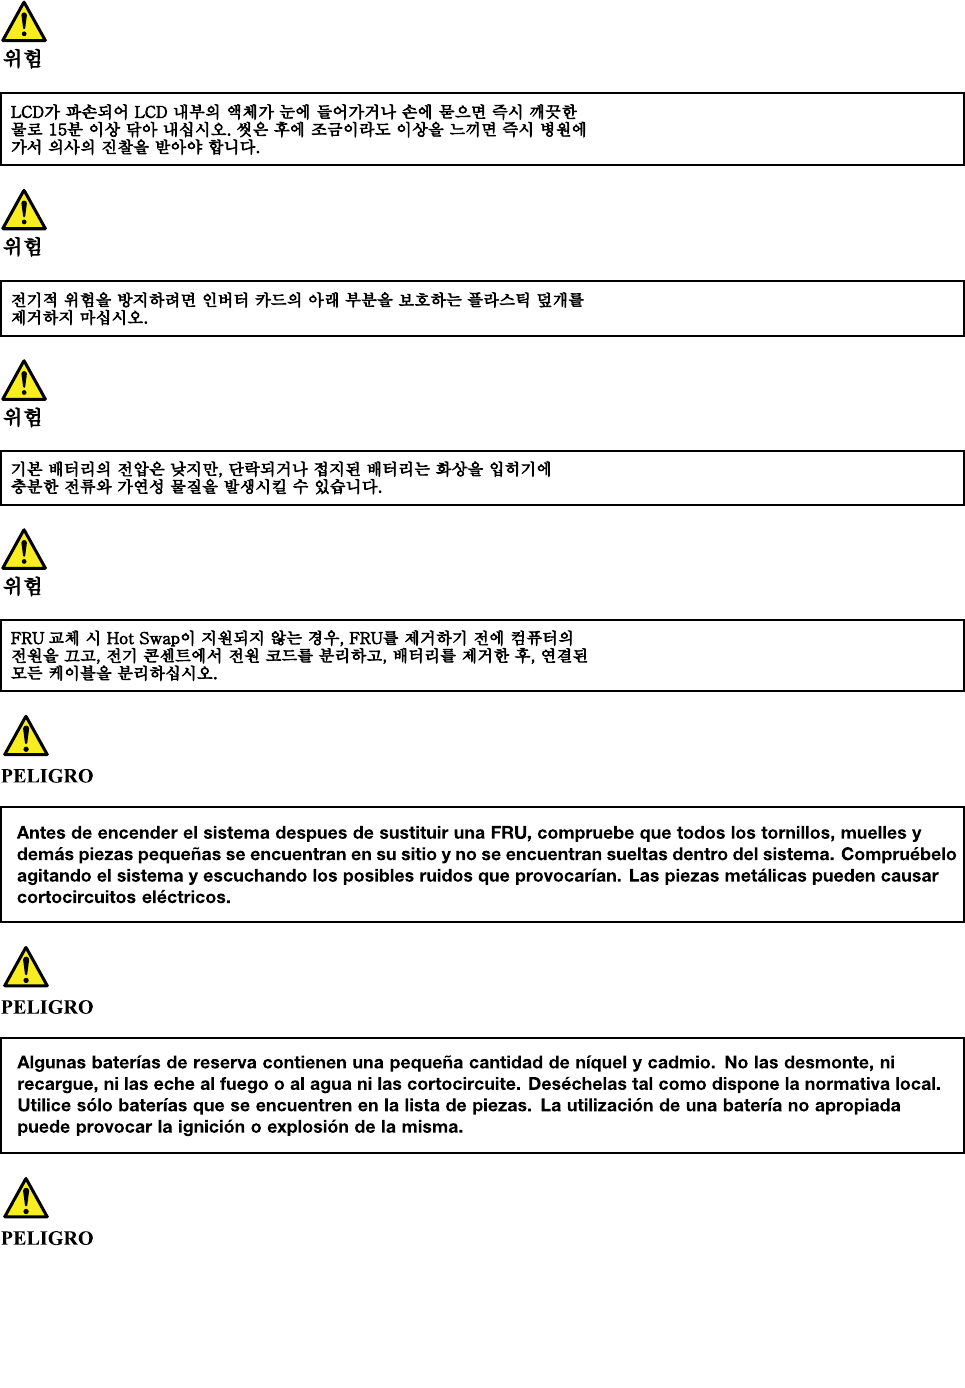
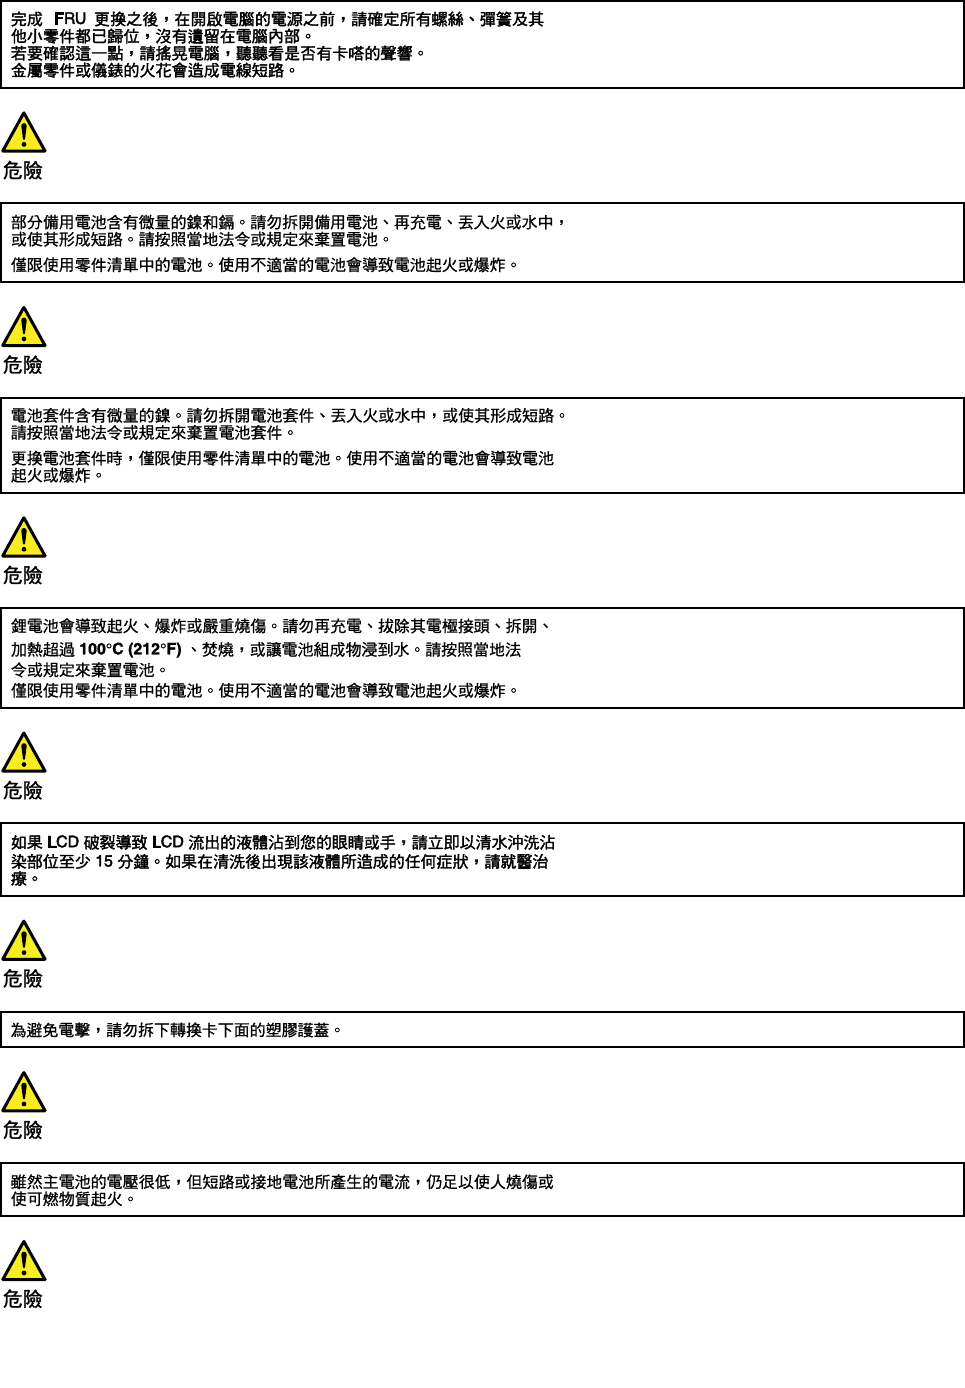
DANGER
DANGER
DANGER
4HardwareMaintenanceManual
6HardwareMaintenanceManual
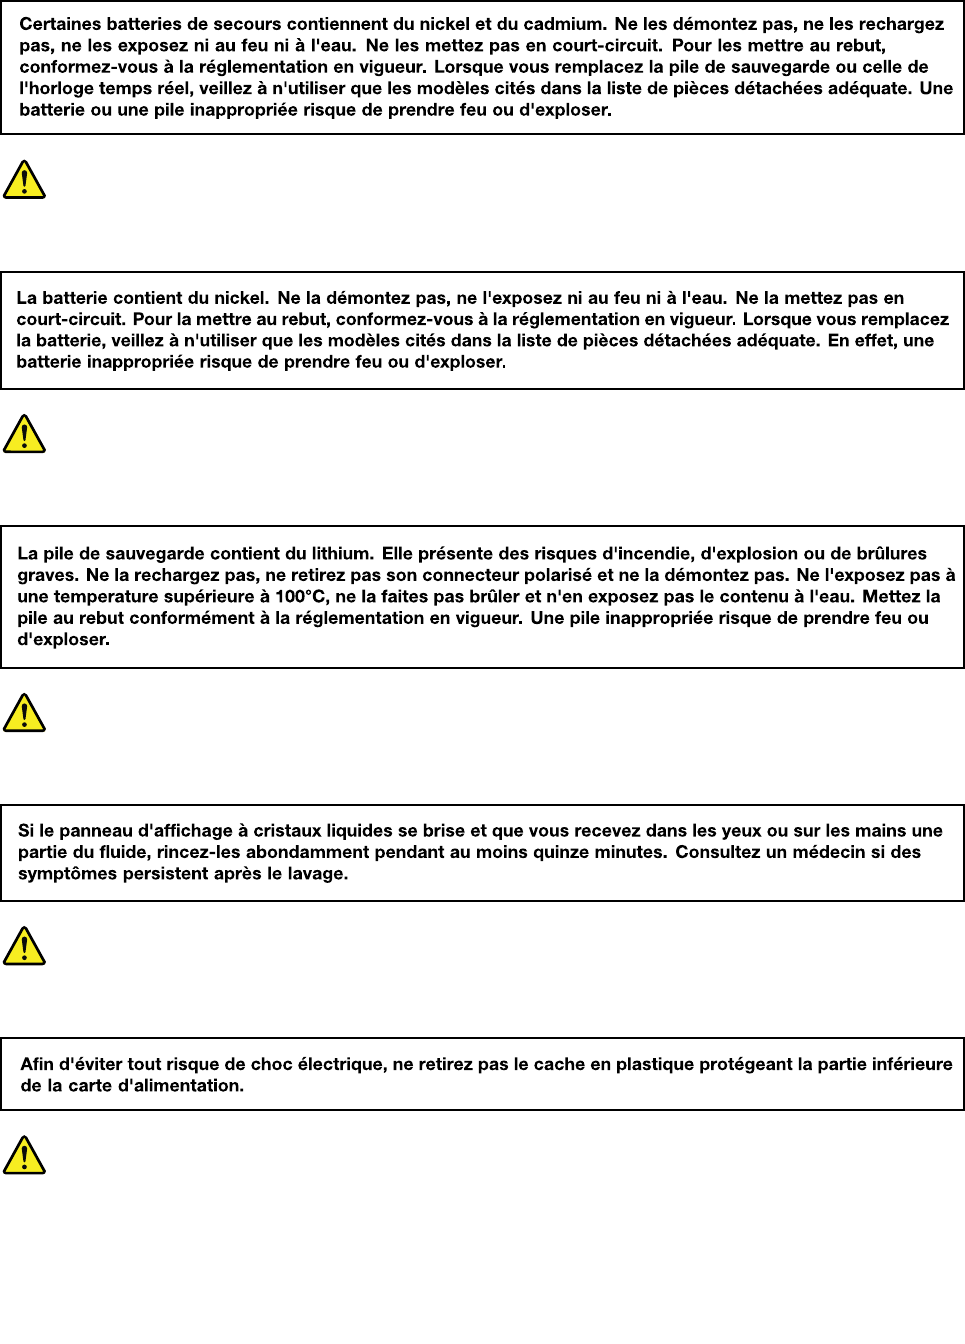
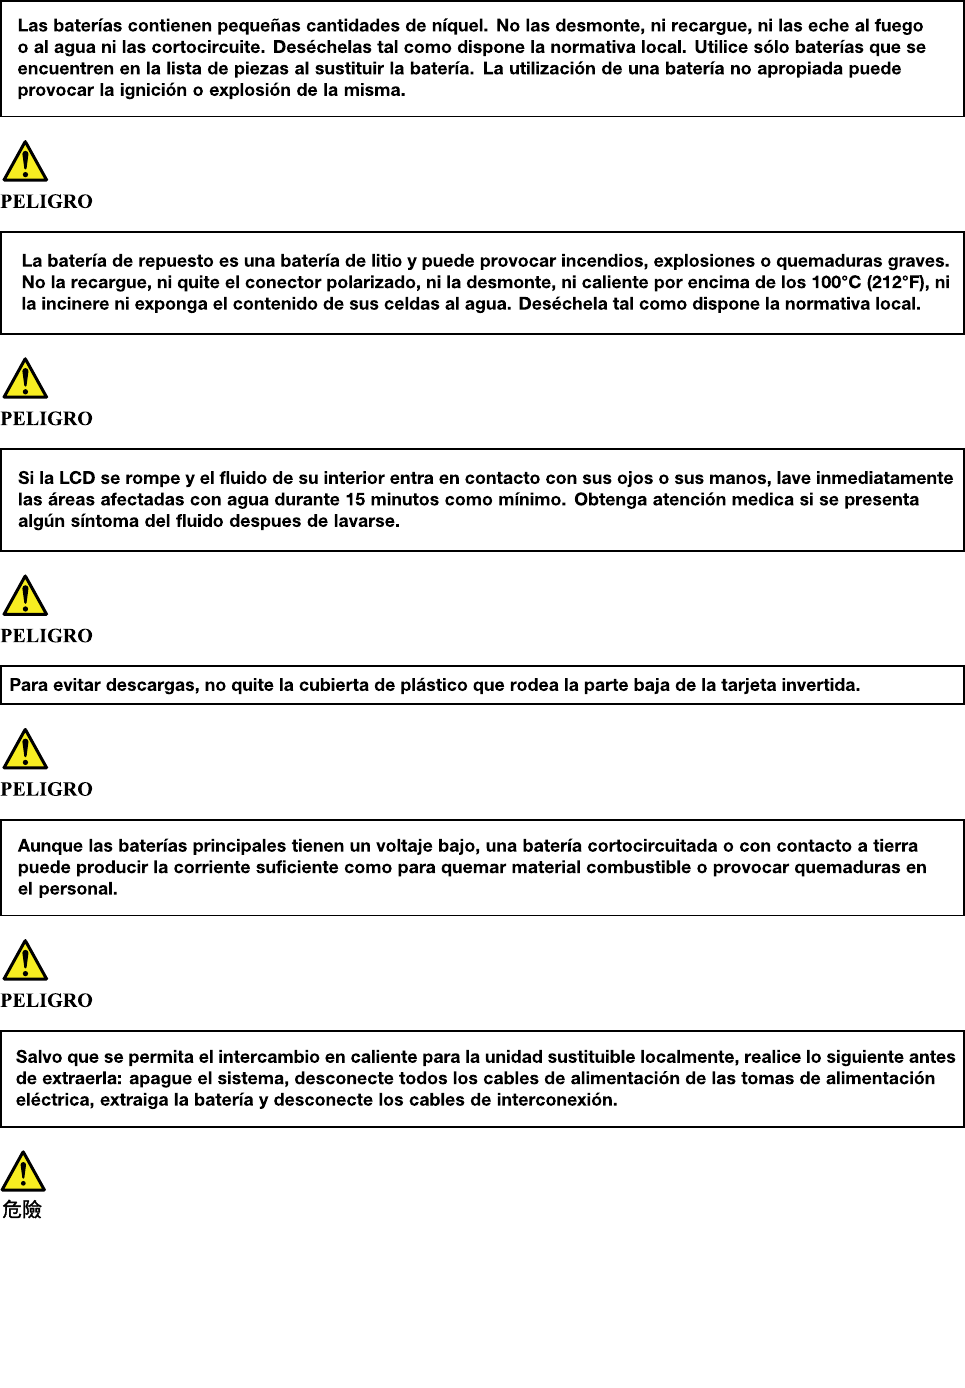
PERIGO
PERIGO
PERIGO
PERIGO
DANGER
8HardwareMaintenanceManual

DANGER
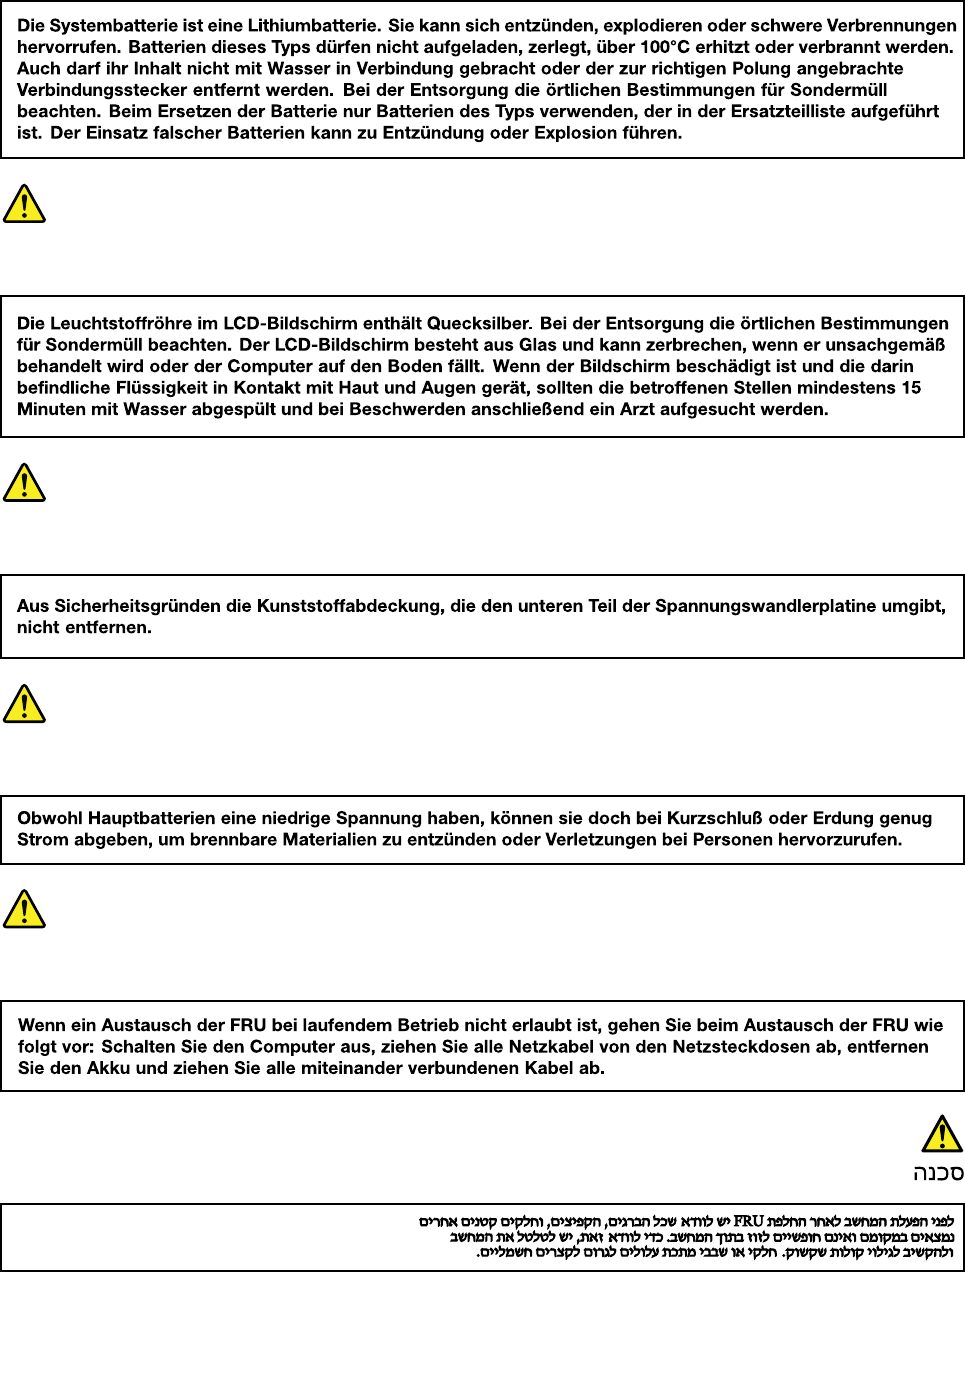
VORSICHT
VORSICHT
VORSICHT
VORSICHT
10HardwareMaintenanceManual
12HardwareMaintenanceManual

14HardwareMaintenanceManual
16HardwareMaintenanceManual

18HardwareMaintenanceManual

Chapter2.Importantserviceinformation
Thischapterintroducesfollowingimportantserviceinformationthatappliestoallmachinetypessupported
bythismanual:
•“StrategyforreplacingFRUs”onpage19
–“Strategyforreplacingasolid-statedrive”onpage19
–“Importantnoticeforreplacingasystemboard”onpage20
–“Howtouseerrormessage”onpage20
•“StrategyforreplacingFRUsforCTO,special-bid,andstandardmodels”onpage20
–“Productdefinition”onpage20
–“FRUidentification”onpage20
Important:
•AdvisecustomerstocontacttheLenovo®SupportWebsiteathttp://www.lenovo.com/supporttoview
thesoftwarefixes,downloadthedrivers,andfollowtheon-screeninstructionstoinstallthedrivers.For
additionalassistance,customersmightcalltheLenovoCustomerSupportCenter.Telephonenumbersfor
theLenovoSupportCenterareavailableat:
http://www.lenovo.com/support/phone
•ServicetrainingdocumentsforLenovoauthorizedservicetechniciansareavailableatthefollowingWeb
site.ThedisassemblyandreassemblyvideosthatshowtheFRUremovalandreplacementprocedures
arecontainedinthedocuments.
http://www.lenovoservicetraining.com
StrategyforreplacingFRUs
Beforereplacingparts:
Ensurethatallsoftwarefixes,drivers,andUEFIBIOSdownloadsareinstalledbeforereplacinganyFRUs
listedinthismanual.
Afterasystemboardisreplaced,ensurethatthelatestUEFIBIOSisloadedtothesystemboardbefore
completingtheserviceaction.
Todownloadsoftwarefixes,drivers,andUEFIBIOS,gotohttp://www.lenovo.com/ThinkPadDriversand
followtheinstructionsonthescreen.
UsethefollowingstrategytopreventunnecessaryexpenseforreplacingandservicingFRUs:
•IfyouareinstructedtoreplaceaFRUbutthereplacementdoesnotcorrecttheproblem,reinstallthe
originalFRUbeforeyoucontinue.
•Somecomputershavebothaprocessorboardandasystemboard.Ifyouareinstructedtoreplaceeither
theprocessorboardorthesystemboard,andreplacingoneofthemdoesnotcorrecttheproblem,
reinstallthatboard,andthenreplacetheotherone.
•IfanadapteroradeviceconsistsofmorethanoneFRU,anyoftheFRUsmaybethecauseoftheerror.
Beforereplacingtheadapterordevice,removetheFRUs,onebyone,toseeifthesymptomschange.
ReplaceonlytheFRUthatchangedthesymptoms.
Strategyforreplacingasolid-statedrive
Alwaystrytorunalow-levelformatbeforereplacingasolid-statedrive.Thiswillcauseallcustomerdata
onthesolid-statedrivetobelost.Besurethatthecustomerhasacurrentbackupofthedatabefore
doingthistask.
©CopyrightLenovo201519

Attention:Thedrivestartupsequenceinthecomputeryouareservicingmayhavebeenchanged.Be
extremelycarefulduringwriteoperationssuchascopying,saving,orformatting.Ifyouselectanincorrect
drive,dataorprogramscanbeoverwritten.
Importantnoticeforreplacingasystemboard
Somecomponentsmountedonasystemboardareverysensitive.Improperhandlingofasystemboardcan
causedamagetothosecomponents,andmaycauseasystemmalfunction.
Attention:Whenhandlingasystemboard:
•Donotdropasystemboardorapplyanyexcessiveforcetoit.
•Avoidroughhandlingofanykind.
•AvoidbendingasystemboardandhardpushingtopreventcrackingateachBGA(BallGridArray)chipset.
Howtouseerrormessage
Usetheerrorcodesdisplayedonthescreentodiagnosefailures.Ifmorethanoneerrorcodeisdisplayed,
beginthediagnosiswiththefirsterrorcode.Whatevercausesthefirsterrorcodemayalsocausefalseerror
codes.Ifnoerrorcodeisdisplayed,seewhethertheerrorsymptomislistedintheSymptom-to-FRU
Indexforthecomputeryouareservicing.
StrategyforreplacingFRUsforCTO,special-bid,andstandardmodels
ThistopicprovidesinformationaboutthemodeltypesandFRUidentification.
Productdefinition
Thistopicintroducesdifferentmodeltypesandhowtoidentifyeachtype.
Dynamicconfigure-to-order(CTO)model
ThismodelprovidestheabilityforacustomertoconfigureaLenovosolutionfromaWebSite,andhavethis
configurationsenttofulfillment,whereitisbuiltandshippeddirectlytothecustomer.Themachinelabeland
eSupportwillloadtheseproductsasthe4-characterMT,4-charactermodel,and2-charactercountrycode.
Themodelis“CTO1”andthedefaultcountrycodeis“WW”(example:20A7CTO1WW).
Special-bidmodel
ThisisauniqueconfigurationthathasbeennegotiatedbetweenLenovoandthecustomer.Auniquemachine
typemodel(MTM)consistsofa4-characterMT,a4-charactermodel,andanumeric2-charactercountry
codeisprovidedtothecustomertoplaceorders(example:20A7000955).Thecountrycodeassignedis
numericanddoesnotdesignateaspecificcountryorregion.ThecustommodelfactsheetfortheMTM
indicateswhichcountrythespecialbidMTMissetupfor.Special-bidofferingisnotgenerallyannounced.
Standardmodel
Standardmodels(fixedconfiguration)areannouncedandofferedtoallcustomers.TheMTMportionofthe
machinelabelconsistsofa4-characterMT,a4-charactermodel,andanalphabetic2-charactercountry
code.Thecountrycodeassignedisalphabeticandrepresentsadesignatedcountryorregion(example:
20A70009UK).
FRUidentification
UseLenovoeSupporttoidentifymajorFRUs,FRUpartnumbers,andFRUdescriptionsforaproductat
anMT-serialnumberlevel.ExamplesofmajorFRUsareharddiskdrive,systemboard,andliquidcrystal
display(LCD).
ToidentifythemajorFRUsforaproduct,dothefollowing:
20HardwareMaintenanceManual

1.Gotohttp://support.lenovo.com/ibasepartslookup.
2.TypetheMachineTypeandSerialNumberinthecorrespondingfields.
3.ClickSubmit.
eSupportalsocanbeusedtoviewthegeneralFRUlistforaproduct.TheFRUlistisagenerallistof
componentsanddoesnotcontainspecificmodelinformation.
TogetthegeneralFRUlistforaproduct,dothefollowing:
1.Gotohttp://www.lenovo.com/support.
2.Followtheinstructionsonthescreentoselectaproduct.
3.ClicktheProduct&Partstab.
4.SelectSystemServicePartstoviewageneralFRUlist.
Chapter2.Importantserviceinformation21

22HardwareMaintenanceManual

Chapter3.Generalcheckout
Thischapterintroducesfollowinginformation:
•“Whattodofirst”onpage23
•“Checkoutguide”onpage24
–“LenovoSolutionCenter”onpage24
–“Quicktestprograms”onpage24
–“UEFIdiagnosticprogram”onpage25
–“Bootablediagnosticprograms”onpage25
•“Powersystemcheckout”onpage26
Beforeyougotothecheckoutguide,besuretoreadthefollowingimportantnotes.
Importantnotes:
•Onlycertifiedtrainedpersonnelshouldservicethecomputer.
•BeforereplacinganyFRU,readtheentirepageonremovingandreplacingFRUs.
•WhenyoureplaceFRUs,itisrecommendedusenewnylon-coatedscrews.
•Beextremelycarefulduringsuchwriteoperationsascopying,saving,orformatting.Thesequence
ofthedrivesinthecomputerthatyouareservicingmighthavebeenaltered.Ifyouselectanincorrect
drive,dataorprogramsmightbeoverwritten.
•ReplaceaFRUonlywithanotherFRUofthecorrectmodel.WhenyoureplaceaFRU,ensure
thatthemodelofthemachineandtheFRUpartnumberarecorrectbyreferringtothewebsite:
http://www.lenovo.com/serviceparts-lookup
•AFRUshouldnotbereplacedbecauseofasingle,unreproduciblefailure.Singlefailurescan
occurforvariousreasonsthathavenothingtodowithahardwaredefect,suchascosmicradiation,
electrostaticdischarge,orsoftwareerrors.ConsiderreplacingaFRUonlywhenaproblemrecurs.Ifyou
suspectthataFRUisdefective,cleartheerrorlogandrunthetestagain.Iftheerrordoesnotrecur,do
notreplacetheFRU.
•BecarefulnottoreplaceanondefectiveFRU.
Whattodofirst
WhenyoureturnaFRU,youmustincludethefollowinginformationinthepartsexchangeformorparts
returnformthatyouattachtoit:
1.Nameandphonenumberofservicetechnician
2.Dateofservice
3.Dateonwhichthemachinefailed
4.Dateofpurchase
5.Failuresymptoms,errorcodesappearingonthedisplay,andbeepsymptoms
6.ProcedureindexandpagenumberinwhichthefailingFRUwasdetected
7.FailingFRUnameandpartnumber
8.Machinetype,modelnumber,andserialnumber
9.Customer'snameandaddress
Note:Duringthewarrantyperiod,thecustomermayberesponsibleforrepaircostsifthecomputerdamage
wascausedbymisuse,accident,modification,unsuitablephysicaloroperatingenvironment,orimproper
maintenancebythecustomer.Followingisalistofsomecommonitemsthatarenotcoveredunderwarranty
andsomesymptomsthatmightindicatethatthesystemwassubjectedtostressbeyondnormaluse.
©CopyrightLenovo201523

Beforecheckingproblemswiththecomputer,determinewhetherthedamageiscoveredunderthewarranty
byreferringtothefollowinglist:
Thefollowingarenotcoveredunderwarranty:
•LCDpanelcrackedfromtheapplicationofexcessiveforceorfrombeingdropped
•Scratched(cosmetic)parts
•Distortion,deformation,ordiscolorationofthecosmeticparts
•Plasticparts,latches,pins,orconnectorsthathavebeencrackedorbrokenbyexcessiveforce
•Damagecausedbyliquidspilledintothesystem
•DamagecausedbytheimproperinsertionofaPCcardortheinstallationofanincompatiblecard
•Improperdiscinsertionoruseofanopticaldrive
•Fusesblownbyattachmentofanonsupporteddevice
•Forgottencomputerpassword(makingthecomputerunusable)
•Stickykeyscausedbyspillingaliquidontothekeyboard
•Useofanincorrectacpoweradapteronlaptopproducts
Thefollowingsymptomsmightindicatedamagecausedbynonwarrantedactivities:
•Missingpartsmightbeasymptomofunauthorizedserviceormodification.
•Checkforobviousdamagetoaharddiskdrive.Ifthespindleofaharddiskdrivebecomesnoisy,thehard
diskdrivemighthavebeendroppedorsubjecttoexcessiveforce.
Checkoutguide
UsethefollowingproceduresasaguideinidentifyingandcorrectingproblemswiththeThinkPadnotebook
computers.
Note:ThediagnostictestsareintendedtotestonlyThinkPadproducts.Theuseofnon-ThinkPadproducts,
prototypecards,ormodifiedoptionscanleadtofalseindicationsoferrorsandinvalidsystemresponses.
1.Identifythefailingsymptomsinasmuchdetailaspossible.
2.Verifythesymptoms.Trytore-createthefailurebyrunningthediagnostictestorbyrepeatingthe
operation.
LenovoSolutionCenter
TheLenovoSolutionCenterprogramenablesyoutotroubleshootandresolvecomputerproblems.It
combinesdiagnostictests,systeminformationcollection,securitystatus,andsupportinformation,along
withhintsandtipsformaximumsystemperformance.
TheLenovoSolutionCenterprogramisavailablefordownloadathttp://www.lenovo.com/diags.
ToruntheLenovoSolutionCenterprogram,gotoControlPanelandclickSystemandSecurity➙Lenovo-
SystemHealthandDiagnostics,andthenfollowtheinstructionsonthescreen.
FormoreinformationabouttheLenovoSolutionCenterprogram,refertothehelpinformationsystem
oftheprogram.
Quicktestprograms
Lenovoprovidesquicktestprogramstotroubleshootandresolvecomputerproblems,especiallywhenthe
computerdoesnothavetheLenovoSolutionCenterprograminstalled.
Todownloadandinstallaquicktestprogram,gotohttp://www.lenovo.com/diags,andfollowtheinstructions
ontheWebsite.
Torunatestusingquicktestprogram,dothefollowing:
24HardwareMaintenanceManual

1.GototheC:\SWTOOLS\ldiagdirectory.
2.Double-clickthegui_lsc_lite.exefile.
3.WhentheUserAccountControlwindowopens,clickYes.
4.Selectthedeviceclasstobetested.
5.Selectthedevicestobetested.
6.Selectthetesttobeperformed.
7.Followtheinstructionsonthescreentostartthetest.Whenaproblemisdetected,information
messagesaredisplayed.Refertothemessagestotroubleshoottheproblem.
UEFIdiagnosticprogram
AUEFIdiagnosticprogramispreinstalledonthecomputer.Itenablesyoutotestinternalstoragedevices,
viewsysteminformation,andcheckandrecoverbadsectorsoninternalstoragedevices.
ToruntheUEFIdiagnosticprogram,dothefollowing:
1.Turnonthecomputer.Ifthecomputercannotbeturnedon,goto“Powersystemcheckout”onpage26,
andcheckthepowersources.Ifanerrorcodeisdisplayed,goto“Symptom-to-FRUindex”onpage37
forerrorcodedescriptionsandtroubleshootinghints.
2.WhentheThinkPadlogoisdisplayed,repeatedlypressandreleasetheF10key.Themainscreenofthe
UEFIdiagnosticprogramisdisplayed.
3.Followtheinstructionsonthescreentousethediagnosticprogram.
Bootablediagnosticprograms
IfthecomputeryouareservicingisnotinstalledwiththeUEFIdiagnosticprogram,youcandownloada
bootablediagnosticprogramfromtheLenovoSupportWebsite.Thebootablediagnosticprogramsenable
youtotestcomputermemoryandinternalstoragedevices,viewsysteminformation,andcheckandrecover
theinternalstoragedevices.Tousethebootablediagnosticprograms,youcancreateabootablediagnostic
mediumonaUSBdeviceorCD.
Tocreateabootablediagnosticmedium,dothefollowing:
1.Gotohttp://www.lenovo.com/diags.
2.ClickLenovoBootableDiagnostics.
3.FollowtheinstructionsontheWebsitetocreateabootablediagnosticmediumonaUSBdeviceorCD.
Tousethediagnosticmediumyouhavecreated,dooneofthefollowing:
•IfyouhavecreatedthebootablediagnosticmediumonaUSBdevice,dothefollowing:
1.AttachtheUSBdevicetothecomputer.
2.Turnonthecomputer.Ifthecomputercannotbeturnedon,goto“Powersystemcheckout”onpage
26,andcheckthepowersources.Ifanerrorcodeisdisplayed,goto“Symptom-to-FRUindex”on
page37forerrorcodedescriptionsandtroubleshootinghints.
3.WhentheThinkPadlogoisdisplayed,repeatedlypressandreleasetheF12key.WhentheBoot
Menuwindowopens,releasetheF12key.
4.UsethearrowkeystoselectUSBHDDandthenpressEnter.Thediagnosticprogramwillbe
launchedautomatically.
5.Followtheinstructionsonthescreentousethediagnosticprogram.
•IfyouhavecreatedthebootablediagnosticmediumonaCD,dothefollowing:
Chapter3.Generalcheckout25
1.Turnonthecomputer.Ifthecomputercannotbeturnedon,goto“Powersystemcheckout”onpage
26,andcheckthepowersources.Ifanerrorcodeisdisplayed,goto“Symptom-to-FRUindex”on
page37forerrorcodedescriptionsandtroubleshootinghints.
2.InserttheCDintotheexternalopticaldrive.
3.Restartthecomputer.
4.WhentheThinkPadlogoisdisplayed,repeatedlypressandreleasetheF12key.WhentheBoot
Menuwindowopens,releasetheF12key.
5.UsethearrowkeystoselectATAPICDx(x:0,1,...)andthenpressEnter.Thediagnosticprogram
willbelaunchedautomatically.
6.Followtheinstructionsonthescreentousethediagnosticprogram.
Powersystemcheckout
Toverifyifabatteryandacpoweradapterarefunctional,dothefollowing:
1.Turnoffthecomputer.
2.Connecttheacpoweradapter.
3.Turnonthecomputer.Ifthecomputercanbeturnedon,itmeansthateitherthebatteryortheac
poweradapterisfunctional.
4.Insertastraightenedpaperclipintotheemergencyresetholetoresetthecomputer.Ifthecomputeris
stillpoweredon,itmeansthattheacpoweradapterisfunctional.
5.Turnoffthecomputer.
6.Disconnecttheacpoweradapterandturnonthecomputer.Ifthecomputercanbeturnedon,it
meansthebatteryisfunctional.
Ifyoususpectapowerproblem,seetheappropriateoneofthefollowingpowersupplycheckouts:
•“Checkingtheacpoweradapter”onpage26
•“Checkingthebatteryandoperationalcharging”onpage27
•“Checkingthecoin-cellbattery”onpage27
Checkingtheacpoweradapter
Youareherebecausethecomputerfailsonlywhentheacpoweradapterisused.
•Ifthesystemstatusindicatordoesnotblinkthreetimeswhenanacpowersourceisconnected,check
thepowercordoftheacpoweradapterforcorrectcontinuityandinstallation.
•Ifthecomputerdoesnotchargeduringoperation,goto“Checkingthebatteryandoperationalcharging”
onpage27.
Tochecktheacpoweradapter,dothefollowing:
1.Unplugtheacpoweradaptercablefromthecomputer.
2.Measuretheoutputvoltageattheplugoftheacpoweradaptercable.Seethefollowingillustration:
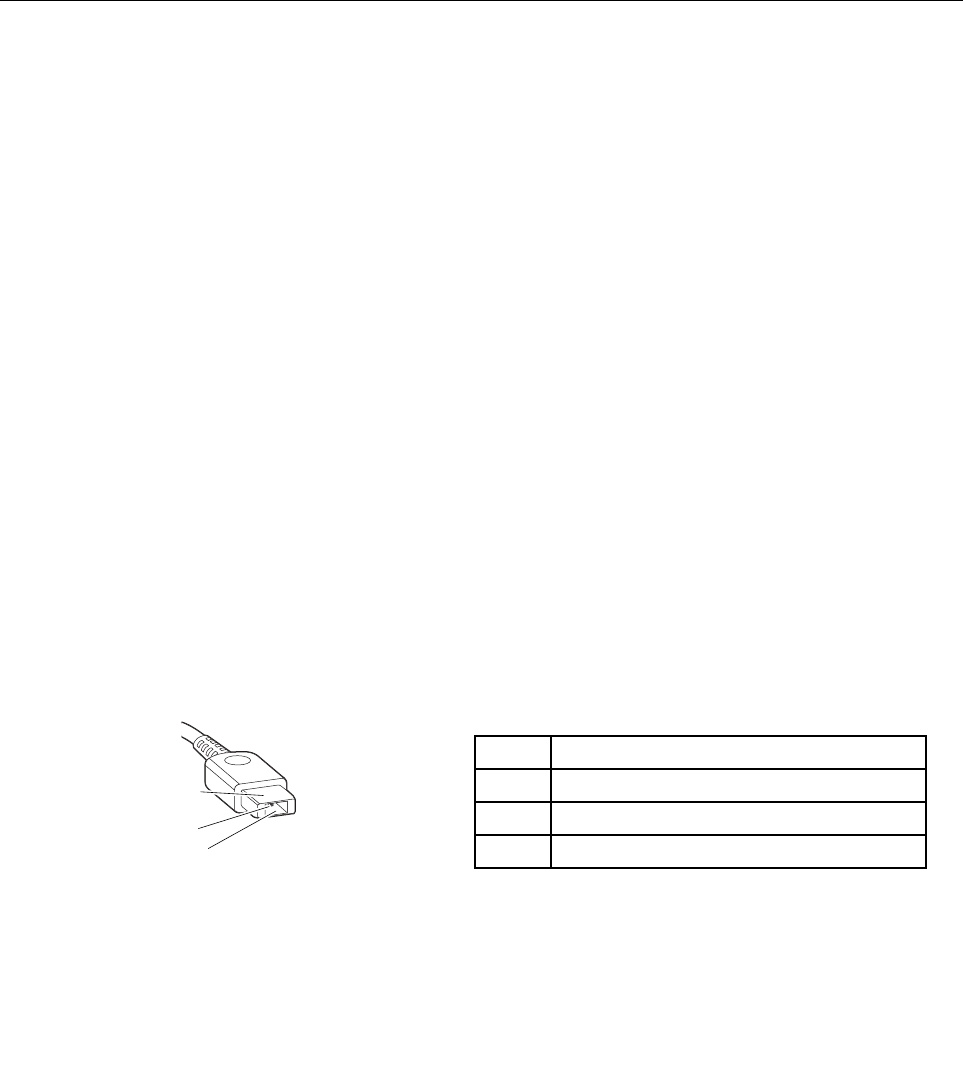
PinVoltage(Vdc)
1+20
20
3Ground
(20V)
1
3
2
Note:Outputvoltageofpin2oftheacpoweradaptermightdifferfromtheoneyouareservicing.
3.Ifthevoltageisnotcorrect,replacetheacpoweradapter.
4.Ifthevoltageisacceptable,replacethesystemboard.
26HardwareMaintenanceManual
Note:Noisefromtheacpoweradapterdoesnotalwaysindicateadefect.
Checkingthebatteryandoperationalcharging
Checkingthebattery
ThissystemsupportsonlybatteriesspeciallydesignedforthisspecificsystemandmanufacturedbyLenovo
oranauthorizedbuilder.Thesystemdoesnotsupportunauthorizedbatteriesorbatteriesdesignedforother
systems.Ifanunauthorizedbatteryorabatterydesignedforanothersystemsisinstalled,thesystemwill
notcharge.
Attention:Lenovohasnoresponsibilityfortheperformanceorsafetyofunauthorizedbatteries,and
providesnowarrantiesforfailuresordamagearisingoutoftheiruse.
Moveyourpointertothebattery-statusiconintheWindows®notificationareatocheckthebatterystatus.
Thebattery-statusicondisplaysthepercentageofbatterypowerremainingandhowlongyoucanuse
yourcomputerbeforeyoumustchargethebattery.
Checkingtheoperationalcharging
Tocheckwhetherthebatterychargesproperlyduringoperation,dothefollowing:
1.Dischargethebatteryuntiltheremainedbatterypowerislessthan50%.
2.Performoperationalcharging.ClickthebatterystatusiconintheWindowsnotificationareatodisplay
detailedbatteryinformation.Ifitindicatesthatthebatteryisnotcharging,replacethebattery.
3.Checkthebatterystatusagain.Ifthesameerrorstillexists,replacethesystemboard.
Checkingthecoin-cellbattery
Tocheckthecoin-cellbattery,dothefollowing:
1.Disablethebuilt-inbattery.See“Disablingthebuilt-inbattery”onpage58.
2.Removethecoin-cellbattery.See“1180Systemboardassembly”onpage81.
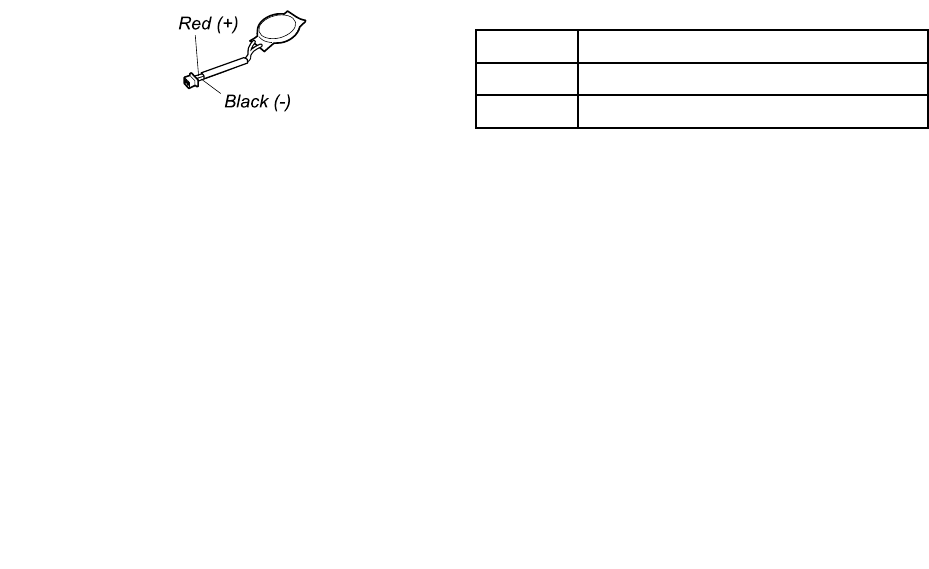
3.Measurethevoltageofthecoin-cellbattery.Seethefollowingillustration.
WireVoltage(Vdc)
Red+2.5to+3.2
BlackGround
•Ifthevoltageiscorrect,replacethesystemboard.
•Ifthevoltageisnotcorrect,replacethecoin-cellbattery.
•Ifthecoin-cellbatterydischargesquicklyafterreplacement,replacethesystemboard.
Chapter3.Generalcheckout27

28HardwareMaintenanceManual

Chapter4.Relatedserviceinformation
Thischapterpresentsfollowinginformation:
•“RestoringthefactorycontentsbyusingtheproductRecoveryDiscSet”onpage29
•“UsingtheWindowsrecoveryprogramsontheWindows8.1operatingsystem”onpage30
•“RecoveryoverviewfortheWindows10operatingsystem”onpage32
•“Passwords”onpage34
•“Powermanagement”onpage36
•“Symptom-to-FRUindex”onpage37
ServiceWebsite:Whenthelatestmaintenancedisketteandthesystemprogramservicediskettebecome
available,theywillbepostedonhttp://www.lenovo.com/support
RestoringthefactorycontentsbyusingtheproductRecoveryDiscSet
Whenthemainstoragedriveisreplacedbecauseofafailure,noproductrecoveryprogramisonthenew
drive.Inthiscase,thecustomermustusetheRecoveryDiscSettorecoverthecomputer.Orderthe
RecoveryDiscSetandthedriveatthesametimesothatthecustomercanrestorethecomputertothe
factorydefaultsettingsbyusingtheRecoveryDiscSetafterthenewdriveisinstalled.Forinformationabout
whichdiscstoorder,goto:
http://www.lenovo.com/serviceparts-lookup.
Dependingonthemodel,thenumberofrecoverydiscsincludedintheRecoveryDiscSetdiffers.Torestore
thefactorycontentsbyusingtheproductRecoveryDiscSet,dothefollowing:
Notes:
•Duringtherecoveryprocess,alldataonthedrivewillbedeleted.Ifpossible,copyanyimportantdata
orpersonalfilesthatyouwanttokeepontoremovablemediaoranetworkdrivebeforeyoustartthe
recoveryprocess.
•Therecoveryprocesstakesonetotwohourstocomplete.Thelengthoftimedependsonthemethodyou
use.IfyouuseproductRecoveryDiscSet,therecoveryprocesstakesabouttwohours.
1.ConnectanexternalCD/DVDdrive.
2.MaketheCD/DVDdrivethefirststartupdeviceinthestartupsequenceusingthefollowingprocedure:
a.OpentheThinkPadSetupprogramandselectStartup➙Boot.
b.SelecttheCD/DVDdriveasthe1stBootDevice.
3.InsertthebootablerecoverydiscintotheCD/DVDdrive.
4.StartthecomputerfromtheexternalCD/DVDdrive.
5.Whenpromoted,selectyourlanguageandclickNext.
6.Readthelicenseandacceptthetermsandconditions.Thenfollowtheinstructionsonthescreen.
7.IftheRecoveryDiscSetcontainsaSupplementalRecoveryDisc,insertitwhenpromptedandclickY es.
Note:NotallRecoveryDiscSetscomewithaSupplementalRecoveryDisc.IfthereisaSupplemental
RecoveryDisc,itwillbeclearlymarkedassuch.
8.Whenallofthedatahasbeencopiedfromthelastdiscinthesetandhasbeenprocessed,remove
theexternalCD/DVDdriveandrestartthecomputer.Followtheinstructionsonthescreentofinish
therecovery.
Note:Therestoftherecoveryprocessisfullyautomatedandnoactionfromyouisrequired.The
computerwillrestartintotheMicrosoftWindows®desktopseveraltimesandyoumightexperience
periodswhennoactivityisapparentonthescreenforseveralminutesatatime.Thisisnormal.
©CopyrightLenovo201529

9.Whentherecoveryprocesscompletes,theWelcometoMicrosoftWindowsscreenisdisplayed.Follow
theinstructionsonthescreentocompletetheWindowssetup.
10.AfteryouhavecompletedtheWindowssetup,youmightwanttorestoretheoriginalstartupsequence.
StarttheThinkPadSetupprogramandthenpressF9torestorethedefaultsettings.PressF10tosave
changesandexittheThinkPadSetupprogram.
Note:Afterrestoringadrivetothefactorydefaultsettings,youmightneedtoreinstallsomedevicedrivers.
UsingtheWindowsrecoveryprogramsontheWindows8.1operating
system
ThissectionprovidesinformationabouttherecoverysolutionsfortheWindows8.1operatingsystem.
AWindowsrecoveryimageispreinstalledintherecoverypartitiononyourcomputer.TheWindowsrecovery
imageenablesyoutorefreshyourcomputer,orresetyourcomputertothefactorydefaultsettings.
YoucancreaterecoverymediaasbackupsorreplacementfortheWindowsrecoveryimage.Withthe
recoverymedia,youcantroubleshootandfixtheproblemsonyourcomputerevenifyoucannotstartthe
Windows8.1operatingsystem.Itisrecommendedthatyoucreaterecoverymediaasearlyaspossible.
Refreshingthecomputer
Ifyourcomputerdoesnotperformwellandtheproblemmightbecausedbyarecentlyinstalledprogram,
youcanrefreshyourcomputerwithoutlosingyourpersonalfilesorchangingyoursettings.
Attention:Ifyourefreshyourcomputer,theprogramsthatcamewithyourcomputerandtheprogramsthat
youinstalledfromWindowsStorewillbereinstalled,butallotherprogramswillberemoved.
Torefreshyourcomputer,dothefollowing:
1.Moveyourpointertothetop-rightorbottom-rightcornerofthescreentodisplaythecharms.Click
Settings➙ChangePCsettings➙Updateandrecovery➙Recovery.
2.IntheRefreshyourPCwithoutaffectingyourfilessection,clickGetstarted.
3.Followtheinstructionsonthescreentorefreshyourcomputer.
Resettingthecomputertothefactorydefaultsettings
Ifyouwanttorecycleyourcomputerorjuststartover,youcanresetyourcomputertothefactorydefault
settings.Resettingthecomputerwillreinstalltheoperatingsystem,reinstallalltheprogramsthatcamewith
yourcomputer,andresetallthesettingstothefactorydefaultsettings.
Attention:Ifyouresetthecomputertothefactorydefaultsettings,allyourpersonalfilesandsettingswillbe
deleted.Toavoiddataloss,makeabackupcopyofallthedatathatyouwanttokeep.
Toresetyourcomputertothefactorydefaultsettings,dothefollowing:
1.Moveyourpointertothetop-rightorbottom-rightcornerofthescreentodisplaythecharms.Click
Settings➙ChangePCsettings➙Updateandrecovery➙Recovery.
2.IntheRemoveeverythingandreinstallWindowssection,clickGetstarted.ThenclickNextto
confirmtheoperation.
3.Dependingonyourneeds,dooneofthefollowing:
•Toperformaquickformat,clickJustremovemyfilestostarttheprocess.Theprocesswilltake
severalminutes.
•Toperformacompleteformat,clickFullycleanthedrivetostarttheprocess.Theprocesswill
takeseveralhours.
30HardwareMaintenanceManual

4.Followtheinstructionsonthescreentoresetyourcomputertothefactorydefaultsettings.
Usingtheadvancedstartupoptions
Withtheadvancedstartupoptions,youcanchangethefirmwaresettingsofthecomputer,changethe
startupsettingsoftheWindowsoperatingsystem,startthecomputerfromanexternaldevice,orrestorethe
Windowsoperatingsystemfromasystemimage.
Tousetheadvancedstartupoptions,dothefollowing:
1.Moveyourpointertothetop-rightorbottom-rightcornerofthescreentodisplaythecharms.Click
Settings➙ChangePCsettings➙Updateandrecovery➙Recovery.
2.IntheAdvancedstartupsection,clickRestartnow➙Troubleshoot➙Advancedoptions.
3.Selectadesiredstartupoption,thenfollowtheinstructionsonthescreen.
RecoveringyourcomputerfromtheWindowsrecoveryenvironment
TheWindowsrecoveryenvironmentonyourcomputeriscapableofoperatingindependentlyfromthe
Windows8.1operatingsystem.Thisenablesyoutorecoverorrepairtheoperatingsystemevenifthe
Windows8.1operatingsystemfailstostart.
Aftertwoconsecutivefailedbootattempts,theWindowsrecoveryenvironmentstartsautomatically.Then
youcanchooserepairandrecoveryoptionsbyfollowingtheinstructionsonthescreen.
Note:Ensurethatyourcomputerisconnectedtoacpowerduringtherecoveryprocess.
YoucancreaterecoverymediaasbackupsfortheWindowsrecoveryenvironmentandtheWindows
recoveryimage.Ifyoucannotstartthecomputer,youcanuserecoverymediatotroubleshootandfixthe
problemsonyourcomputer.
Itisrecommendedthatyoucreaterecoverymediaasearlyaspossible.Onceyoucreaterecoverymedia,
keeptheminasafeplaceanddonotusethemtostoreotherdata.
Creatingrecoverymedia
Tocreaterecoverymedia,youneedaUSBdrivewithatleast16GBofstorage.TherequiredUSBcapacity
dependsonthesizeoftherecoveryimage.
Attention:CreatingrecoverymediawilldeleteanythingstoredontheUSBdrive.Toavoiddataloss,makea
backupcopyofallthedatathatyouwanttokeep.
Tocreaterecoverymedia,dothefollowing:
Note:Ensurethatyourcomputerisconnectedtoacpower.
1.Moveyourpointertothetop-rightorbottom-rightcornerofthescreentodisplaythecharms,and
clickSearch.
2.TyperecoveryintheSearchfieldandclicktheSearchbutton.ThenclickCreatearecoverydrive.
3.ClickYesintheUserAccountControlwindowtoallowtheRecoveryMediaCreatorprogramtostart.
4.EnsurethatyouselecttheCopytherecoverypartitionfromthePCtotherecoverydrive.option.
ThenclickNext.
Important:IfyoucleartheCopytherecoverypartitionfromthePCtotherecoverydrive.option,
youwillcreaterecoverymediawithouttherecoverypartitioncontent.Youstillcanstartthecomputer
fromtherecoverymedia,butyoumightbeunabletorecoveryourcomputeriftherecoverypartitionon
yourcomputerisdamaged.
5.ConnectaproperUSBdrivethenclickNext.
Chapter4.Relatedserviceinformation31

6.ClickCreateintheRecoveryDrivewindow.Thecreationoftherecoverymediastarts.
7.Whenthecreationoftherecoverymediafinishes,dooneofthefollowing:
•Tokeeptherecoverypartitiononyourcomputer,clickFinish.
•Todeletetherecoverypartitiononyourcomputer,clickDeletetherecoverypartition.
Attention:Ifyoudeletetherecoverypartitiononyourcomputer,dokeeptherecoverymediaina
safeplace.TheWindowsrecoveryimagewillnotbestoredinyourcomputeranymore,andyouwill
needtherecoverymediatorefreshorresetyourcomputer.
8.RemovetheUSBdrive.Therecoverymediaarecreatedsuccessfully.
Usingrecoverymedia
Ifyoucannotstartyourcomputer,orifyoucannotstarttheWindowsrecoveryimageonyourcomputer,use
recoverymediatorecoveryourcomputer.
Touserecoverymedia,dothefollowing:
Note:Ensurethatyourcomputerisconnectedtoacpower.
1.Turnonorrestartthecomputer.BeforetheWindowsoperatingsystemstarts,repeatedlypresstheF12
key.TheBootMenuwindowopens.
2.Selecttherecoverydriveasthebootdevice.
3.Selectapreferredlanguageandthenselectapreferredkeyboardlayout.
4.ClickTroubleshoottodisplaytheoptionalrecoverysolutions.
5.Selectacorrespondingrecoverysolutionaccordingtoyoursituation.Forexample,selectResetyour
PCifyouwanttoresetyourcomputertothefactorydefaultsettings.
FormoreinformationabouttherecoverysolutionsprovidedbytheWindows8.1operatingsystem,goto:
http://go.microsoft.com/fwlink/?LinkID=263800
RecoveryoverviewfortheWindows10operatingsystem
TheWindowsrecoveryprogramsenableyoutoresetyourcomputeroruseadvancedstartupoptions.
ItisrecommendedthatyoucreatearecoveryUSBdriveasearlyaspossible.StoretherecoveryUSBdrive
asabackuporreplacementfortheWindowsrecoveryprograms.
Formoreinformation,see“CreatingandusingarecoveryUSBdrive”onpage33.
Resettingyourcomputer
Ifyourcomputerdoesnotperformwell,youmightconsiderresettingyourcomputer.Intheresettingprocess,
youcanchoosetokeepyourfilesorremovethem,andthenreinstalltheWindowsoperatingsystem.
Toresetyourcomputer,dothefollowing:
Note:Thegraphicaluserinterface(GUI)itemsoftheoperatingsystemmightchangewithoutnotice.
1.OpentheStartmenuandthenclickSettings.IfSettingsisnotdisplayed,clickAllappstodisplayall
programs,andthenclickSettings➙Update&security➙Recovery.
2.IntheResetthisPCsection,clickGetstarted.
3.Followtheinstructionsonthescreentoresetyourcomputer.
32HardwareMaintenanceManual

Usingadvancedstartupoptions
Withadvancedstartupoptions,youcanchangethefirmwaresettingsofthecomputer,changethestartup
settingsoftheWindowsoperatingsystem,startthecomputerfromanexternaldevice,orrestorethe
Windowsoperatingsystemfromasystemimage.
Touseadvancedstartupoptions,dothefollowing:
Note:TheGUIitemsoftheoperatingsystemmightchangewithoutnotice.
1.OpentheStartmenuandthenclickSettings.IfSettingsisnotdisplayed,clickAllappstodisplayall
programs,andthenclickSettings➙Update&security➙Recovery.
2.IntheAdvancedstartupsection,clickRestartnow➙Troubleshoot➙Advancedoptions.
3.Selectadesiredstartupoption,thenfollowtheinstructionsonthescreen.
RecoveringyouroperatingsystemifWindows10failstostart
TheWindowsrecoveryenvironmentonyourcomputeriscapableofoperatingindependentlyfromthe
Windows10operatingsystem.Thisenablesyoutorecoverorrepairtheoperatingsystemevenifthe
Windows10operatingsystemfailstostart.
Aftertwoconsecutivefailedbootattempts,theWindowsrecoveryenvironmentstartsautomatically.Then
youcanchooserepairandrecoveryoptionsbyfollowingtheinstructionsonthescreen.
Note:Ensurethatyourcomputerisconnectedtoacpowerduringtherecoveryprocess.
CreatingandusingarecoveryUSBdrive
YoucancreatearecoveryUSBdriveasabackupfortheWindowsrecoveryprograms.Withtherecovery
USBdrive,youcantroubleshootandfixtheproblemsevenifthepreinstalledWindowsrecoveryprograms
aredamaged.
CreatingarecoveryUSBdrive
TheUSBdrivethatyouusetocreatetherecoveryUSBdrivemustbeatleast16GBofstorage.Theactual
USBcapacitythatisrequireddependsonthesizeoftherecoveryimage.
Attention:ThecreationprocessdeletesanythingstoredontheUSBdrive.Toavoiddataloss,makea
backupcopyofallthedatathatyouwanttokeep.
TocreatearecoveryUSBdrive,dothefollowing:
Note:Ensurethatyourcomputerisconnectedtoacpowerduringthefollowingprocess.
1.ConnectaproperUSBdrive(atleast16GBofstorage).
2.Typerecoveryinthesearchboxonthetaskbar.ThenclickCreatearecoverydrive.
3.ClickYesintheUserAccountControlwindowtoallowtheRecoveryMediaCreatorprogramtostart.
4.IntheRecoveryDrivewindow,followtheon-screeninstructionstocreatearecoveryUSBdrive.
UsingtherecoveryUSBdrive
Ifyoucannotstartyourcomputer,usetherecoveryUSBdrivetorecoveryourcomputer.
TousearecoveryUSBdrive,dothefollowing:
Note:Ensurethatyourcomputerisconnectedtoacpower.
1.ConnecttherecoveryUSBdrivetothecomputer.
Chapter4.Relatedserviceinformation33

2.Turnonorrestartthecomputer.BeforetheWindowsoperatingsystemstarts,repeatedlypresstheF12
key.TheBootMenuwindowopens.
3.SelecttherecoveryUSBdriveasthebootdevice.
4.Selectapreferredkeyboardlayout.
5.ClickTroubleshoottodisplaytheoptionalrecoverysolutions.
6.Selectacorrespondingrecoverysolutionaccordingtoyoursituation.Thenfollowtheinstructionson
thescreentocompletetheprocess.
Passwords
AsmanyasthreepasswordsmaybeneededforanyThinkPadnotebookcomputer:thepower-onpassword,
theharddiskpassword,andthesupervisorpassword.
Ifanyofthesepasswordshasbeenset,apromptforitwillbedisplayedonthescreenwheneverthe
computeristurnedon.Thecomputerdoesnotstartuntilthepasswordisentered.
Note:Ifonlyasupervisorpasswordisset,thepasswordpromptwillnotbedisplayedwhentheoperating
systemisstarted.
Power-onpassword
Apower-onpasswordprotectsthesystemfrombeingpoweredonbyanunauthorizedperson.The
passwordmustbeenteredbeforeanoperatingsystemcanbestarted.Forinstructionsonhowtoremove
thepower-onpassword,see“Howtoremovethepower-onpassword”onpage35.
Harddiskpassword
Therearetwokindsofharddiskpasswords:
•Userharddiskpassword-fortheuser
•Masterharddiskpassword-forthesystemadministrator,whocanuseittogetaccesstotheharddisk
eveniftheuserhaschangedtheuserharddiskpassword
Note:Therearetwomodesfortheharddiskpassword:UseronlyandMaster+User.TheMaster+User
moderequirestwoharddiskpasswords;thesystemadministratorentersbothinthesameoperation.The
systemadministratorthenprovidestheuserharddiskpasswordtothesystemuser.
Attention:Iftheuserharddiskpasswordhasbeenforgotten,checkwhetheramasterharddiskpassword
hasbeenset.Ifithas,itcanbeusedforaccesstotheharddiskdrive.Ifnomasterharddiskpasswordis
available,neitherLenovonorLenovoauthorizedservicetechniciansprovideanyservicestoreseteither
theuserorthemasterharddiskpassword,ortorecoverdatafromtheharddiskdrive.Theharddiskdrive
canbereplacedforascheduledfee.
Forhowtoremovetheharddiskpassword,see“Howtoremovetheharddiskpassword”onpage35.
Supervisorpassword
AsupervisorpasswordprotectsthesysteminformationstoredintheThinkPadSetup.Theusermustenter
thesupervisorpasswordinordertogetaccesstotheThinkPadSetupandchangethesystemconfiguration.
Attention:Ifthesupervisorpasswordhasbeenforgottenandcannotbemadeavailabletotheservice
technician,thereisnoserviceproceduretoresetthepassword.Thesystemboardmustbereplacedfor
ascheduledfee.
34HardwareMaintenanceManual

Howtoremovethepower-onpassword
Toremoveapower-onpassword,dothefollowing:
Ifnosupervisorpasswordhasbeenset,dothefollowingtoremovethepower-onpassword:
1.Turnoffthecomputeranddisconnectacpower.
2.Disablethebuilt-inbattery.See“Disablingthebuilt-inbattery”onpage58.
3.Removetheremovablebattery.See“1010Removablebattery”onpage59.
4.Removethebasecoverassembly.See“1020Basecoverassembly”onpage59.
5.Removethecoin-cellbattery.See“1090Coin-cellbattery”onpage71.
6.Reinstallthecoin-cellbattery.See“1090Coin-cellbattery”onpage71.
7.Reinstallthebasecoverassembly.
8.Reinstalltheremovablebattery.
9.Reconnectacpower.
10.TurnonthecomputerandwaituntilthePOSTends.AfterthePOSTends,thepasswordpromptdoes
notappear.Thepower-onpasswordhasbeenremoved.
Ifasupervisorpasswordhasbeensetandisknowntotheservicetechnician,dothefollowingtoremove
thepower-onpassword:
1.Turnonthecomputer.
2.WhentheThinkPadlogoisdisplayed,immediatelypressF1.
3.TypethesupervisorpasswordtoentertheThinkPadSetupprogram.
4.SelectSecurity.
5.SelectPassword.
6.SelectPower-OnPassword.
7.TypethecurrentsupervisorpasswordintheEnterCurrentPasswordfield.ThenleavetheEnter
NewPasswordfieldblank,andpressEntertwice.
8.IntheChangeshavebeensavedwindow,pressEnter.
9.PressF10tosavechangesandexittheThinkPadSetupprogram.Thepower-onpasswordhas
beenremoved.
Howtoremovetheharddiskpassword
Attention:IfUseronlymodeisselectedandtheuserharddiskpasswordhasbeenforgottenandcannotbe
madeavailabletotheservicetechnician,neitherLenovonorLenovoauthorizedservicetechniciansprovide
anyservicestoresettheuserharddiskpasswords,ortorecoverdatafromtheharddiskdrive.Toputthe
systembacktooperationalstatus,theonlyLenovoandLenovo-authorizedservicesolutionwouldbeto
replacetheharddiskdriveorsolid-statedrivewithascheduledfee.
Toremoveauserharddiskpasswordthathasbeenforgotten,whenthesupervisorpasswordandmaster
harddiskpasswordareknown,dothefollowing:
1.Turnonthecomputer.
2.WhentheThinkPadlogocomesup,immediatelypressF1toentertheThinkPadSetupprogram.When
thepower-onpasswordiconisdisplayedonthescreen,entereitherthepower-onpasswordorthe
supervisorpassword.
3.Whentheuserharddiskpasswordiconisdisplayedonthescreen,pressF1.Themasterharddisk
passwordiconisdisplayed.
4.EnterthemasterharddiskpasswordtoentertheThinkPadSetupprogram.
5.SelectSecurity.
6.SelectPassword.
Chapter4.Relatedserviceinformation35

7.SelectHard-diskxpassword,wherexistheletteroftheharddiskdrive.Apop-upwindowopens.
8.SelectMasterharddiskpassword.
9.TypethecurrentmasterharddiskpasswordintheEnterCurrentPasswordfield.ThenleavetheEnter
NewPasswordfieldblank,andpressEntertwice.
10.PressF10tosavechangesandexittheThinkPadSetupprogram.Theuserharddiskpasswordandthe
masterharddiskpasswordhavebeenremoved.
Powermanagement
Toreducepowerconsumption,thecomputerhasthreepowermanagementmodes:screenblank,sleep,
andhibernation.
Screenblankmode(fortheWindows7operatingsystemonly)
Ifthetimesetonthe“Turnoffmonitor”timerintheoperatingsystemexpires,theLCDbacklightturnsoff.
Toputthecomputerintoscreenblankmode,dothefollowing:
1.Right-clickthebatterygaugeinthetaskbar.
2.SelectPoweroffdisplay.
Toendscreenblankmodeandresumenormaloperation,pressanykey.
Sleepmode
Whenthecomputerenterssleepmode,thefollowingeventsoccurinadditiontowhatoccursinscreen
blankmode:
•TheLCDispoweredoff.
•Theinternalstoragedrive(harddiskdrive,solid-statedrive,orhybriddrive)ispoweredoff.
•Themicroprocessorstops.
Toentersleepmode,pressFn+4ordothefollowing:
•ForWindows7:OpentheStartmenu,thenclickthearrownexttotheShutdownbutton.ClickSleep
fromthemenudisplayed.
•ForWindows8.1:GototheStartscreenbypressingtheWindowskey,clickthepowericon,
thenclickSleep.
•ForWindows10:OpentheStartmenu,clickPower,andthenclickSleep.
Incertaincircumstances,thecomputergoesintosleepmodeautomatically:
•Afteraperiodofinactivityspecifiedinpowerplansettings
•Whenthebatterypowerislow
Toresumethecomputerfromsleepmode,pressthepowerbutton.
Also,ineitherofthefollowingevents,thecomputerautomaticallyreturnsfromsleepmodeandresumes
operation:
•Theringindicator(RI)issignaledbyaserialdeviceoraPCCarddevice.
•Thetimesetontheresumetimerelapses.
Note:Thecomputerdoesnotacceptanyinputimmediatelyafteritenterssleepmode.Waitafew
secondsbeforetakinganyactiontoreenteroperationmode.
36HardwareMaintenanceManual

Hibernationmode
Inhibernationmode,thefollowingoccurs:
•Thesystemstatus,RAM,VRAM,andsetupdataarestoredontheharddisk.
•Thesystemispoweredoff.
Note:Ifthecomputerentersthehibernationmodewhileitisdockedtothedockingstation,donotundockit
beforeresumingnormaloperation.Ifyoudoundockitandthentrytoresumenormaloperation,youwillget
anerrormessage,andyouwillhavetorestartthesystem.
Ifyouhavedefinedoneofthefollowingactionsastheeventthatcausesthesystemtogointohibernation
mode,performthataction.
•Closingthelid.
•Pressingthepowerbutton.
Also,thecomputergoesintohibernationmodeautomaticallyafteraperiodofinactivityspecifiedinpower
plansettings.
Whenthepoweristurnedon,thecomputerreturnsfromhibernationmodeandresumesoperation.The
hibernationfileinthebootrecordontheharddiskdriveisread,andsystemstatusisrestoredfromthe
harddiskdrive.
Symptom-to-FRUindex
Thissectioncontainsfollowinginformation:
•“Numericerrorcodes”onpage38
•“Errormessages”onpage39
•“Beepsymptoms”onpage39
•“No-beepsymptoms”onpage39
•“LCD-relatedsymptoms”onpage40
•“Intermittentproblems”onpage40
•“Undeterminedproblems”onpage40
Thesymptom-to-FRUindexinthissectionlistssymptomsanderrorsandtheirpossiblecauses.Themost
likelycauseislistedfirst,inboldfacetype.
Note:DotheFRUreplacementorotheractionsinthesequenceshowninthecolumnheaded“FRUor
action,insequence.”IfreplacingaFRUdoesnotsolvetheproblem,puttheoriginalpartbackinthe
computer.DonotreplaceanondefectiveFRU.
Thisindexcanalsohelpyoudetermine,duringregularservicing,whatFRUsarelikelytoneedtobe
replacednext.
AnumericerrorisdisplayedforeacherrordetectedinPOSTorsystemoperation.Inthedisplays,ncan
beanynumber.
Ifnonumericcodeisdisplayed,checkthenarrativedescriptionsofsymptoms.Ifthesymptomisnot
describedthere,goto“Intermittentproblems”onpage40.
Note:ForadevicenotsupportedbydiagnosticcodesintheThinkPadnotebookcomputers,seethe
manualforthatdevice.
Chapter4.Relatedserviceinformation37

Numericerrorcodes
Table1.Numericerrorcodes
SymptomorerrorFRUoraction,insequence
0177
BadSVPdata,stopPOSTtask—Thechecksumofthe
supervisorpasswordintheEEPROMisnotcorrect.
Systemboard
0183
BadCRCofSecuritySettingsinEFIVariable.Enterthe
ThinkPadSetupprogram.
1.RuntheThinkPadSetupprogram,andthensave
currentsettingbypressingF10.
2.Systemboard
0187
EAIAdataaccesserror—TheaccesstoEEPROMisfailed.
Systemboard
0188
InvalidRFIDSerializationInformationArea.
Systemboard
0189
InvalidRFIDconfigurationinformationarea—The
EEPROMchecksumisnotcorrect.
Systemboard
0190
Criticallow-batteryerror
1.Chargethebattery.
2.Battery
0191
SystemSecurity—InvalidRemoteChangerequested.
1.RuntheThinkPadSetupprogram,andthensave
currentsettingbypressingF10.
2.Systemboard
0199
SystemSecurity—Securitypasswordretrycount
exceeded.
1.RuntheThinkPadSetupprogram,andthensave
thecurrentsettingbypressingF10.
2.Systemboard
0270
RealTimeClockError.
SystemRealTimeClockisnotfunctional.Have
thecomputerserviced.
0271
CheckDateandTimesettings.
Neitherthedatenorthetimeissetinthecomputer.
EnterThinkPadSetupandsetthedateandtime.
1802
Unauthorizednetworkcardispluggedin—Turnoffand
removethenetworkcard.
1.Removewirelessnetworkcard.
2.Systemboard
1820
Morethanoneexternalfingerprintreaderisattached.
Poweroffandremoveallbutthereaderthatyousetup
withinyourmainoperatingsystem.
Removeallbutthereaderthatyousetupforthe
authentication.
2100
DetectionerroronHDD0(MainHDD)
1.Reseattheharddiskdrive.
2.Mainharddiskdrive
3.Systemboard
2101
DetectionerroronSSD1(M.2)
TheM.2SSDdeviceisnotworking.HavetheM.2
SSDdeviceserviced.
2102
DetectionerroronSSD2(M.2)
TheM.2SSDdeviceisnotworking.HavetheM.2
SSDdeviceserviced.
2110
ReaderroronHDD0(MainHDD)
1.Reseattheharddiskdrive.
2.Mainharddiskdrive
3.Systemboard
2111
ReaderroronSSD1(M.2)
TheM.2SSDdeviceisnotworking.HavetheM.2
SSDdeviceserviced.
2112
ReaderroronSSD2(M.2)
TheM.2SSDdeviceisnotworking.HavetheM.2
SSDdeviceserviced.
38HardwareMaintenanceManual

Table1.Numericerrorcodes(continued)
SymptomorerrorFRUoraction,insequence
2200
MachineTypeandSerialNumberareinvalid.
Systemboard
2201
MachineUUIDisinvalid
Systemboard
Errormessages
Table2.Errormessages
SymptomorerrorFRUoraction,insequence
Fanerror1.Fan
2.Thermalgrease
3.Systemboard
ThermalsensingerrorSystemboard
Beepsymptoms
Table3.Beepsymptoms
SymptomorerrorFRUoraction,insequence
Oneshortbeep,pause,threeshortbeeps,pause,three
moreshortbeeps,pause,andoneshortbeep(1-3-3-1
beeps)
Memoryproblem
OnelongandtwoshortbeepsVideoproblem
Threeshortbeeps,pause,oneshortbeep,pause,one
shortbeep,pause,andthreemoreshortbeeps(3-1-1-3
beeps)
PCIresourceproblem
FourcyclesoffourshortbeepsTCG*-compliantfunctionality-relatedproblem
FiveshortbeepsSystemboard
Fiveshortbeeps,pause,fivemoreshortbeeps,and
pause
TCG*-compliantfunctionality-relatedproblem
No-beepsymptoms
Table4.No-beepsymptoms
SymptomorerrorFRUoraction,insequence
Nobeep,system-statusindicatoron,LCDblank,andno
POST.
1.Ensurethateveryconnectorisconnectedtightly
andcorrectly.
2.Systemboard
Nobeep,system-statusindicatoron,andLCDblank
duringPOST.
Systemboard
Thepower-onpasswordpromptappears.Apower-onpasswordorasupervisorpasswordis
set.TypethepasswordandpressEnter.
Thehard-diskpasswordpromptappears.Ahard-diskpasswordisset.Typethepasswordand
pressEnter.
Chapter4.Relatedserviceinformation39

LCD-relatedsymptoms
Important:TheTFTLCDforthenotebookcomputercontainsmanythin-filmtransistors(TFTs).The
presenceofasmallnumberofdotsthataremissing,discolored,oralwayslightedischaracteristicofTFT
LCDtechnology,butexcessivepixelproblemscancauseviewingconcerns.IftheLCDyouareservicinghas
twoorlessvisibledefectivepixels,itshouldnotbeconsideredfaulty.However,iftheLCDhasthreeormore
visibledefectivepixels,itwillbedeemedasdefectivebyLenovoanditshouldbereplaced.
Notes:
•ThispolicyappliestoallThinkPadnotebookspurchasedon1January,2008orlater.
•LenovowillnotprovidewarrantyreplacementiftheLCDiswithinspecificationsbecausewecannot
guaranteethatanyreplacementLCDwillhavezeropixeldefects.
•OnepixelconsistsofR,G,Bsub-pixels.
Table5.LCD-relatedsymptoms
SymptomorerrorFRUoraction,insequence
Nobeep,power-onindicatoron,andablankLCDduring
POST.
Systemboard
•LCDbacklightnotworking.
•LCDtoodark.
•LCDbrightnesscannotbeadjusted.
•LCDcontrastcannotbeadjusted.
1.ReseattheLCDconnectors.
2.LCDassembly
3.Systemboard
•LCDscreenunreadable.
•Charactersmissingpixels.
•Screenabnormal.
•Wrongcolordisplayed.
1.Seeimportantnotefor“LCD-relatedsymptoms.”
2.ReseatallLCDconnectors.
3.LCDassembly
4.Systemboard
HorizontalorverticallinesdisplayedonLCD.LCDassembly
Intermittentproblems
Intermittentsystemhangproblemscanbeduetoavarietyofcausesthathavenothingtodowithahardware
defect,suchascosmicradiation,electrostaticdischarge,orsoftwareerrors.FRUreplacementshouldbe
consideredonlywhenaproblemrecurs.
Whenanalyzinganintermittentproblem,dothefollowing:
1.Runthediagnostictestforthesystemboardinloopmodeatleast10times.
2.Ifnoerrorisdetected,donotreplaceanyFRUs.
3.Ifanyerrorisdetected,replacetheFRUshownbytheFRUcode.Rerunthetesttoverifythatno
moreerrorsexist.
Undeterminedproblems
Ifthediagnostictestsdidnotidentifytheadapterordevicethathasfailed,ifwrongdevicesareinstalled,
orifthesystemsimplyisnotoperating,followtheseprocedurestoisolatethefailingFRU(donotisolate
FRUsthathavenodefects).
Verifythatallattacheddevicesaresupportedbythecomputer.
Verifythatthepowersupplybeingusedatthetimeofthefailureisoperatingcorrectly.See“Powersystem
checkout”onpage26.
1.Turnoffthecomputer.
2.VisuallycheckeachFRUfordamage.ReplaceanydamagedFRU.
3.Removeordisconnectallofthefollowingdevices:
40HardwareMaintenanceManual

a.Non-ThinkPaddevices
b.Printer,mouse,andotherexternaldevices
c.Externaldiskettedriveoropticaldrive
d.Wirelesscards
4.Turnonthecomputer.
5.Determinewhethertheproblemhasbeensolved.
6.Iftheproblemdoesnotrecur,reconnecttheremoveddevicesoneatatimeuntilyoufindthefailingFRU.
7.Iftheproblemremains,replacethefollowingFRUsoneatatime(donotreplaceanondefectiveFRU):
a.Systemboard
b.LCDassembly
Chapter4.Relatedserviceinformation41

42HardwareMaintenanceManual
Chapter5.Locations
Thischapterintroducesthelocationsofthehardwarecomponentsonyourcomputer.
Locatingcomputercontrols,connectors,andindicators
Thistopicintroducesthelocationsofthecomputercontrols,connectors,andindicators.
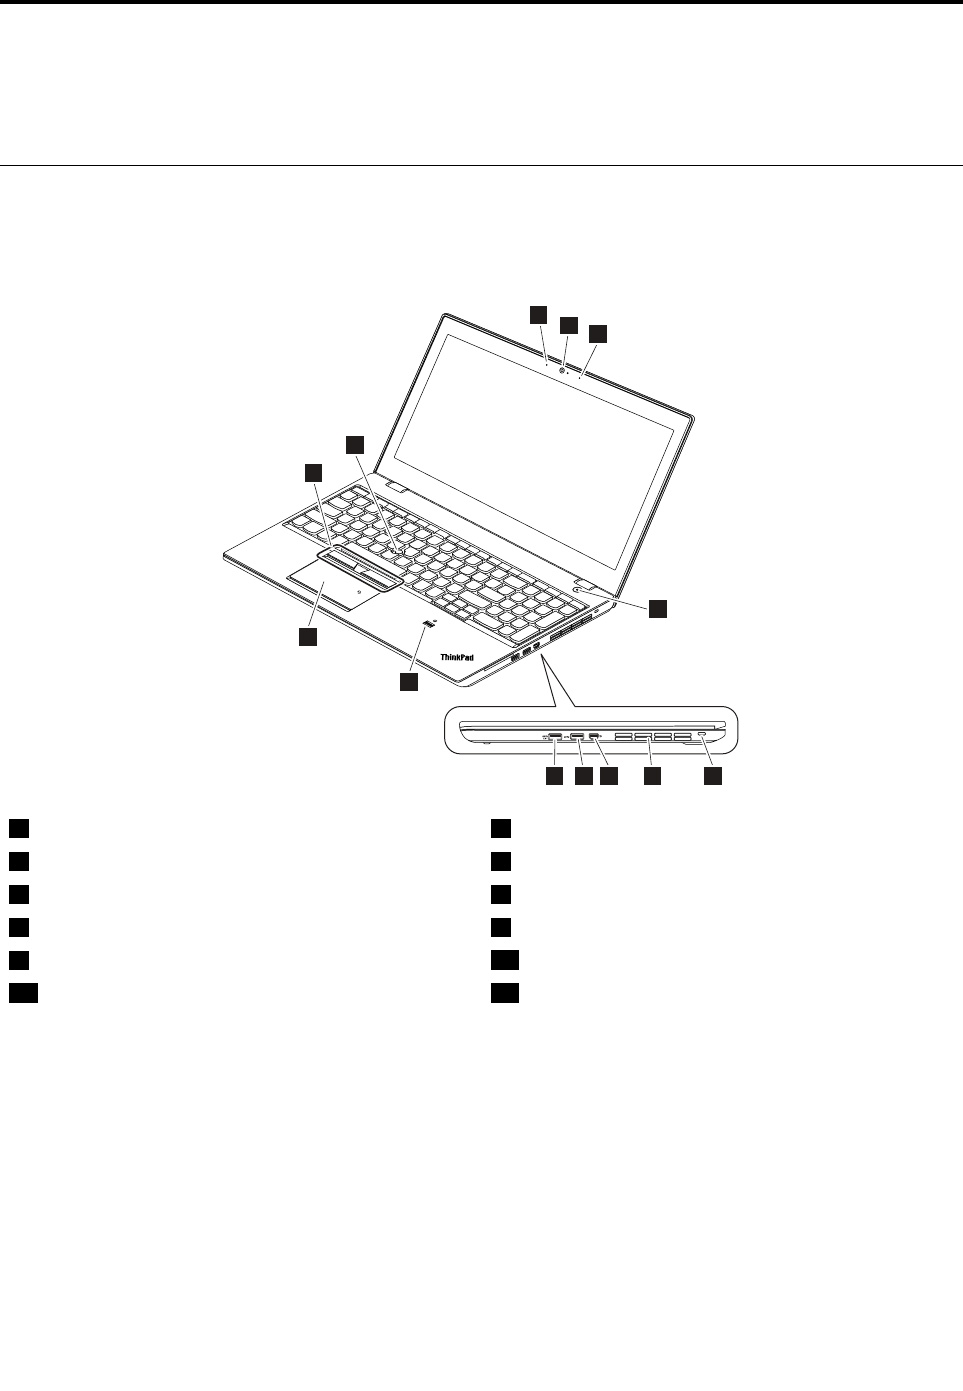
Frontview
1
2
2
45678
3
9
10
11
12
1Camera(availableonsomemodels)2Microphones(availableonsomemodels)
3Powerbuttonwithsystem-statusindicator14Security-lockslot
5Fanlouvers6MiniDisplayPort®connector
7USB3.0connector8AlwaysOnUSB3.0connector
9Fingerprintreader(availableonsomemodels)10Trackpad
11TrackPoint®buttons12TrackPointpointingstick
1:TheindicatorintheThinkPadlogoandtheindicatorinthecenterofthepowerbuttonshowthesystem
statusofthecomputer.
Blinksforthreetimes:Thecomputerisinitiallyconnectedtopower.
On:Thecomputerison(innormalmode).
Blinksfast:Thecomputerisenteringsleeporhibernationmode.
Blinksslowly:Thecomputerisinsleepmode.
Off:Thecomputerisofforinhibernationmode.
©CopyrightLenovo201543
Left-sideview
8
1
2
3
4
5
6
7
1Smart-card-readerslot(availableonsomemodels)2Ethernetconnector
3Media-card-readerslot4Audioconnector
5VGAconnector6USB3.0connector
7Powerconnector8System-statusindicator1
1:TheindicatorintheThinkPadlogoandtheindicatorinthecenterofthepowerbuttonshowthesystem
statusofthecomputer.
Blinksforthreetimes:Thecomputerisinitiallyconnectedtopower.
On:Thecomputerison(innormalmode).
Blinksfast:Thecomputerisenteringsleeporhibernationmode.
Blinksslowly:Thecomputerisinsleepmode.
Off:Thecomputerisofforinhibernationmode.
Bottomview
1
2
3
4
5
3
4
1Removablebattery2Dockingstationconnector
3Keyboarddrainageholes4Speakers
5Emergency-resethole
44HardwareMaintenanceManual

LocatingFRUsandCRUs
Thistopicintroducesthefollowingserviceparts:
•“MajorFRUs”onpage46
•“LCDFRUs”onpage47
•“MiscellaneouspartsandotherFRUs”onpage50
Notes:
•EachFRUisavailableforalltypesormodels,unlessotherwisespecified.
•CRUstatementforcustomers:
Youcanresolvesomeproblemswithyourproductwithareplacementpartyoucaninstallyourself,calleda
“CustomerReplaceableUnit”or“CRU.”SomeCRUsaredesignatedasself-serviceCRUsandothersare
designatedasoptional-serviceCRUs.Installationofself-serviceCRUsisyourresponsibility.Foroptional-service
CRUs,youcaneitherinstalltheCRUyourselforyoucanrequestthataServiceProviderinstalltheCRUaccording
tothewarrantyserviceforyourproduct.IfyouintendoninstallingtheCRU,LenovowillshiptheCRUtoyou.CRU
informationandreplacementinstructionsareshippedwithyourproductandareavailablefromLenovoatanytime
uponrequest.YoucanfindalistofCRUsforyourproductinthisHardwareMaintenanceManual.Anelectronic
versionofthismanualcanbefoundathttp://www.lenovo.com/support.Followtheon-screeninstructionstofind
themanualforyourproduct.YoumightberequiredtoreturnthedefectivepartthatisreplacedbytheCRU.
Whenreturnisrequired:(1)returninstructions,aprepaidshippinglabel,andacontainerwillbeincludedwith
thereplacementCRU;and(2)youmightbechargedforthereplacementCRUifLenovodoesnotreceivethe
defectiveCRUwithinthirty(30)daysofyourreceiptofthereplacementCRU.SeeyourLenovoLimitedWarranty
documentationforfulldetails.
ThinkPadcomputerscontainthefollowingtypesofCRUs:
–Self-serviceCRUs:TheseCRUsunplugorareheldbynomorethantwoscrews.Examplesofthesetypes
ofCRUsincludetheacpoweradapter,powercord,andharddiskdrive.Otherself-serviceCRUsdepending
onproductdesignmightincludethememorymodule,wirelesscard,keyboard,andpalmrestwithfingerprint
readerandtouchpad.
–Optional-serviceCRUs:TheseCRUsareisolatedpartswithinthecomputerthatareconcealedbyanaccess
panelthatistypicallysecuredbymorethantwoscrews.Oncetheaccesspanelisremoved,thespecific
CRUisvisible.
Chapter5.Locations45


No.DescriptionsSelf-serviceCRUOptional-service
CRU
6MemorymoduleYesNo
7Fingerprintreader*NoNo
8Fingerprintreaderbracket*NoNo
9Internalstoragedrive(harddiskdrive,solid-statedrive,orhybrid
drive)
YesNo
10HarddiskdrivecableYesNo
11HarddiskdrivebracketYesNo
12Storage-drivestabilizerbarNoYes
13SpeakerassemblyNoNo
14RemovablebatteryYesNo
15BasecoverassemblyNoNo
16Smartcardreaderordummysmartcardreader(dependingon
themodel)
NoNo
17Built-inbatteryorbatterybracket(dependingonthemodel)NoNo
18Coin-cellbatteryYesNo
19M.2solid-statedrive*NoNo
20WirelessWANcard*YesNo
21WirelessLANcardYesNo
22dc-inbracketNoYes
23dc-incableNoYes
24BoardforTrackpadandTrackPointbuttonsNoNo
25KeyboardNoYes
26TrackPointcapNoYes
Note:Dependingonthemodel,theitemsmarkedwithanasterisk(*)mightnotbeavailableonyourcomputer.
LCDFRUs
Formodelswithouttouchfunction:
Chapter5.Locations47
9
1
2
3
6
5
4
7
8
No.DescriptionsSelf-serviceCRUOptional-service
CRU
1LCDbezelassemblyNoNo
2Camera/microphonecardNoNo
3LCDpanelwithouttouchfunctionNoNo
48HardwareMaintenanceManual

No.DescriptionsSelf-service
CRU
Optional-service
CRU
1LCDpanelassemblywithtouchfunctionNoNo
2Camera/microphonecardNoNo
3TouchsensorcardNoNo
4AntennakitordummyantennakitNoNo
5LEDcableassemblyNoNo
6HingesNoNo
7LCDrearcoverassemblyNoNo
8LCDfrontsheetbezelNoNo
MiscellaneouspartsandotherFRUs
Miscellaneouspart
FRUdescriptionsSelf-serviceCRUOptional-service
CRU
Screwkit
•M2*L3.5,silver,thinhead(100)
•M2*L3,black,thinhead(30)
•M2*L2.5,bighead(30)
•M2*L3,bighead(30)
•M2*L2.5+3.1(30)
•M2*L6(30)
•M2.5*L7(30)
•M2*L2.5,black(30)
•M2.5*L2.5,bighead(30)
•M2.5*L4,silver(30)
•M2*L2,black,P=0.25(30)
•Spec(1)
NoNo
Basecoverassemblymiscellaneouskit
•BatterylatchL(1)
•BatterylatchR(1)
•BatteryknobL(1)
•BatteryknobR(1)
•Frontrubberfoot(1)
•Rearrubberfoot(1)
•BasecoverESDsponge(1)
•Batterylatchspring(1)
•Spec(1)
NoNo
50HardwareMaintenanceManual


52HardwareMaintenanceManual

Chapter6.FRUreplacementnotices
Thischapterpresentsnoticesrelatedtoremovingandreplacingparts.Readthischaptercarefullybefore
replacinganyFRU.
CRUstatementforcustomers:
Youcanresolvesomeproblemswithyourproductwithareplacementpartyoucaninstallyourself,called
a“CustomerReplaceableUnit”or“CRU.”SomeCRUsaredesignatedasself-serviceCRUsandothers
aredesignatedasoptional-serviceCRUs.Installationofself-serviceCRUsisyourresponsibility.For
optional-serviceCRUs,youcaneitherinstalltheCRUyourselforyoucanrequestthataServiceProvider
installtheCRUaccordingtothewarrantyserviceforyourproduct.IfyouintendoninstallingtheCRU,
LenovowillshiptheCRUtoyou.CRUinformationandreplacementinstructionsareshippedwithyour
productandareavailablefromLenovoatanytimeuponrequest.YoucanfindalistofCRUsforyour
productinthisHardwareMaintenanceManual.Anelectronicversionofthismanualcanbefoundat
http://www.lenovo.com/support.ClickGuides&Manualsandthenfollowtheon-screeninstructionstofind
themanualforyourproduct.YoumightberequiredtoreturnthedefectivepartthatisreplacedbytheCRU.
Whenreturnisrequired:(1)returninstructions,aprepaidshippinglabel,andacontainerwillbeincluded
withthereplacementCRU;and(2)youmightbechargedforthereplacementCRUifLenovodoesnot
receivethedefectiveCRUwithinthirty(30)daysofyourreceiptofthereplacementCRU.SeeyourLenovo
LimitedWarrantydocumentationforfulldetails.
Commonservicetools
Belowisthelistofcommonservicetoolsthatyoumightneedwhileservicingthecomputer.
•Screwdriverkit
•1/4"drivespinnerhandle
•1/4"Sq.to1/4"hextorxadapter
•TR7-TR-10tamperresistanttorxbits
•RemovaltoolantennaRFconnector
•USB2.0CD-RW/DVD-ROMcombodriveII
•USBcable
•USBMaintenanceKey
•USBfloppydiskettedriveformaintenancediskette
•USBfloppydiskettedrivetoolkit
•TestcardforintegratedSmartCard
•LENOVOThinkPadHardwareMaintenanceDisketteVersion1.76orlater
Note:DownloadthefilefromthefollowingWebsite:
http://www.lenovo.com/support
Screwnotices
Loosescrewscancauseareliabilityproblem.IntheThinkPadnotebookcomputer,thisproblemisaddressed
withspecialnylon-coatedscrewsthathavethefollowingcharacteristics:
•Theymaintaintightconnections.
•Theydonoteasilycomeloose,evenwithshockorvibration.
•Theyarehardertotighten.
Dothefollowingwhenyouservicethismachine:
•Keepthescrewkitinyourtoolbag.Forthepartnumberofthescrewkit,goto
http://www.lenovo.com/serviceparts-lookup.
•Itisrecommendedtousenewscrews.
©CopyrightLenovo201553
•Itisrecommendedtouseeachscrewonlyonce.
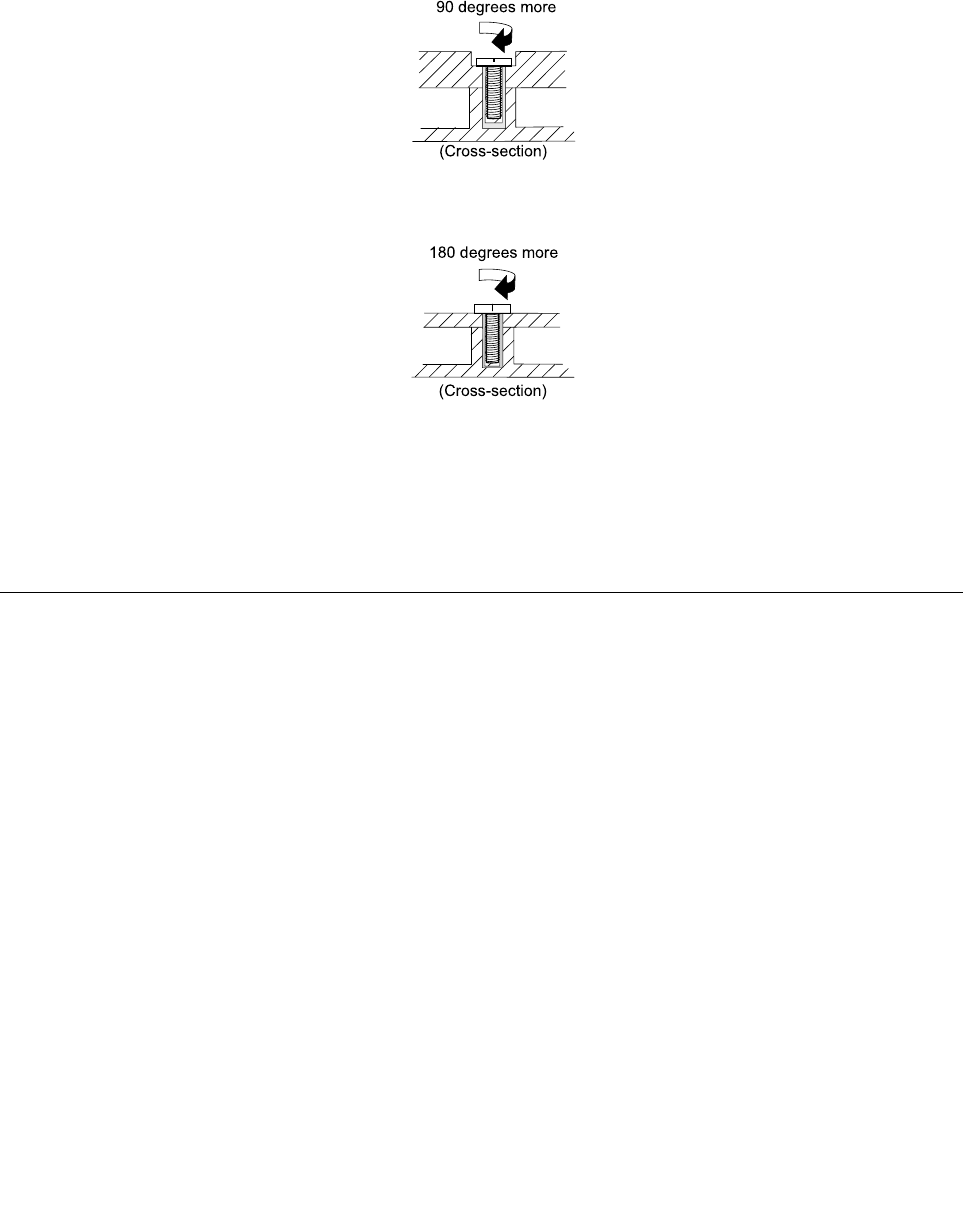
Tightenscrewsasfollows:
•Plastictoplastic
Turnanadditional90degreesafterthescrewheadtouchesthesurfaceoftheplasticpart.
90degreesmore
(Cross-section)
•Logiccardtoplastic
Turnanadditional180degreesafterthescrewheadtouchesthesurfaceofthelogiccard.
180degreesmore
(Cross-section)
Notes:
•Ensurethatyouusethecorrectscrew.Itisrecommendedtousenewscrewsforreplacements.Ifyou
haveatorquescrewdriver,tightenallscrewsfirmlytothetorquespecifiedinthescrewinformation
tableforeachstep.
•Ensurethattorquescrewdriversarecalibratedcorrectlyfollowingcountryspecifications.
Retainingserialnumbers
Thissectionincludesthefollowingdescriptions:
•“Restoringtheserialnumberofthesystemunit”onpage54
•“RetainingtheUUID”onpage55
•“ReadingorwritingtheECAinformation”onpage56
Restoringtheserialnumberofthesystemunit
Whenthecomputerwasmanufactured,theEEPROMonthesystemboardwasloadedwiththeserial
numbersofthesystemandallmajorcomponents.Thesenumbersneedtoremainthesamethroughout
thelifeofthecomputer.
Ifyoureplacethesystemboard,youmustrestoretheserialnumberofthesystemunittoitsoriginalvalue.
Theserialnumberofthesystemunitiswrittenonthelabelattachedtothebottomofthecomputer.
Ifyoucannotfindtheserialnumberofthesystemunitonthebottomofthecomputer,trythefollowing
methodtogetthenumber:
Note:Beforeyouperformtheoperation,ensurethattheUEFI/LegacysettingwithintheStartupmenuin
theThinkPadSetupprogramissettoUEFIOnly.
1.ConnectaUSBmemorykeytothecomputer.
54HardwareMaintenanceManual

2.Gotohttp://www.lenovo.com/maintenanceutilitiesandfollowtheinstructionsonthescreentocreatea
MaintenanceKey.
Note:OnlyanauthorizedLenovoservicetechniciancanaccesstheaboveWebsite.
3.Restartthecomputer.
4.Whenthelogoisdisplayed,pressEsc.TheThinkPadConfigInformationUpdateUtilityinterfaceis
displayed.
5.Type1underEntertheactiondesired,thenpressEnter.TheThinkPadSerialNumberUpdateUtilityfor
AssetIDscreenisdisplayed.
6.Type2underEntertheactiondesired,thenpressEnter.Theserialnumberofeachdeviceinyour
computerisdisplayed;theserialnumberofthesystemunitislistedasfollows:
20-Serialnumber
7.Recordtheserialnumberofthesystemunit.
Afteryoureplacethesystemboard,dothefollowingtorestoretheserialnumberofthesystemunit:
1.ConnecttheMaintenanceKeytothecomputer.
2.Whenthelogoisdisplayed,pressEsc.TheThinkPadConfigInformationUpdateUtilityinterfaceis
displayed.
3.Type1underEntertheactiondesired,thenpressEnter.TheThinkPadSerialNumberUpdateUtilityfor
AssetIDscreenisdisplayed.
4.Type1underEntertheactiondesired,thenpressEnter.Thenfollowtheinstructionsonthescreen
torestoretheserialnumberofthesystemunit.
RetainingtheUUID
TheUniversallyUniqueIdentifier(UUID)isa128-bitnumberuniquelyassignedtoyourcomputerat
productionandstoredintheEEPROMofyoursystemboard.
ThealgorithmthatgeneratesthenumberisdesignedtoprovideuniqueIDsuntiltheyearA.D.3400.Notwo
computersintheworldhavethesamenumber.
Whenyoureplacethesystemboard,performthefollowingstepstocreateanewUUIDforthesystem
boardifthesystemboarddoesnothaveaUUID:
Note:Beforeyouperformtheoperation,ensurethattheUEFI/LegacysettingwithintheStartupmenuin
theThinkPadSetupprogramissettoUEFIOnly.
1.ConnectaUSBmemorykeytothecomputer.
2.Gotohttp://www.lenovo.com/maintenanceutilitiesandfollowtheinstructionsonthescreentocreatea
MaintenanceKey.
Note:OnlyanauthorizedLenovoservicetechniciancanaccesstheaboveWebsite.
3.Restartthecomputer.
4.Whenthelogoscreenisdisplayed,pressEsc.TheThinkPadConfigInformationUpdateUtilityinterface
isdisplayed.
5.Type2underEntertheactiondesired,thenpressEnter.TheAutoUUIDgenerationutilityinterfaceis
displayed.
6.TypeyunderChangeUUID.OK?[Y/N],thenpressEnter.AnewUUIDiscreatedandwritten.Ifa
validUUIDalreadyexists,itisnotoverwritten.
Chapter6.FRUreplacementnotices55

ReadingorwritingtheECAinformation
InformationonEngineeringChangeAnnouncements(ECA)isstoredintheEEPROMofthesystemboard.
TheelectronicstorageofthisinformationsimplifiestheproceduretocheckiftheECAhasbeenpreviously
appliedtoamachine.ThemachinedoesnotneedtobedisassembledtocheckfortheECAapplication.
TocheckwhatECAshavebeenpreviouslyappliedtothemachine,usetheECAInformationRead/Write
functionontheUSBMaintenanceKey.
1.InserttheMaintenanceKeyandrestartthecomputer.
2.Fromthemainmenu,select6.SetECAInformation.
3.ToreadtheECAinformation,select2.ReadECA/reworknumberfromEEPROMandfollowthe
instructionsonthescreen.
4.Toreadtheboxbuilddate,select5.ReadboxbuilddatefromEEPROM,andfollowtheinstructionon
thescreen.
AfteranECAhasbeenappliedtothemachine,theEEPROMmustbeupdatedtoreflecttheECA's
application.UsetheMaintenanceKeytoupdatetheEEPROM.
Note:OnlytheECAnumberisstoredintheEEPROM.ThemachinetypeoftheECAisassumedtobethe
sameasthemachinetypeofthemachinethathadtheECAappliedtoit.
1.InserttheMaintenanceKeyandrestartthecomputer.
2.Fromthemainmenu,select6.SetECAInformation.
3.TowritetheECAinformation,select1.WriteECA/reworknumberfromEEPROM,andfollowthe
instructionsonthescreen.
4.Towritetheboxbuilddate,select4.WriteboxbuilddatefromEEPROM,andfollowtheinstructionon
thescreen.
Ifthesystemboardisbeingreplaced,trytoreadtheECAinformationfromtheoldsystemboardandtransfer
theinformationtothenewsystem.Ifthesystemboardisinoperable,thiswillnotbepossible.
56HardwareMaintenanceManual

Chapter7.RemovingorreplacingaFRU
ThischapterprovidesinstructionsonhowtoremoveorreplaceaFRU.
CRUstatementforcustomers:
Youcanresolvesomeproblemswithyourproductwithareplacementpartyoucaninstallyourself,called
a“CustomerReplaceableUnit”or“CRU.”SomeCRUsaredesignatedasself-serviceCRUsandothers
aredesignatedasoptional-serviceCRUs.Installationofself-serviceCRUsisyourresponsibility.For
optional-serviceCRUs,youcaneitherinstalltheCRUyourselforyoucanrequestthataServiceProvider
installtheCRUaccordingtothewarrantyserviceforyourproduct.IfyouintendoninstallingtheCRU,
LenovowillshiptheCRUtoyou.CRUinformationandreplacementinstructionsareshippedwithyour
productandareavailablefromLenovoatanytimeuponrequest.Y oucanfindalistofCRUsforyourproduct
inthisHardwareMaintenanceManual.Anelectronicversionofthismanualisavailablefordownloadingat
http://www.lenovo.com/support.YoumightberequiredtoreturnthedefectiveCRU.Whenreturnisrequired:
(1)returninstructions,aprepaidshippinglabel,andacontainerwillbeincludedwiththereplacement
CRU;and(2)youmightbechargedforthereplacementCRUifLenovodoesnotreceivethedefective
partwithinthirty(30)daysofyourreceiptofthereplacementCRU.SeeyourLenovoLimitedWarranty
documentationforfulldetails.
Generalguidelines
WhenremovingorreplacingaFRU,besuretoobservethefollowinggeneralguidelines:
1.Donottrytoserviceanycomputerunlessyouhavebeentrainedandcertified.Anuntrainedpersonruns
theriskofdamagingparts.
2.BeforereplacinganyFRU,reviewChapter6“FRUreplacementnotices”onpage53.
3.BeginbyremovinganyFRUsthathavetoberemovedbeforereplacingthefailingFRU.AnysuchFRUs
arelistedatthebeginningofeachFRUreplacementsection.Removethemintheorderinwhichthey
arelisted.
4.FollowthecorrectsequenceinthestepsforremovingaFRU,asgiveninthedrawingsbythenumbers
insquarecallouts.
5.Whenturningascrew,turnitinthedirectionasgivenbythearrowinthedrawing.
6.WhenremovingaFRU,moveitinthedirectionasgivenbythearrowinthedrawing.
7.ToputthenewFRUinplace,reversetheremovalprocedureandfollowanynotesthatpertainto
replacement.
8.WhenreplacingaFRU,usethecorrectscrewsasshowninthereplacementprocedures.
DANGER
BeforeremovinganyFRU,turnoffthecomputer,unplugallpowercordsfromelectricaloutlets,
disconnectanyinterconnectingcables,andthendisablethebuilt-inbattery.
Attention:AfterreplacingaFRU,donotturnonthecomputeruntilyouhavemadesurethatallscrews,
springs,andothersmallpartsareinplaceandnonearelooseinsidethecomputer.Verifythisbyshaking
thecomputergentlyandlisteningforrattlingsounds.Metallicpartsormetalflakescancauseelectrical
shortcircuits.
Attention:Thesystemboardissensitiveto,andcanbedamagedby,electrostaticdischarge(ESD).Before
touchingit,establishpersonalgroundingbytouchingagroundpointwithonehandorbyusinganESDstrap.
©CopyrightLenovo201557
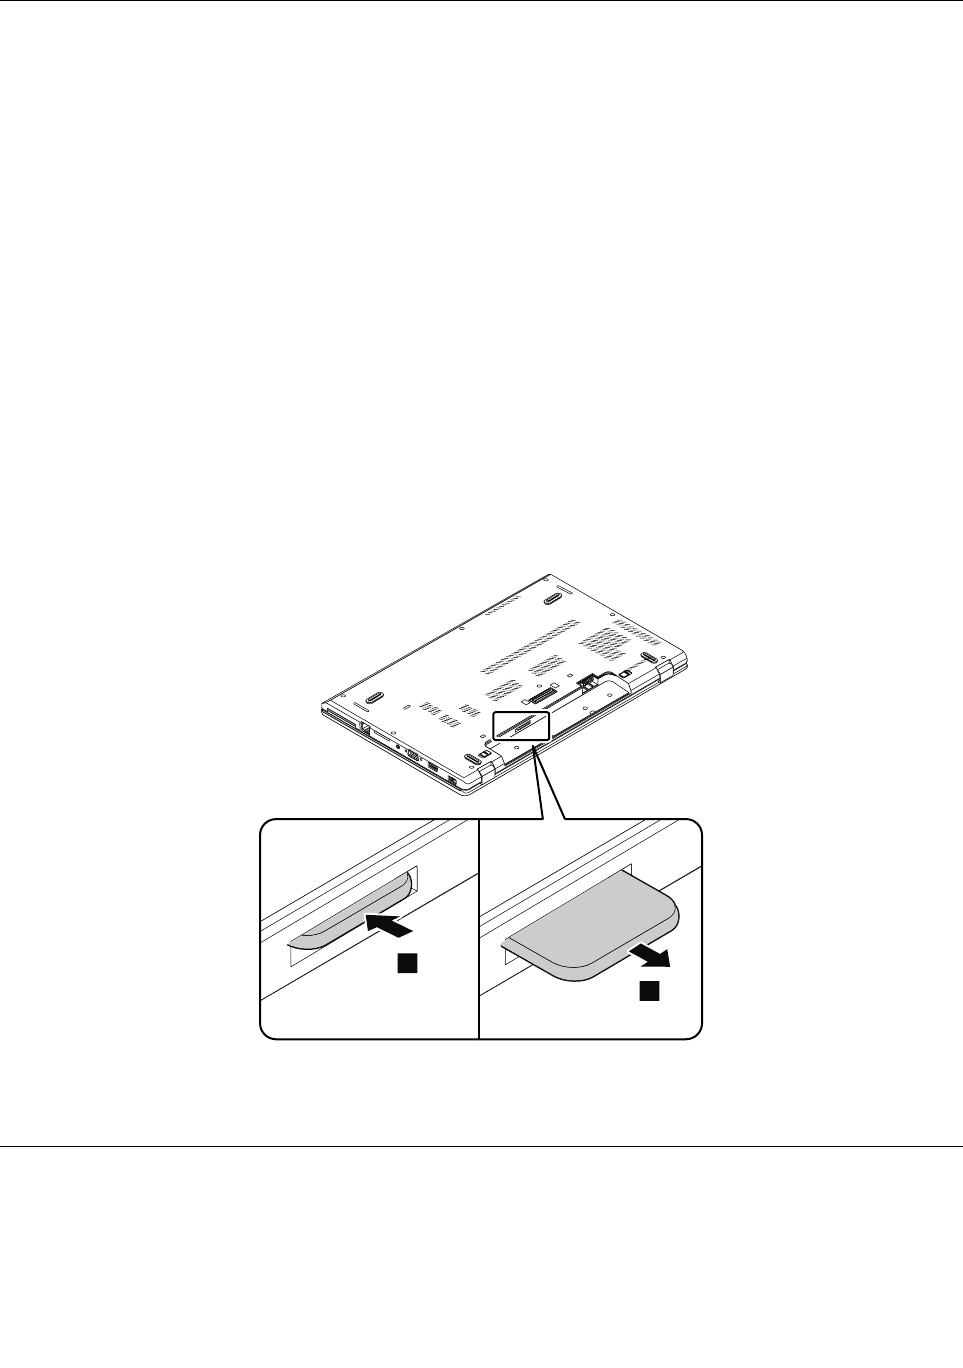
Beforeservicingthecomputer
Carefullyreadthistopicbeforeservicingthecomputer.
Disablingthebuilt-inbattery
BeforereplacinganyFRU,ensurethatyouhavedisabledthebuilt-inbatterybydoingthefollowing:
1.Turnoffyourcomputeranddisconnecttheacpoweradapterandallcablesfromthecomputer.
2.Turnonyourcomputer.WhentheThinkPadlogoisdisplayed,immediatelypressF1toenterThinkPad
Setup.
3.SelectConfig➙Power.ThePowersubmenuisdisplayed.
4.SelectDisablebuilt-inbatteryandpressEnter.
5.SelectYesintheSetupConfirmationwindow.Thebuilt-inbatteryisdisabledandthecomputerturnsoff
automatically.Waitthreetofiveminutestoletthecomputercool.
RemovingthemicroSIMcard
Foraccess,removethisFRU:
•“1010Removablebattery”onpage59
IfthecomputerhasamicroSIMcardinstalled,youalsomustremovethemicroSIMcardbeforeyou
starttheservicing.
1
2
Afteryoufinishtheservicing,ensurethatyouinstallthemicroSIMcard(ifavailable)intothemicroSIM
cardslot.
RemovingamajorFRU
ThissectionprovidesinstructionsonhowtoremoveamajorFRU.
58HardwareMaintenanceManual
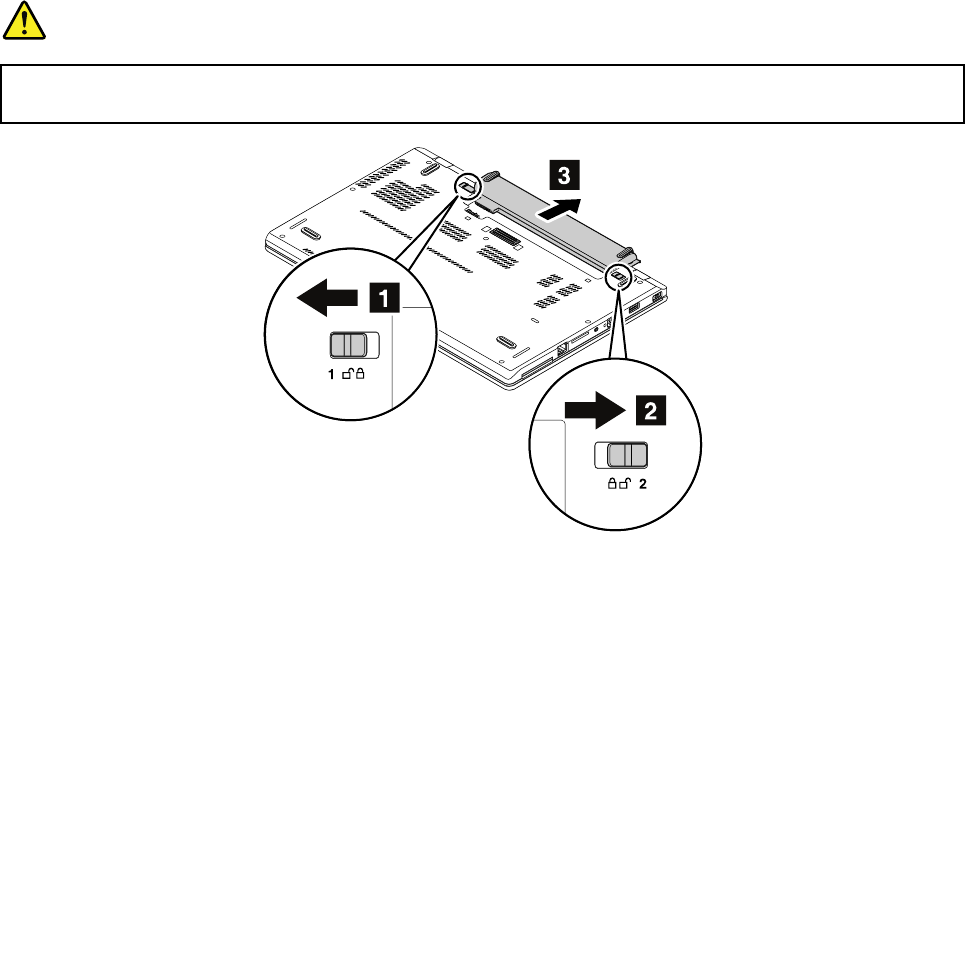
1010Removablebattery
Importantnoticeforreplacingaremovablebattery
Attention:Lenovohasnoresponsibilityfortheperformanceorsafetyofunauthorizedbatteries,and
providesnowarrantiesforfailuresordamagearisingoutoftheiruse.
TheLenovoSolutionCenterprogramprovidesanautomaticbatterydiagnostictestthatdeterminesifthe
batterypackisdefective.AbatterypackFRUshouldnotbereplacedunlessthisdiagnostictestshows
thatthebatteryisdefective.Theonlyexceptiontothisisifthebatterypackisphysicallydamagedora
customerisreportingapossiblesafetyissue.
IftheLenovoSolutionCenterprogramisnotinstalledonthecomputer,thecustomershoulddownloadand
installtheprogramtodiagnosethebatterypack,beforegettinganon-physicallydamagedbatterypack
replaced.Notethatthereplacementofaphysicallydamagedbatterypackisnotcoveredbythewarranty.
Removalstepsoftheremovablebattery
DANGER
Useonlytheauthorizedbatteryspecifiedforyourcomputer.Anyotherbatterycouldigniteor
explode.
1
1
2
2
3
1020Basecoverassembly
Foraccess,removethisFRU:
•“1010Removablebattery”onpage59
Chapter7.RemovingorreplacingaFRU59
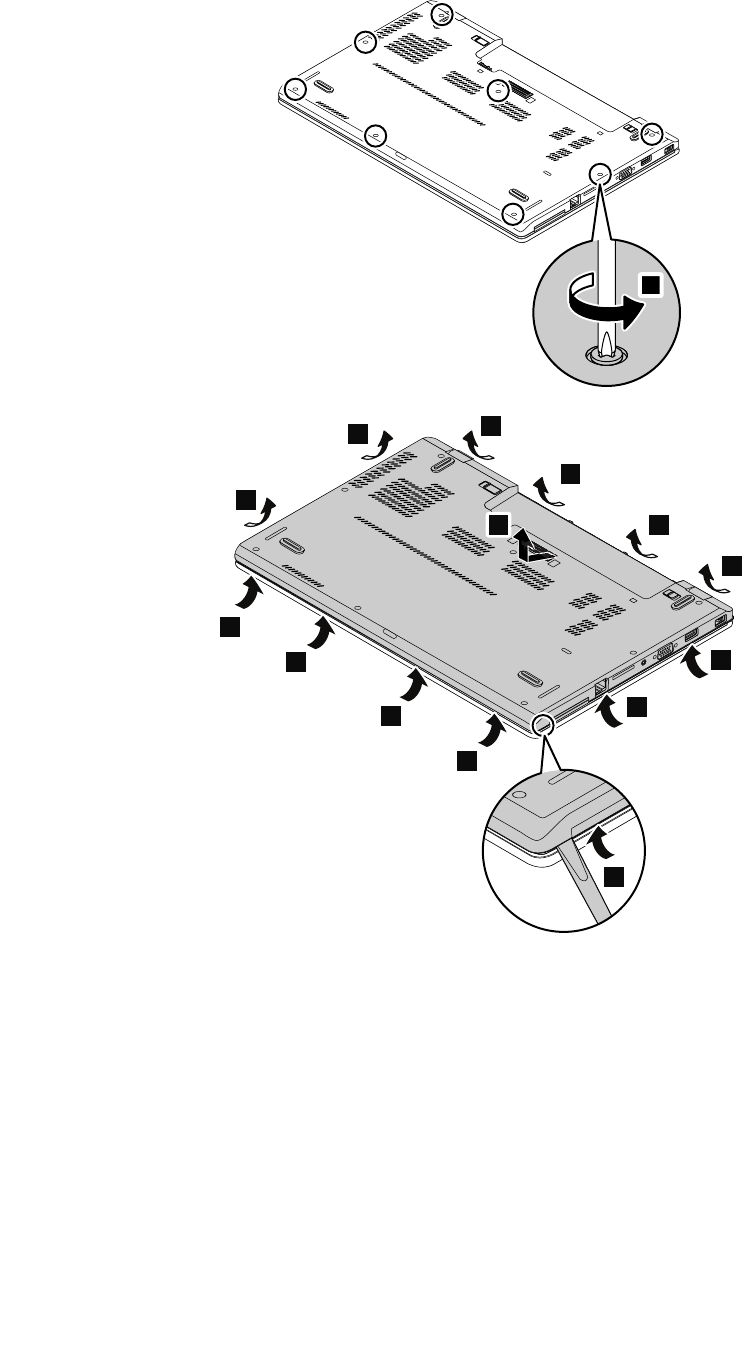
Removalstepsofthebasecoverassembly
1
2
3
3
3
3
3
3
3
33
3
3
3
4
60HardwareMaintenanceManual
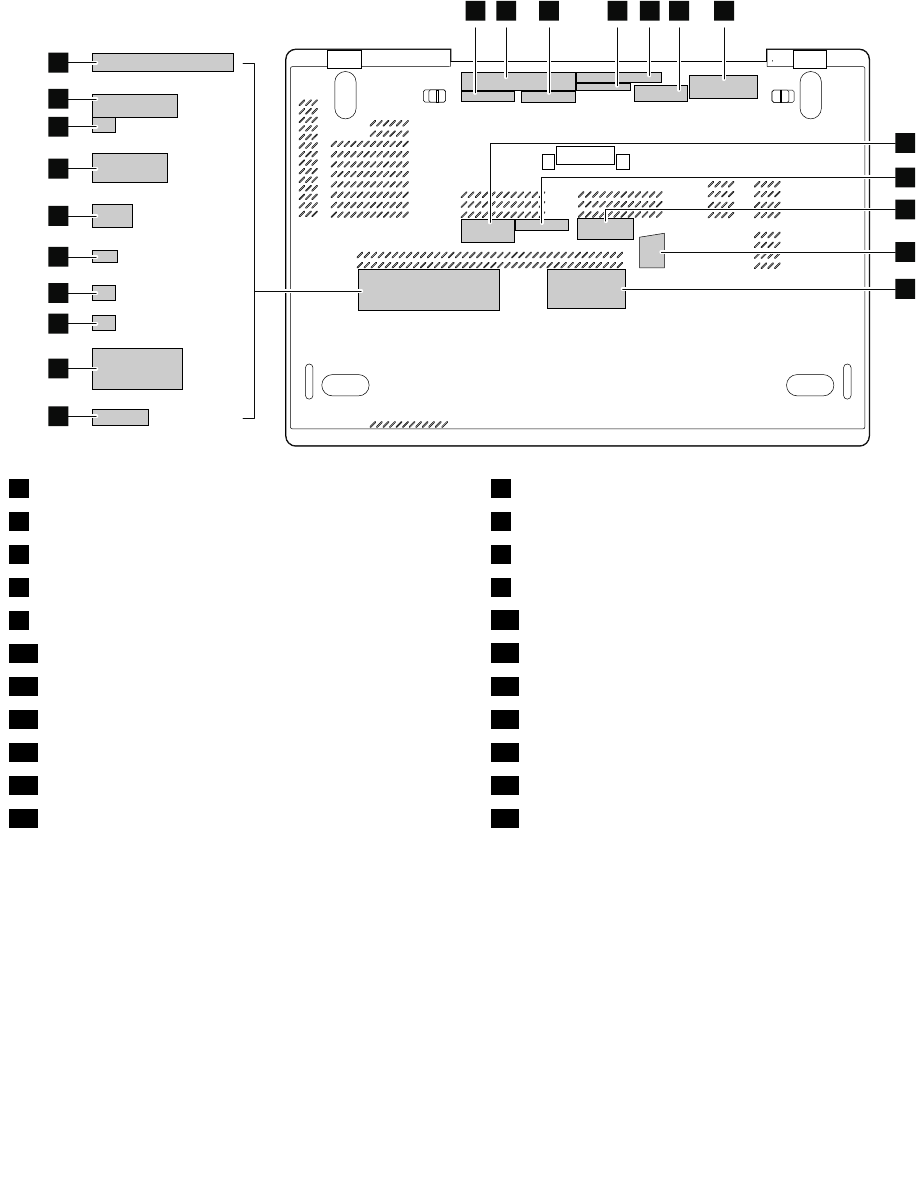
Applyinglabelstothebasecover:
Thenewbasecoverassemblyisshippedwithakitcontaininglabelsofseveralkinds.Applythoselabels
whenyoureplacethebasecoverassembly.Forthelabelsthatarenotshippedwiththenewbasecover
assembly,peelthemfromtheoldbasecoverassembly,andadherethemtothenewone.
Thefollowingillustrationshowsthelocationofeachlabel.
1234567
8
9
11
12
14
16
15
17
18
19
20
21
22
13
10
1Systembarcodelabel2Systemlabel
3FCClabel4WWANlabel(forT aiwanandKorea)
5Informationlabel6GEOlabel
7CertificateofAuthenticitylabel(forWindows7)8ChinaGEOlabel
9CECPlabel(forChina)10WWANIMEIlabel
11GenuineMicrosoftlabel(forWindows8.1)12Assettag
13KoreaKCSafetylabel(forKorea)14MexicoEnergylabel(forMexico)
15SIRIMlabel(forMalaysia)16Postellabel(forMalaysia)
17ICASAlabel(forSouthAfrica)18BrazilWWANlabel(forBrazil)
19ISRAELlabel(forIsrael)20Postellabel(forIndonesia)
21IndonesiaRatinglabel(forIndonesia)22INDIABISlabel(forIndia)
1030Keyboard
Foraccess,removethisFRU:
•“1010Removablebattery”onpage59
Chapter7.RemovingorreplacingaFRU61
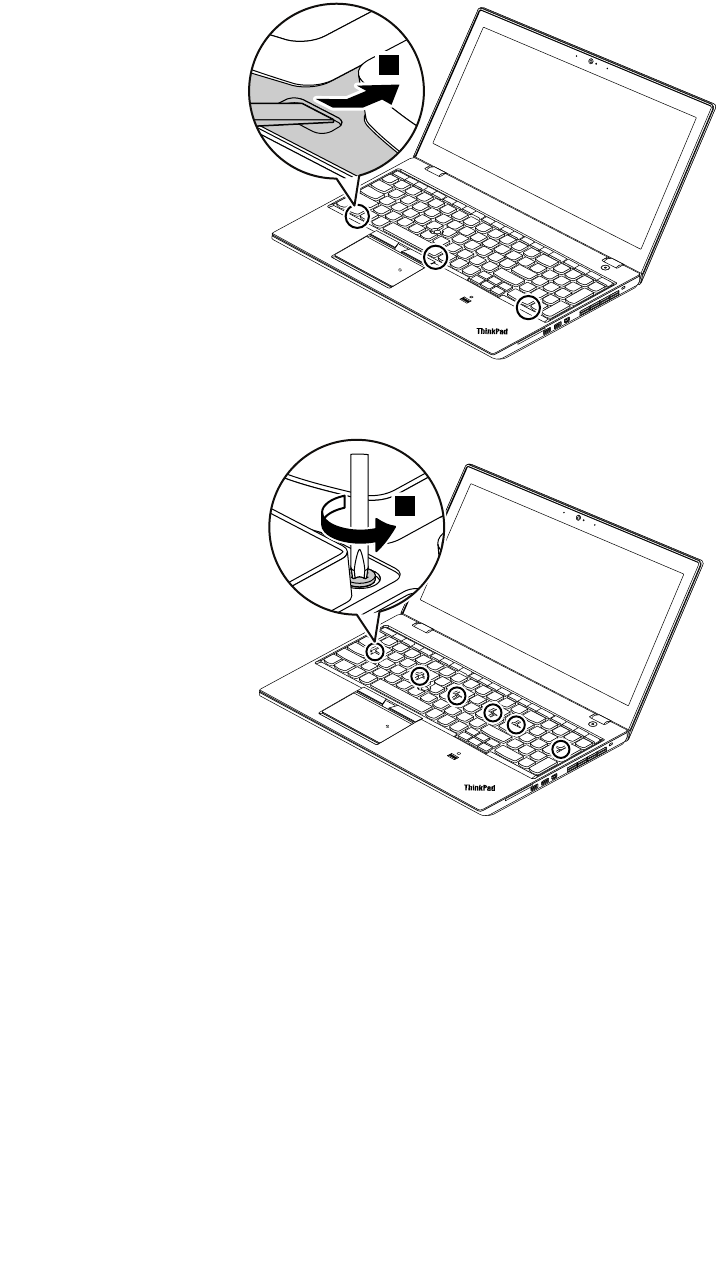
Removalstepsofthekeyboard
Torevealthescrewheadsbeneaththekeyboardframe,slidethekeyboardframeforwardby2.5mm(0.1
inch)withtheflatendofthekeyboardmulti-tool.
1
Loosenthescrewsthatsecurethekeyboardwiththecrossendofthekeyboardmulti-tool.
2
62HardwareMaintenanceManual
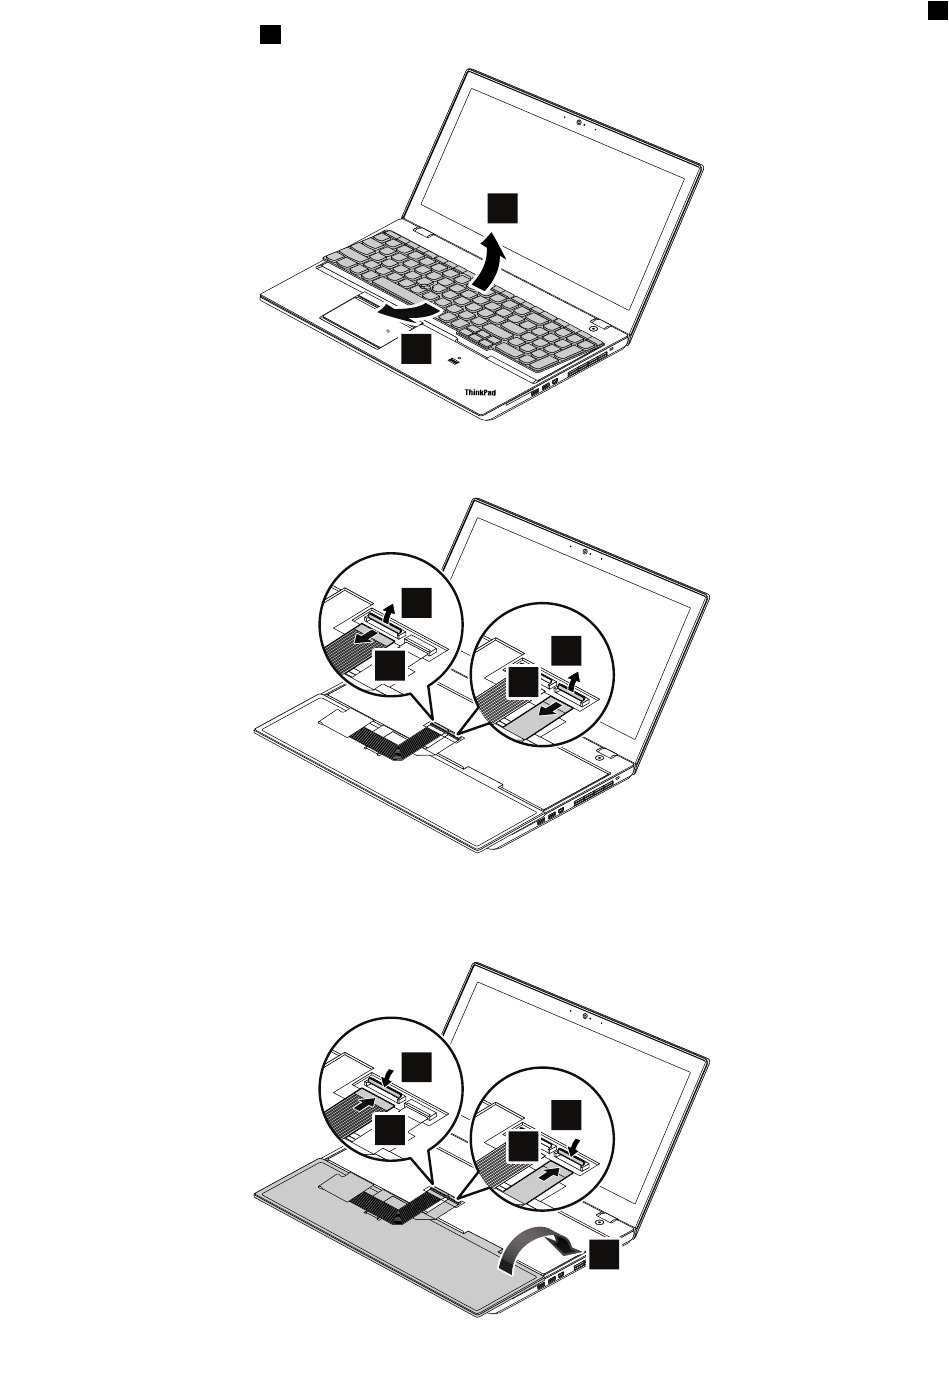
Pivotthekeyboardslightlyupwarduntilyoucanseetheconnectorsonthebottomsideofthekeyboard3.
Thenturnoverthekeyboard4.
4
3
Gentlyputthekeyboardonthepalmrestanddetachtheconnectors.Thenremovethekeyboard.
5
67
8
Installingthenewkeyboard
Attachtheconnectorsandthenturnoverthekeyboard.
4
32
1
0
0
5
Chapter7.RemovingorreplacingaFRU63
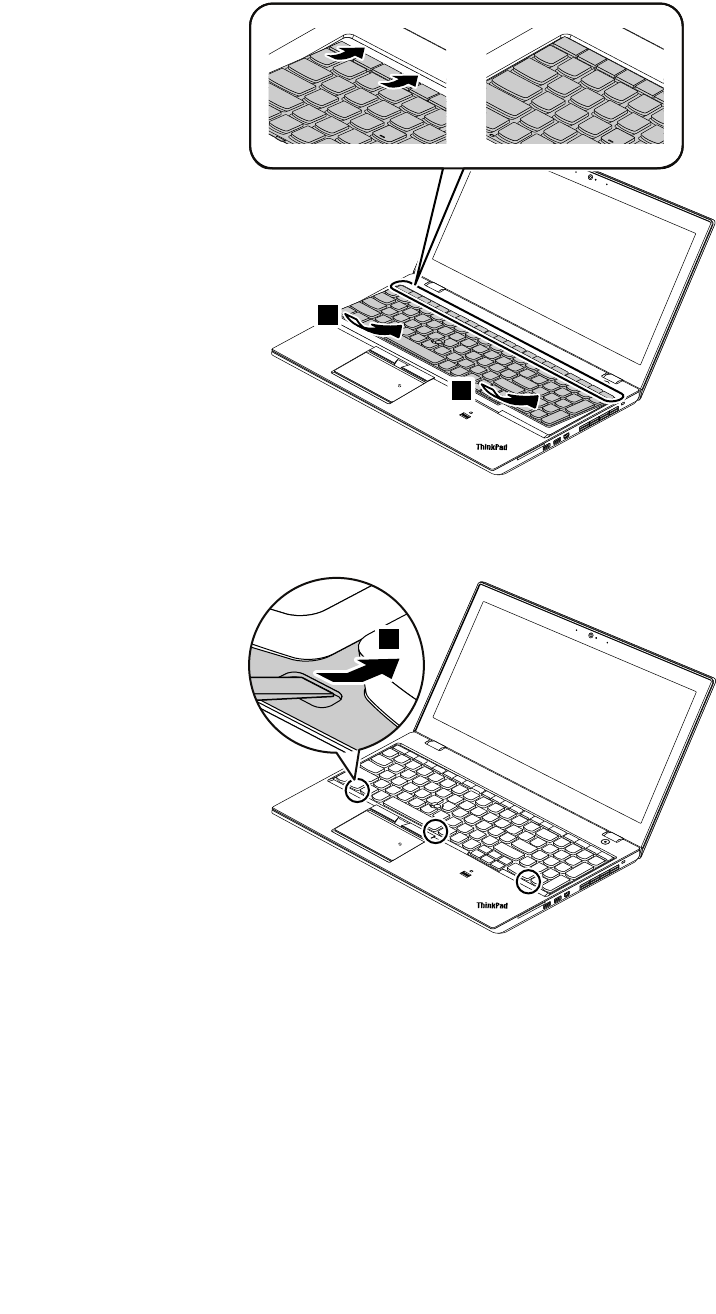
Insertthekeyboardintothespaceundertheframeofthekeyboardbezelasshown.Ensurethatthefront
edgeofthekeyboard(theedgethatisclosetothedisplay)isundertheframeofthekeyboardbezel.
6
6
Revealthescrewheadsbyslidingthekeyboardframeforwardwiththeflatendofthekeyboardmulti-tool.
Ensurethatthescrewheadsareexposedcompletely.
7
64HardwareMaintenanceManual

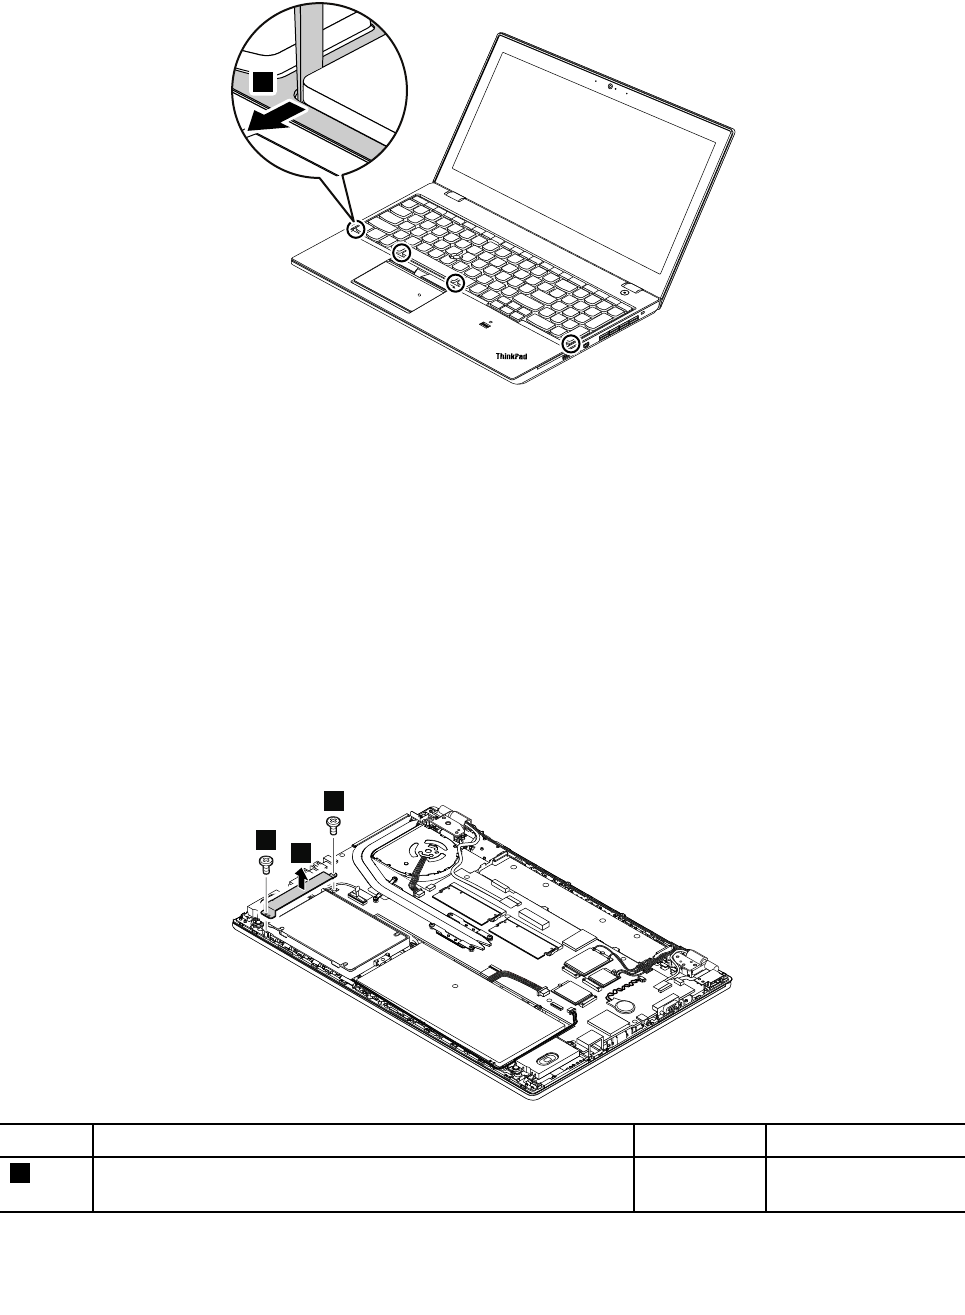
Adjustthekeyboardframeinplacewiththeflatendofthekeyboardmulti-tooltoensurethatallthelatches
aresecuredunderthekeyboardbezel.
10
1040Storage-drivestabilizerbar,internalstoragedrive,harddiskdrive
cable,andharddiskdrivebracket
Foraccess,removethisFRU:
•“1010Removablebattery”onpage59
•“1020Basecoverassembly”onpage59
Attention:
•Donotdropthedriveorapplyanyphysicalshocktoit.Thedriveissensitivetophysicalshock.Improper
handlingcancausedamageandpermanentlossofdata.
•Beforeremovingthedrive,havetheusermakeabackupcopyofalltheinformationonitifpossible.
•Neverremovethedrivewhilethesystemisoperatingorinsuspendmode.
Removalstepsofthestorage-drivestabilizerbar
1
1
2
StepScrew(quantity)ColorTorque
1M2×L3.5mm,flat-head,nylon-coated(2)Silver0.181Nm
(1.85kgf-cm)
66HardwareMaintenanceManual
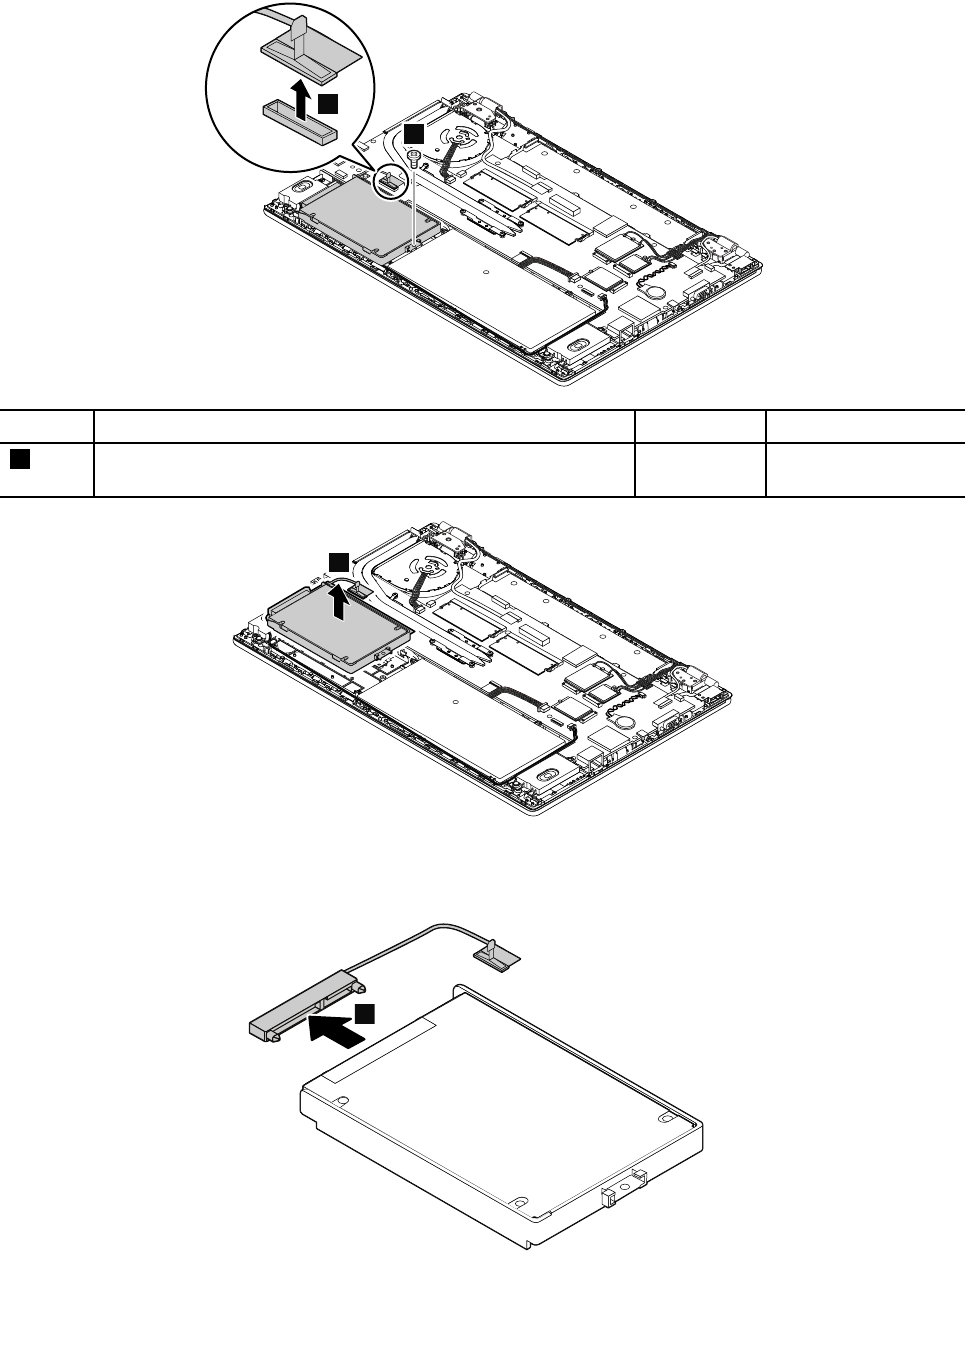
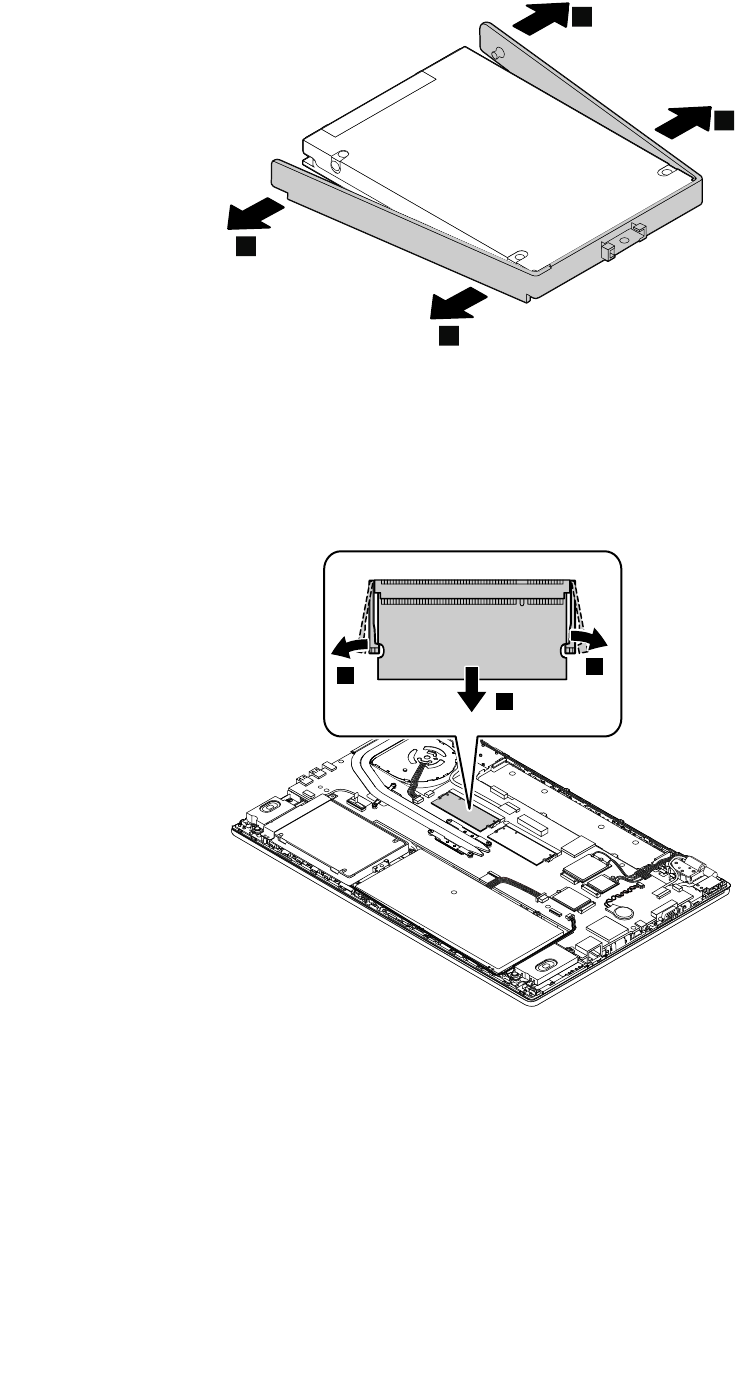
7
7
7
7
1050Memorymodule
Foraccess,removethisFRU:
•“1010Removablebattery”onpage59
•“1020Basecoverassembly”onpage59
Removalstepsofthememorymodule
2
11
1060WirelessLANcard
Note:Thisinformationisonlyfortheuser-replaceablemodules.
Foraccess,removethisFRU:
•“1010Removablebattery”onpage59
•“1020Basecoverassembly”onpage59
68HardwareMaintenanceManual
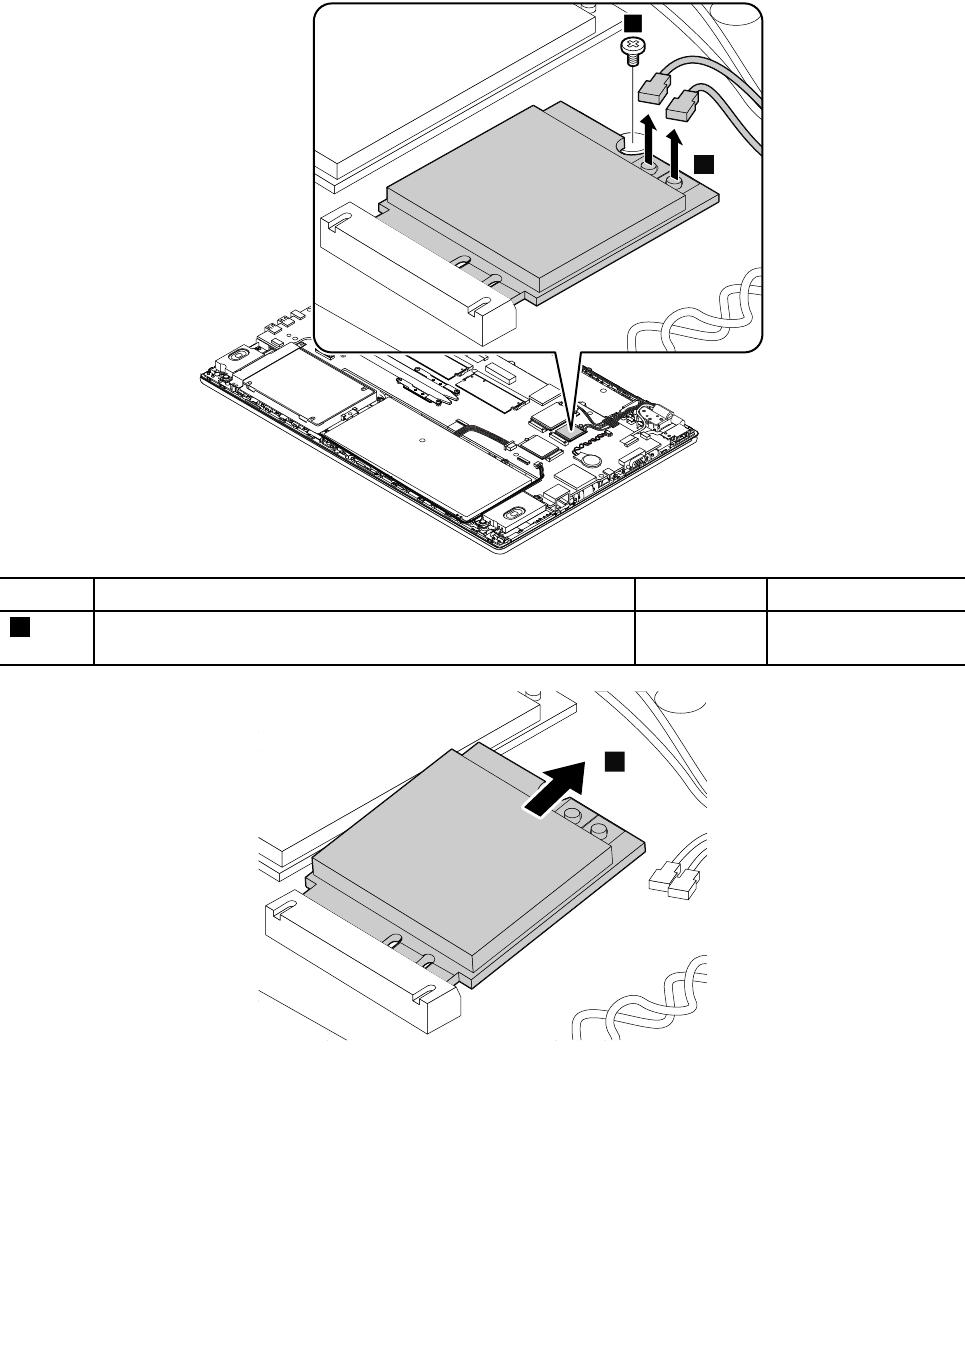
RemovalstepsofthewirelessLANcard
1
2
StepScrew(quantity)ColorTorque
1M2×L3.5mm,flat-head,nylon-coated(1)Bronze0.181Nm
(1.85kgf-cm)
3
Wheninstalling:Plugthegraycableintothemainconnectorandtheblackcableintotheauxiliaryconnector.
1070WirelessWANcard
Note:Thisinformationisonlyfortheuser-replaceablemodules.
Foraccess,removethisFRU:
•“1010Removablebattery”onpage59
•“1020Basecoverassembly”onpage59
Chapter7.RemovingorreplacingaFRU69
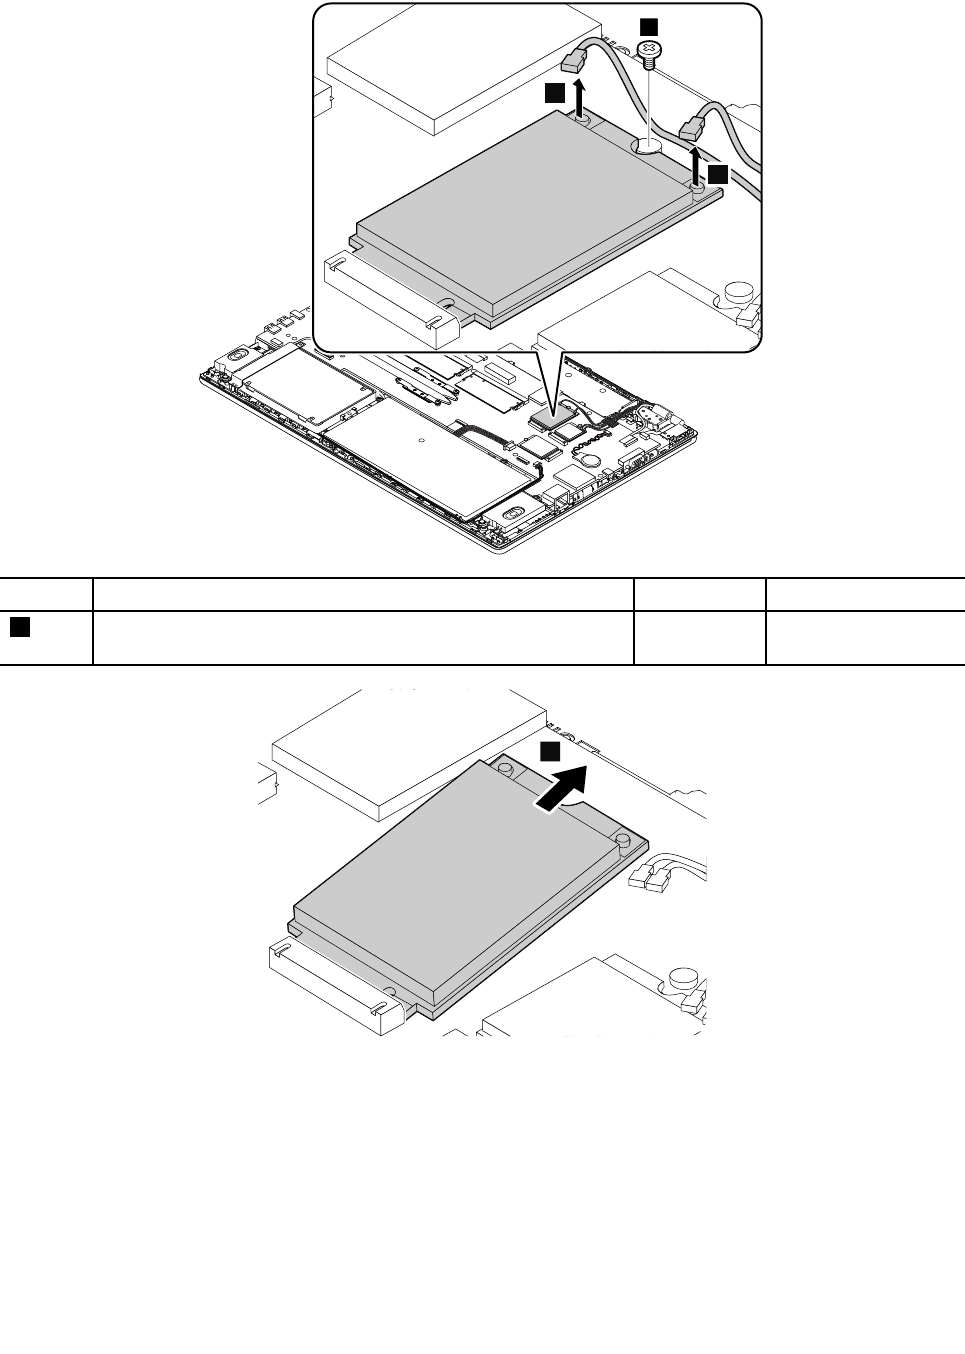
RemovalstepsofthewirelessWANcard
1
2
2
StepScrew(quantity)ColorTorque
1M2×L3.5mm,flat-head,nylon-coated(1)Bronze0.181Nm
(1.85kgf-cm)
3
Wheninstalling:Plugtheorangecableintothemainconnectorandthebluecableintotheauxiliary
connector.
1080M.2solid-statedrive
Foraccess,removethisFRU:
•“1010Removablebattery”onpage59
•“1020Basecoverassembly”onpage59
70HardwareMaintenanceManual
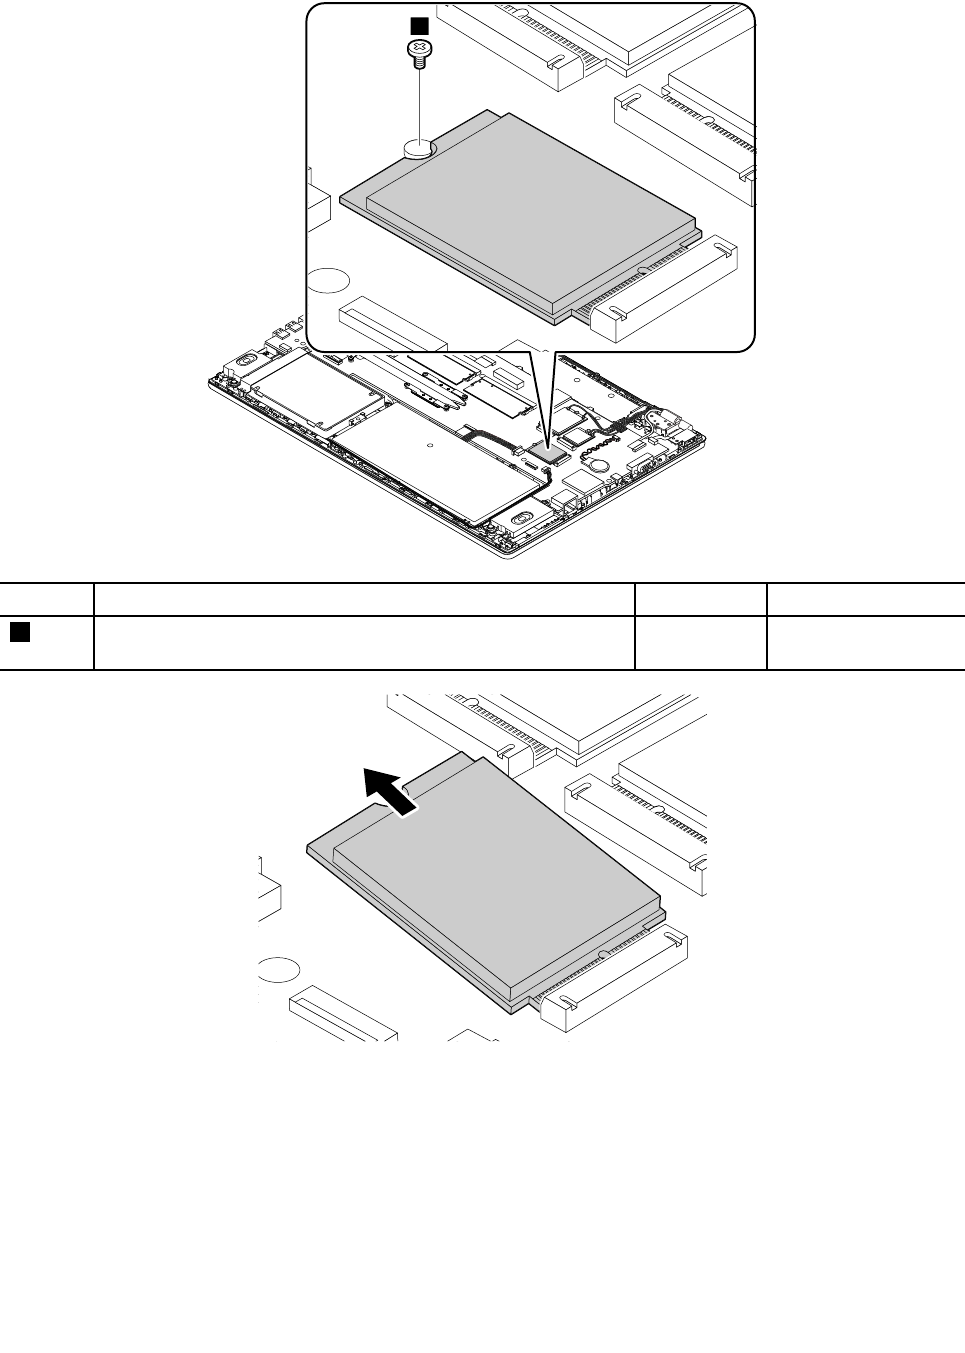
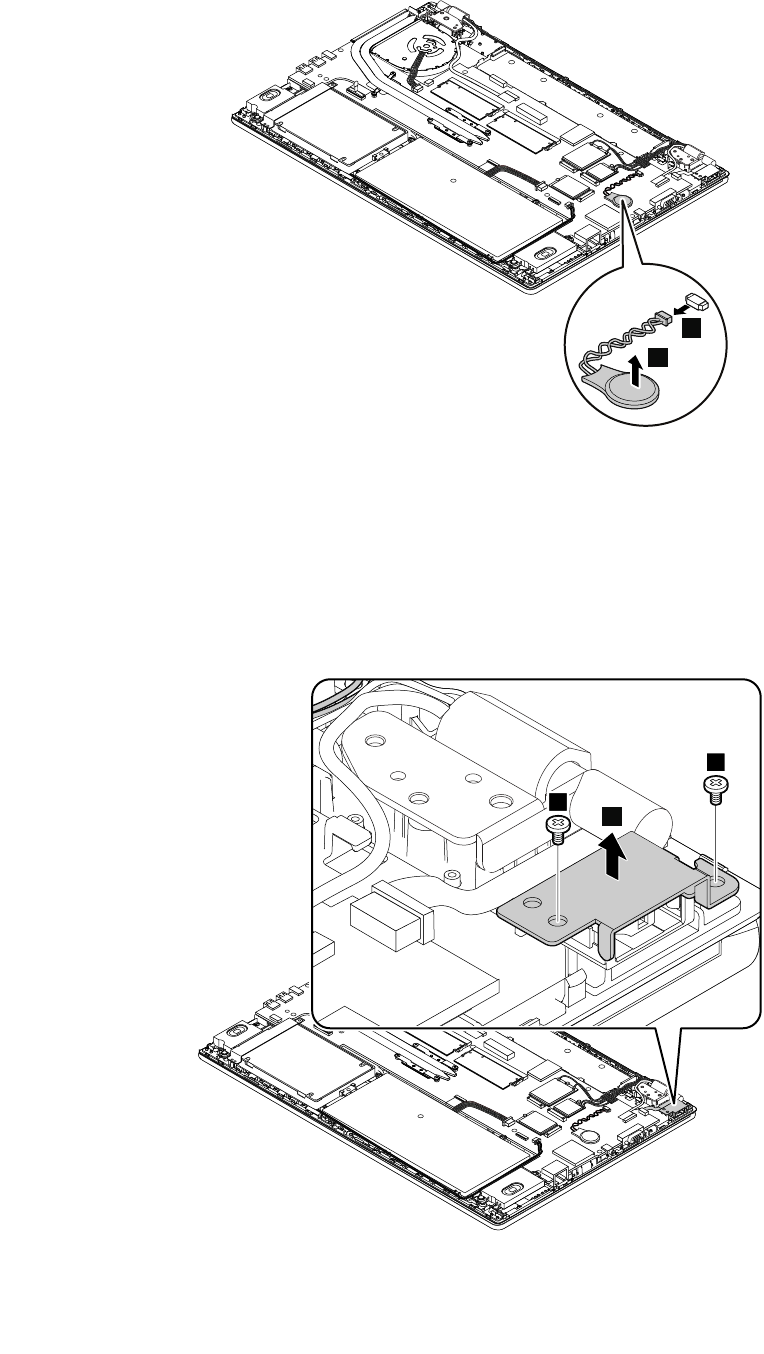
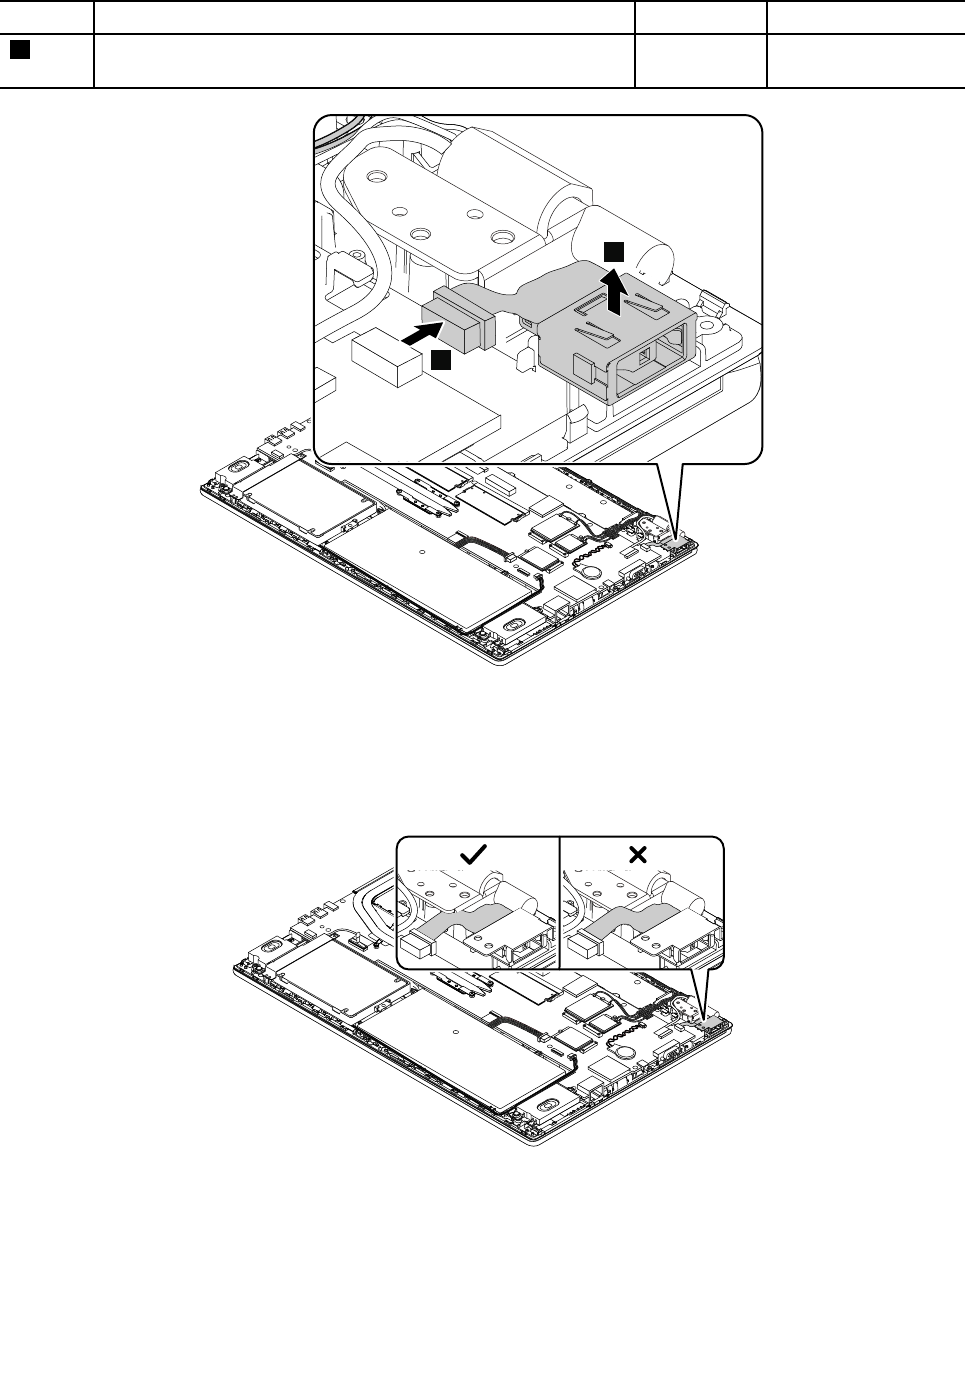
StepScrew(quantity)ColorTorque
1M2×L3.5mm,flat-head,nylon-coated(2)Silver0.181Nm
(1.85kgf-cm)
4
3
Wheninstalling:
Ensurethattheconnectorisattachedfirmly.
Attention:Donotroutethedc-incableonthehinge.Otherwise,thedc-incablemightgetdamagedwhen
thebasecoverassemblyisinstalled.
1120Built-inbatteryordummybattery
Importantnoticesforreplacingabattery
Attention:Lenovohasnoresponsibilityfortheperformanceorsafetyofunauthorizedbatteries,and
providesnowarrantiesforfailuresordamagearisingoutoftheiruse.
Chapter7.RemovingorreplacingaFRU73
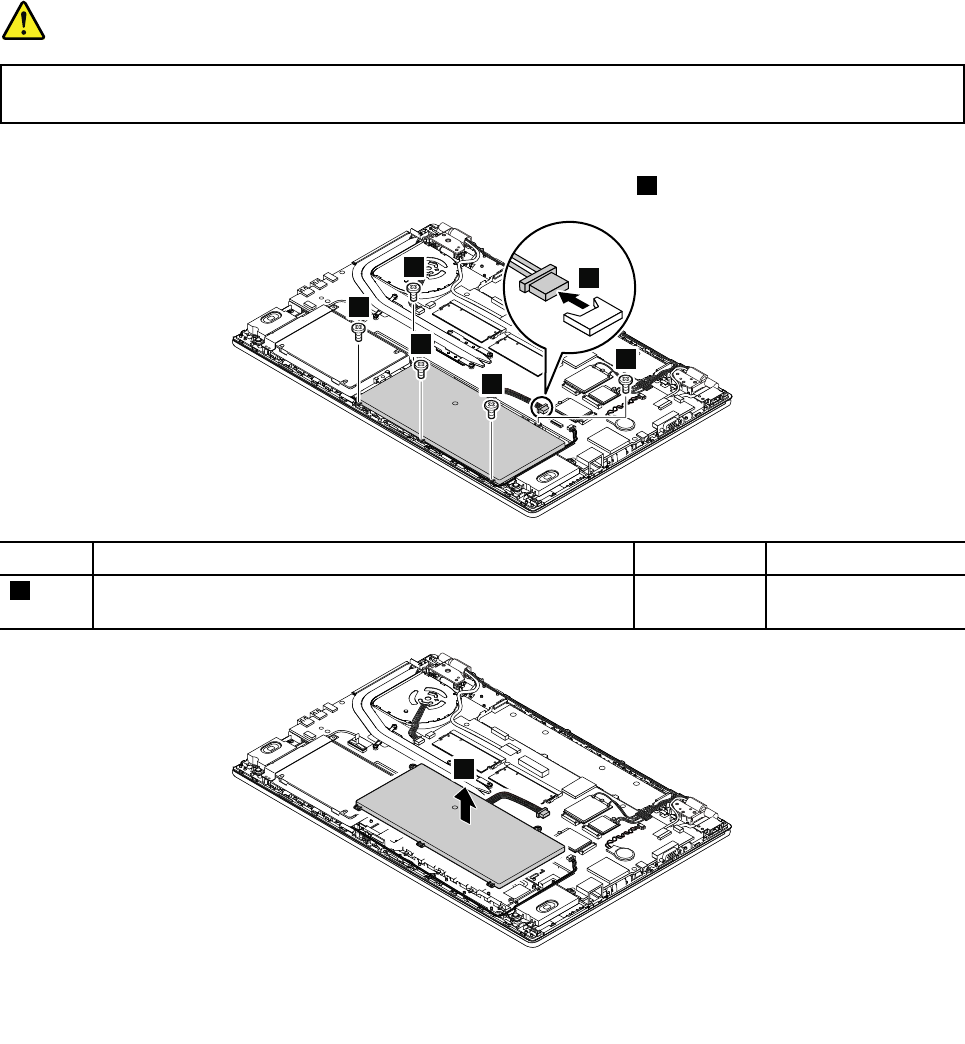
TheLenovoSolutionCenterprogramprovidesanautomaticbatterydiagnostictestthatdeterminesifthe
batteryisdefective.AbatteryFRUshouldnotbereplacedunlessthisdiagnostictestshowsthatthebattery
isdefective.Theonlyexceptiontothisisifthebatteryisphysicallydamagedoracustomerisreportinga
possiblesafetyissue.
IftheLenovoSolutionCenterprogramisnotinstalledonthecomputer,thecustomershoulddownloadand
installtheprogramtodiagnosethebattery,beforegettinganon-physicallydamagedbatteryreplaced.Note
thatthereplacementofaphysicallydamagedbatteryisnotcoveredbythewarranty.
Foraccess,removethisFRU:
•“1010Removablebattery”onpage59
•“1020Basecoverassembly”onpage59
Removalstepsofthebuilt-inbatteryordummybuilt-inbattery
DANGER
Useonlytheauthorizedbatteryspecifiedforyourcomputer.Anyotherbatterycouldigniteor
explode.
Note:Ifyourcomputerdoesnotcomewithabuilt-inbattery,adummybuilt-inbatteryisinstalledinstead.
Toremovethedummybuilt-inbattery,youdonothavetoperformstep1inthefollowingillustration.
1
2
2
2
2
2
StepScrew(quantity)ColorTorque
2M2×L3.5mm,flat-head,nylon-coated(5)Silver0.181Nm
(1.85kgf-cm)
3
74HardwareMaintenanceManual
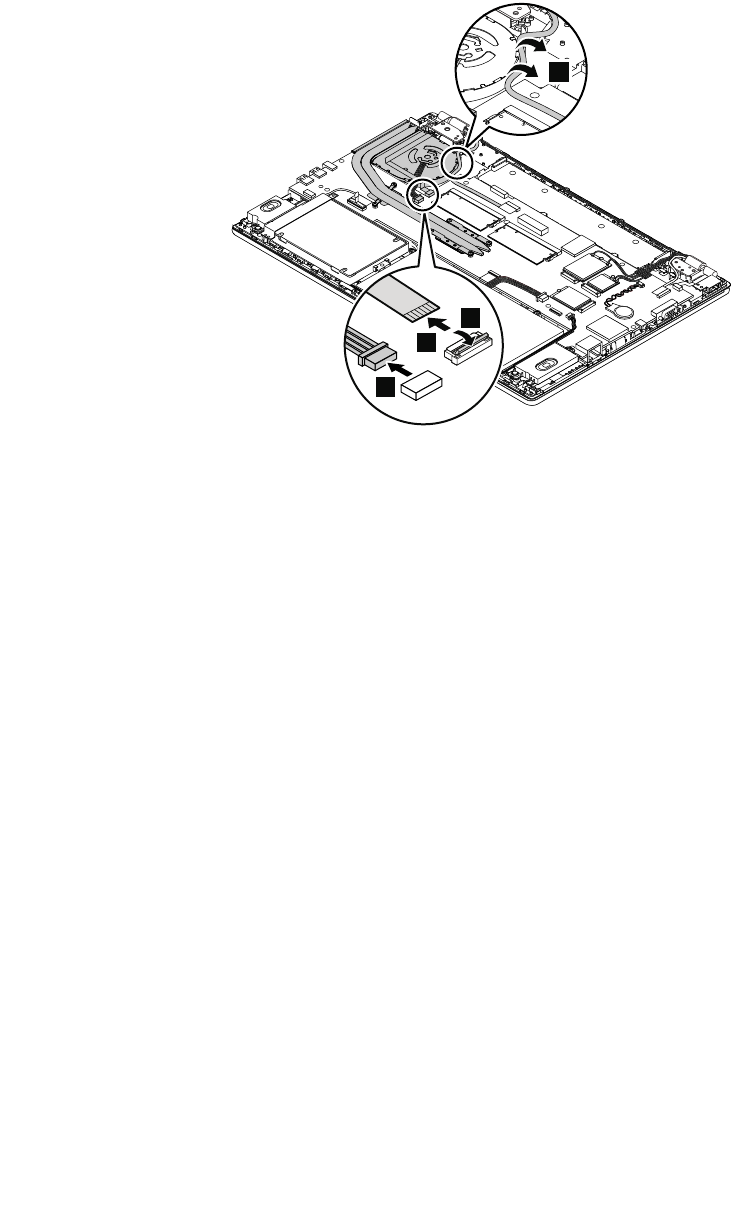
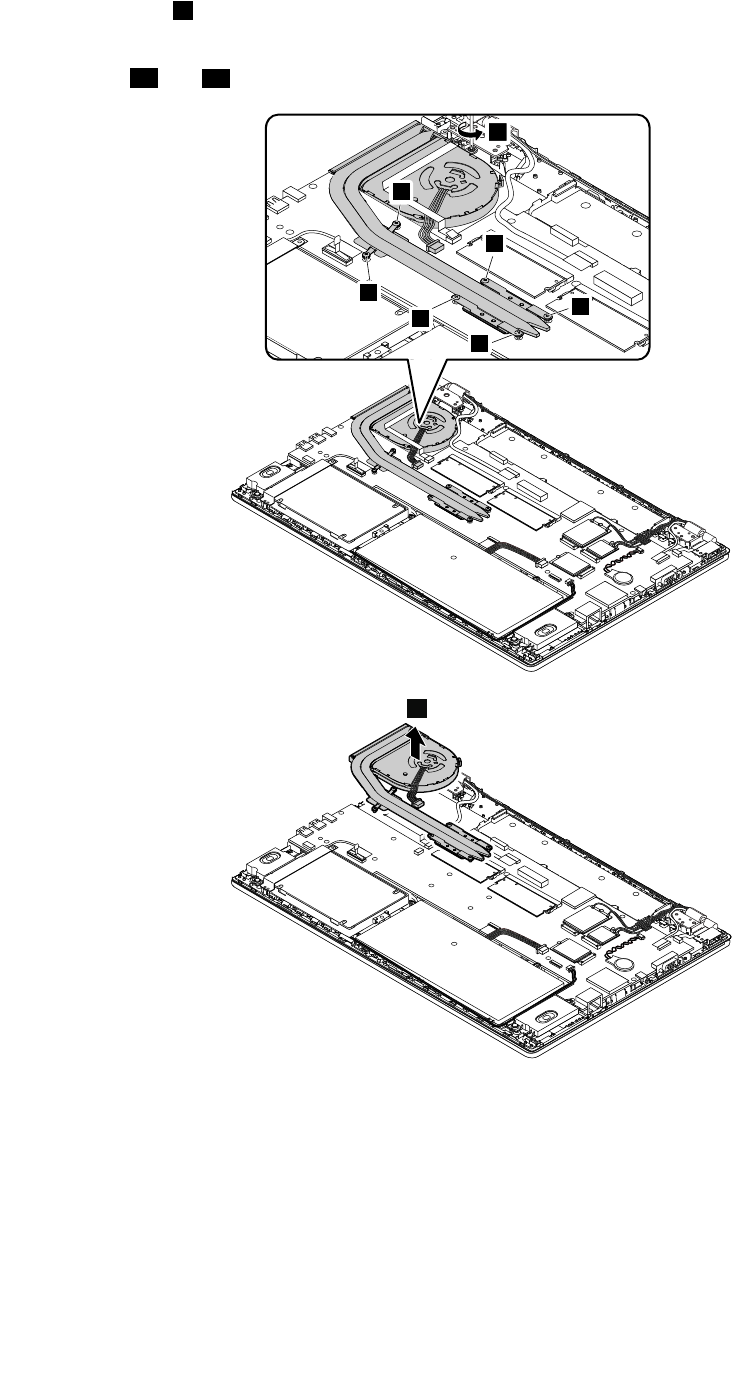
Loosenthescrews5inascendingalphabeticalorderasillustrated.
Note:Thethermalfanonyourcomputermightlookdifferently.Forsomemodels,youmightnothaveto
performsteps5fand5einthefollowingillustration.
5c
5f
5e
5a
5d
5b
6
7
76HardwareMaintenanceManual
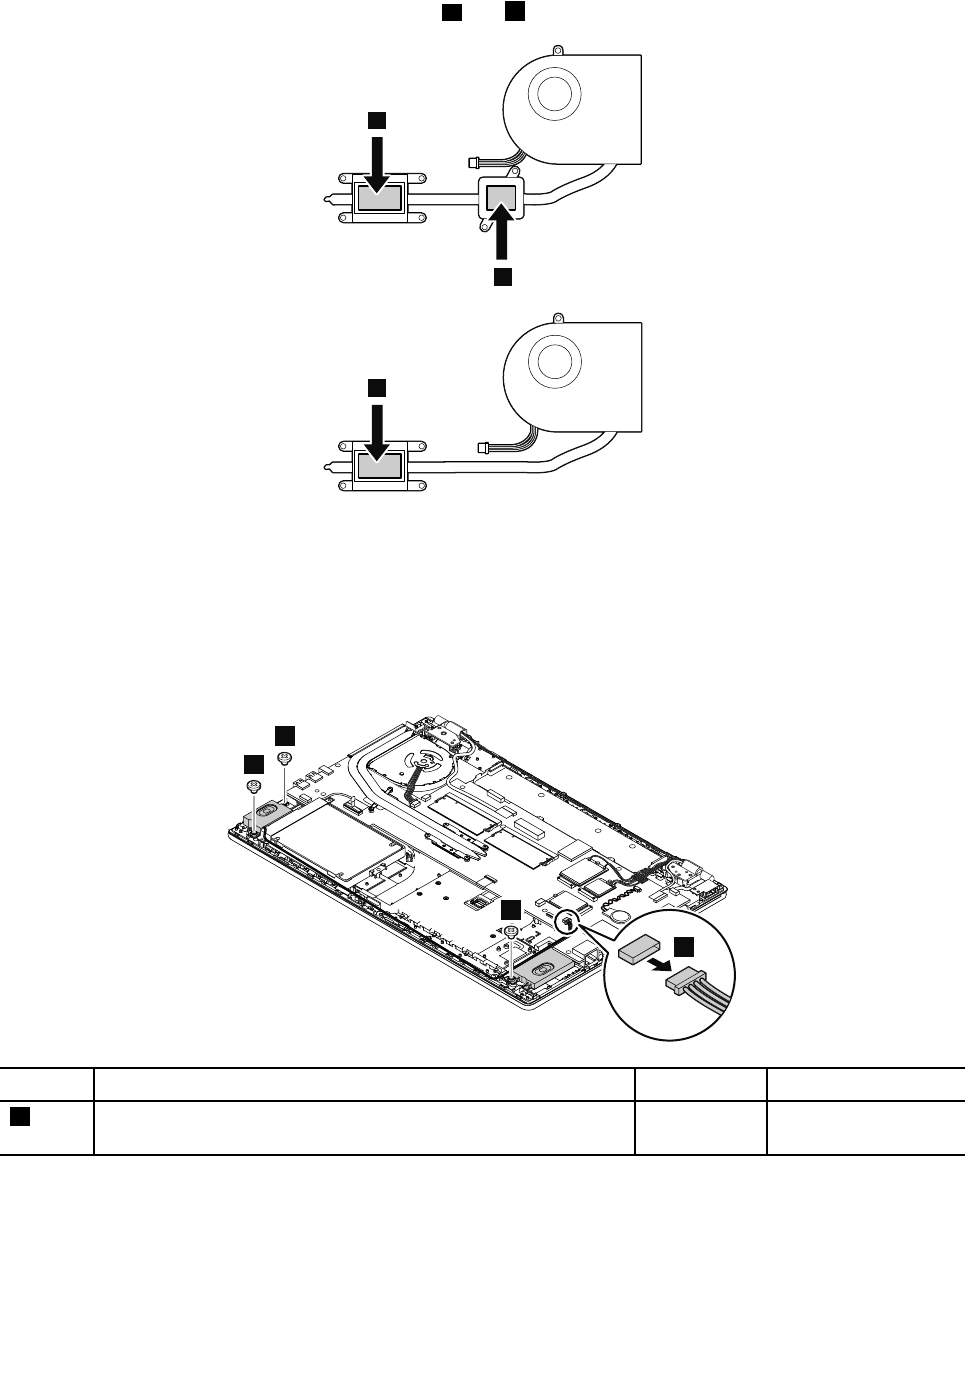
Wheninstalling:Donottouchtheareasmarkedaandbinthefollowingillustrations.
a
b
a
1140Speakerassembly
Foraccess,removethisFRU:
•“1010Removablebattery”onpage59
•“1020Basecoverassembly”onpage59
•“1120Built-inbatteryordummybattery”onpage73
Removalstepsofthespeakerassembly
2
2
2
1
StepScrew(quantity)ColorTorque
2M2×L2.5mm,flat-headshoulder,nylon-coated(3)Black0.181Nm
(1.85kgf-cm)
Wheninstalling:Ensurethattheconnectorisattachedfirmly.
Chapter7.RemovingorreplacingaFRU77
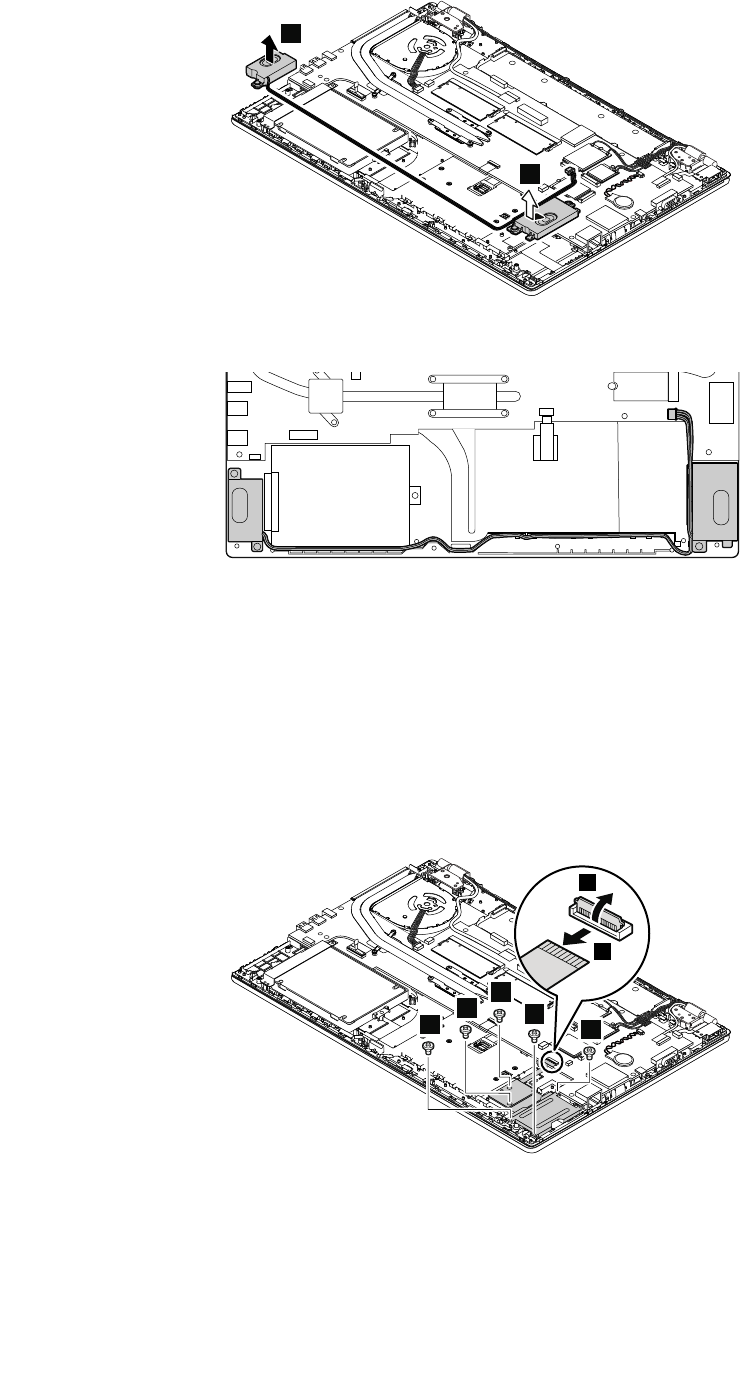
3
3
Cablerouting:Whenyouinstallthespeakerassembly,routethecablesasshowninthefollowingillustration.
1150Smartcardassemblyordummysmartcard
Dependingonthemodel,yourcomputermighthaveasmartcardoradummysmartcardinstalled.
Foraccess,removetheseFRUs:
•“1010Removablebattery”onpage59
•“1020Basecoverassembly”onpage59
•“1120Built-inbatteryordummybattery”onpage73
•“1140Speakerassembly”onpage77
Removalstepsofthesmartcardassembly
2
1
3
3
3
3
3
Wheninstalling:
Ensurethattheconnectorisattachedfirmly.
78HardwareMaintenanceManual
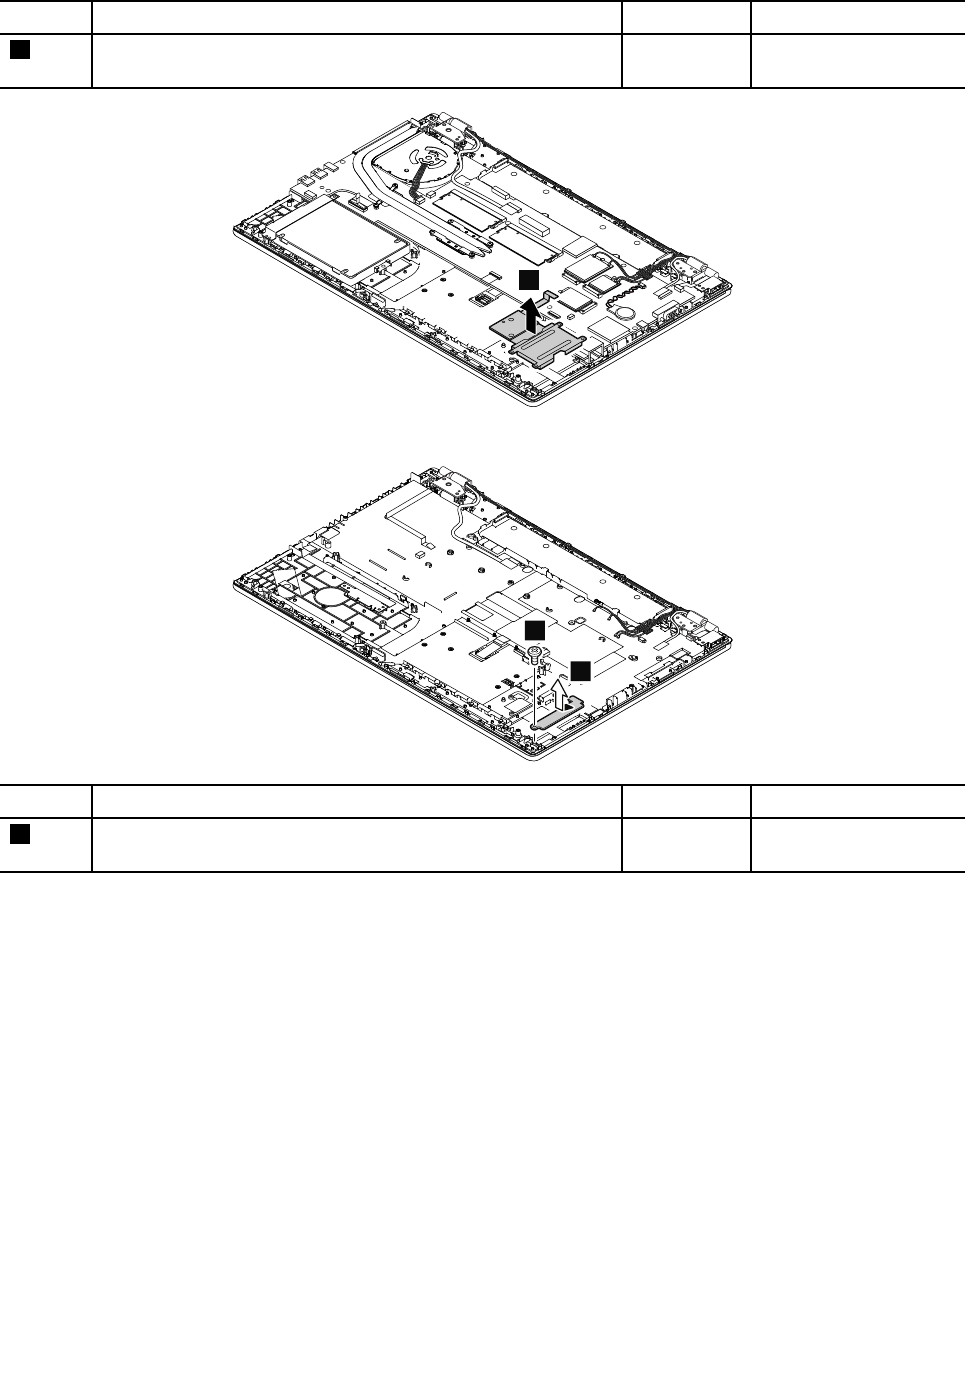
StepScrew(quantity)ColorTorque
3M2×L3mm,flat-head,nylon-coated(5)Black0.181Nm
(1.85kgf-cm)
4
Removalstepsofthedummysmartcard
1
2
StepScrew(quantity)ColorTorque
1M2×L3mm,flat-head,nylon-coated(1)Black0.181Nm
(1.85kgf-cm)
1160Fingerprintreaderassembly
Foraccess,removetheseFRUsinorder:
•“1010Removablebattery”onpage59
•“1020Basecoverassembly”onpage59
•“1040Storage-drivestabilizerbar,internalstoragedrive,harddiskdrivecable,andharddiskdrive
bracket”onpage66
Chapter7.RemovingorreplacingaFRU79
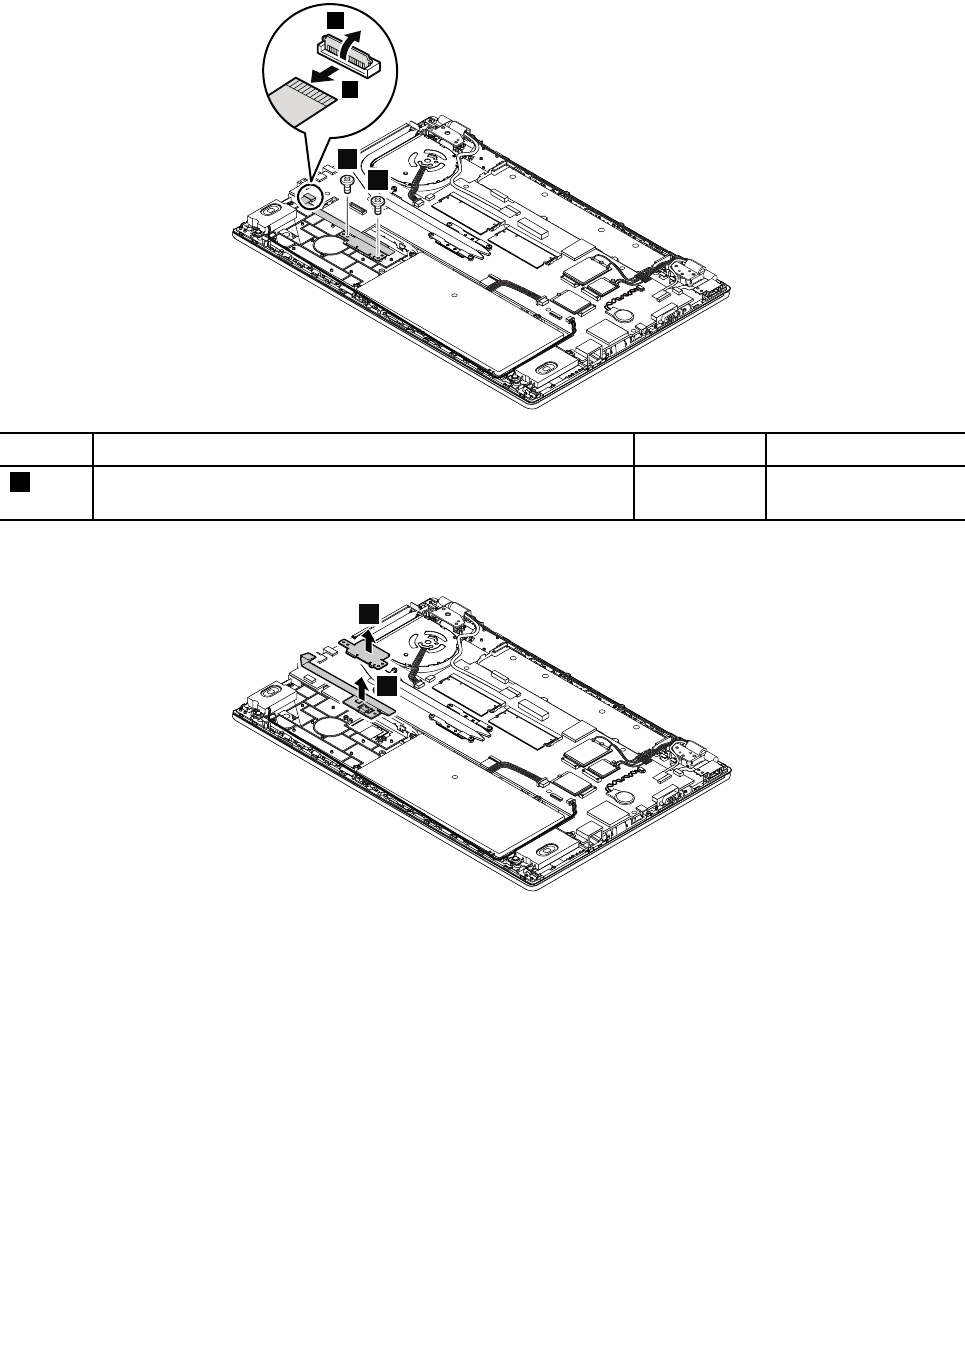
Removalstepsofthefingerprintreaderassembly
2
1
3
3
StepScrew(quantity)ColorTorque
3M2×L3mm,flat-head,nylon-coated(2)Black0.181Nm
(1.85kgf-cm)
Wheninstalling:Ensurethattheconnectorisattachedfirmly.
4
5
1170BoardforthetrackpadandTrackPointbuttons
Foraccess,removethisFRU:
•“1010Removablebattery”onpage59
•“1020Basecoverassembly”onpage59
•“1120Built-inbatteryordummybattery”onpage73
80HardwareMaintenanceManual

RemovalstepsoftheboardforthetrackpadandTrackPointbuttons
2
1
3
3
3
3
StepScrew(quantity)ColorTorque
3M2×L2mm,flat-headshoulder,nylon-coated(4)Black0.181Nm
(1.85kgf-cm)
Wheninstalling:Ensurethattheconnectorisattachedfirmly.
4
5
1180Systemboardassembly
Importantnoticesforhandlingthesystemboard
Whenhandlingthesystemboard,readthefollowing:
Chapter7.RemovingorreplacingaFRU81
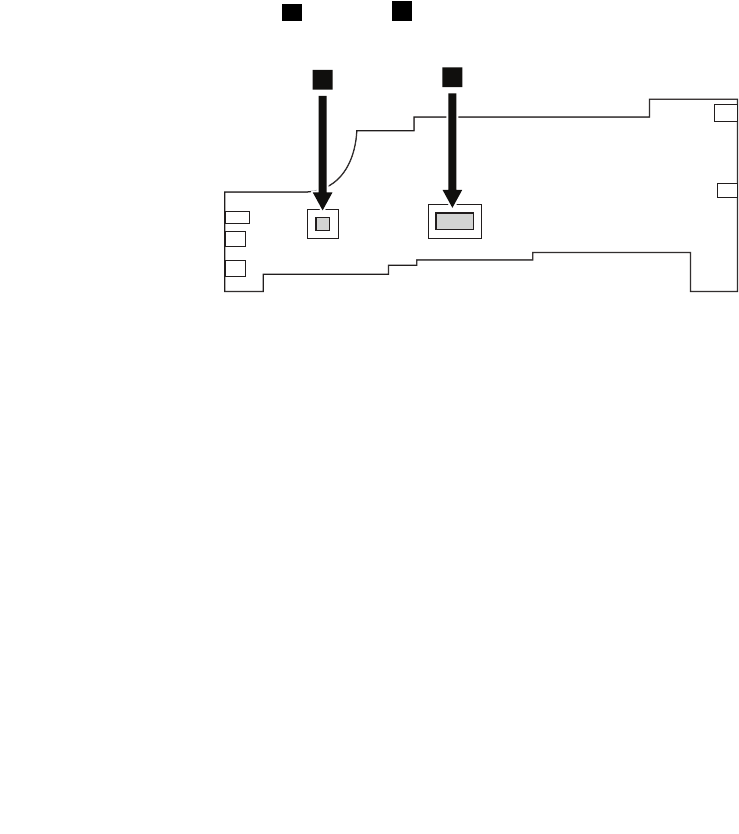
•Thesystemboardhasanaccelerometer,whichcanbebrokenwhenseveralthousandsofG-forces
areapplied.
Note:Droppingasystemboardfromaheightofaslittleassixinchessothatitfallsflatonahardbench
cansubjecttheaccelerometertoasmuchas6000G'sofshock.
•Becarefulnottodropthesystemboardonabenchtopthathasahardsurface,suchasmetal,wood,or
composite.
•Avoidroughhandlingofanykind.
•Ateverypointintheprocess,besurenottodroporstackthesystemboard.
•Ifyouputasystemboarddown,besuretoputitonlyonapaddedsurfacesuchasanESDmatora
corrugatedconductivematerial.
Foraccess,removetheseFRUsinorder:
•“1010Removablebattery”onpage59
•“1020Basecoverassembly”onpage59
•“1040Storage-drivestabilizerbar,internalstoragedrive,harddiskdrivecable,andharddiskdrive
bracket”onpage66
•“1060WirelessLANcard”onpage68
•“1070WirelessWANcard”onpage69
•“1130Thermalfan”onpage75
•“1140Speakerassembly”onpage77
Attention:ThemicroprocessoraandGPUbsolderedonthesystemboardareextremelysensitive.When
youservicethesystemboard,avoidanykindofroughhandling.
ab
82HardwareMaintenanceManual
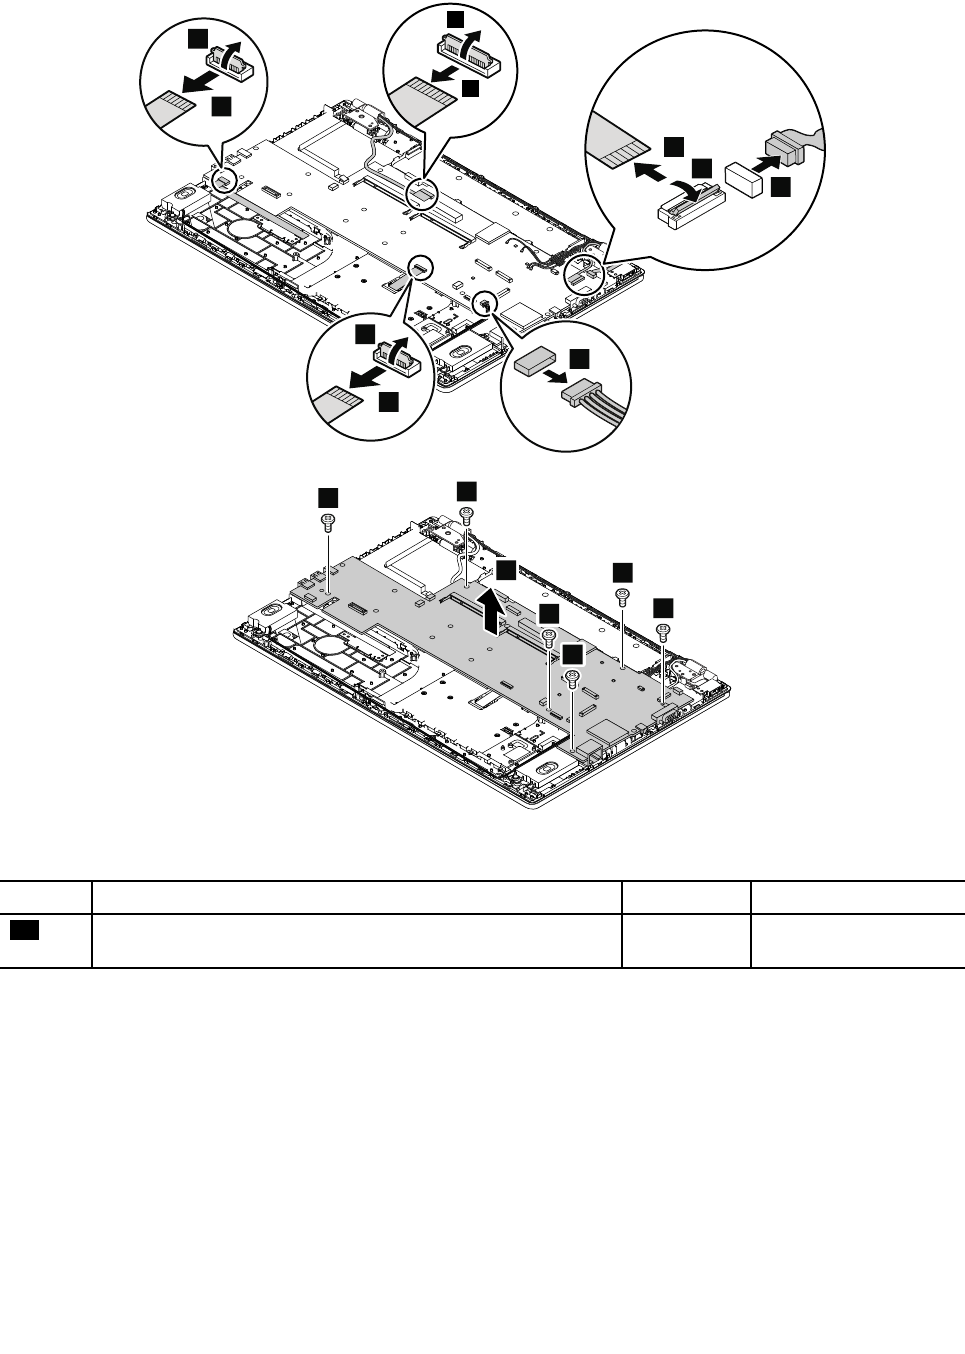
Removalstepsofthesystemboardassembly
6
2
1
5
4
3
8
7
10
9
11
11
11
11
11
11
12
Wheninstalling:Ensurethattheconnectorsareattachedfirmly.
StepScrew(quantity)ColorTorque
11M2×L3.5mm,flat-head,nylon-coated(6)Silver0.181Nm
(1.85kgf-cm)
1190LCDunit
Foraccess,removetheseFRUsinorder:
•“1010Removablebattery”onpage59
•“1020Basecoverassembly”onpage59
Chapter7.RemovingorreplacingaFRU83

RemovalstepsoftheLCDunit
11
4
5
2
1
3
3
3
6 6 6 6
6
6
Wheninstalling:Whenyouroutethecables,ensurethattheyarenotsubjecttoanytension.Tensioncould
causethecablestobedamagedbythecableguides,orawiretobebroken.
77
77
84HardwareMaintenanceManual
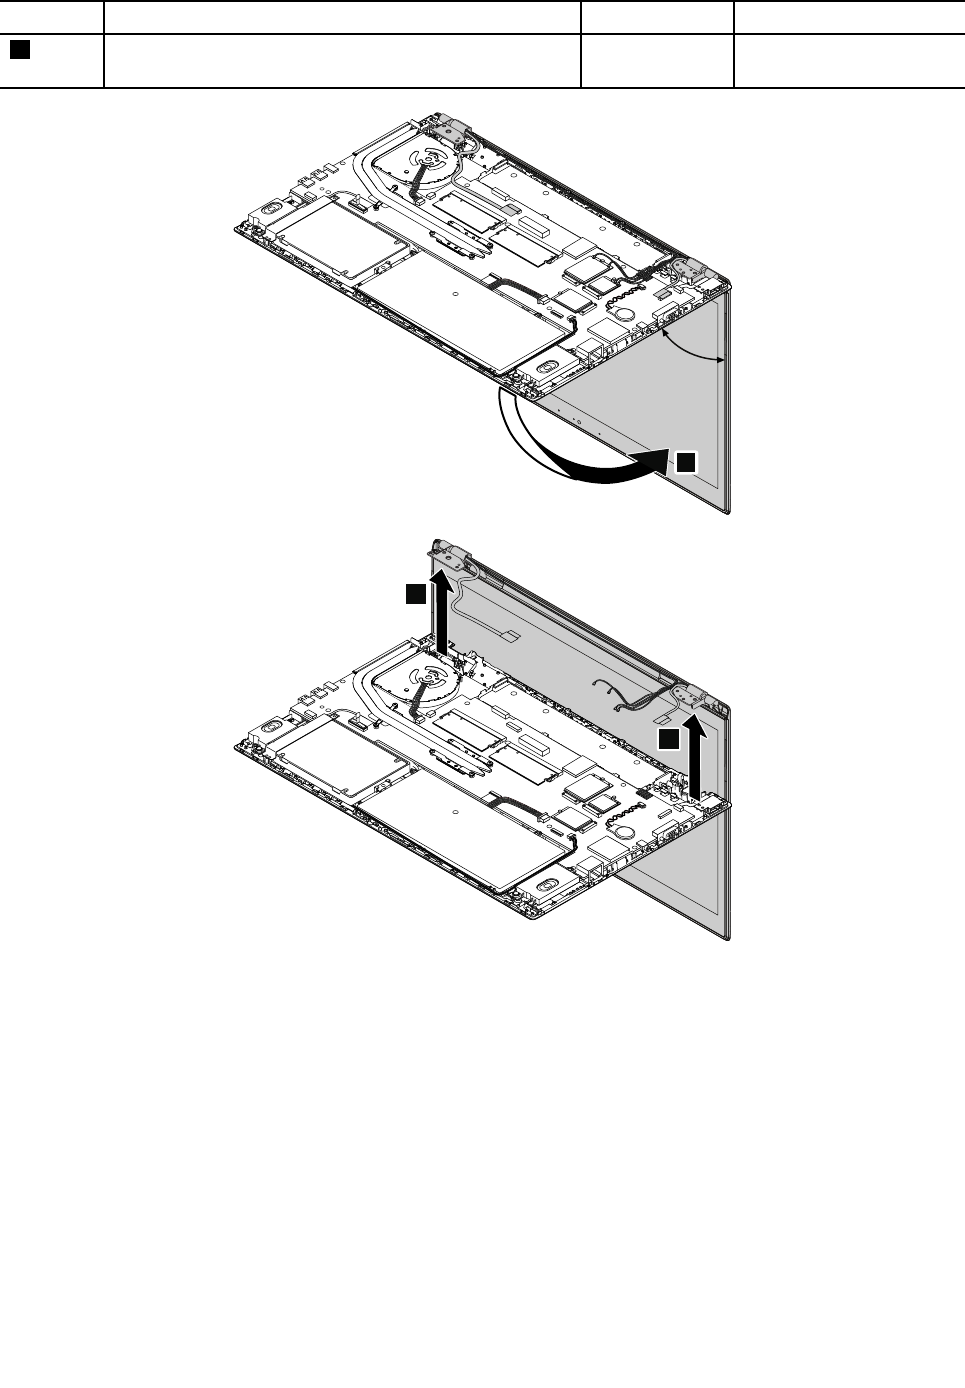
StepScrew(quantity)ColorTorque
7M2.5×L3.5mm,flat-head,nylon-coated(4)Silver0.181Nm
(1.85kgf-cm)
90°
8
9
9
1210Powerbuttonboard
Foraccess,removetheseFRUsinorder:
•“1010Removablebattery”onpage59
•“1020Basecoverassembly”onpage59
•“1040Storage-drivestabilizerbar,internalstoragedrive,harddiskdrivecable,andharddiskdrive
bracket”onpage66
•“1060WirelessLANcard”onpage68
•“1070WirelessWANcard”onpage69
•“1120Built-inbatteryordummybattery”onpage73
•“1130Thermalfan”onpage75
•“1180Systemboardassembly”onpage81
•“1190LCDunit”onpage83
Chapter7.RemovingorreplacingaFRU85
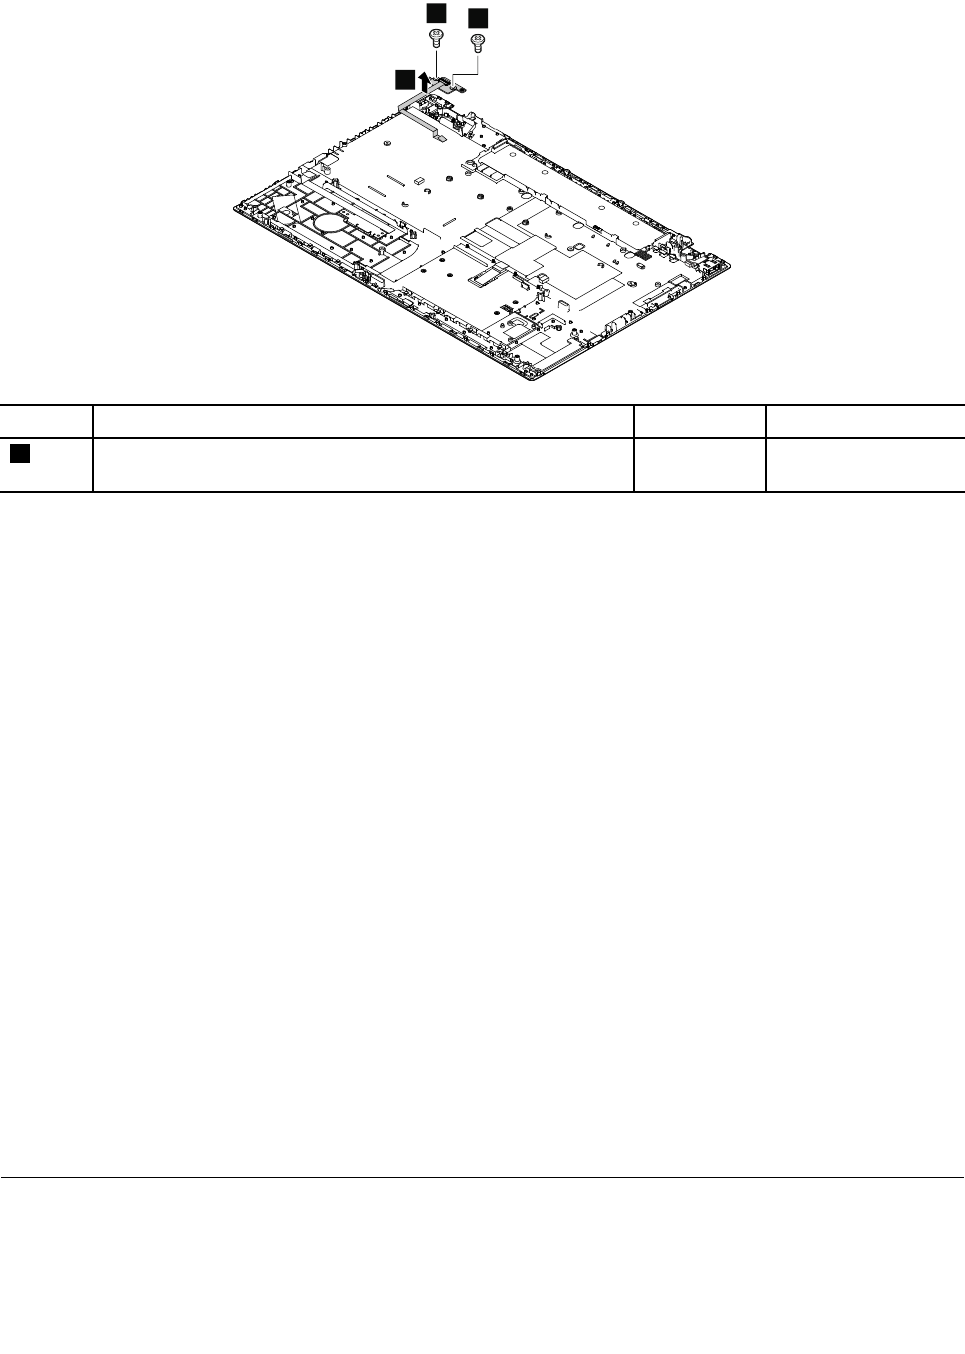
Removalstepsofthepowerbuttonboard
11
2
StepScrew(quantity)ColorTorque
1M2×L3mm,flat-head,nylon-coated(2)Black0.181Nm
(1.85kgf-cm)
Wheninstalling:Ensurethattheconnectorisattachedfirmly.
1220Keyboardassembly
Removalstepsofthekeyboardassembly
Toreplacethekeyboardassembly,removetheseFRUsinorder:
•“1010Removablebattery”onpage59
•“1020Basecoverassembly”onpage59
•“1030Keyboard”onpage61
•“1040Storage-drivestabilizerbar,internalstoragedrive,harddiskdrivecable,andharddiskdrive
bracket”onpage66
•“1060WirelessLANcard”onpage68
•“1070WirelessWANcard”onpage69
•“1080M.2solid-statedrive”onpage70
•“1090Coin-cellbattery”onpage71
•“1110dc-inbracketanddc-incableassembly”onpage72
•“1120Built-inbatteryordummybattery”onpage73
•“1130Thermalfan”onpage75
•“1140Speakerassembly”onpage77
•“1150Smartcardassemblyordummysmartcard”onpage78
•“1160Fingerprintreaderassembly”onpage79
•“1170BoardforthetrackpadandTrackPointbuttons”onpage80
•“1180Systemboardassembly”onpage81
•“1190LCDunit”onpage83
•“1210Powerbuttonboard”onpage85
RemovinganLCDFRUformodelswithouttouchpanel
ThissectionprovidesinstructionsonhowtoremoveanLCDFRUformodelswithouttouchpanel.
86HardwareMaintenanceManual
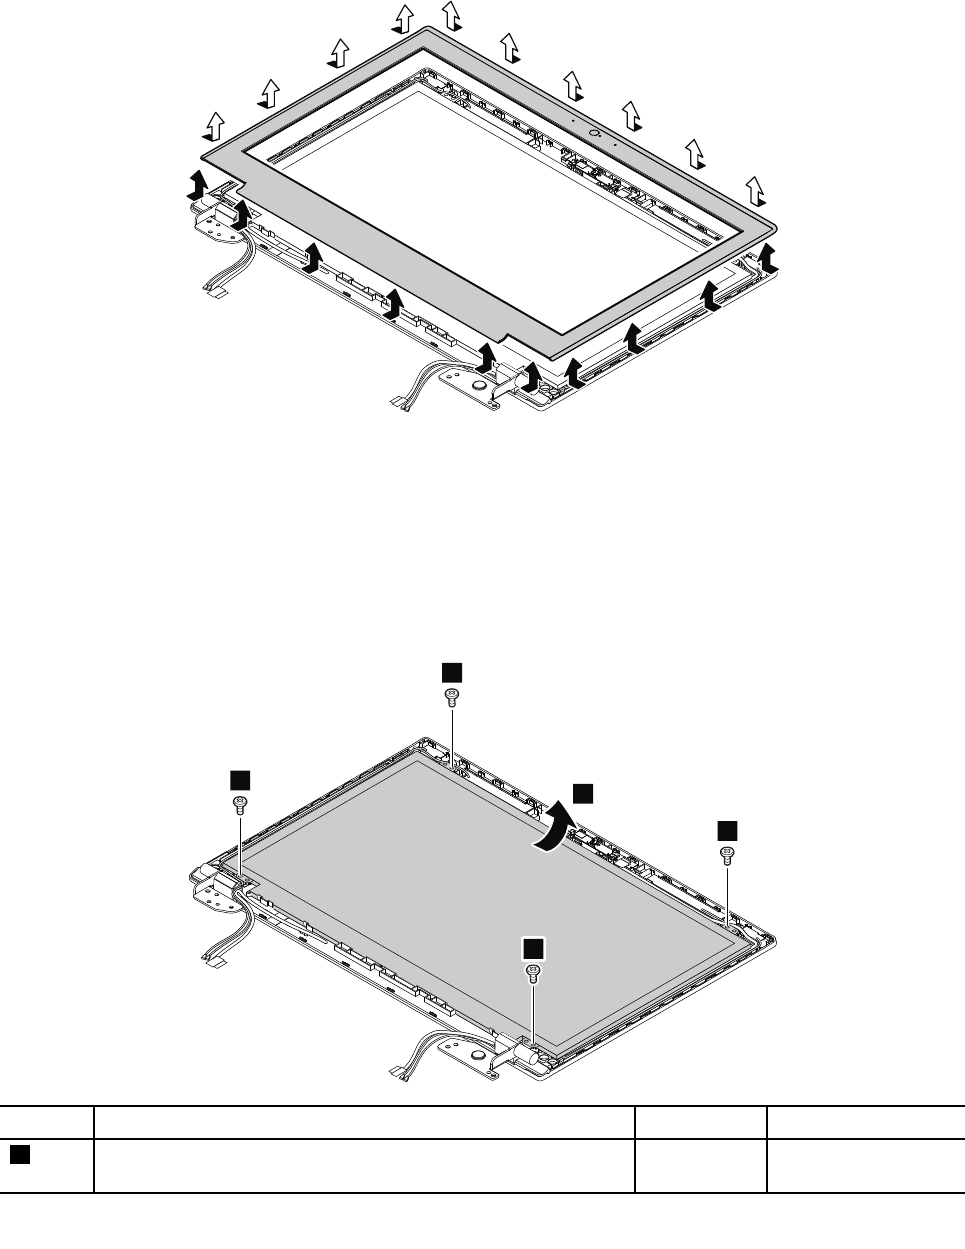
2010LCDbezelassembly
Important:OnceanLCDbezelassemblyisremoved,itcannotbeusedanymore.AnewLCDbezel
assemblyisrequiredforreplacement.
RemovalstepsoftheLCDbezelassembly
Wheninstalling:Ensurethatallthelatchesareattachedfirmly.
2020LCDpanelandLCDcable
Foraccess,removetheseFRUsinorder:
•“1010Removablebattery”onpage59
•“2010LCDbezelassembly”onpage87
RemovalstepsofLCDpanelandLCDcable
1
1
1
1
2
StepScrew(quantity)ColorTorque
1M2×L2.5mm,flat-head,nylon-coated(4)Black0.181Nm
(1.85kgf-cm)
Chapter7.RemovingorreplacingaFRU87
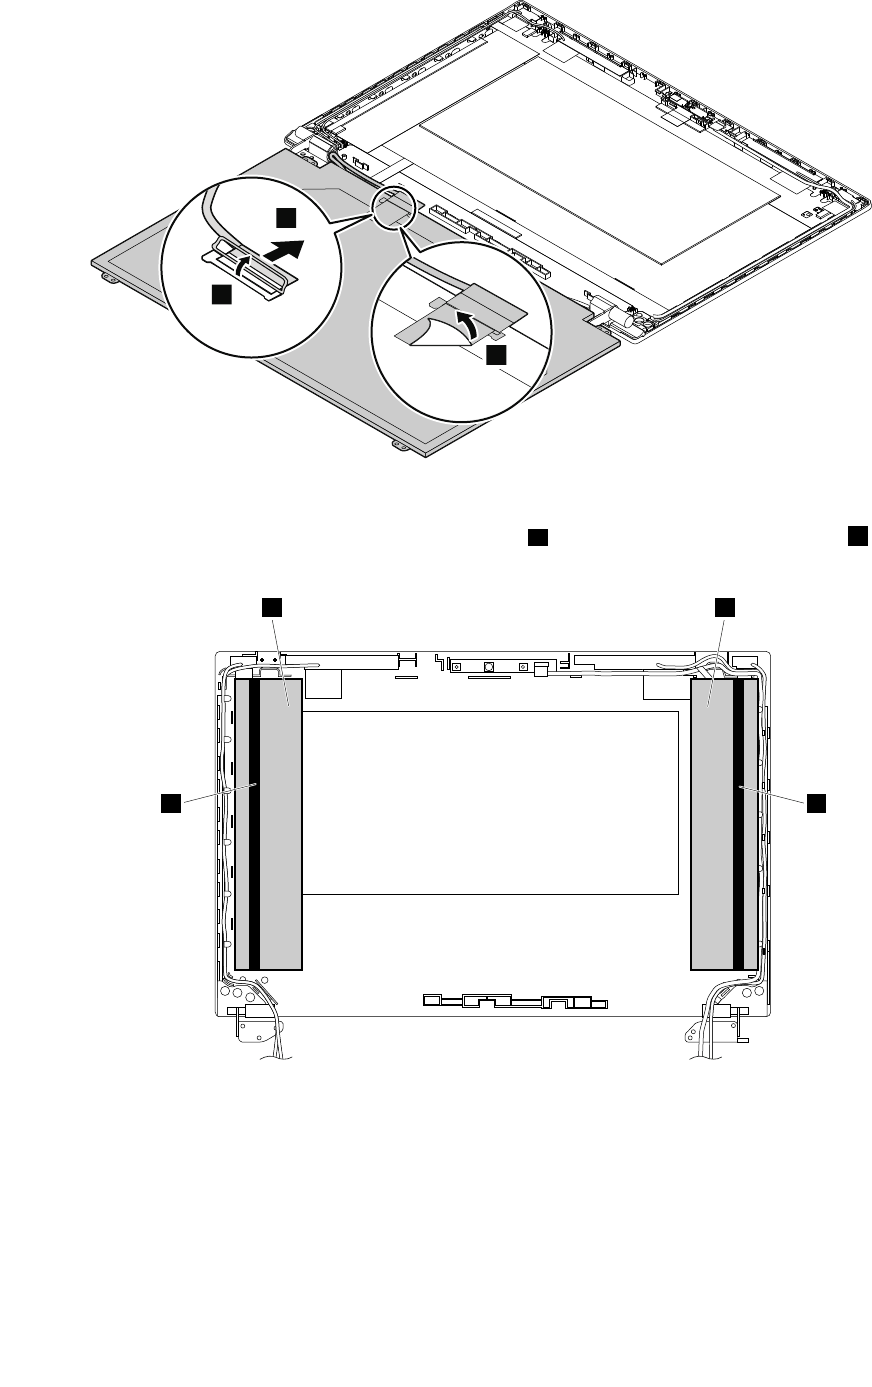
5
4
3
Wheninstalling:
•ForPanasonicLCD,ensurethatyouapplytheALsheetsafirst,andthenpastethespongesbonthetop
oftheALsheetsasshowninthefollowingillustration.
aa
b b
•ForotherLCD,applythespongesasshowninthefollowingillustration.
88HardwareMaintenanceManual
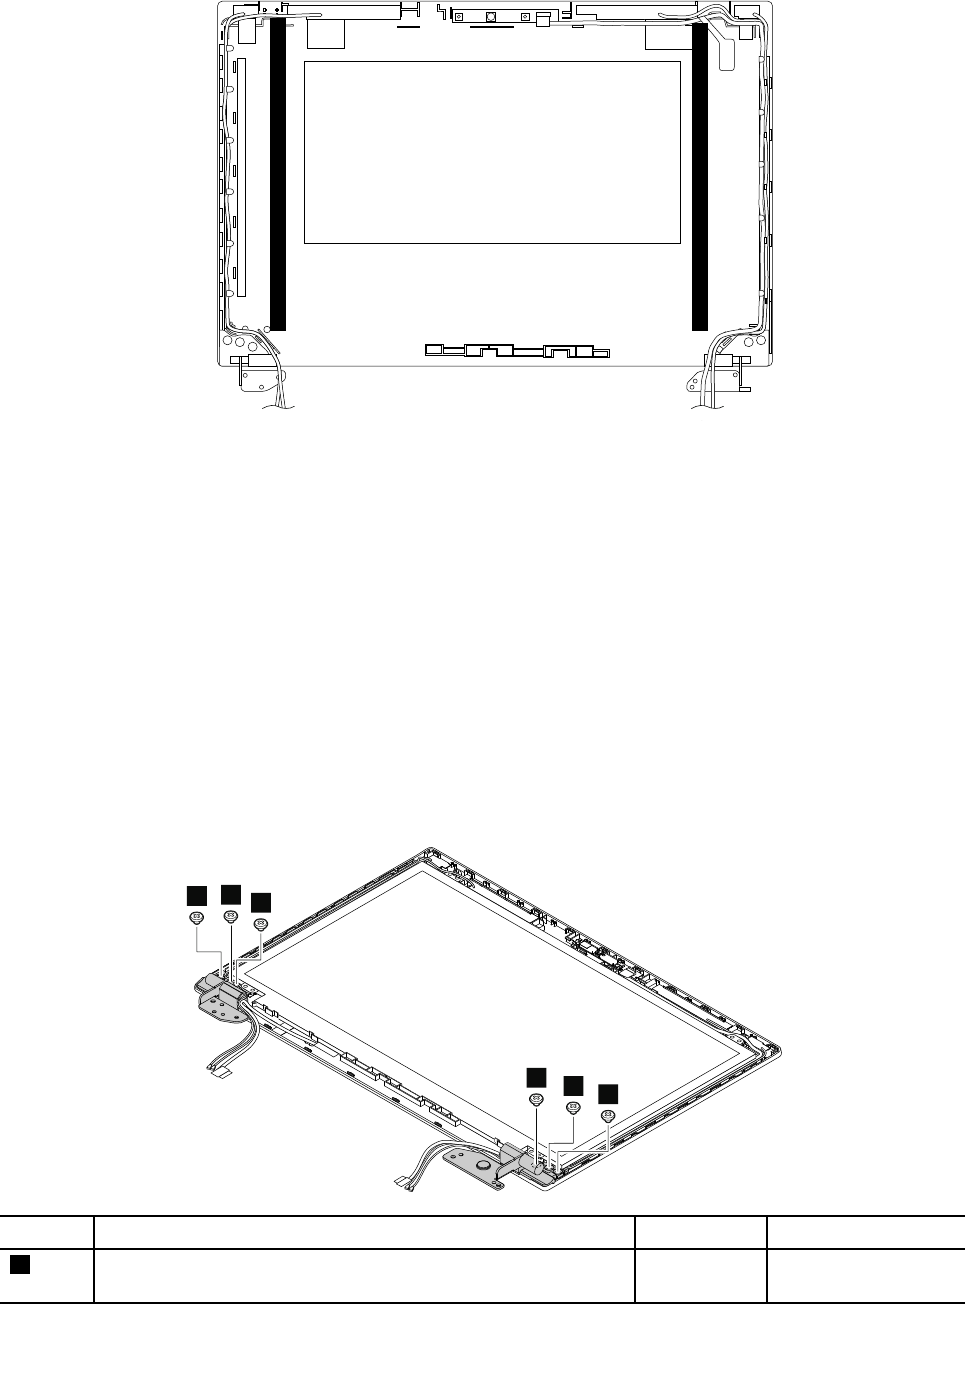
•EnsuretheLCDconnectorisattachedfirmly.
2030Hingesandhingebrackets
Foraccess,removetheseFRUsinorder:
•“1010Removablebattery”onpage59
•“1020Basecoverassembly”onpage59
•“1040Storage-drivestabilizerbar,internalstoragedrive,harddiskdrivecable,andharddiskdrive
bracket”onpage66
•“1060WirelessLANcard”onpage68
•“1070WirelessWANcard”onpage69
•“1130Thermalfan”onpage75
•“1180Systemboardassembly”onpage81
•“1190LCDunit”onpage83
•“2010LCDbezelassembly”onpage87
Removalstepsofthehinges
11
1
111
StepScrew(quantity)ColorTorque
1M2.5×L2.5mm,big-head,nylon-coated(6)Silver0.294Nm
(3kgf-cm)
Chapter7.RemovingorreplacingaFRU89
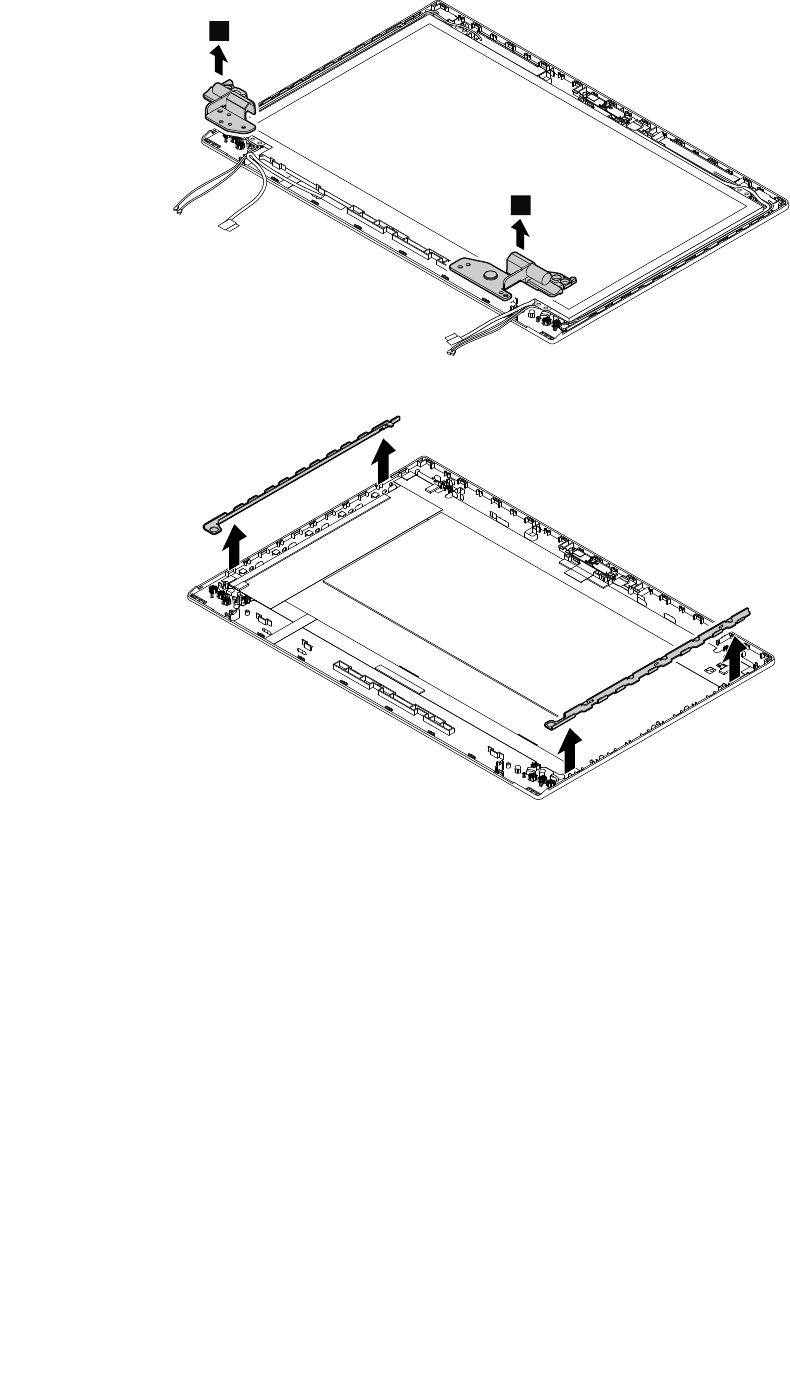

Removalstepsofthecamera/microphonecard
1
Wheninstalling:Ensurethattheconnectorisattachedfirmly.
2
2050LEDcableassembly
Foraccess,removetheseFRUsinorder:
•“1010Removablebattery”onpage59
•“1020Basecoverassembly”onpage59
•“1040Storage-drivestabilizerbar,internalstoragedrive,harddiskdrivecable,andharddiskdrive
bracket”onpage66
•“1060WirelessLANcard”onpage68
Chapter7.RemovingorreplacingaFRU91
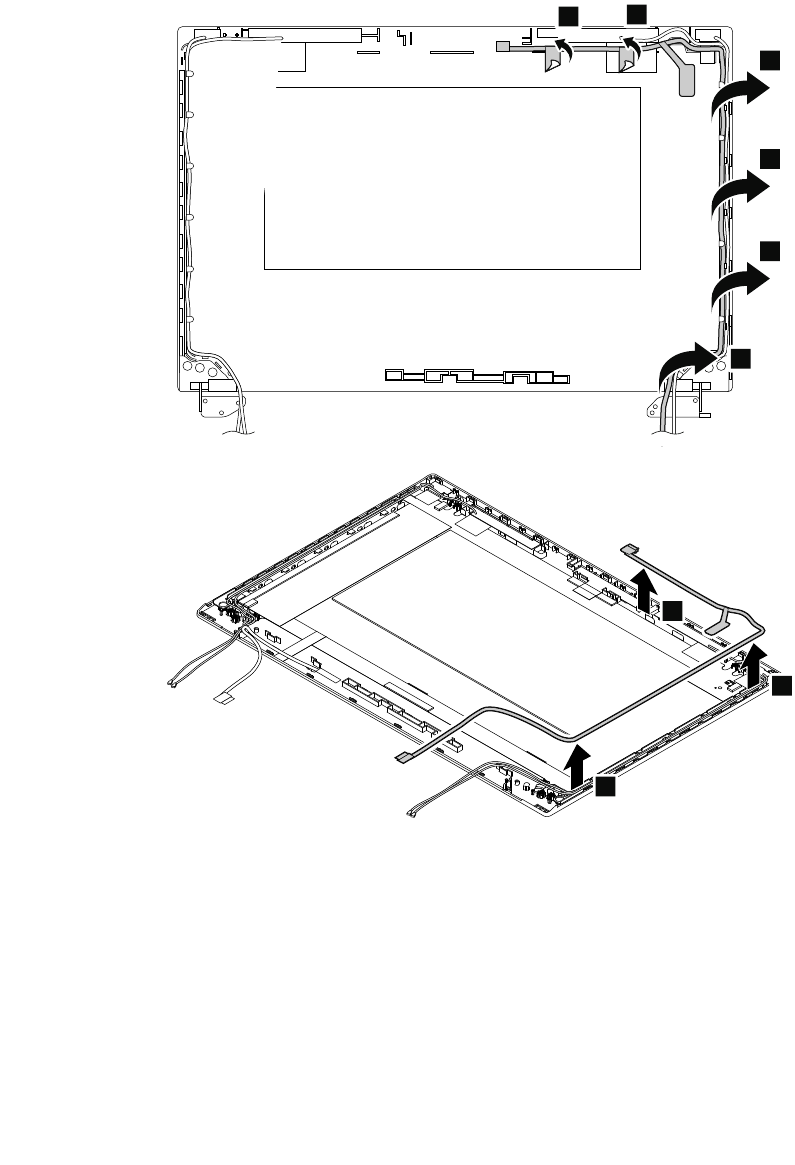
•“1070WirelessWANcard”onpage69
•“1130Thermalfan”onpage75
•“1180Systemboardassembly”onpage81
•“1190LCDunit”onpage83
•“2010LCDbezelassembly”onpage87
•“2020LCDpanelandLCDcable”onpage87
•“2030Hingesandhingebrackets”onpage89
RemovalstepoftheLEDcableassembly
11
2
2
2
2
3
3
3
2060AntennakitandLCDrearcoverassembly
Removalstepsoftheantennakit
Foraccess,removetheseFRUsinorder:
•“1010Removablebattery”onpage59
•“1020Basecoverassembly”onpage59
•“1040Storage-drivestabilizerbar,internalstoragedrive,harddiskdrivecable,andharddiskdrive
bracket”onpage66
•“1060WirelessLANcard”onpage68
92HardwareMaintenanceManual
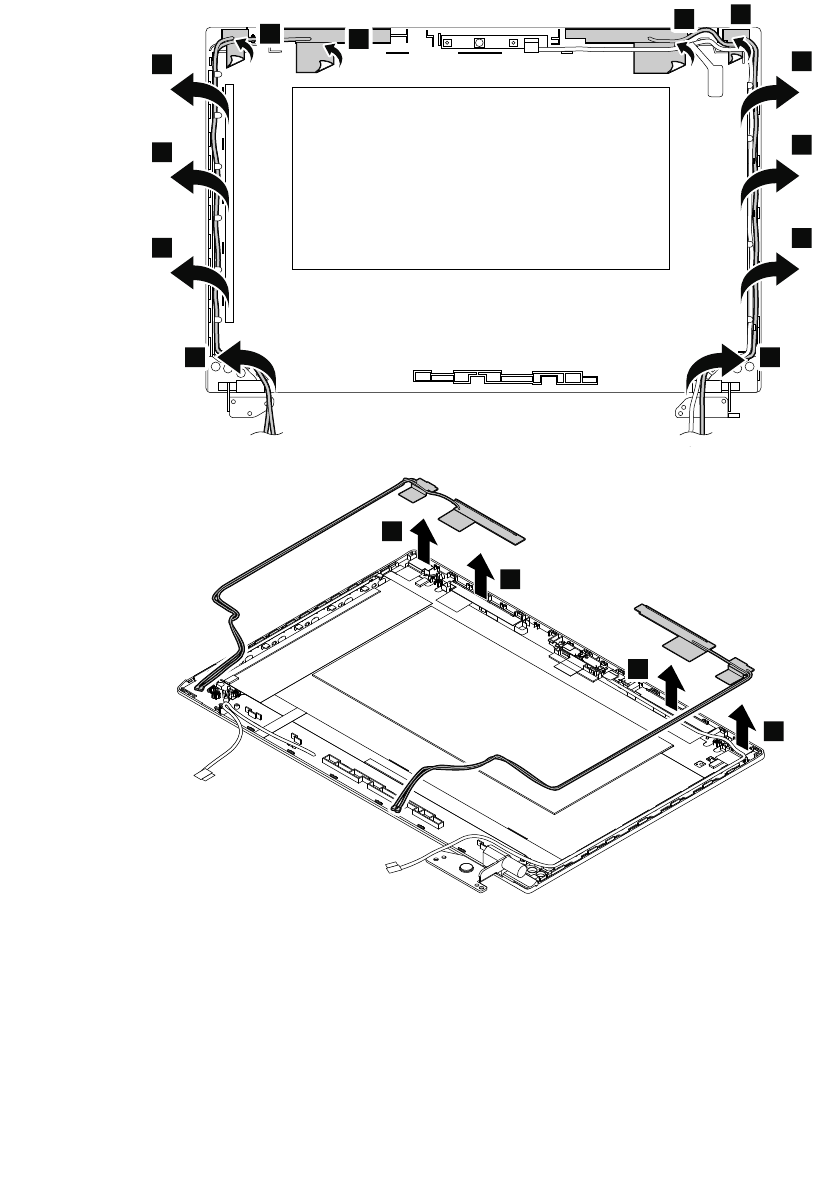
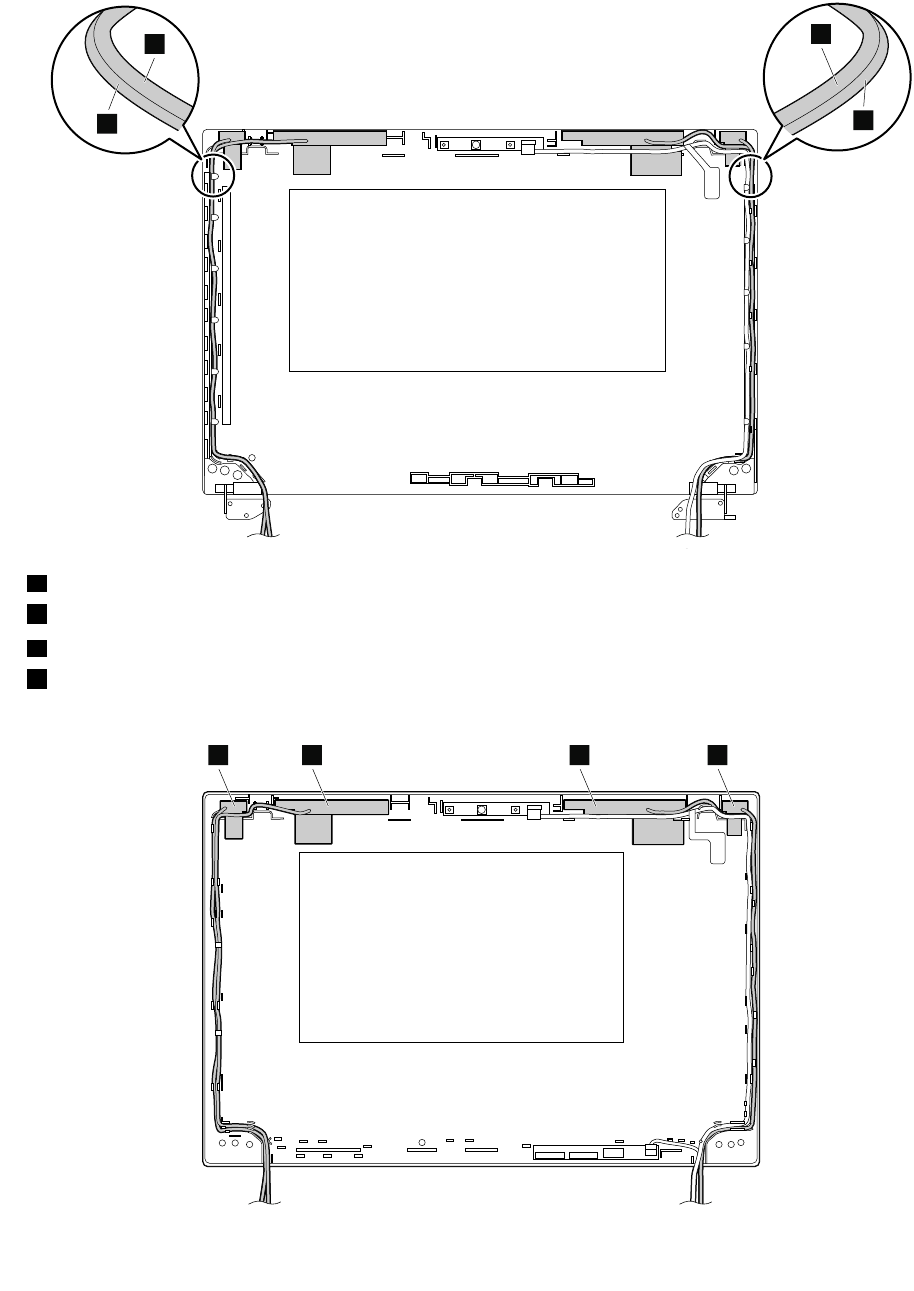
Cablerouting:Whenyouinstalltheantennakit,routethecablesasshowninthefollowingillustration.
Ensurethatthecablesarenotsubjecttoanytension.Tensioncouldcausethecablestobedamagedbythe
cableguides,orawiretobebroken.
c
d
a
b
aBlackcable(WLANauxiliary)
bBluecable(WWANauxiliary)
cOrangecable(WWANmain)
dGraycable(WLANmain)
Antennalocations
bcda
94HardwareMaintenanceManual
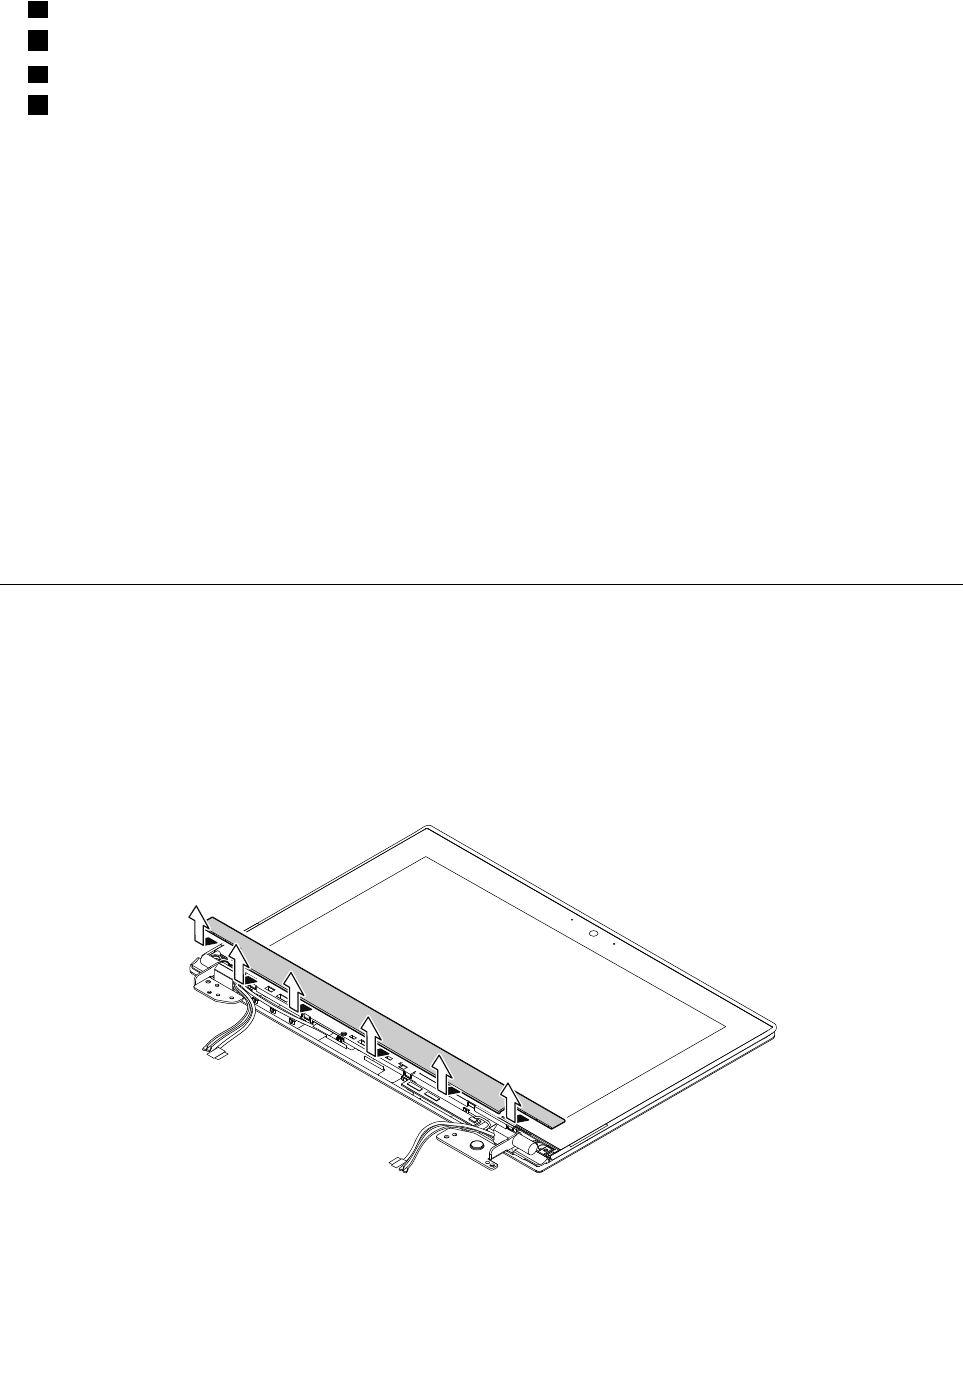
aWLANauxiliaryantenna(black)
bWWANauxiliaryantenna(blue)
cWWANmainantenna(red)
dWLANmainantenna(gray)
RemovalstepsoftheLCDrearcoverassembly
ToreplacetheLCDrearcoverassembly,removetheseFRUsinorder:
•“1010Removablebattery”onpage59
•“1020Basecoverassembly”onpage59
•“1040Storage-drivestabilizerbar,internalstoragedrive,harddiskdrivecable,andharddiskdrive
bracket”onpage66
•“1060WirelessLANcard”onpage68
•“1070WirelessWANcard”onpage69
•“1130Thermalfan”onpage75
•“1180Systemboardassembly”onpage81
•“1190LCDunit”onpage83
•“2010LCDbezelassembly”onpage87
•“2020LCDpanelandLCDcable”onpage87
•“2030Hingesandhingebrackets”onpage89
•“2040Camera/microphonecard”onpage90
•“2050LEDcableassembly”onpage91
•“Removalstepsoftheantennakit”onpage92
RemovinganLCDFRUformodelswithtouchpanel
ThissectionprovidesinstructionsonhowtoremoveanLCDFRUformodelswithtouchpanel.
3010LCDfrontsheetbezel
Important:OnceanLCDfrontsheetbezelisremoved,itcannotbeusedanymore.AnewLCDfront
sheetbezelisrequiredforreplacement.
RemovalstepsoftheLCDfrontsheetbezel
Wheninstalling:Ensurethatallthelatchesareattachedfirmly.
3020LCDpanelassemblyandLCDcable
Foraccess,removetheseFRUsinorder:
Chapter7.RemovingorreplacingaFRU95
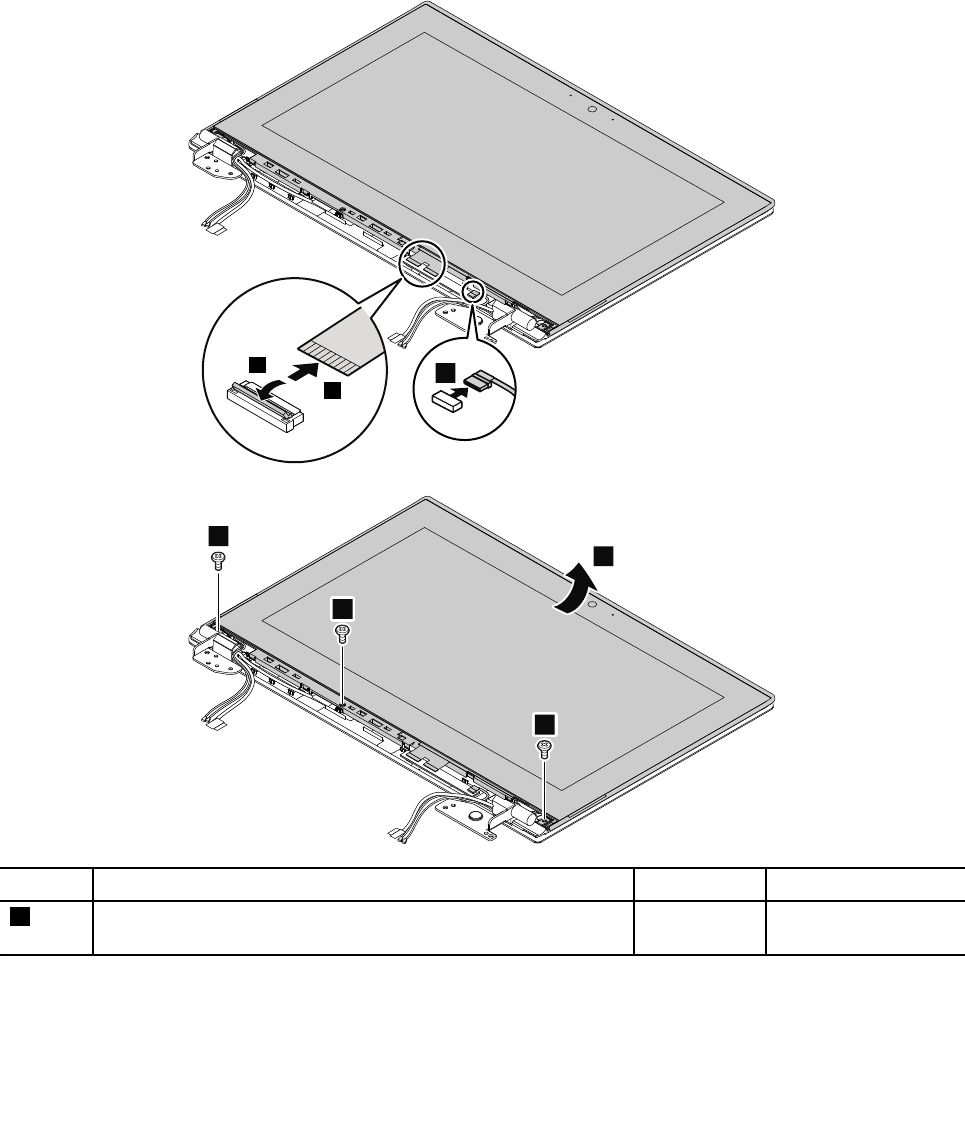
•“1010Removablebattery”onpage59
•“3010LCDfrontsheetbezel”onpage95
RemovalstepsoftheLCDpanelassemblyandLCDcable
TheLCDpanelassemblyconsistsofanLCDpanelandanLCDbezel.TheLCDbezelisgluedtotheback
sideoftheLCDpanel.
Important:OnceanLCDbezelisremoved,itcannotbeusedanymore.AnewLCDbezelisrequired
forreplacement.
1
2
3
4
4
4
5
StepScrew(quantity)ColorTorque
4M2.5×L4mm,big-head,nylon-coated(3)Silver0.294Nm
(3kgf-cm)
96HardwareMaintenanceManual
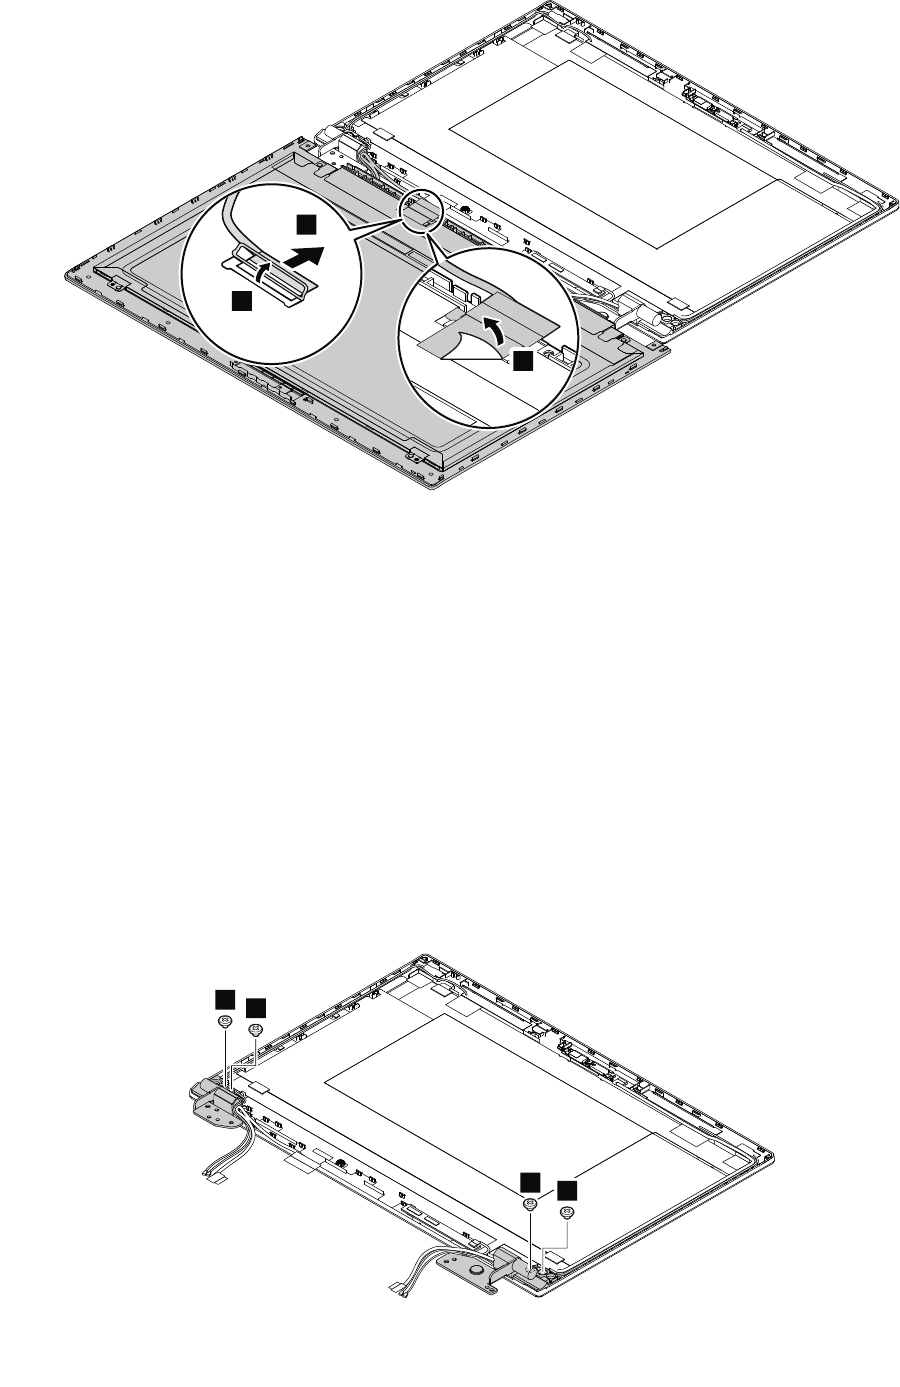
8
7
6
Wheninstalling:Ensurethattheconnectorisattachedfirmly.
3030Hinges
Foraccess,removetheseFRUsinorder:
•“1010Removablebattery”onpage59
•“1020Basecoverassembly”onpage59
•“1040Storage-drivestabilizerbar,internalstoragedrive,harddiskdrivecable,andharddiskdrive
bracket”onpage66
•“1060WirelessLANcard”onpage68
•“1070WirelessWANcard”onpage69
•“1130Thermalfan”onpage75
•“1180Systemboardassembly”onpage81
•“1190LCDunit”onpage83
•“3010LCDfrontsheetbezel”onpage95
•“3020LCDpanelassemblyandLCDcable”onpage95
Removalstepsofthehinges
11
11
Chapter7.RemovingorreplacingaFRU97
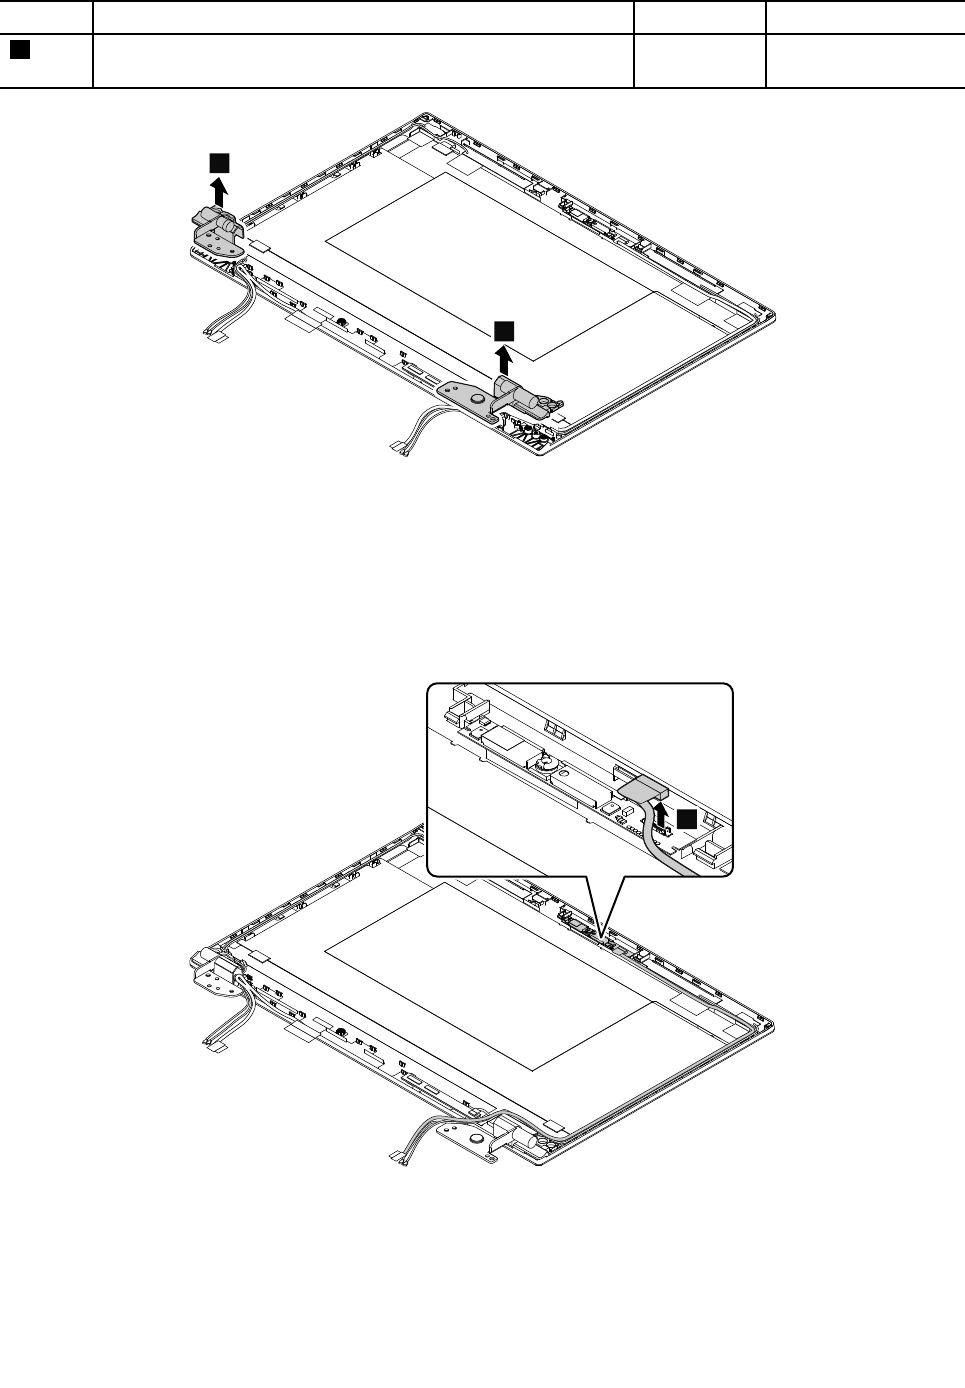
StepScrew(quantity)ColorTorque
1M2.5×L2.5mm,big-head,nylon-coated(4)Silver0.294Nm
(3kgf-cm)
2
2
3040Camera/microphonecard
Foraccess,removetheseFRUsinorder:
•“1010Removablebattery”onpage59
•“3010LCDfrontsheetbezel”onpage95
•“3020LCDpanelassemblyandLCDcable”onpage95
Removalstepsofthecamera/microphonecard
1
Wheninstalling:Ensurethattheconnectorisattachedfirmly.
98HardwareMaintenanceManual
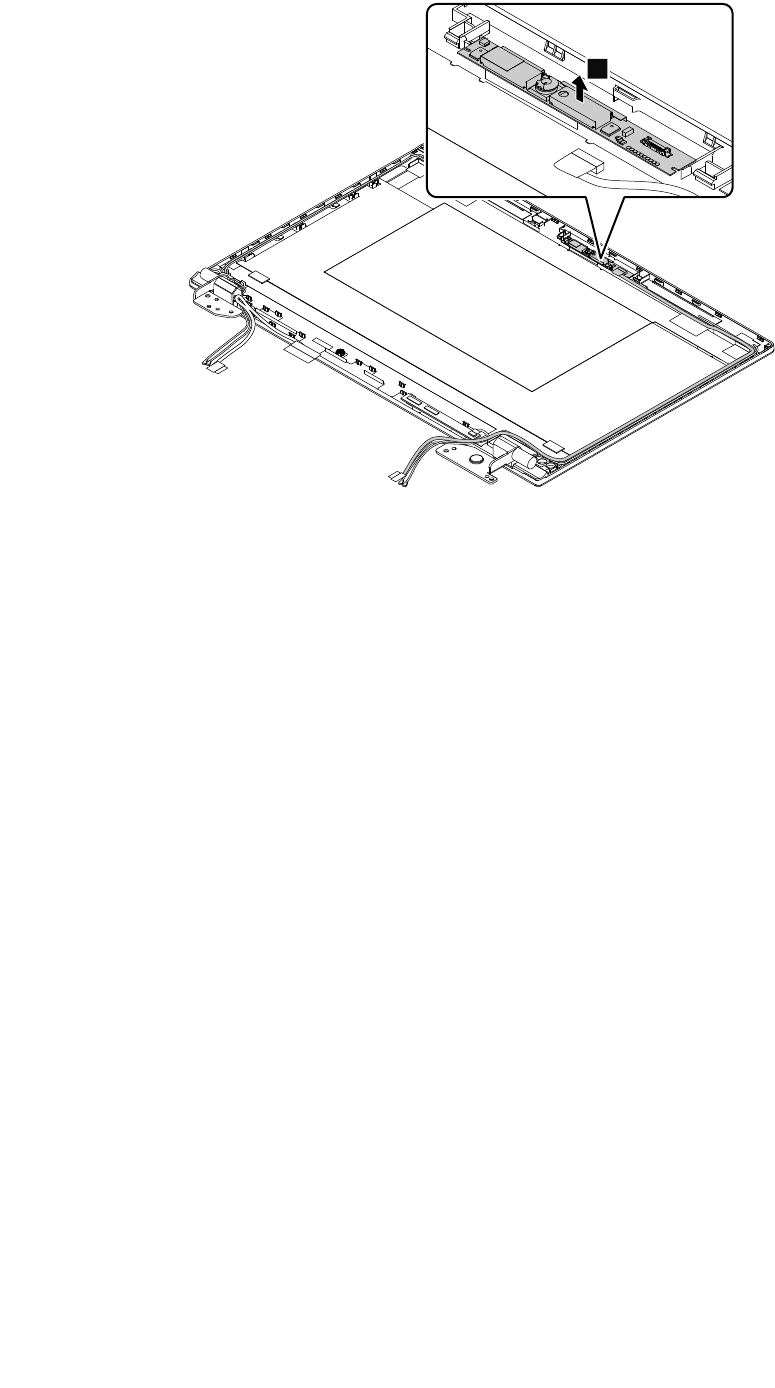
2
3050Touchsensorcard
Foraccess,removetheseFRUsinorder:
•“1010Removablebattery”onpage59
•“1020Basecoverassembly”onpage59
•“1040Storage-drivestabilizerbar,internalstoragedrive,harddiskdrivecable,andharddiskdrive
bracket”onpage66
•“1060WirelessLANcard”onpage68
•“1070WirelessWANcard”onpage69
•“1130Thermalfan”onpage75
•“1180Systemboardassembly”onpage81
•“1190LCDunit”onpage83
•“3010LCDfrontsheetbezel”onpage95
•“3020LCDpanelassemblyandLCDcable”onpage95
Chapter7.RemovingorreplacingaFRU99
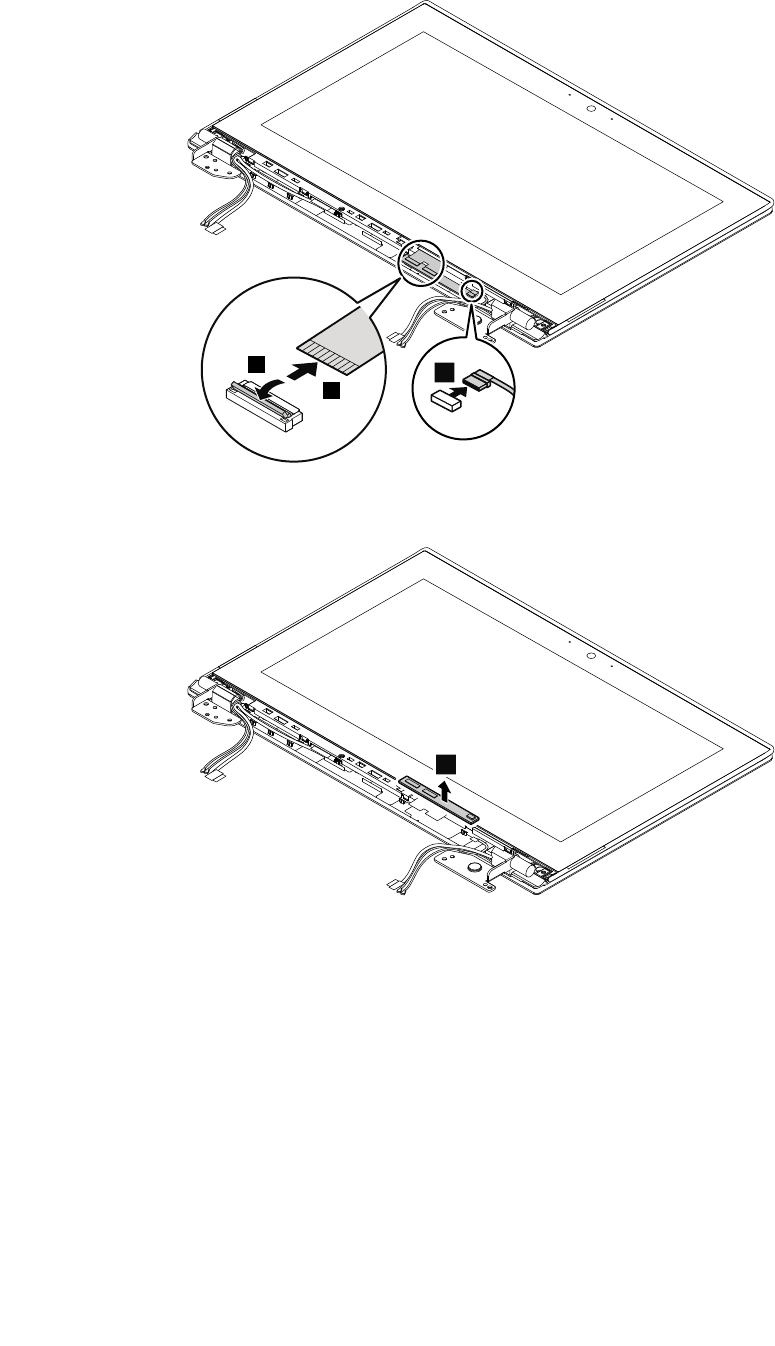
Removalstepsofthetouchsensorcard
1
2
3
Wheninstalling:Ensurethatalltheconnectorsareattachedfirmly.
4
3060LEDcableassembly
Foraccess,removetheseFRUsinorder:
•“1010Removablebattery”onpage59
•“1020Basecoverassembly”onpage59
•“1040Storage-drivestabilizerbar,internalstoragedrive,harddiskdrivecable,andharddiskdrive
bracket”onpage66
•“1060WirelessLANcard”onpage68
•“1070WirelessWANcard”onpage69
•“1130Thermalfan”onpage75
•“1180Systemboardassembly”onpage81
•“1190LCDunit”onpage83
•“3020LCDpanelassemblyandLCDcable”onpage95
•“3030Hinges”onpage97
100HardwareMaintenanceManual
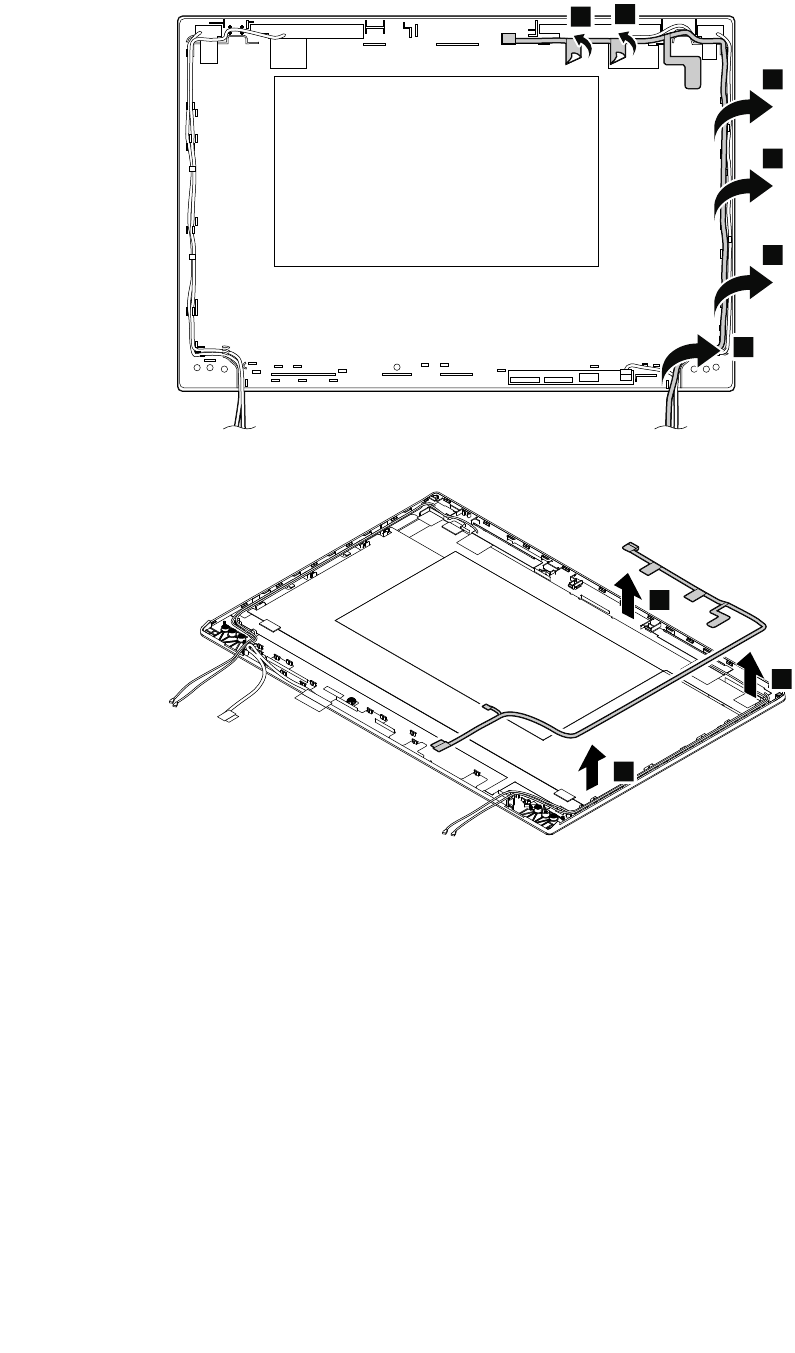
RemovalstepoftheLEDcableassembly
11
2
2
2
2
3
3
3
3070AntennakitandLCDrearcoverassembly
Removalstepsoftheantennakit
Foraccess,removetheseFRUsinorder:
•“1010Removablebattery”onpage59
•“1020Basecoverassembly”onpage59
•“1040Storage-drivestabilizerbar,internalstoragedrive,harddiskdrivecable,andharddiskdrive
bracket”onpage66
•“1060WirelessLANcard”onpage68
•“1070WirelessWANcard”onpage69
•“1130Thermalfan”onpage75
•“1180Systemboardassembly”onpage81
•“1190LCDunit”onpage83
•“3020LCDpanelassemblyandLCDcable”onpage95
•“3030Hinges”onpage97
Chapter7.RemovingorreplacingaFRU101
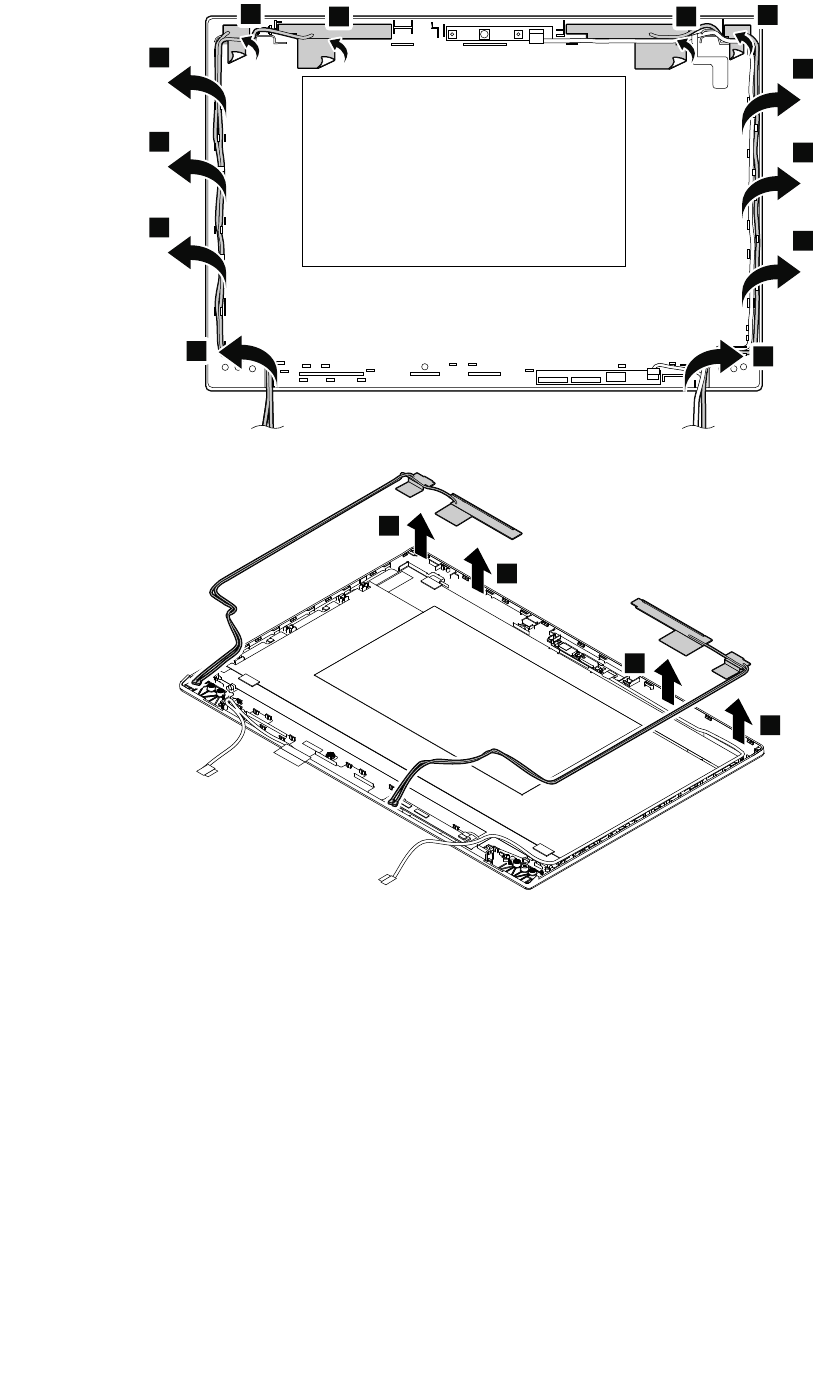
1
1
1
1
2
2
2
2
2
2
2
2
3
3
3
3
102HardwareMaintenanceManual
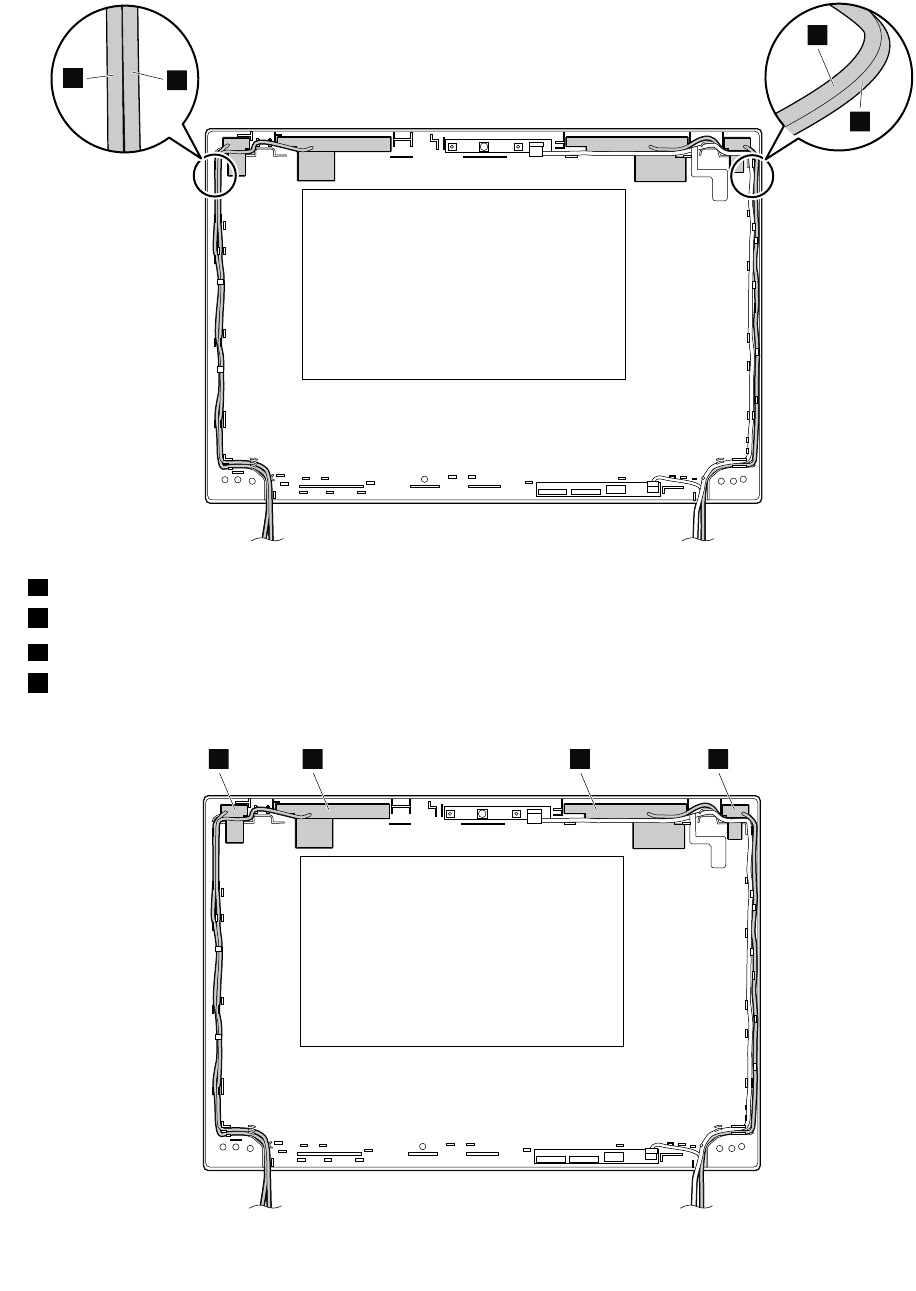
Cablerouting:Whenyouinstalltheantennakit,routethecablesasshowninthefollowingillustration.
Ensurethatthecablesarenotsubjecttoanytension.Tensioncouldcausethecablestobedamagedbythe
cableguides,orawiretobebroken.
b
c
d
a
aBlackcable(WLANauxiliary)
bBluecable(WWANauxiliary)
cOrangecable(WWANmain)
dGraycable(WLANmain)
Antennalocations
bcda
Chapter7.RemovingorreplacingaFRU103

aWLANauxiliaryantenna(black)
bWWANauxiliaryantenna(blue)
cWWANmainantenna(orange)
dWLANmainantenna(gray)
RemovalstepsoftheLCDrearcoverassembly
ToreplacetheLCDrearcoverassembly,removetheseFRUsinorder:
•“1010Removablebattery”onpage59
•“1020Basecoverassembly”onpage59
•“1040Storage-drivestabilizerbar,internalstoragedrive,harddiskdrivecable,andharddiskdrive
bracket”onpage66
•“1060WirelessLANcard”onpage68
•“1070WirelessWANcard”onpage69
•“1130Thermalfan”onpage75
•“1180Systemboardassembly”onpage81
•“1190LCDunit”onpage83
•“3010LCDfrontsheetbezel”onpage95
•“3020LCDpanelassemblyandLCDcable”onpage95
•“3030Hinges”onpage97
•“3040Camera/microphonecard”onpage98
•“3060LEDcableassembly”onpage100
•“Removalstepsoftheantennakit”onpage101
104HardwareMaintenanceManual

AppendixA.Notices
Lenovomaynotoffertheproducts,services,orfeaturesdiscussedinthisdocumentinallcountries.Consult
yourlocalLenovorepresentativeforinformationontheproductsandservicescurrentlyavailableinyour
area.AnyreferencetoaLenovoproduct,program,orserviceisnotintendedtostateorimplythatonlythat
Lenovoproduct,program,orservicemaybeused.Anyfunctionallyequivalentproduct,program,orservice
thatdoesnotinfringeanyLenovointellectualpropertyrightmaybeusedinstead.However,itistheuser’s
responsibilitytoevaluateandverifytheoperationofanyotherproduct,program,orservice.
Lenovomayhavepatentsorpendingpatentapplicationscoveringsubjectmatterdescribedinthis
document.Thefurnishingofthisdocumentdoesnotgiveyouanylicensetothesepatents.Y oucansend
licenseinquiries,inwriting,to:
Lenovo(UnitedStates),Inc.
1009ThinkPlace-BuildingOne
Morrisville,NC27560
U.S.A.
Attention:LenovoDirectorofLicensing
LENOVOPROVIDESTHISPUBLICATION“ASIS”WITHOUTWARRANTYOFANYKIND,EITHEREXPRESS
ORIMPLIED,INCLUDING,BUTNOTLIMITEDTO,THEIMPLIEDWARRANTIESOFNON-INFRINGEMENT,
MERCHANTABILITYORFITNESSFORAPARTICULARPURPOSE.Somejurisdictionsdonotallow
disclaimerofexpressorimpliedwarrantiesincertaintransactions,therefore,thisstatementmaynotapply
toyou.
Thisinformationcouldincludetechnicalinaccuraciesortypographicalerrors.Changesareperiodically
madetotheinformationherein;thesechangeswillbeincorporatedinneweditionsofthepublication.
Lenovomaymakeimprovementsand/orchangesintheproduct(s)and/ortheprogram(s)describedinthis
publicationatanytimewithoutnotice.
Theproductsdescribedinthisdocumentarenotintendedforuseinimplantationorotherlifesupport
applicationswheremalfunctionmayresultininjuryordeathtopersons.Theinformationcontainedinthis
documentdoesnotaffectorchangeLenovoproductspecificationsorwarranties.Nothinginthisdocument
shalloperateasanexpressorimpliedlicenseorindemnityundertheintellectualpropertyrightsofLenovo
orthirdparties.Allinformationcontainedinthisdocumentwasobtainedinspecificenvironmentsandis
presentedasanillustration.Theresultobtainedinotheroperatingenvironmentsmayvary.
Lenovomayuseordistributeanyoftheinformationyousupplyinanywayitbelievesappropriatewithout
incurringanyobligationtoyou.
Anyreferencesinthispublicationtonon-LenovoWebsitesareprovidedforconvenienceonlyanddonotin
anymannerserveasanendorsementofthoseWebsites.ThematerialsatthoseWebsitesarenotpartof
thematerialsforthisLenovoproduct,anduseofthoseWebsitesisatyourownrisk.
Anyperformancedatacontainedhereinwasdeterminedinacontrolledenvironment.Therefore,theresult
obtainedinotheroperatingenvironmentsmayvarysignificantly.Somemeasurementsmayhavebeen
madeondevelopment-levelsystemsandthereisnoguaranteethatthesemeasurementswillbethesame
ongenerallyavailablesystems.Furthermore,somemeasurementsmayhavebeenestimatedthrough
extrapolation.Actualresultsmayvary.Usersofthisdocumentshouldverifytheapplicabledatafortheir
specificenvironment.
©CopyrightLenovo2015105

Electronicemissionsnotices
ForelectronicemissioninformationonClassBdigitaldevices,refertothecorrespondinginformationin
theUserGuide.
Trademarks
ThefollowingtermsaretrademarksofLenovointheUnitedStates,othercountriesorboth:
Lenovo
ThinkPad
TrackPoint
ThinkPadlogo
MicrosoftandWindowsaretrademarksoftheMicrosoftgroupofcompanies.
IntelisatrademarkofIntelCorporationintheU.S.and/orothercountries.
MiniDisplayPort(mDP)andDisplayPortaretrademarksoftheVideoElectronicsStandardsAssociation.
Othercompany,product,orservicenamesmaybethetrademarksorservicemarksofothers.
106HardwareMaintenanceManual

PartNumber:SP40G55010_02
Printedin
(1P)P/N:SP40G55010_02
*1PSP40G55010_02*
