Lenovo X1 Carbon 5Th Hmm En Sp40M11925 02 User Manual Hardware Maintenance Think Pad (Type 20HR, 20HQ, 20K3, 20K4) Gen Kabylake 20HQ) Laptop (Think Pad)
2017-06-19
User Manual: Lenovo X1 Carbon 5Th Hmm En Sp40M11925 02 Hardware Maintenance Manual - ThinkPad X1 Carbon (Type 20HR, 20HQ, 20K3, 20K4) X1 Carbon 5th Gen - Kabylake (Type 20HR, 20HQ) Laptop (ThinkPad) X1 Carbon 5th Gen - Kabylake (Type 20HR, 20HQ)
Open the PDF directly: View PDF ![]() .
.
Page Count: 110 [warning: Documents this large are best viewed by clicking the View PDF Link!]
- About this manual
- Chapter 1. Safety information
- Chapter 2. Important service information
- Chapter 3. General checkout
- Chapter 4. Related service information
- Chapter 5. Special keys
- Chapter 6. Locations
- Chapter 7. FRU replacement notices
- Chapter 8. Removing or replacing a FRU
- General guidelines
- Before servicing the computer
- Removing a major FRU
- 1010 Base cover assembly
- 1020 M.2 solid-state drive and thermal rubber for M.2 solid-state drive
- 1030 Wireless-LAN card
- 1040 Wireless-WAN card
- 1050 Coin-cell battery
- 1060 Thermal fan assembly
- 1070 USB cable
- 1080 Speaker assembly
- 1090 Built-in battery
- 1100 Wireless-WAN antenna kit or wireless-WAN antenna filler, and cable holder for wireless-WAN antenna
- 1110 Wireless-LAN antenna kit and cable holder for wireless-LAN antenna
- 1120 WiGig antenna kit and WiGig bracket
- 1130 Trackpad cable
- 1140 Trackpad assembly and trackpad insulation tape
- 1150 NFC card with NFC support bracket
- 1160 dc-in support bracket
- 1170 micro-SIM-card tray
- 1180 SD support bracket
- 1190 System board assembly
- 1200 Power button card and power-button-card cable
- 1210 Audio card with audio-card cable
- 1220 LCD unit
- 1230 Keyboard bezel assembly
- Removing an LCD FRU
- Appendix A. Notices

HardwareMaintenanceManual
MachineTypes:20HQ,20HR,20K3,and20K4

Note:Beforeusingthisinformationandtheproductitsupports,besuretoreadthegeneralinformation
underAppendixA“Notices”onpage101.
ThirdEdition(June2017)
©CopyrightLenovo2017.
LIMITEDANDRESTRICTEDRIGHTSNOTICE:IfdataorsoftwareisdeliveredpursuanttoaGeneralServices
Administration“GSA”contract,use,reproduction,ordisclosureissubjecttorestrictionssetforthinContractNo.
GS-35F-05925.

Contents
Aboutthismanual...........iii
Chapter1.Safetyinformation......1
Generalsafety................1
Electricalsafety...............1
Safetyinspectionguide............2
Handlingdevicesthataresensitivetoelectrostatic
discharge..................3
Groundingrequirements............4
Safetynotices(multilingualtranslations)......4
Chapter2.Importantservice
information..............19
StrategyforreplacingFRUs.........19
StrategyforreplacinganM.2solid-state
drive.................19
Importantnoticeforreplacingasystem
board................20
Howtouseerrormessage........20
StrategyforreplacingFRUsforCTO,special-bid,
andstandardmodels............20
Productdefinition............20
FRUidentification............20
Chapter3.Generalcheckout.....23
Whattodofirst..............23
Checkoutguide..............24
Diagnosingproblems..........24
Quicktestprograms...........25
UEFIdiagnosticprogram.........25
Bootablediagnosticprograms.......26
Powersystemcheckout...........26
Checkingtheacpoweradapter......27
Checkingthebatteryandoperational
charging...............27
Checkingthecoin-cellbattery.......28
Chapter4.Relatedservice
information..............29
Recoveryinformation............29
Restoringthefactorycontentswiththe
RecoveryDiscSetfortheWindows7
operatingsystem............29
RecoveryinformationfortheWindows7
operatingsystem............30
RecoveryinformationfortheWindows10
operatingsystem............32
Passwords................33
Power-onpassword...........34
Harddiskpassword...........34
Supervisorpassword..........34
Howtoremovethepower-onpassword...34
Howtoremovetheharddiskpassword...35
Powermanagement............35
Screenblankmode(fortheWindows7
operatingsystemonly)..........36
Sleepmode..............36
Hibernationmode...........36
Symptom-to-FRUindex...........37
Numericerrorcodes..........37
Errormessages............38
Beeperrors..............38
LCD-relatedsymptoms.........40
Intermittentproblems..........40
Undeterminedproblems.........40
Chapter5.Specialkeys........43
Chapter6.Locations.........45
Computercontrols,connectors,andindicators..45
Frontview...............45
Left-sideview.............46
Right-sideview.............46
Rearview...............46
Bottomview..............47
Statusindicators............47
LocatingFRUsandCRUs..........49
MajorFRUs..............50
LCDFRUs..............53
MiscellaneouspartsandotherFRUs....55
Connectorandcableguide........55
LookingupFRUinformation.........61
Chapter7.FRUreplacement
notices................63
Commonservicetools...........63
Screwnotices...............63
Retainingserialnumbers...........64
Restoringtheserialnumberofthesystem
unit.................64
RetainingtheUUID...........65
ReadingorwritingtheECAinformation...66
Chapter8.Removingorreplacinga
FRU..................67
Generalguidelines.............67
©CopyrightLenovo2017i

Beforeservicingthecomputer........68
Removingexternaldevices........68
Disablingthebuilt-inbattery.......68
RemovingthemicroSIMcard......68
RemovingamajorFRU...........69
1010Basecoverassembly........69
1020M.2solid-statedriveandthermalrubber
forM.2solid-statedrive.........70
1030Wireless-LANcard.........71
1040Wireless-WANcard.........72
1050Coin-cellbattery..........73
1060Thermalfanassembly........73
1070USBcable............75
1080Speakerassembly.........75
1090Built-inbattery...........77
1100Wireless-WANantennakitor
wireless-WANantennafiller,andcableholder
forwireless-WANantenna........79
1110Wireless-LANantennakitandcable
holderforwireless-LANantenna......81
1120WiGigantennakitandWiGigbracket..83
1130Trackpadcable..........84
1140Trackpadassemblyandtrackpad
insulationtape.............86
1150NFCcardwithNFCsupportbracket..87
1160dc-insupportbracket........88
1170micro-SIM-cardtray........89
1180SDsupportbracket.........89
1190Systemboardassembly.......90
1200Powerbuttoncardand
power-button-cardcable.........92
1210Audiocardwithaudio-cardcable...93
1220LCDunit.............94
1230Keyboardbezelassembly......96
RemovinganLCDFRU...........96
2010LCD-bezelassembly,protectionplate
assembly,andmetalprotectionplate....96
2020HingesandLCDbottombezel....97
2030LCDpanelassemblyandLCDcable..98
2040Camera/microphonecard,and
camera/LEDcable...........99
AppendixA.Notices.........101
Electronicemissionsnotices.........102
Trademarks................102
iiHardwareMaintenanceManual

Aboutthismanual
ThismanualcontainsserviceandreferenceinformationforthefollowingThinkPad®products.
ThinkPadX1CarbonMachineTypes:20HQ,20HR,20K3,and20K4
Usethismanualalongwiththeadvanceddiagnosticteststotroubleshootproblems.
Important:ThismanualisintendedonlyfortrainedservicetechnicianswhoarefamiliarwithThinkPad
products.Usethismanualalongwiththeadvanceddiagnosticteststotroubleshootproblemseffectively.
BeforeservicingaThinkPadproduct,besuretoreadalltheinformationunderChapter1“Safetyinformation”
onpage1andChapter2“Importantserviceinformation”onpage19.
©CopyrightLenovo2017iii

ivHardwareMaintenanceManual

Chapter1.Safetyinformation
Thischapterpresentsfollowingsafetyinformationthatyoumustbefamiliarwithbeforeyouservicea
ThinkPadnotebookcomputer.
•“Generalsafety”onpage1
•“Electricalsafety”onpage1
•“Safetyinspectionguide”onpage2
•“Handlingdevicesthataresensitivetoelectrostaticdischarge”onpage3
•“Groundingrequirements”onpage4
•“Safetynotices(multilingualtranslations)”onpage4
Generalsafety
Followtheserulestoensuregeneralsafety:
•Observegoodhousekeepingintheareaofthemachinesduringandaftermaintenance.
•Whenliftinganyheavyobject:
1.Makesurethatyoucanstandsafelywithoutslipping.
2.Distributetheweightoftheobjectequallybetweenyourfeet.
3.Useaslowliftingforce.Nevermovesuddenlyortwistwhenyouattempttolift.
4.Liftbystandingorbypushingupwithyourlegmuscles;thisactionremovesthestrainfromthe
musclesinyourback.Donotattempttoliftanyobjectthatweighsmorethan16kg(35lb)orthat
youthinkistooheavyforyou.
•Donotperformanyactionthatcauseshazardstothecustomer,orthatmakestheequipmentunsafe.
•Beforeyoustartthemachine,makesurethatotherservicetechniciansandthecustomer'spersonnelare
notinahazardousposition.
•Placeremovedcoversandotherpartsinasafeplace,awayfromallpersonnel,whileyouareservicing
themachine.
•Keepyourtoolcaseawayfromwalkareassothatotherpeoplewillnottripoverit.
•Donotwearlooseclothingthatcanbetrappedinthemovingpartsofamachine.Makesurethatyour
sleevesarefastenedorrolledupaboveyourelbows.Ifyourhairislong,fastenit.
•Inserttheendsofyournecktieorscarfinsideclothingorfastenitwithanonconductiveclip,about8
centimeters(3inches)fromtheend.
•Donotwearjewelry,chains,metal-frameeyeglasses,ormetalfastenersforyourclothing.
Attention:Metalobjectsaregoodelectricalconductors.
•Wearsafetyglasseswhenyouarehammering,drilling,soldering,cuttingwire,attachingsprings,using
solvents,orworkinginanyotherconditionsthatmightbehazardoustoyoureyes.
•Afterservice,reinstallallsafetyshields,guards,labels,andgroundwires.Replaceanysafetydevice
thatiswornordefective.
•Reinstallallcoverscorrectlybeforereturningthemachinetothecustomer.
•Fanlouversonthemachinehelptopreventoverheatingofinternalcomponents.Donotobstructfan
louversorcoverthemwithlabelsorstickers.
Electricalsafety
Observethefollowingruleswhenworkingonelectricalequipment.
Important:Useonlyapprovedtoolsandtestequipment.Somehandtoolshavehandlescoveredwithasoft
materialthatdoesnotinsulateyouwhenworkingwithliveelectricalcurrents.Manycustomershave,near
theirequipment,rubberfloormatsthatcontainsmallconductivefiberstodecreaseelectrostaticdischarges.
Donotusethistypeofmattoprotectyourselffromelectricalshock.
©CopyrightLenovo20171

•Findtheroomemergencypower-off(EPO)switch,disconnectingswitch,orelectricaloutlet.Ifanelectrical
accidentoccurs,youcanthenoperatetheswitchorunplugthepowercordquickly.
•Donotworkaloneunderhazardousconditionsornearequipmentthathashazardousvoltages.
•Disconnectallpowerbefore:
–Performingamechanicalinspection
–Workingnearpowersupplies
–Removingorinstallingmainunits
•Beforeyoustarttoworkonthemachine,unplugthepowercord.Ifyoucannotunplugit,askthecustomer
topower-offthewallboxthatsuppliespowertothemachine,andtolockthewallboxintheoffposition.
•Ifyouhavetoworkonamachinethathasexposedelectricalcircuits,observethefollowingprecautions:
–Ensurethatanotherperson,familiarwiththepower-offcontrols,isnearyou.
Attention:Anotherpersonmustbetheretoswitchoffthepower,ifnecessary.
–Useonlyonehandwhenworkingwithpowered-onelectricalequipment;keeptheotherhandinyour
pocketorbehindyourback.
Attention:Anelectricalshockcanoccuronlywhenthereisacompletecircuit.Byobservingtheabove
rule,youmaypreventacurrentfrompassingthroughyourbody.
–Whenusingtesters,setthecontrolscorrectlyandusetheapprovedprobeleadsandaccessoriesfor
thattester.
–Standonsuitablerubbermats(obtainedlocally,ifnecessary)toinsulateyoufromgroundssuchas
metalfloorstripsandmachineframes.
Observethespecialsafetyprecautionswhenyouworkwithveryhighvoltages;Instructionsforthese
precautionsareinthesafetysectionsofmaintenanceinformation.Useextremecarewhenmeasuring
highvoltages.
•Regularlyinspectandmaintainyourelectricalhandtoolsforsafeoperationalcondition.
•Donotusewornorbrokentoolsandtesters.
•Neverassumethatpowerhasbeendisconnectedfromacircuit.First,checkthatithasbeenpoweredoff.
•Alwayslookcarefullyforpossiblehazardsinyourworkarea.Examplesofthesehazardsaremoistfloors,
nongroundedpowerextensioncables,powersurges,andmissingsafetygrounds.
•Donottouchliveelectricalcircuitswiththereflectivesurfaceofaplasticdentalmirror.Thesurfaceis
conductive;suchtouchingcancausepersonalinjuryandmachinedamage.
•Donotservicethefollowingpartswiththepoweronwhentheyareremovedfromtheirnormaloperating
placesinamachine:
–Powersupplyunits
–Pumps
–Blowersandfans
–Motorgenerators
–Similarunitsaslistedabove
Thispracticeensurescorrectgroundingoftheunits.
•Ifanelectricalaccidentoccurs:
–Usecaution;donotbecomeavictimyourself.
–Switchoffpower.
–Sendanotherpersontogetmedicalaid.
Safetyinspectionguide
Thepurposeofthisinspectionguideistoassistyouinidentifyingpotentiallyunsafeconditions.Aseach
machinewasdesignedandbuilt,requiredsafetyitemswereinstalledtoprotectusersandservicetechnicians
frominjury.Thisguideaddressesonlythoseitems.Youshouldusegoodjudgmenttoidentifypotential
safetyhazardsduetoattachmentofnon-ThinkPadfeaturesoroptionsnotcoveredbythisinspectionguide.
Ifanyunsafeconditionsarepresent,youmustdeterminehowserioustheapparenthazardcouldbeand
whetheryoucancontinuewithoutfirstcorrectingtheproblem.
2HardwareMaintenanceManual

Considertheseconditionsandthesafetyhazardstheypresent:
•Electricalhazards,especiallyprimarypower(primaryvoltageontheframecancauseseriousorfatal
electricalshock)
•Explosivehazards,suchasadamagedCRTfaceorabulgingcapacitor
•Mechanicalhazards,suchaslooseormissinghardware
Todeterminewhetherthereareanypotentiallyunsafeconditions,usethefollowingchecklistatthebeginning
ofeveryservicetask.Beginthecheckswiththepoweroff,andthepowercorddisconnected.
Checklist:
1.Checkexteriorcoversfordamage(loose,broken,orsharpedges).
2.Poweroffthecomputer.Disconnectthepowercord.
3.Checkthepowercordfor:
a.Athird-wiregroundconnectoringoodcondition.Useametertomeasurethird-wireground
continuityfor0.1ohmorlessbetweentheexternalgroundpinandtheframeground.
b.Thepowercordshouldbetheauthorizedtypespecifiedforyourcomputer.Goto:
http://www.lenovo.com/serviceparts-lookup
c.Insulationmustnotbefrayedorworn.
4.Checkforcrackedorbulgingbatteries.
5.Removethecover.
6.Checkforanyobviousnon-ThinkPadalterations.Usegoodjudgmentastothesafetyofany
non-ThinkPadalterations.
7.Checkinsidetheunitforanyobviousunsafeconditions,suchasmetalfilings,contamination,wateror
otherliquids,orsignsoffireorsmokedamage.
8.Checkforworn,frayed,orpinchedcables.
9.Checkthatthepower-supplycoverfasteners(screwsorrivets)havenotbeenremovedortamperedwith.
Handlingdevicesthataresensitivetoelectrostaticdischarge
Anycomputerpartcontainingtransistorsorintegratedcircuits(ICs)shouldbeconsideredsensitiveto
electrostaticdischarge(ESD.)ESDdamagecanoccurwhenthereisadifferenceinchargebetweenobjects.
ProtectagainstESDdamagebyequalizingthechargesothatthemachine,thepart,theworkmat,andthe
personhandlingthepartareallatthesamecharge.
Notes:
1.Useproduct-specificESDprocedureswhentheyexceedtherequirementsnotedhere.
2.MakesurethattheESDprotectivedevicesyouusehavebeencertified(ISO9000)asfullyeffective.
WhenhandlingESD-sensitiveparts:
•Keepthepartsinprotectivepackagesuntiltheyareinsertedintotheproduct.
•Avoidcontactwithotherpeople.
•Wearagroundedwriststrapagainstyourskintoeliminatestaticonyourbody.
•Preventthepartfromtouchingyourclothing.Mostclothingisinsulativeandretainsachargeeven
whenyouarewearingawriststrap.
•Useagroundedworkmattoprovideastatic-freeworksurface.Thematisespeciallyusefulwhen
handlingESD-sensitivedevices.
•Selectagroundingsystem,suchasthoselistedbelow,toprovideprotectionthatmeetsthespecific
servicerequirement.
Note:TheuseofagroundingsystemtoguardagainstESDdamageisdesirablebutnotnecessary.
–AttachtheESDgroundcliptoanyframeground,groundbraid,orgreen-wireground.
Chapter1.Safetyinformation3
–Whenworkingonadouble-insulatedorbattery-operatedsystem,useanESDcommongroundor
referencepoint.Y oucanusecoaxorconnector-outsideshellsonthesesystems.
–Usetheroundgroundprongoftheacplugonac-operatedcomputers.
Groundingrequirements
Electricalgroundingofthecomputerisrequiredforoperatorsafetyandcorrectsystemfunction.Proper
groundingoftheelectricaloutletcanbeverifiedbyacertifiedelectrician.
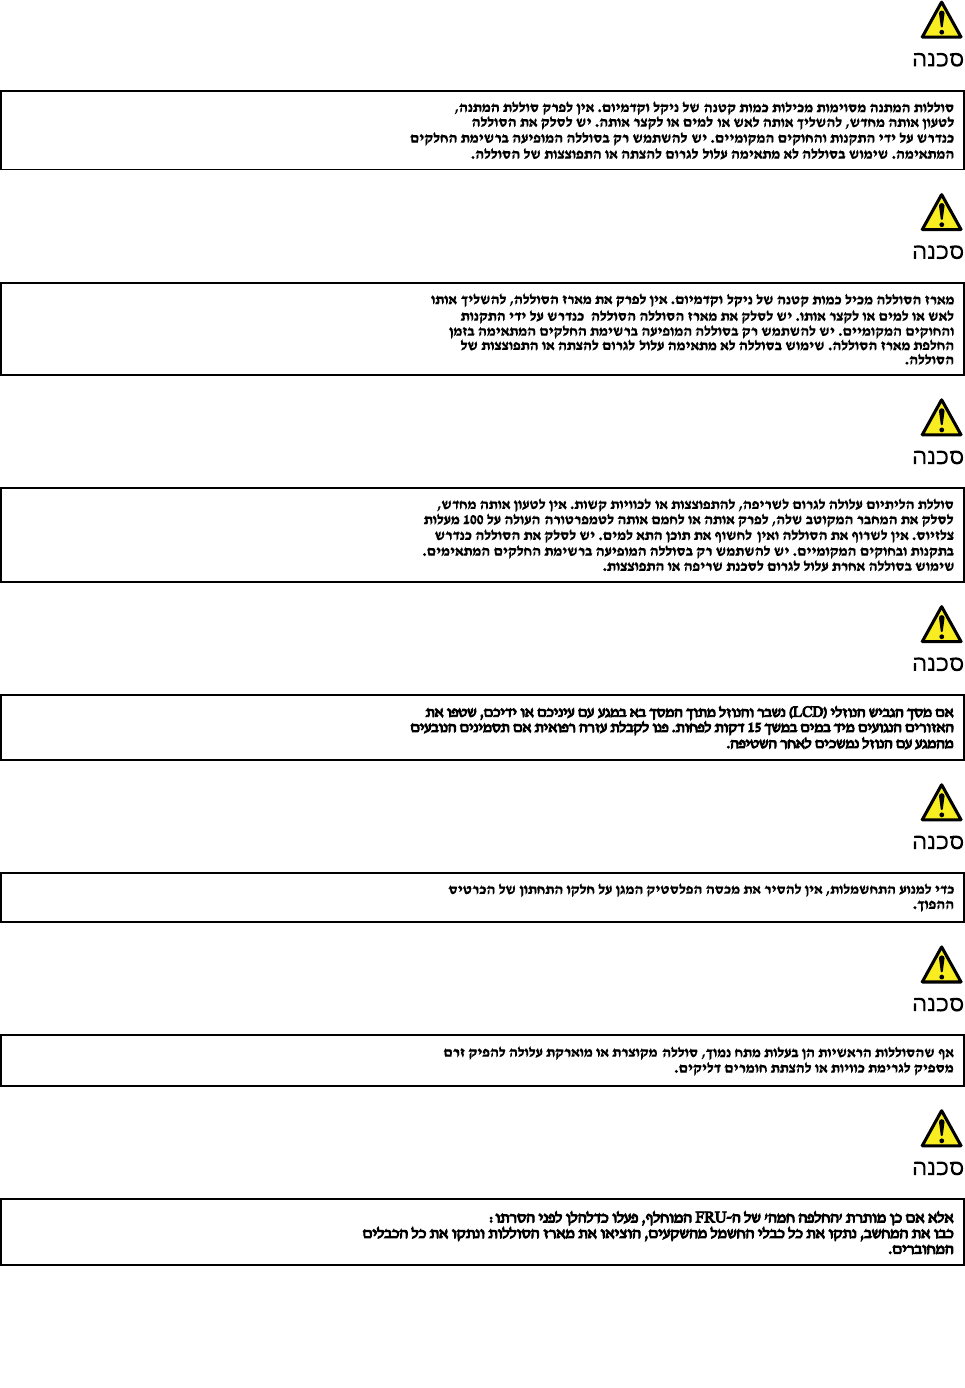
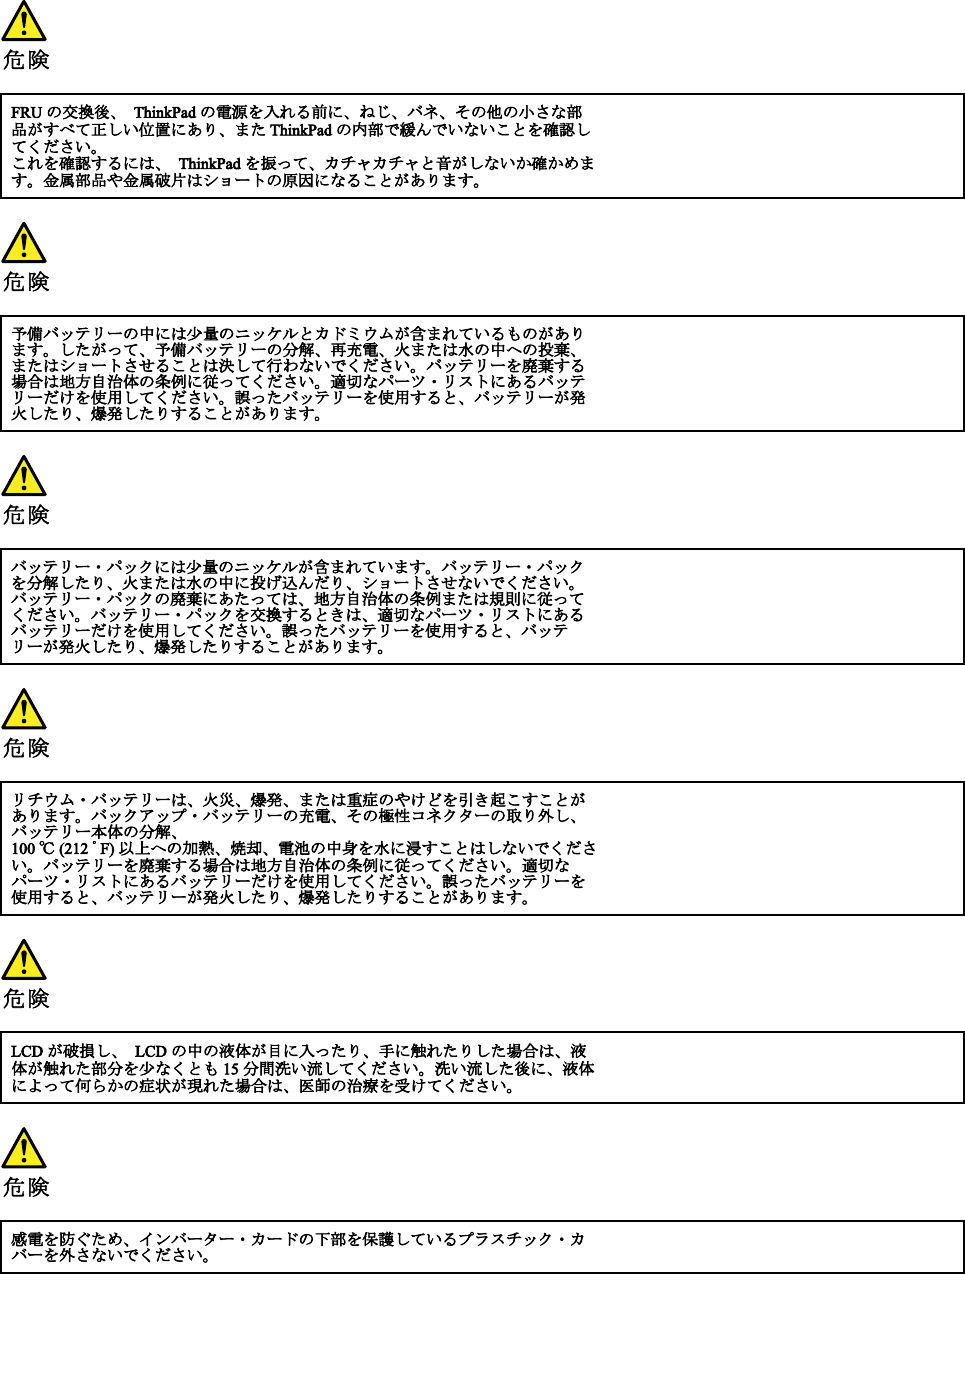
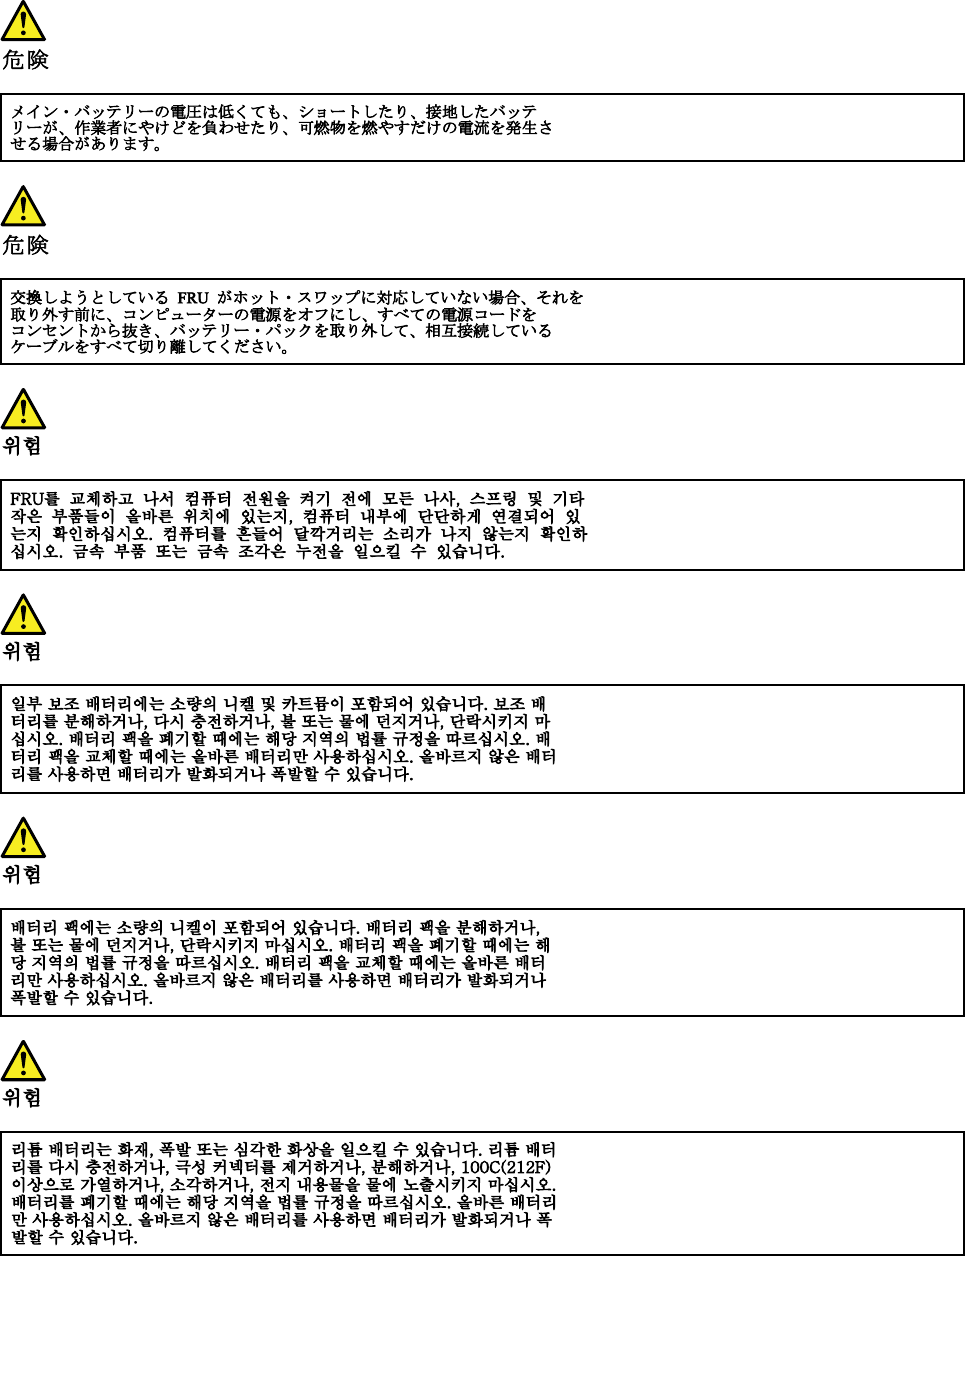
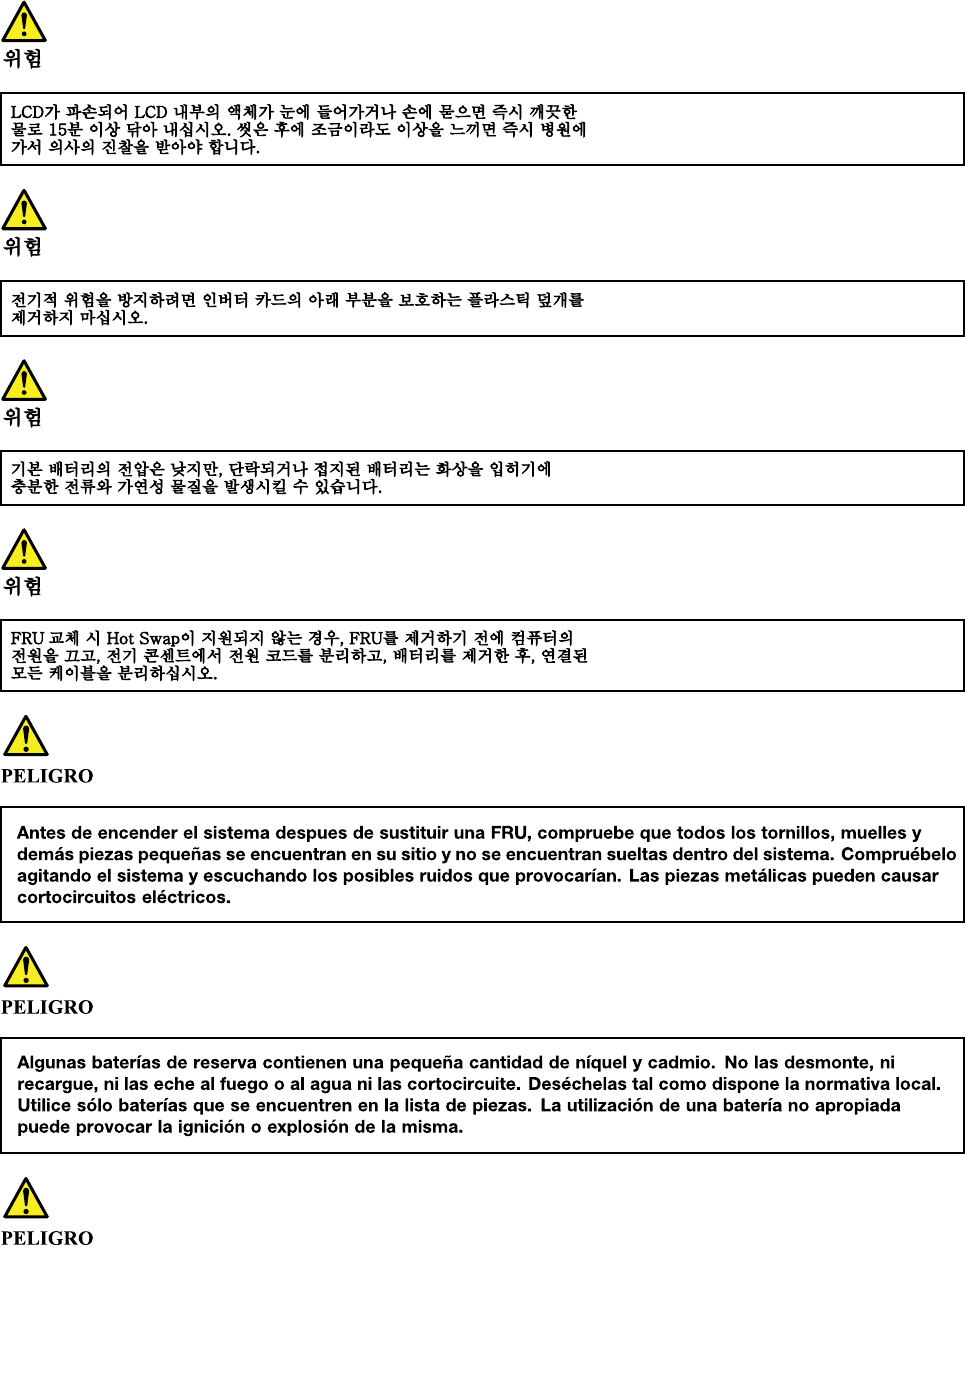
Safetynotices(multilingualtranslations)
Thesafetynoticesinthissectionareprovidedinthefollowinglanguages:
•English
•Arabic
•BrazilianPortuguese
•French
•German
•Hebrew
•Japanese
•Korean
•Spanish
•TraditionalChinese
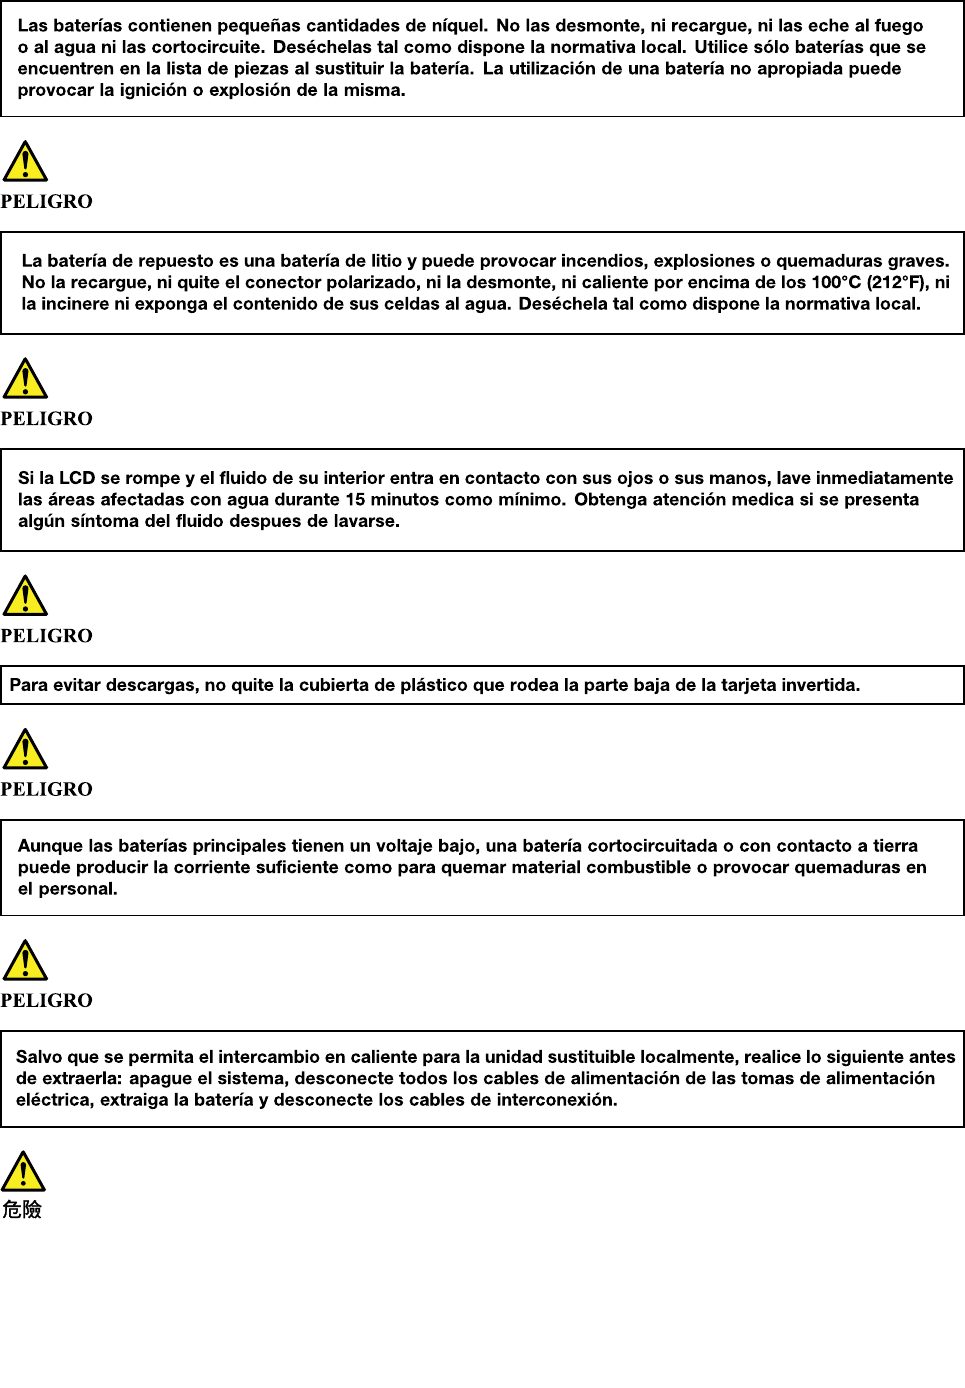
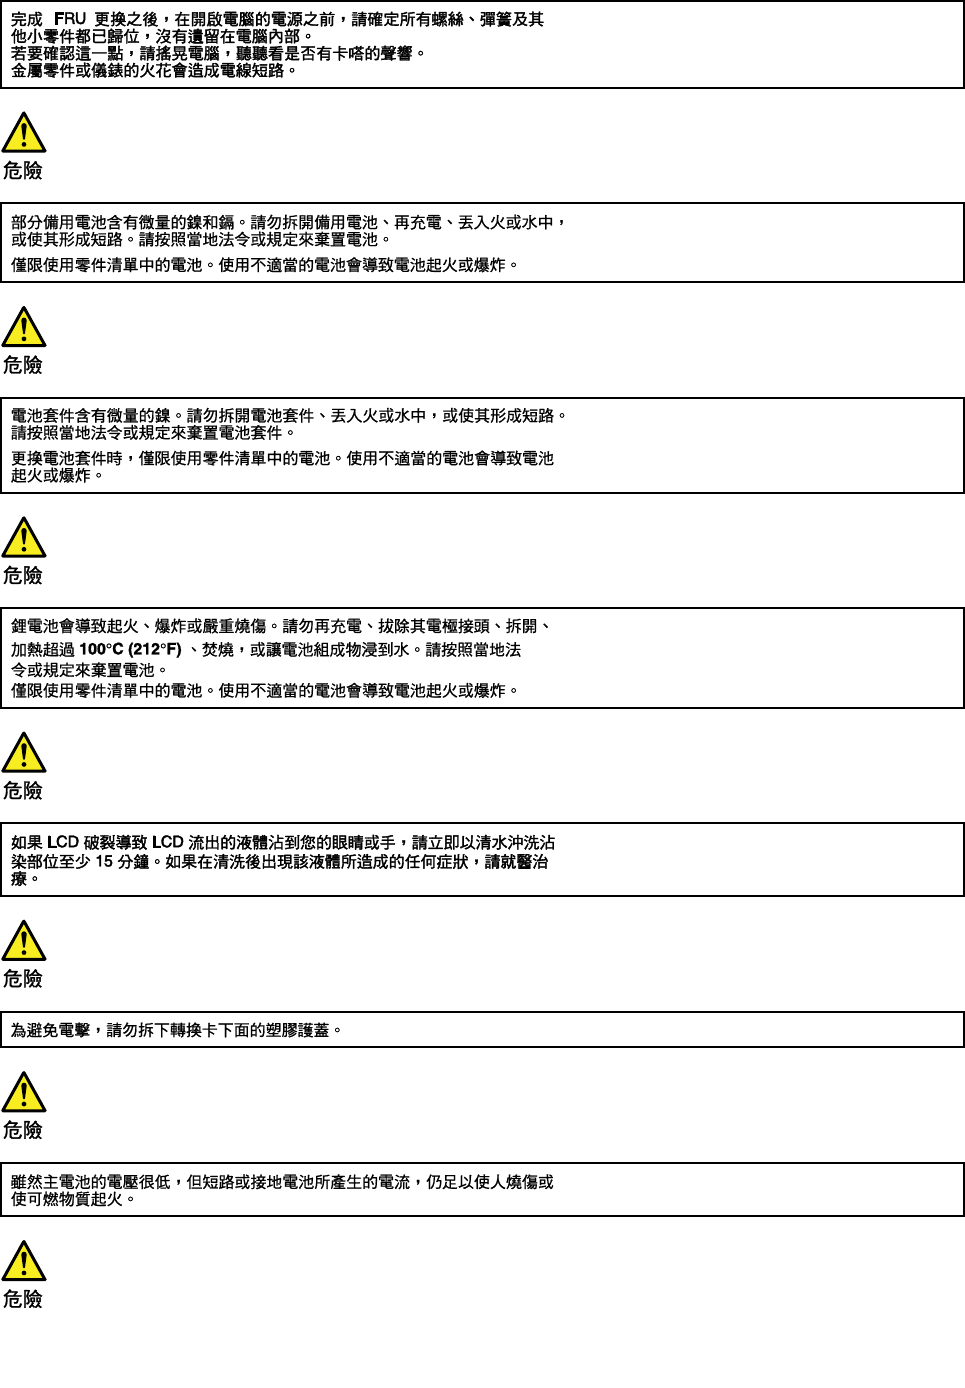
DANGER
DANGER
DANGER
4HardwareMaintenanceManual
6HardwareMaintenanceManual
PERIGO
PERIGO
PERIGO
PERIGO
DANGER
8HardwareMaintenanceManual
DANGER
VORSICHT
VORSICHT
VORSICHT
VORSICHT
10HardwareMaintenanceManual
12HardwareMaintenanceManual
14HardwareMaintenanceManual
16HardwareMaintenanceManual

18HardwareMaintenanceManual

Chapter2.Importantserviceinformation
Thischapterintroducesfollowingimportantserviceinformationthatappliestoallmachinetypessupported
bythismanual:
•“StrategyforreplacingFRUs”onpage19
–“StrategyforreplacinganM.2solid-statedrive”onpage19
–“Importantnoticeforreplacingasystemboard”onpage20
–“Howtouseerrormessage”onpage20
•“StrategyforreplacingFRUsforCTO,special-bid,andstandardmodels”onpage20
–“Productdefinition”onpage20
–“FRUidentification”onpage20
Important:
•AdvisecustomerstocontacttheLenovo®SupportWebsiteathttp://www.lenovo.com/supporttoview
thesoftwarefixes,downloadthedrivers,andfollowtheon-screeninstructionstoinstallthedrivers.For
additionalassistance,customersmightcalltheLenovoCustomerSupportCenter.Telephonenumbersfor
theLenovoSupportCenterareavailableat:
http://www.lenovo.com/support/phone
•ServicetrainingdocumentsforLenovoauthorizedservicetechniciansareavailableatthefollowingWeb
site.ThedisassemblyandreassemblyvideosthatshowtheFRUremovalandreplacementprocedures
arecontainedinthedocuments.
http://www.lenovoservicetraining.com
StrategyforreplacingFRUs
Beforereplacingparts:
Ensurethatallsoftwarefixes,drivers,andUEFIBIOSdownloadsareinstalledbeforereplacinganyFRUs
listedinthismanual.
Afterasystemboardisreplaced,ensurethatthelatestUEFIBIOSisloadedtothesystemboardbefore
completingtheserviceaction.
Todownloadsoftwarefixes,drivers,andUEFIBIOS,gotohttp://www.lenovo.com/ThinkPadDriversand
followtheinstructionsonthescreen.
UsethefollowingstrategytopreventunnecessaryexpenseforreplacingandservicingFRUs:
•IfyouareinstructedtoreplaceaFRUbutthereplacementdoesnotcorrecttheproblem,reinstallthe
originalFRUbeforeyoucontinue.
•Somecomputershavebothaprocessorboardandasystemboard.Ifyouareinstructedtoreplaceeither
theprocessorboardorthesystemboard,andreplacingoneofthemdoesnotcorrecttheproblem,
reinstallthatboard,andthenreplacetheotherone.
•IfanadapteroradeviceconsistsofmorethanoneFRU,anyoftheFRUsmaybethecauseoftheerror.
Beforereplacingtheadapterordevice,removetheFRUs,onebyone,toseeifthesymptomschange.
ReplaceonlytheFRUthatchangedthesymptoms.
StrategyforreplacinganM.2solid-statedrive
Alwaystrytorunalow-levelformatbeforereplacinganM.2solid-statedrive(SSD).Thiswillcauseall
customerdataontheM.2SSDtobelost.Besurethatthecustomerhasacurrentbackupofthedata
beforedoingthistask.
©CopyrightLenovo201719

Attention:Thedrivestartupsequenceinthecomputeryouareservicingmayhavebeenchanged.Be
extremelycarefulduringwriteoperationssuchascopying,saving,orformatting.Ifyouselectanincorrect
drive,dataorprogramscanbeoverwritten.
Importantnoticeforreplacingasystemboard
Somecomponentsmountedonasystemboardareverysensitive.Improperhandlingofasystemboardcan
damagethosecomponents,andmaycauseasystemmalfunction.
Attention:Whenhandlingasystemboard:
•Donotdropasystemboardorapplyanyexcessiveforcetoit.
•Avoidroughhandlingofanykind.
•AvoidbendingasystemboardandhardpushingtopreventcrackingateachBGA(BallGridArray)chipset.
Howtouseerrormessage
Usetheerrorcodesdisplayedonthescreentodiagnosefailures.Ifmorethanoneerrorcodeisdisplayed,
beginthediagnosiswiththefirsterrorcode.Whatevercausesthefirsterrorcodemayalsocausefalseerror
codes.Ifnoerrorcodeisdisplayed,seewhethertheerrorsymptomislistedintheSymptom-to-FRU
Indexforthecomputeryouareservicing.
StrategyforreplacingFRUsforCTO,special-bid,andstandardmodels
ThistopicprovidesinformationaboutthemodeltypesandFRUidentification.
Productdefinition
Thistopicintroducesdifferentmodeltypesandhowtoidentifyeachtype.
Dynamicconfigure-to-order(CTO)model
ThismodelprovidestheabilityforacustomertoconfigureaLenovosolutionfromaWebsite,andhavethis
configurationsenttofulfillment,whereitisbuiltandshippeddirectlytothecustomer.Themachinelabeland
eSupportwillloadtheseproductsasthe4-characterMT,4-charactermodel,and2-charactercountrycode.
Themodelis“CTO1”andthedefaultcountrycodeis“WW”(example:20A7CTO1WW).
Special-bidmodel
ThisisauniqueconfigurationthathasbeennegotiatedbetweenLenovoandthecustomer.Auniquemachine
typemodel(MTM)consistsofa4-characterMT,a4-charactermodel,andanumeric2-charactercountry
codeisprovidedtothecustomertoplaceorders(example:20A7000955).Thecountrycodeassignedis
numericanddoesnotdesignateaspecificcountryorregion.ThecustommodelfactsheetfortheMTM
indicateswhichcountrythespecialbidMTMissetupfor.Special-bidofferingisnotgenerallyannounced.
Standardmodel
Standardmodels(fixedconfiguration)areannouncedandofferedtoallcustomers.TheMTMportionofthe
machinelabelconsistsofa4-characterMT,a4-charactermodel,andanalphabetic2-charactercountry
code.Thecountrycodeassignedisalphabeticandrepresentsadesignatedcountryorregion(example:
20A70009UK).
FRUidentification
UseLenovoeSupporttoidentifymajorFRUs,FRUpartnumbers,andFRUdescriptionsforaproductat
anMT-serialnumberlevel.ExamplesofmajorFRUsareharddiskdrive,systemboard,andliquidcrystal
display(LCD).
ToidentifythemajorFRUsforaproduct,dothefollowing:
20HardwareMaintenanceManual

1.Gotohttp://support.lenovo.com/ibasepartslookup.
2.TypetheMachineTypeandSerialNumberinthecorrespondingfields.
3.ClickSubmit.
eSupportalsocanbeusedtoviewthegeneralFRUlistforaproduct.TheFRUlistisagenerallistof
componentsanddoesnotcontainspecificmodelinformation.
TogetthegeneralFRUlistforaproduct,dothefollowing:
1.Gotohttp://www.lenovo.com/support.
2.Followtheinstructionsonthescreentoselectaproduct.
3.ClicktheProduct&Partstab.
4.SelectSystemServicePartstoviewageneralFRUlist.
Chapter2.Importantserviceinformation21

22HardwareMaintenanceManual

Chapter3.Generalcheckout
Thischapterintroducesfollowinginformation:
•“Whattodofirst”onpage23
•“Checkoutguide”onpage24
–“Diagnosingproblems”onpage24
–“Quicktestprograms”onpage25
–“UEFIdiagnosticprogram”onpage25
–“Bootablediagnosticprograms”onpage26
•“Powersystemcheckout”onpage26
Beforeyougotothecheckoutguide,besuretoreadthefollowingimportantnotes.
Importantnotes:
•Onlycertifiedtrainedpersonnelshouldservicethecomputer.
•BeforereplacinganyFRU,readtheentirepageonremovingandreplacingFRUs.
•WhenyoureplaceFRUs,itisrecommendedusenewnylon-coatedscrews.
•Beextremelycarefulduringsuchwriteoperationsascopying,saving,orformatting.Thesequence
ofthedrivesinthecomputerthatyouareservicingmighthavebeenaltered.Ifyouselectanincorrect
drive,dataorprogramsmightbeoverwritten.
•ReplaceaFRUonlywithanotherFRUofthecorrectmodel.WhenyoureplaceaFRU,ensure
thatthemodelofthemachineandtheFRUpartnumberarecorrectbyreferringtotheWebsite:
http://www.lenovo.com/serviceparts-lookup
•AFRUshouldnotbereplacedbecauseofasingle,unreproduciblefailure.Singlefailurescan
occurforvariousreasonsthathavenothingtodowithahardwaredefect,suchascosmicradiation,
electrostaticdischarge,orsoftwareerrors.ConsiderreplacingaFRUonlywhenaproblemrecurs.Ifyou
suspectthataFRUisdefective,cleartheerrorlogandrunthetestagain.Iftheerrordoesnotrecur,do
notreplacetheFRU.
•BecarefulnottoreplaceanondefectiveFRU.
Whattodofirst
WhenyoureturnaFRU,youmustincludethefollowinginformationinthepartsexchangeformorparts
returnformthatyouattachtoit:
1.Nameandphonenumberofservicetechnician
2.Dateofservice
3.Dateonwhichthemachinefailed
4.Dateofpurchase
5.Failuresymptoms,errorcodesappearingonthedisplay,andbeepsymptoms
6.ProcedureindexandpagenumberinwhichthefailingFRUwasdetected
7.FailingFRUnameandpartnumber
8.Machinetype,modelnumber,andserialnumber
9.Customer'snameandaddress
Note:Duringthewarrantyperiod,thecustomermayberesponsibleforrepaircostsifthecomputerdamage
wascausedbymisuse,accident,modification,unsuitablephysicaloroperatingenvironment,orimproper
maintenancebythecustomer.Followingisalistofsomecommonitemsthatarenotcoveredunderwarranty
andsomesymptomsthatmightindicatethatthesystemwassubjectedtostressbeyondnormaluse.
©CopyrightLenovo201723

Beforecheckingproblemswiththecomputer,determinewhetherthedamageiscoveredunderthewarranty
byreferringtothefollowinglist:
Thefollowingarenotcoveredunderwarranty:
•LCDpanelcrackedfromtheapplicationofexcessiveforceorfrombeingdropped
•Scratched(cosmetic)parts
•Distortion,deformation,ordiscolorationofthecosmeticparts
•Plasticparts,latches,pins,orconnectorsthathavebeencrackedorbrokenbyexcessiveforce
•Damagecausedbyliquidspilledintothesystem
•DamagecausedbytheimproperinsertionofaPCcardortheinstallationofanincompatiblecard
•Improperdiscinsertionoruseofanopticaldrive
•Fusesblownbyattachmentofanonsupporteddevice
•Forgottencomputerpassword(makingthecomputerunusable)
•Stickykeyscausedbyspillingaliquidontothekeyboard
•Useofanincorrectacpoweradapteronlaptopproducts
Thefollowingsymptomsmightindicatedamagecausedbynonwarrantedactivities:
•Missingpartsmightbeasymptomofunauthorizedserviceormodification.
•Checkforobviousdamagetoaharddiskdrive.Ifthespindleofaharddiskdrivebecomesnoisy,thehard
diskdrivemighthavebeendroppedorsubjecttoexcessiveforce.
Checkoutguide
UsethefollowingproceduresasaguideinidentifyingandcorrectingproblemswiththeThinkPadnotebook
computers.
Note:ThediagnostictestsareintendedtotestonlyThinkPadproducts.Theuseofnon-ThinkPadproducts,
prototypecards,ormodifiedoptionscanleadtofalseindicationsoferrorsandinvalidsystemresponses.
1.Identifythefailingsymptomsinasmuchdetailaspossible.
2.Verifythesymptoms.Trytore-createthefailurebyrunningthediagnostictestorbyrepeatingthe
operation.
Diagnosingproblems
Manycomputerproblemscanbesolvedwithoutoutsideassistance.Ifyouexperienceaproblemwithyour
computer,thefirstplacetostartisthetroubleshootinginformationinyourcomputerdocumentation.If
yoususpectasoftwareproblem,seethedocumentation,includingreadmefilesandhelpinformation
systems,thatcomewiththeoperatingsystemorprogram.ThinkPadnotebookcomputerscomewithaset
ofdiagnosticprogramsthatyoucanusetohelpyouidentifyhardwareproblems.
DiagnosingproblemswithLenovoSolutionCenterontheWindows7operatingsystem
LenovoSolutionCenterispreinstalledonyourcomputerandalsoisavailablefordownloadat:
http://www.lenovo.com/diags
Notes:
•IfyouareusinganotherWindows®operatingsystemratherthantheWindows7,youcanfindthelatest
informationaboutdiagnosticsforyourcomputerat:
http://www.lenovo.com/diagnose
•IfyouareunabletoisolateandrepairtheproblemyourselfafterrunningLenovoSolutionCenter,saveand
printthelogfilescreatedbytheprogram.YouneedthelogfileswhenyouspeaktoaLenovotechnical
supportrepresentative.
24HardwareMaintenanceManual

LenovoSolutionCenterenablesyoutotroubleshootandresolvecomputerproblems.Itcombinesdiagnostic
tests,systeminformationcollection,securitystatus,andsupportinformation,alongwithhintsandtipsfor
optimalsystemperformance.
Whenyouaresettingupyourcomputer,theLenovoSolutionCenterprogrampromptsyoutocreaterecovery
media.Youcanusetherecoverymediatorestorethestoragedrivetothefactorydefaultsettings.Formore
information,see“Creatingandusingrecoverymedia”onpage30.
Foradditionalinformation,seetheLenovoSolutionCenterhelpsystem.
DiagnosingproblemswithLenovoCompanionontheWindows10operatingsystem
LenovoCompanionispreinstalledonyourcomputerandalsoisavailablefordownloadat:
https://shop.lenovo.com/us/en/accessories/software/apps/lenovo-apps/companion/
Note:IfyouareunabletoisolateandrepairtheproblemyourselfafterrunningLenovoCompanion,save
andprintthelogfilescreatedbytheprogram.YouneedthelogfileswhenyouspeaktoaLenovotechnical
supportrepresentative.
LenovoCompanionsupportsthehardwarescanfunction.Itcombinesdiagnostictests,systeminformation
collection,securitystatus,andsupportinformation,alongwithhintsandtipsforoptimalsystemperformance.
Thetroubleshootinginformationorthediagnosticprogramsmighttellyouthatyouneedadditionalor
updateddevicedriversorothersoftware.Y oucangetthelatesttechnicalinformationanddownloaddevice
driversandupdatesfromtheLenovoSupportWebsiteat:
http://www.lenovo.com/support
Foradditionalinformation,seetheLenovoCompanionhelpsystem.
Quicktestprograms
Lenovoprovidesquicktestprogramstotroubleshootandresolvecomputerproblems,especiallywhenthe
computerdoesnothavetheLenovoSolutionCenterprograminstalled.
Todownloadandinstallaquicktestprogram,gotohttp://www.lenovo.com/diags,andfollowtheinstructions
ontheWebsite.
Torunatestusingquicktestprogram,dothefollowing:
1.GototheC:\SWTOOLS\ldiagdirectory.
2.Double-clickthegui_lsc_lite.exefile.
3.WhentheUserAccountControlwindowopens,clickYes.
4.Selectthedeviceclasstobetested.
5.Selectthedevicestobetested.
6.Selectthetesttobeperformed.
7.Followtheinstructionsonthescreentostartthetest.Whenaproblemisdetected,information
messagesaredisplayed.Refertothemessagestotroubleshoottheproblem.
UEFIdiagnosticprogram
AUEFIdiagnosticprogramispreinstalledonthecomputer.Itenablesyoutotestinternalstoragedevices,
viewsysteminformation,andcheckandrecoverbadsectorsoninternalstoragedevices.
Chapter3.Generalcheckout25

ToruntheUEFIdiagnosticprogram,dothefollowing:
1.Turnonthecomputer.Ifthecomputercannotbeturnedon,goto“Powersystemcheckout”onpage26,
andcheckthepowersources.Ifanerrorcodeisdisplayed,goto“Symptom-to-FRUindex”onpage37
forerrorcodedescriptionsandtroubleshootinghints.
2.WhentheThinkPadlogoisdisplayed,repeatedlypressandreleasetheF10key.Themainscreenofthe
UEFIdiagnosticprogramisdisplayed.
3.Followtheinstructionsonthescreentousethediagnosticprogram.
Bootablediagnosticprograms
IfthecomputeryouareservicingisnotinstalledwiththeUEFIdiagnosticprogram,youcandownloada
bootablediagnosticprogramfromtheLenovoSupportWebsite.Thebootablediagnosticprogramsenable
youtotestcomputermemoryandinternalstoragedevices,viewsysteminformation,andcheckandrecover
theinternalstoragedevices.Tousethebootablediagnosticprograms,youcancreateabootablediagnostic
mediumonaUSBdeviceorCD.
Tocreateabootablediagnosticmedium,dothefollowing:
1.Gotohttp://www.lenovo.com/diags.
2.ClickLenovoBootableDiagnostics.
3.FollowtheinstructionsontheWebsitetocreateabootablediagnosticmediumonaUSBdeviceorCD.
Tousethediagnosticmediumyouhavecreated,dooneofthefollowing:
•IfyouhavecreatedthebootablediagnosticmediumonaUSBdevice,dothefollowing:
1.AttachtheUSBdevicetothecomputer.
2.Turnonthecomputer.Ifthecomputercannotbeturnedon,goto“Powersystemcheckout”onpage
26,andcheckthepowersources.Ifanerrorcodeisdisplayed,goto“Symptom-to-FRUindex”on
page37forerrorcodedescriptionsandtroubleshootinghints.
3.WhentheThinkPadlogoisdisplayed,repeatedlypressandreleasetheF12key.WhentheBoot
Menuwindowopens,releasetheF12key.
4.UsethearrowkeystoselectUSBHDDandthenpressEnter.Thediagnosticprogramwillbe
launchedautomatically.
5.Followtheinstructionsonthescreentousethediagnosticprogram.
•IfyouhavecreatedthebootablediagnosticmediumonaCD,dothefollowing:
1.Turnonthecomputer.Ifthecomputercannotbeturnedon,goto“Powersystemcheckout”onpage
26,andcheckthepowersources.Ifanerrorcodeisdisplayed,goto“Symptom-to-FRUindex”on
page37forerrorcodedescriptionsandtroubleshootinghints.
2.InserttheCDintotheexternalopticaldrive.
3.Restartthecomputer.
4.WhentheThinkPadlogoisdisplayed,repeatedlypressandreleasetheF12key.WhentheBoot
Menuwindowopens,releasetheF12key.
5.UsethearrowkeystoselectATAPICDx(x:0,1,...)andthenpressEnter.Thediagnosticprogram
willbelaunchedautomatically.
6.Followtheinstructionsonthescreentousethediagnosticprogram.
Powersystemcheckout
Toverifyifabatteryandanacpoweradapterarefunctional,dothefollowing:
1.Turnoffthecomputer.
2.Connecttheacpoweradapter.
26HardwareMaintenanceManual

3.Turnonthecomputer.Ifthecomputercanbeturnedon,itmeansthateitherthebatteryortheac
poweradapterisfunctional.
4.Insertastraightenedpaperclipintotheemergencyresetholetoresetthecomputer.Ifthecomputeris
stillpoweredon,itmeansthattheacpoweradapterisfunctional.
5.Turnoffthecomputer.
6.Disconnecttheacpoweradapterandturnonthecomputer.Ifthecomputercanbeturnedon,it
meansthatthebatteryisfunctional.
Ifyoususpectapowerproblem,seetheappropriateoneofthefollowingpowersupplycheckouts:
•“Checkingtheacpoweradapter”onpage27
•“Checkingthebatteryandoperationalcharging”onpage27
•“Checkingthecoin-cellbattery”onpage28
Checkingtheacpoweradapter
Ensurethatyouusetheacpoweradapterthatisshippedwiththecomputertoprovideenoughpower
tothecomputer.
Note:Noisefromtheacpoweradapterdoesnotalwaysindicateadefect.
Tochecktheacpoweradapter,dothefollowing:
1.Connectthecomputertoapoweroutletandturnonthecomputer.
2.ChecktheadapterstatusfromthefollowingLenovoprograms:
•ForWindows10:OpentheLenovoSettingsprogramandclickPower.
•ForWindows7:OpenthePowerManagerprogramandclickBattery.
Iftheacpoweradapterisworkingwell,adapterinformationwillbedisplayedonthescreen.Ifa
messageisdisplayedwarningthatthepowersupplyisnotenough,replacetheadapterwithaproper
onethatissupportedbythecomputer.Ifyoudonotseeanyinformationabouttheadapter,replace
theadapterwithanewone.
Iftheacpoweradapterisworkingbutthecomputerdoesnotchargeduringoperation,goto“Checking
thebatteryandoperationalcharging”onpage27.
Checkingthebatteryandoperationalcharging
Checkingthebattery
ThissystemsupportsonlybatteriesspeciallydesignedforthisspecificsystemandmanufacturedbyLenovo
oranauthorizedbuilder.Thesystemdoesnotsupportunauthorizedbatteriesorbatteriesdesignedforother
systems.Ifanunauthorizedbatteryorabatterydesignedforanothersystemsisinstalled,thesystemwill
notcharge.
Attention:Lenovohasnoresponsibilityfortheperformanceorsafetyofunauthorizedbatteries,and
providesnowarrantiesforfailuresordamagearisingoutoftheiruse.
Moveyourpointertothebattery-statusiconintheWindowsnotificationareatocheckthebatterystatus.
Thebattery-statusicondisplaysthepercentageofbatterypowerremainingandhowlongyoucanuse
yourcomputerbeforeyoumustchargethebattery.
Checkingtheoperationalcharging
Tocheckwhetherthebatterychargesproperlyduringoperation,dothefollowing:
1.Dischargethebatteryuntiltheremainedbatterypowerislessthan50%.
Chapter3.Generalcheckout27
2.Performoperationalcharging.ClickthebatterystatusiconintheWindowsnotificationareatodisplay
detailedbatteryinformation.Ifitindicatesthatthebatteryisnotcharging,replacethebattery.
3.Checkthebatterystatusagain.Ifthesameerrorstillexists,replacethesystemboard.
Checkingthecoin-cellbattery
Tocheckthecoin-cellbattery,dothefollowing:
1.Disablethebuilt-inbattery.See“Disablingthebuilt-inbattery”onpage68.
2.Removethecoin-cellbattery.See“1190Systemboardassembly”onpage90.
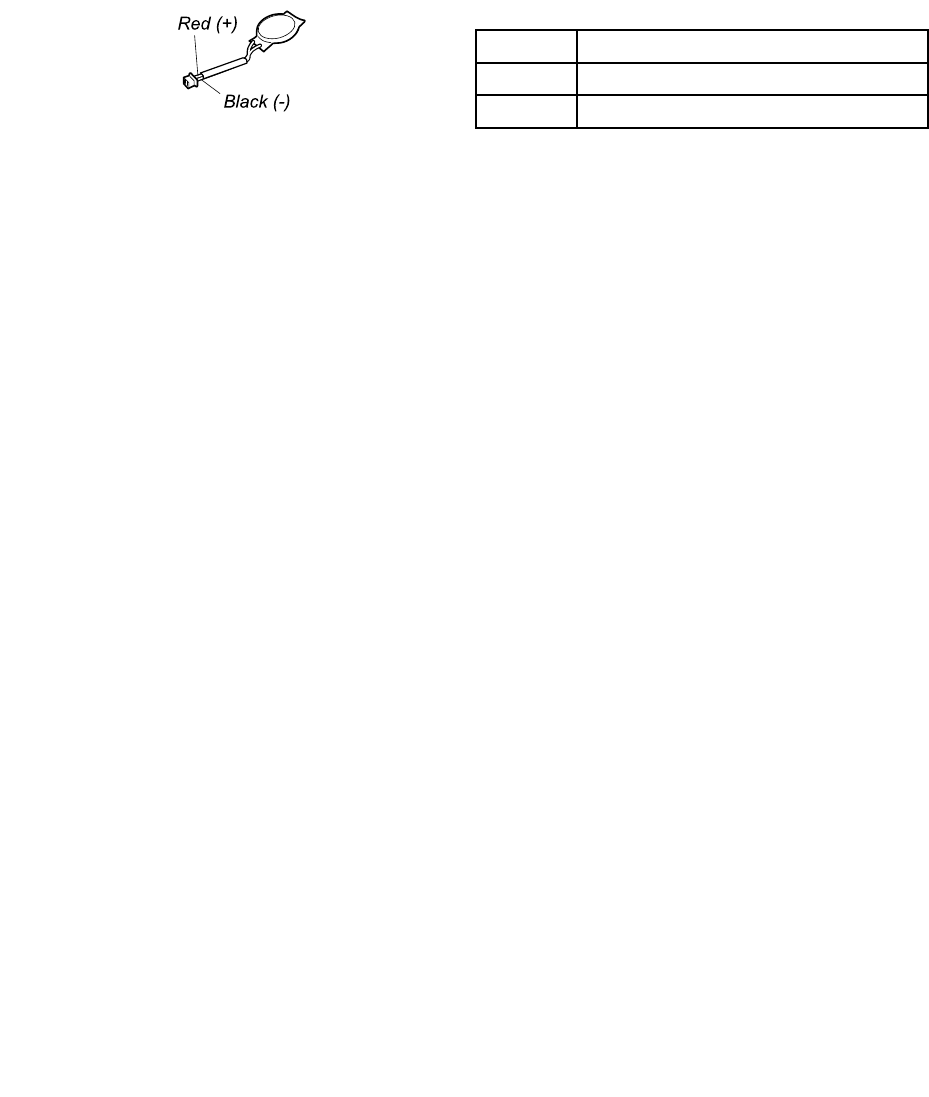
3.Measurethevoltageofthecoin-cellbattery.Seethefollowingillustration.
WireVoltage(Vdc)
Red+2.5to+3.2
BlackGround
•Ifthevoltageiscorrect,replacethesystemboard.
•Ifthevoltageisnotcorrect,replacethecoin-cellbattery.
•Ifthecoin-cellbatterydischargesquicklyafterreplacement,replacethesystemboard.
28HardwareMaintenanceManual

Chapter4.Relatedserviceinformation
Thischapterpresentsfollowinginformation:
•“RestoringthefactorycontentswiththeRecoveryDiscSetfortheWindows7operatingsystem”on
page29
•“RecoveryinformationfortheWindows7operatingsystem”onpage30
•“RecoveryinformationfortheWindows10operatingsystem”onpage32
•“Passwords”onpage33
•“Powermanagement”onpage35
•“Symptom-to-FRUindex”onpage37
ServiceWebsite:Whenthelatestmaintenancedisketteandthesystemprogramservicediskettebecome
available,theywillbepostedonhttp://www.lenovo.com/support
Recoveryinformation
Thissectionprovidesinformationaboutrecoverysolutions.Therearevariousmethodstochoosefromwhen
consideringhowtorecoverintheeventofasoftware-orhardware-relatedproblem.Recoverymethodsvary
dependingonthetypeofoperatingsystemthatisinstalled.Ensurethatyoufollowthecorrectrecovery
procedures.
RestoringthefactorycontentswiththeRecoveryDiscSetforthe
Windows7operatingsystem
Whenthemainstoragedriveisreplacedbecauseofafailure,noproductrecoveryprogramisonthenew
drive.Inthiscase,thecustomermustusetheRecoveryDiscSettorecoverthecomputer.Orderthe
RecoveryDiscSetandthedriveatthesametimesothatthecustomercanrestorethecomputertothe
factorydefaultsettingsbyusingtheRecoveryDiscSetafterthenewdriveisinstalled.Forinformationabout
whichdiscstoorder,goto:
http://www.lenovo.com/serviceparts-lookup.
Dependingonthemodel,thenumberofrecoverydiscsincludedintheRecoveryDiscSetdiffers.Torestore
thefactorycontentsbyusingtheproductRecoveryDiscSet,dothefollowing:
Notes:
•Duringtherecoveryprocess,alldataonthedrivewillbedeleted.Ifpossible,copyanyimportantdata
orpersonalfilesthatyouwanttokeepontoremovablemediaoranetworkdrivebeforeyoustartthe
recoveryprocess.
•Therecoveryprocesstakesonetotwohourstocomplete.Thelengthoftimedependsonthemethodyou
use.IfyouuseproductRecoveryDiscSet,therecoveryprocesstakesabouttwohours.
1.ConnectanexternalCD/DVDdrive.
2.MaketheCD/DVDdrivethefirststartupdeviceinthestartupsequenceusingthefollowingprocedure:
a.OpentheThinkPadSetupprogramandselectStartup➙Boot.
b.SelecttheCD/DVDdriveasthe1stBootDevice.
3.InsertthebootablerecoverydiscintotheCD/DVDdrive.
4.StartthecomputerfromtheexternalCD/DVDdrive.
5.Whenpromoted,selectyourlanguageandclickNext.
6.Readthelicenseandacceptthetermsandconditions.Thenfollowtheinstructionsonthescreen.
7.IftheRecoveryDiscSetcontainsaSupplementalRecoveryDisc,insertitwhenpromptedandclickYes.
©CopyrightLenovo201729

Note:NotallRecoveryDiscSetscomewithaSupplementalRecoveryDisc.IfthereisaSupplemental
RecoveryDisc,itwillbeclearlymarkedassuch.
8.Whenallofthedatahasbeencopiedfromthelastdiscinthesetandhasbeenprocessed,remove
theexternalCD/DVDdriveandrestartthecomputer.Followtheinstructionsonthescreentofinish
therecovery.
Note:Therestoftherecoveryprocessisfullyautomatedandnoactionfromyouisrequired.The
computerwillrestartintotheMicrosoft®Windowsdesktopseveraltimesandyoumightexperience
periodswhennoactivityisapparentonthescreenforseveralminutesatatime.Thisisnormal.
9.Whentherecoveryprocesscompletes,theWelcometoMicrosoftWindowsscreenisdisplayed.Follow
theinstructionsonthescreentocompletetheWindowssetup.
10.AfteryouhavecompletedtheWindowssetup,youmightwanttorestoretheoriginalstartupsequence.
StarttheThinkPadSetupprogramandthenpressF9torestorethedefaultsettings.PressF10tosave
changesandexittheThinkPadSetupprogram.
Note:Afterrestoringadrivetothefactorydefaultsettings,youmightneedtoreinstallsomedevicedrivers.
RecoveryinformationfortheWindows7operatingsystem
ThistopicintroducestheLenovorecoverysolutionsontheWindows7operatingsystem.
Creatingandusingrecoverymedia
Recoverymediaenablesyoutorestorethestoragedrivetothefactorydefaultsettingsafterallotherrecovery
methodshavefailed.Itisimportanttocreaterecoverymediaasearlyaspossible.
Note:Therecoveryoperationsyoucanperformusingrecoverymediavarydependingontheoperating
systemfromwhichtherecoverymediawerecreated.Therecoverymediamightcontainabootmediumand
adatamedium.YourMicrosoftWindowslicensepermitsyoutocreateonlyonedatamedium.Ensurethat
youstoretherecoverymediainasafeplaceafteryouhavemadethem.
Ifyoudidnotcreaterecoverymediaasaprecautionarymeasure,youcancontactLenovoCustomerSupport
CenterandpurchaseasetofrecoverymediafromLenovo.ForalistoftheLenovoSupportphonenumbers
foryourcountryorregion,goto:
http://www.lenovo.com/support/phone
Thedataontherecoverymediacanbeusedonlyforthefollowingpurposes:
•Reinstallingtheprogramsanddevicedriversonyourcomputer
•Reinstallingtheoperatingsystem
•Modifyingthedatafilesontheharddiskdriveusingtheadditionalfiles
Creatingrecoverymedia
Tocreaterecoverymedia,youneedasetofdiscsoraUSBstoragedevice(withatleast16GBofstorage
capacity).TheactualdiscnumberorUSBcapacitythatisrequireddependsonthesizeoftherecovery
image.
Attention:CreatingrecoverymediawilldeleteanythingstoredonthediscsorUSBstoragedevice.Toavoid
dataloss,makeabackupcopyofallthedatathatyouwanttokeep.
Tocreaterecoverymedia,clickStart➙AllPrograms➙LenovoPCExperience.Inthepromptedwindow,
double-clickLenovoT ools➙FactoryRecoveryDisks.Then,followtheinstructionsonthescreen.
30HardwareMaintenanceManual

Usingrecoverymedia
Attention:Duringtherecoveryprocess,allthefilescurrentlyonthestoragedeviceofyourcomputerwillbe
deletedandreplacedbythefactorydefaultsettings.
Tousetherecoverymedia,dothefollowing:
•Ifyouhavecreatedtherecoverymediawithdiscs,dothefollowing:
1.Ifyourcomputerdoesnothaveaninternalopticaldrive,connectanexternalopticaldrivetothe
computer.
2.TurnonthecomputerandrepeatedlypressF12untiltheBootMenuwindowopens.
3.IntheBootMenuwindow,selecttheopticaldrive(internalorexternal)asthefirstbootdevice.Then,
insertthediscsintotheopticaldriveandpressEnter.Therecoveryprocessstarts.
4.Followtheinstructionsonthescreentocompletetheoperation.
•IfyouhavecreatedtherecoverymediawithaUSBstoragedevice,dothefollowing:
1.AttachtheUSBstoragedevicetooneoftheUSBconnectorsonyourcomputer.
2.TurnonthecomputerandrepeatedlypressF12untiltheBootMenuwindowopens.
3.IntheBootMenuwindow,selecttheUSBstoragedeviceasthefirstbootdeviceandpressEnter.
Therecoveryprocessstarts.
4.Followtheinstructionsonthescreentocompletetheoperation.
Note:Afterrestoringyourcomputertothefactorydefaultsettings,youmighthavetoreinstallthedevice
driversforsomedevices.See“Reinstallingpreinstalledprogramsanddevicedrivers”onpage31.
Reinstallingpreinstalledprogramsanddevicedrivers
Yourcomputerenablesyoutoreinstallpreinstalledprogramsanddevicedrivers.
Reinstallingpreinstalledprograms
Toreinstallprogramspreinstalledonyourcomputer,dothefollowing:
1.Turnonyourcomputer.
2.GotoC:\swtools.
3.Opentheappsfolder.Thefoldercontainsseveralsubfoldersnamedforvariouspreinstalledprograms.
4.OpenthesubfolderandlocatetheEXEfile.
5.Double-clicktheEXEfileandfollowtheinstructionsonthescreentocompletetheinstallation.
Reinstallingpreinstalleddevicedrivers
Attention:Reinstallingdevicedriverswillchangethecurrentconfigurationofyourcomputer.Reinstall
devicedriversonlywhenitisnecessarytosolveaproblemwithyourcomputer.
Toreinstalladevicedriverforafactory-installeddevice,dothefollowing:
1.Turnonyourcomputer.
2.GotoC:\swtools.
3.OpentheDriversfolderandlocatethesubfolderthatisnamedafterthefactory-installeddeviceinyour
computer,suchasAUDIOorVIDEO.
4.Openthesubfolderforthedevice.
5.Reinstallthedevicedriverbyoneofthefollowingmethods:
•IfthedevicesubfoldercontainsanEXEfile,double-clicktheEXEfileandfollowtheinstructionson
thescreentocompletetheinstallation.
Chapter4.Relatedserviceinformation31

•IfthedevicesubfoldercontainsareadmeTXTfile,thedevicedriverinstallationinformationisincluded
inthereadmefile.Followtheinstructionstocompletetheinstallation.
•IfthedevicesubfoldercontainsanINFfile,right-clicktheINFfileandselectInstall.Thenfollowthe
instructionsonthescreentocompletetheinstallation.
Ifyouneedupdateddevicedriversforyourcomputer,downloadandinstallthemfromtheLenovoSupport
Websiteat:
http://www.lenovo.com/support
RecoveryinformationfortheWindows10operatingsystem
ThistopicprovidesinformationabouttheWindowsrecoverysolutionsontheWindows10operatingsystem.
Resettingyourcomputer
Ifyourcomputerdoesnotperformwell,youmightconsiderresettingyourcomputer.Intheresettingprocess,
youcanchoosetokeepyourfilesorremovethem,andthenreinstalltheWindowsoperatingsystem.
Toresetyourcomputer,dothefollowing:
Note:Theitemsinthegraphicaluserinterface(GUI)mightchangewithoutnotice.
1.OpentheStartmenu,andthenclickSettings➙Update&security➙Recovery.
2.IntheResetthisPCsection,clickGetstarted.
3.Followtheinstructionsonthescreentoresetyourcomputer.
Usingadvancedstartupoptions
Theadvancedstartupoptionsenableyoutodothefollowing:
•Changethefirmwaresettingsofthecomputer
•ChangethestartupsettingsoftheWindowsoperatingsystem
•Startthecomputerfromanexternaldevice
•RestoretheWindowsoperatingsystemfromasystemimage
Touseadvancedstartupoptions,dothefollowing:
Note:Theitemsinthegraphicaluserinterface(GUI)mightchangewithoutnotice.
1.OpentheStartmenu,andthenclickSettings➙Update&security➙Recovery.
2.IntheAdvancedstartupsection,clickRestartnow➙Troubleshoot➙Advancedoptions.
3.Selectastartupoptionyouwant,andthenfollowtheinstructionsonthescreen.
RecoveringyouroperatingsystemifWindows10failstostart
TheWindowsrecoveryenvironmentonyourcomputeroperatesindependentlyfromtheWindows10
operatingsystem.ItenablesyoutorecoverorrepairtheoperatingsystemeveniftheWindows10operating
systemfailstostart.
Aftertwoconsecutivefailedbootattempts,theWindowsrecoveryenvironmentstartsautomatically.Then
youcanchooserepairandrecoveryoptionsbyfollowingtheon-screeninstructions.
Note:Ensurethatyourcomputerisconnectedtoacpowerduringtherecoveryprocess.
32HardwareMaintenanceManual

CreatingandusingarecoveryUSBdrive
YoucancreatearecoveryUSBdriveasabackupfortheWindowsrecoveryprograms.Withtherecovery
USBdrive,youcantroubleshootandfixtheproblemsevenifthepreinstalledWindowsrecoveryprograms
aredamaged.
ItisrecommendedthatyoucreatearecoveryUSBdriveasearlyaspossible.Ifyoudidnotcreatearecovery
USBdriveasaprecautionarymeasure,youcancontactLenovoCustomerSupportCenterandpurchase
onefromLenovo.ForalistoftheLenovoSupportphonenumbersforyourcountryorregion,goto:
http://www.lenovo.com/support/phone
CreatingarecoveryUSBdrive
TocreatearecoveryUSBdrive,youneedaUSBdrivewithatleast16GBofstoragecapacity.Theactual
USBcapacitythatisrequireddependsonthesizeoftherecoveryimage.
Attention:ThecreationprocesswilldeleteanythingstoredontheUSBdrive.Toavoiddataloss,makea
backupcopyofallthedatathatyouwanttokeep.
TocreatearecoveryUSBdrive,dothefollowing:
Note:Ensurethatyourcomputerisconnectedtoacpowerduringthefollowingprocess.
1.ConnectaproperUSBdrive(atleast16GBofstorage)tothecomputer.
2.Typerecoveryinthesearchboxonthetaskbar.ThenclickCreatearecoverydrive.
3.ClickYesintheUserAccountControlwindowtoallowtheRecoveryMediaCreatorprogramtostart.
4.IntheRecoveryDrivewindow,followtheinstructionsonthescreentocreatearecoveryUSBdrive.
UsingtherecoveryUSBdrive
Ifyoucannotstartyourcomputer,usetherecoveryUSBdrivetorecoveryourcomputer.
TousearecoveryUSBdrive,dothefollowing:
Note:Ensurethatyourcomputerisconnectedtoacpowerduringthefollowingprocess.
1.ConnecttherecoveryUSBdrivetothecomputer.
2.Turnonorrestartthecomputer.BeforetheWindowsoperatingsystemstarts,repeatedlypressF12.The
BootMenuwindowopens.
3.SelecttherecoveryUSBdriveasthebootdevice.
4.Selectapreferredkeyboardlayout.
5.ClickTroubleshoottodisplayoptionalrecoverysolutions.
6.Selectacorrespondingrecoverysolutionaccordingtoyoursituation.Thenfollowtheinstructionson
thescreentocompletetheprocess.
Passwords
AsmanyasthreepasswordsmaybeneededforanyThinkPadnotebookcomputer:thepower-onpassword,
theharddiskpassword,andthesupervisorpassword.
Ifanyofthesepasswordshasbeenset,apromptforitwillbedisplayedonthescreenwheneverthe
computeristurnedon.Thecomputerdoesnotstartuntilthepasswordisentered.
Note:Ifonlyasupervisorpasswordisset,thepasswordpromptwillnotbedisplayedwhentheoperating
systemisstarted.
Chapter4.Relatedserviceinformation33

Power-onpassword
Apower-onpasswordprotectsthesystemfrombeingpoweredonbyanunauthorizedperson.The
passwordmustbeenteredbeforeanoperatingsystemcanbestarted.Forinstructionsonhowtoremove
thepower-onpassword,see“Howtoremovethepower-onpassword”onpage34.
Harddiskpassword
Therearetwokindsofharddiskpasswords:
•Userharddiskpassword-fortheuser
•Masterharddiskpassword-forthesystemadministrator,whocanuseittogetaccesstotheharddisk
eveniftheuserhaschangedtheuserharddiskpassword
Note:Therearetwomodesfortheharddiskpassword:UseronlyandMaster+User.TheMaster+User
moderequirestwoharddiskpasswords;thesystemadministratorentersbothinthesameoperation.The
systemadministratorthenprovidestheuserharddiskpasswordtothesystemuser.
Attention:Iftheuserharddiskpasswordhasbeenforgotten,checkwhetheramasterharddiskpassword
hasbeenset.Ifithas,itcanbeusedforaccesstotheharddiskdrive.Ifnomasterharddiskpasswordis
available,neitherLenovonorLenovoauthorizedservicetechniciansprovideanyservicestoreseteither
theuserorthemasterharddiskpassword,ortorecoverdatafromtheharddiskdrive.Theharddiskdrive
canbereplacedforascheduledfee.
Forhowtoremovetheharddiskpassword,see“Howtoremovetheharddiskpassword”onpage35.
Supervisorpassword
ThesupervisorpasswordprotectsthesysteminformationstoredintheThinkPadSetupprogram.Itprovides
thefollowingsecurityfeatures:
•Ifonlyasupervisorpasswordisset,apasswordpromptisdisplayedwhenyoutrytostarttheThinkPad
Setupprogram.Unauthorizeduserscannotchangemostofthesystemconfigurationoptionsinthe
ThinkPadSetupprogramwithoutthepassword.
•Thesystemadministratorcanusethesupervisorpasswordtoaccessacomputereveniftheuserofthat
computerhassetapower-onpassword.Thesupervisorpasswordoverridesthepower-onpassword.
•ThesystemadministratorcansetthesamesupervisorpasswordonmanyThinkPadnotebookcomputers
tomakeadministrationeasier.
Attention:Ifthesupervisorpasswordhasbeenforgottenandcannotbemadeavailabletotheservice
technician,thereisnoserviceproceduretoresetthepassword.Thesystemboardmustbereplacedfor
ascheduledfee.
Howtoremovethepower-onpassword
Toremoveapower-onpassword,dothefollowing:
Ifnosupervisorpasswordhasbeenset,dothefollowingtoremovethepower-onpassword:
1.Turnoffthecomputeranddisconnectacpower.
2.Disablethebuilt-inbattery.See“Disablingthebuilt-inbattery”onpage68.
3.Removethebasecoverassembly.See“1010Basecoverassembly”onpage69.
4.Removetheinternalbatterypack.See“1090Built-inbattery”onpage77.
5.Removethecoin-cellbattery.See“1050Coin-cellbattery”onpage73.
6.Reinstallthecoin-cellbattery.
7.Reinstalltheinternalbatterypack.
34HardwareMaintenanceManual

8.Reinstallthebasecoverassembly.
9.Reconnectacpower.
10.TurnonthecomputerandwaituntilthePOSTends.AfterthePOSTends,thepasswordpromptdoes
notappear.Thepower-onpasswordhasbeenremoved.
Ifasupervisorpasswordhasbeensetandisknowntotheservicetechnician,dothefollowingtoremove
thepower-onpassword:
1.Turnonthecomputer.
2.WhentheThinkPadlogoisdisplayed,immediatelypressF1.
3.TypethesupervisorpasswordtoentertheThinkPadSetupprogram.
4.SelectSecurity.
5.SelectPassword.
6.SelectPower-OnPassword.
7.TypethecurrentsupervisorpasswordintheEnterCurrentPasswordfield.ThenleavetheEnter
NewPasswordfieldblank,andpressEntertwice.
8.IntheChangeshavebeensavedwindow,pressEnter.
9.PressF10tosavechangesandexittheThinkPadSetupprogram.Thepower-onpasswordhas
beenremoved.
Howtoremovetheharddiskpassword
Attention:IfUseronlymodeisselectedandtheuserharddiskpasswordhasbeenforgottenandcannotbe
madeavailabletotheservicetechnician,neitherLenovonorLenovoauthorizedservicetechniciansprovide
anyservicestoresettheuserharddiskpasswords,ortorecoverdatafromtheharddiskdrive.Toputthe
systembacktooperationalstatus,theonlyLenovoandLenovo-authorizedservicesolutionwouldbeto
replacetheharddiskdrive(HDD)orSSDwithascheduledfee.
Toremoveauserharddiskpasswordthathasbeenforgotten,whenthesupervisorpasswordandmaster
harddiskpasswordareknown,dothefollowing:
1.Turnonthecomputer.
2.WhentheThinkPadlogocomesup,immediatelypressF1toentertheThinkPadSetupprogram.When
thepower-onpasswordiconisdisplayedonthescreen,entereitherthepower-onpasswordorthe
supervisorpassword.
3.Whentheuserharddiskpasswordiconisdisplayedonthescreen,pressF1.Themasterharddisk
passwordiconisdisplayed.
4.EnterthemasterharddiskpasswordtoentertheThinkPadSetupprogram.
5.SelectSecurity.
6.SelectPassword.
7.SelectHard-diskxpassword,wherexistheletteroftheharddiskdrive.Apop-upwindowopens.
8.SelectMasterharddiskpassword.
9.TypethecurrentmasterharddiskpasswordintheEnterCurrentPasswordfield.ThenleavetheEnter
NewPasswordfieldblank,andpressEntertwice.
10.PressF10tosavechangesandexittheThinkPadSetupprogram.Theuserharddiskpasswordandthe
masterharddiskpasswordhavebeenremoved.
Powermanagement
Toreducepowerconsumption,thecomputerhasthreepowermanagementmodes:screenblank,sleep,
andhibernation.
Chapter4.Relatedserviceinformation35

Screenblankmode(fortheWindows7operatingsystemonly)
Ifthetimesetonthe“Turnoffmonitor”timerintheoperatingsystemexpires,theLCDbacklightturnsoff.
Toputthecomputerintoscreenblankmode,dothefollowing:
1.Right-clickthebatterygaugeinthetaskbar.
2.SelectPoweroffdisplay.
Toendscreenblankmodeandresumenormaloperation,pressanykey.
Sleepmode
Whenthecomputerenterssleepmode,thefollowingeventsoccurinadditiontowhatoccursinscreen
blankmode:
•TheLCDispoweredoff.
•Thestoragedriveispoweredoff.
•Themicroprocessorstops.
Toentersleepmode,pressFn+4ordothefollowing:
•ForWindows7:OpentheStartmenu,thenclickthearrownexttotheShutdownbutton.ClickSleep
fromthemenudisplayed.
•ForWindows10:OpentheStartmenu,clickPower,andthenclickSleep.
Incertaincircumstances,thecomputergoesintosleepmodeautomatically:
•Afteraperiodofinactivityspecifiedinpowerplansettings
•Whenthebatterypowerislow
Toresumethecomputerfromsleepmode,pressthepowerbutton.
Also,ineitherofthefollowingevents,thecomputerautomaticallyreturnsfromsleepmodeandresumes
operation:
•Theringindicator(RI)issignaledbyaserialdeviceoraPCCarddevice.
•Thetimesetontheresumetimerelapses.
Note:Thecomputerdoesnotacceptanyinputimmediatelyafteritenterssleepmode.Waitafew
secondsbeforetakinganyactiontoreenteroperationmode.
Hibernationmode
Inhibernationmode,thefollowingoccurs:
•Thesystemstatus,RAM,VRAM,andsetupdataarestoredontheharddisk.
•Thesystemispoweredoff.
Note:Ifthecomputerentersthehibernationmodewhileitisdockedtothedockingstation,donotundockit
beforeresumingnormaloperation.Ifyoudoundockitandthentrytoresumenormaloperation,youwillget
anerrormessage,andyouwillhavetorestartthesystem.
Ifyouhavedefinedoneofthefollowingactionsastheeventthatcausesthesystemtogointohibernation
mode,performthataction.
•Closingthelid.
•Pressingthepowerbutton.
36HardwareMaintenanceManual

Also,thecomputergoesintohibernationmodeautomaticallyafteraperiodofinactivityspecifiedinpower
plansettings.
Whenthepoweristurnedon,thecomputerreturnsfromhibernationmodeandresumesoperation.The
hibernationfileinthebootrecordontheharddiskdriveisread,andsystemstatusisrestoredfromthe
harddiskdrive.
Symptom-to-FRUindex
Thissectioncontainsfollowinginformation:
•“Numericerrorcodes”onpage37
•“Errormessages”onpage38
•“Beeperrors”onpage38
•“LCD-relatedsymptoms”onpage40
•“Intermittentproblems”onpage40
•“Undeterminedproblems”onpage40
Thesymptom-to-FRUindexinthissectionlistssymptomsanderrorsandtheirpossiblecauses.Themost
likelycauseislistedfirst,inboldfacetype.
Note:DotheFRUreplacementorotheractionsinthesequenceshowninthecolumnheaded“FRUor
action,insequence.”IfreplacingaFRUdoesnotsolvetheproblem,puttheoriginalpartbackinthe
computer.DonotreplaceanondefectiveFRU.
Thisindexcanalsohelpyoudetermine,duringregularservicing,whatFRUsarelikelytoneedtobe
replacednext.
AnumericerrorisdisplayedforeacherrordetectedinPOSTorsystemoperation.Inthedisplays,ncan
beanynumber.
Ifnonumericcodeisdisplayed,checkthenarrativedescriptionsofsymptoms.Ifthesymptomisnot
describedthere,goto“Intermittentproblems”onpage40.
Note:ForadevicenotsupportedbydiagnosticcodesintheThinkPadnotebookcomputers,seethe
manualforthatdevice.
Numericerrorcodes
Table1.Numericerrorcodes
SymptomorerrorFRUoraction,insequence
0177
BadSVPdata,stopPOSTtask—Thechecksumofthe
supervisorpasswordintheEEPROMisnotcorrect.
Systemboard
0183
BadCRCofSecuritySettingsinEFIVariable.Enterthe
ThinkPadSetupprogram.
1.RuntheThinkPadSetupprogram,andthensave
currentsettingbypressingF10.
2.Systemboard
0187
EAIAdataaccesserror—TheaccesstoEEPROMisfailed.
Systemboard
0188
InvalidRFIDSerializationInformationArea.
Systemboard
0189
InvalidRFIDconfigurationinformationarea—The
EEPROMchecksumisnotcorrect.
Systemboard
Chapter4.Relatedserviceinformation37

Table1.Numericerrorcodes(continued)
SymptomorerrorFRUoraction,insequence
0190
Criticallow-batteryerror
1.Chargethebattery.
2.Battery
0191
SystemSecurity—InvalidRemoteChangerequested.
1.RuntheThinkPadSetupprogram,andthensave
currentsettingbypressingF10.
2.Systemboard
0199
SystemSecurity—Securitypasswordretrycount
exceeded.
1.RuntheThinkPadSetupprogram,andthensave
thecurrentsettingbypressingF10.
2.Systemboard
0270
RealTimeClockError—SystemRealTimeClockisnot
functional.
Havethecomputerserviced.
0271
CheckDateandTimesettings—Neitherthedatenorthe
timeissetinthecomputer.
Setthedateandtime,usingThinkPadSetup.
1802
Unauthorizednetworkcardispluggedin—Turnoffand
removethenetworkcard.
1.Removewirelessnetworkcard.
2.Systemboard
1820
Morethanoneexternalfingerprintreaderisattached.
Poweroffandremoveallbutthereaderthatyousetup
withinyourmainoperatingsystem.
Removeallbutthereaderthatyousetupforthe
authentication.
2101
DetectionerroronSSD1(M.2)
1.ReseattheM.2solid-statedrive.
2.M.2solid-statedrive
3.Systemboard
2111
ReaderroronSSD1(M.2)
1.ReseattheM.2solid-statedrive.
2.M.2solid-statedrive
3.Systemboard
2200
MachineTypeandSerialNumberareinvalid.
Systemboard
2201
MachineUUIDisinvalid
Systemboard
Errormessages
Table2.Errormessages
SymptomorerrorFRUoraction,insequence
Fanerror1.Fan
2.Thermalgrease
3.Systemboard
ThermalsensingerrorSystemboard
BottomcovertamperdetectionerrorSystemboard
Beeperrors
LenovoSmartBeeptechnologyenablesyoutodecodebeeperrorswithyoursmartphonewhenablack
screenoccurswithbeepsfromyourcomputer.TodecodethebeeperrorwithLenovoSmartBeep
technology,dothefollowing:
1.Gotohttp://support.lenovo.com/smartbeeporscanthefollowingQRCode.
38HardwareMaintenanceManual

2.Downloadtheproperdiagnosticappandinstallitonyoursmartphone.
3.Runthediagnosticappandplacethesmartphonenearthecomputer.
4.PresstheFnkeyonyourcomputertoemitthebeepagain.Thediagnosticappdecodesthebeeperror
andshowspossiblesolutionsonthesmartphone.
Thefollowingsectiondescribessomebeeperrorsandthecorrespondingsolutions.
Note:DonotattempttoserviceaproductyourselfunlessinstructedtodosobytheCustomerSupport
Centerorproductdocumentation.OnlyuseaLenovo-authorizedserviceprovidertorepairyourproduct.
ErrorcodesSolutions
0001:Reseterror(platformresetnotde-asserted)1.Removeallpowerresources:theacpoweradapter,
andthecoin-cellbattery(serviceprovideronly).
Resetthecomputerbyinsertingastraightened
paperclipintotheemergency-resethole.Waitfor
oneminute.Thenreconnectallpowerresources.
2.Replacethesystemboard(serviceprovideronly).
0002:InternalbuserrorReplacethesystemboard(serviceprovideronly).
0281:GeneralembeddedcontrollererrorReplacethesystemboard(serviceprovideronly).
0282:Memorymoduleerror1.Reinstallorreplacethememorymodule(service
provideronly).
2.Replacethesystemboard(serviceprovideronly).
0283:PCIresourceerror1.RemovePCIedevices(theM.2card,PCIecard,
andsoon)(serviceprovideronly).
2.Replacethesystemboard(serviceprovideronly).
0284:TCG-compliantfunctionality-relatederror(mightbe
theBIOScodevalidationfailure)
Replacethesystemboard(serviceprovideronly).
0285:TCG-compliantfunctionality-relatederror(mightbe
theTPMinitializationfailure)
Replacethesystemboard(serviceprovideronly).
0286:IntegratedgraphicserrorReplacethesystemboard(serviceprovideronly).
0287:Discretegraphicserror1.Reinstallorreplacethediscretegraphicscard
(serviceprovideronly).
2.Replacethesystemboard(serviceprovideronly).
0288:Computerdisplayerror1.Reconnectthedisplaycableonboththesystem
boardsideandthecomputerdisplayside(service
provideronly).
2.Replacethesystemboard(serviceprovideronly).
Chapter4.Relatedserviceinformation39

LCD-relatedsymptoms
Important:TheTFTLCDforthenotebookcomputercontainsmanythin-filmtransistors(TFTs).The
presenceofasmallnumberofdotsthataremissing,discolored,oralwayslightedischaracteristicofTFT
LCDtechnology,butexcessivepixelproblemscancauseviewingconcerns.IftheLCDyouareservicinghas
twoorlessvisibledefectivepixels,itshouldnotbeconsideredfaulty.However,iftheLCDhasthreeormore
visibledefectivepixels,itwillbedeemedasdefectivebyLenovoanditshouldbereplaced.
Notes:
•ThispolicyappliestoallThinkPadnotebookspurchasedon1January,2008orlater.
•LenovowillnotprovidewarrantyreplacementiftheLCDiswithinspecificationsbecausewecannot
guaranteethatanyreplacementLCDwillhavezeropixeldefects.
•OnepixelconsistsofR,G,Bsub-pixels.
Table3.LCD-relatedsymptoms
SymptomorerrorFRUoraction,insequence
Nobeep,power-onindicatoron,andablankLCDduring
POST.
Replacethesystemboard.
•LCDbacklightnotworking.
•LCDtoodark.
•LCDbrightnesscannotbeadjusted.
•LCDcontrastcannotbeadjusted.
1.ReseattheLCDconnectors.
2.ReplacetheLCDassembly.
3.Replacethesystemboard.
•LCDscreenunreadable.
•Charactersmissingpixels.
•Screenabnormal.
•Wrongcolordisplayed.
1.Seeimportantnotefor“LCD-relatedsymptoms. ”
2.ReseattheLCDconnectors.
3.ReplacetheLCDassembly.
4.Replacethesystemboard.
HorizontalorverticallinesdisplayedonLCD.ReplacetheLCDassembly.
Intermittentproblems
Intermittentsystemhangproblemscanbeduetoavarietyofcausesthathavenothingtodowithahardware
defect,suchascosmicradiation,electrostaticdischarge,orsoftwareerrors.FRUreplacementshouldbe
consideredonlywhenaproblemrecurs.
Whenanalyzinganintermittentproblem,dothefollowing:
1.Runthediagnostictestforthesystemboardinloopmodeatleast10times.
2.Ifnoerrorisdetected,donotreplaceanyFRUs.
3.Ifanyerrorisdetected,replacetheFRUshownbytheFRUcode.Rerunthetesttoverifythatno
moreerrorsexist.
Undeterminedproblems
Ifthediagnostictestsdidnotidentifytheadapterordevicethathasfailed,ifwrongdevicesareinstalled,
orifthesystemsimplyisnotoperating,followtheseprocedurestoisolatethefailingFRU(donotisolate
FRUsthathavenodefects).
Verifythatallattacheddevicesaresupportedbythecomputer.
Verifythatthepowersupplybeingusedatthetimeofthefailureisoperatingcorrectly.See“Powersystem
checkout”onpage26.
1.Turnoffthecomputer.
2.VisuallycheckeachFRUfordamage.ReplaceanydamagedFRU.
3.Removeordisconnectallofthefollowingdevices:
40HardwareMaintenanceManual

a.Non-ThinkPaddevices
b.Printer,mouse,andotherexternaldevices
c.Externaldiskettedriveoropticaldrive
d.Wirelesscards
4.Turnonthecomputer.
5.Determinewhethertheproblemhasbeensolved.
6.Iftheproblemdoesnotrecur,reconnecttheremoveddevicesoneatatimeuntilyoufindthefailingFRU.
7.Iftheproblemremains,replacethefollowingFRUsoneatatime(donotreplaceanondefectiveFRU):
a.Systemboard
b.LCDassembly
Chapter4.Relatedserviceinformation41

42HardwareMaintenanceManual

Chapter5.Specialkeys
Yourcomputerhasseveralspecialkeystohelpyouworkmoreeasilyandeffectively.
1Windowslogokey
PresstheWindowslogokeytoopentheStartmenu.ForinformationaboutusingtheWindowslogokeywith
otherkeys,seethehelpinformationsystemoftheWindowsoperatingsystem.
23Fnkeyandfunctionkeys
YoucanconfiguretheFnkeyandfunctionkeysintheKeyboardPropertieswindowbydoingthefollowing:
1.GotoControlPanel,andthenchangetheviewofControlPanelfromCategorytoLargeiconsorSmall
icons.
2.ClickKeyboard.IntheKeyboardPropertieswindow,clicktheFnandfunctionkeystab.
3.Selecttheoptionsofyourpreference.
•+SwitchthekeyfunctionbetweenthestandardF1–F12functionandthespecialfunction
printedasanicononeachkey.WhentheFnLockindicatorisoff,youcanusethedefaultfunction.You
canchangethedefaultfunctionintheKeyboardPropertieswindow.
•Muteorunmutethespeakers.Whenthespeakersaremuted,theindicatoronthekeyison.
Ifyoumutethesoundandturnoffyourcomputer,thesoundwillremainmutedwhenyouturnonyour
computer.Toturnonthesound,pressor.
•Decreasethespeakervolume.
•Increasethespeakervolume.
•Muteorunmutethemicrophones.Whenthemicrophonesaremuted,theindicatoronthekeyison.
•Darkenthecomputerdisplay.
•Brightenthecomputerdisplay.
•Manageexternaldisplays.
•Enableordisablethebuilt-inwirelessfeatures.
•
©CopyrightLenovo201743

–ForWindows7:OpenControlPanel.
–ForWindows10:OpentheSettingswindow.
•Enableordisablethebuilt-inBluetoothfeatures.
•Openakeyboardsettingpage.
•Invokethefunctiondefinedbyyourself.Ifnofunctionisdefined,thefollowingdefaultfunctionworks:
–ForWindows7:Openthesearchbox.
–ForWindows10:OpentheCortanapersonalassistant.
Todefineorchangethefunction,dothefollowing:
–ForWindows7:
1.OpenControlPanel,andthenchangetheviewofControlPanelfromCategorytoLargeicons
orSmallicons.
2.ClickLenovo-KeyboardManager.IntheKeyboardManagerwindow,clicktheUSER-DEFINED
KEYtab.
3.Followtheinstructionsonthescreentocompletethesetting.
Onthissettingpage,youcanalsodefinedifferentfunctionsforthekeycombinationswithF12,such
asShift+F12,Alt+F12,orCtrl+F12.
–ForWindows10:
1.OpentheLenovoSettingsprogram.
2.Clicktheinputicon.
3.LocatetheKEYBOARD:USER-DEFINEDKEYsectionandfollowtheinstructionsonthescreen
tocompletethesetting.
Onthissettingpage,youcanalsodefinedifferentfunctionsforthekeycombinationswithF12,such
asShift+F12,Alt+F12,orCtrl+F12.
Keycombinations
•Fn+B:ThiskeycombinationhasthesamefunctionastheBreakkeyonaconventionalexternalkeyboard.
•Fn+K:ThiskeycombinationhasthesamefunctionastheScrLKorScrollLockkeyonaconventional
externalkeyboard.
•Fn+P:ThiskeycombinationhasthesamefunctionasthePausekeyonaconventionalexternalkeyboard.
•Fn+S:ThiskeycombinationhasthesamefunctionastheSysRqkeyonaconventionalexternalkeyboard.
•Fn+4:PressFn+4toputthecomputerintosleepmode.Towakeupthecomputer,pressanykeyor
thepowerbutton.
•Fn+PrtSc:OpentheSnippingToolprogram.
•Fn+Spacebar:PressFn+Spacebartoswitchbetweenthedifferentkeyboardbacklightstatus(off,low,or
high).
44HardwareMaintenanceManual
Chapter6.Locations
Thischapterintroducesthelocationsofthehardwarecomponentsonyourcomputer.
Computercontrols,connectors,andindicators
Thissectionintroduceshardwarefeaturesofthecomputer.
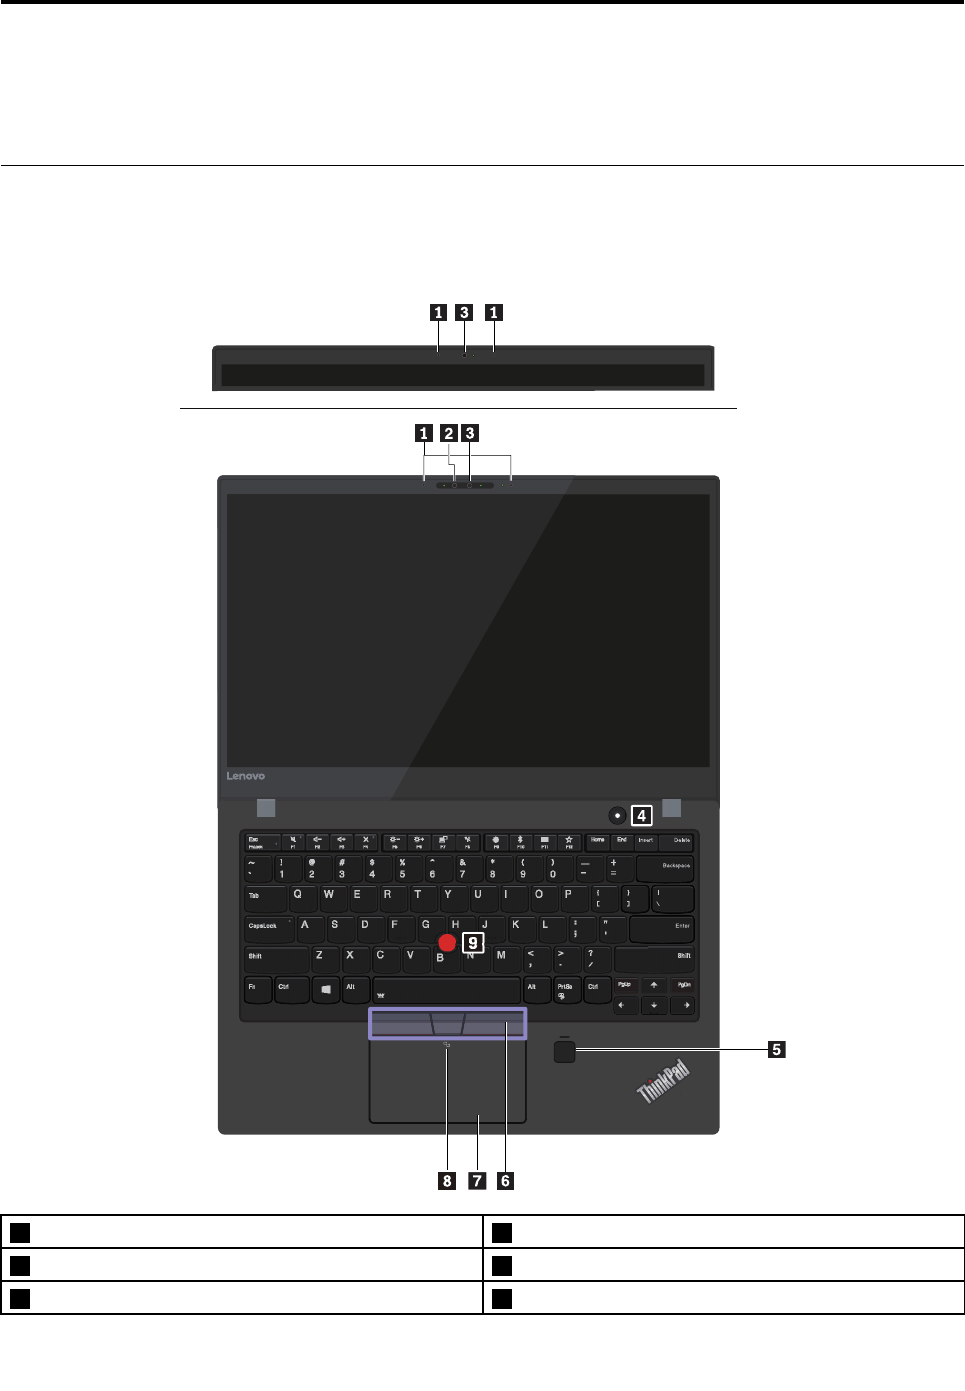
Frontview
1Microphones2Infraredcamera(availableonsomemodels)
3Conventionalcamera(availableonsomemodels)4Powerbutton
5Fingerprintreader6TrackPoint®buttons
©CopyrightLenovo201745
7Trackpad8NFCmark(availableonsomemodels)
9TrackPointpointingstick
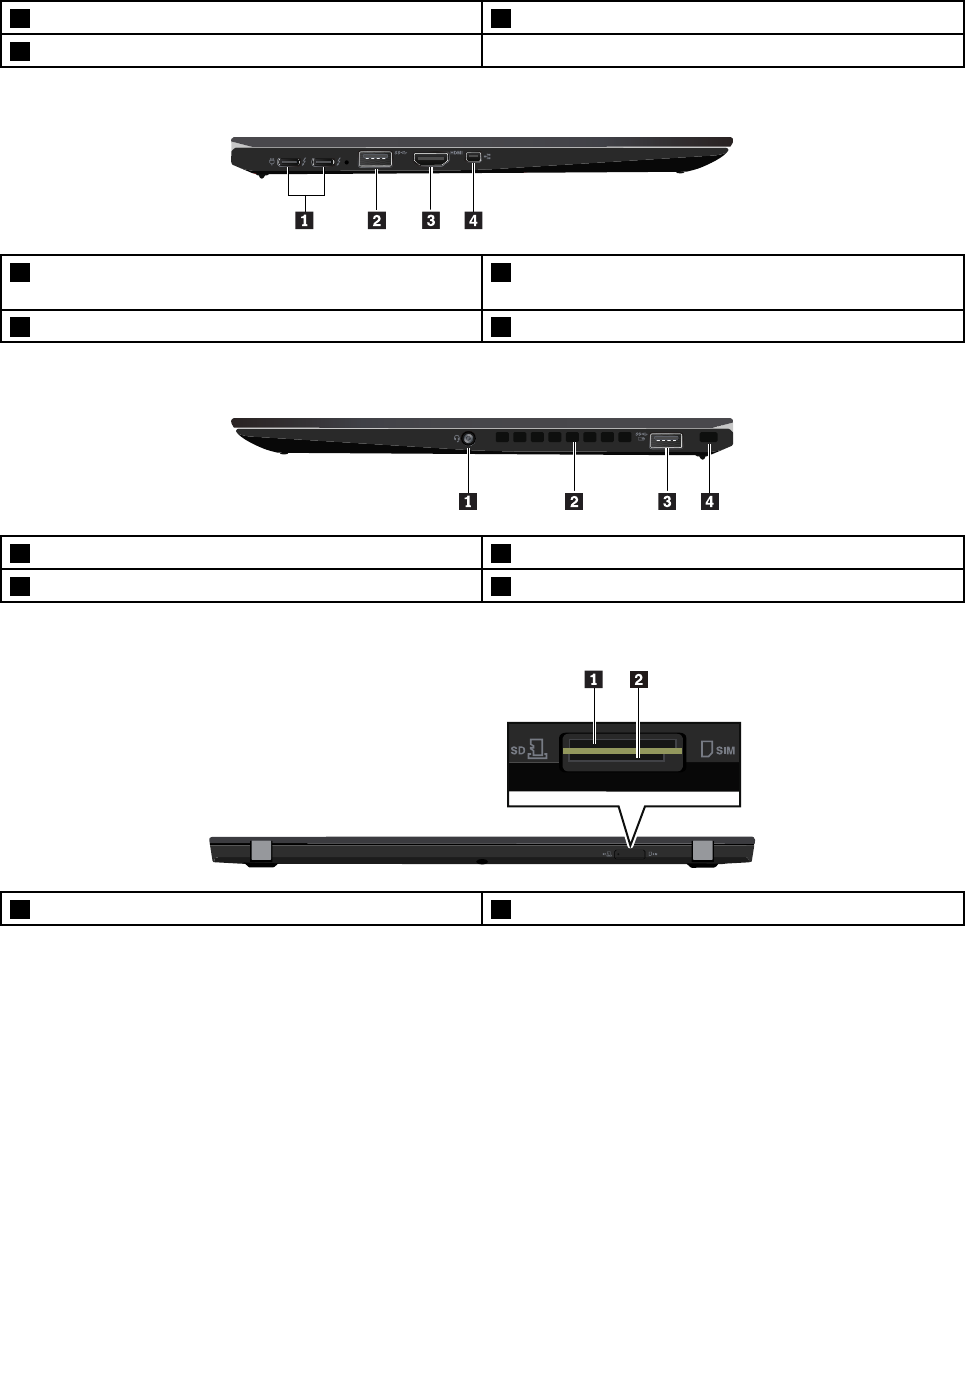
Left-sideview
1USB-Cconnectors(Thunderbolt™3compatible)/
powerconnectors
2USB3.0connector
3HDMI™connector4MiniEthernetconnector
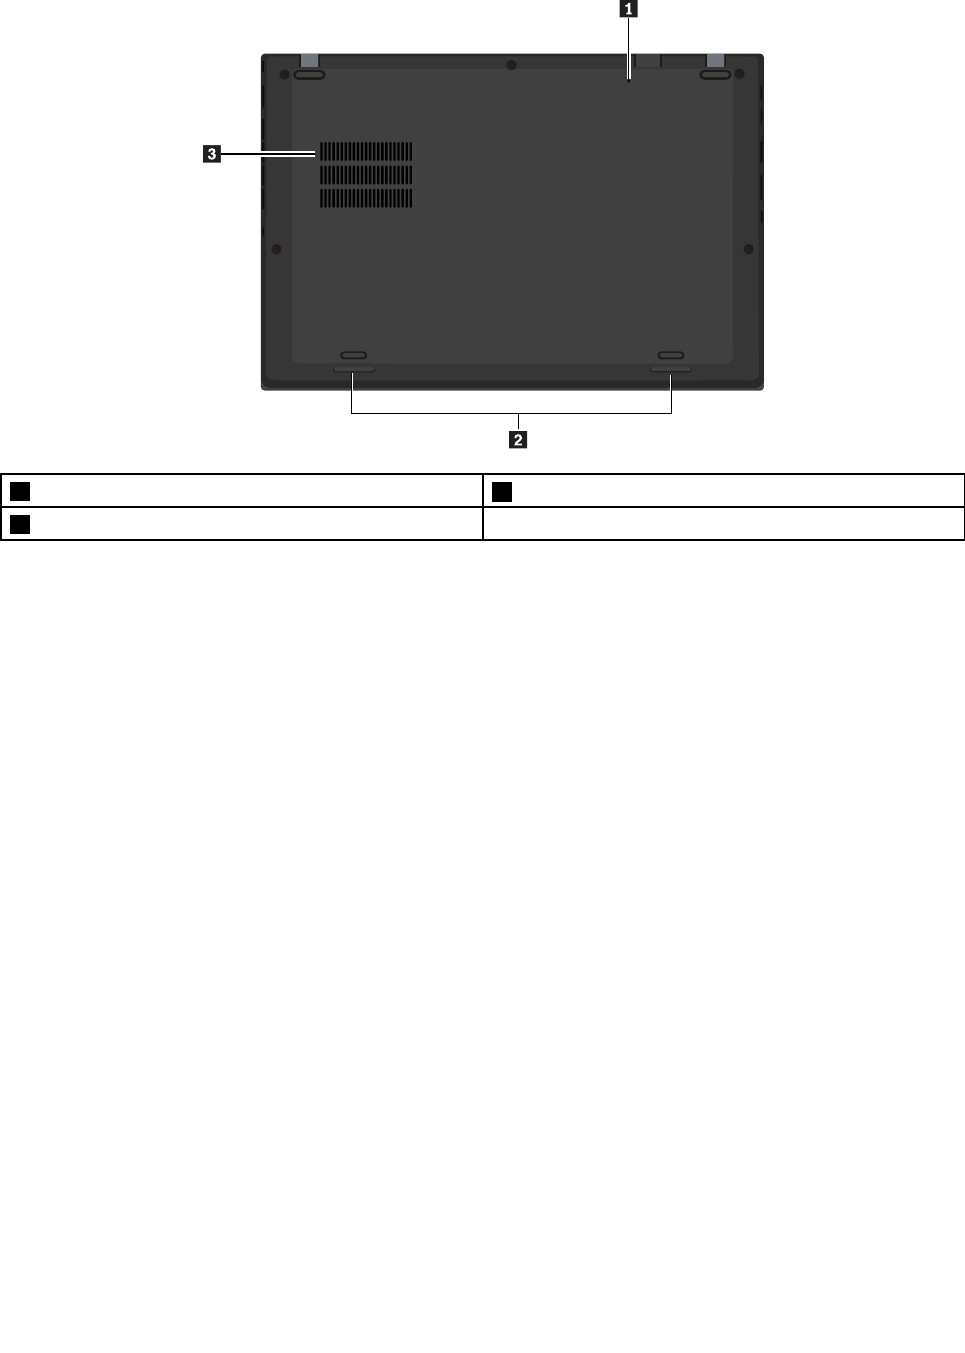
Right-sideview
1Audioconnector2Fanlouvers
3AlwaysOnUSB3.0connector4Security-lockslot
Rearview
1Micro-SIM-cardslot2microSDcardslot
46HardwareMaintenanceManual
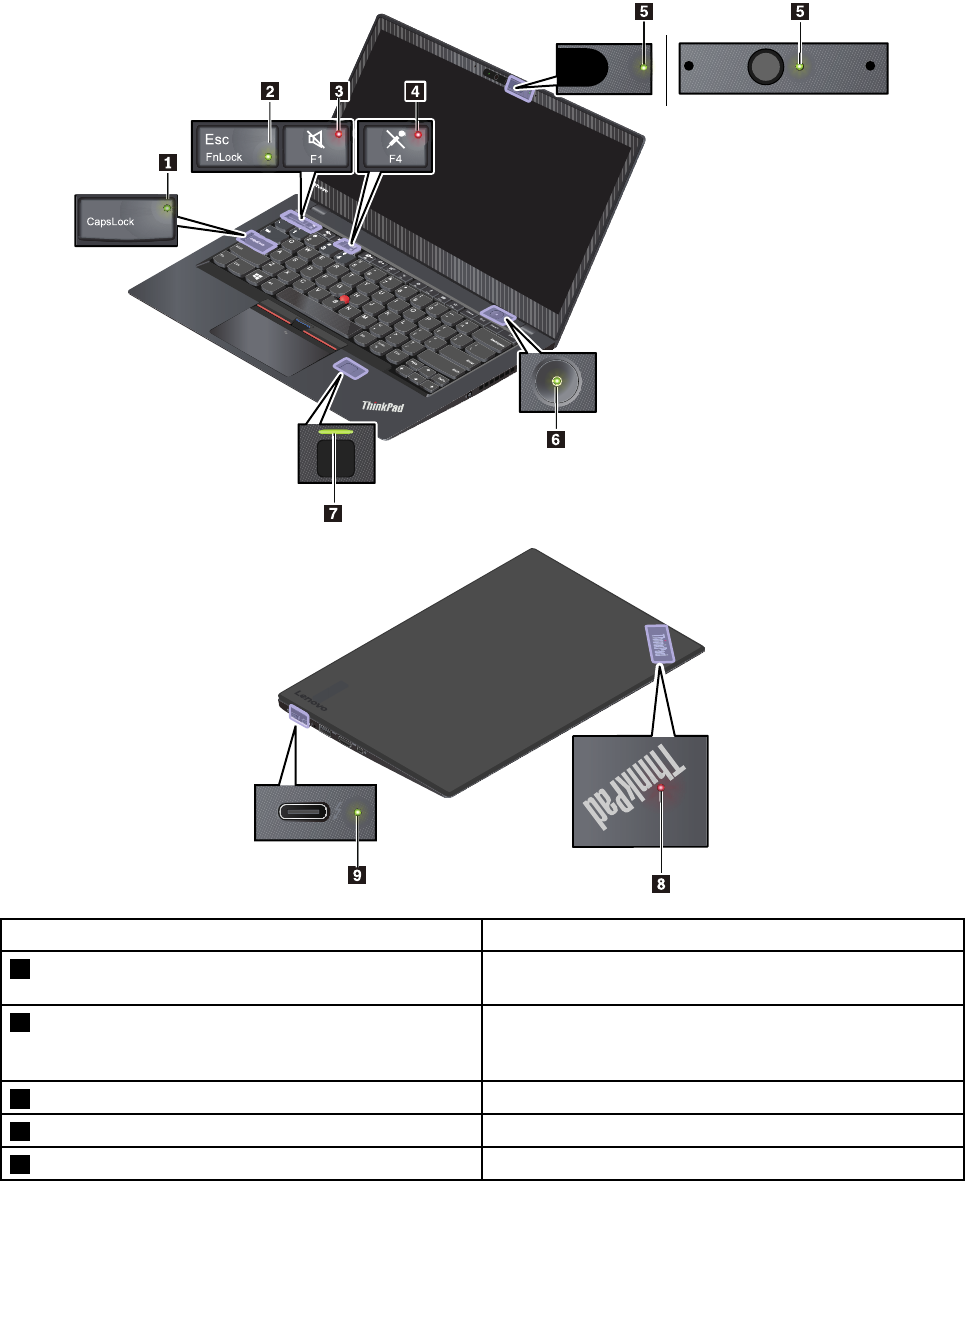
Note:Dependingonthemodel,yourcomputermightlookdifferentfromthefollowingillustrations.
F1
FnLoc k
Es c
F4
CapsLock
IndicatorMeaning
1CapsLockindicatorWhenthisindicatorison,youcantypeuppercaseletters
bydirectlypressingtheletterkeys.
2FnLockindicatorThisindicatorshowsthestatusofFnLockfunction.For
moreinformation,seeChapter5“Specialkeys”onpage
43.
3Speaker-muteindicatorWhenthisindicatorison,thespeakersaremuted.
4Microphone-muteindicatorWhenthisindicatorison,themicrophonesaremuted.
5CamerastatusindicatorWhenthisindicatorison,thecameraisinuse.
48HardwareMaintenanceManual

68SystemstatusindicatorsTheindicatorintheThinkPadlogoonthecomputerlid
andtheindicatorinthepowerbuttonshowthesystem
statusofyourcomputer.
•Blinksforthreetimes:Thecomputerisinitially
connectedtopower.
•On:Thecomputerison(innormalmode).
•Off:Thecomputerisofforinhibernationmode.
•Blinksquickly:Thecomputerisenteringsleepor
hibernationmode.
•Blinksslowly:Thecomputerisinsleepmode.
7FingerprintreaderindicatorThisindicatorshowsthestatusoffingerprintreader.
•Off:Thefingerprintreaderisnotreadyfortapping.
•Solidgreen:Thefingerprintreaderisreadyfortapping.
•Amber,blinking:Thefingerprintcannotbe
authenticated.
9acpowerstatusindicatorThisindicatorshowstheacpowerandbatterypower
statusofthecomputer.
•Green:connectedtoacpower(batterypower
80%–100%)
•Yellow:connectedtoacpower(batterypower
1%–80%)
•Off:notconnectedtoacpower
LocatingFRUsandCRUs
Thistopicintroducesthefollowingserviceparts:
•“MajorFRUs”onpage50
•“LCDFRUs”onpage53
•“MiscellaneouspartsandotherFRUs”onpage55
Notes:
•FRUsrefertopartsthatmustbeinstalledorreplacedonlybytrainedservicetechnicians.Ifcustomers
choosetoreplacetheFRUsbythemselves,theproductwarrantymightbeaffected.
•EachFRUisavailableforalltypesormodels,unlessotherwisespecified.
•CRUstatementforcustomers:
Youcanresolvesomeproblemswithyourproductwithareplacementpartyoucaninstallyourself,called
a“CustomerReplaceableUnit”or“CRU.”SomeCRUsaredesignatedasself-serviceCRUsandothers
aredesignatedasoptional-serviceCRUs.Installationofself-serviceCRUsisyourresponsibility.For
optional-serviceCRUs,youcaneitherinstalltheCRUyourselforyoucanrequestthataServiceProvider
installtheCRUaccordingtothewarrantyserviceforyourproduct.IfyouintendoninstallingtheCRU,
LenovowillshiptheCRUtoyou.CRUinformationandreplacementinstructionsareshippedwithyour
productandareavailablefromLenovoatanytimeuponrequest.Y oucanfindalistofCRUsforyour
productinthisHardwareMaintenanceManual.Anelectronicversionofthismanualcanbefoundat
http://www.lenovo.com/support.ClickGuides&Manualsandthenfollowtheon-screeninstructions
tofindthemanualforyourproduct.Youmightberequiredtoreturnthedefectivepartthatisreplaced
bytheCRU.Whenreturnisrequired:(1)returninstructions,aprepaidshippinglabel,andacontainer
willbeincludedwiththereplacementCRU;and(2)youmightbechargedforthereplacementCRUif
LenovodoesnotreceivethedefectiveCRUwithinthirty(30)daysofyourreceiptofthereplacementCRU.
SeeyourLenovoLimitedWarrantydocumentationforfulldetails.
ThinkPadcomputerscontainthefollowingtypesofCRUs:
Chapter6.Locations49
–Self-serviceCRUs:Refertopartsthatcanbeinstalledorreplacedeasilybycustomerthemselvesor
bytrainedservicetechniciansatanadditionalcost.
–Optional-serviceCRUs:Refertopartsthatcanbeinstalledorreplacedbycustomerswithagreater
skilllevel.Trainedservicetechnicianscanalsoprovideservicetoinstallorreplacethepartsunderthe
typeofwarrantydesignatedforthecustomer’smachine.
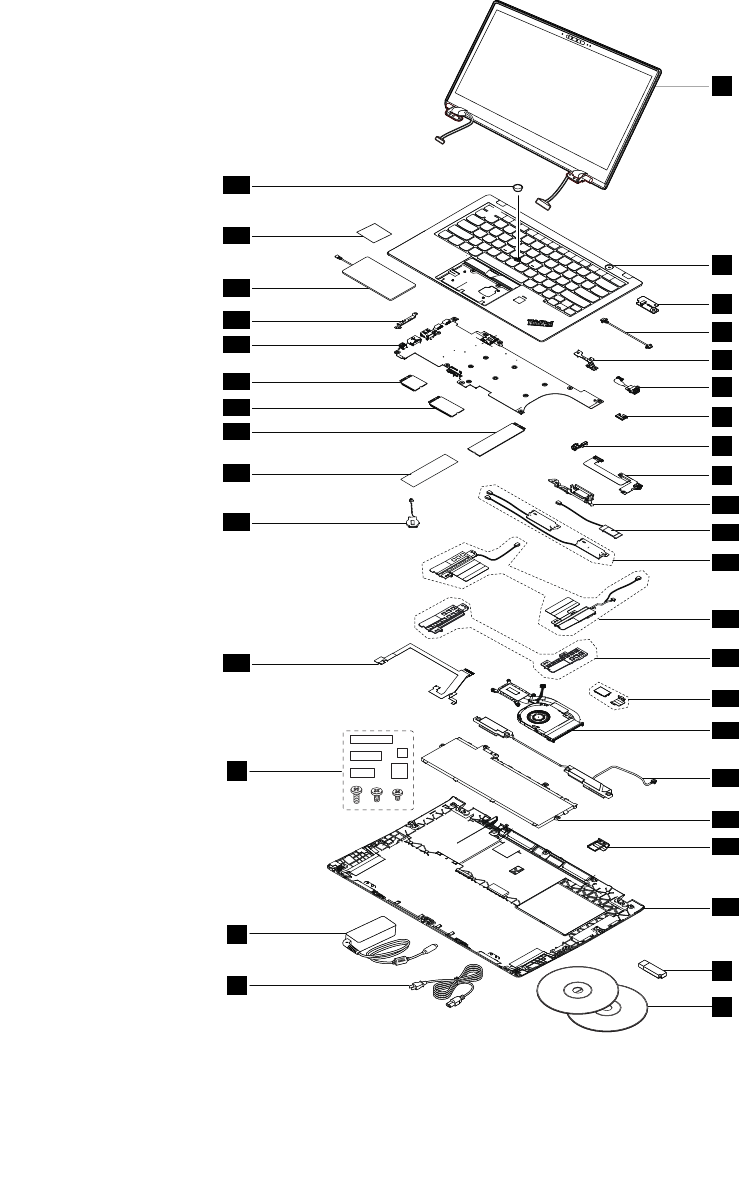
MajorFRUs
1
2
3
4
5
6
7
8
9
a
b
c
d
e
21
18
13
12
11
10
14
15
16
17
19
20
22
23
24
25
26
27
28
29
30
31
50HardwareMaintenanceManual

Table4.MajorFRUsandCRUs
No.FRUdescriptionSelf-serviceCRUOptional-serviceCRU
1LCDunitNoNo
2KeyboardbezelassemblyNoNo
3PowerbuttoncardNoNo
4Power-button-cardcableNoNo
5SDsupportbracketNoNo
6USBcableNoNo
7Cableholderforwirelesslocalareanetwork(LAN)antennaNoNo
8Cableholderforwirelesswideareanetwork(WAN)
antenna*
NoNo
9Audiocardwithaudio-cardcableNoNo
10WirelessGigabit(WiGig®)bracket*NoNo
11WiGigantennakit*NoNo
12Wireless-LANantennakitNoNo
13Wireless-WANantennakit*NoNo
14Wireless-WANantennafiller*NoNo
15Nearfieldcommunication(NFC)cardwithNFCsupport
bracket*
NoNo
16ThermalfanassemblyNoNo
17SpeakerassemblyNoNo
18Built-inbatteryNoNo
19micro-SIM-cardtrayYesNo
20BasecoverassemblyYesNo
21TrackpadcableNoNo
22Coin-cellbatteryNoNo
23ThermalrubberforM.2solid-statedriveNoNo
24M.2solid-statedriveYesNo
25Wireless-WANcard*YesNo
26Wireless-LANcardYesNo
27SystemboardassemblyNoNo
28dc-insupportbracketNoNo
29TrackpadassemblyNoNo
30TrackpadinsulationtapeNoNo
31TrackPointpointingstickYesNo
aLenovofactoryrecoveryUSBkey*YesNo
bLenovorecoverydiscset*YesNo
cPowercordYesNo
dacpoweradapterYesNo
eMiscellaneouspartskitsNoNo
Chapter6.Locations51

*Availableonsomemodels
Note:TheLenovofactoryrecoveryUSBkeyaandtheLenovorecoverydiscsetbareusedtorestorethe
MicrosoftWindowsoperatingsystem.Theymightnotcomewiththecomputer,andausermightorderthem
fromhttp://www.lenovo.com/lenovorecovery,thoughadditionalshippingandhandlingfeesmightapply.
52HardwareMaintenanceManual
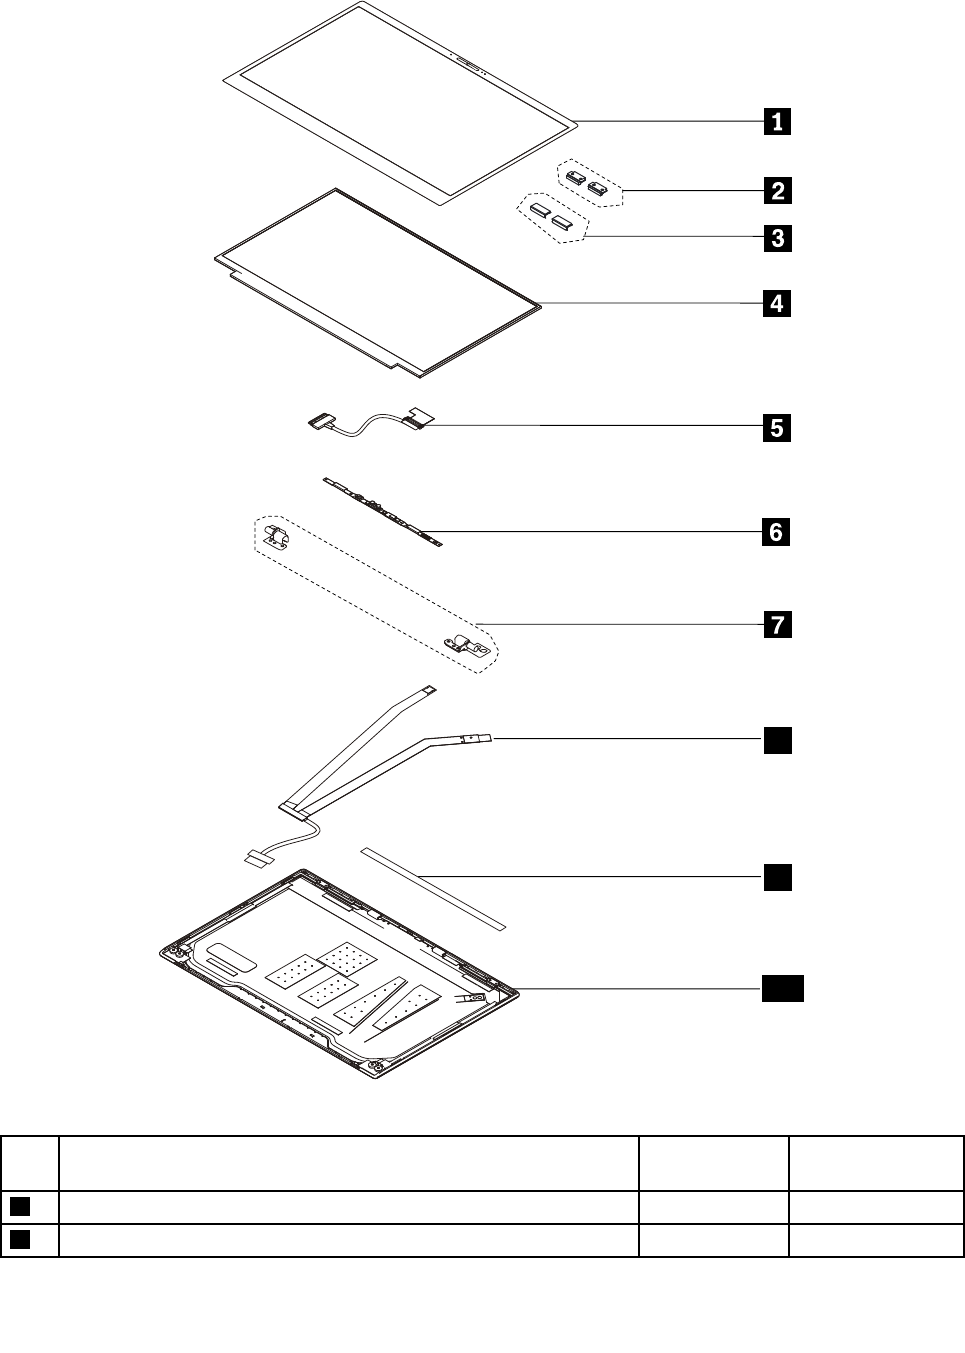

Table5.LCDFRUs(continued)
No.FRUdescriptionsSelf-service
CRU
Optional-service
CRU
3MetalprotectionplateNoNo
4LCDpanelassemblyNoNo
5LCDcableNoNo
6Camera/microphonecard(availableonsomemodels)NoNo
7HingesNoNo
8Camera/LEDcableNoNo
9LCDbottombezelNoNo
10LCDrearcoverassemblyNoNo
54HardwareMaintenanceManual
MiscellaneouspartsandotherFRUs
FRUdescriptionsSelf-serviceCRUOptional-serviceCRU
Screwandtapekit
•M1.2xL1.4,flathead,silver(78)
•M2.0xL1.8,thinhead,silver,fortrackpad(4)
•M2.0xL2.2,largeflathead,black(9)
•M2.0xL3.0,silver(12)
•M2.0xL5.0,black(10)
•M2.5xL2.2,hugeflathead,black,forhinge(4)
•M2.5xL4.0,flathead,black,forhinge(6)
•Tape(5)
NoNo
Miscellaneouskit
•M.2solid-statedrivethermalrubber(1)
•Microphonerubberoncameracard(1)
•NFCbracket(1)
NoNo
LabelkitNoNo
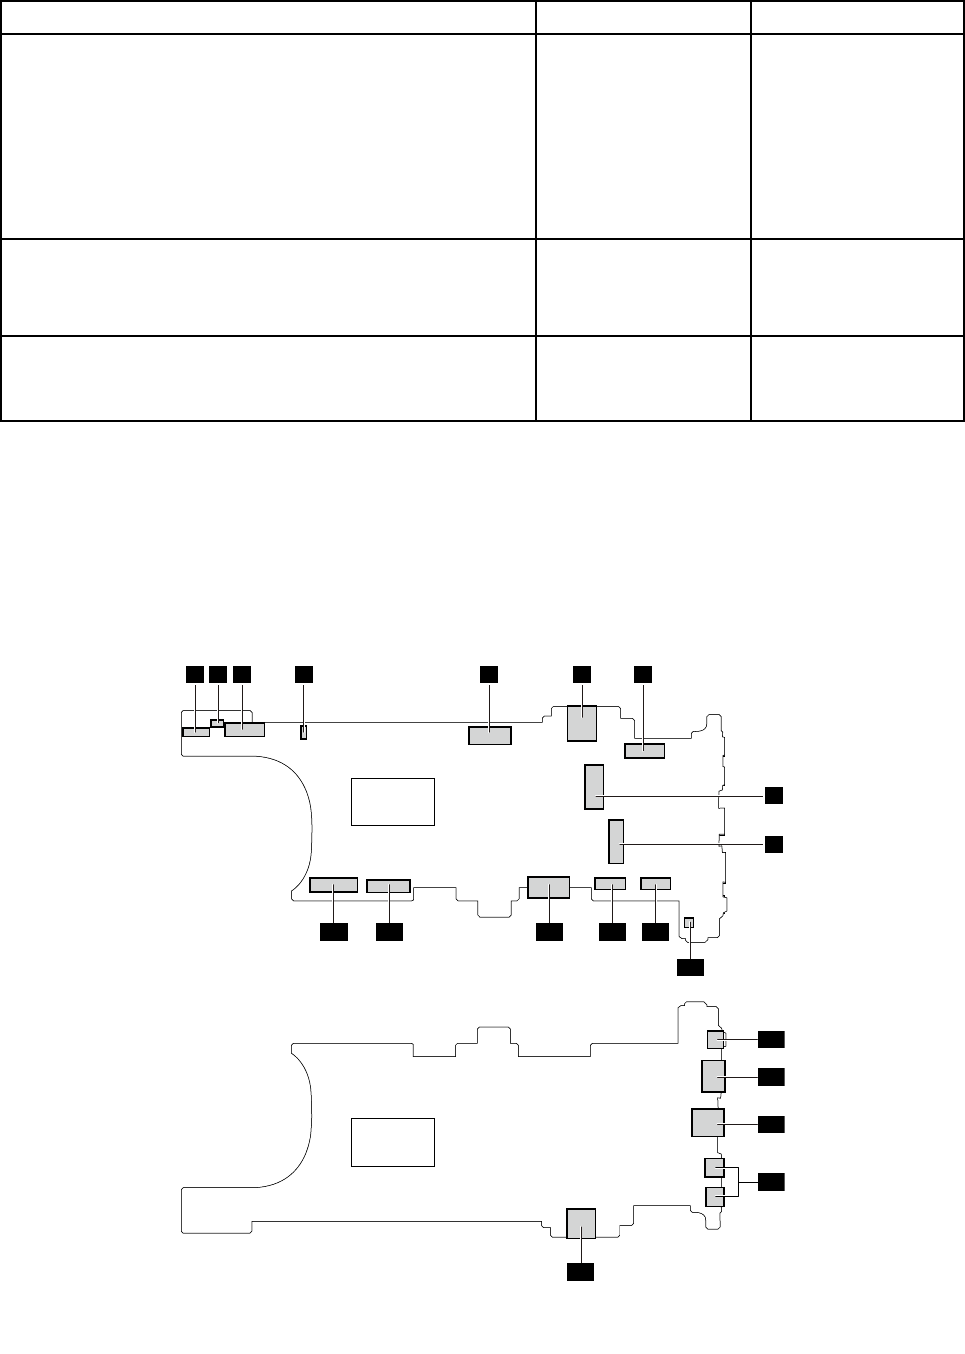
Connectorandcableguide
ThissectionprovidesinformationtohelpLenovoauthorizedservicetechniciansidentifyconnectorsand
cablesforreplacementpurpose.TovieweachFRUandtheexplodedillustrationofthecomputer,see“Major
FRUs”onpage50and“LCDFRUs”onpage53.
Note:Dependingonthemodel,someconnectorsorcablesmightnotbeavailable.
Systemboardconnectorsandcables
1234567
10
1112131415
8
9
20
16
17
18
19
Chapter6.Locations55

No.Connector/featureInternalcablerequiredCableconnection
1USBcableconnector(internal)USBcableTheAlwaysOnUSB3.0connector
comeswithacable.Connectthe
cabletothisconnector.
2Powerbuttonconnector(internal)Power-button-cardcableConnectoneendtothepower
buttoncardandtheotherendto
thisconnector.
3Camera/LEDconnector(internal)Camera/LEDcableSee“Camera/microphonecard
connectorandcable”onpage57
4Thermalfanconnector(internal)ThermalfanassemblycableThethermalfanassemblycomes
withacable.Connectthecableto
thisconnector.
5M.2solid-statedriveslot(internal)NoInsertanM.2solid-statedrive
directlyintothisslot.
6microSDcardslot(external)NoInsertamicroSDcardintothisslot.
7EmbededDisplayPort®connector
(internal)
LCDcableConnectoneendtotheLCD
panelandtheotherendtothis
connector.
8Wireless-LANcardslot(internal)NoInsertthewireless-LANcardinto
thisslot.
9Wireless-WANcardslot(internal)NoInsertthewireless-WANcardinto
thisslot.
10Coin-cellbatteryconnector
(internal)
Coin-cellbatterycableThecoin-cellbatterycomeswitha
cable.Connectthecabletothis
connector.
11Keyboardconnector(internal)KeyboardcableThekeyboardbezelassembly
comeswithakeyboardcable.
Connectthecabletothis
connector.
12TrackPointpointingstickconnector
(internal)
TrackPointpointingstickcableThekeyboardbezelassembly
comeswithaTrackPointpointing
stickcable.Connectthecableto
thisconnector.
13Built-inbatteryconnector(internal)NoConnectthebuilt-inbattery
directlytothisconnector.
14Trackpadconnector(internal)TrackpadcableSee“Trackpadconnectorand
trackpadcable”onpage59
15Audiocardconnector(internal)NoConnecttheaudiocardtothe
systemboarddirectly.
16MiniEthernetconnector(external)NoConnectthecomputertoaLAN
throughthisconnectorbyusingan
Ethernetextensionadapter.
17HDMIconnector(external)NoConnectacompatibledigitalaudio
deviceorvideomonitortothis
connector.
18USB3.0connector(external)NoConnectUSB-compatibledevices
tothisconnector.
56HardwareMaintenanceManual
No.Connector/featureInternalcablerequiredCableconnection
19USB-Cconnectors(Thunderbolt
3compatible)/powerconnectors
(external)
NoConnectUSB-Ccompatible
devicesoraUSB-Cpoweradapter
totheseconnectors.
20Micro-SIM-cardslot(external)NoIfyourcomputersupportsthe
wirelessWANfeature,insert
amicroSIMcardintothis
slottoestablishwirelessWAN
connections.
Audiocardconnectorsandcables
2
1
3
No.Connector/featureInternalcablerequiredCableconnection
1Speakerassemblyconnector
(internal)
SpeakerassemblycableThespeakerassemblycomeswith
acable.Connectthecabletothis
connector.
2Proximitysensorconnector
(internal)
Wireless-WANantennakitConnecttheorangecableofthe
antennakittothemainconnector
andthebluecableoftheantenna
kittotheauxiliaryconnectoronthe
wireless-WANcard.Then,connect
theblackcableoftheantennakit
tothisconnector.
3Audioconnector(external)NoConnectheadphonesoraheadset
witha3.5-mm(0.14-inch),4-pole
plugtothisconnector.
Camera/microphonecardconnectorandcable
1
a
b
c
Chapter6.Locations57
No.Connector(location)InternalcablerequiredCableconnection
1Camera/microphonecard
connector(internal)
Camera/LEDcableConnecttheendcofthecable
tothecamera/LEDconnectoron
thesystemboard,andconnectthe
endbofthecabletotheLCDrear
cover.Then,connecttheendaof
thecabletothisconnector.
Keyboardbezelassemblyconnectorandcable
1
No.Connector(location)InternalcablerequiredCableconnection
1Fingerprintreadercardconnector
(internal)
TrackpadcableSee“Trackpadconnectorand
trackpadcable”onpage59
LCDcable
ab
No.Connector(location)InternalcablerequiredCableconnection
aLCDcableconnector(internal)LCDcableConnectthisendtotheembeded
DisplayPortconnectoronthe
systemboard.
bLCDcableconnector(internal)LCDcableConnectthisendtotheLCD
connectorontheLCDpanel.
NFCcardconnectorsandcables
12
No.Connector(location)InternalcablerequiredCableconnection
1NFCcardconnector(internal)TrackpadcableSee“T rackpadconnectorand
trackpadcable”onpage59
2NFCantennaconnector(internal)NFCantennakitThetrackpadcomeswithanNFC
antennakit.Connecttheantenna
tothisconnector.
58HardwareMaintenanceManual
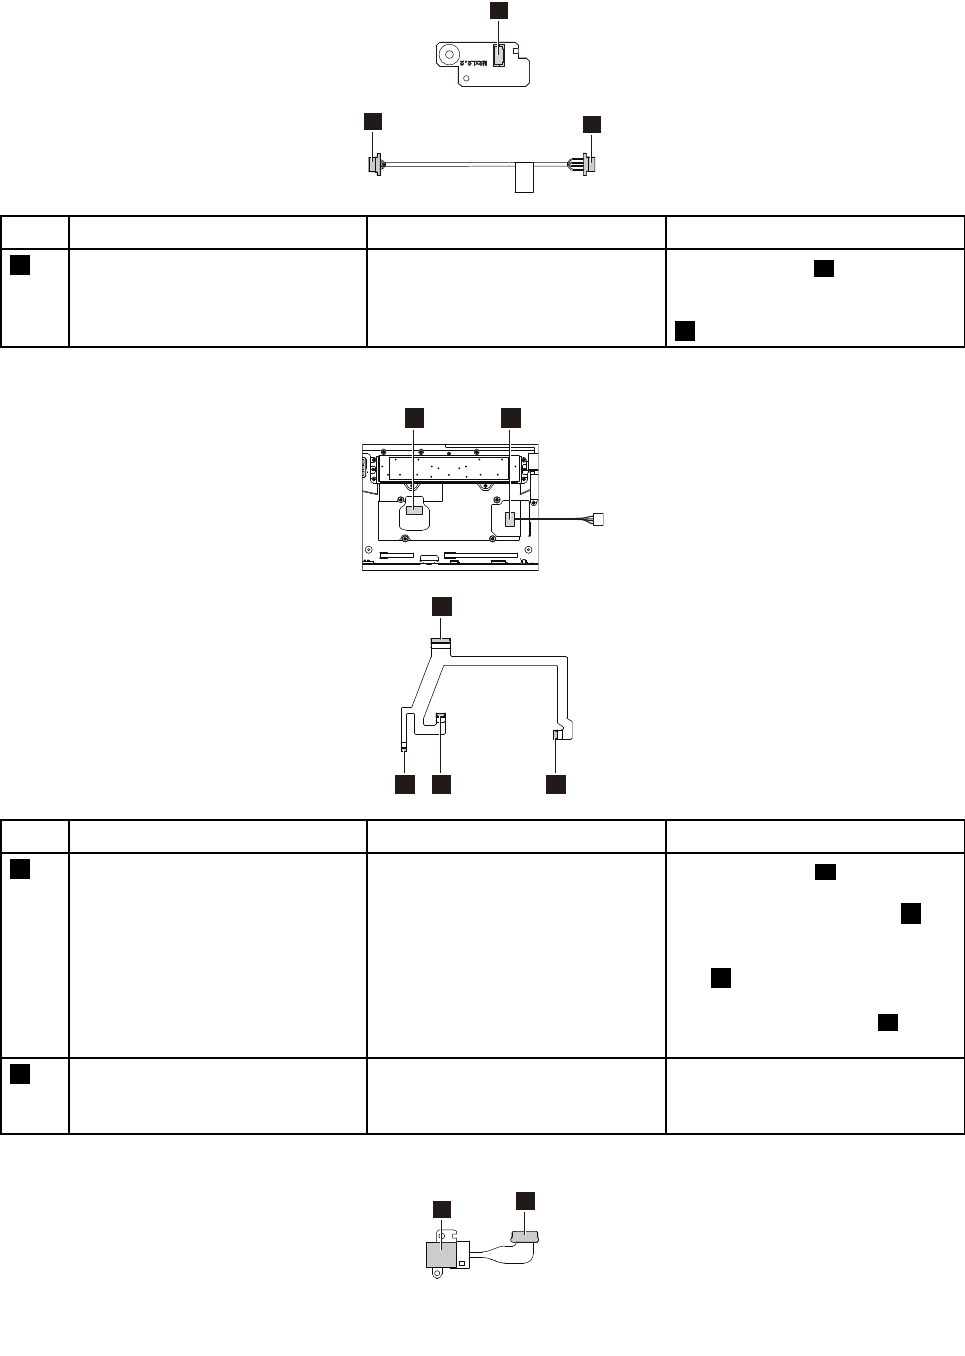
Powerbuttoncardconnectorandcable
1
ab
No.Connector(location)InternalcablerequiredCableconnection
1Power-button-cardconnector
(internal)
Power-button-cardcableConnecttheendaofthecableto
thepowerbuttoncardconnector
onthesystemboardandtheend
btothisconnector.
Trackpadconnectorandtrackpadcable
12
a
bcd
No.Connector(location)InternalcablerequiredCableconnection
1Trackpadconnector(internal)TrackpadcableConnecttheendaofthecable
tothetrackpadconnectoronthe
systemboard,andtheendb
totheNFCcardconnectoron
theNFCcard.Thenconnectthe
enddtothefingerprintreader
cardconnectoronthefingerprint
readercard,andtheendctothis
connector.
2NFCantennaconnector(internal)NFCantennakitThetrackpadcomeswithanNFC
antennakit.Connecttheantenna
tothisconnector.
USBcable
12
Chapter6.Locations59
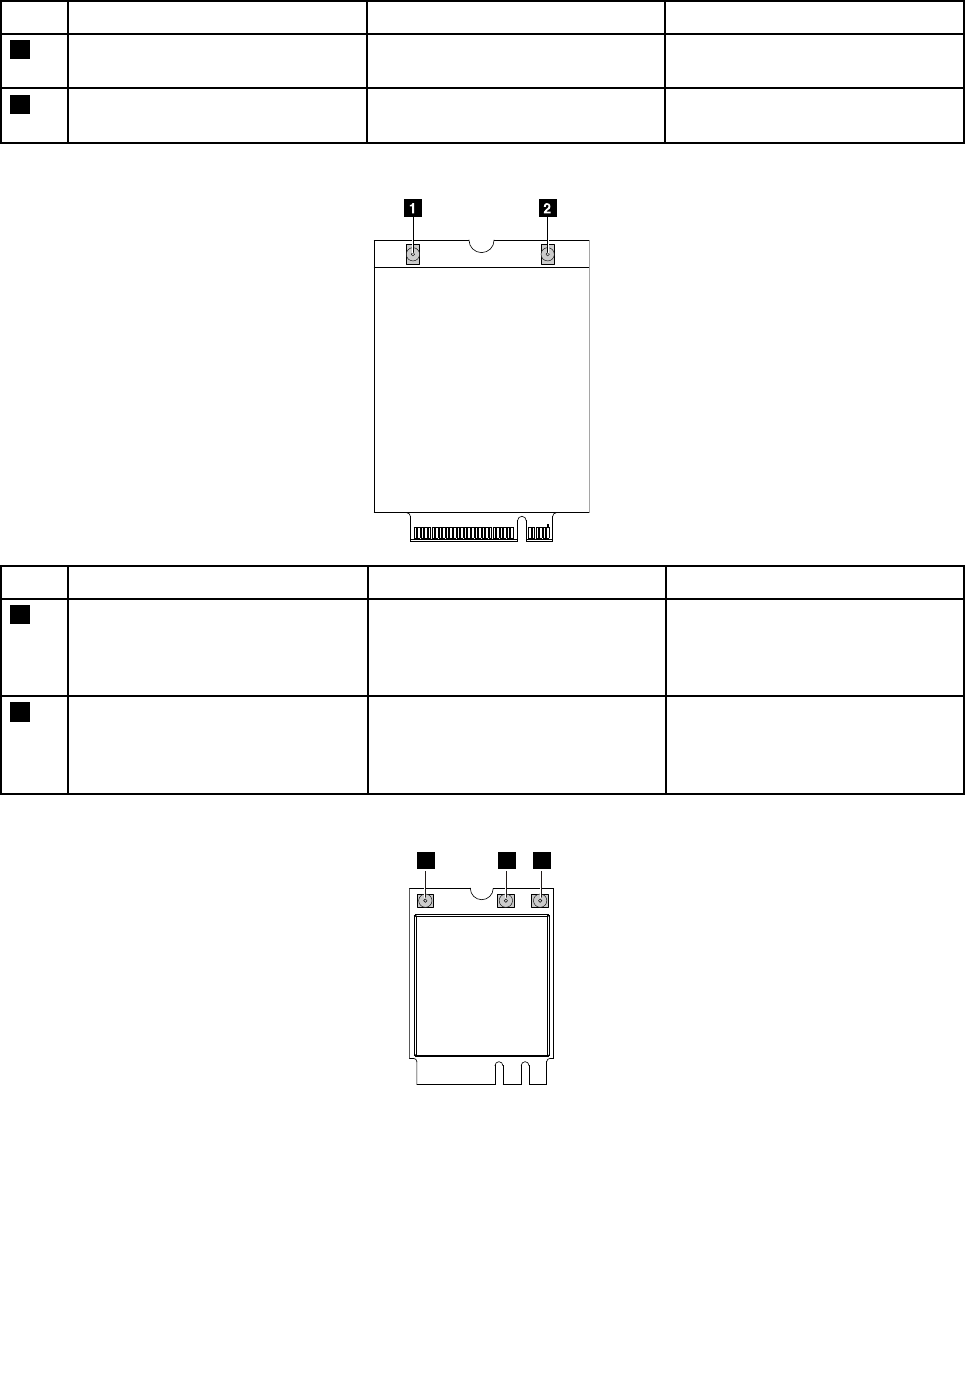
No.Connector(location)InternalcablerequiredCableconnection
1AlwaysOnUSB3.0connector
(external)
NoConnectUSB-compatibledevices
tothisconnector.
2USBcableconnector(internal)USBcableConnectthisendtotheUSBcable
connectoronthesystemboard.
Wireless-WANcardconnectorsandcables
No.Connector(location)InternalcablerequiredCableconnection
1Wireless-WANantennaconnector
(internal)
Wireless-WANantennakitConnectoneendofthe
wireless-WANorangeantennato
theC-coverandtheotherendto
thisconnectorlabeledMAIN.
2Wireless-WANantennaconnector
(internal)
Wireless-WANantennakitConnectoneendofthe
wireless-WANblueantenna
totheC-coverandtheotherend
tothisconnectorlabeledAUX.
Wireless-LANcardconnectorsandcables
123
60HardwareMaintenanceManual

No.Connector(location)InternalcablerequiredCableconnection
1WiGigantennaconnector(internal)WiGigantennakitConnectoneendoftheWiGig
whiteantennatotheC-coverand
theotherendtothisconnector
labeledIFCON.
2Wireless-LANantennaconnector
(internal)
Wireless-LANantennakitConnectoneendofthe
wireless-LANgrayantennato
theC-coverandtheotherendto
thisconnectorlabeledMAIN.
3Wireless-LANantennaconnector
(internal)
Wireless-LANantennakitConnectoneendofthe
wireless-LANblackantenna
totheC-coverandtheotherend
tothisconnectorlabeledAUX.
LookingupFRUinformation
FordetailedFRUinformation,includingpartnumbers,descriptions,andsubstitutionpartnumbers,goto
http://www.lenovo.com/serviceparts-lookup.
Chapter6.Locations61

62HardwareMaintenanceManual

Chapter7.FRUreplacementnotices
Thischapterpresentsnoticesrelatedtoremovingandreplacingparts.Readthischaptercarefullybefore
replacinganyFRU.
CRUstatementforcustomers:
Youcanresolvesomeproblemswithyourproductwithareplacementpartyoucaninstallyourself,called
a“CustomerReplaceableUnit”or“CRU.”SomeCRUsaredesignatedasself-serviceCRUsandothers
aredesignatedasoptional-serviceCRUs.Installationofself-serviceCRUsisyourresponsibility.For
optional-serviceCRUs,youcaneitherinstalltheCRUyourselforyoucanrequestthataServiceProvider
installtheCRUaccordingtothewarrantyserviceforyourproduct.IfyouintendoninstallingtheCRU,
LenovowillshiptheCRUtoyou.CRUinformationandreplacementinstructionsareshippedwithyour
productandareavailablefromLenovoatanytimeuponrequest.Y oucanfindalistofCRUsforyour
productinthisHardwareMaintenanceManual.Anelectronicversionofthismanualcanbefoundat
http://www.lenovo.com/support.ClickGuides&Manualsandthenfollowtheon-screeninstructionstofind
themanualforyourproduct.YoumightberequiredtoreturnthedefectivepartthatisreplacedbytheCRU.
Whenreturnisrequired:(1)returninstructions,aprepaidshippinglabel,andacontainerwillbeincluded
withthereplacementCRU;and(2)youmightbechargedforthereplacementCRUifLenovodoesnot
receivethedefectiveCRUwithinthirty(30)daysofyourreceiptofthereplacementCRU.SeeyourLenovo
LimitedWarrantydocumentationforfulldetails.
Commonservicetools
Belowisthelistofcommonservicetoolsthatyoumightneedwhileservicingthecomputer.
•Screwdriverkit
•1/4"drivespinnerhandle
•1/4"Sq.to1/4"hextorxadapter
•TR7-TR-10tamperresistanttorxbits
•RemovaltoolantennaRFconnector
•USB2.0CD-RW/DVD-ROMcombodriveII
•USBcable
•USBMaintenanceKey
•USBfloppydiskettedriveformaintenancediskette
•USBfloppydiskettedrivetoolkit
•TestcardforintegratedSmartCard
•LENOVOThinkPadHardwareMaintenanceDisketteVersion1.76orlater
Note:DownloadthefilefromthefollowingWebsite:
http://www.lenovo.com/support
Screwnotices
Loosescrewscancauseareliabilityproblem.IntheThinkPadnotebookcomputer,thisproblemisaddressed
withspecialnylon-coatedscrewsthathavethefollowingcharacteristics:
•Theymaintaintightconnections.
•Theydonoteasilycomeloose,evenwithshockorvibration.
•Theyarehardertotighten.
Dothefollowingwhenyouservicethismachine:
•Keepthescrewkitinyourtoolbag.Forthepartnumberofthescrewkit,goto
http://www.lenovo.com/serviceparts-lookup.
•Itisrecommendedtousenewscrews.
©CopyrightLenovo201763
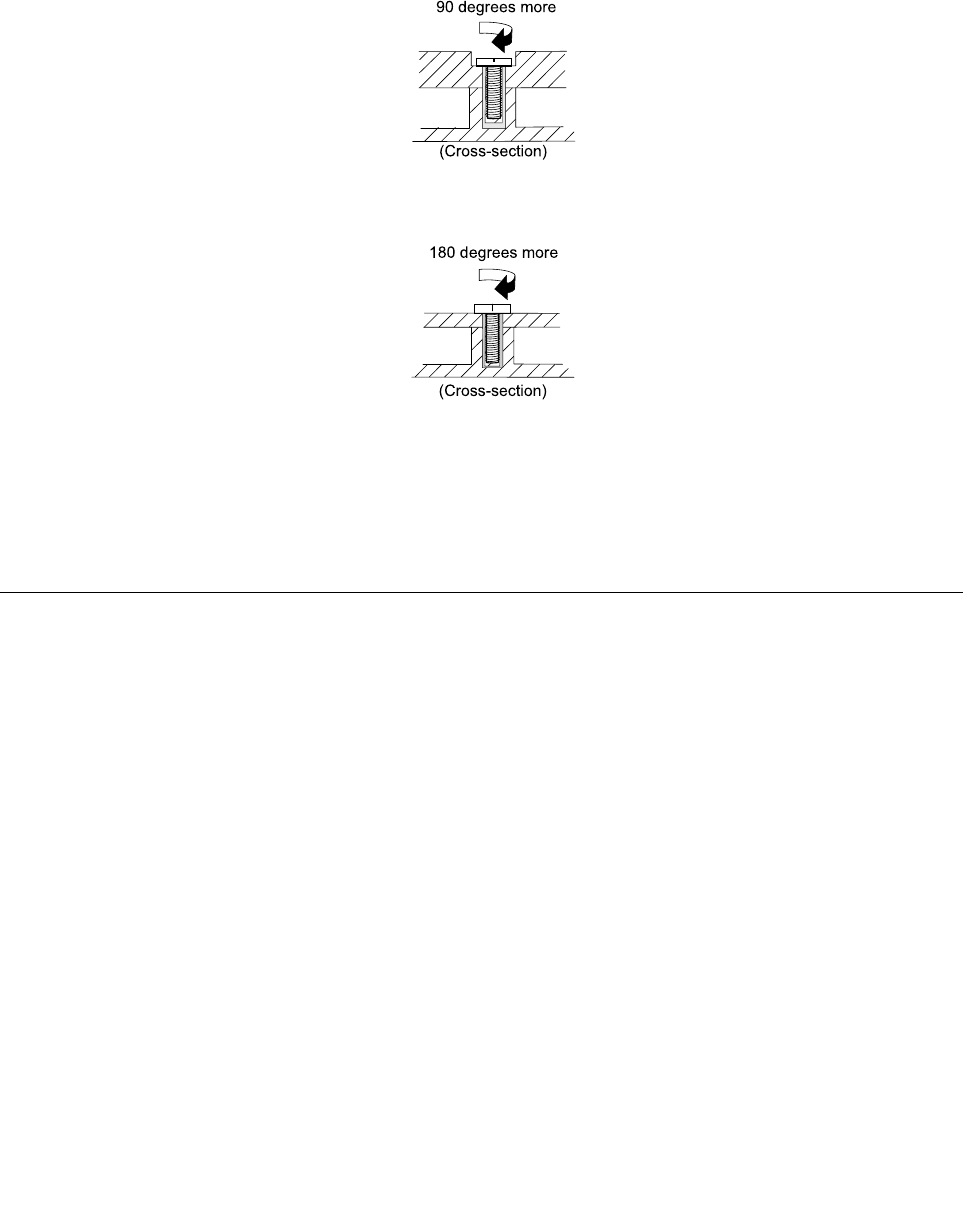
•Itisrecommendedtouseeachscrewonlyonce.
Tightenscrewsasfollows:
•Plastictoplastic
Turnanadditional90degreesafterthescrewheadtouchesthesurfaceoftheplasticpart.
90degreesmore
(Cross-section)
•Logiccardtoplastic
Turnanadditional180degreesafterthescrewheadtouchesthesurfaceofthelogiccard.
180degreesmore
(Cross-section)
Notes:
•Ensurethatyouusethecorrectscrew.Itisrecommendedtousenewscrewsforreplacements.Ifyou
haveatorquescrewdriver,tightenallscrewsfirmlytothetorquespecifiedinthescrewinformation
tableforeachstep.
•Ensurethattorquescrewdriversarecalibratedcorrectlyfollowingcountryspecifications.
Retainingserialnumbers
Thissectionincludesthefollowingdescriptions:
•“Restoringtheserialnumberofthesystemunit”onpage64
•“RetainingtheUUID”onpage65
•“ReadingorwritingtheECAinformation”onpage66
Restoringtheserialnumberofthesystemunit
Whenthecomputerwasmanufactured,theEEPROMonthesystemboardwasloadedwiththeserial
numbersofthesystemandallmajorcomponents.Thesenumbersneedtoremainthesamethroughout
thelifeofthecomputer.
Ifyoureplacethesystemboard,youmustrestoretheserialnumberofthesystemunittoitsoriginalvalue.
Theserialnumberofthesystemunitiswrittenonthelabelattachedtothebottomofthecomputer.
Ifyoucannotfindtheserialnumberofthesystemunitonthebottomofthecomputer,trythefollowing
methodtogetthenumber:
Note:Beforeyouperformtheoperation,ensurethattheUEFI/LegacysettingwithintheStartupmenuin
theThinkPadSetupprogramissettoUEFIOnly.
1.ConnectaUSBmemorykeytothecomputer.
64HardwareMaintenanceManual

2.Gotohttp://www.lenovo.com/maintenanceutilitiesandfollowtheinstructionsonthescreentocreatea
MaintenanceKey.
Note:OnlyanauthorizedLenovoservicetechniciancanaccesstheaboveWebsite.
3.Restartthecomputer.
4.Whenthelogoisdisplayed,pressEsc.TheThinkPadConfigInformationUpdateUtilityinterfaceis
displayed.
5.Type1underEntertheactiondesired,thenpressEnter.TheThinkPadSerialNumberUpdateUtilityfor
AssetIDscreenisdisplayed.
6.Type2underEntertheactiondesired,thenpressEnter.Theserialnumberofeachdeviceinyour
computerisdisplayed;theserialnumberofthesystemunitislistedasfollows:
20-Serialnumber
7.Recordtheserialnumberofthesystemunit.
Afteryoureplacethesystemboard,dothefollowingtorestoretheserialnumberofthesystemunit:
1.ConnecttheMaintenanceKeytothecomputer.
2.Whenthelogoisdisplayed,pressEsc.TheThinkPadConfigInformationUpdateUtilityinterfaceis
displayed.
3.Type1underEntertheactiondesired,thenpressEnter.TheThinkPadSerialNumberUpdateUtilityfor
AssetIDscreenisdisplayed.
4.Type1underEntertheactiondesired,thenpressEnter.Thenfollowtheinstructionsonthescreen
torestoretheserialnumberofthesystemunit.
RetainingtheUUID
TheUniversallyUniqueIdentifier(UUID)isa128-bitnumberuniquelyassignedtoyourcomputerat
productionandstoredintheEEPROMofyoursystemboard.
ThealgorithmthatgeneratesthenumberisdesignedtoprovideuniqueIDsuntiltheyearA.D.3400.Notwo
computersintheworldhavethesamenumber.
Whenyoureplacethesystemboard,performthefollowingstepstocreateanewUUIDforthesystem
boardifthesystemboarddoesnothaveaUUID:
Note:Beforeyouperformtheoperation,ensurethattheUEFI/LegacysettingwithintheStartupmenuin
theThinkPadSetupprogramissettoUEFIOnly.
1.ConnectaUSBmemorykeytothecomputer.
2.Gotohttp://www.lenovo.com/maintenanceutilitiesandfollowtheinstructionsonthescreentocreatea
MaintenanceKey.
Note:OnlyanauthorizedLenovoservicetechniciancanaccesstheaboveWebsite.
3.Restartthecomputer.
4.Whenthelogoscreenisdisplayed,pressEsc.TheThinkPadConfigInformationUpdateUtilityinterface
isdisplayed.
5.Type2underEntertheactiondesired,thenpressEnter.TheAutoUUIDgenerationutilityinterfaceis
displayed.
6.TypeyunderChangeUUID.OK?[Y/N],thenpressEnter.AnewUUIDiscreatedandwritten.Ifa
validUUIDalreadyexists,itisnotoverwritten.
Chapter7.FRUreplacementnotices65

ReadingorwritingtheECAinformation
InformationaboutEngineeringChangeAnnouncements(ECA)isstoredintheEEPROMofthesystemboard.
TheelectronicstorageofthisinformationsimplifiestheproceduretocheckiftheECAhasbeenpreviously
appliedtoamachine.ThemachinedoesnotneedtobedisassembledtocheckfortheECAapplication.
TocheckwhatECAshavebeenpreviouslyappliedtothemachine,usetheECAInformationRead/Write
functionontheUSBMaintenanceKey.
1.InserttheMaintenanceKeyandrestartthecomputer.
2.Fromthemainmenu,select6.SetECAInformation.
3.ToreadtheECAinformation,select2.ReadECA/reworknumberfromEEPROMandfollowthe
instructionsonthescreen.
4.Toreadtheboxbuilddate,select5.ReadboxbuilddatefromEEPROM,andfollowtheinstructionon
thescreen.
AfteranECAhasbeenappliedtothemachine,theEEPROMmustbeupdatedtoreflecttheECA's
application.UsetheMaintenanceKeytoupdatetheEEPROM.
Note:OnlytheECAnumberisstoredintheEEPROM.ThemachinetypeoftheECAisassumedtobethe
sameasthemachinetypeofthemachinethathadtheECAappliedtoit.
1.InserttheMaintenanceKeyandrestartthecomputer.
2.Fromthemainmenu,select6.SetECAInformation.
3.TowritetheECAinformation,select1.WriteECA/reworknumberfromEEPROM,andfollowthe
instructionsonthescreen.
4.Towritetheboxbuilddate,select4.WriteboxbuilddatefromEEPROM,andfollowtheinstructionon
thescreen.
Ifthesystemboardisbeingreplaced,trytoreadtheECAinformationfromtheoldsystemboardandtransfer
theinformationtothenewsystem.Ifthesystemboardisinoperable,thiswillnotbepossible.
66HardwareMaintenanceManual

Chapter8.RemovingorreplacingaFRU
ThischapterprovidesinstructionsonhowtoremoveorreplaceaFRU.
CRUstatementforcustomers:
Youcanresolvesomeproblemswithyourproductwithareplacementpartyoucaninstallyourself,called
a“CustomerReplaceableUnit”or“CRU.”SomeCRUsaredesignatedasself-serviceCRUsandothers
aredesignatedasoptional-serviceCRUs.Installationofself-serviceCRUsisyourresponsibility.For
optional-serviceCRUs,youcaneitherinstalltheCRUyourselforyoucanrequestthataServiceProvider
installtheCRUaccordingtothewarrantyserviceforyourproduct.IfyouintendoninstallingtheCRU,
LenovowillshiptheCRUtoyou.CRUinformationandreplacementinstructionsareshippedwithyour
productandareavailablefromLenovoatanytimeuponrequest.Y oucanfindalistofCRUsforyourproduct
inthisHardwareMaintenanceManual.Anelectronicversionofthismanualisavailablefordownloadingat
http://www.lenovo.com/support.YoumightberequiredtoreturnthedefectiveCRU.Whenreturnisrequired:
(1)returninstructions,aprepaidshippinglabel,andacontainerwillbeincludedwiththereplacement
CRU;and(2)youmightbechargedforthereplacementCRUifLenovodoesnotreceivethedefective
partwithinthirty(30)daysofyourreceiptofthereplacementCRU.SeeyourLenovoLimitedWarranty
documentationforfulldetails.
Generalguidelines
WhenremovingorreplacingaFRU,besuretoobservethefollowinggeneralguidelines:
1.Donottrytoserviceanycomputerunlessyouhavebeentrainedandcertified.Anuntrainedpersonruns
theriskofdamagingparts.
2.BeforereplacinganyFRU,reviewChapter7“FRUreplacementnotices”onpage63.
3.BeginbyremovinganyFRUsthathavetoberemovedbeforereplacingthefailingFRU.AnysuchFRUs
arelistedatthebeginningofeachFRUreplacementsection.Removethemintheorderinwhichthey
arelisted.
4.FollowthecorrectsequenceinthestepsforremovingaFRU,asgiveninthedrawingsbythenumbers
insquarecallouts.
5.Whenturningascrew,turnitinthedirectionasgivenbythearrowinthedrawing.
6.WhenremovingaFRU,moveitinthedirectionasgivenbythearrowinthedrawing.
7.ToputthenewFRUinplace,reversetheremovalprocedureandfollowanynotesthatpertainto
replacement.
8.WhenreplacingaFRU,usethecorrectscrewsasshowninthereplacementprocedures.
DANGER
BeforeremovinganyFRU,turnoffthecomputer,unplugallpowercordsfromelectricaloutlets,
disconnectanyinterconnectingcables,andthendisablethebuilt-inbattery.
Attention:AfterreplacingaFRU,donotturnonthecomputeruntilyouhavemadesurethatallscrews,
springs,andothersmallpartsareinplaceandnonearelooseinsidethecomputer.Verifythisbyshaking
thecomputergentlyandlisteningforrattlingsounds.Metallicpartsormetalflakescancauseelectrical
shortcircuits.
Attention:Thesystemboardissensitiveto,andcanbedamagedby,electrostaticdischarge(ESD).Before
touchingit,establishpersonalgroundingbytouchingagroundpointwithonehandorbyusinganESDstrap.
©CopyrightLenovo201767

Beforeservicingthecomputer
Carefullyreadthistopicbeforeservicingthecomputer.
Removingexternaldevices
Beforeyoustartservicing,ensurethatyouremoveallexternaldevicesinstalledbythecustomer,suchas
microSDcard,dock,andexternaldisplay.
Disablingthebuilt-inbattery
BeforereplacinganyFRU/CRU,ensurethatyoudisablethebuilt-inbattery.
ForWindows10,disableFastStartupbeforedisablingthebuilt-inbattery.
TodisableFastStartupforWindows10,dothefollowing:
1.Fromthedesktop,typePowerinthesearchboxonthetaskbar,andselectPowerOptions.
2.ClickChoosewhatthepowerbuttonsdoontheleftpane.
3.ClickChangesettingsthatarecurrentlyunavailableatthetop.
4.IfpromptedbyUserAccountControl(UAC),clickYes.
5.CleartheTurnonfaststartupcheckbox,andthenclickSavechanges.
Todisablethebuilt-inbattery,dothefollowing:
1.Turnoffyourcomputeranddisconnecttheacpoweradapterandallcablesfromthecomputer.
2.Turnonyourcomputer.Whenthelogoscreenisdisplayed,immediatelypressF1toenterThinkPad
Setup.
3.SelectConfig➙Power.ThePowersubmenuisdisplayed.
4.SelectDisablebuilt-inbatteryandpressEnter.
5.SelectY esintheSetupConfirmationwindow.Thebuilt-inbatteryisdisabledandthecomputerturnsoff
automatically.Waitthreetofiveminutestoletthecomputercool.
RemovingthemicroSIMcard
IfthecomputerhasamicroSIMcardinstalled,removethemicroSIMcardbeforeyoustarttheservicing.
68HardwareMaintenanceManual
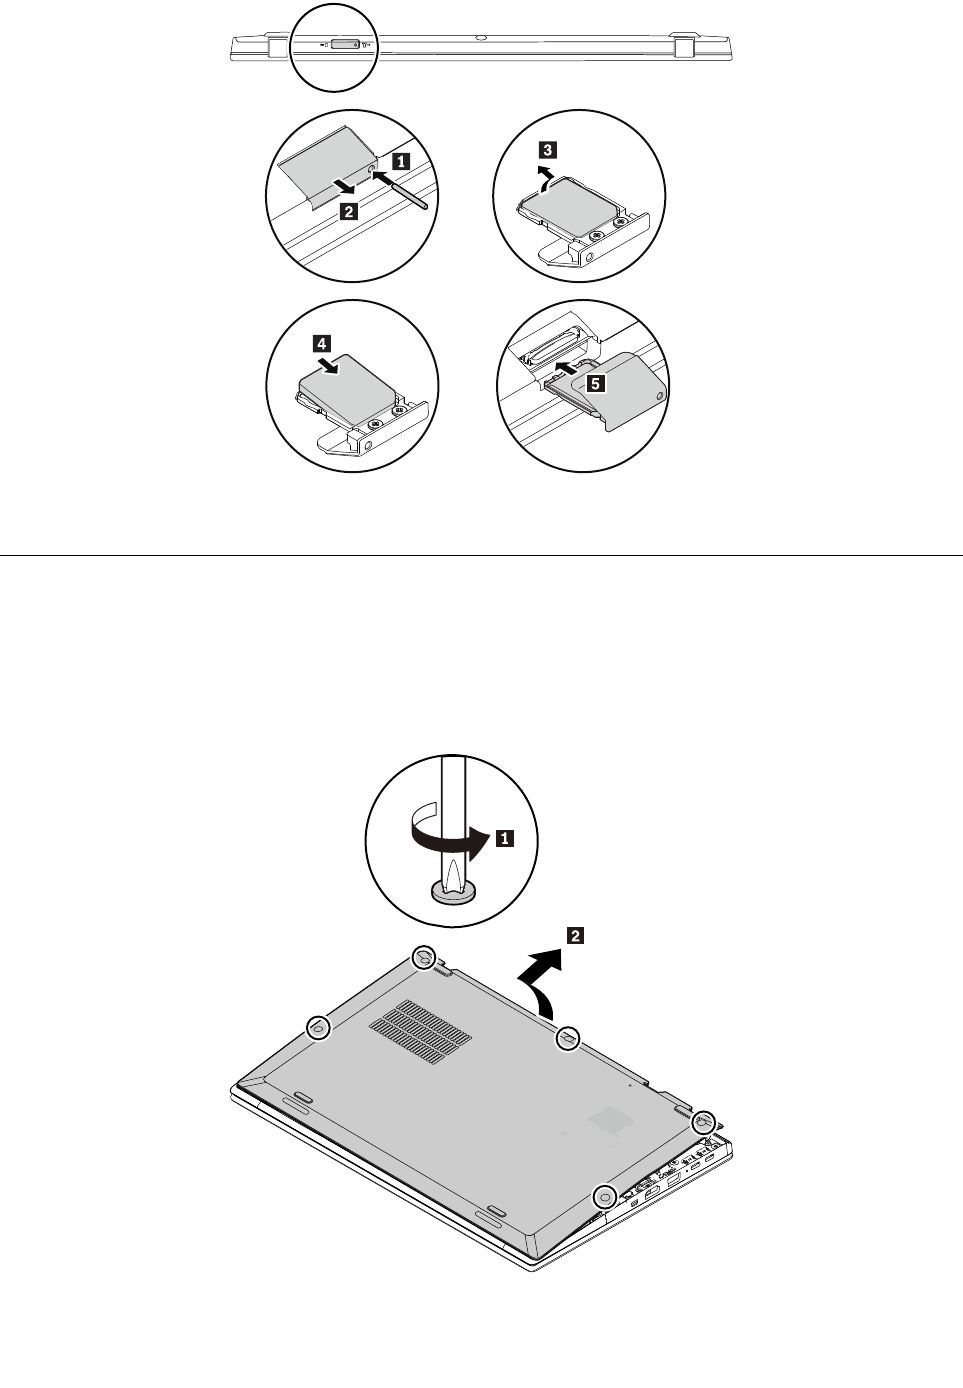
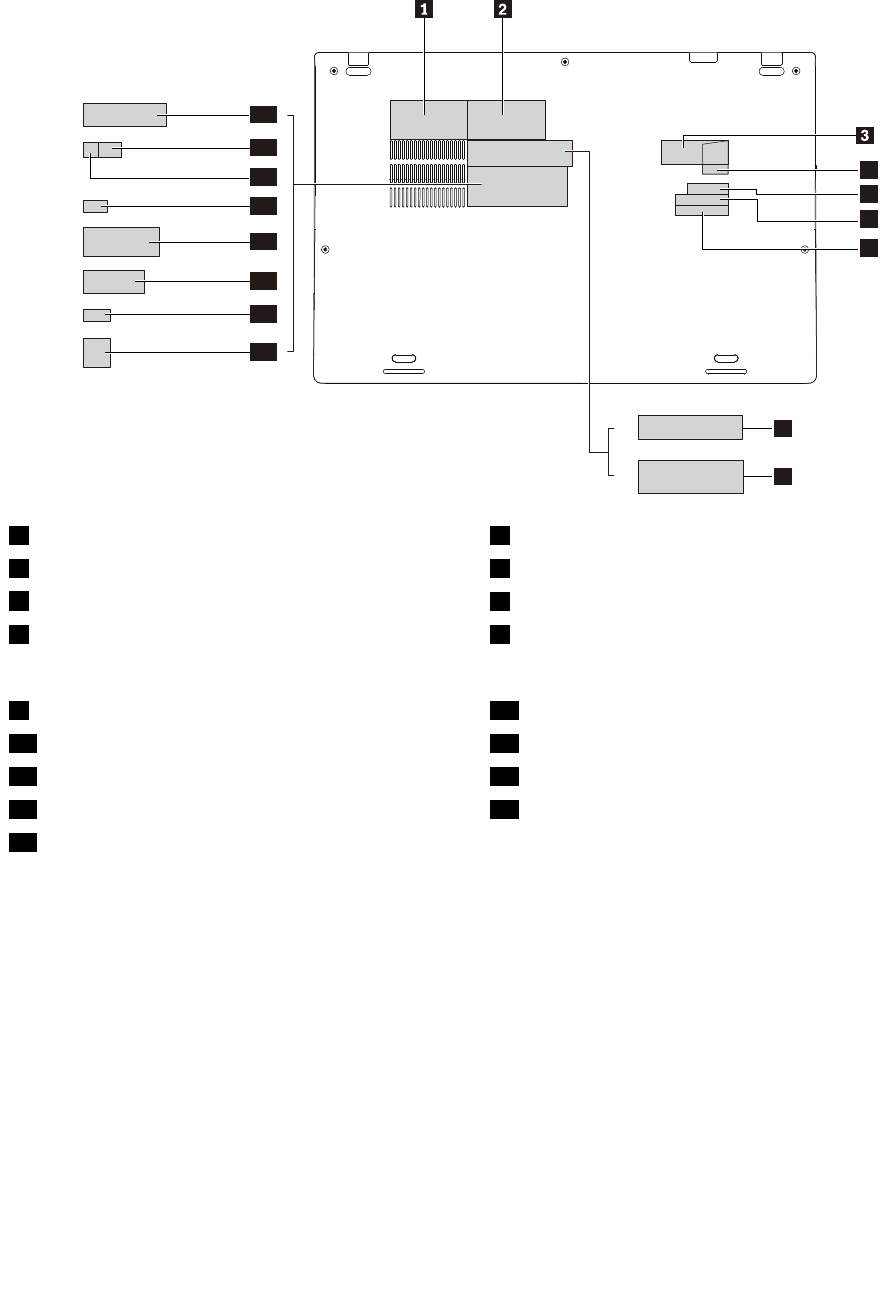
Applyinglabelstothebasecover:
Thefollowingillustrationshowsthelocationofeachlabel.
8
9
4
5
6
7
10
17
16
15
14
13
12
11
1AssetT ag2AssetTag_40Y917Y
3CertificateofAuthenticitylabel(forWindows7)4GenuineMicrosoftlabel(forWindows10)
5IMEIlabel6S/Nlabel
7CECPlabel(forChina)8GEOlabel(forJapan,AustraliaandNewZealand,Asia
Pacific/LatinAmerica,Europe,MiddleEastandAfrica,
Taiwan,orKorea)
9ChinaGEOlabel(forChina)10INDIABISlabel(forIndia)
11KoreaNFClabel(forKorea)12Argentinaadapterlabel(forArgentina)
13ISRAELlabel(forIsrael)14ICASAlabel(forSouthAfrica)
15MCMClabel(forIndonesia)16Postellabel(forMalaysia)
17IndonesiaRatinglabel(forIndonesia)
1020M.2solid-statedriveandthermalrubberforM.2solid-statedrive
Foraccess,removethisFRU:
•“1010Basecoverassembly”onpage69
Attention:
•Donotdropthedriveorapplyanyphysicalshocktoit.Thedriveissensitivetophysicalshock.Improper
handlingcancausedamageandpermanentlossofdata.
•Beforeremovingthedrive,havetheusermakeabackupcopyofalltheinformationonitifpossible.
•Neverremovethedrivewhilethesystemisoperatingorinsuspendmode.
70HardwareMaintenanceManual
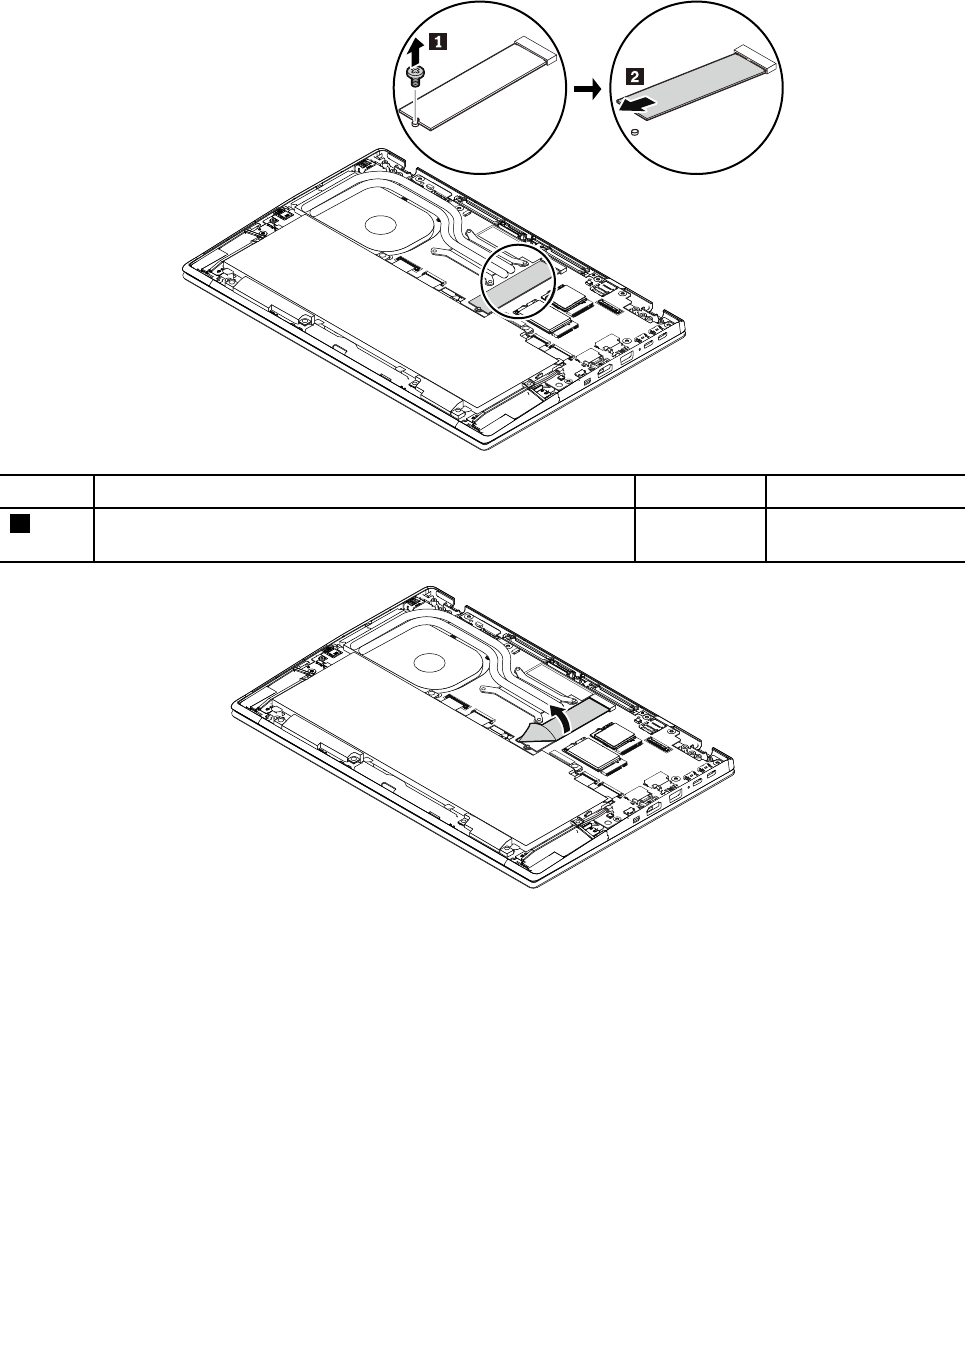
RemovalstepsoftheM.2solid-statedriveandthermalrubberforM.2solid-statedrive
StepScrew(quantity)ColorTorque
1M2×L2.2mm,flat-head,nylon-coated(1)Black0.181Nm
(1.85kgf-cm)
1030Wireless-LANcard
Note:Thisinformationisonlyfortheuser-replaceablemodules.
Foraccess,removethisFRU:
•“1010Basecoverassembly”onpage69
Chapter8.RemovingorreplacingaFRU71
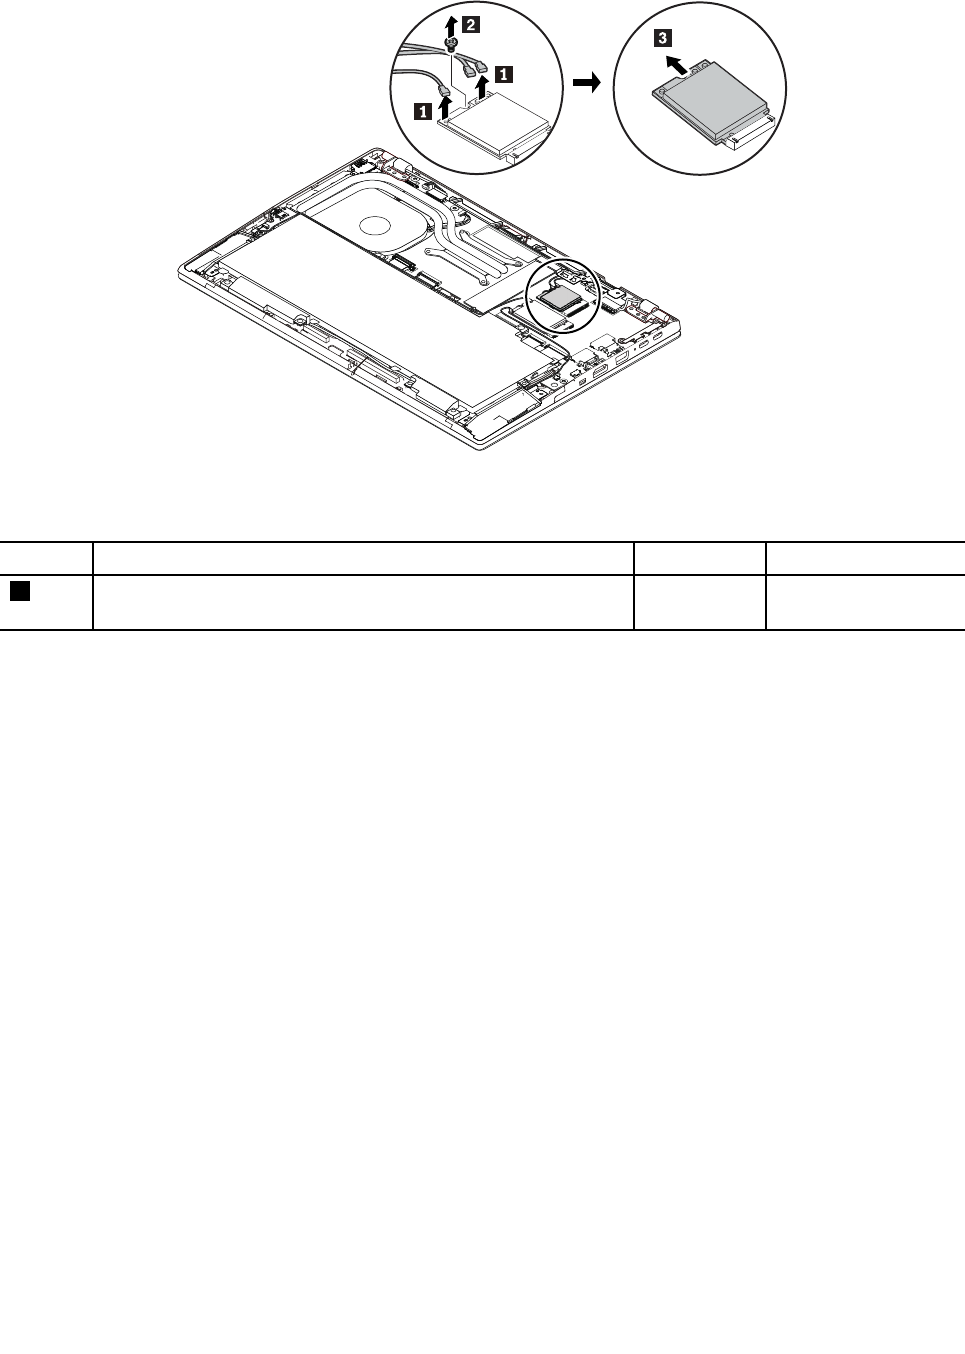
Removalstepsofthewireless-LANcard
Note:Theillustrationisforwireless-LANcardwithWiGigfunction.Forwireless-LANcardwithoutWiGig
function,thecardhasonlytwoantennaconnectors.
StepScrew(quantity)ColorTorque
2M2×L2.2mm,flat-head,nylon-coated(1)Black0.181Nm
(1.85kgf-cm)
Wheninstalling:Plugthegraycableintothemainconnectorandtheblackcableintotheauxiliaryconnector.
Forwireless-LANcardwithWiGigfunction,alsoplugtheWiGigcableintothethirdconnectoronthecard.
1040Wireless-WANcard
Note:Thisinformationisonlyfortheuser-replaceablemodules.
Foraccess,removethisFRU:
•“1010Basecoverassembly”onpage69
72HardwareMaintenanceManual
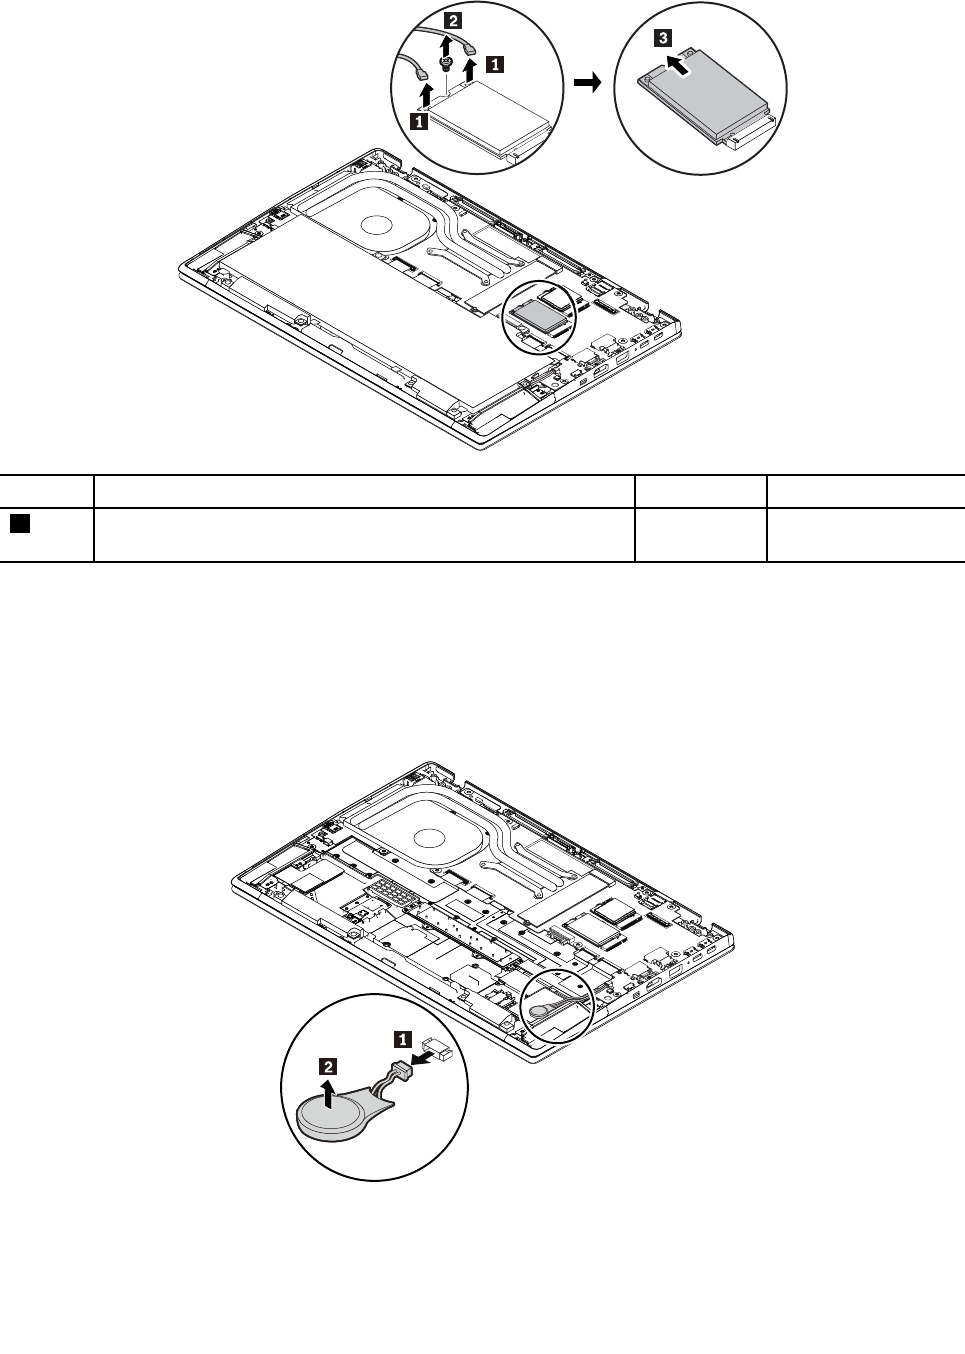
Removalstepsofthewireless-WANcard
StepScrew(quantity)ColorTorque
2M2×L2.2mm,flat-head,nylon-coated(1)Black0.181Nm
(1.85kgf-cm)
1050Coin-cellbattery
Foraccess,removethisFRU:
•“1010Basecoverassembly”onpage69
•“1090Built-inbattery”onpage77
Removalstepsofthecoin-cellbattery
1060Thermalfanassembly
Foraccess,removethisFRU:
Chapter8.RemovingorreplacingaFRU73
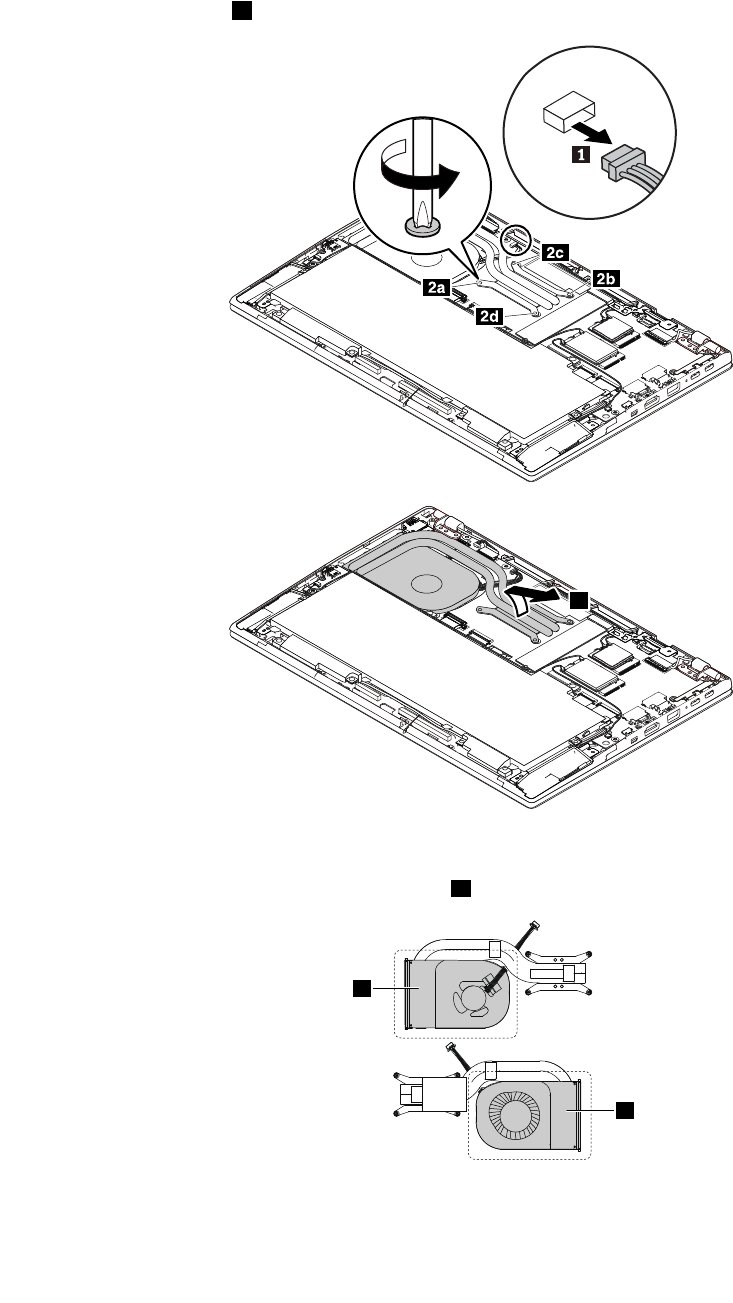
•“1010Basecoverassembly”onpage69
Removalstepsofthethermalfanassembly
Note:Loosenthescrews2inascendingalphabeticalorderasillustrated.
3
Wheninstalling:
•Donottouchthetopandbottomareasmarkedainthefollowingillustration.
a
a
•Tightenthescrewsinascendingorderbyfollowingthenumbermarkedbesideeachscrew.Otherwise,
thesystemboardmightgetdamaged.
74HardwareMaintenanceManual
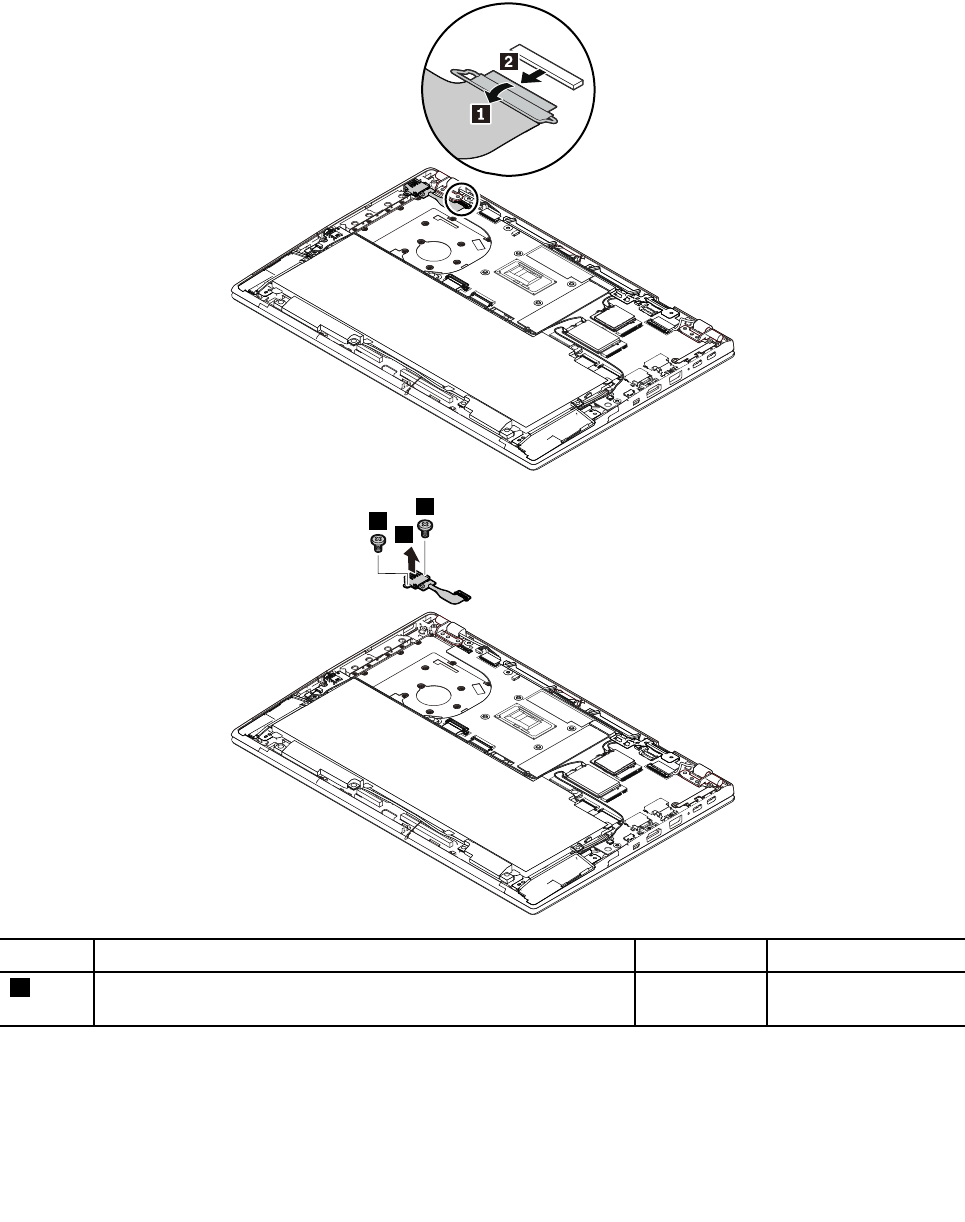
1070USBcable
Foraccess,removethisFRU:
•“1010Basecoverassembly”onpage69
•“1060Thermalfanassembly”onpage73
RemovalstepsoftheUSBcable
3
3
4
StepScrew(quantity)ColorTorque
3M2×L2.2mm,flat-headshoulder,nylon-coated(2)Black0.181Nm
(1.85kgf-cm)
1080Speakerassembly
Foraccess,removethisFRU:
•“1010Basecoverassembly”onpage69
Chapter8.RemovingorreplacingaFRU75
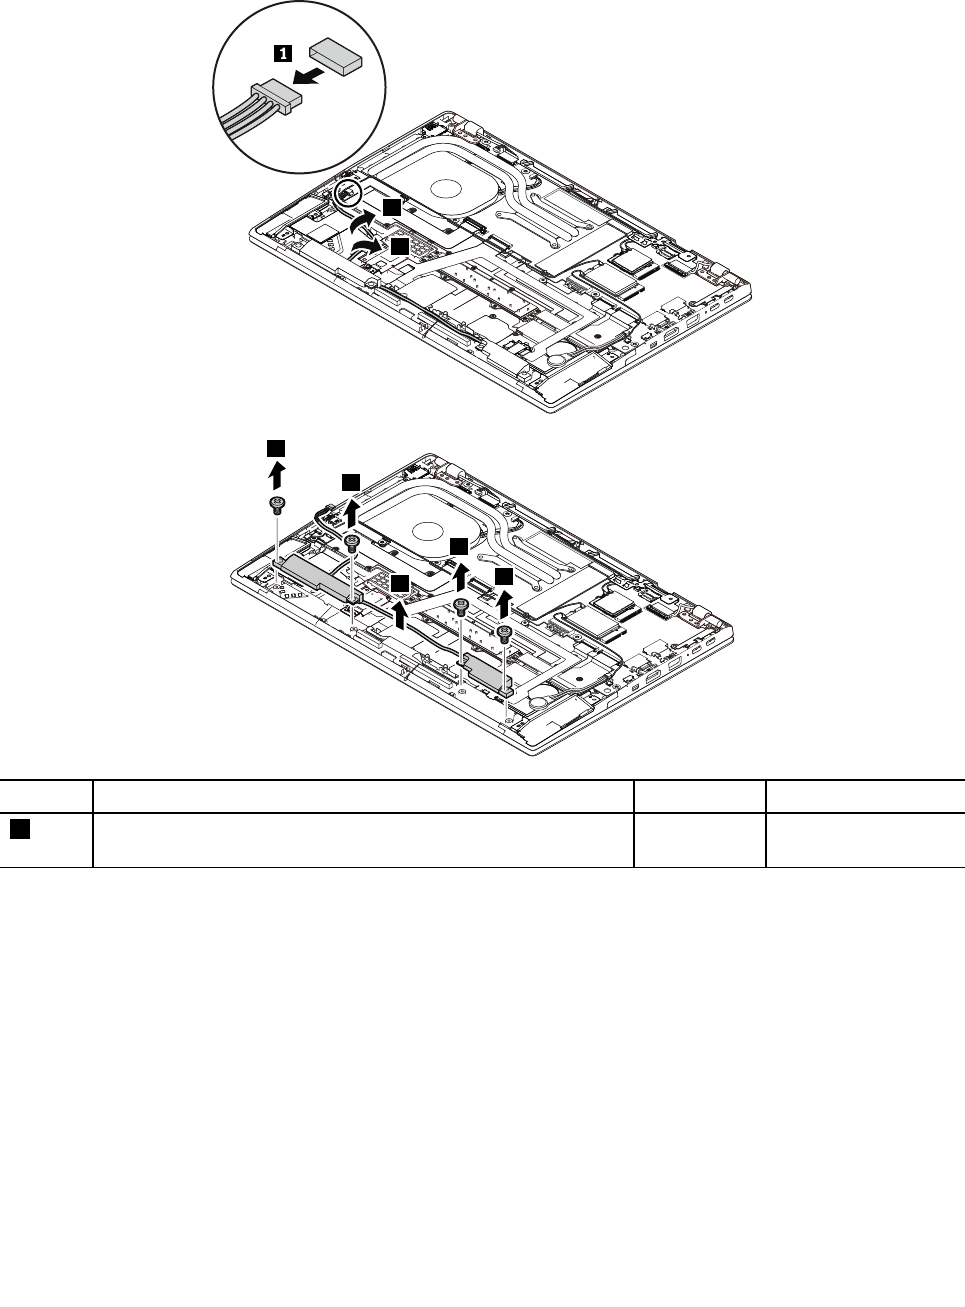
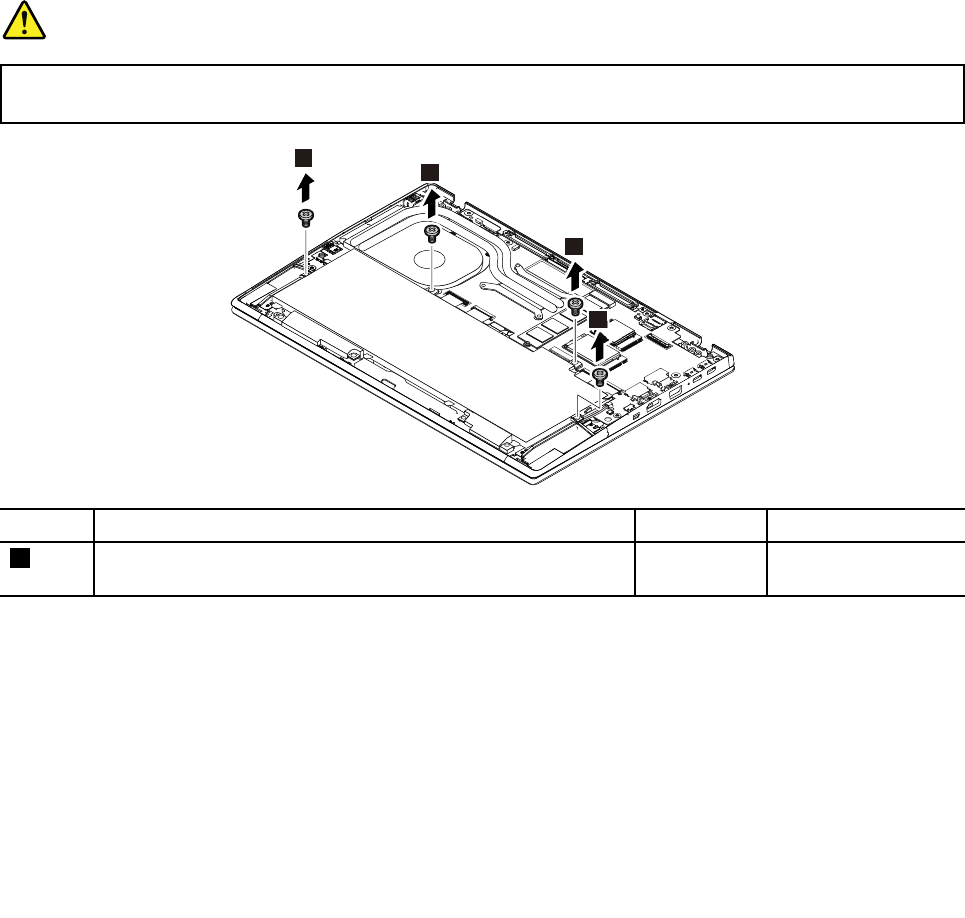
1090Built-inbattery
Importantnoticesforreplacingabattery
Attention:Lenovohasnoresponsibilityfortheperformanceorsafetyofunauthorizedbatteries,and
providesnowarrantiesforfailuresordamagearisingoutoftheiruse.
TheLenovoSolutionCenterprogramprovidesanautomaticbatterydiagnostictestthatdeterminesifthe
batteryisdefective.AbatteryFRUshouldnotbereplacedunlessthisdiagnostictestshowsthatthebattery
isdefective.Theonlyexceptiontothisisifthebatteryisphysicallydamagedoracustomerisreportinga
possiblesafetyissue.
IftheLenovoSolutionCenterprogramisnotinstalledonthecomputer,thecustomershoulddownloadand
installtheprogramtodiagnosethebattery,beforegettinganon-physicallydamagedbatteryreplaced.Note
thatthereplacementofaphysicallydamagedbatteryisnotcoveredbythewarranty.
Foraccess,removethisFRU:
•“1010Basecoverassembly”onpage69
Removalstepsofthebuilt-inbattery
DANGER
Useonlytheauthorizedbatteryspecifiedforyourcomputer.Anyotherbatterycouldigniteor
explode.
1
1
1
1
StepScrew(quantity)ColorTorque
1M2×L5mm,flat-head,nylon-coated(4)Black0.181Nm
(1.85kgf-cm)
Chapter8.RemovingorreplacingaFRU77
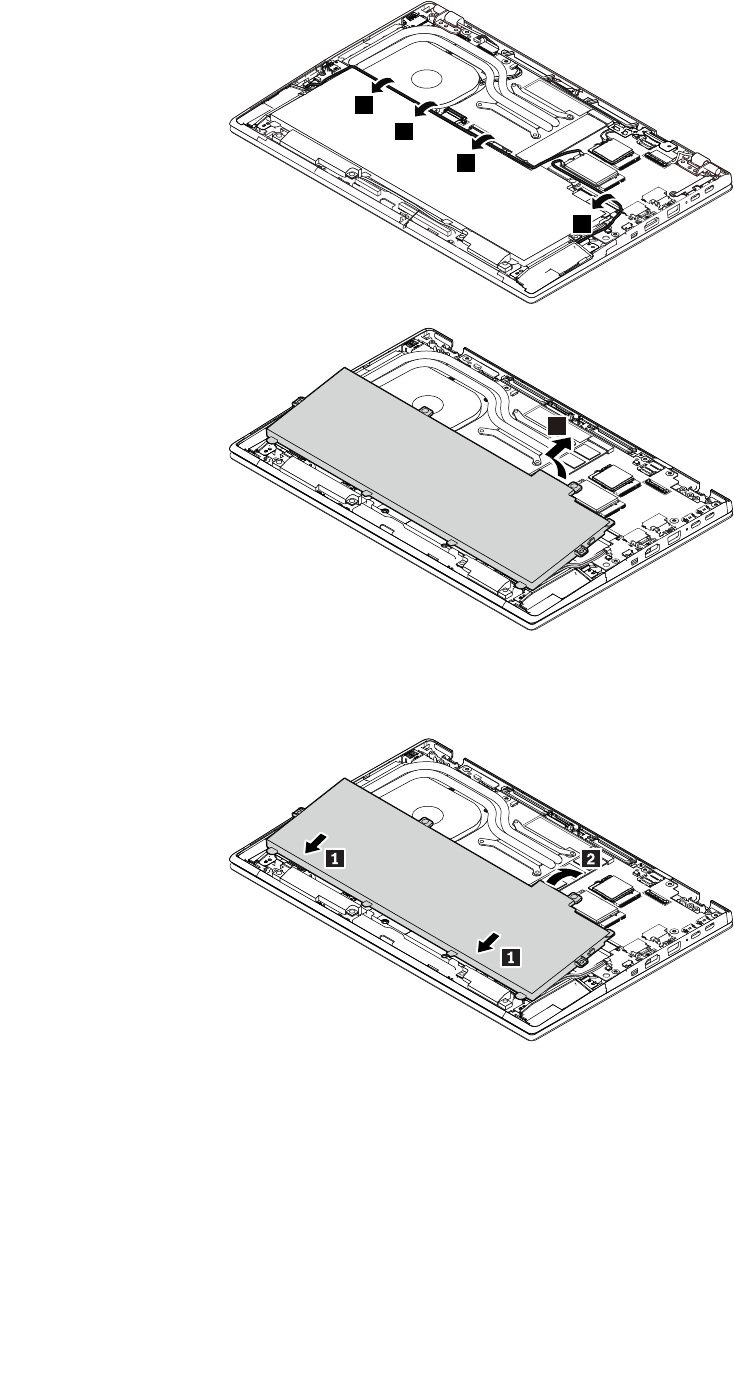
2
2
2
2
3
Installingthebuilt-inbattery
Note:Ensurethatthetwobatterytabsareinsertedunderneaththesystemboard.
78HardwareMaintenanceManual
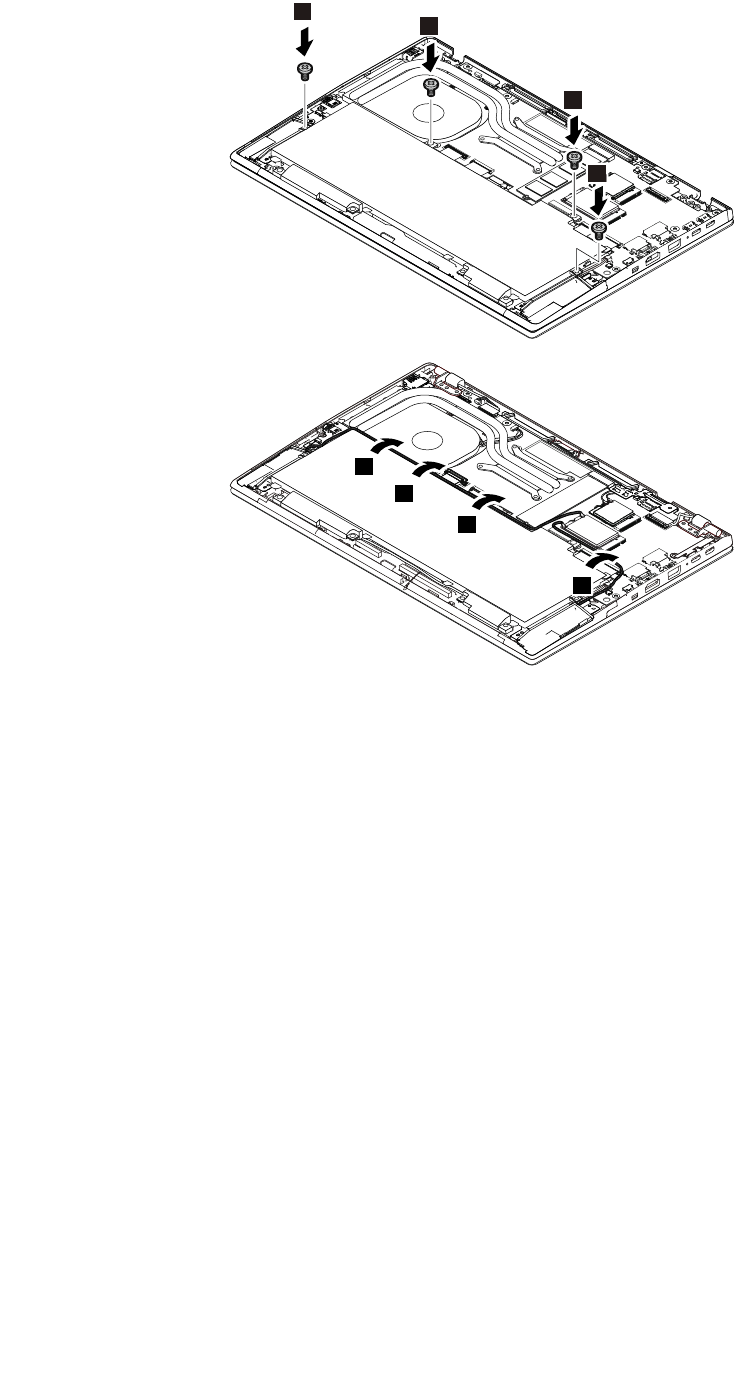
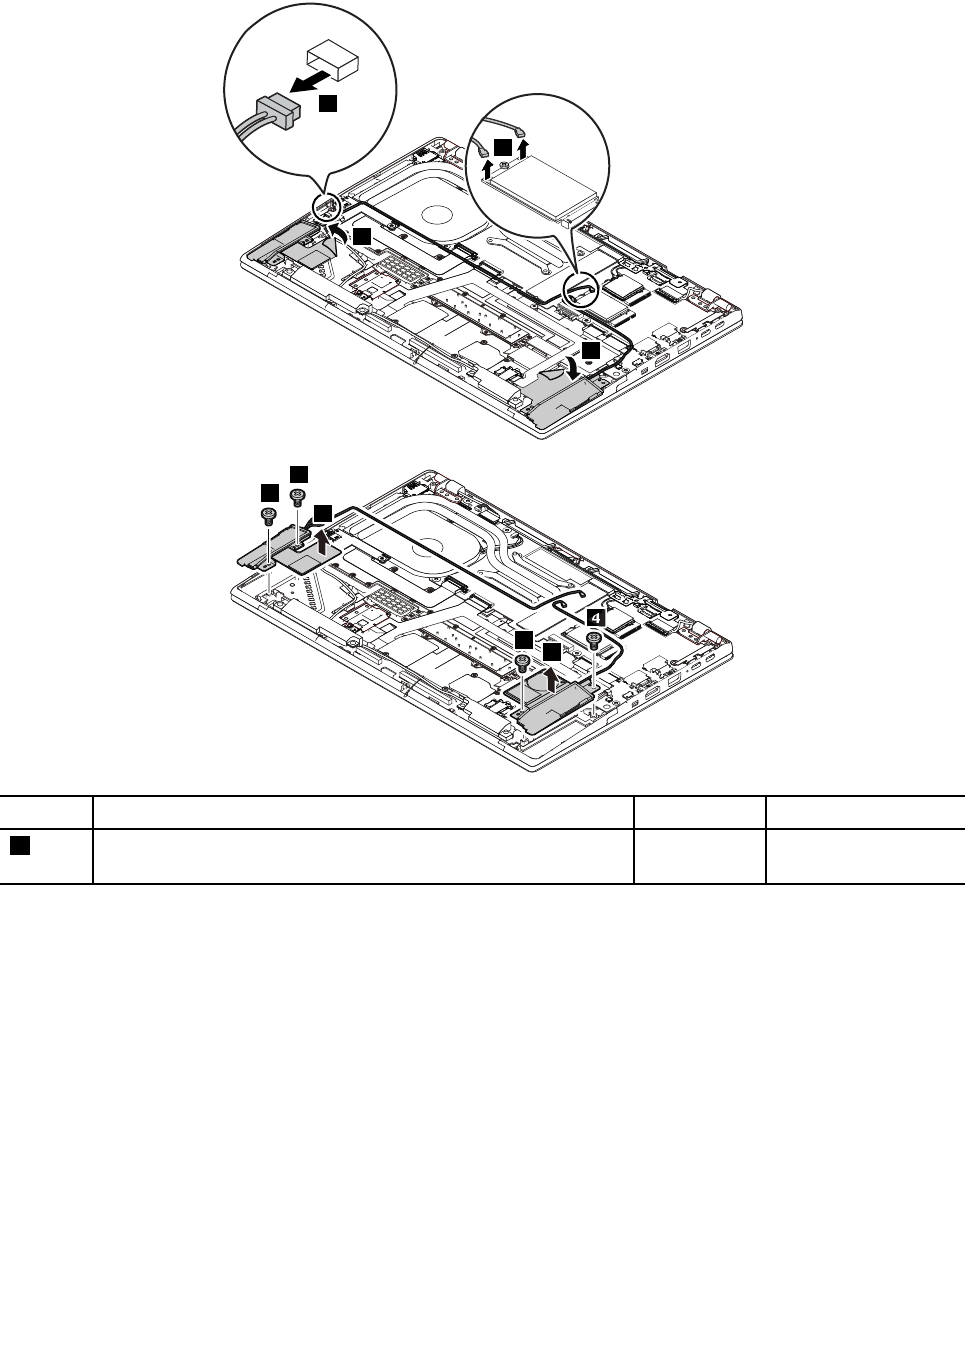
Removalstepsofthewireless-WANantennakit
1
3
3
2
5
4
4
4
4
5
StepScrew(quantity)ColorTorque
4M2×L3mm,flat-headshoulder,nylon-coated(4)Silver0.181Nm
(1.85kgf-cm)
Wheninstalling:
Plugtheorangecableintothemainconnectoronthecard;andplugthebluecableintotheauxiliary
connectoronthecard.
80HardwareMaintenanceManual
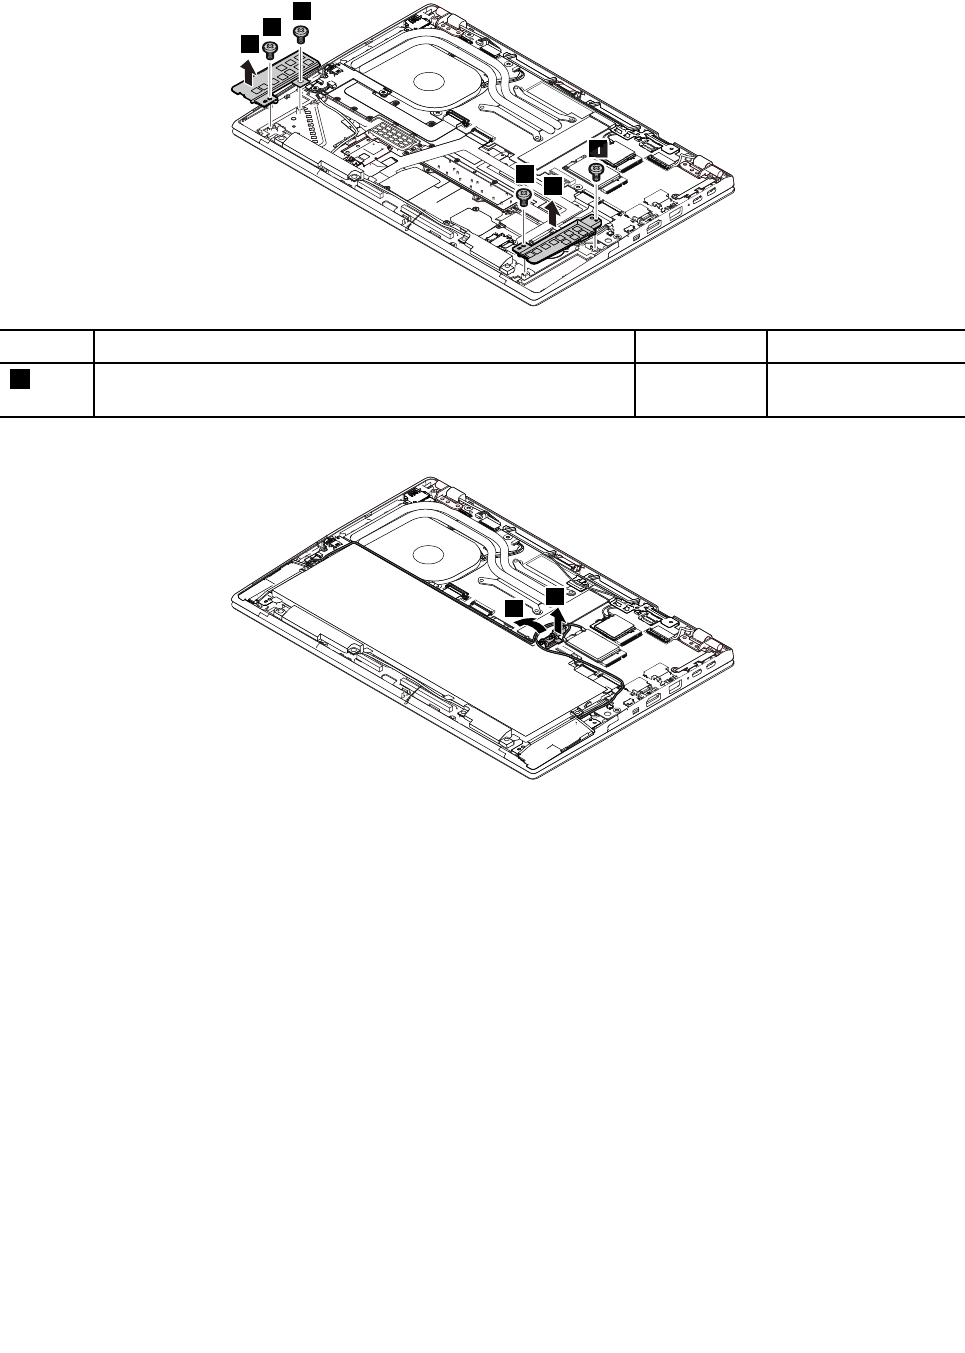
Removalstepsofthewireless-WANantennafiller
2
1
2
1
1
1
StepScrew(quantity)ColorTorque
1M2×L3mm,flat-headshoulder,nylon-coated(4)Silver0.181Nm
(1.85kgf-cm)
Removalstepsofthecableholderforwireless-WANantenna
2
1
1110Wireless-LANantennakitandcableholderforwireless-LAN
antenna
Foraccess,removethisFRU:
•“1010Basecoverassembly”onpage69
Chapter8.RemovingorreplacingaFRU81
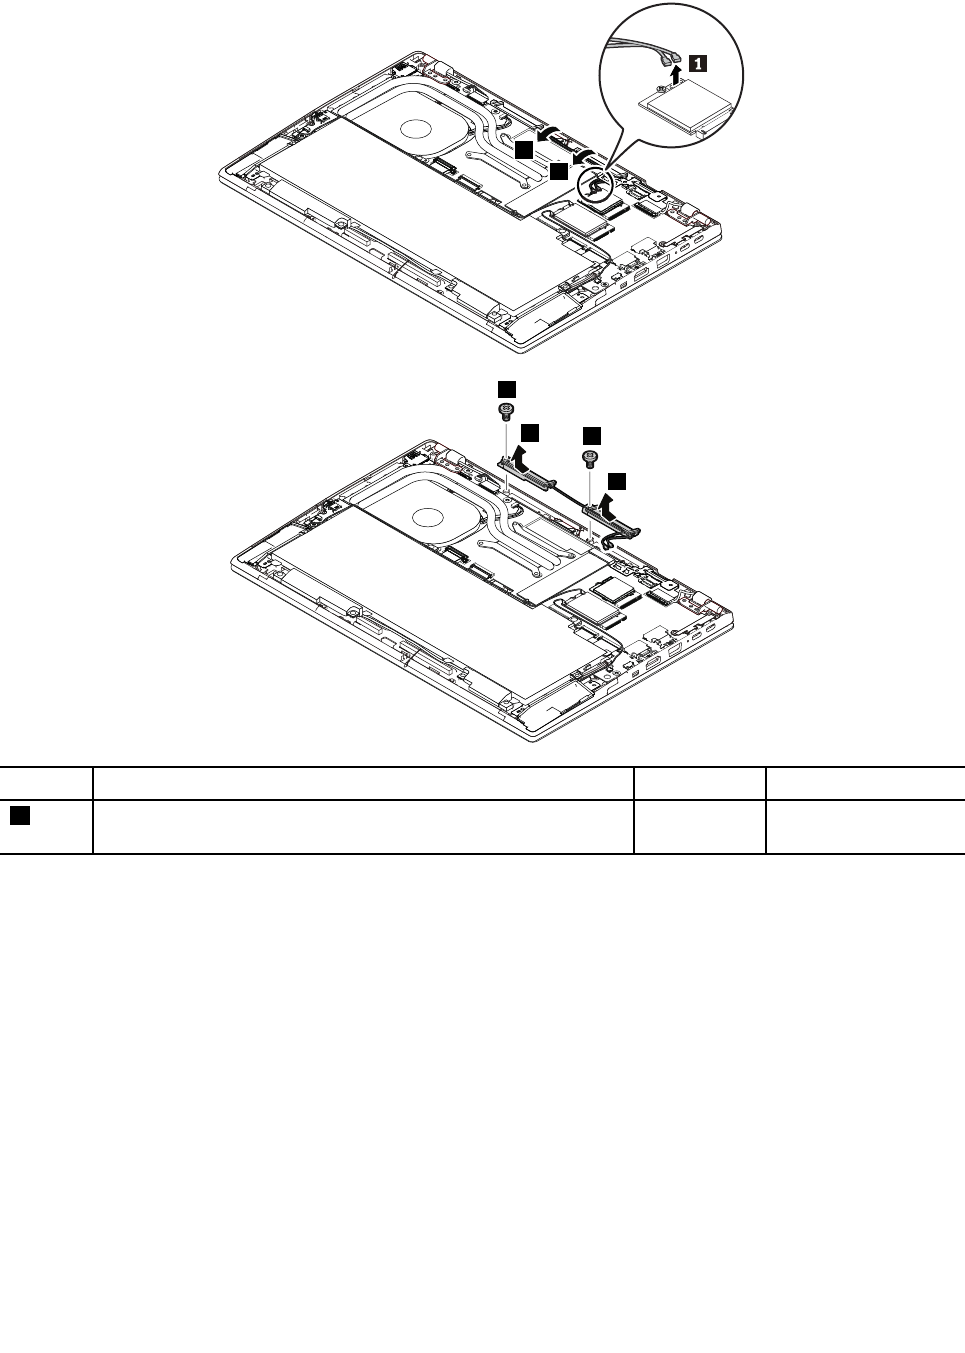
Removalstepsofthewireless-LANantennakit
2
2
3
3
4
4
StepScrew(quantity)ColorTorque
3M2×L3mm,flat-headshoulder,nylon-coated(2)Silver0.181Nm
(1.85kgf-cm)
Wheninstalling:
Plugthegraycableintothemainconnectoronthecard;andplugtheblackcableintotheauxiliary
connectoronthecard.
82HardwareMaintenanceManual
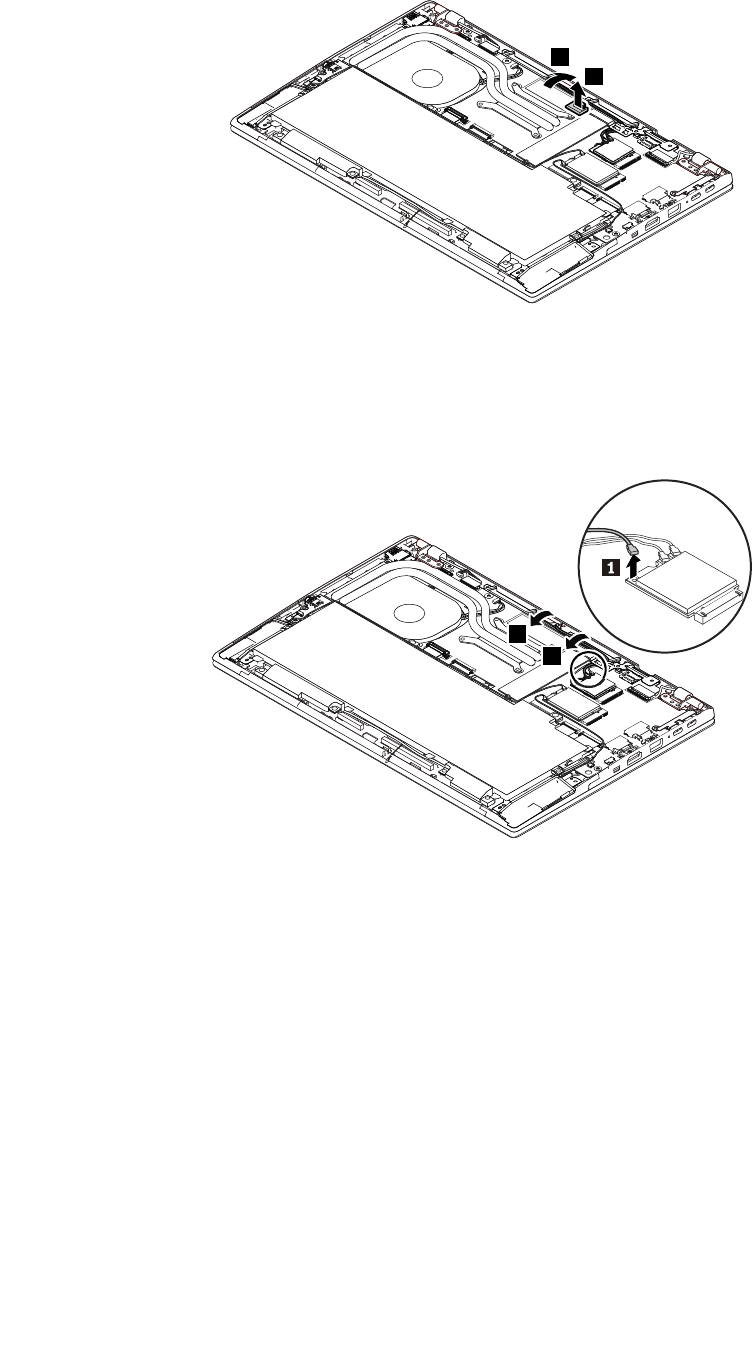
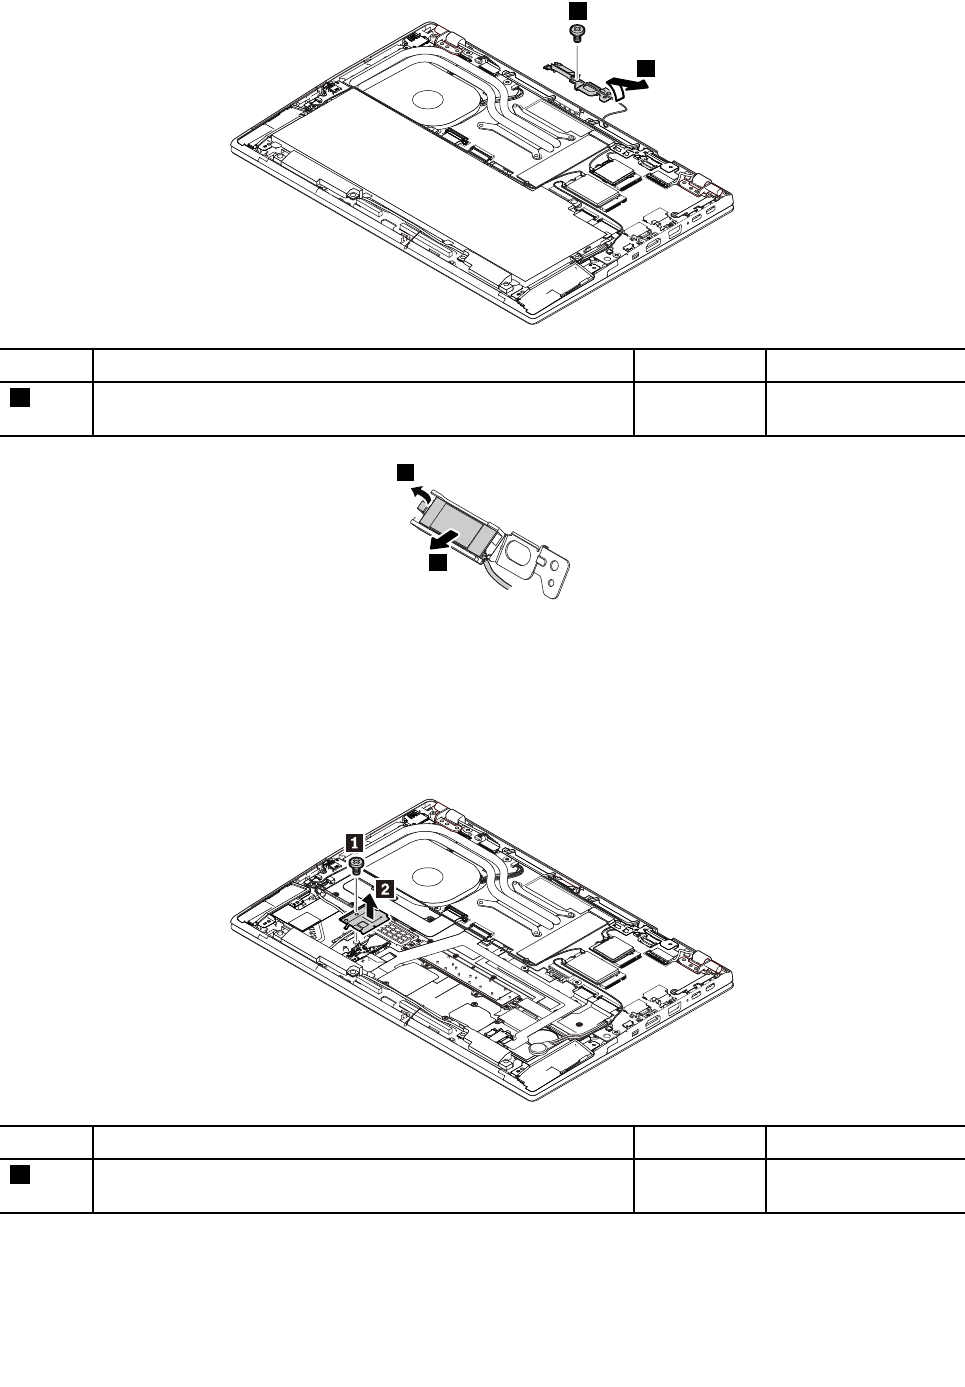
3
4
StepScrew(quantity)ColorTorque
3M2×L3mm,flat-headshoulder,nylon-coated(1)Silver0.181Nm
(1.85kgf-cm)
5
6
1130Trackpadcable
Foraccess,removetheseFRUsinorder:
•“1010Basecoverassembly”onpage69
•“1090Built-inbattery”onpage77
Removalstepsofthetrackpadcable
StepScrew(quantity)ColorTorque
1M2×L2.2mm,flat-head,nylon-coated(1)Black0.181Nm
(1.85kgf-cm)
84HardwareMaintenanceManual
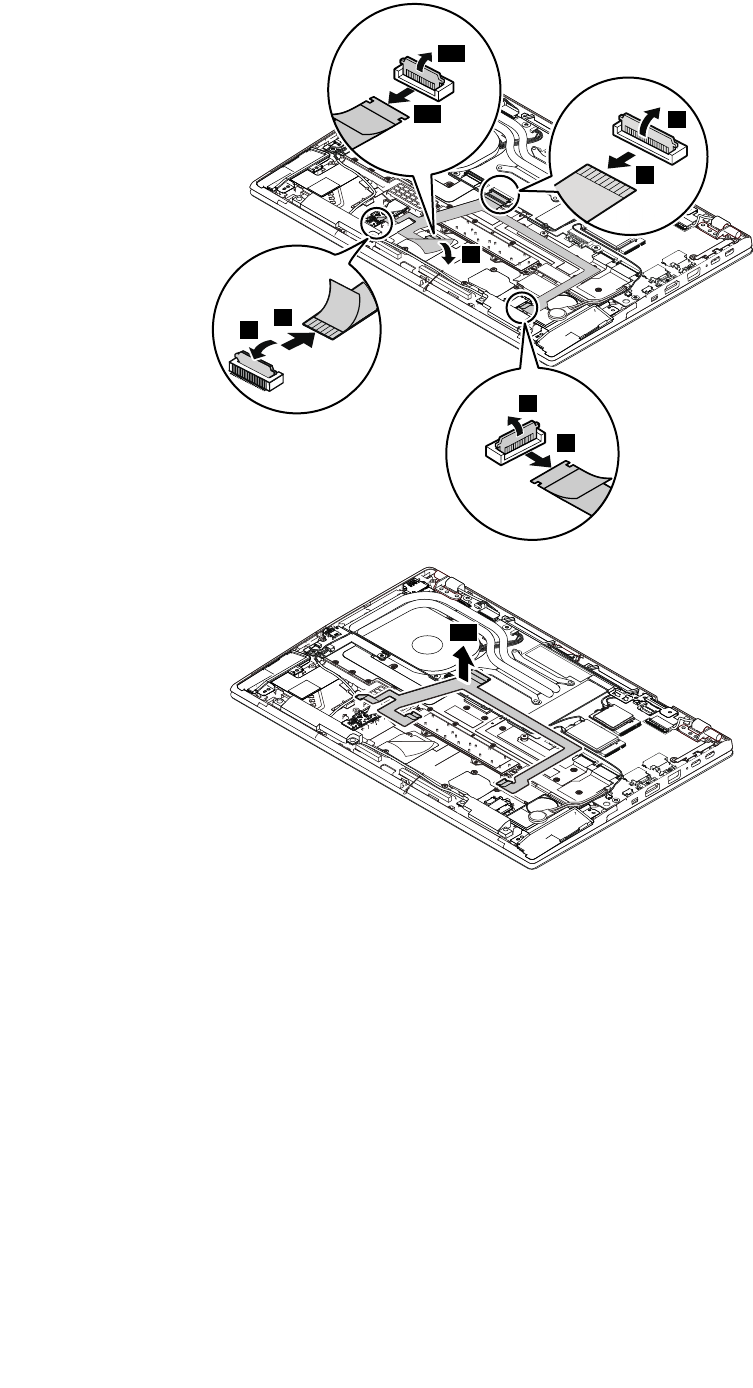
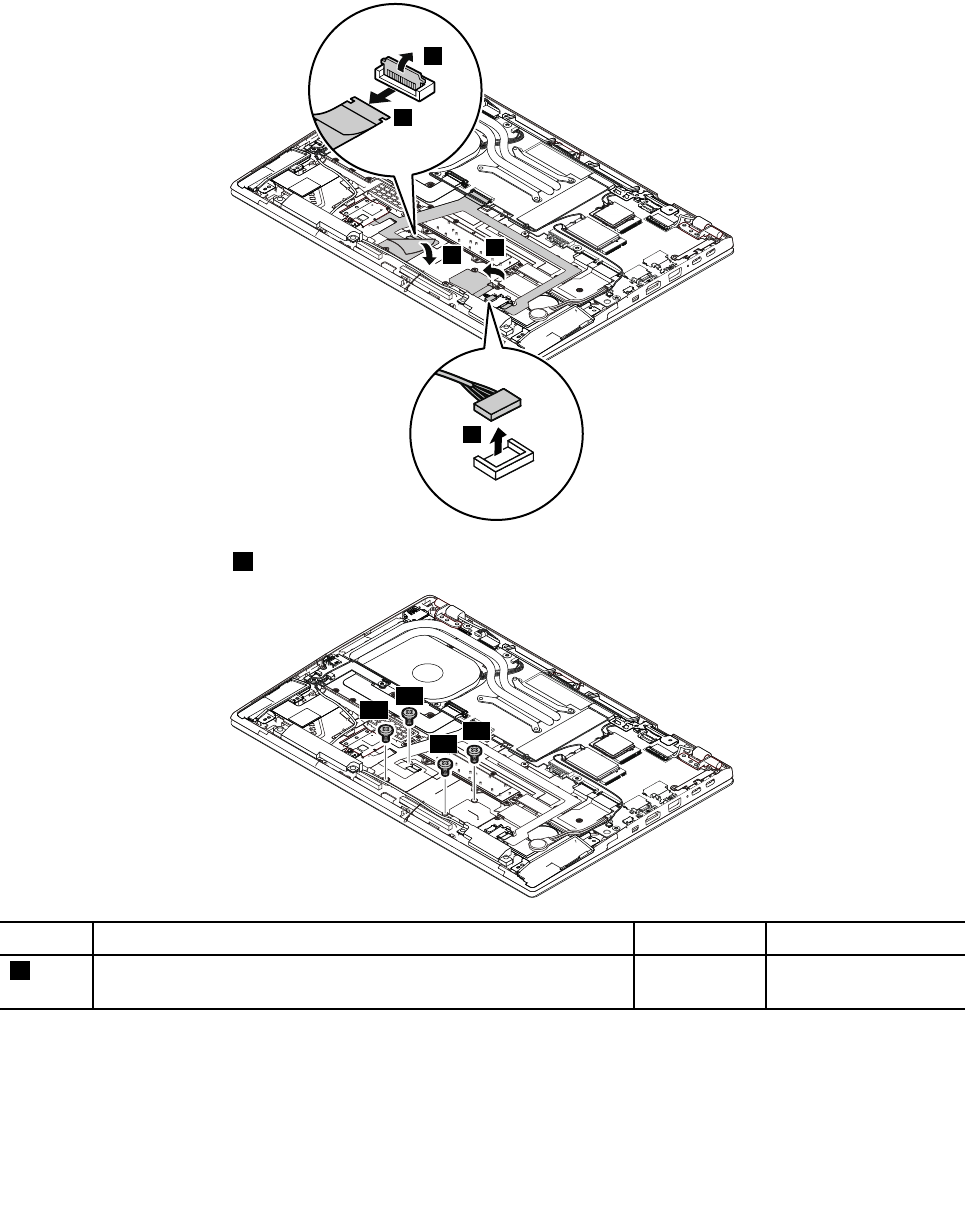
1140Trackpadassemblyandtrackpadinsulationtape
Foraccess,removethisFRU:
•“1010Basecoverassembly”onpage69
•“1090Built-inbattery”onpage77
Removalstepsofthetrackpadassemblyandtrackpadinsulationtape
2
3
5
4
1
Note:Loosenthescrews6inascendingalphabeticalorderasillustrated.
6a
6b
6c
6d
StepScrew(quantity)ColorTorque
6M2×L1.8mm,flat-head,nylon-coated(4)Silver0.181Nm
(1.85kgf-cm)
86HardwareMaintenanceManual
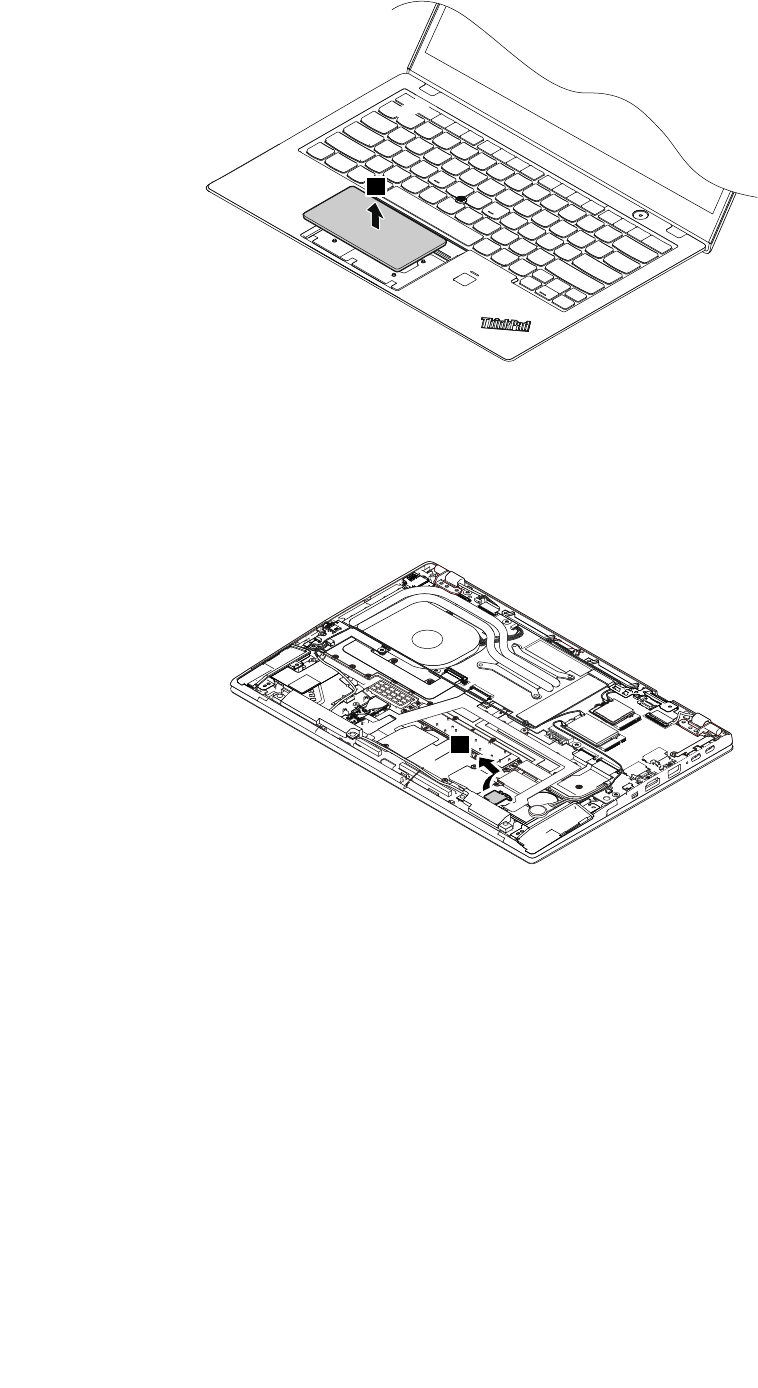
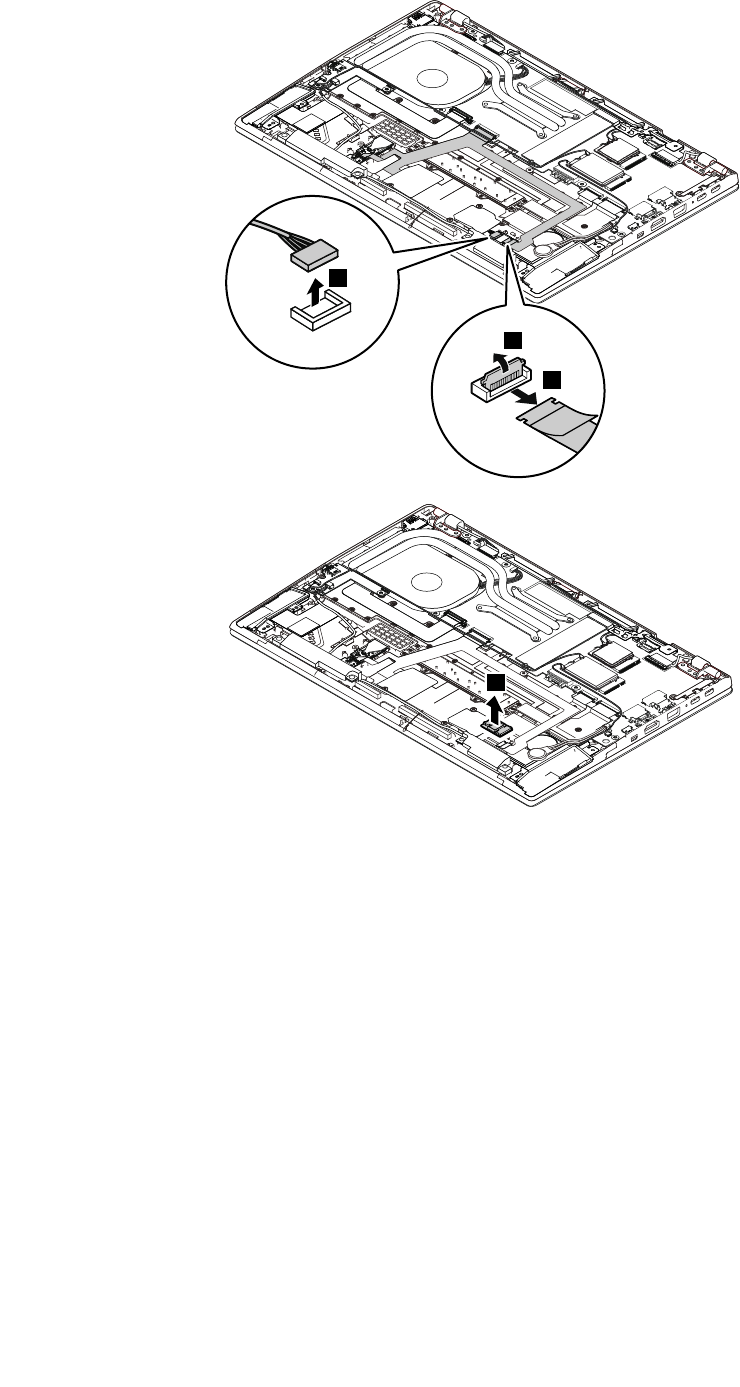
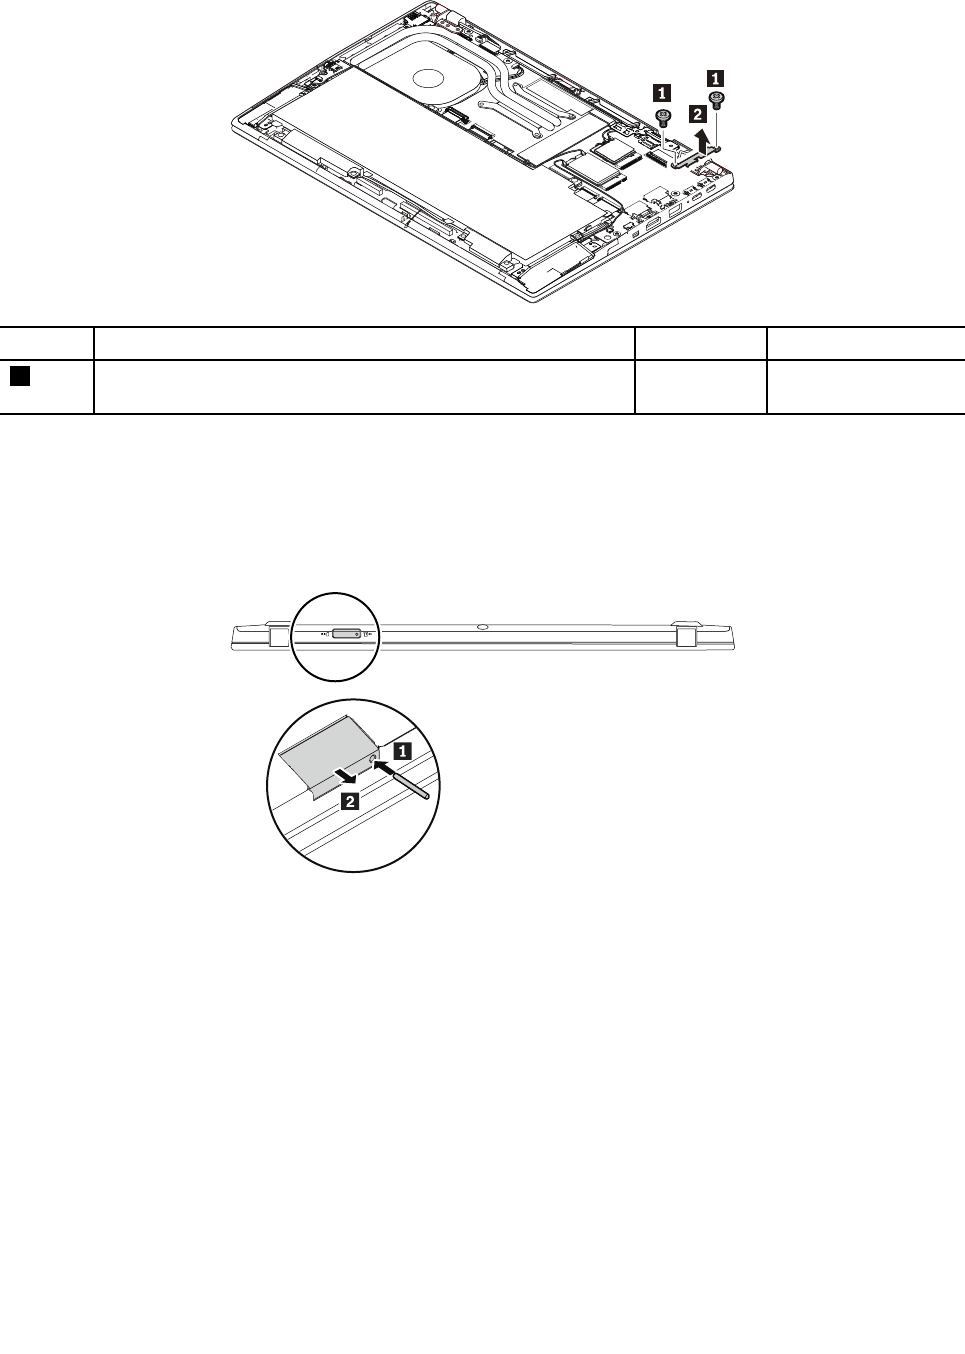
Removalstepsofthedc-insupportbracket
StepScrew(quantity)ColorTorque
1M2×L3mm,flat-headshoulder,nylon-coated(2)Silver0.181Nm
(1.85kgf-cm)
1170micro-SIM-cardtray
Foraccess,removethisFRU:
•“1010Basecoverassembly”onpage69
Removalstepsofthemicro-SIM-cardtray
1180SDsupportbracket
Foraccess,removethisFRU:
•“1010Basecoverassembly”onpage69
Chapter8.RemovingorreplacingaFRU89
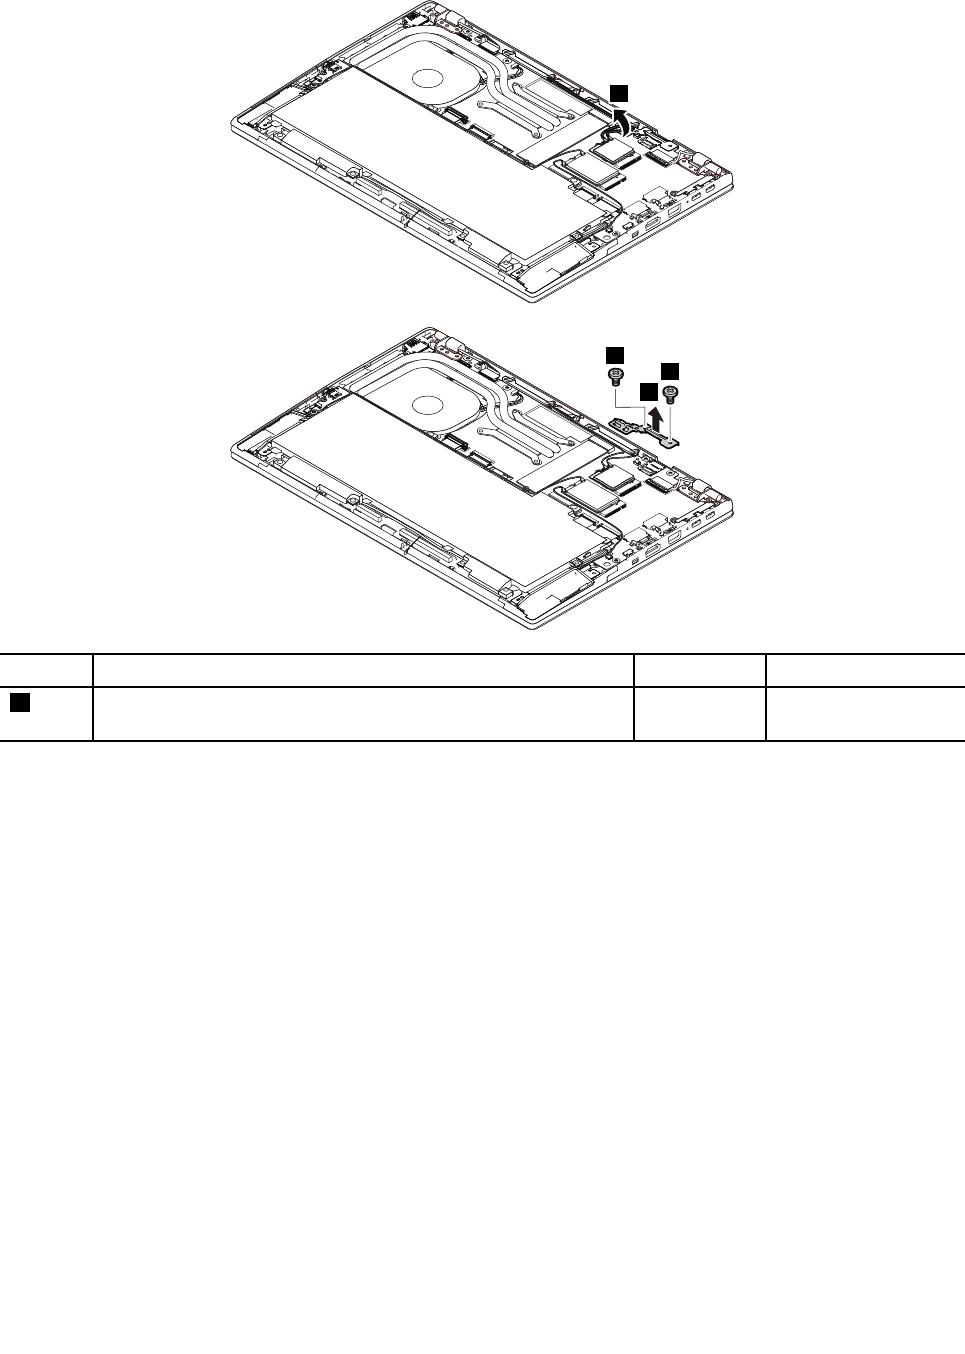
RemovalstepsoftheSDsupportbracket
1
2
2
3
StepScrew(quantity)ColorTorque
2M2×L5mm,flat-headshoulder,nylon-coated(2)Black0.181Nm
(1.85kgf-cm)
1190Systemboardassembly
Importantnoticesforhandlingthesystemboard
Whenhandlingthesystemboard,readthefollowing:
•Thesystemboardhasanaccelerometer,whichcanbebrokenwhenseveralthousandsofG-forces
areapplied.
Note:Droppingasystemboardfromaheightofaslittleassixinchessothatitfallsflatonahardbench
cansubjecttheaccelerometertoasmuchas6000G'sofshock.
•Becarefulnottodropthesystemboardonabenchtopthathasahardsurface,suchasmetal,wood,or
composite.
•Avoidroughhandlingofanykind.
•Ateverypointintheprocess,besurenottodroporstackthesystemboard.
•Ifyouputasystemboarddown,besuretoputitonlyonapaddedsurfacesuchasanESDmatora
corrugatedconductivematerial.
Foraccess,removetheseFRUsinorder:
•“1010Basecoverassembly”onpage69
•“1020M.2solid-statedriveandthermalrubberforM.2solid-statedrive”onpage70
90HardwareMaintenanceManual
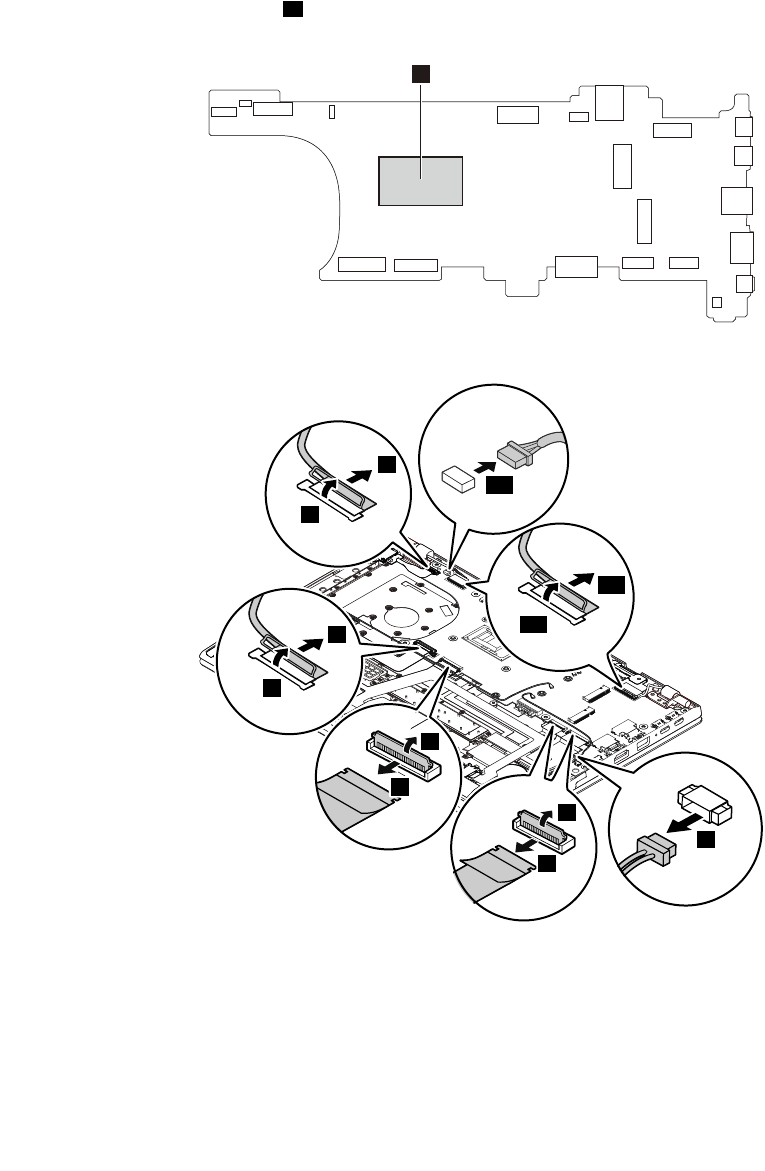
•“1030Wireless-LANcard”onpage71
•“1040Wireless-WANcard”onpage72
•“1060Thermalfanassembly”onpage73
•“1090Built-inbattery”onpage77
•“1160dc-insupportbracket”onpage88
•“1170micro-SIM-cardtray”onpage89
•“1180SDsupportbracket”onpage89
•“1110Wireless-LANantennakitandcableholderforwireless-LANantenna”onpage81
Attention:Themicroprocessorasolderedonthesystemboardisextremelysensitive.Whenyouservice
thesystemboard,avoidanykindofroughhandling.
a
Removalstepsofthesystemboardassembly
1
2
3
4
5
6
7
8
9
10
11
12
Chapter8.RemovingorreplacingaFRU91
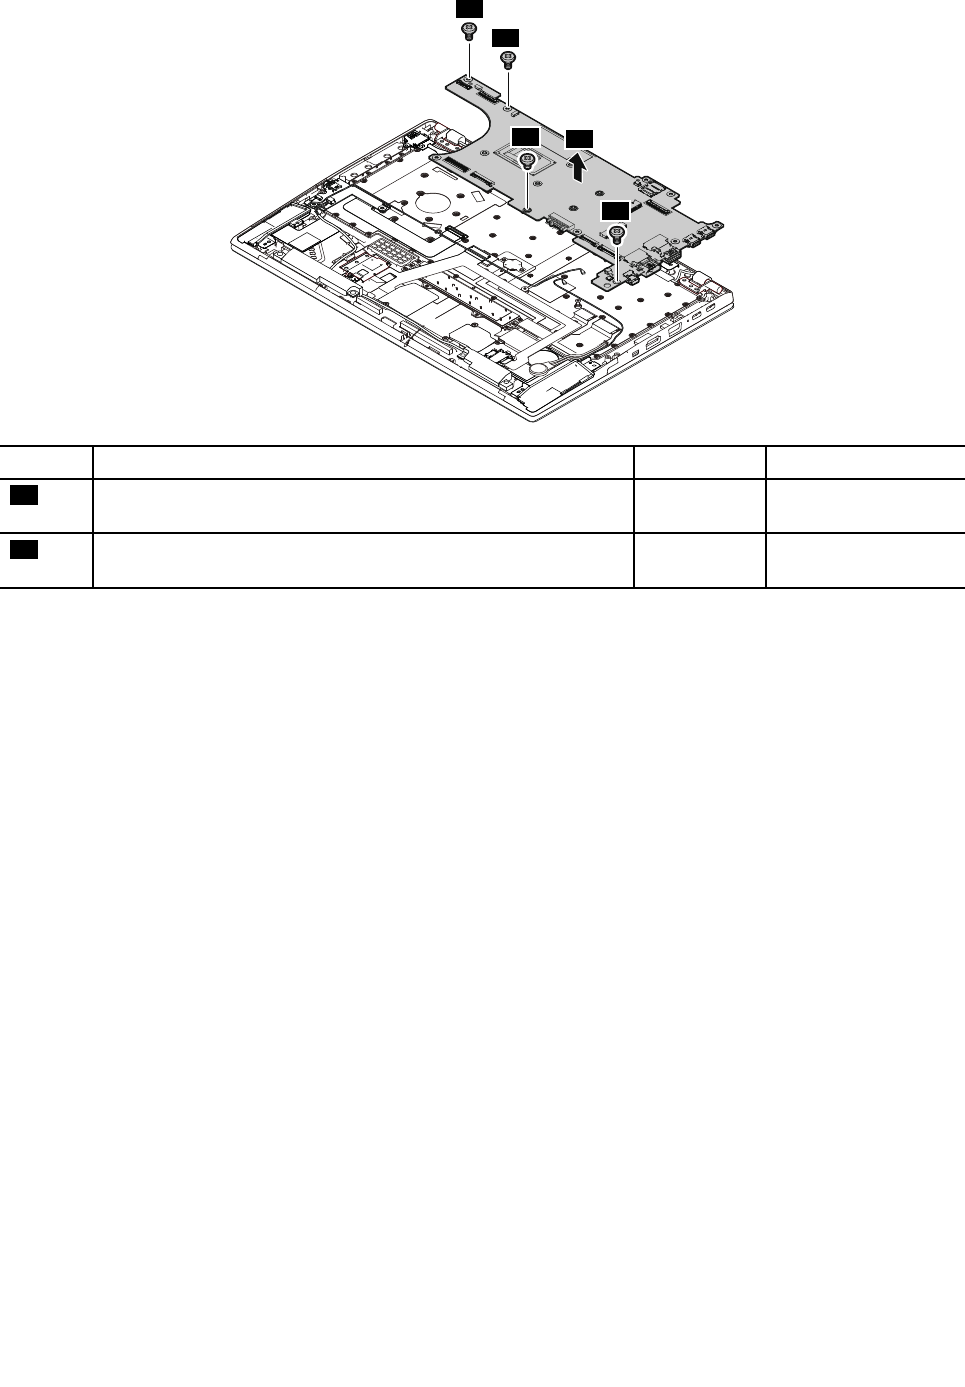
13
13
14
13
15
StepScrew(quantity)ColorTorque
13M2×L3mm,flat-head,nylon-coated(3)Silver0.181Nm
(1.85kgf-cm)
14M2×L2.2mm,flat-head,nylon-coated(1)Black0.181Nm
(1.85kgf-cm)
1200Powerbuttoncardandpower-button-cardcable
Foraccess,removetheseFRUsinorder:
•“1010Basecoverassembly”onpage69
•“1020M.2solid-statedriveandthermalrubberforM.2solid-statedrive”onpage70
•“1030Wireless-LANcard”onpage71
•“1040Wireless-WANcard”onpage72
•“1060Thermalfanassembly”onpage73
•“1090Built-inbattery”onpage77
•“1190Systemboardassembly”onpage90
92HardwareMaintenanceManual
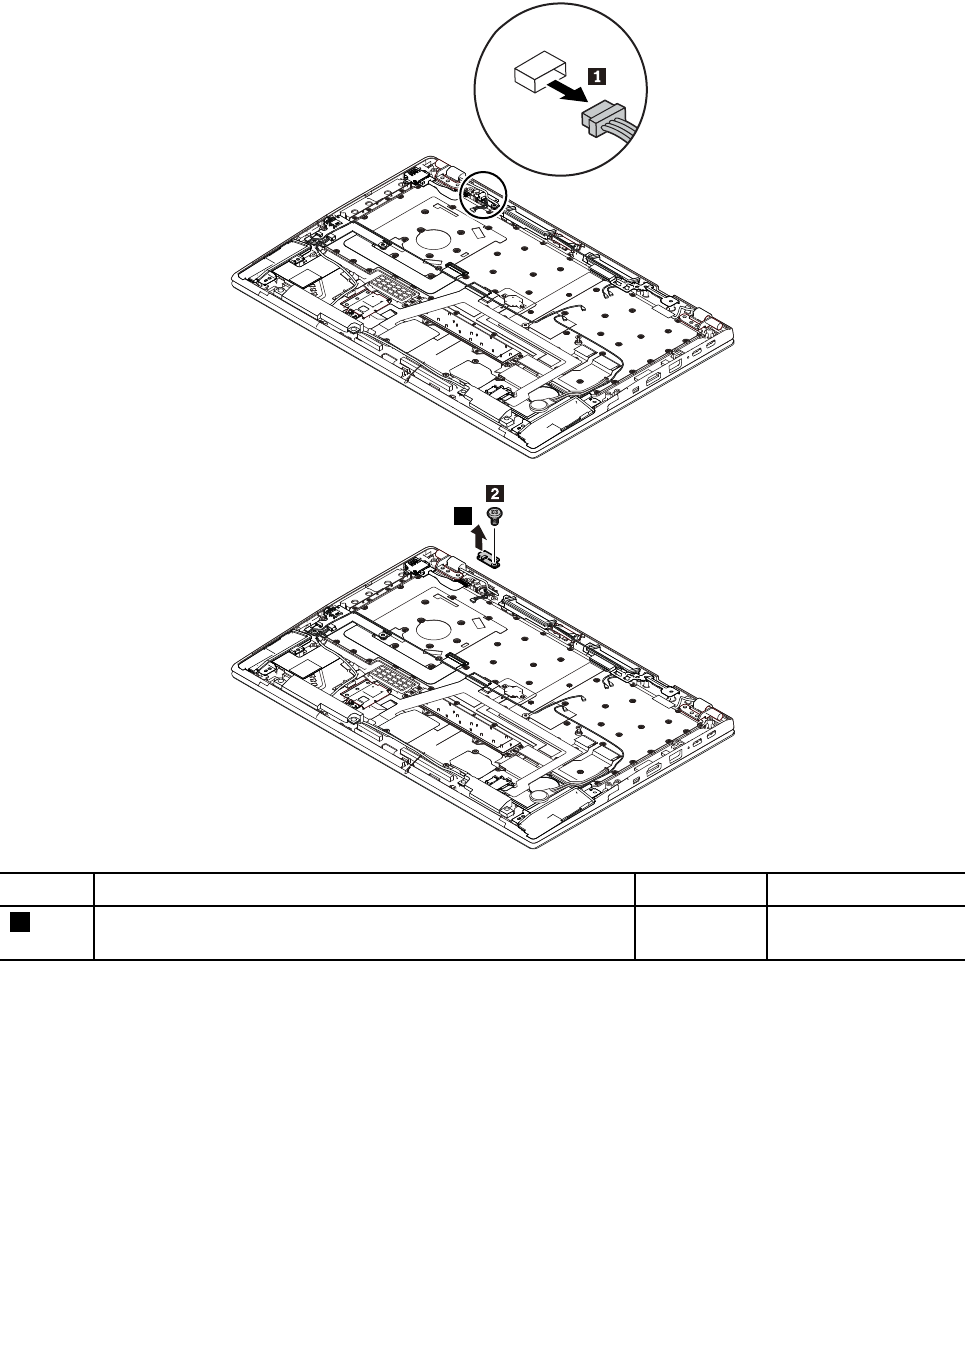
Removalstepsofthepowerbuttoncardandthepower-button-cardcable
3
StepScrew(quantity)ColorTorque
2M2×L2.2mm,flat-head,nylon-coated(1)Black0.181Nm
(1.85kgf-cm)
1210Audiocardwithaudio-cardcable
Foraccess,removetheseFRUsinorder:
•“1010Basecoverassembly”onpage69
•“1020M.2solid-statedriveandthermalrubberforM.2solid-statedrive”onpage70
•“1030Wireless-LANcard”onpage71
•“1040Wireless-WANcard”onpage72
•“1060Thermalfanassembly”onpage73
•“1090Built-inbattery”onpage77
•“1190Systemboardassembly”onpage90
Chapter8.RemovingorreplacingaFRU93
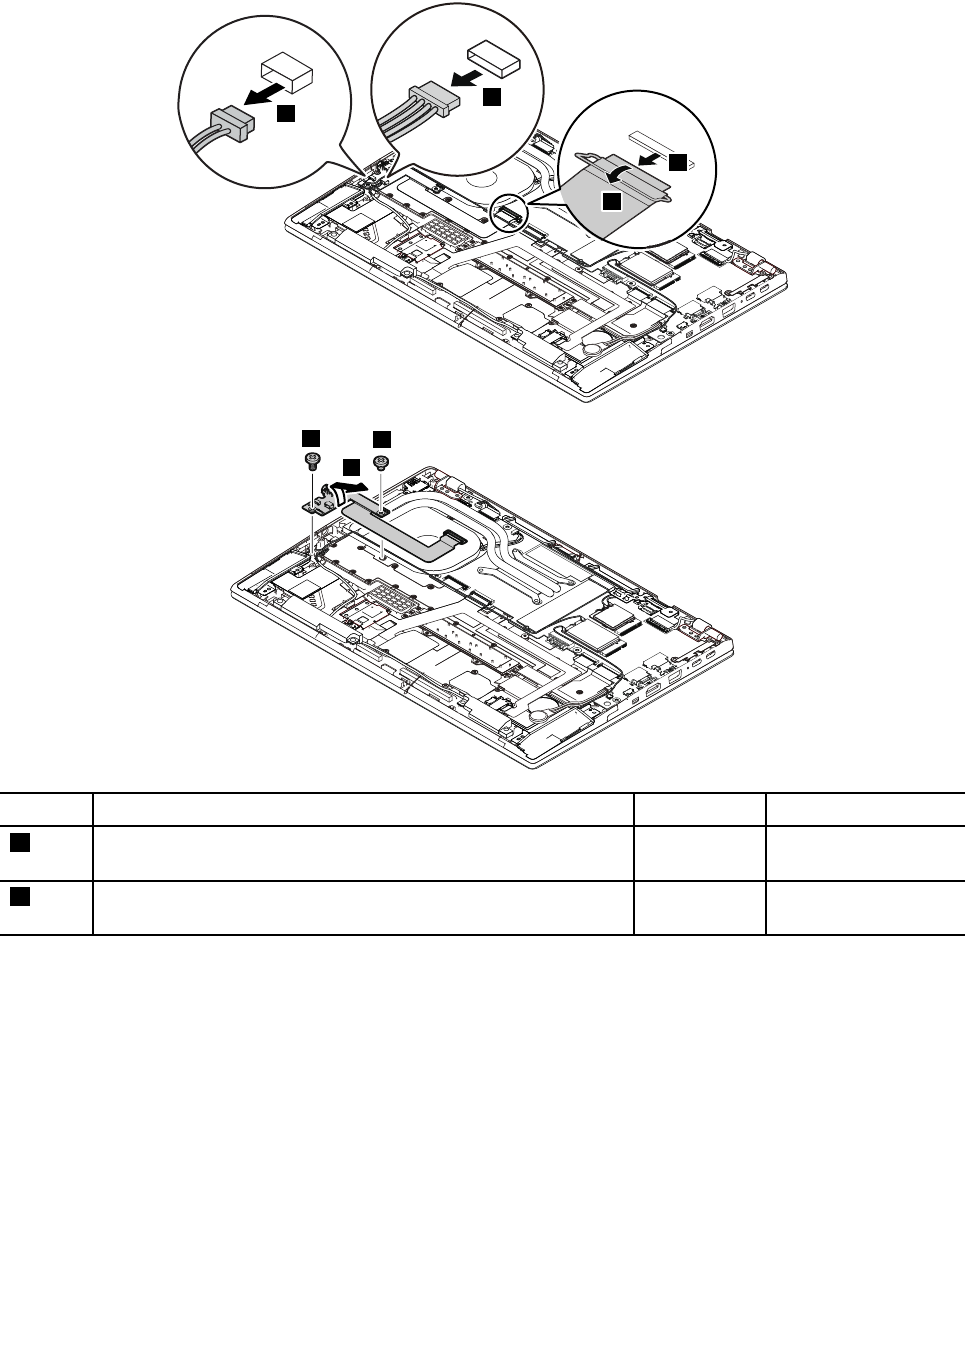
Removalstepsoftheaudiocardwithaudio-cardcable
4
3
1
2
56
7
StepScrew(quantity)ColorTorque
5M2×L3mm,flat-head,nylon-coated(1)Black0.181Nm
(1.85kgf-cm)
6M2×L2.2mm,flat-head,nylon-coated(1)Black0.181Nm
(1.85kgf-cm)
1220LCDunit
Foraccess,removetheseFRUsinorder:
•“1010Basecoverassembly”onpage69
94HardwareMaintenanceManual
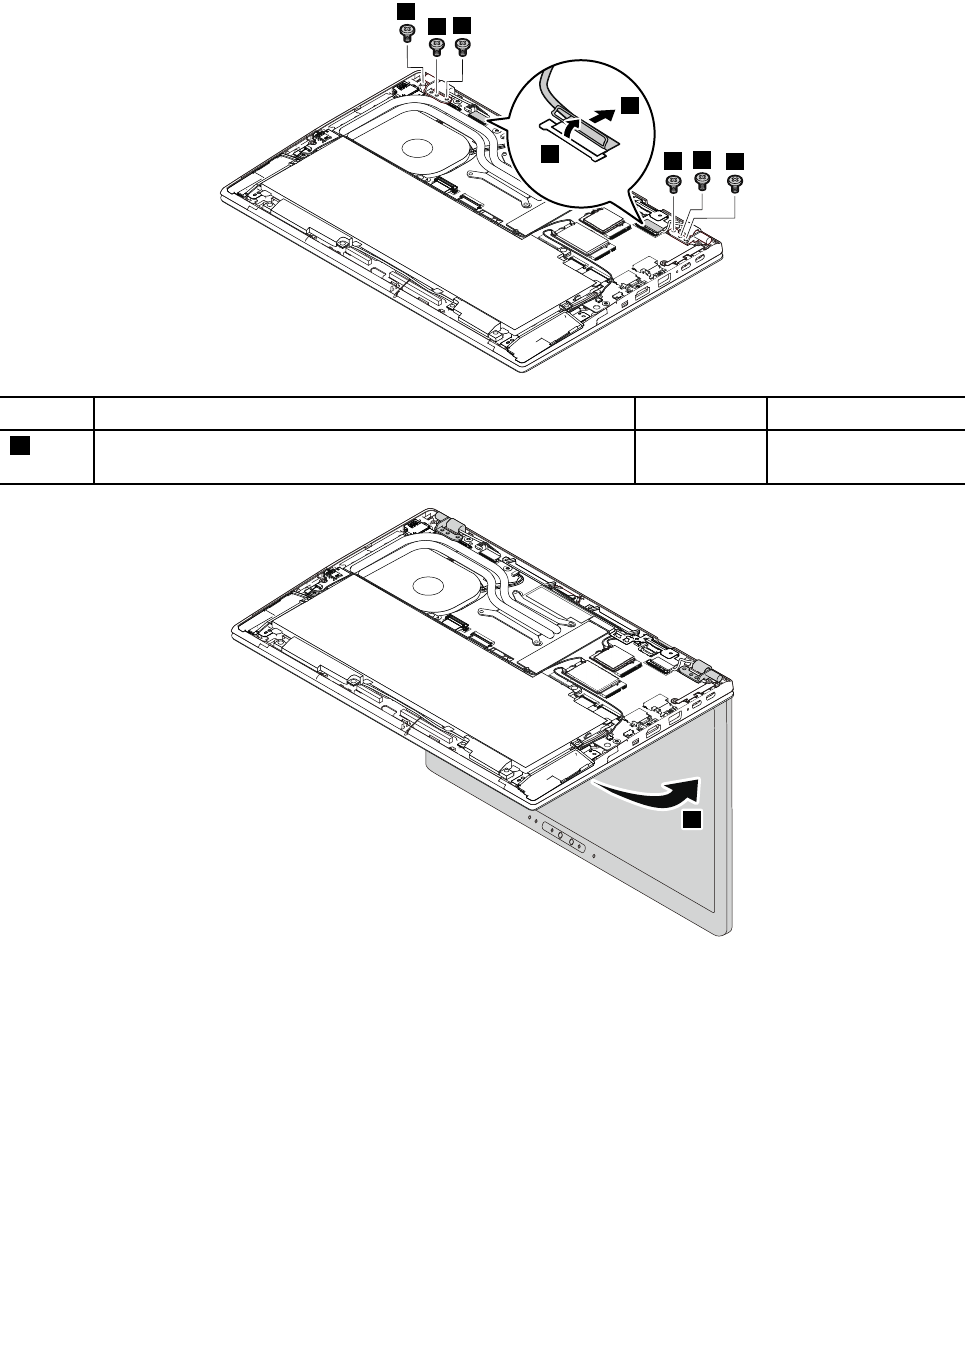
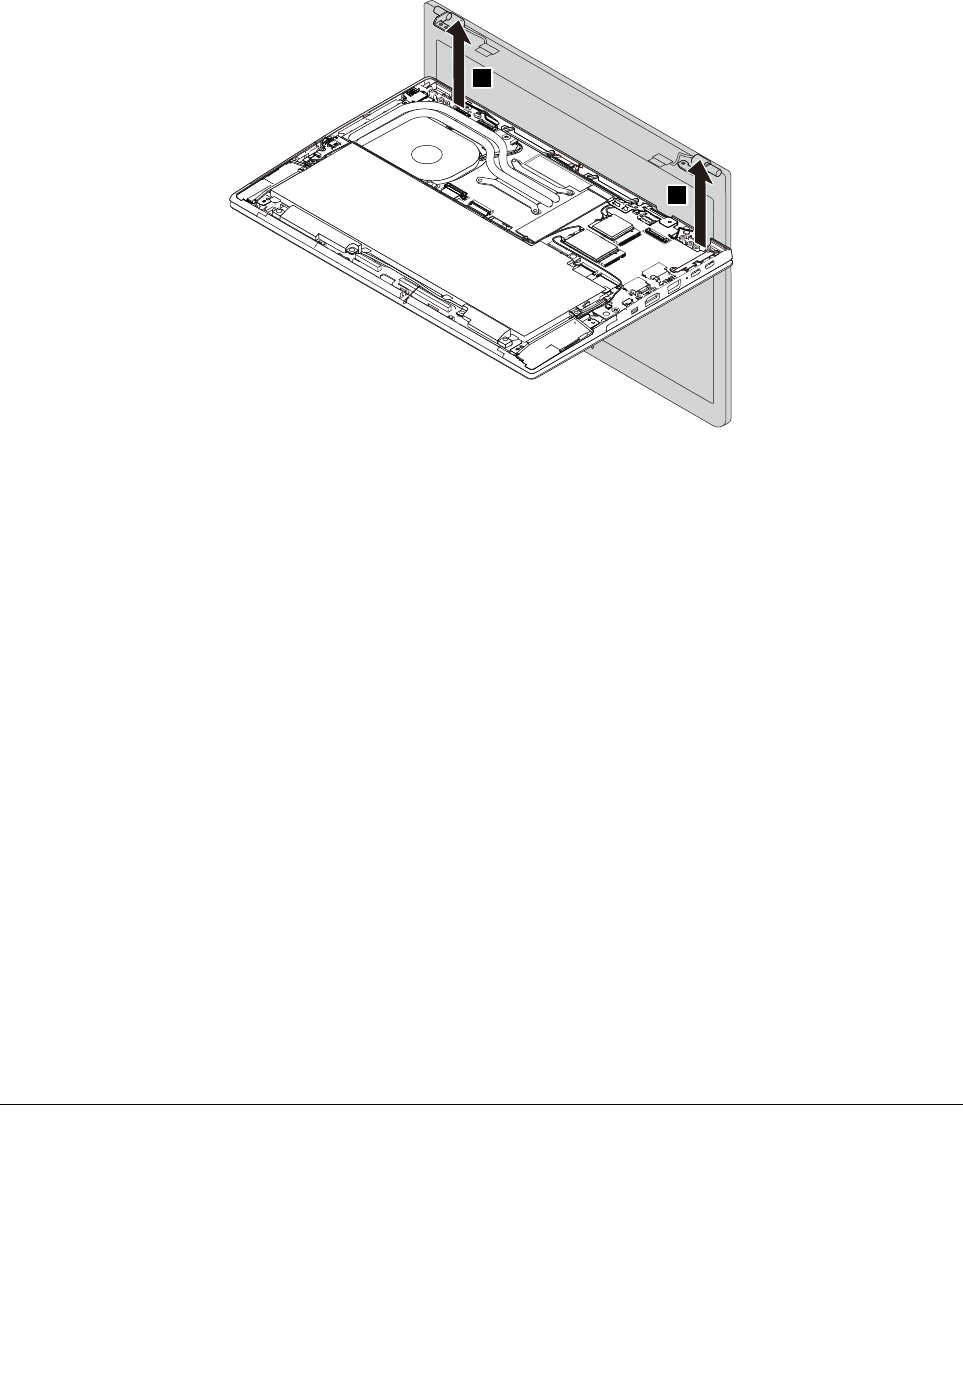
5
5
1230Keyboardbezelassembly
Foraccess,removetheseFRUsinorder:
•“1010Basecoverassembly”onpage69
•“1020M.2solid-statedriveandthermalrubberforM.2solid-statedrive”onpage70
•“1030Wireless-LANcard”onpage71
•“1040Wireless-WANcard”onpage72
•“1050Coin-cellbattery”onpage73
•“1060Thermalfanassembly”onpage73
•“1070USBcable”onpage75
•“1080Speakerassembly”onpage75
•“1090Built-inbattery”onpage77
•“1100Wireless-WANantennakitorwireless-WANantennafiller,andcableholderforwireless-WAN
antenna”onpage79
•“1110Wireless-LANantennakitandcableholderforwireless-LANantenna”onpage81
•“1120WiGigantennakitandWiGigbracket”onpage83
•“1130Trackpadcable”onpage84
•“1140Trackpadassemblyandtrackpadinsulationtape”onpage86
•“1150NFCcardwithNFCsupportbracket”onpage87
•“1160dc-insupportbracket”onpage88
•“1170micro-SIM-cardtray”onpage89
•“1180SDsupportbracket”onpage89
•“1190Systemboardassembly”onpage90
•“1200Powerbuttoncardandpower-button-cardcable”onpage92
•“1210Audiocardwithaudio-cardcable”onpage93
•“1220LCDunit”onpage94
RemovinganLCDFRU
ThissectionprovidesinstructionsonhowtoremoveanLCDFRU.
2010LCD-bezelassembly,protectionplateassembly,andmetal
protectionplate
Foraccess,removetheseFRUsinorder:
•“1010Basecoverassembly”onpage69
96HardwareMaintenanceManual
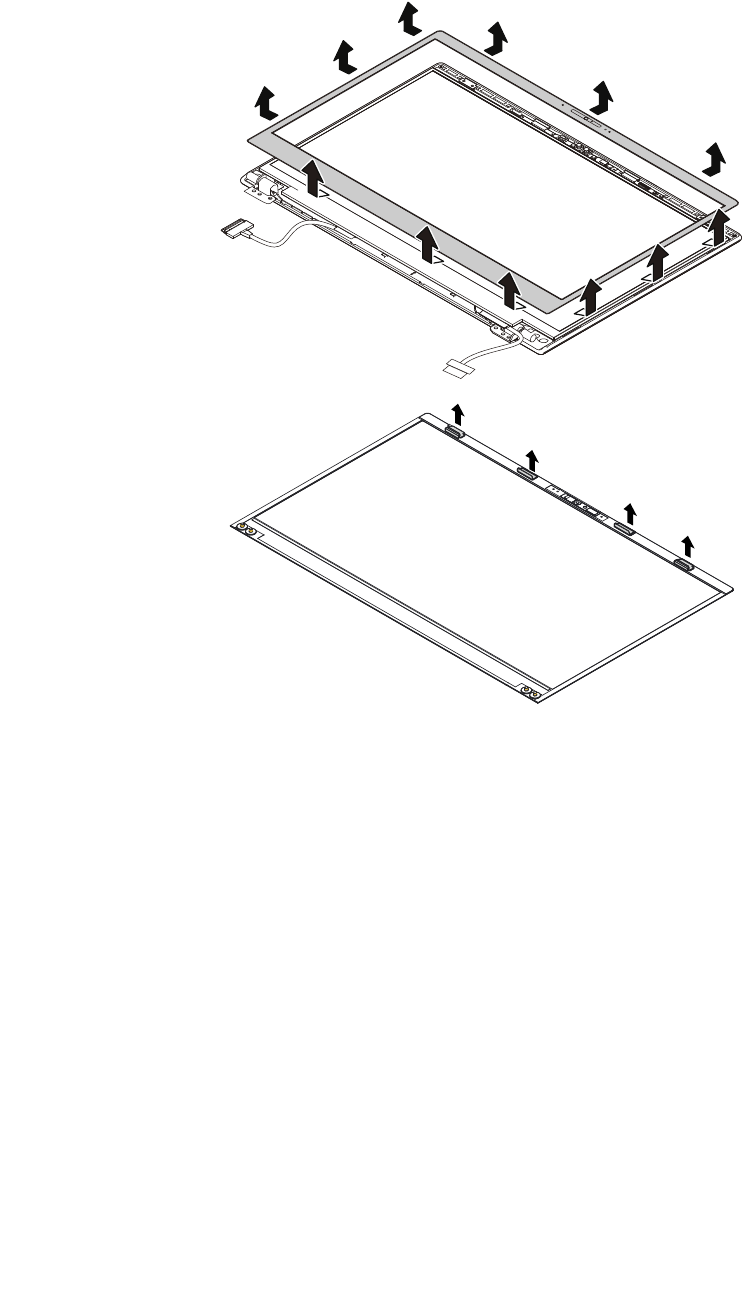
•“1220LCDunit”onpage94
RemovalstepsoftheLCD-bezelassembly,protectionplateassembly,andmetalprotectionplate
Wheninstalling:AftertheLCD-bezelassemblyisremoved,itcannotbeusedanymore.AnewLCD-bezel
assemblyisrequiredforreplacement.
2020HingesandLCDbottombezel
Foraccess,removetheseFRUsinorder:
•“1010Basecoverassembly”onpage69
•“1220LCDunit”onpage94
•“2010LCD-bezelassembly,protectionplateassembly,andmetalprotectionplate”onpage96
Chapter8.RemovingorreplacingaFRU97
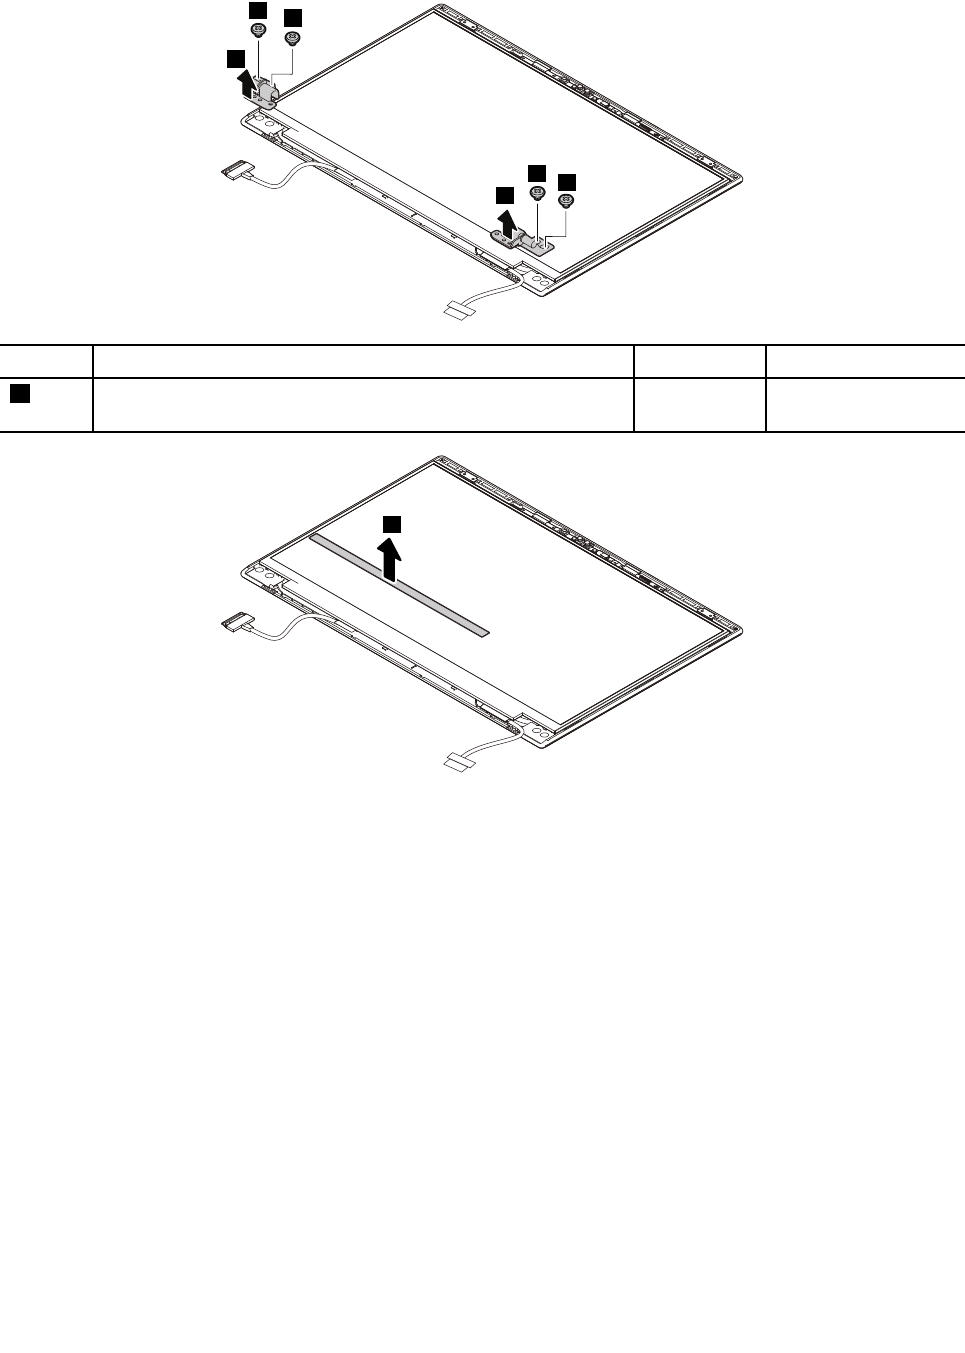
RemovalstepsofthehingesandLCDbottombezel
11
2
2
11
StepScrew(quantity)ColorTorque
1M2.5×L2.2mm,big-head,nylon-coated(4)Black0.294Nm
(3.0kgf-cm)
3
2030LCDpanelassemblyandLCDcable
Foraccess,removetheseFRUsinorder:
•“1010Basecoverassembly”onpage69
•“1220LCDunit”onpage94
•“2010LCD-bezelassembly,protectionplateassembly,andmetalprotectionplate”onpage96
•“2020HingesandLCDbottombezel”onpage97
98HardwareMaintenanceManual
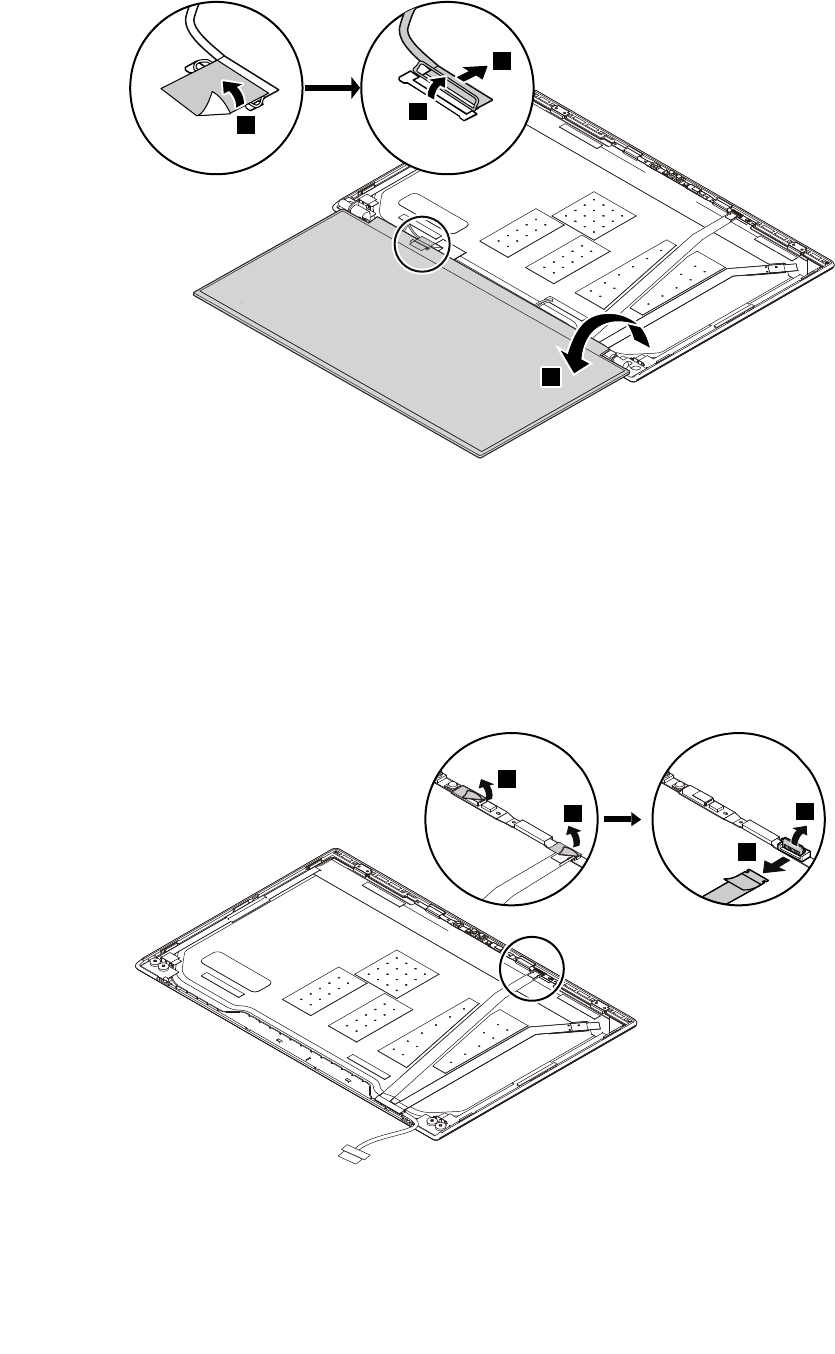
RemovalstepsoftheLCDpanelassemblyandLCDcable
1
2
3
4
2040Camera/microphonecard,andcamera/LEDcable
Foraccess,removetheseFRUsinorder:
•“1010Basecoverassembly”onpage69
•“1220LCDunit”onpage94
•“2010LCD-bezelassembly,protectionplateassembly,andmetalprotectionplate”onpage96
•“2020HingesandLCDbottombezel”onpage97
•“2030LCDpanelassemblyandLCDcable”onpage98
Removalstepsofthecamera/microphonecard
1
12
3
Chapter8.RemovingorreplacingaFRU99
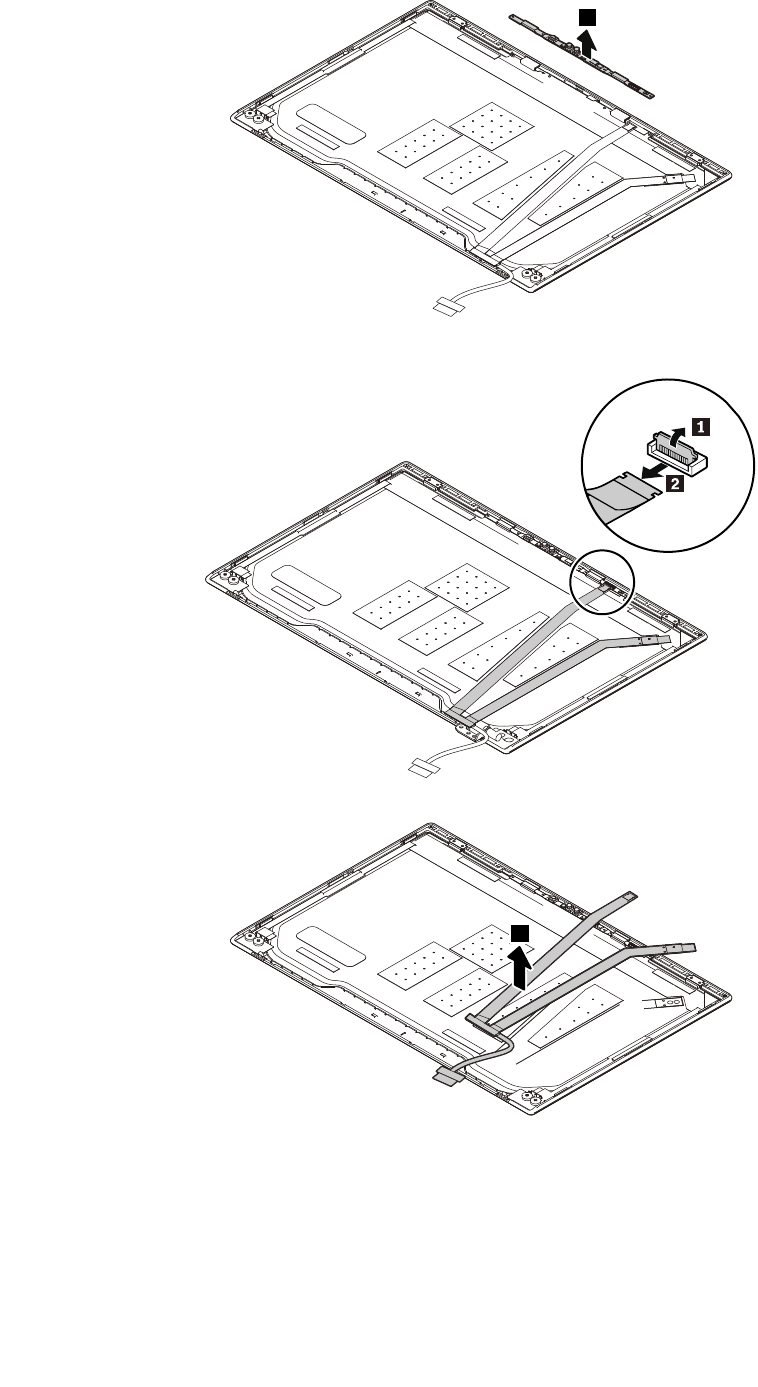
4
Removalstepsofthecamera/LEDcable
3
100HardwareMaintenanceManual

AppendixA.Notices
Lenovomaynotoffertheproducts,services,orfeaturesdiscussedinthisdocumentinallcountries.Consult
yourlocalLenovorepresentativeforinformationabouttheproductsandservicescurrentlyavailableinyour
area.AnyreferencetoaLenovoproduct,program,orserviceisnotintendedtostateorimplythatonlythat
Lenovoproduct,program,orservicemaybeused.Anyfunctionallyequivalentproduct,program,orservice
thatdoesnotinfringeanyLenovointellectualpropertyrightmaybeusedinstead.However,itistheuser’s
responsibilitytoevaluateandverifytheoperationofanyotherproduct,program,orservice.
Lenovomayhavepatentsorpendingpatentapplicationscoveringsubjectmatterdescribedinthis
document.Thefurnishingofthisdocumentdoesnotgiveyouanylicensetothesepatents.Y oucansend
licenseinquiries,inwriting,to:
Lenovo(UnitedStates),Inc.
1009ThinkPlace-BuildingOne
Morrisville,NC27560
U.S.A.
Attention:LenovoDirectorofLicensing
LENOVOPROVIDESTHISPUBLICATION“ASIS”WITHOUTWARRANTYOFANYKIND,EITHEREXPRESS
ORIMPLIED,INCLUDING,BUTNOTLIMITEDTO,THEIMPLIEDWARRANTIESOFNON-INFRINGEMENT,
MERCHANTABILITYORFITNESSFORAPARTICULARPURPOSE.Somejurisdictionsdonotallow
disclaimerofexpressorimpliedwarrantiesincertaintransactions,therefore,thisstatementmaynotapply
toyou.
Thisinformationcouldincludetechnicalinaccuraciesortypographicalerrors.Changesareperiodically
madetotheinformationherein;thesechangeswillbeincorporatedinneweditionsofthepublication.
Lenovomaymakeimprovementsand/orchangesintheproduct(s)and/ortheprogram(s)describedinthis
publicationatanytimewithoutnotice.
Theproductsdescribedinthisdocumentarenotintendedforuseinimplantationorotherlifesupport
applicationswheremalfunctionmayresultininjuryordeathtopersons.Theinformationcontainedinthis
documentdoesnotaffectorchangeLenovoproductspecificationsorwarranties.Nothinginthisdocument
shalloperateasanexpressorimpliedlicenseorindemnityundertheintellectualpropertyrightsofLenovo
orthirdparties.Allinformationcontainedinthisdocumentwasobtainedinspecificenvironmentsandis
presentedasanillustration.Theresultobtainedinotheroperatingenvironmentsmayvary.
Lenovomayuseordistributeanyoftheinformationyousupplyinanywayitbelievesappropriatewithout
incurringanyobligationtoyou.
Anyreferencesinthispublicationtonon-LenovoWebsitesareprovidedforconvenienceonlyanddonotin
anymannerserveasanendorsementofthoseWebsites.ThematerialsatthoseWebsitesarenotpartof
thematerialsforthisLenovoproduct,anduseofthoseWebsitesisatyourownrisk.
Anyperformancedatacontainedhereinwasdeterminedinacontrolledenvironment.Therefore,theresult
obtainedinotheroperatingenvironmentsmayvarysignificantly.Somemeasurementsmayhavebeen
madeondevelopment-levelsystemsandthereisnoguaranteethatthesemeasurementswillbethesame
ongenerallyavailablesystems.Furthermore,somemeasurementsmayhavebeenestimatedthrough
extrapolation.Actualresultsmayvary.Usersofthisdocumentshouldverifytheapplicabledatafortheir
specificenvironment.
©CopyrightLenovo2017101

Electronicemissionsnotices
ForelectronicemissioninformationonClassBdigitaldevices,refertothecorrespondinginformationin
theUserGuide.
Trademarks
ThefollowingtermsaretrademarksofLenovointheUnitedStates,othercountriesorboth:
Lenovo
Lenovologo
ThinkPad
ThinkPadlogo
TrackPoint
Microsoft,Windows,andCortanaaretrademarksoftheMicrosoftgroupofcompanies.
ThunderboltisatrademarkofIntelCorporationoritssubsidiariesintheU.S.and/orothercountries.
DisplayPortisatrademarkoftheVideoElectronicsStandardsAssociation.
ThetermsHDMIandHDMIHigh-DefinitionMultimediaInterfacearetrademarksorregisteredtrademarksof
HDMILicensingLLCintheUnitedStatesandothercountries.
WiGigisaregisteredtrademarkofWi-FiAlliance.
Othercompany,product,orservicenamesmaybethetrademarksorservicemarksofothers.
102HardwareMaintenanceManual

PartNumber:SP40M11925_02
Printedin
(1P)P/N:SP40M11925_02
*1PSP40M11925_02*
