Lenovo X1Tablet Hmm En Sp40G76080 User Manual Hardware Maintenance Think Pad X1 Tablet 1st Gen (Type 20GG, 20GH) Type 20GH
2016-07-25
User Manual: Lenovo X1Tablet Hmm En Sp40G76080 Hardware Maintenance Manual - ThinkPad X1 Tablet ThinkPad X1 Tablet 1st Gen (Type 20GG, 20GH) - Type 20GH ThinkPad X1 Tablet, 20GH
Open the PDF directly: View PDF ![]() .
.
Page Count: 100
- About this manual
- Chapter 1. Safety information
- Chapter 2. Important service information
- Chapter 3. General checkout
- Chapter 4. Related service information
- Chapter 5. Locations
- Chapter 6. FRU replacement notices
- Chapter 7. Removing or replacing a FRU
- General guidelines
- Before servicing the tablet
- 1010 SIM card cover
- 1020 Back cover assembly
- 1030 Coin-cell battery
- 1040 Think LED light
- 1050 NFC card, NFC-card cable, and NFC antenna assembly
- 1060 Wireless-WAN card
- 1070 M.2 solid-state drive and solid-state-drive mylar
- 1080 Touch controller card cable
- 1090 Infrared camera card and infrared camera cable
- 1110 Speaker assembly
- 1120 Mini DisplayPort bracket
- 1130 USB-connector bracket
- 1140 POGO card and POGO-card cable
- 1150 LCD cable
- 1160 Built-in battery
- 1170 Camera cable, camera card, front-facing camera module, and rear-facing camera module
- 1180 Audio card and audio-card cable
- 1190 Thermal module
- 1210 System board
- 1211 Inner frame left and inner frame right
- 1212 Fingerprint-reader module
- 1213 Antenna kit
- 1214 WiGig antenna assembly and thermal spread sheet for WiGig antenna assembly
- 1215 LCD module
- Appendix A. Notices
- Appendix B. Abbreviation and acronym table

ThinkPadX1Tablet
HardwareMaintenanceManual

Note:Beforeusingthisinformationandtheproductitsupports,besuretoreadthegeneralinformation
underAppendixA“Notices”onpage89.
FirstEdition(February2016)
©CopyrightLenovo2016.
LIMITEDANDRESTRICTEDRIGHTSNOTICE:IfdataorsoftwareisdeliveredpursuanttoaGeneralServices
Administration“GSA”contract,use,reproduction,ordisclosureissubjecttorestrictionssetforthinContractNo.
GS-35F-05925.

Contents
Aboutthismanual...........iii
Chapter1.Safetyinformation......1
Generalsafety................1
Electricalsafety...............1
Safetyinspectionguide............3
Handlingdevicesthataresensitivetoelectrostatic
discharge..................3
Groundingrequirements............4
Safetynotices(multilingualtranslations)......4
Chapter2.Importantservice
information..............19
StrategyforreplacingFRUs.........19
Importantnoticeforreplacingasystem
board................19
Howtouseerrormessage........20
StrategyforreplacingFRUsforCTO,specialbid
model,andstandardmodels.........20
Productdefinition............20
FRUidentification............20
Chapter3.Generalcheckout.....23
Whattodofirst..............23
Checkoutguide..............24
LenovoSolutionCenter.........24
Quicktestprograms...........24
UEFIdiagnosticprogram.........25
Bootablediagnosticprograms.......25
Powersystemcheckout...........26
Checkingthebuilt-inbattery.......26
Checkingtheoperationalcharging.....27
Checkingthecoin-cellbattery.......27
Checkingtheacpoweradapter......27
Chapter4.Relatedservice
information..............29
Windowsrecoveryapps...........29
Resettingyourtablet..........29
Usingadvancedstartupoptions......29
Recoveringyouroperatingsystemifthe
Windows10operatingsystemfailstostart..30
CreatingandusingarecoveryUSBdrive..30
LenovofactoryrecoveryUSBkey.......30
Usingpasswords..............31
Symptom-to-FRUindex...........31
Errorcodes..............32
Intermittentproblems..........33
Undeterminedproblems.........33
Chapter5.Locations.........35
Locatingtabletcontrols,connectors,and
indicators.................35
LocatingFRUsandCRUs..........37
MajorFRUs..............38
Miscellaneouskitsandotherparts.....40
Connectorandcableguide........40
LookingupFRUinformation.........46
Chapter6.FRUreplacement
notices................47
Screwnotices...............47
Retainingserialnumbers...........48
Chapter7.Removingorreplacinga
FRU..................49
Generalguidelines.............49
Beforeservicingthetablet..........50
Disablingthebuilt-inbattery.......50
RemovingtheSIMcard,SDcard,andBase
Module................50
1010SIMcardcover............52
1020Backcoverassembly..........53
1030Coin-cellbattery............58
1040ThinkLEDlight............59
1050NFCcard,NFC-cardcable,andNFCantenna
assembly.................60
1060Wireless-WANcard..........61
1070M.2solid-statedriveandsolid-state-drive
mylar..................63
1080Touchcontrollercardcable.......65
1090Infraredcameracardandinfraredcamera
cable..................66
1110Speakerassembly...........68
1120MiniDisplayPortbracket........69
1130USB-connectorbracket.........70
1140POGOcardandPOGO-cardcable....71
1150LCDcable..............73
1160Built-inbattery............74
1170Cameracable,cameracard,front-facing
cameramodule,andrear-facingcameramodule.76
1180Audiocardandaudio-cardcable.....78
1190Thermalmodule............78
1210Systemboard.............80
1211Innerframeleftandinnerframeright....82
1212Fingerprint-readermodule........83
©CopyrightLenovo2016i

1213Antennakit..............83
1214WiGigantennaassemblyandthermalspread
sheetforWiGigantennaassembly.......85
1215LCDmodule.............86
AppendixA.Notices..........89
Electronicemissionnotices..........90
Trademarks................90
AppendixB.Abbreviationand
acronymtable.............91
iiThinkPadX1TabletHardwareMaintenanceManual

Aboutthismanual
ThismanualcontainsserviceandreferenceinformationforthefollowingThinkPad®products.
MachineMachinetype(MT)
ThinkPadX1Tablet20GGand20GH
Important:
•ThismanualisintendedonlyfortrainedservicetechnicianswhoarefamiliarwithThinkPadproducts.Use
thismanualalongwiththeadvanceddiagnosticteststotroubleshootproblemseffectively.
•BeforeservicingaThinkPadproduct,besuretoreadalltheinformationunderChapter1“Safety
information”onpage1andChapter2“Importantserviceinformation”onpage19.
©CopyrightLenovo2016iii

ivThinkPadX1TabletHardwareMaintenanceManual

Chapter1.Safetyinformation
Thischapterpresentsfollowingsafetyinformationthatyoushouldbefamiliarwithbeforeyouservice
aThinkPadtabletcomputer.
•“Generalsafety”onpage1
•“Electricalsafety”onpage1
•“Safetyinspectionguide”onpage3
•“Handlingdevicesthataresensitivetoelectrostaticdischarge”onpage3
•“Groundingrequirements”onpage4
•“Safetynotices(multilingualtranslations)”onpage4
Generalsafety
Followtheserulestoensuregeneralsafety:
•Observegoodhousekeepingintheareaofthemachinesduringandaftermaintenance.
•Whenliftinganyheavyobject:
1.Makesurethatyoucanstandsafelywithoutslipping.
2.Distributetheweightoftheobjectequallybetweenyourfeet.
3.Useaslowliftingforce.Nevermovesuddenlyortwistwhenyouattempttolift.
4.Liftbystandingorbypushingupwithyourlegmuscles;thisactionremovesthestrainfromthe
musclesinyourback.Donotattempttoliftanyobjectthatweighsmorethan16kg(35lb)orthat
youthinkistooheavyforyou.
•Donotperformanyactionthatcauseshazardstothecustomer,orthatmakestheequipmentunsafe.
•Beforeyoustartthemachine,makesurethatotherservicetechniciansandthecustomer'spersonnelare
notinahazardousposition.
•Placeremovedcoversandotherpartsinasafeplace,awayfromallpersonnel,whileyouareservicing
themachine.
•Keepyourtoolcaseawayfromwalkareassothatotherpeoplewillnottripoverit.
•Donotwearlooseclothingthatcanbetrappedinthemovingpartsofamachine.Makesurethatyour
sleevesarefastenedorrolledupaboveyourelbows.Ifyourhairislong,fastenit.
•Inserttheendsofyournecktieorscarfinsideclothingorfastenitwithanonconductiveclip,about8
centimeters(3inches)fromtheend.
•Donotwearjewelry,chains,metal-frameeyeglasses,ormetalfastenersforyourclothing.
Attention:Metalobjectsaregoodelectricalconductors.
•Wearsafetyglasseswhenyouareworkinginconditionsthatmightbehazardoustoyoureyes.The
conditionsincludehammering,drilling,soldering,cuttingwire,attachingsprings,usingsolvents,and
soon.
•Afterservice,reinstallallsafetyshields,guards,labels,andgroundwires.Replaceanysafetydevice
thatiswornordefective.
•Reinstallotherpartsthatyouhaveremoved.
Electricalsafety
Observethefollowingruleswhenworkingonelectricalequipment.
©CopyrightLenovo20161

Important:
•Useonlyapprovedtoolsandtestequipment.Somehandtoolshavehandlescoveredwithasoftmaterial
thatdoesnotinsulateyouwhenworkingwithliveelectricalcurrents.
•Manycustomershave,neartheirequipment,rubberfloormatsthatcontainsmallconductivefibersto
decreaseelectrostaticdischarges.Donotusethistypeofmattoprotectyourselffromelectricalshock.
•Findtheroomemergencypower-off(EPO)switch,disconnectingswitch,orelectricaloutlet.Ifanelectrical
accidentoccurs,youcanthenoperatetheswitchordisconnectthepowercordquickly.
•Donotworkaloneunderhazardousconditionsornearequipmentthathashazardousvoltages.
•Disconnectallpowerbefore:
–Performingamechanicalinspection
–Workingnearpowersupplies
–Removingorinstallingmainunits
•Beforeyoustarttoworkonthemachine,disconnectthepowercord.Ifyoucannotunplugit,poweroff
thewallboxthatsuppliespowertothemachine,andlockthewallboxintheoffposition.
•Ifyouworkonamachinethathasexposedelectricalcircuits,observethefollowingprecautions:
–Ensurethatanotherperson,familiarwiththepower-offcontrols,isnearyou.
Attention:Anotherpersonmustbetheretoswitchoffthepower,ifnecessary.
–Useonlyonehandwhenworkingwithpowered-onelectricalequipment;keeptheotherhandinyour
pocketorbehindyourback.
Attention:Anelectricalshockcanoccuronlywhenthereisacompletecircuit.Byobservingtheabove
rule,youmaypreventacurrentfrompassingthroughyourbody.
–Whenusingtesters,setthecontrolscorrectlyandusetheapprovedprobeleadsandaccessoriesfor
thattester.
–Standonsuitablerubbermats(obtainedlocally,ifnecessary)toinsulateyoufromgroundssuchas
metalfloorstripsandmachineframes.
Observethespecialsafetyprecautionswhenyouworkwithveryhighvoltages;Instructionsforthese
precautionsareinthesafetysectionsofmaintenanceinformation.Useextremecarewhenmeasuring
highvoltages.
•Regularlyinspectandmaintainyourelectricalhandtoolsforsafeoperationalcondition.
•Donotusewornorbrokentoolsandtesters.
•Neverassumethatpowerhasbeendisconnectedfromacircuit.First,checkthatithasbeenpoweredoff.
•Alwayslookcarefullyforpossiblehazardsinyourworkarea.Examplesofthesehazardsaremoistfloors,
nongroundedpowerextensioncables,powersurges,andmissingsafetygrounds.
•Donottouchliveelectricalcircuitswiththereflectivesurfaceofaplasticdentalmirror.Thesurfaceis
conductive;suchtouchingcancausepersonalinjuryandmachinedamage.
•Donotservicethefollowingpartswiththepoweronwhentheyareremovedfromtheirnormaloperating
placesinamachine:
–Powersupplyunits
–Pumps
–Motorgenerators
–Similarunitstolistedabove
Thispracticeensurescorrectgroundingoftheunits.
•Ifanelectricalaccidentoccurs:
–Usecaution;donotbecomeavictimyourself.
–Switchoffpower.
–Sendanotherpersontogetmedicalaid.
2ThinkPadX1TabletHardwareMaintenanceManual

Safetyinspectionguide
Thepurposeofthisinspectionguideistoassistyouinidentifyingpotentiallyunsafeconditions.Aseach
machinewasdesignedandbuilt,requiredsafetyitemswereinstalledtoprotectusersandservicetechnicians
frominjury.Thisguideaddressesonlythoseitems.Youshouldusegoodjudgmenttoidentifypotential
safetyhazardsduetoattachmentofnon-ThinkPadfeaturesoroptionsnotcoveredbythisinspectionguide.
Ifanyunsafeconditionsarepresent,youmustdeterminehowserioustheapparenthazardcouldbeand
whetheryoucancontinuewithoutfirstcorrectingtheproblem.
Considertheseconditionsandthesafetyhazardstheypresent:
•Electricalhazards,especiallyprimarypower(primaryvoltageontheframecancauseseriousorfatal
electricalshock)
•Explosivehazards,suchasadamagedCRTfaceorabulgingcapacitor
•Mechanicalhazards,suchaslooseormissinghardware
Todeterminewhetherthereareanypotentiallyunsafeconditions,usethefollowingchecklistatthebeginning
ofeveryservicetask.Beginthecheckswiththepoweroffandthepowercorddisconnected.
Checklist:
1.Checkexteriorcoversfordamage(loose,broken,orsharpedges).
2.Turnoffthetablet.
3.Disablethebuilt-inbattery.Fortheinstructiononhowtodisablethebuilt-inbattery,see“Disablingthe
built-inbattery”onpage50.
4.Disconnectthepowercord.
5.Checkthepowercordforthefollowing:
a.Makesurethatathird-wiregroundconnectorisingoodcondition.Useametertomeasurethe
third-wiregroundcontinuity.Ensurethatthecontinuitybetweentheexternalgroundpinandthe
framegroundis0.1ohmorless.
b.Thepowercordisthetypespecifiedinthepartslist.
c.Insulationisnotfrayedorworn.
6.RemovetheLCDmoduleassembly.
7.Checkforcrackedorbulgingbuilt-inbatteries.
8.Checkforanyobviousnon-ThinkPadalterations.Usegoodjudgmentastothesafetyofany
non-ThinkPadalterations.
9.Checkinsidetheunitforanyobviousunsafeconditions,suchasmetalfilings,contamination,wateror
otherliquids,orsignsoffireorsmokedamage.
10.Checkforworn,frayed,orpinchedcables.
11.Checkthatthebuilt-inbatteryfasteners(screwsorrivets)havenotbeenremovedortamperedwith.
Handlingdevicesthataresensitivetoelectrostaticdischarge
Anytabletpartcontainingtransistorsorintegratedcircuits(ICs)shouldbeconsideredsensitiveto
electrostaticdischarge(ESD).ESDdamagecanoccurwhenthereisadifferenceinchargebetweenobjects.
ProtectagainstESDdamagebyequalizingthecharge.Sothatthemachine,thepart,theworkmat,andthe
personhandlingthepartareallatthesamecharge.
Chapter1.Safetyinformation3
Notes:
1.Useproduct-specificESDprocedureswhentheyexceedtherequirementsnotedhere.
2.MakesurethattheESDprotectivedevicesyouusehavebeencertified(ISO9000)asfullyeffective.
WhenhandlingESD-sensitiveparts:
•Keepthepartsinprotectivepackagesuntiltheyareinsertedintotheproduct.
•Avoidcontactwithotherpeople.
•Wearagroundedwriststrapagainstyourskintoeliminatestaticonyourbody.
•Preventthepartfromtouchingyourclothing.Mostclothingisinsulativeandretainsachargeeven
whenyouarewearingawriststrap.
•Useagroundedworkmattoprovideastatic-freeworksurface.Thematisespeciallyusefulwhen
handlingESD-sensitivedevices.
•Selectagroundingsystem,suchasthoselistedbelow,toprovideprotectionthatmeetsthespecific
servicerequirement.
Note:TheuseofagroundingsystemtoguardagainstESDdamageisdesirablebutnotnecessary.
–AttachtheESDgroundcliptoanyframeground,groundbraid,orgreen-wireground.
–Whenworkingonadouble-insulatedorbattery-operatedsystem,useanESDcommongroundor
referencepoint.Y oucanusecoaxorconnector-outsideshellsonthesesystems.
–Usetheroundgroundprongoftheacplugonac-operatedtablets.
Groundingrequirements
Electricalgroundingofthetabletisrequiredforoperatorsafetyandcorrectsystemfunction.Proper
groundingoftheelectricaloutletcanbeverifiedbyacertifiedelectrician.
Safetynotices(multilingualtranslations)
Thesafetynoticesinthissectionareprovidedinthefollowinglanguages:
•English
•Arabic
•BrazilianPortuguese
•French
•German
•Hebrew
•Japanese
•Korean
•Spanish
•T raditionalChinese
DANGER
4ThinkPadX1TabletHardwareMaintenanceManual
DANGER
6ThinkPadX1TabletHardwareMaintenanceManual

PERIGO
PERIGO
PERIGO
PERIGO
PERIGO
PERIGO
8ThinkPadX1TabletHardwareMaintenanceManual
DANGER
DANGER
DANGER
VORSICHT
VORSICHT
10ThinkPadX1TabletHardwareMaintenanceManual
VORSICHT
VORSICHT
12ThinkPadX1TabletHardwareMaintenanceManual
14ThinkPadX1TabletHardwareMaintenanceManual
16ThinkPadX1TabletHardwareMaintenanceManual
18ThinkPadX1TabletHardwareMaintenanceManual

Chapter2.Importantserviceinformation
Thischapterintroducesfollowingimportantserviceinformationthatappliestoallmachinetypessupported
bythismanual:
•“StrategyforreplacingFRUs”onpage19
–“Importantnoticeforreplacingasystemboard”onpage19
–“Howtouseerrormessage”onpage20
•“StrategyforreplacingFRUsforCTO,specialbidmodel,andstandardmodels”onpage20
–“Productdefinition”onpage20
–“FRUidentification”onpage20
Important:
•AdvisecustomerstovisittheLenovo®SupportWebsiteathttp://www.lenovo.com/support.The
customerscanviewthesoftwarefixes,downloadthedrivers,andseetheinstructionsforinstallingthe
drivers.Foradditionalassistance,customersmightcalltheLenovoCustomerSupportCenter.Telephone
numbersfortheLenovoSupportCenterareavailableat:
http://www.lenovo.com/support/phone
•Servicetrainingdocuments,forexamplethevideosthatshowtheFRUremovalsorreplacements,are
providedtoLenovoauthorizedservicetechnicians.Thetrainingdocumentsareavailableat:
http://www.lenovoservicetraining.com
StrategyforreplacingFRUs
Beforereplacingparts:
Ensurethatallsoftwarefixes,drivers,andUEFIBIOSdownloadsareinstalledbeforereplacinganyFRUs
listedinthismanual.
Afterasystemboardisreplaced,ensurethatthelatestUEFIBIOSisloadedtothesystemboardbefore
completingtheserviceaction.
Todownloadsoftwarefixes,drivers,andUEFIBIOS,gotohttp://www.lenovo.com/ThinkPadDriversand
followtheinstructionsonthescreen.
•IfyouareinstructedtoreplaceaFRUbutthereplacementdoesnotcorrecttheproblem,reinstallthe
originalFRUbeforeyoucontinue.
•Sometabletshavebothaprocessorboardandasystemboard.Ifyouareinstructedtoreplaceeither
theprocessorboardorthesystemboard,andreplacingoneofthemdoesnotcorrecttheproblem,
reinstallthatboard,andthenreplacetheotherone.
•IfanadapteroradeviceconsistsofmorethanoneFRU,anyoftheFRUsmaybethecauseoftheerror.
Beforereplacingtheadapterordevice,removetheFRUs,onebyone,toseeifthesymptomschange.
ReplaceonlytheFRUthatchangedthesymptoms.
Attention:Thesetupconfigurationonthetabletyouareservicingmayhavebeencustomized.Running
AutomaticConfigurationmayalterthesettings.Notethecurrentconfigurationsettings(usingtheView
Configurationoption);then,whenservicehasbeencompleted,verifythatthosesettingsremainineffect.
Importantnoticeforreplacingasystemboard
Attention:Whenhandlingasystemboard:
•Donotdropasystemboardorapplyanyexcessiveforcetoit.
©CopyrightLenovo201619

•Avoidroughhandlingofanykind.
•AvoidbendingasystemboardandhardpushingtopreventcrackingateachBallGridArray(BGA)chipset.
Howtouseerrormessage
Usetheerrorcodesdisplayedonthescreentodiagnosefailures.Ifmorethanoneerrorcodeisdisplayed,
beginthediagnosiswiththefirsterrorcode.Whatevercausesthefirsterrorcodemayalsocausefalseerror
codes.Ifnoerrorcodeisdisplayed,seewhethertheerrorsymptomislistedintheSymptom-to-FRU
Indexforthetabletyouareservicing.
StrategyforreplacingFRUsforCTO,specialbidmodel,andstandard
models
ThistopicprovidesinformationaboutthemodeltypesandFRUidentification.
Productdefinition
Thistopicintroducesdifferentmodeltypesandhowtoidentifyeachtype.
DynamicConfigureToOrder(CTO)
ThismodelprovidestheabilityforacustomertoconfigureaLenovosolutionfromawebsite,andhavethis
configurationsenttofulfillment,whereitisbuiltandshippeddirectlytothecustomer.Themachinelabeland
eSupportwillloadtheseproductsasthe4-characterMT,4-charactermodeland2-charactercountrycode.
Themodelis“CTO1”andthedefaultcountrycodeis“WW”(example:20AACTO1WW).
Specialbidmodel
ThismodelisauniqueconfigurationthathasbeennegotiatedbetweenLenovoandthecustomer.Aunique
MTMconsistsofa4-characterMT,a4-charactermodel,andanumeric2-charactercountrycodeisprovided
tothecustomertoplaceorders(example:20AA000955).Thecountrycodeassignedisnumericanddoes
notdesignateaspecificcountryorregion.ThecustommodelfactsheetfortheMTMindicateswhichcountry
thespecialbidMTMissetupfor.Specialbidofferingisnotgenerallyannounced.
Standardmodel
Standardmodels(fixedconfiguration)areannouncedandofferedtoallcustomers.TheMTMportionofthe
machinelabelconsistsofa4-characterMT,a4-charactermodel,andanalphabetic2-charactercountry
code.Thecountrycodeassignedisalphabeticandrepresentsadesignatedcountryorregion(example:
20AA0009UK).
FRUidentification
UseLenovoeSupporttoidentifymajorFRUs,FRUpartnumbers,andFRUdescriptionsforaproductat
anMT-serialnumberlevel.ExamplesofmajorFRUsareharddiskdrive,systemboard,andliquidcrystal
display(LCD).
ToidentifythemajorFRUsforaproduct,dothefollowing:
1.Gotohttp://support.lenovo.com/ibasepartslookup.
2.TypetheMachineTypeandSerialNumberinthecorrespondingfields.
3.TapSubmit.
eSupportalsocanbeusedtoviewthegeneralFRUlistforaproduct.TheFRUlistisagenerallistof
componentsanddoesnotcontainspecificmodelinformation.
20ThinkPadX1TabletHardwareMaintenanceManual


22ThinkPadX1TabletHardwareMaintenanceManual

Chapter3.Generalcheckout
Thischapterintroducesfollowinginformation:
•“Whattodofirst”onpage23
•“Checkoutguide”onpage24
–“LenovoSolutionCenter”onpage24
–“Quicktestprograms”onpage24
–“UEFIdiagnosticprogram”onpage25
–“Bootablediagnosticprograms”onpage25
•“Powersystemcheckout”onpage26
Beforeyougotothecheckoutguide,besuretoreadthefollowingimportantnotes.
Important:
•Onlycertifiedtrainedpersonnelshouldservicethetablet.
•BeforereplacinganyFRU,readtheentirepageonremovingandreplacingFRUs.
•WhenyoureplaceFRUs,usenewnylon-coatedscrews.
•Beextremelycarefulduringsuchwriteoperationsascopying,saving,orformatting.
•ReplaceaFRUonlywithanotherFRUofthecorrectmodel.WhenyoureplaceaFRU,ensurethatthe
modelofthemachineandtheFRUpartnumberarecorrectbyreferringtotheFRUpartslist.
•AFRUshouldnotbereplacedbecauseofasingle,unreproduciblefailure.Singlefailurescanoccur
foravarietyofreasonsthathavenothingtodowithahardwaredefect,suchascosmicradiation,
electrostaticdischarge,orsoftwareerrors.ConsiderreplacingaFRUonlywhenaproblemrecurs.Ifyou
suspectthataFRUisdefective,cleartheerrorlogandrunthetestagain.Iftheerrordoesnotrecur,do
notreplacetheFRU.
•Becarefulnottoreplaceanon-defectiveFRU.
Whattodofirst
WhenyoudoreturnaFRU,youmustincludethefollowinginformationinthepartsexchangeformor
partsreturnformthatyouattachtoit:
1.Nameandphonenumberofservicetechnician
2.Dateofservice
3.Dateonwhichthemachinefailed
4.Dateofpurchase
5.FailingFRUnameandpartnumber
6.Machinetype,modelnumber,andserialnumber
7.Customer'snameandaddress
Note:Duringthewarrantyperiod,thecustomermayberesponsibleforrepaircostsifthetabletdamage
wascausedbymisuse,accident,modification,unsuitablephysicaloroperatingenvironment,orimproper
maintenancebythecustomer.Followingisalistofsomecommonitemsthatarenotcoveredunderwarranty
andsomesymptomsthatmightindicatethatthesystemwassubjectedtostressbeyondnormaluse.
Beforecheckingproblemswiththetablet,determinewhetherthedamageiscoveredunderthewarrantyby
referringtothefollowinglist:
Thefollowingarenotcoveredunderwarranty:
•LCDpanelcrackedfromtheapplicationofexcessiveforceorfrombeingdropped
•Scratched(cosmetic)parts
•Distortion,deformation,ordiscolorationofthecosmeticparts
•Plasticparts,latches,pins,orconnectorsthathavebeencrackedorbrokenbyexcessiveforce
•Damagecausedbyliquidspilledintothesystem
•DamagecausedbytheimproperinsertionofaPCCardortheinstallationofanincompatiblecard
©CopyrightLenovo201623

•Fusesblownbyattachmentofanonsupporteddevice
•Forgottentabletpassword(makingthetabletunusable)
•Stickykeyscausedbyspillingaliquid
•Damagecausedduetouseofanincorrectacpoweradapter
Thefollowingsymptommightindicatedamagecausedbynonwarrantedactivities:
•Missingpartsmightbeasymptomofunauthorizedserviceormodification.
Checkoutguide
UsethefollowingproceduresasaguideinidentifyingandcorrectingproblemswiththeThinkPadtablet
computers.
Note:ThediagnostictestsareintendedtotestonlyThinkPadproducts.Theuseofnon-ThinkPadproducts,
prototypecards,ormodifiedoptionscanleadtofalseindicationsoferrorsandinvalidsystemresponses.
1.Identifythefailingsymptomsinasmuchdetailaspossible.
2.Verifythesymptoms.T rytore-createthefailurebyrunningthediagnostictestorbyrepeatingthe
operation.
LenovoSolutionCenter
TheLenovoSolutionCenterprogramenablesyoutotroubleshootandresolvetabletproblems.Itcombines
diagnostictests,systeminformationcollection,securitystatus,andsupportinformation,alongwithhints
andtipsformaximumsystemperformance.
TheLenovoSolutionCenterprogramisavailablefordownloadathttp://www.lenovo.com/diags.
ToruntheLenovoSolutionCenterprogram,dothefollowing:
1.GotoControlPanel.
2.TapSystemandSecurity➙Lenovo-SystemHealthandDiagnostics.
3.Followtheinstructionsonthescreen.
FormoreinformationabouttheLenovoSolutionCenterprogram,refertothehelpinformationsystem
oftheprogram.
Quicktestprograms
Runquicktestprogramstotroubleshootandresolvetabletproblems,especiallywhenthetabletdoesnot
havetheLenovoSolutionCenterprograminstalled.
Todownloadandinstallaquicktestprogram,gotohttp://www.lenovo.com/diags,andfollowtheinstructions
ontheWebsite.
Torunatestusingaquicktestprogram,dothefollowing:
1.GototheC:\SWTOOLS\ldiagdirectory.
2.Double-clickthelsc_lite.exefile.
3.WhentheUserAccountControlwindowopens,ifany,clickYes.
4.Selectthedeviceclasstobetested.
5.Selectthedevicestobetested.
6.Selectthetesttobeperformed.
24ThinkPadX1TabletHardwareMaintenanceManual

7.Followtheinstructionsonthescreentostartthetest.Whenaproblemisdetected,information
messagesaredisplayed.Refertothemessagestotroubleshoottheproblem.
UEFIdiagnosticprogram
AUEFIdiagnosticprogramispreinstalledonthetablet.Itenablesyoutotestmemorymodulesandinternal
storagedevices,viewsysteminformation,andcheckandrecoverbadsectorsoninternalstoragedevices.
ToruntheUEFIdiagnosticprogram,dothefollowing:
Note:Beforeyoustart,connectyourtablettoakeyboard.Usetheexternalkeyboardtoperforrmthe
followingoperations.
1.Restartthetablet.Whenthelogoscreenisdisplayed,repeatedlypressandreleasetheF10key.The
mainscreenoftheUEFIdiagnosticprogramisdisplayed.
Notes:
•Ifthetabletcannotbeturnedon,goto“Powersystemcheckout”onpage26,andcheckthe
powersources.
•Ifanerrorcodeisdisplayed,goto“Symptom-to-FRUindex”onpage31forerrorcodedescriptions
andtroubleshootinghints.
2.Followtheinstructionsonthescreentousethediagnosticprogram.
Theoptionsonthemainscreenareasfollows:
Note:TheitemsonthemainscreenoftheUEFIdiagnosticprogramaresubjecttochange.
Table1.ItemsonthemainscreenoftheUEFIdiagnosticprogram
TestsTools
•QuickMemoryTest
•QuickStorageDeviceTest
•LCDtest
•PCI-etest
•ExitApplication
•SystemInformation
•Generateconfigurationfile
•Executefromconfigurationfile
Bootablediagnosticprograms
IfthetabletyouareservicingisnotinstalledwiththeUEFIdiagnosticprogram,youcandownloada
bootablediagnosticprogramfromtheLenovoSupportWebsite.Thebootablediagnosticprogramsenable
youtotesttabletmemoryandinternalstoragedevices,viewsysteminformation,andcheckandrecover
theinternalstoragedevices.
Tousethebootablediagnosticprograms,youcancreateabootablediagnosticmediumonaUniversal
SerialBus(USB)deviceorCD.
Tocreateabootablediagnosticmedium,dothefollowing:
1.Gotohttp://www.lenovo.com/diags.
2.TapLenovoBootableDiagnostics.
3.FollowtheinstructionsontheWebsitetocreateabootablediagnosticmedium.
Tousethediagnosticmediumyouhavecreated,dothefollowing:
1.Connectthebootablediagnosticmediumtothetablet.
Chapter3.Generalcheckout25

2.Restartthetablet.Whenthelogoscreenisdisplayed,tapTointerruptnormalstartup,pressEnter
ortaphereonthescreen.
Notes:
•Ifthetabletcannotbeturnedon,goto“Powersystemcheckout”onpage26,andcheckthe
powersources.
•Ifanerrorcodeisdisplayed,goto“Symptom-to-FRUindex”onpage31forerrorcodedescriptions
andtroubleshootinghints.
3.TapF12onthescreenandfollowtheinstructionstostartthetabletfromthebootablediagnostic
medium.
4.Followtheinstructionsonthescreentousethediagnosticprogram.
Powersystemcheckout
Toverifyasymptom,dothefollowing:
1.Turnoffthetablet.
2.Connecttheacpoweradapter.
3.Turnonthetablet.Ifthetabletcanbeturnedon,itmeansthateitherthebatteryortheacpower
adapterisfunctional.
4.Insertastraightenedpaperclipintotheemergencyresetholetoresetthetablet.Ifthetabletisstill
poweredon,itmeansthattheacpoweradapterisfunctional.
5.Turnoffthetablet.
6.Disconnecttheacpoweradapterandturnonthetablet.Ifthetabletcanbeturnedon,itmeansthatthe
batteryisfunctional.
Ifyoususpectapowerproblem,seetheappropriateoneofthefollowingpowersupplycheckouts:
•“Checkingthebuilt-inbattery”onpage26
•“Checkingtheoperationalcharging”onpage27
•“Checkingthecoin-cellbattery”onpage27
•“Checkingtheacpoweradapter”onpage27
Checkingthebuilt-inbattery
ThistabletsupportsonlybatteriesspeciallydesignedforthisspecificsystemandmanufacturedbyLenovo
oranauthorizedbuilder.Thesystemdoesnotsupportunauthorizedbatteriesorbatteriesdesignedforother
systems.Ifanunauthorizedbatteryorabatterydesignedforanothersystemisinstalled,thesystemwill
notcharge.
Attention:Lenovohasnoresponsibilityfortheperformanceorsafetyofunauthorizedbatteries,and
providesnowarrantiesforfailuresordamagearisingoutoftheiruse.
Taporclickthebattery-statusiconintheWindowsnotificationareatocheckthebatterystatus.The
battery-statusicondisplaysthepercentageofbatterypowerremainingandhowlongyoucanuseyour
computerbeforeyoumustchargethebattery.
Ifthetabletcannotstart,dothefollowingtocheckwhetherthebuilt-inbatteryisfailed:
1.Ensurethatthetabletfailureisnotcausedbyexhaustedbatterypower.
2.Resetthetabletbyinsertingastraightenedpaperclipintotheemergencyresethole.Thenpressthe
powerbutton.Ifthetabletcannotbeturnedon,continuewiththenextstep.
3.ClearComplementaryMetalOxideSemiconductor(CMOS)bydisconnectingtheacpoweradapter,
coin-cellbattery,andbuilt-inbattery.See“1030Coin-cellbattery”onpage58and“1160Built-in
battery”onpage74.
26ThinkPadX1TabletHardwareMaintenanceManual
4.Connectthebuilt-inbatteryandacpoweradapter,andthenpressthepowerbutton.
•Ifthetabletcanbeturnedon,disconnecttheacpoweradapterfromthetablet.Ifthetabletturnsoff,
itmeansthatthebuilt-inbatteryfails.
•Ifthetabletcannotbeturnedon,replacethebuilt-inbatterywithanotherone.Ifthetabletcanbe
turnedonwiththenewbatteryinstalled,itmeansthattheoriginalbatteryfails.
Checkingtheoperationalcharging
Tocheckwhetherthebatterychargesproperlyduringoperation,dothefollowing:
1.Dischargethebatteryuntiltheremainedbatterypowerislessthan50%.
2.Performoperationalcharging.TaporclickthebatterystatusiconintheWindowsnotificationareato
displaydetailedbatteryinformation.Ifitindicatesthatthebatteryisnotcharging,replacethebattery.
3.Checkthebatterystatusagain.Ifthesameerrorstillexists,replacethesystemboard.
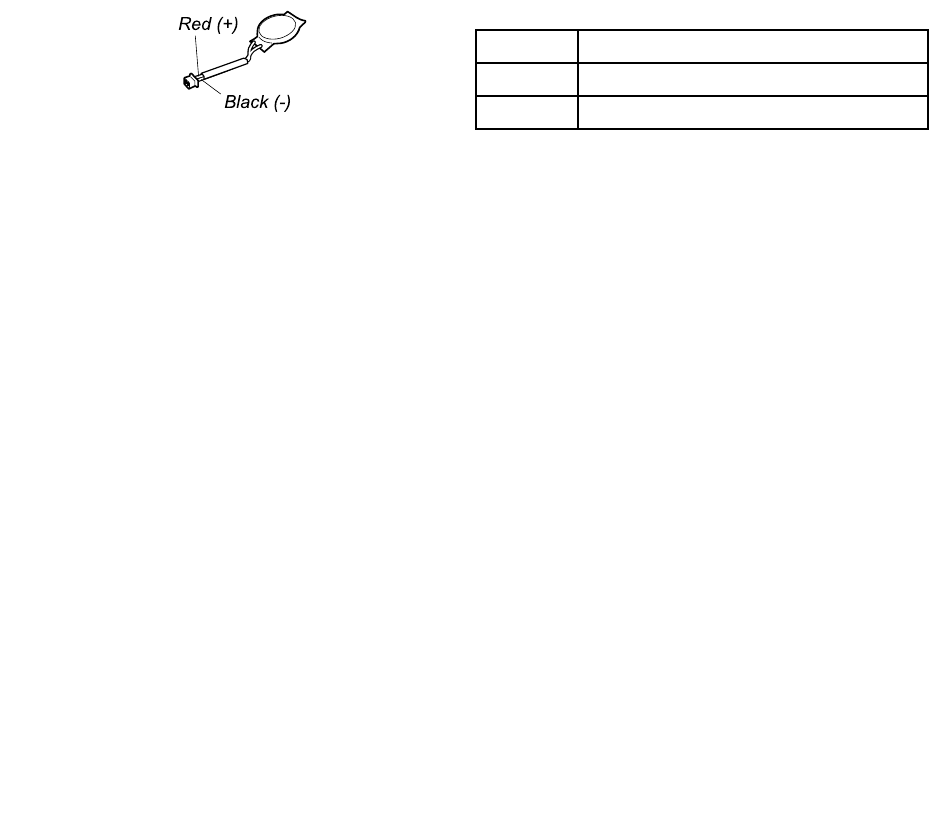
Checkingthecoin-cellbattery
Tocheckthecoin-cellbattery,dothefollowing:
1.Disabletheinternalbatterypack.See“Disablingthebuilt-inbattery”onpage50.
2.Removethecoin-cellbattery.See“1030Coin-cellbattery”onpage58.
3.Measurethevoltageofthecoin-cellbattery.Seethefollowingillustration.
WireVoltage(Vdc)
Red+2.5to+3.2
BlackGround
•Ifthevoltageiscorrect,replacethesystemboard.
•Ifthevoltageisnotcorrect,replacethecoin-cellbattery.
•Ifthecoin-cellbatterydischargesquicklyafterreplacement,replacethesystemboard.
Checkingtheacpoweradapter
ThistabletsupportsonlytheLenovoUSB-C45WACAdapter.Whentheadapterisconnectedtothetablet,
theoutputvoltageattheadapterplugrisesfrom0V(whennotconnected)to5V.Thenthepowerdelivery
communicationstarts.Theacpoweradapteroutputs20Vaccordingtothetabletoutputvoltagerequest.
Whenyouusetheacpoweradaptertochargethetabletbutnopowerischarged,seetheinstructionsinthis
topictochecktheacpoweradapter.
Note:Noisefromtheacpoweradapterdoesnotalwaysindicateadefect.
Tochecktheacpoweradapterwhenthetabletdoesnotcharge,dothefollowing:
1.Disconnecttheacpoweradapterfromthetablet.
2.Connectanewacpoweradaptertothetablet.Forinformationaboutwhichacpoweradaptertoorder,
gotohttp://www.lenovo.com/serviceparts-lookup.
3.Ifthetabletcharges,replacetheacpoweradapter.
Chapter3.Generalcheckout27

28ThinkPadX1TabletHardwareMaintenanceManual

Chapter4.Relatedserviceinformation
Thischapterpresentsthefollowinginformation:
•“Windowsrecoveryapps”onpage29
•“LenovofactoryrecoveryUSBkey”onpage30
•“Usingpasswords”onpage31
•“Symptom-to-FRUindex”onpage31
Windowsrecoveryapps
TheWindowsrecoveryappsenableyoutoresetyourtabletoruseadvancedstartupoptions.
ItisrecommendedthatyoucreatearecoveryUSBdriveasearlyaspossible.StoretherecoveryUSBdrive
asabackuporreplacementfortheWindowsrecoveryapps.
Formoreinformation,see“CreatingandusingarecoveryUSBdrive”onpage30.
Resettingyourtablet
Ifyourtabletdoesnotperformwell,youmightconsiderresettingyourtablet.Intheresettingprocess,you
canchoosetokeepyourfilesorremovethem,andthenreinstalltheWindowsoperatingsystem.
Torefreshyourtablet,dothefollowing:
Note:Thegraphicaluserinterface(GUI)itemsoftheoperatingsystemmightchangewithoutnotice.
1.OpentheStartmenu.TapSettings➙Update&security➙Recovery.
Note:SettingsmightnotbedisplayedintheStartmenu.Inthiscase,tapAllappstofindSettings.
2.IntheResetthisPCsection,tapGetstarted.
3.Followtheinstructionsonthescreentorefreshyourtablet.
Usingadvancedstartupoptions
Withadvancedstartupoptions,youcanchangethefirmwaresettingsofthetablet,changethestartup
settingsoftheWindowsoperatingsystem,startthetabletfromanexternaldevice,orrestoretheWindows
operatingsystemfromasystemimage.
Touseadvancedstartupoptions,dothefollowing:
Note:TheGUIitemsoftheoperatingsystemmightchangewithoutnotice.
1.OpentheStartmenu.TapSettings➙Update&security➙Recovery.
Note:SettingsmightnotbedisplayedintheStartmenu.Inthiscase,tapAllappstofindSettings.
2.IntheAdvancedstartupsection,tapRestartnow➙Troubleshoot➙Advancedoptions.
3.Selectadesiredstartupoption,thenfollowtheinstructionsonthescreen.
©CopyrightLenovo201629

RecoveringyouroperatingsystemiftheWindows10operatingsystem
failstostart
TheWindowsrecoveryappsonyourtabletarecapableofoperatingindependentlyfromtheWindows10
operatingsystem.ThisenablesyoutorecoverorrepairtheoperatingsystemeveniftheWindows10
operatingsystemfailstostart.
Aftertwoconsecutivefailedbootattempts,theWindowsrecoveryenvironmentstartsautomatically.Then
youcanchooserepairandrecoveryoptionsbyfollowingtheinstructionsonthescreen.
Note:Ensurethatyourtabletisconnectedtoacpowerduringtherecoveryprocess.
CreatingandusingarecoveryUSBdrive
YoucancreatearecoveryUSBdriveasabackupfortheWindowsrecoveryapps.Withtherecovery
USBdrive,youcantroubleshootandfixtheproblemsevenifthepreinstalledWindowsrecoveryappsare
damaged.
CreatingarecoveryUSBdrive
TheUSBdrivethatyouusetocreatetherecoveryUSBdrivemustbeatleast16GBofstorage.Theactual
USBcapacitythatisrequireddependsonthesizeoftherecoveryimage.
Attention:ThecreationprocessdeletesanythingstoredontheUSBdrive.Toavoiddataloss,makea
backupcopyofallthedatathatyouwanttokeep.
TocreatearecoveryUSBdrive,dothefollowing:
Note:Ensurethatyourtabletisconnectedtoacpowerduringthefollowingprocess.
1.ConnectaproperUSBdrive(atleast16GBofstorage).
2.Typerecoveryinthesearchboxonthetaskbar.ThentapCreatearecoverydrive.
3.TapYesintheUserAccountControlwindowtoallowtheRecoveryMediaCreatorapptostart.
4.IntheRecoveryDrivewindow,followtheon-screeninstructionstocreatearecoveryUSBdrive.
UsingtherecoveryUSBdrive
Ifyoucannotstartyourtablet,usetherecoveryUSBdrivetorecoveryourtablet.
TousearecoveryUSBdrive,dothefollowing:
Note:Ensurethatyourtabletisconnectedtoacpowerduringthefollowingprocess.
1.ConnecttherecoveryUSBdrivetothetablet.
2.Restartthetablet.Taparound“PressEnterortouchhere”untiltheThinkPadTabletSetupappstarts.
3.TapStartup.IntheBootsubmenu,dragtherecoverydrivetothefirstplacetoselectitastheboot
device.
4.Saveconfigurationchangesandrestartthetablet.
5.Selectacorrespondingrecoverysolutionaccordingtoyoursituation.Thenfollowtheinstructionson
thescreentocompletetheprocess.
LenovofactoryrecoveryUSBkey
LenovofactoryrecoveryUSBkeyenablesyoutoresetyourtablettothefactorydefaultsettings.
30ThinkPadX1TabletHardwareMaintenanceManual

ToobtainaLenovofactoryrecoveryUSBkey,contactLenovoCustomerSupportCenter.Shippingand
handlingfeesapply.TelephonenumbersfortheLenovoSupportCenterareavailableat:
http://www.lenovo.com/support/phone
Note:TheLenovofactoryrecoveryUSBkeymightnotsupportcertainoperatingsystems.ContactLenovo
CustomerSupportCenterformoreinformation.
TousetheLenovofactoryrecoveryUSBkey,dothefollowing:
Note:Ensurethatyourtabletisconnectedtoacpowerduringthefollowingprocess.
1.Turnoffthetablet,waitforaboutfiveseconds,andthenconnecttheLenovofactoryrecoveryUSB
keytoyourtablet.
2.Restartthetablet.Taparound“PressEnterortouchhere”untiltheThinkPadTabletSetupappstarts..
3.TapStartup.OntheBootsubmenu,dragUSBCD/DVDorUSBHDDtothetoptomakeitthefirst
startupdevice.
4.TapSave,andthentapYestosaveyourconfiguration.
5.TapRestartandfollowtheon-screeninstructionstorestartthetablet.Afterthetabletrestarts,the
recoveryapprunsautomatically.
6.Followtheon-screeninstructionstoresetyourtablettothefactorydefaultsettings.
Usingpasswords
Youcansetasupervisorpasswordtopreventyourtabletfromunauthorizeduse.
SupervisorpasswordprotectsthesysteminformationstoredinThinkPadTabletSetup.Withoutthe
supervisorpassword,noonecanchangetheconfigurationofthetablet.
Thesystemadministratorcansetthesamesupervisorpasswordonmanytabletstomakeadministration
easier.Itisrecommendedthatyourecordyourpasswordandstoreitinasafeplace.Ifyouforgetyour
supervisorpassword,Lenovocannotresetyourpassword.YoumusttakeyourtablettoaLenovoreselleror
aLenovomarketingrepresentativetohavethesystemboardreplaced.Proofofpurchaseisrequired,anda
feewillbechargedforpartsandservice.
Toset,change,orremoveapassword:
Note:Beforeyoustart,printtheseinstructionsandtheinstructionson“ThinkPadTabletSetup”oftheUser
Guide.Youalsocanscreen-capturetheinstructionsandsendthepicturestoyoursmartphoneornotebook
computersothatyoucanviewtheinstructionsduringoperation.
1.Saveallopenfiles,andexitallapps.
2.Restartthetablet.Taparound“PressEnterortouchhere”untiltheThinkPadTabletSetupappstarts.
3.TapSecurity➙Password.
4.TapEnternexttothesupervisorpassworditemandfollowtheinstructionsonthescreen.
5.Saveconfigurationchangesandexit.
Symptom-to-FRUindex
Thissectioncontainsfollowinginformation:
•“Errorcodes”onpage32
•“Intermittentproblems”onpage33
•“Undeterminedproblems”onpage33
Chapter4.Relatedserviceinformation31

Thesymptom-to-FRUindexinthissectionlistssymptomsanderrorsandtheirpossiblecauses.Themost
likelycauseislistedfirst,inboldfacetype.
Note:DotheFRUreplacementorotheractionsinthesequenceshowninthecolumnheaded“FRUor
action,insequence.”IfreplacingaFRUdoesnotsolvetheproblem,puttheoriginalpartbackinthetablet.
DonotreplaceanondefectiveFRU.
Thisindexcanalsohelpyoudetermine,duringregularservicing,whatFRUsarelikelytobereplacednext.
AnumericerrorisdisplayedforeacherrordetectedinPOSTorsystemoperation.Inthedisplays,ncan
beanynumber.
Ifnonumericcodeisdisplayed,checkthenarrativedescriptionsofsymptoms.Ifthesymptomisnot
describedthere,goto“Intermittentproblems”onpage33.
Note:ForadevicenotsupportedbydiagnosticcodesintheThinkPadtabletcomputers,seethemanualfor
thatdevice.
Errorcodes
Table2.Errorcodes
SymptomorerrorFRUoraction,insequence
0177
BadSVPdata,stopPOSTtask—Thechecksumofthe
supervisorpasswordintheEEPROMisnotcorrect.
Replacethesystemboard.Havethetabletserviced.
0183
BadCRCofSecuritySettingsinEFIVariable.Enter
ThinkPadTabletSetup.
ChecksumoftheSecuritysettingsintheEFIVariable
isnotcorrect.EnterThinkPadTabletSetuptocheck
Securitysettings.PressF10,andthenpressEnterto
restartthesystem.Ifyourtabletstillhasaproblem,have
thetabletserviced.
0187
EAIAdataaccesserror.
TheaccesstoEEPROMisfailed.Havethetabletserviced.
0188
InvalidRFIDSerializationInformationArea.
TheEEPROMchecksumisnotcorrect(block#0and1).
Thesystemboardshouldbereplaced,andtheboxserial
numbershouldbereinstalled.Havethetabletserviced.
0189
InvalidRFIDconfigurationinformationarea.
TheEEPROMchecksumisnotcorrect(block#4and
5).Thesystemboardshouldbereplaced,andtheUUID
shouldbereinstalled.Havethetabletserviced.
0190
Criticallow-batteryerror.
Thetabletturnedoff,becausethebatteryislow.Connect
theacpoweradaptertothetabletandchargethebattery.
0191
SystemSecurity—InvalidRemoteChangerequested.
Thesystemconfigurationchangehasfailed.Confirmthe
operationandtryagain.Tocleartheerror,enterThinkPad
TabletSetup.
0199
SystemSecurity-Securitypasswordretrycount
exceeded.
Thismessageisdisplayedifyouenterawrongsupervisor
passwordmorethanthreetimes.Confirmthesupervisor
passwordandtryagain.Tocleartheerror,enterthe
ThinkPadTabletSetup.
0270
RealTimeClockError.
SystemRealTimeClockisnotfunctional.Havethetablet
serviced.
0271
CheckDateandTimesettings.
Neitherthedatenorthetimeissetinthetablet.Setthe
dateandtime,usingtheThinkPadT abletSetupprogram.
32ThinkPadX1TabletHardwareMaintenanceManual

Table2.Errorcodes(continued)
SymptomorerrorFRUoraction,insequence
1802
Unauthorizednetworkcardispluggedin—Turnoffand
removethenetworkcard.
Thewirelessnetworkcardisnotsupportedonthistablet.
Removeit.
1820
Morethanoneexternalfingerprintreaderisattached.
Poweroffandremoveallbutthereaderthatyousetup
withinyourmainoperatingsystem.
Poweroffandremoveallbutthereaderthatyousetup
withinyourmainoperatingsystem.
2101
DetectionerroronSSD1(M.2)
TheM.2SSDdeviceisnotworking.HavetheM.2SSD
deviceserviced.
2111
ReaderroronSSD1(M.2)
TheM.2SSDdeviceisnotworking.HavetheM.2SSD
deviceserviced.
2200
MachineTypeandSerialNumberareinvalid.
MachineTypeandSerialNumberareinvalid.Havethe
tabletserviced.
2201
MachineUUIDisinvalid.
MachineUUIDisinvalid.Havethetabletserviced.
Message:ThermalsensingerrorThethermalsensorhasproblem.Shutdownthetablet
immediatelyandhavethetabletserviced.
Message:Error:TheSystemUEFIVariableStorageis
nearlyfull.
Note:
Thiserrorindicatesthattheoperatingsystemor
applicationscannotcreate,modify,ordeletedatain
thenon-volatilesystemUEFIvariablestoragedueto
insufficientstoragespaceafterPOST.
Thenon-volatilesystemUEFIvariablestorageisused
bytheUEFIBIOSandbytheoperatingsystemor
applications.Thiserroroccurswhentheoperatingsystem
orapplicationsstorelargeamountsofdatainthevariable
storage.AlldataneededforPOST,suchasBIOSsetup
settings,chipsetorplatformconfigurationdata,arestored
inaseparateUEFIvariablestorage.
EnterThinkPadTabletSetupaftertheerrormessageis
displayed.Adialogaskstheuserforconfirmationto
cleanupthestorage.IftheuserselectsYes,alldatathat
werecreatedbytheoperatingsystemorapplicationsare
deletedexceptglobalvariablesdefinedbytheUnified
ExtensibleFirmwareInterfaceSpecification.Iftheuser
selectsNo,alldataiskept,buttheoperatingsystemor
applicationswillnotbeabletocreate,modify,ordelete
datainthestorage.
Ifthiserrorhappensataservicecenter,Lenovoauthorized
servicepersonnelwillcleanupthenon-volatilesystem
UEFIvariablestorageusingtheabovesolution.
Intermittentproblems
Intermittentsystemhangproblemscanbeduetoavarietyofcausesthathavenothingtodowithahardware
defect,suchascosmicradiation,electrostaticdischarge,orsoftwareerrors.FRUreplacementshouldbe
consideredonlywhenaproblemrecurs.
Whenanalyzinganintermittentproblem,dothefollowing:
1.Runthediagnostictestforthesystemboardinloopmodeatleast10times.
2.Ifnoerrorisdetected,donotreplaceanyFRUs.
3.Ifanyerrorisdetected,replacetheFRUshownbytheFRUcode.Rerunthetesttoverifythatno
moreerrorsexist.
Undeterminedproblems
Ifthediagnostictestsdidnotidentifytheadapterordevicethathasfailed,ifwrongdevicesareinstalled,
orifthesystemsimplyisnotoperating,followtheseprocedurestoisolatethefailingFRU(donotisolate
FRUsthathavenodefects).
Chapter4.Relatedserviceinformation33

Verifythatallattacheddevicesaresupportedbythetablet.
Verifythatthepowersupplybeingusedatthetimeofthefailureisoperatingcorrectly.See“Powersystem
checkout”onpage26.
1.Turnoffthetablet.
2.VisuallycheckeachFRUfordamage.ReplaceanydamagedFRU.
3.Removeordisconnectallofthefollowingdevices:
a.Non-ThinkPaddevices
b.Devicesattachedtothedockingstationortheportreplicator
c.Printer,mouse,andotherexternaldevices
d.Battery
e.Externaldiskettedriveoropticaldrive
f.PCcards
4.Turnonthetablet.
5.Determinewhethertheproblemhasbeensolved.
6.Iftheproblemdoesnotrecur,reconnecttheremoveddevicesoneatatimeuntilyoufindthefailingFRU.
7.Iftheproblemremains,replacethefollowingFRUsoneatatime(donotreplaceanon-defectiveFRU):
a.Systemboard
b.LCDassembly
34ThinkPadX1TabletHardwareMaintenanceManual
Chapter5.Locations
Thischapterintroducesthelocationsofthehardwarecomponentsonyourtablet.
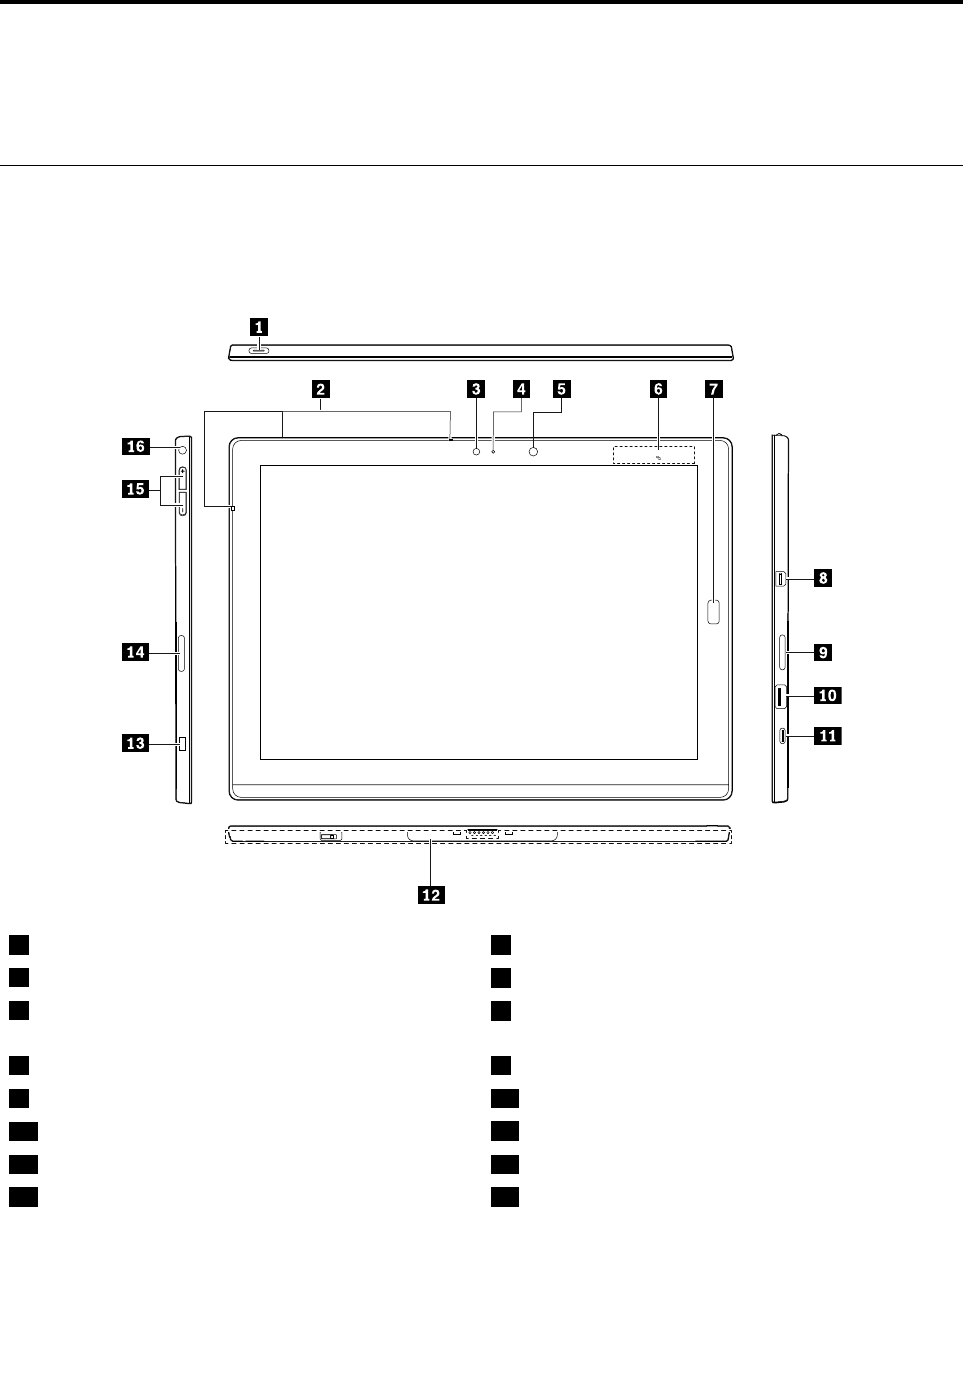
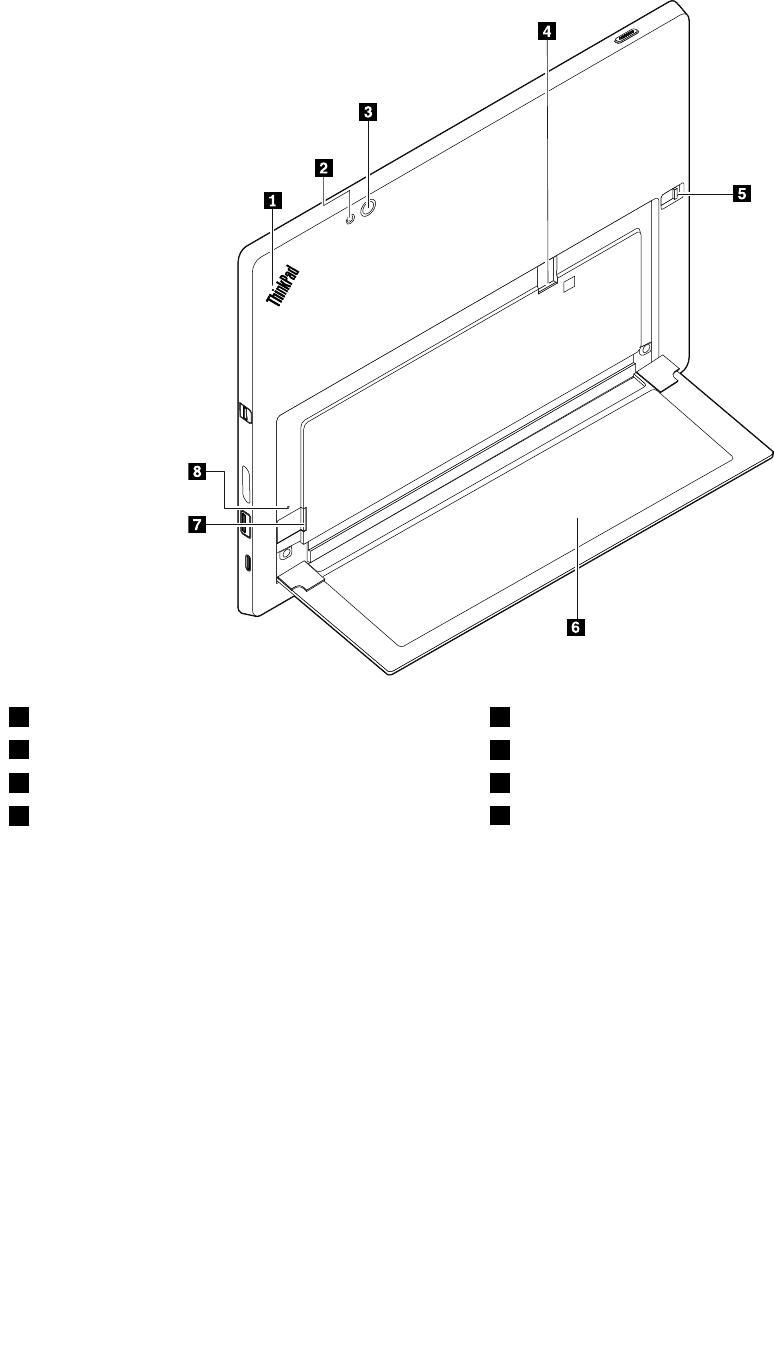
Locatingtabletcontrols,connectors,andindicators
Frontviewandsideview
Note:Thetabletmightlookslightlydifferentfromthefollowingillustration.
1Powerbutton2Microphones
3Frontcamera4Camera-statusindicator
5Ambientlightsensor6Nearfieldcommunication(NFC)touchpointorinfrared
camera*
7Fingerprintreader*8MiniDisplayPort®connector
9Speaker10USB3.0connector
11USB-Cconnector12BaseModule
13Security-lockslot14Speaker
15Volume-controlbuttons16Audioconnector
*Availableonsomemodels
©CopyrightLenovo201635
Rearview
1System-statusindicator2Rear-cameraflashlight
3Rearcamera4Nano-SIM-cardslot*
5Kickstandreleaseknob6Kickstand
7microSDcardslot8Emergency-resethole
*Availableonsomemodels
36ThinkPadX1TabletHardwareMaintenanceManual
System-statusindicator
•Blinksthreetimes:Thetabletisinitiallyconnectedtoapowersource.
•On:Thetabletisonandinuse.
•Off:Thetabletisofforinsleepmode.
LocatingFRUsandCRUs
Thistopicintroducesthefollowingserviceparts:
•“MajorFRUs”onpage38
•“Miscellaneouskitsandotherparts”onpage40
Notes:
•EachFRUisavailableforalltypesormodels,unlessotherwisespecified.
•CRUstatementforcustomers:
Youcanresolvesomeproblemswithyourproductwithareplacementpartyoucaninstallyourself,calleda
“CustomerReplaceableUnit”or“CRU.”SomeCRUsaredesignatedasself-serviceCRUsandothersare
designatedasoptional-serviceCRUs.Installationofself-serviceCRUsisyourresponsibility.Foroptional-service
CRUs,youcaneitherinstalltheCRUyourselforyoucanrequestthataServiceProviderinstalltheCRUaccording
tothewarrantyserviceforyourproduct.IfyouintendoninstallingtheCRU,LenovowillshiptheCRUtoyou.CRU
informationandreplacementinstructionsareshippedwithyourproductandareavailablefromLenovoatanytime
uponrequest.YoucanfindalistofCRUsforyourproductinthisHardwareMaintenanceManual.Anelectronic
versionofthismanualcanbefoundathttp://www.lenovo.com/support.TapGuides&Manualsandthenfollow
theon-screeninstructionstofindthemanualforyourproduct.Youmightberequiredtoreturnthedefectivepart
thatisreplacedbytheCRU.Whenreturnisrequired:(1)returninstructions,aprepaidshippinglabel,anda
containerwillbeincludedwiththereplacementCRU;and(2)youmightbechargedforthereplacementCRUif
LenovodoesnotreceivethedefectiveCRUwithinthirty(30)daysofyourreceiptofthereplacementCRU.Seeyour
LenovoLimitedWarrantydocumentationforfulldetails.
ThinkPadtabletscontainthefollowingtypesofCRUs:
Self-serviceCRUs:ExamplesofthesetypesofCRUsincludetheacpoweradapterandpowercord.
Chapter5.Locations37
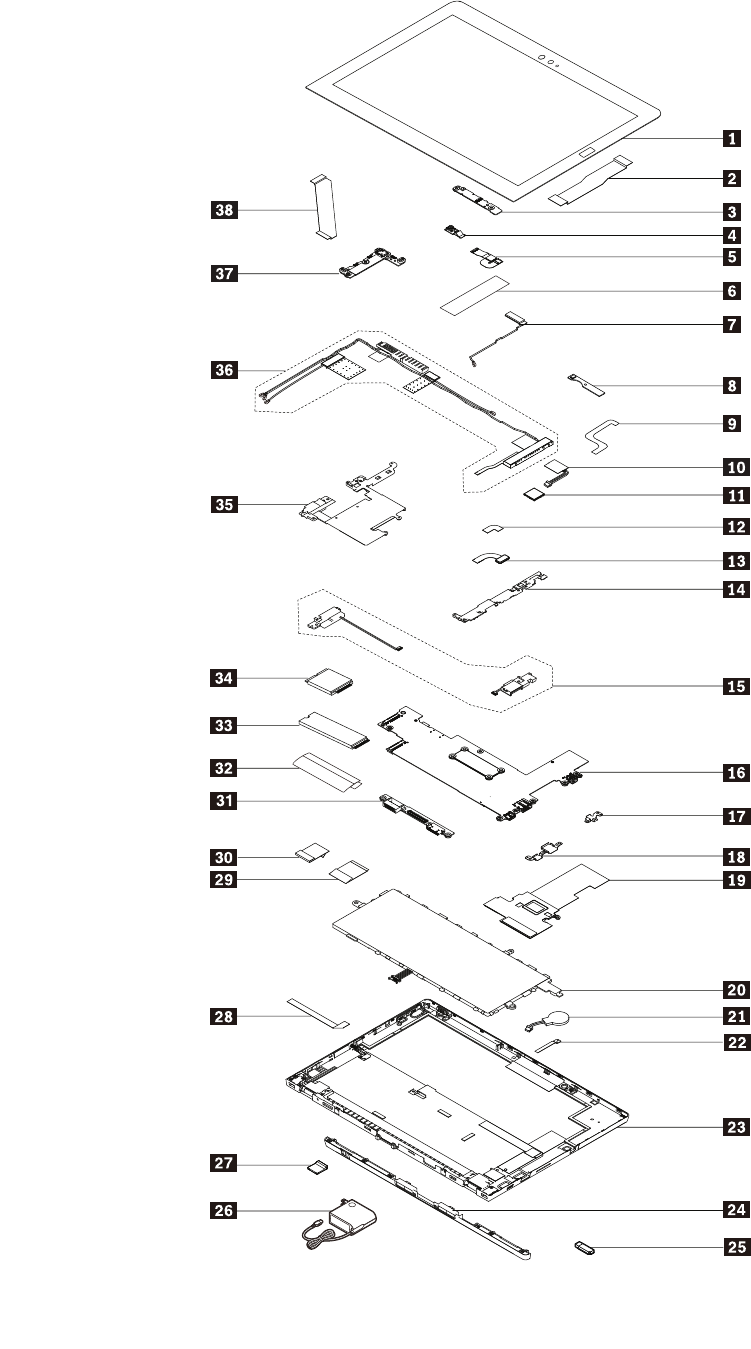
MajorFRUs
38ThinkPadX1TabletHardwareMaintenanceManual

No.FRUSelf-serviceCRUOptional-serviceCRU
1LCDmoduleNoNo
2CameracableNoNo
3CameracardNoNo
4Front-facingcameramoduleNoNo
5Rear-facingcameramoduleNoNo
6ThermalspreadsheetforWiGigantennaassembly*NoNo
7WiGigantennaassembly*NoNo
8Infraredcameracard*NoNo
9Infraredcameracable*NoNo
10NFCantennaassembly*NoNo
11NFCcard*NoNo
12NFC-cardcable*NoNo
13Fingerprint-readermodule*NoNo
14InnerframerightNoNo
15SpeakerassemblyNoNo
16SystemboardNoNo
17MiniDisplayPortbracketNoNo
18USB-connectorbracketNoNo
19ThermalmoduleNoNo
20Built-inbatteryNoNo
21Coin-cellbatteryNoNo
22ThinkLEDlightNoNo
23BackcoverassemblyNoNo
24BaseModuleYesNo
25LenovofactoryrecoveryUSBkeyYesNo
26acpoweradapterYesNo
27SIMcardcover*NoNo
28TouchcontrollercardcableNoNo
29POGO-cardcableNoNo
30LCDcableNoNo
31POGOcardNoNo
32M.2solid-state-drivemylarNoNo
33M.2solid-statedriveNoNo
34Wireless-WANcard*NoNo
35InnerframeleftNoNo
36AntennakitNoNo
37AudiocardNoNo
Chapter5.Locations39

No.FRUSelf-serviceCRUOptional-serviceCRU
38Audio-cardcableNoNo
*Availableonsomemodels
Note:TheLenovofactoryrecoveryUSBkey25isusedtorestoretheMicrosoftWindowsoperatingsystem.They
mightnotcomewiththecomputer,andausermightorderthemfromhttp://www.lenovo.com/lenovorecovery,
thoughadditionalshippingandhandlingfeesmightapply.
Miscellaneouskitsandotherparts
Table3.Miscellaneouskits
FRUdescriptionsSelf-serviceCRUOptional-serviceCRU
ScrewkitNoNo
MicrubberkitNoNo
LabelkitNoNo
Table4.Otherparts
DescriptionsSelf-serviceCRUOptional-serviceCRU
ThinkPadUSB3.0EthernetAdapter*YesNo
ThinkPadPenPro*YesNo
LenovoUSBCtoHDMIplusPowerAdapter*YesNo
LenovoUSBCtoVGAplusPowerAdapter*YesNo
USB3.0penholder*YesNo
ThinkPadX1TabletThinKeyboardPenHolder*YesNo
LenovoMini-DisplayPorttoHDMICable*YesNo
LenovoMini-DisplayPorttoVGAAdapterCable*YesNo
ThinkPadWiGigDock*YesNo
ThinkPadX1TabletProductivityModule*YesNo
ThinkPadX1Tablet3DImagingModule*YesNo
ThinkPadX1TabletPresenterModule*YesNo
ThinkPadX1TabletThinKeyboard*YesNo
*Availableonsomemodels
Connectorandcableguide
ThistopicprovidesinformationtohelpLenovoauthorizedservicetechniciansidentifyconnectorsand
cablesforreplacementpurpose.TovieweachFRUandtheexplodedillustrationofthetablet,see“Major
FRUs”onpage38.
Note:Dependingonyourtabletmodel,someconnectorsorcablesmightnotbeavailable.
40ThinkPadX1TabletHardwareMaintenanceManual
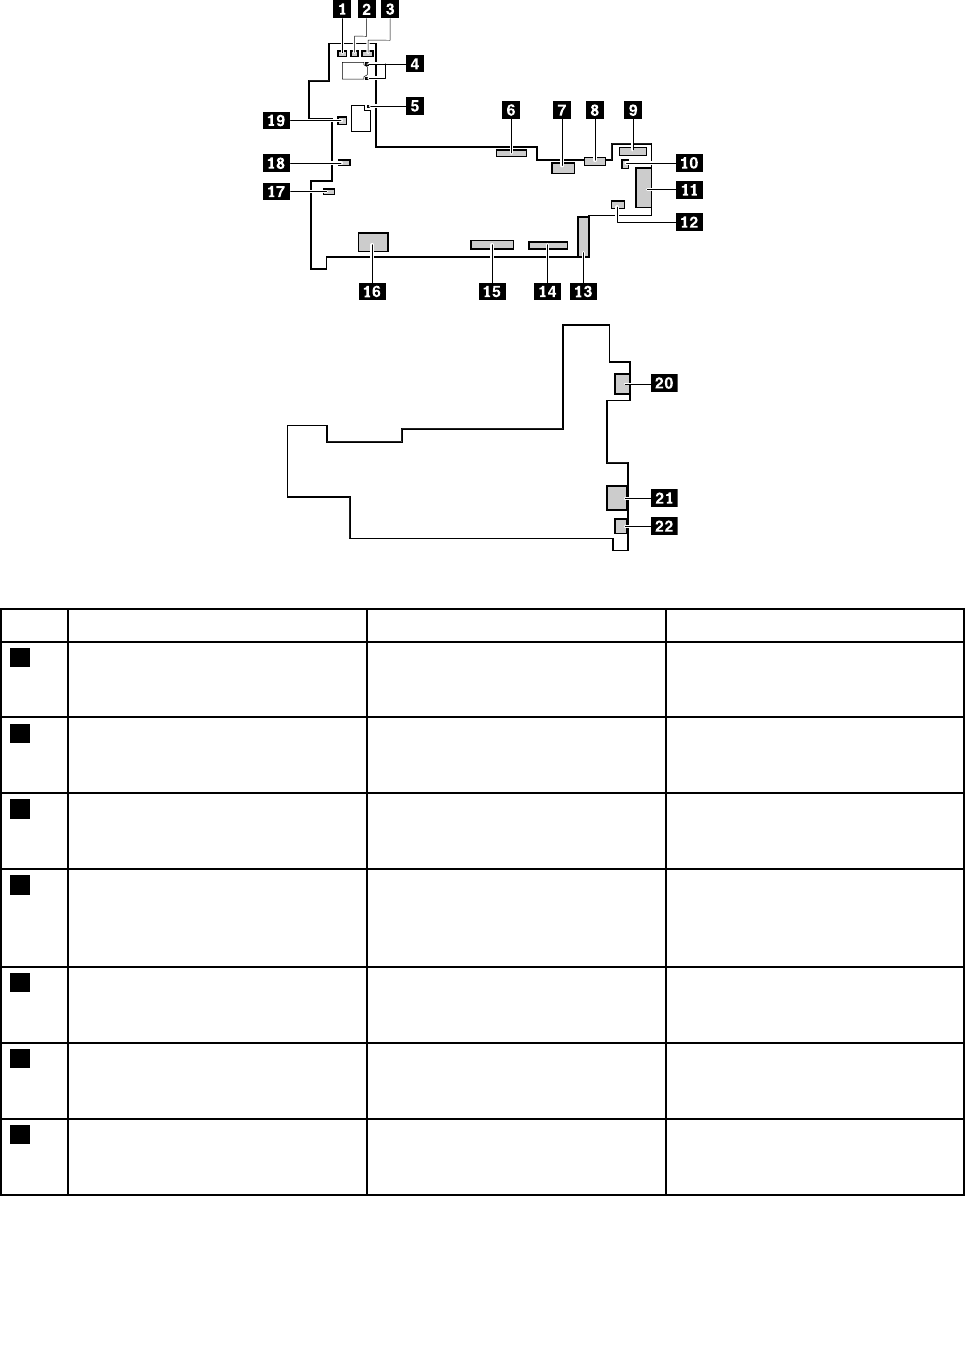
Systemboardconnectorsandcables
Table5.Systemboardconnectorandcableguide
ItemConnector(location)InternalcablerequiredCableconnection
1ThinkLEDlightconnector(internal)ThinkLEDlightcableTheThinkLEDlightcomeswitha
cable.Connectthecabletothis
connector.
2Coin-cellbatteryconnector
(internal)
Coin-cellbatterycableThecoin-cellbatterycomeswith
acable.Connectthecabletothis
connector.
3NFCcardconnectororinfrared
cameracardconnector(internal)
NFC-cardcableorinfraredcamera
cable
ConnectoneendtotheNFCcard
orinfraredcameracardandthe
otherendtothisconnector.
4Wireless-LANantennaconnector
(internal)
Wireless-LANantennaassemblyConnectoneendofthe
wireless-LANantennaassemblyto
theA-coverandtheotherendto
thisconnector.
5WiGigantennaconnector(internal)WiGigantennaassemblyConnectoneendoftheWiGig
antennaassemblytotheA-cover
andtheotherendtothisconnector.
6Cameracardconnector(internal)CameracableConnectoneendtothecamera
cardandtheotherendtothis
connector.
7Built-inbatteryconnector(internal)Built-inbatterycableThebuilt-inbatterycomeswitha
cable.Connectthecabletothis
connector.
Chapter5.Locations41

Table5.Systemboardconnectorandcableguide(continued)
ItemConnector(location)InternalcablerequiredCableconnection
8SIM-cardslot(internal)NoIfthetabletsupportswireless
WAN,insertamicroSubscriber
IdentificationModule(SIM)
cardintothisslottoestablish
wireless-WANconnections.
9Audiocardconnector(internal)Audio-cardcableConnectoneendtotheaudio
cardandtheotherendtothis
connector.
10Speakerconnector-R(internal)SpeakerassemblycableThespeakerassemblycomeswith
acable.Connectthecabletothis
connector.
11Wireless-WANcardslot(internal)NoInsertthewireless-WANcardinto
thisslot.
12Touchcontrollercardconnector
(internal)
TouchcontrollercardcableConnectoneendtothetouch
controllercardandtheotherend
tothisconnector.
13M.2solid-statedriveslot(internal)NoInserttheM.2solid-statedriveinto
thisslot.
14LCDconnector(internal)LCDcableConnectoneendtotheLCD
panelandtheotherendtothis
connector.
15POGOcardconnector(internal)POGO-cardcableConnectoneendtothePOGO
cardandtheotherendtothis
connector.
16SDcardslot(internal)NoInserttheSDcardintothisslot.
17Speakerconnector-L(internal)SpeakerassemblycableThespeakerassemblycomeswith
acable.Connectthecabletothis
connector.
18Fingerprint-readerconnector
(internal)
Fingerprint-readercableThefingerprint-readercomeswith
acable.Connectthecabletothis
connector.
19P-sensorconnector(internal)P-sensorcableThewireless-WANantenna
assemblycomeswithcables.
ConnecttheP-sensorcabletothis
connector.
20MiniDisplayPortconnector
(external)
NoConnectacompatibleprojector,
externalmonitor,orhigh-definition
televisiontothisconnector.
21USB3.0connector(external)NoConnectUSB-compatibledevices
tothisconnector.
22USB-Cconnector(external)NoConnectanHDMI-compatible
audiodeviceorvideomonitor,a
videographicsarray(VGA)monitor
orotherVGA-compatiblevideo
device,oranacpoweradapterto
thisconnectorbyusingaUSB-C
dongleordockingdevice.Or,
connectanacpoweradapter
directlytothisconnector.
42ThinkPadX1TabletHardwareMaintenanceManual
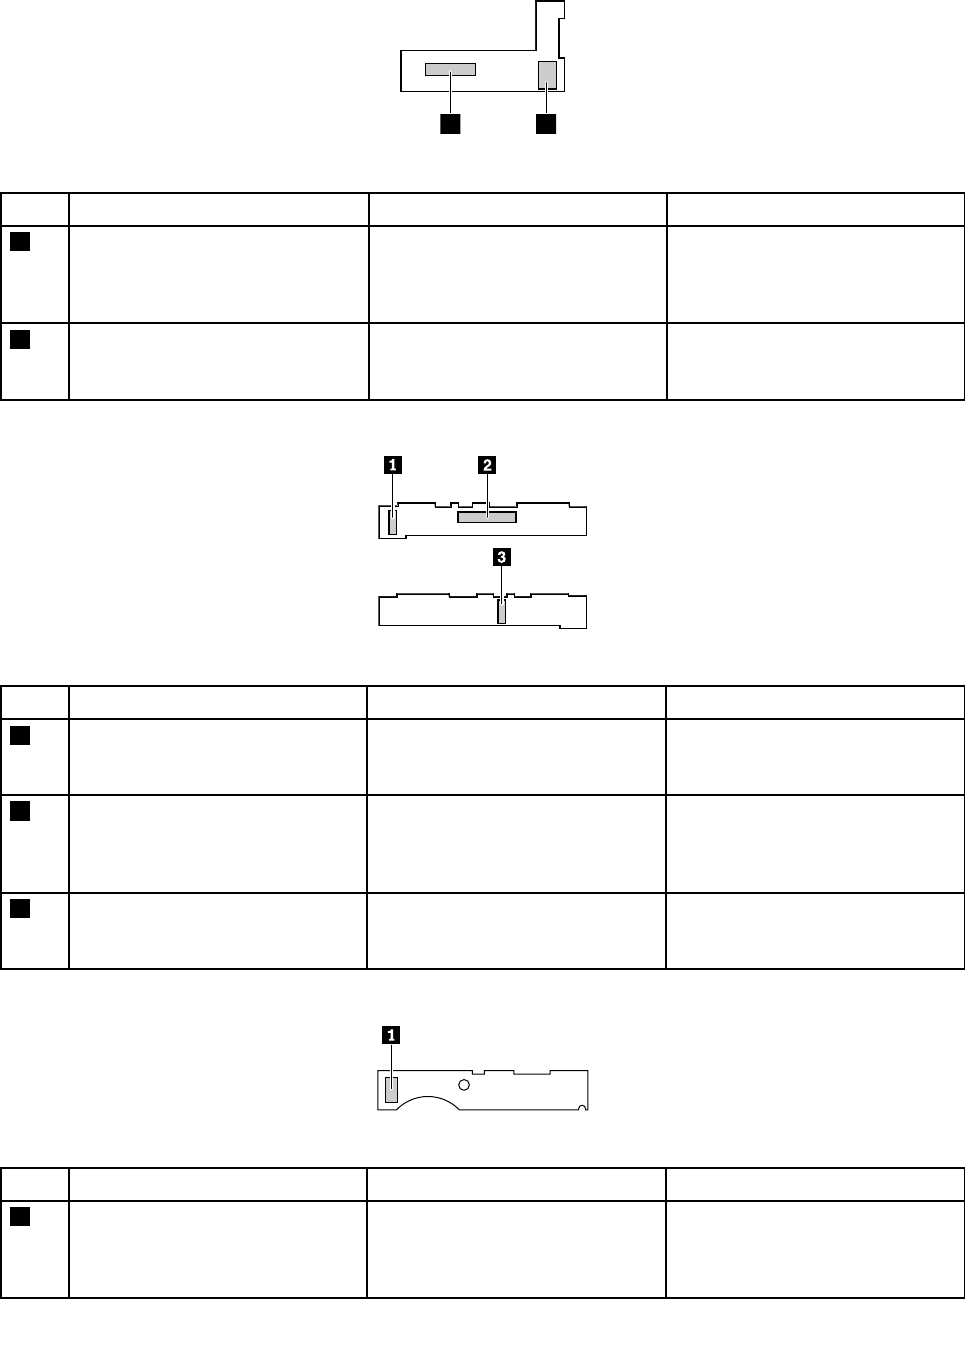
Audiocardconnectorsandcables
12
Table6.Audiocardconnectorandcableguide
ItemConnector(location)InternalcablerequiredCableconnection
1Audiocardconnector(internal)Audio-cardcableConnectoneendtotheaudio
cardconnectoronthesystem
boardandtheotherendtothis
connector.
2Audioconnector(external)NoConnectheadphonesoraheadset
with3.5-mm(0.14-inch)4-pole
plugtothisconnector.
Cameracardconnectorsandcables
Table7.Cameracardconnectorandcableguide
ItemConnector(location)InternalcablerequiredCableconnection
1Rear-facingcameraconnector
(internal)
Rear-facingcameracableTherear-facingcameracomes
withacable.Connectthecableto
thisconnector.
2Cameracardconnector(internal)CameracableConnectoneendtothecamera
cardconnectoronthesystem
boardandtheotherendtothis
connector.
3Front-facingcameraconnector
(internal)
Front-facingcameracableThefront-facingcameracomes
withacable.Connectthecableto
thisconnector.
Infraredcameracardconnectorandcable
Table8.Infraredcameracardconnectorandcableguide
ItemConnector(location)InternalcablerequiredCableconnection
1Infraredcameracardconnector
(internal)
InfraredcameracableConnectoneendtotheinfrared
cameracardconnectoronthe
systemboardandtheotherendto
thisconnector.
Chapter5.Locations43
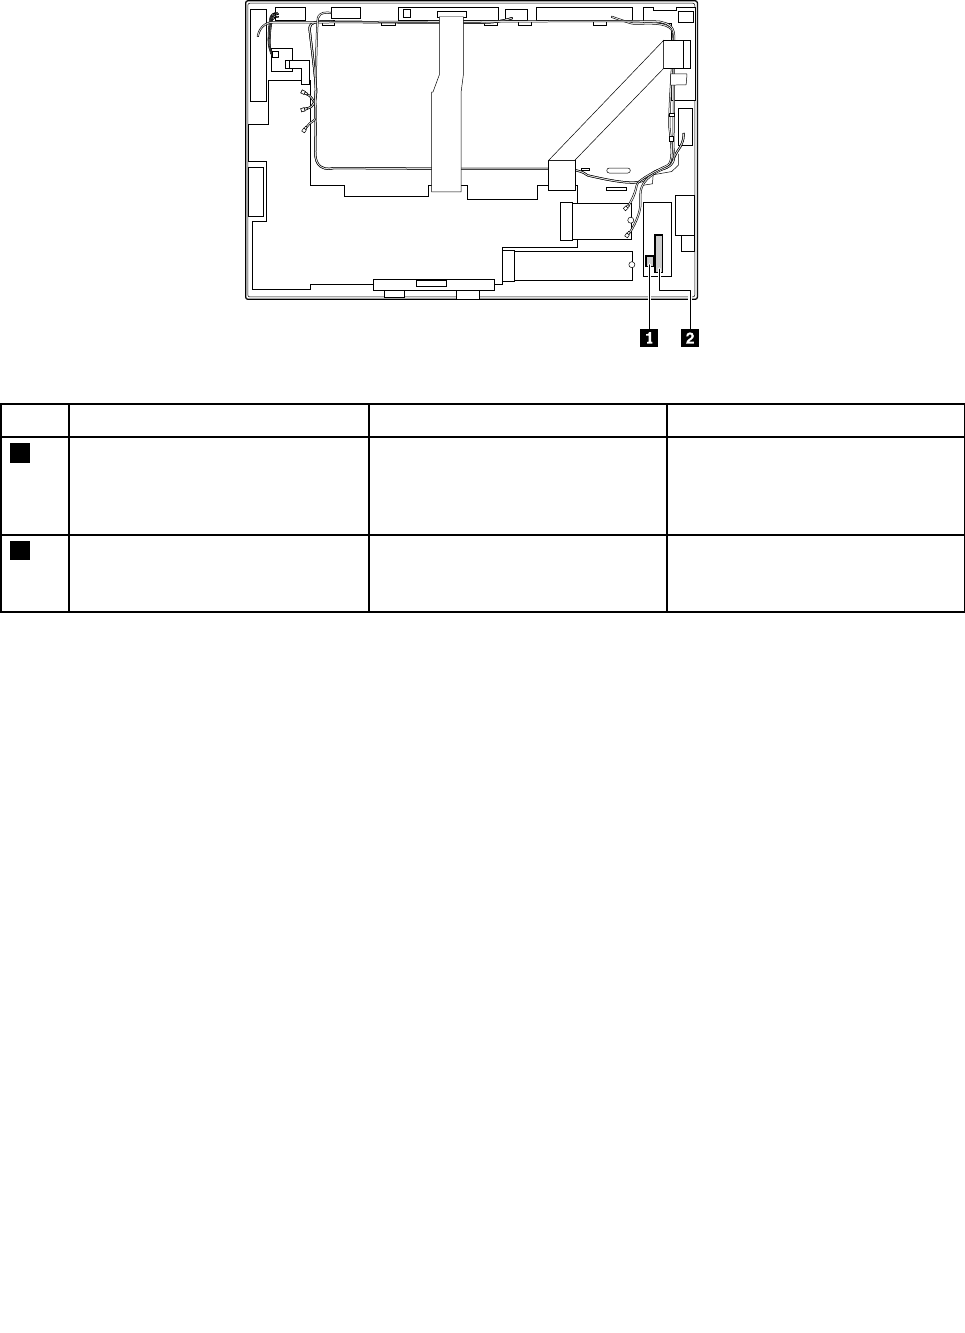
NFCcardconnectorsandcables
12
Table9.NFCcardconnectorandcableguide
ItemConnector(location)InternalcablerequiredCableconnection
1NFCantennaconnector(internal)NFCantennaassemblyConnectoneendoftheNFC
antennaassemblytotheA-cover
andtheotherendtothisconnector.
2NFCcardconnector(internal)NFC-cardcableConnectoneendtoNFCcard
connectoronthesystemboard
andtheotherendtothisconnector.
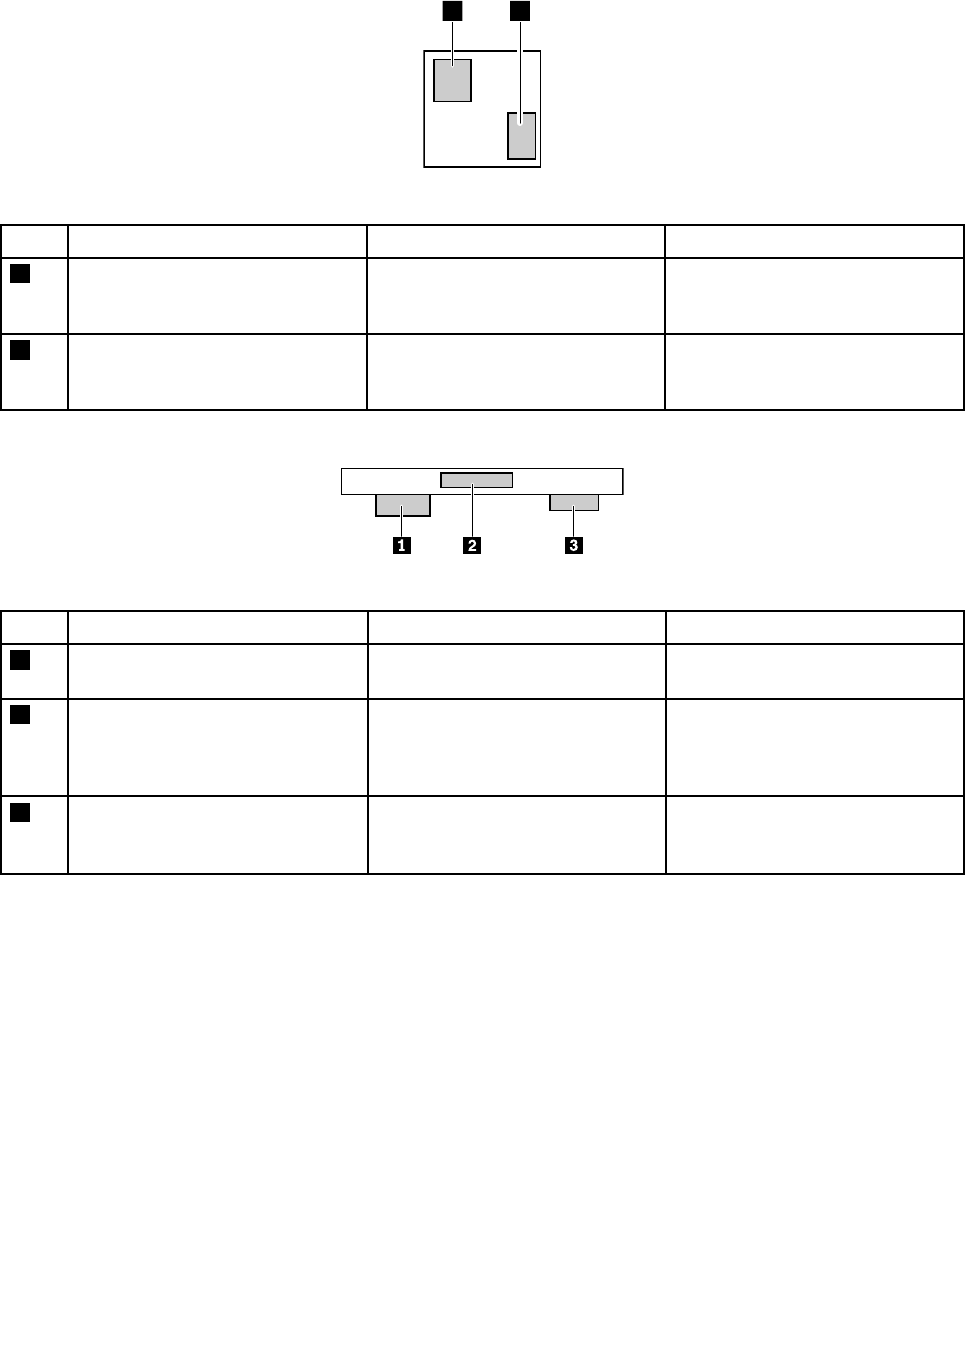
POGOcardconnectorsandcables
Table10.POGOcardconnectorandcableguide
ItemConnector(location)InternalcablerequiredCableconnection
1KeyboardPOGO
connector(external)
NoConnectThinkPadX1TabletThin
Keyboardtothisconnector.
2POGOcardconnector(internal)POGO-cardcableConnectoneendtothePOGO
cardconnectoronthesystem
boardandtheotherendtothis
connector.
3Cartridegedockingconnector
(internal)
NoConnectaprocartridge,pico
projector,3Dcamera,orbase
cartridgetothisconnector.
44ThinkPadX1TabletHardwareMaintenanceManual
Touchcontrollercardconnectorsandcables
Table11.Touchcontrollercardconnectorandcableguide
ItemConnector(location)InternalcablerequiredCableconnection
1Touchcontrollercardconnector
(internal)
TouchcontrollercardcableConnectoneendtothetouch
controllercardconnectoronthe
systemboardandtheotherendto
thisconnector.
2Touchsensorconnector(internal)TouchsensorFlexiblePrinted
Circuit(FPC)cable
TheLCDmodulecomeswitha
cable.Connectthecabletothis
connector.
Chapter5.Locations45
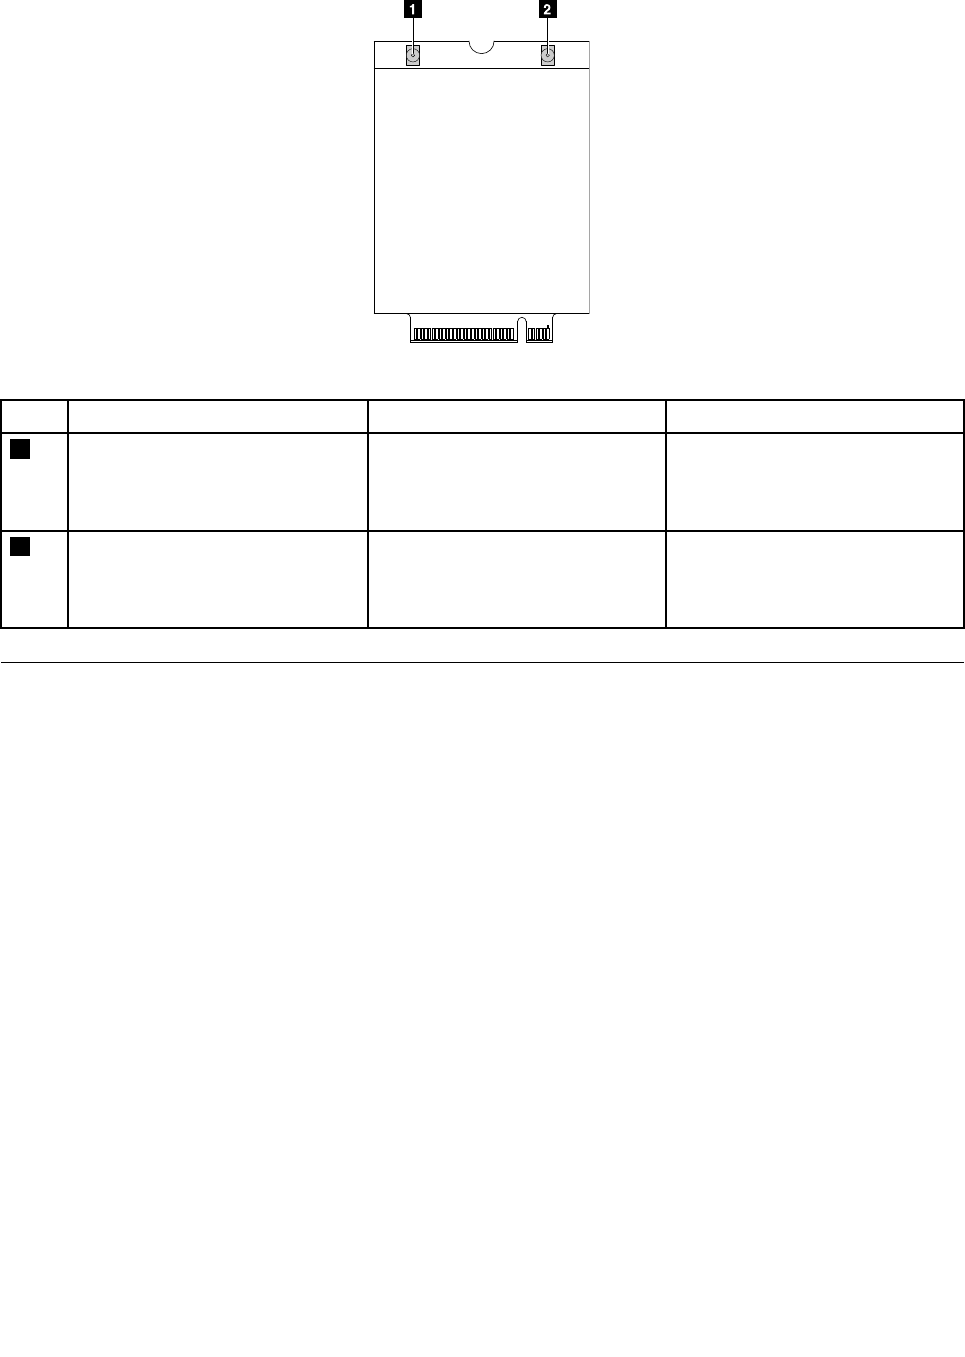
Wireless-WANcardconnectorsandcables
Table12.Wireless-WANcardconnectorandcableguide
ItemConnector(location)InternalcablerequiredCableconnection
1Wireless-WANantennaconnector
(internal)
Wireless-WANantennaassemblyConnectoneendofthe
wireless-WANorangeantennato
theA-coverandtheotherendto
thisconnector.
2Wireless-WANantennaconnector
(internal)
Wireless-WANantennaassemblyConnectoneendofthe
wireless-WANblueantenna
totheA-coverandtheotherend
tothisconnector.
LookingupFRUinformation
FordetailedFRUinformation,includingpartnumbers,descriptions,andsubstitutionpartnumbers,goto
http://www.lenovo.com/serviceparts-lookup.
46ThinkPadX1TabletHardwareMaintenanceManual
Chapter6.FRUreplacementnotices
Thischapterpresentsnoticesrelatedtoremovingandreplacingparts.Readthischaptercarefullybefore
replacinganyFRU.
CRUstatementforcustomers:
Youcanresolvesomeproblemswithyourproductwithareplacementpartyoucaninstallyourself,called
a“CustomerReplaceableUnit”or“CRU.”SomeCRUsaredesignatedasself-serviceCRUsandothers
aredesignatedasoptional-serviceCRUs.Installationofself-serviceCRUsisyourresponsibility.For
optional-serviceCRUs,youcaneitherinstalltheCRUyourselforyoucanrequestthataServiceProvider
installtheCRUaccordingtothewarrantyserviceforyourproduct.IfyouintendoninstallingtheCRU,
LenovowillshiptheCRUtoyou.CRUinformationandreplacementinstructionsareshippedwithyour
productandareavailablefromLenovoatanytimeuponrequest.Y oucanfindalistofCRUsforyour
productinthisHardwareMaintenanceManual.Anelectronicversionofthismanualcanbefoundat
http://www.lenovo.com/support.TapGuides&Manualsandthenfollowtheon-screeninstructionstofind
themanualforyourproduct.YoumightberequiredtoreturnthedefectivepartthatisreplacedbytheCRU.
Whenreturnisrequired:(1)returninstructions,aprepaidshippinglabel,andacontainerwillbeincluded
withthereplacementCRU;and(2)youmightbechargedforthereplacementCRUifLenovodoesnot
receivethedefectiveCRUwithinthirty(30)daysofyourreceiptofthereplacementCRU.SeeyourLenovo
LimitedWarrantydocumentationforfulldetails.
Screwnotices
Loosescrewscancauseareliabilityproblem.IntheThinkPadtablet,thisproblemisaddressedwithspecial
nylon-coatedscrewsthathavethefollowingcharacteristics:
•Theymaintaintightconnections.
•Theydonoteasilycomeloose,evenwithshockorvibration.
•Theyarehardertotighten.
Dothefollowingwhenyouservicethismachine:
•Keepthescrewkitinyourtoolbag.Forthepartnumberofthescrewkit,goto
http://www.lenovo.com/serviceparts-lookup.
•Itisrecommendedtousenewscrews.
•Itisrecommendedtouseeachscrewonlyonce.
Tightenscrewsasfollows:
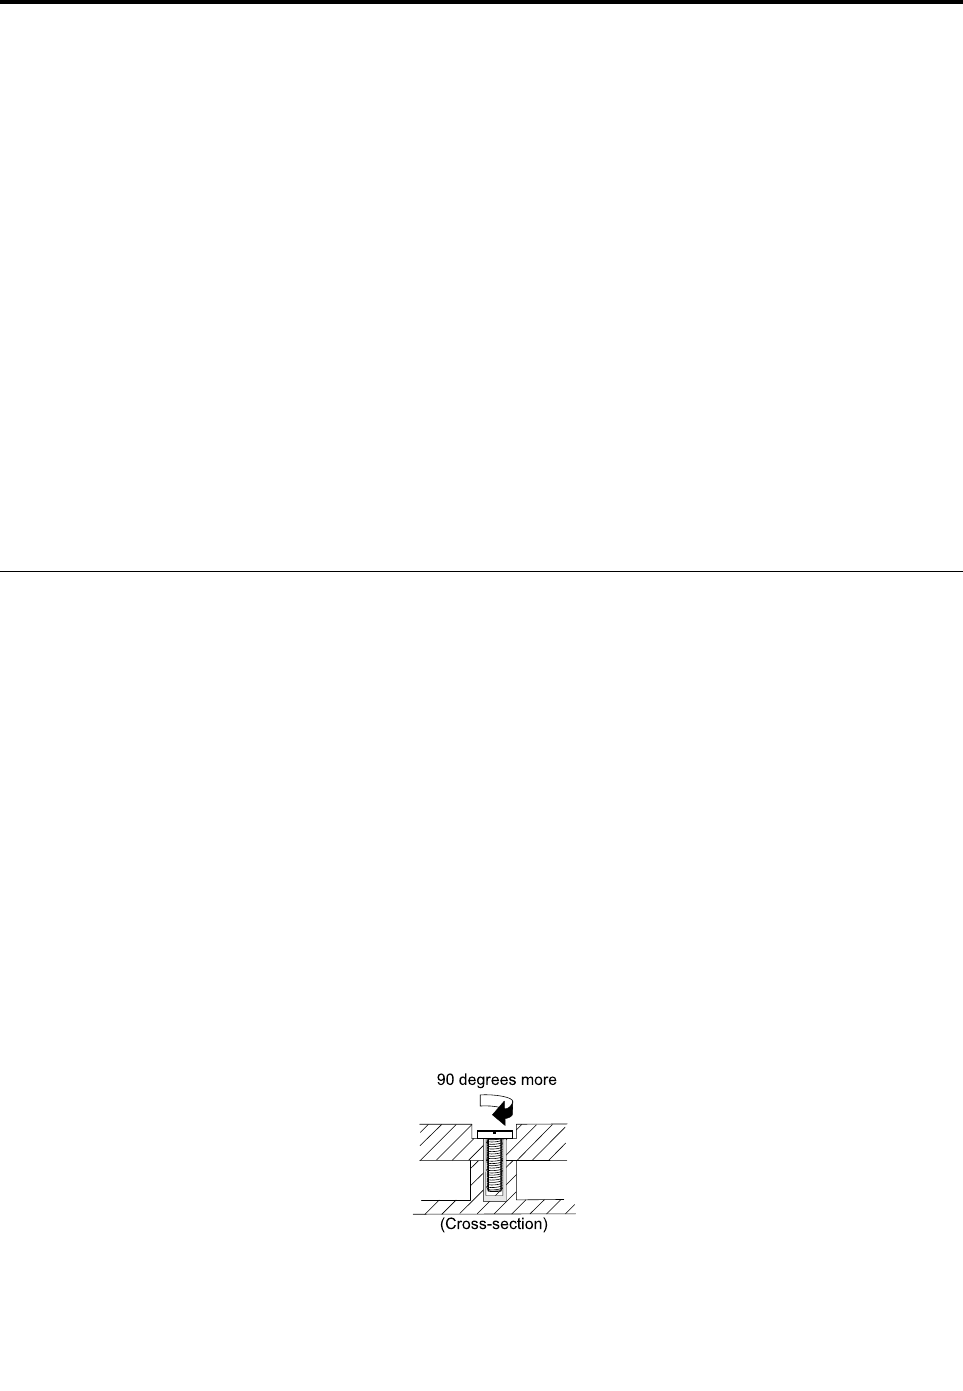
•Plastictoplastic
Turnanadditional90degreesafterthescrewheadtouchesthesurfaceoftheplasticpart.
90degreesmore
(Cross-section)
•Logiccardtoplastic
Turnanadditional180degreesafterthescrewheadtouchesthesurfaceofthelogiccard.
©CopyrightLenovo201647
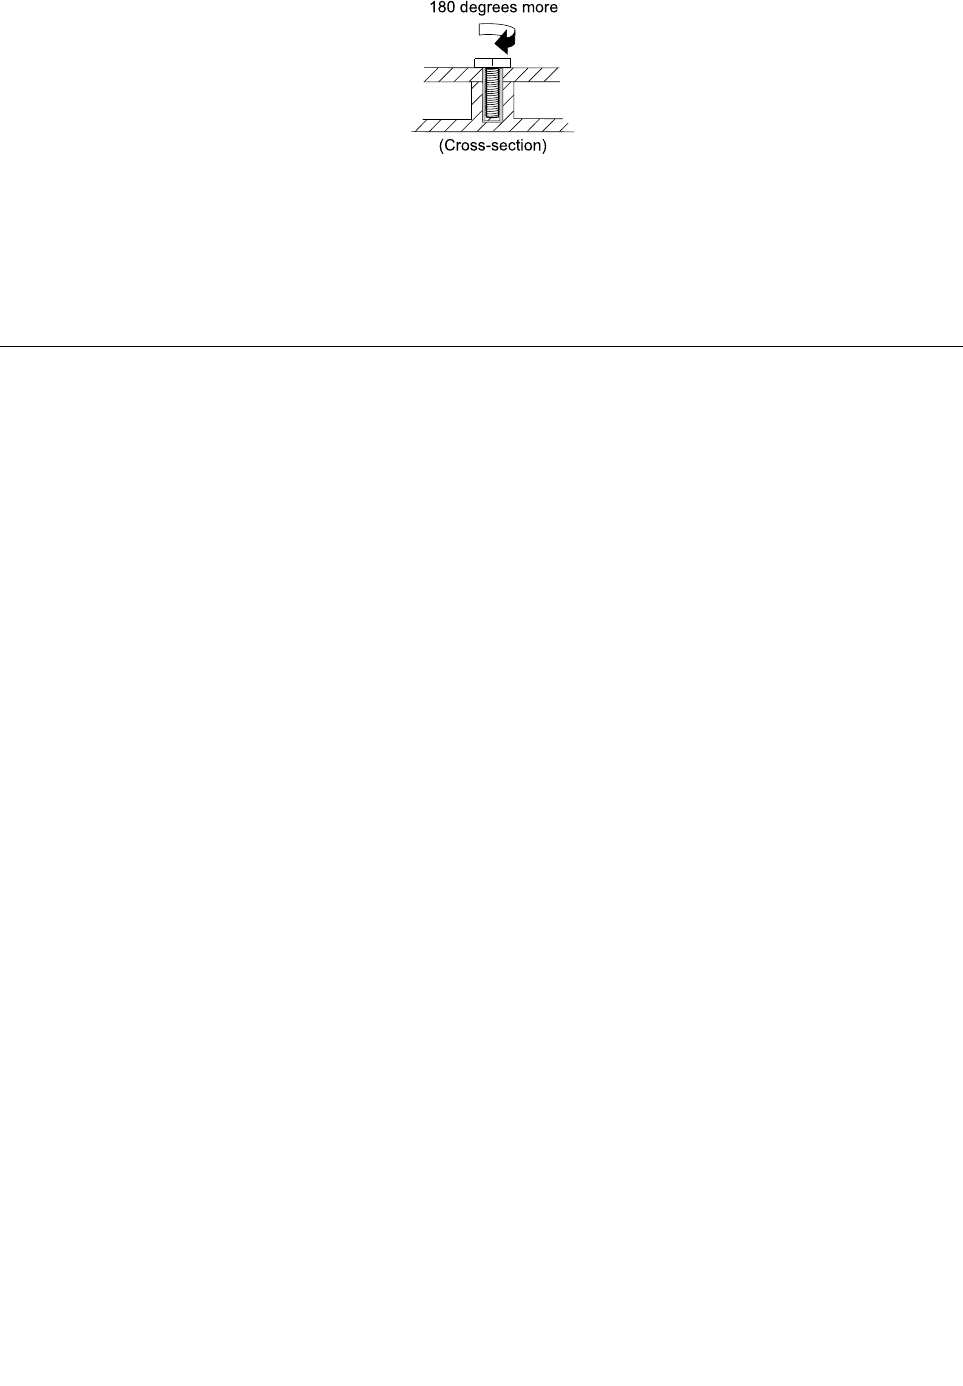
180degreesmore
(Cross-section)
Notes:
•Ensurethatyouusethecorrectscrew.Itisrecommendedtousenewscrewsforreplacements.Ifyou
haveatorquescrewdriver,tightenallscrewsfirmlytothetorquespecifiedinthescrewinformation
tableforeachstep.
•Ensurethattorquescrewdriversarecalibratedcorrectlyfollowingcountryspecifications.
Retainingserialnumbers
Instructionsforretainingserialnumbers,MTM,UUID,orassetIDcanbefoundfromtheLenovoSupport
Websiteat:
http://www.lenovo.com/support
48ThinkPadX1T abletHardwareMaintenanceManual

Chapter7.RemovingorreplacingaFRU
ThischapterprovidesinstructionsonhowtoremoveorreplaceaFRU.
CRUstatementforcustomers:
Youcanresolvesomeproblemswithyourproductwithareplacementpartyoucaninstallyourself,called
a“CustomerReplaceableUnit”or“CRU.”SomeCRUsaredesignatedasself-serviceCRUsandothers
aredesignatedasoptional-serviceCRUs.Installationofself-serviceCRUsisyourresponsibility.For
optional-serviceCRUs,youcaneitherinstalltheCRUyourselforyoucanrequestthataServiceProvider
installtheCRUaccordingtothewarrantyserviceforyourproduct.IfyouintendoninstallingtheCRU,
LenovowillshiptheCRUtoyou.CRUinformationandreplacementinstructionsareshippedwithyour
productandareavailablefromLenovoatanytimeuponrequest.Y oucanfindalistofCRUsforyourproduct
inthisHardwareMaintenanceManual.Anelectronicversionofthismanualisavailablefordownloadingat
http://www.lenovo.com/support.YoumightberequiredtoreturnthedefectiveCRU.Whenreturnisrequired:
(1)returninstructions,aprepaidshippinglabel,andacontainerwillbeincludedwiththereplacement
CRU;and(2)youmightbechargedforthereplacementCRUifLenovodoesnotreceivethedefective
partwithinthirty(30)daysofyourreceiptofthereplacementCRU.SeeyourLenovoLimitedWarranty
documentationforfulldetails.
Generalguidelines
WhenremovingorreplacingaFRU,besuretoobservethefollowinggeneralguidelines:
1.Donottrytoserviceanytabletunlessyouhavebeentrainedandcertified.Anuntrainedpersonruns
theriskofdamagingparts.
2.BeforereplacinganyFRU,reviewChapter6“FRUreplacementnotices”onpage47.
3.BeginbyremovinganyFRUsthathavetoberemovedbeforereplacingthefailingFRU.Anysuch
FRUsarelistedatthebeginningofineachFRUreplacementsection.Removethemintheorderin
whichtheyarelisted.
4.FollowthecorrectsequenceinthestepsforremovingaFRU,asgiveninthedrawingsbythenumbers
insquarecallouts.
5.Whenturningascrew,turnitinthedirectionasgivenbythearrowinthedrawing.
6.WhenremovingaFRU,removeitinthedirectionasgivenbythearrowinthedrawing.
7.ToputthenewFRUinplace,reversetheremovalprocedureandfollowanynotesthatpertainto
replacement.
8.WhenreplacingaFRU,usethecorrectscrewsasshowninthereplacementprocedures.
DANGER
BeforeremovinganyFRU,turnoffthetablet,unplugallpowercordsfromelectricaloutlets,remove
thepack,andthendisconnectanyinterconnectingcables.
Attention:AfterreplacingaFRU,donotturnonthetabletuntilyouhavemadesurethatallscrews,springs,
andothersmallpartsareinplaceandnonearelooseinsidethetablet.Verifythisbyshakingthetabletgently
andlisteningforrattlingsounds.Metallicpartsormetalflakescancauseelectricalshortcircuits.
Attention:Thesystemboardissensitiveto,andcanbedamagedby,electrostaticdischarge(ESD).Before
touchingit,establishpersonalgroundingbytouchingagroundpointwithonehandorbyusinganESDstrap.
©CopyrightLenovo201649
Beforeservicingthetablet
Beforeyouservicethistablet,dothefollowing:
1.Disablethebuilt-inbattery.See“Disablingthebuilt-inbattery”onpage50.
2.RemovetheSIMcard,SDcard,andBaseModule.See“RemovingtheSIMcard,SDcard,andBase
Module”onpage50.
Disablingthebuilt-inbattery
BeforereplacinganyFRU,ensurethatyouhavedisabledthebuilt-inbattery.
ForWindows10,disableFastStartupbeforedisablingthebuilt-inbattery.
TodisableFastStartupforWindows10,dothefollowing:
1.Fromthedesktop,typePowerinthesearchboxonthetaskbar,andselectPowerOptions.
2.ClickChangewhatthepowerbuttonsdoontheleftpane.
3.ClickChangesettingsthatarecurrentlyunavailableatthetop.
4.IfpromptedbyUserAccountControl(UAC),clickYes.
5.CleartheTurnonfaststartupcheckbox,andthenclickSavechanges.
Todisablethebuilt-inbattery,dothefollowing:
1.Turnoffyourcomputeranddisconnecttheacpoweradapterandallcablesfromthecomputer.
2.Turnonyourcomputer.Whenthelogoscreenisdisplayed,immediatelypressF1toenterThinkPad
Setup.
3.SelectConfig➙Power.ThePowersubmenuisdisplayed.
4.SelectDisablebuilt-inbatteryandpressEnter.
5.SelectY esintheSetupConfirmationwindow.Thebuilt-inbatteryisdisabledandthecomputerturnsoff
automatically.Waitthreetofiveminutestoletthecomputercool.
RemovingtheSIMcard,SDcard,andBaseModule
Removethefollowingitemsbeforeyouservicethetablet:
•SIMcard(onsomemodels)
•SDcard(onsomemodels)
•BaseModule
RemovalstepsoftheSIMcard
50ThinkPadX1T abletHardwareMaintenanceManual
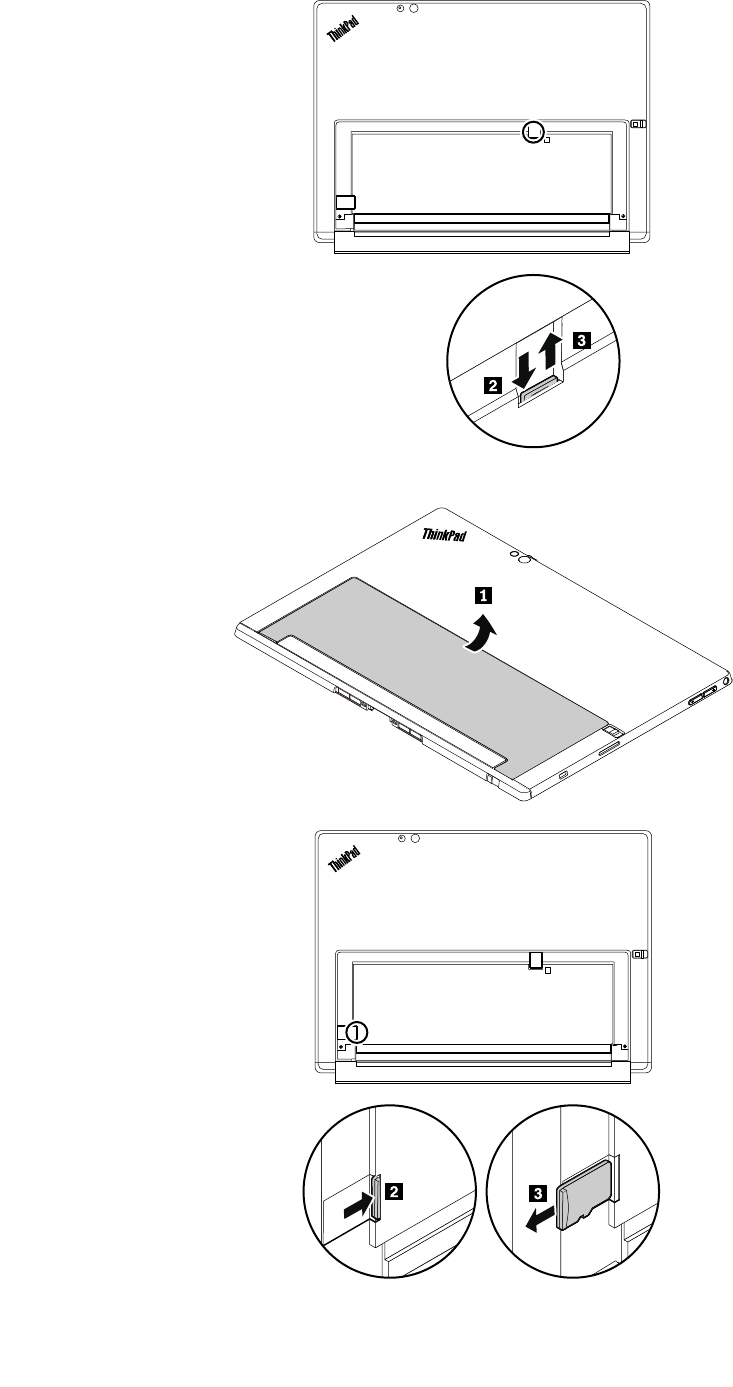
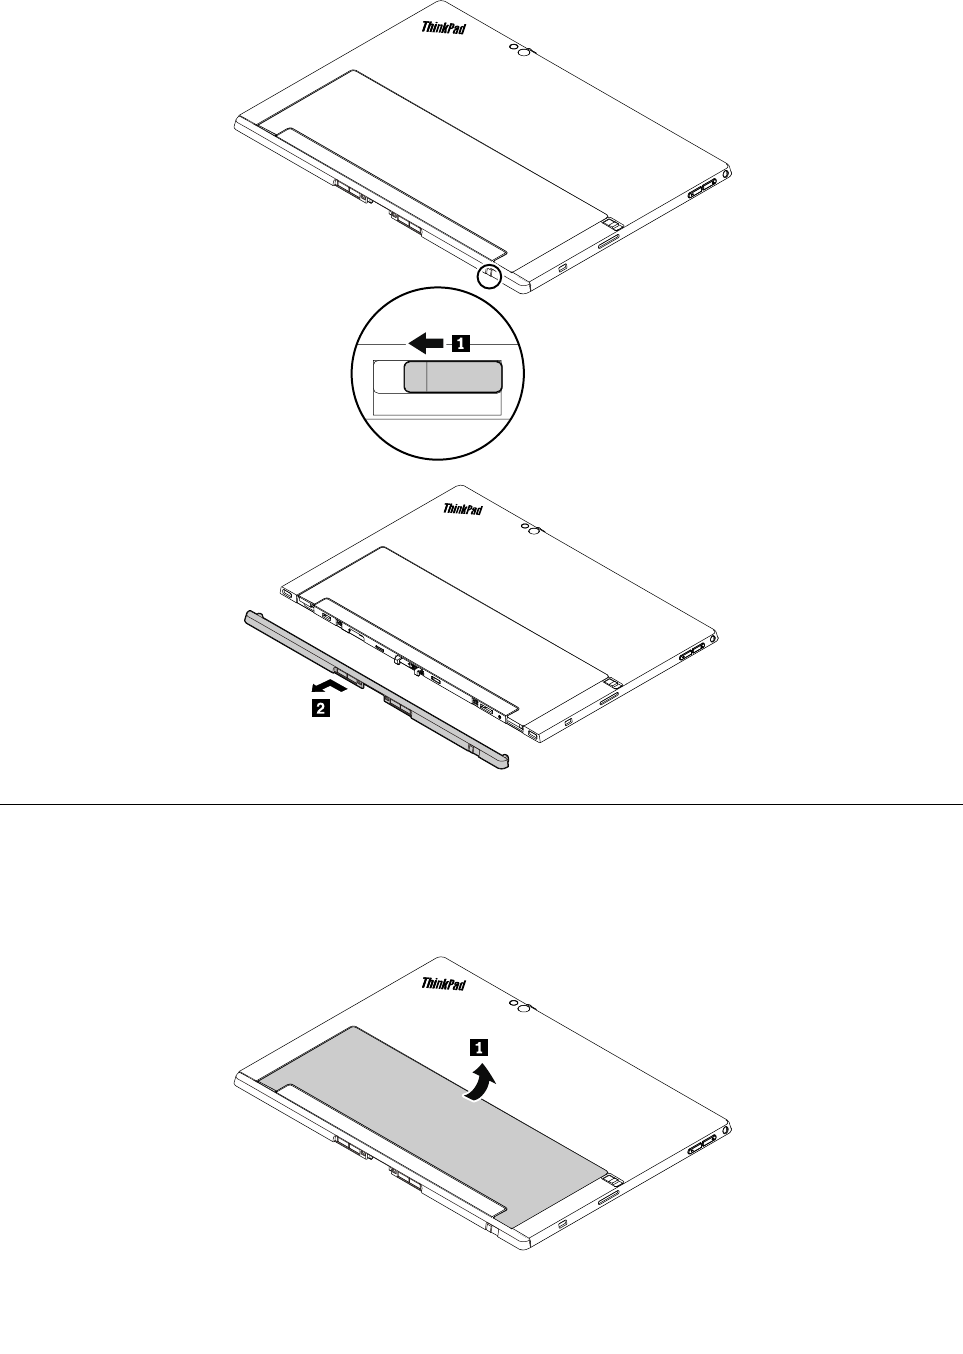
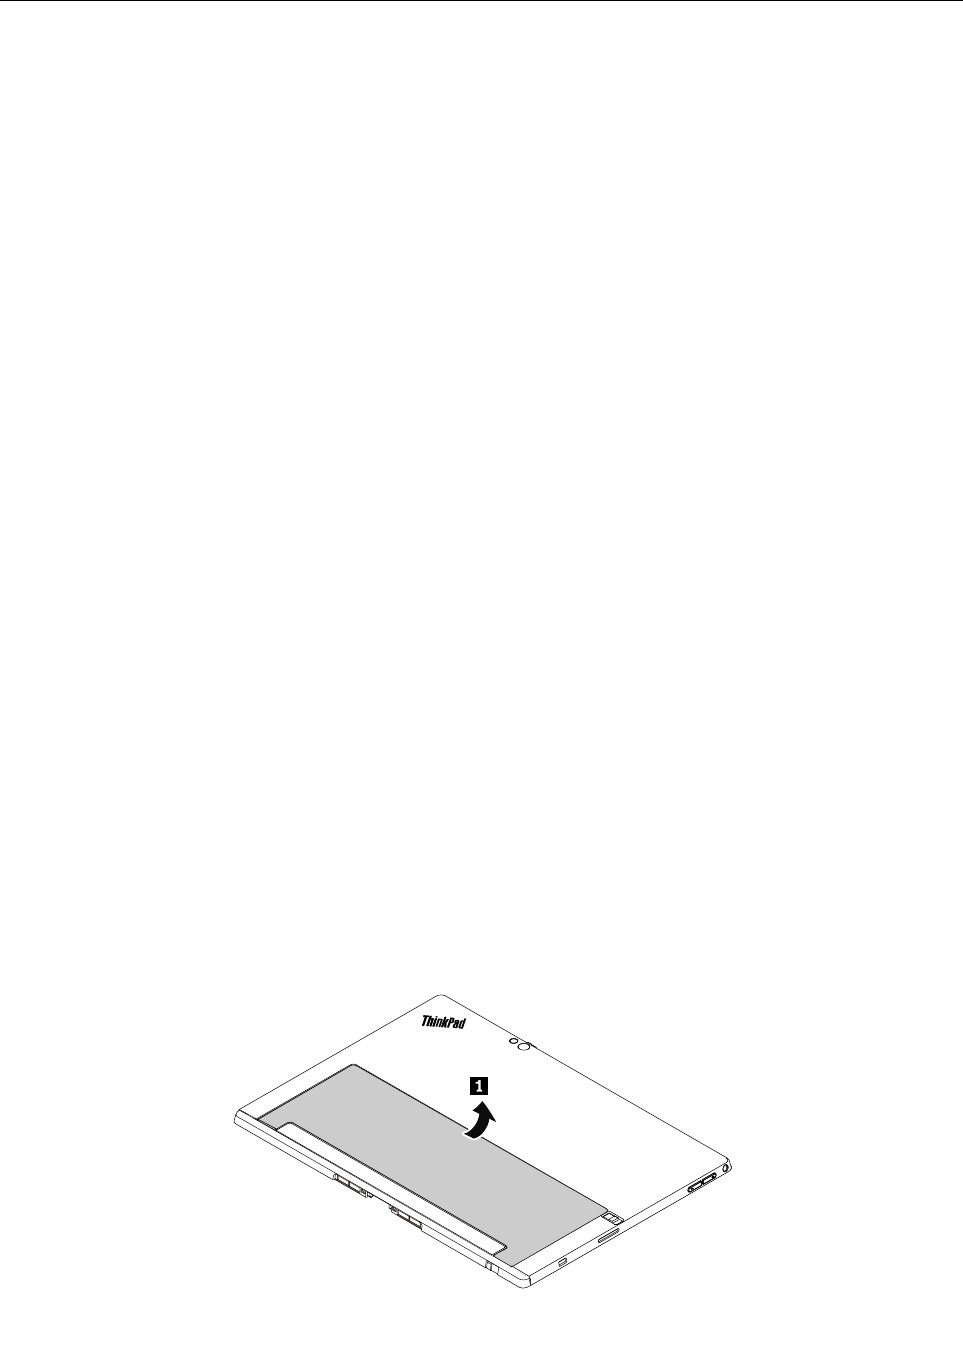
RemovalstepsoftheBaseModule
1010SIMcardcover
RemovalstepsoftheSIMcardcover
TheSIMcardcoverisonlyavailableonsomemodels.
52ThinkPadX1T abletHardwareMaintenanceManual
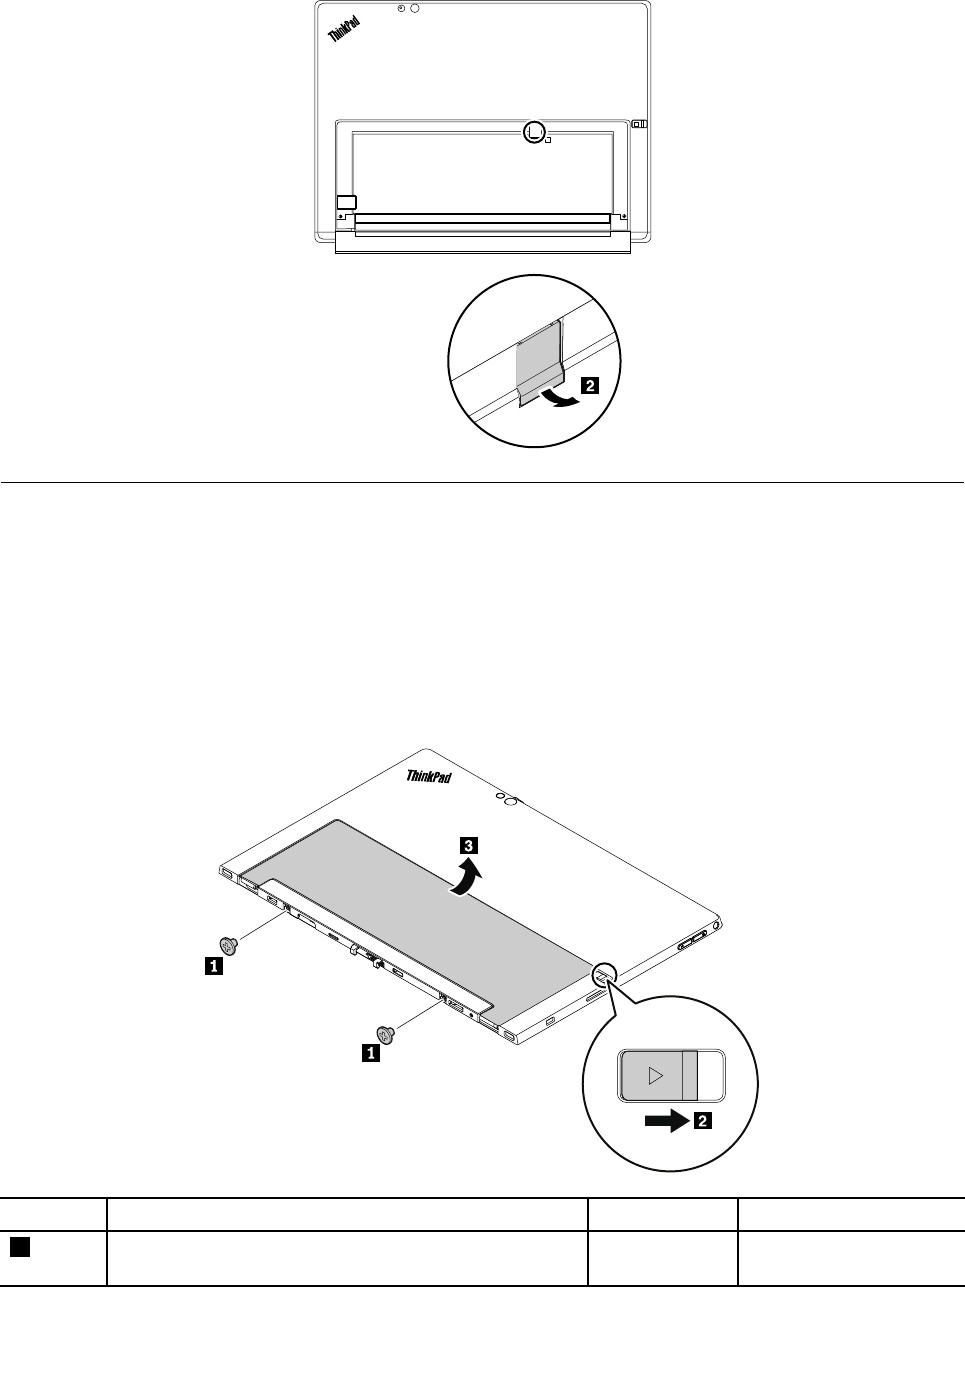
1020Backcoverassembly
Beforeyoureplacethebackcoverassembly,dothefollowing:
1.Disablethebuilt-inbattery.See“Disablingthebuilt-inbattery”onpage50.
2.RemovetheSIMcard,SDcard,andBaseModule.See“RemovingtheSIMcard,SDcard,andBase
Module”onpage50.
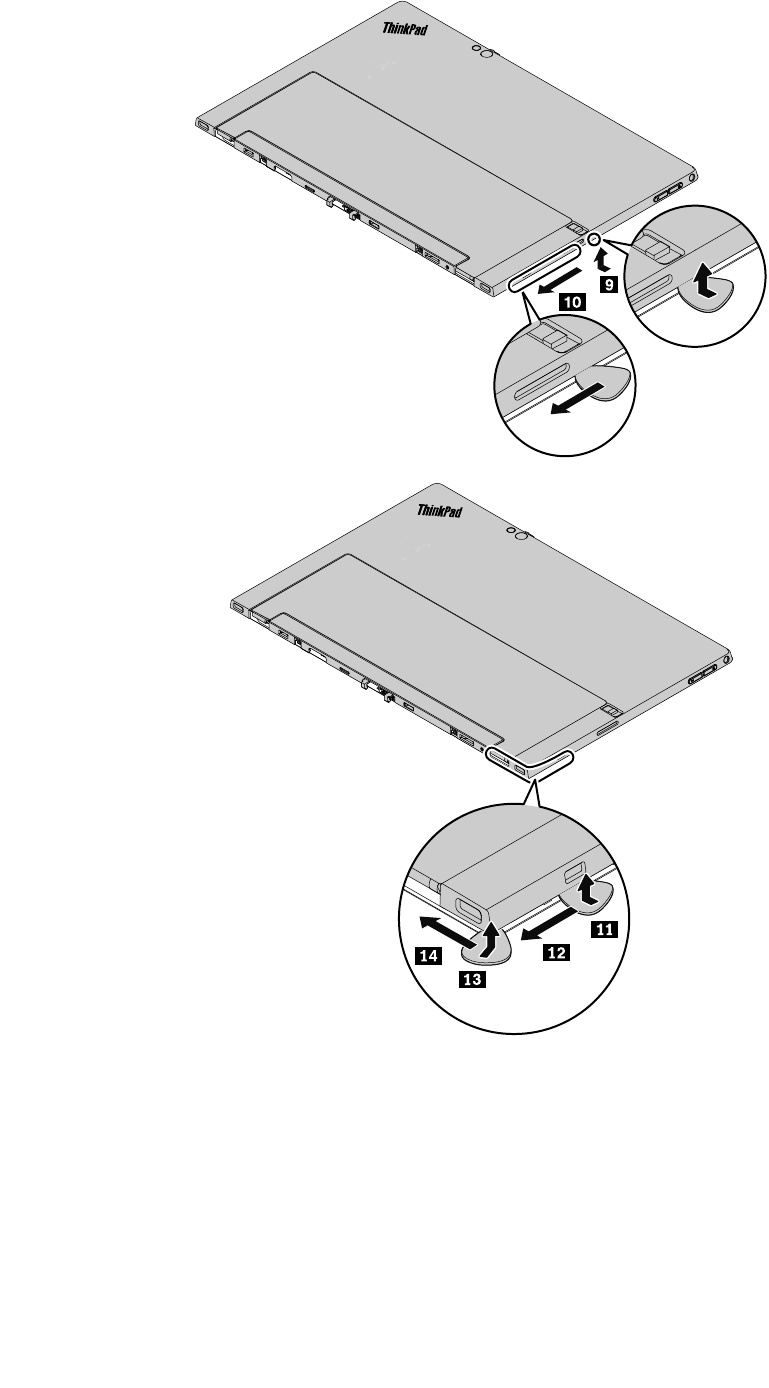
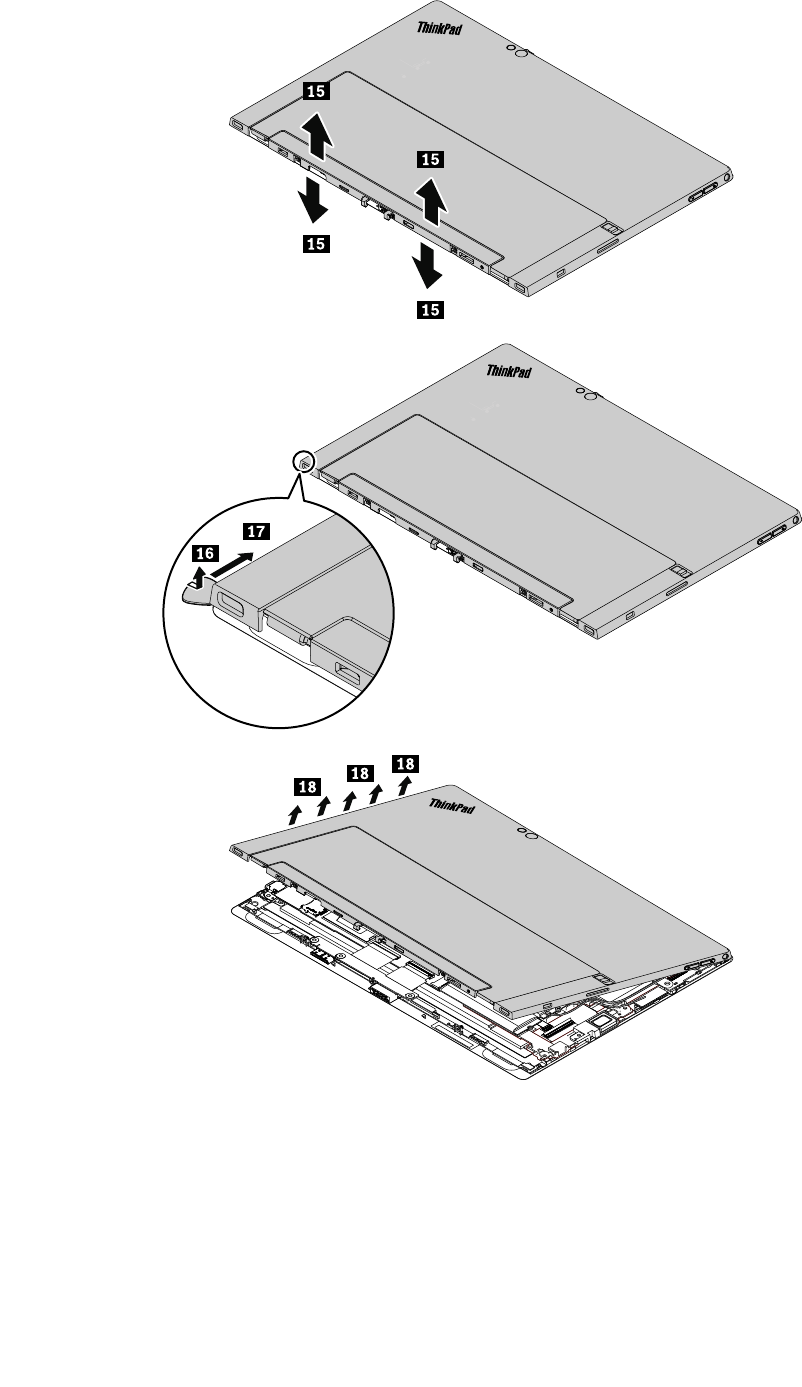
Removalstepsofthebackcoverassembly
Note:Thetabletyouareservicingmightlookslightlydifferentfromthefollowingillustrations.
StepScrew(quantity)ColorTorque
1M2×L4mm,flat-head,nylon-coated(2)Black0.181Nm
(1.85kgf-cm)
Chapter7.RemovingorreplacingaFRU53
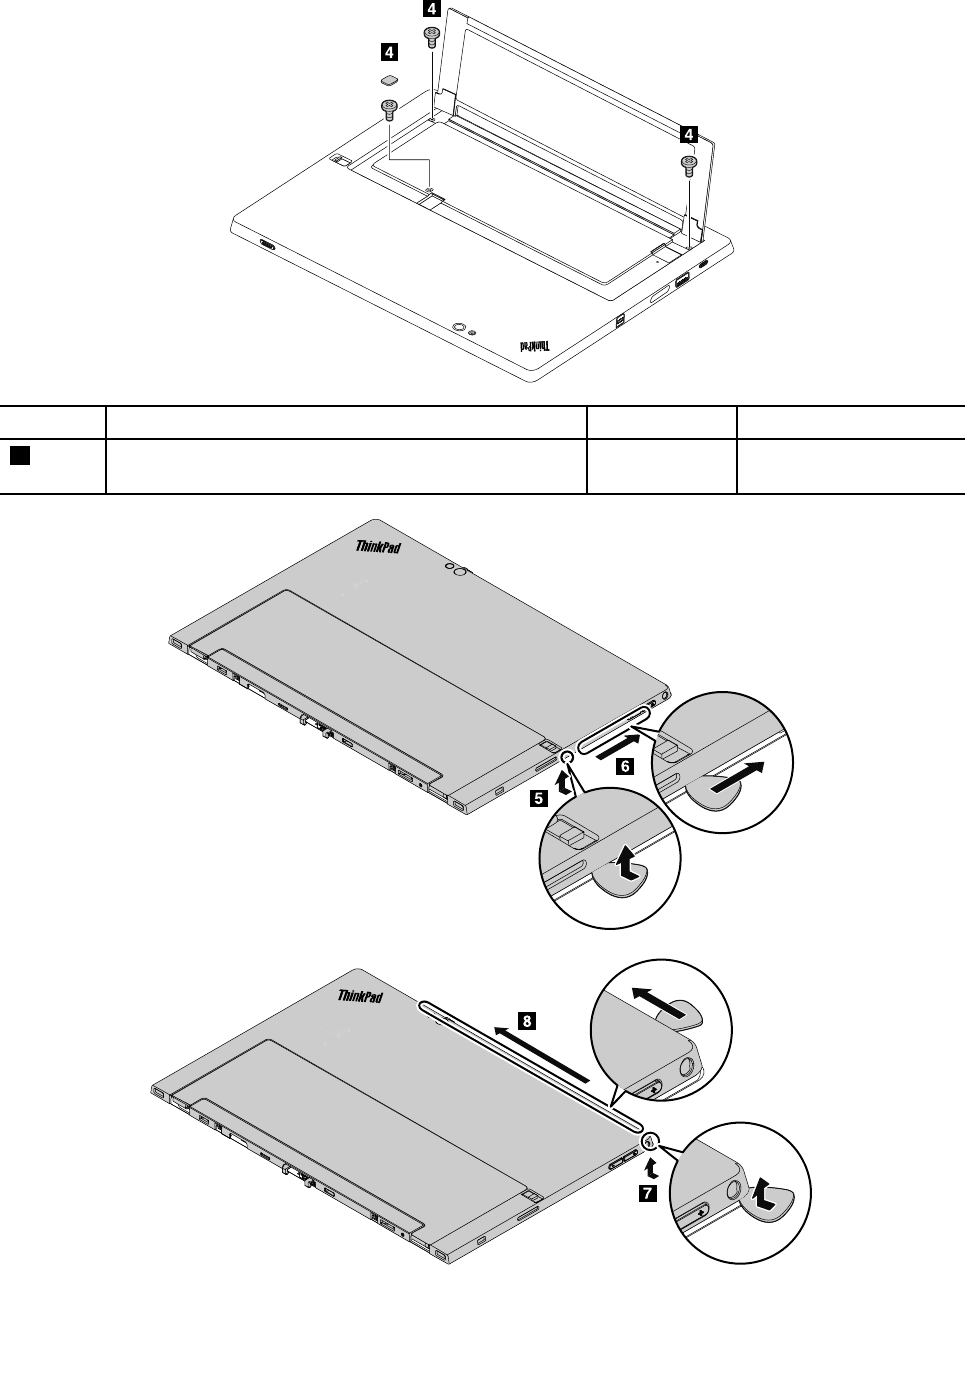
StepScrew(quantity)ColorTorque
4M2×L2.5mm,flat-head,nylon-coated(3)Black0.181Nm
(1.85kgf-cm)
54ThinkPadX1T abletHardwareMaintenanceManual
56ThinkPadX1T abletHardwareMaintenanceManual
Applyinglabelstothebackcoverassembly:
Thenewbackcoverassemblyisshippedwithakitcontaininglabelsofseveralkinds.Applythoselabels
whenyoureplacethebackcoverassembly.Forthelabelsthatarenotshippedwiththenewbackcover
assembly,peelthemofffromtheoldbackcoverassembly,andthenadherethemtothenewone.
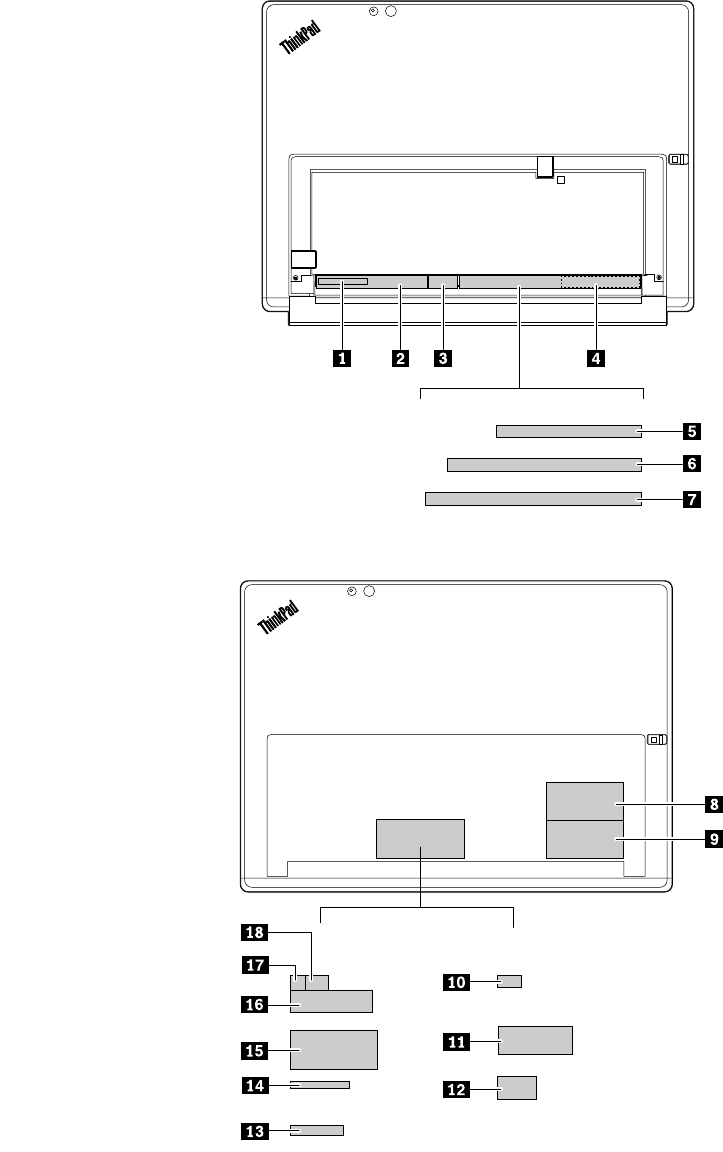
Thefollowingillustrationshowsthelocationofeachlabel.
Labelsbehindthekickstand:
Labelsonthekickstand:
Chapter7.RemovingorreplacingaFRU57
1S/Nlabel2Worldwidemandatoryagencylabel
3CElabel(forMexico,Europe,MiddleEast,Africa,
Australia,NewZealand,orThailand)
4FCCIDlabel
5Systemlabel(forUS)6Systemlabel(forMexico,Europe,MiddleEast,Africa,
Australia,NewZealand,Thailand,Japan,orArgentina)
7Systemlabel(forJapan,China,Korea,Taiwan,
Argentina,Indonesia,orIndia)
8Assettag
9Assettag_40Y917Y10ICASAlabelforWLANandBluetooth(forSouthAfrica)
11ISRAELlabel(forIsrael)12BrazilWLANlabel(forBrazil)
13ChinaModellabel(forChina)14CNClabel(forArgentina)
15MexicoEnergyConsumptionlabel(forMexico)16IndonesiaRatinglabel(forIndonesia)
17MCMClabel(forMalaysia)18Postellabel(forIndonesiaandMalaysia)
1030Coin-cellbattery
Beforeyoureplacethecoin-cellbattery,dothefollowing:
1.Disablethebuilt-inbattery.See“Disablingthebuilt-inbattery”onpage50.
2.RemovetheSIMcard,SDcard,andBaseModule.See“RemovingtheSIMcard,SDcard,andBase
Module”onpage50.
3.Removethebackcoverassembly.See“1020Backcoverassembly”onpage53.
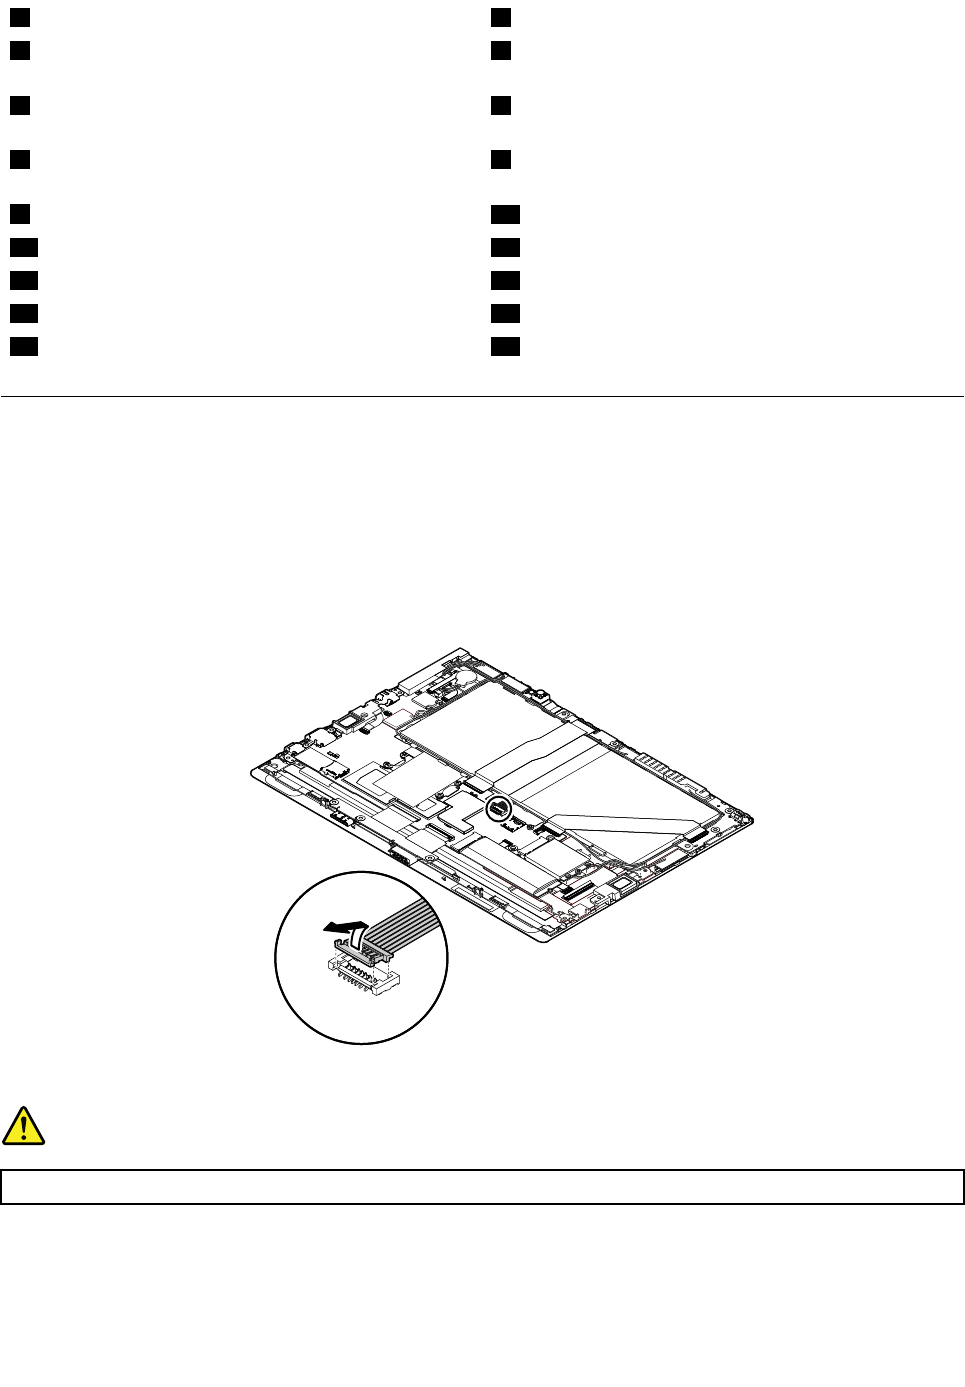
4.Disconnectthecableofthebuilt-inbattery.
Removalstepsofthecoin-cellbattery
DANGER
Useonlytheauthorizedbatteryspecifiedforyourtablet.Anyotherbatterycouldigniteorexplode.
58ThinkPadX1T abletHardwareMaintenanceManual
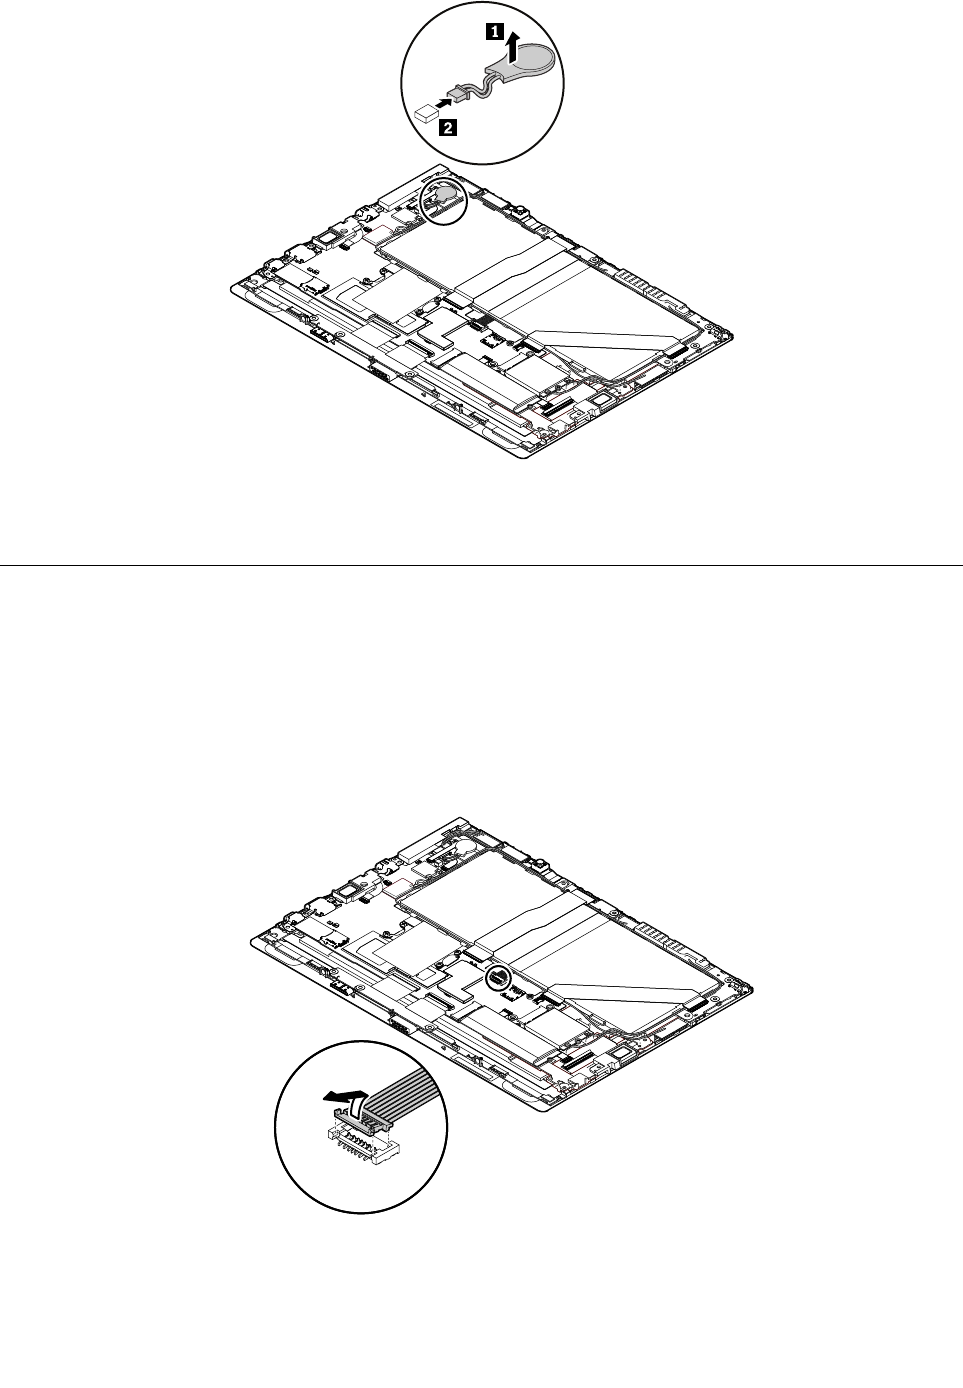
Wheninstalling:Ensurethattheconnectorisattachedfirmly.Afteryouinstallthecoin-cellbattery,resetthe
systemdateandtimeintheThinkPadTabletSetupprogram.
1040ThinkLEDlight
BeforeyoureplacetheThinkLEDlight,dothefollowing:
1.Disablethebuilt-inbattery.See“Disablingthebuilt-inbattery”onpage50.
2.RemovetheSIMcard,SDcard,andBaseModule.See“RemovingtheSIMcard,SDcard,andBase
Module”onpage50.
3.Removethebackcoverassembly.See“1020Backcoverassembly”onpage53.
4.Disconnectthecableofthebuilt-inbattery.
Chapter7.RemovingorreplacingaFRU59
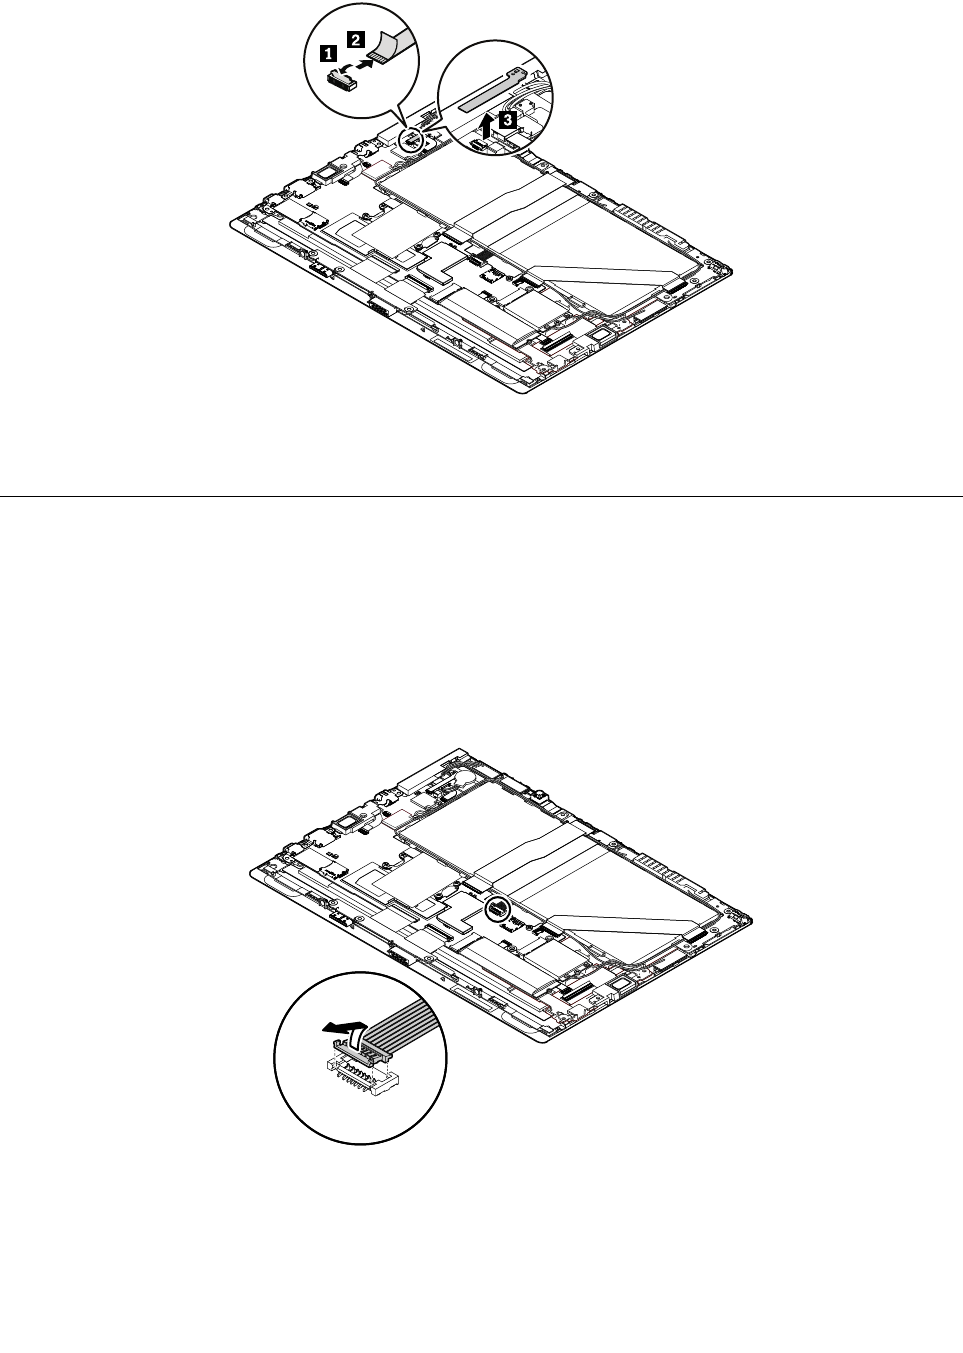
RemovalstepsoftheThinkLEDlight
Note:Donotclosetheconnectorflipsbeforeconnectingthecable.Whenconnectingthecable,ensure
thattheconnectorsareattachedfirmly.
1050NFCcard,NFC-cardcable,andNFCantennaassembly
BeforeyoureplacetheNFCcard,NFC-cardcable,orNFCantennaassembly,dothefollowing:
1.Disablethebuilt-inbattery.See“Disablingthebuilt-inbattery”onpage50.
2.RemovetheSIMcard,SDcard,andBaseModule.See“RemovingtheSIMcard,SDcard,andBase
Module”onpage50.
3.Removethebackcoverassembly.See“1020Backcoverassembly”onpage53.
4.Disconnectthecableofthebuilt-inbattery.
5.RemovetheThinkLEDlight.See“1040ThinkLEDlight”onpage59.
RemovalstepsoftheNFCcard,NFC-cardcable,andNFCantennaassembly
TheNFCcard,NFC-cardcable,andNFCantennaassemblyareonlyavailableonsomemodels.
60ThinkPadX1T abletHardwareMaintenanceManual
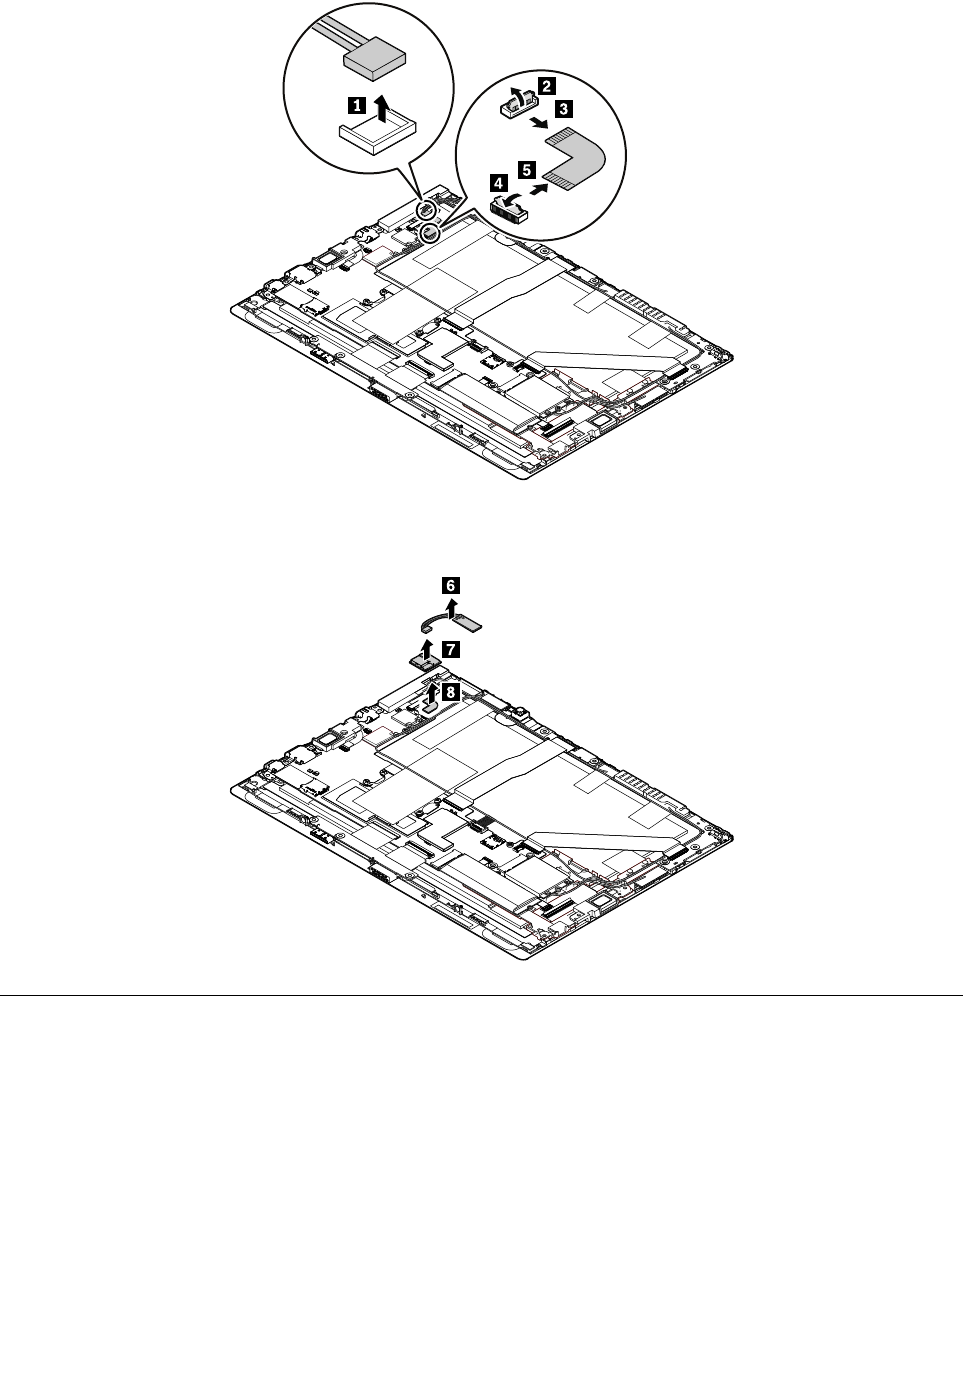
Note:Donotclosetheconnectorflipsbeforeconnectingthecables.Whenconnectingthecables,ensure
thattheconnectorsareattachedfirmly.
1060Wireless-WANcard
Beforeyoureplacethewireless-WANcard,dothefollowing:
1.Disablethebuilt-inbattery.See“Disablingthebuilt-inbattery”onpage50.
2.RemovetheSIMcard,SDcard,andBaseModule.See“RemovingtheSIMcard,SDcard,andBase
Module”onpage50.
3.Removethebackcoverassembly.See“1020Backcoverassembly”onpage53.
4.Disconnectthecableofthebuilt-inbattery.
Chapter7.RemovingorreplacingaFRU61
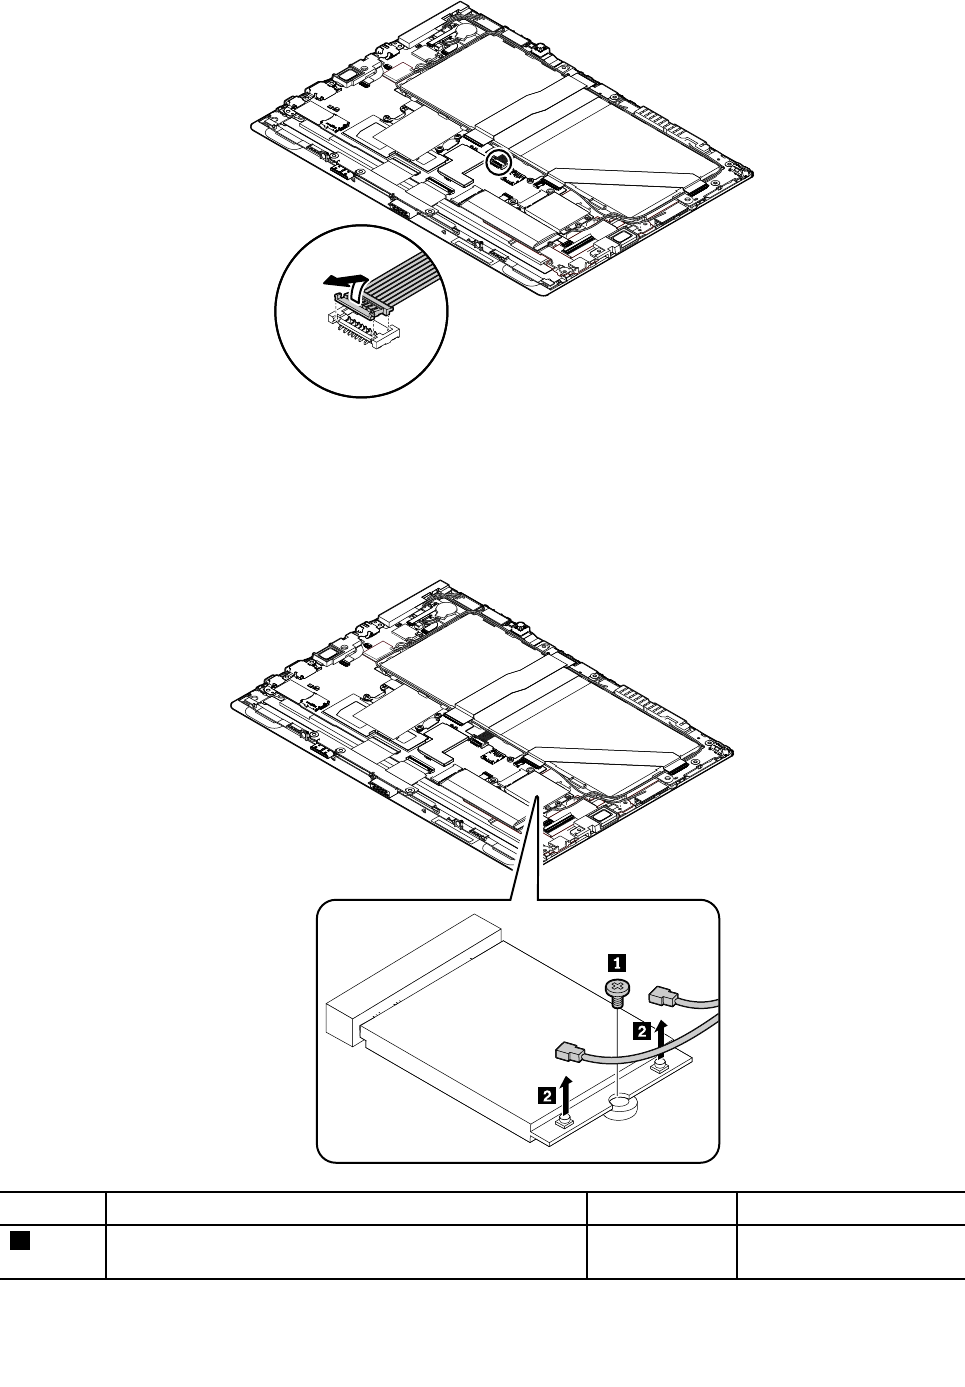
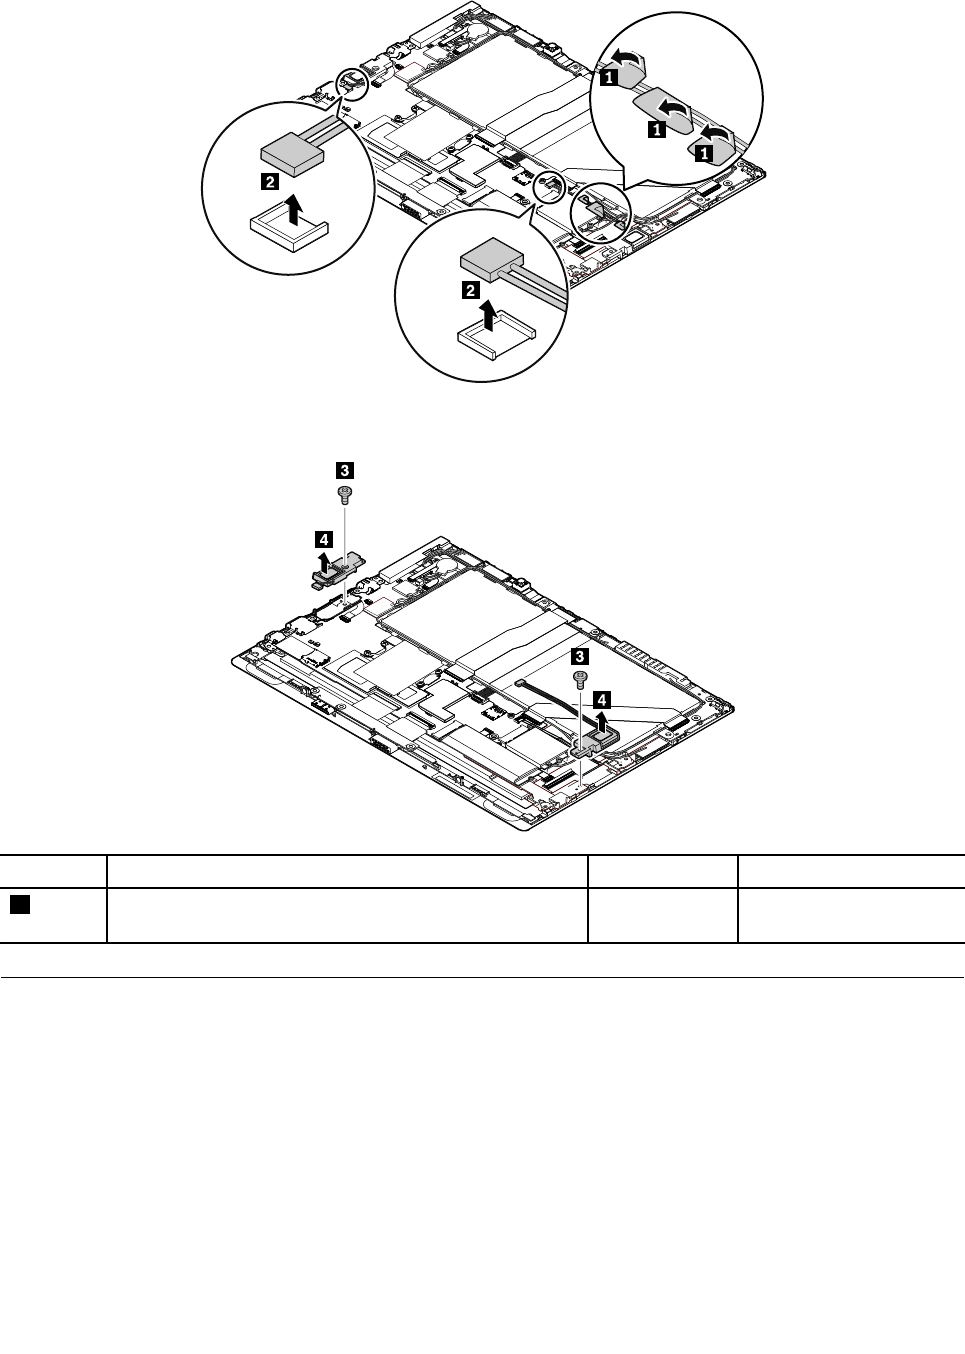
Removalstepsofthewireless-WANcard
Thewireless-WANcardisonlyavailableonsomemodels.
Usetheantenna-RF-connectorremovaltooltodisconnectthecablesoruseyourfingerstopickup
thecablesslightly.
StepScrew(quantity)ColorTorque
1M2×L2mm,flat-head,nylon-coated(1)Silver0.181Nm
(1.85kgf-cm)
62ThinkPadX1T abletHardwareMaintenanceManual
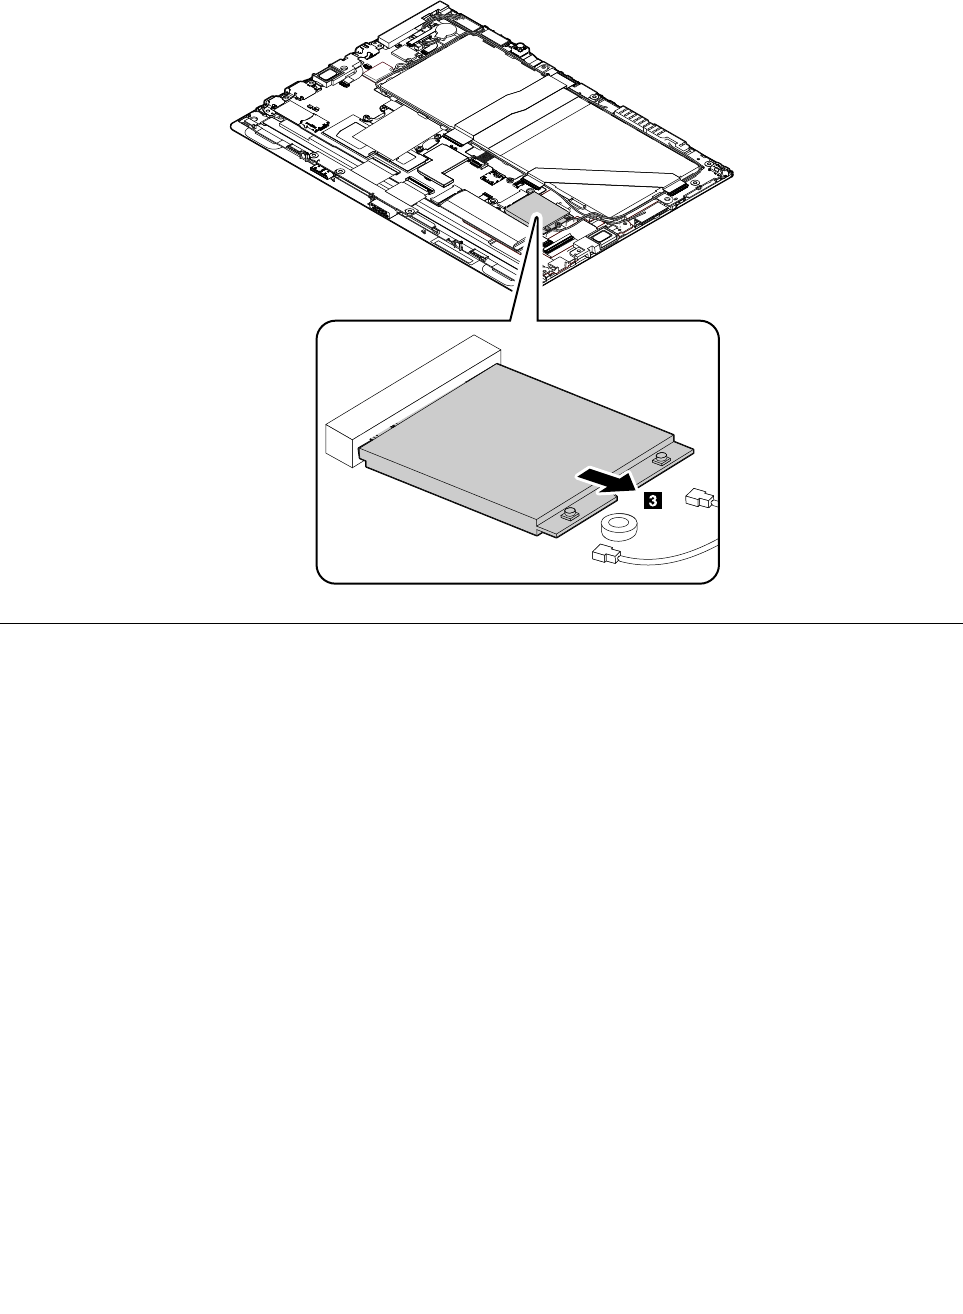
Wheninstalling:Plugtheredcableintothemainconnector,andthebluecableintotheauxiliaryconnector
onthecard.Ensurethattheconnectorsareattachedfirmly.
1070M.2solid-statedriveandsolid-state-drivemylar
BeforeyoureplacetheM.2solid-statedriveorsolid-state-drivemylar,dothefollowing:
1.Disablethebuilt-inbattery.See“Disablingthebuilt-inbattery”onpage50.
2.RemovetheSIMcard,SDcard,andBaseModule.See“RemovingtheSIMcard,SDcard,andBase
Module”onpage50.
3.Removethebackcoverassembly.See“1020Backcoverassembly”onpage53.
4.Disconnectthecableofthebuilt-inbattery.
Chapter7.RemovingorreplacingaFRU63
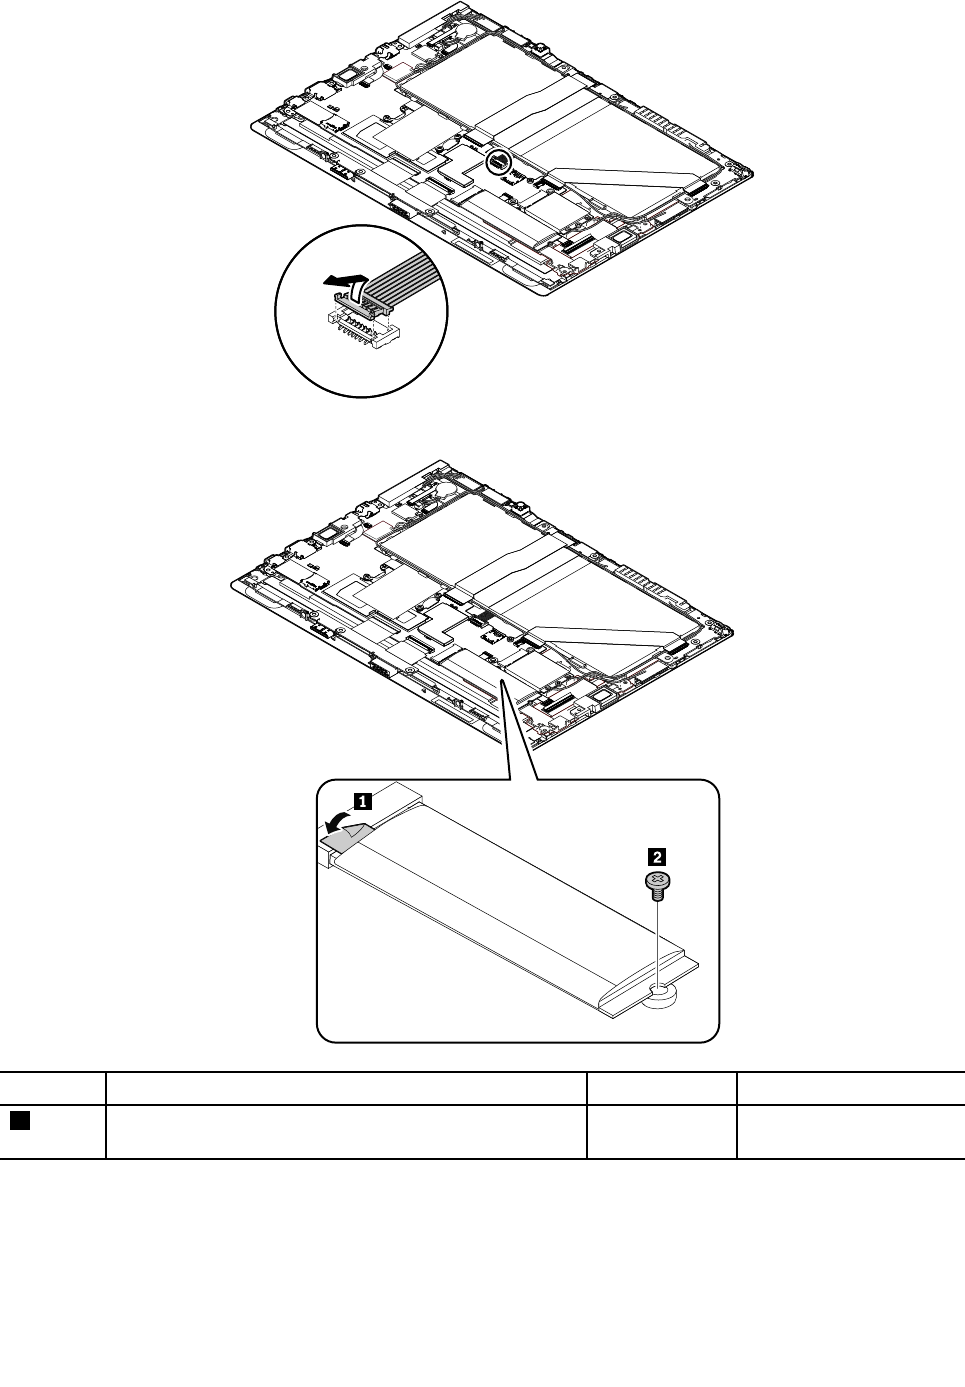
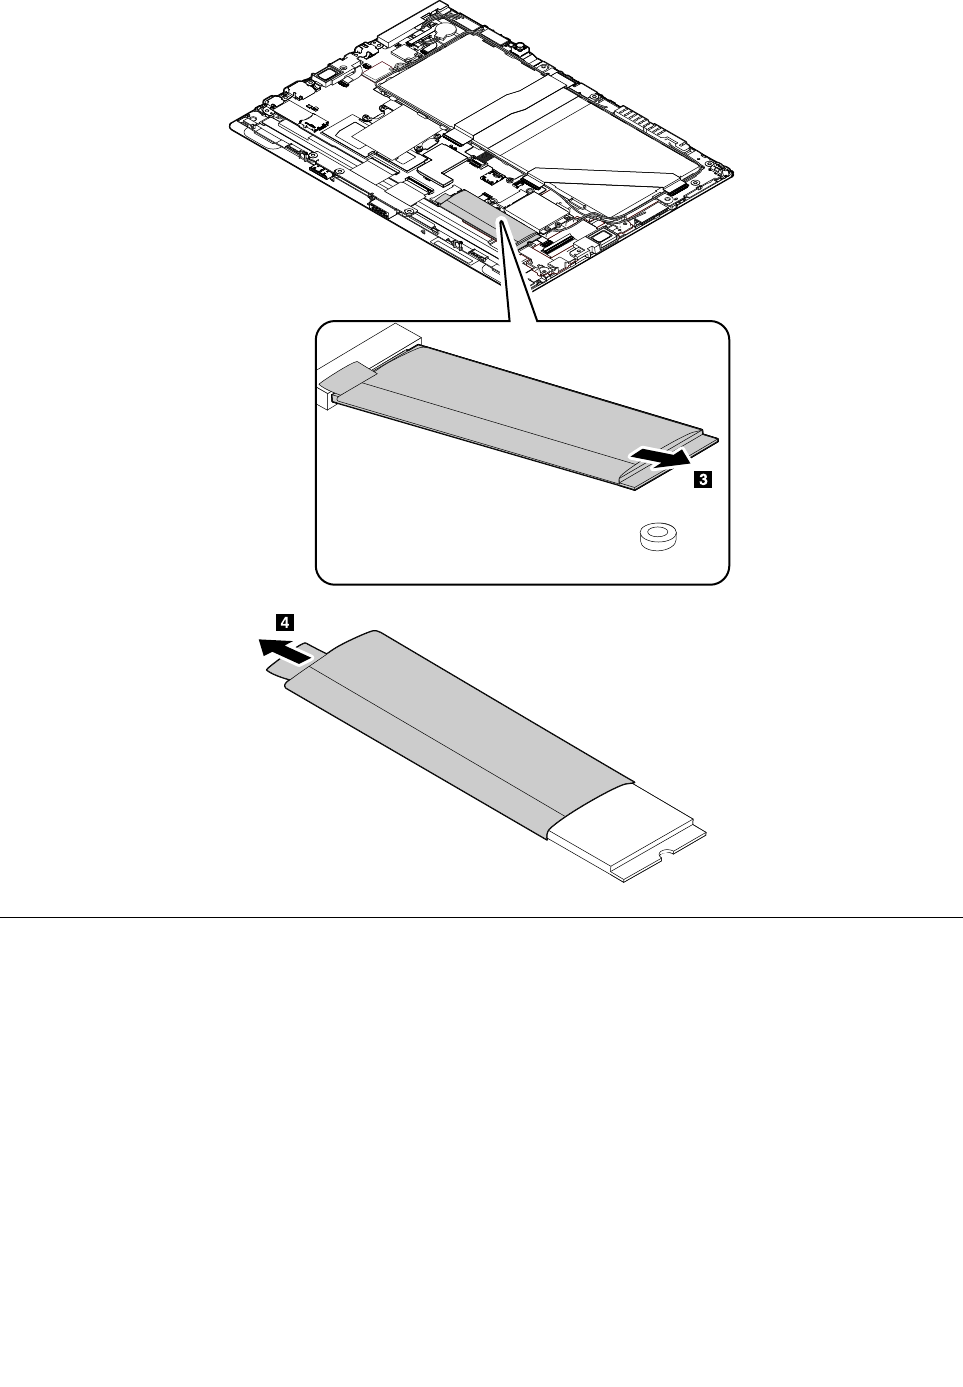
RemovalstepsoftheM.2solid-statedriveandsolid-state-drivemylar
2
StepScrew(quantity)ColorTorque
2M2×L2mm,flat-head,nylon-coated(1)Silver0.181Nm
(1.85kgf-cm)
64ThinkPadX1T abletHardwareMaintenanceManual
1080Touchcontrollercardcable
Beforeyoureplacethetouchcontrollercardcable,dothefollowing:
1.Disablethebuilt-inbattery.See“Disablingthebuilt-inbattery”onpage50.
2.RemovetheSIMcard,SDcard,andBaseModule.See“RemovingtheSIMcard,SDcard,andBase
Module”onpage50.
3.Removethebackcoverassembly.See“1020Backcoverassembly”onpage53.
4.Disconnectthecableofthebuilt-inbattery.
Chapter7.RemovingorreplacingaFRU65
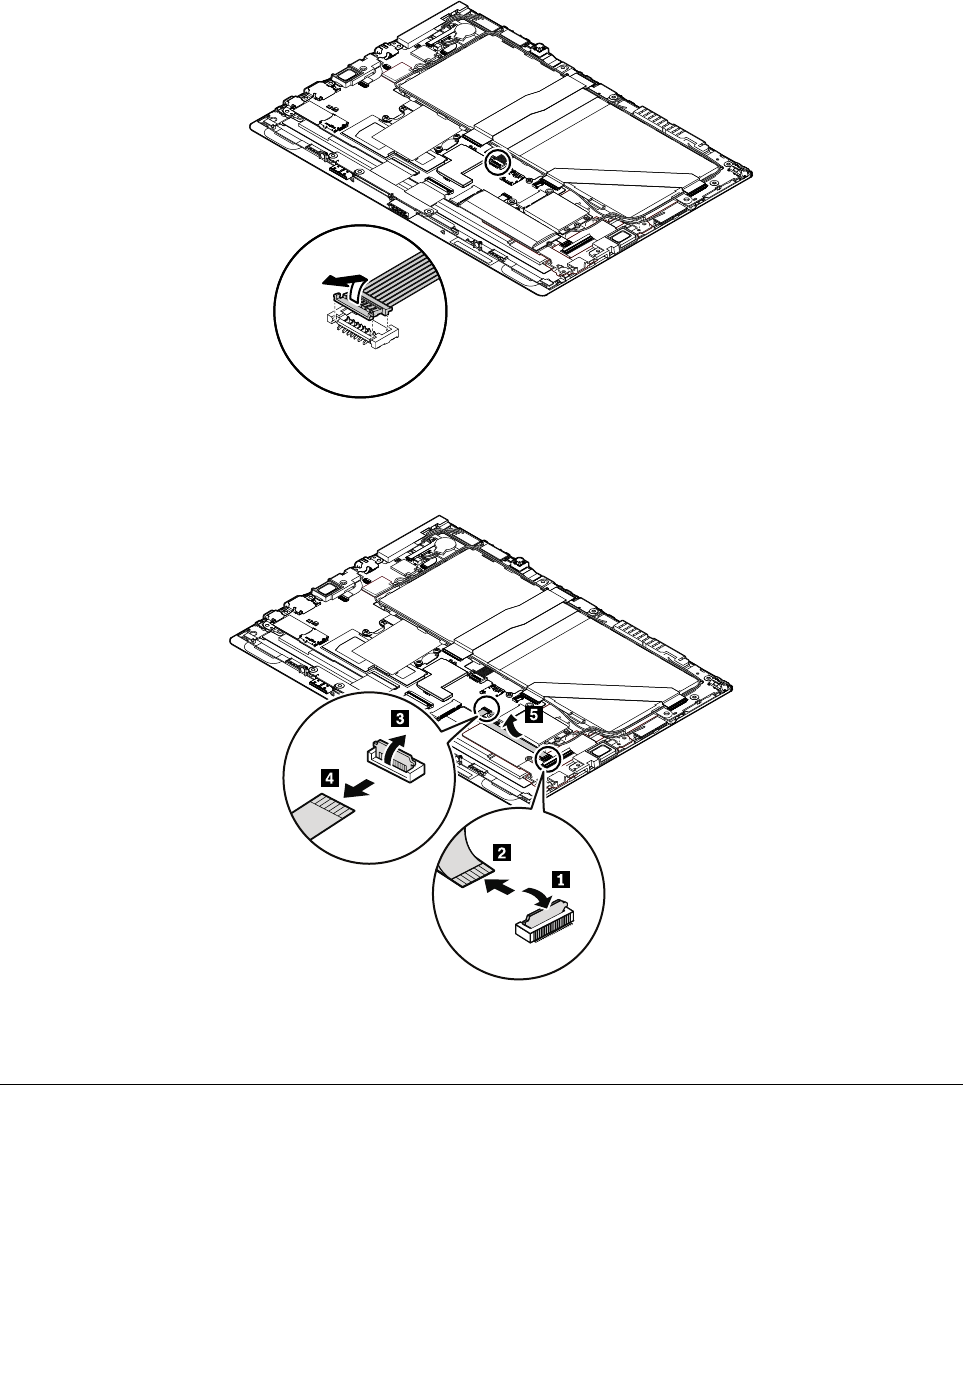
5.RemovetheM.2solid-statedrive.See“1070M.2solid-statedriveandsolid-state-drivemylar”on
page63.
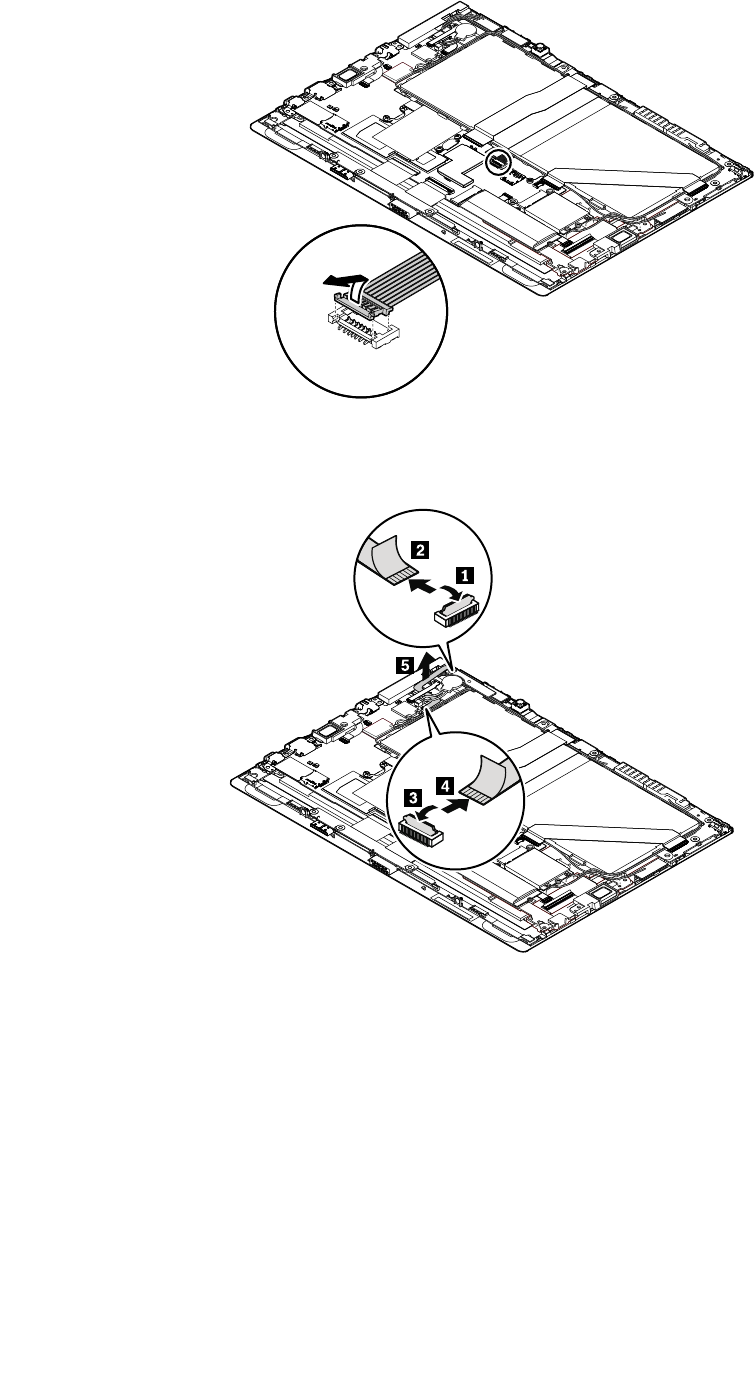
Removalstepsofthetouchcontrollercardcable
Note:Donotclosetheconnectorflipsbeforeconnectingthecables.Whenconnectingthecables,ensure
thattheconnectorsareattachedfirmly.
1090Infraredcameracardandinfraredcameracable
Beforeyoureplacetheinfraredcameracardandinfraredcameracable,dothefollowing:
1.Disablethebuilt-inbattery.See“Disablingthebuilt-inbattery”onpage50.
2.RemovetheSIMcard,SDcard,andBaseModule.See“RemovingtheSIMcard,SDcard,andBase
Module”onpage50.
3.Removethebackcoverassembly.See“1020Backcoverassembly”onpage53.
4.Disconnectthecableofthebuilt-inbattery.
66ThinkPadX1T abletHardwareMaintenanceManual
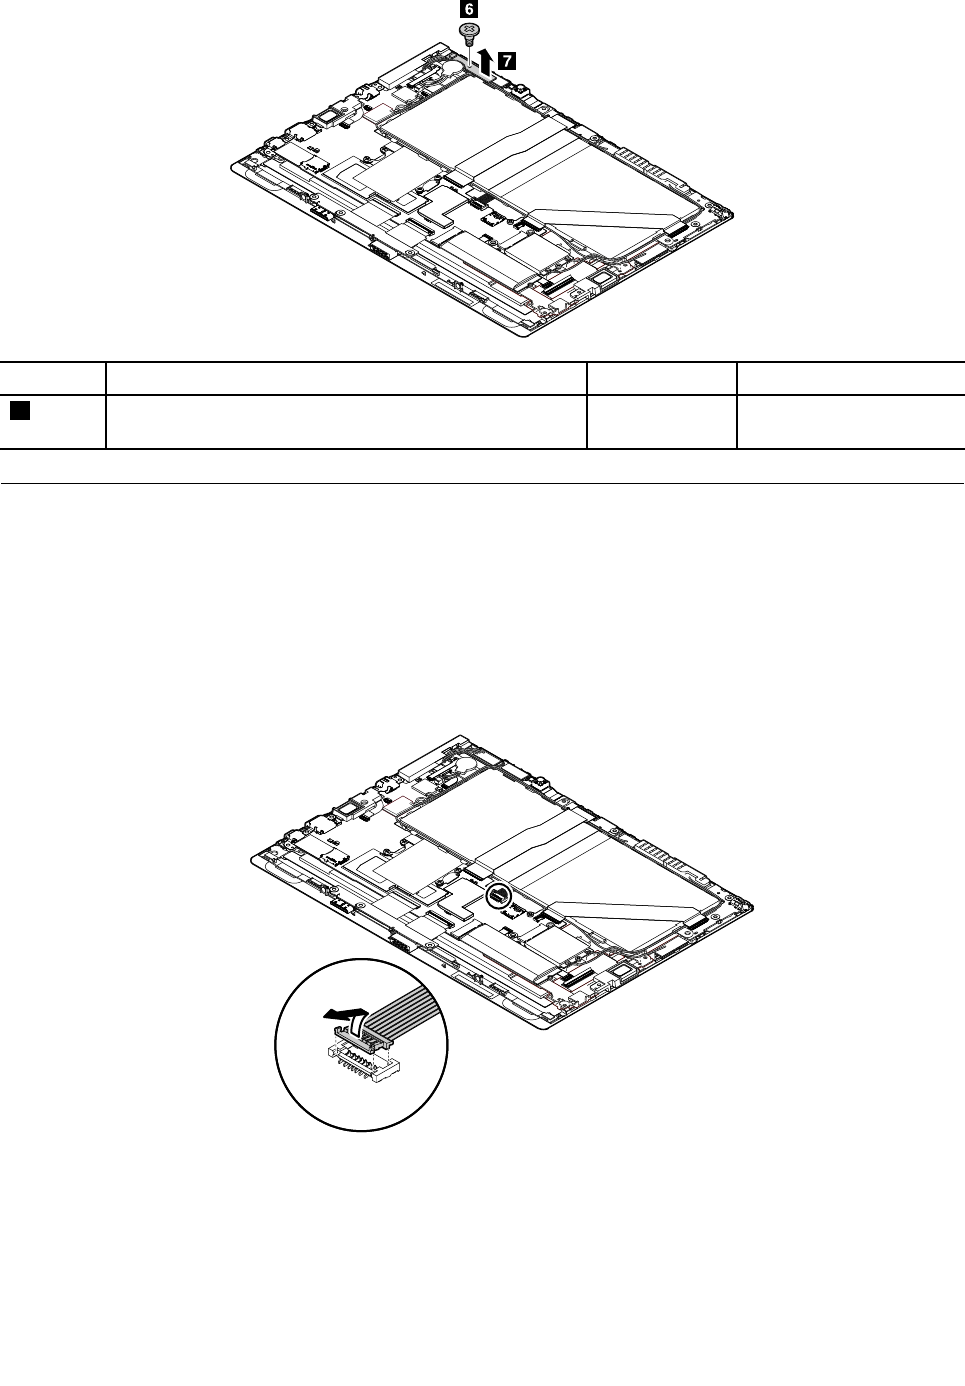
StepScrew(quantity)ColorTorque
6M2×L2.5mm,flat-head,nylon-coated(1)Black0.181Nm
(1.85kgf-cm)
1110Speakerassembly
Beforeyoureplacethespeakerassembly,dothefollowing:
1.Disablethebuilt-inbattery.See“Disablingthebuilt-inbattery”onpage50.
2.RemovetheSIMcard,SDcard,andBaseModule.See“RemovingtheSIMcard,SDcard,andBase
Module”onpage50.
3.Removethebackcoverassembly.See“1020Backcoverassembly”onpage53.
4.Disconnectthecableofthebuilt-inbattery.
68ThinkPadX1T abletHardwareMaintenanceManual
Removalstepsofthespeakerassembly
Wheninstalling:Ensurethattheconnectorsareattachedfirmly.
StepScrew(quantity)ColorTorque
3M2×L4mm,flat-head,nylon-coated(2)Black0.181Nm
(1.85kgf-cm)
1120MiniDisplayPortbracket
BeforeyoureplacetheminiDisplayPortbracket,dothefollowing:
1.Disablethebuilt-inbattery.See“Disablingthebuilt-inbattery”onpage50.
2.RemovetheSIMcard,SDcard,andBaseModule.See“RemovingtheSIMcard,SDcard,andBase
Module”onpage50.
3.Removethebackcoverassembly.See“1020Backcoverassembly”onpage53.
4.Disconnectthecableofthebuilt-inbattery.
Chapter7.RemovingorreplacingaFRU69
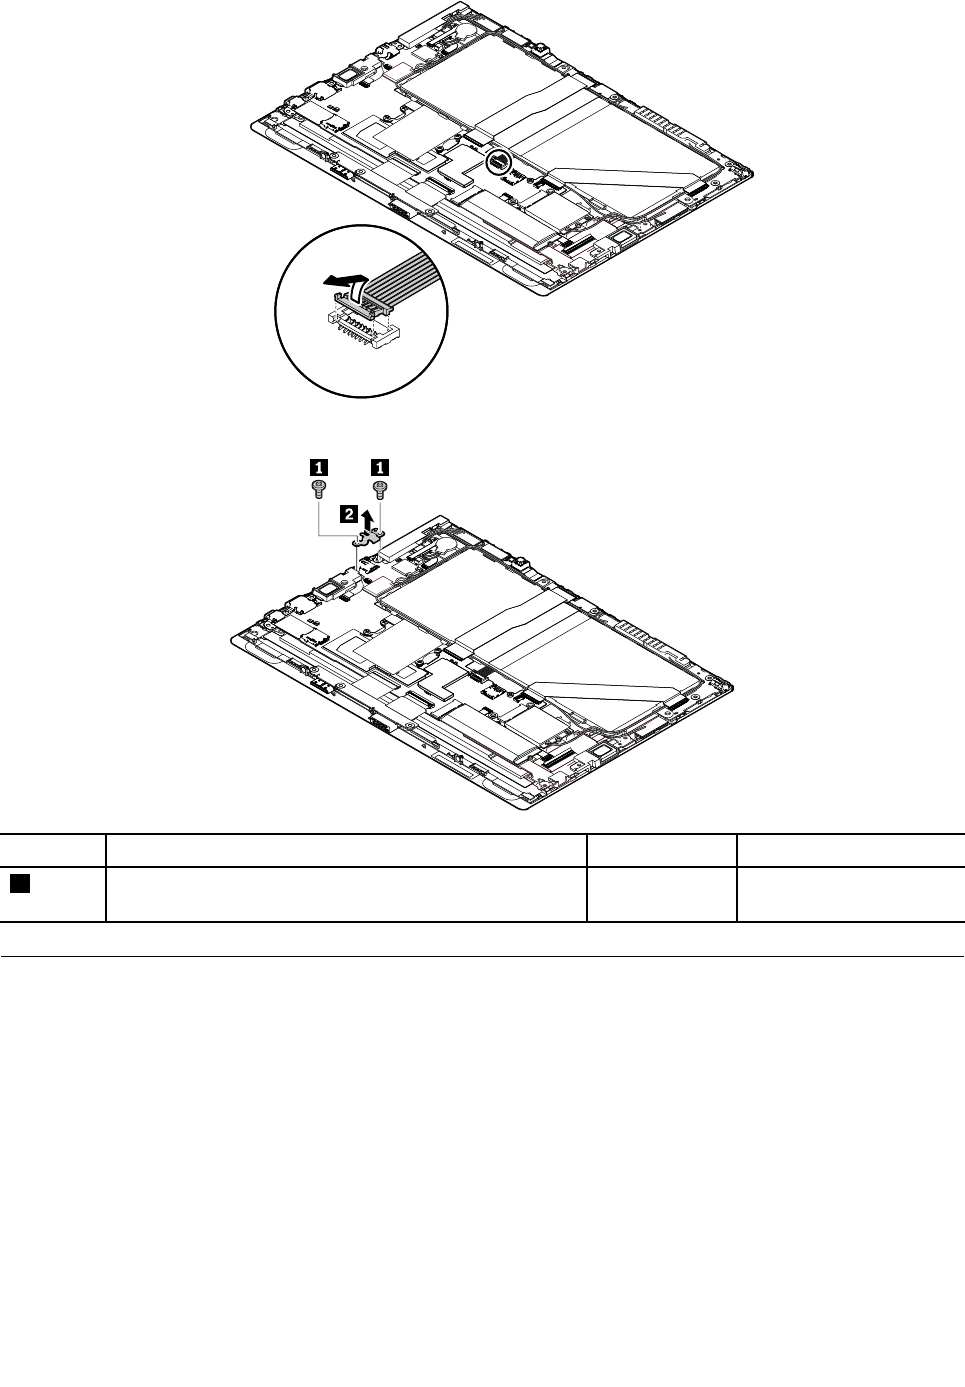
RemovalstepsoftheminiDisplayPortbracket
StepScrew(quantity)ColorTorque
1M2×L4mm,flat-head,nylon-coated(2)Black0.181Nm
(1.85kgf-cm)
1130USB-connectorbracket
BeforeyoureplacetheUSB-connectorbracket,dothefollowing:
1.Disablethebuilt-inbattery.See“Disablingthebuilt-inbattery”onpage50.
2.RemovetheSIMcard,SDcard,andBaseModule.See“RemovingtheSIMcard,SDcard,andBase
Module”onpage50.
3.Removethebackcoverassembly.See“1020Backcoverassembly”onpage53.
4.Disconnectthecableofthebuilt-inbattery.
70ThinkPadX1T abletHardwareMaintenanceManual
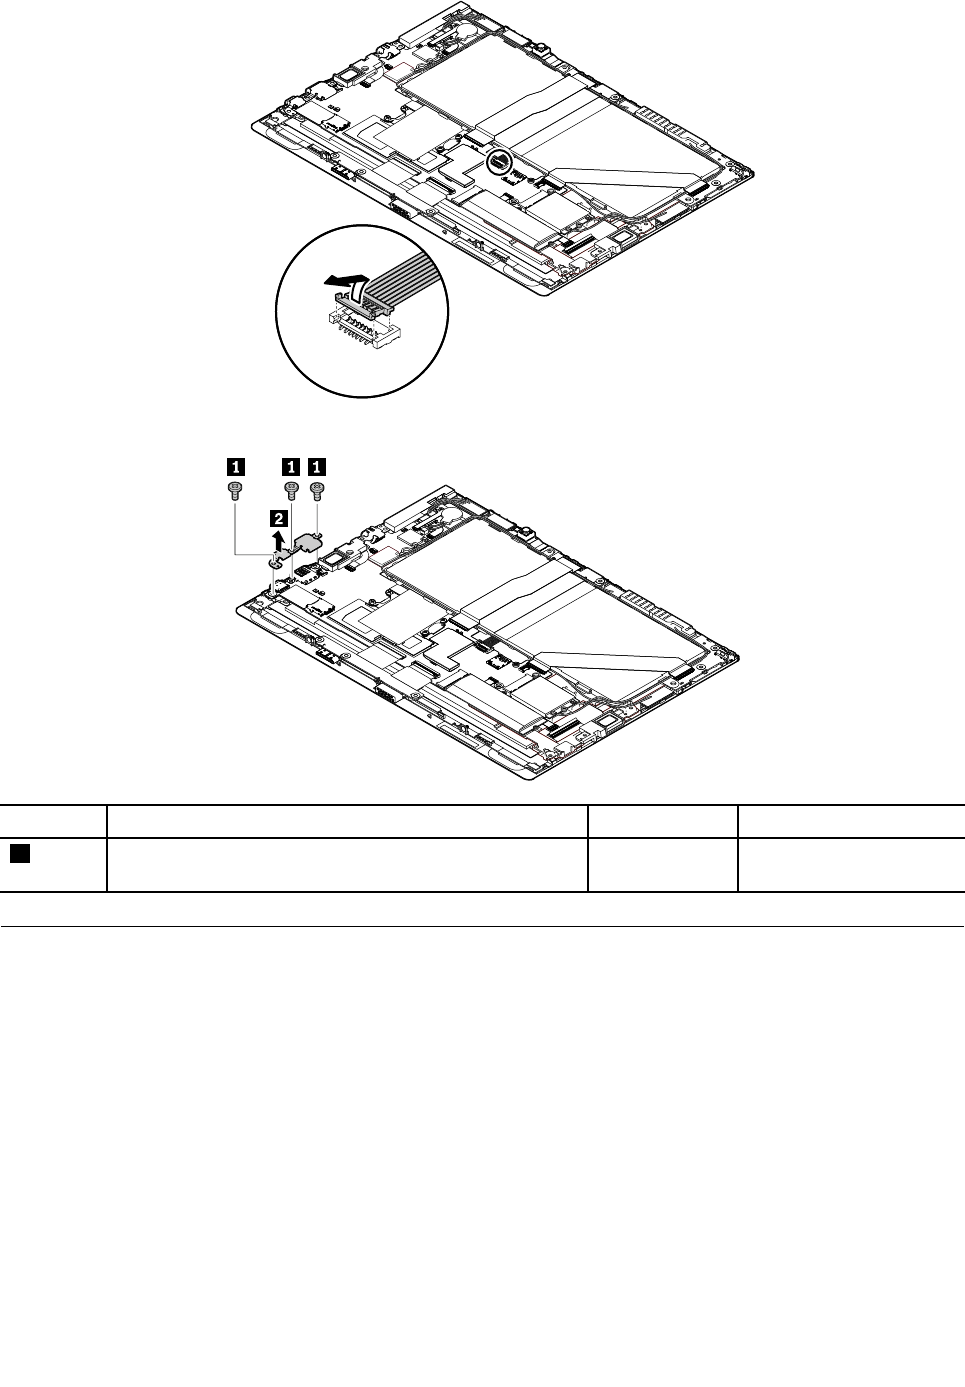
RemovalstepsoftheUSB-connectorbracket
StepScrew(quantity)ColorTorque
1M2×L4mm,flat-head,nylon-coated(3)Black0.181Nm
(1.85kgf-cm)
1140POGOcardandPOGO-cardcable
BeforeyoureplacethePOGOcardorPOGO-cardcable,dothefollowing:
1.Disablethebuilt-inbattery.See“Disablingthebuilt-inbattery”onpage50.
2.RemovetheSIMcard,SDcard,andBaseModule.See“RemovingtheSIMcard,SDcard,andBase
Module”onpage50.
3.Removethebackcoverassembly.See“1020Backcoverassembly”onpage53.
4.Disconnectthecableofthebuilt-inbattery.
Chapter7.RemovingorreplacingaFRU71
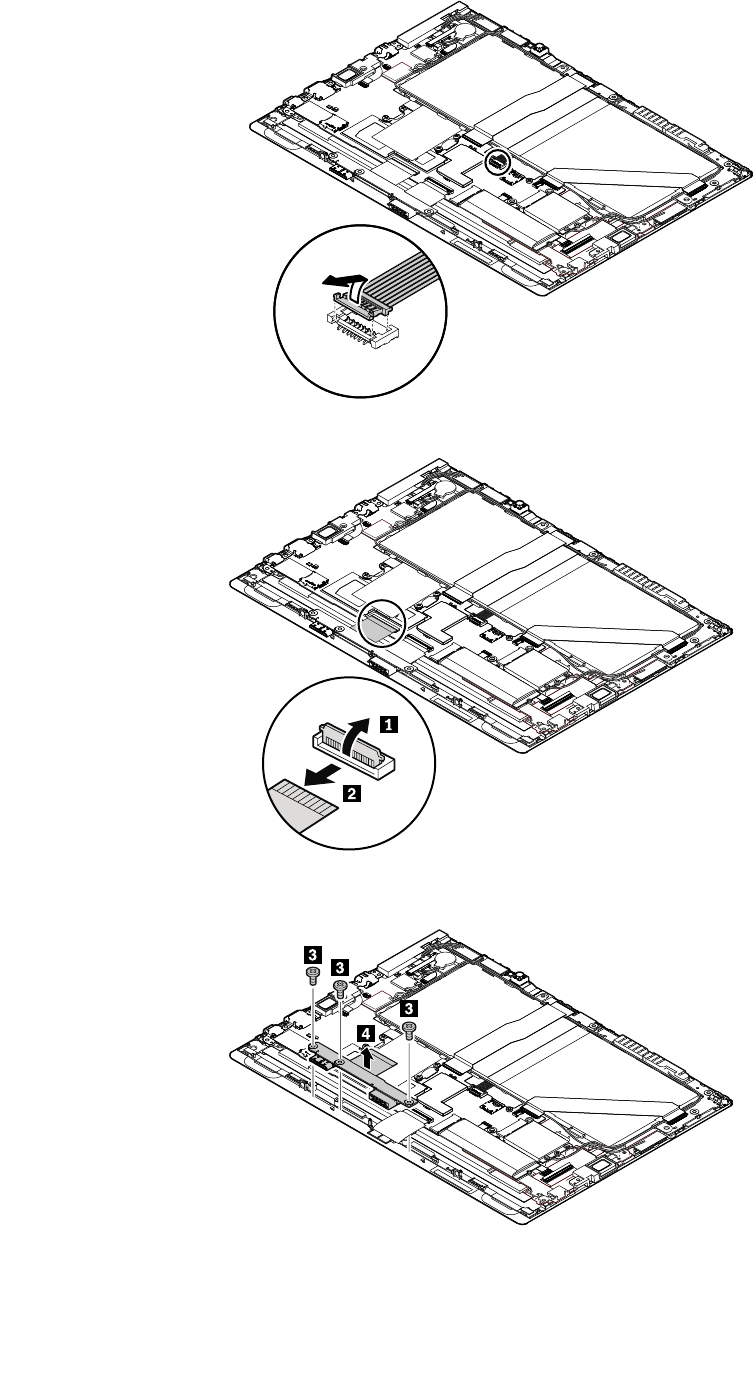
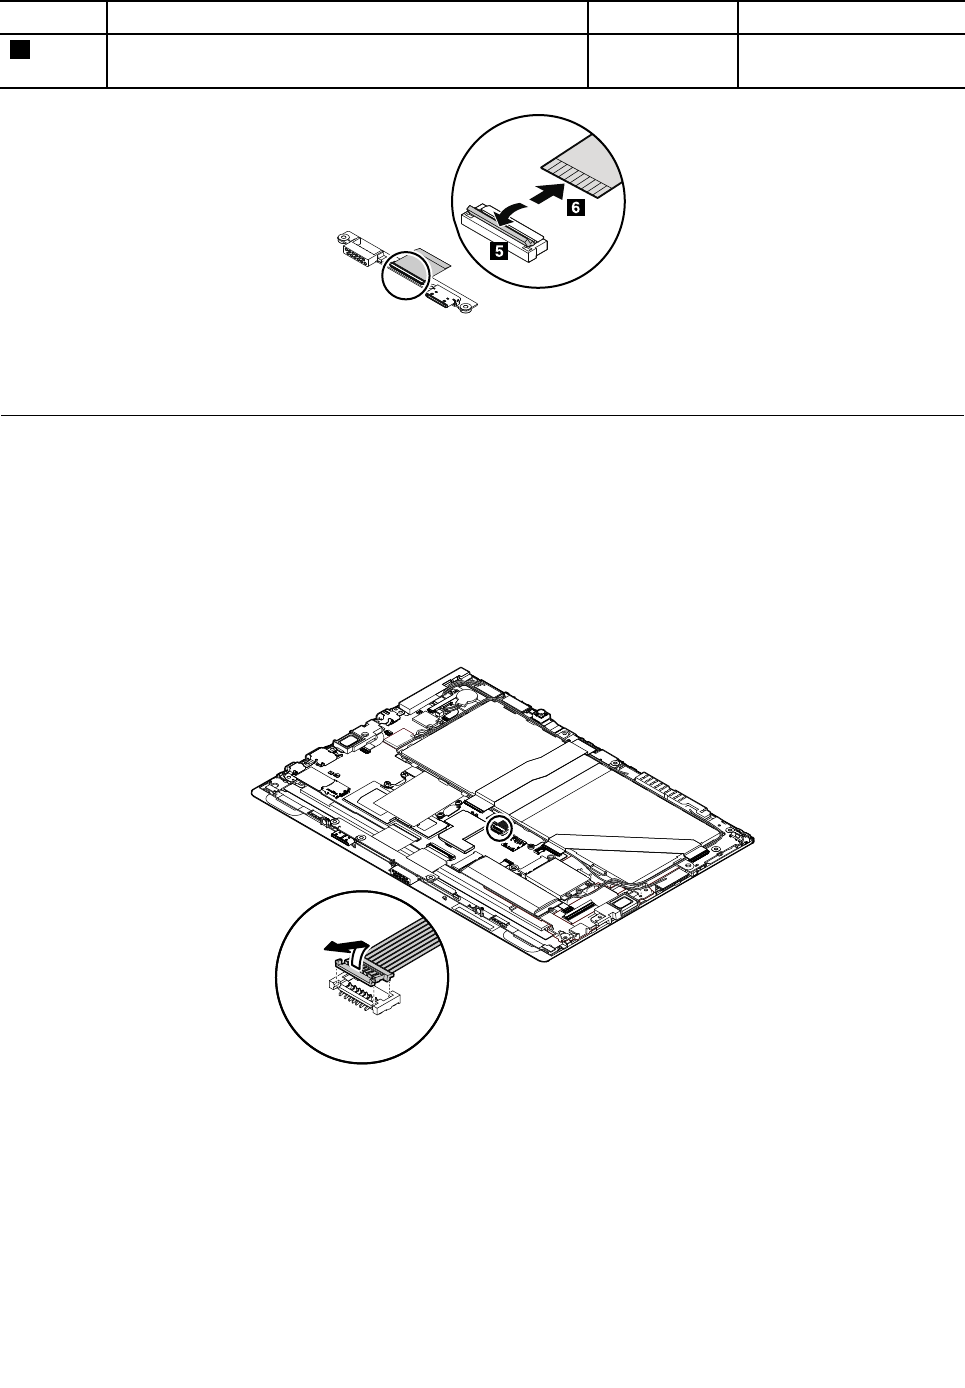
RemovalstepsofthePOGOcardandPOGO-cardcable
Wheninstalling:Ensurethattheconnectorsareattachedfirmly.
72ThinkPadX1T abletHardwareMaintenanceManual
StepScrew(quantity)ColorTorque
3M2×L2.5mm,flat-head,nylon-coated(3)Black0.181Nm
(1.85kgf-cm)
Note:Donotclosetheconnectorflipbeforeconnectingthecable.Whenconnectingthecable,ensure
thattheconnectorisattachedfirmly.
1150LCDcable
BeforeyoureplacetheLCDcable,dothefollowing:
1.Disablethebuilt-inbattery.See“Disablingthebuilt-inbattery”onpage50.
2.RemovetheSIMcard,SDcard,andBaseModule.See“RemovingtheSIMcard,SDcard,andBase
Module”onpage50.
3.Removethebackcoverassembly.See“1020Backcoverassembly”onpage53.
4.Disconnectthecableofthebuilt-inbattery.
5.Removethepogocardandpogo-cardcable.See“1140POGOcardandPOGO-cardcable”onpage71.
Chapter7.RemovingorreplacingaFRU73
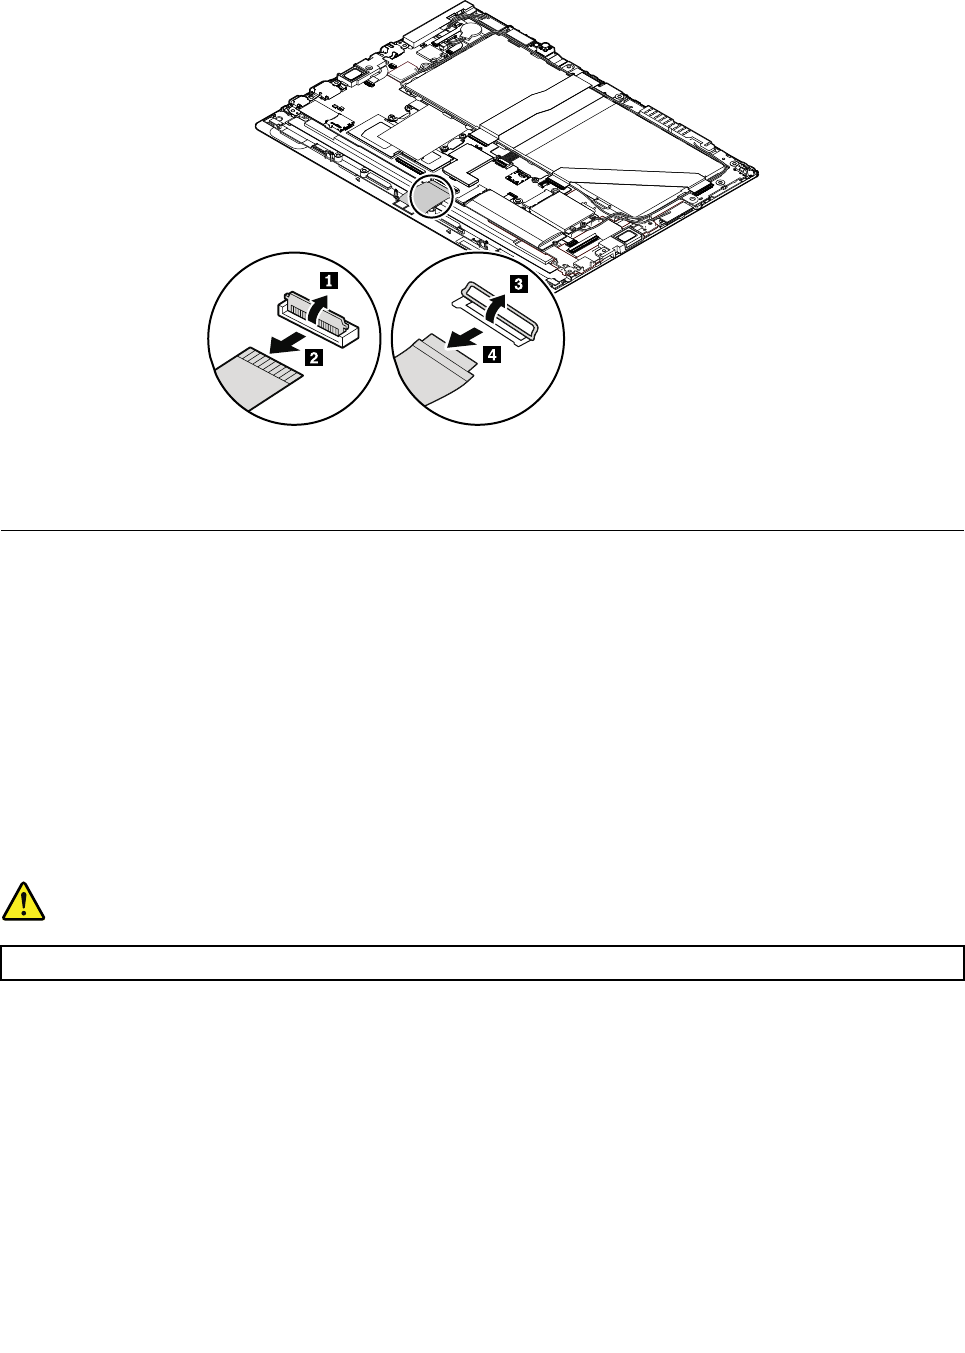
RemovalstepsoftheLCDcable
Note:Donotclosetheconnectorflipsbeforeconnectingthecable.Whenconnectingthecable,ensure
thattheconnectorsareattachedfirmly.
1160Built-inbattery
Beforeyoureplacethebuilt-inbattery,dothefollowing:
1.Disablethebuilt-inbattery.See“Disablingthebuilt-inbattery”onpage50.
2.RemovetheSIMcard,SDcard,andBaseModule.See“RemovingtheSIMcard,SDcard,andBase
Module”onpage50.
3.RemovethefollowingFRUs:
•“1020Backcoverassembly”onpage53
•“1030Coin-cellbattery”onpage58
•“1040ThinkLEDlight”onpage59
Removalstepsofthebuilt-inbattery
DANGER
Useonlytheauthorizedbatteryspecifiedforyourtablet.Anyotherbatterycouldigniteorexplode.
74ThinkPadX1T abletHardwareMaintenanceManual
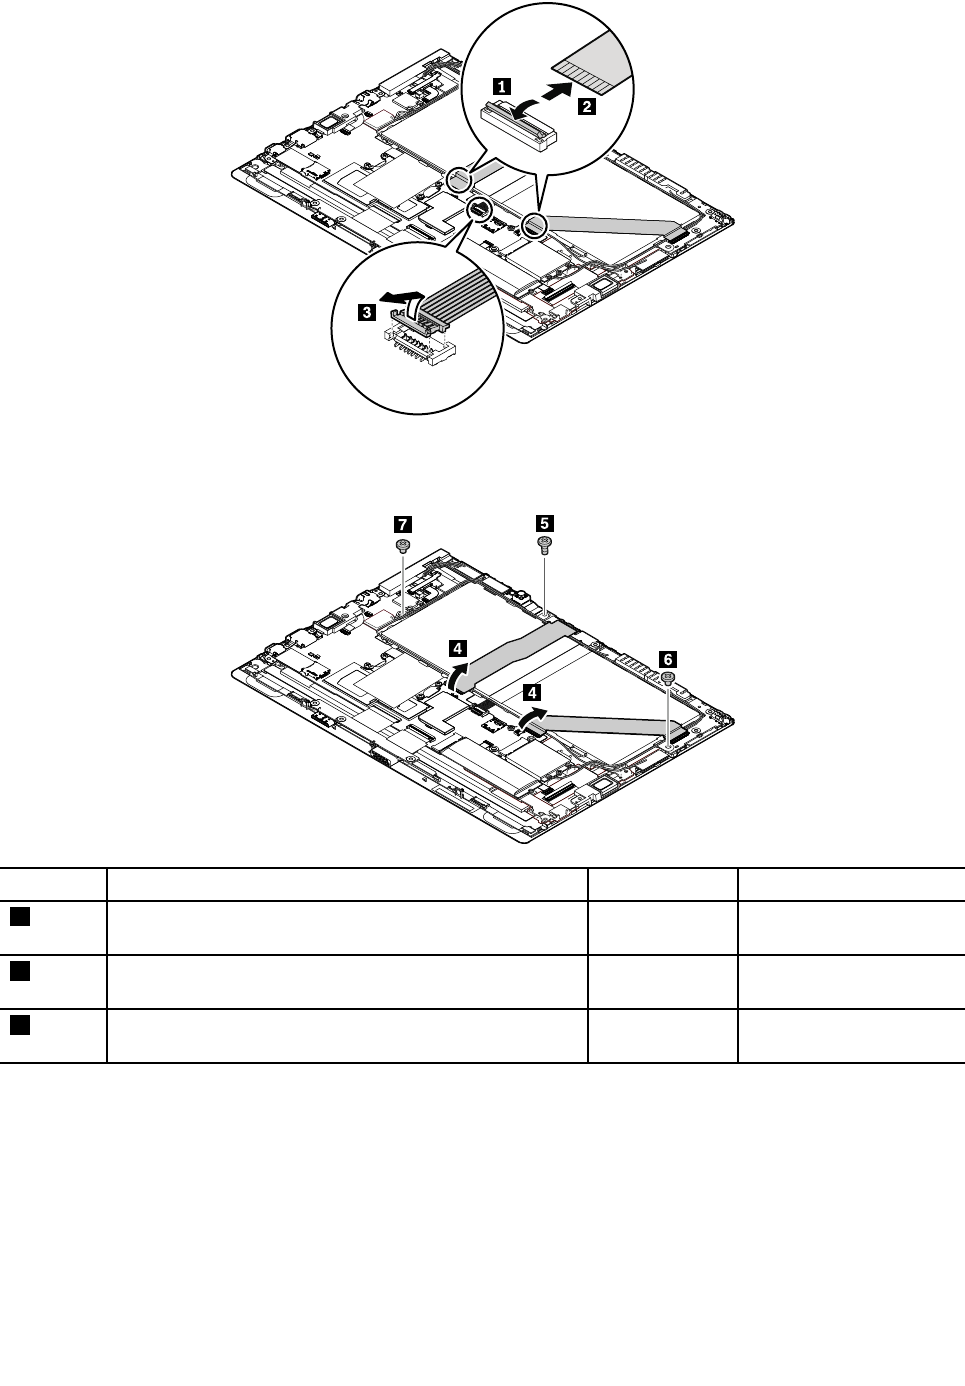
Note:Donotclosetheconnectorflipsbeforeconnectingthecables.Whenconnectingthecables,ensure
thattheconnectorsareattachedfirmly.
StepScrew(quantity)ColorTorque
5M2×L4mm,flat-head,nylon-coated(1)Black0.181Nm
(1.85kgf-cm)
6M2×L2mm,thinbighead,nylon-coated(1)Silver0.181Nm
(1.85kgf-cm)
7M2×L2.5mm,thinbighead,nylon-coated(1)Black0.181Nm
(1.85kgf-cm)
Chapter7.RemovingorreplacingaFRU75
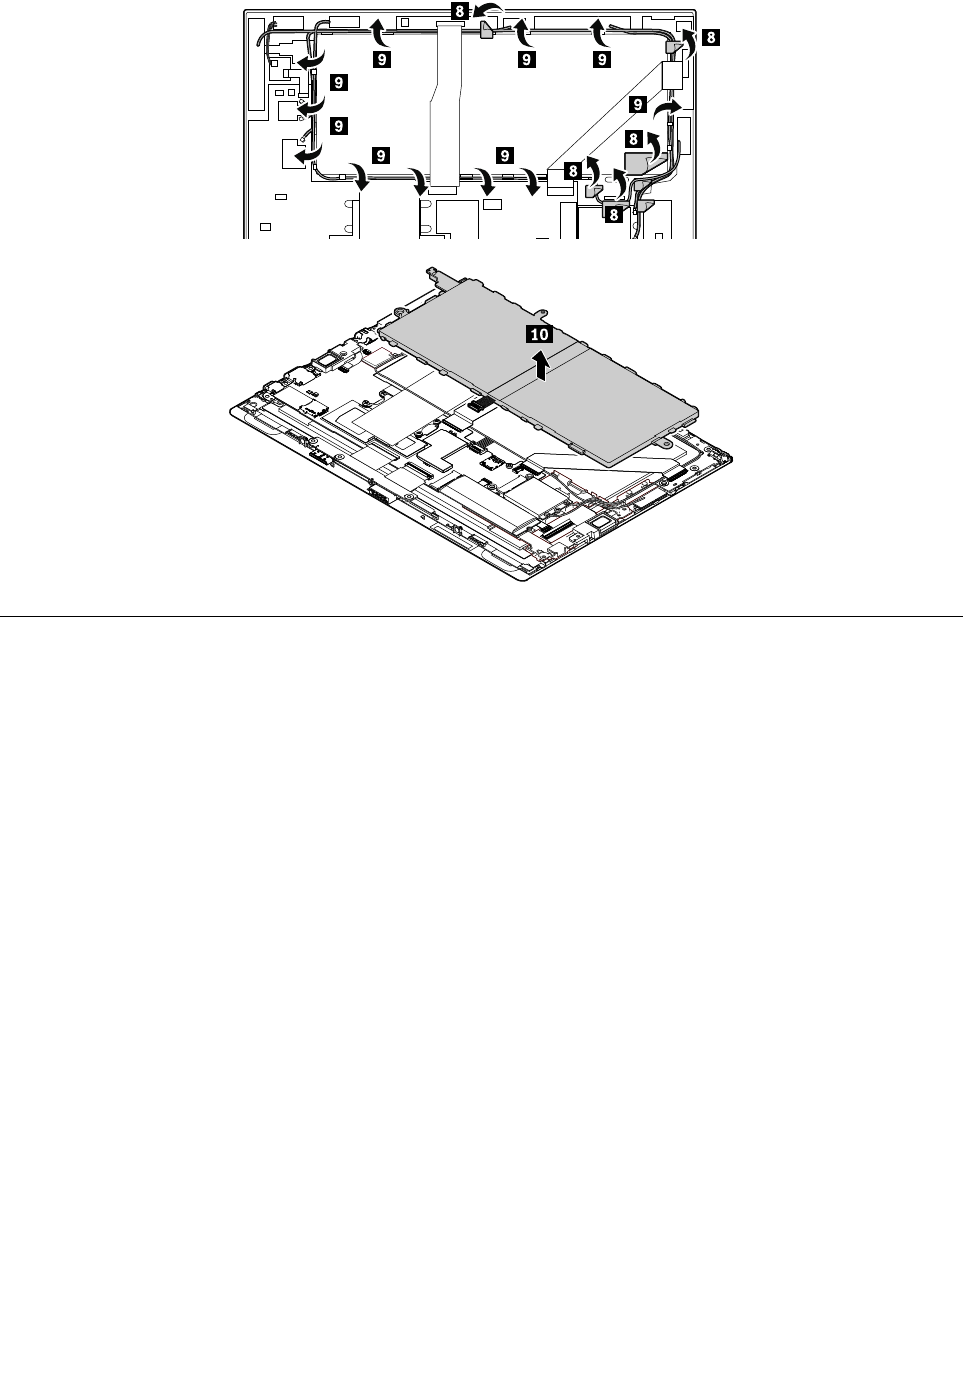
1170Cameracable,cameracard,front-facingcameramodule,and
rear-facingcameramodule
Beforeyoureplacethecameracable,cameracard,front-facingcameramodule,orrear-facingcamera
module,dothefollowing:
1.Disablethebuilt-inbattery.See“Disablingthebuilt-inbattery”onpage50.
2.RemovetheSIMcard,SDcard,andBaseModule.See“RemovingtheSIMcard,SDcard,andBase
Module”onpage50.
3.Removethebackcoverassembly.See“1020Backcoverassembly”onpage53.
4.Removethebuilt-inbattery.See“1160Built-inbattery”onpage74.
76ThinkPadX1T abletHardwareMaintenanceManual
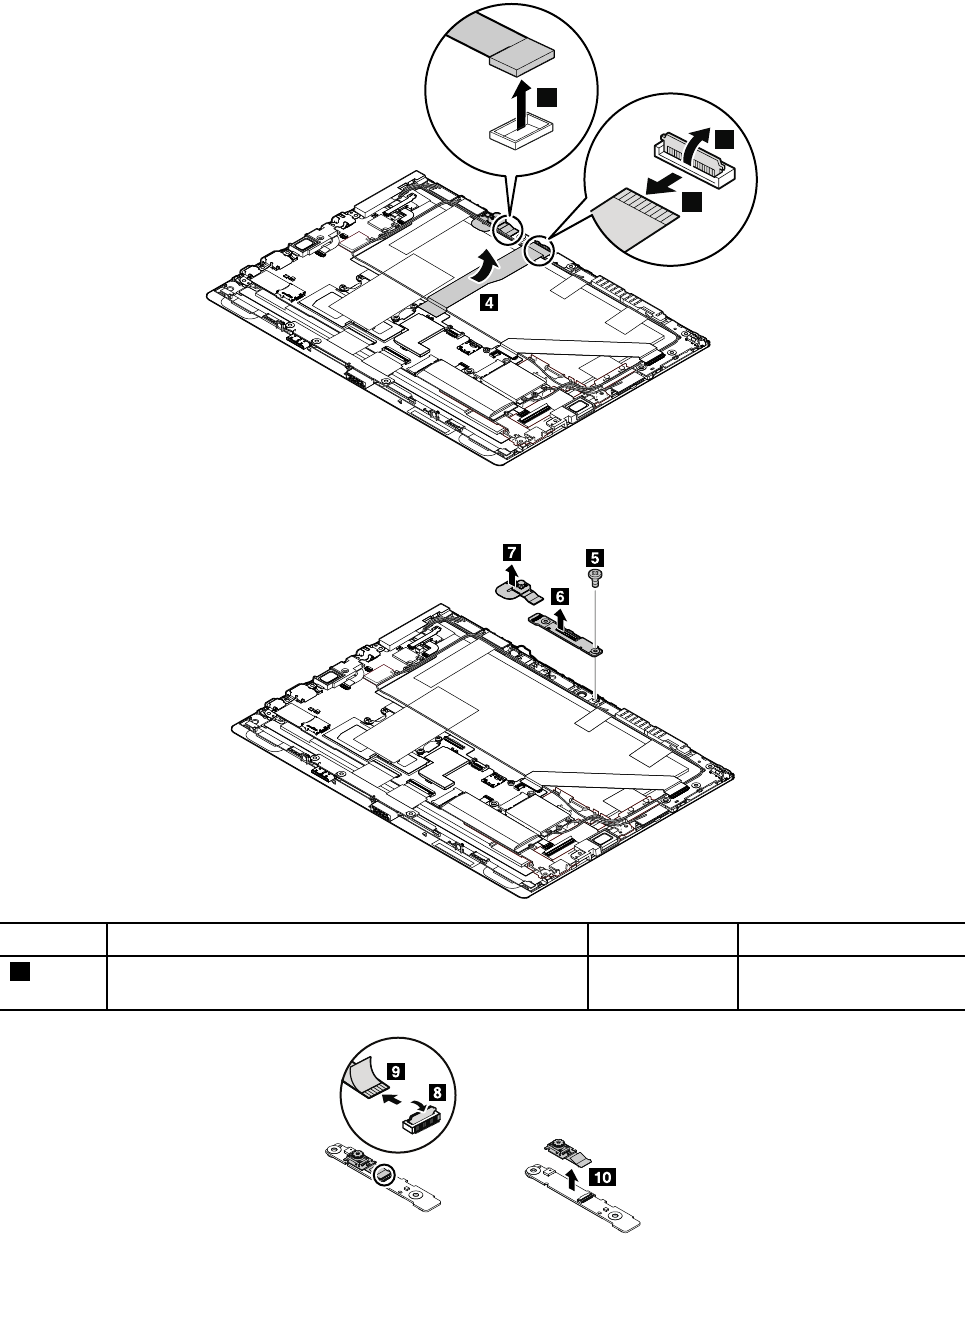
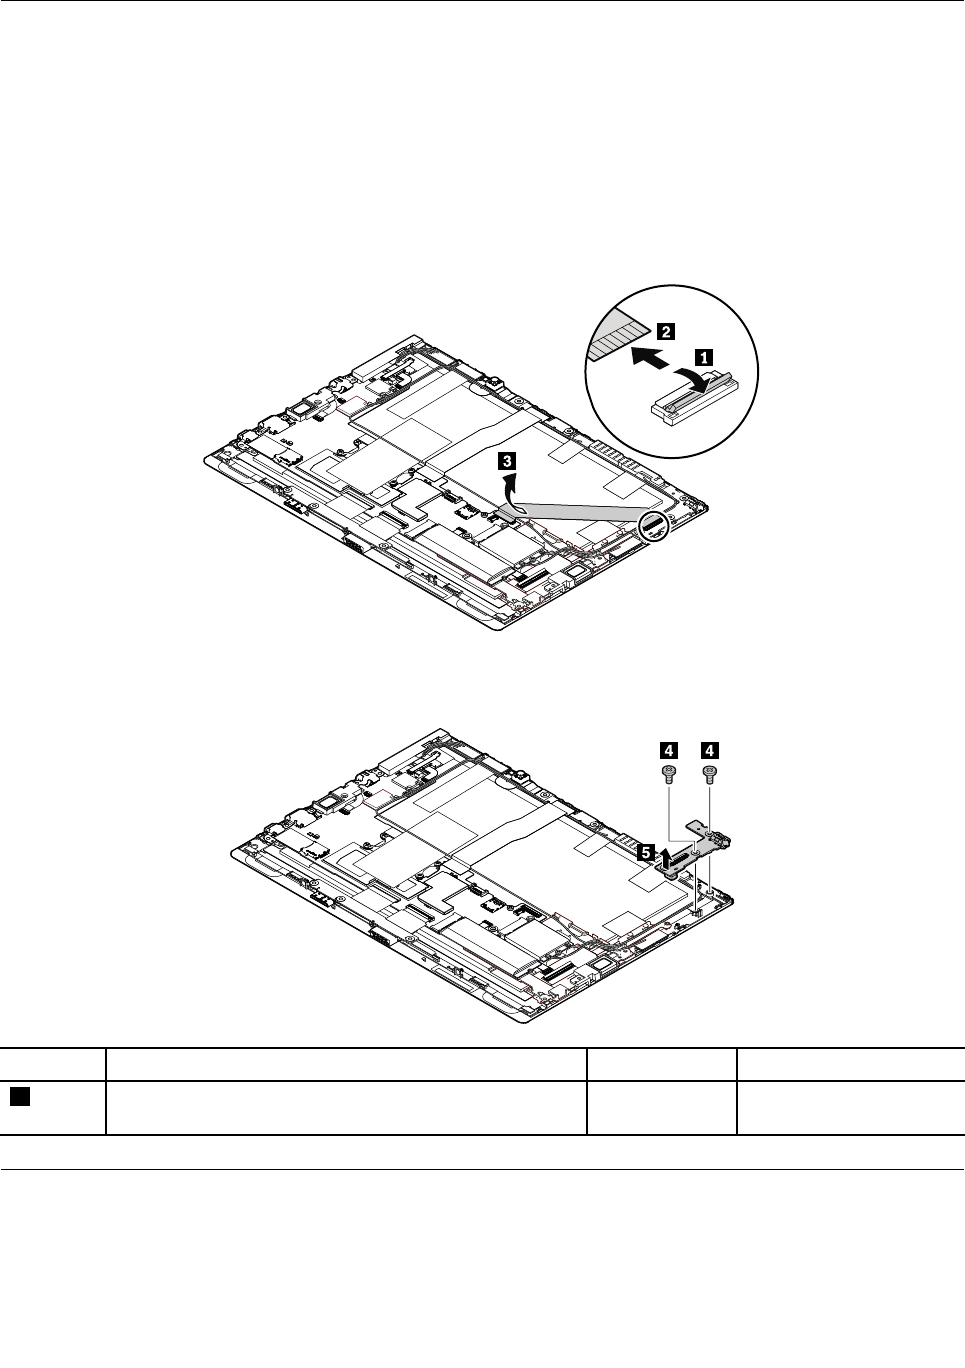
1180Audiocardandaudio-cardcable
Beforeyoureplacetheaudiocardoraudio-cardcable,dothefollowing:
1.Disablethebuilt-inbattery.See“Disablingthebuilt-inbattery”onpage50.
2.RemovetheSIMcard,SDcard,andBaseModule.See“RemovingtheSIMcard,SDcard,andBase
Module”onpage50.
3.Removethebackcoverassembly.See“1020Backcoverassembly”onpage53.
4.Removethebuilt-inbattery.See“1160Built-inbattery”onpage74.
Removalstepsoftheaudiocardandaudio-cardcable
Note:Donotclosetheconnectorflipsbeforeconnectingthecables.Whenconnectingthecables,ensure
thattheconnectorsareattachedfirmly.
StepScrew(quantity)ColorTorque
4M2×L2.5mm,flat-head,nylon-coated(2)Black0.181Nm
(1.85kgf-cm)
1190Thermalmodule
Beforeyoureplacethethermalmodule,dothefollowing:
1.Disablethebuilt-inbattery.See“Disablingthebuilt-inbattery”onpage50.
78ThinkPadX1T abletHardwareMaintenanceManual
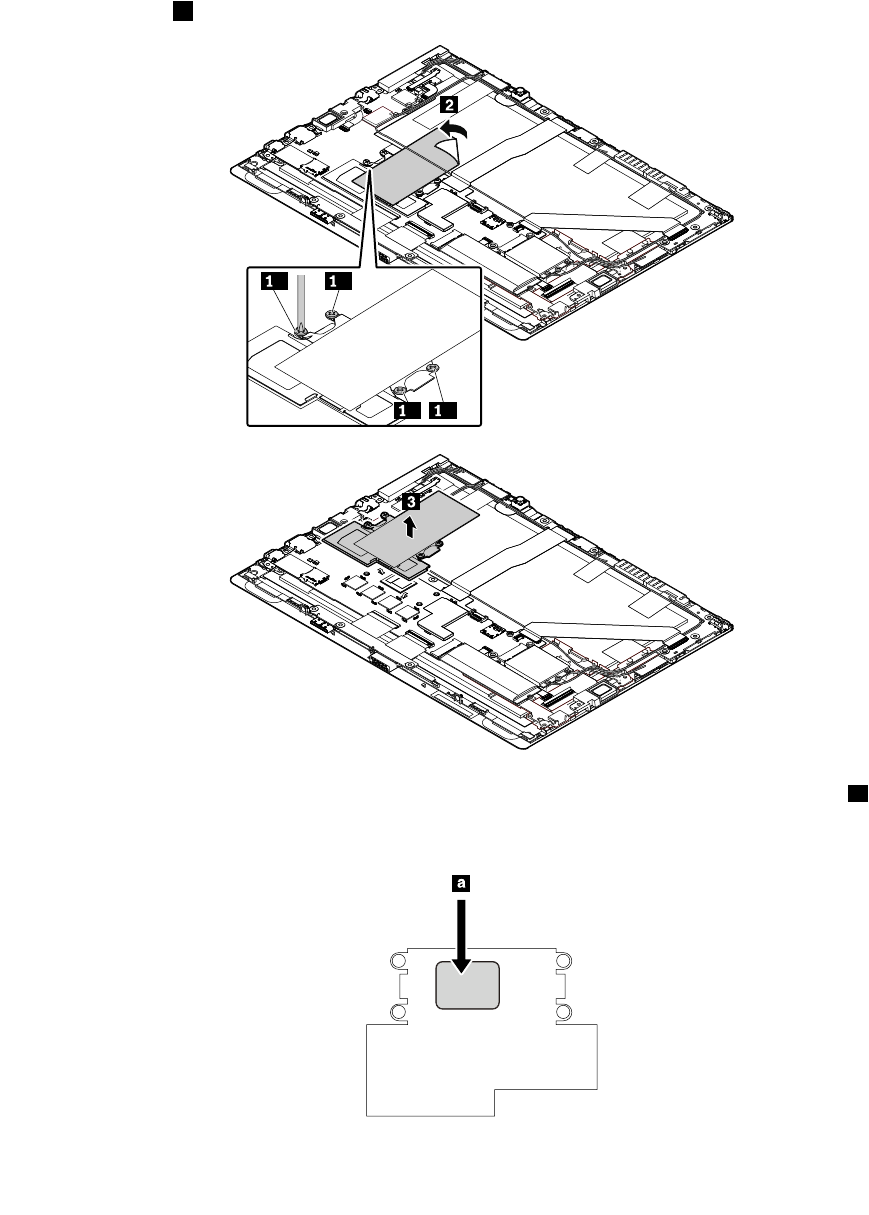
2.RemovetheSIMcard,SDcard,andBaseModule.See“RemovingtheSIMcard,SDcard,andBase
Module”onpage50.
3.Removethebackcoverassembly.See“1020Backcoverassembly”onpage53
4.Removethebuilt-inbattery.See“1160Built-inbattery”onpage74.
Removalstepsofthethermalmodule
Loosenthescrews1inascendingalphabeticalorderasshowninthefollowingillustration.
ac
bd
Wheninstalling:Beforeyouinstallthethermalmodule,apply0.2-gramthermalgreaseonpartaasshown
inthefollowingillustration.Eithertoomuchortoolessapplicationofgreasecancauseathermalproblem
duetoimperfectcontactwithacomponent.
Chapter7.RemovingorreplacingaFRU79
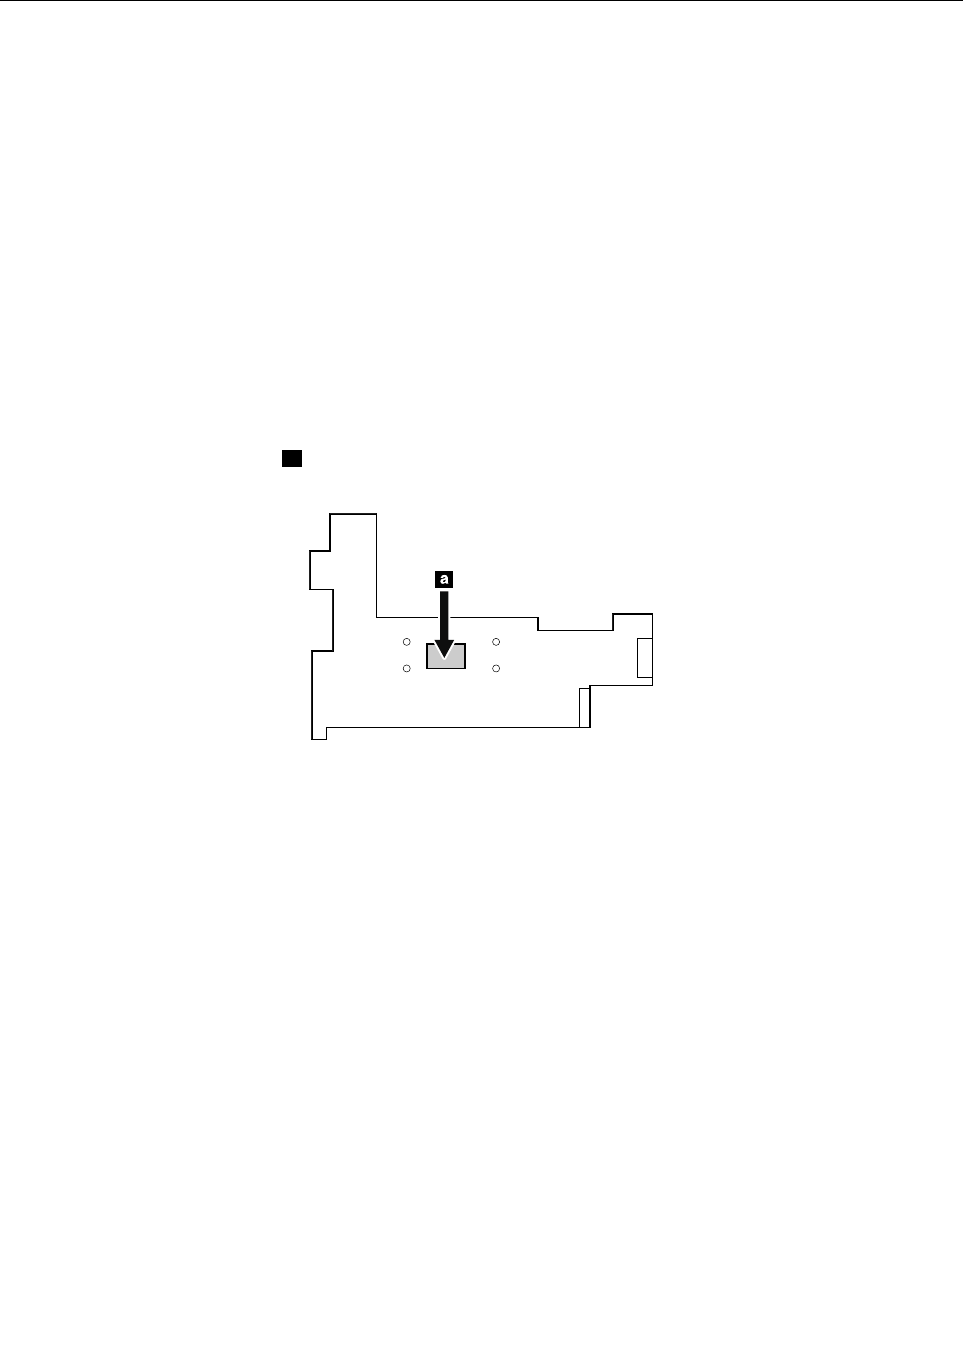
1210Systemboard
Beforeyoureplacethesystemboard,dothefollowing:
1.Disablethebuilt-inbattery.See“Disablingthebuilt-inbattery”onpage50.
2.RemovetheSIMcard,SDcard,andBaseModule.See“RemovingtheSIMcard,SDcard,andBase
Module”onpage50.
3.RemovethefollowingFRUs:
•“1020Backcoverassembly”onpage53
•“1060Wireless-WANcard”onpage61
•“1070M.2solid-statedriveandsolid-state-drivemylar”onpage63
•“1120MiniDisplayPortbracket”onpage69
•“1130USB-connectorbracket”onpage70
•“1160Built-inbattery”onpage74
•“1190Thermalmodule”onpage78
Attention:Themicroprocessorasolderedonthesystemboardareextremelysensitive.Whenyouservice
thesystemboard,avoidanykindofroughhandling.
Removalstepsofthesystemboard
CAUTION:
Whenhandlingthesystemboard,readthefollowing:
•Thesystemboardhasanaccelerometer,whichcanbebrokenwhenseveralthousandsofG-forces
areapplied.
•Becarefulnottodropthesystemboardonabenchtopthathasahardsurface,suchasmetal,
wood,orcomposite.
•Avoidroughhandlingofanykind.
•Ateverypointintheprocess,besurenottodroporstackthesystemboard.
•Ifyouputasystemboarddown,besuretoputitonlyonapaddedsurfacesuchasanESDmator
acorrugatedconductivematerial.
80ThinkPadX1T abletHardwareMaintenanceManual

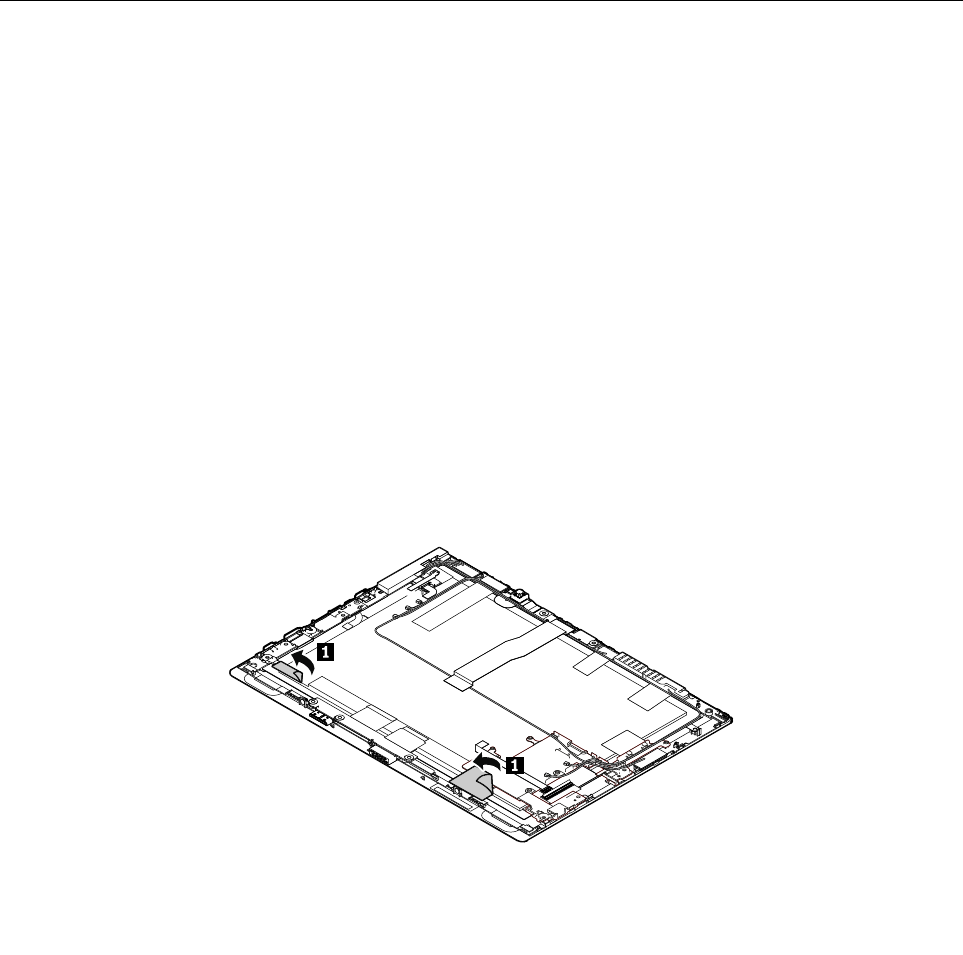
Afterthesystemboardisreplacedwithanewone,dothefollowing:
•Initializethesettingsonthenewsystemboardbydoingthefollowing:
1.Restartthetablet.Whenthelogoscreenisdisplayed,tapTointerruptnormalstartup,pressEnter
ortaphereonthescreen.
2.TapF1onthescreentostarttheThinkPadTabletSetupprogram.
3.TapRestart➙LoadSetupDefaults.
4.Aconfirmationmessageisdisplayed.TapYestoloadthedefaultconfiguration.
•ResettheNVRAM(Non-VolatileRandomAccessMemory).Todownloadthetoolandtheinstruction,
dothefollowing:
1.Gotohttps://support.lenovo.com/documents/HT104297andthenfollowtheinstructionsonthe
screen.
Note:Serviceaccountandpasswordarerequiredfordownloadingthetoolandtheinstruction.
2.LocatetheNVRAMupdatetool,thendownloadthetoolandtheinstruction.
1211Innerframeleftandinnerframeright
Beforeyoureplacetheinnerframeleftandinnerframeright,dothefollowing:
1.Disablethebuilt-inbattery.See“Disablingthebuilt-inbattery”onpage50.
2.RemovetheSIMcard,SDcard,andBaseModule.See“RemovingtheSIMcard,SDcard,andBase
Module”onpage50.
3.RemovethefollowingFRUs:
•“1020Backcoverassembly”onpage53
•“1060Wireless-WANcard”onpage61
•“1070M.2solid-statedriveandsolid-state-drivemylar”onpage63
•“1110Speakerassembly”onpage68
•“1120MiniDisplayPortbracket”onpage69
•“1130USB-connectorbracket”onpage70
•“1160Built-inbattery”onpage74
•“1190Thermalmodule”onpage78
•“1210Systemboard”onpage80
Removalstepsoftheinnerframeleftandinnerframeright
82ThinkPadX1T abletHardwareMaintenanceManual
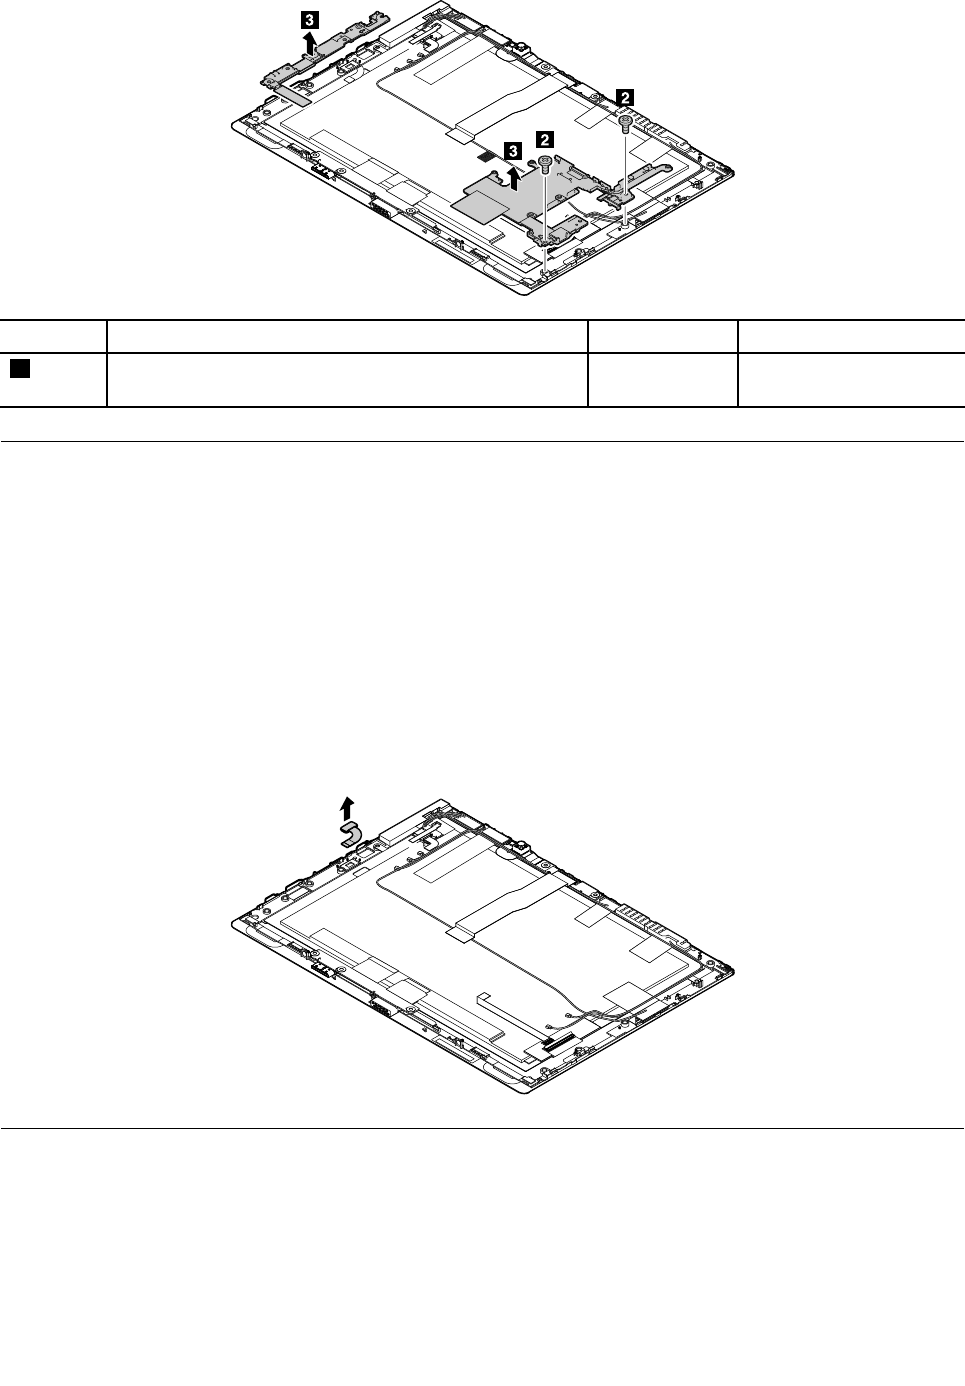
StepScrew(quantity)ColorTorque
2M2×L2.5mm,flat-head,nylon-coated(2)Black0.181Nm
(1.85kgf-cm)
1212Fingerprint-readermodule
Beforeyoureplacethefingerprint-readermodule,dothefollowing:
1.Disablethebuilt-inbattery.See“Disablingthebuilt-inbattery”onpage50.
2.RemovetheSIMcard,SDcard,andBaseModule.See“RemovingtheSIMcard,SDcard,andBase
Module”onpage50.
3.Removethebackcoverassembly.See“1020Backcoverassembly”onpage53.
4.Removetheinnerframeleftandinnerframeright.See“1211Innerframeleftandinnerframeright”
onpage82
Removalstepsofthefingerprint-readermodule
Thefingerprint-readermoduleisonlyavailableonsomemodels.
1213Antennakit
Beforeyoureplacetheantennakit,dothefollowing:
1.Disablethebuilt-inbattery.See“Disablingthebuilt-inbattery”onpage50.
2.RemovetheSIMcard,SDcard,andBaseModule.See“RemovingtheSIMcard,SDcard,andBase
Module”onpage50.
3.RemovethefollowingFRUs:
Chapter7.RemovingorreplacingaFRU83
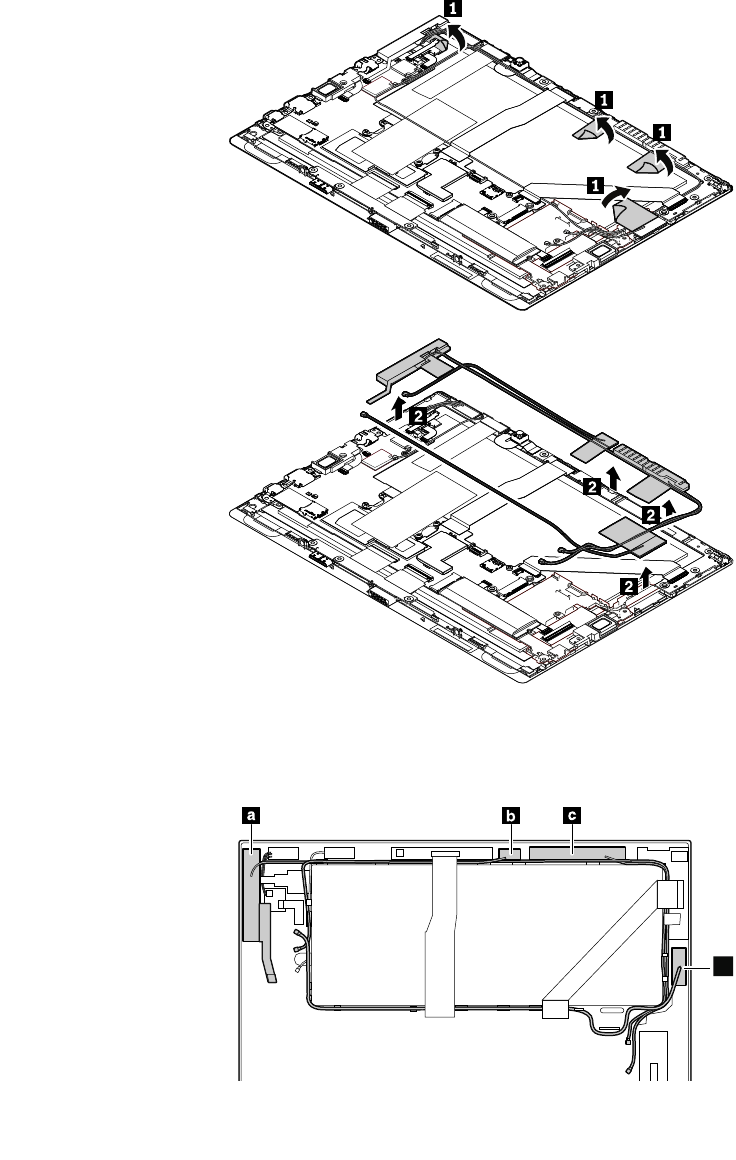
•“1020Backcoverassembly”onpage53
•“1060Wireless-WANcard”onpage61
•“1160Built-inbattery”onpage74
•“1211Innerframeleftandinnerframeright”onpage82
Removalstepsoftheantennakit
Thewireless-WANantennaassemblyisonlyavailableonsomemodels.
Attention:Wheninstallingtheantennaassembly,routethecablesasshowninthefollowingillustration.
Ensurethatthecablesarenottwistedorsubjecttoanytension.Tensioncouldcausethecablestobe
damagedbycableguides.
d
84ThinkPadX1T abletHardwareMaintenanceManual
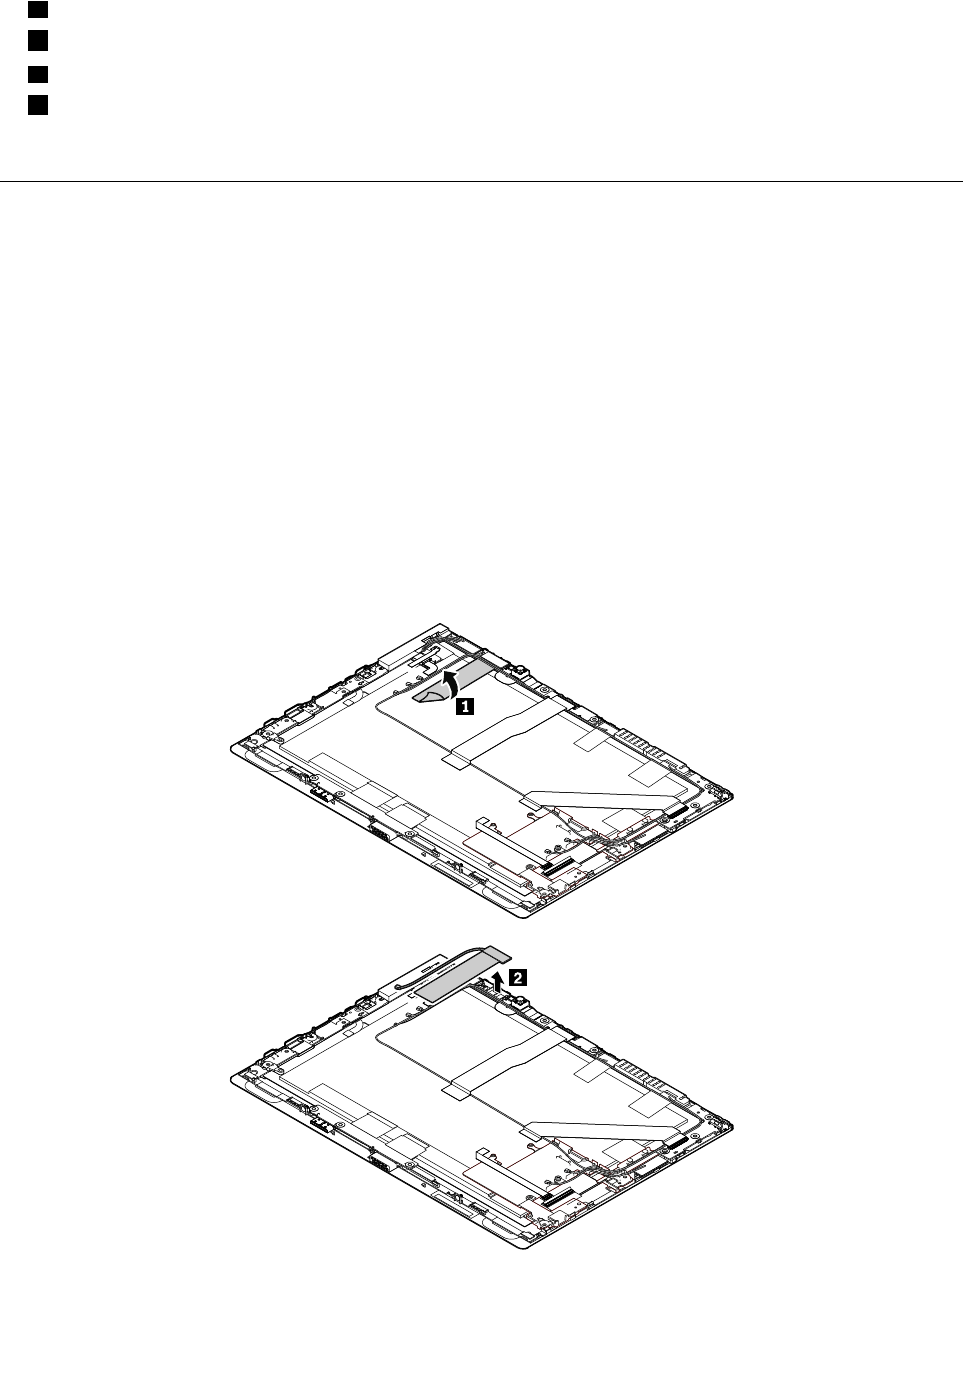
aWireless-WANantenna(Main)*
bWireless-LANantenna(Main)
cWireless-WANantenna(Auxiliary)*
dWireless-LANantenna(Auxiliary)
*Availableonsomemodels
1214WiGigantennaassemblyandthermalspreadsheetforWiGig
antennaassembly
BeforeyoureplacetheWiGigantennaassemblyandthermalspreadsheetforWiGigantennaassembly,
dothefollowing:
1.Disablethebuilt-inbattery.See“Disablingthebuilt-inbattery”onpage50.
2.RemovetheSIMcard,SDcard,andBaseModule.See“RemovingtheSIMcard,SDcard,andBase
Module”onpage50.
3.RemovethefollowingFRUs:
•“1020Backcoverassembly”onpage53
•“1160Built-inbattery”onpage74
RemovalstepsoftheWiGigantennaassemblyandthermalspreadsheetforWiGigantennaassembly
TheWiGigantennaassemblyandthermalspreadsheetforWiGigantennaassemblyareonlyavailable
onsomemodels.
Chapter7.RemovingorreplacingaFRU85
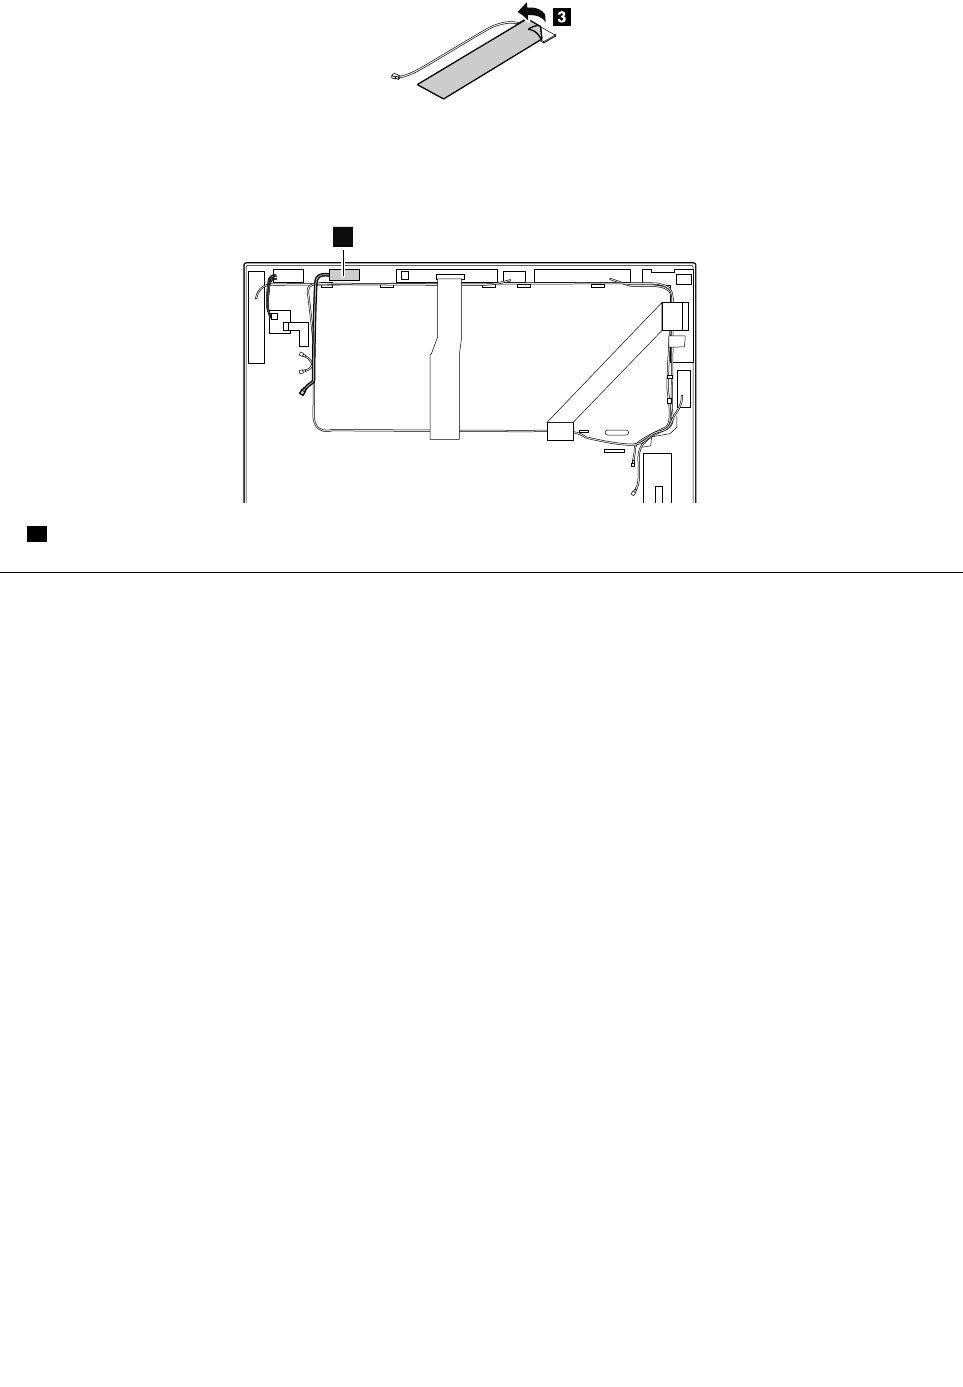
Attention:Wheninstallingtheantennaassembly,routethecablesasshowninthefollowingillustration.
Ensurethatthecablesarenottwistedorsubjecttoanytension.Tensioncouldcausethecablestobe
damagedbycableguides.
a
aWiGigantenna
1215LCDmodule
ToreplacetheLCDmodule,dothefollowing:
1.Disablethebuilt-inbattery.See“Disablingthebuilt-inbattery”onpage50.
2.RemovetheSIMcard,SDcard,andBaseModule.See“RemovingtheSIMcard,SDcard,andBase
Module”onpage50.
3.RemovethefollowingFRUs,thenyouwillhavetheLCDmodule.
•“1020Backcoverassembly”onpage53
•“1030Coin-cellbattery”onpage58
•“1040ThinkLEDlight”onpage59
•“1050NFCcard,NFC-cardcable,andNFCantennaassembly”onpage60
•“1060Wireless-WANcard”onpage61
•“1070M.2solid-statedriveandsolid-state-drivemylar”onpage63
•“1080Touchcontrollercardcable”onpage65
•“1090Infraredcameracardandinfraredcameracable”onpage66
•“1110Speakerassembly”onpage68
•“1120MiniDisplayPortbracket”onpage69
•“1130USB-connectorbracket”onpage70
•“1140POGOcardandPOGO-cardcable”onpage71
•“1150LCDcable”onpage73
•“1160Built-inbattery”onpage74
•“1170Cameracable,cameracard,front-facingcameramodule,andrear-facingcameramodule”
onpage76
•“1180Audiocardandaudio-cardcable”onpage78
86ThinkPadX1T abletHardwareMaintenanceManual


88ThinkPadX1T abletHardwareMaintenanceManual

AppendixA.Notices
Lenovomaynotoffertheproducts,services,orfeaturesdiscussedinthisdocumentinallcountries.Consult
yourlocalLenovorepresentativeforinformationontheproductsandservicescurrentlyavailableinyour
area.AnyreferencetoaLenovoproduct,program,orserviceisnotintendedtostateorimplythatonlythat
Lenovoproduct,program,orservicemaybeused.Anyfunctionallyequivalentproduct,program,orservice
thatdoesnotinfringeanyLenovointellectualpropertyrightmaybeusedinstead.However,itistheuser's
responsibilitytoevaluateandverifytheoperationofanyotherproduct,program,orservice.
Lenovomayhavepatentsorpendingpatentapplicationscoveringsubjectmatterdescribedinthis
document.Thefurnishingofthisdocumentdoesnotgiveyouanylicensetothesepatents.Y oucansend
licenseinquiries,inwriting,to:
Lenovo(UnitedStates),Inc.
1009ThinkPlace-BuildingOne
Morrisville,NC27560
U.S.A.
Attention:LenovoDirectorofLicensing
LENOVOPROVIDESTHISPUBLICATION“ASIS”WITHOUTWARRANTYOFANYKIND,EITHEREXPRESS
ORIMPLIED,INCLUDING,BUTNOTLIMITEDTO,THEIMPLIEDWARRANTIESOFNON-INFRINGEMENT,
MERCHANTABILITYORFITNESSFORAPARTICULARPURPOSE.Somejurisdictionsdonotallow
disclaimerofexpressorimpliedwarrantiesincertaintransactions,therefore,thisstatementmaynotapply
toyou.
Thisinformationcouldincludetechnicalinaccuraciesortypographicalerrors.Changesareperiodically
madetotheinformationherein;thesechangeswillbeincorporatedinneweditionsofthepublication.
Lenovomaymakeimprovementsand/orchangesintheproduct(s)and/ortheprogram(s)describedinthis
publicationatanytimewithoutnotice.
Theproductsdescribedinthisdocumentarenotintendedforuseinimplantationorotherlifesupport
applicationswheremalfunctionmayresultininjuryordeathtopersons.Theinformationcontainedinthis
documentdoesnotaffectorchangeLenovoproductspecificationsorwarranties.Nothinginthisdocument
shalloperateasanexpressorimpliedlicenseorindemnityundertheintellectualpropertyrightsofLenovo
orthirdparties.Allinformationcontainedinthisdocumentwasobtainedinspecificenvironmentsandis
presentedasanillustration.Theresultobtainedinotheroperatingenvironmentsmayvary.
Lenovomayuseordistributeanyoftheinformationyousupplyinanywayitbelievesappropriatewithout
incurringanyobligationtoyou.
Anyreferencesinthispublicationtonon-LenovoWebsitesareprovidedforconvenienceonlyanddonotin
anymannerserveasanendorsementofthoseWebsites.ThematerialsatthoseWebsitesarenotpartof
thematerialsforthisLenovoproduct,anduseofthoseWebsitesisatyourownrisk.
Anyperformancedatacontainedhereinwasdeterminedinacontrolledenvironment.Therefore,theresult
obtainedinotheroperatingenvironmentsmayvarysignificantly.Somemeasurementsmayhavebeen
madeondevelopment-levelsystemsandthereisnoguaranteethatthesemeasurementswillbethesame
ongenerallyavailablesystems.Furthermore,somemeasurementsmayhavebeenestimatedthrough
extrapolation.Actualresultsmayvary.Usersofthisdocumentshouldverifytheapplicabledatafortheir
specificenvironment.
©CopyrightLenovo201689

Electronicemissionnotices
ForelectronicemissioninformationonClassBdigitaldevices,refertothecorrespondinginformationin
theUserGuide.
Trademarks
ThefollowingtermsaretrademarksofLenovointheUnitedStates,othercountriesorboth:
Lenovo
Lenovologo
ThinkPad
ThinkPadlogo
MicrosoftandWindowsaretrademarksoftheMicrosoftgroupofcompanies.
ThetermsHDMIandHDMIHigh-DefinitionMultimediaInterfacearetrademarksorregisteredtrademarksof
HDMILicensingLLCintheUnitedStatesandothercountries.
MiniDisplayPort(mDP)isatrademarkoftheVideoElectronicsStandardsAssociation.
Othercompany,product,orservicenamesmaybetrademarksorservicemarksofothers.
90ThinkPadX1T abletHardwareMaintenanceManual

AppendixB.Abbreviationandacronymtable
Thefollowingtablelistsallabbreviationsandacronymswhichmightbeusedinthismanual.
AbbreviationTerm
3Gthirdgenerationofmobiletelecommunicationstechnology
BGABallGridArray
BIOSbasicinput/outputsystem
CMOScomplementarymetal-oxidesemiconductor
COACertificateofAuthentication
CRCcyclicredundancycheck
CRTcathoderaytube
CRUcustomer-replaceableunit
CTOConfigureToOrder
EAIAEnhancedAssetInformationArea
ECAEngineeringChangeAnnouncements
EEPROMElectricallyErasableProgrammableRead-OnlyMemory
EFIExtensibleFirmwareInterface
EPOemergencypower-off
ESDelectrostaticdischarge
EUEuropeanUnion
FCCFederalCommunicationsCommission
FRUFieldReplaceableUnit
GAVGeneralAnnounceVariant
GPUgraphicsprocessingunit
HDDharddiskdrive
HDMIhigh-definitionmultimediainterface
ICsintegratedcircuits
ICCIDintegratecircuitcardidentity
ISOInternationalStandardizationOrganization
LANlocalareanetwork
LCDliquidcrystaldisplay
MACmediaaccesscontrol
MTmachinetype
MTMmachinetypeandmodel
PCpersonalcomputer
PCHPlatformControllerHub
POSTpower-onself-test
RAMrandom-accessmemory
©CopyrightLenovo201691

AbbreviationTerm
RFradiofrequency
RFIDradio-frequencyidentification
RIringindicator
RJregisteredjack
SATASerialAdvancedTechnologyAttachment
SIMsubscriberidentitymodule
SVPsupervisorpassword
TFTsthin-filmtransistors
UEFIUnifiedExtensibleFirmwareInterface
USBUniversalSerialBus
UUIDuniversallyuniqueidentifier
VGAvideographicsarray
VRAMvideorandom-accessmemory
92ThinkPadX1T abletHardwareMaintenanceManual

PartNumber:SP40G76080
(1P)P/N:SP40G76080
*1PSP40G76080*
