Lenovo X230 X230I Hmm En 0B48666 01 User Manual Hardware Maintenance Laptop (Think Pad) Type 2333
2012-08-15
User Manual: Lenovo X230 X230I Hmm En 0B48666 01 Hardware Maintenance Manual X230 Laptop (ThinkPad) - Type 2333 ThinkPad X230, 2333
Open the PDF directly: View PDF ![]() .
.
Page Count: 104 [warning: Documents this large are best viewed by clicking the View PDF Link!]
- About this manual
- Chapter 1. Safety information
- Chapter 2. Important service information
- Chapter 3. General checkout
- Chapter 4. Related service information
- Chapter 5. Status indicators
- Chapter 6. Fn key combinations
- Chapter 7. Locations
- Chapter 8. FRU replacement notices
- Chapter 9. Removing or replacing a FRU
- General guidelines
- Before servicing the computer
- 1010 Battery pack
- 1020 Hard disk drive or solid-state drive
- 1030 Memory module
- 1040 Keyboard
- 1050 Palm rest
- 1060 Backup battery
- 1070 Speaker assembly
- 1080 PCI Express Mini Card for wireless LAN/WiMAX
- 1090 PCI Express Mini Card for wireless WAN or mSATA solid-state drive
- 1100 Bluetooth daughter card
- 1110 Keyboard bezel
- 1120 LCD unit
- 1130 Base cover assembly
- 1140 Systemboard, DC-in connector, thermal fan assembly, and ExpressCard slot
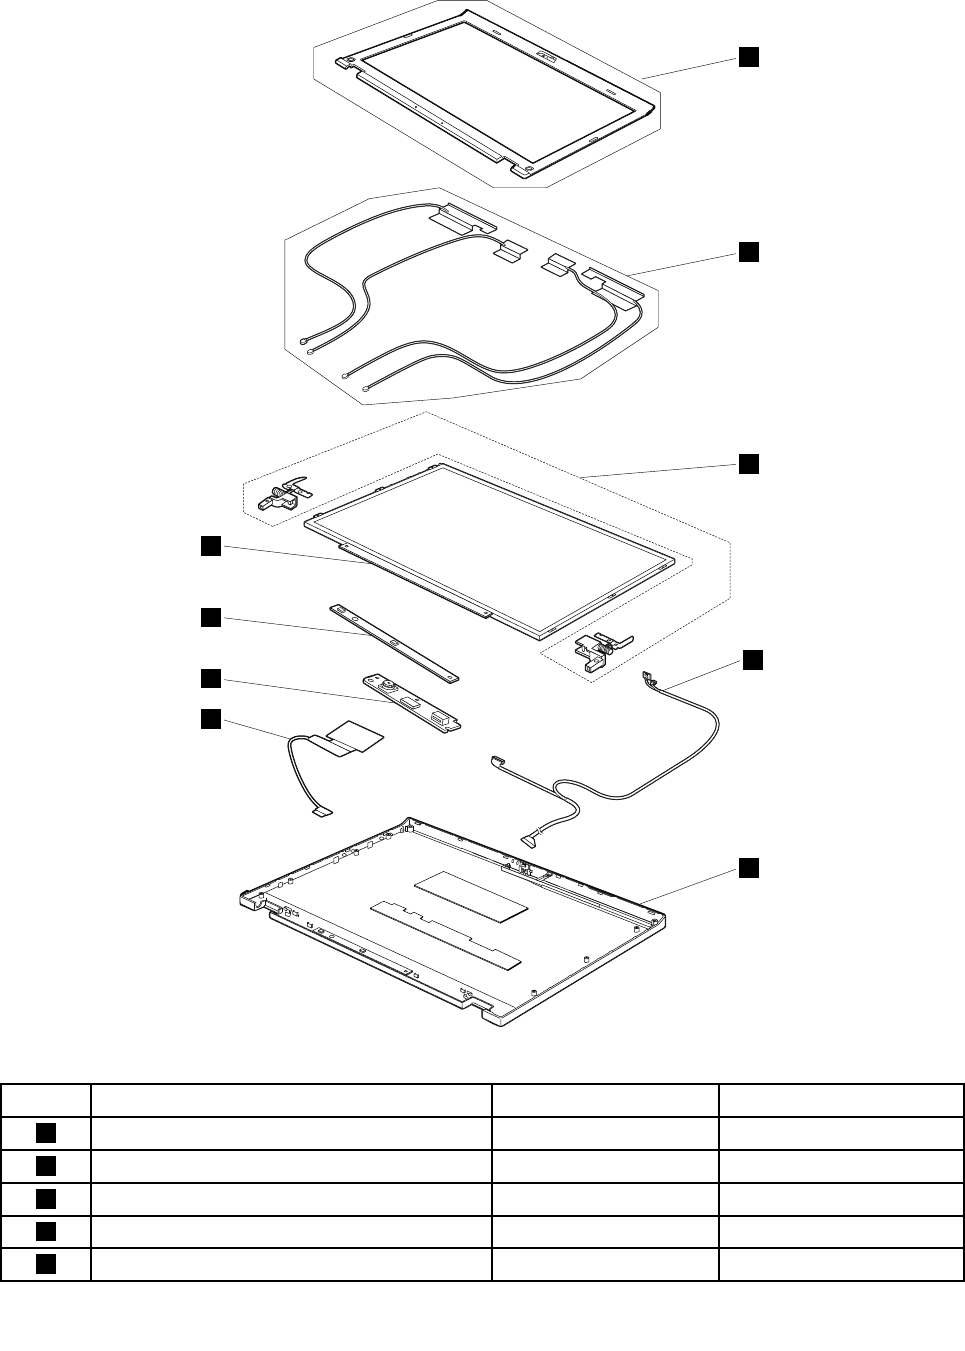
- 2010 LCD front bezel
- 2020 Integrated camera
- 2030 LCD panel
- 2040 LED board
- 2050 Hinges
- 2060 LCD cable
- 2070 LCD rear cover assembly, LED and camera cable, and wireless antenna set
- Appendix A. Notices

HardwareMaintenanceManual
ThinkPadX230andX230i

Note:Beforeusingthisinformationandtheproductitsupports,besuretoreadthegeneralinformation
underAppendixA“Notices”onpage95.
SecondEdition(October2012)
©CopyrightLenovo2012.
LIMITEDANDRESTRICTEDRIGHTSNOTICE:IfdataorsoftwareisdeliveredpursuantaGeneralServicesAdministration
“GSA”contract,use,reproduction,ordisclosureissubjecttorestrictionssetforthinContractNo.GS-35F-05925.

Contents
Aboutthismanual...........iii
Chapter1.Safetyinformation......1
Generalsafety................1
Electricalsafety...............1
Safetyinspectionguide............3
Handlingdevicesthataresensitivetoelectrostatic
discharge..................3
Groundingrequirements............4
Safetynotices(multilingualtranslations)......4
Chapter2.Importantservice
information..............19
StrategyforreplacingFRUs.........19
Strategyforreplacingaharddiskdrive...20
Importantnoticeforreplacingasystem
board................20
Howtouseerrormessage........20
StrategyforreplacingFRUsforCTO,CMV,and
GAV...................20
Productdenition............20
FRUidenticationforCTO,CMV,andGAV
products...............21
Chapter3.Generalcheckout.....23
Whattodorst..............23
Checkoutguide..............24
LenovoSolutionCenter.........24
Quicktestprograms...........24
UEFIdiagnosticprogram.........25
Bootablediagnosticprograms.......25
Powersystemcheckout...........26
Checkingtheacpoweradapter......26
Checkingoperationalcharging......27
Checkingthebatterypack........27
Checkingthebackupbattery.......28
Chapter4.Relatedservice
information..............29
RestoringthefactorycontentsbyusingRecovery
DiscSet.................29
UsingtheWindowsrecoveryprogramsonthe
Windows8operatingsystem.........30
Passwords................31
Power-onpassword...........31
Hard-diskpassword...........31
Supervisorpassword..........32
Howtoremovethepower-onpassword...32
Howtoremovethehard-diskpassword...32
Powermanagement............33
Screenblankmode(fortheWindows7
operatingsystemonly)..........33
Sleepmode..............33
Hibernationmode...........33
Symptom-to-FRUindex...........34
Numericerrorcodes..........35
Errormessages............36
Beepsymptoms............36
No-beepsymptoms...........37
LCD-relatedsymptoms.........37
Intermittentproblems..........37
Undeterminedproblems.........38
Chapter5.Statusindicators.....39
Chapter6.Fnkeycombinations...41
Chapter7.Locations.........43
Locatingcomputercontrols,connectors,and
indicators.................43
Frontview...............43
Rearview...............44
Bottomview..............44
LocatingFRUsandCRUs..........44
MajorFRUsandCRUs..........46
LCDFRUsandCRUs..........48
LookingupFRUinformation.......49
Chapter8.FRUreplacement
notices................51
Screwnotices...............51
Retainingserialnumbers...........52
Restoringtheserialnumberofthesystem
unit.................52
RetainingtheUUID...........53
ReadingorwritingtheECAinformation...53
Chapter9.Removingorreplacinga
FRU..................55
Generalguidelines.............55
Beforeservicingthecomputer........56
RemovingtheSIMcard.........56
1010Batterypack.............56
1020Harddiskdriveorsolid-statedrive....57
1030Memorymodule............59
1040Keyboard..............60
©CopyrightLenovo2012i

1050Palmrest..............63
1060Backupbattery............65
1070Speakerassembly...........66
1080PCIExpressMiniCardforwireless
LAN/WiMAX................68
1090PCIExpressMiniCardforwirelessWANor
mSATAsolid-statedrive...........70
1100Bluetoothdaughtercard........74
1110Keyboardbezel............75
1120LCDunit...............77
1130Basecoverassembly.........80
1140Systemboard,DC-inconnector,thermalfan
assembly,andExpressCardslot........82
2010LCDfrontbezel............85
2020Integratedcamera...........86
2030LCDpanel..............87
2040LEDboard..............88
2050Hinges...............89
2060LCDcable..............90
2070LCDrearcoverassembly,LEDandcamera
cable,andwirelessantennaset........91
AppendixA.Notices..........95
Electronicemissionnotices..........96
Trademarks................96
iiHardwareMaintenanceManual

Aboutthismanual
ThismanualcontainsserviceandreferenceinformationforthefollowingThinkPad®products.
ThinkPadX230andX230iMachineType2306,2320,2322,2324,2325,2330,and2333
Usethismanualalongwiththeadvanceddiagnosticteststotroubleshootproblems.
Important:
ThismanualisintendedonlyfortrainedservicetechnicianswhoarefamiliarwithThinkPadproducts.Use
thismanualalongwiththeadvanceddiagnosticteststotroubleshootproblemseffectively.
BeforeservicingaThinkPadproduct,besuretoreadalltheinformationunderChapter1“Safety
information”onpage1andChapter2“Importantserviceinformation”onpage19.
©CopyrightLenovo2012iii

ivHardwareMaintenanceManual

Chapter1.Safetyinformation
Thischapterpresentsthefollowingsafetyinformationthatyouneedtobefamiliarwithbeforeyouservicea
ThinkPadnotebookcomputer.
•“Generalsafety”onpage1
•“Electricalsafety”onpage1
•“Safetyinspectionguide”onpage3
•“Handlingdevicesthataresensitivetoelectrostaticdischarge”onpage3
•“Groundingrequirements”onpage4
•“Safetynotices(multilingualtranslations)”onpage4
Generalsafety
Followtheserulestoensuregeneralsafety:
•Observegoodhousekeepingintheareaofthemachinesduringandaftermaintenance.
•Whenliftinganyheavyobject:
1.Ensurethatyoucanstandsafelywithoutslipping.
2.Distributetheweightoftheobjectequallybetweenyourfeet.
3.Useaslowliftingforce.Nevermovesuddenlyortwistwhenyouattempttolift.
4.Liftbystandingorbypushingupwithyourlegmuscles;thisactionremovesthestrainfromthe
musclesinyourback.Donotattempttoliftanyobjectthatweighsmorethan16kg(35lb)orthat
youthinkistooheavyforyou.
•Donotperformanyactionthatcauseshazardstothecustomer,orthatmakestheequipmentunsafe.
•Beforeyoustartthemachine,ensurethatotherservicetechniciansandthecustomer'spersonnelare
notinahazardousposition.
•Placeremovedcoversandotherpartsinasafeplace,awayfromallpersonnel,whileyouareservicing
themachine.
•Keepyourtoolcaseawayfromwalkareassothatotherpeoplewillnottripoverit.
•Donotwearlooseclothingthatcanbetrappedinthemovingpartsofamachine.Ensurethatyoursleeves
arefastenedorrolledupaboveyourelbows.Ifyourhairislong,fastenit.
•Inserttheendsofyournecktieorscarfinsideclothingorfastenitwithanonconductiveclip,about8
centimeters(3inches)fromtheend.
•Donotwearjewelry,chains,metal-frameeyeglasses,ormetalfastenersforyourclothing,becausemetal
objectsaregoodelectricalconductors.
•Wearsafetyglasseswhenyouarehammering,drilling,soldering,cuttingwire,attachingsprings,using
solvents,orworkinginanyotherconditionsthatmightbehazardoustoyoureyes.
•Afterservice,reinstallallsafetyshields,guards,labels,andgroundwires.Replaceanysafetydevice
thatiswornordefective.
•Reinstallallcoverscorrectlybeforereturningthemachinetothecustomer.
•Fanlouversonthemachinehelptopreventoverheatingofinternalcomponents.Donotobstructfan
louversorcoverthemwithlabelsorstickers.
Electricalsafety
Observethefollowingruleswhenworkingonelectricalequipment.
©CopyrightLenovo20121

Important:
•Useonlyapprovedtoolsandtestequipment.Somehandtoolshavehandlescoveredwithasoftmaterial
thatdoesnotinsulateyouwhenworkingwithliveelectricalcurrents.
•Manycustomershave,neartheirequipment,rubberoormatsthatcontainsmallconductivebersto
decreaseelectrostaticdischarges.Donotusethistypeofmattoprotectyourselffromelectricalshock.
•Findtheroomemergencypower-off(EPO)switch,disconnectingswitch,orelectricaloutlet.Ifanelectrical
accidentoccurs,youcanthenoperatetheswitchorunplugthepowercordquickly.
•Donotworkaloneunderhazardousconditionsornearequipmentthathashazardousvoltages.
•Disconnectallpowerbefore:
–Performingamechanicalinspection
–Workingnearpowersupplies
–Removingorinstallingmainunits
•Beforeyoustarttoworkonthemachine,unplugthepowercord.Ifyoucannotunplugit,askthecustomer
topoweroffthewallboxthatsuppliespowertothemachine,andtolockthewallboxintheoffposition.
•Ifyouneedtoworkonamachinethathasexposedelectricalcircuits,observethefollowingprecautions:
–Ensurethatanotherperson,familiarwiththepower-offcontrols,isnearyou.Thatpersonmustbethere
toswitchoffthepower,ifnecessary.
–Useonlyonehandwhenworkingwithpowered-onelectricalequipment;keeptheotherhandinyour
pocketorbehindyourback.
CAUTION:
Anelectricalshockcanoccuronlywhenthereisacompletecircuit.Byobservingtheabove
rule,youmaypreventacurrentfrompassingthroughyourbody.
–Whenusingtesters,setthecontrolscorrectlyandusetheapprovedprobeleadsandaccessoriesfor
thattester.
–Standonsuitablerubbermats(obtainedlocally,ifnecessary)toinsulateyoufromgroundssuchas
metaloorstripsandmachineframes.
Observethespecialsafetyprecautionswhenyouworkwithveryhighvoltages.Instructionsforthese
precautionsareinthesafetysectionsofmaintenanceinformation.Useextremecarewhenmeasuring
highvoltages.
•Regularlyinspectandmaintainyourelectricalhandtoolsforsafeoperationalcondition.
•Donotusewornorbrokentoolsandtesters.
•Neverassumethatpowerhasbeendisconnectedfromacircuit.First,checkthatithasbeenpoweredoff.
•Alwayslookcarefullyforpossiblehazardsinyourworkarea.Examplesofthesehazardsaremoistoors,
nongroundedpowerextensioncables,powersurges,andmissingsafetygrounds.
•Donottouchliveelectricalcircuitswiththereectivesurfaceofaplasticdentalmirror.Thesurfaceis
conductive;suchtouchingcancausepersonalinjuryandmachinedamage.
•Donotservicethefollowingpartswiththepoweron:
–Powersupplyunits
–Pumps
–Blowersandfans
–Motorgenerators
–Unitssimilartothoselistedabove
Thispracticeensurescorrectgroundingoftheunits.
•Ifanelectricalaccidentoccurs:
–Usecaution;donotbecomeavictimyourself.
–Switchoffpower.
–Sendanotherpersontogetmedicalaid.
2HardwareMaintenanceManual

Safetyinspectionguide
Thepurposeofthisinspectionguideistoassistyouinidentifyingpotentiallyunsafeconditions.Aseach
machinewasdesignedandbuilt,requiredsafetyitemswereinstalledtoprotectusersandservicetechnicians
frominjury.Thisguideaddressesonlythoseitems.Y oushouldusegoodjudgmenttoidentifypotential
safetyhazardsduetoattachmentofnon-ThinkPadfeaturesoroptionsnotcoveredbythisinspectionguide.
Ifanyunsafeconditionsarepresent,youmustdeterminehowserioustheapparenthazardcouldbeand
whetheryoucancontinuewithoutrstcorrectingtheproblem.
Considertheseconditionsandthesafetyhazardstheypresent:
•Electricalhazards,especiallyprimarypower(primaryvoltageontheframecancauseseriousorfatal
electricalshock)
•Explosivehazards,suchasadamagedCRTfaceorabulgingcapacitor
•Mechanicalhazards,suchaslooseormissinghardware
Todeterminewhetherthereareanypotentiallyunsafeconditions,usethefollowingchecklistatthebeginning
ofeveryservicetask.Beginthecheckswiththepoweroff,andthepowercorddisconnected.
Checklist:
1.Checkexteriorcoversfordamage(loose,broken,orsharpedges).
2.Poweroffthecomputer.Disconnectthepowercord.
3.Checkthepowercordfor:
a.Athird-wiregroundconnectoringoodcondition.Useametertomeasurethird-wireground
continuityfor0.1ohmorlessbetweentheexternalgroundpinandtheframeground.
b.Thepowercordshouldbetheauthorizedtypespeciedforyourcomputer.Goto
http://www.lenovo.com/serviceparts-lookup.
c.Insulationmustnotbefrayedorworn.
4.Checkforcrackedorbulgingbatteries.
5.Removethecover.
6.Checkforanyobviousnon-ThinkPadalterations.Usegoodjudgmentastothesafetyofany
non-ThinkPadalterations.
7.Checkinsidetheunitforanyobviousunsafeconditions,suchasmetallings,contamination,wateror
otherliquids,orsignsofreorsmokedamage.
8.Checkforworn,frayed,orpinchedcables.
9.Checkthatthepower-supplycoverfasteners(screwsorrivets)havenotbeenremovedortamperedwith.
Handlingdevicesthataresensitivetoelectrostaticdischarge
Anycomputerpartcontainingtransistorsorintegratedcircuits(ICs)shouldbeconsideredsensitiveto
electrostaticdischarge(ESD).ESDdamagecanoccurwhenthereisadifferenceinchargebetweenobjects.
ProtectagainstESDdamagebyequalizingthechargesothatthemachine,thepart,theworkmat,andthe
personhandlingthepartareallatthesamecharge.
Notes:
1.Useproduct-specicESDprocedureswhentheyexceedtherequirementsnotedhere.
2.EnsurethattheESDprotectivedevicesyouusehavebeencertied(ISO9000)asfullyeffective.
Chapter1.Safetyinformation3

WhenhandlingESD-sensitiveparts:
•Keepthepartsinprotectivepackagesuntiltheyareinsertedintotheproduct.
•Avoidcontactwithotherpeople.
•Wearagroundedwriststrapagainstyourskintoeliminatestaticonyourbody.
•Preventthepartfromtouchingyourclothing.Mostclothingisinsulativeandretainsachargeevenwhen
youarewearingawriststrap.
•Useagroundedworkmattoprovideastatic-freeworksurface.Thematisespeciallyusefulwhen
handlingESD-sensitivedevices.
•Selectagroundingsystem,suchasthoselistedbelow,toprovideprotectionthatmeetsthespecic
servicerequirement.
Note:TheuseofagroundingsystemtoguardagainstESDdamageisdesirablebutnotnecessary.
–AttachtheESDgroundcliptoanyframeground,groundbraid,orgreen-wireground.
–Whenworkingonadouble-insulatedorbattery-operatedsystem,useanESDcommongroundor
referencepoint.Y oucanusecoaxorconnector-outsideshellsonthesesystems.
–Usetheroundgroundprongoftheacplugonac-operatedcomputers.
Groundingrequirements
Electricalgroundingofthecomputerisrequiredforoperatorsafetyandcorrectsystemfunction.Proper
groundingoftheelectricaloutletcanbeveriedbyacertiedelectrician.
Safetynotices(multilingualtranslations)
Thesafetynoticesinthissectionareprovidedinthefollowinglanguages:
•English
•Arabic
•BrazilianPortuguese
•French
•German
•Hebrew
•Japanese
•Korean
•Spanish
•TraditionalChinese
DANGER
DANGER
4HardwareMaintenanceManual

DANGER
DANGER
DANGER
DANGER
DANGER
Chapter1.Safetyinformation5
DANGER
6HardwareMaintenanceManual
PERIGO
PERIGO
PERIGO
Chapter1.Safetyinformation7
PERIGO
PERIGO
PERIGO
PERIGO
PERIGO
DANGER
8HardwareMaintenanceManual
DANGER
DANGER
DANGER
DANGER
DANGER
Chapter1.Safetyinformation9
DANGER
DANGER
VORSICHT
VORSICHT
VORSICHT
10HardwareMaintenanceManual

VORSICHT
VORSICHT
VORSICHT
VORSICHT
VORSICHT
Chapter1.Safetyinformation11
12HardwareMaintenanceManual
Chapter1.Safetyinformation13
14HardwareMaintenanceManual
Chapter1.Safetyinformation15

16HardwareMaintenanceManual
Chapter1.Safetyinformation17

18HardwareMaintenanceManual

Chapter2.Importantserviceinformation
Thischapterpresentsthefollowingimportantserviceinformationthatappliestoallmachinetypessupported
bythismanual:
•“StrategyforreplacingFRUs”onpage19
–“Strategyforreplacingaharddiskdrive”onpage20
–“Importantnoticeforreplacingasystemboard”onpage20
–“Howtouseerrormessage”onpage20
•“StrategyforreplacingFRUsforCTO,CMV,andGAV”onpage20
–“Productdenition”onpage20
–“FRUidenticationforCTO,CMV,andGAVproducts”onpage21
Important:
•IfthecomputerisequippedwithbothaharddiskdriveandanmSATAsolid-statedrive,donotusethe
mSATAsolid-statedriveasabootabledevice.ThemSATAsolid-statedriveisusedforthe“cache”
functiononly.
•AdvisecustomerstocontacttheLenovo®CustomerSupportCenteriftheyneedanyassistancein
obtainingorinstallinganysoftwarexes,drivers,andUEFIBIOSdownloads.Telephonenumbersfor
LenovoSupportareavailableat
http://www.lenovo.com/support/phone
•SystemDisassembly/ReassemblyvideosthatshowtheFRUremovalsorreplacementsfortheLenovo
authorizedservicetechniciansareavailableinthefollowingsupportsite:
http://www.lenovoservicetraining.com/ion/
StrategyforreplacingFRUs
Beforereplacingparts:
Ensurethatallsoftwarexes,drivers,andUEFIBIOSdownloadsareinstalledbeforereplacinganyFRUs
listedinthismanual.
Afterasystemboardisreplaced,ensurethatthelatestUEFIBIOSisloadedtothesystemboardbefore
completingtheserviceaction.
Todownloadandinstallsoftwarexes,drivers,andUEFIBIOS,gotohttp://www.lenovo.com/ThinkPadDrivers
andfollowtheinstructionsonthescreen.
UsethefollowingstrategytopreventunnecessaryexpenseforreplacingandservicingFRUs:
•IfyouareinstructedtoreplaceaFRUbutthereplacementdoesnotcorrecttheproblem,reinstallthe
originalFRUbeforeyoucontinue.
•Somecomputershavebothaprocessorboardandasystemboard.Ifyouareinstructedtoreplaceeither
theprocessorboardorthesystemboard,andreplacingoneofthemdoesnotcorrecttheproblem,
reinstallthatboard,andthenreplacetheotherone.
•IfanadapteroradeviceconsistsofmorethanoneFRU,anyoftheFRUsmaybethecauseoftheerror.
Beforereplacingtheadapterordevice,removetheFRUs,onebyone,toseeifthesymptomschange.
ReplaceonlytheFRUthatchangedthesymptoms.
©CopyrightLenovo201219

Strategyforreplacingaharddiskdrive
Alwaystrytorunalow-levelformatoperationbeforereplacingaharddiskdriveorasolid-statedrive.This
willcauseallcustomerdataontheharddiskdriveorsolid-statedrivetobelost.Besurethatthecustomer
hasacurrentbackupofthedatabeforeyouperformthistask.
Attention:Thedrivestartupsequenceinthecomputeryouareservicingmighthavebeenchanged.Be
extremelycarefulduringwriteoperationssuchascopying,saving,orformatting.Ifyouselectanincorrect
drive,dataorprogramscanbeoverwritten.
IfthecomputerisshippedwithbothanmSATAsolid-statedriveandaharddiskdrive,themSATAsolid-state
driveisusedforthe“cache”functionandtosupporttheIntel®RapidStartTechnology.Werecommendthat
usersdonotreplacethemSATAsolid-statedrivebythemselves.Otherwise,the“cache”functionwillnot
workandtheIntelRapidStartTechnologycannotbeusedanymore.
Attention:EnsurethatyoupartitionthemSATAsolid-statedriveafterinstallingitonthecomputeryouare
servicing.Otherwise,themSATAsolid-statedrivewillnotfunctioncorrectly.Forinstructionsonpartitioning
themSATAsolid-statedrive,gotohttp://www.lenovo.com/support/msata-fru.
Importantnoticeforreplacingasystemboard
Somecomponentsmountedonasystemboardareverysensitive.Improperhandlingofasystemboardcan
causedamagetothosecomponents,andmaycauseasystemmalfunction.
Attention:Whenhandlingasystemboard:
•Donotdropasystemboardorapplyanyexcessiveforcetoit.
•Avoidroughhandlingofanykind.
•AvoidbendingasystemboardandhardpushingtopreventcrackingateachBallGridArray(BGA)chipset.
Howtouseerrormessage
Usetheerrorcodesdisplayedonthescreentodiagnosefailures.Ifmorethanoneerrorcodeisdisplayed,
beginthediagnosiswiththersterrorcode.Whatevercausesthersterrorcodemightalsocausefalseerror
codes.Ifnoerrorcodeisdisplayed,seewhethertheerrorsymptomislistedinthe“Symptom-to-FRUIndex”.
StrategyforreplacingFRUsforCTO,CMV,andGAV
Productdenition
DynamicCongureToOrder(CTO)
ThisprovidestheabilityforacustomertocongureaLenovosolutionfromaneSite,andhavethis
congurationsenttofulllment,whereitisbuiltandshippeddirectlytothecustomer.Themachinelabel,
ProductEntitlementWarehouse(PEW)andeSupportwillloadtheseproductsasthe4-digitMTand3-digit
model,wheremodel=“CTO”(Example:1829-CTO).
CustomModelVariant(CMV)
ThisisauniquecongurationthathasbeennegotiatedbetweenLenovoandthecustomer.Aunique4-digit
MTand3-digitmodelisprovidedtothecustomertoplaceorders(Example:1829-W15).ACMVisaspecial
bidoffering.Therefore,itisNOTgenerallyannounced.
•TheMTMportionofthemachinelabelisthe4-digitMTand3-digitmodel,wheremodel=“CTO”
(Example:1829-CTO).ThePRODUCTIDportionofthemachinelabelisthe4-digitMTand3-digitCMV
model(Example:1829-W15).
20HardwareMaintenanceManual

•ThePEWrecordisthe4-digitMTand3-digitmodel,wheremodel=“CTO”(Example:1829-CTO).
•eSupportwillshowboththeCTOandCMVmachinetypemodels(Example:1829-CTOand1829-W15
willbefoundontheeSupportsite.)
GeneralAnnounceVariant(GAV)
Thisisastandardmodel(xedconguration).GAVsareannouncedandofferedtoallcustomers.The
MTMportionofthemachinelabelisa4-digitMTand3-digitmodel,wheremodel=a“xedpartnumber”,
not“CTO”(Example:1829-F1U).Also,PEWandeSupportwilllisttheseproductsunderthesamexed
modelnumber.
FRUidenticationforCTO,CMV,andGAVproducts
TherearethreeinformationresourcestoidentifywhichFRUsareusedtosupportCTO,CMV,andGAV
products.ThesesourcesarePEWandeSupport.
UsingPEW
•PEWistheprimarysourceforidentifyingFRUpartnumbersandFRUdescriptionsforthekeycommodities
forCTO,CMV,andGAVproductsatanMT-serialnumberlevel.Anexampleofkeycommoditiesarehard
diskdrives,systemboards,microprocessors,liquidcrystaldisplays(LCDs),andmemorymodules.
•Remember,allCTOandCMVproductsareloadedinPEWunderthe4-digitMTand3-digitmodel,where
model=“CTO”(Example:1829-CTO).GAVsareloadedinPEWunderthe4-digitMTand3-digitmodel,
wheremodel=a“xedpartnumber”,not“CTO”(Example:1829-F1U).
•PEWcanbeaccessedatthefollowingWebsite:
http://www.lenovo.com/support/site.wss/document.do?lndocid=LOOK-WARNTY
SelectWarrantylookup.InputtheMTandtheSerialnumberandthelistofkeycommoditieswillbe
returnedinthePEWrecordunderCOMPONENTINFORMATION.
UsingeSupport
Forkeycommodities(examples-harddiskdrive,systemboard,microprocessor,LCD,andmemory)
eSupportcanbeusedtoviewthewarrantystatusofkeycommoditiesbuiltinaparticularmachineserial(this
isthesamerecordfoundinPEW).eSupportcanbeaccessedathttp://www.lenovo.com/support.
Toviewthewarrantystatusofthekeycommoditiesonyourcomputer,dothefollowing:
1.Gotohttp://www.lenovo.com/support.
2.ClickWarranty&Services.
3.ClickCheckWarrantyStatus.
4.OntheWarrantyStatusLookuppage,clickPartsLookup.
5.Typeyourmachinetypeandserialnumber,andthenclickSubmit.
FortheremainingFRUs(thecompletelistofFRUsattheMTmodellevel)
eSupportalsocanbeusedtoviewthecompletelistofFRUsforamachinetypeandmodel.Toviewthe
completelistofFRUs,dothefollowing:
1.Gotohttp://www.lenovo.com/support.
2.ClickParts&Accessories.
3.ProvideyourproductinformationorclickLaunchtoautomaticallyidentifyyourproduct.
4.ClickProduct&PartsDetail.
5.OnthePRODUCTANDPARTSDETAILpage,clickPartsDetailtoviewthecompletelistofFRUs.
Chapter2.Importantserviceinformation21

UsingtheHardwareMaintenanceManual
Forkeycommodities(examples-harddiskdrive,systemboard,microprocessor,LCD,andmemory)
UsetheHardwareMaintenanceManualasabackuptoPEWandeSupporttoviewthecompletelistof
FRUsattheMTmodellevel.
22HardwareMaintenanceManual

Chapter3.Generalcheckout
Thischapterpresentsthefollowinginformation:
•“Whattodorst”onpage23
•“Checkoutguide”onpage24
•“Powersystemcheckout”onpage26
Somedescriptionsinthischaptermightnotapplytoyourparticularcomputer.
Beforeyougotothecheckoutguide,besuretoreadthefollowingimportantnotes.
Importantnotes:
•Onlycertiedtrainedpersonnelshouldservicethecomputer.
•BeforereplacinganyFRU,readtheentirepageonremovingorreplacingFRUs.
•WhenyoureplaceFRUs,itisrecommendedtousenewnylon-coatedscrews.
•Beextremelycarefulduringsuchwriteoperationsascopying,saving,orformatting.Drivesinthecomputer
thatyouareservicingsequencemighthavebeenaltered.Ifyouselectanincorrectdrive,dataorprograms
mightbeoverwritten.
•ReplaceaFRUonlywithanotherFRUofthecorrectmodel.WhenyoureplaceaFRU,ensure
thatthemodelofthemachineandtheFRUpartnumberarecorrect.FortheFRUpartnumber,goto
http://www.lenovo.com/serviceparts-lookup.
•AFRUshouldnotbereplacedbecauseofasingle,unreproduciblefailure.Singlefailurescanoccurfora
varietyofreasonsthathavenothingtodowithahardwaredefect,suchascosmicradiation,electrostaticdischarge,
orsoftwareerrors.ConsiderreplacingaFRUonlywhenaproblemrecurs.IfyoususpectthataFRUisdefective,
cleartheerrorlogandrunthetestagain.Iftheerrordoesnotrecur,donotreplacetheFRU.
•BecarefulnottoreplaceanondefectiveFRU.
Whattodorst
WhenyoudoreturnaFRU,youmustincludethefollowinginformationinthepartsexchangeformor
partsreturnformthatyouattachtoit:
1.Nameandphonenumberofservicetechnician
2.Dateofservice
3.Dateonwhichthemachinefailed
4.Dateofpurchase
5.Failuresymptoms,errorcodesappearingonthedisplay,andbeepsymptoms
6.ProcedureindexandpagenumberinwhichthefailingFRUwasdetected
7.FailingFRUnameandpartnumber
8.Machinetype,modelnumber,andserialnumber
9.Customer'snameandaddress
Note:Duringthewarrantyperiod,thecustomermayberesponsibleforrepaircostsifthecomputerdamage
wascausedbymisuse,accident,modication,unsuitablephysicaloroperatingenvironment,orimproper
maintenancebythecustomer.Followingisalistofsomecommonitemsthatarenotcoveredunderwarranty
andsomesymptomsthatmightindicatethatthesystemwassubjecttostressbeyondnormaluse.
Beforecheckingproblemswiththecomputer,determinewhetherthedamageiscoveredunderthewarranty
byreferringtothefollowinglist:
Thefollowingarenotcoveredunderwarranty:
•LCDpanelcrackedfromtheapplicationofexcessiveforceorfrombeingdropped
•Scratched(cosmetic)parts
©CopyrightLenovo201223

•Distortion,deformation,ordiscolorationofthecosmeticparts
•Plasticparts,latches,pins,orconnectorsthathavebeencrackedorbrokenbyexcessiveforce
•Damagecausedbyliquidspilledintothesystem
•DamagecausedbytheimproperinsertionofaPCCardortheinstallationofanincompatiblecard
•Fusesblownbyattachmentofanonsupporteddevice
•Forgottencomputerpassword(makingthecomputerunusable)
•Stickykeyscausedbyspillingaliquidontothekeyboard
•Useofanincorrectacpoweradapteronlaptopproducts
Thefollowingsymptomsmightindicatedamagecausedbynonwarrantedactivities:
•Missingpartsmightbeasymptomofunauthorizedserviceormodication.
•Ifthespindleofaharddiskdrivebecomesnoisy,itmayhavebeensubjecttoexcessiveforce,ordropped.
Checkoutguide
UsethefollowingproceduresasaguideinidentifyingandcorrectingproblemswiththeThinkPadnotebook
computer.
Note:ThediagnostictestsareintendedtotestonlyThinkPadproducts.Theuseofnon-ThinkPadproducts,
prototypecards,ormodiedoptionscanleadtofalseindicationsoferrorsandinvalidsystemresponses.
1.Identifythefailingsymptomsinasmuchdetailaspossible.
2.Verifythesymptoms.Trytore-createthefailurebyrunningthediagnostictestorbyrepeatingthe
operation.
LenovoSolutionCenter
TheLenovoSolutionCenterprogramenablesyoutotroubleshootandresolvecomputerproblems.It
combinesdiagnostictests,systeminformationcollection,securitystatus,andsupportinformation,along
withhintsandtipsformaximumsystemperformance.
TheLenovoSolutionCenterprogramisavailablefordownloadathttp://www.lenovo.com/diags.
ToruntheLenovoSolutionCenterprogram,gotoControlPanelandclickSystemandSecurity➙Lenovo-
SystemHealthandDiagnostics,andthenfollowtheinstructionsonthescreen.
FormoreinformationabouttheLenovoSolutionCenterprogram,refertothehelpinformationsystem
oftheprogram.
Quicktestprograms
Youcanrunquicktestprogramstotroubleshootandresolvecomputerproblems,especiallywhenthe
computerdoesnothavetheLenovoSolutionCenterprograminstalled.
Lenovoprovidesthefollowingquicktestprograms:
•LenovoHardDriveQuickT est:Usethisprogramtotroubleshootandresolveinternalstorageproblems.
•LenovoMemoryQuickT est:Usethisprogramtotroubleshootandresolvememorymoduleproblems.
Thequicktestprogramsareapplicableonthefollowingoperatingsystems:
•Microsoft®Windows®8
•MicrosoftWindows7
•MicrosoftWindowsXP
•MicrosoftWindowsServer®2003
24HardwareMaintenanceManual

•MicrosoftWindowsServer2008
Todownloadandinstallaquicktestprogram,gotohttp://www.lenovo.com/diags,andfollowtheinstructions
ontheWebsite.
Torunatestusingaquicktestprogram,dothefollowing:
1.GototheC:\SWTOOLS\ldiagdirectory.
2.Double-clickthegui_lsc_lite.exele.
3.WhentheUserAccountControlwindowopens,clickYes.
4.Selectthedeviceclasstobetested.
5.Selectthedevicestobetested.
6.Selecttheteststobeperformed.
7.Followtheinstructionsonthescreentostartthetest.Whenaproblemisdetected,information
messagesaredisplayed.Refertothemessagestotroubleshoottheproblem.
UEFIdiagnosticprogram
AUEFIdiagnosticprogramispreinstalledonthecomputer.Itenablesyoutotestmemorymodulesand
internalstoragedevices,viewsysteminformation,andcheckandrecoverbadsectorsoninternalstorage
devices.
ToruntheUEFIdiagnosticprogram,dothefollowing:
1.Turnonthecomputer.Ifthecomputercannotbeturnedon,goto“Powersystemcheckout”onpage26,
andcheckthepowersources.Ifanerrorcodeisdisplayed,goto“Symptom-to-FRUindex”onpage34
forerrorcodedescriptionsandtroubleshootinghints.
2.WhentheThinkPadlogoisdisplayed,repeatedlypressandreleasetheF10key.Themainscreenofthe
UEFIdiagnosticprogramisdisplayed.
3.Followtheinstructionsonthescreentousetheprogram.
Table1.ItemsonthemainscreenoftheUEFIdiagnosticprogram
TestsTools
•QuickMemoryTest
•QuickStorageDeviceTest
•ExitApplication
•SystemInformation
•RecoverBadSectorsTool
Bootablediagnosticprograms
IfthecomputeryouareservicingisnotinstalledwiththeUEFIdiagnosticprogram,youcandownloada
bootablediagnosticprogramfromtheLenovoSupportWebsite.Thebootablediagnosticprogramsenable
youtotestcomputermemoryandinternalstoragedevices,viewsysteminformation,andcheckandrecover
theinternalstoragedevices.Tousethebootablediagnosticprograms,youcancreateabootablediagnostic
mediumonaUSBdeviceorCD.
Tocreateabootablediagnosticmedium,dothefollowing:
1.Gotohttp://www.lenovo.com/diags.
2.ClickLenovoBootableDiagnostics.
3.FollowtheinstructionsontheWebsitetocreateabootablediagnosticmediumonaUSBdeviceorCD.
Tousethediagnosticmediumyouhavecreated,dooneofthefollowing:
Chapter3.Generalcheckout25

•IfyouhavecreatedthebootablediagnosticmediumonaUSBdevice,dothefollowing:
1.AttachtheUSBdevicetothecomputer.
2.Turnonthecomputer.Ifthecomputercannotbeturnedon,goto“Powersystemcheckout”onpage
26,andcheckthepowersources.Ifanerrorcodeisdisplayed,goto“Symptom-to-FRUindex”on
page34forerrorcodedescriptionsandtroubleshootinghints.
3.WhentheThinkPadlogoisdisplayed,repeatedlypressandreleasetheF12key.WhentheBoot
Menuwindowopens,releasetheF12key.
4.UsethearrowkeystoselectUSBHDDandthenpressEnter.Thediagnosticprogramwillbe
launchedautomatically.
5.Followtheinstructionsonthescreentousethediagnosticprogram.
•IfyouhavecreatedthebootablediagnosticmediumonaCD,dothefollowing:
1.Turnonthecomputer.Ifthecomputercannotbeturnedon,goto“Powersystemcheckout”onpage
26,andcheckthepowersources.Ifanerrorcodeisdisplayed,goto“Symptom-to-FRUindex”on
page34forerrorcodedescriptionsandtroubleshootinghints.
2.InserttheCDintotheopticaldrive.
3.Restartthecomputer.
4.WhentheThinkPadlogoisdisplayed,repeatedlypressandreleasetheF12key.WhentheBoot
Menuwindowopens,releasetheF12key.
5.UsethearrowkeystoselectATAPICDx(x:0,1,...)andthenpressEnter.Thediagnosticprogram
willbelaunchedautomatically.
6.Followtheinstructionsonthescreentousethediagnosticprogram.
Powersystemcheckout
Toverifyasymptom,dothefollowing:
1.Turnoffthecomputer.
2.Removethebatterypack.
3.Connecttheacpoweradapter.
4.Checkthatpowerissuppliedwhenyouturnonthecomputer.
5.Turnoffthecomputer.
6.Disconnecttheacpoweradapterandinstallthechargedbatterypack.
7.Checkthatthebatterypacksuppliespowerwhenyouturnonthecomputer.
Ifyoususpectapowerproblem,seetheappropriateoneofthefollowingpowersupplycheckouts:
•“Checkingtheacpoweradapter”onpage26
•“Checkingoperationalcharging”onpage27
•“Checkingthebatterypack”onpage27
•“Checkingthebackupbattery”onpage28
Checkingtheacpoweradapter
Ifyoucomputerfailsonlywhentheacpoweradapterisused,usetheinstructionsinthistopic.
•Ifthepowerproblemoccursonlywhenthedockingstationortheportreplicatorisused,replacethe
dockingstationortheportreplicator.
•Ifthepower-onindicatordoesnotturnon,checkthepowercordoftheacpoweradapterforcorrect
continuityandinstallation.
•Ifthecomputerdoesnotchargeduringoperation,goto“Checkingoperationalcharging”onpage27.
Tochecktheacpoweradapter,dothefollowing:
1.Unplugtheacpoweradaptercablefromthecomputer.
26HardwareMaintenanceManual
2.Measuretheoutputvoltageattheplugoftheacpoweradaptercable.Seethefollowingillustration:
PinVoltage(Vdc)
1+20
20
3Ground
1
2
3
(20V)
Note:Outputvoltageacrosspin2oftheacpoweradaptermightdifferfromtheoneyouareservicing.
3.Ifthevoltageisnotcorrect,replacetheacpoweradapter.
4.Ifthevoltageisacceptable,replacethesystemboard.
Note:Noisefromtheacpoweradapterdoesnotalwaysindicateadefect.
Checkingoperationalcharging
Tocheckwhetherthebatterychargesproperlyduringoperation,useadischargedbatterypackorabattery
packthathaslessthan50%ofthetotalpowerremainingwheninstalledinthecomputer.
Performoperationalcharging.Ifthebatterystatusindicatororicondoesnotturnon,removethebattery
packandletitreturntoroomtemperature.Reinstallthebatterypack.Ifthechargeindicatororiconstilldoes
notturnon,replacethebatterypack.
Ifthechargeindicatorstilldoesnotturnon,replacethesystemboard.Thenreinstallthebatterypack.Ifitis
stillnotcharged,gotothenextsection.
Checkingthebatterypack
ThebatterystatusiconintheWindowsnoticationareadisplaysthepercentageofbatterypowerremaining.
Tocheckfordetailedbatterystatusinformation,dothefollowing:
•ForWindows7:OpenthePowerManagerprogramandclicktheBatterytab.
•ForWindows8:OpentheLenovoSupportprogramandclickBatteryHealth,oropentheLenovo
SettingsprogramandclickPower.
Note:Ifthebatterypackbecomeshot,itmaynotbeabletocharge.Removeitfromthecomputerandleave
itatroomtemperatureforawhile.Afteritcoolsdown,reinstallandrechargeit.
Tocheckthebatterypack,dothefollowing:
1.Poweroffthecomputer.
2.Removethebatterypackandmeasurethevoltagebetweenbatteryterminals1(+)and7(-).Seethe
followingillustration:
TerminalVoltage(Vdc)
1+0to+16.8
7Ground(-)
1(+)2(+)
3456(-)7(-)
3.Ifthevoltageislessthan+11.0Vdc,thebatterypackhasbeendischarged.
Chapter3.Generalcheckout27
Note:Rechargingwilltakeatleast3hours,eveniftheindicatordoesnotturnon.
Ifthevoltageisstilllessthan+11.0Vdcafterrecharging,replacethebattery.
4.Ifthevoltageismorethan+11.0Vdc,measuretheresistancebetweenbatteryterminals5and7.
Theresistancemustbe4to30KΩ.Iftheresistanceisnotcorrect,replacethebatterypack.Ifthe
resistanceiscorrect,replacethesystemboard.
Checkingthebackupbattery
Dothefollowing:
1.Poweroffthecomputer,andunplugtheacpoweradapterfromit.
2.Turnthecomputerupsidedown.
3.Removethebatterypack(see“1010Batterypack”onpage56).
4.Removethebackupbattery(see“1060Backupbattery”onpage65).
5.Measurethevoltageofthebackupbattery.Seethefollowingillustration.
WireVoltage(Vdc)
Red+2.5to+3.2
BlackGround
•Ifthevoltageiscorrect,replacethesystemboard.
•Ifthevoltageisnotcorrect,replacethebackupbattery.
•Ifthebackupbatterydischargesquicklyafterreplacement,replacethesystemboard.
28HardwareMaintenanceManual

Chapter4.Relatedserviceinformation
Thischapterpresentsthefollowinginformation:
•“RestoringthefactorycontentsbyusingRecoveryDiscSet”onpage29
•“UsingtheWindowsrecoveryprogramsontheWindows8operatingsystem”onpage30
•“Passwords”onpage31
•“Powermanagement”onpage33
•“Symptom-to-FRUindex”onpage34
ServiceWebsite:
Whenthelatestmaintenancedisketteandthesystemprogramservicediskettebecomeavailable,they
willbepostedonhttp://www.lenovo.com/support.
RestoringthefactorycontentsbyusingRecoveryDiscSet
Whentheharddiskdriveorsolid-statedriveisreplacedbecauseofafailure,noproductrecoveryprogramis
onthenewdrive.Inthiscase,youmustusetherecoverydiscsetforthecomputer.Ordertherecoverydisc
setandthedriveatthesametimesothatyoucanrecoverthenewdrivewiththepreinstalledsoftwarewhen
theyarrive.Forinformationonwhichdiscstoorder,gotohttp://www.lenovo.com/serviceparts-lookup.
TherecoverydiscsetconsistsoftheuserinstructionsandthefollowingsetofDVDstorestorethecomputer
totheoriginalfactoryconguration.
•OperatingSystemRecoveryDisc(onedisc):ThisdiscrestorestheMicrosoft®Windowsoperatingsystem.
Usethisdisctostarttherecoveryprocess.
•ApplicationsandDriversRecoveryDisc(oneormorediscs):Thisdiscrestoresthepreinstalled
applicationsanddriversonthecomputer.
•SupplementalRecoveryDisc:Thisdisccontainsadditionalcontent,suchasupdatestothesoftwarethat
waspreinstalledonthecomputer.NotallrecoverydiscsetscomewithaSupplementalRecoveryDisc.
Notes:
•Y oumusthaveaDVDdrivetousetherecoverydiscs.IfyoudonothaveaninternalDVDdrive,you
canuseanexternalUSBDVDdrive.
•Duringtherecoveryprocess,alldataonthedrivewillbedeleted.Ifpossible,copyanyimportantdata
orpersonallesthatyouwanttokeepontoremovablemediaoranetworkdrivebeforeyoustartthe
recoveryprocess.
Torestorethecomputertotheoriginalfactorycongurationusingtherecoverydiscset,dothefollowing:
Note:Recoverycantakeonetotwohourstocomplete.Thelengthoftimedependsonthemethodyouuse.
Ifyouuserecoverydiscs,therecoveryprocesswilltakeabouttwohours.
1.MaketheCD/DVDdrivetherststartupdeviceinthestartupsequenceusingthefollowingprocedure:
a.PressandholddowntheF1key,andthenturnonthecomputer.Whenthelogoscreenisdisplayed
orwhenyouhearrepeatingbeeps,releasetheF1key.TheThinkPadSetupprogramopens.
b.UsethearrowkeystoselectStartup➙Boot.
c.SelecttheCD/DVDdriveasthe1stBootDevice.
2.InserttheOperatingSystemRecoveryDiscintotheDVDdrive.
3.PressF10tosavetheThinkPadSetupprogramcongurationchanges.Followtheinstructionsonthe
screentobegintherecoveryprocess.
4.SelectyourlanguageandclickNext.
©CopyrightLenovo201229

5.Readthelicense.Ifyouagreewiththetermsandconditions,selectIacceptthesetermsand
conditionsandthenclickNext.Ifyoudonotagreewiththetermsandconditions,followthe
instructionsonthescreen.
6.ClickYesinthedisplayedwindowtobegintheoperatingsystemrecoveryprocess.
7.InserttheApplicationsandDriversRecoveryDiscwhenpromptedandthenclickOKtobeginthe
processofrecoveringapplicationsanddrivers.
8.IfyouhaveaSupplementalRecoveryDisc,insertitwhenpromptedandclickYes.Ifyoudonothavea
SupplementalRecoveryDisc,clickNo.
9.Whenallofthedatahasbeencopiedfromthelastdiscinthesetandhasbeenprocessed,removethe
discandrestartthecomputer.
Note:Therestoftherecoveryprocessisfullyautomatedandnoactionfromyouisrequired.The
computerwillrestartintotheMicrosoftWindowsdesktopseveraltimesandyoumightexperience
periodswhennoactivityisapparentonthescreenforseveralminutesatatime.Thisisnormal.
10.Whentherecoveryprocessiscomplete,theSetUpWindowsscreenisdisplayed.Followthe
instructionsonthescreentocompletetheWindowssetup.
11.AfteryouhavecompletedtheWindowssetup,youmightwanttorestoretheoriginalstartupsequence.
StarttheThinkPadSetupprogramandthenpressF9torestorethedefaultsettings.PressF10tosave
changesandexittheThinkPadSetupprogram.
Note:Afterrestoringadrivetothefactorydefaultsettings,youmightneedtoreinstallsomedevicedrivers.
UsingtheWindowsrecoveryprogramsontheWindows8operating
system
Thecomputeryouareservicingmightcomewithbuilt-inrecoveryprogramsprovidedbytheWindows8
operatingsystem.Y oucanusethoseprogramstorefreshorrestorethecomputer.
Refreshingthecomputer
Ifthecomputeryourareservicingdoesnotperformwellandtheproblemmightbecausedbyarecently
installedprogram,youcanrefreshthecomputerwithoutlosingthecustomers’personallesorchanging
thesettings.
Attention:Allthepersonallesandsettingswillbedeletedafteryouresetthecomputertothefactory
defaultsettings.Ensurethattheuserhasmadeabackupcopyofallthedatabeforeresettingthecomputer
tothefactorydefaultsettings.
Toresetyourcomputer,dothefollowing:
1.Moveyourcursortothebottom-rightcornerofthescreentobringupthecharms.ClickSettings
➙ChangePCsettings➙General.
2.IntheRefreshyourPCwithoutaffectingyourlessection,clickGetstarted.
Resettingthecomputertofactorydefaultsettings
Youcanresetthecomputertothefactorydefaultsettings.Duringtheprocess,theoperatingsystemand
allprogramsthatareshippedwiththecomputerwillbereinstalled.
Attention:Ifyouresetthecomputer,allthepersonallesandsettingswillbedeleted.Toavoiddataloss,
ensurethatthecustomerhasmadeabackupcopyofallthedata.
Toresetyourcomputer,dothefollowing:
1.Moveyourcursortothebottom-rightcornerofthescreentobringupthecharms.ClickSettings
➙ChangePCsettings➙General.
30HardwareMaintenanceManual

2.IntheRemoveeverythingandreinstallWindowssection,clickGetstarted.
Advancedstartupoptions
AdvancedstartupoptionsenableyoutochangethestartupsettingsoftheWindowsoperatingsystem,start
thecomputerfromanexternaldevice,orrestoretheWindowsoperatingsystemfromasystemimage.
Tousetheadvancedstartupoptions,dothefollowing:
1.Moveyourcursortothebottom-rightcornerofthescreentobringupthecharms.ClickSettings
➙ChangePCsettings➙General.
2.IntheAdvancedstartupsection,clickRestartnow➙Troubleshoot➙Advancedoptions.
3.Restartthecomputerfollowingtheinstructionsonthescreen.
FormoredetailsabouttheWindowsrecoverysolutions,refertothehelpinformationsystemoftheWindows
8operatingsystem.
Passwords
AsmanyasthreepasswordsmightbeneededforaThinkPadnotebookcomputer:thepower-onpassword,
theharddiskpassword,andthesupervisorpassword.
Ifanyofthesepasswordshasbeenset,apromptforitwillbedisplayedonthescreenwheneverthe
computeristurnedon.Thecomputerdoesnotstartuntilthepasswordisentered.
Note:Ifonlyasupervisorpasswordisset,thepasswordpromptwillnotbedisplayedwhentheoperating
systemisstarted.
Power-onpassword
Apower-onpasswordprotectsthesystemfrombeingturnedonbyanunauthorizedperson.Thepassword
mustbeenteredbeforeanoperatingsystemcanbebooted.Forinstructionsonhowtoremovethepower-on
password,see“Howtoremovethepower-onpassword”onpage32.
Hard-diskpassword
Therearetwoharddiskpasswords:
•Userharddiskpassword-fortheuser
•Masterharddiskpassword-forthesystemadministrator,whocanuseittogetaccesstotheharddisk
eveniftheuserhaschangedtheuserharddiskpassword.
Note:Therearetwomodesfortheharddiskpassword:UseronlyandMaster+User.TheMaster+User
moderequirestwoharddiskpasswords;thesystemadministratorentersbothinthesameoperation.The
systemadministratorthenprovidestheuserharddiskpasswordtothesystemuser.
Attention:Iftheuserharddiskpasswordhasbeenforgotten,checkwhetheramasterharddiskpassword
hasbeenset.Ifamasterharddiskpasswordhasbeenset,itcanbeusedtoaccesstheharddiskdrive.If
nomasterharddiskpasswordisavailable,neitherLenovonorLenovoauthorizedservicetechniciansprovide
anyservicestoreseteithertheuserharddiskpasswordorthemasterharddiskpassword,ortorecoverdata
fromtheharddiskdrive.Theharddiskdrivecanbereplacedforascheduledfee.
Forinstructionsonhowtoremovetheharddiskpassword,see“Howtoremovethehard-diskpassword”
onpage32.
Chapter4.Relatedserviceinformation31

Supervisorpassword
AsupervisorpasswordprotectsthesysteminformationstoredintheThinkPadSetupprogram.Theuser
mustenterthesupervisorpasswordinordertogetaccesstotheThinkPadSetupprogramandchangethe
systemconguration.
Attention:Ifthesupervisorpasswordhasbeenforgottenandcannotbemadeavailabletotheservice
technician,thereisnoserviceproceduretoresetthepassword.Thesystemboardmustbereplacedfor
ascheduledfee.
Howtoremovethepower-onpassword
Toremovethepower-onpassword,dothefollowing:
Ifnosupervisorpasswordhasbeenset,dothefollowingtoremovethepower-onpassword:
1.Turnoffthecomputeranddisconnecttheacpoweradapter.
2.Removethebatterypack.Forinstructionsonhowtoremovethebatterypack,see“1010Battery
pack”onpage56.
3.Removethebackupbattery.Forinstructionsonhowtoremovethebackupbattery,see“1060Backup
battery”onpage65.
4.Connecttheacpoweradapter.TurnonthecomputerandwaituntilthePOSTends.AfterthePOST
ends,thepasswordpromptwillnotbedisplayed.Thepower-onpasswordhasbeenremoved.
5.Reinstallthebackupbatteryandthebatterypack.
Ifasupervisorpasswordhasbeensetandisknowntotheservicetechnician,dothefollowingtoremove
thepower-onpassword:
1.Turnonthecomputer.
2.WhentheThinkPadlogoisdisplayed,immediatelypressF1.
3.TypethesupervisorpasswordtoentertheThinkPadSetupprogram.
4.SelectSecurity.
5.SelectPassword.
6.SelectPower-OnPassword.
7.TypethecurrentsupervisorpasswordintheEnterCurrentPasswordeld.Then,leavetheEnter
NewPasswordeldblank,andpressEntertwice.
8.IntheChangeshavebeensavedwindow,pressEnter.
9.PressF10tosavechangesandexittheThinkPadSetupprogram.
Howtoremovethehard-diskpassword
Attention:IfUseronlymodeisselectedandtheuserharddiskpasswordhasbeenforgottenandcannot
bemadeavailabletotheservicetechnician,neitherLenovonorLenovoauthorizedservicetechnicians
provideanyservicestoresettheuserharddiskpassword,ortorecoverdatafromtheharddiskdrive.The
harddiskdrivecanbereplacedforascheduledfee.
Toremoveauserharddiskpasswordthathasbeenforgotten,whenthesupervisorpasswordandthemaster
harddiskpasswordareknown,dothefollowing:
1.Turnonthecomputer.
2.WhentheThinkPadlogoisdisplayed,immediatelypressF1toentertheThinkPadSetupprogram.
3.SelectSecurity.
4.SelectPassword.
5.SelectHard-diskxpassword,wherexistheletteroftheharddiskdrive.Apop-upwindowopens.
32HardwareMaintenanceManual

6.SelectMasterHDP,whereHDPstandsforharddiskpassword.
7.TypethecurrentmasterharddiskpasswordintheEnterCurrentPasswordeld.Then,leavetheEnter
NewPasswordeldblank,andpressEntertwice.
8.PressF10tosavechangesandexittheThinkPadSetupprogram.Theuserharddiskpasswordandthe
masterharddiskpasswordhavebeenremoved.
Powermanagement
Toreducepowerconsumption,thecomputerhasthreepowermanagementmodes:screenblank,sleep,
andhibernation.
Screenblankmode(fortheWindows7operatingsystemonly)
Ifthetimesetonthe“Turnoffmonitor”timerintheoperatingsystemexpires,theLCDbacklightturnsoff.
Toputthecomputerintoscreenblankmode,dothefollowing:
1.Right-clickthebatterygaugeinthetaskbar.
2.SelectPoweroffdisplay(keepcurrentpowerplan).
Toendscreenblankmodeandresumenormaloperation,pressanykey.
Sleepmode
Whenthecomputerenterssleepmode,thefollowingeventsoccurinadditiontowhatoccursinscreen
blankmode:
•TheLCDispoweredoff.
•Theharddiskdriveorthesolid-statedriveispoweredoff.
•Themicroprocessorstops.
Toentersleepmode,pressFn+F4.
Incertaincircumstances,thecomputergoesintosleepmodeautomatically:
•Afteraperiodofinactivityspeciedinpowerplansettings
•Whenthebatteryindicatorblinksorange,indicatingthatthebatterypowerislow
Tocausethecomputertoreturnfromsleepmodeandresumeoperation,dooneofthefollowing:
•PresstheFnkey.
•OpentheLCDcover.
•Turnonthepowerswitch.
Also,ineitherofthefollowingevents,thecomputerautomaticallyreturnsfromsleepmodeandresumes
operation:
•Theringindicator(RI)issignaledbyaserialdeviceoraPCCarddevice.(doesnotsupportthering
indicator(RI)resumebyPCCarddevice.)
•Thetimesetontheresumetimerelapses.
Note:Thecomputerdoesnotacceptanyinputimmediatelyafteritenterssleepmode.Waitafew
secondsbeforetakinganyactiontoreenteroperationmode.
Hibernationmode
Inhibernationmode,thefollowingoccurs:
Chapter4.Relatedserviceinformation33

•Thesystemstatus,RAM,VRAM,andsetupdataarestoredontheharddisk.
•Thesystemispoweredoff.
Note:Ifthecomputerentersthehibernationmodewhileitisdockedtothedockingstation,donotundockit
beforeresumingnormaloperation.Ifyoudoundockitandthentrytoresumenormaloperation,youwillget
anerrormessage,andyouwillhavetorestartthesystem.
Ifyouhavedenedoneofthefollowingactionsastheeventthatcausesthesystemtogointohibernation
mode,performthataction.
•Closingthelid.
•Pressingthepowerbutton.
•PressingFn+F4keys.
Also,thecomputergoesintohibernationmodeautomaticallyafteraperiodofinactivityspeciedinpower
plansettings.
Whenthepoweristurnedon,thecomputerreturnsfromhibernationmodeandresumesoperation.The
hibernationleinthebootrecordontheharddiskdriveisread,andsystemstatusisrestoredfromthe
harddiskdrive.
Symptom-to-FRUindex
Thissectioncontainsfollowinginformation:
•“Numericerrorcodes”onpage35
•“Errormessages”onpage36
•“Beepsymptoms”onpage36
•“No-beepsymptoms”onpage37
•“LCD-relatedsymptoms”onpage37
•“Intermittentproblems”onpage37
•“Undeterminedproblems”onpage38
Thesymptom-to-FRUindexinthissectionlistssymptomsanderrorsandtheirpossiblecauses.Themost
likelycauseislistedrst,inboldfacetype.
Note:DotheFRUreplacementorotheractionsinthesequenceshowninthecolumnheaded“FRUor
action,insequence.”IfreplacingaFRUdoesnotsolvetheproblem,puttheoriginalpartbackinthe
computer.DonotreplaceanondefectiveFRU.
Thisindexcanalsohelpyoudetermine,duringregularservicing,whatFRUsarelikelytoneedtobe
replacednext.
AnumericerrorisdisplayedforeacherrordetectedinPOSTorsystemoperation.Inthedisplays,ncan
beanynumber.
Ifnonumericcodeisdisplayed,checkthenarrativedescriptionsofsymptoms.Ifthesymptomisnot
describedthere,goto“Intermittentproblems”onpage37.
Note:ForadevicenotsupportedbydiagnosticcodesintheThinkPadnotebookcomputers,seethe
manualforthatdevice.
34HardwareMaintenanceManual

Numericerrorcodes
Table2.Numericerrorcodes
SymptomorerrorFRUoraction,insequence
0177
BadSVPdata,stopPOSTtask—Thechecksumofthe
supervisorpasswordintheEEPROMisnotcorrect.
Systemboard.
0183
BadCRCofSecuritySettingsinEFIVariable.Enterthe
ThinkPadSetupprogram.
1.RuntheThinkPadSetupprogram,andthensave
currentsettingbypressingF10.
2.Systemboard.
0187
EAIAdataaccesserror—TheaccesstoEEPROMisfailed.
Systemboard.
0188
InvalidRFIDSerializationInformationArea.
Systemboard.
0189
InvalidRFIDcongurationinformationarea—The
EEPROMchecksumisnotcorrect.
Systemboard.
0190
Criticallow-batteryerror
1.Chargethebatterypack.
2.Batterypack.
0191
SystemSecurity—InvalidRemoteChangerequested.
1.RuntheThinkPadSetupprogram,andthensave
currentsettingbypressingF10.
2.Systemboard.
0199
SystemSecurity—Securitypasswordretrycount
exceeded.
1.RuntheThinkPadSetupprogram,andthensave
thecurrentsettingbypressingF10.
2.Systemboard.
0251
SystemCMOSchecksumbad-Defaultconguration
used.
1.Chargethebackupbatteryformorethan8hours
byconnectingtheacadapter.
2.ReplacethebackupbatteryandrunThinkPadSetup
toresetthetimeanddate.
0253
EFIVariableBlockDatawasdestroyed.
0271
Real-TimeClockError.CheckDateandTimesettings.
RunThinkPadSetuptoresetthetimeanddate
1802
Unauthorizednetworkcardispluggedin—Turnoffand
removetheminiPCInetworkcard.
1.RemoveMiniPCInetworkcard.
2.Systemboard.
1820
Morethanoneexternalngerprintreaderisattached.
Poweroffandremoveallbutthereaderthatyousetup
withinyourmainoperatingsystem.
Removeallbutthereaderthatyousetupforthe
authentication.
2000
ThinkVantage®ActiveProtectionsensordiagnostics
failed.
Systemboard
2100
DetectionerroronHDD0(MainHDD)
1.Reseattheharddiskdrive.
2.Mainharddiskdrive.
3.Systemboard.
2101
DetectionerroronHDD1(UltrabayHDD)
1.Reseattheharddiskdrive.
2.Ultrabay®harddiskdrive.
3.Systemboard.
Chapter4.Relatedserviceinformation35

Table2.Numericerrorcodes(continued)
SymptomorerrorFRUoraction,insequence
2102
DetectionerroronHDD2(MiniSATA)
1.ReseattheMiniSATAdevice.
2.MiniSATAdevice.
3.Systemboard.
2110
ReaderroronHDD0(MainHDD)
1.Reseattheharddiskdrive.
2.Mainharddiskdrive.
3.Systemboard.
2111
ReaderroronHDD1(UltrabayHDD)
1.Reseattheharddiskdrive.
2.Ultrabayharddiskdrive.
3.Systemboard.
2112
ReaderroronHDD2(MiniSATA)
1.ReseattheMiniSATAdevice.
2.MiniSATAdevice.
3.Systemboard.
2200
MachineTypeandSerialNumberareinvalid.
Systemboard.
2201
MachineUUIDisinvalid
Systemboard.
Errormessages
Table3.Errormessages
SymptomorerrorFRUoraction,insequence
Fanerror.1.Fan.
2.Thermalgrease.
3.Systemboard.
Thermalsensingerror.Systemboard.
Thebatteryinstalledisnotsupportedbythissystem
andwillnotcharge.Pleasereplacethebatterywiththe
correctLenovobatteryforthissystem.PresstheESC
keytocontinue.
Replacethebattery.
Beepsymptoms
Table4.Beepsymptoms
SymptomorerrorFRUoraction,insequence
FourcyclesoffourshortbeepsSystemboard
Fiveshortbeeps,pause,andvemoreshortbeepsSystemboard
Oneshortbeep,pause,threeshortbeeps,pause,three
moreshortbeeps,pause,andoneshortbeep
1.Memorymodule.
2.Systemboard.
Threeshortbeeps,pause,oneshortbeep,pause,one
moreshortbeep,pause,andthreeshortbeeps
RemovetheinstalledPCIdevices.
FiveshortbeepsSystemboard
OnelongandtwoshortbeepsSystemboard
36HardwareMaintenanceManual

No-beepsymptoms
Table5.No-beepsymptoms
SymptomorerrorFRUoraction,insequence
Nobeep,power-onindicatoron,LCDblank,andno
POST.
1.Ensurethateveryconnectorisconnectedtightly
andcorrectly.
2.Memorymodule.
3.Systemboard.
Nobeep,power-onindicatoron,andLCDblankduring
POST.
1.Reseatmemorymodule.
2.Systemboard.
Thepower-onpasswordpromptappears.Apower-onpasswordorasupervisorpasswordisset.
TypethepasswordandpressEnter.
Thehard-diskpasswordpromptappears.Ahard-diskpasswordisset.Typethepasswordand
pressEnter.
LCD-relatedsymptoms
Important:TheTFTLCDforthenotebookcomputercontainsmanythin-lmtransistors(TFTs).The
presenceofasmallnumberofdotsthataremissing,discolored,oralwayslightedischaracteristicofTFT
LCDtechnology,butexcessivepixelproblemscancauseviewingconcerns.
IftheLCDyouareservicinghastwoorlessvisibledefectivepixels,itshouldnotbeconsideredfaulty.
However,iftheLCDhasthreeormorevisibledefectivepixels,itwillbedeemedasdefectivebyLenovoand
itshouldbereplaced.
Notes:
•ThispolicyappliestoallThinkPadnotebookcomputerspurchasedon1January,2008orlater.
•LenovowillnotprovidereplacementiftheLCDiswithinspecicationaswecannotguaranteethat
anyreplacementLCDwillhavezeropixeldefects.
•OnepixelconsistsofR,G,Bsub-pixels.
Table6.LCD-relatedsymptoms
SymptomorerrorFRUoraction,insequence
Nobeep,power-onindicatoron,andablankLCDduring
POST.
Systemboard.
•LCDbacklightnotworking.
•LCDtoodark.
•LCDbrightnesscannotbeadjusted.
•LCDcontrastcannotbeadjusted.
1.ReseattheLCDconnectors.
2.LCDassembly.
3.Systemboard.
•LCDscreenunreadable.
•Charactersmissingpixels.
•Screenabnormal.
•Wrongcolordisplayed.
1.Seeimportantnotefor“LCD-relatedsymptoms.”
2.ReseatallLCDconnectors.
3.LCDassembly.
4.Systemboard.
HorizontalorverticallinesdisplayedonLCD.LCDassembly.
Intermittentproblems
Intermittentsystemhangproblemscanbeduetoavarietyofcausesthathavenothingtodowithahardware
defect,suchascosmicradiation,electrostaticdischarge,orsoftwareerrors.FRUreplacementshouldbe
consideredonlywhenaproblemrecurs.
Chapter4.Relatedserviceinformation37

Undeterminedproblems
Ifthediagnostictestsdidnotidentifythedevicethathasfailed,ifwrongdevicesareinstalled,orifthe
systemsimplyisnotoperating,followtheseprocedurestoisolatethefailingFRU(donotisolateFRUs
thathavenodefects).
Verifythatallattacheddevicesaresupportedbythecomputer.
Verifythatthepowersupplybeingusedatthetimeofthefailureisoperatingcorrectly.(See“Powersystem
checkout”onpage26.)
1.Turnoffthecomputer.
2.VisuallycheckeachFRUfordamage.ReplaceanydamagedFRU.
3.Removeordisconnectallofthefollowingdevices:
a.Non-ThinkPaddevices
b.Devicesattachedtothedockingstationortheportreplicator
c.Printer,mouse,andotherexternaldevices
d.Batterypack
e.Harddiskdrive
f.Externaldiskettedriveoropticaldrive
g.MemorymoduleinSLOT-1(TolocateSLOT-1,see“1030Memorymodule”onpage59.)
h.ExpressCardandmediacard
4.Turnonthecomputer.
5.Determinewhethertheproblemhasbeensolved.
6.Iftheproblemdoesnotrecur,reconnecttheremoveddevicesoneatatimeuntilyoundthefailingFRU.
7.Iftheproblemremains,replacethefollowingFRUsoneatatime(donotreplaceanondefectiveFRU):
a.Systemboard
b.LCDassembly
38HardwareMaintenanceManual

Chapter5.Statusindicators
Thischapterpresentsthesystemstatusindicatorsthatshowthestatusofthecomputer.
234
5
67
Table7.Statusindicators
IndicatorMeaning
1Speakermute
indicator
Orange:Thespeakersareonmute.Tomuteorunmutethespeakers,pressthe
speakermutebutton.
2Microphonemute
indicator
Orange:Themicrophonesareonmute.Bydefault,whenthemicrophonesareon
mute,noneoftherecordingdevicesisavailable.
©CopyrightLenovo201239
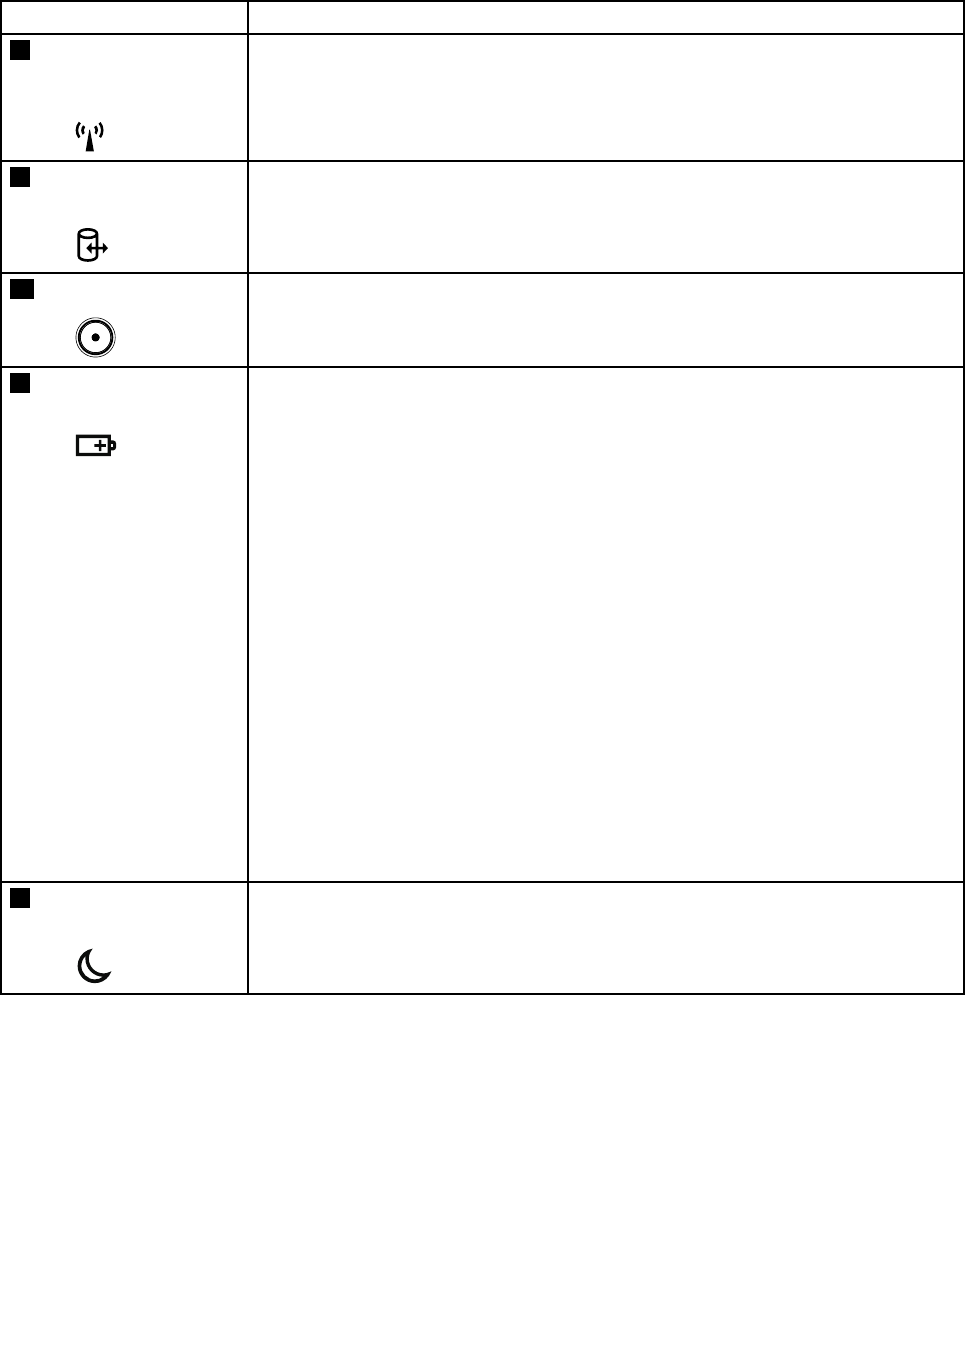
Table7.Statusindicators(continued)
IndicatorMeaning
3WirelessLAN,WAN,
BluetoothorWiMAX
statusindicator
Green:ThewirelessLAN,WAN,Bluetooth,orWiMAXfeatureison.
Blinkinggreen:Dataisbeingtransmitted.
4Deviceaccess
statusindicator
Green:Theharddiskdrive,solid-statedrive,ormSATAsolid-statedriveisreading
orwritingdata.
5Power-onindicatorThepowerbuttonstayslitwheneverthecomputerison,blinkswhenthecomputerisin
sleepmode,andisoffwhenthecomputeristurnedoff.
6Batterystatus
indicator
Steadygreen:Itindicatesoneofthefollowing:
•Thebatterychargelevelis80%orhigher.
•Thebatterychargelevelisbetween20%and80%,andthebatteryisnotcharging.
Slowblinkinggreen:Thebatterychargelevelisbetween20%and80%,andthe
batteryischarging.
Steadyorange:Thebatterychargelevelisbetween5%and20%,andthebatteryis
notcharging.
Slowblinkingorange:Thebatterychargelevelisbetween5%and20%,andthe
batteryischarging.
Fastblinkingorange:Thebatterychargelevelislowerthan5%.
Quickblinkingorange:Anerrorhasoccurredinthebattery.
Blinkingthreetimes:Theacpoweradapterisbeingattachedtothecomputer.
Off:Thebatterypackisdetachedorthecomputerispoweredoff.
Note:Ifthecomputerisoperatingonbatterypower,thebatterystatusindicatordoes
notworkwhilethecomputeristurnedofforisinsleepmodeorhibernationmode.
7Sleepstatus
indicator
Green:Thecomputerisinsleepmode.
Blinkinggreen:Thecomputerisenteringsleepmodeorhibernationmode,oris
resumingnormaloperation.
40HardwareMaintenanceManual

Chapter6.Fnkeycombinations
ThefollowingtabledescribesthefunctionsofFnkeycombinations.
Table8.Fnkeycombinations
KeycombinationDescription
Fn+F3Locksthecomputer.
Fn+F4Putsthecomputerintosleepmode.Toreturntonormaloperation,presstheFnkeyonly.
Notes:
•TousetheFn+F4keycombination,youmusthavetheThinkPadPowerManagement
Driverinstalledonthecomputer.
•Ifyouwanttousethecombinationtoputthecomputerintohibernationmode,change
thepowerplansettings.
Fn+F5Enablesordisablesthebuilt-inwirelessnetworkingfeatures.
Notes:IfyouwanttouseFn+F5toenableordisablethewirelessfeatures,thefollowing
devicedriversmustbeinstalledonthecomputerbeforehand:
•PowerManagementDriver
•OnScreenDisplayUtility
•Wirelessdevicedrivers
Fn+F6•ForWindows7:OpenstheCommunicationssettingswindow,inwhichyoucanpreview
yourvideoimage,takeasnapshotofyourcurrentimage,andchangethecameraand
audiosettings.
•ForWindows8:StartstheLenovoSettingsprogram,whichenablesyoutochangethe
cameraandaudiosettings.
Fn+F7Switchesbetweenthecomputerdisplayandanexternalmonitor.
Note:Y oualsocanusetheWindows+Pcombinationtoswitchbetweenthecomputerdisplay
andanexternalmonitor.
Fn+F8Thecomputerdisplaybecomesdimmer.
Fn+F9Thecomputerdisplaybecomesbrighter.
Fn+F10Previoustrack/scene
Fn+F11Playorpause
Fn+F12Nexttrack/scene
Fn+SpacebarControlsthekeyboardbacklightandtheThinkLight®light.
•Pressonce:Turnonthekeyboardbacklighttolowbrightnesslevel.
•Pressagain:Adjustthekeyboardbacklighttohighbrightnesslevel.
•Pressthethirdtime:TurnoffthekeyboardbacklightandturnontheThinkLightlight.
•Pressthefourthtime:TurnofftheThinkLightlight.
Note:Ifthecomputeryouareservicingdoesnothaveabacklitkeyboard,theFn+Spacebar
combinationcontrolsonlytheThinkLightlight.
Fn+BHasthesamefunctionastheBreakkeyonaconventionalkeyboard.
Fn+KHasthesamefunctionastheScrLKkeyonaconventionalkeyboard.
Fn+PHasthesamefunctionasthePausekeyonaconventionalkeyboard.
Fn+SHasthesamefunctionastheSysRqkeyonaconventionalkeyboard.
©CopyrightLenovo201241

42HardwareMaintenanceManual
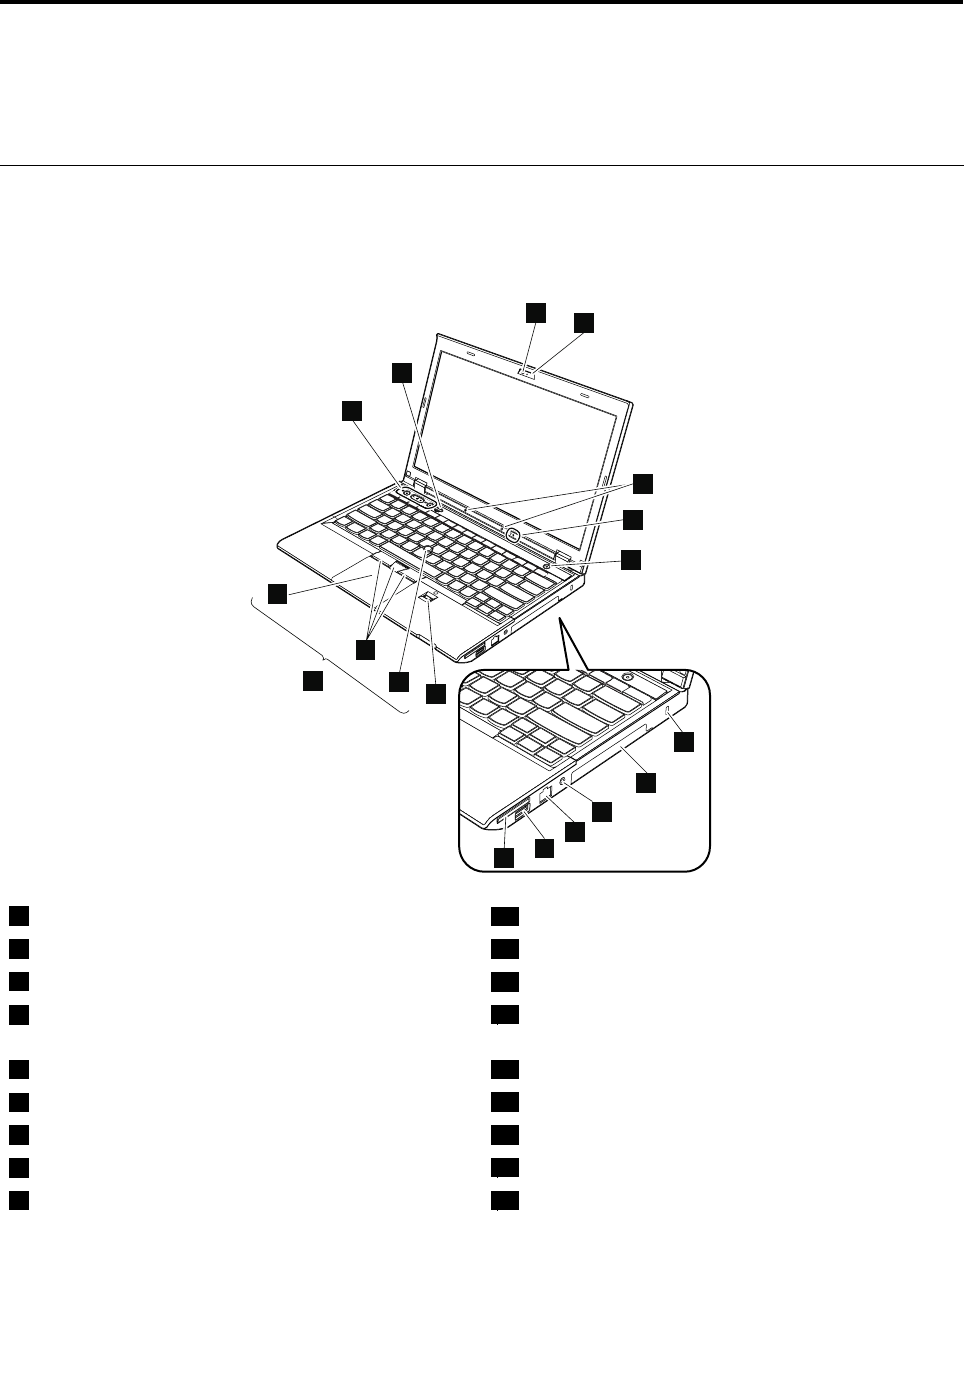
Chapter7.Locations
Thischapterintroducesthelocationsofthecomputerhardwarecomponents.
Locatingcomputercontrols,connectors,andindicators
Thistopicintroducesthelocationsofthecomputercontrols,connectors,andindicators.
Frontview
6
7
8
9
10
11
17
18
12
4
5
16 13
12
14
15
3
1Integratedcamera10AlwaysOnUSBconnector
2ThinkLightlight11Mediacardreaderslot
3Built-inmicrophones12Fingerprintreader(onsomemodels)
4Statusindicators(seeChapter5“Statusindicators”
onpage39)
13TrackPointpointingstick
5Powerbutton14TrackPointbuttons
6Securitykeyhole15Touchpad
7Harddiskdriveorsolid-statedrive16UltraNav®pointingdevice
8Comboaudiojack17Volumecontrolbuttons
9Ethernetconnector18Blackbutton
©CopyrightLenovo201243
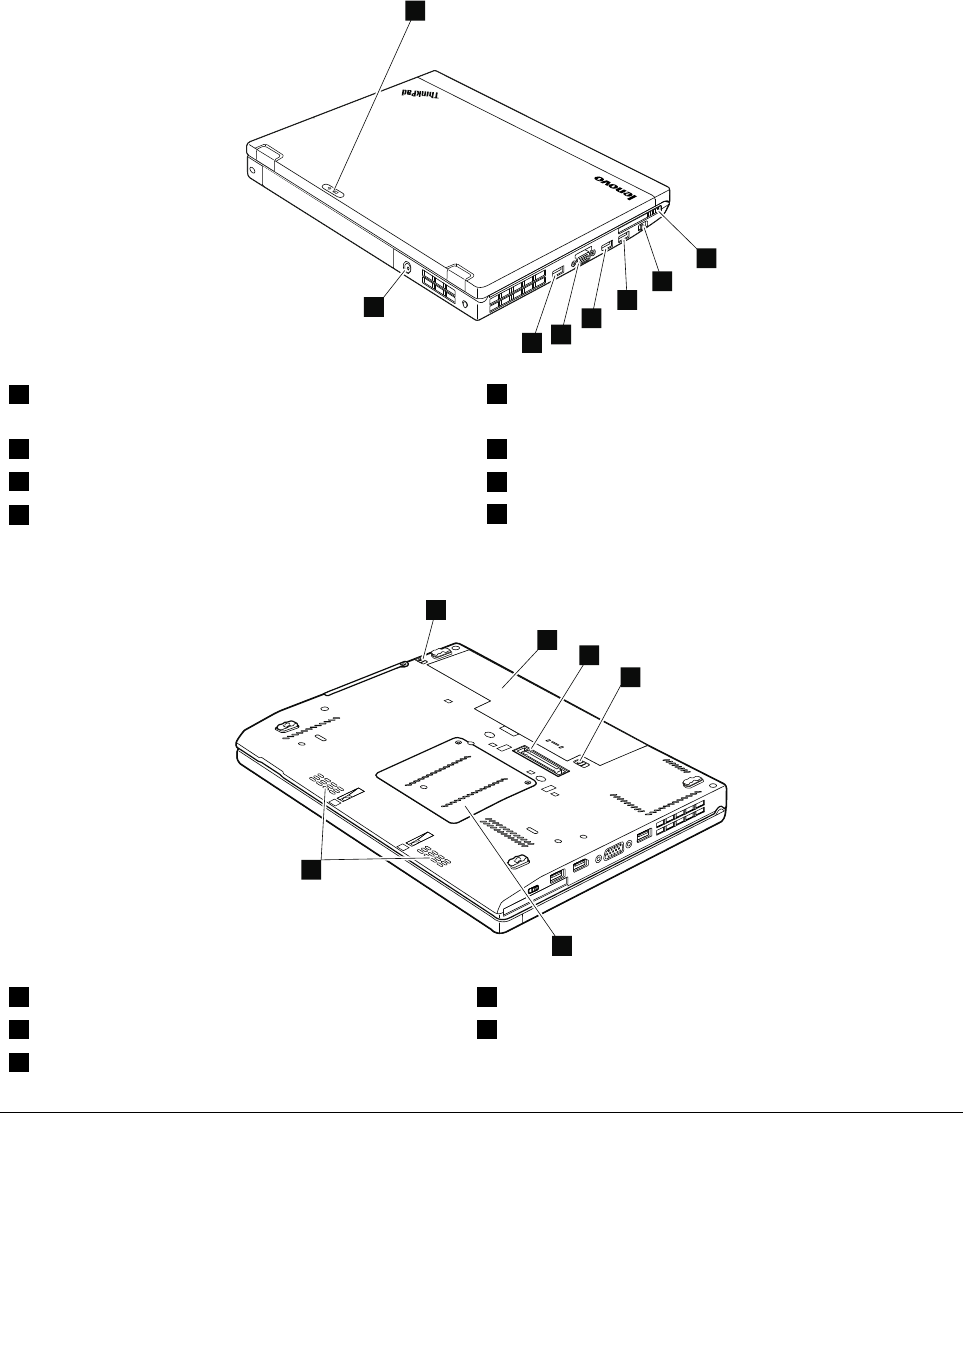
Rearview
2
3
4
5
6
7
8
1
1Statusindicators(seeChapter5“Statusindicators”
onpage39)
5MiniDisplayPortconnector
2ExpressCardslot6Videographicsarray(VGA)connector
3Wirelessradioswitch7USB3.0connector
4USB3.0connector8acpowerconnector
Bottomview
1
1
2
3
4
5
1Batterypacklatches4Memorymoduleslot
2Batterypack5Built-inspeakers
3Dockingstationconnector
LocatingFRUsandCRUs
Thistopicintroducesthefollowingserviceparts:
•“MajorFRUsandCRUs”onpage46
•“LCDFRUsandCRUs”onpage48
44HardwareMaintenanceManual

Notes:
•EachFRUisavailableforalltypesormodels,unlessotherwisespecied.
•CRUstatementforcustomers:
Youcanresolvesomeproblemswithyourproductwithareplacementpartyoucaninstallyourself,calleda
“CustomerReplaceableUnit”or“CRU.”SomeCRUsaredesignatedasself-serviceCRUsandothersare
designatedasoptional-serviceCRUs.Installationofself-serviceCRUsisyourresponsibility.Foroptional-service
CRUs,youcaneitherinstalltheCRUyourselforyoucanrequestthataServiceProviderinstalltheCRUaccording
tothewarrantyserviceforyourproduct.IfyouintendoninstallingtheCRU,LenovowillshiptheCRUtoyou.CRU
informationandreplacementinstructionsareshippedwithyourproductandareavailablefromLenovoatanytime
uponrequest.YoucanndalistofCRUsforyourproductinthisHardwareMaintenanceManual.Anelectronic
versionofthismanualcanbefoundathttp://www.lenovo.com/support.ClickUserGuides&Manualsand
thenfollowtheon-screeninstructionstondthemanualforyourproduct.Youmightberequiredtoreturnthe
defectiveCRU.Whenreturnisrequired:(1)returninstructions,aprepaidshippinglabel,andacontainerwillbe
includedwiththereplacementCRU;and(2)youmightbechargedforthereplacementCRUifLenovodoesnot
receivethedefectiveCRUwithinthirty(30)daysofyourreceiptofthereplacementCRU.SeeyourLenovoLimited
Warrantydocumentationforfulldetails.
ThinkPadcomputerscontainthefollowingtypesofCRUs:
–Self-serviceCRUs:TheseCRUsunplugorareheldbynomorethantwoscrews.Examplesofthesetypes
ofCRUsincludetheacpoweradapter,powercord,battery,andharddiskdrive.Otherself-serviceCRUs
dependingonproductdesignmightincludethememorymodule,wirelesscard,keyboard,andpalmrest
withngerprintreaderandtouchpad.
–Optional-serviceCRUs:TheseCRUsareisolatedpartswithinthecomputerthatareconcealedbyanaccess
panelthatistypicallysecuredbymorethantwoscrews.Oncetheaccesspanelisremoved,thespecic
CRUisvisible.
Chapter7.Locations45
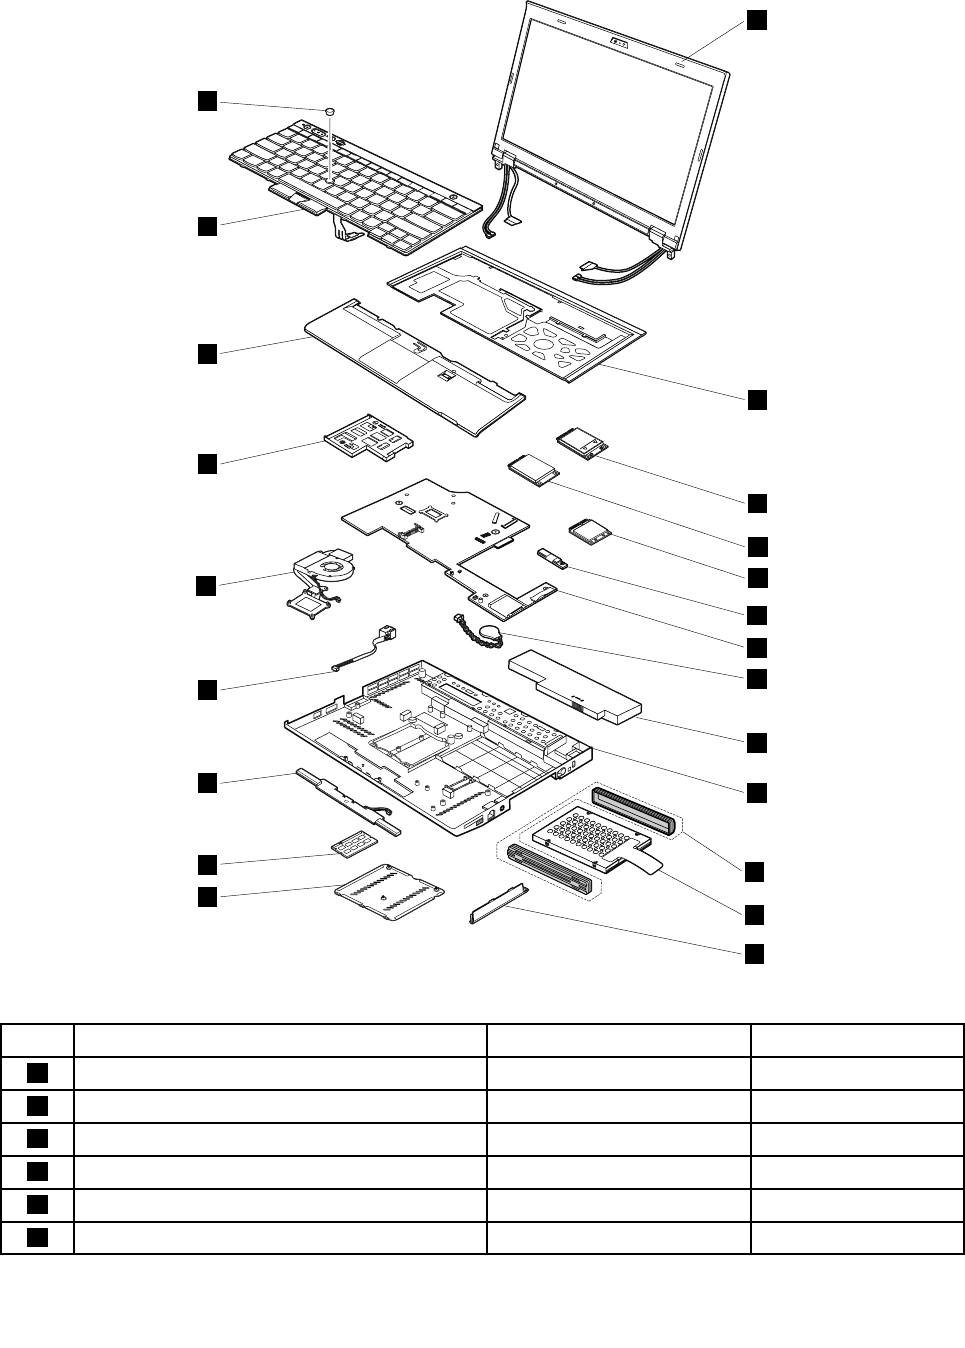
MajorFRUsandCRUs
1
2
3
5
4
7
6
8
9
10
11
12
13
22
21
20
19
18
17
16
15
14
Table9.MajorFRUsandCRUs
No.FRUdescriptionSelf-serviceCRUOptional-serviceCRU
1LCDunit(see“LCDFRUsandCRUs”onpage48)NoNo
2KeyboardbezelNoNo
3PCIExpressMiniCardforwirelessWANNoNo
4mSATAsolid-statedriveNoNo
5PCIExpressMiniCardforwirelessLAN/WiMAXNoNo
6BluetoothdaughtercardNoNo
46HardwareMaintenanceManual
Table9.MajorFRUsandCRUs(continued)
No.FRUdescriptionSelf-serviceCRUOptional-serviceCRU
7SystemboardNoNo
8BackupbatteryNoYes
9BatterypackYesNo
10BasecoverassemblyNoNo
11Harddiskdriverubberrailsorsolid-statedrive
spacers
YesNo
12Harddiskdriveorsolid-statedriveYesNo
13HarddiskdrivecoverY esNo
14MemorymoduleslotcoverYesNo
15MemorymoduleYesNo
16SpeakerassemblyNoYes
17DC-inconnectorNoNo
18ThermalfanassemblyNoNo
19ExpressCardslotNoNo
20PalmrestNoYes
21KeyboardYesNo
22TrackPointcapYesNo
Chapter7.Locations47
LCDFRUsandCRUs
1
2
3
5
4
6
7
8
9
Table10.LCDFRUsandCRUs
No.FRUdescriptionSelf-serviceCRUOptional-serviceCRU
1LCDfrontbezelNoNo
2WirelessantennasetNoNo
3HingesNoNo
4LEDandcameracableNoNo
5LCDrearcoverassemblyNoNo
48HardwareMaintenanceManual

Table10.LCDFRUsandCRUs(continued)
No.FRUdescriptionSelf-serviceCRUOptional-serviceCRU
6LCDcableNoNo
7IntegratedcameraNoNo
8LEDboardNoNo
9LCDpanelNoNo
LookingupFRUinformation
FordetailedFRUinformation,includingpartnumbers,descriptions,andsubstitutionpartnumbers,goto
http://www.lenovo.com/serviceparts-lookup.
Chapter7.Locations49

50HardwareMaintenanceManual
Chapter8.FRUreplacementnotices
CRUstatementforcustomers:
Youcanresolvesomeproblemswithyourproductwithareplacementpartyoucaninstallyourself,called
a“CustomerReplaceableUnit”or“CRU.”SomeCRUsaredesignatedasself-serviceCRUsandothers
aredesignatedasoptional-serviceCRUs.Installationofself-serviceCRUsisyourresponsibility.For
optional-serviceCRUs,youcaneitherinstalltheCRUyourselforyoucanrequestthataServiceProvider
installtheCRUaccordingtothewarrantyserviceforyourproduct.IfyouintendoninstallingtheCRU,
LenovowillshiptheCRUtoyou.CRUinformationandreplacementinstructionsareshippedwithyour
productandareavailablefromLenovoatanytimeuponrequest.YoucanndalistofCRUsforyour
productinthisHardwareMaintenanceManual.Anelectronicversionofthismanualcanbefoundat
http://www.lenovo.com/support.ClickUserGuides&Manualsandthenfollowtheon-screeninstructions
tondthemanualforyourproduct.YoumightberequiredtoreturnthedefectiveCRU.Whenreturn
isrequired:(1)returninstructions,aprepaidshippinglabel,andacontainerwillbeincludedwiththe
replacementCRU;and(2)youmightbechargedforthereplacementCRUifLenovodoesnotreceivethe
defectiveCRUwithinthirty(30)daysofyourreceiptofthereplacementCRU.SeeyourLenovoLimited
Warrantydocumentationforfulldetails.
Screwnotices
Loosescrewscancauseareliabilityproblem.IntheThinkPadnotebookcomputer,thisproblemisaddressed
withspecialnylon-coatedscrewsthathavethefollowingcharacteristics:
•Theymaintaintightconnections.
•Theydonoteasilycomeloose,evenwithshockorvibration.
•Theyarehardertotighten.
Dothefollowingwhenyouservicethismachine:
•Keepthescrewkitinyourtoolbag.Forthepartnumberofthescrewkit,goto
http://www.lenovo.com/serviceparts-lookup.
•Itisrecommendedtousenewscrews.
•Itisrecommendedtouseeachscrewonlyonce.
•Useatorquescrewdriverifyouhaveone.
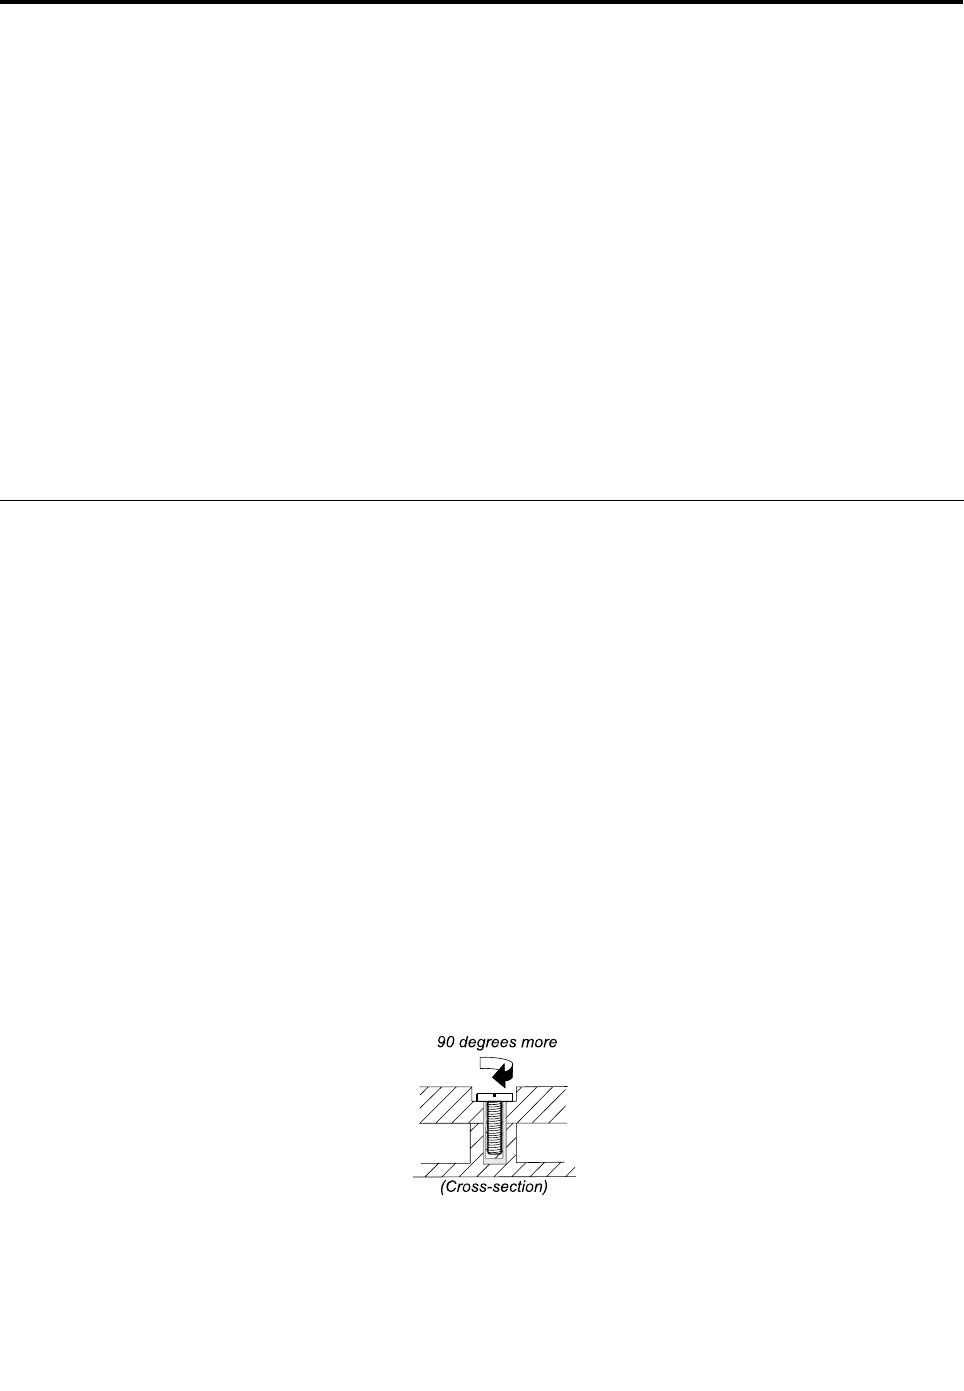
Tightenscrewsasfollows:
•Plastictoplastic
Turnanadditional90degreesafterthescrewheadtouchesthesurfaceoftheplasticpart:
•Logiccardtoplastic
Turnanadditional180degreesafterthescrewheadtouchesthesurfaceofthelogiccard:
©CopyrightLenovo201251
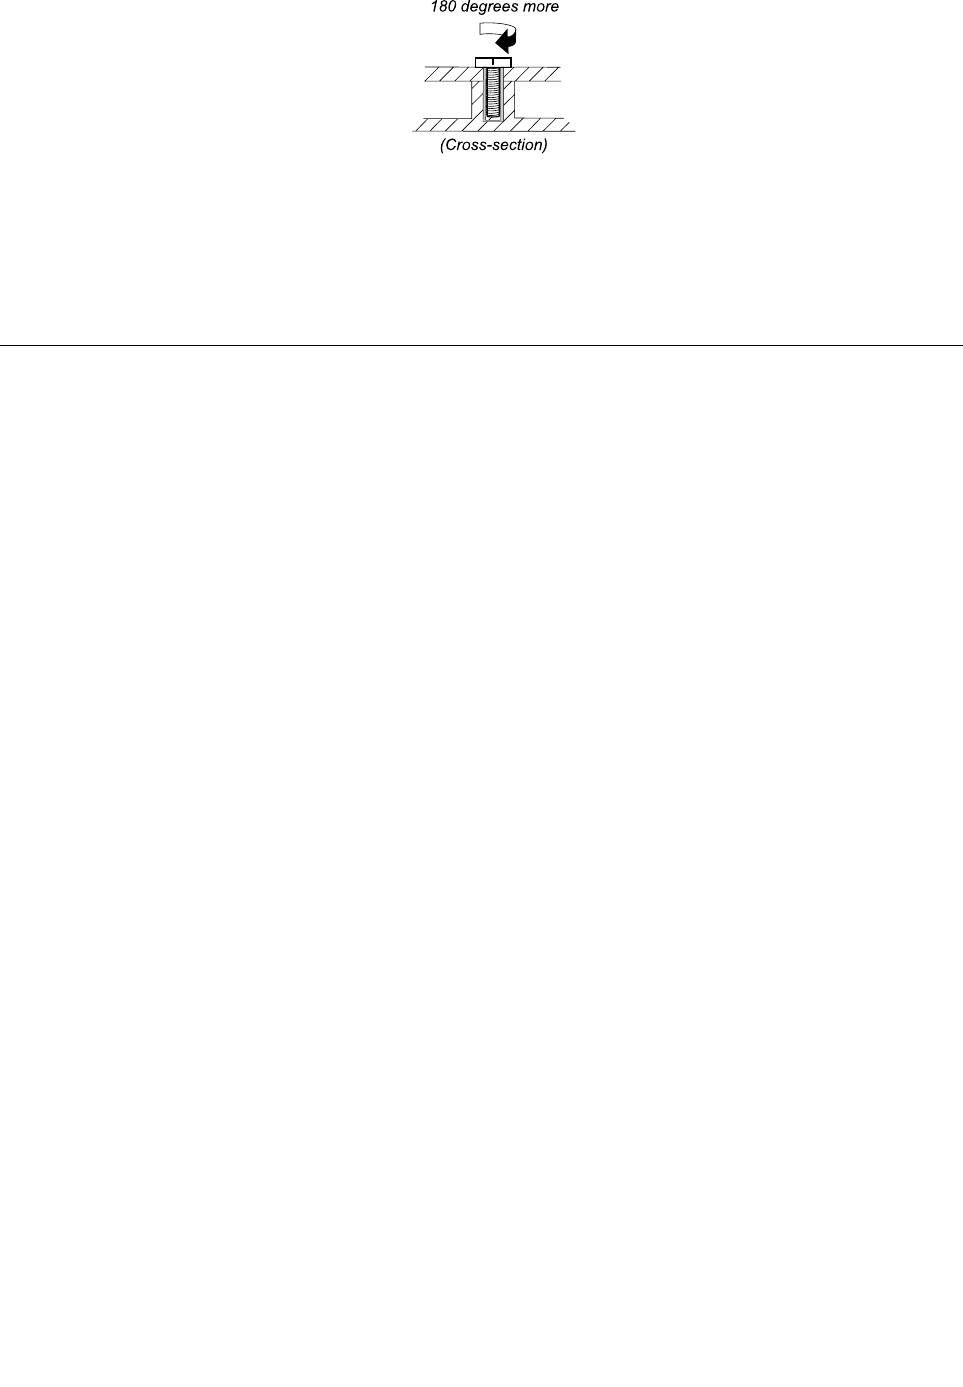
Notes:
•Ensurethatyouusethecorrectscrew.Itisrecommendedtousenewscrewsforreplacements.Ifyou
haveatorquescrewdriver,tightenallscrewsrmlytothetorquespeciedinthescrewinformation
tableforeachstep.
•Ensuretorquescrewdriversarecalibratedcorrectlyfollowingcountryspecications.
Retainingserialnumbers
Thissectionincludesthefollowingdescriptions:
•“Restoringtheserialnumberofthesystemunit”onpage52
•“RetainingtheUUID”onpage53
•“ReadingorwritingtheECAinformation”onpage53
Restoringtheserialnumberofthesystemunit
Whenthecomputerwasmanufactured,theEEPROMonthesystemboardwasloadedwiththeserial
numbersofthesystemandallmajorcomponents.Thesenumbersneedtoremainthesamethroughout
thelifeofthecomputer.
Ifyoureplacethesystemboard,youmustrestoretheserialnumberofthesystemunittoitsoriginalvalue.
Beforereplacingthesystemboard,savetheoriginalserialnumberbydoingthefollowing:
1.InstalltheLENOVOThinkPadHardwareMaintenanceDisketteVersion1.76orlater,andrestartthe
computer.
2.Fromthemainmenu,select1.SetSystemIdentication.
3.Select2.ReadS/NdatafromEEPROM.Theserialnumberofthesystemunitislistedas:20:
Serialnumber.
4.Writedownthatnumber.
Note:Theserialnumberofthesystemunitalsoiswrittenonthelabelattachedtothebottomofthecomputer.
Afteryouhavereplacedthesystemboard,restoretheserialnumberbydoingthefollowing:
1.InstalltheLENOVOThinkPadHardwareMaintenanceDisketteVersion1.76orlaterandrestartthe
computer.
2.Fromthemainmenu,select1.SetSystemIdentication.
3.Select1.AddS/NdatafromEEPROM.Followtheinstructionsonthescreen.
IftheMTMandProductIDnumbersdifferfromeachotherontherearlabel,usewhatisshownforthe
ProductIDeld.Seethefollowingexample:
52HardwareMaintenanceManual

MTMontherearlabel:
TTTT-CTOS/NSSSSSSS
ProductIDontherearlabel:
TTTT-MMM(UsethisnumberwhensettingSerialNumber.)
Intheexample,theSerialNumbertobeinputis“1STTTTMMMSSSSSSS”.
RetainingtheUUID
TheUniversallyUniqueIdentier(UUID)isa128-bitnumberuniquelyassignedtoyourcomputerat
productionandstoredintheEEPROMofyoursystemboard.
ThealgorithmthatgeneratesthenumberisdesignedtoprovideuniqueIDsuntiltheyearA.D.3400.Notwo
computersintheworldhavethesamenumber.
Whenyoureplacethesystemboard,youmustsettheUUIDonthenewsystemboardasfollows:
1.InstalltheLENOVOThinkPadHardwareMaintenanceDisketteVersion1.76orlater,andrestartthe
computer.
2.Fromthemainmenu,select4.AssignUUID.AnewUUIDiscreatedandwritten.IfavalidUUIDalready
exists,itisnotoverwritten.
ReadingorwritingtheECAinformation
InformationonEngineeringChangeAnnouncements(ECA)arestoredintheEEPROMofthesystemboard.
TheelectronicstorageofthisinformationsimpliestheproceduretocheckiftheECAhasbeenpreviously
appliedtoamachine.ThemachinedoesnotneedtobedisassembledtocheckfortheECAapplication.
TocheckwhatECAshavebeenpreviouslyappliedtothemachine,usetheECAInformationRead/Write
functionontheLENOVOThinkPadHardwareMaintenanceDisketteVersion1.76orlater.
1.InserttheLENOVOThinkPadHardwareMaintenanceDisketteVersion1.76orlater,andrestartthe
computer.
2.Fromthemainmenu,select6.SetECAInformation.
3.ToreadtheECAinformation,select2.ReadECA/reworknumberfromEEPROMandfollowthe
instructionsonthescreen.
4.Toreadtheboxbuilddate,select5.ReadboxbuilddatefromEEPROM,andfollowtheinstructions
onthescreen.
AfteranECAhasbeenappliedtothemachine,theEEPROMmustbeupdatedtoreecttheECA's
application.UsetheLENOVOThinkPadHardwareMaintenanceDisketteVersion1.76orlatertoupdatethe
EEPROM.
Note:OnlytheECAnumberisstoredintheEEPROM.ThemachinetypeoftheECAisassumedtobethe
sameasthemachinetypeofthemachinethathadtheECAappliedtoit.
1.InserttheLENOVOThinkPadHardwareMaintenanceDisketteVersion1.76orlater,andrestartthe
computer.
2.Fromthemainmenu,select6.SetECAInformation.
3.TowritetheECAinformation,select1.WriteECA/reworknumberfromEEPROM,andfollowthe
instructionsonthescreen.
4.Towritetheboxbuilddate,select4.WriteboxbuilddatefromEEPROM,andfollowtheinstructions
onthescreen.
Chapter8.FRUreplacementnotices53

Ifthesystemboardisbeingreplaced,trytoreadtheECAinformationfromtheoldsystemboardandtransfer
theinformationtothenewsystem.Ifthesystemboardisinoperable,thiswillnotbepossible.
54HardwareMaintenanceManual

Chapter9.RemovingorreplacingaFRU
ThischapterprovidesinstructionsonhowtoremoveorreplaceaFRU.
CRUstatementforcustomers:
Youcanresolvesomeproblemswithyourproductwithareplacementpartyoucaninstallyourself,called
a“CustomerReplaceableUnit”or“CRU.”SomeCRUsaredesignatedasself-serviceCRUsandothers
aredesignatedasoptional-serviceCRUs.Installationofself-serviceCRUsisyourresponsibility.For
optional-serviceCRUs,youcaneitherinstalltheCRUyourselforyoucanrequestthataServiceProvider
installtheCRUaccordingtothewarrantyserviceforyourproduct.IfyouintendoninstallingtheCRU,
LenovowillshiptheCRUtoyou.CRUinformationandreplacementinstructionsareshippedwithyour
productandareavailablefromLenovoatanytimeuponrequest.YoucanndalistofCRUsforyour
productinthisHardwareMaintenanceManual.Anelectronicversionofthismanualcanbefoundat
http://www.lenovo.com/support.ClickUserGuides&Manualsandthenfollowtheon-screeninstructions
tondthemanualforyourproduct.YoumightberequiredtoreturnthedefectiveCRU.Whenreturn
isrequired:(1)returninstructions,aprepaidshippinglabel,andacontainerwillbeincludedwiththe
replacementCRU;and(2)youmightbechargedforthereplacementCRUifLenovodoesnotreceivethe
defectiveCRUwithinthirty(30)daysofyourreceiptofthereplacementCRU.SeeyourLenovoLimited
Warrantydocumentationforfulldetails.
Generalguidelines
WhenremovingorreplacingaFRU,besuretoobservethefollowinggeneralguidelines:
1.Donottrytoserviceanycomputerunlessyouhavebeentrainedandcertied.Anuntrainedpersonruns
theriskofdamagingparts.
2.BeforereplacinganyFRU,reviewChapter8“FRUreplacementnotices”onpage51.
3.BeginbyremovinganyFRUsthathavetoberemovedbeforereplacingthefailingFRU.Anysuch
FRUsarelistedatthebeginningofeachFRUreplacementprocedure.Removethemintheorderin
whichtheyarelisted.
4.FollowthecorrectsequenceinthestepsforremovingaFRU,asgiveninthedrawingsbythenumbers
insquarecallouts.
5.Whenturningascrew,turnitinthedirectionasgivenbythearrowinthedrawing.
6.WhenremovingaFRU,moveitinthedirectionasgivenbythearrowinthedrawing.
7.ToputthenewFRUinplace,reversetheremovalprocedureandfollowanynotesthatpertainto
replacement.
8.WhenreplacingaFRU,usethecorrectscrew(s)asshowninthereplacementprocedure.
DANGER
BeforeremovinganyFRU,turnoffthecomputer,unplugallpowercordsfromelectricaloutlets,
removethebatterypack,andthendisconnectanyinterconnectingcables.
Attention:AfterreplacingaFRU,donotturnonthecomputeruntilyouhavemadesurethatallscrews,
springs,andothersmallpartsareinplaceandnonearelooseinsidethecomputer.Verifythisbyshaking
thecomputergentlyandlisteningforrattlingsounds.Metallicpartsormetalakescancauseelectrical
shortcircuits.
©CopyrightLenovo201255
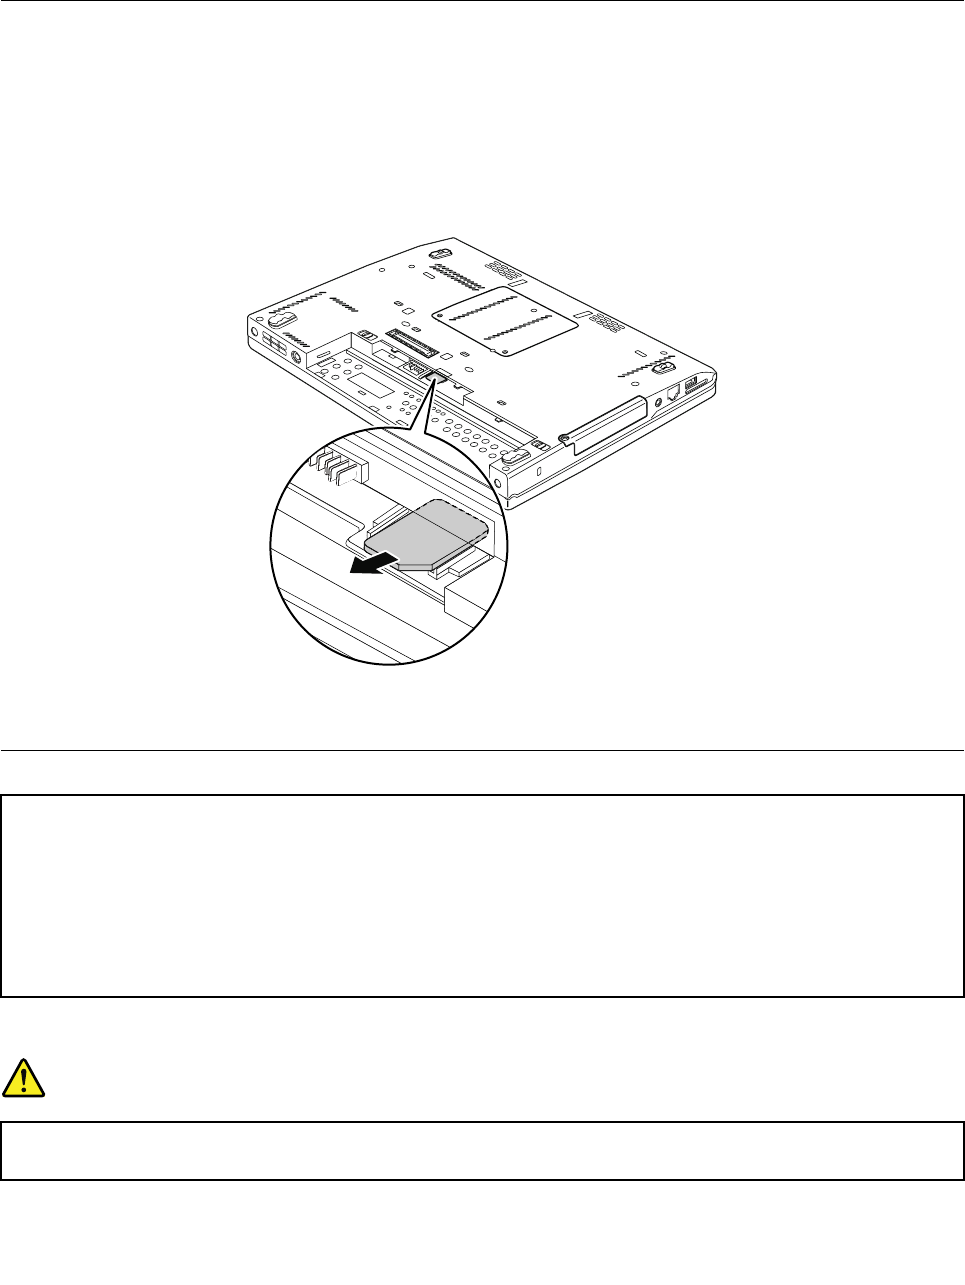
Attention:Thesystemboardissensitiveto,andcanbedamagedby,electrostaticdischarge.Before
touchingit,establishpersonalgroundingbytouchingagroundpointwithonehandorbyusingan
electrostaticdischarge(ESD)strap.
Beforeservicingthecomputer
RemovingtheSIMcard
Dependingonthemodel,thecomputeryouareservicingmighthaveaSIMcardslot.Ifthecustomerhas
installedaSIMcardintheslot,removeitbeforeservicing.
ToremovetheSIMcard,youneedtoremovethebatterypackrst.See“1010Batterypack”onpage56.
Afteryounishtheservicing,ensurethatyouinsertthecardbackintotheslotrmly.
1010Batterypack
Importantnoticeforreplacingabatterypack:
•TheLenovoSolutionCenterprogramprovidesanautomaticbatterydiagnostictestthatdeterminesifthebattery
packisdefective.AbatterypackFRUshouldnotbereplacedunlessthisdiagnostictestshowsthatthebatteryis
defective.Theonlyexceptiontothisisifthebatterypackisphysicallydamagedoracustomerisreporting
apossiblesafetyissue.
•IftheLenovoSolutionCenterprogramisnotinstalledinthecomputer,thecustomershoulddownloadthisprogram
beforeanon-physicallydamagedbatterypackisreplaced.Notethatthereplacementofaphysicallydamaged
batterypackisnotcoveredbythewarranty.
Removalstepsofbatterypack
DANGER
Useonlytheauthorizedbatteryspeciedforyourcomputer.Anyotherbatterycouldigniteor
explode.
56HardwareMaintenanceManual
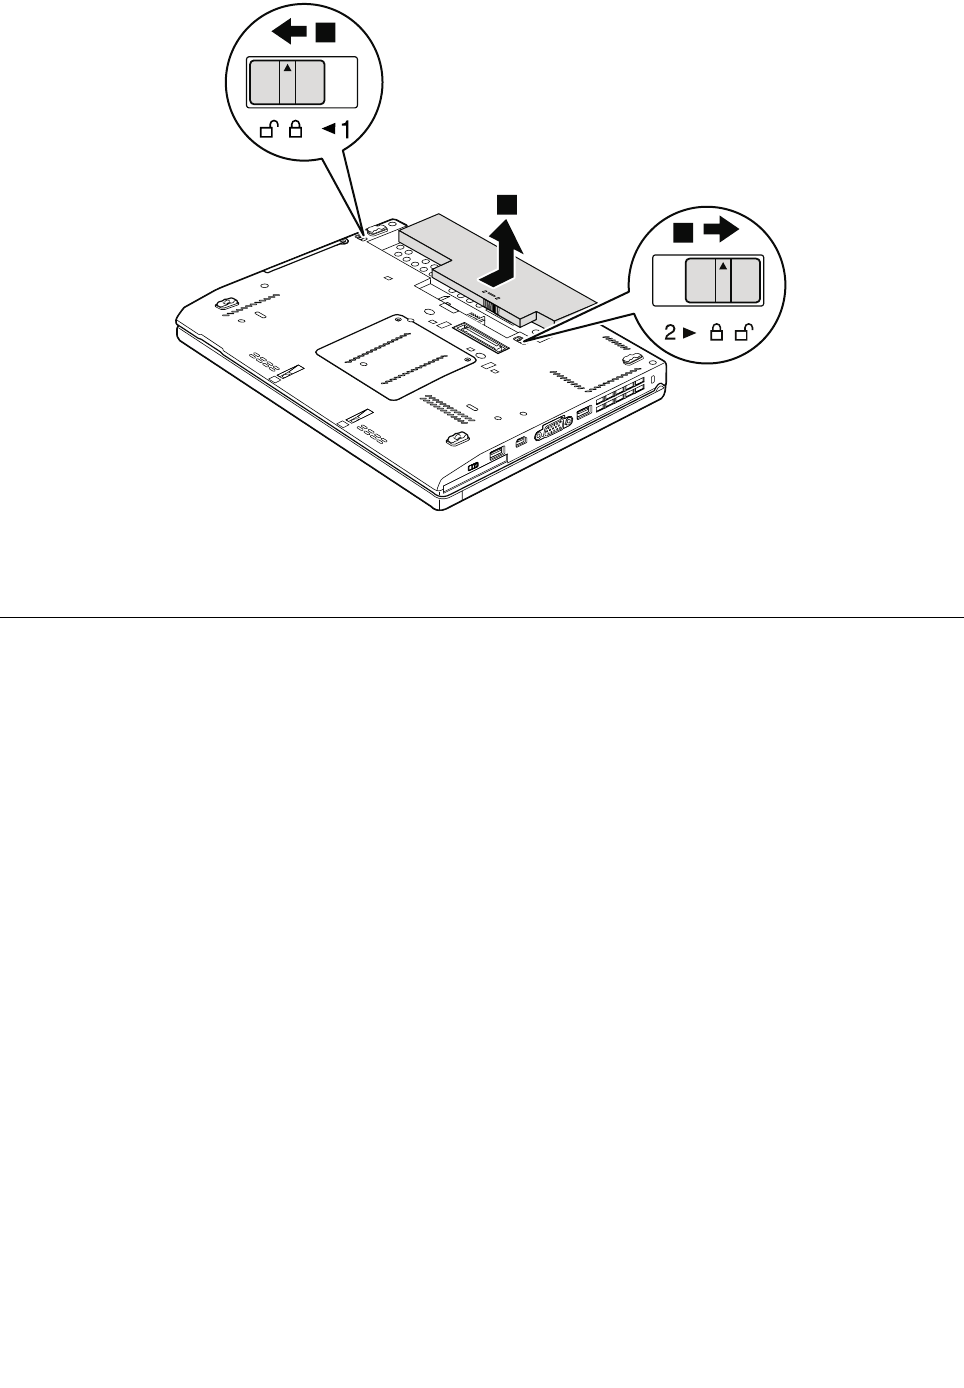
1
2
2
Wheninstalling:Installthebatterypackintheslot,andthenensurethatthebatterylockisinthelocked
position.
1020Harddiskdriveorsolid-statedrive
Foraccess,removethisFRU:
•“1010Batterypack”onpage56
Attention:
•Donotdropthedriveorapplyanyphysicalshocktoit.Thedriveissensitivetophysicalshock.Improper
handlingcancausedamageandpermanentlossofdata.
•Beforeremovingthedrive,havetheusermakeabackupcopyofalltheinformationonitifpossible.
•Neverremovethedrivewhilethecomputerisoperatingorinsuspendmode.
Chapter9.RemovingorreplacingaFRU57
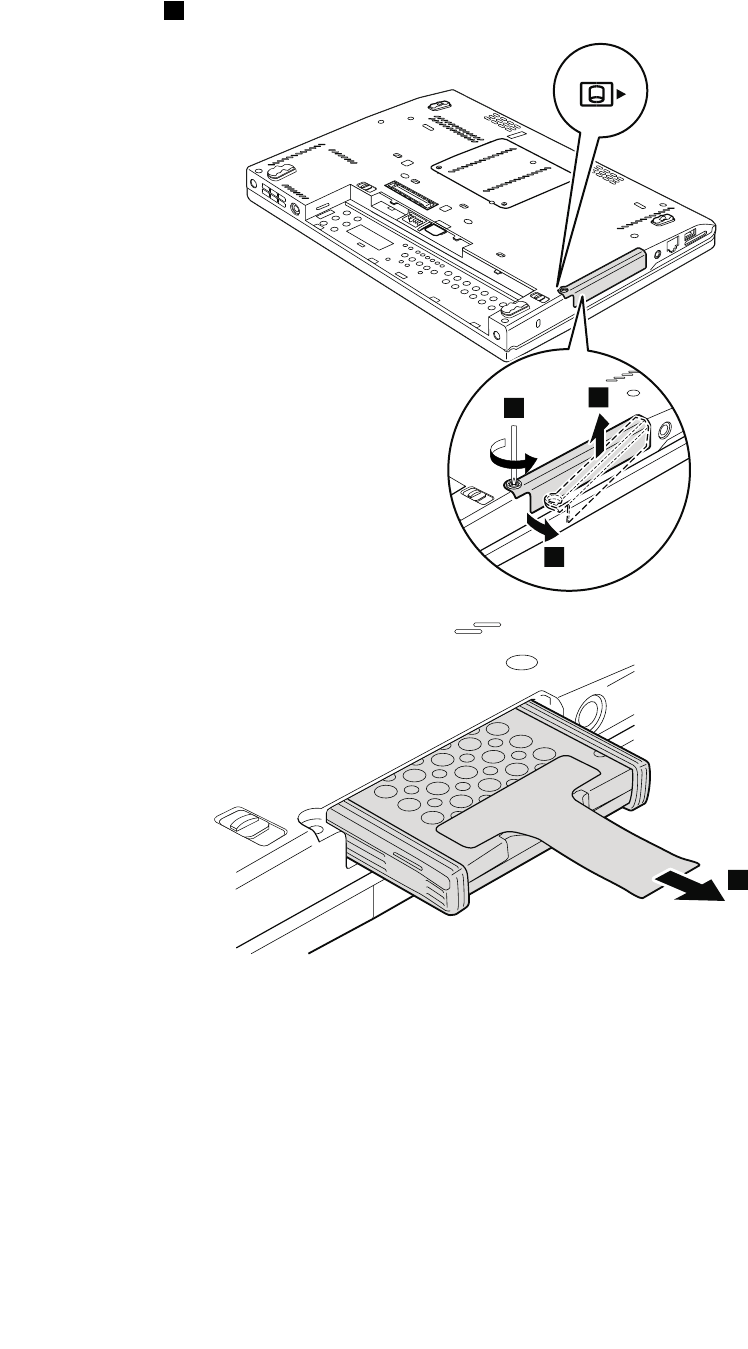
Removalstepsofharddiskdriveorsolid-statedrive
Loosenthescrew1.
1
2
3
4
58HardwareMaintenanceManual
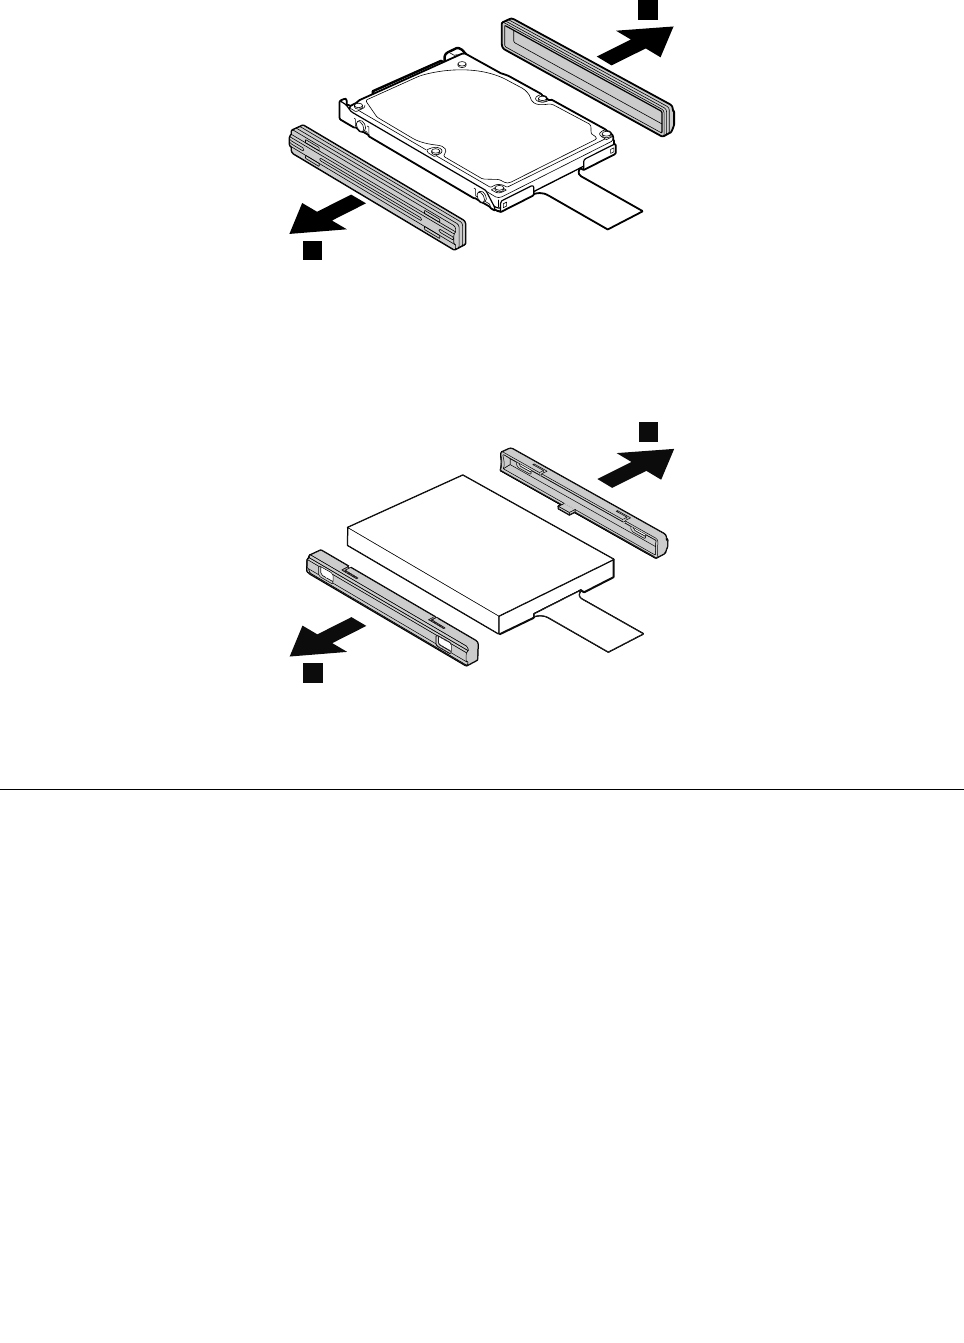
Forharddiskdriveandrubberrails:
5
5
Forsolid-statedriveandspacers:
5
5
5
Wheninstalling:Ensurethatthesolid-statedrivespacersortheharddiskdriverubberrailsareattached
rmly.
1030Memorymodule
Foraccess,removethisFRU:
•“1010Batterypack”onpage56
Removalstepsofmemorymodule
Removethememorymoduleslotcoverasshowninthefollowingillustration.
Chapter9.RemovingorreplacingaFRU59
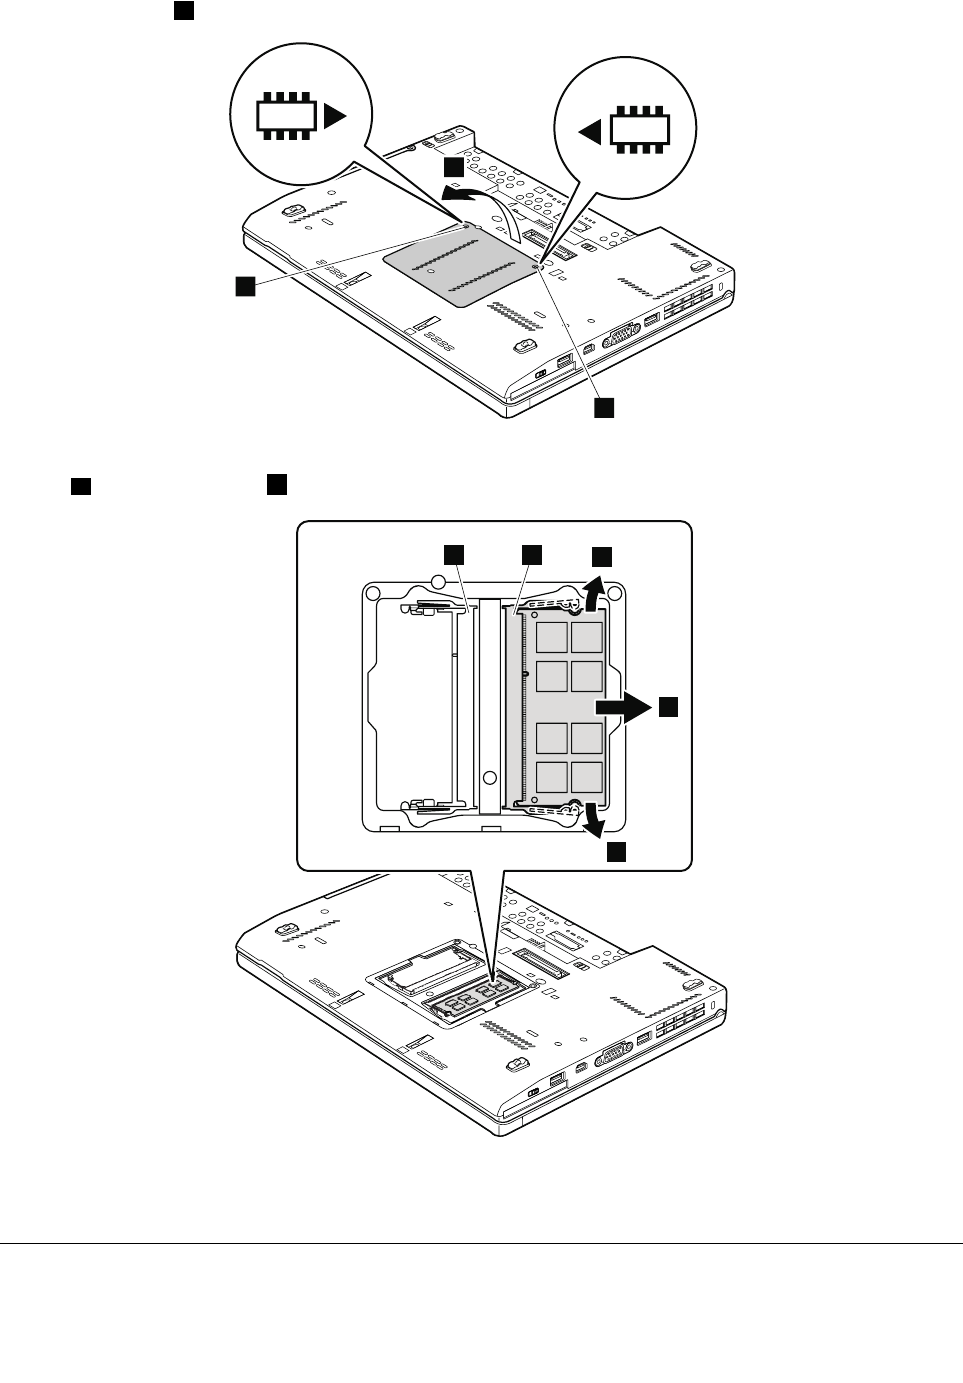
Loosenthescrews1.
2
1
1
Ifonlyonememorymoduleistobeinstalledonthecomputeryouareservicing,itmustbeinstalledin
SLOT-0a,butnotinSLOT-1b.
ab3
4
3
Wheninstalling:Insertthenotchedendofthememorymoduleintotheslot.Pressthememorymodule
rmly,andpivotituntilitsnapsintoplace.Ensurethatitisrmlyinstalledintheslotanddoesnotmoveeasily.
1040Keyboard
Foraccess,removethisFRU:
60HardwareMaintenanceManual

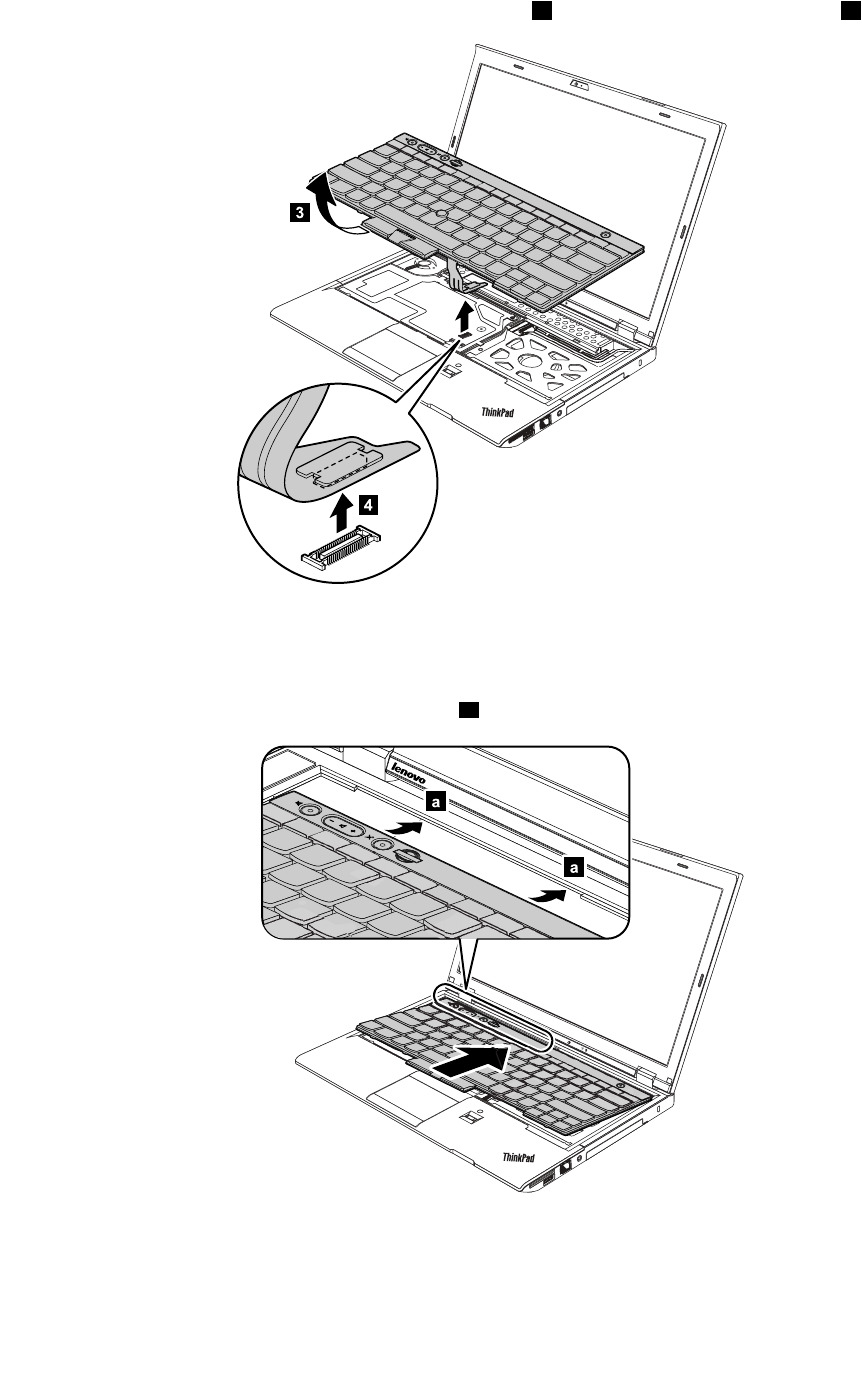
Liftthekeyboardalittleinthedirectionshownbythearrow3,andthendetachtheconnector4.
3
4
Wheninstalling:
1.Attachthekeyboardconnectorrmly.
2.Attachthekeyboardandensurethatthehooksaonthefrontedgeofthekeyboardareundertheframe.
a
a
62HardwareMaintenanceManual
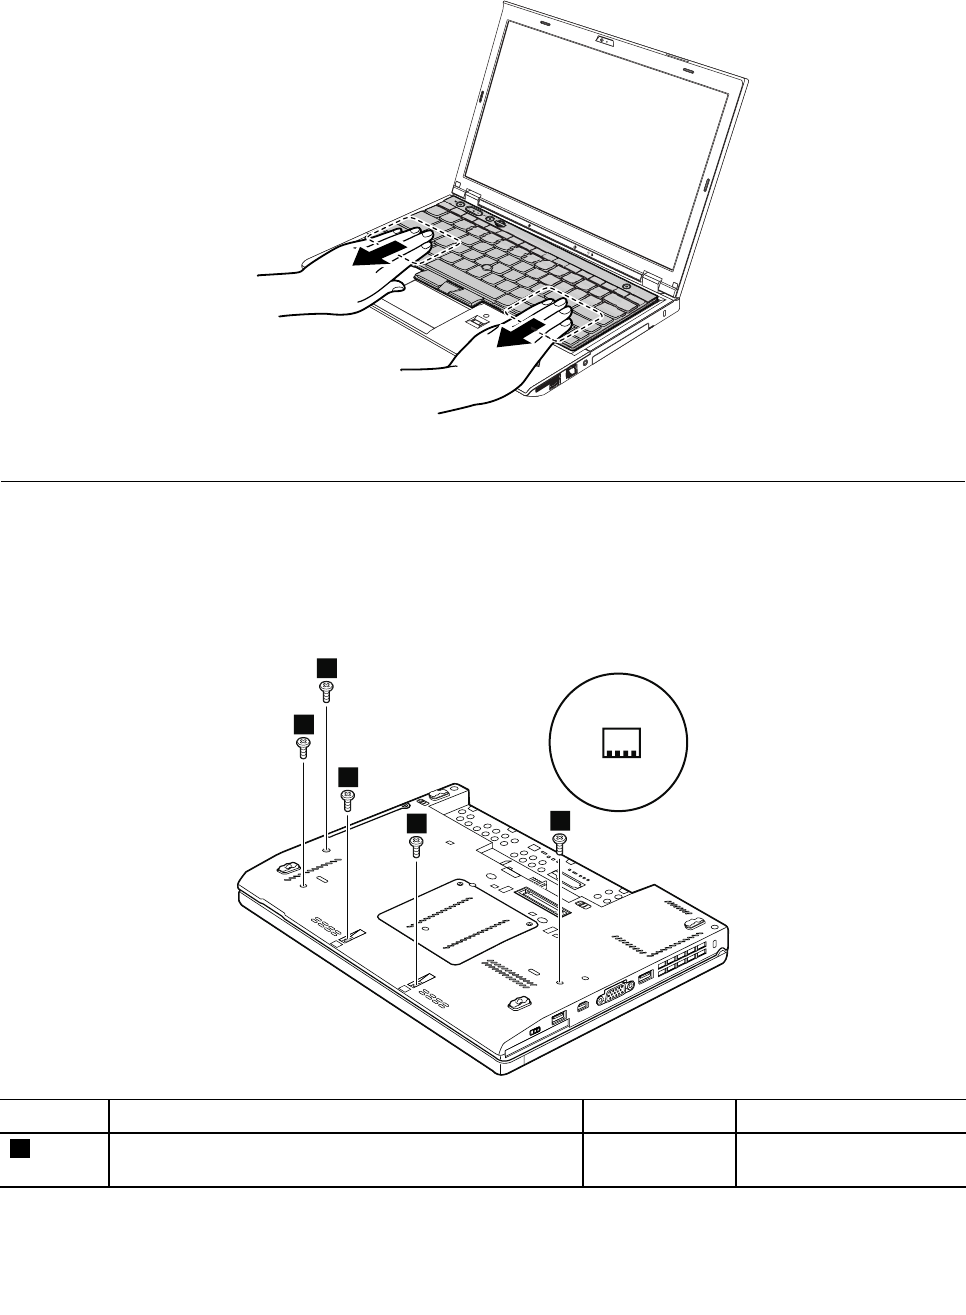
3.Whenthefrontedgeofthekeyboardishousedrmly,gentlypressthekeyswithyourpalmsandslightly
slidethekeyboardtowardyouuntilthekeyboardisinplace.
4.Securethekeyboardbytighteningthescrewsfromthebottomsideofthecomputer.
1050Palmrest
Foraccess,removetheseFRUsinorder:
•“1010Batterypack”onpage56
•“1040Keyboard”onpage60
Removalstepsofpalmrest
1
1
11
1
StepScrew(quantity)ColorTorque
1M2×5mm,wafer-head,nylon-coated(5)Black0.181Nm
(1.85kgf-cm)
Chapter9.RemovingorreplacingaFRU63
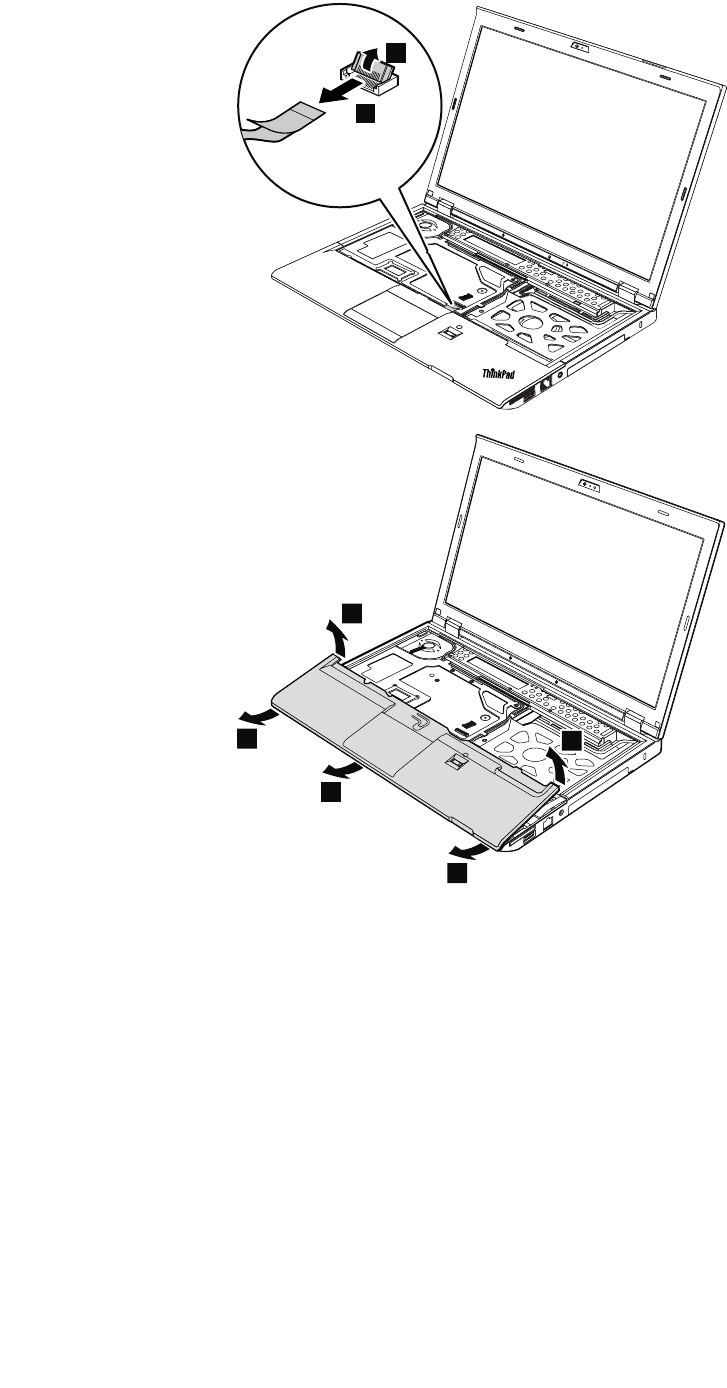
3
2
4
4
5
5
5
Wheninstalling:
1.Attachtheconnectorrmlytothesystemboard.
64HardwareMaintenanceManual
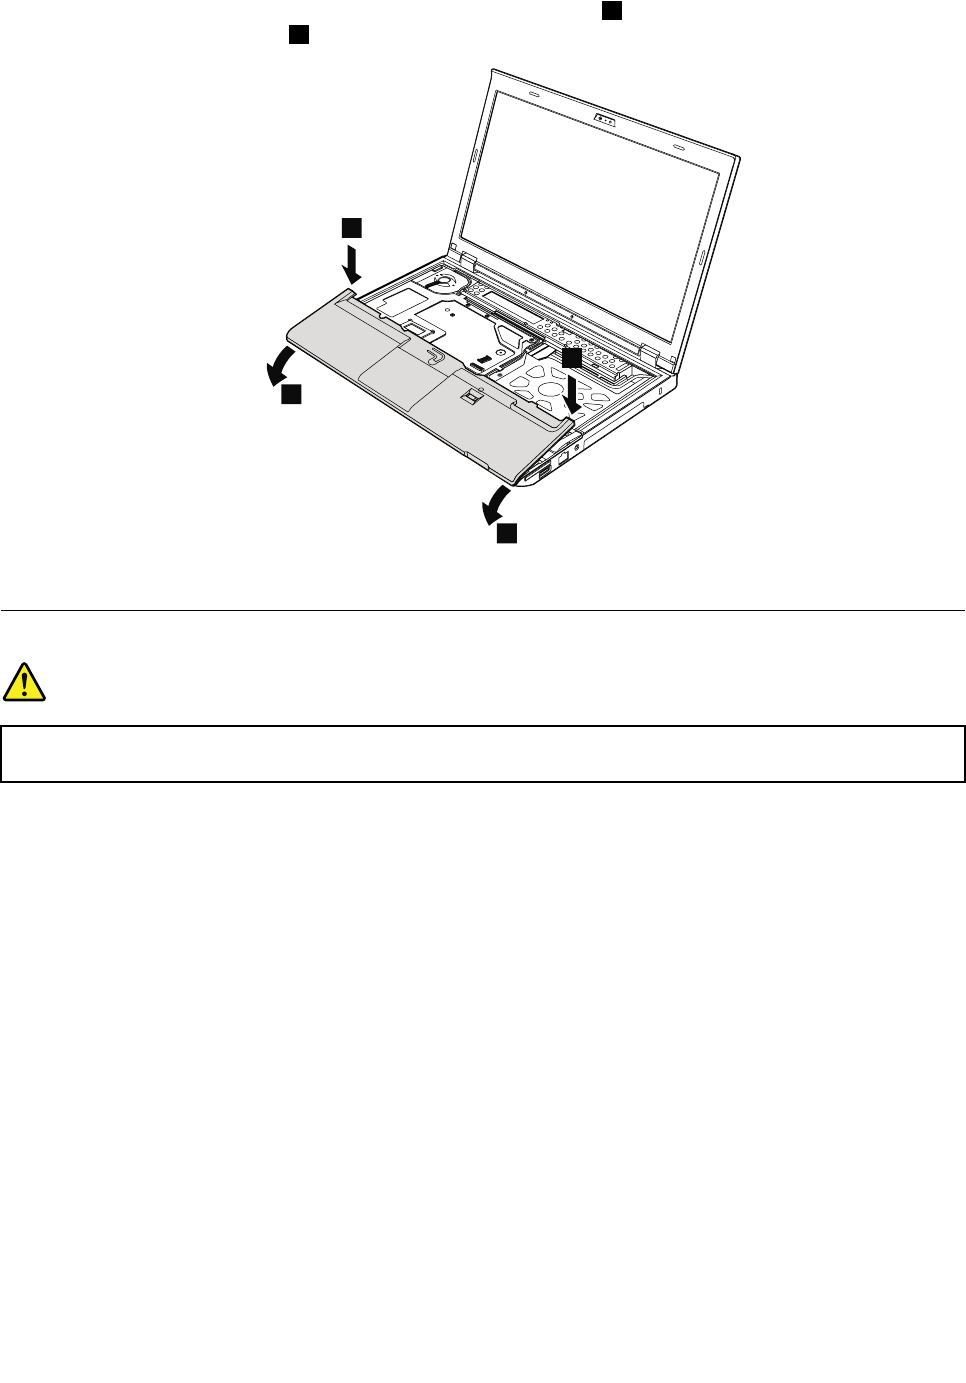
2.Pressthetopleftandrightareasofthepalmrestintoposition1.Then,pushthefrontsideofthe
palmrestuntilitissecured2.
1
1
2
2
3.ClosetheLCDcoverandturnthecomputerover.Thenfastenvescrewstosecurethepalmrest.
1060Backupbattery
DANGER
Useonlytheauthorizedbatteryspeciedforyourcomputer.Anyotherbatterycouldigniteor
explode.
Foraccess,removetheseFRUsinorder:
•“1010Batterypack”onpage56
•“1040Keyboard”onpage60
•“1050Palmrest”onpage63
Chapter9.RemovingorreplacingaFRU65
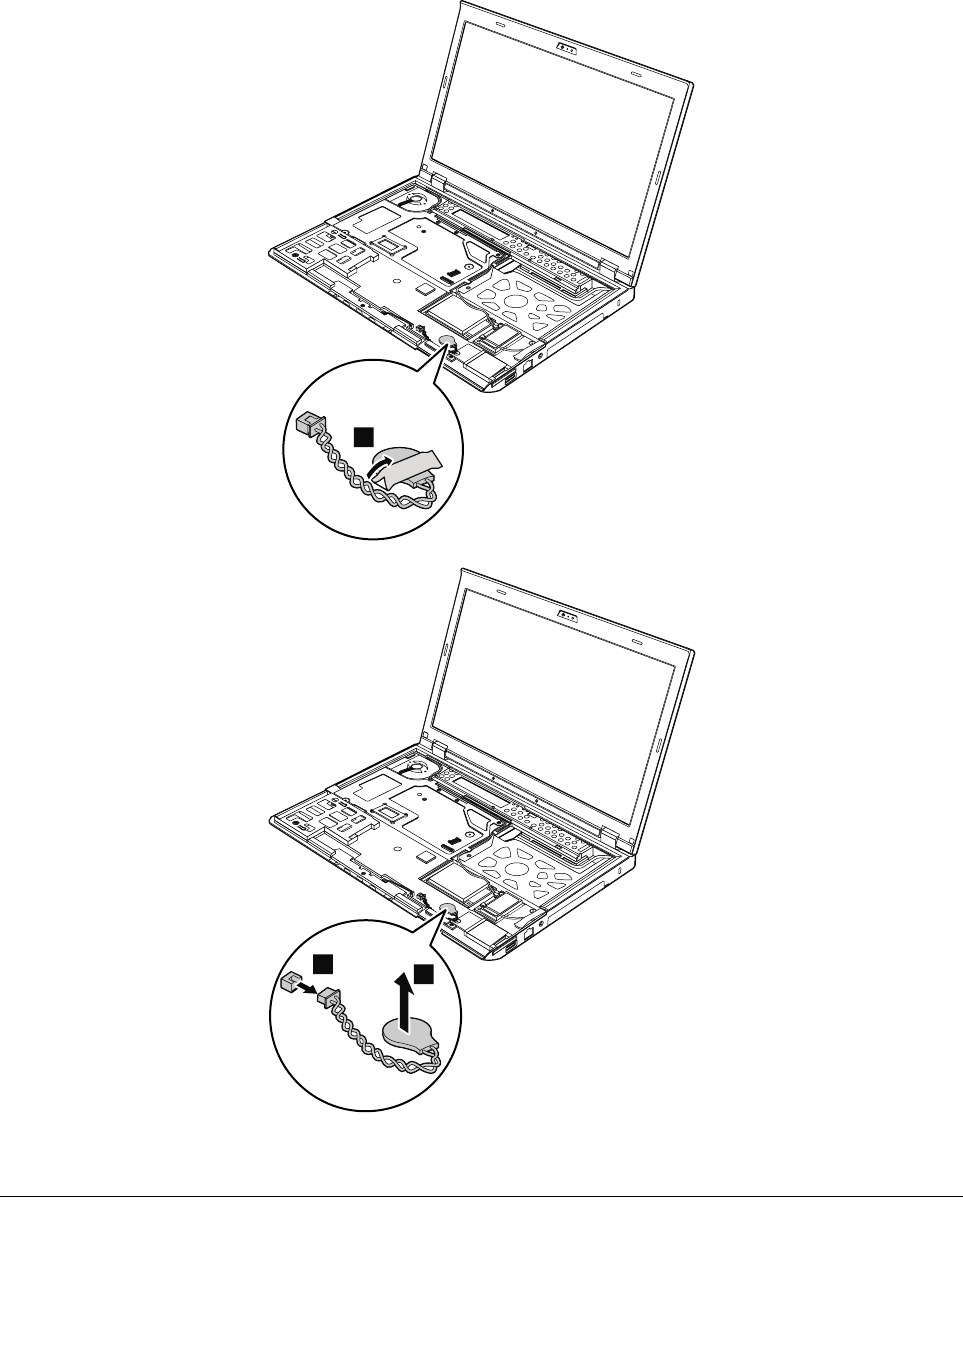
Removalstepsofbackupbattery
1
23
Wheninstalling:Ensurethatthebatteryconnectorisattachedrmly.
1070Speakerassembly
Foraccess,removetheseFRUsinorder:
66HardwareMaintenanceManual

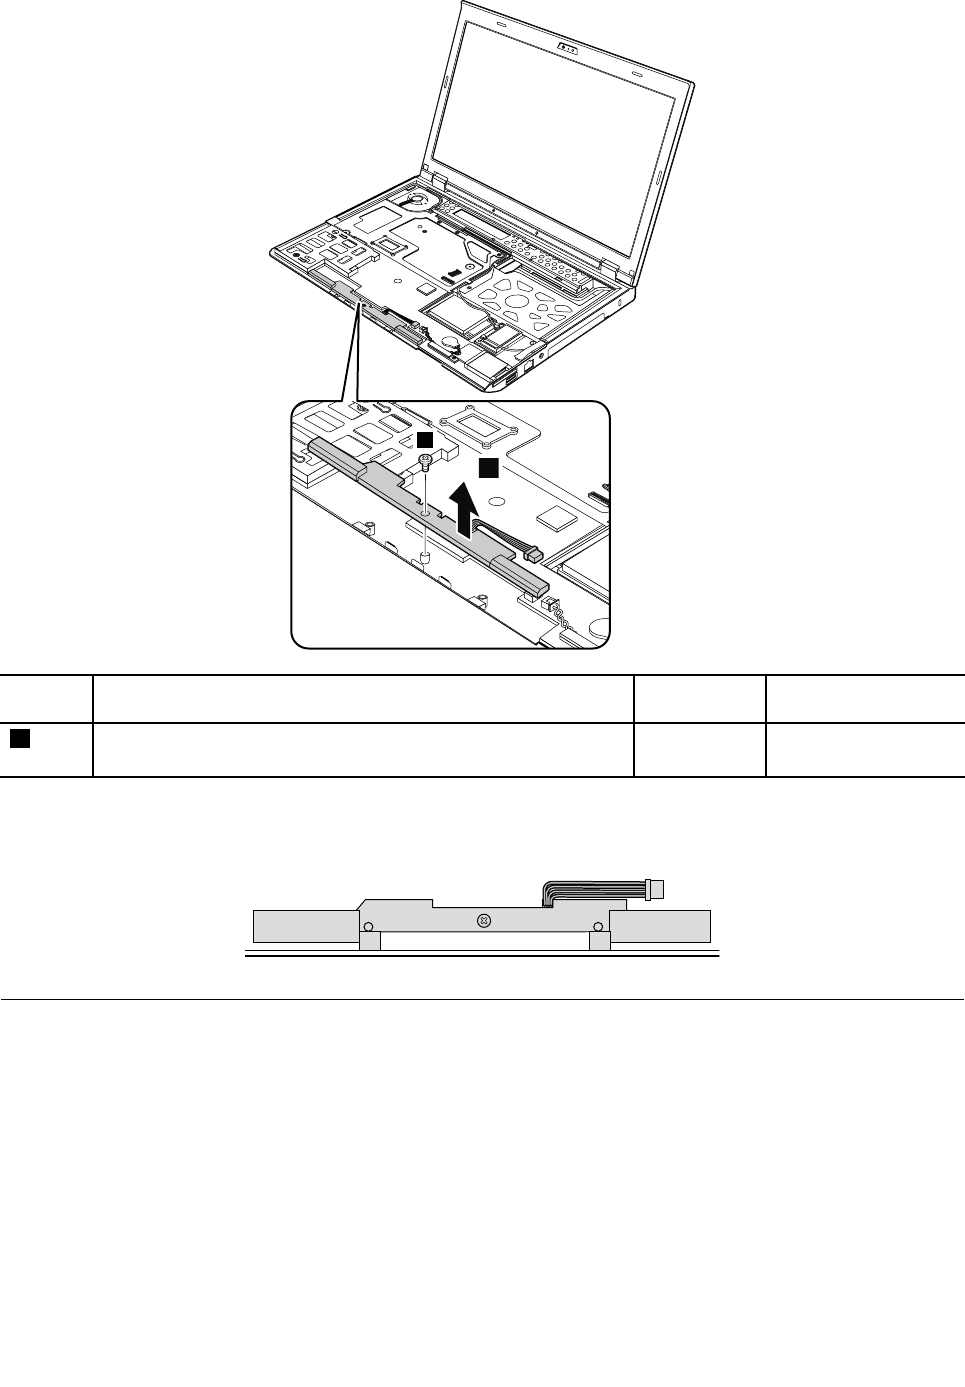
3
2
StepScrew(quantity)ColorTorque
2M2×3.5mm,wafer-head,nylon-coated(1)Silver0.181Nm
(1.85kgf-cm)
Wheninstalling:Ensurethatthespeakerconnectorisattachedrmly.Thenroutethecablesandsecure
themproperlyasshowninthefollowingillustration.
1080PCIExpressMiniCardforwirelessLAN/WiMAX
Foraccess,removetheseFRUsinorder:
•“1010Batterypack”onpage56
•“1040Keyboard”onpage60
•“1050Palmrest”onpage63
68HardwareMaintenanceManual
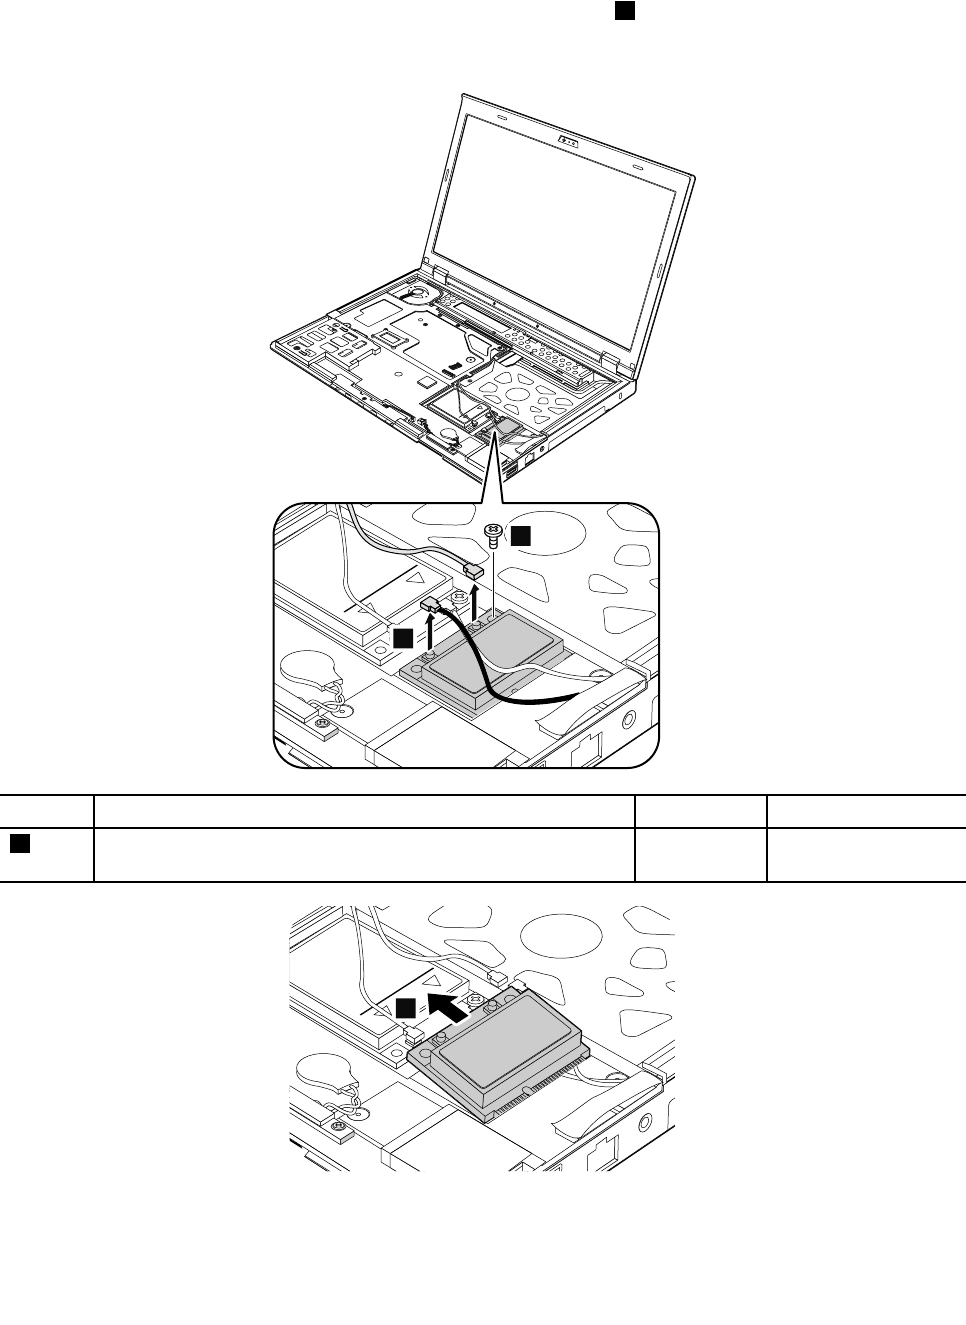
RemovalstepsofPCIExpressMiniCardforwirelessLAN/WiMAX
UnplugtheconnectorsbyusingtheantennaRFconnectorremovaltool,orpicktheconnectorswithyour
ngersandgentlyunplugtheminthedirectionshownbythearrows1.
Note:Somemodelsmighthavethreeantennacables.
1
2
StepScrew(quantity)ColorTorque
2M2×3.5mm,wafer-head,nylon-coated(1)Silver0.181Nm
(1.85kgf-cm)
3
Wheninstalling:
Chapter9.RemovingorreplacingaFRU69
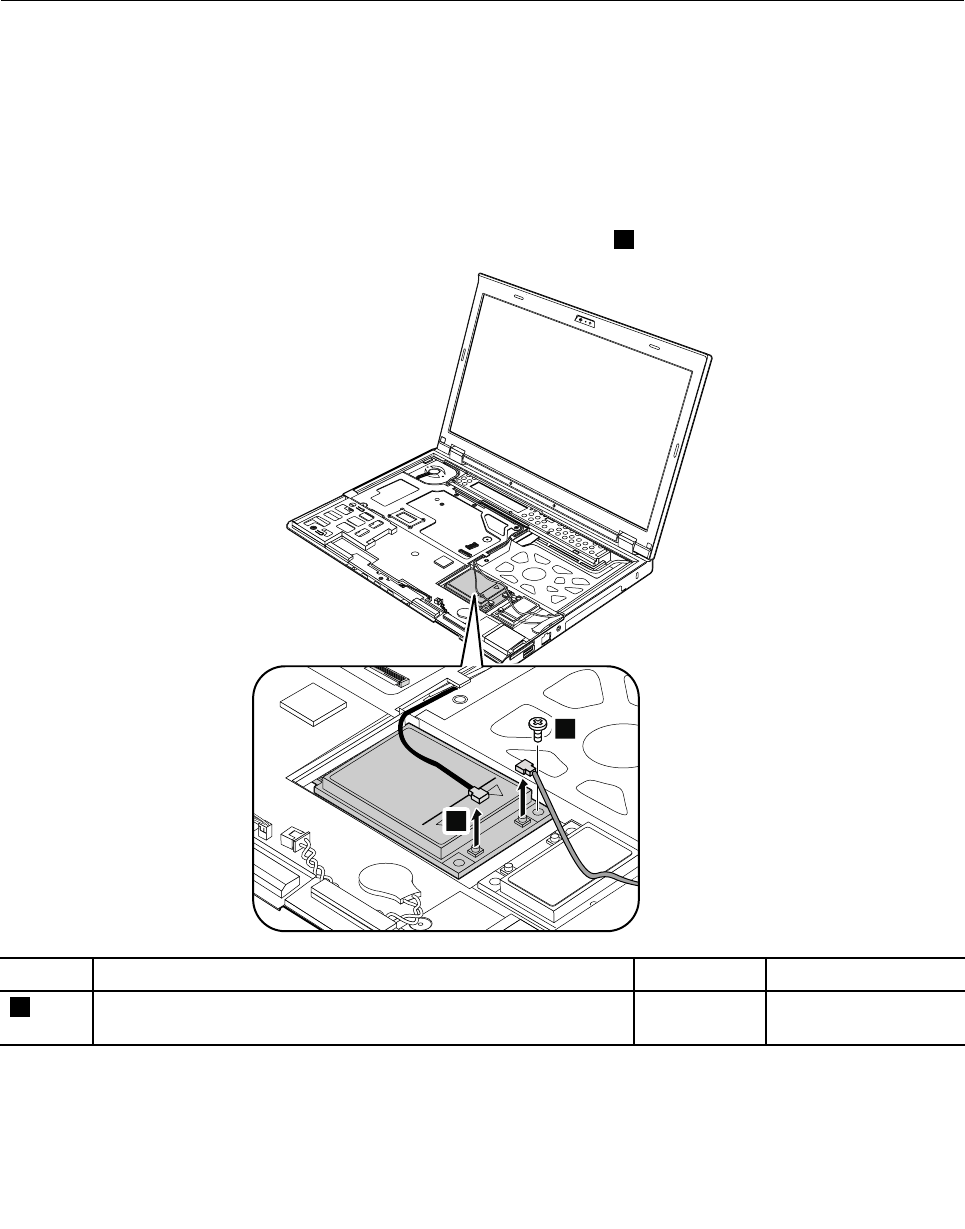
•FormodelswithawirelessLANcardthathastwoantennaconnectors,plugthegraycableintothemain
connector,andtheblackcableintotheauxiliaryconnector.Ifthecomputeryouareservicinghasthree
cables,putthewhitecableinthecableprotectiontubeandsecureitwithtape.
•FormodelswithawirelessLANcardthathasthreeantennaconnectors,plugthegraycableintothemain
connector,theblackcableintotheauxiliaryconnector,andthewhitecableintothelastconnector.
1090PCIExpressMiniCardforwirelessWANormSATAsolid-statedrive
Foraccess,removetheseFRUsinorder:
•“1010Batterypack”onpage56
•“1040Keyboard”onpage60
•“1050Palmrest”onpage63
RemovalstepsofPCIExpressMiniCardforwirelessWAN(full-sizewirelessWANcard)
UnplugtheconnectorsbyusingtheantennaRFconnectorremovaltool,orpicktheconnectorswithyour
ngersandgentlyunplugtheminthedirectionshownbythearrows1.
1
2
StepScrew(quantity)ColorTorque
2M2×3.5mm,wafer-head,nylon-coated(1)Silver0.181Nm
(1.85kgf-cm)
70HardwareMaintenanceManual
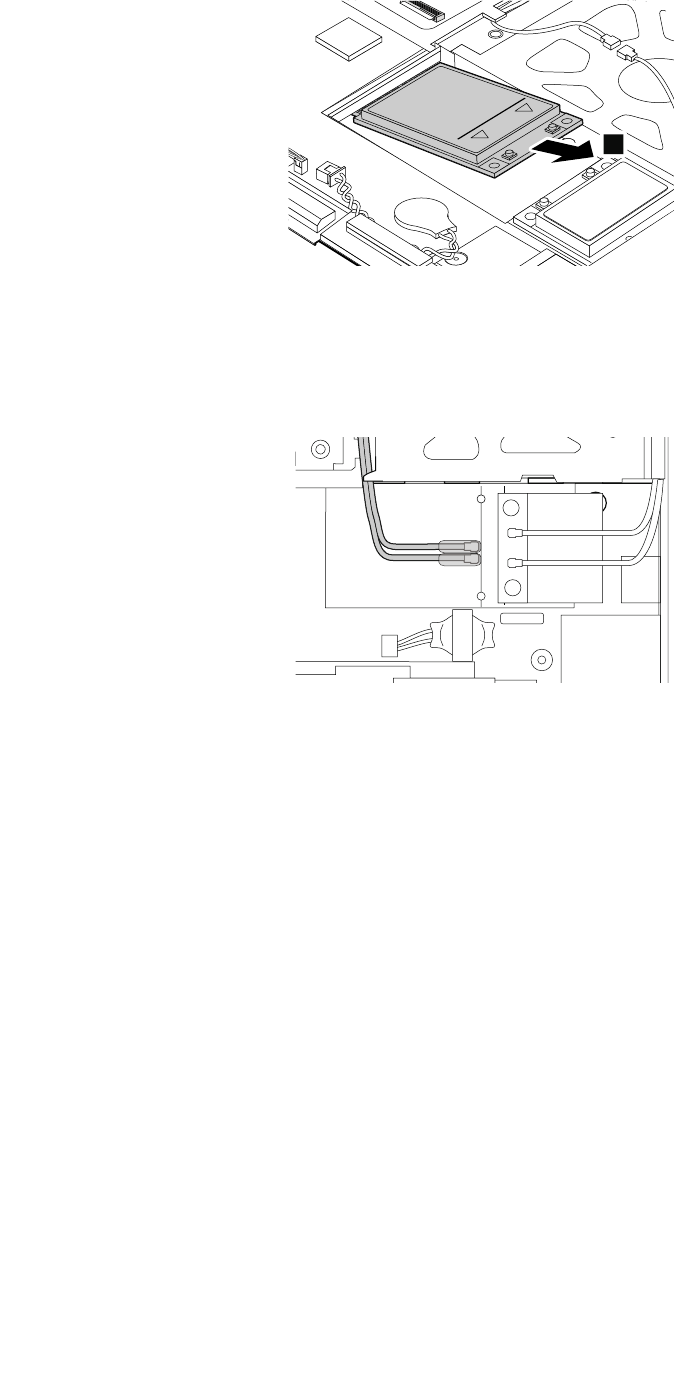
3
Wheninstalling:Plugtheredcableintothemainconnector,andthebluecableintotheauxiliaryconnector
onthecard.
IfthecomputeryouareservicingisawirelessWAN-readymodelanddoesnothaveawirelessWANcard,
routetheantennacablesandsecurethemwithtapeasshowninthefollowingillustration.
Chapter9.RemovingorreplacingaFRU71
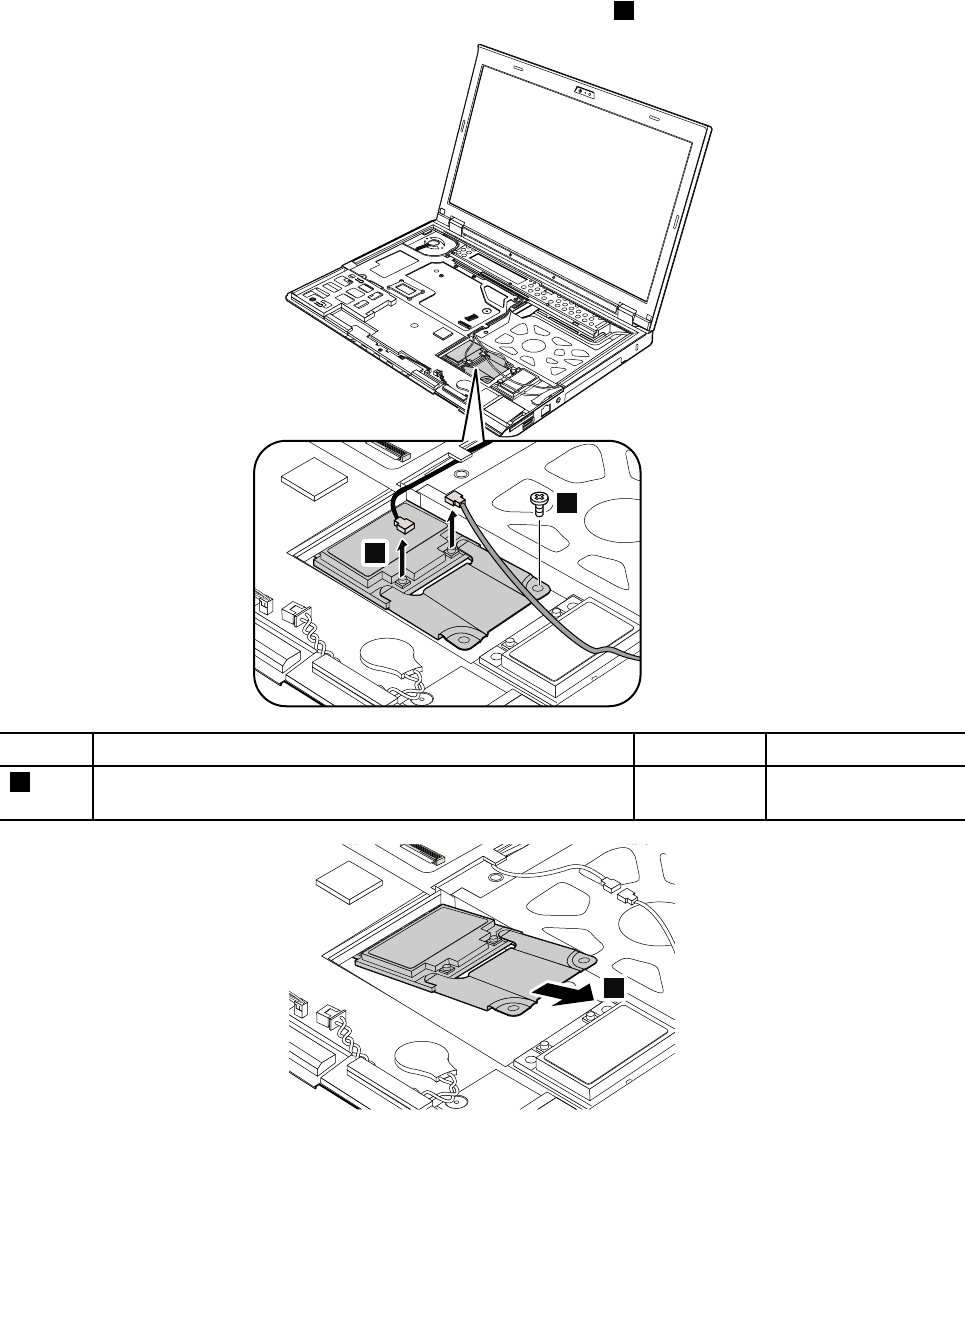
RemovalstepsofPCIExpressMiniCardforwirelessWAN(half-sizewirelessWANcard)
UnplugtheconnectorsbyusingtheantennaRFconnectorremovaltool,orpicktheconnectorswithyour
ngersandgentlyunplugtheminthedirectionshownbythearrows1.
1
2
StepScrew(quantity)ColorTorque
2M2×3.5mm,wafer-head,nylon-coated(1)Silver0.181Nm
(1.85kgf-cm)
3
72HardwareMaintenanceManual
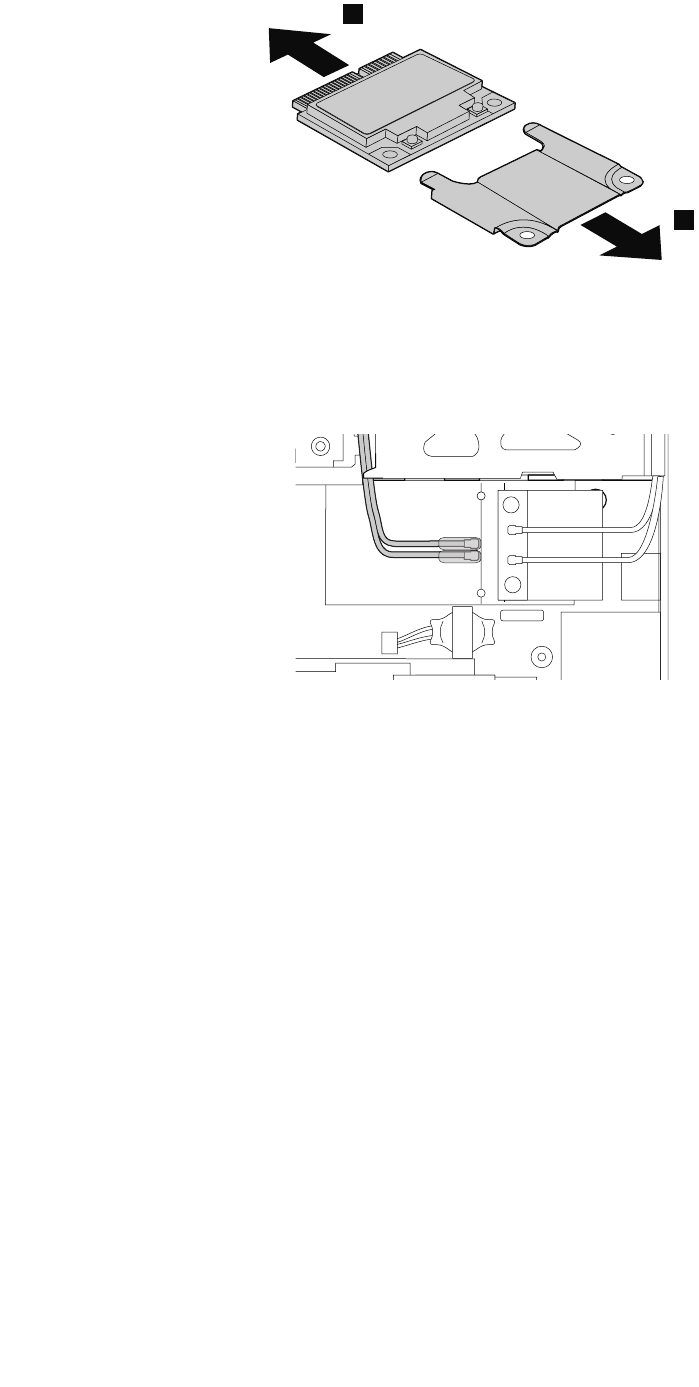
4
4
Wheninstalling:Plugtheredcableintothemainconnector,andthebluecableintotheauxiliaryconnector
onthecard.
IfthecomputeryouareservicingisawirelessWAN-readymodelanddoesnothaveawirelessWANcard,
routetheantennacablesandsecurethemwithtapeasshowninthefollowingillustration.
RemovalstepsofmSATAsolid-statedrive
ThecomputercomeswitheitheraPCIExpressMiniCardforwirelessWANoranmSATAsolid-statedrive.If
thecomputerisequippedwithanmSATAsolid-statedrive,itisinstalledinthewirelessWANcardslot.
Attention:
•Donotdropthedriveorapplyanyphysicalshocktoit.Thedriveissensitivetophysicalshock.Improper
handlingcancausedamageandpermanentlossofdata.
•Beforeremovingthedrive,havetheusermakeabackupcopyofalltheinformationonitifpossible.
•Neverremovethedrivewhilethecomputerisoperatingorinsuspendmode.
•EnsurethatyoupartitionthemSATAsolid-statedriveafterinstallingitonthecomputeryouareservicing.
Otherwise,themSATAsolid-statedrivewillnotfunctioncorrectly.Forinstructionsononhowtopartition
anmSATAsolid-statedrive,gotohttp://www.lenovo.com/support/msata-fru.
Chapter9.RemovingorreplacingaFRU73

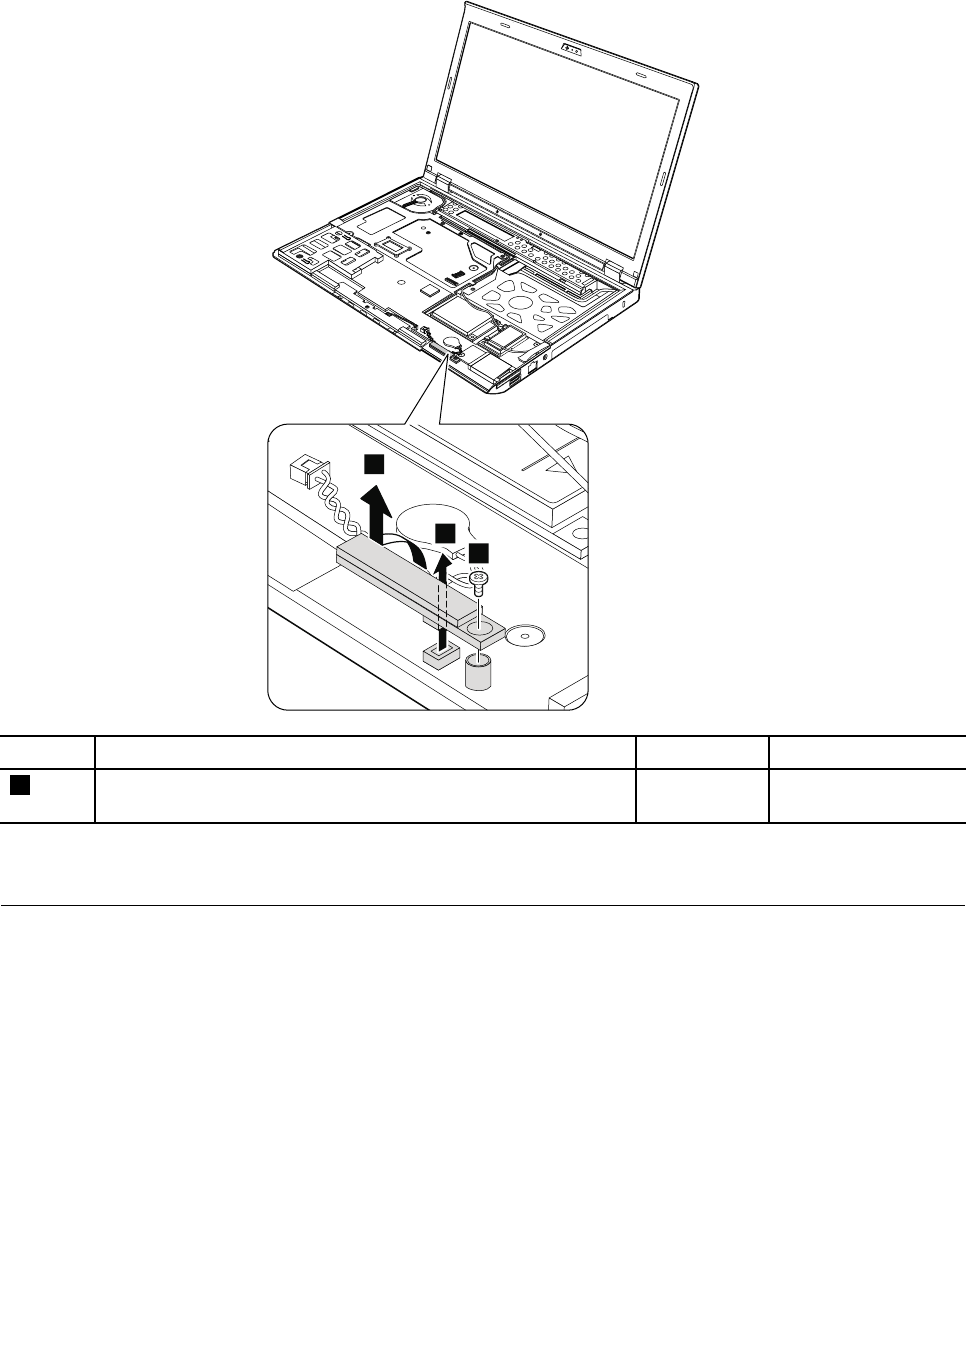
RemovalstepsofBluetoothdaughtercard
1
2
3
StepScrew(quantity)ColorTorque
1M2×3mm,wafer-head,nylon-coated(1)Silver0.181Nm
(1.85kgf-cm)
Wheninstalling:Ensurethattheconnectorisattachedrmly.
1110Keyboardbezel
Foraccess,removetheseFRUsinorder:
•“1010Batterypack”onpage56
•“1040Keyboard”onpage60
•“1050Palmrest”onpage63
Chapter9.RemovingorreplacingaFRU75
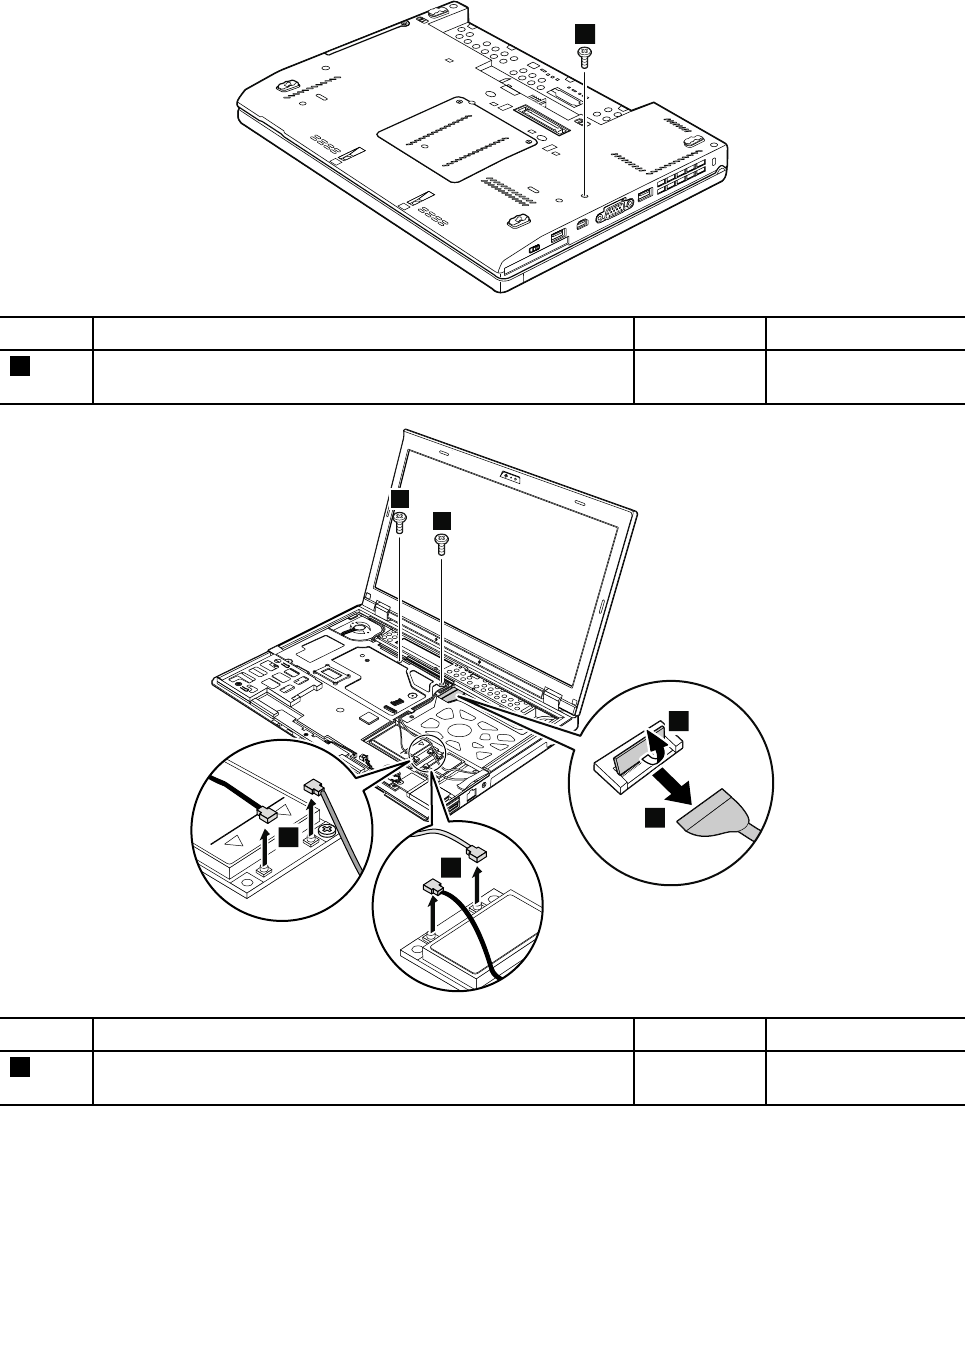
Removalstepsofkeyboardbezel
1
StepScrew(quantity)ColorTorque
1M2×5mm,wafer-head,nylon-coated(1)Black0.181Nm
(1.85kgf-cm)
2
2
4
3
5
5
StepScrew(quantity)ColorTorque
2M2×3.5mm,wafer-head,nylon-coated(2)Silver0.181Nm
(1.85kgf-cm)
76HardwareMaintenanceManual
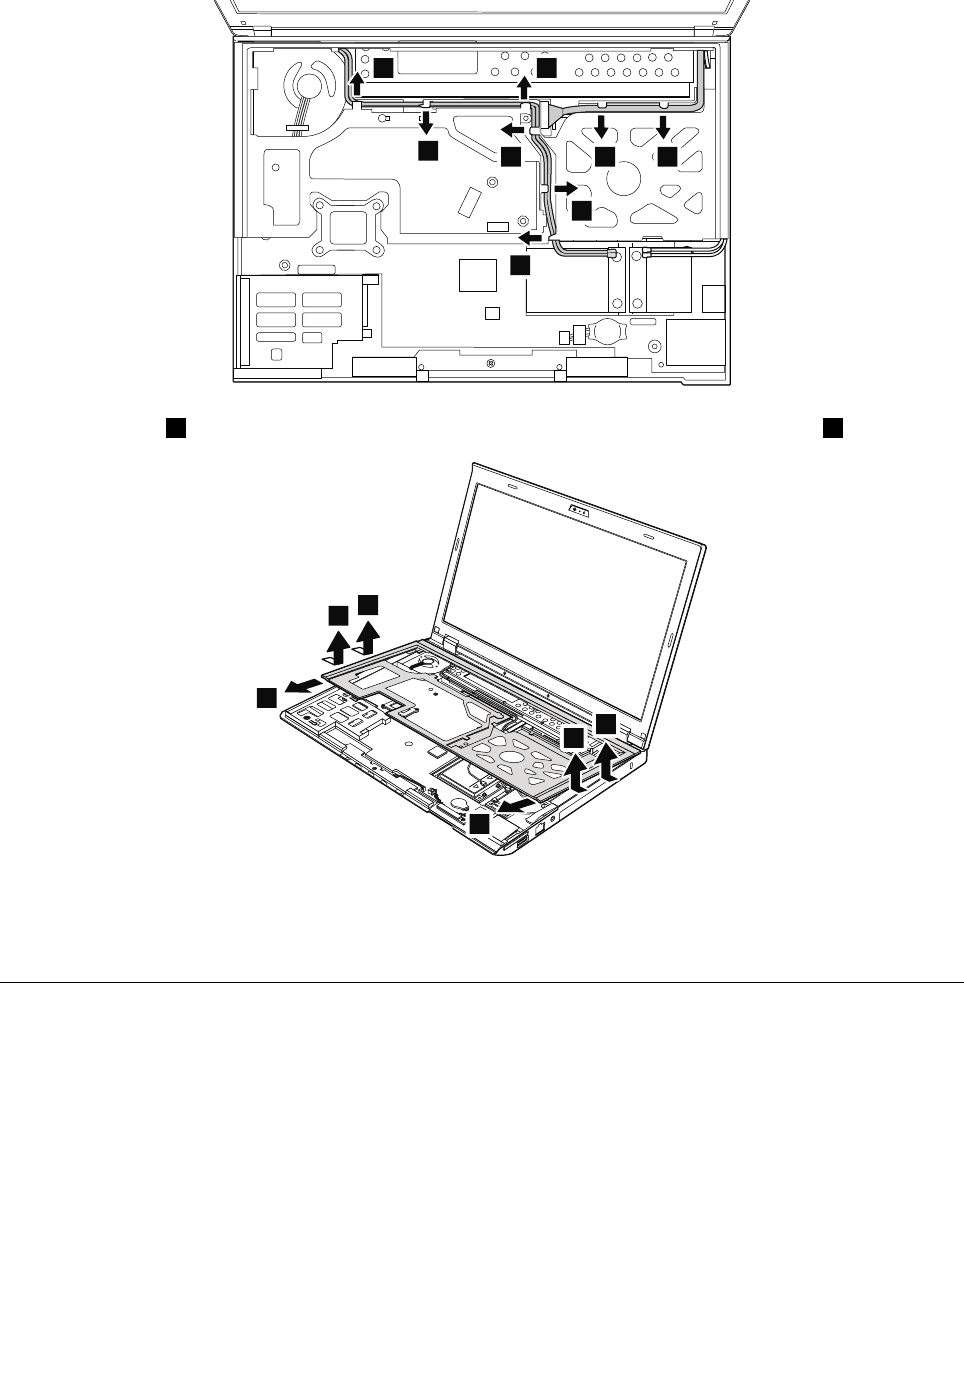
6
66
6 6 6
6
6
Detachthelatches7.Thenremovethekeyboardbezelinthedirectionshownbythearrows8.
7
8
7
7
7
8
Wheninstalling:Ensurethattheconnectorandthelatchesareattachedrmly.
Attention:Whenyouservicethekeyboardbezel,avoidanykindofroughhandling.
1120LCDunit
Foraccess,removetheseFRUsinorder:
•“1010Batterypack”onpage56
•“1040Keyboard”onpage60
•“1050Palmrest”onpage63
•“1110Keyboardbezel”onpage75
Chapter9.RemovingorreplacingaFRU77
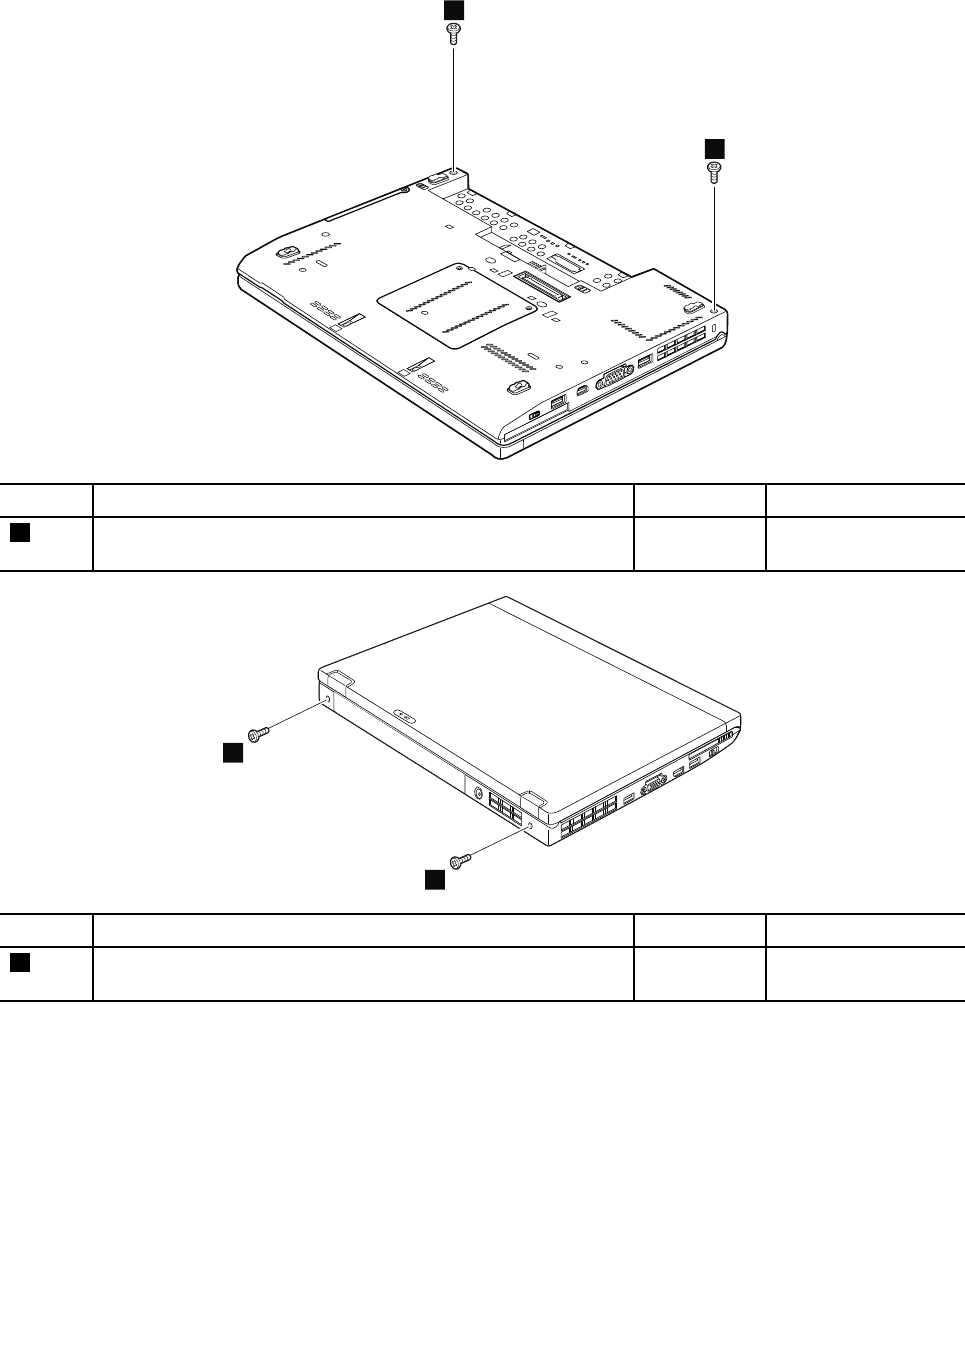
RemovalstepsofLCDunit
1
1
StepScrew(quantity)ColorTorque
1M2×5mm,wafer-head,nylon-coated(2)Black0.181Nm
(1.85kgf-cm)
2
2
StepScrew(quantity)ColorTorque
2M2×5mm,wafer-head,nylon-coated(2)Black0.181Nm
(1.85kgf-cm)
78HardwareMaintenanceManual
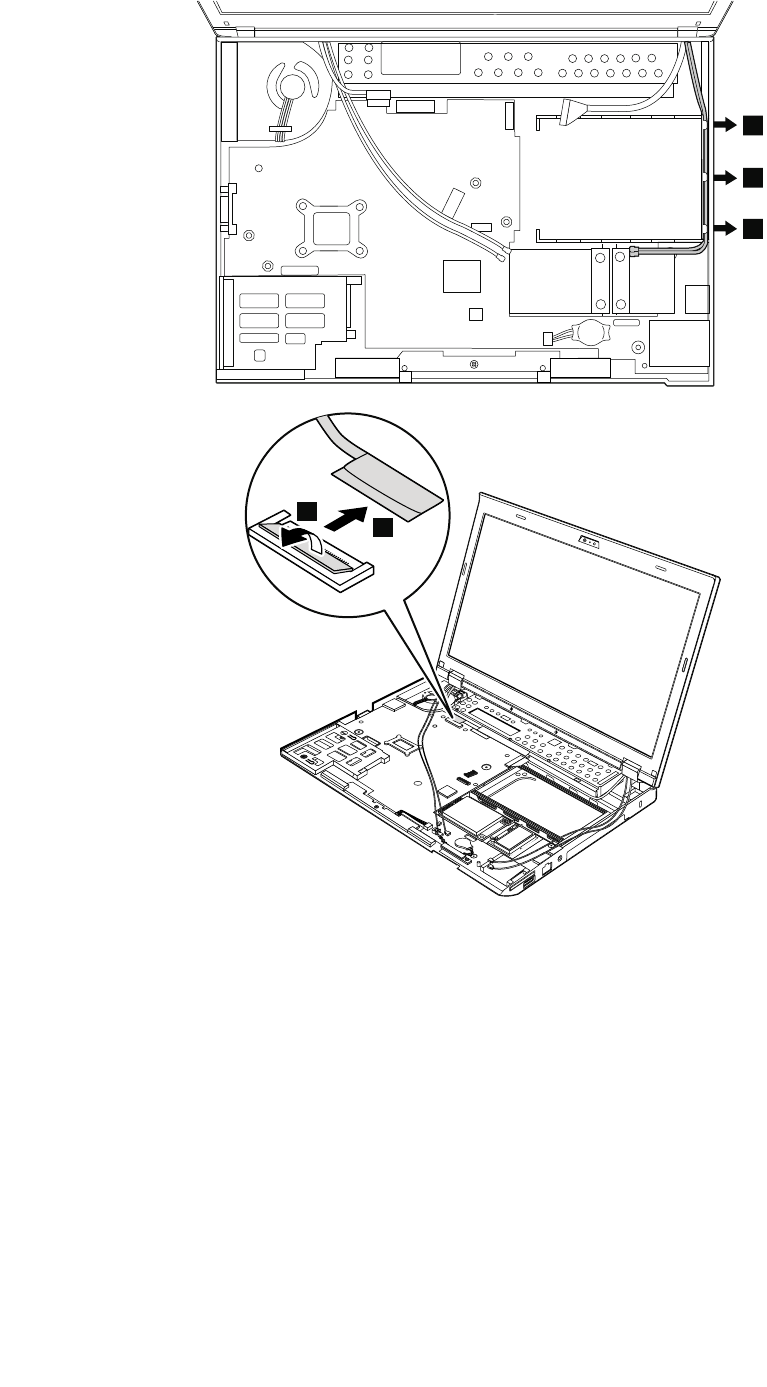
3
3
3
5
4
Chapter9.RemovingorreplacingaFRU79
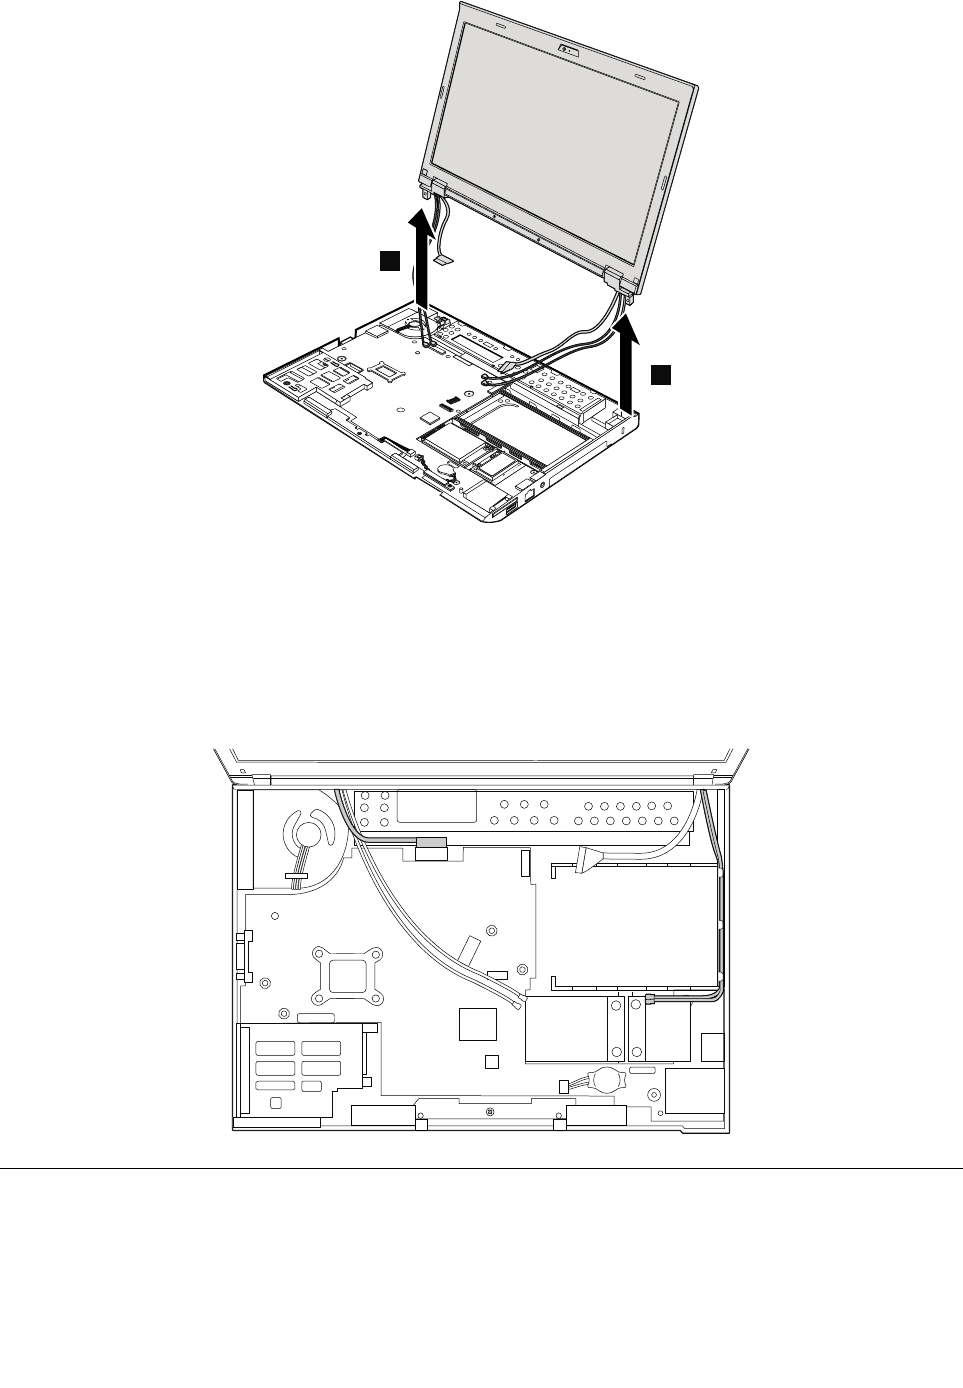
6
6
Wheninstalling:
•Ensurethatyouattachtheconnectorsrmly.
•Ensurethatyourouteandtapeupthecablescorrectlyintheproperpositionsasshowninthefollowing
illustration.
•Whenyouroutethecables,ensurethattheyarenotsubjecttoanytension.Tensioncouldcausethe
cablestobedamagedbythecableguides,orawiretobebroken.
1130Basecoverassembly
Foraccess,removetheseFRUsinorder:
•“1010Batterypack”onpage56
•“1020Harddiskdriveorsolid-statedrive”onpage57
•“1030Memorymodule”onpage59
80HardwareMaintenanceManual
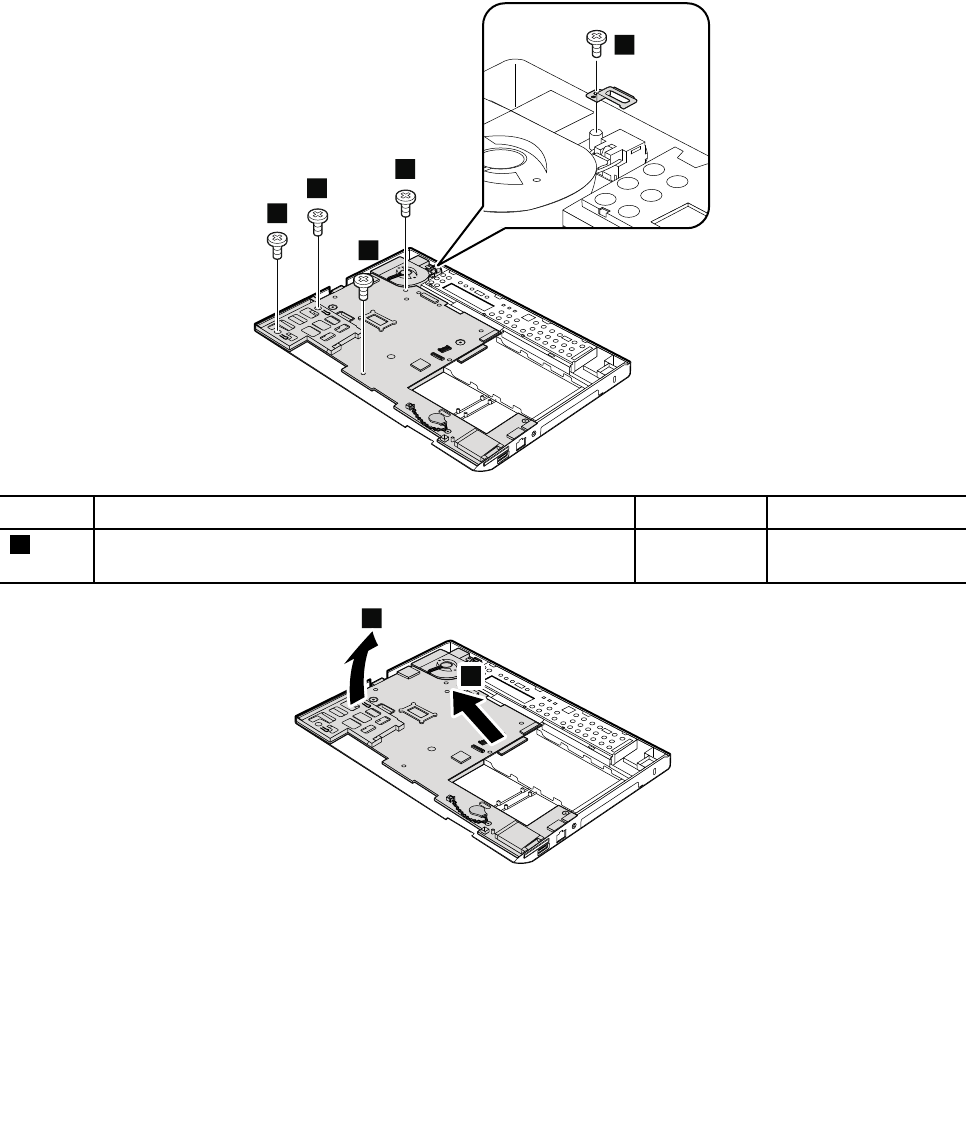
•“1040Keyboard”onpage60
•“1050Palmrest”onpage63
•“1060Backupbattery”onpage65
•“1080PCIExpressMiniCardforwirelessLAN/WiMAX”onpage68
•“1090PCIExpressMiniCardforwirelessWANormSATAsolid-statedrive”onpage70
•“1100Bluetoothdaughtercard”onpage74
•“1110Keyboardbezel”onpage75
•“1120LCDunit”onpage77
Removalstepsofbasecoverassembly
1
1
1
1
1
StepScrew(quantity)ColorTorque
1M2×3.5mm,wafer-head,nylon-coated(5)Silver0.181Nm
(1.85kgf-cm)
2
3
Applyinglabelstothebasecover
ThenewbasecoverFRUisshippedwithakitcontaininglabelsofseveralkinds.
Notes:
•IftheCerticateofAuthentication(COA)labelisattachedtoapartthatisreplaced,returntheoldpartwith
thelabelattachedtothecustomer,orprovidealettertothecustomerstatingwhatthelabelwasoriginally
onthecomputerandwhatthelabelpartnumber,serialnumber,andproductkeywere.
Chapter9.RemovingorreplacingaFRU81
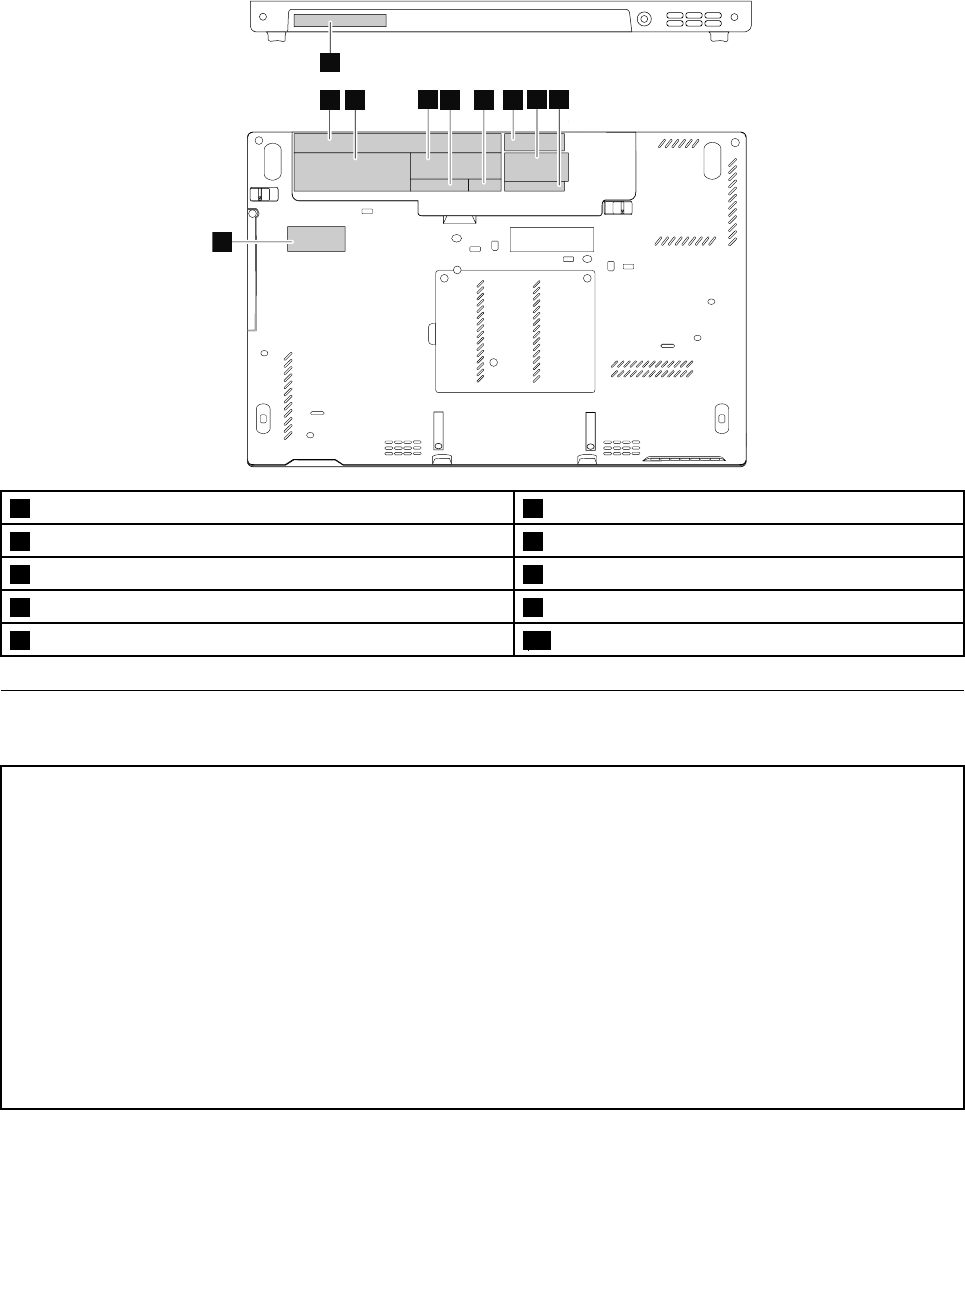
•IfthebasecoverhastwoFCClabels,applybothtothenewbasecover.
Thefollowinglabelsneedtobepeeledofffromtheoldbasecover,andneedtobeputonthenewbasecover.
2
1
3
10
456789
1Informationlabel6SIMiconlabel
2Systemlabel7TaiwanGEOlabel
3CerticateofAuthentication(COA)label8WirelessWANlabel
4Serialnumberlabel9T aiwanwirelessWANlabel
5FCClabel10ChinaGEOlabel
1140Systemboard,DC-inconnector,thermalfanassembly,and
ExpressCardslot
Importantnoticesforhandlingthesystemboard:
Whenhandlingthesystemboard,bearthefollowinginmind:
•Thesystemboardhasanaccelerometer,whichcanbebrokenifseveralthousandsofG-forcesareapplied.
Note:Droppingasystemboardfromaheightofaslittleas6inchessothatitfallsatonahardbenchcansubject
theaccelerometertoasmuchas6,000G'sofshock.
•Becarefulnottodropthesystemboardonabenchtopthathasahardsurface,suchasmetal,wood,orcomposite.
•Ifasystemboardisdropped,besuretodocumentthedropinanyrejectreport,andreplacethesystemboard.
•Avoidroughhandlingofanykind.
•Ateverypointintheprocess,besurenottodroporstackthesystemboard.
•Ifyouputasystemboarddown,besuretoputitonlyonapaddedsurfacesuchasanESDmatoracorrugated
conductivesurface.
Foraccess,removetheseFRUsinorder:
•“1010Batterypack”onpage56
•“1020Harddiskdriveorsolid-statedrive”onpage57
82HardwareMaintenanceManual
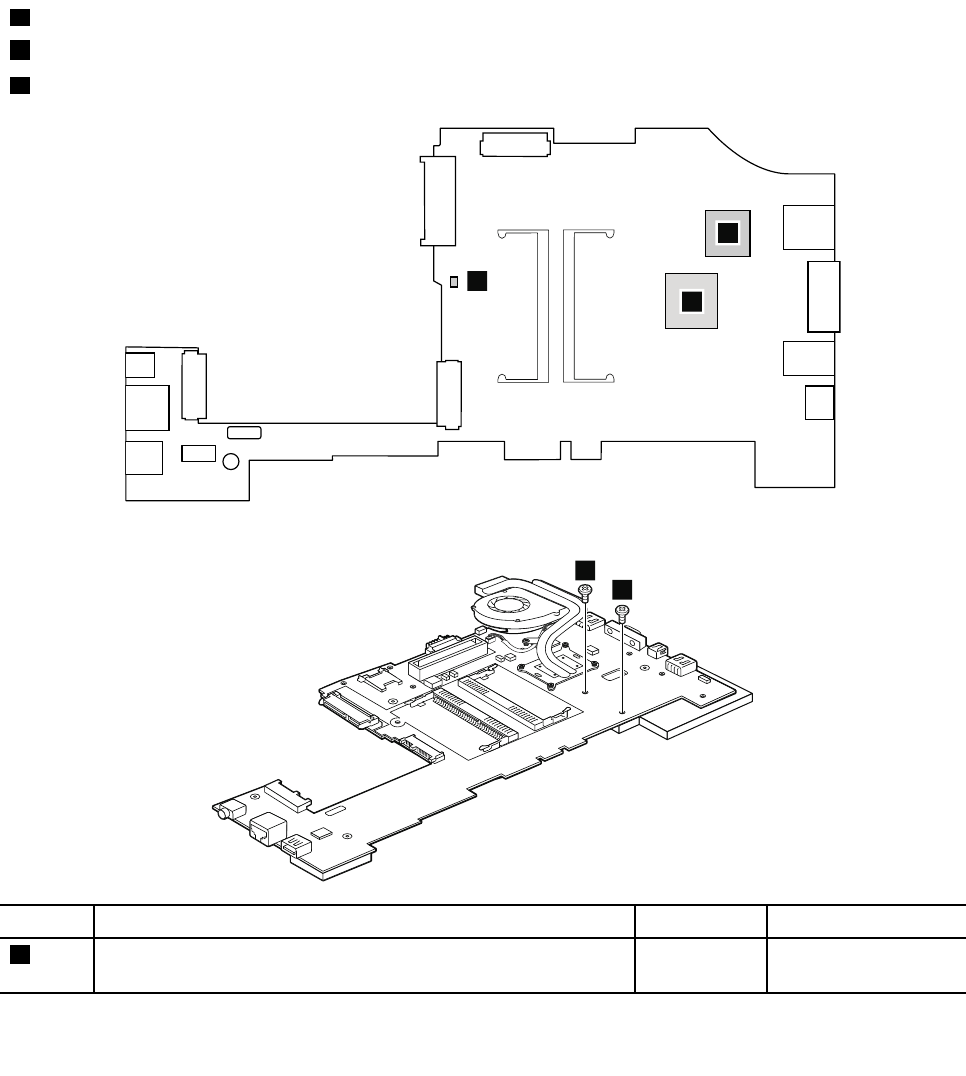
•“1030Memorymodule”onpage59
•“1040Keyboard”onpage60
•“1050Palmrest”onpage63
•“1060Backupbattery”onpage65
•“1080PCIExpressMiniCardforwirelessLAN/WiMAX”onpage68
•“1090PCIExpressMiniCardforwirelessWANormSATAsolid-statedrive”onpage70
•“1100Bluetoothdaughtercard”onpage74
•“1110Keyboardbezel”onpage75
•“1120LCDunit”onpage77
•“1130Basecoverassembly”onpage80
Attention:Thefollowingcomponentssolderedonthesystemboardareextremelysensitive.Whenyou
servicethesystemboard,avoidanykindofroughhandling.
aPlatformControllerHub(PCH)
bMicroprocessor
cAccelerometerchipfortheharddiskdriveActiveProtectionSystem™
b
c
a
Removalstepsofsystemboard,DC-inconnector,thermalfanassembly,andExpressCardslot
1
1
StepScrew(quantity)ColorTorque
1M2×3.5mm,at-head,nylon-coated(2)Silver0.181Nm
(1.85kgf-cm)
Chapter9.RemovingorreplacingaFRU83
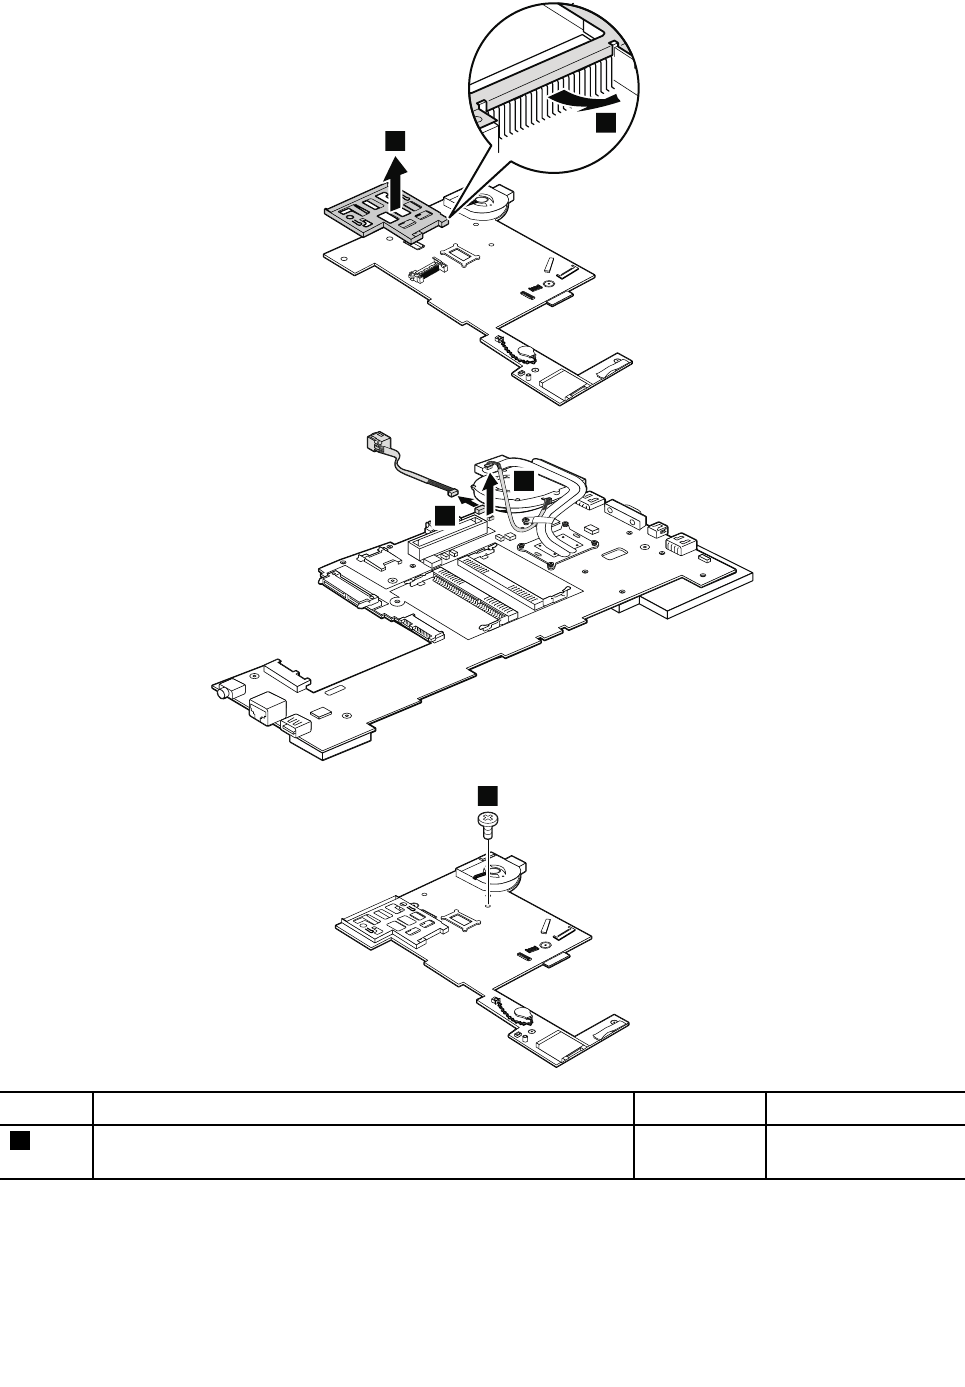
2
3
4
5
6
StepScrew(quantity)ColorTorque
6M2×3.5mm,wafer-head,nylon-coated(1)Silver0.181Nm
(1.85kgf-cm)
84HardwareMaintenanceManual
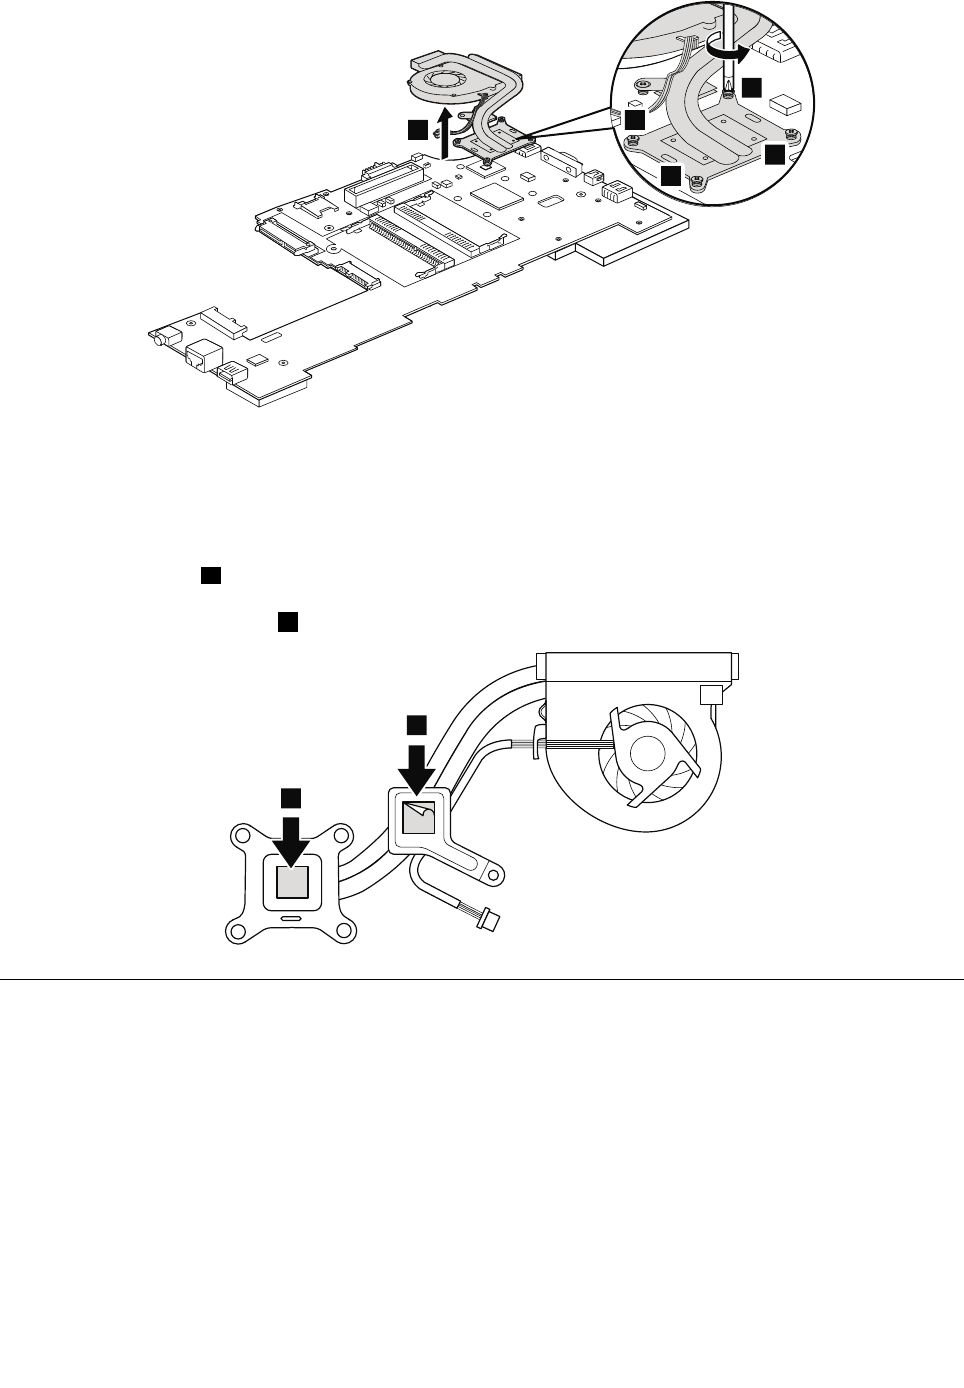
7
8
9
10
11
Wheninstalling:
•EnsurethattheDC-inconnectorandthefanconnectorareattachedtothesystemboardrmly.
•Donotpressthetopofthefancoverandthefanhub
•Beforeyouattachthefanassemblytothecomputer,applythermalgrease,atanamountof0.2grams,
onthepartmarkedaasinthefollowingillustration.Eithertoomuchortoolessapplicationofgrease
cancauseathermalfanproblemduetoimperfectcontactwithacomponent.Youneedtopeelthe
thinlmofffromtherubberb.
a
b
a
2010LCDfrontbezel
Foraccess,removethisFRU:
•“1010Batterypack”onpage56
Chapter9.RemovingorreplacingaFRU85
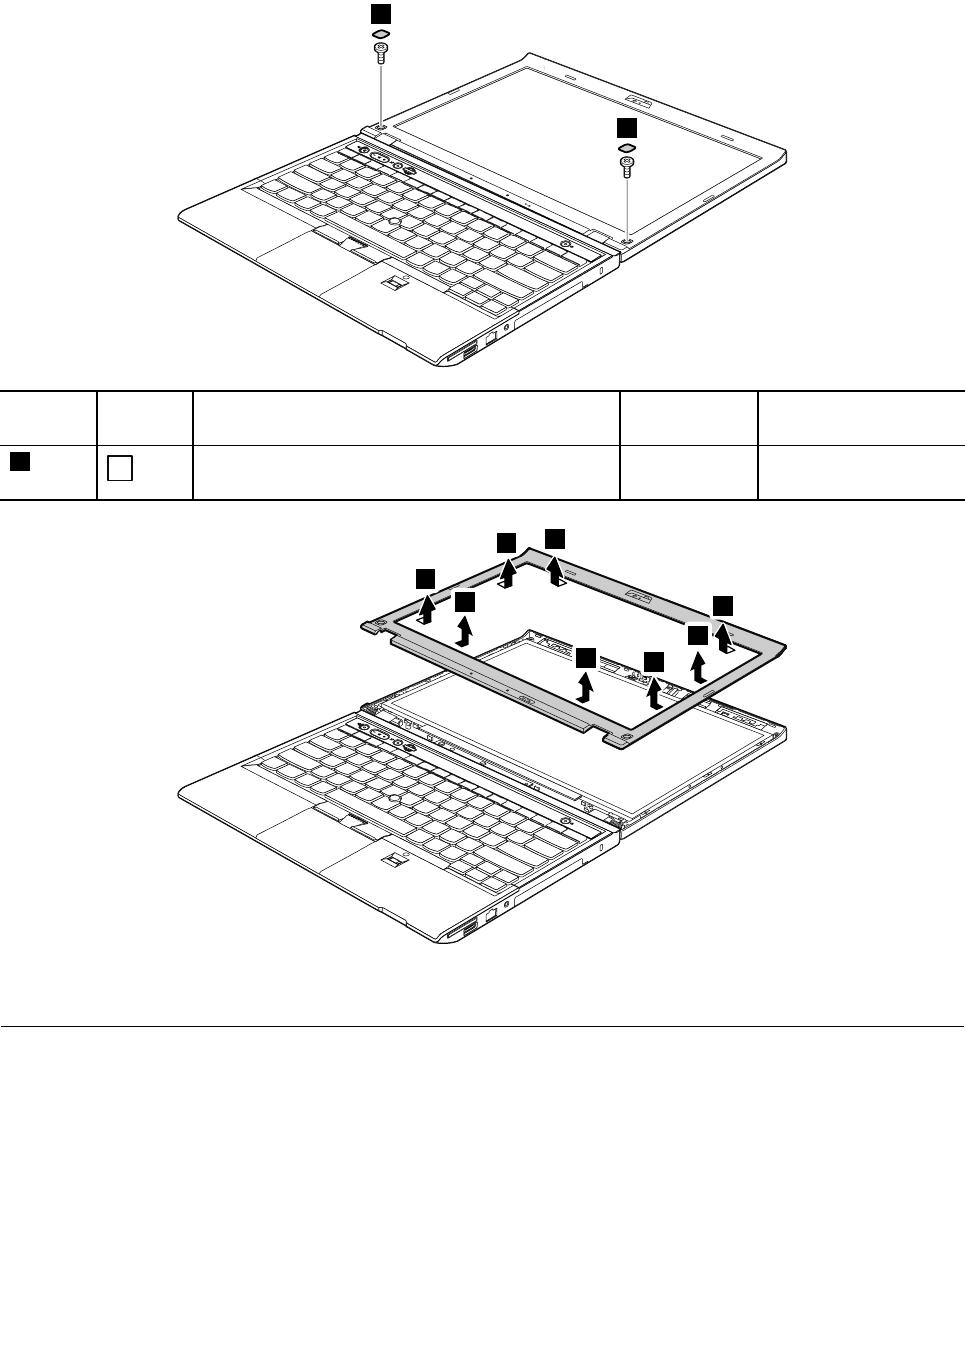
RemovalstepsofLCDfrontbezel
1
1
StepScrew
cap
Screw(quantity)ColorTorque
1M2.5×4mm,wafer-head,nylon-coated(2)Silver0.392Nm
(4kgf-cm)
2
2
2
2
2
2
2
2
Wheninstalling:Ensurethatalltheclawsareattachedrmly.
2020Integratedcamera
Foraccess,removetheseFRUsinorder:
•“1010Batterypack”onpage56
•“2010LCDfrontbezel”onpage85
86HardwareMaintenanceManual

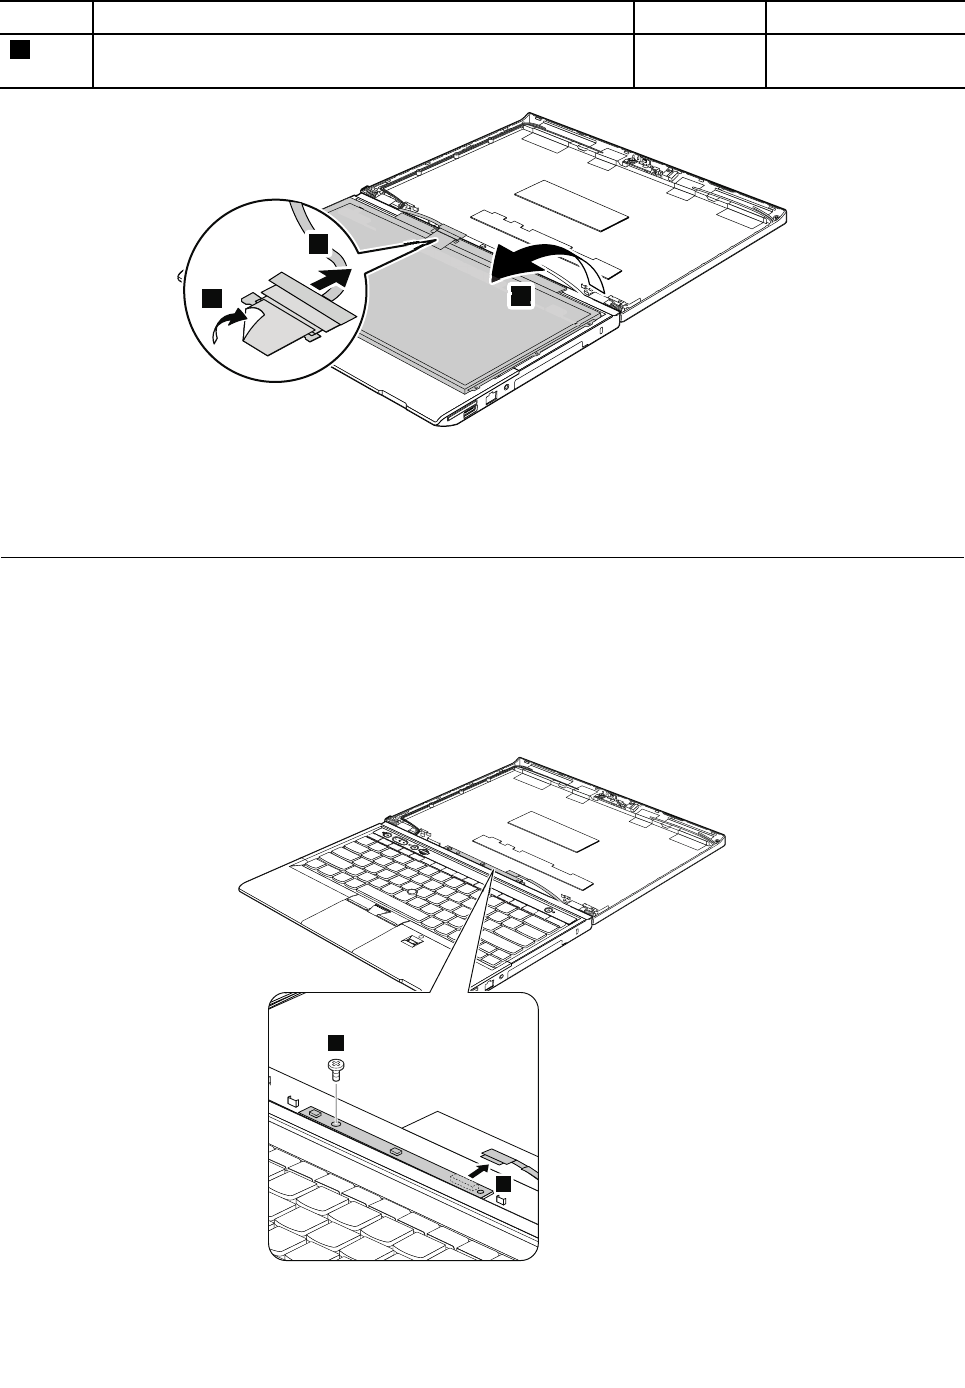
StepScrew(quantity)ColorTorque
1M2×3.5mm,wafer-head,nylon-coated(4)Silver0.181Nm
(1.85kgf-cm)
3
4
2
Wheninstalling:WhenattachingtheLCDpaneltothecover,presstheleftandrightedgescoveredwith
metalgentlywithyourngers.Donotpressthesurfaceofthepanelorapplyanyexcessiveforcetothe
panel.EnsurethattheLCDcableconnectorisattachedrmly.
2040LEDboard
Foraccess,removetheseFRUsinorder:
•“1010Batterypack”onpage56
•“2010LCDfrontbezel”onpage85
•“2060LCDcable”onpage90
RemovalstepsofLEDboard
2
1
88HardwareMaintenanceManual
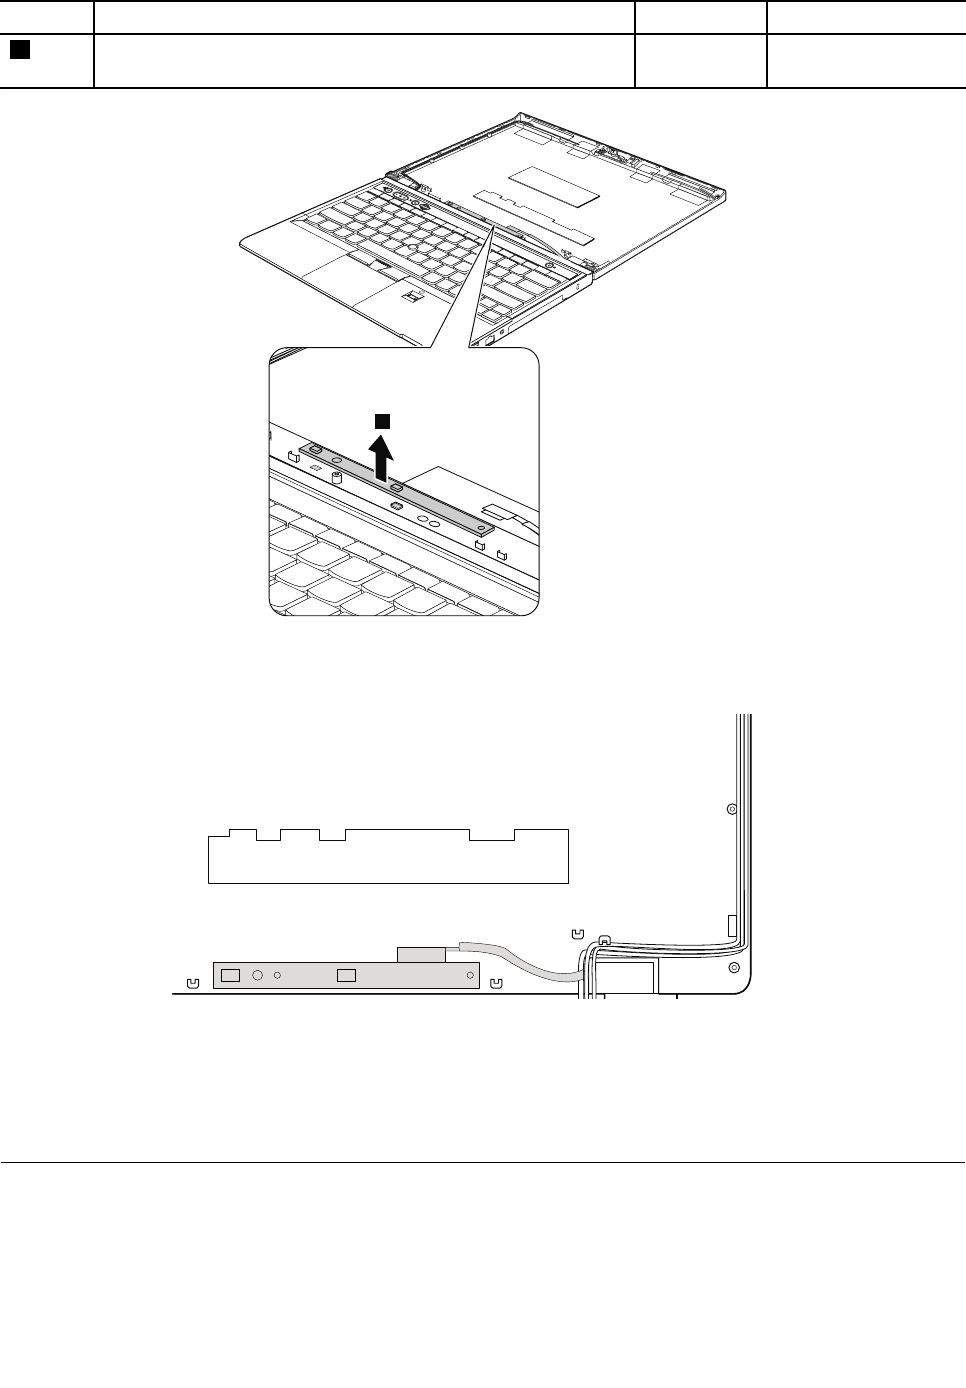
StepScrew(quantity)ColorTorque
2M2×3.5mm,wafer-head,nylon-coated(1)Silver0.181Nm
(1.85kgf-cm)
3
Wheninstalling:Ensurethatconnectorisattachedrmly.Routetheconnectorcableasinthefollowing
illustration.
2050Hinges
Foraccess,removetheseFRUsinorder:
•“1010Batterypack”onpage56
•“1040Keyboard”onpage60
•“1050Palmrest”onpage63
Chapter9.RemovingorreplacingaFRU89
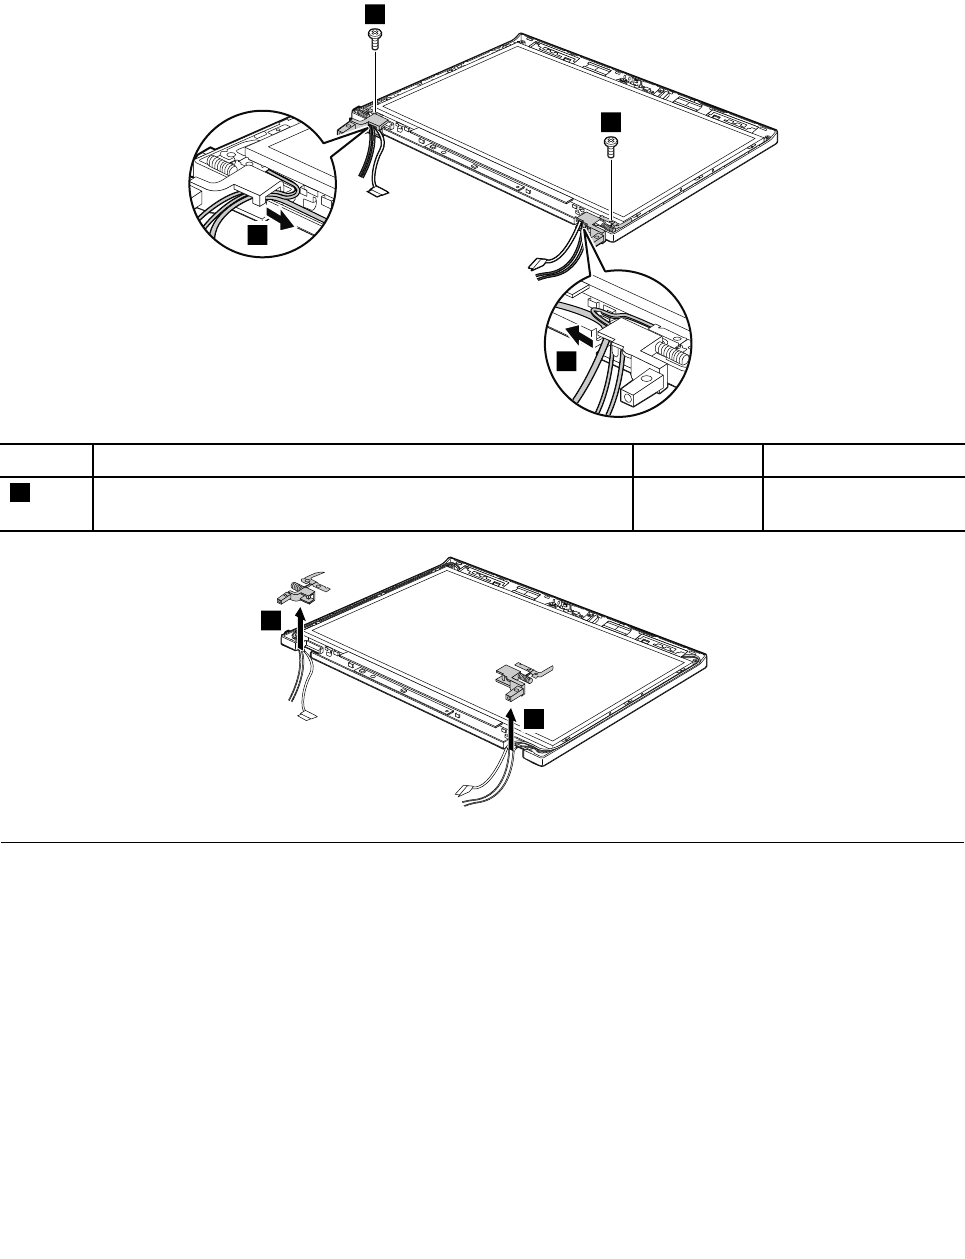
•“1110Keyboardbezel”onpage75
•“1120LCDunit”onpage77
•“2010LCDfrontbezel”onpage85
Removalstepsofhinges
1
1
2
2
StepScrew(quantity)ColorTorque
1M2x3.5mm,wafer-head,nylon-coated(2)Silver0.392Nm
(4kgf-cm)
3
3
2060LCDcable
Foraccess,removetheseFRUsinorder:
•“1010Batterypack”onpage56
•“1040Keyboard”onpage60
•“1050Palmrest”onpage63
•“1110Keyboardbezel”onpage75
•“1120LCDunit”onpage77
•“2010LCDfrontbezel”onpage85
•“2030LCDpanel”onpage87
90HardwareMaintenanceManual

RemovalstepsofLCDcable
2
1
Wheninstalling:EnsurethattheLCDcableconnectorisattachedrmly.
2070LCDrearcoverassembly,LEDandcameracable,andwireless
antennaset
Foraccess,removetheseFRUsinorder:
•“1010Batterypack”onpage56
•“1040Keyboard”onpage60
•“1050Palmrest”onpage63
•“1110Keyboardbezel”onpage75
•“1120LCDunit”onpage77
•“2010LCDfrontbezel”onpage85
•“2020Integratedcamera”onpage86
•“2040LEDboard”onpage88
•“2030LCDpanel”onpage87
•“2050Hinges”onpage89
•“2060LCDcable”onpage90
RemovalstepsofLEDandcameracable
1
Chapter9.RemovingorreplacingaFRU91
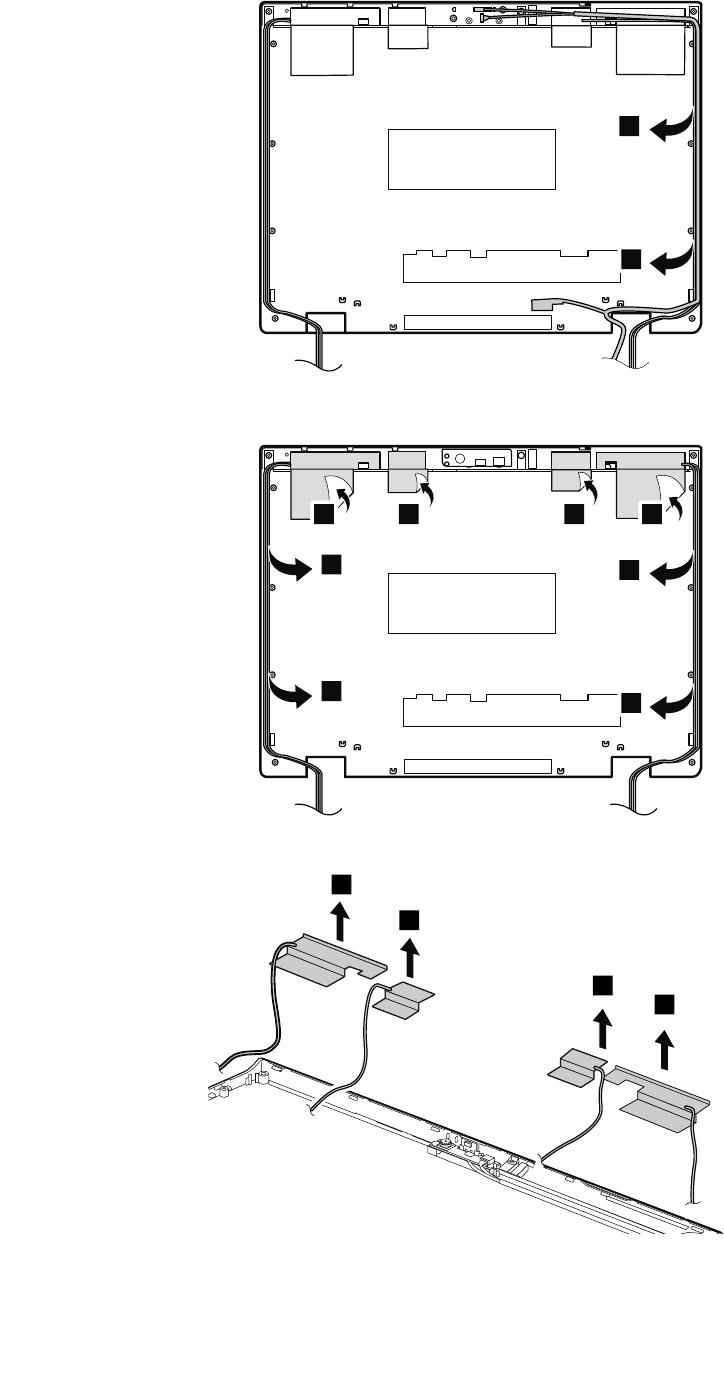
2
1
2
Removalstepsofwirelessantennaset
2
2
1 1
2
2
11
3
3
3
3
92HardwareMaintenanceManual
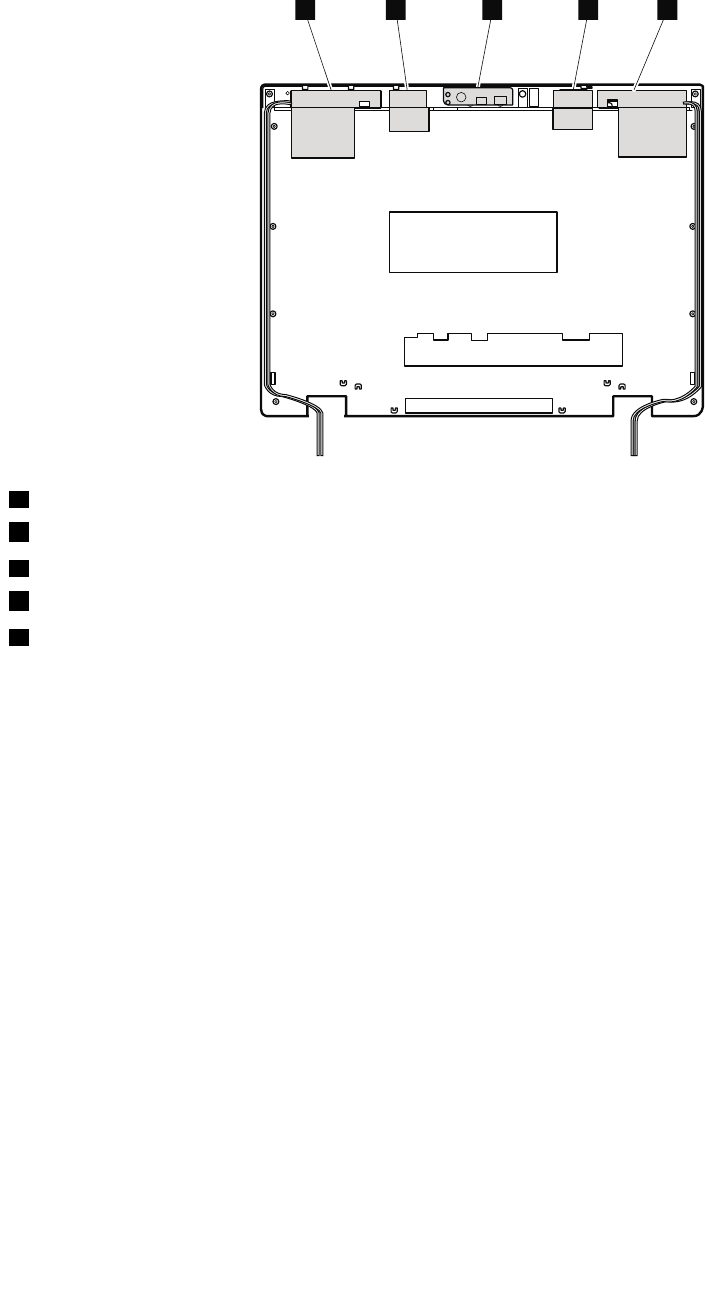
Wheninstalling:Whenyouinstallthewirelessantennaset,routethecablesasshowninthefollowing
illustration.Asyouroutethecables,ensurethattheyarenotsubjecttoanytension.Tensioncouldcausethe
cablestobedamagedbythecableguides,orawiretobebroken.
abdce
aWirelessWANantenna,AUX(blue)
bWirelessLANantenna,AUX(black)
cWirelessLANantenna,3rd(white)
dWirelessLANantenna,MAIN(gray)
eWirelessWANantenna,MAIN(red)
Chapter9.RemovingorreplacingaFRU93

94HardwareMaintenanceManual

AppendixA.Notices
Lenovomaynotoffertheproducts,services,orfeaturesdiscussedinthisdocumentinallcountries.Consult
yourlocalLenovorepresentativeforinformationontheproductsandservicescurrentlyavailableinyour
area.AnyreferencetoaLenovoproduct,program,orserviceisnotintendedtostateorimplythatonlythat
Lenovoproduct,program,orservicemaybeused.Anyfunctionallyequivalentproduct,program,orservice
thatdoesnotinfringeanyLenovointellectualpropertyrightmaybeusedinstead.However,itistheuser’s
responsibilitytoevaluateandverifytheoperationofanyotherproduct,program,orservice.
Lenovomayhavepatentsorpendingpatentapplicationscoveringsubjectmatterdescribedinthis
document.Thefurnishingofthisdocumentdoesnotgiveyouanylicensetothesepatents.Y oucansend
licenseinquiries,inwriting,to:
Lenovo(UnitedStates),Inc.
1009ThinkPlace-BuildingOne
Morrisville,NC27560
U.S.A.
Attention:LenovoDirectorofLicensing
LENOVOPROVIDESTHISPUBLICATION“ASIS”WITHOUTWARRANTYOFANYKIND,EITHEREXPRESS
ORIMPLIED,INCLUDING,BUTNOTLIMITEDTO,THEIMPLIEDWARRANTIESOFNON-INFRINGEMENT,
MERCHANTABILITYORFITNESSFORAPARTICULARPURPOSE.Somejurisdictionsdonotallow
disclaimerofexpressorimpliedwarrantiesincertaintransactions,therefore,thisstatementmaynotapply
toyou.
Thisinformationcouldincludetechnicalinaccuraciesortypographicalerrors.Changesareperiodically
madetotheinformationherein;thesechangeswillbeincorporatedinneweditionsofthepublication.
Lenovomaymakeimprovementsand/orchangesintheproduct(s)and/ortheprogram(s)describedinthis
publicationatanytimewithoutnotice.
Theproductsdescribedinthisdocumentarenotintendedforuseinimplantationorotherlifesupport
applicationswheremalfunctionmayresultininjuryordeathtopersons.Theinformationcontainedinthis
documentdoesnotaffectorchangeLenovoproductspecicationsorwarranties.Nothinginthisdocument
shalloperateasanexpressorimpliedlicenseorindemnityundertheintellectualpropertyrightsofLenovo
orthirdparties.Allinformationcontainedinthisdocumentwasobtainedinspecicenvironmentsandis
presentedasanillustration.Theresultobtainedinotheroperatingenvironmentsmayvary.
Lenovomayuseordistributeanyoftheinformationyousupplyinanywayitbelievesappropriatewithout
incurringanyobligationtoyou.
Anyreferencesinthispublicationtonon-LenovoWebsitesareprovidedforconvenienceonlyanddonotin
anymannerserveasanendorsementofthoseWebsites.ThematerialsatthoseWebsitesarenotpartof
thematerialsforthisLenovoproduct,anduseofthoseWebsitesisatyourownrisk.
Anyperformancedatacontainedhereinwasdeterminedinacontrolledenvironment.Therefore,theresult
obtainedinotheroperatingenvironmentsmayvarysignicantly.Somemeasurementsmayhavebeen
madeondevelopment-levelsystemsandthereisnoguaranteethatthesemeasurementswillbethesame
ongenerallyavailablesystems.Furthermore,somemeasurementsmayhavebeenestimatedthrough
extrapolation.Actualresultsmayvary.Usersofthisdocumentshouldverifytheapplicabledatafortheir
specicenvironment.
©CopyrightLenovo201295

Electronicemissionnotices
ForelectronicemissioninformationonClassBdigitaldevices,refertothecorrespondinginformationin
theUserGuide.
Trademarks
ThefollowingtermsaretrademarksofLenovointheUnitedStates,othercountriesorboth:
ActiveProtectionSystem
Lenovo
ThinkLight
ThinkPad
ThinkVantage
TrackPoint
Ultrabay
UltraNav
MicrosoftWindowsandWindowsServeraretrademarksofMicrosoftgroupofcompanies.
IntelisatrademarkofIntelCorporationintheU.S.and/orothercountries.
Othercompany,product,orservicenamesmaybethetrademarksorservicemarksofothers.
96HardwareMaintenanceManual

PartNumber:0B48666_01
PrintedinChina
(1P)P/N:0B48666_01
*1P0B48666_01*
