Leviton RZC04 In Wall Controller User Manual
Leviton Manufacturing Co., Inc. In Wall Controller
Leviton >
User Manual

PRELIMINARY
NOTES:
• Ifusinganon-LevitonProgrammer/Remote,refertothe
Programmer/Remoteinstructionsheet.
• 4-ScenecontrollersincudedintoaZ-Wave®networkmustbe
updatedafteryouhaveincludedallotherdevices.
• IfusingtheVRCPGInstallChecklistfeature,gotostepC.
A) IfusingaLevitonZ-Wave®Programmer/Remote,Cat.No.VRCPG,
presstheMenubuttonandscrolldowntoSystemSetup.Press
thecenterbuttontoselectSystemSetupMenu.ChooseAdvanced
Settings.PressthecenterbuttontoselectNetwork.Pressthecenter
buttonto<IncludeNode>.
B) IfusingVRCPGProgrammer/Remote,youwillbepromptedtoplace
4-Scenecontrollerintoprogrammingmode.
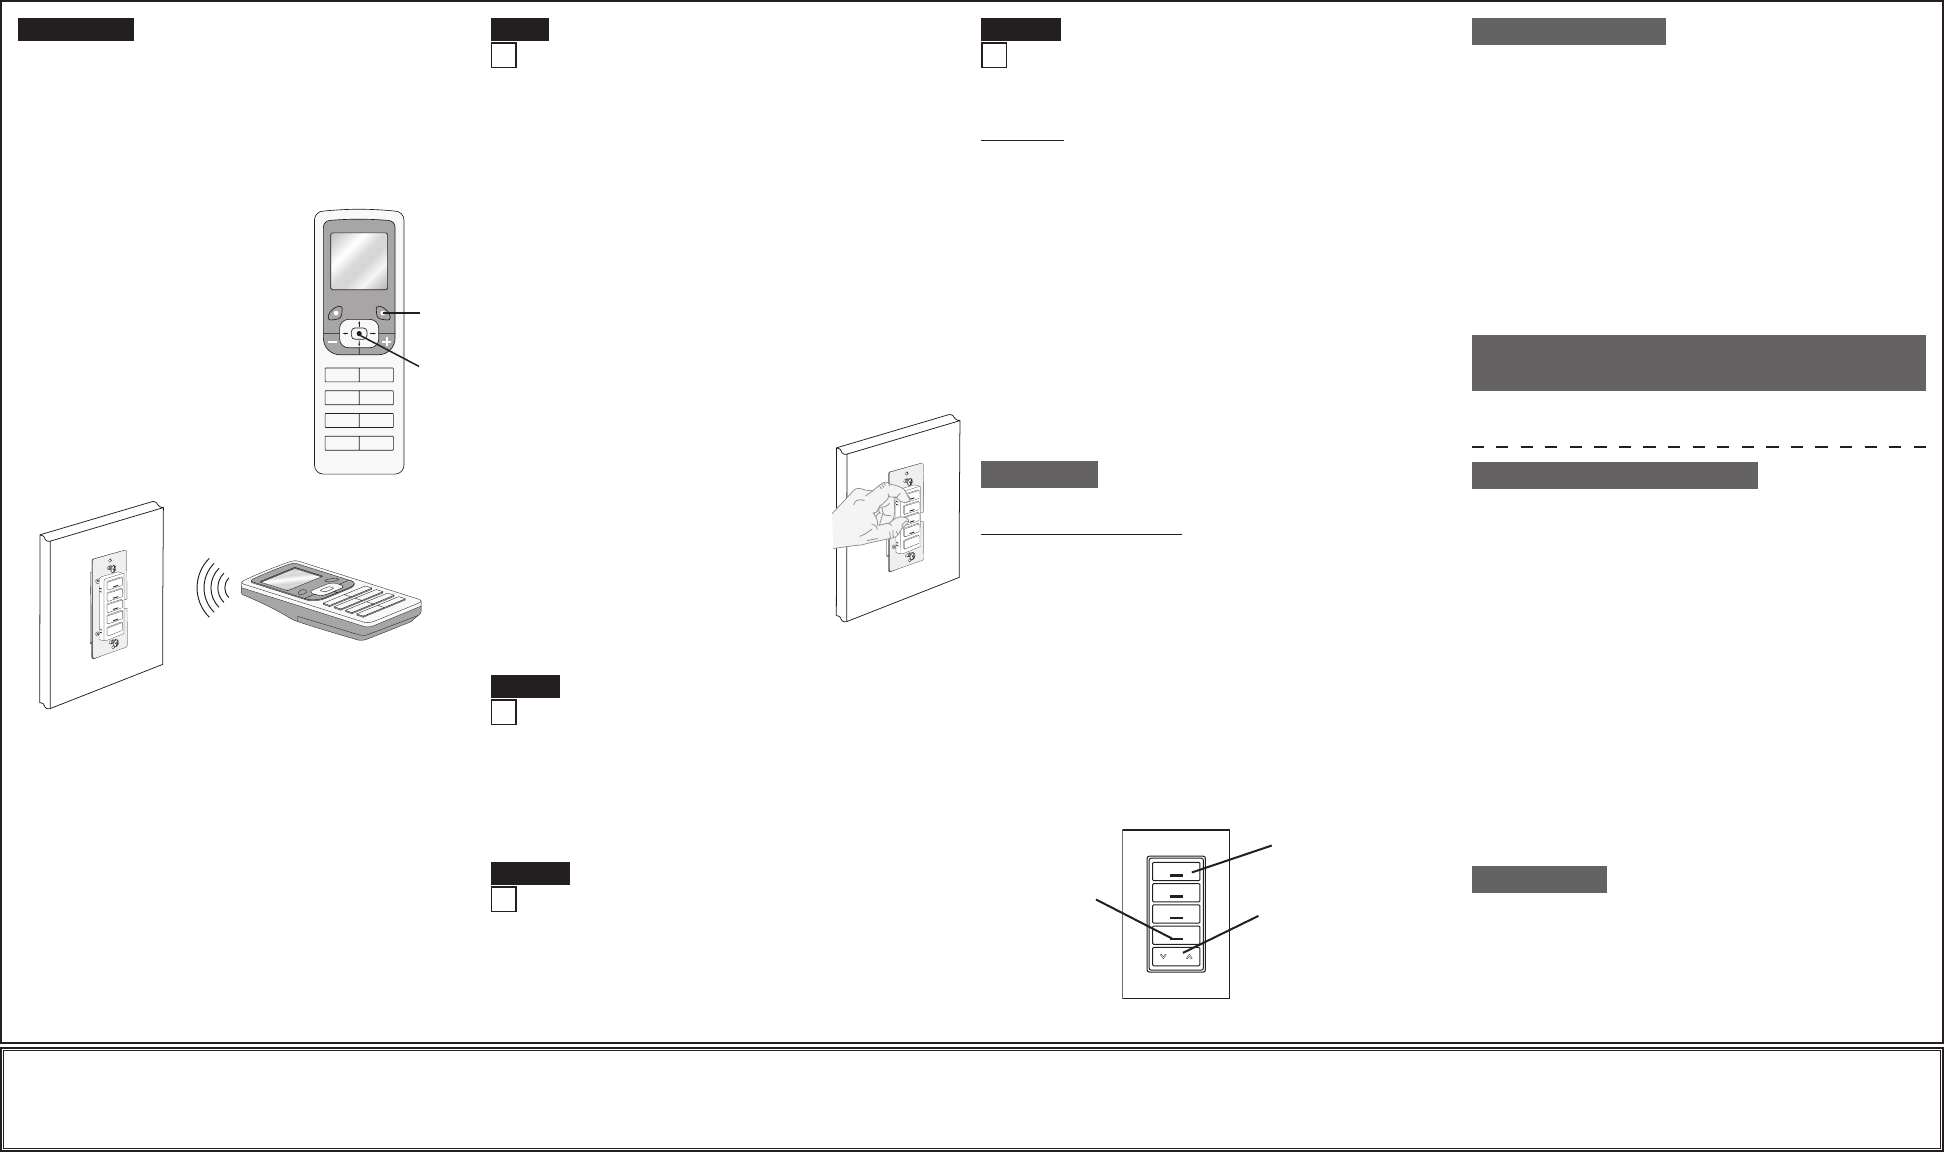
C) ToaccessProgrammode,pressandhold
buttons1and3(refer to figure).Wait
5secondsuntiltheLEDturnsAmber.
ReleasethebuttonsandtheLEDwillblink
Amber.YouarenowinProgrammingmode.
NOTE:IftheLEDonthe4-scenecontroller
turnssolidRedwhileincluding,therehas
beenacommunicationerror.
D) Whilestandingclosetothe4-Scene
controller(approximately1ft.),pressthe
centerbuttonontheProgrammer/Remote
to<Include>deviceinthenetwork.
NOTE:IftheLEDonthe4-scenecontroller
turnssolidRedwhileincluding,therehas
beenacommunicationerror.
NOTE:Onlyonedevicemaybeincludedatanytime.
E) ThePrimaryProgrammer/RemotewillassignaHomeID,NodeID,
andNameforthisdevice.
NOTE:ThisinformationwillbestoredintheProgrammer/Remoteto
beusedforfuturereference.
NOTE:Youmaynameoredityourdeviceatthistime.
F)The 4-Scene controller is now installed in the network.
WARNINGS AND CAUTIONS:
• ON/OFFLEDforremoteloadstatus.
• Tobeinstalledand/orusedinaccordancewithappropriateelectricalcodesandregulations.
• Ifyouareunsureaboutanypartoftheseinstructions,consultaqualiedelectrician.
• ViziaRF+TMVRCS4controllerdoesnotcontroltheload,butprovidessceneapplicationstooperatewithViziaRF+TMdimmers/switches.
• Recommendedminimumwallboxdepthis2-1/2".
WARNINGS AND CAUTIONS:
• Cancallupfour(4)sceneON/OFFwithadvancedProgrammingRemote(seeVRCPG).
• Foracompleteset-up,acontrollersupportingtheadvancedZ-Wave®scenefeaturesisneeded,suchastheadvancedProgrammingRemote(VRCPG).
• Disconnectpoweratcircuitbreakerorfusewhenservicing,installingorremovingxture.
• Usethisdeviceonlywithcopperorcoppercladwire.WithaluminumwireuseonlydevicesmarkedCO/ALRorCU/AL.
4-Scene Controller
Cat.No.VRCS4-1L
120VAC,60Hz
INSTALLATION INSTRUCTIONS
DI-000-VRCS4-02B-X0
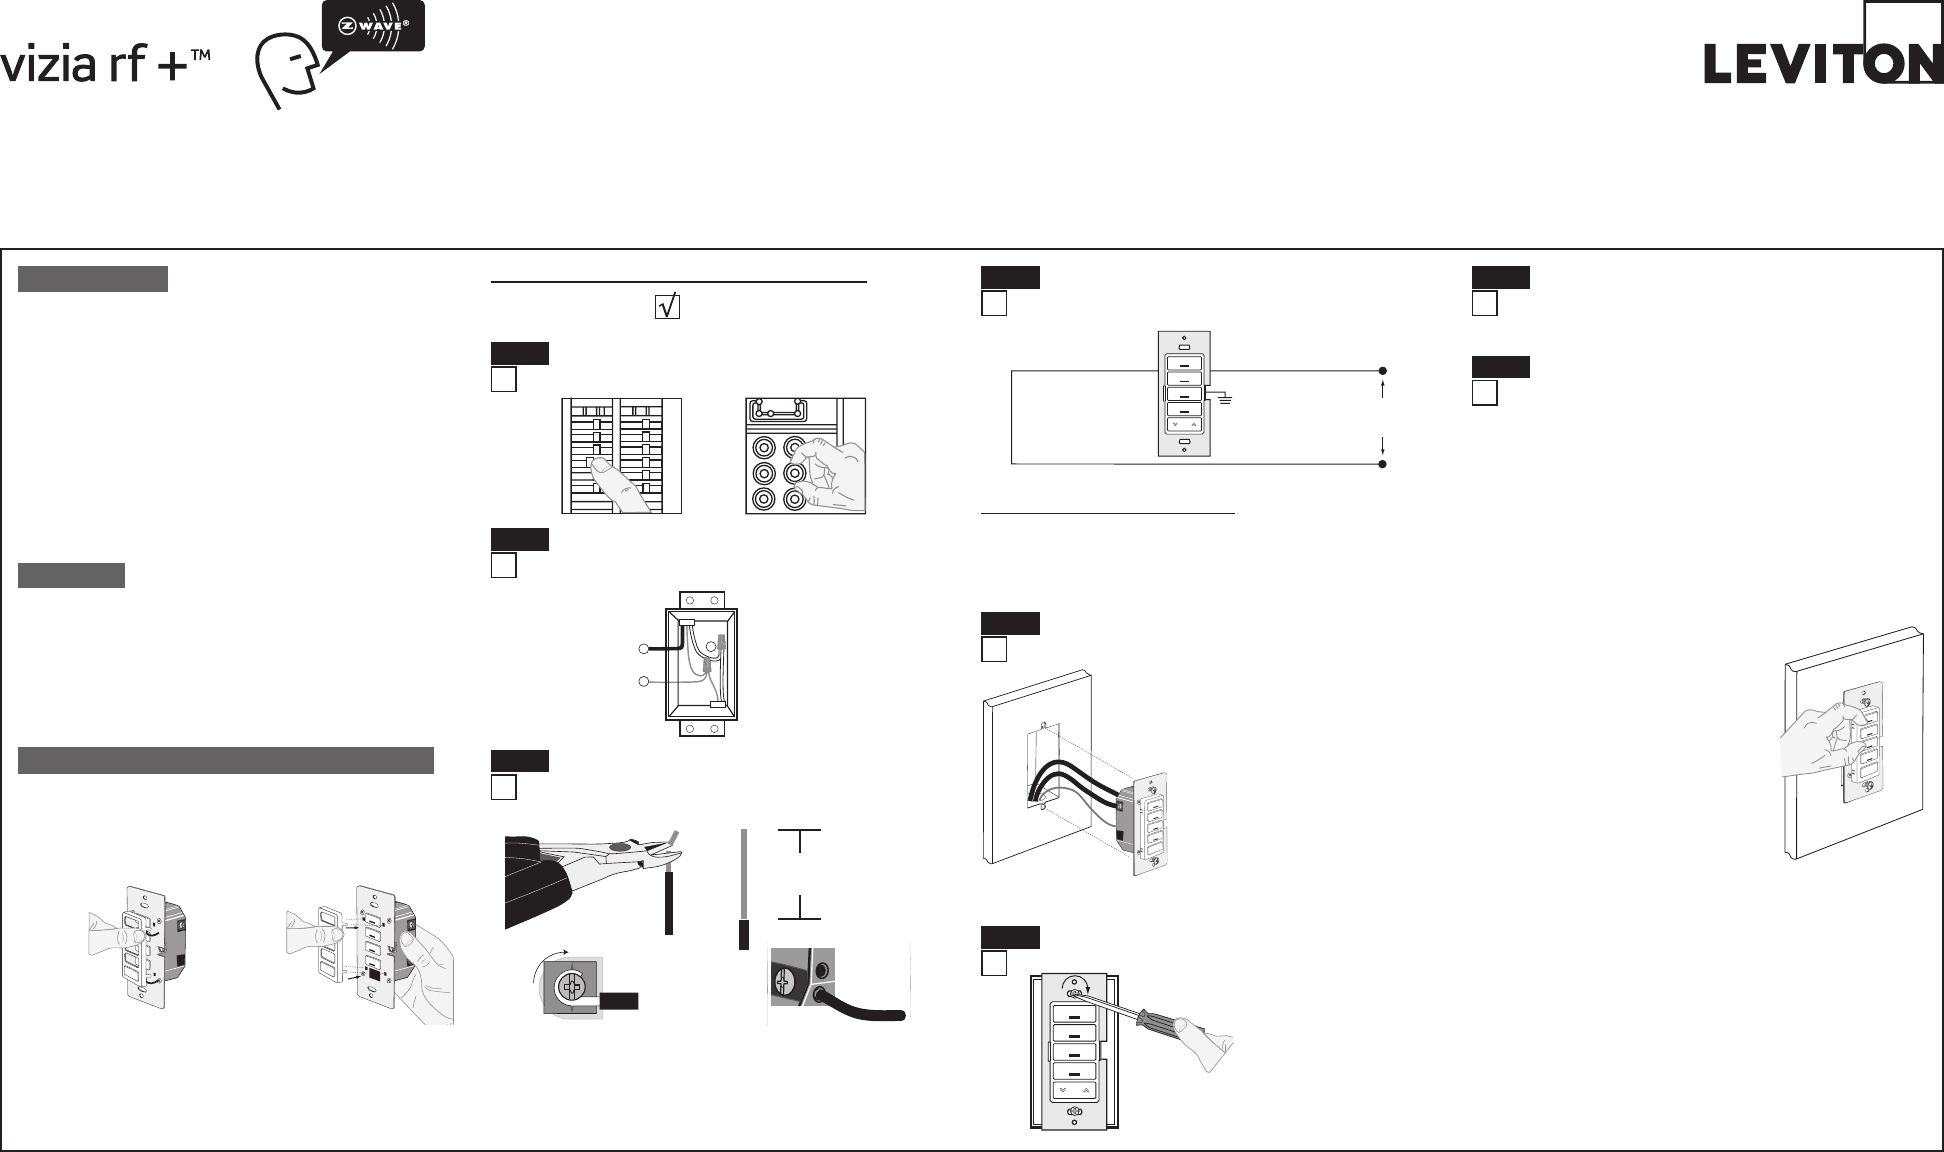
Tools needed to install your 4-Scene Controller
Slotted/PhillipsScrewdriver ElectricalTape Pliers
Pencil Cutters Ruler
ONOFF
ONOFF
ONOFF
ONOFF
ONOFF
ONOFF
ONOFFONOFF
ONOFF
ONOFF
ONOFF
ONOFF
WARNING: TO AVOID FIRE, SHOCK OR DEATH; TURN
OFF POWER atcircuitbreakerorfuseandtestthatpowerisoff
beforewiring!
Step 1
Step 3 Preparing and connecting wires:
This4-Scenecontrollercanbewiredusingsidewireterminal
screwsorthroughbackwireopenings.Chooseappropriatewire
strippingspecicationsaccordingly.
• Makesurethattheendsofthewiresfromthewallboxare
straight (cut if necessary).
5/8"
(1.6 cm) Strip Gage
(measure bare
wire here)
Cut
(if necessary)
Back Wire (either hole may be used)
Backwireopeningsuse#14-12AWG
solid wire copper only.
Side Wire Connection
Sidewireterminalsaccept
#14AWGsolid wire copper only.
WIRING 4-SCENE CONTROLLER:
Connect wires per WIRING DIAGRAM as follows:
• GreenorbarecopperwireinwallboxtoGreenterminalscrew.
• LineHotwallboxwiretoterminalscrewmarked"BK".
• LineNeutralwallboxwiretoterminalscrewmarked"WH".
Wiring Application:
Hot (Blac k)
Neutral (White)
Line
120V AC , 60Hz
BK WH
Green
Gr ound
4-Scene Contr oller
Step 4
2
3
1
1.Line(Hot)
2.Neutral
3.Ground
Identifying your wiring application (most common):
NOTE:Ifthewiringinyourwallboxdoesnotresemblethis
conguration,consultaqualiedelectrician.
Step 2
INTRODUCTION
Leviton’sViziaRF+TMcomponentsaredesignedtocommunicate
witheachotherviaRadioFrequency(RF)toprovideremotecontrol
ofyourlighting.UsingRFtechnologyallowsLevitontoprovidethe
greatestsignalintegritypossible.EachmoduleinLeviton’sViziaRF+TM
componentlineisaZ-Wave®enableddevice.InaZ-Wave®network,
eachdeviceisdesignedtoactasarouter.Theserouterswillre-transmit
theRFsignalfromonedevicetoanotheruntiltheintendeddevice
isreached.Thisensuresthatthesignalisreceivedbyitsintended
devicebyroutingthesignalaroundobstaclesandradiodeadspots.
This4-SceneControllerismeanttocontrolspecialsceneenabled
Z-Wave®products.Tocontrolgroupsofdevicesthataremixedordo
notsupportscenecommandclassusetheLeviton4-ZoneController
(VRCZ4).Settingupthisdevicerequiresspecicadvancedcontroller
functionalities,yourcontrollermustbeabletoassociatedevicetogroups
andmustbeabletocontrolthescenecontrollercongurationcommands
suchastheadvancedProgrammingRemote(VRCPG).
• ThisisaZ-Wave®Controller
• Scenecontrolwithouttravelerwires
• Cancall4scenes
• ON/OFFLED
• Twowaycommunication
• RFreliability
• Easeofinstallation–Nonewwiring
• CompatiblewithotherZ-Wave®enableddevices
FEATURES
Step 8 Including 4-Scene Controller into Z-Wave®
Network:
Changing the color of your 4-Scene Controller:
Your4-Scenecontrollerincludesthreecoloroptions.Thecontrollerships
withtheWhiteframeattached.Tochangecolorofframe,proceedas
follows:
Line up tabs
and press in
side to attach
Push in
side at tab
to release
Afterframeisremoved,removeexistingpushbuttonsandreplacethem
withdesiredcolorchangepushbuttons.TochangetheDIM/BRIGHT
button,beforemountingframe,pressoutDIM/BRIGHTbutton(bottom)
frombackofframeandpressinfromfrontofframenewDIM/BRIGHT
button.TomakeIRcapable,replacewithaDIM/BRIGHTbuttonthathas
theIRwindow.
INSTALLING YOUR 4-SCENE CONTROLLER
NOTE:UsecheckboxeswhenStepsarecompleted.
• Positionallwirestoprovideroomin
outletwallboxfordevice.
• Ensurethattheword“TOP”isfacingup
ondevicestrap.
• Partiallyscrewinmountingscrewsin
wallboxmountingholes.
NOTE:Dresswireswithabendas
shownindiagraminordertorelieve
stresswhenmountingdevice.
• Restorepoweratcircuitbreakerorfuse.
• LEDshouldturnON.
If LED does not turn ON, refer to the
TROUBLESHOOTING section.
Testing your 4-Scene Controller prior to
mounting in wall box:
Step 5
Bl
Restore Power:
Restorepoweratcircuitbreakerorfuse.
Installation is complete.
Installationmaynowbecompletedby
tighteningmountingscrewsintowallbox.
Attachwallplate.
4-Scene Controller Mounting:
TURN OFF POWER AT CIRCUIT BREAKER OR FUSE.
Step 6
Step 7

PRELIMINARY
Including 4-Scene Controller into
Z-Wave® Network:
A) IfusingaLevitonZ-Wave®Programmer/Remote,Cat.No.VRCPG,
presstheMenubuttonandscrolldowntoSystemSetup.Press
thecenterbuttontoselectSystemSetupMenu.ChooseAdvanced
Settings.PressthecenterbuttontoselectNetwork.Scrolldownto
<ExcludeNode>andpressthecenterbutton.
B) IfusingVRCPGProgrammer/Remote,youwillbepromptedtoplace
4-Scenecontrollerintoprogrammingmode.
C) ToaccessProgrammode,pressandholdbuttons1and3(refer to
figure).Wait5secondsuntiltheLEDturnsAmber.Releasethebuttons
andtheLEDwillblinkAmber.YouarenowinProgrammingmode.
NOTE:IftheLEDonthe4-ScenecontrollerturnssolidRedwhile
excluding,therehasbeenacommunicationerror.
D) Whilestandingclosetothe4-Scenecontroller(approximately1ft.),
pressthecenterbuttonontheProgrammer/Remoteto<Exclude>
devicefromthenetwork.
Factory Default:
Ifyour4-Scenecontrollerisnotresponding,oryouareunabletocontrolit
afteryouhavetriedtoInclude/Excludeitmultipletimes,itmaybenecessary
toresetthe4-Scenecontrollertoitsoriginalfactorysettings.Toaccomplish
this,proceedasfollows:
• Onthe4-Scenecontroller(refer to figure),press
andholdbuttons1and3.Waitapproximately5
secondsuntiltheLEDturnsAmberandthenturns
solidRed.Releasethebuttons.The4-Scene
controllerisnowreset.Oncethecontrolleris
reset,itwillbenecessarytoRe-Includeittoa
networkbeforeitcanbeused.
CAUTION:SETTINGADEVICETOAFACTORY
DEFAULTDOESNOTEXCLUDETHATDEVICE
FROMANETWORK.THEEXCLUSION
PROCEDUREMUSTSTILLBEFOLLOWEDTO
REMOVETHEDEVICEFROMTHEPRIMARY
CONTROLLER’SINFORMATIONTABLE.FAILURE
TODOSOMAYRESULTINSYSTEMTHATIS
SLOWTORESPOND,ORMAYFAILTORESPONDTOSOMEDEVICES.
DI-000-VRCS4-02B-X0
LIMITED 5 YEAR WARRANTY AND EXCLUSIONS
LevitonwarrantstotheoriginalconsumerpurchaserandnotforthebenetofanyoneelsethatthisproductatthetimeofitssalebyLevitonisfreeofdefectsinmaterialsandworkmanshipundernormalandproperuseforveyearsfromthepurchasedate.Leviton’sonlyobligationistocorrectsuchdefectsbyrepairorreplacement,
atitsoption,ifwithinsuchveyearperiodtheproductisreturnedprepaid,withproofofpurchasedate,andadescriptionoftheproblemtoLeviton Manufacturing Co., Inc., Att: Quality Assurance Department, 59-25 Little Neck Parkway, Little Neck, New York 11362-2591.Thiswarrantyexcludesandthereisdisclaimedliability
forlaborforremovalofthisproductorreinstallation.Thiswarrantyisvoidifthisproductisinstalledimproperlyorinanimproperenvironment,overloaded,misused,opened,abused,oralteredinanymanner,orisnotusedundernormaloperatingconditionsornotinaccordancewithanylabelsorinstructions.There are no other or
implied warranties of any kind, including merchantability and fitness for a particular purpose,butifanyimpliedwarrantyisrequiredbytheapplicablejurisdiction,thedurationofanysuchimpliedwarranty,includingmerchantabilityandtnessforaparticularpurpose,islimitedtoveyears.Leviton is not liable for incidental,
indirect, special, or consequential damages, including without limitation, damage to, or loss of use of, any equipment, lost sales or profits or delay or failure to perform this warranty obligation.Theremediesprovidedhereinaretheexclusiveremediesunderthiswarranty,whetherbasedoncontract,tortorotherwise.
Step 8 cont'd Step 9 Excluding 4-Scene Controller from
Z-Wave® Network:
For additional information, contact Leviton’s
Techline at 1-800-824-3005 or visit Leviton’s
website at www.ViziaRF+.com
ProtectedunderU.S.PatentNumber6,388,399andpatentspending
andlicensedunderU.S.PatentsNumbers5,905,442,and5,982,103
ThisdevicecomplieswithPart15oftheFCCRules.Operationissubject
tofollowingtwoconditions:(1)thisdevicemaynotcauseharmful
interference,and(2)thisdevicemustacceptanyinterference,including
interferencethatmaycauseundesiredoperationofthedevice.
Thisequipmenthasbeentestedandfoundtocomplywiththelimitsfor
aClassBDigitalDevice,pursuanttoPart15oftheFCCRules.These
limitsaredesignedtoprovidereasonableprotectionagainstharmful
interferenceinaresidentialinstallation.Thisequipmentgenerates,uses,
andcanradiateradiofrequencyenergyand,ifnotinstalledandusedin
accordancewiththeinstructions,maycauseharmfulinterferencetoradio
communications.However,thereisnoguaranteethatinterferencewill
notoccurinaparticularinstallation.Ifthisequipmentdoescauseharmful
interferencetoradioortelevisionreception,whichcanbedetermined
byturningtheequipmentOFFandON,theuserisencouragedtotryto
correcttheinterferencebyoneormoreofthefollowingmeasures:
• ReorientorrelocatethereceivingAntenna.
• Increasetheseparationbetweentheequipmentandthereceiver.
• Connecttheequipmentintoanoutletonacircuitdifferentfromthatto
whichthereceiverisconnected.
• Consultthedealeroranexperiencedradio/tvtechnicianforhelp.
FCC COMPLIANCE STATEMENT
Scene Application:
Push Button (Default settings)
Turn ON from OFF position:
Press–Sceneisactivated,SceneLEDturnsON.
LEDwillblinkuntilSceneisreached.
Turn OFF from ON position:
Press–TurnsalllightsinsceneOFF,SceneLEDturnsOFF.
DIM/BRIGHT:
PressleftsideofDim/Brightbutton–LightsinlastactivatedScenewilldim.
PressrightsideofDim/Brightbutton–LightsinlastactivatedScenewill
brighten.
NOTE:ControllerwillonlyDim/Brightdeviceslocatedwithindirectradio
frequencyrange.
NOTE:LEDwillbelitonlywhenalllightsinscenehavereachedtheirpreset
level.Ifthereisamanualchangetoanylightinthescene,theLEDwillturn
OFFindicatingthatyouarenolongerinthatscene.
OPERATION
TROUBLESHOOTING
• LocatorLEDoncontrollerdoesnotturnON
- Circuitbreakerorfusehastripped.
- If4-ScenecontrollerispoweredupandLEDdoesnotturnON,
checkwiring.
• SceneControllerdoesnotoperatelights
-Checkassociation.
-Ensurethatcontrollerwasproperlyupdated.
• LEDturnssolidRed
-Checkassociation.
-Ensurethateachdeviceinthenetworkiswithin70ft.(21m)of
anotherdevice.
• SceneControllerdoesnotoperatelights
-Checkassociation.
-Ensurecontrollerwasproperlyupdated.
- Re-congurethecontrollerbuttontooperateusingthe
AREAON/OFFaction(refertoVRCPGdocumentation).
Step 10
After inclusion process, you must associate the devices to
the controllers. Refer to the Primary Programmer/Remote
instruction sheet for complete details.
NOTE:Thissteprequiresacontrollerthatcancreateassociationliststo
specicgroups1-4.
NOTE:One(1)Z-Wave®devicecanbeassociatedtomultiplecontrollers
(uptove(5)controllersmaximum).
NOTE:Ifusinganon-LevitonProgrammer/Remote,refertothe
Programmer/Remoteinstructionsheetforassociatingadevice.
Device Association:
Programmer/Remote
Cat. No. VRCPG
NOTE:Programmer/Remotemustbe
incloseproximityto4-Scenecontroller
whenincludinginthenetwork.
LED
Push
Button
Dim/Bright
Button
G) Afteralldevicesareincludedintothenetwork,thecontrollermust
beupdatedtoallowpropernetworkfunction.Toupdatecontroller
proceedasfollows:
• Ifusinganon-LevitonProgrammer/Remote,refertothe
Programmer/Remoteinstructionsheetforupdatingcontroller.
• IfusingLevitonZ-Wave®Programmer/Remote,Cat.No.VRCPG,
presstheMenubuttonandscroll
downtoSystemSetup.Pressthe
centerbuttontoselectSystemSetup
Menu.ChooseAdvancedSettings.
Pressthecenterbuttontoselect
Network.Pressthecenterbutton
toselectUpdate"cntrl".When
prompted,pressdesiredbuttonon
4-Scenecontroller.
• WaituntiltheVRCPGProgrammer/
Remoteconrmscompletion.Update
isdone.
NOTE:Ifthe4-Scenecontrollerhas
beensuccessfullyIncludedinthe
networkandtheusertriestoInclude
itagainwithoutrstexcludingitfromthe
network,thecontrollerwillretaintherst
nodeIDithadreceivedandignorethe
second.
Cat. No. VRCPG
1 ON
2 ON
3 ON
4 ON
OFF
OFF
OFF
OFF
Menu
Button
Center
Button
Scene Programming:
NOTE: Alldevicesassociatedtothebuttonsmustsupport
Z-Wave®scenecommand.Ifadeviceinthegroupdoesnot
supportthescenecommanditwillnotbecontrolled.
• Pressandholddesiredscenebuttonon4-SceneController
untilLEDblinksGreen.
• Adjustdevicesassociatedtothebutton.
• Pressbuttonagainon4-SceneControllerandtheLEDwill
stopblinking.
• Thescenehasnowbeenset.
Step 11a
Step 11b Mixed group or device that does not support
scene:
NOTE: Thissteprequiresa4-ZoneControllerorZ-Wave®
ControllerthatsupportsZ-Wave®scenecontrollerconguration
commands.
AREA ON/OFF Application:
Push Button
Turn ON from OFF position:
Pressbutton–TurnsalllightsinZone/AreaON,LEDturnsON.
LEDwillblinkuntilZone/AreaisON.
Turn OFF from ON position:
Pressbutton–TurnsalllightsinZone/AreaOFF,LEDturnsOFF.
DIM/BRIGHT:
PressleftsideofDim/Brightbutton-LightsinlastactivatedZone/Areawill
dim.
PressrightsideofDim/Brightbutton-LightsinlastactivatedZone/Areawill
brighten.
NOTE:ControllerwillonlyDim/BrightdeviceslocatedwithindirectRadio
Frequencyrange.
NOTE:LEDwillbelitGreenifanyoneloadintheassociatedAreaisON.
LEDwillbeOFFwhenallloadsareturnedOFF.
Ifthereisapoweroutage,whenthepowerisrestored,thelightswillreturn
tothelastsettingbeforethepowerinterruption.
Cleaning:Cleanwithadampcloth.DO NOTusechemicalcleaners.
AnychangesormodicationsnotexpresslyapprovedbyLeviton
ManufacturingCo.,Inc.,couldvoidtheuser'sauthoritytooperatethe
equipment.
FCC CAUTION