Lexmark 4061-RF1 RFID UHF Option User Manual Setup Guide
Lexmark International Inc RFID UHF Option Setup Guide
Lexmark >
Users Manual


Safety information
Refer service or repairs, other than those described in the user documentation, to a professional service person.
CAUTION—SHOCK HAZARD: Make sure that all external connections (such as Ethernet and telephone system connections) are properly
installed in their marked plug-in ports.
CAUTION—POTENTIAL INJURY: Use of controls or adjustments or performance of procedures other than those specified herein may result
in hazardous radiation exposure.
This product is designed, tested, and approved to meet strict global safety standards with the use of specific Lexmark components. The safety
features of some parts may not always be obvious. Lexmark is not responsible for the use of other replacement parts.
Lexmark Confidential until announced

Contents
Safety information.............................................................................2
Setting up the RFID UHF option ......................................................5
Checking the box contents................................................................................................................................................5
Accessing the system board to install internal options...........................................................................................6
Installing flash memory and firmware cards................................................................................................................7
Installing an interface card.................................................................................................................................................8
Replacing the system board cover..................................................................................................................................9
Installing the RFID UHF option.......................................................................................................................................10
Connecting the RFID cable..............................................................................................................................................11
Installing the fuser wiper..................................................................................................................................................12
Choosing output and input devices.............................................14
Choosing an output device.............................................................................................................................................14
Choosing an input device.................................................................................................................................................14
Preparing to print............................................................................15
Loading RFID labels............................................................................................................................................................15
Printing...............................................................................................17
Identifying rejected labels................................................................................................................................................17
Understanding the RFID menu......................................................18
Configuring RFID-specific settings................................................................................................................................18
Understanding RFID printer messages........................................20
RFID error messages...........................................................................................................................................................20
RFID service messages.......................................................................................................................................................21
Notices................................................................................................22
Product information...........................................................................................................................................................22
Edition notice........................................................................................................................................................................22
Index...................................................................................................27
Lexmark Confidential until announced
Contents
3
Lexmark Confidential until announced
4
Setting up the RFID UHF option
Checking the box contents
Notes:
•You must have a 250- or 500-sheet drawer installed on the printer to load RFID labels and print tags.
•This option works with all LexmarkTM T64x series printers, except the Lexmark T640rn.
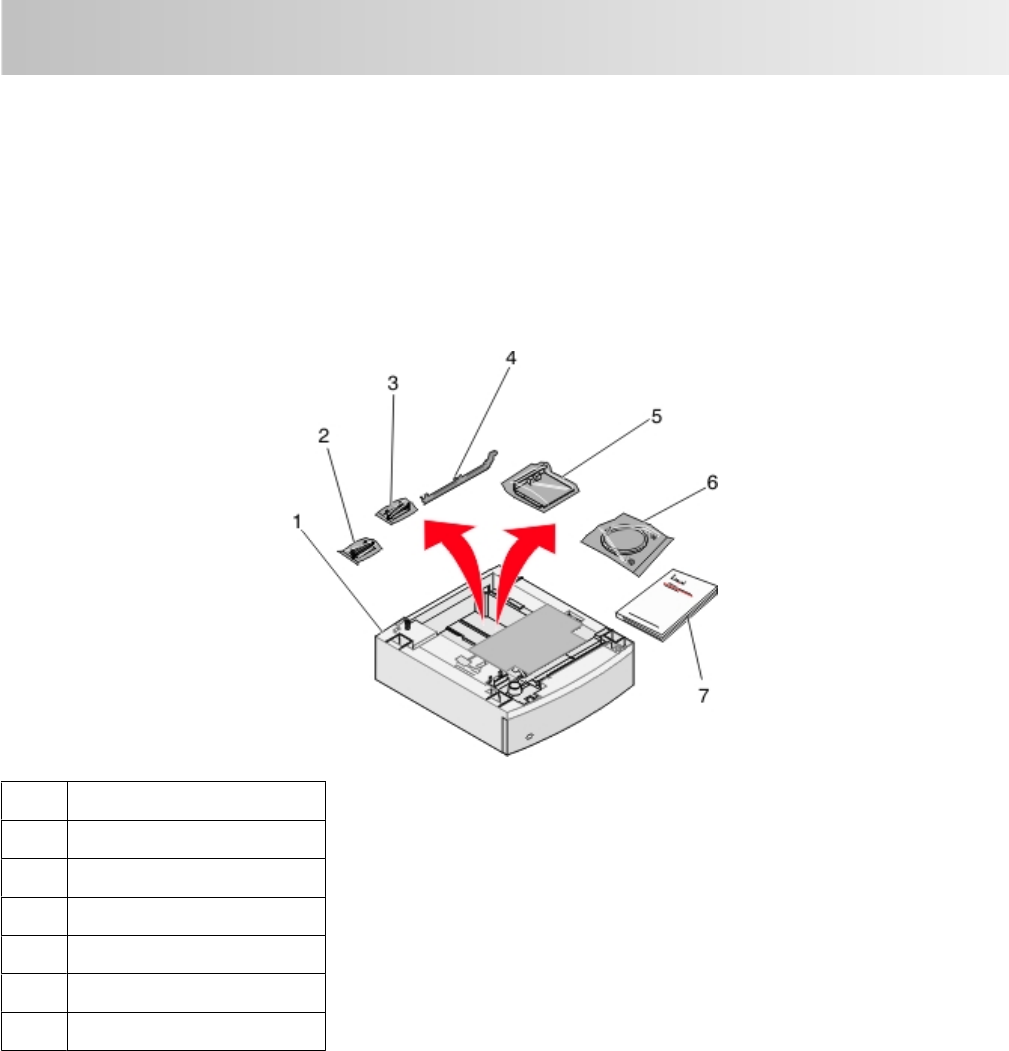
The RFID UHF option comes in a box with other items needed for installation. Once the box is unpacked, verify that
you have the following items:
1RFID UHF option
2Firmware card
3Flash memory card
4Fuser wiper
5Interface card
6RFID cable
7RFID UHF option Setup Guide
Lexmark Confidential until announced
Setting up the RFID UHF option
5
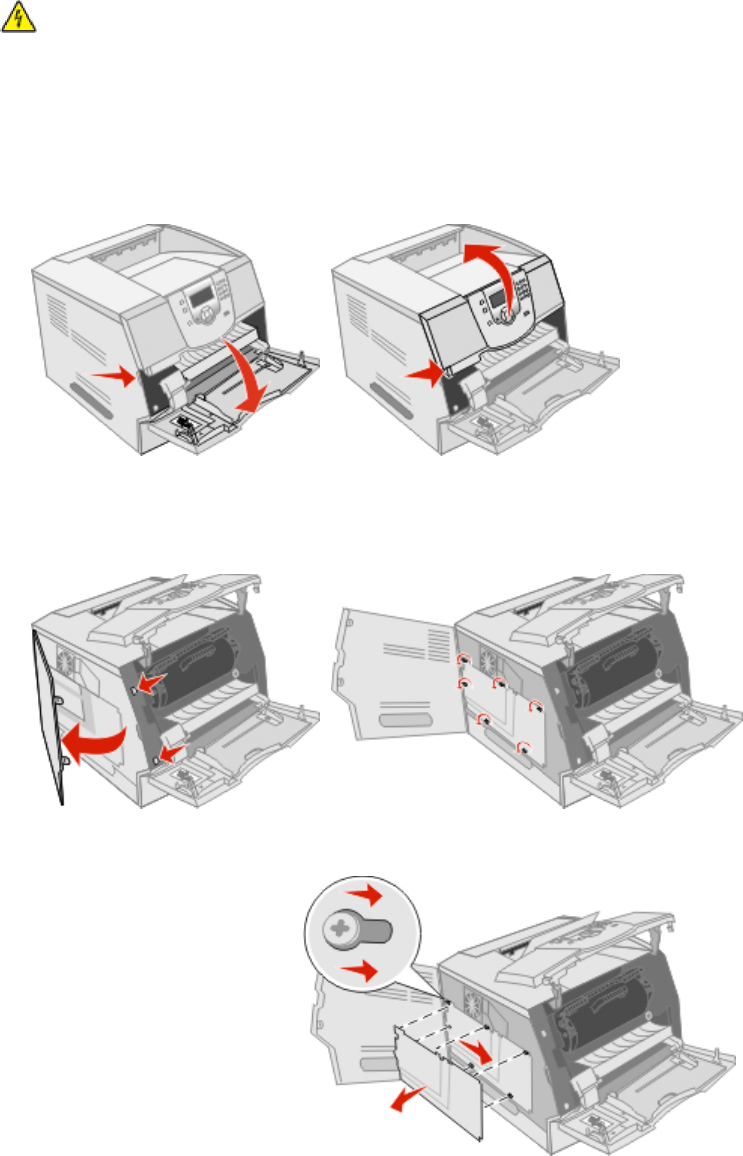
Accessing the system board to install internal options
CAUTION—SHOCK HAZARD: Turn the printer off, and unplug the power cord from the wall outlet before
continuing. If you have any other devices attached to the printer, turn them off as well and unplug any cables
going into the printer.
Note: Use a #2 Phillips screwdriver to remove the system board cover.
1Push the release latch, and then lower the multipurpose feeder tray.
2Push the release latch, and then open the top front cover.
3Press both side door latches, and open the side door.
4Loosen, but do not remove, the six screws on the system board cover.
5Slide the system board cover to the right, and then remove it.
6Set the system board cover aside.
Lexmark Confidential until announced
Setting up the RFID UHF option
6
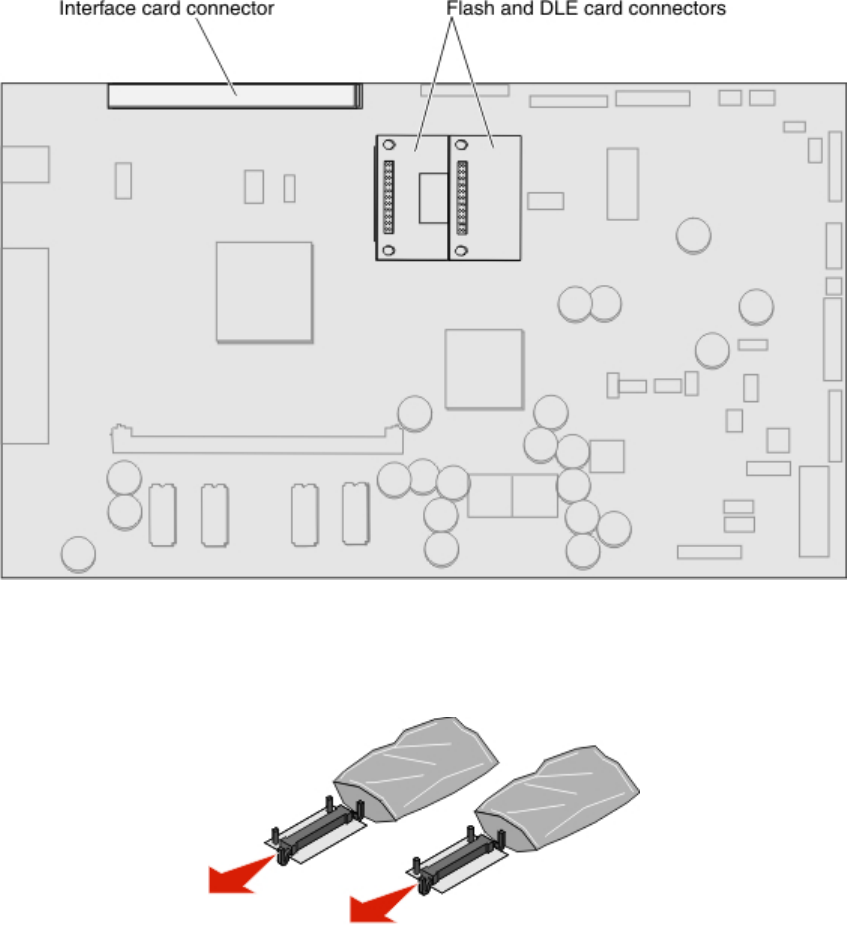
7Use the following illustration to locate the appropriate connector.
Warning—Potential Damage: System board electrical components are easily damaged by static electricity.
Touch something metal on the printer before touching any system board electronic components or connectors.
Installing flash memory and firmware cards
1Unpack the flash memory and firmware cards.
2Holding the flash memory card by the locking clips, align the plastic pins on the card with the holes on the system
board.
Lexmark Confidential until announced
Setting up the RFID UHF option
7

3Push the flash memory card firmly into place, and then release the locking clips.
4Holding the firmware card by the locking clips, align the plastic pins on the card with the holes on the system
board.
5Push the firmware card firmly into place beside the flash memory card, and then release the locking clips.
Notes:
•The entire length of the connector on the flash memory and firmware cards must touch the system board and
be locked into the connector.
•Be careful not to damage the connectors.
Installing an interface card
1Locate the card connectors on the system board.
2Remove the screw and the cover plate, and save them.
Lexmark Confidential until announced
Setting up the RFID UHF option
8
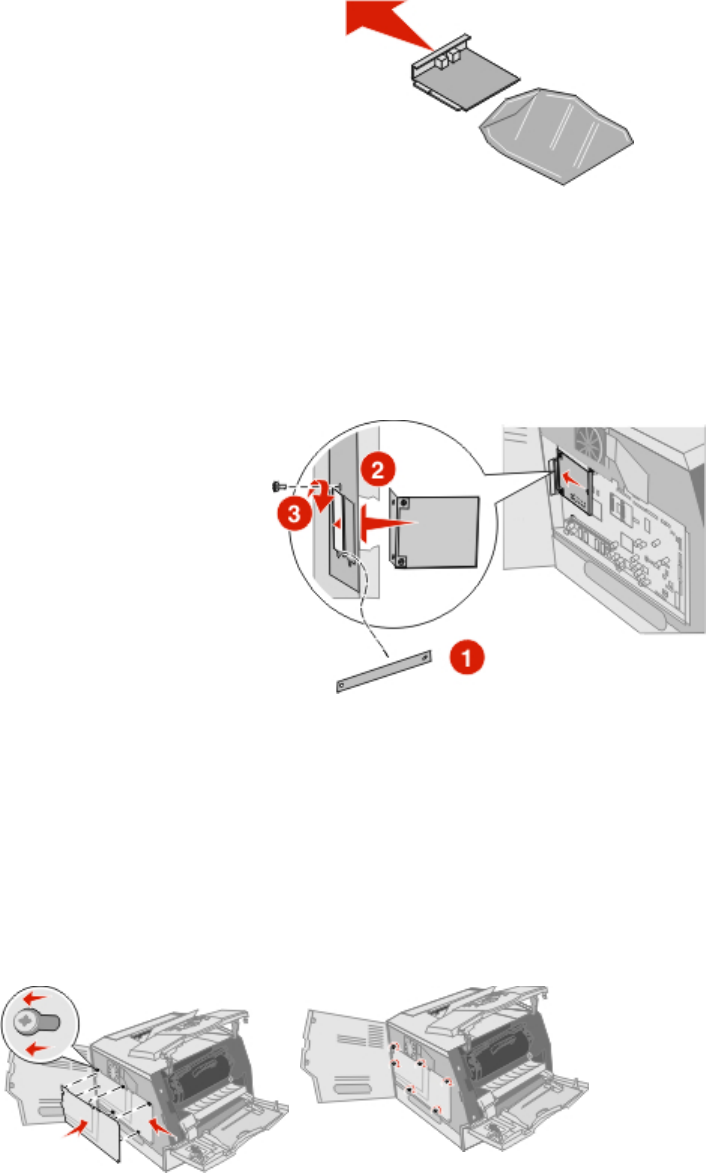
3Unpack the interface card.
4Align the connection points on the card with the connector on the system board, and push the card firmly into
the system board connector.
5Insert the screw saved from the cover plate (or the extra screw shipped with the card).
6Tighten the screw to secure the card.
Note: The Lexmark T642 and T644 have two card connectors. The interface card must be installed into the left
connector, which is the closest to the controller card.
Replacing the system board cover
After you have installed the options on the printer system board, follow these steps to reattach the system board
cover and close the doors.
1Align the keyholes on the system board cover with the screws on the frame.
2Slide the system board cover to the left onto the screws.
3Tighten the screws.
4Close the side door.
Lexmark Confidential until announced
Setting up the RFID UHF option
9
5Close the top front cover.
6Close the multipurpose feeder.
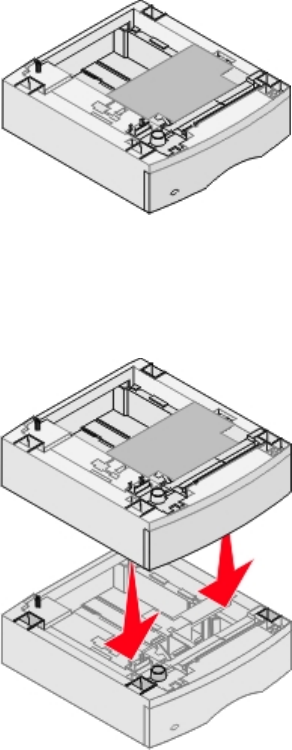
Installing the RFID UHF option
The RFID UHF option is positioned under the printer, or, if a duplex unit is installed, it is positioned under the duplex
unit.
1Remove all packing material and tape from the RFID UHF option.
2Disconnect all cables from the printer.
3Separate the printer from the 250- or 500-sheet drawer.
4Place the RFID UHF option on top of the 250- or 500-sheet drawer.
Lexmark Confidential until announced
Setting up the RFID UHF option
10
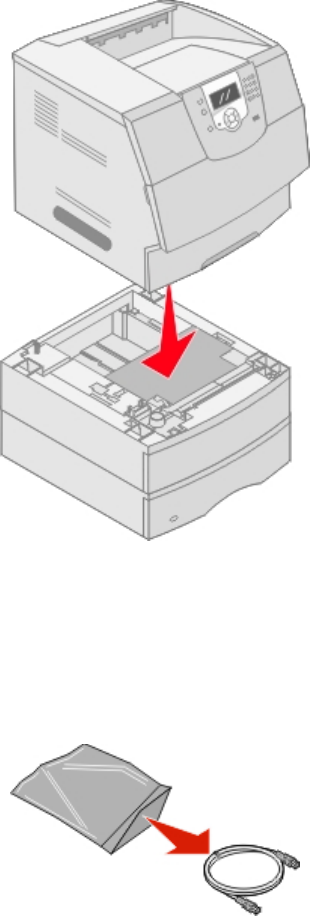
5Place the printer on top of the RFID UHF option.
6Do not reconnect the cables until after the RFID cable is connected. For more information, see “Connecting the
RFID cable” on page 11.
Connecting the RFID cable
1Unpack the RFID cable.
2Attach one end to the RFID UHF option.
Lexmark Confidential until announced
Setting up the RFID UHF option
11
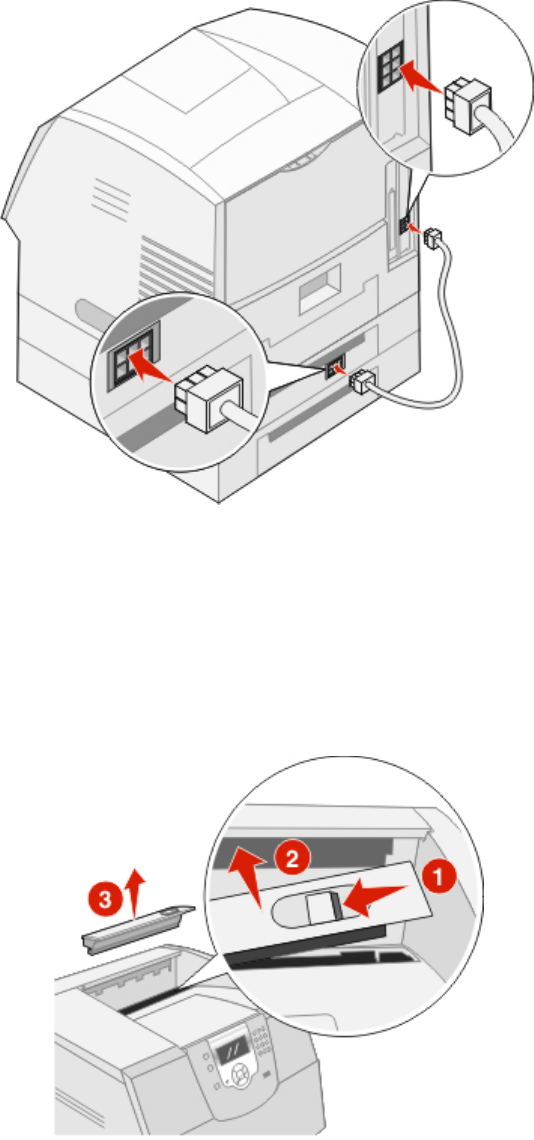
3Attach the other end to the printer.
4Reconnect all other cables to the printer, and then turn the printer on.
The printer is now ready to print with the RFID UHF option.
Installing the fuser wiper
1Unpack the fuser wiper.
2Locate the fuser wiper cover latch on the right side of the printer.
3Squeeze the buttons together, and then lift the right end of the fuser cover to remove it.
4Pull the cover out to the right.
5Grasp the handle on the old fuser wiper, and then lift it out.
Lexmark Confidential until announced
Setting up the RFID UHF option
12
6Replace the old fuser wiper with the new one.
7Replace the fuser wiper cover.
Lexmark Confidential until announced
Setting up the RFID UHF option
13

Choosing output and input devices
Choosing an output device
Output devices used in printing labels include the output expander, high-capacity output stacker, adjustable stacker,
and 500-sheet RFID drawer. Choose an output device based on the software program, the length of label needed,
and the number of labels that you expect to print at one time. To order an output device, visit the Lexmark Web site
at www.lexmark.com.
Output device Part number
Output expander
Note: Lexmark recommends using the adjustable stacker when using dual Web media equal to or
greater than the length of an 8.5 x 11-inch sheet.
20G0894
High-capacity output stacker
Note: Lexmark recommends using the adjustable stacker when using dual Web media equal to or
greater than the length of an 8.5 x 11-inch sheet.
20G0896
Adjustable stacker (standard output bin option)
Note: The adjustable stacker is useful in situations in which label media approaches lengths that
could extend beyond the length of the standard output bin. It allows customers to tailor the output
stacking properties of their media for maximum effectiveness.
20G1360
Choosing an input device
Input devices available for this printer include the 250-sheet drawer and the 500-sheet drawer. Choose an input
device based on the software program, the length of label needed, and the number of labels that you expect to print
at one time. To order an input device, visit the Lexmark Web site at www.lexmark.com.
Input device RFID label support Part number
250-sheet drawer Yes 20G0889
500-sheet drawer Yes 20G0890
Lexmark Confidential until announced
Choosing output and input devices
14
Preparing to print
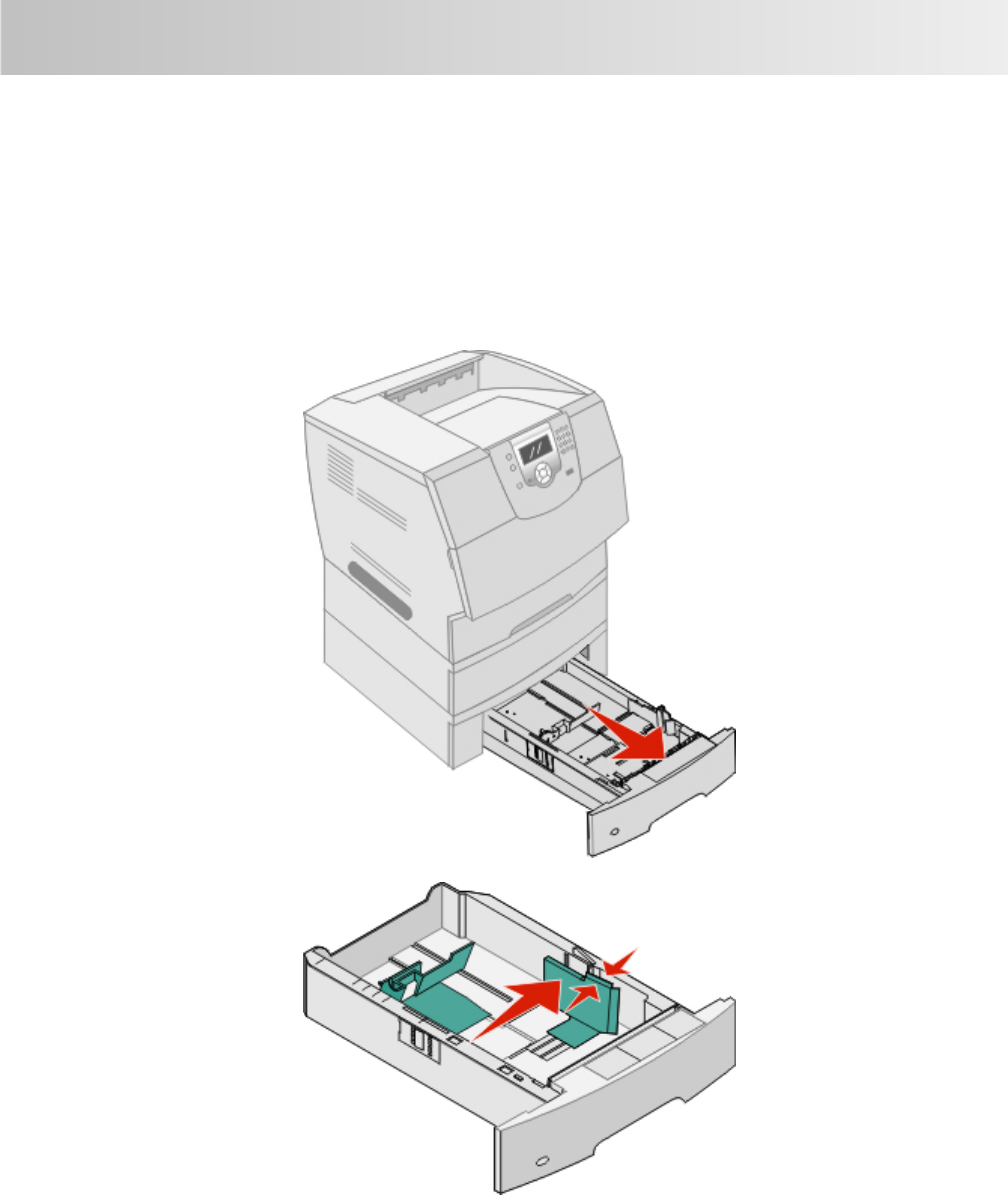
Loading RFID labels
To load labels:
Note: Do not remove a tray when a job is printing or when the operator panel indicator light is blinking. Doing so
may cause a jam.
1Remove the tray from the printer, and place it on a flat, level surface.
2Squeeze the side guide tab, and slide the guide to the outer edge of the tray.
3Flex the label sheets back and forth to loosen them, and then fan them. Do not fold or crease the label sheets.
Straighten the edges on a level surface.
Lexmark Confidential until announced
Preparing to print
15
4Place the label sheets with the print side facing down and the labels positioned at the front of the tray.
Note: When loading labels, leave at least 1 inch of space between the top of the label stack and the top of the
drawer. Overloading may cause paper jams or damage to the labels.
5Squeeze the rear guide tab, and slide the guide to the correct position for the size label sheets you are loading.
6Insert the tray into the printer.
The increased thickness of RFID labels reduces the capacity of input and output devices. For information on label
construction, see the Card Stock and Label Guide on the Lexmark Web site at www.lexmark.com/publications.
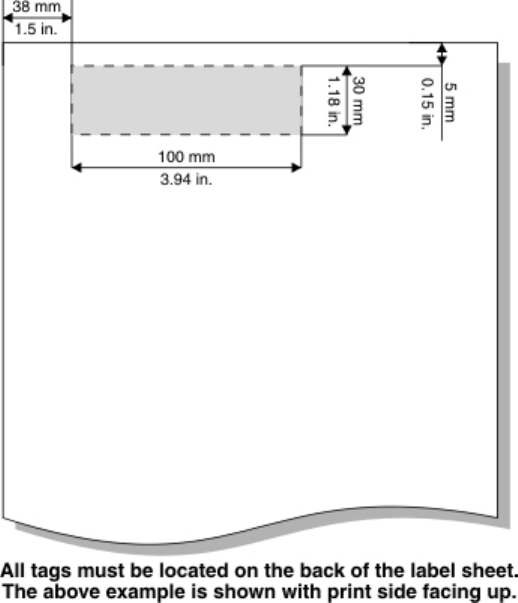
Proper tag orientation for printing
Tags must be built to EPC class 1 generation 2 specifications (IS0 18000-6C).
Note: The RFID UHF option supports one tag per sheet.
The following are examples of tags known to work correctly:
•Avery Dennison
AD-222
•Raflatec
Dogbone 3000838
G2 Web 3001106
Lexmark Confidential until announced
Preparing to print
16

Printing
Identifying rejected labels
When a label is rejected, a unique defective tag marking pattern or symbol appears at the bottom of the label sheet
as shown in the following diagram.
Note: A pattern or symbol appears only if Yes is selected from the Mark on Error menu.
Lexmark Confidential until announced
Printing
17
Understanding the RFID menu
Configuring RFID-specific settings
The RFID menu is used to configure RFID-specific settings.
Note: RFID settings appear on the menu settings page. For information on printing a menu settings page, see the
User's Guide available on the Software and Documentation CD.
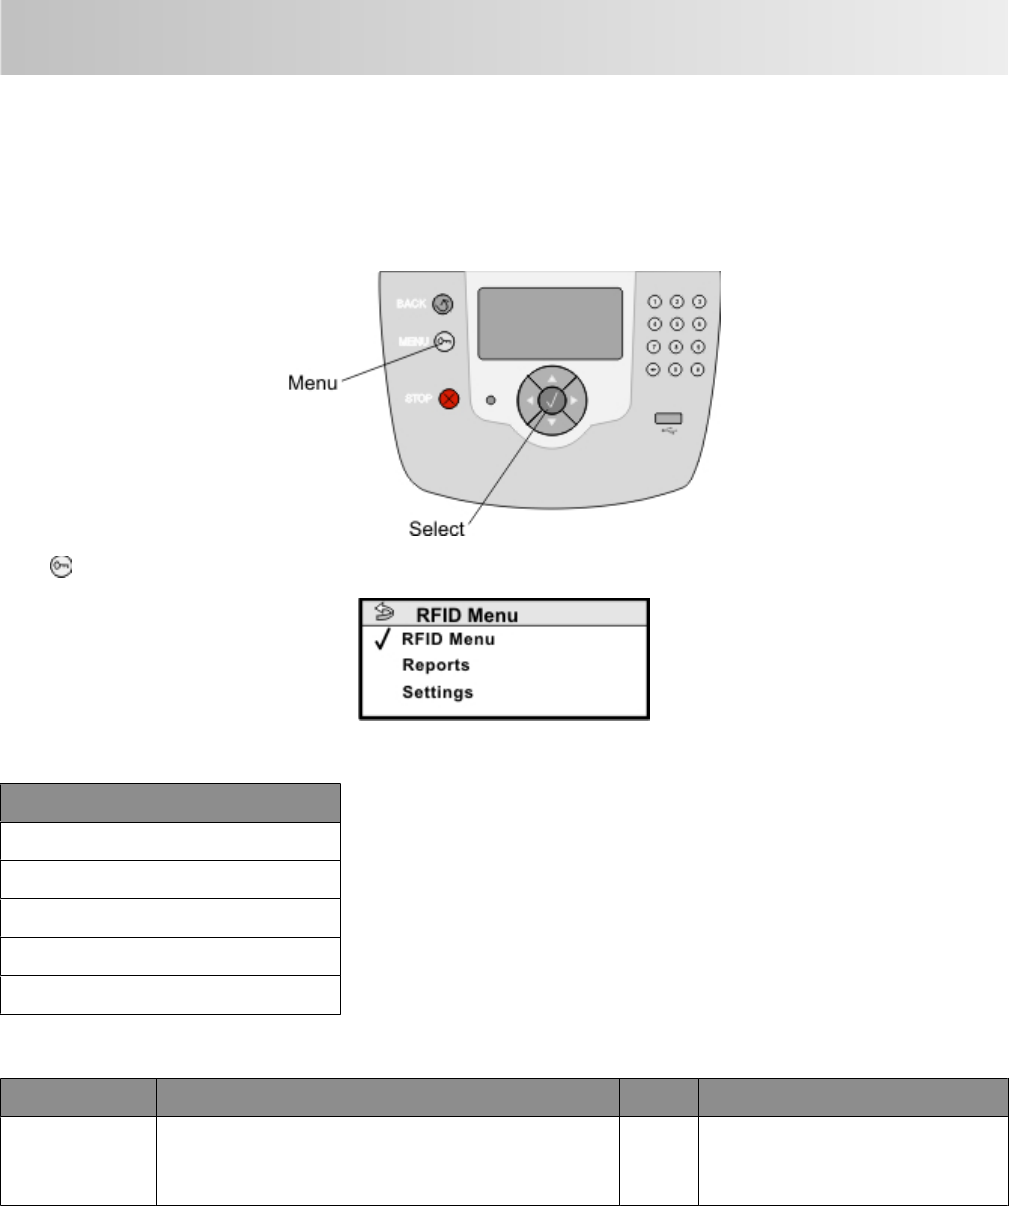
Press to access the Menu options. Select RFID Menu from the list.
The RFID Menu settings appear.
RFID Settings
Retry Count
Stop on Error
Reject Bin
Mark on Error
Reset Label Counters
Retry count
Menu selection Purpose Option Comments
Retry Count Determines how many times to retry printing an
RFID page when a tag refuses to program. Each retry
uses a new sheet of RFID media.
0–255 Zero is the factory default setting.
Lexmark Confidential until announced
Understanding the RFID menu
18
Stop on Error
Menu selection Purpose Option Comments
Stop on Error Determines whether to stop printing and post a
message on the display when the Retry Count is
exhausted
Yes
No
Yes is the factory default setting.
Reject Bin
Menu selection Purpose Option Comments
Reject Bin Determines where to send
sheets with RFID tags that
failed to program correctly.
Standard Bin and Disabled are
displayed if no option bins are
installed.
Disabled
Standard Bin
Bin 1
Bin 2
Bin 3
Bin 4
Bin 5
Bin 6
Bin 7
Bin 8
Bin 9
Bin 10
Note: Bins 7–10 are not
recommended for label
applications.
Disabled is the factory default
setting.
Mark on Error
Menu selection Purpose Option Comments
Mark on Error Tells the printer to print a defective tag pattern on the
bottom of any media when a defective tag is detected Yes
No
No is the factory default setting.
Reset Label Counters
Menu selection Purpose Option Comments
Reset Label Counters Clears the current version of label
counters (passed and failed). Reset is
the only menu selection
Value
Reset
When Reset is selected, a “Contents will be
lost” confirmation prompt appears.
Lexmark Confidential until announced
Understanding the RFID menu
19

Understanding RFID printer messages
RFID error messages
Message Action
44.00 RFID error (generic) 1Turn the printer off.
2Unplug the power cord from the wall outlet.
3Check all cable connections.
4Connect the power cord to a grounded outlet.
5Turn the printer on.
6If the message recurs, contact Customer Support, and report
the message number and a description of the problem.
44.01 Bad tag error •Cancel the current job and reprint.
•Contact the software program solution provider if the
percentage of failure seems high.
44.11 Data is bad
44.12 Missing bytes in subcommand
44.13 Too many bytes in subcommand
44.14 Generic invalid argument error
44.15 Invalid magic number
44.16 Known but unsupported magic number
44.17 Illegal characters in subcommand
44.18 Invalid opcode
44.19 Valid but unsupported opcode
44.20 Invalid protocol
44.21 Valid but unsupported protocol
44.22 Operation not supported by reader
44.23 Invalid ID length for given protocol
44.24 Invalid ID bit pattern for given protocol
44.25 Too many tags on page
44.26 Tag location parameters invalid
44.31 Generic run-time reader error
44.32 Reader response timeout
44.33 Garbled or short response from reader
44.34 Read/verify operation failed
Lexmark Confidential until announced
Understanding RFID printer messages
20

RFID service messages
Message Action
902.81 Service engine software error 1Turn the printer off.
2Unplug the power cord.
3Check all cable connections.
4Make sure the RFID UHF option is positioned under
the printer, or, if a duplex unit is installed, it is
positioned under the duplex unit.
5Connect the power cord to a properly grounded
outlet.
6Turn the printer on.
7If the service message recurs, contact Customer
Support, and report the message number and a
description of the problem.
982.xx Tray controller card error
985.01 Unable to communicate with interface card
985.02 Unable to communicate with radio
985.03 Radio fails internal self test
985.04 Antenna appears disconnected
985.05 Radio firmware flash upgrade failed
985.06 Antenna is plugged into the incorrect port
985.07 Unable to detect antenna
Lexmark Confidential until announced
Understanding RFID printer messages
21

Notices
Product information
Machine type:
4061
Model(s):
RF1
Edition notice
February 2008
The following paragraph does not apply to any country where such provisions are inconsistent with local
law: LEXMARK INTERNATIONAL, INC., PROVIDES THIS PUBLICATION “AS IS” WITHOUT WARRANTY OF ANY KIND,
EITHER EXPRESS OR IMPLIED, INCLUDING, BUT NOT LIMITED TO, THE IMPLIED WARRANTIES OF MERCHANTABILITY
OR FITNESS FOR A PARTICULAR PURPOSE. Some states do not allow disclaimer of express or implied warranties in
certain transactions; therefore, this statement may not apply to you.
This publication could include technical inaccuracies or typographical errors. Changes are periodically made to the
information herein; these changes will be incorporated in later editions. Improvements or changes in the products
or the programs described may be made at any time.
References in this publication to products, programs, or services do not imply that the manufacturer intends to make
these available in all countries in which it operates. Any reference to a product, program, or service is not intended
to state or imply that only that product, program, or service may be used. Any functionally equivalent product,
program, or service that does not infringe any existing intellectual property right may be used instead. Evaluation
and verification of operation in conjunction with other products, programs, or services, except those expressly
designated by the manufacturer, are the user’s responsibility.
For Lexmark technical support, visit support.lexmark.com.
For information on supplies and downloads, visit www.lexmark.com.
If you don't have access to the Internet, you can contact Lexmark by mail:
Lexmark International, Inc.
Bldg 004-2/CSC
740 New Circle Road NW
Lexington, KY 40550
USA
© 2008 Lexmark International, Inc.
All rights reserved.
Trademarks
Lexmark and Lexmark with diamond design are trademarks of Lexmark International, Inc., registered in the United
States and/or other countries.
All other trademarks are the property of their respective owners.
Lexmark Confidential until announced
Notices
22
UNITED STATES GOVERNMENT RIGHTS
This software and any accompanying documentation provided under this agreement are commercial computer
software and documentation developed exclusively at private expense.
Federal Communications Commission (FCC) compliance information
statement
This product has been tested and found to comply with the limits for a Class B digital device, pursuant to Part 15 of
the FCC Rules. Operation is subject to the following two conditions: (1) this device may not cause harmful interference,
and (2) this device must accept any interference received, including interference that may cause undesired operation.
The FCC Class B limits are designed to provide reasonable protection against harmful interference when the
equipment is operated in a residential installation. This equipment generates, uses, and can radiate radio frequency
energy and, if not installed and used in accordance with the instructions, may cause harmful interference to radio
communications. However, there is no guarantee that interference will not occur in a particular installation. If this
equipment does cause harmful interference to radio or television reception, which can be determined by turning
the equipment off and on, the user is encouraged to try to correct the interference by one or more of the following
measures:
•Reorient or relocate the receiving antenna.
•Increase the separation between the equipment and receiver.
•Connect the equipment into an outlet on a circuit different from that to which the receiver is connected.
•Consult your point of purchase or service representative for additional suggestions.
The manufacturer is not responsible for radio or television interference caused by using other than recommended
cables or by unauthorized changes or modifications to this equipment. Unauthorized changes or modifications could
void the user's authority to operate this equipment.
Note: To assure compliance with FCC regulations on electromagnetic interference for a Class B computing device,
use a properly shielded and grounded cable such as Lexmark part number 1021294 for USB attach. Use of a substitute
cable not properly shielded and grounded may result in a violation of FCC regulations.
Any questions regarding this compliance information statement should be directed to:
Director of Lexmark Technology & Services
Lexmark International, Inc.
740 West New Circle Road
Lexington, KY 40550
(859) 232–3000
Modification notice
Pursuant to Part 15.21 of the FCC Rules, any changes or modifications to this equipment not expressly approved by
the manufacturer may cause harmful interference and void your authority to operate this equipment. Use of supplied
data cable is required to comply with the Class B limits of Part 15 of the FCC Rules. This product does not contain any
user serviceable components and is to be used with the supplied antenna only.
Lexmark Confidential until announced
Notices
23

Exposure to radio frequency radiation
The radiated output power of this device is far below the radio frequency exposure limits of the FCC and other
regulatory agencies. A minimum separation of 20 cm (8 inches) must be maintained between the antenna and any
persons for this device to satisfy the RF exposure requirements of the FCC and other regulatory agencies.
US/Canada radio frequency statement
Due to radio frequency limitations, this product works only within the United States and Canada.
Industry Canada radio interference statement
Industry Canada (Canada)
This device complies with Industry Canada specification RSS-210. Operation is subject to the following two conditions:
(1) this device may not cause interference, and (2) this device must accept any interference, including interference
that may cause undesired operation of the device.
The installer of this radio equipment must ensure that the antenna is located or pointed such that it does not emit
RF fields in excess of Health Canada limits for the general population; consult Safety Code 6, obtainable from Health
Canada's Web site www.hc-sc.gc.ca/rpb.
The term "IC:" before the certification/registration number only signifies that the Industry Canada technical
specifications were met.
Industry Canada (Canada)
Cet appareil est conforme à la norme RSS-210 d'Industry Canada. Son fonctionnement est soumis aux deux conditions
suivantes :
(1) cet appareil ne doit pas provoquer d'interférences et (2) il doit accepter toute interférence reçue, y compris celles
risquant d'altérer son fonctionnement.
L'installateur de cet équipement radio doit veiller à ce que l'antenne soit implantée et dirigée de manière à n'émettre
aucun champ HF dépassant les limites fixées pour l'ensemble de la population par Santé Canada. Reportez-vous au
Code de sécurité 6 que vous pouvez consulter sur le site Web de Santé Canada www.hc-sc.gc.ca/rpb.
Le terme « IC » précédant le numéro de d'accréditation/inscription signifie simplement que le produit est conforme
aux spécifications techniques d'Industry Canada.
European Community (EC) directives conformity statement for radio
products
This product is in conformity with the protection requirements of EC Council directives 2004/108/EC, 2006/95/EC,
and 1999/5/EC on the approximation and harmonization of the laws of the Member States relating to electromagnetic
compatibility, safety of electrical equipment designed for use within certain voltage limits and on radio equipment
and telecommunications terminal equipment.
Compliance is indicated by the CE marking.
Lexmark Confidential until announced
Notices
24

A declaration of conformity with the requirements of the directives is available from the Director of Manufacturing
and Technical Support, Lexmark International, S. A., Boigny, France.
This product satisfies the limits of EN 55022; safety requirements of EN 60950; radio spectrum requirements of ETSI
EN 302 208; and the EMC requirements of EN 55024, ETSI EN 301 489-1 and ETSI EN 301 489-3.
Česky Společnost Lexmark International, Inc. tímto prohlašuje, že výrobek tento výrobek je ve shodě se
základními požadavky a dalšími příslušnými ustanoveními směrnice 1999/5/ES.
Dansk Lexmark International, Inc. erklærer herved, at dette produkt overholder de væsentlige krav og øvrige
relevante krav i direktiv 1999/5/EF.
Deutsch Hiermit erklärt Lexmark International, Inc., dass sich das Gerät dieses Gerät in Übereinstimmung mit
den grundlegenden Anforderungen und den übrigen einschlägigen Bestimmungen der Richtlinie
1999/5/EG befindet.
Ελληνική ΜΕ ΤΗΝ ΠΑΡΟΥΣΑ Η LEXMARK INTERNATIONAL, INC. ΔΗΛΩΝΕΙ ΟΤΙ ΑΥΤΟ ΤΟ ΠΡΟΪΟΝ
ΣΥΜΜΟΡΦΩΝΕΤΑΙ ΠΡΟΣ ΤΙΣ ΟΥΣΙΩΔΕΙΣ ΑΠΑΙΤΗΣΕΙΣ ΚΑΙ ΤΙΣ ΛΟΙΠΕΣ ΣΧΕΤΙΚΕΣ
ΔΙΑΤΑΞΕΙΣ ΤΗΣ ΟΔΗΓΙΑΣ 1999/5/ΕΚ.
English Hereby, Lexmark International, Inc., declares that this type of equipment is in compliance with
the essential requirements and other relevant provisions of Directive 1999/5/EC.
Español Por medio de la presente, Lexmark International, Inc. declara que este producto cumple con los
requisitos esenciales y cualesquiera otras disposiciones aplicables o exigibles de la Directiva
1999/5/CE.
Eesti Käesolevaga kinnitab Lexmark International, Inc., et seade see toode vastab direktiivi
1999/5/EÜ põhinõuetele ja nimetatud direktiivist tulenevatele muudele asjakohastele sätetele.
Suomi Lexmark International, Inc. vakuuttaa täten, että tämä tuote on direktiivin 1999/5/EY oleellisten
vaatimusten ja muiden sitä koskevien direktiivin ehtojen mukainen.
Français Par la présente, Lexmark International, Inc. déclare que l'appareil ce produit est conforme aux
exigences fondamentales et autres dispositions pertinentes de la directive 1999/5/CE.
Magyar Alulírott, Lexmark International, Inc. nyilatkozom, hogy a termék megfelel a vonatkozó alapvetõ
követelményeknek és az 1999/5/EC irányelv egyéb elõírásainak.
Íslenska Hér með lýsir Lexmark International, Inc. yfir því að þessi vara er í samræmi við grunnkröfur og
aðrar kröfur, sem gerðar eru í tilskipun 1999/5/EC.
Italiano Con la presente Lexmark International, Inc. dichiara che questo questo prodotto è conforme ai requisiti
essenziali ed alle altre disposizioni pertinenti stabilite dalla direttiva 1999/5/CE.
Latviski Ar šo Lexmark International, Inc. deklarē, ka šis izstrādājums atbilst Direktīvas 1999/5/EK
būtiskajām prasībām un citiem ar to saistītajiem noteikumiem.
Lietuvių Šiuo Lexmark International, Inc. deklaruoja, kad šis produktas atitinka esminius reikalavimus ir
kitas 1999/5/EB direktyvos nuostatas.
Malti Bil-preżenti, Lexmark International, Inc., jiddikjara li dan il-prodott huwa konformi mal-ħtiġijiet
essenzjali u ma dispożizzjonijiet oħrajn relevanti li jinsabu fid-Direttiva 1999/5/KE.
Nederlands Hierbij verklaart Lexmark International, Inc. dat het toestel dit product in overeenstemming is met de
essentiële eisen en de andere relevante bepalingen van richtlijn 1999/5/EG.
Norsk Lexmark International, Inc. erklærer herved at dette produktet er i samsvar med de grunnleggende
krav og øvrige relevante krav i direktiv 1999/5/EF.
Lexmark Confidential until announced
Notices
25

Polski Niniejszym Lexmark International, Inc. oświadcza, że niniejszy produkt jest zgodny z
zasadniczymi wymogami oraz pozostałymi stosownymi postanowieniami Dyrektywy
1999/5/EC.
Português A Lexmark International Inc. declara que este este produto está conforme com os requisitos essenciais
e outras disposições da Diretiva 1999/5/CE.
Slovensky Lexmark International, Inc. týmto vyhlasuje, že tento produkt spĺňa základné požiadavky a
všetky príslušné ustanovenia smernice 1999/5/ES.
Slovensko Lexmark International, Inc. izjavlja, da je ta izdelek v skladu z bistvenimi zahtevami in ostalimi
relevantnimi določili direktive 1999/5/ES.
Svenska Härmed intygar Lexmark International, Inc. att denna produkt står i överensstämmelse med de
väsentliga egenskapskrav och övriga relevanta bestämmelser som framgår av direktiv 1999/5/EG.
Wireless device notice
In some environments, the use of wireless devices may be restricted. Such restrictions may apply aboard airplanes,
in hospitals, near explosives, in hazardous locations, and so on. If you are uncertain of the policy that applies to the
use of this device, ask for authorization to use it prior to turning it on.
Lexmark Confidential until announced
Notices
26

Index
Numerics
44.xx 20
902.xx 21
985.xx 21
B
box contents 5
C
contents, box 5
E
emission notices 23, 24, 25
F
FCC notices 23, 24
flash memory and firmware cards
installing 7
removing packaging 7
fuser wiper
installing 12
I
identifying
rejected labels 17
input device
choosing 14
interface card
installing 8
removing packaging 8
L
labels
loading 15
tag orientation 15
loading
labels 15
M
messages
RFID error 20
RFID service 21
N
notices 22, 23, 24, 25, 26
O
output device
choosing 14
P
printer messages
44.xx 20
902.xx 21
985.xx 21
R
rejected labels
identifying 17
RFID cable
connecting 11
removing packaging 11
RFID menu
using 18
RFID UHF option
installing 10
removing packaging 10
S
safety information 2
system board
accessing 6
system board cover
replacing 9
U
unboxing
RFID UHF option 5
verifying box contents 5
using the RFID menu 18
Lexmark Confidential until announced
Index
27