Lexus 2012 CT200h QG
2012 CT200h QG 2012 Lexus CT 200h Owners Manual Pdf | Owner's Manual Pdf
User Manual: Lexus 2012 Lexus CT 200h Owners Manual Pdf | Owner's Manual Pdf
Open the PDF directly: View PDF ![]() .
.
Page Count: 98
- 2012 CT200H Owners Manual Quick Guide (OM76052U)
- Table of Contents
- Overview
- Hybrid System
- Energy Monitor/ Consumption Screen
- Keys
- Smart Access System with Push-button Start
- Theft Deterrent System
- Power (Ignition) Switch
- Hybrid Transmission
- Multi-information Display
- Turn Signal Lever
- Cruise Control (if equipped)
- Dynamic Radar Cruise Control (if equipped)
- Intuitive Parking Assist (if equipped)
- Headlights
- Windshield Wipers and Washer
- Rear Window Wiper and Washer (if equipped)
- Remote Touch (if equipped)
- Navigation System (if equipped)
- Hands-free System For Cellular Phone (vehicles with a navigation system)
- Audio System (vehicles with a navigation system)
- Air Conditioning System (vehicles with a navigation system)
- Hands-free System For Cellular Phone (vehicles without a navigation system)
- Audio System (vehicles without a navigation system)
- Air Conditioning System (vehicles without a navigation system)
- Voice Command System
- Portable Audio Device Ports
- Garage Door Opener (if equipped)
- Safety Connect (if equipped)
- Lexus Enform with Safety Connect (if equipped)
- Door Locks
- Power Windows
- Moon Roof (if equipped)
- Fuel Tank Cap
- What to do if...
- Your Lexus dealer

1
The Quick Guide is not intended as a substitute for your
Owner’s
Manual
. We strongly encourage you to review the
Owner’s
Manual
and supplementary manuals so you will have a better
understanding of your vehicle’s capabilities and limitations.
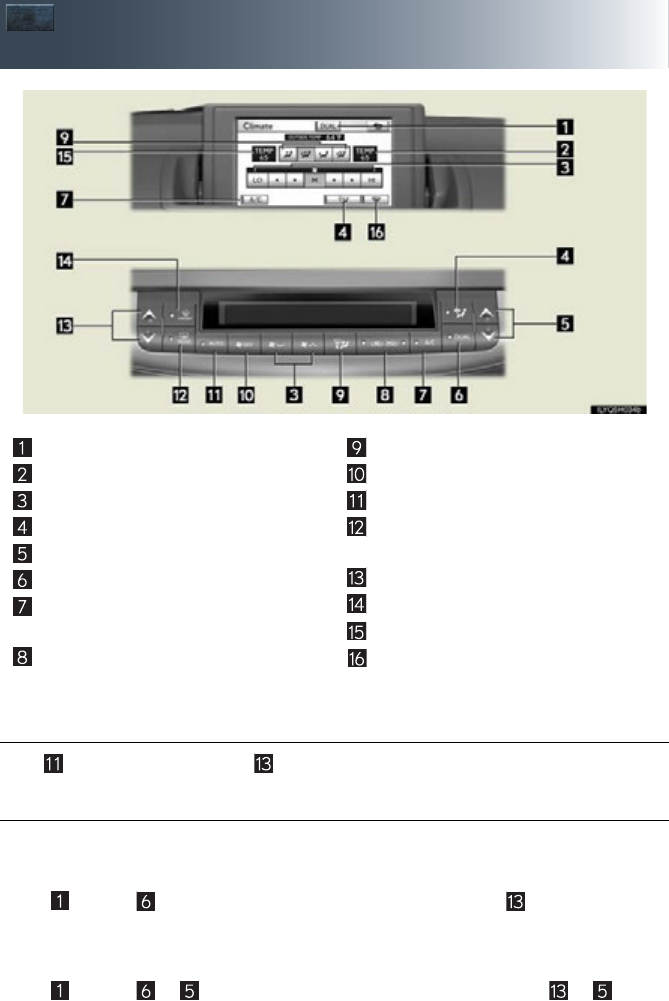
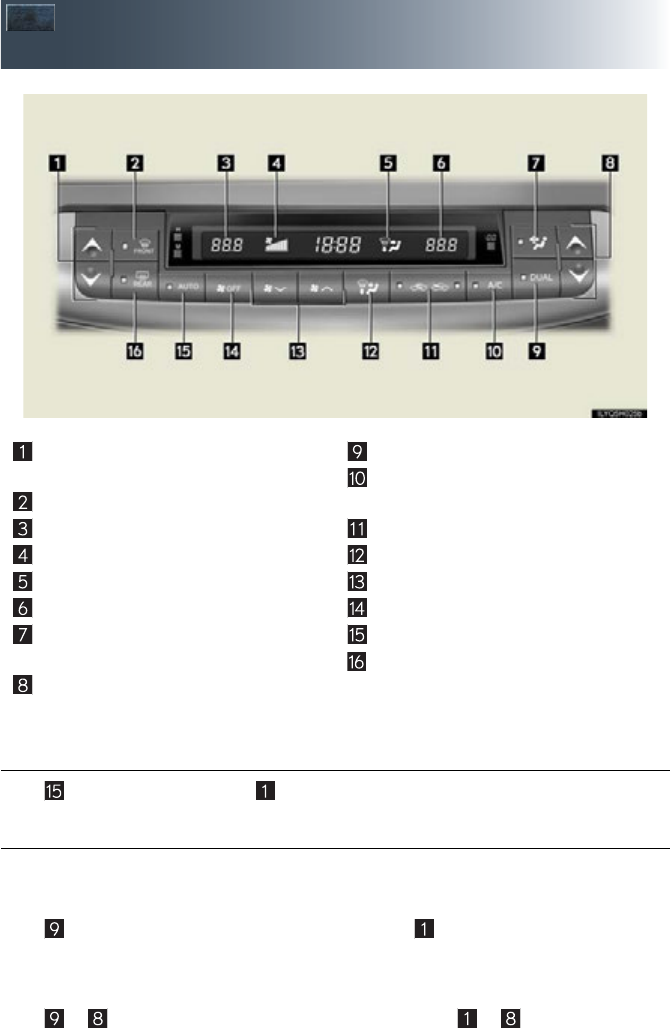
Air Conditioning System (vehicles with a navigation system)
Using the automatic mode.........................................................................................................60
Adjusting the temperature.........................................................................................................60
Air Conditioning System (vehicles without a navigation system)
Using the automatic mode......................................................................................................... 73
Adjusting the temperature......................................................................................................... 73
Audio System (vehicles with a navigation system)
Audio control screen....................................................................................................................55
Basic operation...............................................................................................................................56
Radio...................................................................................................................................................56
DVD player/CD player...............................................................................................................57
Operating an iPod.........................................................................................................................59
Remote control (steering wheel switches)..........................................................................59
Audio System (vehicles without a navigation system)
Basic operation............................................................................................................................... 67
Radio...................................................................................................................................................68
CD player..........................................................................................................................................69
Operating an iPod...........................................................................................................................71
Remote control (steering wheel switches).......................................................................... 72
Cruise Control...................................................................................................................................... 27
Door Locks .............................................................................................................................................87
Dynamic Radar Cruise Control.....................................................................................................29
Energy Monitor/Consumption Screen........................................................................................ 12
Fuel Tank Cap ........................................................................................................................................90
Garage Door Opener........................................................................................................................81
Hands-free System For Cellular Phone (vehicles with a navigation system)
Bluetooth® phone pairing .........................................................................................................49
Phonebook transfer..................................................................................................................... 50
Registering a voice tag ................................................................................................................. 51
Registering a speed dial..............................................................................................................52
Calling by name..............................................................................................................................53
Calling by speed dial....................................................................................................................54
Receiving a call...............................................................................................................................55

2
Hands-free System For Cellular Phone (vehicles without a navigation system)
Bluetooth® phone pairing .......................................................................................................... 61
Calling by number.........................................................................................................................62
Calling by name..............................................................................................................................62
Calling by speed dial....................................................................................................................63
Phonebook transfer......................................................................................................................64
Changing the registered name................................................................................................65
Registering a speed dial..............................................................................................................66
Headlights ...............................................................................................................................................33
Hybrid System ........................................................................................................................................10
Hybrid Transmission............................................................................................................................. 21
Intuitive Parking Assist .......................................................................................................................32
Keys.............................................................................................................................................................15
Lexus Enform with Safety Connect............................................................................................. 85
Moon Roof ............................................................................................................................................. 89
Multi-information Display.................................................................................................................25
Navigation System
Register home.................................................................................................................................43
Destination input - Search by address ..................................................................................44
Destination input - Search points of interest by name....................................................46
Destination input - Search points of interest by category.............................................47
Destination input - Search points of interest by telephone number.........................48
Portable Audio Device Adapters................................................................................................. 80
Power (Ignition) Switch....................................................................................................................... 19
Power Windows................................................................................................................................... 88
Remote Touch........................................................................................................................................40
Rear Window Wiper and Washer.................................................................................................39
Safety Connect .................................................................................................................................... 83
Smart Access System with Push-button Start........................................................................... 16
Theft Deterrent System ......................................................................................................................18
Turn Signal Lever..................................................................................................................................26
Voice Command System
Basic operation................................................................................................................................74
Command list ..................................................................................................................................75
Windshield Wipers and Washer....................................................................................................35

3
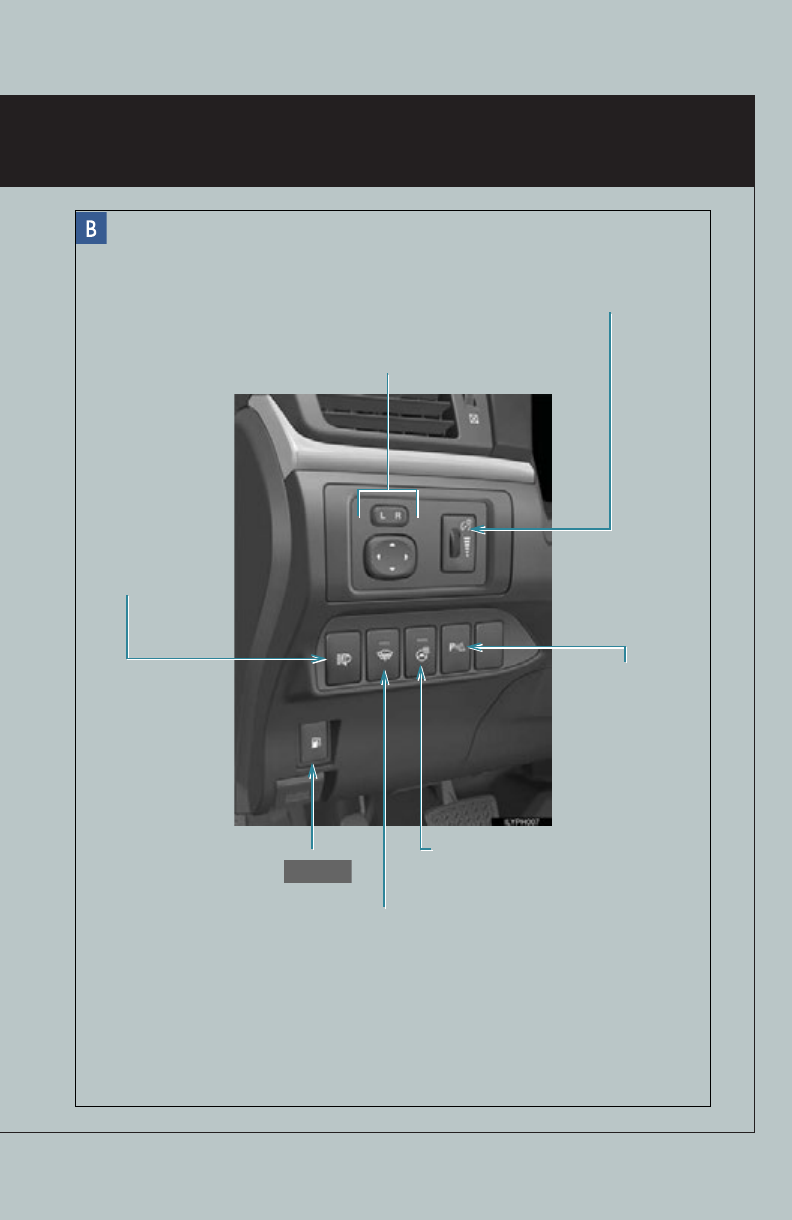
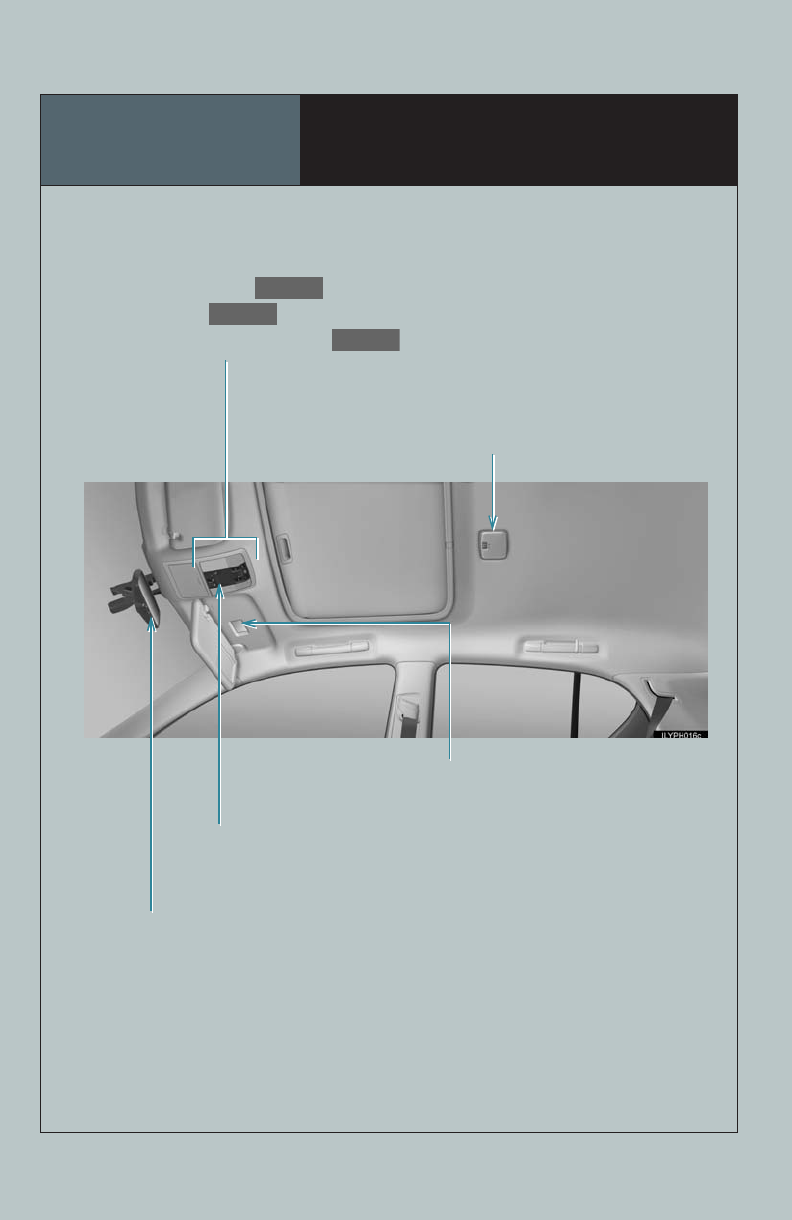
Overview Instrument Panel
See P.6
Inside door lock button
P.87
Driving position memory
switches*1
Windshield wipers and washer switch
P.35
Shift lever
P.21
Headlight switch
Turn signal lever
Fog light switch*1
P.33
P.26
Power (ignition) switch
P.19
See P.5
Multi-information display
P.25
Window lock switch
P.88
Door lock switch
P.87
P position switch
P.22
Hood lock release lever*1
Power window switches
P.88
Parking brake pedal*1
Tilt and telescopic steering control lever*1
Pre-collision braking off switch*1
Tire pressure warning reset button*1

4
Seat heater switches*1
Security indicator
P.18
Audio system
P.55, 67
See P.8
See P.7
Driving mode select switch
P.23
EV drive mode switch
P.24
: If equipped
*1: Refer to “Owner’s Manual”.
*2: For vehicles without a navigation system, refer to the “Owner’s Manual”.
*3: For vehicles with a navigation system, refer to the “Navigation System Owner’s Manual”.
Air conditioning system
P.60, 73
Clock*2, *3
Rear window and outside rear view mirror
defoggers switch*2, *3
6
: If equipped
*1: Refer to “Owner’s Manual”.
*2: For vehicles without a navigation system, refer to the “Owner’s Manual”.
*3: For vehicles with a navigation system, refer to the “Navigation System
Owner’s Manual”.
Instrument panel light control dial*1
Outside rear view mirror switches*1
Headlight cleaner
switch*1
Fuel filler door opener
P.90
Heated steering wheel switch*1
Windshield wiper de-icer switch*2, *3
Intuitive parking
assist switch*2, *3
10
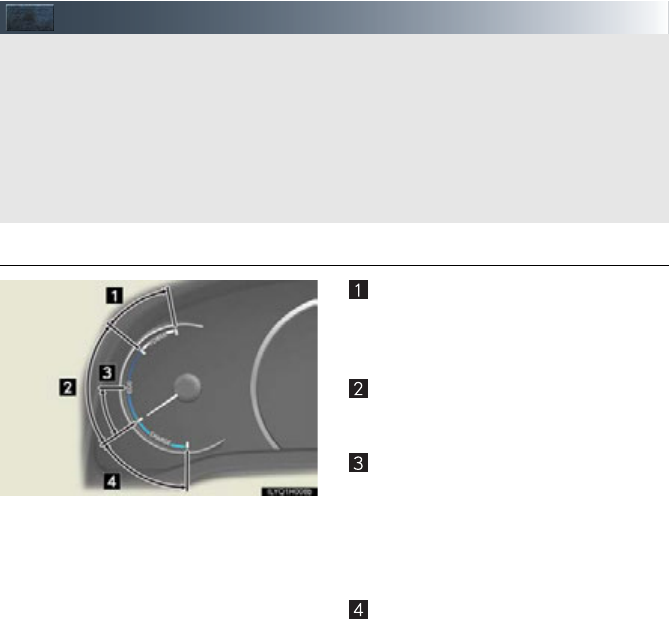
Hybrid System
■Hybrid System Indicator
Power area
Shows that an Eco-friendly driving range
is being exceeded (during full power
driving etc.)
Eco area
Shows that the vehicle is being driven in
an Eco-friendly manner.
Hybrid Eco area
Shows that gasoline engine power is not
being used very often.
The gasoline engine will automatically
stop and restart under various condi-
tions.
Charge area
Shows that energy is being recovered
via the regenerative brake.
●Hybrid System Indicator is displayed when the driving mode is other than the sport
mode.
●By keeping the indicator needle within Eco area, more Eco-friendly driving can be
achieved.
●Charge area indicates regeneration* status. Regenerated energy will be used to charge
the battery.
*: When used in this manual, “regeneration” refers to the conversion of energy created by
the movement of the vehicle into electrical energy.
Your vehicle is a hybrid vehicle. It has characteristics different from conventional vehicles.
Be sure you are closely familiar with the characteristics of your vehicle, and operate with
care.
The hybrid system combines the use of a gasoline engine and an electric motor (traction
motor) according to driving conditions, improving fuel efficiency and reducing exhaust
emissions.
For details, refer to the “Owner’s Manual”.

11
■Charging the hybrid battery (traction battery)
When shift position N is selected, the hybrid battery (traction battery) will not be charged.
Thus, select P when the vehicle is stopped.
In addition, when driving in heavy traffic, use D or B.
■Regenerative braking
The motor generator converts kinetic energy to electric energy when:
●The accelerator pedal is released while driving with the shift position in D or B.
●The brake pedal is depressed while driving with the shift position in D or B.
■Sounds and vibrations specific to a hybrid vehicle
There may be no engine sounds or vibration even though the vehicle is able to move. For
safety, apply the parking brake and make sure to shift the shift position to P when parked.
The following sounds or vibrations may occur when the hybrid system is operating and are
not a malfunction:
●Motor sounds may be heard from the engine compartment.
●Sounds may be heard from the hybrid battery (traction battery) behind the rear seats
when the hybrid system starts or stops.
●Sounds may be heard from the transmission when the gasoline engine starts or stops,
when driving at low speeds, or during idling.
●Engine sounds may be heard when accelerating sharply.
●Sounds may be heard due to regenerative braking when the brake pedal is depressed
and accelerator is loosened.
●Other sounds, such as motors and mechanical noises, may be heard from the brake sys-
tem when the brake pedal is depressed.
●Vibration may be felt when the gasoline engine starts or stops.
●Cooling fan sounds may be heard from the air intake vent on the side of rear right seat-
back.
■Running out of fuel
When the vehicle has run out of fuel and the hybrid system cannot be started, refuel the
vehicle with at least enough gasoline to make the low fuel level warning light go off. If there is
only a small amount of fuel, the hybrid system may not be able to start.
(The minimum amount of fuel to add to make the low fuel level warning light go out is about
3.1 gal. [11.8 L, 2.6 Imp.gal.], when the vehicle is on a level surface. This value may vary when
the vehicle is on a slope.)
12
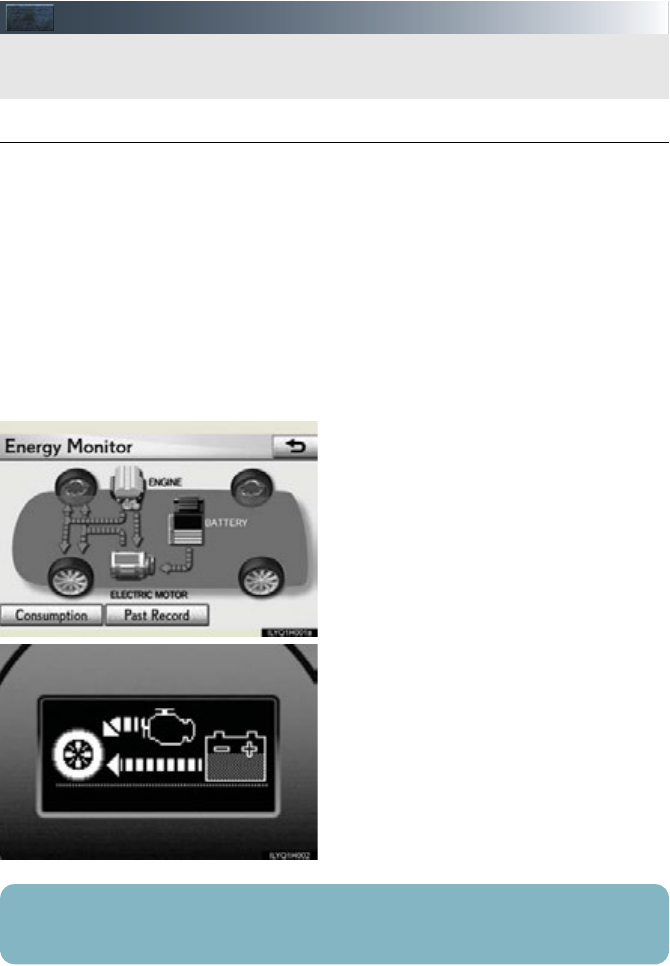
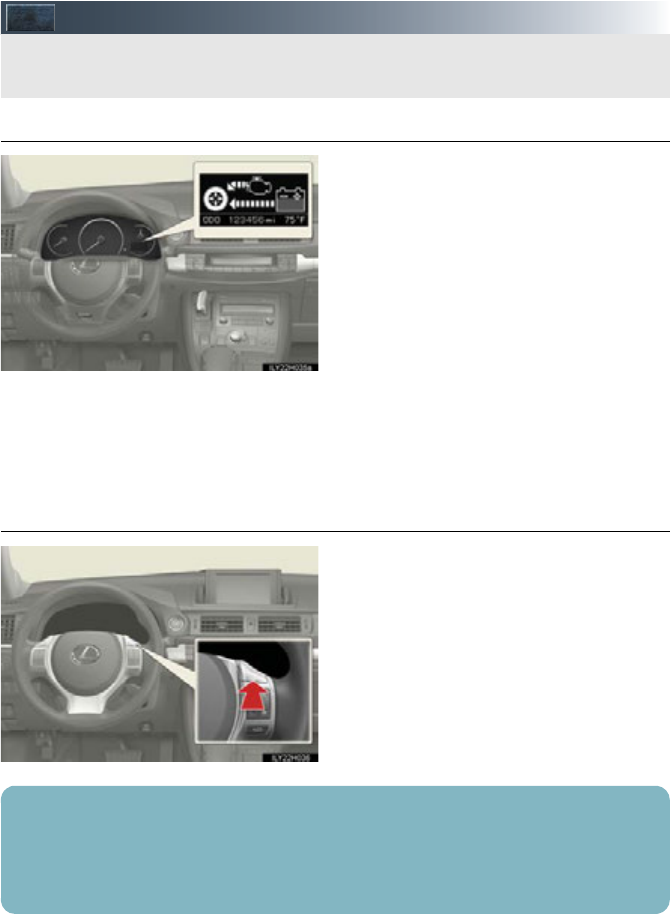
Energy Monitor/Consumption Screen
■Energy monitor
The energy monitor can be displayed on both the navigation system screen and the multi-
information display.
●How to display on the navigation system screen (if equipped):
Press the “MENU” button on the Remote Touch, and select “Info. Phone” after that select
“Fuel consumption”.
If the “Consumption” or “Past Record” screen is displayed, select “Energy” and press the
“ENTER” button on the Remote Touch.
Please refer to P.40 for the Remote Touch operation.
●How to display on the multi-information display:
Press the “DISP” button on the steering wheel several times to select the energy monitor
display.
●The flow of energy is displayed on the
navigation system screen.
Amber: gasoline energy
Yellow: electrical energy
Green: energy recovery
A green arrow appears when regen-
erative braking occurs.
●The flow of energy is indicated by the
movement of the arrows on the multi-
information display.
You can view the status of your hybrid system on the multi-information display and the
navigation system screen.
The displayed energy flow, battery level, etc. will change in response to the current driving
conditions.
13
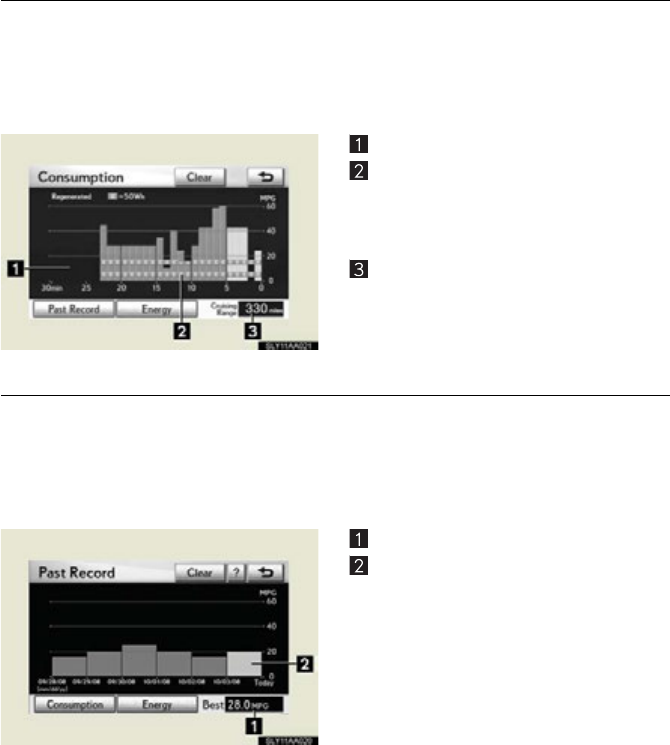
■Consumption (vehicles with a navigation system)
Press the “MENU” button on the Remote Touch and select “Info. Phone”, after that select
“Fuel consumption” and press the “ENTER” button on the Remote Touch.
If the “Consumption” screen does not appear, select “Consumption” and press the “ENTER”
button on the Remote Touch.
Please refer to P.40 for the Remote Touch operation.
Fuel consumption in the past 30 minutes
Regenerated energy in the past 30 min-
utes
One symbol indicates 50 Wh. Up to 4
symbols are shown.
Cruising range
■Past record (vehicles with a navigation system)
Press the “MENU” button on the Remote Touch and select “Info. Phone”, after that select
“Fuel consumption” and press the “ENTER” button on the Remote Touch.
If the “Past Record” screen does not appear, select “Past Record” and press the “ENTER”
button on the Remote Touch.
Please refer to P.40 for the Remote Touch operation.
Best past fuel consumption
Average fuel consumption
Displays the average fuel consumption
between each reset of the total average
fuel consumption on the multi-informa-
tion display.
When resetting, if the total average fuel
consumption is better than the best past
fuel consumption, the best past fuel con-
sumption will be updated.

14
■Hybrid warning message
A message is automatically displayed when a malfunction occurs in the hybrid system or an
improper operation is attempted.
If a warning message is shown on the multi-
information display, read the message and
follow the instructions.
15
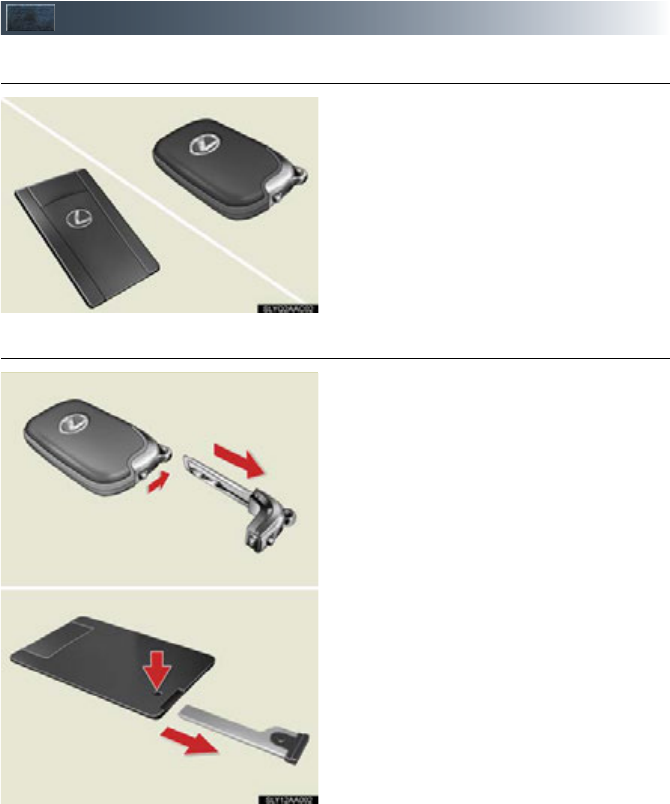
Keys
■Electronic key
Smart access system with push-button start
(P.1 6 )
Wireless remote control (P.16 )
*: If equipped
■Mechanical key
.
Carry the mechanical key together with the
electronic key. If the electronic key battery
is depleted or the entry function does not
operate properly, you will need the
mechanical key.
To take out the mechanical key:
Electronic keys: Slide the release lever
and take the key out.
Card key: Press the lock release button
and take the key out.
Card key*
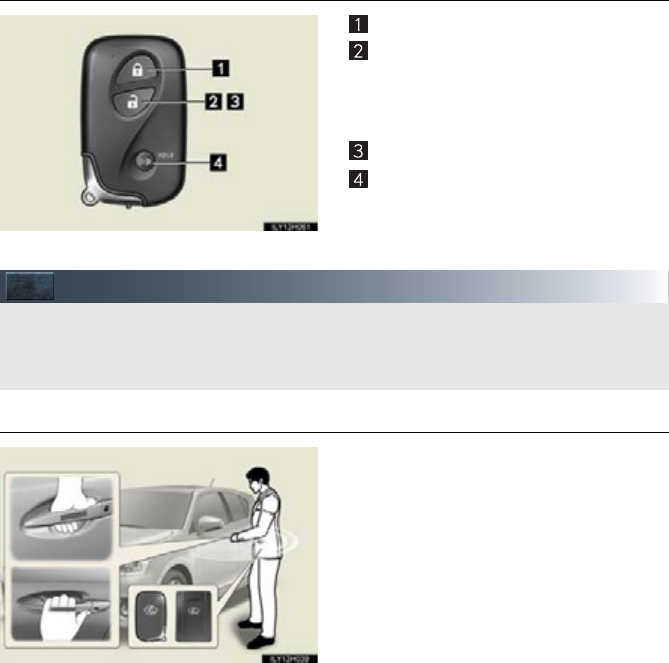
16
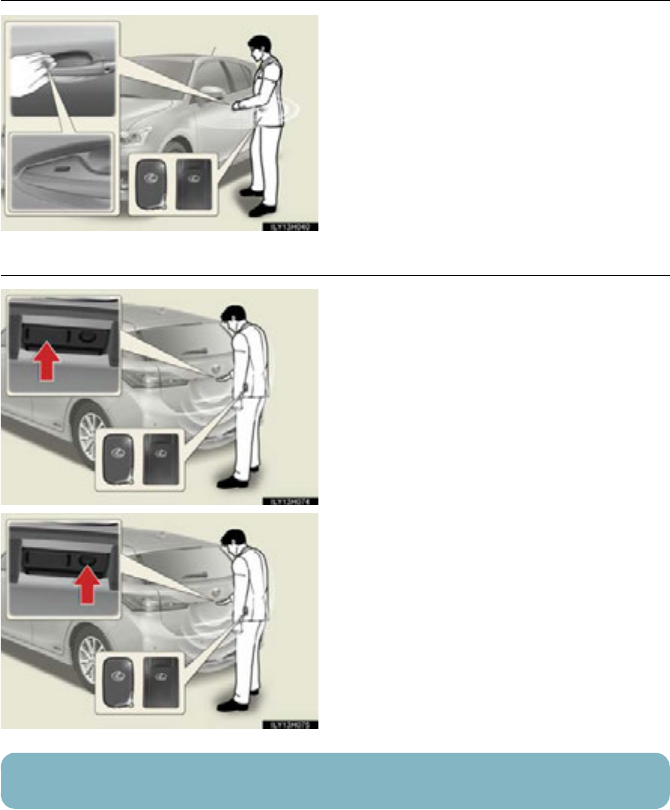
■Wireless remote control
Locks all the doors
Unlocks all the doors
Pressing the button unlocks the driver’s
door. Pressing the button again within 3
seconds unlocks the other doors.
Opens the windows (press and hold)*
Sounds the alarm (press and hold)
*: This setting must be customized at
your Lexus dealer.
Smart Access System with Push-button Start
■Entering the vehicle
Grip the driver’s door handle to unlock the
door. Grip the passenger’s door handle to
unlock all the doors.
Make sure to touch the sensor on the
back of the handle.
The doors cannot be unlocked for 3 sec-
onds after the doors are locked.
The following operations can be performed simply by carrying the electronic key
(including the card key) on your person, for example in your pocket.
For details on starting the hybrid system, see page 19.
17
■Exiting the vehicle
Touch the lock sensor (the indentation on
the upper part of the door handle) to lock
the doors.
■Unlocking and locking the back door
Press the unlock button to unlock all the
doors.
The doors cannot be unlocked for 3 sec-
onds after the doors are locked.
Press the lock button to lock all the doors.
For details on what to do when the electronic key does not operate properly, see page 93.
18
Theft Deterrent System
■Immobilizer system
The indicator light flashes after the
“POWER” switch has been turned off to
indicate that the system is operating.
The indicator light stops flashing after
the “POWER” switch has been turned to
ACCESSORY or ON mode to indicate
that the system has been canceled.
■Alarm
The system sounds the alarm and flashes the lights when forced entry is detected.
To set the alarm: Close the doors and hood, and lock all the doors. The system will be set
automatically after 30 seconds.
The indicator light changes from being on to flashing when the system is set.
To deactivate or stop the alarm:
●Unlock the doors
●Turn the “POWER” switch to ACCESSORY or ON mode, or start the hybrid system.
(The alarm will be deactivated or stopped after a few seconds.)
19
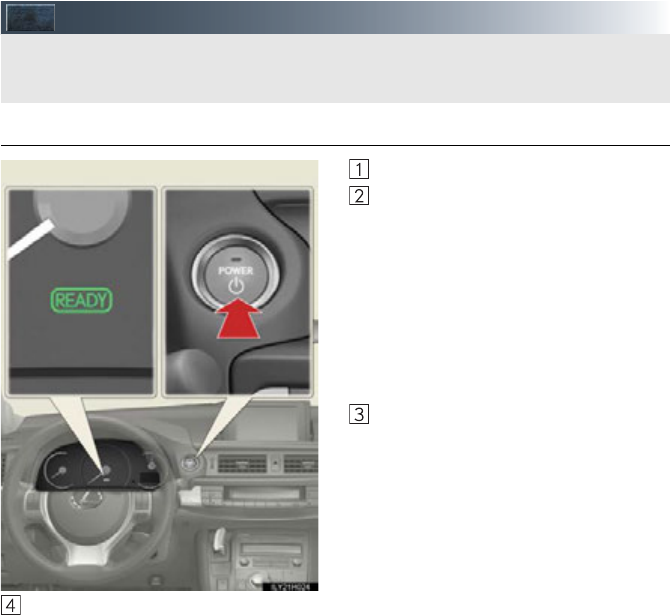
Power (Ignition) Switch
■Starting the hybrid system
Check that the parking brake is set.
Firmly depress the brake pedal.
Check that the “POWER” switch
indicator turns green. If the indicator
does not turn green, the hybrid sys-
tem cannot be started.
When the shift position is N, the
hybrid system cannot start. Shift the
shift position to P, when starting the
hybrid system. (P.22)
Press the “POWER” switch.
Continue depressing the brake pedal
until the hybrid system is completely
started.
The hybrid system can be started
from any “POWER” switch mode.
Check that the “READY” indicator is on.
If the “READY” indicator changes from a flashing light to a solid light and the buzzer
sounds, the hybrid system is starting normally.
The vehicle will not move when the “READY” indicator is off.
The vehicle can move when the “READY” indicator is on even if the engine is stopped.
(The gasoline engine starts or stops automatically in accordance with the state of the
vehicle.)
Performing the following operations when carrying the electronic key on your person
starts the hybrid system or changes “POWER” switch modes.
20
■Stopping the hybrid system
Stop the vehicle completely.
Set the parking brake.
Shift the shift position to P.
Check that the shift position indicator shows P.
Press the “POWER” switch.
The hybrid system will stop, and the meter display will be extinguished (the shift position
indicator will be extinguished a few seconds after the meter display).
Slowly release the brake pedal and check that the indicator on the “POWER” switch is
off.
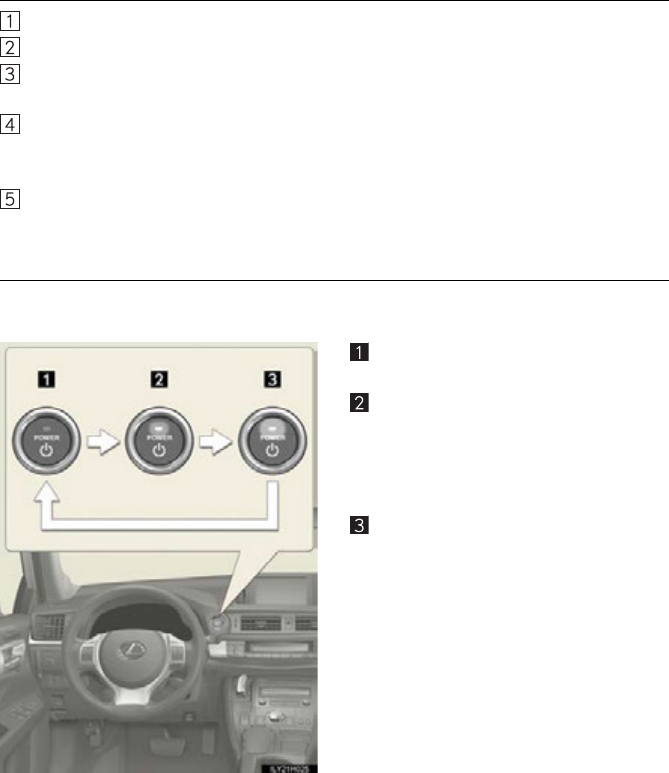
■Changing “POWER” switch modes
Modes can be changed by pressing the “POWER” switch with the brake pedal released.
(The mode changes each time the switch is pressed.)
Off
The emergency flashers can be used.
ACCESSORY mode
Some electrical components such as the
audio system can be used.
The “POWER” switch indicator turns
amber.
ON mode
All electrical components can be used.
The “POWER” switch indicator turns
amber.
21
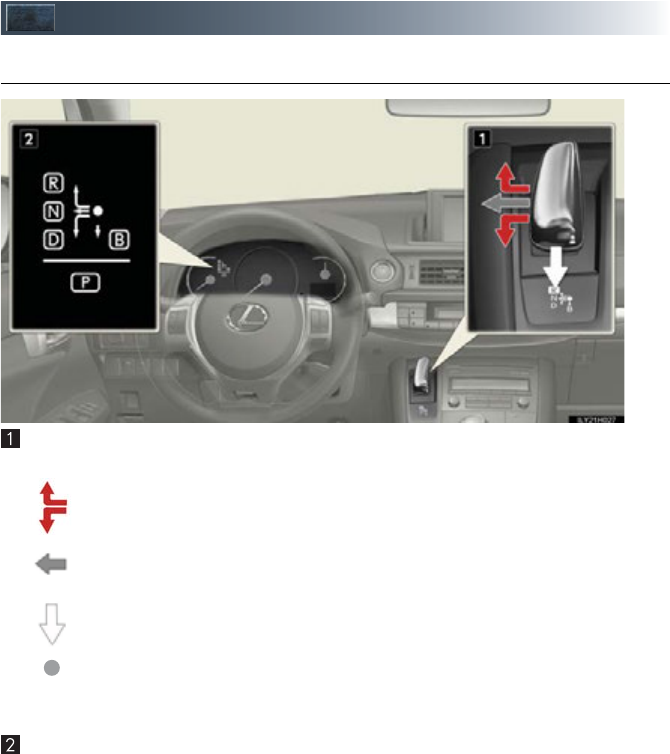
Hybrid Transmission
■Shifting the shift lever
Shift lever
Operate the shift lever gently and ensure correct shifting operation.
When shifting to the D or R positions, move the shift lever along the shift gate.
To shift to the N position, slide the shift lever to the left and hold it. The shift posi-
tion will change to N.
Shifting to B is only possible when shift position D is selected.
The shift lever will always return to this original position after a shifting operation.
When shifting from P to N, D or R, from D to R, or from R to D, ensure that the brake
pedal is being depressed and the vehicle is stationary.
Shift position indicator
The current shift position is illuminated.
When any shift position other than D or B is selected, the arrow toward B disappears
from the shift position indicator.
When selecting the shift position, make sure that the shift position has been changed to the
desired position by checking the shift position indicator provided on the instrument cluster.
22
■Shift position purpose
*: For good fuel economy and noise reduction, the D position should usually be used.
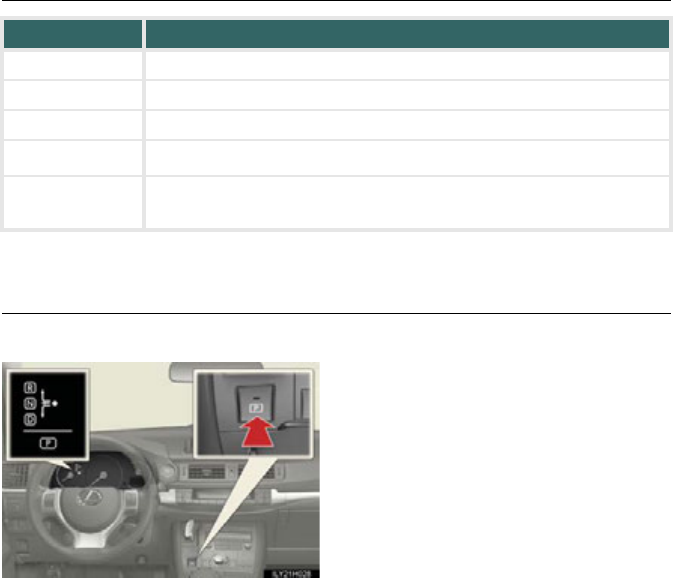
■P position switch
■When shifting the shift position to P
Fully stop the vehicle and set the parking
brake, and then press the P position switch.
When the shift position is changed to P,
the switch indicator comes on.
Check that the P position is illuminated
on the shift position indicator.
■Shifting the shift position from P to other positions
●While depressing the brake pedal firmly, operate the shift lever. If the shift lever is
operated without depressing the brake pedal, the buzzer will sound and the shifting
operation will be disabled.
●When selecting the shift position, make sure that the shift position has been changed
to the desired position by checking the shift position indicator provided on the instru-
ment cluster.
●The shift position cannot be changed from P to B directly.
Shift position Function
PParking the vehicle/starting the hybrid system
RReversing
NNeutral
DNormal driving*
BApplying engine braking or strong braking when the accelerator
pedal has been released on steep downward slopes etc.
23
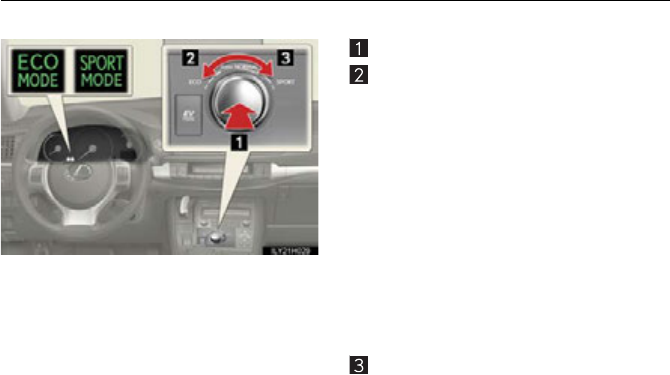
■Selecting a driving mode
The following modes can be selected to suit driving conditions:
Normal mode
Eco drive mode
The torque generated in response to
accelerator pedal depression will lessen
compared to normal, and air condition-
ing operation (heating/cooling) will be
restrained, thus suiting driving with
improved fuel efficiency.
When the driving mode select switch is
turned left, the “ECO MODE” indicator
comes on in the instrument cluster.
Press the switch to change the driving
mode to normal mode.
Sport mode
Use when high levels of response and
feeling are desirable, such as when driv-
ing in mountainous regions or when
overtaking.
When the driving mode select switch is
turned right, the “SPORT MODE” indi-
cator comes on in the instrument cluster.
Press the switch to change the driving
mode to normal mode.
24
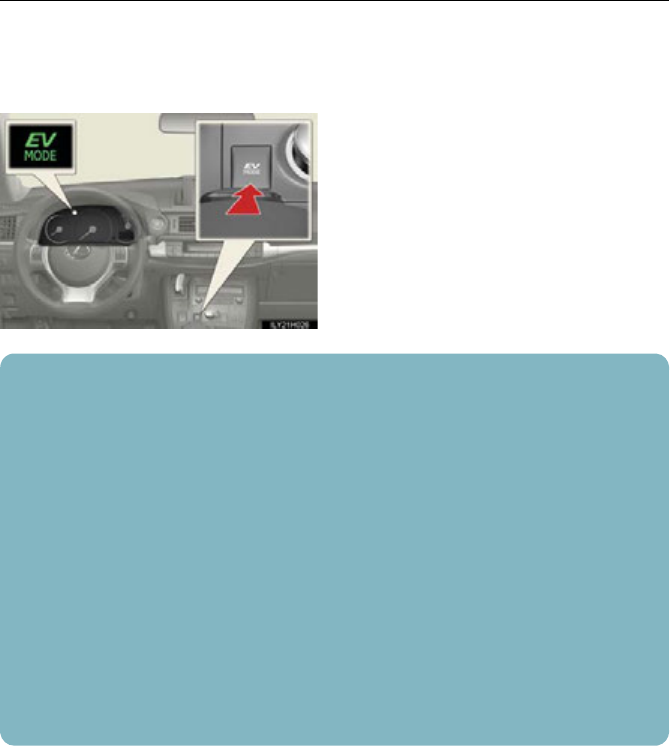
■EV drive mode
In EV drive mode, the electric motor (traction motor), powered by the hybrid battery (trac-
tion battery), is used to drive the vehicle.
This mode allows you to drive in residential areas late at night, or in indoor parking lots etc.
without concern for noises and exhaust gas emissions.
Turns EV drive mode on/off
When EV drive mode is turned on, the
EV drive mode indicator will come on.
Pressing the switch when in EV drive
mode will return the vehicle to normal
driving (using the gasoline engine and
electric motor [traction motor]).
■Situations in which EV drive mode cannot be turned on
It may not be possible to turn EV drive mode on in the following situations. If it cannot be
turned on, a buzzer will sound and a message will be shown on the multi-information dis-
play.
• The temperature of the hybrid system is high.
The vehicle has been left in the sun, driven on a hill, driven at high speeds, etc.
• The temperature of the hybrid system is low.
The vehicle has been left in temperatures lower than about 68F (20C) for a long
period of time etc.
• The gasoline engine is warming up.
• The hybrid battery (traction battery) is low.
An “Energy Monitor” display of level 3 or lower may indicate a low battery level.
• Vehicle speed is high.
• The accelerator pedal is depressed firmly or the vehicle is on a hill etc.
• The windshield defogger is in use.
25
Multi-information Display
■Display contents
●Energy monitor
●Trip information
• Current fuel consumption/Average
fuel consumption after refueling
• Average fuel consumption
• Cruising range
•Elapsed time
• Average vehicle speed
●Instrument cluster setting
●Intuitive parking assist display (if
equipped)
●Dynamic radar cruise control display (if
equipped)
●Warning messages
■Switching the display
Items displayed can be switched by press-
ing the “DISP” button.
The multi-information display presents the driver with a variety of driving-related data
including the warning messages.
■When using the intuitive parking assist or dynamic radar cruise control, the appropriate
display is shown on the screen.
■If a problem is detected in any of the vehicle’s systems, a warning message is shown on
the multi-information display.
26
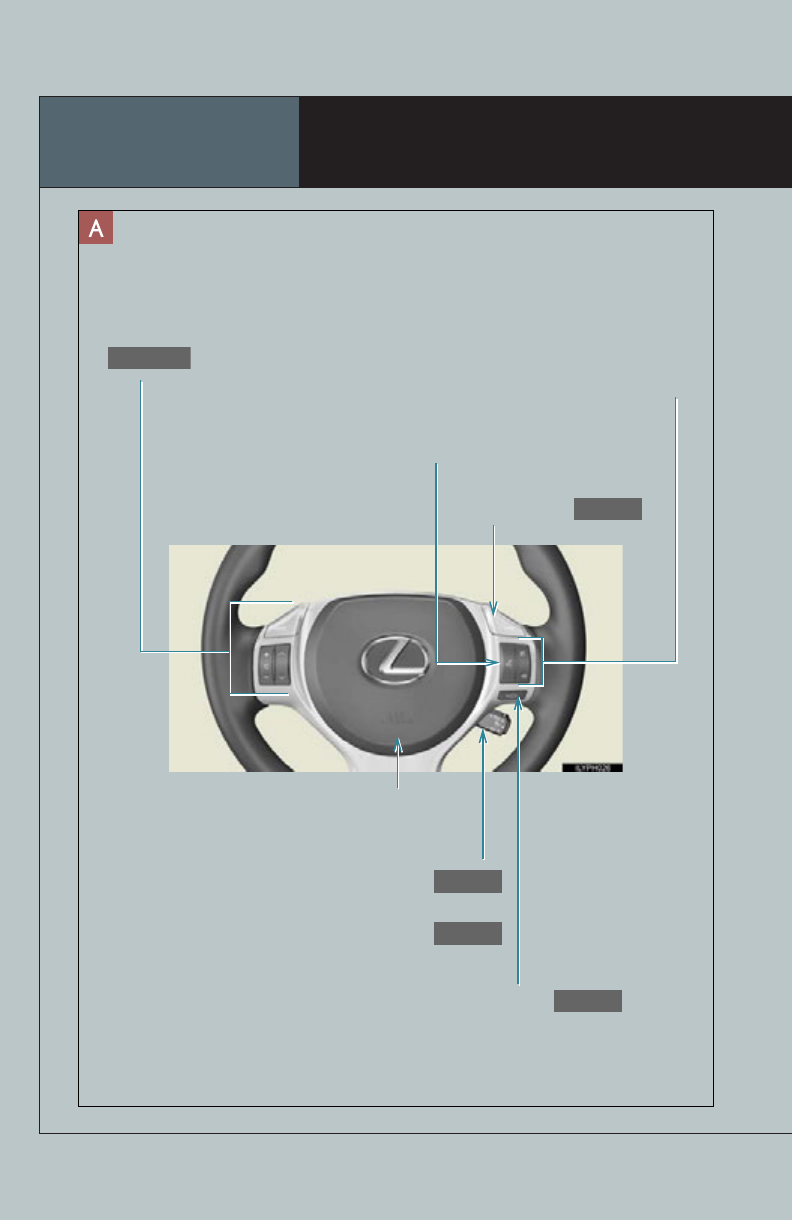
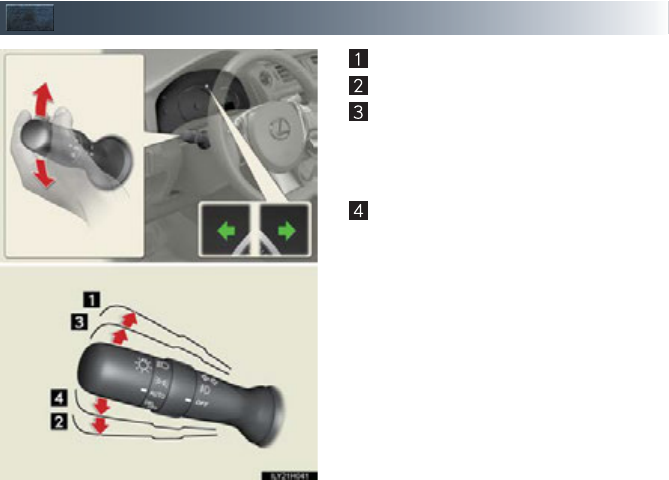
Tur n S ignal Lever
Right turn
Left turn
Lane change to the right (push and hold
the lever partway)
The right hand signals will flash until you
release the lever.
Lane change to the left (push and hold
the lever partway)
The left hand signals will flash until you
release the lever.
27
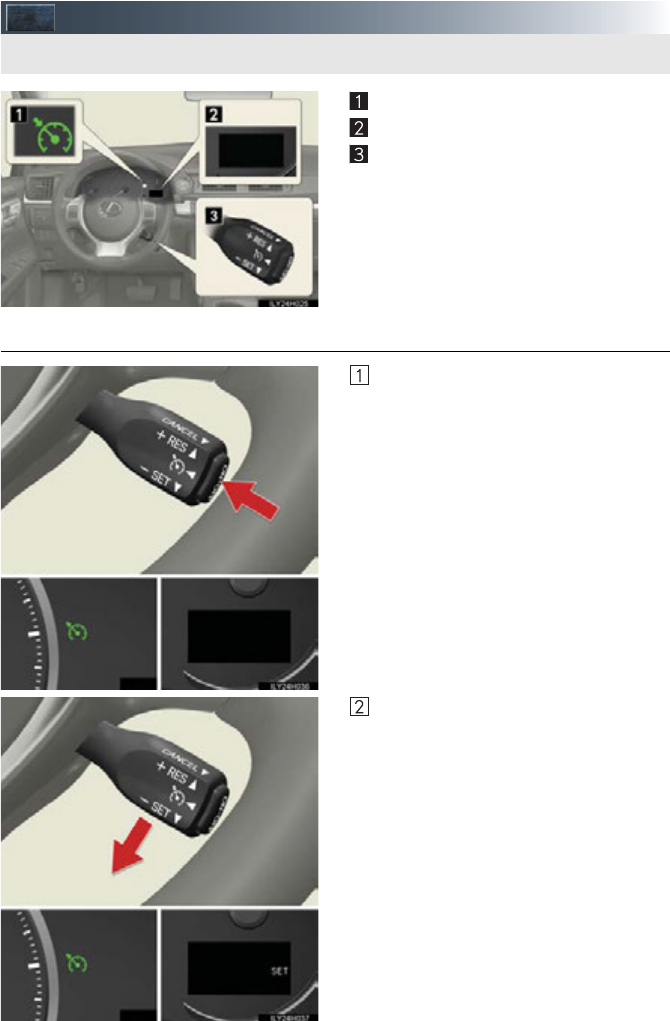
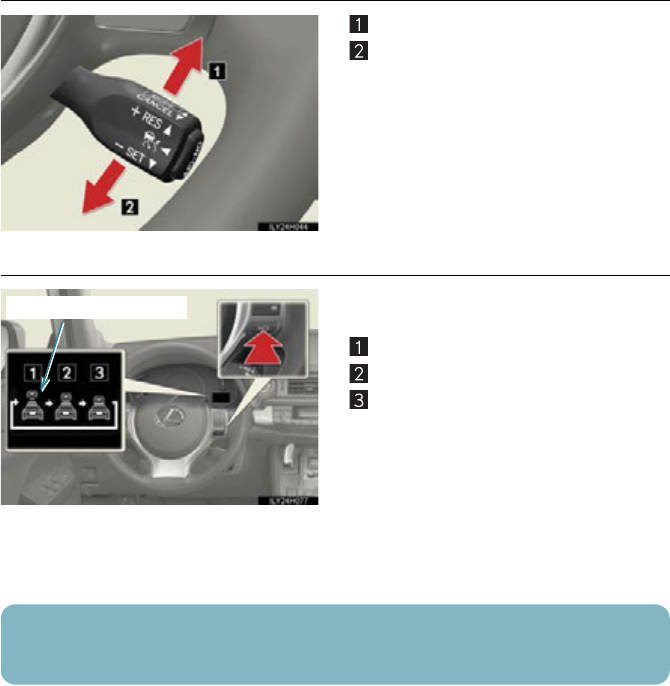
Cruise Control (if equipped)
Indicators
Display
Cruise control switch
■Setting the vehicle speed
Press the “ON-OFF” button to activate
the cruise control.
Cruise control indicator will come on.
Press the button again to deactivate
the cruise control.
Accelerate or decelerate the vehicle to
the desired speed, and push the lever
down to set the speed.
“SET” will be displayed.
The vehicle speed at the moment the
lever is released becomes the set
speed.
Use the cruise control to maintain a set speed without depressing the accelerator pedal.
28
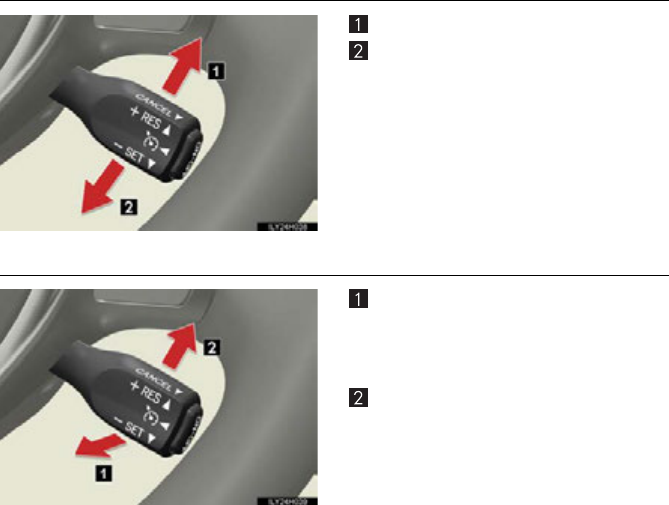
■Adjusting the set speed
Increases the speed
Decreases the speed
Fine adjustment: Momentarily move the
lever in the desired direction.
Large adjustment: Hold the lever in the
desired direction.
■Canceling and resuming the constant speed control
Pulling the lever toward you cancels the
constant speed control.
The speed setting is also canceled when
the brakes are applied.
Pushing the lever up resumes the con-
stant speed control.
Resuming is available when the vehicle
speed is more than approximately 25
mph (40 km/h).
29
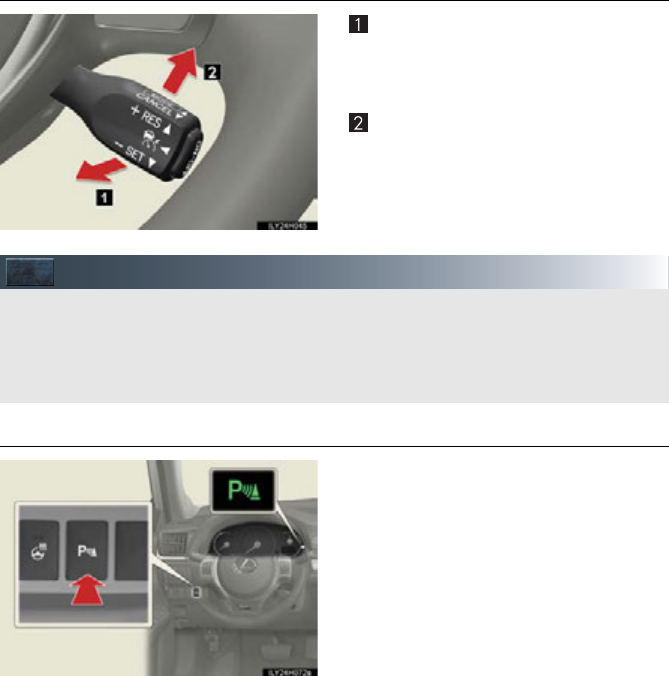
Dynamic Radar Cruise Control (if equipped)
Indicators
Display
Set speed
Vehicle-to-vehicle distance button
Cruise control switch
Dynamic radar cruise control supplements conventional cruise control with a vehicle-to-
vehicle distance control. In vehicle-to-vehicle distance control mode, the vehicle automat-
ically accelerates or decelerates in order to maintain a set following distance from vehi-
cles ahead.
30
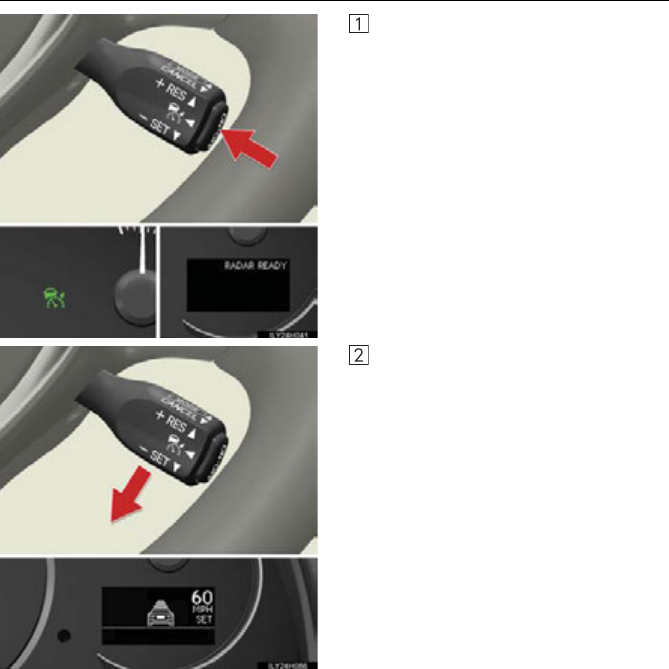
■Setting the vehicle speed (vehicle-to-vehicle distance control mode)
Press the “ON-OFF” button to activate
the cruise control.
Rader cruise control indicator will
come on.
Press the button again to deactivate
the cruise control.
Accelerate or decelerate the vehicle to
the desired speed, and push the lever
down to set the speed.
“SET” will be displayed.
The vehicle speed at the moment the
lever is released becomes the set
speed.
31
■Adjusting the set speed
Increases the speed
Decreases the speed
Fine adjustment: Momentarily move the
lever in the desired direction.
Large adjustment: Hold the lever in the
desired direction.
■Changing the vehicle-to-vehicle distance
Pressing the button changes the vehicle-to-
vehicle distance as follows:
Long
Medium
Short
The vehicle-to-vehicle distance is set
automatically to long mode when the
“POWER” switch is turned to ON
mode.
If a vehicle is running ahead of you, the
preceding vehicle mark will be also dis-
played.
Preceding vehicle mark
The vehicle-to-vehicle distance control mode maintains the preset cruising speed as long
as no vehicle is detected ahead.
32
■Canceling and resuming the constant speed control
Pulling the lever toward you cancels the
constant speed control.
The speed setting is also canceled when
the brakes are applied.
Pushing the lever up resumes the con-
stant speed control.
Resuming is available when the vehicle
speed is more than approximately 25
mph (40 km/h).
Intuitive Parking Assist (if equipped)
■Turning the system on and off
Turns the intuitive parking assist on/off
When on, the indicator light comes on to
inform the driver that the system is oper-
ational.
The distance from your vehicle to nearby obstacles when parallel parking or maneuver-
ing into a garage is measured by the sensors and communicated via the multi-informa-
tion display, touch screen and a buzzer. Always check the surrounding area when using
this system.
33
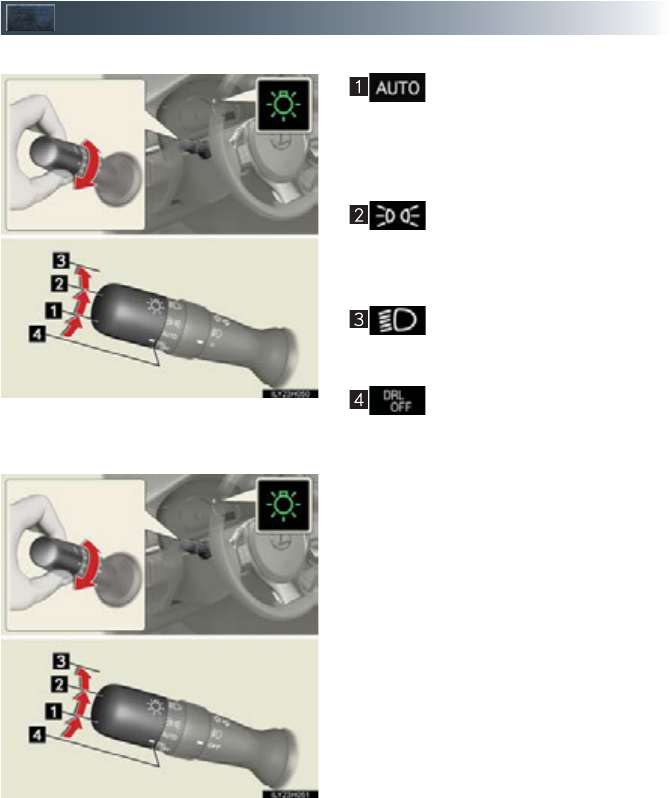
Headlights
Ty pe A
The headlights, parking lights,
daytime running lights and so on
turn on and off automatically
(when the “POWER” switch is in
ON mode).
The side marker, parking, tail,
license plate, daytime running
lights and instrument panel lights
turn on.
The headlights and all the lights
listed above (except daytime run-
ning lights) turn on.
The daytime running light turn
off.
Ty pe B
34
Type C
The daytime running lights turn
on.
The side marker, parking, tail,
license plate, daytime running
lights and instrument panel lights
turn on.
The headlights and all the lights
listed above (except daytime run-
ning lights) turn on.
The headlights, parking lights,
daytime running lights and so on
turn on and off automatically
(when the “POWER” switch is in
ON mode).
■Turning on the high beam headlights
With the headlights on, push the lever
away from you to turn on the high
beams.
Pull the lever toward you to the center
position to turn the high beams off.
Pull the lever toward you and release it
to flash the high beams once.
You can flash the high beams with the
headlights on or off.
35
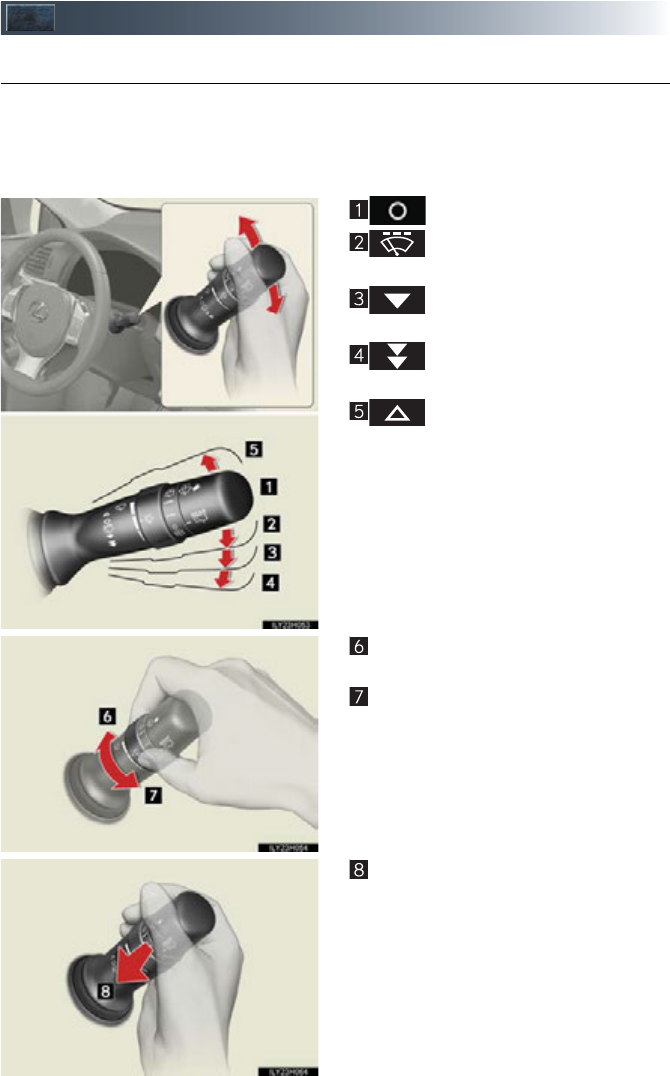
Windshield Wipers and Washer
■Intermittent windshield wipers with interval adjuster (if equipped)
The wiper operation is selected by moving the lever as follows.
When intermittent windshield wiper operation is selected, wiper intervals can be also
adjusted.
Ty pe A
OFF
Intermittent windshield wiper
operation
Low speed windshield wiper
operation
High speed windshield wiper
operation
Te mpo r a r y oper ation
Increases the intermittent windshield
wiper frequency
Decreases the intermittent windshield
wiper frequency
Washer/wiper dual operation
The wipers will automatically operate a
couple of times after the washer squirts.
36
Type B
OFF
Intermittent windshield wiper
operation
Low speed windshield wiper
operation
High speed windshield wiper
operation
Temporary operation
Increases the intermittent windshield
wiper frequency
Decreases the intermittent windshield
wiper frequency
Washer/wiper dual operation
The wipers will automatically operate a
couple of times after the washer squirts.

37
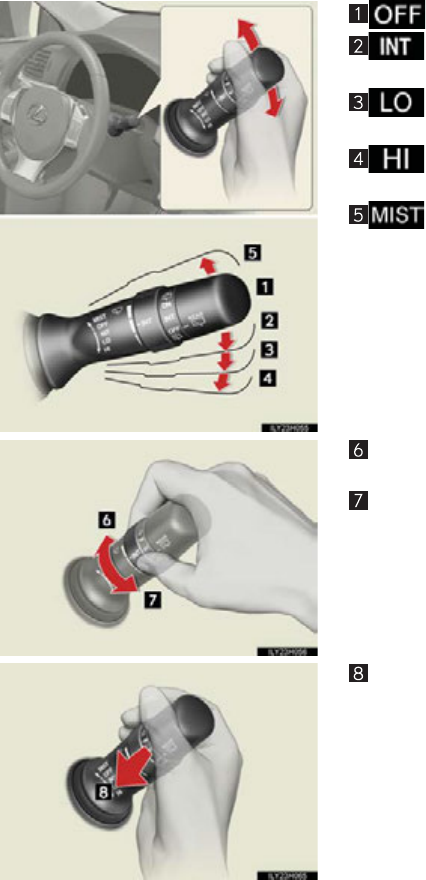
■Rain-sensing windshield wipers (if equipped)
When “AUTO” is selected, the wipers will operate automatically when the sensor detects
falling rain. The system automatically adjusts wiper timing in accordance with rain volume
and vehicle speed.
When “AUTO” is selected, the sensor sensitivity can be adjusted as follows by turning the
switch ring:
Ty pe A
OFF
Rain-sensing wiper operation
Low speed wiper operation
High speed wiper operation
Te mpo r a r y oper ation
Increases the sensitivity
Decreases the sensitivity
Washer/wiper dual operation
The wipers will automatically operate a
couple of times after the washer squirts.
38
Type B
OFF
Rain-sensing wiper operation
Low speed wiper operation
High speed wiper operation
Temporary operation
Increases the sensitivity
Decreases the sensitivity
Washer/wiper dual operation
The wipers will automatically operate a
couple of times after the washer squirts.
39
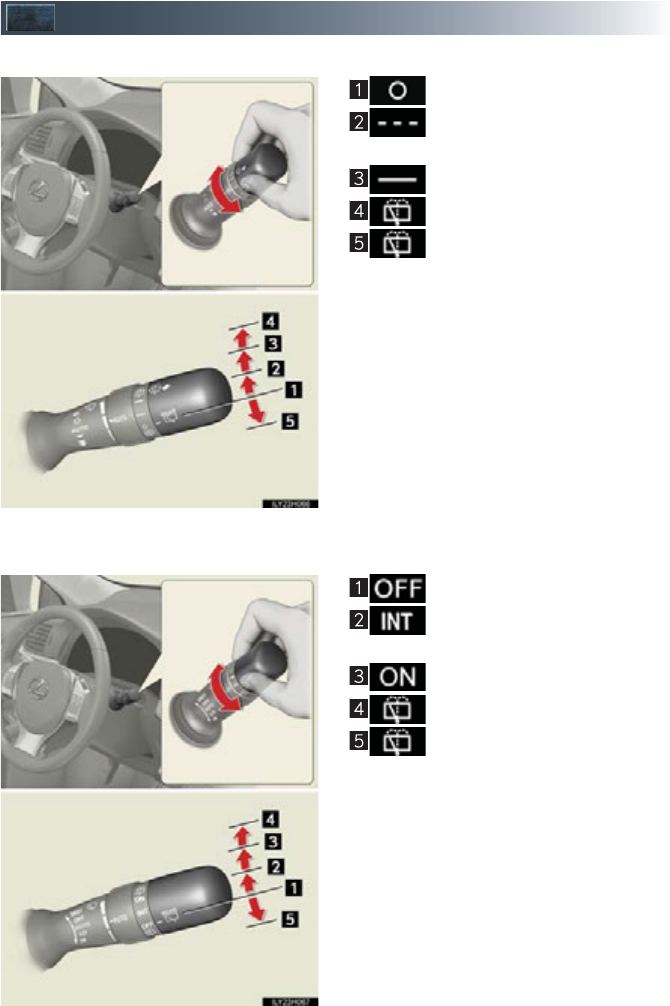
Rear Window Wiper and Washer (if equipped)
Ty pe A
OFF
Intermittent window wiper oper-
ation
Normal window wiper operation
Washer/wiper dual operation
Washer/wiper dual operation
Ty pe B
OFF
Intermittent window wiper oper-
ation
Normal window wiper operation
Washer/wiper dual operation
Washer/wiper dual operation
40
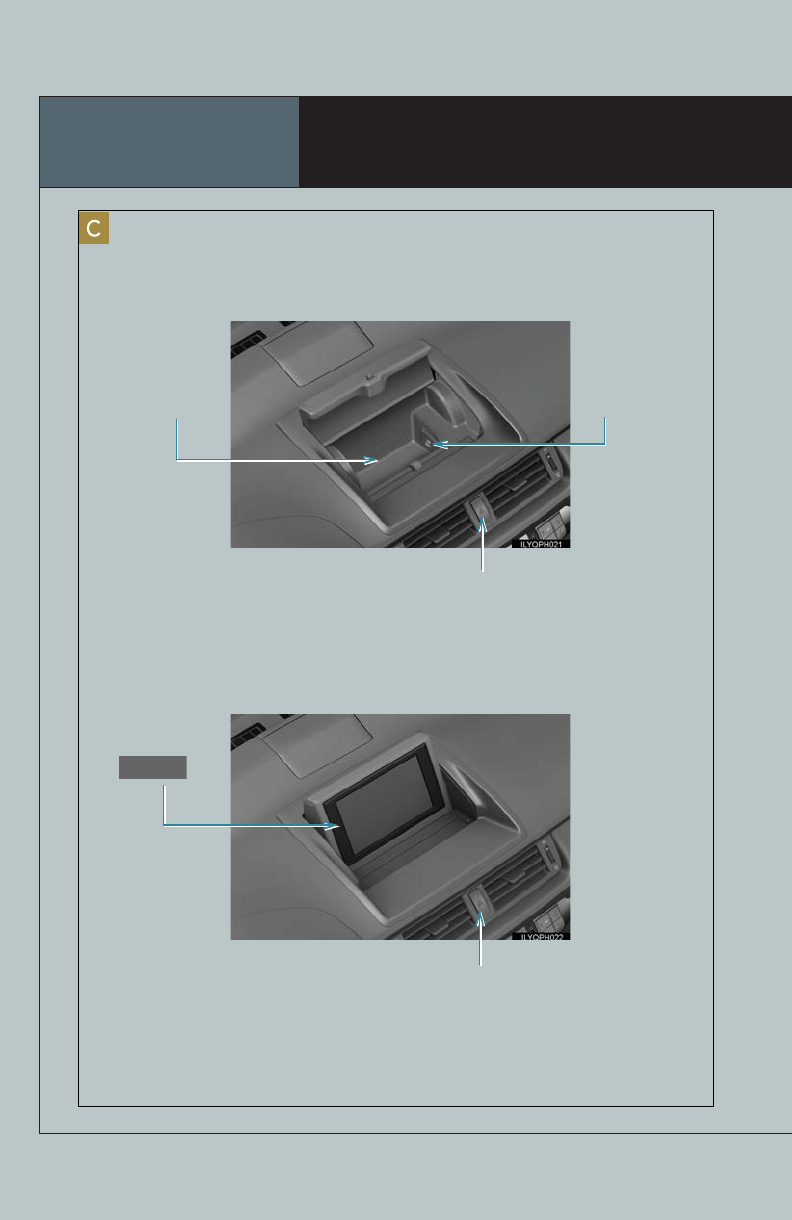
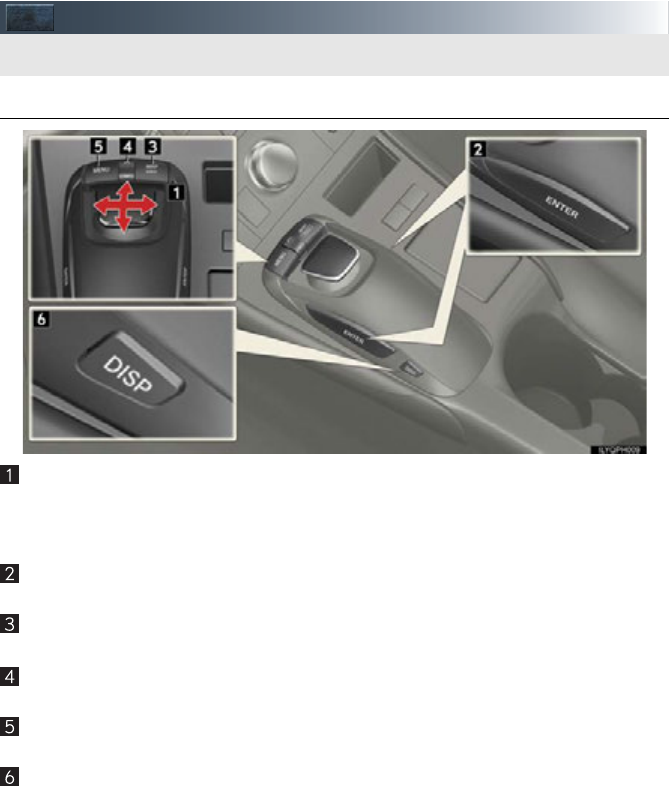
Remote Touch (if equipped)
■Basic operation
Remote Touch knob
Use this knob to move the cursor and select items on the screen.
Feedback force, pointer shape, and on or off of selection sounds can be changed. Refer
to the “Navigation System Owner’s Manual”.
“ENTER” button
Press this button to confirm a selection.
“MAP/VOICE” button
Press this button to display the vehicle’s current position.
“•” button
Press this button to change map scale and scroll through lists.
“MENU” button
Press this button to display the “Start” (menu) screen.
“DISP” button
Press this button to adjust picture quality.
The Remote Touch can be used to operate the navigation screens and configure settings.
41
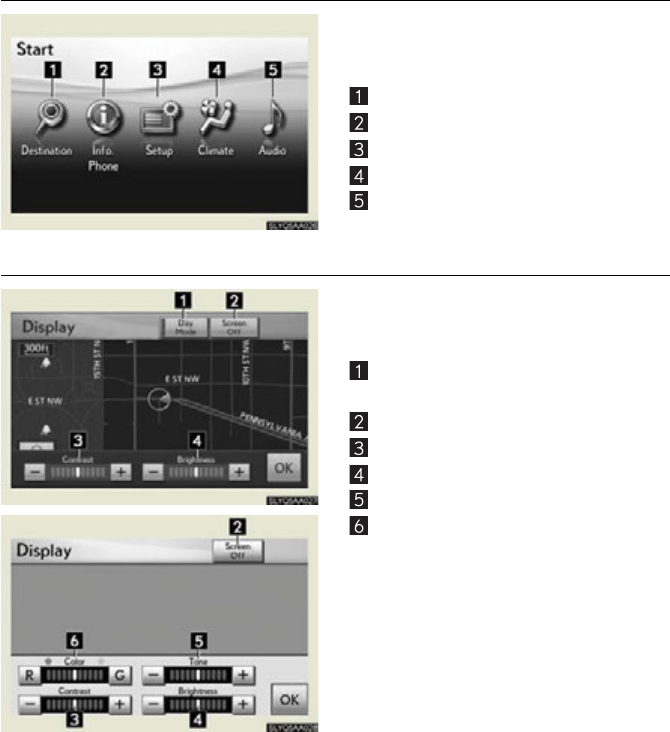
■Start
Press the “MENU” button on the Remote
Touch to display the “Start” screen.
Destination
Info.Phone
Setup
Climate (P.6 0)
Audio (P. 55 )
■Display
Press the “DISP” button on the Remote
Touch to show the “Display” screen.
Displays the screen in “Day Mode” with
the headlight switch on
Turns the screen off
Adjust contrast
Adjust brightness
Adjust color tone
Adjust color
42
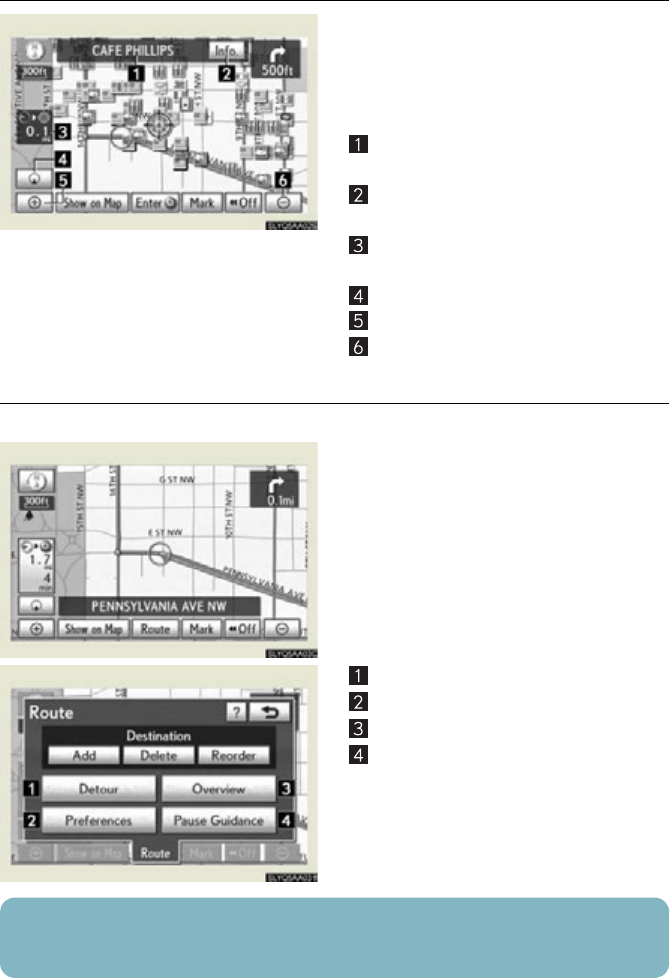
■Screen scroll operation
To scroll over the map, place the pointer in a
position near the desired destination and
then press and hold the “ENTER” button on
the Remote Touch.
Indicates the street name, city name, etc.
for the selected point
Displays various information for the
selected point (if available)
Indicates the distance from the current
position to the pointer
Switches the screens
Zooms in on the map
Zooms out on the map
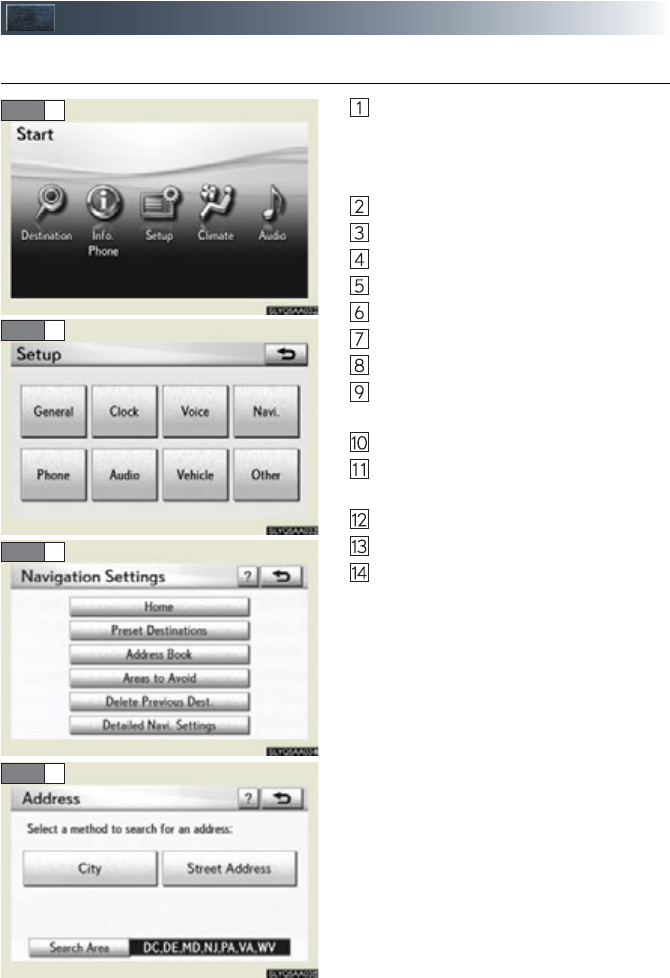
■Setting a route
While route guidance is operating, you can change the route using the following method.
Select “Route”.
The following settings can be accessed
Detour setting
Route preferences
Route overview
Pause and resume route guidance
Some functions are unavailable while the vehicle is in motion. Refer to the “Navigation Sys-
tem Owner’s Manual”.
43
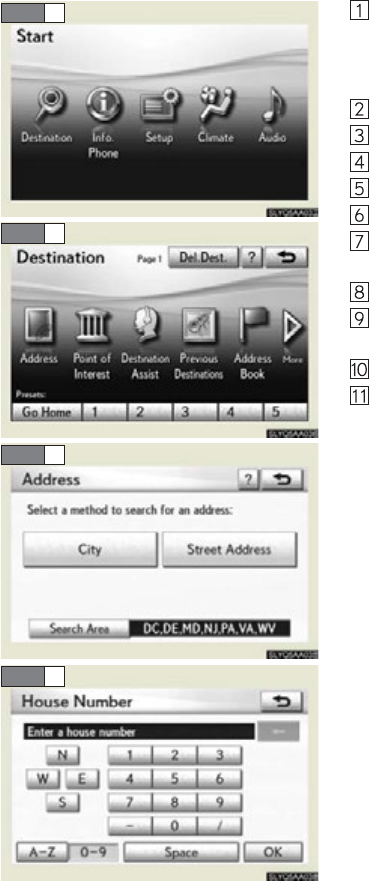
Navigation System (if equipped)
■Register home
Press the “MENU” button on the
Remote Touch.
Please refer to P.40 for the Remote
Touch o p era t i on.
Select “Setup”.
Select “Navi.”.
Select “Home”.
Select “Set Home”.
Select “Address”.
Select “City”.
Input a city name and select “OK”.
Select the button of the desired city
name from the displayed list.
Input the street name and select “OK”.
When the desired street name is found,
select the corresponding button.
Input a house number and select “OK”.
Select “Enter”.
Select “OK”.
STEP 2
STEP 3
STEP 4
STEP 7

44
■Destination input Search by address
Select by city name
Press the “MENU” button on the
Remote Touch.
Please refer to P.40 for the Remote
Touc h op e ra t io n .
Select “Destination”.
Select “Address”.
Select “City”.
Input a city name and select “OK”.
Select the button of the desired city
name from the displayed list.
Input the street name and select “OK”.
When the desired street name is found,
select the corresponding button.
Input a house number and select “OK”.
Select “Go to”.
Select “OK”.
STEP 2
STEP 3
STEP 4
STEP 5
45
Select by street address
Press the “MENU” button on the
Remote Touch.
Please refer to P.40 for the Remote
Touch o p era t i on.
Select “Destination”.
Select “Address”.
Select “Street Address”.
Input a house number and select “OK”.
Input the street name and select “OK”.
When the desired street name is found,
select the corresponding button.
Input a city name and select “OK”.
Select the button of the desired city
name from the displayed list.
Select “Go to”.
Select “OK”.
STEP 2
STEP 3
STEP 4
STEP 5
46
■Destination input Search points of interest by name
Press the “MENU” button on the
Remote Touch.
Please refer to P.40 for the Remote
Touc h op e ra t io n .
Select “Destination”.
Select “Point of Interest”.
Select “Name”.
Input the name of the point of interest
and select “OK”.
Select the button of the desired destina-
tion.
Select “Go to”.
Select “OK”.
STEP 2
STEP 3
STEP 4
STEP 5
47
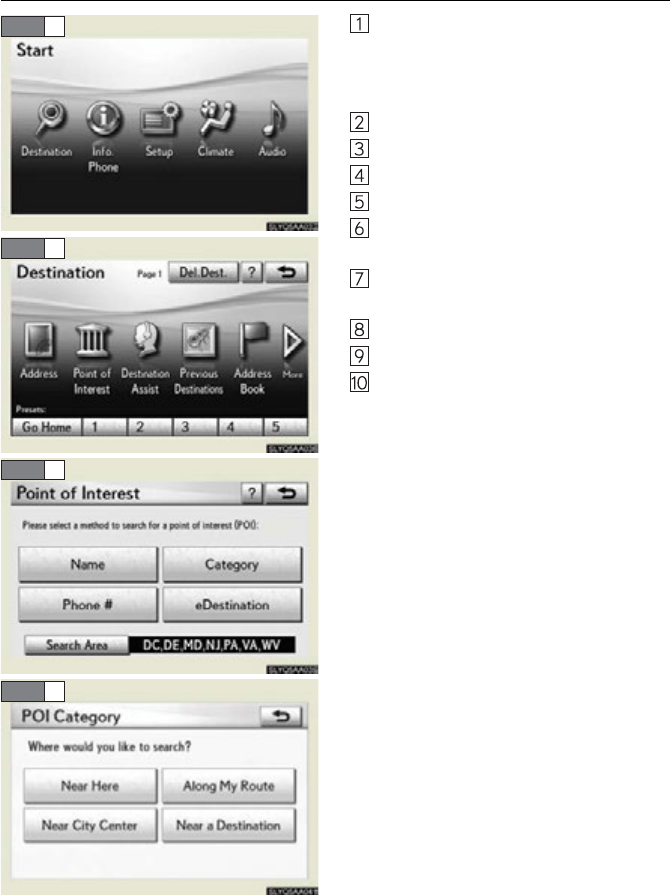
■Destination input Search points of interest by category
Press the “MENU” button on the
Remote Touch.
Please refer to P.40 for the Remote
Touch o p era t i on.
Select “Destination”.
Select “Point of Interest”.
Select “Category”.
Select “Near a Destination”.
Select the button of the desired destina-
tion and set the search point.
Select the desired point of interest cate-
gory.
Select the button of the desired item.
Select “Go to”.
Select “OK”.
STEP 2
STEP 3
STEP 4
STEP 5
48
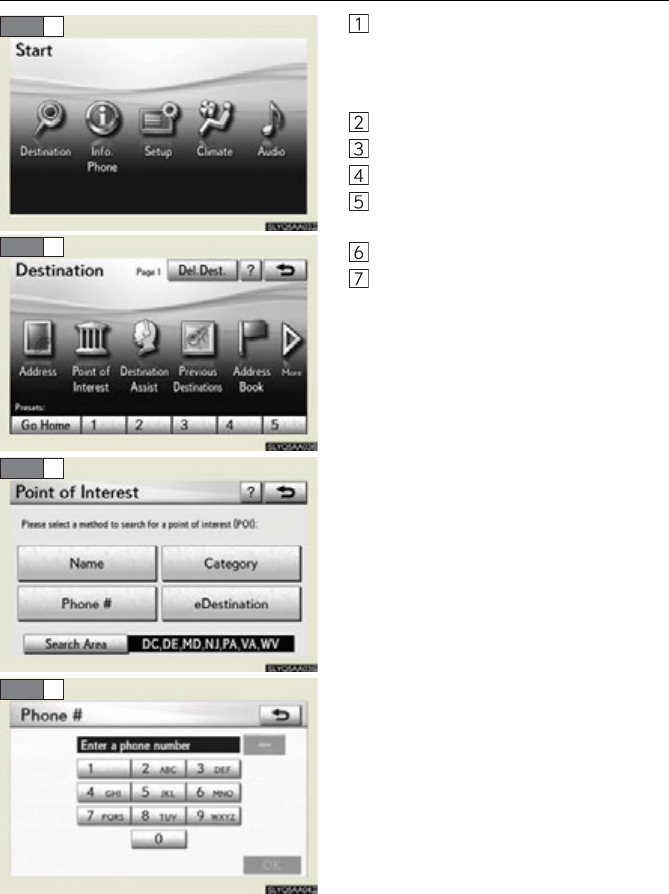
■Destination input Search points of interest by telephone number
Press the “MENU” button on the
Remote Touch.
Please refer to P.40 for the Remote
Touc h op e ra t io n .
Select “Destination”.
Select “Point of Interest”.
Select “Phone #”.
Input a telephone number and select
“OK”.
Select “Go to”.
Select “OK”.
STEP 2
STEP 3
STEP 4
STEP 5
49
Hands-free System For Cellular Phone
(vehicles with a navigation system)
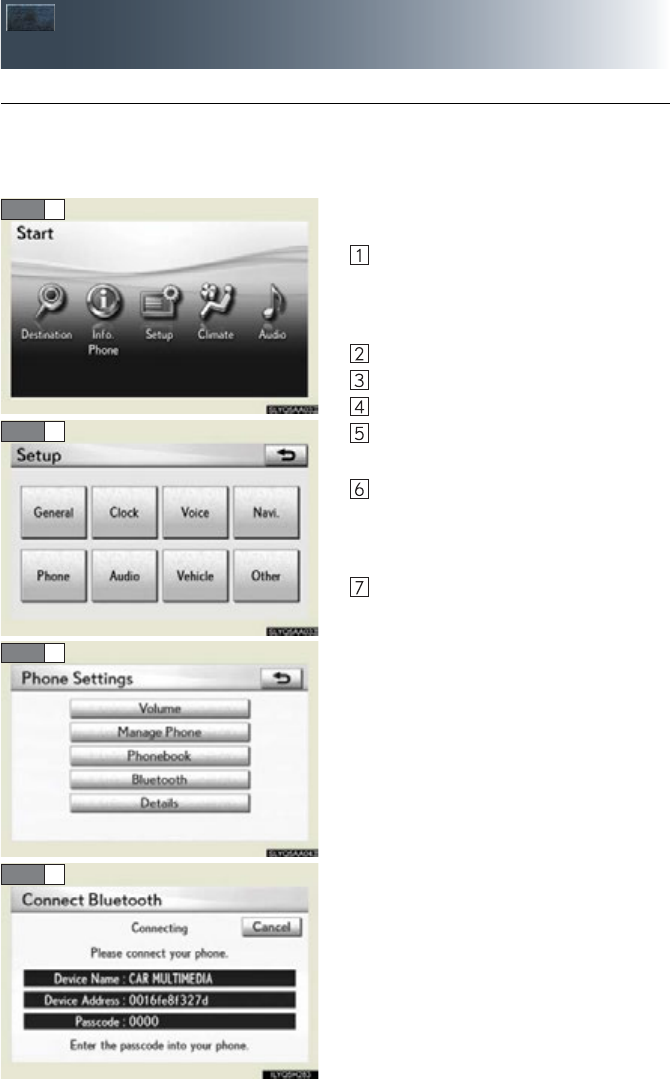
■Bluetooth® phone pairing
Compatible Bluetooth®-equipped phones can be connected to the vehicle, enabling
hands-free operation. Please refer to the cellular phone manufacturer’s user guide for pair-
ing procedures, or go to “www.lexus.com/bluetooth” for more phone information.
To use a Bluetooth® phone, it is necessary
to first register it in the system.
Press the “MENU” button on the
Remote Touch.
Please refer to P.40 for the Remote
Touch o p era t i on.
Select “Setup”.
Select “Phone”.
Select “Manage Phone”.
Select “(add new)” to display the screen
for connecting Bluetooth®.
Enter the passcode displayed on the
screen into the phone.
Refer to the cellular phone user’s manual
for cellular phone operation.
When the connection is completed,
“Bluetooth connection successful.” will
appear.
STEP 2
STEP 3
STEP 4
STEP 6
50
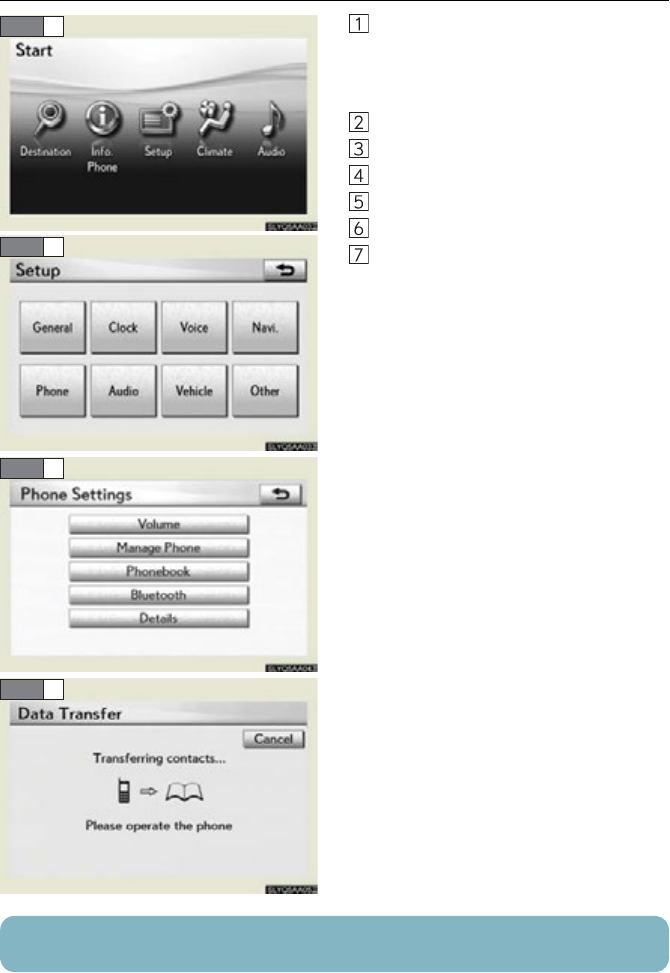
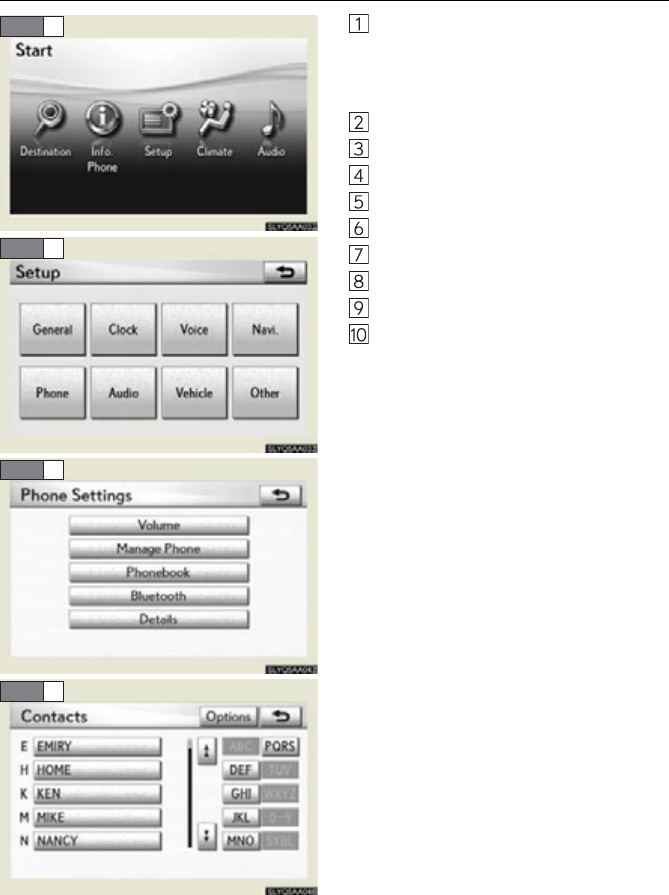
■Phonebook transfer
Press the “MENU” button on the
Remote Touch.
Please refer to P.40 for the Remote
Touc h op e ra t io n .
Select “Setup”.
Select “Phone”.
Select “Phonebook”.
Select “Manage Contacts”.
Select “Transfer Contacts”.
Transfer the phonebook data to the sys-
tem using the cellular phone.
Refer to the cellular phone user’s manual
for cellular phone operation.
STEP 2
STEP 3
STEP 4
STEP 7
Phonebook transfer may not be possible depending on phone model.
51
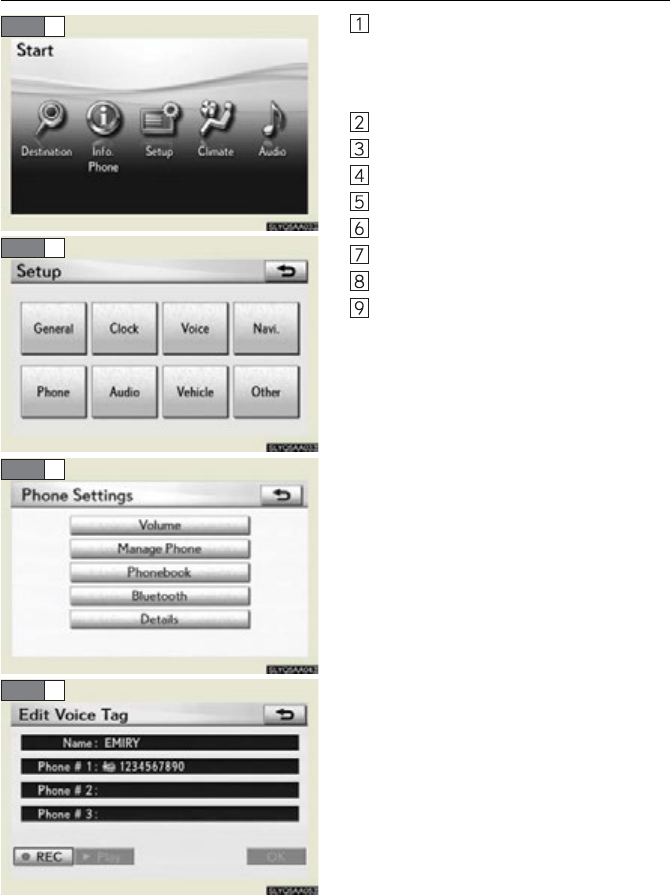
■Registering a voice tag
Press the “MENU” button on the
Remote Touch.
Please refer to P.40 for the Remote
Touch o p era t i on.
Select “Setup”.
Select “Phone”.
Select “Phonebook”.
Select “Manage Voice Tags”.
Select “New Voice Tag”.
Select the data you want to register.
Select “REC”, and record a voice tag.
Select “OK”.
STEP 2
STEP 3
STEP 4
STEP 8
52
■Registering a speed dial
Press the “MENU” button on the
Remote Touch.
Please refer to P.40 for the Remote
Touc h op e ra t io n .
Select “Setup”.
Select “Phone”.
Select “Phonebook”.
Select “Manage Speed Dials”.
Select “New Speed Dial”.
Select the data you want to register.
Select the desired phone number.
Select the button you want to register in.
The registration completion message is
displayed on the screen.
STEP 2
STEP 3
STEP 4
STEP 7

53
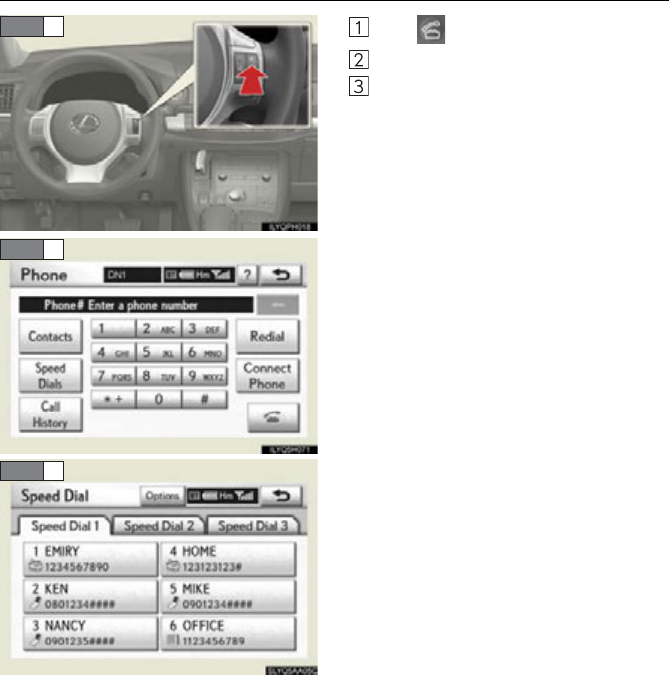
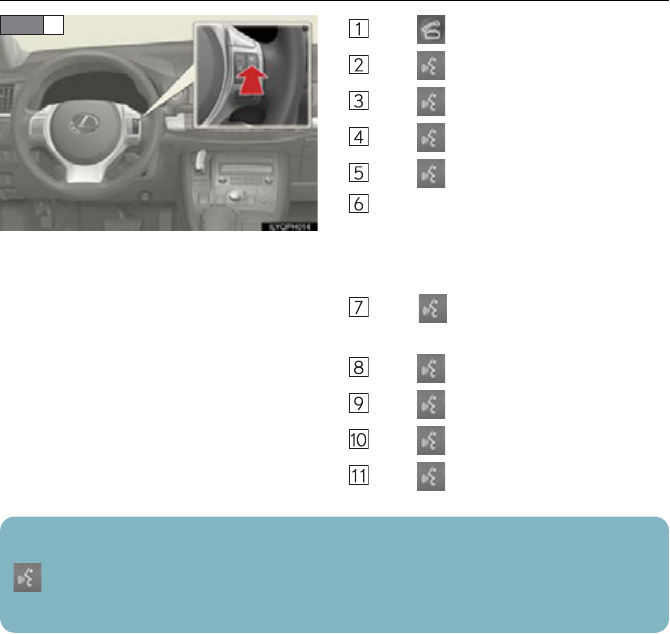
■Calling by name
You can call by saying a voice tag registered in the phonebook. For setting the voice recog-
nition, refer to the “Navigation System Owner’s Manual”. Only when English is selected as
the system language can you call by saying a name registered in the phonebook without
registering any voice tags beforehand. (Names in the phonebook work as voice tags.)
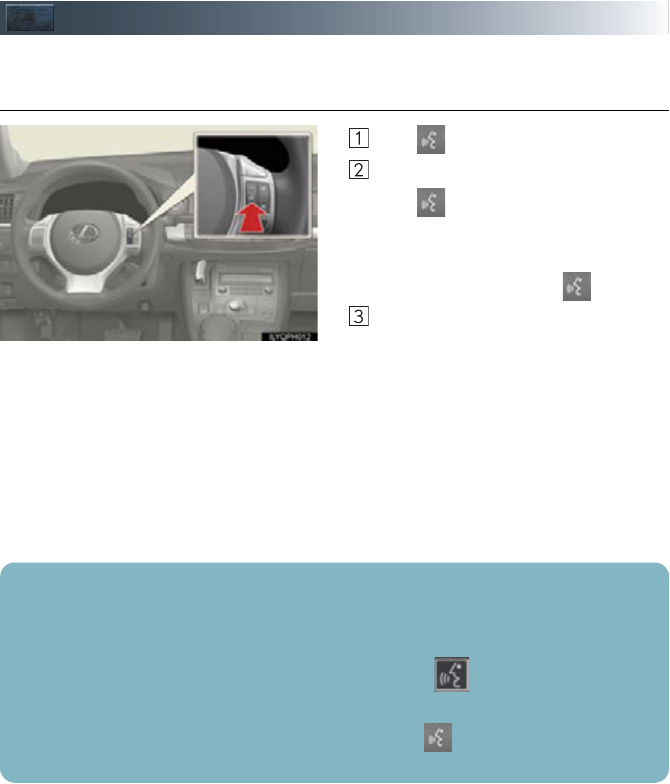
Press .
Follow the voice guidance and say
“Phone”.
Follow the voice guidance and say “Dial
by name”.
Follow the voice guidance and say a
contact name.
Follow the voice guidance and say the
type of phone number (home, mobile,
work, other).
Follow the voice guidance and say “Dial”.
STEP 1
STEP 2
STEP 4
: Pressing this switch turns the voice command system on. Say a command after the
beep.
54
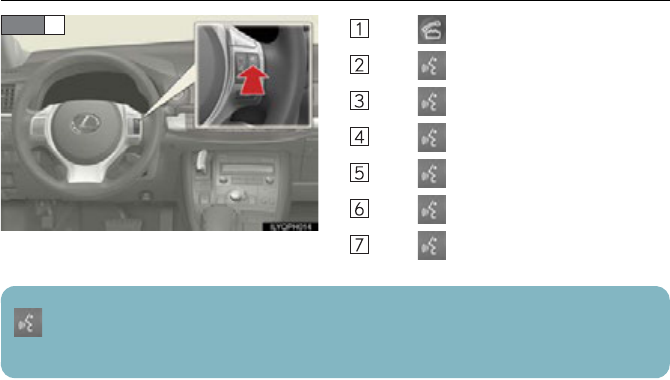
■Calling by speed dial
Press .
Select “Speed Dials”.
Select the desired number to call.
STEP 1
STEP 2
STEP 3

55
■Receiving a call
When a call is received, this screen is
displayed with a sound.
Press on the steering wheel to talk
on the phone.
To refuse the call, press on the steering
wheel.
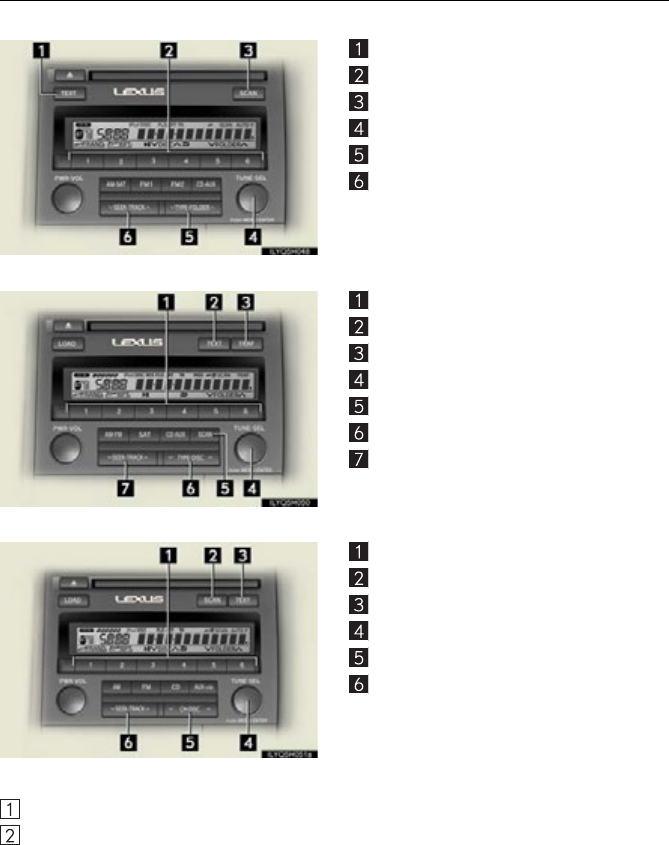
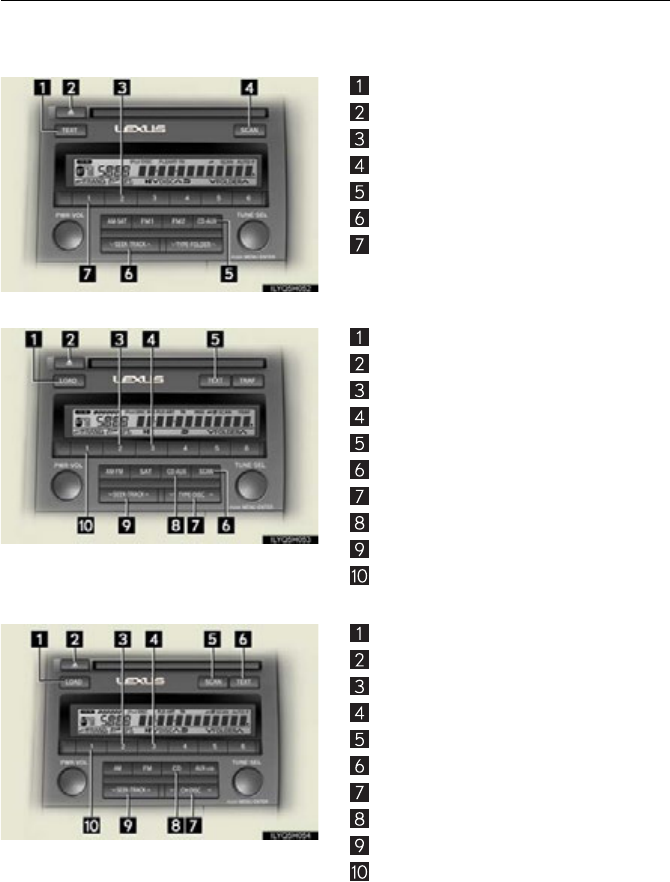
Audio System (vehicles with a navigation system)
■Audio control screen
Follow the procedure below to display the audio control screen.
Press the “MENU” button on the
Remote Touch.
Please refer to P.40 for the Remote
Touch o p era t i on.
The “Start” screen will be displayed.
Using the Remote Touch, select “Audio”
and press the “ENTER” button.
STEP 1
STEP 2

56
■Basic operation
Sound quality modes
Audio sources
AM•FM: AM radio/FM radio
SAT (if equipped): Satellite radio
DISC (if equipped): DVD changer
CD (if equipped): CD changer
AUX•USB: Bluetooth® audio/Auxil-
iary audio device/USB
memory/iPod
Power/Volume
■Radio
Station selector
Scanning for receivable stations
Adjusting the frequency
Station selector
Seeking the frequency
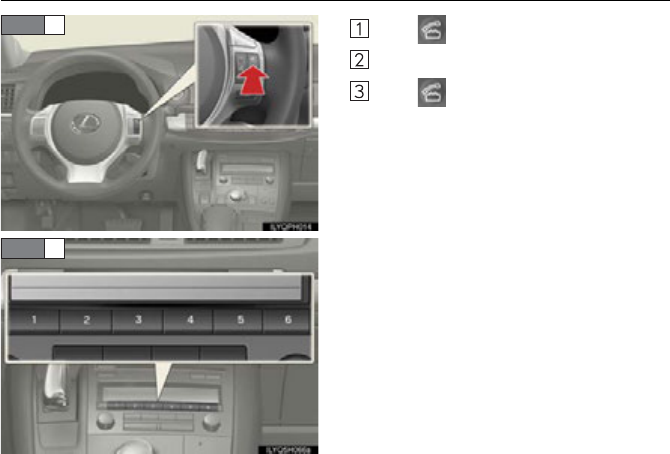
■Entering station presets
Select the desired station by using the tune, the seek or the scan function.
Using the Remote Touch, select one of the preset switches (1-6), then press the “ENTER”
button until a beep is heard, indicating that the station has been set.
57
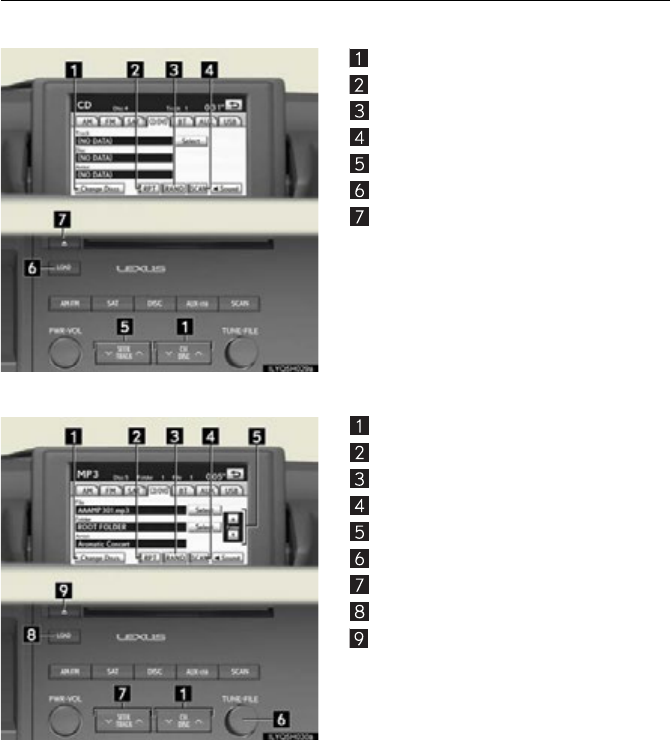
■DVD changer/CD changer
■Playing an audio CD
CD selection
Repeat play
Random playback
Search play
Selecting a track
CD insert
CD eject
■Playing a CD with MP3/WMA files
CD selection
Repeat play
Random playback
Search play
Folder selection
File selection
Selecting a file
CD insert
CD eject
58
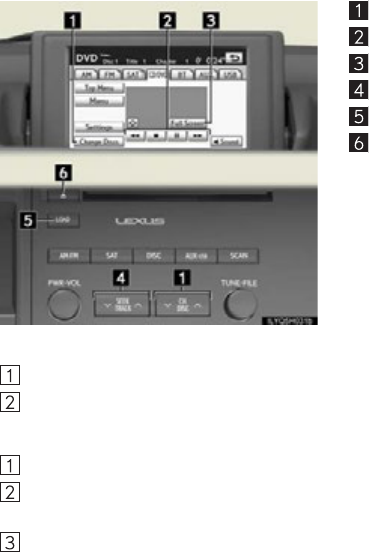
■Playing a DVD (DVD changer only)
DVD selection
DVD operation
Image display (full screen)
Chapter selection
DVD insert
DVD eject
■Loading a disc
Press the “LOAD” button.
When the indicator on the slot turns from amber to green, insert a disc.
■Loading multiple discs
Press and hold the “LOAD” button until you hear a beep.
When the indicator on the slot turns from amber to green, insert a disc.
The indicator on the slot turns to amber when the disc is being inserted.
When the indicator on the slot turns from amber to green, insert the next disc.
Repeat the procedure for the remaining discs.
To cancel the operation, press the “LOAD” button. If you do not insert a disc within 15
seconds, loading will be canceled automatically.
59
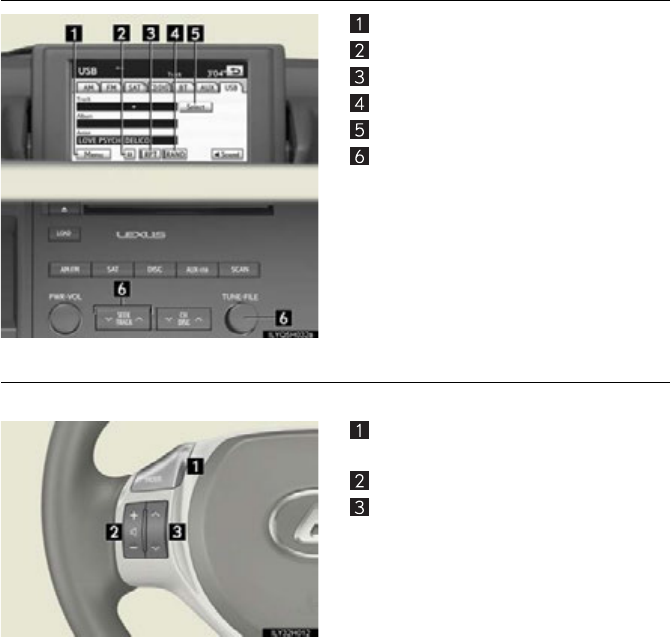
■Operating an iPod
iPod menu
Playback/pause
Repeat play
Shuffle playback
Song list
Song selection
■Remote control (steering wheel switches)
Some audio features can be controlled using the switches on the steering wheel.
Turns the power on, selects an audio
source
Increases/decreases volume
Radio mode: Selects a radio station
DVD mode: Selects a track, chapter and
disc
CD mode: Selects a track, file (MP3 and
WMA) and disc
iPod mode: Selects a song
60
Air Conditioning System
(vehicles with a navigation system)
■Using the automatic mode
Press to turn on the airflow and to adjust the temperature.
■Adjusting the temperature
■To simultaneously adjust the driver’s side and passenger’s side temperature
settings
Select or press to turn the “DUAL” indicator off and then press .
■To individually adjust the driver’s side and passenger’s side temperature set-
tings
Select or press or to turn the “DUAL” indicator on and then press or .
Dual mode button
Passenger side temperature display
Fan speed control button
Micro dust pollen filter button
Passenger side temperature control
Dual mode button
Cooling and dehumidification function
on/off button
Outside air/recirculated air mode
button
Air outlet selector button
“OFF” button
Automatic mode button
Rear window and outside rear view
mirror defoggers switch
Driver side temperature control
Windshield defogger
Driver side temperature display
Windshield wiper de-icer button
61
Hands-free System For Cellular Phone
(vehicles without a navigation system)
■Bluetooth® phone pairing
Compatible Bluetooth®-equipped phones can be connected to the vehicle, enabling
hands-free operation. Please refer to the cellular phone manufacturer’s user guide for pair-
ing procedures, or go to“www.lexus.com/bluetooth” for more phone information.
To use a Bluetooth® phone, it is necessary
to first register it in the system.
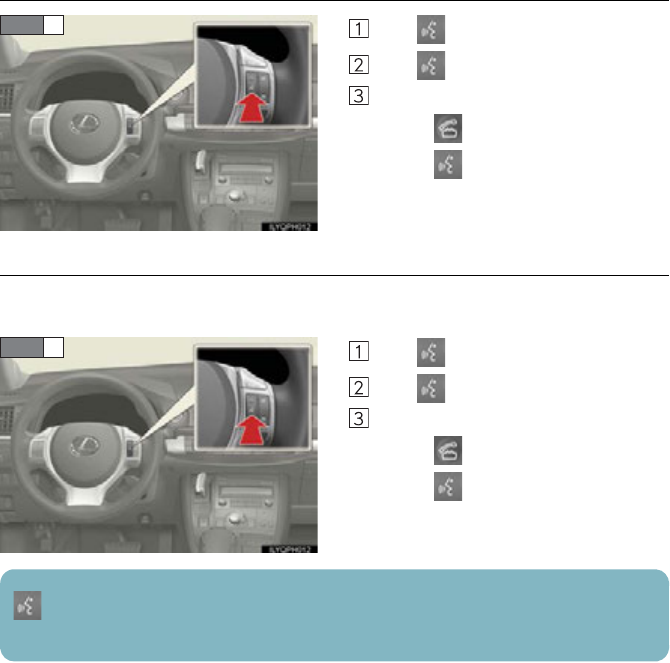
Press or .
Press and say “Pair phone”.
Press and say a name*.
*: This name will be used to identify
your phone in the case that more than
one phone has been registered to the
system.
Press and say “Confirm” to display
the passkey.
Enter the passkey shown on the display
into the phone.
Refer to the cellular phone user’s manual
for cellular phone operation.
Once the voice guidance for registration
completion is finished, press .
STEP 1
: Pressing this switch turns the voice command system on. Say a command after the
beep.
62
■Calling by number
Press and say “Dial by number”.
Press and say the phone number.
Dialing
a. Press .
b. Press and say “Dial”.
■Calling by name
You can call by saying a voice tag registered in the phonebook. For setting the voice recog-
nition, refer to the “Owner’s Manual”.
Press and say “Dial by name”.
Press and say a contact name.
Dialing
a. Press .
b. Press and say “Dial”.
STEP 1
STEP 1
: Pressing this switch turns the voice command system on. Say a command after the
beep.
63
■Calling by speed dial
Press .
Press the desired preset button.
Press .
STEP 1
STEP 2
64
■Phonebook transfer
Press .
Press and say “Phone book”.
Press and say “Add entry”.
Press and say “By phone”.
Press and say “Confirm”.
Transfer the phonebook data to the sys-
tem using the cellular phone.
Refer to the cellular phone user’s manual
for cellular phone operation.
Press and say “Previous” or “Next”
until the desired data is displayed.
Press and say “Confirm”.
Press and say the desired name.
Press and say “Confirm”.
Press and say “Confirm” again.
STEP 1
Phonebook transfer may not be possible depending on phone model.
: Pressing this switch turns the voice command system on. Say a command after the
beep.
65
■Changing the registered name
Press .
Press and say “Phone book”.
Press and say “Change name”.
Press and say the desired name.
Press and say “Confirm”.
Press and say the new name.
Press and say “Confirm”
STEP 1
: Pressing this switch turns the voice command system on. Say a command after the
beep.
66
■Registering a speed dial
Press .
Press and say “Phone book”.
Press and say “Set speed dial”.
Select the data to be registered.
Press and say the desired name.
Press and say “Confirm”.
Press the desired preset button.
Press and say “Confirm”
.
STEP 1
STEP 7
: Pressing this switch turns the voice command system on. Say a command after the
beep.

67
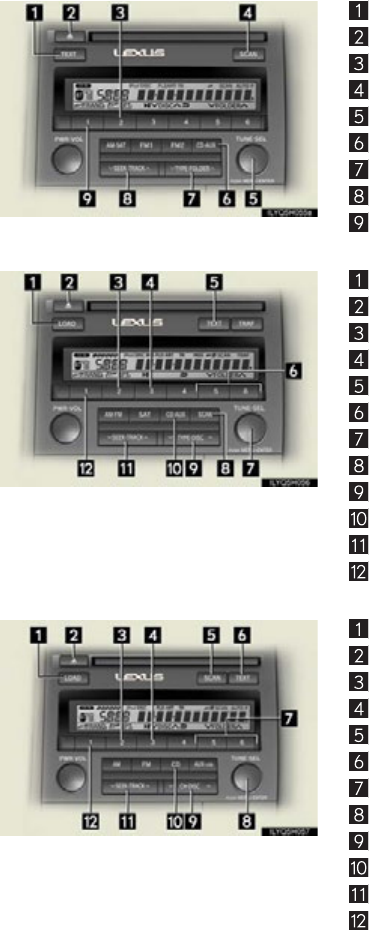
Audio System
(vehicles without a navigation system)
■Basic operation
Ty pe A
Power/Volume
Audio sources
AM•SAT: AM radio/Satellite radio
FM1/FM2: FM radio
CD•AUX: CD player/Auxiliary audio
device/USB memory/
iPod/Bluetooth® audio
Sound quality modes
Ty pe B
Power/Volume
Audio sources
AM•FM: AM radio/FM radio
SAT: Satellite radio
CD•AUX: CD player/Auxiliary audio
device/USB memory/
iPod/Bluetooth® audio
Sound quality modes
Ty pe C
Power/Volume
Audio sources
AM: AM radio
FM: FM radio
CD: CD player
AUX•USB: Auxiliary audio device/
USB memory/iPod/
Bluetooth® audio
Sound quality modes
68
■Radio
Type A
Displaying text message
Station selector
Scanning for receivable stations
Adjusting the frequency
Changing the program type
Seeking the frequency
Type B
Station selector
Displaying text message
Traffic information button
Adjusting the frequency
Scanning for receivable stations
Changing the program type
Seeking the frequency
Type C
Station selector
Scanning for receivable stations
Displaying text message
Adjusting the frequency
Station selector
Seeking the frequency
■Entering station presets
Select the desired station by using the tune, the seek or the scan function.
Press and hold one of the preset buttons (1-6) until you hear a beep, indicating that the
station is set.
69
■CD player
■Playing an audio CD
Ty pe A
Displaying text message
CD eject
Repeat play
Search play
Playback
Selecting a track
Random playback
Ty pe B
CD insert
CD eject
Repeat play
Playback/pause
Displaying text message
Search play
CD selection
Playback
Selecting a track
Random playback
Ty pe C
CD insert
CD eject
Repeat play
Playback/pause
Search play
Displaying text message
CD selection
Playback
Selecting a track
Random playback
70
■Playing a CD with MP3/WMA files
Type A
Displaying text message
CD eject
Repeat play
Search play
File selection
Playback
Folder selection
Selecting a file
Random playback
Type B
CD insert
CD eject
Repeat play
Playback/pause
Displaying text message
Folder selection
File selection
Search play
CD selection
Playback
Selecting a file
Random playback
Type C
CD insert
CD eject
Repeat play
Playback/pause
Search play
Displaying text message
Folder selection
File selection
CD selection
Playback
Selecting a file
Random playback
71
■Loading a CD
Ty pe A
Insert a CD.
Type B and C
Press the “LOAD” button.
“WAIT” is shown on the display.
When the indicator on the slot turns from amber to green, insert a CD.
The display changes from “WAIT” to “LOAD”.
■Loading multiple CDs (Type B and C)
Press and hold the “LOAD” button until you hear a beep.
“WAIT” is shown on the display.
When the indicator on the slot turns from amber to green, insert a CD.
The display changes from “WAIT” to “LOAD”.
The indicator on the slot turns to amber when the CD is being inserted.
When the indicator on the slot turns from amber to green, insert the next CD.
Repeat the procedure for the remaining CDs.
To cancel the operation, press the “LOAD” button. If you do not insert a disc within 15
seconds, loading will be canceled automatically.
■Operating an iPod
Ty pe A
Displaying text message
Repeat play
Playback/pause
Go back
iPod menu/Song selection
Playback
Song selection
Shuffle playback
72
Type B
Repeat play
Playback/pause
Go back
Displaying text message
iPod menu/Song selection
Playback
Song selection
Shuffle playback
Type C
Repeat play
Playback/pause
Go back
Displaying text message
iPod menu/Song selection
Playback
Song selection
Shuffle playback
■Remote control (steering wheel switches)
Some audio features can be controlled using the switches on the steering wheel.
Turns the power on, selects an audio
source
Increases/decreases volume
Radio mode: Selects a radio station
CD mode: Selects a track, file (MP3 and
WMA) and disc
iPod mode: Selects a song
73
Air Conditioning System
(vehicles without a navigation system)
■Using the automatic mode
Press to turn on the airflow and to adjust the temperature.
■Adjusting the temperature
■To simultaneously adjust the driver’s side and passenger’s side temperature
settings
Press to turn the “DUAL” indicator off and then press .
■To individually adjust the driver’s side and passenger’s side temperature set-
tings
Press or to turn the “DUAL” indicator on and then press or .
Driver’s side temperature control but-
tons
Windshield defogger button
Driver’s side temperature display
Fan speed display
Air outlet display
Passenger’s side temperature display
Micro dust and pollen filter mode but-
ton
Passenger’s side temperature control
buttons
Dual mode button
Cooling and dehumidification function
on/off button
Outside/recirculated air mode button
Air outlet selector button
Fan speed control buttons
“OFF” button
Automatic mode button
Rear window and outside rear view
mirror defoggers switch
74
Voice Command System
NOTE:When inputting voice commands you must wait until after the beep to speak.
■Basic operation
Press on the steering wheel.
- If you know the command:
Press again.
- If you do not know the command:
Follow the voice guidance to learn the
command and then press again.
Say a command after the beep.
Continue on to pages 75-79 for a detailed list of Voice Commands for the following cate-
gories:
PHONE. . . . . . . . . . . . . . . . . . . . . . . . . . . . . . . . . . . . . . . . . . . . . . . . . . . P.75, 77
DESTINATIONS. . . . . . . . . . . . . . . . . . . . . . . . . . . . . . . . . . . . . . . . . . P.75
GENERAL NAVIGATION COMMANDS. . . . . . . . . . . . . . . P.76
AUDIO . . . . . . . . . . . . . . . . . . . . . . . . . . . . . . . . . . . . . . . . . . . . . . . . . . .P.78
XM INFORMATION . . . . . . . . . . . . . . . . . . . . . . . . . . . . . . . . . . . . . P.79
CLIMATE CONTROL/AIR CONDITIONING. . . . . . . . . . . P.79
■Important voice commands information and tips
Voice commands can be used while driving.
You must wait until after the beep to say a command.
In vehicles with a navigation system, a large TALK icon will appear on the naviga-
tion screen to prompt you to say a command.
If you know what command to use, you can press at any time to interrupt the
voice guidance.

75
■Command list
All vehicles
Vehicles with a navigation system
PHONE
To Operate a
Bluetooth
Connected
Phone/Make
Calls, SAY:
“Phone” and
then SAY:
“Dial by Name” NOTE: You
can also make
a call by simply
saying: “Call
XXX-555-
5555” ETC.
“Dial by Number”
“Redial”
“Call Back”
“Mute”
DESTINATIONS
To Ente r a n Ad d re s s/
Destination, SAY:
(English only)
“Destination” and then SAY:
“Address” and then follow
the prompts to enter city,
state, street and house
number
To Enter a Point of Interest,
SAY:
A Point of Interest Category, Such As: “Dining”, “Shopping
Malls”, “Police”, “Gas”, ETC.
“Destination”
and then SAY:
“Point of
Interest” and
then SAY:
“Near Here”
And then
follow the
prompts
“A l o n g Ro u t e ”
“Emergency”
“Phone Number”
To Ente r a Prev ious
Destination, SAY: “Destination” and then SAY: “Previous Destinations”
To Enter/Go to Preset
Destinations, SAY:
“Destination”
and then SAY:
“Presets”
and then
SAY:
“Home” (HOME must
already be set using manual
controls)
“Preset 1” or “Preset 2” ETC.
(preset addresses must
already be set using manual
controls)

76
GENERAL NAVIGATION COMMANDS
To Change the Map Screen,
SAY:
“Map”
“Dual Map”
“Single Map”
“Compass Mode”
To Change the Map Scale/
Size, SAY:
“Zoom In”
“Zoom Out”
“Right Map Zoom In”
“Right Map Zoom Out”
To Change the Map
Orientation, SAY:
“North Up”
“Heading Up”
“Map Direction”
“Right Map North Up”
“Right Map Heading Up”
“Right Map Direction”
To Change the Guidance
Mode, SAY:
“A r r o w M o d e ”
“Turn List Mode”
“Intersection Mode”
“Freeway Mode”
To Save a Point on the Map,
SAY: “Mark This Point”
To Remove Icons from Map,
SAY: “Clear All Icons”
To Set t h e Des t i nat i o n, SAY: “Previous Start Point”
To Change the Route, SAY:
“Quick Route”
“Short Route”
“A l t e r n a t e R o u t e ”
“Detour”
“Detour Entire Route”

77
To Review the Route, SAY:
“Route Overview”
“Next Destination Map”
“First Destination Map”
“Second Destination Map”
“Third Destination Map”
“Fourth Destination Map”
“Fifth Destination Map”
“Final Destination Map”
To Delete the Destination, SAY:
“Delete Next Destination”
“Delete Final Destination”
“Delete All Destinations”
To Operate Guidance
Options, SAY:
“Pause Guidance”
“Resume Guidance”
“Repeat Guidance”
“Louder”
“Softer”
To Operate the Traffic
Information, SAY: “Traffic Information”
To Show the I c o n, SAY: “Show GAS”, “Show PARKING” ETC.
GENERAL NAVIGATION COMMANDS
PHONE
To Operate a
Bluetooth
Connected
Phone/Make
Calls, SAY:
“Phone” and
then SAY:
“Send Tones”
NOTE: You
can also make
a call by simply
saying: “Call
XXX-555-
5555” ETC.
“Connect
Phone” and
then SAY:
“Select Phone”
“A d d N e w
Phone”
“Hands Free
Power ON”
“Hands Free
Power OFF”

78
AUDIO
To Turn Audio On or
Off, SAY:
“A u d i o O N ”
“Audio OFF”
To Change the Audio
Mode, SAY:
FM, AM, Radio, Satellite
Radio, Auxiliary, CD,
CD Changer, DVD,
DVD Changer,
Bluetooth® Audio, iPod,
USB Audio
To Change to a different
CD/DVD track, SAY:
“Track Up”, “Track
Down” or “Previous
Tr a c k ”
To Change to a different
CD/DVD, SAY: “Disc Up” “Disc Down”
To Chan g e Rad i o
Stations, SAY:
“Seek Up” or “Seek
Down”
“Type Up” or “Type
Down”
To Operate Satellite
RadioXM Controls,
SAY:
“Satellite Radio” and
then SAY:
“Select
Channel
Number”
“Select
Channel
Name”
(English only)
“Select
Channel
Type”
(English only)
“Command
List” and then
SAY:
“Seek Up” or
“Seek Down”
“Type Up” or
“Type Down”

79
XM INFORMATION
To Operate XM NavWeather,
SAY: (English only)
“Information” and then
SAY:
“XM NavWeather” and
follow the prompts
To Operate XM NavTraffic,
SAY: (English only)
“Information” and then
SAY:
“XM NavTraffic” and
follow the prompts
To Operate XM Sports, SAY:
(English only)
“Information” and then
SAY:
“XM Sports” and follow
the prompts
To Operate XM Stocks, SAY:
(English only)
“Information” and then
SAY:
“XM Stocks” and follow
the prompts
To Operate Lexus Insider, SAY: “Information” and then
SAY:
“Lexus Insider” and
follow the prompts
CLIMATE CONTROL/AIR CONDITIONING
To Turn On and Adjust setting
for Climate Control and
Temperature, SAY:
“Automatic Climate Control”
“Raise Temperature”
“Lower Temperature”
To Set a Specific Temperature,
SAY: “70 Degrees” or “65 Degrees” ETC.
80
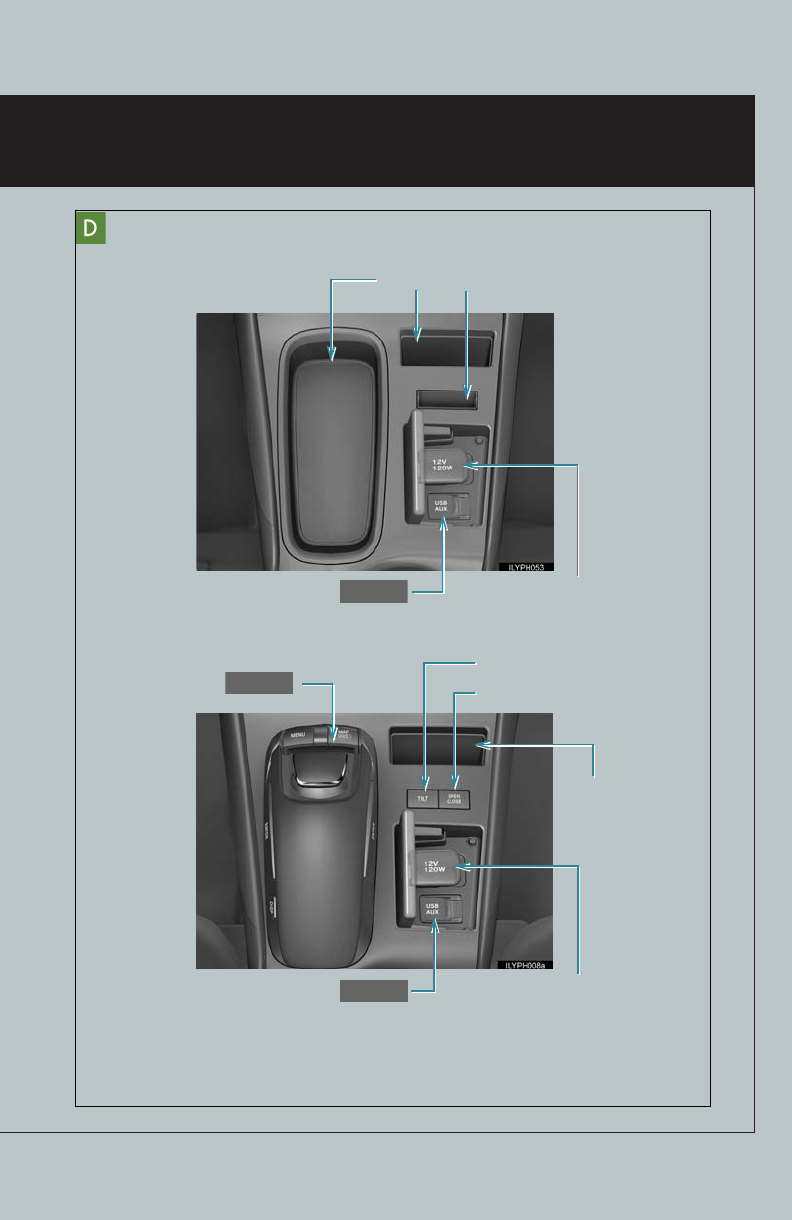
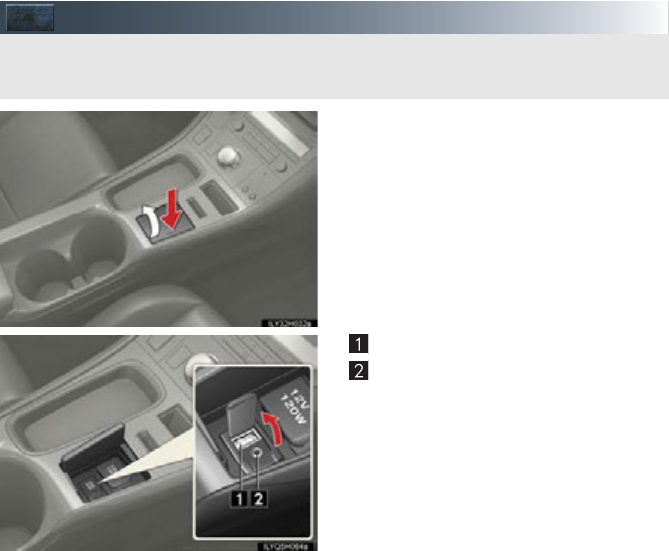
Portable Audio Device Ports
Press down and release the lid.
USB port
AUX port
These ports can be used to connect a portable audio device and listen to it through the
vehicle’s speakers.
81
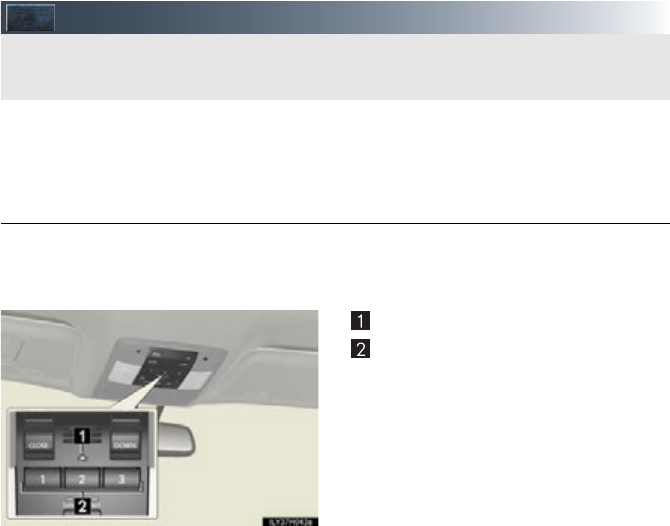
Garage Door Opener (if equipped)
The garage door opener (HomeLink® Universal Transceiver) is manufactured under
license from HomeLink®.
■Programming the HomeLink® (for U.S.A. owners)
The HomeLink® compatible transceiver in your vehicle has 3 buttons which can be pro-
grammed to operate 3 different devices. Refer to the programming method below
appropriate for the device.
Indicator light
Buttons
The garage door opener can be programmed to operate garage doors, gates, entry
doors, door locks, home lighting systems, security systems, and other devices.
82
■Programming HomeLink®
Hold your hand-held transmitter 1 to 3
in. (25 to 75 mm) of the HomeLink®
buttons.
Press and hold down the desired
HomeLink® button.
For U.S.A. owners:
While pressing the HomeLink® but-
ton, press and hold down the button
on the hand-held transmitter until the
indicator light changes from a slow to
a rapid flash.
For Canadian owners:
While pressing the HomeLink® but-
ton, repeatedly press and release
(cycle) the button on the hand-held
transmitter every 2 seconds until the
indicator light changes from a slow to
a rapid flash.
If your garage door is of the rolling code
type:
Press the training button on the motor-
head unit in your garage.
Press and hold the vehicle’s pro-
grammed HomeLink® button for 2 sec-
onds and release it. Repeat this step
once again.
If the door does not open, press and
release the same button once again.
83
■Programming other devices
For U.S.A. owners:
To program an entry gate, see the Owner’s Manual.
To program other devices, contact your Lexus dealer.
For Canadian owners:
To program all other devices, follow the same procedure as for garage door programming.
■Operating HomeLink®
Press the appropriate HomeLink® button.
The indicator light should come on.
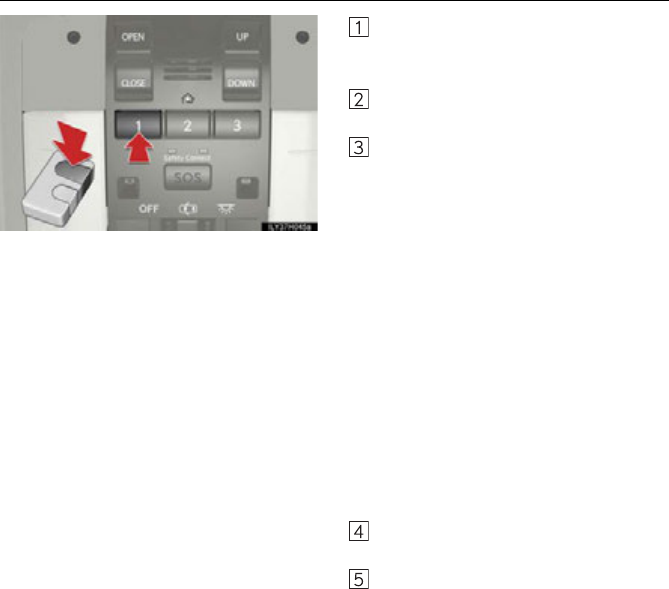
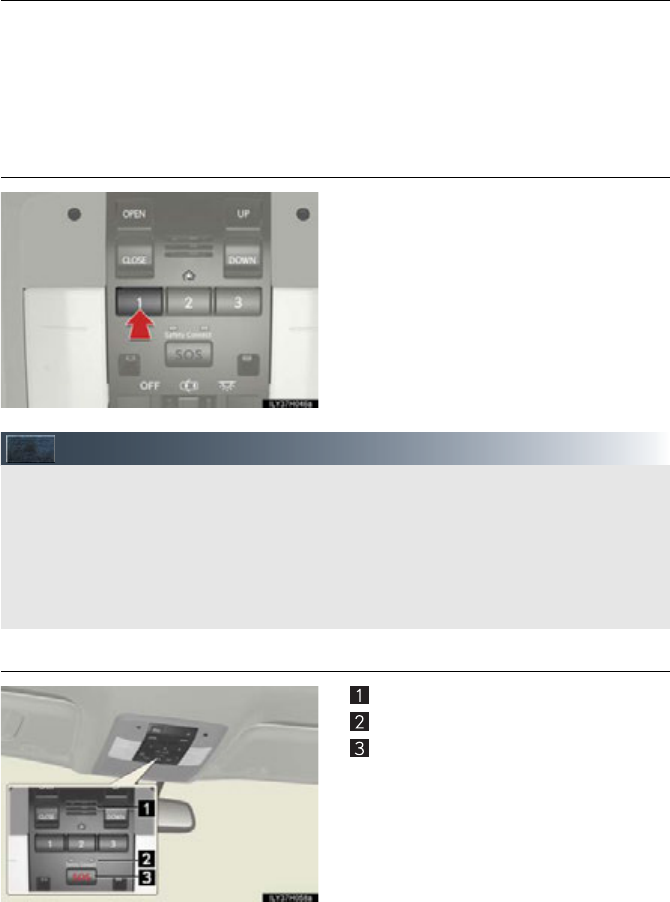
Safety Connect (if equipped)
■System components
Microphone
LED light indicators
“SOS” button
Safety Connect is a subscription-based telematics service that uses Global Positioning
System (GPS) data and embedded cellular technology to provide safety and security
features to subscribers. Safety Connect is supported by Lexus’ designated response
center, which operates 24 hours per day, 7 days per week.
Safety Connect service is available by subscription on select, telematics hardware-
equipped vehicles.

84
■Services
Subscribers have the following Safety Connect services available:
●Automatic Collision Notification*
In case of either airbag deployment or severe rear-end collision, the system is designed
to automatically call the response center. The responding agent receives the vehicle’s
location and attempts to speak with the vehicle occupants to assess the level of emer-
gency. If the occupants are unable to communicate, the agent automatically treats the
call as an emergency, contacts the nearest emergency services provider to describe the
situation, and requests that assistance be sent to the location.
*: U.S. Patent No. 7,508,298 B2
●Stolen Vehicle Location
If your vehicle is stolen, Safety Connect can work with local authorities to assist them in
locating and recovering the vehicle. After filing a police report, call the Safety Connect
response center at 1-800-25-LEXUS (1-800-255-3987) and follow the prompts for
Safety Connect to initiate this service.
In addition to assisting law enforcement with recovery of a stolen vehicle, Safety-Con-
nect-equipped vehicle location data may, under certain circumstances, be shared with
third parties to locate your vehicle. Further information is available at Lexus.com.
●Emergency Assistance Button (SOS)
In the event of an emergency on the road, push the “SOS” button to reach the Safety
Connect response center. The answering agent will determine your vehicle’s location,
assess the emergency, and dispatch the necessary assistance required.
If you accidentally press the “SOS” button, tell the response-center agent that you are
not experiencing an emergency.
●Enhanced Roadside Assistance
Enhanced Roadside Assistance adds GPS data to the already included warranty-based
Lexus roadside service.
Subscribers can press the “SOS” button to reach a Safety Connect response-center
agent, who can help with a wide range of needs, such as: towing, flat tire, fuel delivery, etc.
For a description of the Roadside Assistance services and their limitations, please see the
Safety Connect Terms and Conditions, which are available at Lexus.com.
■Subscription
After you have signed the Telematics Subscription Service Agreement and are enrolled,
you can begin receiving services.
A variety of subscription terms is available for purchase. Contact your Lexus dealer, call 1-
800-25-LEXUS (1-800-255-3987) or push the “SOS” button in your vehicle for further
subscription details.

85
Lexus Enform with Safety Connect (if equipped)
Lexus Enform and Safety Connect are subscription-based telematics services that use Glo-
bal Positioning System (GPS) data, embedded cellular technology and XM® satellite data
services to provide safety and security as well as convenience features to subscribers.
Lexus Enform and Safety Connect services are supported by Lexus’ designated response
center, which operates 24 hours per day, 7 days per week.
Lexus Enform service is available by subscription on select, telematics hardware-equipped
vehicles.
For details, refer to the “Owner’s Manual” and “Navigation System Owner’s Manual”.
■Services
With an active Lexus Enform subscription, the following features are available:
●Safety Connect features (P. 83)
• Automatic collision notification*1
• Stolen vehicle location
• Emergency assistance button (SOS)
• Enhanced roadside assistance
●Destination Assist
Destination Assist provides you with live assistance for finding destinations via the Lexus
Enform response center. You can request either a specific business, address, or ask for
help locating your desired destination by category, such as restaurants, gas stations,
shopping centers or other points of interest (POI).
After you tell the agent your choice of destination, its coordinates are sent wirelessly to
your vehicle’s navigation system.
●eDestination
With the eDestination feature, you can go online, via the Lexus.com owner’s Web site, to
select and organize destinations of your choice and then wirelessly send them to your
vehicle’s navigation system.
You can store up to 200 locations online to access and update at any time.
Your locations can be organized into up to 20 personalized folders.
You must first go online at www.lexus.com and go to the “Owners” section where you will
need to register and log in. After this, you can create your personalized folders contain-
ing the locations you wish to send to your vehicle. (See Lexus Enform Guide for more
information.)

86
●XM® Sports and Stocks*2
XM® Sports and Stocks is a service included with XM® satellite radio subscriptions for
Lexus Enform vehicles. With this service, you can receive updates via the navigation sys-
tem on your personally selected sports teams and stocks.
●XM NavWeatherTM*3
The subscription-based XM NavWeather™ service allows the navigation system to dis-
play weather information on the map.
●XM® NavTraffic*3
The subscription-based XM® NavTraffic service allows the navigation system to display
traffic information on the map.
The following navigation-based Lexus Enform features are available without a subscrip-
tion:
●Lexus Insider
Lexus Insider is an optional service that can send audio messages, or articles, to partici-
pating owner’s vehicles via the navigation system. Potential Lexus Insider subjects might
include, for example, Lexus vehicle technology tips, updates on regional Lexus events, or
audio excerpts from Lexus Magazine articles. Up to 20 articles can be stored at a time.
●Voic e Co mma nd
The voice command system enables you to operate the navigation system, audio/video
system, air conditioning system and hands-free system by giving a command.
*1: U.S. Patent No. 7,508,298 B2
*2: Available at no extra charge with an active XM® satellite radio subscription.
*3: Available via separate XM® subscription(s).
■Subscription
After you have signed the Telematics Subscription Service Agreement and are enrolled,
you can begin receiving services. A variety of subscription terms is available for purchase.
Contact your Lexus dealer, call 1-800-25-LEXUS (1-800-255-3987), or select “Destina-
tion Assist” in your vehicle for further subscription details. XM® NavTraffic and XM
NavWeather™ require separate XM® subscription(s). XM® Sports and Stocks is available
with an XM® Satellite Radio subscription. After a 90-day free trial, you must set up the
appropriate XM® subscription(s) to continue receiving these services.
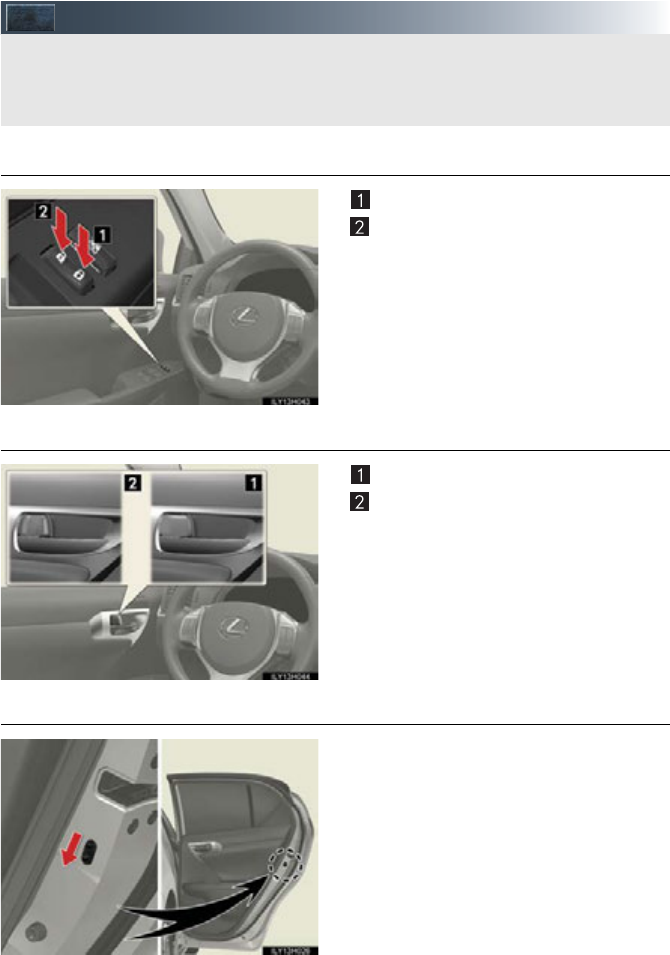
87
Door Locks
■Door lock switch
Locks all the doors
Unlocks all the doors
■Inside lock button
Locks the door
Unlocks the door
The front doors can be opened by pull-
ing the inside handle even if the lock but-
tons are in the lock position.
■Rear door child-protector lock
The door cannot be opened from inside the
vehicle when the lock is set.
These locks can be set to prevent chil-
dren from opening the rear doors. Push
down on each rear door switch to lock
both rear doors.
The vehicle can be locked and unlocked using the entry function, wireless remote control
or door lock switch.
For details the entry function or wireless remote control (P.15, 16)
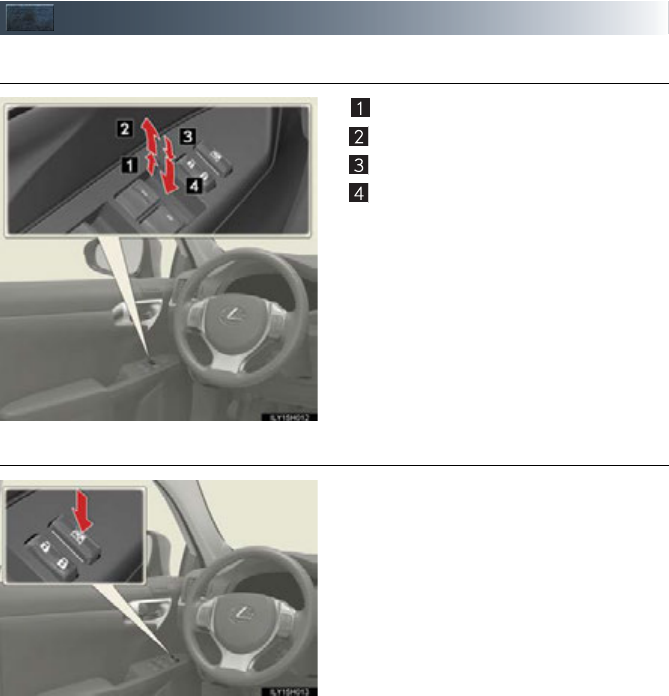
88
Power Windows
■Power window switches
Closing
One-touch closing*
Opening
One-touch opening*
*: Pushing the switch in the opposite direc-
tion will stop window travel partway.
■Window lock switch
Press the switch down to lock the passen-
ger window.
Use this switch to prevent children from
accidentally opening or closing a pas-
senger window.
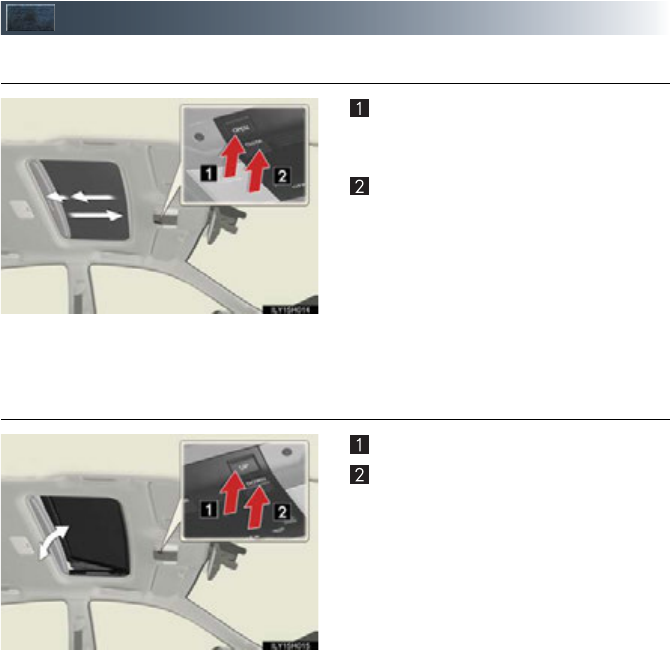
89
Moon Roof (if equipped)
■Opening and closing
Opens the moon roof*
Push and hold “OPEN”. The moon roof
tilts up and then opens automatically.
Closes the moon roof*
Push and hold “CLOSE”. The moon roof
closes automatically to the tilt up posi-
tion. Push and hold “CLOSE” again to
fully close the moon roof.
*: Lightly press either of the moon roof
switches to stop the moon roof part-
way.
■Tilting up and down
Tilts the moon roof up*
Tilts the moon roof down*
*: Lightly press either of the moon roof
switches to stop the moon roof part-
way.
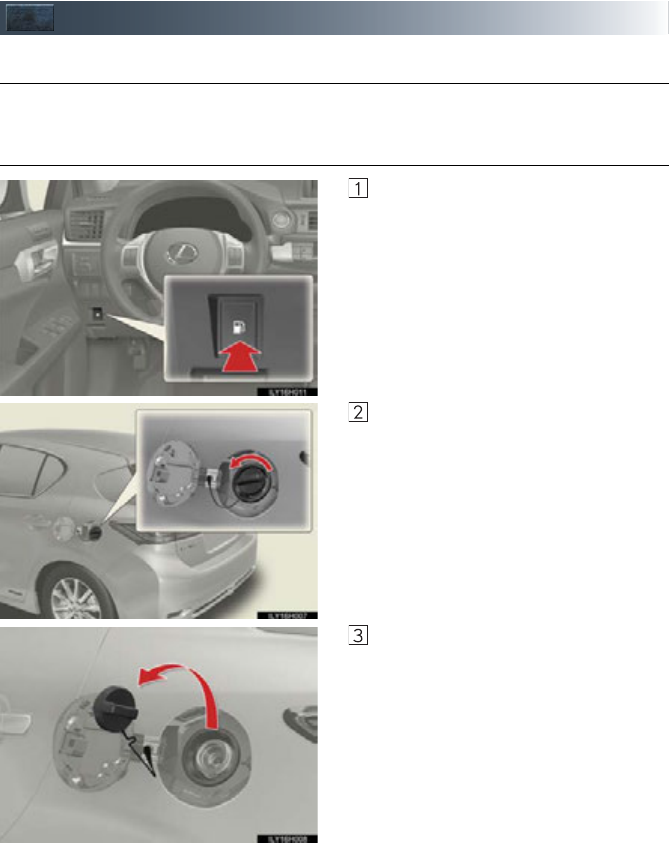
90
Fuel Tank Cap
■Before refueling the vehicle
Turn the “POWER” switch off and close all the doors and windows.
■Opening the fuel tank cap
Press the opener to open the fuel filler
door.
Turn the fuel tank cap slowly to open.
Hang the fuel tank cap on the back of the
fuel filler door.
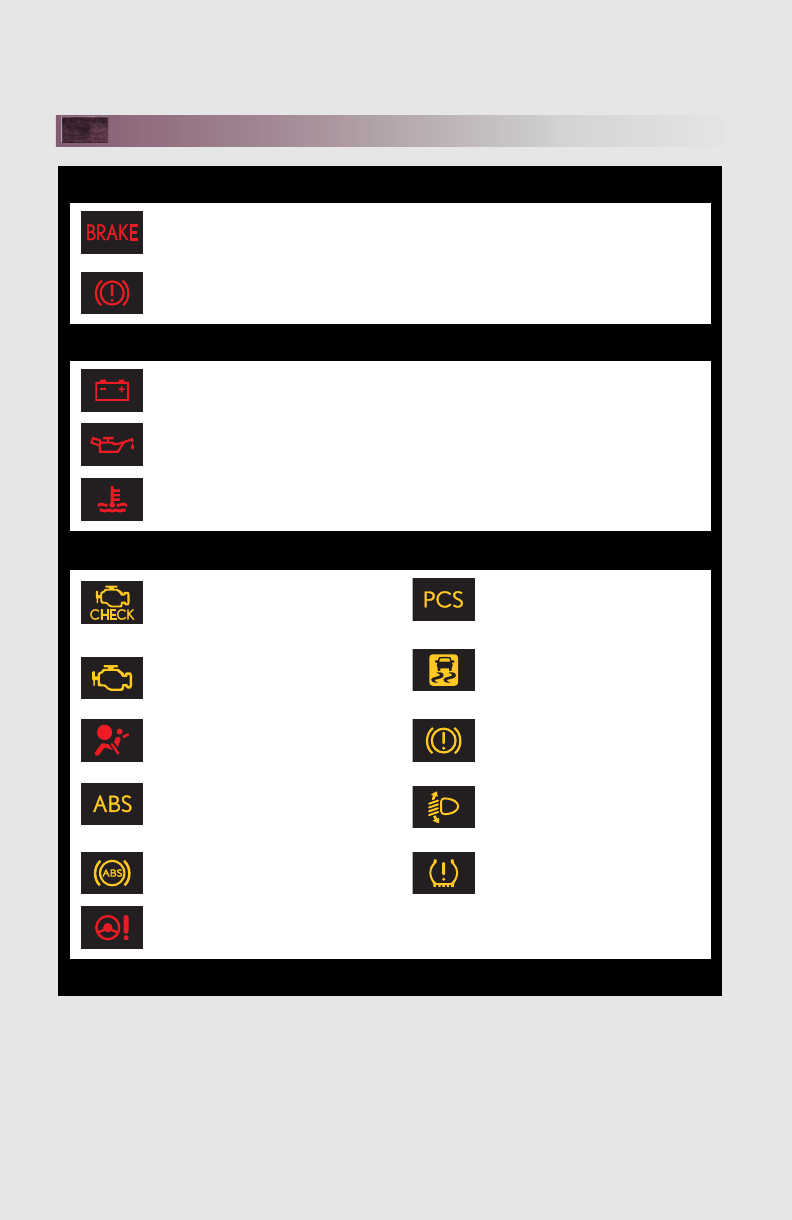
What to do if...
91
List of Warning/Indicator Lights
Stop the vehicle immediately. Continuing to drive the vehicle may be dangerous.
(U.S.A.)
Brake system warning light (red indicator)
(Canada)
Stop the vehicle immediately.
Charging system warning light
Low engine oil pressure warning light
High coolant temperature warning light
Have the vehicle inspected immediately.
(U.S.A.)
Malfunction
indicator lamp
(Flashes)
Pre-collision system warning
light (if equipped)
(Canada)
(Comes on)
Slip indicator light
SRS warning light Brake system warning light
(yellow indicator)
(U.S.A.)
ABS warning light
Automatic headlight leveling
system warning light
(if equipped)
(Canada)
(Blinking and
then continu-
ously on)
Tire pressure warning light
Electric power steering
system warning light
For further information, refer to the Owner’s Manual.
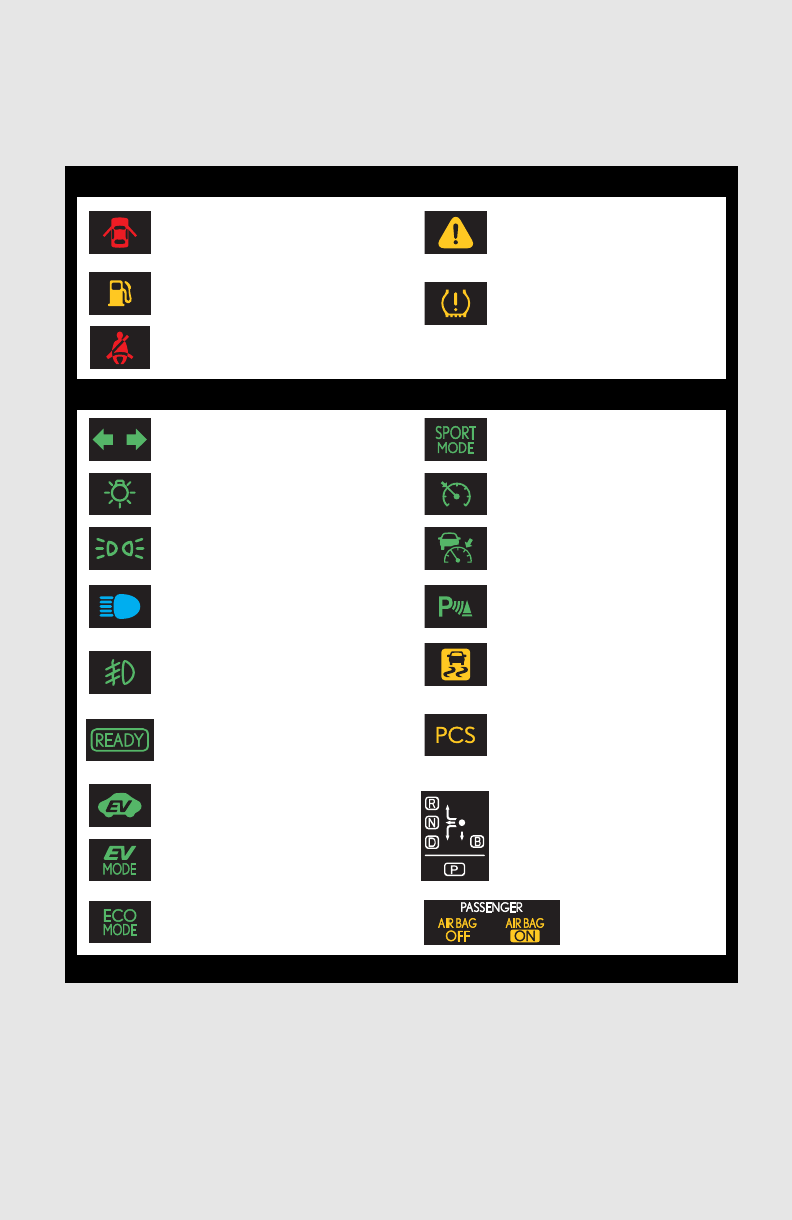
92
What to do if...
*: It also comes on due to natural causes such as natural air leaks and tire inflation pressure
changes caused by temperature. Adjust the tire inflation pressure to the specified level.
The light will turn off after a few minutes. In case the light does not turn off even if the tire
inflation pressure is adjusted, have the system checked by your Lexus dealer.
Follow the correction procedures.
Open door warning light Master warning light
Low fuel level warning light
(Illuminates
without
blinking)
Tire pressure warning light*
Seat belt reminder light
See the Owner’s Manual
Tu r n s i g nal in d i c a t o r “SPORT MODE” indicator
Headlight indicator (U.S.A.) Cruise control indicator
Tail light indicator (Canada) Radar cruise control
indicator (if equipped)
Headlight high beam indicator Intuitive parking assist
indicator (if equipped)
Front fog light indicator
(if equipped) (Flashes)
Slip indicator
“READY” indicator
(Flashes faster)
Pre-collision system warning
light (if equipped)
EV indicator
Shift position indicators
EV drive mode indicator
“ECO MODE” indicator SRS airbag on-off
indicator
For further information, refer to the Owner’s Manual.

What to do if...
93
If the electronic key does not operate properly
■Unlocking and locking the doors
Use the mechanical key in order to perform
the following operations:
Locks all the doors
Closes the windows* (turn and hold)
Unlocks the door
Turning the key rearward unlocks the
driver’s door. Turning the key once again
within 3 seconds unlocks the other
doors.
Opens the windows* (turn and hold)
*: This setting must be customized at
your Lexus dealer.
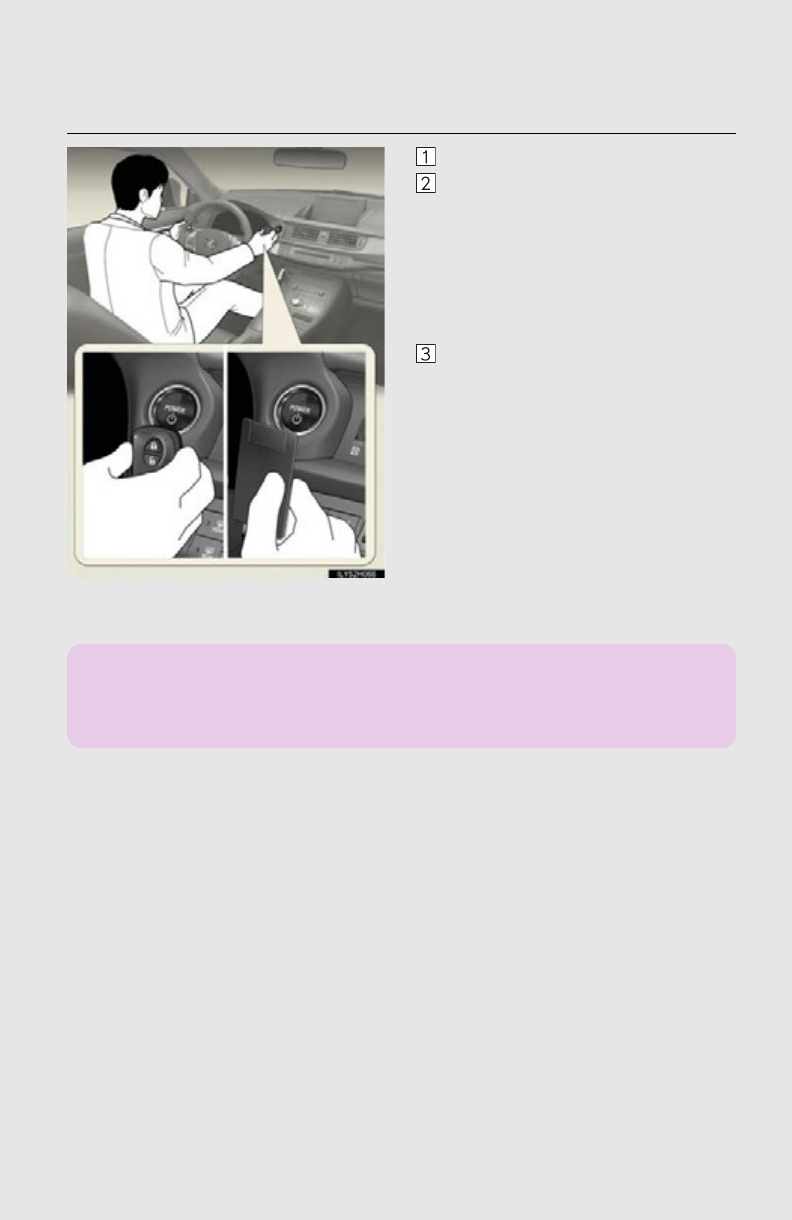
94
What to do if...
■Starting the hybrid system
Depress the brake pedal.
Touch the Lexus emblem side of the
electronic key to the “POWER” switch.
If any of the doors is opened or
closed while the key is being touched
to the switch, an alarm will sound to
indicate that the start function cannot
detect the electronic key.
To change “POWER” switch modes:
Within 10 seconds of the buzzer sound-
ing, release the brake pedal and press
the “POWER” switch. Modes can be
changed each time the switch is pressed.
To start the hybrid system: Press the
“POWER” switch within 10 seconds
of the buzzer sounding, keeping the
brake pedal depressed.
In the event that the hybrid system still cannot be operated, contact your Lexus dealer.
If the electronic key battery becomes depleted, replace it with a new battery. For instruc-
tions on replacing the battery, refer to the Owner’s Manual. If you need further assistance,
contact your Lexus dealer.

What to do if...
95
If the hybrid system doesn’t start
Make sure that the correct operating procedures have been followed.
Make sure that the brake pedal is firmly
depressed when attempting to start the
hybrid system.
Brake pedal
If the hybrid system still does not start, see the Owner’s Manual for more information or
contact your Lexus dealer.

96
Memo

97
Memo

98
Your Lexus dealer
Your Lexus dealer will provide quality maintenance and any other assistance
you may require.
If there is not a Lexus dealer near you, please call the following number:
■U.S. OWNERS
●In the U.S. mainland or Canada:
Lexus Roadside Assistance
1-800-25-LEXUS or 1-800-255-3987 (Toll-Free)
●In Hawaii:
Servco Automotive Roadside Assistance/Customer Services
1-800-25-LEXUS or 1-800-255-3987 (Toll-Free)
■CANADIAN OWNERS
●In Canada or the U.S. mainland:
Lexus Roadside Assistance/Customer Service
1-800-26-LEXUS or 1-800-265-3987 (Toll-Free)
Please access our websites for further information.
●The U.S. mainland: www.lexus.com
●Hawaii: www.servcolexus.com
●Canada: www.lexus.ca
©2011 TOYOTA MOTOR CORPORATION
All rights reserved. This material may not be reproduced or copied, in whole or in part,
without the written permission of Toyota Motor Corporation.
