LifeScan M Blood Glucose meter with Bluetooth Sync. User Manual 15 Mango UserMan
LifeScan Inc Blood Glucose meter with Bluetooth Sync. 15 Mango UserMan
UserMan
Navigation menu
Upload a User Manual
Namespaces
Wiki Guide
HTML
PDF
Info
Views
User Manual
Discussion / Help
Navigation
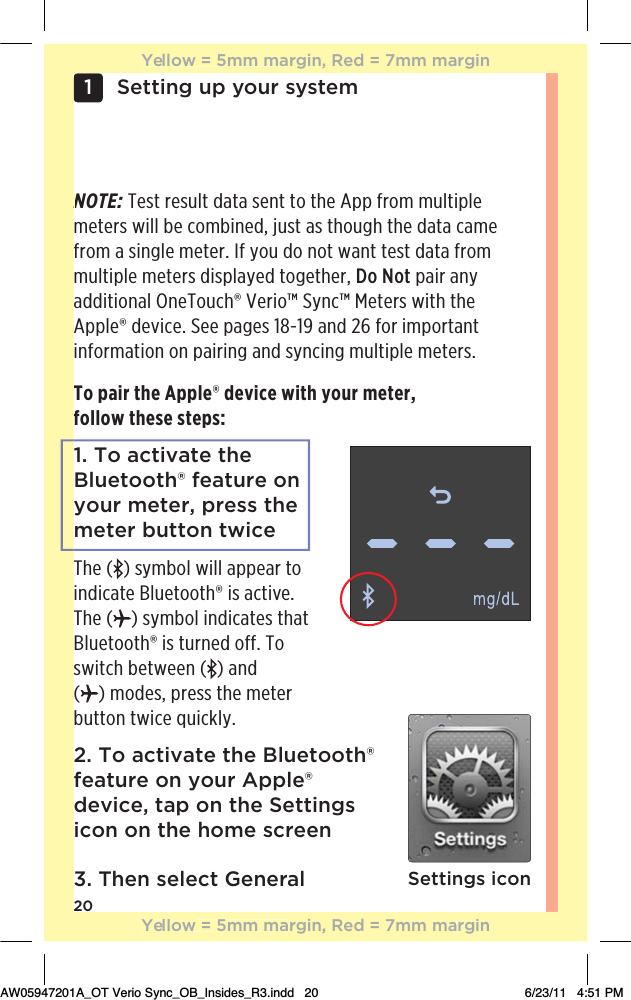
![10If you experience meter interference problems, you should try moving your meter away from the source of the interference, or relocate the electronic device or its antenna to another location to resolve the problem.If you continue to experience interference problems, contact [CS Lead-in (Abbr.)][CS Contact][CS Hours of Operation], or contact support service for the manufacturer of the electronic device causing the interference.In locations where cell phone use is not permitted, such as hospitals, some health care professional offices, and airplanes, you should set the meter to “Airplane” mode (Bluetooth® not activated). See Step 1 on page 20 for more information.ƽ WARNINGThe Bluetooth® feature on your meter sends test results to your Apple® device. To prevent other people’s results from being sent to the Apple® device, Do Not let anyone else use your meter to test their blood glucose.Yellow = 5mm margin, Red = 7mm marginYellow = 5mm margin, Red = 7mm marginAW05947201A_OT Verio Sync_OB_Insides_R3.indd 10 6/23/11 4:51 PM](https://usermanual.wiki/LifeScan/M/User-Guide-1538050-Page-10.png)

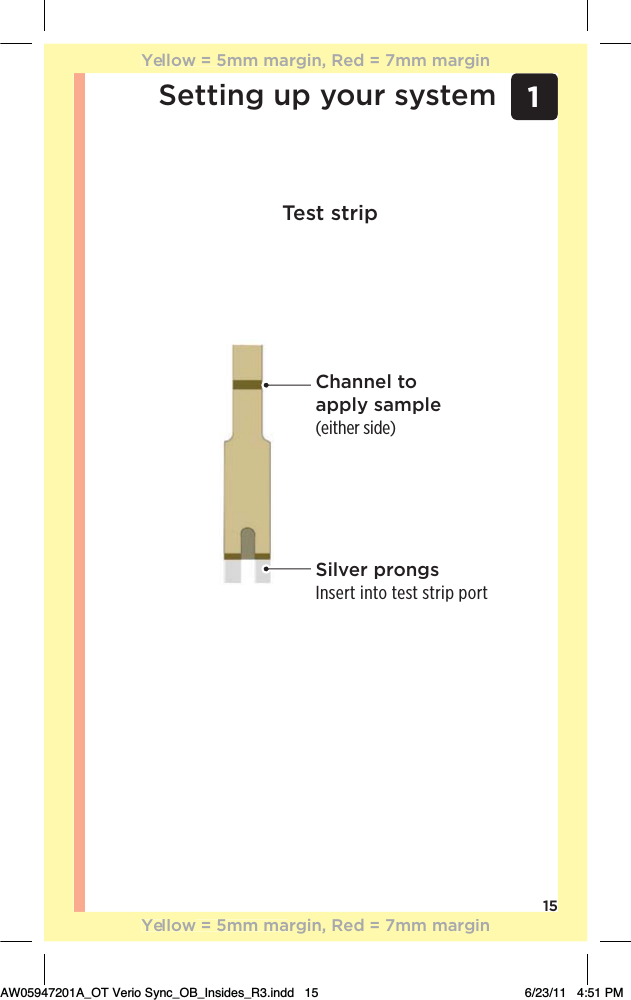
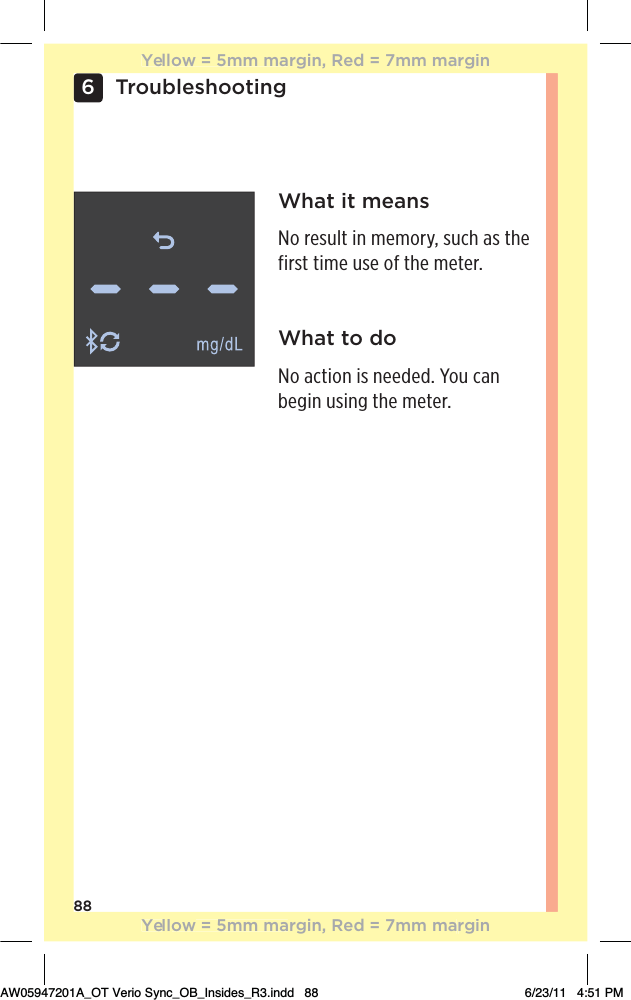
![16Setting up your system1 Turning your meter on1. Press and hold the meter button until the meter comes onƽ CAUTIONIf you see any missing segments within the start-up screen, there may be a problem with the meter. Contact [CS Lead-in (Abbr.)][CS Contact][CS Hours of Operation].Next, the Last Result screen appears. The arrow ( ) indicates that this is the Last Result screen and the three dashes ( ) mean that no results are currently stored in the meter. The airplane symbol ( ) indicates that Bluetooth® is not activated. When Bluetooth® is activated, your meter will automatically attempt to sync () any unsent blood glucose readings.Yellow = 5mm margin, Red = 7mm marginYellow = 5mm margin, Red = 7mm marginAW05947201A_OT Verio Sync_OB_Insides_R3.indd 16 6/23/11 4:51 PM](https://usermanual.wiki/LifeScan/M/User-Guide-1538050-Page-16.png)
![22Setting up your system1 7. Enter your meter PIN number using the keypadThe PIN number can be found on the back of your meter in the box. Blood Glucose Meter / Blood Glucose Meter[Insert Website]PIN: xxxxxx[COO (Meter)] [COO (Meter)][Insert manufacturing address]AW05947204AIn vitro diagnostic. / For self-testing.In vitro diagnostic. / For self-testing.Contains/Contains FCC ID: QOQWT12Verio™ Sync™SN: XXXXXXXXPIN Number8. Tap PairYellow = 5mm margin, Red = 7mm marginYellow = 5mm margin, Red = 7mm marginAW05947201A_OT Verio Sync_OB_Insides_R3.indd 22 6/23/11 4:51 PMPlease addand box indwith the follo[Use final AWlabel image,include Serito match Apshot.]](https://usermanual.wiki/LifeScan/M/User-Guide-1538050-Page-22.png)
![30Taking a test2ƽ CAUTIONđƫƫDo Not use your test strips if your vial is damaged or left open to air. This could lead to error messages or inaccurate results. Contact [CS Lead-in(Abbr.)] [CS Contact][CS Hours of Operation] immediately if the test strip vial is damaged.đƫƫ"ƫ5+1ƫ**+0ƫ0!/0ƫ 1!ƫ0+ƫƫ,.+(!)ƫ3%0$ƫ5+1.ƫ0!/0%*#ƫsupplies, contact your health care professional. Failure to test could delay treatment decisions and lead to a serious medical condition.đƫƫThis meter meets the requirements for immunity to electrical interference at the frequency range and test levels specified in international standard ISO-15197:2003(E). Do Not use this meter near other sources of electromagnetic radiation.đƫƫ$!ƫ0!/0ƫ/0.%,ƫ2%(ƫ+*0%*/ƫ .5%*#ƫ#!*0/ƫ0$0ƫ.!ƫ$.)"1(ƫif inhaled or swallowed and may cause skin or eye irritation.đƫƫDo Not use test strips after the expiration date (printed on the vial) or the discard date, whichever comes first, or your results may be inaccurate.Yellow = 5mm margin, Red = 7mm marginYellow = 5mm margin, Red = 7mm marginAW05947201A_OT Verio Sync_OB_Insides_R3.indd 30 6/23/11 4:51 PMr](https://usermanual.wiki/LifeScan/M/User-Guide-1538050-Page-30.png)
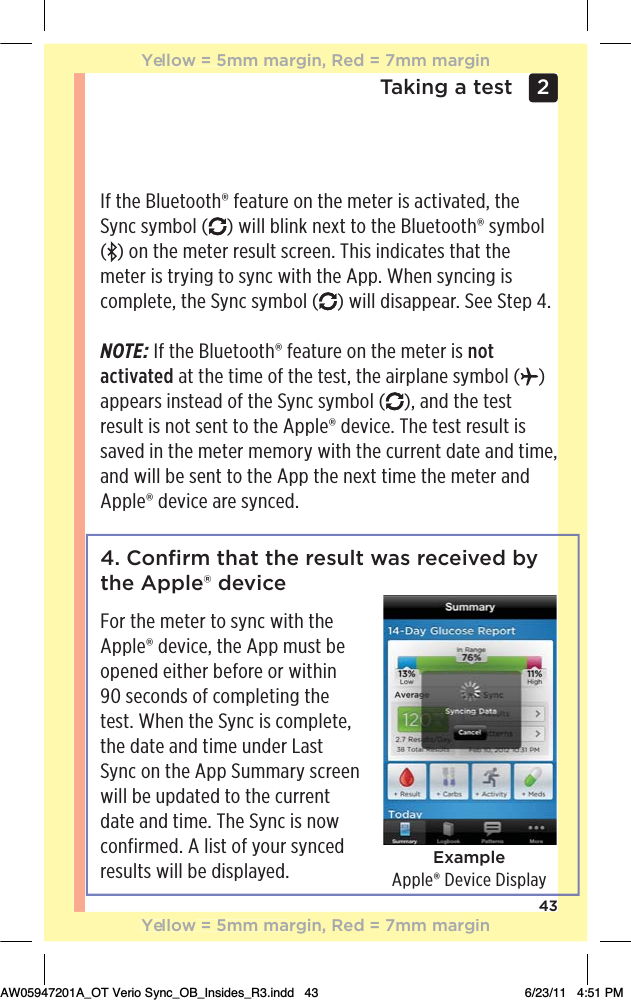
![42Taking a test23. Read your result on the meterYour blood glucose result appears on the meter display along with the unit of measure. The date and time for this result will then appear after about 3 seconds.If mg/dL does not appear with the blood glucose result, contact [CS Lead-in (Abbr.)][CS Contact] [CS Hours of Operation].Exampleƽ CAUTIONIf the letter (for a control solution result) appears on the screen when testing your blood glucose, repeat the test with a new test strip. If the problem persists, contact [CS Lead-in (Abbr.)][CS Contact][CS Hours of Operation].Yellow = 5mm margin, Red = 7mm marginYellow = 5mm margin, Red = 7mm marginAW05947201A_OT Verio Sync_OB_Insides_R3.indd 42 6/23/11 4:51 PM](https://usermanual.wiki/LifeScan/M/User-Guide-1538050-Page-42.png)

![56Taking a test24. Read your result on the meterThe meter will count down from 5 to 1. Your result is displayed along with the unit of measure and the letter (control solution). The meter automatically marks the result as a control solution test. The date and time for this result will then appear on the display after about 3 seconds.Control solution test results are stored in the meter, but are not sent to the Apple® device.ExampleNOTE: If the Bluetooth® feature on the meter is activated, the meter will attempt to send any “blood glucose” test results to the App that have not yet been sent.ƽ CAUTIONIf the letter does not appear on the screen, repeat the test with a new test strip. If the problem persists, contact [CS Lead-in (Abbr.)][CS Contact][CS Hours of Operation].NYellow = 5mm margin, Red = 7mm marginYellow = 5mm margin, Red = 7mm marginAW05947201A_OT Verio Sync_OB_Insides_R3.indd 56 6/23/11 4:51 PM](https://usermanual.wiki/LifeScan/M/User-Guide-1538050-Page-56.png)
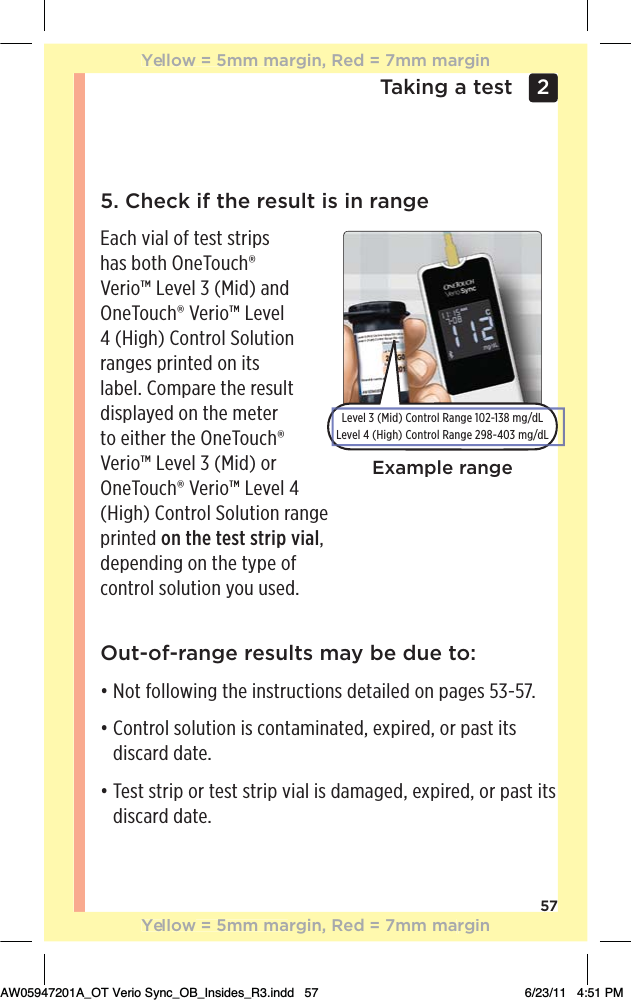
![58Taking a test26. CleaningClean the top of the control solution cap with a clean, damp tissue or cloth.Control solution results can be seen immediately after a test or if it is your last result in the meter.ƽ CAUTIONđƫƫ"ƫ5+1ƫ+*0%*1!ƫ0+ƫ#!0ƫ+*0.+(ƫ/+(10%+*ƫ.!/1(0/ƫ0$0ƫ"((ƫoutside the range printed on the test strip vial, Do Not use the meter, test strips, or control solution. Contact [CS Lead-in (Abbr.)][CS Contact][CS Hours of Operation].đƫƫ$!ƫ+*0.+(ƫ/+(10%+*ƫ.*#!/ƫ,.%*0! ƫ+*ƫ0$!ƫ0!/0ƫ/0.%,ƫvial are for control solution tests only and are not recommended ranges for your blood glucose level.đƫƫ!0!.Čƫ0!/0ƫ/0.%,/ƫ* ĥ+.ƫ+*0.+(ƫ/+(10%+*ƫ3!.!ƫ*+0ƫ((ƫ0ƫthe same temperature when the control solution test was performed.đƫƫƫ,.+(!)ƫ3%0$ƫ0$!ƫ)!0!.ċđƫƫ%.0ƫ+.ƫ+*0)%*0%+*ƫ%*ƫ0$!ƫ/)((ƫ3!((ƫ+*ƫ0$!ƫ0+,ƫ+"ƫ0$!ƫcontrol solution cap (see Step 2).Yellow = 5mm margin, Red = 7mm marginYellow = 5mm margin, Red = 7mm marginAW05947201A_OT Verio Sync_OB_Insides_R3.indd 58 6/23/11 4:51 PM](https://usermanual.wiki/LifeScan/M/User-Guide-1538050-Page-58.png)
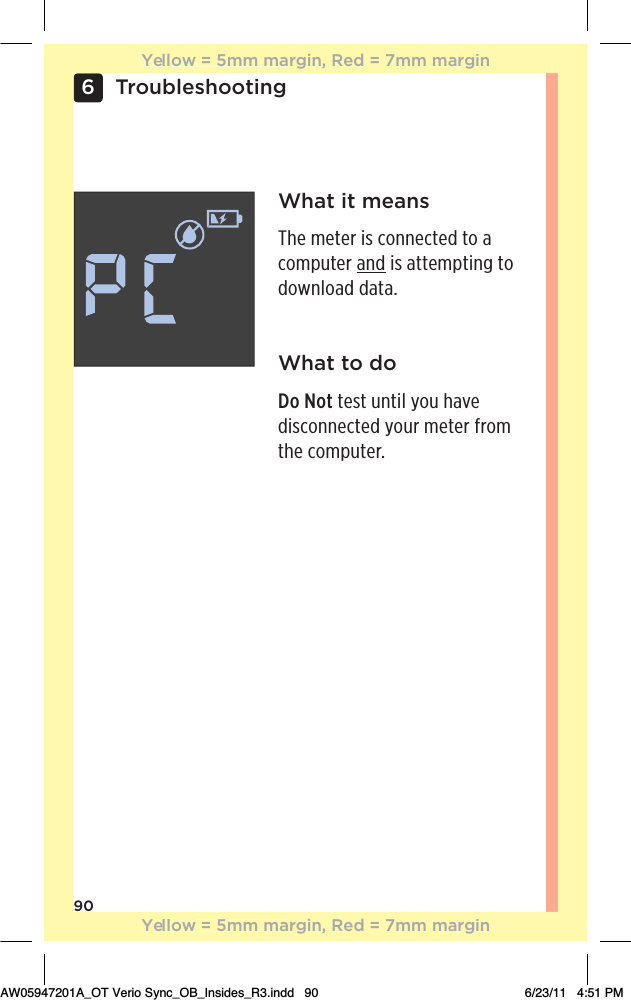
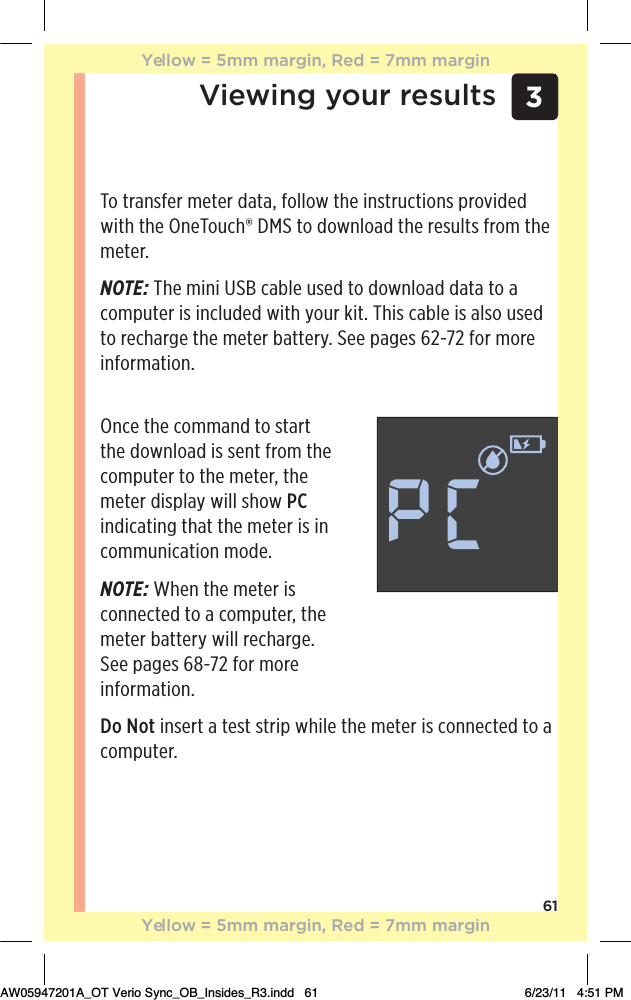
![603Viewing your resultsWhenever you press and hold the meter button to turn the meter on your last test result, indicated by the arrow ( ), appears on the display. NOTE: Your meter stores up to 500 test results but only your last result can be displayed. When the memory is full, the oldest result is removed as the newest is added. To view all results, sync the meter with the App (see pages 23-25) or download the results to a computer.Downloading results to a computerOneTouch® Diabetes Management Software (DMS) can store all of your records and help you spot patterns for planning meals, exercise, insulin dosing, and medication. To learn more about OneTouch® DMS and to order the software, visit www.OneTouchDiabetes.com or contact [CS Lead-in (Abbr.)][CS Contact][CS Hours of Operation].Use only the mini USB interface cable provided by LifeScan, Inc. Connect only to a computer certified to UL 60950-1.NYellow = 5mm margin, Red = 7mm marginYellow = 5mm margin, Red = 7mm marginAW05947201A_OT Verio Sync_OB_Insides_R3.indd 60 6/23/11 4:51 PM](https://usermanual.wiki/LifeScan/M/User-Guide-1538050-Page-60.png)
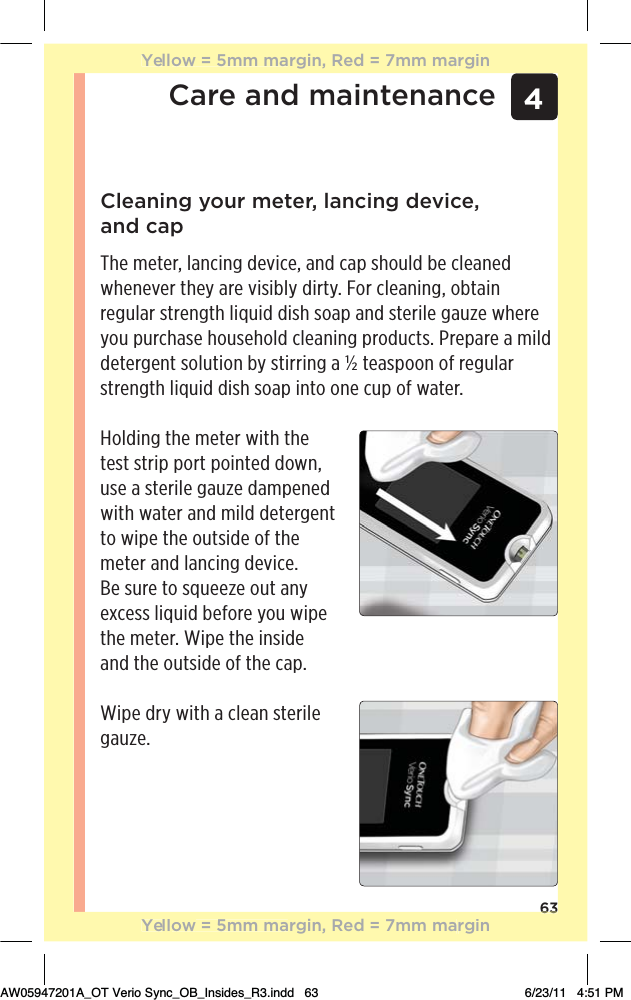
![66Care and maintenance4Wash hands thoroughly with soap and water after handling the meter, lancing device and cap.đƫƫDo Not use alcohol or any other solvent.đƫƫDo Not allow liquids, dirt, dust, blood, or control solution to enter the test strip port or the data port.đƫƫDo Not squeeze gauze into test strip portđƫƫDo Not spray cleaning solution on the meter and lancing device.đƫƫDo Not immerse the meter and lancing device in any liquid.The OneTouch® Verio™ Sync™ System withstood cleaning and disinfection cycles well in excess of LifeScan’s recommendation. See table on page 67 for more details.If you have questions about cleaning or disinfecting, or if you see evidence of physical damage, contact [CS Lead-in (Abbr.)][CS Contact][CS Hours of Operation].Yellow = 5mm margin, Red = 7mm marginYellow = 5mm margin, Red = 7mm marginAW05947201A_OT Verio Sync_OB_Insides_R3.indd 66 6/23/11 4:51 PM](https://usermanual.wiki/LifeScan/M/User-Guide-1538050-Page-66.png)

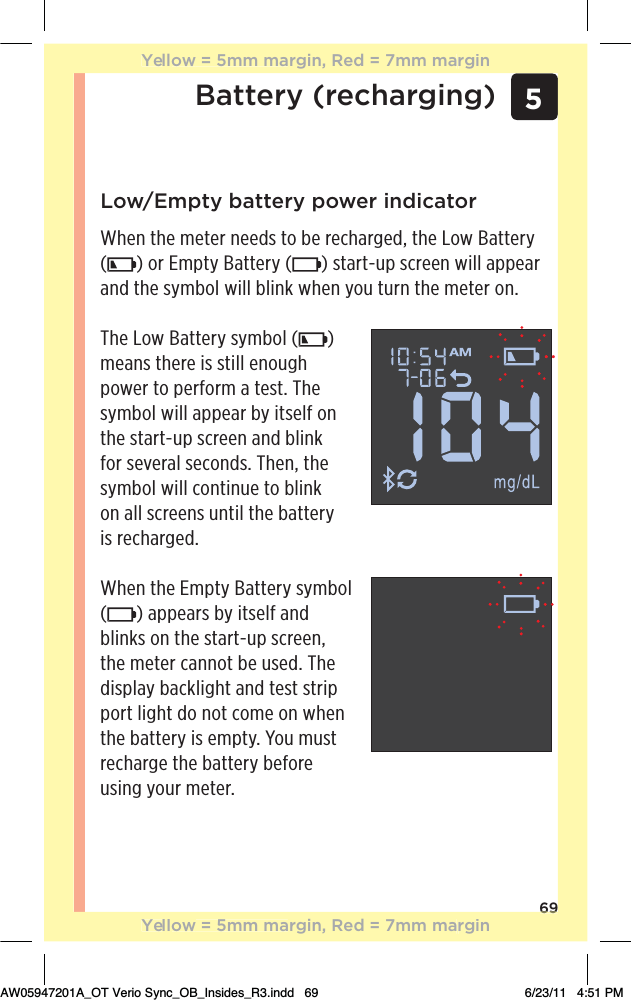
![685Battery (recharging)BatteryYour OneTouch® Verio™ Sync™ Meter uses a rechargeable battery. When fully charged, the meter will perform blood glucose or control solution tests for about 1 to 2 weeks before recharging is needed, depending on use. Using the meter button to turn the meter off will preserve battery power.NOTE: When the battery can no longer hold a charge, the meter needs to be replaced. Contact [CS Lead-in (Abbr.)][CS Contact][CS Hours of Operation] for more information.ƽ CAUTIONThe meter battery is permanent and is not replaceable. Do Not try to open the meter and remove or replace the battery.68NYellow = 5mm margin, Red = 7mm marginYellow = 5mm margin, Red = 7mm marginAW05947201A_OT Verio Sync_OB_Insides_R3.indd 68 6/23/11 4:51 PM](https://usermanual.wiki/LifeScan/M/User-Guide-1538050-Page-68.png)
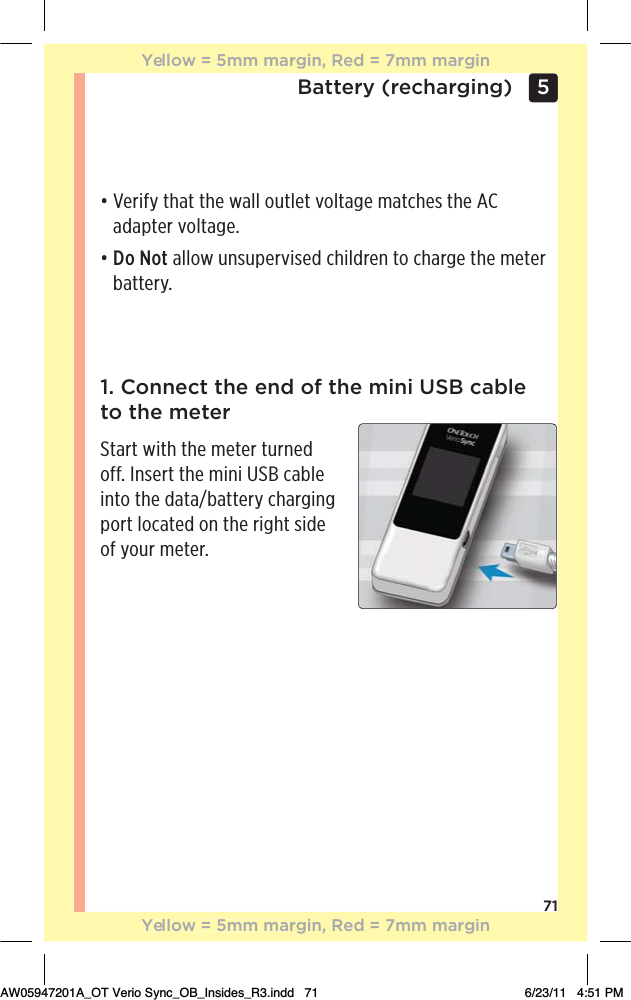
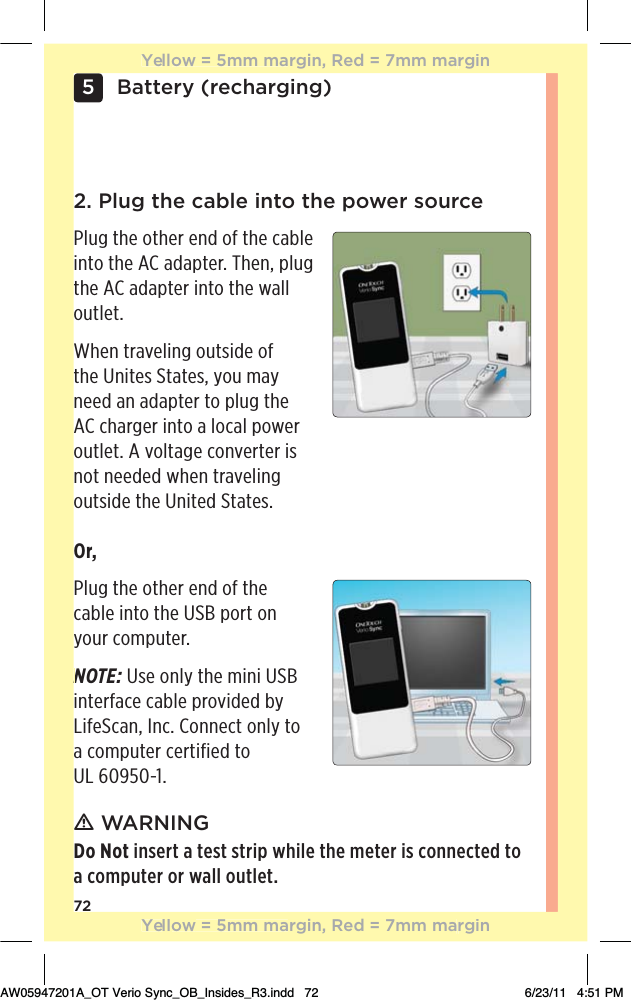
![70Battery (recharging)5Recharging the meter batteryThe meter battery may be charged using one of the following options:đƫ%*%ƫƫ(!ƫĨ+),10!.ƫ$.#%*#ĩđƫ%*%ƫƫ(!ƫ3%0$ƫ0$!ƫƫ ,0!.ƫĨ3((ƫ$.#%*#ĩċBoth the mini USB cable and AC adapter are included in your kit.ƽ CAUTION đƫƫ*(5ƫ1/!ƫ0$!ƫ%"!*ƫ)%*%ƫƫ(!ƫ* ƫƫ ,0!.ƫ3%0$ƫthe OneTouch® Verio™ Sync™ Meter. If you misplace the mini USB cable or AC adapter, call [CS Lead-in (Abbr.)][CS Contact][CS Hours of Operation].đƫƫDo Not charge meter outdoors or in a wet area.đƫƫDo Not use the mini USB cable, AC adapter or meter if it is damaged, discolored, abnormally hot, or has an unusual odor. Call [CS Lead-in (Abbr.)][CS Contact][CS Hours of Operation].đƫƫDo Not plug the AC adapter into wall outlet and leave it unattended.đƫƫ*(5ƫ,(1#ƫ0$!ƫ)%*%ƫƫ(!ƫ%*(1 ! ƫ3%0$ƫ5+1.ƫ'%0ƫ%*0+ƫthe AC adapter.Yellow = 5mm margin, Red = 7mm marginYellow = 5mm margin, Red = 7mm marginAW05947201A_OT Verio Sync_OB_Insides_R3.indd 70 6/23/11 4:51 PM](https://usermanual.wiki/LifeScan/M/User-Guide-1538050-Page-70.png)
![75Battery (recharging) 5 4. Complete the chargeWhen the charge is completed (about 2 hours when charging an empty battery) the Battery Charging symbol () will disappear from the display. Remove the mini USB cable from the meter before turning the meter on or before you take a test.NOTE: đƫƫƫ"ƫ0$!ƫ)!0!.ƫ%/ƫ*+0ƫ"1((5ƫ$.#! ƫ"0!.ƫĂƫ$+1./Čƫ$!'ƫ0$0ƫthe cable is plugged in correctly. If this does not solve the problem, call [CS Lead-in (Abbr.)][CS Contact][CS Hours of Operation].đƫƫƫ2!*ƫ3$!*ƫ00!.5ƫ,+3!.ƫ%/ƫ!40.!)!(5ƫ(+3Čƫ%0ƫ3%((ƫ*+0ƫaffect results stored in the meter. However, if the date and time were lost, you may need to sync your meter with the App to reset the date and time in the meter. See pages 23-25.Meter disposalDispose of the meter and internal lithium ion battery according to your local/country laws and regulations.Yellow = 5mm margin, Red = 7mm marginYellow = 5mm margin, Red = 7mm marginAW05947201A_OT Verio Sync_OB_Insides_R3.indd 75 6/23/11 4:51 PM](https://usermanual.wiki/LifeScan/M/User-Guide-1538050-Page-75.png)
![Error and other messagesThe OneTouch® Verio™ Sync™ Meter displays messages when there are problems with the test strip, with the meter, or when your glucose levels are above 600 mg/dL or below 20 mg/dL. Improper use may cause an inaccurate result without producing an error message.NOTE: If the meter is on but does not operate (locks-up), contact [CS Lead-in (Abbr.)][CS Contact][CS Hours of Operation].776TroubleshootingYellow = 5mm margin, Red = 7mm marginYellow = 5mm margin, Red = 7mm marginAW05947201A_OT Verio Sync_OB_Insides_R3.indd 77 6/23/11 4:51 PM](https://usermanual.wiki/LifeScan/M/User-Guide-1538050-Page-77.png)
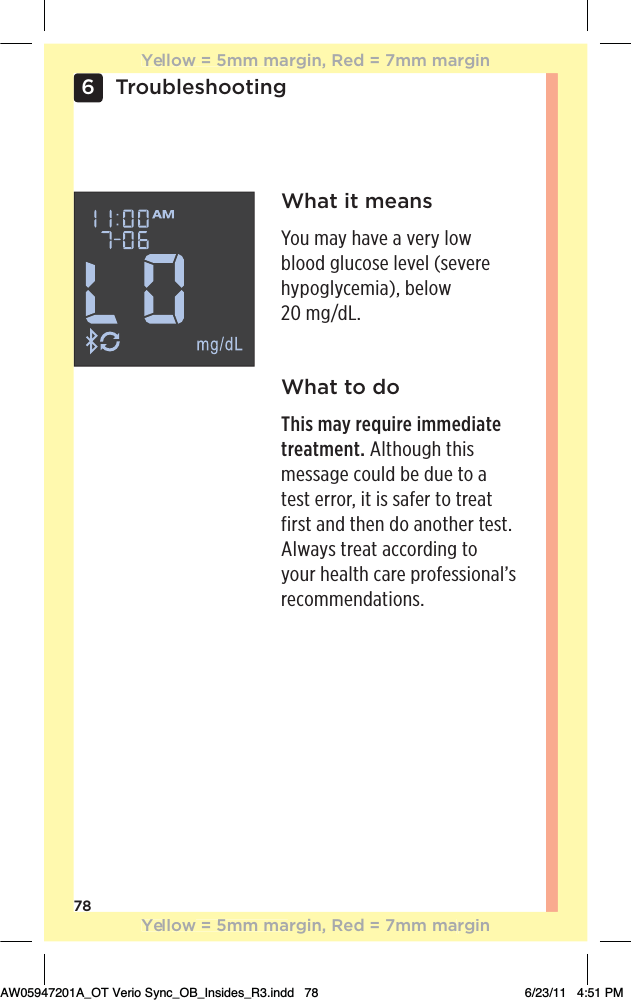
![806TroubleshootingWhat it meansThere is a problem with the meter.What to doDo Not use the meter. Contact [CS Lead-in (Abbr.)][CS Contact][CS Hours of Operation].What it meansOne of the following may apply:đƫƫƫ!/0%*#ƫ3%0$ƫ1/! ƫ0!/0ƫ/0.%,ċƫđƫƫƫ!/0%*#ƫ3%0$ƫƫ)+%/0ƫ0!/0ƫ/0.%,ƫor wet hands. đƫƫƫ.+(!)ƫ3%0$ƫ0$!ƫ)!0!.ċWhat to doRepeat the test with a new, dry test strip; see blood application (pages 39-42) or control solution testing (pages 51-58). If this message continues to appear, contact [CS Lead-in (Abbr.)][CS Contact][CS Hours of Operation].p]Yellow = 5mm margin, Red = 7mm marginYellow = 5mm margin, Red = 7mm marginAW05947201A_OT Verio Sync_OB_Insides_R3.indd 80 6/23/11 4:51 PM](https://usermanual.wiki/LifeScan/M/User-Guide-1538050-Page-80.png)
![816 TroubleshootingWhat it meansThe sample was applied before the meter was ready.What to doRepeat the test with a new test strip. Apply a blood or control solution sample only after Apply Blood symbol ( ) appears on the display. If this message continues to appear, contact [CS Lead-in (Abbr.)][CS Contact][CS Hours of Operation].Yellow = 5mm margin, Red = 7mm marginYellow = 5mm margin, Red = 7mm marginAW05947201A_OT Verio Sync_OB_Insides_R3.indd 81 6/23/11 4:51 PM](https://usermanual.wiki/LifeScan/M/User-Guide-1538050-Page-81.png)
![826TroubleshootingWhat it meansOne of the following may apply:đƫƫ+0ƫ!*+1#$ƫ(++ ƫ+.ƫ+*0.+(ƫsolution was applied or more was added after the meter began to count down.đƫƫ$!ƫ0!/0ƫ/0.%,ƫ)5ƫ$2!ƫ!!*ƫdamaged or moved during testing.đƫƫ$!ƫ/),(!ƫ3/ƫ%),.+,!.(5ƫapplied.đƫƫ$!.!ƫ)5ƫ!ƫƫ,.+(!)ƫ3%0$ƫthe meter.What to doRepeat the test with a new test strip; see blood application (pages 39-42) or control solution testing (pages 51-58). If the error message appears again, contact [CS Lead-in (Abbr.)][CS Contact][CS Hours of Operation].Yellow = 5mm margin, Red = 7mm marginYellow = 5mm margin, Red = 7mm marginAW05947201A_OT Verio Sync_OB_Insides_R3.indd 82 6/23/11 4:51 PM](https://usermanual.wiki/LifeScan/M/User-Guide-1538050-Page-82.png)
![836 TroubleshootingWhat it meansThe meter has detected a problem with the test strip. Possible cause is test strip damage.What to doRepeat the test with a new test strip; see blood application (pages 39-42) or control solution testing (pages 51-58). If the error message appears again, contact [CS Lead-in (Abbr.)][CS Contact][CS Hours of Operation].NOTE: There is no Er6 message.Yellow = 5mm margin, Red = 7mm marginYellow = 5mm margin, Red = 7mm marginAW05947201A_OT Verio Sync_OB_Insides_R3.indd 83 6/23/11 4:51 PM](https://usermanual.wiki/LifeScan/M/User-Guide-1538050-Page-83.png)