Lifecomm LC140 CDMA1x 850MHz/1900MHz MPERs Pendant User Manual
Lifecomm, LLC CDMA1x 850MHz/1900MHz MPERs Pendant
Lifecomm >
User Manual

Draft Lifecomm User Guide
1
User Guide

Draft Lifecomm User Guide
2
Table of Contents
User Guide .................................................................................................................................................... 1
Welcome to Lifecomm .................................................................................................................................. 3
About Lifecomm ............................................................................................................................................ 4
Quick Start ................................................................................................................................................. 5
Adjusting Speaker Volume ........................................................................................................................ 5
Getting Started .............................................................................................................................................. 5
Cleaning the Lifecomm Device .................................................................................................................. 6
About the Device .......................................................................................................................................... 6
Lifecomm Device Controls/Attributes: ..................................................................................................... 6
Waterproof ............................................................................................................................................... 6
Device Icons .................................................................................................................................................. 7
Calling for Help .............................................................................................................................................. 8
Automatic Fall Detection .............................................................................................................................. 9
Charging the Device .................................................................................................................................... 10
Battery......................................................................................................................................................... 11
Optional Travel Charger .............................................................................................................................. 11
Listening to Audio Messages ...................................................................................................................... 12
Testing the Device ....................................................................................................................................... 13
Airplane Mode ............................................................................................................................................ 14
User and Caregiver Web Applications ........................................................................................................ 15
General Information ................................................................................................................................... 16
Manufacturer’s Warranty ........................................................................................................................... 16
Operating Environment .............................................................................................................................. 16
Regulatory Information ............................................................................................................................... 17
FDA and FCC Requirements .................................................................................................................... 17
For the most updated User Guide, please visit www.lifecomm.com

Draft Lifecomm User Guide
3
Welcome to Lifecomm
Thank you for choosing the Lifecomm Mobile Personal Emergency Response System (MPERS) and
congratulations on your purchase and subscription. You are now on your way to greater freedom and
independence.
Whether you’re at home or away, your Lifecomm Device provides a one-button connection to an
Emergency Response Specialist, anywhere and anytime day or night.*
This User Guide introduces you to the Lifecomm MPERS solution and explains how to use the features of
your new Device. Your use of the Lifecomm Device is subject to the complete Lifecomm Terms and
Conditions, a copy of which was included in the package containing your Lifecomm Device and which
may be viewed at www.lifecomm.com.
Included with your purchase and subscription are the following:
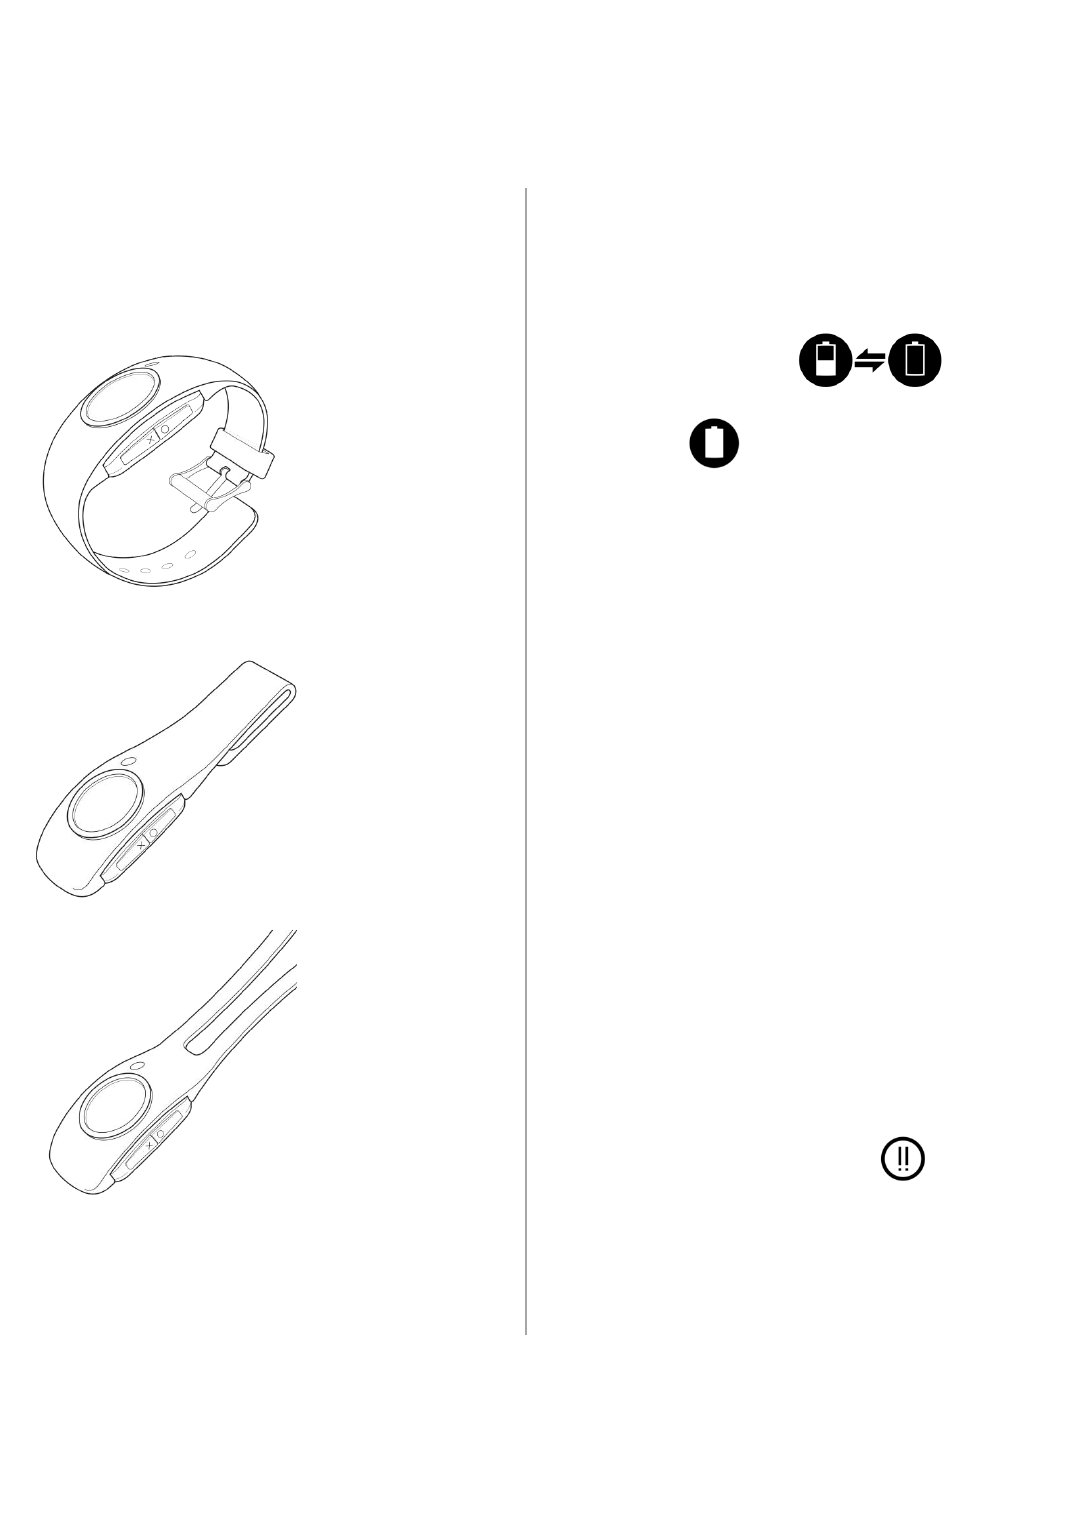
Lifecomm Device (Wristwatch, Pendant or Belt Clip)
Charging Station
Additional Accessories:
Travel Charger
Contact the Customer Care Center to purchase additional accessories at 1-800-XXX-XXXX.
*IMPORTANT: The Device will operate only in the United States and may not operate in all locations
at all times. Your Device works by using cellular communications networks to connect
the Device with our Emergency Response Specialists and by using GPS (the Global
Positioning System Satellite Network) to determine your location. The System will not
work unless you are in an area that has cellular coverage. Also, location data may not
be available if the Device is unable to receive GPS signals. SOME OR ALL OF THE
SYSTEM FEATURES MAY NOT BE AVAILABLEAT ALL TIMES, ESPECIALLY IN ENCLOSED
OR REMOTE AREAS.

Draft Lifecomm User Guide
4
About Lifecomm
The Lifecomm MPERS solution is a wearable, one-touch, wireless Device which provides access to
emergency assistance services for the User while in and outside of the home. A User can summons
assistance at any time day or night by pressing the Emergency Help Button. Even after an accidental fall,
when a User might not be physically able to call for help, the Device will automatically make a call to an
Emergency Response Specialist.
At the time you purchased your Lifecomm Device, you chose one of three wearable Device styles–either
the wristwatch, pendant or belt clip. The Lifecomm solution offers the following features:
Automatic Fall Detection - Device sensors in the pendant and belt clip wearable Device can
detect certain accidental falls and, subject to cellular coverage, automatically connect the User
to an Emergency Response Specialist.*
Cellular Communications and GPS - The MPERS solution merges GPS technology with
comprehensive wireless coverage, enabling the Device to operate both in and outside of the
home.
Expert Emergency Response Services - Users have one-button access to industry-leading
emergency support services, ensuring proper aid is quickly received - 24/7.
Activity Overview - The User and Caregiver can review the "Number of Steps Taken" and
"General Activity Levels" each day or for the past 30 days.
Personalized Messages and Alerts - The User and Caregiver can choose to receive important
alerts such as text messages, emails or automated voice messages.
Customized Web Applications - The User and Caregiver have access to password protected
Web-based tools to customize settings based on their personal preferences.
By combining cellular technology, automatic fall detection, activity measurements, and GPS
functionality, Lifecomm offers peace of mind for both the User and Caregiver.
*IMPORTANT: Automatic Fall Detection is not currently available for the wristwatch Device. In
certain situations, the pendant or belt clip Device may not detect a fall. IF YOU FALL
AND NEED ASSISTANCE AND ARE NOT AUTOMATICALLY CONNECTED TO AN
EMERGENCY RESPONSE SPECIALIST, PUSH THE EMERGENCY HELP BUTTON IF YOU ARE
ABLE.
Draft Lifecomm User Guide
5
Getting Started
Quick Start
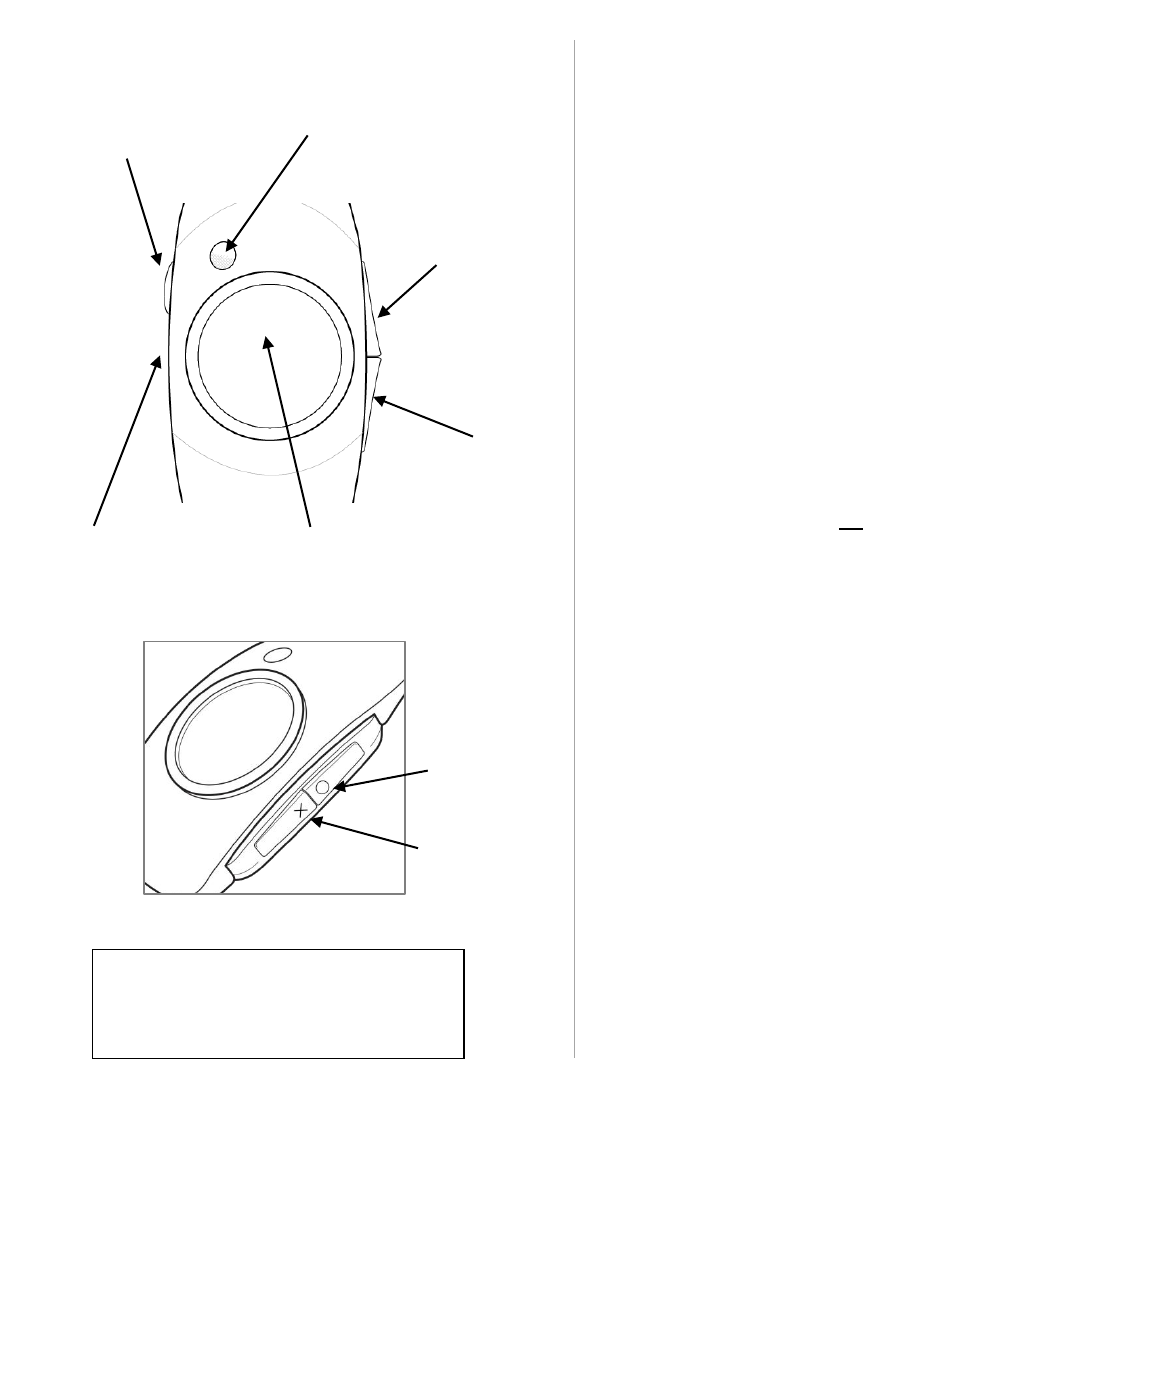
Whether you have chosen the wristwatch, pendant or belt
clip, begin with these quick start steps:
1. Carefully read this entire User Guide.
2. Plug the Charging Station into a local AC outlet.
3. Place the Device on the Charging Station. The first
time you charge the Device allow two hours to fully
charge the battery. You will notice alternating battery
icons flashing on the Device display indicating the
battery is being charged.
When the Device battery is fully charged, the Full
Battery icon will appear on the Device display.
(See Charging Your Device - pg. 10)
Note: After the first battery charge, it typically will
take an average of 30 minutes to fully charge your
Device.
4. Once the Device is charged for at least one hour, and
before removing the device from the Charging Station,
please use a separate phone line to call the Customer
Care Center at 1-800-XXX-XXXX to fully register your
Device with a Customer Care Specialist.
5. Once instructed by the Customer Care Specialist,
remove the Device from the Charging Station and
while holding the device in your hand push the
Emergency Help Button to perform a new Device Test
Call to confirm cellular connectivity.
6. When the call is answered, inform the Emergency
Response Specialist that you are performing your
initial Test Call using your new Device.
7. When the Test Call has ended, place the Device back
on the Charging Station to finish charging.
Note: Since the Device will not work in areas where
there is no cellular coverage, you should confirm
cellular connectivity in all areas of your home,
including bathrooms, basement and garage. Move
the Device to all areas of your home to verify that
the Out of Wireless Coverage Area icon does
not appear on the Device display.
Adjusting Speaker Volume
To adjust the volume of your Device, contact the
Emergency Response Center by pushing the Emergency
Help Button while holding the Device in your hand and
request a volume adjustment.
IMPORTANT: Changing the Device configuration from
one form to another (e.g. from a wristwatch to a
pendant) should only be done through a qualified
Lifecomm Service Provider. Attempting to do so on your
own will nullify the warranty.
Wristwatch
Belt Clip
Pendant
Draft Lifecomm User Guide
6
About the Device
5. Emergency Help
Button and Display
1. Light Button
4. Terminate
Button
n
3. Play/Skip
Button
2. Speaker
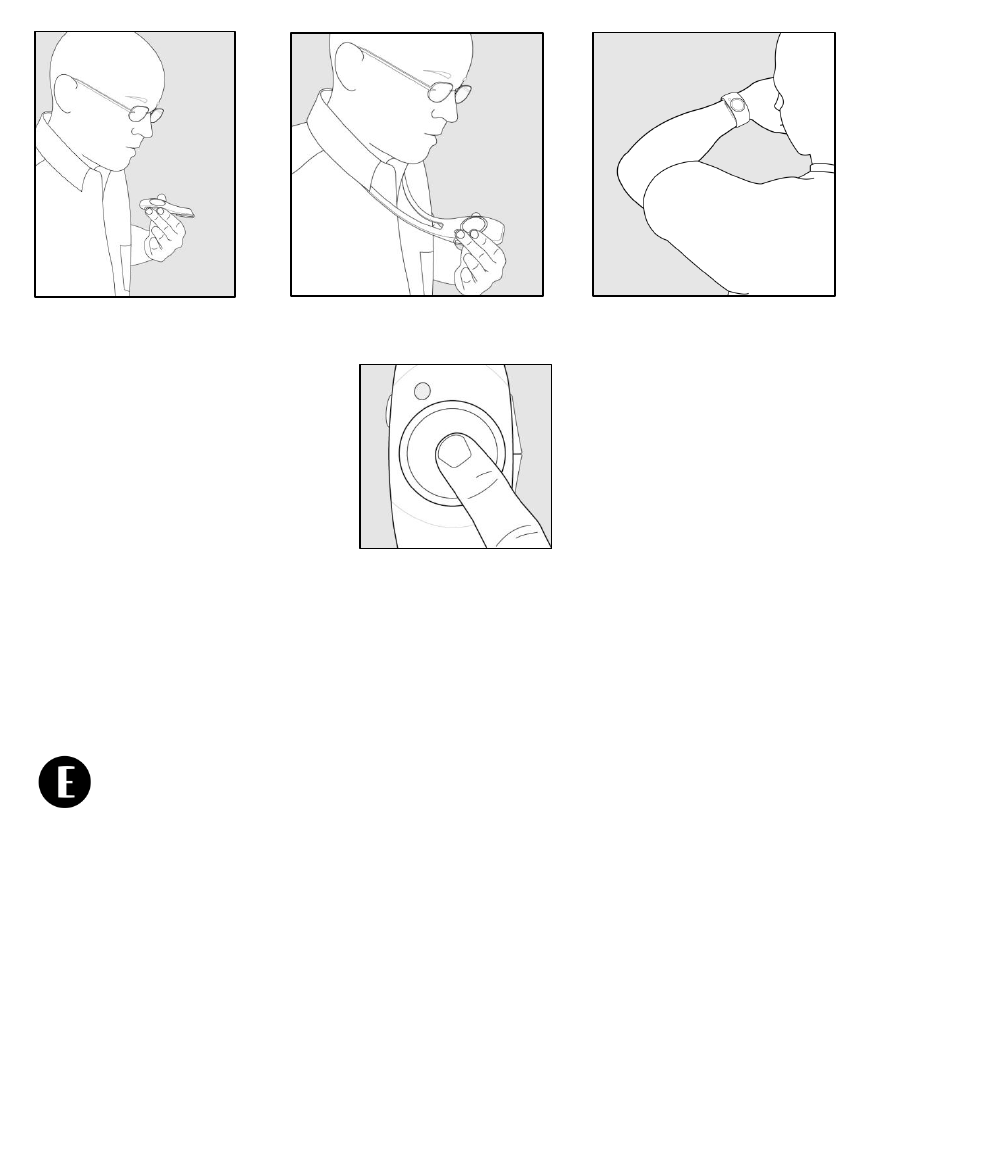
Lifecomm Device Controls/Attributes:
1. Light Button – Press this button to illuminate the Device
display.
2. Speaker – Use to listen to an Emergency Response
Specialist, messages and alerts.
3. Play/Skip Button – Press this button to play/skip audio
messages in the queue.
4. Terminate Button – Press this button to stop playback
of an audio message.
5. Emergency Help Button and Display – In the event of an
emergency, press this button to connect to an
Emergency Response Specialist. This also displays the
time and messages using the icons described below.
6. Microphone – Use to speak to an Emergency Response
Specialist.
Note: The Device is always on; there is no on/off button.
Waterproof
The Lifecomm Device is waterproof to a depth of three feet
and can be worn in the shower, bath or during a typical rain
fall. The Device is not designed for use while swimming. The
device may not function if you press the Emergency Help
Button while the device is submerged.
Cleaning the Lifecomm Device
Use a soft, slightly damp, lint free cloth to periodically clean
your Device. Do not use household cleaners, solvents,
alcohol, ammonia or any abrasive cleaners on the Device.
The control buttons are the same for
each Device type - wristwatch,
pendant or belt clip.
6. Microphone
Terminate
Button
n
Play/Skip
Button
IMPORTANT: There are no user-serviceable parts inside the device. Do not attempt to open or
modify the device.

Draft Lifecomm User Guide
7
Device Icons
The icons on the Device display provide important information:
The emergency call is connected.
The Device is being charged.
The Device battery is fully charged.
Low battery level.
A new audio message has been sent and is waiting to be played.
Number of messages in queue. (1-5)
Warning – Out of wireless coverage area.
Warning – Out of service.
The Device is in Airplane Mode.
Draft Lifecomm User Guide
8
Calling for Help
In the event of an emergency, accessing help is a simple push of a button.
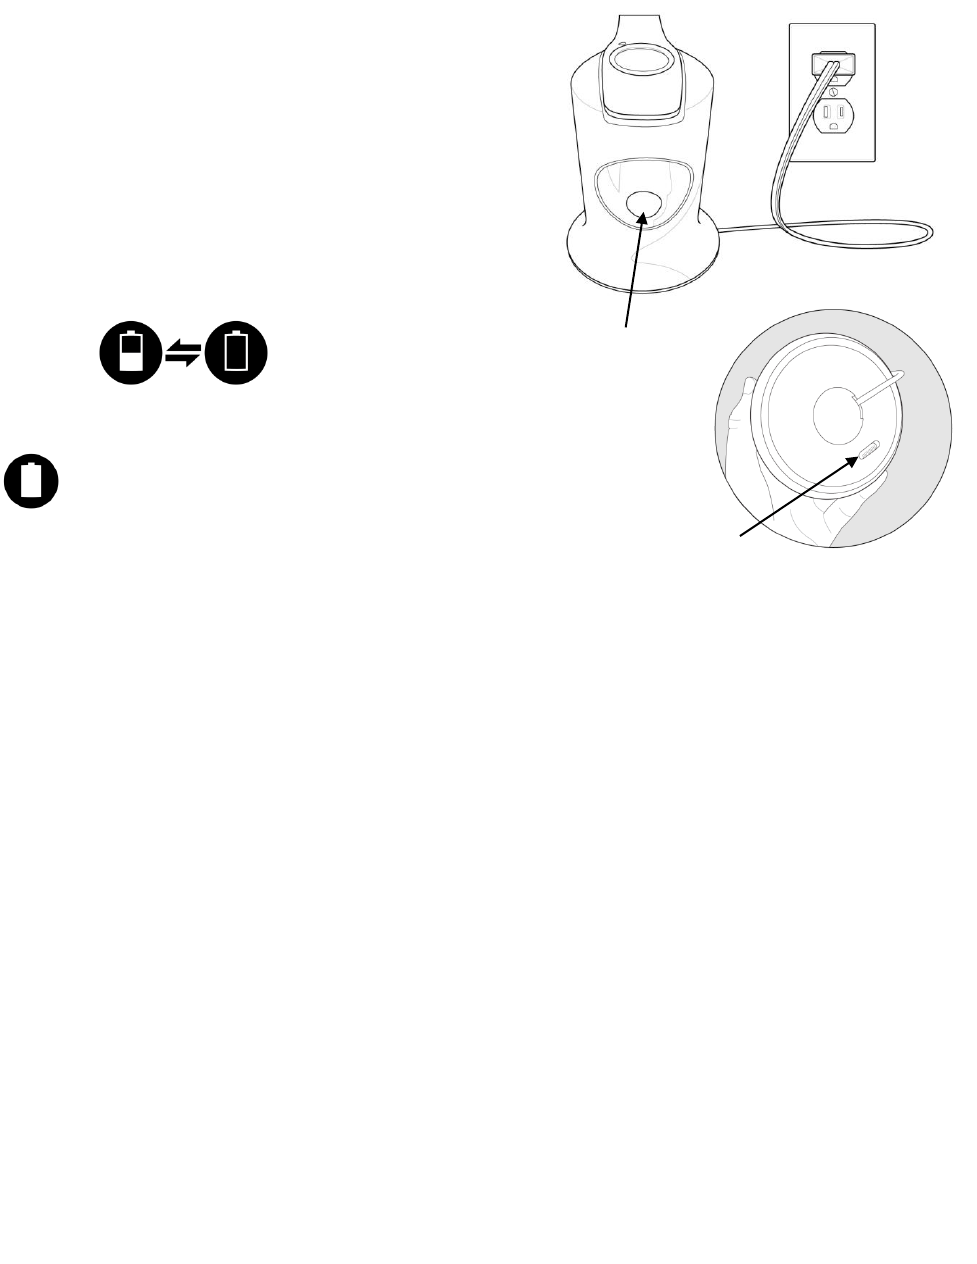
1. Hold the Device at least 1 inch (2.5cm) away from your body with the Device display facing you in
order to achieve optimal voice communications with the Emergency Response Specialist.
2. Press and hold the Emergency Help Button – this will initiate a call to the Emergency Response
Center.
You will hear an audio message instructing you how to hold the device and confirming that the
call is being connected to the Emergency Response Center.
The Device will also determine your current location.
3. You will then be connected to an Emergency Response Specialist and the Emergency Call Connected
icon will appear on the Device display.
4. Communicate with the Emergency Response Specialist through your Device’s speaker and
microphone while continuing to hold the Device in your hand (Belt Clip, Pendant) or in front of you
(Wristwatch) as indicated above.
5. In the event of a critical situation, the Emergency Response Specialist will immediately contact and
dispatch the appropriate emergency responders as well as call someone from your Contact List.
Note: You will not be able to cancel a call once the button is pressed. Not a problem, our Emergency
Response Specialist will be prepared to provide assistance, as necessary.
Belt Clip Pendant Wristwatch

Draft Lifecomm User Guide
9
Automatic Fall Detection
In the event of an accidental fall, the pendant and belt clip Devices feature Automatic Fall Detection and
will automatically initiate a call to the Emergency Response Center.
IMPORTANT: Automatic Fall Detection is not currently available for the wristwatch Device. In
certain situations, the pendant or belt clip Device may not detect a fall. IF YOU FALL
AND NEED ASSISTANCE AND ARE NOT AUTOMATICALLY CONNECTED TO AN
EMERGENCY RESPONSE SPECIALIST, PUSH THE EMERGENCY HELP BUTTON IF YOU ARE
ABLE.
1. After an accidental fall is detected, you will hear an audio message instructing you how to hold the
device and confirming that the call is being connected to the Emergency Response Center.
The Device will also determine your current location.
2. Once you are connected to an Emergency Response Specialist the Emergency Call Connected icon
will appear on the Device display.
3. Communicate with the Emergency Response Specialist.
a. Hold the Device at least 1 inch (2.5cm) away from your body with the Device display facing
you in order to achieve optimal voice communications.
b. Communicate with the Emergency Response Specialist through your Device’s speaker and
microphone while continuing to hold the Device in your hand (Belt Clip, Pendant) or in front
of you (Wristwatch) if possible.
4. In the event of a critical situation, the Emergency Response Specialist will immediately contact the
appropriate emergency responders and the designated individuals on your Contact List.
Note: If you fall and do not require emergency services, you can cancel the Automatic Fall Detection
call within 15 seconds by pressing any button other than the Emergency Help Button. The
Automatic Fall Detection feature is enabled by default. This function can be disabled by
pushing the Emergency Help Button and making the request with the Emergency Response
Specialist or by calling the Customer Care Center.
Draft Lifecomm User Guide
10
Charging the Device
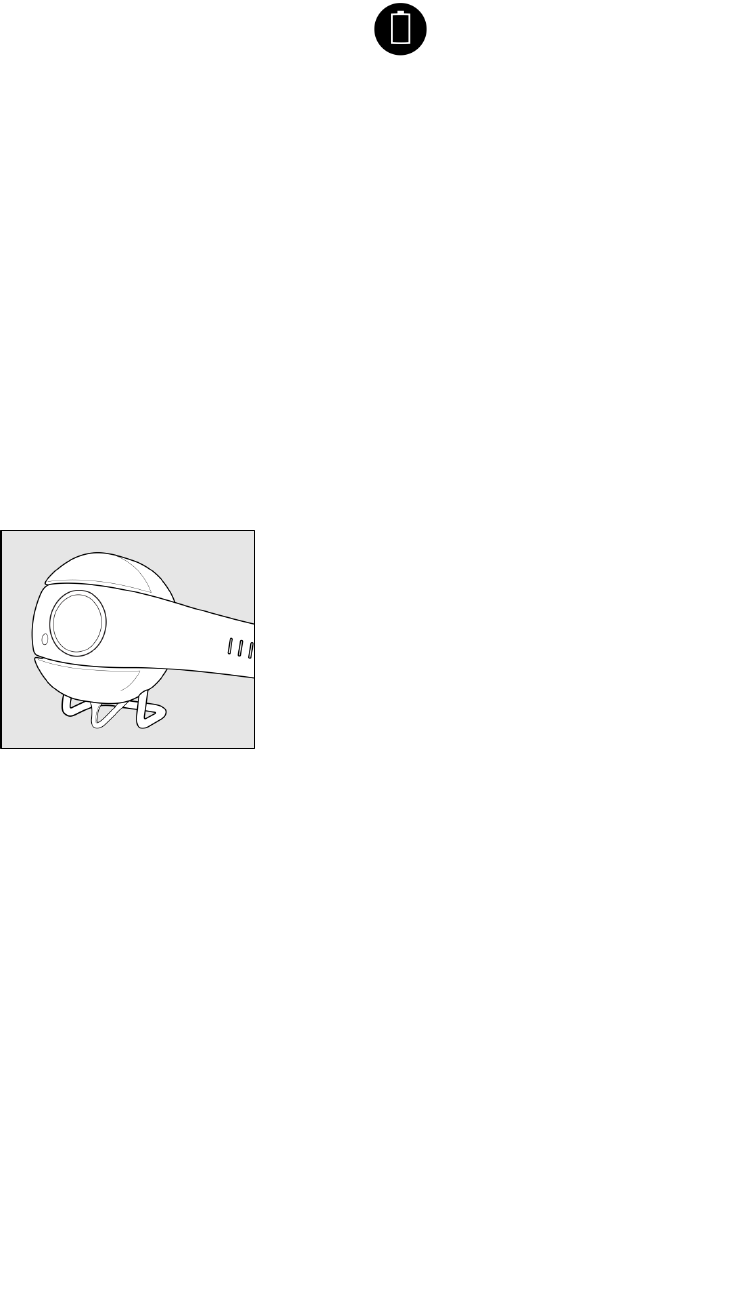
1. Place the Charging Station within your home where it can be conveniently accessed such as a
bedroom night stand or kitchen counter.
2. Plug the Charging Station into a local AC power outlet.
Although not required, we recommend you use a
surge protector to prevent damage to your Charging
Station if a power surge of an electric spike occurs.
3. Place your Device onto the Charging Station. You will
notice alternating battery icons flashing on the Device
display indicating the battery is being charged.
4. When the Device battery has been fully charged, the Full Battery
icon will appear on the Device display. The Device typically
takes 30 minutes to become fully charged.
5. You can turn the Charging Station light on or off using the On/Off switch in the center of the unit.
6. When removing your Device, the Charging Station will automatically illuminate for ten minutes or
until the Device is placed back in the Charging Station, whichever is shorter.
7. This automatic illumination can be disabled by turning the switch under the base to the off position.
If you disable the automatic illumination, the Charging Station light will also be disabled.
On/Off
Light Button
Enable/Disable
Light Function
Switch
Draft Lifecomm User Guide
11
Battery
The Lifecomm Device has a built-in, rechargeable battery.
When the battery becomes low during normal use, a low battery icon will appear on the
Device display
The Device will sound short, audible alerts after the audio message until the Device is placed on the
Charging Station.
Note: Do not attempt to change the battery in the Lifecomm Device. The battery should only be
replaced by a qualified Lifecomm Service Provider. Please contact the Customer Care Center at
1-800-XXX-XXXX using a separate phone line if you think the battery needs to be replaced.
Optional Travel Charger
An optional, Lifecomm Travel Charger is available for purchase.
Plug the Travel Charger into a local AC power outlet before placing the Lifecomm Device onto the
Travel Charger.

Draft Lifecomm User Guide
12
Listening to Audio Messages
Lifecomm may periodically send important audio messages to the Device.
An envelope icon on the Device display indicates there is an audio message waiting to be
played.
Your Device can store up to five audio messages. When an envelope icon appears on the Device display,
push the Play/Skip button and the Device display will indicate the number of messages. The Device will
then play an audible message indicating the number of messages in queue and begin playing the first
message.
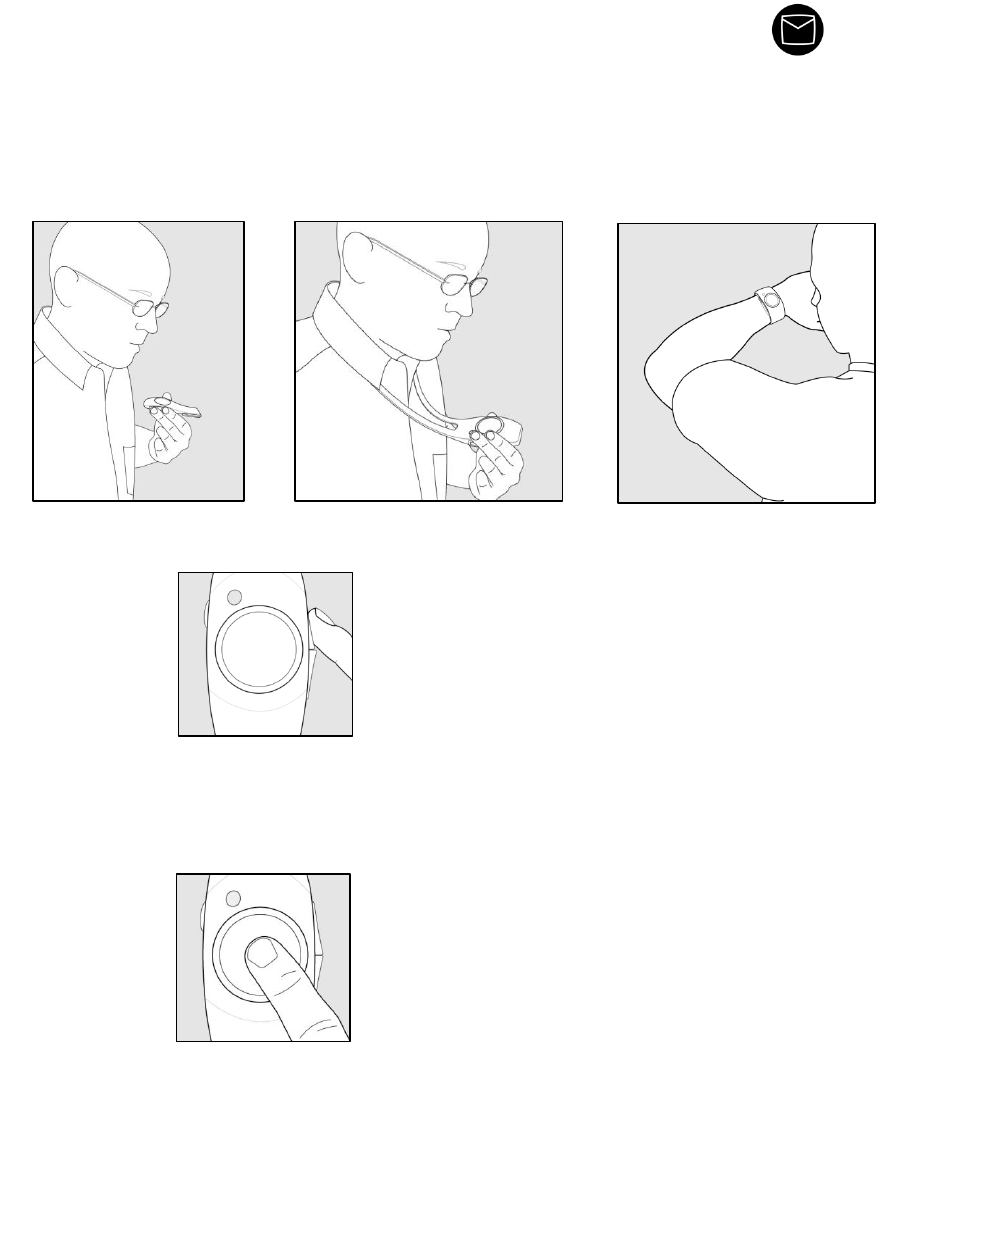
1. To play and listen to an audio message when you see the envelope icon, hold the Device at least
1 inch (2.5cm) away from your body with the Device Display facing you in order to achieve
optimal communications with the Emergency Response Specialist and push the Play/Skip
button.
2. To skip to the next audio message during playback, push the Play/Skip button again.
3. To stop playback of an audio message, press the Terminate button on the Device. This will not
erase the message and you can listen to it again by pushing the Play/Skip button until you return
to the message.
IMPORTANT: It is extremely important to listen to all audio messages immediately upon receipt. If
your Device has five messages stored in queue; it will automatically delete the oldest
message upon receiving an additional new audio message - even if the oldest message
has never been played. The Device will automatically delete a message after 7 days.
Draft Lifecomm User Guide
13
Testing the Device
To ensure your Device is functioning properly, you will periodically receive audible voice messages from
Lifecomm prompting you to perform a Test Call.
1. Once a Device Test Call notification has been sent to the Device, an envelope icon
will appear on the Device display indicating a new audio message is waiting to be played.
2. Hold the Device at least 1 inch (2.5cm) away from your body with the Device display facing you
in order to achieve optimal voice communications with the Emergency Response Specialist.
3. Push the Play/Skip button to listen to the message.
4. The message will instruct you to hold the Device in your hand (Belt Clip, Pendant) or in front of you
(Wristwatch) as indicated above and push the Emergency Help button. When the call is connected,
inform the Emergency Response Specialist that you are performing a requested Test Call.
Note: It is important for you to respond to a Test Call request as soon as possible. If you are not in an
area where there is cellular communication coverage, you may not receive a Test Call request. If
you have not received a Test Call request, you should make a Test Call at least once every 30 days.
Belt Clip Pendant Wristwatch
Draft Lifecomm User Guide
14
Airplane Mode
Airplane Mode disables your Device's wireless features in order to comply with airline regulations when
flying. While Airplane Mode is enabled, the transmitter, receiver, GPS, emergency call and automatic
fall detection are disabled.
To Enable Airplane Mode:
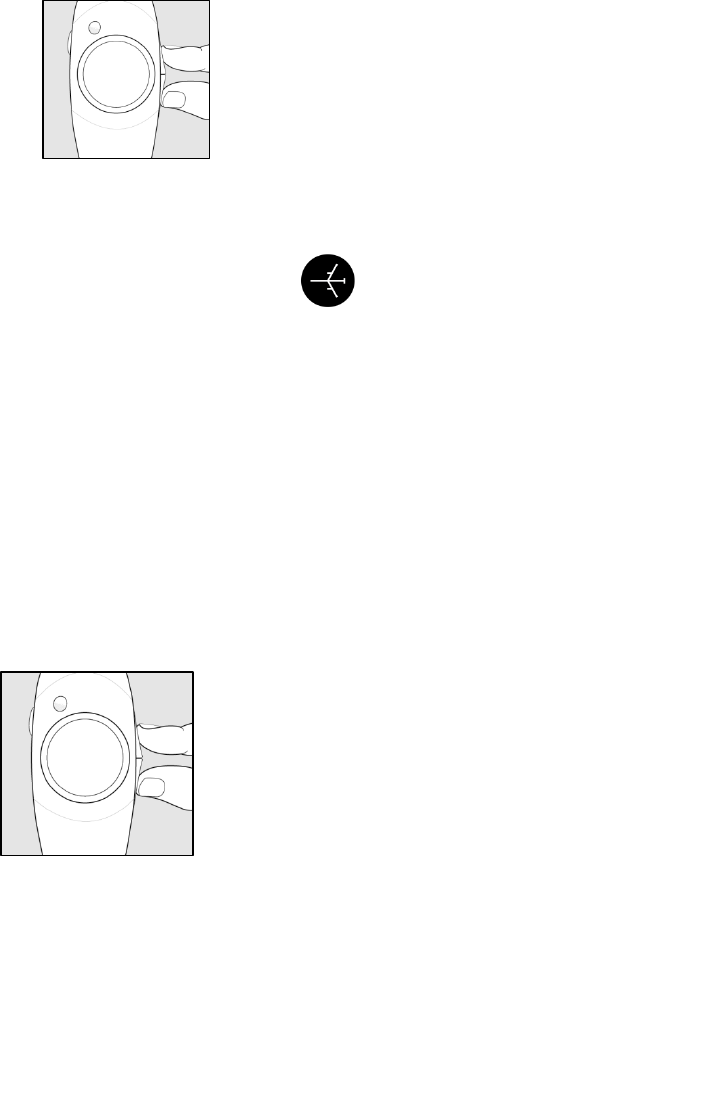
1. Simultaneously press both the Play/Skip and Terminate buttons, holding them for at least 6 seconds.
2. You will hear an audio message stating the Device is entering Airplane Mode.
3. When Airplane Mode has been enabled, the Airplane Mode icon will appear on the Device
display.
4. If you do not hear the audio message or see the Airplane Mode icon, then your Device is not in
Airplane Mode and you should repeat step 1.
5. As a default, the Device will remain in Airplane Mode for 6 hours
You can change the setting from as short as 1 hour to as long as 12 hours using the User or
Caregiver web portals or by calling the Customer Care Center.
To Disable Airplane Mode:
1. Simultaneously press both the Play/Skip and Terminate buttons, holding them for at least 6
seconds.
2. You will hear an audio message stating the Device is exiting Airplane Mode. If you do not hear
the audio message or if the Airplane Mode icon is still present, then your Device is still in
Airplane Mode and you should repeat step 1.
3. The Airplane Mode icon will clear from the Device display when Airplane Mode is disabled.

Draft Lifecomm User Guide
15
User and Caregiver Web Applications
The User and Caregiver have access to password protected Web Applications to perform a number of
functions outlined below.
To access the Web Applications, visit www.xxxxxxx.com and select the “log-in” link at the top right of the
homepage.
Requirements for Web Application Use:
Computer
Internet connectivity
PC operating systems - Windows 7; Windows Vista; Windows XP or Professional with Service Pack 3
or later
OR
Mac operating system – Mac OS X v10.5.8 or later
IMPORTANT: Many additional features and benefits of the Lifecomm system are available only by
accessing the web applications. To experience all features and benefits of your
Lifecomm Device, you or someone acting on your behalf, should access the web
application after you register your Device with a Customer Care Specialist.

Draft Lifecomm User Guide
16
General Information
Lifecomm
2002 Summit Blvd., Ste. 1800
Atlanta, GA 30319
Telephone: 404-257-2807
Customer Care Center: 1-800-XXX-XXXX
Website: www.lifecomm.com
Email: XXXXX@lifecomm.com
Manufacturer’s Warranty
Lifecomm warrants that the Products furnished hereunder will conform to the specifications applicable
to the Products and will be free of defects in workmanship and in materials used to manufacture the
Products. The warranty period for the Products will be for a period of twelve (12) months from the
shipment date of such Products purchased. This warranty shall survive inspection, acceptance and
payment. Lifecomm shall be responsible for repair/replacement and return shipment for any defective
Products returned during the warranty period.
Operating Environment
Optimal Operating Temperature: -10oC – 50oC (14oF – 122oF)
Optimal Operating Humidity Levels: 10 to 85%

Draft Lifecomm User Guide
17
Regulatory Information
FDA and FCC Requirements
Radio Frequency Emissions
Your wireless Device, which contains a radio transmitter and receiver, emits radio frequency energy
during use. The following consumer information addresses commonly asked questions about the health
effects of wireless Devices.
Safety and Wireless Devices
Scientific research on wireless Devices and radio frequency (“RF”) energy has been conducted
worldwide for many years, and continues. In the United States, the Food and Drug Administration
(“FDA”) and the Federal Communications Commission (“FCC”) set policies and procedures for wireless
Devices. The FDA issued a website publication on health issues related to usage of cell phones where it
states, “The scientific community at large believes that the weight of the scientific evidence does not
show an association between exposure to RF from cell phones and adverse health outcomes.” Still the
scientific community does recommend conducting additional research to address gaps in knowledge.
That research is being conducted around the world and the FDA continues to monitor developments in
this field. You can access the FDA website at http://www.fda.gov (Under “C” in the subject index, select
Cell Phones > Research.). You can also contact the FDA toll free at (888) 463-6332 or (888) INFO-FDA.
The FCC issued its own website publication stating that “there is no scientific evidence that proves that
wireless telephone usage can lead to cancer or other problems, including headaches, dizziness, or
memory loss.” The publication is available at http://www.fcc.gov/cgb/cellular.html or through the FCC
at (888) 225-5322 or (888) CALL-FCC. The National Cancer Institute (“NCI”) states that concerns about
the potential health effects of using cellular phones – “and specifically the suggestion that using a cell
phone may increase a person’s risk of developing brain cancer – are not supported by a growing body of
research on the subject.” You can access NCI’s review of the research at
http://www.cancer.gov/aboutnci/ncicancerbulletin/archive/2008/092308/page7.
What does Specific Absorption Rate (“SAR”) mean?
In 1996, the FCC working with the FDA, the U.S. Environmental Protection Agency (“EPA”), and other
agencies established RF exposure safety guidelines for wireless Devices in the United States. Before a
wireless Device model is available for sale to the public, it must be tested by the manufacturer and
certified to the FCC that it does not exceed limits established by the FCC. One of these limits is
expressed as a SAR, which is a measure of the rate of absorption of RF energy in the body. Tests for SAR
are conducted with the wireless Device transmitting at its highest power level in all tested frequency
bands.
Since 1996, the FCC has required that the SAR of a handheld wireless Device not exceed 1.6 watts per
kilogram, averaged over one gram of human tissue. Although the SAR is determined at the highest
power level, the actual SAR level of a wireless Device while operating can be less than the reported SAR
value. This is because the SAR value may vary from call to call, depending on factors such as proximity
to a cell site, the proximity of the wireless Device to the body while in use, and the use of hands-free
Devices. For more information about SARs, see the FCC’s OET Bulletins 56 and 65 at
www.fcc.gov/Bureaus/Engineering_Technology/Documents/bulletins, and www.fcc.gov/oet/ea.

Draft Lifecomm User Guide
18
Can I minimize my RF exposure?
If you are concerned about RF, there are several simple steps you can take to minimize your RF
exposure. You can, of course, minimize your talk time. You can also place more distance between your
body and the source of the RF, as the exposure level drops off dramatically with distance. All three
Lifecomm wearable Devices pose little risk to RF exposure to the head because the Devices do not need
to be placed on or near the head for communications.
Wireless Devices marketed in the United States are required to meet safety requirements regardless of
whether they are used against the head or against the body. Either configuration complies with the FCC
RF exposure limit.
Where can I obtain further information?
For further information, see the following additional resources (need to make sure all of these are still
operational)
U.S. Food and Drug Administration
FDA Consumer Magazine
November-December, 2000
1-888-INFO-FDA
http://www.fda.gov
Under “C” in the subject index, select Cell Phones > Research
American National Standards Institute
1819 L Street, N.W. Suite 600
Washington D.C., 20036
1-202-293-8020
www.ansi.org
Implantable Medical Devices
A minimum separation of six (6) inches should be maintained between a wireless Device and an
implantable medical Device, such as a pacemaker or an implantable cardioverterdefibrillator, to avoid
potential interference with the Device. Persons who have such Devices:
The Pendant Device should not be used with an implantable Medical Device such as a
pacemaker or a cardioverter-defibrillator.
Must not carry the Device in their breast pocket
Should always keep the wireless Device more than six (6) inches from their implanted medical
Device when the wireless radio is turned ON:
Read and follow the directions from the manufacturer of your implanted medical Device.
If you have any questions about using your wireless Device with such a medical Device, consult your
healthcare provider. For additional information, see http://www.fda.gov (under “C” in the subject
index, select Cell Phones > Interference with Pacemakers and Other Medical Devices).
For regulatory identification purposes, your product is assigned the following FCC ID
numbers:
o Wristwatch: ZQR-LC120
o Belt Clip: ZQR-LC130
o Pendant: ZQR-LC140

Draft Lifecomm User Guide
19
This equipment has been tested and found to comply with the limits for a Class B digital
Device, pursuant to Part 15 of the FCC rules. These limits are designed to provide reasonable
protection against harmful interference in a residential installation. This equipment uses and
can radiate radio frequency energy and, if not installed and used in accordance with the
instructions, may cause harmful interference to radio communications. However, there is no
guarantee that interference will not occur in a particular installation. If this equipment does
cause harmful interference to radio or television reception, which can be determined by
turning the equipment off and on, the user is encouraged to try to correct the interference
by one or more of the following measures:
Reorient or relocate the receiving antenna.
Increase the separation between the equipment and receiver.
Connect the equipment into an outlet on a circuit different from that to which the
receiver is connected.
Consult the dealer or an experienced radio/TV technician to help.
Changes or modifications not expressly approved by the party responsible for compliance
could void the user’s authority to operate the MPERS Device.
In an aircraft:
Place the MPERS Device in Airplane Mode before entering the aircraft. The MPERS
Device transmissions may interfere with aircraft electrical and communications systems.
Potentially Explosive Environments:
Place the MPERS Device in Airplane Mode when in any area with a potentially explosive
atmosphere and obey all signs and instructions. Sparks in such areas could cause an
explosion or fire resulting in bodily injury or even death.
Place the MPERS Device in Airplane Mode while at a fuel distribution or storage area,
chemical plant, where blasting operations are in progress and areas where the air
contains chemicals or particles such as grain dust or metal powders, and any other area
where you would normally be advised to turn off your vehicle engine.
Operation of the MPERS Device near medical equipment.
Other Medical Devices
If you use any other medical Device, consult the manufacturer of your Device to
determine if they are adequately shielded from external RF energy. Your physician may
be able to assist you in obtaining this information.
UL Certification Requirements
The AC adapter for the MPERS Device is UL Listed to safety standards UL 60950-1 (Safety of Information
Technology Equipment) and/or UL 1310 (Class 2 Power Units).