Lifeline Systems 7000PHB Halifax Personal Help Button with ISM User Manual
Lifeline Systems Inc Halifax Personal Help Button with ISM
User Manual
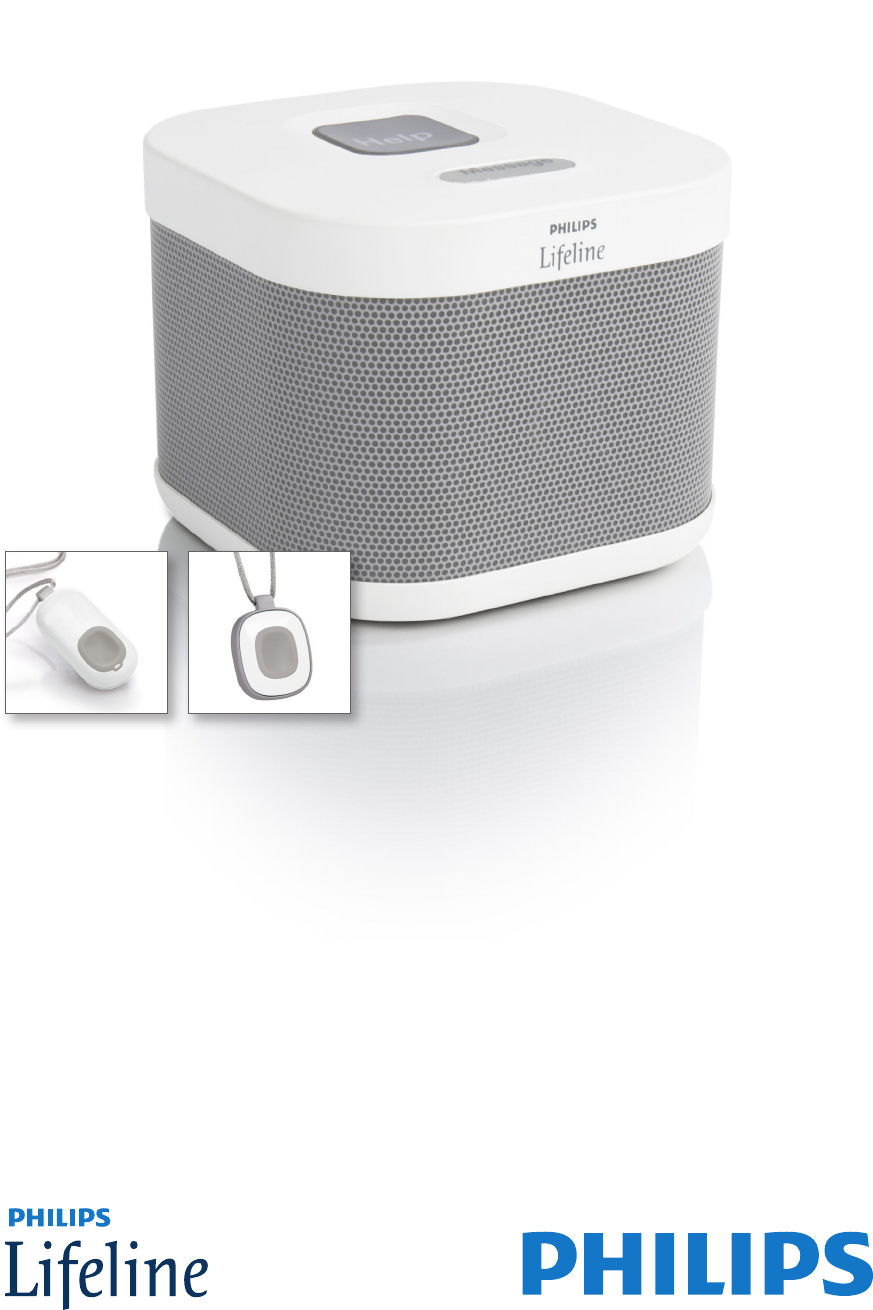
Philips Lifeline
Medical Alert Service
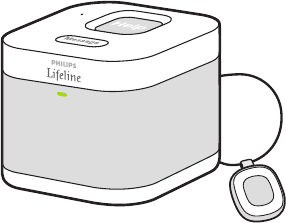
HomeSafe Wireless System
Instructions for use

2
Contents
Philips Lifeline Service ...............................4
Welcome to Philips Lifeline
Setting up your Lifeline Service
Responders and People to Notify
Calling for help
Signal range
Battery information
Equipment service
Contact Lifeline or their representative
HomeSafe Wireless Communicator (7000C) ...........12
Description
Safety information
Cleaning
Backup battery
HomeSafe Help Buttons
– General Information ..............................17
Warnings and Cautions
Compatible Home Communicator
Setting up a replacement Help Button
Cleaning
Recommended usage
HomeSafe Personal Help Button (7000PHB) ...........22
Features
Using the wristband
Adjusting the neck cord
3
HomeSafe AutoAlert Button (7000AHB) ..............25
Cautions
Features
What to expect if you fall
Battery
Safety and Regulatory Compliance ....................30
Safety standards
Recommended environmental conditions
IEC regulations
System classication
Radio specications
FCC Notice to Users
Industry Canada Notice to Users
Class B digital device notice
UL1635 and UL1637 Compliance
4
HomeSafe Wireless Communicator (7000C)
The communicator connects to Lifeline using a wireless network, no
phone line is required. Wireless service is provided as part of your Lifeline
Service, no additional wireless equipment is needed.
Help call in
progress.
Please wait.
Hello, Mrs. Smith.
Do you need help?
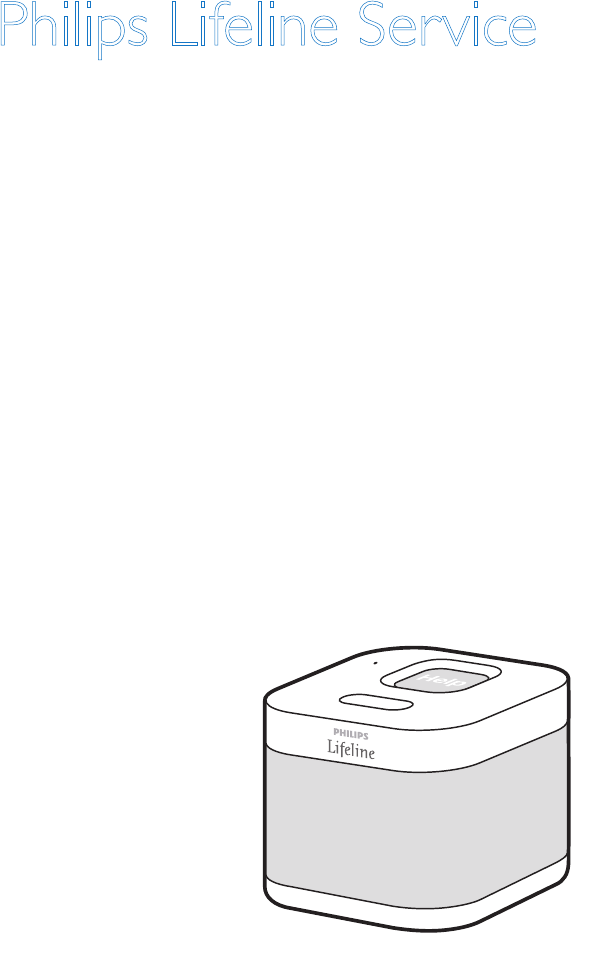
Philips Lifeline Service
Welcome to Philips Lifeline
Thank you for choosing the Philips Lifeline Medical Alert Service.
Please refer to the Quick Setup Guide provided with this equipment for
instructions on setting up the HomeSafe Wireless System.
These Instructions for Use will provide you with information about your
equipment and the Lifeline Medical Alert Service. Please read the manual
carefully, and if you have questions, call Lifeline at any time. Please save
this manual to refer to later.
This document covers the following:
5
Help call in
progress.
Please wait.
Hello, Mrs. Smith.
Do you need help?
Help call in
progress.
Please wait.
Hello, Mrs. Smith.
Do you need help?
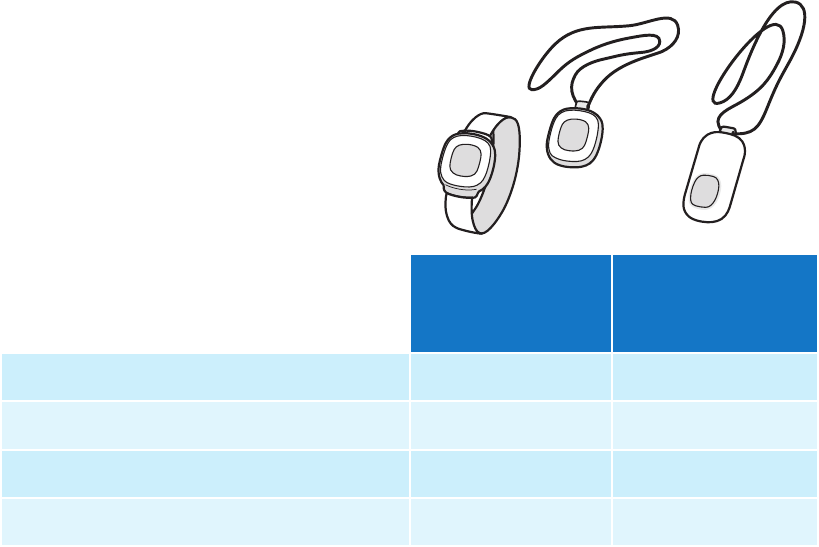
HomeSafe
Personal Help
Button
HomeSafe
AutoAlert
Button
Works inside your home
Can be worn as a pendant
Can be worn on a wristband
Detects falls* in your home
* The AutoAlert Help Button provides an added layer of protection by placing a Help Call if a fall
is detected and you can’t push the button. Not all falls can be detected. If you fall and need help,
press your Help Button.
Setting up your Lifeline Service
Before you can use your system, your communicator must be properly set
up, and the coverage range of your Help Button must be determined for
your Lifeline Service. Please see the Quick Setup Guide for instructions
on how to set up your system and test the coverage range of your Help
Button. If you have any questions, please contact Philips Lifeline or
your representative.
HomeSafe Help Buttons
6
Responders and People to Notify
What is a “Responder”?
As a Lifeline subscriber, you should have designated people who have
agreed to be “Responders.” These are people whom Lifeline should call
in an emergency, when appropriate. Examples include: neighbors, friends,
relatives, your current nursing aide, etc.
Choosing a Responder
It is best to choose a Responder who:
• Has a key to your home or knows where one is located
(perhaps in a key lockbox)
• Could come to help you at different times of the day or night
• Lives or works within 10 minutes of where you live
• Has a phone, preferably a cell phone
• Ideally has a driver’s license and access to a vehicle
Information Lifeline needs about Responders
Please ensure that Lifeline has the following information about each
person acting as a Responder:
• Name
• Phone numbers – home, work and cell phone.
• Whether or not the Responder has a key to your home.
It’s very important that you keep your Responders and their contact
information up to date. Remember to contact Lifeline if one of
your Responders is no longer able to assist you or if they get a new
telephone number.
Please contact Lifeline for any questions about selecting or being a
Responder.
7
Who are “People to Notify”?
If you call for help, Lifeline will contact the “People to Notify” to let them
know that you received assistance once we receive conrmation. “People
to Notify” will not be contacted to help you, unless they are also on your
list of “Responders.”
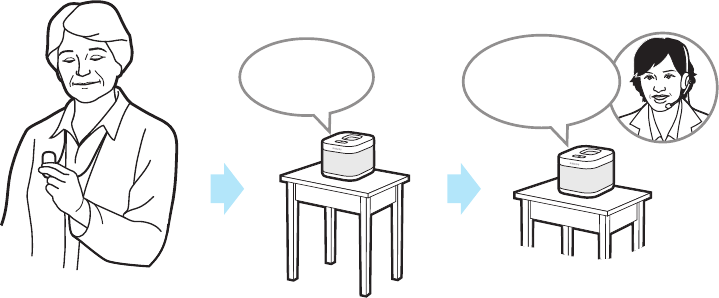
Calling for help
1. Press the Help Button that you wear or the gray Help Button on the
top of your Home Communicator. You can press either button, but
you do not need to press both. The Home Communicator will beep
and dial the Lifeline Response Center.
Note: The Response Center is available 24 hours a day, 365 days a year.
A trained Personal Response Associate is always available to assist you.
Help call in
progress.
Please wait.
Hello, Mrs. Smith.
Do you need help?
8
2. The Home Communicator calls the Response Center. When it dials
the Response Center, the Home Communicator will repeatedly say:
“Your Help Call is in progress; please wait.” Once it connects with the
Response Center, it will say: “Your call has been connected; Lifeline will
be right with you.”
3. The Response Center will answer the call. A Response Associate
will speak to you through the Home Communicator’s built-in speaker
and hear you through the Home Communicator’s highly sensitive
microphone. He/she will ask if you need help. If you do not need help,
just tell the Response Associate that help is not needed.
Note: If you cannot speak or be heard, the Response Associate will try
calling you back. If you cannot answer or if the Response Associate cannot
hear you, Lifeline will contact your Responder or emergency services.
4. The Response Center will assess the situation. If help is needed, our
response associate will contact your list of Responders (i.e., a caregiver,
neighbor, loved one) or emergency services in accordance with your
request.
5. Once your Responder or the emergency service arrives, they should
press your Help Button to let Lifeline know that help has arrived. The
Response Associate will contact the household to conrm that you
received the help that you needed.
6. Once Lifeline conrms that you have been assisted, a Response
Associate will contact the “People to Notify” you’ve designated,
letting them know you needed and received help.
9
Accidental help calls: If you accidentally press your Help Button, a
Response Associate will respond to your call and ask if you need help.
Just tell them that it was pressed accidentally and that you do not need
assistance. Don’t be concerned that you are bothering Lifeline; we just
want to be sure that you are all right.
Signal range
CAUTION
Please see the Quick Setup Guide included in the box for instructions on
how to set up your system and test the range of your Help Button. The
Home Communicator must be properly set up, and the coverage range
of the Help Button must be tested prior to use. The Help Button is a
radio frequency (RF) device that transmits a signal to a compatible Lifeline
Home Communicator.
Your Help Button and Home Communicator provide coverage inside
your home and may provide coverage in the area immediately outside (in
the yard, etc.). If you live in an apartment building or condominium, you
may have coverage in areas immediately outside your apartment (e.g., the
hallway, stairway, or another oor of the building). A Signal Range Test is
required to determine which areas are covered. Be sure to thoroughly
test the coverage range of the system in all areas of your home.
The signal range may be affected by environmental factors, including
building materials, large masses covering the AutoAlert Help Button
(e.g. a person falling on top of it) and submersion in liquid.
10
A Signal Range Test will determine your coverage range, which is the
distance you can move away from your Home Communicator and still
call for help. If you press your Help Button outside of your apartment,
but still in range of the Home Communicator, help will be sent to the
location of the Home Communicator (i.e., your apartment).
Signal Range Test
You should conduct a Signal Range Test during initial installation
and, if you move your Home Communicator to a different location in
your home.
1. Make sure that your Home Communicator is ON and that you have
your Help Button in hand.
2. PRESS and HOLD DOWN the Message button. The Home
Communicator will beep and announce: “Continue to hold the
Message button for AutoLearn. When you are ready for Range Test,
please release the Message button.”
3. Release the Message button. The Home Communicator will announce:
“Please press the ashing orange Message button after you have
completed the range test. Begin Signal Range Test.”
4. Press your Help Button. The Home Communicator will beep and the
light on your Help Button will ash green to indicate that the Home
Communicator has received the signal.
5. Move to other parts of your home and press your Help Button again.
Listen for the beep and check to see if the green light is ashing.
6. Once you have tested different locations in your home and
immediately outside your home, return to the Home Communicator
and press the ashing orange Message button.
11
Battery information
All Philips Lifeline equipment contains batteries that can only be replaced
by Philips Lifeline in the factory. The equipment will automatically send a
signal to Lifeline when the battery needs to be replaced. Philips Lifeline
or your representative will contact you directly to make arrangements for
a replacement.
Equipment service
Every Home Communicator and Help Button is manufactured to high
quality standards. Philips Lifeline equipment can only be factory-serviced
by Philips Lifeline. If you need service or a repair, please contact Philips
Lifeline or your representative.
Contact Lifeline or their representative
• If you would like to transfer your service to a new or second home.
• If your Responder or People to Notify list needs to be updated. It
is important that your list is up to date with the correct people and
telephone numbers.
• If someone else in your home needs to use the Lifeline Service. More
than one person living in the same household can have the service.
12
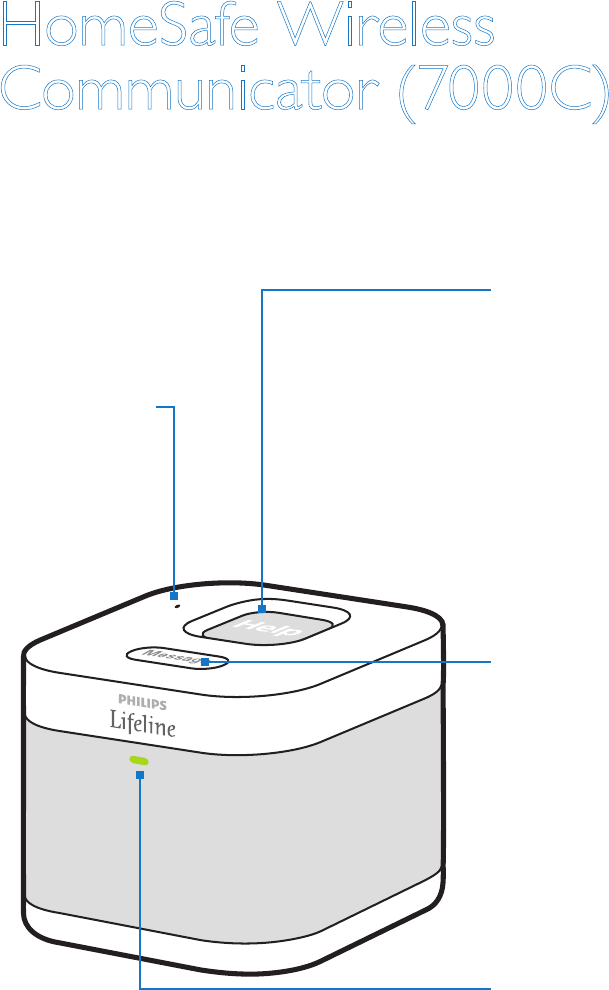
HomeSafe Wireless
Communicator (7000C)
Help button
• Press to send a Help Call
to the Response Center
• Flashes red while a
Help Call is connecting
• Steady red when a
Help Call is connected
Message button
• Used during the setup
process
• When the button is
ashing orange, press to
hear a status message
Green status light
• Steady green when the
Communicator is ON
• Flashes green when the
communicator is running
on battery (AC power loss)
Microphone
• Used to talk
to Lifeline
Description
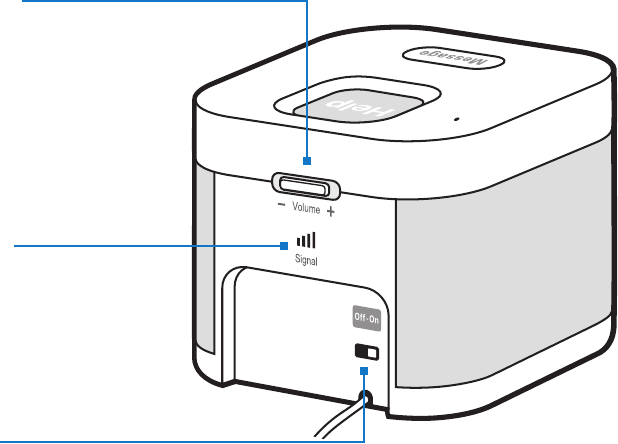
13
Volume control
• Controls the volume
of the speaker on the
Communicator
Signal strength
• Indicates the strength
of the wireless signal*
Power switch
• Used to turn the
Communicator ON or
OFF. The power switch
must be ON at all times
for your Lifeline service
to work.
* Signal strength may vary.

14
Safety information
The Wireless Communicator (7000C) uses a wireless network* to
communicate with the Lifeline Response Center.
1. The strength of the wireless signal may
be stronger in some areas of your home
than others. When you set up our
Home Communicator, look at the signal
strength indicator on the back of the
Home Communicator. The number of
green bars that are glowing indicate signal
strength, the more bars you see, the stronger the signal. Place your
Home Communicator in a location where you spend the majority of
your time, and the signal strength indicator shows two or more bars.
2. If the wireless network experiences an outage or the Home
Communicator loses its signal, the Message button on top of the
Home Communicator will ash and it will not be able to send a
Help Call to Lifeline. If you press your Button and the wireless
network is not available, you will hear a message saying: “Your call
cannot be connected. There is no signal strength. Move your Home
Communicator to a different location.” Try moving the Home
Communicator to a different location in your home. Once the signal
is restored, you will hear a message saying: “Connection has been
restored.” Your Help Call will then be dialed.
3. The Home Communicator must be placed in an indoor living area.
Please keep in mind that direct sunlight may make it difcult to see the
status lights.
Help call in
progress.
Please wait.
Hello, Mrs. Smith.
Do you need help?
* The HomeSafe Wireless Communicator uses the AT&T wireless network.
15
4. Make sure that you do not plug your Home Communicator into a
power outlet that is controlled by a switch because someone could
accidentally turn off the switch and shut off the power to your Home
Communicator.
5. Do not place anything on top of the Home Communicator. The Help
Button and the Message button must always be visible and accessible.
6. The Home Communicator contains a speaker and microphone. Take
care not to block these, since doing so will make it difcult for you to
communicate with Lifeline.
7. Make sure your Home Communicator is away from any clutter or
any object that might block its ability to receive a signal from the Help
Button. The Home Communicator should not be placed on or near
your refrigerator or any type of metal cabinet or bookcase, since this
may limit the overall range of the System.
8. To reduce the risk of electrical shock or re, do not place the Home
Communicator in or near water or other liquids.
9. Do not abuse the cords. Never carry the Home Communicator by the
cord or yank the cord to disconnect it from a power outlet. Instead,
grasp the plug and pull to disconnect.
16
Cleaning
Keep the Home Communicator free of dust by wiping it with a soft
cotton cloth. If additional cleaning is required, follow the steps below:
1. Move the power switch on the back of the Home Communicator to
the OFF position and unplug the power cord from the power outlet.
Note: You cannot call for help while the Home Communicator is
off. Accordingly, you may wish to have a family member or caregiver
present while you are cleaning your Home Communicator.
2. Slightly dampen a soft cloth with a mild soap and water and gently wipe
the surfaces clean. Do not use detergent or abrasive cleaners
on your Home Communicator.
3. Reconnect the power cord to the power outlet. Move the power
switch on the back of the Home Communicator to the ON position.
4. Test your system by pressing your Help Button. Tell the Response
Associate that you are just testing your equipment after cleaning it.
Caution: Do not spray water or cleaners directly on your Home
Communicator. Excessive moisture could get inside the Home
Communicator and cause damage.
Backup battery
Your Home Communicator uses a factory-installed battery for back-up.
If you lose power, the back-up battery begins to work automatically.
17
HomeSafe Help Buttons –
General Information
Warnings and Cautions
Warnings are:
Potentially hazardous situations which could result in injury,
death, or other serious adverse reactions if these instructions
are not followed.
WARNING
• Any cord worn around the neck can pose a strangulation risk, including
the possibility of death and serious injuries. This may be of more
concern to wearers in wheelchairs, using walkers, using beds with guard
rails, or who might encounter other protruding objects upon which the
cord can become tangled.
• Philips Lifeline neck cords contain a special fuse
designed to breakaway under certain conditions
to reduce the remote risk of strangulation. If the
neck cord breaks apart, contact Philips Lifeline or
your representative for a replacement.
• Do not use any neck cord other than the one provided by Philips
Lifeline or your representative. Other neck cords may not provide the
feature to break apart therefore increasing the risk of strangulation.
• Do not tie a knot in your neck cord since this may prevent the break
away feature from working properly.
8235
Model: 7000PHB
2000148235-YYYYMMDD
FCC: BDZ700 0PHB
IC: 655C -7000P HB
8235
2000148235-YYYYMMDD
FCC: BDZ700 0AHB
IC: 655C -7000A HB
Model: 7000AHB
8235
2000148235-YYYYMMDD
FCC: BDZ7000AHB
IC: 655C-7000AHB
Model: 7000AHB

18
CAUTION indicates the potential of device malfunctions,
device failures, damage to the device, or damage to other
property. And if these instructions are not followed may
result in minor or moderate injury.
CAUTION
There are no user-serviceable parts inside the Help Button. Do not
attempt to open or modify the device.
The Help Button contains a lithium battery that must be disposed of
properly. Do not discard the Help Button in the trash or expose it to
ames or intense heat.
The Help Button is not suitable for use in the presence of ammable
mixtures.
Do not put your Help Button through the dishwasher, clothes washer
or dryer. Please be sure to remove your Help Button from articles of
clothing that are being dry-cleaned.
Do not leave your Help Button on the dashboard of your car or on
a windowsill that receives direct sunlight since the excessive heat may
damage it. Likewise, do not wear your Help Button into a whirlpool bath,
hot tub or sauna.
Compatible Home Communicator
The HomeSafe Personal Help Button and the HomeSafe AutoAlert
Button are only compatible with the following Philips Lifeline Home
Communicator:
• HomeSafe Wireless Communicator (7000C)
19
Setting up a replacement Help Button
If you receive a replacement Help Button, you will need to set it up to
work with your Home Communicator. You’ll need to be within arm’s
reach of the Home Communicator to set up your replacement Help
Button.
If more than one Help Button is used in your home, gather them all for
this process. You will need to reprogram them all, even if you are only
replacing one of them.
1. Make sure that your Home
Communicator is ON and that you have
your replacement Help Button in hand.
2. PRESS and HOLD DOWN the Message
button on the Home Communicator.
The Home Communicator will beep
and announce: “Continue to hold the
Message button for AutoLearn. When
you are ready for Range Test, please release the Message button.”
Do not release the Message button until you get to Step 5.
3. Continue to hold down the Message button on your Home
Communicator. With your other hand, press the Help Button until you
hear a long beep and a voice announcement saying: “Your Lifeline Help
Button is now auto-learned and ready to use.” This will indicate that
the Help Button is working with the Home Communicator.
4. After you’ve heard the announcement, release the Help Button.
5. Repeat steps 3 and 4 to reprogram all the other Help Buttons in your
home. Then, release the Message button on the Home Communicator.
The Home Communicator will announce: “Please press the ashing
20
orange Message button after you have completed the range test. Begin
Signal Range Test.”
6. Press your Help Button. The Home Communicator will beep and the
light on your Help Button will ash green to indicate that the Home
Communicator has received the signal.
7. Move to other parts of your home and press your Help Button again.
Listen for the beep and check to see if the green light is ashing.
8. Once you have tested different locations in your home and
immediately outside your home, return to the Home Communicator
and press the ashing orange Message button.
Cleaning
Your Help Button is waterproof (IPX7 or up to 1 meter or 3 feet), so you
can submerge it in warm water for easy cleaning.
1. Wash your neck cord with a mild liquid dishwashing detergent.
2. Wash the Help Button under warm running water, being careful
not to accidentally press the Help Button. You may also gently wipe
your AutoAlert Help Button with an isopropyl (rubbing) alcohol wipe
or a cotton pad moistened with alcohol. However, do not soak it in
the alcohol.
3. Blot excess moisture with a towel and allow the Help Button to nish
air-drying while you’re wearing it.
4. If you accidentally push your Help Button during cleaning and a Help
Call is placed, please simply tell the Personal Response Associate that
you accidentally pressed the button.
21
Recommended usage
• Wear your Help Button in your home at all times, especially while
sleeping and bathing. The bathroom is often a place where people fall
and need help.
• Your Help Button is waterproof and should be worn in the shower
or bath.
• Press your Help Button any time you need help.
• Your Help Button does not contain a microphone, so you don’t need
to talk into it. Press the Help Button and speak in the direction of your
Home Communicator when talking to Lifeline.
• Do not throw or toss the Help Button onto a bed, table, or other
surface because it may accidentally send a Help Call.
• You may continue to wear your Help Button when leaving your home.
However, the Help Button will not provide coverage outside of the
range determined by the Signal Range Test.
• Please remember to contact Lifeline before moving the HomeSafe
Wireless System to a new address.
• If you are traveling on an airplane and need to bring your HomeSafe
Wireless System with you, do not take it into the cabin of the airplane.
Instead, pack your Help Button and Home Communicator in your
checked luggage. Make sure that the Home Communicator’s power
switch is turned off.
22
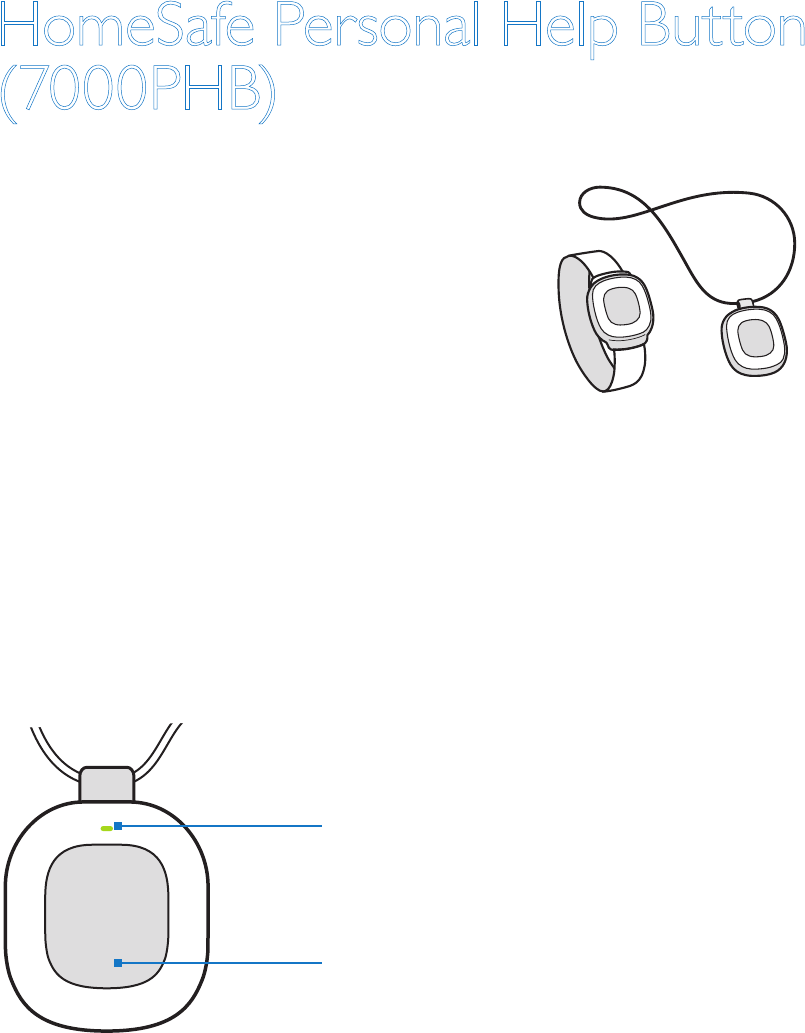
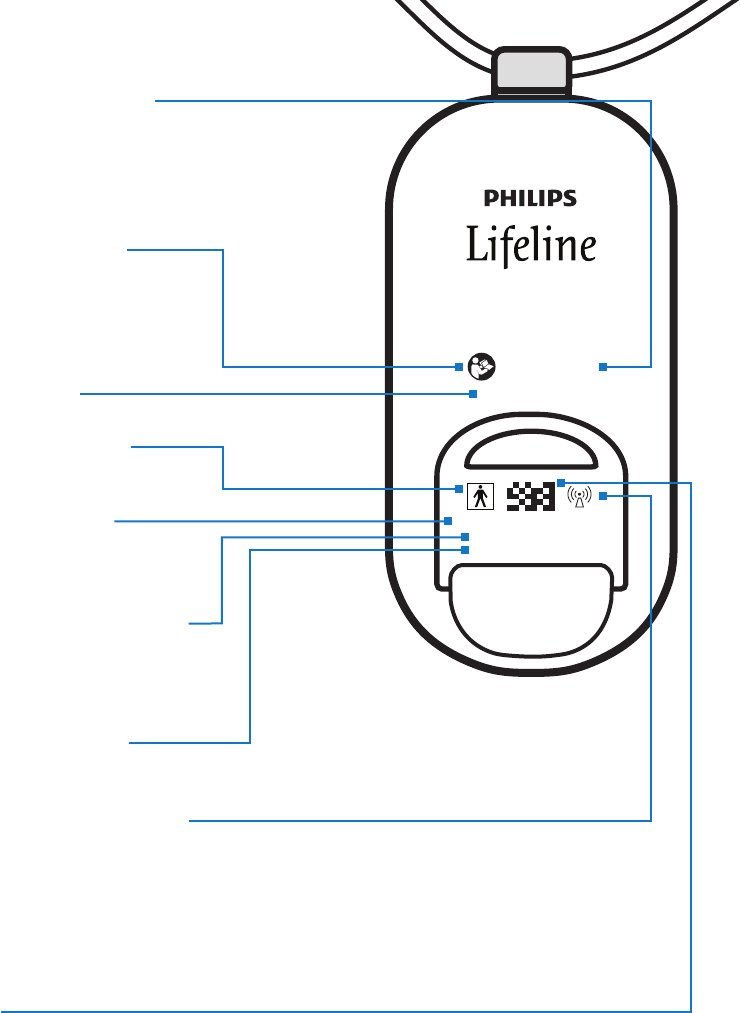
HomeSafe Personal Help Button
(7000PHB)
Features
• The HomeSafe Personal Help Button
is waterproof
• The HomeSafe Personal Help Button
can be worn on the neck or wrist
The Help Button allows you to summon
assistance anytime. When you press your Help Button, it transmits a
signal to your Home Communicator. The Home Communicator then calls
the Lifeline Response Center for you. You must be in the range of the
Home Communicator for your Help Call to be placed.
8235
Model: 7000PHB
2000148235-YYYYMMDD
FCC: BDZ70 00PHB
IC: 655C-7000PHB
8235
2000148235-YYYYMMDD
FCC: BDZ70 00AHB
IC: 655C-7000AHB
Model: 7000AHB
8235
2000148235-YYYYMMDD
FCC: BDZ7000AHB
IC: 655C-7000AHB
Model: 7000AHB
Front view
Conrmation light – Flashes green during
range testing. Flashes red when an alarm is
received by the Communicator.
Button – Press here to send a Help Call
to the Lifeline Response Center.
23
Barcode
Explanation of symbols
Product code: Report
this code if you ever have
to replace the unit
Serial number and
date of manufacture
Federal Communications
Commission ID
Industry Canada ID
Attention: Read the
Instructions for Use for
important information
Interference to electronic
equipment may occur
in the vicinity of devices
marked with this symbol
Model Number
Type BF applied part
8235
Model: 7000PHB
2000148235-YYYYMMDD
FCC: BDZ7000PHB
IC: 655C-7000PHB
8235
2000148235-YYYYMMDD
FCC: BDZ7000AHB
IC: 655C-7000AHB
Model: 7000AHB
8235
2000148235-YYYYMMDD
FCC: BDZ7000AHB
IC: 655C-7000AHB
Model: 7000AHB
24
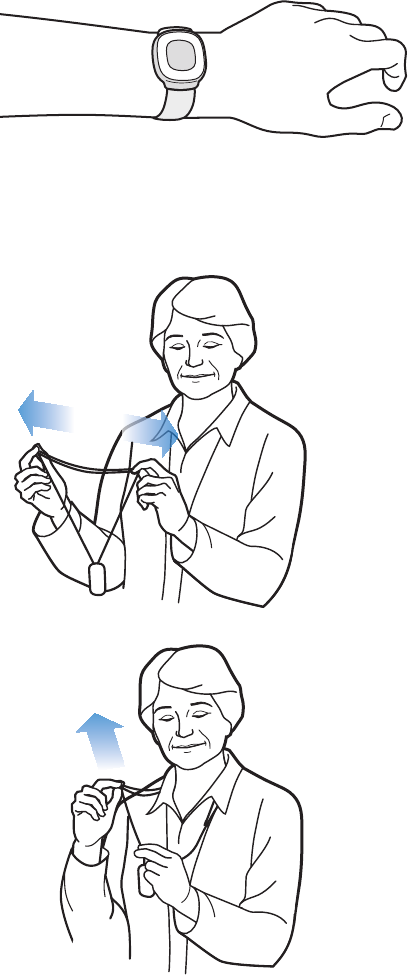
Using the wristband
To wear the HomeSafe Personal Help Button on your wrist place it on
your wrist and adjust the strap so that it is snug and comfortable.
Adjusting the neck cord
To shor ten: With a tab between your
rst nger and thumb of each hand,
slide both tabs apart in line with your
shoulders.
To lengthen: Pull one strand of the
neck cord while sliding the tab to the
back. Repeat on the other side.
25
HomeSafe AutoAlert Button
(7000AHB)
Cautions
CAUTION indicates the potential of device malfunctions,
device failures, damage to the device, or damage to other
property. And if these instructions are not followed, may
result in minor or moderate injury.
CAUTION
In certain situations, the HomeSafe AutoAlert Button may not detect a
fall. A gradual slide from a seated position – such as from a wheelchair –
may not register as a fall and would not be detected. If you fall and need
help, always press the Help Button if you are able to.
The vent located on the back of the HomeSafe AutoAlert Button is
part of the fall detection sensor system and needs to remain clear of
obstructions (e.g., lint or food products). A continuous ow of water (e.g.,
a shower) hitting the vent directly may also temporarily obstruct the vent.
However, your HomeSafe AutoAlert Button is waterproof and should be
worn at all times – even when bathing or showering.
The HomeSafe AutoAlert Button may interfere with certain medical
equipment, such as magnetic resonance imaging (MRI), X-ray
machine as well as metal detectors. It may also interfere with aircraft
communications, so do not take the HomeSafe AutoAlert Button aboard
an airplane.
26
To conserve battery power for Help Calls, the sensors that are used
to detect falls will be disabled when there are approximately 7 days of
battery life remaining. During this time, the HomeSafe AutoAlert Button
will not detect falls. But, it will continue to function as a Help Button,
which you can press if you need help. See battery information section for
more on battery life and replacements.
The HomeSafe AutoAlert Button may not detect every fall
In certain situations, the HomeSafe AutoAlert Button may not detect
a fall. Some movements may not register as a fall and would not be
detected. Examples include, but are not limited to:
• A gradual slide such as from a seated position
• Lowering oneself slowing to the ground (to brace the impact of a fall)
• A fall from a height of less than 20 inches (0.5 meters)
Certain conditions can affect the ability of the HomeSafe AutoAlert
Button to detect a fall:
• If you live at an altitude above 6,600 feet (2000 meters)
• If you are less than 4 feet 6 inches in height (1.4 meters)
• If you weigh less than 88 pounds (40 kilograms)
However, the ability to send a Help Call by pressing the button is not
affected by such conditions.

27
Features
• The HomeSafe AutoAlert Button allows you to summon assistance
anytime, day or night. When you press your Help Button, it transmits
a signal to your Home Communicator. The Home Communicator then
calls the Lifeline Response Center for you. You must be in the range of
the Home Communicator for your Help Call to be placed.
• The HomeSafe AutoAlert Button provides an added layer of
protection by automatically calling for help if it detects you have fallen.
The HomeSafe AutoAlert Button does not detect 100% of falls. If you
are able, you should always press your Button when you need help.
8235
Model: 7000PHB
2000148235-YYYYMMDD
FCC: BDZ70 00PHB
IC: 655C-700 0PHB
8235
2000148235-YYYYMMDD
FCC: BDZ70 00AHB
IC: 655C-7000AH B
Model: 7000AHB
8235
2000148235-YYYYMMDD
FCC: BDZ7000AHB
IC: 655C-7000AHB
Model: 7000AHB
8235
Model: 7000PHB
2000148235-YYYYMMDD
FCC: BDZ70 00PHB
IC: 655C-700 0PHB
8235
2000148235-YYYYMMDD
FCC: BDZ70 00AHB
IC: 655C-7000AH B
Model: 7000AHB
8235
2000148235-YYYYMMDD
FCC: BDZ7000AHB
IC: 655C-7000AHB
Model: 7000AHB
Front view
Button – Press here to send a Help Call
to the Lifeline Response Center.
Conrmation light – Flashes green during
range testing. Flashes red when an alarm is
received by the Communicator.
Back view
Important: The vent hole located on the
back of the HomeSafe AutoAlert Button is
part of the fall detection sensor system and
needs to remain clear of obstructions (e.g.,
lint or food products).
28
Product code: Report
this code if you ever have
to replace the unit
Attention: Read the
Instructions for Use for
important information
Model number
Serial number and
date of manufacture
Federal Communications
Commission ID
Industry Canada ID
Interference to electronic
equipment may occur
in the vicinity of devices
marked with this symbol
Barcode
Type BF applied part
8235
Model: 7000PHB
2000148235-YYYYMMDD
FCC: BDZ7000PHB
IC: 655C-7000PHB
8235
2000148235-YYYYMMDD
FCC: BDZ7000AHB
IC: 655C-7000AHB
Model: 7000AHB
8235
2000148235-YYYYMMDD
FCC: BDZ7000AHB
IC: 655C-7000AHB
Model: 7000AHB
Explanation of symbols

29
What to expect when the AutoAlert Button detects a fall
• A Help Call is automatically generated after approximately 30 seconds
of a fall being detected
• If the Help Button detects that you have gotten up within
approximately 30 seconds of a fall being detected, a Help Call
will not be generated.
• Do not attempt to stand if you feel unable to.
• If you think you need assistance, push your Help Button immediately
to initiate the Help Call. Pushing the Help Button generates the
Help Call immediately.
False “fall detected” alarms may occasionally occur
• While the AutoAlert Help Button is designed to have very few false
alarms, it might occasionally trigger a fall detected alarm when there
was not a fall (i.e., a false alarm).
• If this occurs, please simply tell the Response Associate that it was a
false alarm.
• Occasional false alarms do not indicate that the AutoAlert Help Button
is malfunctioning.
Battery
The HomeSafe AutoAlert Button has a non-rechargeable battery that
can only be replaced at the factory. The HomeSafe AutoAlert Button
will send a low battery signal to Lifeline when there are approximately
30 days of battery life remaining. Philips Lifeline or your representative will
contact you to arrange for a replacement.
30
Safety and Regulatory
Compliance
Safety standards
The HomeSafe Help Buttons and Home Communicator comply with the following
safety standards for medical devices and home healthcare equipment:
Safety Standards
UL1637 Home Healthcare Signaling Equipment
CSA C22.2 NO 205-M1983 Signal Equipment
IEC60601-1:2005
(3rd Edition)
Medical Electrical Equipment
General Requirements for Basic Safety and
Essential Performance (CA/EN/US National
Differences)
IEC60601-1-2 Electromagnetic Compatibility
IEC62133 Safety requirements for portable sealed
secondary cells, and for batteries made from
them, for use in portable applications
RSS-GEN General Requirements and Information for the
Certication of Radio Apparatus
RSS-210 Licence-exempt Radio Apparatus (All Frequency
Bands): Category I Equipment
ISO10993-1 Biological evaluation of medical devices
31
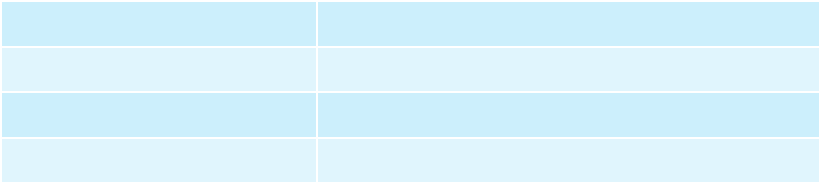
Recommended environmental conditions
Altitude 6,600 feet (2 km) maximum*
Operating Temperature 41°F (5°C) to 113°F (45°C)
Storage Temperature -4°F (-20°C) to 140°F (60°C)
Humidity 10% to 90%
* AutoAlert button only
IEC regulations
The HomeSafe Help Buttons and Home Communicator are medical electrical (ME)
equipment.
Medical electrical equipment can either generate or receive electromagnetic
interference. This product has been evaluated for electromagnetic compatibility
(EMC) with the appropriate accessories according to IEC 60601-1-2:2007, the
international standard for EMC for medical electrical equipment.
The HomeSafe Help Buttons and Home Communicator must emit electromagnetic
energy in order to perform its intended function. Nearby electronic equipment may
be affected. Medical Electrical Equipment needs special precautions regarding EMC
and needs to be installed and put into service according to the EMC information
provided in the accompanying documents.
The use of accessories, transducers and/or cables other than those specied, with
the exception of those sold by the manufacturer as replacement parts for internal
components, may result in increased emissions or decreased immunity of the
equipment or system.
The equipment or system should not be used adjacent to or stacked with other
equipment and that if adjacent or stacked use is necessary, the equipment or system
should be observed to verify normal operation in the conguration in which it will
be used.
32
System classication
The HomeSafe Help Buttons and Home Communicator are FDA Class II devices.
They are an internally powered devices for continuous operation.
Radio specications
The HomeSafe Help Buttons and Home Communicator have radios with the
following characteristics: 3 channel frequency agility (917 MHz, 919 MHz, 921 MHz);
maximum EIRP -1.23 dBm; FSK digital modulation. It fully complies with FCC Part 15,
Section 15.249.
FCC Notice to Users
This device complies with Part 15 of the FCC Rules. Operation is subject to the
following two conditions:
• Device may not cause harmful interference
• Device must accept any interference received, including interference that may
cause undesired operation.
Changes or modications not expressly approved by Philips Healthcare, Home
Monitoring, Lifeline Systems Inc. could void the user’s authority to operate the
equipment. The manufacturer is not responsible for any radio or TV interference
caused by unauthorized modications to this equipment.
Note: This equipment has been tested and found to comply with the limits for
a Class B digital device, pursuant to part 15 of the FCC Rules. These limits are
designed to provide reasonable protection against harmful interference in a residential
installation. This equipment generates, uses and can radiate radio frequency
energy and, if not installed and used in accordance with the instructions, may cause
harmful interference to radio communications. However, there is no guarantee that
interference will not occur in a particular installation. If this equipment does cause
harmful interference to radio or television reception, which can be determined
by turning the equipment off and on, the user is encouraged to try to correct the
interference by one or more of the following measures:
33
• Reorient or relocate the receiving antenna.
• Increase the separation between the equipment and receiver.
• Connect the equipment into an outlet on a circuit different from that to which the
receiver is connected.
• Consult the dealer or an experienced radio/TV technician for help.
Industry Canada Notice to Users
This device complies with Industry Canada license-exempt RSS standard(s). Operation
is subject to the following two conditions:
• Device may not cause interference
• Device must accept any interference, including interference that may cause
undesired operation of the device.
Le présent appareil est conforme aux CNR d’Industrie Canada applicables
aux appareils radio exempts de licence. L’exploitation est autorisée aux deux
conditions suivantes:
• l’appareil ne doit pas produire de brouillage
• l’utilisateur de l’appareil doit accepter tout brouillage radioélectrique subi, même si
le brouillage est susceptible d’en compromettre le fonctionnement.
Class B digital device notice
CAN ICES-3 (B) / NMB-3 (B).
34
RF Exposure Guidance
During the operation of the Home Communicator (7000C), a separation distance
of 20 cm is required to be maintained from users during transmission to ensure
compliance with RF Exposure requirements.
Pour assurer la conformité aux exigences de la FCC/IC en matière d’exposition aux
radiofréquences lors du fonctionnement du Home Communicator (7000C), une
distance de 20 cm (8 pouces) doit être maintenue entre l’utilisateur et l’appareil
durant la transmission.
UL1635 and UL1637 Compliance
The maximum separation (range) of the equipment, under test conditions and for
comparative purposes only, is 650 feet. This range may be signicantly reduced when
the equipment is installed in a typical home.
A clear, plastic power supply retaining strip is provided in the packaging with this
system. To prevent the power supply from accidentally pulling out of the AC wall
outlet under force, plug the power supply into the outlet you select to power your
system, peel the release liner from the adhesive panels on the strip and afx it across
the back of the power supply, adhering the 2 adhesive panels to the wall on each
side of the power supply. Be sure that the adhesion area is devoid of any dirt, oil or
grease that would prevent the adhesive from sticking properly.
35

Philips Lifeline
111 Lawrence Street
Framingham, MA 01702-8156
Tel: 1-800-451-0525
www.lifelinesystems.com
Philips Lifeline Canada
95 Barber Greene Road, Suite 105
Toronto, Ontario, Canada M3C 3E9
Tel: 1-800-387-8120
www.lifeline.ca
© 2013. All rights reserved.
Signal range may vary due to environmental factors.
P/N 0940864, Rev. 02 - DRAFT