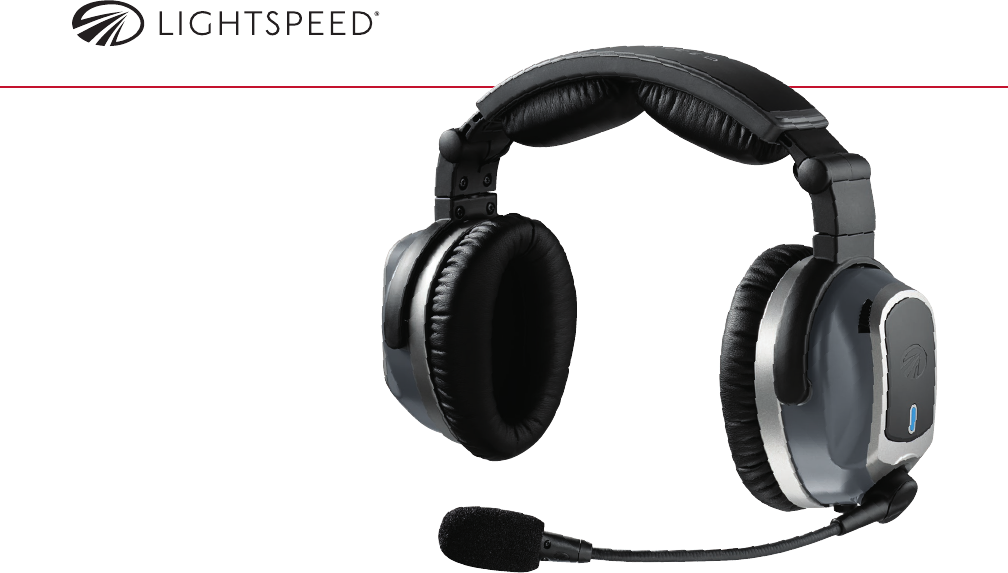
Lightspeed Aviation T0102 Tango Aviation Headset User Manual
Lightspeed Aviation Tango Aviation Headset
User Manual
Tango User Guide

Congratulations on purchasing a Lightspeed Aviation Tango wireless headset. Your headset is a premium
product that will provide many years of comfortable high performance for your flying endeavors.
If this is your first Lightspeed Aviation headset—welcome to the Lightspeed family! We look forward to
building a lasting community with our customers founded on products and service that are best in class. To
support your passion for flying we invite you to visit LightspeedAviation.com where you’ll find useful insights
about our other products and aviation.
Thank you for choosing a Lightspeed Aviation headset.
Welcome

Contents
Introduction .....................................................................................2
Getting Started .............................................................................. 4
Fitting your headset ..................................................................4
Battery installation ..................................................................... 4
The panel interface (front and side) ...............................6
The panel interface (back) ....................................................8
The headset ................................................................................10
Using Your Tango Headset ................................................. 12
Turning the system ON and OFF ................................... 12
Matching stereo/mono setting
to an audio panel ....................................................................12
ComPriority™ ...............................................................................13
Wired auxiliary devices ........................................................13
Multiple Headsets .....................................................................14
Bluetooth Devices ....................................................................16
Connecting Bluetooth devices
for the first time ........................................................................ 16
Bluetooth mode — ON and OFF ..................................17
Bluetooth cell phone features .........................................17
FlightLink .........................................................................................18
Features ........................................................................................18
How to activate ....................................................................... 18
Toggling between apps ...................................................... 18
FAQs ..................................................................................................... 19
Peak Performance Tips..........................................................21
Batteries and Compliance .................................................. 22
Specifications .............................................................................. 23
Warranty Information ............................................................ 24
Registration ...................................................................................25

2
Introduction
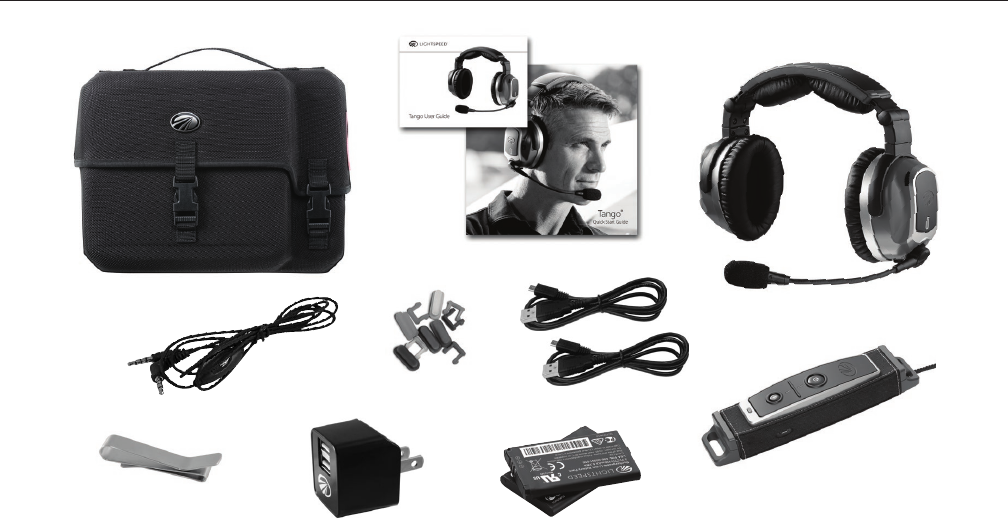
Your Tango headset package includes (clockwise, from top left on the following page):
• Carryingcase
• UserGuideandQuickStartGuidewithwarrantyinformation
• TangoANRheadset
• Tangopanelinterface
• TwoMicro-USBchargingcables
• TwoLightspeedrechargeablebatteries(onewithpanelpowerversion)
• Colorchipsformultipleheadsets
• DualUSBwallcharger
• Audiodevicecablewith3.5mmconnector
• Steelclip
3
Introduction

4
Fitting your headset
Fitting your headset properly is the key to
comfortable use and superior Active Noise
Reduction(ANR)capabilities.Togainpeak
performancefromtheANRfeatureit’snecessaryto
have a solid seal around your entire ear combined
with a symmetrical fit on your head.
The following tips will assist in achieving the proper fit.
A. Fit your ears entirely within the ear cups
providing a solid seal.
B. Resttheheadbandlightlyontopofyourheadwith
the right and left sliders extended to equal lengths.
C. Position the microphone 1∕8 inch from your
mouth, with the gain adjustment cap facing away
from you (visible when you remove the mic muff).
Note: The microphone will not transmit unless the
panel interface is plugged into an intercom and the
system is turned on.
Battery installation
The Tango headset requires two rechargeable
lithium ion batteries, except the panel powered
version, which requires only one (batteries included).
A. Open the headset battery compartment door
by pressing down on the release button. Align
the contacts on the battery with the contacts
GettingStarted
This side of the microphone
should face away from you.

5
in the compartment and close the battery
compartment door.
B. To access the panel interface battery compartment
door, open the jacket, then open the battery
compartment on the back of the panel interface.
Align the contacts on the battery with the contacts
in the compartment, and close the battery
compartment door.
C. TheLEDashesGREEN when charged batteries
are in use and the power is on.
D. Thebatterieswilllastapproximately12hours
whenfullycharged.ThepowerLEDwillashRED
and an audible tone will play when there are 4
hours of battery life remaining. If this happens
during flight, the headset will continue to
operate.Rechargebatteriesassoonaspossible
at any indication of low batteries.
Heavy Bluetooth usage can significantly reduce
battery life.
Under quiet conditions Tango will automatically shut
off approximately five minutes after the headset is
removed from your head. The panel interface will
shut off five minutes after it has been unplugged
from the intercom or intercom power is turned off.
AutoShuto™canbedisabledoneitherdevice
by holding the power switch for that device for 3
seconds when turning the system on. The power
LEDwilldoubleblinktoindicatethatAutoShuto
has been disabled.
Note:Thepanel-poweredversion(LEMO)ofthe
panel interface runs solely on aircraft power and
turns off immediately when aircraft power is turned
off or when it is disconnected from the aircraft.
GettingStarted
6
A
C
B
D
EF
G
H
I
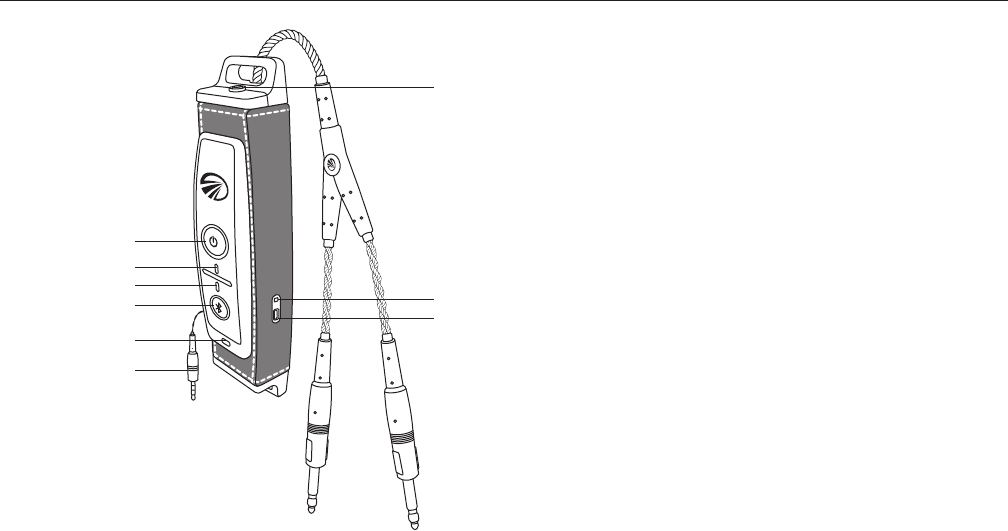
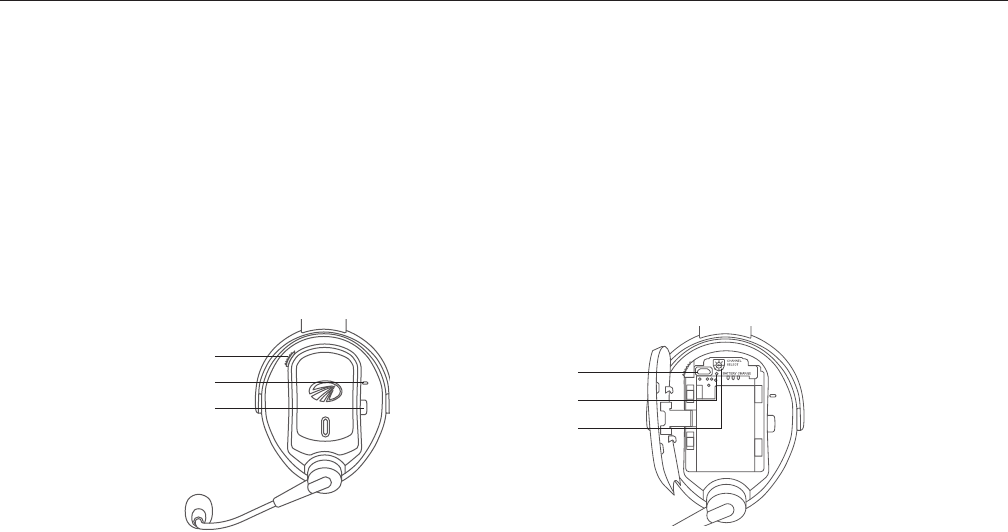
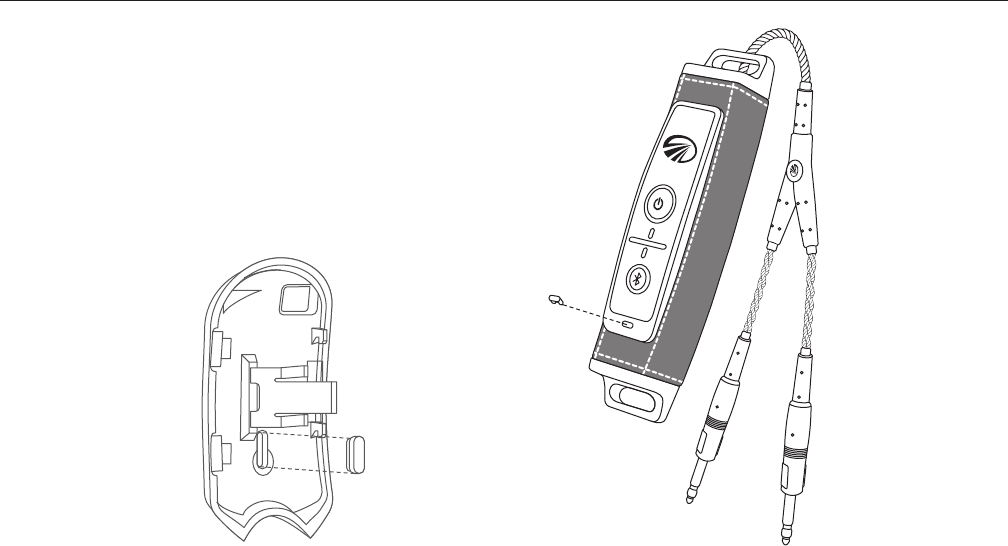
The panel interface (front and side)
A. Auxiliary input: Use the supplied cable to
connect a wired auxiliary audio source or phone.
Also use this connection for FlightLink recording
functions.See“FlightLink”sectiononpage18.
B. Power button: Press button once to turn the
panel interface on; press and hold to turn it off.
C. PowerindicatorLED:FlashesGREEN when
power is supplied and batteries are strong.
Flashes RED when there are approximately 3
hours of battery life remaining.
D. BluetoothindicatorLED:FlashesBLUE when
Bluetooth mode is on and RED when Bluetooth
is being turned off. In pairing mode, flashes
alternating RED and BLUE.
GettingStarted

7
E. Bluetooth button: Turns the Bluetooth function
onandoandcontrolsBluetooth-connected
devices, including cell phones and music players.
F. ChargingLED:RED/AMBER indicates charging in
progress. GREEN indicates charging complete.
G. USBchargingport:PluginUSBcabletocharge
the battery. Note: You can charge the battery
while using the panel interface.
H. Channel identification color chip
I. Backup cable: In the event that you lose power
in the headset or the panel interface, pull the
backup cable from the panel interface and plug
it into the headset.
Note: Plugging the backup cable into the
headsetwillturnotheANR.Theheadsetwill
run in passive mode.
GettingStarted
8
A
B
C
E
F
D
The panel interface (back)
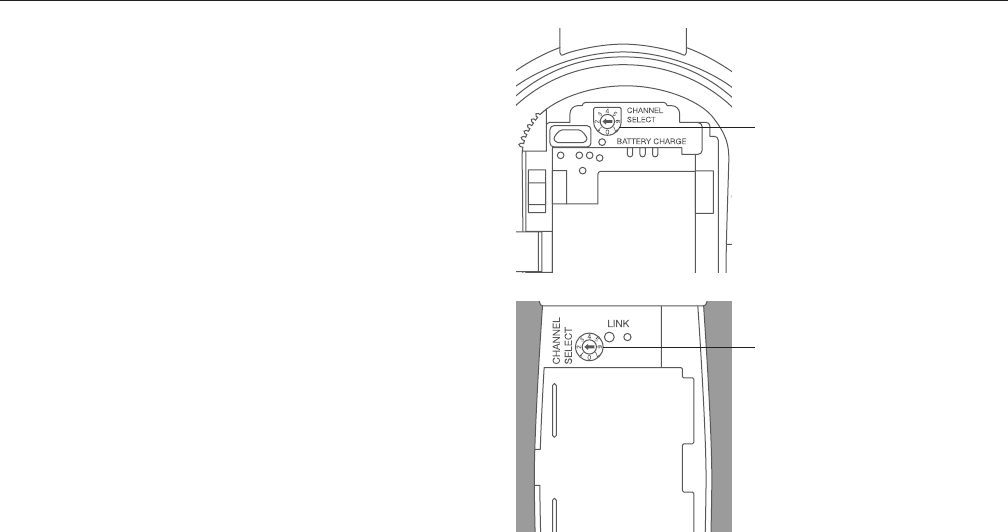
A. Channel select switch: Changes the channel
of the boom microphone link. Changing the
factory setting is only necessary when using
multiple Tango headsets in the same aircraft.
See“MultipleHeadsets”onpage14.
B. Link button: This button is used to establish the
wireless link between the headset and panel
interface. The system is shipped with the link
already established and this button is only
needed when a new headset/panel interface
connection needs to be established.
See“MultipleHeadsets”onpage14.
C. LinkLED:BlinkingRED indicates not linked.
SolidRED indicates link established.
GettingStarted

9
D. Batterycompartment:Openthiscompartment
to access the panel interface battery.
E. Stereo/monoselectswitch:Selectthecorrect
position based on your intercom. If you only
hear the intercom in one ear, select the opposite
position for mono operation.
F. Lower cable: Adjust the length of the lower cable
to fit your application by winding or unwinding
cable around the post.
GettingStarted
10
The headset
A. Battery access button: Push down on this button
to open the battery compartment door.
B. PowerindicatorLED:FlashesGREEN when
power is supplied and batteries are strong.
Flashes RED when batteries are low.
C. Power button: Press button once to turn the
headset on; press and hold to turn it off.
D. USBchargingport:PluginUSBcabletocharge
the battery.
E. ChargingLED:RED/AMBER indicates charging in
progress. GREEN indicates charging complete.
F. Channel select switch: Changes the channel
of the boom microphone link. Changing the
factory setting is only necessary when using
multipleTangoheadsetsinthesameaircraft.See
“MultipleHeadset”onpage14.
GettingStarted
C
D
E
F
B
A

11
H. Volume control: Adjust volume by tapping the
upper part of the volume control to increase
the volume and the lower part to decrease
the volume. To cover a range of situations and
preferences, we have engineered a wide volume
range, with a larger number of detents than you
may find in less expensive audio products. If you
are not hearing a volume change as you tap the
volume control, pause briefly between taps.
I. ComPriority™ button: Lowers the volume of music
and other audio from auxiliary devices during
radio communications.
J. Link button: This button is used to establish the
wireless link between the headset and panel
interface. The system is shipped with the link
already established and this button is only
needed when a new headset/panel interface
connection needs to be established.
See“MultipleHeadsets”onpage14.
GettingStarted
I
J
H

12
Using Your Tango Headset
Turning the system ON and OFF
ON: Press the power button on panel interface
once. The GREENpowerLEDasheswhenpoweris
supplied. Lightspeed Link will automatically connect
to the headset when the system is powered on.
Press the power button on the headset once. The
GREENpowerLEDasheswhenpowerissupplied.
ActiveNoiseReduction(ANR)isengagedwhenyou
turn on the headset.
OFF: Press and hold the power button on the
headset until the GREENpowerLEDturnso.Press
and hold the power button on the panel interface
until the GREENpowerLEDturnso.
TheheadsetandpanelinterfaceincludeAutoShuto
topreservebatterylife.See“BatteryInstallation”on
page 4.
Matching stereo/mono setting to an audio panel
The stereo/mono switch setting should match the
signal from your audio panel. Incorrect settings
result in communications being heard in only one
ear. The stereo/mono switch does not affect auxiliary
devices, so you can enjoy auxiliary audio in stereo
regardless of how the stereo/mono switch is set.

13
ComPriority™
ComPriority lowers the volume of music and
other audio from auxiliary devices during radio
communications. Its button is next to the volume
control on the headset. An audible tone will notify the
user that ComPriority has been enabled or disabled.
Wired auxiliary devices
To connect a music player or cell phone to Tango’s
auxiliary input jack, use the cord provided.
IMPORTANT: To use a cell phone via the auxiliary input
jack, the headset must be connected to the intercom.
To adjust the volume on a device connected to
Tango’s auxiliary input jack, use the controls on the
device itself.
Using Your Tango Headset
14
Multiple Headsets
Up to 6 Tango headsets can be used simultaneously
in an aircraft.
When more than one headset is used in an aircraft,
theChannelSelectswitchwillneedtobechanged
such that each headset/panel interface system is
set to its own channel (i.e. first headset and panel
interface set to channel 1, second headset and panel
interface set to channel 2, etc.).
HEADSET
CHANNELSELECT
PANELINTERFACE
CHANNELSELECT
15
We have provided 6 color chips with each headset.
These allow you to color code the headset and
panel interface that go together.
To change the color chip on the headset, pull the
color chip out from the back. To change the color
chip on the panel interface, gently pry it out with a
fingernail or screwdriver.
Multiple Headsets

16
Connecting Bluetooth devices for the first time
Before using a Bluetooth cell phone or other
Bluetooth-capabledeviceforthersttimewith
Tangoitmustbe“paired”orelectronicallyconnected.
To pair a Bluetooth cell phone with Tango:
1. Turn on the panel interface and verify the
GREENLEDisashing.MakesureBluetooth
mode is turned off. BLUE or RED flashes from
theBluetoothLEDshouldnotbepresent.See
“BluetoothMode—ONandOFF”onpage17.
2. Press and hold the panel interface Bluetooth
button for about five to ten seconds or until the
BluetoothLEDcontinuallyashesRED and BLUE.
This lasts about two minutes. If this step takes
longerandtheBluetoothLEDisnolonger
alternating RED and BLUE, start over from step one.
3. With Tango in pairing mode, follow the menu
prompts on your Bluetooth device directing it to
look for Bluetooth devices.
4. SelectLightspeed-V###(numbersmayvary)
on your Bluetooth device from the list of found
devices.
5. If asked to enter a password or PIN, enter 0000.
Your Bluetooth device should now be paired and
ready for use with Tango.
BluetoothDevices

17
Bluetooth mode—ON and OFF
ON: With Tango turned ON, press and hold the
Bluetooth button until you hear a tone and the
BluetoothindicatorLEDashesthreeBLUE pulses.
For first time pairing see instructions on page 16.
OFF: Press and hold Tango’s Bluetooth button for
about three seconds until a high tone is emitted and
theBluetoothindicatorLEDashesthreeRED pulses.
Note: The Bluetooth feature must be turned ON for
Bluetooth connected devices to correctly function.
When you turn on the Tango Bluetooth mode, it will
connect to the most recently paired device. Most
Bluetooth devices connect to Tango automatically. If
that doesn’t happen it may be necessary to use the
device’s menu of found devices to manually connect
toLightspeed-V###(numbersmayvary).
Bluetooth cell phone features
DependingontheBluetoothproleofthephone,
you can use Tango’s Bluetooth button to perform
severalfunctions.Sometypicalfunctionsare:
• PressandholdtheBluetoothbuttonfortwo
seconds to redial the last number called.
• PresstheBluetoothbuttononceforvoicedialing
(if supported by your phone).
• PresstheBluetoothbuttononcetoanswerthe
phone when it rings.
• PresstheBluetoothbuttononcetodisconnect
from a call.
BluetoothDevices

18
FlightLinkistherstin-ight
cockpit recording application for
the iPad® and iPhone®. The free
app works seamlessly with all new
Lightspeed headsets to capture
and retrieve all incoming and
outgoing communications.
Features
• Recordallactivityovertheintercom
• ImmediatereplayofATCcalls
• Storehighresolutionorcompressedlesin
your library
• Drawnotes,codes,ordiagramsonthe
convenient iPad® scratchpad for reference
How to activate
DownloadtheFlightLinkappfromtheAppStore.
Connect the provided auxiliary cable between your
iOSdevice(iPhone®oriPad®)andyourTangopanel
interface auxiliary input.
Tap the icon on your iPad® or iPhone® to begin using
the app.
Toggling between apps
Press your device’s Home button and select another
app. Your recording will continue uninterrupted as you
switch between different applications. A red bar at
the top of the screen indicates FlightLink is recording.
FlightLink

19
Why do I hear radio communications
in only one ear?
Tango’s stereo/mono switch is probably set to
Stereowhileyouraudiopanelistransmittinga
mono signal. To fix this, change Tango’s stereo/mono
switch to Mono. This setting does not affect music
or audio from auxiliary devices; you can hear stereo
sound on auxiliary devices even when the stereo/
mono switch is set to Mono.
When pairing Tango with my Bluetooth device,
why does my device indicate it cannot connect?
The headset may not be in pairing mode. To enter
pairing mode, you must start with Bluetooth mode
turnedfullyOFF.See“ConnectingBluetoothcell
phonesforthersttime”onpage16.
Why doesn’t my Bluetooth device accept
Tango’s 0000 passcode?
Yourheadsetmaynotbeinpairingmode.Some
devices prompt for a pass code without checking
for pairing mode. When the device cannot pair with
the headset, it rejects the passcode. To enter pairing
mode, you must start with Bluetooth mode turned
fullyOFF.See“ConnectingBluetoothcellphonesfor
thersttime”onpage16.
How can I reduce static noise during
cell phone calls?
ToreduceRFinterferenceduringphonecalls,
keep cell phones at least 12 inches from the Tango
controller and headset when making calls.
FAQs
20
When flying what causes a warbling noise
in the ear cup?
If your ear is not entirely inside the cup, with a
tightseal,aircanseepinandcausetheANRto
compensate for uneven internal cup pressure.
My Bluetooth audio is dropping out, how can I
fix this?
Try moving the Bluetooth source (phone or other) to
a location closer to the panel interface. Also, if your
panel interface is inside a pocket or box, try placing
it on the outside and use the included hook for
mounting it on the outside of a pocket.
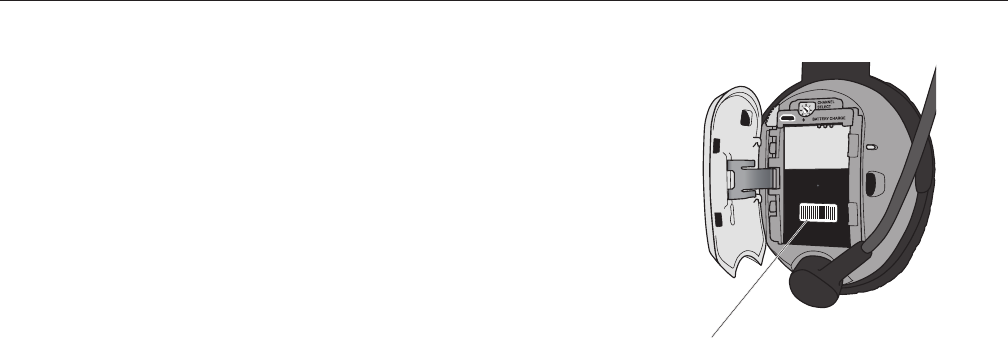
Where is my product serial number?
The serial number (a
small,white,bar-code
sticker with numbers)
can be found on
the outside of the
outer box, and on
the headset behind
the battery access
door in the battery
compartment.
TangoSerialNumber
FAQs

21
Startwithanexcellentt.See“Fittingyourheadset”
on page 4.
SetTango’sstereo/monoswitchtomatchthesignal
fromyouraudiopanel.See“MatchingTango’s
stereo/monosettingtoyouraudiopanelsignal”on
page 12.
Keep cell phones at least 12 inches from the Tango
panel interface and headset when making call to
reduce static noise during phone calls.
To conserve battery life, turn OFF Bluetooth mode
when not in use.
Lightspeed Link has been optimized for wireless
aviation performance. However, there is still a slight
delay (latency) in the wireless path. To minimize
the sound of the echo, try placing the microphone
closertoyourmouth.Slightlyincreasingthelevel
of your intercom either with the headset volume
control or directly on the intercom.
Lightspeed recommends replacement of the soft
goods on your headset (ear seals, head pads and
micmus)every18monthstoensurepeakANR
performance and comfort. These are wear items
and are not covered by the Lightspeed warranty
and are available for purchase on our website at
LightspeedAviation.com/Accessories.
Peak Performance Tips

22
Batteries and Compliance
Note: This equipment has been tested and found
to comply with the limits for a Class B digital device,
pursuanttopart15oftheFCCRules.
Operation is subject to the following two conditions:
(1) This device may not cause harmful interference,
and (2) this device must accept any interference
received, including interference that may cause
undesired operation.
ThisdevicecomplieswithFCCRFradiationexposure
limits for general population.
Caution: Any changes or modifications to this
system will void the user’s authority to operate
the equipment.
Lightspeed Aviation declares that this product
complies with essential requirements and other
relevantprovisionsofDirective1999/5/EC.
AcopyoftheDeclarationofConformityisavailable
on request from Lightspeed Aviation:
6135JeanRoad
LakeOswego,OR97035
1-800-332-2421
sales@lightspeedaviation.com
Battery instructions:
• OnlyusegenuineLightspeedrechargeable
batteries designed for this product.
• Avoidprolongedexposuretoextremeheat.
• Ifthesystemistobestoredformorethana
month, it is better to store them in a discharged
state (not fully charged).
• Thebatterieswilltakeapproximatelytwohours
to fully charge from a discharged state. After 60
minutes the batteries will be at 75% capacity.

23
Connectors
ConnectorDualgeneralaviationconnectorswith
.250-inchcommercialstereoheadphoneplugand
.206-inchMIL-SPECmicrophoneplug
General
Battery power supply: 3.7V Lithium Ion battery
Headset Weight (with battery): 18.5 oz.
Headphone
Transducer: 40mm moving coil
Frequencyresponse:20Hz-20kHz
Nominal impedance when wired with backup cable
@ 1 kHz:
Mono: 180 ohms
Stereo:250ohms
Microphone
Transducerprinciple:Noise-cancelingelectret
Frequencyresponse:200Hz-6000Hz
MaximumSPL:114dB
Terminating impedance: 220–2200 ohms
Operatingvoltage:8V–16VDC
ANR
MaximumSPL:Greaterthan120dBat100Hz
Specications

24
Warranty Information
Limited Warranty For New Aviation Headsets Sold By Lightspeed Aviation, Inc.
(Including 2-Year Limited Warranty for batteries)
LightspeedAviation,Inc.(“LSA”)warrantsthatthenewaviationheadsetsoldbyLSA
(“NewHeadset”)isfreefromallmaterialdefectsinworkmanshipandmaterials.With
respect to the New Headset but excluding all batteries provided with the New Headset
(“Batteries”),allwarrantiesprovidedbyLSAandallimpliedwarrantiesimposedbylaw
arelimitedtoa5-yearperiod,beginningonthepurchasedateshownontheNew
Headset’ssalesreceipt.WithrespecttotheBatteries,allwarrantiesprovidedbyLSA
andallimpliedwarrantiesimposedbylawarelimitedtoa2-yearperiod,beginning
onthepurchasedateshownontheNewHeadset’ssalesreceipt.“WarrantyPeriod”
means 5 years for the New Headset (excluding Batteries) and 2 years for the Batteries.
ThisLimitedWarranty(“LimitedWarranty”)isprovidedsolelyforthebenetofthe
initialpurchaseroftheNewHeadset(“Purchaser”),anditexcludesall3rdparties,
including distributors, dealers, retailers, subsequent owners, and other users of the
New Headset. This Limited Warranty is not assignable and remains in full force and
effect during the Warranty Period, but only if the New Headset: (a) has been properly
maintained; (b) has not been abused or misused; and (c) has not been repaired, altered,
ormodiedwithoutLSA’sapproval.ThisLimitedWarrantyspecicallyexcludesalltaxes,
shipping costs, and problems relating to any: (1) repair, alteration, or modification
notapprovedbyLSA;(2)abuseorfailuretoproperlymaintaintheNewHeadset;(3)
faultyworkmanshipbyanyperson,exceptLSAoritsapprovedagent;(4)operation
of the New Headset, except as specified in its operating manual; (5) ordinary wear
and tear; or (6) finish and appearance item. For each claim made under this Limited
Warranty(“Claim”),Purchasermust,within10daysofdiscoveringaNewHeadset
problemindicatingabreachofthisLimitedWarranty,delivertoLSAawrittennotice
that explains in detail the New Headset’s specific defect, that shows proof of Purchaser’s
purchase of the New Headset before the end of the Warranty Period, and that shows
proofthatthisLimitedWarrantyappliestotheNewHeadset.LSAoritsagentmay
investigateanyClaim.ForeachClaim,LSAmay,initssolediscretion,chooseanyofthe
following exclusive remedies: (I) repair or replace the New Headset or any part thereof,
withoutchargetoPurchaser,butrstPurchasermustreturntheNewHeadsettoLSA’s
authorizedrepairfacility,pre-payingallshippingcharges,andPurchasermustaccept
the same as repaired or replaced at the facility’s location (i.e., FOB the facility) within 10
daysofthedateofLSA’scompletionnoticesenttoPurchaser,orelseLSAwilldeemthe
NewHeadsetabandoned,inwhichcaseLSAmaykeep,sell,orotherwisediscardit;or
(II) refund the New Headset’s purchase price to Purchaser. Without paying any amount
toPurchaser,LSAmaykeep,sell,orotherwisediscardallreplacedNewHeadsetsand
partsthereofandallNewHeadsetswhereLSAhasrefundedthepurchasepriceto
Purchaser.InrepairingorreplacinganyNewHeadset,LSAmay,initssolediscretion,
use new, used, or reconditioned parts or provide a refurbished used headset as a
replacement.Inconnectiontherewith,LSAwarrantsthatallnew,used,orreconditioned
parts or refurbished used headsets will be free from all material defects in workmanship
and materials during the Warranty Period and for a period of up to 90 days thereafter,
but only to the extent that such event occurs during the final 90 days of the Warranty
Period.LSAmay,initssolediscretion,(i)establishseparate,additional,non-warranty
repairandreplacementprogramsforanyneworusedheadset(“Non-WarrantyService
Programs”),(ii)theNon-WarrantyServiceProgramsmaycoveranytimeperiod,beforeor
after any Warranty Period has expired, and (iii) charge any amount and impose any term
withrespecttoanyNon-WarrantyServiceProgram.ForNon-WarrantyServicePrograms,
LSAwarrantsthatallnew,used,reconditioned,orrefurbishedpartsandheadsetsused
to repair or replace any headset will be free from all material defects in workmanship
and materials, but only for a limited period of 90 days thereafter. Purchaser
acknowledges that used or reconditioned parts may be used to repair any new or used
headset, and that a refurbished used headset may be provided as a replacement for
anyneworusedheadset.LSAmayhirea3rdpartytorepairorreplaceanyneworused
headset.“Including”means“including,butnotlimitedto.”
THETERMSINTHISDOCUMENTARETHEONLYTERMSTHATGOVERNLSA’SWARRANTY
OBLIGATIONSFORANYNEWORUSEDHEADSETORPARTTHEREOF.NOORALOROTHER
WRITTENTERMAPPLIES.THISDOCUMENTPROVIDESTHEEXCLUSIVEREMEDYFORALL
CLAIMSAGAINSTLSAWITHRESPECTTOANYNEWORUSEDHEADSETORPARTTHEREOF.
NOTWITHSTANDINGANYPROVISIONTOTHECONTRARYINTHISLIMITEDWARRANTY,
LSARESERVESTHERIGHTTOMODIFY,ATANYTIMEANDFROMTIMETOTIMEINITSSOLE
DISCRETION,ANYANDALLTERMSINTHISLIMITEDWARRANTY.EACHSUCHMODIFICATION
ISDEEMEDEFFECTIVEUPONPUBLICATIONONLSA’SWEBSITEOROTHERWISE.

Cert: 0046503
Lightspeed Aviation, Inc.’s Management
SystemisRegisteredtoISO9001:2008
©2015LightspeedAviation,Inc.Allrightsreserved.ComPriority,AutoShuto,and
Lightspeed Link are trademarks of Lightspeed Aviation. Lightspeed and Tango are
registered trademarks of Lightspeed Aviation, Inc. Bluetooth is a registered trademark of
theBluetoothSIG.iPhoneandiPadaretrademarksofApple,Inc.Specicationssubjectto
change without notice.
Partnumber704-00009-000.A11015
Product Registration
To optimize your customer experience,
please register using your FlightLink app
or at LightspeedAviation.com.
TOTHEEXTENTALLOWEDBYLAW:LSADISCLAIMSANDPROVIDESTHISLIMITED
WARRANTYINLIEUOFALLOTHEREXPRESSORIMPLIEDWARRANTIES,INCLUDINGANY
WARRANTYOFMERCHANTABILITYORFITNESSFORAPARTICULARPURPOSE.LSAISNOT
LIABLEFORCONSEQUENTIAL,INCIDENTAL,PUNITIVE,INDIRECT,SPECIAL,LOSTPROFITS,
ORSIMILARDAMAGESCLAIMEDUNDERANYSTATUTEORLEGALOREQUITABLETHEORY.
LSA’STOTALLIABILITYFORALLCONTRACT,TORT(INCLUDINGNEGLIGENCE),STATUTORY,
OROTHERCLAIMSARISINGFROMORRELATINGTOTHISLIMITEDWARRANTYORANY
HEADSETORPARTTHEREOFISLIMITEDTO$1,000.SOMESTATESDONOTALLOWTHE
LIMITATIONOFCONSEQUENTIALDAMAGES,SOTHEABOVELIMITATIONSMIGHTNOT
APPLYTOPURCHASER.THISLIMITEDWARRANTYGIVESPURCHASERSPECIFICLEGAL
RIGHTS,ANDPURCHASERMIGHTHAVEOTHERRIGHTSTHATVARYFROMSTATETOSTATE.
FORPURCHASERSINCALIFORNIA:PURCHASERHASTHERIGHTTOHAVETHENEW
HEADSETSERVICEDANDREPAIREDDURINGTHEWARRANTYPERIOD.THEWARRANTY
PERIODWILLBEEXTENDEDFORTHENUMBEROFWHOLEDAYSTHATTHENEW
HEADSETHASBEENOUTOFPURCHASER’SHANDSFORWARRANTYREPAIRS.IFA
DEFECTEXISTSDURINGTHEWARRANTYPERIOD,THISLIMITEDWARRANTYWILLNOT
EXPIREUNTILTHEDEFECTHASBEENFIXED.IFANYWARRANTYREPAIRHASBEEN
DELAYEDBECAUSEOFCIRCUMSTANCESBEYONDPURCHASER’SCONTROL,ORIF
ANYWARRANTYREPAIRDIDNOTREMEDYADEFECTANDPURCHASERNOTIFIESLSA
OFSUCHFAILUREWITHIN10DAYSAFTERTHEREPAIR,THEWARRANTYPERIODWILL
BEEXTENDEDFORAPERIODEQUALTOTHEDURATIONOFTHEDELAY.IF,AFTERA
REASONABLENUMBEROFATTEMPTS,THEDEFECTREMAINSUNFIXED,PURCHASER
MAYRETURNTHENEWHEADSETFORREPLACEMENTORREFUND,SUBJECTTOA
REASONABLEDEDUCTIONFORPURCHASER’SUSEOFTHENEWHEADSET.ANY
EXTENSIONOFTHEWARRANTYPERIODDOESNOTAFFECTANYPROTECTIONOR
REMEDYAVAILABLETOPURCHASERUNDERAPPLICABLELAW.
Registration

Lightspeed Aviation
6135JeanRoad
Lake Oswego, Oregon 97035
sales@lightspeedaviation.com
service@lightspeedaviation.com
800.332.2421 Toll Free
503.968.3113 Tel
503.968.7664 Fax
LightspeedAviation.com