Linak U S 13EAXBE Handheld portable transmitter – Remote control for actuator system User Manual Contour Plat Users Manual0809 indd
Linak U.S. Inc Handheld portable transmitter – Remote control for actuator system Contour Plat Users Manual0809 indd
User Manual
CONTOUR PLATINUMCONTOUR PLATINUMCONTOUR PLATINUM
CONTOUR PLATINUMCONTOUR PLATINUMCONTOUR PLATINUM
CONTOUR PLATINUMCONTOUR PLATINUMCONTOUR PLATINUM
CONTOUR PLATINUMCONTOUR PLATINUMCONTOUR PLATINUM
CONTOUR PLATINUMCONTOUR PLATINUMCONTOUR PLATINUM
CONTOUR PLATINUMCONTOUR PLATINUMCONTOUR PLATINUM
CONTOUR PLATINUMCONTOUR PLATINUMCONTOUR PLATINUM
CONTOUR PLATINUMCONTOUR PLATINUMCONTOUR PLATINUM
CONTOUR PLATINUMCONTOUR PLATINUMCONTOUR PLATINUM
CONTOUR PLATINUMCONTOUR PLATINUMCONTOUR PLATINUM
CONTOUR PLATINUMCONTOUR PLATINUMCONTOUR PLATINUM
CONTOUR PLATINUMCONTOUR PLATINUMCONTOUR PLATINUM
CONTOUR PLATINUMCONTOUR PLATINUMCONTOUR PLATINUM
CONTOUR PLATINUMCONTOUR PLATINUMCONTOUR PLATINUM
CONTOUR PLATINUMCONTOUR PLATINUMCONTOUR PLATINUM
CONTOUR PLATINUMCONTOUR PLATINUMCONTOUR PLATINUM
CONTOUR PLATINUMCONTOUR PLATINUMCONTOUR PLATINUM
CONTOUR PLATINUMCONTOUR PLATINUMCONTOUR PLATINUM
CONTOUR PLATINUMCONTOUR PLATINUMCONTOUR PLATINUM
CONTOUR PLATINUMCONTOUR PLATINUMCONTOUR PLATINUM
CONTOUR PLATINUMCONTOUR PLATINUMCONTOUR PLATINUM
CONTOUR PLATINUMCONTOUR PLATINUMCONTOUR PLATINUM
CONTOUR PLATINUMCONTOUR PLATINUMCONTOUR PLATINUM
CONTOUR PLATINUMCONTOUR PLATINUMCONTOUR PLATINUM
CONTOUR PLATINUMCONTOUR PLATINUMCONTOUR PLATINUM
CONTOUR PLATINUMCONTOUR PLATINUMCONTOUR PLATINUM
CONTOUR PLATINUMCONTOUR PLATINUMCONTOUR PLATINUM
CONTOUR PLATINUMCONTOUR PLATINUMCONTOUR PLATINUM
CONTOUR PLATINUMCONTOUR PLATINUMCONTOUR PLATINUM
CONTOUR PLATINUMCONTOUR PLATINUMCONTOUR PLATINUM
CONTOUR PLATINUMCONTOUR PLATINUMCONTOUR PLATINUM
CONTOUR PLATINUMCONTOUR PLATINUMCONTOUR PLATINUM
CONTOUR PLATINUMCONTOUR PLATINUMCONTOUR PLATINUM
CONTOUR PLATINUMCONTOUR PLATINUMCONTOUR PLATINUM
CONTOUR PLATINUMCONTOUR PLATINUMCONTOUR PLATINUM
CONTOUR PLATINUMCONTOUR PLATINUMCONTOUR PLATINUM
CONTOUR PLATINUMCONTOUR PLATINUMCONTOUR PLATINUM
CONTOUR PLATINUMCONTOUR PLATINUMCONTOUR PLATINUM
CONTOUR PLATINUMCONTOUR PLATINUMCONTOUR PLATINUM
CONTOUR PLATINUMCONTOUR PLATINUMCONTOUR PLATINUM
CONTOUR PLATINUMCONTOUR PLATINUMCONTOUR PLATINUM
CONTOUR PLATINUMCONTOUR PLATINUMCONTOUR PLATINUM
CONTOUR PLATINUMCONTOUR PLATINUMCONTOUR PLATINUM
CONTOUR PLATINUMCONTOUR PLATINUMCONTOUR PLATINUM
CONTOUR PLATINUMCONTOUR PLATINUMCONTOUR PLATINUM
CONTOUR PLATINUMCONTOUR PLATINUMCONTOUR PLATINUM
CONTOUR PLATINUMCONTOUR PLATINUMCONTOUR PLATINUM
CONTOUR PLATINUMCONTOUR PLATINUMCONTOUR PLATINUM
CONTOUR PLATINUMCONTOUR PLATINUMCONTOUR PLATINUM
CONTOUR PLATINUMCONTOUR PLATINUMCONTOUR PLATINUM
CONTOUR PLATINUMCONTOUR PLATINUMCONTOUR PLATINUM
CONTOUR PLATINUMCONTOUR PLATINUMCONTOUR PLATINUM
CONTOUR PLATINUMCONTOUR PLATINUMCONTOUR PLATINUM
CONTOUR PLATINUMCONTOUR PLATINUMCONTOUR PLATINUM
CONTOUR PLATINUMCONTOUR PLATINUMCONTOUR PLATINUM
CONTOUR PLATINUMCONTOUR PLATINUMCONTOUR PLATINUM
CONTOUR PLATINUMCONTOUR PLATINUMCONTOUR PLATINUM
CONTOUR PLATINUMCONTOUR PLATINUMCONTOUR PLATINUM
CONTOUR PLATINUMCONTOUR PLATINUMCONTOUR PLATINUM
CONTOUR PLATINUMCONTOUR PLATINUMCONTOUR PLATINUM
CONTOUR PLATINUMCONTOUR PLATINUMCONTOUR PLATINUM
CONTOUR PLATINUMCONTOUR PLATINUMCONTOUR PLATINUM
CONTOUR PLATINUMCONTOUR PLATINUMCONTOUR PLATINUM
CONTOUR PLATINUMCONTOUR PLATINUMCONTOUR PLATINUM
CONTOUR PLATINUMCONTOUR PLATINUMCONTOUR PLATINUM
User ManualNo. 0840342
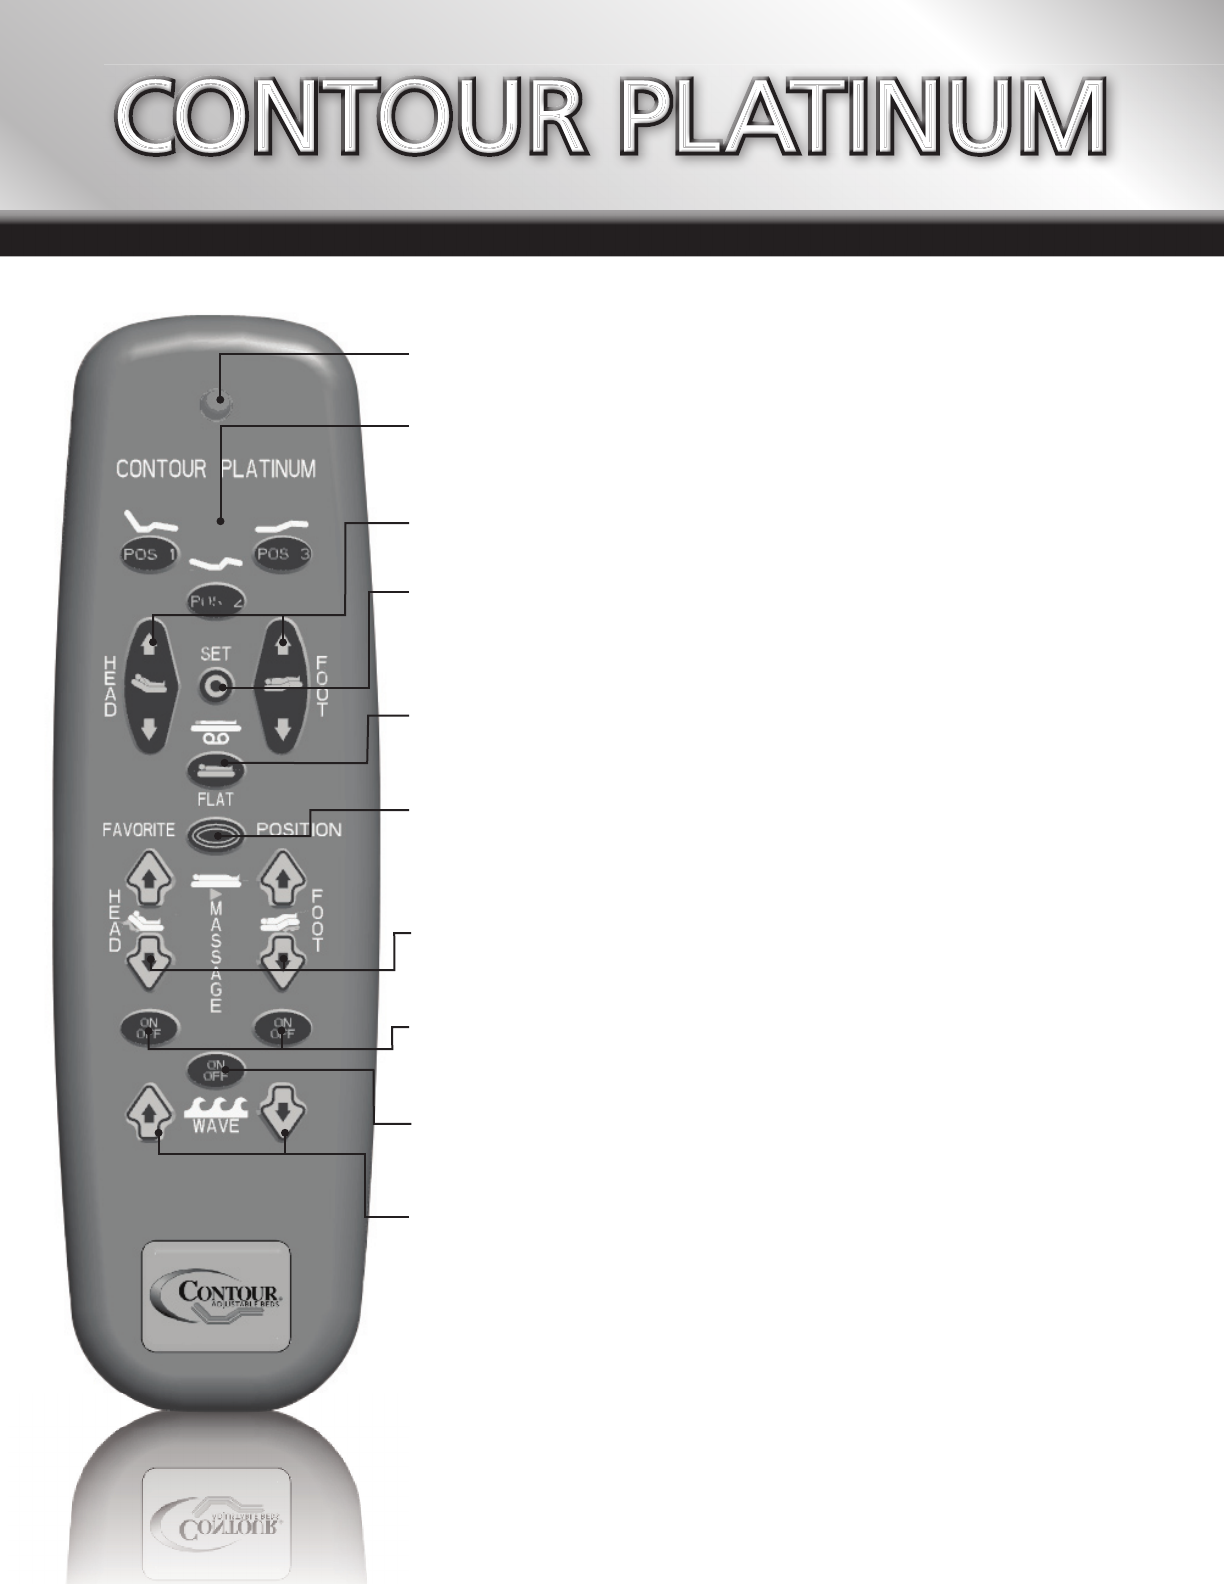
1) Transmission indicator light:
Verifi es a legal button is being pressed, and RF signal is being sent.
2) Position buttons:
Press shortly and the bed will automatically move to the selected position; at fi rst the head section
moves, then the foot section. To stop the automatic movement, press any key shortly.
3) Head & foot up/down buttons:
Press and hold to adjust the head & foot section of the bed to the desired positions.
4) SET button:
Once the desired position of head, foot, vibrators and wave have been made, press the SET button
shortly, release and then press POS1, POS2, POS3 or FAVORITE POSITION button shortly to set the
position.
5) Flat Button:
To level the bed to the sleeping position, press the FLAT button shortly. This also turns off the
vibrators. To stop the automatic movement, press any key shortly.
6) Favorite position button:
To recall the bed’s saved position, press the FAVORITE POSITION button shortly. The bed will
automatically move to the saved position. At fi rst the head section moves, then the foot section.
To stop the automatic movement, press any key shortly.
7) Head & foot massage (vibrator) buttons:
Slowly increases or decreases the intensity of each vibrator for as long as the appropriate button is
pressed.
8) Massage (vibrator) ON – OFF buttons:
Turns on or off the corresponding vibrator. When turned on, the vibrator has an automatic shut off
timer of 30 minutes.
9) Wave ON –OFF button:
Toggle between wave and continuous mode for the vibrators if they are turned on. If they are
turned off, the vibrators turn on in the mode they were in previously.
10) Wave up/down buttons:
Once one or both vibrators are activated and the wave feature is selected, these buttons increase
or decrease the speed of the wave.
Continued on back.
Other features:
• Toconservebatterylife,thetransmitterturnsoffallfunctionsifanybuttonispressedformorethan5consecutiveminutes.
• Savedpositionsandsettingsofthevibratorsarenotaffectedbylossofpower.
• Ifbatterieshavebeenreplaced,pressanybuttonfor3seconds.Whentheindicatorlightturnsonitisreadyforuse.
Matching the RF (Radio Frequency) handset to the receiver:
The receiver has the capability to accept commands from as many as 2 different RF handsets. The handsets must be matched in the
receivers learning mode.
• Thebedmustbeinthefullydownpositionbeforeactivatingthelearningmode.
If the head or foot bed portions are not in the fully down position before the reset button is activated, then the learning mode
cannot be activated and the button will perform an ordinary FLAT function instead.
After the FLAT function is complete, the reset button must be released and reactivated.
Activating the learning mode:
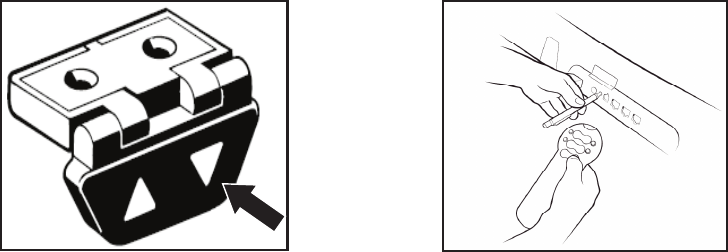
Learning mode is activated by pressing one of two available reset buttons illustrated below:
Reset button on external switch Reset button on motor unit
• Activatetheresetbuttonontheexternalswitchbypressingandholdingthedownarrowindicatedintheillustrationaboveorby
pressing the reset button on the motor unit by using a pen or similar object to keep the button pressed.
• Whileholdingeitheroftheresetbuttonsindicated,pressanybuttonontheRFhandset(s).Ifmatchingmorethanonehandset,
activate a button on each handset while continually holding the reset button. If the reset button is released before the 2nd handset is
matched, only the first handset will be active.
• AfteractivatingtheRFhandsetbutton(s);theresetbuttonmustbereleased.
• IfaRFhandsetbuttonisnotactivatedduringthematchingprocedure;thehandsetsthatarecurrentlymatchedarenot reset.
Emergency lowering function:
If the battery option is connected to the motor unit, it is possible to lower the system during a power failure.
• Itisonlypossibletoruninthedowndirection.
• WhenpushingtheFLATbuttononthehandsetcontrol,onlyonesection(motor)willrunatatime.Thesequenceisheadrestdown
and then footrest down.
• Itisalsopossibletoactivatetheheadorfootrestusingtheirrespectivebuttonsonthehandcontrol,butonlyindowndirection.
Removal/fitting of the 2 x 9 V batteries:
The2x9Vbatteriesforemergencyloweringmaybereplaced.
• Firstdisconnectthecableandthenpulloutthedrawerfromthemotorunit.
• Onthebottomofthedrawerare2holesthatcanbepushedwithangerorabluntinstrumenttoreleasethebatteries.
• Replacewithfresh9Vbatteriesandplaceinthedrawerofthemotorunitandreconnectthecable.
• Onlyusealkalinebatteries,andbesuretopolarizethebatteriescorrectlyaccordingtothesymbolsinthedrawer.
Additional information:
• Pleasebeawarethatotherequipment(i.e.doorbells),whichusethe433MHz,candisturbtheRFsignal.
• Undersomecircumstancesitisnotpossibletorun2ormoremotorunitsatthesametimeduetotheRFsignalinterference.
• EveryRFhandsethasitsown32bituniqueaddressandtheRFprotocolcontainsachecksumwhichensuresthatonlyhandsetsthat
havebeenactivatedduringthelearningprocesscanactivatethemotorunit.NonoisesignalfromotherRFequipmentcanactivate
the system, but might prevent it from running depending on the signal strength of the noise signal.