Linksys Pps1Uw Quick Start Guide Install
Pps1Uw Qi 0 pps1uw_qi_0 pps1uw_qi_0 quickinstall s s.linksys.com 3:
2014-07-06
: Linksys Linksys-Pps1Uw-Quick-Start-Guide linksys-pps1uw-quick-start-guide linksys pdf
Open the PDF directly: View PDF ![]() .
.
Page Count: 2

This sheet will guide you through the basic steps needed to install this
product onto your network. If you have any problems during installation,
refer to the Troubleshooting section of the User Guide.
Installing the Wireless-Ready PrintServer
Connecting the Wireless-Ready PrintServer to Your Network
1. After powering on the Wireless-Ready PrintServer, plug one
end of a UTP Category 5 (or better) cable into the Wireless-
Ready PrintServer’s LAN Port.
2. Connect the other end of the cable into a networked hub or
switch. The distance between the Wireless-Ready
PrintServer and the second device should not exceed 328
feet (100 meters).
3. The LAN LED will become active. If the LAN LED does
not light up, see the User Guide’s Troubleshooting section
for more information.
Connecting a Printer to the Wireless-Ready PrintServer
1. Connect your printer to the Wireless-Ready PrintServer’s
USB port with your USB cable.
2. Power on your printer.
The Autorun Bi-Admin Management Utility
1. Insert the Setup CD. A built-in autorun will begin the installa-
tion of the Wireless-Ready PrintServer’s Bi-Admin
Management Utility. Click the Install tab to continue.
2. The installation routine will begin to run and display the follow-
ing screen. Close any other programs you might have running
during this installation procedure and click Next to continue or
Cancel to forgo installation.
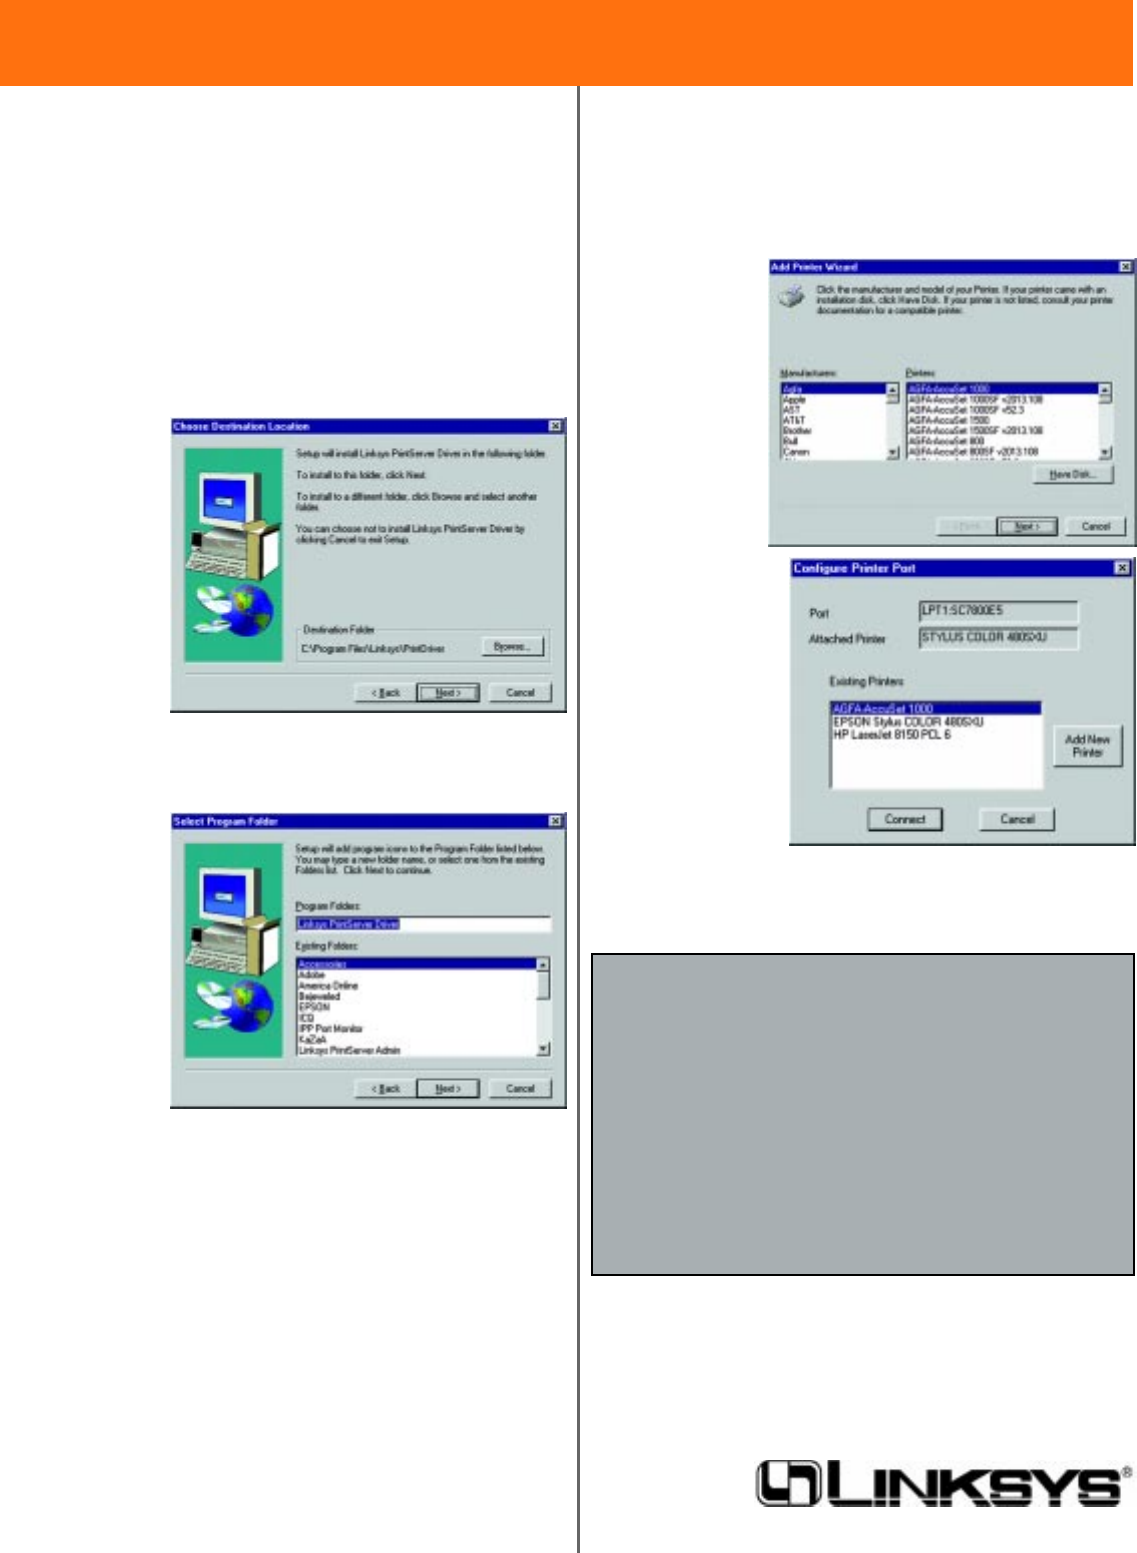
3. The next screen will request that you choose a destination
folder. You can either use the default folder by clicking Next
or choose an alternate folder by clicking Browse and selecting
a folder from the window that pops up. Click Back to take a
step backward in the installation or Cancel to forgo installa-
tion.
4. The Bi-Admin Management Utility is now installed. Click
OK on the final screen and continue to the next section,
Installing the Wireless-Ready PrintServer’s Drivers for
installing the USB drivers.
Model No.:PPS1UW
EtherFast
®
Wireless-Ready
USB PrintServer
Instant EtherFast
®
Series
Quick Installation
Making Connectivity Easier™
Continued on back...
Note: After you have run the Autorun program and installed the
Bi-Admin Management Utility, the Autorun will still run every
time you insert the CD. Do NOT install the Bi-Admin
Management Utility again. Click the EXIT tab to prevent dupli-
cate installation
Installing the Wireless-Ready PrintServer’s Drivers
1. To begin driver installation, click Start , select Run, and type
D:\Driver\Win9xnt\AddPort_Linksys.exe (where D is the
letter of your CD-ROM drive) in the Open field that appears.
Click OK.
2. The Install Wizard window appears. Read the text that
appears and click Next.
3. Click Next to accept the default Destination Directory, shown
below (recommended). If you choose to utilize another direc-
tory, click
Browse and
choose the
appropriate
directory.
Then, click
Next.
4. The following screen will assign a Program Folder to the
Windows Taskbar. The default Program Folder is the “Linksys
PrintServer Driver”. If you would like to use another name for
the Program Folder, type it in the Program Folders field or
select one
from the
Existing
Folders
field. Click
Next to
continue.
5. Driver installation is now completed but the Print Driver still
needs to be configured. The Wireless-Ready PrintServer will
not function properly until the Print Driver is configured.
Check the box beside Configure Print Driver Now and click
Finish to continue.
6. Before setting up and configuring the Print Port, follow the
directions on the screen below and click OK to continue.
7. The Print Port Setup screen will display the Wireless-Ready
PrintServer and all of the printers with which it communicates.
Here, you have the option of installing the printer by high-
lighting its description and clicking Next. You can also close
this screen by clicking Close.
8. This will display the Configure Printer Port screen. Any installed
printers will be displayed in the Existing Printers field. You can
install a printer by clicking Add New Printer.
9. The Add New Printer Wizard will come up at this point. Follow
the standard pro-
cedure for adding
printers under
Windows. If you
have any ques-
tions on adding
printers, please
refer to your
Windows docu-
mentation.
10. After your print-
er(s) have been
added, you will
return to the
Configure Printer
Port screen. Click
the Connect but-
ton to connect the
printer(s).
11. The Printer Port Setup screen will appear again, displaying the
printers which are now communicating with the Wireless-Ready
PrintServer. Click the Next button to add any more printers or
Close to complete the installation and configuration procedure.
Installation of the Wireless-Ready PrintServer is now complete.
For information on configuring the Wireless-Ready PrintServer on
a Windows 95/98/Millennium computer, refer to the Windows 95,
98 and Millennium Port Configuration section in the User Guide.
If you are configuring the Wireless-Ready PrintServer on a
Windows NT 4.0 or 2000 computer, refer to the Windows NT and
2000 Port Configuration section in the User Guide.
QI-PPS1UW-011208A KL
EtherFast
®
Wireless-Ready USB PrintServer
Model No.:PPS1UW
If the Wireless-Ready PrintServer does not appear in this window:
• Windows 95/98/Millennium users - the Wireless-Ready
PrintServer probably does not have an IP address. You can assign one
using the Bi-Admin software. See the section on Bi-Admin:
PrintServer Management in the User Guide. If you know you are
using DHCP through software or your router/hub/switch, try resetting
the Wireless-Ready PrintServer and clicking the Browse button again.
If this does not work, refer to the Troubleshooting section in the User
Guide.
• Windows NT 4.0 or 2000 users - try resetting the Wireless-Ready
PrintServer and clicking the Browse button again. If this does not
work, refer to the Troubleshooting section in the User Guide.
