Lionda Technology Co MH9940LD02 900MHz Crdls Phn w/ Dgtl Answrng Mchn & CID User Manual
Lionda Technology Co Ltd 900MHz Crdls Phn w/ Dgtl Answrng Mchn & CID Users Manual
Users Manual
Special Features
ongratulations on your selection of a quality BellSouth Product. With proper
care and adherence to the setup and user instructions in this Owner’s Manual,
this unit will provide you with years of trouble free service.
BellSouth is committed to providing quality products that fit your needs. We would like to
have any comments or suggestions you might have on this product. You may mail your
comments to: U.S. Electronics
105 Madison Avenue
New York, NY 10016
When examining your new BellSouth cordless telephone, you will find an array of
special features including:
Filtered Sound™ System - Receives considerably less noise than conventional cordless
telephones because of a special circuit which delivers the clearest possible
reception.
40 Channel Autoscan - Press the button on the HANDSET to find and lock on
to the clearest channel for any call.
Desk or Wall Mount - Use this equipment as a desk phone or as a wall phone.
TONE or PULSE Dialing - Use this phone for either TONE (rotary) or PULSE (push-
button) dialing.
Automated Functions - Redial the last number called and automatic STANDBY mode.
Security - Ensures greater privacy because a built-in security code with 65,536
combinations prevents use of your telephone line by another nearby cordless
telephone.
Dependable Battery - Recharge your BATTERY PACK many times with the built-in
charger. The battery low warning tone tells you when the BATTERY PACK needs
recharging (See page 37).
Special Services - Use the button to access special services such as Call
Waiting supplied by your telephone company or company switchboard.
STANDBY Mode - When in STANDBY mode (ON-HOOK), the telephone is capable of
receiving a call. When the HANDSET is on the BASE UNIT, it is automatically in the
STANDBY mode (ON-HOOK). When the HANDSET is taken off the BASE UNIT, it
remains in the STANDBY mode until you activate the button.
Battery Power Saver - Once fully charged, in STANDBY mode, the HANDSET can
receive/send calls for a maximum of five days without the need for recharging.
Length of charge depends on frequency of use.
HANDSET Ringer Level - Select the ringer sound level (HI, LOW, OFF).
HANDSET Volume Control Switch - Select the receiver volume level (HI, MID, LOW).
Luminous LCD Screen - The LCD Screen emits light for 10 seconds every time you
press any of the TELEPHONE KEYPAD buttons.
HEADSET JACK - Your telephone can utilize a headset for hands-free communication.
BELT CLIP - Use the BELT CLIP to hang your HANDSET on your belt.
C
Special Features
CALLER ID SYSTEM
Multi-Function Large LCD Screen - Shows the number you are dialing, and with Caller ID
service (available through subscription from your local telephone company), displays
information about the caller before you answer the call.
Name and Number Directory - Stores up to 40 names and numbers so that you can call them
with a single key stroke.
Caller List - Available with Caller ID service. Stores up to 80 calls to keep track of everyone who
called. The name, phone number, time and date of the call are recorded. Allows you to return
their calls with a single key stroke.
Preferred Calls - You can mark the name and number of a welcome caller in the DIRECTORY.
When that number calls in, the caller’s name will appear on the LCD Screen and a special ring
sound will be heard.
Blocked Calls - You can mark the name and number of an unwelcome caller in the DIRECTORY.
When that number calls in, the caller’s name will appear on the LCD Screen and the ringer will
be disabled.
Repeat Call Indicator - Shows if a new incoming call has called more than once.
Unavailable Call Indicator - Advises you that the origin of the incoming call does not support the
Caller ID system.
Call Waiting Service - Displays the name and number of the second caller, if you have subscribed
for Call Waiting service from your local telephone company (see page 15).
Voice Mail - Indicates message waiting signal if you subscribed to Voice Mail message service
and requested Visual Message Indication from your local telephone company (see page 15).
This telephone also detects a Stutter Dial Tone signal every time there is a Voice Mail message
for you from your Voice Mail message provider if you have subscribed to Voice Mail message
service.
ANSWERING SYSTEM FEATURES
Fully Digital Answering System - Provides a full range of answering functions without using
cassette tapes.
Digital Memory - Allows recording of memos and messages.
Two-Digit LED Message Display - Indicates the number of messages, indicates the status of the
system.
Ring-Detection Selectable - Choose the number of times the telephone rings before the system
answers.
Voice Day/Time Stamp - System tells the day and time of each received message or recorded
memo.
Message Alert - The ability to generate a sound signal when new messages are recorded.
Call Screening - The ability to intercept a call when the unit is recording an incoming message
(ICM).
Mailboxes - Allows four separate individuals to receive their own incoming messages.
Auto Disconnection - Will automatically stop answering when the HANDSET of any phone on the
same line goes OFF-HOOK.
Fast Message Skip Function - Skips to the next message.
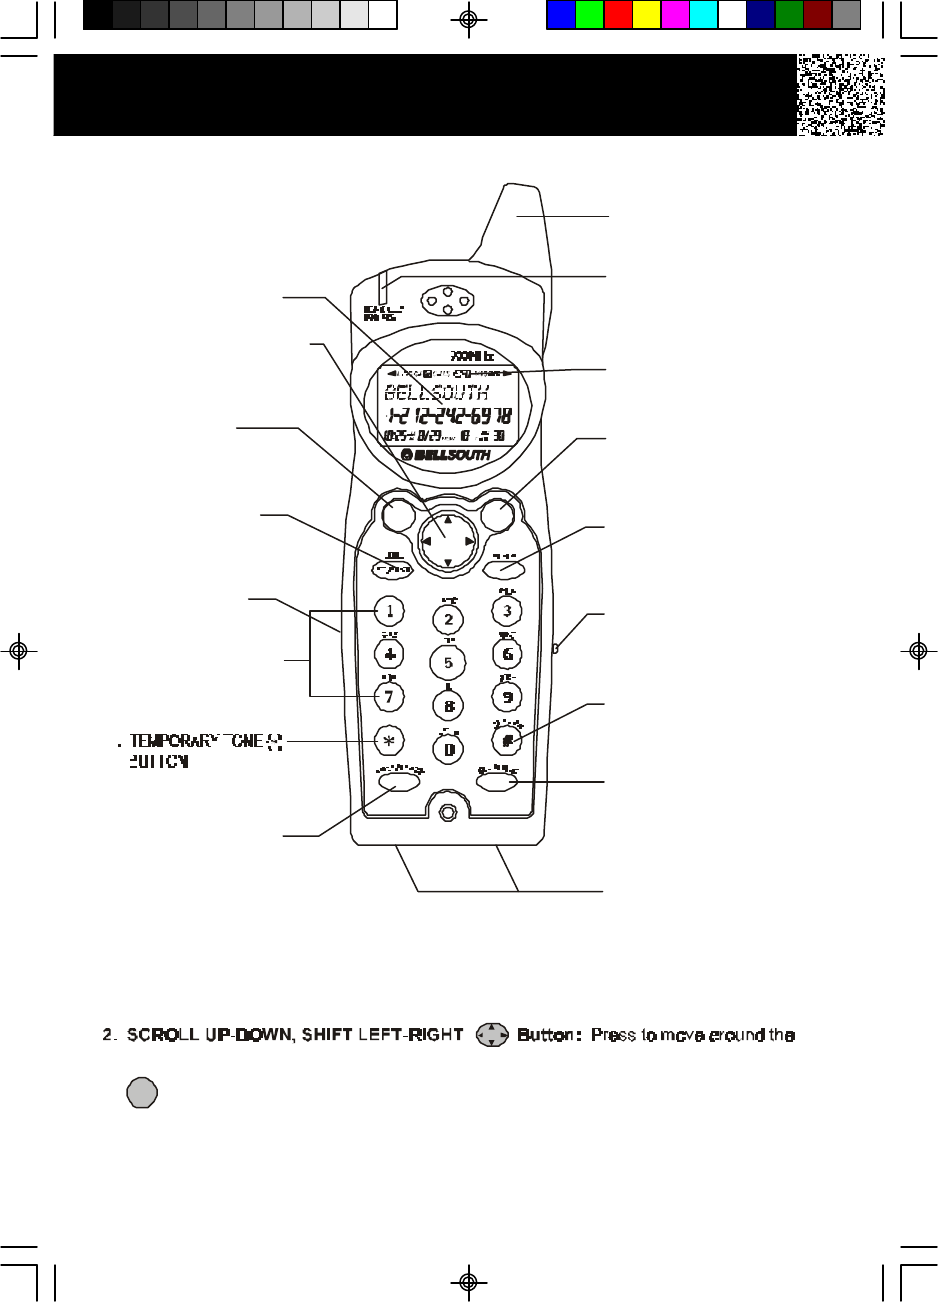
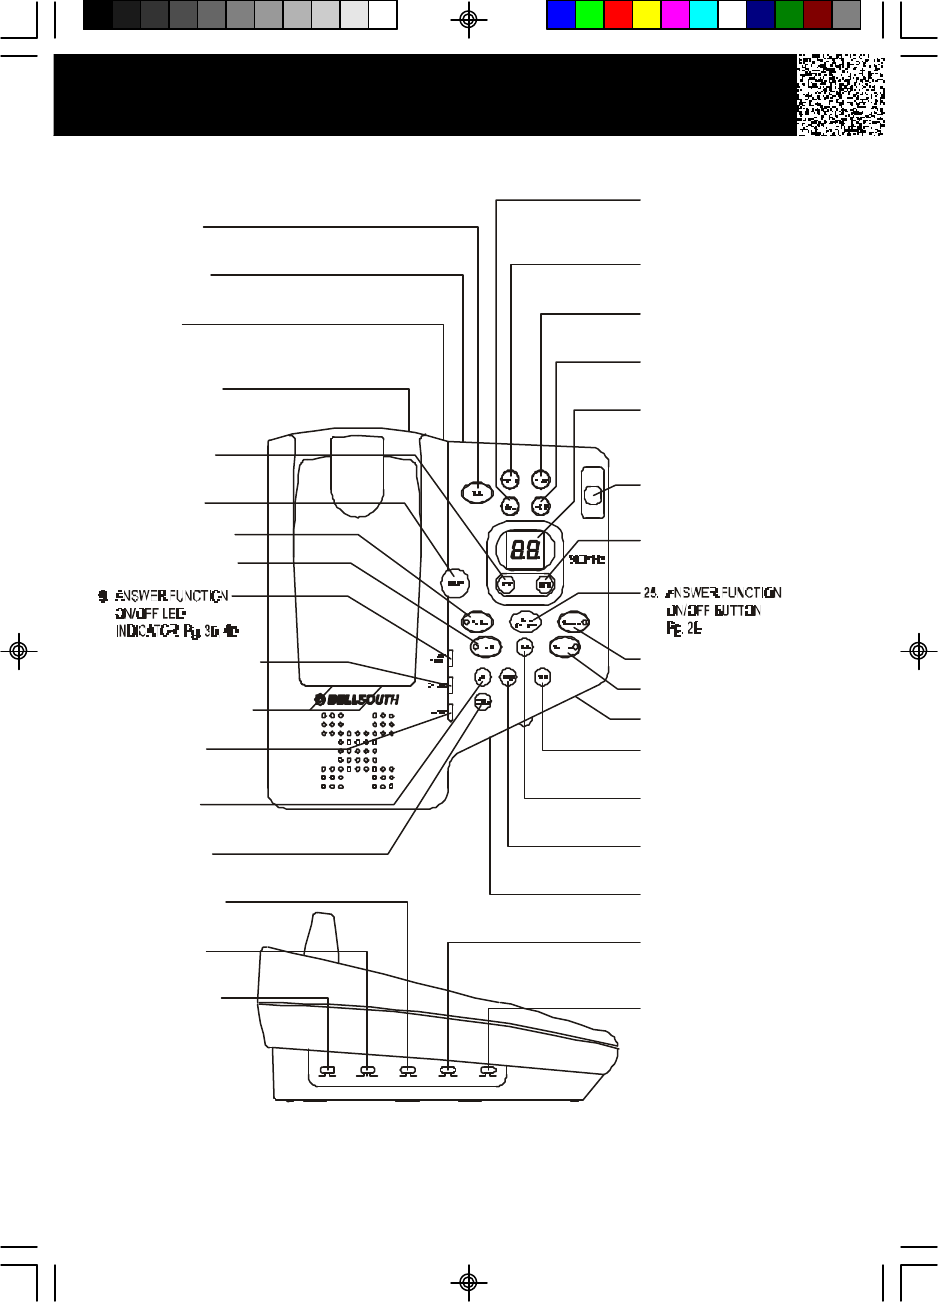
HANDSET Controls
1. LARGE LCD SCREEN
12. DIR (DIRECTORY)
BUTTON
Pg. 16~21
16.
DEL (DELETE)/CHAN
(CHANNEL) BUTTON
Pg. 17, 18, 20, 21,
36, 39, 41
13. RE (
SAVE/REDIAL)/PA
(PAUSE) BUTTON
Pg. 12, 17~20, 22~27
10. MESSAGE
WAITING LED
INDICATOR Pg. 15, 16
NEW CALL/
14. VOLUME CONTROL
(HI, MID, LOW)
SWITCH
11. BATT LOW
INDICATOR Pg. 37
5. HEADSET JACK
Pg. 13
4. MENU/VOICE MAIL
BUTTON
Pg. 15, 22~27
6. TELEPHONE KEYPAD
Pg. 18~20, 22~24, 26, 27
8. FLASH BUTTON
Pg. 15, 18~20, 22~27
EDIT/
17. CHARGE CONTACTS
2. SCROLL UP-DOWN/SHIFT
LEFT-RIGHT BUTTON
Pg. 14, 16~26
3.
TALK BUTTON
Pg. 8, 9, 11, 12, 15,
16, 20, 27, 39
Pg. 21, 23, 27
7
15. OPTION BUTTON
Pg. 16, 20, 21, 27
9.HANDSET ANTENNA
3. Button:
Press to answer an incoming call or to place a call. Press to end a call.
HANDSET Controls
1. Large LCD Screen: Shows call information, phone status, prompts and directory
(phonebook) items.
large LCD Screen.
TALK DIR
SAVE
TALK
HANDSET Controls
4. /MENU Button: (VOICE MAIL) Press to automatically dial the Voice Mail
Post Code in your area to access your Voice Mail message. (MENU) Press to
access the special functions operation in STANDBY mode. (For special functions
see pages 15, 22~27.)
5. HEADSET JACK: For connecting your headset plug to enjoy hands-free
communication. (See page 13 for detail.)
6. TELEPHONE KEYPAD to Buttons: Allows you to make a call depending
on pressed button. (For TELEPHONE KEYPAD characters, see page 19.)
7. TEMPORARY TONE Button: Press to temporarily change the DIALING mode
from PULSE to TONE for Rotary Service Users. (Press once before entering
numbers to access the answering system or electronic banking services, etc.)
8. Button: (EDIT) Press to edit listed items. (FLASH) Press to answer a call
if you have Call Waiting.
9. HANDSET ANTENNA
10. NEW CALL/MSG WTG (MESSAGE WAITING) LED Indicator: (NEW CALL) Blinks to
indicate that you have a new Caller ID call stored in memory. (MESSAGE WAITING)
Blinks at a slow rate when receiving a Message Waiting signal, if you have
subscribed to a Voice Mail message service from your local telephone company.
(See page 15.)
11.BATT LOW INDICATOR: Appears on the LCD Screen when the battery charge is low.
(See page 37 for detail.)
12. DIRECTORY (PHONEBOOK) Button: Press to access names and numbers
stored in the DIRECTORY (PHONEBOOK). (See pages 16 to 21 for details.)
13. /RE (REDIAL)/PA (PAUSE) Button: (SAVE) Press and hold down to save the
changes on the listed items. (REDIAL) Press to redial the last number you dialed.
(PAUSE) Press to insert a pause while dialing. (You will need the /RE/PA
button to dial numbers which use an alternative Long Distance Access Code.)
14. HANDSET Volume Control (hi, mid, low) Switch: Select the receiver volume level
(HI, MID, LOW).
15. /OPTION Button: (OPTION) Press to change the displayed telephone number
into 7, 10, or 11 digit DIALING mode during Caller ID callback.
16. (DELETE/CHANNEL) Button: (DELETE) - Press and hold down to
delete items or individual characters. (CHANNEL) Press to change the operating
channel when you hear interference.
17. CHARGE CONTACTS: For charging the BATTERY PACK inside the HANDSET. We
recommend cleaning the CHARGE CONTACTS periodically with a damp cloth.
1 0
*
#
33. ANNOUNCE ONLY/
INCOMING MESSAGE
SWITCH Pg. 30, 40
15. MESSAGE ALERT
SWITCH Pg. 31
17. RINGER ON/OFF
SWITCH
16. RING SELECT
SWITCH P. 31
34.
TONE-PULSE SELECT
SWITCH Pg. 8, 39
ON OFF
RINGER TS 5R 3R
RING SELECT ON OFF
MSSG ALERT ICM ANNC
SELECT TONE PULSE
13. SET BUTTON
Pg. 28
11. CHARGE TERMINALS
18.
OUTGOING
MESSAGE BUTTON
Pg. 29, 30
14. CODE BUTTON
Pg. 34
6. PAGE BUTTON
22. LED MESSAGE
DISPLAY
Pg. 33
21. SKIP BUTTON
Pg. 32
24. REPEAT BUTTON
Pg. 32
19. MEMO BUTTON
Pg. 31, 33
20. STOP BUTTON
Pg. 32
23. BASE UNIT
ANTENNA
8. MAILBOX 3 BUTTON
7. MAILBOX 1 BUTTON
5. ERASE BUTTON
Pg. 33
30. DAY BUTTON
Pg. 28, 34
31. HOUR BUTTON
Pg. 28, 34
29. MINUTE BUTTON
Pg. 28, 34
28. MICROPHONE
32. VOLUME CONTROL
SLIDE SWITCH
26. MAILBOX 2 BUTTON
27. MAILBOX 4 BUTTON
10. IN USE LED INDICATOR
12. CHARGE LED
INDICATOR
3. POWER-IN
CONNECTION JACK
Pg. 7, 8
4. TELEPHONE LINE
CONNECTION JACK
Pg. 7, 8, 10, 39
1. PLAY BUTTON
Pg. 32
2. RESET BUTTON
Pg. 28, 40
BASE UNIT Controls
1. Button: Press to play messages.
2. RESET Button: Press to reset the system and clear all recordings.
3. POWER-IN CONNECTION JACK
4. TELEPHONE LINE CONNECTION JACK
5. ERASE Button: Press to erase messages.
6. Button: Press to PAGE the HANDSET. Press again to stop.
7. (MAILBOX 1) Button: Press to activate functions for MAILBOX 1.
8. (MAILBOX 3) Button: Press to activate functions for MAILBOX 3.
9. ANSWER FUNCTION ON/OFF (ANS. ON/OFF) LED Indicator: Lights when the
answer function is turned ON.
10. IN USE LED Indicator: Lights up to indicate that the HANDSET is in TALK mode or
blinks to indicate an extension phone is in use.
11. CHARGE TERMINALS: For charging the HANDSET BATTERY PACK. For best
performance, clean the CHARGE TERMINALS periodically with a damp cloth.
12. CHARGE LED Indicator: Lights up when the HANDSET is placed on the BASE UNIT
for charging.
13. Button: Press to set/check the day and time.
14. Button: Press to set the 3-digit Remote Access Code for remote operation.
15. MESSAGE ALERT: Set switch to ON to generate a “beep” sound every 15 seconds
when a new message has been received.
16. RING SELECT Switch: To select the number of rings before the Answering System
answers a call.
3R -System answers a call after the third ring.
5R -System answers a call after the fifth ring.
TS (TOLL SAVER) - System answers after the third ring only if you have new
messages. Otherwise, the system will answer after the fifth ring.
17. RINGER ON/OFF Switch: Set switch to OFF position to disengage the ringer on the
BASE UNIT.
BASE UNIT Controls
18. (OUTGOING MESSAGE) Button: Press and hold down to record OGM messages.
19. Button: Press and hold down to record memo messages.
20. Button: Press to stop playing a message.
21. Button: Press to skip messages.
22. LED MESSAGE DISPLAY: Indicates the number of memos/messages received,
status of the system.
EAEA - Erasing 01 01 ~63 63 - No. of memos/messages OP OP - OGM is playing
AoAo - Announce Only FU FU - Memory is full
Channel Display - Shows the channel on which the telephone is locked.
23. BASE UNIT ANTENNA
24. REPEAT Button: Press to repeat messages.
25. (ANSWER FUNCTION ON/OFF) Button: Press to activate or deactivate
the answer function.
26. (MAILBOX 2) Button: Press to activate functions for MAILBOX 2.
27. (MAILBOX 4) Button: Press to activate functions for MAILBOX 4.
28. MICROPHONE
29. MINUTE Button: Press to set minute during time setting, or press to set the
third digit of the access code during code setting.
30. Button: Press to set the day during time setting, or press to set the first digit
of the access code during code setting.
31. Button: Press to set the hour during time setting, or press to set the second
digit of the access code during code setting.
32. BASE UNIT VOLUME CONTROL Slide Switch: Used to adjust the speaker volume
level of the BASE UNIT.
33. ANNOUNCE ONLY/INCOMING MESSAGE Switch:
ICM - System records the incoming messages.
ANNC -System plays your announcement and then hangs up without
recording messages.
34. TONE-PULSE SELECT SWITCH
Safety Instructions.....................................................................................................................4
Getting Started........................................................................................................................... 7
Desk Mounting............................................................................................................................10
Wall Mounting.............................................................................................................................10
Cordless Telephone Operation...................................................................................................11
Preparing for Use................................................................................................................ 11
Receiving Calls.................................................................................................................... 11
Placing Calls.........................................................................................................................12
Redialing.............................................................................................................................. 12
Using the Headset Feature.................................................................................................. 13
Caller ID System Operation........................................................................................................ 14
Caller ID System...................................................................................................................14
Viewing Caller Information During Incoming Calls......................................................... 14
Caller ID with Call Waiting.............................................................................................. 15
Message Waiting........................................................................................................... 15
One-Touch Voice Mail Dialing........................................................................................ 15
Caller List............................................................................................................................. 16
Viewing the Caller List.................................................................................................. 16
Placing a Call from the Caller List.................................................................................. 16
Storing Caller ID Records into the DIRECTORY................................................................. 17
To Delete a Single Record in the Caller List................................................................... 17
To Delete all Records in the Caller List.......................................................................... 17
Name and Telephone Number DIRECTORY.......................................................................... 18
Viewing the DIRECTORY (Phonebook)........................................................................ 18
Storing Phone Numbers.................................................................................................18
Telephone Keypad Characters......................................................................................19
Placing Calls from the DIRECTORY................................................................................ 20
Editing a Stored Number in the DIRECTORY.................................................................. 20
Deleting a Stored Number in the DIRECTORY ...............................................................21
Preferred Calls.............................................................................................................. 21
Blocked Calls................................................................................................................. 21
Contents
1
Function Settings................................................................................................................22
A. Setting the Ringer Level.........................................................................................23
B. Changing the Language.........................................................................................23
C. Turning the First Ring ON or OFF........................................................................... 24
D. Setting the Time and Date...................................................................................... 24
E. Adjusting the Contrast........................................................................................... 25
F. Setting the PBX Number......................................................................................... 25
G. Changing the Flash Time........................................................................................25
H. Changing the Pause Time.......................................................................................26
I. Programming One-Touch Voice Mail Dialinbg......................................................... 26
J. Deleting Message Waiting Indication......................................................................27
K. Setting the Area Code............................................................................................27
Answering System Operation.................................................................................................... 28
Setting the Day/Time Stamp................................................................................................28
Recording your Outgoing Messages..................................................................................28
Turning the Answering System ON/OFF............................................................................30
Setting to Answer Calls..................................................................................................... 30
Setting to Announce Only...................................................................................................30
Message Alert....................................................................................................................31
Setting Ring Select......................................................................................................... 31
Recording a Memo..........................................................................................................31
Playing of Messages/Memos..........................................................................................32
Saving Mesages.............................................................................................................33
Erasing Messages..........................................................................................................33
When the Memory is Full................................................................................................ 33
Two-Way Recording...................................................................................................... 33
Remote Operation through a Tone Telephone.................................................................34
Remote Access Codes.................................................................................................. 34
Changing of the Remote Access Codes........................................................................ 34
Using the Remote Instruction Code.................................................................................35
Contents
2
Security................................................................................................................................ 36
Recharging the BATTERY PACK...........................................................................................37
Changing the BATTERY PACK.............................................................................................. 38
Problem Solving.................................................................................................................... 39
Technical Information.................................................................................................................... 41
FCC Requirements..........................................................................................................................42
Warranty Information......................................................................................................................44
Wall Mount Template....................................................................................................................... 48
Contents
3

Safety Instructions
4
IMPORTANT SAFETY INSTRUCTIONS
To reduce the risk of fire, electric shock and/or injury, always follow these
basic safety precautions when using your cordless telephone equipment.
1. Read and understand all instructions.
2. Follow all warnings and instructions marked on the telephone.
3. Do not use this telephone near a bathtub, wash bowl, kitchen sink, or laundry tub,
in a wet basement, near a swimming pool, or anywhere else where there is water.
4. Avoid using a telephone (other than a cordless type) during an electrical storm.
There may be a remote risk of electric shock from lightning.
5. Do not use the telephone to report a gas leak in the vicinity of the leak.
6. Use only the power cord and BATTERY PACK indicated in the Owner’s Manual. Do
not dispose of the BATTERY PACK in a fire. The BATTERY PACK may explode.
Check with local codes for possible special disposal instructions.
7. Operate this telephone using the electrical voltage as stated on the BASE UNIT or
in the Owner’s Manual. If you are not sure of the voltage in your home, consult your
dealer or local power company.
8. Unplug this telephone from the wall outlet before cleaning or replacing the
BATTERY PACK. Do not use liquid cleaners or aerosol cleaners on the telephone.
Use a damp cloth for cleaning.
9. Place this telephone on a stable surface. Serious damage and/or injury may result
if the telephone falls.
10. Do not cover the slots and openings on this telephone. This telephone should never
be placed near or over a radiator or heat register. This telephone should not be
placed in a built-in installation unless proper ventilation is provided.
11. Do not place anything on the power cord. Install the telephone where no one will
step or trip on the cord.
12. Do not overload wall outlets or extension cords as this can increase the risk of fire
or electric shock.
13. Never push any objects through the slots in the telephone. They could touch
dangerous voltage points or short out parts that could result in a risk of fire or
electric shock. Never spill liquid of any kind on the telephone.
14. To reduce the risk of electric shock, do not take this telephone apart. If service or
repair work is required on this telephone, take it to a qualified service
representative. Opening or removing covers may expose you to dangerous voltage
or other risks. Incorrect reassembly can cause electric shock when the appliance is
subsequently used.
15. Unplug this telephone from the wall outlet and consult a qualified service
representative in any of the following situations.
A. When the power supply cord is frayed or damaged.
B. If liquid has been spilled into the telephone.
C. If the telephone has been exposed to rain or water.
D. If the telephone does not operate normally by following the operating
instructions. Adjust only those controls that are covered by the operating
instructions. Improper adjustment may require extensive work by a qualified
technician to restore the telephone to normal operation.

E. If the telephone has been dropped or the case has been damaged.
F. If the telephone exhibits a distinct change in performance.
16. Never install telephone wiring during a lightning storm.
17. Never install telephone jacks in wet locations unless the jack is specifically
designed for wet locations.
18. Never touch uninsulated telephone wires or terminals unless the telephone line
has been disconnected at the network interface.
19. Use caution when installing or modifying telephone lines.
Battery Safety
CAUTION:
Danger of explosion if BATTERY PACK is incorrectly replaced. Replace only
with the same or equivalent type. To reduce the risk of fire or personal
injury, read and follow these instructions:
1. Use only the following type and size of BATTERY PACK:
Cordless Telephone BATTERY PACK
3.6V, 600mAh
U.S. Electronics Inc.
Ni-Cd BATTERY PACK: model B650
(See page 37 for ordering information.)
2. Do not dispose of the BATTERY PACK in a fire. The BATTERY PACK may explode.
Check with local codes for possible special disposal instructions.
3. Do not open or mutilate the BATTERY PACK. Released electrolyte from a BATTERY
PACK is corrosive and may cause damage to the eyes or skin. Electrolyte may be
toxic if swallowed.
4. Exercise care in handling the BATTERY PACK to prevent shorting the BATTERY
PACK with conductive materials such as rings, bracelets and keys. The BATTERY
PACK or conductor may overheat and cause burns.
5. Charge the BATTERY PACK provided with (or identified for use with) this telephone
only in accordance with the instructions and limitations specified in this manual.
6. Observe proper polarity orientation between the BATTERY PACK and BATTERY
CHARGER.
Safety Instructions
5

Safety Instructions
SAVE THESE INSTRUCTIONS
ATTENTION:
The product that you have purchased contains a rechargeable BATTERY PACK. The
BATTERY PACK is recyclable. At the end of its useful life under various state and local
laws, it may be illegal to dispose of this BATTERY PACK into the municipal waste
stream. Check with your local solid waste officials for details in your area for recycling
options or proper disposal.
6
Getting Started
Connecting Your Phone
This section is a reference guide to the basic functions and operations of your cordless
telephone. For more detailed descriptions of the operations and features of this
telephone, refer to the Contents on page 1.
1.Carefully remove your cordless telephone from its shipping carton. If there is any
visible damage, do not attempt to operate this equipment. Return it to the place
of purchase.
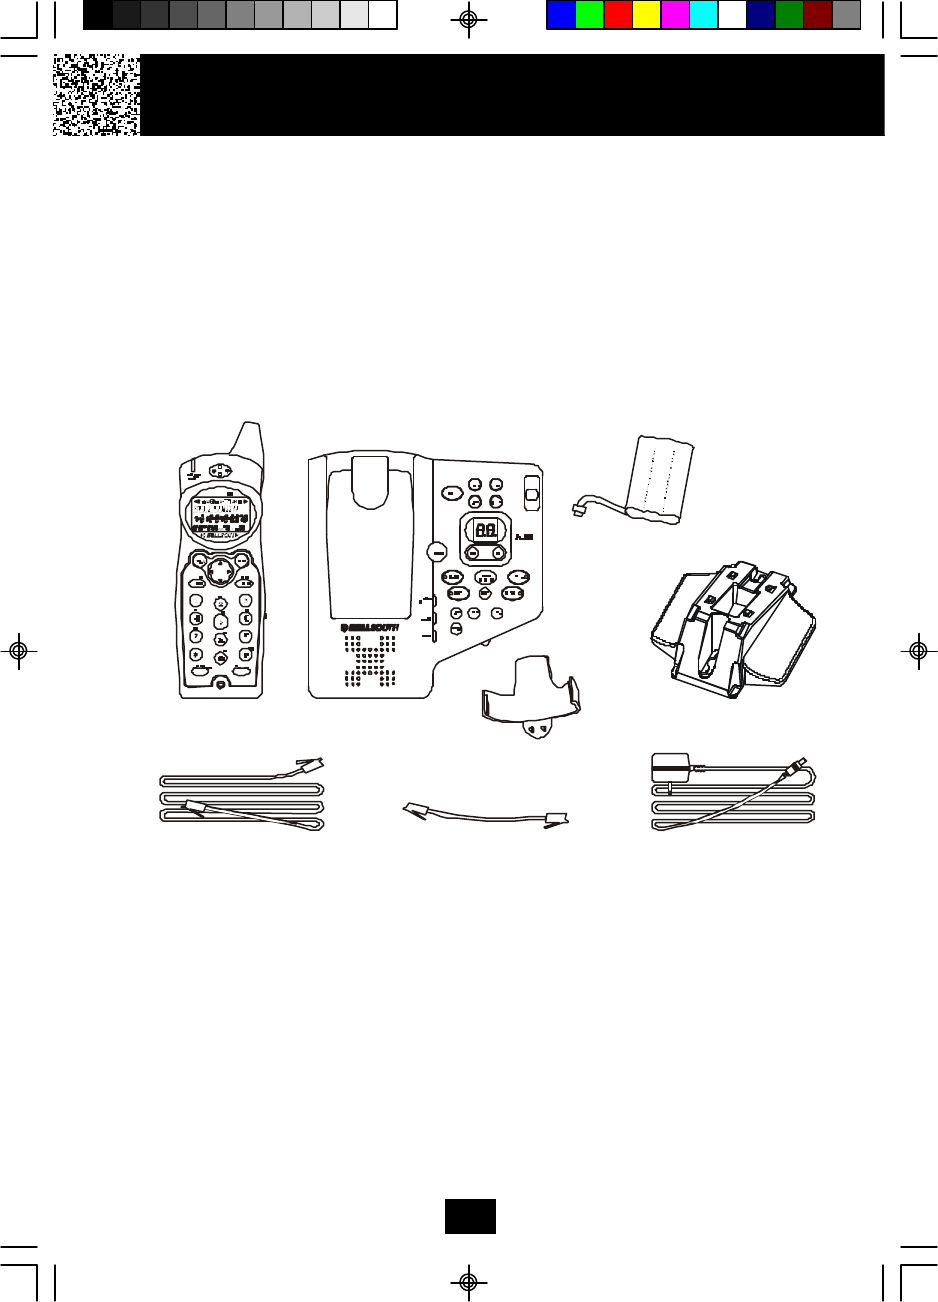
2.Check to be sure you have all items that come with this cordless telephone system.
You should have a HANDSET, BASE UNIT, AC ADAPTOR, BATTERY PACK,
MOUNTING BRACKET, TELEPHONE LINE CORD, SHORT TELEPHONE LINE CORD,
BELT CLIP andOwner’s Manual.
7
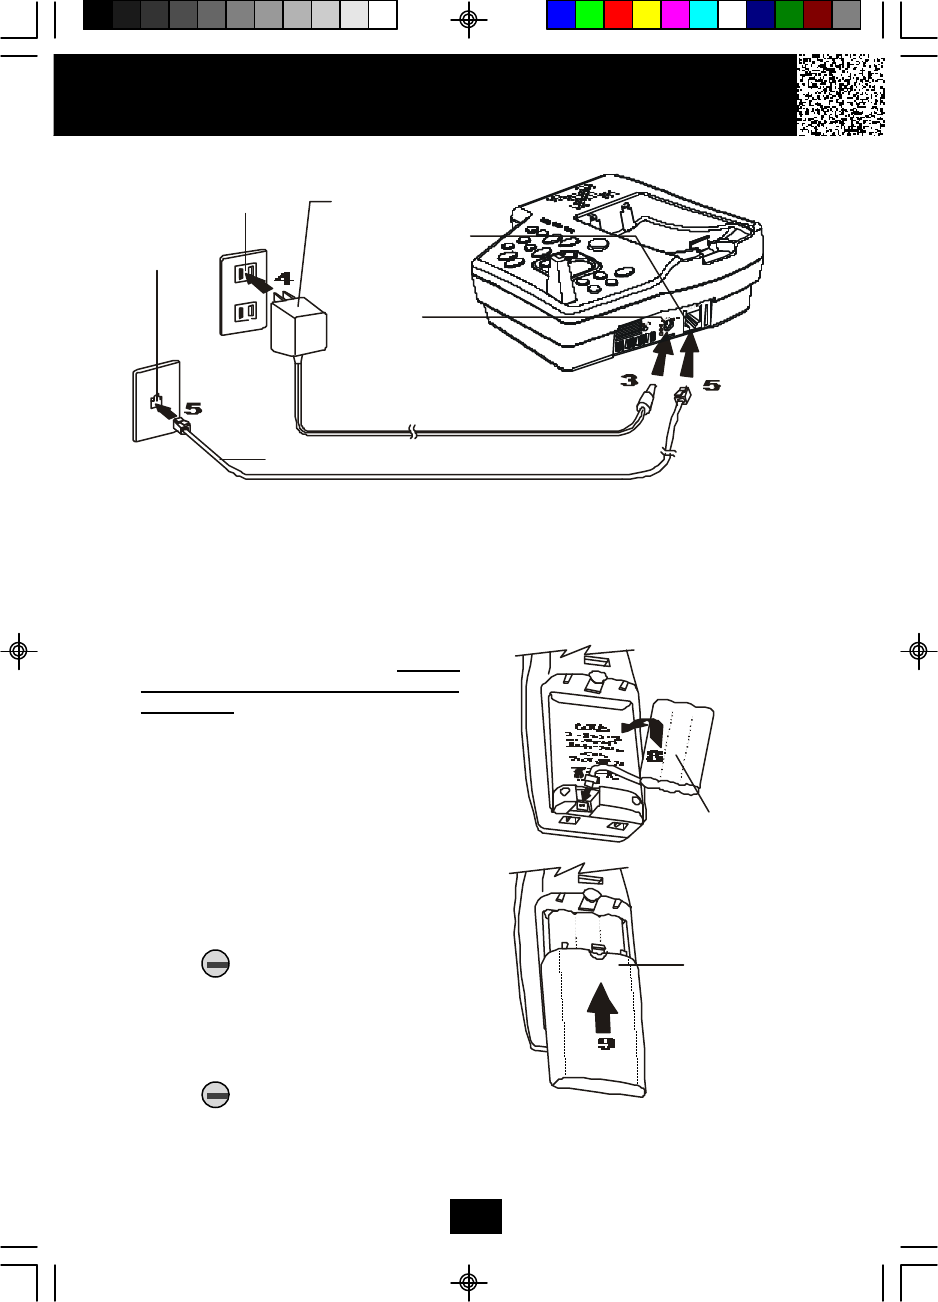
3. Insert the small plug on the end of the AC ADAPTOR into the POWER-IN
CONNECTION JACK at the back of the BASE UNIT.
4. Plug the AC ADAPTOR into a 120V AC wall outlet.
USE ONLY WITH CLASS 2 POWER SOURCE 9V DC, 500mA.
5. Insert one plug of the TELEPHONE LINE CORD into the house TELEPHONE JACK
and the other end into the TELEPHONE LINE CONNECTION JACK at the back of
the BASE UNIT. (If you have an older 4-prong TELEPHONE JACK, you will need an
RJ-11C TELEPHONE JACK ADAPTOR. This adaptor is available at the same place
you purchased your telephone.)
6. We recommend not placing this unit next to appliances. Doing so may cause
interference.
HANDSET
TELEPHONE LINE CORD
AC ADAPTOR
SHORT TELEPHONE LINE CORD
BASE UNIT MOUNTING BRACKET
BATTERY PACK
BELT CLIP
Getting Started
7. Install the HANDSET BATTERY PACK by plugging it into the BATTERY CONNECTOR
inside the BATTERY COMPARTMENT.
8. Place the BATTERY PACK inside the BATTERY COMPARTMENT.
9. Slide the HANDSET BATTERY
COMPARTMENT COVER firmly into
place in its closed position.
10. IMPORTANT: Before initial use, charge
the HANDSET for 12 hours. Do not
charge the HANDSET with KEYPAD
face down.
11. TONE/PULSE Select Switch:
A.If your home is equipped with a tone
dialing system, set the TONE/
PULSE Select Switch to the TONE
position.
B.If you have a rotary dialing system,
set the TONE/PULSE Select Switch
to the PULSE position.
C.If you are not sure which system you
have, set the TONE/PULSE Select
Switch to the TONE position. Press
the button on the HANDSET
to get a dial tone, and press any
button on the TELEPHONE KEYPAD
except the zero. If the dial tone
continues, it means that you do not
have TONE dialing service. Press
the button on the HANDSET
to hang up. Set the TONE/PULSE
Select Switch to the PULSE mode
and then try again.
8
AC ADAPTER
TELEPHONE LINE CORD
TELEPHONE
JACK
120V WALL
OUTLET
POWER-IN
CONNECTION JACK
TELEPHONE LINE
CONNECTION
JACK
BATTERY PACK
BATTERY
COMPARTMENT
COVER
Getting Started
Press the button to confirm that you
have a dial tone. If you do not get a dial tone,
review steps 3 through 11. If you still do not
have a dial tone, refer to the Problem
Solving section on page 39.
12. Set the date and time on the HANDSET. (See page 24 for details.)
13. Set the date and time on the BASE UNIT. (See page 28 for details.)
You are now ready to use your new
BellSouth Cordless Telephone.
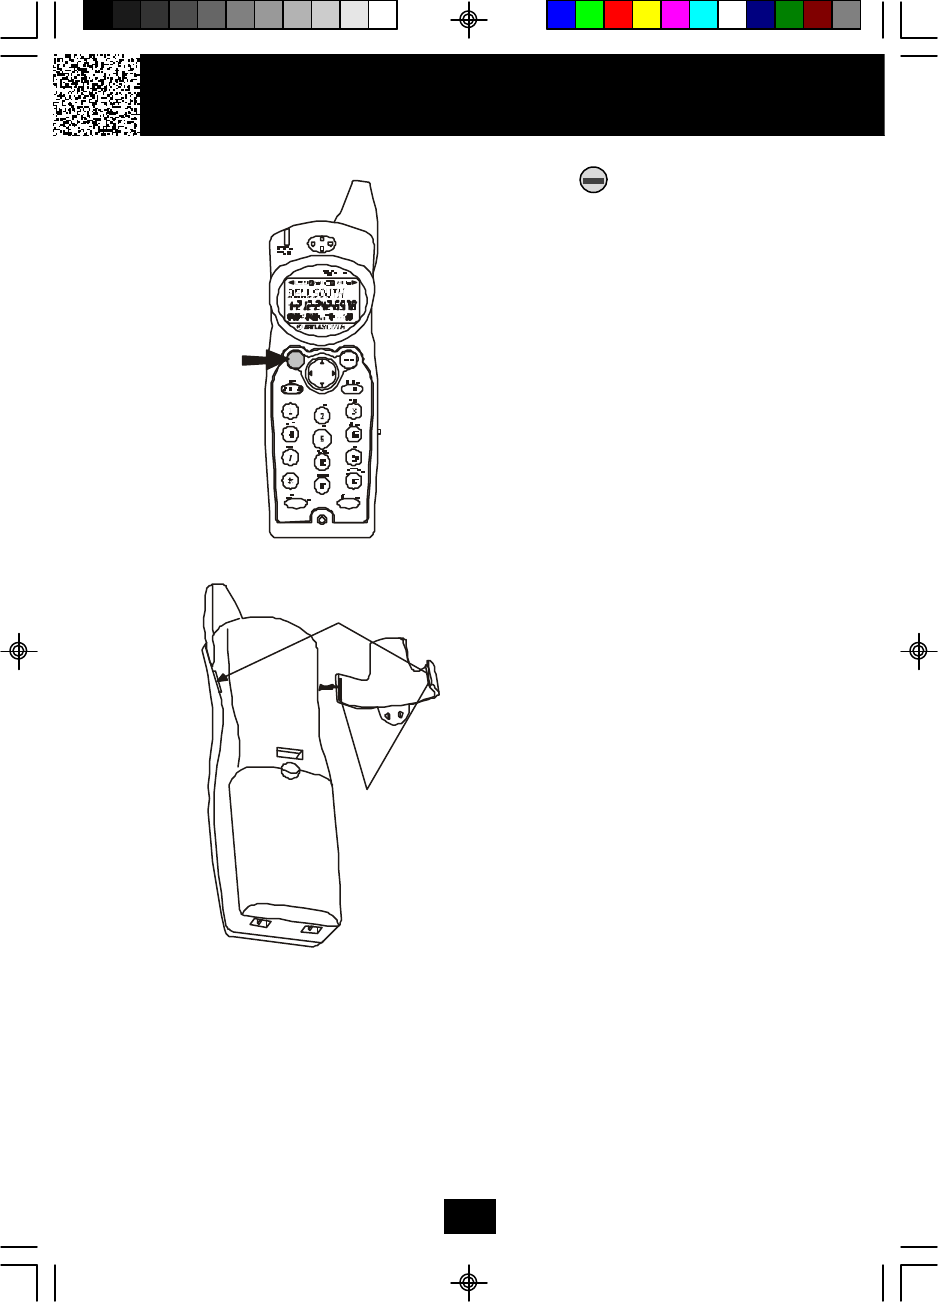
Belt Clip Installation
With the back of the HANDSET facing up,
insert one side of the BELT CLIP HOOK into
the matching slot at the top side of the
HANDSET. Press down on the opposite side
of the BELT CLIP until the other hook locks
into the slot on the side of the HANDSET.
9
BELT CLIP HOOK
TALK
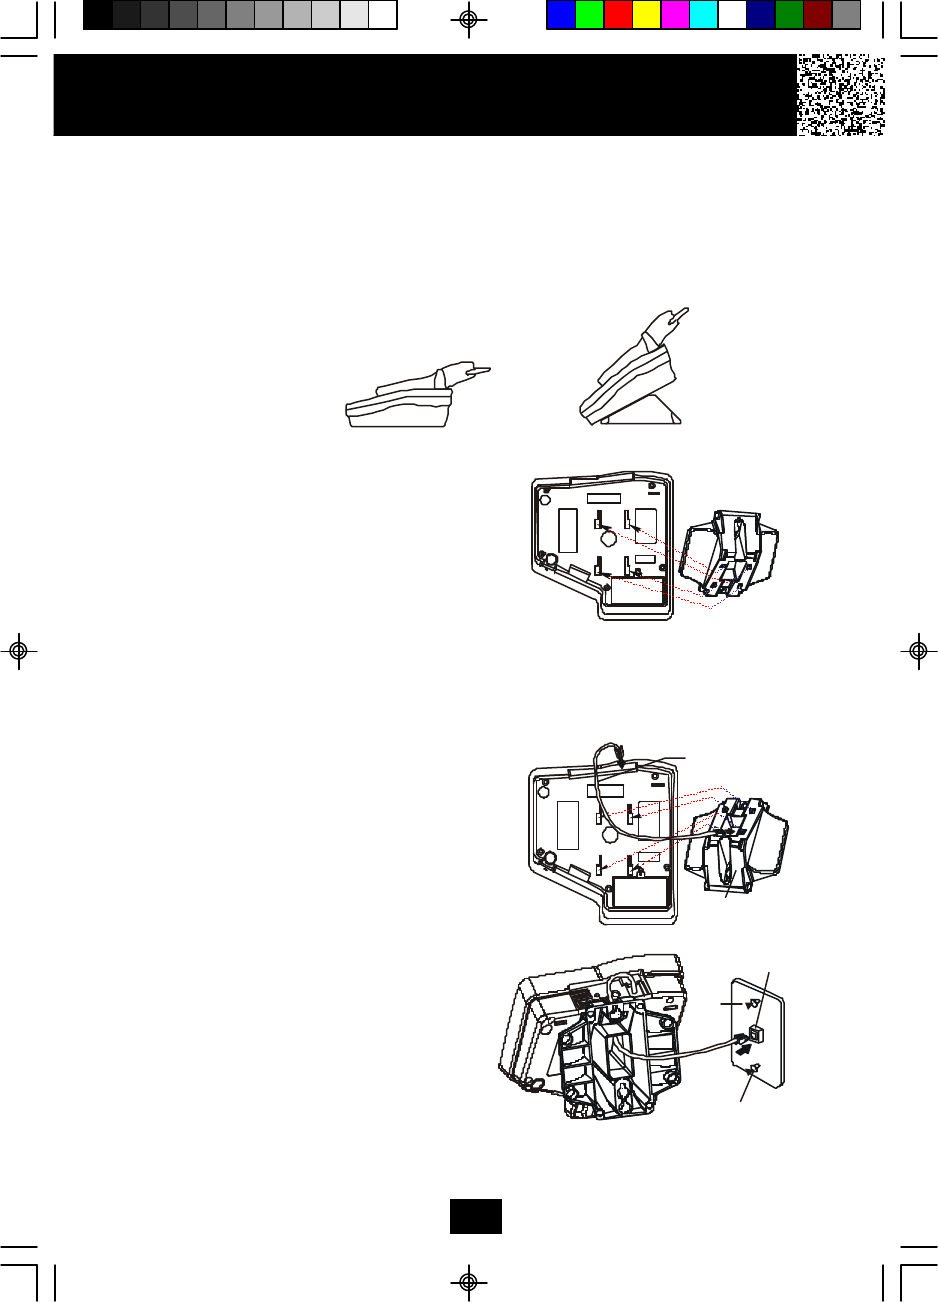
Desk Mounting
One of the special features of your telephone is the unique design of the MOUNTING BRACKET
which can hold your phone at an angle of 30° when desk mounting. There are two positions to
choose from:
1. NORMAL POSITION (MOUNTING BRACKET not required):
For normal position, as shown in Figure 1, place
the BASE UNIT on any desired but suitable
location.
2. 30° POSITION (See Figure 2):
With the back of the BASE UNIT facing up, insert
the hooks of the MOUNTING BRACKET (with the
position as shown in Figure 3) into the upper slots
of the BASE UNIT. Then slide the MOUNTING
BRACKET upward until it locks into place.
Wall Mounting
You may choose to put the BASE UNIT of your cordless
telephone on a wall.
1. With the back of the BASE UNIT facing up, connect
the SHORT TELEPHONE LINE CORD to the
TELEPHONE LINE CONNECTION JACK.
2. Insert the free end of the SHORT TELEPHONE LINE
CORD through the hole of the MOUNTING BRACKET.
3. Insert the hooks of the MOUNTING BRACKET into
the matching slots on the back of the BASE UNIT
(following the arrow direction for the WALL MOUNT)
then slide the MOUNTING BRACKET until it locks
into place.
4. Plug the free end of the SHORT TELEPHONE LINE
CORD into the MODULAR WALL JACK.
5.Align the upper keyhole of the MOUNTING BRACKET
with the upper stud of the wall plate, so that the
opening end of the MOUNTING BRACKET matches
the lower stud, then pull the BASE UNIT down until
it is securely seated.
6.Pull out the HANDSET RETAINER TAB on the BASE
UNIT, then place the HANDSET in the BASE UNIT
CHARGE CRADLE.
Desk Mounting
10
FIGURE 1
FIGURE 2
FIGURE 3
MODULAR
WALL JACK
WALL
PLATE
WALL PLATE STUD
4
5
5
MOUNTING
BRACKET
SHORT TELEPHONE
LINE CORD
1
2
33
33
Cordless Telephone Operation
11
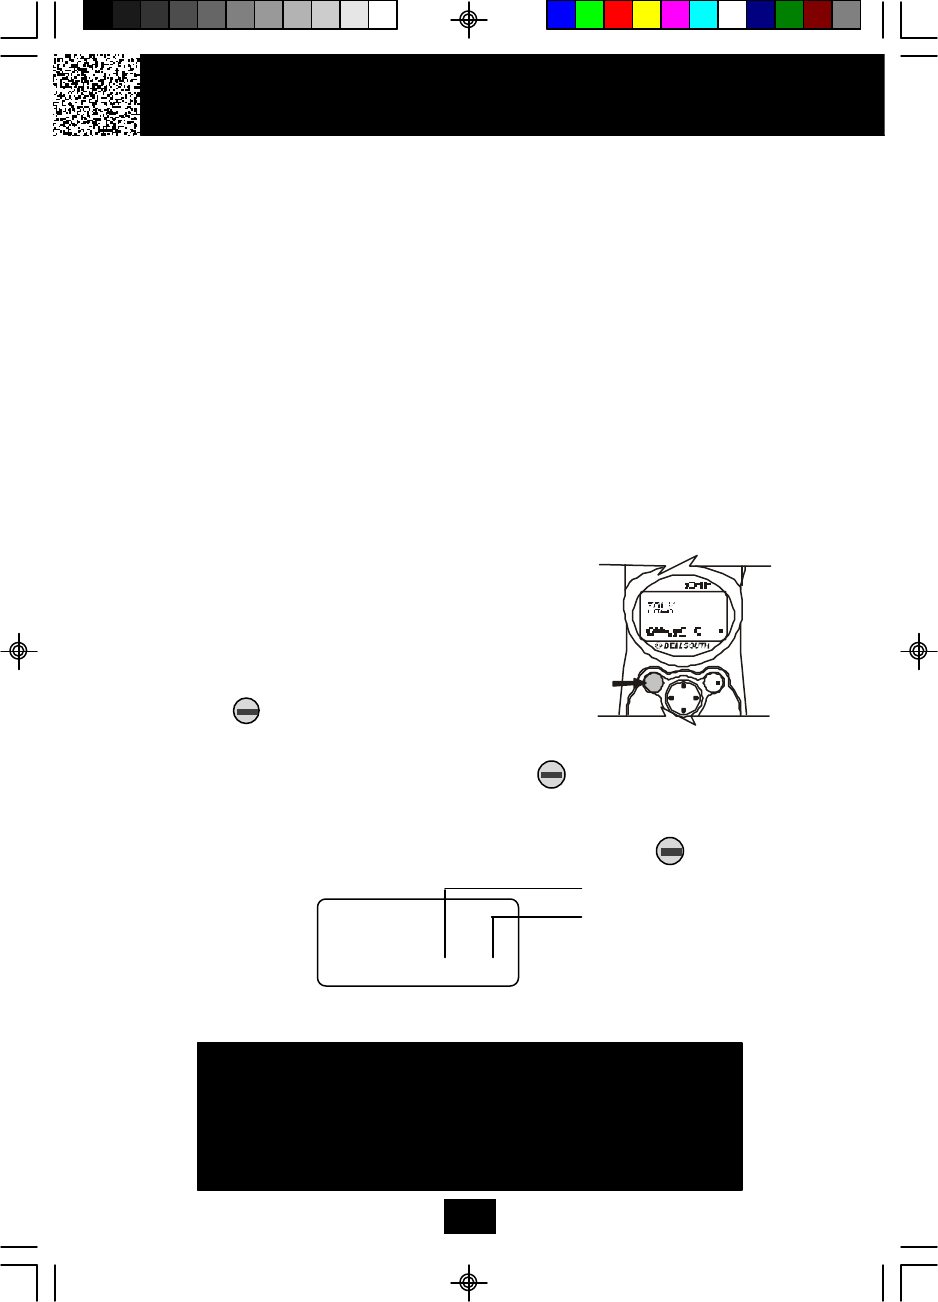
Receiving Calls
1. When the phone rings, the LCD Screen
will show “RING.” If you have Caller ID,
the LCD Screen will show the Caller ID
information after the first ring.
2. With the HANDSET off the base, press
the button. Start your conversation.
The Call Timer starts to count.
3. To end your conversation, either press the button or place the HANDSET on
the BASE UNIT. If you place the HANDSET on the BASE UNIT CHARGE CRADLE,
you activate the AUTOMATIC STANDBY feature.
NOTE: The Call Timer will start to count once you press the button.
Minutes
Seconds
Call Timer Display
02 08
IMPORTANT
Do not use this telephone within 20 ft. of a microwave oven
while it is working, as you may experience interference .
This is a normal occurrence with 2.4 GHz phones and
should not be interpreted as a defect in the product.
Preparing for Use
Before you can use your cordless telephone, you must charge the HANDSET for 12
hours. Failure to do so will require recharging of the BATTERY PACK more often.
1. Place the HANDSET on the BASE UNIT for 12 hours.
2. After 12 hours, remove the HANDSET from the BASE UNIT.
Before you can use your cordless telephone, you must charge the HANDSET
for 12 hours. Failure to do so will require more frequent charging of the
BATTERY PACK. See page 37 for more information on the BATTERY PACK.
NOTE:
Depending on the frequency of use, once the HANDSET is fully charged, it remains
functional for approximately 4 hours of continuous use and approximately 5 days when
the HANDSET is off the BASE UNIT in STANDBY mode.
TALK
TALK
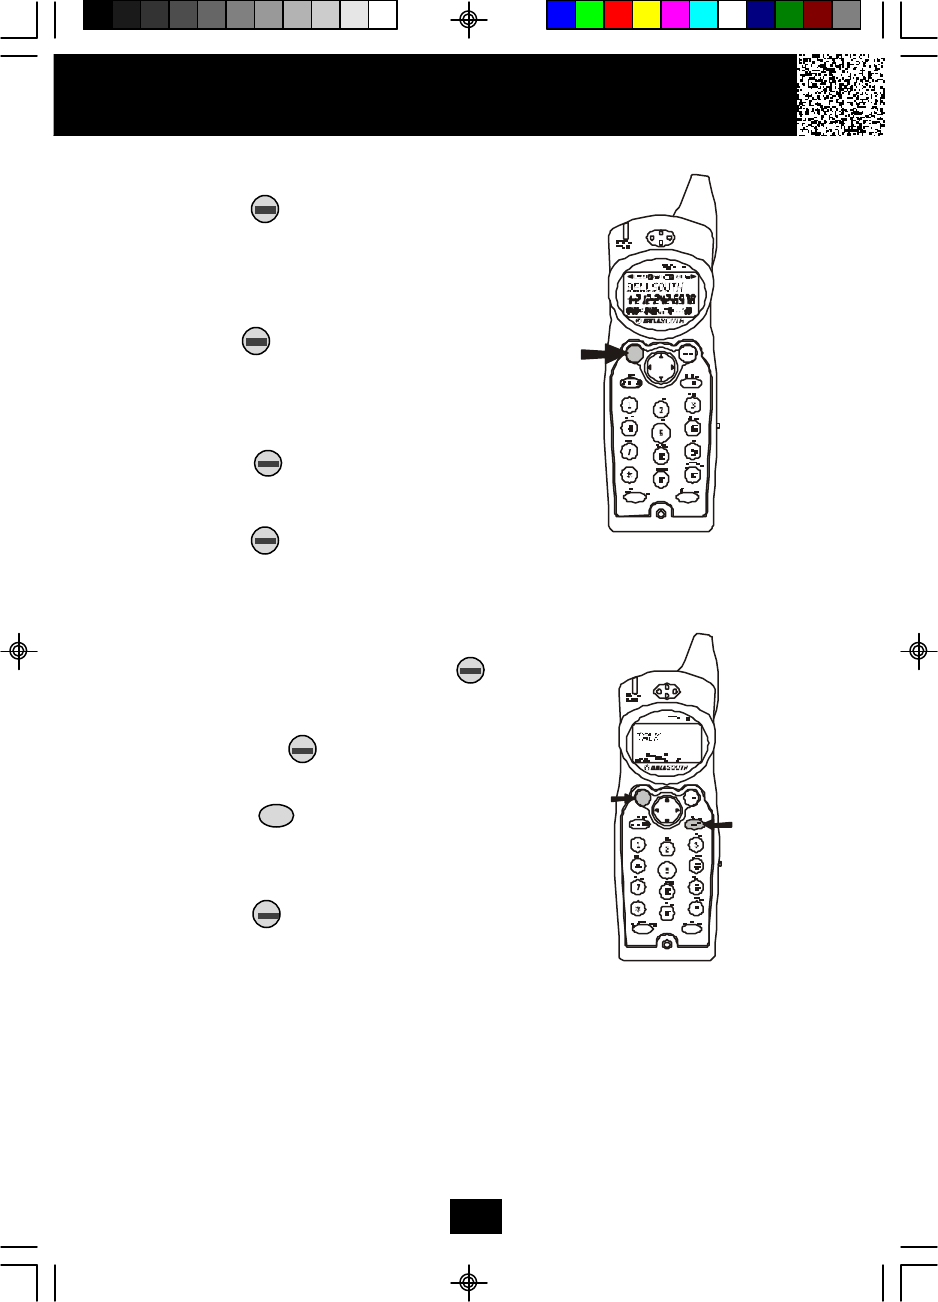
Placing Calls
1. Press the button, the Call Timer
starts to count.
2. Wait until you hear a dial tone and then
dial the phone number.
3. When you have finished your call,
press the button again or place the
HANDSET on the BASE UNIT.
OR
1. Dial the phone number.
2. Press the button. The number
displayed will be dialed.
3. When you have finished with your call,
press the button again or place
the HANDSET on the BASE UNIT.
Redial Feature
1. If you get a busy tone, press the
button or place the HANDSET on the BASE
UNIT to hang up.
2. Later, press the button again.
3. Listen for a dial tone.
4. Press the /RE/PA button. This
will automatically redial the last telephone
number you called.
5. When you have finished with your call,
press the button again or place
the HANDSET on the BASE UNIT.
NOTE:
If you are too far away from the BASE UNIT, the HANDSET emits “beep” sounds to
warn you that the background noise level is too high for proper communication between
the HANDSET and the BASE UNIT. When you hear this sound, you should move closer
to the BASE UNIT to reduce the noise level. Otherwise, the call will automatically cut off.
Cordless Telephone Operation
12
TALK
SAVE 1, 2, 5 4
TALK
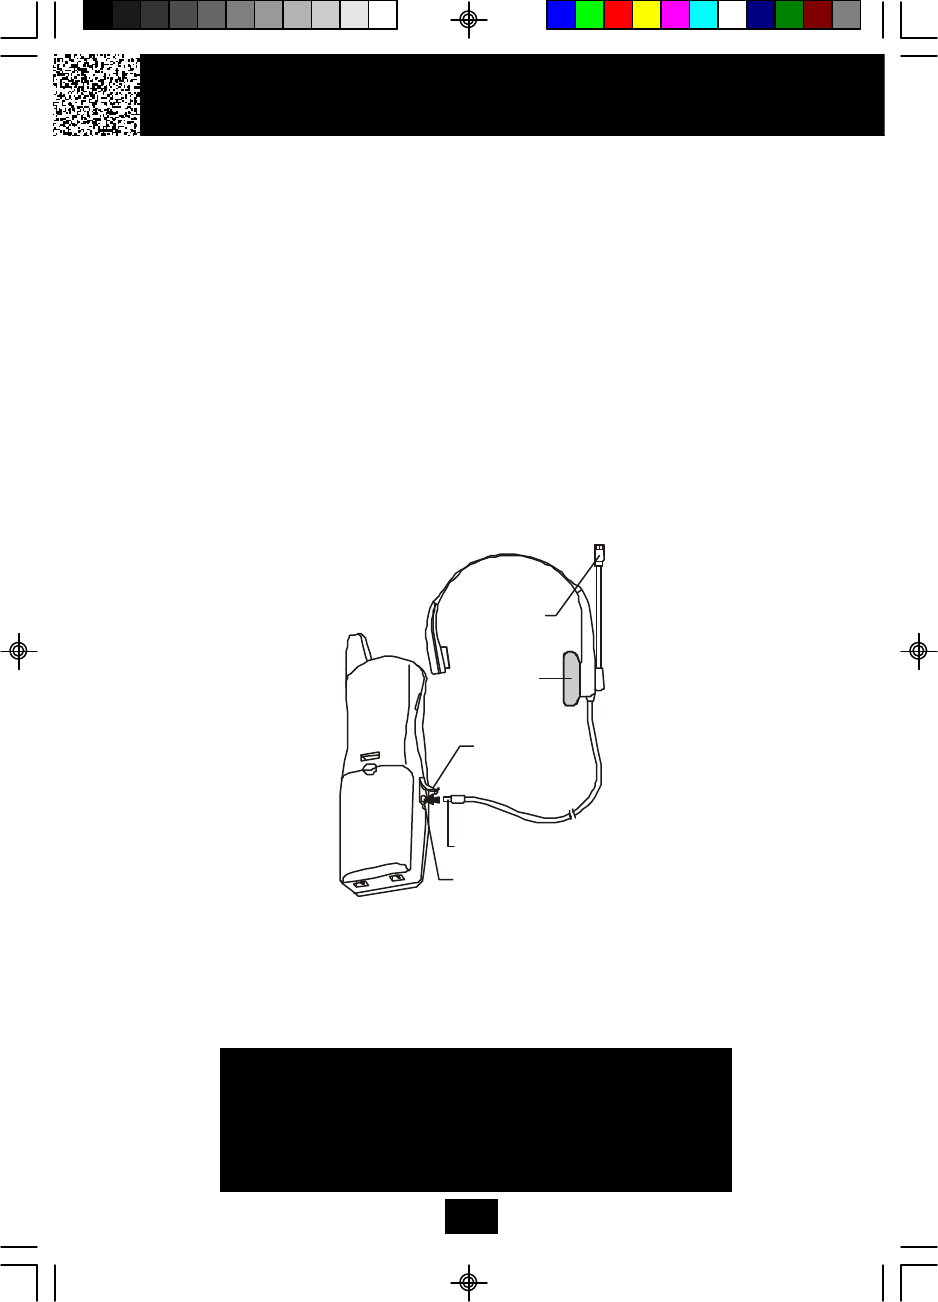
Using the Headset Feature
Your telephone can utilize a headset (not included) to be connected to your HANDSET
for you to enjoy hands-free communication.
Pull out the HEADSET JACK COVER then insert the small plug on the end of the head-
set into the HEADSET JACK at the left side of the HANDSET. Follow the procedures
discussed in “Receiving Calls” and “Placing Calls” to receive and place a call.
NOTE:
When you plug the headset plug into the HEADSET JACK it automatically mutes the
MICROPHONE and SPEAKER of the HANDSET. Unplug the headset to return the
HANDSET to normal use.
Headsets are available at most retail outlets that sell telephone equipment. The
HEADSET JACK is compatible with 2.5 mm headset plugs only.
Cordless Telephone Operation
13
IMPORTANT
Placing your BASE UNIT near appliances
such as televisions, refrigerators, radios, or
microwave ovens may cause interference.
MICROPHONE
HEADSET
SPEAKER
HEADSET JACK
HEADSET JACK
COVER
HEADSET PLUG (2.5mm)
Caller ID System Operation
Caller ID System
This telephone automatically displays an incoming caller’s name and telephone
number together with the date and time of the call. It records up to 80 calls and stores
the data in Memory.
IMPORTANT: You must subscribe to the Caller ID service from your local telephone
company to utilize this feature.
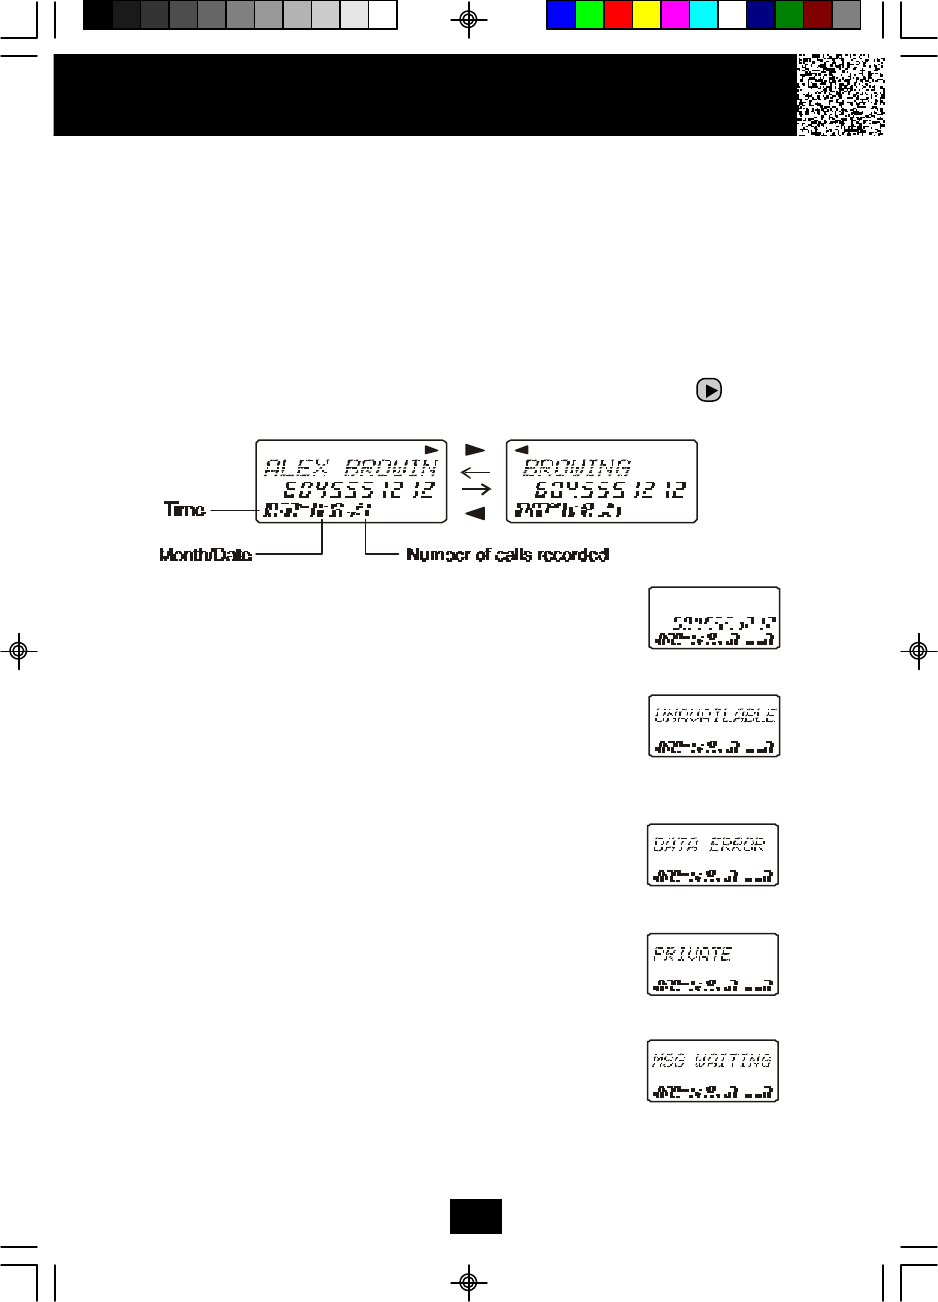
Viewing Caller Information During Incoming Calls
1. When there is an incoming call, the name and the telephone number of the caller
will automatically appear after the first ring. Press the SHIFT RIGHT button to
view a name of more than 11 digits.
ORCaller’s telephone number will appear if the caller’s name
is not available.
OR “UNAVAILABLE” will appear when Caller ID information
is not available. The origin of the call does not support
the Caller ID system (including international calls).
OR “DATA ERROR” will appear when the Caller ID
information was received incorrectly or only part of the
data was received.
NOTE: When an error is received, none of the data from
this call is saved in memory.
OR “PRIVATE” will appear if the caller’s name and/or
telephone number is blocked.
OR “MSG WAITING” will appear when a Voice Mail Message
has been received and is stored by Message Waiting
service provided by the telephone company.
14
Caller ID with Call Waiting
When you subscribe to Call Waiting service from your local telephone company, this
telephone will display the name and number of the second caller while you are
having a conversation with the first caller.
When a new call comes in while you are
talking, you will hear a notification beep from
the HANDSET and the volume is momentarily
muted. The new caller’s name and phone
number, if available, appears on the display.
1. When you receive a “Call Waiting” call and you want to connect the call,
press the button and start talking with the second caller. The
active call will be placed on hold.
2. Press the button to alternate between calls.
3. Press the button or place the HANDSET on the BASE UNIT to end the
call.
“MSG WAITING” (Message Waiting)
The Message Waiting LED indicator will blink when there is a message for you from
your telephone company if you have subscribed to Voice Mail message service and
if you have requested Visual Message Indication from your local telephone
company. “MSG WAITING” will appear on the LCD Screen in STANDBY mode. (To
remove the MSG WAITING indicator, see page 27 for detail.)
Note: This function requires voice mail subscription from the local telephone
company. Furthermore, the local phone company must provide a type of voice mail
signaling called “FSK” (Frequency Shift Key). Not all telephone companies have
the visual message waiting feature available. Please contact your local telephone
company to check if this is available in your area.
One-Touch Voice Mail Dialing
When the setting is programmed in the Functions menu (see “Programming
One-Touch Voice Mail Dialing” on page 26) you can dial out a programmed number
at the touch of a button. This feature is specifically designed to easily check voice
mail when you have that service through your telephone company.
1. Press the button to access the telephone line.
2. Press the /MENU button.
3. The phone will automatically dial the number.
Caller ID System Operation
15
MIN SEC
RPT
Second
Caller
First
Caller
Caller ID System Operation
16
RPT
RPT
RPT
RPT
First press.
Second press.
Third press.
Caller List
This phone automatically stores the last 80 calls received. It records call information
such as caller’s name and telephone number together with the date and time of the call.
The NEW CALL RED LED indicator will blink to indicate that you have a new Caller ID
call stored in memory.
Viewing the Caller List
1. With the HANDSET in STANDBY mode, press the SCROLL UP or DOWN
button.
2. Any unviewed (new) calls will be displayed first. The most recent call will be
displayed. The information on the call will be displayed with the name, number,
date, and time that the call was received.
3. To scroll to the next call, press the SCROLL UP or DOWN button. Pressing
the SCROLL DOWN button will go through the calls from the last call received
to the first Caller ID record. Pressing the SCROLL UP button will allow you to
view the calls from the first call received to the last.
4. If the name or number is more than 11 characters, press the SHIFT RIGHT
button to view the rest of the display as indicated by the arrows in the top line of
the LCD Screen. Press the SHIFT LEFT button to return to the previous
display.
5. Press the button to return to STANDBY mode.
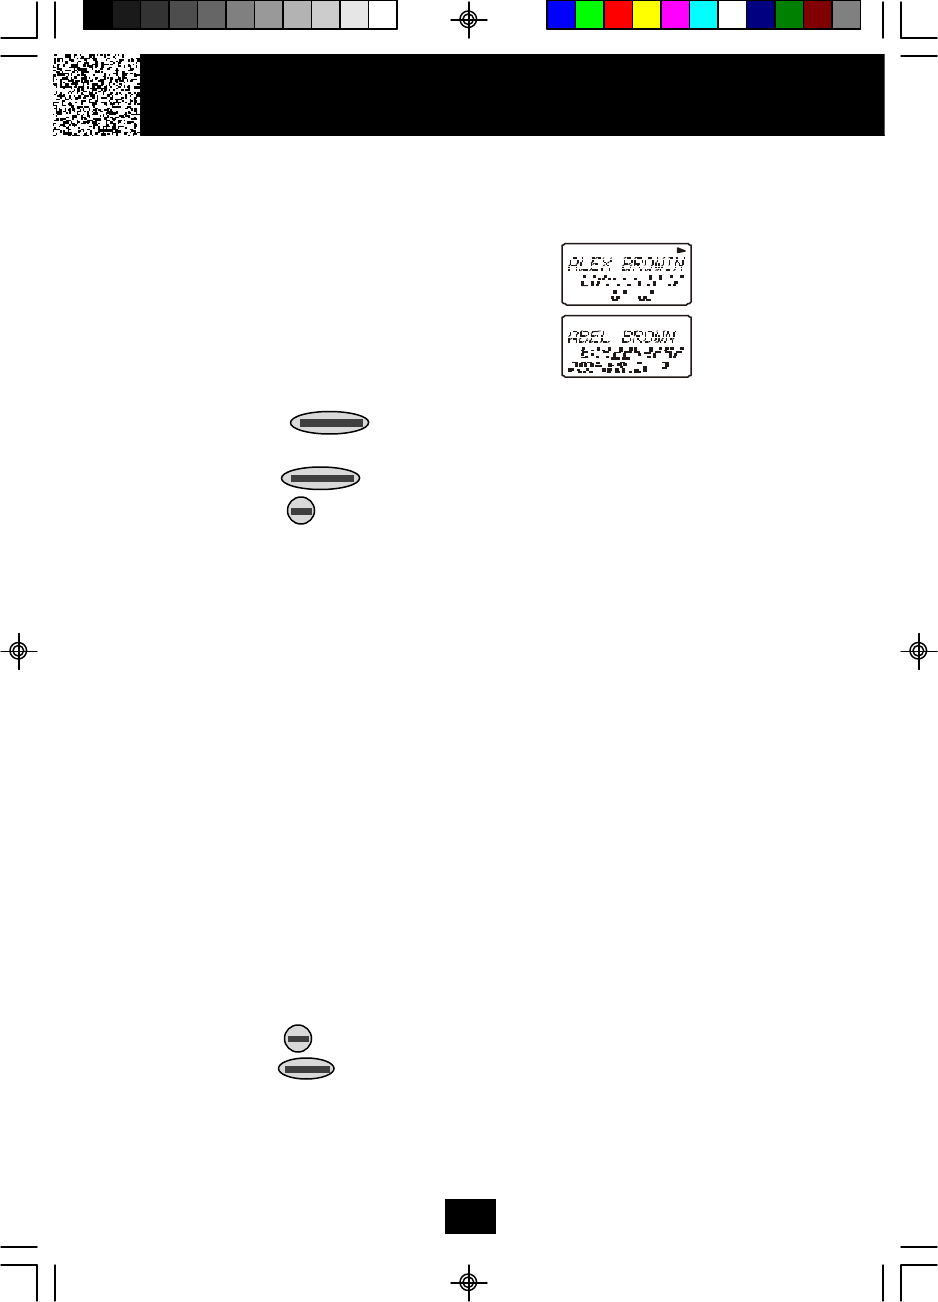
Placing a Call from the Caller List
You can place a call from the Caller List by using the Caller ID CALLBACK feature.
1. Press the SCROLL UP or DOWN button to find the Caller ID record you
wish to call back.
2. Press the /OPTION button to change the displayed number to 7, 10, or 11
digits. The first dialing option displayed
is the 11 digits for a long distance call.
Press the /OPTION button for the
second time, the displayed number will
change to 7 digits for a local call.
Press the /OPTION button for the third
time, the displayed number will change
to 10 digits for a local call with area code.
3. Press the button to dial the displayed number.
4. Press the button to cancel dialing and return to STANDBY mode.
5. To end a call, either press the button or place the HANDSET on the BASE
UNIT.
#
#
#
Storing Caller ID Records into the DIRECTORY (PHONEBOOK)
1. Press the SCROLL UP or DOWN button to find the record you wish to
store into the DIRECTORY (PHONEBOOK).
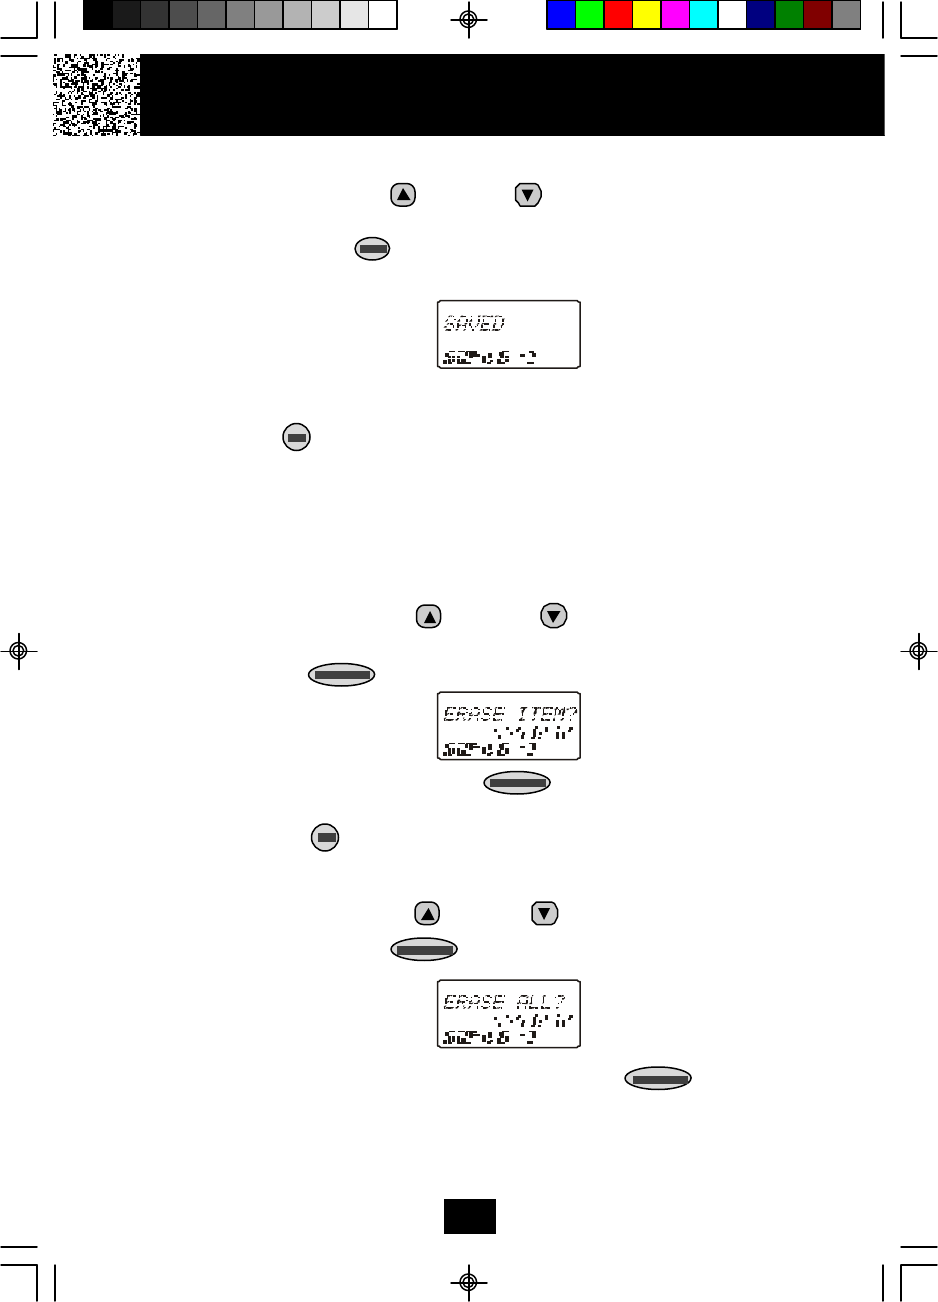
2. Press and hold the /RE/PA button.
3. The display will show “SAVED.”
4. If you wish to edit the newly stored number, edit it in the DIRECTORY
(PHONEBOOK) (page 20, “Editing a Stored Number”).
5. Press the button to return to STANDBY mode.
Deleting Caller ID Records
When viewing the Caller ID information you can delete a single call record or all
of the call records.
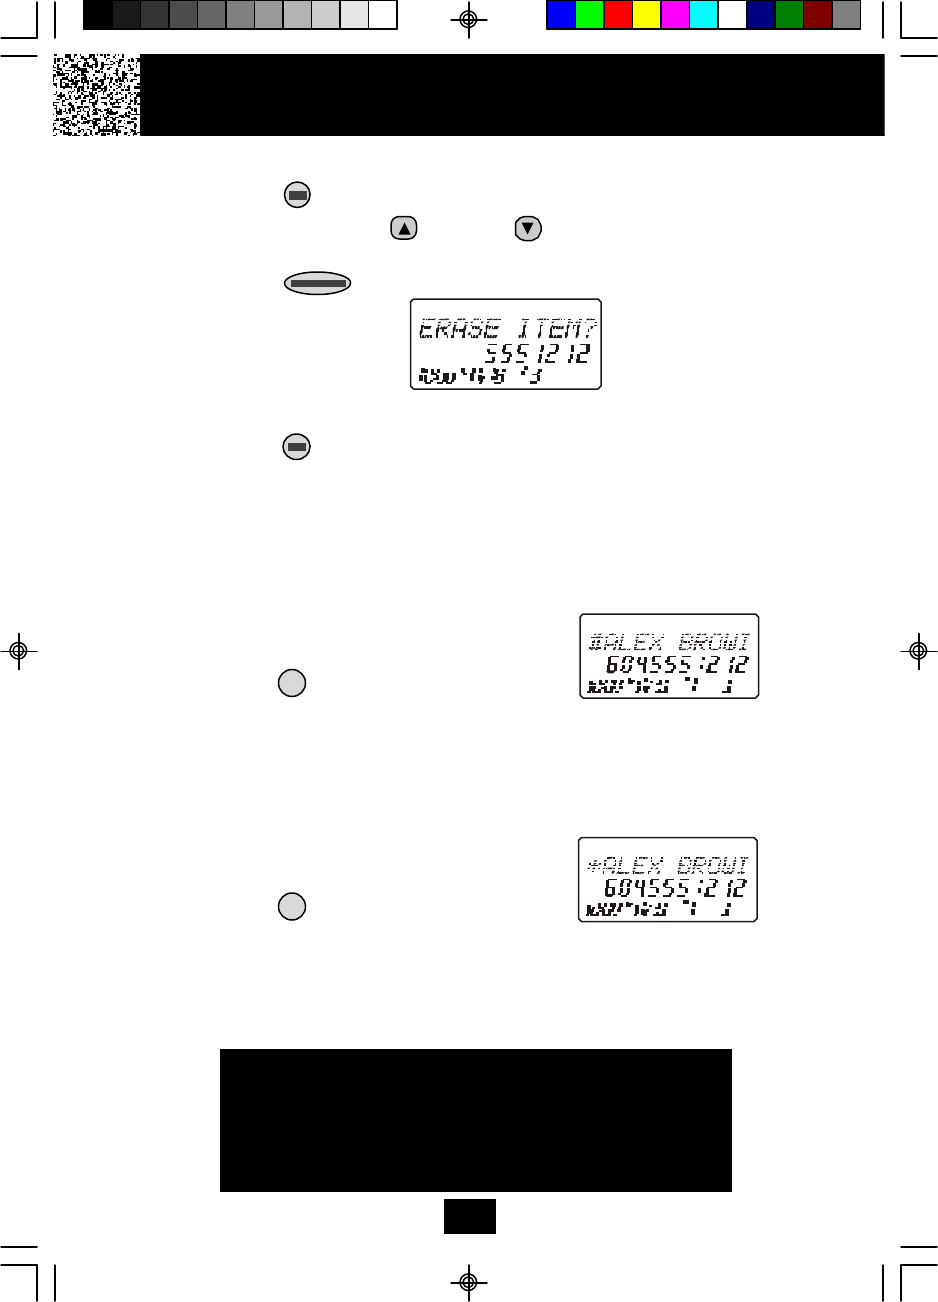
Deleting a Single Record
1. Press the SCROLL UP or DOWN button to find the record you wish
to delete.
2. Press the button. The LCD Screen will display “ERASE ITEM?”
3. To delete the record, press the button. The LCD Screen will show
“ERASED.”
4. Press the button to exit the Caller ID list.
Deleting All Records
1. Press the SCROLL UP or DOWN button.
2. Press and hold the button. The LCD Screen will prompt “ERASE
ALL?”
3. To delete all of the Caller ID records, press the button. The LCD
Screen will show “ALL ERASED” and then return to STANDBY mode.
Caller ID System Operation
17
Name and Telephone Number DIRECTORY (PHONEBOOK)
This DIRECTORY (PHONEBOOK) lets you scroll through the list to find the person you
need for one touch dialing. You can store up to 40 names and telephone numbers in the
Memory.
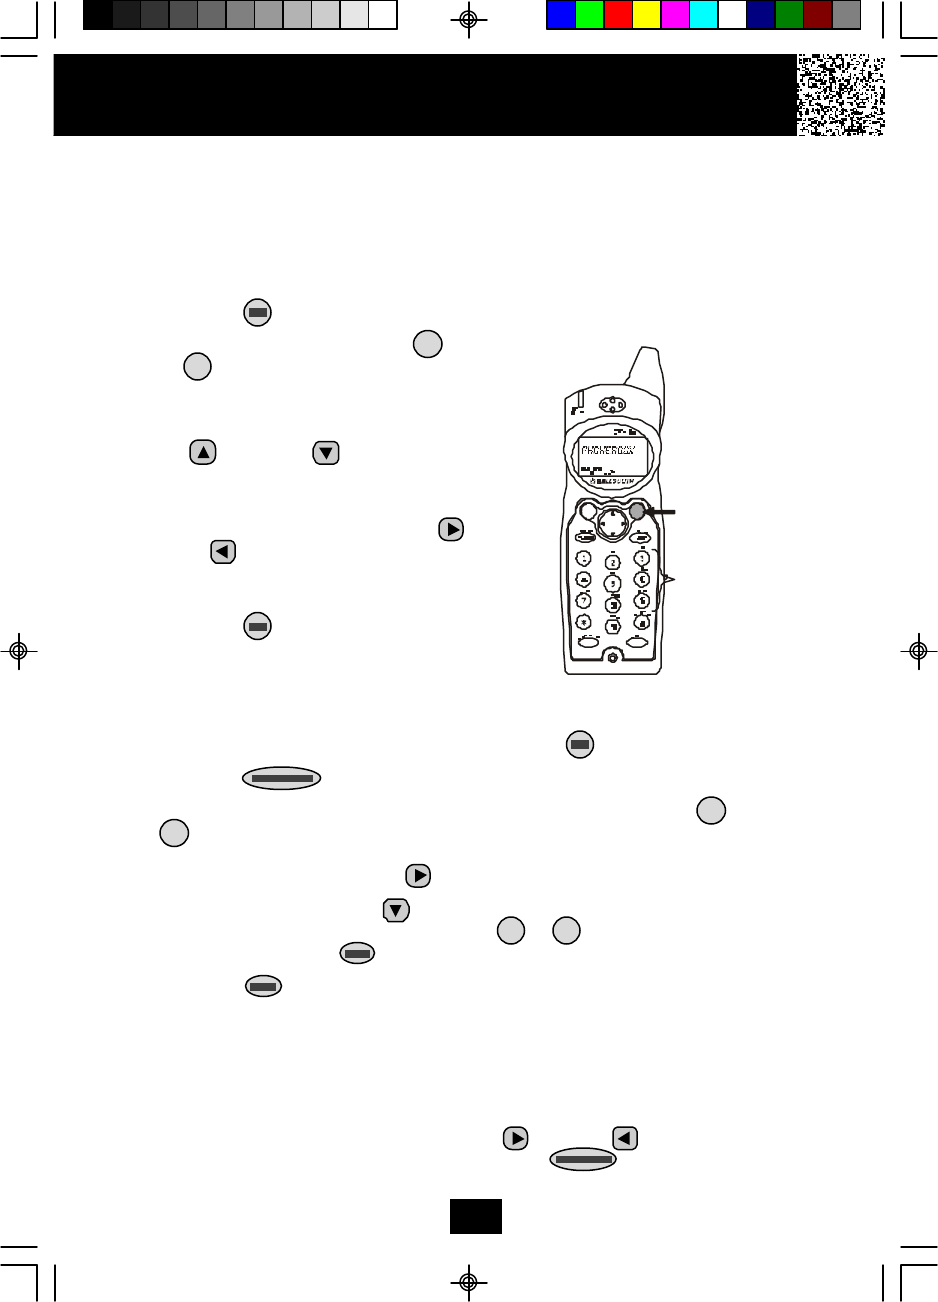
Viewing the DIRECTORY (PHONEBOOK)
1. Press the button.
2. Press the TELEPHONE KEYPAD ( /ABC
to /WXY) button that corresponds to
the first letter of a Caller’s name (a triple
“beep” will sound if no entries are stored
under those letters). Press the SCROLL
UP or DOWN button to find the
record you wish to view.
3. If the name or number is more than 11
characters, press the SHIFT RIGHT or
LEFT button to view the rest of the
display (as indicated by the arrows in the
top line of the LCD Screen).
4. Press the button to exit the DIREC-
TORY (PHONEBOOK), or the DIRECTORY
(PHONEBOOK)time out.
Storing Phone Numbers
1. With the HANDSET in STANDBY mode, press the button.
2. Press the button to create a new DIRECTORY (PHONEBOOK) entry.
3. Enter the name you wish to store using the TELEPHONE KEYPAD /ABC to
/WXY buttons to enter the name, (see page 19 for detail) you can store up
to 18 letters. To move the cursor to the right, create a space or to enter a new
letter, press the SHIFT RIGHT button.
4. Press the SCROLL DOWN button, and dial the telephone number you wish
to store using the TELEPHONE KEYPAD to buttons. You can store up
to 22 digits. Press the /RE/PA button to insert a pause into the number.
5. Press the /RE/PA button to store the number into memory.
NOTES:
1. If there are no memory locations left in the speed dial directory (phonebook)
the LCD screen will display “MEMORY FULL.” To continue with memory
programming, you must delete or edit existing speed dial numbers.
2. If you mis-type entering the phone number, you can move through the number
and edit it by pressing the SHIFT RIGHT or LEFT button. To delete a
character or number inside the cursor, press the button.
Caller ID System Operation
18
2
9
2
9
10
1, 4
2
TALK
Caller ID System Operation
19
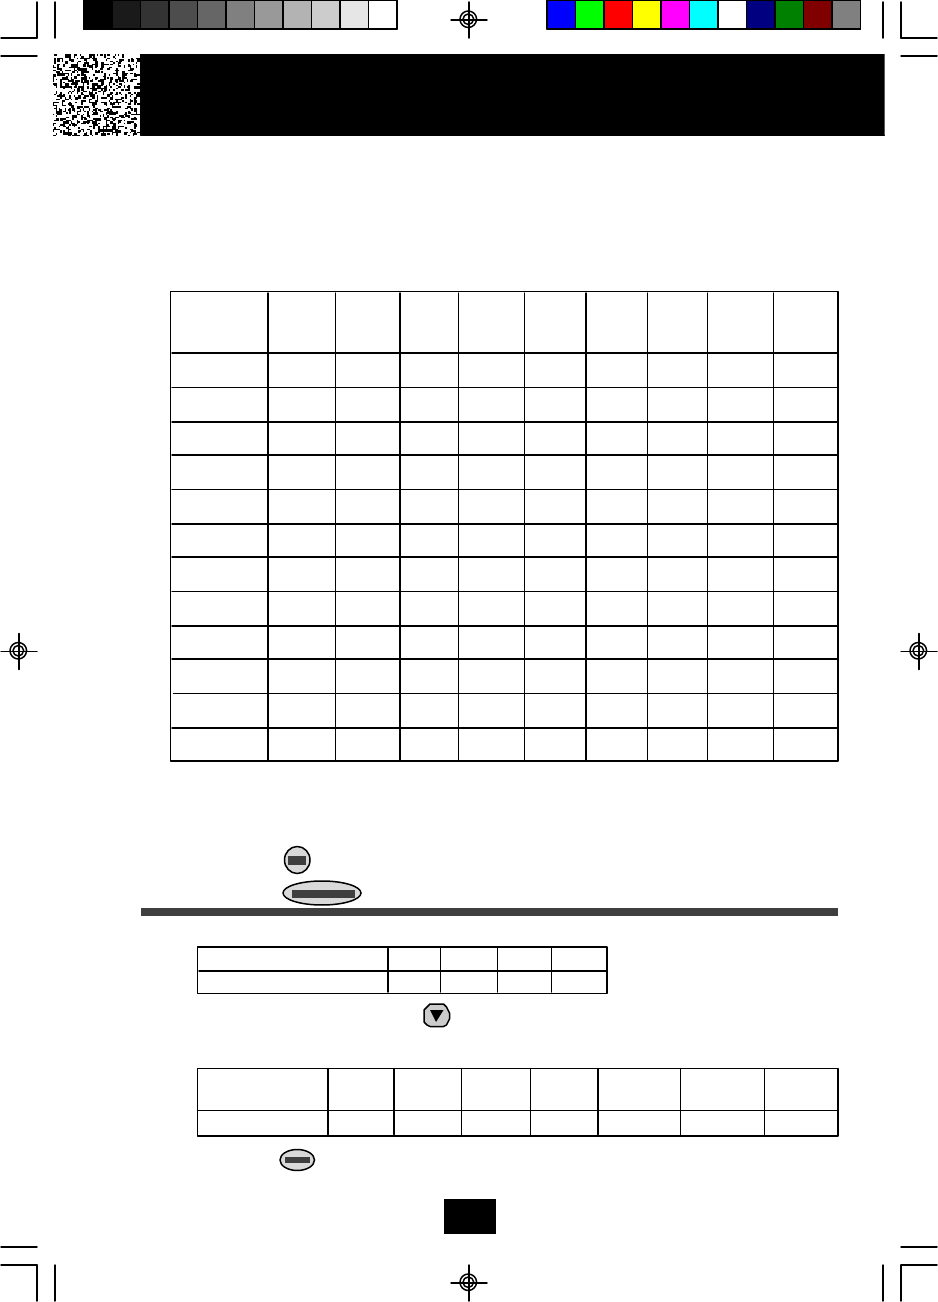
Telephone Keypad Characters
The TELEPHONE KEYPAD buttons are used to enter characters when entering
names and numbers. Press the appropriate TELEPHONE KEYPAD button to
get the following characters. You can store a maximum of 18 characters on the
letter icon and a maximum of 22 digits on the number icon.
EXAMPLE:
If you want to enter the name “ALEX” with telephone number “2426978,” dial this
sequence:
1. Press the button.
2. Press the button to create a new DIRECTORY (PHONEBOOK) entry.
3. Press the following TELEPHONE KEYPAD buttons to get the desired letters:
4. Press the SCROLL DOWN button to move the cursor to the number icon.
5. Press the following TELEPHONE KEYPAD buttons to get the desired numbers:
6. Press the /RE/PA button to store the data in the DIRECTORY (PHONEBOOK)
memory.
Keypad 1st 2nd 3rd 4th 5th 6th 7th 8th 9th
Buttons Press Press Press Press Press Press Press Press Press
1 Space 1&‘( ) . Space 1
2A B Cabc2A B
3DEFdef3DE
4GHIghi4GH
5JKLjkl5JK
6MNOmno6MN
7PQRSp q rs7
8TUVtuv8TU
9WX Y Zwxyz9
0 0 0 0 0 0 0 0 0 0
* * * * * * * * * *
# # # # # # # # # #
TELEPHONE KEYPAD BUTTON 2555 33 99
LETTER A L E X
TELEPHONE KEYPAD 2222222 4444444 2222222 6666666 999999999 777777777 88888888
BUTTON
TELEPHONE NUMBER 2 4 2 6 9 7 8
Caller ID System Operation
20
TOTAL
RPT
RPT
RPT
First press.
Second press.
Third press.
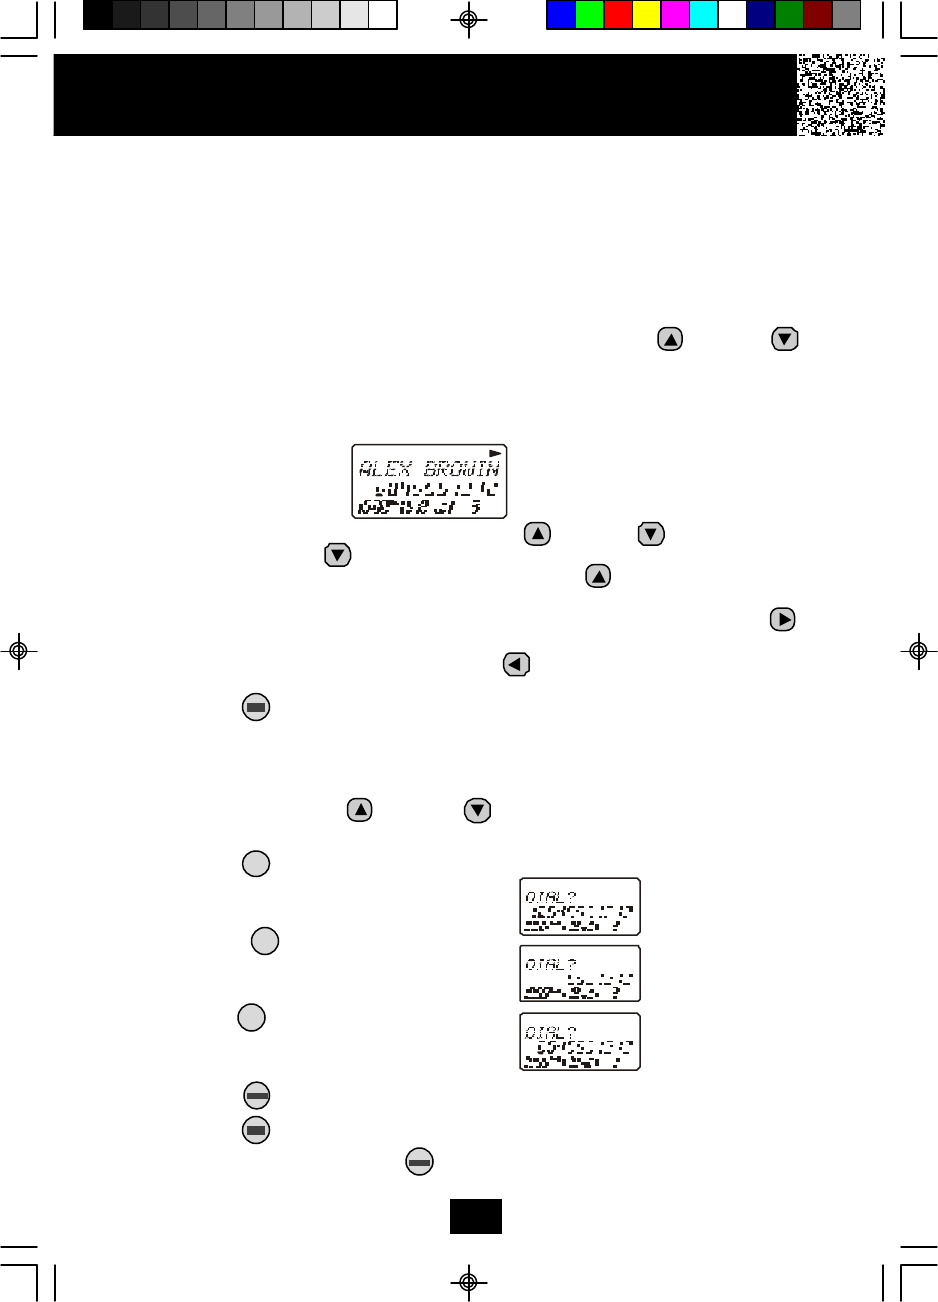
Placing Calls from the DIRECTORY (PHONEBOOK)
1. Press the button.
2. Press the SCROLL UP or DOWN button to find the record you want to
call.
OR
Press a TELEPHONE KEYPAD ( /ABC to /WXY) which group
corresponds to the first letter of a name. Press the SCROLL UP or DOWN
button to find the record you wish to call.
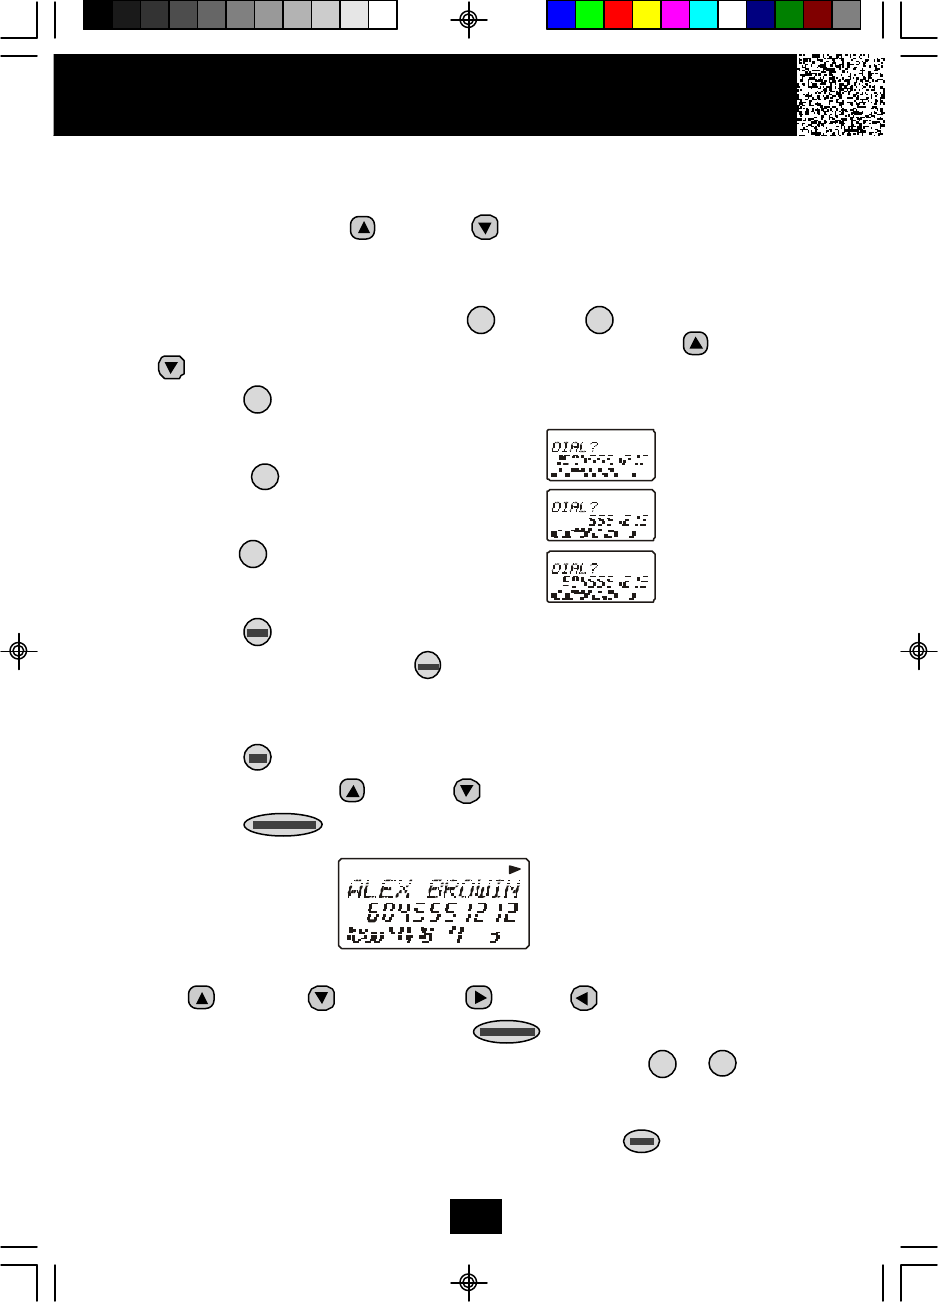
3. Press the /OPTION button to change the displayed number to 7, 10, or 11
digits. The first dialing option displayed
is the 11 digits for a long distance call.
Press the /OPTION button for the
second time, the displayed number will
change to 7 digits for a local call.
Press the /OPTION button for the third
time, the displayed number will change
to 10 digits for a local call with area code.
4. Press the button to dial the displayed number.
5. To end the call, either press the button or place the HANDSET on the BASE
UNIT.
Editing a Stored Number in the DIRECTORY (PHONEBOOK)
1. Press the button.
2. Press the SCROLL UP or DOWN button to find the record you wish to edit.
3. Press the button. The entry will display with a flashing prompt over
the first character.
4. Move the cursor to the letter or number you wish to edit by pressing the SCROLL
UP or DOWN , SHIFT RIGHT or LEFT button.
To erase a character or digit, press the button.
To add a letter or number, use the TELEPHONE KEYPAD to /OPER
buttons. Characters or numbers will be inserted in front of the cursor (See page
19 for details.)
5. When the entry is edited as you desire, press and hold the /RE/PA button to
store the edited record.
1 0
2 9
#
#
#
Deleting a Stored Number in the DIRECTORY (PHONEBOOK)
1. Press the button.
2. Press the SCROLL UP or DOWN button to find the record you wish to
delete.
3. Press the button. The LCD screen will display “ERASE ITEM?”
4. To delete the record, press the button.
5. Press the button to return to STANDBY mode.
PREFERRED CALLS
You can assign stored numbers a PREFERRED CALL status. When an incoming
call is matched to a stored number designated as preferred, the phone will generate
a special ringer sound after the Caller ID information is received.
When you are saving the name and number
into the DIRECTORY (PHONEBOOK), add a
“#” symbol at the beginning of the name by
pressing the button.
BLOCKED CALLS
You can assign stored numbers a BLOCKED CALL status. When an incoming call
is matched to a stored number designated as blocked, the phone will not ring after
the Caller ID information is received.
When you are saving the name and number
into the DIRECTORY (PHONEBOOK), add an
“**” symbol at the beginning of the name by
pressing the button.
Caller ID System Operation
TOTAL
TOTAL
21
IMPORTANT
Placing your BASE UNIT near appliances
such as televisions, refrigerators, radios, or
microwave ovens may cause interference.
#
*
Caller ID System Operation
22
Function Settings
You can change the setting on the HANDSET in the functions menu. Access the
functions menu by pressing and holding the /MENU button.
There are 11 settings in the functions menu which can be changed. You can scroll
through the function menu in the listed order by pressing the SCROLL DOWN
button.
Settings can be accessed by pressing the corresponding TELEPHONE KEYPAD
button. To edit a setting, press the button, use the SCROLL UP or DOWN
button to toggle between the setting options, and then press and hold the
/RE/PA button to save the changes. Press the /MENU button to exit the
functions menu.
TELEPHONE Function
KEYPAD
Ring Hi/Low/Off: Changes the volume of the ringer on the HANDSET
or turn the ringer OFF.
Language: Changes the language that appears on the LCD Screen.
Choose between English, French, or Spanish.
First Ring On/Off: Turns the first ring of the phone OFF so that it does
not ring until Caller ID information has been displayed. Particularly
useful when using the preferred and blocked call features or the
private and unavailable ring settings.
Time Set: Changes the time and date.
Contrast: Adjusts the brightness of the display for optimum viewing.
PBX Number: Inserts if a “PBX Number” before an outgoing number
is dialed. Select the number (0-9) which is required to access an
outside line when using a switchboard system, and the phone will
automatically dial the PBX number and a pause before any speed
dial or Caller ID callback number. Factory setting is “OFF.”
Flash Time: Changes the flash time to accommodate the phone
service in your area.
Pause Time: Changes the number of seconds that a pause lasts
when using programmed pauses in your speed dial numbers or
after your PBX number.
Voice Mail: Programs the one-touch number that enables easy
access to the voice mail service provided by your telephone
company.
2
1
3
4
5
6
7
8
9
TELEPHONE Function
KEYPAD
MSG Waiting Delete: Clears current message waiting indication.
Area Code: This unit does not require any programming of an Area
Code. However, this option could be used to add the local Area Code
to numbers that were stored as 7-digits in the phone book and 10-
digit dialing is required in the local calling area.
NOTE: At any time during options programming you can quit and the settings
that you have changed will be saved. Press the /MENU button to quit
the options menu or let the options programming time out by not pressing
any TELEPHONE KEYPAD buttons for 20 seconds.
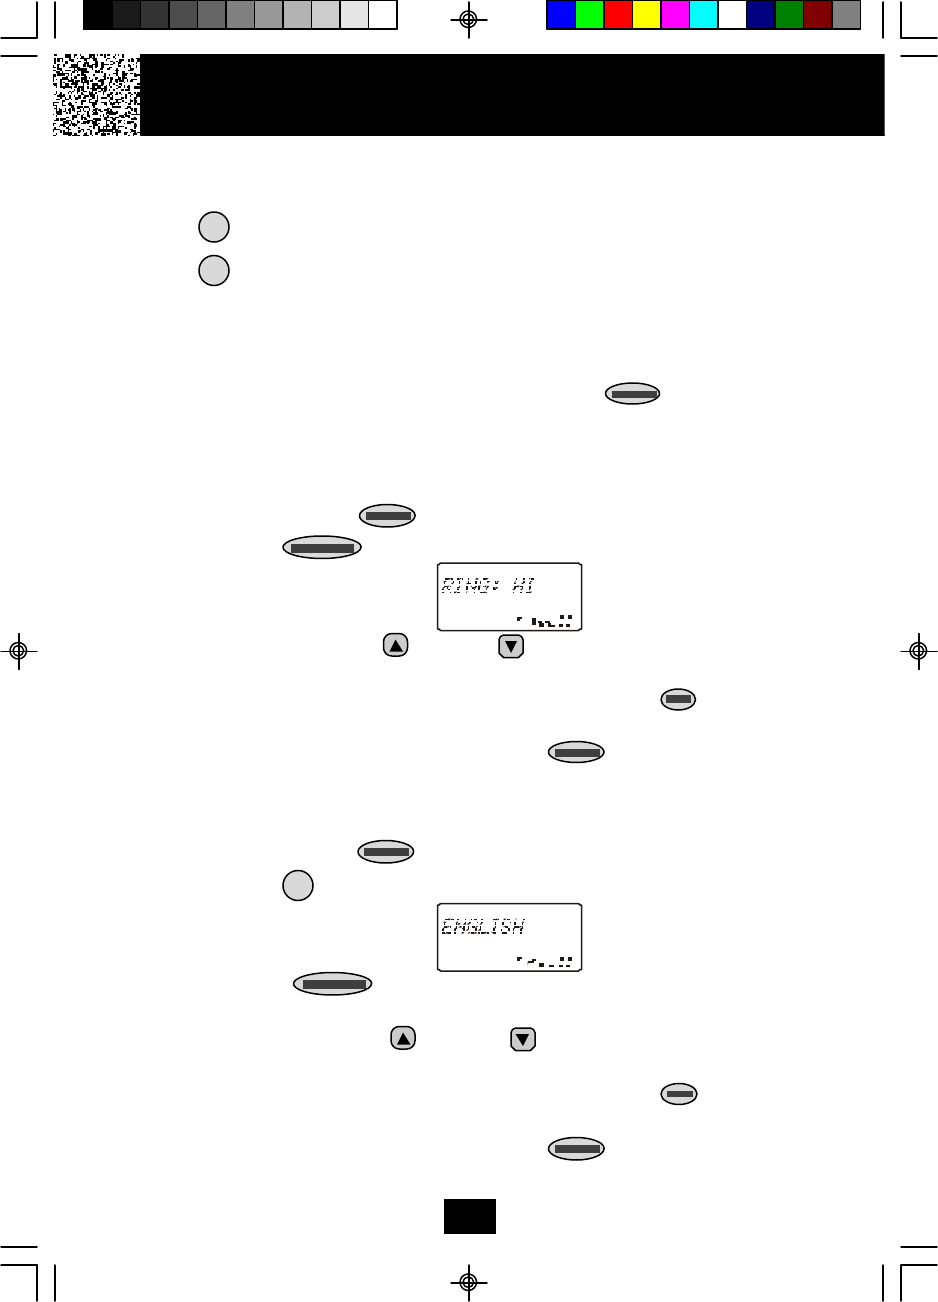
A. Setting the Ringer Level
1. Press and hold the /MENU button to enter the menu.
2. Press the button to change the setting. “HI” will begin flashing.
3. Press the SCROLL UP or DOWN button to toggle between HI, LOW, and
OFF.
4. When the desired setting is displayed, press and hold the /RE/PA button to
save the setting. A long “beep” will sound to confirm the setting has been saved.
5. Continue with programming or press the /MENU button to return to
STANDBY mode.
B. Changing the Language
1. Press and hold the /MENU button to enter the menu.
2. Press the button to go to the LANGUAGE programming option.
3. Press the button to change the setting. “ENGLISH” will begin
flashing.
4. Press the SCROLL UP or DOWN button to toggle between ENGLISH,
ESPANOL, and FRANCAIS.
5. When the desired setting is displayed, press and hold the /RE/PA button to
save the setting. A long “beep” will sound to confirm the setting has been saved.
6. Continue with programming or press the /MENU button to return to
STANDBY mode.
Caller ID System Operation
23
*
0
2
Caller ID System Operation
24
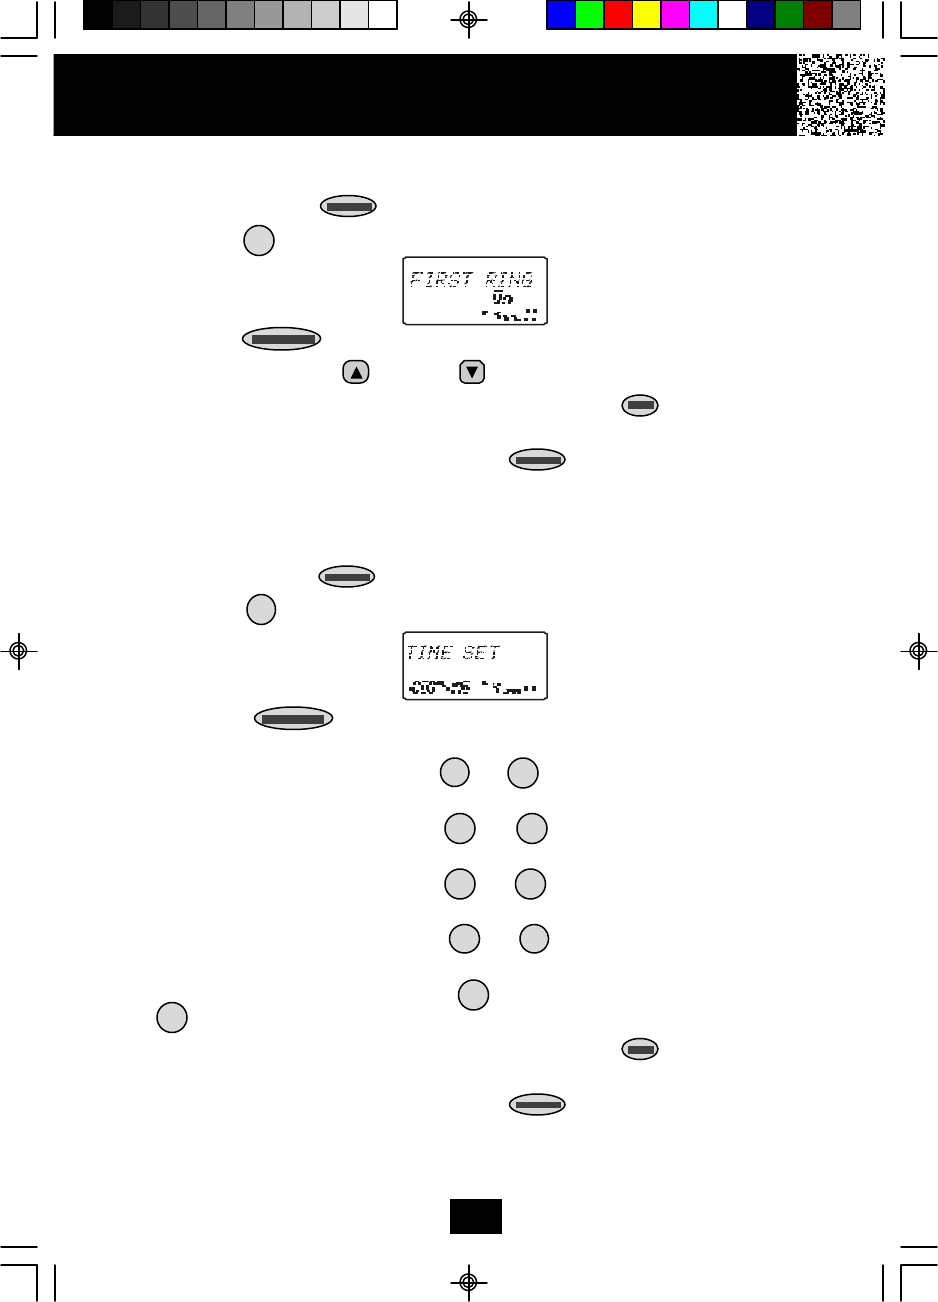
C. Turning the FIRST RING ON or OFF
1. Press and hold the /MENU button to enter the menu.
2. Press the button to go to the FIRST RING programming option.
3. Press the button to change the setting. “On” will begin flashing.
4. Press the SCROLL UP or DOWN button to toggle between ON and OFF.
5. When the desired setting is displayed, press and hold the /RE/PA button to
save the setting. A long “beep” will sound to confirm the setting has been saved.
6. Continue with programming or press the /MENU button to return to
STANDBY mode.
D. Setting the Time and Date
1. Press and hold the button to enter the menu.
2. Press the button to go to the TIME set programming option.
3. Press the button to change the setting. The month will begin
flashing.
4. Press the TELEPHONE KEYPAD to button to enter the month. The
date will begin flashing.
5. Press the TELEPHONE KEYPAD to button to enter the date. The
hour will begin flashing.
6. Press the TELEPHONE KEYPAD to button to enter the hour. The
minutes will begin flashing.
7. Press the TELEPHONE KEYPAD to button to enter the minutes.
“AM” and “PM” will begin flashing.
8. Press the TELEPHONE KEYPAD button to choose AM or press the
button to choose PM.
9. When the desired setting is displayed, press and hold the /RE/PA button to
save the setting. A long “beep” will sound to confirm the setting has been saved.
10.Continue with programming or press the /MENU button to return to
STANDBY mode.
3
4
1
2
01
01
1 0
1 0
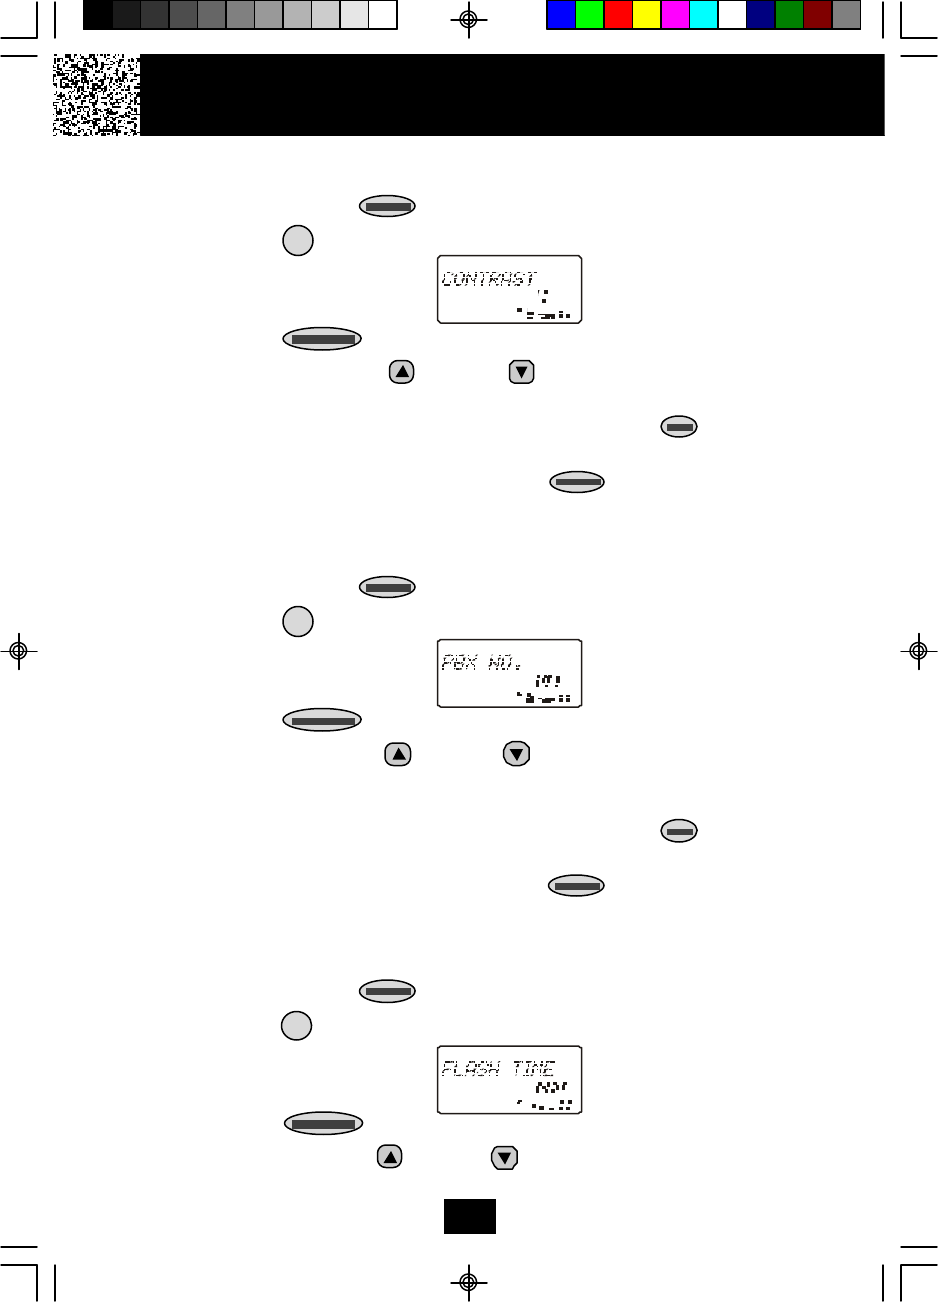
E. Adjusting the Contrast
1. Press and hold the /MENU button to enter the menu.
2. Press the button to go to the CONTRAST programming option.
3. Press the button to change the setting. “4” will begin flashing.
4. Press the SCROLL UP or DOWN button to toggle from 1 to 8 levels of
contrast.
5. When the desired setting is displayed, press and hold the /RE/PA button to
save the setting. A long “beep” will sound to confirm the setting has been saved.
6. Continue with programming or press the /MENU button to return to
STANDBY mode.
F. Setting the PBX Number
1. Press and hold the /MENU button to enter the menu.
2. Press the button to go to the PBX NUMBER programming option.
3. Press the button to change the setting. “OFF” will begin flashing.
4. Press the SCROLL UP or DOWN button to customize the digit to match
your PBX system. When not connected to a PBX, the phone will only function
normally when set to “OFF.”
5. When the desired setting is displayed, press and hold the /RE/PA button to
save the setting. A long “beep” will sound to confirm the setting has been saved.
6. Continue with programming or press the /MENU button to return to
STANDBY mode.
G. Changing the Flash Time
1. Press and hold the /MENU button to enter the menu.
2. Press the button to go to the FLASH TIME programming option.
3. Press the button to change the setting. “600” will begin flashing.
4. Press the SCROLL UP or DOWN button to select the desired dialing delay.
Caller ID System Operation
25
5
6
7
5. When the desired setting is displayed, press and hold the /RE/PA button to
save the setting. A long “beep” will sound to confirm the setting has been saved.
6. Continue with programming or press the /MENU button to return to
STANDBY mode.
NOTE: The standard and default flash time setting is 600 msec. This is the setting
you should use to access standard telephone services such as call waiting. This
setting is adjustable to allow for PBX and other special uses.
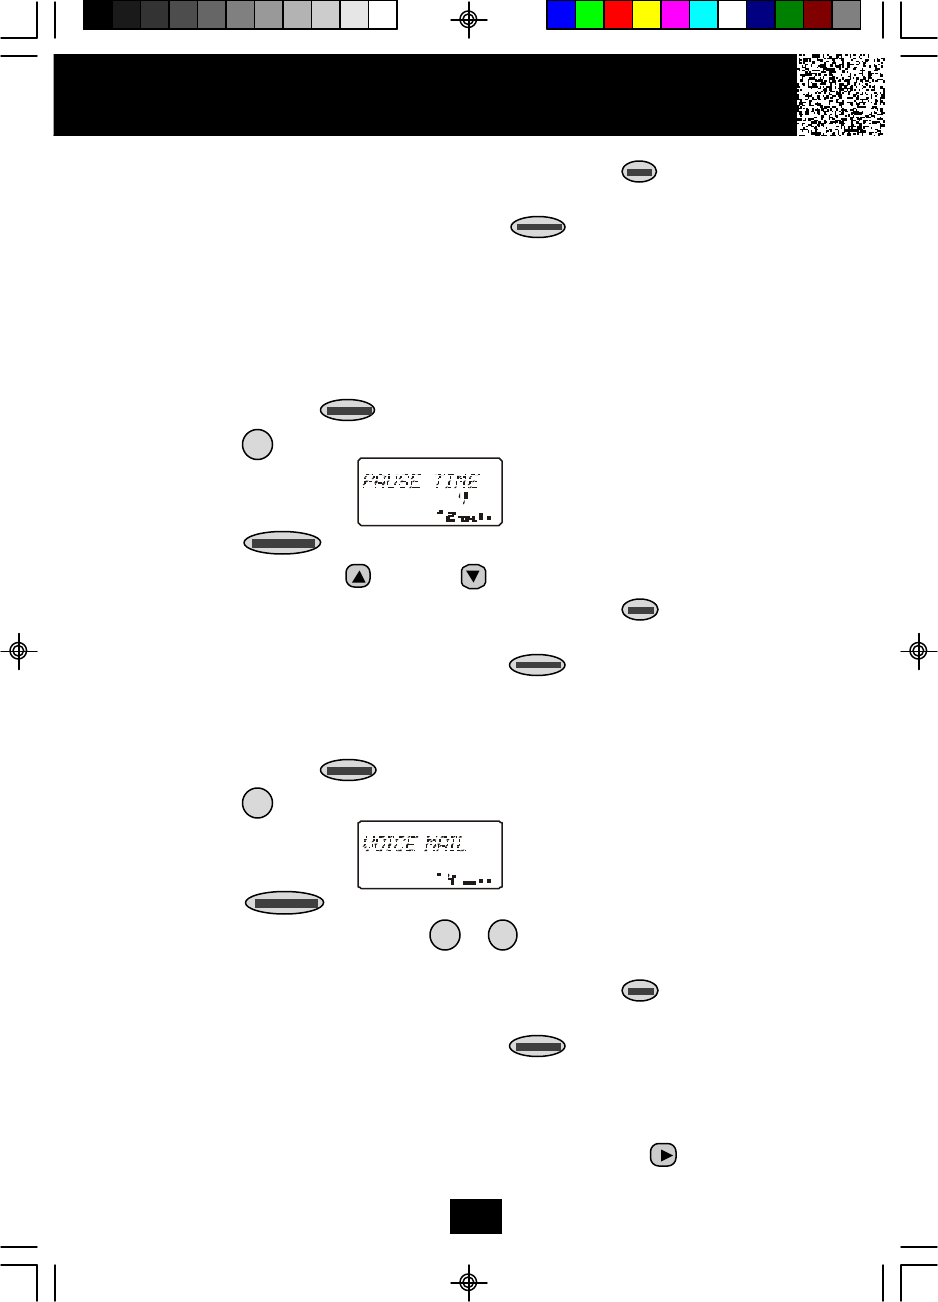
H. Changing the Pause Time
1. Press and hold the /MENU button to enter the menu.
2. Press the button to go to the PAUSE TIME programming option.
3. Press the button to change the setting. “4” will begin flashing.
4. Press the SCROLL UP or DOWN button to select the desired time delay.
5. When the desired setting is displayed, press and hold the /RE/PA button to
save the setting. A long “beep” will sound to confirm the setting has been saved.
6. Continue with programming or press the /MENU button to return to
STANDBY mode.
I. Programming One-Touch Voice Mail Dialing
1. Press and hold the /MENU button to enter the menu.
2. Press the button to go to the VOICE MAIL programming option.
3. Press the button to enter the voice mail speed dial number.
4. Press the TELEPHONE KEYPAD to buttons to enter the phone number
used to access your voice mail messages (up to 15 digits).
5. When the desired setting is displayed, press and hold the /RE/PA button to
save the setting. A long “beep” will sound to confirm the setting has been saved.
6. Continue with programming or press the /MENU button to return to
STANDBY mode.
NOTE:
When reviewing a stored VOICE MAIL number that contains more than 11 digits,
the last 11 digits will be displayed first. Press the SHIFT RIGHT button to view
the preceeding numbers.
Caller ID System Operation
26
8
1
9
0
Caller ID System Operation
27
IMPORTANT
In order to utilize the Caller ID feature, you
must subscribe to Caller ID service from
your local telephone company.
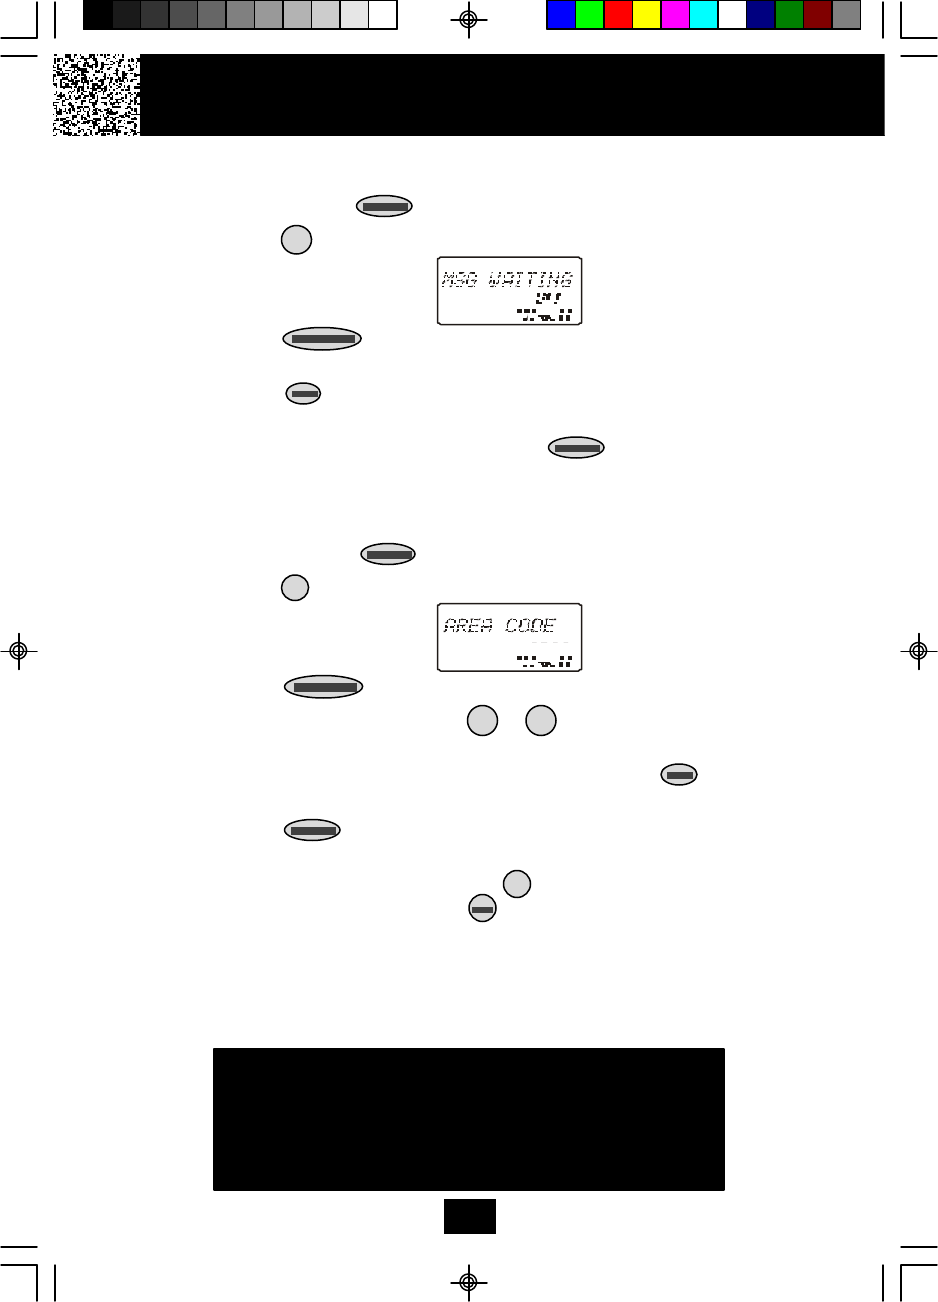
J. Deleting Message Waiting Indication
1. Press and hold the /MENU button to enter the menu.
2. Press the button to go to the MESSAGE WAITING programming option.
3. Press the button to reset the Message Waiting Indication. “DEL” will
begin flashing.
4. Press the /RE/PA button to delete the indication. A long “beep” will sound
to confirm the setting has been saved.
5. Continue with programming or press the /MENU button to return to
STANDBY mode.
K. Setting the Area Code
1. Press and hold the /MENU button to enter the menu.
2. Press the button to go to the AREA CODE programming option.
3. Press the button to change the setting. “000” will begin flashing.
4. Press the TELEPHONE KEYPAD to buttons to enter the three digit area
code for your phone number.
5. When the desired setting is displayed, press and hold the /RE/PA button to
save the setting. A long “beep” will sound to confirm the setting has been saved.
6. Press the /MENU button to return to STANDBY mode.
NOTE:
To use the call back function, press the /OPTION button and then select the
10-DIGIT DIALING mode. Press the button and the unit will automatically dial
the stored 7-digit number plus the area code.
0
#
*
01

IMPORTANT: To ensure the proper operation of your Answering System,
1. Press the RESET button at the back of the BASE UNIT before initial use.
2. Wait for at least 45 seconds after plugging the AC ADAPTOR into the
POWER-IN CONNECTION JACK before operating your Answering System.
Setting the Day/Time Stamp
Press and hold down the button until you hear the announcement “Please enter the
day and time.” Then, enter the current day and time.
Press the button to confirm the selected day and time. The system will announce
the set day and time.
NOTES:
1. The HANDSET and BASE UNIT clock are independent from each other. Set the
BASE UNIT clock by following the time setting on the HANDSET clock.
2. In case of power failure, reset the time setting on the BASE UNIT clock.
Recording Your Outgoing Messages
Your Answering System provides one PRIMARY MAILBOX and four individual
MAILBOXES (1, 2, 3, 4) which can receive their own Incoming Messages (ICM). Before
using your Answering System, it is suggested that you record an Outgoing Message
(OGM). This is the announcement callers will hear when the system answers a call.
A prerecorded system announcement “Please record your message after the beep” is
available if you choose not to record your own OGM.
1. Day Setting
Press and hold down the button.
The corresponding day will be
displayed and announced. Release the
button when the desired day is
mentioned.
2. Hour Setting
Press and hold down the button.
The corresponding hour will be
displayed and announced. Release
the button when the desired hour is
mentioned.
3. Minute Setting
Press and hold down the button.
The corresponding minute will be
displayed and announced. Release the
button when the desired minute is
mentioned.
Answering System Operation
28
1
23
A. Recording your OGM in the PRIMARY MAILBOX
1. Press and hold down the button to record your message.
2. Begin speaking immediately after you hear, “Please record your announcement
after the beep.” Continue to depress the button. One second after
completing your OGM, release the button and the Answering System will
announce, “End of Recording.” Your recorded message will be played back for
your approval.
NOTE: Your OGM must be at least 3 seconds and no more than 30 seconds in
length.
If you wish to change your OGM, repeat steps 1 through 2.
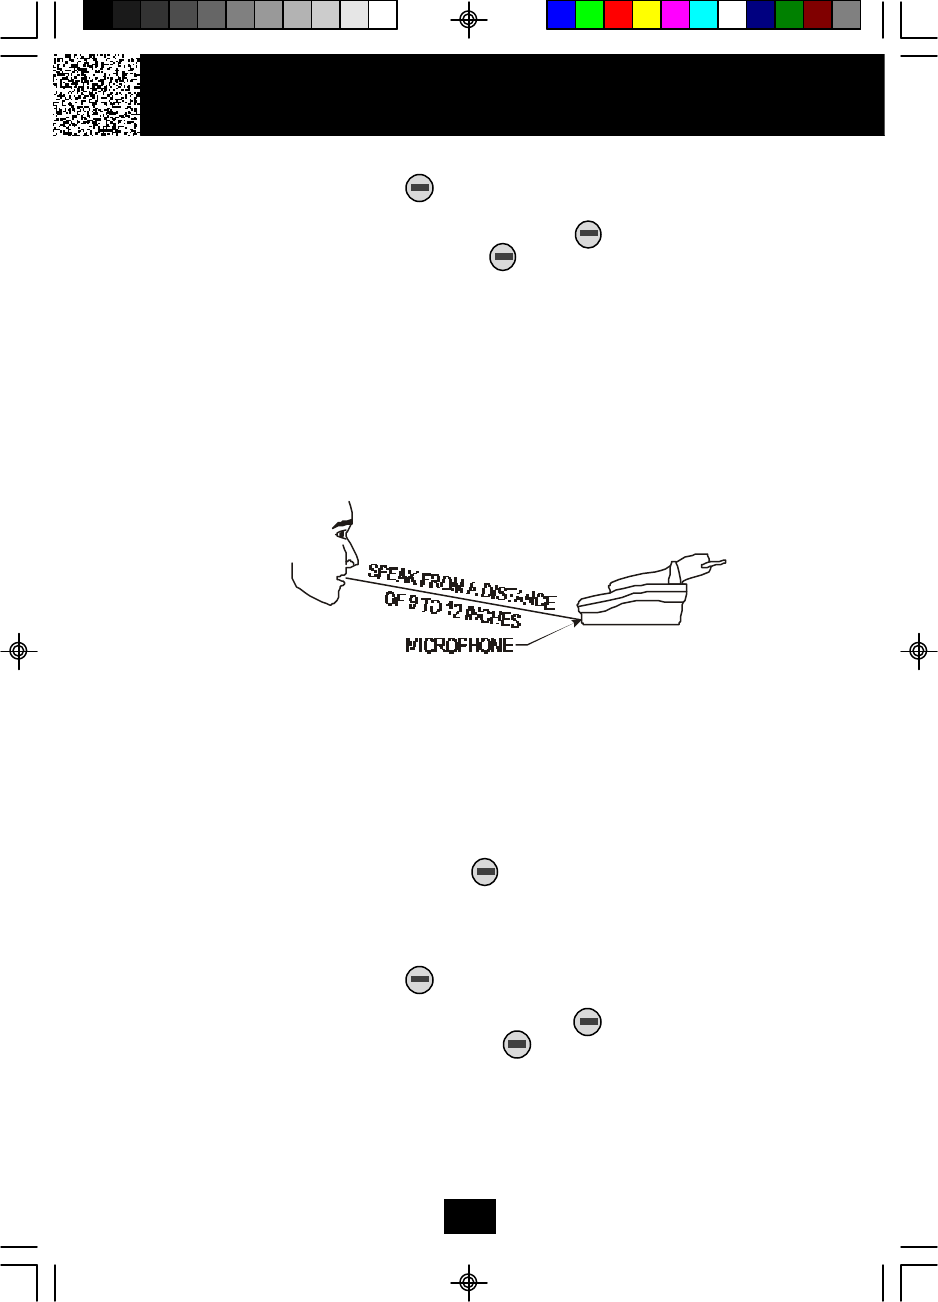
NOTE: To obtain a better sound quality for locally recorded (OGMs and Memos)
messages, speak directly into the MICROPHONE from a distance of
9 to 12 inches.
It is recommended that you record an OGM on your PRIMARY MAILBOX instructing
a caller to leave an ICM in one of the four mailboxes. If the caller is using a Touchtone
telephone, this will enable the caller to record an ICM directly into one of the four
mailboxes by dialing “110” for MAILBOX 1, “220” for MAILBOX 2, “330” for MAILBOX 3,
“440” for MAILBOX 4.
Example of a Primary OGM: “Hello, please leave a message after the tone, or if you
are using a Touchtone telephone, please Dial 11 for Beth, Dial 22 for Jenny, Dial 33
for Jonathan, Dial 44 for Esson.”
NOTE: To check your OGM, press the button. If you did not record an OGM, your
Answering System will announce, “You have no announcement.”
B. Recording your OGM for Individual MAILBOX 1, 2, 3 or 4
1. Press a mailbox button, the corresponding MAILBOX LED indicator will blink.
2. Press and hold down the button to record your message.
3. Begin speaking immediately after you hear, “Please record your announcement
after the beep.” Continue to depress the button. One second after
completing your OGM, release the button. The Answering System will
announce, “End of Recording.” Your recorded message will be played back for
your approval.
NOTE: Your OGM must be at least 3 seconds and no more than 30 seconds in
length.
If you wish to change your OGM, repeat steps 1 through 3.
Answering System Operation
29
NOTE: To check your OGM in a mailbox, press a mailbox button and then press
the button. If you do not have an OGM in a mailbox, it will announce
“MAILBOX #, you have no announcement.” Once a mailbox is activated, its
corresponding MAILBOX LED indicator blinks slowly to show that the
mailbox is active. If you do not press a button to activate another function
within 10 seconds, the Answering System will return to the PRIMARY
MAILBOX. You may return to the PRIMARY MAILBOX at anytime by
pressing the button.
Turning the Answering System ON/OFF
1. Press the button to turn ON the Answering System. You will hear the
following message, “Answering machine is ON.”
2. Press the button again to turn OFF the Answering System. You will now hear
the following, “Answering machine is OFF.”
NOTE: Once turned OFF, the answer function will answer only after the tenth ring,
allowing you to turn the Answering System ON from a remote location.
Setting to Answer Calls
The ANSWER ON/OFF LED indicator must be ON for the Answering System to
answer calls. Depending on the setting of the ANNC/ICM switch, the Answering
System will either hang up after your announcement (ANNC) or begin to record your
caller’s messages (ICM). After the caller leaves an ICM, the time and day will be
stamped at the end of each recorded ICM. The ICM is stored in the MEMORY and
the LED Message Display shows the total number of ICMs currently stored.
NOTE: ICMs are limited to a maximum of 2 minutes. If the ICM is more than 2
minutes, the system “beeps” and hangs up; or if the Answering
System’s MEMORY runs out, the Answering System announces, “Memory
full” and hangs up.
Setting to Announce Only
During ANNC (Announce) mode, your system answers incoming calls with your
recorded ANNC but will not record any ICMs.
1. Set the ANNC/ICM select switch to ANNC. The LED Message Display shows “Ao.”
2. Press and hold down the button to record your ANNC.
3. Begin speaking after you hear, “Please record your announcement after the
beep.” Do not release the button until you have copleted your announcement
OGM.
4. One second after completing your ANNC, release the button and you will
hear, “End of recording.” Your recorded ANNC will be played back for your
approval.
NOTE: Your OGM must be at least 3 seconds and no more than 30 seconds in
length. If you have not recorded an ANNC, the Answering System will answer
“Memory Full” and hangs up.
Answering System Operation
30
Message Alert
When the message alert switch is “ON,” the unit will generate a “beep” sound every
15 seconds after a new message has been recorded. If you do not want to hear the
“beep,” set the switch to “OFF.”
Setting Ring Select
To choose the number of times the phone rings before the Answering System re-
sponds, set the Ring Select switch to 3R, 5R or TS (TOLL SAVER)
Set to 3R -System answers call after the third ring.
Set to 5R - System answers call after the fifth ring.
Set to TS -Use “TOLL SAVER” (TS) when you will be checking your system for
message from a remote location using long distance services or from
a pay phone. The Answering System responds after the third ring only
if you have new message waiting. If there are no new message, the
phone will answer after the fifth ring. You can then hang up after the
fourth ring to avoid paying for the call.
Recording a Memo
A. To record a Memo in the PRIMARY MAILBOX
1. Press and hold down the button to record your Memo.
2. Begin speaking immediately after you hear, “Please record your message after
the beep.” Continue to depress the button. One second after completing
your Memo, release the button and you will hear, “End of recording.” Day and
time are automatically stamped at the end of the message.
NOTE: The Answering System advances the message count automatically after the
actual message is recorded.
B. To record a Memo in an individual MAILBOX (1, 2, 3, 4)
1. Press a mailbox button, the corresponding MAILBOX LED indicator will blink.
2. Press and hold down the button to record your Memo.
3. Begin speaking immediately after you hear, “Please record your message after
the beep.” Continue to depress the button. One second after completing
your Memo, release the button and you will hear, “End of Recording.”
Day and time are automatically stamped at the end of the message.
NOTE: The Answering System advances the message count automatically after
the actual message is recorded.
Answering System Operation
31
IMPORTANT
Before operating the Answering System, wait for at least
45 seconds after plugging the AC ADAPTOR into the
POWER-IN CONNECTION JACK.
Playing of Messages/Memos
A. To play messages/memos in the PRIMARY MAILBOX.
1. Press the button, the system will play all NEW messages/memos.
2. After playing all NEW messages/memos, press the button again, the system
will play all of its messages.
B. To play messages/memos in an individual MAILBOX (1, 2, 3, 4).
1. Press a mailbox button, the corresponding MAILBOX LED indicator starts to
blink.
2. Press the button. The system will play all NEW messages/memos.
3. After playing all NEW messages/memos, press the button again, the system
will play all of its messages/memos.
NOTE: When the MAILBOX LED indicators are lit, messages are present.
C. To interrupt a message.
1. Press the button to end the playing of message. The Answering System
will announce, “End of message.”
D. To repeat a message/memo.
1. Press the button while playing a message. The Answering System
repeats the current message in its entirety.
E. To skip message/memo.
1. Press the button once. The Answering System stops playing, moves to the
next message/memo and resumes playback. The system advances one
message/memo each time you press the button.
Answering System Operation
32
IMPORTANT
To obtain a better sound quality for locally recorded (OGMs
and Memos) messages, speak directly into the
MICROPHONE from a distance of 9 to 12 inches.
Saving Messages
The Answering System saves your messages automatically. After playing all of your
messages, the Answering System announces, “End of message” and the total number
of messages stored in the memory will be indicated on the LED Message Display.
NOTE:The Answering System has a total Memory capacity of 14 minutes or up to 63
messages (OGM/ICM/MEMO). If the recorded messages contain high background
noise, the total recording capacity of the unit will be less than 14 minutes.
Erasing Messages
A. To erase all of the messages in the PRIMARY MAILBOX
1. Press and hold down the button until you hear the announcement,
“Messages erased.”
B. To erase all of the messages in an individual MAILBOX (1, 2, 3, 4)
1. If you want to erase all of the messages in a mailbox, activate the desired
mailbox.
2. Press and hold down the button until you hear the announcement,
“Mailbox #, Messages erased”
C. To erase selected messages/memos
1. While the unwanted message is playing, press the button. The
Answering System announces erasure of the selected message/memo. After
the erasure is complete, the numeric order of the remaining messages will be
rearranged.
When the Memory is Full
When there is no memory available for additional messages, the Answering System
will announce, “Memory full,” but will not save messages.
Two-Way Recording
Two-way recording allows you to record your conversation with another caller. Two-way
recording can be enabled during conversation while you are using the HANDSET.
1. During conversation, press a mailbox button (MAILBOX 1, 2, 3, or 4) where you want
to record your conversation. The corresponding MAILBOX LED indicator will blink.
2. Press and hold down the button. The LED Message Display will show “2r”
to indicate the recording mode.
3. Release the button to end your conversation recording.
4. Also you can record on the PRIMARY MAILBOX, just follow steps 2 and 3.
NOTE: Recording two-way conversations may be subject to local, state or federal laws
and regulations. Consent of both parties is required when a conversation will be
recorded.
Answering System Operation
33
Remote Operation through a Tone Telephone
You can use many Answering System features when you are away from home. To
protect your privacy, most of the features can be used only after you enter the three-digit
Remote Access Code.
Remote Access Codes
The Remote Access Codes are preset at the factory as shown below. You can use the
preset codes or choose your own.
PRIMARY MAILBOX: 999
MAILBOX 1: 555
MAILBOX 2: 666
MAILBOX 3: 777
MAILBOX 4: 888
NOTE: If the RESET button is pressed, the Remote Access Codes return to the factory
preset codes.
Changing of the Remote Access Codes
All of the digits of the Remote Access Codes are a combination of numbers 5, 6, 7, 8,
9, 0.
IMPORTANT: Digits 1, 2, 3, and 4 cannot be used when changing the Remote Access
Codes for any mailbox (including the PRIMARY MAILBOX).
1. Press a mailbox button for MAILBOX 1, 2, 3, or 4. For the PRIMARY MAILBOX,
follow steps 2 to 6.
2. Press and hold down the button until you hear the announcement,
“Please enter new password.”
3. Press and hold down the button. Release the button when you hear the
desired first digit of the code.
4. Press and hold down the button. Release the button when you hear the
desired second digit of the code.
5. Press and hold down the button. Release the button when you hear the
desired third digit of the code.
6. Press the button, the 3-digits you have selected will be announced.
7. If your new Remote Access Code is the same as that of another mailbox, the
Answering System will not record your new password.
Answering System Operation
34

Using the Remote Instruction Code
1. Dial your telephone number.
2. Listen to or bypass the OGM in the PRIMARY MAILBOX.
3. Enter your Remote Access Code. If the announcement does not stop, enter the
Remote Access Code again.
4. The Answering System will request that you enter the Instruction Code or
press “*” button for help.
A. If you do not know the Instruction Code, press “*” button immediately. The
Answering System will announce the Instruction Codes. Otherwise, if a
command is not received by the Answering System within 10 seconds, it will
signal 3 “beeps” and hang up.
The following is the Remote Instruction Code Help Menu:
Instruction Codes
To Playback Message Press “2.”
To Repeat Message Press “1.”
To Skip Message Press “3.”
To Stop Press “8.”
To Playback Announcement Press “5.”
To Turn Answering Machine ON or OFF Press “6.”
(Press “1” for MAILBOX 1, Press “2” for MAILBOX 2, Press “3” for MAILBOX 3,
and Press “4” for MAILBOX 4. Otherwise, if you did not press the desired
MAILBOX # location within 2~3 seconds, the memo will be automatically
recorded in the PRIMARY MAILBOX.)
To Erase Message Press “9.”
To Record MEMO or Announcement Press “0.”
(To record a message press “2”, to record announcement press “5”)
(Press “1” for MAILBOX 1, Press “2” for MAILBOX 2, Press “3” for MAILBOX 3,
and Press “4” for MAILBOX 4. Otherwise, if you did not press the desired
MAILBOX # location within 2~3 seconds, the memo will be automatically
recorded in the PRIMARY MAILBOX.)
To Change Mailbox Press “#.”
B. Press the corresponding number of the Instruction Code you wish to activate.
You don’t have to listen to the entire Instruction Code Help Menu before giving a
command. You may enter the desired Instruction Code Number at any given
time.
Answering System Operation
35
Security
Security System
Your cordless telephone uses a digital coding security system to prevent unauthorized
use of your telephone line by another nearby cordless telephone. The system has its
own identifying signal created by microcomputers in both the BASE UNIT and the
HANDSET.
Security Code
This telephone has an internal security code with 65,536 possible combinations.
Resetting Security Code and Channel Information
Communication between the HANDSET and the BASE UNIT may not be possible in any
of the following situations:
1. After a power failure.
2. After relocating the BASE UNIT by disconnecting the AC ADAPTOR.
3. After replacing the HANDSET BATTERY PACK.
To reset, place the HANDSET on the BASE UNIT for 2 to 5 seconds.
Multi-Channel Access
Your cordless telephone lets you select a channel from the 40 frequencies available to
transmit signals between the BASE UNIT and the HANDSET. When you notice
interference from other cordless telephones, change to another channel by pressing
the button on the HANDSET.
36
IMPORTANT
When you hear interference, press the
button change the operating channel.
Battery Type
Use the following type and size of BATTERY PACK:
Cordless Telephone BATTERY PACK
3.6V, 600mAh
U.S. Electronics Inc.
Ni-Cd BATTERY PACK: Model B650 Ni-Cd
This BATTERY PACK is available through:
U.S. Electronics Service Center
105 Madison Avenue
New York, NY 10016
1-800-828-5208
NOTE: During a power interruption, the BASE UNIT does not operate, and a phone
conversation cannot be made on the HANDSET.
Recharging the BATTERY PACK
The nickel cadmium (Ni-Cd) BATTERY PACK in the HANDSET can be recharged many
times using the built-in charger in the BASE UNIT.
When the BATT LOW symbol appears on the LCD Screen, a “beep” sound will be heard
every 10 seconds. This indicates that the BATTERY PACK needs to be recharged.
Charge the BATTERY PACK at least once every 90 days of non-use to avoid battery
failure. When the BATTERY PACK can no longer be charged, replacement of the
BATTERY PACK will be necessary.
The BATTERY PACK used in your telephone may develop a condition known as
“MEMORY.” Once subjected to a regular short discharging routine, the BATTERY PACK
assumes the discharging pattern it was subjected to. This causes rapid discharging
thereby shortening the BATTERY PACK charge span. If you believe your BATTERY PACK
has developed a “MEMORY” condition, do not charge the HANDSET until the BATT LOW
symbol appears on the LCD Screen. When the BATT LOW symbol appears on the LCD
Screen, charge the HANDSET fully for 12 hours.
IMPORTANT
In order to get maximum life from the HANDSET
BATTERY PACK, be sure to charge the HANDSET
for 12 hours before initial use.
Recharging the BATTERY PACK
37
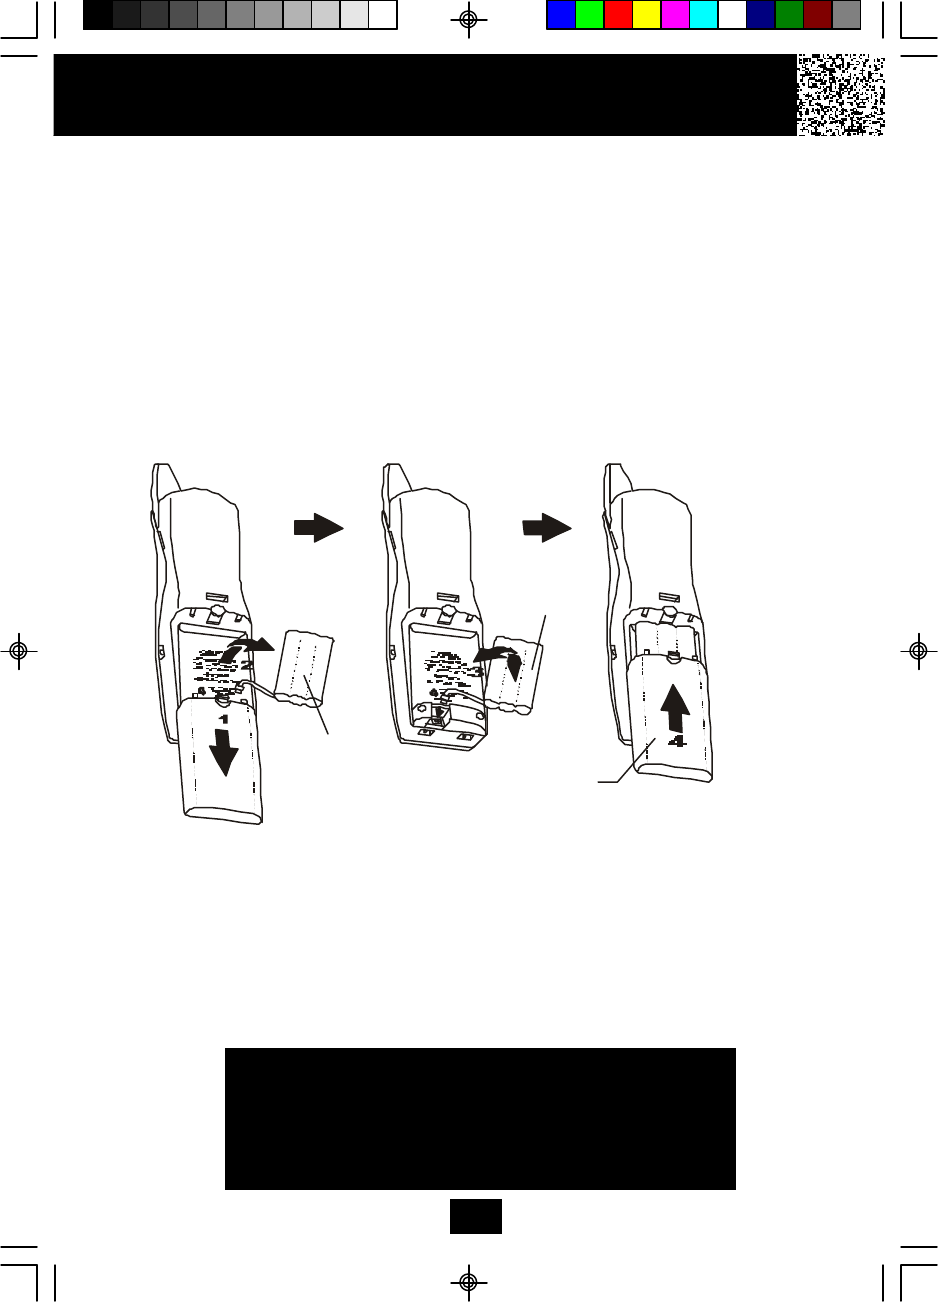
Changing the BATTERY PACK
The BATTERY PACK provides power for the HANDSET of your cordless telephone.
To Replace the BATTERY PACK:
1. Remove the HANDSET BATTERY COMPARTMENT COVER by sliding it down.
2. Pull out the old BATTERY PACK and install the new BATTERY PACK with the CHARGE
PLATE facing the CONTACT SPRINGS in the BATTERY COMPARTMENT.
4. Slide the HANDSET BATTERY COMPARTMENT COVER firmly into place in its closed
position.
5. Before use, charge the new BATTERY PACK for 12 hours.
Changing the BATTERY PACK
ATTENTION:
The telephone that you have purchased contains a rechargeable BATTERY PACK. The
BATTERY PACK is recyclable. At the end of its useful life, under various state and local
laws, it may be illegal to dispose of this BATTERY PACK into the municipal waste
stream. Check with your local solid waste officials for details in your area for recycling
options or proper disposal.
IMPORTANT
In order to get maximum life from the HANDSET
BATTERY PACK, be sure to charge the HANDSET
for 12 hours before initial use.
38
OLD
BATTERY
PACK
NEW
BATTERY
PACK
BATTERY
COMPARTMENT
COVER
Problem Solving Section
For your assistance, we have listed below a few common problems.
Phone does not work, check the following:
1. BASE UNIT is plugged into a power source.
2. HANDSET is charged.
3. TONE/PULSE Select Switch is in the right position.
4. TELEPHONE LINE CORD is plugged into the TELEPHONE JACK.
Range of phone limited, check the following:
1. BASE UNIT is centrally located in your residence.
2. BASE UNIT is not located near appliances.
No dial tone, check the following:
1. TELEPHONE LINE CORD plugs are connected to the TELEPHONE JACK and
TELEPHONE LINE CONNECTION JACK.
2. BASE UNIT is plugged into a power source.
3. If you had a power failure or had unplugged the BASE UNIT, replace the HANDSET on
the BASE UNIT for 2 to 5 seconds to reset the system.
Received signal flutters or fades, check the following:
1. BATTERY PACK in the HANDSET is fully charged.
2. HANDSET is not too far from the BASE UNIT.
Interference on reception, check the following:
1. Noise may be picked up from electrical products in the home or electrical storms.
Generally, this noise is a minor annoyance and should not be interpreted as a defect
in your system. (See Technical Information on page 41).
2. Choose an alternate channel using the button on the HANDSET.
Excess static, check the following:
1. Check to see that the ANTENNA is not touching another metal object.
If after pressing the button, you receive three “beeps” and no dial tone, check the
following:
1. BASE UNIT is plugged into a power source.
2. If you had a power failure or had unplugged the BASE UNIT, replace the HANDSET on
the BASE UNIT for 2 to 5 seconds to reset the system.
Problem Solving
39
Answering System does not work, check the following:
1. BASE UNIT is plugged into the power source.
2. Reset the system by pressing the RESET button at the top side of the BASE UNIT.
Answering System does not answer calls, check the following:
1. ANSWER ON/OFF LED indicator is lit.
Answers calls only after 10 rings, check the following:
1. ANSWER ON/OFF LED indicator is lit.
2. Message Memory is not full.
Does not respond to remote commands, ensure the following:
1. Correct Remote Access Code is entered.
2. A TONE telephone is being used.
Messages are incomplete, ensure the following:
1. Message Memory is not full.
2. Caller may be hesitating and pausing for more than 7 seconds.
Answers calls but does not record messages, check the following:
1. ANNC/ICM switch is set to ICM.
2. Memory is not full.
3. Extension telephone was not picked up.
NOTE:
If none of the telephones in the house are working, disconnect one set at a time to verify
that none of the telephones are causing the problem. If you still have a problem after
doing this, and your telephone still does not work, please contact your local phone
company.
Problem Solving
40
Technical Information
This cordless telephone uses radio frequencies to allow mobility. There are certain
difficulties in using radio frequencies with a cordless telephone. While these are
normal, the following could affect the operation of your system.
Noise
Electrical pulse noise is present in most homes at one time or another. This noise is
most intense during electrical storms. Certain kinds of electrical equipment such as
light dimmers, fluorescent bulbs, motors, and fans also generate noise pulses.
Because radio frequencies are susceptible to these noise pulses, you may
occasionally hear them in your HANDSET. Generally they are a minor annoyance and
should not be interpreted as a defect in your system.
Range
Because radio frequency is used, the location of the BASE UNIT can affect the operating
range. Try several locations in your home or office and pick the one that gives you the
clearest signal to the HANDSET.
Interference
Electronic circuits activate a relay to connect the cordless telephone to your telephone
line. These electronic circuits operate in the radio frequency spectrum. While several
protection circuits are used to prevent unwanted signals, there may be periods when
these unwanted signals enter the BASE UNIT. You may hear clicks or hear the relay
activate while you are not using the HANDSET. If the interference occurs frequently, it can
be minimized or eliminated by lowering the height of your BASE UNIT ANTENNA or by
relocating the BASE UNIT. You can check for interference before selecting the final BASE
UNIT location by plugging in the telephone.
NOTICE:
This cordless telephone uses radio communication between the HANDSET and the
BASE UNIT and may not ensure privacy of communication. Other devices, including
other cordless telephones, may interfere with the operation of this cordless telephone
or cause noise during operation. Units not containing coded access may be accessed
by other radio communication systems. Cordless telephones must not cause
interference to any licensed radio service.
Technical Information
41
IMPORTANT
When you hear interference, press the
button change the operating channel.
FCC Requirements
Federal Communications Commission Requirements
This equipment complies with Part 68 of the FCC Rules. A label on the BASE UNIT of
this equipment contains, among other information, the ACTA product number and the
Ringer Equivalence Number (REN) for this equipment. You must, upon request,
provide this information to your telephone company.
The REN is also useful in determining the quantity of devices that you may connect
to your telephone line and still allow these devices to ring when your telephone number
is called. In most areas, but not all, the sum of the RENs for all devices connected to one
line should not exceed five (5.0). To be certain of the number of devices that you may
connect to your line, you should contact your local telephone company.
If your equipment should cause harm to the telephone network, the telephone company
may temporarily disconnect your service. If possible, they will notify you in advance that
temporary discontinuance of service may be required. However, when advanced written
notice is not possible, the telephone company may temporarily discontinue service
without notice if such action is necessary under the circumstances. The telephone
company may make changes in its communication facilities, equipment, operations, or
procedures where such action is reasonably required in the operation of its business
and is not inconsistent with the rules and regulations of the Federal Communications
Commission. Do not attempt to repair or modify this equipment.
WARNING: Changes or modifications not expressly approved by the party responsible
for its compliance could void the user’s authority to operate the equipment.
Some cordless telephones operate at frequencies that may cause interference to nearby
TVs and VCRs. To minimize or prevent such interference, the BASE UNIT of the cordless
telephone should not be placed on or near a TV or VCR. If interference is experienced,
moving the cordless telephone farther away from the TV or VCR will often reduce or
eliminate the interference.
IMPORTANT
Placing your BASE UNIT near appliances
such as televisions, refrigerators, radios, or
microwave ovens may cause interference.
42
Federal Communications Commission Requirements (continued)
This equipment should not be used on coin telephone lines. Connection to party line
service is subject to state tariffs. If trouble is experienced, disconnect this equipment
from the telephone line to determine if it is causing the malfunction. If the equipment is
determined to be malfunctioning, its use should be discontinued until the problem has
been corrected.
NOTE: This equipment has been tested and found to comply with the limits for a class
B digital device, pursuant to Part 15 of the FCC Rules. These limits are designed to
provide reasonable protection against harmful interference in a residential installation.
This equipment generates, uses and can radiate radio frequency energy and, if not
installed and used in accordance with the instructions, may cause harmful interference
to radio communications.
However, there is no guarantee that interference will occur in a particular installation. If
this equipment does cause harmful interference to radio or television reception, which
can be determined by turning the equipment off and on, the user is encouraged to try to
correct the interference by one or more of the following measures.
1. Reorient or relocate the receiving ANTENNA.
2. Increase the distance between the equipment and the receiver.
3. Connect the equipment into an outlet on a circuit different from that to which the
receiver is connected.
4. Consult the dealer or an experienced radio/TV technician for help.
This device complies with Part 15 of the FCC Rules. Operation is subject to the
following two conditions: (1) this device may not cause harmful interference, and
(2) this device must accept any interference received, including interference that
may cause undesired operation.
FCC Requirements
43

Warranty
Warranty Information
BellSouth Products
One-Year Limited Warranty
This limited warranty sets forth all BellSouth Products responsibilities regarding your
product. There are no other expressed or implied warranties from BellSouth Products.
Warranty Service Provided
If you purchased the telephone new from a retail vendor, BellSouth Products warrants
the telephone against defects in material and workmanship for a period of one (1) year
from the original date of purchase. This warranty is in lieu of all other expressed
warranties. This warranty begins when you purchase the telephone and continues for
one (1) year unless you sell or rent the telephone, in which case the warranty stops.
BellSouth Products disclaims any implied warranty, including the warranty of
merchantability and the warranty of fitness for a particular purpose, as of the date of 90
days from your original purchase of the telephone. BellSouth Products assumes no
responsibility for any special, incidental, or consequential damages.
This warranty gives you specific legal rights and you may have other rights which vary
from state to state. Some states do not allow the exclusion or limitations of special,
incidental or consequential damages, or limitations on how long a warranty lasts, so
the above exclusion and limitation may not apply to you.
Warranty Service Not Provided
This warranty does not cover damage resulting from accident, misuse, abuse,
improper installation or operation, lack of reasonable care, unauthorized modification,
the affixing of any attachment not provided by BellSouth Products with the telephone
and/or loss of parts. This warranty is voided in the event any unauthorized person
opens, alters or repairs the telephone. All BellSouth equipment being returned for
repair must be suitably packaged. Telephone companies use different types of
equipment and offer various types of services to customers. BellSouth Products does
not warrant that this telephone is compatible with the type of equipment of any particular
telephone company or the services provided by it.
44
Warranty
What to Do for Warranty Service
During the first thirty (30) days, a defective product is eligible for over-the-counter
exchange at the retailer from whom it was purchased. After thirty (30) days, the defective
product should be returned to the authorized service center. Please allow 2-3 weeks for
the return of your telephone product. The shipping address of the authorized service
center is:
U.S. Electronics CONSUMER CENTER
C/O Southern Bonded Warehouse
7137 Southlake Parkway
Morrow, GA 30260
NOTE: A product received which was not made for BellSouth Products or which is not
defective as determined by our test procedures will not be repaired and will
be returned C.O.D., freight.
To Obtain Warranty Service
•Provide proof of the date of purchase within the package.
•Prepay all shipping costs to the authorized service center.
•Include a return shipping address within the package.
Please retain your sales receipt, the carton, the packing materials, and the printed
material. The original carton is the best shipping container for the telephone should
you have to return it.
For your reference:
Serial number
Date of Purchase
Name of Dealer
Visit Us on the Web
www.uselectronics.info
Customer Service Telephone Number:
1-800-210-8950
OUTSIDE THE U.S.A. CALL 1-212-242-6978
45

Notes
46

Wall Mount Template
This page serves as a template for attachment of screws to the wall
when mounting this telephone on the wall.
1. Cut out this page.
2. Use this template to determine the distance between screws
when mounting this phone on the wall. The two cross hairs
identify where to attach the screws.
48
IMPORTANT
The AC ADAPTOR must always be plugged
into an electrical outlet.
IMPORTANT
In order to utilize the Caller ID feature, you
must subscribe to Caller ID service from
your local telephone company
IMPORTANT
If you live in an area which receives frequent
thunderstorms, we strongly recommend plugging
your AC ADAPTOR into a surge protector.
IMPORTANT
In order to get maximum life from the HANDSET
BATTERY PACK, be sure to charge the HANDSET
for 12 hours before initial use.
IMPORTANT
Placing your BASE UNIT near appliances
such as televisions, refrigerators, radios, or
microwave ovens may cause interference.
IMPORTANT
When you hear interference, press the
button change the operating channel.