Lionel BTSPKR1 Lionel Bluetooth Radio Tower User Manual
Lionel L.L.C. Lionel Bluetooth Radio Tower
Lionel >
User Manual

78-4611-250
4/18
Lionel
Plug-Expand-Play®
Bluetooth® Radio Tower
Owner’s Manual
1829000

Thank You
Thank you for your purchase of the Plug-Expand-Play Bluetooth Radio Tower. This
accessory allows you to stream sounds from any Bluetooth-enabled device such as your
smartphone, notebook, tablet or mp3 player!
Be sure that your trains clear the accessory.
Note!
2
Warning: Changes or modifications to this unit not expressly approved by Lionel LLC could
void the user authority to operate the equipment.
Notes: This equipment has been tested and found to comply with the limits for a Class B digital
device, pursuant to Part 15 of the FCC Rules. These limits are designed to provide reasonable
protection against harmful interference in a residential installation. This equipment generates, uses
and can radiate radio frequency energy and, if not installed and used in accordance with the
instructions, may cause harmful interference to radio communications.
However, there is no guarantee that interference will not occur in a particular installation. If this
equipment does cause harmful interference to radio or television reception, which can be determined
by turning the equipement off and on, the user is encouraged to try to correct the interference by one
or more of the following measures:
• Reorient or relocate the receiving antenna.
• Increase the separation between the equipment and receiver.
• Connect the equipment into an outlet on a circuit different from that to which the receiver
is connected.
• Consult the dealer or an experienced radio/TV technician for help.
This device complies with part 15 of the FCC Rules. Operation is subject to the following two
conditions: (1) this device may not cause interference, and (2) this device must accept any
interference, including interference that may cause undesired operation.
This device complies with Industry Canada license-exempt RSS standard(s). Operation is subject to
the following two conditions: (1) this device may not cause interference, and (2) this device must
accept any interference, including interference that may cause undesired operation of the device.
Cet appareil est conforme aux RSS exemptés de licence d'Industrie Canada. Son fonctionnement est
assujetti aux deux conditions suivantes : (1) cet appareil ne peut pas causer de brouillage nuisible et
(2) doit accepter tout brouillage capté, y compris un brouillage pouvant causer un fonctionnement
non voulu.
FCC Statement
This device complies with Part 15 of the FCC Rules and with Industry Canada license-exempt RSS
standard(s). Operation is subject to the following two conditions: (1) This device may not cause harmful
interference, and (2) This device must accept any interference received, including interference that may
cause undesired operation.
Model: 1829000
Contains
FCC ID: LIV-BTSPKR1
IC: 7032A-BTSPKR1
3
The Bluetooth® word mark and logos are registered trademarks owned by the
Bluetooth SIG, Inc. and any use of such marks by Lionel is under license. Other
trademarks and trade names are those of their respective owners.
The following Lionel marks are used throughout this Owner’s Manual and are protected under law.
All rights reserved.
Lionel®, FasTrack®, LEGACY®, LEGACY®Control System, Lockon®, TMCC®, CAB-1®Remote Controller,
Plug-Expand-Play®, ASC®, Accessory Switch Controller®
Table of Contents
Wiring your accessory to a Plug-Expand-Play lock-on 4
Wiring your accessory to FasTrack and tubular track 5
Connecting your accessory to a transformer 6
Wiring for TMCC or Legacy 7
SC-2 wiring and operation 7
ASC and ASC2 wiring and operation 8
Pairing the radio tower 9
Replacing the LED 10
Notes 11
Lionel Limited Warranty Policy & Service 12
4
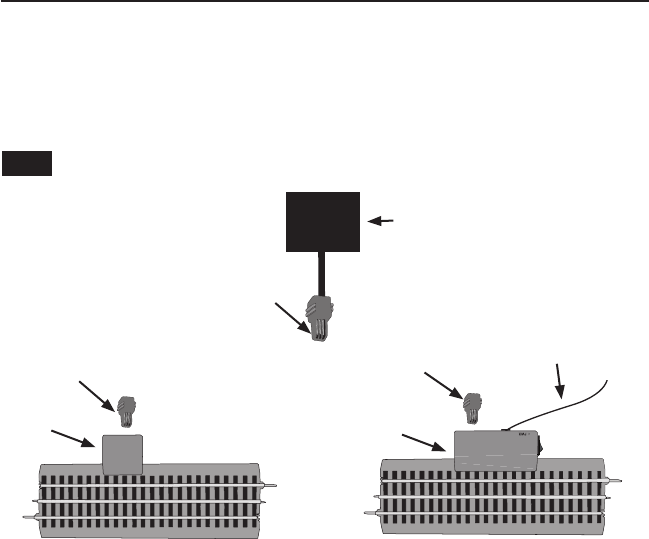
Wiring your accessory to a Plug-Expand-Play lock-on
Figure 1. Plug-Expand-Play wiring
Lock-on Power Block
Lock-on
3-pin male
connector
3-pin male
connector
3-pin male
connector
Plug-Expand-Play
Accessory
OR
Your Plug-Expand-Play accessory connects to either a Plug-Expand-Play lock-on
(6-81313) or a Plug-Expand-Play power block lock-on (6-81314) with the 3-pin male
connector that is attached to its base. Simply plug this connector into the lock-on and apply
track power. To turn the accessory OFF, unplug the 3-pin connector from the lock-on or turn
off the track power. See figure 1 for wiring.
Auxiliary Power Supply
(optional)
Note Do not exceed 18V AC/DC to this accessory!
OR
Plug-Expand-Play
Accessory
5
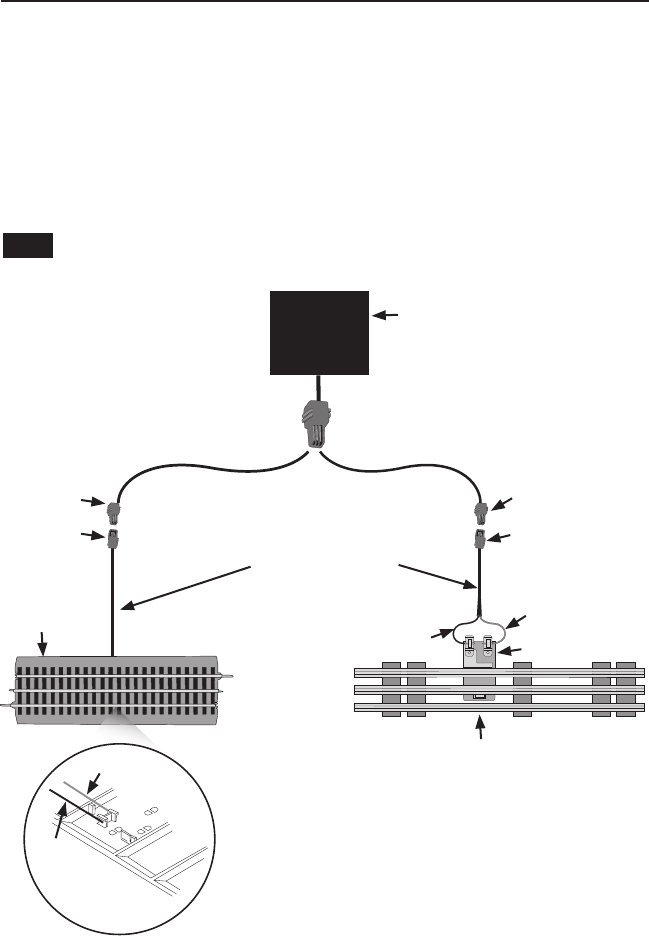
Connecting your accessory to FasTrack and tubular track
Note The white wire is not used when connecting your accessory to FasTrack or tubular track.
3-pin male
connector
3-pin male
connector
3-pin female
connector 3-pin female
connector
FasTrack
Tubular Track
Underside of FasTrack
Red wire
Black
wire
8" 3-pin female pigtail
(6-82038)
Figure 2. Connecting your accessory to FasTrack and tubular track.
You are able to connect your accessory to FasTrack using an 8" 3-pin female pigtail
(available separately, 6-82038). Plug in the 3-pin male connector from the accessory into
the 3-pin female pigtail. Then attach the red wire to the inside rail and the black wire to the
outside rail.
Universal lock-on
Red wire
Black wire
Additionally, you can connect your accessory to tubular track using an 8" 3-pin female
pigtail (available separately, 6-82038). Plug in the 3-pin male connector of the accessory into
the 3-pin female pigtail. Then attach the red wire to the inside rail position of the universal
lock-on (6-24213) and the black wire to the outside rail position.
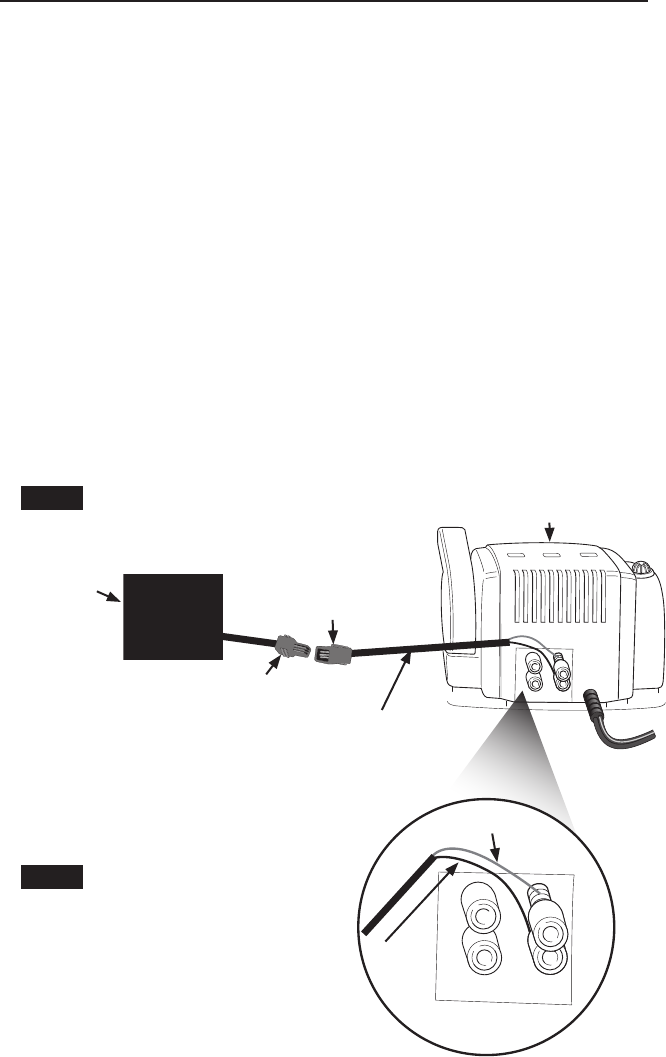
120/60z
TRACK ACCESSORY
U
0~18VAC
AB
U
0~18VAC
U
0~18VAC
AB
U
0~18VAC
3-pin male
connector
3-pin female
connector
Transformer
Red wire
Black wire
Figure 3. Connecting your accessory to a transformer.
8" 3-pin female pigtail
(6-82038)
Connecting your accessory to a transformer
To power your accessory using a CW-80 Transformer (6-14198)or any other power supply,
you will need an 8" 3-pin female pigtail (available separately, 6-82038) to connect to the
transformer terminals. Make sure that all connections are secure. Loose connections can
produce extremely high temperatures. For this reason, do not touch the terminals or track
connections during use. Also, do not locate scenery materials such as lichen or ground foam
near the terminals.
1. Plug in the 3-pin male connector on the accessory to the 3-pin female slot
on the pigtail.
2. Loosen the red ACCESSORY thumbscrew terminal, then place the red wire
on the metal terminal bar. Still holding the wire end, tighten the red
thumbscrew until secure. Be sure that the wire is touching the metal post.
3. Loosen the black ACCESSORY thumbscrew terminal, then place the black
wire on the metal terminal bar. Still holding the wire end, tighten the
black thumbscrew until secure. Be sure that the wire is touching the metal post.
4. Plug the CW-80 Transformer into your wall outlet (120 volts).
5. Refer to your CW-80 transformer manual for instructions on how to set
the voltage for your accessory output. It is recommended to set it at 14
volts.
6
Plug-Expand-Play
Accessory
Note!
Note!
Do not exceed 18 volts or you will risk damage
to your accessory.
The white wire is not used when
connecting your accessory to a
transformer.
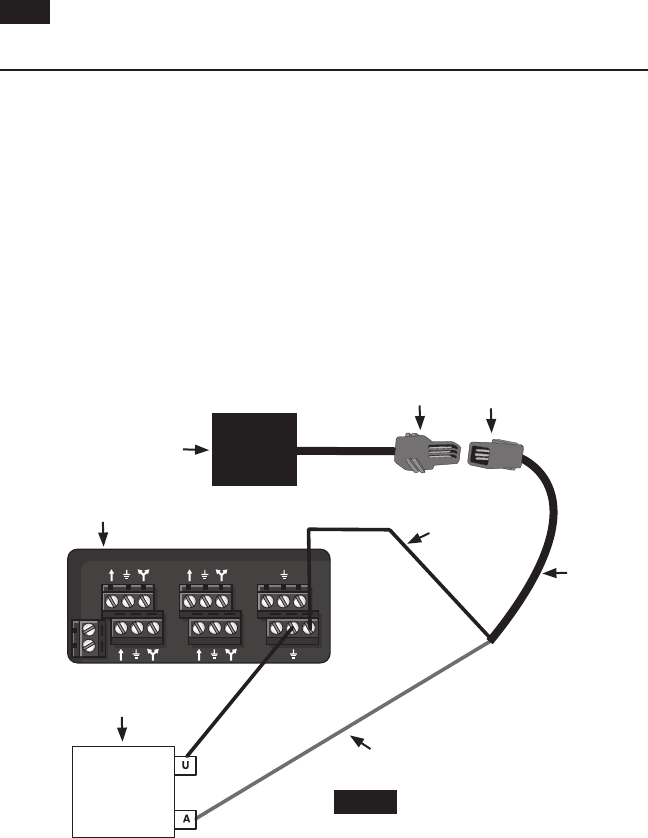
Wiring for TMCC or LEGACY
To power your accessory in the Command Control and LEGACY environments, you will
need an SC-2 (6-22980), an ASC (6-14182), or an ASC2 (6-81639). You will also need an
8" 3-pin female pigtail (available separately, 6-82038) and a transformer (6-14198). See
figures 4 and 5 for wiring.
Note Refer to your CAB-1, CAB-1L, or LEGACY manual for remote instructions.
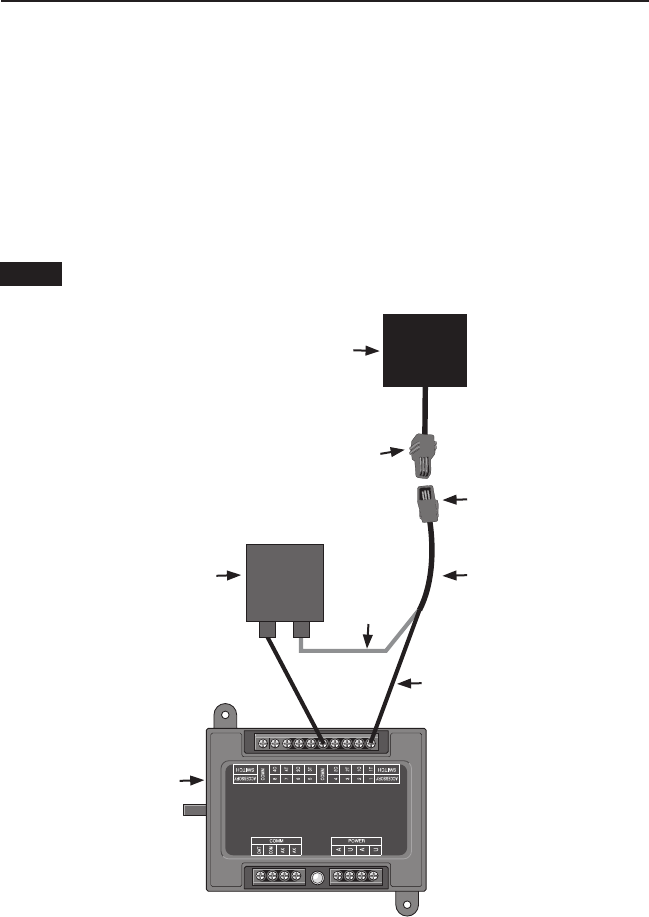
SC-2 wiring and operation
Three wires are needed to connect your accessory to the SC-2 and a separate accessory
transformer. Refer to Figure 4.
1. Attach a wire to the transformer Common/Ground/U terminal and connect it to the COMM
(common) position on the SC-2.
2. Connect the black wire of the pigtail to the AUX2 terminal on the SC-2.
3. Finally, connect the red wire of the pigtail to the transformer Power/A terminal.
AUX2 will turn the accessory on. The accessory will turn off when AUX2 is released.
ACC3 ACC4
ACC1 ACC2
SC-2
Black wire
Red wire
Transformer
3-pin male
connector
3-pin female
connector
Figure 4. Wiring an SC-2.
8" 3-pin female
pigtail (6-82038)
7
Plug-Expand-Play
Accessory
Note! The white wire is not used when
connecting your accessory to an SC-2.
ASC and ASC2 wiring and operation
Three wires are needed to connect your accessory to the ASC/ASC2 and a separate accessory
transformer. Refer to Figure 5.
1. Attach a wire to the transformer Common/Ground/U terminal and connect it to the COMM
(common) position on the ASC/ASC2.
2. Connect the black wire of the pigtail to the Accessory 2 terminal on the ASC/ASC2.
3. Finally, connect the red wire of the pigtail to the transformer Power/A terminal.
AUX2 will turn the accessory on. The accessory will turn off when AUX2 is released.
AU
3-pin male
connector
3-pin female
connector
Transformer
ASC/ASC2
Black wire
Red wire
Figure 5. Wiring an ASC/ASC2.
8" 3-pin female pigtail
(6-82038)
8
Plug-Expand-Play
Accessory
Note! The white wire is not used when connecting your accessory to an ASC/ASC2.
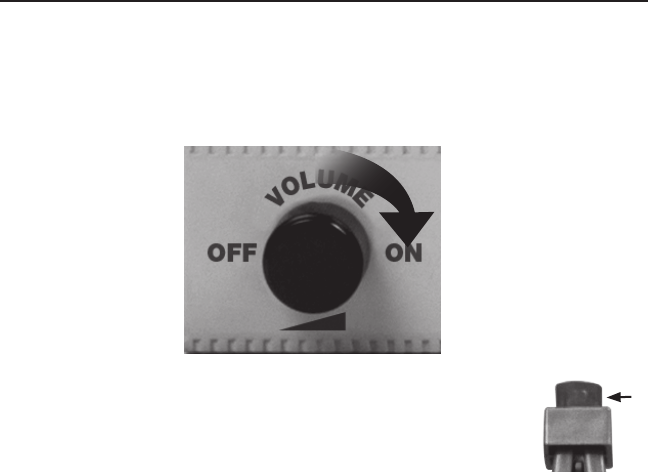
Pairing the radio tower
1. After installing your Bluetooth Radio Tower and connecting it to power, turn the power on
to your layout.
2. Turn the power/volume knob on the accessory to the ON position
3. The LED at the top of the tower will begin to blink at 2 times per second.
4. Open your Bluetooth settings on your smart device, making sure your Bluetooth capability
is turned on as described in your devices user manual.
5. Choose "WLLC Radio Tower" from your devices Bluetooth menu and connect. The LED at
the top of the tower will begin to blink at 1 time per second, indicating it has paired with
your device.
6. You are now connected! You can begin to stream your audio.
Troubleshooting Tip:
If the volume of the tower seems low:
- Check the volume knob and make sure it is turned to the desired level
- Check the volume on your smart device and make sure it is not turned down
LED
9

10
Replacing the LED
Your accessory is illuminated an LED that is expected to last for the life of the accessory.
The LED is not user serviceable. If service is required, we recommend that you have your
accessory serviced at a Lionel Factory Trained Authorized Service Station or Lionel Service.

Notes
11

©2018 LIONEL L.L.C.
6301 Performance Dr., CONCORD, NC 28027
UNITED STATES OF AMERICA
PRINTED IN CHINA
Lionel Limited Warranty Policy & Service
T
his Lionel product, including all mechanical and electrical components, moving parts, motors and structural components, with the exception of LIGHT BULBS,
LED’s & TRACTION TIRES are warranted to the original owner-purchaser for a period of one year from the original date of purchase against
original defects in materials or workmanship when purchased through a Lionel Authorized Retailer*.
This warranty does NOT cover the following:
• Normal wear and tear
• Light bulbs or LED’s
• Defects appearing in the course of commercial use
• Damage resulting from abuse/misuse of the product
Transfer of this product by the original owner-purchaser to another person voids this warranty in its entirety. Modification of this product in any way; visually,
mechanically or electronically, voids the warranty in its entirety.
Any warranted product which is defective in original materials or workmanship and is delivered by the original owner-purchaser (this warranty is non-
transferrable) to Lionel LLC or any Lionel Authorized Service Station MUST be accompanied by the original receipt for purchase (or copy) from an Authorized
Lionel Retailer*, will at the discretion of Lionel LLC, be repaired or replaced, without charge for parts or labor. In the event the defective product cannot be repaired,
and a suitable replacement is not available, Lionel will offer to replace the product with a comparable model (determined by Lionel LLC), if available. In the
event a comparable model is not available the customer will be refunded the original purchase price (requires proof of purchase from the Authorized Lionel
Retailer* it was originally purchased). Any products on which warranty service is sought must be sent freight or postage prepaid (Lionel will refuse any package when
postage is due). Transportation and shipping charges are not covered as part of this warranty.
NOTE: Products that require service that do not have a receipt from an LIONEL AUTHORIZED RETAILER* will be required to pay for all
parts required to repair the product (labor will not incur a charge) providing the product is not older than 3 years from date of
manufacture and is within 1 year from date of purchase. A copy of the original
sales receipt is required.
In no event shall Lionel LLC be held liable for incidental or consequential damages.
Instructions for Obtaining Service
I
f service for this Lionel LLC product is required; bring the item, along with your DATED sales receipt and completed warranty information (at the bottom of this page)
to the nearest Lionel Authorized Service Station. Your nearest Lionel Service Station can be found by calling 1-800-4-LIONEL or by accessing the website at www.
lionel.com.
If you prefer to send your Lionel product directly to Lionel, for repair you must FIRST call 1-800-4-LIONEL or write to Lionel Customer Service, 6000 Victory Lane,
Concord, NC 28027. Please have the 6-digit Lionel product number, the date of original purchase, the dealer where the item was purchased and what seems to be the
problem. You will receive a return authorization (RA) number to ensure your merchandise will be properly tracked and handled upon receipt at Lionel LLC.
Once you have your Return Authorization (RA) number, make sure the item is packed in its original Styrofoam inner container which is placed inside the original
outer display box (this will help prevent damage during shipping and handling). This shipment MUST be prepaid and we recommend that it be insured with the
carrier of your choice.
Please make sure you have followed all of the above instructions carefully before returning any merchandise for service. You may choose to have your product repaired
by one of Lionel LLC’s Authorized Service Stations after its warranty has expired. A reasonable service fee should be expected once the product warranty has expired.
Warranty Information
P
lease complete the information below and keep it, along with your DATED ORIGINAL SALES RECEIPT. You MUST present this form AND your DATED
SALES RECEIPT when requesting warranty service.
*A complete listing of Lionel Authorized retailers can be found by calling 1-800-4-LIONEL or by visiting our website at www.lionel.com.
Products that are more than 3 years old, from date of manufacture, are not applicable for warranty coverage, even if they have never been sold prior to this date. (Under
no circumstance shall any components or labor be provided free of charge.)
Name _________________________________________________________________________
Address ________________________________________________________________________
Place of Purchase _________________________________________________________________
Date of Purchase __________________________________________________________________
Product Number __________________________________________________________________
S
ome states do not allow the exclusion or limitation of incidental or consequential damages, so the above exclusion may not apply to you. This warranty gives you
specific legal rights and you may have other rights which vary from state to state.