Lionel LCFTX2G4 Thomas and Friends Remote set User Manual
Lionel L.L.C. Thomas and Friends Remote set
Lionel >
User Manual
73-0218-250
5/13
CAUTION—ELECTRIC TOY
NOT RECOMMENDED FOR CHILDREN UNDER EIGHT YEARS OF AGE. AS WITH ALL ELECTRIC
PRODUCTS, PRECAUTIONS SHOULD BE OBSERVED DURING HANDLING AND USE TO PREVENT
ELECTRIC SHOCK.
TRANSFORMER RATINGS—INPUT: 120-240 VAC 50/60 HZ.
OUTPUT: 18 VDC; 2000 MA.
Remote Control
Ready-To-Run Set
Owner’s Manual
Remote Control
Ready-To-Run Set
Owner’s Manual
Featuring: RailSounds
RC™
and

2
Congratulations!
Welcome to the world of Lionel trains! You’re off to a great start with this ready-to-run LionChief
train set. This set features everything you need to get started—a wall-pack power supply, a
huge, easy-to-assemble FasTrack oval, a string of detailed cars, and a powerful Lionel locomotive that
is equipped with RailSounds RC sound system.
Have fun growing with this complete train set! Start with the set components, then follow your
imagination into your own miniature world. Expand your railroad empire with additional FasTrack
track sections, enhance your layout with accessories, lengthen your consist with extra cars, or operate
a new locomotive at the head end of your train!
Use this Owner’s Manual to learn how to set up, operate, and maintain your train set for years of
reliable operation.
Locomotive Features:
• Electric locomotive controlled by a remote control that is paired with the locomotive in this set
• Official "All aboard the Polar Express" and “Tickets, please!” movie sound clip (remote only)
• On/Off switches for smoke and steam chuffing sound
• RailSounds RC sound system with steam chuffing and engine background sounds, whistle, bell,
and user-activated announcements.
• Operating headlight
• Synchronized chuffing sounds with puffing smoke
• Easy connect drawbar system
• Operating coupler on rear of tender
• Powerful maintenance-free motor
• Two traction tires
• Die-cast metal locomotive body
• Large pilot and headlight lens shield
Passenger Cars Feature:
• Interior lighting
• Decorated drumhead and distinctive railing on observation car
• Silhouettes in window
Remote Features:
• Forward and reverse speed control knob
• Three buttons activate whistle sound, bell sound, and official announcements
• Requires three AAA alkaline batteries (not included)
THE POLAR EXPRESS and all related characters and elements
are trademarks of and © Warner Bros. Entertainment Inc.
WB SHIELD: TM & © Warner Bros. Entertainment Inc.
(s09)

3
Table of contents
Safety information
Operating your wall-pack power supply safely 4
LionChief system basics
Model railroading with the LionChief system 5
Installing AAA batteries into the Remote Control 6
Operating your train with LionChief remote 7
LionChief locomotive overview
Locomotive Overview 8
Building your Lionel layout 9
Joining the FasTrack track sections 9
Connecting your wall-pack power supply 10
Installing the observation car platform 10
Operating your train set
Adding smoke fluid to your locomotive's smoke generator 11
Running your train set 12
Triggering announcements with your LionChief remote control 13
Coupling 13
Attaching the figures 14
Silencing the steam chuffing sounds 15
Maintaining and servicing your set
Lubricating your locomotive 16
Replacing your locomotive's traction tire 16
Replacing your locomotive's headlamp 16
Replacing the passenger car lamps 18
Troubleshooting
Troubleshooting from Customer Service 19-21
Ideas for expanding your layout
Expanding your Lionel railroad empire 22
FCC Statement 23
Lionel Limited Warranty Policy & Service 24
The following Lionel marks are used throughout this Owner’s Manual and are protected under
law. All rights reserved.
Lionel®, LEGACY™, FasTrack™, TrainMaster®, Odyssey®, RailSounds®, CrewTalk™, TowerCom™,
DynaChuff™, StationSounds™, Pullmor®, ElectroCoupler™, Magne-Traction®, CAB-1® Remote
Controller, American Flyer®, Lionel ZW®, ZW®, MagniVision®, TMCC®, Lionelville®, Wireless
Tether™, Powerhouse™, LionMaster®, Conventional Classics™, Postwar Celebration Series™,
TruRail™, PH-1 Powerhouse®, Powermaster®, Powerstation-Powerhouse®, Accessory Motor
Controller™, AMC™, Accessory Switch Controller™, ASC™, Action Recorder Controller™, ARC™, Track
Power Controller 300™, TPC 300™, Track Power Controller 400™, TPC 400™, Block Power
Controller™, BPC™, Operating Track Controller™, OTC™, FatBoy™, Lionel Lines®, Joshua Lionel
Cowen Series™, Lockon®, TrainSounds™, MultiHorn™, MultiWhistle™, Choo-Choo™

Operating your wall-pack power supply safely
4
Your Lionel wall-pack power supply is listed by Underwriter’s Laboratory Inc. and has been
carefully designed to ensure peak performance. When using electrical products, basic safety
precautions should be maintained.
Be sure to observe the following guidelines:
• Read the manual thoroughly before using this device.
• This device is not recommended for children under eight years of age.
• Parents should periodically inspect this product for potential hazards and, if necessary, have them
repaired by a Factory Trained Authorized Lionel Service Station. In the event that such a condition
exists, the transformer should not be used until it has been properly repaired.
• The wall-pack power supply is intended to be used indoors. Do not use this device if water is
present. Serious or fatal injuries may result.
• Use the wall-pack power supply only for its intended purpose.
• The wall-pack power supply was designed to operate on 120-240 volt AC, 50/60-Hertz power. Do
not connect this product to any other power supply.
• Do not operate the wall-pack power supply with a damaged cord, plug, or case.
• To avoid the risk of electrical shock, do not disassemble the unit. There are no user serviceable
parts inside. If damaged, take this product to a Factory Trained Authorized Lionel Service Station.
Visit www.lionel.com for a list of authorized Service Centers.
• Do not operate the wall-pack power supply on your layout unattended. Obstructed accessories or
stalled trains may overheat, resulting in damage to your layout.
• Always unplug the wall-pack power supply from the power source when not in use.
• Never insert objects into the ventilation slots on this product. Damage to sensitive
electronic components can result.
Safety information

5
Model railroading with the LionChief system
Your ready-to-run LionChief train set comes with a DC wall-pack power supply, a LionChief
remote control, a LionChief-equipped locomotive, rolling stock, and a FasTrack oval, complete
with a wall-pack terminal section for “plug-and-play” set up.
Your locomotive runs on fixed voltage, which is optimal for the sound system, smoke system,
and lamps. The locomotive listens to commands from its LionChief remote at a specific frequency
to increase or decrease speed, change directions, or trigger sounds. That’s why the locomotive and
remote must be operated as a matched pair.
The DC wall-pack power supply is capable of running the locomotive and cars that come with
this set, plus a few add-on cars and accessories, depending on the power they require. Keep in mind
that your locomotive can run on AC power, too, so you may choose to upgrade to most Lionel or
Lionel-compatible AC transformers (available separately at your authorized Lionel retailer) when you
expand your layout.
Important! Run only your layout with only the DC wall-pack power supply OR an AC transformer.
Do not run both! Also, keep in mind that most other Lionel locomotives require AC power specifically;
check the instructions included with the other locomotives.
If you do choose to run your LionChief locomotive with a transformer, set the train voltage to full
(18 volts) and use the remote to run the train and trigger the sounds. The locomotive is not designed
to respond to the transformer’s throttle, direction button, horn button, or bell button; the locomotive
only responds to commands from its LionChief remote.
Keep in mind that the remote that comes with the train set is paired with the locomotive. This
locomotive and remote share a frequency, and your LionChief remote will not communicate with
other locomotives. However, locomotives of the same type, for example a 2-8-4 berkshire, may share a
frequency. Where the frequency is shared, any locomotive of the same type on the track would respond
together, at the same time, to commands from a remote. To avoid this scenario, you may choose not
to run multiples of the same locomotive type at the same time.
Otherwise, you may run more than one LionChief-equipped locomotive on the track at the same
time. You may also choose to run your LionChief locomotive on a LEGACY Control System-equipped
layout; however, you must use your LionChief remote control to control the LionChief locomotive
(LionChief locomotives do not receive commands from the LEGACY remote).
LionChief system basics
6
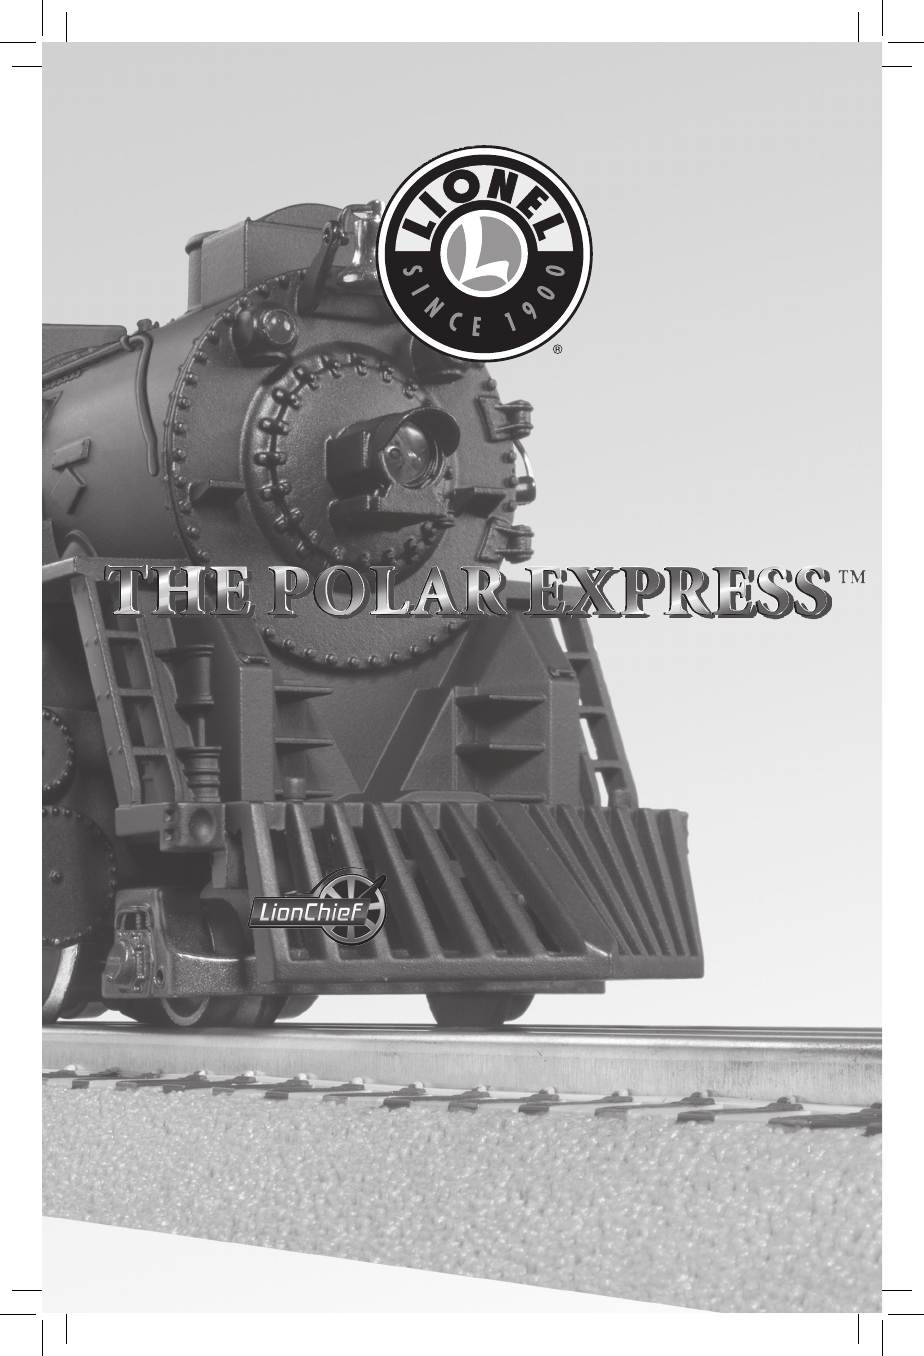
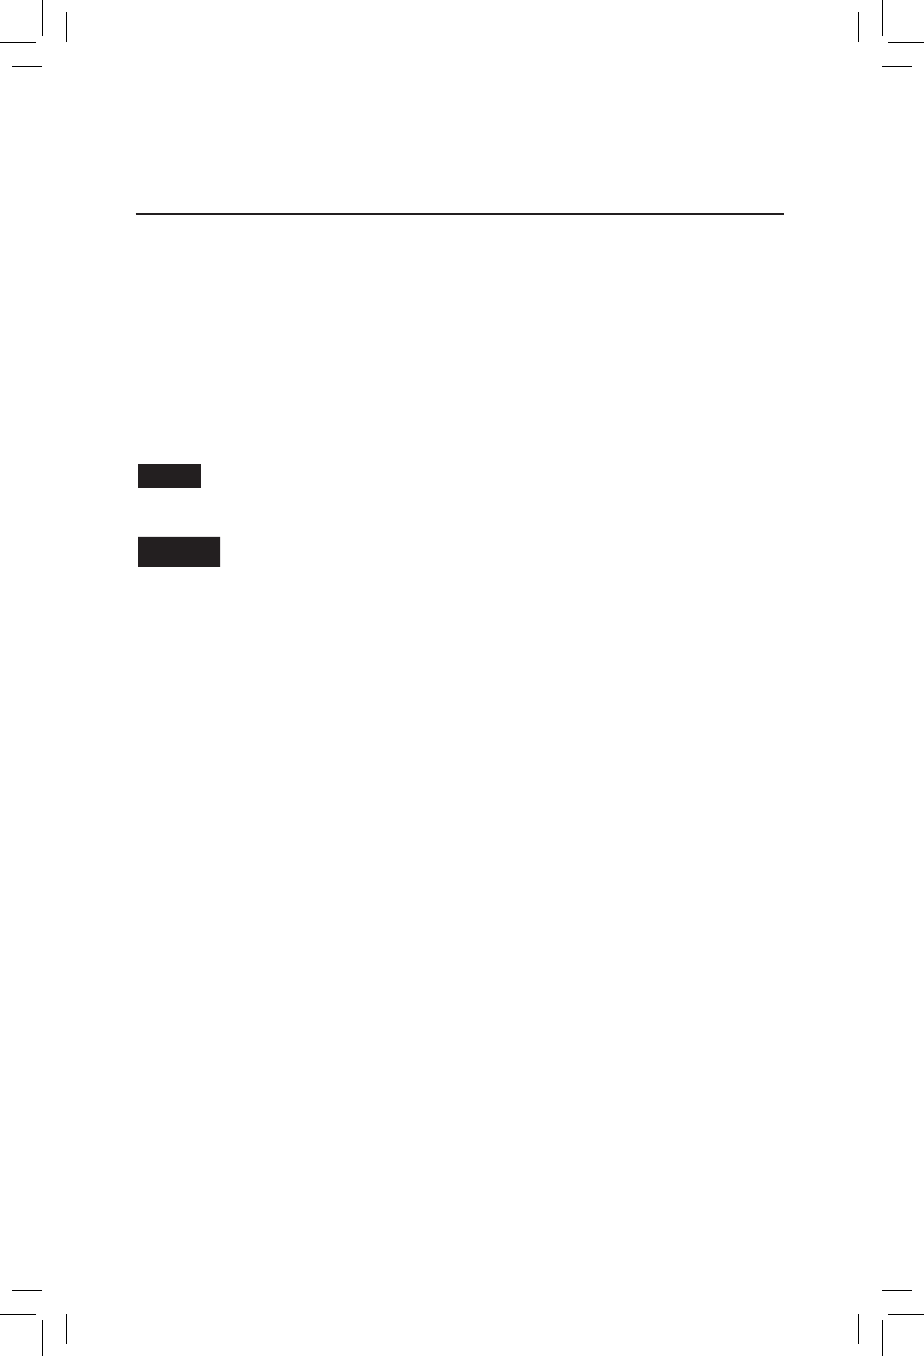
Installing AAA batteries into the Remote Control
For safety purposes, you must use a Phillips screwdriver to access the battery compartment. Use
a Phillips screwdriver to remove the screw that secures the battery compartment hatch and
lift the hatch to access battery compartment (as shown in Figure 1). Insert three AAA batteries
orientating the +/- as shown in the bottom of the battery compartment. Replace the battery door
and snap closed.
Use only Alkaline AAA batteries. Use only new batteries. Never mix new and used
batteries or use different types together.
Figure 1. Opening and closing the battery compartment
REMOVE ALL BATTERIES WHEN THE TRAIN WILL NOT BE USED FOR AN
EXTENDED PERIOD OF TIME.
Important!
When you are not operating the train, slide the On/Off switch to the Off
position to conserve the batteries.
Important!
The LionChief remote control overview
Important!
Remove screw and remove
battery compartment hatch
7
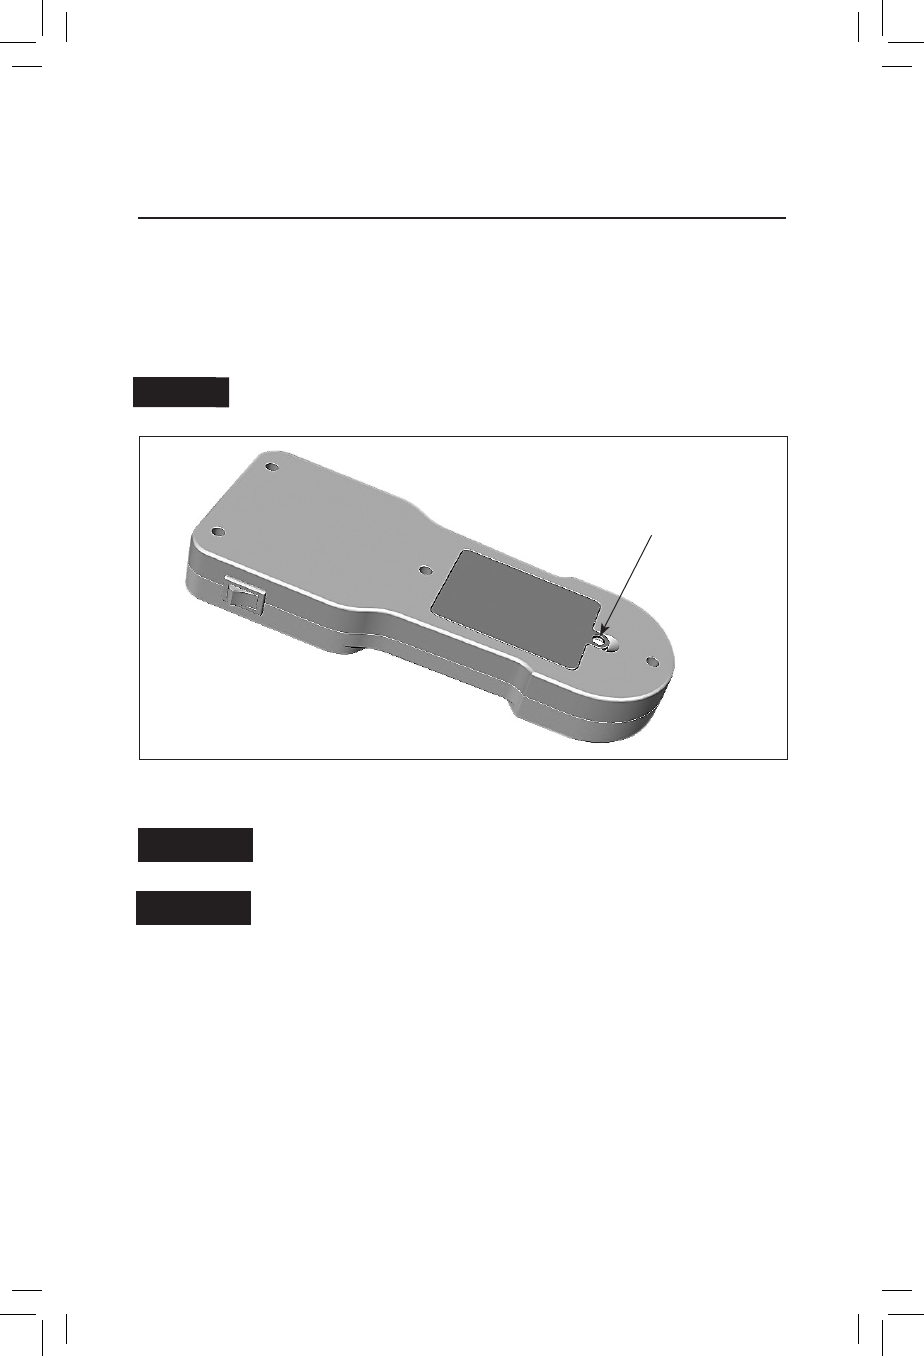
The LionChief remote control overview
Operating your train with your LionChief remote
ON/OFF SWITCH
To conserve your batteries,
slide the On/Off switch to the
Off position when you are
done operating your train.
SPEED INDICATOR LIGHT
The red light will remain on during
normal operation. The light will begin to
flash when the locomotive is in motion,
and the flashing will vary with the loco-
motive's speed.
BELL
The BELL button will
activate the bell sounds on
locomotives equipped with
this feature. Press the BELL
button to begin the sounds;
press the button again to
turn off the ringing.
WHISTLE
The WHISTLE button will activate
your locomotive’s whistle.
ANNOUNCEMENTS
Press the center button for a variety of
announcements that may vary depending on
the train set. See page 14 for more informa-
tion.
THROTTLE
Turn the throttle knob clockwise to go for-
ward and adjust the speed. Turn the throttle
knob counter-clockwise to go reverse and
adjust the speed. To stop the train, simply
return the throttle knob to the
center position.

8
Locomotive 0verview
Your LionChief locomotive is designed to operate with commands from its corresponding
LionChief remote. You may choose to power it with the wall-pack power supply included with
this ready-to-run train set, or you may choose to expand and upgrade to essentially any Lionel or
Lionel-compatible AC transformer. Even DC transformers will work for this particular locomotive!
Smoke
Your locomotive features an operating smoke unit that produces safe, clean, white smoke. Always
keep a small amount of smoke fluid in the smoke unit when you are running your locomotive with
the smoke unit in the On position. Slide the smoke unit switch to the Off position if you do not want
to operate the locomotive with smoke or you choose not to add smoke fluid. From more information,
please see page 17.
Additional Lionel Premium Smoke Fluid (6-37841) is available separately when you deplete the
sample.
LionChief RC sound system
Your locomotive features a wide range of sounds to make operation even more realistic and impres-
sive! The steam chuffing sounds are coordinated with the blasts of smoke from the smokestack, and
they increase with the speed of the locomotive. You may choose to turn the chuffing sounds off by
sliding the sound switch to the off position. See page 17.
Use the whistle, bell, and announcement buttons on the LionChief remote control to trigger those
sounds. See page 7 for more information.
Keep in mind that the speaker is housed in the tender. Ensure that the drawbar is connected prop-
erly for good electrical contact.
Care and maintenance
A few simple precautions will help to ensure a long life for the locomotive:
• Lubricate the wheels, axles, and linkage regularly to avoid squeaks and wear. See page 18 for
complete details.
• Avoid squeezing and bending the side rods and linkage when handling and packing the locomo-
tive to prevent binding.
LionChief locomotive Overview

9
Getting ready to run your trains
Building your Lionel layout
Your set comes with eight curved sections, three 10" straight sections, and one wall-pack terminal
section of track. Figure 2 shows the oval layout that you can build with these track sections.
You may choose to add more FasTrack track sections to create an endless number of exciting track
arrangements for more fun, action, and variety.
Figure 2. Track layout
Joining the FasTrack track sections
FasTrack track sections join together easily. With interlocking roadbed sections and large rail tabs,
the track fits together securely so you always have good electrical contact. Take a look at Figure 3
to see how to join the track sections.
1. Line up your two sections of track.
2. Insert the rail tabs into the openings at the ends of the corresponding rails.
3. Press the sections together until the interlocking roadbed snaps into place.
Figure 3. Joining the track sections
Rail tab
10
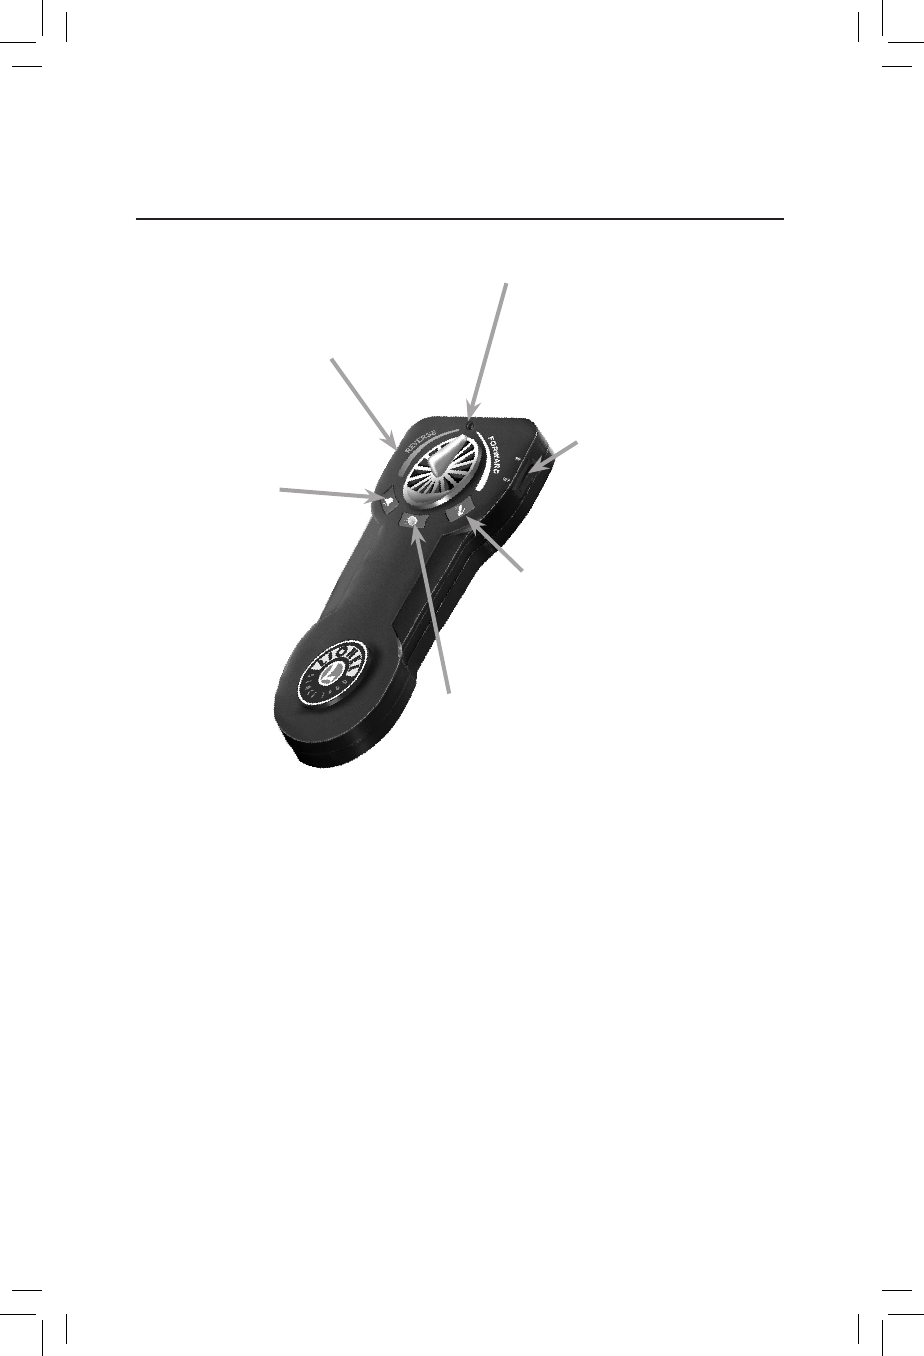
Connecting your wall-pack power supply
Your trains are powered by a DC wall-pack power supply. To power the track, simply plug the
wall-pack into an outlet and plug the jack into the terminal section as shown in Figure 4.
Figure 4. Wall-pack power supply connection
Jack on wall-pack
power supply
Terminal track section
Getting ready to run your trains
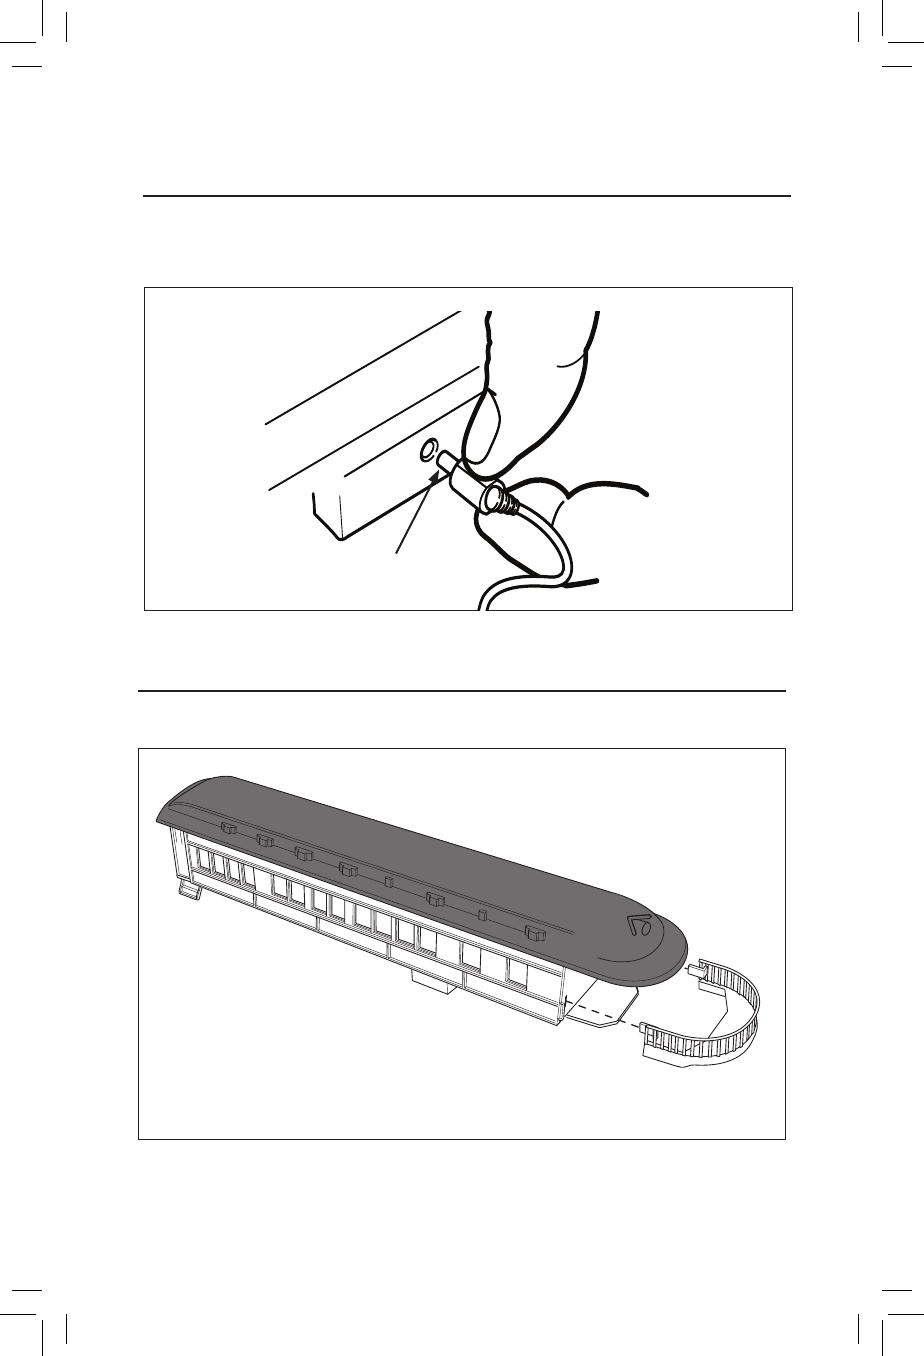
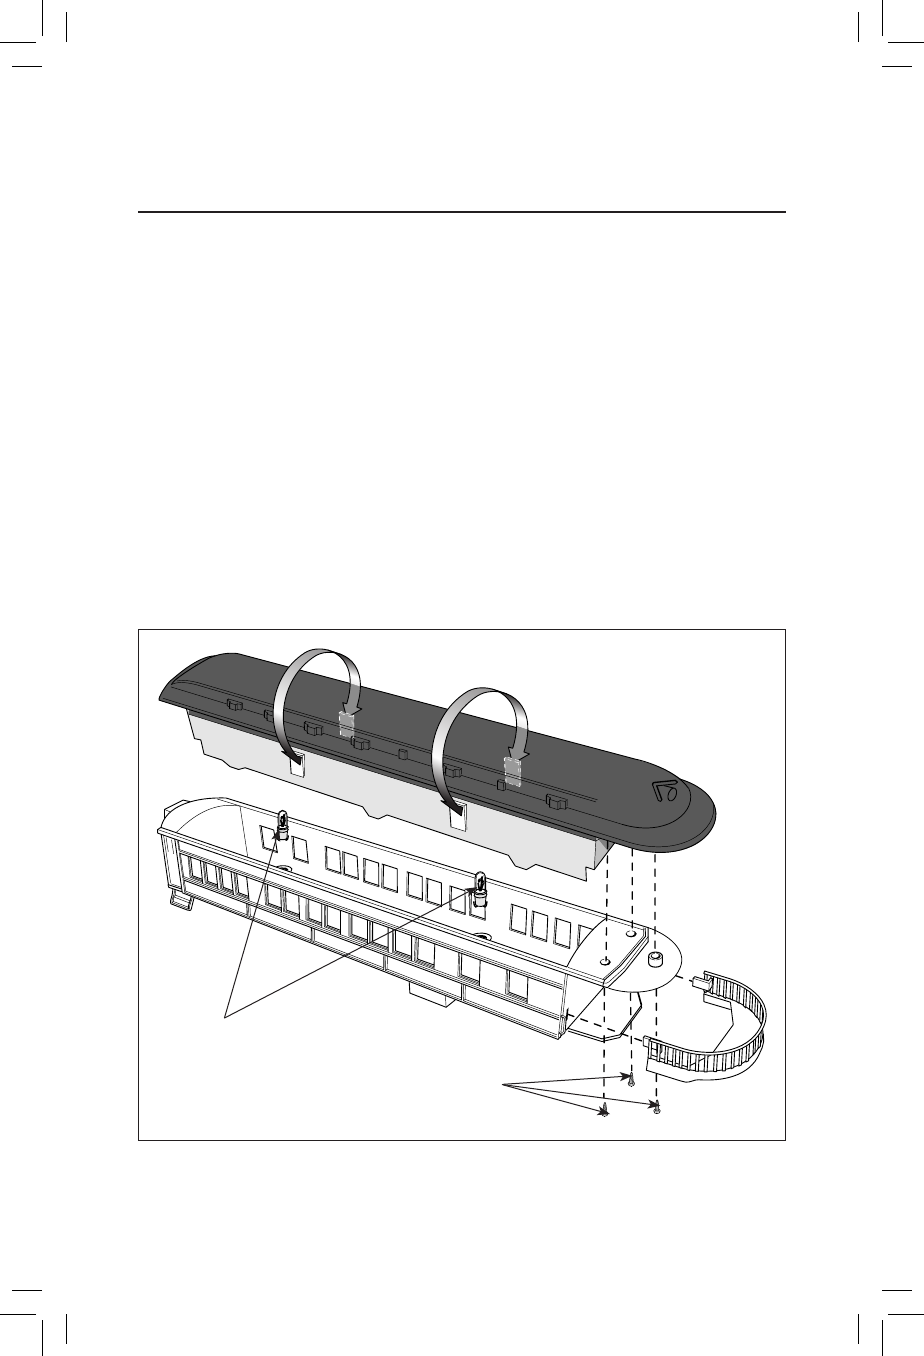
Installing the observation car platform
Slide the tabs on the observation car platform into the slots in the rear of the body. Refer to Figure 5.
Figure 5. Installing the observation car platform
11
Adding smoke fluid to your locomotive's smoke generator
Your locomotive is equipped with a smoke generator that produces safe, clean white smoke dur-
ing operation if the smoke unit switch is in the ON position. Refer to Figure 9 on page 17 for the
location of the switch.
The smoke generator requires the periodic addition of Lionel smoke fluid in order to function. A
small bottle of smoke fluid is included with this set. Press down and unscrew the cap. Pierce the end
of the nozzle with a pin, then add about four drops of fluid directly into the locomotive’s stack. Smoke
production commences momentarily. It will start faster if you run your locomotive at higher speeds.
When smoke production decreases, add more fluid (about four drops). An idle locomotive will not
smoke.
If you prefer to operate the locomotive without smoke or you do not want to add
smoke fluid, slide the smoke unit switch to the OFF position.
When the smoke unit switch is in the ON position, always keep a small amount of
smoke fluid in the locomotive’s smoke generator; the generator’s element can become
damaged if operated without smoke fluid. This is particularly true if your locomotive
sits in neutral for an extended period of time without smoke fluid in the generator.
Operating your train set
Caution!
Note!
12
Operating your train set
Running your train set
With track power unplugged, place your train set on the track.
Refer to the following section for information on coupling the cars.
3
4
Plug in your wall-pack power supply, connect
it to the track, and switch on the remote.
Move ‘em out!
Use your remote to run your train. You can adjust the speed
in forward or reverse, blow the whistle, sound the bell, or trigger an
announcement. Refer to page 14 for complete details.
1
5Unplug the wall-pack power supply when you are done running
your trains.
2Couple the locomotive to the tender
Switch off your remote control to conserve the batteries.
Figure 6. Drawbar connection
Fit the tab on the locomotive drawbar into the slot on
the tender's drawbar as illustrated in Figure 6. Note that
the drawbar connection connects the locomotive and
tender electronically. Make the connection securely to
ensure good electrical contact.
13
Operating your train set
Triggering announcements with your LionChief remote control
Your locomotive plays a variety of announcements that are designed to match the way you play
with the locomotive. You can trigger an announcement that corresponds to each part of the
journey.
When the locomotive is… The announcements states…
At a stop “All aboard! This is the Polar Express!”
In motion “Tickets! Tickets. please!”
Coupling
When coupling your cars, at least one of the mating couplers must be open as shown at the left
in Figure 7. Press down on the lock release to open the coupler, then push the cars toward
each other until they lock together.
Keep in mind that it’s easier to couple cars on a straight section of track.
Lock release
Figure 7. Coupler operation
Note!
14
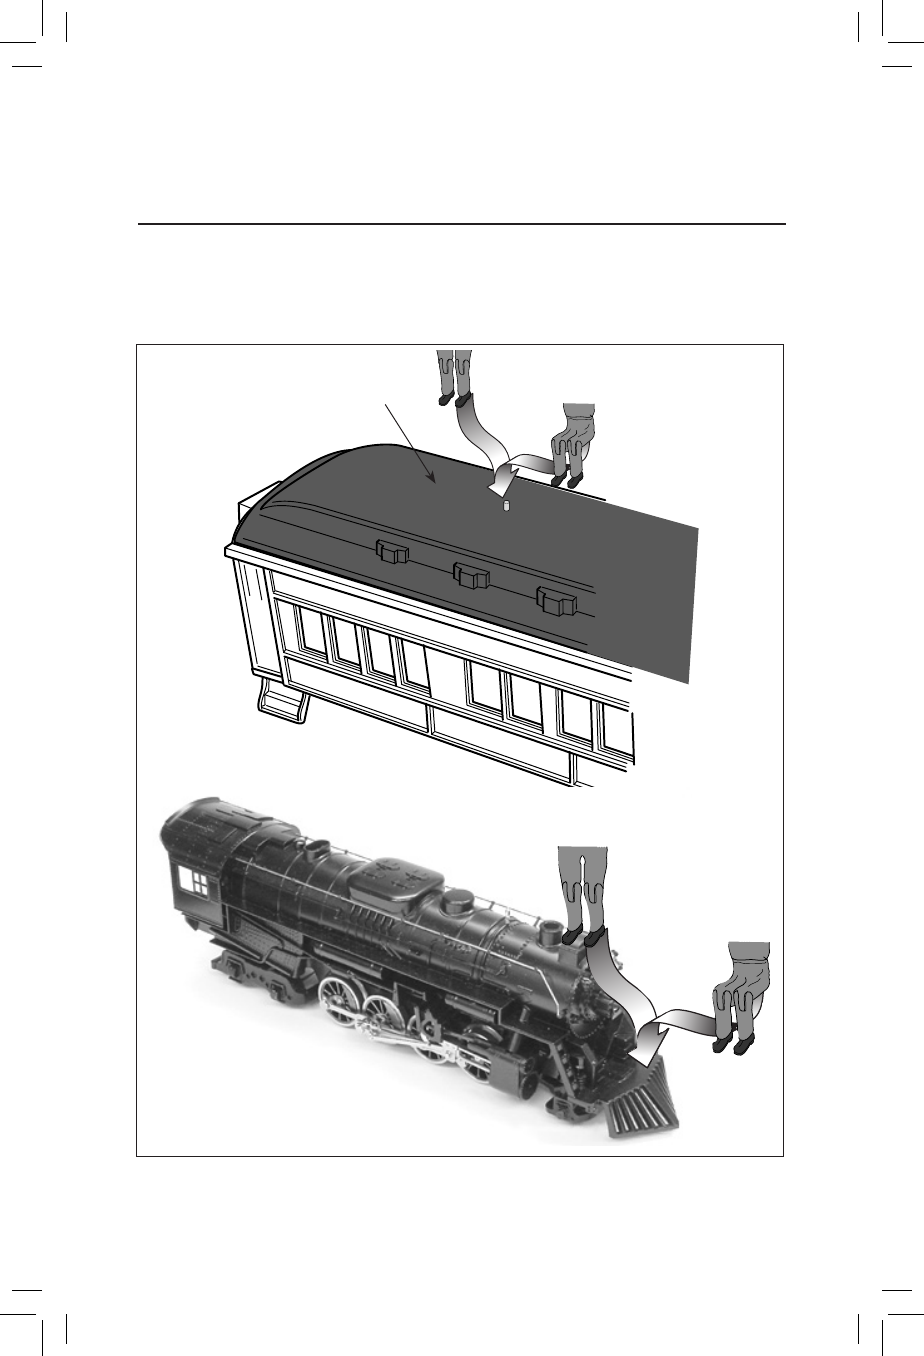
Attaching the figures
The four figures included with this train set are equipped with holes that allow them to ride on the
train. As illustrated in Figure 8, press the figures onto the posts located on the roofs of the passen-
ger cars and on the locomotive.
Operating your train set
Figure 8. Figure installation
Passenger car

15
Operating your train set
Silencing the steam chuffing sounds
To silence the background steam sounds, slide the SOUNDS switch to the OFF position inside the
cab. See Figure 9. Turn off track power for about two seconds, and then the background sound
will be silenced when the track power is restored. The whistle, announcement, and bell sounds can
still be triggered at any time using the remote. To restore the background sounds, simply slide the
SOUNDS switch to the ON position and then turn off track power for two or more seconds.
Always turn off track power for about two seconds after you slide the switch. The
background sounds will be reset according to the new switch position when the
track power is switched on again.
Figure 9. Switch locations
Note!
ON
SMOKE
OFF ON
SOUNDS
OFF
Smoke ON/OFF switch
(see page 12)
Sounds switch
REAR of Locomotive
16
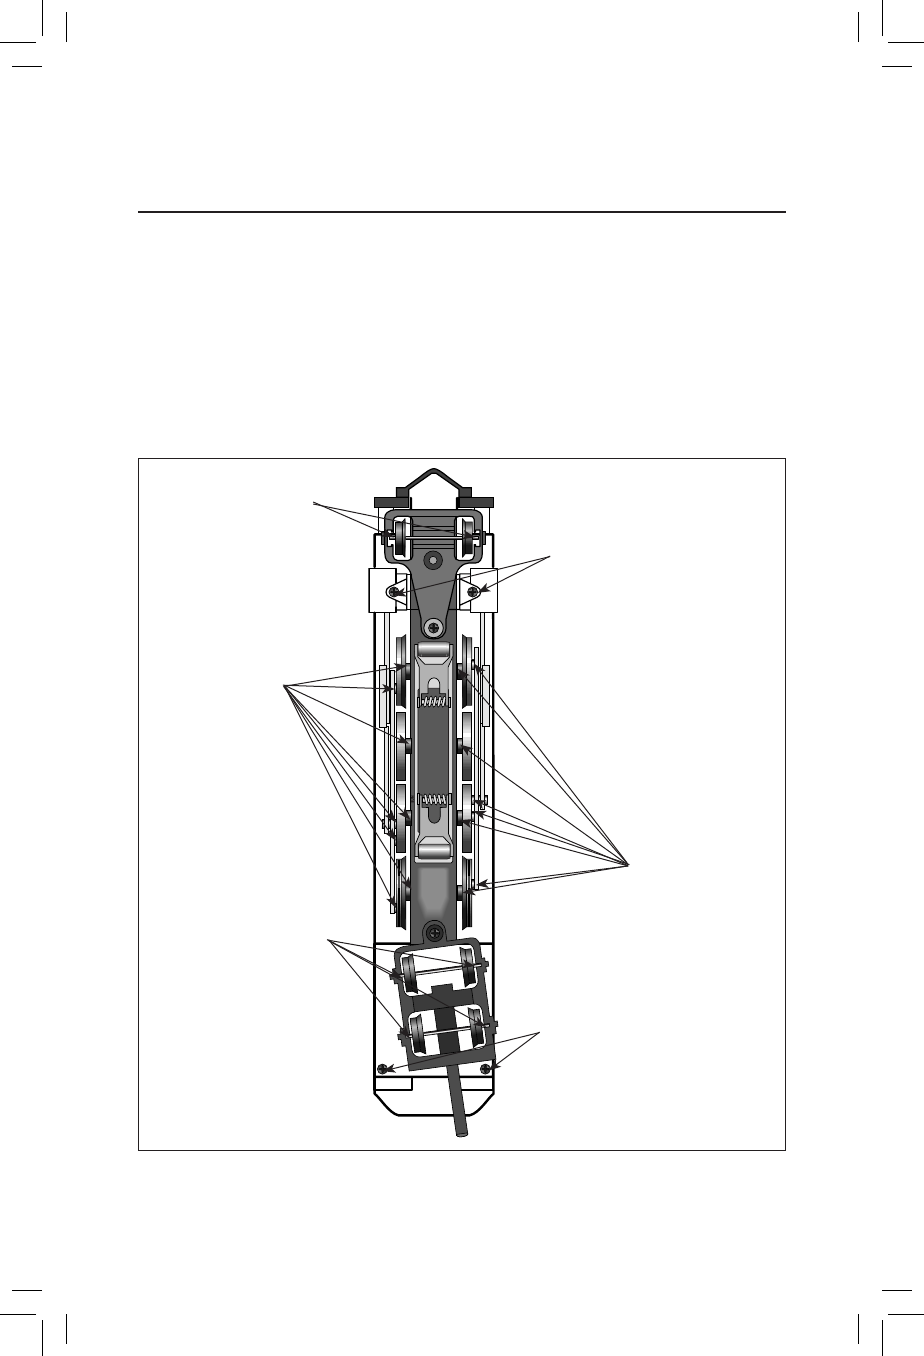
Maintaining and servicing your set
Lubricating your locomotive
H
elp your steam locomotive lead a long and productive life on your railroad by maintaining it
properly.
We recommend that you purchase a Lionel Lubrication and Maintenance Kit (6-62927),
available from your Lionel dealer. Two basic rules to keep in mind: never over-lubricate
(a small amount will do) and avoid getting grease or oil on the locomotive’s wheels, contact
rollers, or your track.
You’ll know your locomotive requires lubrication when visual inspection reveals dryness on the
parts indicated in Figure 10 and also on the tender's axles. Remove accumulated dirt and dust before
lubricating, and always lubricate any locomotive emerging from prolonged storage.
Lubricate axle
with Lionel oil
sparingly
Lubricate axle
with Lionel oil
sparingly
Body screws
Body screws
Lubricate both
sides with Lionel oil
sparingly
Lubricate both
sides with Lionel oil
sparingly
Figure 10. Lubricating points
17
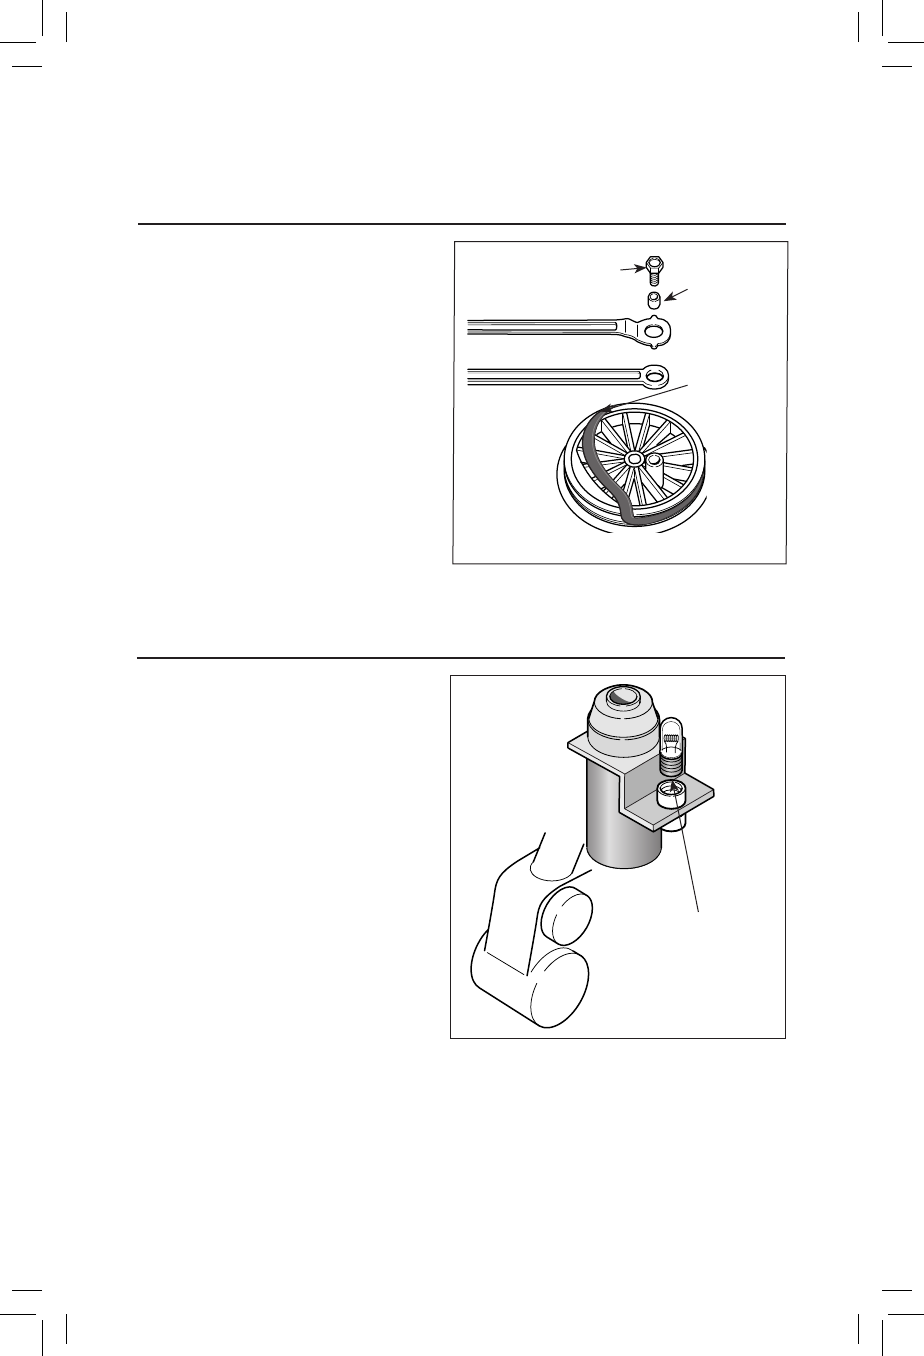
Maintaining and servicing your set
Replacing your locomotive’s traction tire
One of the locomotive’s drive wheels is fit-
ted with a rubber traction tire to enhance
tractive effort, allowing your locomotive to pull
many cars at once.
To replace the traction tire, simply unscrew
the drive rod nut from the wheel using a
3/16” nut driver. Refer to Figure 9. Remove
the old traction tire from under the drive rod
and slip on the replacement, Lionel part no.
6000222108. Replace the spacer, retighten the
drive rod nut, and you’re ready to pull that
long freight back to the yard.
Replacing your locomotive’s headlamp
Your locomotive’s headlight and marker
lights are illuminated by one lamp.
During the course of normal operations, the
lamp may require replacement.
Carefully remove the four body screws (see
Figure 10 on page 18 for their locations),
then lift the body off of the frame. Locate and
unscrew the expired lamp shown in Figure
10. Replace the lamp with Lionel part no.
6208653300, available from a Factory Trained
Authorized Lionel Service Station. (See the
Lionel Service section on page 24 for more
information.) Reinstall the cab and the four
screws, taking care to not pinch any wires dur-
ing reassembly.
Figure 9. Traction tire replacement
Figure 10. Lamp replacement
Driver rod nut
Spacer
Lionel part no.
6000242206
Lionel part no.
6208653300
18
Maintaining and servicing your set
Replacing the passenger car lamps
Each passenger car is illuminated by two lamps, Lionel part no. 6205100300. During the course
of normal operations, you may find that the lamps require replacement. Replacement lamps
are available at a Factory Trained Authorized Lionel Service Station or directly from Lionel Customer
Service. See the warranty page for contact information.
Before performing this procedure on the observation car, pull the platform back to disengage the
tabs from the slots in the body. Lift away the platform and remove the three screws from the underside
of the roof above the end platform.
1. Observation car only. Remove the platform, and then remove the three screws from the
underside of the roof.
2. As illustrated in Figure 13, press in the four window insert tabs.
3. Lift away the roof and window insert.
4. Pull the expired lamp straight up and out of the socket and install the replacement.
5. Replace the roof and window insert. Replace the three screws in the roof above the observation car
platform. Refer to Figure 13.
6. Observation car only. Secure the roof with the three screws and replace the platform.
Figure 13. Passenger car lamp replacement
Lionel part no.
6205100300 End platform screws
(Observation car only)

19
LionChief Troubleshooting
Problem: The power indicator LED on the terminal track is not illuminated.
Resolution:
If any of the wheels of the train are not properly positioned on the rails, a short circuit will occur and
the circuit breaker inside the transformer will prevent power from being applied to the track until that
short circuit is removed.
Remove the locomotive and all cars from the track. With no trains on the track check to see if the LED
is illuminated. If it is not illuminated, disconnect the track one piece at a time until the LED comes
on. If the problem is a section of track, the LED will illuminate when that section of track is removed
from the layout.
Now disconnect the barrel jack from the terminal section and place only one car on the track once
the car is on the track reconnect the barrel jack into the terminal section. The LED should be illu-
minated, if it does illuminate, disconnect it again and place another car on the track. Repeat this
process until the entire train, including the locomotive, is on the track.
Problem: One or more of the illuminated cars will not light.
Resolution:
The lamps in your trains are designed for easy replacement in the event they burn out over time. It is
possible that a lamp can become disconnected in transit; as such we suggest you first check the lamp
in its socket to ensure it is seated properly.
The lamps inside the cars and locomotive get their power from the rails. There are two wires con-
nected to the trucks on each illuminated car. One wire connects to the center rail collector (roller),
and one wire attaches to a contact for the axles that ride on the outside rails. Because the trucks are
able to pivot back and forth, it is possible that one or both of these wires may become disconnected
from these contacts and short out when they touch one another. The wires can be reconnected by hav-
ing an adult solder them to their contacts. You may want to take the item to a local Factory Trained
Authorized Lionel Service Station for this repair.
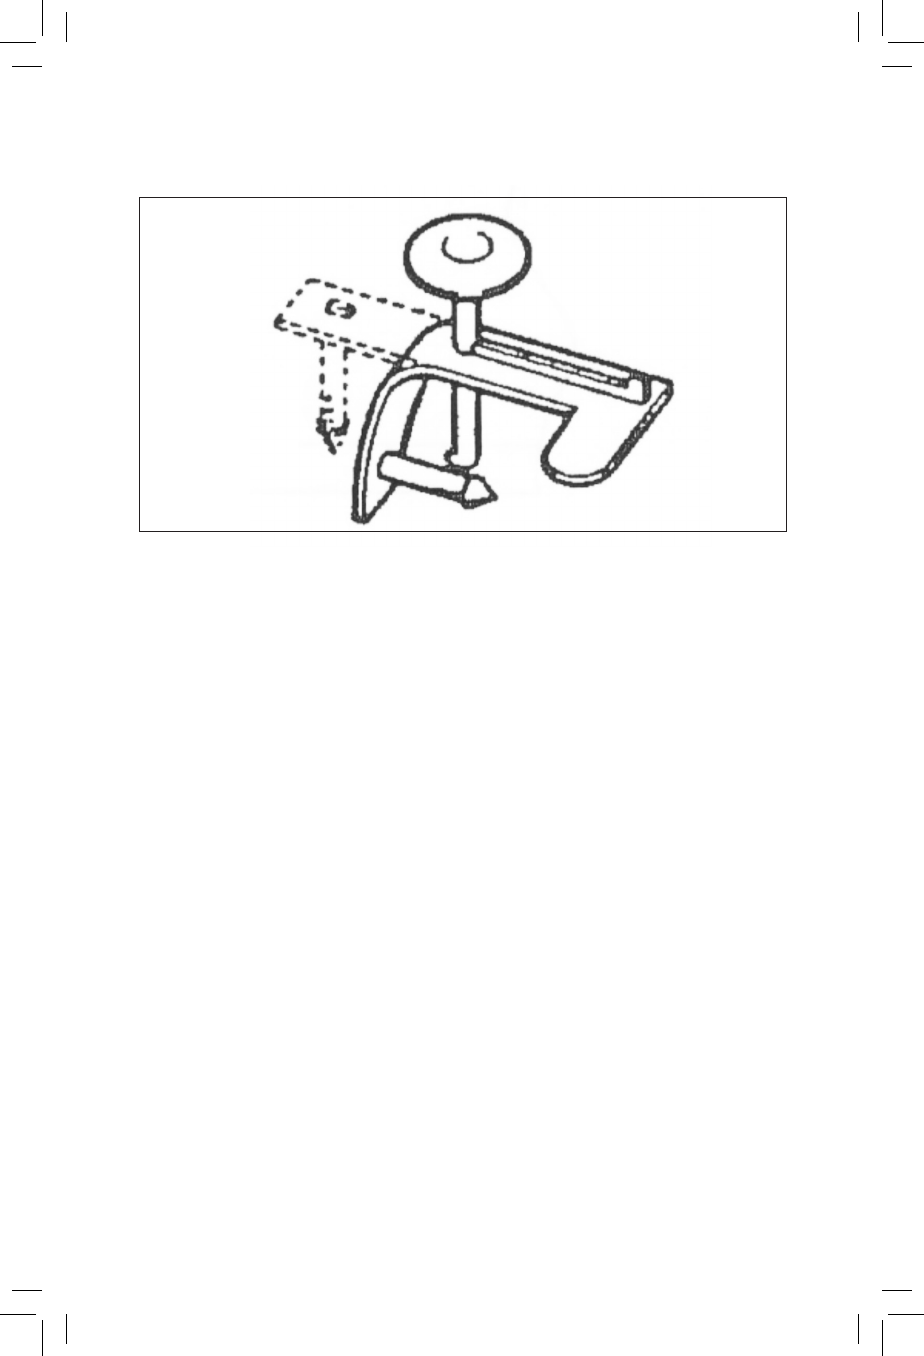
Problem: The train cars will not stay coupled to one another.
Resolution:
The couplers on each car come equipped with an uncoupling plunger, which allows you to uncouple
the cars using an Uncoupling Section. These plungers have a pin which holds the knuckle closed,
sometimes the plunger will need to be bent upwards slightly to ensure the pin holds the knuckle shut.
Use a pair of needle-nosed pliers to bend the plunger upwards slightly. This operation is shown in the
illustration below.
20
Problem: I do not hear any sounds from the locomotive.
Resolution:
The drawbar, which connects your locomotive to its tender, serves two purposes. It connects the loco-
motive and tender together and it serves as a four-conductor tether responsible for transferring the
speaker leads from the electronics inside the locomotive to the speaker inside the tender. Ensure the
male side of the drawbar (locomotive side) is fully and properly inserted into the female side of the
drawbar (tender side) and that the tops of each side of the drawbar are even with one another.
Make sure the sound on/off switch is positioned to the “on” setting and power is being applied to the
track. If the switch is set to the “off” position, only the horn/whistle and bell will be heard when the
commands are sent to the locomotive from the remote.
Problem: The locomotive does not smoke.
Resolution:
Ensure the smoke on/off switch is in the “on” position. The locomotive must be moving for smoke to
be seen ejecting from the stack. The locomotive will not smoke when sitting at idle. Ensure you have
added 4-5 drops of Lionel Liquid Smoke Fluid. It should only take 5-10 seconds for smoke to vaporize
and begin being ejected from the stack once the train begins to move. If you do not plan to use the
smoke feature on this locomotive be sure the smoke on/off switch is placed in the “off” position, so no
damage occurs to the smoke generator.
LionChief Troubleshooting (continued)

21
LionChief Troubleshooting (continued)
Problem: The LionChief Remote will not control the locomotive.
Resolution:
First, ensure the remote you are using to control the locomotive is the proper one, mated to that loco-
motive. Reference the road name and road number printed on the remote with the road name and
road number of the locomotive you are trying to control. Second, ensure you have installed three new
Alkaline AAA batteries into the remote and the on/off switch is set to the “on” position.
The red LED at the top of the remote should be on steady when the speed dial is in the top dead center
position.
The LED will begin to blink when the throttle know is turned in either direction, slowly to quickly,
mimicking the speed you set for the locomotive. The sounds in the locomotive should be on when
you attempting to make the train go. If your locomotive will not move, you will need to take both the
wireless LionChief remote and the locomotive and tender to a local Factory Trained Authorized Lionel
Service Station or contact Lionel Customer Service for further assistance.

22
Ideas for expanding your layout
Expanding your Lionel railroad empire
You’re off to a great start with this LionChief ready-to-run train set! Let your imagination guide
you as you expand and build the layout of your dreams!
Embark on an adventure! You can add another LionChief locomotive and run them on the track
at the same time. You can add additional cars and build new consists. Add accessories like stations,
figures, buildings, and more for even more fun.
Because you are starting with a FasTrack oval, expanding your track layout is easy to do!

23
FCC Statement
FCC Statement
Warning: Changes or modifications to this unit not expressly approved by the party responsible for
compliance could void the user authority to operate the equipment.
Notes: This equipment has been tested and found to comply with the limits for a Class B digital device, pursuant
to Part 15 of the FCC Rules. These limits are designed to provide reasonable protection against harmful
interference in a residential installation. This equipment generates, uses and can radiate radio frequency energy
and, if not installed and used in accordance with the instructions, may cause harmful interference to radio
communications.
However, there is no guarantee that interference will not occur in a particular installation. If this equipment does
cause harmful interference to radio or television reception, which can be determined by turning the equipement
off and on, the user is encouraged to try to correct the interference by one or more of the following measures:
• Reorient or relocate the receiving antenna.
• Increase the separation between the equipment and receiver.
• Connect the equipment into an outlet on a circuit different from that to which the receiver is
connected.
• Consult the dealer or an experienced radio/TV technician for help.

©2013 LIONEL L.L.C., CONCORD, NC 28027
UNITED STATES OF AMERICA
PRINTED IN CHINA
Lionel Limited Warranty Policy & Service
T
his Lionel product, including all mechanical and electrical components, moving parts, motors and structural components, with the
exception of LIGHT BULBS, LED’s & TRACTION TIRES are warranted to the original owner-purchaser for a period of one
year from the original date of purchase against original defects in materials or workmanship when purchased through a Lionel
Authorized Retailer*.
This warranty does NOT cover the following:
• Normal wear and tear
• Light bulbs or LED’s
• Defects appearing in the course of commercial use
• Damage resulting from abuse/misuse of the product
Transfer of this product by the original owner-purchaser to another person voids this warranty in its entirety. Modification of this product in
any way; visually mechanically or electronically, voids the warranty in its entirety.
Any warranted product which is defective in original materials or workmanship and is delivered by the original owner-purchaser
(this warranty is non-transferrable) to Lionel LLC or any Lionel Authorized Service Station MUST be accompanied by the original receipt for
purchase (or copy) from an Authorized Lionel Retailer*, will at the discretion of Lionel LLC, be repaired or replaced, without charge for
parts or labor. In the event the defective product cannot be repaired, and a suitable replacement is not available, Lionel will offer to replace the
product with a comparable model (determined by Lionel LLC), if available. In the event a comparable model is not available the customer
will be refunded the original purchase price (requires proof of purchase from the Authorized Lionel Retailer* it was originally purchased).
Any products on which warranty service is sought must be sent freight or postage prepaid (Lionel will refuse any package when postage is due).
Transportation and shipping charges are not covered as part of this warranty.
NOTE: Products that require service that do not have a receipt from an LIONEL AUTHORIZED RETAILER* will be
required to pay for all parts required to repair the product (labor will not incur a charge) providing the product is
not older than 3 years from date of manufacture and is within 1 year from date of purchase. A copy of the original
sales receipt is required.
In no event shall Lionel LLC be held liable for incidental or consequential damages.
Some states do not allow the exclusion or limitation of incidental or consequential damages, so the above exclusion may not apply to you.
This warranty gives you specific legal rights and you may have other rights which vary from state to state.
Instructions for Obtaining Service
If service for this Lionel LLC product is required; bring the item, along with your DATED sales receipt and completed warranty information
(at the bottom of this page) to the nearest Lionel Authorized Service Station. Your nearest Lionel Service Station can be found by calling
1-800-4-LIONEL or by accessing the website at www.lionel.com.
If you prefer to send your Lionel product directly to Lionel, for repair you must FIRST call 586-949-4100 extension 2 or FAX Lionel at 586-
949-5429 or write to Lionel Customer Service, 6655 Seville Drive, Canfield, OH 44406. Please have the 6-digit Lionel product number, the date
of original purchase, the dealer where the item was purchased and what seems to be the problem. You will receive a return authorization (RA)
number to ensure your merchandise will be properly tracked and handled upon receipt at Lionel LLC.
Once you have your Return Authorization (RA) number, make sure the item is packed in its original Styrofoam inner container which is
placed inside the original outer display box (this will help prevent damage during shipping and handling). This shipment MUST be prepaid and
we recommend that it be insured with the carrier of your choice.
Please make sure you have followed all of the above instructions carefully before returning any merchandise for service. You may choose to
have your product repaired by one of Lionel LLC’s Authorized Service Stations after its warranty has expired. A reasonable service fee should be
expected once the product warranty has expired.
Warranty Information
Please complete the information below and keep it, along with your DATED ORIGINAL SALES RECEIPT. You MUST present this form
AND your DATED SALES RECEIPT when requesting warranty service.
*A complete listing of Lionel Authorized retailers can be found by calling 1-800-4-LIONEL or by visiting our website at www.lionel.com.
Products that are more than 3 years old, from date of manufacture, are not applicable for warranty coverage, even if they have never been
sold prior to this date. (Under no circumstance shall any components or labor be provided free of charge.)
Name _________________________________________________________________________
Address ________________________________________________________________________
Place of Purchase _________________________________________________________________
Date of Purchase __________________________________________________________________
Product Number __________________________________________________________________
Product Description ________________________________________________________________