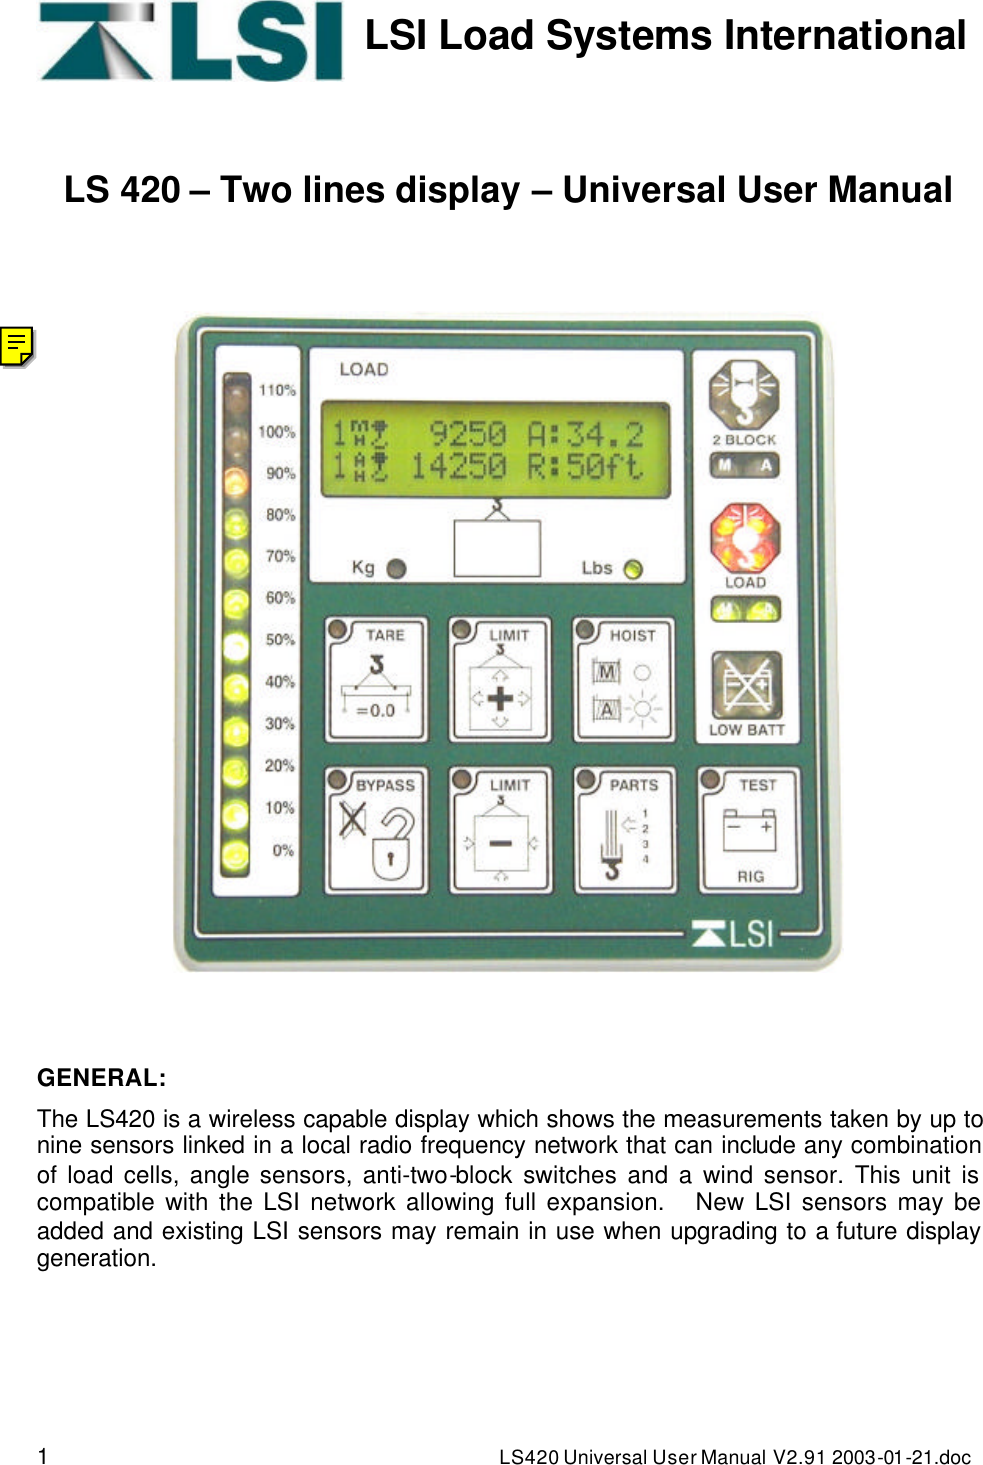
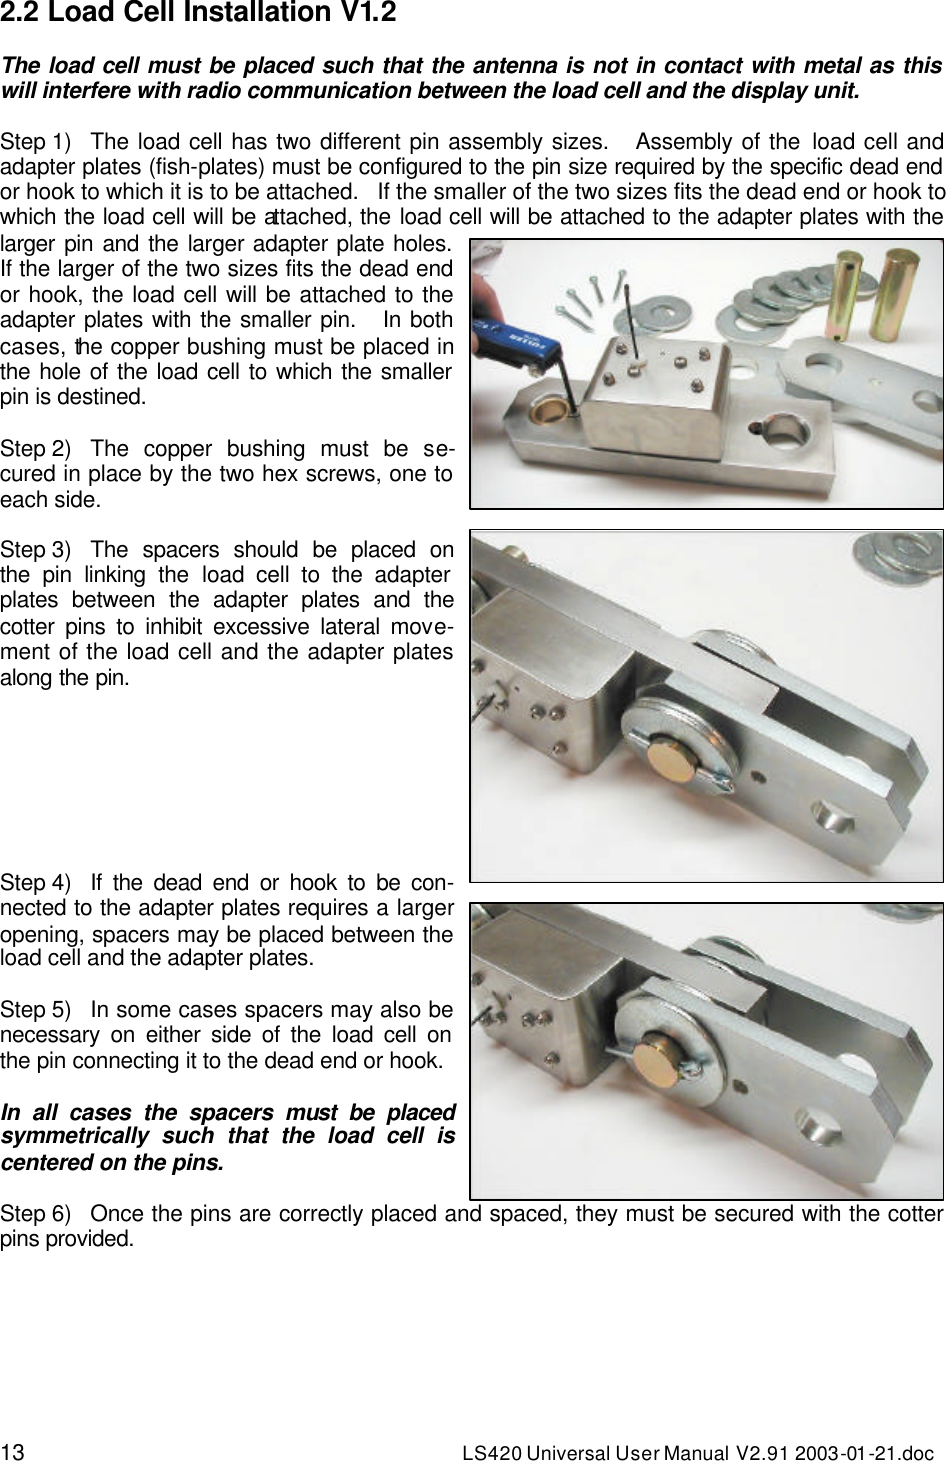
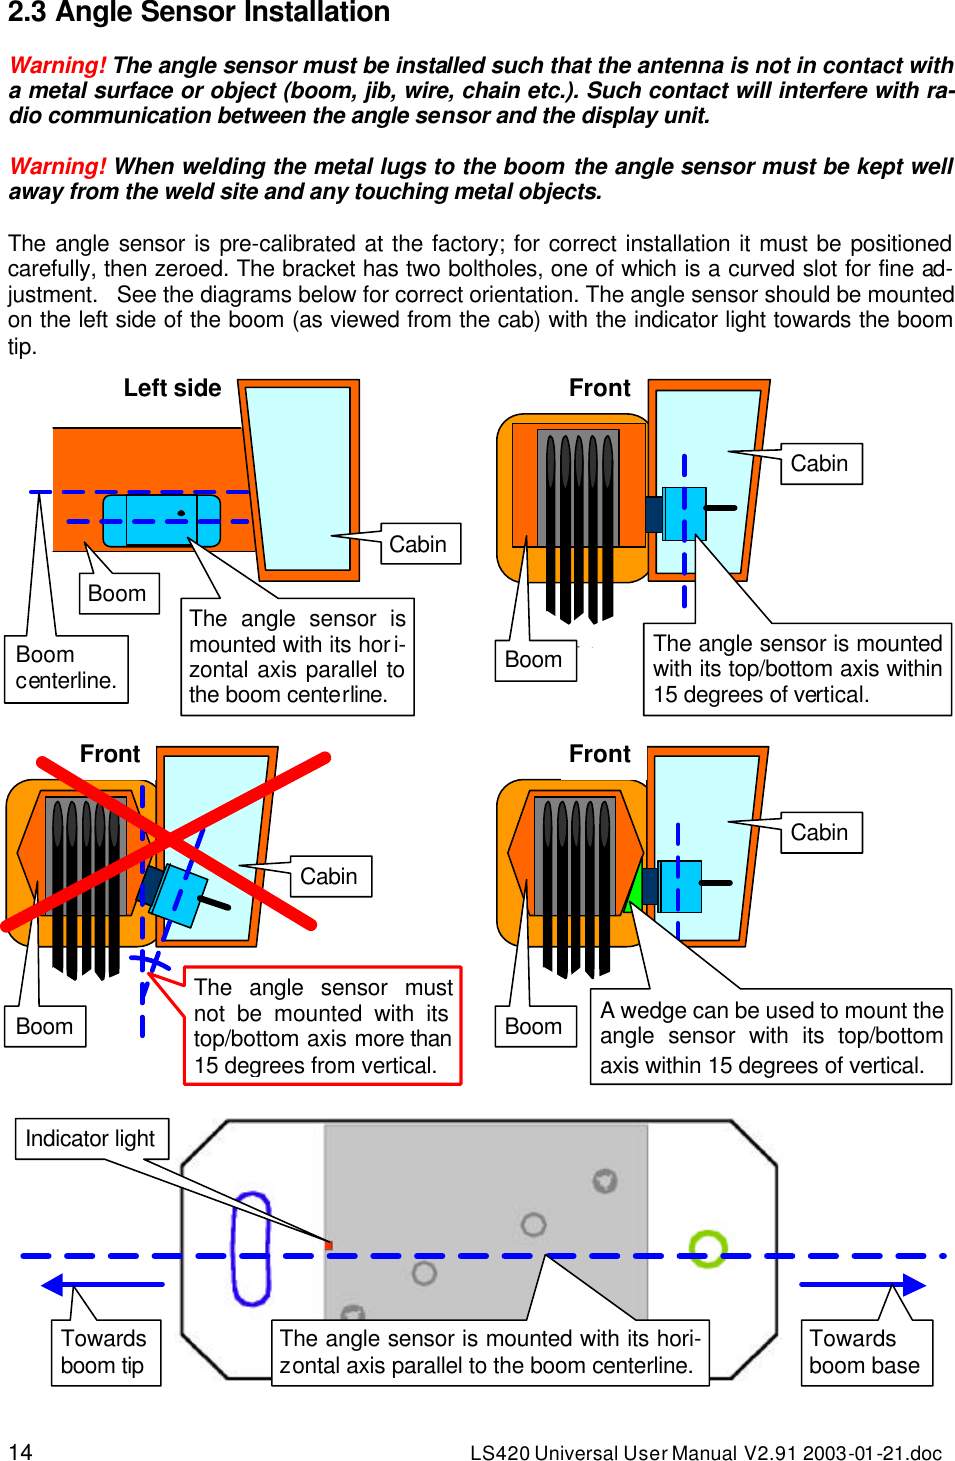
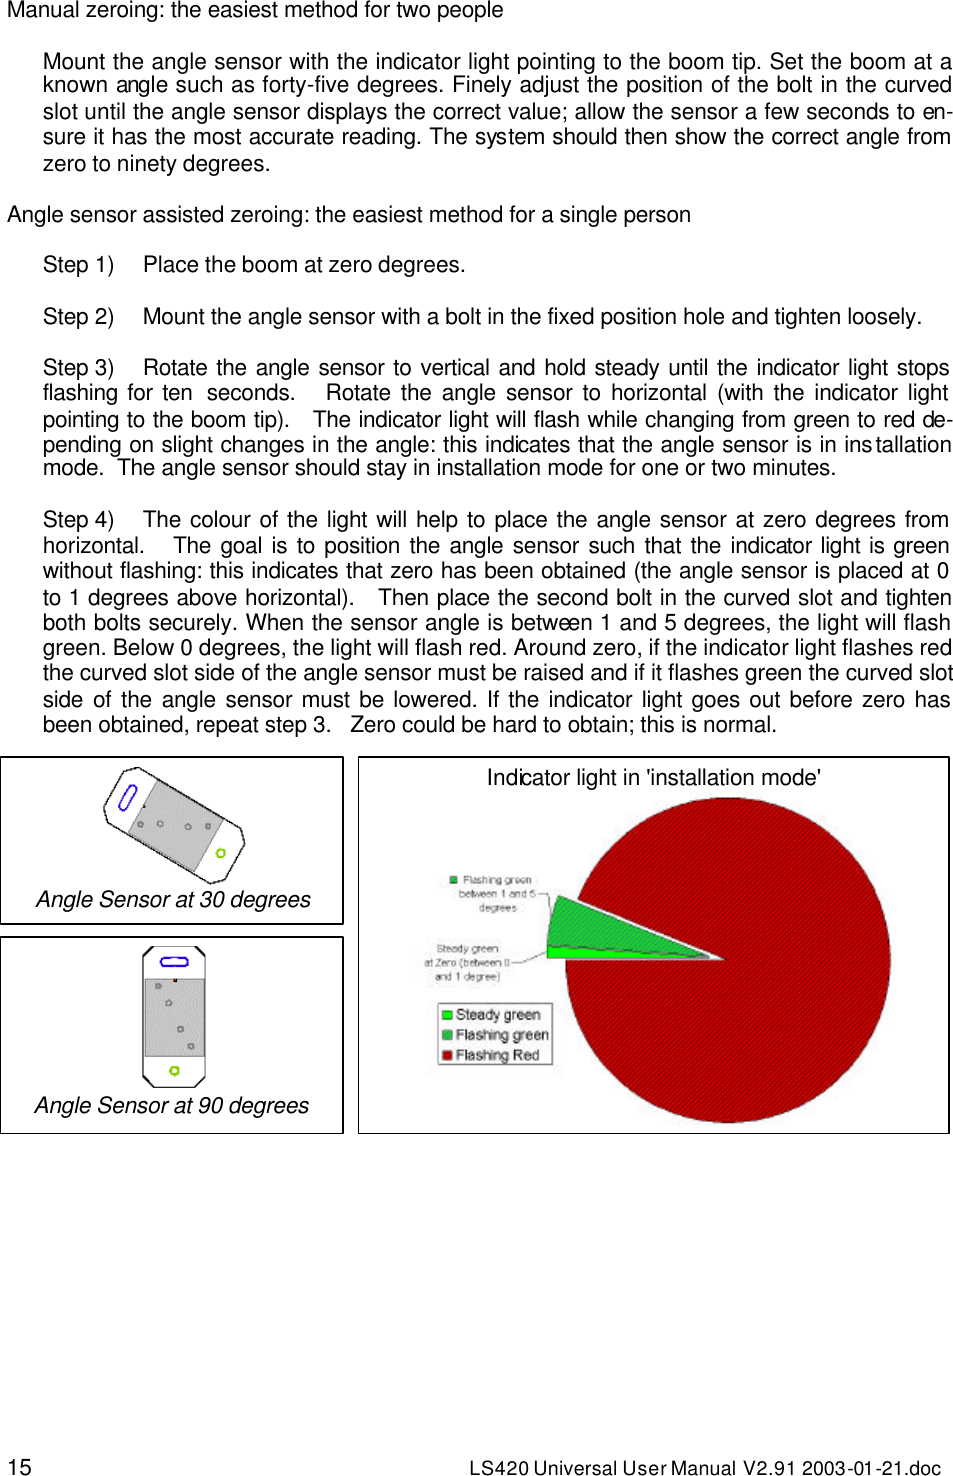
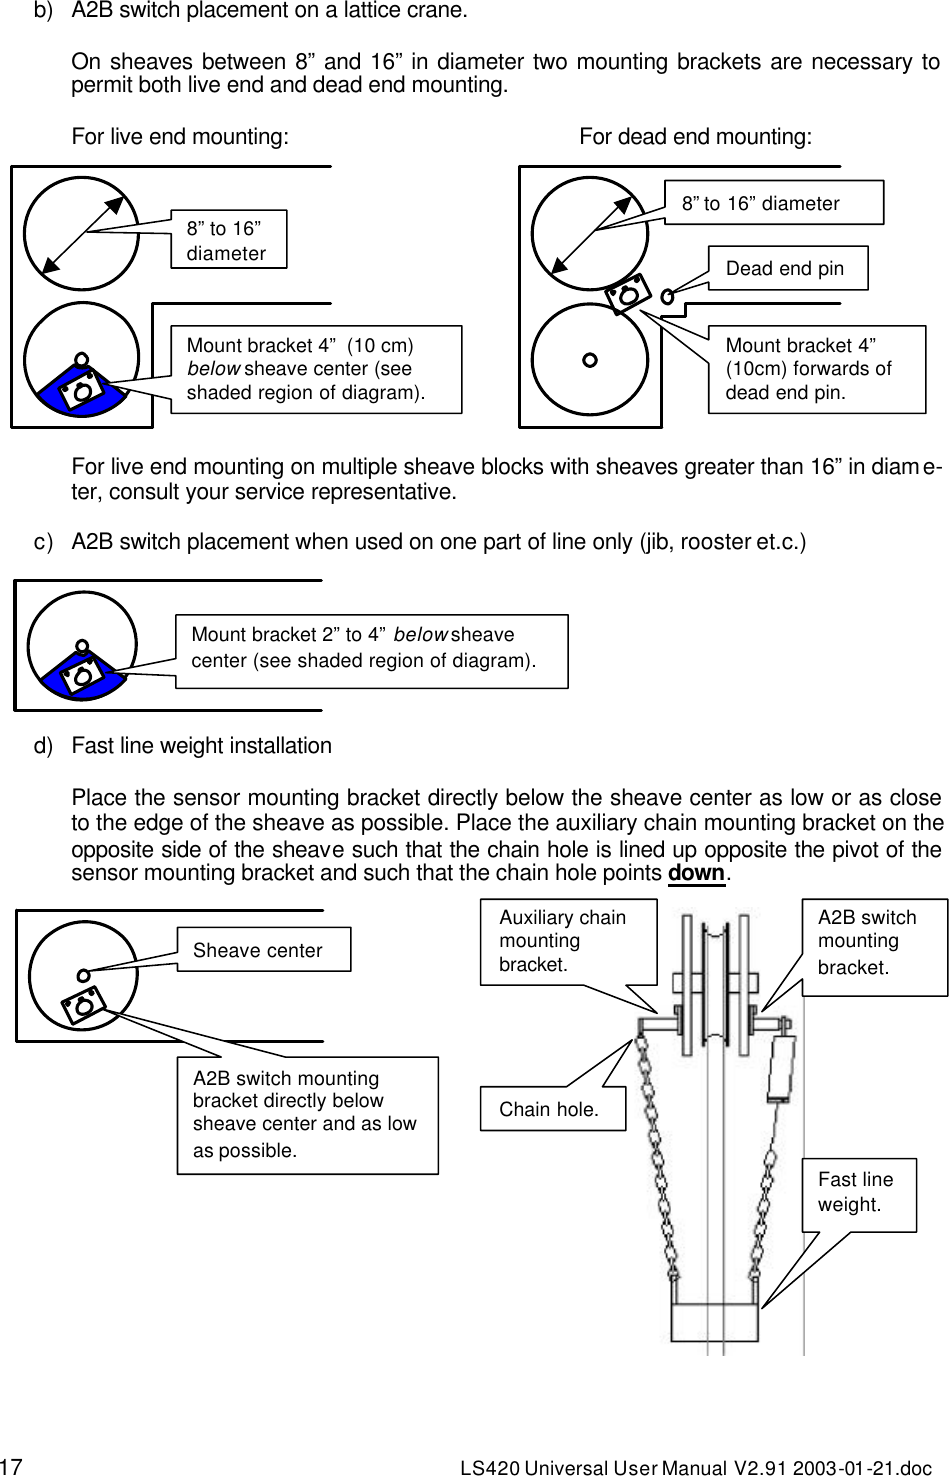
Load Systems LS010 Angle Sensor User Manual LS420 Universal V2 91 2003 01 21

Load Systems International, Inc. Angle Sensor LS420 Universal V2 91 2003 01 21

Users Manual

1 LS420 Universal User Manual V2.91 2003-01 -21.doc   LSI Load Systems International    LS 420 – Two lines display – Universal User Manual        GENERAL: The LS420 is a wireless capable display which shows the measurements taken by up to nine sensors linked in a local radio frequency network that can include any combination of load cells, angle sensors, anti-two-block switches and a wind sensor. This unit is compatible with the LSI network allowing full expansion.   New LSI sensors may be added and existing LSI sensors may remain in use when upgrading to a future display generation.
2 LS420 Universal User Manual V2.91 2003-01 -21.doc Table of Contents System Description and Features.........................................................................................3 Important Note on System Operation and Start-up:........................................................4 Contact Information:..................................................................................................................4 1.1 LS420 Indicator Lights........................................................................................................... 5 1.2 LS420 Display Screen Abbreviations.................................................................................... 5 1.3 LS420 Buttons ....................................................................................................................... 6 1.4 LS420 Display Options.......................................................................................................... 8 Chapter 2: Installation ..............................................................................................................9 2.1 Display Unit Installation ......................................................................................................... 9 2.2 Load Cell Installation V1.2................................................................................................... 13 2.3 Angle Sensor Installation..................................................................................................... 14 2.4 Anti-two-block switch installation V2.0................................................................................ 16 2.5 Installation of a length sensor cable reel............................................................................. 19 2.6 Installation of radius calculation V1.0.................................................................................. 20 Chapter 3: Changing Batteries ............................................................................................24 3.1 Changing Load Sensor Batteries V1.4................................................................................ 24 3.2 Changing Angle Sensor Batteries V1.4 .............................................................................. 27 3.3 Changing Anti-two-block Batteries V1.5 ............................................................................. 30 Chapter 4: Replacing Antennae..........................................................................................31 4.1 Replacing Load, Angle and Two-block Sensor Antennae V2.1.......................................... 31 Chapter 5: Adding and Removing Sensors .....................................................................33 5.1 How To Add A Sensor to the LS420................................................................................... 33 5.2 How to Remove A Sensor from the LS420......................................................................... 34 5.3 Changing Sensor Configuration of the LS420.................................................................... 34 Chapter 6: Troubleshooting 1.0...........................................................................................36 6.1 The Display Unit Does Not Light Up ................................................................................... 37 6.2 The Lock-out Doesn't Engage............................................................................................. 38 6.3 The Display Unit Is Always In Alarm Mode, The "2 Block" warning light is on................... 39 6.4 The Display Unit Is Always In Alarm Mo de, the main hoist green light is flashing............. 39 6.5 The Display Unit Is Always In Alarm Mode, the Load warning light is on.......................... 40 6.6 The Display Unit Is Always In Alarm Mode, the Limit+ or Limit- warning light is flashing.. 41 6.7 The Display Unit Is Always In Alarm Mode, the wind speed alarm message is flashing... 42 6.8 Radio Communication Problem .......................................................................................... 43 Chapter 7: Purchasing and Customer Service ...............................................................44
3 LS420 Universal User Manual V2.91 2003-01 -21.doc System Description and Features  The LS420 system detects and displays load and capacity related information and can warn the operator when a limit is exceeded or a two-block event is pending. This system is an operator aid and should not be solely relied upon for safe hoist operation. The op-erator must at all times be fully aware of the approach of the hook block to the head sheave, the length and angle of the boom and jib, the hoist and crane configuration and rigging (including parts of lines, counter-weights, outriggers, rotation etc.) and the ap-propriate capacity charts. This system is designed as a backup to the operator in the event that he has exceeded the safe limits of the crane.   - Displays information from up to nine wireless sensors including load cells, angle sen-sors, wind speed sensors and anti-two-block switches. - Adjustable load limits and overload warning for hoists. - Adjustable maximum and minimum angle limits with warning for booms and luffing jibs. - Anti-two-block alarm and bypass. - Waterproof. - Multi-position mounting bracket. - All sensors pre-calibrated. - Parts of lines setting. - Tare function. - Bar graph display of percentage of load limit on load cells. - Sensor battery status display and low battery warning.
4 LS420 Universal User Manual V2.91 2003-01 -21.doc Important Note on System Operation and Start-up:  For proper operation of the LS420 display unit it must be calibrated for the configuration of installed sensors. The display unit powers up with several green lights flashing, this indicates that a radio communication link is being created with all load sensors, angle sensors, wind sensors and anti-two-block switches. Once a reliable radio communication link is established, all green lights will remain lit without flashing.  This process takes about two minutes for sensors in sleep mode. The delay is created by the battery management function and does not affect system security. If an anti-two-block switch detects a pending two-block event, if a load cell detects a change in load, or if an angle sensor detects a change in angle, the appropriate radio link will be estab-lished in less than 1/10th of a second. To immediately wake-up a load cell, lift the hook with a load; to immediately wake up an angle sensor, change the boom angle.  In special conditions of lockout created by a missing sensor, you may bypass that sen-sor until the next display power up by pressing bypass for 10 seconds. That sensor green light should stop flashing and then turn off.      Contact Information:                     Corporate Office: Toll Free Ph.: (888) 819-4355 Toll Free Fax: (888) 238 -4099 Load Systems International Dir. Ph.: (360) 666-5028 Dir. Fax: (360) 258 -4093 P.O. Box 820486 sales@loadsystems.com   Vancouver, WA 98682  For any information visit our website www.loadsystems.com   U.S. Western Regional Office:  Central/Gulf Regional Office: North Central Regional Office: Scott Colberg Randall Perrin Terry Petzold Toll Free Ph.: (877) 287-7011 Toll Free Ph.: (877) 278-7340 Toll Free Ph.: (877 ) 256-1674 Dir. Ph.: (360) 575-9518 Phone (337) 893 -2322 Phone (920) 894-2785 Fax: (360) 575-8532 Fax (337) 893-0026 Fax (920) 894-4934 scolberg@loadsystems.com  rperrin@loadsystems.com  tpetzold@loadsystems.com
5 LS420 Universal User Manual V2.91 2003-01 -21.doc Chapter 1: LS420 Front Panel   1.1 LS420 Indicator Lights       1.2 LS420 Display Screen Abbreviations  "A" = angle "AH" = auxiliary hoist "L" = length "MA" = maximum or minimum angle, whichever actual angle is closest to "MH" = main hoist "MN" = minimum "MX" = maximum "R" = radius "W" = wind speed WARNING!   “Two-Block” light indicates two-block condition WARNING!   “Load” light indicates that a load limit has been exceeded. WARNING!   “Limit –” light flashes when minimum angle limit is passed. WARNING!   “Low Batt” light indicates that one or more sensors need new batteries. “M” = main,  “A” = auxiliary. Steady green indicates a2b sensor online and functioningLoad indicated in pounds WARNING!   “Limit +” light flashes when maximum angle limit is passed. “M” = main,  “A” = auxiliary. Steady green indicates load cell online and functioning
6 LS420 Universal User Manual V2.91 2003-01 -21.doc 1.3 LS420 Buttons  Bypass   1) The basic function of the bypass button is to bypass the anti-two block lock-out for emergency purposes. The alarm will remain silent until the next two-block event; lockout will re-engage as soon as the button is released.  2) When one of the operating screens is displayed, pressing the bypass button automatically returns the display to the main hoist operating screen.  3) When adjusting a limit, a parts of lines or tare, pressing bypass the button automatically re-turns the display to the operating screen from which the limit, parts of lines or tare function was accessed.  Hoist   1) The hoist button allows the operator to scroll the display from the main oper-ating screen to the sensor specific operating screens appropriate to system con-figuration. Operating screens may include:  a) The main hoist operating screen which shows the parts of lines for the main hoist, the load on the main hoist including the tare/no tare indicator and potentially the current wind speed, the main boom angle and the luffing jib angle. b) The auxiliary hoist operating screen which shows the parts of lines for the auxiliary hoist, the load on the auxiliary hoist including the tare/no tare indicator and potentially the cur-rent wind speed, the main boom angle and the luffing jib angle. c) The main and auxiliary hoists' load maximum limits screen. d) The boom angle maximum and minimum limits screen. e) The luffing jib angle maximum and minimum limits screen. f) The wind speed maximum limit screen. Note: the precise order and aspect of operating screens depends on system configuration.  2) When adjusting limits (after pushing either the limit+ or limit- buttons) the hoist button al-lows the operator to scroll the display between adjustable limits of the system configuration.   For example: the main and auxiliary hoists' maximum load, the boom and luffing jib maximum and minimum angles, and the wind maximum speed.  3) When adjusting the parts of lines (after pushing the parts button) or using the tare function (after pushing the tare button) the hoist button allows the operator to scroll between the main and auxiliary hoists.  Parts      1) The parts button allows the operator to adjust the parts of lines displayed for the main and auxiliary hoists. Use the limit+ and limit- buttons to adjust the parts of lines and the hoist button to scroll the display between the main and auxiliary hoists.  2) Precise concordance between crane configuration and parts of lines indicated by the LS420 is necessary for accurate load display.  3) When the battery status of a wireless sensor is displayed in the test function, press the parts button to select and hold the radio reception diagnostic screen.
7 LS420 Universal User Manual V2.91 2003-01 -21.doc Tare   1) The tare function enables the operator to zero the hook and rigging weight. The operating screen will show the net weight. Pushing the tare button accesses the tare function. The tare can now be enabled, or disabled, by again pushing the tare button.   The hoist button allows the operator to scroll between the main and the auxiliary hoists. When the tare function is not in use, the load displayed is preceded by the hook and ball symbol:   . With the tare function enabled, the tared load is displayed preceded by the hook symbol:   . When the tare function is enabled for any hoist the tare light will light.   2) When the battery status of a wireless sensor is displayed in the test function, press the tare button to select and hold the radio power diagnostic screen.  Limit+ And Limit-     Pushing the limit+ or limit- button allows the operator to adjust the limits coherent with the system configuration.   For example: the main and auxiliary hoist load limits, the boom and luffing jib angle maximum and minimum limits and the wind speed maximum limit.   The hoist button allows the operator to scroll between these limits.   Further use of the limit+ and  limit- buttons will adjust the limit chosen accordingly.  While adjusting a limit, if both limit buttons are pressed simultaneously, that limit will return to a factory default value.  Test     Pushing the test button engages the battery test function of the LS420 and per-mits the adjustment of indicator light intensity, display screen contrast, and display screen back-light. The display screen will report the crane battery status (for about 16 seconds) then successively the battery status of each sensor (for about 8 sec-onds each). Pushing the test button advances from one battery report to the next, bypassing the 8 second delay. Additionally, the intensity of the indicator lights may be adjusted using the limit+ and limit- buttons during the first 8 seconds of the test function.  The contrast of the dis-play screen may be adjusted during the second 8 seconds using the limit+ and limit- buttons.  During the third 8 seconds use of the limit+ or limit- buttons will switch the back-light operation between "automatic mode" and "always on". (The default automatic mode will switch the back-light off or on, based on system temperature and portable batteries options. The "always on" setting will force the back-light to stay lit.)  "Batt: 40%" indicates 40% of battery life remains.   40% typically represents several months of battery life.   Batteries should be changed when 10-20% of life remains. "NoSignYet" indicates that a communication link with the sensor indicated has not yet been es-tablished. "NoBattYet" indicates that a communication link has been established but battery life remaining has not yet been measured. Battery measurement is a low priority task, many other functions have a higher priority. Battery life remaining can usually be known within 5 minutes.   When less than 10% of battery life remains for any sensor the Low Batt indicator will light.   Use the test function to determine which sensor is implicated. Usually, several days or weeks of op-eration remain from the moment the Low Batt indicator first lights.
8 LS420 Universal User Manual V2.91 2003-01 -21.doc 1.4 LS420 Display Options  1.4.1 Weight units  To change from pounds (lbs.) to kilograms (kg) or vice versa: Step 1) Press the bypass and tare buttons simultaneously to enter the calibration menu. Step 2) Press the hoist button to advance to the weight units selection screen. Step 3) Press either the limit+ or limit- button to change from pounds to kilograms. Step 4) Turn the display off, then on again. Adjust all load limits to conform to the new units.   1.4.2 Lock limits  To prevent the operator from changing the set limits. Step 1) Press the bypass and tare buttons simultaneously to enter the calibration menu. Step 2) Press the hoist button to advance to the limit locked selection screen. Step 3) Press either the limit+ or limit- button to lock or unlock the set limits.  1.4.3 Indicator light intensity  To adjust indicator light intensity, Step 1) Press the test button to enter the test function. Step 2) Press the limit+ or limit- button to raise or lower indicator light intensity.  1.4.4 Display screen contrast  To adjust display screen contrast, Step 1) Press the test button to enter the test function. Step 2) Press the hoist button to select the display screen contrast control screen. Step 3) Press the limit+ or limit- button to increase or decrease display screen contrast.  1.4.5 Display Screen Back-light  There are two different control systems that regulate the display screen back-light. 1) The back-light generates heat: the temperature control system permits the LS420 display to turn the back-light on or off in reaction to extremes in internal temperature. This allows the system to better maintain its optimum working temperature. To override the temperature control system (i.e. when operating the display unit from a battery pack in low temperatures or when conditions are both hot and poorly lit): Step 1) Press the test button to enter the test function. Step 2) Press the hoist button to select the back-light control screen. Step 3) Press the limit+ or limit- button to select the temperature control system or the back-light always on override.  2) When the display is operated from a battery pack, using the 4-second standby mode can double battery life. In this mode the back-light will turn off after four seconds and turn on immediately when a display button is pressed. To engage the standby mode: Step 1) Press bypass and tare simultaneously to enter the calibration menu. Step 2) Press the hoist button to advance to the back-light control screen. Step 3) Press either the limit+ or limit- button to select the 4-second standby mode or the normal back-light always on mode.
9 LS420 Universal User Manual V2.91 2003-01 -21.doc Chapter 2: Installation 2.1 Display Unit Installation  To ensure reliable radio communication between the display unit and the installed sen-sors), the display unit antenna must not be in contact with metal and must have a direct, clear line of sight to the antennae of all sensors.  2.1.1 Mounting the display  The display box may be installed either inside or outside the cab; though water can penetrate the display box, the interior is fully potted and will function properly in up to 1 ft (30 cm) of water. The mounting bracket is designed with three pivoting axes so that it can be mounted on the dash, on either sidewall or on the ceiling of the cab.  One 3/8'' bolthole must be drilled to mount the display. The 3/8'' stainless bolt, washers and stainless lock nut are supplied with the display. Choose a flat surface of at least 1-1/2'' in diame-ter on both sides and where the back of the surface is accessible in order to tighten the nut. Drill the hole with a 3/8'' bit. Place the display with the bolt through the hole. Mount the 2 large washers and the lock nut behind and tighten sufficiently. If the nut is on the outside of the cab, caulk with silicone between the large washer and the cab to prevent water entry. Orient the dis-play to face the operator. Make sure the display antenna is not close to any metal surface and has a direct line of sight to the antennae of all sensors.  For a boom truck with two operator stations, weld or bolt a pivoting arm in the center of the col-umn facing the rear. The bracket should be above the rear ledge in order to pivot easily. Bolt the display in place. Use a wing nut instead of the mounting nut in order to make the display more easily removable.  2.1.2 Yellow Power Cable Wiring:  The connector of the yellow power cable is waterproof and well rated for external environments. Simply connect the cable to the display and gently tighten the nut. Do not put a kink in the yellow cable where it enters the connector; any bend in the cable at the base of the con-nector must not be so severe as to break the internal connections where the cable meets the connector.  The display can be connected to a power source between 10 and 28V positive or to a power source between 12 and 28V AC. The display will automatically detect the voltage level and ad-just itself; it is almost impossible to damage the unit when connecting.   • Black wire: ground. The ground connection must be bolted to the body of the machine. Use a 1/4'' or 5/16'' bolt. The ground connection must be strong enough to sustain 3 Amp. • Red wire: +12 or +24 volts.  The red wire terminal must be connected to an accessory source rated at least 10 Amps if the display is to be connected to a lockout system. The red wire terminal must be connected to an accessory source rated at least 2 Amps if the display is not to be connected to a lockout system. An accessory source is a terminal, a fuse or wire providing fused voltage only when the crane or the ignition is on. • White wire: optional lockout. If optional lockout is to be connected, the red wire must be connected to an accessory source rated at least 10 Amps.  Ideally, the white wire should be connected to a Bosch relay coil and the other lead of the relay solenoid connected to the ground. Alternately, the white wire may be connected directly to the valve or valves solenoid lead and the other lead of solenoid connected to the ground. When operating properly, the white wire will be energizing at the battery positive level. If no voltage is present, try to remove
10 LS420 Universal User Manual V2.91 2003-01 -21.doc the load connected on the lockout. An internal auto-re-settable fuse limits the current to 1 Amp. If a current higher than 1.5 Amp appears on the white wire, the fuse will trigger, cutting the current on this circuit. The fuse will permit the normal current flow to resume a few sec-onds after short-circuit removal.   Fuse model #60R075 from www.littlefuse.com. • Green wire: normally not used. For optional second lockout, only when ordered. • Orange wire: do not connect. Display units made before July 2001 (s/n lower than 22545) were powered with the orange wire instead of the red. This was changed to conform to indus-try standard. Now for optional cabled A2B, only when ordered.                                                 Black wire: negative (ground) Red wire: +12 or 24 volts (crane power supply) White wire: standard lockout Green wire: for optional second lockout, only when ordered  Orange wire: do not connect. For op-tional cabled A2B, only when ordered. Wiring example without lockout  Battery +12V or  +24V Black wire Red wire Yellow cable
11 LS420 Universal User Manual V2.91 2003-01 -21.doc                                                         Battery +12V or  +24V Black wire Red wire White wire Diode Valve coil Yellow cableWiring example with lockout for valve requiring less than 0.75 Amp, without recommended Bosch Relay Wiring example with lockout and recommended Bosch Relay Battery +12V or  +24V n.c. n.o. co Black wire Red wire White wire Bosch relay To valve coil if n.c. is required. To valve coil if n.o. is required. Yellow cable
12 LS420 Universal User Manual V2.91 2003-01 -21.doc 2.1.3 LS420 Display Unit Datasheet  Dimensions :  Weight: 1.5 pounds Hardware Electronics: • Voltage: 10Vdc to 28Vdc • Radio Frequency: 925.43 MHz • Temperature: 0°F to 140°F (-20°C to +60°C) • Power requirement: 0.3 Amp • Output: 1 Amp mosfet relay (for lock out relay) • Antenna: 3.25" semi-rigid, replaceable Hardware Housing: • Rugged aluminum box. Electronic circuit com-partment completely filled with neutral gel.  For any information visit our website www.loadsystems.com or contact:  1) Thickness: 2.30" 2) Width: 4.45" 3) Height: 4.45" 4) Antenna length: 3.25" 5) Bracket length: 4.5" The yellow cable should have this 4.5" room to protect the connector. LSI Corporate Offices: Dave Smith PO Box 820486 Vancouver, WA 98682 Phone (888) 819-4355 Fax (360) 256-3344 sales@loadsystems.com Western Regional Office: Scott Colberg Phone (877) 287-7011 Fax (360) 575-8532 scolberg@loadsystems.com Central Regional Office: Randall Perrin Phone (337) 893-2322 Fax (337) 893-0026 rperrin@loadsystems.com
13 LS420 Universal User Manual V2.91 2003-01 -21.doc 2.2 Load Cell Installation V1.2  The load cell must be placed such that the antenna is not in contact with metal as this will interfere with radio communication between the load cell and the display unit.  Step 1) The load cell has two different pin assembly sizes.   Assembly of the load cell and adapter plates (fish-plates) must be configured to the pin size required by the specific dead end or hook to which it is to be attached.   If the smaller of the two sizes fits the dead end or hook to which the load cell will be attached, the load cell will be attached to the adapter plates with the larger pin and the larger adapter plate holes. If the larger of the two sizes fits the dead end or hook, the load cell will be attached to the adapter plates with the smaller pin.   In both cases, the copper bushing must be placed in the hole of the load cell to which the smaller pin is destined.  Step 2)   The copper bushing must be se-cured in place by the two hex screws, one to each side.  Step 3) The spacers should be placed on the pin linking the load cell to the adapter plates between the adapter plates and the cotter pins to inhibit excessive lateral move-ment of the load cell and the adapter plates along the pin.        Step 4) If the dead end or hook to be con-nected to the adapter plates requires a larger opening, spacers may be placed between the load cell and the adapter plates.     Step 5) In some cases spacers may also be necessary on either side of the load cell on the pin connecting it to the dead end or hook.  In all cases the spacers must be placed symmetrically such that the load cell is centered on the pins.  Step 6) Once the pins are correctly placed and spaced, they must be secured with the cotter pins provided.
14 LS420 Universal User Manual V2.91 2003-01 -21.doc 2.3 Angle Sensor Installation  Warning! The angle sensor must be installed such that the antenna is not in contact with a metal surface or object (boom, jib, wire, chain etc.). Such contact will interfere with ra-dio communication between the angle sensor and the display unit.  Warning! When welding the metal lugs to the boom the angle sensor must be kept well away from the weld site and any touching metal objects.   The angle sensor is pre-calibrated at the factory; for correct installation it must be positioned carefully, then zeroed. The bracket has two boltholes, one of which is a curved slot for fine ad-justment.   See the diagrams below for correct orientation. The angle sensor should be mounted on the left side of the boom (as viewed from the cab) with the indicator light towards the boom tip.  Boom centerline. Cabin Boom The angle sensor is mounted with its hori-zontal axis parallel to the boom centerline. Left side Front Cabin The angle sensor is mounted with its top/bottom axis within 15 degrees of vertical. Front Front Cabin Boom The angle sensor must not be mounted with its top/bottom axis more than 15 degrees from vertical. Cabin Boom A wedge can be used to mount the angle sensor with its top/bottom  axis within 15 degrees of vertical. Boom The angle sensor is mounted with its hori-zontal axis parallel to the boom centerline. Towards boom tip Indicator light Towards boom base
15 LS420 Universal User Manual V2.91 2003-01 -21.doc Manual zeroing: the easiest method for two people  Mount the angle sensor with the indicator light pointing to the boom tip. Set the boom at a known angle such as forty-five degrees. Finely adjust the position of the bolt in the curved slot until the angle sensor displays the correct value; allow the sensor a few seconds to en-sure it has the most accurate reading. The system should then show the correct angle from zero to ninety degrees.  Angle sensor assisted zeroing: the easiest method for a single person  Step 1) Place the boom at zero degrees.  Step 2) Mount the angle sensor with a bolt in the fixed position hole and tighten loosely.  Step 3) Rotate the angle sensor to vertical and hold steady until the indicator light stops flashing for ten  seconds.   Rotate the angle sensor to horizontal (with the indicator light pointing to the boom tip).   The indicator light will flash while changing from green to red de-pending on slight changes in the angle: this indicates that the angle sensor is in installation mode.  The angle sensor should stay in installation mode for one or two minutes.  Step 4) The colour of the light will help to place the angle sensor at zero degrees from horizontal.   The goal is to position the angle sensor such that the indicator light is green without flashing: this indicates that zero has been obtained (the angle sensor is placed at 0 to 1 degrees above horizontal).   Then place the second bolt in the curved slot and tighten both bolts securely. When the sensor angle is between 1 and 5 degrees, the light will flash green. Below 0 degrees, the light will flash red. Around zero, if the indicator light flashes red the curved slot side of the angle sensor must be raised and if it flashes green the curved slot side of the angle sensor must be lowered. If the indicator light goes out before zero has been obtained, repeat step 3.   Zero could be hard to obtain; this is normal.    Indicator light in 'installation mode'   Angle Sensor at 30 degrees  Angle Sensor at 90 degrees
16 LS420 Universal User Manual V2.91 2003-01 -21.doc 2.4 Anti-two-block switch installation V2.0  To ensure reliable radio communication between the sensor (anti-two-block switch) and the display unit the sensor must be placed such that its antenna is not in contact with metal and has a direct, clear line of sight to the display unit antenna. Mount the sensor on the same side of the boom as the operator's cab.  Before mounting any anti-two-block switch, verify that it is calibrated to the display unit. All switches shipped with display units are pre-calibrated in the factory. The display unit should go into alarm when the wire rope of a calibrated switch is pulled and released. Please note that the black travel clip must be removed to permit the switch to function. If a switch does not appear correctly calibrated to the display unit please follow the instructions in the calibration section (chapter 5) of this manual.  Step 1) Remove the black travel clip.      •   Leave the black travel clip at-tached to the sensor by the thin wire: it will be useful if the sensor is to be removed and stored in the fu-ture.  •   Releasing the wire rope will cause the alarm buzzer of the dis-play to which it is calibrated to sound. Pressing the  bypass button of the display will silence the buzzer until the next two-block event or simulation.   Step 2) Position the sensor mounting bracket.  To ensure that the sensor can pivot securely on the mounting bracket throughout the full range of boom angle, the mounting bracket must be positioned at a 30° from horizontal with the boom parallel to the ground and such that the locking pin of the mounting bracket points up. Bolt or weld securely.   a) A2B switch placement on a telescopic crane.  For both live end and dead end mounting:         Up to 8” diameter Mount bracket below and behind sheave center (see shaded region of diagram). Depress the small button to release the locking mechanism and simultaneously… …slide the locking ring back. The clip can now be opened to release the wire rope. Pin up 30° from horizontal
17 LS420 Universal User Manual V2.91 2003-01 -21.doc b) A2B switch placement on a lattice crane.  On sheaves between 8” and 16” in diameter two mounting brackets are necessary to permit both live end and dead end mounting.  For live end mounting:    For dead end mounting:  For live end mounting on multiple sheave blocks with sheaves greater than 16” in diame-ter, consult your service representative.  c) A2B switch placement when used on one part of line only (jib, rooster et.c.)        d) Fast line weight installation  Place the sensor mounting bracket directly below the sheave center as low or as close to the edge of the sheave as possible. Place the auxiliary chain mounting bracket on the opposite side of the sheave such that the chain hole is lined up opposite the pivot of the sensor mounting bracket and such that the chain hole points down.  8” to 16” diameter Mount bracket 4”  (10 cm) below sheave center (see shaded region of diagram). 8” to 16” diameter Dead end pin Mount bracket 4”  (10cm) forwards of dead end pin. Mount bracket 2” to 4” below sheave center (see shaded region of diagram). A2B switch mounting bracket directly below sheave center and as low as possible. Sheave center Auxiliary chain mounting bracket. Chain hole. Fast line weight. A2B switch mounting bracket.
18 LS420 Universal User Manual V2.91 2003-01 -21.doc Step 3) Test chain length.  i) At minimum boom angle, with no additional weight on the hook block and one part of line only, lift the boom just enough to have the hook block suspend and clear the sensor chain and weight.  ii) Hoist slowly until the red two-block warning lights up and the buzzer sounds. Note the hoisting distance remaining; this distance must be great enough to allow the operator or the lockout system, if installed, to prevent a two-block event. If necessary, add lightweight chain between the sensor and weight to increase warning distance. If still insufficient, contact your service representative. iii) Raise the boom to the maximum angle and repeat the procedure detailed in Step 2 very carefully.  It will help to have a second person standing off to the side of the crane to closely monitor the hoisting distance from the hook block to the head sheave block. Verify that the warning distance is equal to or greater than that determined at the minimum boom angle.               iv) Lower the boom until the weight height becomes visually clear to the operator. Repeat-edly create two-block, progressively hoisting faster to ensure that the warning and lockout (if installed) work within acceptable amount of time and distance. Increase the length of the small chain if needed.  Boom at minimum angle, two-block alarm triggered. Hook block stops rising, two-block prevented with safety margin. Boom at maximum angle, two-block alarm triggered. Hook block stops rising, two-block prevented with safety margin.
19 LS420 Universal User Manual V2.91 2003-01 -21.doc 2.5 Installation of a length sensor cable reel  Step 1) Install the reel on its solder tab on the main boom.  The cable reel is usually installed on the main boom’s lower section on a clear area. Guides should be placed along the boom sections and a cable anchor near the boom head.  Step 2) Feed the cable through the cable guides and pull on it to attach it to the cable anchor. There should be minimal tension on the cable reel spring when the boom is fully retracted. Ver-ify the boom length as shown on the appropriate operation screen of the display unit. Please consult your Quick Reference Guide to find the length display for your specific LS420 system configuration. The boom length should represent the actual total boom length from the boom pin to the head sheave center, however, depending on the exact placement of the cable reel and cable anchor the displayed length may differ from the actual length. Note the difference to the tenths of feet.  Step 3) Adjust the length displayed: press the hoist button re-peatedly until the display shows the advanced options entry screen. Press the test button to enter the advanced options, and then press the hoist button until the display shows “Trim Length” or “Offset AD1”. Use the  limit+ and limit– buttons to enter the difference noted above, to the tenths of feet. Note: For “Offset AD1” the decimal point may be hidden so, if the length displayed is 10 feet too short, the trim length factor must be set to 100 (10.0 ft) and if the length displayed is 6 feet 6 inches too long, the trim length must be set to – 65 (- 6.5 ft). When finished, press bypass to return to the main operation screen. For help with the buttons of the display please refer to the quick reference guide or section 1.3 of the user manual.  IMPORTANT!   Step 4) Test: verify that the display correctly shows boom length when com-pletely retracted and when fully extended. It is safer to have someone helping to ensure that the reel has enough cable to reach full crane extension.    Cable anchorCable guide Cable reel Boom base pin Boom length: distance from boom base pin to head sheave center.
20 LS420 Universal User Manual V2.91 2003-01 -21.doc 2.6 Installation of radius calculation V1.0  Before proceeding with radius calibration: • Install the display unit (see section 2.1 of this manual). • Install the angle sensor (see section 2.3 of this manual). If a pendulum type angle sensor is to be used it must be properly calibrated (see section 2.6.5 of this manual). • Install the length sensor (hydraulic cranes only) (see section 2.5 of this manual) • Enter the boom length on the boom length adjustment screen of the display (lattice cranes only). This value must be adjusted every time the length of the lattice boom is changed. • Enter the jib length if the working hoist is rigged to a jib. This value must be adjusted every time the length of the lib is changed. • Enter the jib-offset angle if the working hoist is rigged to a jib. This value must be adjusted every time the angle of the jib is changed. Note: for accurate radius display when working with a luffing jib, an angle sensor must be installed on the luffing jib.  2.6.1 Radius calibration  The boom length (lattice cranes only), jib length and jib offset angle must be correctly entered in the LS420 for accurate radius display. Furthermore, upon installation the LS420 must be cali-brated for several crane specific angle and length parameters. Default values may have been programmed at the factory before shipping. Upon installation these parameters must be con-firmed and accurate radius display verified.  Step 1) Determine the following measurements to within a tenth of a foot: slew offset, sheave head length and sheave ra-dius. These measurements are described in sections 2.6.2 (lat-tice cranes) and 2.6.3 (hydraulic cranes).   Step 2) Confirm the parameters entered in the advanced op-tions of the LS420 display. Press the  hoist button until the ad-vanced options entry screen is displayed. Press the test button to proceed to the advanced options. Verify that the radius pa-rameters have been set correctly; the values may be adjusted with the  limit + and limit - buttons. Press the  hoist button to proceed from one parameter to the next.  Step 3) Test radius display. Compare the radius displayed with the actual radius at different lengths of boom extension and dif-ferent boom angles. If the radius displayed by the LS420 corresponds to the actual radius in all cases, the radius function is correctly calibrated. Be sure that all radius parameters have been carefully noted to facilitate re-calibration in the event of component or system upgrade, change, or re-installation. If there is a difference between displayed radius and actual radius that remains constant during changes in boom length and angle the slew offset can be adjusted to compen-sate (see step 2 above). E.g. if the radius displayed is always 2.3 feet longer than the actual ra-dius subtract 2.3 from slew offset. If the radius displayed is still different from the actual radius proceed to section 2.6.4 of this manual (radius display trouble shooting).
21 LS420 Universal User Manual V2.91 2003-01 -21.doc 2.6.2 Radius parameters for a lattice crane.  The radius calculation parameters highlighted in green must be measured on the crane and set into the advanced menu of the LS420 display unit.      The radius equation is roughly: slew offset  + boom length x cos(angle) + sheave length x sin(angle) + sheave radius = radius  Jib offset angle. Jib length.  Boom length: distance from boom base pin to head sheave center.  Crane center of rotation.  Slew offset: distance from boom base pin to crane center of rotation. If the boom base pin is behind the crane centerof rotation this value must be negative.   (Your measurement)  Boom base pin. Distance from head sheave center to jib mounting point.   (Your measurement) Head sheave radius.  (Your measurement)  Sheave head length: distance from head sheave center to boom centerline.   (Your measurement)  Head sheave. Jib mounting point.
22 LS420 Universal User Manual V2.91 2003-01 -21.doc 2.6.3 Radius parameters for a hydraulique crane.  The radius calculation parameters in green must be measured on the crane and set into the advanced menu in the LS420 display.  The radius equation is roughly: slew offset + boom length x cos(angle) + sheave length x sin(angle) + sheave radius = radius                                             The slew offset is the distance between the boom pin and the center of rotation. If the boom pin is behind the center of rotation, the value must be negative.   (Your measurement) Sheave radius.   (Your measurement) Crane center of rotation Boom base pinBoom length: distance from boom base pin to head sheave center.  The sheave head length is the distance between the boom centerline and the center of the lower sheave.   (Your measurement)
23 LS420 Universal User Manual V2.91 2003-01 -21.doc 2.6.4 Radius display troubleshooting  For accurate radius calculation the actual boom length and angle, and the jib length and angle must be correctly displayed by the LS420 and the calibration parameters described in section 2.6.1 must be correctly measured and entered in the advanced options of the LS420 display. Before proceeding with troubleshooting confirm that the radius calibration procedure described in section 2.6.1 has been followed correctly. The most common reason for error is caused by incorrect slew offset compensation. If the difference between the radius displayed and the ac-tual radius remains constant through all boom angles and boom lengths the slew offset should be adjusted accordingly.  Some booms bend significantly with a load on the hook, thus reducing effective radius. Boom deflection can be verified if the displayed radius is equal to the actual radius with the boom at 0° and at 90° but greater at a boom angle of 45° (boom deflection is greatest at 45°). Furthermore, the effect of boom deflection is greater when the boom is longer. To compensate for boom de-flection adjust the boom deflection value in the advanced options of the LS420 display. Follow the steps below to determine the appropriate boom deflection compensation value.  Step 1) Raise the boom to 45° with a known load.  Step 2) Compare the radius displayed with the actual radius. Change the boom deflection compensation value and again compare the radius displayed with the actual radius. Adjust the boom deflection value until the radius displayed equals the actual radius.  Tip: with the boom at 45° and the maximum load on the hoist, the boom deflection compensation value should equal the difference in feet between the radius displayed and the actual radius. With the boom at 45° and half the maximum load on the hoist, the boom deflection compensation value should equal twice the difference in feet be-tween the radius displayed and the actual radius. Etc.  Note: the "No Ld Defl" (no load deflection) value permits compensation for booms that deflect significantly under their own weight, even with no load on the hoist. This value should only be adjusted in consultation with LSI. For any information contact LSI: see page 2 of this manual.  2.6.5 Calibration of angle display with non-LSI angle sensors.  LS420 requires accurate boom angle information to display radius correctly. If a non-LSI pendulum type angle sensor is to be used it must be correctly calibrated before proceed-ing with radius calibration.  Step 1) Place the boom at a known angle.  Step 2) Compare the angle displayed with the actual angle. Adjust the angle offset (or offset AD2) in the advanced options of the LS420 display to compensate, e.g. if the angle displayed is 1.5° greater than the actual angle, subtract 1.5 from the angle offset value.  Step 3) Verify that the boom angle displayed equals the actual boom angle.  Note: the "scale ADC2" value should only be adjusted in consultation with LSI. For any informa-tion contact LSI: see page 2 of this manual.
24 LS420 Universal User Manual V2.91 2003-01 -21.doc Chapter 3: Changing Batteries 3.1 Changing Load Sensor Batteries V1.4  DO NOT change load sensor batteries without first reading these instructions.  Many operators of LS401 and LS420 systems damage their load sensors with incorrect battery changing procedures.  ALWAYS replace all three batteries of a load sensor at the same time. Replacing just one or two batteries will cause the unchanged batteries to reverse polarity, dramatically reducing the efficiency and life of the new bat-teries. This means all batteries will need to be changed again within the next couple of days or even hours…  ONLY use  an RTV  non-corrosive silicone (available where auto-parts are sold) to reseal the box after batteries have been changed. Many silicones give off corrosive gasses that destroy the battery contacts; this renders the sensor useless.  ALWAYS remove the battery closest to the indicator light first, by applying pressure to the NEGATIVE pole ( – ) only.  When metal (i.e. a screwdriver) touches the steel box and any battery pole other than the nega-tive pole of the battery closest to the indicator light, a short is caused which may burn the sensor's internal circuits.  FOLLOW all the instructions detailed below. Carefully following every step described below is the quickest, easiest way to successfully change bat-teries without damaging the load sensor.   • Batteries should be changed when reduced to 10 – 20 % of full charge.  • The following items are necessary to successfully change the batteries of the load sen-sor: a) Three new, high quality, alkaline “C” cell batteries (e.g. Duracell Ultra or Energizer E2). b) A Phillips head screwdriver c) A small knife d) A flat head screwdriver e) Optionally, a very small flat head screwdriver f) An RTV non-corrosive silicone (available where auto parts are sold)  Step 1. Remove the load sensor from the crane  Step 2. Clean off dust and grime.  During the following operations the interior of the battery box must be protected from dirt and humidity at all times.
25 LS420 Universal User Manual V2.91 2003-01 -21.doc Do not unscrew the white nylon hex bolt of the antenna.  Do not unscrew the four round topped hex bolts  Do not cut any wires  Step 3. Unscrew the two Phillips head screws about ¼ inch.   Do not fully unscrew or remove these screws to avoid destroying the seal in which they are set.  Step 4. Carefully cut the silicone seal all around the base of the box where it meets the link.  Step 5. Carefully separate the box from the link by inserting a flat head screwdriver in the notch where the box meets the link and turning. Do not damage the wires that run between the link and the box.  Step 6. Gently pull on the connecting wires to disconnect the plug in the bat-tery box.  Avoid all contact with the tiny white inter-rupter switches.   Step 7. To remove the batteries, always  remove the battery closest to the indicator light first, the mid-dle battery second, and the battery furthest from the indicator LED last. The batteries can easily be re-moved by hand.   Gently apply pressure in the direc-tion of the negative pole while lifting out the positive pole.  Tip: Alternative method: use a  very small,  flat head screwdriver. Gently place the tip of the screwdriver against the top of the negative pole of the battery closest to the indicator light and, using the side of the box for support, lift the battery up until it can be grasped and removed by hand.  Indicator light + The battery closest to the indicator light is removed first. The screwdriver is applied to the negative contact only. + + Notch
26 LS420 Universal User Manual V2.91 2003-01 -21.doc Step 8. To install the three fresh, top quality, alkaline “C” cells the positive/negative alignment of the batteries as in-dicated on the interior walls of the box must be respected.   Insert the negative pole first.   Once the negative pole is halfway in, gentle pressure in the direction of the negative pole will allow the positive end of the battery to be pushed in.   Do not force more than is necessary.   Upon installa-tion of the third battery, the indicator LED will light briefly, indicating correct placement of the batteries  Step 9. Clean the leading edges of the box and the surface of the load cell where contact is to be made.  Step 10. Apply the RTV non-corrosive silicone to the link to create a joint of 1/8th inch.  Step 11. Reconnect the wire connector.   Only one orientation is possible. When correct ori-entation is achieved, press down to mate securely.  Once again the small flat head screwdriver may help: use extreme caution!  Step 12. Reposition the box over the link.   Avoid pinching the connecting wire between the box and the link or between the batteries and the link.   Verify that the silicone forms an ef-fective seal all around the joint between box and link.  Step 13. Secure the box to the link by tightening the two Phillips head screws.  Step 14. Clean off excess silicone.  Step 15. If battery replacement has been successful,  the “Low Batt” icon of the cabin-mounted display will no longer be lit.   Use of the test function will confirm new battery status.  Step 16. Reinstall load sensor.
27 LS420 Universal User Manual V2.91 2003-01 -21.doc 3.2 Changing Angle Sensor Batteries V1.4  DO NOT change angle or wind sensor batteries with-out first reading these instructions.  Many operators of LS401, 420, 425 and 2002 systems damage their angle and wind sensors with incorrect battery changing procedures.  ALWAYS replace all three batteries of an angle or wind sensor at the same time. Replacing just one or two batteries will cause the unchanged batteries to reverse polarity. This means that all batteries  will need to be changed again within the next couple of days or even hours…  ONLY use an RTV  non-corrosive silicone (available where auto parts are sold) to reseal the box after batteries have been changed. Many silicones give off corrosive gasses that destroy the battery contacts; this renders the sensor useless.  ALWAYS remove the battery closest to the indicator light first, by applying pressure to the NEGATIVE pole ( – ) only.  When metal (i.e. a screwdriver) touches the steel box and any battery pole other than the nega-tive pole of the battery closest to the indicator light, a short is caused which may burn the sensor's internal circuits.  FOLLOW all the instructions detailed below. Carefully following every step described below is the quickest, easiest way to successfully change bat-teries without damaging the angle or wind sensor.   • Batteries should be changed when reduced to 10 – 20 % of full charge.  • An angle sensor must be re-calibrated after this procedure. Follow instructions in the angle sensor installation chapter of this manual.  • The following items are necessary to successfully change angle or wind sensor batteries: a) Three new, high quality, alkaline “C” cell batteries (e.g. Duracell Ultra or Energizer E2). b) A Phillips head screwdriver c) A small knife d) A flat head screwdriver e) Optionally, a very small flat head screwdriver f) An RTV non-corrosive silicone (available where auto parts are sold)  Step 1. Remove the angle or wind sensor from the crane.  Step 2. Clean off dust and grime.  During the following operations the interior of the angle or wind sensor box must be protected from dirt and humidity at all times.
28 LS420 Universal User Manual V2.91 2003-01 -21.doc Do not unscrew the white nylon hex bolt of the antenna.  Do not unscrew the four round topped hex bolts  Step 3. Unscrew the two Phillips head screws about ¼ inch.   Do not fully unscrew or remove these screws to avoid destroying the seal in which they are set.  Step 4. Carefully cut the silicone seal all around the base of the box where it meets the mounting plate.  Step 5. Carefully separate the box from the mounting plate by inserting a flat head screw-driver in the notch where the box meets the link and turning.   Avoid all contact with the tiny white interrupter switches.  Step 6. Remove the battery closest to the indicator light first, the middle battery second, and the battery furthest from the indicator LED last. The batteries can easily be removed by hand.   Gently apply pressure in the direction of the negative pole while lifting out the positive pole.  Tip: Alternative method: use a  very small,  flat head screwdriver. Gently place the tip of the screwdriver against the top of the negative pole of the battery closest to the indicator light and, using the side of the box for support, lift the battery up until it can be grasped and removed by hand.    Indicator light + The battery closest to the indicator light is removed first. The screwdriver is applied to the negative contact only. + + Notch
29 LS420 Universal User Manual V2.91 2003-01 -21.doc Step 7. Install the three fresh, top quality, alkaline “C” cells; the positive/negative alignment of the batteries must be re-spected as indicated on the interior walls of the box.   Insert the negative pole first, keeping the battery as parallel to its final position as possible.   Once the negative pole is half-way in, gentle pressure in the direction of the negative pole will allow the positive end of the battery to be pushed in.   Do not force more than is necessary.   Upon installation of the third battery, the indicator light will flash briefly, indicat-ing correct battery placement.   Step 8. Clean the leading edges of the sensor box and the surface of the mounting plate where contact is to be made.  Step 9. Apply the RTV  non-corrosive silicone to the mounting plate to create a 1/8th inch joint.  Step 10. Reposition the sensor box over the mounting plate.   Verify that the silicone forms an effective seal all around the joint between box and plate.  Step 11. Secure the box to the mounting plate by tightening the two Phillips head screws.  Step 12. Clean off excess silicone.  Step 13. If battery replacement has been successful, the “Low Batt” icon of the cabin-mounted display will no longer be lit.   Use of the test function will confirm new battery status.  Step 14. Reinstall the angle or wind sensor; calibrate an angle sensor following the installa-tion procedure outlined in the angle sensor installation chapter of this manual.
30 LS420 Universal User Manual V2.91 2003-01 -21.doc 3.3 Changing Anti-two-block Batteries V1.5  ALWAYS replace  all four batteries of a two-block sensor at the same time. Replacing just one, two or three batteries will cause the un-changed batteries to reverse polarity. This means that all batteries will need to be changed again within the next couple of days or even hours…  • Batteries should be changed when reduced to 10 – 20 % of full charge.  • The following items are necessary to successfully change the batteries of the anti-two-block: a) A monkey wrench. b) Four new, high-quality, alkaline “C”-cell batteries (Duracell Ultra or Energizer E2 rec-ommended).  Step 1) Remove the anti-two-block from the crane and clean off dust and grime.  During the following operations the interior of the anti-two-block must be protected from dirt and humidity at all times.  Do not unscrew the white nylon hex bolt of the antenna.  Do not unscrew the small screw to the left of the antenna.  Do not remove the small black plastic plug on the bottom of the anti-two-block.  Step 2) Place the anti-two-block on the edge of flat surface.   Using a monkey wrench, partly unscrew (about a half-inch) the large white nylon hex bolt through which the wire rope passes.  Step 3) Carefully remove the plunger assembly, without separating it from the cover, and place it on a clean and dry sur-face.  Step 4) The four batteries will easily slide out.  Step 5) Insert the four fresh, clean, top quality, alkaline “C” cells according to +/- schema printed on the back of the sensor.  Step 6) Replace the plunger assembly.   Correctly align the bot-tom cover before screwing in the white nylon hex bolt through which the wire rope passes.   This hex bolt should be well tightened with the monkey wrench.   If battery replacement has been successful the LED on the bottom of the sensor will flash red when the wire rope is pulled and the “Low Batt” icon of the cabin-mounted display will no longer be lit.   Use the test function of the cabin-mounted display unit to confirm new battery status.  Step 7) Reinstall the anti-two-block.
31 LS420 Universal User Manual V2.91 2003-01 -21.doc Chapter 4: Replacing Antennae 4.1 Replacing Load, Angle and Two-block Sensor Antennae V2.1  • There are two types of sensor antennae: 1. Two-block sensor antennae: a blue tape identifies those made in the spring of 2002 and thereafter, they are replaceable. The antennae of two-block sensors made before February 16th, 2002 are not replaceable in the field: please contact your service representative. 2. Load/angle/wind sensor antennae: a green tape identi-fies those made in the spring of 2002 and thereafter. All load/angle/wind sensor antennae are replaceable. Note: two-block sensor antennae are not compatible with load, angle or wind sensors. Only a two-block antenna is compatible with a two-block sensor.  • Slightly damaged antennae (bent, sheathing scratched, plastic head cap missing etc.) should not be replaced unless otherwise identified as preventing proper sensor function.   Heavily damaged antennae (ripped out, sheared off, wire exposed and fraying etc.) should be replaced to ensure communication between the sensor and the cabin mounted display unit.  • The following items are necessary to successfully replace the antenna of a load or angle sensor: a) a new antenna, of the appropriate type (load/angle/wind sensor or two-block sensor), with white nylon hex bolt b) a small pair of pliers c) an electrical insulating compound  Step 1. Place the crane, boom, jib or ball hook such that the sensor is safely accessible.  This procedure may be followed without removing the sensor from the crane only if it is safe to do so; avoiding removal and reinstallation procedures may save time.   If removed, an angle sensor must be re-calibrated during reinstallation for correct angle display (see the angle sensor installation section of the user manual).  During this procedure the interior of the sensor must be protected from dust, grime and water at all times.   If it rains during the procedure an umbrella or other suitable means of protection should be used.  Step 2. Clean dust, grime and water from the sensor.  Step 3. Identify the short black whip antenna and the white hex bolt securing it.  Step 4. Inspect the antenna for signs of obvious physical damage.  Step 5. Carefully unscrew the white nylon hex bolt completely and slide it up the antenna.  Anti-two-block an-tenna with identifying blue strip Load/ angle/ wind an-tenna with identi-fying green strip
32 LS420 Universal User Manual V2.91 2003-01 -21.doc Step 6. Grip the antenna by the base of the black plastic sheathing and pull it straight out of the hole in which it is seated.   Place the old antenna aside.  Step 7. Slide the white nylon hex bolt to the middle of the length of the new antenna.  Step 8. Coat the exposed metal foot of the new an-tenna with an electrical insulating compound by care-fully inserting it in the mouth of the compound tube.     Step 9. Hold the new antenna by the black plastic sheathing and guide it through the hole in the sensor box. Carefully seat the antenna in its mating connector.   When the antenna is correctly seated, pulling on it will be met with light resistance.   Step 10.Carefully re-thread, screw-in and tighten the white nylon hex bolt to secure the antenna in place.  Step 11.Reinstall the sensor if necessary (if removed from the boom or jib, an angle sensor will require re-calibration during the installation procedure, see the angle sensor installation section of the user manual).  Step 12.Verify that the sensor functions properly.   White nylon hex bolt Antenna Sensor box Antenna receptacle
33 LS420 Universal User Manual V2.91 2003-01 -21.doc Chapter 5: Adding and Removing Sensors  • If in difficulty, disconnect and reconnect the yellow cable of the LS420, then press the test button to verify all calibrated sensors. If in serious difficulty, simply start over by erasing all sensors from the system (section 5.2), then re-entering them one by one (section 5.1).  • Correctly set the parts of line, tare and all applicable limits for any newly added sensor. The buzzer will usually sound when a sensor is added until the appropriate limits have been set; this is to ensure that the limits will be verified. While adjusting limits or parts of line, press the limit + and the limit - buttons simultaneously to set a default value.   5.1 How To Add A Sensor to the LS420.  5.1.1 The Manual Calibration Mode  Step 1) Determine the ID (a number between 0 and 60000) of the sensor to be added; the ID is engraved on the sensor. The LS420 uses the ID to identify the sensor.  Sensors should be installed on the crane before engaging in the calibration procedure. Sensors must transmit to be identified by the LS420; lifting a load with a load cell or changing the angle of an angle sensor will ensure immediate transmission.   Step 2) To enter the manual calibration mode, hold the bypass button down continuously and press the  tare button once. Release the  bypass button when the screen displays "Calibra-tion Mode".  Step 3) Press the hoist button until the second line of the screen displays “No Sensor”. Use the parts button to select the type of sensor to be added. Use the limit + and limit - buttons to set the ID number of the sensor to be added. Use the parts button to select the type of sensor to be added. Press the bypass button to exit the manual calibration mode at any time.    5.1.2 The Automatic Calibration Mode (An Alternative Method for Adding Sensors)  In the automatic calibration mode the LS420 detects and identifies all functioning LSI sensors not calibrated to the LS420 and within radio transmission distance. This facilitates adding a sen-sor that’s ID is not easily determined (e.g.: an a2b at the end of a 300’ boom). Care must be taken not to add the wrong sensor to the system (e.g.: an a2b on a neighboring crane).  Step 1) To enter the automatic calibration mode hold the bypass button down continuously and press the limit - button once. Release the bypass button when the screen displays "Auto Calibr Mode". Press the  hoist button twice. The buzzer may make small noises depending on sur-rounding radio signals.  Step 2) Press the hoist button until the LS420 shows the sensor to be added with the correct ID. Press the test button to add the sensor to the system. Press the bypass button to exit the automatic calibration mode at any time.
34 LS420 Universal User Manual V2.91 2003-01 -21.doc 5.2 How to Remove A Sensor from the LS420  Step 1) To enter the manual calibration mode, hold the bypass button down continuously and press the tare button once. Release the bypass button when the screen displays "Calibration Mode".  Step 2) Press the hoist button until the sensor to be removed is shown with the correct ID and sensor type (Load, Angle etc.). Press the  tare button to remove the sensor. The display will show "ID = 0" on the first line and "No Sensor" on the second line. Press the bypass button to exit the manual calibration mode at any time.  5.3 Changing Sensor Configuration of the LS420  When a sensor is added or removed, the system configuration number is automatically ad-justed. Use the table below to determine the appropriate configuration number by cross-referencing the appropriate combination of sensors. If necessary the configuration number can be adjusted manually. To enter the manual calibration mode, hold the bypass button down con-tinuously and press the tare button once. Release the bypass button when the screen displays "Calibration Mode". Press the hoist button until the screen displays "Select Configur." Use the limit + and limit - buttons to select the appropriate configuration number. Press the  bypass button to exit the manual calibration mode at any time.   x 64 x 32 x 16 x 8 x 4     Config.  Number Custom Length Radius Wind Angle Load Comment 0 0 0 0 0 0 0    1 0 0 0 0 0 1 1 load sensor 2 0 0 0 0 0 2 2 load sensors 3 0 0 0 0 0 3 3 load sensors 4 0 0 0 0 1 0 1 angle sensor 5 0 0 0 0 1 1 1 load, 1 angle 6 0 0 0 0 1 2 2 load, 1 angle 7 0 0 0 0 1 3 3 load, 1 angle 8 0 0 0 1 0 0 1 wind sensor 9 0 0 0 1 0 1    10 0 0 0 1 0 2    11 0 0 0 1 0 3    12 0 0 0 1 1 0 1 angle, 1 wind 13 0 0 0 1 1 1 1 load, 1 angle, 1 wind 14 0 0 0 1 1 2 2 load, 1 angle, 1 wind 15 0 0 0 1 1 3    16 0 0 0 2 0 0 2 wind speed sensors 17 0 0 1 0 0 1    18 0 0 1 0 0 2    19 0 0 1 0 0 3    20 0 0 1 0 1 0    21 0 0 1 0 1 1 1 load, 1 angle, 1 radius 22 0 0 1 0 1 2 2 load, 1 angle, 1 radius
35 LS420 Universal User Manual V2.91 2003-01 -21.doc  23 0 0 1 0 1 3    24 0 0 1 1 0 0    25 0 0 1 1 0 1    26 0 0 1 1 0 2    27 0 0 1 1 0 3    28 0 0 1 1 1 0    29 0 0 1 1 1 1 1 load, 1 angle, 1 wind, 1 radius 30 0 0 1 1 1 2 2 load, 1 angle, 1 wind, 1 radius 31 0 0 1 1 1 3    32 l load, 2 angle, 1 wind  33 For systems with only a2bs    34 1 load, 1 angle, 1 radius, 1 length    35 LS2002 configuration    36                     37 2 load with sum     38 2 load with sum, 1 angle    39 2 load, 2 angle, 1 wind, 1 radius    40 LS425     41 5 load    42 load and a2b with dual lock-out outputs    43                     44 4 load cells, A, B, C & D    45                     46                     47 2 load, summation, angle    48 0 1 1 0 0 0    49 0 1 1 0 0 1    50 0 1 1 0 0 2    51 0 1 1 0 0 3    52 0 1 1 0 1 0 1 angle, 1 radius, 1 length 53 0 1 1 0 1 1 1 load, 1 angle, 1 radius, 1 length 54 0 1 1 0 1 2 2 load, 1 angle, 1 radius, 1 length 55 0 1 1 0 1 3    56 0 1 1 1 0 0    57 0 1 1 1 0 1    58 0 1 1 1 0 2    59 0 1 1 1 0 3    60 0 1 1 1 1 0    61 0 1 1 1 1 1 1 load, 1 angle, 1 radius, 1 length, 1 wind 62 0 1 1 1 1 2 2 load, 1 angle, 1 radius, 1 length, 1 wind 63 0 1 1 1 1 3     x64 x32 x16 x8 x4      Configurations used in custom applications
36 LS420 Universal User Manual V2.91 2003-01 -21.doc Chapter 6: Troubleshooting 1.0  Troubleshooting Index  6.1 The Display Doesn't Light Up 6.2 The Lock-out Doesn't Engage 6.3 The Display Unit Is Always In 2 Block Alarm Mode 6.4 The Display Unit Is Always In Alarm Mode, the main hoist green light is flashing 6.5 The Display Unit Is Always In Overload Alarm Mode 6.6 The Display Unit Is Always In Limit Alarm Mode 6.7 The Display Unit Is Always In Wind Speed Alarm Mode 6.8 Radio Communication Problem
37 LS420 Universal User Manual V2.91 2003-01 -21.doc 6.1 The Display Unit Does Not Light Up  Verify the connections of the blackwire, the red wire and, if appro-priate, the white wire of the yellowcable as described in section 2.1of the Universal User Manual.YesNoYesVerify the voltage on the black wire,the red wire and, if appropriateaccording to the specifications inthe user manual, the white wire ofthe yellow cable.NoYesNoDisconnect theyellow cable fromthe display unitand reconnect itcarefullyNoNoYesYesIs therea change in thedisplay?Please call your servicerepresentativeThe display won't light upPress "Test" buttonIs there a badconnection? reconnect properlyIs therea change in thedisplay?Press "Test" buttonto verify communica-tion and battery sta-tus of all sensors.Is thevoltage on the wiresequal to that of the cranebattery?Verify the crane battery.   Verify thecrane fuse.   Verify the craneaccessory switch if applicable.Please call your servicerepresentativePress "Test" buttonto verify communica-tion and battery sta-tus of all sensors.Is therea change in thedisplay?
38 LS420 Universal User Manual V2.91 2003-01 -21.doc 6.2 The Lock-out Doesn't Engage  Disconnect the yellowcable from the displayunit and reconnect itcarefully.Wait 30 seconds and measure the voltage on the white wire.Is the voltage on thewhite wire equal to thatof the crane battery?Please call yourservice representativeThe lock-out doesn't engageVerify the connection of thewhite wire of the yellow cableNoNoDisconnect the white wire from the lock-out circuitPlace the cranein non-lock-outconditionYesIs thedisplay in lock-out oralarm mode?Verify the voltage on the white wire of the yellow cable.Is the voltage on thewhite wire equal to that of thecrane battery?Is there a bad connection?reconnect thewhite wirecarefullyNoIs the voltage on thewhite wire equal to that of thecrane battery?Wait 30 secondsand measure thevoltage on thewhite wire.NoNoThe display should befine, verify lock-outfunctionYesMeasure currentdrawn on whitewire by lock-outsystem.   Refer tolock-out section inthe user manual.Yes Does lock-out systemdraw more than 1A on thewhite wire?Is thevoltage on thewhite wire equal to thatof the cranebattery?Measure the voltageon the white wire.Reconnect the white wire to the lock-out circuitNoYesNoInstall a relay asexplained in thelock-out section ofthe user manual.YesYesCarefully create a lock-out using an A2B switch.   If there isno A2B switch in communication with the display lock-outmay be created by temporarily adjusting a load or angle limit.Measure the voltage on the white wire of the yellow cable.Is the voltageon the white wireequal to zero?Everything seemsfine, return any limitsyou may have changedto their appropriatevalues and verifylock-out functionDisconnect the white wirefrom the lock-out circuitWait 30 seconds andmeasure the voltage onthe white wire.Is the voltageon the white wireequal to zero?YesNoLock-out coilsmay be connected tothe positive batteryvoltage of the craneinstead of the negativeground.   Verify andrefer to the lock-outsection of the usermanual.Call customer serviceNoYesYes
39 LS420 Universal User Manual V2.91 2003-01 -21.doc 6.3 The Display Unit Is Always In Alarm Mode, The "2 Block" warning light is on 6.4 The Display Unit Is Always In Alarm Mode, the main hoist green light is flashing  YesPlace all A2Bswitches insafe condition.NoThe anti-two-block switchappears to be working properly,please refer to the lockoutsection of the user manual.YesPress the "Test" button.Are A2Bbatteries low? NoTake the A2Bswitch off thecable.   Pullon the wirerope.Does the redlight on the A2B switchflash after pulling on thewire rope?YesThereappears to be acommunicationproblem, seediagnosticmode p. ?YesThe batteriesneed changing.Refer to thechanging anti-two-block batteriessection of theuser manual.NoReinstall the batteries, carefully inspectthe battery and plunger cavities forinfiltration of water or dirt.   Refer to thechanging batteries section of the usermanual.Pull on the wire rope.Does the red light onthe A2B switch flash after pulling onthe wire rope?YesReinstall the A2Bswitch on the cable.Verify A2B function.NoPlease call yourservice representativeIs the"2 Block"warninglight stillon?YesThe load cell failsafewarning is on.   Onstartup this is normal asthe load cell may take upto fifteen minutes tocommunicate its batterystatus to the display unit,until which time thefailsafe warning willsound.Are load cell batteries low?Verify battery installation orchange batteries if necessary,see the changing load cellbatteries of the user manual.YesNoVerifycommunicationbetween the loadcell and the displayunit (follow theprocedure).Press the "Test" button to verify battery status.The display is always in alarm mode,the "2 Block" warning light is on? The display is always in alarm mode,the main hoist green light is on?
40 LS420 Universal User Manual V2.91 2003-01 -21.doc 6.5 The Display Unit Is Always In Alarm Mode, the Load warning light is on   If "Hoist" button green light is on press the "Hoist" button until it goes off.Press the "Parts" button to verify that the parts of lines is consistent with actualcable configuration.   Refer to the "Parts" button section in the user manual.If the "Tare" button light is on, press the "Tare" button once to disable the tare functionPress either the "Limit +" or the "Limit -" button to see the limit programmed for the hoist.Verify thatthe limit programmed is consistent with the crane capacity in its present configuration.Remove weightfrom load cell.The display isalways in alarmmode:  the "Load"warning lightis on.If there is an auxilliary load cell press the "Hoist" button until the "Hoist" button light is on.   Repeatthe previous three steps to verify the parts of lines, tare and laod limit for the auxilliary hoist.Does theload displayed nowcorrespond with theweight on theload cell?NoYesIs theoverload alarmstill on?Please call yourservice representativeYesEverything seems to befunctioning normally.NoVerifycommunicationbetween load cell anddisplay unit (followprocedure on page x)then return here.Verify overloadalarm function.Doesthe overloadalarm now functionproperly?YesNo Press "Test" to verifyloadcell batteries.   Verify battery installation.   Please pay specialattention to avoid infiltration of water or dirt and toensure that the load cell wires are properly connectedand not severed.   Change the batteries if necessary.Verify proper loadcell function.Does theload displayed nowcorrespond with theweight on theload cell?Is theoverload alarmstill on?Please call yourservice representativeEverything seems to befunctioning normally.Please callyour servicerepresentativeYesNoNoYes
41 LS420 Universal User Manual V2.91 2003-01 -21.doc  6.6 The Display Unit Is Always In Alarm Mode, the Limit+ or Limit- warning light is flashing The display  is alwaysin alarm mode:  the"Limit +" warninglight is flashing.Press the "Hoist" button untilthe boom angle is displayed.Does the angleshown correspond toactual boom angle.The maximum angle limitappears to be reached:  pressthe "Limit +" button to verifythat this limit has beencorrectly set, refer to theadjusting angle limit section ofthe user manual.Press the "Bypass" button toreturn to the main operatingscreen.   Press the "Hoist"button until the boom angle isshown.Verify the angle sensorinstallation.   Reinstall orrecalibrate if necessary, seethe angle sensor installationsection of the user manual.Press the "Test" button toverify battery status.Is theboom angleshown less than themaximum anglelimit set?Is the"Limit +" warning lightstill flashing?The maximumangle limit warningappears to befunctioning normally:refer to the usermanual for adescription of thiswarning.Please contact yourservice representative.YesNoYesYesAre anglesensor batterieslow?Verify battery installationor change batteries ifnecessary, see thechanging angle sensorbatteries of the usermanual.YesNoVerifycommunicationbetween anglesensor and displayunit (Section 6.4).NoNo The display is alwaysin alarm mode:  the"Limit -" warning lightis flashing.Press the "Hoist" button untilthe boom angle is displayed.Does the angleshown correspond toactual boom angle.The minimum angle limitappears to be reached:  pressthe "Limit -" button to verifythat this limit has beencorrectly set, refer to theadjusting angle limit sectionof the user manual.Press the "Bypass" button toreturn to the main operatingscreen.   Press the "Hoist"button until the boom angleis shown.Is theboom angleshown greater than themaximum anglelimit set?Is the"Limit -" warning light stillflashing?The minimumangle limit warningappears to befunctioning normally:refer to the usermanual for adescription of thiswarning. Please contact yourservice representative.YesNoYesYesNoNo
42 LS420 Universal User Manual V2.91 2003-01 -21.doc  6.7 The Display Unit Is Always In Alarm Mode, the wind speed alarm message is flashing The windspeed alarmmessage is alwaysflashingVisually inspect the windspeed sensor forphysical damage.   Verifyproper installation, referto wind speed sensorinstallation instructions.Does thewind speed showncorrespond to actualwind speed?Is windspeed greater thanset wind speedlimit?YesYesNoNoThe maximumwind speed warningappears to befunctioning normally:refer to the usermanual for adescription of thiswarning.Press the "Test" buttonto verify battery status.Are windspeed sensorbatteries low?Verify battery installationor change batteries ifnecessary, see thechanging wind speedsensor batteries of theuser manual.YesNoVerifycommunicationbetween windspeed sensor anddisplay unit(Section 6.4).
43 LS420 Universal User Manual V2.91 2003-01 -21.doc 6.8 Radio Communication Problem  Radio communication between sensor(s) and cabin mounted display unit faulty.Press the "Test" button and verify the sensor ID #.   The ID # for each sensor can be found on the sensor itself or on any invoiceor shipping document for that sensor.   Note that the ID # of older A2B switches is indicated on the A2B switch body in binaryform.   The binary to decimel conversion procedure is detailed in the A2B calibration mode section of the distributor manual.Does thedisplay unit indicatethe correct ID # forthe sensor?YesNoDoes thedisplay unit indicate"0" or "5535" as thesensor ID #?YesThe sensor chip's memory has been erased,  please refer tothe technical manual or contact your service representative.NoVisually inspect the antennas of the sensorand the cabin mounted display unit.Is there a clear anddirect line of sight between the sensor antenna and theantenna of the display unit?YesAre both the sensor andthe display unit antennas clear of all contact with any metalobject at all times?YesAre both the sensorand the display unit antennas complete andundamaged?Reinstall either the display unit,  thesensor or both such that there is a clearand direct line of sight between the twoantennas at all times.NoReinstall either the display unit orthe sensor such that both antennas areclear of all contact with any metalincluding cables,  chains,  the boom,or the cabin itself.NoNoA damaged antenna may need replacing.To replace the antenna of a load cell,  an anglesensor or a wind speed sensor please see theappropriate section of the user manual.   If anA2B switch antenna needs to be replaced pleasecontact your service representative.YesIf it is safe to do so, verify that the sensor is operational by observing its red LED during  a changein condition (change the boom angle for an angle sensor,  pull the wire whip for an A2B switch,change the load for a load cell,  change the apparent wind speed for a wind sensor).If either the sensor or the display unit hasrecently been installed or replaced,  the displayunit may require recalibration.   If display unit'smemory has been affected by a lightning strike orother electrical event it may need reprogramming.Refer to the technical manual or contact yourservice representative.Does thesensor appearoperational?NoVerify sensor batteries,reinstall or replace ifnecessary,  see theappropriate section ofthe user manual.Does thesensor appearoperational?There appears to be aproblem with the sensor,please contact your servicerepresentative.No
44 LS420 Universal User Manual V2.91 2003-01 -21.doc Chapter 7: Purchasing and Customer Service  Always call your service representative first, as he or she already knows the details of the sale and applications. They may also supply lockout and be able to provide the required service for that application.  If not available please contact:  Our service personnel will do their best to help customers as quickly as possible and in the most courteous manner.  Please be ready to give the following information:  i) Your name, company name, shipping address (no mail box), your phone number, fax number and emergency phone number ii) A credit card number - either Visa or MasterCard.  And for technical support, replacement, exchange or warranty:  iii) The part number of the defective or broken part iv) The serial number of each display or sensor (If re-calibration is possible, it will be done)  In the event of exchange, replacement or warranty, a return tag will be in the box for return-ing defective or broken parts. The customer can reuse the original box and the prepaid re-turn tag to return defective or broken parts.  Note: Some parts may not need to be returned.  Please note: although we design our products to fit the majority of cranes, there are exceptions that will prevent the product from working or cause installation or operational problems. Our technical staff will do their best to assist, help and advise any customer with such problems.  We strive to resolve problems as they may arise.   LSI Corporate Offices: Dave Smith PO Box 820486 Vancouver, WA 98682 Phone (888) 819-4355 Fax (360) 256-3344 sales@loadsystems.com Western Regional Office: Scott Colberg Phone (877) 287-7011 Fax (360) 575-8532 scolberg@loadsystems.com Central Regional Office: Randall Perrin Phone (337) 893-2322 Fax (337) 893-0026 rperrin@loadsystems.com
45 LS420 Universal User Manual V2.91 2003-01 -21.doc  INSTRUCTION TO THE USER  This equipment has been tested and found to comply with the limits for a class B digital device, pursuant to part 15 of the FCC Rules. These limits are designed to provide reasonable protec-tion against harmful interference in a residential installation. This equipment generates, uses and can radiate radio frequency energy and if not installed and used in accordance with the in-structions, may cause harmful interference to radio communications. However, there is no guar-antee that interference will not occur in a particular installation. If this equipment does cause harmful interference to radio or television reception, which can be determined by turning the equipment off and on, the user is encouraged to try to correct the interference by one or more of the following measures:  • Reorient or relocate the receiving antenna. • Increase the separation between the equipment and receiver. • Connect the equipment into an outlet on a circuit different from that to which the receiver is connected. • Consult the dealer or an experienced radio/TV technician for help.  In order to maintain compliance with FCC regulations, shielded cables must be used with this equipment. Operation with non-approved equipment or unshielded cables is likely to result in interference to radio and TV reception. The user is cautioned that changes and modifications made to the equipment without the approval of manufacturer could void the user's authority to operate this equipment.

Navigation menu