Loewe Individual 32 Compose 3D 46 Tv User Guide Manual Operating Instructions Pdf To The 3468f621 E1fb 4f34 Af55 84978026d2c7
User Manual: Loewe Individual 32 Compose 3D to the manual
Open the PDF directly: View PDF ![]() .
.
Page Count: 158 [warning: Documents this large are best viewed by clicking the View PDF Link!]
- 2
english
Colour key function during radio operation
Red button: On/Off screen
Yellow button: Last selecting station
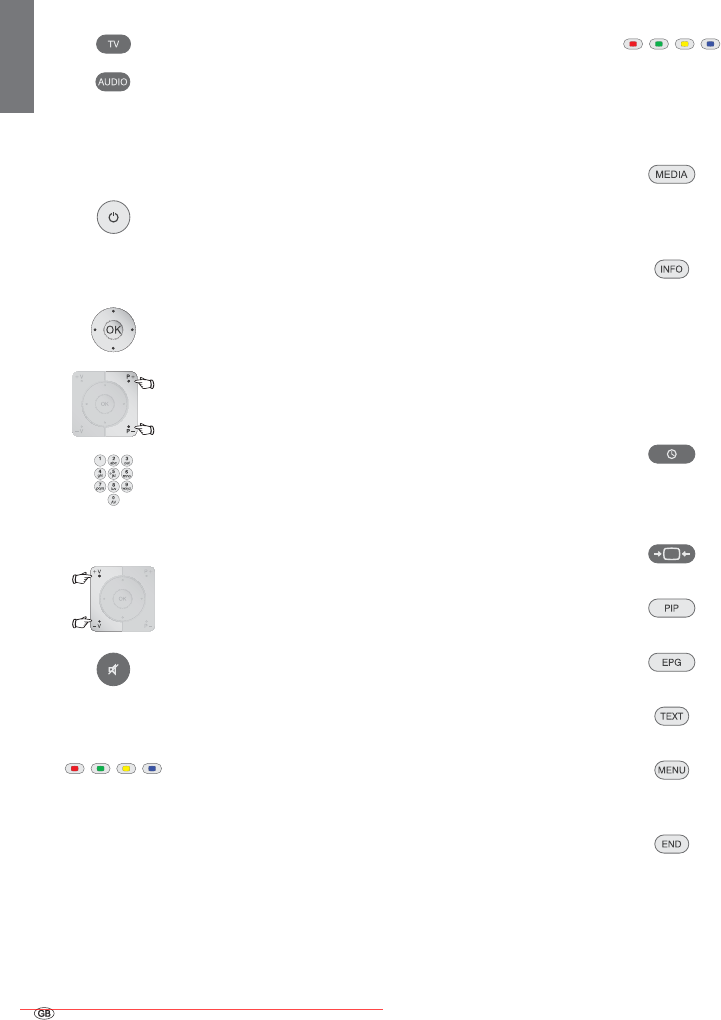
Button functions
Call MediaPortal,
select operating mode or function.
(e.g. Index)
with on-screen display: Info display,
info text appropriate to the content that can assist you
further, should you have any questions about your TV
device;
without on-screen display: Access status display,
with status display open and repeatedly pressing
programme information (if available)
Open DR archive
Press button twice in quick succession:
Show / hide time permanently
Adjust picture format
On/Off PIP (picture in picture)
On/Off EPG (Electronic Programme Guide)
On/Off teletext/MediaText (1
Call TV menu,
carry out settings
With opened menu: Exit menu;
Terminate inserts
Set operating mode
TV operation
Radio operation (standard assignment)
The assignment of the AUDIO button can be changed
(see page 127).
On/Off of the television set
On/Off device in standby
(Main switch must be turned on)
Selecting stations
OK Call station overview and with
Select station
or
P+/P– Programme +/–
or
Select station with numeric buttons
Sound
V+/V– Volume up/down
Sound on/off
Colour key function during TV operation
Red button: Start HbbTV (1 or interactive data service,
if this is available.
Green button: Teletext functions
Yellow button: Last selected station
Blue button: Programme information
Overview of the most important functions
(1
Depending on the corresponding settings (see page 82).
Downloaded From TV-Manual.com Manuals
3 -
english
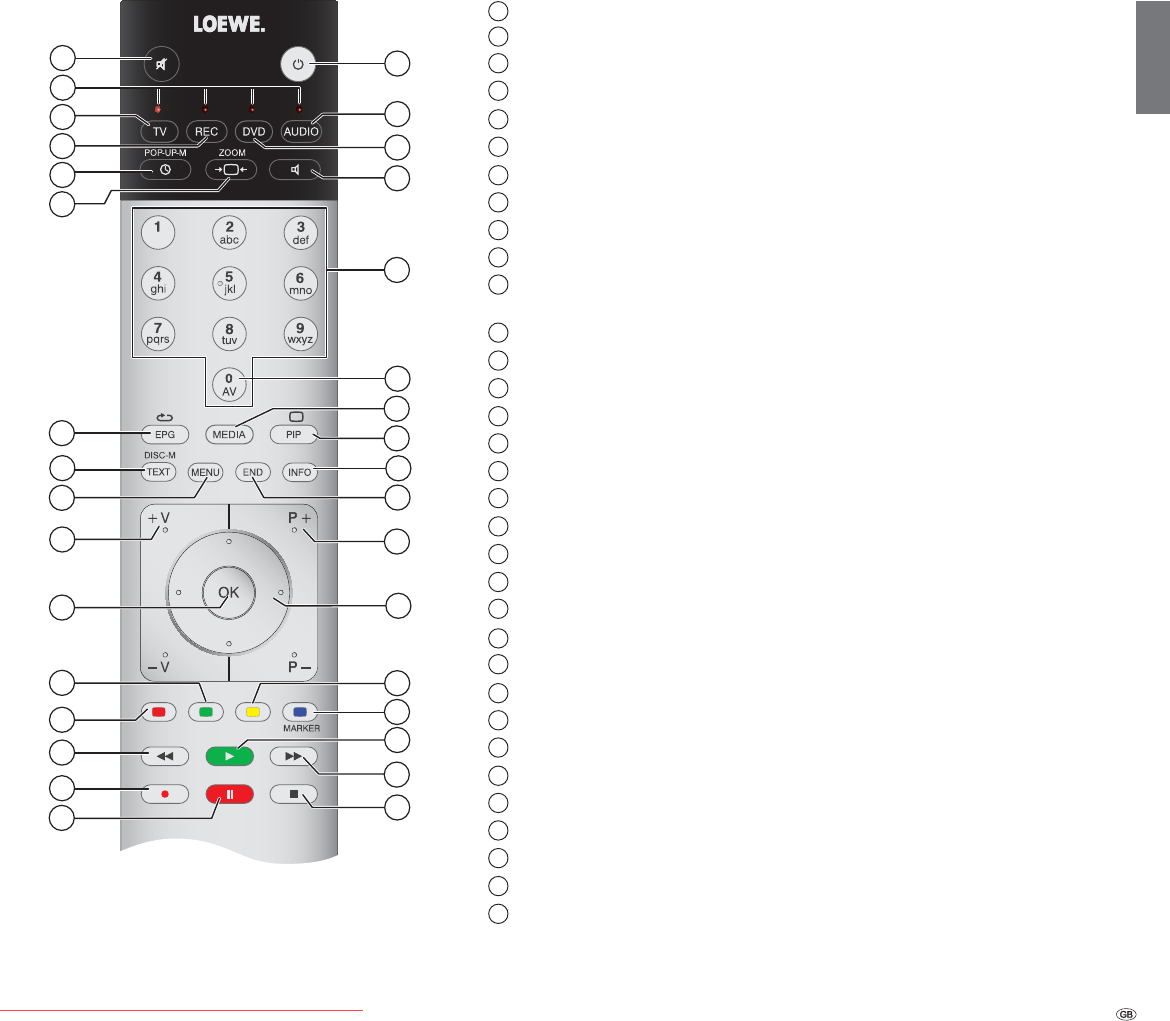
1
Sound off/on ...........................................................................................................(page 34)
2
LED display for current operating mode ................................................................(page 127)
3
Switch over to TV mode ..................................................................................(page 22; 127)
4
Switch over to operate recorder (1 .........................................................................(page 127)
5
DR archive ............................................................................................................(page 97)
6
Set picture format ....................................................................................................(page 37)
7
Electronic Programme Guide on/off ........................................................................(page 50)
8
Teletext/MediaText (2 on/off......................................................................................(page 52)
9
Menu on/off ............................................................................................................ (page 14)
10
V+/V– Volume louder/quieter ..................................................................................(page 34)
11
Station list on ...........................................................................................................(page 32)
in the menu: Confirm/call ........................................................................................(page 14)
12
Green button: Teletext functions .............................................................................(page 40)
13
Red button: Start HbbTV or interactive data service (2 ....... ......................................(page 82)
14
Jump / Rewind ...................................................................................................(page 89; 98)
15
Direct recording .......................................................................................................(page 91)
16
Interrupt timeshift television ....................................................................................(page 89)
17
End timeshift............................................................................................................(page 89)
18
Jump / Fast forward ...........................................................................................(page 89; 98)
19
Continue timeshift television / Highlights ..........................................................(page 89; 90)
20
Blue button: Programme info on/off .......................................................................(page 40)
21
Yellow button: Previous station ...............................................................................(page 40)
22
In the menu / Lists: Select/Set ..................................................................................(page 14)
23
P+/P– Select Station up/down .................................................................................(page 32)
24
Close all displays ......................................................................................................(page 14)
25
Status display on/off / in the menu: context-relevant Info on/off ......................(page 42; 17)
26
PIP on/off (picture in picture) ...................................................................................(page 48)
27
MediaPortal on/off ............................................................................................(page 16; 62)
28
AV selection .............................................................................................................(page 33)
29
Select station directly; in the menu: Enter numbers or letters ..................................(page 32)
30
Set sound mode ......................................................................................................(page 34)
31
Switch over to operate DVD player (1 .....................................................................(page 127)
32
Switch over to radio mode (1 ..................................................................... (page 23; 54; 127)
33
Switch on/off – to standby mode ............................................................................(page 23)
The key assignment displayed here is valid for the main menu level of the TV set. The key assignment
may vary in certain operating modes (see the corresponding chapter in this operating manual).
1
2
3
4
5
6
7
8
9
10
11
12
13
14
15
16
32
18
19
20
21
22
23
24
25
26
27
28
29
30
31
33
17
Remote control – TV functions
(1
The assignment of these keys can be changed (see page 127).
The description refers to the standard setting.
(2 Depending on the corresponding settings (see page 82)..
Downloaded From TV-Manual.com Manuals

5 -
english
Contents
Overview of the most important functions ............................................. 2
Remote control – TV functions ................................................................ 3
Acknowledgements .................................................................................. 4
Welcome ................................................................................................... 7
Scope of delivery ..................................................................................... 7
About this operating manual .................................................................. 7
For your safety ......................................................................................... 8
Control unit front side of the device (Individual 55 / 46 / 40) ............... 10
Connections rear side of the device
(Individual 55 / 46 / 40) ................... 11
Control unit front side of the device (Individual 32) ............................. 12
Connections rear side of the device (Individual 32) .............................. 13
Operating convenience .......................................................................... 14
General information on menu operation .............................................. 14
Operating convenience with wizards .................................................... 15
Overview of wizards .............................................................................. 15
MediaPortal ........................................................................................... 16
The index in the TV set .......................................................................... 17
The info display ..................................................................................... 17
TV menu – Overview diagram ............................................................... 18
Radio menu – Overview diagram .......................................................... 19
Other menus– Overview diagram ......................................................... 19
Initial installation ................................................................................... 20
Installing the TV set ............................................................................... 20
Set covers .............................................................................................. 20
Connecting the TV Set .......................................................................... 20
Bundling the Cables .............................................................................. 22
Preparing the remote control unit ......................................................... 22
Turning the set on/off............................................................................ 23
First installation wizard .......................................................................... 24
Positioning/aligning DVB-T antenna ...................................................... 31
Daily operation ...................................................................................... 32
Select station ......................................................................................... 32
Selecting Audio/Video Source ............................................................... 33
Daily operation (continuation)............................................................... 34
Adjusting the sound .............................................................................. 34
Adjusting the picture ............................................................................. 36
3D function ........................................................................................... 38
Button functions ................................................................................... 40
Operation without remote control ........................................................ 41
Status display ......................................................................................... 42
Managing stations ................................................................................. 44
TV stations ............................................................................................. 44
Put together / change favourites lists .................................................... 47
Picture in Picture .................................................................................... 48
Picture in Picture (PIP) ............................................................................ 48
iPIP ........................................................................................................ 48
Standard PIP .......................................................................................... 48
Configure Picture in Picture (PIP) mode ................................................. 49
Electronic Programme Guide ................................................................. 50
Electronic Programme Guide – EPG ...................................................... 50
Configuring EPG .................................................................................... 51
Teletext ................................................................................................... 52
Teletext .................................................................................................. 52
Teletext menu ........................................................................................ 53
Interactive data services (Digital teletext/MHEG-5) ................................ 54
Digital radio ........................................................................................... 54
Radio mode (DVB radio) ........................................................................ 54
EPG – Electronic Programme Guide (radio) ........................................... 55
Radio mode (Internet radio) .................................................................. 56
Audio playback from external devices ................................................... 57
Other settings ........................................................................................ 58
Parental lock .......................................................................................... 58
Timer functions ..................................................................................... 59
Language .............................................................................................. 59
On-screen displays ................................................................................ 60
Time and date ....................................................................................... 60
Coded Stations ....................................................................................... 61
Conditional Access module (CA module) .............................................. 61
Downloaded From TV-Manual.com Manuals

- 6
english
Media+ .................................................................................................. 62
General information on Media+ ........................................................... 62
Connecting the TV set to your network ................................................ 62
MediaNet .............................................................................................. 62
Help for configuration problems ........................................................... 62
MediaUpdate - additional functions ...................................................... 62
Accessing your media ........................................................................... 63
Media menu .......................................................................................... 64
MediaHome .......................................................................................... 68
MediaNet .............................................................................................. 72
Video podcasts ...................................................................................... 77
MediaMusic .......................................................................................... 78
MediaPhoto .......................................................................................... 79
MediaVideo ........................................................................................... 80
HbbTV / MediaText................................................................................ 82
Digital Recorder ..................................................................................... 84
About the Digital Recorder system ........................................................ 84
Settings ................................................................................................. 87
TV viewing with time shift ..................................................................... 89
Archive recording – Direct recording ..................................................... 91
Archive playback ................................................................................... 97
DR+ Streaming .................................................................................... 105
External devices ................................................................................... 110
Connections menu .............................................................................. 110
Gaming mode ..................................................................................... 111
Devices to the connections AV/AVS .................................................... 112
Devices to the HDMI connections ....................................................... 114
Digital Link HD .................................................................................... 115
Devices to the PC IN connection ......................................................... 116
Sound components wizard ................................................................. 117
Connecting Loewe sound system ....................................................... 118
Connecting active loudspeakers .......................................................... 119
Adjusting the speaker system .............................................................. 119
Connecting audio amplifiers ............................................................... 122
Assignment of the digital audio input ................................................. 123
Audio connection in HDMI/DVI devices .............................................. 123
Serial interface RS-232C (RJ12) ............................................................ 123
The direct way to record ..................................................................... 124
External devices (continuation) ........................................................... 126
Timer recording with external devices ................................................. 126
Operating Loewe equipment .............................................................. 127
Software update .................................................................................. 128
Basic information ................................................................................ 128
USB stick.............................................................................................. 128
Download ........................................................................................... 128
Software update ................................................................................. 128
Input of characters ............................................................................... 130
USB keyboard ...................................................................................... 130
Button combinations ........................................................................... 130
Character table .................................................................................... 131
Rotating the TV set .............................................................................. 132
Troubleshooting ................................................................................... 133
Technical data ...................................................................................... 136
General data........................................................................................ 136
Electrical data ...................................................................................... 137
Signals via PC IN / HDMI ..................................................................... 137
Connections (max. equipment) ........................................................... 138
MediaHome ........................................................................................ 139
Accessories ........................................................................................... 140
Accessories .......................................................................................... 140
Upgrade Kits / Conversion Kits / Cables ............................................... 141
Equipment variants.............................................................................. 142
TV set equipment ................................................................................ 142
Setup possibilities Individual 55 / 46 / 40 ............................................ 143
Setup possibilities Individual 32 ........................................................... 144
Environment ......................................................................................... 145
Legal notes ........................................................................................... 146
Glossary ................................................................................................ 147
EC Declaration of Conformity .............................................................. 152
Index .................................................................................................... 154
Service .................................................................................................. 157
Contents
Downloaded From TV-Manual.com Manuals

7 -
english
Thank you
for choosing a Loewe TV set!
Loewe stands for the highest demands in technology, design and user
friendliness. This applies equally for TV, video and accessories.
In addition to the elegant design and the many different possible colour
combinations and installation possibilities, your Loewe TV set also offers
many technological options.
Loewe Image+
State-of-the-art Full-HD-LCD-displays with LED-Backlight Technology. The
advantage of the LED-Backlight is in the reduced energy consumption and
high contrast values.
24p films played by a connected HDMI unit can be displayed optimally.
Loewe Sound+
Loewe Sound+ contains sound processors that are optimally calibrated
to the TV set and boasts a closed coverage construction type for the
integrated loudspeakers.
Many Loewe TV sets are fitted with a digital multi-channel audio decoder
for impressive 5.1 surround sound (1.
Loewe Media+
You can reach the MediaPortal via the MEDIA button on your remote control,
giving you access to all multimedia functions of your TV set.
Loewe DR+
If the hard disk recorder DR+ is integrated into your TV set, you can record
TV programmes simply at the press of a button. Programmes currently
being watched can be interrupted, rewound and played back from the
desired point if needed.
Scope of delivery
• LCD TV set
• Mains cable
• Velcro cable ties
• Remote control Assist with two batteries
• TV quick guide
The TV (apart from Individual 32) set is delivered ex-factory without
speakers. You can configure your own individual speaker system for your
TV set to suit your needs. Ask your dealer.
About this operating manual
For best results regarding safety and the longevity of the set, we recom-
mend you read the chapter For your Safety (page 8) before switching
it on for the first time.
The functions of the Loewe TV set are largely self-explanatory. However,
should you have any questions, the integrated index and the info display
(see page 17) can assist you further.
The index/glossary from page 147 onwards gives explanations of certain
terms used in the TV set and the operating manual.
Paragraphs which begin with the symbol ➠ indicate important instruc-
tions, tips or conditions for the following settings.
Terms which you will find in the menus or printed on the remote control
or TV set are written in bold type.
The necessary control elements are shown in the descriptions to the left
of the text containing the instructions for action.
In addition to the remote control, a PC keyboard can be connected to one of the
USB ports on your TV and then used to control your TV set (see also page 130).
In the operating manual, this symbol indicates places in
which the use of a keyboard is particularly advantageous.
Depending on the connected accessory equipment the menus in the TV
set can differ from those described here. The sets are illustrated without
speakers in most figures.
All the station names, programme contents, the illustrated photos, titles,
albums and album covers in this operating manual are examples.
In some countries, the stations also transmit interactive data services with
their programmes (see page 54, Digital Teletext/MHEG-5), whereby the
functions of individual keys are not available or only so to a limited extent.
InterActive
The symbol indicates which functions can differ for a loaded
application.
The operating instructions for your TV set are updated at irregular
intervals. We recommend checking now and then, especially after a
software update.
Welcome
Downloaded From TV-Manual.com Manuals
- 8
english
For your own safety and to prevent unnecessary damage to your device,
read and comply with the following safety instructions:
Proper use and environmental conditions
This TV set is designed exclusively for reception and reproduction of
video and audio signals and is designed for living rooms or office facilities,
and should not be operated in rooms with high humidity, such as a
bathroom, or sauna, or where there is a high concentration of dust (e.g.
workshops). The manufacturer‘s warranty is only valid for use in the specified
permissible environment.
If the set is used outdoors ensure that it is protected against moisture
(rain, splashing water, or dew). High humidity and dust concentrations
cause leak currents in the device, which can cause a shock hazard if the
device is touched, or a fire.
If you have brought the set into a
warm environment from the cold,
then wait for about 1 hour before
switching it on to avoid formation of
condensation.
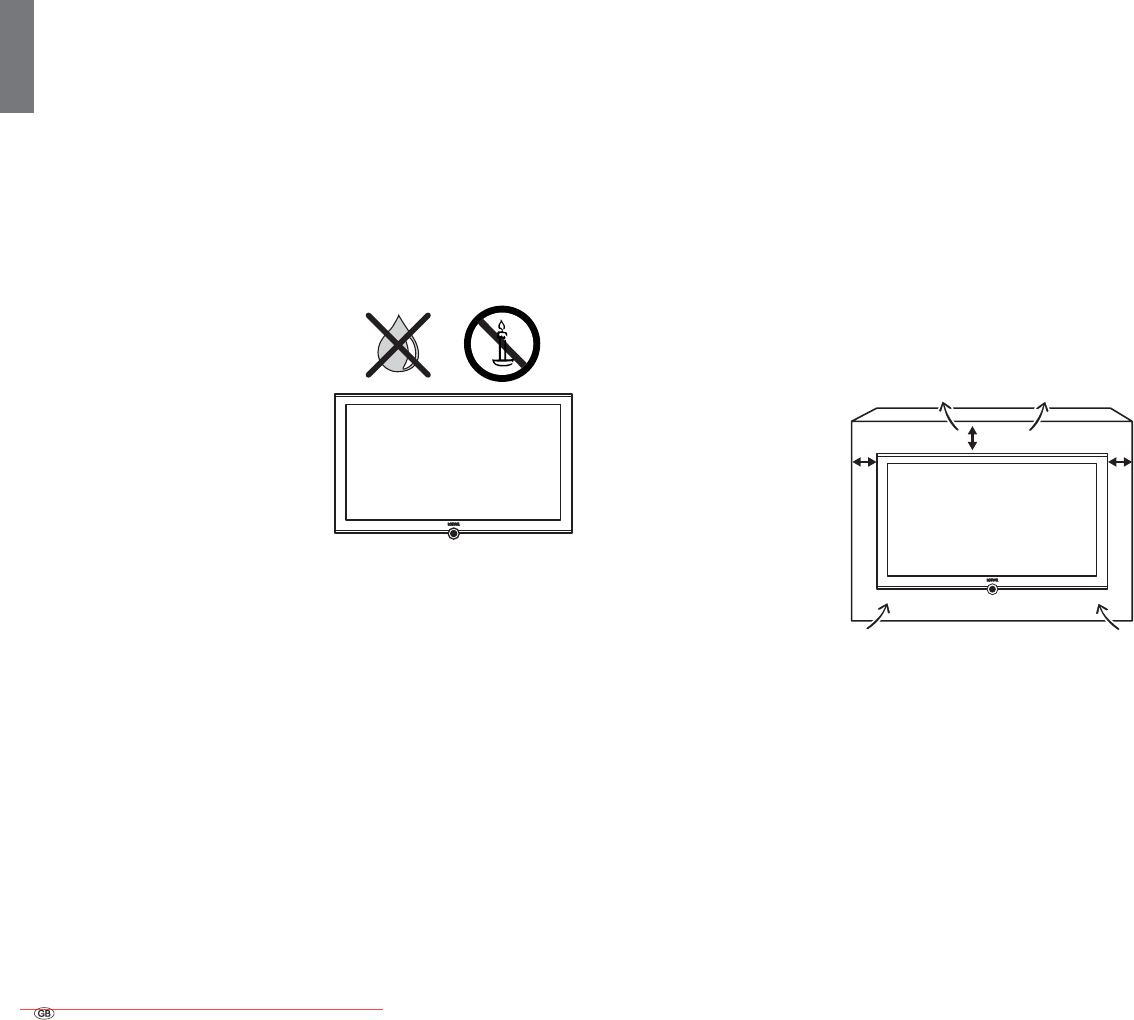
Do not place any objects filled with
liquids on top of the appliance. Pro-
tect the appliance against dripping
and splashing water.
Candles or naked flames must be kept
away from the appliance at all times
to prevent it from catching fire.
Never place the TV set in a position where it is exposed to vibrations. This
can lead to material overload.
Transporting
Only transport the device in vertical position. Grasp the device on the
upper and lower edges of the housing. Sets without system speakers
should never be placed on the protruding control unit on the bottom of
the set. This could damage the control unit.
If the set has to be put down during packing/unpacking, place the TV
set with the entire front surface lying flat on a soft underlay such as a
blanket or the felt from the packing material.
The LCD screen is made of glass or plastic and can break if not handled
properly.
Always wear rubber gloves to carry the TV set if the LCD screen is dam-
aged and liquid crystal might be leaking out. In the case of skin contact
immediately wash thoroughly with water.
Power supply
The wrong voltage can damage the set. This equipment must only be
connected to a mains power supply which has the same voltage and
frequency as that specified on the rating plate; use the mains cable
provided. The mains plug of the TV set must be easily accessible so that
the device can be disconnected from the mains at any time. When you
unplug the mains plug, do not pull on the cable rather pull on the plug
housing. The cable in the mains plug could be damaged and cause a
short circuit the next time it is plugged in.
Lay out the mains cable in such a manner that it cannot be damaged.
The mains cable must not be kinked or laid over sharp edges, stepped
on or exposed to chemicals; The latter also applies for the entire equip-
ment. A mains cable with damaged insulation can cause electrical shock
and is a fire hazard.
Air circulation and high temperatures
The vent slots on the rear panel of the set must always be kept free.
Please do not place newspapers or cloths on/over the TV.
Ensure that there is at least 10
cm free space on the sides and
above the set for air circulation,
if the set is placed in a cabinet
or on a shelf.
Like any electronic device, your
TV set requires air for cooling.
Obstruction of the air circula-
tion can cause fires.
The set is suitable for different
installation solutions. See the
instructions for assembly for the different installation solutions. Stand
the TV set with the table or floor stand only on a level, sturdy, horizontal
base. Particularly ensure that the set does not protrude to the front when
placed in or on pieces of furniture. The TV set may only be operated
horizontally, the vertical tilt must not be more than 10 degrees maximum.
The TV set must never be operated on edge, lying on the ground or
hanging from the ceiling.
Set up the device where it is not exposed to direct sunlight and where it
is not exposed to additional warming through heating elements.
Prevent metal items, needles, paper clips, liquids, wax, or similar items,
from getting into the interior of the device through the vent slots in the
rear panel. Such objects can cause short circuits in the set, which could
possibly cause a fire.
If something should get into the interior of the set then immediately
unplug the mains plug of the device and contact customer service for
more information.
For your safety
10 cm 10 cm 10 cm
Downloaded From TV-Manual.com Manuals

9 -
english
Thunder storms
Pull out the mains plug and all connected antenna cables from the TV
set in a thunderstorm. Overvoltage caused by lightning can damage the
set via the antenna system, as well as via the mains. The mains plug and
all connected antenna cables should also be pulled out during long pe-
riods of absence.
Note on the LCD screen
The TV set you have purchased with LCD screen satisfies the most rigor-
ous quality requirements and has been inspected relative to pixel errors.
Despite our thorough care when manufacturing the display, it cannot be
100% guaranteed that no subpixel defects will be present due to techni-
cal reasons. Please understand that these types of effects, as long as they
are within the standard of specified limits, cannot be considered as a
device defect in terms of the guarantee.
Avoid displaying still images for long periods of time. It is possible that
a copy of the image may remain.
Cleaning and care
➠ Switch off the TV set at the main switch before cleaning.
Clean the TV set, the screen, and the remote control unit with a soft,
moist, and clean cloth only, without any aggressive or scouring cleaning
agents.
Sets with glass screens may be cleaned with a conventional glass cleaner.
TV sets with 3D function
Read the following safety instructions before using the 3D function of
your TV set.
Please only use Loewe 3D glasses (see Accessories on page 140) in
conjunction with Loewe 3D TV sets.
People that have a visual disorder may not be able to perceive 3D effects
or may only be able to perceive them to a limited extent. People that are
sensitive to flickering images (e.g. those with epilepsy) should only use
this product after having consulted their doctor.
It might take some time for you to get used to the 3D glasses and before
you can perceive the 3D effects properly.
Stop using the 3D devices immediately if you experience any feelings of
nausea, dizziness or malaise when viewing 3D content.
Supervise children whilst they are viewing 3D content, as they can be
particularly sensitive to it.
Allow more time for a break when viewing 3D films, so that you are able
to relax. Failure to do this could result in headaches, fatigue, dizziness
or malaise.
Position yourself comfortably in front of the 3D TV set and ensure that
you are seated firmly. By doing this, you will avoid any injuries that may
arise due to reacting to extreme 3D content.
Switch off any artificial light sources (e.g. energy saving lamp) between
the TV set and the 3D glasses. These could impair the infrared reception
or the TV picture may flicker as a result.
Repairs and accessories
Never remove the back of the TV set yourself. Only have your TV device
repaired or serviced by authorised television technicians.
Only use original accessories such as Loewe stands if possible (see Acces-
sories on page 140.
Supervision
Do not allow children to use the TV set without supervision or to play in
the immediate vicinity of the TV set. The set could tip over, be pushed
off or pulled down from the stand surface and injure someone.
Do not allow the switched-on TV set to run unattended.
Volume
Loud music can lead to ear damage. Avoid extreme volume especially
over long periods and when using headphones.
For your safety
Downloaded From TV-Manual.com Manuals
- 10
english
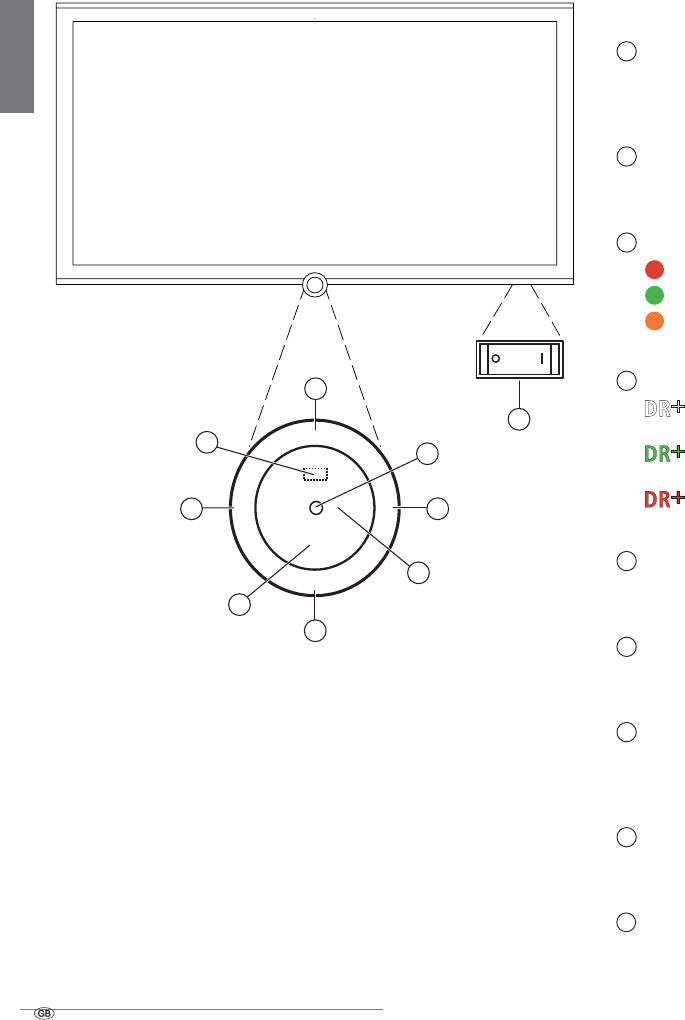
Functions of the operating elements
1 Mains switch:
The mains switch is located on the bottom of the set.
Always return the TV set to Standby mode before switching it off
with the main switch.
2 On/Off button:
Switch on from the standby mode
Switch off to the standby mode
3 Display:
red = Standby
green = Operation
orange = Operation without on-screen display
(Radio, EPG data capture, timer recording).
4 Display DR+:
white = Digital Recorder inactive
(no recording, no playback)
green = Digital Recorder active (offset TV viewing or
archive playback)
red = Digital Recorder active
(archive recording)
5 Infrared transmitter:
When showing 3D content, the 3D glasses Loewe Active Glasses 3D
are controlled via the infrared sensor.
6 Button M:
Call the menu
in the menu: up/down
7 Button R:
Radio on/off (back to TV mode)
Switch on the radio from the standby mode
in the menu: down
8 Button +:
Station up
in the menu: to the right
9 Button – :
Station down
in the menu: to the left
Control unit front side of the device (Individual 55 / 46 / 40)
DR+
M
R
+
-
3
1
6
8
9
2
4
7
5
Downloaded From TV-Manual.com Manuals
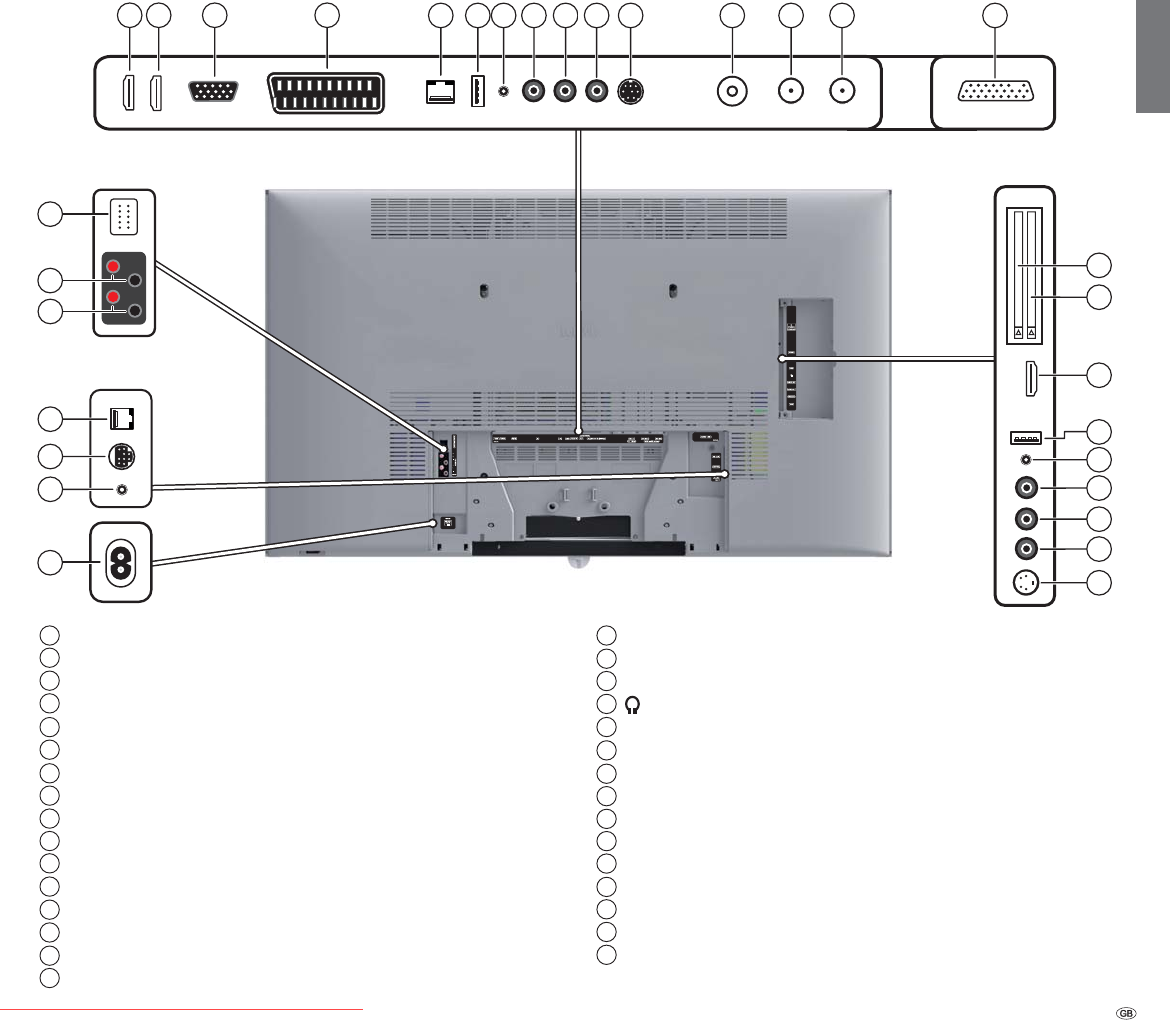
11 -
english
1
HDMI 1 - HDMI input 1
2
HDMI 2 - HDMI input 2
3
PC IN - VGA/XGA input
4
AV - Euro-AV socket
5
LAN - Network connection
6
USB - USB connection
7
AUDIO IN - Audio input (analogue)
8
AUDIO DIGITAL OUT - Digital audio output
9
AUDIO DIGITAL IN - Digital audio input
10
CENTER IN - Centre audio input (analogue)
11
SERVICE - Service socket
12
ANT-TV - Antenna/cable analogue/digital
13
ANT SAT 2 - Satellite antenna (Sat tuner 2)
14
ANT SAT - Satellite antenna (Sat tuner 1)
15
AUDIO LINK - Surround audio outputs (analogue)
16
CI-COMMON INTERFACE - Common Interface 1 (CI slot 1)
17
CI-COMMON INTERFACE - Common Interface 2 (CI slot 2)
18
HDMI 3 - HDMI input 3
19
USB - USB connection
20
- Headphones connection
21
AUDIO IN L - Audio in left (AVS)
22
AUDIO IN R - Audio in right (AVS)
23
VIDEO IN - Video in (AVS)
24
AVS - S-Video connection (AVS)
25
220-240V~ 50/60Hz – Mains connection
26
IR LINK - Infrared transmitter connection
27
CONTROL - Rotating stand control
28
RS-232C - Serial interface
29
AUDIO OUT L - Speaker connection left (+/–)
30
AUDIO OUT R - Speaker connection right (+/–)
31
SYSTEMSPEAKER - Loewe system speaker connection
Connections rear side of the device
(Individual 55 / 46 / 40)
29
1 2
11
9
10
12
13
26
27
15
31
4 5
23
3
24
28
30
8
19
20
22
21
18
25
6 7
14
17
16
Downloaded From TV-Manual.com Manuals
- 12
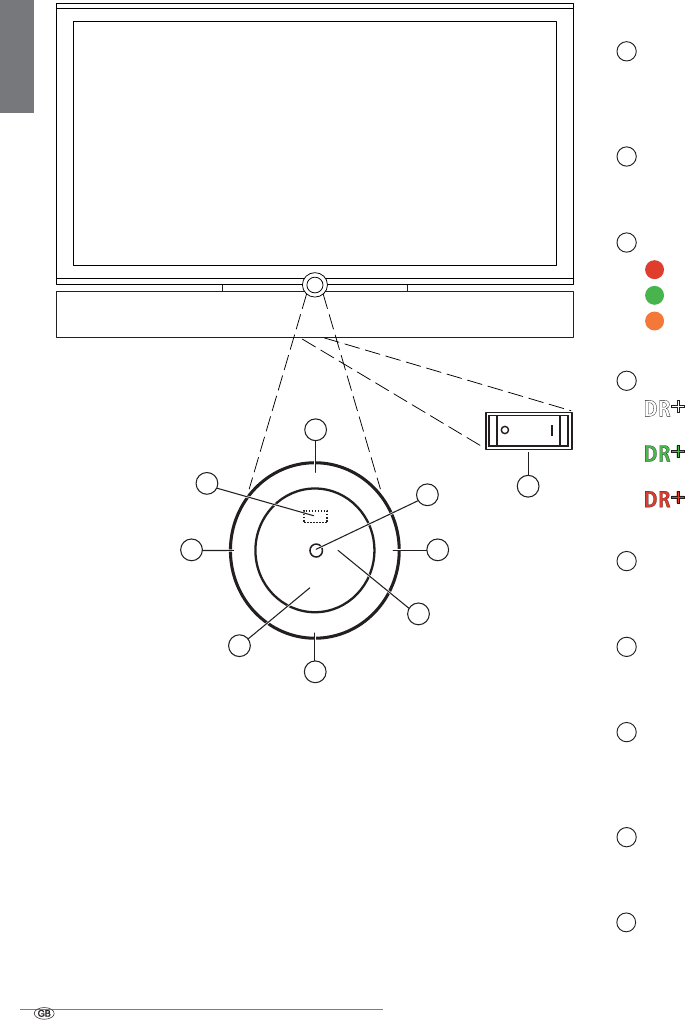
english
Control unit front side of the device (Individual 32)
Functions of the operating elements
1 Mains switch:
The mains switch is located on the bottom of the set.
Always return the TV set to Standby mode before switching it off
with the main switch.
2 On/Off button:
Switch on from the standby mode
Switch off to the standby mode
3 Display:
red = Standby
green = Operation
orange = Operation without on-screen display
(Radio, EPG data capture, timer recording).
4 Display DR+:
white = Digital Recorder inactive
(no recording, no playback)
green = Digital Recorder active (offset TV viewing or
archive playback)
red = Digital Recorder active
(archive recording)
5 Infrared transmitter:
When showing 3D content, the 3D glasses Loewe Active Glasses 3D
are controlled via the infrared sensor.
6 Button M:
Call the menu
in the menu: up/down
7 Button R:
Radio on/off (back to TV mode)
Switch on the radio from the standby mode
in the menu: down
8 Button +:
Station up
in the menu: to the right
9 Button – :
Station down
in the menu: to the left
DR+
M
R
+
-
3 1
6
8
9
2
4
7
5
Downloaded From TV-Manual.com Manuals
13 -
english
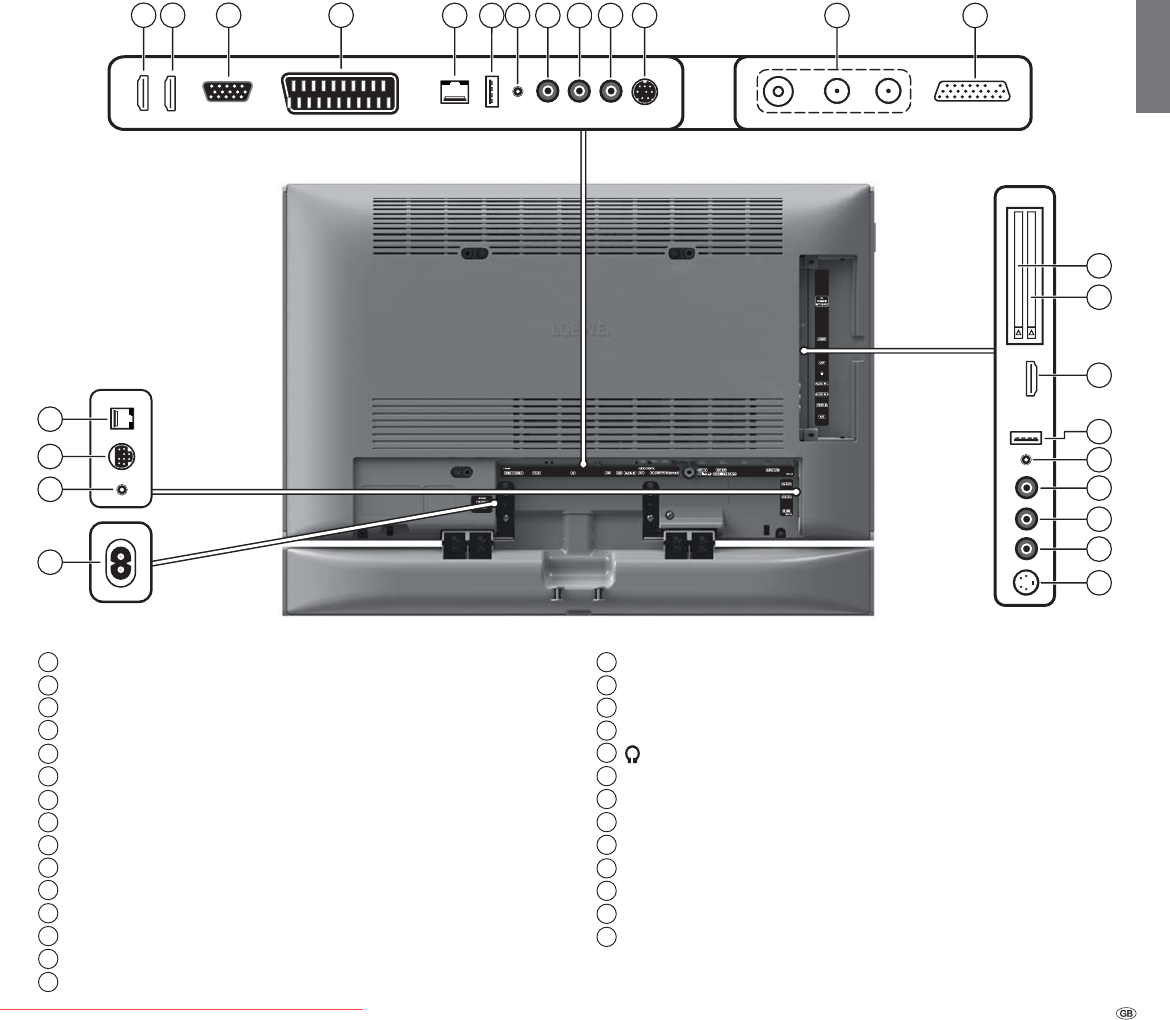
(1 Equipment and upgrade options, see page 142.
(2 The position of the aerial sockets depends on the tuner equipment.
Connections rear side of the device (Individual 32)
1
HDMI 1 - HDMI input 1
2
HDMI 2 - HDMI input 2
3
PC IN - VGA/XGA input
4
AV - Euro-AV socket
5
LAN - Network connection
6
USB - USB connection
7
AUDIO IN - Audio input (analogue)
8
AUDIO DIGITAL OUT - Digital audio output
9
AUDIO DIGITAL IN - Digital audio input
10
CENTER IN - Centre audio input (analogue)
11
SERVICE - Service socket
12
ANT-TV - Antenna/cable analogue/digital (1 (2
12
ANT SAT - Satellite antenna (Sat tuner 1) (1 (2
12
ANT SAT 2 - Satellite antenna (Sat tuner 2) (1 (2
13
AUDIO LINK - Surround audio outputs (analogue)
14
CI-COMMON INTERFACE - Common Interface 1 (CI slot 1)
15
CI-COMMON INTERFACE - Common Interface 2 (CI slot 2)
16
HDMI 3 - HDMI input 3
17
USB - USB connection
18
- Headphones connection
19
AUDIO IN L - Audio in left (AVS)
20
AUDIO IN R - Audio in right (AVS)
21
VIDEO IN - Video in (AVS)
22
AVS - S-Video connection (AVS)
23
220-240V~ 50/60Hz – Mains connection
24
IR LINK - Infrared transmitter connection
25
CONTROL - Rotating stand control
26
RS-232C - Serial interface
1 2
11
9
10
12
13
26
15
4 5
23
3
24
8
19
20
22
21
18
25
6 7
14
17
16
Downloaded From TV-Manual.com Manuals
- 14
english
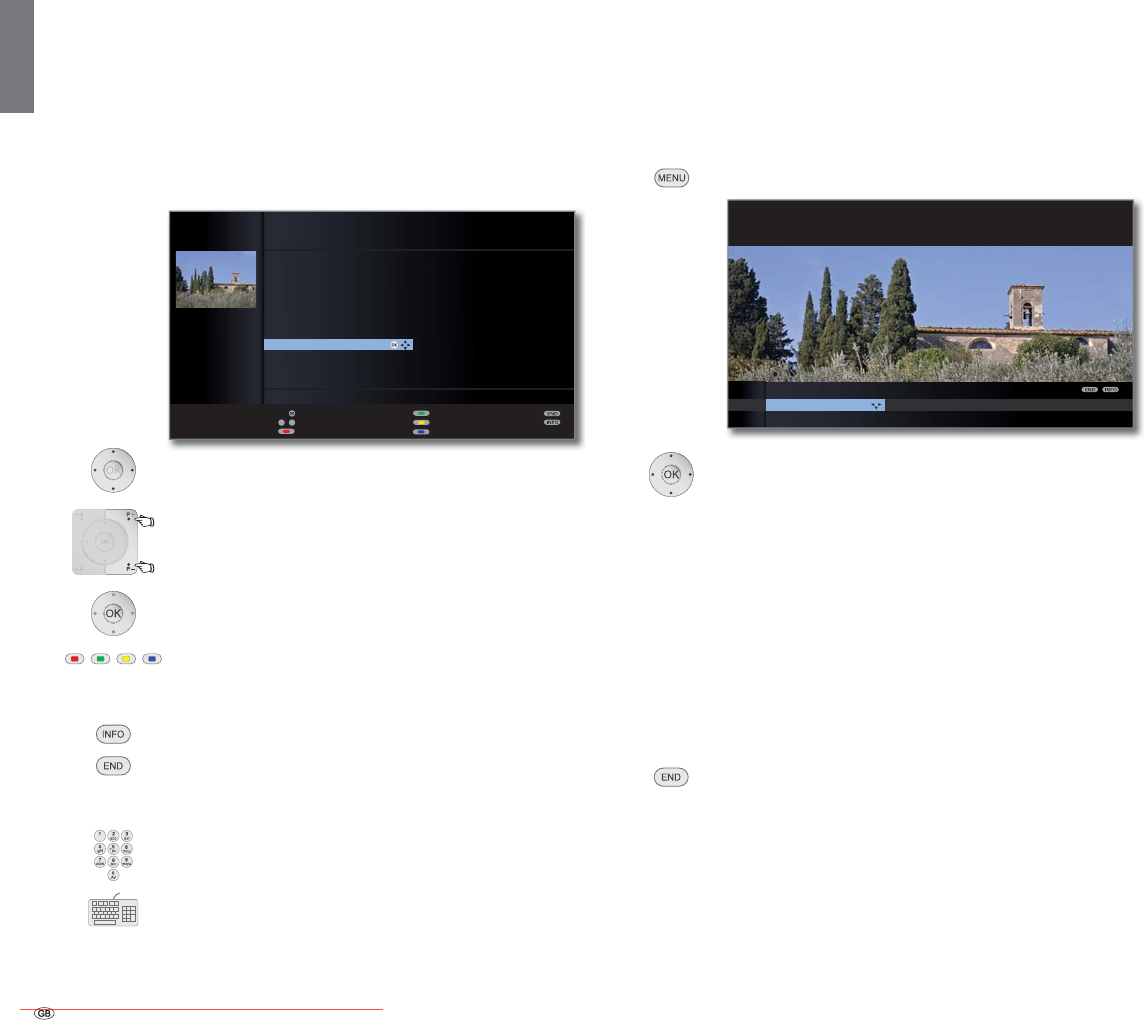
Menu operation (example: TV menu)
Menus for the individual modes (TV, Radio, PIP, EPG, Teletext, MediaPortal
and DR archive) are called with the MENU button.
The menus are displayed at the bottom of the screen. At the top you get
additional information about the selected menu item (see info display on
page 17).
➠ In normal TV mode, without other displays.
MENU: Call TV menu.
Select Picture,
go to the menu line below.
Select Brightness,
go to the menu line below.
Set Brightness.
Return to the Brightness menu line
to make other picture settings.
Select more ... ,
OK call more ... functions.
Select Auto format,
go to the menu line below.
Select on / off.
END: Conclude the settings.
Menu structure
You can find a diagram of the menu structure in the overview diagrams,
page 18 and after.
General information on menu operation
The operation can be divided basically into two areas: The operation of
dropdown lists (e.g. station list, favourites list, EPG etc.) and the menu
operation (TV menu etc.) for configuring your TV set.
➠ If any questions arise during the operation of your TV set, an appro-
priate info screen can be accessed to help you by pressing the INFO
button, see also info display on page 17.
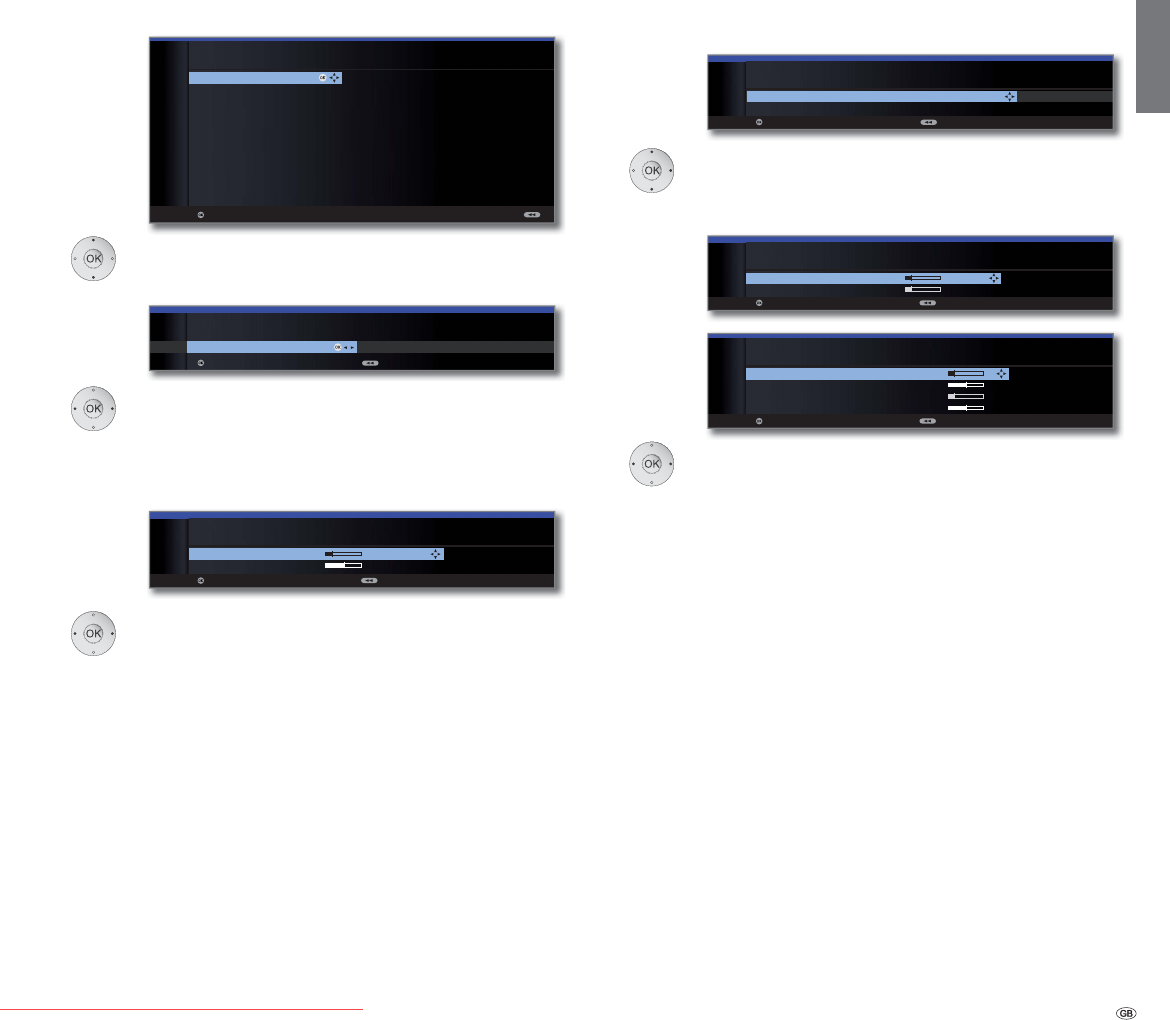
Selection list (example: Station list)
You move the cursor by pressing the ring (up,
down, left, right).
P+/P– If more selection options are available than will fit
on one screen page page ܬ is displayed. You can
scroll the pages with P+/P–.
OK The OK button calls the selection or confirms the
setting.
With the coloured buttons you can select different op-
tions depending on the application. The assignment of
the coloured keys is shown at the bottom of the screen.
INFO: Additional information about the screen page.
END: Close/exit dropdown list.
Inputs with the numeric buttons
Letters have to be entered for specific functions. When
using the remote control, press the numeric buttons just
as on a mobile phone keypad (0-9) until the desired
symbol is displayed. The available letters are printed on
the individual numeric buttons.
See page 131 for a detailed overview of the available
characters.
OK
az
-
P+
P–
STATION LIST
21:00-21:45 Urlaubsparadies - Toskana
HDMI3
HDMI2
HDMI1
PC IN
AVS
AV
0 VIDEO
'DV(UVWH۽
=')۽
:'5.¸OQ ۽
%D\HULVFKHV)6 ۽
KUIHUQVHKHQ ۽
3KRHQL[ ۽
%5DOSKD۽
VDW۽
(LQV([WUD۽
(LQV)HVWLYDO۽
(LQV3OXV ۽
=')LQIRNDQDO ۽
=')GRNXNDQDO ۽
=')WKHDWHUNDQ ۽
DUWH۽
.LND۽
OK
Scan stations
Change stations
Sort alphabetically
Switch to ...
Select station
Favourites3DJHܬ
Sound Recording Connections Settings G
PICTURE
Here you can adjust among other things: Contrast, colour, brightness,
picture adjustment, sharpness, picture format.
TV MENU
Picture
Picture adjustment ...
Operating convenience
Downloaded From TV-Manual.com Manuals

15 -
english
Operating convenience with wizards
For many settings your TV set has user guidance with wizards which
guide you through the settings step by step.
Overview of wizards
Initial installation
The initial installation wizard helps you with the initial installation and
connection of any existing equipment (see page 24).
Setting up the antenna
You enter in the antenna wizard which antenna signals are available to
you. The antenna wizard is called in initial installation (see page 24).
You can also call the antenna wizard in the TV menu under Connections
ט Antenna DVB ט Antenna DVB-S (1 or Antenna DVB-T.
Search wizard
If you want to search for new stations after the initial installation, or if you
have set up your antenna for the first time, then you can handle this task
with the help of the search wizard (see page 44).
You will find the search
wizard in the TV menu under Settings
ט Stations ט Search wizard.
Connecting sound components
The sound component wizard ensures that the components which re-
produce the TV sound are correctly registered, connected and set. It is
started automatically at the end of the initial installation wizard but can
also be called separately (see page 117). You will find the sound com-
ponents wizard in the TV menu under Connections ט Sound components.
Programming and managing recordings
The recording wizard helps you when programming a record with video, DVD
or digital recorder (DR+) (see page 124 onwards).
Software update
You can download the latest software for your TV set from the Loewe
Service site and update using a USB stick (see page 128).
Operating convenience
(1 Equipment and upgrade options, see page 142.
Downloaded From TV-Manual.com Manuals
- 16
english
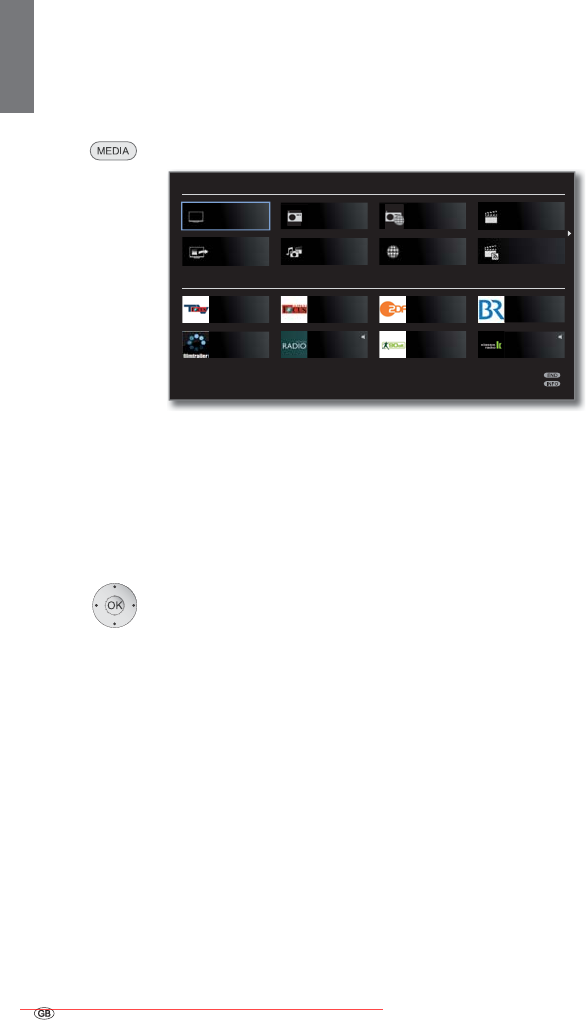
MediaPortal
The MediaPortal is the central overview page for your TV set‘s functions.
From here you can gain access to TV channels, local and online media,
digital radio and to the archive of the Digital Recorder (1.
Call MediaPortal
MEDIA: Call MediaPortal.
The individual media and the various functions are dis-
played at the top of the MediaPortal.
The number of selectable items varies depending on the
TV equipment, network connection, available media/
media servers and connected appliances.
The lower part of the MediaPortal contains the selectable
recommendations.
Select menu item,
OK call.
Description of the individual functions:
TV: Here you call the TV mode of your TV set.
See page 32 for further information.
DVB radio: Use this to open the DVB radio mode of your TV set
to listen to digital radio stations over DVB.
See page 54 for further information.
Internet radio: Use this to open the Internet radio mode of your TV
set to listen to digital radio stations over the Internet.
The menu item only appears if an Internet connection
is available.
See page 56 for further information.
DR archive: Using the DR Archive, you have access to the recorded
programmes on the integrated hard disk or to the
recordings on a storage device connected via USB.
See page 84 for further information.
DR+ Streaming: Here, you can switch off the TV set in the advanced
standby mode for DR+ Streaming.
The menu item only appears if the DR archive is shared
with other televisions.
See page 105 for further information.
MediaHome: Here you have access to your personal memory media,
e.g. to all memory media connected via USB or to net-
works with which your TV set is connected.
See page 62 onwards for further information.
MediaNet: Here you have access to multimedia content in the
Internet as well as a high-quality web browser.
See page 62 onwards for further information.
Video podcasts: Here you have access to video podcasts and Web TV
from the Internet. The menu item only appears if an
Internet connection is available.
See page 77 for further information.
Index: Here you have access to the index integrated in the TV
set.
See page 17 for further information.
MEDIA PORTAL
BR
Klassik RadioFilmtrailer.com
90elf - Dein
Fussball-Radio
DELUXE
LOUNGE RADIO
Focus TV ZDFFocus Online
TV
DR+ Streaming MediaHome
DVB radio Internet radio
RECOMMENDATIONS
MediaNet
DR archive
Video podcasts
Operating convenience
Downloaded From TV-Manual.com Manuals
17 -
english
Operating convenience
The index in the TV set
The index explains the TV functions and the terms that you may be con-
fronted with when operating the TV set. You can start all the assistants
and many of the operating functions directly from here.
Alphabetic sorting is preceded by the items Menu language, Energy ef-
ficiency, Integrated features and Repeat initial installation.
Call index
MEDIA: Call MediaPortal.
Select Index,
OK call.
You will see an info text for the highlighted keyword in
the info display.
If an OK symbol appears in the marked line, this function
can be called directly with OK.
Selecting a keyword
Enter initial letters with the numeric buttons like with a
mobile phone keypad (see page 14).
or go with:
to the preceding / next letters,
from line to line,
P+/P– scroll backwards or forwards in whole pages.
Example: You want to have the TV set switch off automatically at
a specific time:
Select the keyword Switch off ט Automatic, with OK you can
activate the setting and with back again.
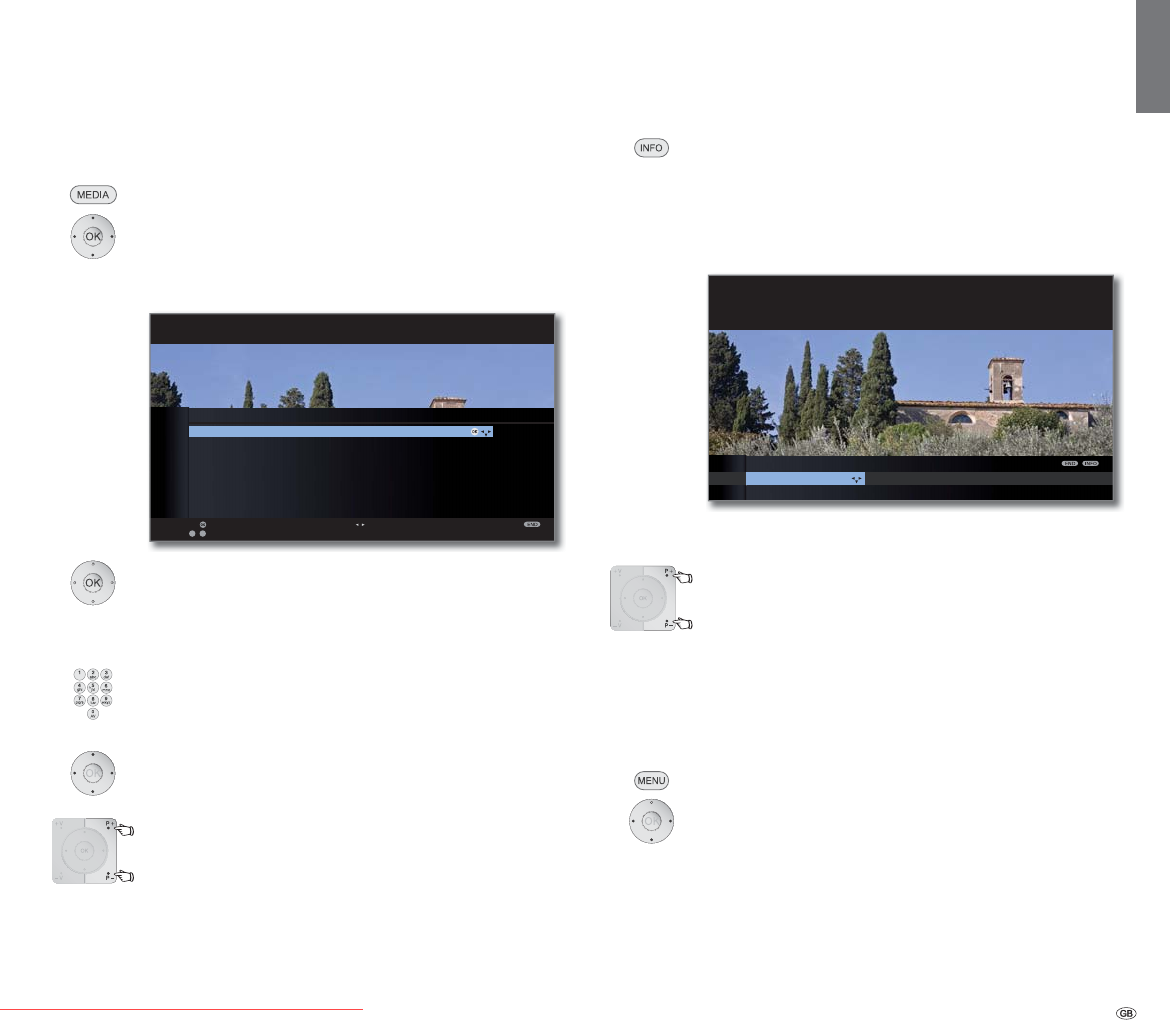
The info display
The info display provides an info text appropriate to the on-screen display
that can assist you further with the operation of your TV set. Together
with the index it makes for a comfortable operating system.
➠ An on-screen display is faded in.
The factory setting is that the info display is shown auto-
matically for each menu item. In this case you can tempo-
rarily hide the info texts with the INFO button.
The automatic info display can be hidden via a menu
setting. Then it can be displayed temporarily by pressing
the INFO button.
An INFO icon at the bottom right above the menu bar
also tells you that an info text is available.
If an info text over several pages is available the number
of available pages and P+P– Page ܬ is displayed in the
Info window. You can scroll through the individual info
pages with P+ and P–.
Permanently display or hide the automatic info display
Once you have become familiar with how to operate the TV set, you can
switch off the automatic info display.
➠ In normal TV mode, without other displays.
MENU: Call TV menu.
Select Settings,
go to the menu line below.
Select Miscellaneous,
go to the menu line below.
Select On-screen displays,
go to the menu line below.
Select Automatic info,
go to the menu line below: yes / no.
OK
az
-
OK
P+
P–
Activate Previous/next letter
6HOHFWOHWWHU 3DJHܬ
INDEX
Menu language
Energy efficiency
Integrated features
Repeat initial installation
*
Access code
Automatic dimming - Room
Automatic station programming
You can select your language for operating the TV set.
Picture Sound Recording
SETTINGS
Here, you can search for stations automatically or manually as well as set
the menu language, timer functions, parental lock,
on-screen displays, etc.
TV MENU
Settings
Station ...
t
ions
Downloaded From TV-Manual.com Manuals
- 18
english
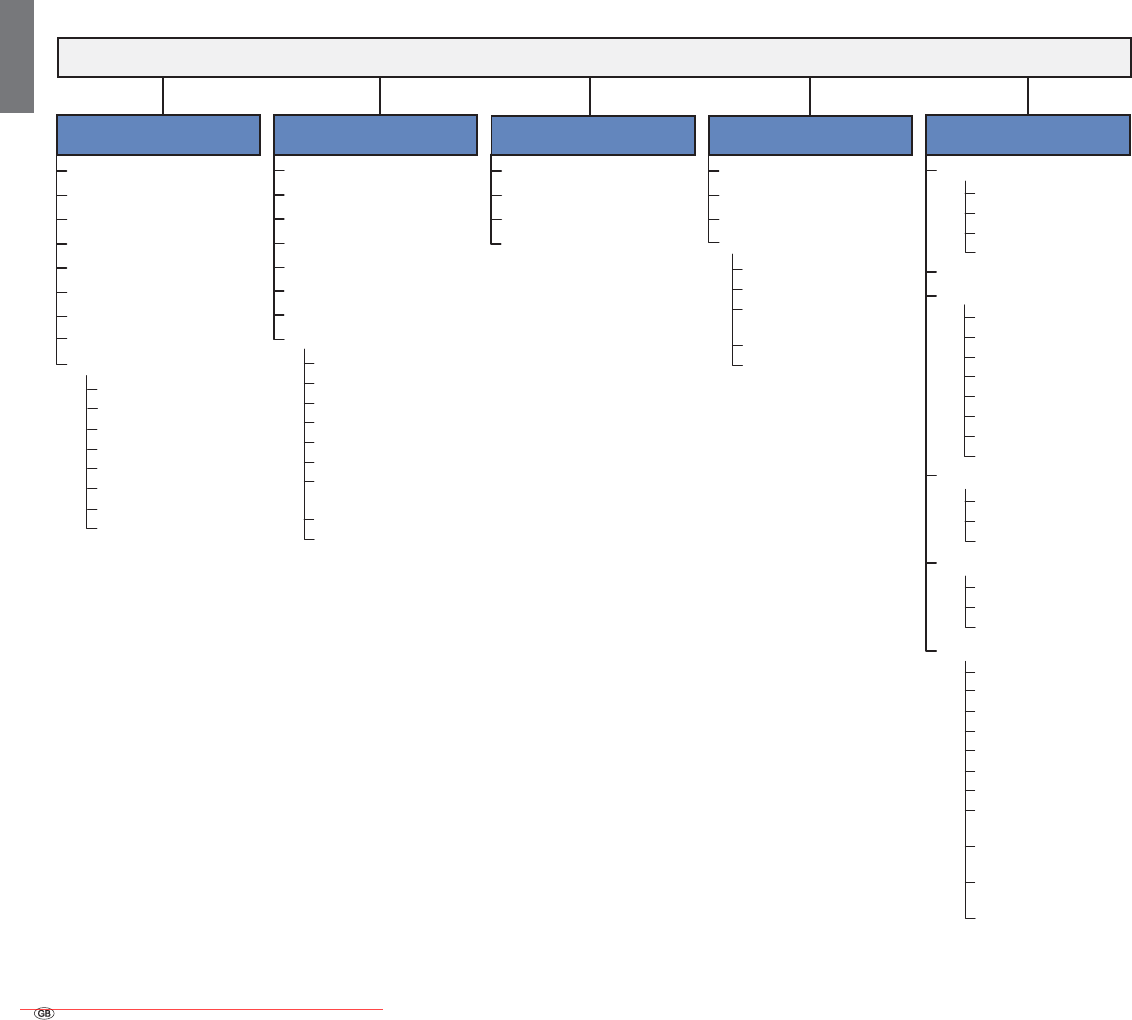
TV menu – Overview diagram
(1 Menu items appear depending on the signal source currently selected (DVB or analogue) and/or at definite presettings in the relevant
menus. For individual details, see the corresponding chapter of the operating instructions.
(2 Menu item only appears if a foot with motor drive is used (see page 132).
(3 Menu item only appears if the audio commentary is activated and available (see page 43).
(4 Menu item can only be selected if a valid signal is present at the PC IN input.
(5 Menu item only available if a Decoder has been selected as Device at connection AV (see page 110).
(6 Menu item not available if the TV set is showing 3D content.
Operating convenience
Settings
TV menu
Picture Sound Connections
Recording
Recording wizard
Timer list
Pre-record time
Post record time
Sound components
Antenna DVB
AV connecting settings
Miscellaneous
3D
Picture adjustment
Contrast
Colour intensity
Colour temperature
Brightness
Sharpness
Digital Noise Control (DNC)
more...
Image+ Active
Auto dimming - Room (6
Auto dimming - Video (VBD+)
Film quality improvement (DMM)
Auto format
Picture format
Move picture up/down (1
PC IN display (4
Search wizard
Manual adjustment
Change stations
Select/change favourites
On-screen displays
Time and date
Software update
CA module: xxx (1
DVB settings
Rotate TV (2
HbbTV mode
Start behaviour
of HbbTV stations
Check integrated
hard disk
Format integrated
hard disk
Format external
hard disk
Menu language
Subtitles (DVB)
Audio (DVB)
Energy efficiency
Stations
Parental lock
Timer functions
Language
Eco standard
Premium mode
Shop mode
Miscellaneous
Digital Link Plus
Decoder stations (5
Remote TV switch on
via Digital Link
Assign digital audio input
Gaming mode
Switch off once
Switch off daily
One-time alarm
Wake up Mon-Fri
Wake up Sat
Wake up Sun
Wake up with
Wake up signal volume
Sound mode
Dolby PLII mode (1
Sound adjustment
Audio commentary volume (3
Headphone volume
Loudness
Sound-picture synchronisation
more...
Loudspeaker sound (1
Headphone sound (1
Auto volume
AV output signal
Maximum volume
max. switch on volume
Volume adjustment for
current station
Balance
Auto speech detection
Downloaded From TV-Manual.com Manuals
19 -
english
Operating convenience
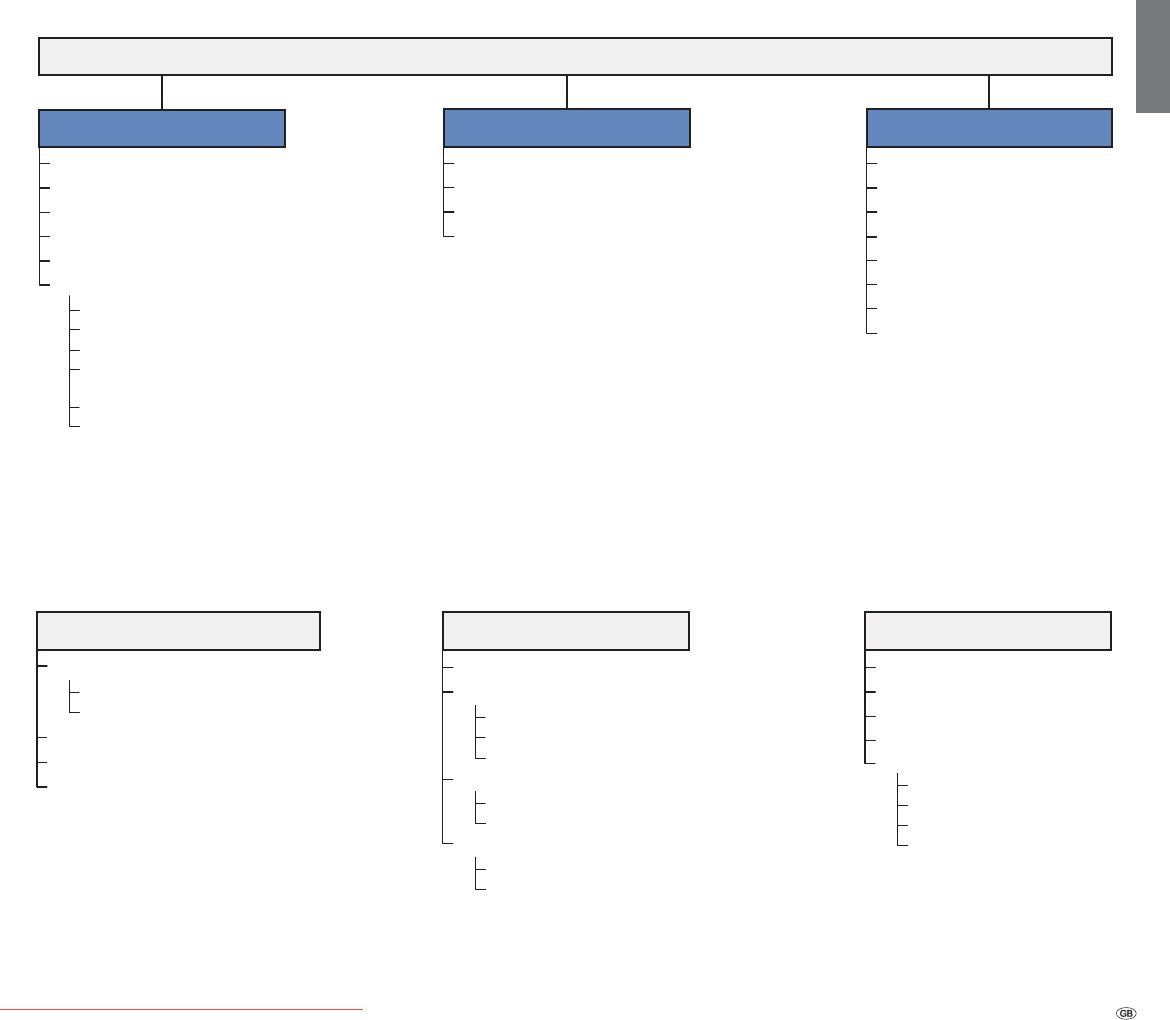
Radio menu – Overview diagram
Other menus– Overview diagram
Radio menu
Sound Stations Timer functions
Search wizard
Manual adjustment
Change stations
Select/change favourites
Switch off once
Switch off daily
One-time alarm
Wake up Mon-Fri
Wake up Sat
Wake up Sun
Wake up with
Wake up signal volume
Switch on TV when marked
off
on (only for DVB)
on (for DVB + analogue)
Station selection
Data capture
no
yes
EPG menu Teletext menu
Preview pages
Sub-title pages
Personal text pages
Character set
Station selection
Newsflash
Reveal
Recording wizard
Settings
Sorting
corresponding to station list
chronologically
Sound mode
Dolby PLII mode (1
Sound adjustment
Headphone volume
Loudness
more...
Auto volume
Maximum volume
max. switch on volume
Volume adjustment for
current station
Balance
Auto speech detection
Photo settings
Music settings
Video settings
Network access
Other
Network settings
Media menu
Downloaded From TV-Manual.com Manuals
- 20
english
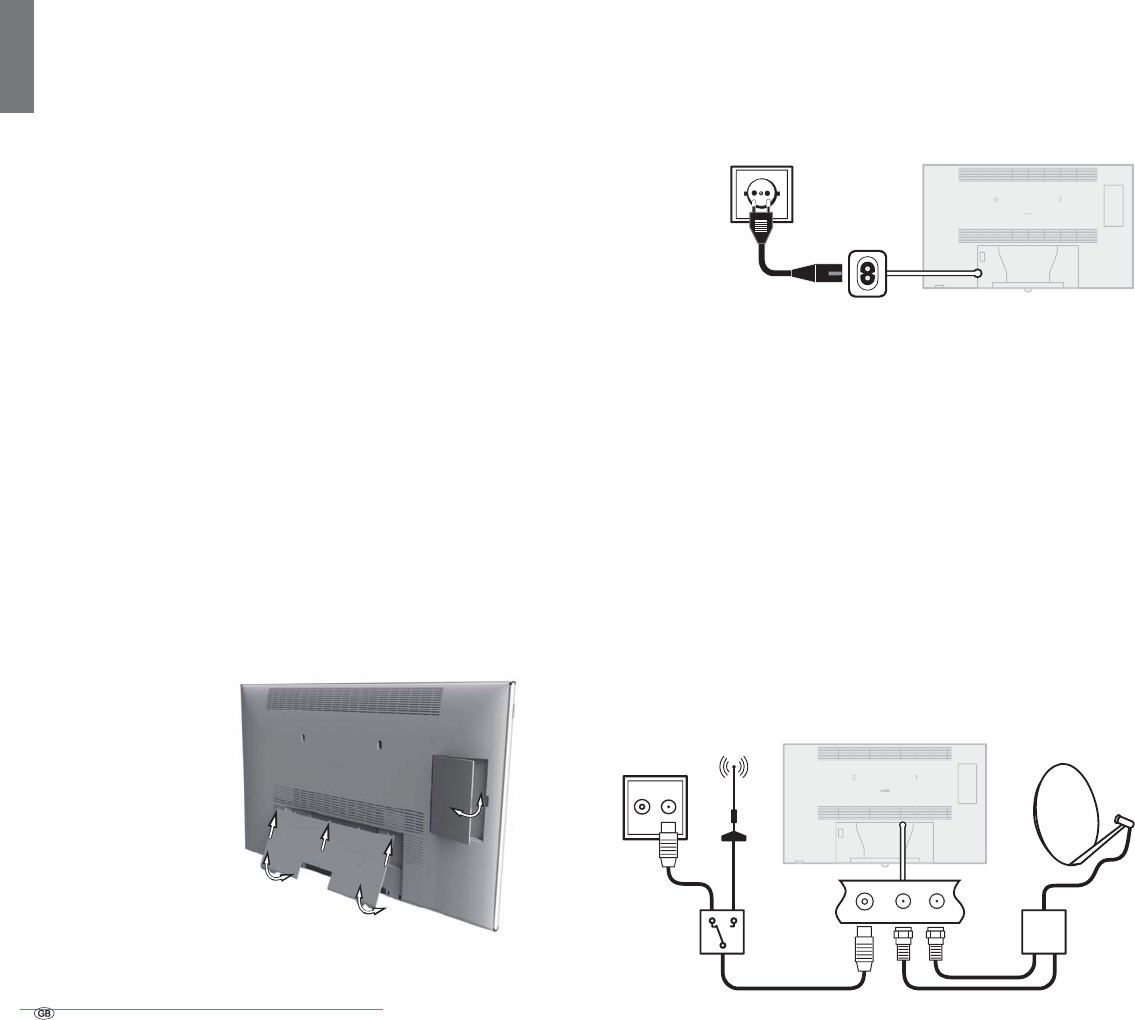
Connecting the TV Set
Connecting to the mains
Remove the cover for the connections.
Connect the TV set to a 220-240V mains socket:
First plug the small plug of the power cable into the mains connection
on the back of the TV and then the large mains plug into a mains socket.
Connecting antennas
Cable (analogue) / DVB-C / DVB-T antenna:
Plug the antenna cable of antenna, cable system or room antenna into
the ANT TV socket.
If you want to use analogue cables / DVB-C connection and a DVB-T
antenna together, use an external antenna switch (available from your
dealer).
Satellite antenna DVB-S:
If the TV set is equipped with a Single or Twin satellite tuner (ex-factory or
means of upgrade kit / conversion kit), the ANT-SAT and ANT-SAT2 sockets
are available.
Depending on the used satellite system, connect a connecting cable from
the multi-switch or directly from the LNC to the ANT-SAT and ANT-SAT2
sockets of the TV set respectively.
When connecting the TV set to a single cable community antenna, con-
nect the ANT-SAT and ANT-SAT2 sockets directly to the appropriate SAT
antenna socket. Ask your dealer if required.
Installing the TV set
Installation options
Your TV set is delivered without installation options. This gives you the
option of choosing the installation solution tailored to your requirements
from your Loewe dealer. Only use Loewe installation solutions (e.g. wall
mounts, floor stand) that are included in the Accessories – Setup pos-
sibilities chapter on page 143.
After selecting an installation option, read the appropriate assembly
instructions.
Installation notes
Choose a place for installing your TV where no bright light or sunlight
shines directly onto the screen. This could cause reflections which impair
the picture.
3 times the screen diagonal can be taken as a guide value or the view-
ing distance (e.g. for 40-inch set approx. 3m for SD signal). The viewing
distance can be reduced with an HD signal.
Set covers
Covers for rear and side connections
To remove the rear cable cover, pull the two recessed handles at the
bottom and drop down the cover.
To fit the cover, insert the lugs at the top edge of the cover into the corre-
sponding cut-outs in the rear panel and push up the cover until it snaps in.
The side cover of the TV set can also be completely removed. For this,
open it as far as it will go and gently pull on the open cover.
The cover detaches from the holder and gives free access to the con-
nection area. To replace the cover, simply push it until it latches back
into place.
DVB-T DVB-S
an. cable /
DVB-C
Initial installation
e
.
R TV
Downloaded From TV-Manual.com Manuals
21 -
english
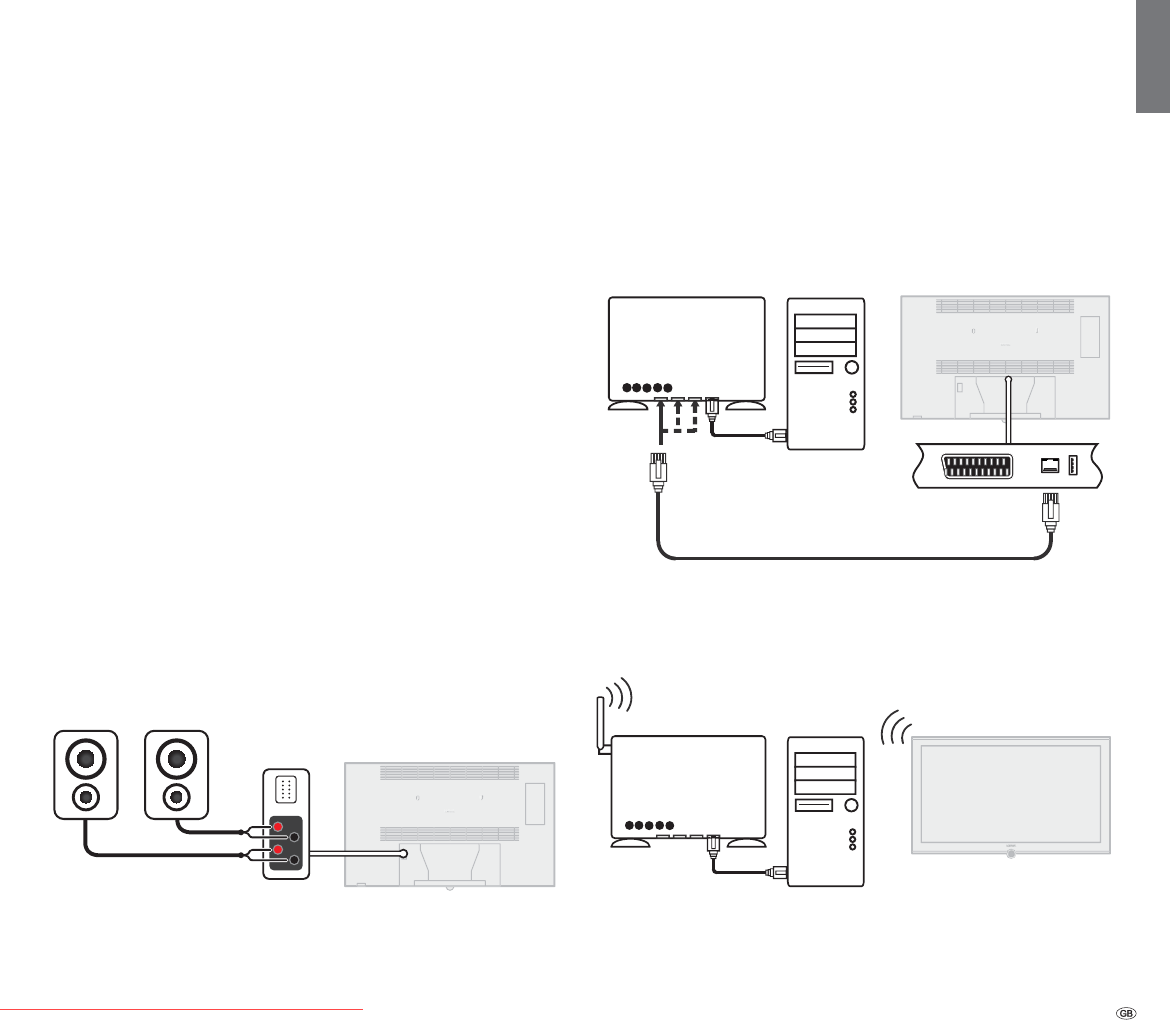
Connecting the TV set to the Home network
You can connect your TV set to the home network by a wire connection
(Ethernet, Powerline) or if available by a wireless radio connection (WLAN).
Please contact your specialist dealer for more information on Powerline.
For the network adapter configuration, see page 65.
➠
Under no circumstances may the TV set be wired and at the same time
connected by a wireless connection to the same network, e.g. router.
This may cause severe operational faults.
Example for a wire connection
Connect the LAN socket of your TV set to the LAN switch/router of your
home network with a network cable (available from your dealer).
Example for a wireless connection
You can connect the TV set to your home network by a wireless radio
connection via the WLAN antenna inside the set.
Connecting speakers
The TV set (exception Individual 32) is delivered ex-factory without speak-
ers. Various options are available for connecting speakers to your set.
As an accessory you can obtain a Loewe system speaker Stereospeaker I
Sound for certain set sizes (1 which can be fitted underneath the set and
connected to the System speaker connection. See the assembly instruc-
tions for the Loewe system speaker for further information.
If you want to use other speakers, two speakers can be connected to
the speaker connections (screw terminals) of the TV set (min. 4 Ohm /
min. 20W Sinus) (not possible for Individual 32).
Speaker systems or active speakers can be connected to the AUDIO LINK
connection.
How to configure and connect speaker systems or active speakers is
described from page 117.
Connecting external speakers to the screw terminals
To connect the speakers, switch the TV set off with the mains switch and
pull out the mains plug.
The bridge plug on the system speaker connection must be plugged or
remain plugged.
You have connected and laid the connecting cables at the speakers.
Turn the 4 screw terminals anticlockwise about 2 or 3 turns. The con-
nection openings for the speaker connecting cables are laid free.
Make sure that no open cable ends get inside the set when connecting.
Avoid short-circuiting between the individual screw terminals.
Push the connecting cables (max. 1.5mm2) of the speakers under the
same coloured screw terminal (red to red, black to black). Also note the
connection labels of the speakers Right and Left and the symbols “+”
equals red and “–” equals black (see figure).
Make sure that the sheaths of the connecting cables are not acciden-
tally pinched.
Tighten the screw terminals in clockwise direction.
Initial installation
LAN switch/router
Homeserver,
e.g. PC
TV set
LAN switch/router
Homeserver,
e.g. PC
TV set
(1 Equipment and upgrade options, see page 142.
Downloaded From TV-Manual.com Manuals
- 22
english
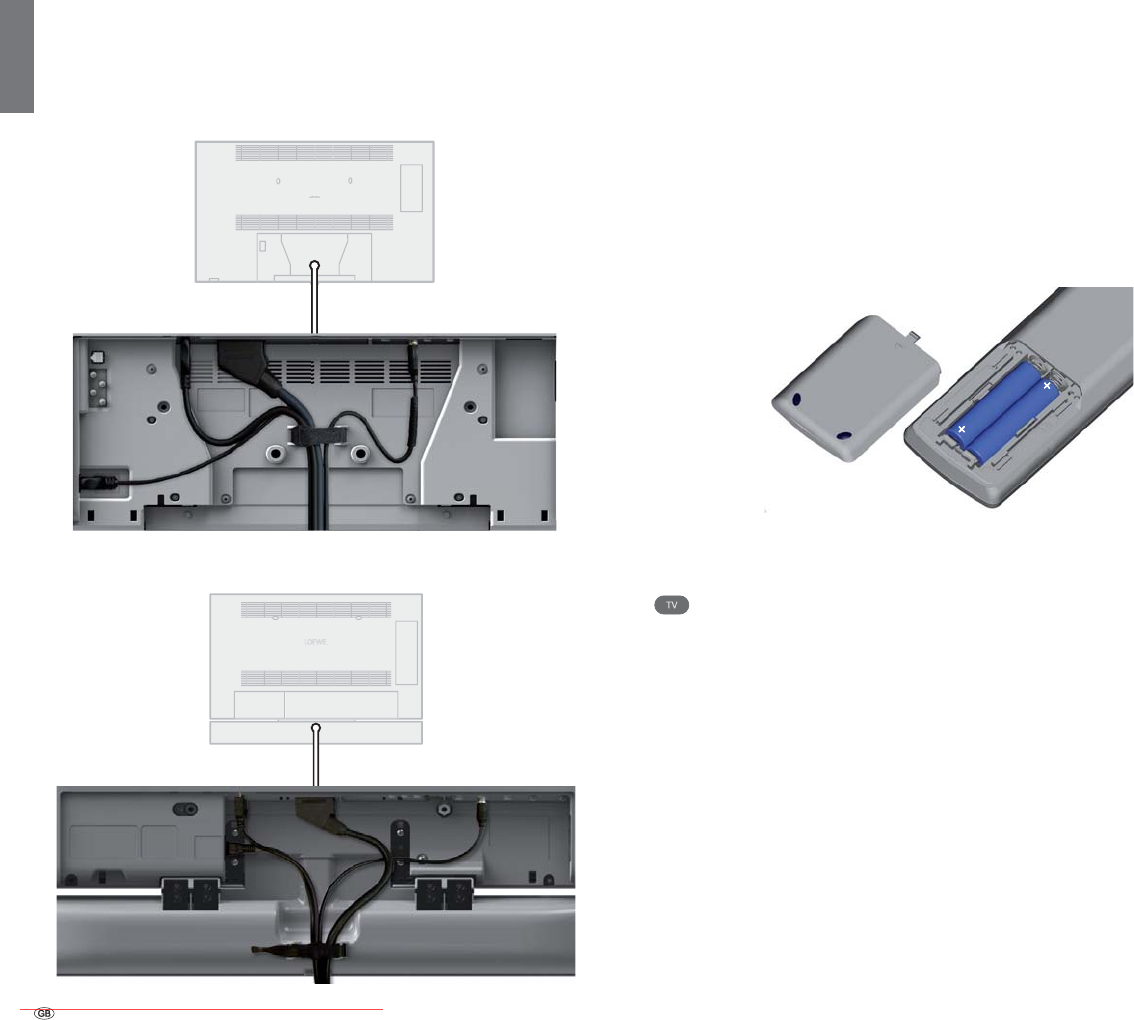
Preparing the remote control unit
Inserting or replacing batteries
Press on the embossed arrow whilst pushing the battery cover down.
Only use leak-proof micro-cells of the LR 03 (AAA) Alkali-Manganese type.
Do not use different types of batteries and old and new batteries together.
Pay attention to the correct polarity of + and – when inserting the bat-
teries.
If the batteries are too weak after longer use, the TV set prompts you
to change the batteries.
Dispose of used batteries in an environmentally friendly way (see page 145).
Push the cover back on from below after inserting the batteries.
Adjusting the remote control for operating the TV set
Press the TV button.
See page 127 for how to operate other Loewe appli-
ances and how to reprogramme the remote control
buttons.
AAA LR03
AAA LR03
Initial installation
Bundling the Cables
The cables connected to the TV set can be bundled and fixed to the back
of the housing using the Velcro cable tie provided.
Then fit the cover for the connections (see page 20).
Individual 55 / 46 / 40
Individual 32
Downloaded From TV-Manual.com Manuals
23 -
english
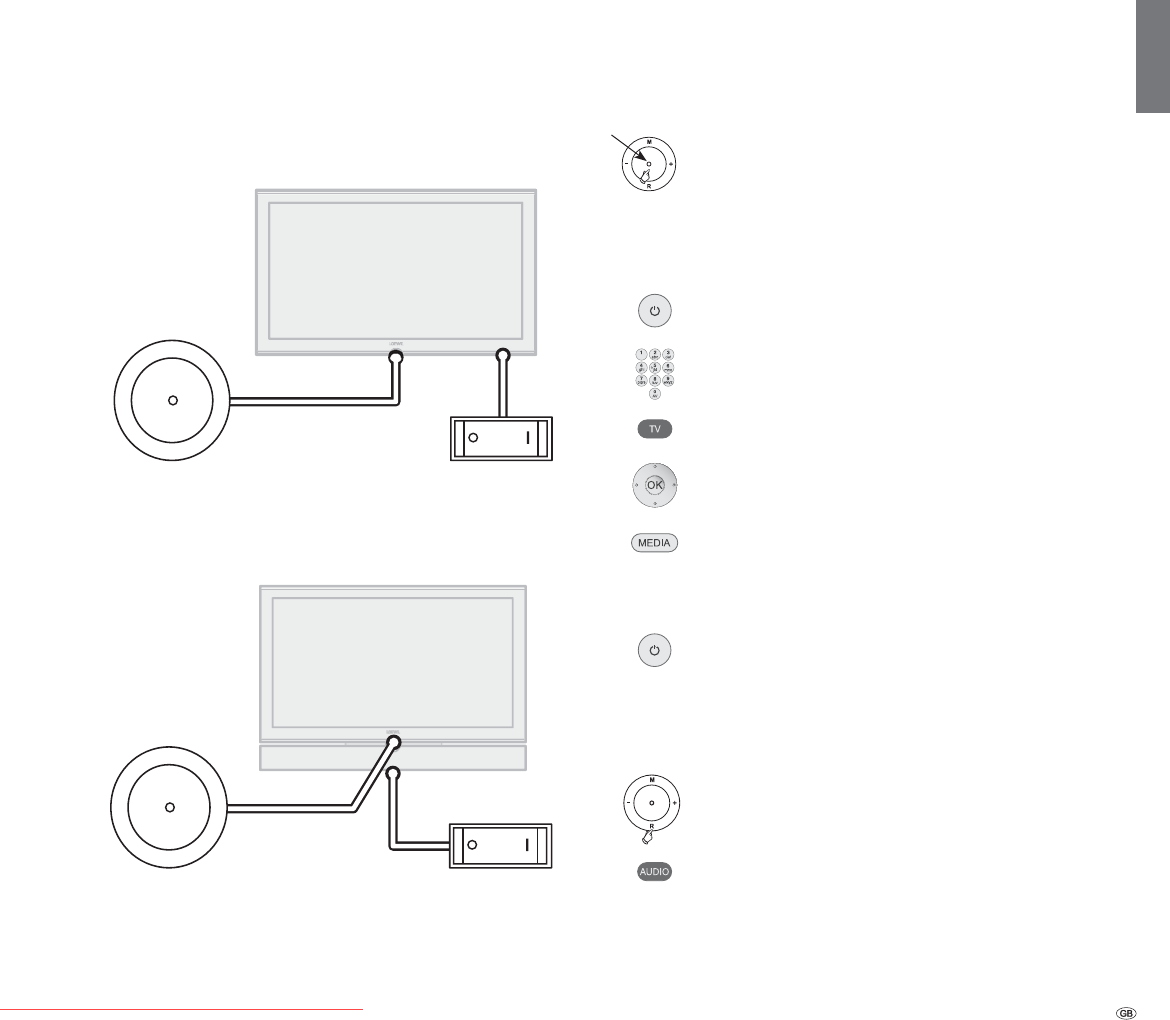
Turning the set on/off
Switching the TV set to standby mode
Press the mains switch on the bottom of the set.
The display in the control panel on the front lights up first orange and
then red. The set is now in standby mode.
Individual 55 / 46 / 40
Individual 32
Switching the TV on/off on the control unit
To switch the TV set into Operating mode or switch it off into Standby
mode, press the middle of the On/Off button for about 2 seconds.
Meaning of the display colour of the LEDs in the On/Off
button:
Red: Standby mode
Green: TV set is switched on
Orange: Radio mode, the device receives EPG data, timer
recording is active.
Switching the set on with the remote control
Press the on/off button
or
numeric buttons
or
TV button
or
OK button – station list is called
or
MEDIA button – MediaPortal is called.
Switching the set off with the remote control
Press the on/off button.
➠ Before switching off the set with the mains switch, we
recommend you to switch it to standby mode.
Switch on in Radio mode
Press R on the TV control unit.
or:
Press the AUDIO button on the remote control
(radio mode, see page 54).
Display
Initial installation
Mains switch
Control unit
M
R
+
-
M
R
+
-
Mains switch
Control unit
Downloaded From TV-Manual.com Manuals

- 24
english
Eco standard:
The emphasis for home use is on low energy consump-
tion. The automatic dimmer is activated.
Premium mode:
This mode optimises the settings to a brighter environ-
ment at a higher energy consumption. The automatic
dimmer is activated.
Shop mode:
The picture settings are aligned to operation in the presen-
tation room. The automatic dimmer is deactivated. If the
ambient brightness diminishes, the energy consumption
is not reduced.
The presetting can be changed later in the TV menu under
Picture ט Picture adjustment ט Presettings (see page
36) or under Settings ט Energy efficiency.
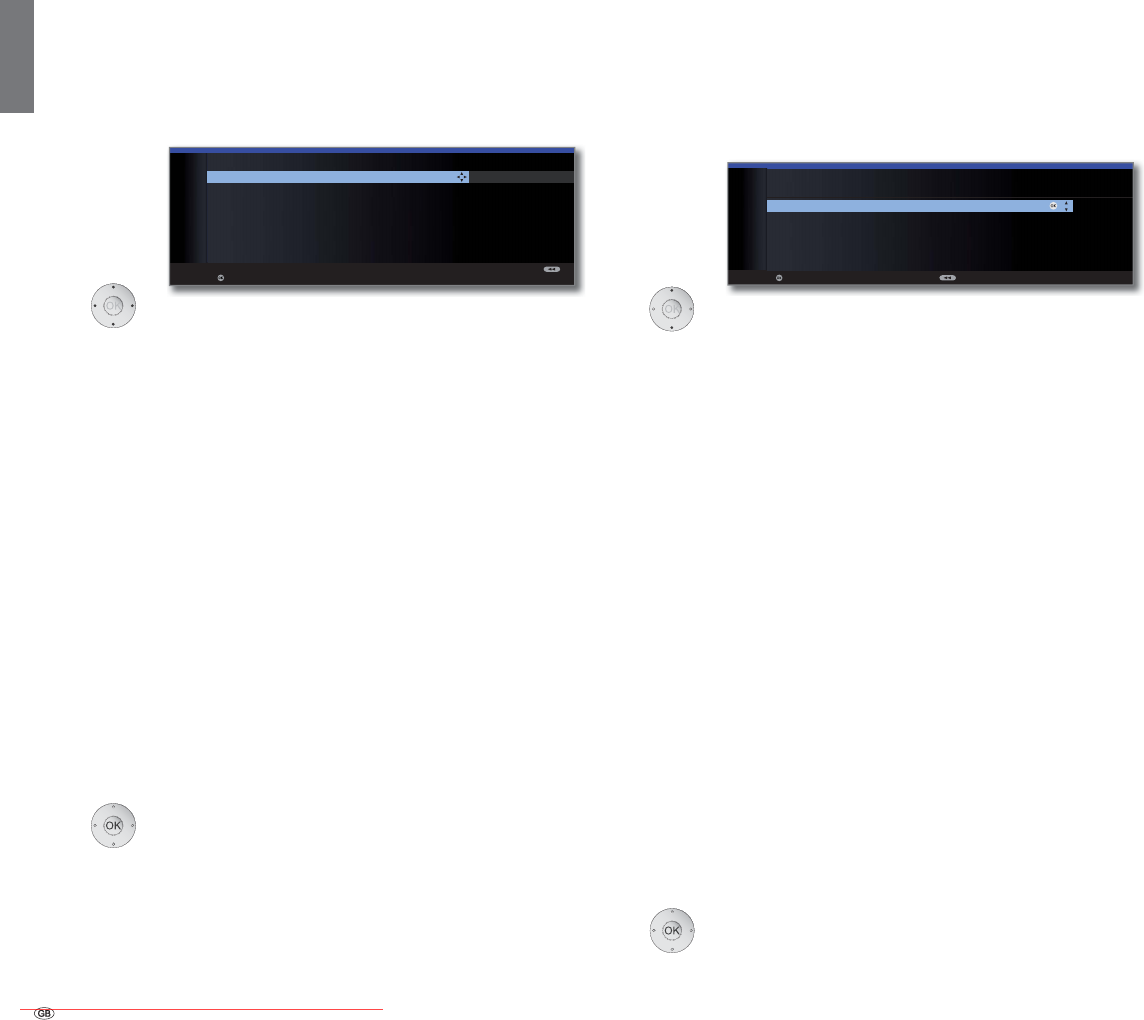
OK proceed.
Select Location of TV set (national defaults are
adopted).
OK Proceed.
Select antenna cable.
Yellow button: Connect/disconnect antenna cable.
Antenna/cable (analogue):
analogue stations via
cable/antenna
DVB-T: digital terrestrial stations
DVB-C: digital stations via cable
DVB-S (cable 1): digital stations via satellite
DVB-S (cable 2): digital stations via satellite
Energy
efficiency
(continued)
Location of
TV set
Selecting
antennas
First installation wizard
Initial installation after switching on for the first time
This wizard starts automatically after the set is switched on for the first
time, however it can also be called later manually in the TV index, see
Repeat initial installation on page 17.
➠
If at least one station is locked the access code must be entered before
repeating initial installation (see Parental lock on page 58).
First installation wizard routine
The routine of the first installation wizard depend on the selected settings.
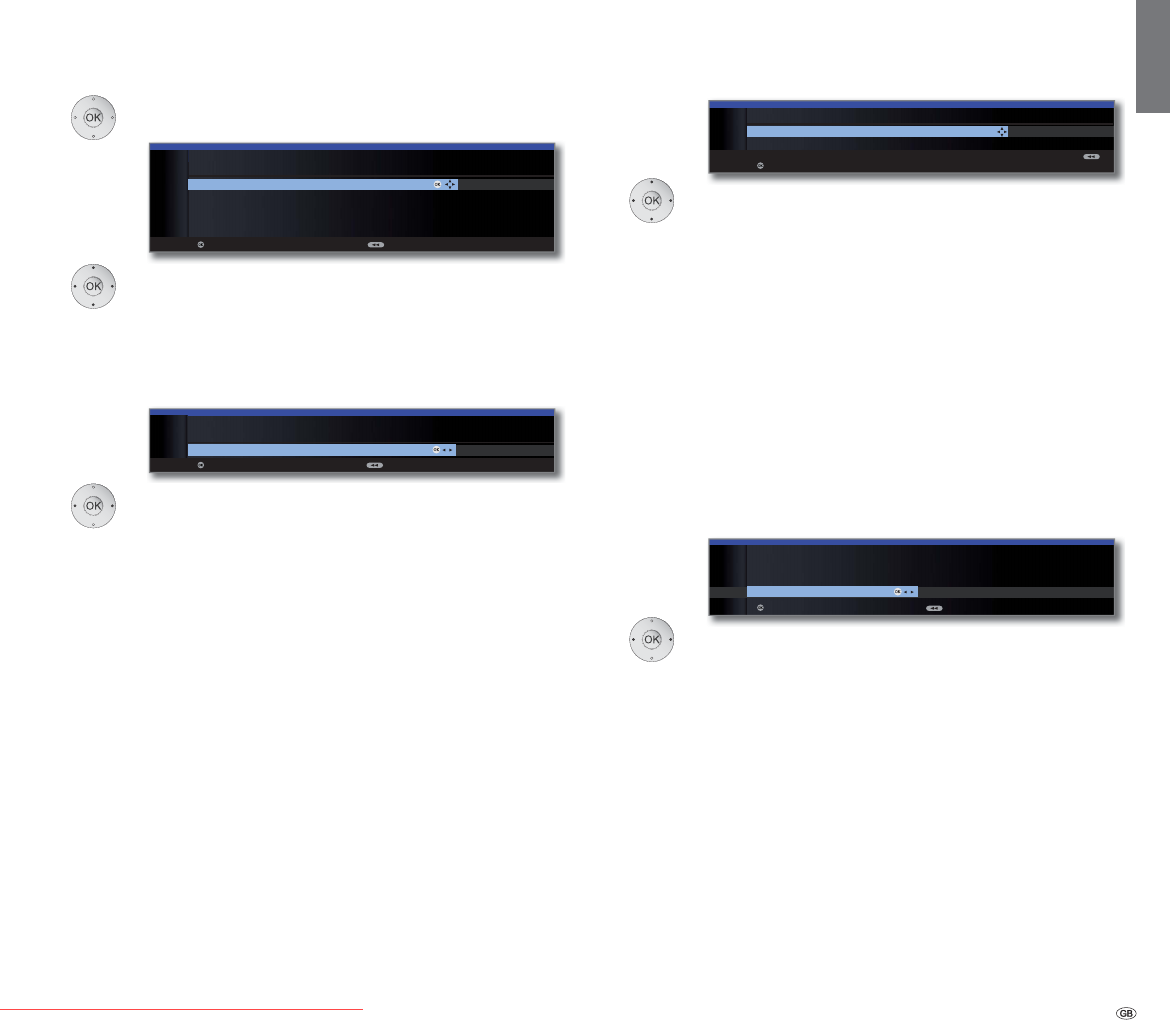
Select language.
Selecting the language of the user guidance is the
wizard’s first step. Then you simply follow the instructions
on your TV screen.
OK Proceed.
Select Energy efficiency.
Decide how energy efficiently you want to operate
your TV set. The value for the contrast (and thus the
brightness of the background lighting) is adapted and
the automatic dimmer activated or deactivated (see
page 36) depending on the presetting.
Initial installation
OK
OK
FIRST INSTALLATION WIZARD
Which language do you want to use for operation?
INITIAL INSTALLATION
Language
Sprache D Kieli FIN
Language GB Jezik SLO
Langue F Jazyk SK
Lingua I Lisan TR
Idioma E Språk S
Taal NL Sprog DK
Jazyk CZ Idioma P
˿̦̹̮̮̜
*5ΓΧΖ586
-Û]\N3/6SU§N1
Nyelv H
Proceed
OK
Premium mode Shop mode
INITIAL INSTALLATION
Energy efficiency
Eco standard
Proceed Back
OK
OK
OK
INITIAL INSTALLATION
Location of TV set (1/2)
A Austria I Italy
B Belgium NL Netherlands
CH Switzerland P Portugal
CZ Czech Republic PL Poland
D Germany S Sweden
DK Denmark H Hungary
E Spain SLO Slovenia
F France FIN Finland
GB United Kingdom AUS Australia
IRL Ireland NZ New Zealand
Proceed Back
Language
Energy
efficiency
OK
INITIAL INSTALLATION
Connect antenna cable(s)
Antenna cable(s) for: to antenna socket(s):
Antenna/cable (analogue) ANT TV ۪
DVB-T ANT TV ۪
DVB-C ANT TV ۪
Proceed Connect/disconnect
Back
continued on next page p
Downloaded From TV-Manual.com Manuals
25 -
english
The selection options for the aerials depend on the
receiver units installed or upgraded at the factory (see
also page 142).
Depending on which antenna(s) was (were) selected, the
appropriate settings are called later during the routine.
OK proceed.
Select desired languages and alternative
languages for subtitles and audio for DVB
programmes (see page 59).
Set up audio commentary for the visually
impaired (see page 43).
OK Proceed.
Accept Logical Channel Number no / yes.
In various countries, digital stations (DVB-T, DVB-C,
DVB-S) are transmitted with a preset channel
number per station, known as “Logical Channel
Numbers“ – “LCN“.
If you indicate yes here, the specified programme
numbers will be adopted as station memory loca-
tions and the stations of the preferred signal
sources sorted by LCN. There may be gaps in the
numbering of the station list depending on the LCN.
OK Proceed.
Depending on which antennas (DVB-T, DVB-C, DVB-S)
were selected, the appropriate settings appear
below.
Selecting
antennas
(continued)
Subtitle and
audio
languages
(DVB)
Logical
Channel
Number
Settings
Encrypted
stations
Search
method
Supply voltage
Setting options for DVB-T reception:
If you have not selected a DVB-T antenna in the antenna
selection: Continue with setting options for DVB-C recep-
tion on page 26.
Select and adapt settings for DVB-T reception.
You can state whether coded stations are to be searched
for in the search/update. Select yes to save all found
scrambled stations. However, these stations can only
be received in connection with a CA module and the
appropriate Smart Card. Handling of the CA module is
described on page 61.
If a CA module with a SmartCard is already plugged in for
the station search, all the stations which this module can
descramble are also saved when no is preset.
If you want to run the station search independently of
the channel grid, select frequency search for the search
method.
OK Proceed.
Select supply voltage no / yes.
Use a DVB-T antenna that requires a supply voltage
(active antenna) and which is not already supplied
via a power adapter, then select yes (5V) for the
antenna’s power supply.
How to align your DVB-T antenna is described on
page 31.
OK Proceed.
OK
no yes
INITIAL INSTALLATION
Logical Channel Number
Accept Logical Channel Number
Proceed Back
OK
OK
INITIAL INSTALLATION
Subtitle and audio languages (DVB)
Favoured subtitle language English ...
Alternative subtitle language German
Favoured audio language English
Alternative audio language German
Audio commentary off
Proceed Back
OK
Initial installation
OK
INITIAL INSTALLATION (DVB-T)
Scrambled stations no yes
Search method Channel search
Proceed
OK
yes (5V)
INITIAL INSTALLATION (DVB-T)
Antenna
Supply voltage
no (0V)
Proceed Back
OK
Downloaded From TV-Manual.com Manuals
- 26
english
Setting options for DVB-C reception:
If you have not selected a DVB-C antenna in the antenna
selection: Continue with Setting options for DVB-S recep-
tion (see right hand column).
The normal DVB-C settings are derived from the selection
of the location and do not need to be changed.
Select and adapt settings for DVB-C reception.
You can state whether coded stations are to be searched
for in the search/update. Select yes to save all found
scrambled stations. However, these stations can only be
received in connection with a CA module and the appro-
priate Smart Card. Handling of the CA module is described
on page 61.
If a CA module with a SmartCard is already plugged in for
the station search, all the stations which this module can
descramble are also saved when no is preset.
If you want to run the station search independently of
the channel grid, select frequency search for the search
method.
The DVB stations are only searched for in the frequency
range above the start frequency.
Only change these defaults if you are familiar with other
symbol rates and types of modulation or if you have to
specify the network ID for your cable network. In the
case of small cable networks fed directly from the satel-
lite, the rate of 6900 might have to be replaced by 6111.
Your cable provider has the information you need.
OK Proceed.
Setting options for DVB-S reception:
If you have not selected a DVB-S antenna in the antenna
selection: Continue with Setting options for all types of
reception on page 30.
The normal DVB-S settings are derived from the selection
of the location and do not need to be changed in most
cases.
Selecting the satellite system.
Specify how you receive which satellite(s) (single
satellite or type of satellite system). Ask your dealer
if required.
Reception of a single satellite via a connected LNC (LNB).
See page 27 for settings.
Reception of two different satellites with two LNCs (LNBs)
which are connected to the TV set by a 22 kHz switchbox.
See page 27 for settings.
Reception of two different satellites with two LNCs (LNBs)
which are connected to the TV set by a toneburst switch.
See page 27 for settings.
The TV set controls a DiSEqC multiswitch to which up to
four LNCs (LNBs) for different satellites are connected.
See page 28 for settings.
Select setting if the TV set is connected to a DiSEqC
single-cable system (according to EN 50494). Several Sat
receivers can be connected to one Sat cable. See page
28 for settings.
Select setting if the TV set is connected to a single-cable
system (without DiSEqC). Several Sat receivers can be
connected to one Sat cable. Unlike a DiSEqC single-cable
system there are restrictions in the range of certain recep-
tion frequencies in single-cable community systems. See
page 29 for settings.
OK Proceed
(to the appropriate page of the satellite system).
OK
INITIAL INSTALLATION (DVB-C)
Scrambled stations no yes
Search method Channel search
Start frequency 047.0 MHz
Network ID none
Symbol rate 1 (DVB-C) 6875
Symbol rate 2 (DVB-C) 6900
QAM modulation 1 64
QAM modulation 2 256
Proceed
Settings
Encrypted
stations
Search
method
Start
frequency
Network ID
Symbol rate
QAM
modulation
OK
OK
INITIAL INSTALLATION (DVB-S)
Select satellite installation
Single satellite
2 satellites on 22 kHz switchbox
2 satellites on toneburst switch
Max. 4 satellites on DiSEqC multiswitch
DiSEqC one cable communal system
other communal installation
Proceed Back
Select
satellite
installation
Single
satellite
2 satellites
on 22 kHz
switchbox
2 satellites
on toneburst
switch
Max. 4
satellites
on DiSEqC
multiswitch
DiSEqC
one cable
communal
system
other
communal
installation
Initial installation
Downloaded From TV-Manual.com Manuals
27 -
english
Setting options for the satellite system (2 satellites on 22 kHz switchbox
/ 2 satellites on toneburst switch):
Select Satellite 1 / Satellite 2,
select satellites from list,
OK Proceed.
Set LNB frequencies.
Normally, you do not need to change the values for
high and low band, unless the LNC (LNB) of your
satellite system uses a different oscillator frequency
(important for the frequency display).
OK Proceed.
(with Setting options for DVB-S reception (continued)
on page 29).
Setting options for the satellite system (single satellite):
Select satellite,
OK Proceed.
High band no / yes.
Specify here whether the high band of the selected
satellite is to be searched in addition to the low
band.
OK Proceed.
Set LNB frequencies.
Normally, you do not need to change the values for
high and low band, unless the LNC (LNB) of your
satellite system uses a different oscillator frequency
(important for the frequency display).
OK Proceed.
(with Setting options for DVB-S reception (continued)
on page 29).
Select single
satellite
High band
LNB
frequencies
Satellite
selection
LNB
frequencies
(22 kHz
switchbox)
LNB
frequencies
(toneburst
switch)
Initial installation
OK Proceed Back
INITIAL INSTALLATION (DVB-S)
LNB frequencies
Low band 9750 MHz
High band 10600 MHz
OK
OK
INITIAL INSTALLATION (DVB-S)
Select single satellite
Astra1 19,2°E Hellas Sat2 39°E
Hot Bird 13°E Hispasat 30°W
Astra2 28,2°E Intelsat10 02 1°W
Astra3 23,5°E Intelsat901 18°W
Atlantic Bird1 12,5 °W Nilesat 7°W
Atlantic Bird2 8°W Pan Am Sat 43°W
Atlantic Bird3 5°W Sirius2/3 5°E
Eurobird1 28,5°E
Telekom2C 5°W
Eurobird 9A 9°E
Telekom2D 8°W
Eutelsat W2 16°E Telestar12 12,5°W
Eutelsat W3A 7°E Thor2/3 0,8°W
Eutelsat W4 36°E Türksat 42°E
Proceed
OK
no
INITIAL INSTALLATION (DVB-S)
High band
yes (with 0/22 kHz)
Proceed Back
OK
OK
INITIAL INSTALLATION (DVB-S)
Satellite selection
Satellite 1 Astra1 19,2°E ...
Satellite 2 Hot Bird 13°E
Proceed Back
OK
INITIAL INSTALLATION (DVB-S)
LNB frequencies
ASTRA1 19,2°E 9750 MHz
Hot Bird 13°E 9750 MHz
Proceed Back
OK
INITIAL INSTALLATION (DVB-S)
LNB frequencies
ASTRA1 19,2°E Low band 9750 MHz
ASTRA1 19,2°E High band 10600 MHz
Hot Bird 13°E Low band 9750 MHz
Hot Bird 13°E High band 10600 MHz
Proceed Back
Downloaded From TV-Manual.com Manuals
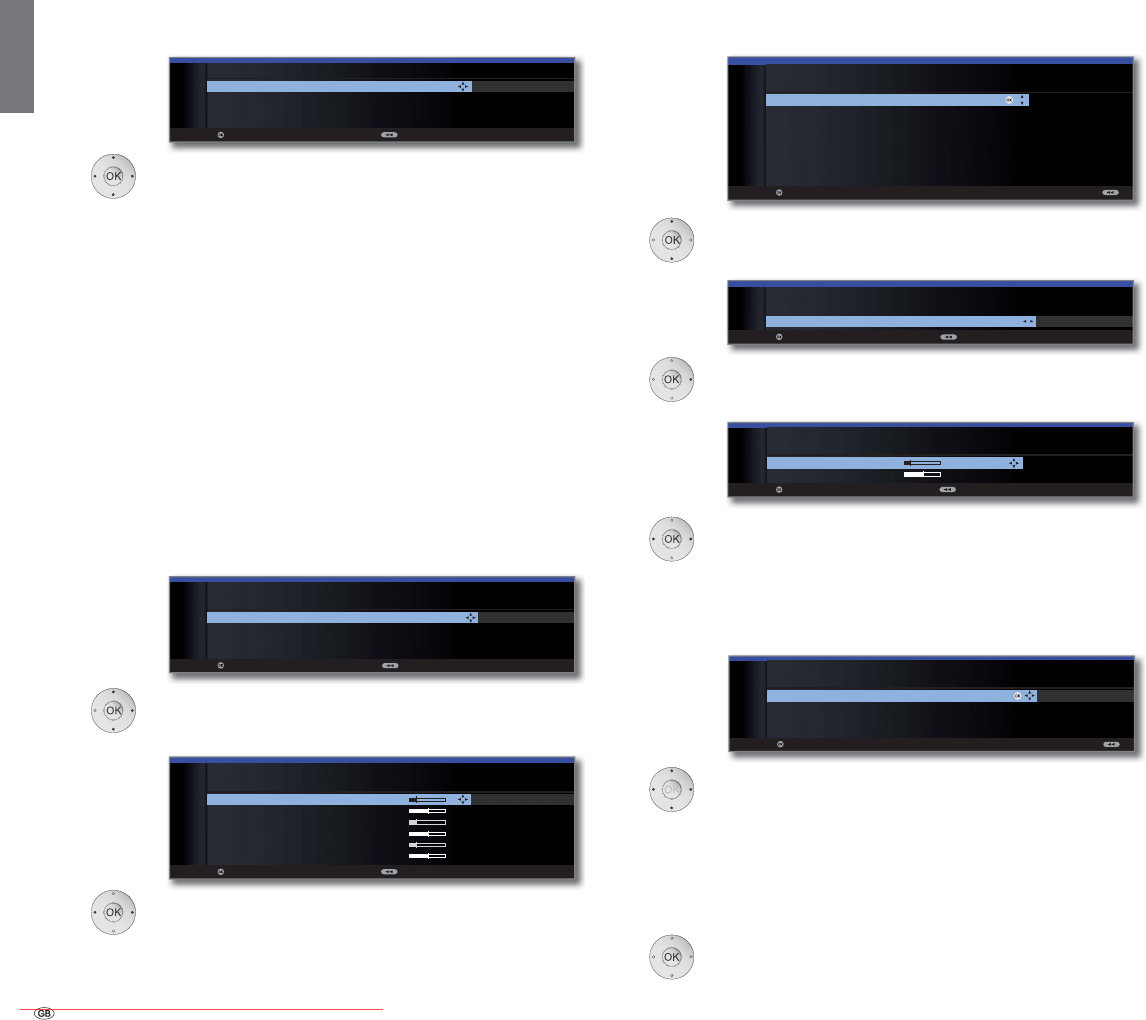
- 28
english
DiSEqC one
cable
communal
system
Satellite
selection
LNB
frequencies
Manual
registration
(for socket
ANT SAT)
Transmission
channel /frequency
PIN protection
Setting options for the satellite system
(max. 4 satellites on DiSEqC multiswitch):
Select and adapt settings for the DiSEqC multi-
switch.
The refresh rate determines how often a DiSEqC
command is output. A refresh is only necessary with
cascaded systems.
The control voltage controls the switching of the
polarisation level (horizontal/vertical) in non-DiSEqC
capable components (e.g. control of single LNBs via
DiSEqC multiswitch).
The 22kHz signal controls the switching between high
and low band in the Band setting. The Position setting
controls the selection of the satellites in non-DiSEqC
capable components.
The Toneburst controls the selection of the satellites in
non-DiSEqC but toneburst capable components with the
Position and Option settings.
OK Proceed
Select Satellite 1 ... Satellite 4,
select satellites from list,
OK Proceed.
Set LNB frequencies.
You do not normally need to change the values.
OK Proceed.
(with Setting options for DVB-S reception (continued)
on page 29).
Setting options for the satellite system
(DiSEqC one cable communal system):
Select DiSEqC single cable communal installation.
OK Proceed.
Select satellites from list,
OK Proceed.
Set LNB frequencies.
Normally, you do not need to change the values for
high and low band, unless the LNC (LNB) of your
satellite system uses a different oscillator frequency
(important for the frequency display).
OK Proceed.
Select and adjust settings for the DiSEqC single
cable communal installation.
Select the desired transmission channel and the corre-
sponding transmission frequency.
If your system is designed for it, it is possible to protect
your used transmission data from use by other subscrib-
ers with a PIN.
OK Proceed.
(with Setting options for DVB-S reception (continued)
on page 29).
Initial installation
Settings
DiSEqC
multiswitch
Repeat rate
Control
voltage
22kHz signal
Toneburst
Satellite
selection
LNB
frequencies
OK
INITIAL INSTALLATION (DVB-S)
Repeat rate none 1 2
Control voltage 13/18V on
22kHz signal Band
Toneburst off
Proceed Back
OK
INITIAL INSTALLATION (DVB-S)
Satellite selection
Satellite 1 Astra1 19,2°E ...
Satellite 2 Hot Bird 13°E
Satellite 3 Eutelsat W2 16°E
Satellite 4 none
Proceed Back
OK
INITIAL INSTALLATION (DVB-S)
LNB frequencies
ASTRA1 19,2°E Low band 9750 MHz
ASTRA1 19,2°E High band 10600 MHz
Hot Bird 13°E Low band 9750 MHz
Hot Bird 13°E High band 10600 MHz
Eutelsat W2 16°E Low band 9750 MHz
Eutelsat W2 16°E High band 10600 MHz
Proceed Back
OK
OK
INITIAL INSTALLATION (DVB-S)
Select DiSEqC single cable communal installation
DELTA SUM-514
DELTA SUM-516
DELTA SUM-518
DELTA SUM-918
DELTA SUM-928
KATHREIN EXR-551
KATHREIN EXR-552
KATHREIN EXR-501
Proceed
OK
INITIAL INSTALLATION (DVB-S)
Satellite selection
Satellite 1 Astra1 19,2°E ...
Proceed Back
OK Proceed Back
INITIAL INSTALLATION (DVB-S)
LNB frequencies
Low band 9750 MHz
High band 10600 MHz
OK
INITIAL INSTALLATION (DVB-S)
Manual registration (for socket ANT SAT)
Transmission channel 1 2 3 4 5 6
Transmission frequency 1284
PIN protection no
Define/change PIN 0000
Proceed
OK
Downloaded From TV-Manual.com Manuals
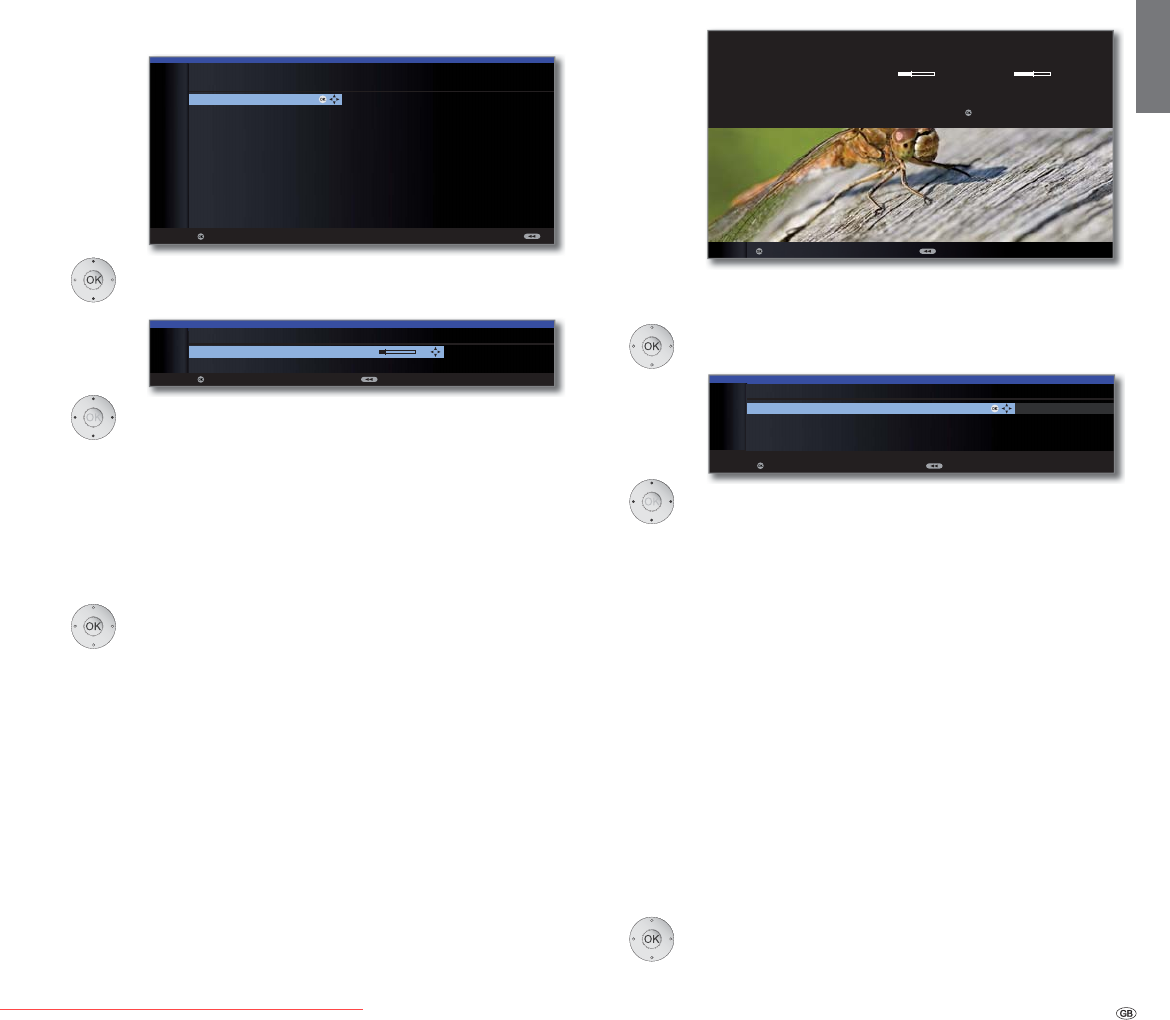
29 -
english
Setting options for the satellite system
(other communal installation):
Select satellite,
OK Proceed.
Select and adapt settings.
Normally, you do not need to change the values for high
and low band, unless the LNC (LNB) of your satellite
system uses a different oscillator frequency (important
for the frequency display).
If your set is connected to a single-cable system without
external voltage supply, you can connect the antenna
supply (13V or 18V / max. 450mA).
OK Proceed.
(with Setting options for all types of reception on
page 30).
Setting options for DVB-S reception (continued):
After you have made the previous settings, you should
receive picture and sound of the selected satellites (only
possible for Astra1 and HOTBIRD).
OK Proceed.
Select and adapt settings.
If several satellites are received, the following settings
must be made for every satellite. The scope of the settings
may differ depending on the selected satellite.
You can state whether coded stations are to be searched
for in the search/update. Select yes to save all found
scrambled stations. However, these stations can only be
received in connection with a CA module and the appro-
priate Smart Card. Handling of the CA module is described
on page 61.
If a CA module with a SmartCard is already plugged in for
the station search, all the stations which this module can
descramble are also saved when no is preset.
If you want to run the station search independently of
the channel grid, select frequency search for the search
method.
The symbol rates are specified by the satellite provider
and do not normally need to be changed.
OK Proceed.
Initial installation
Select single
satellite
LNB
settings
LNC
frequency
Supply voltage
Test reception
Settings
Encrypted
stations
Search
method
Symbol rates
OK
FIRST INSTALLATION WIZARD
You should now receive a picture and sound from the following satellite:
ASTRA1 19,2°E C/N Level
If not, please align your dish correctly. If however it is correctly aligned and
you have an older version you can proceed with .
Proceed Back
OK
OK
yes
INITIAL INSTALLATION (ASTRA1 19,2°E)
Scrambled stations no
Search method Channel search
Symbol rate 1 (DVB-S) 27500
Symbol rate 2 (DVB-S) 22000
Proceed Back
OK
OK
OK
INITIAL INSTALLATION (DVB-S)
Select single satellite
Astra1 19,2°E Hellas Sat2 39°E
Hot Bird 13°E Hispasat 30°W
Astra2 28,2°E Intelsat10 02 1°W
Astra3 23,5°E Intelsat901 18°W
Atlantic Bird1 12,5 °W Nilesat 7°W
Atlantic Bird2 8°W Pan Am Sat 43°W
Atlantic Bird3 5°W Sirius2/3 5°E
Eurobird1 28,5°E
Telekom2C 5°W
Eurobird 9A 9°E
Telekom2D 8°W
Eutelsat W2 16°E Telestar12 12,5°W
Eutelsat W3A 7°E Thor2/3 0,8°W
Eutelsat W4 36°E Türksat 42°E
Proceed
OK
INITIAL INSTALLATION (DVB-S)
LNB frequency 9750 MHz
Supply voltage off
Proceed Back
Downloaded From TV-Manual.com Manuals
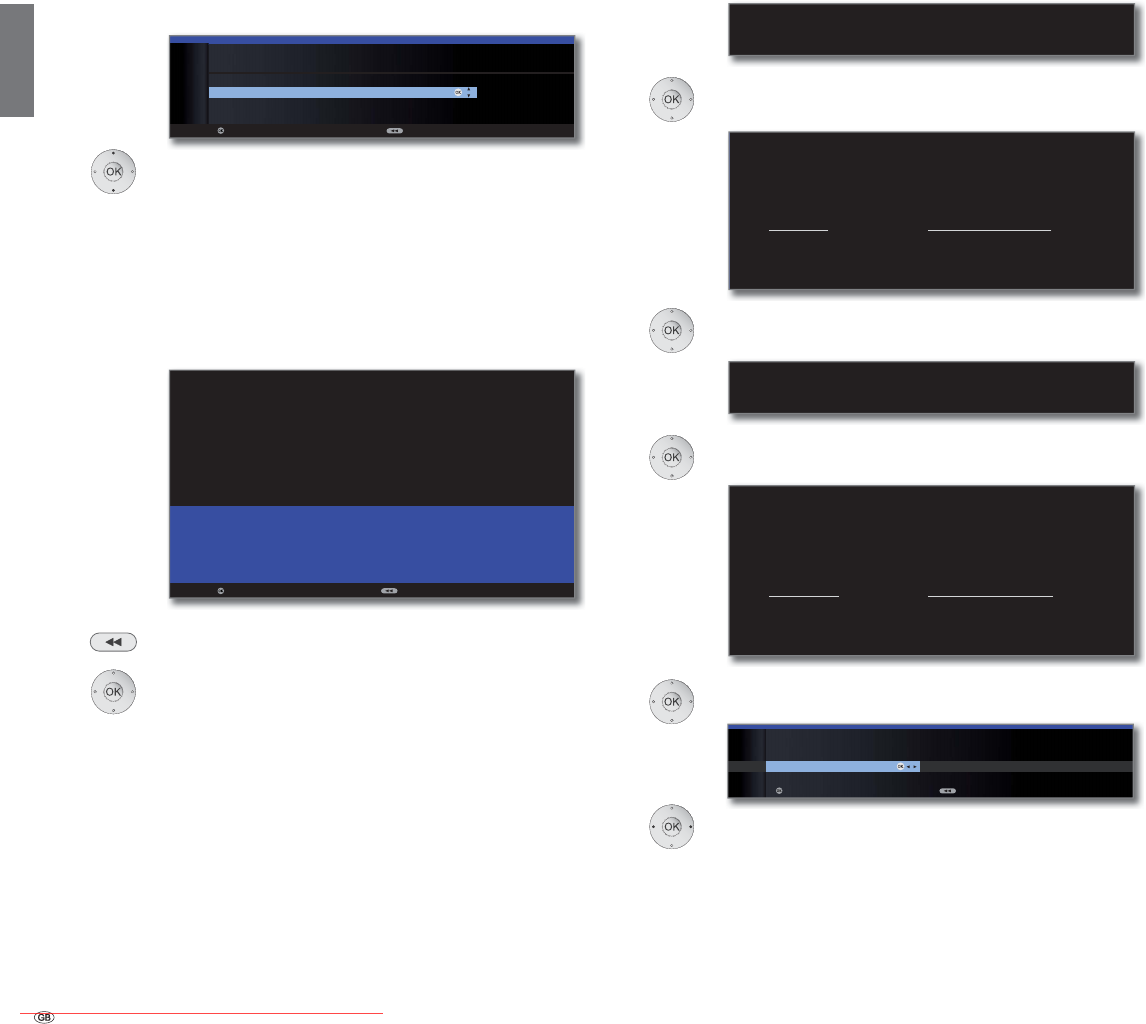
- 30
english
Setting options for all types of reception:
Select favoured signal source.
Select the signal source from a list, the station of
which is to be at the top of your station list (starting
with station slot 1).
The listed signal sources depend on the selected
antennas and, if the set is equipped with a satellite
tuner, the type of satellite system used and the
received satellites.
OK Proceed.
You will see a list of the selected settings. You can go
back in steps with the button to make any changes
to the settings.
OK Start automatic search.
The set now searches for TV and radio stations.
The stations found in the automatic search are divided
into the appropriate station blocks depending on the
previously selected antenna cables (signal sources).
Subsequently the stations can only be re-sorted within
these blocks.
➠ At the beginning of the station list you will find the
block with the stations of the preferred signal source.
Any mixed sorting of stations from different signal
sources is only possible with the favourites list.
The number of found TV stations is displayed.
OK Proceed.
The structure of the TV station list is displayed.
OK Proceed.
The number of found radio stations is displayed.
OK Proceed.
The structure of the radio station list is displayed.
OK Proceed.
Select Age-related lock.
You can specify an age limit for your TV set here.
DVB broadcasts which have an appropriate age
identification are locked and can only be watched
after entering the access code (see page 58).
OK Proceed.
Initial installation
Info
TV stations
Structure TV
station list
Info
radio stations
Structure radio
station list
Age-related
lock
Favoured
signal source
Overview of
settings for
station search
OK
OK
INITIAL INSTALLATION
Favoured signal source
DVB-T
DVB-C
ASTRA1 19,2°E
Antenna/cable (analogue)
Proceed Back
OK
FIRST INSTALLATION WIZARD
Your TV set will perform the automatic search with the following settings:
Location of your TV set United Kingdom
Signal source(s) Antenna/cable (analogue)
DVB-T
DVB-C
DVB-S
Installation satellite Single satellite (ASTRA1 19,2°E)
Favoured signal source ASTRA1 19,2°E
Start automatic search Back
FIRST INSTALLATION WIZARD
The automatic TV station search and sorting has ended.
966 new TV station(s) has (have) been found.
FIRST INSTALLATION WIZARD: STRUCTURE OF TV STATION LIST
The TV stations found in the automatic search were divided into appropriate
station blocks according to the previously selected antenna cables (signal
sources). The stations can only be reorganised later within these blocks. The
block with the stations of your favoured signal source is at the top of the
station list.
Signal source Associated station numbers
ASTRA1 19,2°E 1- 900
DVB-C 901-1300
DVB-T 1301-1400
Antenna/cable (analogue) 1401-1500
FIRST INSTALLATION WIZARD
The automatic radio station search and sorting has ended.
336 new radio station(s) has (have) been found.
FIRST INSTALLATION WIZARD:
STRUCTURE OF RADIO STATION LIST
The radio stations found in the automatic search were divided into appropriate
station blocks according to the previously selected antenna cables
(signal sources). The stations can only be reorganised later within these blocks.
The block with the stations of your favoured signal source is at the top of the
station list.
Signal source(s) Associated station numbers
ASTRA1 19,2°E 1- 300
DVB-C 301-500
DVB-T 501-700
Antenna/cable (analogue) 701-900
OKOK
INITIAL INSTALLATION
Age-related lock
no yes
Proceed Back
OK
continued on next page p
Downloaded From TV-Manual.com Manuals
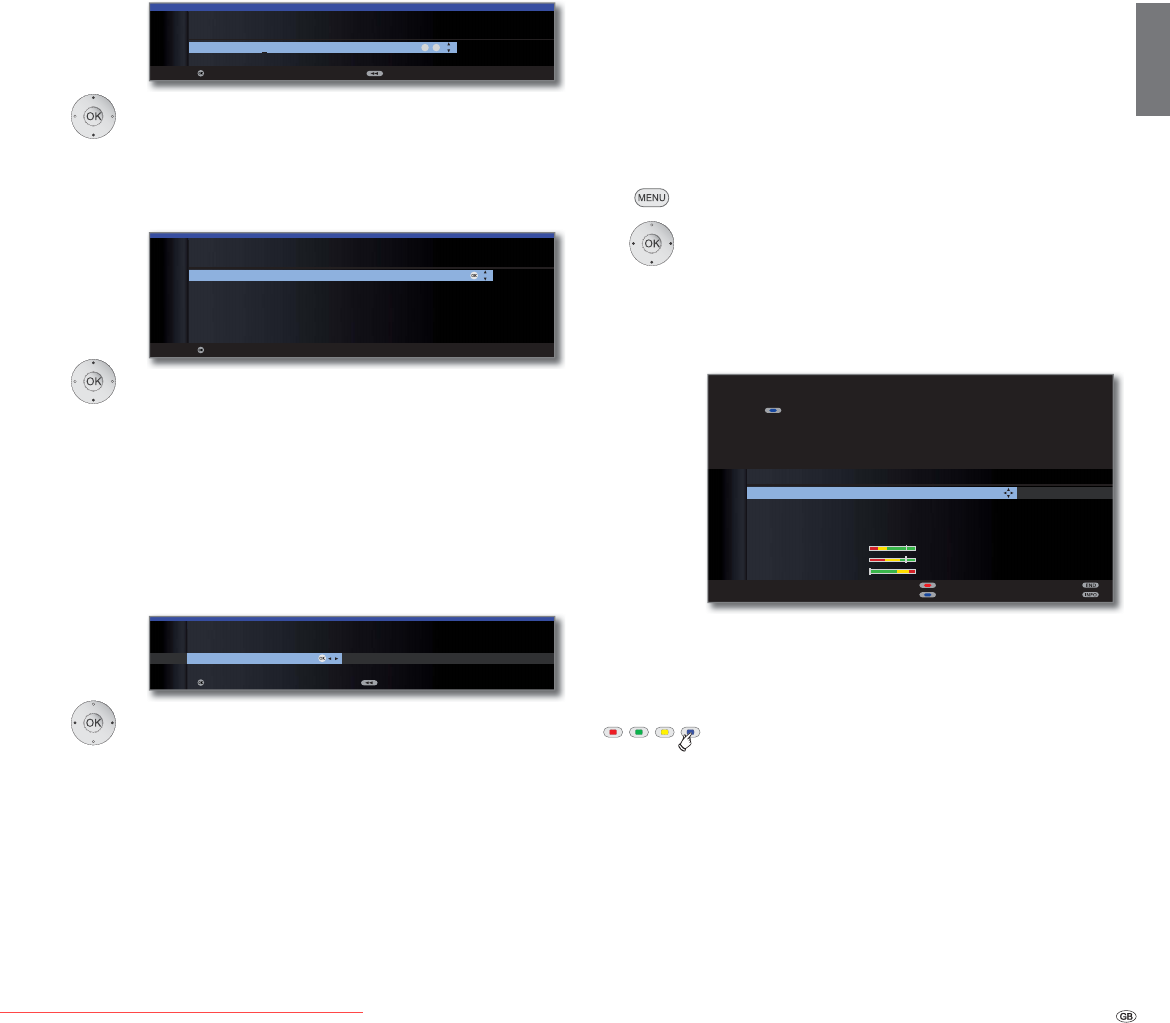
31 -
english
Select time / date.
If no values or no correct values have been entered
for the data and time, enter the correct values with
the numeric buttons here.
OK Proceed.
Select sound components.
This selection indicates which sound components
you want to use to hear your TV sound. Depending
on the selection, the sound component wizard starts
with which you can make further settings.
The sound component wizard is described from page
117 and can also be started at any time outside of
first time operation (TV menu under Connections ט
Sound components).
OK Proceed.
Select the option.
With the selection, specify whether you want to
configure the available network adapter now. For
Perform now see Media menu from page 64
onwards. For Do not perform or perform later:
OK End of wizard.
Positioning/aligning DVB-T antenna
If you are receiving one or more DVB-T stations with picture and sound
interference then you should change the installation location and align-
ment of the antenna. Ask your dealer to tell you which channels are used
to broadcast the DVB-T stations in your region.
➠ In normal TV mode, without other displays.
A DVB-T station is received and selected.
MENU: Call TV menu.
Select Settings,
go to the menu line below.
Select Stations,
go to the menu line below.
Select Manual adjustment,
OK call manual adjustment.
The signal source is already on DVB-T due to the station
preselection.
Position and align the antenna in such a manner that
maximum values for C/N and Level are obtained.
Blue button: Start search.
Search for DVB-T stations one after another and compare
values for C/N and Level.
Then position/align the antenna to the weakest station
so that maximum values for C/N and Level are obtained.
The value for BER should be as low as possible.
Thereafter perform an automatic search for all DVB-T
stations (see page 44).
Initial installation
Time and date
Sound playback
via ...
Network
configuration
OK
OK
SOUND COMPONENTS
Sound playback via ...
TV speakers ۪
Speaker system
HiFi/AV amplifier
Sound projector
HiFi/AV amplifier or TV speakers (switchable)
Sound projector or TV speakers (switchable)
Proceed
MANUAL ADJUSTMENT
Signal source DVB-T DVB-C DVB-S C
a
Channel E05
Frequency 177.50 MHz
Bandwidth 7 MHz
Name
C/N 81
Level 80
BER 0 E-7
Store
Search
SIGNAL SOURCE
Select the area in which you want the broadcaster to search here. You can use
the button to automatically select station by station.
OK
09
-
INITIAL INSTALLATION
Time and date
Time 09:19:14
Date 26.02.2010
Proceed Back
OK
OK
INITIAL INSTALLATION
Network configuration
Perform now Do not perform or perform later
Proceed Back
OK
Downloaded From TV-Manual.com Manuals
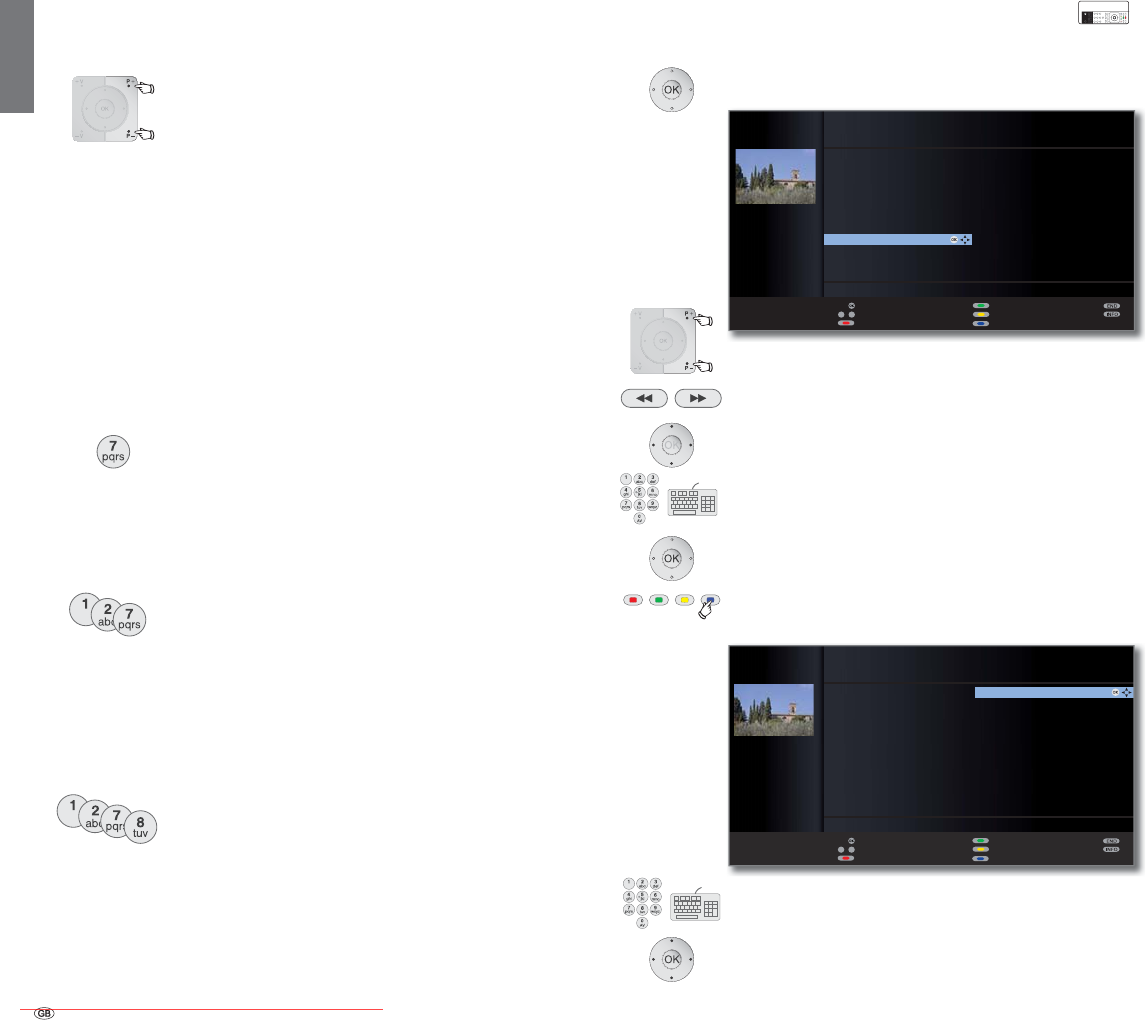
- 32
english
Select station
Select station with P+ / P–
P+/P– Station up/down.
The status display with station title, progress bar, time and
sound identification signal is shown briefly (see page 42).
➠ If Favourites are selected, you can change to the corre-
sponding station in the Favorites list using P+/P– (see
page 33).
➠ The symbols for the sound identification are described
on page 42.
➠ If there are additional languages or DVB subtitles for
DVB stations, then language and subtitle selection is
shown below the station display.
See also page 43: Selection possibilities for DVB
stations.
Select station using the numeric buttons
1-digit stations
Keep the numeric button pressed for one second, the
station changes immediately.
or:
Press the numeric button briefly, the station changes after
2 seconds (changes immediately in case up to 9 stations
are stored).
2-digit and 3-digit stations
Press first (and second) numeric button briefly.
Keep the last numeric button pressed for one second, the
station changes immediately.
or:
Press all the numeric buttons briefly, the station changes
after 2 seconds (changes immediately in case of up to 99
or 999 stored stations).
4-digit stations
Press all four numeric buttons, the station changes imme-
diately.
➠ If Favorites are selected, you can change to the corre-
sponding station in the Favorites list using the
numeric keys (see page 33). Maximum two-digit
station numbers are possible.
➠ If you select an unoccupied station slot, the next avail-
able station is switched to.
Select station with the station list
➠ In normal TV operation, without further displays, no
favourites selected:
OK Call Station list.
P+/P– Scroll in the pages of the station list.
Jump to the next station block.
Mark stations.
or:
Input the channel number.
The marked station is shown as a small picture .
OK The marked station is called.
Blue button: Changes the sorting between numerically
and alphabetically.
.
Input the first letter (see also pagee 14).
The first station for the specified letters is marked.
Mark stations.
OK The marked station is called..
OK
az
-
P+
P–
STATION LIST
21:00-21:45 Urlaubsparadies - Toskana
HDMI3
HDMI2
HDMI1
PC IN
AVS
AV
0 VIDEO
'DV(UVWH۽
=')۽
:'5.¸OQ ۽
%D\HULVFKHV)6 ۽
KUIHUQVHKHQ ۽
3KRHQL[ ۽
%5DOSKD۽
VDW۽
(LQV([WUD۽
(LQV)HVWLYDO۽
(LQV3OXV ۽
=')LQIRNDQDO ۽
=')GRNXNDQDO ۽
=')WKHDWHUNDQ ۽
DUWH۽
.LND۽
OK
Scan stations
Change stations
Sort alphabetically
Switch to ...
Select station
Favourites3DJHܬ
.
OK
az
-
P+
P–
PIP scan
Change stations
Sort numerically
VDW۽
/LYH ۽
DUWH۽
$5'۽
AVS
%D\ULVFKHV)6۽
%5DOSKD۽
BR
CNN INT
Switch to ...
Select station
Favourites
'DV(UVWH۽
'6)۽
DVD-REC
D Vierte
(LQV([WUD۽
(LQV)HVWLYDO۽
(LQV3OXV ۽
(XURVSRUW ۽
HDMI1
HDMI2
3DJHܬ
OK
STATION LIST
21:00-21:45 Urlaubsparadies - Toskana
Daily operation
long
short short long
all short
Sorting
numerically
Sorting
alphabetically
InterActive
Downloaded From TV-Manual.com Manuals
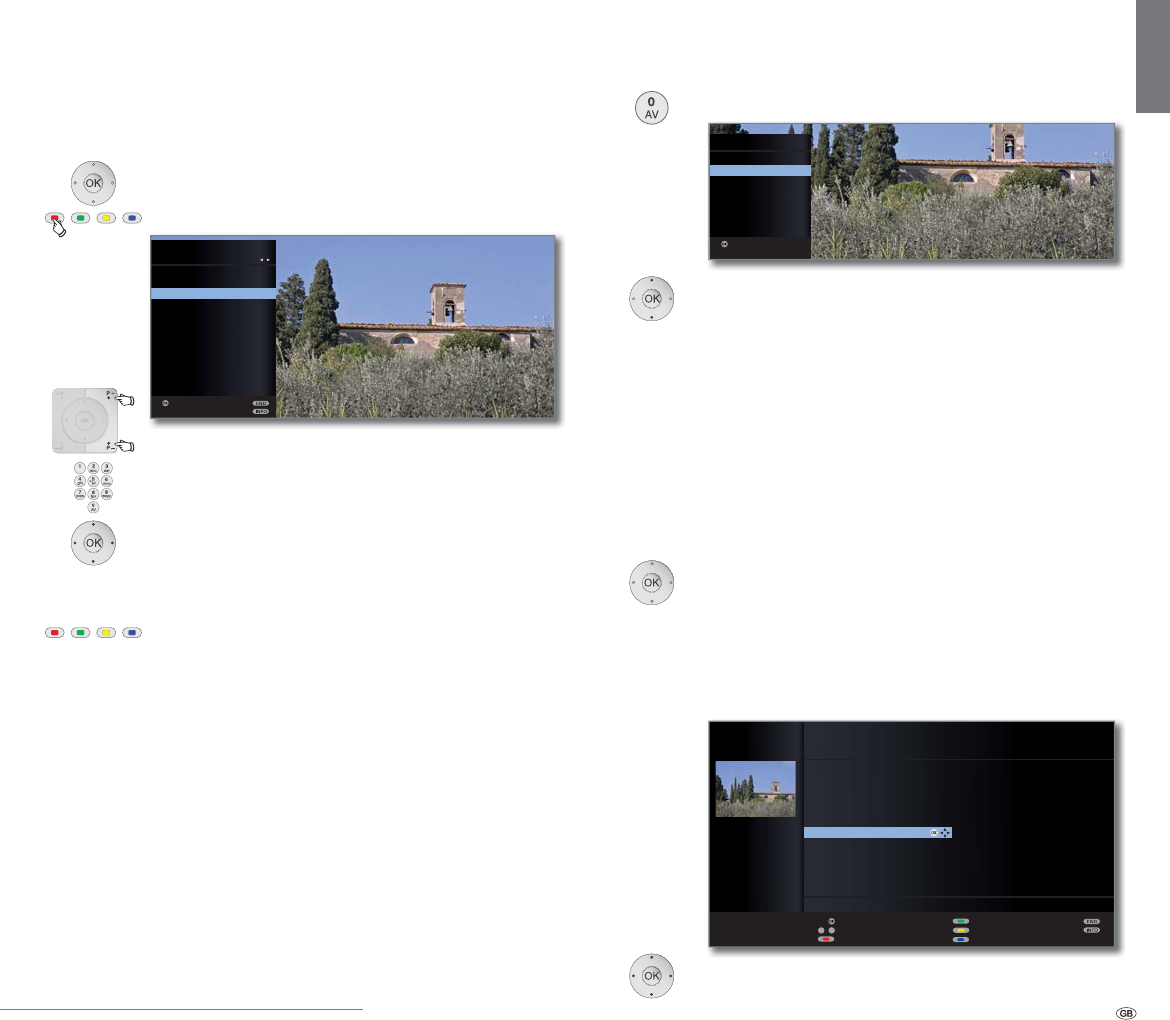
33 -
english
Select station via favourites list
You can save and call your favourite stations in 6 favourites lists (e.g. for
multiple users). Each favourites list can contain up to 99 stations. After
initial installation, 10 stations from the station list are already stored in
the first list. Change the favourites list to suit your requirements (see Put
together / change favourites lists on page 47).
➠ In normal TV mode, without other displays:
OK calls the station list.
Red button: Calls the favourites list.
P+/P– Scroll in the pages of the favourites list.
Select station directly with numeric buttons. Or:
Mark stations.
Select other favourites list.
OK The marked station is called.
➠ Other favourites lists can only be selected if these
contain stations.
Red button: Back to the station list.
Green button: Scan all stations of the currently selected
favourites list.
Yellow button: Change the Favourites lists, see page
47.
Explanation of the favourites lists:
The selection made with the red button (favourites list) is retained until
you switch back to the station list with the red button.
If favourites are selected, the name of the favourites list appears in the
status display after the station name after changing stations.
Explanation of the icons following station names:
ۼ DVB-T station (digital terrestrial via antenna)
۽ DVB-C station (digital via cable)
ۻ DVB-S station (digital via satellite)
۩ Coded station
v CI Plus coded station
ۮ Locked station (see Parental lock on page 58)
Selecting Audio/Video Source
Select the AV source via the AV selection
➠ In normal TV mode, without other displays:
Call AV selection.
Select desired connection,
OK switch over.
If the selected AV source provides a signal (picture), it
should be visible now.
For the VIDEO selection the set switches to programme
place 0 (signal source antenna/cable (analogue), factory
setting channel E36). The TV set shows the signal of a
provider via antenna (see page 113). The channel can
be changed as required (see page 45).
Select the AV source via station list
➠ In normal TV mode, without other displays:
OK Call the station list.
If the favourites list is displayed, switch to the
station list first.
The connections are always at the beginning of the list
in numerical sorting.
The connections are sorted into the list in alphabetical
order in alphabetic sorting.
Select connection.
OK Switch over.
OK
FAVOURITES
FavouriteList 1
'DV(UVWH ۽
=') ۽
:'5.¸OQ ۽
%D\ULVFKHV)6 ۽
KUIHUQVHKHQ ۽
3KRHQL[۽
%5DOSKD ۽
VDW ۽
(LQV3OXV۽
(LQV([WUD ۽
079 ۽
9,9$۽
Switch to ...
OK
az
-
P+
P–
STATION LIST
21:00-21:45 Urlaubsparadies - Toskana
PIP scan
Change stations
Sort alphabetically
HDMI3
HDMI2
HDMI1
PC IN
AVS
AV
0 VIDEO
'DV(UVWH۽
=')۽
:'5.¸OQ ۽
%D\HULVFKHV)6 ۽
Switch to ...
Select station
Favourites
KUIHUQVHKHQ ۽
3KRHQL[ ۽
%5DOSKD۽
VDW۽
(LQV([WUD۽
(LQV)HVWLYDO۽
(LQV3OXV ۽
=')LQIRNDQDO ۽
=')GRNXNDQDO ۽
=')WKHDWHUNDQ ۽
DUWH۽
.LND۽
3DJHܬ
OK
OK
AV SELECTION
HDMI3
HDMI2
HDMI1
PC IN
AVS
AV
VIDEO
Switch to ...
Daily operation
Downloaded From TV-Manual.com Manuals
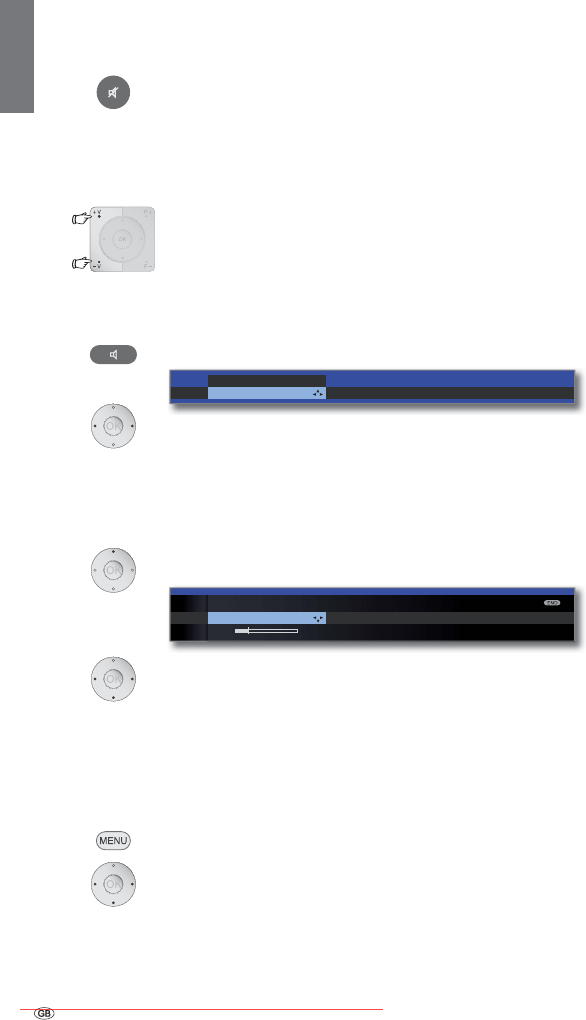
- 34
english
Adjusting the sound
Switching sound off/on
Sound off.
Sound on: Press the button again or increase the volume
using V+.
Setting the volume
V+/V– Volume louder / quieter.
The volume bar will be shown briefly if no other menu
is displayed.
Setting the Sound mode
Call Sound mode.
Select the number of speakers you want to hear.
Additional sound settings
➠ As long as you can still see the volume bar or the
selection of speakers for sound mode:
Call additional sound settings.
Select sound setting (right column),
go to the menu line below.
Make changes.
Sound settings via the TV menu
➠ In normal TV mode, without other displays.
MENU: Call TV menu.
Select Sound,
go to the menu line below.
Select desired sound setting (right column),
go to the menu line below.
Make changes.
Explanations of the sound settings:
Select the number of speakers you want to hear. The
selection depends on the connected sound components
(from page 117) and on the transmitted audio signal.
➠ If the number of speakers appears in brackets, the
sound of missing speakers is transmitted by the existing
speakers (virtual).
The momentarily reproduced audio signal is output with
the ideal number of speakers.
Play centre sound or mono (left/right).
Play front sound (L/R stereo).
Play front and centre sound.
Play front and surround sound.
Play front, surround and centre sound.
Play via an external HiFi amplifier. Selection is only possible
if an amplifier has been selected in the sound components
wizard (see page 122).
Here you can make Dolby Pro Logic II sound settings for
movie and music. Menu item only appears with certain
sound mode settings.
Speech, Classical, Pop, Custom music, and Custom film
sound.
Set the volume of the audio commentary to be relative to
the volume of the programme being transmitted. Should
negative values result (those in the area of -50… -1), the
audio commentary is quieter than the programme sound.
Should positive values result (those in the area of +1…
+50), the audio commentary is louder than the programme
sound. If the value 0 results, then the audio commentary
is at the exactly the same volume as the programme sound.
The menu item only appears if audio commentary is
activated (see page 43) and is offered by the current
station. Additionally, the Loudspeaker sound or Head-
phone sound must be set to normal + audio commentary
must be switched on (see next page).
Adjust the headphones volume.
Proper boost of bass and treble tones at low volume.
If the sound does not exactly match the picture, you
can correct it here. If you move to the left in the bar you
delay the sound in relation to the picture. If you move to
the right you accelerate it in relation to the picture. The
sound is adapted in time steps of 10ms each.
The Sound-picture synchronisation menu item only ap-
pears for DVB stations.
Call with OK (see next page).
Sound mode Dolby PLII mode Sound adjustmen
t
Volume
24
Daily operation
Sound mode ...
optimal ܃܃܃܃܃
Sound mode
optimal
1܃
2܃
3܃
4܃
5܃
Amplifier܃
Dolby PLII
mode
Sound
adjustment
Audio
commentary
volume
Headphone
volume
Loudness
Sound-picture
synchronisation
more ...
Downloaded From TV-Manual.com Manuals

35 -
english
Explanations of the sound settings:
For analogue stations: In the case of programmes with
twin sound, you can select separately between Mono/
Stereo or Sound 1 or Sound 2 for the loudspeakers and
the headphones.
For DVB channels: You can choose here if you wish to
listen to a special soundtrack for the visually impaired over
the speakers. This soundtrack uses an audio commentary
to describe the action taking place on-screen.
The menu item only appears if an audio commentary is
offered by the current channel.
Reduces volume differences, e.g. for advertisements that
are too loud.
You can indicate here which sound is output via the AV
socket for dual sound programmes: Sound 1 (e.g. main
language), sound 2 (e.g. foreign language), or sound 1+2
(both simultaneously).
Determining the maximum volume that can be set.
Specify the volume that is set when switching on the TV
set with the mains switch.
If the volume is higher when switching the TV set to the
standby mode than specified here, then it is reduced
automatically to the fixed maximum switching on volume
when it is turned on again.
The volume can differ according to the individual stations.
If the sound is too loud or too quiet in relation to other
stations, adjust the volume. When the menu is open, you
can select the stations one after another with P+/P– and
adjust every single station conveniently.
Set stereo balance so that the volume impression is identical
on the left and right.
If the automatic speech detection is activated, the sound
of the current programme is automatically output with
optimum comprehensibility when speech is detected.
Daily operation
more ...
Loudspeaker/
Headphone
sound
Auto Volume
AV output
signal
Maximum
volume
max. switch on
volume
Volume
adjustment for
current station
Balance
Auto speech
detection
Downloaded From TV-Manual.com Manuals
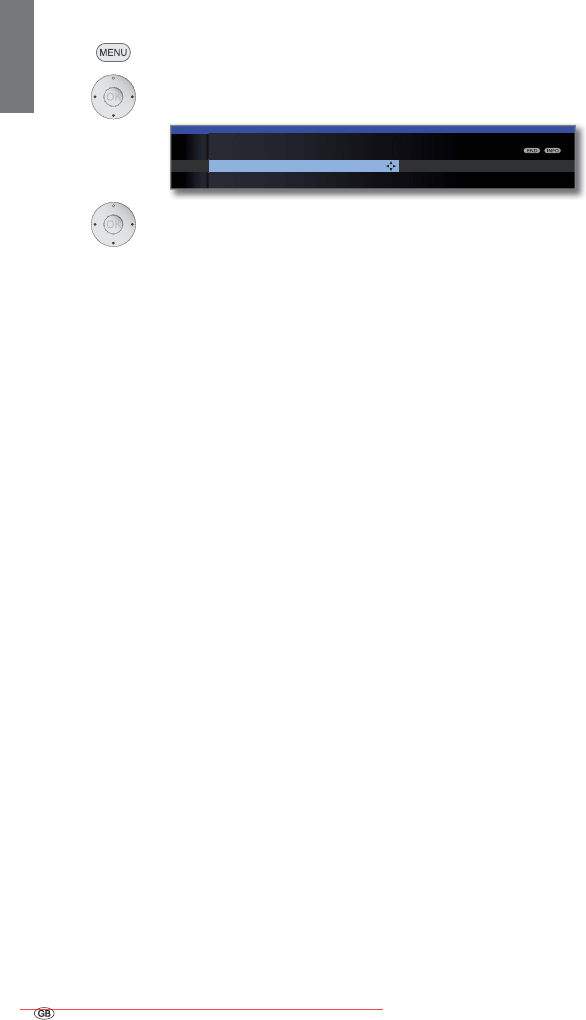
- 36
english
Adjusting the picture
MENU: Call TV menu.
Select Picture,
go to the menu line below.
Select the desired picture function,
go to the menu line below.
Make changes.
Explanations of the picture settings:
Select the settings for your TV set‘s 3D display (see page 38).
You can switch between three fixed picture setting vari-
ants and the three personal picture values that you have
set here (see page 37).
The contrast setting depends on the brightness of the
room. The brighter the surroundings the higher the
contrast should be set.
The power consumption of the TV set is directly depend-
ent on the value set here (see also page 24).
Set the colour intensity to suit your personal taste. The
colours should appear natural.
Here, you can give the TV picture a warmer or colder hue
according to your personal taste.
Set the brightness so that the black areas of the picture
only just appear black.
Here you can adjust picture sharpness to obtain the best
definition.
With active DNC (Digital Noise Control) you can eliminate
or reduce picture noise.
Call with OK (see right hand column).
Explanations of the picture settings (continuation):
Picture improvement on/off and demo mode for Image+
Active.
If this auto dimming is active then the television picture
contrast is automatically reduced when the room bright-
ness diminishes (Optical Power Control – OPC). This will
also reduce the power consumption of the TV.
➠ Owing to a reduction in the luminance in 3D mode
for technical reasons, this function is deactivated when
showing 3D content.
If this automatic dimming (“Video compensating Back-
light Dimming”) is active then, dependant on the current
video content, the background lighting is reduced and
concurrently the video signal is enhanced resulting in
improved contrast to your television picture. This will also
reduce the power consumption of the TV.
DMM reduces jolt in rapid picture object movements and
rolling text displays. This applies especially for movies.
Automatic detection and setting of the picture format
for Cinemascope or widescreen movies.
Set picture format (see page 37).
Move picture vertically (see page 37).
Contrast Colour intensity Colour
t
TV MENU
Picture
Picture adjustment
Personal settings (TV digital) ...
3D
Daily operation
Image+ Active
Auto dimming
- Room
Auto dimming
- Video (VBD+)
Film quality
impr. (DMM)
Auto format
Picture format
Move picture
up/down
3D
Picture
adjustment
Contrast
Colour intensity
Colour
temperature
Brightness
Sharpness
Digital Noise
Control (DNC)
more ...
Downloaded From TV-Manual.com Manuals
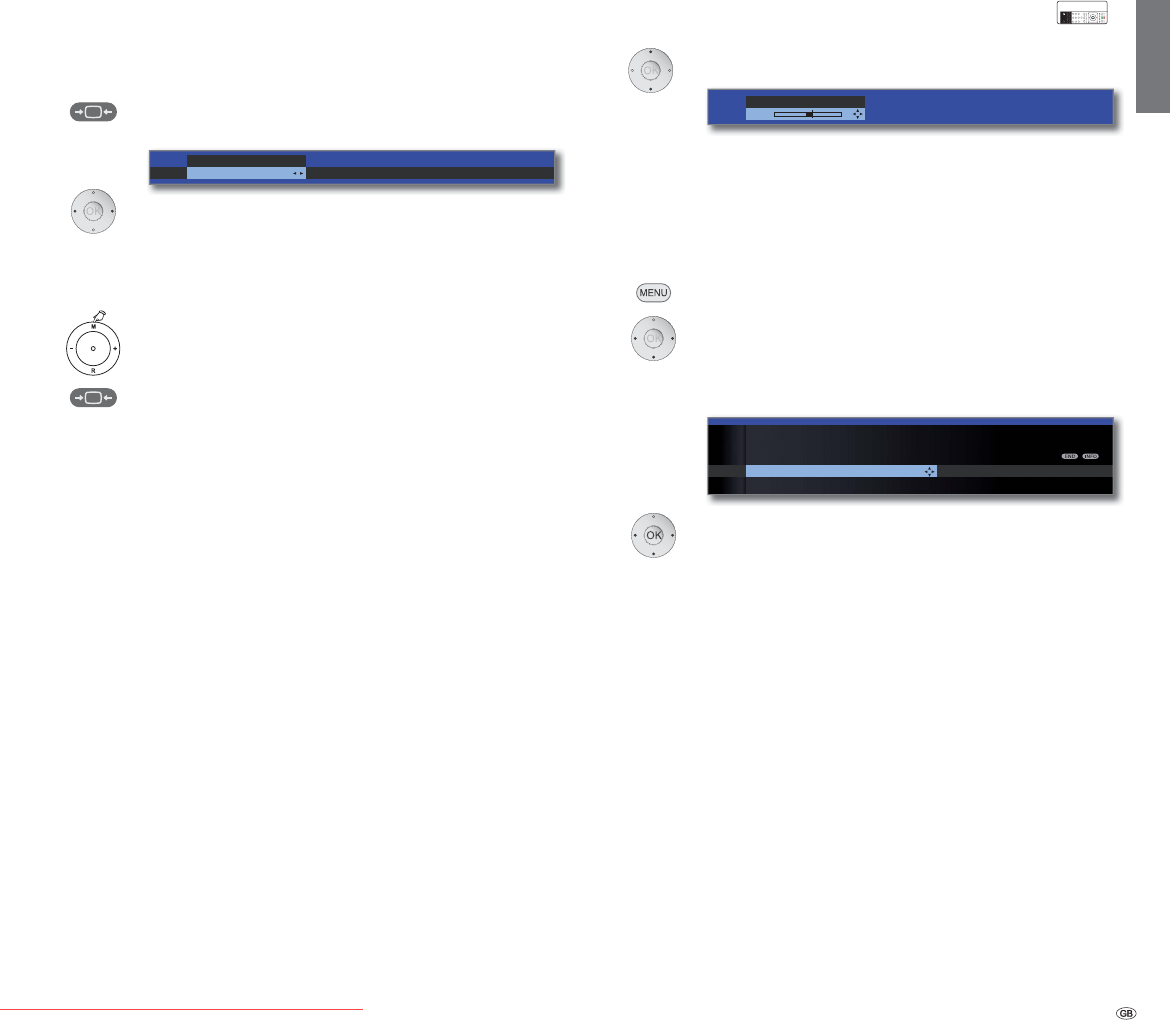
37 -
english
Move picture vertically
➠ In normal TV mode without other displays.
Move picture up/down.
To show subtitles or news tickers which have been cut
off, the picture can be moved up or down in the picture
formats Panorama, Cinema and Zoom (not with high
resolution signal) with the arrow buttons .
Presettings / Personal settings for picture adjustment
MENU: Call TV menu.
Select Picture,
go to the menu line below.
Select Picture adjustment,
go to the menu line below.
Select Presettings or Personal settings.
For presettings, go to the menu line below.
Select the desired presetting for the picture.
OK Confirm selection.
Explanations for Picture adjustment:
If you select Presettings, the picture settings for the signal input group
currently active are set to predefined values. See Glossary for an explana-
tion: Signal input groups.
Your own settings for contrast, colour intensity, colour temperature,
brightness, sharpness and digital noise suppression are saved in the
personal values. At the same time, you have your own personal values
for each signal input group.
All picture and sound adjustments can be reset to the default values in
one step for all signal input groups in the index of the TV set under Reset
picture/sound or Factory settings picture/sound.
Personal settings (TV digital)
TV MENU
Picture
Picture adjustment
Presettings (TV digital)
Eco standard ...
Selecting the picture format
➠ The picture format cannot be altered if an HbbTV
application (1 is active (see page 82) or if the TV set
is in 3D mode (see page 39).
Press the Picture format button until the desired picture
format is set or press
to select the desired picture format.
The Panorama picture format can be set between
proportionally correct and format filling display. Black
bars are visible on the left and right of the picture in
the proportionally correct display.
Switch: Keep the M button on the TV pressed, at the
same time, press the Picture format button on the remote
control briefly.
Reset: Press the same button combination again.
Explanations of the picture formats:
➠ The setting options depend on the transmitted picture
content.
16:9 Proportionally correct display of 16:9 broadcasts.
4:3 Proportionally correct display of 4:3 broadcasts.
Panorama Proportionally correct or format filling display (as-delivered
state) of 4:3 broadcasts on the 16:9 screen. Station logo
and subtitles remain visible.
See above for switching the Panorama mode.
Zoom Proportionally correct display. Maximum picture magni-
fication.
PALplus Is a 4:3-compatible 16:9 picture broadcast supplied by
the station which is detected automatically.
If a high resolution video signal is displayed on the TV set
or fed in via the interfaces PC IN, HDMI1, HDMI2 or
HDMI3, the picture formats 16:9 PC, 16:9 TV, 16:9 Zoom,
4:3 PC, 4:3 TV and 4:3 Zoom can be set.
In the PC formats, the complete picture content will be
shown. In the TV formats a small part of the picture is
cropped. This may be necessary to hide possible interfer-
ence at the edge of the picture, which arises from the
signal supplied.
Panorama
Picture format
Zoom 16:9
4:3
Bild vert. verschieben
2
Move picture up/down
Daily operation
InterActive
(1 Depending on the settings selected.
Downloaded From TV-Manual.com Manuals
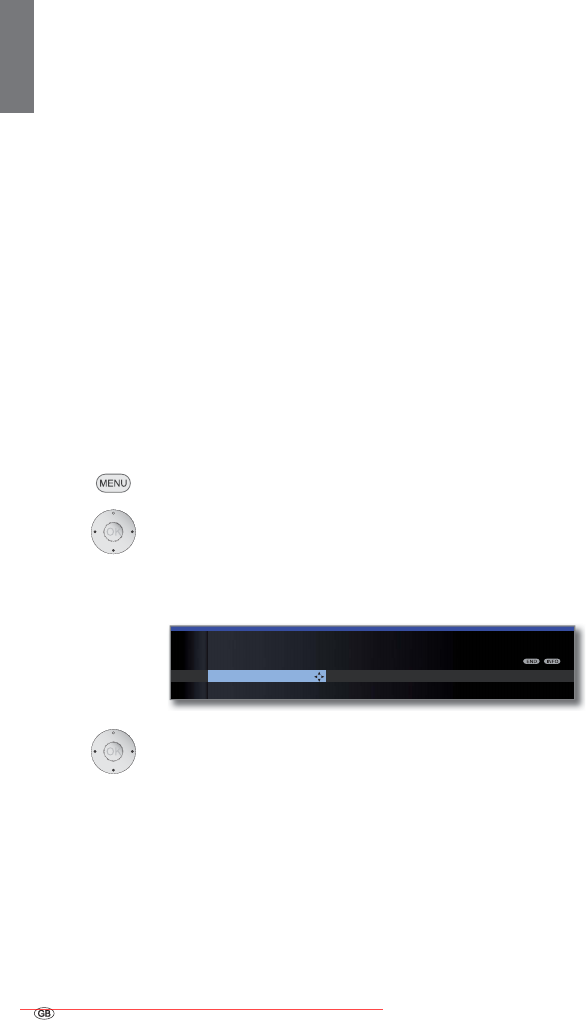
- 38
english
3D function
You can use the 3D functionality of your TV set to display 3D material
transmitted by a channel or from an external player that is connected.
You require a pair of Loewe Active 3D Glasses to be able to use the 3D
functionality in its entirety (see Accessories on page 140). Please read
the operating instructions included with the 3D glasses.
3D settings
Using the 3D settings you can select the correct display format, should
this not have been detected automatically. What’s more, you can choose
to view 3D material in 2D or “traditional” 2D material in 3D.
For 3D content that is being played back from an external HDMI player,
the 3D display format is normally recognised correctly when the factory
setting 3D mode ט automatic is selected. You may need to set the 3D
mode manually to view 3D content from broadcasters.
➠ Owing to a reduction in the luminance in 3D mode for technical re-
asons, the
Auto dimming - Room
(see page 36) is deactivated when
showing 3D content.
➠ If the TV set is operated with the remote control during a 3D playback,
flicker effects can occur in the 3D glasses during this.
MENU: Call TV menu.
Select Picture,
go to the menu line below.
Select 3D,
go to the menu line below.
Select the desired function,
go to the menu line below.
Set the changes.
Explanations of the 3D settings:
2D->3D
If you set 2D->3D to on, all 2D image material will be
displayed in 3D. You will need to wear the 3D glasses to
view it properly.
➠ The 2D->3D conversion is not available for the Indivi-
dual 32 Compose 3D.
3D mode
Here you can deactivate the 3D mode of the TV set. The
TV set shows the 2D/3D image material in the same way
as it is provided by the station or external player.
If the TV is set to this setting (factory setting), then the TV
set automatically switches over to the correct 3D mode,
if this is possible.
Only change the setting if the 3D content is not displayed
correctly.
To display 3D content in side by side format. When view-
ing 3D content with this setting, two almost identical
images are displayed next to each other and put together
correctly by the TV set.
➠ The 3D mode is automatically reset the next time you
switch on the TV set.
To display 3D content in top/bottom format. When view-
ing 3D content with this option, two almost identical im-
ages are displayed one above the other and put together
correctly by the TV set.
➠ The 3D mode is automatically reset the next time you
switch on the TV set.
To display 3D content in full picture format. When viewing
3D content with this option, two almost identical images
are displayed as full pictures and put together correctly
by the TV set.
➠ The 3D mode is automatically reset the next time you
switch on the TV set.
3D->2D
If you set 3D->2D to on, the 3D material from both TV
stations and from external players will be changed into
2D and played back. The three dimensional (3D) effect
will disappear. You will not need to wear the 3D glasses
to view it properly.
3D->2D
TV MENU
Picture
3D
3D mode
off ...
2
D->3D
on/off
off
automatic
side by side
top/bottom
Games
on/off
Daily operation
Downloaded From TV-Manual.com Manuals
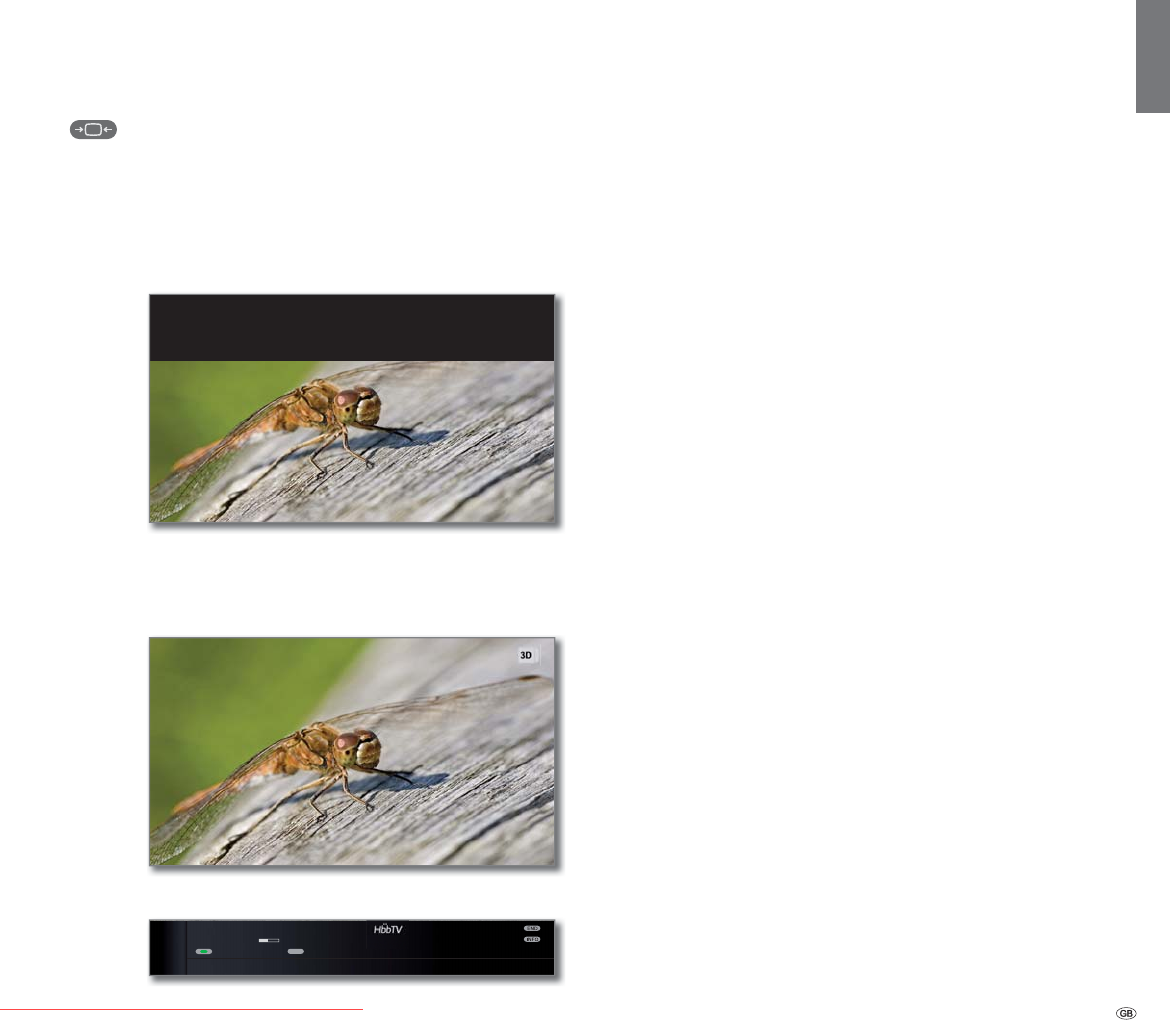
39 -
english
Picture format / 3D mode
If 3D contents are recognised by the TV device, the picture format can-
not be subsequently changed. The picture format when in 3D operation
is always 16:9 PC.
The 3D mode can be changed using the Picture Format button.
Select the 3D mode.
Refer to page 38 for further explanations.
Instruction / Symbol
If 3D content is detected by the TV set, a corresponding message appears
if Automatic info ט yes is selected in the menu (TV menu ט Settingsט
Miscellaneous ט On-screen displays ט Automatic info).
If Automatic info ט no is set, a symbol appears instead
of the text instruction. The instruction and the symbol
will disappear after the display time has elapsed (see also
page 60).
The symbol can also be seen in the status display.
HINT
The following images will be displayed in 3D mode. For this part, put the
3D glasses on and then switch them on. Viewing 3D images for extended
periods of time can tire out the eyes and/or cause feelings of dizziness.
'DV(UVWHሇᇀᇢ'LJLWDOᇳ
7RVNDQD
ሇ
/DQJXDJHVRXQG6XEWLWOH
ᇜ $ODUPWLPH6OHHSWLPHU
TEXT
Daily operation
Downloaded From TV-Manual.com Manuals

- 40
english
Button functions
Every operating mode of the TV set (TV, Radio, MediaPortal, Teletext, EPG, PIP,
and DR archive) has its own menu and own functions for the coloured buttons.
The function of the coloured buttons is shown at the bottom of the menus
and wizards. Below, some of the function are listed which you need in TV
mode for the daily handling of your TV set.
Coloured buttons in TV mode
➠ In normal TV mode, without other displays.
Red button: If an interactive data service is available (e.g.
HbbTV (1 see page 82 or MHEG-5 see page 54), the
red button will load or start the corresponding application.
Green button: Open the Teletext functions menu (2.
You can select
Subtitles
and your Personal text pages via
the Teletext functions menu. The operation of subtitles
depends on the station selected.
Subtitles analogue stations:
Select Subtitles,
go to the menu line below.
Select the size of the teletext subtitles,
OK show teletext subtitles
(display only if subtitles are available).
END: Teletext subtitles off or select off in menu.
Subtitles DVB stations:
➠ If the DVB station does not provide any subtitles, the
menu item Subtitles is greyed out and cannot be
accessed with OK.
➠ The DVB subtitles can also be selected via the status
display (see page 43).
Select Subtitles,
OK call.
Select subtitle mode,
OK show/hide subtitles.
Coloured buttons in TV mode (continuation)
Green button: Open the Teletext functions menu.
Select Personal text pages,
OK call.
Select text page,
OK view.
➠ If only one text page is defined, no list will be shown
and the Teletext page will be opened immediately. To
define your personal text pages, see page 53.
Yellow button: Go to the last viewed station.
Use this button to quickly switch back and forth between
two stations.
Blue button: Show programme info.
The programme info of the following programme is
displayed additionally for DVB stations.
Explanation of the symbols in the programme information:
۳ Programme in 16:9 picture format
ܦ Programme in high picture definition (HDTV)
۲ Programme with Dolby-Digital sound
۴ Broadcast of subtitles for the deaf and hard of hearing
۵ Programme with youth protection (see Parental
lock - Age-related lock on page 58).
The symbols may also appear in combinations.
Subtitles
Personal
text
pages
Detailed info (Teletext) Programme preview (
E
PROGRAMME INFO 14:43
Detailed info (EPG)
1 ARD Stereo
14:30-15:15 Urlaubsparadies Toskana
Urlaubsparadies Toskana
۳
15:15-15:45 Reiseziele dieser Erde
Ägypten
OK
Personal text pages
TELETEXT FUNCTIONS
Subtitles
off ...
TELETEXT FUNCTIONS
Subtitles Personal text pages
OK
TELETEXT FUNCTIONS
Personal text pages OK
btitles Subti
t
OK
PERSONAL TEXT PAGES
arte 112 News
ZDF 200 Sport
ARD 170 Wetter
-------- --- ----------
-------- --- ----------
-------- --- ----------
View
OK
Daily operation
InterActive
(1
Depending on the corresponding settings (see page 82).
(2
If the audio commentary is active, this button will have other functions, see page 43.
Downloaded From TV-Manual.com Manuals
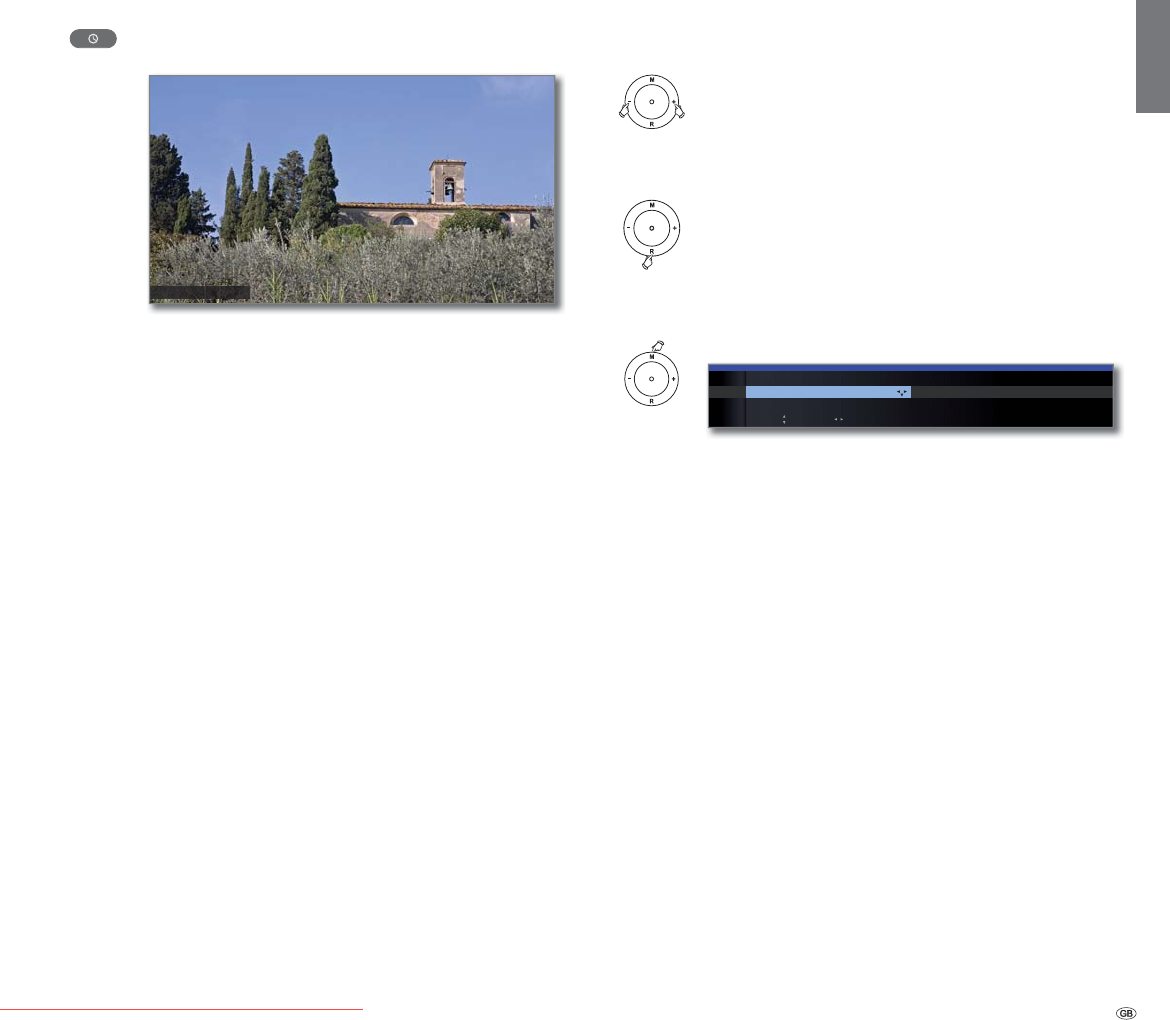
41 -
english
Permanent display of time
Press twice in rapid succession:
Time is shown/hidden permanently.
The permanent display of the time can also be set in the
TV menu under Settings ט Miscellaneous ט On-screen
displays ט Permanent clock display (see page 60).
The display position of the time depends on the selected
setting in the On-screen displays menu (ex-factory: bot-
tom). See page 60 for how to change the display
position.
Operation without remote control
Changing the station on the TV set
+ / – Station up/down.
Switching radio on or off or switching to radio
R Radio on or switch between TV and Radio.
Calling the TV menu on the set
M Call Direct control on TV set menu,
– / + select function.
M or R Go to the menu line below,
– / + make changes.
M Move up one menu line,
– / + select other function.
Explanations of the settings:
Switch between TV and radio operation.
Select AV interface.
Set volume.
Set brightness.
Set contrast.
The power consumption of the TV set depends directly
on the value set here (see also page 24).
Set picture format (see also page 37).
Select station +/-.
The Service menu item is provided for service purposes
by dealers only.
۫
Daily operation
AV selection Volume Brightness Con
DIRECT CONTROL ON TV SET
Operating mode
TV ...
Key M: Keys -/+:
Operating
mode
AV selection
Volume
Brightness
Contrast
Picture format
Station
Service
Downloaded From TV-Manual.com Manuals
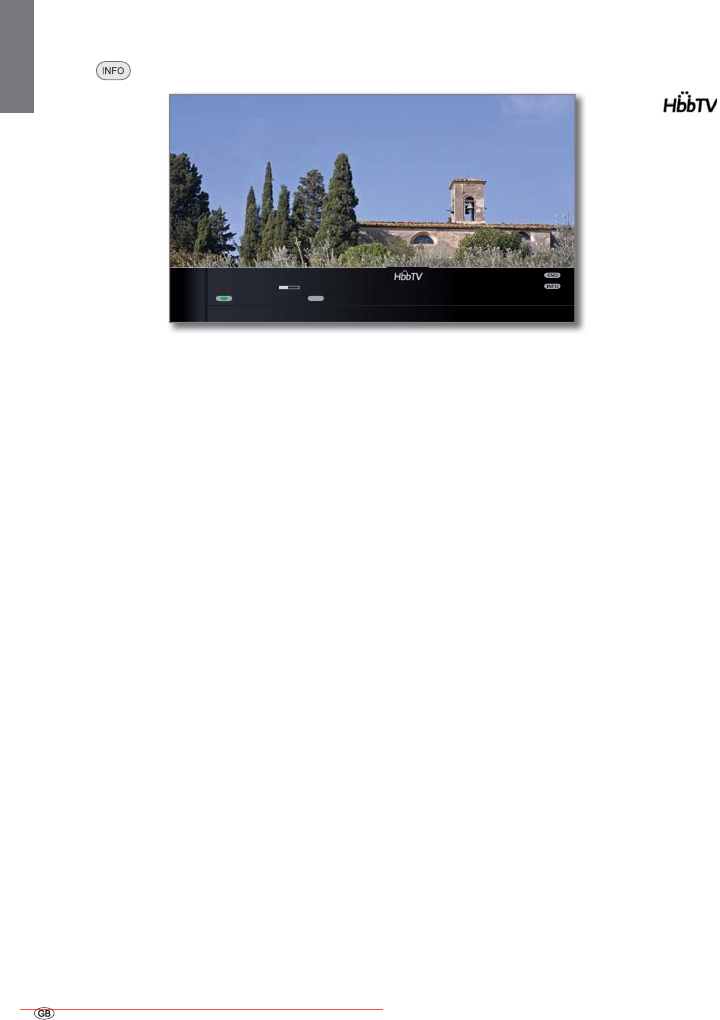
- 42
english
Explanations of the symbols in the status display:
General symbols:
t Display in 3D mode (use Loewe Active 3D Glasses, see
accessories on page 140).
HbbTV mode is on and HbbTV applications are available
Transmitted audio signal:
Mono Mono audio transmission analogue
2-sound Two-sound transmission (Sound1/Sound2) analogue
1+1 Two-sound transmission (Sound1/Sound2) digital
Stereo Stereo sound transmission analogue
Stereo (AAC+) Stereo sound transmission (HEAAC)
ܐ Stereo sound transmission digital (PCM)
۲ Digital Dolby Digital sound transmission (DD)
۲ Digital+ Dolby Digital+ sound transmission (DD+)
۲ Digital (AAC+)
Dolby Digital AAC+ sound transmission (HEAAC)
dts dts sound transmission
MPEG MPEG sound transmission
۲ PLII Dolby Pro Logic II sound transmission
۲ VS Ref Dolby Virtual Speaker Reference display
۲ VS Wide Dolby Virtual Speaker Wide display
Transmitted audio channels:
܂ DD / dts 1.0 / mono
܆ DD / dts / MPEG 2.0
܉ DD / dts 3.0
܈ DD / dts 4.0
܋ DD / dts 5.0
܍ DD / dts 2.1
܅ DD / dts 3.1
DD / dts 4.1
ۿ DD / dts 5.1
Selected listening mode:
܃1 Play centre sound or mono (left/right).
܃2 Play front sound (L/R stereo).
܃3 Play front and centre sound.
܃4 Play front and surround sound.
܃5 Play front, surround and centre sound.
➠ If the number of speakers appears in brackets, the
sound of missing speakers is transmitted by the exist-
ing speakers (virtual). The Dolby Virtual speaker (VS
mode) developed by Dolby is activated for the virtual
sound reproduction.
Status display
➠ In normal TV mode, without other displays.
INFO: Show status display.
In the upper two lines, you will see the number and name
of the station, the title and transmission time of the
programme currently showing (if available) and the sound
identification signal.
The bar (if available) indicates the progress of the current
programme.
If information about the current programme is available,
this can be called by pressing the INFO button again; in
this case the button on the right is displayed.
A menu (see page 43), the time and, if activated, the
alarm time and switch-off time appear at the bottom of
the screen depending on the DVB station.
The status bar is also shown automatically every time you
change channels.
The status bar is hidden automatically at the end of the
display time (see page 60 for setting).
If you want to hide the status bar manually before the dis-
play time ends, you can only do this with the END button.
'DV(UVWHሇᇀᇢ'LJLWDOᇳ
7RVNDQD
ሇ
/DQJXDJHVRXQG6XEWLWOH
ᇜ $ODUPWLPH6OHHSWLPHU
TEXT
Daily operation
Downloaded From TV-Manual.com Manuals

43 -
english
Other setting options for DVB stations
You can make general presettings for DVB stations under TV menu ט
Settings ט Miscellaneous ט DVB settings.
Here you can preset whether a subtitle is always to be
displayed as soon as it is offered by the station. A special
subtitle for impaired hearing can also be selected.
Subtitles are not offered by all stations. Many stations only
broadcast subtitles by teletext.
You can activate a special sound for viewers with impaired
vision here (see below).
Select the DVB character set so that the title of the broad-
cast of your favourite received station or the texts of your
CA module are displayed correctly.
Further explanations of the audio commentary
You can set the system here to always play an additional special
soundtrack for the visually impaired whenever one is available. This
soundtrack uses an audio commentary to describe the action taking
place on-screen. The function can be activated and deactivated in the
TV menu (see above) the first time that it is used (see page 25), or by
holding down the green button for a few seconds.
See chapter Adjusting the sound on pages 34 and 35 for more
information on how to configure the audio commentary.
Audio commentary status prompt
➠ Audio commentary is activated (see above).
A quick press of the green button will tell you if audio commentary is
available.
If audio commentary is available:
You will see a corresponding message on the screen. You will also hear
a beep lasting approximately 1.5 seconds.
If audio commentary is not available:
You will see a corresponding message on the screen. You will also hear
three short beeps.
Selection possibilities for DVB stations
In the status display additional selection possibilities can be offered for
specific programmes depending on the DVB programme provider.
➠ If during the status display you press one of the coloured
buttons or the TEXT button then the associated selection
menu will be displayed.
➠ The selection line is also displayed automatically when
a new broadcast with different options to the previous
broadcast begins or when you switch stations.
The selection menus are only available as long as the
status display is shown. However you can call them again
by pressing the INFO button.
Red button:
Channel selection for multi-channel providers
Green button: Language/sound
The sound formats on offer and their
designations depend on the programme
being broadcast.
Yellow button: Time selection
Blue button: CA module selection
The CA module selection only appears
when two CA module are plugged in,
which are both able to descramble the
encrypted station.
In this case, you can choose which of the
two CA modules should descramble the
station.
TEXT: Subtitles
The subtitles available depend on the
programme being broadcast
Subtitle
mode
Audio
commentary
DVB character
set
Daily operation
Downloaded From TV-Manual.com Manuals

- 44
english
TV stations
Various options for managing stations are available via the TV menu. For
example the description for TV stations. For radio stations the same applies,
except that the Radio menu is called in Radio mode (see also page 54).
➠
Station management is not possible if a programmed timer recording
is still pending.
➠
If at least one station is locked the access code must be entered before
Search/Update (see Parental lock on page 58).
Search/update stations – Search wizard
In the search/update with the search wizard, new stations are searched
for which have not yet been stored.
➠ You have to repeat the initial installation (see page
24) and automatically search for new ones if you
want to delete all the existing stations and automati-
cally search for new ones.
MENU: Call TV menu.
Select Settings,
go to the menu line below.
Select Stations,
go to the menu line below.
Select Search wizard,
go to the menu line below.
In the upper info text the current search settings will now
be displayed:
If you want to change these search settings:
Select Change search settings,
OKwizard prompts search settings.
If you agree with these settings:
Select Start search/update,
OKstart search.
Red button: Abort current search/update.
Explanations of some search settings:
Select the country for country-specific defaults and
station sorting.
Select antenna/cable (analogue), DVB-T, DVB-C or DVB-S (1
here depending on which signal source you want to search
for new stations.
A configuration of DVB-T and DVB-S (1 antennas can also be
called by the green button (see also page 25 and 26).
➠ Calling up the DVB antenna configuration causes the
Change search settings dialogue to be quit. You must
call up the dialogue again after finishing the configu-
ration.
With selection of set location the conventional TV
standard/colour standard is the default. This should only
be changed if stations with other standards are to be
searched.
You can state whether coded stations are to be searched
for in the search/update. Select yes then coded stations
are also searched for. However, these stations can only
be received in connection with a CA module and the ap-
propriate Smart Card. Ask your dealer which Smart Card
you need to receive certain stations. Handling of the CA
module is described on page 61.
If you want to run the station search independently of
the channel grid, select frequency search for the search
method.
With the selection of set location the conventional set-
tings will be preset. Only change this if you know other
symbol rates and modulation types or if you have to
specify the network ID for your cable network (informa-
tion available from your cable network provider).
If you want to run the station search independently of
the channel grid, select frequency search for the search
method.
If you want to run the station search independently of
the channel grid, select frequency search for the search
method.
The symbol rate is specified by the satellite provider and
normally does not need to be adjusted.
Start search/update
SEARCH WIZARD
Your TV carries out the update of the station list (search for new stations; delete
stations no longer broadcast) with the following settings:
Location of TV set United Kingdom
Signal source DVB-C
TV MENU
Settings
Station
Search wizard
Change search settings
OK
Managing stations
(1 Equipment and upgrade options, see page 142.
Set location
Signal source
Antenna/cable:
TV/colour
standard
Encrypted
stations
DVB-T
Search method
DVB-C
Settings
DVB-S
Settings
Downloaded From TV-Manual.com Manuals

45 -
english
Search for/update stations – handling of new and no longer found stations
The number of new stations found is displayed after the automatic search/
update has been completed.
OK List of new stations found
Select station.
Yellow button: Mark / unmark station
Blue button: Mark / unmark all
OK saves the selected stations.
Afterwards, a list of the stations which are saved but
which are temporarily not broadcasting or no longer exist
is displayed, if available.
The number of the memory location used is displayed in
front of the station. Please select the stations you really
want to delete.
Select station.
Yellow button: Mark / unmark station
Blue button: Mark / unmark all
OK deletes the selected station.
END: Exit the search wizard.
Search/update station – manual search / settings
➠ If you want to adapt the parameters of an existing station, first select
the appropriate station.
MENU: Call TV menu.
Select Settings,
go to the menu line below.
Select Stations,
go to the menu line below.
Select Manual adjustment,
OKcall input box.
You can enter or edit the station data in the following
lines:
Or:
Blue button: Starts Search and searches for next station.
Red button: Stores station.
➠ Only stations for the selected signal source can be
saved which do not yet exist in the station list.
➠ Stations which already exist in the station list for the
selected signal source are displayed with their station
numbers and names on a grey background. These
stations can only be overwritten with the red button.
Explanations of some search settings:
Various settings are possible depending on the selected signal source.
Some settings have already been explained in the initial installation (see
page
24
onwards).
Selection of range in which you want to search for the
station.
Direct input of channel.
Direct input of station frequency.
Input of station TV standard.
Ask your dealer in this regard.
Input of the station colour standard.
Ask your dealer in this regard.
MANUAL ADJUSTMENT
Signal source Cable (analogue) DVB-T DVB-C
Channel S21
Frequency 303.25 MHz
Name KiKa
TV standard B/G
Col. standard Automatic
Store
Search
OK
P+
P–
OK
Proceed Mark/unmark station
3DJHܬ Mark/unmark all
SEARCH FOR/UPDATE STATION
Newly found stations
:'5.¸OQ ۽
(LQV)HVWLYDO ۽۪
0'56$1+$/7 ۽۪
7HVW5۽۪
$5'2QOLQH.DQDO ۽
$5'7(67 ۽۪
$5'7(67 ۽
0'57+5,1*(1 ۽۪
.L.D۽۪
SEARCH WIZARD
All statiRQVPDUNHGZLWKD۪DUHVDYHG
Note: The newly found stations which you have already deleted
DUHQRWPDUNHG
OK
P+
P–
OK
Proceed Mark/unmark station
3DJHܬ Mark/unmark all
SEARCH FOR/UPDATE STATION
Stations no longer found
6 ۽۪
7HVW5 ۽۪
7927(;7 ۽۪
$5'2QOLQH ۽
SEARCH WIZARD
The following stored stations were no longer found because they are not
currently broadcasting a programme or no longer exist. Please mark those
you want to delete completely. Those not marked are retained.
Managing stations
Signal source
Channel
Frequency
TV stand.
Col. standard
Downloaded From TV-Manual.com Manuals
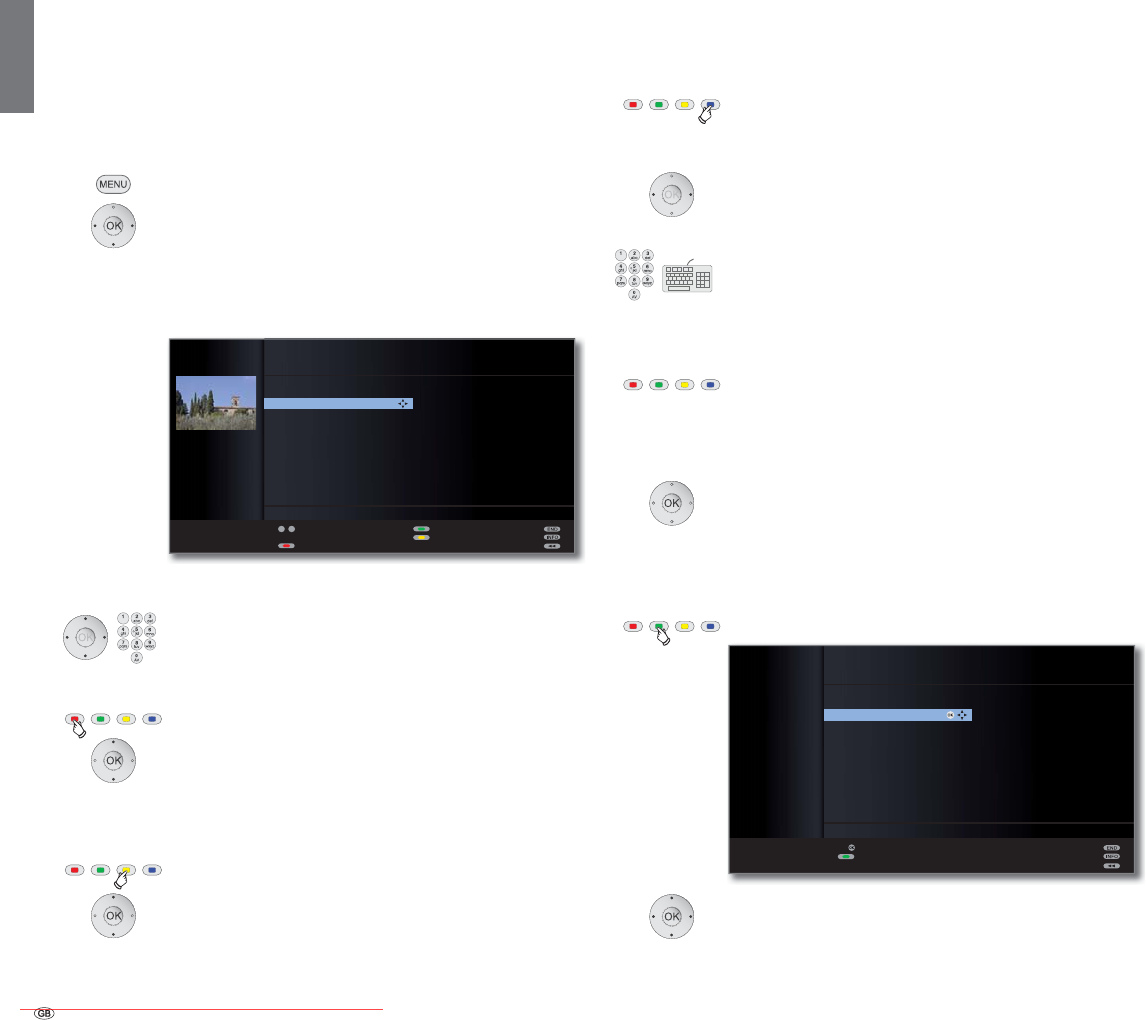
- 46
english
Change, delete, move, rename, restore station
➠ Change station can also be called via the station list (page 32).
➠ If at least one station is locked the access code must
be entered before changing stations start-up (see
Parental lock on page 58).
➠ In some TV broadcasting networks (e.g. FreeView) you
are not allowed to move or rename stations. Use
Favourites instead.
Call TV menu.
Select Settings,
go to the menu line below.
Select Stations,
go to the menu line below.
Select Change stations,
OKcall list of stations.
In this menu you can delete, move, rename or restore
stations.
or numeric buttons:
Select the appropriate station.
Scroll with P+/P– if necessary.
Delete station
Red button: Starts Delete station.
Select several stations to be deleted if necessary,
OK to execute the delete.
Move station / Change order
➠ Stations can only be resorted within the signal source block.
Yellow button: Starts Move station.
Mark several stations if needed,
OK selection ended,
Select insertion position from which the selected
stations are to be inserted,
OK to execute the move.
Rename station
➠ DVB stations for which the station name is also broadcast
cannot be renamed. In this case, the Rename function
is hidden.
Blue button: Starts Rename station.
Under the 1st letter of the name you will see a line indi-
cating the current input position.
Input position one character to the right (also for
blanks).
Input position one character to the left.
Input the letters one after another. When using the
remote control, press the numberic buttons just as on a
telephone keypad until the desired symbol is displayed.
The available letters are printed respectively on the
buttons. See page 131 for a detailed overview of the
available characters.
Green button: Switch upper/lower case letters.
Yellow button: Deletes the character before the input
position.
Blue button: Cancel rename.
OK to save new name.
Restore stations
Stations which have been deleted from the station list can be restored.
Green button: Starts Restore stations.
Select station,
OK
station is restored.
The restored station is sorted in according to its signal
source at the end of the respective signal block
.
OK
P+
P–
OK
CHANGE STATIONS
Restore deleted stations
3sat
KIKA
ZDF
=')LQIRNDQDO ۻ
=')GRNXNDQDO ۽
=')LQIRNDQDO ۽
(XURVSRUW ۼ
121$0(ۼ
RTL
Phoenix
BRalpha
NDR FS HH
Restore
Cancel restore
'DV(UVWHۻ
'DV9LHUWH ۻ
57/7HOHYLVLRQ ۻ
9Live
:'5.¸OQ ۼ
VOX
3UR6LHEHQ ۽
6XSHU57/ ۽
n-tv
DSF
RTL2
KABEL1
3DJHܬ
09
-
P+
P–
CHANGE STATIONS
21:00 - 21:45 Urlaubsparadies - Toskana
1 ARD
2 ZDF
3 SAT.1
4 D Vierte
5 RTL
6 VOX
7 S-RTL
8 N-TV
9 DSF
10 EinsPlus
11 9Live
12 RTL2
13 WDR 3
14 BR
15 HR
16 MDR 3
17 KIKA
18 PHOENIX
19 BR-ALPHA
20 3SAT
21 KABEL 1
'DV(UVWH۽
=')۽
:'5.¸OQ ۽
Restore stations
Move
Select station
Delete
3DJHܬ
Managing stations
Downloaded From TV-Manual.com Manuals
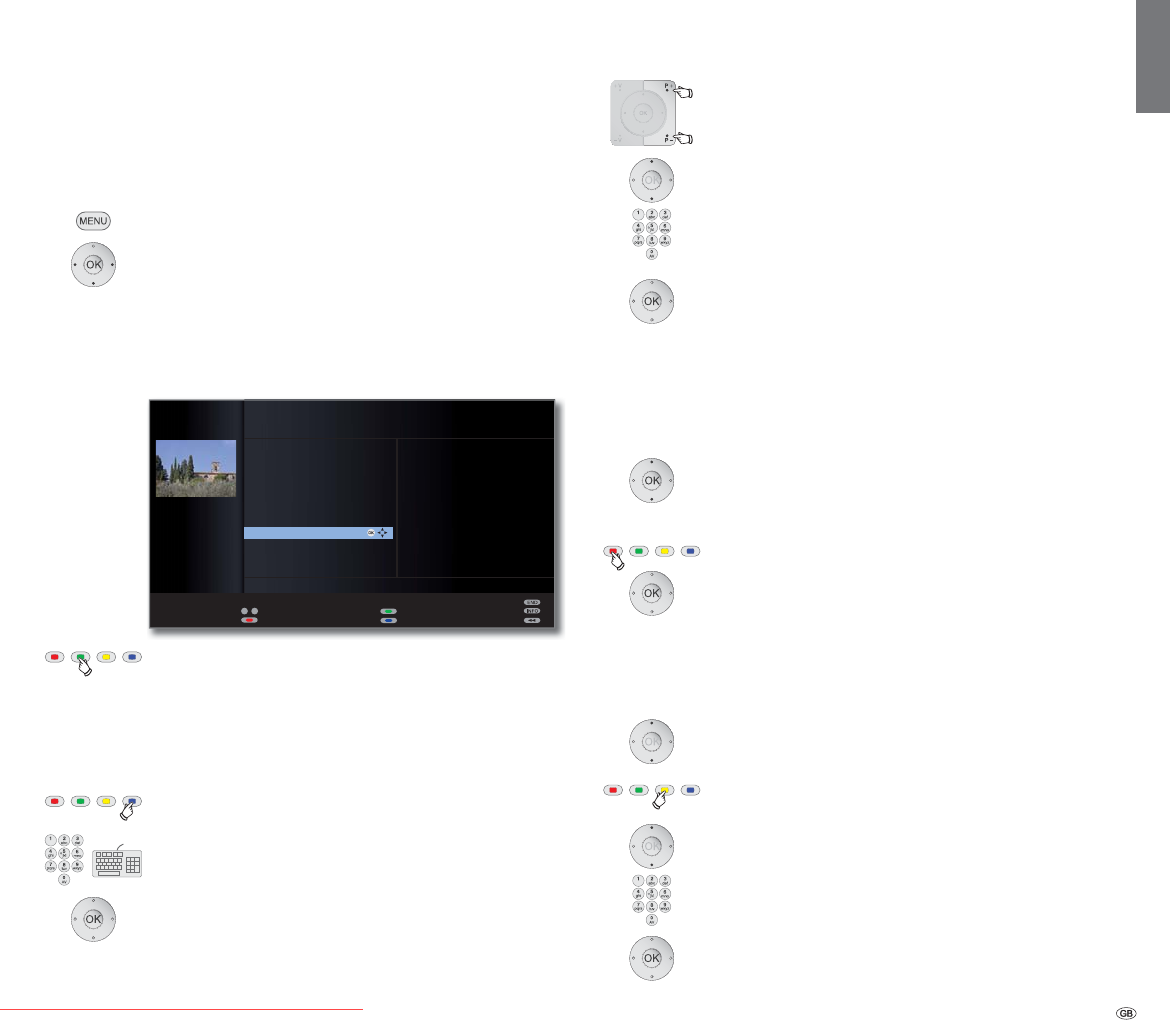
47 -
english
Put together / change favourites lists
Each favourites list can contain up to 99 stations. You can put together
the favourites lists to suit your requirements (e.g. topic lists). Other persons
using this TV set can create their own favourites lists.
The favourites lists also have the advantage that the stations of different
signal sources can be stored in the order you wish.
➠ Change favourites can also be called via the favourites
list (page 33).
MENU: Call TV menu.
Select Settings,
go to the menu line below.
Select Stations,
go to the menu line below.
Mark Select/change favourites,
OKcalls list of all stations and last active favourites list.
Green button: Select the next favourites list.
Rename favourites list
➠ Favourites list (right column) must be selected.
If not, change the list with .
Blue button: Starts Rename favourites list.
Enter new name (same procedure as for rename station,
see page 46).
OK to save new name.
Add station to favourites list
➠ All stations (left column) must be selected.
If not, change the list with .
P+/P– Scroll in the pages of the station list if necessary.
Mark station or select station with the numeric buttons
(
for alphabetical station sorting enter the initial
letter
) which is to be transferred as a favourite to the
favourites list.
OK transfers the station to the favourites list.
The new station is inserted at the end of the favourites
list. Proceed in the same manner with additional
stations.
Delete station from favourites list
➠ Favourites list (right column) must be selected.
If not, change the list with .
Mark station to be deleted.
OK
Removes the marked station from the favourites list.
or:
Red button: Starts Clear favourite list.
OK confirms clear favourites list.
Move / change order of stations in the favourites list
➠ Favourites list (right column) must be selected.
If not, change the list with .
Mark station to be moved.
Yellow button: Starts Move station.
Select insertion position at which the marked
station is to be inserted.
The insertion position can also be selected with
the numeric buttons.
OK to execute the move.
09
-
P+
P–
SELECT/CHANGE FAVOURITES
All stations Stations of FAV.LIST1
Next favourite list
Sort alphabetically
HDMI3/DVI
HDMI2/DVI
HDMI1/DVI
PC IN
AVS
DVD-REC
0 VIDEO
'DV(UVWH۽
=')۽
:'5.¸OQ ۽
%D\HULVFKHV)6 ۽
Select station
Clear favourite list
'DV(UVWH ۽
=') ۽
:'5.¸OQ ۽
%D\ULVFKHV)6 ۽
KUIHUQVHKHQ ۽
3KRHQL[۽
%5DOSKD ۽
VDW ۽
(LQV([WUD ۽
(LQV)HVWLYDO ۽
6$7۽
57/ ۽
3DJHܬ
OK
Managing stations
Downloaded From TV-Manual.com Manuals
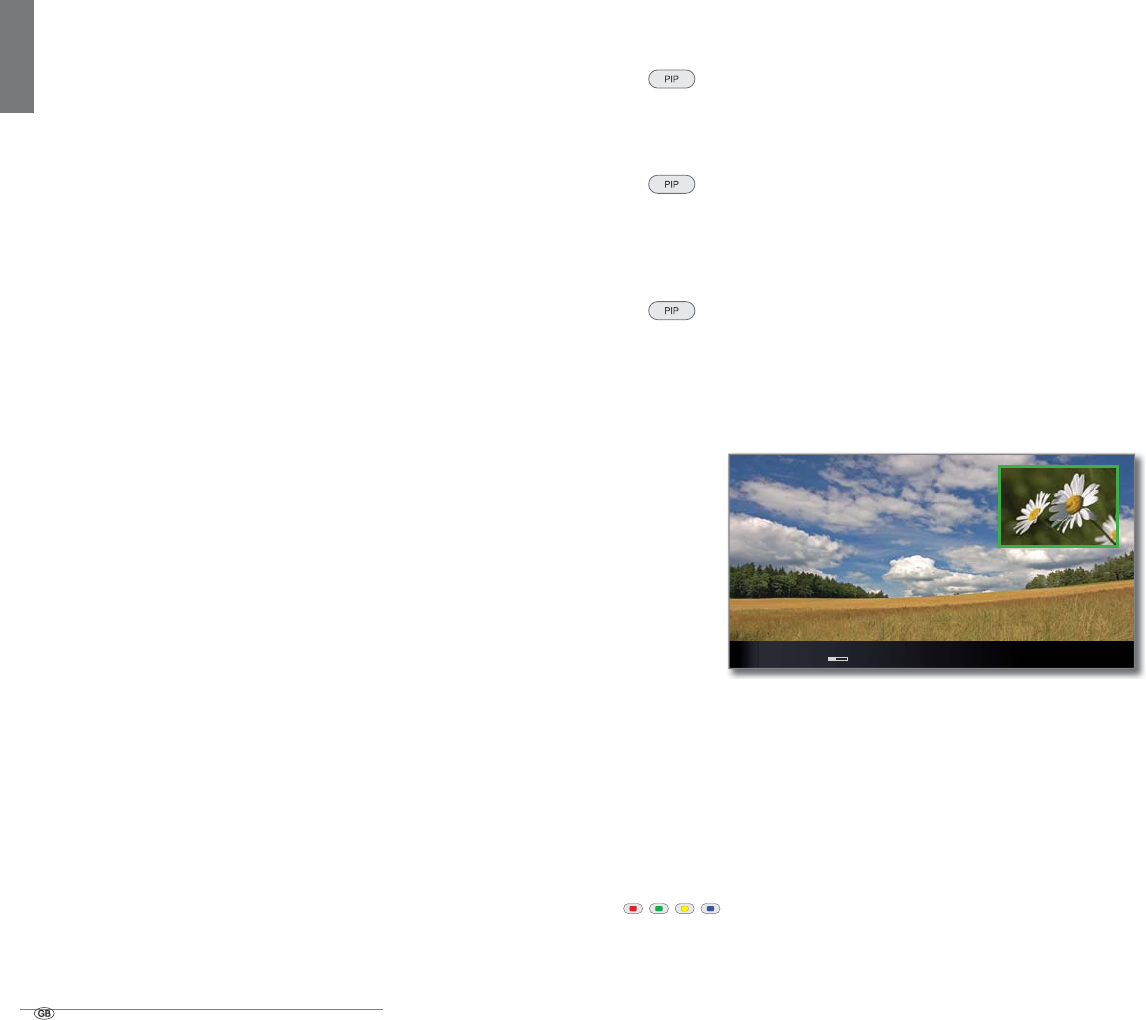
- 48
english
Picture in Picture ( PIP)
The concurrent display of two different images is referred to as Picture
in Picture.
Restrictions for the PIP mode:
➠ The selection and combination options for main screen/PIP screen
basically depend on the device variant and the number of receivers
(tuners) of the TV set (see Equipment variants on page 142).
➠ A concurrent representation of two MPEG4 coded HDTV signals is
not possible.
➠ A concurrent representation of two coded stations is not possible.
➠ Simultaneous display of two analogue stations is not possible.
➠ Picture change and station selection is restricted during recording.
➠ PIP Mode is not accessible as long as an HbbTV application is active
(see page 82).
The PIP operation distinguishes between two functionalities:
iPIP The TV picture is moved to the PIP picture when you
start the iPIP mode. The station of the TV picture is now
freely selectable. When you exit iPIP mode the PIP picture
becomes the TV picture again and the PIP window is
closed.
An orange frame around the PIP picture shows the iPIP
functionality
Standard PIP Stations freely selectable and changeable for PIP and TV
picture (coloured buttons have PIP-specific meaning, see
right hand column).
A green frame around the PIP picture indicates that the
station selection affects the PIP picture. A white frame
means that the operation refers to the main picture. If the
frame is blue, the station play is active in the PIP picture.
iPIP
Starting and ending iPIP mode
On pressing the PIP button the currently displayed TV
picture becomes the PIP picture. You can select other
stations for the TV picture and still keep an eye on the
PIP picture. You can temporarily shift commercials or
programme sections to the PIP picture in this way.
The PIP picture becomes the TV picture again (PIP off).
Standard PIP
Starting and ending standard PIP mode
Show/hide PIP.
Select the PIP picture
➠ The frame is green,
if not, press the green button.
Select the station as usual.
Select the station for the main picture
➠ The frame is white,
if not, press the green button.
Select the station as usual.
Function of the coloured buttons in standard PIP functionality
➠ The frame is green,
if not, press the green button.
Red button: Freeze picture in PIP on / off.
Yellow button: Switches contents of TV picture and PIP
picture.
Blue button: Start/stop PIP scan in the PIP picture.
Picture in Picture
=')۶
17.00-18.30 Flora & Fauna
Downloaded From TV-Manual.com Manuals

49 -
english
Change position of Small PIP
➠ Other than the status line, which may possibly be
displayed, no other display is shown on the screen:
Move the PIP into a corner of the screen.
The position of the small picture can also be selected
under Position in the PIP menu (see left hand column).
Switch PIP functionality (iPIP / Standard PIP)
➠ PIP menu is opened.
Select Functions,
go to the menu line below.
Select iPIP or Standard PIP.
Configure Picture in Picture (PIP) mode
You can set different parameters for the picture in picture mode in the
PIP menu.
Open the PIP menu
➠ PIP mode started,
if not, press PIP button.
➠ In Standard PIP functionality:
The frame is green,
if not, press the green button.
MENU: Call PIP menu.
Explanations of the setting options in the PIP menu:
➠ Note restrictions for the PIP mode (see page 48).
You can determine the position of the small picture here
(upper left, bottom left, bottom right, upper right).
Without a screen display the position can also be changed
with the menu control buttons (see right hand column).
You can switch the PIP functionality between iPIP and
Standard PIP (also see right hand column).
See page 48 for a more detailed explanation of the
PIP functionality.
TYP
Sie können wählen, ob Sie Ihr Zweitbild als überblendetes Kleinbild oder als
ein die rechte Schirmhälfte füllendes Bild ("Split Screen") sehen wollen.
Standard PIP
TV MENU
Settings
PIP
Functions
iPIP
Picture in Picture
Position
Functions
Functions
POSITION
Here, you can determine the position of the small picture, top left, bottom left,
top right or bottom right. Without a screen display you can also do this with the
"up", "down", "left" and "right" buttons.
TV MENU
Settings
PIP
Position
upper right ...
Downloaded From TV-Manual.com Manuals
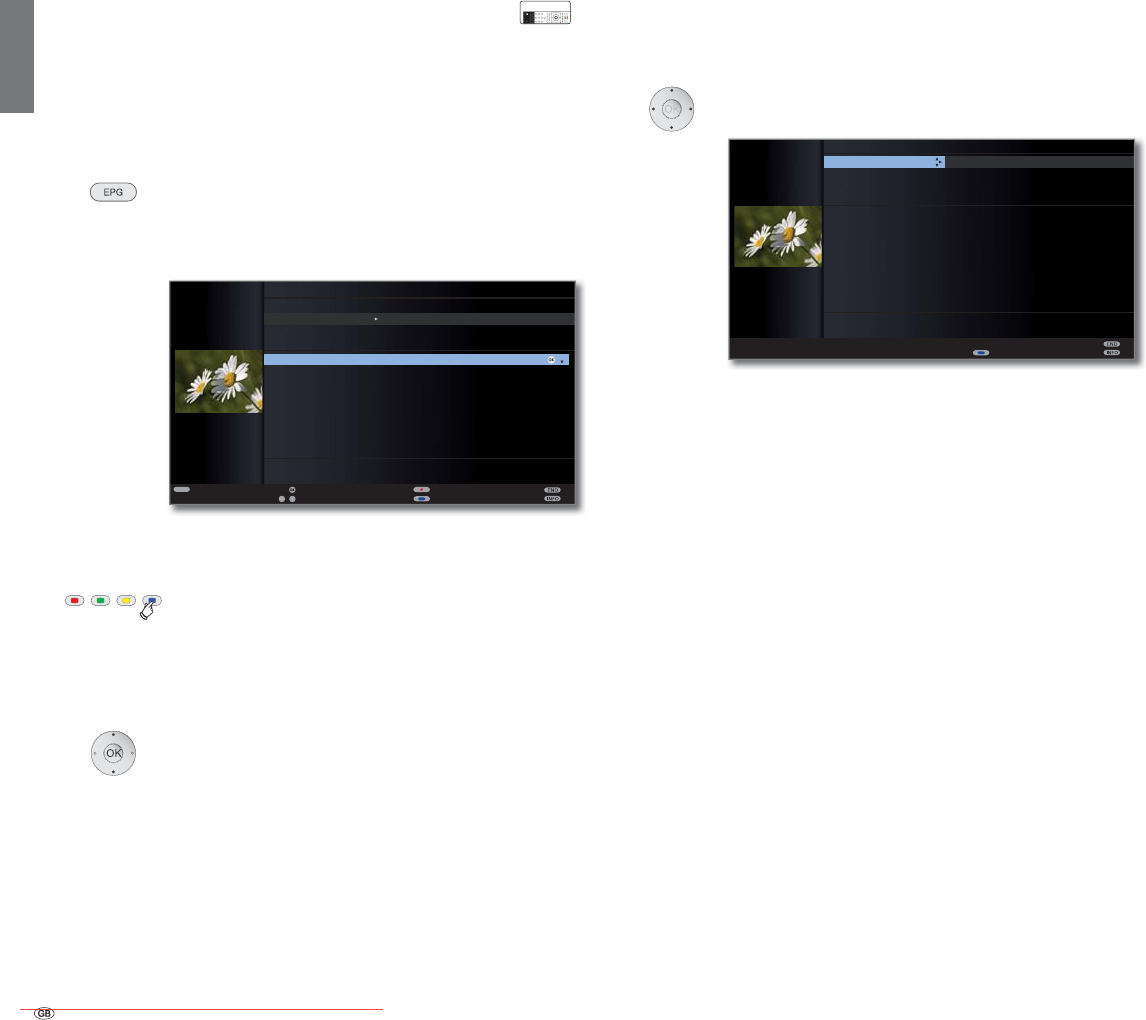
- 50
english
Adjusting the programme list
➠ The selection is at the top of the specifications,
if not, press the blue button.
Select Date, Time, Stations or Topics.
Select defaults within the respective line.
Example If you are searching for the next news, select today’s date,
17:00 for example for the time, all for station and News
for topics. Then you get a list of all news programmes
from 17.00 h onwards in the programme list below it.
The type of list of programmes in the programme list
depends on the setting of the sorting in the EPG menu
(page 51).
Time entry If the line Time is selected, then you can enter the time
after which the programmes will be displayed, via the
numeric buttons of the remote control. The broadcasts
are sorted according to the order of the station list within
the selected time window.
Stations If a favourites list has been selected, only the programmes
of stations from the favourites list are displayed in the
programme list. A single station can be selected with
“...”. The Select single station window is opened. After
selection, only programmes of the selected single station
are displayed.
Hint Before pressing the blue button to leave the upper selec-
tion lines, select one of the preceding lines. If you then
switch back to the programme list, you can change this
menu line with , without having to leave the pro-
gramme list. If you have marked Time, then you can enter
the time, after which the programmes will be displayed,
with the numeric buttons of the remote control.
Electronic Programme Guide – EPG
EPG stands for Electronic Programme Guide and provides you with
on-screen programme details. With the system, as with a printed pro-
gramme guide, you can learn about the current programme. In addition
programmes can be sorted according to certain topics, memorised, and
also recordings can be programmed.
Starting and ending EPG
EPG: Switch EPG on / off.
➠ EPG is only available for DVB stations.
➠ The first time you start EPG, an assistant will guide you
through the necessary presettings.
The display of the programme guide is divided into two
branches. The specifications in the upper section limit
the scope of the stations displayed in the lower section.
Blue button: Switches between the upper default lines
Date, ..., Topics and the lower programme list.
Switching and memorizing with the programme list
➠ You are in the lower programme list,
if not, press the blue button.
Select station.
OK View / Memorise.
View The programme is in progress. The TV set switches to the
marked programme.
Memorise The programme has not started yet and is memorised. A ۪
will appear in front of the station title. The TV will ask at the
beginning of a programme if it should change the channel
or switch on from the stand-by mode if the corresponding
option of the EPG menu is activated (see page 51).
➠ Programmes can also be noted by the timer overview
(see page 125).
OK
OK
az
-
P+
P–
TEXT
Recording
Select date, ..., topics
View
Select time
Detail
3DJHܬ
EPG (ELECTRONIC PROGRAMME GUIDE) Mon 01.03./16:05
Date
Time
Station
Topics
arte 15:57-16:59 Charmed - Zauberhafte Hexen
Das Erste 16:00-16:10 Tagesschau
ZDF 16:00-16:10 heute - in Europa
WDR Köln 16:00-16:15 WDR aktuell
Bayerisches... 16:00-16:05 Rundschau
hr-fernsehen 16:00-16:30 Schlemmerreise Spanien
MDR FERNS... 16:00-16:15 Hier ab vier
NDR FS HH 16:00-16:30 Tipps und Trends - Der Verbraucher...
SWR Fernse... 16:00-16:05 Baden-Württemberg aktuell
2 ZDF
&KDUPHG=DXEHUKDIWH+H[HQ۲
MON 01.03.
now until 17.00 17.00 18.00 19.00
all
all
P+
P–
Change to programme list
3DJHܬ
arte 15:57-16:59 Charmed - Zauberhafte Hexen
Das Erste 16:00-16:10 Tagesschau
ZDF 16:00-16:10 heute - in Europa
WDR Köln 16:00-16:15 WDR aktuell
Bayerisches... 16:00-16:05 Rundschau
hr-fernsehen 16:00-16:30 Schlemmerreise Spanien
MDR FERNS... 16:00-16:15 Hier ab vier
NDR FS HH 16:00-16:30 Tipps und Trends - Der Verbraucher...
SWR Fernse... 16:00-16:05 Baden-Württemberg aktuell
2 ZDF
EPG (ELECTRONIC PROGRAMME GUIDE) Mon 01.03./16:05
Mon 01.03.
Tue 02.03 Wed 03.03 Thu 04.03
now
all
all
&KDUPHG=DXEHUKDIWH+H[HQ۲
Date
Time
Station
Topics
Electronic Programme Guide
InterActive
Downloaded From TV-Manual.com Manuals
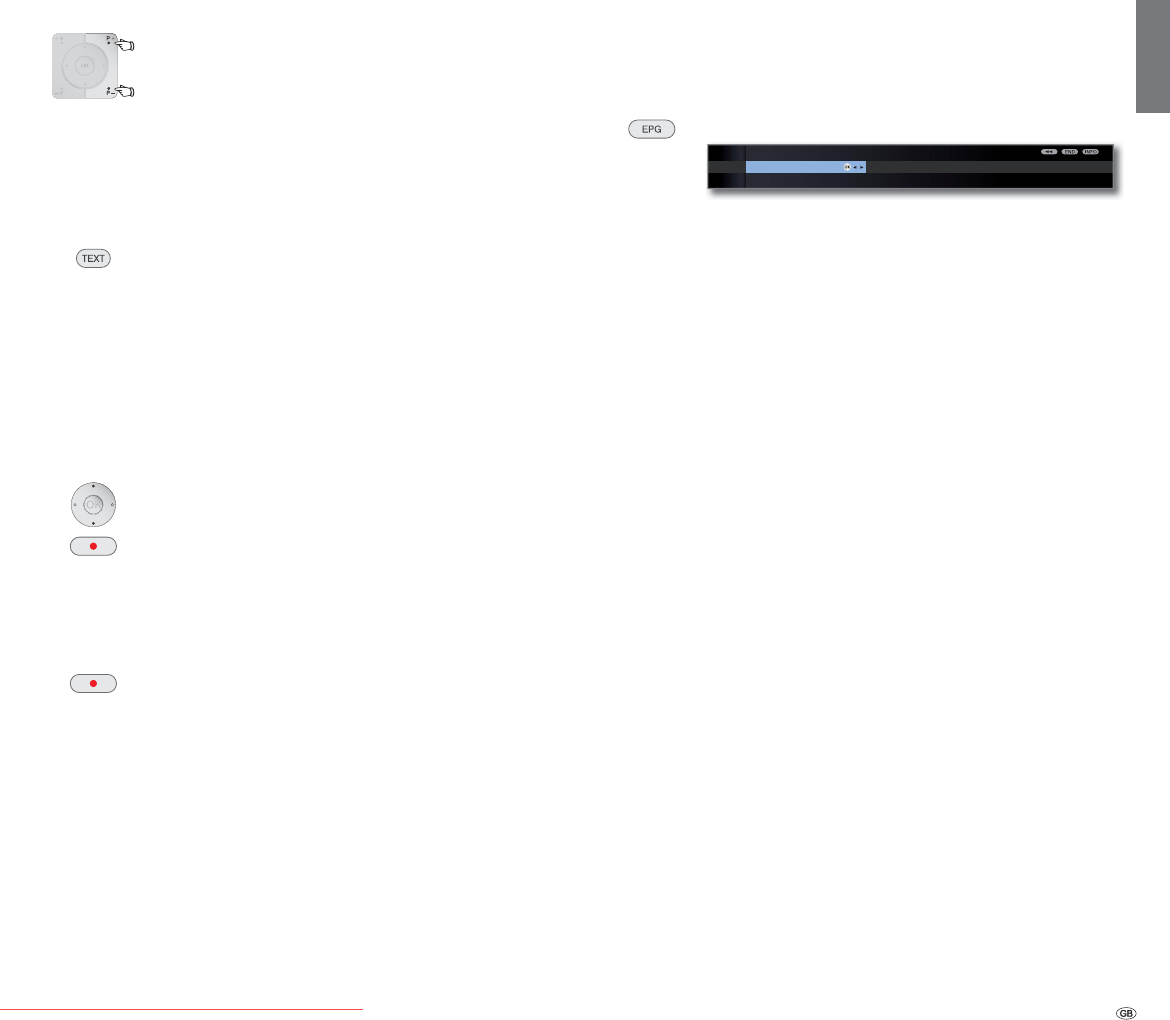
51 -
english
Configuring EPG
Start the EPG menu
➠ EPG mode is started,
if not, press the EPG button.
EPG: Call the EPG menu.
Explanations of setting possibilities in the EPG menu:
In the station selection you can determine for which
station in the programme guide information is to be
displayed. Programme information is only displayed for
stations with ۪ in the EPG list.
With the coloured buttons you can select or remove sta-
tions or only select the stations from the favourites lists.
Because of the large number of receivable DVB-S (1 sta-
tions you should restrict the station selection. This reduces
the data entry time and increases the clarity in the EPG.
Marking the stations according to reception ranges:
ۼ Digital terrestrial stations (DVB-T).
۽ Digital cable stations (DVB-C).
ۻ Digital satellite stations (DVB-S) (1.
Here you can switch the data entry for the electronic
programme guide (EPG) on and off.
If the data entry is switched on, your TV set tries to update
the database overnight (normally between 2 and 5 am)
or if required two minutes after switching to stand-by
mode. The TV set must be on stand-by for this and not
switched off at the mains switch.
The indicator on the TV set lights orange during data
entry in stand-by mode.
The data are also updated while you are watching the
EPG station.
When yes is set, the switched off TV switches on auto-
matically from the standby mode at the beginning of a
set programme. A screen message appears when switch-
ing on. If this is not confirmed within 5 minutes with the
OK button, the TV switches back off automatically for
safety reasons.
The programmes can be sorted either according to their
start times (chronologically) or according to stations (cor-
responding to station list).
Paging through the programme list
P+/P– Page backwards / forwards.
In the entries for Date and Time, you will see changes in
time as well as in date when paging. Scrolling in the
programme list is also possible when the selection is at
the top of the specifications.
Calling additional information about the programmes
➠ Brief information about many programmes is displayed
below the programme list of the broadcasts.
You can call detailed information with the TEXT button if
this function is offered by the TEXT icon in the lower left.
The symbol explanations are described on page 40.
Programming a recording for a recorder
➠ The selection is in the lower programme list,
if not, press the blue button.
➠ The displayed page of the programme list includes the
desired programme, otherwise browse to it or suitably
limit via the specifications in the lower section.
Mark the desired programme.
RECORD button: Timer data is called up.
Change or confirm timer data if necessary (see page 124,
“The direct way to record”).
Then a red dot will be displayed in front of this programme
as an identification.
RECORD button: Deletes the already programmed record-
ing of the red marked programme from the timer.
If the timer data have been transferred to an external
recorder, then the timer must also be deleted there.
Data capture Switch on TV when marked Sorting
EPG MENU
Station selection OK
Electronic Programme Guide
Station
selection
Data capture
Switch on TV
when marked
Sorting
(1 Equipment and upgrade options, see page 142.
Downloaded From TV-Manual.com Manuals
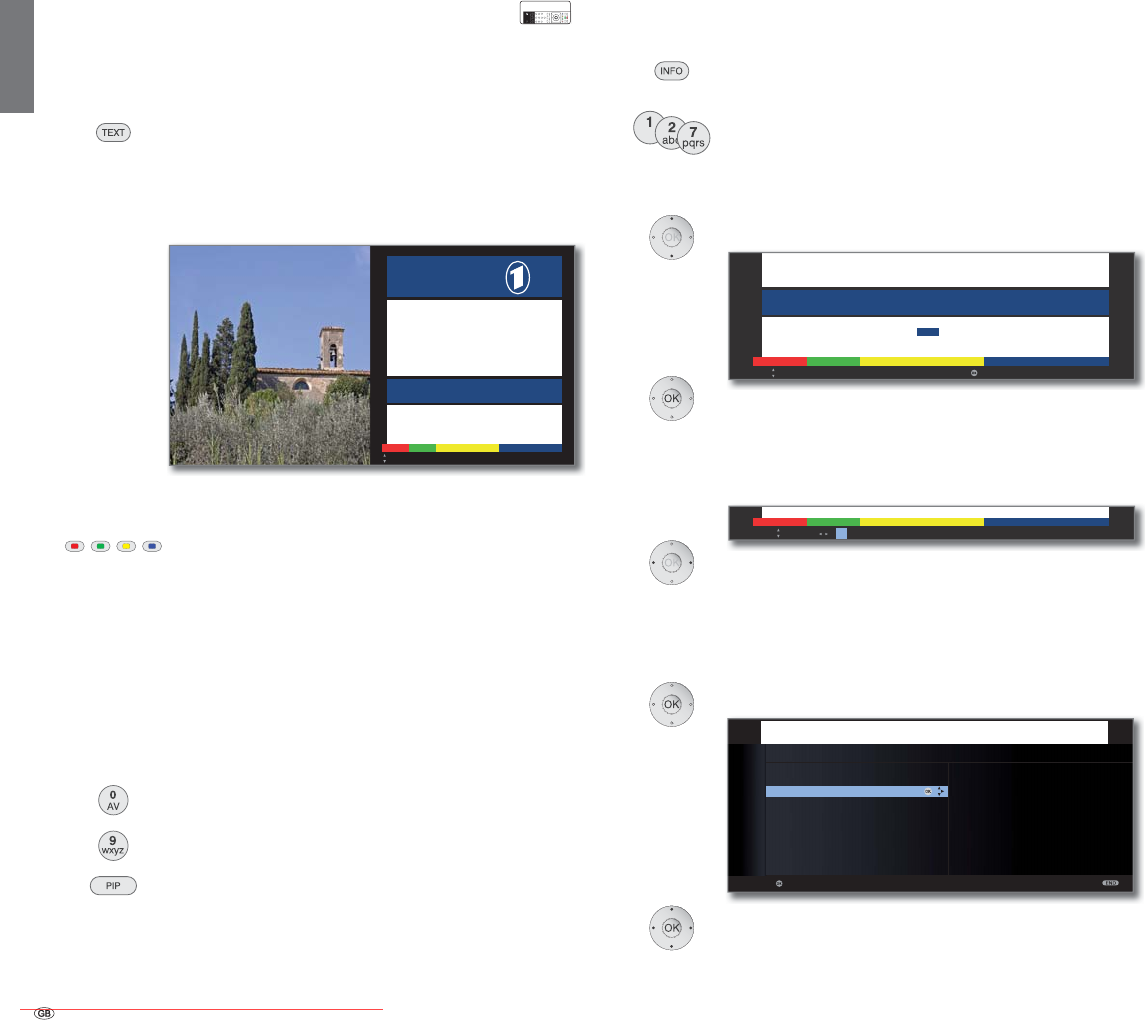
- 52
english
Additional page selection possibilities
1st possibility:
Call overview page 100.
2nd possibility:
Directly enter the page number.
3rd possibility:
➠ The page includes 3-digit page numbers.
Mark desired page number.
OK Call the page.
4th possibility:
➠ The page consists of several sub-pages (indicated by
the selection option on the last line).
Page through sub-pages.
Call TOP table
➠ The table can only be called for stations with the TOP
operating system.
OK Call TOP table.
Mark topic area,
select topic column,
select topic,
OK call the page.
Teletext
Your TV set supports the two operating systems TOP Text and FLOF.
Up to 2,000 pages are stored so that you have quick access .
Starting and ending Teletext
Switch Teletext on / off.
If HbbTV is offered by the channel, then the MediaText/
HbbTV text (1 opens up (see page 82).
In this case, pressing the TEXT button again opens the
“standard” teletext/videotext.
Page selection with the coloured buttons
Red button: Back to the previously viewed page.
Green button: On to next page.
Yellow button: To next topic.
Blue button: To next range of topics.
The coloured bars (for TOP) or the coloured text (for FLOF)
in the second last line indicate which coloured buttons you
can use to page through topic areas and topics.
Teletext page displays
0 AV: Stop self changing pages.
9: Enlarge page (press several times).
PIP: Show / hide TV picture (full screen/split screen).
OK
Tagesschau . . . . 110/112 Kultur. . . . . . . . . . 500
Wetter. . . . . . . . . . 170 Gesellschaft . . . . . 530
Sport. . . . . . . . . . . 200/600 Lotto/Toto. . . . . . . 666
TV Guide . . . . . . . 300/400 Wirtschaft. . . . . . . 700
Page selection View
Tennis: Auftaktmatch wurde abgebrochen . . . . . . . 204
Formel 1: Neues Reglement für Motoren. . . . . . . . . 213
Fussball: Heimsieg für den Meister . . . . . . . . . . . . 204
– +
Inhalt tagesschau
13:00 ARD-Mittagsmagazin . . . . . . . . . . . . . . . . . 312
14:00 Tagesschau
Tagesschau . . . 110/112 Kultur . . . . . . . . . . 500
Wetter. . . . . . . . . . . 170 Gesellschaft . . . . . 530
Sport. . . . . . . . . 200/600 Lotto/Toto. . . . . . . 666
TV Guide. . . . . . 300/400 Wirtschaft. . . . . . . 700
Politik: Die neuen Gesetzesentwürfe. . . . . . . . . . 120
Wird auch der Nahverkehr teurer?. . . . . . . . . . . . 121
Australien: Keine Zugeständnisse . . . . . . . . . . . 122
Tote bei Zugunglück in Schweden . . . . . . . . . . . 532
Tennis: Auftaktmatch wurde abgebrochen . . . 204
Formel 1: Neues Reglement für Motoren. . . . . . . 213
Fussball: Heimsieg für den Meister . . . . . . . . . . . 204
100 100 ARDtext Do 07.09.06 14:14:42
ARD
Text
– +
Inhalt tagesschau
13:00 ARD-Mittagsmagazin . . . . . . . . . . . . . . . . 312
14:00 Tagesschau
Page selection
Tagesschau . . . . 110/112 Kultur. . . . . . . . . . 500
Wetter. . . . . . . . . . 170 Gesellschaft . . . . . 530
Sport. . . . . . . . . . . 200/600 Lotto/Toto. . . . . . . 666
TV Guide . . . . . . . 300/400 Wirtschaft. . . . . . . 700
Seitenauswahl
Politik: Die neuen Gesetzesentwürfe . . . . . . . . . . . . 120
Wird auch der Nahverkehr teurer? . . . . . . . . . . . . . . 121
Australien: Keine Zugeständnisse . . . . . . . . . . . . . . 122
Tote bei Zugunglück in Schweden . . . . . . . . . . . . . 532
Tennis: Auftaktmatch wurde abgebrochen . . . . . . . 204
Formel 1: Neues Reglement für Motoren. . . . . . . . . 213
Fussball: Heimsieg für den Meister . . . . . . . . . . . . 204
– +
Inhalt tagesschau
13:00 ARD-Mittagsmagazin . . . . . . . . . . . . . . . . . 312
14:00 Tagesschau
OK
OK
TOP TABLE
ARD Text
tagesschau
Wetter
Sport 1
Fußball
TV Guide
ARD heute
ARD morgen
Kultur
weitere ...
Wetter
Vorhersage
Staedte
Ballungsr.
Reise
View
p
TV Guide . . . . . . . 300/400 Wirtschaft. . . . . . . 700
– +
Inhalt tagesschau
1 2 3 4 5
Teletext
InterActive
(1 Depending on the settings selected.
Downloaded From TV-Manual.com Manuals
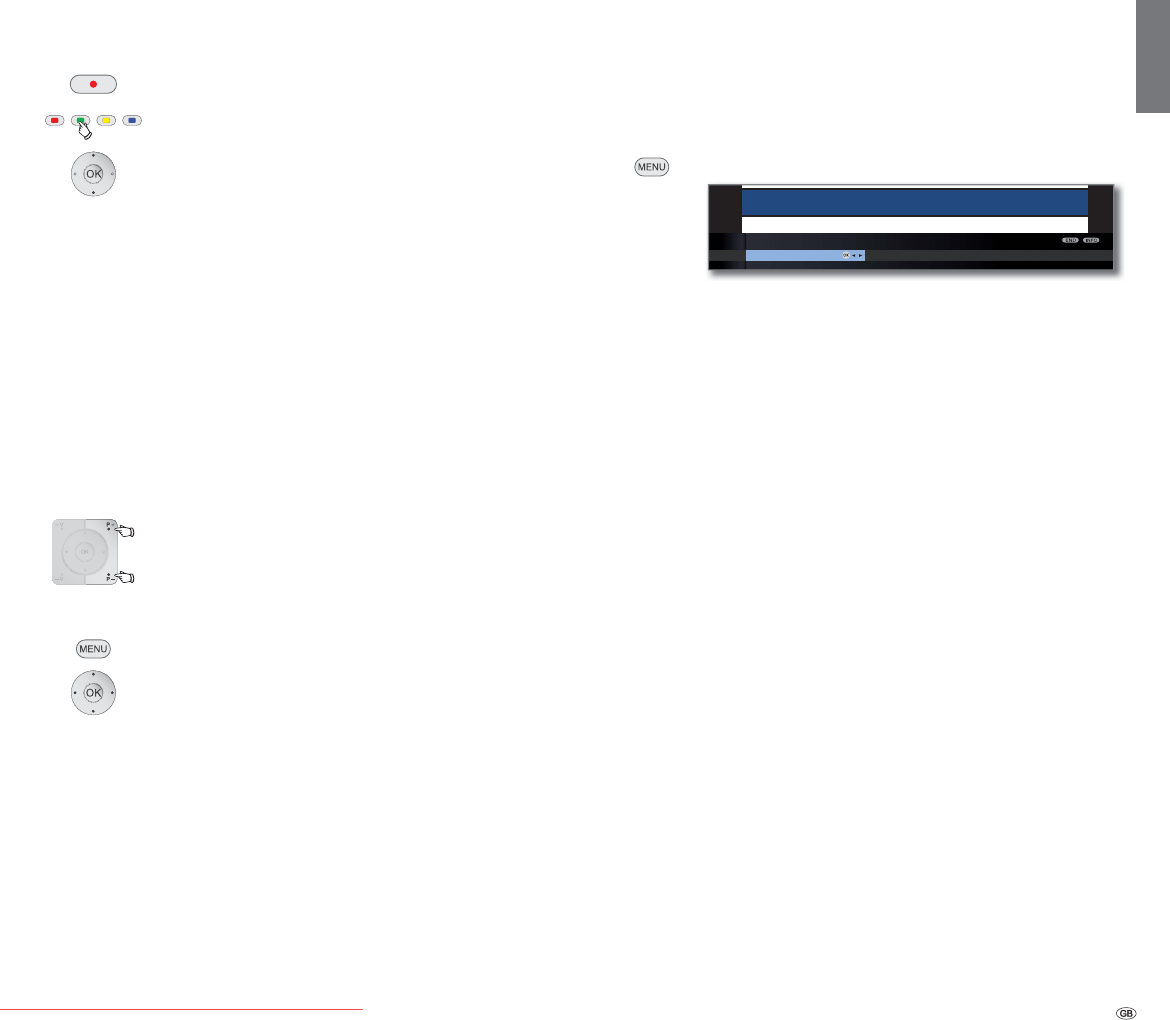
53 -
english
Programming timer recordings via Teletext
➠ Teletext is started,
if not, press the TEXT button.
Call the programme pages of the current station.
Green button: Go to the appropriate page.
Select the desired programme,
OK to programme the recording.
Change the appropriate recording data in the following
menu Timer data if necessary (see also page 124, “The
direct way to record”).
OK Confirm.
Changing teletext station
You can change the teletext provider independently of the DVB station
you are watching.
➠ The function is only available if two reception channels are available in
the TV set (see Equipment variants on page 142). The teletext provider
can only be changed if a DVB station was selected as a TV picture
➠ Teletext is started, if not, press the TEXT button.
P+/P– Select next/previous station.
The TV set switches through all the stations in
the Station list (see page 32) or the current
Favourites list (see page 33) one after another.
Or:
MENU: Call Teletext menu.
Select Station selection,
OK call station.
Select station as in the station list (page 32),
OK call station.
Teletext menu
In the Teletext menu you can activate messages, reveal pages and con-
figure the teletext with the Settings menu function.
Starting the Teletext menu
➠ Teletext is started, if not, press the TEXT button.
MENU: Call the Teletext menu.
Explanations of the Teletext menu functions:
You can select the teletext of a different station here (see
left hand column).
The current page is hidden when you activate Newsflash.
A symbol at the top left indicates that the function is ac-
tive. If the contents of the message are updated and it is
a small newsflash, this is displayed in the TV picture. If it
is a full screen page, the symbol is displayed in blue and
the page can be called with the OK button.
Shows concealed information, e.g. for quiz questions or
VPS pages in the programme preview pages.
A wizard for recording via teletext helps to programme
an external recorder or the integrated Digital Recorder,
see also left column.
Other Teletext menu functions:
Input of the first teletext programme preview page if this
deviates from the factory setting (page 301).
Input of the teletext subtitle pages for every station if this
deviates from the factory setting (page 150).
Define up to six teletext pages which can be opened later
from a list in the menu Teletext functions ט Personal text
pages (in TV mode press green button, see page 40).
Teletext character set can be switched to other languages
(Russian, Greek, Polish and Turkish).
Tagesschau . . . . 110/112 Kultur. . . . . . . . . . 500
Wetter. . . . . . . . . . 170 Gesellschaft . . . . . 530
Sport. . . . . . . . . . . 200/600 Lotto/Toto. . . . . . . 666
TV Guide . . . . . . . 300/400 Wirtschaft. . . . . . . 700
Sit hl
– +
Inhalt tagesschau
13:00 ARD-Mittagsmagazin . . . . . . . . . . . . . . . . . 312
14:00 Tagesschau
TELETEXT MENU
Station selection Newsflash Reveal Recording wizard Settings
OK
Teletext
Station
selection
Newsflash
Reveal
Recording
wizard
Settings
Preview
pages
Sub-title
pages
Personal
text pages
Character set
Downloaded From TV-Manual.com Manuals
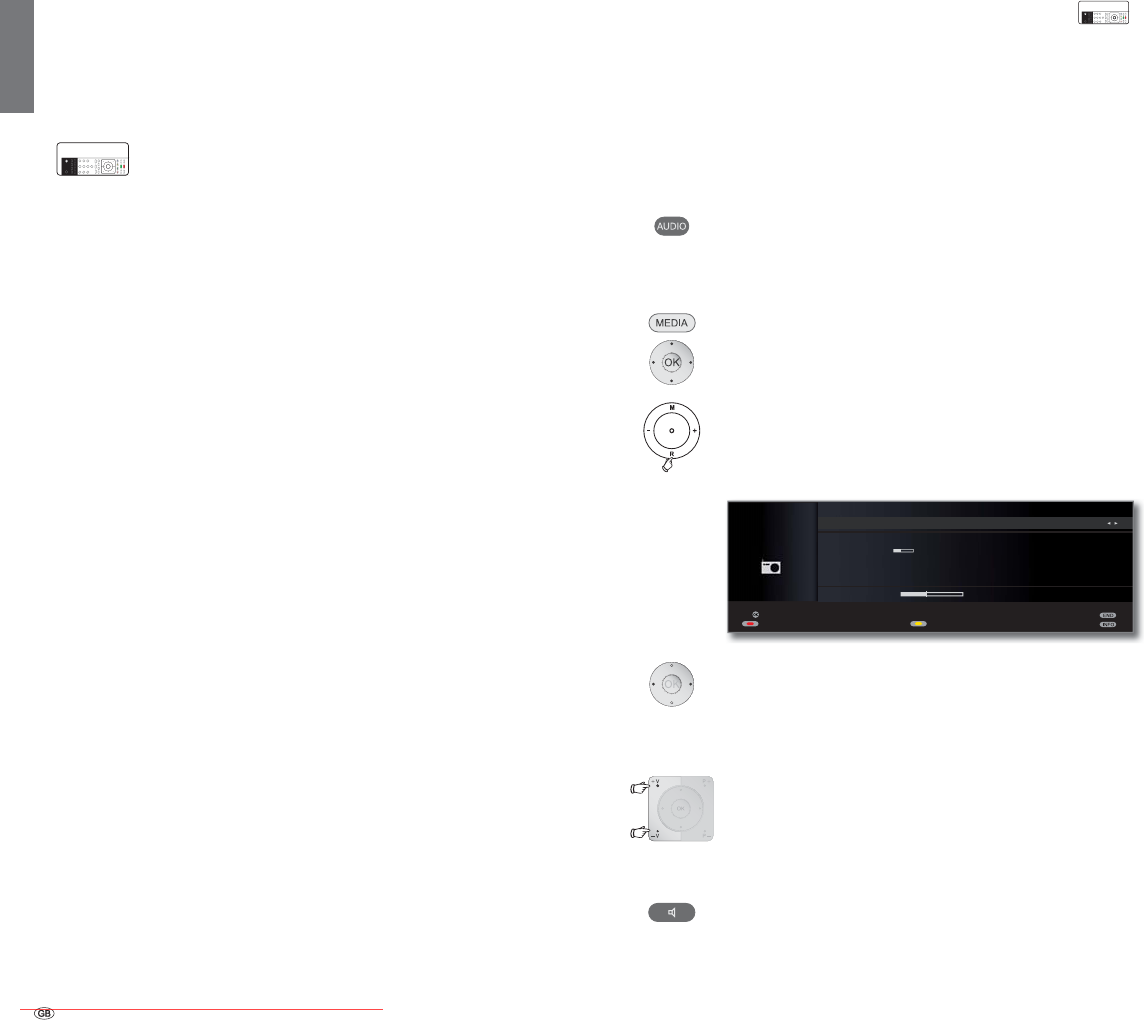
- 54
english
Interactive data services
( Digital teletext/MHEG-5)
In some countries, the stations also transmit interactive data services with
their programmes (e.g. Digital teletext/MHEG-5), whereby the functions
of individual keys are not available or only so to a limited extent.
The symbol indicates which functions can differ for a loaded
application.
In the UK or Ireland, the teletext for DVB-T stations is transmitted as per
the MHEG-5 standard. It contains text, graphics, functions and links.
➠ Available in e.g., UK, Ireland, New Zealand.
➠
Digital teletext is not available when DVB subtitles are being displayed.
The operation of these menus depends on the particular provider. Nor-
mally after a station is changed, the provider broadcasting the digital
teletext makes an introductory offer for this service on the screen via
menu selection. Follow these notes.
If no message appears telling you how to switch to digital teletext after
switching to another station, press the TEXT key. If a selection for DVB
subtitles is available, this item must be hidden before.
Depending on the provider’s respective offer, you can use the
buttons and the OK button, the coloured buttons, the END/
TEXT button and sometimes even the numeric buttons.
If you want to close the digital teletext, just select a different station using
the P+/P– buttons or follow the menu prompts on the screen.
Radio mode (DVB radio)
The TV set can receive digital radio stations over DVB or over the internet
(see page 56).
In addition you can play the sound from an external device through the
TV set via the audio/AV inputs of the TV set (see page 55).
➠ The AUDIO button has been preset for radio operation in the factory.
To change the configuration see page 127.
Radio mode on
Press AUDIO button on the remote control.
The radio mode that was last selected will be opened
(DVB or internet radio).
Or:
MEDIA: Call MediaPortal.
Select DVB radio,
OK call.
Or:
R on the operating ring on the TV set.
You see and information window about the currently set
station.
If a connection to the internet is already established:
Change between DVB radio and Internet radio (see
page 56).
Setting the volume
V+/V– Volume louder / quieter.
Other sound settings are the same as for the volume
setting in TV mode (see page 34).
Sound mode
Call Sound mode.
Other settings as for TV mode (see page 34).
Digital radioTeletext
InterActive
InterActive
OK
RADIO DIGITAL 12:45
DVB radio
'/) 6WHUHR ܃
12:10 - 13:30 Informationen am Mittag
Berichte, Interviews, Musik
Volume 30
Previous station
Station list
Screen off/on
Downloaded From TV-Manual.com Manuals
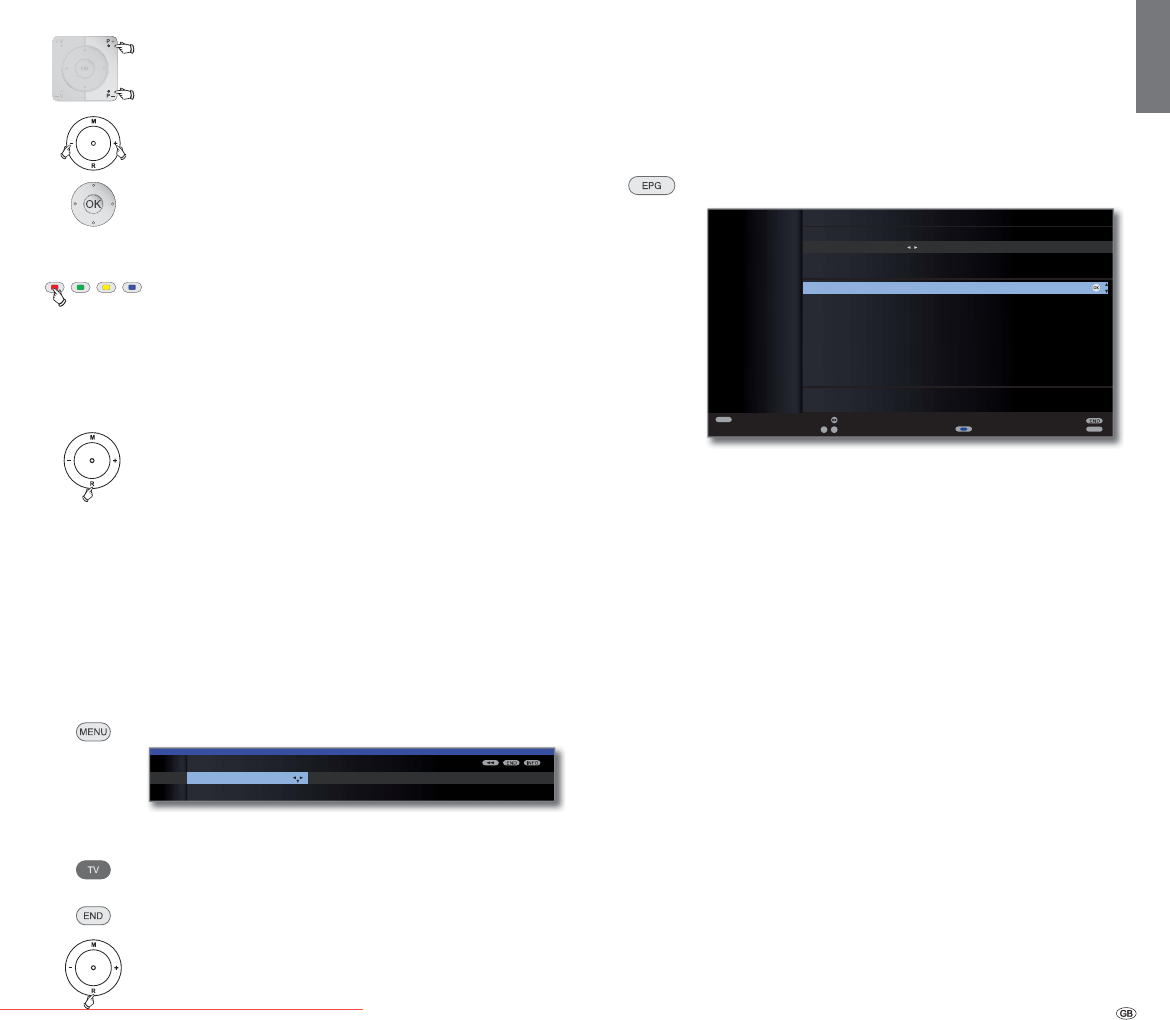
55 -
english
Station switching (DVB radio)
➠ The selection of the stations / favourites is the same as
the procedure in TV mode (see pages 32 and 33).
Press P+/P– or the numeric buttons of the remote control.
Or:
+ / – on the TV set operating ring.
Or:
OK Call station list / favourites.
Switching the screen on/off
Red button: Switch off the screen.
Switching off the screen reduces the power consumption
of the TV set.
The LED display on the TV set (see page 10) changes
from green to orange.
Switch on the screen with the remote control:
Red button, AUDIO button or OK button (station list is
opened).
Switch on the screen on the TV set:
Press R on the TV set operating ring.
Radio menu
In the Radio menu, you can set the sound, search for and store radio
stations (automatically or manually), change stations and set switch off/
alarm functions.
The settings are made as described in TV mode.
Call Radio menu
➠ Radio mode switched on,
if not, see page 54.
MENU: Call the Radio menu.
Switch off radio mode
Press TV button
Or:
END button on the remote control.
Or:
R on the operating ring on the TV set.
EPG – Electronic Programme Guide (radio)
You can also use an electronic programme guide for the DVB radio sta-
tions if the radio stations provide programme information.
Starting and ending EPG
➠ Radio mode switched on,
if not, see page 54.
EPG: Switch EPG on / off.
➠ The EPG functions in radio mode are the same as in
TV mode. Read from page 50 onwards for further
information.
EPG configuration (radio)
The EPG settings in Radio mode correspond to those in TV mode (see
page 51). If the EPG menu is called up in Radio mode, only radio sta-
tions will be included in the station selection.
As already indicated under EPG configuration in TV mode (see page
51), we recommend omitting all radio stations unimportant to you
in the EPG station selection for Radio mode (do not highlight with ۪).
This gives you a clearer overview in the EPG, as there are a large number
of stations for the signal source DVB-S in particular.
The collection of EPG data can also be shorted significantly by this.
Station Timer functions
RADIO MENU
Sound
Sound mode ...
Digital radio
OK
09
-
P+
P–
TEXT
MENU
Bayern 1 16:00-16:06 Nachrichten
Bayern 2 16:00-16:03 Nachrichten
BAYERN 3 16:00-16:04 Nachrichten
BAYERN 4 K... 16:00-16:05 Nachrichten
B5 aktuell 16:00-16:05 Nachrichten
hr1 16:00-16:05 Nachrichten
hr2 16:00-16:05 Nachrichten
hr3 16:00-16:05 Nachrichten
hr4 16:00-16:05 Nachrichten
EPG (Electronic Programme Guide) Mon 31.07./16:05
Date
Time
Station
Topics
MON 31.07.
now until 17.00 17.00 18.00 19.00
all
all
Nachrichten - Welt, Deutschland, Bayern
OK
Select date, ..., topics
Listen
Select time
Detail
3DJHܬ
Downloaded From TV-Manual.com Manuals
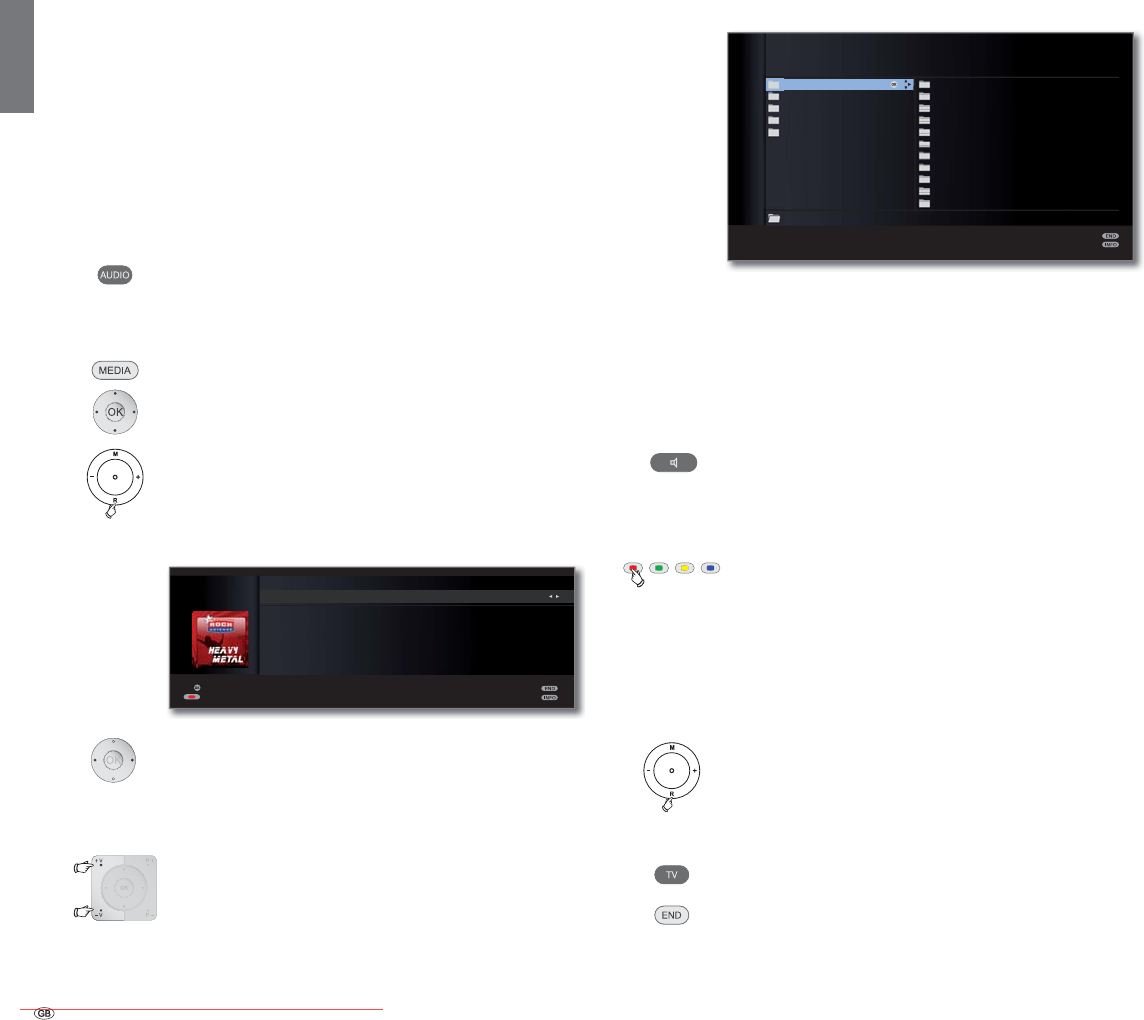
- 56
english
Radio mode (Internet radio)
The TV set can receive digital radio stations over DVB (see page 54)
or over the internet.
In addition you can play the sound from an external device through the
TV set via the audio/AV inputs of the TV set (see page 55).
➠ The AUDIO button has been preset for radio operation in the factory.
To change the configuration see page 127.
➠ Internet radio is only accessible if a connection to the internet has
been established.
Radio mode on
Press AUDIO button on the remote control.
The radio mode that was last selected will be opened
(DVB or internet radio).
Or:
MEDIA: Call MediaPortal.
Select Internet radio,
OK call.
Or:
R on the operating ring on the TV set.
You see and information window about the currently set
station.The station overview appears the first time you call
up Internet radio (see right column).
If a connection to the internet is already established:
Change between DVB radio and Internet radio (see
page 54).
Setting the volume
V+/V– Volume louder / quieter.
Other sound settings are the same as for the volume
setting in TV mode (see page 34).
Station list (internet radio)
➠ When playing Internet radio stations, the folder names
specified by the provider vTuner are adopted for display
on the TV.
For further operation, see General navigation in the media
overview on page69.
Sound mode
Call Sound mode.
Other settings as for TV mode (see page 34).
Switching the screen on/off
Red button: Switch off the screen.
Switching off the screen reduces the power consumption
of the TV set.
The LED display on the TV set (see page 10) changes
from green to orange.
Switch on the screen with the remote control:
Red button, AUDIO button or OK button (station list is
opened).
Switch on the screen on the TV set:
Press R on the TV set operating ring.
Switch off radio mode
Press TV button or
END button on the remote control.
OK
:/
:
Local Germany
by Location
by Genre
Popular stations
New stations
All stations
Highlighted stations
Alternative
Ambient
Blues
Business news
Celtic
Christian Contemporary
Classic Rock
Classical
College
INTERNET RADIO
Elements 5
OK
ܕ
RADIO DIGITAL
Internet radio
5RFN$QWHQQH+HDY\0HWDO 6WHUHR ܃
Artist: Judas Priest - Living after midnight
3OD\WLPH
Station list
Screen off/on
Digital radio
Downloaded From TV-Manual.com Manuals
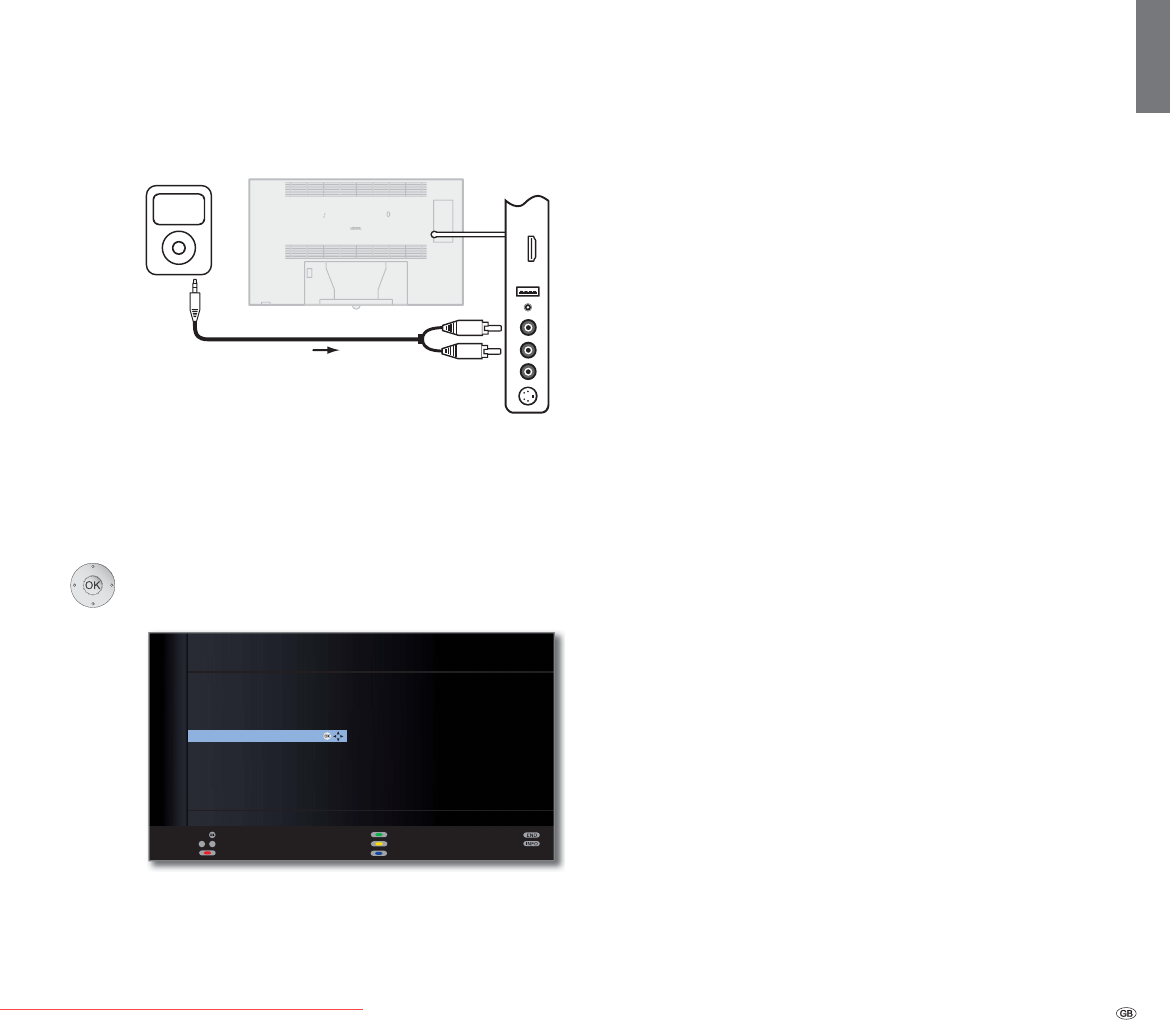
57 -
english
Audio playback from external devices
You can play the sound of external AV devices (e.g. MP3 players, DVD
players) in radio mode.
Connecting an external appliance (e.g. MP3 player)
Connect the output (jack) of the MP3 player to the cinch audio in sockets
L/R (white/red) of the TV set.
Select AV input
➠ Radio mode switched on,
if not, see page 54.
OK Open station list.
The AV inputs are listed before the first radio station in
a numerically sorted list.
➠ The selection of the AV inputs is the same as in TV
mode (see page 33).
Start playback on the external device after selecting the
AV input.
OK
OK
az
-
STATION LIST
PIP scan
Change stations
Sort alphabetically
AUDIO DIGITAL IN
AUDIO IN
HDMI 3
HDMI 2
HDMI 1
AVS
AV
%D\HUQ ۽
%D\HUQ ۽
%D\HUQ ۽
'.8/785 ۽
Switch to ...
Select station
Favourites
%DNWXHOO ۽
KU ۽
KU ۽
KU ۽
KU ۽
%59HUNHKU ۽
%SOXV ۽
0'56SXWQLN ۽
-803 ۽
1'5۽
1RUGZHVWUDGLR ۽
1RUGZHVWUDGLR ۽
TV set
MP3 player
AUDIO IN L/R
Connection example of an MP3 player
Digital radio
Downloaded From TV-Manual.com Manuals
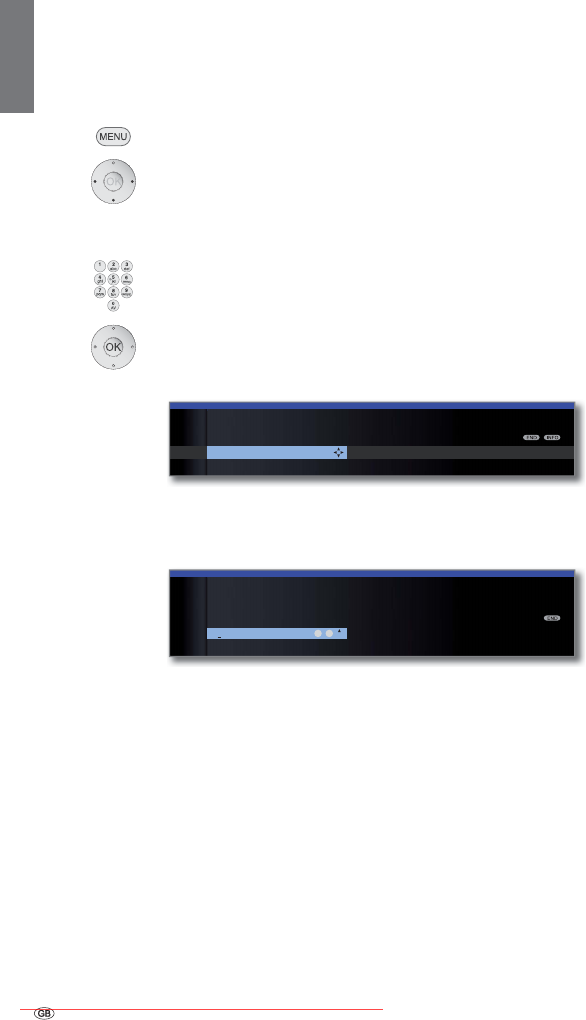
- 58
english
Parental lock
You can select and set various security options to prevent unauthorised use
of the TV set and to protect your children from unsuitable programmes.
Defining the access code ( PIN)
MENU: Call TV menu.
Select Settings,
go to the menu line below.
Select Parental lock,
go to the menu line below.
Define a four digit access code (PIN) the first time
you open it. The numbers appear in plain text. Note
the access code (PIN) well.
OK Confirm the access code (PIN).
The Parental lock menu is opened.
The four-digit access code (PIN) must be entered when
the parental lock is opened in future. It appears encrypted
(****) when entering for security reasons.
Code number
The code number cancels all entered PINs. It can be used for example if
you have forgotten your PIN. You will find a note about the code number
on page 145. Remove this from the manual and keep it in a safe place.
Explanations of setting possibilities in the Parental lock menu:
The TV set is locked immediately the menu is exited. All
programmes can then only be watched after entering the
access code. The lock can be activated both Immediately
and for a Daily defined period.
The lock remains active until it is switched off in the menu.
You can lock / unlock individual or all of the stations in
the station list specifically.
The lock remains active until it is switched off in the menu.
Some DVB stations also broadcast an age classification.
If the age set here is below the broadcast age limit, the
programme can only be watched after entering the ac-
cess code.
You can change your access code at any time. Enter the
new access code in place of the old one.
All set parental locks (locked stations, age-dependent
locks, locked films in the DR archive) are cancelled. The
current secret code is deleted. When the parental lock is
reactivated all the previous parental locks are set again
automatically.
All currently set parental locks are finally cancelled. The
secret code is deleted.
Protection of minors for CI Plus programmes
Youth-protected broadcasts of programme providers with CI Plus
encoding possibly require you to enter the secret number (PIN) of the
CA module.
We recommend selecting the secret number of the TV set according to
the secret number of the CA module, since the secret number of the CA
module cannot be changed. This means that you must only remember
one secret number.
Lock single stations Age-related lock
TV MENU
Settings
Parental lock
Lock all stations
Immediately ...
TV MENU
Settings
Parental lock
Access code
****
Please enter PIN
09
-
Other settings
Lock all
stations
Lock single
stations
Age-related
lock
Change
access code
Deactivate
Reset
Downloaded From TV-Manual.com Manuals
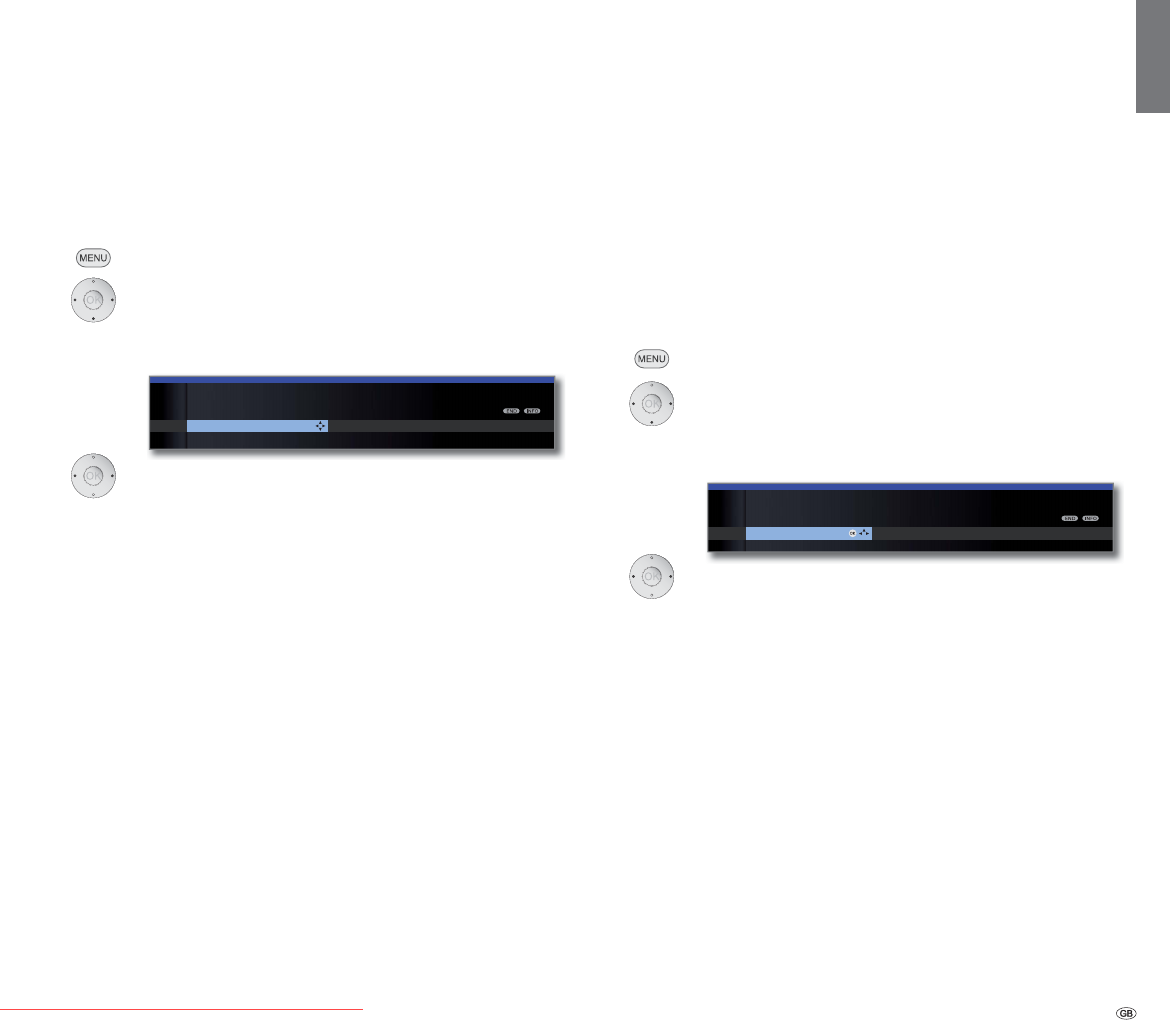
59 -
english
Timer functions
This menu offers you convenient alarm services. Programmed alarms are
also active when the TV set has been switched off to standby.
If the TV set switches on from the standby mode by alarm, a screen
message appears. If this is not confirmed within 5 minutes with the OK
button, the TV switches back off automatically for safety reasons.
The TV set can also be switched off automatically at certain times. A screen
warning appears one minute before automatic switch off. The automatic
switch off can be interrupted by pressing any button.
Call Timer functions
MENU: Call TV menu.
Select Settings,
go to the menu line below.
Select Timer functions,
go to the menu line below.
Select the desired setting.
Explanations of setting possibilities in the Timer functions menu:
The set switches to the standby mode automatically at
the specified time.
If a time is specified which has already passed on the
same day, the set switches off at this time the next day.
The set regularly switches to the standby mode automati-
cally every day at the specified time.
The set alerts you once today at the specified time.
If a time was specified which has already passed on the
same day, the alarm is saved for the next day.
The set regularly alerts you from Monday to Friday at
the set time.
The set alerts you regularly every Saturday at the speci-
fied time.
The set alerts you regularly every Sunday at the speci-
fied time.
Explanations of setting possibilities in the Timer functions menu:
Specify whether the TV set switches on in the event of an
alarm from the standby mode in TV or radio mode with
the respectively last active station.
Set the desired volume of the alarm tone. The alarm
tone is emitted as a continuous tone as a guide during
the setting.
Language
Specify the language for all menus in the TV set in the language menu.
The language for the DVB subtitles and the film language can be set for
DVB programmes.
Call language
MENU: Call TV menu.
Select Settings,
go to the menu line below.
Select Language,
go to the menu line below.
Select the desired setting.
Explanations of setting possibilities in the Language menu:
You can change the menu language here. The menu lan-
guage can be changed with the index (siehe Seite 17).
If subtitles are provided by the DVB station, you can set
your desired language in advance here. If this is included
in the range of languages of the station, it will be shown
automatically.
You can also specify an alternative language under this
menu item, in case your chosen language is not offered
by the station
Specify your desired film language in advance here.
If this is included in the range of languages of the station,
it will be shown automatically.
You can also specify an alternative language under this
menu item, in case your chosen language is not offered
by the station.
Switch off daily One-time alarm Wake up M
o
TV MENU
Settings
Timer functions
Switch off once
no ...
Subtitle (DVB) Audio (DVB)
TV MENU
Settings
Language
Menu language OK
Other settings
Switch off
once
Switch off
daily
One-time
alarm
Wake up
Mon-Fri
Wake up Sat
Wake up
Sun
Wake up
with
Wake up
signal
volume
Menu
language
Subtitle (DVB)
Audio (DVB)
Downloaded From TV-Manual.com Manuals
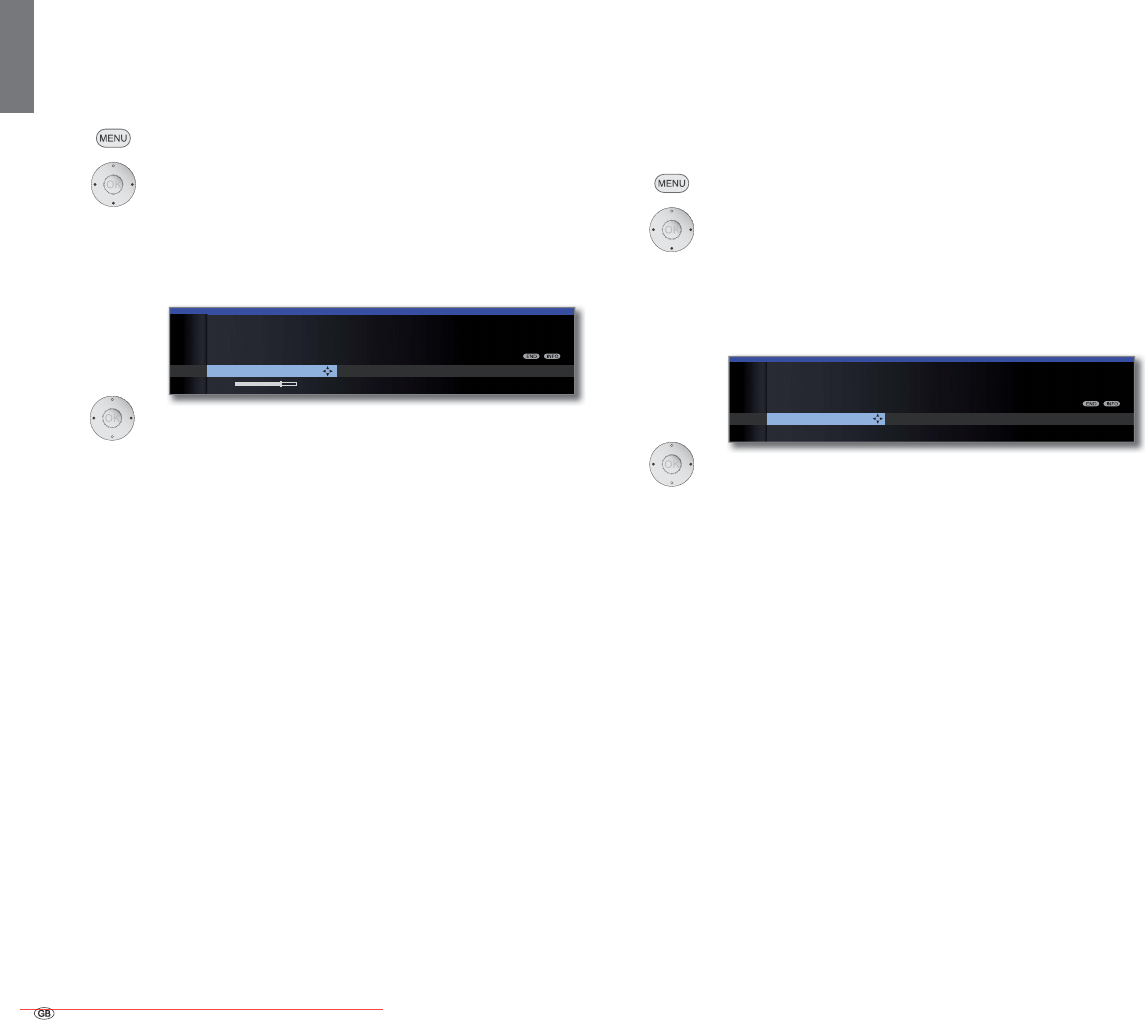
- 60
english
On-screen displays
You can select different settings in this menu which affect the on-screen
displays.
Call On-screen displays
MENU: Call TV menu.
Select Settings,
go to the menu line below.
Select Miscellaneous,
go to the menu line below.
Select On-screen displays,
go to the menu line below.
Select the desired setting.
Explanations of setting possibilities in the On-screen displays menu:
Here you set the duration of the display, e.g. for the
volume or the station display when changing stations.
The duration can be set between 2 and 9 seconds.
You can select between an upper and a lower display posi-
tion so that other displays (subtitles) are not concealed.
Here you set whether or not the change in the volume
should also be displayed visually on the screen.
Select yes here if you want to be able to see the additional
help permanently in the upper part of the screen while
navigating the menu. Also see page 17 for further
information.
The time can be displayed permanently with this menu
item or by pressing the button twice in quick succession
(see also page 41). It is always visible as long as no
other display is made.
If you switch to an HDMI programme place to which
a Digital Link HD-capable device is connected (see also
page 115), a reference to the adapted function of the
remote control always appears when yes is set.
Time and date
If you receive a station with teletext after switching on the TV, the time
and date are recorded automatically. The date may have to be entered
manually for some stations.
Enter the time and date manually if you receive station without teletext.
Call Time and date
MENU: Call TV menu.
Select Settings,
go to the menu line below.
Select Miscellaneous,
go to the menu line below.
Select Time and date,
go to the menu line below.
Select the desired setting.
Explanations of setting possibilities in the Time and date menu:
➠ If a definite time has been identified by the TV set
(dependent on the channel), certain menu items may
not be available.
Enter the time (00:00 to 23:59) with the numeric buttons
of the remote control.
The current time at the Greenwich Meridian 0 is to be
understood as world time. The time shift in relation to
this time must be given in hours (–11 to +13) (with the
buttonsor the numeric buttons on the remote con-
trol). Summer time is ignored.
Enter the date (day.month.year) with the numeric buttons
on the remote control.
Enter the date on which the time is switched over to
summer time if it deviates from the automatically cal-
culated date.
Enter the date on which the summer time ends if it devi-
ates from the automatically calculated date.
Deviation from Universal Time Date Beginning of
TV MENU
Settings
Miscellaneous
Time and date
Time
14:32:21
On-screen display position Volume Automat
i
TV MENU
Settings
Miscellaneous
On-screen displays
On-screen display time
7 s
Other settings
On-screen
display time
On-screen
display position
Volume
Automatic
info
Permanent
clock display
Automatic
hint after
switch to
HDMI
Time
Deviation from
Universal Time
Date
Beginning of
daylight-saving
time
End of
daylight-saving
time
Downloaded From TV-Manual.com Manuals
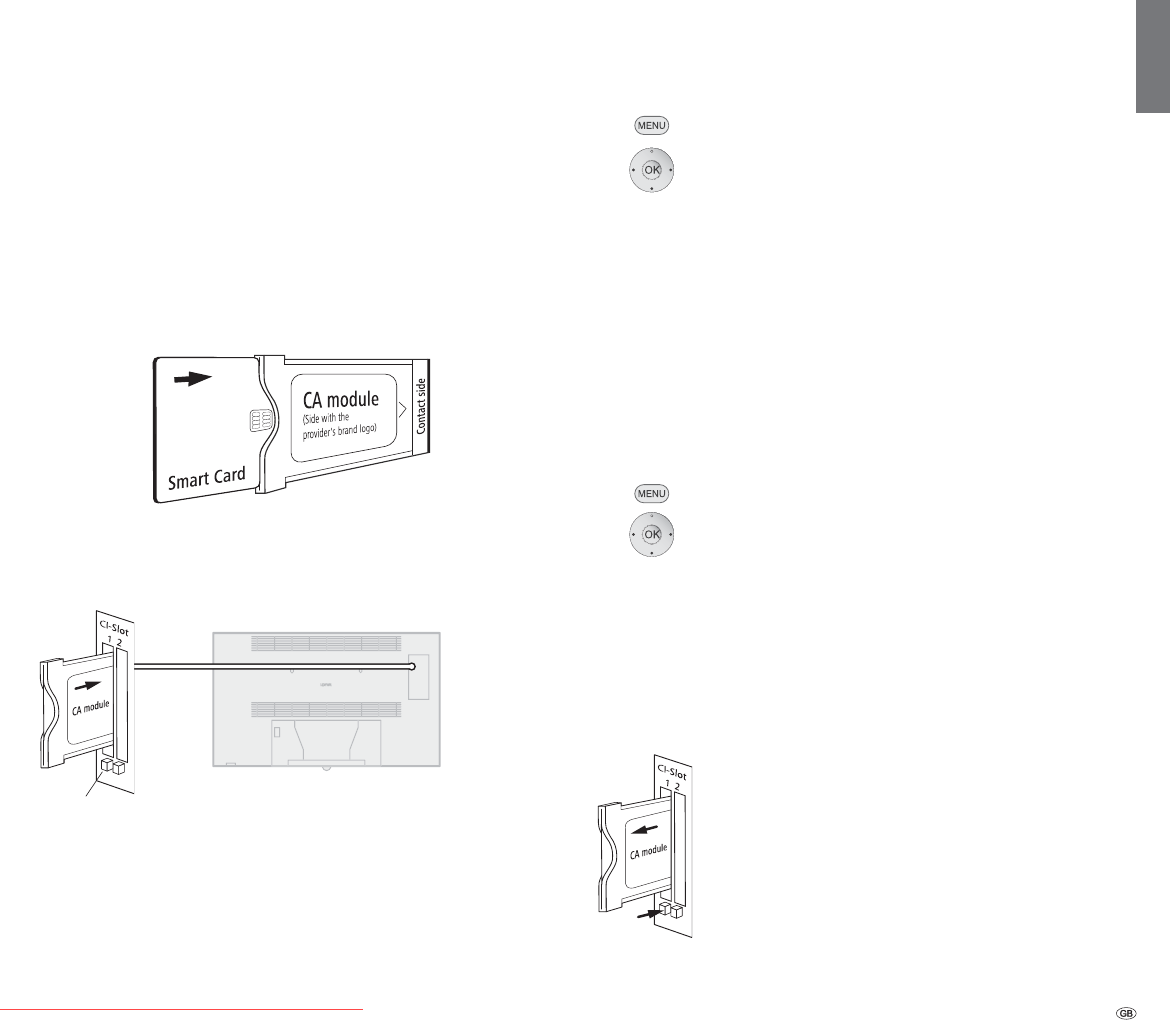
61 -
english
Conditional Access module (CA module)
In order to receive coded digital stations, a Conditional Access module
( CA module) and a Smart Card must be inserted in the CI slot of your TV
set (see page 11).
The CA module and the Smart Card are not part of the TV set’s scope
of delivery. They are usually available from your dealer. Loewe does not
provide any guarantee for the functioning of the CA module.
The TV set must first recognise and set up the CA module during initial
operation. Therefore, it can take up to a minute until decoding starts
during initial operation.
Inserting the Smart Card into the CA module
Push the Smart Card into the CA module as far as it goes so that the side
with the gold coloured contact chip is facing the side of the CA module
marked with the provider’s logo. Note the direction of the arrow printed
on the Smart Card.
Inserting the CA module in the CI slot
➠ Switch off the TV set’s mains switch.
Remove the cover from the rear of the set.
Carefully insert the CA module in CI slot 1 or CI slot 2
with the contact side forward.
If you are standing in front of the TV set (display) then
the logo on the CA module must be pointing to the rear.
Do not use force. Make sure the module is not twisted
in the process. If the CA module is correctly installed, the
ejector button protrudes a little further.
Replace the cover.
Coded Stations
Searching for encrypted stations
➠ The search wizard must only be started if the setting
option no has been selected during first installation in
the search for encrypted stations and no CA-module
was inserted.
MENU: Call TV menu.
Select Settings,
go to the menu line below.
Select Stations,
go to the menu line below.
Select Search wizard,
go to the menu line below.
Select Change search settings,
OKwizard guides you through the search settings.
See page 44 for a description of the search settings.
Calling CA module information
➠ This menu is only available for digital stations and when
a CA module is plugged in.
MENU: Call TV menu.
Select CA module: xxx,
OKcall information.
The content of this menu depends on the provider of the
CA module.
The CA module information can also be called up in the
TV menu under Settings ט Other ט CA module: xxx (xxx
corresponds to the CA module provider).
Removing the CA module
➠ Switch off the TV set’s mains switch.
Remove the cover from the rear of the set.
Press in the ejector button on the appropriate module
drawer, the module is released.
Remove the module from the set.
Replace the cover.
Ejector
button
Downloaded From TV-Manual.com Manuals
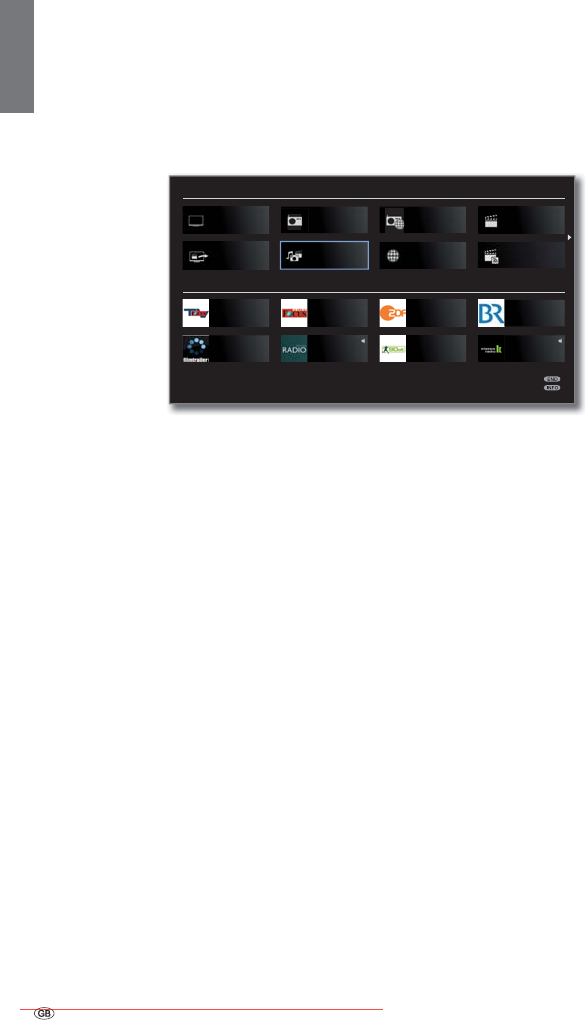
- 62
english
Media+
General information on Media+
MediaHome gives you access to photos, videos and music from your per-
sonal storage media, e.g. from storage media connected via USB and from
media servers in your home network to which your TV set is connected.
MediaNet delivers multimedia data from the Internet.
➠ Please follow the information in the right column for the Internet
functions.
Connecting the TV set to your network
To receive media via media servers in your home network or via the
Internet, you have to integrate your TV set in your home network. You can
connect your TV set both with a wired connection (Ethernet, PowerLine)
or via a wireless radio connection (WLAN). The TV set has an internal WLAN
antenna. You can find connection examples for both cases on page 21.
The TV sets are provided with a standard network configuration ex works
(automatic assignment of the IP address, WLAN deactivated). The TV set
can normally have a wired connection to your home network without any
problems when using these default settings. For a wireless connection
or for integration in special networks, please select the corresponding
settings in the Media menu (see page 64).
Your Loewe TV set supports the UPnP AV standard for data playback in
the home network. You can find more detailed information on this in the
technical data on page 139 and in the glossary from page 147 onwards.
MediaNet
If you wish to use the internet functions, we recommend registering your
TV set on our homepage.
http://support.loewe.tv (International),
http://support.loewe.tv/uk (United Kingdom and Republic of Ireland),
http://support.loewe.tv/au (Australia) or
http://support.loewe.tv/nz (New Zealand)
(under Register now).
Simply follow the steps in the registration process.
The MAC address of your TV set is required for the registration. You can find
this in the index of the TV set under Integrated features – MAC address (TV).
➠ Some of the Internet functions described below may not be available
(see also MediaUpdate chapter below). The general availability and range
of Internet functions are entirely dependent on the provider. Loewe has
no influence over the long-term availability of individual offers.
➠ The content shown in the Recommendations area may change from
time to time without prior notice.
Help for configuration problems
Loewe cannot provide any support for PC hardware and software or
network components owing to the diverse configuration options with
home networks.
Please contact the administrator of your home network and/or special-
ist dealer for support when setting up and for maintenance of network
connections, storage media, media server software and network devices,
e.g. routers.
MediaUpdate - additional functions
Additional functions in the MediaPortal are planned, particularly for Loewe
Media+. You can update your TV set yourself. You will find new software
versions on our internet page.
You can find notes on carrying out a software update on page 128.
MEDIA PORTAL
BR
Klassik RadioFilmtrailer.com
90elf - Dein
Fussball-Radio
DELUXE
LOUNGE RADIO
Focus TV ZDFFocus Online
TV
DR+ Streaming MediaHome
DVB radio Internet radio
RECOMMENDATIONS
MediaNet
DR archive
Video podcasts
Downloaded From TV-Manual.com Manuals
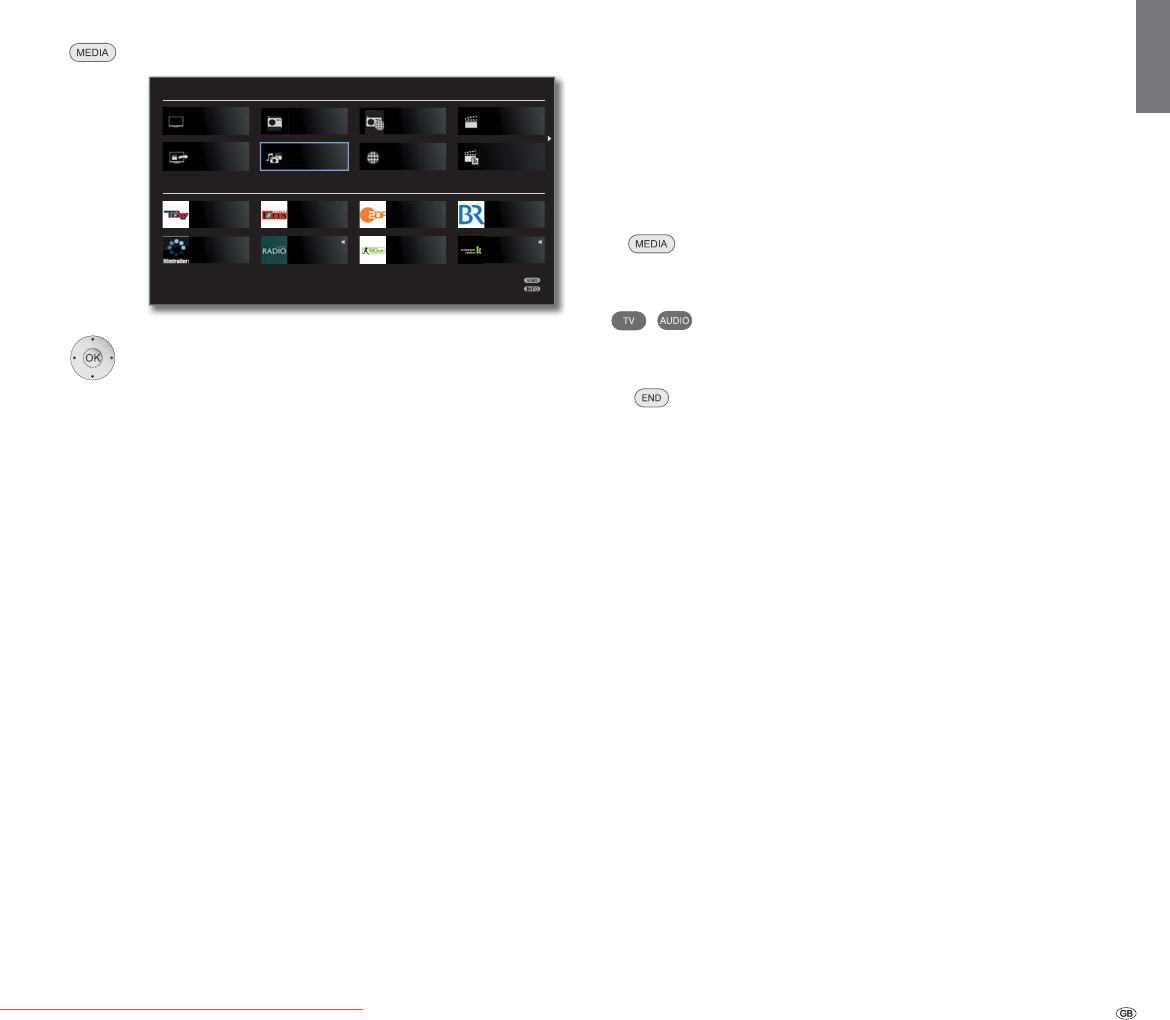
63 -
english
Media+
Accessing your media
MEDIA: Call MediaPortal.
Mark desired function,
OK call function.
MediaHome: see page 68.
MediaNet: see page 72.
Video podcasts: see page 77.
Playing music and videos, displaying images
The windows for playing music and videos and for displaying photos are
comparable for all cases irrespective of the media source. The relevant
players are therefore grouped together:
MediaMusic (including Internet radio): see page 78.
MediaPhoto: see page 79.
MediaVideo: see page 80.
Quit media
Call MediaPortal and select other function (see left
column).
Or:
Press TV or AUDIO button for changing to TV or radio
mode (1.
Oder:
Press END button in the MediaPortal main level to change
to the last active operating mode (TV, radio).
MEDIA PORTAL
BR
Klassik RadioFilmtrailer.com
90elf - Dein
Fussball-Radio
DELUXE
LOUNGE RADIO
Focus TV ZDFFocus Online
TV
DR+ Streaming MediaHome
DVB radio Internet radio
RECOMMENDATIONS
MediaNet
DR archive
Video podcasts
(1 The AUDIO key can be assigned another function (see page 127).
Downloaded From TV-Manual.com Manuals
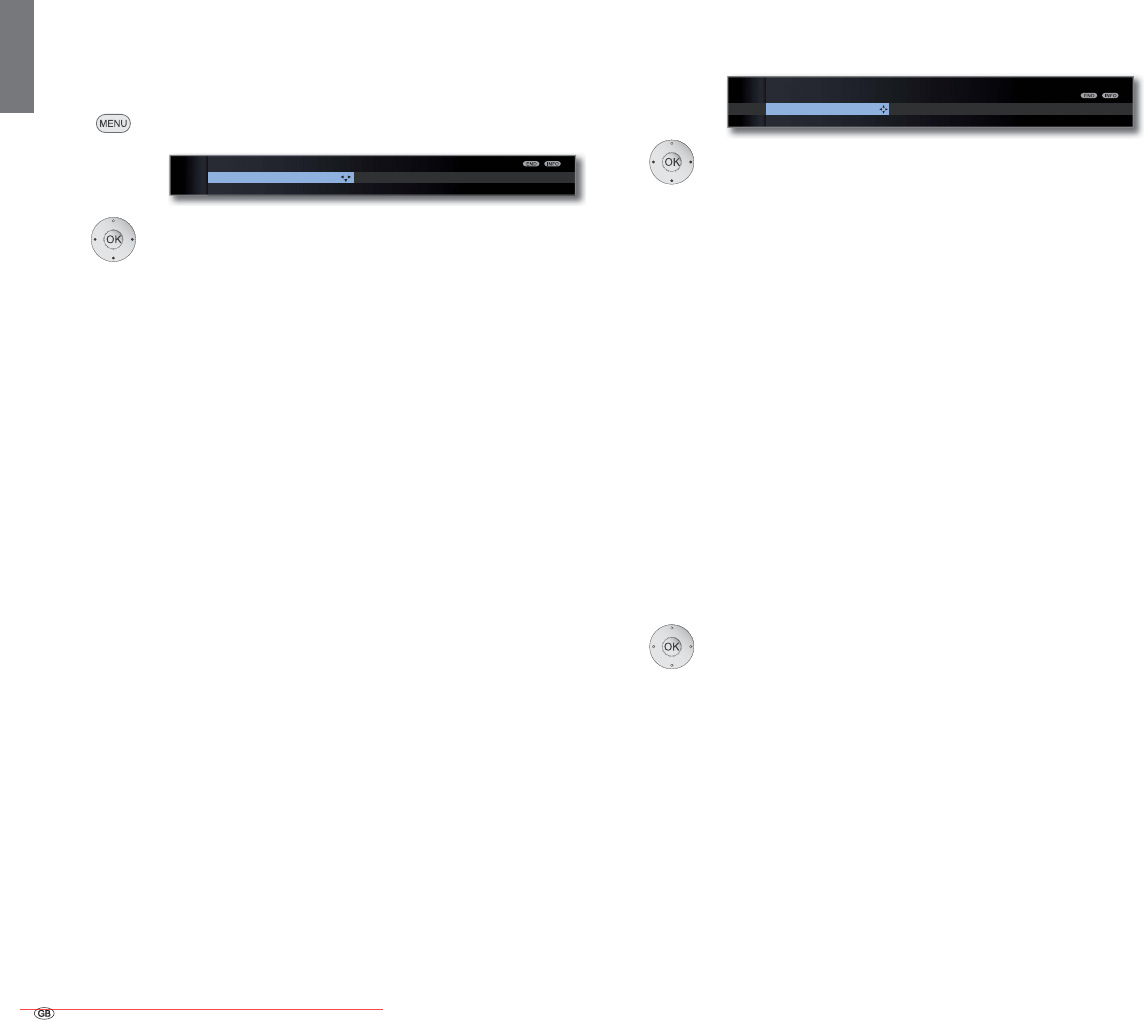
- 64
english
Media+
Media menu
The Media menu is used for making settings to your network adapter
and the various types of media (photo, music, video).
➠ MediaPortal is open.
MENU: Call / close Media menu.
Select desired menu item,
go to the menu line below.
Select the desired setting,
OK call.
Network settings: see right column.
Photo settings: see page 67.
Music settings: see page 67.
Video settings: see page 67.
Explanation of the setting possibilities in Network settings menu
You can activate or deactivate the network settings of
your TV set here.
Select Network access,
go to the menu line below.
Select the type of access required.
off deactivates all existing network adapters of your TV
set.
On, wired only: Access to the network only via a network
cable. The wireless access is deactivated.
On, wireless only: Access to the network only via WLAN.
The access via a network cable is deactivated.
On, wireless + bridge function: Both network adapters
are activated. Wireless Internet access is possible (WLAN).
Internet-enabled devices connected to the network
socket (LAN) (e.g. Loewe MediaCenter, Loewe BluTechVi-
sion Interactive) can use the wireless connection of the TV
set to access the Internet via the WLAN bridge function.
➠
Under no circumstances may the TV set be wired and at
the same time connected by a wireless connection to
the same network, e.g. router. This may cause severe
operational faults!
OK Adopt access type or change Current settings for
the adapter.
Network
access
MEDIA MENU
Network settings Photo settings Music settings Video settin
g
Network access
MEDIA MENU
Network settings
Network access Other
On, wired only ...
Downloaded From TV-Manual.com Manuals

65 -
english
Media+
Configuration of the built-in LAN adapter
You will see an overview of the current settings for the
selected network adapter (for an explanation of the points,
see page 66).
OK Change settings for the network adapter.
Select type of IP configuration.
Manual: Enter your fixed static IP address manually
(see below).
Automatic: Automatic configuration of the IP address
via DHCP server or via multiple protocols
according to UPnP specification (including
DHCP).
OK Proceed.
If manual has been selected under IP configuration:
Enter IP, Subnet mask, Gateway and DNS server
addresses in succession with the numeric keys on
the remote control.
OK Proceed.
You will now see an updated overview of the settings for
the network adapter.
OK End of wizard.
Configuration of a wireless adapter (e.g. WLAN bridge adapter)
You will see an overview of the current settings of the
network adapter (see left column).
OK Change settings for the network adapter.
The TV set now searches for wireless routers.
Red button: Stop search.
After the end of the search:
Select required base station from the options found.
OK Proceed.
If the desired access point is not found:
Red button: Repeat the search. Or:
Yellow button: Specify base station manually, e.g. if the
SSID of the access point is not transferred.
Same procedure as for Rename station,
see page 46.
If your wireless network has an encryption:
Numeric buttons: Enter WLAN password (procedure same
as Rename stations, see page 46).
Green button: Switch from lower case to capital letters
and vice versa.
Delete last character.
➠ Contact your network administrator if you do not
know the WLAN code.
➠ For encryption types supported, see page 139.
For WEP encryption:
Select the WEP index,
OK Proceed.
Select type of IP configuration (see left column).
You will now see an updated overview of the settings for
the network adapter.
OK End of wizard.
OK
NETWORK WIZARD: WIRED
Current adapter settings:
IP configuration Manual
IP address 192.168.2.123
Subnet mask 255.255.255.0
Gateway 192.168.2.1
DNS server 1 192.168.2.1
DNS server 2 192.168.2.1
Additional adapter data:
MAC address 00:09:82:11:99:11
Change settings
Downloaded From TV-Manual.com Manuals
- 66
english
Media+
Explanation of the adapter settings
The current assignment method for the IP address of
your TV set.
Your current IP address.
Your current subnet-mask IP address.
(only for IP configuration ט manual)
Your manually set gateway IP address.
(only for IP configuration ט manual)
Your manually set first DNS server IP address.
(only for IP configuration ט manual)
Your manually set second DNS server IP address.
The name of your network.
Indicates the MAC address that is built into the hardware
of your TV set’s wired network adapter (LAN).
Indicates the MAC address that is built into the hardware
of your TV set’s wireless network adapter (WLAN).
Gives you information about the current status of your
wireless connection (save settings, connecting, login
failed, access point not found, not connected, connec-
tion established).
Specifies the signal strength as a percentage.
Explanation of the setting possibilities in Network settings menu
(continued)
This menu contains settings which have to be changed
less frequently.
Select Other,
OK call other network settings.
Select desired setting,
or numeric buttons: Perform changes.
Enter characters (procedure same as Rename stations,
see page 46).
Host name: Give your TV set a name so that it can be
uniquely identified in the network.
Use proxy server: Indicate whether your network access
is to be direct or via a proxy server.
➠ A proxy server is not necessary for most home net-
works.
➠ Contact your home network administrator if you are
unclear about the proxy server settings.
Proxy server name:
(only available if Use proxy server ט yes)
Indicate the name or IP address of the proxy server used.
Proxy port number:
(only available if Use proxy server ט yes)
Indicate the network port number.
Proxy server requires login:
(only available if Use proxy server ט yes)
Specify whether your proxy server requires a special login.
User name and Password:
(only available if Proxy server requires login p yes)
Enter your login data for the proxy server.
MENU: Quit Other network settings menu.
Other
IP
configuration
IP address
Subnet mask
Gateway
DNS server 1
DNS server 2
Network SSID
MAC address
(TV)
MAC address
(WLAN)
Link status
Link quality
MEDIA MENU
Network settings
Other Networ
k
access OK
Downloaded From TV-Manual.com Manuals

67 -
english
Media+
Explanation of the setting possibilities in the Photo settings menu
➠ The menu can only be opened when a photo is displayed (see page 79).
Skip to a definite picture or to the start/end of the cur-
rent folder.
Display pictures in optimal size or in original resolution.
Select how long each picture is to be shown during a
slideshow
Three picture transitions can be chosen for the picture
change. You can have alternately running picture transi-
tions.
You can carry out the picture settings for the photo display
here. The settings correspond to the picture settings in
TV mode (see page 36).
Explanation of the setting possibilities in the Music settings menu
➠ The menu can only be opened when the Music Player is displayed
(see page 78).
You can carry out the audio settings for playing music
here. The settings correspond to the audio settings in TV
mode (see page 34).
Explanation of the setting possibilities in the Video settings menu
➠ The menu can only be opened when the Video Player is displayed
(see page 80).
You can make the picture settings for playing videos
here. The settings correspond to the picture settings in
TV mode (see page 36).
You can carry out the audio settings for playing videos
here. The settings correspond to the audio settings in TV
mode (see page 34).
Go to ...
Picture display
Picture change
Picture
crossovers
Picture settings
Sound settings
Picture settings
Sound settings
Downloaded From TV-Manual.com Manuals
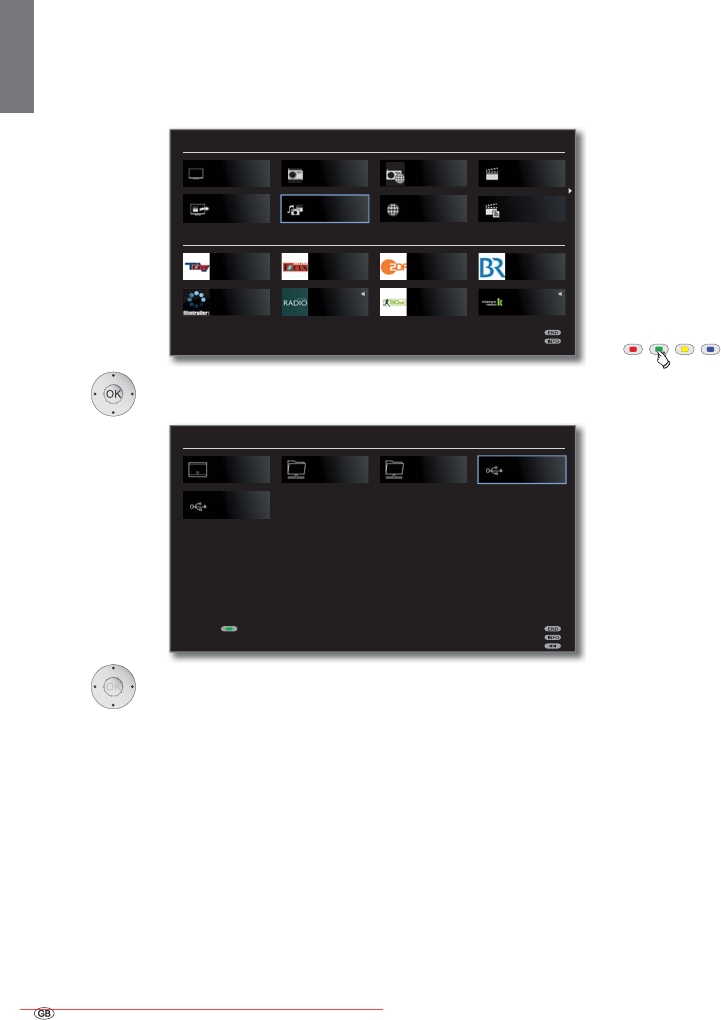
- 68
english
Media+
A Loewe MediaCenter connected to your home network.
Examples with media servers in your home network. The
exact designation depends on the media server used.
USB storage media on the USB connections of your TV set.
The exact designation depends on the relevant storage
medium.
➠ Please also observe the notes on page 128 regarding
USB sticks!
Unmounting USB storage media
You should unmount USB storage media properly after
use before removing them from the TV set. This avoids
a loss of data.
➠ A USB storage medium is marked in MediaHome.
Green button: Unmount USB storage medium before
removing it.
➠ Once unmounted, the USB storage medium cannot
be used again until it is reinserted!
MediaHome
MediaHome includes both storage media directly connected to the TV
set (e.g. USB sticks) as well as data provided in your home network (e.g.
from a media server on a PC or a network hard drive).
➠ MediaPortal is open.
Mark MediaHome,
OK activate.
Mark desired media source.
OK Open highlighted media source. All available content
will be shown.
➠ The media sources shown here depend on the devices
available/used.
MEDIA PORTAL
BR
Klassik RadioFilmtrailer.com
90elf - Dein
Fussball-Radio
DELUXE
LOUNGE RADIO
Focus TV ZDFFocus Online
TV
DR+ Streaming MediaHome
DVB radio Internet radio
RECOMMENDATIONS
MediaNet
DR archive
Video podcasts
MEDIA HOME
MediaCenter
USB 2
TwonkyMedia USB 1WMP11
Unmount medium before removing
MediaCenter
TwonkyMedia
WMP11
USB
Downloaded From TV-Manual.com Manuals
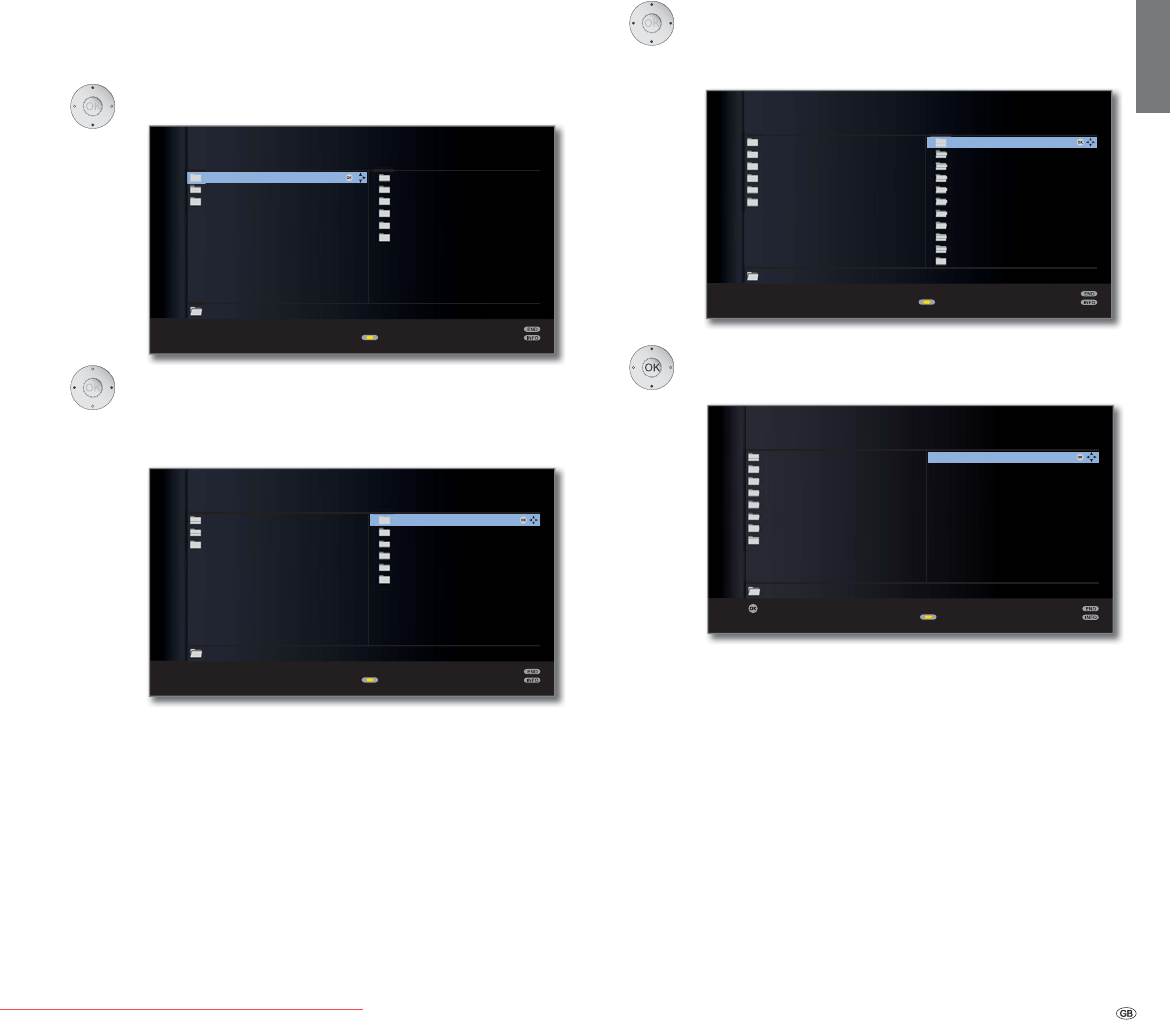
69 -
english
Repeat procedure if necessary. The content of
the selected folder is still displayed in the right
window, the previous folder structure in the
left window.
Select media file (example below: music title).
OK Play/display selected media file.
Playing music: see MediaMusic, page 78.
Displaying photos: see MediaPhoto, page 79.
Playing videos: see MediaVideo, page 80.
General navigation in the media overview
➠ The graphics on this page typically show a two-column list view. You
can switch between the views as required (see page 70).
Select desired folder.
Open marked folder. The content of the folder is
displayed in the right window.
Go back a folder level if necessary.
OK
:/
LOEWE_USB (USB)
:
Elements 3
Change view
Music
Photo
Video
Titles
Artists
Albums
Categories
Playlist
Files
OK
LOEWE_USB (USB)
Music
Photo
Video
:/Music/
Titles
Artists
Albums
Categories
Files
Elements 5
OK
LOEWE_USB (USB)
Alan Parsons Project
Alphaville
Backstreet Boys
Bad Boys Blue
Barclay James Harvest
Bee Gees
Benton Franz
Captain Hollywood Project
Carey Tony
Cocker Joe
Cretu Michael
A
A
A
A
B
A
B
B
B
B
B
B
B
B
B
B
B
B
B
C
B
C
C
C
C
C
C
C
C
C
C
Titles
Artists
Albums
Categories
Playlist
Files
:/Music/Artists/ Elements 38
Change view
Media+
OK
OK
Prime Time
Let Me Go Home
One Good Reason
Since The Last Goodbye
Don't Answer Me
Dancing On A Highway
You Don't Believe
Pipeline
Ammonia Avenue
Ammonia Avenue
Eve
Eye In The Sky
I Robot
Pyramid
Tales Of Mystery And Imagination
The Turn Of A Friendly Card
Vulture Culture
A
E
A
E
E
E
E
I
E
I
P
I
P
T
P
T
T
T
T
V
T
V
Listen
:/.../Artists/Alan Parsons Project/Ammonia Avenue/
LOEWE_USB (USB)
Album Title
Elements 9
Change view
Downloaded From TV-Manual.com Manuals
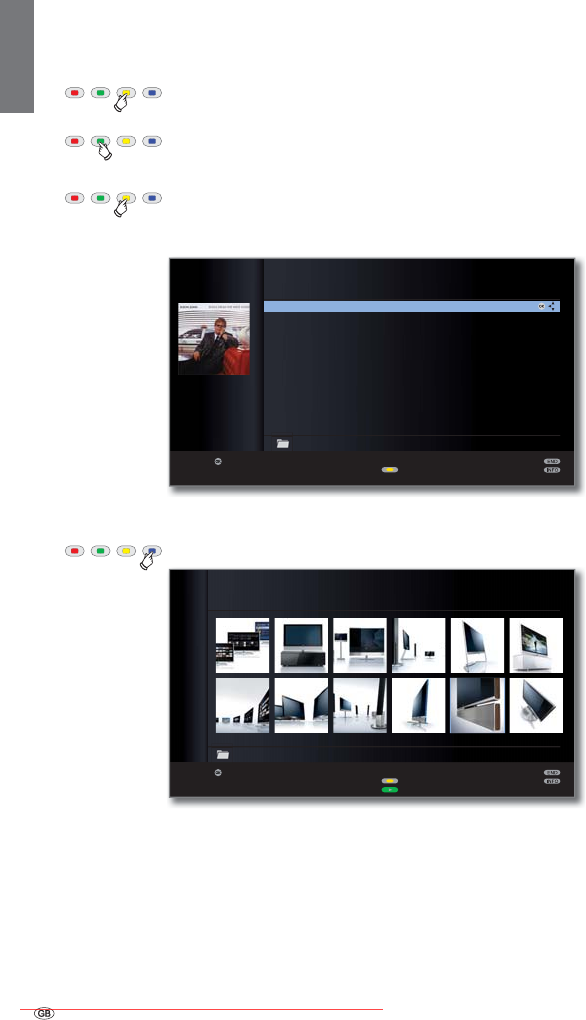
- 70
english
Change view
You can change the view of the displayed files and folders.
In the Media Overview:
Yellow button: opens Change View, and:
Green button: Switches over to two-column list view (see
sample figures on page 69).
Yellow button: Switches over to single-column list view
(with picture for the element currently
selected).
Single-column list - example with music titles
Blue button: Switches over to thumbnail view.
Thumbnails - example with photo overview
Playing/displaying data from USB storage media
If a USB storage medium is selected as a source (see page 68), the
following special features apply for actions and the media overview:
• The uppermost folder level is divided into three fixed categories:
Music
with the subfolders Titles, Artists, Albums, Categories, Playlists,
Files (see below).
Photo
Video
• The original folder structure of the USB storage medium is retained
in the media overview for Photo and Video. For playing Music, the
available titles are prepared and offered in the above subfolders.
Subfolders in Music mode
Titles: The music titles found on the USB storage medium
are sorted by title name.
Artists: The music titles found on the USB storage medium
are sorted by the respective artist.
Albums: The music titles found on the USB storage medium
are sorted by album name.
Categories: The music titles found on the USB storage medium
are sorted by their respective musical categories
(e.g. Jazz, Classical, Pop, Rock) and displayed cor-
respondingly.
Playlists: Display and play back any play lists that have been
generated on the PC.
Files: The music titles found on the USB storage medium
will be shown without being especially sorted (in
order of file name).
Media+
P+
P–
OK
OK
The Emperor's New Clothes
Dark Diamond
Look Ma, No Hands
American Triangle
Original Sin
Birds
I Want Love
The Wasteland
Ballad Of The Boy In The Red Shoes
Love Her Like Me
Mansfield
This Train Don't Stop There Anymore
LOEWE_USB (USB)
:/.../John, Elton/Songs From The West Coast
Change view
Listen
Page ܬ (1/2)
Elements 13
P+
P–
OK
LOEWE_USB (USB)
Change view
Slide show
View
Page ܬ (1/9)
Elements 106:/Photo/LOEWE/loewe_011
Downloaded From TV-Manual.com Manuals
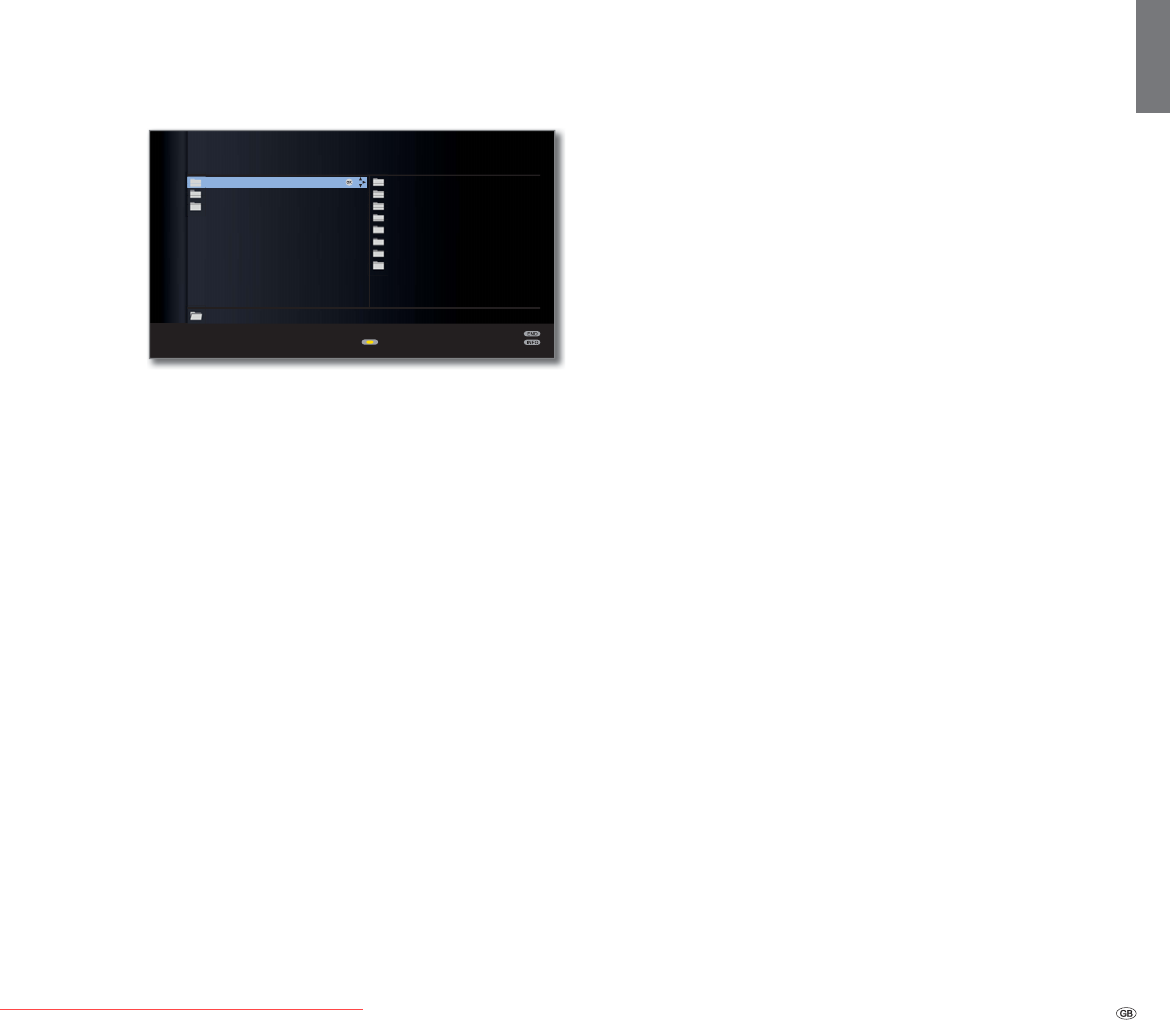
71 -
english
Playing files from the home network
When using a media server in your home network as a source (see
page 68), the names of the folders displayed are specified by the
media server.
For further operation, see General navigation in the media overview on
page 69.
Example: Overview of a media server with the name Twonky Media
OK
:/
:
Music
Photo
Video
TWONKY MEDIA (NETWORK)
Elements 3
By folder
All music
Playlist
Smart playlist
By album
By artist
By genre
Artist/album
Change view
Media+
Downloaded From TV-Manual.com Manuals
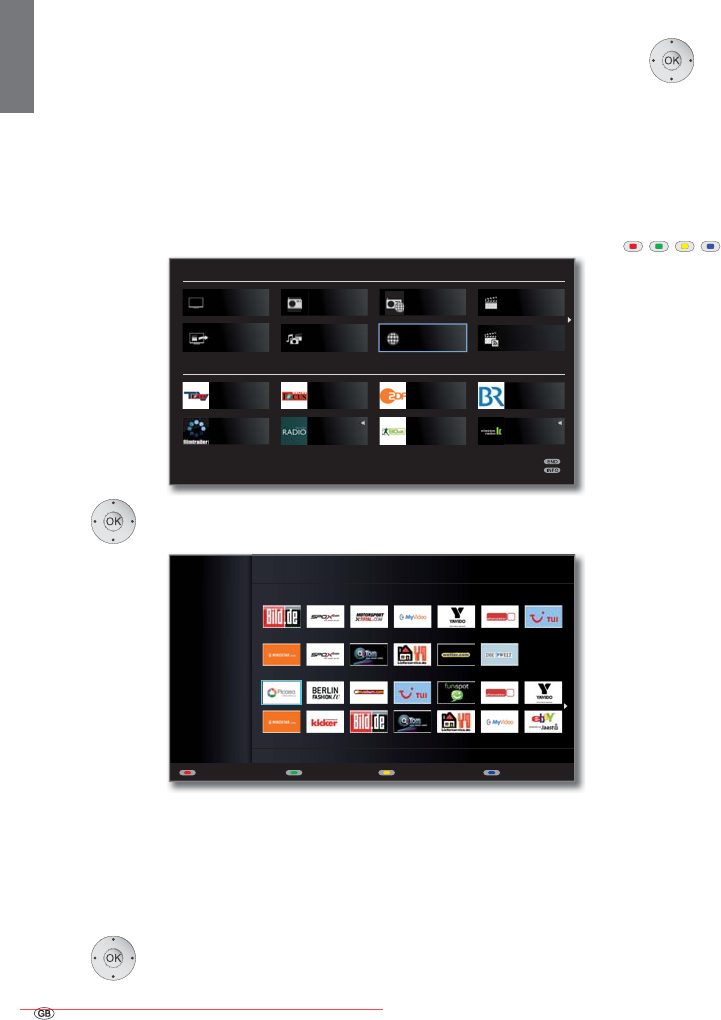
- 72
english
MediaNet
Under the menu item MediaNet you will find a continually expanding
platform for interactive TV applications from the Internet. All applications
are optimised for use on the TV. In addition, you can access Internet sites
directly via the integrated Opera browser.
The web browser can also be used without an Internet connection. Thus
you can access local devices which provide a web interface (e.g. router,
home control, home network server).
Call MediaNet
➠ MediaPortal is open.
Select MediaNet,
OK activate.
The upper section of the MediaNet basis dialog contains
Loewe Recommendations. The middle section displays
your own Favourites (Edit favourites, see page 75).
Depending on the topic selected (see right column), all
the available online content matching the topic is
displayed in the lower section.
Select the desired online content.
OK Display/play content.
Topic selection
Go to Topics.
Select the desired topic.
OK Confirm topic.
The content associated with the selected topic is
displayed in the lower section.
Function of the coloured buttons in the basic MediaNet dialogue
Red button: Edit favourites
Media content from the topic can be
defined as personal Favourites and the
Favourites can also be moved or deleted.
See page 75.
Green button: Internet
You can enter Internet addresses here and
open the associated Internet sites.
See page 73.
Yellow button: Personal area
Using a definable access code, you can
define favourites and call up websites in
the personal section.
See page 74.
Blue button: Configure MediaNet settings.
See page 76.
Media+
MEDIA PORTAL
BR
Klassik RadioFilmtrailer.com
90elf - Dein
Fussball-Radio
DELUXE
LOUNGE RADIO
Focus TV ZDFFocus Online
TV
DR+ Streaming MediaHome
DVB radio Internet radio
RECOMMENDATIONS
MediaNet
DR archive
Video podcasts
MEDIA NET
All Topics
Favourites
Recommendations
Internet Personal area SettingsEdit favourites
Picasa
Legal details
All
Topics
Downloaded From TV-Manual.com Manuals
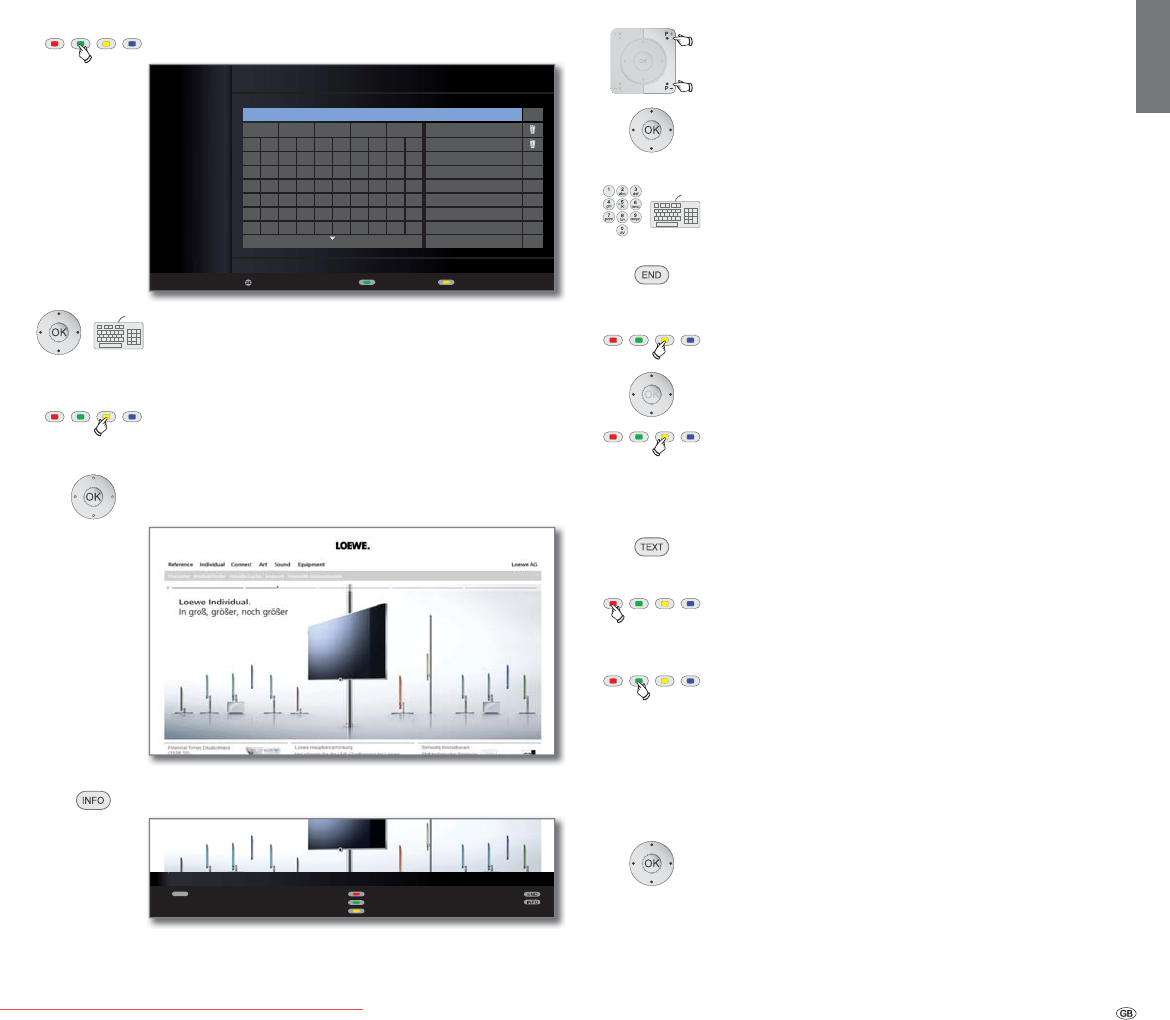
73 -
english
Navigation in websites
P+/P– Scroll the page vertically.
Select link or text input field,
OK open link or confirm text input.
➠ Letters and numbers can be entered into input fields
on Internet sites either using the numeric buttons or a
USB keyboard.
Same procedure as for Rename station, see page 46.
END: Cancel text input and exit input field.
Yellow button: Zoom website.
Move picture section.
Yellow button: Re-display website at the original size.
Select other website / Quit Internet
TEXT: Return to URL input window.
Or:
Red button: Call History (previously visited websites).
Delete history: see below.
Or:
Green button: Exit Internet and go back to the MediaNet
base dialogue.
Delete history
➠ The address input window is open (see left column).
Select the trash symbol next to the History
entry to be deleted.
OK Delete an entry or the entire history.
Internet
Green button: Call Internet.
Select the desired symbols/terms,
OK adopt to input line.
Go to the input line.
If necessary:
Yellow button: Delete characters to the left of the cursor.
When the Internet address (URL) is completely entered:
OK View the website.
INFO: Display MediaNet info line.
➠ The functions of the coloured buttons are enabled
even without the status line being shown.
Media+
OK
URL
View Back Delete one character
Legal details
www. .de .org .com .net HISTORY
a
j
s
1
.
,
b
k
t
2
!
:
c
l
u
3
#
;
d
m
v
4
$
=
e
n
w
5
%
?
f
o
x
6
(
@
g
p
y
7
)
-
h
q
z
8
*
_
i
r
/
9
+
~
ז
<
>
0
&
‘
OK
www.loewe.de|
www.loewe.de
MEDIA NET - INTERNET
TEXT
History
Back
Zoom in
Edit internet address
Downloaded From TV-Manual.com Manuals
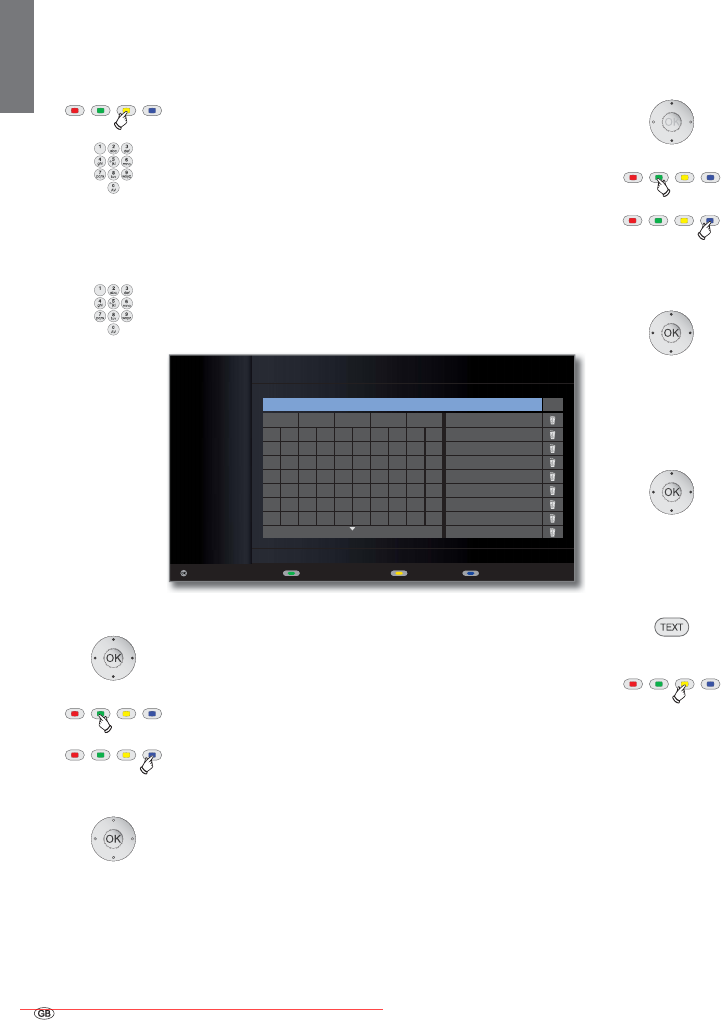
- 74
english
Personal area
In the personal area protected with an access code, you can store websites
as favourites. In addition, the history of websites visited by you is managed
separately from the history in the general Internet section (see page 73).
Yellow button: Call Personal area.
Define a four digit access code (PIN) the first time you
open it. The numbers appear in plain text. Note the access
code (PIN) well.
➠ The access code in the personal section and the PIN
of the parental lock (page 58) are independent of
each other.
The four-digit access code (PIN) must be entered when
the parental lock is opened in future. It appears encrypted
(****) when entering for security reasons.
Select the desired symbols/terms,
OK adopt to input line.
Go to the input line.
If necessary:
Green button: Delete characters to the left of the cursor.
Blue button: Add the Internet address to favourites.
For favourites, see right column.
When the Internet address (URL) is completely entered:
OK View the website.
See page 73 for further operation.
Personal area - Favourites
You can save up to four favourite websites in the personal section. These
are displayed in the right part of the user interface under Favourites.
Enter the desired Internet address (URL) (see left column).
Go to the input line.
If necessary:
Green button: Delete characters to the left of the cursor.
Blue button: Add the Internet address to favourites.
The Internet address (URL) is added to the
Favourites on the right side.
Select Favourites entry,
OK transfer the Internet address to the input line.
OK View the website.
Delete favourites / history
Select the trash symbol next to the Favourites
or History entry to be deleted.
OK Delete entry or entire list.
Quit Personal area
TEXT: Return to URL input window.
Or:
Yellow button: Leave personal area and go back to the
MediaNet base dialogue.
Media+
OK
URL
Legal details
www. .de .org .com .net HISTORY
a
j
s
1
.
,
b
k
t
2
!
:
c
l
u
3
#
;
d
m
v
4
$
=
e
n
w
5
%
?
f
o
x
6
(
@
g
p
y
7
)
-
h
q
z
8
*
_
i
r
/
9
+
~
ז
<
>
0
&
‘
OK
www.loewe.de|
MEDIA NET - PERSONAL AREA
www.loewe.de
www.loewe-uk.com
www.loewe-fr.com
www.loewe.it
VERLAUF
www.loewe.de
www.loewe-es.com
www.loewe.be/be-nl/
View BackDelete one character Add to favourites
Downloaded From TV-Manual.com Manuals
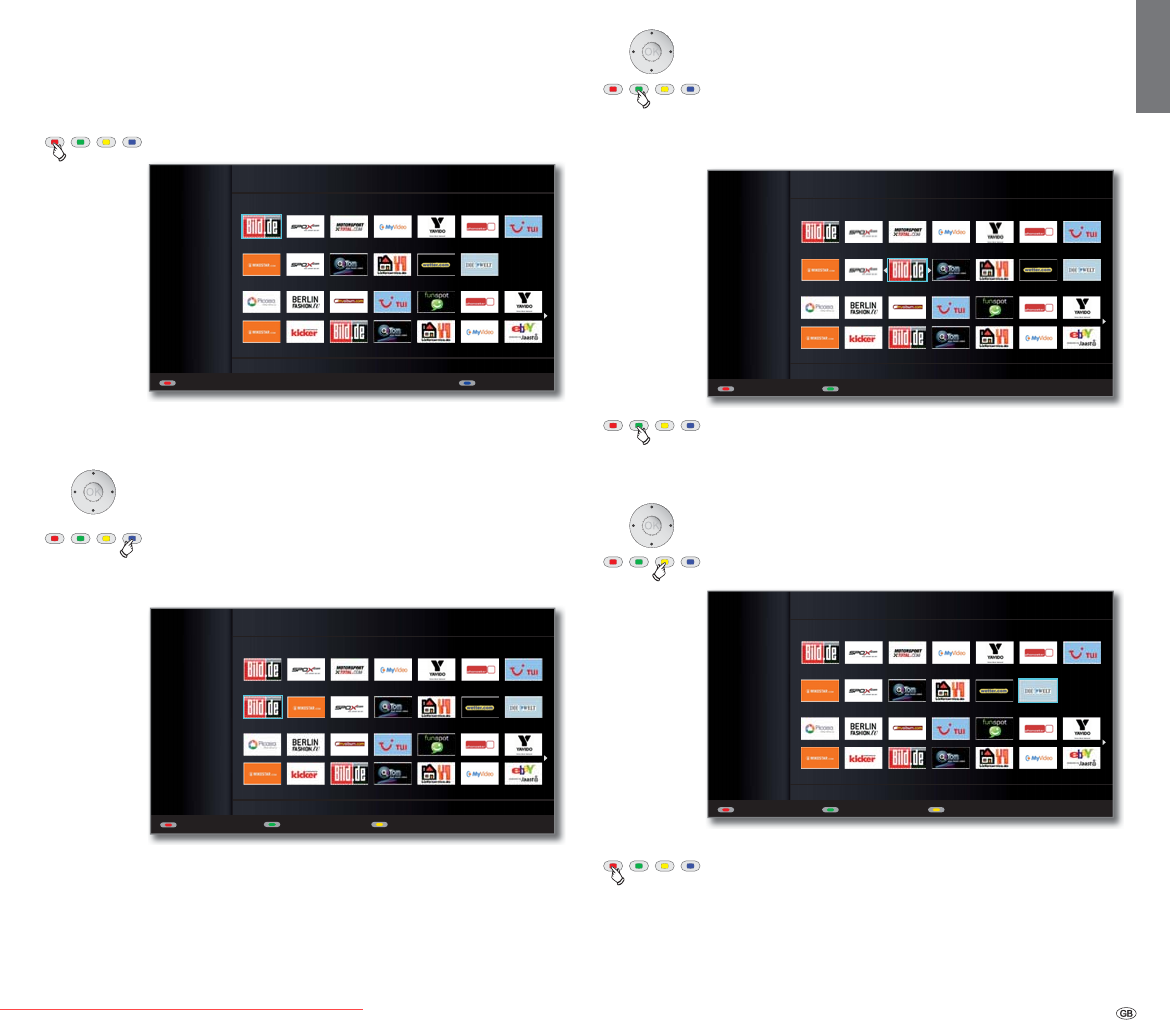
75 -
english
Edit MediaNet favourites
The middle section of the basic MediaNet dialogue contains the MediaNet
favourites. You can define and delete these favourites or change their
sequence as desired.
➠ MediaNet is open (page 72).
Red button: Call Edit favourites.
Add entry to favourites
Select entry under Recommendations or Topics.
Blue button: Add selected entry to favourites.
The entry is added on the left side of the
Favourites.
Change the sequence of MediaNet favourites
Select entry under Favourites.
Green button: Move selected favourite.
Select the insertion position to which the selected
favourite is to be moved.
Green button: End moving the selected favourite.
Remove entry from MediaNet favourites
Select entry under Favourites.
Yellow button: Delete selected favourite.
Red button: Quit Edit favourites and go back to the
basic MediaNet dialogue.
All Topics
Favourites
Recommendations
Picasa
Legal details
All
Topics
Add to favouritesBack
MEDIA NET - EDIT FAVOURITES
All Topics
Favourites
Recommendations
Picasa
Legal details
All
Topics
Back Move off
MEDIA NET - EDIT FAVOURITES - MOVE FAVOURITE
All Topics
Favourites
Recommendations
Picasa
Legal details
All
Topics
Back
MEDIA NET - EDIT FAVOURITES
Move favourite Delete favourite
All Topics
Favourites
Recommendations
Picasa
Legal details
All
Topics
MEDIA NET - EDIT FAVOURITES
Back Move favourite Delete favourite
Media+
Downloaded From TV-Manual.com Manuals
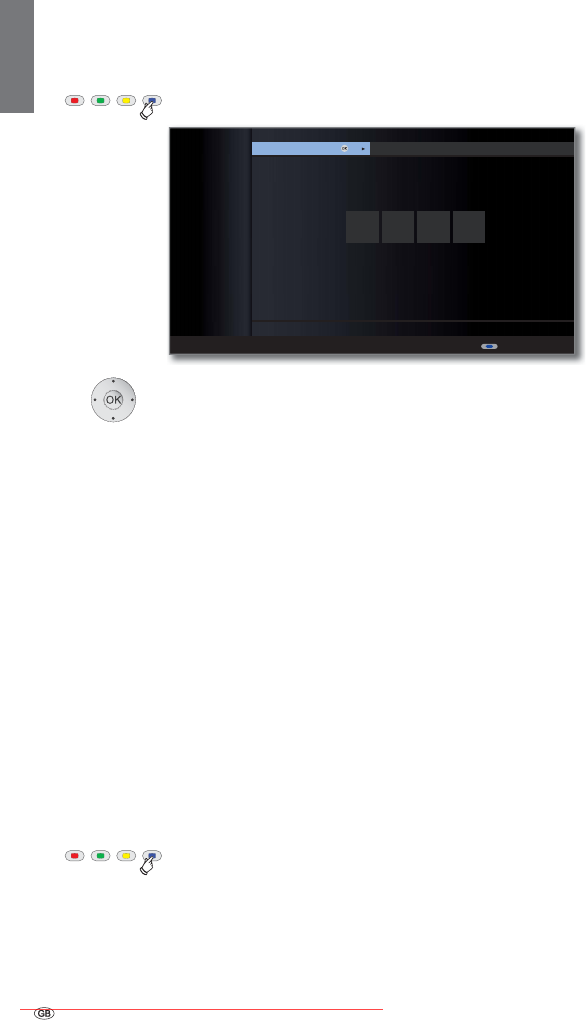
- 76
english
MediaNet settings
Here, you can find more setting options for MediaNet.
➠ MediaNet is open (page 72).
Blue button: Call Settings.
Select the desired setting,
OK call.
Here, you can define/change your MediaNet access code
for the personal area. When changing, first enter the
previous and then the new access code.
Here, you can delete the entire personal section in a single
step (favourites, history and access code). Press the red
button to confirm the procedure.
Select the countries whose online services you want to
receive.
You can delete here the Favourites in the MediaNet basis
dialog (see page 75). Press the red button to confirm
the procedure.
Reset MediaNet to status as at delivery (Favourites in
MediaNet basis dialog, personal area, Internet history).
Press the red button to confirm the procedure.
Blue button: Quit settings and go back to the basic
MediaNet dialogue.
Access code
Personal area
Country
selection
Favourites
Factory
settings
****
Back
You can change your access code to your personal area here.
Mentions légales
MEDIA NET - SETTINGS
OK
Access code Personal area Country selection
Media+
Downloaded From TV-Manual.com Manuals
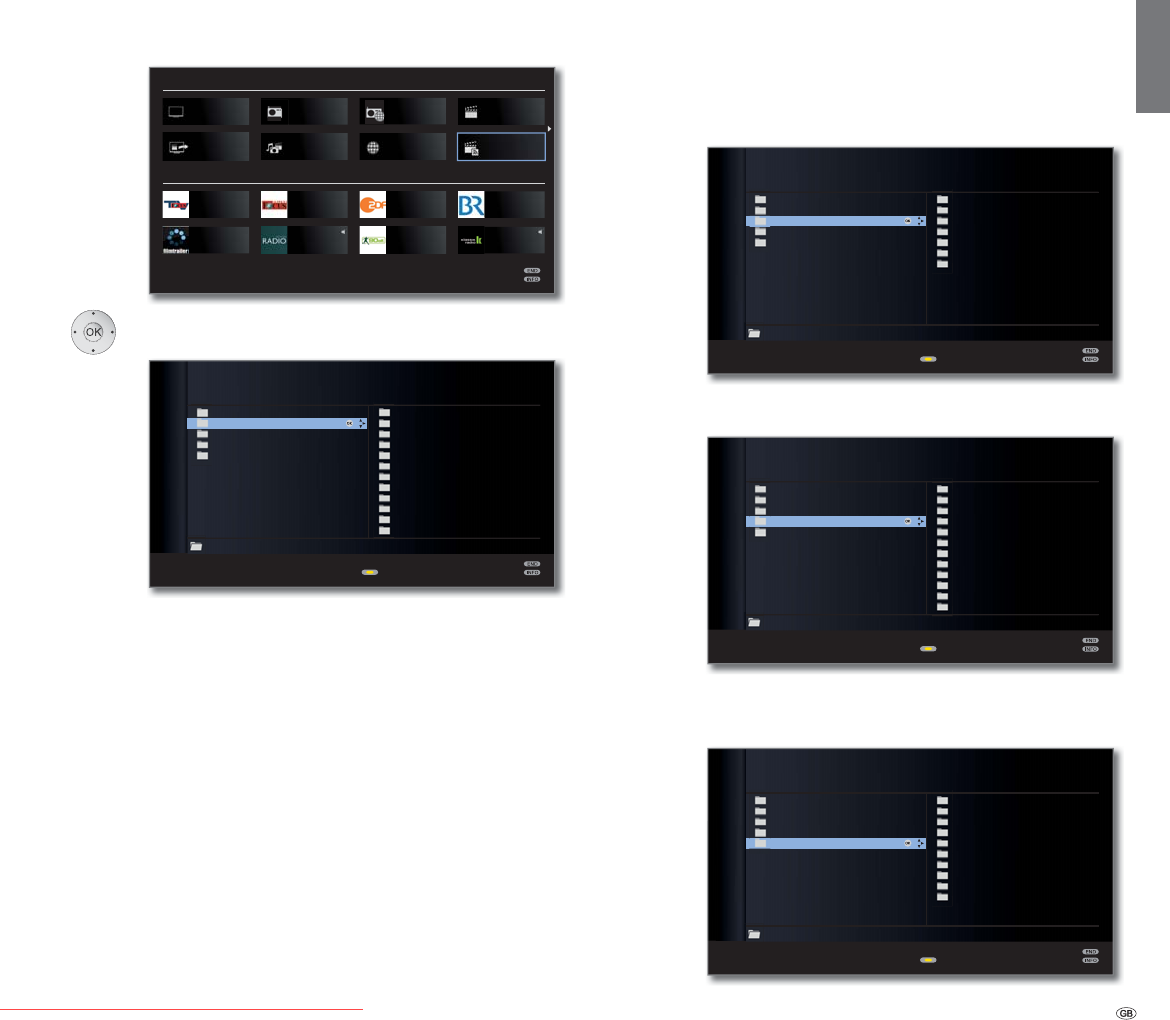
77 -
english
Video podcasts
➠ MediaPortal is open.
Select Video podcasts,
OK activate.
➠ The names of the folders in the Video Podcasts area are fixed by the
provider vTuner and are adopted for display on the TV.
For further operation, see General navigation in the media overview on
page 69.
Video podcasts by genre
The available video podcasts are sorted by genre and offered accordingly
(see left column).
Video podcasts by country
The video podcasts that are available are sorted initially by region, then
by country and are offered accordingly.
Web TV by genre
The available web TV videos are sorted by genre and offered accordingly.
Web TV by country
The web TV videos that are available are sorted initially by region, then
by country and are offered accordingly.
Media+
MEDIA PORTAL
BR
Klassik RadioFilmtrailer.com
90elf - Dein
Fussball-Radio
DELUXE
LOUNGE RADIO
Focus TV ZDFFocus Online
TV
DR+ Streaming MediaHome
DVB radio Internet radio
RECOMMENDATIONS
MediaNet
DR archive
Video podcasts
Elements 5
VIDEO PODCASTS
Animals
Arts-Culture
Arts-Interview
Blog
Buisness
Cars-Transportation
Christian
Comedy
Comics
Commentary
Cooking
Current Affairs
Change view
OK
Favorites
Video Podcasts by genre
Video Podcasts by location
Web-TV by genre
Web-TV by location
:/
Elements 5
VIDEO PODCASTS
Africa
Asia
Europe
Middle East
North America
Oceania
South America
Change view
OK
Favorites
Video Podcasts by genre
Video Podcasts by location
Web-TV by genre
Web-TV by location
:/
Elements 5
VIDEO PODCASTS
Music TV
Religious
TV Audio
TV College
TV Government
TV Live Broadcast
TV News
TV On Demand
TV Public
TV Religious
TV Shopping
TV Sports
Change view
OK
Favorites
Video Podcasts by genre
Video Podcasts by location
Web-TV by genre
Web-TV by location
:/
Elements 5
VIDEO PODCASTS
Change view
OK
Favorites
Video Podcasts by genre
Video Podcasts by location
Web-TV by genre
Web-TV by location
Africa
Asia
Caribbean
Central America
Europe
Internet Only
Middle East
North America
Oceania
South America
:/
Downloaded From TV-Manual.com Manuals
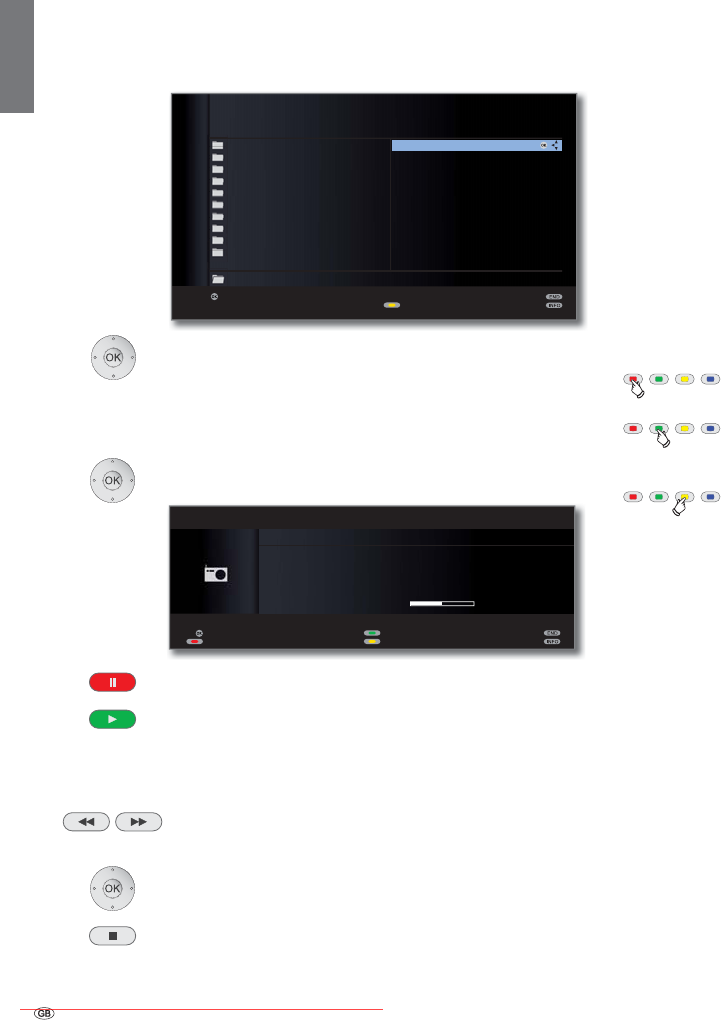
- 78
english
MediaMusic
➠ A music title is highlighted in the media overview.
OK Play highlighted music title (see right column).
Play music files
➠ A music title is highlighted.
OK Play music title.
PAUSE button: Pause current playback.
PLAY button: If playback is paused:
Continue paused playback.
For playback in progress:
Play title from the beginning.
short: Playback previous / next title.
long: Rewind/fast forward.
OK Return to the overview without ending the current
playback.
STOP button:
End playback and return to overview.
Explanation of the symbols in the playback window
The symbols at the top right show you information about the current
playback.
ܕ Playback
ܔ Pause
ܓ
Rewind
ܒ
Fast-forward
_ Replay current title
ܨ Replay all titles in the current folder
ܫ Random play activated
The bar behind the playtime shows you how far the music file has been
played.
Function of coloured buttons during music playback
Red button: Switch screen off/on.
Green button: Repeat individual title / all titles /
Repeat off.
Yellow button: For music files from local media
Random play of files in currently selected
folder on / off.
for Internet radio:
Change to the last radio station listened
to.
Media+
OK
OK
Prime Time
Let Me Go Home
One Good Reason
Since The Last Goodbye
Don't Answer Me
Dancing On A Highwire
You Don't Believe
Pipeline
Ammonia Avenue
Ammonia Avenue
Eve
Eye In The Sky
Gaudi
I Robot
Pyramid
Stereotomy
Tales Of Mystery And Ima...
The Turn Of A Friendly Card
Vulture Culture
A
E
A
E
E
E
E
G
E
G
I
G
I
P
I
P
S
P
S
T
S
T
T
T
T
V
T
V
Listen
LOEWE_USB (USB)
Albums Title
:/.../Artists/Alan Parsons Project/Ammonia Avenue/ Elements 9
Change view
ܕ
OK
"Dark Diamond" 6WHUHR܃
Artist: Elton John
Album: Songs From The West Coast
3OD\WLPH
Repeat title/all/off
Random on/off
back
Screen off/on
MUSIC PLAYER
Downloaded From TV-Manual.com Manuals
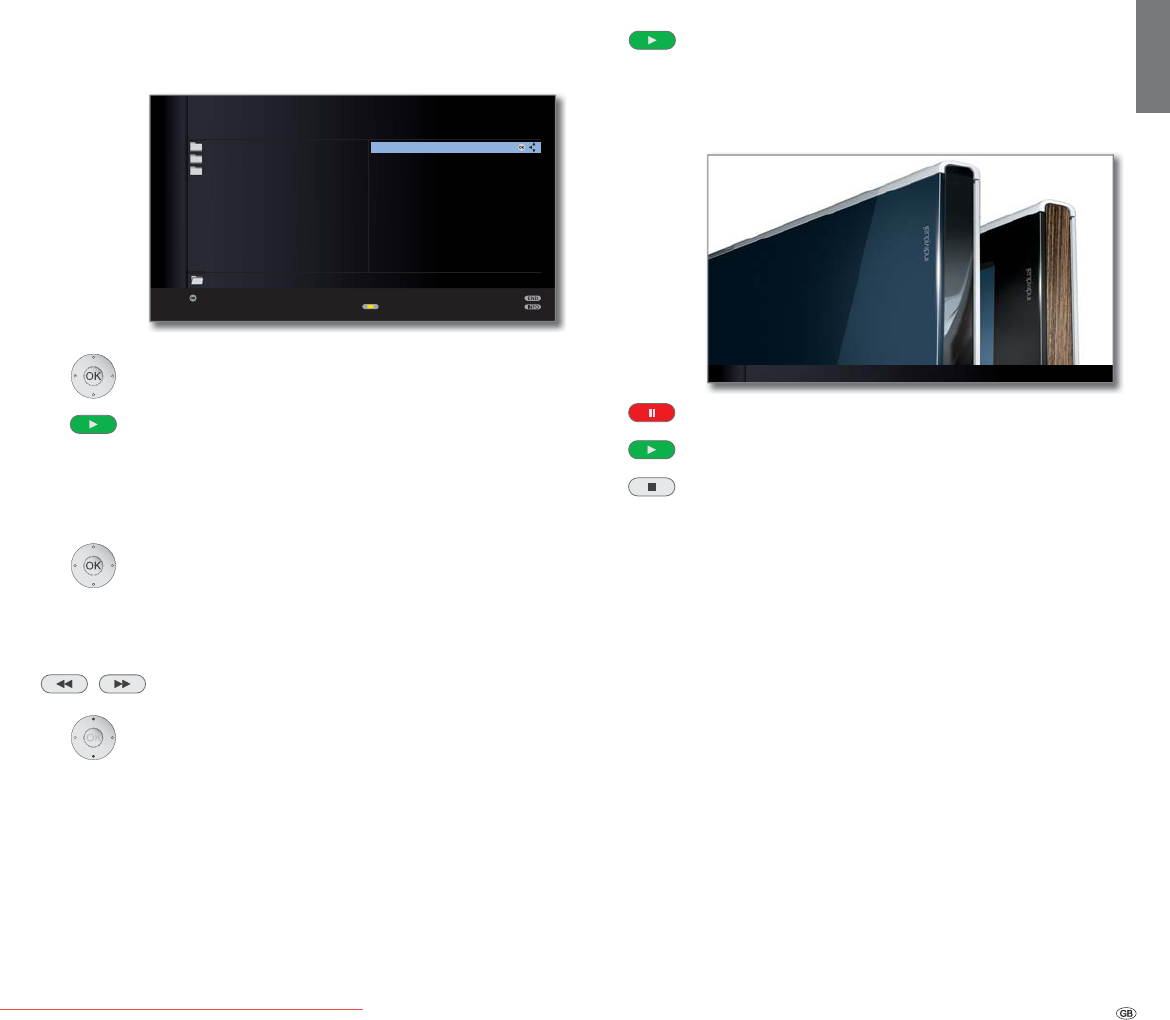
79 -
english
MediaPhoto
➠ A picture is selected in the media overview.
OK View marked picture in full screen mode (see below).
PLAY button: Start slideshow (see right column).
Full-screen mode
➠ A picture has been selected.
OK Opens full picture mode.
➠ Portrait photos (with the corresponding entry in the
Exif files) are automatically positioned correctly for
viewing.
Show previous / next picture.
Rotate picture by 90 degrees to the left/right.
OK Quit full-screen mode and return to overview.
Slide show
PLAY button: Start slide show.
➠ from photo overview: Start slide show with marked
picture.
➠
in full screen mode: Start slide show with displayed
picture.
PAUSE button: Pause slide show.
PLAY button: Continue slide show.
STOP button: End slide show and return to overview.
Media+
ܕ
2 / 106 <Loewe_2_highres> Slide show
OK
P+
P–
OK
LOEWE_USB (USB)
Loewe_1_highres
Loewe_2_highres
Loewe_3_highres
Loewe_4_highres
Loewe_5_highres
Loewe_6_highres
Loewe_7_highres
Loewe_8_highres
Loewe_9_highres
Loewe_10_highres
Loewe_11_highres
Photo
Music
Video
View
Page חי
3KRWR Elements 106
Change view
Downloaded From TV-Manual.com Manuals
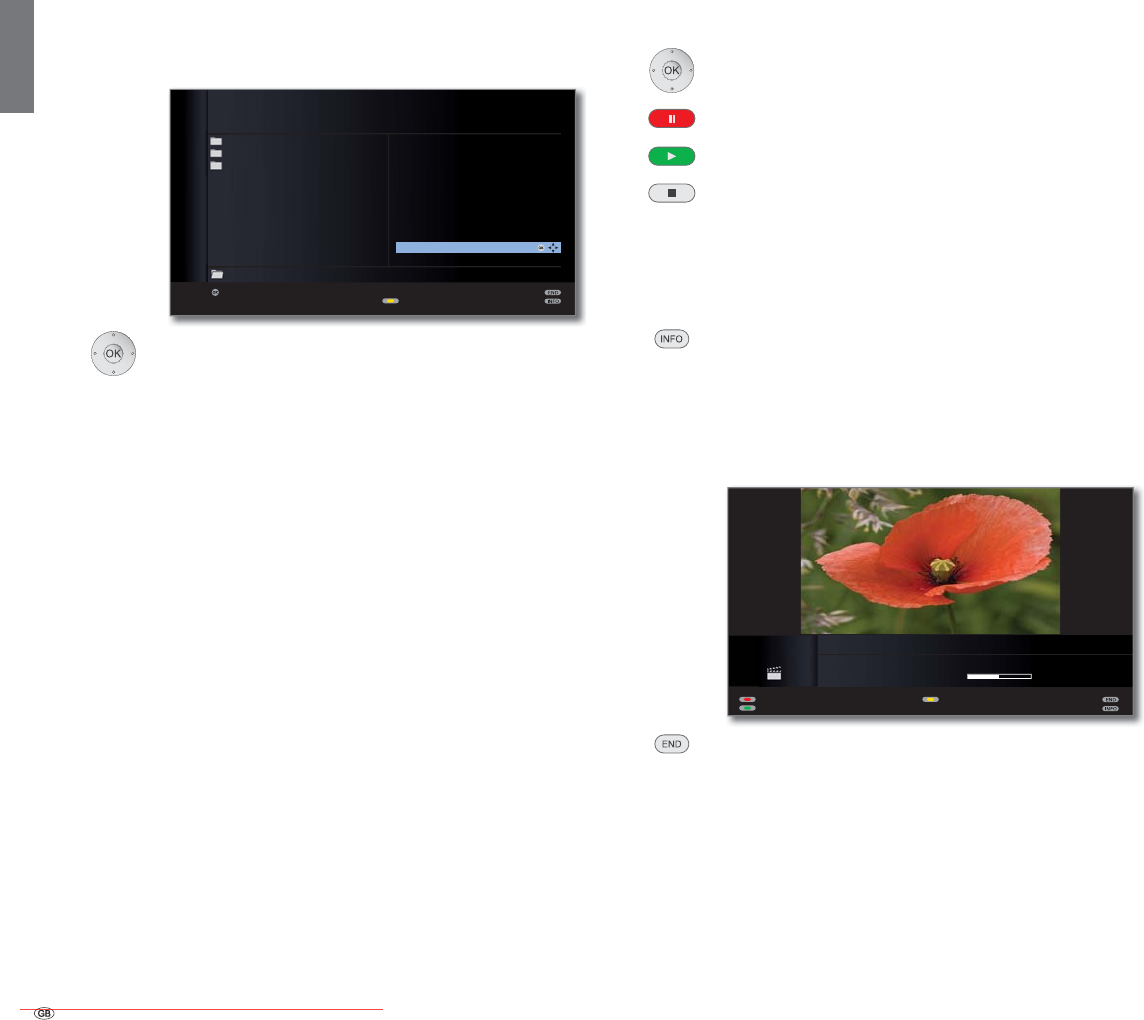
- 80
english
Media+
MediaVideo
➠ A video is selected in the media overview.
OK Play highlighted video (see right column).
Information on high-resolution films in general
Due to technical limitations (e.g. interference, limited bandwidth), inter-
ruptions to playback up to and including complete termination of the
playback may occur when playing high definition film material (HD films)
on 720p format or above (1280 x 720 resolution or above).
Information on high-resolution films via wireless connection
High definition film material (HD films) from format 720p upwards (resolu-
tion 1280 x 720 or higher) should be played back via a wired connection.
If there is a wireless connection, then technical limitations (e.g. fault li-
ability, bandwidth limitations) can cause disruptions in the playback right
up to a complete breakdown of the playback.
Playback
➠ A video is selected.
OK Play highlighted video.
PAUSE button: Pause current playback.
PLAY button: Continue paused playback.
STOP button: Stop current playback and return to over-
view.
Video status bar
The video status bar provides you with further information about the
current playback.
INFO: Display/hide status bar/file information/context
information.
Pressing the INFO button the first time will show the video
status bar. Pressing a second time shows the file informa-
tion for the video. Pressing the INFO button again shows
the context information with operating instructions. The
displayed information is hidden again by pressing again.
END: Close displayed content.
Explanation of status bar symbols
The symbols (in the status bar top right) show you information about
the current playback.
ܕ Playback
ܔ Pause
ܓ
Rewind (speed 2x, 5x, 10x, 20x)
ܒ
Fast-forward (speed 2x, 5x, 10x, 20x)
The bar behind the playtime shows you how far the video has been played.
P+
P–
OK
OK
LOEWE_USB (USB)
video1.avi
video2.avi
video2.wmv
video3.avi
video4.avi
video5.avi
video6.avi
video6.wmv
video7.avi
video8.avi
video9.avi
Photo
Music
Video
View
Page חי
9LGHR Elements 17
Change view
ܕ
ܕ
VIDEO PLAYER
"Flower Exhibition"
Playtime: 02:13 (04:26)
Language/sound
Change size
Jump to ...
Downloaded From TV-Manual.com Manuals
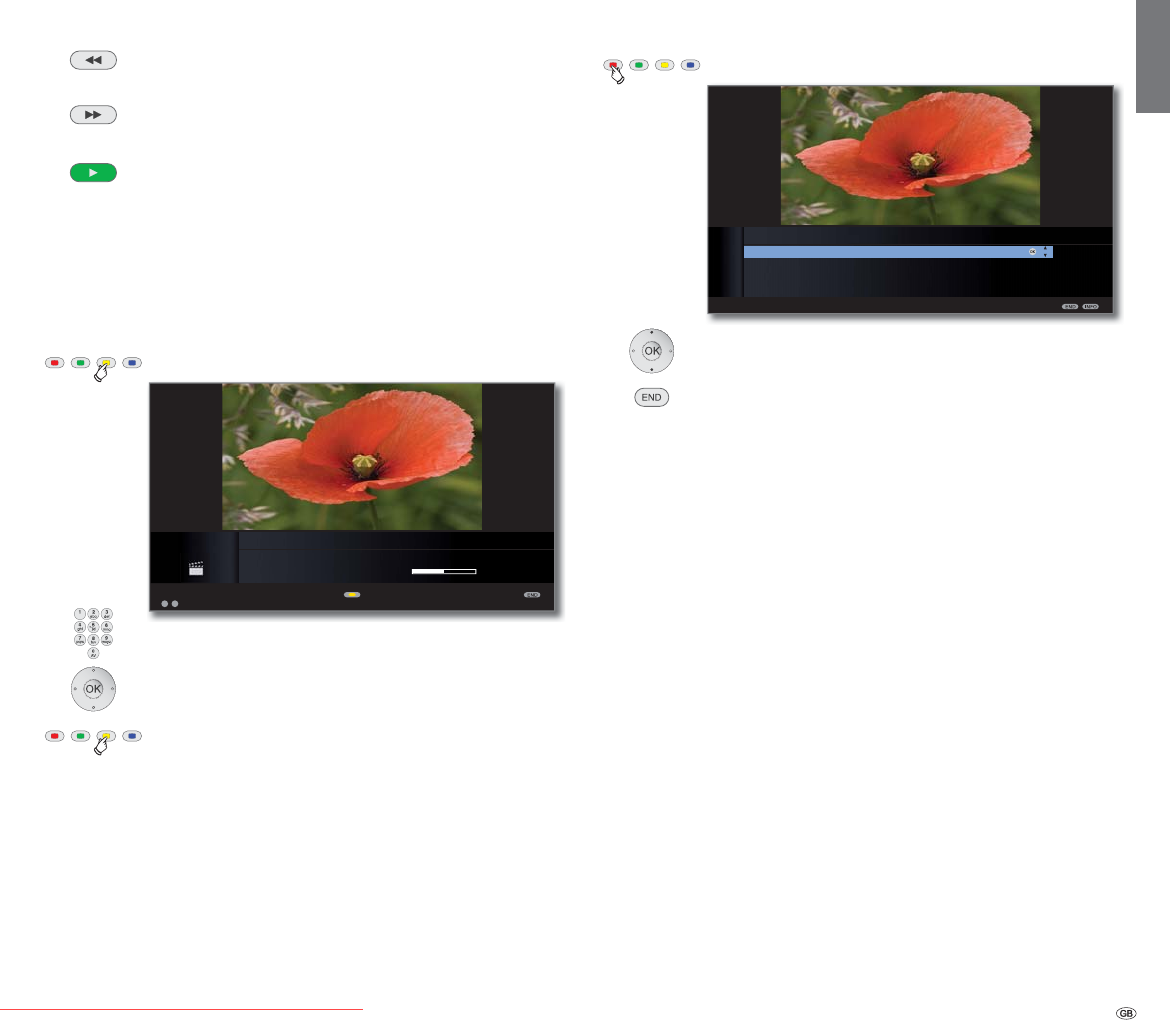
81 -
english
Wind
You can fast-forward/rewind videos to search for desired scenes.
Rewind at double speed.
Speed 2x, 5x, 10x, 20x.
Fast-forward at double speed.
Speed 2x, 5x, 10x, 20x.
PLAY button: Continue playback.
➠ In the case of Internet videos, please wait until these
are buffered in the memory. This can take a few
seconds, depending on the bit rate of the film and
internet speed.
Jumping
You can jump to any point in the video by entering a time.
Yellow button: opens jump to …..
Enter the desired time with the numberic buttons.
OK jumps to the time entered.
Yellow button: cancels the jump.
Select language/sound
Video files can contain several audio tracks.
Red button: selects language/sound.
Highlight the desired sound or language and
OK selects the audio track.
END: Cancels audio track selection.
Media+
OK
LANGUAGE/SOUND
130
129
128
131
ܕ
ܕ
09
-
VIDEO PLAYER
"Flower Exhibition"
Playtime: ??:??:?? (04:26)
Cancel jump
Enter time
Downloaded From TV-Manual.com Manuals
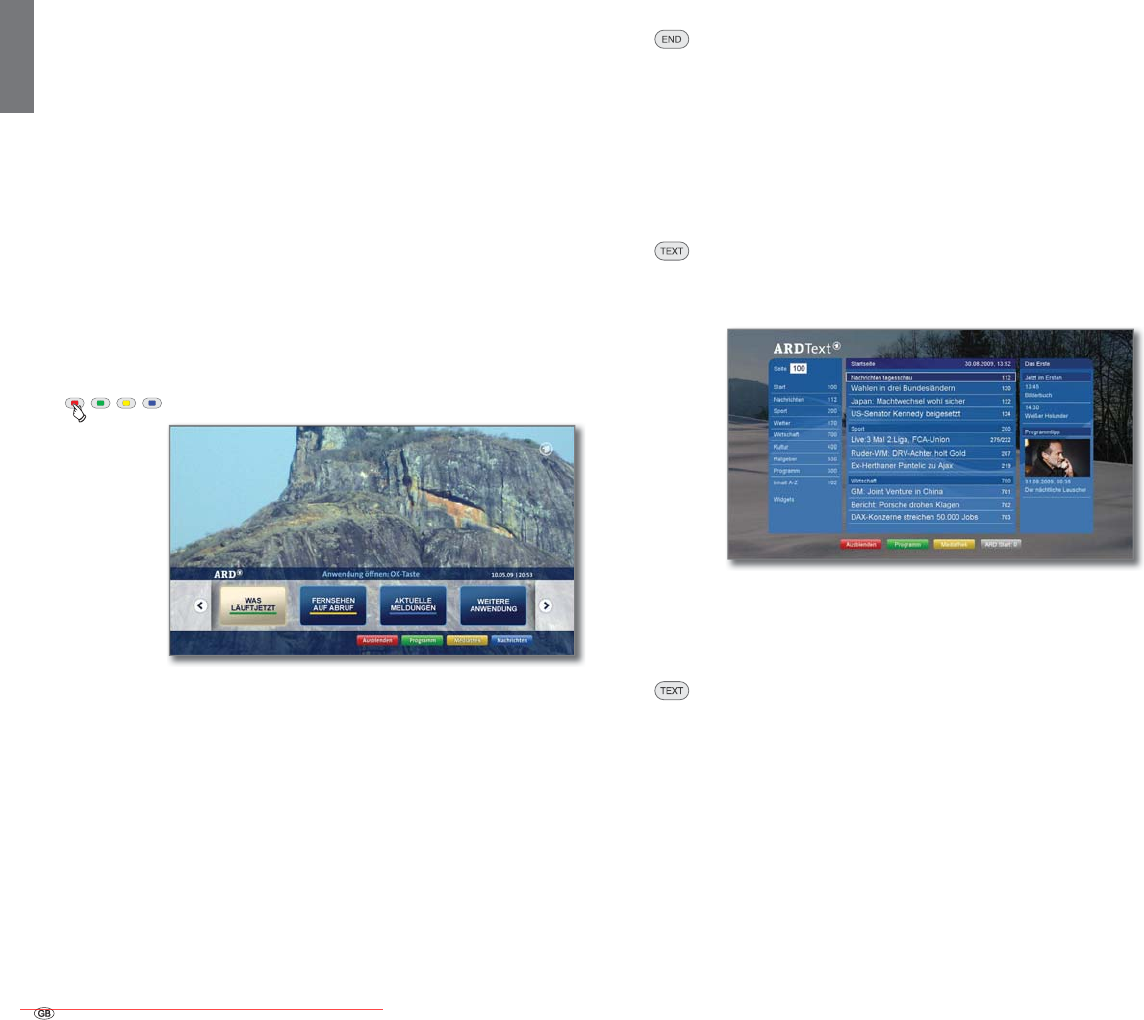
- 82
english
HbbTV / MediaText
HbbTV (1 (Hybrid broadcast broadband television) offers the user exten-
sive multimedia content, e.g. media libraries or additional information
on the programme that is currently playing (if these are available from
the current channel).
MediaText helps you to use the next generation of teletext/videotext
for HbbTV.
MediaText/HbbTV text can either be started directly or through an HbbTV
application.
Open HbbTV application
If an HbbTV application is available for the chosen channel after changing
channels, this will be loaded during the automatic start process (see page
83) and a red button symbol will appear. When starting manually, the
application will only be loaded by pressing the red button.
➠ HbbTV is offered by the selected channel.
➠ Connection to the Internet.
➠ HbbTV mode is set to on.
Red button: Load / display HbbTV application.
The appearance, key assignment and available functions
of the HbbTV applications are dependent on the provider.
Under certain circumstances, the recording and
bookmarking functions of the applications may not be
supported.
Loewe takes no responsibility for the accessibility,
functionality or content of HbbTV applications.
Hide / close HbbTV
END: Hide / close HbbTV application.
Depending on the start behaviour set (see page 83),
the HbbTV application will be hidden (automatically) or
closed (manually). In the start behaviour automatically,
you need to press the END button a second time for
closure. You will see a screen message after closing.
Open HbbTV text directly
➠ MediaText/HbbTV text is offered by the selected channel.
TEXT: Open HbbTV text.
Pressing the TEXT button again opens the “standard”
teletext/videotext (see page 52).
Navigation within the HbbTV text and how the coloured
buttons are assigned can vary depending on the provider.
Leaving HbbTV mode/standard teletext
TEXT: Pressing the TEXT button again ends teletext.
Media+
(1
Depending on the settings selected.
Downloaded From TV-Manual.com Manuals
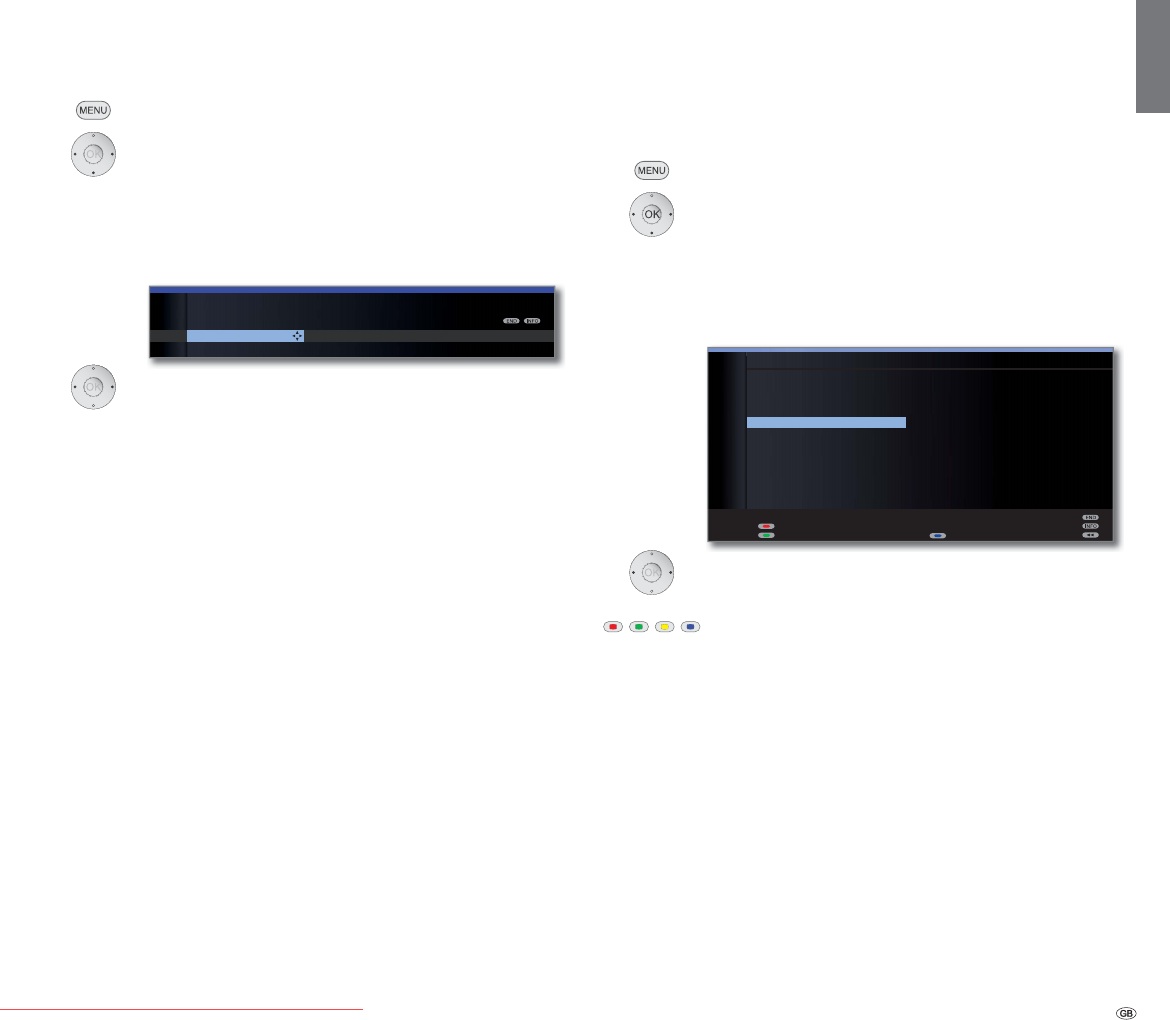
83 -
english
HbbTV mode on/off
When the HbbTV mode is active (factory setting), additional services and
further information (e.g. also from the Internet) can be viewed if these
are offered by the current station.
MENU: Call TV menu.
Select Settings,
go to the menu line below.
Select Miscellaneous,
go to the menu line below.
Select HbbTV mode,
go to the menu line below.
Set the changes.
➠ If the setting HbbTV mode ט off has been selected,
you can open the DR archive / video archive by press-
ing the red button.
Start behaviour of HbbTV-stations
If the setting HbbTV mode ט on has been selected (see left column), you
can specify if a available HbbTV application should be loaded automati-
cally after the channel has been changed or if this should only occur
manually after the red button has been pressed once. After loading the
HbbTV application, an on screen instruction is displayed (depending on
the channel that is being viewed).
MENU: Call TV menu.
Select Settings,
go to the menu line below.
Select Miscellaneous,
go to the menu line below.
Select Start behaviour of HbbTV-stations,
OK open.
Choose station.
Blue button: Change whole list / Change items individu-
ally.
Red button: Starts HbbTV on the selected channel Start
automatically / Start all automatically.
Green button:
Starts HbbTV on the selected channel Start
manually / Start all manually.
Media+
START BEHAVIOUR OF HBBTV STATIONS
Change whole list
'DV(UVWH۪
=')۪
57/7HOHYLVLRQ ۪
6$7 ۪
3UR6LHEHQ۪
92;۪
NDEHOHLQV ۪
DUWH۪
57/ ۪
6XSHU57/ ۪
'DV(UVWH+' ۪
=')+' ۪
6WDUWDXWRPDWLFDOO\۪
Start manually (l
DUWH+' ۪
$1,;(+' ۪
6HUYXV79+' ۪
(LQVIHVWLYDO ۪
$675$+' ۪
%D\HULVFKHV ۪
0'56DFKVHQ ۪
UEE%HUOLQ ۪
1'5)61'6 ۪
:'5.¸OQ ۪
KUIHUQVHKHQ ۪
65)HUQVHKHQ ۪
Start behaviour of HbbTV stations Check integrated
h
TV MENU
Settings
Miscellaneous
HbbTV mode
on ...
s
ettings
Downloaded From TV-Manual.com Manuals

- 84
english
About the Digital Recorder system
You can record stations on the integrated hard disk of your TV set with the digital recorder of your Loewe TV set (DR+).
The Digital Recorder can also process HDTV signals including the audio and auxiliary signals that they contain.
The various ways in which your Digital Recorder can be used are listed below.
Overview of functions
Digital Recorder function
Loewe TV sets
with integrated hard disk
(DR+)
Archive recording on the integrated hard disk z
Archive recording on the USB storage device (external hard disk) –
View other channels whilst the archive recording is taking place z
Archive playback from DR+z
Archive playback from USB storage devices (external hard disk) z
Delay TV in live play mode (timeshift) z
Subsequent archive recording z
Delay TV when archive recording is running z
View other channels with delay TV whilst the archive recording is taking place z
Copy recorded programmes onto an external recorder z
Copy recorded programmes from DR+ onto a USB storage device z
Copy recorded programmes from one USB storage device to another z
Permit recorded programmes to be viewed on the network z
View programmes that have been permitted to be viewed over the network z
DR archive view with cover pictures z
Highlight replay z
Set/delete manual bookmarks z
Hide parts of a recording z
zavailable
– not available
Digital Recorder
Downloaded From TV-Manual.com Manuals

85 -
english
TV viewing with time shift
In the case of devices with an integrated hard disk, the Digital Recorder
records the TV programme you are currently watching in the background
if DR continuous mode is switched on in the Digital Recorder menu
(factory setting).
➠ Time-shifted operation is perhaps not possible or only to a limited
extent for programmes of stations working with CI Plus encoding
(see page 109).
• Time shift
You can stop a TV programme at any time and continue playing it
later with a time shift. The maximum time shift is up to 3 hours. The
recording starts again from the beginning and the old content is
deleted every time you switch stations.
• Fast navigation by jumping
You can wind and rewind during a film at just the press of a button.
The jump distance is adjustable.
The Smart Jump function also ensures that the jump width is halved
each time the jump direction is changed or doubled after three jumps
in the same direction (max. 8 minutes). This way you can quickly find
a certain spot of the recording.
• Fast forward and rewind
You can fast forward and rewind at three different speeds in the
programme you are viewing with time shift.
• Slow motion
You can play a programme which you are watching with a time offset
at four different slow motion speeds.
• Subsequent archive recording
When viewing a time-shift TV programme, you can archive the whole
programme to the digital recorder’s archive.
• Setting bookmarks
During a football match, for example, you can flag goals or exciting
scenes. For this, the time shift recording is converted into an archive
recording. At a later viewing you can replay bookmarked sections of
a film as highlights. 30 seconds before and after the set bookmark
are played.
• Replay function
When, for example, you are watching live football, you can, at the
touch of a button, rewind by 40 seconds and replay a scene. You
see the live picture at the same time in a PIP picture (not for HDTV
broadcasts).
Digital Recorder archive
You can record movies you want to watch later in the Digital Recorder‘s
archive.
➠ Recordings of CI Plus encoded programmes are perhaps not possible
or only to a limited extent (see page 109).
If EPG or teletext data are available, the Digital Recorder stores the title
and additional information about each programme in the archive.
If additional languages are being transmitted for a DVB broadcast, these
are also recorded. DVB subtitles or teletext subtitles are recorded if the
recording of subtitles has been activated in the Digital Recorder settings.
Display language selection and subtitles as in TV mode.
Start playback of your recordings from the archive.
If bookmarks were set in a recording, these entries are marked accord-
ingly (ܑ). You can start playback so that the bookmarks are played as
highlights (see page 102).
Comfortably select your favourite programme for recording from the EPG
or teletext and watch the programmes later from the Digital Recorder’s
archive.
An automatic Delete Manager always ensures there is sufficient recording
space for new movies (see page 96).
• Sort titles
You can have the broadcasts displayed according to time, alphabeti-
cally or by station name. You can therefore quickly find the recording
you want to watch.
• Rename/edit titles
You can change the title of a programme in the archive, if necessary.
• Parental lock
Protect your archive against unauthorised access by using the parental
lock feature.
• Delete protection
Set the delete protection for a movie to prevent it from being deleted
automatically by the Delete Manager (see page 96).
• Copy
Using time control, copy films from the archive of the digital recorder
to the external DVD recorder or onto external hard disks.
Digital Recorder
Downloaded From TV-Manual.com Manuals

- 86
english
Archive recording
➠ To record encoded programmes, please also read the instructions on
pages 108 and 109.
You can playback a recorded programme from the archive at the same time
as recording a TV programme into the archive. You can also play the same
programme you are currently recording with a time shift.
• Immediate recording
Record interesting programmes directly into the DR archive with the
RECORD button. When viewing time-shift broadcasts (see page 85)
the current broadcast can be saved to the DR archive. The programme
is recorded from the beginning to the end of the time offset recording
or to the end of the set recording time.
• Timer-controlled recording
Comfortably select your favourite programme for recording, from the
EPG or teletext. The timer overview has room for 50 entries. Watch the
programmes later from the Digital Recorder‘s archive.
• Serial recording
You can conveniently programme series broadcast with alternating start
times.
In some broadcast networks (like UK FreeView) you can even let the TV
set record series and split events automatically depending on the infor-
mation provided by the broadcaster. A conflict manager (see page 14)
will also automatically try to find alternate instances of conflicting
recordings if signalled by the broadcaster (e.g. UK FreePlay).
• Time shift viewing with archive recording
If you have programmed recording and come home before it is finished,
you can watch the movie with a time shift while the rest is still being
recorded.
Archive playback
All the recorded programmes can be selected in the archive and played.
During archive playback, another programme can be recorded into the
archive.
• Fast forward and rewind
There are three different speeds for winding and rewinding films.
• Fast navigation by jumping
You can fast forward and rewind during a film at the touch of a button.
The jump width is adjustable (see page 87).
The Smart Jump function also ensures that the jump width is halved
each time the jump direction is changed or doubled after three jumps
in the same direction (max. 8 minutes). This way you can quickly find
a certain spot of the recording.
• Slow motion
You can use playback at four different slow motion speeds.
• Bookmarks
To find interesting scenes in a movie later, you can manually set the
bookmarks. In addition, there are also automatically set bookmarks every
time a broadcast is changed. You can jump to each of the bookmarks in
succession at the press of a button.
• Playing highlights
For recordings with manually set bookmarks you can limit the playback
only to the highlights. You then see the scenes 30 seconds before
and after each set bookmark. If there is more than one bookmark the
highlights are played one after the other.
• Cut/Hide functions
Unwanted sections at the beginning and ending of a recording are easy to
delete. Set hiding marks around uninteresting sections to watch a movie
without interruptions or to archive it on DVD.
• Copying your recordings
You should burn recordings that you want to save permanently on
DVD or copy them on an external USB hard disk. Afterwards, you can
delete the recording from the archive.
➠ Copying recordings, which originate from a CI Plus encoded station,
is perhaps not possible or only to a limited extent (see page 109).
Technical information
Switching off the TV set with the mains switch during operation or an
inadvertent disruption to the power supply (e.g. power failure) can cause
damage to the hard disk file system and hence loss of the recorded
broadcasts. Always first switch your TV set to standby mode (press On/
Off button on the remote control or switch-off button in the middle
of the operating eye on the TV set), before switching off at the mains
switch. Do not disconnect the USB storage device from the TV set under
any circumstances whilst it is being copied onto.
However, if unexpected problems occur when operating the hard disk,
formatting the hard disk may rectify this. Refer to the instructions on
page 107. Also follow the information for formatting on page 107
when using an external USB disk
Digital Recorder
Downloaded From TV-Manual.com Manuals
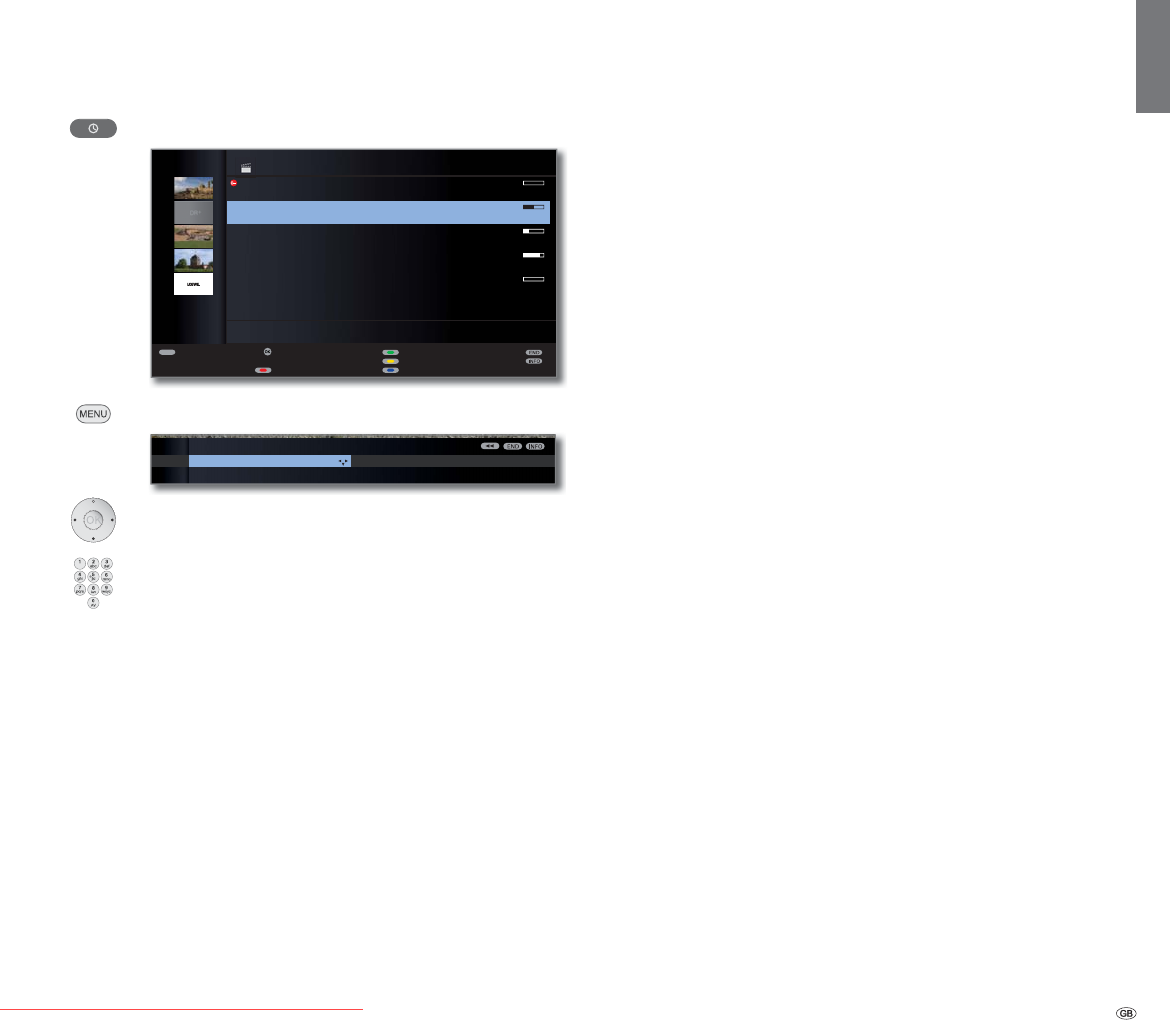
87 -
english
Settings
You can make a few settings in the Digital Recorder menu to adapt the
Digital Recorder to your requirements.
Call Digital Recorder menu
Call DR archive.
MENU: Call Digital Recorder menu.
Choose a setting,
switch to the menu line below.
Set or enter using the
numeric buttons of the remote control.
Explanation of the setting facilities
Select the storage medium whose accessible content is
to be displayed in the DR archive.
➠ The menu item only appears if several storage devices
are available (for external hard disks and TV devices
that are capable of permitting DR archive programmes
to be viewed on the network, see page 105 onwards).
If DR continuous mode is switched on, the programme
being watched is recorded permanently in the back-
ground.
Factory setting: on.
Adjust the recording quality for recording analogue pro-
grammes. This results in a change in the recording capacity.
Factory setting: high.
Explanation of the setting facilities (continue)
Display DR archive entries with or without covers.
For determining covers, see page 104.
Factory setting: With cover pictures.
➠ If you watch the broadcast during recording (e.g. for di-
rect recording), a cover will automatically be adopted.
A broadcast whose recording is running completely
in the background is initially saved without a cover.
If an entry has been hidden in an archive recording (see
page 99), you can be informed by a screen message
when skipping a hidden area.
Factory setting: yes.
Set the standard jump width (in minutes) used for jumping
forwards or backwards in the film by pressing or .
Use the numeric buttons on the remote control to enter
the time (always two-digit for 01 to 15 min.).
Factory setting: 04 min.
➠ If Smart Jump is activated, the jump width can only be
set between 1 and 4 minutes.
Activate or deactivate Smart Jump function (see page 89).
Factory setting: yes.
A broadcast programmed with the recording type Serial
is recorded only if it begins within the programmed start
time ± series recording tolerance. Use the numeric buttons
on the remote control to enter the time (always two-digit
for 01 to 60 min).
Factory setting: +-30 min.
➠ Serial recording tolerance is ignored when recording a
programme with auto time control (see page 95).
Select here whether subtitles are to be recorded in
continuous operation for DVB stations.
Factory setting: no (1 .
The TV set can possibly already record decoded pro-
grammes in DR-continuous operation that have been
watched as time-shifted encoded programmes. Recording
the programme directly into the DR archive saves you
having to descramble it later.
Factory setting: no (2.
See page 88.
(1 for location of TV set DK, FIN, N or S: yes.
(2 for location of TV set NL: yes.
Select memory
medium
DR continuous
operation
Recording
quality
DR archive
view
Inform about
hidden
sections
Jump distance
Smart Jump
Serial
recording
tolerance
Record
subtitles at DR
continous
operation
Descrambling at
DR continuous
operation
DR+ Streaming
settings
TEXT
OK
۩
-
Top-Movie 1
15.09. Sky Cinema HD
Bon(n) jour Berlin
14.09. Phoenix
da capo
31.08. Das Erste
Tagesschau
29.07. 3sat
Individual
00.00. LOEWE.
09:45 - 10:00
DR ARCHIVE free capacity 68:42 hrs
Edit/protect
Delete/copy
Change sorting
Detail View
Timer list
DR continuous operation Recording quali
DIGITAL RECORDER MENU
Select memory medium
Integrated hard disk
...
Digital Recorder
Downloaded From TV-Manual.com Manuals
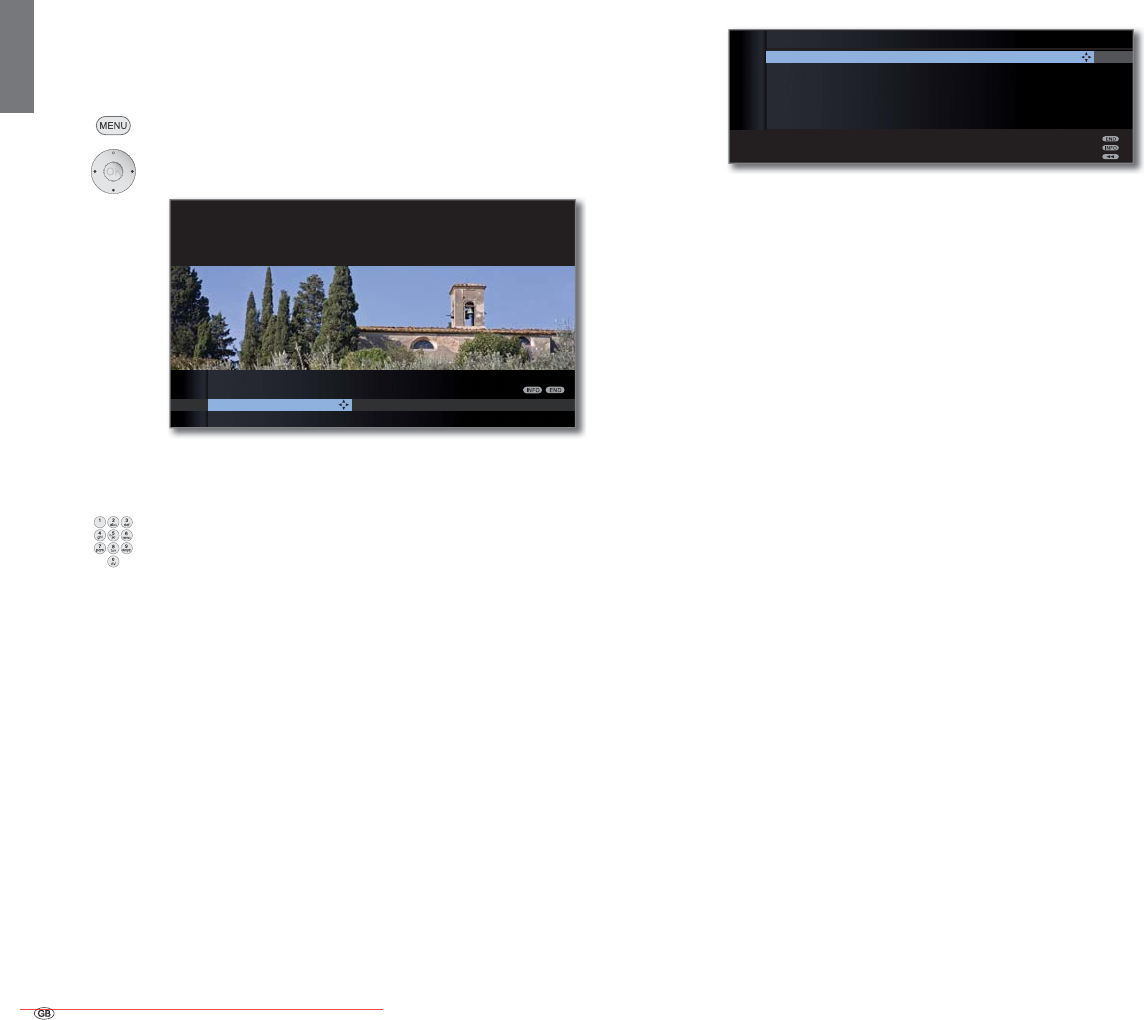
- 88
english
Setting the pre-record and post-record time
You can set a pre-record and post-record time for timer recordings made
without VPS (analogue) or auto time control (DVB) (see also page 108).
This minimizes the risk that a part of the broadcast is not recorded due
to the broadcast starting earlier and/or finishing later.
MENU:
Call TV menu.
Choose Recording,
switch to the menu line below.
Set pre-record or post-record time,
switch to the menu line below.
Enter the time using the numeric buttons (always 2-digit:
01 to 15 mins for pre-record time; 01 to 60 mins for
post-record time). Factory setting: pre-record: 00 min,
post-record: 05 min.
DR+ Streaming settings
Enter here whether recorded broadcasts within your TV
set’s DR archive are to be accessible for viewing from
other TV sets (server function).
Setting yes enables you, via the DR archive, to also view
recordings from other TV sets that have accessible films
within the home network (client function).
Give your TV set a unique name for quick identiÆ cation
in DR+ Streaming.
Give a name for your TV set group.
Using different group names enables you to group your
TV sets as required. Only TV sets under the same group
name can exchange data.
IP port numbers are preset ex-factory. Under normal
circumstances they do not require amending.
Set here how long your TV set is to continue to give access
to Æ lms after calling DR+ Streaming within the MediaPor-
tal (refer also to the operating instructions of the TV set).
This stand-by period is also activated as soon as data
exchange to another TV set has been completed.
Post-record time Recording wizardlist
PRE-RECORD TIME
If you record a programme without VPS, you can enter a time span here
specifying how long before the scheduled time your programmed recording
should start so that programmes which begin too early are recorded
in full.
TV MENU
Recording
Pre-record time
00 min (0 - 15)
DR+ STREAMING SETTINGS
Share the DR archive with other TVs yes
Using the DR archives of other TVs yes
DR device name LOEWE TV
DR device group name Home
IP port number 17123
DR standby 2 hrs
no
Share the DR
archive with
other TVs
Using the DR
archives of
other TVs
DR device
name
DR device
group name
IP port
number
DR standby
Digital Recorder
Downloaded From TV-Manual.com Manuals
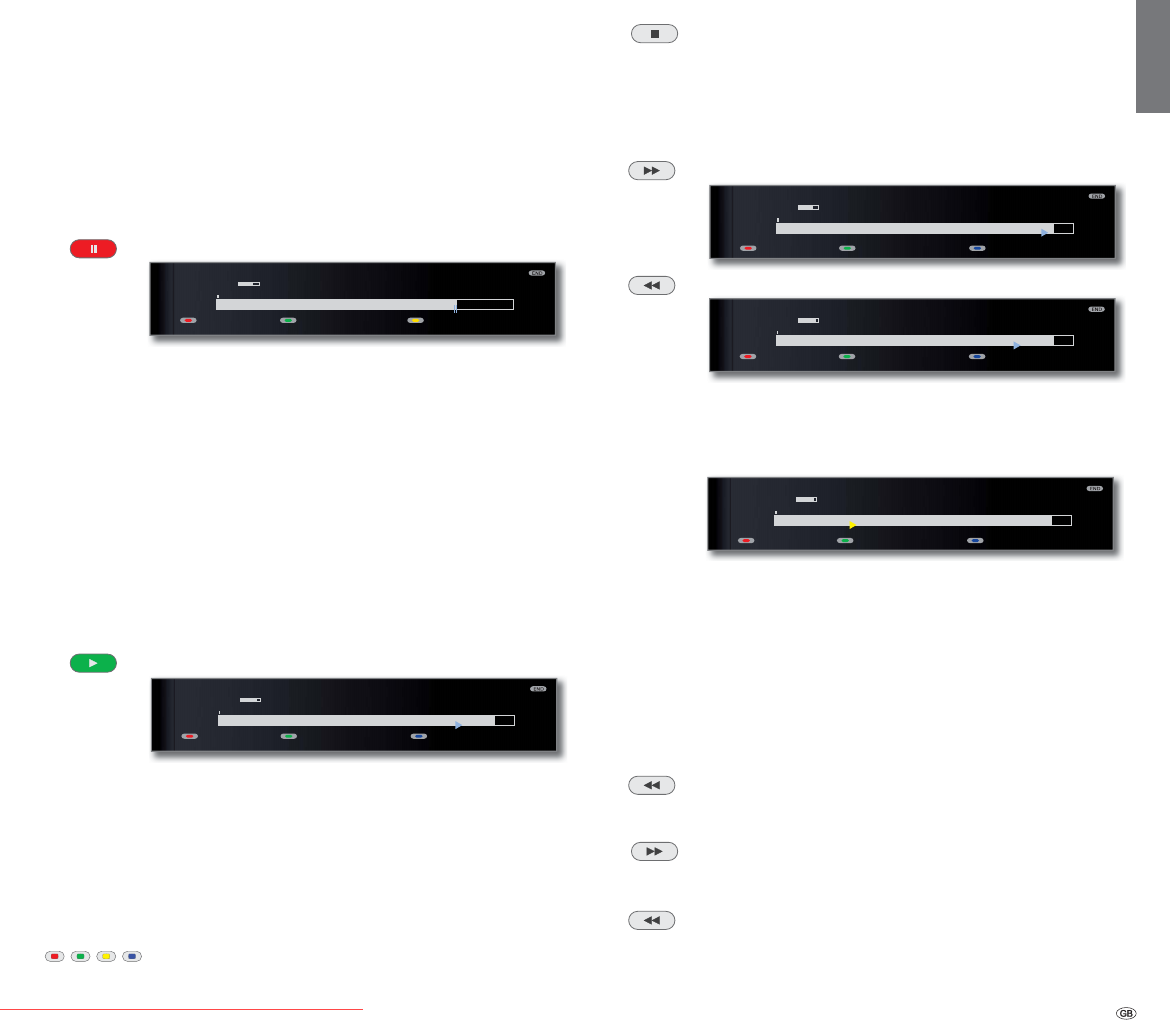
89 -
english
TV viewing with time shift
The Digital Recorder continuous operation is switched on as the factory
default setting (see page 87). In this case, the TV broadcast that you
wish to view is automatically recorded in the background. The maximum
time shift is up to 3 hours.
➠ Please also read the instructions on watching time-shifted television
on page 85.
➠ Programmes with copy protection (e.g. Macrovision) cannot be
watched with a time shift for legal reasons.
Interrupt
Press PAUSE button.
The TV image becomes a freeze frame and the DR status
display appears.
At the top you will see the number and name of the
station if EPG or teletext data are available, in addition
to the start and end of the current programme and the
title of the programme.
On the left hand side of the bar you can see the start time
for time shift recording. On the right hand side of the bar
you can see the time at which the time shift recorder will
be full (automatically extends by 30 minutes, up to a max.
3 hours). The bar shows the amount of available record-
ing capacity already used. The time displayed inside the
bar is the time at which the Pause button was pressed.
Continue ( time shift viewing)
Press PLAY button.
You can now watch the TV programme with a time shift
from the time you pressed the PAUSE button. The Playback
symbolappears in place of the Pause symbol.
Jump to automatically set bookmarks
With time-shift television, and with the status display showing, you can
skip to automatically set bookmarks or to the start or end of the cur-
rent recording. White bookmarks mark the beginnings and endings of
broadcasts.
Red button: Jump back
Blue button: Jump forwards
Switch to live picture
Press STOP button.
You see the station’s live picture again.
Jumping
You can jump during time shift viewing by briefly pressing the buttons
in the jump distance set; this enables you to skip uninteresting
sections quickly.
Jump forwards.
Jump backwards.
Smart Jump
If Smart Jump is activated, the jump width is halved every time you change
the jump direction. The jump width is doubled if you jump more than
three times in the same direction (max. 8 min.).
: Jump width corresponds to the jump width preset
in the Digital Recorder menu.
: Jump width is less than preset in the Digital Recorder
menu (e.g. after changing the jump direction).
: Jump width is greater than preset in the Digital
Recorder menu (e.g. after jumping three times in the
same direction).
For example, you are searching for the beginning of a broadcast that
has already started.
Press repeatedly to jump back.
If you have jumped past the beginning of the programme,
jump in the opposite direction:
This jump in the opposite direction is only carried out
for half the jump distance. Jump forward using .
If you have jumped past the start of the programme:
Jump back again. In the process, the jump distance
is cut in half again.
By halving the jump distance when changing direction
again you can find your way to a specific place.
09:5609:45 10:00
Follow me
3KRHQL[6WHUHR܃
09:45-10:00 Bon(n) jour Berlin
DR archive Language/sound
09:5609:45 10:00
3KRHQL[6WHUHR܃
09:45-10:00 Bon(n) jour Berlin
%RRNPDUNז %RRNPDUNטLanguage/sound
09:5809:45 10:00
3KRHQL[6WHUHR܃
09:45-10:00 Bon(n) jour Berlin
DR archive Language/sound %RRNPDUNט
09:5609:45 10:00
3KRHQL[6WHUHR܃
09:45-10:00 Bon(n) jour Berlin
%RRNPDUNז %RRNPDUNטLanguage/sound
09:4909:45 10:00
3KRHQL[6WHUHR܃
09:45-10:00 Bon(n) jour Berlin
%RRNPDUNז %RRNPDUNטLanguage/sound
Digital Recorder
Downloaded From TV-Manual.com Manuals
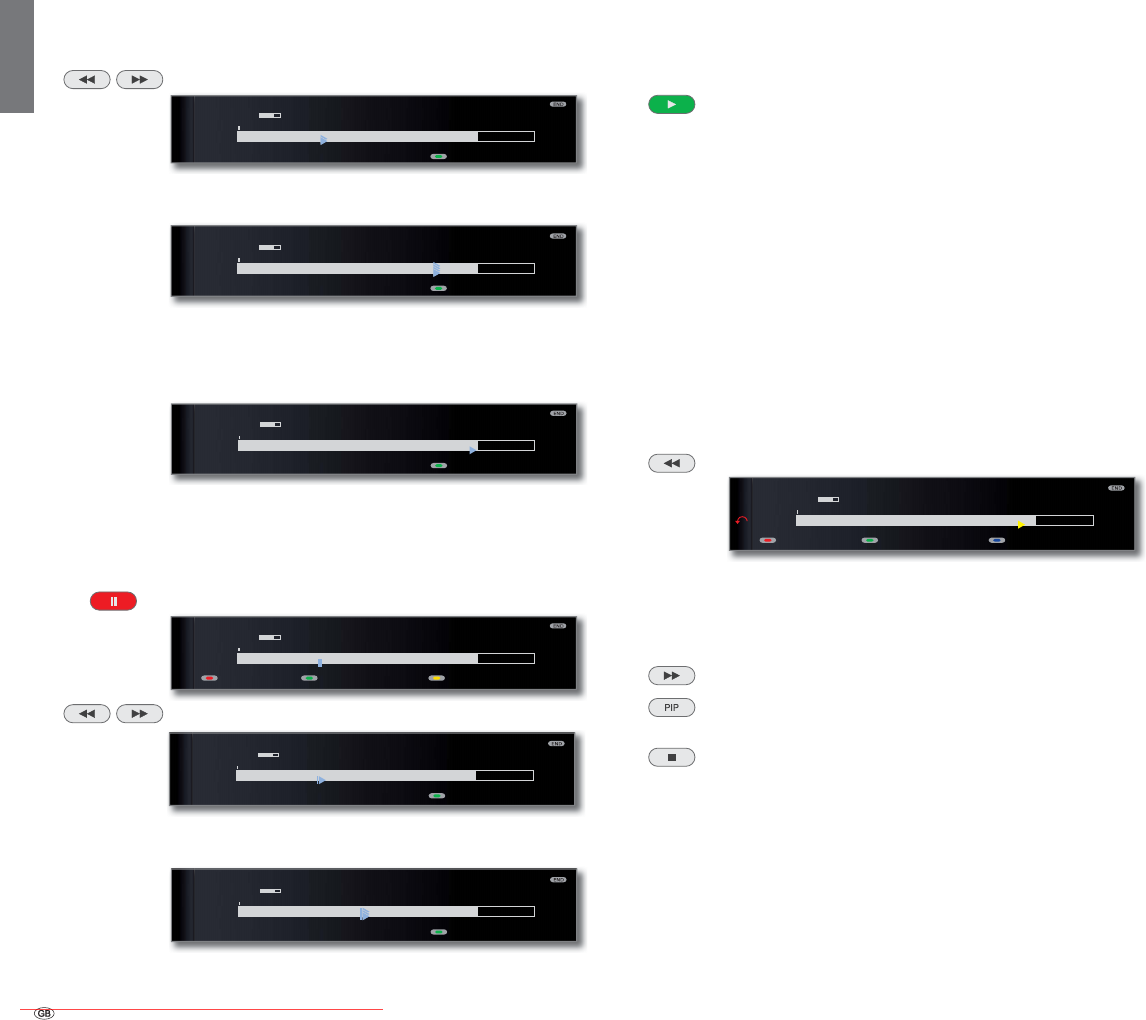
- 90
english
Fast forward and rewind
During time shift viewing you can fast forward and rewind at three dif-
ferent speeds. Sound is not audible during winding.
Press or for a little longer.
By briefly pressing or , the speed will increase until
you switch back to the first speed.
Playback begins automatically upon reaching the end of
the recording. You are then about 10 seconds behind the
live picture or when rewinding at the beginning of the
time shift recording.
Slow motion
If Pause is active (freeze picture) you can play at four slow-motion speeds.
Sound is not audible during slow motion. When viewing HDTV slow mo-
tion backwards is not possible.
Press PAUSE button.
Press or briefly.
Increase speed:
Press or several times briefly.
The speed increases every time you press the button until
eventually switching back to the initial speed.
Highlight function
You can mark interesting scenes in sports reports for example to watch
these again specially at a later viewing.
You can set bookmarks in time-shift TV or during live viewing.
Press PLAY button for a little longer: Set bookmark.
The time shift recording that is already active in the back-
ground is converted into an archive recording. You will see
a message on the screen. Every time the PLAY button is
pressed down again a little longer, a new bookmark is set.
➠ If there is no teletext or EPG programme information,
the Recording duration menu will appear the first time
you press the PLAY button. Select the desired record-
ing duration and confirm using OK (see page 91).
Recordings which contain manual bookmarks can be
replayed as highlights (see chapter Archive playback on
pages 98 and 102).
Replay function
You can watch interesting scenes of sports reports again for example
(only in live picture).
Press button .
The set jumps back 40 seconds into time shift mode. The
playback flag is yellow (Smart Jump active).
At the same time, the live image is shown as a PIP small
picture (not with HD stations).
Button : Skip forwards 20 seconds.
PIP button: Close PIP picture, without quitting the
time-shift playback.
STOP button: End replay function and return to live
picture.
Switch to a different station
The time offset recording is restarted when you change stations. The
previous time offset recording is deleted.
09:5209:45 10:00
3KRHQL[6WHUHR܃
09:45-10:00 Bon(n) jour Berlin
Language/sound
09:5509:45 10:00
3KRHQL[6WHUHR܃
09:45-10:00 Bon(n) jour Berlin
Language/sound
09:5709:45 10:00
3KRHQL[6WHUHR܃
09:45-10:00 Bon(n) jour Berlin
Language/sound
09:4909:45 10:00
Follow me
3KRHQL[6WHUHR܃
09:45-10:00 Bon(n) jour Berlin
DR archive Language/sound
09:4909:45 10:00
3KRHQL[6WHUHR܃
09:45-10:00 Bon(n) jour Berlin
Language/sound
09:5209:45 10:00
3KRHQL[6WHUHR܃
09:45-10:00 Bon(n) jour Berlin
Language/sound
09:5509:45 10:00
3KRHQL[6WHUHR܃
09:45-10:00 Bon(n) jour Berlin
%RRNPDUNז %RRNPDUNטLanguage/sound
Digital Recorder
Downloaded From TV-Manual.com Manuals
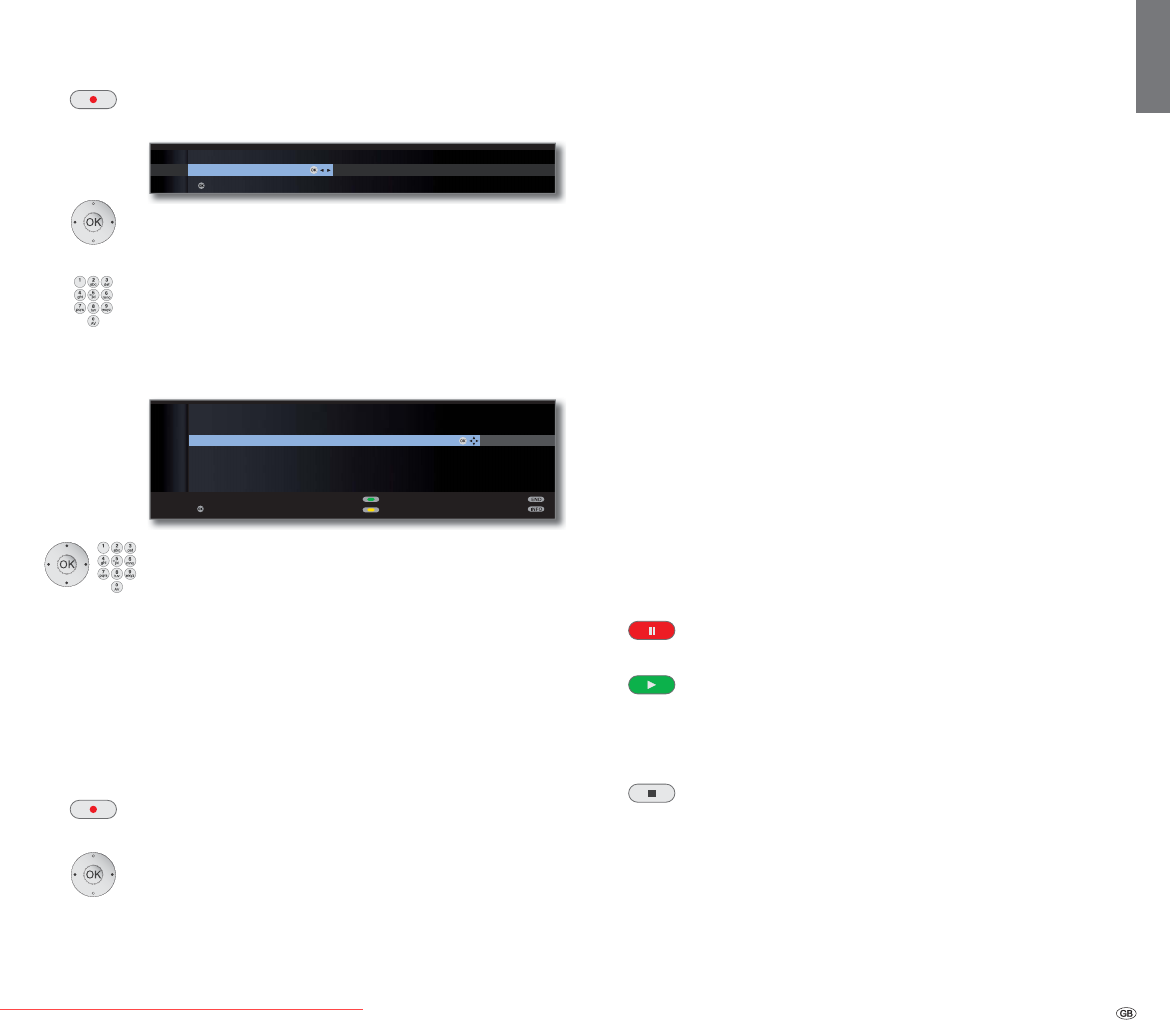
91 -
english
Archive recording – Direct recording
➠ For recording encrypted broadcasts, please also refer to the informa-
tion on pages 108 and 109.
Press RECORD button briefly: Start direct recording.
The Recording duration selection is called.
Select desired recording time.
current programme: The broadcast being watched is
adopted in the DR archive.
??? : Manually enter the recording dura-
tion with the numeric buttons of the
remote control.
OK Confirm. Call Timer data.
Check the timer data, change if necessary and confirm
with OK. The recording is started.
See page 95 for explanations of the setting options in the Timer data
menu.
One Touch Recording
With One Touch Recording, the recording starts immediately at the press
of a button. You only need to specify the recording time. There is no
need to select the recorder (e.g. DVD recorder). The programme is always
recorded onto the integrated hard disk.
Press RECORD button longer: Start One Touch Recording.
The Recording duration selection is called.
Select desired recording time,
OK confirm.
➠ When the start of the broadcast has been recorded, the broadcast will
be adopted from the beginning (only when DR continuous operation
is activated, see page 87). Otherwise, recording begins at the point
from which viewing of the broadcast began.
➠ With DR continuous mode activated (see page 87), you can also
adopt a viewed and finished broadcast to the archive provided there
has been no change of broadcast in between. Skip or wind to the
desired broadcast and start the recording with current programme
(see left column).
During the archive recording, the bar showing the recording progress
is red and the REC message is shown for a current archive recording.
➠ Scrambled programmes are recorded according to the presetting in
the Digital Recorder menu ט Descrambling at DR continuous opera-
tion. If yes is set, no other programme can be viewed during direct
recording of a scrambled programme.
➠ If the presetting in Descrambling at DR continuous operation is changed
while you are watching a scrambled programme, the time offset
recording is restarted. The previous recording is deleted.
Setting bookmarks during archive recording
During immediate recording or a running timer recording, you can set book-
marks at interesting sections (press the PLAY buttonfor a little longer). You
will see a screen message. This enables you to find this part of the recording
quickly during playback. You can set up to 15 bookmarks per recording.
Time shift viewing during archive recording
PAUSE button: Change to freeze frame.
The recording is continued in the background.
PLAY button: Continue playback.
You will now see the time-shift archive recording.
Skipping, rapid winding and rewinding and slow motion function as de-
scribed in the chapter TV viewing with time shift (pages 89 and 90).
STOP button: End time shift and return to the live image.
OK
OK
30 60 90 120 180 240 ???
RECORDING DURATION (MIN.)
current programme
confirm
OK
OK
OK
TIMER DATA
09:45 Bon(n) jour Berlin
Parental lock
Set delete protection
confirm
AVRecorder DR
Station 45 Phoenix
Date 05.02.2010
Recording time 09:45 until 10:00
Recording type once only
Digital Recorder
Downloaded From TV-Manual.com Manuals
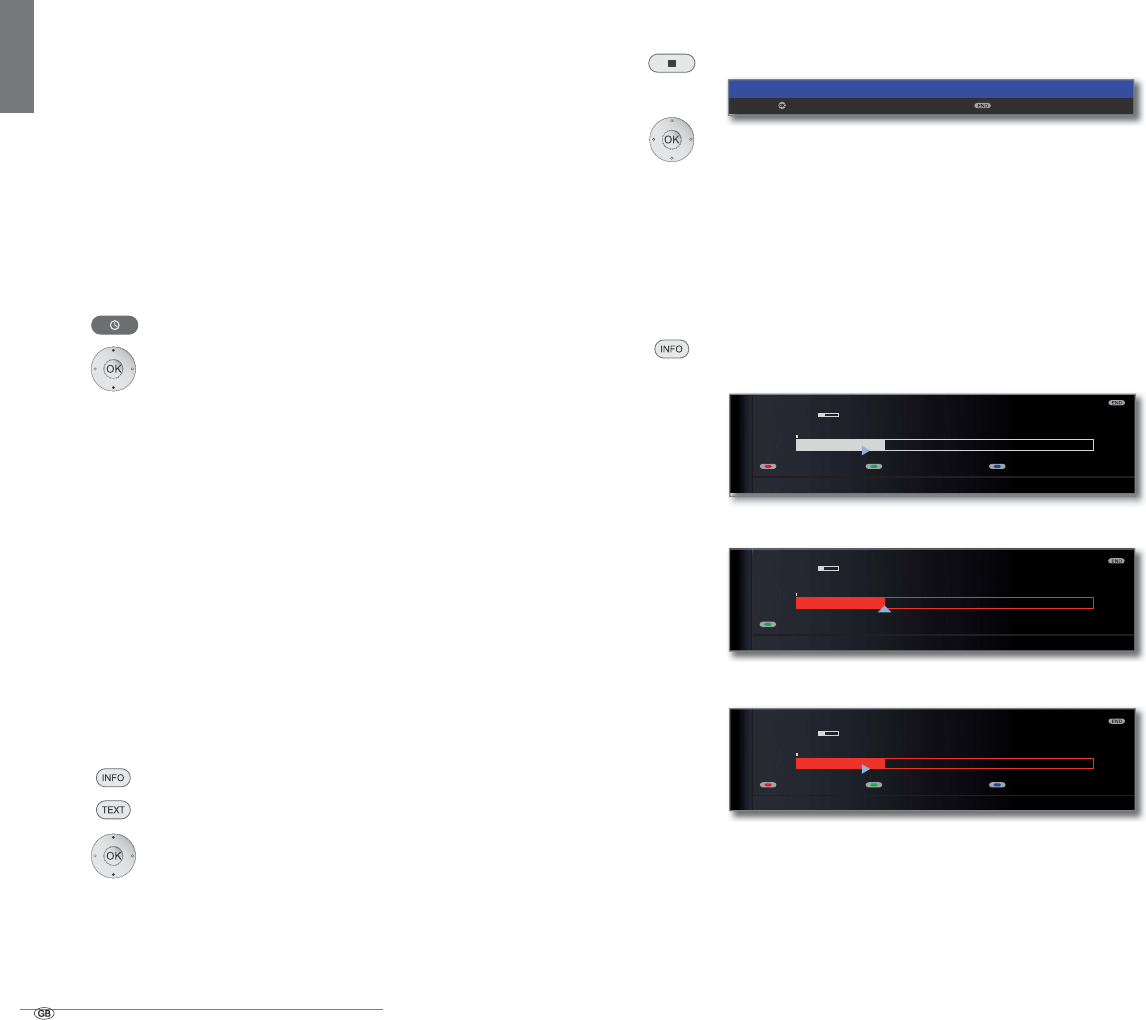
- 92
english
Watching other stations during archive recording
After you have started the recording, you can switch to another station.
The recording process is continued in the background.
➠ The second channel can be watched in delay TV whilst a recording
is taking place (Timeshift during archive recording, see also delay TV
on page 89).
➠ If an encrypted programme is recorded with the option Descrambled
recording ט yes, the CA module required for decoding is used for
the recording. In this case you cannot watch any other encrypted
programme.
Viewing another movie from the archive during archive recording
After you have started the recording, you can also watch a programme
you have already recorded.
Call DR archive.
Select recording,
OK view film.
➠ If an encrypted programme is recorded with the option Descrambled
recording ט yes, the CA module required for decoding is used for
the recording. In this case you cannot watch any other encrypted
programme from the archive.
Switching off the TV set during recording
You can switch off the TV to standby whilst recording. The recording is
continued in the standby mode. The display on the set shows orange.
➠ Never switch the TV set off at the mains and do not pull out the plug
of the TV set out of the socket. Otherwise the recording will be lost!
Subtitles
If subtitles are transmitted, these are recorded.
➠ The recording of subtitles in DR continuous mode must be switched
on in the Digital Recorder menu (see page 87).
Call subtitles in later playback:
INFO: Show status display (see right column)
TEXT: Call subtitle selection.
Select desired subtitles.
OK Show subtitles.
Stop recording early
You can end a current archive recording prematurely.
Press STOP button.
OK Stop recording.
The recording process is ended. The material recorded up
to this point is saved on the hard disk and can be played
back via the DR archive.
You can also end a running recording by deleting the
entry in the timer overview or in the DR archive. See page
96 for further information.
Status display during time shift and archive recording
INFO: Show status display.
Display with time shift:
Display with live picture during an archive recording:
Display with time shift during an archive recording:
09:45
۫
10:0509:51
REC
3KRHQL[6WHUHR܃
%RQQMRXU%HUOLQ
7LPHVKLIWPLQ
%RRNPDUNז /DQJXDJHVRXQG %RRNPDUNט
09:45
۫
10:05
3KRHQL[6WHUHR܃
%RQQMRXU%HUOLQ
/LYHSLFWXUH
/DQJXDJHVRXQG
09:45
۫
10:0509:51
3KRHQL[6WHUHR܃
%RQQMRXU%HUOLQ
7LPHVKLIWPLQ
%RRNPDUNז /DQJXDJHVRXQG %RRNPDUNט
OK
Stop recording Don't stop recording
Digital Recorder
Downloaded From TV-Manual.com Manuals
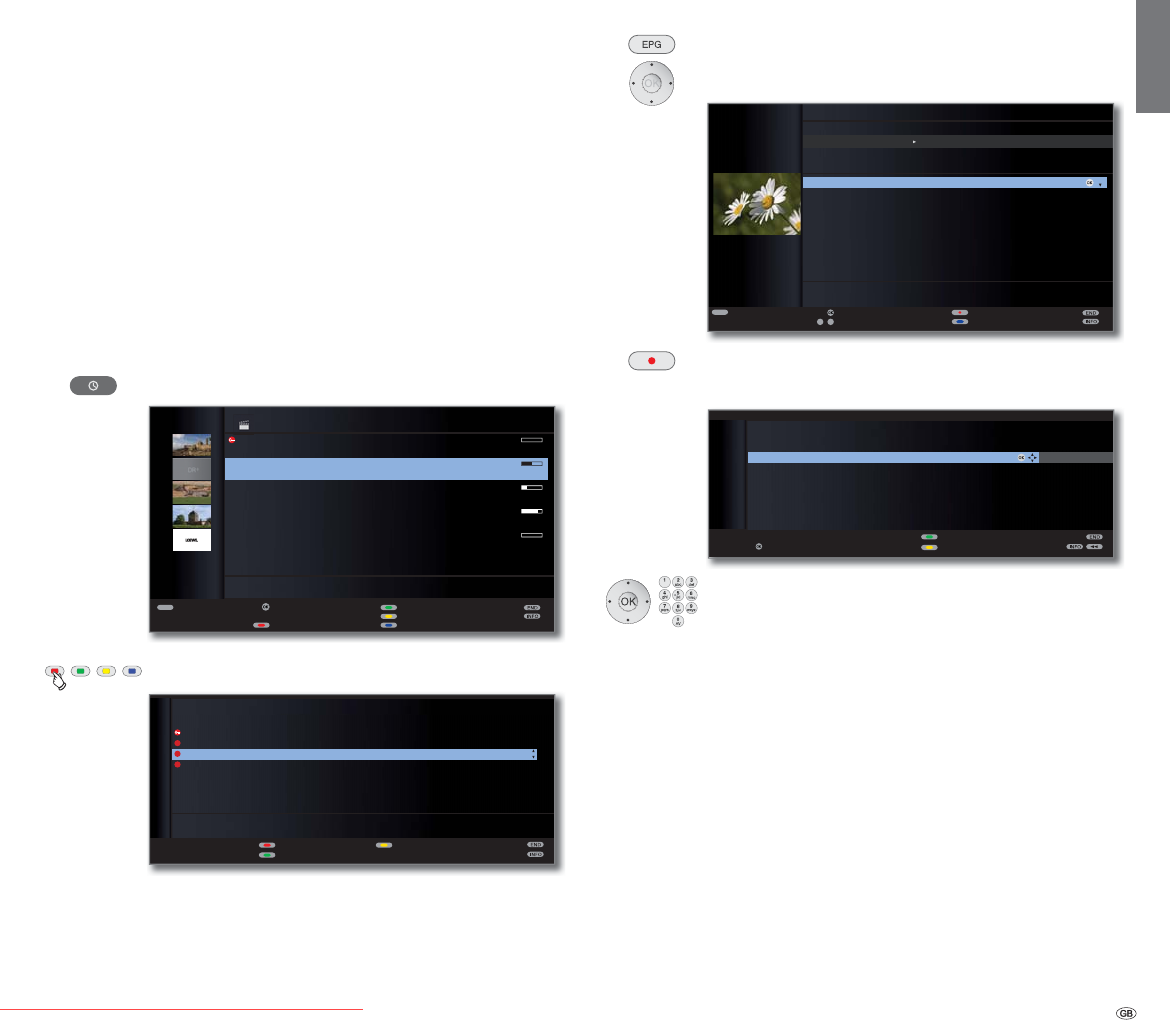
93 -
english
Archive recording – Timer recording
➠ For recording encrypted broadcasts, please also refer to the informa-
tion on pages 108 and 109.
You can programme timer recordings for the Digital Recorder conveni-
ently using the EPG, teletext or manually. Up to 50 simultaneous timer
entries are possible.
When you have programmed timer recordings, the TV set can only be
switched off to the standby mode. Never switch the TV set off at the mains
and do not pull out the plug of the TV set out of the socket. Otherwise
no timer recordings can be made!
Programmed timers for the Digital Recorder are displayed in the timer
overview.
The code DRטDR appears instead of the programme name in front of
the entry for scrambled recordings still to be descrambled.
For an explanation of the symbols in the timer list see the chapter The
direct way to record on page 124.
Call DR-archive.
Red button: Call Timer list.
A red dot with a key symbol appears in front of the entry
for scrambled recordings still to be descrambled.
Programming a timer recording with the EPG
Call EPG.
Flag the broadcast to be recorded.
RECORD button: Programme the recording of a broadcast.
Timer data dialogue is opened.
Check the timer data and change it if necessary.
OK Confirm timer data. The broadcast is entered into
the timer overview.
See page 95 for explanations of the setting options in the Timer data
menu.
In the EPG a red dot is set in front of the title of the programme.
If a broadcast is already marked with a red dot, you can re-delete the pro-
grammed timer entry using the RECORD button. The red dot disappears.
Aktuelle NachrichtenAktuelle Nachrichten
7,0(5/,67
)UL
)UL DUWH ۪r*HR5HSRUWDJH
6DW 6N\ )X¡EDOOOLYH
۰ 57/ 8QWHUXQV
ܱ =') KHXWH
7XH VDWZLVVHQVSH]LDO
1HZHQWU\
&KDQJHUHFRUGLQJ
'HOHWHUHFRUGLQJ
TEXT
OK
۩
-
Top-Movie 1
15.09. Sky Cinema HD
Bon(n) jour Berlin
14.09. Phoenix
da capo
31.08. Das Erste
Tagesschau
29.07. 3sat
Individual
00.00. LOEWE.
09:45 - 10:00
DR ARCHIVE free capacity 68:42 hrs
Edit/protect
Delete/copy
Change sorting
Detail View
Timer list
OK
OK
az
-
P+
P–
TEXT
Recording
Select date, ..., topics
View
Select time
Detail
3DJHܬ
EPG (ELECTRONIC PROGRAMME GUIDE) Mon 01.03./16:05
Date
Time
Station
Topics
arte 15:57-16:59 Charmed - Zauberhafte Hexen
Das Erste 16:00-16:10 Tagesschau
ZDF 16:00-16:10 heute - in Europa
WDR Köln 16:00-16:15 WDR aktuell
Bayerisches... 16:00-16:05 Rundschau
hr-fernsehen 16:00-16:30 Schlemmerreise Spanien
MDR FERNS... 16:00-16:15 Hier ab vier
NDR FS HH 16:00-16:30 Tipps und Trends - Der Verbraucher...
SWR Fernse... 16:00-16:05 Baden-Württemberg aktuell
2 ZDF
&KDUPHG=DXEHUKDIWH+H[HQ۲
MON 01.03.
now until 17.00 17.00 18.00 19.00
all
all
OK
OK
TIMER DATA
09:45 Charmed - Zauberhafte Hexen
Parental lock
Set delete protection
confirm
AVRecorder DR
Station 23 arte
Date 05.02.2010
Recording time 15:57 until 16:59
Auto time control no
Recording type once only
Record subtitles no
Digital Recorder
Downloaded From TV-Manual.com Manuals
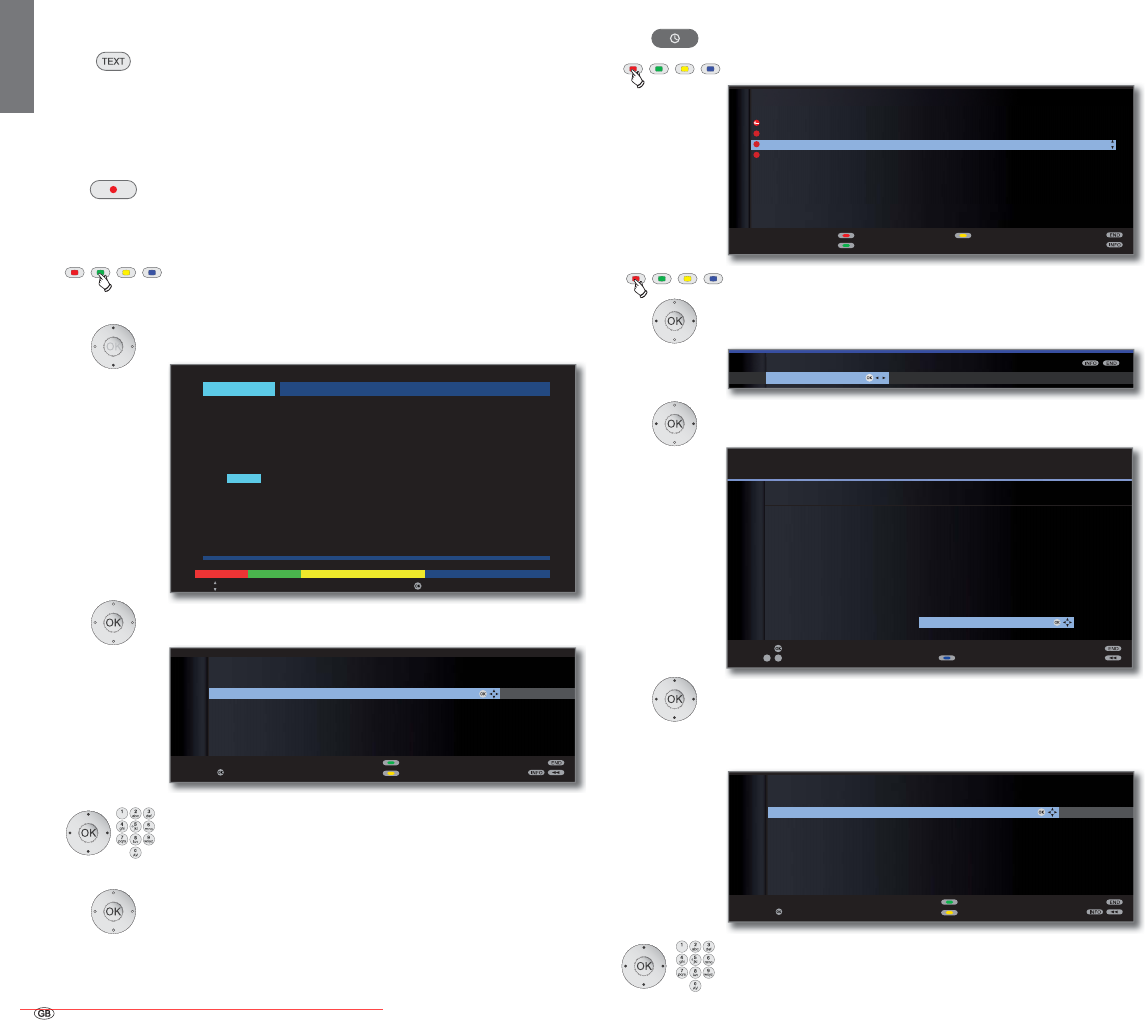
- 94
english
Programming a timer recording via teletext
Call the station on which you want to make a timer recording.
TEXT: Call teletext.
If HbbTV is offered by the channel, then the MediaText/
HbbTV text opens up (see page 82).
In this case, pressing the TEXT button again opens the
“standard” teletext/videotext.
RECORD button: Call first programme preview page.
If not possible, define the preview page in the Teletext
menu ט Settings ט Preview page.
Green button: Select the programme preview page which
contains the programme which you want
to record.
Flag the time at which the broadcast starts.
OK Programme the recording of a broadcast.
Check the timer data and change it if necessary.
Check the recording time and date for broadcasts which
last past midnight or begin the following day. The data
from the teletext may not be complete.
OK Confirm timer data. The broadcast is entered into
the timer overview.
See page 95 for explanations of the setting options in
the Timer data menu.
Programming a timer recording manually
Call DR-archive.
Red button: Call Timer list.
Red button: Call New entry.
Select Recording.
OK Call Recording wizard.
Select Manual.
OK Start programming.
Select the station or connection socket to be
recorded.
OK Accept.
The Timer Data menu is displayed.
Check the timer data. Enter the date and recording time
in any case.
OK Confirm. The broadcast is entered into the timer
overview.
OK
300 << Abend > 303
14.00 Tagesschau
14.10 In aller Freundschaft UT . . . . . . . . . . . 316
Zweite Begegnung (D, 2005)
15.00 Tagesschau
15.10 Sturm der Liebe (221) . . . . . . . . . . . . . 317
16.00 Tagesschau UT
16.10 Eisbär, Affe & Co. . . . . . . . . . . . . . . . 318
17.00 Tagesschau um fünf UT
17.15 Brisant . . . . . . . . . . . . . . . . . . . . . . . 319
17.47 Tagesschau
17.55 Verbotene Liebe . . . . . . . . . . . . . . . . 320
18.20 Marienhof . . . . . . . . . . . . . . . . . . . . . 321
18.50 Das Geheimnis meines . . . . . . . . . . . . 322
Vaters (19)
19.20 Das Quiz mit Jörg Pilawa . . . . . . . . . . 384
bis 19.50 Uhr
302 302 ARDtext Fr 05. 02. 10 09: 36 : 42
– +
Jetzt im TV ARD morgen
Fr 05. 02. 10 Das Erste
Select programme Record
OK
OK
TIMER DATA
17:15 Brisant
Parental lock
Set delete protection
confirm
AVRecorder DR
Station 21 Das Erste
Date 05.02.2010
Recording time 17:15 until 17:45
Recording type once only
Record subtitles no
Aktuelle NachrichtenAktuelle Nachrichten
7,0(5/,67 )UL
)UL DUWH ۪r*HR5HSRUWDJH
6DW 6N\ )X¡EDOOOLYH
۰ 57/ 8QWHUXQV
ܱ =') KHXWH
7XH VDWZLVVHQVSH]LDO
1HZHQWU\
&KDQJHUHFRUGLQJ
'HOHWHUHFRUGLQJ
OK
RECORDING WIZARD
Manual
etext Via EPG Via Tele
t
OK
OK
09
-
P+
P–
OK
KUIHUQVHKHQ ۽
3KRHQL[۽
%5DOSKD ۽
VDW ۽
(LQV([WUD ۽
(LQV)HVWLYDO ۽
(LQV3OXV۽
=')GRNXNDQDO ۽
=')WKHDWHUN ۽
DUWH ۽
6N\&LQHPD+'۽۩
0'57K¾ULQJ۽
HDMI3
HDMI2
HDMI1
PC IN
AVS
AV
0 VIDEO
'DV(UVWH ۽
=')۽
:'5.¸OQ ۽
%D\ULVFKHV)6۽
Station selection
MANUAL
3URFHHG3DJHܬ
Select station Sort alphabetically
RECORDING WIZARD
Please specify the station you want to record from.
OK
OK
TIMER DATA
**:** Sky Cinema HD
AVRecorder DR
Station 15 Sky Cinema HD
Date 05.02.2010
Recording time **:** until **:**
Descrambled recording no
Decoding overnight yes
Recording type once only
Record subtitles no
Parental lock
Set delete protection
confirm
Digital Recorder
Downloaded From TV-Manual.com Manuals

95 -
english
➠ If a DVD recorder was selected as a recording source, start playing
the connected device manually from the beginning of the entered
recording time.
Explanations of the setting options in the Timer data menu
Select the recorder that is to be used. Select DR here to
select the Digital Recorder.
(only available when the selected station can be received
via different signal sources, e.g. DVB-T and DVB-S)
Select the signal source for the recording.
Date of recording.
Time of the recording.
(only available for some analogue stations, see also page
108).
Use VPS data for analogue stations, yes / no.
(only available for some DVB stations and when recording
via EPG, see also page 108).
Use automatic time control, yes / no.
➠ Auto time control must be set to yes to use UK
FreeView+ functionality.
When recording scrambled stations, you can define here
whether the station is to be descrambled during the re-
cording, if possible. If you select yes, you cannot watch
another coded station during recording because the CA
module is used for the recording.
Hint: Select yes if you do not want to watch another coded
station during recording. You are then saved a subse-
quent descrambling.
➠ For a direct recording (page 91) the presetting is
taken from the Digital Recorder menu ט Descrambling
at DR continuous operation (page 87).
➠ When recording from CI Plus scrambled programmes
the auto time control cannot be used due to technical
reasons, if here yes is chosen.
(only with presetting Descrambled recording ט no).
If you choose the setting yes, the programme will be
automatically decrypted at 02.00 the following day (CA
module must be plugged in). Choose no if you would like
the decryption to take place at another time. Enter the
decryption time of your choosing with the remote control.
Explanations of the setting options in the Timer data menu (continued)
(only for recording CI Plus protected broadcasts)
Enter the CA module’s parental-lock PIN. Refer also to
page 109.
Select once only, Mon-Fri, daily or weekly. For timer re-
cordings via EPG Serial is available in addition.
Select whether broadcast subtitles are to be recorded too.
➠ For a direct recording (page 91) the presetting is
taken from the Digital Recorder menu ט Record sub-
titles at DR continuous operation (page 87).
Only allow later playback of this recording after entering
the PIN number (child lock). Press green button.
➠ If a PIN still hasn’t been entered under TV menu ט
Settings ט Parental lock, the Parental lock will at first
be activated.
Protect against automatic deletion by the Delete
Manager. Press yellow button.
Recorder
Station
Date
Recording
time
VPS
Auto time
control
Descrambled
recording
Decoding
overnight
Programme
provider PIN
Recording type
Record
subtitles
Lock movie
Set delete
protection
Digital Recorder
Downloaded From TV-Manual.com Manuals
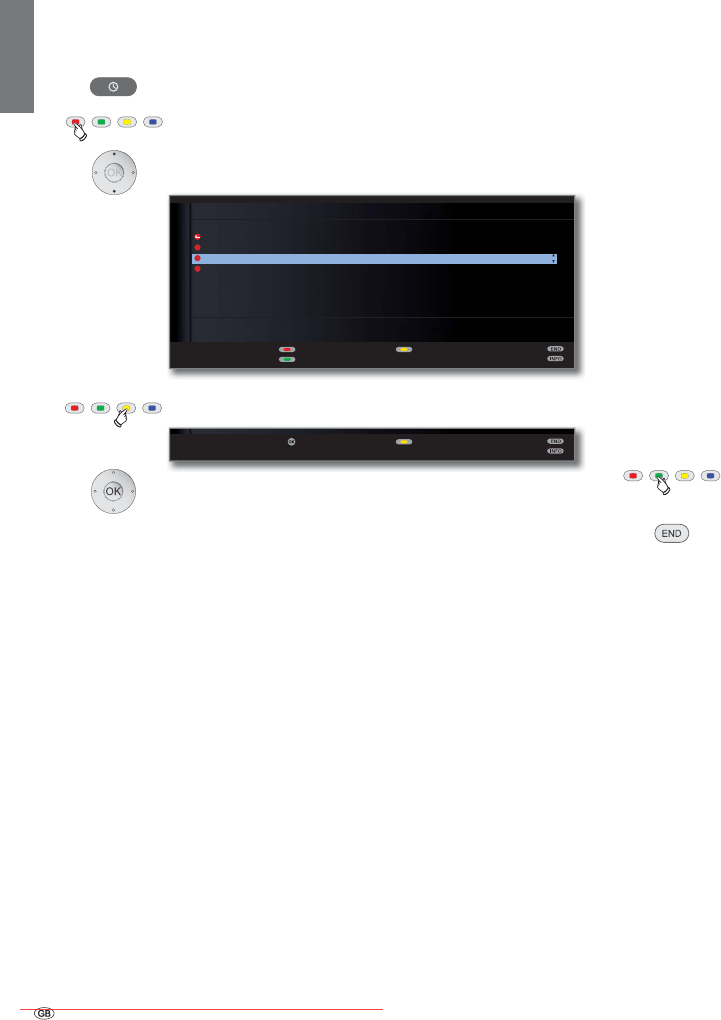
- 96
english
Delete programmed timer entries
Use this function in the timer overview if you want to delete recordings
already programmed or end a running timer recording.
Call DR-archive.
Red button: Call Timer list.
Mark the timer to be deleted.
Yellow button: Delete timer entry.
OK Confirm.
➠ The letters of a timer currently active are red. If you
delete this timer, the recording is stopped.
The Delete Manager
The Delete Manager always makes sure there is enough memory space
on the hard disk for new recordings.
When the capacity of the hard disk is almost exhausted the old record-
ings are deleted.
Recordings which have been protected with a delete protection (see
page 104) are not deleted by the Delete Manager. However, you can
still delete these recordings manually.
To avoid data loss, we recommend copying important recordings to a
rewritable DVD.
Delete the recordings from the Digital Recorder after copying.
Loewe is not liable for data loss from the Digital Recorder’s hard disk.
Record conflict
If you wish to programme a new recording which overlaps an timer
recording already saved, the Recording conflict dialogue will open. Here
you define whether only one or both recordings are to be made.
If you decide for both, you have to state which of the two programmes
is to be recorded fully.
Other ways of solving this recording conflict:
Green button:
Change the timer data of the individual
programmes.
END: Reject new timer. The older timer entry is
retained.
Aktuelle NachrichtenAktuelle Nachrichten
7,0(5/,67
)UL
)UL DUWH ۪r*HR5HSRUWDJH
6DW 6N\ )X¡EDOOOLYH
۰ 57/ 8QWHUXQV
ܱ =') KHXWH
7XH VDWZLVVHQVSH]LDO
1HZHQWU\
&KDQJHUHFRUGLQJ
'HOHWHUHFRUGLQJ
OK
&RQILUPGHOHWH $ERUWGHOHWH
Digital Recorder
Downloaded From TV-Manual.com Manuals
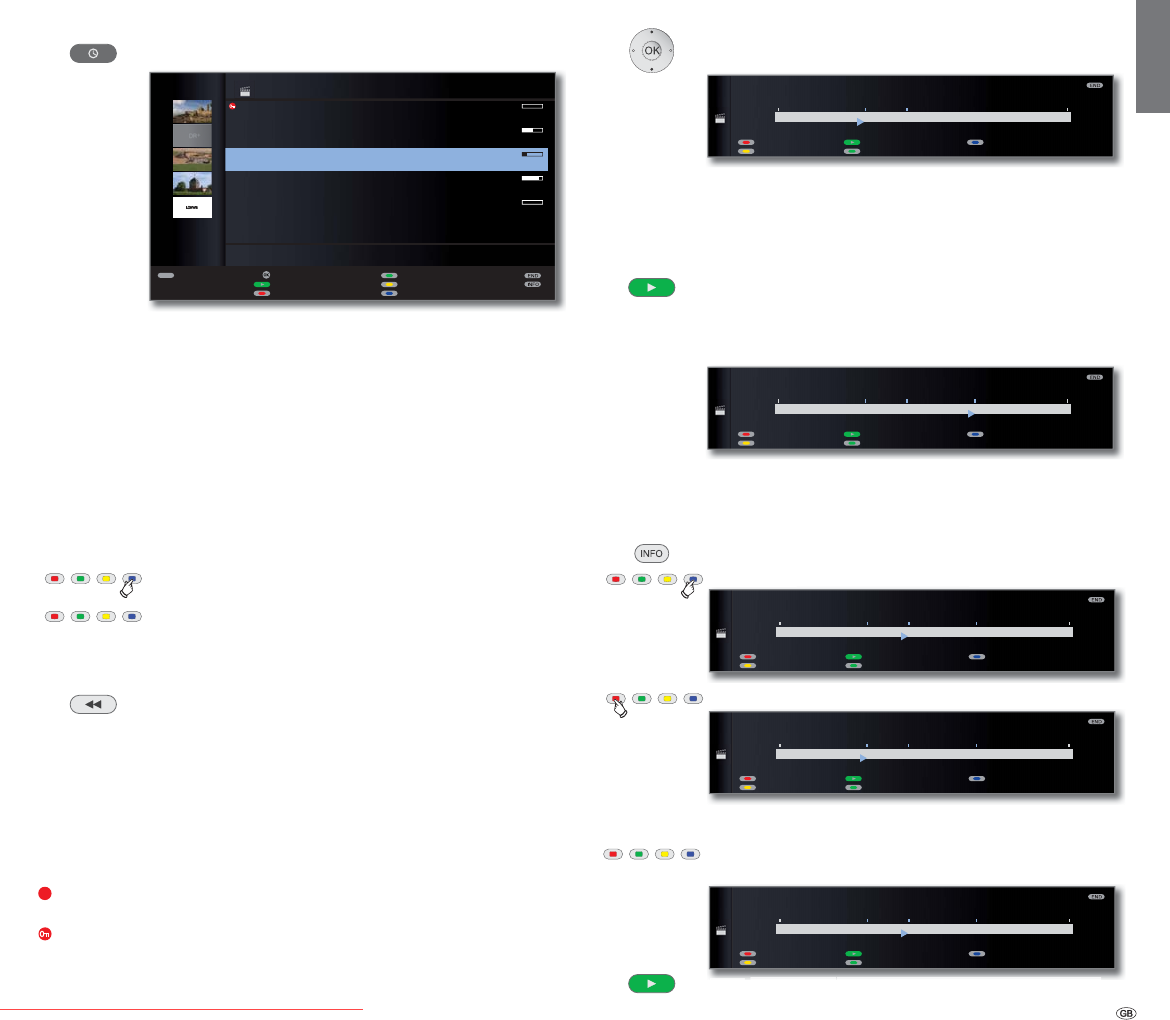
97 -
english
Archive playback
Call DR archive.
The remaining free space on the storage device is shown at the top
right-hand corner.
➠ The specified free capacity is an estimated value. The exact remaining
capacity of the hard disk depends on the broadcasts recorded in future
and on the recording quality set in the case of analogue broadcasts
(see page 87).
The progress bar shows you how much of the recording has been
watched.
If other programme data is available from EPG or teletext these are shown
below the archive list for the entry just flagged. Other information about
the recording can be called with the TEXT button, if this is offered.
Blue button: Change sorting of the recordings.
Green button: Sort recordings by date.
Yellow button: Sort recordings alphabetically.
Blue button: Sort recordings by station.
Back to overview. The sorting last selected is retained.
Explanations of the symbols in the DR archive
s Archive entry with active replay (page 100).
ۮ Archive entry with set parental lock (page 103).
ۯ Archive entry with set delete protection (page 104).
ܑ Archive entry with manually set bookmarks (see right column).
۩ Coded archive entry.
v CI Plus coded archive entry.
Archive entry is entered for transferring/copying in the timer overview
(see page 100, Copying recordings to a connected recorder).
Archive entry is entered for descrambling in the timer overview (see
page 101, Descramble scrambled recording).
Playing from the DR archive
Select the recording.
OK Start playback.
➠ The CA module with Smart Card must be plugged in when playing
recordings which are still coded.
Setting bookmarks
While playing an archive recording, you can set bookmarks.
PLAY button (press for a little longer): Set bookmark.
You will see a screen message. The drive display is then faded in and you
will see the set bookmark above the bar for the playback. You can set
up to 15 bookmarks per recording.
➠ Automatically set bookmarks are white. Manually set
bookmarks are blue.
Jumping to bookmarks
INFO: Show status display.
Blue button: Skip to next bookmark.
Red button: Skip to previous bookmark.
Delete individual bookmarks
Red or blue button: Jump to the manually set bookmark
to be deleted.
Press PLAY button for a little longer: Delete bookmark.
TEXT
OK
۩
=
{-
Top-Movie 1
15.09. Sky Cinema HD
Bon(n) jour Berlin
14.09. Phoenix
da capo
31.08. Das Erste
Tagesschau
29.07. 3sat
Individual
00.00. LOEWE.
09:45 - 10:00
DR ARCHIVE free capacity 68:42 hrs
Edit/protect
Delete/copy
Change sorting
Detail View
Highlights
Timer list
00:00 01:0300:17
%RRNPDUNז
Repeat
Highlights
Language/sound
%RRNPDUNט
$UFKLYH 6WHUHR܃
da capo
00:00 01:0300:42
%RRNPDUNז
Repeat
Highlights
Language/sound
%RRNPDUNט
$UFKLYH 6WHUHR܃
da capo
p
00:00 01:0300:27
%RRNPDUNז
Repeat
Highlights
Language/sound
%RRNPDUNט
$UFKLYH 6WHUHR܃
da capo
00:00 01:0300:17
%RRNPDUNז
Repeat
Highlights
Language/sound
%RRNPDUNט
$UFKLYH 6WHUHR܃
da capo
P
PLAY b tt
f littl l D l t b k k
00:00 01:0300:27
%RRNPDUNז
Repeat
Highlights
Language/sound
%RRNPDUNט
$UFKLYH 6WHUHR܃
da capo
Digital Recorder
Downloaded From TV-Manual.com Manuals
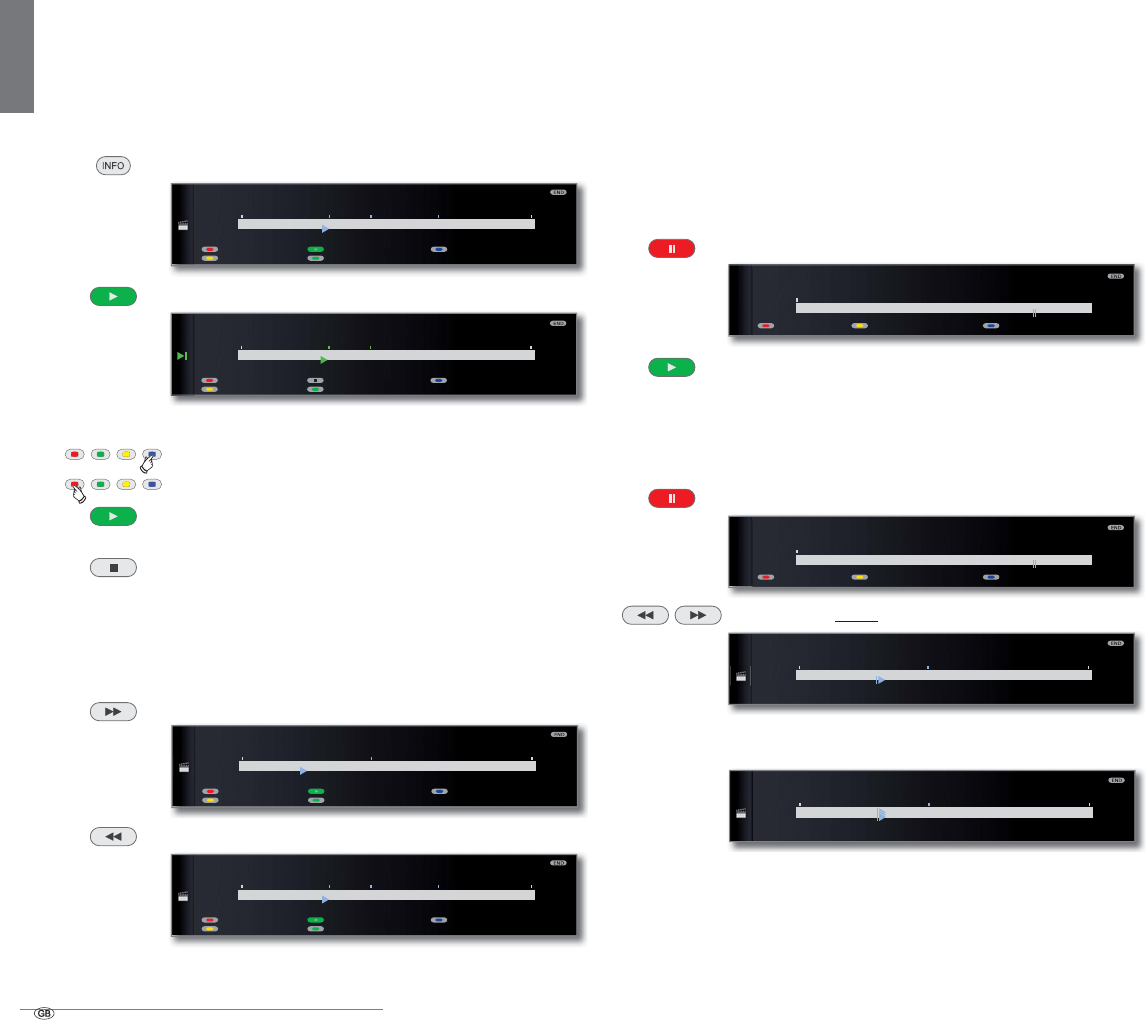
- 98
english
➠ When playing coded recordings, some of the following functions
might only be possible with limitations.
Playing highlights
If there are manually set bookmarks in the current playback, they can be
played as highlights. 30 seconds before and after the set bookmark are
played. Highlights will be replayed sequentially according to the markings.
INFO: Show status display.
PLAY button: Replay Highlights.
As long as the status display is shown:
Blue button: Jump to the next highlight.
Red button: Jump to the previous highlight.
PLAY button: Jump to the next highlight (also possible
without status display).
STOP button: End highlight replay.
Further information concerning highlight playback can
be found on page 102.
Jumping
By pressing button or you can skip through the broadcast.
Jump forwards.
Jump backwards.
➠ Setting the jump distance: see page 87.
Smart Jump
Smart Jump allows you to search quickly for certain scenes of a recording.
You will find more about this on page 89.
Fast forward and rewind
During time shift viewing you can fast forward and rewind at three dif-
ferent speeds. Sound is not audible during winding. You will find more
about this on page 90.
Pause (freeze picture)
PAUSE button: Switch to freeze picture.
PLAY button: Continue playback.
Slow motion
At an active pause (freeze frame) you can select from four slow motion
speeds (for wind/rewind). There is no sound during slow motion replay.
PAUSE button: Change to freeze frame
Press or briefly.
Increase speed:
Press button several times briefly.
The speed increases every time you press the button until
eventually switching back to the initial speed.
00:00 01:0300:17
%RRNPDUNז
Repeat
Highlights
Language/sound
%RRNPDUNט
$UFKLYH 6WHUHR܃
da capo
00:00 01:0300:17
+LJKOLJKWז
Repeat
Highlights stop
Language/sound
+LJKOLJKWט
$UFKLYH 6WHUHR܃
da capo
Highlight 1
00:00 01:0300:13
%RRNPDUNז
Repeat
Highlights
Language/sound
%RRNPDUNט
$UFKLYH 6WHUHR܃
da capo
00:00 01:0300:17
%RRNPDUNז
Repeat
Highlights
Language/sound
%RRNPDUNט
$UFKLYH 6WHUHR܃
da capo
00:1100:00 00:15
$UFKLYH 6WHUHR܃
da capo
DR archive Delete/hide Adopt as cover picture
00:1100:00 00:15
$UFKLYH 6WHUHR܃
da capo
DR archive Delete/hide Adopt as cover picture
00:1700:00 01:03
$UFKLYH 6WHUHR܃
da capo
00:1700:00 01:03
$UFKLYH 6WHUHR܃
da capo
Digital Recorder
Downloaded From TV-Manual.com Manuals

99 -
english
Deleting parts of the recording
You can delete sections of a recording from the current position within
the film to the beginning or to the ending.
PAUSE button: During archive playback press at the point
from which, to the start or to the end, the archive record-
ing is to be deleted.
Yellow button: Call Delete/hide.
Red button: Select Delete from here to start.
Green button: Select Delete from here to end.
OK Confirm delete.
In this case, 11 min were deleted from the end of the
broadcast so that the recording length is then just 52 min.
Or:
Red or green button: Abort delete.
Hiding sections of the recording
You can hide sections of an archive recording. The hidden parts are
skipped in the future playback and when copying to a connected recorder.
Press the PAUSE button at the point of the archive play-
back where the hide is to begin.
Yellow button: Call Delete/hide.
Yellow button: Set the start of the section to be hidden.
PLAY button: Continue playback or
skip/wind to the point where the hide is to end.
Yellow button: Set hiding end.
The hidden area of the recording is shown hatched in the
bar. It will be skipped in future during playing.
If in the settings in the Digital Recorder menu ט Inform
about hidden sections ט yes is set, you will see a screen
message, if the hidden area has been reached during the
playback.
Blue button during the screen message:
Show hidden area again permanently.
00:1100:00 00:15
$UFKLYH 6WHUHR܃
da capo
DR archive Delete/hide Adopt as cover picture
00:00 01:0300:52
$UFKLYH 6WHUHR܃
da capo
Delete from here to start
Delete from here to end
Set hiding start
Delete bookmark
00:00 01:0300:52
OK
Confirm delete to end Abort delete
$UFKLYH 6WHUHR܃
da capo
00:00 00:5200:52
DR archive Language/sound
$UFKLYH 6WHUHR܃
da capo
00:1100:00 00:15
$UFKLYH 6WHUHR܃
da capo
DR archive Delete/hide Adopt as cover picture
00:00 01:0300:52
$UFKLYH 6WHUHR܃
da capo
Delete from here to start
Delete from here to end
Set hiding start
Delete bookmark
00:00 01:0300:17
Set hiding end
Cancel hiding
$UFKLYH 6WHUHR܃
da capo Hide
00:00 01:0300:17
Set hiding end
Cancel hiding
$UFKLYH 6WHUHR܃
da capo Hide
00:2300:00 01:03
%RRNPDUNז Highlights
Language/sound
%RRNPDUNט
$UFKLYH 6WHUHR܃
da capo
Digital Recorder
Downloaded From TV-Manual.com Manuals
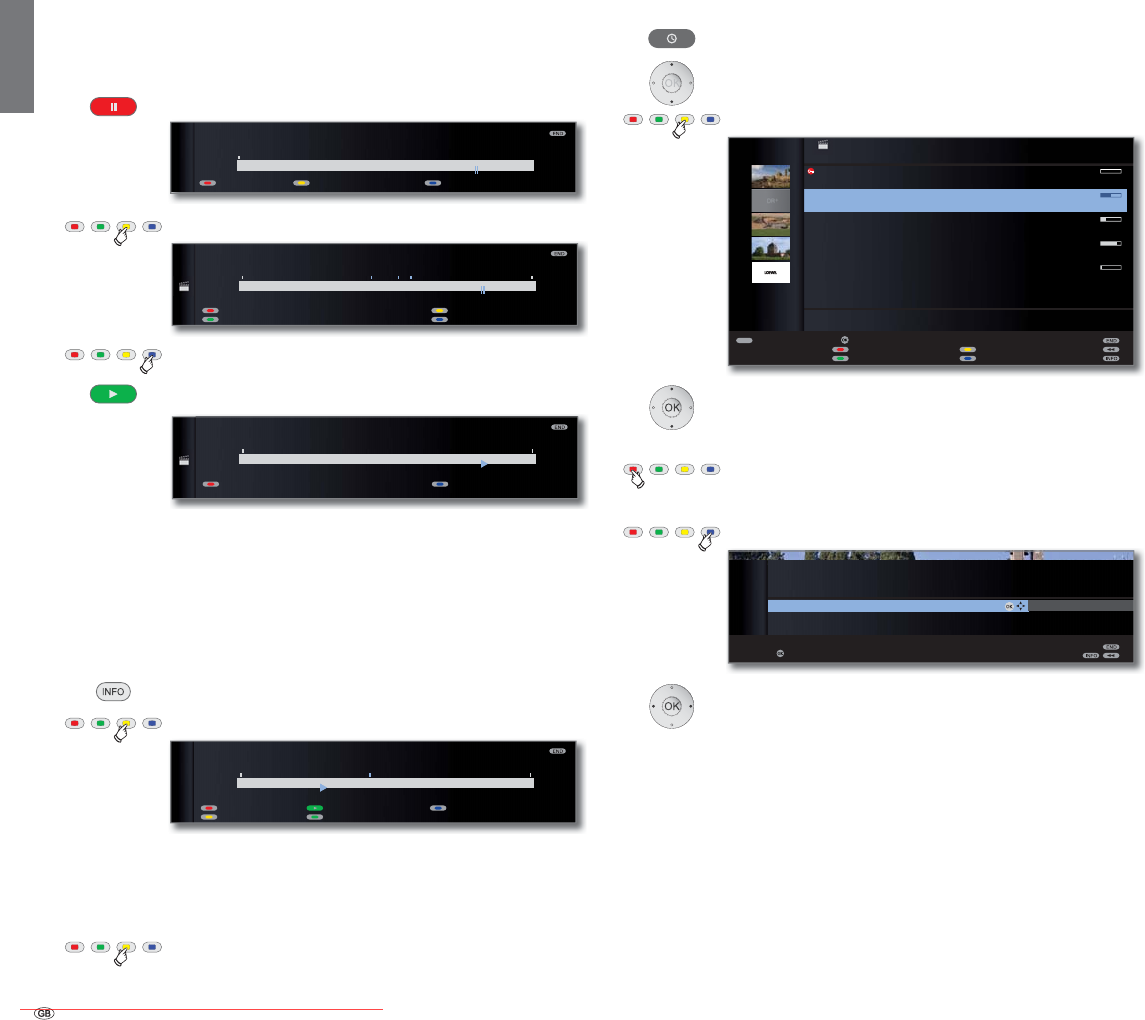
- 100
english
Deleting bookmarks
You can globally delete all manually set bookmarks.
➠ Manually set bookmarks are blue, automatically set bookmarks are
displayed in white.
PAUSE button: Change to freeze picture.
Yellow button: Call Delete/hide.
Blue button: Delete manually set bookmarks.
PLAY button: Continue playback.
➠ Automatically set bookmarks are not deleted.
In addition, you have the option of deleting the book-
marks via DR archive ט Delete/copy (see page 102).
Repeat playback of recording
You can repeat recorded broadcasts and hence play them in an infinite
loop.
INFO: Show status display.
Yellow button: Repeat film.
You will see a circular arrow on the left of the status
display and in the DR archive after the name of the
broadcast (see page 97). The function remains set for
this broadcast even if the playback is interrupted.
Yellow button: Switch off repeat function again.
Copying recordings to a connected recorder
Call DR archive.
Flag the recording to be copied.
Yellow button: Call Delete/copy.
Select others if necessary and
OK mark entry.
Or:
Red button: Mark all entries.
➠ Titles to be copied are displayed in blue.
Blue button: Call Copy entry.
Select AV in the copy menu.
Should be copied over later, change date and time.
OK Confirm.
You will see the DR archive again. In front of the date
of the recording(s) to be copied, you will now see a red
point for the programmed copying.
The status of copying assignments in progress/pending
can be seen in the timer overview
➠ You cannot watch a DVB station whilst copying. The TV set can,
however, be switched off to the standby mode. It is best to copy at
night when the TV is not in use.
00:1100:00 00:15
$UFKLYH 6WHUHR܃
da capo
DR archive Delete/hide Adopt as cover picture
00:00 01:0300:52
$UFKLYH 6WHUHR܃
da capo
Delete from here to start
Delete from here to end
Set hiding start
Delete bookmark
00:00 01:0300:52
%RRNPDUNז %RRNPDUNט
$UFKLYH 6WHUHR܃
da capo
_
00:00 01:0300:1700:17
%RRNPDUNז
Repeat off
Highlights
Language/sound
Bookmark ט
$UFKLYH 6WHUHR܃
da capo
TEXT
OK
۩
=
-
DR ARCHIVE free capacity 68:42 hrs
Delete/copy
Top-Movie 1
15.09. Sky Cinema HD
Bon(n) jour Berlin
14.09. Phoenix
da capo
31.08. Das Erste
Tagesschau
29.07. 3sat
Individual
00.00. LOEWE.
09:45 - 10:00
Delete entry
Copy entry
Detail Unmark
Mark all entries
Delete bookmark
OK
OK
DR
DR ARCHIVE
Copy
14.09. Phoenix Bon(n) jour Berlin
confirm
Copy to ... AV
Date 16.09.2009
Time 18:00-19:10 (70
min)
Digital Recorder
Downloaded From TV-Manual.com Manuals
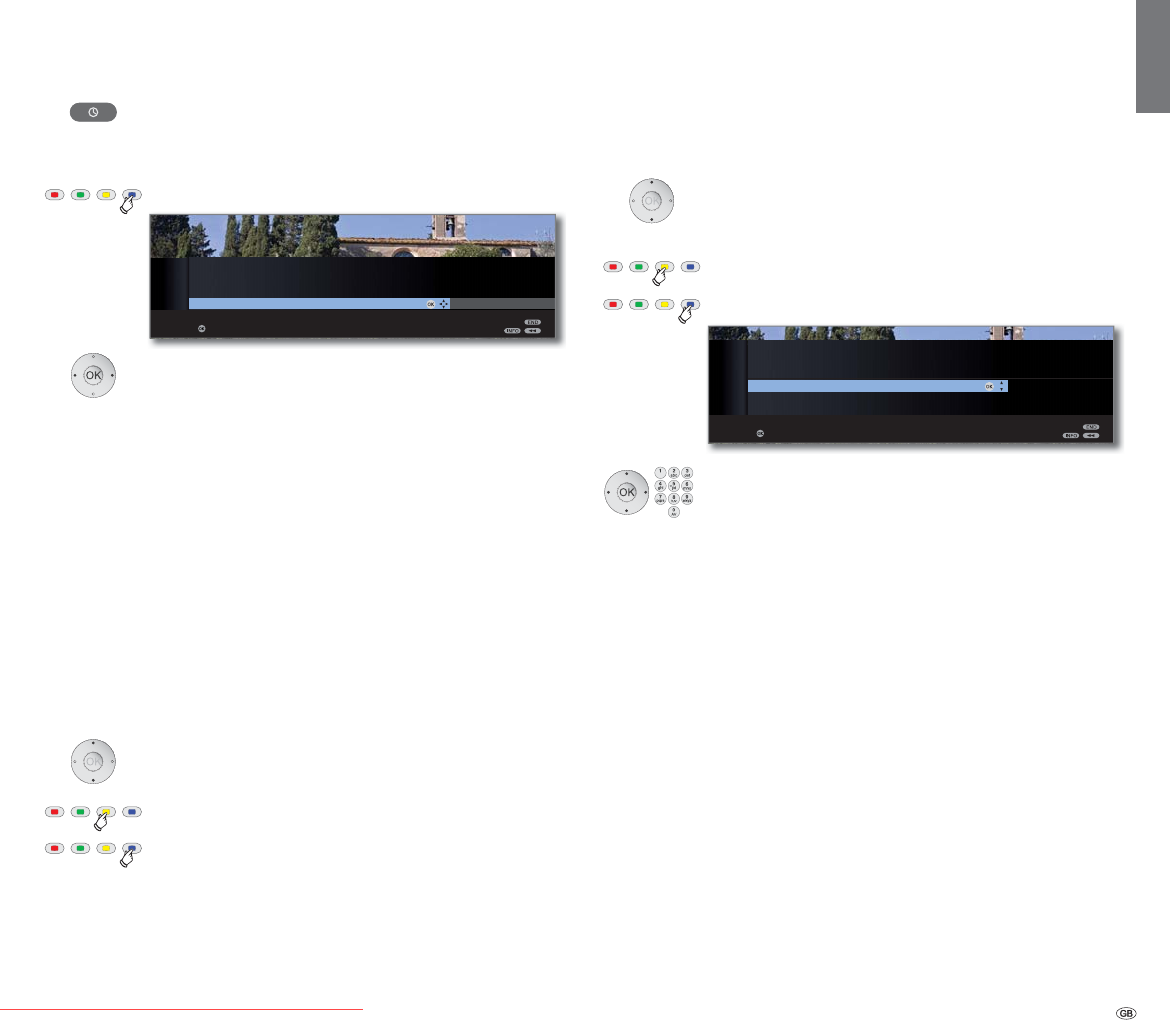
101 -
english
Copy recordings onto an external hard disk
You can also copy programmes onto a external hard disk, and archive
them or make them available to other Loewe LCD TV sets (even those
without DR+).
Call DR archive.
Select titles that you want to transfer as described on
page 100.
Blue button: Call Copy entry.
Select USBx in the Copy menu.
OK Start copying.
➠ Copying to an external hard disk takes place in the background and
at a significantly higher speed. Contrary to copying recordings to a
connected recorder (see page 100), there are no selection restrictions
here regarding the stations. You see a screen message, when copying
has finished.
The status of copying assignments in progress can be seen in the timer
overview.
➠ The TV set must not be switched off with the mains switch during the
copying!
Delete programmed descrambling
You can delete a programmed descrambling of scrambled recordings
at any time.
➠ DR archive is displayed.
Mark the desired programme (red dot with key
symbol).
Yellow button: Call Delete/descramble.
Blue button: Cancel descrambling.
The red dot with key symbol and the entry in the timer
list are deleted.
Descramble scrambled recording
You can start descrambling scrambled recordings manually at any time (1.
The CA module with the smart card must be inserted at the time of de-
scrambling. Descrambling should be done as soon as possible because
the probability that the code may become invalid increases with the time
between recording and descrambling.
Proceed similarly to copying from the archive:
➠ DR archive is displayed.
Mark recording to be descrambled.
➠ Scrambled recordings are marked by ۩ in front of the bar.
Yellow button: Call Delete/copy.
Blue button: Call Descramble entry.
Select Integrated hard disk
Determine date and time of the descrambling.
OK Confirm.
You see the DR archive again. You will see a red dot
with key symbol for the programmed descrambling
in front of the date.
➠ No other DVB station can be watched during descrambling. But the
TV set can be switched off to standby mode. It is best to descramble
at night when the TV is not in use.
➠ You will find the recording descrambled in the DR archive after suc-
cessful descrambling (without a ۩ before the bar).
➠ The time and date of the descrambling can be changed subsequently
in the timer list (see page 93).
(1 Please also read the instructions on pages 108 and 109 concerning the han-
dling of encoded programmes.
OK
OK
DR ARCHIVE
Copy
14.09. Phoenix Bon(n) jour Berlin
confirm
Copy to ... USB1 AV
OK
OK
DR ARCHIVE
Descramble
15.09. Sky Cinema HD Top-Movie 1
confirm
Store at ... Integrated hard disk
Date 16.09.2009
Time 03:00-05:15 (135
min)
Digital Recorder
Downloaded From TV-Manual.com Manuals
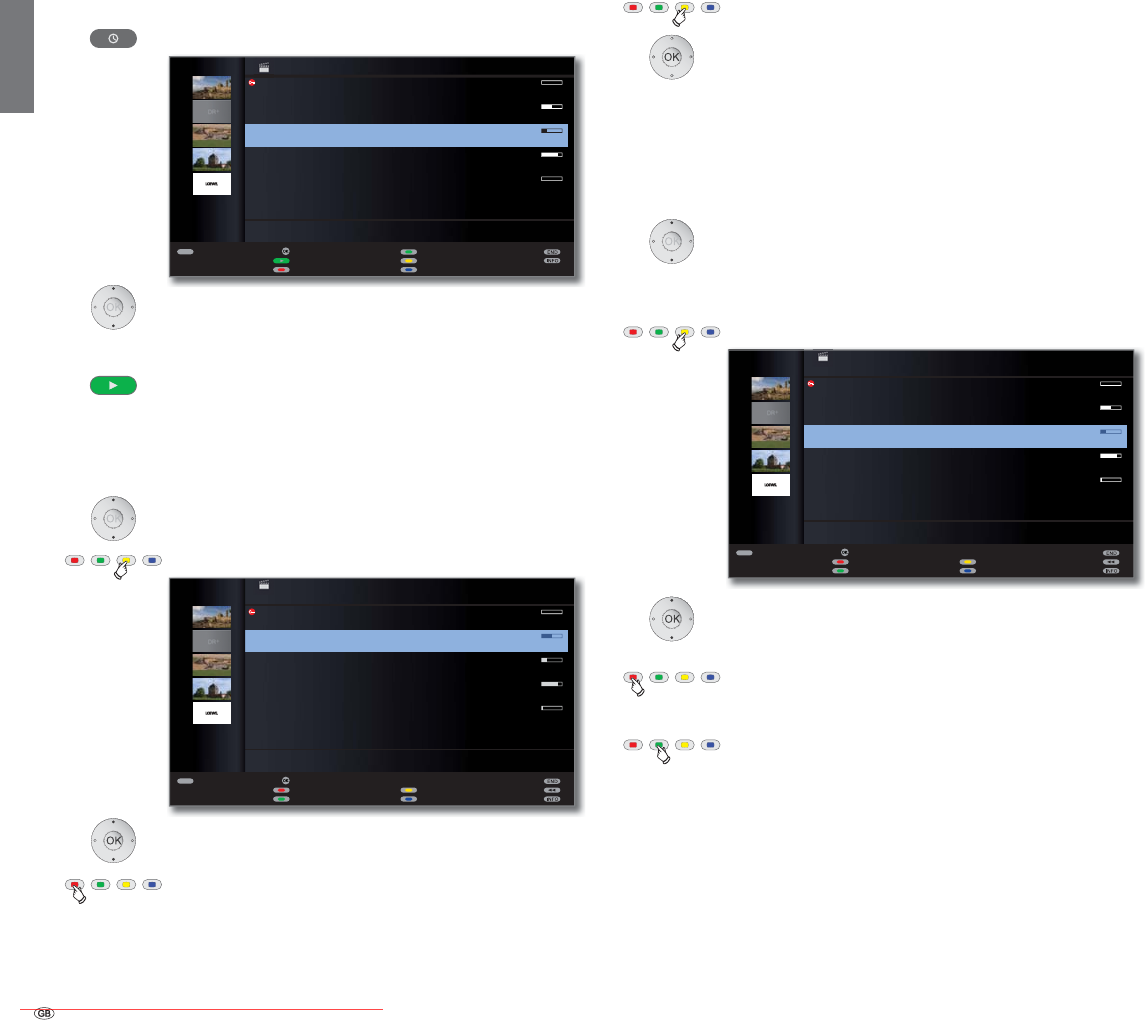
- 102
english
Viewing highlights from the archive
Call DR archive.
Highlight recording with manually set bookmarks.
➠ Recordings with manually set bookmarks are high-
lighted with ܑ.
PLAY button: View Highlights.
The highlights are played in sequence.
Deleting recordings from the archive
➠ DR archive is displayed.
Flag the recording to be deleted.
Yellow button: Call Delete/copy.
Select others if necessary and
OK confirm.
Red button: Mark all entries.
➠ Titles to be deleted are displayed in blue.
Yellow button: Call Delete entry.
OK ConÆ rm delete.
The recording(s) is/are deleted.
The DR archive is displayed again.
Delete bookmarks
➠ DR archive is displayed.
Select the recording for which you want to delete
the bookmarks.
➠ Recordings with manually set bookmarks are
flagged with ܑ in front of the bar.
Yellow button: Call delete/copy.
Select others if necessary and
OK confirm.
Or:
Red button: Mark all entries.
➠ The selected titles are displayed in blue.
Green button: Delete bookmark.
All manually set bookmarks from the marked entries are
deleted. Automatically set bookmarks are not deleted.
TEXT
OK
۩
=
{-
Top-Movie 1
15.09. Sky Cinema HD
Bon(n) jour Berlin
14.09. Phoenix
da capo
31.08. Das Erste
Tagesschau
29.07. 3sat
Individual
00.00. LOEWE.
09:45 - 10:00
DR ARCHIVE free capacity 68:42 hrs
Edit/protect
Delete/copy
Change sorting
Detail View
Highlights
Timer list
TEXT
OK
۩
=
-
DR ARCHIVE free capacity 68:42 hrs
Delete/copy
Top-Movie 1
15.09. Sky Cinema HD
Bon(n) jour Berlin
14.09. Phoenix
da capo
31.08. Das Erste
Tagesschau
29.07. 3sat
Individual
00.00. LOEWE.
09:45 - 10:00
Delete entry
Copy entry
Detail Unmark
Mark all entries
Delete bookmark
TEXT
OK
۩
=
-
DR ARCHIVE free capacity 68:42 hrs
Delete/copy
Top-Movie 1
15.09. Sky Cinema HD
Bon(n) jour Berlin
14.09. Phoenix
da capo
31.08. Das Erste
Tagesschau
29.07. 3sat
Individual
00.00. LOEWE.
09:45 - 10:00
Delete entry
Copy entry
Detail Unmark
Mark all entries
Delete bookmark
Digital Recorder
Downloaded From TV-Manual.com Manuals
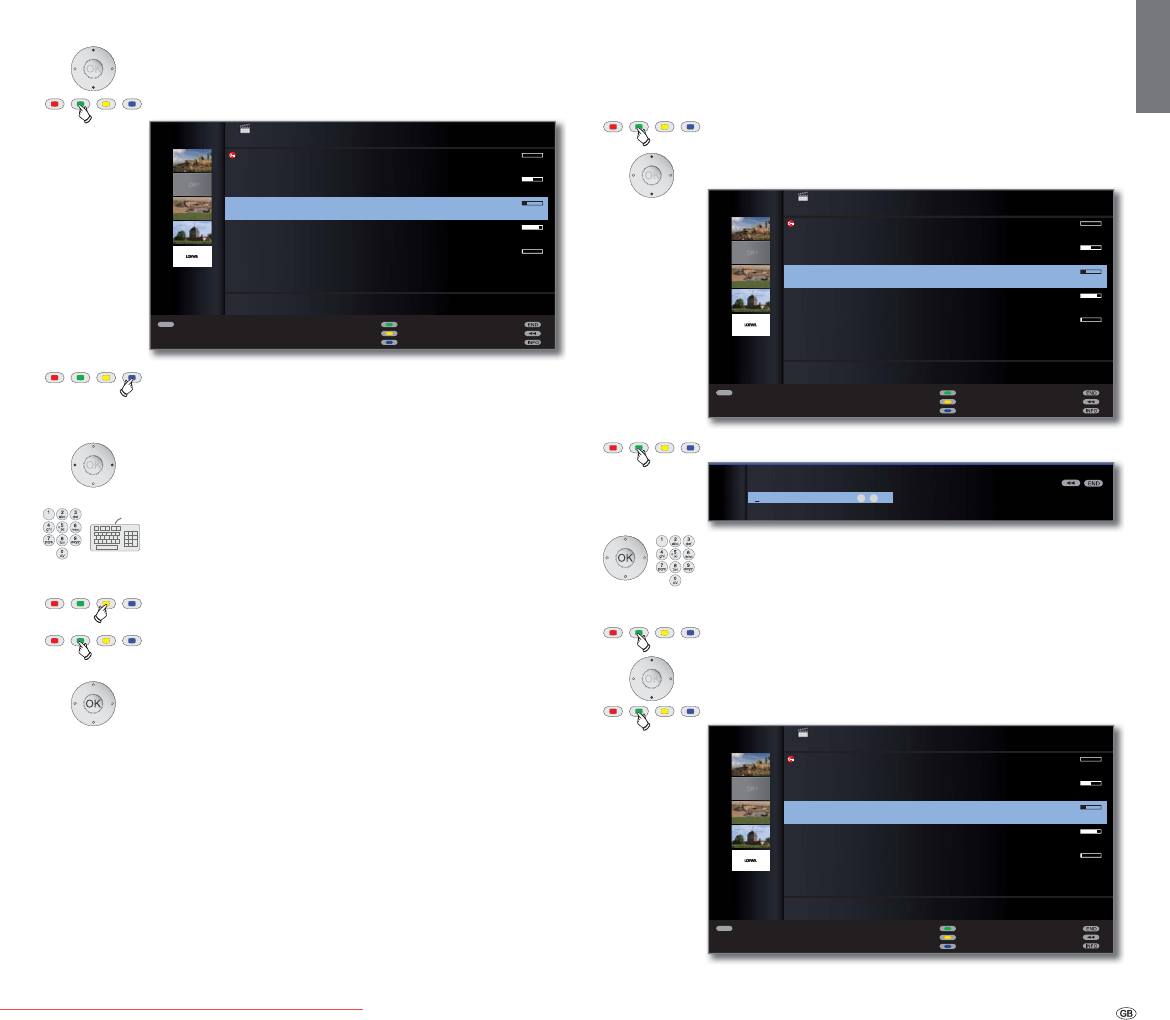
103 -
english
Changing the title of an archive
➠ DR archive is displayed.
Select the title to be changed.
Green button: Call Edit/protect.
Press the blue button for Rename.
Underneath the first letter of the title, you will see a line
which indicates the current input position for the letter.
Input position to the right.
Input position to the left.
In put the characters one after another (if entering using
the number buttons on the remote control, use it as if it
were a telephone keypad; see page 131 for the exact
assignment of the buttons).
Yellow button: Delete character to the left of the cursor.
Green button: Switch between capital letters and small
letters.
OK Conclude the entry.
This saves the change permanently.
Locking/unlocking a movie ( Parental lock)
You can lock movies that your children are not permitted to view, for
instance. Viewing is then only possible if the PIN number has been en-
tered beforehand.
➠ DR archive is displayed.
Green button: Call Edit/protect.
Mark the title that is to be locked.
Green button: Call Parental lock.
Enter your access code with the numeric buttons of the re-
mote control. If you define an access code for the first time,
remember it well. Confirm the new access code with OK.
The DR archive opens again.
Green button: Lock movie.
Select others if necessary.
Green button: Lock movie or Unlock movie again.
A lock symbol ۮ will be displayed before the bar in the
case of locked films.
TEXT
۩
=
-
DR ARCHIVE free capacity 68:42 hrs
Edit/protect
Top-Movie 1
15.09. Sky Cinema HD
Bon(n) jour Berlin
14.09. Phoenix
da capo
31.08. Das Erste
Tagesschau
29.07. 3sat
Individual
00.00. LOEWE.
09:45 - 10:00
Parental lock
Set delete protection
Rename
Detail
TEXT
۩
=
-
DR ARCHIVE free capacity 68:42 hrs
Edit/protect
Top-Movie 1
15.09. Sky Cinema HD
Bon(n) jour Berlin
14.09. Phoenix
da capo
31.08. Das Erste
Tagesschau
29.07. 3sat
Individual
00.00. LOEWE.
09:45 - 10:00
Parental lock
Set delete protection
Rename
Detail
TEXT
۩
=ۮ
-
DR ARCHIVE free capacity 68:42 hrs
Edit/protect
Top-Movie 1
15.09. Sky Cinema HD
Bon(n) jour Berlin
14.09. Phoenix
da capo
31.08. Das Erste
Tagesschau
29.07. 3sat
Individual
00.00. LOEWE.
09:45 - 10:00
Unlock movie
Set delete protection
Rename
Detail
Access code
PARENTAL LOCK
Please enter PIN
****
09
-
Digital Recorder
Downloaded From TV-Manual.com Manuals
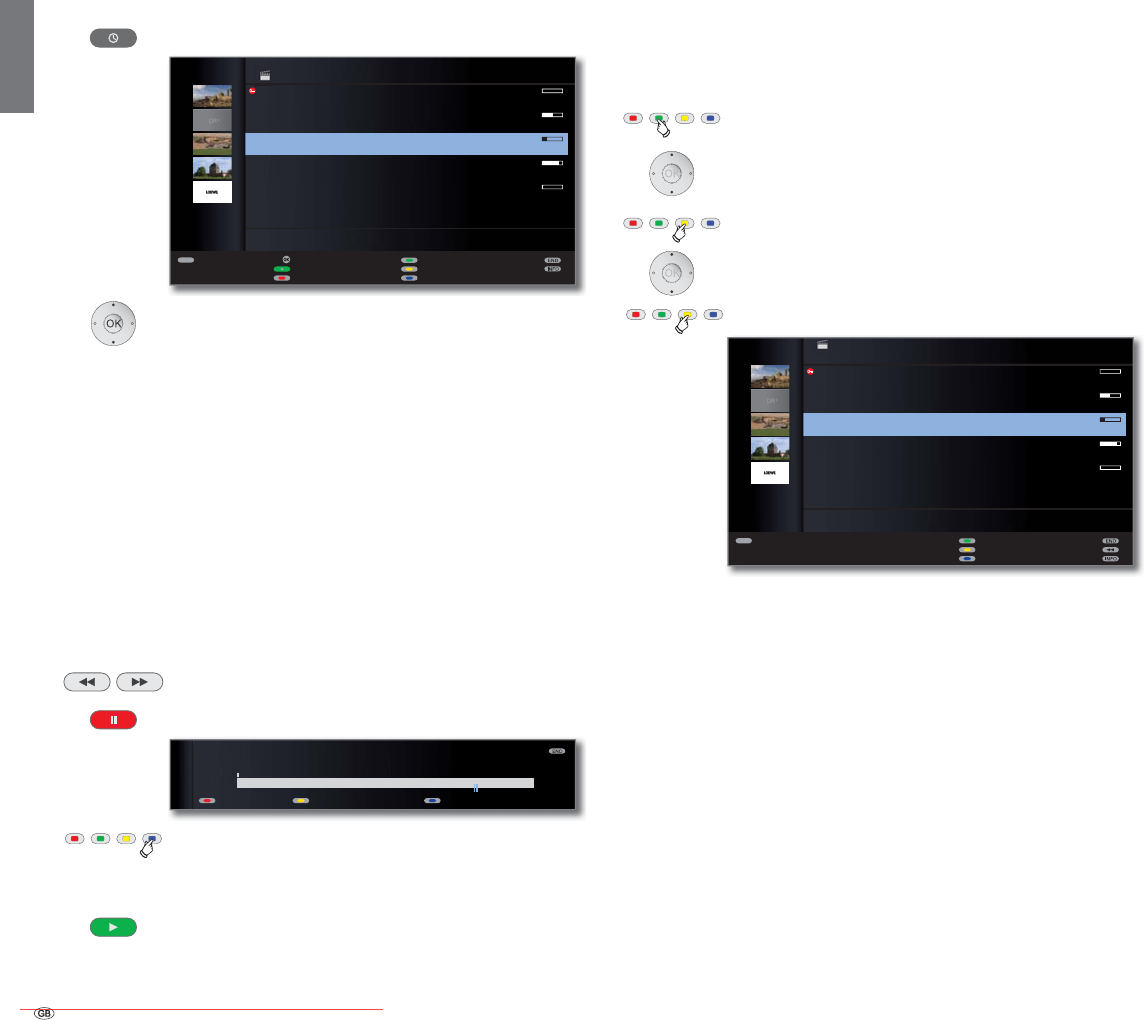
- 104
english
Viewing a locked movie
Call DR archive.
Mark locked film,
OK View film.
➠ The covers of locked films cannot be read. The detailed
information for the recording cannot be called up. The
cover (for archive view with covers, see page 87) is
replaced by a neutral image with a key symbol. In
addition, the entry receives the symbol ۮ at the end
of the line.
The system requests you to enter your access code (PIN).
After entering the access code the playback of the movie
starts.
Determine cover picture
You can display cover pictures for your recorded broadcasts in the DR
archive (see page 87). The covers can be freely determined by you
during an archive replay:
Jump / wind to the desired location in the recording.
PAUSE button: Switch to freeze picture.
Blue button: Adopt displayed freeze frame as cover picture.
The image will be displayed next to the broadcast in the
DR archive in future (see also page 97).
PLAY button: Continue playback.
Setting/cancelling delete protection
You can provide films with a delete protection to prevent an automatic
deletion by the delete manager (see page 96).
➠ DR archive is displayed.
Green button: Call Edit/protect.
Select the title for which you want to set/cancel a
delete protection.
Yellow button: Set/Cancel delete protection.
Select others if necessary.
Yellow button: Set/Cancel delete protection.
The symbol ۯ appears in front of the bar when the delete
protection is activated.
OK
TEXT
۩
=ۮ
-
DR ARCHIVE free capacity 68:42 hrs
Top-Movie 1
15.09. Sky Cinema HD
Bon(n) jour Berlin
14.09. Phoenix
** ****
31.08. Das Erste
Tagesschau
29.07. 3sat
Individual
00.00. LOEWE.
The parental lock is active.
Parental lock
delete/copy
Change sorting
Detail View
Highlights
Timer list
TEXT
۩
ۯ=
-
DR ARCHIVE free capacity 68:42 hrs
Edit/protect
Top-Movie 1
15.09. Sky Cinema HD
Bon(n) jour Berlin
14.09. Phoenix
da capo
31.08. Das Erste
Tagesschau
29.07. 3sat
Individual
00.00. LOEWE.
09:45 - 10:00
Parental lock
Cancel delete protection
Rename
Detail
00:1100:00 00:15
$UFKLYH 6WHUHR܃
da capo
DR archive Delete/hide Adopt as cover picture
Digital Recorder
Downloaded From TV-Manual.com Manuals
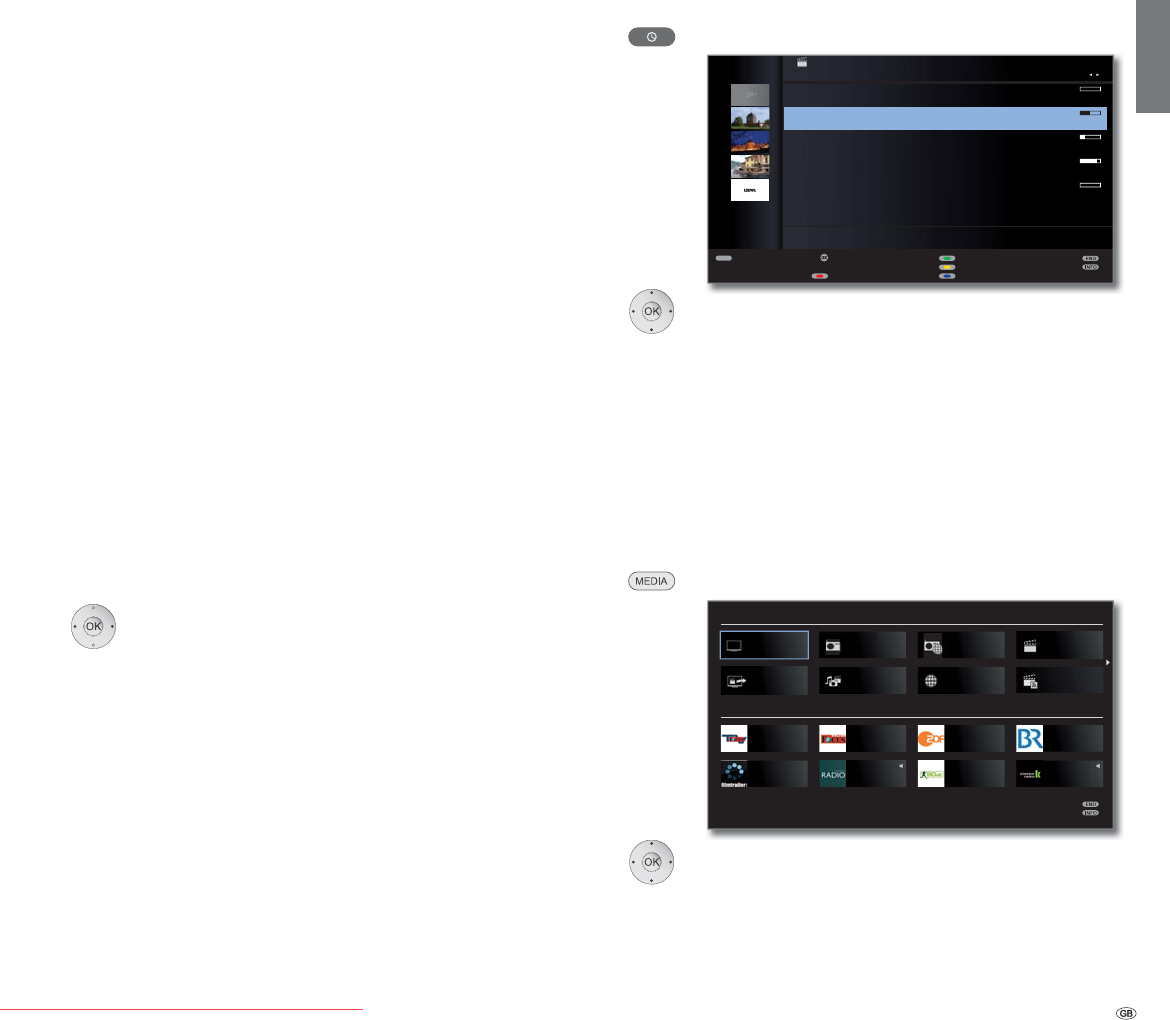
105 -
english
DR+ Streaming
You can make your DR archive entries accessible so that other Loewe
TV sets can view them via the network. It is also possible to interrupt a
current broadcast and “take it” to another TV set (Follow me function,
see page 106).
➠ To use DR+ Streaming, at least two Loewe TV sets are required with SL
1xx chassis (at least one of which has an integrated Digital Recorder).
The TV sets also need to be connected via a wireless connection
(WLAN) or a cable connection (e.g. Ethernet, PowerLine).
➠ DR+ Streaming must be activated in the DR+ Streaming settings (see
below).
➠ Archive entries can only be hosted or permitted to be viewed by TV
sets with an integrated hard disk (DR+). Playback of archive entries
that have been permitted to be viewed can take place on all TV sets
with Chassis SL1xx (with or without DR+) on the network.
➠ The following functions would require write access on the device
that is permitting the programme to be viewed, and are therefore
not available when viewing a DR archive entry over the network (see
right column): child protection, delete protection, rename function,
delete entry or bookmark, set bookmark, partial delete or hide of the
recording.
DR+ Streaming settings
Prior to the first use of DR+ Streaming, a number of settings are required.
➠ Digital Recorder menu is open (page 87).
Select DR+ Streaming settings,
OKopen settings options.
For explanations of the settings see page 88.
Play DR archive entry via network
Call DR archive.
Select required TV set..
The name of the accessible TV set is shown in the second
line (in this example: LOEWE TV).
Mark the required archive entry,
OK view archive entry.
See page 97 for further information.
Extended standby mode with DR+ Streaming access
Switching off the accessible TV set ends access to the DR archive. You
can, however, place your TV set in an extended standby mode to enable
access to the DR archive even when the TV set is switched off.
MEDIA: Open MediaPortal.
Select DR+ Streaming,
OK call.
You will see a message on the screen. After approximately 20 seconds
the TV set will enter extended standby mode. The DR archive will then
be accessible within the network for the period of time set in the DR+
Streaming settings (see page 88).
TEXT
OK
{,-=
,
-
UEFA Champions League - Qualifikation
20.08. Sat.1
Tagesschau
19.08. Das Erste HD
heute
19.08. ZDF HD
Tatort
29.07. 3sat
Individual
00.00. LOEWE.
09:45 - 10:00
DR ARCHIVE free capacity 59:14 hrs
LOEWE TV
Edit/protect
Delete/copy
Change sorting
Detail View
Timer list
MEDIA PORTAL
BR
Klassik RadioFilmtrailer.com
90elf - Dein
Fussball-Radio
DELUXE
LOUNGE RADIO
Focus TV ZDFFocus Online
TV
DR+ Streaming MediaHome
DVB radio Internet radio
RECOMMENDATIONS
MediaNet
DR archive
Video podcasts
Digital Recorder
Downloaded From TV-Manual.com Manuals
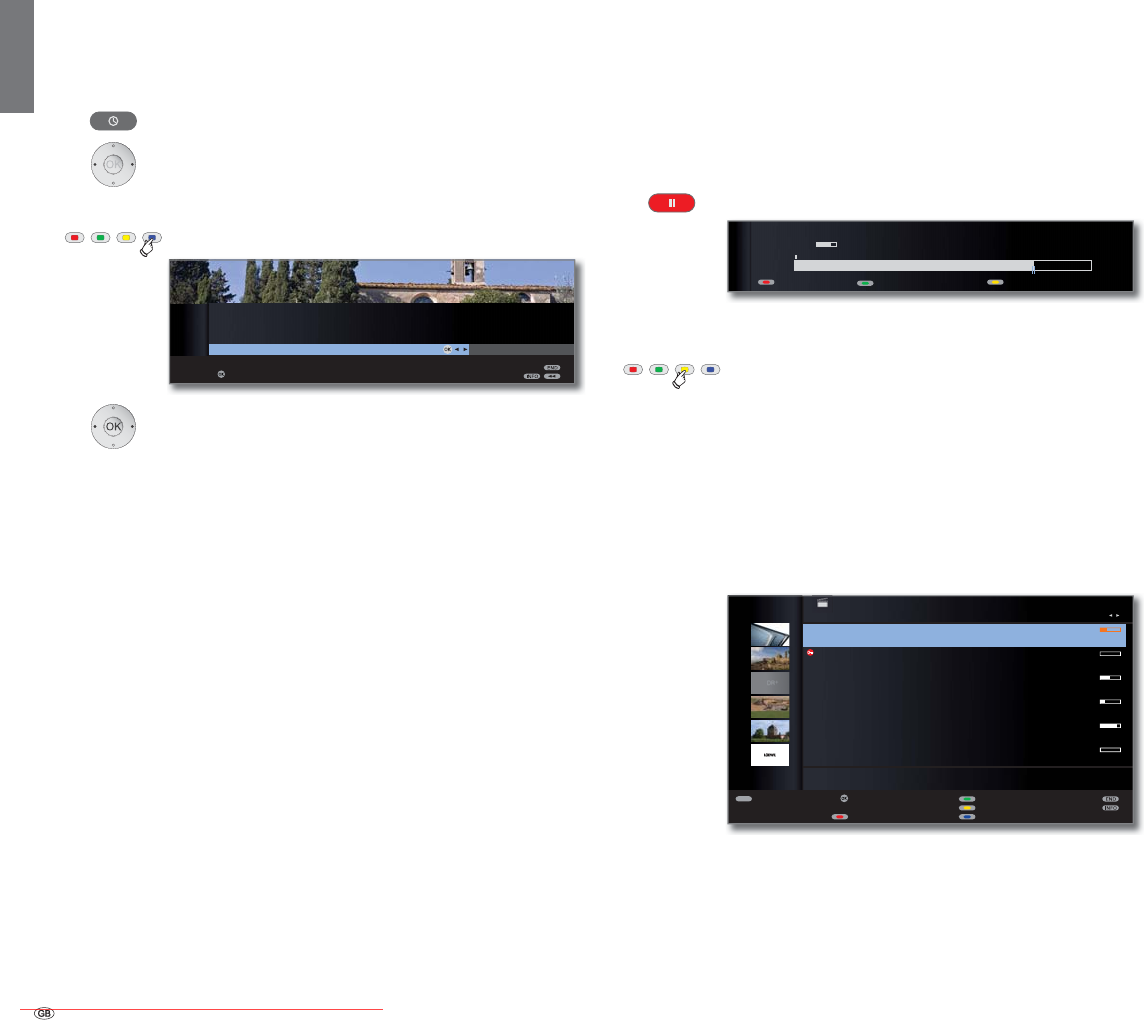
- 106
english
Copy recordings from an accessible TV set
You can copy archive entries from an accessible TV set via a network to
the integrated hard disk, or to a storage medium connected to the TV
set’s USB.
At the target TV set:
Call DR archive.
Select required accessible TV set.
Select titles to be copied as described on page 100.
Blue button: Call Copy entry.
If there are multiple storage mediums available,
select the one required.
OK Start the copy procedure.
➠ Copying to the integrated or external hard disk takes place in the
background and at a significantly higher speed. Contrary to copying
recordings to a connected recorder (see page 100), there are no
selection restrictions here regarding the stations. You see a screen
message, when copying has finished.
The status of copying assignments in progress can be seen in the timer
overview.
➠ During copying, neither the accessible TV set nor the target TV set may
be disconnected from the mains! Copying will otherwise be interrupted
and the recording may then be unusable.
Follow me function
The Follow me function enables you to interrupt a current broadcast and
to continue viewing at an alternative TV set from the point of interruption.
➠ DR continuous operation is activated (page 87).
➠ Share the DR archive with other TVs (see page 88)
is activated.
➠ Using the DR archives of other TVs (see page 88) is
activated at the target TV set.
Press PAUSE button.
The TV image becomes a freeze frame and the DR status
display appears.
Yellow button: Activate Follow me.
You will see a message on the screen. An archive record-
ing starts in approximately 20 seconds. The broadcast
is adopted into the DR archive. The set switches off
automatically.
The recording TV set will make the broadcast available to the network
from now. Open the DR archive of the TV set on which you wish to
view the broadcast. The broadcast appears in orange during the current
recording.
To play accessible broadcasts on other TV sets, see
page 105.
For further information on general operation see page 97.
TEXT
OK
۩
,
-
IFA 2010 - Highlights
16.09. ZDF HD
Top-Movie 1
15.09. Sky Cinema HD
Bon(n) jour Berlin
14.09. Phoenix
da capo
31.08. Das Erste
Tagesschau
29.07. 3sat
Individual
00.00. LOEWE.
DR ARCHIVE free capacity 68:28 hrs
INDIVIDUAL 55
Edit/protect
Delete/copy
Change sorting
Detail View
Timer list
09:5609:45 10:00
Follow me
3KRHQL[6WHUHR܃
09:45-10:00 Bon(n) jour Berlin
DR archive Language/sound
OK
OK
DR ARCHIVE
Copy
14.09. Phoenix Bon(n) jour Berlin
confirm
Copy to ... Integrated hard disk USB1
Digital Recorder
Downloaded From TV-Manual.com Manuals
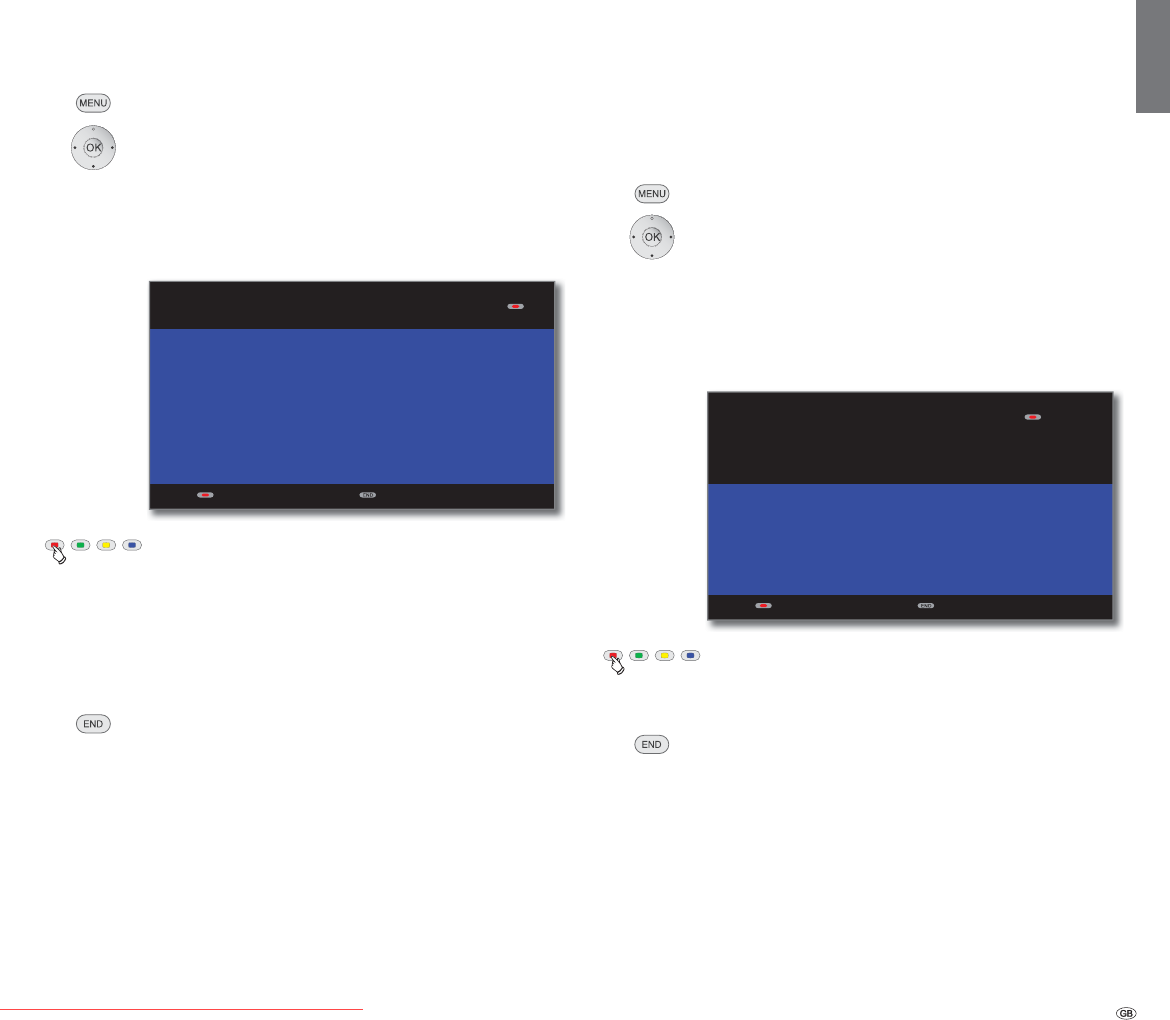
107 -
english
Checking the hard disk
You can check the integrated hard disk of the TV set, e.g. if problems
with the Digital Recorder function occur.
Call TV menu.
Select Settings,
switch to the menu line below
.
Select Miscellaneous,
switch to the menu line below
.
Select Check integrated hard disk,
OKactivate.
Red button: Start check.
After the check, a message will appear on the screen
showing the results of the check and tips on how to
resolve any problems that are present, should there be
any.
➠ After the check, the TV set must be re-started.
Or:
END: Cancel the operation.
Formatting the hard disk
If problems were detected when the hard disk was being tested (see left
column), re-formatting may be able to remedy the problem.
Additionally, you can re-format the hard disk in order to quickly and easily
delete all the data stored on it.
Attention!
Formatting of the hard disk deletes all the data saved on it!
Call TV menu.
Select Settings,
switch to the menu line below
.
Select Miscellaneous,
switch to the menu line below
.
Select Format integrated hard disk or Format external
hard disk,
OKactivate.
Red button: Start formatting.
➠ After the formatting, the TV set must be re-started.
Or:
END: Cancel the operation.
Note on formatting external USB disks:
The TV set uses the hard disk file system FAT32. The file system NTFS is
not supported. PCs with the operating system Microsoft Windows only
support a total hard disk volume of 32GB when formatting on FAT32.
Larger hard disks are automatically reduced in their capacity by this.
Format external USB disks that you wish to use with the TV set as de-
scribed above.
ATTENTION
If the formatting of the hard disc is confirmed by pressing the button
then the TV switches itself off and then back on, and the formatting of the
herd disc starts automatically. Attention! This process will delete all data
stored on the hard disc.
Do you really want to format the hard disc?
Start formatting No, cancel the operation
Digital Recorder
ATTENTION
The hard disk check can be launched by pressing the confirmation key
and can take up to 20 minutes?
Start check No, cancel the operation
Downloaded From TV-Manual.com Manuals

- 108
english
Further information
VPS and automatic time control
Your TV set can use the supporting technologies VPS (Video Programming
System) and automatic time control for recording a broadcast.
VPS serves for monitoring the start and end time of the broadcast with
analogue stations. The VPS time indication is compared by the digital
recorder with the start time programmed by the user. If both times cor-
respond the recording is started. However, VPS is not supported by all
stations.
The automatic time control assumes the corresponding monitoring of the
start and end time for DVB stations. The recording is started at the begin-
ning of the broadcast and switched off at the end, even if the start and/
or end time have been changed by the programme provider. Broadcast
interruptions are also taken into account. However, the automatic time
control is not supported by all stations.
DVB Common Interface standard (CI)
If a programme has been recorded coded, the decoding process is carried
out automatically the next night in the standby mode (when timer data
settings do not differ). Please note that the TV set may not be switched
off at the mains overnight and that the CA module with SmartCard must
be inserted in the CI slot of the TV set.
If the recording is not decoded fairly soon after decoding, it may not be
possible to decode it at all. The longer the time between recording and
decoding, the greater the probability that the code is no longer valid.
➠ Scrambled hard disk recordings appear in the timer list until they are
descrambled (page 93).
➠ You can also start decoding manually (see page 101).
➠ Your programme provider may not support later (time offset) descram-
bling.
You can have programmes from scrambled stations descrambled already
in DR continuous mode. This saves you having to decode directly recorded
scrambled programmes later. An appropriate CA module with SmartCard
must be inserted in the TV set’s CI slot for this.
➠ The playback of encrypted programmes is strongly dependent on
which CA module is used. The playback of encrypted recordings may
sometimes not be possible, or only to a limited extent.
Hint: When possible, record unencrypted programmes or unencrypt
them as soon as possible.
➠ Selection possibilities in the CA module menu (see operating manual
of the TV set) and performance capability of your CA module depend
on the type of module used and the installed software. Consult the
manufacturer of the module if you have any questions.
Digital Recorder
Downloaded From TV-Manual.com Manuals

109 -
english
DVB Common Interface Plus standard (CI Plus)
Software update for CI Plus capable CA modules
Every now and then, there will be new system software for your CA
module software. There are two software update types.
Recommended update:
Information on an available update is displayed. You can either run this
or cancel the procedure. If you do not install the update, the informa-
tion will reappear in regular intervals until the update has been installed.
Forced update:
Information on an available update is displayed. The module does not
decode any more until the update has been successfully implemented.
Troubleshooting (CA module)
The following information can help, if problems should occur when
running a CA module:
Switch the TV set off to the standby mode. Remove the CA module from
the TV set. Switch the TV set off completely. Wait a few seconds. Reinsert
the CA module. Switch the TV set on again.
If errors continue to occur, make a note of the displayed two-digit error
code (only for CI Plus capable CA modules). Contact your technical cus-
tomer service. You will find the service addresses on page 157.
Digital Recorder
CI Plus is an advanced development of the DVB Common Interface
Standard. CI Plus slots are in principle downward compatible to the
previous CI standard, i.e. CA modules and Smart Cards according to the
past CI standard can continue to be used in CI Plus slots, as far as the
programme provider permits this.
The regulations of the past standards (see page 27) likewise apply to CI
Plus. There are however further additional regulations.
Programme providers, who use the CI Plus standard, can assign differ-
ent rights for their broadcast programmes. For instance, the programme
provider can restrict or completely prevent recording or later watching of
an encoded programme. If there are such regulations, these also apply
to time-shifted watching of television programmes.
A screen message informs you of this fact, if you would like to record
such a programme. Recording is carried out in such a case (an appropriate
entry is displayed in the DR archive), later watching of the programme
is however not possible at all or only for a limited period (e.g. 10 days).
A possible time limitation of the playback will also appear in the cor-
responding entry in the DR archive.
The provider can also prohibit later decoding of a recorded encoded
programme.
➠ All restrictions mentioned here are the responsibilities of the broad-
caster. The TV simply values the broadcaster set signalling as neutral.
Furthermore, the programme provider can prevent external copying
of protected programmes, e.g. on a DVD recorder (also after possible
decoding).
It could be necessary to enter the parental protection PIN of the CA mod-
ule when programming the data, if you want to record a CI Plus protected
programme, which has been protected against viewing by minors. The
secret number of the TV set is required for watching the programme later.
The appearance of the CA module menu of CI Plus (see operating in-
structions of the TV set) can deviate from the normal appearance of the
TV menu.
Downloaded From TV-Manual.com Manuals
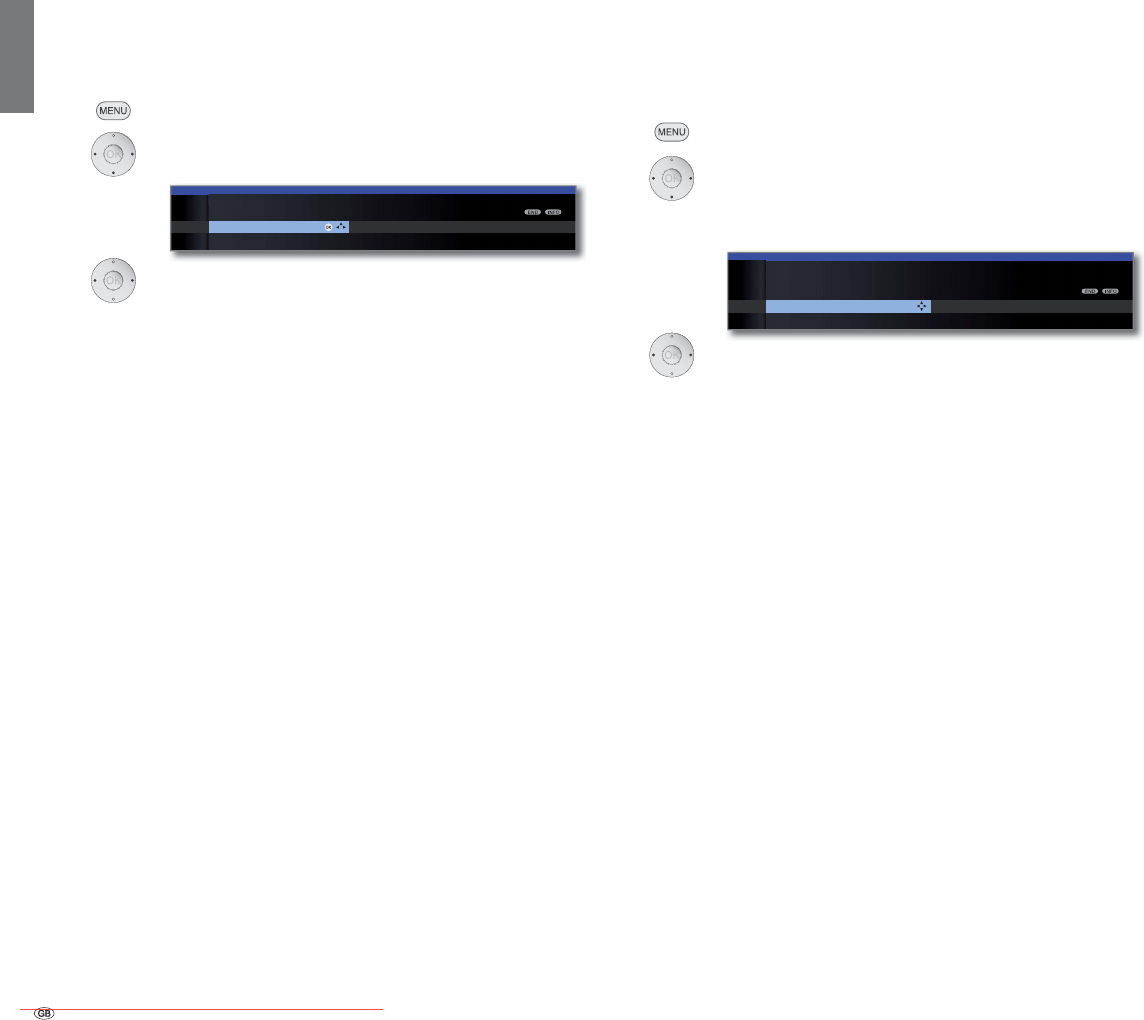
- 110
english
Connections menu
Settings for the connection of external appliances are made in this menu.
Calling the connections menu
MENU: Call TV menu.
Select Connections,
go to the menu line below.
Select the desired setting.
Explanations of setting possibilities in the Connections menu:
The sound components wizard helps you to configure the
components which are used to reproduce the TV sound.
You will find a description of the sound components
wizard on page 117.
Here you can set the parameters of the DVB-T and the
DVB-S (1 antenna with the antenna wizard. The setting
options of the DVB antennas are described in the first
time operation routine (from page 24).
See right column for explanations.
See page 111 for explanations.
AV connection settings
In the AV connection settings menu the parameters for the AV and AVS
connection sockets can be adapted.
Calling AV connection settings
MENU: Call TV menu.
Select Connections,
go to the menu line below.
Select AV connecting settings,
go to the menu line below.
Select the desired setting.
Explanations of setting possibilities in the AV connecting settings menu:
Indicate here whether a set and, if yes, which one is con-
nected to the AV socket.
You set the AV standard of the connected appliance to
AV or AVS here.
Normally you leave the setting on Automatic. If the
standard of the connected appliance is not detected
automatically, select the right standard.
Ask your dealer or consult the operating manual of the
connected appliance if necessary.
You set the signal type of the device connected to AV
or AVS here. Normally, you should leave the setting at
Automatic; otherwise select a suitable signal type. You
can find out more from your dealer.
If this function is activated and you switch an AV device
(not at AVS) that outputs a switching voltage to playback,
its picture and sound will be played immediately on all
TV station slots.
External devices
Sound
components
Antenna DVB
AV connecting
settings
Miscellaneous
Antenna DVB AV connecting settings Miscel
TV MENU
Connections
Sound components OK
AV standard Signal type Allow switchi
n
TV MENU
Connections
AV connecting settings
Device at connection AV
No device ...
Device at
connection AV
AV standard
Signal type
Allow
switching
voltage
(1 Equipment and upgrade options, see page 142.
Downloaded From TV-Manual.com Manuals
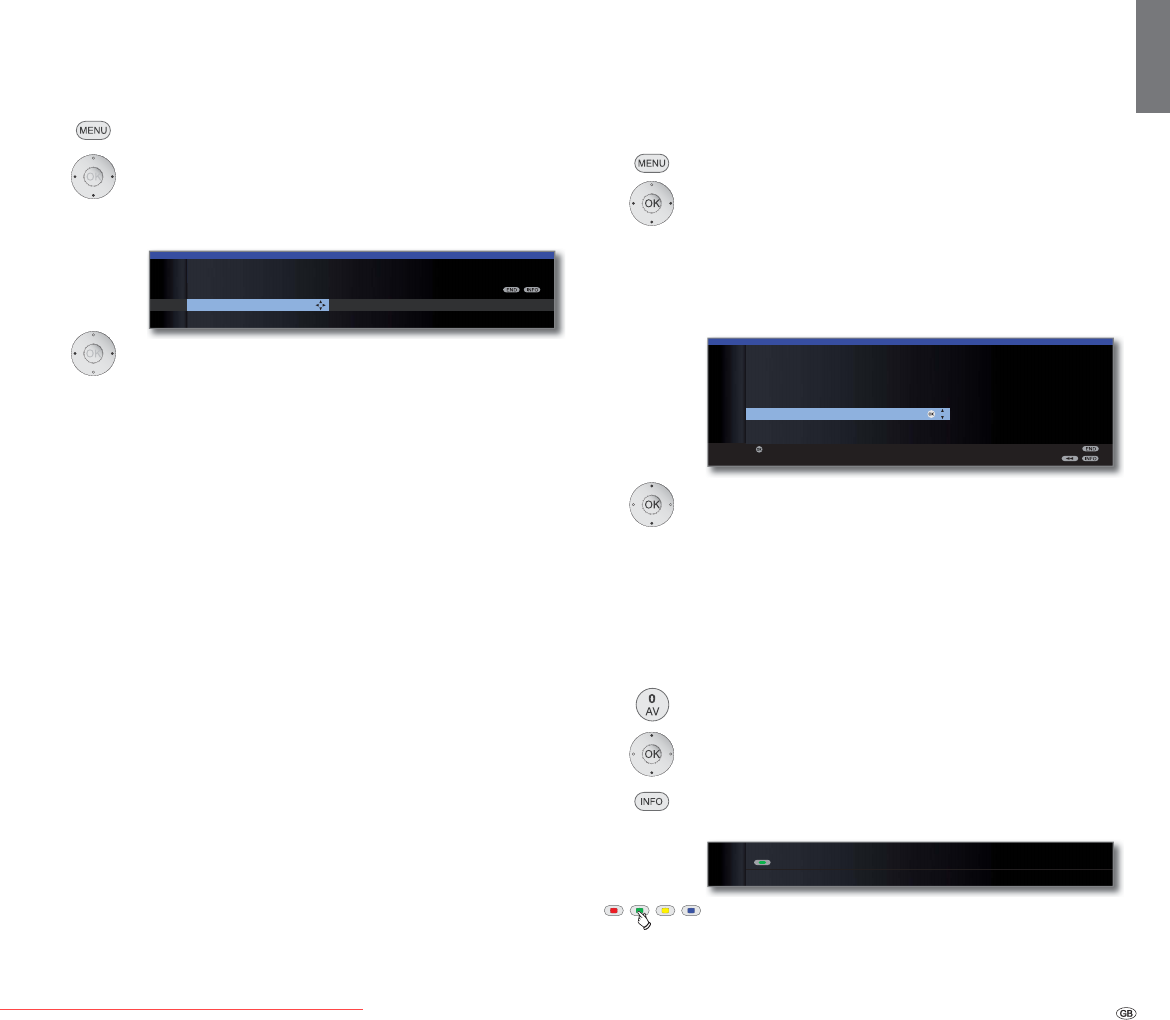
111 -
english
Connections – Miscellaneous
Various settings (e.g. Digital Link, Decoder etc.) in connection with ex-
ternal appliances are made in this menu.
Calling up other settings for connections
MENU: Call TV menu.
Select Connections,
go to the menu line below.
Select Miscellaneous,
go to the menu line below.
Select the desired setting.
Explanations of setting possibilities in the Miscellaneous menu:
With this function the station data of the TV set can
be transmitted to a connected Digital Link Plus capable
recorder. Only the station data of analogue TV stations
can be transmitted.
Here you can identify analogue stations with encoded
content as decoder stations and set the mode of the sound
encoding of encoded audio signals, so that these are
automatically decoded by a decoder connected to AV.
Menu item only available if a Decoder has been selected
as Device at connection AV (see page 110).
Here you can select whether the TV set is to switch on
automatically from Standby mode, if a tape / disc is to be
played or a screen menu displayed from Digital Link HD
or Digital Link Plus-enabled devices which are connected
to HDMI or AV inputs (see also page 112 and 114).
You can assign the digital audio input socket (AUDIO
DIGITAL IN) to an AV input (AV, HDMI, PC IN etc.) here
(see page 123).
Here you can set a faster display of your activities on the
screen for various inputs of the TV set, e.g. for games
consoles (see right hand column).
Gaming mode
For the inputs of your TV set on which game consoles, PC applications
or even Karaoke machines are operated, we recommend you to activate
the Gaming mode. Your activities are then displayed quicker on the screen
by reducing the complex picture improving techniques. This mode can
be set separately for every input of your TV set.
MENU: Call TV menu.
Select Connections,
go to the menu line below.
Select Miscellaneous,
go to the menu line below.
Select Gaming mode,
OK call.
Select socket,
OK Gaming mode for selected socket on/off.
You can recognise AV connections with set Gaming mode
by the symbol ܫ after the connection name.
Switching Games mode on/off via the status display
You can also switch the Games mode for the selected AV input on and
off via the status display.
Call AV selection.
Select desired connection,
OK switch over.
INFO: Call up status display (if this is no longer shown
after switching to the AV connection).
Green button: Switch Gaming mode for selected connect-
ed on or off according to status.
External devices
Digital
Link Plus
Decoder
stations
Remote TV
switch on via
Digital Link
Assign digital
audio input
Gaming mode
Decoder stations Remote TV switch on via Dig
TV MENU
Connections
Miscellaneous
Digital Link Plus
Start transmission
OK
OK
SET GAMING MODE FOR INPUTS ...
HDMI3
HDMI2
+'0,ܫ
PC IN
AVS
AV
VIDEO
Gaming mode on/off
Gaming mode on
۫
+'0,$9VRXQG܃
Downloaded From TV-Manual.com Manuals
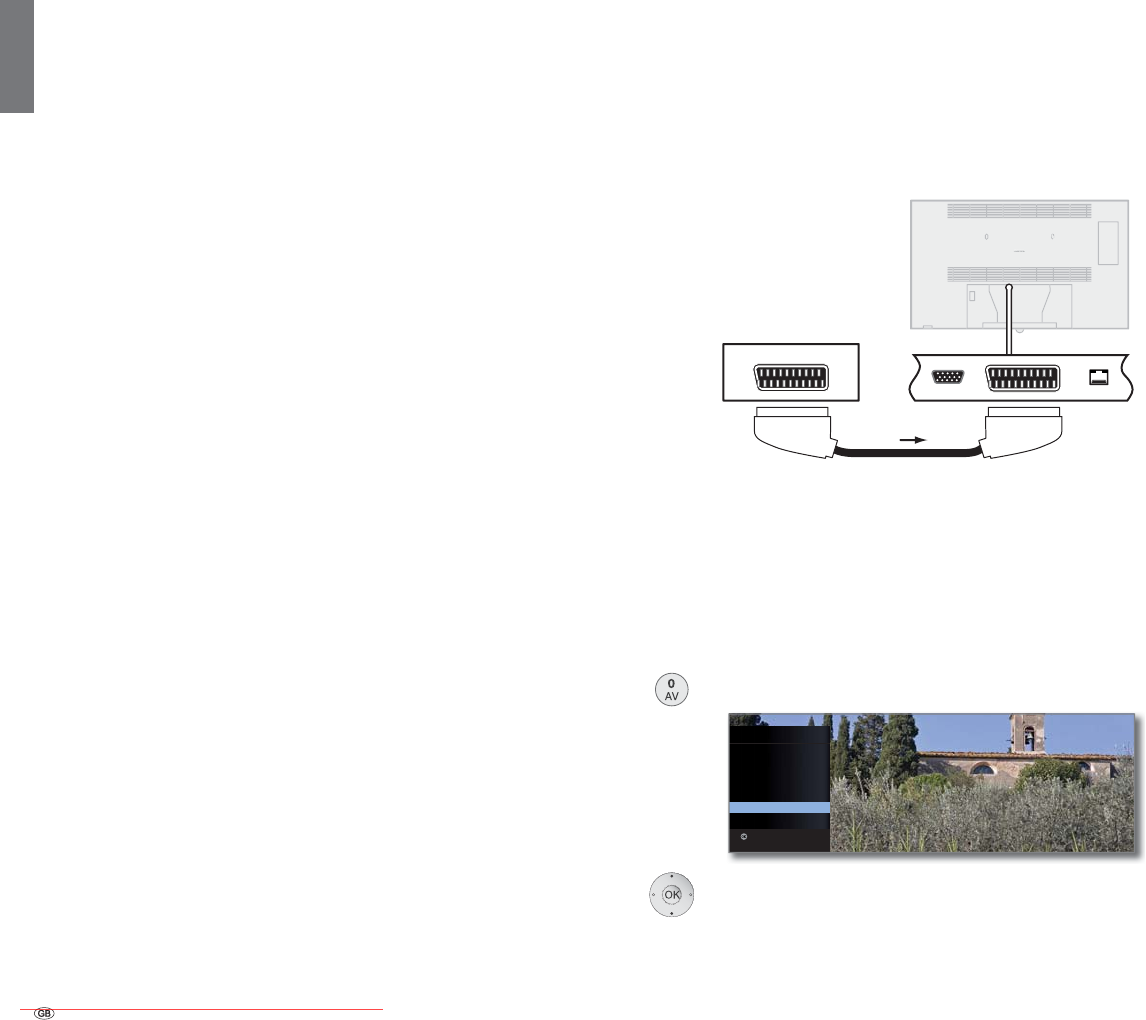
- 112
english
Connecting a DVD player to the TV set
➠ A DVD player has been selected in the TV Menu under Connections ט
AV connecting settings ט Device at connection AV (see also page 110).
Switch off all equipment before connecting.
Connect the Euro-AV output of the DVD player to the AV socket of the
TV set.
Use a fully equipped Euro-AV cable (available from your dealer) for this.
Playback from AV device
If the device at AV supports the Digital Link Plus functionality or if in the
TV menu ט Connections ט AV connecting settings ט Allow switching
voltage ט yes, the TV set will automatically switch to the corresponding
AV input after starting the replay at the AV device.
The AV input can also be called manually, however.
Call AV selection.
Select AV,
OK switch over.
Start playback on the connected device.
Devices to the connections AV/AVS
An additional appliance such as a DVD player, VCR/DVD recorder etc. can
be connected to the TV set at the Euro-AV socket AV (see page 11).
The AV input AVS (see page 11) offers the possibility of connecting a
digital camera or a Camcorder for example.
The AV sockets can process different signal types. Which signal type your
accessory device provides can be found in the operating manual of the
appropriate device.
Owing to the large number of AV devices available on the market, we can
only mention a few examples for the connection of accessory equipment
to the AV sockets here.
If the sound of the device connected to an AV socket is to be transmit-
ted digitally, a cinch cable must be plugged between the coaxial digital
output of the accessory equipment and the AUDIO DIGITAL IN socket of
the TV set. In addition, the digital audio input must be assigned to the
appropriate AV socket.
The digital audio input can be assigned to the appropriate AV socket by
the TV menu ט Connections ט Miscellaneous ט Assign digital audio input
(see page 123).
Remote TV switch on via Digital Link
You can select whether the TV set is to switch on automatically from
Standby mode if a disc is played or a screen menu displayed on a Digital
Link Plus-enabled device connected to AV.
You can find the settings in the TV Menu under Connections ט Other ט
Remote TV switch on via Digital Link (see also page 111).
OK
AV SELECTION
HDMI3
HDMI2
HDMI1
PC IN
AVS
AV
VIDEO
Switch to ...
External devices
AV
Connection example of a DVD player
TV set
DVD player
AV
Downloaded From TV-Manual.com Manuals
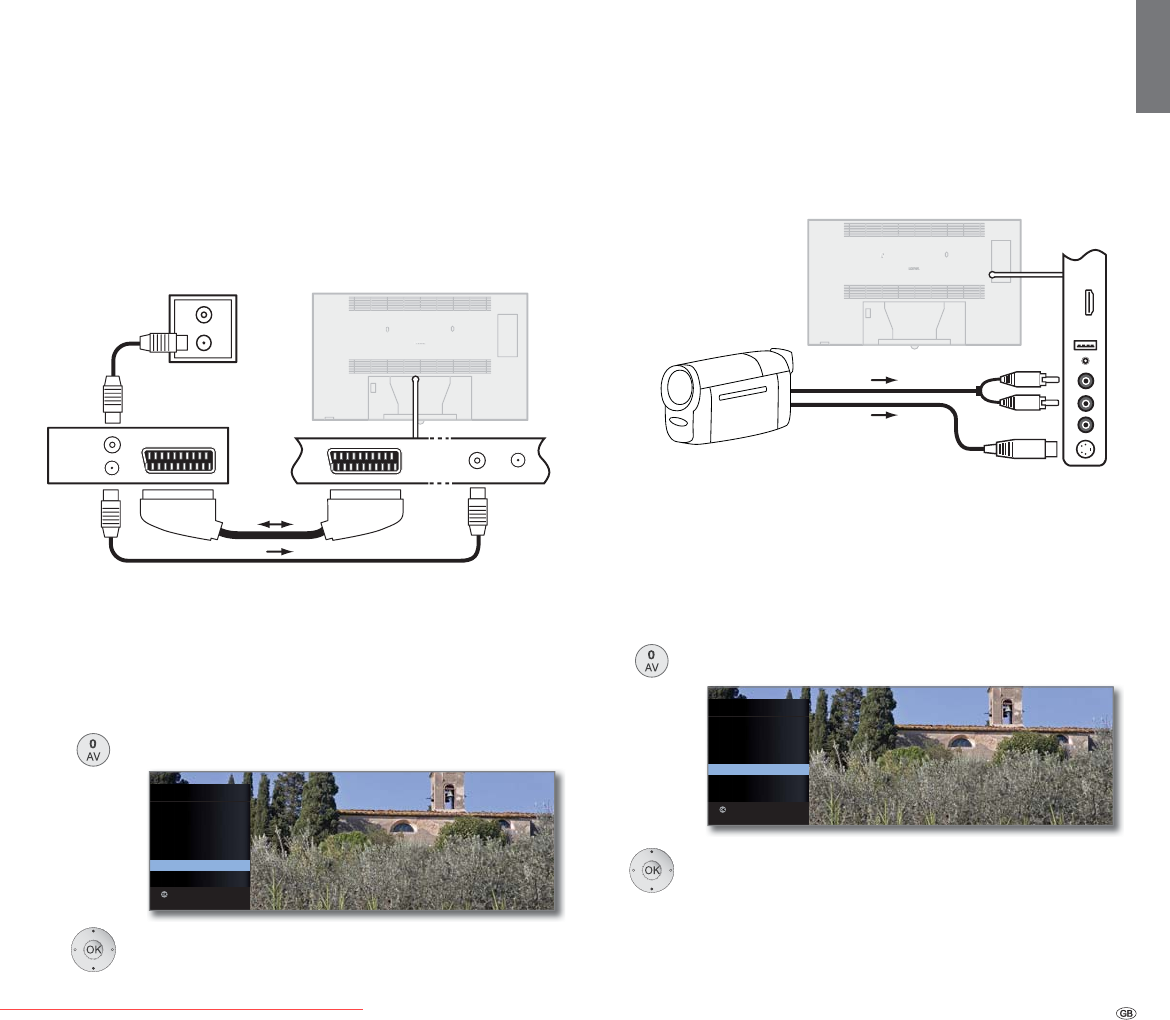
113 -
english
Connecting a DVD recorder to the TV set
➠ A DVD recorder has been selected in the TV Menu under Connections ט
AV connecting settings ט Device at connection AV (see also page 110).
Switch off all equipment before connecting.
Connect the Euro-AV output of the DVD recorder to the AV socket of
the TV set.
Use a fully equipped Euro-AV cable (available from your dealer) for this.
If you want to receive and record analogue stations with the receiver
(tuner) built into the recorder, the recorder must be looped into the
aerial cable.
Connect the DVD recorder as shown in the connection example below.
➠ If you want to record DVB stations with an external recorder, the
internal receiver of the TV set must be used (see Timer recording with
external devices on page 126).
Playback from AV device
Call AV selection.
Select AV,
OK switch over.
Start playback on the connected device.
Connecting Camcorder/camera
Switch off all equipment before connecting.
Connect the AV output of the camcorder to the sound input sockets
AUDIO IN L (white) and AUDIO IN R (red) and the AVS connection of the
side AV sockets of the TV set.
Use the AV cable enclosed with the camcorder for this.
Some camcorders only supply an FBAS signal instead of an S-Video signal
at the AV output. In this case use the VIDEO IN input (yellow).
If your camcorder has an HDMI output, you can also connect the ap-
pliance via the HDMI socket HDMI3 on the side (see connections page
11 or Devices to the HDMI connections page 114).
Playback from AV device
Call AV selection.
Select AVS,
OK switch over.
Start playback on the connected device.
Connection example of a DVD recorder
TV set
DVD recorder
AV ANT TV
TV set
Camcorder
AUDIO IN L/R
AVS
Connection example of a camcorder
OK
AV SELECTION
HDMI3
HDMI2
HDMI1
PC IN
AVS
AV
VIDEO
Switch to ...
OK
AV SELECTION
HDMI3
HDMI2
HDMI1
PC IN
AVS
AV
VIDEO
Switch to ...
External devices
ANT IN
ANT OUT
AV
R
TV
Downloaded From TV-Manual.com Manuals
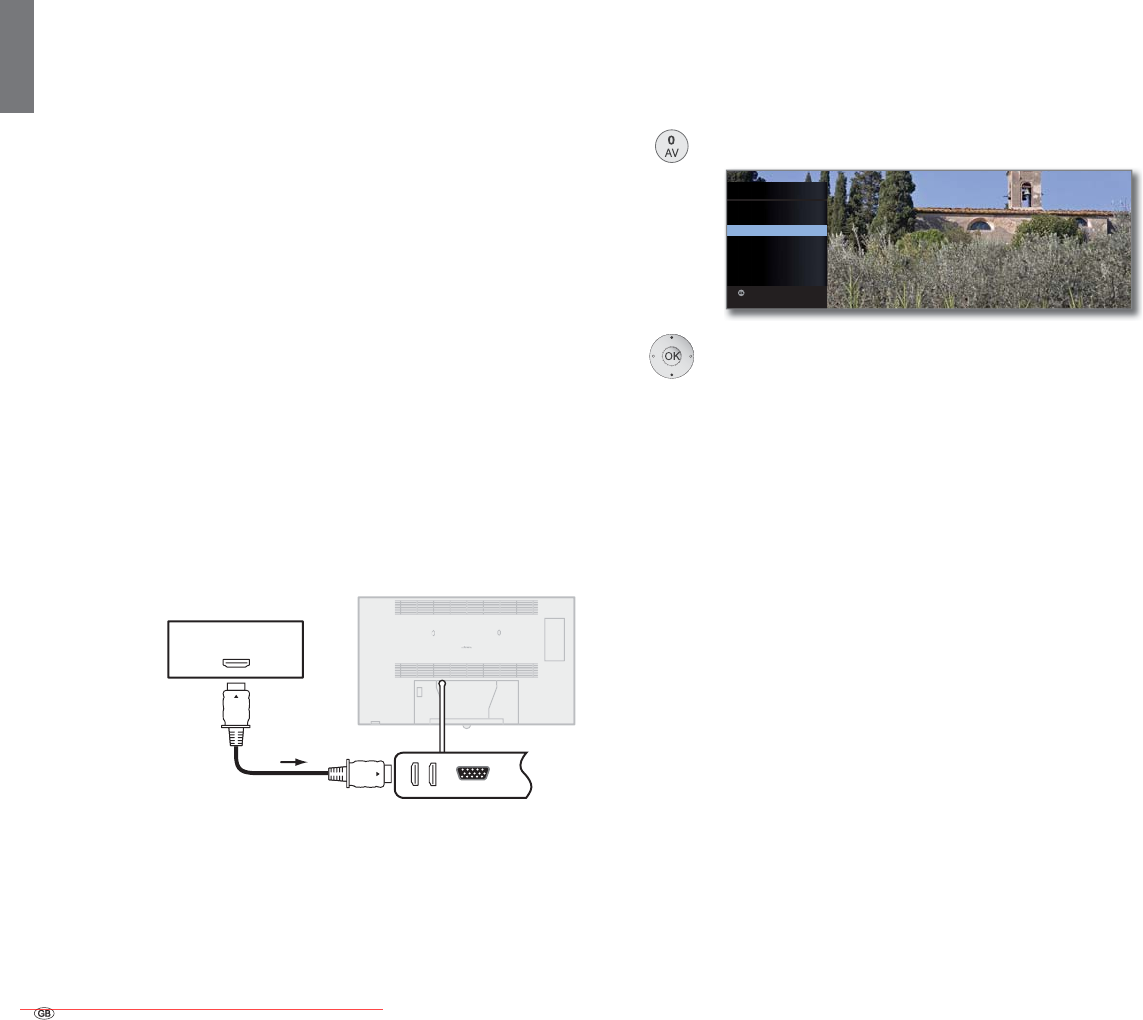
- 114
english
Devices to the HDMI connections
The HDMI connections (High Definition Multimedia Interface) allow the
transmission of digital video and audio signals from a player (e.g. DVD
player, DVD recorder, Blu-ray player, game console or Set-Top-Box) via
a single cable.
The digital video and audio data are transmitted without data compres-
sion digitally and therefore lose none of their quality.
A maximum of five devices can be connected in cascade to every HDMI
socket. The devices are arranged in the AV menu and in the station list
below the appropriate HDMI socket. If the respective device sends its own
device name, this appears in place of the connection name.
Your TV set can show 24p films, which are output from a connected
HDMI player (e.g. Loewe BluTech Vision Interactive) optimally (see glos-
sary, page 147).
Digital video signals from a DVI player can be also be reproduced by the
HDMI connection using a DVI/HDMI adapter cable. The sound must be
piped in additionally. However, the sound must then be supplied additionally.
HDMI and DVI both use the same copy protection method HDCP.
Connecting the device
Switch off all equipment before connecting.
Connect the device by an HDMI cable (Type A, 19-pole) to one of the
HDMI sockets of the TV set.
An HDMI device is connected to the side HDMI socket (e.g. camcorder)
in the same way as shown in the figure.
If a DVI/HDMI adapter cable is used, the corresponding sound can be
piped through the AUDIO IN (analogue) or AUDIO DIGITAL IN (digital)
socket on the TV set (see also page 123).
Playback from the device
If the device at HDMI supports the Digital Link HD functionality, the TV set
will automatically switch to the corresponding HDMI input after starting
the replay at the HDMI device.
The HDMI input can also be called up manually:
Call AV selection.
Select HDMI socket.
With Digital Link HD-capable devices the device
name may possibly appear in place of the connection
name.
OK Switch over.
Start playback on the connected HDMI device. The best
possible format for the picture is detected and set auto-
matically.
Remote TV switch on via Digital Link
You can select whether the TV set is to switch on automatically from
Standby mode if a disc is played or a screen menu displayed on a Digital
Link HD-enabled device connected to HDMI1 or HDMI2.
You can find the settings in the TV Menu under Connections ט Other ט
Remote TV switch on via Digital Link (see also page 111).
HDMI1
TV set
Blu-ray player
Connection example of an HDMI device (e.g. Blu-ray Player)
OK
AV SELECTION
HDMI3
HDMI2
HDMI1
PC IN
AVS
AV
VIDEO
Switch to ...
External devices
HDMI
Downloaded From TV-Manual.com Manuals
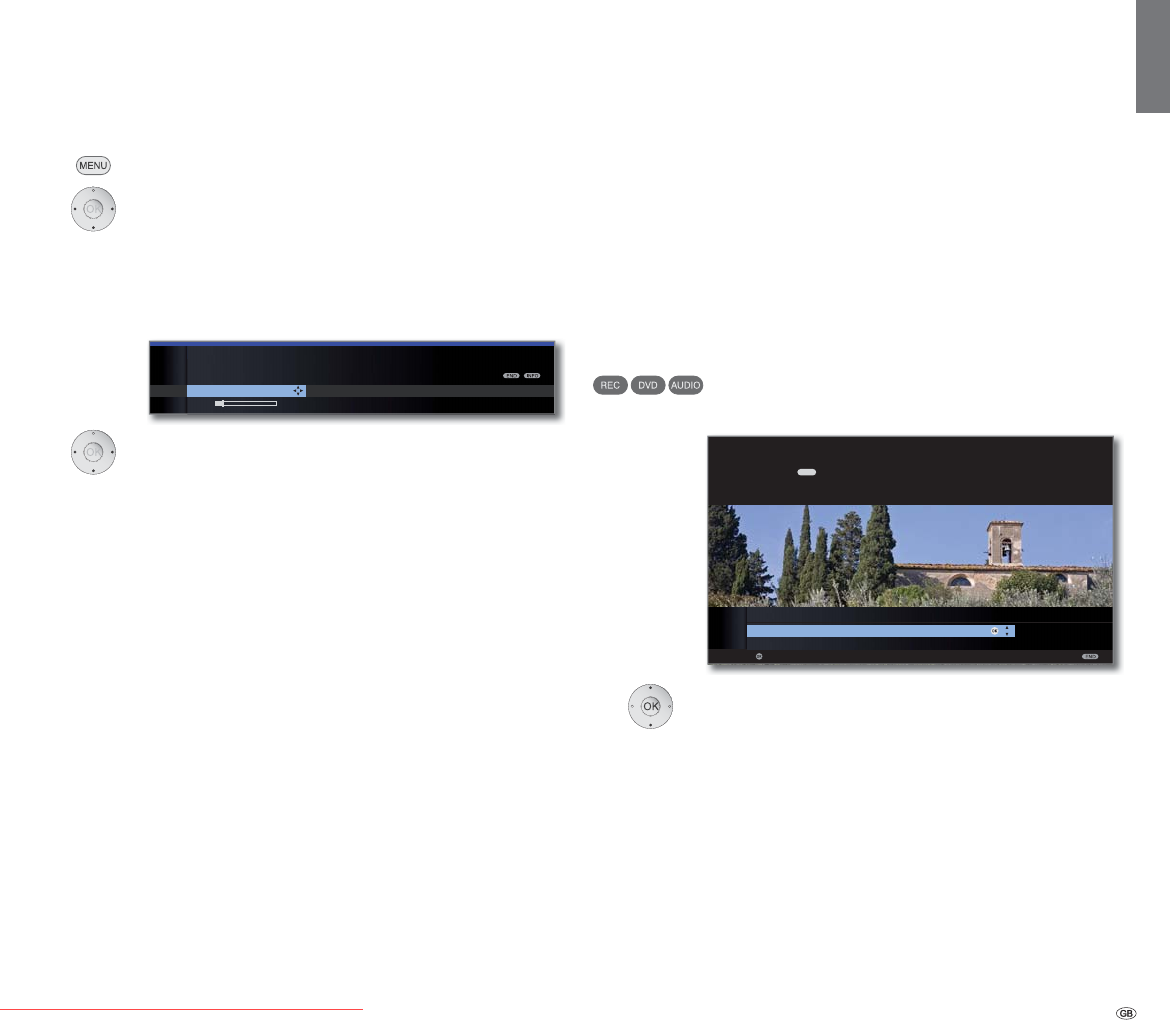
115 -
english
Digital Link HD
Digital Link HD ( HDMI CEC)
The Digital Link HD (HDMI CEC) system operation allows Loewe television
sets to transmit the remote control signals via the HDMI connection of a
TV set to compatible HDMI devices, such as e.g. Loewe AudioVision. You
can therefore set up a concealed CEC capable HDMI device.
Concealed installation of HDMI devices
For this, first assign the HDMI CEC function with Code 22 to the required
device button (REC, DVD or AUDIO) as described on page 127.
Now assign the Digital Link HD function to the used HDMI device.
Assign HDMI device
➠ The CEC capable HDMI device is connected to one of
the HDMI sockets of the TV set and switched on.
Press required button for 5 seconds.
A selection menu appears on the TV set.
Select required device from the list.
OK Adopt.
From now on, the commands of the remote control are
communicated from the TV set to the HDMI device, if
the corresponding device button (REC, DVD or AUDIO)
has been pressed previously.
Adjust Geometry (only possible with certain signals)
This allows you to shift the picture (horizontally and vertically) so that it
fills the entire screen.
➠ When connecting a PC to an HDMI socket of the TV set, set the out-
put signal at your PC beforehand so that it corresponds to one of the
signals in the table on page 137.
MENU: Call TV menu.
Select Picture,
go to the menu line below.
Select more ...,
OKcall.
Select PC IN display,
go to the menu line below.
Select the desired setting,
go to the menu line below.
Make settings.
OK
OK
HINT
Here you select the device which you want to switch over your remote control
to with the key. After confirming the selection with OK all remote control
commands are passed on to the selected device via the TV set in future when
you press this key.
SELECT HDMI DEVICE FOR KEY AUDIO
AudioVision
No device
Adopt
AUDIO
External devices
Picture vertical
MENU TV
Picture
PC IN display
Picture horizontal
66
Downloaded From TV-Manual.com Manuals
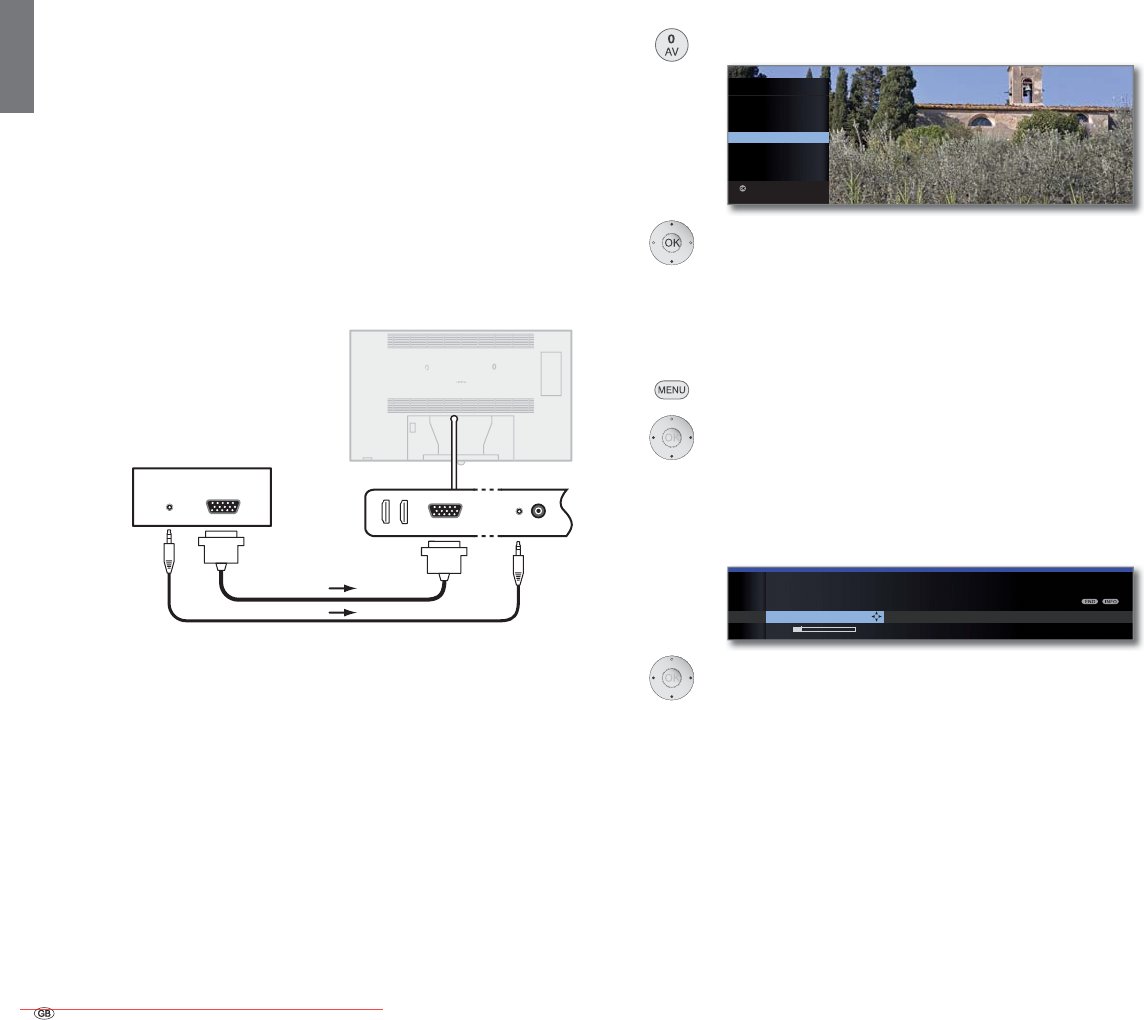
- 116
english
Devices to the PC IN connection
You can connect a PC to the PC IN socket for example and thus use the
TV screen as a monitor.
➠ When connecting a PCs or accessory device to the PC IN socket of the
TV set, set the output signal on your PC first so that it matches one of
the signals in the table on page 137.
Connecting the device
Switch off all equipment before connecting.
Connect the device to the TV set’s PC IN socket with a VGA cable.
Connect the analogue audio signal of the PC to the AUDIO IN jack on
the TV set with a stereo cable.
Alternatively, connect the digital audio output of the PC or accessory equip-
ment to the AUDIO DIGITAL IN socket of the TV set with a cinch cable.
The digital audio input can be assigned to the PC IN socket by TV menu
ט
Connections
ט
Miscellaneous
ט
Assign digital audio input (see page
123).
If your PC has an HDMI interface, you can also connect the PC via the
HDMI socket to your TV set (see page 114).
Depending on the version of the HDMI connection on the PC, the audio
signal is also transmitted via the HDMI connection.
If this is not the case, connect the analogue or digital sound as described
above. See the appropriate operating manual for further information
about the version of the HDMI interface on your PC.
.
Playback from the device
Call AV selection.
Select PC IN socket,
OK switch over.
PC picture adjustment (only possible with certain signals)
In this menu you can set the position (vertical, horizontal) and the phase
length of your PC.
MENU: Call TV menu.
Select Picture,
go to the menu line below.
Select more ...,
OKcall.
Select PC IN display,
go to the menu line below.
Select the desired setting,
go to the menu line below.
Make settings.
OK
AV SELECTION
HDMI3
HDMI2
HDMI1
PC IN
AVS
AV
VIDEO
Switch to ...
External devices
Connection example of a PC
PC
PC IN AUDIO
IN
TV set
Picture vertical Phase position
TV MENU
Picture
PC IN display
Picture horizontal
66
VGAAUDIO
Downloaded From TV-Manual.com Manuals

117 -
english
Sound components wizard
The sound components wizard helps you to configure the components
that are used to reproduce the TV sound. For sound reproduction, you
can configure the TV loudspeakers, active loudspeakers, loudspeaker
systems, Loewe Individual Sound Projector SL as well as analogue and
digital HiFi/AV amplifiers.
TV sets that are equipped with an integrated digital multi-channel audio
decoder can output sound signals with up to six channels (5.1 surround
sound) via the AUDIO LINK interface irrespective of whether the sound
signal comes from an external device (DVD player, Blu-ray player) or from
a DVB station.
For settings for loudspeaker systems and active speakers at the AUDIO
LINK interface of the TV set, see page 118 onwards.
For sound formats supported by the digital audio decoder, see page 137.
Sound reproduction in TV sets with an integrated digital multi-channel
audio decoder
Sound reproduction via the built-in TV speakers (factory
setting).
Sound reproduction via a loudspeaker system or active
loudspeakers (see page 118).
Sound reproduction via an external analogue or digital
audio amplifier (see page 122).
Sound reproduction via a sound projector, e.g. Loewe
Individual Sound Projector SL. For further information,
refer to the operating instructions of the sound projector.
Sound reproduction optionally via an external analogue
or digital audio amplifier (see page 122) or via the built-
in TV loudspeakers. The sound reproduction can be
changed using the button ܃.
Sound reproduction optionally via a sound projector or
via the built-in TV loudspeakers. The sound reproduction
can be changed using the button ܃.
External devices
OK
OK
SOUND COMPONENTS
Sound playback via ...
TV speakers ۪
Speaker system
HiFi/AV amplifier
Sound projector
HiFi/AV amplifier or TV speakers (switchable)
Sound projector or TV speakers (switchable)
End of wizard
TV speakers
Speaker system
HiFi/AV
amplifier
Sound
projector
HiFi/AV-
amplifier or TV
speakers
(switchable)
Sound projector
or TV speakers
(switchable)
Downloaded From TV-Manual.com Manuals
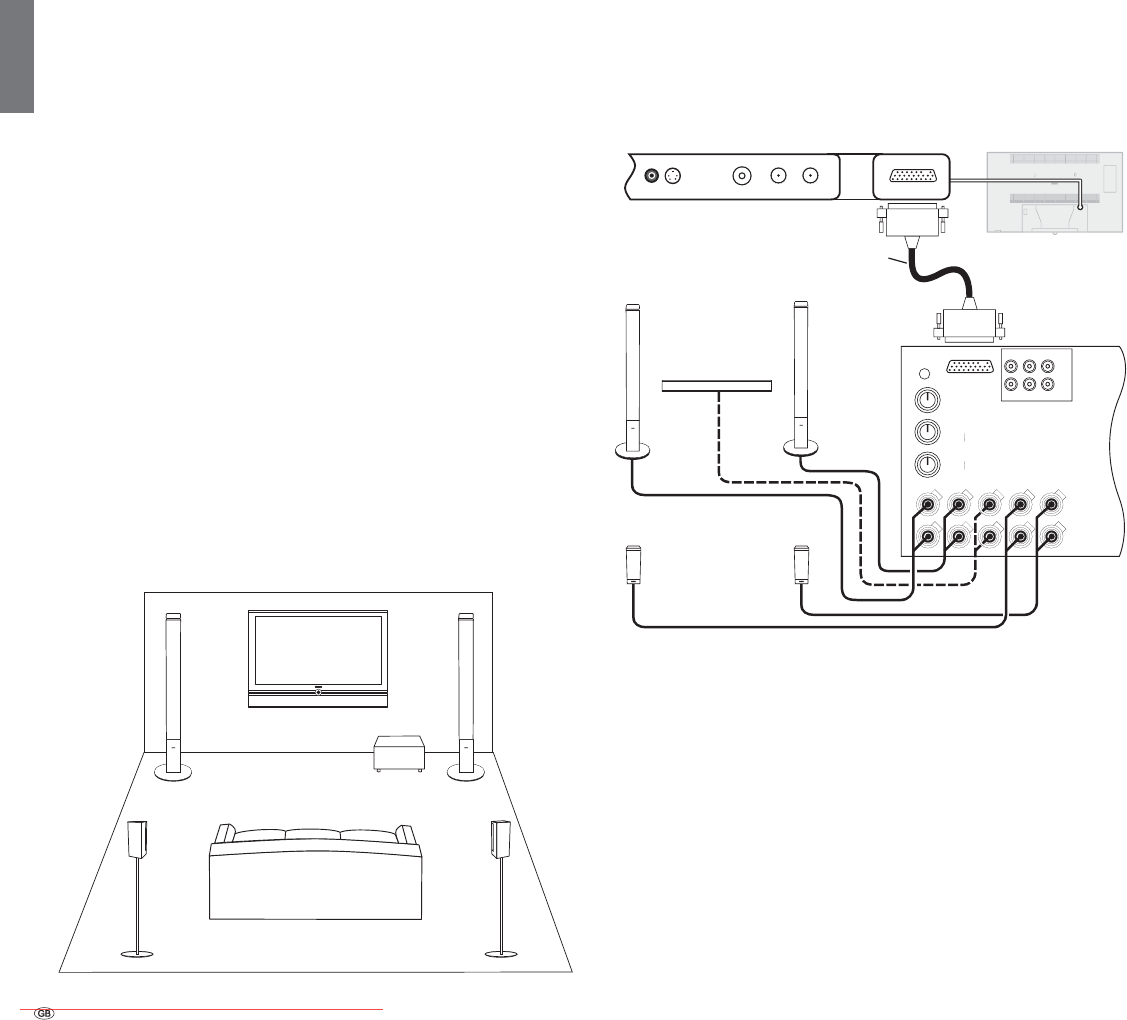
- 118
english
Connecting
Switch off all devices before connecting.
Subwoofer with AUDIO LINK interface (see connection diagram):
The subwoofer is connected to the TV set via the AUDIO LINK interface.
Use the AUDIO LINK cable provided with the subwoofer.
Subwoofer without AUDIO LINK interface (not illustrated):
Plug the adapter cable to the AUDIO LINK interface of the TV set. Connect
the cinch connections of the adapter cable to the 6-pin cinch connections
of the subwoofer. Use the 6-pole cinch cable provided with the subwoofer
for this.
The cubic plug cable connects the master connection on the subwoofer
to the cubic plug of the adapter cable.
The adapter and cubic plug cable are available from your dealer (see
Accessories, page 141).
Connecting Loewe sound system
Setup
The arrangement of speakers and TV set can look like the illustration
below:
The front and surround speakers should be installed symmetrically to the
TV set and to your sitting position.
You can place the subwoofer anywhere on the floor. We recommend
placing it in front asymmetrically next to the TV set.
If a centre speaker is used, it should be placed centrally below the TV set.
For the settings in the sound components wizard enter the distances of
the centre speaker, and the front and surround speakers to your sitting
position. This guarantees a natural spatial image of the sound.
➠ If you have connected speakers directly to the TV set (Connecting sys-
tem speakers; e.g. Loewe Stereospeaker I 40/46 Sound or at the screw
terminals), you can use these as front or center speakers depending
on the setting in the sound components wizard.
➠ If you have not connected any speakers directly to the TV set (connec-
tion system speakers or screw terminals), the two front speakers and
the center speaker (e.g. Centerspeaker I Compose) are connected to
the subwoofer of the Individual Sound System.
Installation example for a Loewe sound system
Connection Loewe sound system (Subwoofer) to the TV set
AUDIO LINK cable
TV set
Subwoofer
External devices
Front
left
Surround
left
Centre speaker
Subwoofer
Front
right
Surround
right
AudioLink
Line In
Speaker
Out
Left
Center
Right
Left Right Left Right
Left
Phase
Equalizer
Crossover
Frequency
Bass
Intensity
180°
-3dB
+6dB
50Hz
250Hz
min
max
0°
Subw Right
Rear
Front
Front Rear
Downloaded From TV-Manual.com Manuals
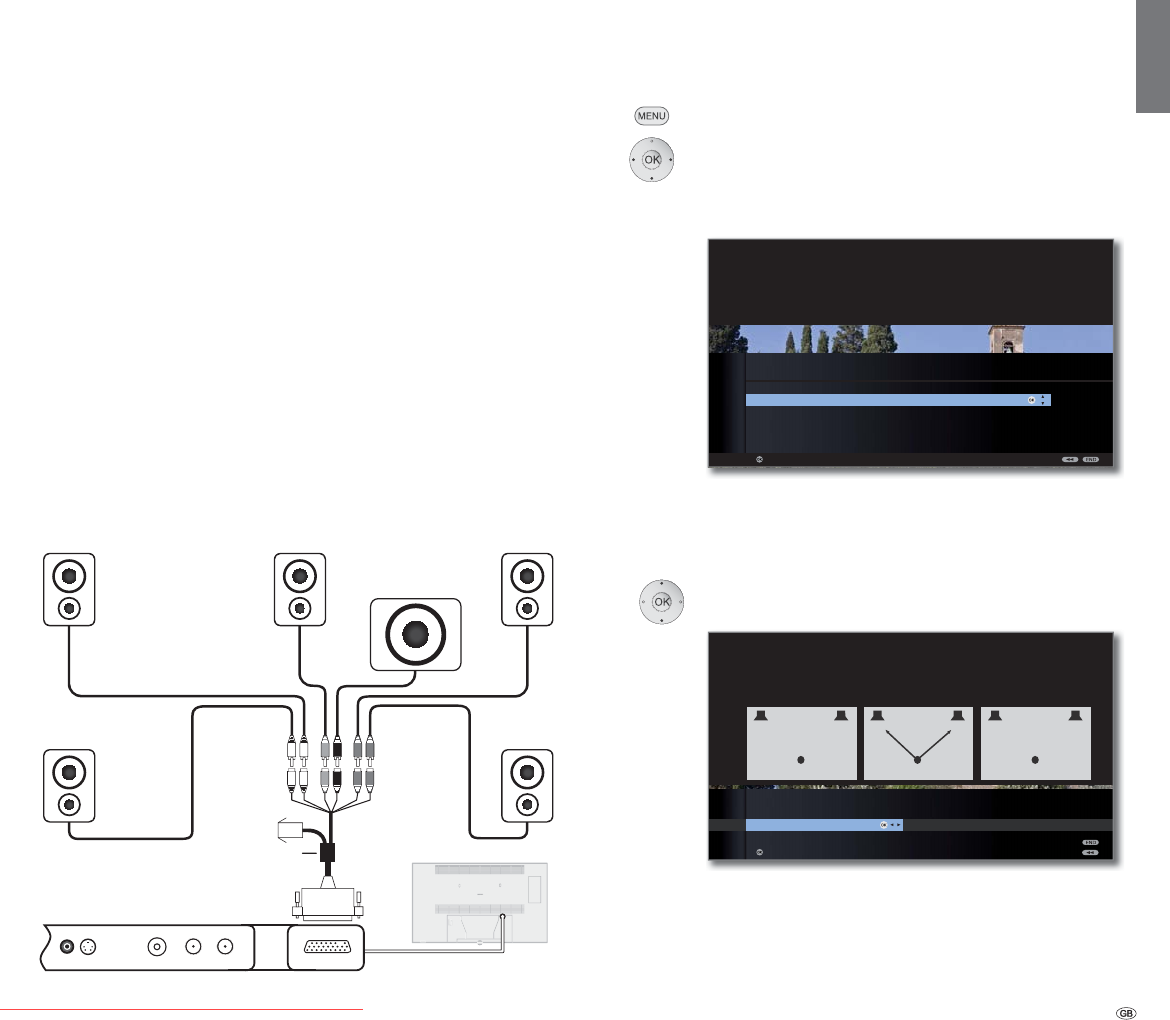
119 -
english
R
SR
SL
L
C
SUB
R
SR
SL
C
SUB
L
Connecting active loudspeakers
If you want to use another similar speaker system or active speakers,
you can connect these to the AUDIO LINK interface of the TV set with
an adapter cable.
A comparable speaker system is connected in a similar way to that de-
scribed above for “subwoofer without AUDIO LINK interface”.
The adapter cable is available from your dealer (see Accessories, page 141).
Connecting active speakers
Switch off all devices before connecting.
Plug the adapter cable into the AUDIO LINK interface of the TV set. Con-
nect the cinch connections of the adapter cable to the connections of
the corresponding active speakers.
The cinch connections of the adapter cable are labelled:
R for Front right SR for Surround right
L for Front left SL for Surround left
C for Centre SUB for Subwoofer
The connections on the adapter cable are preamplifier outputs. Therefore,
only active speakers may be connected directly to the adapter cable.
Adjusting the speaker system
Calling the sound components wizard
➠ In normal TV mode, without other displays.
MENU: Call TV menu.
Select Connections,
go to the menu line below.
Select Sound components,
OK calls the sound components wizard.
Sound playback via ... speakers system
Enter here that you want to hear the TV sound over a speaker system.
If you connect active speakers, please use the setting Speaker system.
Mark Speaker system,
OK to continue.
If nothing has been set yet, the factory settings or other-
wise the last set values are displayed.
continued on the next page p
OK
OK
SOUND COMPONENTS
Sound playback via ...
TV speakers
6SHDNHUV\VWHP۪
HiFi/AV amplifier
Sound projector
HiFi/AV amplifier or TV speakers (switchable)
Sound projector or TV speakers (switchable)
Proceed
SOUND COMPONENTS WIZARD
Please specify here via which sound components you want to listen to your TV
sound. If you select a "Speaker system", this must be connected to the
AUDIO LINK socket on the back of the TV set (with an additional adapter if
necessary).
If your TV has no built-in speakers, the sections relating to "TV-speakers" may
not be selected.
TV TV
90Hz 90Hz 4,0m 4,0m
TV TV
0dB 0dB
TV TV
OK
SOUND COMPONENTS
Speaker system
Configuration/modification
Proceed
SOUND COMPONENTS WIZARD
Please specify whether you want to change the illustrated setting of your
speaker system or whether all existing settings are to be reset to the values
of the delivery state.
Components Distances Level
Reset to factory settings
OK
Adapter cable TV set
Connection of active speakers to the TV set
External devices
Front
right
Front
left
Surround
left
Surround
right
Centre
Subwoofer
Downloaded From TV-Manual.com Manuals
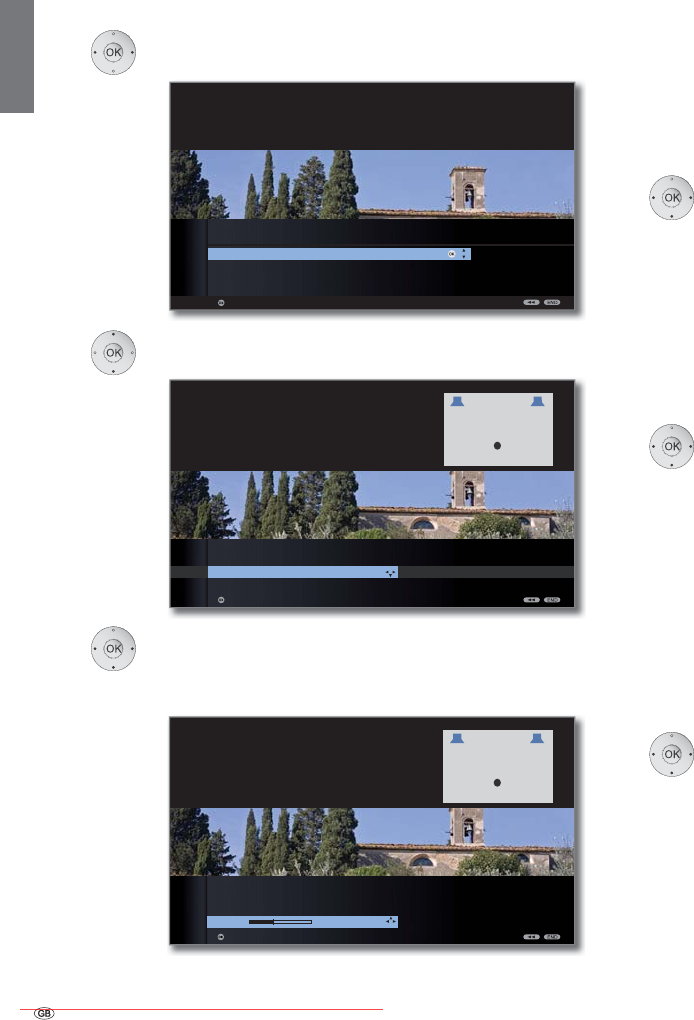
- 120
english
If you want to set up or change a speaker system:
Select Configuration/modification,
OK call selection.
Select Complete,
OK continue to connect and set the front speakers.
Select External speakers or TV speakers,
go to the menu line below and
set the lower limit frequency of the external front
speakers in 10 Hz steps.
➠ Select the start value of the frequency response of the
speakers for the right setting (e.g. 50Hz for the
specification “Frequency response 50-20.000Hz”). See
the technical data of the speakers for the value.
➠ You can replace the external front speakers by the TV
speakers if necessary. In this case, select TV speakers.
Then transmit the sound of the front speakers.
OK continue to connect and set the surround speakers.
Select yes for external speakers.
➠ If no surround speakers are connected, these can be
simulated using the front and centre speakers.
Go to the menu line below and
set the lower limit frequency of the surround
speakers in 10 Hz steps.
➠ Select the start value of the frequency response of the
speakers for the right setting.
OK continue to connect and set the centre speaker.
Select whether the TV speakers or an External
speaker is to reproduce the centre sound or no if
no centre speaker is connected.
➠ If no centre speaker is connected, the front speakers
also transmit the centre sound parts additionally.
for External speakers or TV speakers go to the
menu line below and
set the lower limit frequency of the centre speaker
in 10 Hz steps.
➠ Select the start value of the frequency response of the
speakers for the right setting.
OK continue to connect the Subwoofer.
yes is the selection for subwoofer.
➠ If no subwoofer is connected, the front speakers
additionally transmit the sound parts intended for the
subwoofer as far as possible.
OK
OK
SOUND COMPONENTS
Configuration/modification of speaker system
Complete
Connections only
Distances only
Levels only
SOUND COMPONENTS WIZARD
Please specify here whether you want to completely reconfigure a speaker
system or whether you want to limit the configuration to changing the speaker
connections, the speaker distances from the listening position or the individual
speaker levels in relation to each other.
Select
40Hz 40Hz
OK Proceed
SOUND COMPONENTS WIZARD
Please specify here whether you want to connect
external front speakers. In this case, their lower
limit frequency must be entered in Hz (see
instruction manual and technical data of the
speakers).
TV speak
e
SOUND COMPONENTS
Connect front speakers
External speakers
40 Hz
k
ers
90Hz 90Hz
OK
Proceed
SOUND COMPONENTS WIZARD
Please specify here whether you want to connect
external front speakers. In this case, their lower
limit frequency must be entered in Hz (see
instruction manual and technical data of the
speakers).
SOUND COMPONENTS
Connect front speakers
External speakers
90 Hz
External devices
continued on the next pagep
Downloaded From TV-Manual.com Manuals
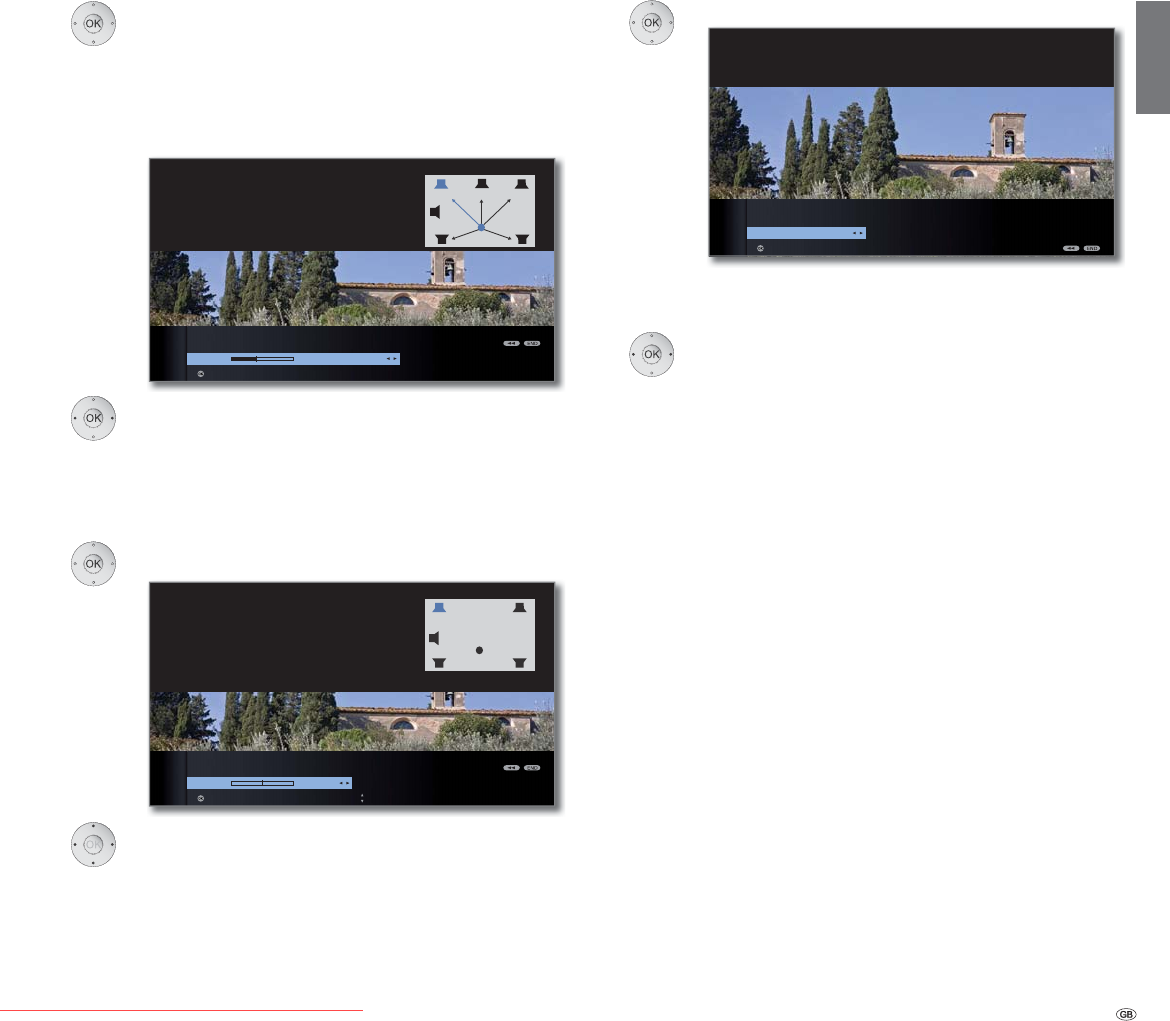
121 -
english
OK continue to set the
Distance to left front speaker.
➠ Measure the distances from your listening position to
the front, surround, and centre speakers respectively.
The digital audio decoder calculates delay times from
this for the loudspeaker signals, so that these reach
the listener simultaneously.
Set the distance between the left front speaker
and your listening position in 10 cm steps.
OK continue respectively to the other speakers and
adjust the distance.
➠ After setting the distance for the centre speaker ...
OK continue to Adjust speaker level.
Adjust the volume for each speaker.
Select speakers manually.
➠
For balanced audio reproduction all speakers should be
set at the same volume level. A noise signal will be
reproduced automatically on each speaker in succession.
Adjust every speaker to equal perceived volume from
your listening position
.
OK continue to Subwoofer phase.
Switch to a station with music with P+/P– or start playback
with music on a DVD player.
Test both values (0º and 180º) and select the one
with which you get a clearer bass reproduction
from your listening position.
OK to confirm the setting and exit the wizard.
This ends the sound components wizard for connecting
and setting up a speakers system.
4,2m 4,0m
1,0m 0,9m
2,7m
OK
Proceed
SOUND COMPONENTS WIZARD
Please enter the distance of the left front speaker
from your listening position here.
SOUND COMPONENTS
Distance to left front speaker
2 m
0dB 0dB
0dB 0dB
OK
Proceed Preceding/next loudspeaker
SOUND COMPONENTS WIZARD
You hear a sound from every speaker one after
another. But you can also select the speakers
manually with the menu control buttons up/down.
Set the volume for the respectively active speaker
shown in blue so that you get approximately
the same volume impression from
all the speakers.
SOUND COMPONENTS
Adjust speaker level
0 dB
OK
180°
SOUND COMPONENTS WIZARD
Here you can reverse the phase of your subwoofer. Test both values in
music reproduction and then select the one with which you get a better
bass reproduction.
SOUND COMPONENTS
Subwoofer phase
0°
End of wizard
External devices
Downloaded From TV-Manual.com Manuals
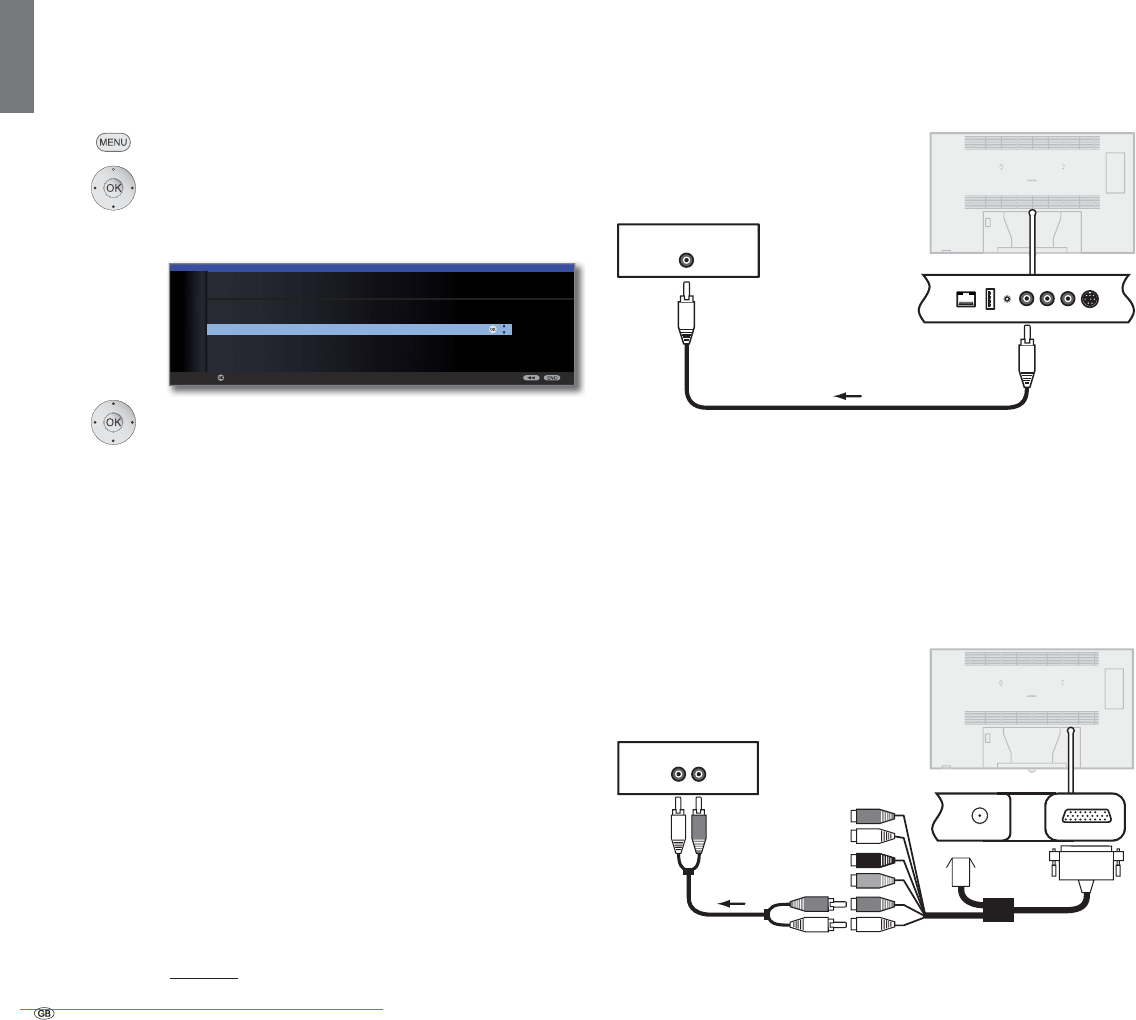
- 122
english
AUX IN
R
L
SR
R
SUB
C
L
SL
DIGITAL IN
Connecting digital audio amplifiers
Continuation of the left column above ...
For digital audio transmission: Select yes.
Connect the digital audio output of the TV set AUDIO DIGITAL OUT with
the digital audio input of the amplifier via a cinch cable:
Sound formats, amplifier type and other settings, see explanations of the
setting possibilities (left hand column).
Connecting analogue audio amplifiers
Continuation of the left column above ...
For digital audio transmission: Select no.
Connect the analogue audio output of the TV set to the analogue audio
input of the amplifier with a stereo cinch cable with the AUDIO LINK
adapter cable (see accessories on page 141):
For selecting the amplifier type and making other settings, see explana-
tions of the setting possibilities (left hand column).
Connecting audio amplifiers
The sound components wizard permits configuration of different audio
amplifiers (stereo amplifiers, surround amplifiers, analogue or digital) with
different digital audio formats (Dolby Digital, dts, MPEG, and stereo/PCM).
See the operating manual of the audio amplifier for more information.
MENU: Call TV menu.
Select Connections,
go to the menu line below.
Select Sound components.
OK calls the sound components wizard
Mark the HiFi/AV amplifier.
OK Proceed.
Select whether the sound is to be transmitted digi-
tally or analogue to the the amplifier. Continue,
depending on the amplifier, see right column.
Explanations of the setting possibilities:
➠
Settings for the sound projector: See operating manual
of the sound projector.
Select setting if an amplifier is connected and your TV set
does not have any TV speakers connected.
Select setting if an amplifier is connected and your TV set
has TV speakers connected. In the sound mode selection
the audio reproduction can then be switched between
the amplifier and the TV speakers.
Specify sound formats which can be decoded with the digital
amplifier (see operating manual of the used amplifier).
Select either stereo or surround amplifier.
For every connected surround amplifier, select whether
the TV loudspeakers are to be used as centre speaker.
If so, establish a connection between the centre output
of the amplifier and the centre input of the TV set
CENTER IN with a cinch cable.
Attention: Do not use the centre speaker connection of
the amplifier, use the centre pre-amp output instead!
OK
OK
SOUND COMPONENTS
Sound playback via ...
TV speakers
Speaker system
HiFi/AV amplifier ۪
Sound projector
HiFi/AV amplifier or TV speakers (switchable)
Sound projector or TV speakers (switchable)
Proceed
External devices
AUDIO
DIGITAL
OUT
TV set
Digital amplifier
Analogue amplifier
TV set
AUDIO
LINK
HiFi/AV
amplifier
HiFi/AV
amplifier or TV
speakers
(switchable)
Sound
formats
Type of
amplifier
TV loudsp. as
centre speaker
Downloaded From TV-Manual.com Manuals
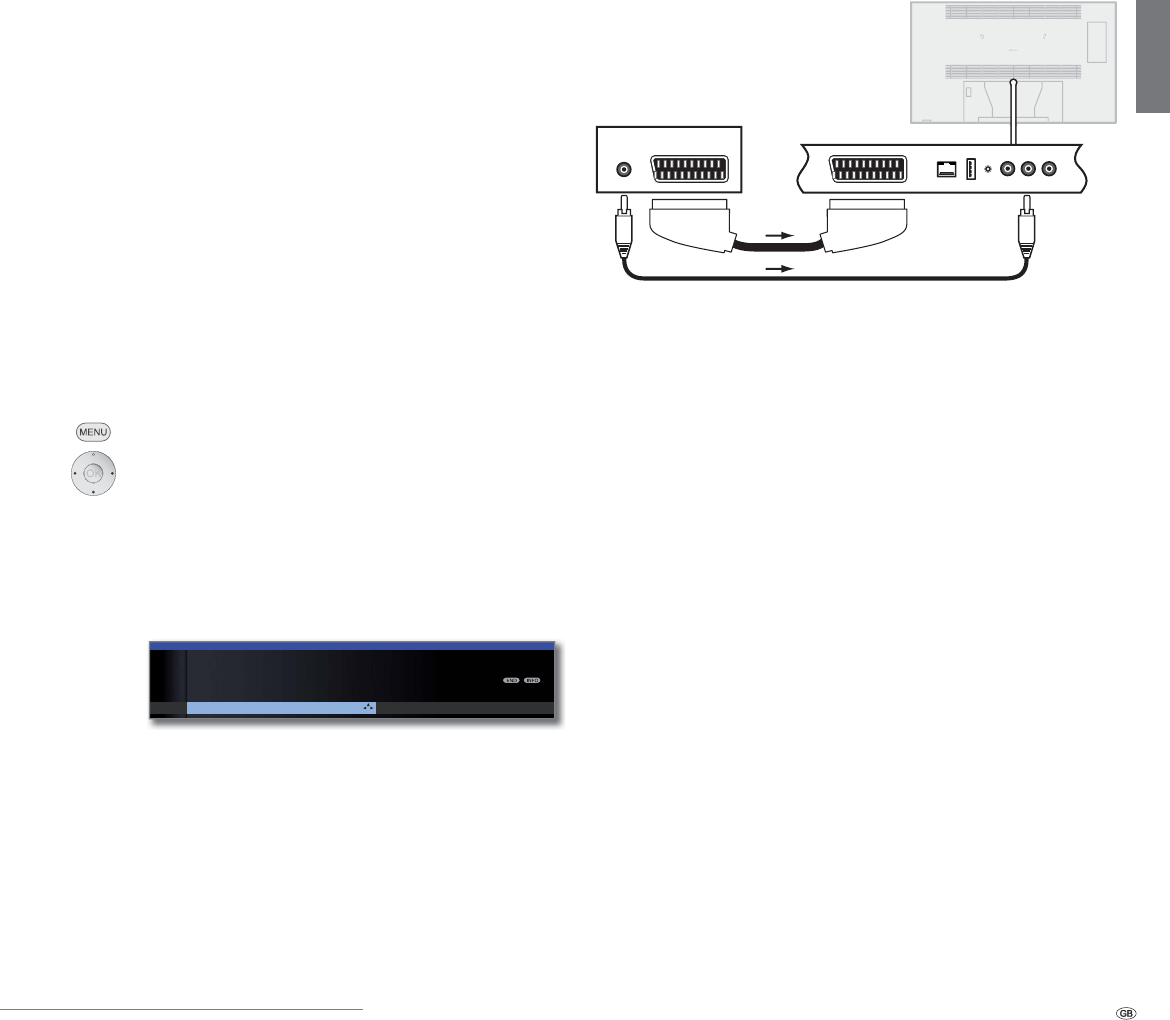
123 -
english
DIGITAL
OUT AV
Audio connection in HDMI/DVI devices
External devices with DVI connection
If an external device with DVI interface is connected via a HDMI/DVI
adapter to one of the HDMI sockets of the TV set, you can connect the
digital sound of the external device to the digital audio input socket
AUDIO DIGITAL IN.
The assignment of the digital audio input to the corresponding HDMI
socket of the TV set takes place as described in the column on the left.
If you want to use the analogue sound of the external device, connect
it to the AUDIO IN socket.
External devices with HDMI connection
If external devices with an HDMI interface are connected to one of the
HDMI sockets of the TV set, no assignment of the audio input is necessary
because the digital transmission of picture and sound takes place via a
single connection in HDMI.
Serial interface RS-232C (RJ12)
You can connect either the Loewe Individual Sound Projector SL or a home
network system of different manufacturers (e.g. AMX, Crestron) to your
TV set via the RS-232C (RJ12) interface.
Please consult your dealer for configuration of the RS-232C (RJ12) interface
and further information about the different home networking systems.
Assignment of the digital audio input
In order to be able to hear the digital sound of an external device con-
nected to an AV input, an AV input can be assigned to the digital audio
input socket AUDIO DIGITAL IN. By switching to this AV input, the digital
audio signal at the AUDIO DIGITAL IN input is communicated to the integral
digital multi-channel audio decoder and the digital audio output socket
AUDIO DIGITAL OUT. You will then hear the digital sound of the assigned
AV input instead of the analogue sound if available.
Connecting devices to the digital audio input
For the digital audio playback from an external device, e.g. the DVD player,
you have to feed the digital audio signal to the TV set.
The external digital audio signal can be reproduced via the digital multi-
channel audio decoder integrated in the TV set, via an externally connected
digital audio amplifier or via a Loewe Individual Sound Projector SL.
➠ If an external audio amplifier or Loewe Individual Sound
Projector is used, this must be registered in the sound
components wizard (see page 122).
MENU: Call TV menu.
Select Connections,
go to the menu line below.
Select Miscellaneous,
go to the menu line below.
Select Assign digital audio input,
go to the menu line below.
Select AV input.
To connect a DVD player to the digital audio input of the
TV set for example, connect the digital output socket of
the DVD player (DIGITAL OUT) via a cinch cable to the
AUDIO DIGITAL IN socket on the TV set.
Connection example for a DVD player, see right hand
column.
to AVS to HDMI1 to HDMI2 to
H
TV MENU
Connections
Miscellaneous
Assign digital audio input
to AV
no
External devices
AUDIO
DIGITAL
IN
TV set
DVD player
AV
Downloaded From TV-Manual.com Manuals
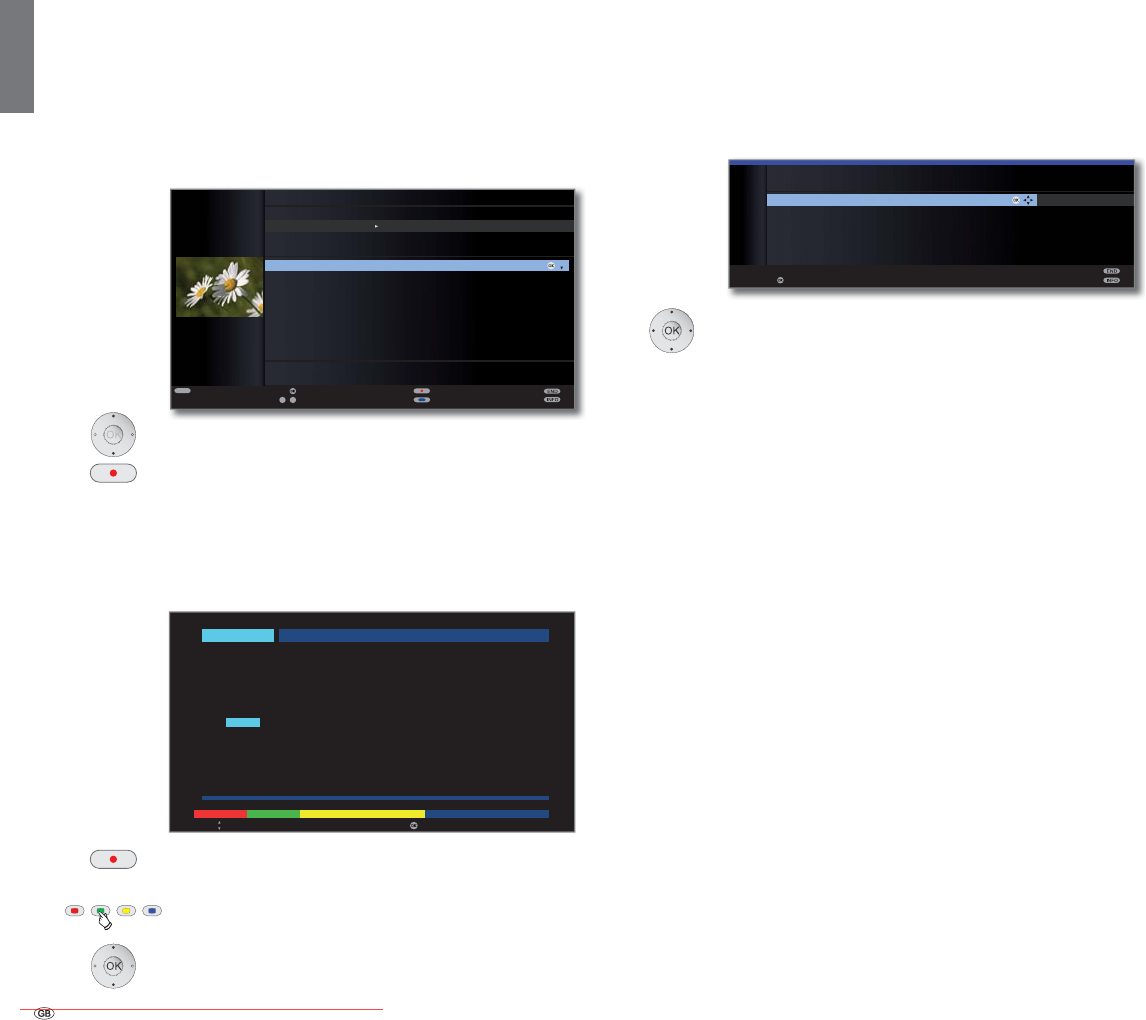
- 124
english
The direct way to record
You can programme timer recordings via the integrated Digital Recorder (if
installed) or connected recorders on the TV set. The recording wizard is in-
tegrated at several places for programming a recording. You will find further
information on recording with the digital recorder from page 91 onwards.
Programming a timer recording with the EPG
➠ You are in EPG mode; if not, press the EPG button.
Mark the desired broadcast.
RECORD button: Call Timer data (see right hand column).
Programming a timer recording via teletext
➠ You are using the teletext mode; or if not, press the TEXT
button. If HbbTV text opens instead of the standard
teletext (see page 82), press the TEXT button again.
RECORD button: Call the programme pages of the current
station.
Green button: Go to the appropriate page.
Select desired broadcast,
OK calls Timer data (see right hand column).
Entering the Timer data
After selecting the station you wish to record, timer data
will be displayed.
The setting options for the timer data differ depending
on the recorder selection, whether an analogue or DVB
station is to be recorded or via which route (EPG, Teletext)
the recording has been programmed.
Change Timer data if required or,
OK confirm.
Setting possibilities in the Timer data menu:
Selection of the recorder used (AV, DR).
Day of recording.
Time of recording.
Use VPS data for analogue stations, yes/no (1.
If recording encoded stations you can define here whether
the station is to be encoded during the recording, if possible.
If you choose the setting yes, the programme will be
automatically decrypted at 02.00 the following day (CA
module must be plugged in).
Here you can indicate the PIN of the programme provider
for your CI plus CA module in order to enable decrypted
recording of a station protected with parental control.
Use automatic time control, yes/no (2.
The recording is performed precisely at the time, even if
the beginning/end time of the programme provider has
changed.
Select once only, Mo–Fri, daily, weekly or Serial (2.
Select whether broadcast subtitles are to be recorded.
OK
OK
TIMER DATA
17:15 Brisant
Recorder AV DR
Station 01 Das Erste
Date 22.01.10
Recording time 17:15 until 17:45
Auto time control no
Recording type once only
confirm
OK
300 << Abend > 303
Select programme Record
14.00 Tagesschau
14.10 In aller Freundschaft UT . . . . . . . . . . . 316
Zweite Begegnung (D, 2005)
15.00 Tagesschau
15.10 Sturm der Liebe (221) . . . . . . . . . . . . . 317
16.00 Tagesschau UT
16.10 Eisbär, Affe & Co. . . . . . . . . . . . . . . . 318
17.00 Tagesschau um fünf UT
17.15 Brisant . . . . . . . . . . . . . . . . . . . . . . . 319
17.47 Tagesschau
17.55 Verbotene Liebe . . . . . . . . . . . . . . . . 320
18.20 Marienhof . . . . . . . . . . . . . . . . . . . . . 321
18.50 Das Geheimnis meines . . . . . . . . . . . . 322
Vaters (19)
19.20 Das Quiz mit Jörg Pilawa . . . . . . . . . . 384
bis 19.50 Uhr
302 302 ARDtext Do 05. 10. 06 09: 36 : 42
– +
Jetzt im TV ARD morgen
Do 05. 10. 06 Das Erste
OK
OK
az
-
P+
P–
TEXT
Recording
Select date, ..., topics
View
Select time
Detail
3DJHܬ
EPG (ELECTRONIC PROGRAMME GUIDE) Mon 01.03./16:05
Date
Time
Station
Topics
arte 15:57-16:59 Charmed - Zauberhafte Hexen
Das Erste 16:00-16:10 Tagesschau
ZDF 16:00-16:10 heute - in Europa
WDR Köln 16:00-16:15 WDR aktuell
Bayerisches... 16:00-16:05 Rundschau
hr-fernsehen 16:00-16:30 Schlemmerreise Spanien
MDR FERNS... 16:00-16:15 Hier ab vier
NDR FS HH 16:00-16:30 Tipps und Trends - Der Verbraucher...
SWR Fernse... 16:00-16:05 Baden-Württemberg aktuell
2 ZDF
&KDUPHG=DXEHUKDIWH+H[HQ۲
MON 01.03.
now until 17.00 17.00 18.00 19.00
all
all
External devices
Recorder
Date
Recording time
VPS
Descrambled
recording
Decoding
overnight
Programme
provider PIN
Auto time
control
Recording type
Record
subtitles
(1 only available with some analogue stations.
(2 only available when recording via EPG.
Downloaded From TV-Manual.com Manuals

125 -
english
Programming the timer with the timer overview
All programmed recordings, marked programmes and copy orders are listed
in the timer overview. You can also programme new recordings, mark other
programmes and copy pre-recorded programmes from the DR archive to
an external recorder with the timer overview.
Call DR-archive.
Red button: Call Timer list.
Red button: New entry (see right hand column).
Green button: Change recording.
Yellow button: Delete recording.
Blue button: Delete memo.
Explanation of the symbols in the timer list:
Record
۰ Repeated recording (daily, weekly or Mon-Fri)
ܱ Serial recording
Decoding order (later decoding of an encrypted recorded
programme)
۪ Marked programme (see page 50)
New entry: Programme timer recording manually
➠ Timer list is opened.
Red button: Call New timer entry.
Select Recording,
OK call.
Select Manual.
For programming a timer recording Via EPG or Via
Teletext see page 124.
OK Call Station selection.
Select station.
OK Call Timer data.
Entry of the timer data see page 124.
After confirming the timer data the new recording is
transferred to the timer overview.
New entry: Memorize programme using the timer overview
➠ Timer list is opened.
Red button: Call New timer entry.
Select Memo.
OK EPG is opened.
Note desired programme as described in Switching and
memorizing with the programme list (Seite 50).
New entry: Copying DR archive entries
➠ Timer list is opened.
➠ An external recorder is registered.
Red button: Call New timer entry.
Select Copy.
OK The DR archive is opened.
See the chapter Copying recordings in the operating
instructions of the Digital Recorder for further steps.
7,0(5/,67 0RQ
0RQ 'DV(UVWH ۪%ULVDQW
7XH '5 )X¡EDOOOLYH
۰ 57/ 8QWHUXQV
ܱ =')KHXWH
7XH VDWZLVVHQVSH]LDO
:HG '5ט$9 :HOWGHU:XQGHU
'HOHWHUHFRUGLQJ1HZHQWU\
&KDQJHUHFRUGLQJ
Memo Copy
NEW TIMER ENTRY
Recording OK
Via teletext Manual
RECORDING WIZARD
Via EPG OK
Copy
NEW TIMER ENTRY
Memo OK Rec
o
ording
NEW TIMER ENTRY
Copy OK Recording Vorme
rM
emo
External devices
Downloaded From TV-Manual.com Manuals

- 126
english
Timer recording with external devices
➠ The recording of HDTV stations with external devices is only possible
to a limited degree. The HD transmission is scaled down to SD quality
and output at the AV output for the recording.
Recorder with Digital Link Plus
If you use an externally connected recorder with Digital Link Plus or a
similar system, the TV set and connected recorder exchange data (e.g.
compare station lists TV set/recorder or timer data of analogue stations).
Please consult the operating manual of your recorder to find out of your
recorder is Digital Link Plus compatible. In addition use only Euro-AV
cables for the connection between TV set and recorder.
Analogue stations
The timer data are transmitted automatically from the TV set to
the recorder after programming is complete. (For DVD recorders
in addition the recording quality SQ or EQ is also transmitted.)
The recording is then controlled by the recorder and the recorder
tuner is used for reception of the programme.
The recording data are not saved in the timer overview of the TV
set. Consequently if you want to change or delete the timer data
then you must do so on the recorder.
Digital stations
If you want to record digital stations with an externally connected
recorder, then the DVB tuner is used and the TV device takes over
control of the recorder. Then the station on the TV set is locked
during the timer recording.
It is not possible to switch over to another DVB station.
If using devices with DVB-T/C Twin-Tuner (Equipment variants see
page 142), analogue stations can be viewed on the TV set paral-
lel to the recording with the external device.
Copy protection
Copy-protected programmes will not be output on the EURO AV sockets
for legal reasons.
External devices
Downloaded From TV-Manual.com Manuals
127 -
english
Operating Loewe equipment
Using the remote control for the TV mode of the TV set
Press the TV button, the display above it will light for
approx. 5 seconds.
Using the remote control for a Loewe recorder
Press the REC button, the display above it will light for
approx. 5 seconds.
Using the remote control for a Loewe player
Press the DVD button, the display above it will light for
approx. 5 seconds.
Using the remote control for the radio mode of the TV set
Press the AUDIO button, the display above it will light for
approx. 5 seconds.
As long as a button is pressed, the display of the selected operating mode
lights up (TV – REC – DVD – AUDIO). This allows you to check which op-
erating mode the remote control is set to every time you press a button.
The factory setting of the buttons is described above (see also table in
right hand column). The assignment of the buttons can be changed to
suit the existing accessory devices (see right hand column).
Setting the remote control for other Loewe devices
You can operate various Loewe devices with the remote control. The
device keys REC – DVD – AUDIO can be reassigned to operate various
Loewe devices.
Press the required device buttons and the Stop button
simultaneously for 5 sec. until the corresponding LED
display flashes twice.
Then enter the two-digit device code from the list below.
Device Code Factory setting
Loewe ViewVision 8106 H 10
Loewe Viewvision, Centros 21x2 12
Loewe ViewVision DR+ DVB-T 13 REC
Loewe Auro 2216 PS/8116 DT 14
Loewe BluTech Vision 15
Loewe Soundprojector 17
Loewe TV - Digital radio 19 AUDIO
Loewe Mediacenter 20
Loewe BluTech Vision Interactive 21 DVD
HDMI CEC mode 22
Loewe AudioVision 24
Loewe Individual Sound Projector SL 25
Apple IR codes 26
Apple IR codes (Apple TV-2G) 27
Resetting to factory setting 99
The associated LED display flashes twice.
➠ The codes shown here only apply for direct operation of the acces-
sory device.
➠ For operation of the connected accessory device via the TV set, e.g.
with concealed installation (Code 22), see page 115. The remote
control’s signal is transmitted from the TV set to the accessory device
with concealed installation.
External devices
Downloaded From TV-Manual.com Manuals
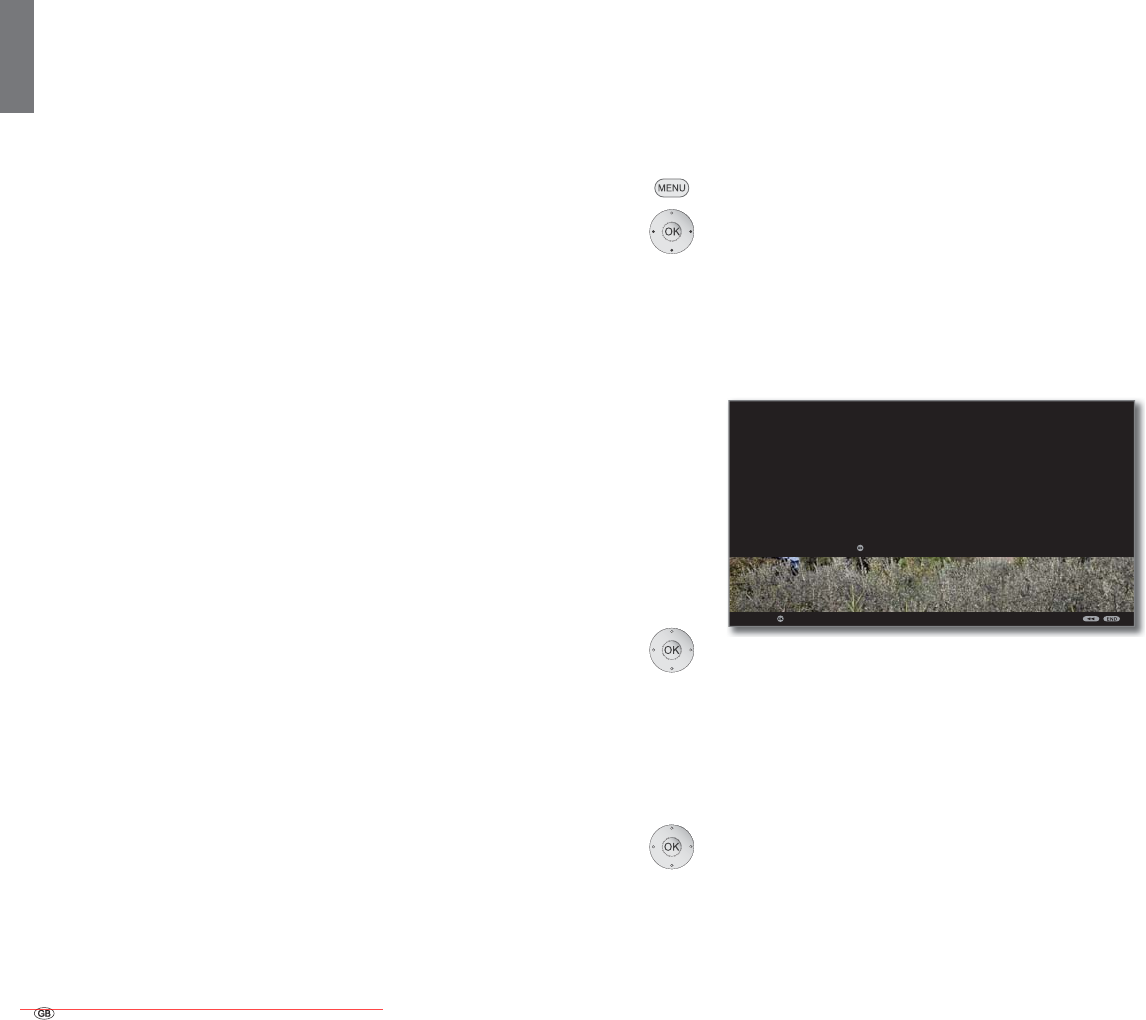
- 128
english
Software update
In the software update (package update) all the software releases in the
TV are scanned and updated as required.
To do this, insert the USB stick with the downloaded software into a free
USB port on the TV set (see connections page 11).
Calling Software update
MENU: Call TV menu.
Select Settings,
go to the menu line below.
Select Miscellaneous,
go to the menu line below.
Select Software update,
OK Call Software update Wizard.
The versions of the current software package are
displayed.
OKProceed.
The TV set searches for a new software package on
the USB stick.
If a new software version is available after the search, the
following on-screen message appears (see page 129).
If several different software packages are found on the
USB stick, the latest software package is always used.
If no new software package was found in the search:
OKExit wizard.
Basic information
It is possible to update the software on your TV set. Current software
versions can be downloaded from the Loewe Internet site and installed
on your set using a USB stick.
USB stick
Requirements of USB stick
USB sticks tested by Loewe and compatible in type and format can be
ordered from the Loewe dealer using the article no. 90456.900.
If you would like to use your own USB stick, please follow these tips/
conditions:
• Formatting in FAT32.
• Only 1 partition.
• Do not use encrypted USB sticks.
• Do not use USB sticks which simulate a CD ROM drive.
• There may be no hidden files on the device.
• For some types of device, the construction of the USB stick is significant.
Maximum dimensions in mm: 70x20x10.
• If in doubt, the USB stick should be formatted as “FAT32” without
“extended attributes”.
Download
Software download from the Loewe Internet site
You can download new software for your TV set from our homepage.
To do this register on our homepage
http://support.loewe.tv (International),
http://support.loewe.tv/uk (United Kingdom and Republic of Ireland),
http://support.loewe.tv/au (Australia) or
http://support.loewe.tv/nz (New Zealand)
(under Register now).
Simply follow the steps in the registration process.
After the successful registration process and subsequent login to the
homepage you have to register your set (have the article number and
serial number ready – both are mentioned on the sticker on the rear
side of the set or under Integrated features in the index of the TV set,
see page 17).
Then you will get a list of downloadable contents for your TV set including
the software for your TV set. Download the data and unpack all the files
in this ZIP archive into the main directory of your USB stick.
Then carry out the software update as described below.
.
continued on the next page p
OK
V1.6.0.0
V10.5.0.40
V10.6.0.165
V1.0.0.0
V0.0.11.0
V10.4.21.0
V8.103.0.0
V8.22.102.0
V1.1.100.0
SOFTWARE UPDATE WIZARD
Current software package:
TV base software
DVB software
DVB bootloader
WiFi software
FRC software
MSP software
MPEG encoder software
Standby processor software
You can now search for new software. Please select the software type and start
the search with the button.
OK
Proceed
Software update
Downloaded From TV-Manual.com Manuals
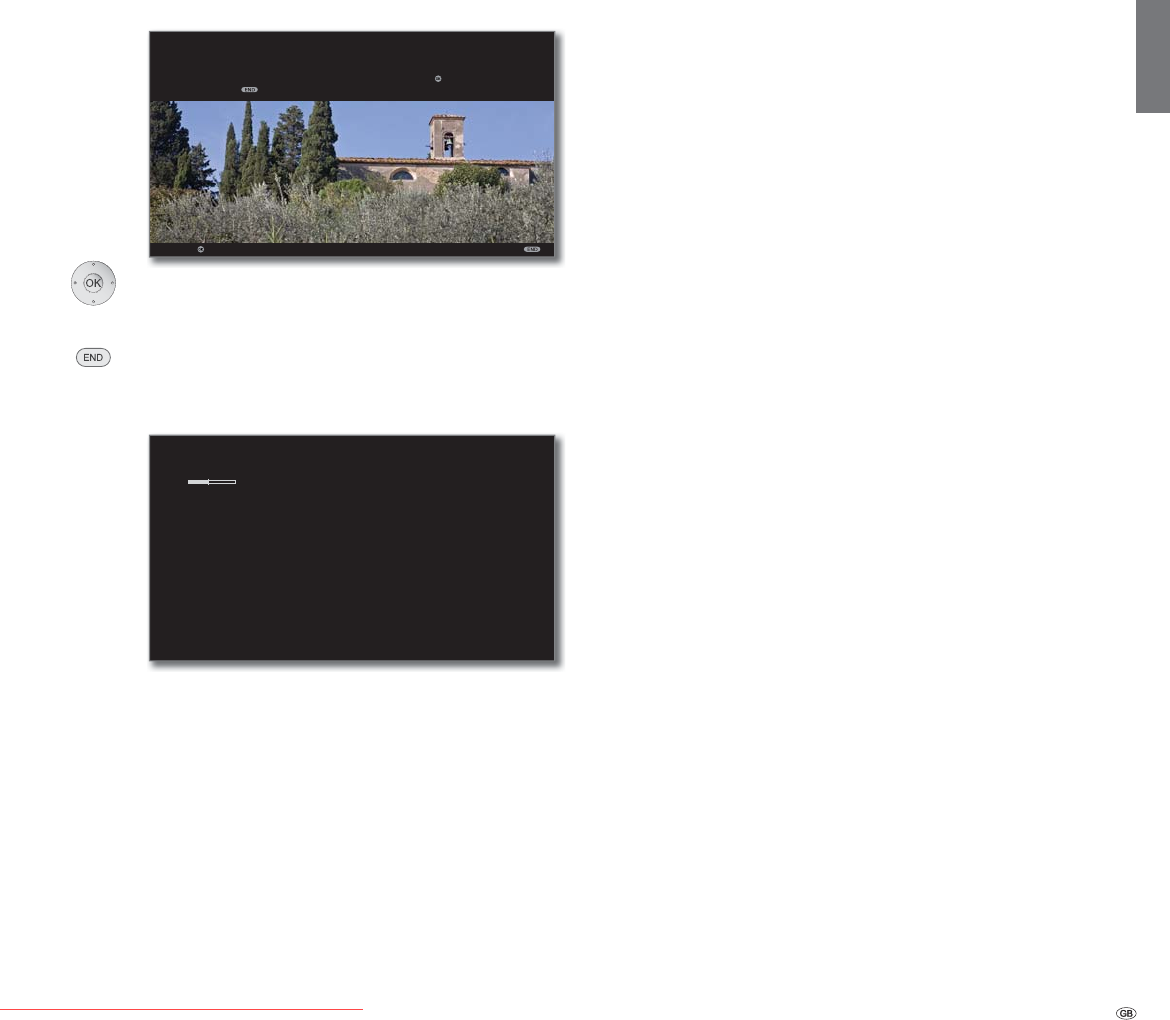
129 -
english
New software package found
OKProceed.
OKStart loading software.
END: Exit wizard.
Load new software package
A bar shows you the progress of the download. This
process can take up to 50 min. Do not turn your set off
during this time!
You will be informed at the end of the update.
After finishing loading:
Switch the TV off and back on at the mains switch.
Software update
OK
SOFTWARE UPDATE WIZARD
Software package: current V1.6.0.0 new V2.1.0.0
If you want to load the new software now please press . Otherwise you can
stop it with .
OK
Proceed
SOFTWARE UPDATE WIZARD
The software package is about to be loaded.
TV base software V11.1.0 1/5
The loading process may take up to 50 minutes. Please do not switch off the
TV set with the mains switch during this time.
Downloaded From TV-Manual.com Manuals
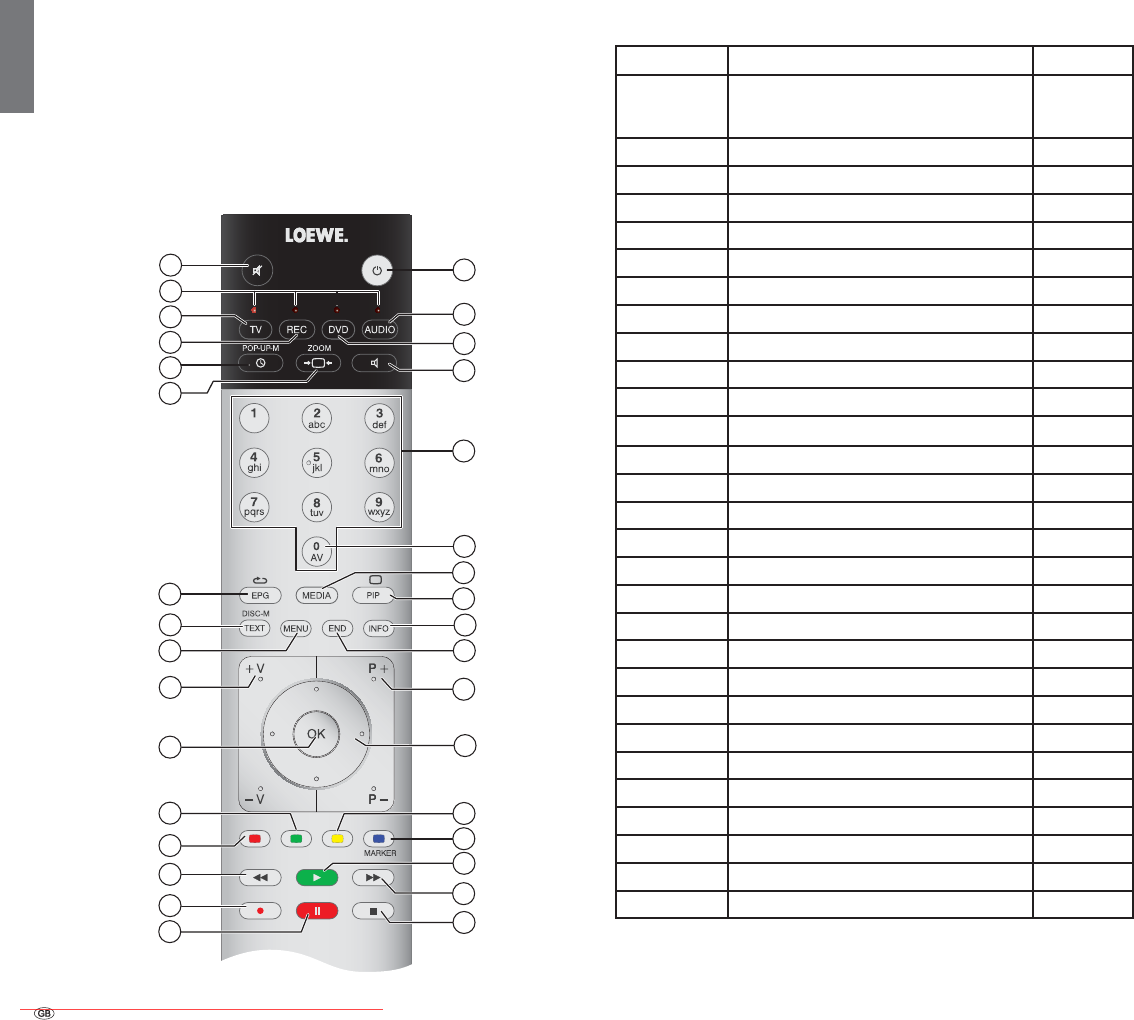
- 130
english
USB keyboard
You can connect a USB keyboard to one of the USB ports of your TV set
and use it in place of a remote control. With it, you can type internet
addresses more comfortably into the browser and you can type charac-
ters more easily when changing the names of channels or inputting lists
of favourites.
The keyboard can completely replace the remote control. An overview of
the button assignment is on the right hand side of the table.
Button combinations
Keyboard Remote control No.
Left and right
switching
button
Keyboard layout between Standard (Latin) and
Greek or Russian (only for the menu languages
Greek and Russian)
-
F1 Red button 13
F2 Green button 12
F3 Yellow button 21
F4 Blue button 20
F5 RECORD button 15
F6 PAUSE button 16
F7 STOP button 17
F8 PLAY button 19
F9 Button ܓ14
F10 Button ܒ18
Alt + ESC END button 24
Ctrl + End In the browser: Stop input, leave input field -
Enter OK button 11
0 ... 9 Number buttons 28, 29
Pg ח / יP+ / P- buttons 23
Alt + + / - V+ / V- buttons 10
Alt + F TV button 3
Alt + R AUDIO button 32
Alt + P PIP button 26
Alt + T TEXT button 8
Alt + O Place the TV set into standby mode 33
Alt + A MEDIA button 27
Alt + I INFO button 25
Alt + M MENU button 9
Alt + E EPG button 7
Alt + S Sound off/on 1
Alt + W TIMER button 5
Arrow button Directional keys 22
Input of characters
1
2
3
4
5
6
7
8
9
10
11
12
13
14
15
16
32
18
19
20
21
22
23
24
25
26
27
28
29
30
31
33
17
Downloaded From TV-Manual.com Manuals

131 -
english
Character table
Key assignment for text input via the remote control
For certain functions the input of letters or characters is required. As with
a cell phone press the numeric button (0-9) repeatedly until the desired
character appears.
➠ The characters available are language dependent.
Here the key assignment is for the menu language English.
Key Character (uppercase - lowercase)
11
2 A B C 2 - a b c 2
3 D E F 3 - d e f 3
4 G H I 4 - g h i 4
5 J K L 5 - j k l 5
6 M N O 6 - m n o 6
7 P Q R S 7 - p q r s 7
8 T U V 8 - t u v 8
9 W X Y Z 9 - w x y z 9
0 0 [space] . / \ - + _ , ; : ? ! = & # % ~ @ $ * ´ | ( )
Input of characters
Downloaded From TV-Manual.com Manuals
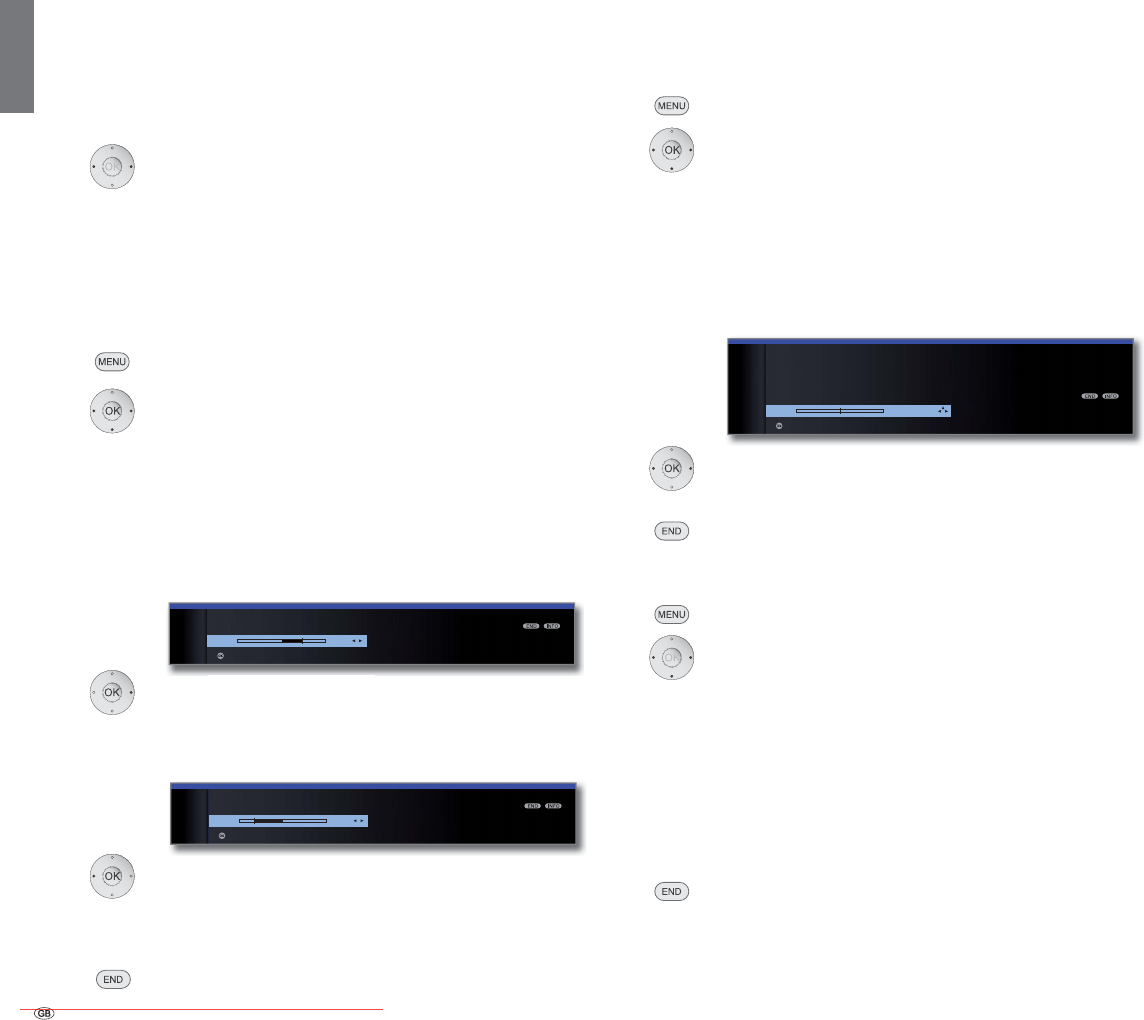
- 132
english
Rotating the TV set
Your TV set has a connection for a rotating stand control. If the set is
mounted on a motorised Loewe stand, you can use the remote control
to adjust it to your seating location accordingly.
➠ A motor unit is connected (socket CONTROL).
➠ In normal TV mode, without other displays.
Rotate the TV set.
Do not place any objects in the rotation range of the TV set that could
obstruct the rotation or that could be knocked over by the rotation
movement.
Setting the range of rotation
You can specify the rotation range of the TV device (maximum +/- 40
degrees) by setting the maximum right and left stop position.
MENU: Call TV menu.
Select Settings,
go to the menu line below.
Select Miscellaneous,
go to the menu line below.
Select Rotate TV,
go to the menu line below.
Select Basic adjustment,
OK calls the basic adjustment.
Basic adjustment (right)
Turn your TV set as far to the right as the installation
position of your set allows. This will be the maximum
right rotation position in future.
OK confirms basic adjustment to right.
Basic adjustment (left)
Turn your TV set as far to the left as the installation
position of your set allows. This will be the
maximum left rotation position in future.
OK ends the basic adjustment.
END: Close the menu.
Specifying the switch off position
This is where you specify the position that the TV will take when it is
switched off. In order for the TV set to return to the determined switch-
off position when switching it off, this must be activated (see below).
MENU: Call TV menu.
Select Settings,
go to the menu line below.
Select Miscellaneous,
go to the menu line below.
Select Rotate TV,
go to the menu line below.
Select Set switch-off position,
OK calls Set switch-off position.
Set desired switch-off position.
The TV set rotates in the process.
OK Save the set position as the switch-off position.
END: Close the menu.
Activating the switch-off position
MENU: Call TV menu.
Select Settings,
go to the menu line below.
Select Miscellaneous,
go to the menu line below.
Select Rotate TV,
go to the menu line below.
Select Activate switch-off position,
go to the menu line below.
Select yes.
END: Close the menu.
If the TV set is switched off with the on/off key on the remote control or with
the switch integrated in the display then it will turn to the defined switch-
off position. When it is switched back on, it returns to the position last set.
Rotating the TV set
d
(
h
)
OK
ROTATE TV
Basic adjustment (right)
21
Proceed
OK
ROTATE TV
Basic adjustment (left)
-30
End of basic adjustment
OK
TV MENU
Settings
Miscellaneous
Rotate TV
Set switch-off position
0
Adopt
Downloaded From TV-Manual.com Manuals

133 -
english
Problem Possible cause Remedy
All menus are displayed in the wrong
language.
The menu language was set incorrectly. Set the menu language:
Press the MEDIA button in TV mode. In the MediaPortal,
highlight the last menu item (Index) in the upper half and
call up with OK. Mark the first key word and call it with
OK. Then select the language and confirm it with OK.
In the TV menu, Connections cannot be
called (displayed in grey ).
A timer recording is in progress. Wait until the timer recording ends or delete the
timer recording (page 125).
The control functions of the Loewe
Recorder and the Timer are not working
or are not working properly
a) The Digital Link function is not activated or
not possible in the recorder.
b) EURO-AV cable is not connected.
a) Activate Digital Link in the recorder (see operat-
ing instructions of the recorder).
b) Connect EURO-AV cable (page 113).
General problems when connecting
external devices via an AV input.
a) The AV standard is set incorrectly.
b) The signal type is set incorrectly.
a) Set the correct standard (page 110).
b) Set the correct signal type (page 110).
If AV standard or AV signal is set to “Automatic”
then this can cause errors to be detected with
signals that do not comply with standards. In this
case standard and signal must be set according to
the information in the operating manual of the
external device.
The connection of a decoder does not
function or does not function properly.
a) The signal is not decoded because the correct
decoder stations are not selected in the menu.
b) The sound is missing in decoder mode becau-
se the wrong decoder sound is assigned in the
menu.
a) Select the right decoder stations in the menu (TV
menu ט Connections ט Miscellaneous ט Decoder
stations ט Select decoder station(s) (see page 111).
b) Select the right sound code (always, never, automa-
tic) in the menu (TV menu ט Connections ט
Miscellaneous ט Decoder stations ט Sound encodig),
see also decoder instructions.
Digital Link Plus does not work. a) EURO-AV cable is not fully wired (pin 10 not
wired).
b) Some recorders can only adopt stations
during the initial installation of the TV set.
a) Replace the EURO-AV cable.
b) Restore the recorder to the as-delivered state
(see recorder’s operating manual).
With Teletext various characters are
displayed incorrectly.
The wrong character set has been set in the
Teletext menu.
Set the right character set: Select Teletext menu ט
Settings ט Character set ט Standard or the
appropriate character set.
Errors occurred when running a CA
module.
Switch the TV set off. Remove the CA-module from
the TV set. Wait a few seconds. Reinsert the CA-
module. Switch the TV set on again.
Troubleshooting
Downloaded From TV-Manual.com Manuals

- 134
english
Problem Possible cause Remedy
No sound via the external digital audio
amplifier.
a) The external digital audio amplifier does not
support the selected sound format (Dolby
Digital, dts, MPEG).
b) TV set and external digital audio amplifier are
not connected with each other.
a) Set PCM stereo on the DVD player in the
sound selection. For DVB stations on the TV
set switch to stereo in the Status display
(INFO) – Language/sound (green button).
b) Connect AUDIO DIGITAL OUT from the TV set
to a digital input of the external digital audio
amplifier and select the appropriate input to
this.
A programmed recording was not made. Recording of analogue stations with VPS data:
The programme to be recorded was not (no longer)
in the programmes offered by the station via VPS.
Recording of DVB stations with automatic time
control:
The provider deleted the programme from the
EPG data, for example due to a programme
change.
The stations are exclusively responsible for the
transmission of VPS data (for analogue stations)
or for the use of the automatic time control (for
DVB or MHEG-5 stations). The availability of the
appropriate data cannot be guaranteed.
The picture format cannot be adjusted. A HbbTV application is loaded but is not active
(not displayed).
End the HbbTV application with the END
button (see page 82).
When the Picture format button is pressed,
the 3D mode selection appears instead of
the Picture format selection.
The TV set is displaying picture material in 3D. Whilst 3D material is being displayed, the picture
format cannot be changed (see page 39).
The free capacity of the external hard disk is
essentially indicated smaller than expected in
the OSD.
The hard disk has been formatted on FAT32 on a
PC with Microsoft Windows (see also page 107).
Format external hard disk on TV set again via
TV menu ט Settings ט
Miscellaneous
ט
Format
external hard disk
.
Troubleshooting
Downloaded From TV-Manual.com Manuals

135 -
english
Troubleshooting
Problem Possible cause Remedy
If a desired IP address has been specified then
no IP address will be automatically issued to
your TV set.
No DHCP server is working on your network. Set up a DHCP server.
Assign the IP addresses for the TV set manually.
Despite video or music file being played back,
no sound can be heard.
a) The TV set is set to mute or the volume has
been turned down too far.
b) An audio device that does not exist or that is
not connected is registered in the TV menu
under Connections ט Sound components (e.g.
HiFi/AV amplifier).
a) Increase the volume by pressing the V+
button on the remote control for longer.
This will also cancel any mute setting.
b) Connect up the audio device and switch it
on.
In the Sound components wizard change
back to TV speakers.
Although the file is visible on the media
server, it is not displayed in the MediaPortal.
The file is not made available by your media
server.
Change to your media server. For this, read the
section Media server software on page 139.
A media file that is displayed can not be
played back.
The format of the file is not supported (see also
limitations in section File formats supported on
page 139).
No remedy.
Characters received in the WLAN code of the
wireless router cannot be entered for the
network configuration at the TV set.
The device does not support all special cha-
racters.
Change the WLAN key of the router.
When searching for wireless routers, no
device is found.
The router is not ready for wireless communica-
tion.
Check your wireless router.
Try to make the connection again a few
minutes later.
If with wireless operation there should be any interference such as disruptions during playback or slow reactions by devices to commands, you could
try the following:
- Keep at least three metres distance from microwave ovens, bluetooth devices, mobile telephones and Wi-Fi compatible devices such as printers
and PDAs.
- Change the active channel on the WLAN router.
Downloaded From TV-Manual.com Manuals
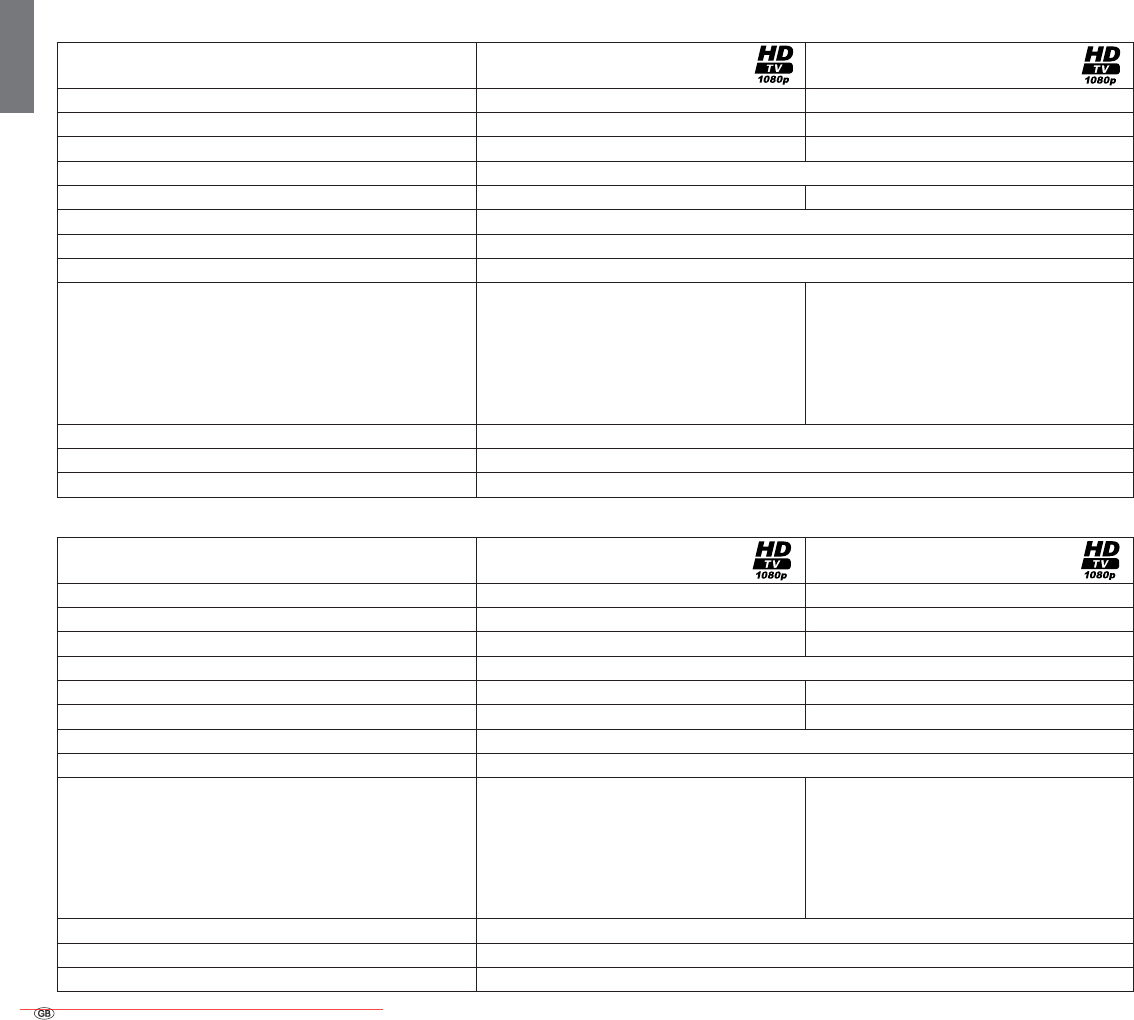
- 136
english
General data
Type Individual 55
Compose 3D
Individual 46
Compose 3D
Article number 50432xxx 50431xxx
Device dimensions without stand (W x H x D) in cm 132.6 x 80.4 x 6.0 113.3 x 69.2 x 6.0
Weight without stand (approximate) in kg 36.8 27.5
Display technology Full-HD LCD with Edge-LED backlight
Screen diagonal (in cm) / Picture format 140 / 16:9 117 / 16:9
Resolution (in pixels) / Motion Response 1920 x 1080 / 400 Hz
Contrast (static / dynamic) 5,000 : 1 / 5,000,000 : 1
Viewing angle (horizontal / vertical) 178° / 178°
Power consumption On-Mode max. (W)
(Audio output 1/8 of the maximum value)
Power consumption On-Mode Home (W)
(Ambient light sensor according to ErP considered)
Power consumption in Standby Mode (W)
Power consumption when set is switched off (W)
169
133
0,37
0
146
106
0,37
0
Ambient temperature (Celsius) 5° – 35°
Relative humidity (non-condensing) 20 – 80%
Air pressure 800 – 1114 hPa (0 – 2000 m above sea level)
Type Individual 40
Compose 3D
Individual 32
Compose 3D
Article number 50430xxx 51425xxx
Device dimensions without stand (W x H x D) in cm 100.0 x 61.7 x 6.0 80.0 x 59.4 x 6.1
Weight without stand (approximate) in kg 24.4 18.6
Display technology Full-HD LCD with Edge-LED backlight
Screen diagonal (in cm) / Picture format 101 / 16:9 80 / 16:9
Resolution (in pixels) / Motion Response 1920 x 1080 / 400 Hz 1920 x 1080 / 100 Hz
Contrast (static / dynamic) 5,000 : 1 / 5,000,000 : 1
Viewing angle (horizontal / vertical) 178° / 178°
Power consumption On-Mode max. (W)
(Audio output 1/8 of the maximum value)
Power consumption On-Mode Home (W)
(Ambient light sensor according to ErP considered)
Power consumption in Standby Mode (W)
Power consumption when set is switched off (W)
119
97
0,37
0
81
66
0,39
0
Ambient temperature (Celsius) 5° – 35°
Relative humidity (non-condensing) 20 – 80%
Air pressure 800 – 1114 hPa (0 – 2000 m above sea level)
Technical data
Downloaded From TV-Manual.com Manuals

137 -
english
Electrical data
Chassis designation: SL 150 / SL 151
Power supply: 220 V – 240 V/50–60 Hz
Tuner: terr./cable:
satellite (1:
VHF/hyperband/UHF
4 levels: 13/18V/22kHz
16 levels: DiSEqC 1.0
Single cable system: EN 50494
Range: terr./cable:
satellite (1:
45 MHz to 860 MHz
950 MHz to 2150 MHz
Station storage locations
incl. AV and radio: 5000
TV standards: analogue:
digital:
B/G, I, L, D/K, M, N
DVB-T/T2 (1, DVB-C
DVB-S (1/ S2 (1
Colour standards: SECAM, PAL, NTSC,
NTSC-V, PAL-V (60 Hz)
Sound standards: analogue:
BG, DK, MN:
BG, I, DK:
L, L1:
digital:
mono, stereo, dual-channel
FM-A2
FM-Nicam
AM-Nicam
mono, stereo, dual-channel, PCM
Dolby Digital
Dolby Digital Plus
Dolby Virtual Speaker
DTS
Dolby Digital AAC+
Audio output power
(music/sine): 2 x 40W / 2 x 20W
Teletext: TOP/FLOF Level 2.5
Page memory: 2000
Signals via PC IN / HDMI
The following table lists the compatible signals which your TV set can
show via the PC IN connection and the HDMI connections (HDMI1,
HDMI2, HDMI3).
Set the output signal on your PC, HDMI or DVI device so that it matches
one of the signals in the table.
Format Horizontal x Vertical Image
frequency
Connection
480i60 720 x 480i 60Hz PC IN, HDMI
576i50 720 x 576i 50Hz PC IN, HDMI
480p60 720 x 480p 60Hz PC IN, HDMI
576p50 720 x 576p 50Hz PC IN, HDMI
1440 x 480p 60Hz HDMI
1440 x 576p 50Hz HDMI
720p50 1280 x 720p 50Hz PC IN, HDMI
720p60 1280 x 720p 60Hz PC IN, HDMI
1080i50 1920 x 1080i 50Hz PC IN, HDMI
1080i60 1920 x 1080i 60Hz PC IN, HDMI
1080p24 1920 x 1080p 24Hz PC IN, HDMI
1080p25 1920 x 1080p 25Hz PC IN, HDMI
1080p30 1920 x 1080p 30Hz PC IN, HDMI
1080p50 1920 x 1080p 50Hz HDMI
1080p60 1920 x 1080p 60Hz HDMI
VGA 640 x 480 60Hz PC IN, HDMI
SVGA 800 x 600 60Hz PC IN, HDMI
XGA 1024 x 768 60Hz PC IN, HDMI
WXGA 1360 x 768 60Hz PC IN, HDMI
SXGA 1280 x 1024 60Hz PC IN, HDMI
Technical data
(1 Equipment and upgrade options, see page 142.
Downloaded From TV-Manual.com Manuals
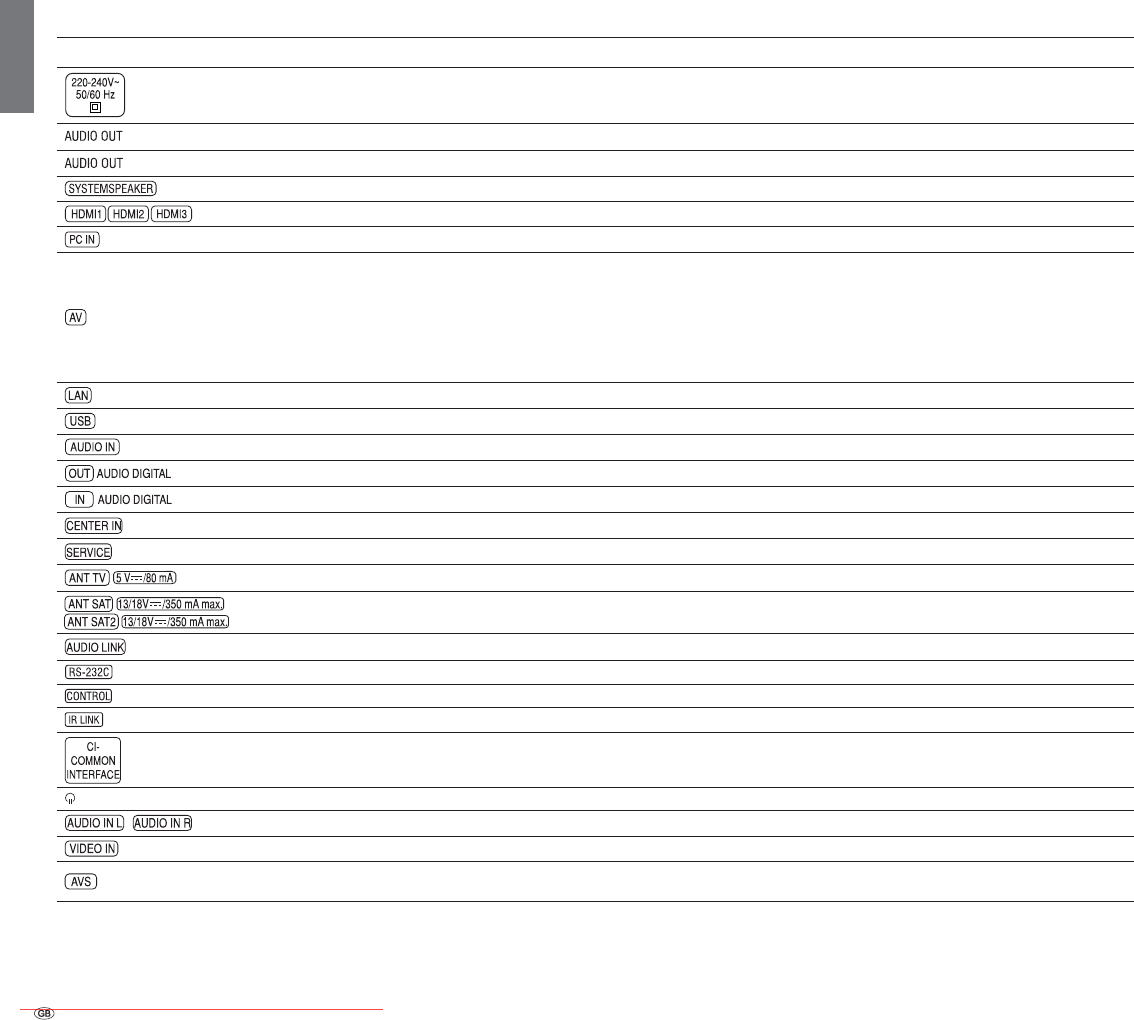
- 138
english
Connections (max. equipment)
Designation Type Function / Signal
Mains socket 220-240V ~ 50/60 Hz Supply voltage
+ R - Screw terminals (2x) (1 Speaker Right: + (red) / - (black)
+ L - Screw terminals (2x) (1 Speaker Left: + (red) / - (black)
10-pole connector (1 Loewe system speaker
HDMI type A (3x) Digital Video/Audio IN: Digital video (2 and audio
D-SUB 15-pole Video IN: PC/STB video signal (2
EURO-AV
Video IN:
Video OUT:
Audio IN:
Audio OUT:
Y/C (S-VHS/Hi 8)
CVBS (VHS/8 mm)
RGB
CVBS (VHS/8 mm)
Y/C (S-VHS/Hi 8)
L/R
L/R
RJ-45 Ethernet: Network interface
USB type A (2x) USB 2.0: Multimedia files/software update
Jack 3,5 mm Audio IN: L/R
Cinch (yellow) Digital Audio OUT (SPDIF): Digital audio
Cinch (red) Digital Audio IN (SPDIF): Digital audio
Cinch (white) Audio IN: max. 2Vrms: Centre
Mini-DIN Service/L-Link
IEC socket 75 Ohm / 5 V / 80 mA: Antenna/cable/DVB-T/C
F socket (2x) (1 75 Ohm 13/18 V / 450 mA: ANT-SAT DVB-S/S2
D-SUB 26-pole Audio OUT: Multi-sound
RJ12 Data I/O: serial interface
Mini-DIN Rotating stand control (Positioning accuracy 1.5°)
Jack 3,5 mm Connection for IR station
CI slot (2x) Common Interface: Slot for CA module
Jack 3,5 mm Headphones 32–2000 Ohm
Cinch (white/red) Audio IN: L (white) / R (red)
Cinch (yellow) Video IN: CVBS (VHS/8 mm)
Mini-DIN Video IN:
Y/C (S-VHS/Hi 8)
CVBS (VHS/8 mm)
Technical data
(1 Equipment and upgrade options, see page 142.
(2 For compatible picture signals, see table on page 137.
Downloaded From TV-Manual.com Manuals

139 -
english
MediaHome
File formats supported
Pictures: JPG, PNG, GIF
Audio: MP3, M4A (AAC LC), WMA (without lossless), FLAC, WAV (PCM)
Video: AVI (MPEG-1/2, DivX, XviD, AC3, MP3), WMV (WMV9, VC-1,
WMA9, WMA Pro), MP4 (DivX, XviD, H.264/MPEG-4 AVC, AAC
LC), MOV (H.264/MPEG-4 AVC, AAC LC), MKV (H.264/MPEG-4
AVC, AC3), FLV (H.264/MPEG-4 AVC, H.263, MP3, AAC LC),
MPG (MPEG-1, MPEG Audio), TS/PS (MPEG-2, H.264/MPEG-4
AVC, MPEG2 Audio, AC3), VOB (MPEG-2, MPEG2 Audio, AC3)
➠ DivX up to a resolution of 720p
➠ H.264/MPEG-4 AVC up to Profile High (Level 4.2)
Ethernet (wired network)
Standards supported: 10 Mbit/sec Ethernet (10Base-T), 100 Mbit/sec Fast
Ethernet (100Base-T)
WLAN (wireless network)
Standards supported:
IEEE 802.11b/g/n
Frequency range used:
2400-2483.5 MHz and 5180-5730 MHz
Types of encoding that are supported:
WEP 64 and 128 Bit (ASCII and HEX), WPA PSK, WPA2 AES
Supported home network standard
Universal Plug and Play Audio / Video (UPnP AV)
Media server software
To play multimedia contents from devices in your home network, you
require media server software which makes the relevant files available
to you. Handling of individual files depends on the technical properties
and also on the media server software used.
You can download a test version of the TwonkyMedia Mediaserver from
our homepage. With your TV set, you have also acquired the option of
obtaining a free licence for the currently available version of the Twonky
media server. Alternatively, you can also use other media servers, e.g. the
Windows Media Player (WMP) from Version 11.
For communication with your PC, certain port addresses of the network
connection are required. They may not be blocked by a firewall if there
is one, otherwise this could cause serious connection errors.
Windows Media Player 11 requires the port addresses 1900 and the block
of 10280 up to and including 10284 (all for UDP) as well as 2869 and
10243 (both for TCP). For TwonkyMedia the port addresses 1030, 1900
and 9080 (all for UDP) and 9000 (for TCP) must be available.
Other ports to be kept free depend on the operating system you are using.
Contact your network administrator about configuring the firewall.
Technical data
Downloaded From TV-Manual.com Manuals

- 140
english
Loewe DVD recorder:
The DVD recorders from Loewe are characterised by form and colour,
which match Loewe TV sets, adapted user guidance and technology.
Combined these devices form a system that offers many advantages.
Loewe Blu-ray player:
With the Loewe Blu-ray player BluTech Vision Interactive you are ideally
equipped for the successor format to DVD. With the Loewe system in-
tegration you control BluTech Vision Interactive and your Loewe TV set
simultaneously with the Assist remote control.
Loewe 3D Blu-ray player:
With the Loewe Blu-ray player BluTech Vision Interactive 3D you’re fully
kitted out to watch Blu-ray discs with 2D and 3D material. With the Loewe
system integration you control BluTech Vision Interactive 3D and your
Loewe TV set simultaneously using the Assist remote control.
Loewe 3D glasses:
The Loewe 3D shutter Active 3D Glasses give you clear 3D enjoyment
and are compatible with all Loewe 3D flat TVs.
Loewe Audiovision:
Audiovision with integral 5.1 decoder creates impressive surround sound,
even for televisions without a surround sound decoder.
As well as FM radio and CD/DVD player, Audiovision offers a connection
for your iPod or your iPhone. Plus, thanks to video upscaling 1080p, you
can also experience DVDs in full HD resolution.
Loewe Vesa adapter bolts:
You can purchase adapter bolts for wall holders in line with the VESA
standard from your dealer or the Technical Customer Service (see service
addresses on page 157). Four items are required.
Spacer bolts (1 item) Loewe order no. 70873.001.
Accessories
The following accessories are obtainable from your Loewe dealer.
Installation options:
A large range of options for floor, table or wall installation are available
for your TV set.
An overview of the available options can be found on page 143.
Trim:
With your TV set it is possible to replace the laterally attached trim (pan-
els) to match the ambiance of your home. There are different surface
structures or colours that can be selected for your device. Please contact
your dealer in this regard.
Wood trim is a natural product. In this case UV light (strong sunlight) can
cause slight discoloration.
Loewe Stereospeaker I 40/46 Sound:
Extend your Individual with the system speaker Stereospeaker I Sound
which can be mounted directly underneath the TV set.
Loewe Individual Sound Projector SL:
With the Loewe Individual Sound Projector SL you can enjoy digital Sur-
round Sound without expensive installation and connection of several
speakers. The Sound Projector is easy to set and operate.
Loewe Individual Sound:
The TV sets can be perfectly enhanced with the Individual Sound speaker
system. Numerous options for loudspeaker combinations can be realised
with floor-standing loudspeakers, satellite loudspeakers and a subwoofer.
Individual housing and trim colour designs are possible here too.
Loewe Individual Mediacenter:
With the Loewe Mediacenter you can play all radio sources, DVDs, CDs
and audio data from the network, USB or NAS. You can connect an iPod or
an iPhone via an integrated interface. The Mediacenter can be integrated
into the home network via LAN, Powerline or WLAN. It forms the heart
of the Loewe Multiroom systems.
Accessories
Subject to availability.
Downloaded From TV-Manual.com Manuals

141 -
english
Upgrade Kits / Conversion Kits / Cables
Module DVB-S2 Twin (Art.No. 70286.080):
You can have two digital satellite tuners installed in sets with Digital
Recorder. This enables reception of digital satellite and HDTV stations
and extends the display of PIP and the recording possibilities of Digital
Recorder for two digital satellite stations.
The retrofit possibilities for your set can be found in the table on page 142.
Module DVB-T2/C Twin (Art.No 70914.080):
For sets with a Digital Recorder (DVB-T/C Twin) you add the Standard
DVB-T2 to the reception possibilities of your TV set with the DVB-T2/C
Twin conversion kit.
The Standard DVB-T2 is not available in all countries at the moment
The retrofit possibilities for your set can be found in the table on page 142.
Adapter and Cables:
AUDIO LINK adapter cable 0,25 m Loewe Art.No. 89954.001
AUDIO LINK cable 1,5 m Loewe Art.No. 89952.001
AUDIO LINK cable 6 m Loewe Art.No. 89952.002
AUDIO LINK cable 10 m Loewe Art.No. 89952.003
Cubic connector cable 6 m Loewe Art.No. 90418.930
USB extension (Art.No. 70167.080):
To ensure easy accessibility of the USB connection or enable USB sticks
to be inserted with a large casing, the TV set can be connected to a
USB extension.
This upgrade kit is available from your Technical Customer Service (see
service addresses on page 157).
Accessories
Subject to availability.
Downloaded From TV-Manual.com Manuals

- 142
english
Equipment variants
The equipment of the individual set variants and their upgrade/conversion possibilities is listed in the table below.
Accessories
Set variants Individual 55
Compose 3D
Individual 46
Compose 3D
Individual 40
Compose 3D
Individual 32
Compose 3D
Stereospeaker I Sound {{{z
DR+zzzz
DVB-T/C Twin zzzz
Digital audio decoder zzzz
HbbbTV zzzz
WLAN zzzz
DVB-T2/C Twin
Art.No. 70914.080
DVB-S2 Twin
Art.No. 70286.080 zzz
zex factory
{optionally available as an upgrade kit
optionally available as a conversion kit
– not available
TV set equipment
See the rating plate on the rear of the set for the precise product desig-
nation. The precise features are listed in the Integrated features item in
the index of the TV set (see page 17).
Downloaded From TV-Manual.com Manuals
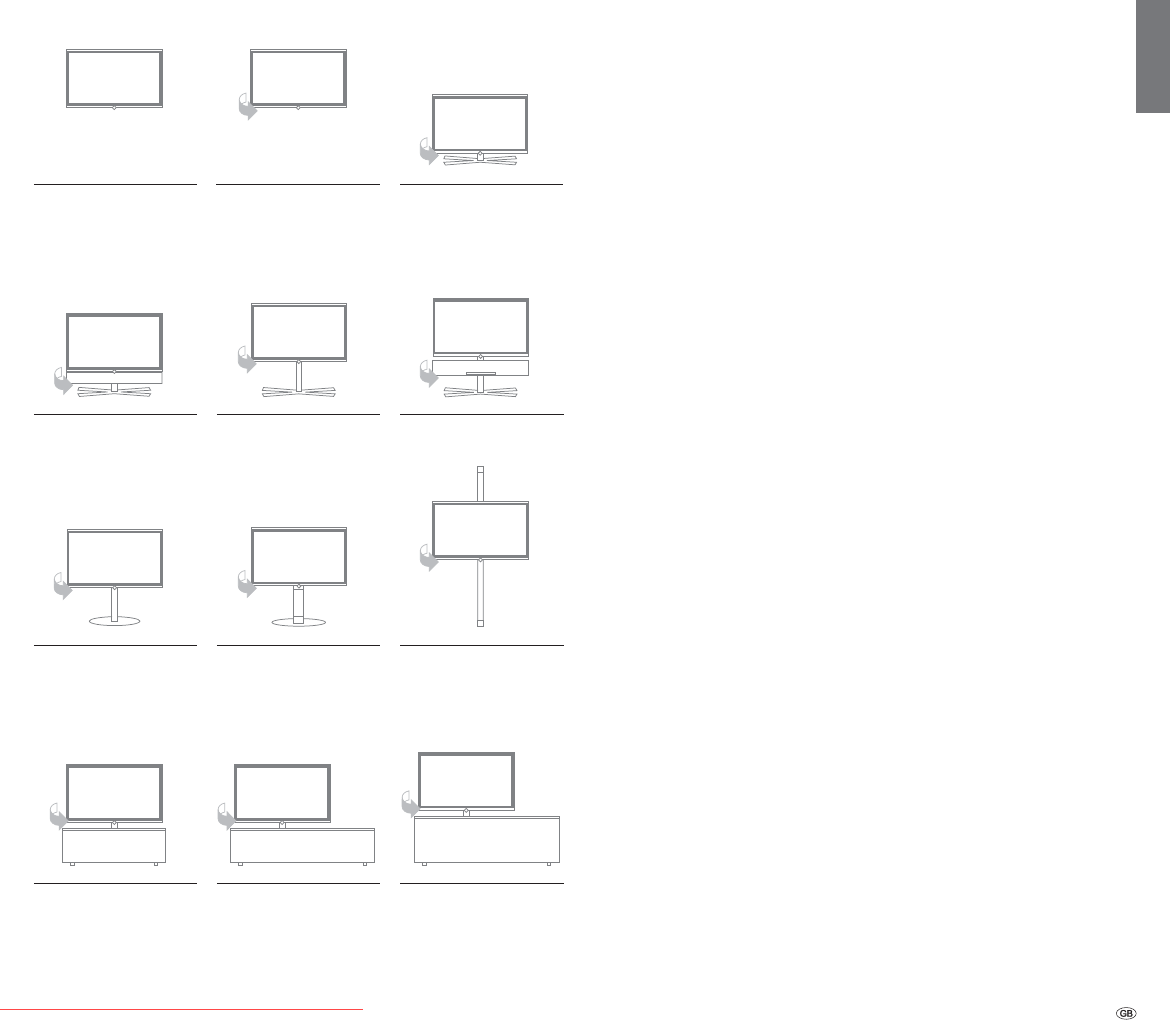
143 -
english
Setup possibilities Individual 55 / 46 / 40 Individual 55 Compose 3D
• Wall Mount (WM62)
• Wall Mount Flex 52 L (1
• Table Stand I 55
• Floor Stand I 55
• Floor Stand I 55 SP
• Center Floor Stand I 40-55 (1
• Screen Lift Plus (1
• Rack 110.30 (1
• Rack 110.30 SW (1
• Rack 165.30 (1
• Rack 165.45 CS (1
• Rack 165.45 SP (1
Individual 46 Compose 3D
• Wall Mount (WM62)
• Wall Mount Flex 52 L (1
• Table Stand I 40/46
• Table Stand I 40/46 Sound
• Floor Stand I 40/46
• Floor Stand I 40/46 SP
• Floor Stand 8 42-46 (1
• Center Floor Stand I 40-55 (1
• Screen Lift Plus (1
• Rack 110.30 (1
• Rack 110.30 SW (1
• Rack 165.30 (1
• Rack 165.45 CS (1
• Rack 165.45 SP (1
Individual 40 Compose 3D
• Wall Mount (WM62)
• Wall Mount Flex 52 L (1
• Table Stand I 40/46
• Table Stand I 40/46 Sound
• Floor Stand I 40/46
• Floor Stand I 40/46 SP
• Floor Stand 8 32-40 (1
• Center Floor Stand I 40-55 (1
• Screen Lift Plus (1
• Rack 110.30 (1
• Rack 110.30 SW (1
• Rack 165.30 (1
• Rack 165.45 CS (1
• Rack 165.45 SP (1
(1 Only in connection with appropriate adapter to be ordered separately.
Accessories
Wall Mount (WM62)
Floor Stand I 55 SP
Floor Stand I 40/46 SP
Wall Mount Flex 52 L (1 Table Stand I 55
Table Stand I 40/46
Floor Stand I 55
Floor Stand I 40/46
Screen Lift Plus (1
Center Floor Stand I 40-55 (1
Rack 165.45 CS
(1
Rack 165.45 SP
(1
Rack 165.30
(1
Table Stand I 40/46 Sound
Floor Stand 8 32-40 (1
Floor Stand 8 42-46 (1
Rack 110.30
(1
Rack 110.30 SW
(1
Downloaded From TV-Manual.com Manuals
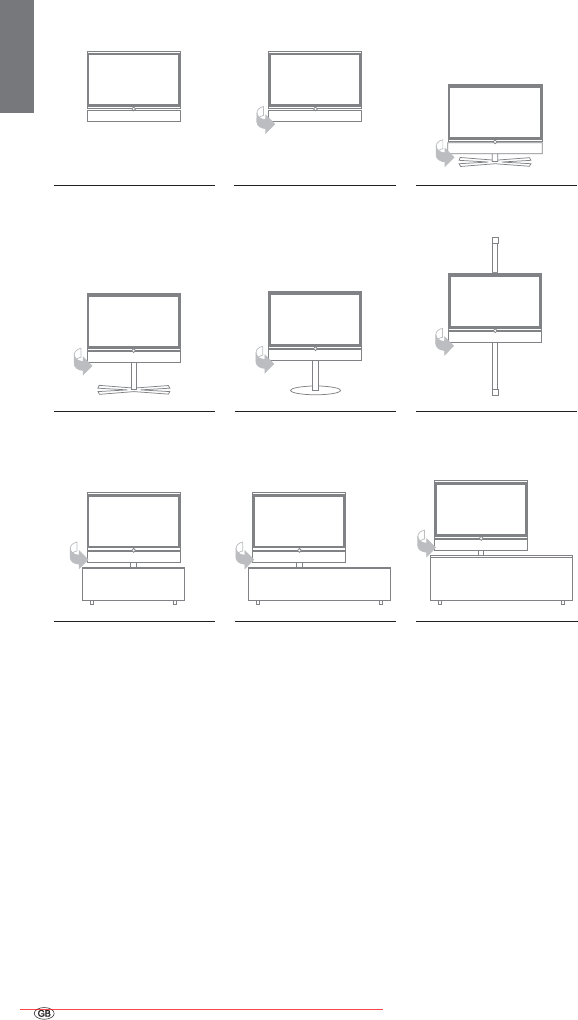
- 144
english
Setup possibilities Individual 32
Individual 32 Compose 3D
• Wall Mount (WM62)
• Wall Mount Flex 32 L (1
• Table Stand I 32 Sound
• Floor Stand I 32
• Floor Stand 8 32-40 (1
• Screen Lift Plus (1
• Rack 110.30 (1
• Rack 110.30 SW (1
• Rack 165.30 (1
• Rack 165.45 CS (1
• Rack 165.45 SP (1
Wall Mount (WM62)
Screen Lift Plus (1
Wall Mount Flex 32 L (1 Table Stand I 32 Sound
Floor Stand 8 32-40 (1
Rack 165.45 CS
(1
Rack 165.45 SP
(1
Rack 165.30
(1
Floor Stand I 32
Rack 110.30
(1
Rack 110.30 SW
(1
Accessories
(1 Only in connection with appropriate adapter to be ordered separately.
Downloaded From TV-Manual.com Manuals

145 -
english
Environment
Environmental protection
Energy consumption
Your TV set is equipped with an eco-standby power supply. In the standby
mode, the power consumption drops to low power (see Technical data
on page 136). If you want to save even more energy then switch the
device off with the mains switch. Please also note that the EPG data
(Electronic Programme Guide) is lost under certain circumstances and pos-
sibly programmed timer recordings cannot be carried out via the TV set.
The power consumed by the TV set during operation depends on the
energy efficiency preset in the initial installation (see page 24) or the
setting in the TV menu (see page 36).
If you activate the automatic dimming (see page 36), your TV picture
will adapt to the ambient brightness. This reduces the power consump-
tion of the TV set.
Packaging and box
You have made a decision to purchase a high-quality technical product
with a long service life. For disposal of the packaging, in accordance
with national legislation we have paid a fee to a commissioned recycler
to pick up the packaging from the dealer.
The set
The EU directive 2002/96/EC regulates the proper way
to recycle, handle and utilise used electronic devices.
Old electronic devices consequently must be disposed of
separately. Please do not dispose of this device in normal
household trash!
You may return your used set free of charge at designated
recycling centres or at your specialist dealer whenever you purchase a
new, comparable set. Additional details about return (also for non EU
countries) are available from your local municipal authorities.
Batteries
The batteries supplied as initial equipment do not contain
any pollutants such as cadmium, lead, or mercury.
Used batteries should no longer be disposed of in the do-
mestic waste according to the Battery Ordinance. Dispo se
of your batteries at no charge in the collection containers
which are set up for this purpose in retail stores.
The code number cancels an access
code and thus the parental
lock. Please keep
in a safe place.
✄
Downloaded From TV-Manual.com Manuals

- 146
english
Legal notes
Trademarks
Manufactured under licence from Dolby Laboratories. “Dolby”, “Pro
Logic” and the double-D symbol are trademarks of Dolby Laboratories.
Manufactured under license under U.S. Patent #’s: 5,451,942; 5,956,674;
5,974,380; 5,978,762; 6,487,535 & other U.S. and worldwide patents
issued & pending. DTS and DTS Digital Surround are registered trademarks
and the DTS logos and Symbol are trademarks of DTS, Inc. © 1996-2007
DTS, Inc. All Rights Reserved.
The screen font “LoeweL2700” is based on the “Tavmjong Bah Arev
(tavmjong.free.fr)” font, which in turn is based on “Bitstream Vera”.
Bitstream Vera is a trademark of Bitstream Inc.
This set contains a software which is based partly on the work of the
Independent JPEG Group.
DivX and the corresponding DivX logos are registered trademarks of
DivX, Inc.
This product includes software developed by the OpenSSL Project for use
in the OpenSSL Toolkit (http://www.openssl.org/).
This software is provided by the OpenSSL project “as is“ and any expressed
or implied warranties, including, but not limited to, the implied warranties
of merchantability and fitness for a particular purpose are disclaimed. In no
event shall the OpenSSL project or its contributors be liable for any direct,
indirect, incidental, special, exemplary, or consequential damages (includ-
ing, but not limited to, procurement of substitute goods or services; loss
of use, data, or profits; or business interruption) however caused and on
any theory of liability, whether in contract, strict liability, or tort (including
negligence or otherwise) arising in any way out of the use of this software,
even if advised of the possibility of such damage.
This product includes cryptographic software written by Eric Young (eay@
cryptsoft.com).
This product includes software written by Tim Hudson (tjh@cryptsoft.com).
This product contains software which was developed by third parties
and / or software which is subject to GNU General Public License (GPL)
and/or GNU Lesser General Public License (LGPL). You can pass on and
modify them in accordance with Version 2 of the GNU General Public
License or optionally every later version which is published by the Free
Software Foundation.
Loewe publishes this programme WITHOUT ANY GUARANTEE OR SUP-
PORT especially without an implicit guarantee of MARKET MATURITY or
APPLICABILITY FOR A CERTAIN PURPOSE. Details can be found in the
GNU General Public License. You can order the software from Loewe
Customer Service.
You can download the GNU General Public License here:
http://www.gnu.org/licenses/.
Downloaded From TV-Manual.com Manuals

147 -
english
0-9
24p movie display: Films released on Blu-ray Disc support presentation of
24p cinema films. The Blu-ray player transfers the original film format to
the television with 24 frames per second. The DMM (DigitalMovieMode)
set in the factory calculates and inserts additional intermediate pictures,
which suppress film jerking typical for the cinema, thereby providing for
a smooth motion sequence.
A
Active antenna: An antenna with its own power supply or amplification
which can improve the reception is areas with a poor coverage.
Administrator: Person who administers the network, i.e. takes care of
setting up and maintaining all components belonging to the network.
Automatic time control: Similar to VPS for analogue stations the automatic
time control monitors the start and end times of programmes from DVB
stations. If these times deviate from the data programmed in the timer
data the running time of the recording is adapted automatically. The
automatic time control is not supported by all DVB stations.
AVI: Abbreviation for Audio Video Interleave, a video container file format
developed by Microsoft. A single AVI video file can contain several audio,
video and text data streams (thus the name container format).
AV socket: Socket for audio and video signals.
AV sources: Audio/video source.
AVS: Audio/video sockets on the side of the TV set (cinch and mini-DIN).
B
Band: Name for a transmission range.
Blu-ray Disc: The follow-up format of DVD. The contents of about five
DVDs fit onto one Blu-ray Disc (abbreviated BD). Therefore, the Blu-ray
disc provides enough space for high-resolution images and multi-channel
sound formats.
BMP: Abbreviation for Bitmap, a grid graphics format designed for Micro-
soft Windows and OS/2 that is wide spread and therefore supported by
almost every popular graphics software package without any problems.
C
CA module: The Conditional Access module contains the coding system
and compares the transmitted code with the one on the Smart Card. If
they match, the appropriate stations or programmes are decoded.
CEC: Abbreviation for Consumer Electronics Control. CEC provides uni-
versal component control functions for entertainment electronics devices
(e.g. System standby, One Touch Play). CEC is also known as Digital Link
HD at Loewe.
Channel (WLAN): The channel is a certain part of the WLAN frequency
band. Devices that want to communicate with each other have to use the
same WLAN channel. In Europe the WLAN frequency band is currently
divided into 13 channels.
Cinch cable: Cable for transmitting audio or video.
CI slot: See Common Interface.
Client: Also referred to as network client; describes an end device such
as your TV set that is connected to the network and gets data from a
(media) server to make it accessible to the user.
Common Interface: The Common Interface (CI slot) is a standardised
interface. By inserting suitable decoding modules (CA modules) and a
Smart Card coded digital programmes can be used.
Common Interface Plus: CI Plus is an advanced development of the Com-
mon Interface standard. CI Plus slots are in principle downward compatible
to the previous CI standard, i.e. CA modules and Smart Cards according
to the past CI standard can continue to be used in CI Plus slots, as far as
the programme provider permits this. Additionally, extended regulations
apply however to CI Plus.
Component IN: Connection in which the video signal is transmitted via
three separate cinch connections. It is made up of the brightness signal
“Y“ and the colour difference signals “Pb“ and “Pr“. YPbPr is the original
analogue version of the digital YCbCr in which video data saved on the
DVD as well as transmitted via satellite, cable or antenna in DVB are
colour coded.
Conditional Access module: See CA module.
D
Decoder: Analogue, coded TV signals are passed through a decoder and
made visible again.
DHCP: Abbreviation for Dynamic Host Configuration Protocol. DHCP al-
lows automatic assignment of IP addresses with the aid of a DHCP server.
DHCP server: Network service which takes care of automatic assignment
of IP addresses to clients.
Digital Link: System for controlling recorders (for video and DVD recorders
from Loewe) via the Euro AV sockets of the Loewe TV set with concealed
setup. Controlling the recorder for timer recordings.
Digital Link HD: System for controlling devices via the HDMI connection
of the Loewe TV set in the case of concealed installation.
Digital Link Plus: System for controlling recorders according to protocol
50. For analogue stations the station and timer data are transmitted via
the EURO-AV socket to the recorder. The timer recording is executed
exclusively by the recorder. There is a different designation with different
manufacturers.
DivX: Video Codec which allows even large files to be relatively highly com-
pressed in their file size without having to tolerate important quality losses.
Glossary
Downloaded From TV-Manual.com Manuals

- 148
english
D (continuation)
DNS: Abbreviation of Domain Name System. Readable names (e.g. www.
loewe-int.de) are assigned to numerical IP addresses. DNS servers are
responsible for the resolution of readable addresses into the correspond-
ing IP addresses.
Dolby Digital: Digital multi-channel audio. The digital standard for high
quality home movie systems. The individual channels are broadcast sepa-
rately in this standard. The three front channels right, left and centre,
the two surround channels right and left and the external subwoofer
channels are called a 5:1 signal.
Dolby Pro Logic: Analogue multi-channel audio. Converts a Dolby-
coded stereo signal into a surround sound. This usually contains four
channels (front left, centre, front right, surround channel). A special
subwoofer channel is not generated in this method.
Dolby Pro Logic II: Analogue multi-channel audio. Dolby Pro Logic II is a
further development of Dolby Pro Logic. This method generates a 6-chan-
nel spatial sound from a stereo or Pro-Logic signal (front left, centre, front
right, surround left, surround right, subwoofer).
Dolby Surround: Analogue multi-channel audio system that brings four
audio channels down to two audio tracks with the aid of a matrix coding.
Dolby Virtual Speaker: The Dolby Virtual Speaker technology simulates the
surround playback of a real 5.1-channel playback with only two speakers.
DRM: Digital Rights Management. Processes to control copyright pro-
tected data. To be used correctly, DRM protected contents require not
only a DRM capable device but also the possession of a license issued
by the provider (to be paid for).
DTS: Digital Theater Systems; Digital multi-channel audio.
DVB-C/-S/-T: Digital Video Broadcasting stands for digital television.
Technical DVB is the standardised process for transmitting digital content
(television, radio, multi-channel audio, room sound, EPG, Teletext, and
other supplemental services) through digital technology. C stands for
transmission via cable, S for distribution via satellite and T for terrestrial
or antenna distribution.
DVD: Abbreviation of Digital Video Disk and later Digital Versatile Disk.
DVD preceiver: Combi-device of DVD player and radio without integrated
amplifier.
DVI: Digital Visual Interface, is an interface for transmitting digital video
and graphic data (without audio).
Dynamic contrast ratio: Here the light intensity of the display is adapted
in case of a high black portion in the picture. The so-called backlights
are dimmed automatically and the contrast ratio increases temporarily,
i.e. dynamically.
E
Electronic Programme Guide: See EPG.
EPG: Electronic Programme Guide is the electronic variant of a printed
TV guide. Using the EPG you can watch the TV programme of the TV
station, transfer the appropriate data. The list of programmes contains
the title, beginning and end and duration of the programme. In addition
brief descriptions of the content of the programmes is also displayed.
Ethernet: Cable linked data net technology for local networks (LANs). Also
covers standards for e.g. plug connectors and transfer speeds.
Euro AV socket: Interface for connecting video devices to a TV set. This
socket is also referred to as Scart socket.
F
FLOF: Full Level One Facilities. Teletext system in which names and
numbers of the jump destinations are transmitted in the bottom line
on every page. This guides the reader to related topics for example. An
information about which pages exist and which pages have sub-pages
is not available in FLOF.
G
Gateway: Transfer into another network; in this case connection from
home network to internet.
The network device is usually used as the standard gateway which
produces this connection. The DSL router generally also represents the
internet gateway.
H
HbbTV: HbbTV (Hybrid broadcast broadband television) is an industry
standard that offers an open platform for technology that is not dependent
on manufacturers. HbbTV combines TV programmes with online services
seamlessly over broadband internet (DSL).
HDCP: High-bandwidth Digital Content Protection. Coding system pro-
vided for the DVI and HDMI interfaces for secure transmission of audio
and video data.
HDMI: High Definition Multimedia Interface is a newly developed interface
for full digital transmission of audio and video data.
HDTV: High Definition Television is an umbrella term that covers a number
of high resolution television standards.
HD-Ready: A quality seal that is awarded to products that are capable of
displaying high-definition television (HDTV).
High band and Low band: Transmission ranges for satellites.
Host: Computer that the server services are provided from, i.e. that makes
data available. Refer also to media server.
Glossary
Downloaded From TV-Manual.com Manuals

149 -
english
I
ID3 tags: Additional information for MP3 and WMA audio files. Informa-
tion about the singer, title, album and album cover can be saved here
among other things. These data are edited on the PC by an ID3 tag editor.
IP address: IP addresses (Internet Protocol Addresses) are used to identify
devices in an Internet Protocol (IP) network. IP addresses are made up of
four groups of numbers of three digits each.
IR-Link: The IR-Link function allows the operation of accessory devices
with concealed installation made by other manufacturers via the Loewe
TV set. The infrared sensor required for this is available as an accessory
and can be connected to the IR-Link connection of the TV set.
J
JPEG/JPG: Joint Photographic Experts Group is a committee which has
developed a standard method for the compression of digital photos. This
method JPEG (JPG for short), named after the committee, is a commonly
used graphic format for photos.
L
LAN: Abbreviation for Local Area Network. Mainly used as a designation
for networks with wiring (Ethernet).
LCD: Liquid Crystal Display.
LCN: Logical Channel Numbers. In stations with LCN, the channel loca-
tion number belonging to the station is also transmitted by the provider.
The stations are sorted according to these channel location numbers.
L-Link: Intelligent system connection between Loewe devices for the
automatic exchange of information. Makes the operation of TV and
Loewe system components even more convenient.
LNB/LNC: The crucial electronic component of a satellite antenna is
referred to as an LNB (Low Noise Block Converter). It is mounted in the
focal point of a parabolic antenna. The designation LNC (Low Noise
Converter) indicates that conversion to lower intermediate frequency
takes place. The supplemental block in the LNB refers to the fact that a
whole frequency range (a block) is converted in each case.
M
MAC address: Hardware address of a network adapter, e.g. the network
card in the PC. It is permanently assigned by the manufacturer and is
used to uniquely identify devices in networks.
Mbit/sec: Information about the transfer rate in networks in megabits,
i.e. millions of characters per second. With WLAN the maximum speed
is 11 (IEEE 802.11b), 54 (IEEE 802.11g) or 300 (IEEE 802.11n) Mbit/sec,
in wired networks 10 Mbit/sec or 100 Mbit/sec (Fast Ethernet).
Media server: Stands for the device which multimedia contents are stored
on, but is also the name for the service provided by the device that makes
this data available to the network.
MHEG-5: Digital teletext standard of the Multimedia and Hypermedia Ex-
pert Group. At the moment only available in United Kingdom and Ireland.
Modulator: Transmitter in the video or DVD recorder so that the devices
can receive signals via the tuner of the TV device.
Mono: Single-channel audio.
MPEG: Digital compression process for video.
MP3: Data format for compressed audio files.
Multimedia contents: Videos, music files and photos are grouped together
under this term.
N
NAS: Abbreviation for Network Attached Storage. The term describes a
hard disk which is independently linked to the network (i.e. without a PC).
Network ID: NID refers to the so-called programme ID number, also known
as network ID – a number between 0 and 8191. This specification is
necessary in specific cable networks of some countries. Then only DVB
signals of this station network are searched for.
NICAM: Audio standard. Is used in Denmark, England, France, Sweden,
and Spain.
NTSC: American colour standard.
P
Page Catching: For teletext, refers to going to and calling a page
number.
PAL: European standard.
PCM: Pulse Code Modulation for digital sound.
Picture in Picture: See PIP.
PIP: Picture in Picture; a function which displays two pictures on the
screen.
Pixel: Denotes both the smallest unit of a digital graphic grid and its
display on a screen with grid control.
Pixel error: A pixel error is a defective pixel, usually on an LCD. Pixel errors
may be caused by production errors. They are expressed for example by
a constantly lit pixel or a constantly black pixel. Single defective pixels
however are excluded from a guarantee.
PNG: Abbreviation for Portable Network Graphics, a freely available grid
graphics format for loss-free compression.
Port: A port is part of a network address (or also IP address). It allows
assignment of data packages to various services which are running on
one device under the same network address.
Powerline: Powerline refers to a type of wired network connection in
which data can be transmitted via the domestic power supply using the
optionally available adapters.
Glossary
Downloaded From TV-Manual.com Manuals

- 150
english
Glossary
P (continuation)
Progressive JPEG: Progressive JPEGs are built up gradually. The quality of
the picture increases progressively during the loading process.
ProScan/Progressive Scan: Progressive Scan (abbr. PS) or full picture
method is a technique in the picture build-up of monitors, TV sets,
beamers, and other display devices in which the output device is not
sent line interlaced half pictures – unlike in the interlace technique – but
real full pictures.
PSK: Stands in connection with WLAN encoding for Pre-Shared Key.
Clients, who want to connect up to a wireless network secured with
PSK have to know this key.
R
RGB: Colour signals red, green and blue.
Router: Device for connecting up several networks, e.g. home network
and internet.
S
Satellite tuner: Receiver for satellite programmes.
SDTV: Standard Definition TeleVision.
SECAM: French colour standard.
Set-Top-Box: Set-Top-Box (STB for short) refers to a device in entertain-
ment electronics which is connected to another device, usually a TV set,
and offers the user additional functional options.
Signal input groups: Depending on the applied signal, the signal sources
are divided into different groups. All signal input groups with their cor-
responding signal types and the possible inputs are listed below.
TV analogue:
Signal type: FBAS, YC, RGB-SD (480i/576i), Component-SD (480i/576i)
Input: Tuner analogue, AV, AVS
TV digital:
Signal type: DVB-SD, HDMI-SD (480i/576i)
Input: Tuner digital, HDMI1, HDMI2, HDMI3
HD analogue:
Signal type: RGB-HD (video mode: e.g.1920x1080, 1280x720),
Component-HD (video modes: e.g. 1920x1080, 1280x720)
Input: PC IN
HD digital:
Signal type: DVB-HD, HDMI-HD
Input: Tuner digital, HDMI1, HDMI2, HDMI3
Signal input groups (continuation):
PC:
Signal type: RGB
(PC modes: e.g. 800x600, 1024x768, 1280x1024, 1360x768)
Input: PC IN
PhotoViewer:
Input: USB
Signal strength: Strength of the received antenna signal.
Signal quality: Quality of the incoming antenna signal.
Smart Card: The Smart Card is an electronic chip card issued by the respec-
tive programme provider or by the certification-free Pay-TV operators. It
contains the code which is decoded by the CA module.
Static contrast ratio: Describes the difference between the brightest and
darkest picture display.
Stereo: Dual-channel audio.
Switch: Device for connecting several computers to a network.
Switch voltage: Video devices specify this voltage to switch the TV device
to playback.
Symbol rate: Describes the transmission speed for data transmission.
T
Terrestrial: In data transmission a wireless transmission that does not use
satellites as intermediate station is referred to as terrestrial.
TFT: Thin Film Transistor. One widely distributed application is control of
liquid crystal flat screens, for which a signal transistor is used for each
pixel. This design of display is also referred to as active matrix, however
it is frequently also referred to as TFT display.
TOP: Table of Pages. Teletext system in which the individual pages are
divided into topics. The blocks stand for a higher hierarchy level (e.g.
News, Sport, Programmes) and the groups for the level below (e.g. Home/
Abroad, Football/Tennis). Abbreviations can be assigned to the pages
which are displayed in colour on the bottom line and can be selected
with the four coloured buttons on the remote control. Information is also
transmitted about which pages exist and which of them have sub-pages.
Tuner: Another term for receiver.
U
UPnP AV: Abbreviation for Universal Plug and Play Audio / Video. Is used
to control network devices from all manufacturers. Has become a wide
spread standard for home networking.
USB: Universal Serial Bus. Serial bus system for connecting external devices
(USB card reader, USB stick).
Downloaded From TV-Manual.com Manuals

151 -
english
Glossary
V
VGA: PC interface for connecting a monitor.
VPS: The Video Programming System (VPS) is a signal which some (but
not all) analogue TV stations transmit in the blanking gap. The signal is
used by video and DVD recorders when recording programmes to react
to delays in start time, programme changes and excesses of the planned
programme time.
W
WEP: Abbreviation for Wired Equivalent Privacy. Former standard process
in the WLAN encryption, now outdated.
Wired network: see LAN.
Wireless network: see WLAN.
WLAN: Abbreviation for Wireless Local Area Network. Also referred to in
brief as wireless network.
WMA: Abbreviation for Windows Media Audio, Microsoft’s own audio
data format. The contents are compressed as in MP3 files.
WMV: Abbreviation for Windows Media Video, Microsoft own video
data format.
WPA: Abbreviation for Wi-Fi Protected Access. Replaced WEP as standard
encryption for wireless networks.
Y
Ycc/Ypp: Colour standards for Set-Top-Boxes.
YCbCr: Digital colour model, see COMPONENT IN.
YPbPr: Analogue colour model, see COMPONENT IN.
Downloaded From TV-Manual.com Manuals

- 152
english
Ɍɨɡɢ ɭɪɟɞ ɨɬɝɨɜɚɪɹ ɧɚ ɨɫɧɨɜɧɢɬɟ ɢɡɢɫɤɜɚɧɢɹ ɢ ɪɚɡɲɢɪɟɧɢɬɟ ɫɴɨɬɜɟɬɧɢ ɩɪɟɞɩɨɫɬɚɜɤɢ Ⱦɢɪɟɤɬɢɜɚ 1999/5/ȿɋ. Ɋɚɡɪɟɲɟɧɨ
ɟ ɢɡɩɨɥɡɜɚɧɟɬɨ ɦɭ ɜɴɜ ɜɫɢɱɤɢ ɞɴɪɠɚɜɢ ɨɬ ȿɋ, ɢ ɨɫɜɟɧ ɬɨɜɚ ɜ ɂɫɥɚɧɞɢɹ, ɇɨɪɜɟɝɢɹ ɢ ɒɜɟɣɰɚɪɢɹ. ȼɴɜ Ɏɪɚɧɰɢɹ ɢ
ɂɬɚɥɢɹ ɢɡɩɨɥɡɜɚɧɟɬɨ ɦɭ ɟ ɪɚɡɪɟɲɟɧɨ ɫɚɦɨ ɜ ɡɚɬɜɨɪɟɧɢ ɩɨɦɟɳɟɧɢɹ .
Toto zaĜízení je v souladu se základními požadavky a ostatními odpovídajícími ustanoveními SmČrnice 1999/5/EG.
MĤže být používan ve všech zemích EU dodateþnČ také na Islandu, v Norsku a ve Švýcarsku. Ve Francii a v Italii je
použití pĜístroje dovolené jenom v interiéru.
Dieses Gerät entspricht den grundlegenden Anforderungen und den weiteren entsprechenden Vorgaben der Richtlinie 1999/5/EG.
Es darf in allen Ländern der EU sowie zusätzlich in Island, Norwegen und der Schweiz betrieben werden. In Frankreich und Italien ist
die Nutzung nur in Innenräumen zulässig.
Dette udstyr er i overensstemmelse med de væsentlige krav og andre relevante bestemmelser i Direktiv 1999/5/EF. Det må kun
anvendes i EU-landene samt i Island, Norge og Schweiz. I Frankrig og Italien er det kun tilladt at anvende det indendørs.
Este equipo cumple con los requisitos esenciales así como con otras disposiciones de la Directiva 1999/5/CE. Puede operar en todos
los países de la UE y adicionalmente en Islandia, Noruega y Suiza. En Francia e Italia, su uso está permitido únicamente en espacios
interiores.
Tämä laite täyttää direktiivin 1999/5/EY olennaiset vaatimukset ja on siinä asetettujen muiden laitetta koskevien määräysten mukai-
nen. Laitetta saa käyttää kaikissa EU-maissa sekä Islannissa, Norjassa ja Sveitsissä. Ranskassa ja Italiassa laitetta saa käyttää vain
sisätiloissa.
Cet appareil est conforme aux exigences essentielles et aux autres dispositions pertinentes de la Directive 1999/5/EC. L‘utilisation est
possible dans tous les pays de l‘UE, en Islande, en Norvège et en Suisse. En France et en Italie l‘utilisation est autorisée uniquement
dans des espaces fermés.
This equipment is in compliance with the essential requirements and other relevant provisions of Directive 1999/5/EC. It may be
operated in all countries in the EU and also in Iceland, Norway and Switzerland. In France and Italy it may only be used indoors.
ǹȣIJȩȢ Ƞ İȟȠʌȜȚıȩȢ İȓȞĮȚ ıİ ıȣȩȡijȦıȘ İ IJȚȢ ȠȣıȚȫįİȚȢ ĮʌĮȚIJȒıİȚȢ țĮȚ ȐȜȜİȢ ıȤİIJȚțȑȢ įȚĮIJȐȟİȚȢ IJȘȢ ȅįȘȖȓĮȢ 1999/5/
EC. ǼʌȚIJȡȑʌİIJĮȚ Ș ȜİȚIJȠȣȡȖȓĮ IJȘȢ ıİ ȩȜİȢ IJȚȢ ȤȫȡİȢ IJȘȢ ǼǼ, țĮșȫȢ țĮȚ ıIJȘȞ ǿıȜĮȞįȓĮ, ıIJȘȞ ȃȠȡȕȘȖȓĮ țĮȚ ıIJȘȞ ǼȜȕİIJȓĮ.
ȈIJȘȞ īĮȜȜȓĮ țĮȚ ıIJȘȞ ǿIJĮȜȓĮ İʌȚIJȡȑʌİIJĮȚ Ș ȤȡȒıȘ ȝȩȞȠ ıİ İıȦIJİȡȚțȠȪȢ ȤȫȡȠȣȢ.
Questo apparato é conforme ai requisiti essenziali ed agli altri principi sanciti dalla Direttiva 1999/5/CE. Può essere messo in funzione
in tutti i paesi dell‘UE e inoltre in Islanda, Norvegia e in Svizzera. In Francia e in Italia è consentito l‘uso solo in ambienti chiusi.
Dette utstyret er i samsvar med de grunnleggende krav og andre relevante bestemmelser i EU-direktiv 1999/5/EF. Det kan brukes i
alle EU-land og dessuten i Island, Norge og Sveits. I Frankrike og Italia er kun innendørs bruk tillatt.
Dit apparaat voldoet aan de essentiele eisen en andere van toepassing zijnde bepalingen van de Richtlijn 1999/5/EG. Het gebruik is
toegestaan in alle landen van de EU en ook in IJsland, Noorwegen en Zweden. In Frankrijk en Italië is het gebruik slechts binnenshu-
is toegestaan.
Denna utrustning är i överensstämmelse med de väsentliga kraven och andra relevanta bestämmelser i Direktiv 1999/5/EC. Appara-
ten får användas i alla länder inom EU liksom på Island, i Norge och i Schweiz. I Frankrike och Italien får apparaten användas endast
inomhus.
EC Declaration of Conformity
Downloaded From TV-Manual.com Manuals
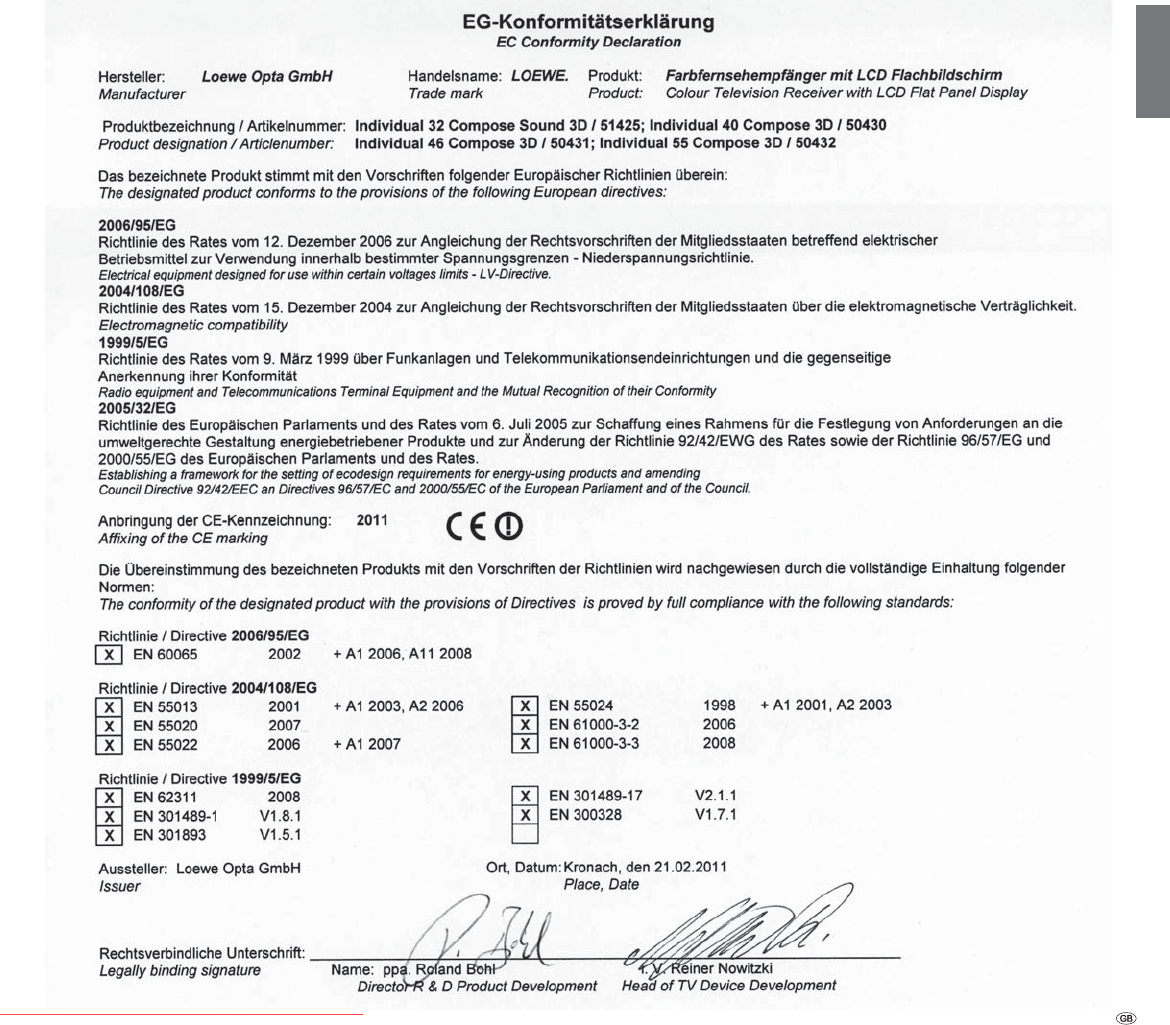

- 154
english
Index
0-9
3D .............................................................34
3D function ...............................................36
3D mode ...................................................36
24p format ..............................................112
A
Access code ...............................................56
Active loudspeakers .................................117
Adjusting the picture ..................................34
Adjusting the sound ...................................32
Alarm ........................................................57
Allow switching voltage ...........................108
Antenna DVB ...........................................108
Archive playback ........................................95
Assign digital audio input .........................109
Audio ampliÆ ers .......................................120
AUDIO button ................................... 21, 125
Audio commentary ....................... 23, 32, 33
Auto dimming - Room ...............................34
Auto dimming - Video (VBD+) ....................34
Auto format ...............................................34
Automatic speech detection .......................33
Automatic time control ............................106
AV audio signal ..........................................33
AV standard .............................................108
B
Balance ......................................................33
Batteries ....................................................20
Blu-ray player ...........................................112
Bookmarks
Delete all ....................................... 98, 100
Delete individual .....................................95
Jumping to .............................................95
Setting ...................................................95
Brightness ..................................................34
Bundling the Cables ...................................20
Button combinations ................................128
Button functions ........................................38
C
Call Digital Recorder menu .........................85
Camcorder ...............................................110
CA module ................................................59
CA module selection ..................................41
Change favourites lists ...............................45
Add station ............................................45
Delete station .........................................45
Move station ..........................................45
Rename list ............................................45
Change station ..........................................44
Delete station .........................................44
Move station ..........................................44
Rename station ......................................44
Restore station .......................................44
Changing the title of a recording ..............101
Character Table ........................................129
Checking the hard disk .............................105
CI slot ........................................................59
Cleaning and care ........................................9
Code number .............................................56
Coloured buttons .......................... 38, 41, 50
Colour intensity ..........................................34
Colour temperature....................................34
Common Interface Plus ................... 106, 107
Connecting antennas .................................18
Connecting speakers ..................................19
Connecting the TV Set ...............................18
Connections ..............................................11
Contrast .....................................................34
Control unit ...............................................10
Copy protection .......................................124
Copy recordings
from an accessible TV set .....................104
to a connected recorder .........................98
D
Data capture ..............................................49
Decoder ...................................................109
Decoder stations ......................................109
Delete Manager .........................................94
Set delete protection in the Timer data
menu .....................................................93
Setting/cancelling delete protection ......102
Delete programmed descrambling ..............99
Deleting .....................................................97
All bookmarks ............................... 98, 100
Individual bookmarks..............................95
Parts of the recording .............................97
Recording .............................................100
Deleting timer entries .................................94
Descramble scrambled recording ................99
Descrambling at DR continuous operation ..85
Device at connection AV ..........................108
Digital audio input ...................................121
Digital camera ..........................................110
Digital Link HD (HDMI CEC) ......................113
Digital Link Plus ............................... 109, 124
Digital Noise Control ..................................34
Digital teletext ...........................................52
Direct recording .........................................89
One Touch Recording .............................89
Display .......................................................21
DR archive view .........................................85
DR continuous operation ...........................85
DR+ Streaming .........................................103
Copy from accessible TV set .................104
Extended standby mode .......................103
Follow me ............................................104
Play via network ...................................103
DR+ Streaming settings ..............................86
DR device group name ...........................86
DR device name .....................................86
DR standby after switch-off ....................86
IP port number .......................................86
Share the DR archive with other TVs .......86
Using the DR archives of other TVs .........86
DVB character set ......................................41
DVB subtitles .............................................38
DVD button .............................................125
DVD player ..............................................112
DVD recorder ...........................................112
DVI/HDMI ................................................112
E
Encrypted stations ............. 23, 24, 27, 42, 59
Energy efÆ ciency ................................. 15, 22
Environmental protection .........................142
EPG ...........................................................48
F
Factory settings picture/sound ....................35
Fast forward and rewind ..................... 88, 96
Favourites ..................................................31
Film quality impr. (DMM) ............................34
First installation wizard ...............................22
FLOF ..........................................................50
Formatting the hard disk ..........................105
G
Game console ................................. 109, 112
Gaming mode ..........................................109
Downloaded From TV-Manual.com Manuals

155 -
english
Index
H
HbbTV .......................................................80
HDMI .......................................................112
HDMI CEC ...............................................113
Headphone volume....................................32
Help ...........................................................15
Hiding sections ..........................................97
HiFi/AV ampliÆ er ............................. 115, 120
Highlight function ......................................88
I
Index in the TV set .....................................15
Info display ................................................15
Inform about hidden sections.....................85
Installing the TV set ....................................18
Interactive data services .............................52
Internal WLAN antenna ..............................60
iPIP ............................................................46
J
Jump distance ............................................85
Jumping .............................................. 87, 96
Jumping to bookmarks ...............................95
Jump to automatically set bookmarks .........87
L
Language .................................... 22, 57, 131
Language/sound ........................................41
Last station ................................................38
Lautstärke Audio-Kommentar .....................32
LNC/LNB ....................................... 25, 26, 27
Locking/unlocking a movie .......................101
Logical Channel Number ............................23
Loudness ...................................................32
M
Mains switch....................................... 10, 21
Manual station search ................................43
Maximum volume ......................................33
Max. switch on volume ..............................33
Media
Access ....................................................61
Overview ................................................61
Quit .......................................................61
MediaHome ...............................................66
Media menu ..............................................62
MediaMusic ...............................................76
MediaNet ..................................................70
Favourites ........................................ 70, 73
Internet ..................................................71
Personal area ..........................................72
Recommendations ..................................70
Settings ..................................................74
Topic selection ........................................70
MediaPhoto ...............................................77
Full-screen mode ....................................77
Rotate picture ........................................77
Slide show ..............................................77
MediaPortal ...............................................14
MediaText ..................................................80
MediaUpdate .............................................60
MediaVideo ...............................................78
Jumping .................................................79
Playback .................................................78
Select language/sound ...........................79
Wind ......................................................79
Memorise ..................................................48
Menu language .........................................15
Menu operation .........................................12
Mobile phone keypad ................................12
Move picture vertically ...............................35
Muting ......................................................32
N
Numeric buttons ........................... 12, 15, 30
O
On/Off button ............................................10
On-screen displays .....................................58
OPC ...........................................................34
Overview diagram ......................................16
P
Page selection ............................................50
Parental lock ..................................... 56, 101
PC IN .......................................................114
Personal text pages ............................. 38, 51
Picture .......................................................34
Picture adjustment .............................. 34, 35
Picture format ..................................... 34, 35
PALplus ..................................................35
Panorama ............................................... 35
Zoom .....................................................35
Picture in Picture ........................................46
PIN ............................................................56
PIP .............................................................46
Playing highlights .......................................96
Programme info .........................................38
R
Radio menu ........................................ 17, 53
Radio mode .................................. 21, 52, 54
REC button ..............................................125
Record conÇ ict ...........................................94
Recording ................................................122
Recording capacity .....................................85
Recording quality .......................................85
Recording subtitles .....................................85
Recording wizard .............................. 92, 122
Remote control ............................. 3, 20, 125
Remote TV switch on via Digital Link ........109
Repeat initial installation ............................22
Replay function ..........................................88
Reset picture/sound ...................................35
Rotating the TV set ..................................130
RS-232C interface ....................................121
S
Safety ......................................................8, 9
Scope of delivery ..........................................7
Search wizard ............................................42
Selecting Audio/Video Source ....................31
Select memory medium .............................85
Select satellite installation ...........................24
Select station .............................................30
via favourites lists ...................................31
with P+/P- ..............................................30
with the numeric buttons .......................30
with the station list .................................30
Serial interface .........................................121
Serial recording tolerance ...........................85
Set Covers ..................................................18
Setting pre-record time and post record time ..86
Set-Top-Box .............................................112
Sharpness ..................................................34
Side by side ................................................36
Signal type ...............................................108
Slow motion ....................................... 88, 96
Smart Card.................................................59
Smart Jump................................... 85, 87, 96
Software download .................................126
Software update ......................................126
Sound ........................................................32
Sound components wizard .......................115
Downloaded From TV-Manual.com Manuals

- 156
english
Sound mode ..............................................32
Sound off ..................................................32
Sound-picture synchronisation ...................32
Sound system ..........................................116
Standard PIP ..............................................46
Standby mode ...........................................21
Station list ..................................................30
Station search/update ................................42
Status display ...................................... 40, 90
Stop recording early ...................................90
Subtitles .............................................. 38, 41
Switching off .............................................21
Switching off the TV set during recording ...90
Switching on ..............................................21
Switch on TV when marked .......................49
Switch to live picture ..................................87
T
Teletext ......................................................50
Teletext functions .......................................38
Teletext subtitles ........................................38
Time ..........................................................39
Time and date ............................................58
Timer data ........................................ 93, 122
Automatic time control.........................122
Auto time control ...................................93
Date .............................................. 93, 122
Decoding overnight ....................... 93, 122
Descrambled recording .................. 93, 122
Lock movie .............................................93
Programme provider PIN ................ 93, 122
Recorder ....................................... 93, 122
Recording time .............................. 93, 122
Recording type .............................. 93, 122
Record subtitles ............................. 93, 122
Set delete protection ..............................93
Station ...................................................93
VPS ............................................... 93, 122
Timer functions ..........................................57
Timer overview ..................... 91, 92, 94, 123
Timer recording..........................................91
manually ................................................92
via EPG ...................................................91
via teletext .............................................92
Timer recordings ......................................122
TOP ...........................................................50
Top/bottom................................................36
TOP table ...................................................50
TV button ......................................... 20, 125
TV menu ....................................................16
TV set equipment .....................................140
TV viewing with time shift ................... 87, 89
U
UPnP..........................................................60
USB keyboard ..........................................128
USB stick ..................................................126
V
Video podcast
Video podcasts by country .....................75
Video podcasts by genre ........................75
Video podcasts ..........................................75
Videotext subtitles .....................................51
Viewing a locked movie ...........................102
Viewing another movie from the archive
during archive recording ............................90
Viewing highlights from the archive .........100
Volume ......................................................32
Volume adjustment ....................................33
VPS ..........................................................106
VPS times ...................................................51
W
Watching other stations during
archive recording .......................................90
Wired connection ......................................60
Wireless radio connection ..........................60
Index
Downloaded From TV-Manual.com Manuals

157
Loewe Austria GmbH
Parkring 12
1010 Wien, Österreich
Tel +43 - 810 0810 24
Fax +43 - 1 22 88 633 - 90
E-mail: loewe@loewe.co.at
Audio Products Group Pty Ltd
67 O’Riordan St
Alexandria NSW 2015, Australia
Tel +61 - 2 9669 3477
Fax +61 - 2 9578 0140
E-mail: help@audioproducts.com.au
Loewe Opta Benelux NV/SA
Uilenbaan 84
2160 Wommelgem, België
Tel +32 - 3 - 2 70 99 30
Fax +32 - 3 - 2 71 01 08
E-mail: ccc@loewe.be
SOFIA AUDIO CENTRE
138 Rakovski St.
1000 SoÀ a, Bulgaria
Tel +359 - 29 877 335
Fax +359 - 29 817 758
E-mail: sac@audio-bg.com
Telion AG
Rütistrasse 26
8952 Schlieren, Schweiz
Tel +41 - 44 732 15 11
Fax +41 - 44 732 15 02
E-mail: lgelpke@telion.ch
Hadjikyriakos & Sons Ltd.
121 Prodromos Str., P.O Box 21587
1511 Nicosia, Cyprus
Tel +357 - 22 87 21 11
Fax +357 - 22 66 33 91
E-mail: savvas@hadjikyriakos.com.cy
BaSys CS s.r.o.
Sodomkova 1478/8
10200 Praha 10 - Hostivar, ýesko
Tel +420 2 34 70 67 00
Fax +420 2 34 70 67 01
E-mail: ofÀ ce@basys.cz
Loewe Opta GmbH,
Customer Care Center
Industriestraße 11
96317 Kronach, Deutschland
Tel +49 180122256393
Fax +49 926199500
E-mail: ccc@loewe.de
Kjaerulff1 Development A/S
C.F. Tietgens Boulevard 19
5220 Odense SØ, Denmark
Tel +45 - 66 13 54 80
Fax +45 - 66 13 54 10
E-mail: info@loewe.dk
Gaplasa S.A.
Conde de Torroja, 25
28022 Madrid, España
Tel +34 - 917 48 29 60
Fax +34 - 913 29 16 75
E-mail: loewe@maygap.com
Tedra Trading Oy
Kuusemetsa 3
Saue 76506, Estonia
Tel +372 - 50 14 817
Fax +372 - 67 09 611
E-mail: info@futurehiÀ .com
Loewe France SAS
Rue du Dépôt,
13 Parc de l l‘Europe, BP 10010
67014 Strasbourg Cédex, France
Tel +33 - 3- 88 79 72 50
Fax +33 - 3- 88 79 72 59
E-mail: loewe.france@loewe-fr.com
Karevox Oy
Museokatu 36
00100 Helsinki, Finland
Tel +358 - 9 44 56 33
E-mail: kare@haloradio.À
Loewe UK Limited
Century Court, Riverside Way
Riverside Business Park, Irvine, Ayrshire
KA11 5DJ, UK
Tel +44 - 1294 315 000
Fax +44 - 1294 315 001
E-mail: enquiries@loewe-uk.com
Issagogiki Emboriki Ellados S.A.
321 Mesogion Av.
152 31 Chalandri-Athens, Hellas
Tel +30 - 210 672 12 00
Fax +30 - 210 674 02 04
E-mail: christina_argyropoulou@
isembel.gr
Basys Magyarorszagi KFT
Tó park u.9.
2045 Törökbálint, Magyar
Tel +36 - 2341 56 37 (121)
Fax +36 - 23 41 51 82
E-mail: ertekesites@basys.hu
Galerien und PartnerPlus
Kings Tower 28D, 111 King Lam Street
Kowloon, Hong Kong
Tel +852 -92 60 89 88
Fax +852-23 10 08 08
E-mail: info@loewe-cn.com
Plug&Play Ltd.
Bednjanska 8, 10000 Zagreb
Hrvatska (Kroatia)
Tel +385 1 4929 683
Fax +385 1 4929 682
E-mail: info@loewe.hr
Loewe Italiana S.r.L.
Largo del Perlar, 12
37135 Verona (VR), Italia
Tel +39 - 045 5281690
Fax +39 - 045 82 51 622
E-mail: info@loewe.it
Clear electronic entertainment Ltd
13 Noah Mozes St.
Agish Ravad Building
Tel Aviv 67442, Israel
Tel +972 - 3 - 6091100
Fax +972 - 3 - 6092200
E-mail: info@loewe.co.il
Salem Agencies & Services Co.
Hamad Al Haqueel Street, Rawdah,
Jeddah 21413
Kingdom of Saudi Arabia
Tel +966 (2) 665 4616
Fax +966 (2) 660 7864
E-mail: hkurkjian@aol.com
Service
A Cappella Ltd.
Ausros Vartu 5, Pasazo skg.
01129 Vilnius, Lithuania
Tel +370 - 52 12 22 96
Fax +370 - 52 62 66 81
E-mail: info@loewe.lt
Loewe. service center
Brivibas gatve 332,
Riga, Latvia, LV-1006
Tel +371 673 105 68
E-mail: dom332@dom332.lv
Doneo Co. Ltd
34/36 Danny Cremona Street
Hamrun, HMR1514, Malta
Tel +356 - 21 - 22 53 81
Fax +356 - 21 - 23 07 35
E-mail: service@doneo.com.mt
Somara S.A.
377, Rue Mustapha El Maani
20000 Casablanca, Morocco
Tel +212 - 22 22 03 08
Fax +212 - 22 26 00 06
E-mail: somara@somara.ma
Pce. Premium Consumer
Electronics as
Ostre Kullerod 5
3241 Sandefjord, Norge
Tel +47 - 33 29 30 46
Fax +47 - 33 44 60 44
E-mail: service@pce.no
Mayro Magnetics Portugal, Lda.
Rua Professor Henrique de Barros
Edifício Sagres, 2º. C
2685-338 Prior Velho, Portugal
Tel +351 - 21 942 78 30
Fax +351 - 21 940 00 78
E-mail: geral.loewe@mayro.pt
Tele Radio Video
Ul. Boh. Getta Warszawskiego 18
81-609 Gdynia
Tel. 58 624-50-09
E-Mail: loewe@trv.com.pl
Avitech Co. SRL
1/II Pipera Tunari St.
007190 Voluntari, Ilfov, Romania
Tel +40 - 21 200 64 64
Fax +40 - 21 200 64 65
E-mail:gina.surghila@avitech.ro
Service Center Loewe
per. Aptekarsky, dom 4 str. 2
105005 Moscow, Russia
Tel +7 - 495 730 78 00
Fax +7 - 495 730 78 01
E-mail: service@loewe-cis.ru
Kjaerulff 1 AB
Ridbanegatan 4, Box 9076
200 39 Malmø, Sverige
Tel +46 - 4 06 79 74 00
Fax +46 - 4 06 79 74 01
E-mail: loewe@loewe.se
Atlas Sound & Vision Pte Ltd
10 Winstedt Road #01-18
Singapore 227977
Tel +65 - 6334 9320
Fax +65 - 6339 1615
E-mail: michael.tien@atlas-sv.com
JADRAN d.d., Sežana
Partizanska cesta 69
6210 Sežana, Slovenija
Tel +386 57391200
Fax +386 57391460
E-mail: info@jadran.si
BaSys SK, s.r.o.
Stará Vajnorská 37/C
83104 Bratislava, Slovakia
Tel + 421 2 49 10 66 18
Fax + 421 2 49 10 66 33
E-mail: loewe@basys.sk
SERVISPLUS GENEL MERKEZ
ÖRNEK MAH. ATES SOK. NO:1
34704 ATASEHIR, ISTANBUL, TÜRKIYE
Tel +90 - 216 315 39 00
Fax +90 - 216 315 49 50
E-mail: info@servisplus.com.tr
Dubai Audio Center
P.O. Box 32836, Sheikh Zayed Road
Dubai, UAE
Tel +971 - 4 343 14 41
Fax +971 - 4 343 77 48
E-mail: service@dubaiaudio.com
The Soundlab (Pty) Ltd
P.O. Box 31952, Kyalami 1684
Gauteng, Republic of South Africa
Tel +27 - 1 14 66 47 00
Fax +27 - 1 14 66 42 85
E-mail: loewe@mad.co.za
© by Loewe Opta 19.01.11
Downloaded From TV-Manual.com Manuals