Logitech 201440 Wireless Mouse User Manual 622480 Palomar NV
Logitech Inc Wireless Mouse 622480 Palomar NV
Logitech >
users manual
English
Logitech
®
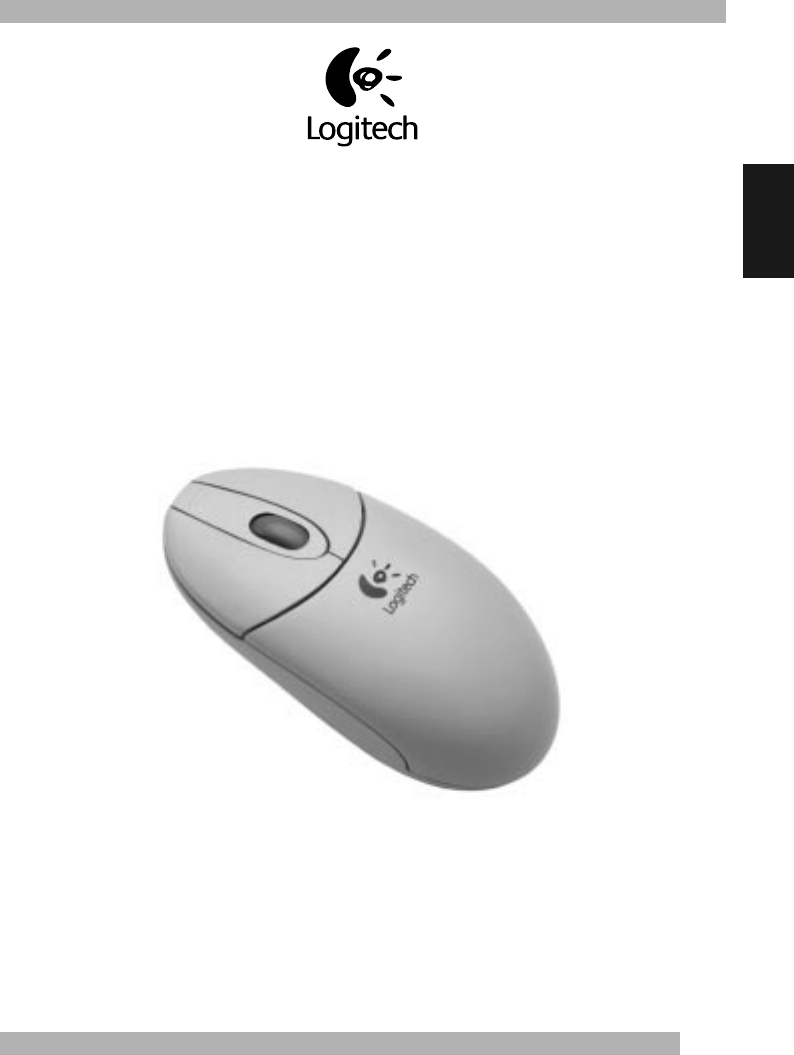
Cordless Wheel Mouse
User’s Guide
Français DeutschItalianoEspañolNederlands

ii
Copyright
© 1999 Logitech. All Rights Reserved. Logitech, the Logitech logo, and the Logitech products referred to herein are either
the trademarks or the registered trademarks of Logitech. All other trademarks are the property of their respective owners.
Logitech assumes no responsibility for any errors that may appear in this manual. Information contained herein is subject to change
without notice.
Part Number:
622480-0600
Software License Agreement.
LOGITECH IS WILLING TO LICENSE THE ENCLOSED SOFTWARE TO YOU ONLY ON THE CONDITION
THAT YOU ACCEPT ALL OF THE TERMS CONTAINED IN THIS LICENSE AGREEMENT.
This is a legal agreement between you (either
an individual end-user or an entity) and Logitech. By opening the software package, you are agreeing to be bound
by the terms and conditions of the Agreement. If you do not agree to the terms of this Agreement, promptly return
the software package and other items that are part of this product in their original package with your payment
receipt to your point of purchase for a full refund. Grant of License.
Logitech and its suppliers grant you a nonexclusive
license to use one copy of the enclosed software program (“Software”) on one computer only with the Logitech product you have
purchased. No other rights are granted. The Software is in use if it is loaded on the computer’s permanent or temporary memory.
For backup purposes only, you may make one copy of the Software. You must include on the backup copy all copyright and other
notices included on the Software as supplied by Logitech. Installation on a network server for the sole purpose of your internal
distribution of the Software is permitted only if you have purchased an individual Software package for each networked computer
to which the Software is distributed.
Restrictions.
Logitech and its suppliers retain ownership of the Software. You shall not
decompile, disassemble, reverse-engineer, or modify the Software in any way. You may not transmit the Software over a network
(except as expressly permitted above), by telephone, or electronically using any means. You may not transfer the Software except
upon a permanent transfer of the enclosed Logitech product provided that all Software updates are included in the transfer, you do
not retain a copy of the Software, and the transferee agrees to be bound by the terms and conditions in this license. Upon any
violation of any of the provisions of this Agreement, rights to use the Software shall automatically terminate and the Software must
be returned to Logitech or all copies of the Software destroyed.
Limited Product Warranty.
Logitech warrants that any
hardware products accompanying this documentation shall be free from significant defects in material and workmanship for a period
of five years from the date of purchase. Logitech also warrants that the software accompanying this documentation will perform
substantially in accordance with the documentation for a period of 90 days from the date of purchase. Logitech’s hardware
and software warranty is nontransferable and is limited to the original purchaser.
Product Remedies.
Logitech’s entire liability
and the Licensee’s exclusive remedy for any breach of warranty, shall be, at Logitech’s option, either (a) return of the price paid
or (b) repair or replacement of the hardware or software, provided that the hardware or software is returned to the point of purchase,
with a copy of the sales receipt. Any replacement hardware or software will be warranted for the remainder of the original warranty
period or 30 days for the hardware and 30 days for the software, whichever is longer. These remedies are void if failure of
the hardware or software has resulted from accident, abuse, or misapplication.
LIMITATION OF LIABILITY.
THE WARRANTIES SET FORTH IN THIS AGREEMENT REPLACE ALL OTHER WARRANTIES. LOGITECH
EXPRESSLY DISCLAIMS ALL OTHER WARRANTIES, INCLUDING, BUT NOT LIMITED TO, THE IMPLIED WARRANTIES OF MERCHANTABILITY
AND FITNESS FOR A PARTICULAR PURPOSE AND NONINFRINGEMENT OF THIRD-PARTY RIGHTS WITH RESPECT TO THE DOCUMENTATION,
SOFTWARE, AND HARDWARE. NO LOGITECH DEALER, AGENT, OR EMPLOYEE IS AUTHORIZED TO MAKE ANY MODIFICATION, EXTENSION,
OR ADDITION TO THIS WARRANTY. IN NO EVENT WILL LOGITECH OR ITS SUPPLIERS BE LIABLE FOR ANY COSTS OF PROCUREMENT
OF SUBSTITUTE PRODUCTS OR SERVICES, LOST PROFITS, LOSS OF INFORMATION OR DATA, OR ANY OTHER SPECIAL, INDIRECT,
CONSEQUENTIAL, OR INCIDENTAL DAMAGES ARISING IN ANY WAY OUT OF THE SALE OF, USE OF, OR INABILITY TO USE ANY LOGITECH
PRODUCT OR SERVICE, EVEN IF LOGITECH HAS BEEN ADVISED OF THE POSSIBILITY OF SUCH DAMAGES. IN NO CASE SHALL LOGITECH’S
LIABILITY EXCEED THE ACTUAL MONEY PAID FOR THE PRODUCTS AT ISSUE. Because some jurisdictions do not allow the limitation
of implied warranties or liability for incidental, consequential, special, or indirect damages, the above limitation may not always apply.
The above limitations will not apply in case of personal injury where and to the extent that applicable law requires such liability.
U.S. Government Restricted Rights.
The Software is provided to the U.S. Government only with restricted rights and limited
rights. Use, duplication, or disclosure by the U.S. Government is subject to restrictions set forth in 48 C.F.R. 2.101 (October 1995),
consisting of “Commercial Computer Software” and “Commercial Computer Software Documentation” as such terms are used
in 48 C.F.R. 12.212 (September 1995), and in FAR Sections 52-227-14 and 52-227-19 or DFARS Section 52.227-7013 (C) (1) (ii),
or their successors, as applicable. Consistent with 48 C.F.R. 12.212 and 48 C.F.R. 227.7202-1 through 227.7204-4 (June 1995), or any
successor regulations, this Software is provided to U.S. Government users pursuant to the terms and conditions herein. Contractor/
Manufacturer is Logitech Inc., 6505 Kaiser Drive, Fremont, CA 94555.
FCC Compliance and Advisory Statement.
This hardware device complies with Part 15 of the FCC Rules. Operation is subject
to the following two conditions: 1) this device may not cause harmful interference, and 2) this device must accept any interference
received, including interference that may cause undesired operation. This equipment has been tested and found to comply with
the limits for a Class B digital device, pursuant to Part 15 of the FCC Rules. These limits are designed to provide reasonable protection
against harmful interference in a residential installation. This equipment generates, uses, and can radiate radio frequency energy
and, if not installed or used in accordance with the instructions, may cause harmful interference to radio communications. However,
there is no guarantee that interference will not occur in a particular installation. If this equipment does cause harmful interference
to radio or television reception, which can be determined by turning the equipment off and on, the user is encouraged to try
to correct the interference by one or more of the following measures: 1) reorient or relocate the receiving antenna; 2) increase
the separation between the equipment and the receiver; 3) connect the equipment to an outlet on a circuit different from that to
which the receiver is connected; 4) consult the dealer or an experienced radio/TV technician for help. Any changes or modifications
not expressly approved by the party responsible for compliance could void the user's authority to operate the equipment.
Where shielded interface cables have been provided with the product or specified additional components or accessories elsewhere
defined to be used with the installation of the product, they must be used in order to ensure compliance with FCC regulations.
Canadian DOC Statement.
This digital device does not exceed the Class B limits for radio noise emissions from digital
apparatus specified in the interference-causing equipment standard entitled “Digital Apparatus,” ICES-003 of the Department
of Communications.
Cet appareil numérique respecte les limites bruits radioélectriques applicables aux appareils numériques de Classe B prescrites
dans la norme sur le matériel brouilleur: “Appareils Numériques,” NMB-003 édictée par le Ministère des Communications.
This device complies with RSS-210 of Industry and Science Canada. Operation is subject to the following two conditions: 1) this device
may not cause interference, and 2) this device must accept any interference, including interference that may cause
undesired operation of the device. Transmitter frequency: 26.995; 27.045; 27.145; 27.195 MHz. Power Output: < 10mV/m @ 3m.
1
Using Your Cordless Wheel Mouse in Windows® 95/Windows® 98/Windows NT® 4.0
English
Using Your Cordless Wheel Mouse in Windows
®
95/
Windows
®
98/Windows NT
®
4.0
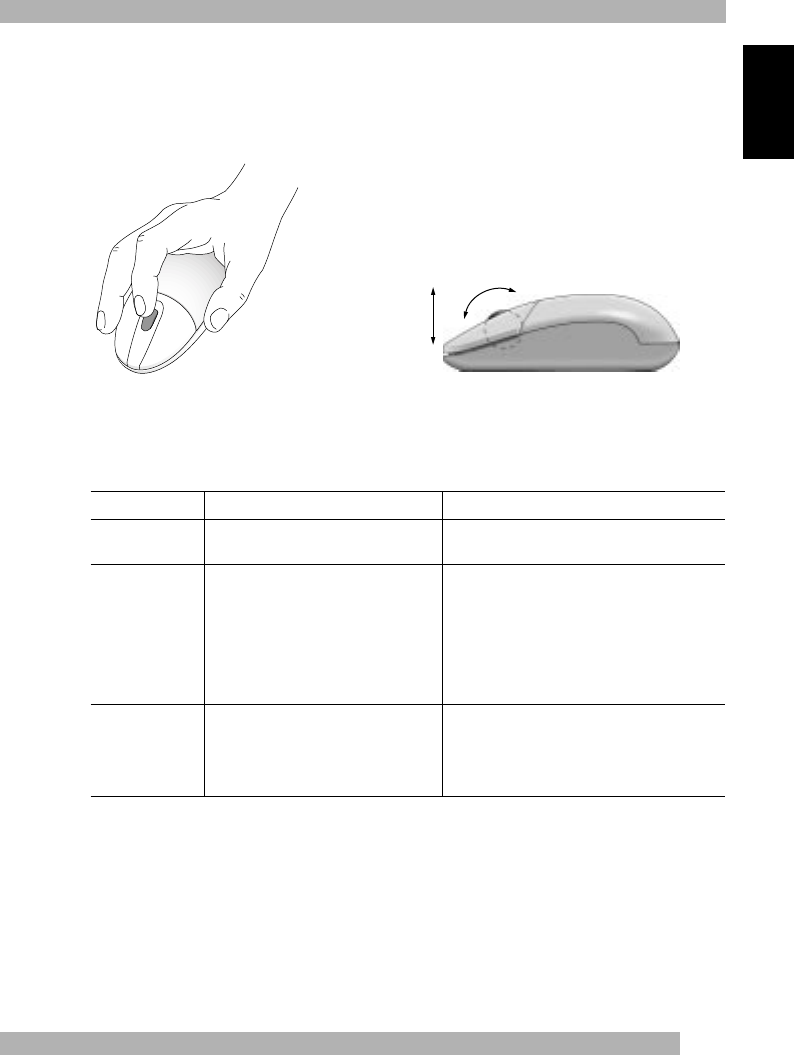
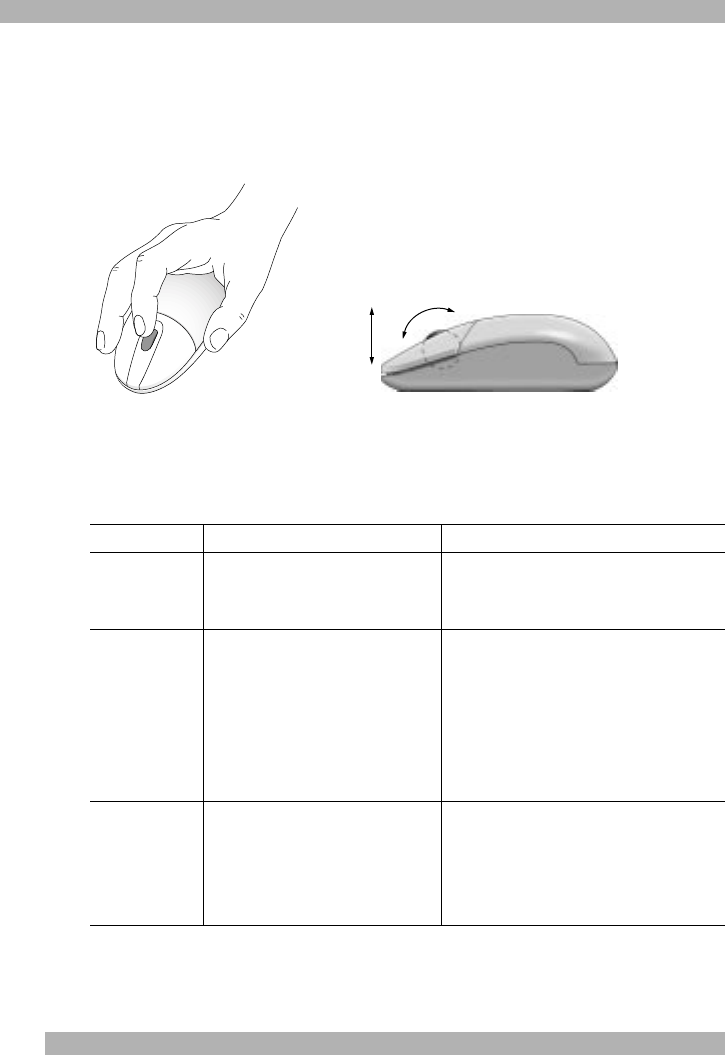
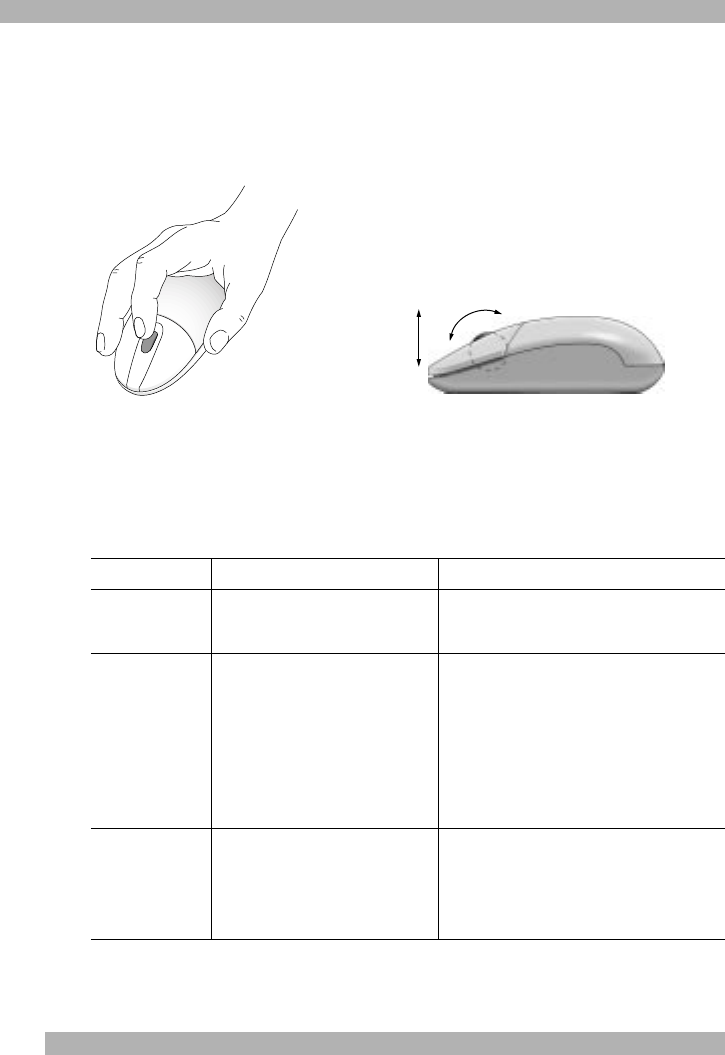
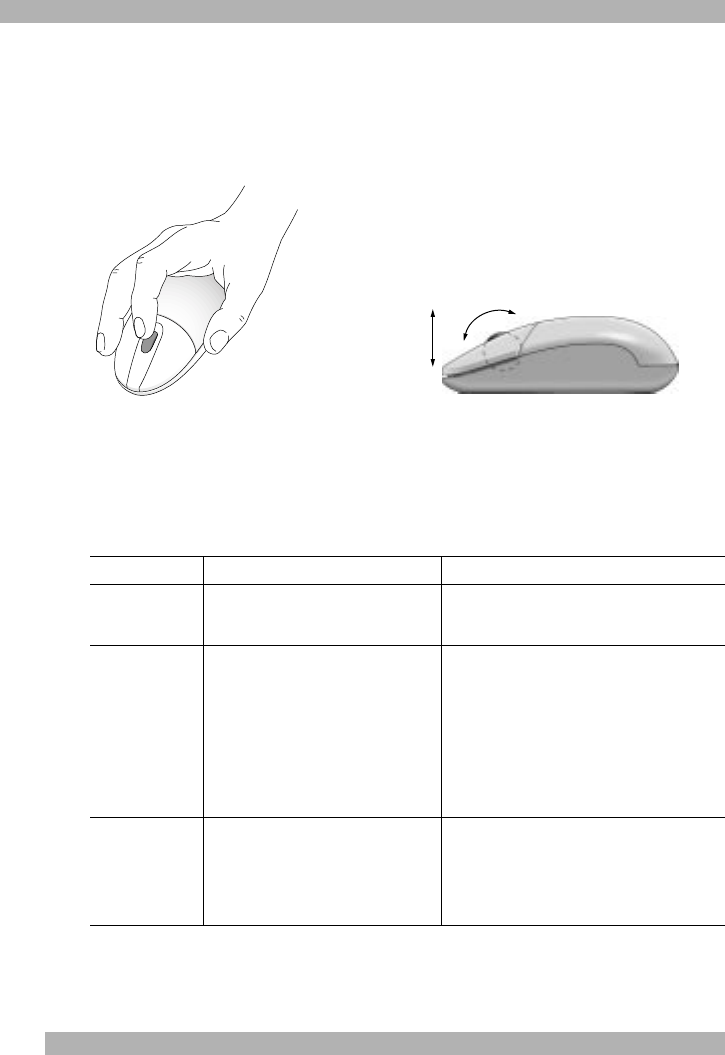
Your cordless mouse has a wheel that functions both as a wheel and as a button.
Scrolling and Zooming with the Cordless Wheel Mouse
• To scroll, simply move the wheel.
• To use the wheel like a standard
mouse button, click (press down)
the wheel.
The mouse wheel also works like a button. The mouse wheel simplifies scrolling.
Task What is It? How to Do It?
Wheel Scroll Use Wheel Scroll for precise up
and down movement.
To scroll up, move the wheel forward; to scroll
down, move the wheel back.
Horizontal Scroll Use Horizontal Scroll in Windows
®
95,
Windows
®
98, and Windows NT
®
4.0
to scroll left to right, or right to left,
whenever horizontal scroll bars
are present in the active window.
When both vertical and horizontally scroll bars
are present in a window, press the Ctrl
and Shift keys on your keyboard, then move
the mouse wheel forward to scroll left;
move the mouse wheel backward to scroll
right. If
no
vertical scroll bars are present,
simply move the mouse wheel to scroll
horizontally.
Zoom Use Zoom to either magnify
or demagnify the view of a document
in an application that supports it.
Place the cursor in an application that is
Microsoft
®
Office 97 compliant. Press and hold
the Ctrl key on the keyboard, then to zoom in,
move the wheel forward; to zoom out,
move the wheel backwards.
2
Using the MouseWare Software in Windows 95/Windows 98/Windows NT 4.0
Using the MouseWare Software in Windows 95/
Windows 98/Windows NT 4.0
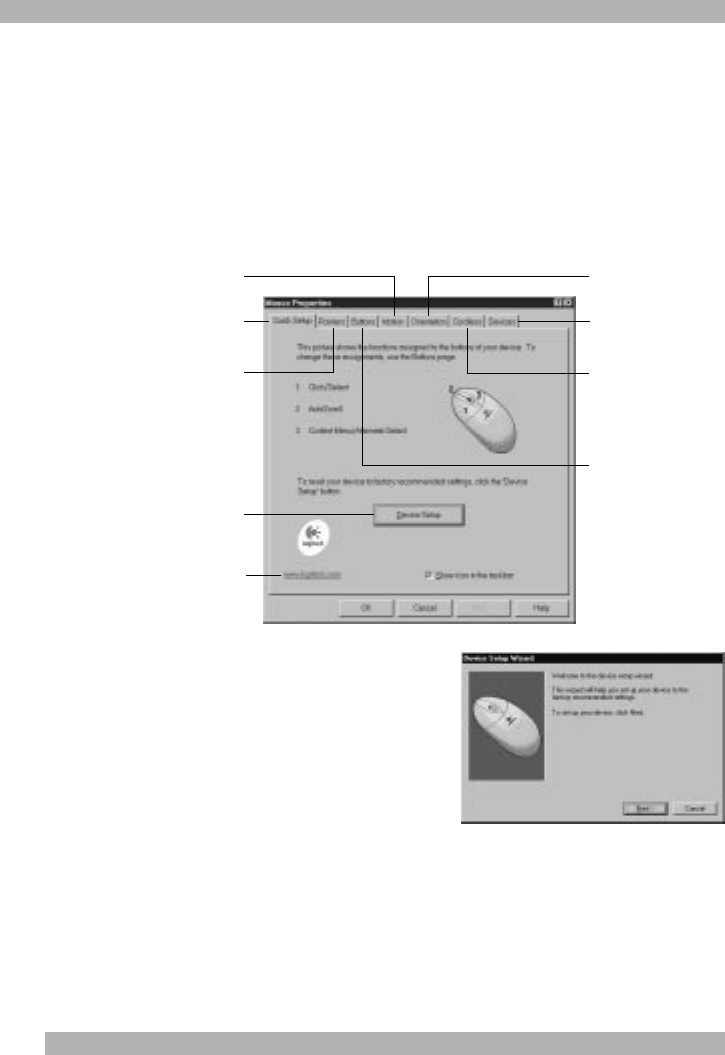
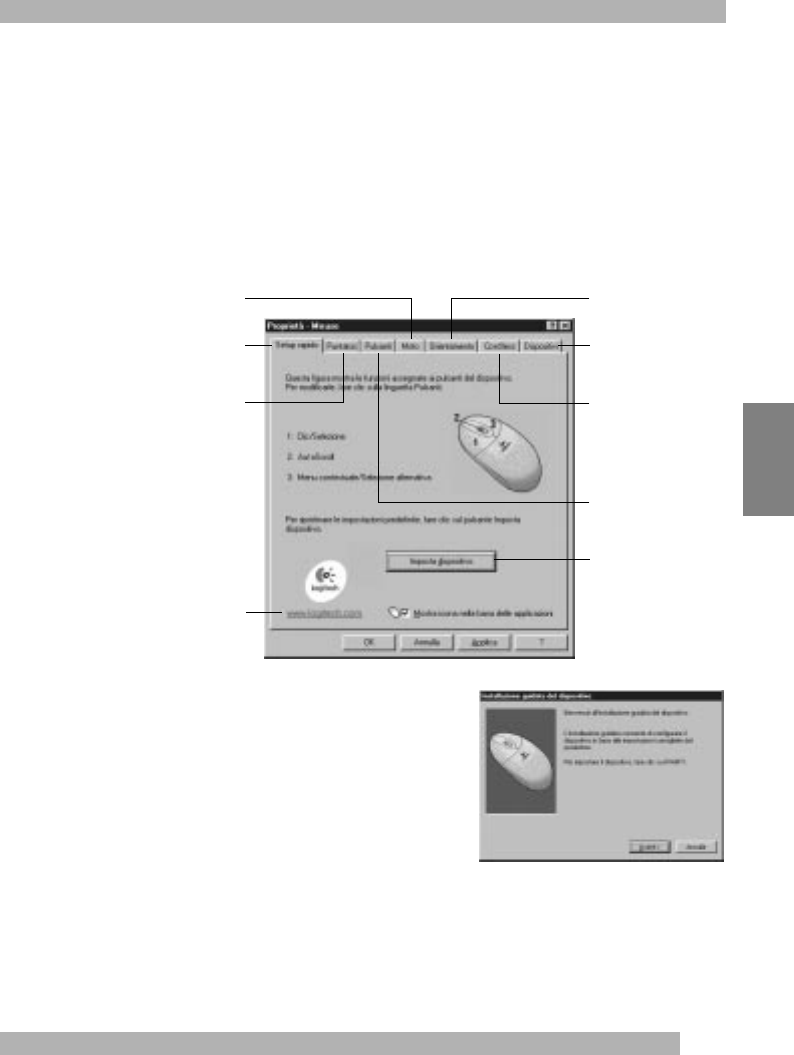
The MouseWare software includes features for making button assignments, controlling
cursor movement, and setting up the cordless wheel mouse. To access the MouseWare
software, double-click the mouse icon on the Windows 95/Windows 98/Windows NT 4.0
Taskbar, or double-click the mouse icon in the Windows Control Panel. The Mouse
Properties tabs display, as shown below. Choose from the available options to configure
the cordless wheel mouse.
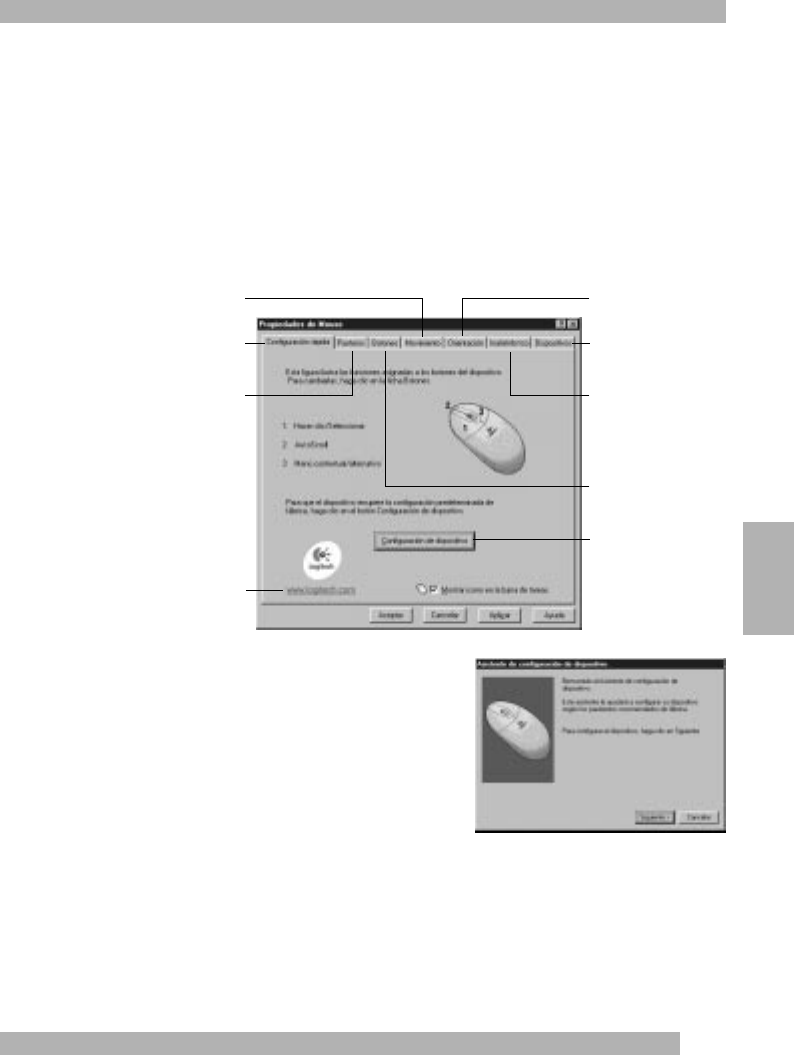
Choosing Options
for the Cordless Wheel Mouse
Need help choosing options? Let the Mouse
Wizard show you how. To begin,
go to the Mouse Properties. To do this,
click Start on the Windows 95/Windows 98/
Windows NT 4.0 Taskbar, then select Settings,
Control Panel, then double-click the Mouse icon.
Now choose the Quick Setup tab and click the Device Setup button. Follow the on-screen
instructions.
Sets up a mouse
Modifies cursor movement Sets mouse orientation
Adds another mouse
Makes button
assignments
Click this button to run the
Mouse Wizard which helps
you set up a mouse
Selects a pointer shape Shows battery level
Click this button to launch
the Logitech website
3
Using the Software in Windows 3.1x
English
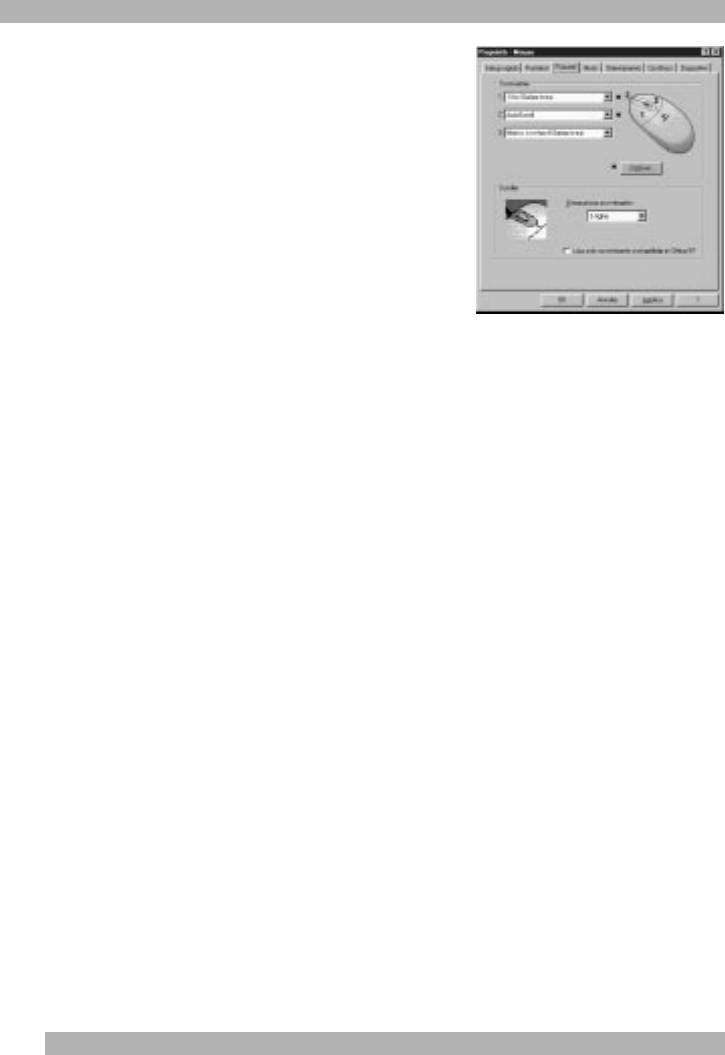
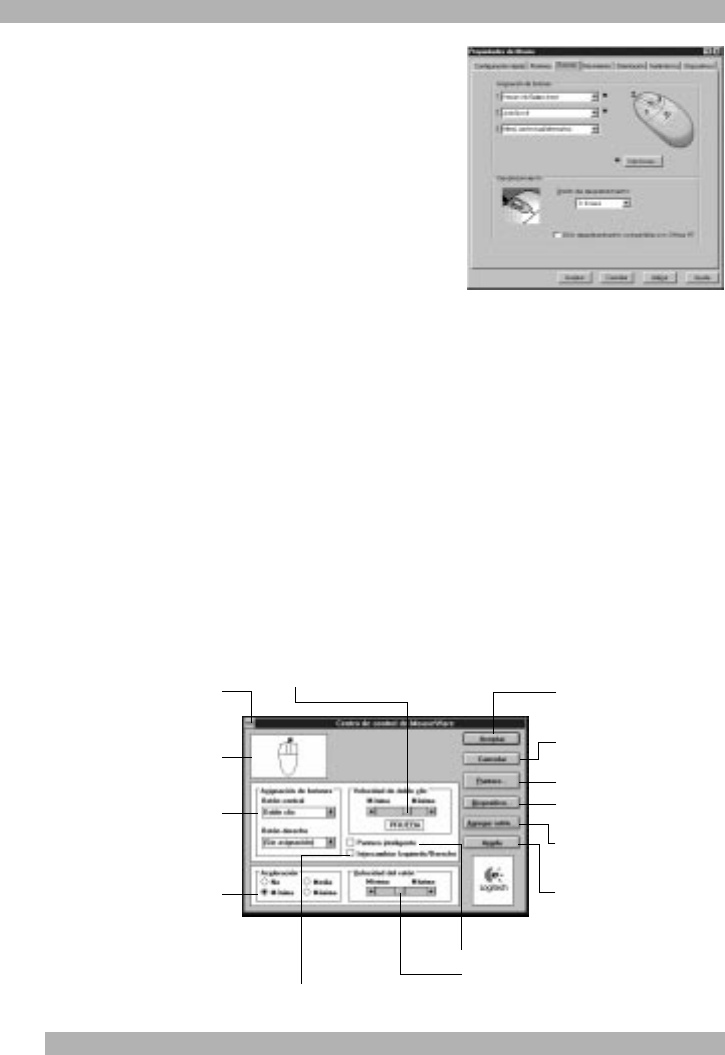
Making Button Assignments
Assign special functions to mouse buttons
using the Buttons tab. The Buttons tab is part
of Mouse Properties.
Click the down arrow to select a function
for a button. Click the Options button to specify
settings for AutoScroll, Universal Scroll,
CyberJump
™
, HyperJump and Double-Click
timing.
For more information click the Help button.
Using the Mouse Icon
on the Windows
®
Taskbar
A mouse icon appears on the Windows Taskbar after MouseWare has been installed.
This icon makes it possible for you to display the mouse property sheet quickly by simply
double-clicking the mouse icon.
Using the Software in Windows 3.1x
Double-click the MouseWare icon located in the Logitech
®
MouseWare group window
(or in the Windows Control Panel). Choose from the available options to configure
the wheel mouse.
Please note that Scroll and Zoom, as well as CyberJump
and HyperJump functions, are not supported in Windows
®
3.1x.
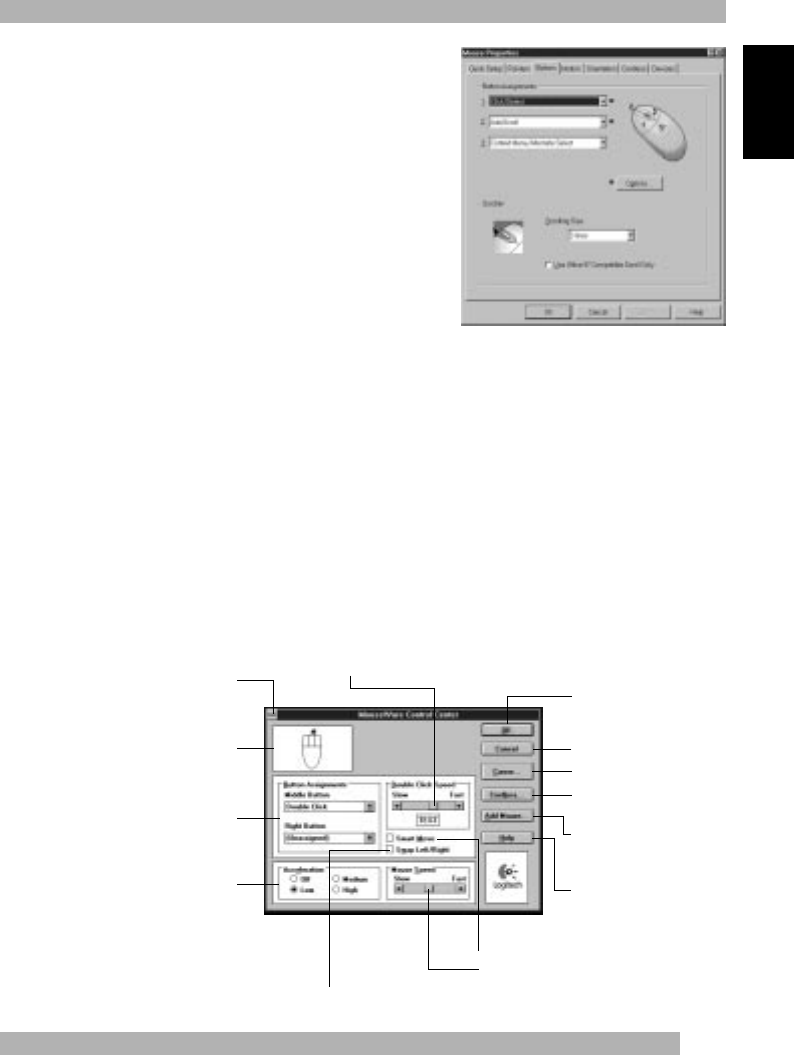
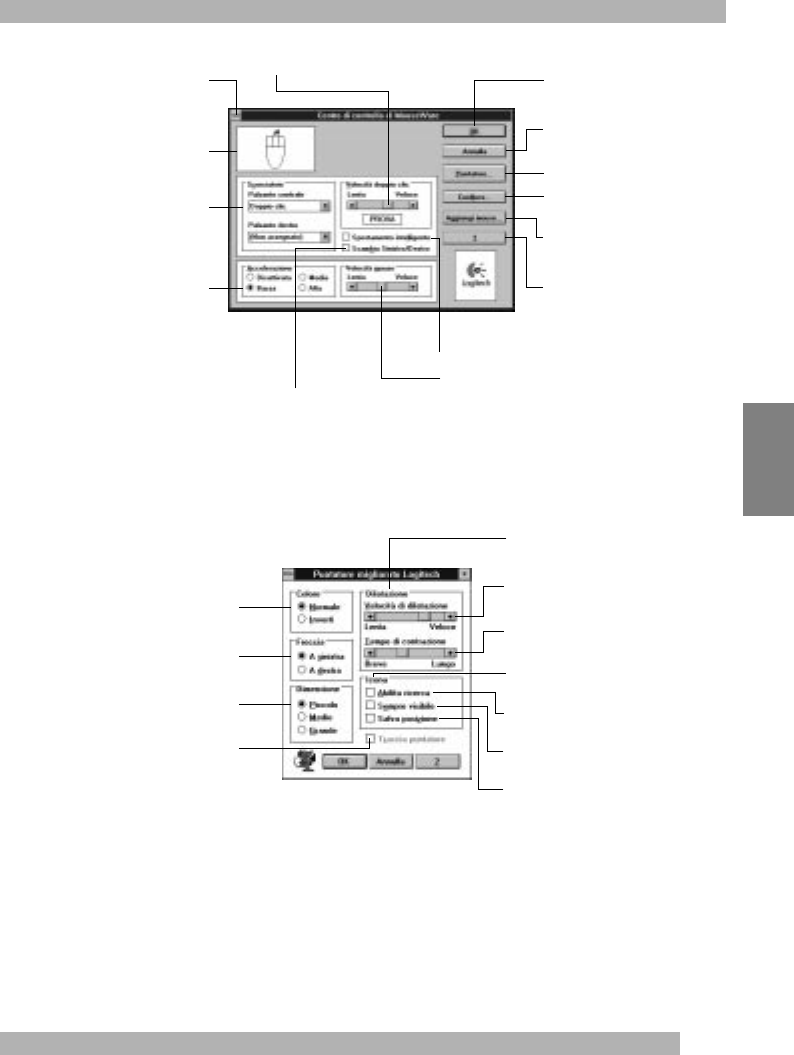
The MouseWare Control Center in Windows 3.1x
Performs Windows
functions
Identifies button being
pressed
Assigns shortcuts
to second/third buttons
Sets cursor travel in relation
to mouse speed
Sets double-click speed
Saves settings
Cancels changes
Redetects devices after
plugging/unplugging a serial
mouse
Interchanges
button functions
Adjusts cursor speed in relation
to mouse movement
Moves cursor to default command button
automatically
Provides online help
Enhances the cursor
Provides Connection settings
and battery status
4
Cordless Wheel Mouse Maintenance
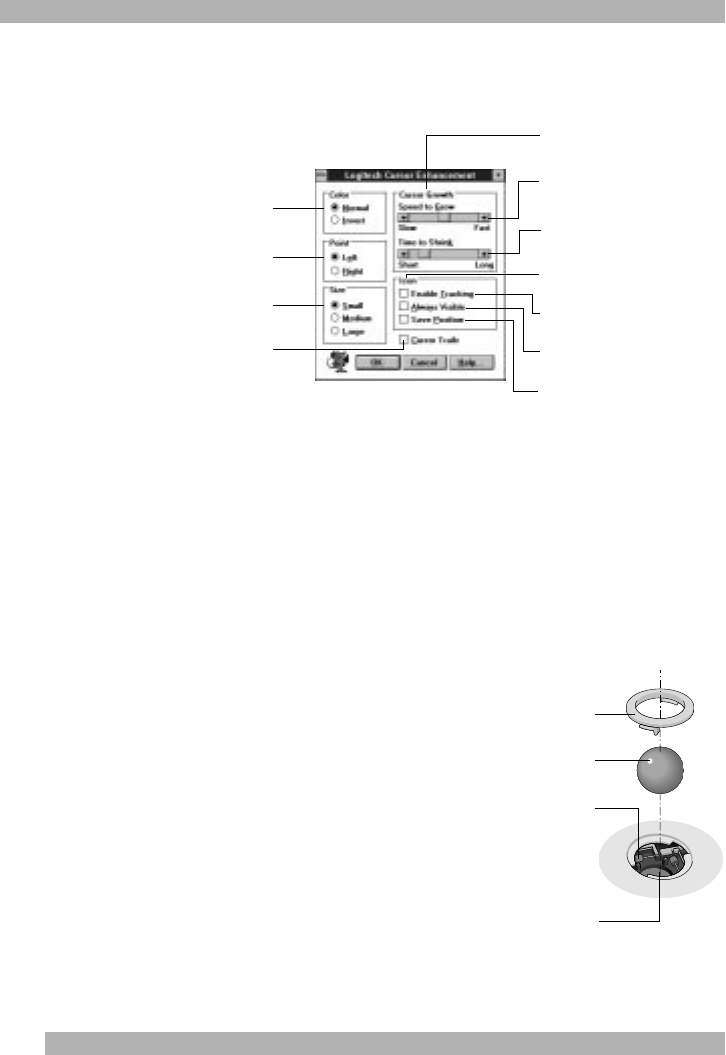
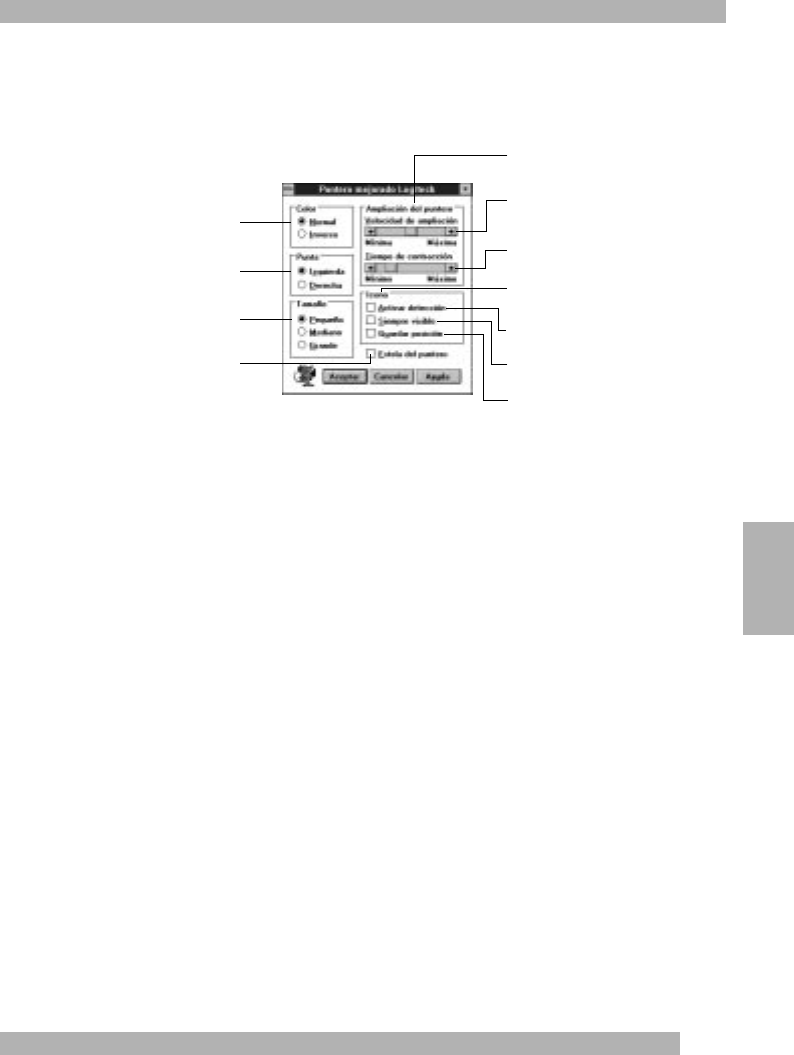
Cursor Enhancement in Windows 3.1x
Use the Logitech Cursor Enhancement dialog box to customize the cursor. To display
the dialog box, click the Cursor... button in the MouseWare Control Center.
Button Assignments in Windows 3.1x
MouseWare allows you to assign functions to three mouse buttons and replaces
frequently used tasks, such as Double-Click, DragLock, etc., to a single button click.
To override a button assignment temporarily so you can use an application-specific
feature, press the Control key while clicking the button to be overridden.
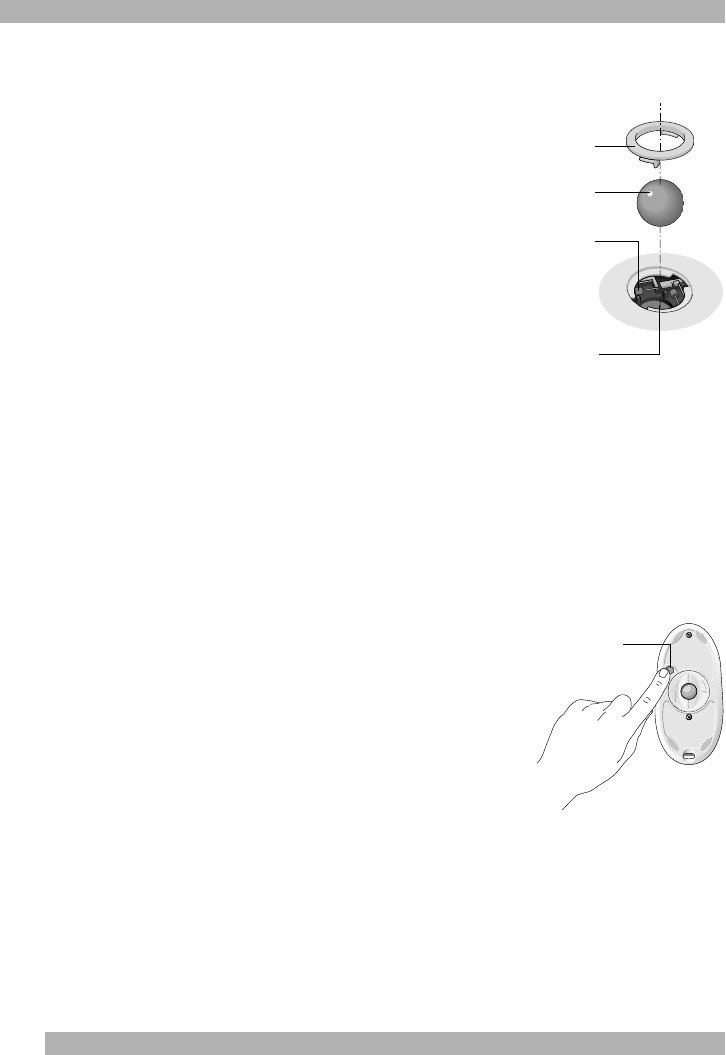
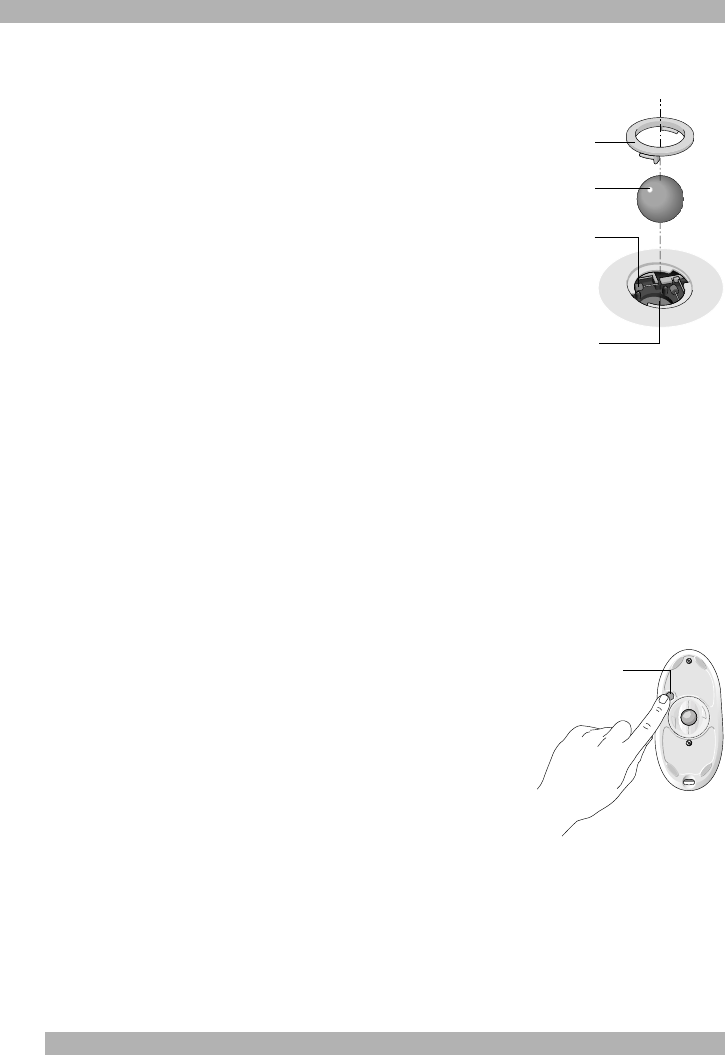
Cordless Wheel Mouse Maintenance
If the cursor skips or moves abnormally, clean the ball
of your cordless wheel mouse.
1. Remove the retainer ring.
On the bottom
of the cordless wheel mouse, twist the retainer ring
counter clockwise to remove it.
2. Remove the ball and wipe it with a clean, lint-
free cloth, then blow carefully into the ball-
cage to dislodge dust and lint.
Look for a build-up
of dirt on the rubber roller(s) inside the ball-cage.
3. If dirty, clean the roller(s) using a cotton swab
moistened lightly with isopropyl (rubbing)
alcohol.
After cleaning, make sure the roller(s) are still
centered in their channels. Make sure that fluff from the swab is not left on the roller(s).
4. Replace the ball and retainer ring.
Displays the cursor in normal
or reverse video
Changes the pointing
direction of the cursor
Sets cursor size
Leaves trail behind cursor as
it moves*
Makes the cursor grow larger as
it moves across the screen**
Sets the speed the cursor must move
to change size**
Sets the time the cursor stays large
before it shrinks in size**
Controls tracker icon at the bottom
of screen
Causes tracker icon to point to cursor
as it moves
Places the tracker icon on top
of all applications
Retains position of tracker icon
upon exiting
* Disabled with some SVGA resolutions.
**Disabled if Size is set to Large.
Ball
Inside roller
Retainer ring
Ball-cage
5
Troubleshooting
English
Troubleshooting
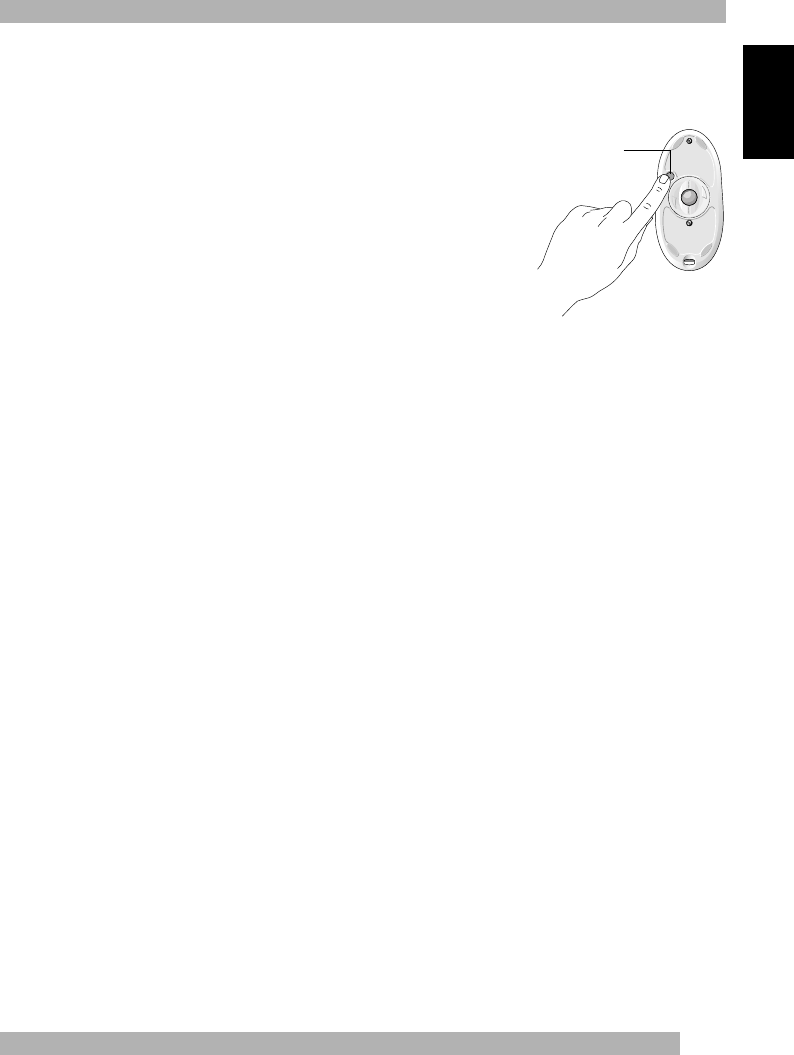
The Cordless Wheel Mouse Does Not Work after Installation
• Make sure you have connected the receiver correctly.
The receiver cable goes into the computer’s PS/2
mouse port. For optimal performance, place the receiver
at least
8 inches or 20 centimeters away from other
electrical devices, such as the computer, the computer
monitor, or external storages drives.
• Make sure you have installed the batteries correctly.
• Establish communication between the receiver
and the cordless wheel mouse. Press the Connect button
on the receiver, then press the Connect button under the cordless wheel mouse.
• If you are working on a metallic surface, try using a mouse pad and turning
the receiver on its side for better reception.
The Cordless Wheel Mouse Is Not Detected
• Make sure the receiver cable is plugged into the PS/2 mouse port.
Do not plug
or unplug the receiver cable while the computer is running.
• Make sure the PS/2 mouse port has the proper configuration. Refer to your computer
documentation for the correct port configuration.
• You may have other system devices that conflict with the cordless wheel mouse.
Check the IRQ/address settings of these devices for conflicts, and change the settings
as required. Refer to your computer documentation to make these changes.
• To determine whether the problem is cordless wheel mouse or system related,
try the cordless wheel mouse on a second system or a different mouse on
your current system.
The Wheel Mouse Does Not Work after Changing the Batteries
Check to make sure the batteries you have installed are not dead. Try the batteries
in another device. You may also need to re-establish the connection between
the cordless wheel mouse and its receiver. To do this, press the Connect button on
the receiver, then press the Connect button on the bottom of the mouse.
Connect button

6
Troubleshooting
The Screen Cursor Does Not Move Properly on the Screen
Clean the mouse ball and roller(s). See “Cordless Wheel Mouse Maintenance” for more
information. Try changing the position of the receiver. It is possible that the receiver
may be too far from the cordless wheel mouse. Or the computer monitor
(or a large metal object) may be interfering with the receiver’s radio reception.
Also, the mouse batteries may be nearly dead. Check the mouse batteries as described
in “The Cordless Wheel Mouse Does Not Work after Installation” and replace
the batteries if required. You may also need to re-establish the connection between
the cordless wheel mouse and its receiver. To do this, press the Connect button
on the receiver, then press the Connect button on the bottom of the mouse.
7
Deutsch
Logitech Cordless Wheel Mouse
Handbuch

8
Verwendung der Cordless Wheel Mouse unter Windows 95/Windows 98/Windows NT 4.0
Verwendung der Cordless Wheel Mouse
unter Windows 95/Windows 98/Windows NT 4.0
Ihre kabellose Maus ist mit einem Rad ausgestattet, das sowohl als Rad als auch als Taste
verwendet wird.
Bildlauf- und Zoom-Funktionen mit
der Cordless Wheel Mouse
• Bewegen Sie das Rad, um
Bildlauffunktionen auszuführen.
• Drücken Sie das Rad, um es als Taste
zu verwenden.
Das Tastenrad wird gleichzeitig als Taste
verwendet.
Das Tastenrad vereinfacht das Ausführen
von Bildlauffunktionen.
Funktion Was ist das? Wie wird's gemacht?
Rad-Bildlauf Verwenden Sie den Rad-Bildlauf
für präzise vertikale Bewegungen.
Drehen Sie das Rad nach vorne, um das Bild
nach oben zu verschieben bzw. nach hinten,
um das Bild nach unten zu verschieben
Horizontaler
Bildlauf
Verwenden Sie den horizontalen
Bildlauf unter Windows 95,
Windows 98 und Windows NT 4.0,
um das Bild von links nach rechts oder
von rechts nach links zu verschieben,
wenn im aktiven Fenster horizontale
Bildlaufleisten zu sehen sind.
Wenn in einem Fenster sowohl eine vertikale
als auch eine horizontale Bildlaufleiste
angezeigt wird, halten Sie die Strg- und
die Umschalttaste gedrückt, und drehen Sie
das Mausrad nach vorne, um das Bild nach
links zu verschieben, und nach hinten,
um es nach rechts zu verschieben.
Wenn
keine
vertikalen Bildlaufleisten
zu sehen sind, wird das Bild durch Drehen
am Mausrad ausschließlich in horizontaler
Richtung verschoben.
Zoom Mit der Zoom-Funktion können Sie
in einer kompatiblen Anwendung
die Ansicht eines Dokuments
vergrößern bzw. verkleinern.
Plazieren Sie den Cursor in einer Microsoft
Office 97-kompatiblen Anwendung. Halten Sie
die Strg-Taste gedrückt, und drehen Sie
das Rad nach vorne, um die Ansicht zu
vergrößern bzw. nach hinten, um die Ansicht
zu verkleinern.
9
Verwenden der MouseWare-Software unter Windows 95/Windows 98/Windows NT 4.0
Deutsch
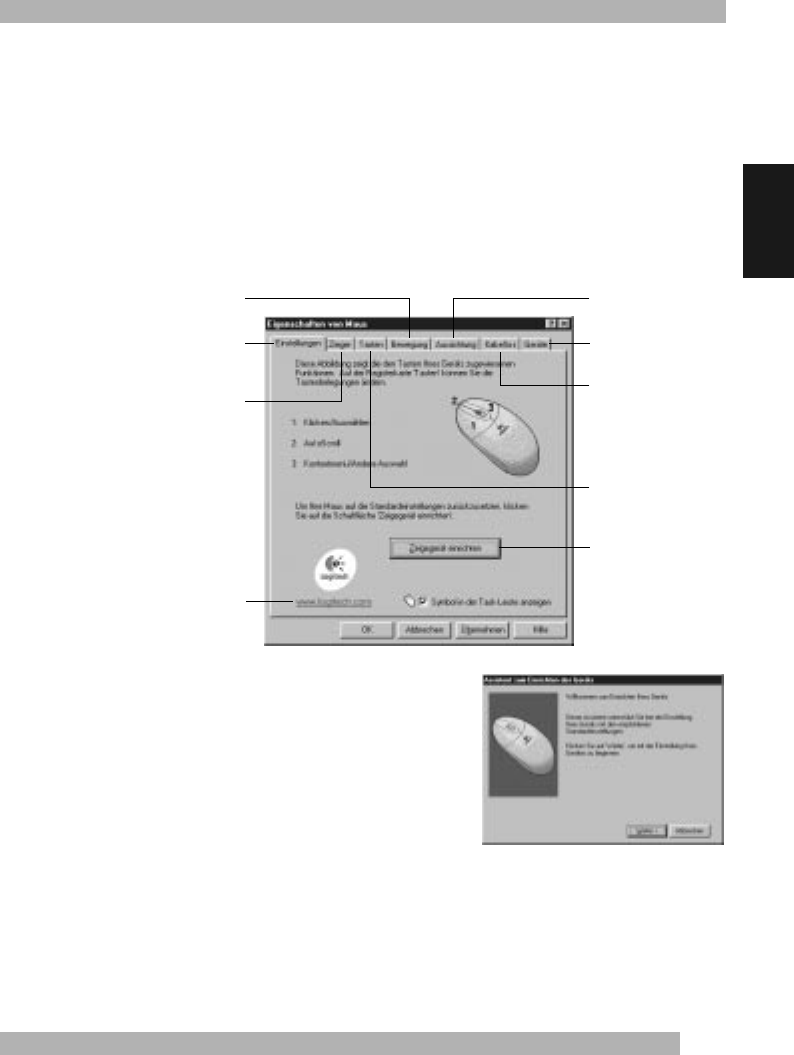
Verwenden der MouseWare-Software
unter Windows 95/Windows 98/Windows NT 4.0
Die MouseWare-Software beinhaltet Funktionen zum Programmieren der Tasten,
zum Steuern der Cursorbewegung und zum Einrichten der Maus. Doppelklicken Sie
zum Starten der MouseWare-Software auf das Maus-Symbol in der Windows 95/
Windows 98/Windows NT 4.0-Taskleiste, oder doppelklicken Sie auf das Maus-Symbol
in der Windows-Systemsteuerung. Das Dialogfeld „Eigenschaften von Maus“
wird geöffnet (siehe Abbildung). Wählen Sie zum Konfigurieren der Maus aus
den verfügbaren Optionen.
Konfigurieren der Cordless Wheel Mouse
Benötigen Sie Hilfe beim Wählen der Optionen?
Dafür gibt es den Assistenten zum Einrichten
der Maus. Öffnen Sie dazu die Mauseigenschaften:
Klicken Sie in der Windows 95/Windows 98/
Windows NT 4.0-Taskleiste auf „Start“, wählen Sie
dann „Einstellungen“ und „Systemsteuerung“,
und doppelklicken Sie auf das Maus-Symbol.
Wählen Sie die Registerkarte „Einstellungen“,
und klicken Sie auf „Zeigegerät einrichten“. Folgen Sie den Anweisungen auf
dem Bildschirm.
Einrichten der Maus
Einrichten
£der Cursorbewegung
Einrichten der Ausrichtung
Hinzufügen weiterer
Zeigegeräte
Programmieren der Tasten
Wählen einer Zeigerform
Anzeigen des Lade-
zustands der Batterien
Klicken Sie auf diese Schalt-
fläche, um die Logitech-Web-
Seite aufzurufen.
Klicken Sie auf
diese Schaltfläche,
um den Assistenten
zum Einrichten der Maus
zu starten.

10
Verwenden der Software unter Windows 3.1x
Programmieren der Tasten
Auf der Registerkarte „Tasten“ können Sie
den Maustasten Funktionen zuweisen.
Diese Registerkarte finden Sie in den Maus-
eigenschaften.
Klicken Sie zum Wählen der Funktionen auf
den Pfeil nach unten. Klicken Sie auf „Optionen“,
wenn Sie Einstellungen für AutoScroll,
Universal Scroll, CyberJump, HyperJump oder
die Doppelklickgeschwindigkeit vornehmen
möchten.
Weitere Informationen erhalten Sie, wenn Sie
auf „Hilfe“ klicken.
Verwenden des Maus-Symbols in der Windows-Taskleiste
Nach der Installation von MouseWare erscheint in der Windows-Task-Leiste ein Maus-
Symbol. Doppelklicken Sie auf dieses Symbol, um die Mauseigenschaften zu öffnen.
Verwenden der Software unter Windows 3.1x
Doppelklicken Sie auf das MouseWare-Symbol in der Programmgruppe „Logitech
MouseWare“ (oder in der Windows-Systemsteuerung). Wählen Sie zum Konfigurieren
der Maus aus den verfügbaren Optionen.
Beachten Sie, daß die Funktionen
Bildlauf, Zoom, CyberJump und HyperJump unter Windows 3.1x nicht
unterstützt werden.
Das MouseWare-Steuerfeld unter Windows 3.1x
Ausführen von Windows-
Befehlen
Zeigt die gedrückte Taste an
Belegen der zweiten/dritten
Taste mit Funktionen
Einstellen
der Cursorbeschleunigung
Einstellen der Doppelklickgeschwindigkeit
Speichern der Einstellungen
Abbrechen des Vorgangs
Erkennen von Geräten nach
dem Ein-/Ausstecken einer
seriellen Maus.
Einstellen der Cursorgeschwindigkeit
Bewegt den Cursor automatisch
zur Standardschaltfläche
Startet die Online-Hilfe
Einstellen des Cursors
Kanaleinstellung
und Batteriestatus
Austauschen
der Tastenfunktionen
11
Verwenden der Software unter Windows 3.1x
Deutsch
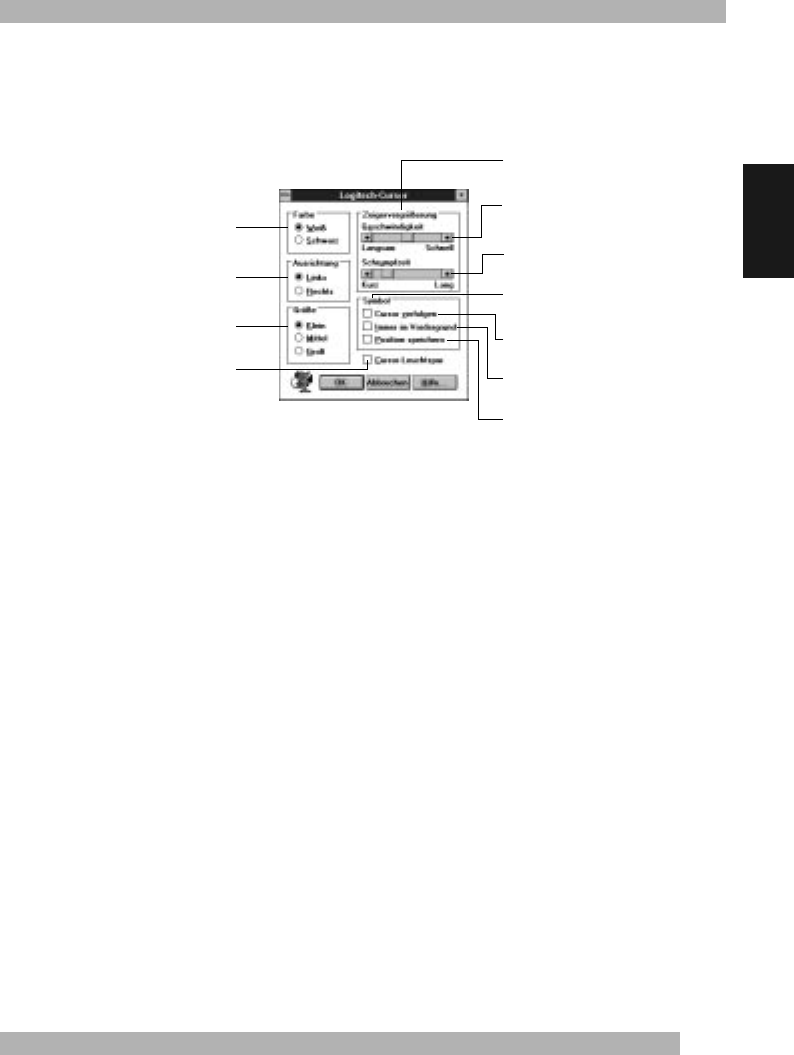
Cursor-Einstellungen unter Windows 3.1x
Die Optionen im Dialogfeld „Logitech-Cursor“ dienen dem Verändern der Cursor-
Darstellung. Klicken Sie im MouseWare-Steuerfeld auf die Schaltfläche „Cursor...“,
um das Dialogfeld zu öffnen.
Tastenbelegungen unter Windows 3.1x
Mit MouseWare können Sie drei Maustasten Funktionen zuweisen, um häufig
verwendete Befehle, wie etwa Doppelklick, Klick-und-Ziehen usw. mit einem einzigen
Tastendruck ausführen zu können. Um eine Tastenbelegung kurzzeitig außer Kraft
zu setzen, z. B. zum Ausführen einer anwendungsspezifischen Funktion, halten Sie
beim Drücken der Maustaste die Strg-Taste gedrückt.
Einstellung für normale
(weiß) oder inverse (schwarz)
Cursor-Darstellung
Bestimmen der Cursor-
Ausrichtung
Bestimmen der Cursor-Größe
Cursor hinterläßt Spuren,
wenn er über den Bildschirm
bewegt wird*
Der Cursor wird größer, wenn er über
den Bildschirm bewegt wird**
Die Geschwindigkeit, mit welcher der Cursor
sich bewegen muß, damit die Größe
geändert wird**
Die Zeitspanne, in der der Cursor
vergrößert bleibt, bevor er
seine ursprüngliche Größe annimmt**
Einrichten des Cursor-Verfolgungssymbols
am unteren Bildschirmrand
Das Cursor-Verfolgungssymbol zeigt
auf den Zeiger
Das Cursor-Verfolgungs-Symbol wird immer
im Vordergrund eingeblendet
Das Cursor-Verfolgungssymbol bleibt beim
Beenden der Anwendung an seiner Position
* Nicht bei allen SVGA-Auflösungen verfügbar.
** Nicht verfügbar, wenn die Cursorgröße „Groß“ gewählt ist.

12
Reinigen der Cordless Wheel Mouse
Reinigen der Cordless Wheel Mouse
Wenn der Mauszeiger springt oder sich nicht mehr richtig
bewegen läßt, sollten Sie die Kugel der Maus reinigen.
1. Entfernen Sie den Fassungsring.
Dieser befindet
sich auf der Unterseite der Maus und kann durch
Drehen entgegen dem Uhrzeigersinn entfernt werden.
2. Nehmen Sie die Kugel heraus, wischen Sie
sie mit einem sauberen, fusselfreien Tuch ab,
und blasen Sie vorsichtig in das Kugelgehäuse,
um Staub und Fasern zu entfernen.
Achten Sie
darauf, ob sich Schmutz auf den Gummirollen im
Kugelgehäuse angesammelt hat.
3. Wenn sich Schmutz auf den Gummirollen angesammelt hat, reinigen Sie
diese mit einem mit Isopropyl-Alkohol befeuchteten Wattestäbchen.
Nach dem Reinigen überprüfen Sie, ob die Rollen in ihren Kanälen sitzen. Achten Sie
darauf, daß keine Watte an den Rollen hängenbleibt.
4. Legen Sie die Kugel wieder ein, und bringen Sie den Fassungsring an.
Fehleranalyse
Die Cordless Wheel Mouse funktioniert nach der Installation nicht
• Überprüfen Sie, ob der Empfänger richtig
angeschlossen ist. Das Empfängerkabel muß an der
PS/2-Schnittstelle des Computers angeschlossen sein.
Stellen Sie den Empfänger in einem Abstand von
mindestens
20 Zentimetern von anderen elektrischen
Geräten wie dem Computer, dem Monitor und
Peripheriegeräten auf.
• Überprüfen Sie, ob die Batterien richtig eingelegt sind.
• Stellen Sie manuell eine Verbindung zwischen
dem Empfänger und der Maus her. Drücken Sie die Verbindungstaste am Empfänger
und dann die Verbindungstaste an der Unterseite der Maus.
• Wenn Sie auf einer Metalloberfläche arbeiten, sollten Sie ein Mauspad verwenden
und den Empfänger hochkant aufstellen.
Kugel
Gummirollen
Fassungsring
Kugelgehäuse
Verbindungstaste

13
Fehleranalyse
Deutsch
Die Cordless Wheel Mouse wird nicht erkannt
• Vergewissern Sie sich, daß das Empfängerkabel an der PS/2-Schnittstelle
angeschlossen ist.
Schließen Sie das Empfängerkabel nicht an, solange der Computer
eingeschaltet ist.
• Überprüfen Sie, ob die PS/2-Schnittstelle richtig konfiguriert wurde. Informationen
dazu finden Sie in der Dokumentation zu Ihrem Computer.
• Es ist außerdem möglich, daß andere Geräte einen Konflikt mit der Maus verursachen.
Überprüfen Sie die IRQ-/Adressen-Einstellungen dieser Geräte, und nehmen Sie
ggf. Änderungen daran vor. Informationen dazu finden Sie in der Dokumentation
zu Ihrem Computer.
• Um festzustellen, ob es sich um einen Fehler an der Maus oder im System handelt,
schließen Sie die Maus an einem anderen System an, oder schließen Sie eine andere
Maus an Ihrem System an.
Die Maus funktioniert nach dem Auswechseln der Batterien nicht
Vergewissern Sie sich, daß die neu eingelegten Batterien nicht leer sind, indem
Sie versuchen, ein anderes Gerät damit zu betreiben. Möglicherweise müssen Sie
die Verbindung zwischen der Maus und dem Empfänger wiederherstellen.
Drücken Sie dazu die Verbindungstaste am Empfänger und dann die Verbindungstaste
an der Unterseite der Maus.
Der Cursor bewegt sich ruckartig über den Bildschirm
Reinigen Sie die Kugel und die Gummirollen der Maus. Unter „Reinigen der Cordless
Wheel Mouse“ finden Sie weitere Informationen. Stellen Sie den Empfänger an
einer anderen Stelle auf. Er ist u. U. zu weit von der Maus entfernt. Außerdem könnte
der Monitor (oder ein großer Metallgegenstand) den Empfang beeinträchtigen.
Eventuell sind auch die Batterien erschöpft. Überprüfen Sie den Ladezustand
der Batterien wie unter „Die Cordless Wheel Mouse funktioniert nach Installation nicht“
beschrieben, und wechseln Sie diese ggf. aus. Möglicherweise müssen Sie
die Verbindung zwischen der Maus und dem Empfänger wiederherstellen.
Drücken Sie dazu die Verbindungstaste am Empfänger und dann die Verbindungstaste
an der Unterseite der Maus.
15
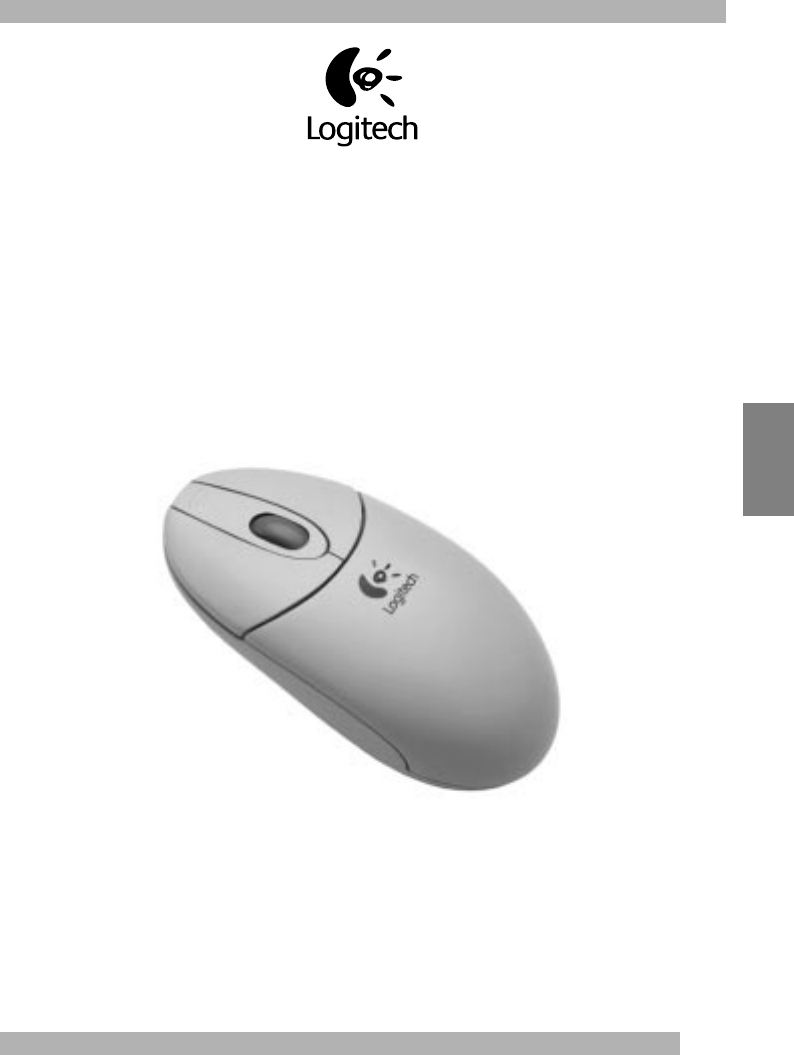
Français
Cordless Wheel Mouse de Logitech
Guide de l’utilisateur
16
Utilisation de la Cordless Wheel Mouse sous Windows 95/Windows 98/Windows NT 4.0
Utilisation de la Cordless Wheel Mouse
sous Windows 95/Windows 98/Windows NT 4.0
Votre souris est dotée d’une roulette fonctionnant à la fois comme un bouton et comme
une roulette.
Défilement et zoom à l’aide de la Cordless Wheel Mouse
• Pour faire défiler un document,
actionnez la roulette vers l'avant ou l'arrière.
• Pour l'utiliser comme un bouton de souris
classique, cliquez (appuyez) sur la roulette.
La roulette de la souris fonctionne également
comme un bouton.
La roulette de la souris simplifie le défilement.
Fonction Finalité Mise en application
Défilement
par roulette
La fonction Défilement par roulette
permet un déplacement précis vers
le haut ou vers le bas.
Pour effectuer un défilement vers le haut,
actionnez la roulette vers l'avant;
pour effectuer un défilement vers le bas,
actionnez-la vers l'arrière.
Défilement
horizontal
La fonction Défilement horizontal
sous Windows 95, Windows 98
et Windows NT 4.0 permet
un défilement de la gauche vers
la droite, ou de la droite vers la gauche,
dans la mesure où les barres
de défilement horizontal figurent
dans la fenêtre active.
Lorsque les barres de défilement horizontal
et vertical figurent dans une fenêtre,
appuyez simultanément sur les touches CTRL
et MAJ du clavier, puis actionnez la roulette
vers l'avant pour un défilement vers la gauche,
et actionnez-la vers l'arrière pour
un défilement vers la droite. Si la fenêtre
ne contient pas
de barres de défilement
vertical, vous pouvez actionner la roulette
pour un défilement horizontal.
Zoom La fonction Zoom permet d'agrandir
ou de réduire l'affichage
d'un document dans une application
qui prend en charge cette fonction.
Placez le curseur dans la fenêtre d'une
application compatible Microsoft Office 97.
Appuyez sur la touche CTRL du clavier, et,
tout en la maintenant enfoncée, actionnez
la roulette vers l'avant pour effectuer
un zoom avant, ou vers l'arrière pour effectuer
un zoom arrière.
17
Utilisation du logiciel MouseWare sous Windows 95/Windows 98/Windows NT 4.0
Français
Utilisation du logiciel MouseWare sous Windows 95/
Windows 98/Windows NT 4.0
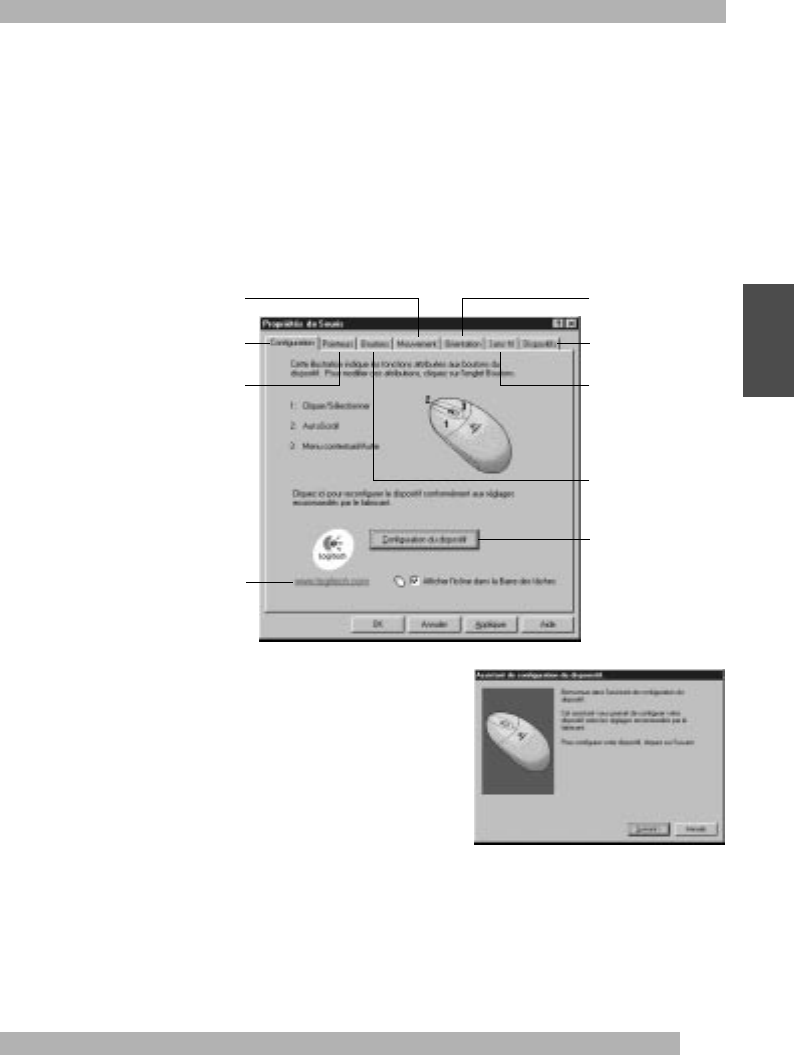
Les fonctions spécifiques au logiciel MouseWare vous permettent d’attribuer
des raccourcis aux boutons, de contrôler le déplacement du curseur et de configurer
la souris sans fil. Pour accéder au logiciel MouseWare, double-cliquez sur l’icône
de la souris sur la barre des tâches de Windows 95/Windows 98/Windows NT 4.0,
ou double-cliquez sur l'icône de la souris dans le “Panneau de configuration”
de Windows. La boîte de dialogue “Propriétés de Souris” apparaît, comme illustrée
ci-dessous. Sélectionnez les options de votre choix pour configurer la souris sans fil.
Sélection d'options
pour votre Cordless Wheel Mouse
Besoin d’aide pour choisir parmi les différentes
options ? Laissez-vous guider par l'Assistant.
Tout d’abord, ouvrez la boîte de dialogue
“Propriétés de Souris”. Pour ce faire, cliquez sur
le bouton “Démarrer”, situé sur la barre des tâches
de Windows 95/Windows 98/Windows NT 4.0,
sélectionnez la commande “Paramètres”, puis “Panneau de configuration”, et double-
cliquez sur l’icône “Souris”. Cliquez à présent sur l’onglet “Configuration”, puis sur
le bouton “Configuration du dispositif”. Suivez les instructions qui s'affichent à l'écran.
Configure le dispositif
de pointage
Modifie le déplacement
du curseur
Définit l'orientation
de la souris
Ajoute un autre dispositif
Attribue des raccourcis
aux boutons
Sélectionne la forme
du pointeur
Affiche le niveau des piles
Cliquez sur ce bouton
pour accéder au site Web
de Logitech
Cliquez sur ce bouton
pour lancer l’Assistant de
configuration de la souris,
lequel vous permet
de configurer la souris de
votre choix.
18
Utilisation du logiciel sous Windows 3.1x
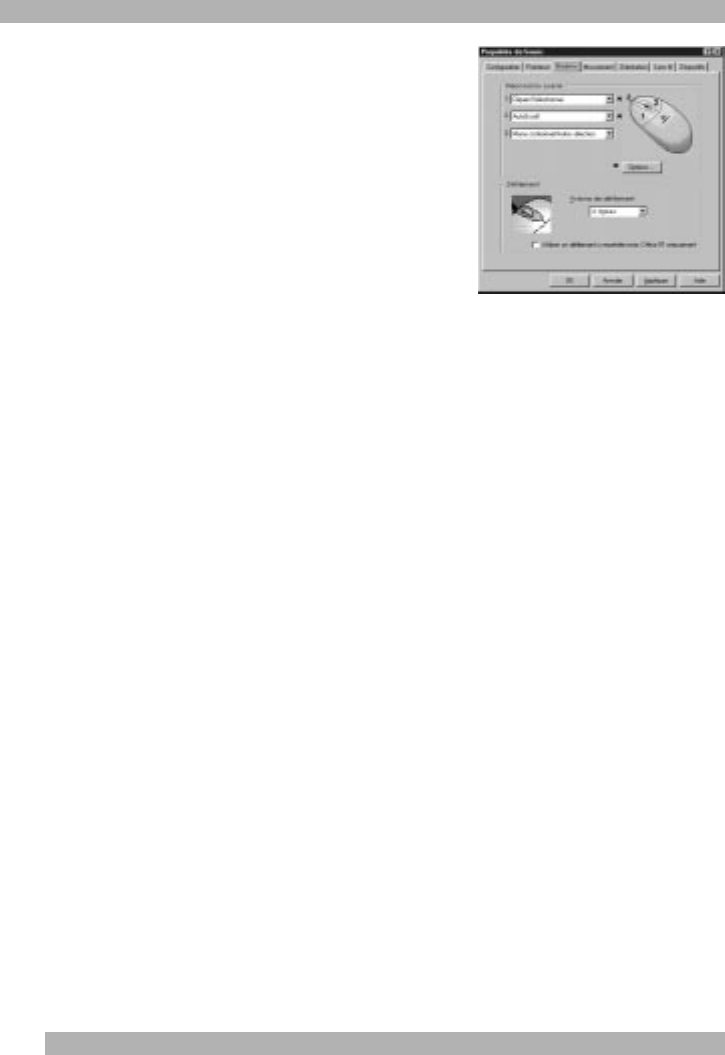
Attribution de raccourcis
L’onglet “Boutons” vous permet d’attribuer
des fonctions spécifiques aux boutons
de votre souris. Cet onglet se trouve dans la boîte
de dialogue “Propriétés de Souris”.
Cliquez sur la flèche pointant vers le bas pour
sélectionner la fonction d’un bouton. Cliquez sur
le bouton “Options” pour spécifier les paramètres
des fonctions AutoScroll, Universal Scroll,
CyberJump, HyperJump et la vitesse du double-clic.
Pour de plus amples informations, cliquez sur
le bouton “Aide”.
Utilisation de l’icône de la souris sur la barre des tâches de Windows
Une fois MouseWare installé, une icône en forme de souris apparaît sur la barre
des tâches de Windows. Double-cliquez sur cette icône pour afficher les caractéristiques
de la souris.
Utilisation du logiciel sous Windows 3.1x
Double-cliquez sur l’icône MouseWare située dans le groupe MouseWare de Logitech
(ou dans le “Panneau de configuration” de Windows). Sélectionnez les options de
votre choix pour configurer la souris à roulette.
Veuillez noter que les options
de défilement et de zoom, ainsi que les fonctions CyberJump et HyperJump,
ne sont pas prises en charge sous Windows 3.1x.
19
Utilisation du logiciel sous Windows 3.1x
Français
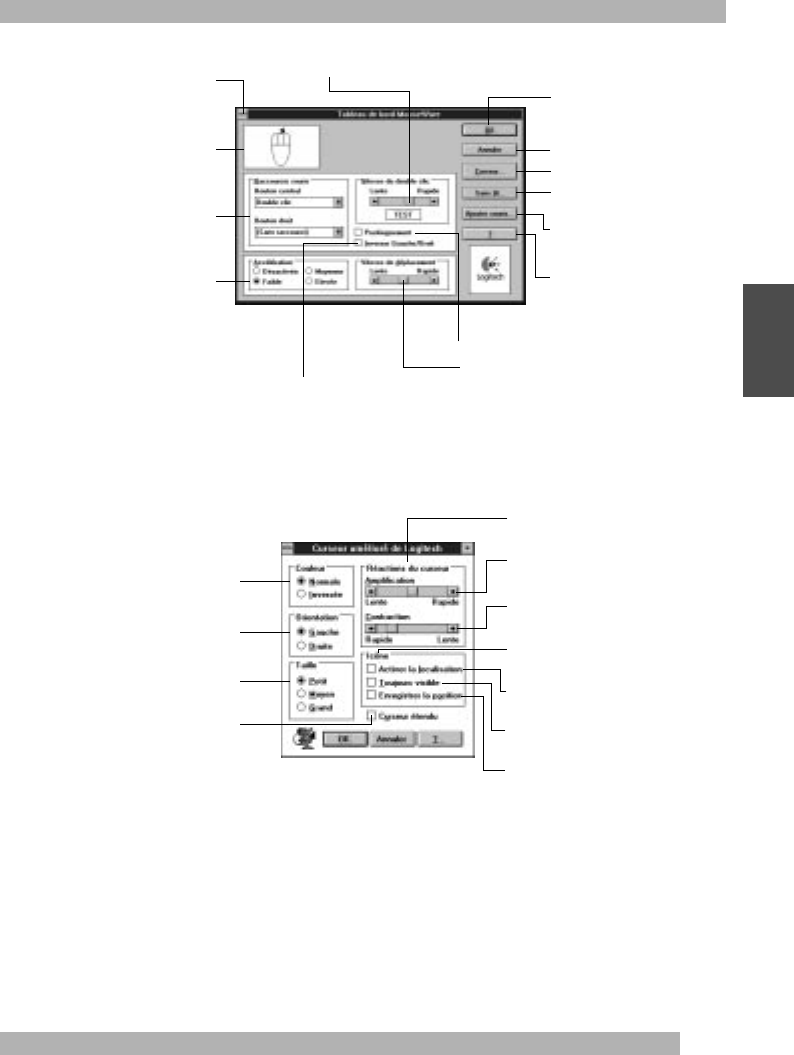
Le Tableau de bord MouseWare sous Windows 3.1x
Paramètres du curseur sous Windows 3.1x
Utilisez la boîte de dialogue “Curseur amélioré de Logitech” de Logitech pour
personnaliser le curseur. Pour ouvrir cette dernière, cliquez sur le bouton “Curseur...”
situé dans le Tableau de bord MouseWare.
Raccourcis sous Windows 3.1x
MouseWare vous permet d’attribuer des raccourcis à trois boutons de la souris et vous
donne accès aux fonctions les plus fréquemment sollicitées, telles que le double-clic,
le cliquer-glisser, etc., par le biais d’un simple clic. Si vous désirez annuler
momentanément la fonction attribuée à l’un des boutons de façon à pouvoir utiliser
une fonction spécifique à l’application dans laquelle vous vous trouvez, appuyez sur
la touche CTRL tout en cliquant sur le bouton que vous souhaitez annuler.
Réalise les fonctions
Windows classiques
Identifie le bouton sur
lequel vous appuyez
Attribue
des raccourcis
aux deuxième
et troisième boutons
Définit le déplacement
du curseur en fonction
de la vitesse de la souris
Définit la vitesse du double-clic
Enregistre les paramètres
Annule les modifications
Redétecte les dispositifs
après connexion/déconnexion
d’une souris sérielle
Intervertit les fonctions
des boutons
Règle la vitesse du curseur en fonction
du déplacement de la souris
Place automatiquement le curseur sur le bouton
de commande par défaut
Affiche l'aide en ligne
Personnalise le curseur
Permet de régler le canal
et de vérifier le niveau des piles
Affiche le curseur en mode
normal ou vidéo inverse
Modifie la direction dans
laquelle pointe le curseur
Définit la taille du curseur
Fait apparaître une traînée
à mesure que le pointeur
se déplace*
Permet d’agrandir le curseur à mesure
qu’il se déplace**
Définit la vitesse à laquelle le curseur doit
se déplacer pour modifier sa taille**
Définit la durée pendant laquelle le curseur
reste agrandi avant de voir sa taille décroître
à nouveau**
Contrôle l’icône de suivi qui apparaît au bas
de l’écran
Déplace l'icône de suivi qui désigne
le pointeur au cours de son déplacement
Place l'icône de suivi au premier plan
Mémorise la position de l'icône de suivi
lors de la fermeture
* Option désactivée avec certaines résolutions SVGA.
**Option désactivée si l'option “Grand” de la zone “Taille” est sélectionnée.
20
Entretien de la Cordless Wheel Mouse
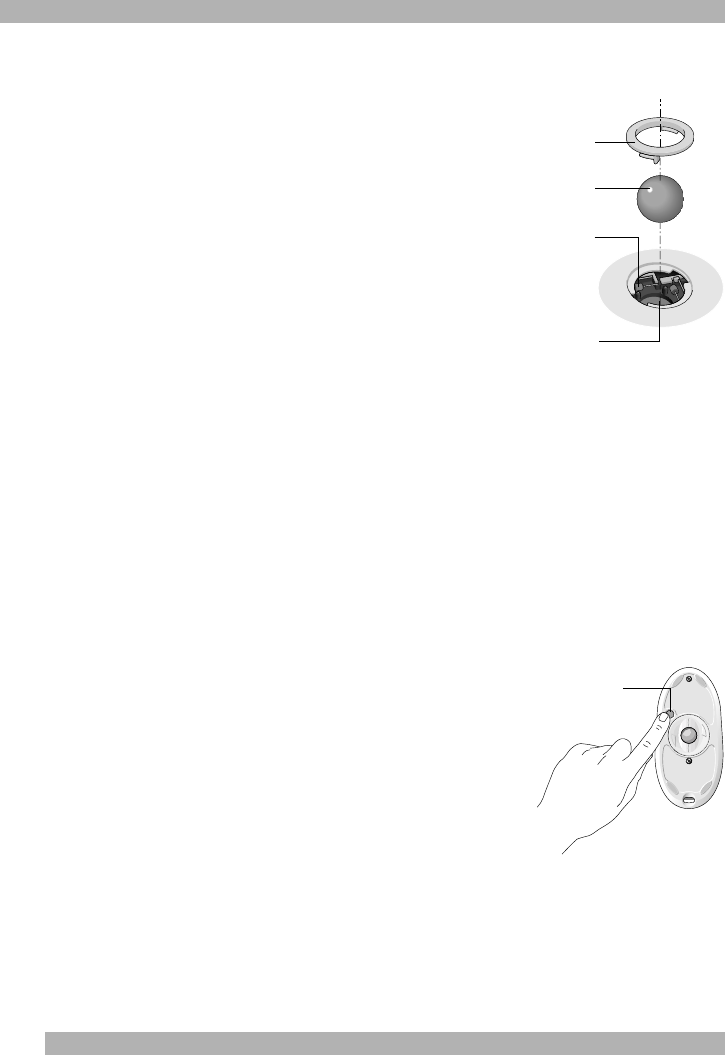
Entretien de la Cordless Wheel Mouse
Si le déplacement du curseur est saccadé ou
anormal, il convient de nettoyer la boule de la souris.
1. Retirez l'anneau de maintien.
Sous la souris,
faites tourner l'anneau de maintien dans le sens
inverse des aiguilles d'une montre pour l’ôter.
2. Otez la boule et essuyez-la à l'aide
d'un chiffon propre, non pelucheux,
puis soufflez à l'intérieur du logement afin
d'éliminer la poussière et les peluches.
Regardez si de la saleté s'est accumulée autour
du ou des petits rouleaux situés dans le logement
de la boule.
3. Le cas échéant, nettoyez le ou les rouleaux à l'aide d'un tampon d'ouate
légèrement imbibé d'alcool.
Après le nettoyage, assurez-vous que le ou
les rouleaux soient bien centrés dans les sillons. Veillez à ne laisser aucune peluche
sur les rouleaux.
4. Replacez la boule et l'anneau de maintien.
Dépannage
La Cordless Wheel Mouse ne fonctionne pas après installation
• Assurez-vous d'avoir correctement connecté le
récepteur. Le câble du récepteur se branche dans le port
PS/2 de l’ordinateur. Pour des performances optimales,
placez le récepteur à 20 cm
au minimum
de tout
appareil électrique, tels que l'unité centrale, le moniteur
ou des unités externes.
• Assurez-vous d'avoir correctement installé les piles.
• Etablissez manuellement la communication entre
le récepteur et la souris sans fil. Appuyez sur le bouton
de connexion du récepteur, puis appuyez sur le bouton de connexion situé sous
la souris sans fil.
• Si vous travaillez sur une surface métallique, utilisez de préférence un tapis pour
souris et posez le récepteur latéralement pour obtenir une meilleure réception.
Boule
Rouleau
Anneau de maintien
Logement de la boule
Bouton
de connexion

21
Dépannage
Français
La Cordless Wheel Mouse n'est pas détectée
• Assurez-vous que le câble du récepteur soit branché sur le port PS/2 de la souris.
Ne branchez pas ou ne débranchez pas le câble du récepteur pendant
que l’ordinateur fonctionne.
• Assurez-vous que le port souris PS/2 ait été configuré correctement. Reportez-vous
à la documentation de votre ordinateur relative à la configuration du port.
• Il se peut que d'autres dispositifs de votre système soient en conflit avec la souris sans
fil. En cas de conflit, vérifiez les paramètres d'adresse et d'IRQ de ces dispositifs
et modifiez les réglages. Reportez-vous à la documentation de votre ordinateur pour
effectuer ces modifications.
• Pour déterminer si le problème provient de la souris ou du système,
connectez la souris à un ordinateur différent ou connectez une souris différente
à votre ordinateur.
La CordlessWheel Mouse ne fonctionne pas après le changement de piles
Assurez-vous que les piles que vous avez installées ne soient pas usées. Essayez de faire
fonctionner ces piles sur un autre dispositif. Il se peut que vous deviez rétablir
la connexion entre la souris sans fil et son récepteur. Pour ce faire, appuyez sur le bouton
de connexion du récepteur, puis sur le bouton de connexion situé sous la souris.
Le curseur se déplace erratiquement à l’écran
Nettoyez la boule de la souris ainsi que le ou les rouleaux. Consultez la section “Entretien
de la Cordless Wheel Mouse” pour de plus amples informations. Pensez à changer
le récepteur de place. Il se peut en effet que celui-ci soit trop éloigné de la souris sans fil.
Il se peut également que le moniteur (ou qu’un objet métallique de taille importante)
provoque des interférences avec la réception radio du récepteur. Il se peut aussi que
les piles de la souris soient pratiquement usées. Vérifiez le niveau des piles de la souris
conformément à la section “La Cordless Wheel Mouse ne fonctionne pas après
installation” et remplacez les piles si nécessaire. Il se peut que vous deviez rétablir
la connexion entre la souris sans fil et son récepteur. Pour ce faire, appuyez sur le bouton
de connexion du récepteur, puis sur le bouton de connexion sous la souris.
23
Italiano
Logitech Cordless Wheel Mouse
Guida all'utilizzo
24
Uso di Cordless Wheel Mouse in Windows 95/Windows 98/Windows NT 4.0
Uso di Cordless Wheel Mouse in Windows 95/
Windows 98/Windows NT 4.0
Il mouse cordless è dotato di una rotellina che può essere utilizzata sia come scroller
sia come pulsante.
Esecuzione delle funzioni di scorrimento e zoom
con Cordless Wheel Mouse
• Per scorrere, spostare lo scroller.
• Per utilizzare lo scroller come
un normale pulsante basta premerlo.
Lo scroller del mouse funziona anche come
un normale pulsante.
Lo scroller del mouse facilita lo scorrimento.
Funzione Che cos'è? Utilizzo
Scorrimento
mediante scroller
Questo tipo di scorrimento consente
di spostarsi con precisione verso
l'alto e verso il basso.
Per scorrere in su, spostare lo scroller in avanti;
per scorrere in giù, spostare lo scroller indietro.
Scorrimento
orizzontale
Utilizzare lo scorrimento orizzontale
in Windows 95, Windows 98
e Windows NT 4.0 per scorrere
da sinistra a destra e viceversa
quando le barre di scorrimento
orizzontali sono visualizzate
nella finestra attiva.
Se nella finestra vengono visualizzate le barre
di scorrimento verticali e orizzontali,
premere i tasti Ctrl e Maiusc della tastiera
e quindi muovere lo scroller del mouse
in avanti per effettuare lo scorrimento
a sinistra e indietro per effettuare
lo scorrimento a destra. Se
non
sono presenti
solo le barre di scorrimento verticali,
per effettuare lo scorrimento orizzontale
muovere lo scroller del mouse.
Zoom Consente di ingrandire o ridurre
un documento in un'applicazione
che supporta questa funzione.
Posizionare il puntatore all'interno
di un'applicazione compatibile
con Microsoft Office 97. Premere e tenere
premuto il tasto Ctrl e quindi spostare
lo scroller in avanti per ingrandire e indietro
per ridurre.
25
Utilizzo del software MouseWare in Windows 95/Windows 98/Windows NT 4.0
Italiano
Utilizzo del software MouseWare in Windows 95/
Windows 98/Windows NT 4.0
Il software MouseWare consente di assegnare funzioni ai pulsanti, controllare
lo spostamento del puntatore e configurare il mouse cordless con scroller. Per accedere
al software MouseWare, fare doppio clic sull'icona del mouse nella barra delle
applicazioni di Windows 95/Windows 98/Windows NT 4.0 oppure fare doppio clic
sull'icona Mouse nel Pannello di controllo di Windows. Viene visualizzata la finestra
“Proprietà - Mouse” riportata di seguito. Per configurare il mouse, selezionare le opzioni
desiderate.
Selezione delle opzioni
per Cordless Wheel Mouse
Occorre una mano nel scegliere le opzioni?
Attenersi alle istruzioni dell’installazione guidata
del mouse. In primo luogo aprire la finestra
“Proprietà - Mouse”. A questo scopo fare clic
su “Avvio” nella barra delle applicazioni
di Windows 95/Windows 98/Windows NT 4.0,
selezionare “Impostazioni” e quindi “Pannello di controllo”. Nella finestra visualizzata
fare doppio clic su “Mouse”. Selezionare la scheda “Setup rapido” e fare clic sul pulsante
“Imposta dispositivo”. Attenersi alle istruzioni visualizzate sullo schermo.
Imposta il mouse
Modifica lo spostamento
del puntatore
Imposta l’orientamento
Aggiunge un mouse
Assegna funzioni
ai pulsanti
Seleziona la forma
del puntatore
Mostra il livello
delle batterie
Fare clic su questo pulsante
per accedere al sito Web
di Logitech
Fare clic su questo
pulsante per eseguire
l'installazione guidata
26
Utilizzo del software in Windows 3.1x
Assegnazione di funzioni ai pulsanti
del mouse
La scheda “Pulsanti” consente di assegnare
funzioni speciali ai pulsanti. Tale scheda si trova
nella finestra di dialogo “Proprietà - Mouse”.
Fare clic sulla freccia rivolta verso il basso per
selezionare la funzione che si desidera assegnare
al pulsante. Fare clic sul pulsante “Opzioni”
per definire le impostazioni per le funzioni
AutoScroll, Universal Scroll, CyberJump,
HyperJump e Velocità doppio clic.
Per ulteriori informazioni fare clic sul pulsante “?”.
Utilizzo dell'icona del mouse nella barra delle applicazioni di Windows
Al termine dell’installazione di MouseWare nella barra delle applicazioni di Windows
viene visualizzata l’icona del mouse. L’icona consente di visualizzare la scheda
“Proprietà - Mouse” in modo veloce facendovi doppio clic sopra.
Utilizzo del software in Windows 3.1x
Fare doppio clic sull’icona di MouseWare situata nella finestra del gruppo Logitech
MouseWare (o nel Pannello di controllo di Windows). Per configurare il mouse
con scroller, selezionare le opzioni desiderate.
Si tenga presente che le funzioni
di scorrimento e zoom nonché CyberJump e HyperJump non sono
supportate da Windows 3.1x.
27
Utilizzo del software in Windows 3.1x
Italiano
Centro di controllo di MouseWare in Windows 3.1x
Funzioni puntatore in Windows 3.1x
Per personalizzare il puntatore, utilizzare la finestra di dialogo relativa alle funzioni
del puntatore. Per visualizzare tale finestra, fare clic sul pulsante “Puntatore...” nel Centro
di controllo di MouseWare.
Assegnazione delle funzioni ai pulsanti in Windows 3.1x
MouseWare consente di assegnare le funzioni a tre pulsanti del mouse ed eseguire
operazioni comuni, quali doppio clic, clic e trascina, ecc., con un solo clic. Per escludere
temporaneamente una funzione in modo da potere utilizzare una funzione specifica
di un’applicazione, premere il tasto Ctrl facendo contemporaneamente clic sul pulsante
da escludere.
Esegue le funzioni
di Windows
Mostra il pulsante
premuto
Assegna funzioni
al secondo
e al terzo pulsante
Imposta l'accelerazione
del puntatore
in relazione
allo spostamento
Imposta la velocità del doppio clic Salva le impostazioni
Annulla le modifiche
Individua nuovamente i dispositivi
dopo aver collegato/scollegato
un dispositivo seriale
Scambia
le funzioni dei pulsanti
Regola la velocità del puntatore in relazione
allo spostamento del dispositivo
Posiziona automaticamente il puntatore
sul pulsante predefinito
Accede alla guida in linea
Modifica il puntatore per renderlo
più visibile
Modifica il canale e mostra il livello
delle batterie
Visualizza il puntatore in
modalità normale o invertita
Modifica l'orientamento
del puntatore
Imposta le dimensioni
del puntatore
Lascia una traccia dietro
al puntatore man mano
che lo si sposta*
Fa sì che il puntatore diventi più grande man
mano che si sposta sullo schermo**
Imposta la velocità alla quale deve spostarsi
il puntatore per cambiare dimensione**
Imposta il tempo che trascorre
prima che il puntatore, ingrandito,
torni alla dimensione normale**
Controlla l'icona di ricerca in fondo
allo schermo
Fa sì che l'icona di ricerca sia orientata verso
il puntatore man mano che si sposta
Colloca l'icona di ricerca sopra tutte le altre
applicazioni
Mantiene la posizione dell'icona di ricerca
all'uscita
* Funzione disattivata con alcune risoluzioni SVGA
**Funzione disattivata se la dimensione è impostata su Grande
28
Manutenzione di Cordless Wheel Mouse
Manutenzione di Cordless Wheel Mouse
Se i movimenti del puntatore sono irregolari, può darsi
che occorra pulire la sfera del mouse.
1. Rimuovere l’anello.
Sulla parte inferiore del mouse
girare l'anello in senso antiorario per rimuoverlo.
2. Estrarre la sfera e spolverarla con un panno
pulito e non lanoso, quindi soffiare
delicatamente all’interno della gabbia per
rimuovere polvere e pulviscolo.
Controllare se vi
è accumulo di polvere sui rulli di gomma all’interno
della gabbia.
3. Se sono sporchi, pulire i rulli usando
un batuffolo di cotone leggermente imbevuto di alcol isopropilico.
Una volta terminata la pulizia, accertarsi che i rulli all’interno della gabbia siano situati
nei rispettivi canali. Accertarsi che non rimanga lanugine sui rulli.
4. Rimontare la sfera e l’anello.
Ricerca e soluzione dei problemi
Cordless Wheel Mouse non funziona dopo l’installazione
• Verificare di avere collegato il ricevitore correttamente.
Collegare il cavo del ricevitore alla porta mouse PS/2
del computer. Per ottenere una prestazione ottimale,
collocare il ricevitore a una distanza di
almeno
20 centimetri da altri dispositivi elettrici
come il computer, il monitor e altre unità esterne.
• Verificare di avere installato le batterie correttamente.
• Stabilire la comunicazione tra il ricevitore e il mouse.
Premere il pulsante di connessione sul ricevitore e quindi
quello sul mouse.
• Se si sta lavorando su una superficie metallica, utilizzare un tappetino per il mouse
e ruotare il ricevitore su un lato per una migliore ricezione.
Sfera
Rullo interno
Anello
Gabbia della sfera
Pulsante
di connessione

29
Ricerca e soluzione dei problemi
Italiano
Cordless Wheel Mouse non viene individuato
• Assicurarsi che il cavo del ricevitore sia collegato alla porta mouse PS/2 del computer.
Non collegare o scollegare il cavo del ricevitore mentre il computer
è acceso.
• Assicurarsi che la porta mouse PS/2 sia configurata correttamente. Consultare
la documentazione fornita con il computer per l’esatta configurazione della porta.
• Può darsi che altri dispositivi del sistema creino conflitti con il mouse cordless con
scroller. Controllare le impostazioni di IRQ/indirizzo di tali dispositivi e, se necessario,
modificarle. Consultare la documentazione fornita con il computer per apportare
le modifiche necessarie.
• Per stabilire se il problema è causato dal mouse o è inerente al sistema,
provare a collegare il mouse a un altro sistema oppure a utilizzare un mouse diverso
con il sistema in uso.
Dopo avere sostituito le batterie, Cordless Wheel Mouse non funziona
Verificare che le batterie installate non siano scariche. Provare le batterie in un altro
dispositivo. Inoltre può darsi che sia necessario ristabilire il collegamento fra il mouse
e il ricevitore. A tal fine premere il pulsante di connessione sul ricevitore e quindi
quello situato nella parte inferiore del mouse.
Il puntatore non si sposta correttamente sullo schermo
Pulire la sfera e i rulli del mouse. Per ulteriori informazioni consultare la sezione
“Manutenzione di Cordless Wheel Mouse”. Cambiare la posizione del ricevitore.
Può darsi che il ricevitore sia troppo lontano dal mouse o che lo schermo del computer
(o un oggetto di metallo di grosse dimensioni) interferisca con il ricevitore. Inoltre
le batterie del mouse potrebbero essere quasi esaurite. Verificare il livello delle batterie
del mouse come illustrato nella sezione “Cordless Wheel Mouse non funziona dopo
l'installazione” e sostituire le batterie se necessario. Può darsi che sia inoltre necessario
ristabilire il collegamento fra il mouse e il ricevitore. A tal fine premere il pulsante
di connessione sul ricevitore e quindi quello situato nella parte inferiore del mouse.
31
Español
Logitech Cordless Wheel Mouse
Manual del usuario
32
Uso de Cordless Wheel Mouse en Windows 95/Windows 98/Windows NT 4.0
Uso de Cordless Wheel Mouse en Windows 95/
Windows 98/Windows NT 4.0
El ratón inalámbrico tiene un botón rueda que puede utilizarse como botón rueda
o como botón normal.
Operaciones de desplazamiento y zoom
con Cordless Wheel Mouse
• Para desplazarse, basta girar
el botón rueda.
• Para utilizar el botón rueda
como un botón de ratón estándar,
haga clic con él (púlselo).
El botón rueda también funciona como
un botón de ratón estándar.
El botón rueda permite desplazarse fácilmente.
Función Definición Uso
Desplazamiento
por rueda
Utilice Desplazamiento por rueda
para desplazarse hacia arriba o hacia
abajo con gran precisión.
Para desplazarse hacia arriba, mueva el botón
rueda hacia adelante. Para desplazarse
hacia abajo, mueva el botón rueda hacia atrás.
Desplazamiento
horizontal
Utilice Desplazamiento horizontal
en Windows 95, Windows 98
y Windows NT 4.0 para desplazarse
de derecha a izquierda o de izquierda
a derecha, según las barras de
desplazamiento horizontal presentes
en la ventana activa.
Cuando la ventana activa dispone de
una barra de desplazamiento horizontal
y otra vertical, pulse las teclas Ctrl y Mayús y,
a continuación, gire el botón rueda hacia
adelante para desplazarse hacia la izquierda
o gírelo hacia atrás para desplazarse
hacia la derecha. Si no hay ninguna barra de
desplazamiento vertical en la ventana activa,
basta girar el botón rueda para desplazarse
horizontalmente.
Zoom Utilice Zoom para ampliar o reducir
la visualización de un documento en
pantalla en una aplicación que admita
dicha operación.
Sitúe el puntero en una aplicación compatible
con Microsoft Office 97. Pulse la tecla Ctrl
del teclado y manténgala pulsada mientras
mueve el botón rueda hacia adelante
para ampliar la visualización o hacia atrás
para reducirla.
33
Uso del software MouseWare en Windows 95/Windows 98/Windows NT 4.0
Español
Uso del software MouseWare en Windows 95/
Windows 98/Windows NT 4.0
El software MouseWare incluye funciones para realizar asignaciones de botones,
controlar el movimiento del puntero y configurar el ratón inalámbrico con botón rueda.
Para acceder a MouseWare, haga doble clic en el icono de ratón en la barra de tareas
de Windows 95/Windows 98/Windows NT 4.0 o haga doble clic en el icono de “Mouse”
del “Panel de control” de Windows. A continuación, aparecerá el cuadro de diálogo
“Propiedades de Mouse” con todas sus fichas (ilustración inferior). Configure el ratón
inalámbrico con botón rueda con las opciones disponibles.
Selección de opciones
de Cordless Wheel Mouse
¿Necesita ayuda? Para eso está el “Asistente
de configuración de dispositivo”. Primero,
deberá acceder al cuadro de diálogo “Propiedades
de Mouse”. Para ello, haga clic en “Inicio” en
la barra de tareas de Windows 95/Windows 98/
Windows NT 4.0, elija “Configuración”,
“Panel de control” y haga doble clic en el icono de “Mouse”. Por último, seleccione
la ficha “Configuración rápida” y haga clic en el botón “Configuración de dispositivo”.
Siga las instrucciones en pantalla.
Configura un ratón
Modifica el movimiento
del puntero
Define la orientación
del ratón
Añade otro ratón
Realiza asignaciones
Selecciona la forma
del puntero
Muestra el estado
de las pilas
Haga clic en este botón
para acceder a la sede en
la Web de Logitech.
Haga clic en este botón
para ejecutar el “Asistente
de configuración de
dispositivo”, que le ayudará
a configurar el ratón
34
Uso del software en Windows 3.1x
Asignación de funciones a los botones
La ficha “Botones” permite asignar funciones
especiales a los botones del ratón. Dicha ficha
forma parte del cuadro de diálogo “Propiedades
de Mouse”.
Haga clic en una flecha para asignar a un botón
la función deseada. Haga clic en el botón
“Opciones” para especificar los parámetros
de AutoScroll, Universal Scroll, CyberJump,
HyperJump y el intervalo de doble clic.
Para más información, haga clic en el botón
“Ayuda”.
Uso del icono de ratón en la barra de tareas de Windows
Tras instalar el software MouseWare, aparece un nuevo icono en la barra de tareas
de Windows. Este icono permite acceder fácil y rápidamente al cuadro de diálogo
“Propiedades de Mouse” con sólo hacer doble clic sobre el icono.
Uso del software en Windows 3.1x
Haga doble clic sobre el icono de MouseWare ubicado en la ventana de grupo
“Logitech MouseWare” (o en el “Panel de control” de Windows). Configure el ratón con
botón rueda con las opciones disponibles. Tenga en cuenta que Windows 3.1x no
acepta las funciones de desplazamiento, zoom, HyperJump ni CyberJump.
Centro de control de MouseWare en Windows 3.1x
Realiza las funciones
de Windows
Identifica el botón que
se está pulsando
Asigna acciones
habituales
al botón segundo
y tercero
Define el desplazamiento
del puntero en relación
con la velocidad del ratón
Define la duración de doble clic Guarda la configuración
Cancela los cambios
Vuelve a detectar los dispositivos
tras la conexión o desconexión de
un ratón serie
Intercambia las funciones
de los botones
Ajusta la velocidad del puntero en relación con
el desplazamiento del ratón
Lleva automáticamente el puntero al botón
de comando predeterminado
Proporciona ayuda en pantalla
Mejora la representación
del puntero
Ofrece información sobre el canal
y el estado de las pilas
35
Uso del software en Windows 3.1x
Español
Mejora del puntero en Windows 3.1x
El cuadro de diálogo “Puntero mejorado Logitech” permite personalizar el puntero.
Para acceder a dicho cuadro de diálogo, haga clic en el botón “Puntero...” del Centro
de control de MouseWare.
Asignación de funciones a los botones en Windows 3.1x
MouseWare permite asignar funciones a los tres botones del ratón y asignar tareas
habituales como doble clic, bloqueo de arrastre, etc., a un solo clic de botón. Para anular
temporalmente la asignación de un botón con el fin de poder usar una función
específica de una aplicación, pulse la tecla Ctrl al tiempo que hace clic con el botón cuya
asignación desea anular.
Presenta el puntero en modo
normal o negativado
Cambia la dirección en que
apunta el puntero
Define el tamaño del puntero
Deja una estela a su paso
a medida que se desplaza*
El puntero aumenta de tamaño a medida
que se desplaza por la pantalla**
Define la velocidad a la que debe
desplazarse el puntero por la pantalla
para cambiar de tamaño**
Determina el tiempo que tiene
que transcurrir para que el puntero
recupere su tamaño normal**
Controla el icono del detector en la parte
inferior de la pantalla
Hace que el icono del detector apunte
al puntero a medida que se desplaza
Coloca el icono del detector por encima
de todas las aplicaciones
Retiene la ubicación del icono del detector
tras la salida
* Desactivada con ciertas resoluciones SVGA.
**Desactivada si la configuración de “Tamaño” es “Grande”.
36
Mantenimiento de Cordless Wheel Mouse
Mantenimiento de Cordless Wheel Mouse
Si el puntero presenta un comportamiento o movimiento
anómalo, limpie la bola del ratón inalámbrico con botón
rueda.
1. Quite el aro de sujeción. En la parte inferior
del ratón inalámbrico con botón rueda, gire el aro
de sujeción en dirección contraria a las agujas del reloj
para sacarlo.
2. Extraiga la bola y límpiela con un paño limpio
que no suelte pelusa y después sople en
el interior del compartimento de la bola para
eliminar toda formación de polvo y pelusa.
Compruebe si están sucios los rodillos de goma
del interior del compartimento de la bola.
3. Si estuvieran sucios, limpie los rodillos con un bastoncillo de algodón
humedecido en alcohol. Tras la limpieza, asegúrese de que los rodillos
estén centrados en sus canales. Cerciórese de que no quedan restos de pelusa
del bastoncillo en los rodillos.
4. Vuelva a colocar la bola y el aro de sujeción.
Resolución de problemas
Cordless Wheel Mouse no funciona tras la instalación
• Compruebe que el receptor está conectado
correctamente. El cable del receptor debe estar
conectado al puerto de ratón PS/2 del ordenador.
Para obtener resultados óptimos, coloque el receptor,
como mínimo
, a 20 centímetros de otros dispositivos
electrónicos como el ordenador, el monitor o unidades
de almacenamiento externas.
• Compruebe que las pilas están colocadas
correctamente.
• Establezca comunicación entre el receptor y el ratón inalámbrico con botón rueda.
Para ello, pulse el botón Connect del receptor y, a continuación, el botón de conexión
del ratón inalámbrico con botón rueda.
• Si trabaja sobre una superficie metálica, utilice una alfombrilla para el dispositivo
señalador y coloque el receptor sobre su lateral para mejorar la recepción.
Bola
Rodillo interior
Aro de sujeción
Compartimento
de la bola
Botón
de conexión

37
Resolución de problemas
Español
No se detecta Cordless Wheel Mouse
• Compruebe que el cable del receptor está conectado al puerto de ratón PS/2.
Nunca conecte ni desconecte el cable del receptor con el ordenador
encendido.
• Compruebe que el puerto de ratón PS/2 está debidamente configurado.
Consulte la documentación del ordenador en lo relativo a la configuración
del puerto.
• Puede que otros dispositivos conectados al sistema entren en conflicto con el ratón
inalámbrico con botón rueda. Compruebe los parámetros de dirección e IRQ
correspondientes a dichos dispositivos y modifíquelos si fuera preciso.
Consulte la documentación del ordenador para realizar dichas modificaciones.
• Para averiguar si el problema lo ha originado el ratón inalámbrico con botón rueda
o el sistema, pruebe el ratón inalámbrico con botón rueda en otro sistema o pruebe
otro ratón en el sistema actual.
Cordless Wheel Mouse no funciona tras cambiar las pilas
Pruebe las pilas recién colocadas en otro dispositivo para asegurarse de que no están
agotadas. Además, puede que sea necesario volver a establecer la comunicación entre
el ratón inalámbrico con botón rueda y el receptor. Para ello, pulse el botón Connect
del receptor y, a continuación, el botón de conexión situado en la parte inferior del ratón.
El puntero no se mueve en pantalla como es debido
Limpie la bola y los rodillos. Consulte la sección “Mantenimiento de Cordless Wheel
Mouse” para obtener más información al respecto. Pruebe a cambiar la posición
del receptor ya que puede que esté demasiado lejos del ratón inalámbrico con botón
rueda o que el monitor del ordenador o un objeto grande de metal esté causando
interferencias en la recepción de las ondas de radio. Otra posibilidad es que se estén
acabando las pilas. Por ello, compruebe el estado de las pilas tal como se explica
en la sección “Cordless Wheel Mouse no funciona tras la instalación” y cambie las pilas
si fuera preciso. Además, puede que sea necesario volver a establecer la comunicación
entre el ratón inalámbrico con botón rueda y el receptor. Para ello, pulse el botón
Connect del receptor y, a continuación, el botón de conexión situado en la parte inferior
del ratón.
39
Nederlands
Logitech Cordless Wheel Mouse
Gebruikershandleiding
40
Uw Cordless Wheel Mouse in Windows 95/Windows 98/Windows NT 4.0 gebruiken
Uw Cordless Wheel Mouse in Windows 95/Windows 98/
Windows NT 4.0 gebruiken
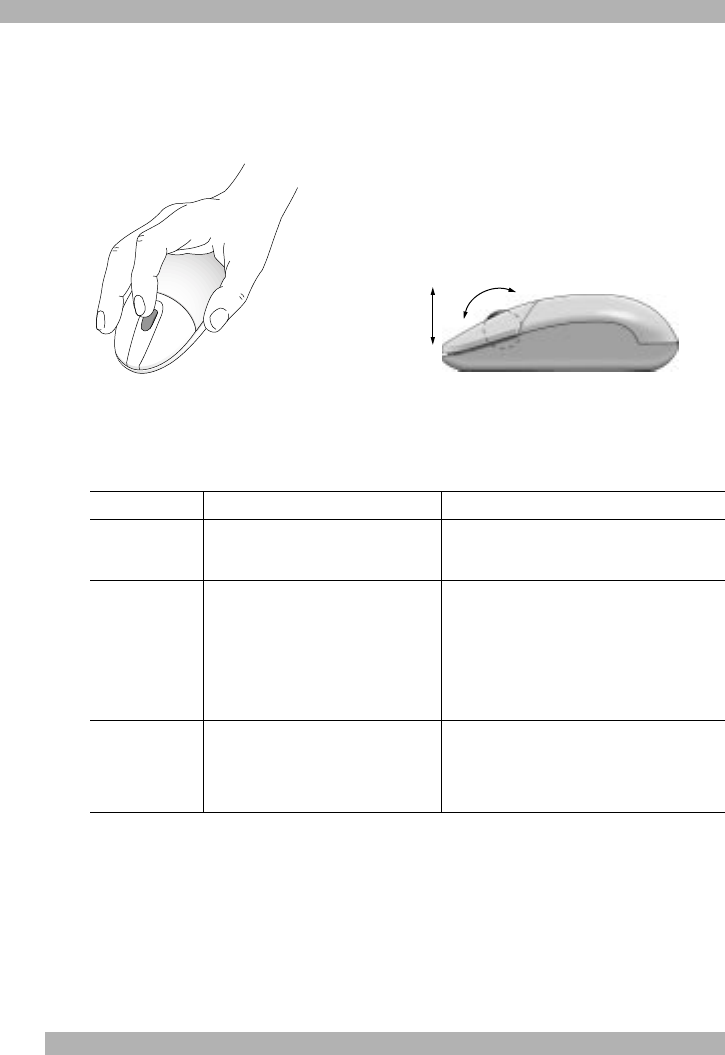
Uw draadloze muis heeft een wiel dat als wiel en knop functioneert.
Scrollen en zoomen met de Cordless Wheel Mouse
• Beweeg het wiel eenvoudigweg
om te scrollen.
• U gebruikt het wiel als
een standaardmuisknop door erop
te klikken (het omlaag te duwen).
Het muiswiel werkt ook als een knop. Het muiswiel vereenvoudigt scrollen.
Taak Wat is het? Hoe gebruikt u het?
Wielscrollen Gebruik “Wielscrollen” voor precieze
bewegingen omhoog en omlaag.
U scrollt omhoog door het wiel vooruit
te bewegen en omlaag door het wiel achteruit
te bewegen.
Horizontaal
scrollen
Gebruik “Horizontaal scrollen”
in Windows 95, Windows 98
en Windows NT 4.0 om van links
naar rechts of van rechts naar links
te scrollen wanneer er horizontale
schuifbalken in het actieve venster zijn.
Wanneer er zowel verticale als horizontale
schuifbalken in een venster zijn, drukt u op
de Ctrl- en Shift-toetsen op uw toetsenbord,
beweegt u het muiswiel vooruit om links
te scrollen, en achteruit om rechts te scrollen.
Indien er geen verticale schuifbalken
aanwezig zijn, beweegt u het muiswiel
gewoon om horizontaal te scrollen.
In-/uitzoomen Gebruik deze functie om het beeld
van een document te vergroten
of te verkleinen in een toepassing
die deze functie ondersteunt.
Zet de cursor in een Microsoft Office 97-
volgzame toepassing. Houd de Ctrl-toets
op het toetsenbord ingedrukt, en beweeg het
wiel vooruit om in te zoomen en achteruit
om uit te zoomen.
41
De MouseWare software in Windows 95/Windows 98/Windows NT 4.0 gebruiken
Nederlands
De MouseWare software in Windows 95/Windows 98/
Windows NT 4.0 gebruiken
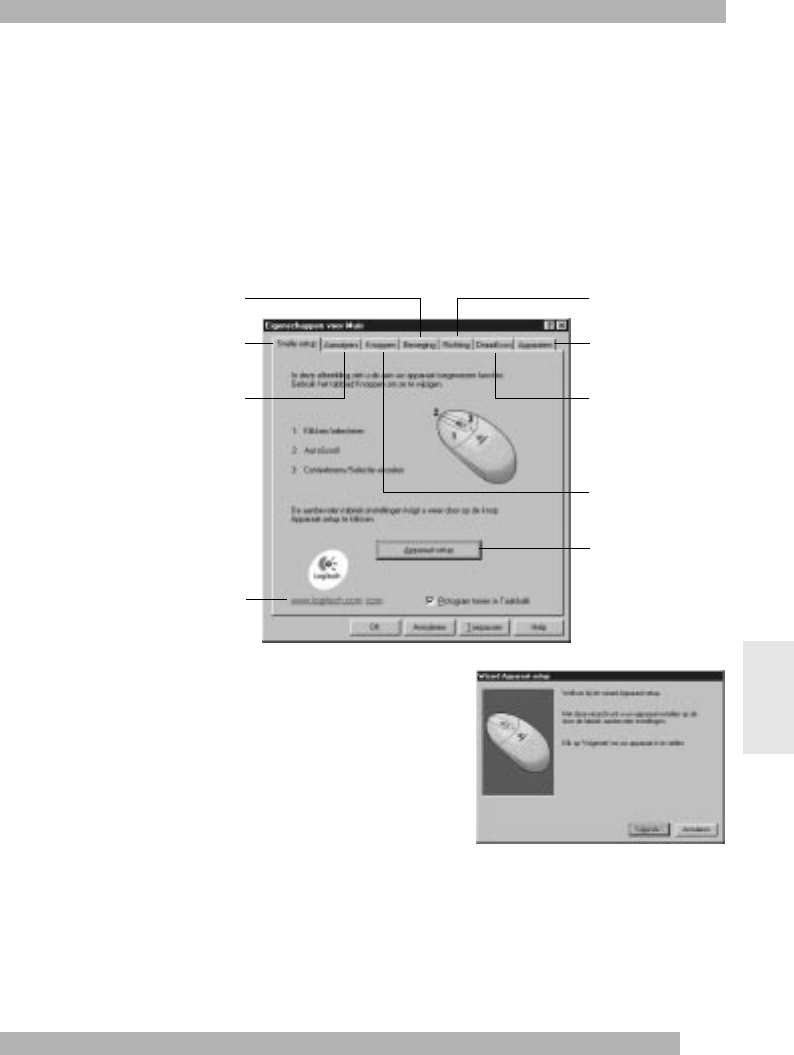
De MouseWare software heeft functies om knoptoewijzingen te maken, cursorbeweging
te bepalen en de draadloze wielmuis in te stellen. Zo roept u de MouseWare software op:
dubbelklik op het muispictogram in de Taakbalk van Windows 95/Windows/Windows 98/
Windows NT 4.0 of dubbelklik op het muispictogram in het Windows-configuratiescherm.
Nu verschijnen de tabbladen in het dialoogvenster “Eigenschappen voor Muis” zoals
in de afbeelding hieronder. Kies uit de beschikbare opties om de draadloze wielmuis
te configureren.
Opties kiezen
voor de Cordless Wheel Mouse
Hulp nodig bij het kiezen van opties?
De muiswizard is de redder in de nood.
Eerst gaat u naar “Eigenschappen voor Muis”.
Hiervoor klikt u op de Start knop in de Taakbalk
van Windows 95/Windows 98/Windows NT 4.0,
dan selecteert u “Instellingen” en vervolgens
“Configuratiescherm”. Ten slotte dubbelklikt u op het muispictogram. Kies nu de tab
“Snelle setup” en klik op de knop Apparaatsetup. Volg de instructies op het scherm.
Stelt een muis in
Wijzigt cursorbeweging Stelt muisrichting in
Voegt een andere muis toe
Maakt knop-
toewijzingen
Selecteert
een aanwijzervorm
Toont batterijniveau
Klik op deze knop om
de weblokatie van Logitech
te starten
Klik op deze knop om de
muiswizard te draaien
waarmee u een muis kunt
installeren
42
De software in Windows 3.1x gebruiken
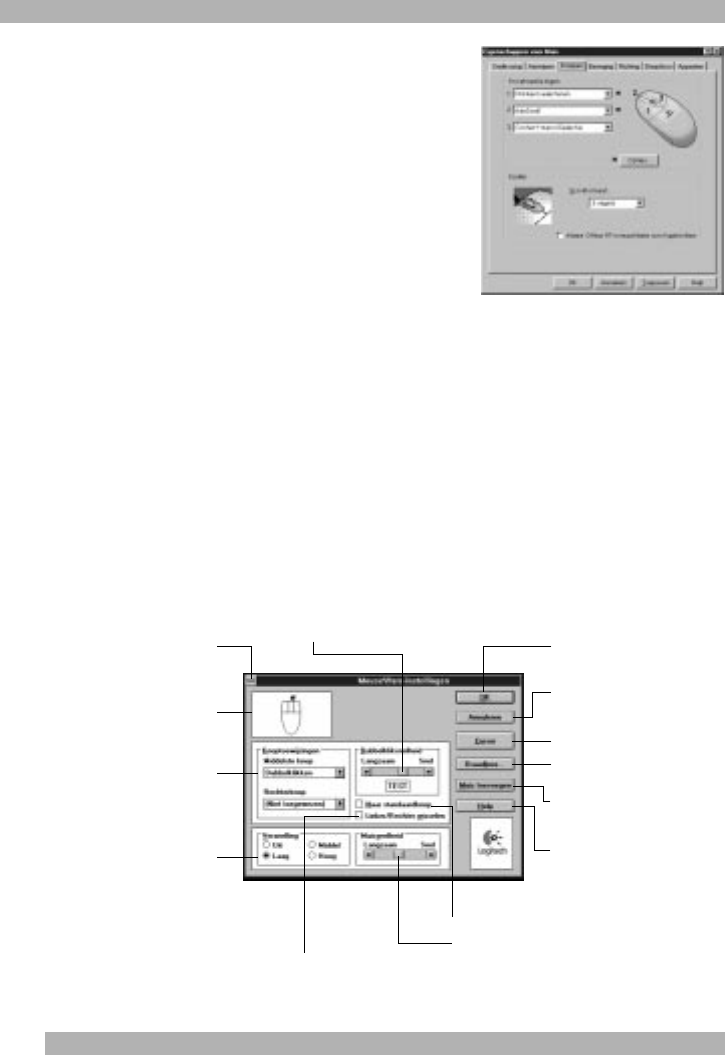
Knoptoewijzingen maken
Wijs speciale functies toe aan muisknoppen
via het tabblad “Knoppen”. Dit tabblad vindt
u in “Eigenschappen voor Muis”.
Klik op het omlaagwijzende pijltje om een functie
voor een knop te selecteren. Klik op de knop
“Opties” om instellingen te specificeren voor
AutoScroll, Universal Scroll, CyberJump, HyperJump
en dubbelkliksnelheid.
Klik op de knop “Help” voor meer informatie.
Het muispictogram gebruiken op de Taakbalk van Windows
Er verschijnt een muispictogram op de Taakbalk van Windows nadat MouseWare
geïnstalleerd is. Met dit pictogram kunt u het dialoogvenster met muiseigenschappen
snel oproepen door eenvoudigweg op het muispictogram te dubbelklikken.
De software in Windows 3.1x gebruiken
Dubbelklik op het pictogram MouseWare in het Logitech MouseWare groepsvenster
(of in het Windows configuratiescherm). Kies uit de beschikbare opties om de wielmuis
te configureren. Scrollen, zoomen en de CyberJump- en HyperJumpfuncties
worden echter niet ondersteund in Windows 3.1x.
Het MouseWare-instellingen onder Windows 3.1x
Voert Windows-
functies uit
Identificeert
de ingedrukte knop
Wijst snel-
koppelingen toe aan
de tweede
of derde knop
Stelt cursorsnelheid
in ten opzichte
van muissnelheid
Stelt dubbelkliksnelheid in Slaat instellingen op
Annuleert veranderingen
Bespeurt apparaten opnieuw
na het aansluiten/ontkoppelen
van een seriële muis
Wisselt knoppenfuncties om
Stelt cursorsnelheid in ten opzichte
van muisbeweging
Verplaatst cursor automatisch naar
standaardopdrachtknop
Biedt online hulp
Verbetert zichtbaarheid
van de cursor
Biedt kanaalinstellingen
en batterijstatus
43
De software in Windows 3.1x gebruiken
Nederlands
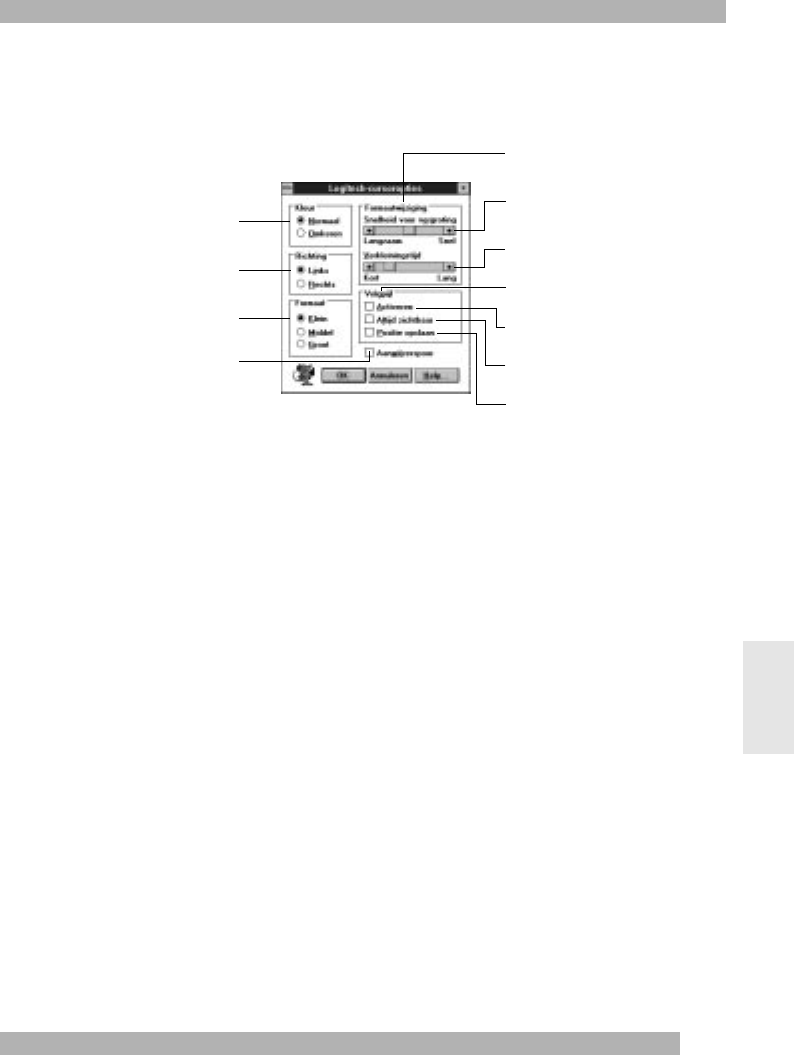
Cursoropties in Windows 3.1x
Gebruik het dialoogvenster “Logitech-cursoropties” om de cursor op maat te maken.
U roept dit dialoogvenster op door op de knop “Cursor...” te klikken in “MouseWare-
instellingen”.
Knoptoewijzingen in Windows 3.1x
Met MouseWare kunt u functies aan drie muisknoppen toewijzen en veelgebruikte
taken (zoals een dubbelklik of sleepvergrendeling) vervangen door één klik met de knop.
Wilt u een knoptoewijzing tijdelijk opheffen om een bepaalde functie van
een toepassing te gebruiken, dan houdt u de Ctrl-toets ingedrukt terwijl u met
de bewuste knop klikt.
Hiermee wordt de cursor
normaal of omgekeerd
afgebeeld
Verandert de aanwijsrichting
van de cursor
Stelt cursorformaat in
Hiermee verschijnt er
een spoor achter de cursor
terwijl hij zich voortbeweegt*
Hiermee wordt de cursor groter terwijl hij
over het scherm verplaatst wordt**
Stelt de snelheid in waarmee de cursor moet
gaan om van formaat te veranderen**
Bepaalt hoe lang de cursor groot blijft
voordat hij kleiner wordt**
Bestuurt de volgpijl die onder in het scherm
verschijnt
Hierdoor wijst de volgpijl naar de cursor
terwijl hij over het scherm gaat
Zet de volgpijl boven alle toepassingen
Bewaart de positie van de volgpijl bij
het afsluiten
* Uitgeschakeld bij sommige SVGA-resoluties.
** Uitgeschakeld als “Formaat” op “Groot” staat.

44
Onderhoud van de Cordless Wheel Mouse
Onderhoud van de Cordless Wheel Mouse
Als de cursor springt of zich abnormaal beweegt,
dient u de kogel van uw draadloze wielmuis schoon
te maken.
1. Verwijder de borgring. Draai de borgring op
de onderkant van de muis tegen de klok in om hem
te verwijderen.
2. Verwijder de kogel en veeg hem af met
een schone, pluisvrije doek en blaas
dan zachtjes in de kogelhouder om stof
en pluis te verwijderen. Kijk of er vuil zit op
de rubberrolwiel(en) in de kogelhouder.
3. Is dit het geval, dan kunt u ze schoonmaken met een in isopropyl-(wrijf)
alcohol gedoopt wattenstaafje. Zorg dat de rolwielen na de schoonmaakbeurt
nog steeds midden in hun kanalen zitten. Zorg dat er geen wattenpluis op de
rolwielen achterblijft.
4. Zet de kogel en borgring er weer in.
Problemen oplossen
De Cordless Wheel Mouse werkt niet na installatie
• Zorg dat u de ontvanger goed heeft aangesloten.
Het snoer van de ontvanger sluit aan op de PS/2
muispoort van de computer. Voor optimale prestaties zet
u de ontvanger
ten minste
20 centimeter van andere
elektrische apparatuur, zoals de computer, monitor
of externe opslagapparaten.
• Zorg dat u de batterijen goed geïnstalleerd heeft.
• Breng communicatie tussen de ontvanger
en de draadloze wielmuis tot stand. Druk het
verbindingsknopje in op de ontvanger en dan het verbindingsknopje onder de
draadloze wielmuis.
• Als u op een metalen oppervlak werkt, gebruik dan een muismat en zet de ontvanger
op zijn kant voor betere ontvangst.
Kogel
Intern rolwieltje
Borgring
Kogelhouder
Verbindings-
knopje

45
Problemen oplossen
Nederlands
De Cordless Wheel Mouse wordt niet bespeurd
• Zorg dat het snoer van de ontvanger op de PS/2 muispoort is aangesloten.
Het snoer van de ontvanger niet aansluiten of ontkoppelen terwijl
de computer aanstaat.
• Zorg dat de PS/2 muispoort goed geconfigureerd is. Raadpleeg uw computer-
documentatie voor de juiste poortconfiguratie.
• Er kunnen natuurlijk ook andere systeemapparaten zijn die in conflict raken met
de draadloze wielmuis. Controleer de IRQ-/adresinstellingen van deze apparaten
op conflicten en wijzig de instellingen indien nodig. Raadpleeg hiervoor uw
computerdocumentatie.
• Als u wilt bepalen of het probleem te maken heeft met de draadloze wielmuis
of het systeem, probeer de draadloze wielmuis dan op een tweede systeem
of een andere muis op uw huidige systeem aan te sluiten.
De Cordless Wheel Mouse werkt niet na vervanging van de batterijen
Controleer of de batterijen die u geïnstalleerd heeft, niet leeg zijn. Probeer de batterijen
in een ander apparaat. U dient misschien ook de verbinding tussen de draadloze
wielmuis en de ontvanger opnieuw tot stand te brengen. Hiervoor drukt u het
verbindingsknopje op de ontvanger in en dan het verbindingsknopje aan de onderkant
van de muis.
De cursor beweegt zich niet goed op het scherm
Reinig de kogel en de wielen van de muis. Zie “Onderhoud van de Cordless Wheel
Mouse” voor meer informatie. Probeer de positie van de ontvanger te veranderen.
Het is mogelijk dat de ontvanger te ver van de muis afstaat. Of misschien veroorzaakt
de monitor (of een groot metalen voorwerp) storing met de radio-ontvangst van
de ontvanger. Of misschien zijn de batterijen in de muis bijna leeg. Controleer de
muisbatterijen zoals beschreven in “De Cordless Wheel Mouse werkt niet na installatie”,
en vervang indien nodig de batterijen. U dient misschien ook de verbinding tussen
de draadloze wielmuis en de ontvanger opnieuw tot stand te brengen. Hiervoor drukt
u het verbindingsknopje op de ontvanger in en dan het verbindingsknopje aan de
onderkant van de muis.
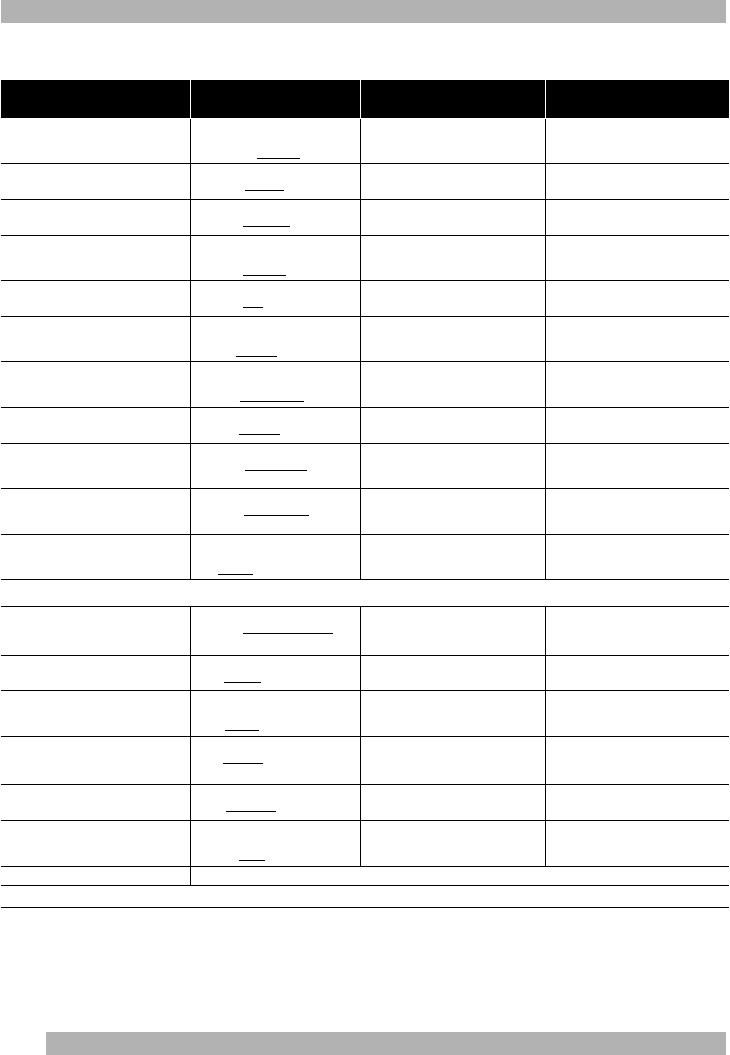
46
Logitech Addresses and Phone Numbers*
* Refer to your Registration Card for the most up-to-date addresses and phone numbers.
Note Please read the following prior to exchanging or returning your product. To exchange or return your product within
the first 30 days, we recommend returning it to the point of purchase. If you return or exchange your product
through Logitech, you must first contact Customer Support to obtain a Return Merchandise Authorization (RMA)
number. Customer Support will give you an RMA number and a special address for the exchange.
Country Address Product Information
(Infoline)
Technical Help
(Hotline)
Benelux (B, LUX, NL)
LOGITECH Benelux
Bedrijvenpark Lindenholt
Kerkenbos 1045
NL - 6546 BB Nijmegen
✆+31 (0)10 243 88 97
Nederlands
✆+32 (0)2 626 89 63
Français (Belg.)
✆+32 (0)2 626 89 61
Vlaams (Belg.)
✆+31 (0)10 243 88 98
Nederlands
✆+32 (0)2 626 89 62
Français (Belg.)
✆+32 (0)2 626 89 60
Vlaams (Belg.)
Denmark
LOGITECH Representation
Mesterlodden 16
DK - 2620 Gentofte
✆+45-35 44 55 16 ✆+45-35 44 55 17
Deutschland & Eastern European countries
LOGITECH GmbH
Gabriele-Münter-Strasse 3
D - 82110 Germering
✆+49 (0)69-92 032 165 ✆+49 (0)69-92 032 166
España
LOGITECH S.A.
Oficina de representación en España
Calle Nicaragua, 48 2º 1ª
E - 08029 Barcelona
✆+34 91-375 33 68 ✆+34 91-375 33 69
France
LOGITECH France SARL
26-28 Rue Danielle Casanova
F - 75002 Paris
✆+33 (0)1-43 62 34 13 ✆+33 (0)1-43 62 34 14
Hungary
Logitech Sales Office in Hungary
Rubin Business Center/308
Dayka Gabór utca 3
H - 1118 Budapest
✆+41 (0)21 863 54 00
English
✆+41 (0)21 863 54 01
English
Italia
LOGITECH Italia S.r.l
Centro Direzionale Colleoni
Palazzo Andromeda 3
I - 20041 Agrate Brianza, MI
✆+39-02 215 1062 ✆+39-02 214 0871
Österreich
LOGITECH Repräsentanz
Göra 580, Postfach 77
A - 5580 Tamsweg
✆+43 (0)1 502 221 349 ✆+43 (0)1 502 221 348
Schweiz/Suisse/Svizzera
LOGITECH Switzerland
Täfernstrasse 16
CH - 5405 Baden-Dättwil
✆D+41 (0)21 863 54 10
✆F+41 (0)21 863 54 30
✆I+41 (0)21 863 54 60
✆D+41 (0)21 863 54 11
✆F+41 (0)21 863 54 31
✆I+41 (0)21 863 54 61
Sweden, Iceland, Norway & Finland
Logitech Representation
Geometrivägen 3-7
S - 141 75 Kungens Kurva
✆+46 (0)8-519 920 19
Sweden
✆+47 (0)23 500 084
Norway
✆+358 (0)9 817 100 21
Finland
✆+46 (0)8-519 920 20
Sweden
✆+47 (0)23 500 083
Norway
✆+358 (0)9 817 100 21
Finland
UK + Eire
LOGI (U.K.) Ltd.
The Old Court House
267-273 High Street
GB - Dorking, RH4 1RL, Surrey
✆+44 (0)181 308 6582 ✆+44 (0)181 308 6581
Logitech Headquarters
European, Middle Eastern
& African Headquarters
LOGITECH Trading S.A.
Moulin-du-Choc
CH - 1122 Romanel-sur-Morges
✆+41 (0)21 863 54 00
English
Fax +41 (0)21 863 54 02
✆+41 (0)21 863 54 01
English
Fax +41 (0)21 863 54 02
Corporate Headquarters
LOGITECH Inc.
6505 Kaiser Drive
USA - Fremont, CA 94555
✆(800) 231-7717 ✆+1 702 269 3457
Asian Pacific Headquarters
LOGITECH Far East Ltd.
#2 Creation Road IV
Science-Based – Industrial Park
ROC - Hsinchu, Taiwan
✆+886 (2) 7466601
x2206
Australia
Logitech Australia Computer
Peripherals Pty Ltd.
Level 2, 633 Pittwater Road
AUS - Dee Why NSW 2099, Australia
✆+61 (02)9804 6968
✆+61 (02)9972 3561
Canada
Sales & Marketing Office
5025 Orbitor Dr., Bldg. 6, Suite 200
CDN - Mississauga, ON L4W 4Y5
✆(800) 231-7717 ✆+1 702 269 3457
Japan
LOGICOOL Co. Ltd.
Ryoshin Ginza East Mirror Bldg., 7F
3-15-10 Ginza
Chuo-ku, Tokyo, Japan 104-0061
✆+81 (3) 3543 2122
Fax +81 (3) 3543 2911
In Latin America and the Caribbean: Contact your local authorized distributor, or call our Customer Support Hotline in the USA, at ✆ +1 702 269 3457.
World Wide Web:
http://www.logitech.com
FTP:
ftp://ftp.logitech.com/pub