Longcheer Technology H11LC GSM/GPRS/EDGE Handhold Phone User Manual W200 User manual V0 2 english
Longcheer Technology (Shanghai) Co., Ltd. GSM/GPRS/EDGE Handhold Phone W200 User manual V0 2 english
User Manual

1
Begin
Thank you for your choice of this version of the phone. Before using or while at use, please
read this manual and remain it for future use.
Please use the phone carefully in order to ensure the long-term excellent performance of the
phone.
Environment
Please keep the temperature between -10℃ and 50℃,which is suitable for the phone.
The phone supports the operating systems: Windows 2000, Windows XP, Windows Vista and
MAC OS.
Use
Under some environment, it is strongly recommended for you that the important text
information shall be remained because the data in the electronic memories may be changed or
lost.
The display window in the instruction of the manual may be inconsistent with the actual
situation of the phone.
Some functions defined in the manual may not be supported by the network.
Introduction to Manual
Introduction to Use Method
The user’s manual provides the guidance information for you to use the phone. Please read
the function schedule if you need to grasp the basic function of the phone fast.
The user’s manual uses the following path-displayed method in order to search the functional
manual:
Operating path: main menu > information.
The instance indicates: press the OK key at the side under the standby window, switch the
main menu to the [Information] with a sliding wheel at the side of the phone when the phone
displays the main menu, and press the OK key at the side to open the information functional
menu.
Introduction to Symbol
The user’s manual uses the following expression method in order to illuminate the phone
window.
[] : display main functional menu window.
““ : display the functional submenu window.
<> : window prompt.
The following Info icon is used to illuminate the special information:
Info: prompt information.
Note: a service or a function requires the support of the network or the predetermined service.
Please consult your network service supplier for details.
Contents
Environment ...................................................1
Use ...........................................................1
Introduction to Manual ........................................1
Introduction to Use Method................................................. 1
Contents ......................................................1
Health&Safety .................................................3
Phone ..................................................................................... 4
Batteries................................................................................. 4
Adapter.................................................................................. 4
USB........................................................................................ 4
Please note to tune the volume of the audio device when using
the audio accessories. A too high volume will damage your
hearing.................................................................................... 4
Micro SD ............................................................................... 4
Attentions for Use ............................................4
General Consideration......................................................... 4
Phone ..................................................................................... 4
Battery................................................................................... 5
Adapter.................................................................................. 5
USB........................................................................................ 5
Earphone............................................................................... 5

2
Micro SD ............................................................................... 5
Display screen ....................................................................... 5
Use Consideration at Public Situation................................ 6
About Copyright ...............................................6
About Recycling ...............................................6
Disclaimer ....................................................7
About Trademark ...............................................7
Export Management Rules .......................................7
Before Use ....................................................7
Support Accessories.............................................................. 7
Understand Your Phone....................................................... 7
Front View..................................................................... 7
Side View ....................................................................... 7
Back View...................................................................... 7
SIM Card .............................................................................. 7
Micro SD Card...................................................................... 8
Power Phone on/off............................................................... 8
Display Screen....................................................................... 9
Keys ....................................................................................... 9
Menu contents....................................................................... 9
Use Keys .............................................................................. 10
Basic Functions ..............................................10
Dial............................................................................... 10
Answer......................................................................... 10
Dial with Recent Call Log.......................................... 10
Useful Function........................................................... 10
Shortcut Functions ......................................................11
With the function, you can view your local phone
number...........................................................................11
Call .........................................................11
Dial................................................................................11
Answer Incoming Call................................................ 12
Call-related Function ................................................. 12
Text Input ...................................................13
Multi-press Input........................................................ 13
Smart Input................................................................. 13
Input Symbols............................................................. 13
Shortcut Switch to Input Modes ............................... 13
Input Keys................................................................... 13
Setting ......................................................14
Profile Mode................................................................ 14
Display Setting............................................................ 14
Phone Setting .............................................................. 14
Call Setting.................................................................. 14
Network Setting.......................................................... 15
Safety Setting .............................................................. 16
Default Setting ............................................................ 16
Play Music ...................................................16
Play List....................................................................... 16
Set up Play Mode........................................................ 17

3
Set up Equalizer.......................................................... 17
Set up Volume ............................................................. 17
Play Music................................................................... 17
Operate Player............................................................ 17
Message ......................................................18
Inbox............................................................................ 18
Outbox......................................................................... 19
Create SMS ................................................................. 19
Icons of SMS for Marking ......................................... 19
Setting.......................................................................... 20
View Memory Capacity.............................................. 20
Phonebook ....................................................20
View Contacts ............................................................. 20
Create Contacts .......................................................... 20
Delete Contacts ........................................................... 20
Send Contacts ............................................................. 20
Send Message to Contact ........................................... 21
Copy Contact .............................................................. 21
Display Contacts in SIM/USIM Card....................... 21
Create My Businness Card........................................ 21
Send My Business Card ............................................. 21
Quick Dial ................................................................... 21
Memory Capacity....................................................... 21
Phonebook Option...................................................... 21
Call Log .....................................................21
View call log ................................................................ 21
Send SMS to logged Phone Number ......................... 22
Save Logged Phone Numbers.................................... 22
Set up Logged Phone Number as Quickly Dialed
Number........................................................................ 22
Clear Away Call Log................................................... 22
Option of Call Log...................................................... 22
My File ......................................................22
Operate Folder............................................................ 22
Operate File................................................................. 23
Memory Capacity....................................................... 23
Connection ...................................................23
EMOBILE-An Additional Service ................................23
About Accessories ............................................23
SAR Data .....................................................24
Function Schedule ............................................24
Failure and Solution .........................................24
Guarantee and After Serive ...................................26
Gurantee.............................................................................. 26
Repair.................................................................................. 26
Attention.............................................................................. 26
Accessories .......................................................................... 26
Reference ....................................................26
Health&Safety

4
Phone
The subscriber shall use the phone at the right operating locations (at the ear with the antenna
toward to the upper side of the arm) in order for you to operate satisfactorily and safely.
Please use the phone carefully because it is designed deliberately and produced with the high
technology. You can use the phone happily for long time with the suggestions as follows.
Do not let the kids or pets touch the phone, which is possible to throttle the kids or the pets or
kids are possible to damage the phone.
Keep the phone dry and prevent various kinds of liquid from entering in the phone against the
damage of the phone.
Please do not operate the phone with wet hands, which are possible to engender the electric
shock.
Please do not store the phone under the high temperature environment, which is possible to
shorten the service life of the electronic device, to damage the batteries or to melt the
accessories.
Please do not store the phone under the low temperature environment because the vapor can
enter in the phone and damage the circuit board of the phone when the phone is recovered to
the normal operating temperature.
Please do not expose your phone under the strong sunlight to prevent the phone from be
heated.
Please do not place your phone at the locations, near which there are flammable liquid, gas
and explosive articles.
Batteries
Please do not use the damaged adapter or batteries.
Please use the batteries rightly, do not let the batteries at the short circuit, prevent the batteries
from be heated, or otherwise causing the fire disaster possibly.
Prohibit playing the batteries under the high temperature or throwing the batteries into the fire,
or otherwise causing the explosion.
Should return the waste batteries to the supplier or place at the designated recycling point and
should not place them together with the life waste.
The charging time of the battery is dependent of the remained capacity, type and adapter of
the battery. The battery may be charged for thousands of times, but it can be worn out
gradually. Please purchase new batteries when the standby time is shorter than the normal
standby time of the phone.
Please use the adapter or battery dedicated or authorized for the phone.
Please disconnect the adapter and the power supply when the adapter is not used.
Please do not charge the battery for long time, or otherwise the service life of the battery will
be cut off.
The temperature extremes will have influences on the charging capacity. Please pre-cool or
pre-heat up to the normal temperature (the lithium ion battery will be affected when the
temperature is lower than 0 )℃
Adapter
With the adapter, the AC 100V~240V input can be transferred into DC 5V for charging the
batteries.
The optimum operating temperature of the adapter is from 0℃ to 40℃.
USB
Be sure not to try disassembling or refitting the memory card.
Be sure not to let the dirt, dust or foreign substances from contaminating the USB socket.
Earphone
It is recommended that you should use the authorized original audio accessories. Use the
accessories of a third party is possible to lower the product performance or to engender the
risk for your health and safety.
Please note to tune the volume of the audio device when using the audio accessories. A too
high volume will damage your hearing.
Micro SD
Be sure not to expose the memory card to the damp environment.
Be sure not to touch the connecting terminals of the memory card with hands or any other
metal article.
Be sure not to strike, bend or drop the memory card.
Be sure not to try disassembling or refitting the memory card.
Be sure not to use or store the memory card at the location where is damped, eroded or
overheated (such as in a summer car). Please avoid the direct sunlight. Be sure not to place the
memory card near to a heater).
Be sure not to press or bend the adapter of the memory card forcedly.
Be sure not to let the dirt, dust and foreign substances enter in the socket of the adapter of the
memory card.
Attentions for Use
General Consideration
Please use the authorized accessories in order to guarantee using the phone safely and
effectively.
Phone

5
The phone described under the manual is authorized to use the GSM900, GSM1900 and
UMTS1700 networks. Please contact with the network service supplier for more information
of the network.
Please abide by the laws or regulations, respect the rights and privacies of other persons when
using the function of the phone.
Please power the phone on when in need of the function of the phone exclusive of the prompt
of the alarm clock.
Please do not power the phone on when the wireless device is possible to engender the
interference or risk.
Please do not throw, or beat the phone crudely, or otherwise the internal circuit board is
possible to be damaged.
Please use the wetter or static electricity-resistant clothing, do not use the dry clothing prone
to produce the static electricity when cleaning the phone. Please do not use such chemicals as
the detergent when cleaning the phone surface. Please power the phone off firstly and clean
the phone secondly.
Please do not paint your phone because the paintings will hinder the normal use of the phone.
Please let the phone to be not too closed to the eye in preventing the eyes from damage when
the phone is equipped with the flash light.
The after service provider will not guarantee the quality of the manufacture even if within the
guarantee-to-repair period if your phone or battery is wetted and the internal label of the
phone will be damaged.
Please do not shelter the phone during the use because the call quality is affected and the
actual power of the phone will be increased, thus shortening the call and standby time of the
phone.
Battery
The phone is powered with the chargeable battery. The new battery required a 2-3-hour
charging and discharging process. The battery can be charged or discharged for hundreds of
times, but it will be worn out gradually. When the call and standby time is less than the typical
time, please purchase a new battery. Please use the ##-authorized battery or ##-authorized
adapter for charging the battery.
Disassemble the battery when the phone is powered off. The over-charged battery will be
shortened in the service time. Please do not let the battery that is finished charging remained
at the charging status. The battery of full capacity will be gradually reduced in the capacity
along with the time even if is not used.
The phone will display the charging icon after it is charged for a period of time when the
battery is overused.
Please do not let the battery at short circuit because the short circuit will damage the battery.
Such metal articles as the coins, pins or pen can result in the short circuit if directly
connecting the positive and negative poles of the battery.
The call and standby time is depended on the different usage situations of the phone. For
instance, the signal strength, the working temperature, the usage mode, the selected function,
voice or data transport when the phone is operated. The battery can be up to 110 hours in the
standby time optimally.
Adapter
Please confirm the model of the adapter before connecting the phone. The applicable current
of the phone is 500mA.
Connect the AC adapter to the power supply of identical specified label of the product. Ensure
the right position of the cables, which are not damaged or stressed.
Be sure to disconnect the power supply of all components before cleaning in preventing from
electric shock.
Prohibit using the AC adapter outdoors or at the damp environment.
Be sure not to alter the cables or plugs. If the plug is not supported by the power supply
socket, should ask the qualified electric technician to install the suitable power supply socket.
Please grasp and pull out the connector when disconnecting the adapter.
USB
Used to connect the USB socket of the PC communicated with the phone.
Earphone
Please be sure that you have inserted the earphone in the right earphone socket, or otherwise
the earphone cannot be used normally.
Please do not draw the cables, or otherwise the earphone will be damaged.
Micro SD
Be sure that you have inserted the memory card rightly.
Insert the memory card in the adapter of the memory. The memory card required inserting
completely, or otherwise it cannot be used normally.
Please back up your critical information. Our company will be irresponsible for any damaged
or lost data on the memory card.
Be sure not to pull out the memory card or the adapter of the memory card or power the phone
off when you format, read or write data.
The data is possible to be damaged or lost when the memory card is positioned in the static
electricity or strong magnetic field.
Display screen
The display screen of 65K colors is used under suitable environmental temperature from

6
-40℃ to 70℃.
A 160° wide-angle is supported for viewing the display screen.
Be sure not to strike or bend the display screen.
Be sure not to scrape the display screen with the sharp and hard articles.
Use Consideration at Public Situation
Electronic Device
Most electronic device shields the wireless information. Please consult the manufacture for
related information.
Pacemaker: keep it 6-inch (15cm)-distance from the phone; should not carry the phone in the
chest packet; please answer the call with the phone at the other side of the pacemaker,
lowering the possibly-caused interference. Please power the phone off rightly if you concern
that the phone is interfering.
Hearing aid: partial digital wireless phone is possible to interfere the normal operation of the
hearing aid. Please contact with the manufacturing of the hearing aid if there is a
disturbance.
Other medical apparatus: please consult with the manufacture of the medical apparatus in
confirming whether the medical apparatus shield the radio wave if you use the other medical
personal apparatus. The doctor can assist you in obtaining the information. Please power the
phone off near the healthcare facilities where the phone is prohibited using.
Automobile device: please contact with the manufacture of the device for the pertinent
information because the wireless signal is possible to have influences on the electronic device
installed in the automobile.
Traffic
The phone has a strong wireless voice communication function and you can make a call
anywhere and anytime, thus the subscriber should undertake some significant responsibilities.
The driving is a first responsibility of you when driving. Should be alerted to answer the call
and abide by the local regulations when at drive.
Please understand the radio phone and its function, such as quick dial and redial. With these
functions, you can dial out conveniently without distraction when driving.
Should use the hand-free device if there is the hand-free device; if possible, using any
now-supplied hand-free device may let you use the wireless phone conveniently safely.
Place the wireless phone at the place where the phone is easy to be stretched without
distracting to get the phone from the road. You should use the voice mailbox to answer the
call as far as possible if receiving a call at an inconvenient time.
Tell the opposite part of the call that you are driving; if necessary, hang up the call at the
traffic congestion or bad climate. It will be extremely dangerous when it is rainy, rainy and
snowy or frozen, even if at the traffic congestion.
The safety gas sac, brake and speed control system and fuel-jetting system shall be not
affected by the wireless transmission. In foregoing cases, please contact with the distributor of
the automobile.
Please power your phone when fueling or where the bidirectional wireless devices are
prohibited using. Please place the flammable and explosive articles together with the phone
because the internal spark of the phone is possible to fire them.
Please power the mobile phone off on board of the plane. The phone is not allowable to use
during the flight in order to prevent the communication system of the plane from being
disturbed. The phone should be used with the consent of the flight crew member according to
the regulation when the plane is not taken off.
Please confirm that the phone will not be powered on when the alarm clock is launched
automatically during the flight.
Environments Possibly Resulting in Risks
Please power the phone off at the potentially-explosive locations. Please abide by the safety
labels and instruction at these locations the spark produced in these locations is possible to
result in the explosion or fire, body injury or death.
It is recommended that the subscriber powers the phone off at the gas station or maintenance
station. It is minded that the subscriber abides by the instruction to use the wireless device at
the locations, such as oil depots, oil storage and distribution areas, chemical plants or the sites
where are exposing.
The safety labels are possible to mark in the locations where there are risks of explosion,
however, all the locations will not be marketed always, including the underside of the ship
deck, chemical storage or place facilities, vehicle using the liquefied natural gas, locations
where there is chemicals or particles in the air and other locations where you are
recommended to turn off the engine of the automobile.
About Copyright
Based on the Copyright Law, the materials which is protected by the law for the reproduction,
alternation and use (such as music) are limited to use personally. The subscriber will be
regarded as violation of the law if the subscriber reproduces, alters or use the materials of the
manual without copyright or authorization of the owner of the copyright and the owner of the
copyright reserves to prosecute. Please do not use the copy-right-protected material of the
manual.
About Recycling
The phone is labeled not to treat as the life waste in the product or package labels. The right
method: send the product to the related electronic device recycling point for reusing. The
correct treatment of the product can prevent the environment and human health from damage.
If the product is treated improperly, the natural environment and human health will be
7
affected seriously. The recycling and reusing will benefit the conservation of the natural
resources. Please contact with the local municipal office of life waste treatment institute for
the details of the recyclable products.
The battery can be treated as the common life waste and should better to treat with the waste
battery treatment equipment.
Disclaimer
We are exempted from the direct or indirect asset loss or claims of a third party caused in the
usage of the phone or related functions, such as stolen information, lost data or changed data.
About Trademark
The names of the products and companies referred in the manual are the trademarks of
various owners.
Export Management Rules
The software is supervised by the ####export control law, and possibly supervised by the
export control laws of other countries. The client agrees to conform to the laws and
regulations, and promises to obtain the licenses for the export, exported or imported software
accountably. The client shall not export the software to any countries or regions or residents or
citizens of any countries on which an embargo are laid on by downloading or in any other
ways.
Before Use
Support Accessories
You may have the following accessories:
Battery
Adapter
Earphone
Data cable
3-way connector
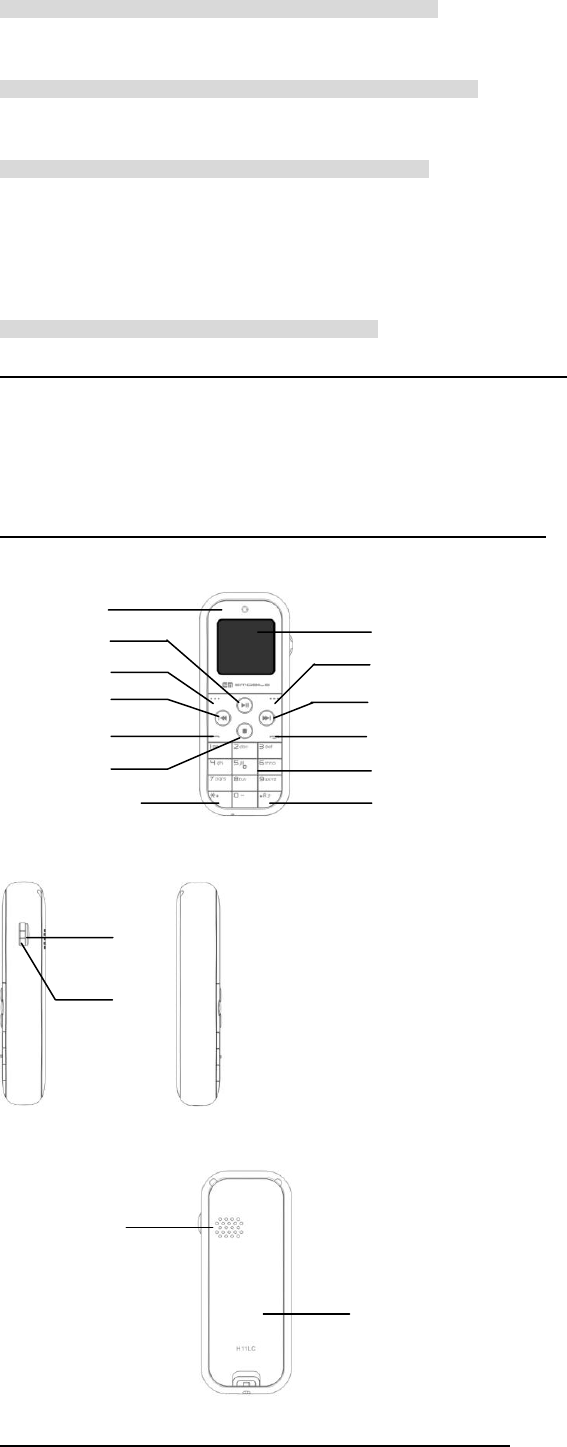
Understand Your Phone
Front View
Side View
Back View
SIM Card
Microphone
Play/Pause Key
Left Soft Key
Previous/Backward
Send Key
Stop Key
Special Functional Key
Display Screen
Right Softkey
Next/Forward
End Key
Special Functional Key
Numeral Key
OK Key
Wheel
Microphone
Battery Cover
8
You will receive an SIM card that can be inserted in the phone when you preset to access to
the communication network service. The SIM (Subscriber Identity Model) card contains the
information of the preset network service, your PIN (Personal Identification Number) and the
network service information that you can obtain.
Please consult with the provider of the SIM card, the network service provider or the network
operator for the information for obtaining and using.
If you need to obtain the 3G network service, you can purchase the USIM (Universal
Subscriber Identity Model) card.
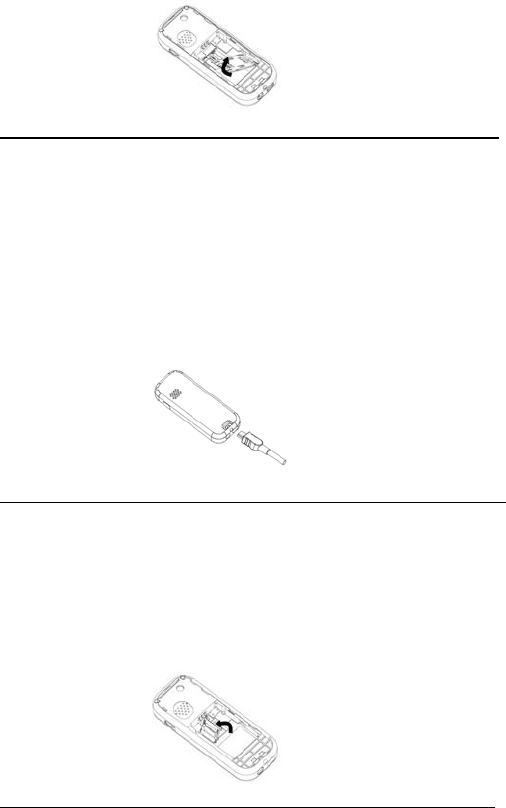
Insert SIM Card
Please power the phone off in ensuring the disconnection of the adapter and the phone before
removing the battery.
1. Slightly push the bottom of the phone with the phone back on, push the rear cover of the
phone upwards till the cover is removed.
2. Move upwards and remove the battery.
3. Insert the SIM/USIM card in the socket with the gold wafer downwards.
4. Insert the battery with the metal interface aligned with the connecting socket and push
the rear cover of the phone back.
Charge Battery
The phone will issue the alarm tone when the battery capacity is lower, displaying the
information for the insufficient electric capacity with the flashing empty battery icon. Under
the case, you cannot use partial functions of the phone.
The phone will automatically power off when the battery capacity is lower than the critical
value. Please charge the battery.
The phone will display the flashing battery icon at the right corner of the screen when the
phone is being charged. The screen will display a picture of charging status and hint the
finished charging when the phone is charged under the power-off mode. It takes about 2.5
hours to charge.
1. Insert the charging connector in the phone.
2. Lightly pull out the charging connector after finishing charging.
Micro SD Card
The phone supports the Micro SD inserted. Please search the file information saved in the
card with the file manager of the phone.
Insert Micro SD Card
Please power the phone off, remove the battery and ensure the disconnection of the adapter
and the phone before inserting the Micro SD.
1. Move the SD card socket.
2. Insert the Micro SD card in the socket.
3. Push the socket back.
Power Phone on/off
Please confirm that the phone is charged and the SIM card or USIM card is inserted before the
phone is powered on.
The window of the phone will display the information of inserting the USIM card in case that
the SIM card is not inserted or the USIM card is launched. In this case, the phone only
supports the emergency call. You can input the phone number for emergency calls and click
the send key to dial out.
The phone supports to be launched under the charging status. When the phone displays the
power-on information, the phone is launched.
When the phone is too lower in the electric capacity and powered off, the power-on
information requires to display after a period of charging.
Power Phone on
1. Press and hold the end key for lastingly 2 seconds.
2. Please input the phone lock password/PIN lock password and then click the OK key for
confirmation if the password enquiry is displayed on the screen.
3. The screen will display the default standby picture when the phone leaves the factory
upon the phone is launched at the first time.
4. Please refer to related information if the phone is required to set up.
Note:
The phone can recognize the provider of the SIM card or USIM card automatically and finish
the setup of parameters of the SMS and wireless network after the phone is launched. Please
consult with the service provider for the right parameters and finish the setup of the
9
parameters if the phone does not set the related parameters automatically.
Power Phone off
1. Press and hold the end key for lastingly 4 seconds.
2. Enter in the power-off status after the screen displays the power-off animation.
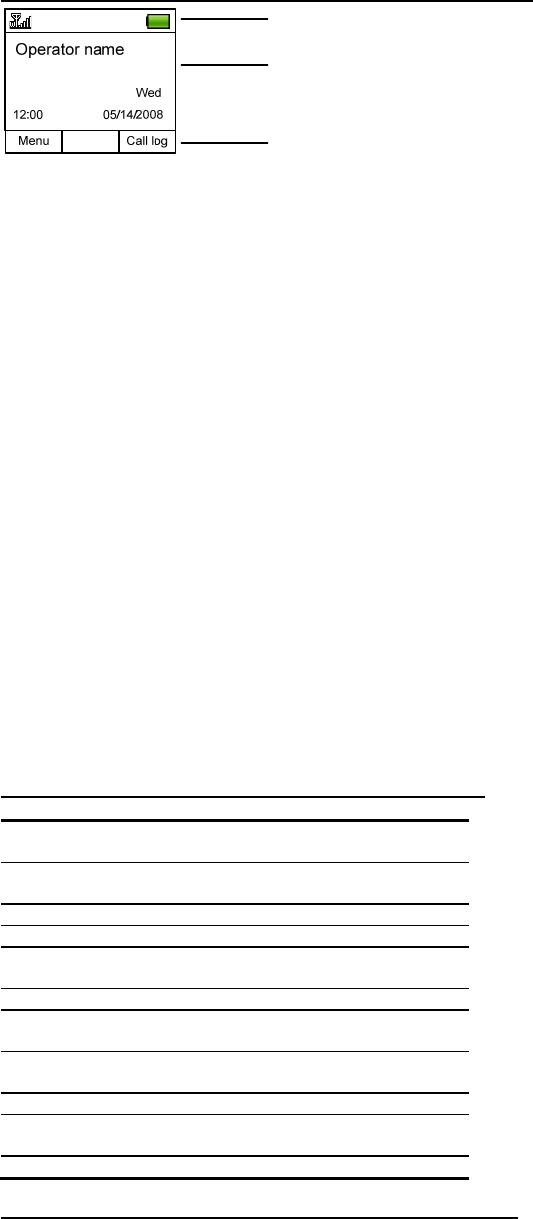
Display Screen
z Status prompt: signal status, battery status, SMS status, profile mode status,
function-activated status and inserting status of the external device.
z Standby info: operator name, date, week, morning and afternoon prompts (12 hours
system).
z Soft key functional prompt: left soft key -> main functional menu; OK key -> main
functional menu; right soft key -> call log in default setting when the phone leaves the
factory.
Icons in Status Bar
Strength of receiving signal
GPRS network
EDGE network
Calling
Launch the call forwarding function (display only when the SIM/USIM card supports it)
Missed calls
Roaming network
New message
New voice message
Send message
Message is full
Playing MP3
Activate mute mode
Activate conference mode
Activate in-car mode
Activate outdoor mode
Activate new profile mode
Insert earphone
Insert USB
Insert external memory card
Activate the dialing function
Activate the phone lock function
Keys
OK key Enter in the main functional menu or confirm the
selected options.
Wheel Move the selection box between various levels of
menu and options and adjust the volume.
Soft key Execute the function displayed on the top of the key
Send key Dial or answer a call.
End key End a call, decline a call, power the phone on/off or
return to the standby mode.
Numeral key 1 Press and hold to dial the voice mailbox service out.
Numeral keys
2-9
Press and hold to call the contact of the phone
number with the quick dial is set up.
Numeral keys
1-9
Input the letters or numbers
Numeral key0 Input the number 0 or space character.
Special key * Dial and input *,/,+,/ and p; input the punctuation
symbols or lock and unlock the keypad lock.
Special key # Switch the phone amid the mute and cycle mode.
Menu contents
Setting
Profile mode
Display setting
Phone setting
Call setting
Network setting
Security setting
Default setting
Music player
Message
Inbox
Status Indicator
Standby Info
Soft key functional prompt

10
Outbox
Draft
Create
Setting
Memory status
Phonebook
Call logs
Dialed-in calls
Dialed-out calls
All calls
File manager
Use Keys
Use Soft Keys
The functions of soft keys vary with the current operating. The current function is displayed
in the lowest line on the screen.
Press the left soft key to select the option of the highlighting display.
Press the right soft key to return to the previous functional menu.
Select Option
1. Press the pertinent soft key.
2. Press the side sliding wheel to move upon to the previous or next option.
3. Press <Option> to enter in the option of the highlighting display, or press the side OK
key to confirm the display function.
4. If you require exiting, you can press <Back> to return to the previous functional menu
or press the end key to return to the standby mode.
Use Shortcut Keys
Press the numeral key corresponding to the option required, confirming the pertinent function
under the functional list status.
Basic Functions
Dial
1. Input the district number and the phone number, press the dial key or side OK key to
launch the call under the standby mode.
2. Press the right soft key to delete the number at the left side of the cursor in sequence or
press and hold the right soft key to delete all the numbers if a wrong number is input.
3. Press the end key if you require terminating or cancelling a call.
Answer
The phone will ring or vibrate and the screen will display the incoming call icon when you
phone receives an incoming call.
1. Press the left soft key or end key to answer the call.
2. Click the end key to terminate the call or refuse the call if necessary.
3. Use the earphone key to answer if the earphone is inserted or the Bluetooth earphone is
used.
Dial with Recent Call Log
1. Press the call key to display the recent call log under the standby mode or via the path:
standby > call log > dialed-in calls/dialed-out calls/ all calls.
2. Use the side sliding wheel to select the phone number of the contact.
3. Press the call key or side OK key to originate the call.
Useful Function
Profile Mode
Use the phone, set up the personal ringtones and phone-pertinent prompt tones under the
different profiles..
1. Operating path: standby > setting > profile mode.
2. Select the profile mode required to set up with the sliding wheel via the path: option >
edit or use the side OK key to open the setting window of the profile mode.
3. Select the setting option with the sliding wheel, and press the side OK key to set up the
parameters.
4. Return to the setting window after finishing setup, click the left soft key to save the
setting value.
5. Activate the selected profile mode via the path: option > option when the phone
displays the profile mode list.
Set up Phone Language
Set the display language for the phone:
1. Operating path: standby > setting > phone setting > language.
2. Select the phone display language with the sliding wheel and press the left soft key or
side OK key for confirmation.
Set up Date and Time for Phone
1. Operating path: standby> setting > phone setting > date and time.
2. Select the type to be set up with the sliding wheel and press the side OK key to set up
the parameters.
3. Return to the setting window after finishing setup and click the left soft key to save the
set value.
Select Music to be played
1. Operating path: standby > music player.
2. Press the left soft key to open the option menu, and select the “play list”.

11
3. Select the play list with the sliding wheel and press the left soft key to select “view”.
4. Select the music to be played with the sliding wheel and press the side OK key to begin
playing.
View Received SMS
1. Operating path: standby > SMS > inbox.
2. The SMS is arranged by the time sequence and marked with the icons for the read or
unread status. Scroll the SMS list and search the SMS to be viewed with the sliding
wheel.
3. Press the side OK key to view the SMS content under the SMS list status.
View Contact Data
1. Operating path: standby >phonebook.
2. Press * key or press the left soft key to open the option menu and select “search”.
3. Select the sender with the sliding wheel or press the left soft or side OK key for
confirmation.
4. The phone will display the contact list of the senders.
Shortcut Functions
Activate Mute Mode in Shortcut Way
1. Press and hold # key under the standby mode.
2. The window displays the prompt after the mute mode is launched and the mute mode
icon is displayed in the standby mode bar.
Play Music in Shortcut Way
1. Press and hold the music key under the standby mode.
2. The phone displays the music list. Select the list or music to play.
Search Contact in Shortcut Way
1. Press and hold * key under the standby mode.
2. Select the sender with the sliding wheel and press the left soft key or the side OK key
for confirmation.
3. The phone will display the contact list f the senders.
View Local Phone Number
With the function, you can view your local phone number.
1. Under the standby mode, press the left soft key or the side OK key for confirmation,
entering in the main menu.
2. Press the numeral key 0 to view the local phone number under the main menu status.
Manually Lock Keypad
1. Press the left soft key and then press the * key under the standby mode.
Manually unlock Keypad
1. Press the left soft key and then press the * key under the standby mode.
Call
The phone will actively access to the main network if it is within the coverage of the main
network after the phone is powered on. The phone can use the other network, termed as
roaming, if it is not within the coverage of the main network and permitted by the network
operator protocol.
You can dial out or in when the network supplier symbol is displayed on the screen.
The signal icon at the left-up corner of the screen indicates the current network signal strength
and the call quality will be affected when the signal is weak.
The call quality is subject to the hindrance, therefore a move within a small range can enhance
the signal strength and call quality effectively.
Dial
Dial Typically
1. Under the standby mode, input the district number and phone number, press the call key
or the side OK key to originate a call.
2. Press the right soft key to delete the numbers at the left of the cursor or press and hold
the right soft key to delete all numbers if a number is input wrongly.
3. Press the end key if you want to end or cancel a call.
Dial Telephone Extension
1. Under the standby mode, input the exchanger number and then consecutively input * till
the P number appears.
2. Input the extension number, press the call key or side OK key to originate the call.
Dial Emergency Call
1. Use the keypad to input the emergency call whenever the SIM card or USIM card is
inserted in the phone or not, such as 999 or 911.
2. Press the call key or side OK key to originate a call.
3. Press the left soft key to directly launch the call of local emergency call under the
standby mode when the phone is not inserted with the SIM card or USIM card or the
card is invalided.
Dial Internal Long-distance Call
1. Under the standby mode, continuously press * till the + sign appears.
2. Input the country code, district number and the phone number, press the call key or the
side OK key to originate a call.
Dial with Recent Call Log
1. Under the standby mode, press the call key to display the recent call log or via path:
standby >call log > dialed-in calls /dialed-out calls /all calls.
2. Select the phone number of a contact with the sliding wheel.
3. Press the call key or the side OK key to originate a call.
Dial with Phonebook
1. Via path: standby > phonebook.

12
2. Select the phone number of a contact with the sliding wheel.
3. Press the call key or the side OK key to originate a call.
Dial with Shortcut Key
1. First you are required to set up the shortcut key for a contact with reference to related
information if you want to dial out with the shortcut key.
2. Under the standby mode, press and hold numeral keys from 2 to 9 or 0, originate a call
to the phone number corresponding to the shortcut key.
Info:
The numeral key 1 is set up as a shortcut key of the voice mailbox and cannot be adopted as
shortcut key of phone numbers.
Dial Voice Mailbox
1. The default voice mailbox number is preset in the phone. If it is required to reset, please
refer to related information.
2. Under the standby mode, press and hold the numeral key 1 to originate the call of the
voice mailbox.
Answer Incoming Call
Answer Incoming Call Typically
Your phone will ring or vibrate and the screen will display the incoming call icon when you
phone receives an incoming call.
1. Press the left soft key or the call key to answer the call.
2. Click the end key to terminate or refuse the call if necessary.
3. You can use the earphone to answer if the earphone is inserted or a Bluetooth earphone
is used.
Info:
You can press any keys other than the right soft key, end key and the side sliding wheel to
answer any incoming call if you activate the function of answering by pressing any key.
Press the earphone key to answer an incoming call if the earphone is inserted.
Press the right soft key or the end key to decline a call if necessary.
View Missed Calls
1. The phone will display the missed call information under the standby window when
there is a missed call.
2. Press the left soft key to view the call log and press the call key to originate a call to the
phone number of the missed call.
3. View the missed call information via the call log via an operating path: standby >call
log > dialed-in call.
Call-related Function
Adjust Call Volume
Adjust the microphone volume with the side sliding wheel during the call, increasing the
volume with the sliding wheel upwards moved and reducing the volume with the sliding
wheel downwards moved.
Call Holding/Resuming
Press the right soft key to hold or resume a call during the call.
Dial another Call during Call
The function requires the supports of the network. Please consult with the network service
provider.
1. Press the right soft key to hold the current call and then dial a second call in a normal
way.
2. Or directly input the second phone number with the keypad, press the call key or side
OK key to originate a call.
3. Switch the modes of holding and activating the call with the right soft key if you require
switching to one of two calls.
Answer Second Call
The function requires the support of the network. You can consult with the network service
provider for the details of the call waiting.
1. Press the call key to answer the second call and the first call will be held automatically.
2. Switch the modes of holding and activating the call with the right soft key if you require
switching to one of two calls.
3. Press the end key to terminate the current call.
Use Speaker Function
With the hand-free function, you can speak to the mobile phone and answer a call within a
short distance.
1. During the call, press the side OK key, open the speaker and launch the hand-free call
function.
2. Re-press the side OK key, close the speaker and switch to the microphone if you require
switching to the normal call. 。
Write SMS during
1. During a call, press the left soft key to open the open menu and select “send SMS”.
2. Input the SMS content and press the side OK key to send the SMS when the phone
skids to the SMS-edited window with reference to the related content.
Call Options
During a call, press the left soft key and select one of the following options during the call:
Speaker: open or close the hand-free call function.
Mute: close the phone microphone and the opposite party will hear no voice of yours.
Add: add another call in the current call.
End: end the current call.
Send SMS: enter in the SMS-edited window.
DTMF: send DTMF(dual tone multifrequency) tones in group. The DTMF tone is a
13
phone-dialing tone that is issued when the numeral keys are pressed. When you use the
computerized call system(such as phone banking), it will assist you recording the password or
account.
Volume: adjust the call volume.
Contact: enter in the contact list.
Shift to Earphone: shift the call to the Bluetooth earphone or hand-free car-accessories.
Text Input
The phone supports the English and special symbol input.
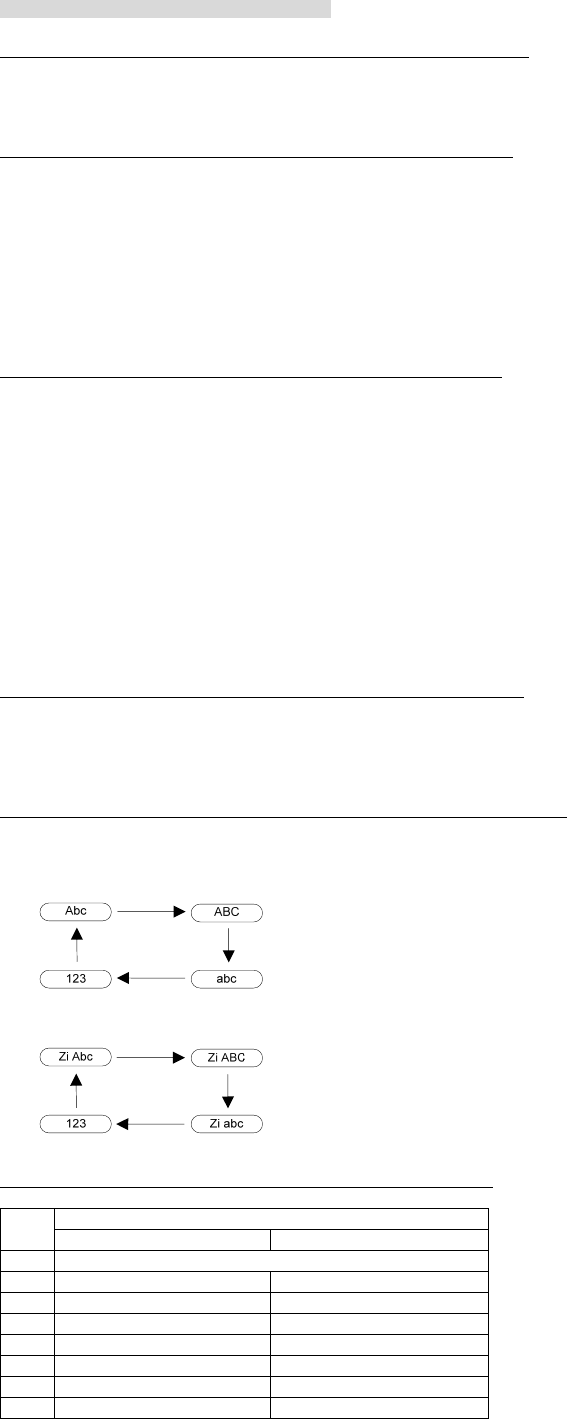
Change Input Mode
1. Under the text input mode, such as : standby >message> Create.
2. Press the left soft key to open the option menu and select “ input mode” .
3. Select the input mode with the sliding wheel and press the left soft key or side OK key
for storage.
Multi-press Input
1. Under the text input mode, such as: main menu>message > Create >SMS
2. Please use the path: option > smart mode> close if the current input mode is not the
multi-press one.
3. Hold the cursor at a same place for 0.5 seconds, repeatedly press the numeral keys from
2 to 9 till the wanted character appears before moving the cursor.
4. For instance, you want to input the word “Phone”, press the numeral key 7 once,
numeral key 4 twice, numeral key 6 trice and numeral key 3 twice in sequence.
5. Press the right soft key in turn to delete the character previous to the cursor and press
and hold the right soft key to delete all characters if inputting wrongly.
6. Press the numeral key 0 if you want to inut the space sysmbol fast.
Smart Input
With the smart input method, you can use the built-in dictionary to identify the
commonly-used characters of each key sequence. Thus you can only click the key of the
corresponding letter once whatever the key position of the corresponding letter.
1. Under the text input mode, such as: standby >message> Create.
2. Please use the path: option > smart mode> open if the current input method is not a
smart one.
3. For instance, you want to input “Phone” word, please press numeral keys 7,4,6,6 and 3
in sequence.
4. Press the side OK key for confirmation if the screen displays your wanted character;
view other candidate character with the sliding wheel if the screen does not display your
wanted character, press the side OK key for confirmation till you search your wanted
character.
5. Press the right soft key in turn to delete the character previous to the cursor and press
and hold the right soft key to delete all characters if inputting wrongly.
6. Press the numeral key 0 if you want to inut the space sysmbol fast.
Input Symbols
1. Under the text input mode, such as: standby >message> Create.
2. Repeatedly press numeral key 1 to input your wanted symbols if you want to input the
common sysmbols.
3. Press * key, select the suitable symbols with the sliding wheel and confirm the input
with the left soft key or side OK key if you want to input with the symbol table.
Shortcut Switch to Input Modes
1. Under the text input mode, such as: standby >message> Create.
2. Repeatedly PRESS # key to switch amid the input modes.
3. When at the multi-press input method, switch to the input modes in sequence with the #
key:
4. When at the smart input method, switch amid the input methods with the 3 key:
Input Keys
Characters Displayed in Sequence Keys
Capital Lower Case
1 . , ? ! : / @ - _ ~ 1
2 A B C 2 a b c 2
3 D E F 3 d e f 3
4 G H I 4 g h i 4
5 J K L 5 j k l 5
6 M N O 6 m n o 6
7 P Q R S 7 p q r s 7
8 T U V 8 t u v 8

14
9 W X Y Z 9 w x y z 9
0 Space 0
Setting
Profile Mode
It is used to set up the personal ringtones or phone-related prompt tones in order to use the
phone under the different scene.
1. Operating path:standby > setting> profile mode.
2. Select a profile mode to be set up with the sliding wheel and open the profile mode
setting window via the path: option>edit or with the side OK key for confirmation.
3. Select a setting option with the sliding wheel and set up the parameters with side OK
key for confirmation.
4. Return to the setting window after finishing setup, and click the left soft key to save the
setting value.
5. When the phone displays the profile mode list, activate the selected profile mode via the
path: option >select.
Setting Options of Standard/Conference/ In-car/Outdoor/New Profile Mode:
z Voice ringtone for incoming call: set up the voice ringtone for an incoming call.
z Volume: set up the volume of the ringtone.
z Message prompt tone: set up the prompt tone for message.
z Vibrate: set up whether to vibrate.
z Key tone: set up whether to activate the key tone.
z Warning tone: set up whether to activate the warning tone.
Setting Options of Mute mode:
z Voice ringtone for incoming call: set up the voice ringtone for an incoming call.
z Message prompt tone: set up the message prompt one.
Display Setting
Set up StandbyDisplay
Set up the screen display parameter of the standby phone.
1. Operating path: standby >setting> display setting > standby management.
2. Select the type to be set up with the sliding wheel and press the side OK key to set up
the parameters.
3. Return to the setting window after finishing setup, and click the left soft key to save the
setting value.
Setting Option of StandbyManagement:
z Wallpaper: set up a standby picture for the phone.
z Time display: set up whether to display the time under the standby mode.
z Date display: set up whether to display the date under the standby mode.
Set up Background Light Time
Set up the waiting time of the screen light under the non-working mode.
1. Operating path:standby >setting>display setting> background light waiting time.
2. Select the required waiting time with the sliding wheel and press the left soft key or the
side OK key for confirmation.
Set up Display Screen Brightness
Set up display screen brightness.
1. Operating path:standby >setting>display setting> screen brightness.
2. Select the required screen brightness level with the sliding wheel and press the left soft
key or the side OK key for confirmation.
Phone Setting
Set up phone language
Set up the display language for the phone.
1. Operating path:standby > setting>phone setting > language.
2. Select the required phone display language with the sliding wheel and press the left soft
key or the side OK key for confirmation.
Set up phone date and time
1. Operating path:standby >setting> phone setting>date and time.
2. Select the required type to be set up with the sliding wheel and press the left soft key or
the side OK key for confirmation.
3. Return to the setting window after finishing setup, and click the left soft key to save the
setting value.
Set up power-on/off tones
1. Operating path:standby > setting >phone setting >power-on/off ringtone.
2. Select the attribute of the power-on/off ringtones with the sliding wheel and press the
left soft key or the side OK key for confirmation.
Call Setting
Set up display attribute of local phone number
Set up whether to dispay the local phone number to be displayed on the phone of the called. It
is required the support of the network tosend the local phone number.
1. Operating path: standby > setting > call setting >local phone number.
2. Select the display attribute of the local phone number with the sliding wheel and press
the left soft key or the side OK key for confirmation.
Set up attribute of call waiting
Set up whether to answer a second call if the phne is under the calling mode. The function
requires the support of the network.
1. Operating path:standby > setting > call setting >call waiting.
2. Select the attribute of the call waiting time with the sliding wheel and press the left soft

15
key or the side OK key for confirmation.
Set up the answering mdoe
Set up to answer an incoming call by pressing any key or answer key.
1. Operating path:standby > setting > call setting > answer mode.
2. Select an answering mode with the sliding wheel and press the left soft key or the side
OK key for confirmation.
Set up attribute of auto redial
Set up whether to continue to dial if the local phone fials in dialing. The function supports
redialing for 10 times at maximum.
1. Operating path: standby > setting > call setting >auto redial.
2. Select the attribute of auto redial with the sliding wheel and press the left soft key or the
side OK key for confirmation.
Set up attribute of minding at minute
Set up whether to give a prompt 10 seconds before a minute integer if the phone is under a
calling mode.
1. Operating path:standby > setting >call setting >mind in minute
2. Select the attribute of minding at minute with the sliding wheel and press the left soft
key or the side OK key for confirmation.
Set up attribute of prompt tone of answering a call
Prompt that the call network is accessed
1. Operating path:standby > setting >call setting > prompt tone of answering a call.
2. Select the attribute of the prompt tone of answering a call with the sliding wheel and
press the left soft key or the side OK key for confirmation.
Set up Call Forwarding
Forward the incoming a voice call to a designated phone number or the voice mailbox.
1. Operating path: standby > setting >call setting >call forwarding.
2. Select the condition for forwarding with the sliding wheel.
3. Press the left soft key to open the option menu and select “open” .
4. Select forwarding mode: voice mailbox or other.
5. Input the phone number with the keypad or select the contact from the phonebook with
the side OK key for confirmation and press the left soft key for confirmation if
forwarding to other phone number.
Set up call restriction
Set up the right of calling and answering, including: barring of dialing out, barring of
dialingan international long-distance call, barring of all incoming calls, barring of an
incoming call upon international roaming and cancel all call restrictions. The function
requires the supports of the network.
1. Operating path: standby > setting >call setting >call restriction.
2. Select the restriction type with the sliding wheel.
3. Press the left soft key to open the option menu and select “open”.
View call time
1. Operating path:standby > setting >call setting >call time.
Reset Call Time
The time displaying on the phone is possible to differ from the actual call time of the call toll
of the network service supplier.
1. Operating path:standby > setting >call setting >call time.
2. Press the left soft key to re-calculate the call time.
Info Option of Call Time
Last call time: view the time length of the last call.
All dialed voice calls: view the time length sum of all dialed calls.
All answered voice calls: view the time length sum of all answered calls.
Reset All: reset the last call time, time sum of all dialed voice calls and all answered voice
calls as 0.
View Call Toll
The function will display only when it is supported by the SIM/USIM card.
1. Operating path: standby > setting >call setting >call toll.
Reset Call Toll
1. Operating path: standby > setting >call setting >call toll.
2. Press left soft key to re-calculate the call toll.
Set up Call Toll Limitation
1. Operating path:standby > setting >call setting >call toll.
2. Press the left soft key to open the option menu and select “modify limited toll”.
3. Input PIN2 and press the left soft key for confirmation.
4. Open the call toll restriction, input the limited toll and press the left soft key to store.
Set up call toll rate
1. Operating path:standby > setting >call setting >call toll.
2. Press the left soft key to open the option menu and select “toll rate setting”.
3. Input PIN2 and press the left soft key for confirmation.
4. Input currency and unit price and press the left soft key to store.
Info Option of Call Toll
Last call toll: view the loast call toll.
Total toll: view the toll sum of all calls. If the total cal toll exceeds the limited call toll, you
cannot dial any call out till you reset the toll meter as 0.
Limited Toll: view the maximum toll set in the option menu“modify limited toll”.
Network Setting
Set up network mode
1. Operating path:standby > setting >network setting >network mode.
2. Select a network mode with the sliding wheel.

16
3. Press the left soft key or the side OK key for confirmation.
Set up network-searching mode
1. Operating path:standby > setting >network setting > network-searching mode.
2. Select a network-searching mode with the sliding wheel.
3. Press the left soft key or the side OK key for confirmation.
Set up network channel
1. Operating path:standby > setting >network setting >channel setting.
2. Select the network channel with the sliding wheel.
3. Press the left soft key or the side OK key for confirmation.
Safety Setting
Set up auto keypad lock
Set up to open or close the auto keypad lock function. When the auto keypad lock function is
activated, the phone will automatically lock the keypad after there is no key-action for 1
minute in preventing from dialing wrongly.
1. Operating path: standby > setting >safety setting >auto keypad lock.
2. Select the auto keypad lock attribute with the sliding wheel.
3. Press the left soft key or the side OK key for confirmation.
Set up Phone Lock
Set up to open or close the phone lock function. When the phone lock is activated, the phone
password is required to input upon each power-on.
1. Operating path: standby > setting >safety setting >phone lock.
2. Select phone lock attribute.
3. Input phone lock password which is preset as 0000 in default.
4. Press the left soft key or the side OK key for confirmation.
Set up PIN Lock
Set up to open or close the PIN lock function. When the PIN lock is activated, the PIN lock
password is required to input upon each power-on.
1. Operating path: standby > setting >safety setting > PIN lock.
2. Select PIN lock attribute.
3. Input PIN lock password.
4. Press the left soft key or the side OK key for confirmation.
Note:
You have 3-time chance to input the PIN lock password. If the PIN is wrongly input for
continuously 3 times, the PUK is required to input to unlock the PIN lock; and if the PUK is
wrongly input for continuously 10 times, the card will be damaged. Please consult with the
network service provider for the details.
Change Phone Password
1. Operating path: standby > setting >safety setting >change phone password.
2. Input the original password and new password in sequence and finally confirm the new
password.
3. Press the left soft key or the side OK key for confirmation.
Change PIN
1. Operating path:standby > setting >safety setting >change PIN.
2. Input the original PIN and new PIN in sequence and finally confirm the new PIN.
3. Press the left soft key or the side OK key for confirmation.
Change PIN2
1. Operating path:standby > setting > safety setting >change PIN2.
2. Input the original PIN2 and new PIN2 in sequence and finally confirm the new PIN2.
3. Press the left soft key or the side OK key for confirmation.
Default Setting
Recover partial default settings
With this function, only the preset default parameters are recovered. The file information
created by the user, such as phonebook, message and play list etc will be remained.
1. Operating path:standby > setting >default setting >recover partial default settings.
2. Input the phone password which is preset as 0000 in default.
3. Press the lef soft key for confirmation.
4. After the phone is reset, the phone will return to the standby window.
Recover all default settings
With this function, all the preset default parameters are recovered. The file information
created by the user, such as phonebook, message and play list etc will be deleted.
1. Operating path: standby > setting >default setting >recover all default settings.
2. Input the phone password which is preset as 0000 in default.
3. Press the lef soft key for confirmation.
4. After the phone is reset, the phone will return to the standby window.
Play Music
Play List
Create play list
1. Operating path: standby >music player.
2. Press the left sof key to open the option menu and select “play list” .
3. Press the left soft key to open the option menu and select “Create”.
4. Input the play list name and press the side OK key for storage.
View Play List
1. Operating path: standby >music player
2. Press the left soft key to open the option menu and select “play list”.
3. Select the play list with the slidin wheel and select “View”.
4. Press the left soft key to select “Add”, and then select a adding mode: “folder” or “file”.

17
Option Menu of Play List
z Add: add the folder or file in the play list.
z Move: move the current file or a batch of files from the play list.
Edit Play List
1. Operating path:standby >music player,
2. Press the left soft key to open the option menu and select the “play list”.
3. Select the play list with the sliding wheel and select “View” with the left soft key.
4. Press the left soft key to select “add” , and then select an adding mode: “folder” or
“file”.
5. In the file manager, select a folder or file to be added in the play list, press the side OK
key for confirmation.
6. If a file in the play list is required to delete, press the left soft key to select “move” , and
then select a moving mode. Press the left soft key or the side OK key for confirmation
upon enquiry for deletion.
Delete PLay List
1. Operating path:standby >music player.
2. Press the left soft key or open the option menu and select “play list” .
3. Select the play list with the sliding wheel and press the left soft key to select “delete” .
4. Upon enquiry for deletion, press the left soft key or the side OK key for confirmation.
Option of Play List
View: enter in play list
Create: create play list
Rename: rename the play list
Delete: delete the play list
Option for Entering in Play List
Add: add the file in the play list
Move: delete the files from the play list
Set up Play Mode
1. Operating path:standby >music player
2. Press the left soft key to open the option menu and select “play mode”.
3. Select a cycled play option, press the side OK key to set up the cycled play attribute.
4. Select randon play option, press the side OK key to set up the randon play attribute.
5. After finishing setup, press the left soft key to save the setting parameters of a play
mode.
Set up Equalizer
1. Operating path:standby >music player.
2. Press the left soft key to open the option menu and select “equalizer”.
3. Select the wanted equalizer with the sliding wheel.
4. Press the left soft key or the side OK key for confirmation.
Set up Volume
1. Operating path:standby >music player.
2. Press the left soft key to open the option menu and select “volume adjustment”.
3. Adjust the volume with the sliding volume.
4. Press the side OK key for confirmation, or, the phone will return to the original window
and save the volume parameter if there is no operating-action for 2 seconds.
Play Music
Play by List
1. Operating path:standby >music player
2. Press the left soft key to open the option menu and select “play list ”.
3. Press the side OK key for confirmation and begin to play the music in the play list.
Select Music to Play
1. Operating path:standby >music player.
2. Press the left soft key to open the option menu and select “play list”.
3. Select the play list with the sliding wheel and press the left soft key to select “View”.
4. Select the music to be played with the sliding wheel and press the side OK key to begin
to play.
Adjust Play Volume
When playing the music with the music player, use the side sliding wheel to adjust the volume
of the player, increasing the volume with the sliding wheel upwards moved and reducing the
volume with the sliding wheel downwards moved.
Backstage Play
1. Operating path: standby >music player.
2. Play a song from the play list or begin to play a song directly under the player mode.
3. Press the right soft key to return to the previous window. The player will play at the
backstage.
4. Directly operate the player with the music key when the player is playing at the back
stage. Please refer to related content for details.
Operate Player
Operate with player key
1. Operating path: standby >music player.
2. Use the following keys when the player is playing a song.
: pause /play
: stop
: return to a previous file.
: skid to a next file.

18
Option of Player
Play list: open the play list.
Play mode: set up the cycled play mode and random play mode attributes.
Equalizer: select the equalizer setting.
Volume adjustment: adjust player volume.
Message
Send or receive message with the message menu.
Please confirm to operate as following procedures before sending or receiving message:
1. Insert SIM/USIM card.
2. The network supports message function if the phone is located within the wireless
network service area.
3. Set up network access points.
4. Set up message parameters.
The phone can recognize the SIM/USIM card provider and can self-configure the related
message parameter. If the phone is not provided with the self-configureation of message
parameters, you can set them up manually. Please consult with the service provider or the
network operator for concerns on the parameter setting.
The different types of folders will be displayed with the message menu. Please refer to the
folder as follows:
Inbox: save the received message.
Outbox: save the message, which is trial-sent, succeeds or fails in sending by the phone.
Draft: save the message for future sending.
Create: create the message and edit a new message.
Inbox
View received message
1. Operating path: standby >message >inbox.
2. The message is arranged by time sequence with icons marking the read or unread status.
Pleasse scroll the list with the sliding wheel to search the message to be viewed.
3. Press the side OK key to view the message content under the message list status.
Seve Phone Number of Message Sender
1. Operating path: standby >message >inbox.
2. Press the left soft key to select “save phone number” .
3. Select a save mode: create contact or update existing contacts. Please refer to the related
content for contact edition information.
Reply Received Message
1. Operating path: standby >message > inbox.
2. Press the left soft key to select “reply” .
3. The phone will skid to the SMS-editing window, and export the phone number of the
SMS sender as the receiver of the SMS. Please refer to the related content for sending
SMS.
Forward Received SMS
1. Operating path:standby >message >inbox.
2. Press the left soft key to select “forwarding”.
3. The phone will skid to the SMS-editing window, and export the content of the SMS as
the content of a new SMS. Please refer to the related content for sending SMS.
Delete Received SMS
1. Operating path:standby >messsage>inbox.
2. Press the left soft key to select “delete” and deleting mode.
3. Press the left soft key or the side OK key for confirmation upon enquiry for deletion.
4. Please input the phone password,which is preset as 0000 in default, and press the left
soft key or the side OK key for confirmation when you delete many contacts and the
system enquires the password.
Abstract Phone Number of Received SMS
1. Operating path: standby >message>inbox.
2. Scroll the list with the sliding wheel, press the side OK key to view the SMS till you
search the SMS to be viewed.
3. Press the left soft eky to open the option menu and select “abstract”.
4. The phone abstracts and displays the phone number that can be called or saved.
Save Received SMS
1. Operating path: standby >message> inbox.
2. Scroll the list with the sliding wheel, search the SMS to be viewed, press the side OK
key to view the SMS.
3. Press the left soft key to open the option menu, and select “save in USIM/phone” .
4. The phone will save the SMS in the pertinent position.
Option of Inbox
Reply: reply the sender with the SMS.
Forward: forward the SMS.
Delete: delete the SMS.
Delete all: delete all SMS in the inbox.
Call: call the SMS sender in voice.
Save phone number: save the phone number of SMS sender in phonebook.
Option of Viewing Inbox Info
Reply: reply SMS sender with SMS.
Forward: forward the SMS.
Delete: delete the SMS.

19
Call: call the SMS sender in voice.
Abstract: abstract the phone number in the SMS.
Move to UISM card: move the SMS between the USIM card and phone memory.
Outbox
View SMS in Outbox
1. Operating path:standby >message>outbox.
2. The message is arranged by time sequence with icons marking the modes that the SMS
is sending, succeeds or fails in sending. Pleasse scroll the list with the sliding wheel to
search the message to be viewed.
3. Press the side OK key to view the message content under the message list status.
Option of Outbox (Failed SMS)
Resend: resend the SMS.
Delete: delete the SMS.
Delete all: delete all SMS in outbox.
Option of Outbox (Succeeded SMS)
Forward: forward the SMS.
Delete: delete the SMS.
Delete all: delete all SMS in the outbox.
Call: call the SMS sender in voice.
Option of Viewing SMS in Oubox (failed)
Resend: resend the SMS.
Delete:delete the SMS.
Call: call the SMS sender in voice.
Abstract: abstract the phone number in the SMS.
Ooption of Viewing SMS in Outbox (succeeded)
Forward: forward the SMS.
Delete: delete the SMS.
Call: call the SMS sender in voice.
Abstract: abstract the phone number in the SMS. 。
Create SMS
Create SMS
1. Operating path:standby >message> Create.
2. Inpt the SMS with the keypad.
3. After finishing edition, press the left soft key to opent the option menu and select
“ Send” or press the side OK key to enter in the SMS-sending window.
4. Press the left soft key to open the option menu and select “save to draft” if the edited
SMS is required to saved in the draft.
Note:
The maximum quantity of characters allowable to write in the SMS differs from the network
service supplier. The phone will decompose the SMS to send it if the SMS is at excess of the
maximum quanity of characters.
Option of Editing SMS
Send: send the SMS.
Save to draft: save the SMS to the draft.
Switch input mode: change the input mode.
Insert symbol: invoke the symbol table and selectively input a symbol.
Smart mode: open or close the preset smart mode.
Send SMS
1. Under the SMS-editing window, such as: standby >message> Create.
2. Press the left soft key to open the option menu, select “send” or press the side OK key
to enter in the SMS-sending window.
3. Input the phone number of SMS receiver with the keypad, press the left soft key to open
the option menu, select the phone number from the recent contact list or form the
phonebook list.
4. Select “add new address” to add the SMS receiver, adding the phone numbers of
receivers in sequence if you want to send the SMS to many contacts.
5. After finishing the edition of contact phone number, press the left soft key to open the
option menu and select “send” .
Option of Sending SMS
List of recent receiver: enter in the list of recent receivers of SMS.
Phonebook: enter in the phonebook.
Save to draft: save the SMS to the draft.
Draft
View and edit drafts
1. Operating path:standby >message>draft.
2. The drafts are arranged by the time sequence. Scroll the lsit with the sliding wheel and
search the wanted draft SMS.
3. Press the side OK key to open the draft SMS re-editing window. Refer to related
content.
Option of Draft
Send: send the SMS.
Delete: delete the SMS.
Delete all: delete all SMS in the draft.
Icons of SMS for Marking
20
: Unread SMS saved in USIM card.
: Read SMS saved in the USIM card.
: Unread SMS saved in the phone.
: Read SMS saved in the phone.
: Draft SMS.
: SMS fialing in sending.
: SMS succeeding in sending.
: SMS in sending.
Setting
Set up account of SMS
1. Operating path:standby > SMS > setting> SMS setting > setting.
2. The phone will automatically read the account info in the SIM/USIM card and display it
on the window.
3. If there is no SMS displayed, please consult with the network service provider and input
manually.
Setting Option of SMS Account
SMS center number: save or modify the SMS center number.
Valid date: set up the time length of the SMS saved in the SMS center.
Default type: set up the type of the default SMS. The network can transfer the SMS into a
selected format.
Set name: input the set name.
Set up SMS Report
1. Operating path: standby >message> setting >SMS setting >send setting.
2. Select the status report option with the sliding wheel and press the side OK key to open
the report status.
3. After finishing setup, press the left soft key to save it.
Setting Option of Sending SMS
Reply path: reply the SMS via SMS center for the SMS receiver.
Send report: the network is set up to notify you upon the arrival of the SMS.
Network selection: select GSM or GPRS priority based on your location in the network.
Set up Store Position of SMS
1. Operating path:standby >message> setting > SMS setting >default setting.
2. Select the store position with the sliding wheel.
3. Press the left soft key or the side OK key for confirmation.
Set up Voice Mailbox Number
1. Operating path: standby > message> setting > voice mailbox.
2. The phone will display the default voice mailbox number, can clear away the default
number, input new voice mailbox number with the keypad or press the side OK key to
select the number from the phonebook list.
3. After finishing input, press the left soft key or the side OK key for confirmation.
View Memory Capacity
1. Operating path: standby >message>memory status.
2. The phone will display the memory status of the phone and the SIM/USIM card.
Phonebook
You can store the phone number in the SIM/USIM card or phone memory.
View Contacts
1. Operating path:standby >phonebook.
2. Press* key or press the left soft key to open the option menu and select “search” .
3. Select a contact with the sliding wheel and press the left soft key or the side OK key for
confirmation.
4. The phone will display the contacts list.
Create Contacts
1. Operating path:standby >phonebook.
2. Press * key or press the left soft key to open the option menu and select “Create”.
3. Select the edit option with the sliding wheel and input the contact info.
4. After finishing edition, press the left soft key to save the contact.
Delete Contacts
1. Operating path:standby >phonebook.
2. Press * key or press the left soft key to open the option menu, select “Delete” and delete
mode.
3. Press the left soft key or the side OK key for confirmation upon enquiry for deletion.
4. Please input the phone password and press the left soft key or the side OK key for
confirmation when you want to delete many contacts and the system enquires into the
password, which is preset as 0000 in default.
Send Contacts
1. Operating path:standby > phonebook.

21
2. Press * key or press the left soft key to open the option menu, select “send” .
3. The phone will export the contact info. Refer to pertinent information for sending.
Send Message to Contact
1. Operating path:standby >phonebook.
2. Press * key or press the left soft key to open the option menu, select “send” .
3. The phone will skid to the SMS window, export the contact phne number as the number
of the receiver. Refer to pertinent content for editing and sending.
Copy Contact
1. Operating path:standby > phonebook.
2. Press * key or press the left soft key to open the option menu, select “copy to USIM
card/phone” and copy mode.
3. If it is a batch operation, please use the side OK key to select or cancel, and press the
left soft key to operate.
Display Contacts in SIM/USIM Card
1. Operating path: standby > phonebook.
2. Press * key or press the left soft key to open the option menu, select “contact in USIM
card ”.
3. The phone will display the list of contacts saved in the SIM/USIM card.
4. Press the side OK key to view the contact details. 。
Create My Businness Card
1. Operating path: standby > phonebook.
2. Press the left soft key to open the option menu, select “setting” .
3. Select my business card option.
4. Select the edit option with the sliding wheel and input the business card info in
sequence.
5. After finishing edition, click the left soft key to save it.
Send My Business Card
1. Operating path:standby > phonebook.
2. Press the left soft key to open the option menu, select “setting” 。
3. Select my business card option.
4. When there is a business card, press the left soft key for conformation of sending. The
phone will skid to the sending window and export the contact info as the SMS content
automatically. Refer to pertinent conent for operation. 。
Quick Dial
1. Operating path:standby > phonebook.
2. Press the left soft key to open the option menu, select “setting” 。
3. Select quick dial list option.
4. The key 1 is assigned to the voice mailbox. Select the shortcut keys 2-9 with the side
sliding wheel and press the OK key to begin to edit the shortcut phone number.
5. Input the pertinent phone number of the shortcut key or press the left soft key to select
the contact phone number in the phonebook.
6. After finishing setup of shortcut keys, press the left soft key to save them.
Memory Capacity
1. Operating path:standby >phonebook.
2. Press the left soft key to open the option menu, select “memory status”.
3. The phone will dislay the memory status of the phone and the SIM/USIM card.
Phonebook Option
Search: search the contact via the Pinyin table quickly.
Call: call the contact in voice.
Send SMS: send the SMS to the contact.
Create: create the contact info.
Edit: edit the contact info.
Delete: delete the contact info.
Copy to USIM: copy the contact info to the USIM card.
Send: send the contact info via SMS.
USIM contact: dispay the contact data saved in the USIM card.
Setting: set up the quick dial and my business card info.
Memory status: view the quantity of contacts saved in th ephone memory and USIM card.
Contact Info Option
Store position: set up the store position of the contact.
Name: input the name of the contact.
Voice: input the voice of the contact.
Phone number 1: input the phone number of the contact.
Phone number 2: input phone number of the contact.
Call Log
View the dialed, answered and missed calls, call time and call toll.
View call log

22
1. Operating path: standby > call log> dialed-in calls /dialed-out calls/all calls.
2. Scroll the log list with the sliding wheel and view the call log entries.
Send SMS to logged Phone Number
1. Operating path:standby > call log> dialed-in calls /dialed-out calls/all calls.
2. Press the left soft key to open the option menu, select “create SMS”.
3. The phone will skid to the SMS-editing window and export the logged phone numbers
as the phone number of the receiver. Refer to the pertinent content for SMS edition and
send.
Save Logged Phone Numbers
1. Operating path:standby > call log> dialed-in calls /dialed-out calls/all calls.
2. Press the left soft key to open the option menu, select “ save phone number”.
3. Select a save mode from: create contact or update existing contact. Refer to pertinent
content for editing contact.
Set up Logged Phone Number as Quickly Dialed Number
1. Operating path:standby > call log> dialed-in calls /dialed-out calls/all calls.
2. Press the left soft key to open the option menu, select “set as quickly dialed number” 。
3. The phone will skid to the quickly-dialling list window, select a shortcut key with the
sliding wheel and press the left soft key or the side OK key for confirmation of the
setting.
Clear Away Call Log
1. Operating path:standby > call log> dialed-in calls /dialed-out calls/all calls.
2. Press the left soft key to open the option menu, select “delete all” .
3. Please input the phone password and press the left soft key or the side OK key for
confirmation when you want to delete many contacts and the system enquires into the
password, which is preset as 0000 in default.
Option of Call Log
Edit before call: the phone exports the phone number to the number-dialing window.
Create SMS: skid to the SMS-editing window. The phone will export the phone number as the
number of the receiver.
Delete: delete the call log.
Save phone number: save the phone number in the phonebook.
Set as quick dial: set the phone number as quickly dialed number.
My File
Veiw the files saved in the Micro SD memory card with this function.
Frequent deletion or write can shorten the servive life of the memory card.
Do not pull the memory card from the phone or power off the phone when the data is used or
transported, or otherwise, possibly resulting in the lost data or damaged memory card or
phone.
Do not impact the memory card strongly.
Do not touch the ports of the memory card with the hands or metal articles. If polluted, clean
it with the soft clothing.
Place the memory card out stretch of the kids or pets.
Do not place the memory card in the locations where there are static electricity and electronic
disturbance.
Note:
The phone may not support some files due the different formats and attributes of the files.
Operate Folder
Create folder
1. Operating path:standby > my file.
2. Press the left soft key to open the option menu, select “Create folder”.
3. The phone will skid to the editing window. Input a name of folder and press the side OK
key to save.
Move Folder
1. Operating path:standby > my file.
2. Select a folder .
3. Press the left soft key to open the option menu, select “move”.
4. The phone skids to the first layer of the file and select a position to be pasted.
5. Press the left soft key to open the option menu, select “ paste”.
Copy Folder
1. Operating path:standby > my file.
2. Select a folder .
3. Press the left soft key to open the option menu, select “copy”.
4. The phone skids to the first layer of the file and select a position to be pasted.
5. Press the left soft key to open the option menu, select “copy”.
Delete Folder
1. Operating path:standby > my file.
2. Select a folder.
3. Press the left soft key to open the option menu, select “Delete” 。
4. Press the left soft key or the side OK key to delete.
Rename Folder
1. Operating path:standby > my file.
2. Select a folder.

23
3. Press the left soft key to open the option menu, select “Rename” 。
4. The phone skids to the editing window. Input a new folder name and press the side OK
key to save.
Folder Option
Create: create a folder.
Delete: delete a folder.
Move: move a folder.
Copy: copy a folder.
Memory status: view the memory status of Micro SD.
Operate File
MP3 Music File
1. Operating path:standby > my file.
2. Select music file, press the side OK key to invoke the multimedia player to play it.
Vcard file
1. Operating path:standby > my file.
2. Select Vcard file, press the side OK key to viw the calendar file.
Move File
1. Operating path:standby > my file.
2. Select a file.
3. Press the left soft key to open the option menu, select “move”.
4. The phone skids to the first layer of the file and select a position to be pasted.
5. Press the left soft key to open the option menu, select “paste”.
Copy File
1. Operating path:standby > my file.
2. Select a file.
3. Press the left soft key to open the option menu, select “copy” .
4. The phone skids to the first layer of the file and select a position to be pasted.
5. Press the left soft key to open the option menu, select “paste”.
Delete File
1. Operating path:standby > my file.
2. Select a file.
3. Press the left soft key to open the option menu, select “Delete” 。
4. Press the left soft key or the side OK key to delete upon the enquiry into deletion or not.
Rename File
1. Operating path:standby >my file.
2. Select a file.
3. Press the left soft key to open the option menu, select “Rename” 。
4. The phone skids to the editing window. Rename the file and press the side OK key to
save.
View file attribute info
1. Operating path:standby > my file.
2. Press the left soft key to open the option menu, select “detail info”.
3. The phone will display the file attributes, including the name, creating time and size.
File Option
Move: move a file.
Copy: copy a file.
Delete: delete a file.
Rename: rename a file.
Create: create a file.
Detail : view file attributes.
Memory status: view the memory status of Micro SD.
Memory Capacity
1. Operating path:standby > my file.
2. Press the left soft key to open the option menu, select “memory status” .
3. The phone will display the memory status.
Connection
1. Connect the phone and the PC with the USB cable.
2. The PC will display the installation prompt if the software is not installed. Please install
the software according to the installation prompt.
3. The phone with the Mirco SD card inserted can be used a a mobile memory if the PC is
installed with the software. When the software is started, the phone can be used as a
Modem of dialing and accessing to the network for the PC.
Note:
When the phone is served as a mobile memory or a Modem, the phone will be not used in the
partial functions.
EMOBILE-An Additional Service
####
About Accessories
Pay attention to the maintenance of the products that are placed in the clean dust-free location.
Be sure not expose the product to the liquid or high humidity
Be sure not expose the battery to the temperature extremes.
Be sure not place the products in the lit cigar or fire.
Be sure not drop, throw or bend the products.

24
Be sure not paint the products.
SAR Data
Your phone is a low-energy wireless transceiver. Upon power-on, the phone will emit a
low-level RF.
Varous countries in the world all adopt the national security guidances formulated by the
specialized scientific organizations, such as ICNIRP and IEEE. These guidances establish the
approved level of the RF exposed to the general population, including the difference in any
measurement, such as age and health in the calculation, guaranteeing the safety of the human
being.
The specific absorption rate(SAR) refers to a unit measuring the quantiy of the RF
absorbedby the human body. The SAR value is regulated based on the verified maximjm
energy level based on the experient status. The true SAR level of the phone will be far lower
than the level. Generally, the closer to the base station, the lower the energy emited by the
phone is.
The SAR levels of various models of phones vary. The phone is designed and manufactured
based on the radio exposure directive in order to ensure the safety and health of the users.
The SAR of RF applicable for the public is 2.0w/kg /10 g body issue in the average limit. The
phone conforms to the restriction after tested.
Function Schedule
Call Inbox
Dial Create SMS
Answer SMS icons for
marking
Call-related
functions
setting
Test input View memory
capacity
Multi-press input phonebook
Smart input Search contact
Input symbol Create contact
Switch input modes
in shortcut way
Delete contact
Input keys Send contact
setting Send SMS to contact
Profile mode Copy contact
Display setting Display SIM/USIM
cntacts
Phone setting Create my business
card
Call setting Send my business
card
Network setting Quick dial
Safety setting Memory capacity
Default setting Phonebook option
Music play Call log
Play list View call log
Set play mode Send SMS to logged
phone number
Set up equalizer
Equalizer
Remain logged
phone number
Set volume Set logged number
as quick dial
Music play Clear away call log
Player operation Option of call log
SMS My file
Inbox Operate file
Operate file
Memory capacity
Failure and Solution
Before contacting with the post sales server, you can check the phone simply, or you can
avoid the excessive maintenance time and expense waste.
Cannot power the phone on
z Check whether the Powering-on key is pressed and hold for 1 second or above;
z Check whether the battery is contacted badly or not. Please remove the battery firstly
and then try to power the phone on;
z Check whether the battery capacity is used up or not; please charge the battery;

25
When the phone is powered on, there is no information displayed
z Check whether the SIM card is installed rightly;
z The phone is locked with the Auto Lock function activated and the password shall be
input;
z Input PIN; select the function of inputting PIN when the phone is powered on. The PIN
shall be input (the PIN attached with the SIM card should be input for the first use.);
z Input PUK: after the PIN is input wrongly for successively 3 times, the phone will be
locked. The PUK provided by the network operator should be input;
USIM card error
z There is some dirt on the metal surface of the USIM card. Please wipe the metal
contacts of the USIM card with a clean cloth ;
z USIM card is not installed ;
z USIM card is damaged. Please contact with your network supplier;
Cannot access to the network
z The signal is weak, please move to the place where the signal is strong and retry;
z Beyond the coverage of the network of the network server;
z USIM card is invalid, please contact with your network supplier;
Can not dial a phone number out
z Please confirm whether the dial key is pressed after the number is dialed;
z Please confirm whether the call is barred due to owned toll;
z Please confirm whether the SIM card is valid or not;
z Please confirm whether the call restriction function is set up;
z Please confirm whether the fixed dial function is set up;
Bad Call Quality
z Check whether the volume is adjusted appropriately;
z Use the phone at the place where the receiving quality is not good, such as near to the
building or in the basement where the radio wave cannot reach.
z Use the phone at the peak time, such as at the time of going on/off the duty, the
channel is congested;
Contact can not call you
z Please confirm that the phone is powered on and is uplinked with network;
z Please confirm that the call is barred because of owned toll;
z Please confirm whether the USIM card is valid;
z Please confirm the ingoing call is barred due to owned toll;
Contact can not hear you
z Please confirm that the microphone is opened.。
z Please maintain the lower end of the microphone aligned to your mouth.
Shortened Standby Time
z The stand-by time is relevant to the system setup. The phone is possibly at the place
where the signal state is bad. When the phone cannot receive the signal, the phone will
transmit to search the base station continuously; consuming a great deal of battery
capacity and shortening the stand-by time of the battery. Please move to the place
where the signal is strong to use the phone or temporarily power the phone off.
z The battery requires to be displaced with a new battery ;
Can not Charge
z Bad contact; please check whether the plug is connected well;
z Accumulated dirt, clean the phone and battery sockets with soft dry clothing.
z Charge at the environment below -10℃ or beyond 45 . Please change the charging ℃
environment;
z The battery or adapter is damaged and requires to be replaced;
If the aforementioned instructions cannot facilitate you to conquer these problems, please
record:phone model and SN,detailed contents in the guarantee-to-repair sheet and clear
statement of the problem, and then contact with the post sales service department or the local
distributor.
Other
If the aforementioned instructions cannot facilitate you to conquer these problems, please
record:

26
z Phone model and SN
z Detailed contents in the guarantee-to-repair sheet
z Clear statement of the problem
z The battery or adapter is damaged and required to replace.
Guarantee and After Serive
Gurantee
We provide a limited guarantee-to-repir for the phone together with the accessories. If your
products need a gurantee service, please be sure to mail to the guarantee sheet to the
distributor.
During the guarantee period, under the normal usage and maintainane condition, if the
product fails due to defective design, material or process, the distributor or repair partner from
the products are purchased by the user wil decide to repair or replace the product by
themselves base don the regulations.
Repair
If the products delivered to repair do not conform to the gurantee-to-repair consition, the
authorized maintenance center reserves to charge the maintenance of such products:
z Only when the repaired and replaced products can be issued with the original purchase
invoice with the purchase date and SN issued by the distributor to the purchaser , the
guarantee will be valid. After the product is purchased from the distributor, the
purchase invoice or three-guarantee certificates are changed, alternated or deleted, the
authorized maintenance service center will reserve to refuse to repair.
z If the authorized maintenance service center replaces or repair the products, the
repaired or replaced products, the gurantee service will be continued within 30 days
from the repairing date or within the remained guarantee period. The equivalent
components can be used for the repair or replacement. The replaced or changed
components will be processed by the authorized maintenance service center.
z The guarantee-to-repair is not covered the fialed products which is worn out or
damaged by the wrong manmade operation. The fialed products due to accident,
refitting, debugging, force majeure, improper ventilation, damp or wrong operation
will not be covered in the guarantee-to-repair range. The battery is a consumable
product with a limited service life. After a period of useage, the capacity of the battery
will be reduced gradally. When the call time and the standby time are drastically cut off,
a new battery should be purchased. Please use the authorized original battery and
adapter.
z The screen brightness and colors of various phones will be different from each other.
The smaller light points or dark points on the screen are called as defective pixel.
When individual points appear the failure, the failure can not be adjusted. The
individual pixel on the screen is regarded as acceptable.
z We understake no any accountabililty for the system operation, availibity, coverage
area, service and service range becaue the cellular system for the product is provided
by the telecommunication company.
z Any product failure due to installation, refit, repair or disassembly by not authorized
service center personnel will not be covered in the gurantee-to-repair range.
z The fialed products due to usage of the non-authorized accessories or other peripherial
devices will not be covered within the guarantee-to-repair range.
z Changing or damaging any orginal labels will result in failure of the
guarantee-to-repair.
z Only the limited gurantee-to-repair will be acknowledged in the publication with
exception to the oral or written form. All the hinted gurantee-to-repair, including but
not limited to the trial-promotion or gurantee-to-repair of hint suiability for a special
purpose, are all based on the provision of this gurantee-to-repair article. Any accident
or undirect damage in violation of the laws, including but not limited to the gain loss or
commercial bankruptc will exempt the law responsibility of our company.
The forgoing limitation or disclaimer may not suit for you because some countries or regions
prohibit or limit the accident or accasional or subsequently occurred damage or
gurantee-to-repair period in concealing form.
Additional information requires to be provided in some nations or regions, thus, the
effectivepurchasing certificates shall be indicated with the information.
Attention
Please note: for some products, the user’s personal data, setting or saved information will be
lost after the products are maintained or replaced. Currently, based on the related laws,
regulations or technical limitation, the authorized service center is not allowed to treat the
information. The authorized service center will not undertake any responsibility for or
indemnify any lost. Please back up your personal data saved in the products before delivering
them for repair or maintenance.
Accessories
Please consult with the related distributor or the maintenance partners of the products for
maintenance.
Please replace the accessories with the authorized original ones in order to ensure the safe and
effective use.
Reference
27
####
Federal Communication Commission Interference Statement
This equipment has been tested and found to comply with the limits for a Class B digital
device, pursuant to Part 15 of the FCC Rules. These limits are designed to provide
reasonable protection against harmful interference in a residential installation. This
equipment generates, uses and can radiate radio frequency energy and, if not installed and
used in accordance with the instructions, may cause harmful interference to radio
communications. However, there is no guarantee that interference will not occur in a
particular installation. If this equipment does cause harmful interference to radio or
television reception, which can be determined by turning the equipment off and on, the user is
encouraged to try to correct the interference by one of the following measures:
z Reorient or relocate the receiving antenna.
z Increase the separation between the equipment and receiver.
z Connect the equipment into an outlet on a circuit different from that to which the
receiver is connected.
z Consult the dealer or an experienced radio/TV technician for help.
FCC Caution: Any changes or modifications not expressly approved by the party responsible
for compliance could void the user's authority to operate this equipment.
15.101 statement:
This device complies with Part 15 of the FCC Rules. Operation is subject to the following two
conditions: (1) This device may not cause harmful interference, and (2) this device must
accept any interference received, including interference that may cause undesired operation.
IMPORTANT NOTE:
Federal Communication Commission (FCC) Radiation Exposure Statement
This EUT is compliance with SAR for general population/uncontrolled exposure limits in
ANSI/IEEE C95.1-1999 and had been tested in accordance with the measurement methods
and procedures specified in OET Bulletin 65 Supplement C.
For body worn operation, this phone has been tested and meets FCC RF exposure guidelines
when used with an accessory that contains no metal and that positions the handset a minimum
of 1.5cm from the body. Use of other accessories may not ensure compliance with FCC RF
exposure guidelines.”