Longcheer Technology WM62 GSM/GPRS/EDGE/WCDMA/HSDPA Data Modem User Manual User Manua WM62
Longcheer Technology (Shanghai) Co., Ltd. GSM/GPRS/EDGE/WCDMA/HSDPA Data Modem User Manua WM62
User Manual
HSDPA MODEM
USER Manual
2
Index
Introduction .....................................................................................3
Main interface introduction ..............................................................5
Entrance to main interface ..............................................................8
Connect to the Internet....................................................................9
SMS Service .................................................................................13
Contacts ........................................................................................16
Settings .........................................................................................19
FAQ ...............................................................................................25
FCC Part 15 statement .................................................................29

3
Introduction
This PC Suite is designed to enable users to access the Internet via the
GPRS / EDGE / UMTS / HSDPA networks.
With this application, users can access the following functions:
y Wireless Internet connection
y An SMS service
y A contact manager
y Settings
1. Internet connection
This application will ensure easy connection to the Internet. Users will
be able to enjoy a high-speed data service by clicking on the
button in the main window or by clicking directly on the device.
Users can also access the connection status in the tray bar, including
connection time and volume of data transferred.
2. SMS service
With this PC Suite, users can use the following functions:
4
y New SMS
y Edit SMS
y Group SMS
y Reply
y Forward
y Save number
y Export to PC
y Delete
3. Contacts
It contains 2 memories: PC and (U)SIM card.
It supports the following functions:
y New
y Edit
y Send SMS
y Export vCard file
y Export text file
y Copy to PC and (U)SIM card
y Delete
y Search

5
4. Settings
This contains the following settings:
y Network mode
y Network band
y Network selection
y Request PIN
y Modify PIN
y Connection profile settings
y Diagnostics
y SMS settings
y System settings
y Help
y About
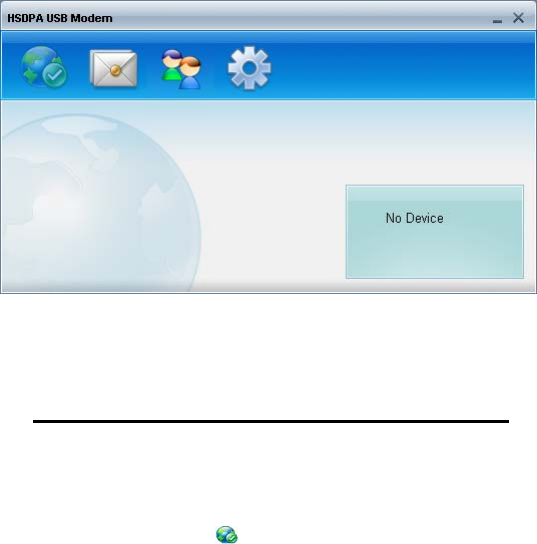
Main interface introduction
1. Function icon
/: Connect / disconnect to Internet
: Access the SMS service window

6
: Access the contact management window
: Set parameters of the PC suite
2. Status bar information
Current network operator name will be displayed on the status bar.
y If no device is found, ”No device” is displayed
y If no SIM card is found, “No (U)SIM card” is displayed
y If the SIM card is invalid, “Invalid (U)SIM card” is displayed
y During Initialization, ”Initializing” is displayed
y If searching for the network, “Searching” is displayed
y If no network is found,” No service” is displayed
3. Signal status bar
: Indicates the signal strength of the current network
Network type:
is displayed when GSM/GPRS is connected
is displayed when UMTS is connected
Support data service:
is displayed if HSDPA is available
is displayed if EDGE is available

7
Nothing is displayed if GPRS support is available
: Indicates that there is an unread SMS in main interface
: Indicates that the (U)SIM card memory is full
4. Tray Icon
If you click on , the main window is closed and the tray icon will
appear in the tray bar. The main window can be reopened by double
clicking on the tray icon.
5. System tray menu
y Open: Opens the main window
y Connect/Disconnect: Connects/disconnects to the Internet
y Statistics: Displays connection status information
y Contacts: Opens contact management window
y SMS: Opens SMS service window
y About: Application version
y Exit: Exits the application

8
Entrance to main interface
y The application runs automatically and the main window will pop
up when a device is connected. Users can also access and run
the application from the <Start> menu.
y If the PIN code is enabled, please enter the correct PIN code in
the entry field, and click on <OK>. Users may try only 3 times to
enter the correct PIN code; after three incorrect attempts, the
(U)SIM card will be blocked.
y A PUK dialog box will then be displayed asking the user to enter
the right PUK code. Click on <OK>, and a default PIN code will be
retrieved. If the user fails to input the correct PUK code after 10
attempts, he should contact the operator.
y If the PIN code is correct, the application will be launched and all
functions can be used.
9
Figure1: Main window
Connect to the Internet
1. Connecting with the default log-on profile
If you want to connect to the Internet without setting any user-defined or
predefined profiles, press . The default connection profile will be
used in accordance with your (U)SIM card.
Connecting

10
y Click on from the main window;
y Wait several seconds until the connection is established;
y Once you are connected, will change into and the
connection information window will appear in the tray bar.
Disconnecting
Click on from the main window to disconnect from the Internet.
2. Connecting with a user-defined log-on profile
Click on and select the <Connection settings> menu to open the
profile setting window.
Adding a new connection profile
Click on <Add> to open a new connection profile window:
1. If <New profile> is selected
y Click on <Next>, and the edit settings window will pop up;
y Enter any profile such as APN;
y Click on <Finish> to add it to the available profile list.
2. If <Choose from predefined list> is selected
y Click on <Next>, and a predefined list will pop up as shown
below;
y Select one item in the predefined profile list;
11
y Click on <Finish> to add it to the available profile list.
Note:Users may obtain APN information from their operator.
Setting a default connection profile
1. Select one item from the list of available connection profile(s);
2. Click on <Set default> to set it as the default profile;
3. Click on to start the connection using the specified profile.
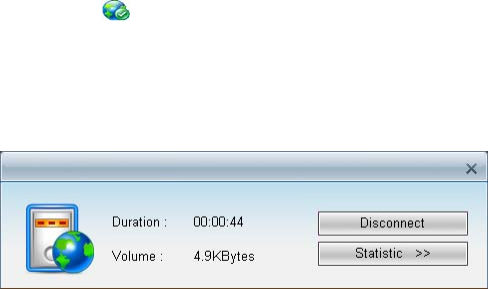
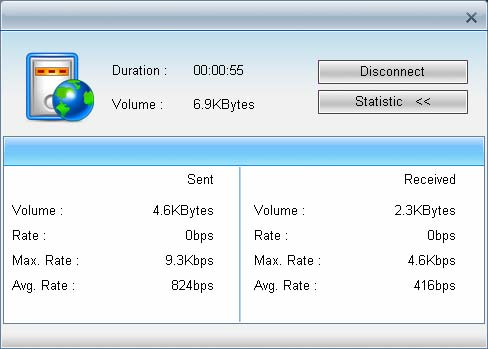
3. Connection status information
A connection status window will be displayed in the tray bar as soon as
you are connected.
Figure 1: Statistics
12
Figure 2: Statistics
It includes details such as the connection time and volume of data
transferred.
Click on <Statistics> for more details on the connection.

13
SMS Service
Click on in the main window to access the SMS service interface.
You can select <Contacts> at the bottom of the screen to switch to the
contacts management window.
1. Displaying the received SMS
When a new message is received, a message box appears in the tray
bar.
y Click on <View> in the box to access the inbox or click on ;
y Left-click to show the content of the chosen message. You may
also display the content by double-clicking on the message.
Note: Received SMS will be saved on the (U)SIM card if the main
window is closed, otherwise saved on the PC.
2. New SMS
y Click on <New SMS> in the shortcut menu bar. An SMS creation
window will pop up;
y Enter the text.
3. Send
14
(1)You may enter a recipient’s number in 3 ways:
y Enter the number directly. If there are two or more recipients, use
“,” to separate each;
y Enter the name of a recipient saved in the phonebook;
y Click on <To> to access the recipients selection window. Select
one party, or more (using the ctrl/shift key), and then click on <OK>
to add the chosen party (ies) to the recipient list. (2)Click on
<Send> to send the message. If the message is not sent, it will be
saved in the Outbox.
4. Reply
y Select a message in the inbox and then click on <Reply> in the
shortcut menu bar;
y The recipient’s number will appear in the <To> field. It can now be
modified;
y Enter the reply in input field, and then click on <Send>.
5. Forward
y Select a message and then click on <Forward> in the shortcut
menu bar;
y The content of the selected message will appear in the input field.
It can now be modified;
15
y Enter the recipient’s number and then click on <Send>.
6. Edit
y Access the draft list to select a message, and open it by
double-clicking on it;
y Click on <Save> or <Send> when you have finished editing.
7. Delete
y Select a message, or several messages (using the ctrl/shift key);
y Click on <Delete> in the tool bar. A dialog box will ask “Are you
sure to delete?”
y Click on <OK> and the SMS will be deleted, it will not be restored.
8. Resend
y Access the outbox to select a message or several messages
(using the ctrl/shift key);
y Click on <Send> in the tool bar;
y The application will resend the unsent message(s).
9. Export
y Select a message or several messages (using the ctrl/shift key) in

16
the current list;
y Click on the <File> menu and on <Export>. A window will prompt
for the location on your PC where the file should be stored;
y Click on <OK> to confirm. The SMS will be exported to the chosen
location and saved as a *.txt file.
Contacts
Press from the main window to access the contacts management
interface.
The contacts list column contains: All / PC / (U)SIM. Users can use
contacts stored either on the PC or on the (U)SIM card in the
corresponding window.
1. New
y Select <New> from the tool bar to access the contacts editor;
y Enter the relevant information, and press <OK>; the new contact
will appear in the current contact list.
2. Edit
y Select a contact and access the contact editor by selecting <Edit>
17
from the tool bar or double-click on the contact;
y Modify the relevant contact information, and select <Save> to
save the changes.
3. Delete
y Select one contact, or more (using the ctrl/shift key);
y Click on <Delete> from the tool bar. A dialog box will ask “Are you
sure to delete?”;
y Click on <OK> and the contact(s) will be deleted; deleted contacts
will not be restored.
4. Send SMS
y Select one contact or more (using ctrl/shift key);
y Click on <Send SMS> in the tool bar;
y When the message is completed, you may send it by clicking on
<Send>.
5. Copy to (U) SIM card/PC
y Select one contact, or more (using ctrl/shift key) stored in the
same memory;
y Click on <Copy to> in the tool bar and select a target memory
different from the memory being used;
18
y Contact(s) will be copied to the target memory.
6. Search
y Enter the key words or numbers in the empty field in the tool bar;
y The system will find entry(ies) which match(es) the key word(s);
7. Export
y Select one or more contacts by pressing the ctrl/shift key from the
current list;
y Click on <File> menu and select <Export>; select the export text or
a vCard file. A window will pop up requesting the location on the
PC where the contacts should be stored.
y Click on <OK> to confirm, and the contact(s) will be exported to the
chosen location and saved as a *.txt or *.vcf file.
8. Import
y Click on the <File> menu and select <Import>. A window will pop
up requesting the vCard file to be imported.
y Click on <OK> to confirm and the contact(s) will be imported to the
current window.

19
Settings
Click on from the main window. A menu with the various settings will
appear.
1. Network mode
y Select <Network mode> in the menu. The default connecting
mode will be according to the (U)SIM card for your login to the
Internet. Click on <GSM900/1800>/<GSM1900>. It will search for
GSM and register it;
y Click on <Only UMTS/HSDPA>/<UMTS/HSDPA Preferred>/<Only
GPRS/EDGE>/ <GPRS/EDGE Preferred>, the device will search
and register with the selected network mode for the next
connection. It will be saved as the default mode when you
connect again to the Internet.
2. Network band
y Select <Network band> in the menu. The default setting is
<auto>;
y Click on <GSM900/1800>/<GSM1900>. It will search for GSM
and register it;

20
y Click on <UMTS2100>. It will search for UMTS2100 and register
it.
3. Network selection
y Select <Network selection> in the menu. The default setting
is <Automatically>;
y Click on <Manually> to activate the network list window;
y A list of networks appears when the search is complete;
y Select an available network from the list of available operators
and click on <Select>. It will register the selected network.
4. Request PIN
y Click on the <Request PIN> menu and select <Enable/Disable>.
Activate the PIN input dialog box;
y Enter the correct PIN code;
y Click on <OK>. You will see the following message “PIN code has
been enabled (disabled)”.
5. Modify PIN
y Click on <Modify PIN>, and activate the PIN modify dialog box;
y Input the old PIN and the new PIN, then confirm;
y Click on <OK> to confirm the new PIN code

21
Note: You can only access the modify menu if the PIN is enabled.
6. (U)SIM Unlock
Click on <(U)SIM Unlock>, and activate the NCK code dialog box to
unlock this function, Input the NCK and click on <OK> to confirm;
Note: The NCK code is supplied by your Operator.
7. Connection profile settings
Select <Connection settings> in the menu to access the connection
profile setting window. There is (are) available connection profile(s) in
the list.
Adding a new connection profile
Click on <Add> to open a new connection profile window:
1. If <New profile> is selected
y Click on <Next>, and the edit settings window will pop up;
y Enter any profile such as APN;
y Click on <Finish> to add it to the available profile list.
2. If <Choose from predefined list> is selected
y Click on <Next>, and a predefined list will appear on the pop up
window;

22
y Select one item in the predefined profile list;
y Click on <Finish> to add it to the available profile list.
Note:Users may obtain APN information from their operator.
Edit
y Select an item in the connection profile list;
y Click on <Edit> to access the profile edit window;
y Modify the parameters and click on <Finish> to save the
modification.
Delete
y Select an item in the connection profile list;
y Click on <Delete> on the keyboard. You will be asked if you are
sure you want to delete;
y Choose <Yes> to delete the profile from the list.
Set a default connection profile
y Select one item from the list of available connection profile(s);
y Click on <Set default> to specify set it as the default profile;
y Click on to start the connection using the specified profile.
8. Diagnostics

23
Select <Diagnostics> in the menu to access the diagnostic
information window.
3 types of diagnostic information are listed below:
y Modem information
y Operator information
y Network status
Click on <Export> to export the list and save it as a *.txt file.
9. SMS settings
Choose <SMS settings> in the menu to access the SMS settings
window.
SMS centre number
The default number is found in the (U)SIM card. You may change it.
SMS validity period
You can choose between: 1 hour/6 hours/1 day/1 week/maximum.
SMS Alert
Click √ to validate the message alert sound.
You can choose *.wav file saved in the PC using the <Browse> option.
24
10. System settings
Click √ to validate the sound prompt when the Internet will be
connected/ disconnected.
11. About & help
You can get information on the version in the <About> menu.
If you need help, click on <Help> to access the help document.

25
FAQ
1. Q: Which operation systems does this PC suite support?
A: It supports Windows 2000, Windows XP, and Windows Vista.
2. Q: The PC suite does not auto-run when the device is
plugged in
Situation1: if there is no notification from the PC, please
check if the auto-run has been disabled by Windows.
Situation2: If the device remains on the U-disk, please check
if an anti-virus application has disabled the auto-run.
A: Please launch the PC suite manually if you do not change the
configuration of your PC.
3. Q: I cannot install the driver
A: On some PCs, installation of the driver may take a long time
because of the PC configuration. So please wait and do not
cancel the process or you will have to uninstall and re-install
again.
26
4. Q: What should I do if the main window continues to
display “Searching device”?
A: Please remove the device and reinsert it.
5. Q: What should I do if the (U)SIM card is unplugged during
the application?
A: Please disconnect the device first, and then restart the
application.
6. Q: The (U) SIM card does not register the network
A: The reasons are shown below:
1. Unstable local signal;
2. The PC suite is an old version;
3.Hardware problem.
You may:
1. Try to log from another location;
2. Update the PC suite;
3. Check the hardware or use another data card and retry.
7. Q: Why does the prompt “Unavailable connection profile”
appears?
A: Please add one manually.
27
8. Q: It failed to connect to the internet
A: Please check if the connection profile is correct.
9. Q: The connection speed and data transfer rate are too slow
A: Please check the local network signal.
10. Q: What is the meaning of the network light indicators?
A: Indicator “Network” flashing green, red & multi-colour:
searching network;
Indicator “Network” flashing green: UMTS/HSDPA network;
Indicator “Network” constant green: UMTS connected;
Indicator “Network” flashing red: GPRS/EDGE;
Indicator “Network” constant red: GPRS/EDGE connected.
11. Q: It failed to send an SMS
A: Please make sure the SMS centre number is correct.
12. Q: I cannot receive an SMS
A: Please check whether your (U)SIM card memory is full.
28
13. Q: Why can I only save part of the name when adding a new
contact?
A: Because the (U)SIM card can only 12 SBC cases, and 6
DBC cases.
14. Q: The information in the tray bar displays only 115.2Kpbs
after connection is
established
A: 115.2kpbs is not the connection speed, please refer to the
PC suite connection status information.
15. Q: Does it support roaming?
A: This depends on the local operator. Please consult your local
operator.
16. Q: What should I do if the power supply is insufficient?
A: Please use two plugs.

29
FCC Part 15 statement
This device complies with part 15, part 22 and part 24 of the FCC rules.
Operation is subject to the following two conditions:
(1) this device may not cause harmful interference
(2) this device must accept any interference, including interference that
may cause undesired operation.
This equipment has been tested and found to comply with the
limits for a Class B digital device, pursuant to Part 15 of the FCC
Rules. These limits are designed to provide reasonable protection
against harmful interference in a residential installation. This
equipment generates uses and can radiate radio frequency energy
and, if not installed and used in accordance with the instructions,
may cause harmful interference to radio communications.
However, there is no guarantee that interference will not occur in a
particular installation. If this equipment does cause harmful
interference to radio or television reception, which can be
determined by turning the equipment off and on, the user is
encouraged to try to correct the interference by one or more of the
following measures:
- Reorient or relocate the receiving antenna.
- Increase the separation between the equipment and receiver.
- Connect the equipment into an outlet on a circuit different from
that to which the receiver is connected.
Consult the dealer or an experienced radio/TV technician for help.
WARNING
Changes or modifications made to this equipment not expressly
approved by Longcheer Technology for compliance could void the
user's authority to operate the equipment.
30
Notice: Please maintain at least 20cm from the body to this device
and its antenna when the device is used.