Longhorn Technology H-113 PARKING SENSOR User Manual 1
Shenzhen Longhorn Technology Co., Ltd. PARKING SENSOR 1
Users Manual

USER'S MANUAL
Wireless Parking Sensor
System For Truck
H-113
Printed in China
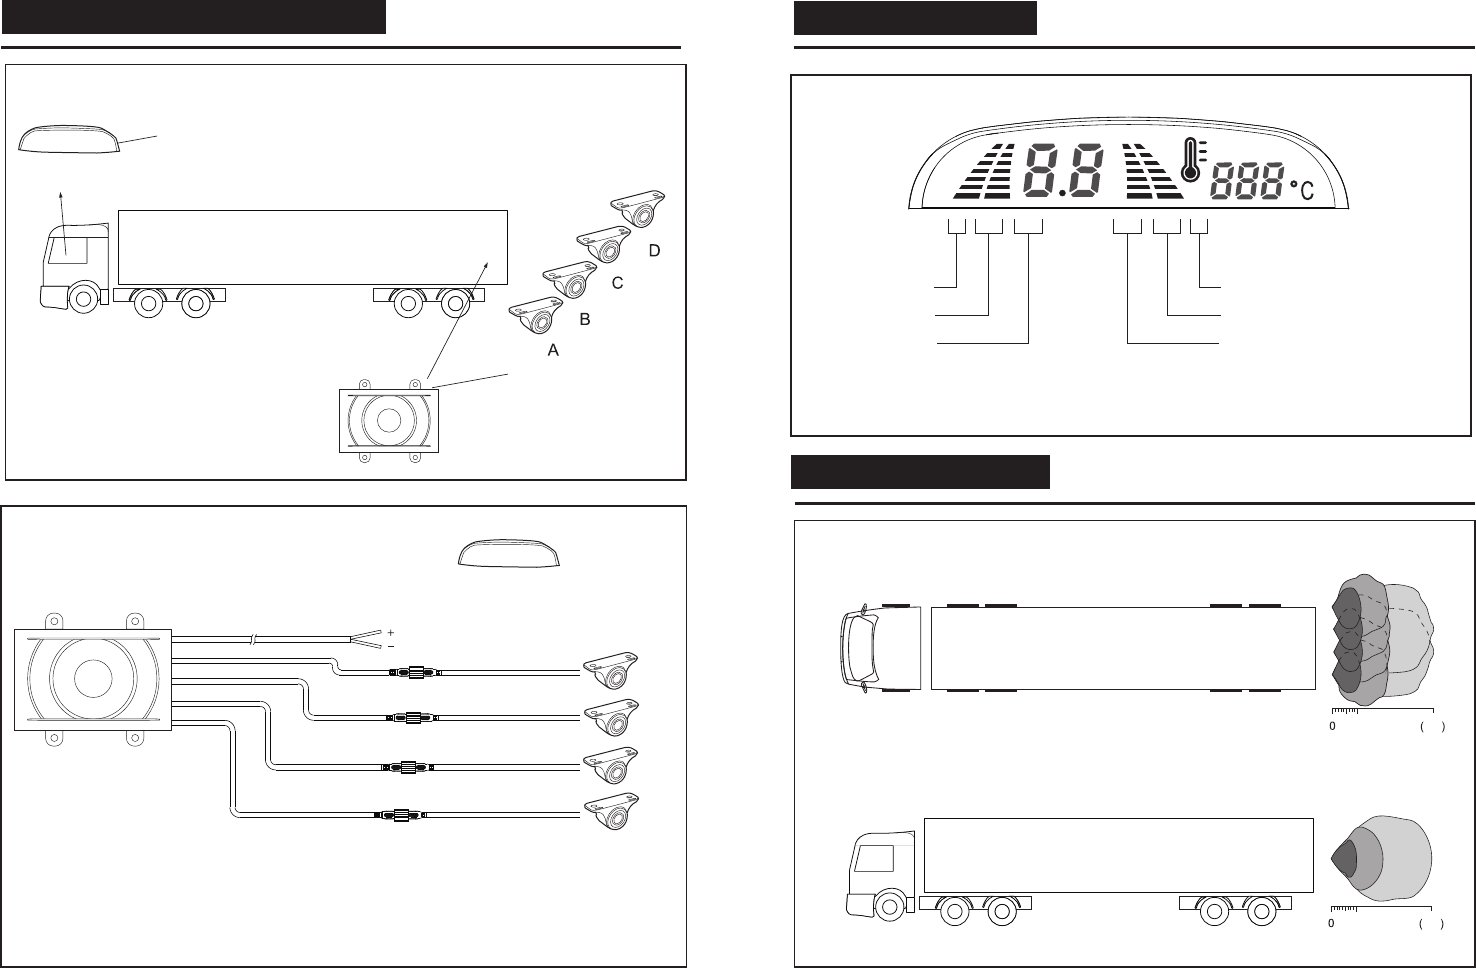
GENERAL INSTALLATION DIAGRAM
LED DIGITAL DISPLAY
Display
Control box
Sensor
Display
Control box
Red wire
Black wire
Sensors
Top view
Side view
Safe area
Alarm area
Danger area
Safe area
Alarm area
Danger area
Connect the power
of reversing light
5.5-2.5ft
2.5-0.0ft
5.5-8.5ft 5.5-8.5ft
5.5-2.5ft
2.5-0.0ft
DETECTING RANGE
ft
ft
8.0
8.01.5
1.5
Connect the ACC power
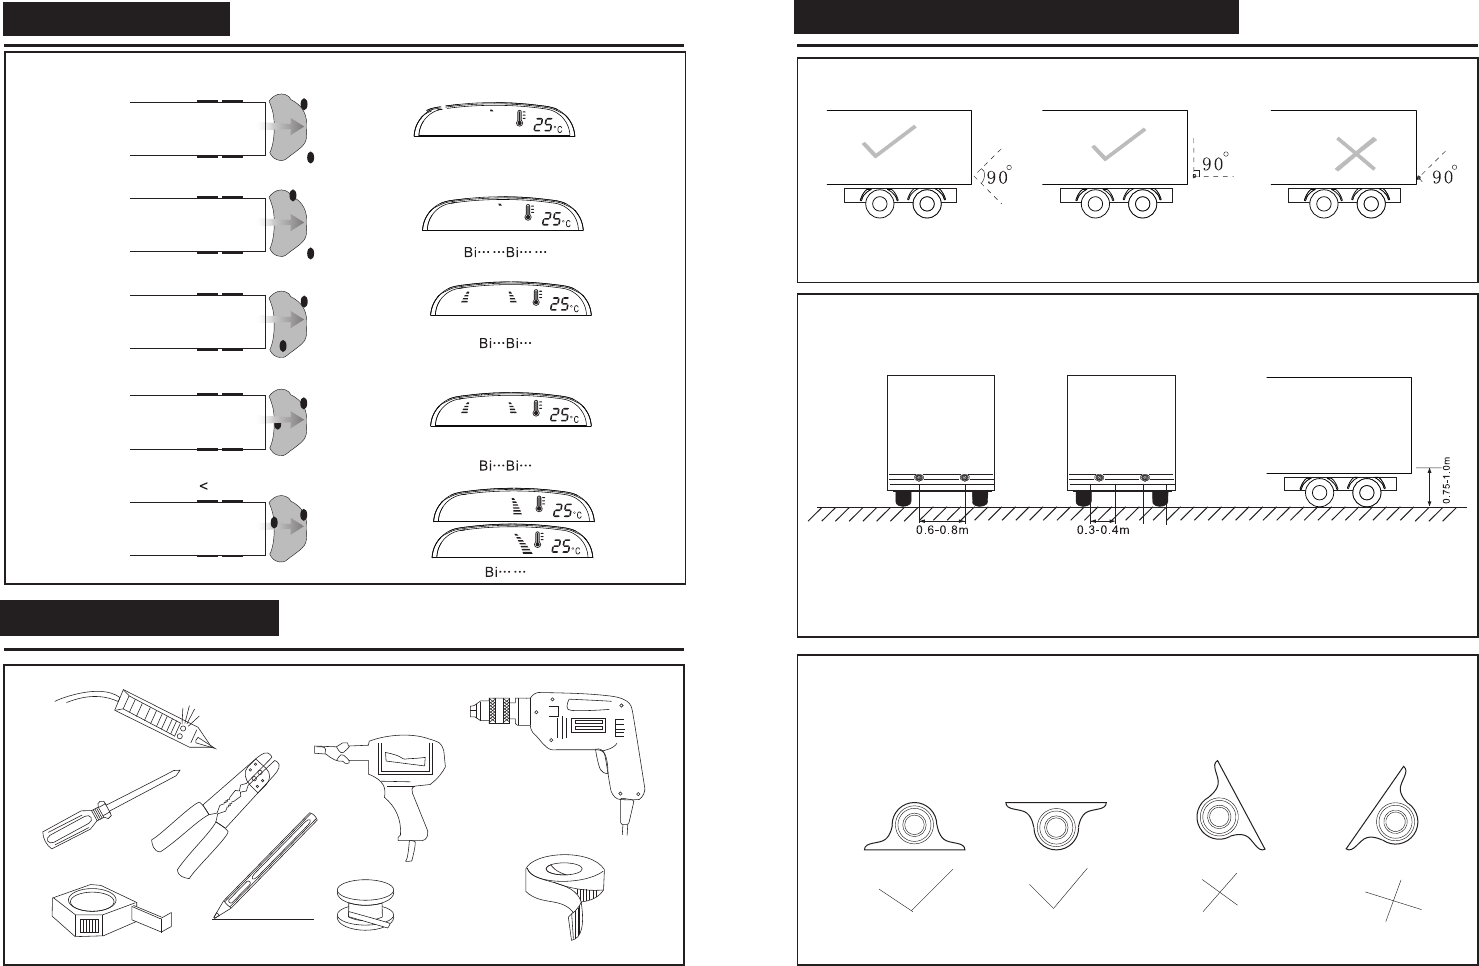
Safe Area
Safe Area
Alarm Area
Danger Area
Danger Area
Fix the position of sensor ,and no obstacle should be found at 90
from side view ,otherwise the system would mis-alarm
Advised position to install the sensors
Best position for 2 sensors Best position for 4 sensors
Sensor Installation Diagram
1.5f
1.5f
1.5-5f
5.5-8f
> 8.5f
8.5
6.0
3.5
1.5
1.0
0.0
DISPLAY STATUS
INSTALLATION TOOLS
SENSOR INSTALLATION DISGRAM
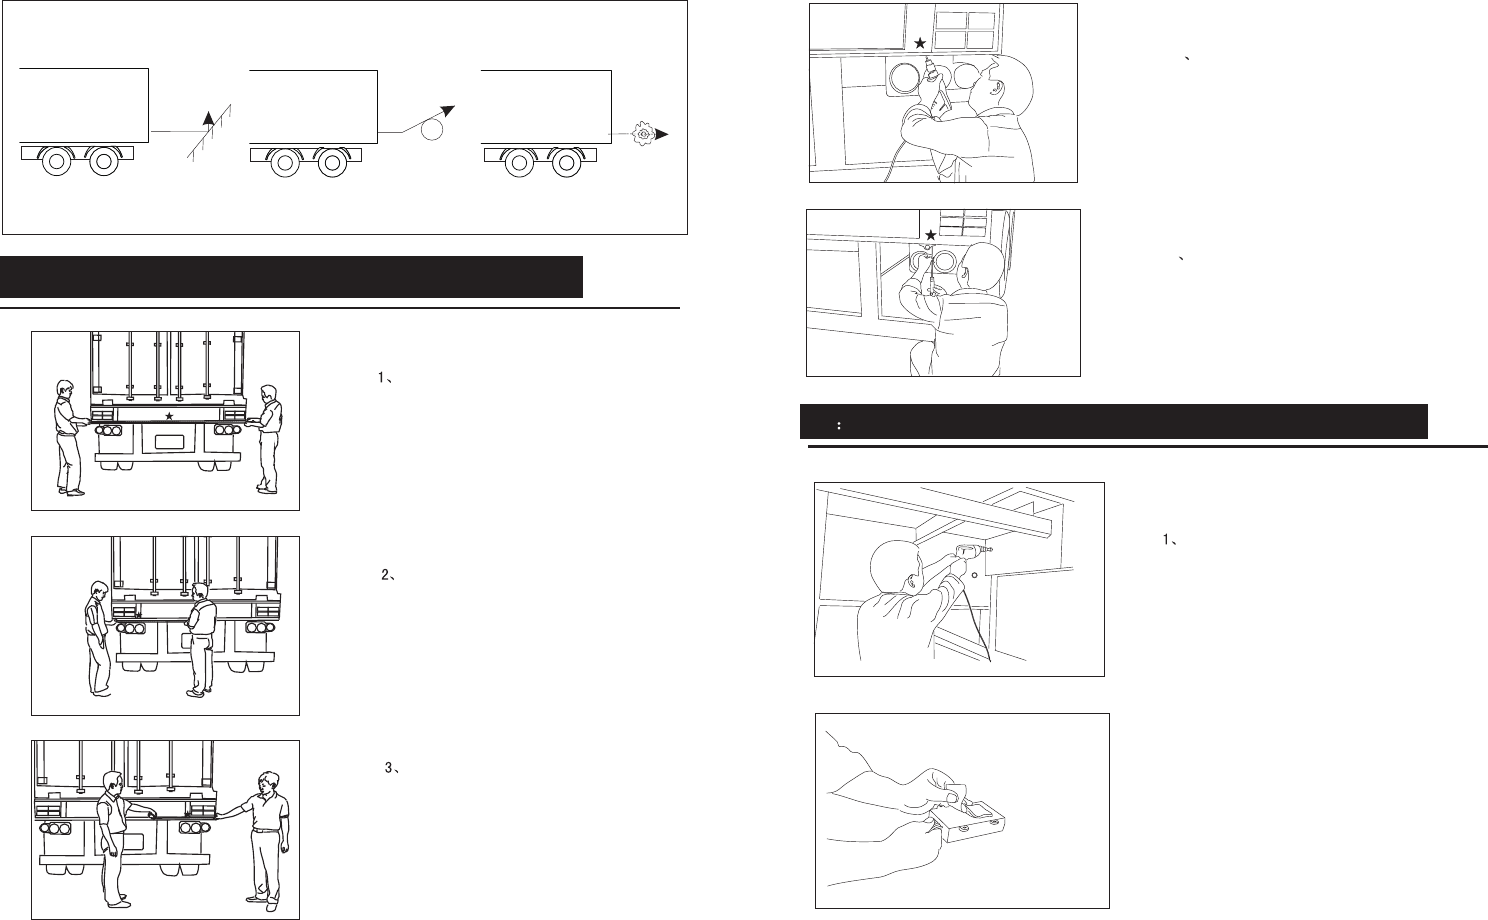
Objects maybe cause failure detection
Smooth slope Smooth round object Object absorbing
wave, e.g. Cotton
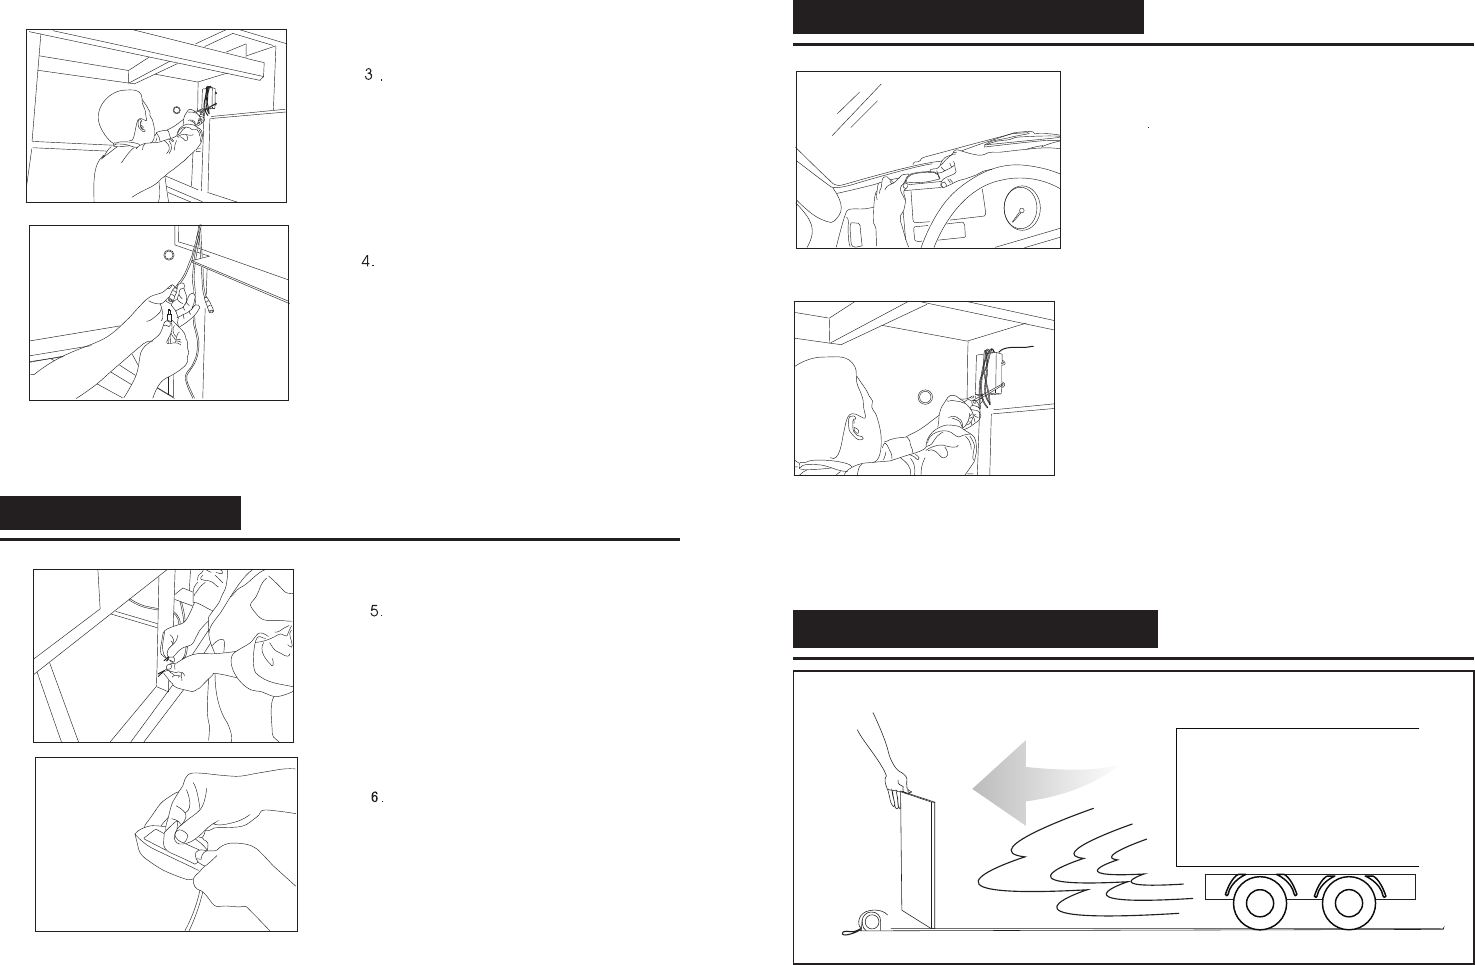
4 drilled holes (A,B.C.D) should
be under the same line.
Measure the distance 0.5-0.65f on its
side for position A&D,between sensor
A&D get the result “L”,mark sensor
B&C for every 1/3 “L”interval.
Installation height for sensor can be
adjusted,2.5-4.0ft vertically high to
the ground
Choose suitable drilling position,
in the corresponding position with
drill for fixed.
Use screws to fix the sensors
2. 3M sticker paste to the back of control box.
Advised position to install the sensors
Choose suitable control box position,
then punching in the corresponding position.
2.CONTROL BOX INSTALLATION AND CONNECTION
1. ADVISED POSITION TO INSTALL THE SENSORS
4
5
Stick the control box on the fixed position,
then fixed by screw.
Connect sensor and control box
Sticker the control box on the
dashboard
Let the power line out ward,
acknowledge and transmit signal
Connect the power line of control box
and power source of reversing light
Switch on the display , after normal test ,then
stick 3M stick on the backside of display
Dusolay installation
7.
8.
5.0tf
6. SENSOR DETECTING
4. CONNECTION
5. DISPLAY INSTALLATION
H-113 consists of ultrasonic sensors, display and control box .
This system detects
the distance between the truck and the back obstruction by the ultrasonic sensors. The display
H-113
MAIN FEATURES
TECHNICAL SPECIFICATIONS
ALARM MODE
INSTALLATION STEPS
NOTE
1. The car must be in power-off during the installation.
2.Its performance may be affected in following situation: heavy rain, gravel road, bumpy
road sloping road and bush, very cold, hot or moist weather, or the sensor is covered by
ice, mud, etc..
.
4.The sensors should be installed appropriately loose or tight.
5.Its performance may be affected if the sensors are fixed on metallic bumper.
6. Avoid installing the digital control box in places of great interference, such as vent-pipe,
wiring nearby.
7.Test the system to make sure it works normally before using.
8.This system is a reversing aid and the manufacturer will take no responsibility for any
accident after the kit is installed.
3.Other ultrasonic or electric wave, the instance of DC/AC switch or 24/12v switch maybe
affect the performance of the system.
Digital LED display
Direction indicate or if left ,middle & right.
Simulated bars display direction indicator
Rated voltage: DC 24V Operating range: DC 9~32V
Operating current: 12V 20-150mA(Be concerned with alarm status)
Detection distance:0.5~8.0f
Ultrasonic frequency: 40KHz
Working temperature: -30~+70℃
Display size: 93.2*49*22.3mm
1. Choose right installation position for sensors
2. Select drilling position for sensor A .B. C.D
3. Select drilling position for sensor
4. Locate the position and drill
5. Install the sensors and hide the wires
6. Install the display
7. Install the control box
1. After the installation of sensors, adjust the axis and direction to the correct range, then
arrange the wire in good order;
2. Connect the power wire of the control box with the reversing light correctly;
4.Put the shift lever to reverse gear, radix point in the display should be lighted, it indicates
the system is under detecting status. If not, please check it as following steps. a .If there
is not a buzz at the time of power on, please check whether the power wire is connected
correctly, whether the voltage is 12V or higher than 9V, whether the display is well
connected; b. If the display makes sound like “bi…” continuously, please switch the
power off then put the shift lever to reverse gear again, if the problems could not be
removed yet, the control unit could be judged to be failed. The whole system should be
replaced.
5.Connect one sensor with corresponding plug in control box , it can operate normally if
person stands in 2.0f. Check other sensors according to this way. After check, all of
sensors would be connected with corresponding plugs.
Test: a. When testing some sensor, if the buzzer gives “Bi…” sound , please check
whether some parts of the car or some unwanted objects fall into the detecting range,
whether the hole is too small to let the sensor too tight in it, whether the sensors is near to
some strong interference sources (such as exhaust pipe, other wires);b. If the alarm
sound is hint sound in field (eg. “Bi…Bi”) and display shows distance but there are
nothing in front of the sensor, maybe the sensor is detecting the ground, please check the
position and direction of the sensor; or the sensor maybe detect some parts of the car; c.
If above problem still could not be removed, the whole system should be replaced.
BiBi alarm sound
Wire emitting receive system
Stage Distance Area Alarm sound Digital Display Alarm Color
1 0.0 ~ 0.5fDanger area Bi……... 0.0 ~ 0.5
21.0f1.0
3 1.5 ~ 2.0fDanger area Bi…Bi… 1.5 ~ 2.0 3 Green+2 Yellow
4 2.5 ~ 3.0f Alarm area Bi.…Bi….
2.5 ~ 3.0
3 Green+1 Yellow
5 3.5 ~ 4.0f Alarm area Bi……Bi…… 3.5 ~ 4.0 3 Green
64.5 ~ 5.0f Bi……Bi…… 4.5 ~ 5.0 3 Green
75.5 ~ 8.0fno voice 5.5 ~ 8.0 2 Green
8
8.5 ~ ∞
no voice no display
Safety area
Danger area
Alarm area
Safety area
Bi……... 3 Green+2 Yellow+ 1 Red
no display
3. Connect the control box and display with power, the display has the function
of learning ID, in order that the users could place the display or control box if necessary.
will be shown by the digital display, and the driver could judge the distance and avoid
the accident
All LED light up
INSTALLATION AND TEST
Temperature Display
This device complies with Part 15 of the FCC Rules.
Operation is subject to the following two conditions: (1) this device may not cause harmful
interference, and (2) this device must accept any interference received, including
interference that may cause undesired operation.
FCC NOTE:
THE MANUFACTURER IS NOT RESPONSIBLE FOR ANY RADIO OR TV INTERFERENCE CAUSED
BY UNAUTHORIZED MODIFICATIONS TO THIS EQUIPMENT. SUCH MODIFICATIONS COULD
VOID THE USER’S AUTHORITY TO OPERATE THE EQUIPMENT.
FCC Note