Lorex Technology FXV101 IP wireless camera User Manual
Lorex Technology Inc. IP wireless camera
user manual

DRAFT
Instruction Manual
FLIR FX
DRAFT

DRAFT
Instruction Manual
FLIR FX
#LX400034; r.16787/16787; en-US iii
DRAFT

DRAFT
Table of contents
1 Safety Precautions ..............................................................................1
2 What is included with my FLIR FX camera?.............................................2
3 How do I set up my FLIR FX camera? .....................................................3
4 What are the parts of my FLIR FX camera? .............................................5
4.1 Front ........................................................................................5
4.2 Top ..........................................................................................5
4.3 Left..........................................................................................6
4.4 Right........................................................................................6
4.5 Back ........................................................................................7
4.6 Indoor Stand..............................................................................7
5 How do I activate manual recording? .....................................................8
6 How do I view recordings on my computer?............................................9
7 How do I wall mount my FLIR FX camera? ............................................ 11
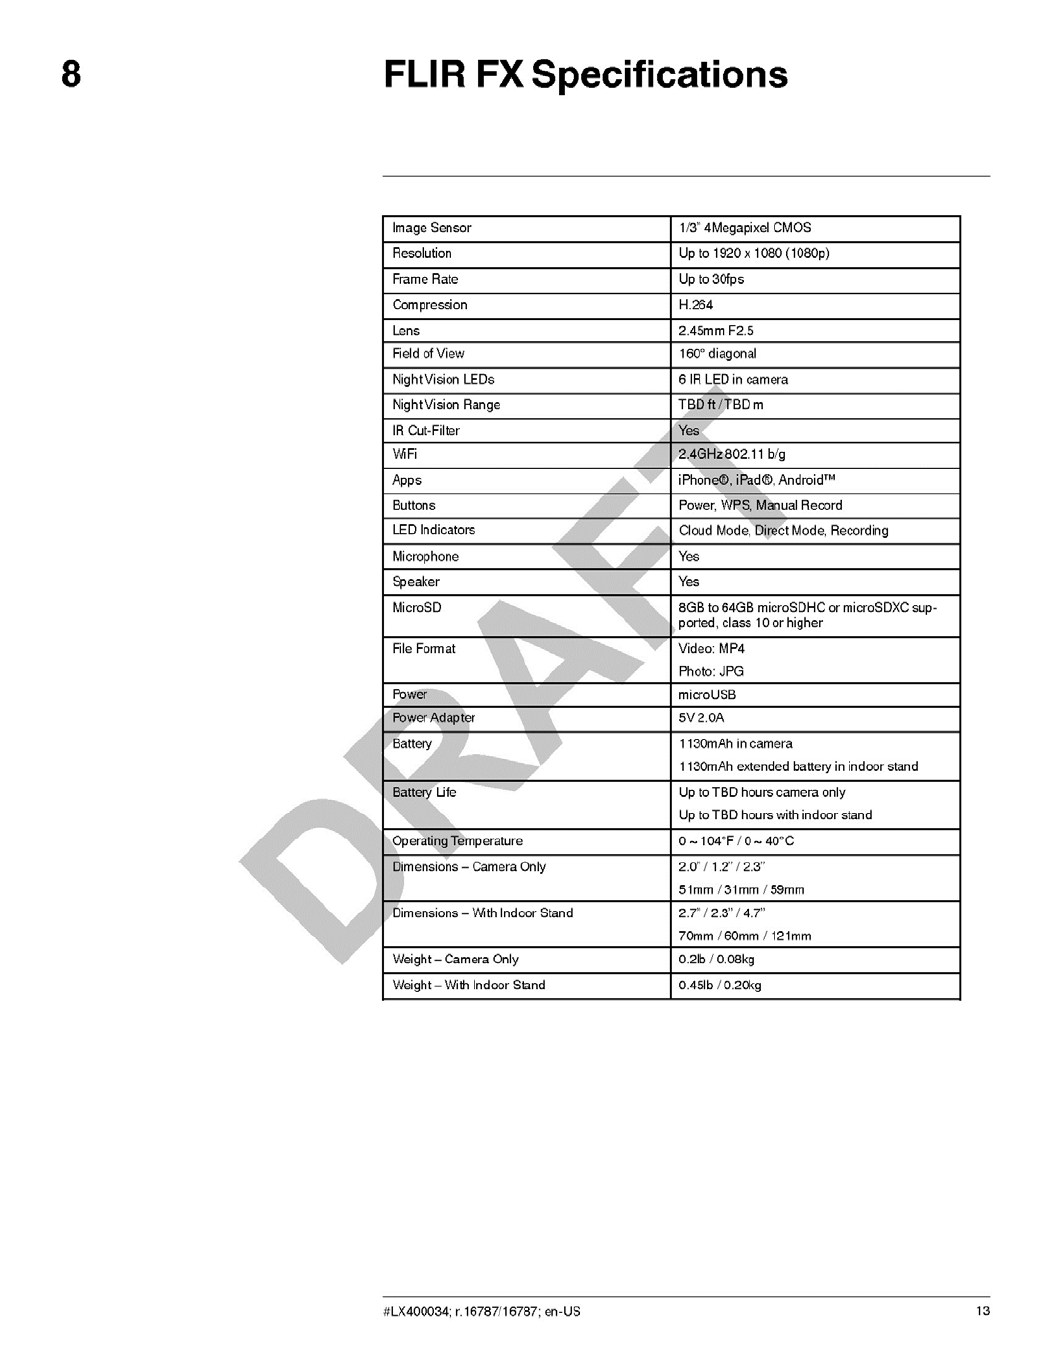
8 FLIR FX Specifications .......................................................................13
9 Notices.............................................................................................14
#LX400034; r.16787/16787; en-US v
DRAFT

DRAFT
Safety Precautions
1
• Camera is not weatherproof. Use the appropriate outdoor accessory if using the cam-
era outdoors or where it will be exposed to moisture.
• Make sure that outdoor power outlets and cable connections are properly sheltered
from the elements.
• Do not use the camera below 32°F / 0°C or above 104°F / 40°C.
• Only use the camera with approved FLIR accessories.
• Do not use or install the camera near a radiator or heat source.
• Do not cover the camera with a towel or blanket.
• Do not point the camera directly towards the sun or a source of intense light.
• Aiming the camera through a window will cause the nighttime LEDs to reflect off of the
glass, causing a bright spot in the image.
• Keep the cables at least 3ft / 1m away from baby cribs and out of reach of children and
infants.
• Use the included cable clips to help keep cables away from children.
• Do not disassemble the product. No user serviceable parts inside.
• Do not disassemble or do a modification to the battery. The battery contains safety and
protection devices which, if damage occurs, may cause the battery to become hot, or
cause an explosion or an ignition.
• If you are not using the product for a prolonged time, charge the battery every 6 months
to keep the battery in working condition.
• Dispose or recycle the product and batteries in accordance with local laws, which may
vary by location.
• If using an accessory with replaceable batteries, only use replacement batteries speci-
fied by FLIR. Use of other types of batteries may damage the product.
• The camera makes a clicking noise when changing between day and night modes. This
clicking is normal and indicates that the camera filter is working.
• Do not connect more than one USB cable to the product at once.
#LX400034; r.16787/16787; en-US 1

DRAFT
What is included with my FLIR FX
camera?
2
The standard model FXV101–H comes with the following components:
• Camera with indoor stand.
• microUSB cable.
• 8GB microSD card pre-installed in the camera.
• Power adapter.
• Power points for European and UK use.
• Mounting screws and drywall anchors.
• Extra mounting / camera ID plate for convenience.
• Quick start guide and safety information.
Note
Other models or configurations may come with slightly different components or accessories.
#LX400034; r.16787/16787; en-US 2

DRAFT
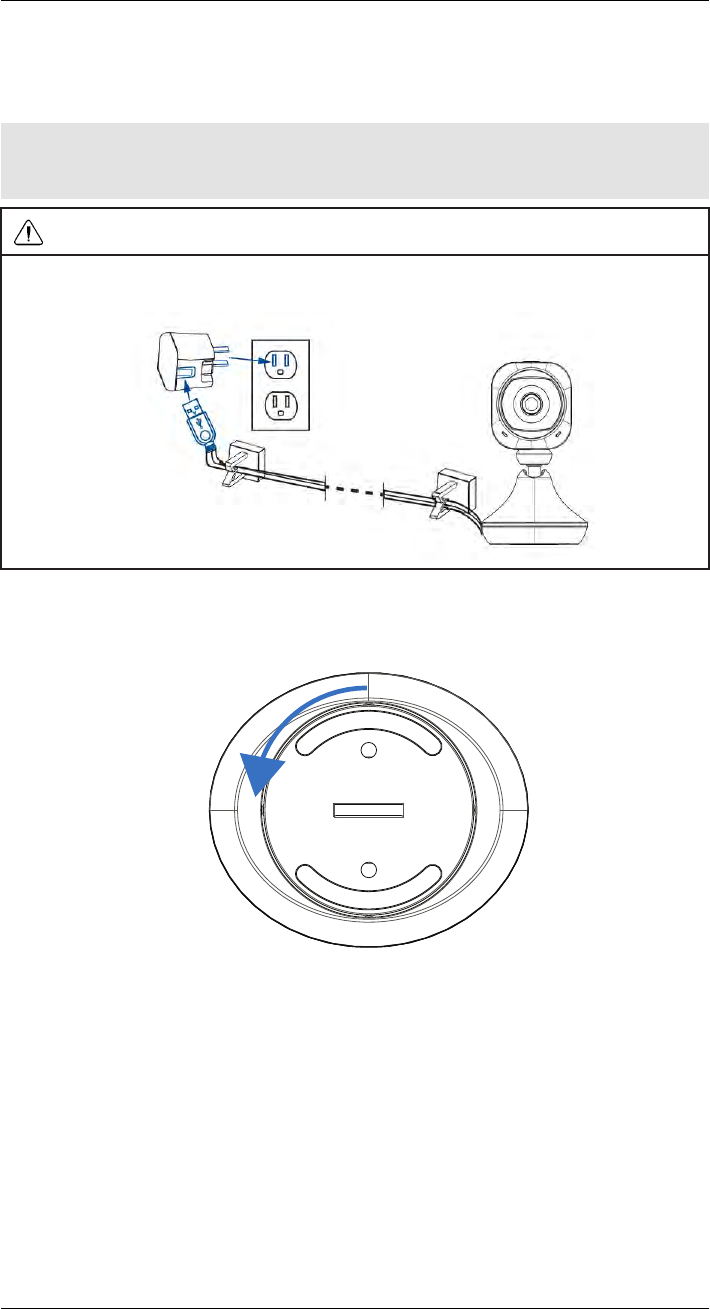
How do I set up my FLIR FX
camera?
3
1. Connect the included USB cable to the power adapter. Connect the other end of the
USB cable to the camera and connect the power adapter to a power outlet.
Note
• The REC LED will glow orange to indicate the camera is charging. It will glow green when the
camera is finished charging. The battery will take 6 hours to fully charge.
• You can connect the power adapter to either the USB cable on the camera or camera stand. Do
not connect a USB cable to both the camera and stand at the same time.
2. Press the power button on the camera. The camera will start up and the Direct Mode
LED will glow orange.
#LX400034; r.16787/16787; en-US 3

DRAFT
What are the parts of my FLIR FX
camera?
4
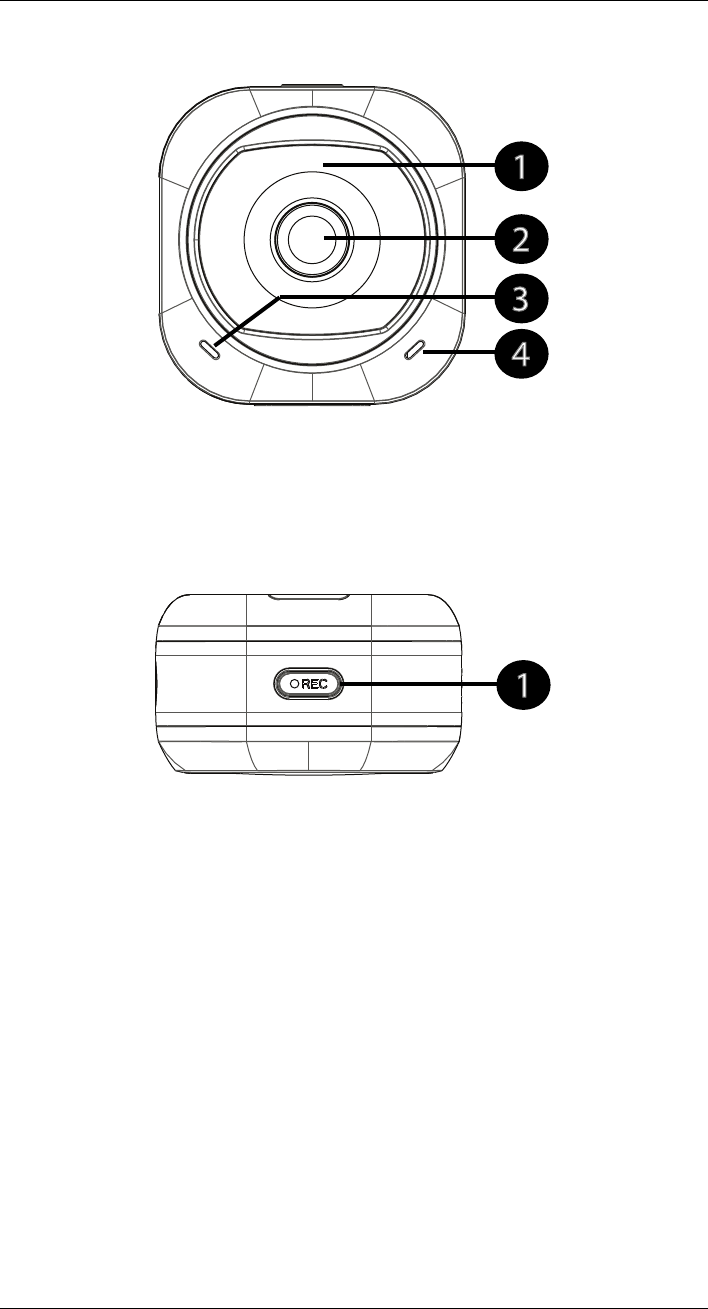
4.1 Front
1. Infrared night vision LEDs: Allows the camera to see up to Xft / Xm in total darkness.
2. Lens: Provides a wide-angle 160 degree field of view.
3. Microphone: Allows you to hear the area around the camera.
4. Speaker: Allows you to talk through your camera from your mobile device using 2-
way-talk.
4.2 Top
1. REC button / status LED: Press to start / stop manual recording.
LED colors:
•Flashing red: Camera is recording.
•Solid orange: Camera is charging.
•Solid green: Camera is fully charged.
#LX400034; r.16787/16787; en-US 5
What are the parts of my FLIR FX camera?
DRAFT
4
4.3 Left
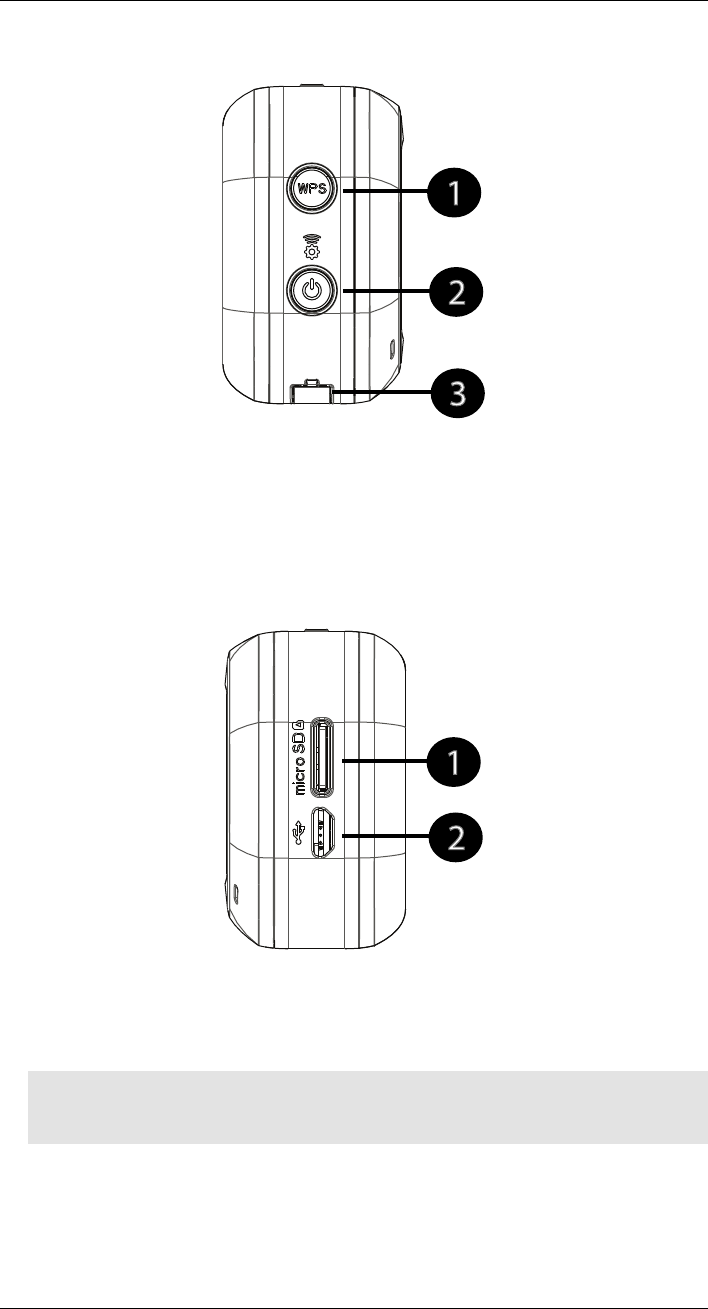
1. WPS button: Used to connect the camera to a WPS-compatible router (not included).
Press the WPS button on the router and then press the WPS button on the camera to
make the connection.
2. Power/WiFi button: Press to turn the camera on. Press to switch the camera between
hotspot mode and WiFi mode. Press and hold to turn off the camera.
3. Accessory connector: Allows the camera to slide into compatible accessories.
4.4 Right
1. microSD slot: Insert a microSDHC, or microSDXC card between 8GB and 64GB for
recording on the camera. It is recommended to use microSD class 10 or higher cards.
2. microUSB port: Connect a microUSB cable to the camera for charging or to save vid-
eo file from the camera to a PC or Mac.
Note
While the camera is connected to a computer, you will not be able to connect to it on a mobile device.
Do not connect a USB cable to both the camera and stand at the same time.
#LX400034; r.16787/16787; en-US 6

What are the parts of my FLIR FX camera?
DRAFT
4
4.5 Back
1. Direct mode LED: Indicates the camera is in Direct (AP) mode. When the camera is
in Direct mode, you can connect to the WiFi hotspot created by the camera to connect
to it in areas without access to wireless.
2. Cloud mode LED: Glows solid green to indicate the camera is connected to a WiFi
network, allows you to connect to the camera from anywhere. Flashing indicates the
camera is connecting to a WiFi network.
3. Temperature/humidity sensor (built-in): Senses the temperature and humidity in
the room.
4. Accelerometer: Senses the motion of the camera.
4.6 Indoor Stand
1. Connect: Allows the stand to connect to the camera.
2. Ball joint: Provides the camera with a flexible range of motion.
3. Expanded battery: Provides extra battery life for the camera.
4. microUSB port: Connect a microUSB cable to the stand for charging the battery in
the camera and stand.
Note
While the camera is connected to a computer, you will not be able to connect to it on a mobile device.
Do not connect a USB cable to both the camera and stand at the same time.
5. Mounting plate: Enables the camera to be mounted to a wall. The mounting plate can
be removed from the camera. The camera comes with an additional mounting plate,
so you can keep a permanent mounting position while still having the ability to move
the camera around.
6. Device ID label: Contains the Device ID and QR code used for initial setup using the
mobile app.
#LX400034; r.16787/16787; en-US 7

DRAFT
How do I view recordings on my
computer?
6
The easiest way to view video recordings from your FLIR FX camera on a computer is to
connect the camera directly to the computer using the included microUSB cable. If your
computer has an SD or microSD card reader, you can use it to view the recordings.
Note
This section covers local recordings saved to the camera’s microSD card only. If you have a subscription
plan and have recordings saved in the cloud, you will need to use the FLIR FX app to view those
recordings.
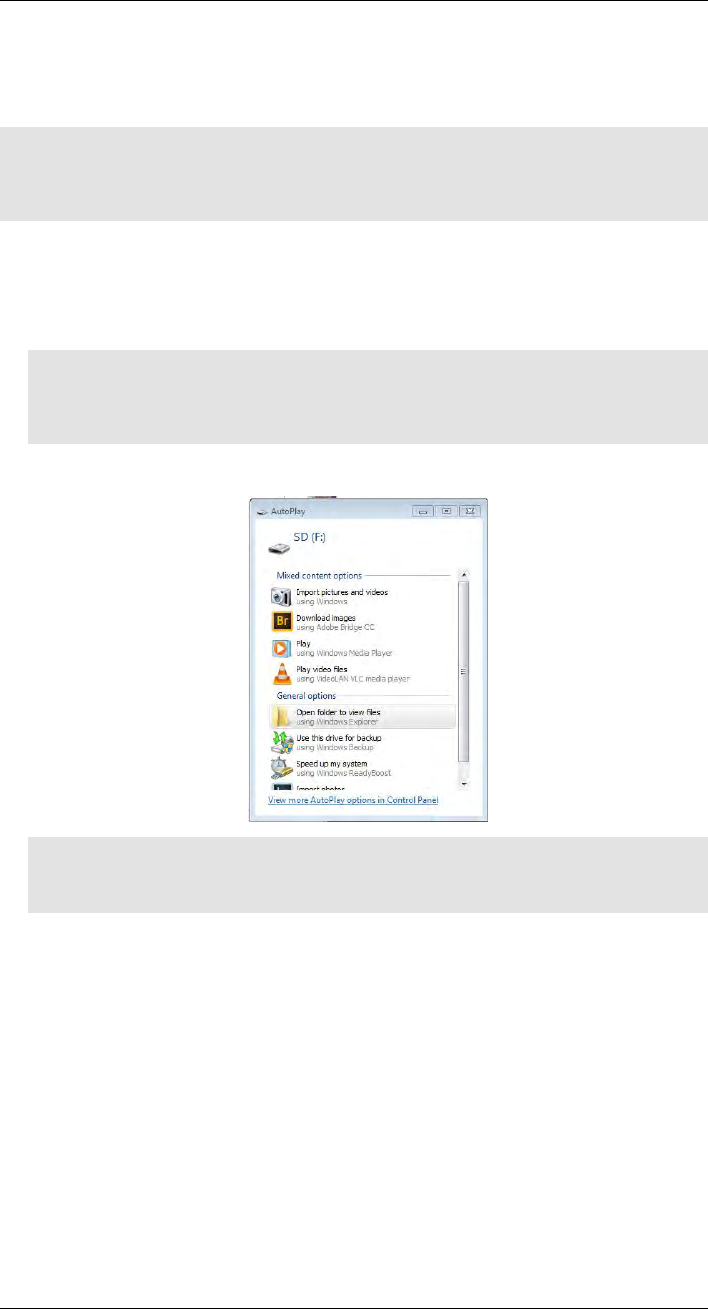
To view video recordings from the camera microSD card on a computer running
Windows:
1. Connect a microUSB cable to the camera and connect the large end to a USB port on
your computer. This puts the camera into USB storage mode.
Note
When the camera is in USB storage mode, you cannot connect to the camera using the apps on a
smartphone or tablet. You must disconnect the camera from the computer in order to allow
connectivity.
2. An AutoPlay window appears. Click Open folder to view files.
Note
If AutoPlay does not appear, click on My Computer and browse to the SD card. If the SD card does
not appear, disconnect and reconnect the USB cable to the computer.
#LX400034; r.16787/16787; en-US 9
How do I view recordings on my computer?
DRAFT
6
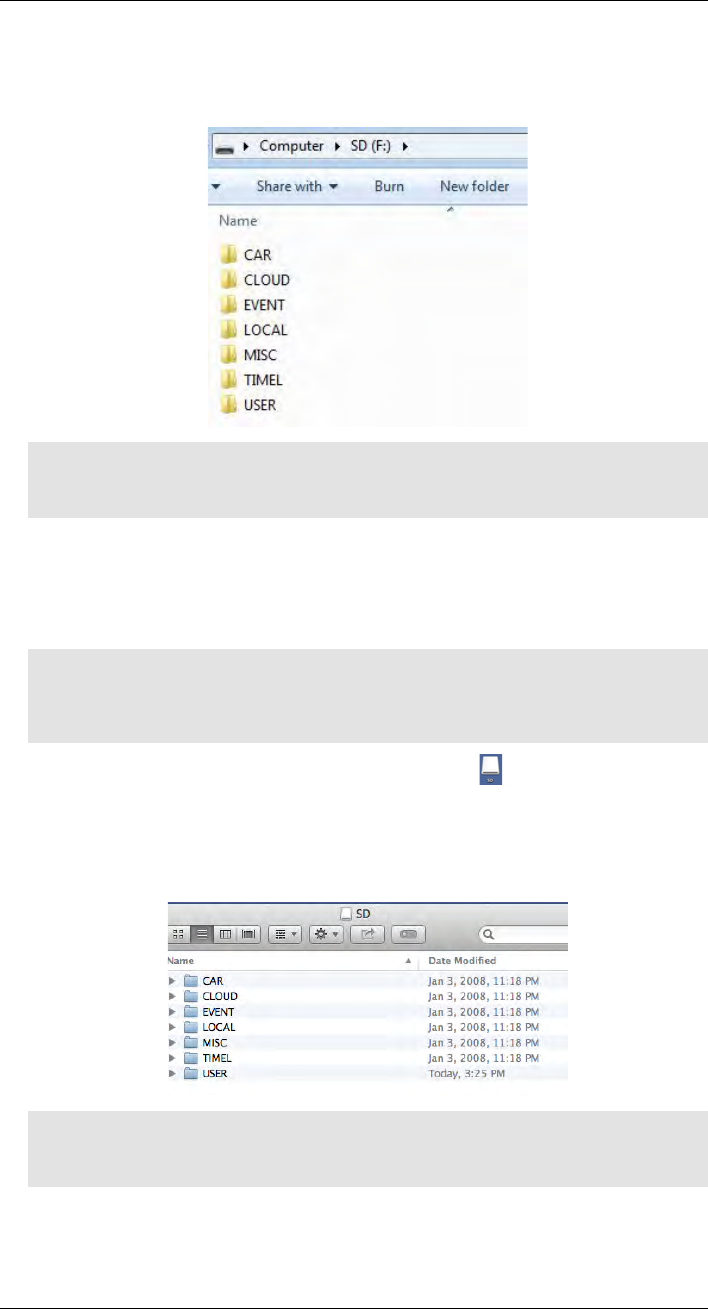
3. The camera saves videos and images onto the microSD card in folders based on the
type of recording. For example, the USER folder contains manual video recordings.
Double-click on the folders to access the video files.
Note
The camera saves video files to the microSD card in .mp4 format and saves images in .jpg format.
You can view .mp4 videos using Windows Media Player or VLC Player.
To view video recordings from the camera microSD card on a computer running
Mac OSX:
1. Connect a microUSB cable to the camera and connect the large end to a USB port on
your computer. This puts the camera into USB storage mode.
Note
When the camera is in USB storage mode, you cannot connect to the camera using the apps on a
smartphone or tablet. You must disconnect the camera from the computer in order to allow
connectivity.
2. The camera’s microSD card will show up on the desktop ( ). Double-click SD to
open.
3. The camera saves videos and images onto the microSD card in folders based on the
type of recording. For example, the USER folder contains manual video recordings.
Double-click on the folders to access the video files.
Note
The camera saves video files to the microSD card in .mp4 format and saves images in .jpg format.
You can view .mp4 videos using Quick Time Player or VLC Player.
#LX400034; r.16787/16787; en-US 10
DRAFT
How do I wall mount my FLIR FX
camera?
7
The indoor stand allows you to simply mount the camera to a wall. An extra mounting plate
is provided so you can have a permanent mounting place for the camera while still being
able to move the camera around when needed.
Note
Before mounting the camera, determine the best mounting position to get a view of the area you want.
Ensure the power cable is long enough to power the camera.
CAUTION
Keep the cables at least 3ft / 1m away from baby cribs and out of reach of children and infants. Use the in-
cluded cable clips to help manage the cables.
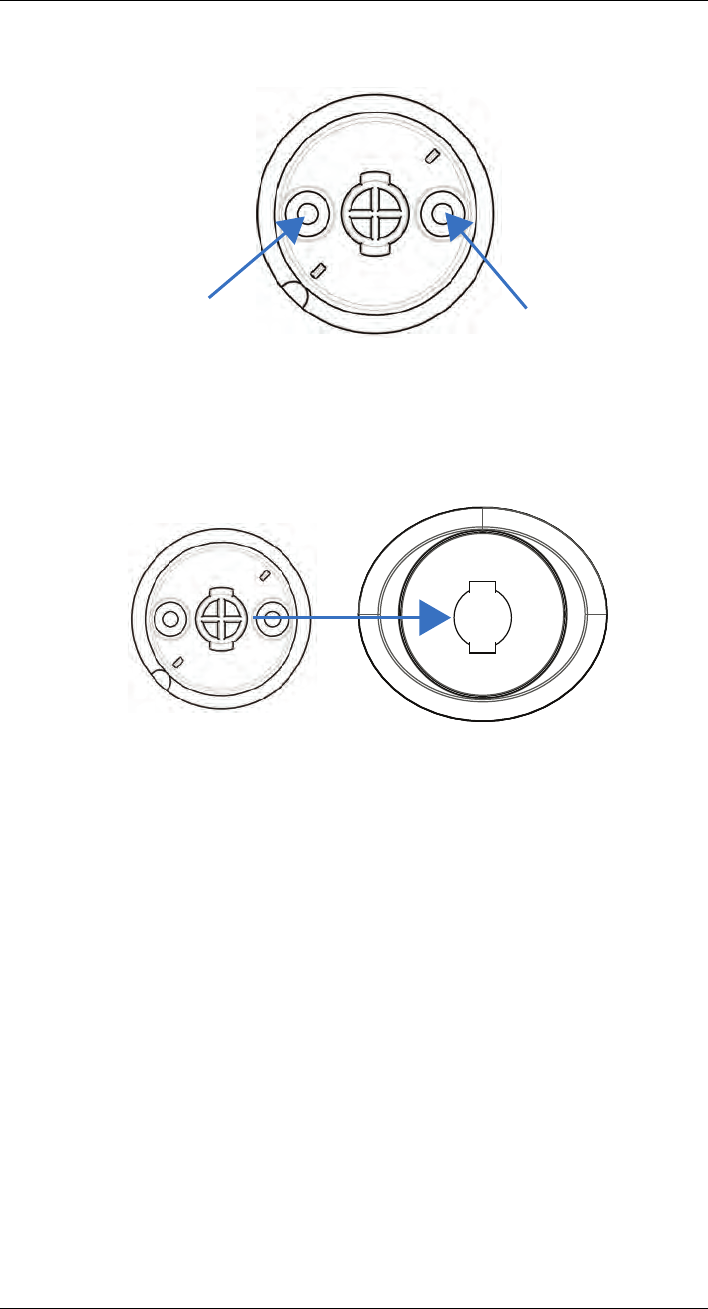
To wall mount the FLIR FX:
1. Using a coin, turn the mounting plate on the bottom of the indoor stand counter-clock-
wise to remove it from the base.
#LX400034; r.16787/16787; en-US 11
How do I wall mount my FLIR FX camera?
DRAFT
7
2. Use a pencil to mark holes for the mounting screws.
3. Drill holes where marked using a drill.
4. Tap the included drywall anchors into the holes with a hammer.
5. Attach the mounting plate to the wall using the included mounting screws.
6. Attach the camera stand to the mounting plate. Make sure the locking mechanism on
the plate lines up with the indent in the camera stand. Twist the camera stand clock-
wise to secure it to the mounting plate.
#LX400034; r.16787/16787; en-US 12

DRAFT
Notices
9
FCC Notice: This device complies with Part 15, subpart C, of the FCC Rules. Operation is
subject to the following two conditions: (1) this device may not cause harmful interference,
and (2) this device must accept any interference received, including interference that may
cause undesired operation.
The manufacturer is not responsible for any radio or TV interference caused by unauthor-
ized modifications to this equipment. Such modifications could void the user’s authority to
operate the equipment. However, it is imperative that the user follows the guidelines in this
manual to avoid improper usage which may result in damage to the unit, electrical shock
and fire hazard injury.
Changes or modifications made to this equipment not expressly approved by FLIR Sys-
tems, Inc. may void the FCC authorization to operate this equipment.
Radio Frequency Exposure: The radiated output power of the device is below the FCC/
IC radio frequency exposure limits. Nevertheless, the device shall be used in such a man-
ner that the potential for human contact during normal operation is minimized.
FCC/IC: This device complies with Part 15 of the FCC Rules and with RSS-210 of Industry
Canada. Operation is subject to the following two conditions: 1. This device may not cause
harmful interference, and 2. This device must accept any interference received, including
interference that may cause undesired operation.
Exposition aux radiofréquences : La puissance de sortie rayonnée de l'appareil est in-
férieure aux limites d'exposition de radiofréquences de la FCC/IC. Néanmoins, le dispositif
doit être utilisé de telle manière que le niveau de contact avec un être humain soit réduit
au minimum pendant une utilisation normale.
FCC/IC: Ce dispositif est conforme à la section 15 des réglementations de la FCC et à la
norme RSS-210 d'Industrie Canada. Son fonctionnement est soumis aux deux conditions
suivantes : 1. Ce dispositif ne doit pas causer d'interférences nuisibles, et 2. Ce dispositif
doit accepter toute interférence reçue, y compris les interférences qui peuvent provoquer
un fonctionnement indésirable.
CE: This device complies with the essential requirements of the R&TTE Directive 1999/5/
EC. The following test methods have been applied in order to prove presumption of con-
formity with the essential requirements of the R&TTE Directive:
• EMI/EMC Directive 2004/108/EC - Electromagnetic Compatibility
• WEEE Directive 2012/19/EU - Waste Electrical and Electronic Equipment
• LVD Directive 2006/95/EC - Low Voltage Directive
• Battery Directive 2006/66/EC - Batteries and accumulators and waste batteries and
accumulators
• ErP Directive 2009/125/EC - on the Eco-Design requirements of Energy-related
Products
• RoHS2 Directive 2011/65/EC - Restriction on the use of certain Hazardous Substances
Disposal: As with most electronic products, this equipment must be disposed of in an en-
vironmentally friendly way, and in accordance with existing regulations for electronic waste.
Please contact your FLIR Systems, Inc. representative for more details.
#LX400034; r.16787/16787; en-US 14
IC: This device complies with Industry Canada licence-exempt RSS standard(s).
Operation is subject to the following two conditions: (1) this device may not cause
interference, and (2) this device must accept any interference, including
interference that may cause undesired operation of the device.
IC: Le présent appareil est conforme aux CNR d'Industrie Canada applicables aux
appareils radio exempts de licence. L'exploitation est autorisée aux deux
conditions suivantes : (1) l'appareil ne doit pas produire de brouillage, et (2)
l'utilisateur de l'appareil doit accepter tout brouillage radioélectrique subi, même si
le brouillage est susceptible d'en compromettre le fonctionnement.

Notices
DRAFT
9
Audio Recording: Audio recording without consent is illegal in certain jurisdictions. FLIR
Systems, Inc. assumes no liability for use of its products that does not confirm with local
laws.
Need Help
Visit www.flir.com/fx to access the FLIR FX knowledgebase or contact technical support
or customer service.
#LX400034; r.16787/16787; en-US 15
Federal Communication Commission
Interference Statement
This equipment has been tested and found to comply with the limits for a
Class B digital device, pursuant to Part 15 of the FCC Rules. These limits are
designed to provide reasonable protection against harmful interference in a
residential installation. This equipment generates, uses and can radiate radio
frequency energy and, if not installed and used in accordance with the
instructions, may cause harmful interference to radio communications.
However, there is no guarantee that interference will not occur in a particular
installation. If this equipment does cause harmful interference to radio or
television reception, which can be determined by turning the equipment off
and on, the user is encouraged to try to correct the interference by one or
more of the following measures:
Reorient or relocate the receiving antenna.
Increase the separation between the equipment and receiver.
Connect the equipment into an outlet on a circuit different from that to which
the receiver is connected.
Consult the dealer or an experienced radio/TV technician for help.
Federal Communication Commission (FCC) Radiation Exposure
Statement
This EUT is compliance with SAR for general population/uncontrolled
exposure limits in ANSI/IEEE C95.1-1999 and had been tested in accordance
with the measurement methods and procedures specified in OET Bulletin 65
Supplement C.
This device and its antenna(s) must not be co-located or operating in
conjunction with any other antenna or transmitter.
IC Radiation Exposure Statement
This EUT is compliance with SAR for general population/uncontrolled
exposure limits in IC RSS-102 and had been tested in accordance with the
measurement methods and procedures specified in IEEE 1528.
DRAFT
DRAFT

last page
DRAFT
Publ. No.: LX400034
Commit: 16787
Head: 16787
Language: en-US
Modified: 2014-08-29
Formatted: 2014-08-29
Corporate Headquarters
FLIR Systems, Inc.
27700 SW Parkway Ave.
Wilsonville, OR 97070
USA
Telephone: +1-503-498-3547
Website
http://www.flir.com
Customer support
http://support.flir.com
Copyright
© 2014, FLIR Systems, Inc. All rights reserved worldwide.
Disclaimer
Specifications subject to change without further notice. Models and accessories subject to regional market considerations. License procedures may apply. Products
described herein may be subject to US Export Regulations. Please refer to exportquestions@flir.com with any questions.