Lorex Security Camera System With Night Vision Cameras And Audio Quick Start Guide LH130 Series
Lorex-8-Channel-Dvr-Security-System-With-8-Cameras-Quick-Start-Guide lorex-8-channel-dvr-security-system-with-8-cameras-quick-start-guide
2014-07-19
: Lorex Lorex-Security-Camera-System-With-Night-Vision-Cameras-And-Audio-Quick-Start-Guide lorex-security-camera-system-with-night-vision-cameras-and-audio-quick-start-guide lorex pdf
Open the PDF directly: View PDF ![]() .
.
Page Count: 2
Skill Level
Intermediate
easy advanced
Time
under 30 minutesunder 15 minutes under 60 minutes
Hand Tools Hardware
Router
Hi Speed
over 60 minutes
Skill Level
Intermediate
easy advanced
Time
under 30 minutesunder 15 minutes under 60 minutes
Hand Tools Hardware
Router
Hi Speed
over 60 minutes
Time: 20 Minutes Time: 20 Minutes
Hand Tools Skills - Easy Skills - Easy
BASIC INSTALLATION GUIDE BASIC INSTALLATION GUIDE BASIC INSTALLATION GUIDE
Skill Level
Intermediate
easy advanced
Time
under 30 minutesunder 15 minutes under 60 minutes
Hand Tools Hardware
Router
Hi Speed
over 60 minutes
Digital Video Surveillance Recorder
ECO2 LH130 Series
Quick Setup Guide
ATTENTION:
• ThisguiderefersonlytotheDVRset-up.
• Monitorandcamerasarenotincluded.
• Broadbandrouterandcomputerarerequiredforlocalandremotemonitoring
(notincluded).
Informationinthisdocumentissubjecttochangewithoutnotice.As
ourproductsaresubjecttocontinuousimprovement,LorexTechnology
Inc.andoursubsidiariesreservetherighttomodifyproductdesign,
specificationsandprices,withoutnoticeandwithoutincurringany
obligation.E&OE©2012LOREX.Allrightsreserved.
* For setup of Instant Mobile Viewing
refer to your Instruction Manual.
It’sallontheWeb
Time: 30 Minutes Skills - Intermediate
Hardware:
PC/Router
Skill Level
Intermediate
easy advanced
Time
under 30 minutesunder 15 minutes under 60 minutes
Hand Tools Hardware
Router
Hi Speed
over 60 minutes
Skill Level
Intermediate
easy advanced
Time
under 30 minutesunder 15 minutes under 60 minutes
Hand Tools Hardware
Router
Hi Speed
over 60 minutes
Congratulations!Youcannowview&playbackvideoonyourviayourLAN.
1xDigitalVideoRecorderwithpre-installedHDD*
1xUSBmouse
1xPoweradapter
1xRemotecontrol
1xEthernetcable
1xHDMIcable(in8and16channelmodelsonly)*
1xAudioharnesscable(in16channelmodelsonly)*
1xInstructionmanual
1xQuickstartguide
1xCD
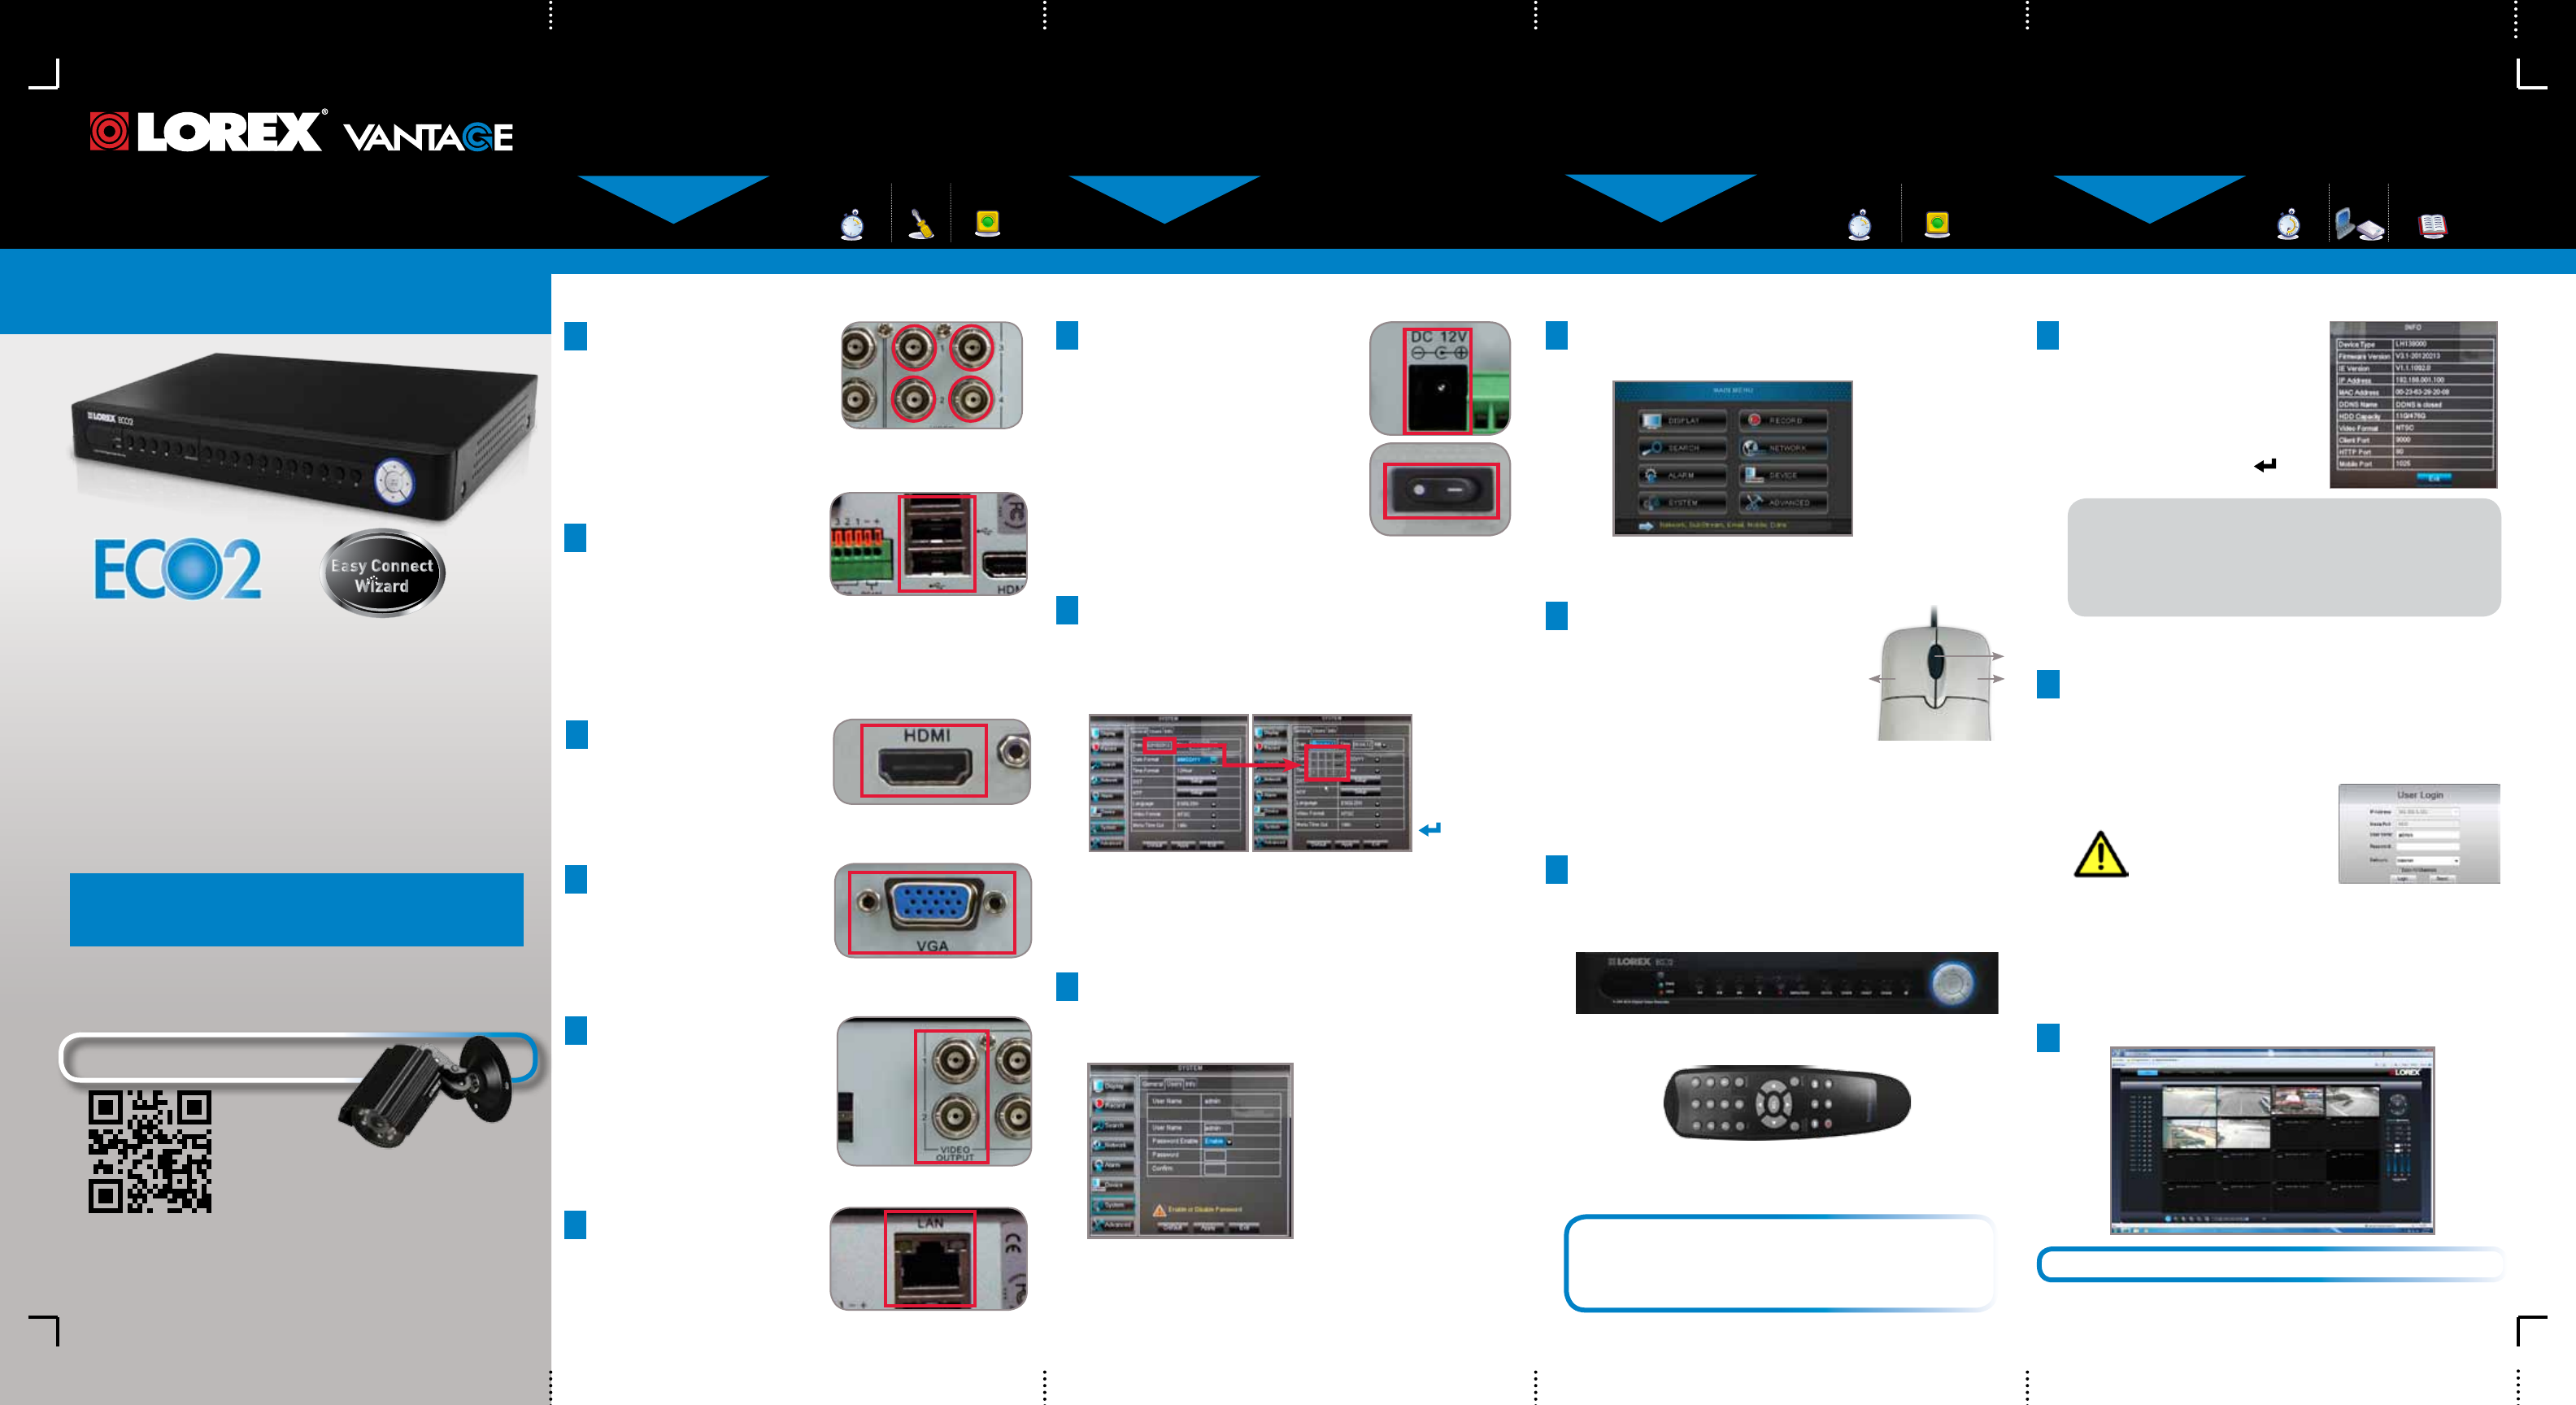
PACKAGE CONTENTS:
2
Connecting the USB Mouse
ConnecttheUSBmouseto
oneoftheUSBportsonthe
backpaneloftheDVR.
4
Connecting the Ethernet Cable
Connectoneendofthe
Ethernetcabletoanavailable
LANportofyourrouter(not
included)andtheotherendto
theDVR’sLANport.
3b ConnectaVGAcable(not
included)fromyourmonitor
orTVtotheVGAportonthe
rearpaneloftheDVR.
3c FromoneoftheVIDEO
OUTPUTportsconnectaBNC
terminatedcable(notincluded)
toaTVorCCTVmonitor.
OR
OR
2
Using a Mouse (Recommended)
1:Left-button:Clicktoselectamenu
option;duringliveviewinginsplit-
screen,double-clickonachannel
toviewtheselectedchannelin
full-screen;double-clickthechannel
againtoreturntosplit-screenview.
2:Right-button:Clicktoopenthe
MenuBarortoexitfromamenu.
3:Scroll-wheel:Nofunction.
1 2
3
YouhavecompletedSTEPS1&2successfully.YourDVR
isnowreadytouse.Refertotheowner’smanualtolearn
howtorecord,playback,searchandforallotherfeatures
availablewiththisDVR.
Managing Passwords
Bydefault,passwordsaredisabledonthesystem.
Youdonotneedtoenterapasswordwhenaccessingthe
MenuBarorMainMenu.However,youmaybeaskedfor
apasswordtoaccesscertainfunctions.
7
NOTE: For security purposes, it is highly recommended to
enable passwords on the system using the Password Menu.
Please refer to the instruction manual for more information.
NOTE: By default, the
username is admin and
password is 000000.
Connecting Cameras (not included)
1ConnectBNCcamerastothe
BNCports(VIDEO INPUT)
ontherearpanel.
NOTE:Testthecameraspriorto
selectingapermanentmounting
locationbytemporarily
connectingthecamerasand
cablestoyourDVR. NOTE:thefourchannel
modelisshown
21.LaunchInternet Explorer.
NOTE: IfusingInternetExplorer9,besureyoudonotselect64bit.
2.Intheaddressbar,entertheIP address of your DVR (recorded
inthepreviousstep)
NOTE: Enterhttp://followedbytheIPaddressofyourDVR(recorded
instep3-1),thenacolonfollowedbytheWebPortnumber
i.e. http://192.168.X.XXX:80
Logging into Lorex Web Client (LOCALLY)
4.YoumustinstalltheActiveX®plug-inforDVRNetviewertofunction.
ClicktheattentionbarandselectInstall ActiveX Control.Lorex
WebClientwillreset.
5.LoginwithyourLANusernameandpassword.Fromthesecurity
window,clickInstall.
3.Enteryouruser name and
password,thenclickLOGIN.
Yourdefaultlogin:
Username is “admin”
Password is left blank
TheDVRcanalsobecontrolledusingthefrontpanel
buttonsandtheincludedremotecontrol.
Pleaserefertotheinstructionmanualformoreinformation
onthesemethods.
Other Control Options
3
FrontPanelButtons
BASICSETUPBASICSETUP NAVIGATIONANDCONTROLS SET-UPLOCALVIEWINGONYOURPC
Continued
STEP1 STEP2 STEP3
STEP1
RemoteControl
*remotecontrolmaynotbeexactlyasshown
3a ConnectanHDMIcablefrom
yourTVormonitortothe
HDMIportontherearpanel
oftheDVR.
Connecting a Monitor
TheECO2featuresmultipleoptionsforconnectingtoamonitor.
Fortheabsolutebestpicturequality,itisrecommendedthatyou
connecttoamonitorwithanHDMIinput.
Powering ON the DVR
5ConnectthepowercabletotheDC12V
portontherearpanelandthepower
cordintoanelectricaloutlet.Topower
ontheDVR,turntheON/OFFswitchto
theONposition.Atstartup,thesystem
performs a basic system check and
runsaninitialloadingsequence.After
afewmoments,thesystemloadsalive
displayview.
NOTE:Makesureallcamerasandcables
areproperlyconnectedpriortopowering
onthesystem.
Using the Main Menu
Right-clickanywhereon-screentoopentheSub-Menuandselect
MAIN MENU(mouseonly),orpresstheSEL buttonontheremote
controlorthePTZbuttononthesystemfrontpaneloftheDVR.
1
5
6
7
8
1
2
3
4
1.Display
2.Search
3.Alarm
4.System
5.Record
6.Network
7.Device
8.Advanced
Itisimportanttosetthecorrecttimetoassureaccuratetime
stampsonvideorecordings.
Setting the Date & Time
1.Movethemousecursortothebottomofthescreento
openthemenubarandselectMAIN MENU.
2.ClickSYSTEM.
3.ConfigurethedateandpressAPPLYtosaveyour
settings.ClickAPPLY.Tofinish,pressOK.
6
NOTE:
A pop-up key
pad will open.
When you
have selected
the desired
date, press the
button to
confirm.
Recordtheinformationinthesectionbelow:
IPADDRESS: _______._______ ._______._______
MACADDRESS: _____:_____:_____:_____:_____:____
HTTPPORT: _________
(RequiredforDDNSregistration)
Retrieve the DVR Information
1Thisstepwillteachyouhowtolocally
viewyoursystemovertheLAN(local
areanetwork)usingyourPC.
NOTE:Thismethodonlyworks
ifyourcomputerisonthesame
networkastheDVR.
TorecordyourIPAddress,MacAddress
andHTTPPort,simplypressthe
buttononthefrontoftheDVR.
3
Live Viewing Using the Web Client (LOCALLY)
Uponlogin,theWebClientmainscreenappearsinyourbrowser.
CHECK OUR WEBSITE FOR LATEST DVR SOFTWARE
FIRMWARE UPGRADES, VIDEOS & DOCUMENTATION.
www.lorextechnology.com
* Contentmayvarybymodel,includingnumberofchannels/portconfigurationand
HDD(harddiskdrive)capacity.Checkyourpackageforspecificcontentinformation.
LH130ECO2SeriesQuickSetupGuide-English-R3
INTERNETREMOTEMONITORING
INTERNETREMOTEMONITORING INTERNETREMOTEMONITORING INTERNETREMOTEMONITORING INTERNETREMOTEMONITORING
Continued
Continued
Continued Continued
5
Openyourwebbrowser(InternetExplorerbydefault)and
enter http://www.lorexddns.netintheaddressbar.
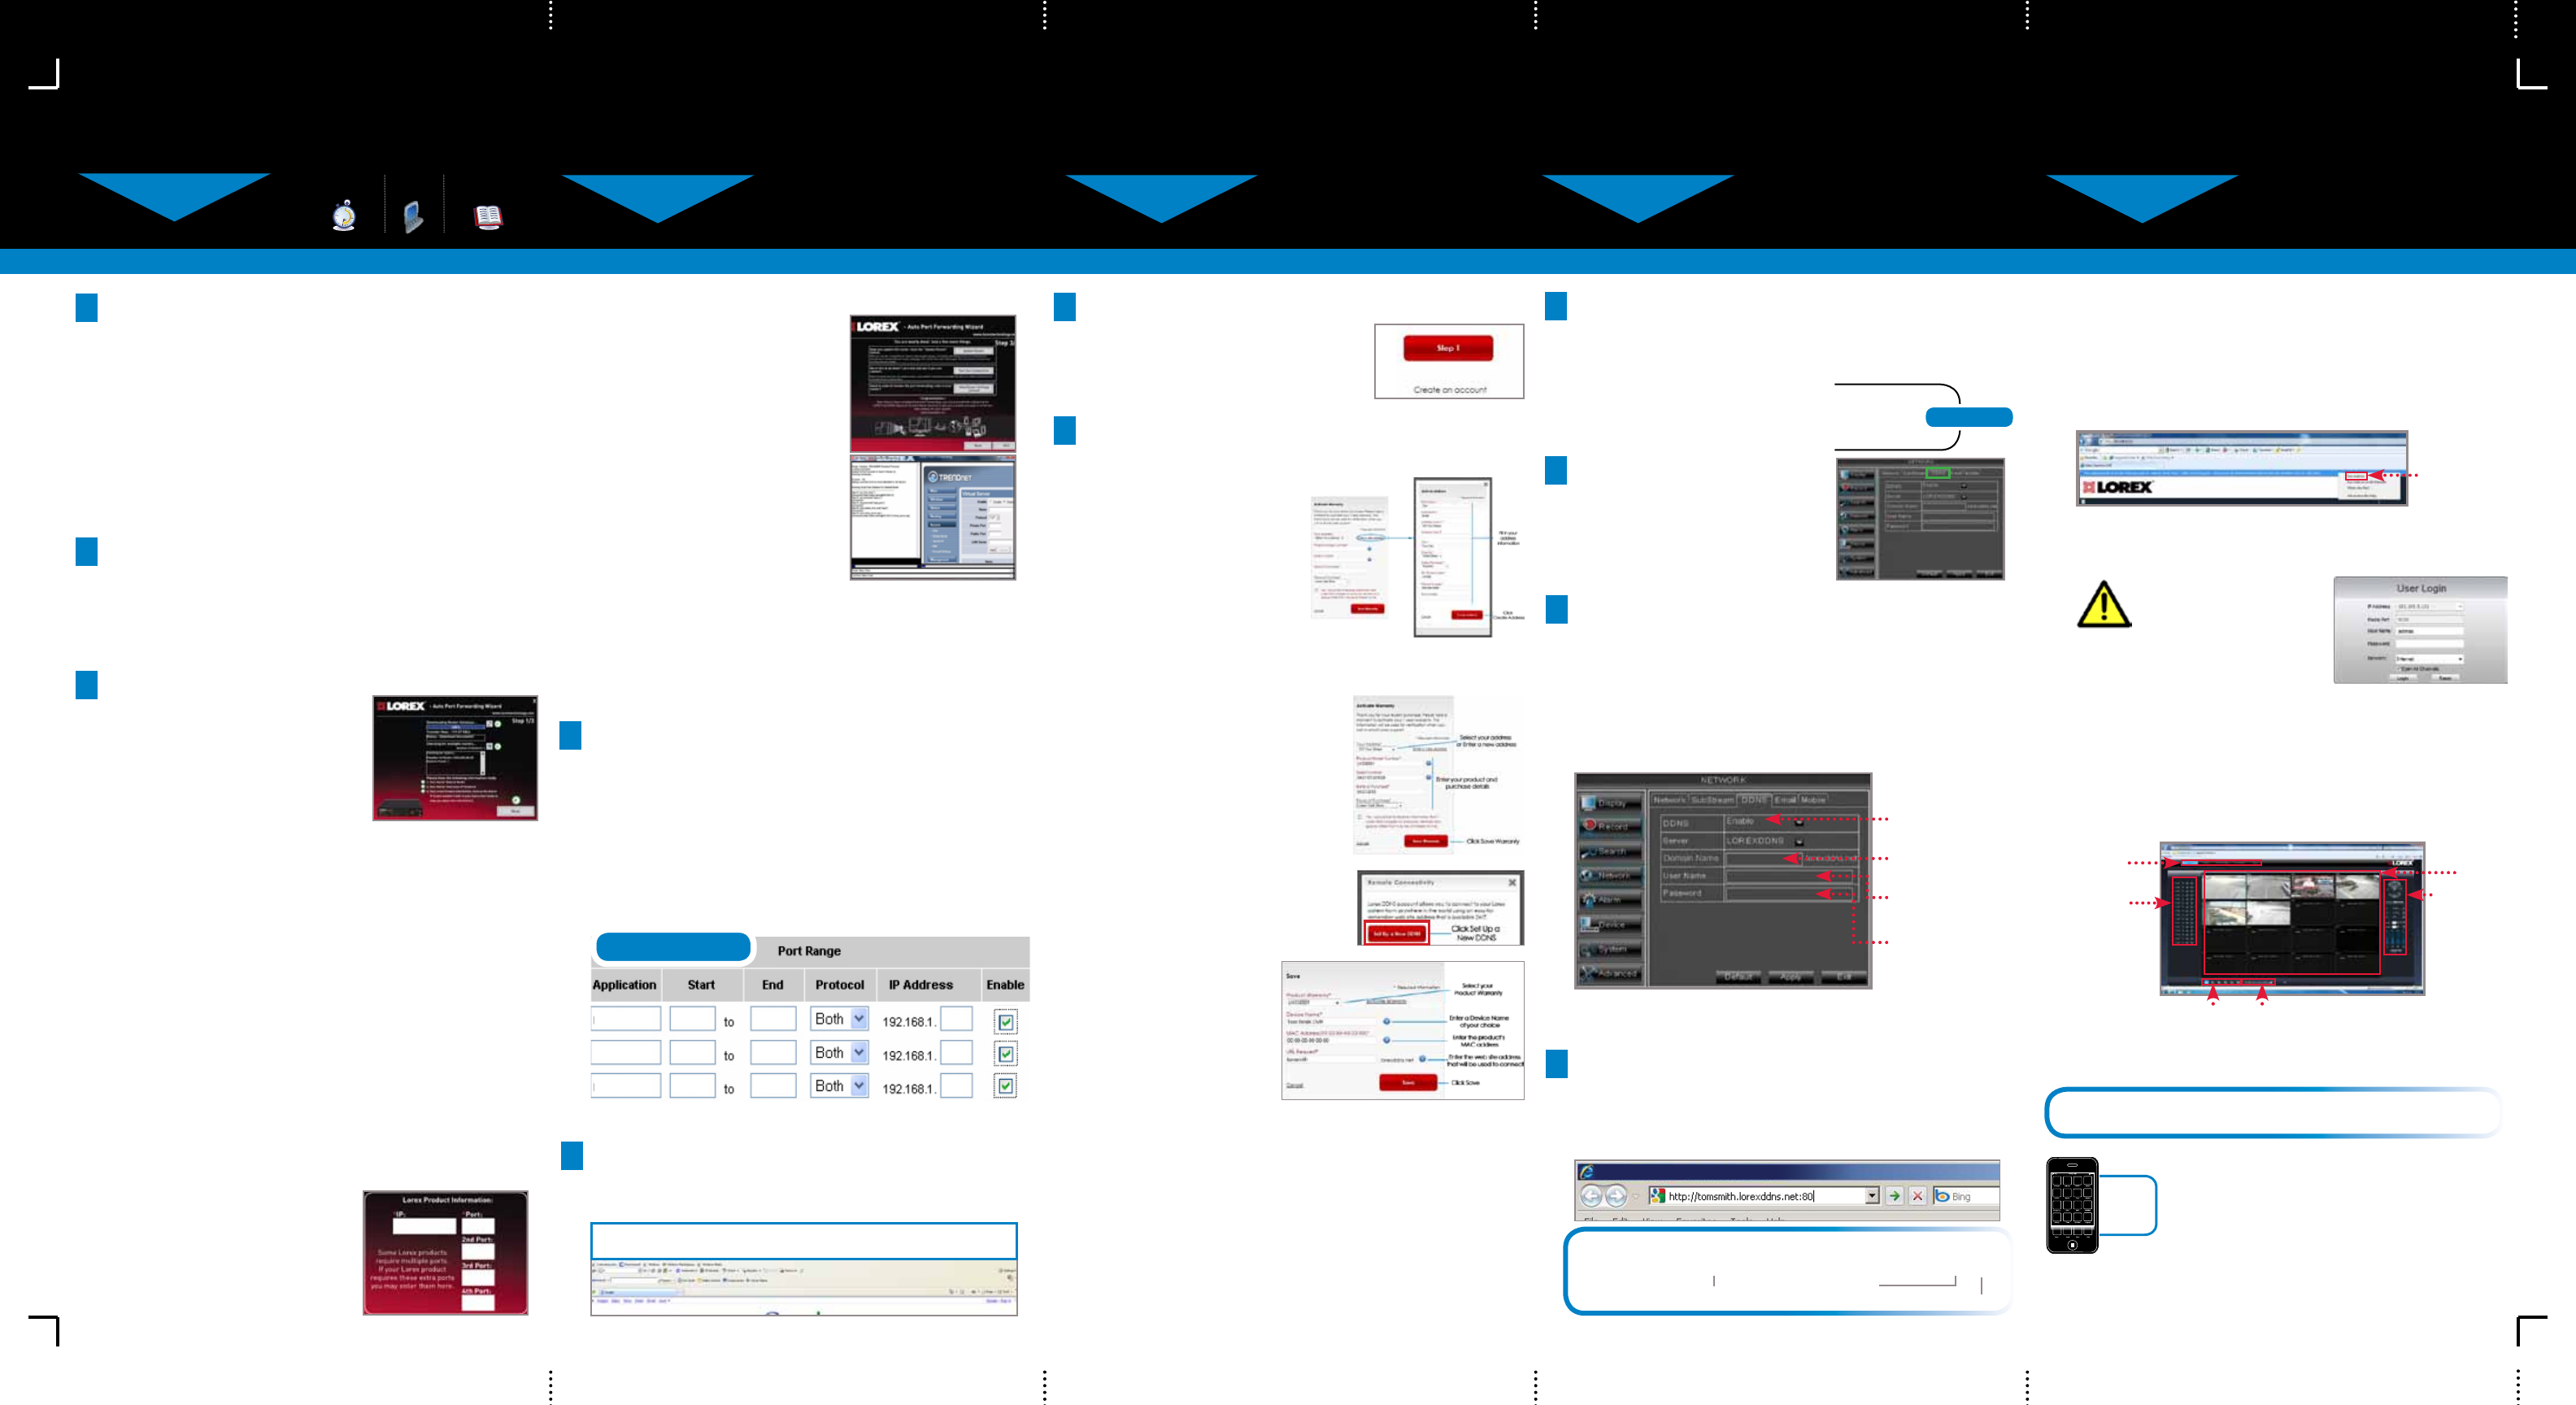
DDNS (Dynamic Domain Name System) Set-up
http://www.lorexddns.net
1: Populate the Router Database
3
TheAutoPortForwardingWizard
automaticallypopulatesalistof
currentrouters,anddetectsthe
numberofconnectedrouters.
1.ClicktheNextbuttonafterthe
softwaredetectsyourrouter
configuration.
2.UnderRouter IP,clicktheDetect Router IP button.
Therouter’sIPpopulatesintheblankfield.
3.UnderUsername and Password,entertherouter’s
usernameandpassword.
4.UnderIP,entertheIPaddressofyour
LorexdeviceasrecordedinStep3-1.
5.UnderPort,entertheport
number(s)thatrequireforwarding
(80,9000,1025).
6.ClickNexttocontinue.
80YourIP
9000
1025
NOTE:ClicktheAuto Detectbuttonifyouhavea
LinksysorNetgearrouter(thisworkswithmostmodels).
2: Enter your Router Settings
1.UndertheRouterdrop-downlist,selectthemodelofyour
router OR clicktheSearchbuttontoenterthenameof
yourroutermodel.
NOTE:Ensureyouselectthepropermodelandfirmware
numberoftherouter(asitappearsonthebackoftherouter)
IMPORTANT:Defaultportsthatmustbeportforwarded
forremoteaccess:
Port80(HTTPPort)
Port9000(MediaRTSPStreamingPort)
Port1025(MobileConnectivityPort)
4: Test your Connection
1.ClicktheTest Your Connection button.Yoursystem’s
defaultbrowseropensandconnectstoyourLorexdevice.
NOTE:EnsurethatInternetExplorerisyoursystem’s
defaultinternetbrowser.
3: Update the Router Settings
1.ClicktheUpdate Router
button.Theprogrambegins
updatingtheroutersettings.
Thismaytake20-30seconds.
2.Closetheupdatewindow
whentheupdatefinishes.
NOTE: Youmayhaveto
manuallysaveyourroutersettings
afterthesoftwaremakesthe
requiredchangestoyourrouter.
Auto Port Forward Wizard
1
TheLorexAutoPortForwardingWizardisasoftwarethat
automatesrouterportforwarding.
NOTE: YoumustbeonthesamenetworkastheDVRwhen
settinguptheDDNS.
Youmusthavethefollowingbeforeyouconfigurethesoftware:
1.Yourrouter’smodel and versionnumbers
2.Yourrouter’suser name and password
3.YourLorexdevice’sIP address (recorded in Step 3-1)
4.YourLorexdevice’sportnumbersthatrequireportforwarding
(80,9000,1025)
Optional: Manual Port Forward
4
If you were unable to port-forward your router
automatically using the wizard, you will need to
manually forward ports 80, 9000 and 1025 to
your DVR’s IP address.
Allroutersaredifferent.Toportforwardyourrouter,pleaserefer
toyourrouter’susermanual.
Anexampleofaportforwardingscreenisshownfor
illustrationpurposes.
80 80
HTTP
EXAMPLE
9000 12
12
Media 9000
1025 12
Mobile 1025
STEP4 STEP4 STEP4 STEP4 STEP4
REMOTE INSTALLATION GUIDE
Time: 30 Minutes Skills - Intermediate
Hardware:
PC
Skill Level
Intermediate
easy advanced
Time
under 30 minutesunder 15 minutes under 60 minutes
Hand Tools Hardware
Router
Hi Speed
over 60 minutes
Logging into DVR Web Client (REMOTELY)
ToaccessyourDVRremotely,entertheDDNSaddress
thatyoucreatedearlierintoInternetExplorer.TheDDNS
URLmustincludehttp://,yourURLrequest,followedby
.lorexddns.net, a colon,thentheHTTP port number
of your DVR.
http://tomsmith.lorexddns.net:80
ExampleofaDDNSaddress:
URLRequest Colon
HTTPPortNumber
9Enable DDNS on the DVR
1.ClickonMain Menu fromthe
menubar,thenclickNetwork.
2. ClicktheDDNStab.
3. SelectEnableintheDDNS
drop-downmenu.
NOTE:Pleaseallow10~15minutesfortheDDNSserverstoupdate
withyournewDDNSaddress.ThisisnormalfortheDDNSsystem.
EnterthefollowingintotheDDNS Setupmenu:
•Domain Name:EntertheDomainName/URLRequest
thatwasemailedtoyouafterDDNSregistration.
•User Name:EnteryourDDNSUserNamethatwas
emailedtoyouafterDDNSregistration.
•Password:EnteryourDDNSDevicePasswordthatwas
e-mailedtoyouafterDDNSregistration.
Click Applytosaveyoursettings.
Enter the DDNS Information into the DVR
10
11
Select Enable
Domain Name:
EnterDomainName/
URLRequest
User Name: Enter
DDNSUserName
Password: Enter
DDNSDevicePassword
1.Insertthesystem’ssoftwareCD,andfollowtheinstructions
tolaunchtheLorex Auto Port Forwarding Wizard
software.
Installation
2
NOTE: TheWizardisPCcompatibleonly.
Macusers,pleasegotoStep4-4.
Congratulations!YouhavecompletedStep4successfully.You
cannowconnectovertheinternettoviewandplaybackvideo.
To install ActiveX® plug-ins on Internet Explorer:
1. LogintoyoursystemusingInternetExplorer.
2. ClicktheActiveXbannerandthenclickRun Add-on.
Whenconnectingtoyoursystemthefirsttime,youwillhaveto
installanActiveXplug-inforInternetExplorer.
Installing ActiveX Plug-ins
RunAdd-on
LH130ECO2SeriesQuickSetupGuide-English-R3
3-07062012
ForafullexplanationofalltheWebClientbuttonsand
features,pleaserefertotheinstructionmanual.
Uponlogin,theWebClientmainscreenappearsinyourbrowser.
Navigation
Tabs
Active
ChannelList
Viewing
Options Split-Screen
Viewing
PTZControls
Main
Screen
Lorex Web Client Screen
Forremoteconnectivityusingcompatiblesmartphonesand
tabletsrefertotheinstructionmanual.Makesuretocomplete
Step4entirely.ToconnectremotelyusingMac,refertothe
instructionmanual.
Instant
Mobile
Viewing
Shouldyourequirefurtherassistance,LOREXTechSupport
isavailabletoassistyou.Makesuretoregisteryourproduct
prior to contacting support at :
www.lorextechnology.com/support
1.Click Step 1
2.CreateanewMyLorexaccountor
signinusinganexistingaccount.
6Create Account
7.ClickSavetoregisteryourproductforDDNS.ADDNS
registrationconfirmationemailwillbesenttotheemail
addressusedtoregisterforMyLorex.
NOTE:URLRequestshouldnotbemorethan15characters.
6.FillouttheMy
DDNSform:
• Product Warranty:
Selecttheproduct
warrantyyoucreated
intheprevioussteps.
• Device Name:Enteranameforyourdevice.Youcan
enteryourname,businessname,oranythingofyourchoice.
• MAC Address:EntertheMACaddressofyourLorex
systemrecordedinStep3-1.
• URL Request:Enterthewebsiteaddressthatwillbe
usedtoconnecttoyourLorexsystem.
Complete New Account Information
7
3.UnderYourAddress,
select an address or click
Enter a New Address
tocreateanewaddress.
Fillinyouraddress
informationandclick
Create Address.
1.ClickWarranties.
2. ClickActivate Warranty.
NOTE:WarrantyRegistrationisrequiredforDDNS.
4.Fillinthewarrantyregistration
formwithyourproductand
purchasedetailsandclickSave
Warranty.Checkthesticker
underneathyourDVRforthe
ProductModelNumberand
SerialNumber.
5.ClickSet Up a New DDNS.
AnautomatedREGISTRATION CONFIRMATION E-MAIL
willbesenttoyouremail.Printandsavethisconfirmation.You
willneedtoenteritintoyoursystemtoenableremoteaccess.
8Registration E-mail
DomainName/URLRequest:tomsmith
DDNSUserName:tomsmith
DDNSDevicePassword:(yourpassword)
EXAMPLE
Logging into the System
NOTE:CertainISP(InternetServiceProviders)blockport
80.Ifyouareunabletoconnect,checkwithyourISPand
consultwiththeusermanualforinstructionsonchangingthe
webport.Makesuretoportforwardyourrevisedwebport.
1.Entertheuser name and password,asshownbelow.
3. SelecttheOpenAllChannels
Previewcheckbox.
4. ClickLogintoconnecttothesystem.
Defaultlogin:
Username is “admin”
Password is left blank
