Luidia Global WB-859-03 U-BOARD LITE User Manual uBoard Hardware Installation Guide V2 2
PNF CO.,LTD U-BOARD LITE uBoard Hardware Installation Guide V2 2
USERS MANUAL

uBoard Hardware Installation
Guide (V2.2)
This manual is uBaord hardware installation guide manufactured by
PenAndFree Co.,Ltd.
2010 PenAndFree Co.,Ltd. All rights reserved. uBoard is a trademark
of PenAndFree Co.,Ltd. All contents of this publication are subject to
change.
2010. 7
PenAndFree Co.,Ltd

Information to user :
This equipment has been tested and found to comply with limits for a class B digital device, pursuant
to Part 15 of the FCC Rules. These limits are designed to provide reasonable protection against
harmful interference in a residential installation.
This equipment can generates, uses, and radiate radio frequency energy and, if not installed and
used in accordance with the instructions, may cause harmful interference to radio communications.
However, there is no guarantee that interference will not occur in a particular installation.
If this equipment does cause unacceptable interference to radio and television reception, which can
be determined by turning the equipment off and on, the user is encouraged to try to correct the
interference by one or more of the following measures.
ᆞReorient or relocate the receiving antenna.
ᆞIncrease the separation between the equipment and receiver.
ᆞConnect the equipment into an outlet on a circuit different from that to which the receiver is
connected.
ᆞConsult the dealer or an experienced Radio/TV technician for help.
This device complies with part 15 of the FCC Rules. Operation is subject to the following two
conditions: (1) This device may not cause harmful interference, and (2) this device must accept any
interference received, including interference that may cause undesired operation.
Caution
Changes or modifications not expressly approved by the party responsible for compliance could void
the user’s authority to operate the equipment.

uBoard Hardware Installation Guide (V2.2)
PenAndFree Co.,Ltd, 2010 2
INDEX
1. Verify Components before Installation ---- 3
2. Station Installation ---- 3
2.1 Connecting USB cable properly ---- 4
2.2 Connection VGA cable properly ---- 4
3. Digital Pen ---- 5
3.1 Key features ---- 5
3.2 Digital pen operation ---- 6
uBoard Hardware Installation Guide (V2.2)
PenAndFree Co.,Ltd, 2010 3
1. Verify Components before Installation.
Before hardware installation, firstly, please check if components listed below are
included in the package. If you find missed one, please contact the store you purchased.
.
Item Quantity Remarks
1
Station
1
2
Digital Pen
1
3
Recharging battery Cable
1
1M
5
Software CD
1
Including Calibration & Board SW
6
Station Holer
3
2. Station Installation.
2.1 Connecting USB Cables properly.
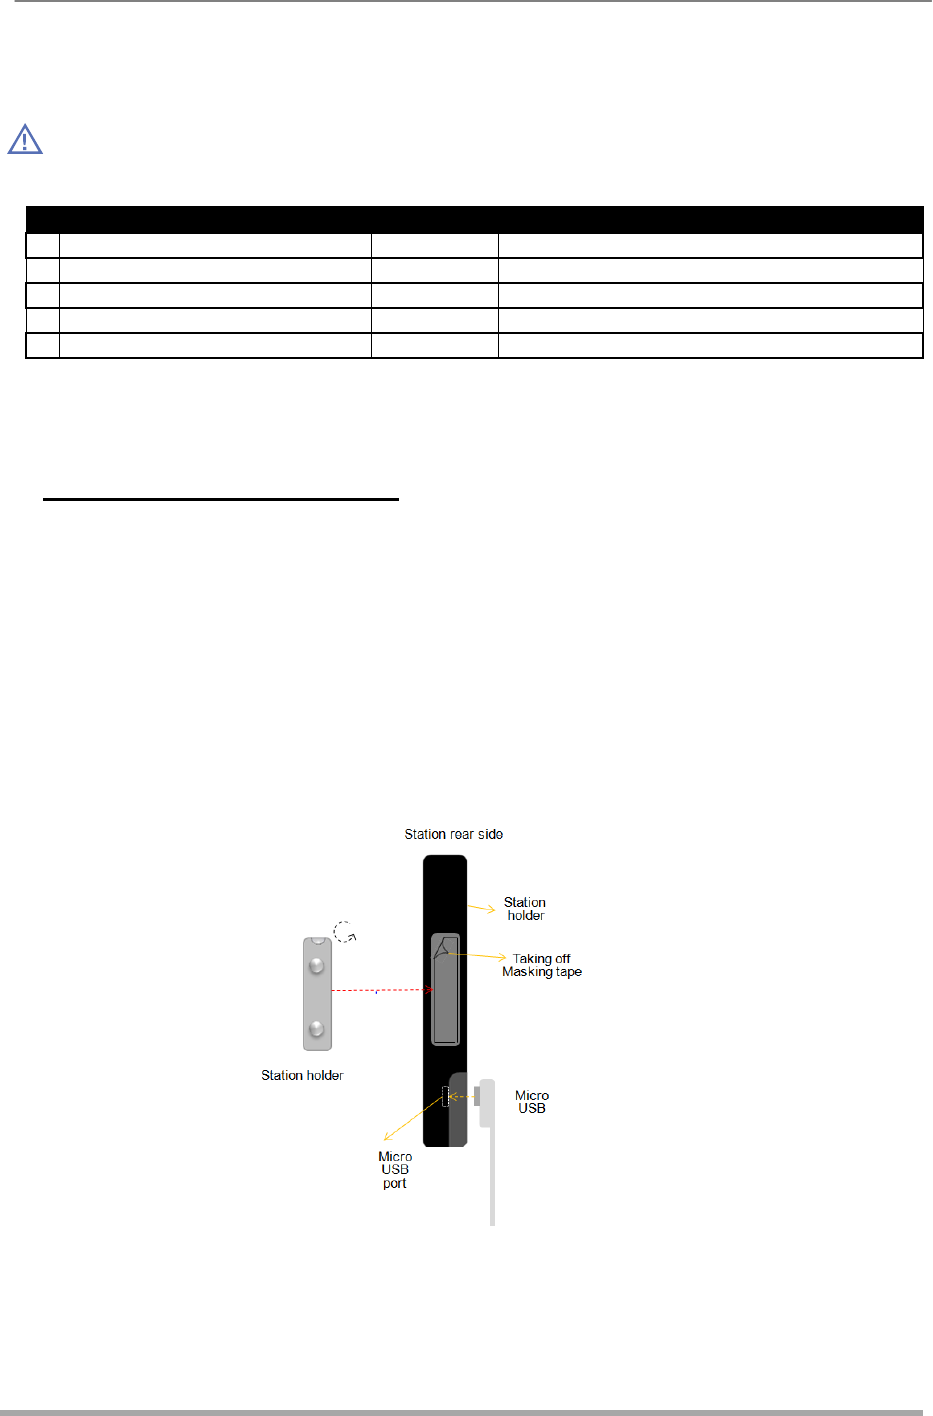
2.1.1 Connect Micro USB connector to Micro USB port of Station.
Connects USB cable to micro USB port of uBoard station and adhere station holder to
whiteboard or flat surface.
Attach Station holder to the backside of station. As magnet is included in the back side of
station, it can be easily attached.
Connect micro USB connector of USB cable to micro USB port of Station.
Take off masking tape of station holder.
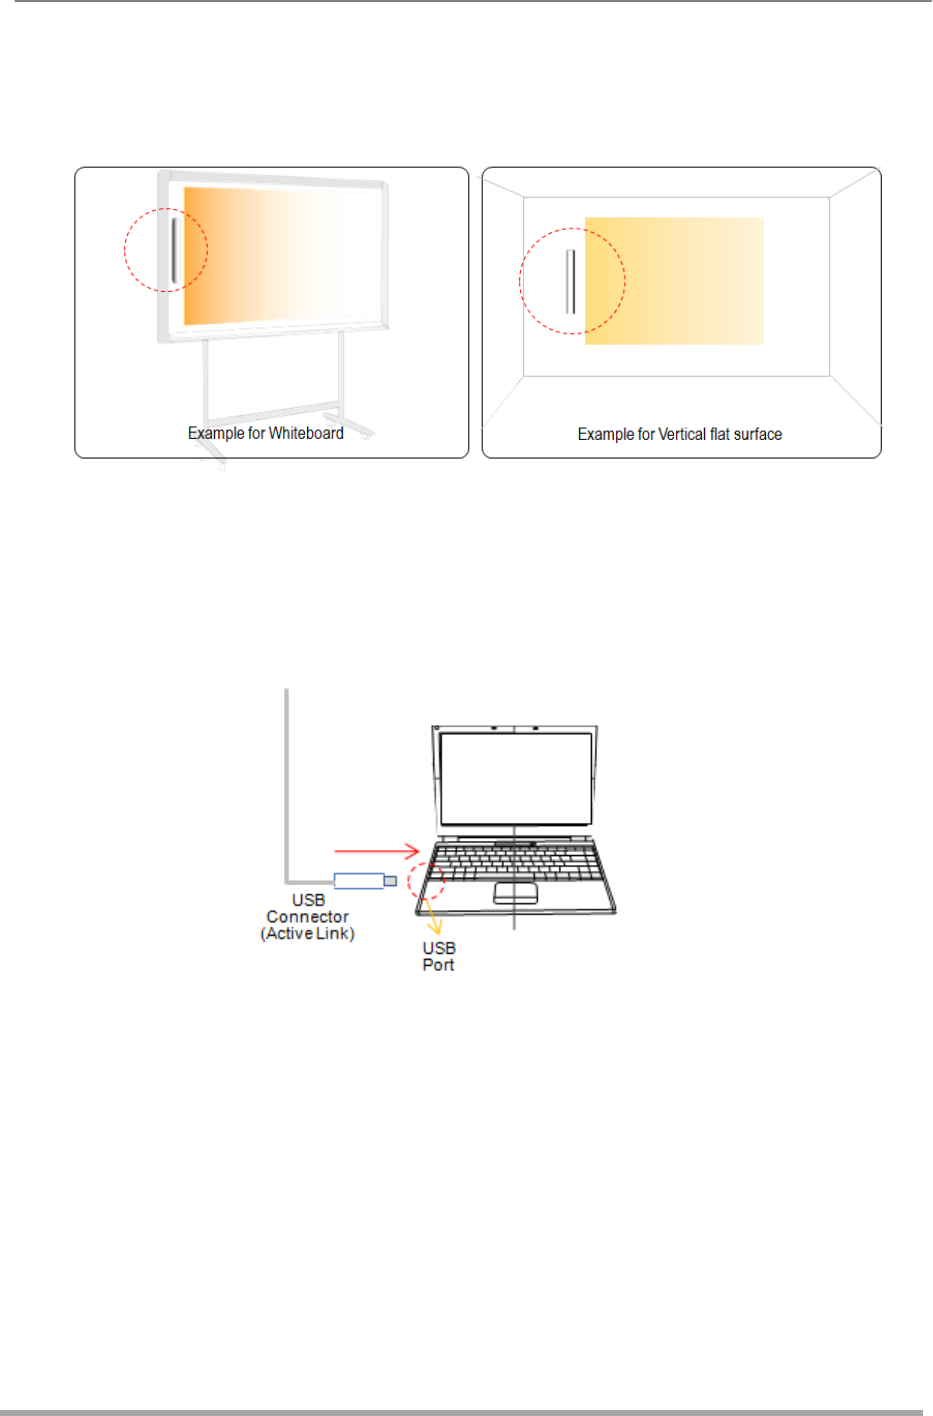
Place Station in the middle of whiteboard or working area and press Station to adhere
station holder.
Make sure station position with screen without tilting vertically.
uBoard Hardware Installation Guide (V2.2)
PenAndFree Co.,Ltd, 2010 4
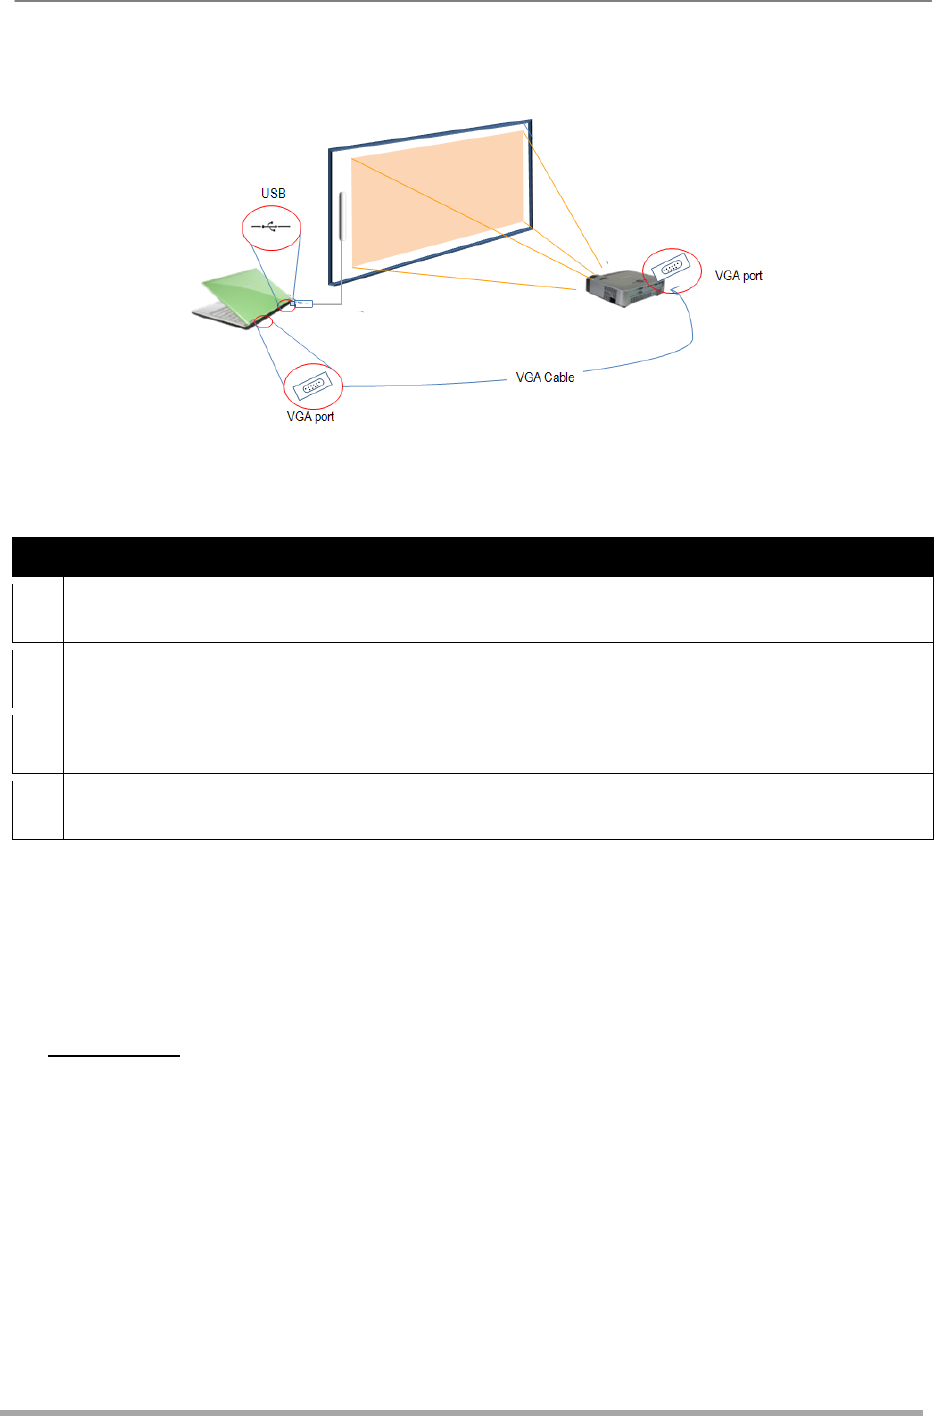
2.1.2 Connect USB connector to USB port of Computer.
Connect USB connector, the other end of USB cable, to the USB port on the computer.
If cable length is not enough, please use USB extension cable.
2.2 Connecting VGA cable properly.
After connecting USB cable between uBoard station and computer, connect VGA cable
between Beam project and the computer. It is the last step for hardware installation. When
this step is completed successfully, you are ready to use uBoard in hardware side.
However, in order to use uBoard, Software installation is additionally required.
As for SW installation, Please refer to the software installation guide.
uBoard Hardware Installation Guide (V2.2)
PenAndFree Co.,Ltd, 2010 5
NOTICE:
.
Notice
1
Avoid using this device in the environment that air is blown directly to receiver from air
conditioner or heater.
2
Place Station in the middle of whiteboard or working area in the left side if possible,
and make sure station position with screen without tilting vertically
3
Position station to keep 2 cm at the least away from left vertical line of projected
screen
4
Recommend to use USB repeater in case that USB extension cable is exceeding
10m.
3. Digital pen
Digital pen for uBoard is ideally designed to support upto120 inches as effective working
area. It adopted many key features to maximize user convenience.
3.1 Key features
3.1.1 Button functions
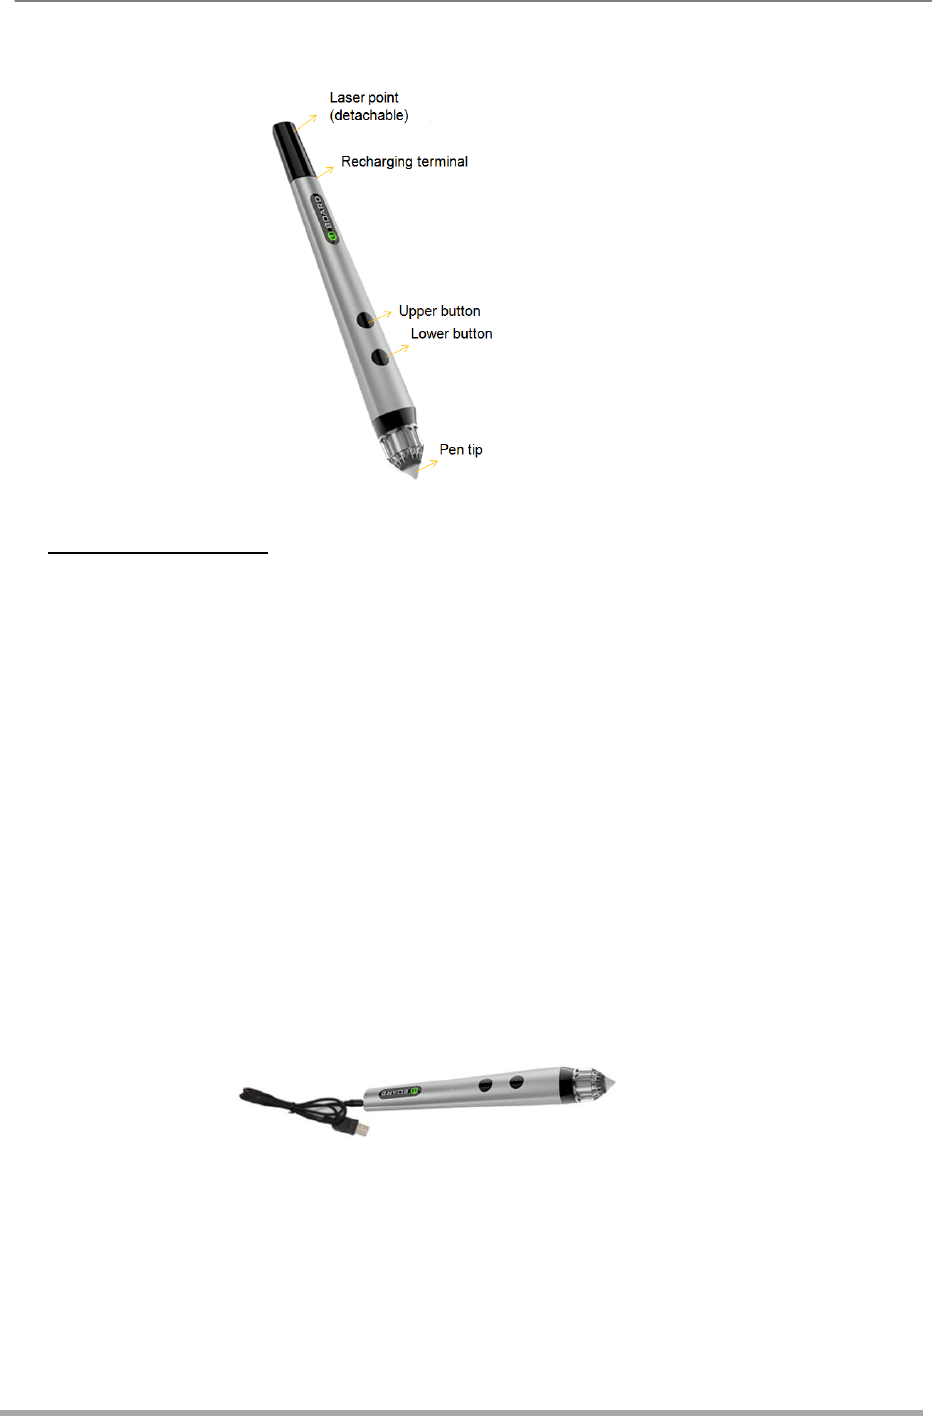
uBoard digital pen has 2 buttons executing different functions depending working
environment.
a. In MINT Interactive mode (Board software).
- Low button (close to pen tip): executes the right button of mouse.
- Upper button: switching eraser mode to writing mode or vice versa.
b. In Window mode.
- Low button: executes the right button of mouse.
- Upper button: executes window Exit when to push it during a couple of seconds.
(This function is only available during MINT control is active.)
uBoard Hardware Installation Guide (V2.2)
PenAndFree Co.,Ltd, 2010 6
3.2 Digital Pen operation
uBoard digital pen is using rechargeable battery to avoid environment contamination with
maximizing user convenience.
a. Recharging time & continuous operating time: It takes about 1 hour for full
recharge and lasts 20 hours for continuous operating time.
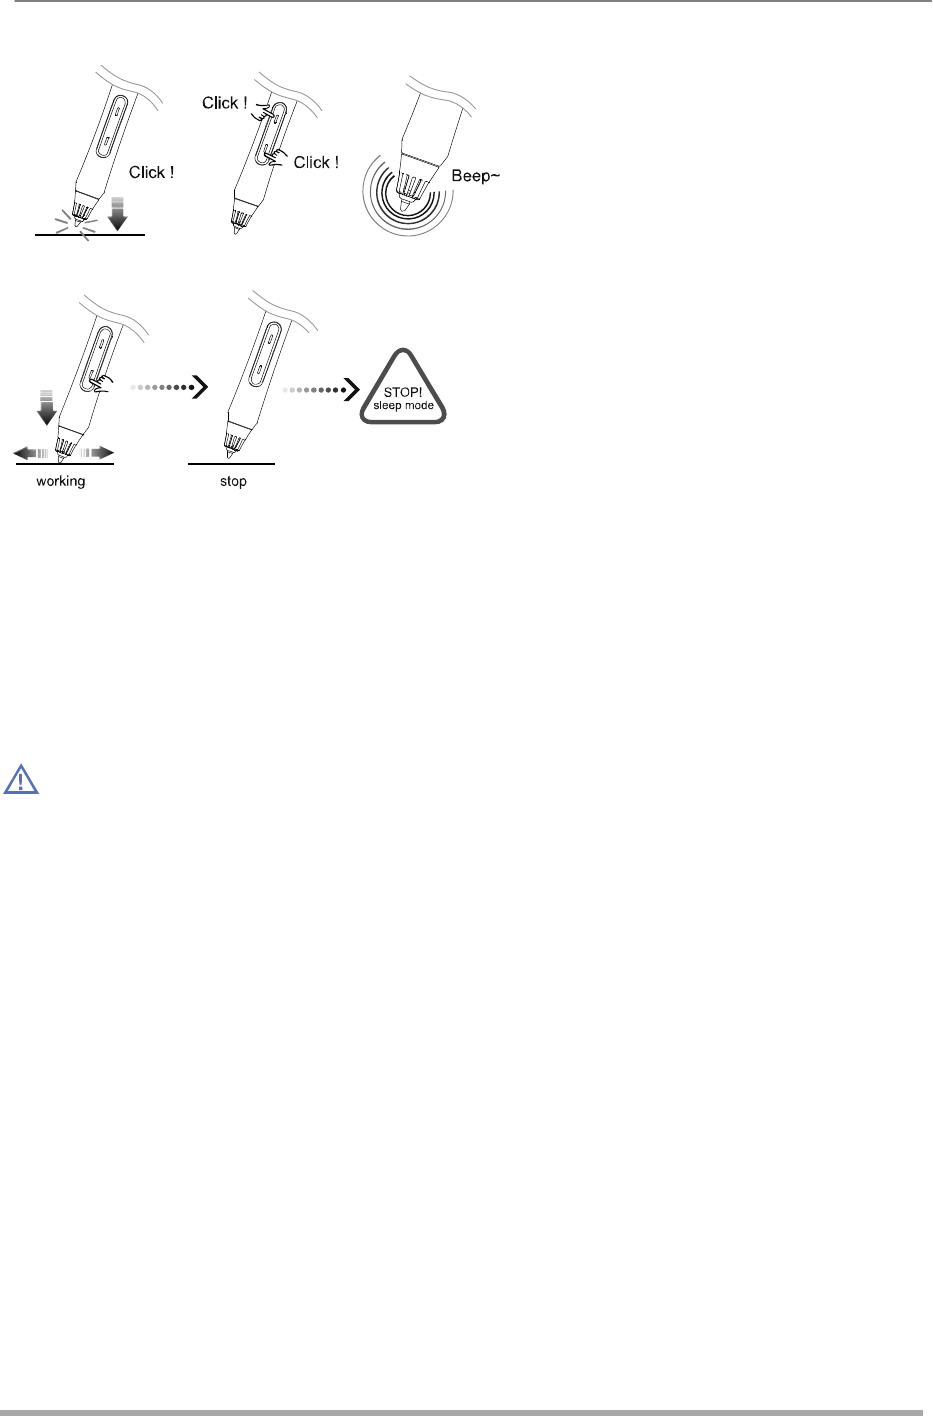
b. Automatic power save function: When the pen is idle for 10 seconds since last click,
it will automatically enter sleep mode to save battery. Pen can be in active mode
again by pressing any button or click pen tip.
c. 2 level battery monitoring indicator: Let user know current battery status by turning
on red LED light for low battery.
3.2.1 The way to recharge digital pen
In order to recharge digital pen safely, please use recharging cable enclosed in the package.
Connect the recharging terminal of the cable to the recharging hole at the end of pen body
and plug USB knob to computer.
3.2.2 How to check the pen status.
Press pen tip or pen button, then you can hear low beep sound generated by the pen when
it works properly.
uBoard Hardware Installation Guide (V2.2)
PenAndFree Co.,Ltd, 2010 7
.
3.2.3 Pen tip change
When pen tip is worn-out, it can be replaced with new one.
[To remove] Turn pen-tip to right or left direction by 90 degrees and then pull it out carefully
[To insert] Insert pen-tip into pen cage and turn it to right or left direction by 90 degrees
to lock it.
Notice: Possible to overheat, explode, fire or etc.
Do not expose to heat(130°F), imapct, chops or etc
Careful of inhaled or bited case by children or pets
Prohivits to insert metals to charger connector or sink in water.
10 sec