Lumi IML-COMM-1 Interactive Audience Communicator User Manual Manual
IML Ltd Interactive Audience Communicator Manual
Lumi >
Contents
- 1. Manual
- 2. Data Sheet
Manual

1
IML Communicator
Installation
Guide
Au
g
ust 2003
2
INDEX
SAFETY AND GENERAL INFORMATION 3
IML COMMUNICATOR 4
IML SYSTEM HARDWARE 5
CHARGING THE COMMUNICATOR KEYPADS 7
INITIALIZING THE BASE STATION & CONNECTING THE
COMMUNICATOR KEYPADS. 10
POWERING DOWN THE COMMUNICATOR KEYPADS 12
BASE NUMBERS, UIDS AND INDEXES 13
COMMUNICATOR KEYPAD FEATURES 15
IML COMMUNICATOR KEYPAD TECHNICAL SPECIFICATIONS 19
IML COMMUNICATOR CHARGING RACK FEATURES 20
IML COMMUNICATOR CHARGING RACK TECHNICAL SPECIFICATIONS
22
FAULT FINDING AND FIXES 23
THE COMMUNICATOR KEYPAD FAQ 24
COMMUNICATOR CHARGING FAQ 26

3
Safety and General Information
FCC – using the IML communicator in the USA
FCC CAUTION:
Any changes or modifications not expressly approved by the manufacturer could
void the user’s authority to operate the equipment.
This device complies with Part 15 of the FCC Rules. Operation is subject to the
following two conditions: (1) this device may not cause harmful interference, and
(2) this device must accept any interference received, including interference that
may cause undesired operation.
Note: This equipment has been tested and found to comply with the limits for a
Class B digital device, pursuant to part 15 of the FCC Rules. These limits are
designed to provide reasonable protection against harmful interference in a
residential installation. This equipment generates, uses and can radiate radio
frequency energy and, if not installed and used in accordance with the
instructions, may cause harmful interference to radio communications. However,
there is no guarantee that interference will not occur in a particular installation. If
this equipment does cause harmful interference to radio or television reception,
which can be determined by turning the equipment off and on, the user is
encouraged to try to correct the interference by one or more of the following
measures:
• Reorient or relocate the receiving antenna.
• Increase the separation between the equipment and receiver.
• Connect the equipment into an outlet on a circuit different from that to
which the receiver is connected.
• Consult the dealer or an experienced radio/TV technician for help.
European Union Directives Conformance Statement
Hereby, IML Ltd declares that this product is in compliance with
the essential requirements and other relevant provisions of
Directive 1999/5/EC.
You can view your product’s Declaration of Conformity (DoC) to Directive
1999/5/EC (The R&TTE Directive) at www.iml.co.uk.
France
In order to comply with power restrictions in the 2.4 GHz band in France, the IML
communicator can only be used indoors.
4
IML communicator
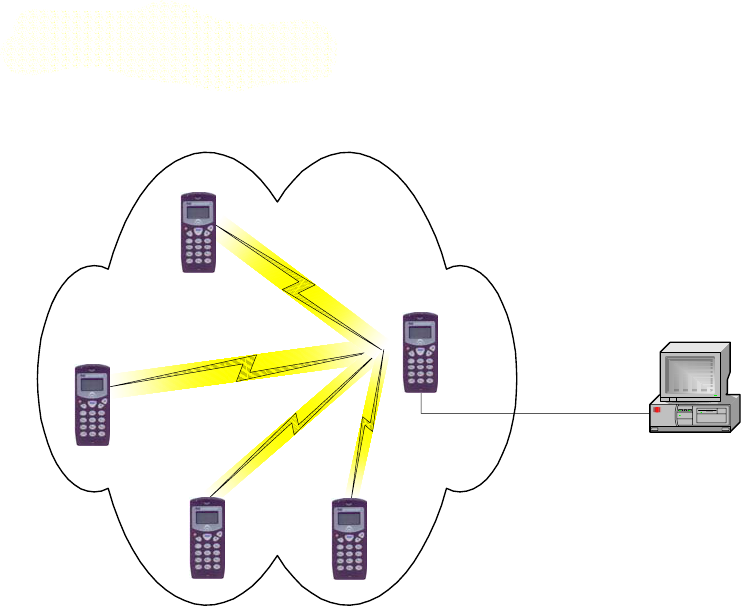
A unique, state of the art handheld radio device, fusing advanced
audience interaction features with a voice communication system for
meetings of all kinds and in all situations.
IML communicators enable an audience to view information on the handset
screen, respond with data by using the keypad, and to listen to audio, and to
transmit audio. The handsets use radio communication to transmit/receive data
and audio between a base station and the audience handsets. The base station is
a normal handset that is configured by the application or the operator to work as
a base station. The handsets are typically used with a PC application such as
IMLPort and IML Question Wizard. The PC is connected to the base station via
data (RS232) cable. The presenter runs the application and can then initiate
votes where the audience can then vote on their handsets, with the information
being transmitted back to the application via the base station. Applications such
as Question Wizard will display the vote results.
Computer
Base
station
RS232
Cable
5
IML System Hardware
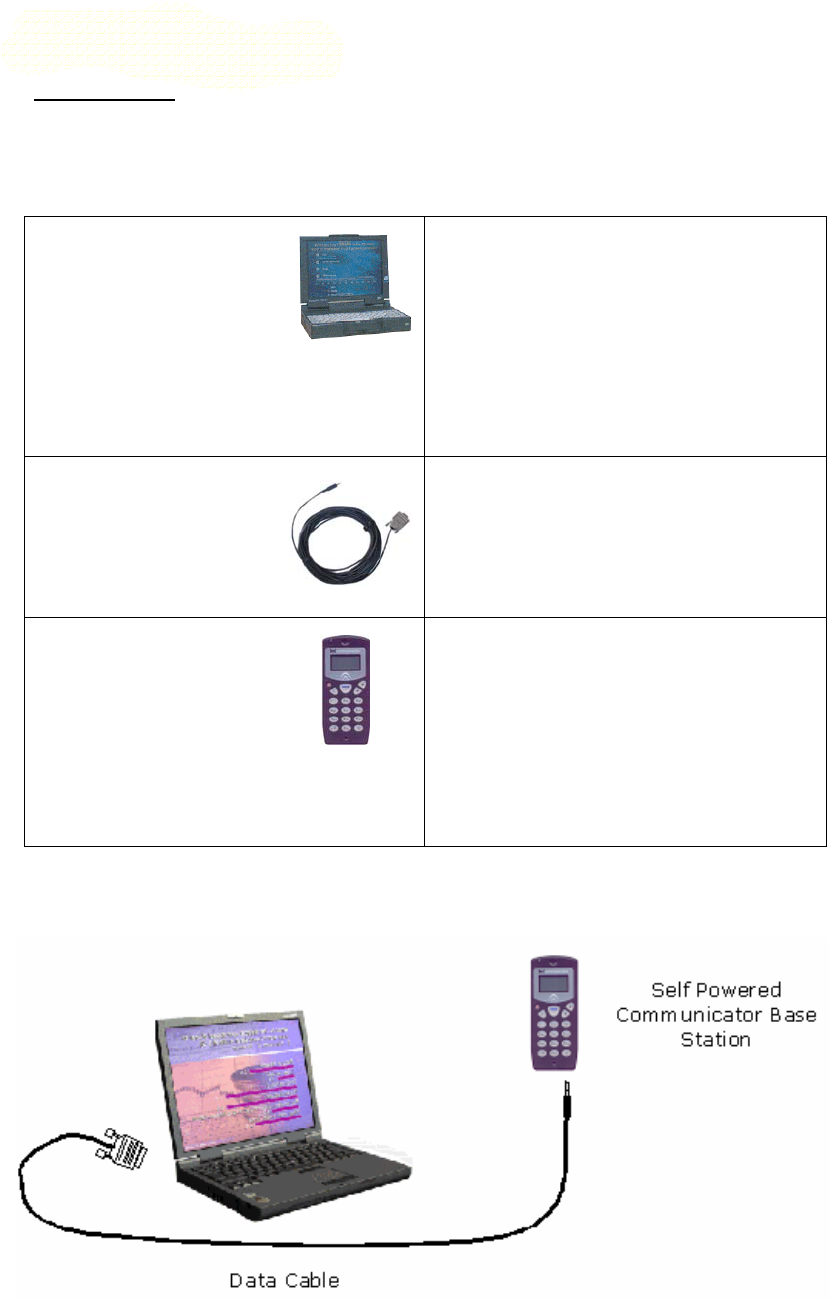
Base Station:
The base station comprises the radio module that transmits and receives
information to and from the keypads. The unit is connected to an available serial
port on the PC by means of a data cable and is monitored and controlled by the
application software.
PC & Application
Software
Requires:
Microsoft Windows Operating
System
Serial Port – for data connection
Application Software
Note that the application software
may have specific system
requirements
Base Station Data
Cable
The communications cable that
connects the PC serial port to the base
station. It is identified by a mini-jack
plug (Blue) at one end and a 9-pin
female D-type connector at the other
end of the cable.
Self Powered
Communicator Keypad
Base Station (battery
powered)
ANY Communicator keypad can be
initialised to operate as a base station.
(Refer to chapter ‘Initializing the Base
Station and connecting the
Communicator keypads’ for initializing
instructions).
A fully charged keypad working as a
base station will last approx. 6 hours.
Self Powered Communicator Keypad Base Station (Battery powered)
6
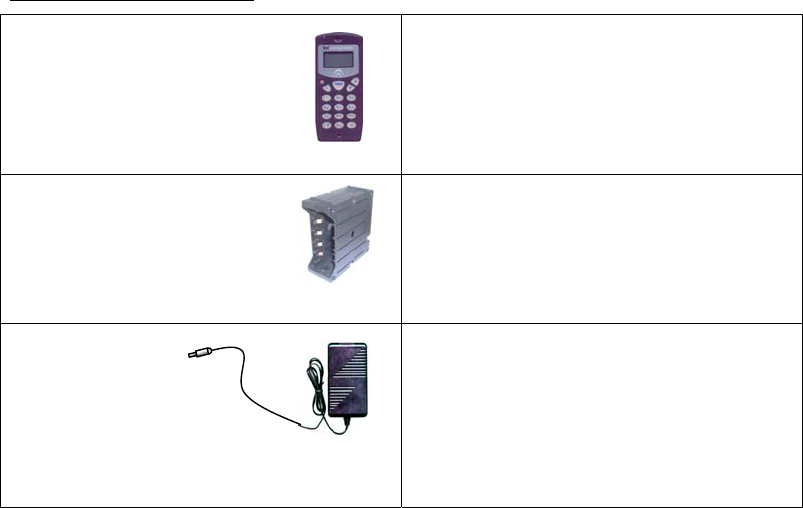
Keypads and Chargers:
Communicator Keypads Rechargeable batteries power the
keypads. The keypads are stored and
charged in stackable charging racks.
Charging module &
Storage Case
Each charging module can contain 5
keypads for both storage and charging.
Up to 5 modules can be clamped
together to form a single 25-keypad
rack.
Charging Rack
Power Supply
& IEC Mains lead
The chargers require an external AC/DC
power supply.
Each power supply can charge up to 50
keypads.
International Voltage Input: 100–240
Volts
7
Charging the Communicator Keypads
For power, a Communicator keypad requires 4 x NiMH (Environmentally friendly)
AAA rechargeable batteries. The keypads are charged in modular racks that are
also used to store them when they are not in use.
Each charging module contains up to 5 keypads and up
to 5 of these modules can be locked together to form a
25 keypad rack.
The charging racks may be wall mounted or supplied
with either a soft carrying case or a hard shelled flight
case which includes an integral cooling fan to keep the
keypad batteries cool during charging.
The charging racks require an external AC/DC power supply that connects to an
external socket at the back of a flight case or to one of two sockets on the
module itself. Each power supply is capable of charging up to a maximum of 50
Communicator keypads.
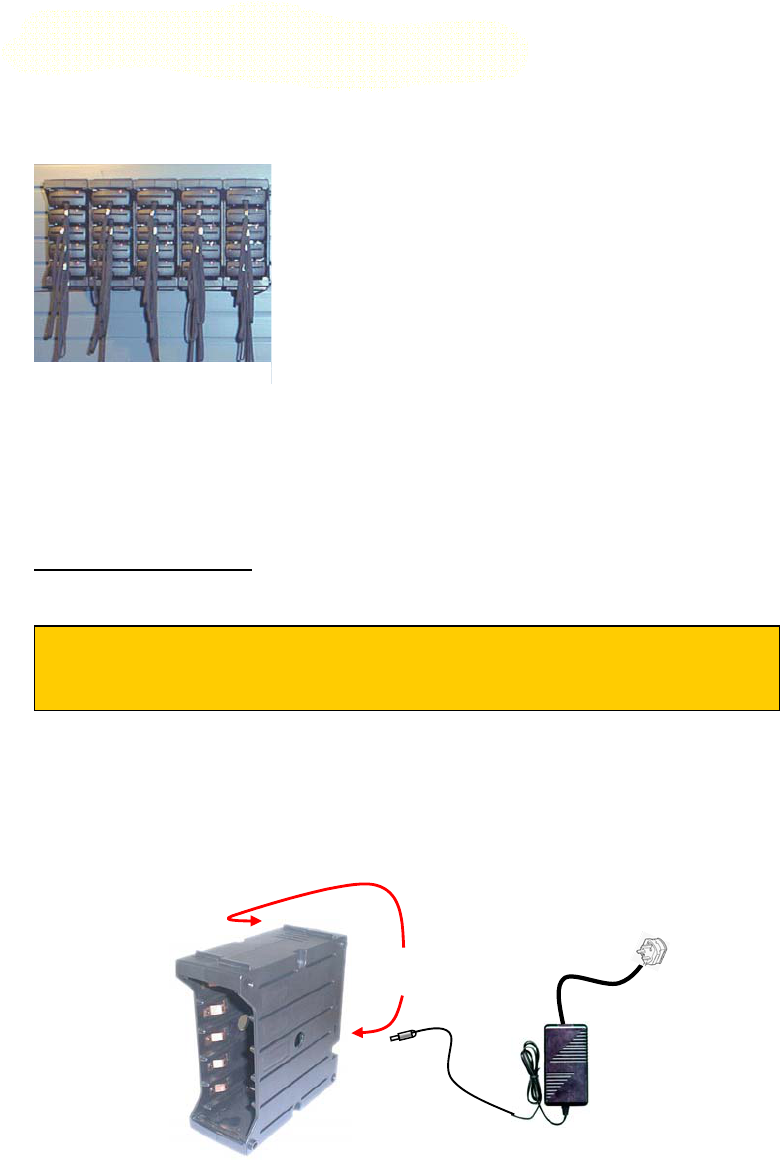
Charging Procedure:
Step 1:
Remove the charging rack from the soft case and place in a ventilated area.
Locate either one of the two DC sockets visible at the rear of the rack and
plug in the 10V DC power supply.
DC Sockets
Charging Rack
Power Supply
25 keypad wall mounted
charging rack
IMPORTANT
To avoid overheating of the keypad batteries, you MUST remove the
charging racks and keypads from the soft case before charging.
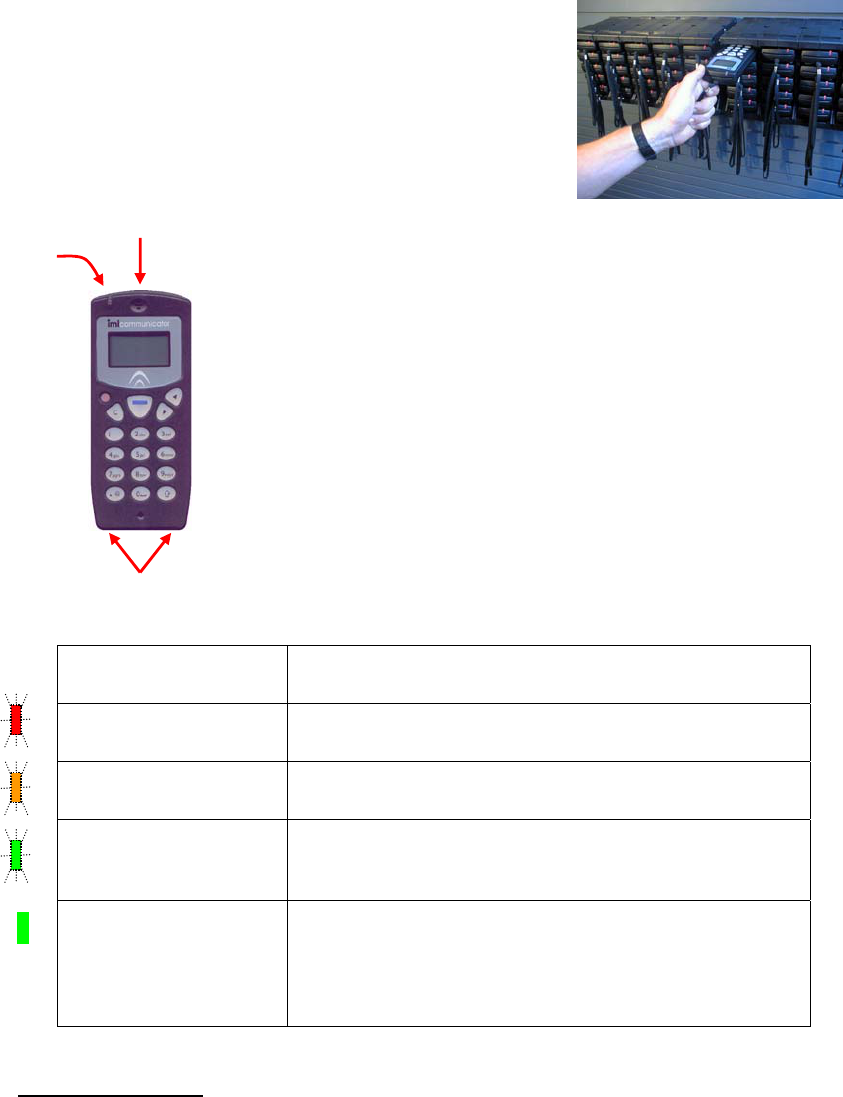
8
Smart Card Slot
LED
Charging Contacts
Step 2:
If the keypads are not already in the racks, slide each of
them into the charging rack with the charging contacts
end first so that the smart card slots are visible from the
outside.
Ensure that the Communicators’ charging contacts
positively click to the magnetic contacts in the rack.
Ensure that each keypad’s LED initially illuminates red
when it makes contact with the charger. If the LED does
not illuminate, push the keypad gently into the rack until
the LED comes on.
A full charge cycle of 10 – 12 hours is necessary for a
completely flat Communicator. Partially charged
Communicators will take less time to fully charge.
Each Communicator gets fast charged for a minute at a
time in a cycle within each rack.
During the charging process the LEDs will change from
red through orange to green.
Battery Duration:
It is estimated that a fully charged Communicator keypad will last:
36 hours in standby or data response mode (voting)
20 hours in talk mode (microphones)
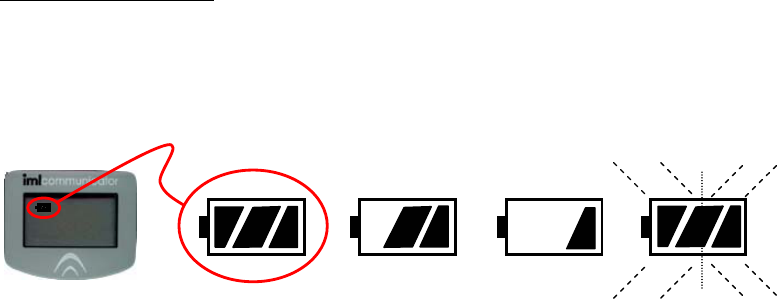
LED Status when in
a charger
Function
Red flashing LED The keypads are charging, but still only have low
capacity
Orange flashing LED The keypads are charging and have now reached
medium capacity
Green flashing LED Indicates that the battery capacity is 100% fully
charged and is currently being trickle charged to
maintain 100% charge.
Green LED (Not
flashing)
Indicates that the battery capacity is 100% fully
charged and the charge cycle is complete. After a
period of time as the battery capacity decays, the
handsets will go back into the trickle charge (i.e.
flashing green LED part of the cycle
9
Battery Status Icon:
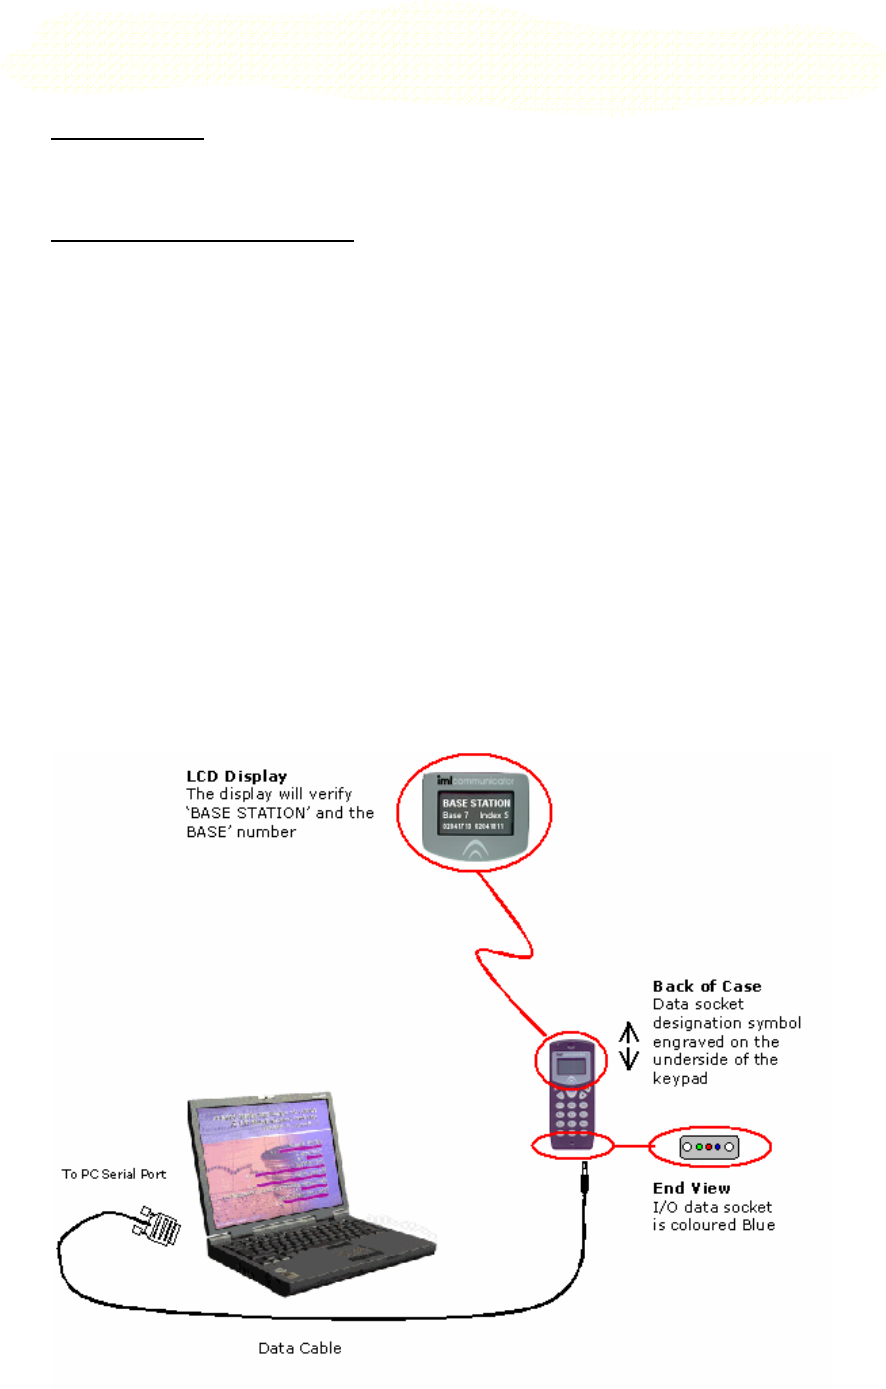
When the Communicator keypad is powered up, the LCD display displays a
battery power icon at the top left of the screen. This icon gives a visual display on
how much charge there is left in the Communicators’ batteries. There are 3
segments within the icon that represent 30% of the full battery capacity.
Charge Capacity
90 - 100% 60 - 90% 30 – 60% 10% or less
Flashin
g
10
Initializing the Base Station & Connecting the Communicator
Keypads.
PC Application
Start up the PC and its applications (e.g. IMLPort) following the guide for the
application.
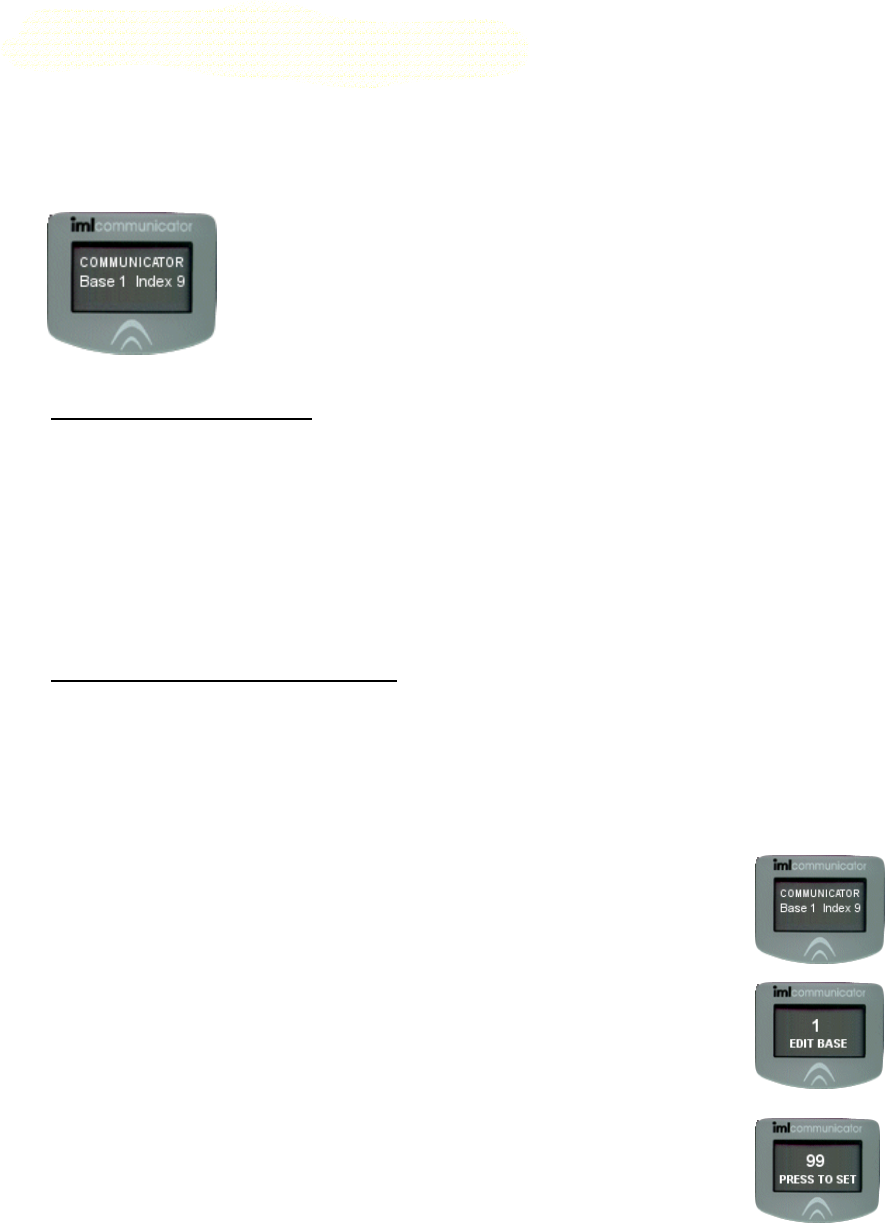
Initialising the Base Station:
• Select a fully charged Communicator keypad from the charging rack.
• Identify the base station cable and connect the blue mini-jack, to the blue
I/O data socket at the base of the keypad.
• The I/O port socket on the Communicator is located at the bottom right
hand side of the keypad, is coloured blue and labeled with an ‘opposing
arrows’ symbol inscribed on the underside of the case.
• Connect the other end of the cable (9-pin female D-Type) to the correct
serial port on the PC (This is the serial port that was configured in the
application).
• Power up the Communicator by pressing the red power button on the
keypad.
• Some applications will automatically switch the handset into base station
mode, others require the use of a base station smart card.
• Confirm that a beep is heard and that the keypad has been initialized as a
‘BASE STATION’. The LCD will be displaying the words ‘BASE STATION’.

11
Connecting the Communicator keypads to the system:
There are two methods of connecting the Communicator keypads to the system:
(1) Individually from power down
If the Communicator keypads are switched off (the display is blank), press
the round red power on button at top left side of the keyboard.
Allow up to 10 – 15 seconds for the keypad to connect to the base station.
• The flashing LED at the top edge of the Communicator and the
‘Signal Strength’ icon on the display will indicate the connection
status.
• Flashing green indicates a connection with a strong signal
• Flashing orange indicates an acceptable signal for data (i.e. voting)
but not for audio (i.e. microphone).
• Flashing red indicates that the keypad has not connected to the
base station.
(2) Globally from the charging rack
Ensure that the charging rack(s) are switched on and charging the
Communicator keypads.
To automatically connect the keypads to the base station, either remove
the keypads from the rack or switch off the power to the charging rack(s).
When Communicator keypads are in their charging racks with the charger
on they are automatically switched off and cannot communicate with any
Base station. As soon as the charging is stopped or the keypads are
removed from the charger the keypads switch on and snoop around for a
base station with the same base number as their own. If a Base station
signal is not detected after 15 seconds, the Communicator keypad will
power down.
Allow up to 10 –15 seconds for the keypad to connect to the base station.
• The flashing LED at the top edge of the Communicator and the
‘Signal Strength’ icon on the display will indicate the connection
status.
• Flashing green indicates a connection with a strong signal
• Flashing orange indicates an acceptable signal for data (i.e. voting)
but not for audio (i.e. microphone).
• Flashing red indicates that the keypad has not connected to the
base station.
Signal Strength Icon:
Poor Signal
Unreliable
for Data &
Audio
Signal Strength
Strong Signal
Data / Audio
No Icon
No Connection Acceptable
Signal for Data
but not for Audio

12
Powering down the Communicator keypads
There are several methods of powering down the keypads. These methods
depend on whether the keypads have connected to a base station or not.
If the Keypads have not connected to a base station then there are two ways of
powering down the keypads:
1. Press the red Power On/Off button on the keypad
2. Place the keypads in the charge racks and switch on the power to the
racks.
If the keypads have connected to a base station the Power On/Off button on the
keypad may have been disabled by the application e.g. IML Question Wizard (this
is to stop the delegates from accidentally switching off the keypad during a
meeting).
1. Place the keypads in the charge racks and switch on the power to the
racks.
2. Press the power On/Off button if this has not been disabled by the
application
3. Use application specific commands or methods, refer to application
documentation for details.
13
Base Numbers, UIDs and Indexes
The IML Communicator System utilizes a license free radio band 2.45 GHz
employing spread spectrum frequency hopping protocols. Basically this means
that the system provides assurance that it will operate in high interference
situations and when other radio based system are being used e.g. wireless LAN,
Blue Tooth etc.
You may have noticed that when a Communicator keypad is
powered up and not connected to a base station, the LCD
display shows a Base Number and an Index Number.
What is a BASE number?
A Base number is similar to channels and can be set to any value from 0 to 99.
The base number must be set in each Communicator and it must be the same as
the base number set in the base station that you want it to connect to.
The advantage of being able to set different base numbers in a system is that it
allows different interactive presentations to be run in close proximity without
interference.
When a system leaves the factory, the default base number for the keypads is set
to Base 1.
How to change the Base Number
There are two methods of changing the base number on a keypad:
(1) Using a Base Number Smart Card (Currently not released)
(2) By placing the keypad into Base Number Setup Mode by entering a special
coded number.
Step 1 - Ensure that the base station and keypads are switched off
Step 2 - Switch on a keypad. The keypads LCD will display
COMMUNICATOR, the BASE number and the INDEX number.
Step 3 - Type in the word BASE on the keypad using the letters
printed on the buttons, i.e. 2273
Step 4 –
• Enter the new Base Number. Use the ‘C’ button to
clear your input if necessary.
• Press the Blue Soft Key to set the new Base Number
• Power down the keypad
Ensure that all the keypads have the same base number – including the base
stations.

14
What is a Unique ID (UID)?
A Unique ID (UID) is the number printed on the Communicator label. It is set
inside the Communicator during manufacture and will never be changed. It
ensures that all Communicators can work together on the same base station
without clashing.
15
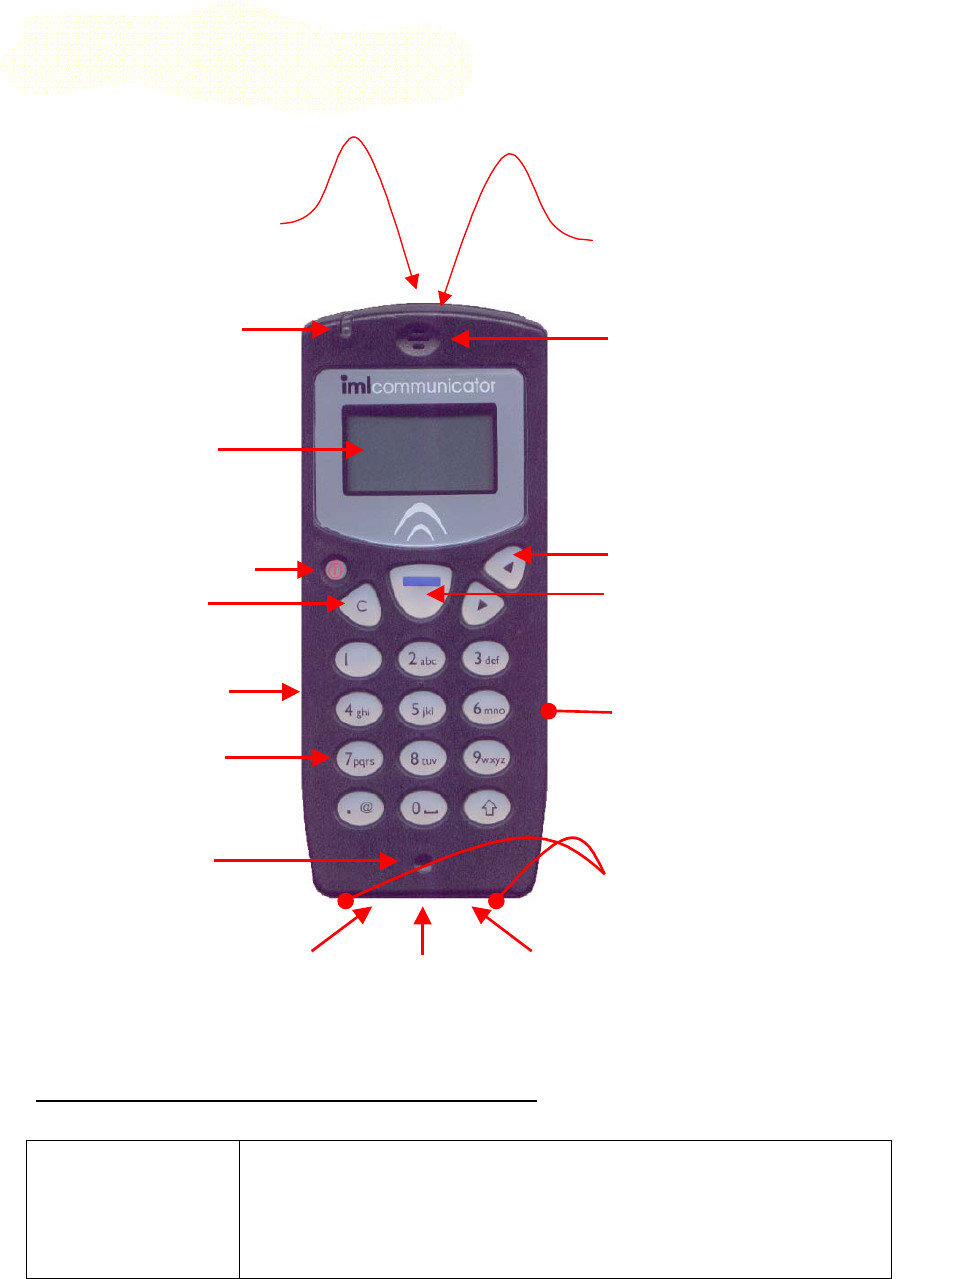
Communicator Keypad Features
Communicator Keypad Functions & Accessories
(1) Wrist strap • The Communicator comes with a wrist strap that can be
removed by unlooping it from the bar located at the back
of the unit.
• Neck lanyards with crocodile clips can be used that allow
the keypad to be quickly released and then reattached.
• The straps can be supplied with the client's name.
(9) Smart Card Slot
(10) Internal Earpiece
(12) Soft Key
(8) Internal
Microphone
(5) Cancel Key
(3) Backlit LCD
(14) Power Charging Contacts
(7) Backlit alpha
numeric keypad
(2) Red, Orange,
Green LED indicator
(11) In built Questionnaire
Response Memory
(4) Power On / Off
(16) External
Microphone
Socket
(15) External
Headphone
Socket
(17) Data
Socket
(1) Wrist strap / neck
lanyard attachment.
(6) Internal anti-theft
alarm & sounder (13)
Rechargeable
batteries

16
(2) Red, Orange,
Green LED indicator
The LED indicator on the Communicator performs two visual uses
to the user:
• Base Station:
This indicator flashes green to show that the
Communicator keypad is connected to the base station,
flashes orange to show that the signal level is low and
flashes red to show that it is attempting to connect to the
base station.
• Charging:
When the Communicator is in the battery charging rack,
the indicator shows the keypads recharging progress
within the charging cycle. Red for low, orange from low to
nearly complete and green for complete. The LED blinks
to show it is being charged and is viewable from outside
the charging rack.
(3) Backlit LCD • Blue on green dot matrix LCD
• Backlit – A display backlight is switched on automatically
for approx. 10 seconds whenever a key is pressed.
• 97 x 32 pixels display
• The display includes 5 icons to display battery power,
signal strength, current time, message pending and alarm
bell.
- The battery power icon has three segments to
indicate the amount of battery remaining.
- The signal strength (aerial) icon has five bars
indicating the signal strength.
- The clock icon displays the system time in HH:MM
which follows the PC clock.
- The envelope icon is currently not implemented.
- The alarm icon is displayed if the keypad anti-theft
alarm has been enabled.
• Customizable fonts and icons may be configured for the
display (i.e. company logo).
(4) Power On / Off Power button for switching the Communicator on or off.
• During normal operation (e.g. when used with IML
Question Wizard), the keypad cannot be manually powered
off once it has connected to the base station; this prevents
the user accidentally switching off the device during a
meeting. A password can be entered onto the keypad to
re-enable the power off mode.
• A global power down command from the IML Question
Wizard can be sent to power down all connected keypads.
(5) Cancel Key • In number entry fields the cancel key clears the display &
clears any previously submitted values sent to the PC
whether the submit key (Soft Key) has been enabled or
not.

17
(6) Internal anti-
theft alarm &
sounder
• The internal sounder is used ….
o to generate an audible sounds when keys are pressed
on the keypad
o to trigger an alarm sound when a keypad is out of
range of the base station. i.e. If the Communicator is
taken out of the meeting room and loses the base
station signal, the sounder will automatically trigger
and a message to return the keypad back to the
administrator will be displayed on the LCD display. The
sounder will stop and the message will clear from the
LCD display when the Communicator reconnects back
to the base station. The trigger signal strength can be
adjusted to suit the room.
(7) Backlit alpha
numeric keypad
• Molded silicon tactile feedback pad with gold contacts.
• Backlit - The keyboard is switched on for approx. 10 seconds
when ever a key is pressed.
• 0-9 plus decimal point.
• The keyboard makes a quiet click if a valid key is pressed
otherwise a beep is heard. These sounds are generated from
the internal sounder.
• A-Z upper and lower (similar to a mobile phone layout) plus
symbols and space bar. Alpha text input is currently
unavailable but is intended for name / email details and short
message response.
(8) Internal
Microphone
• The internal microphone is indicated by the small indentation
near the lower edge of the communicator.
• The microphone is fairly omni-directional.
• 60Db (20Hz – 3.5KHz).
• Sibilance is good.
(9) Smart Card Slot • PC/SC compatible
• Currently, Smart cards can be provided for different uses:
o Logging on
o Manually setting the Communicator base number
• Manually setting the Communicator index number.
(10) Internal
Earpiece
• The internal earpiece is located above the LCD display and is
currently only enabled on the base station.
(11) In built
Questionnaire
Response Memory
• The Up/Down selector keys are currently enabled for
asynchronous voting allowing delegates to enter up to 100
multiple responses to either printed questionnaires or whilst
they roam around an exhibition in their own time and respond
to questions on display boards. The responses can be
downloaded into Question Wizard at a later time for
processing.
• Future development will allow these keys to be used for other
types of applications where menu selection may be necessary.
(12) Soft Key • As in mobile phones the large central blue key changes
function depending on the current mode. A flashing, reversed
out text in the lower centre of the display will prompt the user
what action the blue key will perform. e.g. To submit the
vote, request to talk.
• Normal text is used to indicate a state or feedback e.g.
response sent, valid response.

18
(13) Rechargeable
Batteries
• Charging time: 10-12 hours for full charge.
• Battery type: Re-chargeable NiMH (Environmentally friendly).
• Battery Size: 3 x AAA pack.
• 3 year estimated battery life.
• Estimated charge capacity:
36 hours in standby or data response mode (voting)
20 hours in talk mode (microphones)
6 hours in base station mode
(14) Power
Charging Contacts
• The power charging contacts on the Communicator are
attracted and lock onto magnetic contacts in the charger. This
provides a reliable connection for charging and stops the
Communicators from falling out of the charging case when put
into any position.
• Nickel plated contacts for anti-corrosion and high conductivity.
(15) External
Headphone Socket
• Currently only enabled on the Base Station
• An external headphone switches off the internal headphone
when it is plugged into the 3.5mm stereo jack socket.
• A designation showing the headphone is engraved on the
underside of the case and the socket is coloured green for
quick identification.
(16) External
Microphone Socket
• The central microphone socket provides the usual power for
PC type microphones (electret) dynamic microphones. An
external microphone switches off the internal microphone
when it is plugged into the 3.5mm stereo jack socket.
• A designation showing the headphone is engraved on the
underside of the case and the socket is coloured red for quick
identification.
(17) Data Socket • The I/O port is used to turn a Communicator to a base station
by connecting a base station lead from the Communicator to a
serial port on a PC or Laptop.
• A designation showing the data socket is engraved on the
underside of the case and the socket is coloured blue for quick
identification.

19
IML Communicator Keypad Technical Specifications
Manufacturer Details
Manufacturer IML Ltd 8 London Road Liphook Hampshire GU30 7AN UK
Name/Model Communicator
Country of origin United Kingdom
Description Rechargeable radio audience handheld device for polling and
audio feedback.
Size and Material
Enclosure material Black ABS plastic
Dimensions Length
x Width x Height
150mm x 65mm x 25mm
Weight 0.180Kg
Microprocessor
Microprocessor 16 bit 10MHz RISC base band microprocessor with re-
programmable FLASH memory for firmware upgrades /
customization and future proofing.
Power Management
Power management
features
Automatic power management saves battery energy when a
keypad detects low activity.
Asset Tracking
Asset tracking A bar coded label is attached to the back of the keypad for use in
inventory control.
Transmission Standards
RF Wireless
Specification
ISM license free radio band 2.45 GHz employing Spread Spectrum
Frequency Hopping system according to ETS 300 328 and FCC
part 15 standards adopted in USA, Europe and Asia.
This standard provides assurance that the system will operate in
high interference situations and will interoperate with other radio
users, other electronic or non-electronic devices when operated in
conjunction with these devices. i.e. Wireless LAN, Blue Tooth.
Specification Value
Frequency 2400 – 2483.5 MHz
Power +20dBm
Modulation FHSS
Hop Dwell Time 10 ms
Sequence Pseudo Random
20
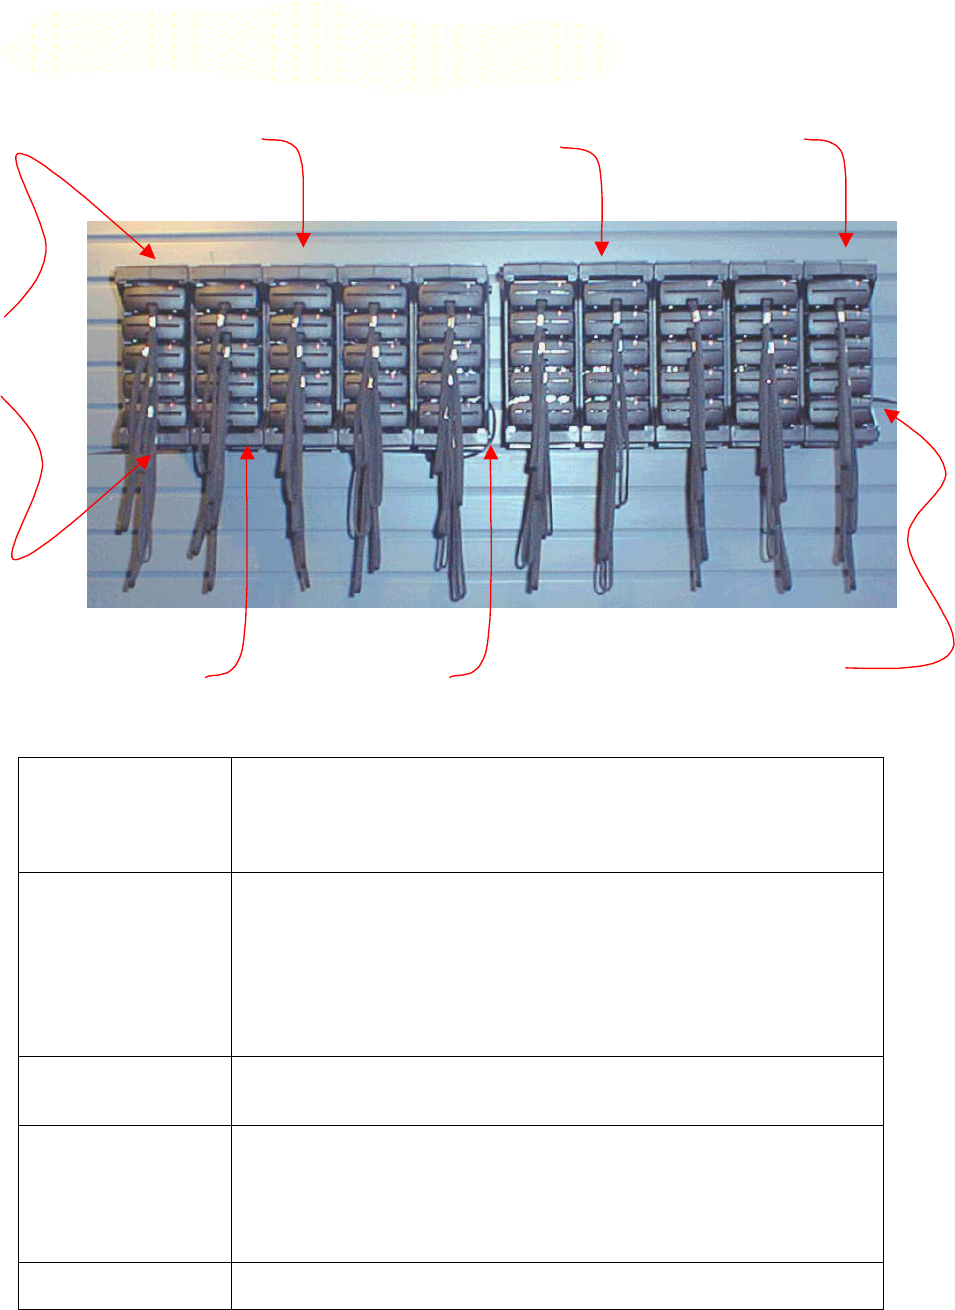
IML Communicator Charging Rack Features
(1) Modular Design
Charging Rack
Each 5-slot charger can be used on its own with a 9 to 12V
(500mA) DC power supply. Five modules can be locked and held
together by using two tie bars and two power inter-connectors to
form a standard block of 25 Communicators.
(2) Internal
Microprocessor for
Intelligent
Charging.
The charger is controlled by microprocessor which gives a 60
second charge to each Communicator in turn. The Communicator
controls the colour of its LED from red through orange to green to
indicate its charge state. If a slot is not filled or a Communicator
is fully charged then the intelligent charger skips the slot and
carries on with the next. If a Communicator LED is not solid green
it gets a 60 second rest between charges.
(3) Fixing Lugs for
Wall Mounting
Two Keyhole slots are provided at the back of each rack for
attachment to vertical surfaces using Pan head screws.
(4) Power Supply
Input
Two DC inlets are available on each 5 keypad module.
Any of the DC inlets can be used for power supply input or linking
to another block using a DC to DC link cable.
No more than 50 communicators should be linked together.
(5) Stackable Racks The racks are designed to stack on top of each other.
(1) Modular
Design
Charging Rack
DC to DC
Link Cable
(4) Power Supply Input
(3) Fixing Lugs
for Wall Mounting
(2) Internal
Microprocessor for
Intelligent Charging.
(6)
Ventilation
slots
(5) Stackable
Racks

21
(6) Ventilation slots The ventilation slots at the top and bottom and at the back should
be kept clear when charging is in progress.
Reversible The Communicators can be inserted either way round in a mixed
fashion into the charging rack.
LED Power On
Indicator
A green LED on the inside-middle-back of the rack indicates that
the power is on.

22
IML Communicator Charging Rack Technical Specifications
Manufacturer Details
Manufacturer IML Ltd 8 London Road, Liphook, Hampshire GU30 7AN UK
Name/Model PDC (Personal Digital Communicator) Charging Rack
Country of origin United Kingdom
Description A modular charging rack designed to hold 5 Communicator
keypads.
5 modules can be clamped together to form a single 25
keypad charging rack.
Suitable for permanent wall mounting for side keypad access
or placing on horizontal surface for pull up access.
Can be housed into mobile trolleys or flight cases for
transportation.
Rack Size and Material
5 Keypad Rack:
Enclosure material Black ABS plastic
Dimensions Length
x Width x Height
184mm x 75mm x 132mm
Weight (Net) 0.490Kg
External Power Supply
(50 keypad capacity):
Input 120-240VAC 50-60Hz
Output 9V DC 5A (Centre Pin +ve)
Max. Keypad
Capacity
Up to 50 keypads
Dimensions Length
x Width x Height
145mm x 76mm x 44mm
Weight 0.750Kg
Listings UL, CE, GS, CB listed

23
Fault finding and Fixes
Communicator does not function
Fault: Display is dead even after pressing on/off key.
Fix: Charge and re-test
Action: Make sure keypads are on charge the day before you use them.
Fault: Display is dead after charging and pressing on/off key.
Fix: None
Action: Contact supplier
Communicator does not connect
Fault: Communicator flashing red LED does not turn green.
Check: Communicator(s) and base station must be configured with the
same Base number.
Fix: Change the base number so that all the communicators and the base
station are running with the same base number.
Fault: Signal strength meter icon has no bars.
Fix: Switch of Communicator and switch it on again. If position is not the
cause then there is no fix.
Action: Contact supplier.

24
The Communicator Keypad FAQ
Base station
Q: Can any Communicator be used as a base station?
A: Yes, any Communicator goes into base station mode when connected to a PC
that is running the appropriate IML software, or if manually changed into base
station mode.
Q: Will the Communicators stay connected if I disconnect the Base
Station data lead?
A: Yes.
Q: Why doesn’t the LED flash normally on the base station?
A: The base station LED cannot indicate the signal strength of every
Communicator that is connected to it so it is not used in this way – see next Q.
Q: What do the occasional red, orange and green LED flashes indicate on
the base station?
A: The Communicator LED behaves differently in base station mode. It does not
indicate signal strength as it does in normal mode. A red flash indicates a
message has been received by the base station from one or more
Communicators. A green flash indicates that a command has been transmitted
from the base station to one or more of the connected Communicators. An orange
flash indicates that commands and messages are passing between the base
station and Communicators.
Base number
Q: What is the Base number?
A: The base number can be any value from 0 to 99. Using different base
numbers allows different interactive presentations to be run in close proximity
without interference.
The base number must be set in each Communicator and it must be the same as
the base number set in the base station that you want it to connect to.
Q: When would I need to change to a different base number?
A: If you discovered that you were using the same base number as another user
close to you - either you or the other user would need to change to another base
number.
Q: How do I tell what the current base number is?
A: Look at the displays on the base station or Communicators.
Q: What happens to a Communicator with the wrong base number.
A: Communicators with a different base number to the base station will not
connect. They will not interfere with the system. Check the base number
displayed on the base station and use the base numbering smart card as above to
set the Communicator to the right number.
Q: What happens if I connect up more than one base station with the
same base number?
A: This is not recommended and the system may be unreliable. Communicators
do not necessarily connect to the strongest signal.

25
Handset
Q: What is the unique ID (UID)?
A: It is the number printed on the Communicator label. It is set during
manufacture and will never be changed. It ensures that all Communicators can
work together on the same base station without clashing.

26
Communicator Charging FAQ
Q: When Communicators are in the charger and you switch off the power
supply, why do they sometimes stay on and at other times switch off?
A: You will notice that if the base station is on they will connect and stay on but if
the base station is off they will also switch off. The rule is - if they have
connected at any time they stay on but if they cannot connect at all they switch
off.
Q: If I pull out a Communicator when it is on charge does it follow the
same rule as above.
A: Yes. Pulling out a Communicator when it is on charge is the same as switching
off the charger.
Q: Can the Communicators connect to the base station when they on
charge?
A: No. The Communicators are disconnected from the base station when they go
on charge.
Q: Does it matter in which order and which way round the
Communicators are put into the rack?
A: No. As long as the Communicator is slid into the rack contacts first. The
Communicator’s keyboard can face up or down. The rack itself can also be used
either way up.
Q: Do I need to fill all the rack positions when charging?
A: No. If you distribute the Communicators across the rack modules they will
take less time to charge as the charger skips empty positions.
Q: Do fully charged or vacant rack positions get skipped?
A: Yes, they do not receive the 60 second charge cycle.
Q: Will Communicators charge faster when they are on their own?
A: A single Communicator in the rack will be fast charged one minute on and one
minute off etc so it will take 2/5th of the time it would normally take in a rack of
five i.e. roughly 2 hours for a full charge. A full charge for two Communicators is
also 2/5th.
Q: Sometime the charging cycle goes from top to bottom other times
from bottom to top, why is this?
A: The cycle order, either top to bottom or visa versa, will depend on which way
round you have positioned the rack.
Q. How do I know if the charging rack is powered on?
A. Either insert a Communicator keypad into the rack and check that the LED
turns Red or remove the keypad that is in the middle rack position (third down)
and note the green LED inside the back of the rack.
Q: Can the rack be stood on its backside?
A: Yes, as long as air can circulate into the racks from underneath.
Q: Can the charging rack be stood on it side?
A: This is not recommended, as the airflow is restricted.
27
Q: Can I charge more than 25 Communicators by linking up blocks of 25?
A: 2.5A power supply can charge up to 50 Communicators at a time, so you may
link two blocks of 25 Communicators together using the interconnecting DC-DC
cable between two outside charge rack sockets.
Q: How many racks can a power supply serve?
A: A 10V DC 5.5A power supply can power up to 50 Communicators in 10 racks.
Do not try to power more than 50 Communicators from a single power supply.
Q: Is it best to top up the Communicators after use or to use them until
flat before charging?
A: The NiMH batteries do not suffer the so-called memory effect experienced with
NiCad batteries so the Communicators may be topped up as a routine.
Q: Can I stop the charging half way through, use the keypads and then
put them on charge again?
A: Yes. They will start red but soon go to orange and then eventually to green.
Q: How do I extend the batteries serviceable life?
A: Store and charge in cool surroundings. Always allow air to circulate into
charger during charging.
Q: Do I ever need to replace the batteries?
A: All rechargeable batteries lose their capacity over time. As this time depends
on usage and operating environment it is not possible to be precise about this.
However they should expect them to retain enough capacity for 3-5 years.
Q: How long do the Communicators keep their charge?
A: After a month the Communicators may lose 10% of their capacity.
Q: How long can a fully charged Communicator run for?
A: In base station mode it will last 6 hours.
In standby or response mode a Communicator will last 36 hours.
In talk mode it will last 20 hours.
Q: Can the power supply be used abroad?
A: Yes, the power supply is 110-240V AC 50-60Hz. You will however require the
correct mains plug for the country you are working in.
Q: Can the racks be used individually?
A: Yes. Two metal ties hold the racks together. These may be unscrewed to
release the individual racks. There are two inter-connecting pin sets between
each pair of racks that must be kept for when the racks are re assembles into a
block.
Q: Can different numbers of racks be fitted together?
A: Yes. Phone the IML Sales department for availability of different tie bar
lengths.
Q: Can the contacts on the Communicator erase floppy disks?
A: No. The magnets are inside the charging case and the Communicator contacts
never get magnetized.
Q: Can I get a shock from the Communicator contacts?
A: No. Power is not available from these.

28