Lumi IML-CONN-1 IML Connector User Manual IML Connector
Lumi Technologies Limited IML Connector IML Connector
Lumi >
Users manual

IML Connector
User Manual

IML Connector
Page 2
Contents
1. System at a Glance ..................................................................................................................................... 4
2. Features ...................................................................................................................................................... 5
3. Quick Start .................................................................................................................................................. 7
4. Licensing ..................................................................................................................................................... 8
5. Charging ...................................................................................................................................................... 9
6. Switching On ............................................................................................................................................. 12
7. Switching Off ............................................................................................................................................. 14
8. Network Screen ........................................................................................................................................ 15
9. User Driven Roaming ................................................................................................................................ 17
10. Utility Cards .............................................................................................................................................. 18
11. System Manager ....................................................................................................................................... 20
12. Audio Settings ........................................................................................................................................... 24
13. Custom Screens ........................................................................................................................................ 27
14. Alarm ........................................................................................................................................................ 29
15. Using a Handset as a Base Station ............................................................................................................ 30
16. Microphones ............................................................................................................................................. 31
17. Audio Hardware ........................................................................................................................................ 33
18. Additional Audio Features ........................................................................................................................ 34
19. Text Messaging ......................................................................................................................................... 35
20. Voting ........................................................................................................................................................ 36
21. USB Connectivity ...................................................................................................................................... 37
22. Attendance Tracking ................................................................................................................................. 39
23. Safety, Maintenance & Compliance Information ..................................................................................... 40

IML Connector
Page 3
Appendix A: Audio Routing Diagrams ............................................................................................................. 43
Appendix B: Hotkeys ....................................................................................................................................... 47
Appendix C: Glossary of Terms ....................................................................................................................... 48
IML Connector
Page 4
1. System at a Glance
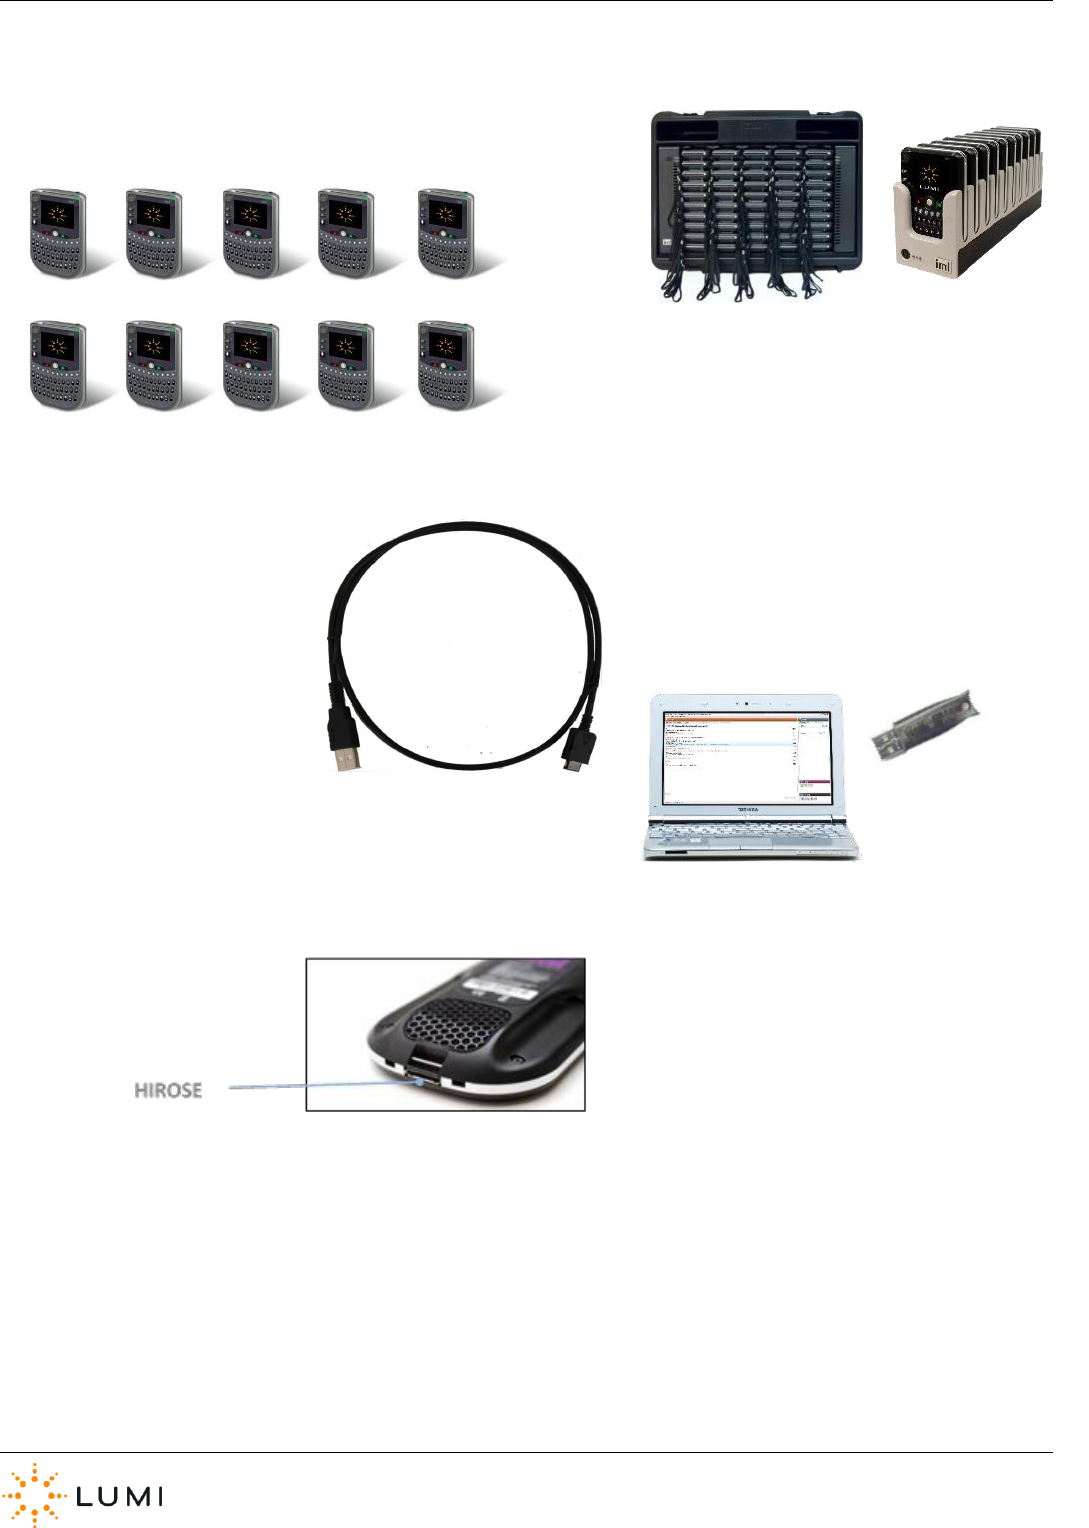
Hirose – USB CABLE
‘CONTROL PC’
USB LICENCE
IML CONNECTOR
DEVICES
IML MULTIDOCK
IML MINIDOCK
IML Connector
Page 5
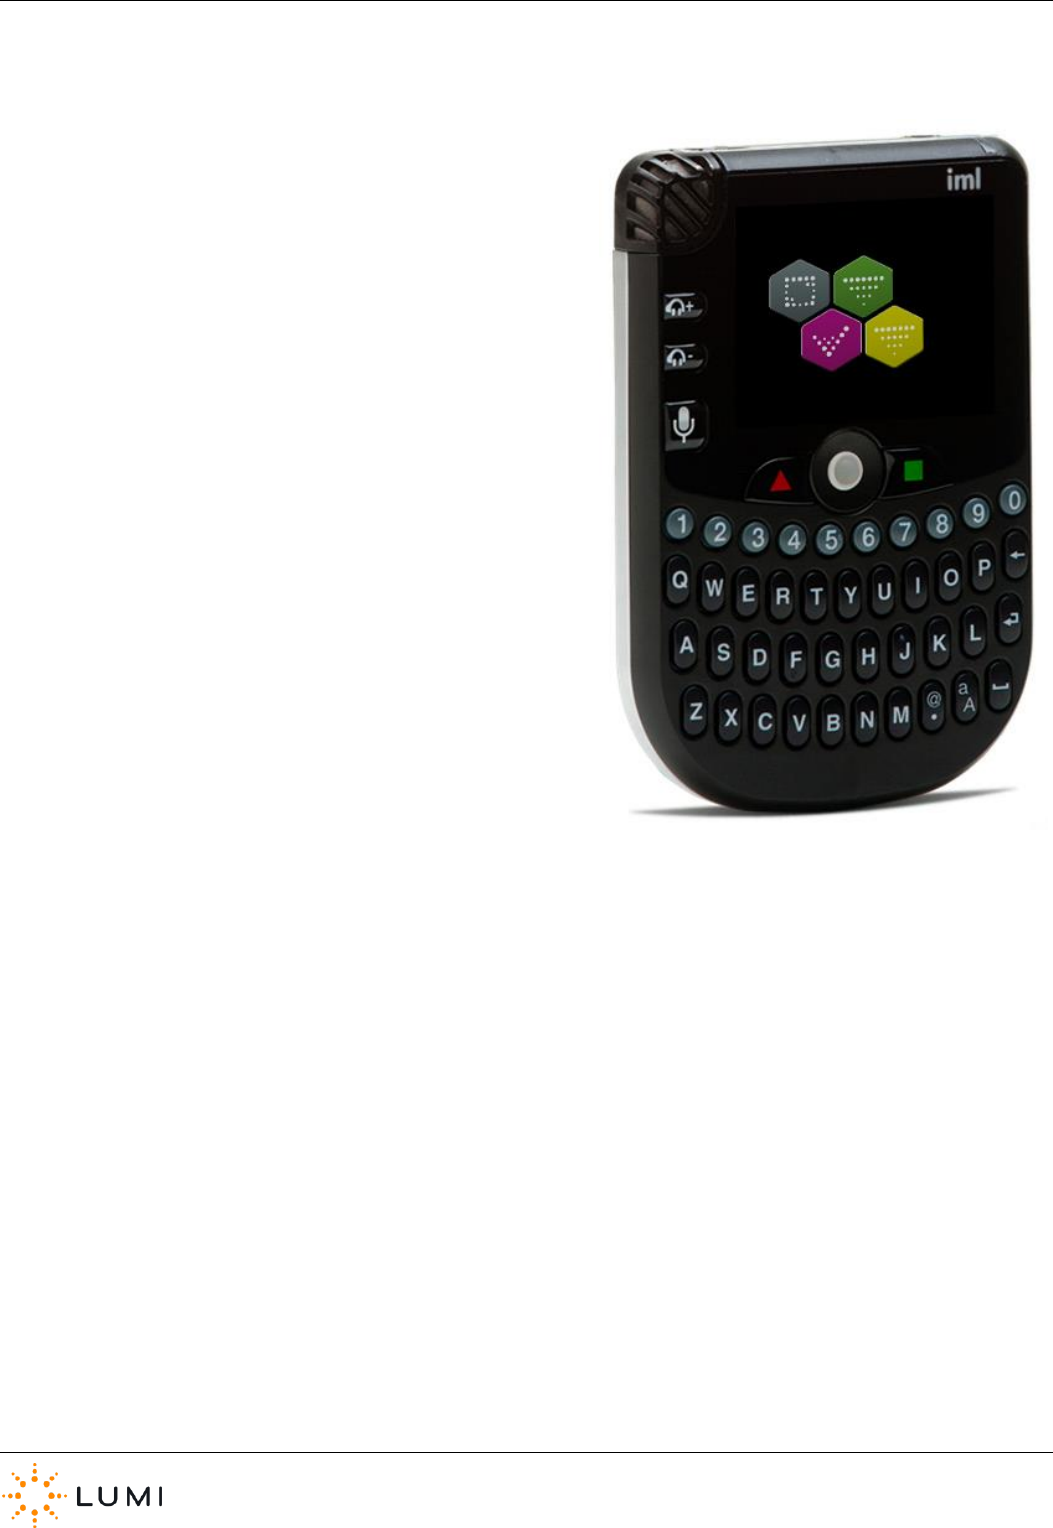
2. Features
› Colour screen
› Full QWERTY keyboard
› Backlit keys
› Soft keys
› Trackball
› Headphone/Microphone socket
› Headphone volume control
› Tally light
› Status LED
› Microphone
› Microphone Key
› Loudspeaker
› Light sensor
› Rumbler
› Universal smartcard reader/writer
› Wrist strap
› Accelerometer
› Lithium Ion battery
› 1 GB memory
IML Connector
Page 6
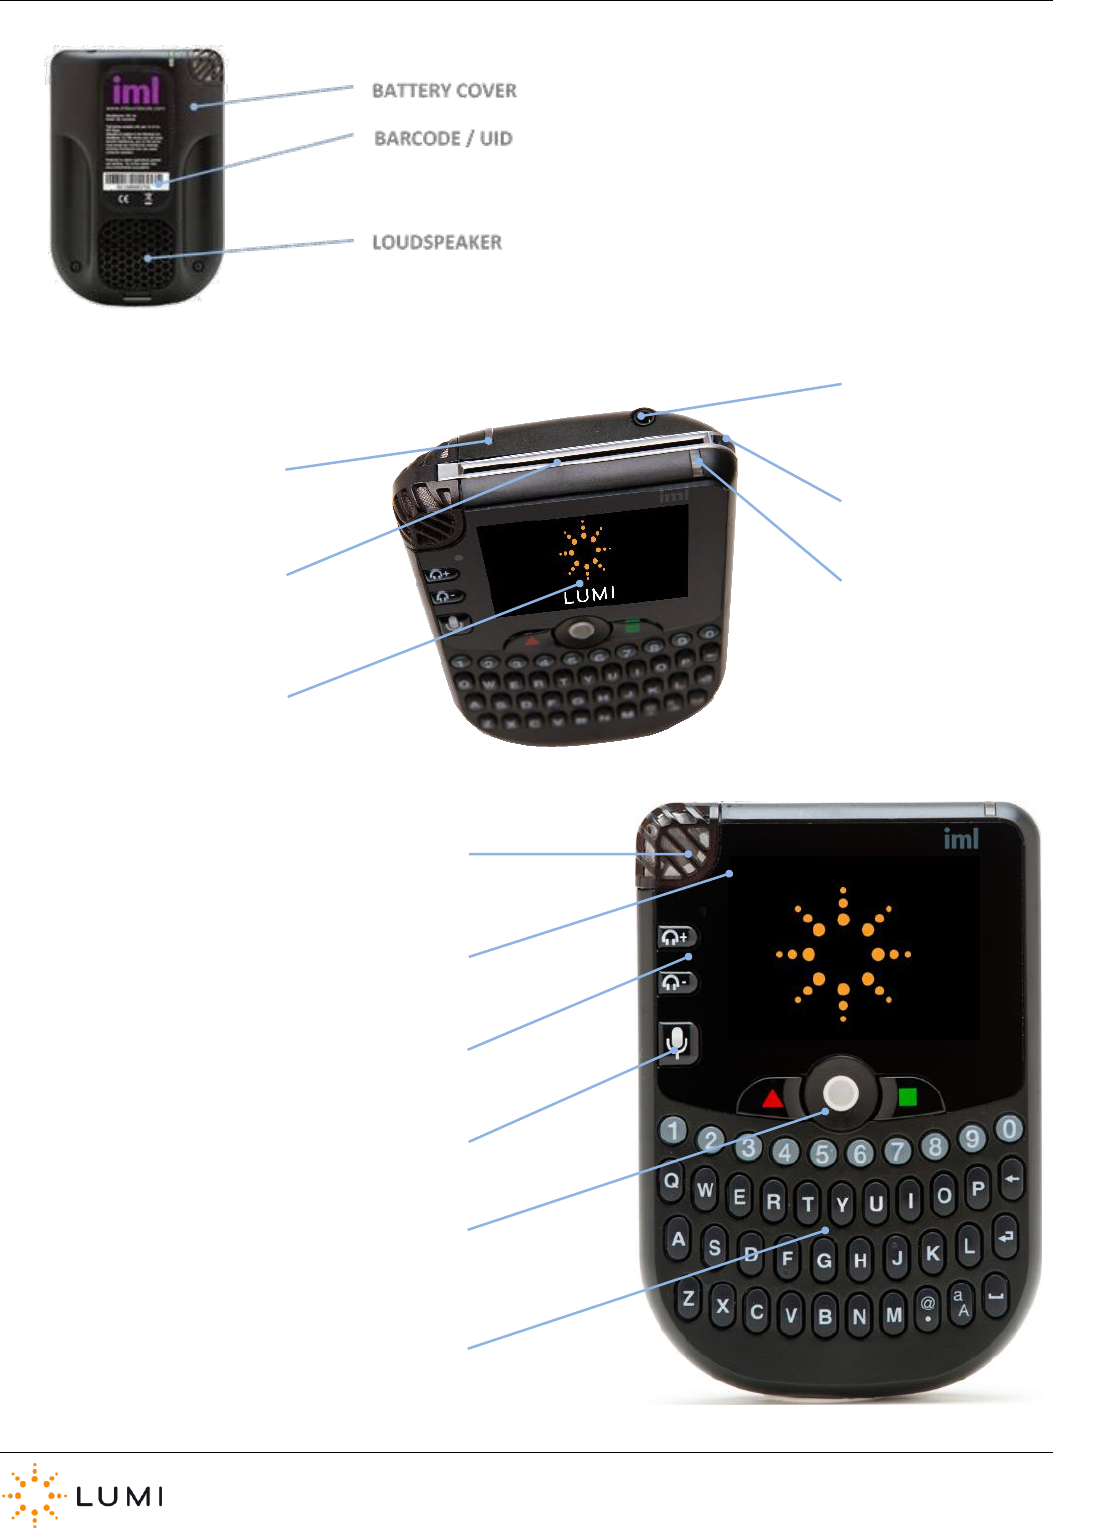
MICROPHONE KEY
MICROPHONE
HEADPHONE VOLUME
LIGHT SENSOR
TRACKBALL & SOFT KEYS
QWERTY KEYBOARD
TALLY LIGHT
HEADPHONES /
MICROPHONE SOCKET
STATUS LED
SMARTCARD READER /
WRITER
WRIST STRAP
COLOUR SCREEN

IML Connector
Page 7
3. Quick Start
a) Ensure IML Connector devices are charged sufficiently before
use
b) Connect the USB licensing dongle to a ‘control PC’
c) Setup the ‘control PC’ (i.e. power supply, projector/screen, etc.)
d) Connect the A/B USB cable between a ‘control PC’ and one of
the IML Connectors, which will then initialise (blue status LED)
e) Connect the devices to the system
f) Start Lumi software
g) Check that all devices have connected in IML Connector
System Manager
h) Proceed with use of the IML Connector System

IML Connector
Page 8
4. Licensing
A battery powered, timed USB HASP ‘dongle’ is used for preventing unlicensed use of Lumi
software as well as providing a level of security for the owner of the IML Connector System.
The information contained within a licensing dongle is used to allow the use of specific Lumi
software and to enable certain features and functions within it. The licence will also limit the
number of IML Connector devices that may be used as part of the system.
a) Plug the dongle into any available USB port on the control
PC. A red LED will light up inside the casing. If the LED is
flashing, wait until it is solid before proceeding. If it is the
first time the dongle has been used with the PC, new
hardware will be detected and device drivers installed.
b) The HASP device drivers are pre-installed onto a PC with any
Lumi software.
c) The dongle must remain connected to the control PC for the
IML Connector devices to function.
d) Licensed dongles can be updated with new functionality and
timing information without having to be returned to Lumi.
e) The licence will expire at a certain date and time. Users
need to ensure it is updated before re-using.
f) When required, an update file is generated by Lumi and
sent to the user.
The IML Connector System will not operate
without a valid licensing dongle.
Important
Lumi recommends that the dongle is kept in
a safe and secure place when not being
used, and that it is insured to the value of a
replacement licence.
Tip
IML Connector
Page 9
5. Charging
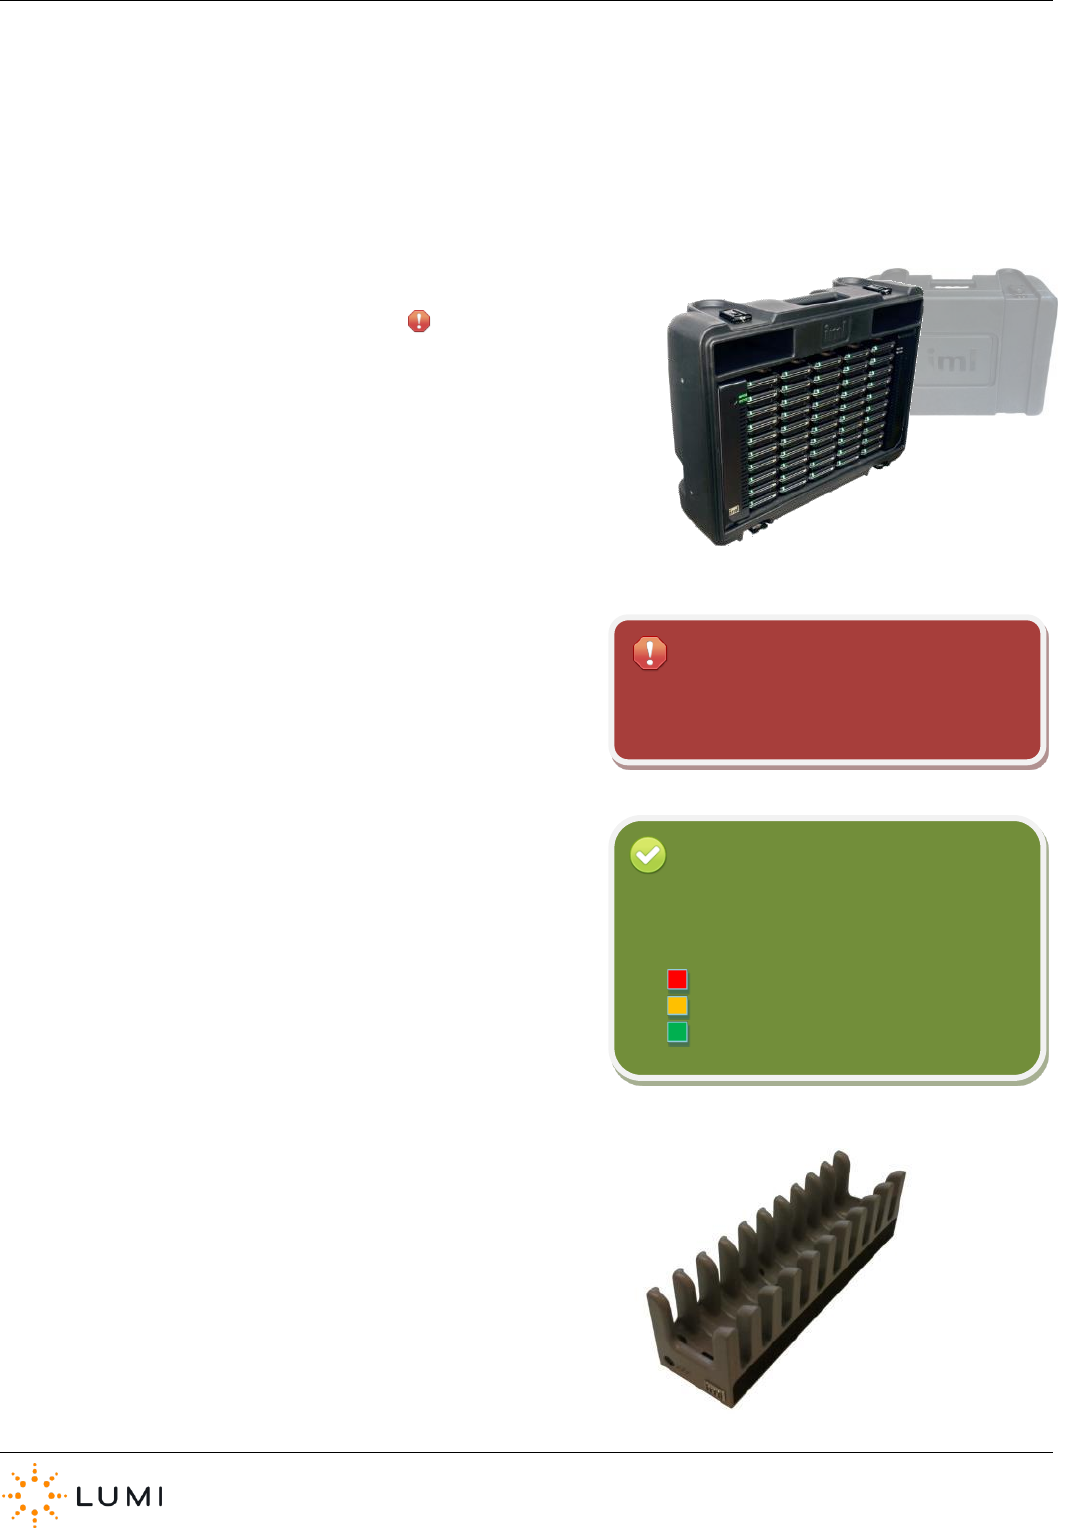
This section describes the process for charging IML Connector devices using an IML Multidock or IML Minidock. Whilst there are
slight differences in the below instructions between the two dock devices, functionality remains the same.
› IML Multidock
a) Remove the cover of the charging case.
b) If not already in the IML Multidock (i.e. ‘docked’), return the
IML Connector devices to the charging rack.
c) Connect the IEC power lead to the rear of the charging case.
d) Once powered, the fan built into the IML Multidock will start.
This is designed to circulate air around the IML Connector
devices and prevent overheating whilst charging.
e) The charging process will start straight after the initial boot
up phase of the IML Connector devices (taking approximately
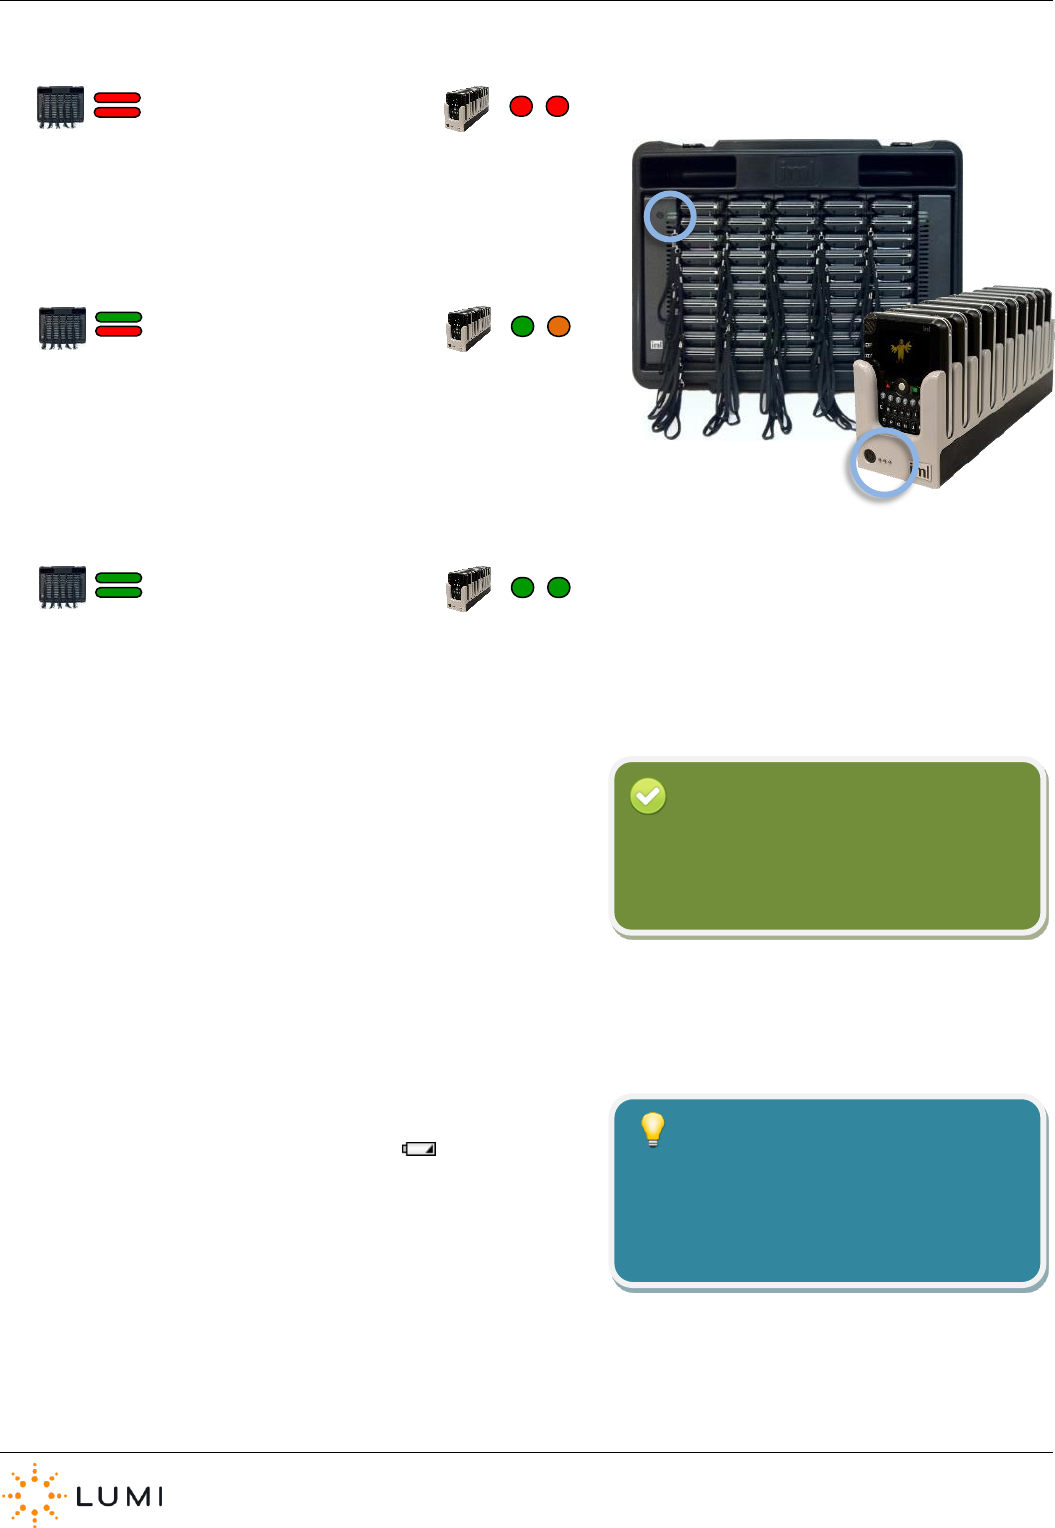
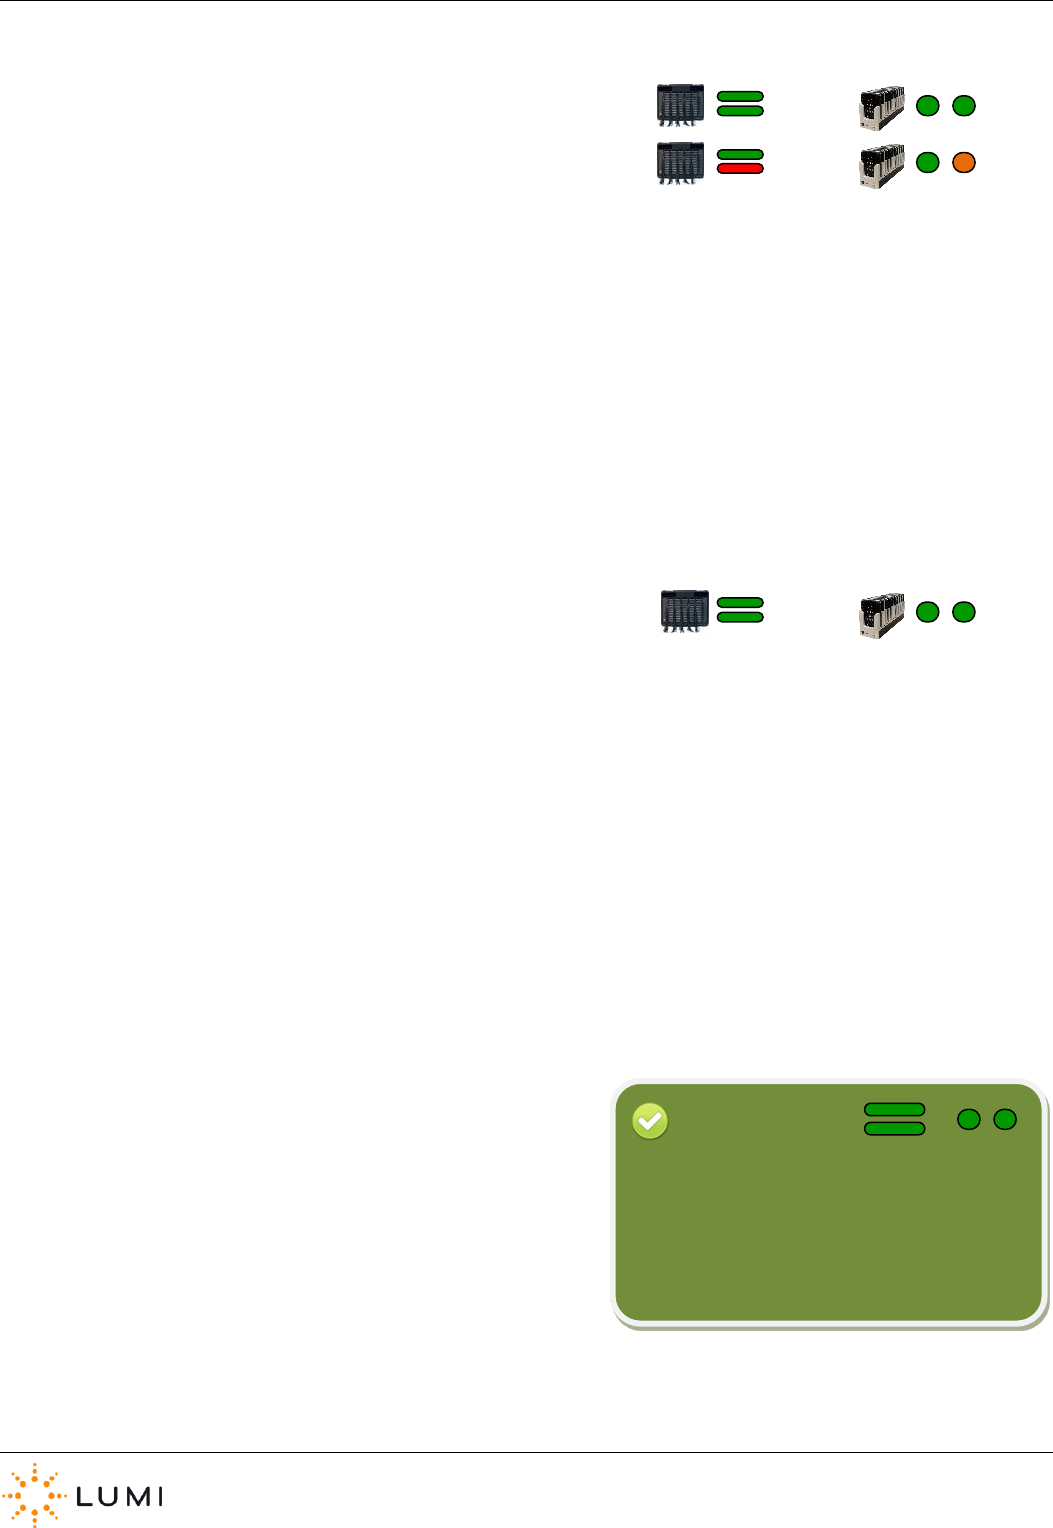
30 seconds). The ‘traffic light’ colour coding on the device’s
status LED will then indicate the current level of battery
charge.
f) Once power is connected to the dock, the ON/OFF button on
the front can be used to cycle through different power states
(by pressing and holding). The colours of the two LED lights
next to the power button (i.e. the left-hand side of an IML
Multidock) indicate the power state of the dock (see the next
page for further details).
› IML Minidock
An IML Minidock (pictured on the right) offers the same docking and
charging functionality as an IML Multidock, for 10 IML Connector
devices. IML Minidocks require a separate power supply unit and
cannot be powered with the same IEC power lead as an IML Multidock.
Always charge the IML Connector devices with
the case cover removed.
Important
Whilst charging, the status LED on the IML
Connector device will flash depending on its
current battery level…
Red 0 – 90%
Amber 91 – 99%
Green 100%
Reminder
IML Connector
Page 10
› OFF
Power is connected to the dock, but it is in the
OFF state. Devices will not charge.
› ON - Radio Off
Power is connected to the dock and it is in the ON
state. The devices will charge but will not connect
by radio to the Lumi system (if running).
› ON - Radio On
Power is connected to the case and the radio is
switched on. Devices will charge, but will also
connect to the IML system (if running).
› If the status LED on an IML Connector device isn’t flashing, it is not
charging. Check the device is correctly inserted into the dock.
› If an IML Connector device battery is completely flat (i.e. won’t
turn on), it may take a short period of time to start charging after
being docked.
› For an IML Connector device which is turned on, when the battery
is critically low (approximately 1 hour remaining) a low battery
warning is provided by a small battery icon ( ) in the status bar
on the device display screen.
› An IML Connector device with a flat battery will take approximately
8 hours to charge and once the battery is fully charged will provide
up to 12 hours of life (depending on level of use).
Reminder
To toggle between the two different ON
states, press and hold the power button on
the IML Multidock or IML Minidock.
Unlike some electrical devices, the IML
Connector device batteries do not need to
be completely discharged before fully
recharging.
Tip
IML Connector
Page 11
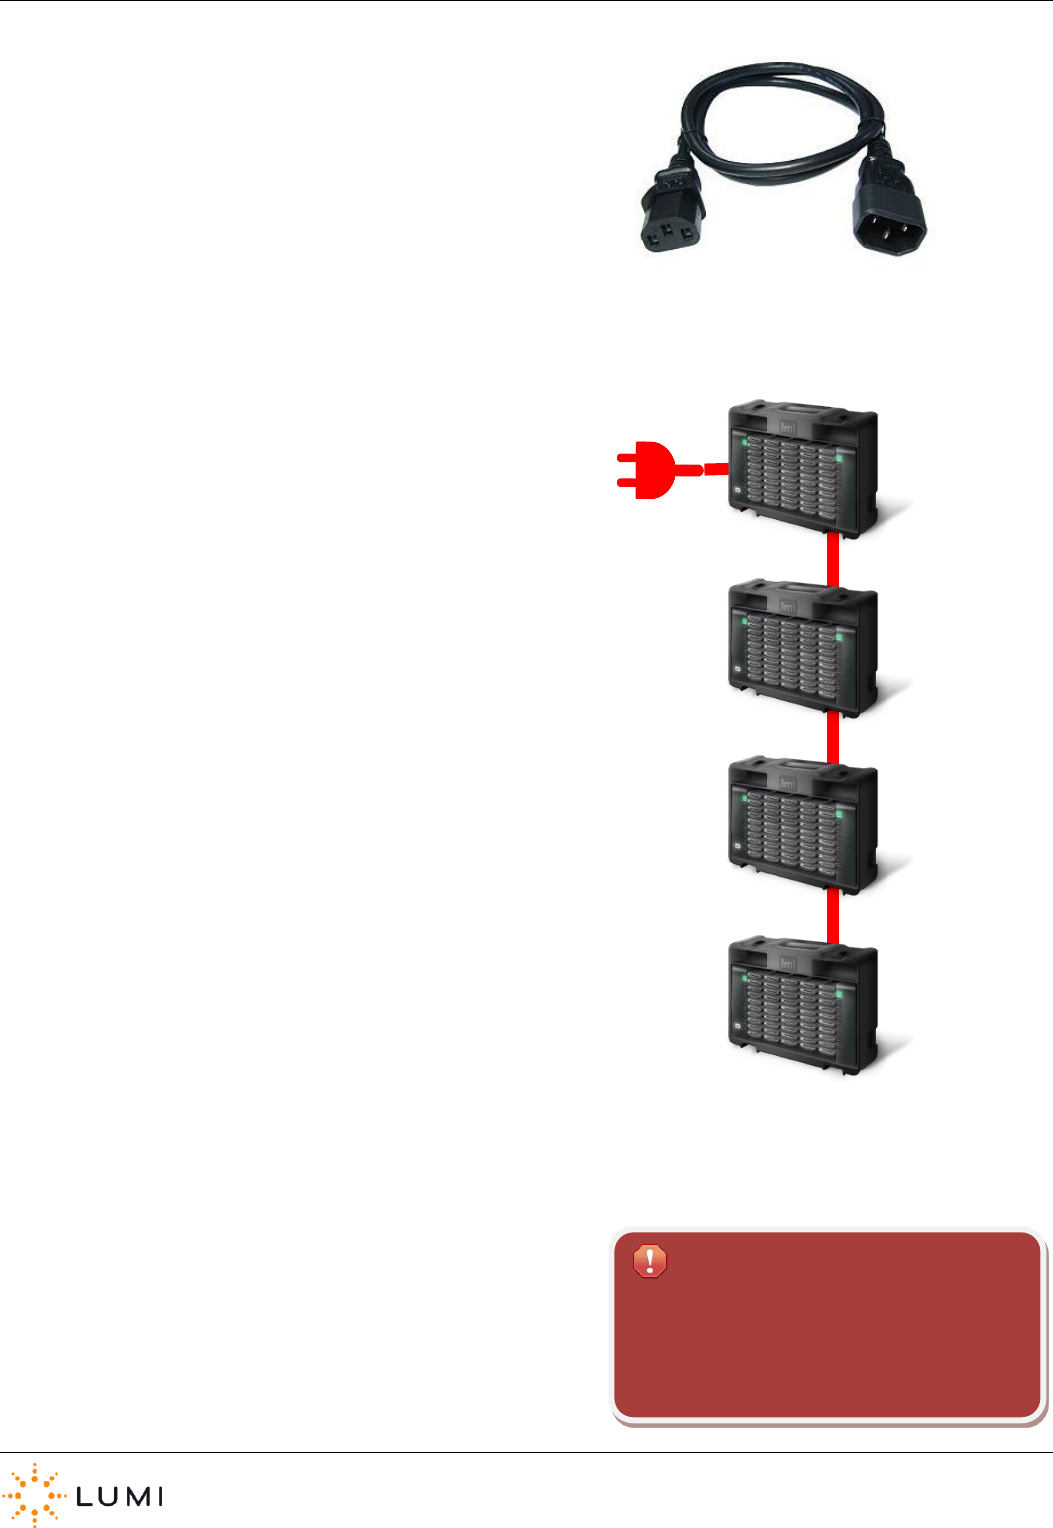
› Using an IEC Mains Extension cable (supplied separately), up to 4
IML Multidocks can be ‘daisy chained’ together, requiring less
mains power sockets. IML Minidocks do not have this
functionality.
If the IML Connector devices are not being
used for long periods of time, it is still
important to charge them on a regular basis
(to maintain the battery’s performance).
Important
IML Connector
Page 12
6. Switching On
› Method 1
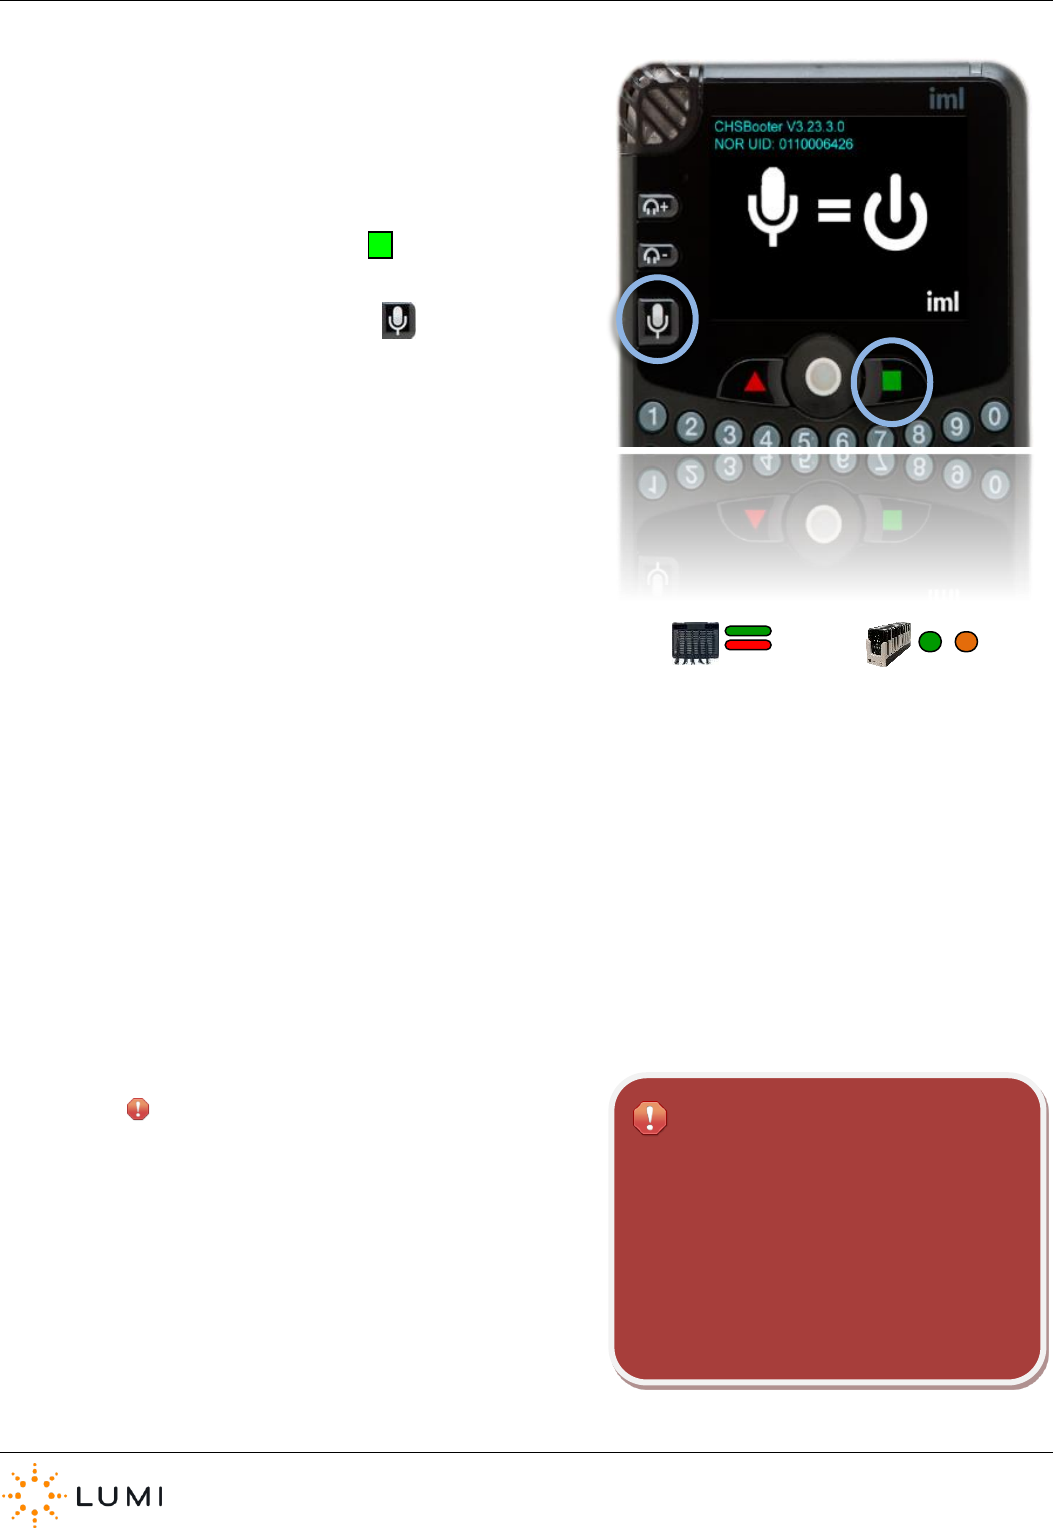
a) If an IML Connector device is switched off, it can be turned
on manually via the device’s keypad.
b) Press and hold the green button.
c) The LED will turn green, when indicated on the display
screen, press the microphone key.
d) If the microphone button is not pressed in time, the IML
Connector device will not turn on and both steps need to be
repeated.
› Method 2
a) Turn on the control PC and wait for it to finish starting up.
b) Make sure the dongle is plugged into the control PC and
that the IML Connector Base Station is connected and
switched on.
c) Ensure that the Base Station has initialised (users will see
the words “BASE STATION” on the display screen and the
status LED will be blue).
d) With power connected, turn the IML Multidock or IML
Minidock ON and wait for the IML Connector devices to go
through the boot up process.
e) Remove the IML Connector devices from the dock. The
devices will stay turned on whilst they search for radio
signal from the IML Connector Base Station. Once they
have found this and have connected, the devices will stay
on.
f) The status LED on the IML Connector device will blink (a
quicker, double flash) when it is turned on. It will blink red
if it is on but not connected to an IML Connector Base
Station and will blink green if it is on and is connected to the
Base Station. The slower, single flash indicates a device is
charging.
An IML Connector device will turn off
automatically after approximately 2 minutes if
it does not connect to an IML Connector Base
Station. Once an IML Connector device has
connected to the Base Station it will not turn
off. A device which is or has been connected
can only be turned off manually or by using
Lumi software.
Important
IML Connector
Page 13
› Method 3
a) Repeat the first 3 steps of Method 2 (see previous page).
b) With power connected, turn the dock ON (at this point, it
doesn’t matter which of the two power states is used).
c) The IML Connector devices will start their boot up process.
d) At any stage (users do not have to wait for the devices to
finish booting up), removing the power lead from the dock
will cause the devices to look for radio signal from the IML
Connector Base Station and connect.
e) As per Method 2, once connection with the Base Station has
been established, the devices will stay turned on.
› Method 4
a) Repeat the first 3 steps of Method 2 (see above).
b) With power connected, turn the dock ON (Radio On,
Green/Green power state LEDs).
c) The IML Connector devices will start their boot up process.
d) The devices will start charging, however, with the dock in
this mode - they will also connect to an IML Connector Base
Station if available. If an IML Connector device is inserted
into a dock in this state, it will remain connected and will
charge.
With an IML Multidock or IML Minidock in the
Radio On state, the status LED on the IML
Connector device will show the single flash for
charging as well as the double ‘blink’
indicating the device is connected or trying to
connect.
Reminder
IML Connector
Page 14
7. Switching Off
› Method 1
a) An IML Connector can be turned off manually via the device’s
keypad.
b) Press and hold both the and buttons together and
press the X key on the device.
c) The device will turn off.
› Method 2
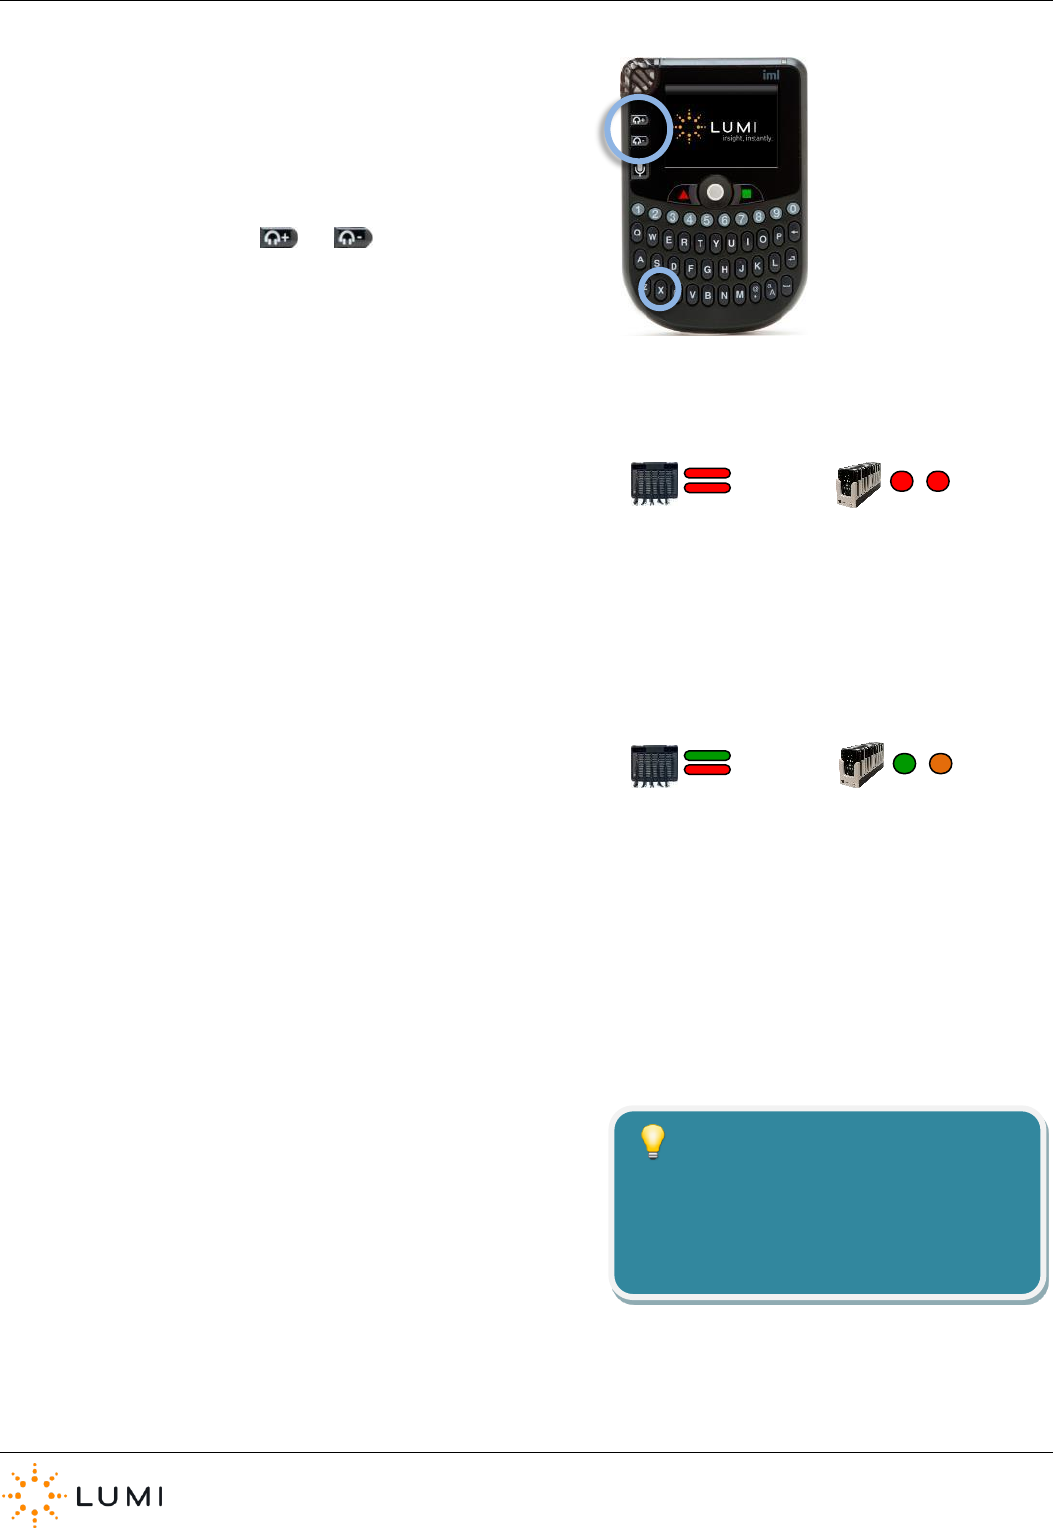
a) Ensure that the power lead is connected to the dock and that it
is in the OFF state (Red/Red LED status).
b) Put an IML Connector device back into one of the slots in the
IML Multidock or IML Minidock (i.e. so it is ‘docked’).
c) The device will turn off.
› Method 3
a) Ensure that power is connected to the dock and set it to the
ON state.
b) If an IML Connector device is ‘docked’ now (i.e. inserted into an
IML Multidock or IML Minidock), it will no longer connect to an
IML Connector Base Station but will remain on and charging in
the case.
c) Press the power button on the charging case, turning it OFF.
All docked devices will turn off.
› Method 4
a) Using IML Connector System Manager, all connected devices
can be turned off globally.
b) Select Commands.
c) Choose the Power OFF All option and select Yes when asked
to proceed.
d) Any IML Connector devices which are in signal range and
connected to the IML Connector Base Station will turn off.
Only use Method 4 when certain that all
devices have been returned. Alarms will
not sound on IML Connector devices that
are powered down.
Tip
IML Connector
Page 15
8. Network Screen
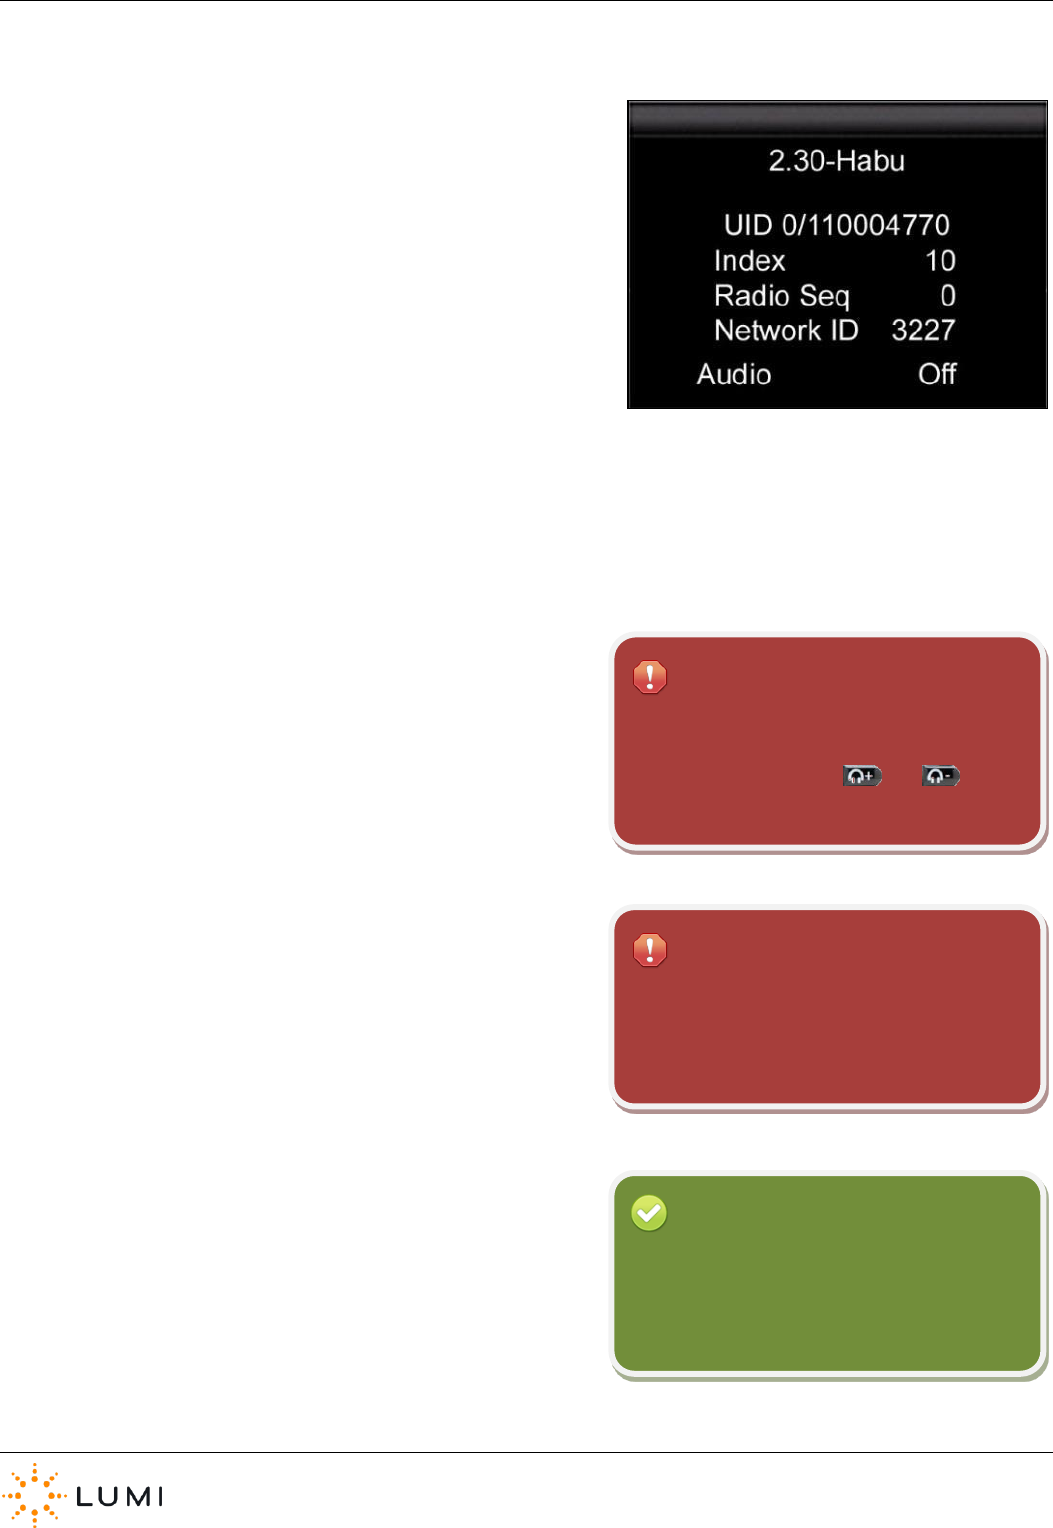
Once an IML Connector device has been turned on, it will immediately
start seeking a radio signal from the IML Connector Base Station in an
attempt to connect. The status LED on the IML Connector device will
show a red double blink whilst it is turned on and attempting to connect.
At this stage (i.e. before connecting), users will see the Network Screen
on the device’s display. As soon as a device connects to an IML
Connector Base Station, this is replaced by the default Home Screen
(without any custom theming or branding on the devices, this is usually a
Lumi or IML logo).
The Network Screen contains information about the device, as well as
displaying important connectivity settings…
› Firmware
The release and version of Connector firmware (in the above example,
the device is on the ‘Habu’ release of IML Connector device firmware,
version 2.30).
› UID
This is the unique identity number of the device, set by the
manufacturer, which corresponds with the barcode on the reverse of
the device.
› Index
This is a programmable number, identifying an IML Connector device,
ranging from 1 – 9,999 that allows all devices in a system to be
sequentially and uniquely numbered.
To change network settings on an IML
Connector device, use the Hotkey shortcut by
pressing and holding the and
buttons together with N.
Important
To access certain features on an IML
Connector device, a password is required.
Password = gaffer
Important
Reminder
If IML Smartcards are not being used to
identify delegates using the IML Connector
devices, the index number can be used to
track an individual’s responses.

IML Connector
Page 16
› Radio Sequence
The radio sequences all use the 2.4 GHz radio spectrum. The number
used here specifies a unique hopping pattern within that spectrum. .
For further information on radio sequences and how these ‘map’
against wireless (i.e. WiFi) channels, please contact Lumi.
› Network ID
This is a value that determines a discreet network between an IML
Connector Base Station and the IML Connector devices. In order for a
device to connect to the Base Station, it must use the same network ID.
Valid network IDs range from 0 – 65,535.
The Network ID value becomes key when the User Driven Roaming
feature is used on the IML Connector system.
For further information on getting the most
out of the IML Connector system, or for a
particular environment (for example - to
avoid wireless interference), please contact
Lumi.
Tip
The Network ID on an IML Connector device
must match the Network ID on the Base
Station for the devices to join the network.
Important
IML Connector
Page 17
9. User Driven Roaming
› User Driven Roaming enables a participant to choose which
Network to join from a pre-determined list loaded on to the
device.
› Using IML Connector Configuration Tool, a list of Networks is
created utilising the Network ID for each system (for example, this
could be workshops or breakout sessions running in different
rooms). This information is contained within a configuration file
which must be deployed to all devices and the IML Connector Base
Station.
› The Default Network feature ensures that when a device is
rebooted, it will always revert to this Network ID (this will always
be the top row in the list of Networks).
› With all Networks in the list (except the Default Network) the
ability to enable a password (which must be entered into the
device) ensures that access to certain Networks can be controlled.
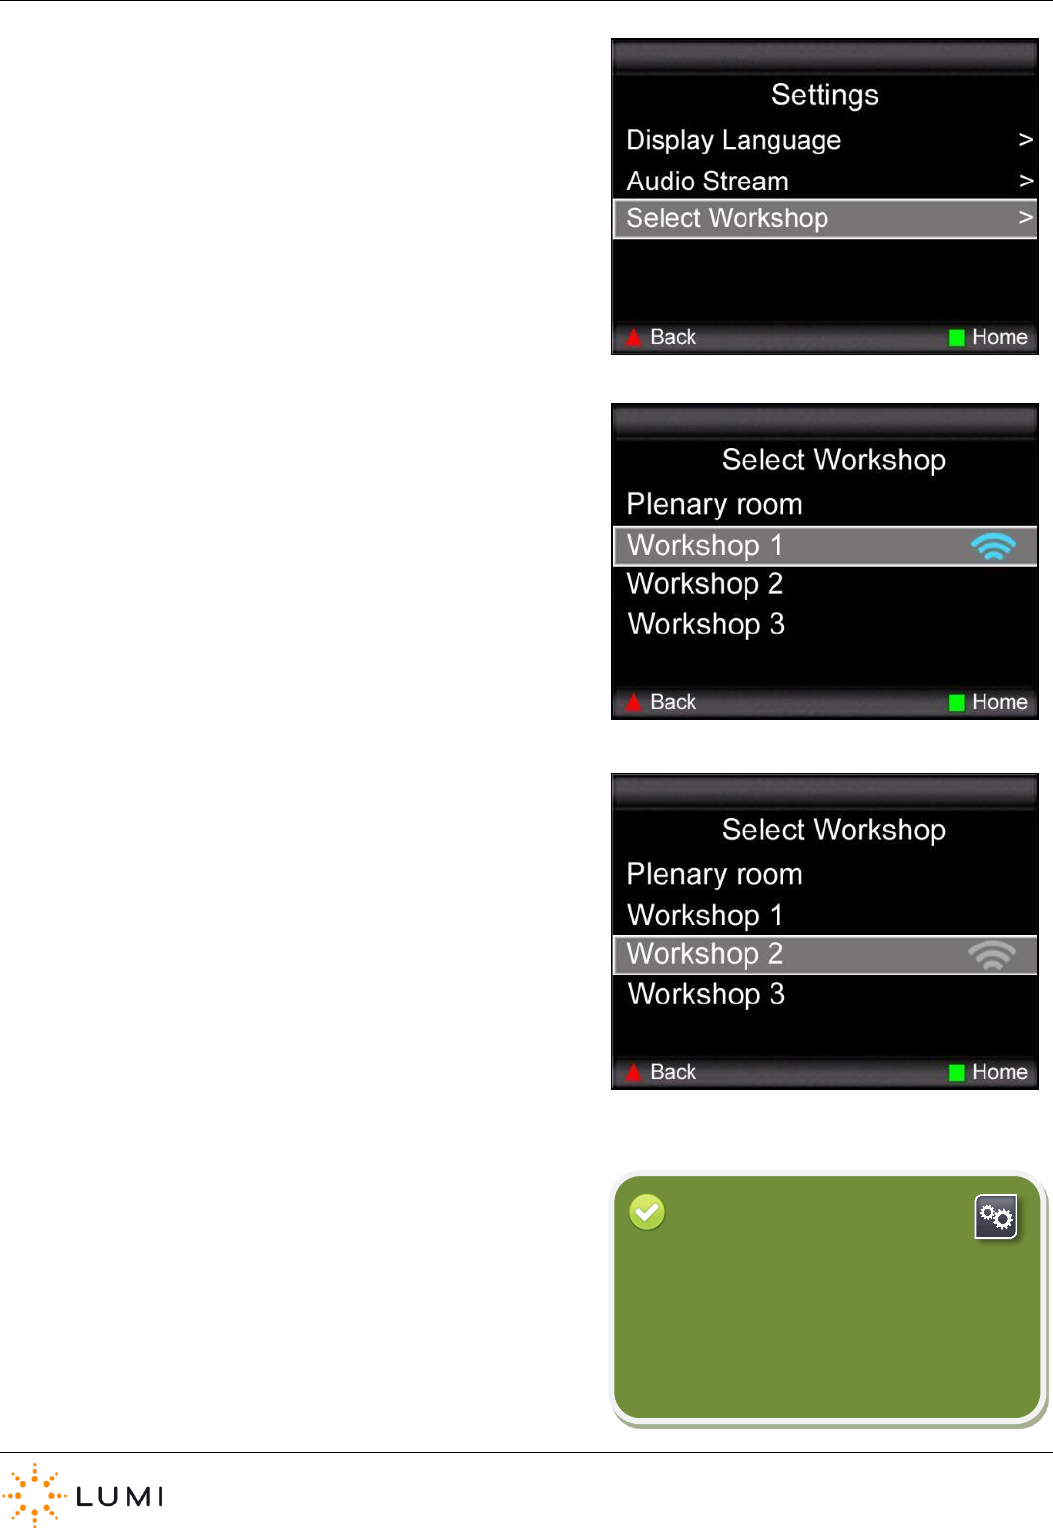
› When User Driven Roaming is enabled, the Network selection
menu is accessed by navigating to the Settings menu on an IML
Connector device. The trackball and soft keys on the device are
used to navigate through the menu system.
› A wireless icon indicates which Network a device has joined. A
blue icon here indicates the device is connected. A gray icon
shows that the device is not connected to an IML Connector Base
Station configured with that Network ID.
› Using the localisation options in IML Connector Configuration
Tool, a variety of terms are available in different languages for use
in the Network selection menu (for example, users do not have to
use “Workshop” as seen in the example images on the right).
To implement User Driven Roaming, a
configuration file must be deployed to the IML
Connector Base Station and all IML Connector
devices. This is achieved by connecting
devices via USB cable to a PC and using IML
Connector Configuration Tool.
Reminder

IML Connector
Page 18
10. Utility Cards
Using an IML Smartcard (supplied separately), utility cards can be created (using any IML
Connector device) to perform certain functions. This usually saves time compared to
performing these functions manually. Once created, inserting the utility card into any
other device will automatically carry out the programmed task. Utility cards include…
› Facilitator Microphone
The facilitator microphone provides an additional IML Connector device microphone that can be used independently of the
standard microphone feature (hereafter called the delegate microphone). The facilitator microphone is enabled by simply
inserting a facilitator microphone utility card into the device.
Unlike delegate microphones, the facilitator microphone can operate whilst another delegate microphone is in-use. The IML
Connector Powered Base Station contains two audio outputs, A and B. The delegate microphone audio is delivered through
Output A, and the facilitator microphone audio is delivered through Output B. This allows a facilitator and a delegate to have a
back-and-forth conversation without needing to repeatedly open and close the two microphones. Only one facilitator
microphone card can be used at a time in an IML Connector System.
› Language
Once a language utility card has been created, this can be used on other IML Connector devices to quickly repeat changing the
language setting on a device (e.g. if a French card is created, a user will not need to manually go into individual devices’ language
settings and change to French, simply inserting the card will do this instantly).
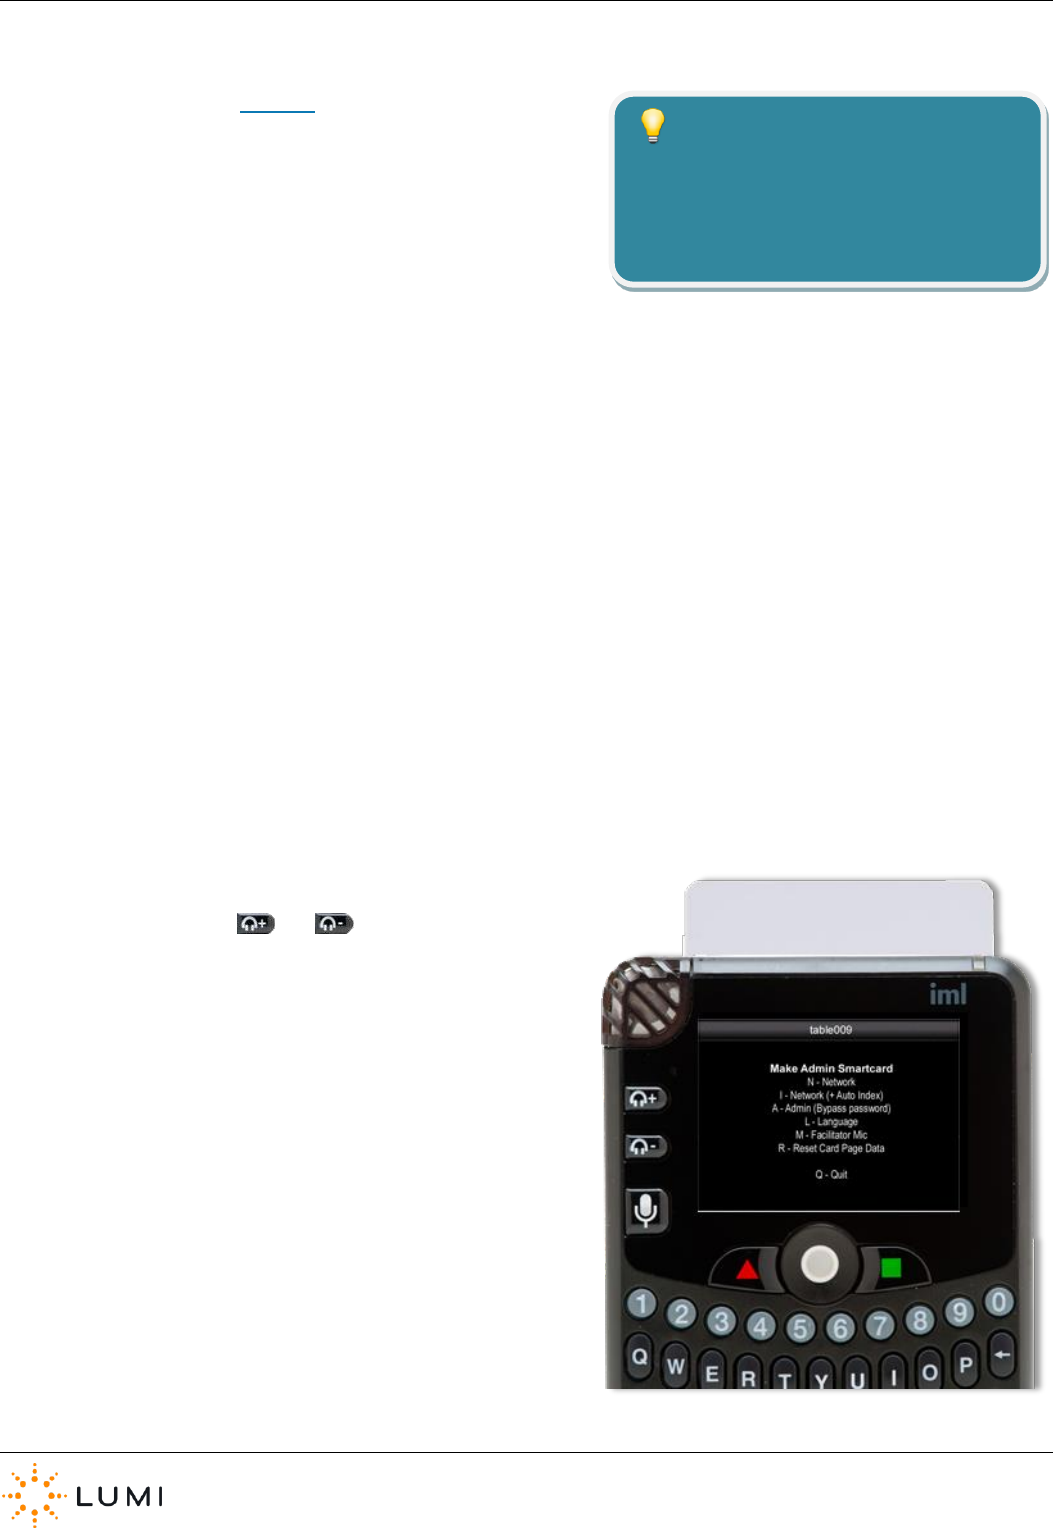
› Admin
When accessing settings menus on the IML Connector device (see Appendix B), a password is required to proceed. The same
password as provided earlier in this document (gaffer) applies to all menus on the IML Connector device. An admin card (when
inserted into a device) saves time by removing the need to type this password.
IML Connector
Page 19
› Net Config
As seen in an earlier section (Section 8) there are some IML Connector
device settings which are configurable (known as ‘Network settings’,
these include Index number, Radio Sequence and Network ID). Whilst
a method has been outlined (using the Hotkey shortcuts), to change
these settings manually on a device, a Net Config utility card can be
created to save time by automating the process. As with other utility
cards, simply inserting the card into a device will automatically carry
out the instructions programmed onto it.
› A Net Config card will update…
a) Index number (optionally set to update incrementally)
b) Radio Sequence
c) Network ID
› To create a Utility Card…
a) Insert an IML Smartcard into any IML Connector device
b) Press and hold the and buttons together
c) Press C on the device’s keypad
d) Enter the password gaffer
e) Press U and follow the on-screen instructions to create the
Utility Card
Network settings can be changed globally
using other Lumi applications such as IML
Connector Configuration Tool or IML
Connector System Manager.
Tip

IML Connector
Page 20
11. System Manager
The IML Connector System Manager application is the user interface or portal into the Lumi Hub platform (a
software service which performs the core communication between control PC and IML Connector devices).
› After installing Lumi software, Lumi Hub will not appear as an icon on the PC’s desktop or in the system
tray. This is because it runs as a Service in the background, as opposed to an application which can be
opened or closed.
› Once the control PC has started up and Lumi Hub has loaded, IML Connector System Manager can be accessed via the
Windows Start button (installing Lumi software does not automatically create a desktop shortcut).
Start > All Programs > Lumi > IML Connector System Manager
› IML Connector System Manager is installed with any Lumi software that uses it and does not require a separate installation.
› IML Connector System Manager allows users to see details of their IML Connector system, ranging from how many IML
Connector Base Stations and devices are connected, to the version of firmware installed and current battery levels
remaining on connected devices.
› IML Connector System Manager also enables the user to run operational commands such as…
a) Enable/disable alarms
b) Power down all devices
c) Find and/or beep selected or all devices
d) Change network settings
e) Sequentially index devices
f) Analyse index numbers
g) Export a report of all connected devices
h) Control the audio setup of the IML Connector system
i) Control the microphones
j) Change the displayed screens
k) Log battery statistics and run battery tests
Users should always allow a period of time for
the information in IML Connector System
Manager to populate. Once an IML Connector
device has been turned on and is connected to
the IML Connector Base Station, IML
Connector System Manager will need time to
‘sync’ with the device.
Important
IML Connector
Page 21
Handsets
› Handsets
Displays the number of IML Connector devices connected to Lumi Hub, with further diagnostic information.
› Base Stations
Displays diagnostic information relating to any IML Connector Base Stations connected to the control PC.
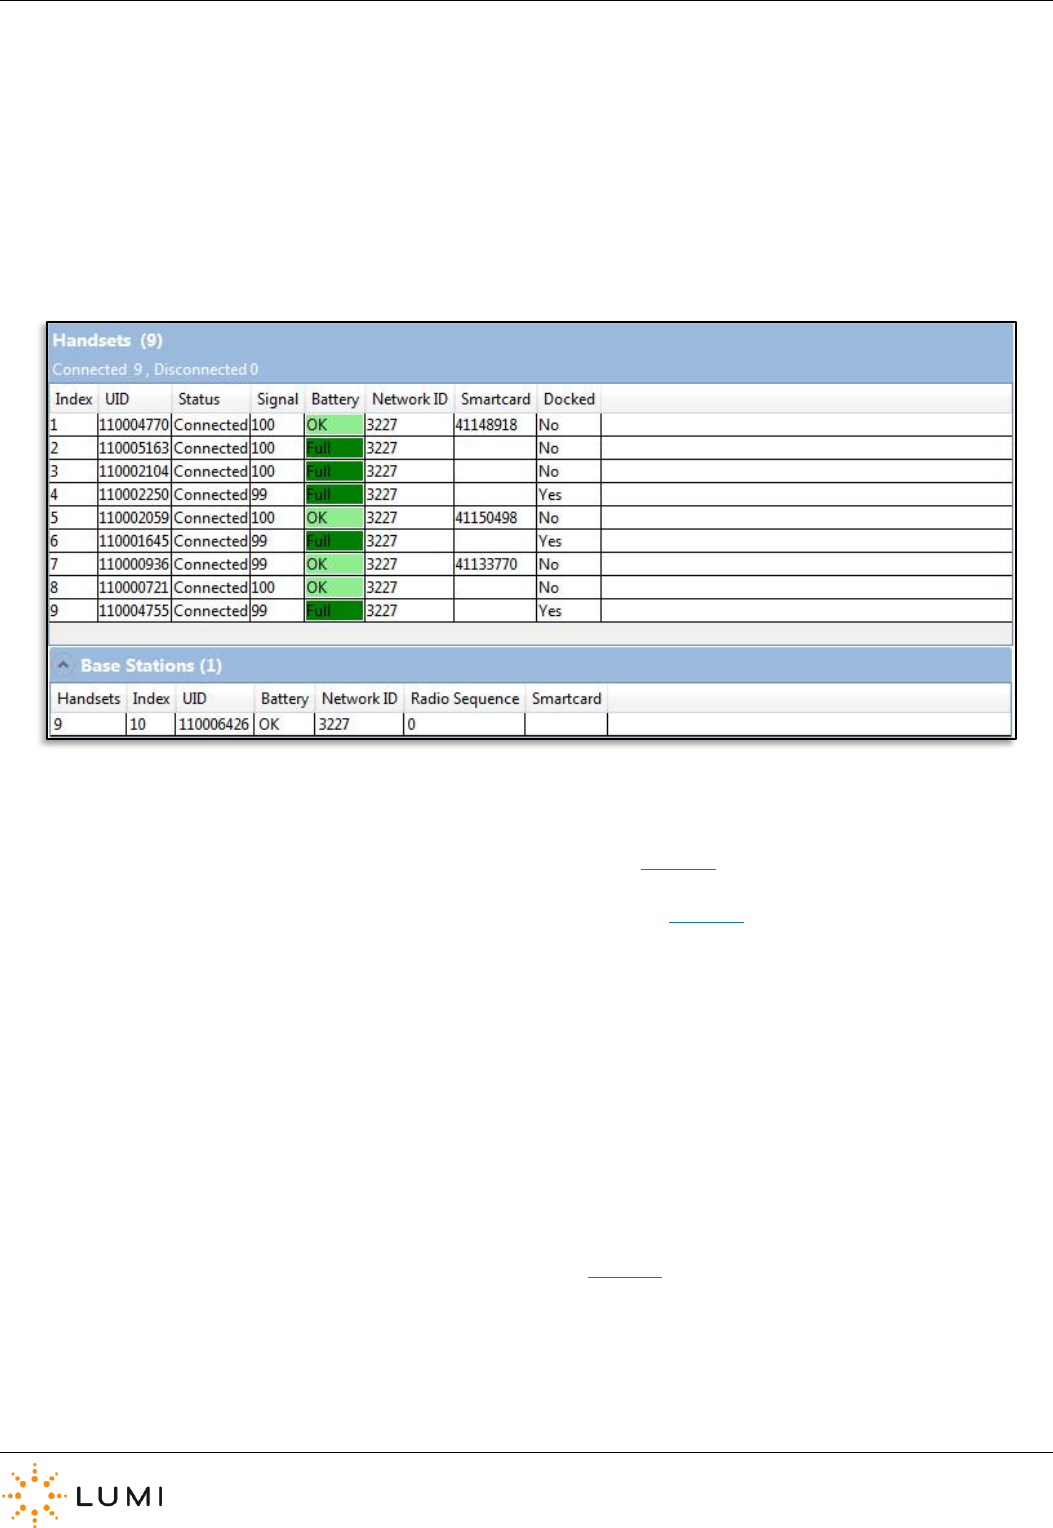
The status table, with an example image above, shows information including…
› Index The device’s numeric identifier (please see Section 8).
› UID The device’s unique serial number (please see Section 8).
› Status If a device is ‘seen’ successfully by Lumi Hub, it will appear here as Connected.
Note that if an IML Connector device has been disconnected, this will show as
Retrieving until the necessary information has been populated into the table.
› Signal Displays live information in regard to the radio signal. This is a useful tool for
determining the strength of radio connection and is especially key when using
microphones, offering a Quality of Service (QoS) reading for audio channels.
› Battery Provides live information regarding the current battery life of the devices.
› Network ID The device’s Network ID (please see Section 8).
› Smartcard If an IML Smartcard is inserted into a device, it is indicated here with the card’s UID
› Docked Whether or not a device is inserted (‘docked’) into an IML Multidock or IML Minidock.
IML Connector
Page 22
Advanced View
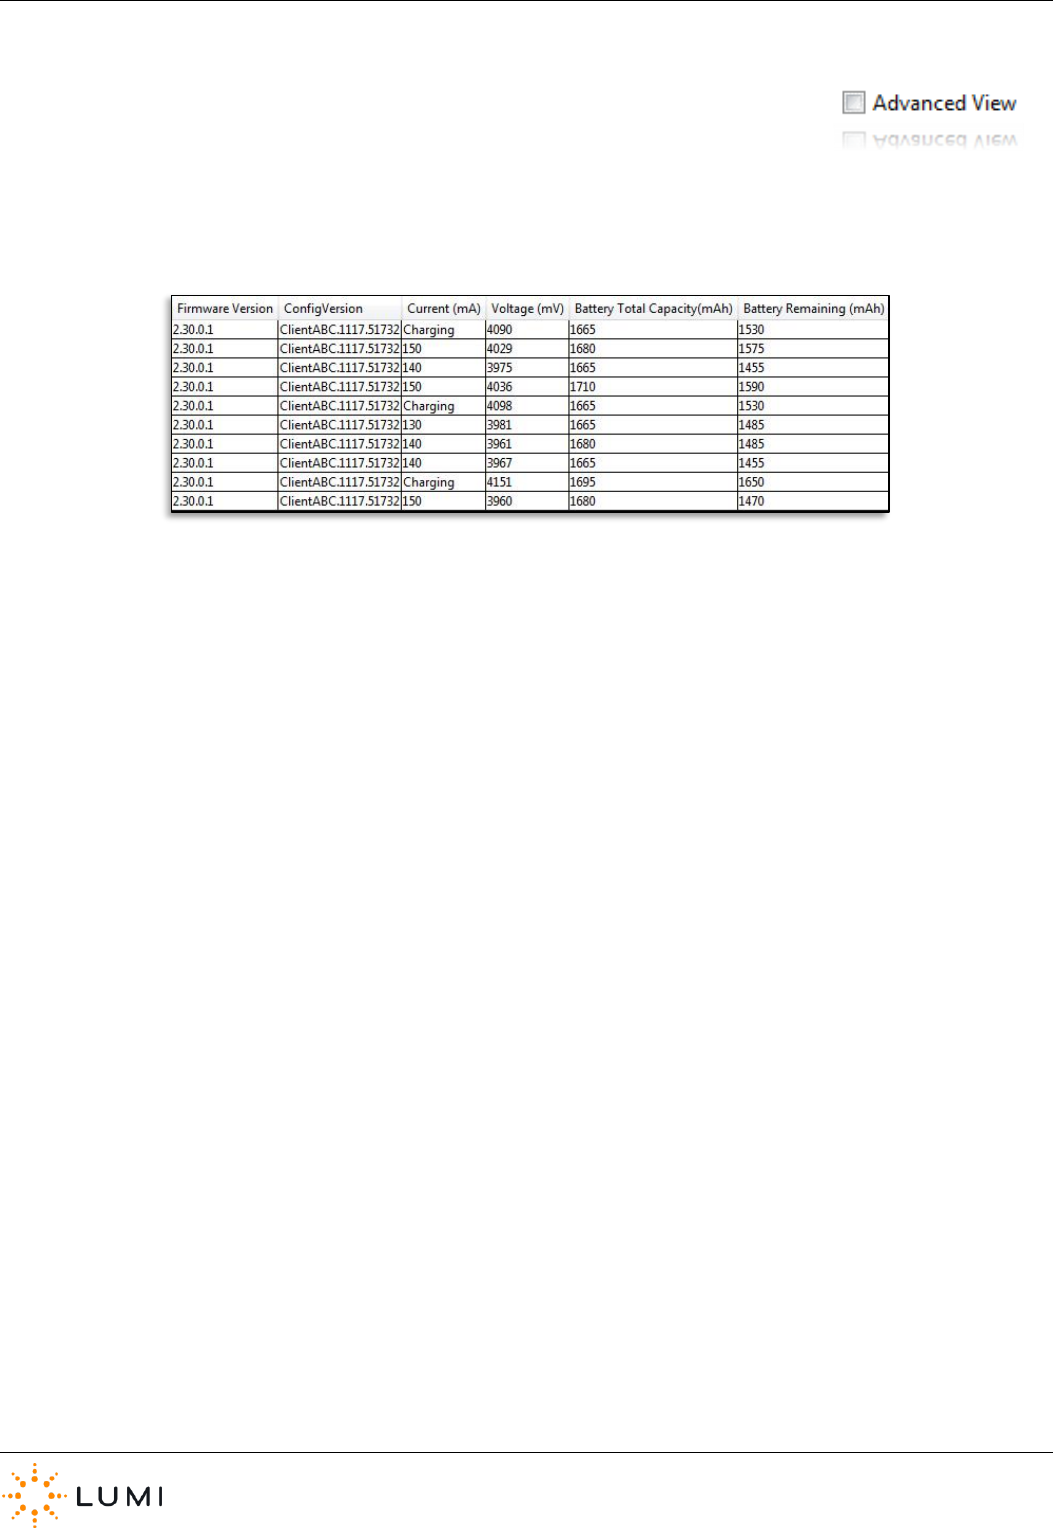
Selecting this option will expand the status table, providing additional details for IML Connector
device firmware, configuration files (e.g. branding or theming) and also providing further data on
battery performance.
› Firmware Version The version number of IML Connector firmware installed on the device.
› Config Version If a configuration file (created using IML Connector Configuration Tool) has been
deployed to a device, it will display this information here. From the example table
above, the Config name built into the configuration file is “ClientABC” whereas
the second part of the value, i.e. “1117.51732” is the Config UID assigned by
IML Connector Configuration Tool.
› Current The milliamp is a unit relating to the flow of electrical charge.
› Voltage Represents the amount of energy remaining in the battery.
› Battery Total Capacity The amount of electrical charge the battery can store.
› Battery Remaining Amount of electrical charge remaining using the total capacity figure.
› Location Indicates whether IML Connector devices are connected to the PC on which IML
Connector System Manager is being run (i.e. “LOCAL” will be displayed here) or if
connected to an additional, networked PC using IML Connector Satellite. Please
contact Lumi for more information.
› Base Station The UID of the IML Connector Base Station a device is connected to.

IML Connector
Page 23
Screens
› The Interactive Content section of IML Connector System Manager will only be available if the configuration file deployed
to the IML Connector Powered Base Station contains custom screens.
› For further information on custom screens and how to control the display of these on the IML Connector, please refer to
Section 14 of this User Manual.
Audio
For further information on the Audio tab, please refer to Section 12 of this User Manual

IML Connector
Page 24
12. Audio Settings
› Lumi products such as Text Vote Talk and Queue utilise the built-in audio features of
the IML Connector device, with subsequent sections of this User Manual outlining the
operation of these.
› IML Connector System Manager includes an Audio tab that allows the user to change the Audio
Routing on connected devices, this is done globally (i.e. to all connected devices) and over radio.
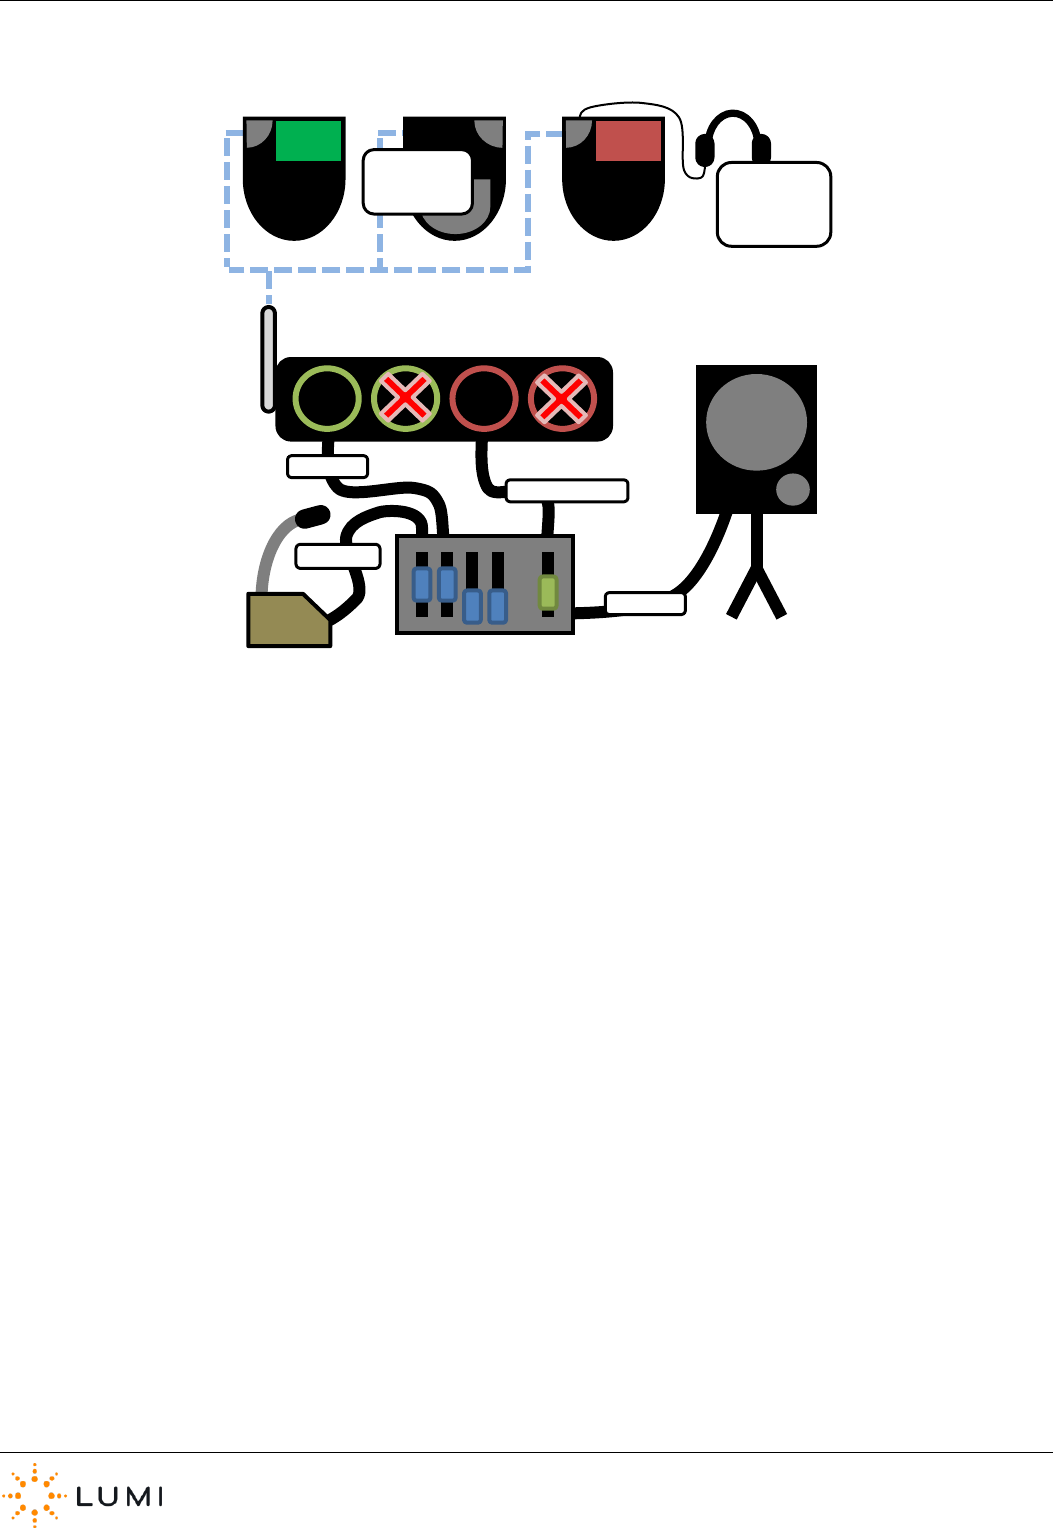
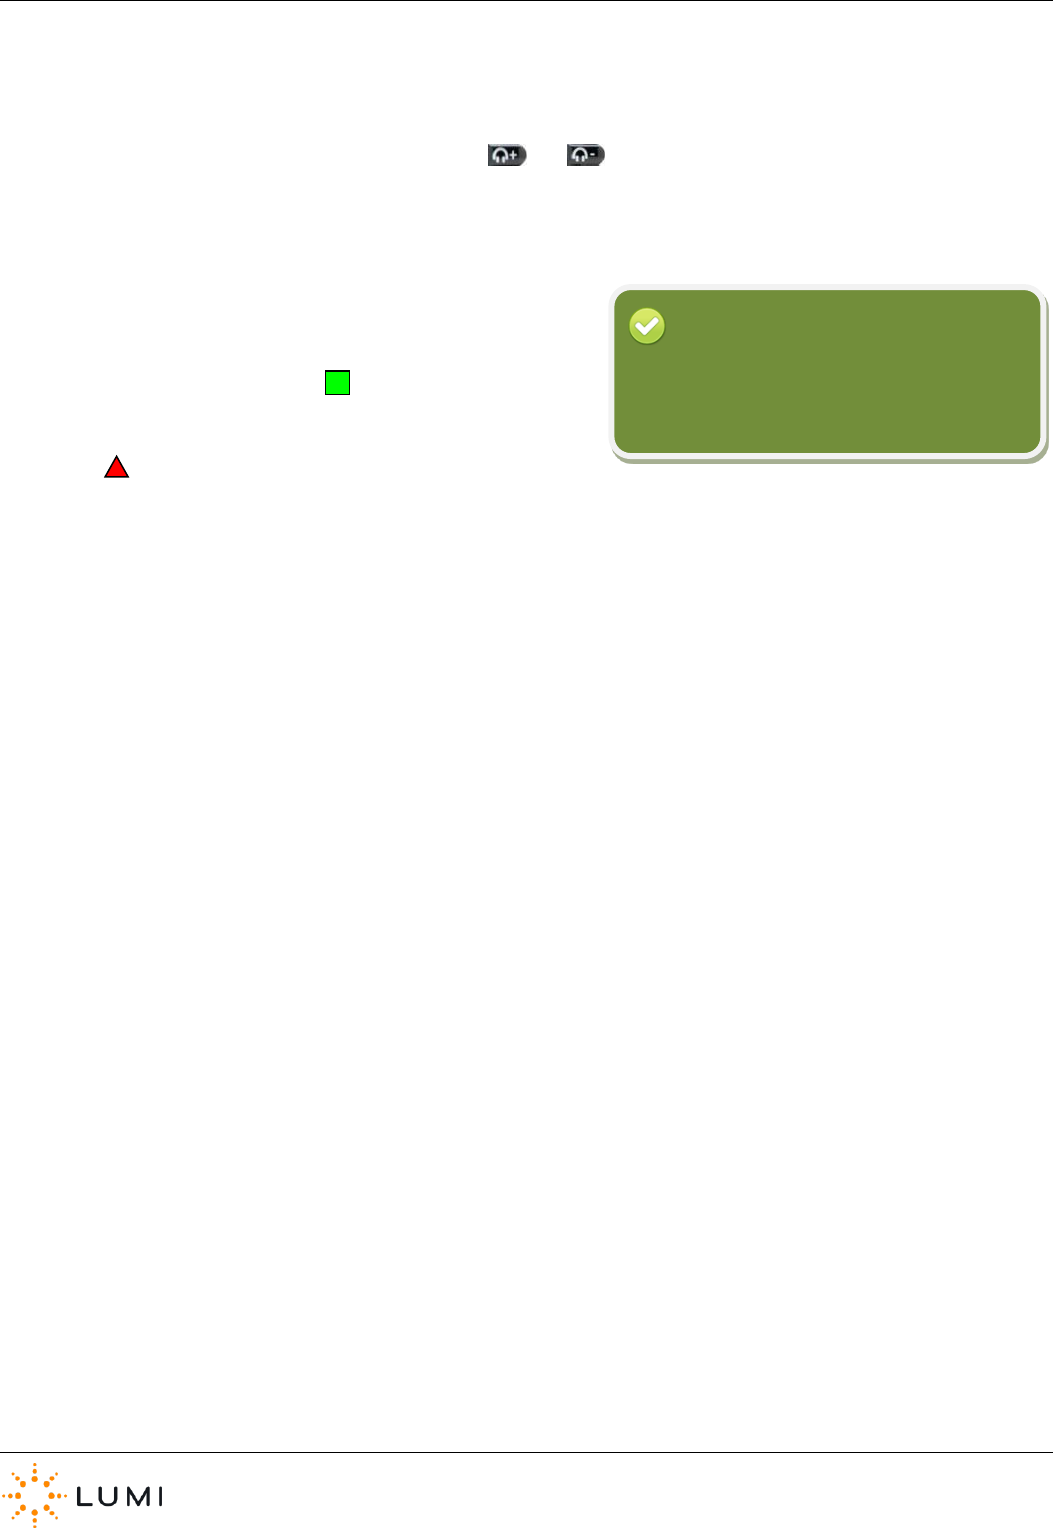
Always ensure that the correct routing is selected for the required setup. The below table, in
conjunction with Appendix A (Audio Routing Diagrams), provides technical detail on how each of the
7 available routings function.
IML Connector Device
IML Connector Powered
Base Station
Example Scenario
Off
(Default)
No audio functionality is enabled on the devices.
This provides for a very fast vote response time
No impact on battery life.
Outputs A and B are
disabled.
Inputs A and B are disabled.
Shareholder meetings where
clients can confirm microphones
are not required. 6,000 vote
responses can be received in
approximately 12 seconds.
Single Output
One channel of audio output is available. This
provides for a fast response time
Delegate microphones are available.
Headphones and speakers are disabled.
No impact on battery life when the microphone
is not in use, low when it is.
Output A from delegate
microphone.
Delegates have use of the
microphones and there is no
facilitator microphone required.
Single Input
One channel of audio input is available.
Microphones are unavailable.
Audio transmitted to devices is enabled through
the headphones and speakers.
No impact on battery life when audio is not
transmitted, low when it is.
Input A for audio transmitted
to devices.
Breakout sessions in close
proximity where delegates do
not require microphones and
are issued with headphones to
listen to the session.
Dual Output
Delegate and facilitator microphones are
available.
Headphones and speakers are disabled.
No impact on battery life when the microphone
is not in use, moderate when it is.
Output A from delegate
microphone.
Output B from facilitator
microphone.
Inputs A and B are disabled.
The chairperson wants to use an
IML Connector microphone
simultaneously while a delegate
is also using their device
microphone.
IML Connector
Page 25
IML Connector Device
IML Connector Powered
Base Station
Example Scenario
Dual Input
Two streams of audio are available on the
headphones; the device user can choose either
stream.
Stream 1 can also be routed to the IML
Connector loudspeakers, Stream 2 cannot.
The delegate and facilitator microphones are
disabled.
Heavy impact on battery life.
Outputs A and B are
disabled.
Input A to Stream 1.
Input B to Stream 2.
Simultaneous Interpretation (SI)
supporting two different
languages. The device user can
pick the language they prefer.
Loopback
The delegate microphone is routed directly to the
headphones (and loudspeakers, if enabled).
The facilitator microphone is disabled.
Minor impact on battery life when the
microphone is not in use, moderate when it is.
Output A from delegate
microphone.
Inputs A and B are disabled.
Route the delegate
microphones directly to the IML
Connector headphones or
loudspeakers, without the need
for an external mixing deck.
Pass Through
The delegate microphone is available for use.
The facilitator microphone is disabled.
A single audio stream is available for the
headphones (and loudspeakers, if enabled).
Minor impact on battery life when the
microphone is not in use, moderate when it is.
Output A from delegate
microphone.
Input A to handset
headphones or loudspeakers.
Audio from the delegate
microphone is sent to an
external mixing deck. It is mixed
with other audio sources and
sent back to the headphones or
loudspeakers.
TABLE 1: AUDIO ROUTINGS
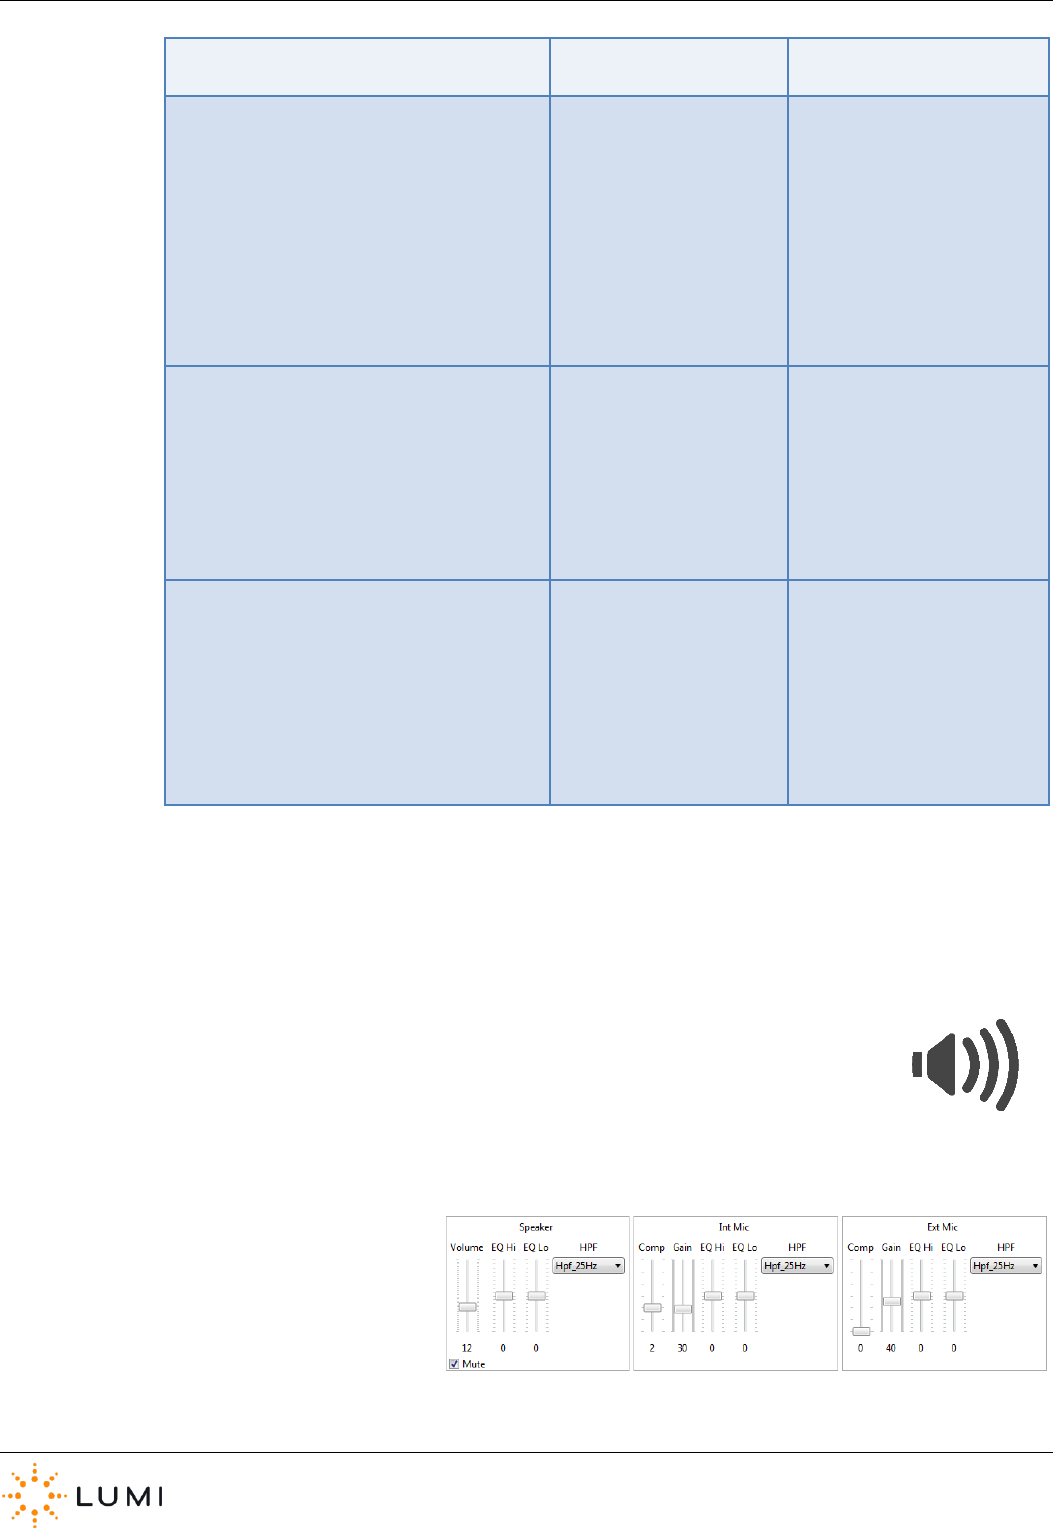
There are three further audio components that can be configured using the controls in IML Connector System Manager. These
are…
› Speaker
› Internal Mic
› External Mic (for example a lapel microphone connected to the device)
Any changes made here are global and will happen
to all IML Connectors devices connected to the IML
Connector Base Station. The ‘Reset All Levels’
button will return all audio settings back to default.
IML Connector
Page 26
› To use the IML Connector device loudspeakers, ensure Mute is
unchecked and the correct routing is in use.
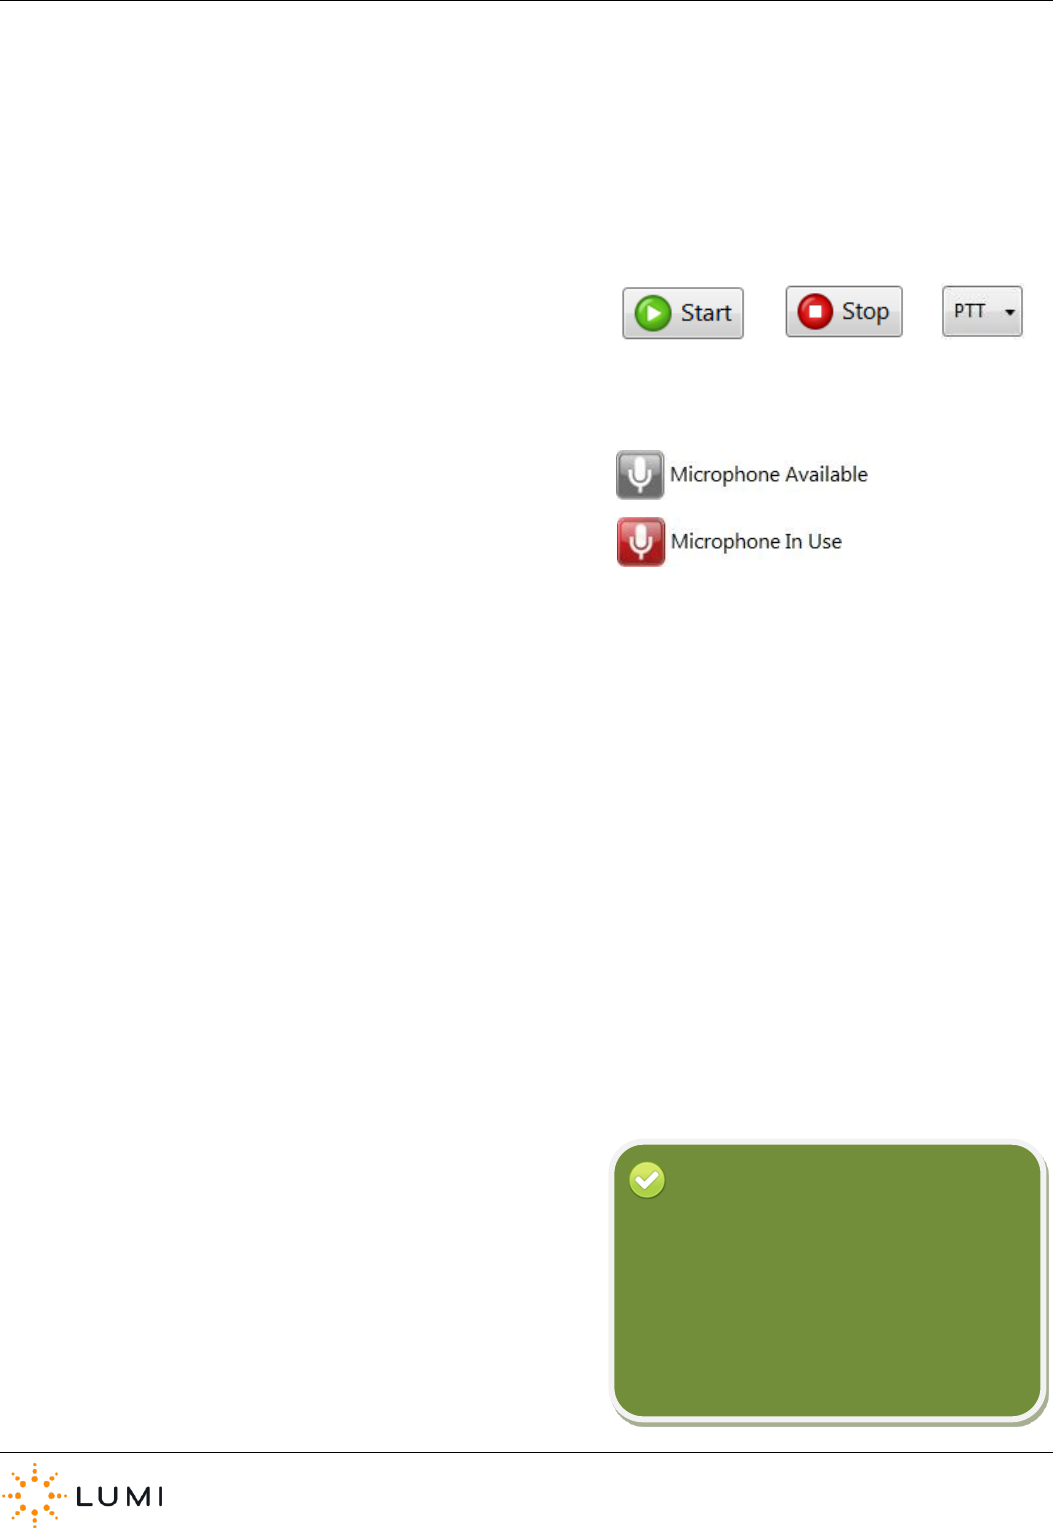
› ‘Push To Talk’ (PTT) or ‘Latch’ mode microphones can be activated
on the IML Connector devices with controls in the Microphones
section.
› The availability of microphones is reflected beneath the Start and
Stop controls.
‘Push To Talk’ (PTT) mode requires a user to
keep the Microphone key pressed to open the
IML Connector device microphone.
‘Latch’ mode means that a user toggles the
microphone on and off by pressing the
Microphone key.
Reminder
IML Connector
Page 27
13. Custom Screens
The IML Connector device has the ability to display custom screens.
These provide functionality to create a variety of items such as…
› Agendas
› Speaker biographies
› Interactive menus
› Lists
› Text
› Fixed images
› Slide shows
Furthermore, with IML Connector Configuration Tool these screens
can be setup in a way which links screens to other custom screens,
enabling the creation of a menu system which IML Connector
device users are able to navigate through using the soft keys and
trackball.
Changing Screens…
› To change the screen displayed on all IML Connector devices, IML
Connector System Manager must be used.
a) Open IML Connector System Manager
b) Go to the Screens tab
c) Press the Change button
d) Set the screens as desired and press OK
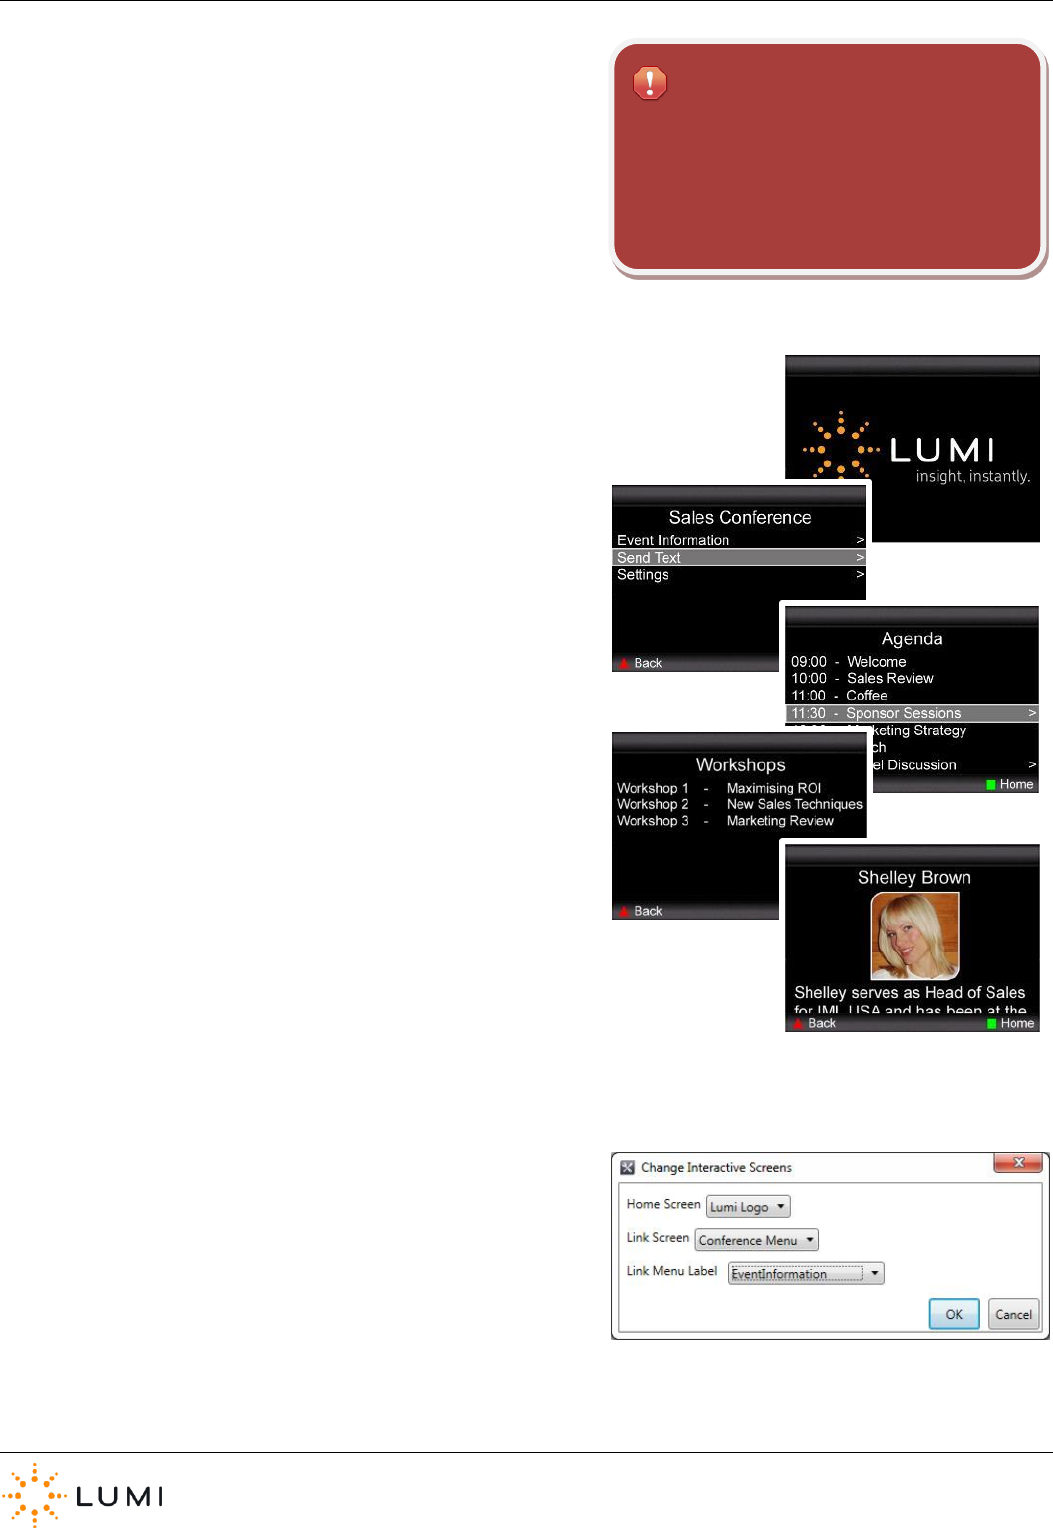
› The Screens tab allows the user to set the Home Screen and Link
Screen.
The Link Screen…
Custom screens and links can only be created
and deployed to devices by using IML
Connector Configuration Tool.
For further information please contact Lumi.
Important
IML Connector
Page 28
Reminder
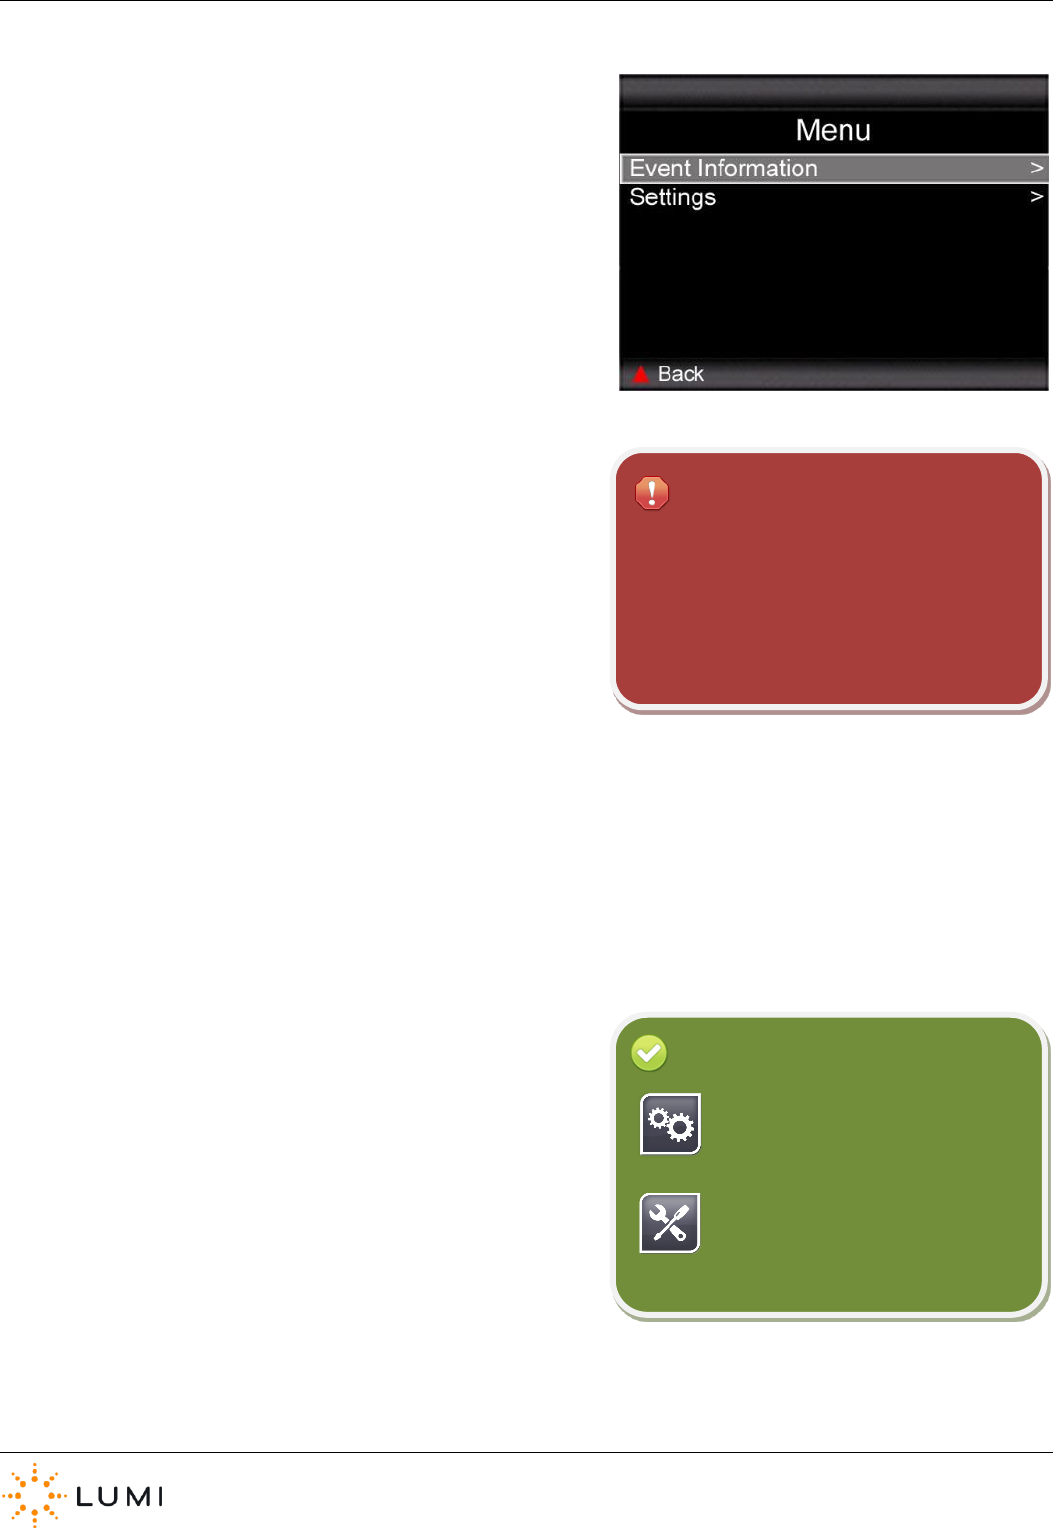
› The Link Screen is a custom screen which, if configured, will always
appear as a link in the top row of the IML Connector device menu.
› The Link Screen can be changed globally over radio by following
the Changing Screens instructions on the previous page.
Alternatively, a default Link Screen can be setup in the IML
Connector device configuration file using IML Connector
Configuration Tool.
› There are a number of localised names which can be used for the
Link Screen label (for example “Event Information” as seen in the
image on the right). A custom value can also be set here by the
user, however this is not localised and is hence not translated
when a different language is selected by the user on an IML
Connector device.
A configuration file created in IML Connector
Configuration Tool should always be deployed
to all IML Connector devices AND the IML
Connector Powered Base Station. This
ensures that both custom screen and Link
Screen options can be set globally over radio.
Important
Custom screens are created and
deployed to devices using IML
Connector Configuration Tool.
IML Connector System Manager can
be used to change the displayed
screen and Link Screen settings used
on a device.
Reminder
IML Connector
Page 29
14. Alarm
The IML Connector devices are designed with an integrated anti-theft alarm. This is a proximity alarm,
meaning that as long as a device is within range of (and connected to) an IML Connector Base Station,
the alarm will not activate.
If a device is taken outside of radio range (approximately 150 metres in
clear line of sight of an IML Connector Powered Base Station) the alarm
will activate after approximately 15 seconds of loss of signal. A user is
not able to switch off their device or stop the alarm, however –
instructions are displayed on the IML Connector device display screen
asking them to return the handset to the “event organiser”. Once a
device is back within range of the IML Connector Powered Base Station
and reconnects, the alarm will stop sounding.
› To turn off an alarm which is sounding…
a) An alarm will stop sounding when the IML Connector device
is bought back into range of the IML Connector Base
Station. If a device is returned and this is not possible (for
example, the control PC and IML Connector Base Station
have been switched off and packed away), it is still possible
to turn off the device…
b) Press and hold both the and buttons together
and press X. This turns the device off manually.
The IML Connector device alarm is not on by
default and needs to be activated by the
operator of the system.
Important
Alarms are controlled using the IML
Connector System Manager application.
Tip
‘Docking’ an IML Connector device (i.e.
returning it to the IML Multidock or IML
Minidock) will stop the alarm sounding.
Tip
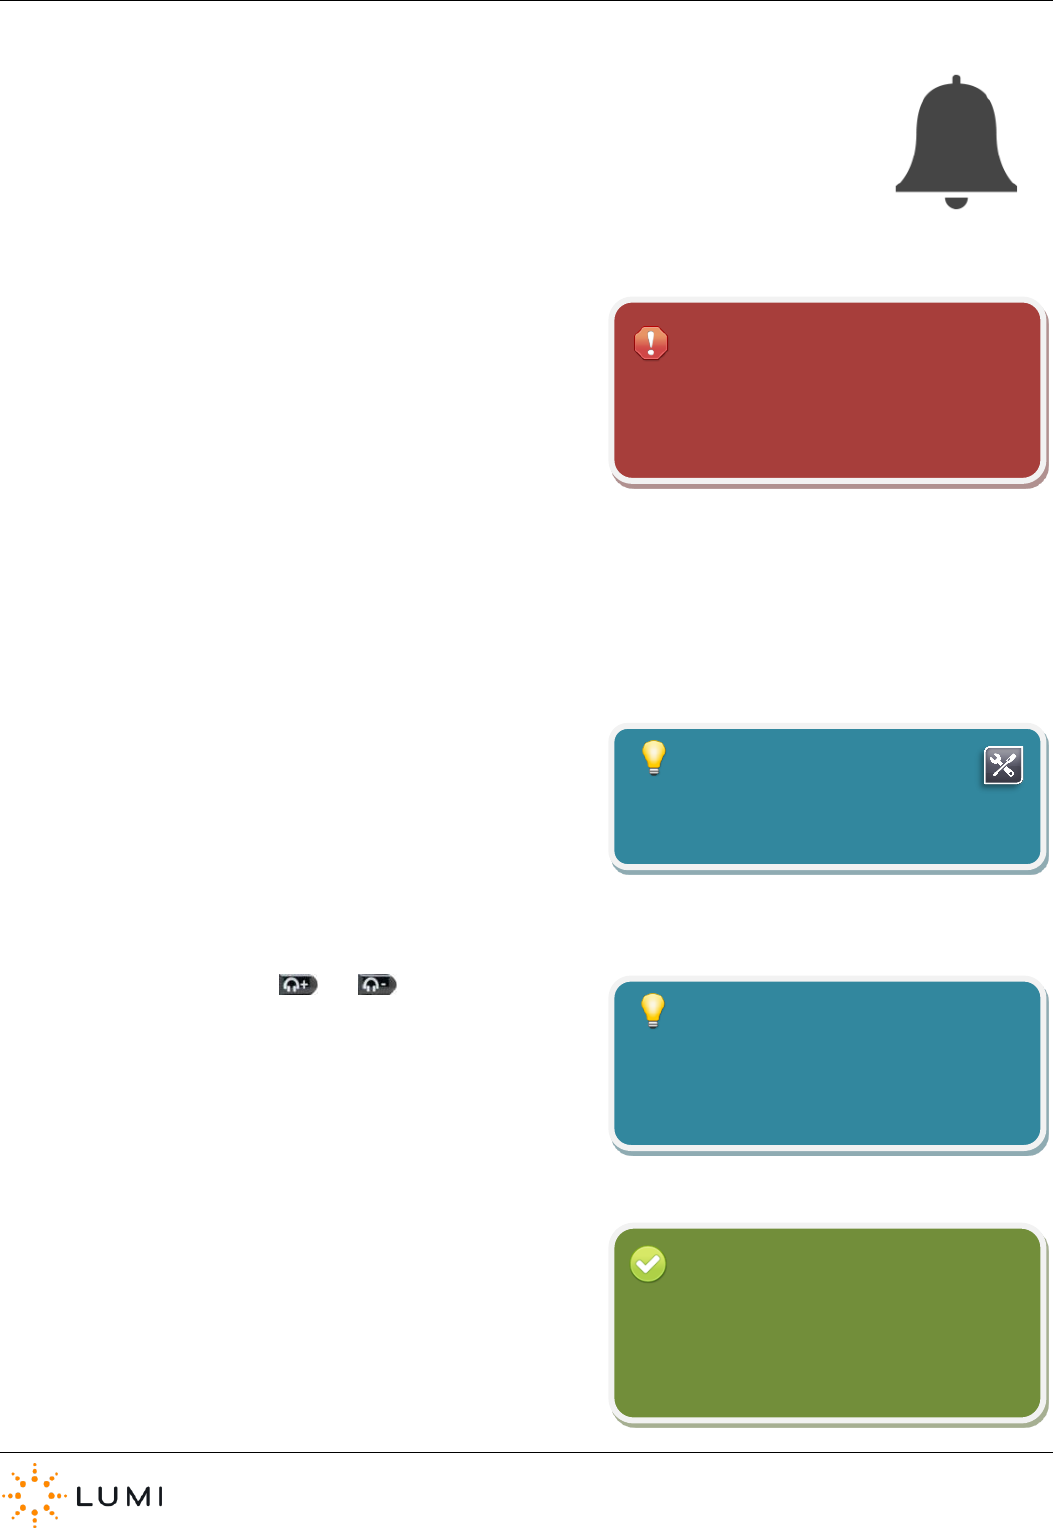
Looking at the status bar on the IML
Connector device’s display screen, an alarm
symbol will be present if the alarms are
enabled
Reminder
IML Connector
Page 30
15. Using a Handset as a Base Station
Any IML Connector handset can be used as a Base Station.
› To setup any IML Connector handset as a Base Station…
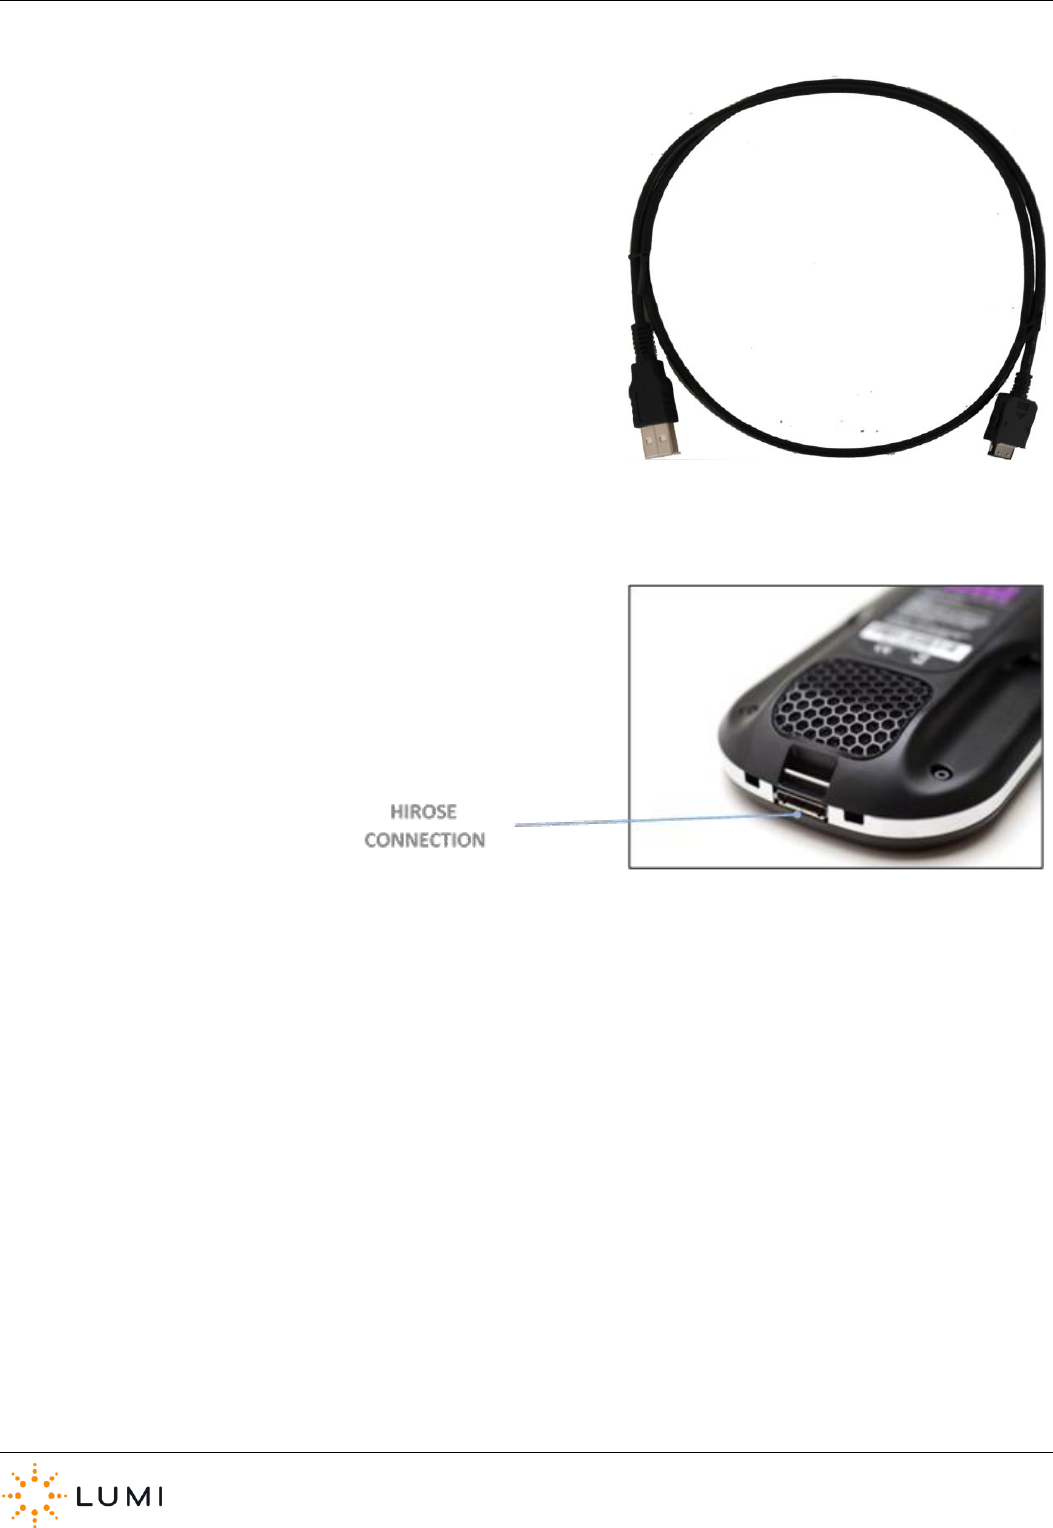
a) Connect the data lead (USB to Hirose) to the control PC
b) Plug the USB end into the PC and the other (Hirose) end of
the lead into the bottom of the handset
c) After several seconds, the device will re-initialise as a Base
Station (indicated on the display screen).
d) IML Connector devices will connect to the Base Station (this
may take up to a minute) and allow normal use of the
system.
e) Using a handset as a Base Station will offer an effective
radio range of approximately 100 metres.
IML Connector
Page 31
16. Microphones
Each IML Connector device has a microphone built into it. When in
operation, these can be used by attendees of a meeting and
provide the chance of instant input from the audience without the
practical, technical or financial implications of passing a handheld
microphone around the room.
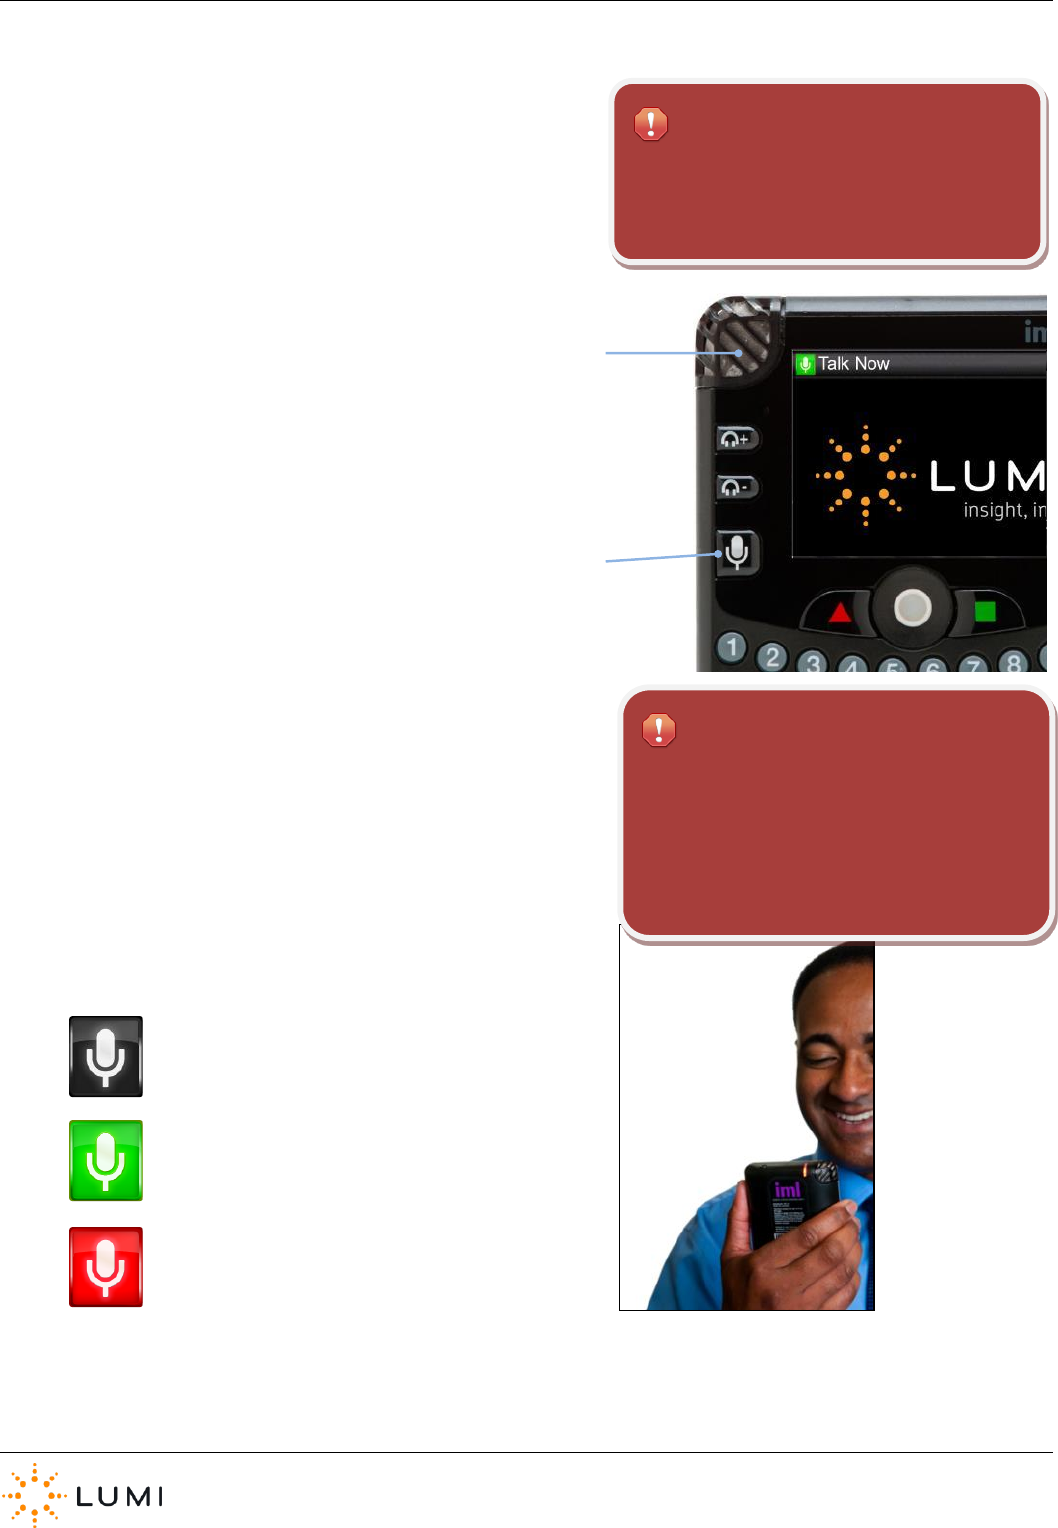
Each IML Connector device has a tally light built into the back of the device. This LED will light red to indicate that a microphone
is open. This is a useful feature as it means it is easy to see who is using
the microphone and where they are seated in the audience. This can be
beneficial to a presenter, sound engineer or even a panel of experts on
stage during a Q&A session.
When microphones are enabled by an operator of the IML Connector
system, users can refer to the display screen on an IML Connector
device to determine the current microphone status…
› MICROPHONE AVAILABLE
› MICROPHONE OPEN
› MICROPHONE NOT AVAILABLE
To avoid confusion, only one delegate
microphone on an IML Connector device can
be open (i.e. ‘live’) at any given time.
Important
Audio quality may differ depending on how
users hold the IML Connector device.
Lumi recommend that the IML Connector
device is held approximately 15 – 30
centimetres in front of the face.
Important
MICROPHONE
MICROPHONE
KEY
IML Connector
Page 32
Speaker Queuing
Using the Lumi Queue product, IML Connector devices can be used to facilitate Speaker Queuing. This
enables registered users (i.e. issued with an IML Smartcard) to join a microphone queue if they would
like to speak, which can then be controlled by an Operator or chairman for example.
› Participants are not able to activate or deactivate their own microphone. Instead - they are
opened and closed by the controller of the queue. A speaker queue can either be generic or split
into up to 8 different Queue Lines. These provide the ability for participants to register their wish
to speak against a certain topic, item or motion for example. Information including the speaker’s
name, time they spoke and duration they spoke for are included in reporting. Please contact Lumi
for more information.
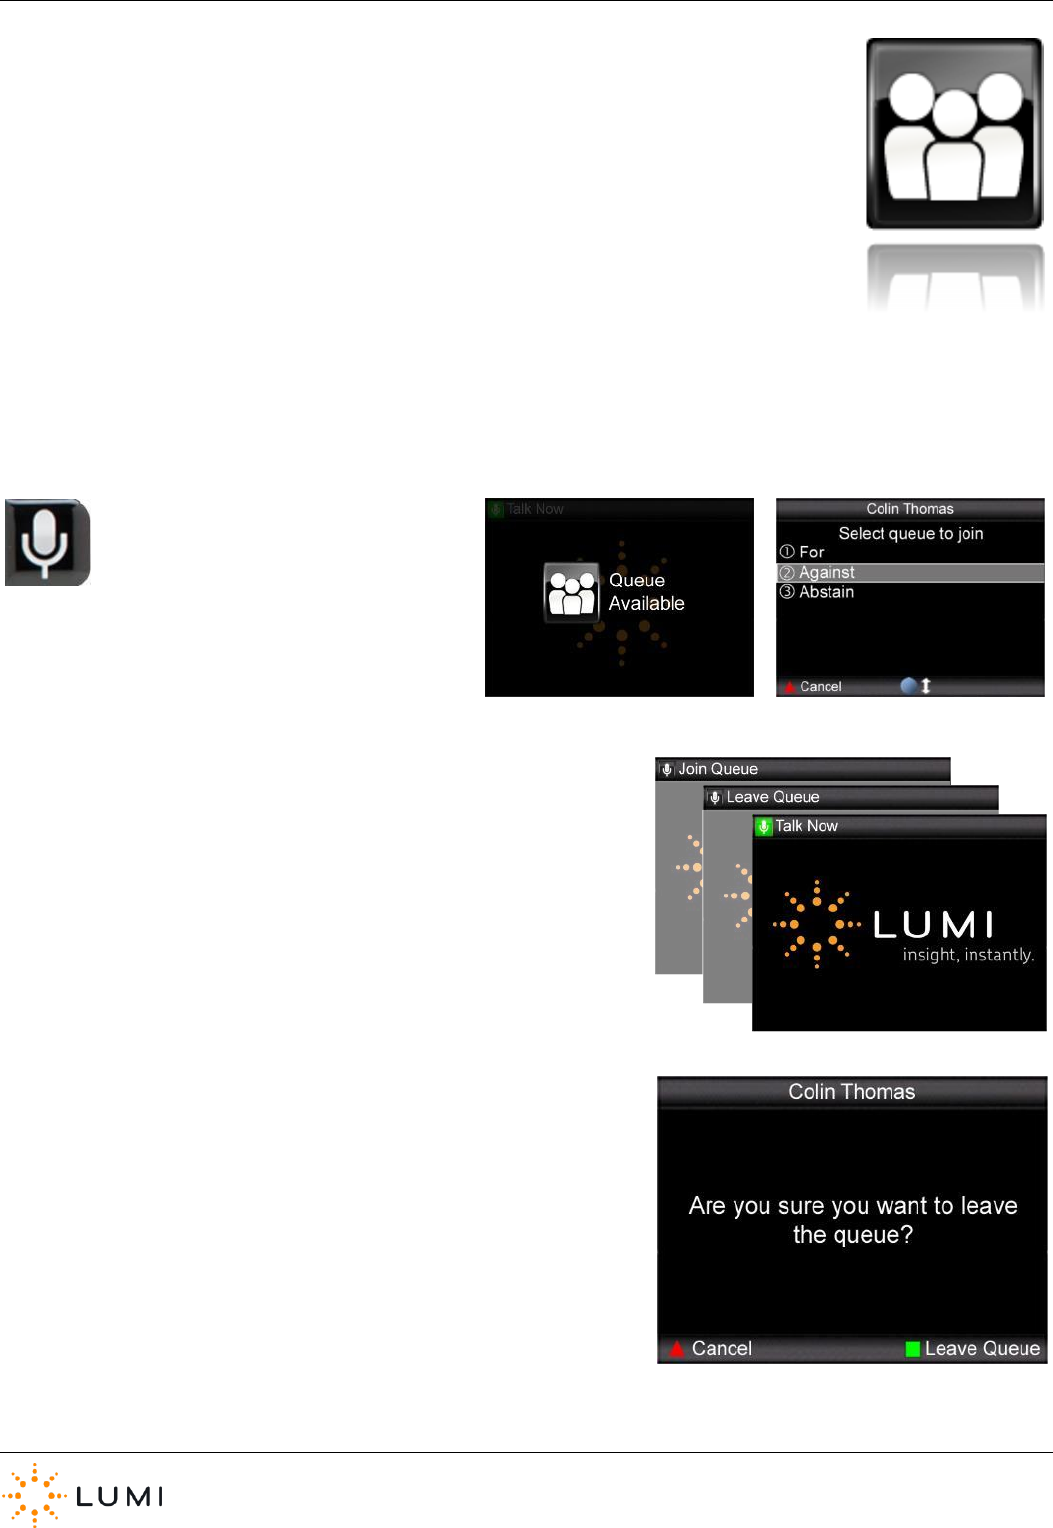
When enabled, registered users can join
or leave a queue by pressing the
microphone button on the IML
Connector device.
› The Status Bar on the IML Connector device will reflect whether or not
a user can join or leave a queue and if their microphone has been
activated by the controller of the queue.
› Users are prompted to confirm or cancel if they would like to leave a
speaker queue by using the soft keys on the device.

IML Connector
Page 33
17. Audio Hardware
Integrated loudspeakers built into the IML Connector device mean that in some
circumstances, i.e. for smaller events, the use of a PA system is not required.
For large scale events, or when using Audio Routings other than ‘Dual Input’, ‘Off’ or ‘Single Input’, maximise the quality of the
IML Connector device microphones by linking into a PA system or sound desk.
› For smaller scale events, The IML Connector Base Station also
features standard 3.5mm ‘mini-jack’ connections.
IML Connector
Page 34
18. Additional Audio Features
› Loudspeaker
Each IML Connector device has a loudspeaker built into the back of it. In
some scenarios this feature can negate the need for a PA system.
The volume level and enabling/disabling of the loudspeakers is
controlled using IML Connector System Manager (please see Section 13).
It cannot be set manually via the IML Connector device and is a global
setting (i.e. the same for all connected devices).
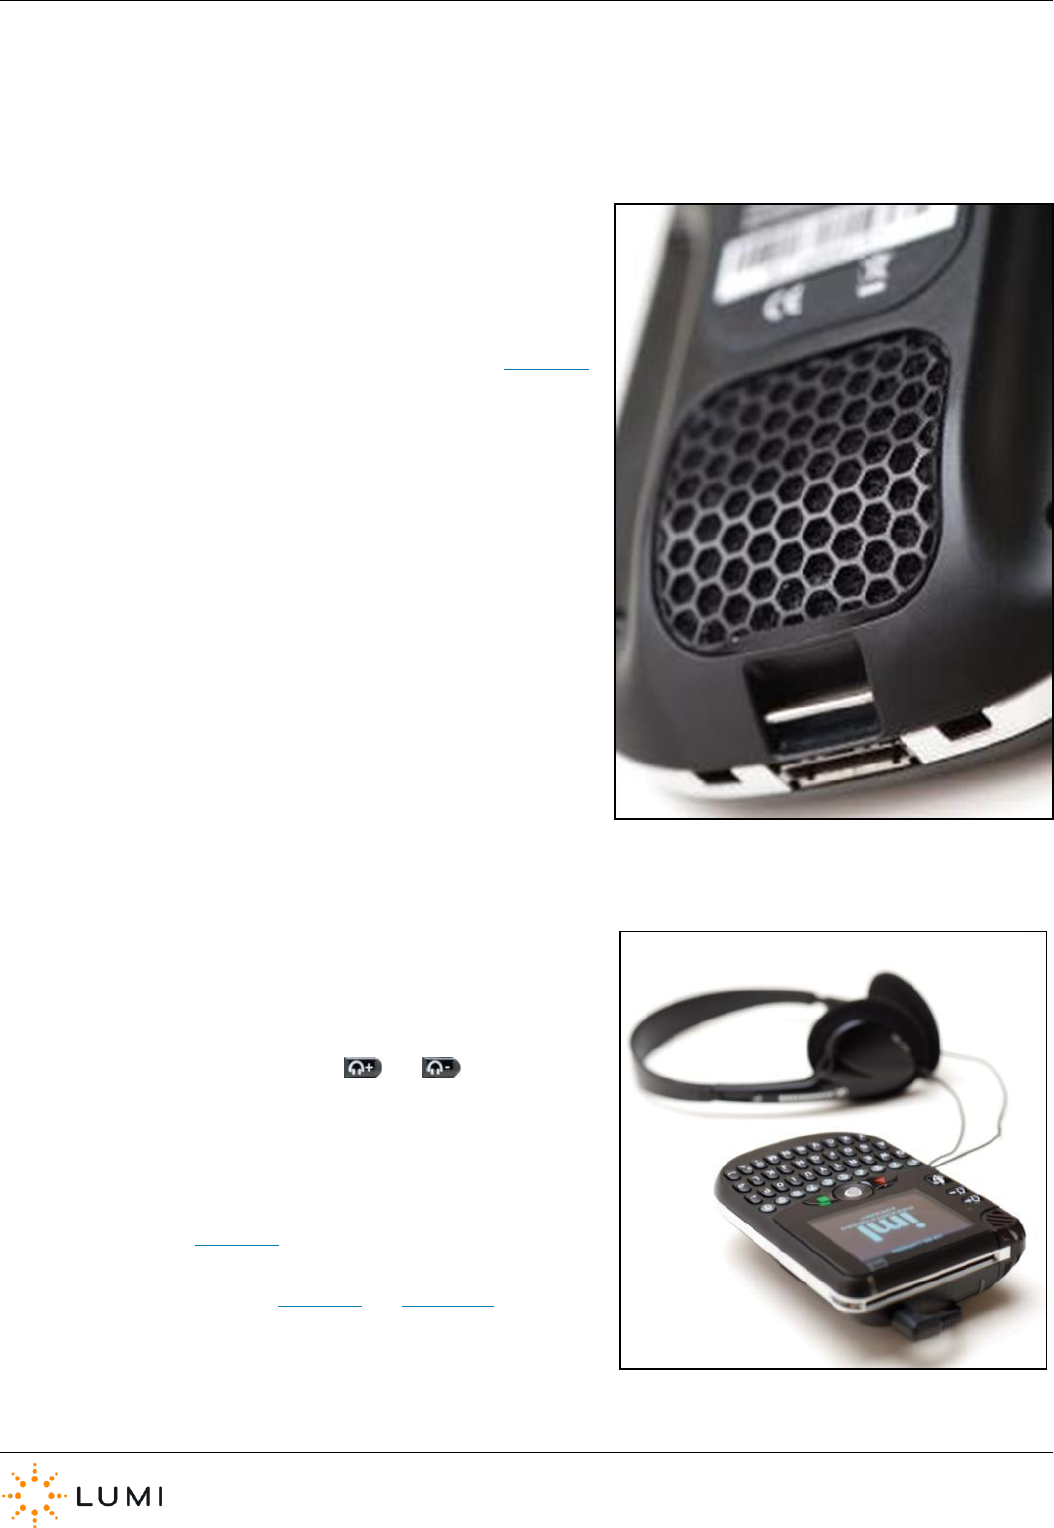
› Headphones/Microphone Connection
Example uses include for the hard of hearing or Simultaneous
Interpretation (SI). The Connector has a 4-pole, 3.5mm ‘mini-jack’ socket
enabling headphones (and/or a microphone) to be connected.
Headphone volume is controlled with the and buttons.
To utilise either of the above two features may require additional
cabling, please see Section 17 for further information. Please also
note that the availability of both of the above features depends on
the Audio Routing in use (see Section 12 and Appendix A).
IML Connector
Page 35
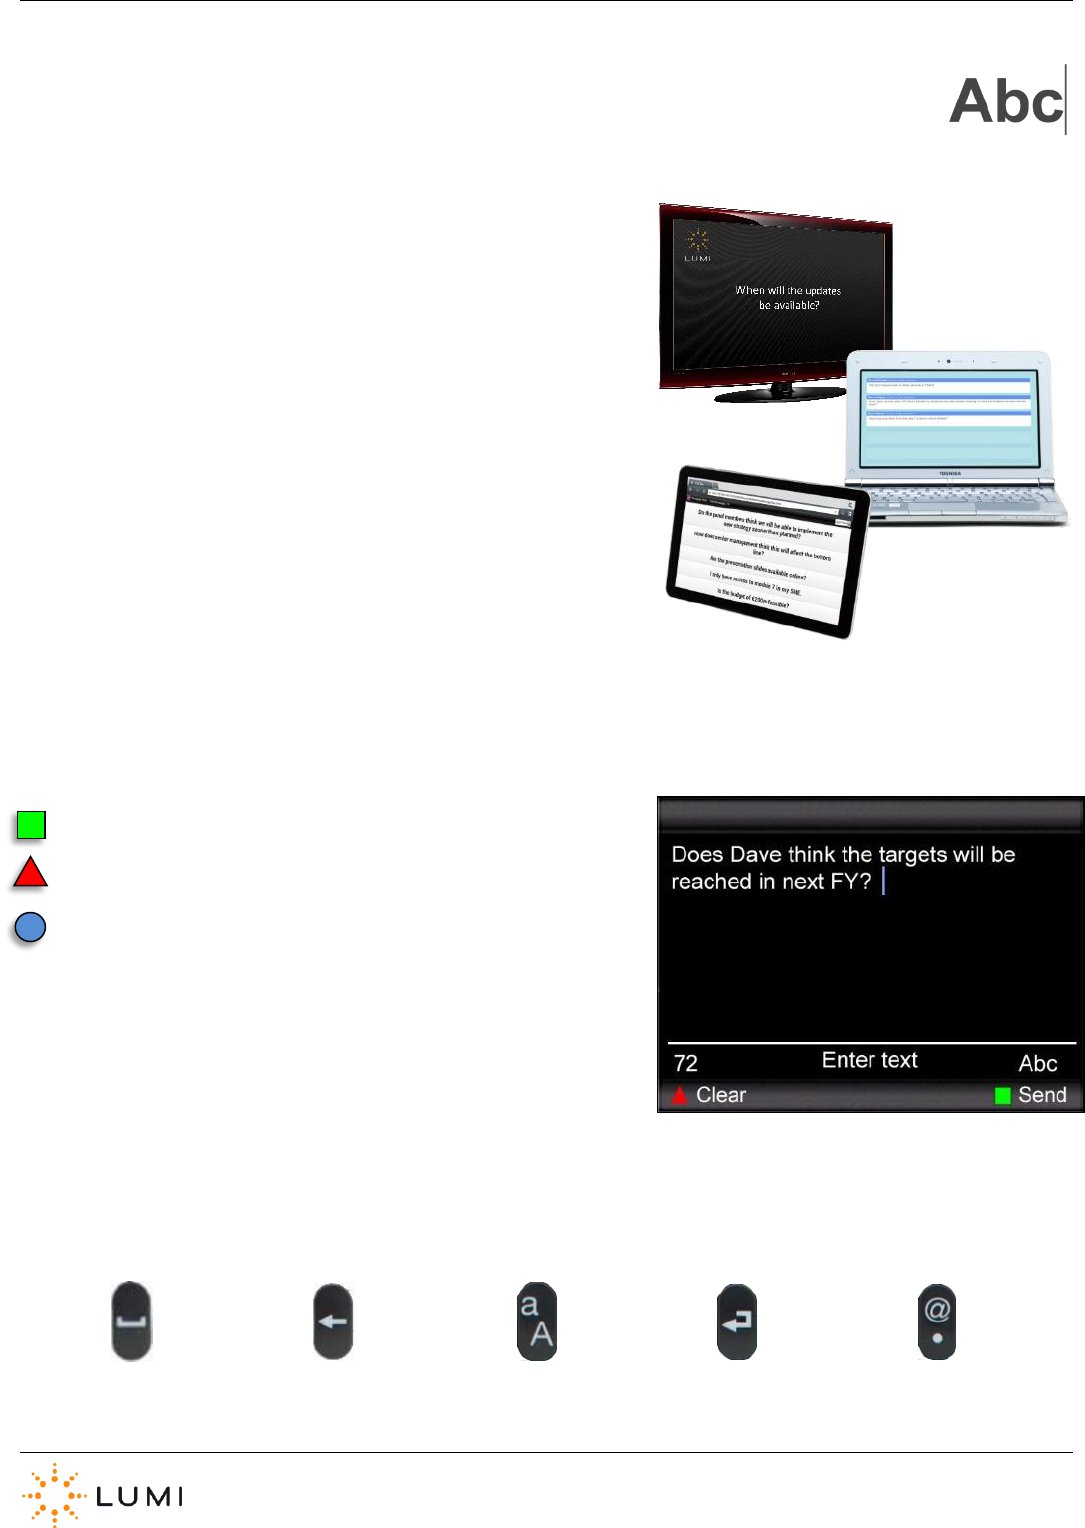
19. Text Messaging
With products such as Lumi Text Vote Talk, participants can use the
QWERTY keyboard on the IML Connector devices to send text messages
to a ‘control PC’. These messages can be used to gain valuable
information and insight from an audience. Additionally, system users are
also able to broadcast a message to all connected devices.
As well as collecting data, with a selection of options available through
products such as Lumi Audience Display or Lumi Message, text messages
can be displayed to an audience or to presenters/facilitators in a wide
variety of formats and on a host of connected devices. Please contact Lumi
for more information.
› Text messages can contain a maximum of 127 characters (including
spaces).
› A remaining character count is displayed on the IML Connector device.
Use the green square soft key to Send a message
Use the red triangle soft key to Clear the message
The blue trackball can be used as a cursor to navigate through the
message to edit before sending
› Additional messaging buttons on the IML Connector device are included below…
SPACE
BACKSPACE
CAPS
RETURN
SYMBOLS
IML Connector
Page 36
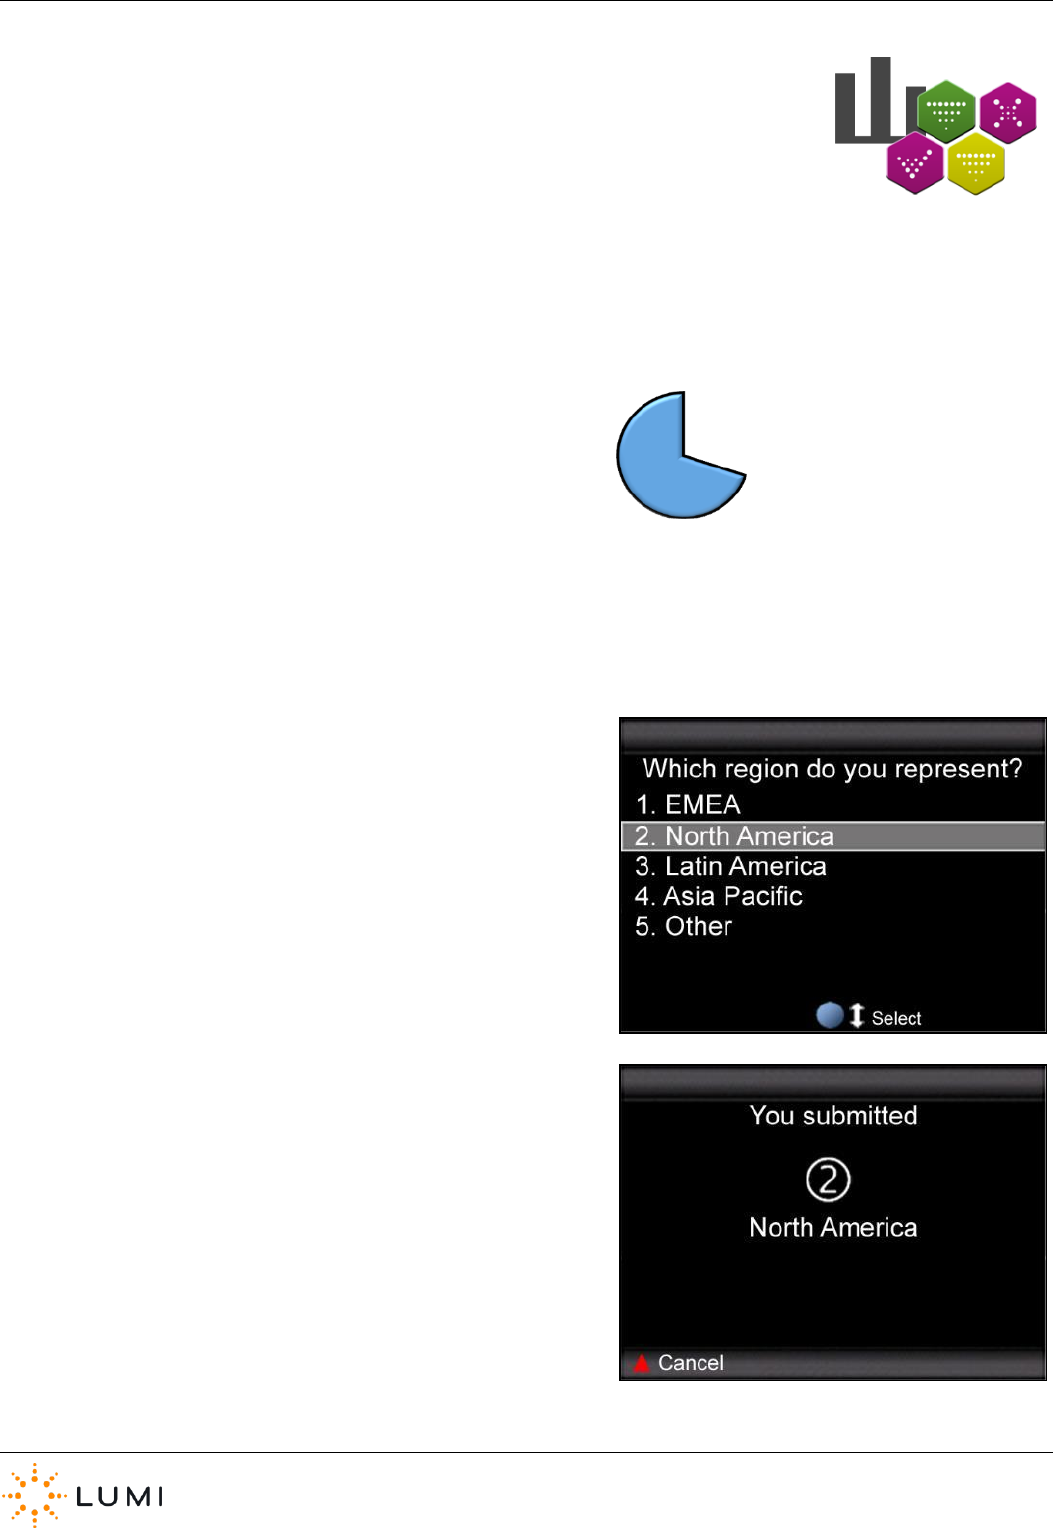
20. Voting
A range of Lumi products provide participants with the ability to vote. Across these applications,
whether dealing with a quiz question in Lumi ViewPoint, or a legal vote at a shareholder meeting,
there are some basics around voting which this section outlines.
› IML Connector devices allow participants to submit a response whilst a vote, or poll, is open. Votes are opened by the
operator, after which all connected devices will respond. Participants can change their response during this time, however,
once the vote is closed no more responses can be sent by participants as the IML Connector devices will return to the state
they were previously in.
› Some Lumi products may make use of timer, or countdown clock,
which can aid a consistent voting process. When a clock is started
the vote is open. The vote usually closes automatically once the
clock has finished, after which participants can no longer submit
responses on their device.
› IML Connector devices must be connected to a Base Station and within radio range, otherwise they will not respond to a
vote which is opened. Once opened, IML Connector devices must remain connected to the Base Station to submit a
response.
› Depending on the Lumi product in use, or the nature of the vote,
options (or choices) can be displayed to participants on the IML
Connector display screen. Participants can submit responses using
one of the two methods below…
a) Submit a response by pressing a number button on the IML
Connector device which corresponds with their voting option.
b) A response can also be submitted by using the blue trackball to
highlight a choice, pressing the trackball in to select and submit.
› Depending on the setting (and also on the Lumi product in use),
there are usually different ways in which a participant can cancel or
change their vote. Please note that instructions are always provided
on the IML Connector device screen. A response can usually be
cancelled by pressing the Clear or Cancel button. Some meetings
may require the use of, for example, X or C buttons – which can also
be used to change a response. Whilst participants can resubmit a
response after clearing, they are also able to submit a new response
by simply entering a new number or selecting the new option.
IML Connector
Page 37
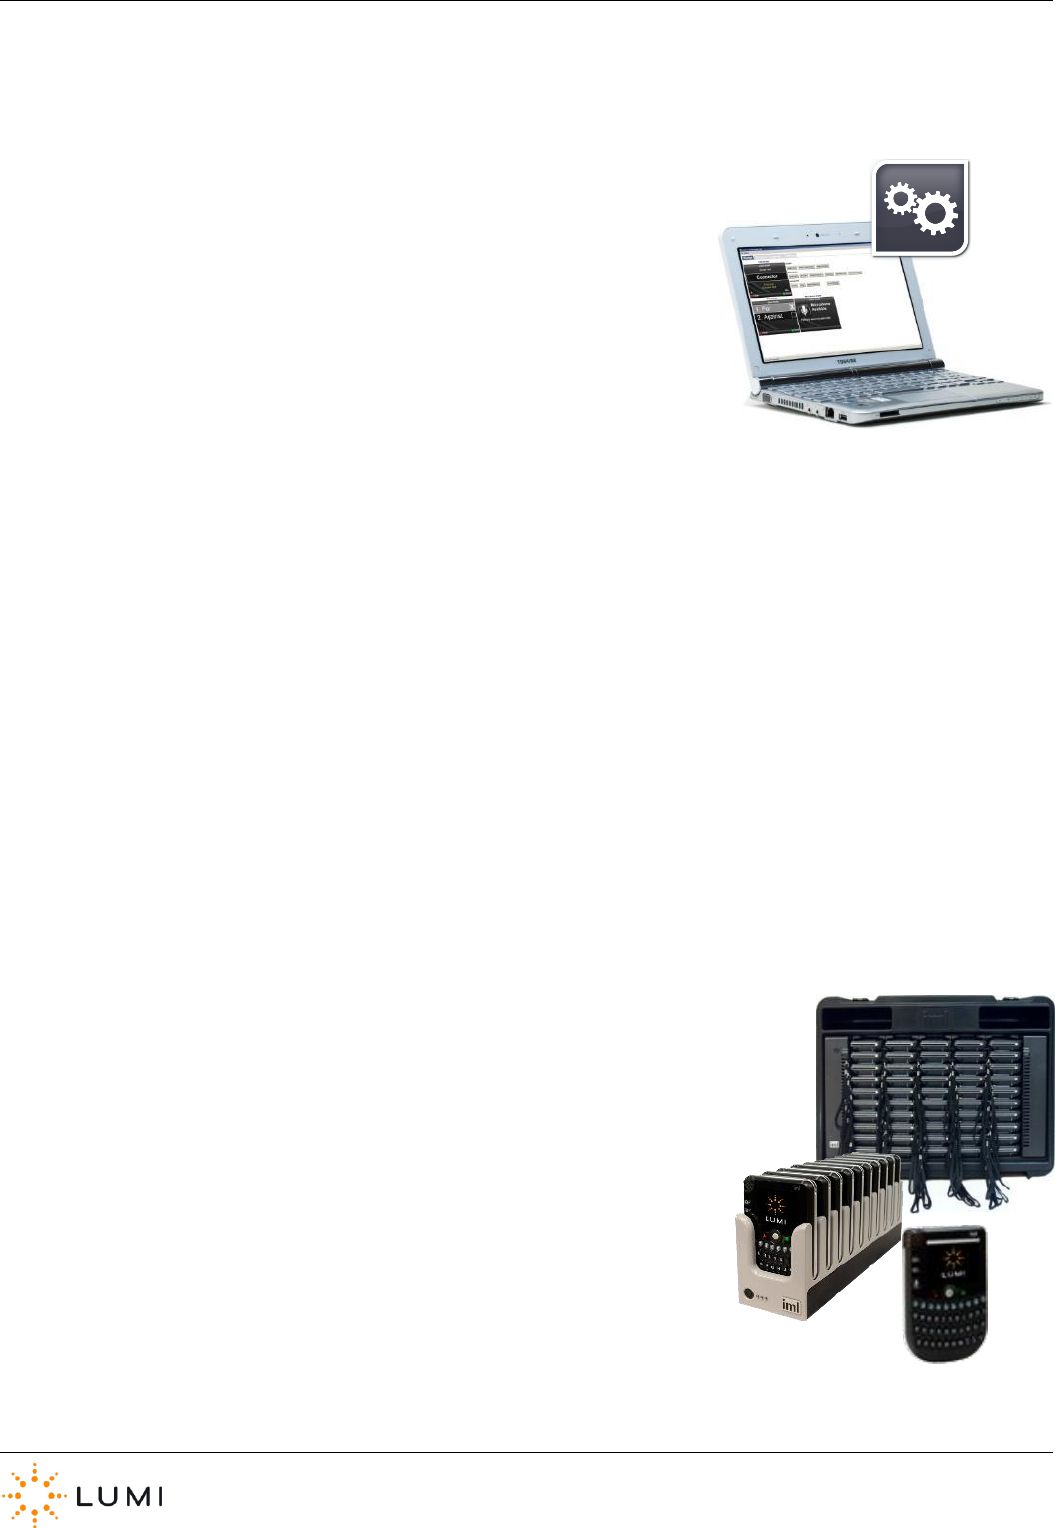
21. USB Connectivity
IML Connector devices can be connected to a PC for a variety of features and
functionality. All of which requires the use of IML Connector Configuration Tool.
Available functions provided by this application include…
› Deploying an IML Connector configuration file
Custom theming or branding, enabling User Driven
Roaming, configuring audio and language settings,
etc.
› Reporting on hardware
Generating reports which contain diagnostic
information on IML Connector devices.
› Configuring Network settings
Uniquely indexing devices, editing radio settings, etc.
› Upgrading IML Connector device firmware
Upgrading the firmware installed on the device to
work with updated Lumi software.
There are 3 methods in which an IML Connector device can be connected to a PC…
a) A single IML Connector device can be connected to an
available USB port on the PC using the USB to Hirose cable
b) Multiple IML Connector devices can be connected to a PC
via an IML Minidock
c) Multiple IML Connector devices can be connected to a PC
via an IML Multidock
IML Connector
Page 38
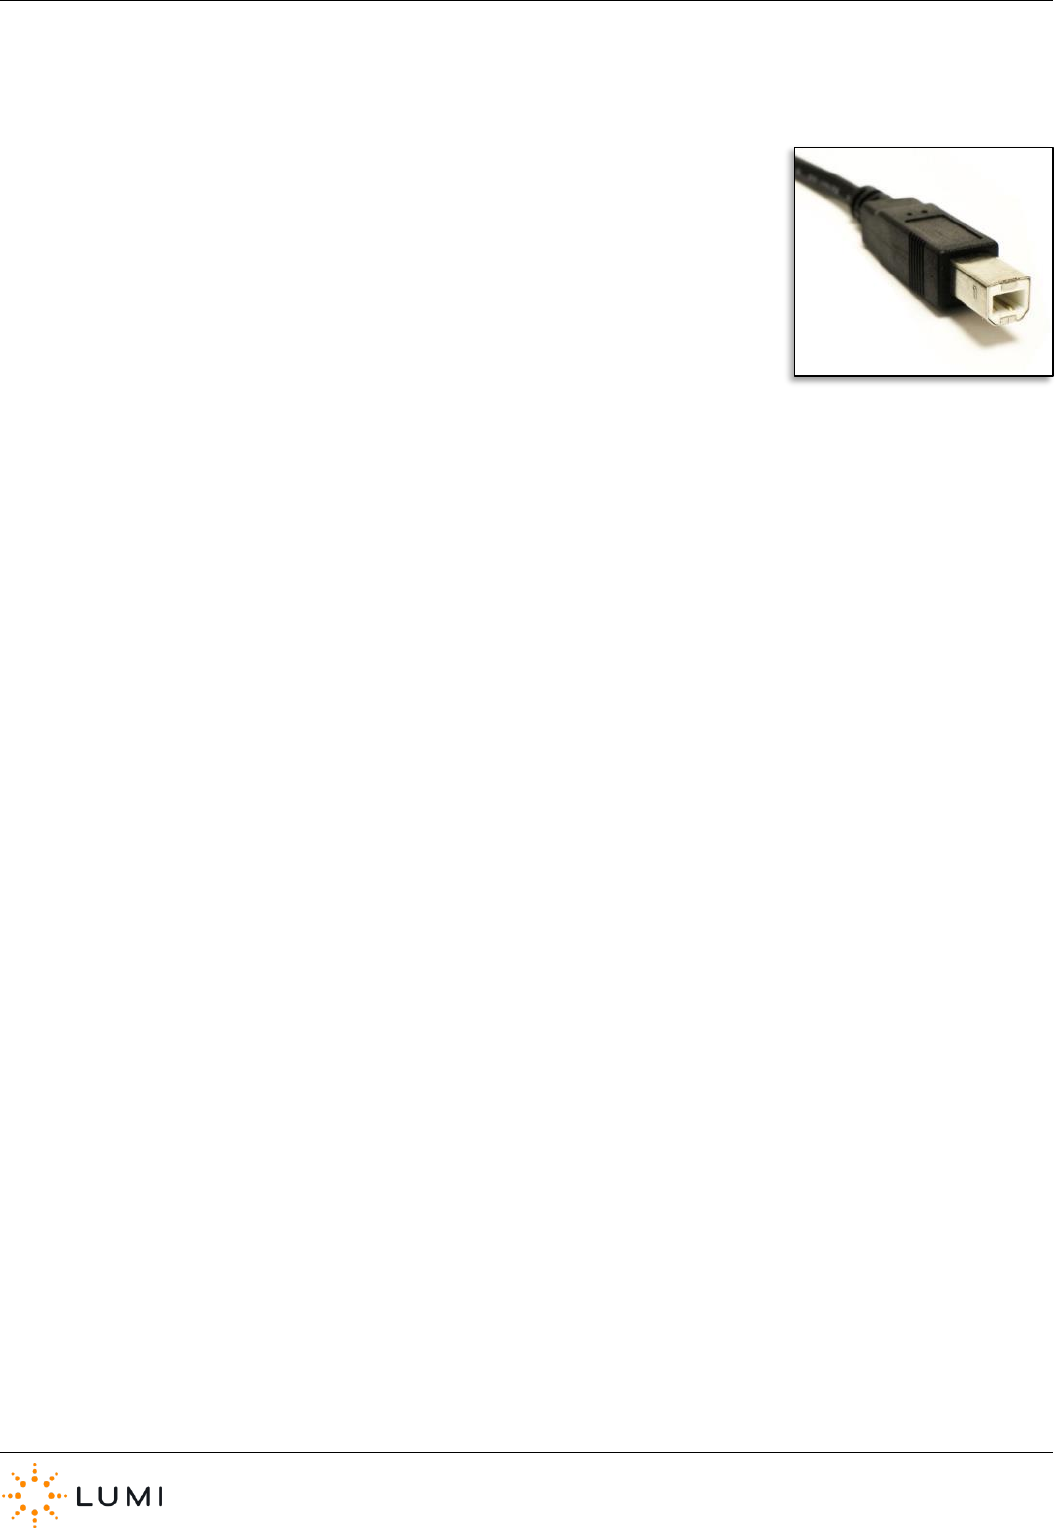
IML Multidocks & IML Minidocks…
› Both docking devices can be connected to a PC via a standard A/B USB cable. The
connection is located on the rear of the docking device.
› An additional feature available with IML Multidocks, is that these can be ‘daisy
chained’ by connecting one dock to another. This method will require less available
USB ports on the PC.
› Lumi recommends a maximum of six docking devices are connected to a PC at one
time (this will depend on available USB ports, USB hubs, A/B USB cables, etc.)
› On both docking devices, USB connectivity is indicated by the right-hand LEDs on the
front of an IML Multidock or the third (i.e. right-hand) LED on the front of an IML
Minidock. These LEDs will be green when a dock is successfully connected to a PC.
IML Connector
Page 39
22. Attendance Tracking
Providing that participants are identified in the Register and issued with IML smartcards,
then system users are able to benefit from the latest Attendance Tracking feature of the
IML Connector system.
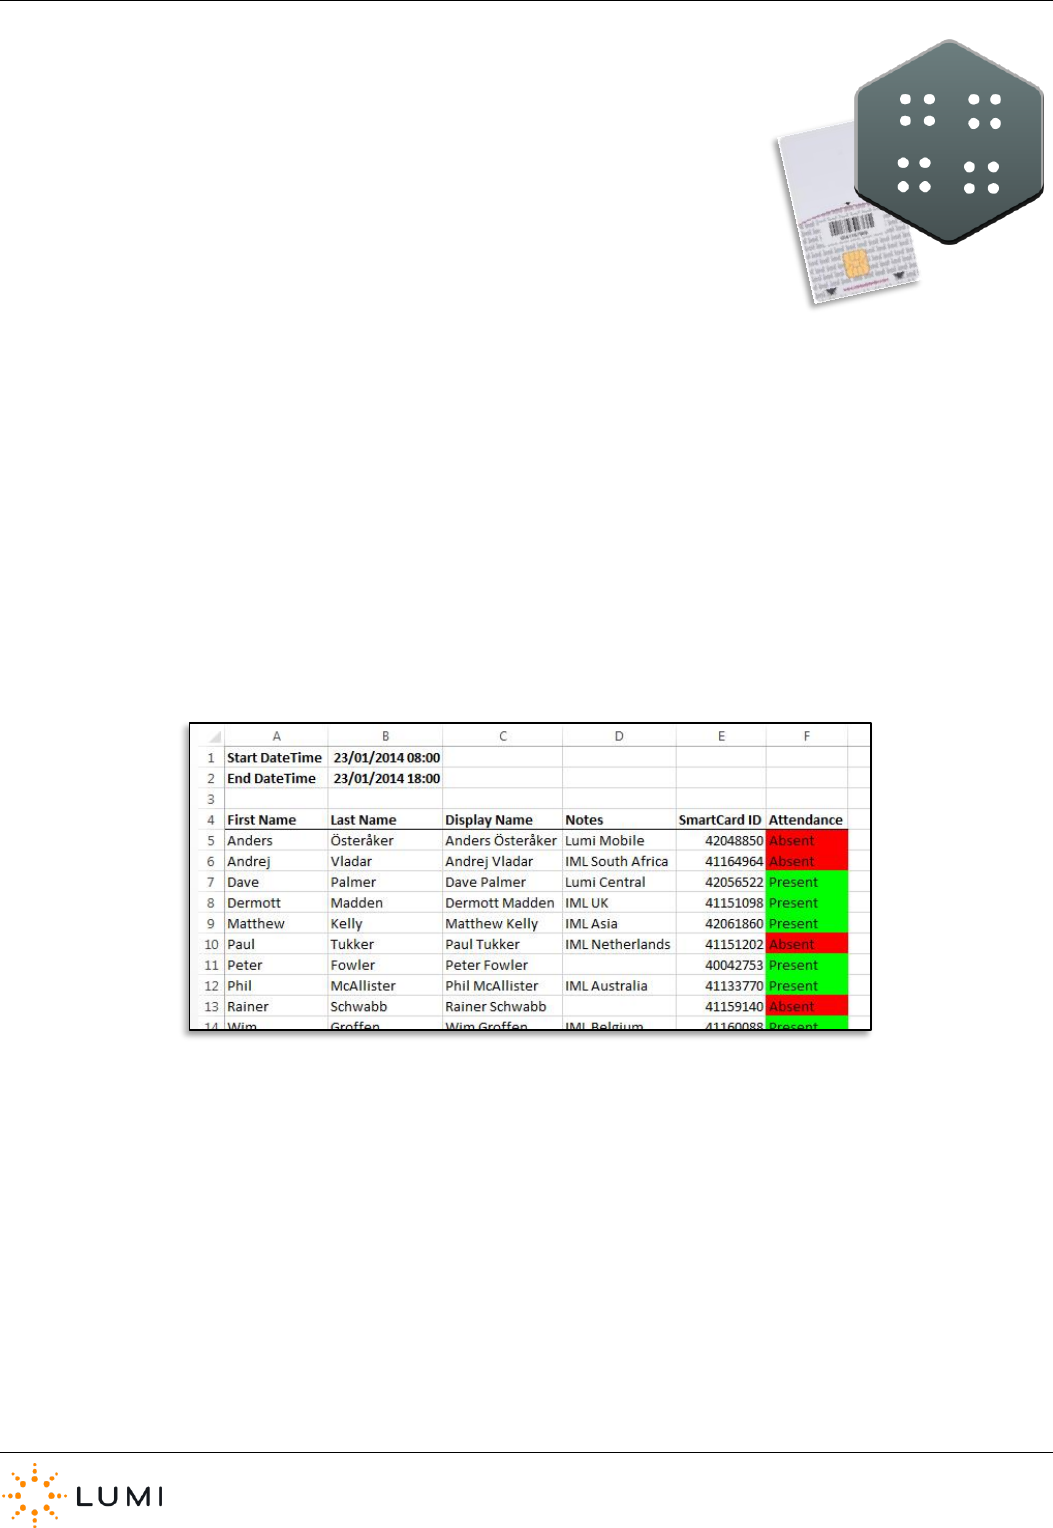
› Attendance tracking works by recording if an attendee’s smartcard has been inserted into an IML Connector device or not
during a particular timeframe.
› When generating an Attendance Report, users are able to define a start and end time. Once generated, the report will
return whether or not attendees were Absent or Present during this period (see image of example report below).
› An attendee is marked as Present if their smartcard was detected in an IML Connector device at any point during the
timeframe set by the user when creating the report.
› The Attendance Tracking report is generated using Lumi Text Vote Talk, however,
this feature is still available to users of other products such as Lumi ViewPoint. For
further information, please refer to the Lumi Text Vote Talk User Manual or
alternatively please contact Lumi.
IML Connector
Page 40
23. Safety, Maintenance & Compliance Information
Safety
IML Connector Devices:
› Only charge IML Connector devices in an IML Minidock or IML Multidock.
› Do not expose the product to moisture. Never spill any liquid on the product.
IML Multidock:
› Use only the type of power source indicated on the marking labels.
› Do not overload wall outlet or extension cords as this may increase the risk of electric shock or fire. If the power cord is
frayed, replace it with a new one.
› Proper ventilation is necessary to prevent the product overheating. Do not block or cover the slots and openings on
the device, which are intended for ventilation and proper operation.
› Do not place the product near any source of heat or expose it to direct sunshine.
› Do not expose the product to moisture. Never spill any liquid on the product.
› Do not place the product on an unstable stand or table.
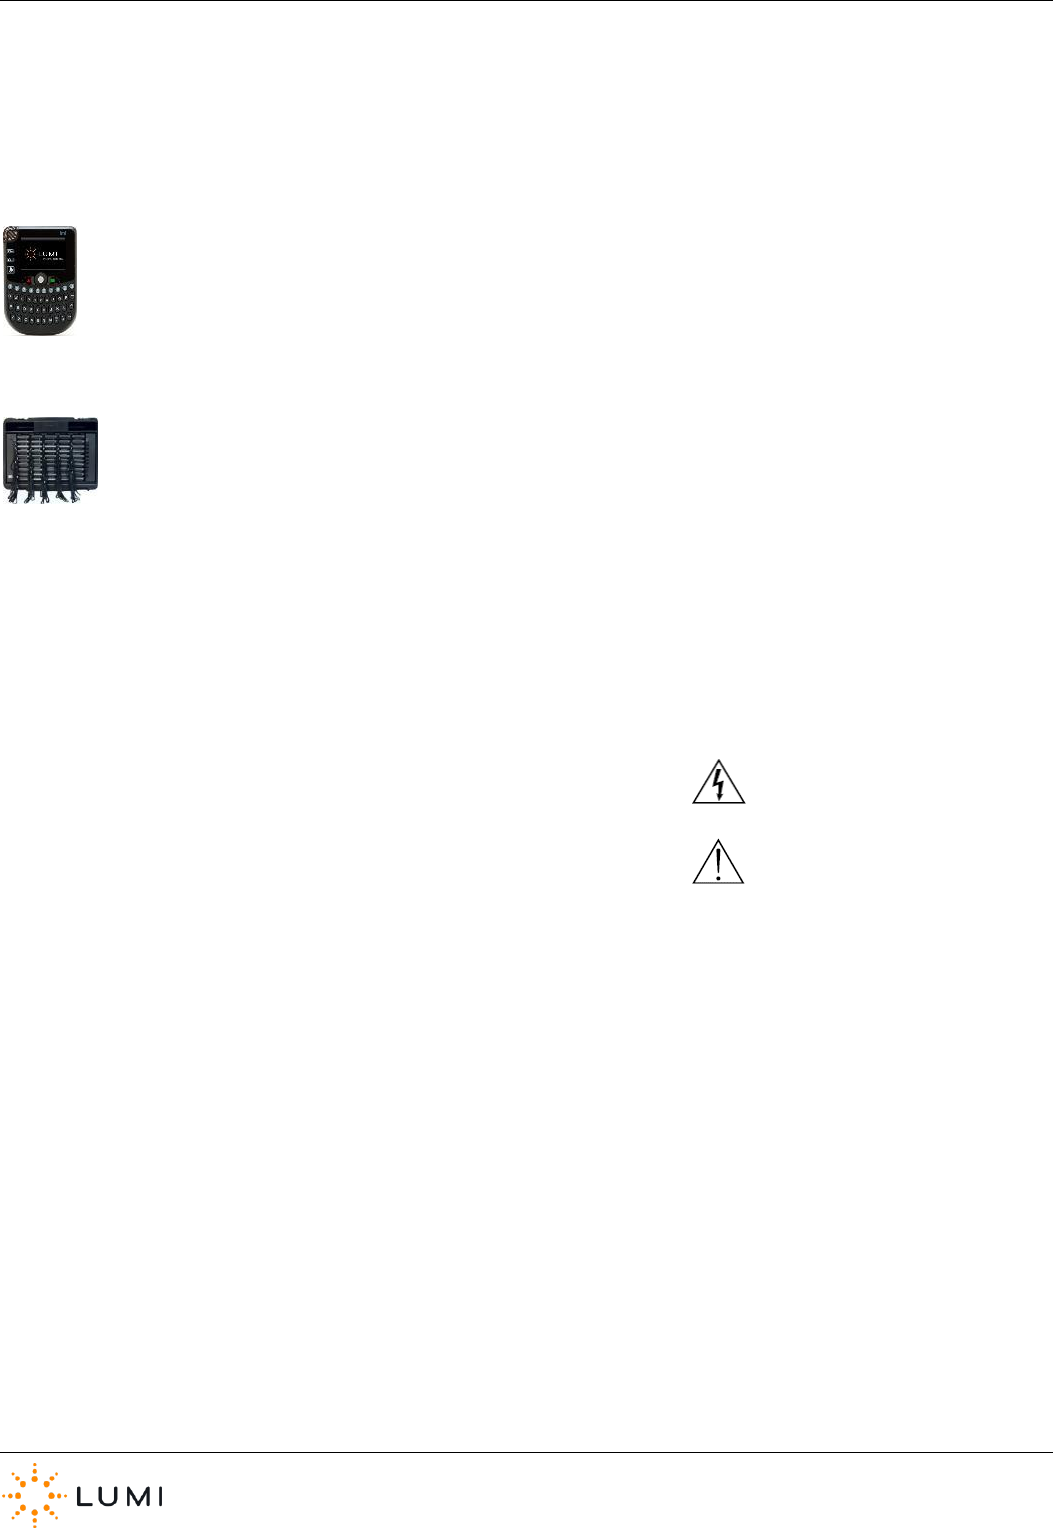
› This symbol indicates that dangerous voltage constituting a risk of
electric shock is present within this unit.
› This symbol indicates that there are important operating and
maintenance instructions in the literature accompanying this unit.
Maintenance
IML Connector Devices:
› Do not attempt to disassemble or open covers of this unit, nor attempt to service the product (which may void the user’s authority to
operate it). Contact qualified Lumi service personnel under the following conditions:
a) If liquid has been spilled into the product.
b) If the product has been exposed to rain or water.
c) If the product does not operate normally when the operating
instructions are followed.
d) If the product has been dropped or the casing has been damaged.
e) If the product exhibits a distinct change in performance.

IML Connector
Page 41
IML Multidock:
› This product contains mains voltages. Do not attempt to disassemble or open covers of this unit, nor attempt to service the product
(which may void the user’s authority to operate it). Contact qualified Lumi service personnel under the following conditions:
a) If the power cord or plug is damaged or frayed.
b) If liquid has been spilled into the product.
c) If the product has been exposed to rain or water.
d) If the product does not operate normally when the operating
instructions are followed.
e) If the product has been dropped or the cabinet has been damaged.
f) If the product exhibits a distinct change in performance.
Battery Safety…
The IML Connector device contains a lithium-ion battery that must be disposed of properly. Please contact Lumi for
information about recycling and proper disposal. The battery in an IML Connector device should only be replaced by
an authorised service provider.
Compliance
Disposal…
In some regions, the disposal of certain electronic devices is regulated. Users must ensure to dispose of or recycle the IML Connector System
in accordance with local laws and regulations.
IML Ltd is registered with WEEE compliance schemes in various countries.
End-of life products can often be disposed of free of charge at local municipal collection points. For more information about where to drop off
waste equipment for recycling, please contact a local city office, waste authority, approved WEEE scheme or household waste disposal service.
The symbol on the left (a crossed out, wheeled bin) indicates that a product is not to be disposed of with regular
household waste. By not discarding the product along with other household waste, the volume of waste sent to
incinerators or landfills will be reduced and natural resources will be conserved.

IML Connector
Page 42
FCC Class A Statement…
Caution: Changes or modifications not expressly approved by the party responsible for compliance could void the user’s authority to operate the equipment.
FCC ID RJO-IML-CONN1
This device complies with Part 15 of the FCC Rules. Operation is subject to the following two conditions:
1. This device may not cause harmful interference.
2. This device must accept any interference received, including interference
that may cause undesired operation.
Note: This equipment has been tested and found to comply with the limits for a Class A digital device, pursuant to Part 15 of the FCC Rules. These limits are
designed to provide reasonable protection against harmful interference when the equipment is operated in a commercial environment. This equipment
generates, uses, and can radiate radio frequency energy, and if it is not installed and used in accordance with the instruction manual, it may cause harmful
interference to radio communications. Operation of this equipment in a residential area is likely to cause harmful interference. If this equipment does cause
harmful interference to radio or television reception, which can be determined by turning the equipment off and on, the user is encouraged to try to correct the
interference by one or more of the following measures:
Reorient or relocate the receiving antenna
Increase the separation between the equipment and receiver
Connect the equipment into an outlet on a circuit different from that to which the receiver is connected
Consult the dealer or an experienced radio/television technician for help
IMPORTANT NOTE: Federal Communications Commission (FCC) Radiation Exposure Statement
This equipment complies with FCC radiation exposure limits for an uncontrolled environment.
Industry Canada (IC) Statement…
This device complies with RSS-247 of the Industry Canada Rules. Operation is subject to the following two conditions:
1 This device may not cause harmful interference
2 This device must accept any interference received, including interference
that may cause undesired operation.
Ce dispositif est conforme à la norme CNR-247 d'Industrie Canada applicable aux appareils radio exempts de licence. Son fonctionnement est sujet aux deux
conditions suivantes:
1. le dispositif ne doit pas produire de brouillage préjudiciable
2. ce dispositif doit accepter tout brouillage reçu, y compris un brouillage
susceptible de provoquer un fonctionnement indésirable.
IMPORTANT NOTE: (For mobile device use)
Radiation Exposure Statement:
This equipment complies with IC radiation exposure limits set forth for an uncontrolled environment. This equipment should be installed and operated
handheld with minimum distance of 25mm between the unit & your face.
NOTE IMPORTANTE: (Pour l'utilisation de dispositifs mobiles)
Déclaration d'exposition aux radiations:
Cet équipement est conforme aux limites d'exposition au rayonnement du IC établies pour un environnement non contrôlé. Cet équipement doit être installé et
utilisé manuellement avec une distance minimale de 25 mm entre l'unité et votre visage.
IML Connector
Page 44
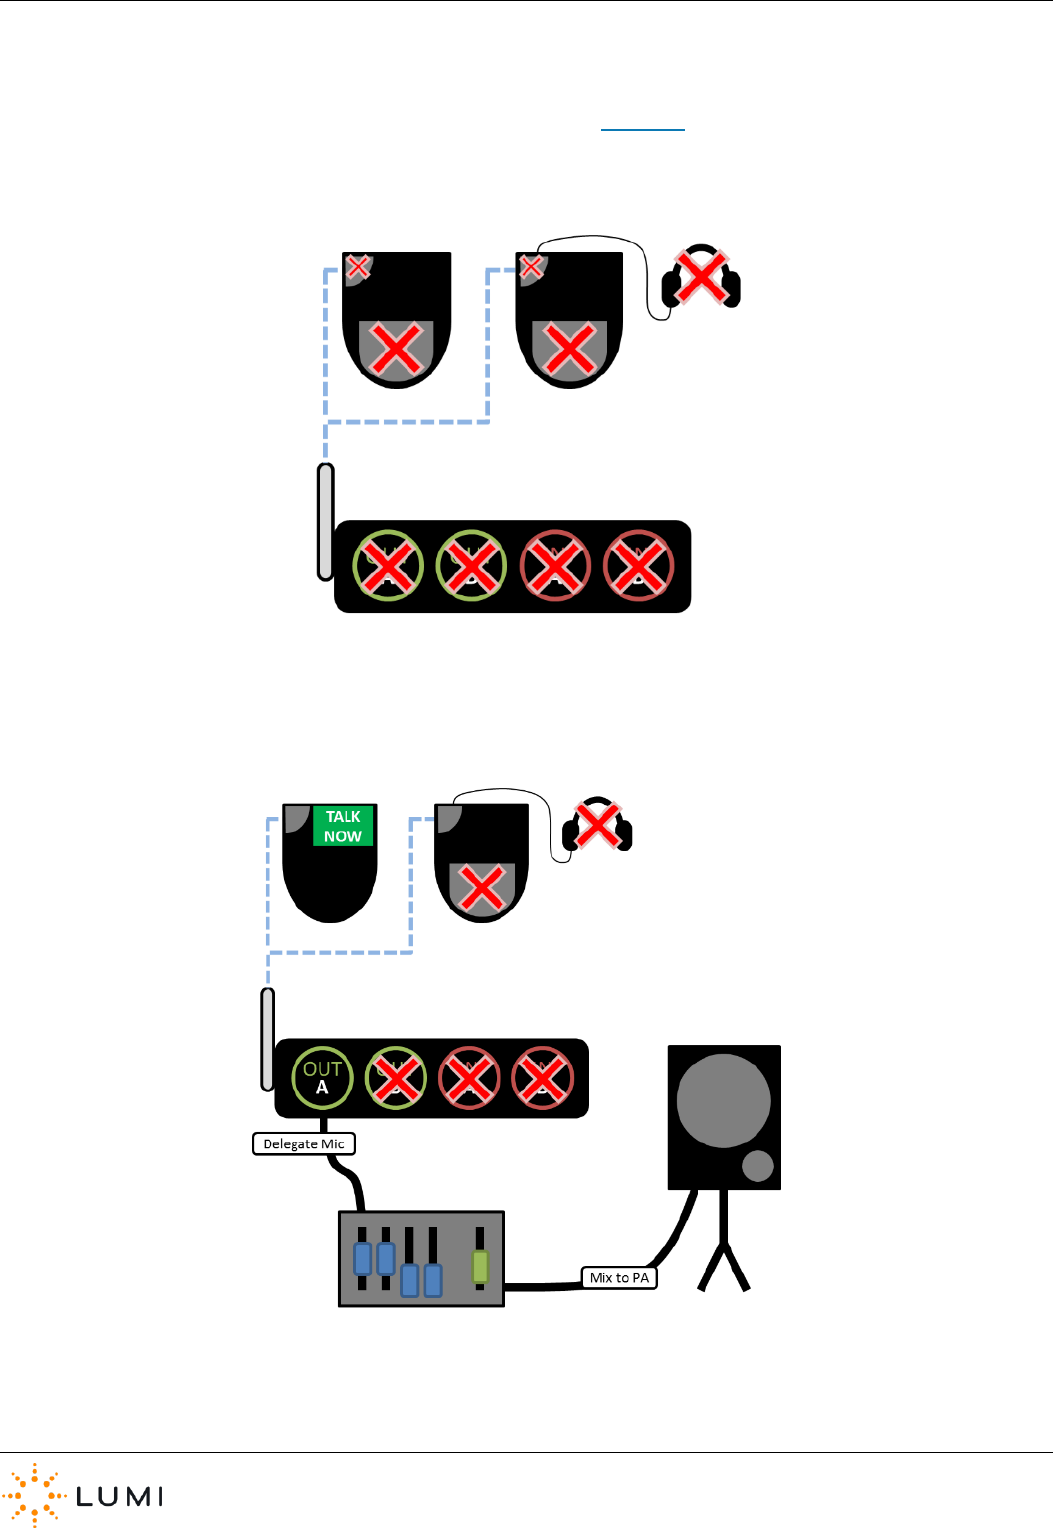
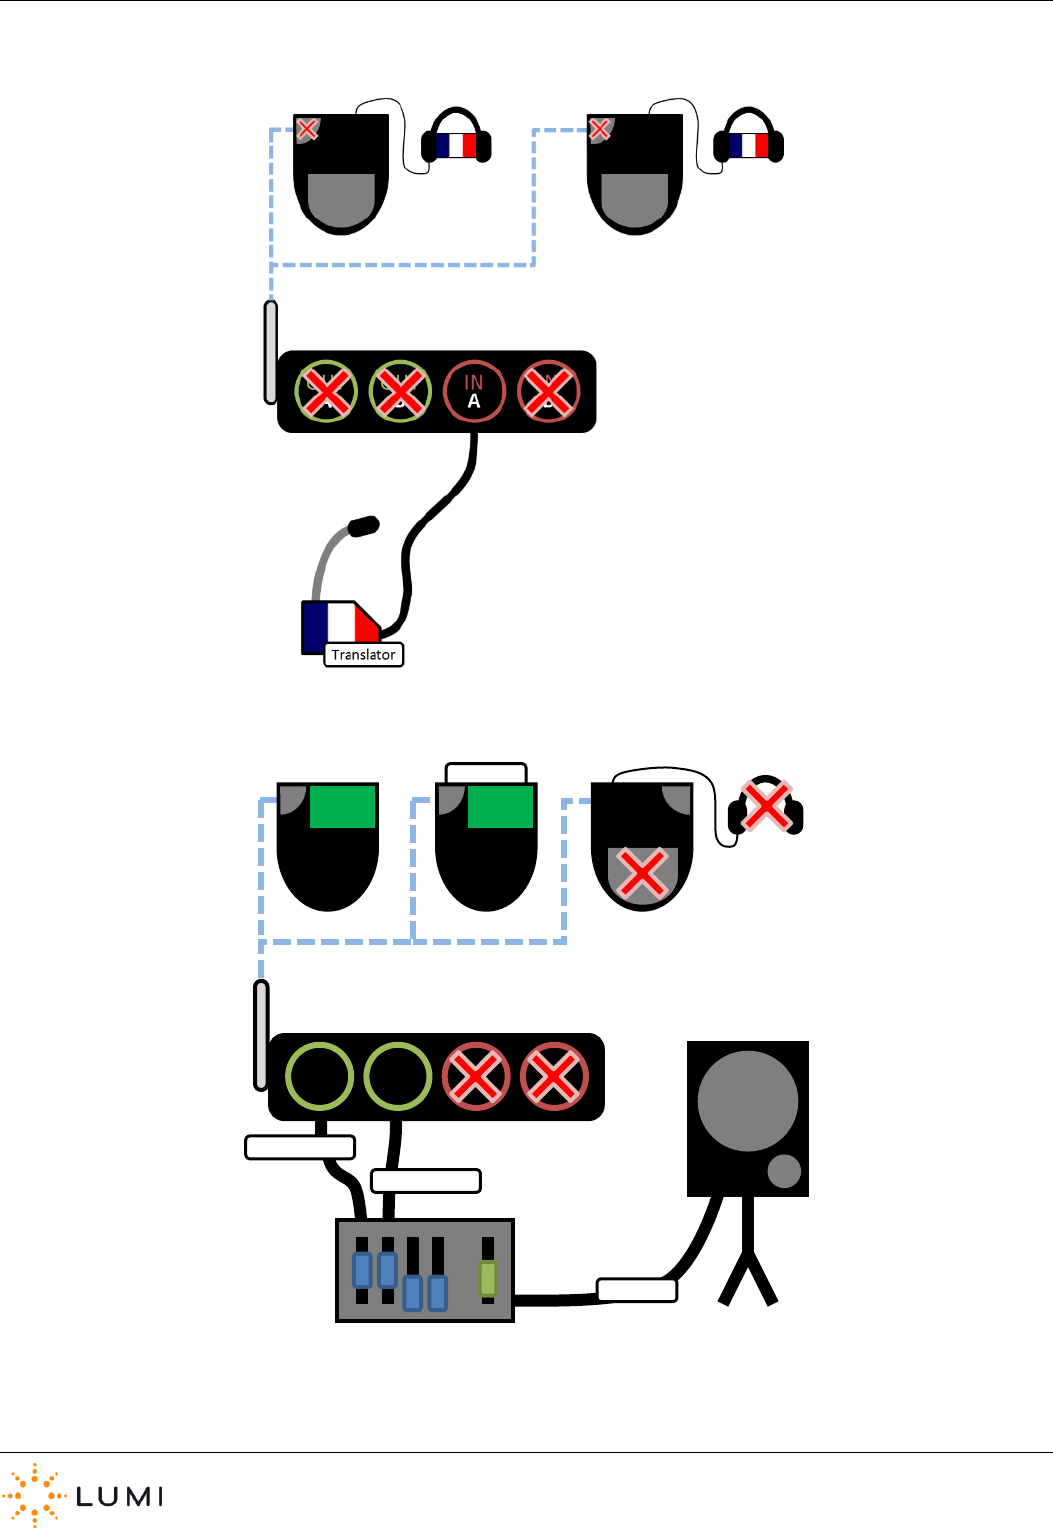
FIGURE 3: SINGLE INPUT
FIGURE 4: DUAL OUTPUT
Facilitat
O
UT
A
O
UT
B
IN
A
IN
B
TAL
K
TAL
K
Facilitator
Delegate
Mix to
IML Connector
Page 45
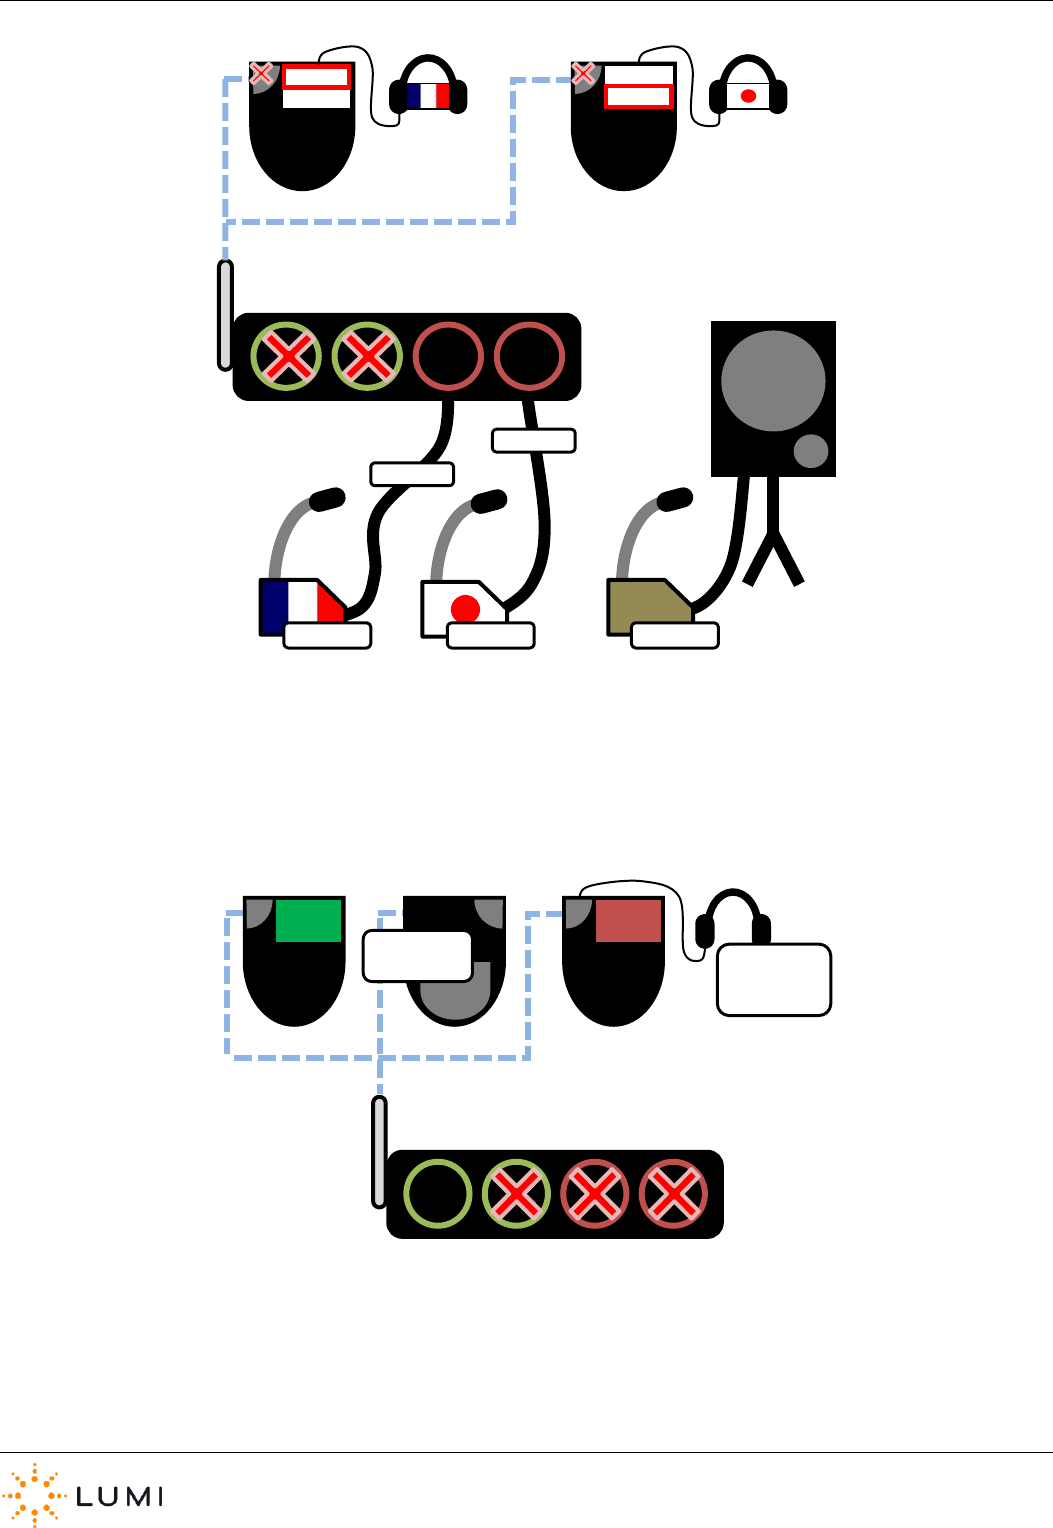
FIGURE 5: DUAL INPUT
FIGURE 6: LOOPBACK
O
UT
A
O
UT
B
IN
A
IN
B
Stream
Stream
Stream
1
Stream
1
Translat
or
Translat
or
Chairma
n
O
UT
A
O
UT
B
IN
A
IN
B
TAL
K
MI
C
Delegate
Mic to
Delegate
Mic to
Headphon
IML Connector
Page 46
FIGURE 7: PASS THROUGH
TAL
K
MI
C
Delegate &
Chairman
Mix to
Delegate &
Chairman
Mix to
O
UT
A
O
UT
B
IN
A
IN
B
Delegat
Mix to
Chairma
Mix to
IML Connector
Page 47
Appendix B: Hotkeys
See below for a complete list of the IML Connector device Hotkeys. These open various menus or display diagnostic information
on the device and are accessed by pressing and holding the and buttons together, followed by the Hotkey letter as
listed below.
› Once a Hotkey has been entered into an IML
Connector device, users will have to input the admin
password “gaffer” and press OK.
› Where applicable, users can exit a menu by pressing
Back.
Please note that these menus can also be accessed on an IML Connector Powered Base Station…
› X Power off Turns the device off.
› P Power/Battery levels Provides additional information relating to the battery life and capacity
Estimated time remaining can also be seen.
› N Network settings Enables user to manually change the network settings on the device.
› S Performance statistics Displays live information in regard to the radio signal. This is a useful tool
for determining the strength of connection and is especially key when using
microphones. Offers a Quality of Service (QoS) reading for audio channels.
› L Language settings Depending on the device configuration, participants can choose a language
(i.e. the device display language, not the audio channel). Whether the Display
Language setting is enabled or not in the configuration file, this Hotkey
will always access the Current Language menu.
› C Utility card tool To create utility cards and view information on a smartcard that is currently
inserted into the device.
› V Version Displays IML Connector device firmware and software details.
› G Show log Displays a log of the IML Connector device’s activity.
To avoid having to type the admin password
into the Connector, create an Admin Utility
Card.
Reminder

IML Connector
Page 48
Appendix C: Glossary of Terms
A/B USB cable
Common USB data connection for devices to connect to a PC.
Accelerometer
Device which measures acceleration, usually associated with detecting movement of the IML Connector device.
Alarm
Proximity alarm on each IML Connector device which can be enabled to activate shortly after once the device has
disconnected frin the Base Station (i.e. goes out of range).
Attendance Tracking
Feature which marks participants as present once they have inserted the IML Smartcard into an IML Connector. Time
period can be set by the operator.
Application
The term used for a software program, which can [usually] be installed and/or run from a PC.
Audio Routing
An audio configuration which provides for multiple scenarios and various levels of audio use.
Bandwidth
Rate of data transfer, bit rate or throughput.
Base Station
IML Connector handset which connects to the PC and communicates wirelessly with other IML Connector devices.
Battery
Hardware device which converts chemical energy into electrical energy. Each IML Connector device contain a
rechargeable Lithium Ion battery.
Boot Up
The period of time whilst a device is turning on initialising before it can be used.
Configuration File
Programmable file which is deployed to IML Connector devices and manages settings such as power, language and
customisable content.
Control PC
Term used for the PC which is used to connect a Base Station to and control IML Connector devices. Lumi applications
installed and used on the PC control this.
Countdown Clock
Timer used to show audience when vote is open and how long remaining.
Custom Screen
A customisable screen which is included in the IML Connector configuration file. Can usually be accessed by
participants or displayed on devices by the operator.
Daisy Chain
Term used when devices are connected to each other in linear formation, as opposed to in a star.
Default Network
User Driven Roaming, the network appearing at the top of the list, which an IML Connector device connects to if
restarted. Can’t be secured with a password.
Delegate Mic
The standard microphone functionality available on the IML Connector device.
Deploy
To ‘burn’ or copy a configuration file onto an IML Connector device
Display screen
Electronic visual display device built into each IML Connector.
Docked
Term used to indicate that an IML Connector device is inserted into the docking device.
Docking device
IML Multidock or IML Minidock, hardware for storing, charging or connecting IML Connector devices to a PC.
Dongle
Small piece of hardware which attaches to a PC (usually by USB). Term commonly used for a Lumi USB HASP licence.
Drivers
Configuration files needed for a PC to communicate with hardware.

IML Connector
Page 49
Facilitator Mic
An additional micrphone in an IML Connector system which is provided by inserting a utilty card.
Firmware
A software program or set of instructions programmed on a hardware device.
Gigabyte (GB)
A multiple of the ‘byte’ digital data storage unit (1 GB = 1,024 Megabytes)
Global
If referring to a setting or action, implies all IML Connector devices will be affected.
Handset
Alternative term for an IML Connector device, or keypad.
Hardware
Collection of physical components which comprise a system.
Headphones
Small pair of loudspeakers designed to be held in place close to a user’s ears. Third party audio hardware which can be
connected to an IML Connector device.
Hirose
Data connection type built into each IML Connector device.
Home Screen
Default screen displayed on the IML Connector device during perios of no use or activity.
Hotkey
Button(s) used to quickly access a menu or setting on the IML Connector device.
IEC
International Electrotechnical Commission, a standard of common, three-pin power connection.
IML Connector
Configuration Tool
Application to create and deploy configuration files to IML Connector devices.
IML Connector device
An IML Connector wireless handset, or keypad
IML Connector System
The IML hardware and Lumi software system as a whole, usually including the control PC, all IML Connector devices
and a Base Station.
IML Connector System
Manager
Application to monitor and control the IML Connector System
IML Minidock
Docking device for up to 10 IML Connector devices. Provides charging and USB connectvity.
IML Multidock
Docking device for up to 50 IML Connector devices. Provides charging and USB connectvity. IML Multidocks can be
‘daisy-chained’ by up to four devices for power or data connections.
IML Smartcard
Chip card which can be programmed to identify participants or carry out administrator tasks on IML Connector devices.
Index Number
Programmable number on each IML Connector device used for identification purposes.
Keypad
Alternative term for an IML Connector device, or handset. Can also refer to the actual keyboard and buttons on the
front of the IML Connector device.
Latch
Microphone mode where the Microphone key is pressed once to open and again to close the microphone.
LED
A Light-Emitting Diode is a [usually] small, low energy, light source.
Licence
End user licence for Lumi software and hardware, provided via use of a USB HASP licensing ‘dongle’.
Light sensor
Hardware on the front of the IMl Connector device which can be configured for IML Connector devices to use and set
optimum screen brightness.

IML Connector
Page 50
Link Screen
Additional cutsom screen which can be set to always appear as the top of the IML Connector device’s on-screen menu.
Localisation
Translation of device display when a user selects a language.
Loudspeaker
Audio hardware that produces sound in response to an electrical signal input.
Lumi Audience Display
Lumi display application working in conjunction with Lumi Text Vote Talk.
Lumi Hub
Platform of Lumi software which performs core communication between control PC and connected devices.
Lumi Message
Lumi text message display application working in conjunction with Lumi Text Vote Talk.
Lumi Queue
Lumi application working in conjunction with Lumi Text Vote Talk to provide speaker queueing.
Lumi Text Vote Talk
Lumi application which provides for text message management, microphone use (including speaker queueing) and ad-
hoc voting.
Lumi ViewPoint
Lumi voting plug in for Microsoft PowerPoint.
Microphone
Audio hardware that converts sounds in to an electrical signal (i.e. for recording or amplification).
Microphone key
Button on the IML Connector device to open and/or close the built in microphone. Also used for certain administrative
functions.
Network ID
A value that determines a discreet network between an IML Connector Base Station and the IML Connector devices.
Network Screen
An administrator screen on the IML Connector device displaying various ‘network’ and radio settings.
Operator
A system user of Lumi software applications, controlling the IML Connector devices.
Over Radio
Wirelessly, using the radio network connection
PA System
Public Address system, usually comprises a microphone and amplified loudspeakers and the ability to connect other
audio sources.
PC
A Personal Computer (PC) is a general-purpose computer, whose size, capabilities and price makes it useful for
individuals, and is intended to be operated directly by an end-user with no intervening computer operator
Power State
Term used for the power mode a docking device can be set to.
Projector
Optical device which projects an image onto a surface.
Push To Talk (PTT)
Microphone mode where the Microphone Key must be pressed down to open the microphone.
Queue Line
A topic, motion, subject, etc. which a participant can join, indicating they wish to talk around.
QWERTY
Most common modern-day keyboard layout for Latin script.
Radio
Wireless transmission of electromagnetic signals through space.
Radio Sequence
A number used which specifies either an area of the 2.4 GHz radio spectrum for the IML Connector system to use
and/or a unique hopping pattern within that specific area.
Register
Lumi application integrated into a number of products which allows for identifying of participants via several methods.

IML Connector
Page 51
Rumbler
Vibrate functionality on the IML Connector device which can be used to notify or alert and attendee.
Simultaneous
Interpretation (SI)
Instant translation of conference audio into another language and provided to participants, usually through
headphones.
Smartcard reader/writer
Hardware built into the top of each IML Connector device used to read and/or write data to compatible chip cards.
Soft keys
The green square and red triangle buttons on the IML Connector device, which have different functions depending on
how the system is in use.
Software
Non tangible components installed on computers.
Speaker Queue
A list or queue which particpants join using their IML Connector device, indicating their desire to speak during a
meeting/event.
Status bar
The upper bar on an IML Connector device display, used to display IML Smartcard information (when inserted) and
other messages to attendees (for example microphone availability or instructions)
Status LED
LED on the front of the IML Connector device used to indicate power, battery or charge level, connectivity, signal
strength and other system functions.
Tally light
Additional LED on the reverse of the IML Connector device used to show if a participant is in an audio queue or if their
microphone is open.
Trackball
Pointing device using the ball on the IML Connector, which can also be used to select by pressing in.
User Driven Roaming
Participant ability to select which network to connect to on their IML Connector device.
UID
Universal ID (Identification). Term used for the serial number of hardware (IML Connector devices, Powered Base
Stations or smartcards)
USB
Universal Serial Bus, data connection technology for connecting devices to a PC via cable.
Utility Card
An IML Smartcard which has been programmed to carry out certain functions on the IML Connector device when
inserted.
WiFi
Local area wireless technology.
XLR
An electrical connector commonly used in audio equipment.

IML Connector
Page 52
Notes

IML Connector
Page 53
Notes

IML Connector
Page 54
Notes
