Lutron Electronics 0035 Lighting Control Transceiver User Manual 043 118a
Lutron Electronics Company Inc Lighting Control Transceiver 043 118a
Users Manual
Please Read Before Installing
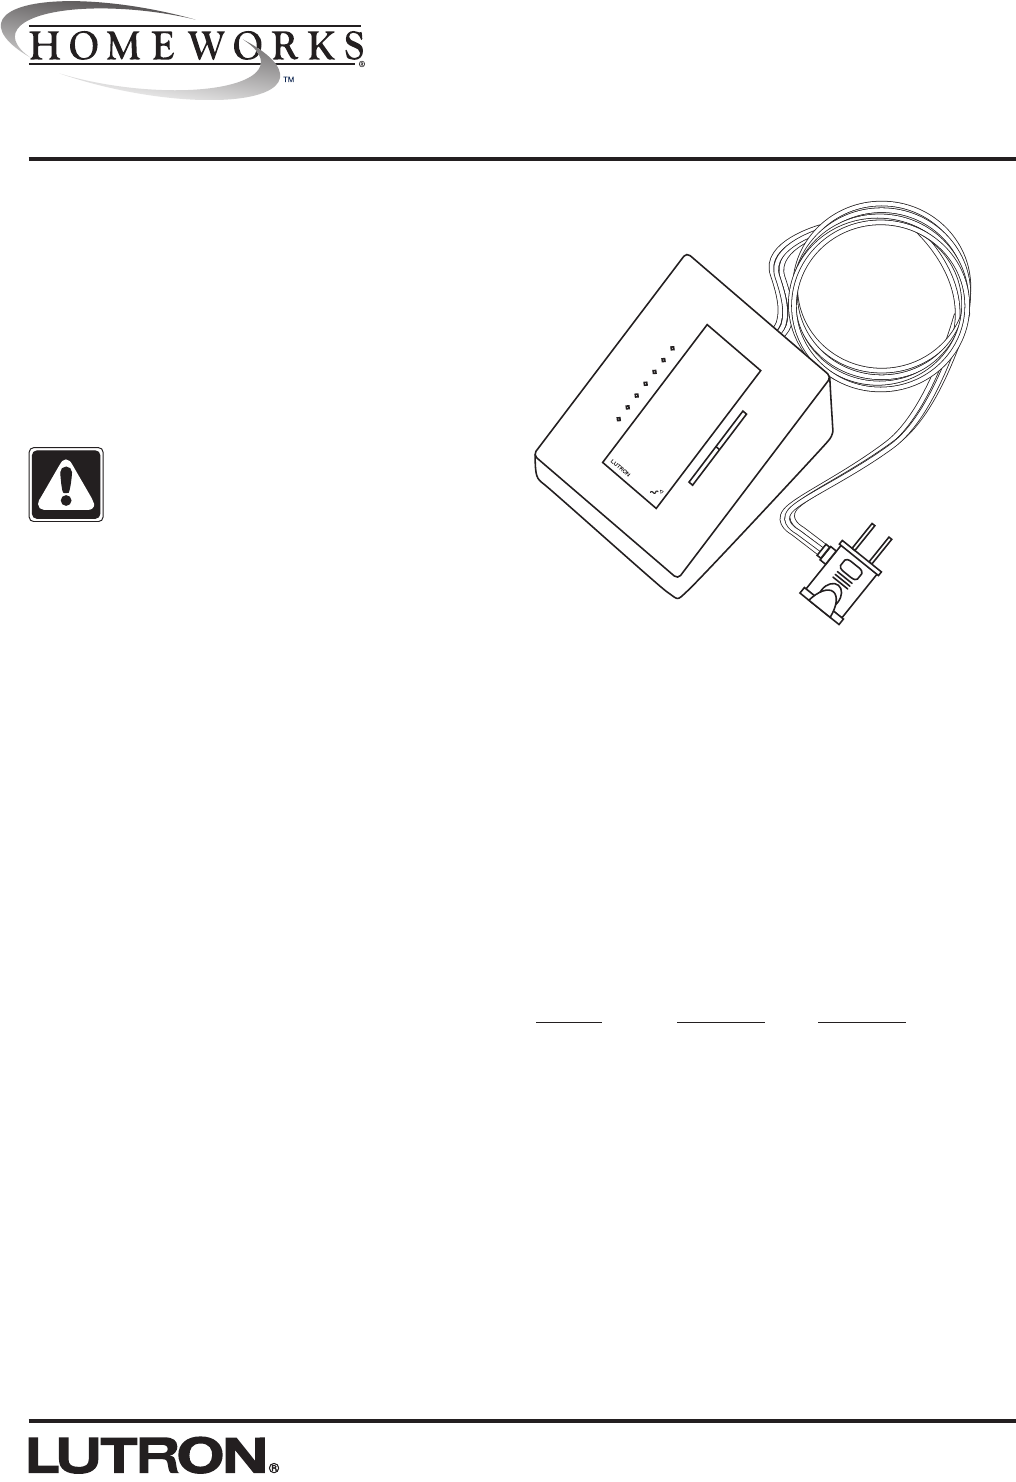
RF Lamp Dimmer
HRT-3LD
120/127 V~, 50/60 Hz
Installation Instructions
Overview
The HRT-3LD RF Lamp Dimmers are for use with
HomeWorks systems. The dimmer is used to provide
local control of table and floor lamps and integrate them
into the HomeWorks system.
HRT-3LD
Important Notes
Codes: Install in accordance with all local and national
electrical codes.
Danger: The Lamp Dimmer must not be used
to control equipment which is not visible from
every control location. It must also not be used
to control equipment which could create haz-
ardous situations such as entrapment if operated acci-
dentally. Examples of such equipment which must not be
operated by the Lamp Dimmer include (but are not limit-
ed to) motorized gates, garage doors, industrial doors,
microwave ovens, heating pads, etc. It is the installer’s
responsibility to ensure that the equipment being con-
trolled is visible from every control location and that only
suitable equipment is connected to the Lamp Dimmer.
Overheat Damage: To reduce the risk of overheating
and possibly damaging other equipment, do not install
to control motor-operated appliances, transformer-sup-
plied appliances, or other non-lighting loads.
Environment: Ambient operating temperature:
0-40°C, 32-104°F, 0-90% humidity, non-condensing.
Indoor use only. It is normal for a Lamp Dimmer to feel
warm to the touch during operation.
Lamp Type: Lamp Dimmers are designed for use with
incandescent, magnetic low-voltage, and tungsten halo-
gen lamps only. Do not use to control fluorescent lamps,
touch lamps, or lamps with an integral dimmer. For
lamps with integral 3-way switches, the switch should be
set to full on. Lamp Dimmers may not work with dioded
lamps (Sylvania Designer 16TM or Philips PAR-16TM).
Low-Voltage Applications: Use Lamp Dimmers with
magnetic (core and coil) low-voltage lamps only. Not for
use with electronic (solid-state) low-voltage transformers.
Operation of a low-voltage circuit with lamps inoperative
or removed may result in transformer overheating and
premature failure. Lutron strongly recommends the fol-
lowing:
a. Do not operate low-voltage circuits without operative
lamps in place.
1
b. Replace burned-out lamps as quickly as possible.
c. Use transformers that incorporate thermal protection or
fused transformer primary windings to prevent trans-
former failure due to overcurrent.
Load Specifications:
Control Min. Load Max. Load
HRT-3LD 10 W/VA 300 W/VA
Cleaning: To clean, wipe with a clean damp cloth. DO
NOT use any chemical cleaning solutions.
Cordset: Cordset length is 6 ft. (1.8m).
RF Device Placement: RF Lamp Dimmers must be
located within 30 ft. (9m) of an RF Signal Repeater or an
RF Processor.
Setup: RF Lamp Dimmers cannot be controlled by the
system until they are addressed and programmed. See
the HomeWorks Utility online help.
2
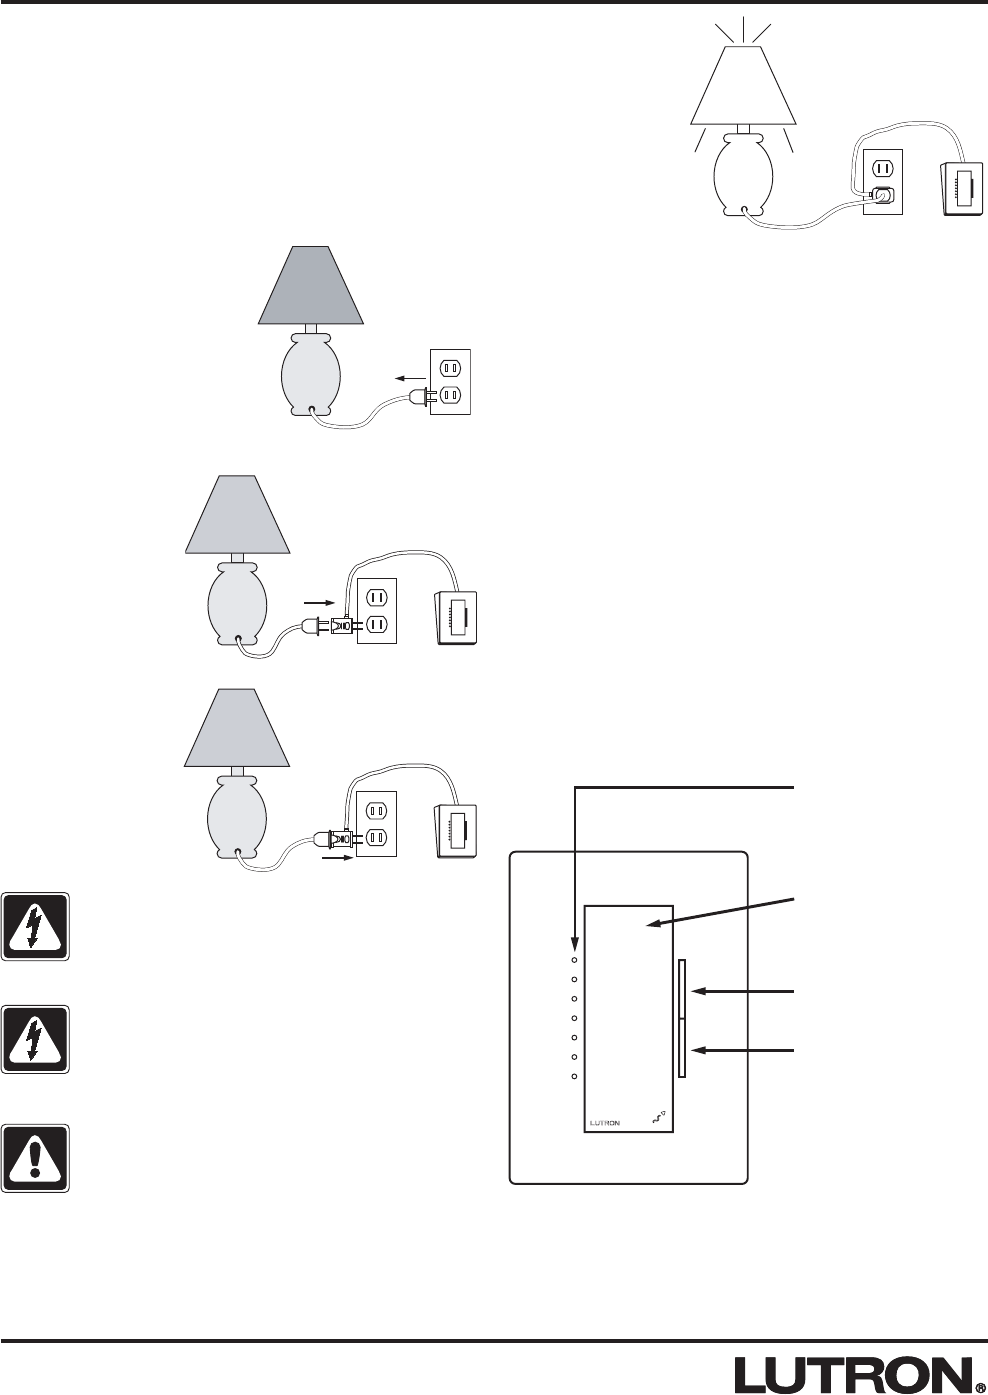
Status LEDs
Indicate light level;
glow softly as night
light when lamp is off
1. Find a suitable location for the Lamp Dimmer. Place
the Lamp Dimmer in a convenient and accessible
location.
Note: Lamp Dimmer must be located within 30 feet of
an RF Signal Repeater or an RF Processor.
2. Turn OFF lamp and
unplug lamp cord from
receptacle.
3. Plug lamp cord
into back of Lamp
Dimmer plug.
4. Plug Lamp
Dimmer into any
standard wall out-
let.
DANGER: To avoid risk of electrical shock, do
not open, cut cord or rewire the Lamp Dimmer.
DANGER: Unplug Lamp Dimmer when chang-
ing light bulbs.
CAUTION: This is a POLARIZED cord set. It
has a polarized plug (one blade is wider than
the other). The polarized plug is not intended to
be mated with nonpolarized outlets (having both
slots the same size). A polarized outlet is intend-
ed to mate with a polarized plug in only one way
(the longer slot with the wider blade).
Installation
Local Operation
Tapswitch
Tap on/off
Dimming Rocker
Press to Brighten
Press to Dim
5. Turn lamp switch
ON and operate
Lamp Dimmer.
Pressing the Tapswitch on the Lamp Dimmer will alter-
nately turn the lights ON and OFF.
The ON level will be the level previously set using the
Dimming Rocker to the right of the Tapswitch. The LED
that is glowing slightly brighter than the others indicates
the level to which the lights will turn ON. Press and hold
the top or bottom of the Dimming Rocker to raise or
lower the light level. Double-tapping the Tapswitch will
turn the lights ON to full. Pressing and holding the
Tapswitch for 1/2 second (while ON) activates a 10-sec-
ond long fade-to-off.

3
Setting High /Low-End Trim
High/Low-End levels may be adjusted with the following
procedure:
a. Press the Dimming Rocker to set the dimmer to the
desired new High/Low-End level (>50% for high-end,
<50% for low-end), and then turn OFF. Note: Middle
LED cannot be used for High-End or Low-End set-
tings.
b. While pressing and holding the Tapswitch:
1. The dimmer will turn ON to its preset level,
2. The preset LED will light,
3. After 10 seconds, the load will turn OFF and then
back ON,
4. The preset LED will begin to flash quickly (for two
seconds).
c. While the LED is flashing, release the Tapswitch. The
LED will remain ON and the dimmer will be at its pre-
set level. The High/Low-End value has been changed.
High/Low-End levels may be restored to their factory
default setting with the following procedure:
a. Press the Dimming Rocker to set the dimmer to >50%
to reset high-end, or to <50% to reset low-end, and
then turn OFF.
b. While pressing and holding the Tapswitch:
1. The dimmer will turn ON to its preset level,
2. The preset LED will light,
3. After 10 seconds, the load will turn OFF and then
back ON,
4. The preset LED will begin to flash quickly (for two
seconds) and then turn OFF. Continue holding the
Tapswitch for at least six seconds after the LED
stops flashing.
c. The load will turn OFF then back ON to its preset
level. The preset LED will flash (for two seconds) and
then remain ON. The default High or Low-End value
has been restored.

Lutron Electronics Co., Inc.
7200 Suter Road
Coopersburg, PA 18036-1299
Made and printed in the U.S.A. 02/03 P/N 043-118 Rev. A
LIMITED WARRANTY
Lutron will, at its option, repair or replace any unit that is defective in materials or manufac-
ture within two years after purchase. For warranty service, return unit to place of purchase or
mail to Lutron at 7200 Suter Rd., Coopersburg, PA 18036-1299, postage pre-paid. Telephone
the Lutron Technical Support Center toll free at 800-523-9466. After the two year period, a
pro-rated warranty applies to this product until eight years after the purchase. For more infor-
mation regarding this warranty contact your Lutron representative.
THIS WARRANTY IS IN LIEU OF ALL OTHER EXPRESS WARRANTIES, AND THE
IMPLIED WARRANTY OF MERCHANTABILITY IS LIMITED TO TWO YEARS FROM PUR-
CHASE. THIS WARRANTY DOES NOT COVER THE COST OF INSTALLATION,
REMOVAL OR REINSTALLATION, OR DAMAGE RESULTING FROM MISUSE, ABUSE,
OR IMPROPER OR INCORRECT REPAIR, OR DAMAGE FROM IMPROPER WIRING OR
INSTALLATION. THIS WARRANTY DOES NOT COVER INCIDENTAL OR CONSEQUEN-
TIAL DAMAGES. LUTRON’S LIABILITY ON ANY CLAIM FOR DAMAGES ARISING OUT
OF OR IN CONNECTION WITH THE MANUFACTURE, SALE, INSTALLATION, DELIVERY,
OR USE OF THE UNIT SHALL NEVER EXCEED THE PURCHASE PRICE OF THE UNIT.
This warranty gives you specific legal rights, and you may also have other rights which vary
from state to state. Some states do not allow limitations on how long an implied warranty lasts,
so the above limitation may not apply to you. Some states do not allow the exclusion or limi-
tation of incidental or consequential damages, so the above limitation or exclusion may not
apply to you.
This product may be covered by one or more of the following U.S. patents: 4,835,343;
4,889,999; 5,170,068; 5,237,207; 5,248,919; 5,399,940; 5,637,930; 5,736,965; 5,798,581;
5,848,054; 5,905,422;5,982,103; D353,798; D439,220 and corresponding foreign patents.
U.S. and foreign patents pending. Lutron and HomeWorks are registered trademarks and the
HomeWorks Logo is a trademark of Lutron Electronics Co., Inc.
© 2003 Lutron Electronics Co., Inc.
Technical and Sales Assistance
If you need assistance, call the toll-free Lutron
Technical Support Center. Please provide exact
model number when calling.
(800) 523-9466 (U.S.A., Canada and the Caribbean)
Other countries call:
Tel: (610) 282-3800
Fax: (610) 282-3090
Visit our Web site at www.lutron.com
FCC Information
Note: This equipment has been tested and found to comply with the limits for a Class B digi-
tal device, pursuant to Part 15 of the FCC rules. These limits are designed to provide rea-
sonable protection against harmful interference in a residential installation. This equipment
generates, uses and can radiate radio frequency energy and, if not installed in accordance
with the instructions, may cause harmful interference to radio communications. However,
there is no guarantee that interference will not occur in a particular installation. If this equip-
ment does cause harmful interference to radio or television reception, which can be deter-
mined by turning the equipment off and on, the user is encouraged to try to correct the inter-
ference by one or more of the following measures:
• Reorient or relocate the receiving antenna.
• Increase the seperation between the equipment and receiver.
• Connect the equipment into an outlet on a circuit different from that to which the
receiver is connected.
• Consult the dealer or an experienced radio/TV technician for help.
Caution: Changes or modifications not expressly approved by Lutron Electronics Co. could
void the user’s authority to operate this equipment.
Industry Canada Information
The term “IC:” before the radio certification number only signifies that Industry Canada tech-
nical specifications were met.
Troubleshooting Guide
Symptom Cause and Action
Light bulb(s) are burned out.
• Replace light bulb(s).
Switch on lamp turned OFF.
• Turn lamp switch ON.
Light bulbs are dioded.
• If dioded light bulbs (Sylvania Designer 16TM or Philips PAR-
16TM) are being used, replace with non-dioded light bulbs.
Breaker is OFF.
• Turn breaker ON.
Cord is not plugged in.
• Plug in cord.
Lamp has an integral dimmer.
• Use a lamp without an integral dimmer.
Lamp 3-way switch not set to full.
• Turn lamp 3-way switch to full.
Solid-state control dissipation
• Solid-state dimmers internally dissipate about 2% of the total
connected load. It is normal for dimmers to feel warm to the
touch during operation.
Improper programming
• Check programming in the HomeWorks Utility.
Out of RF range
• Reposition RF Signal Repeater or RF Processor to be within
30 feet (9m) of control.
Light does not turn ON, but LEDs on Lamp Dimmer are ON.
Light does not turn ON, and LEDs on Lamp Dimmer are OFF.
Lamp Dimmer does not dim properly or lights flicker.
Lamp Dimmer is warm.
Lights don’t turn ON/OFF from Keypad.