MAD Gaze VADERA100 AR Smart Glass User Manual Users manual
MAD Gaze Limited AR Smart Glass Users manual
MAD Gaze >
Users manual
LET’S GET STARTED
www.madgaze.com
VADER USE GUIDELINES
MADGazeVader_V6.2.indd2 18/5/20186:26PM

ENGLISH
ENGLISH
简体中文
简体中文
繁體中文
繁體中文
Table of Contents
Package Overview ................................................................................................................................................................ 1
Hardware Specification ....................................................................................................................................................... 3
Mechanism .......................................................................................................................................................................... 4
Start Using .......................................................................................................................................................................... 8
Wearing Vader ..................................................................................................................................................................... 9
Adjusting Nose Pad ........................................................................................................................................................... 10
Adjusting Ear Hooks .......................................................................................................................................................... 12
Adjusting Display Distance ................................................................................................................................................ 14
Using Corrective Lenses .................................................................................................................................................... 15
General Controls ............................................................................................................................................................... 16
MAD Gaze Connector ........................................................................................................................................................ 21
Switching To 3D Mode ....................................................................................................................................................... 22
Warranty ........................................................................................................................................................................... 23
Limited Warranty ............................................................................................................................................................... 24
Cautions ............................................................................................................................................................................ 25
MADGazeVader_V6.2.indd4 18/5/20186:26PM
1 2
ENGLISH
ENGLISH
简体中文
简体中文
繁體中文
繁體中文
Please use only MAD Gaze approved accessories. The use of unapproved accessories may cause performance problems
and failures, which are not covered by the warranty.
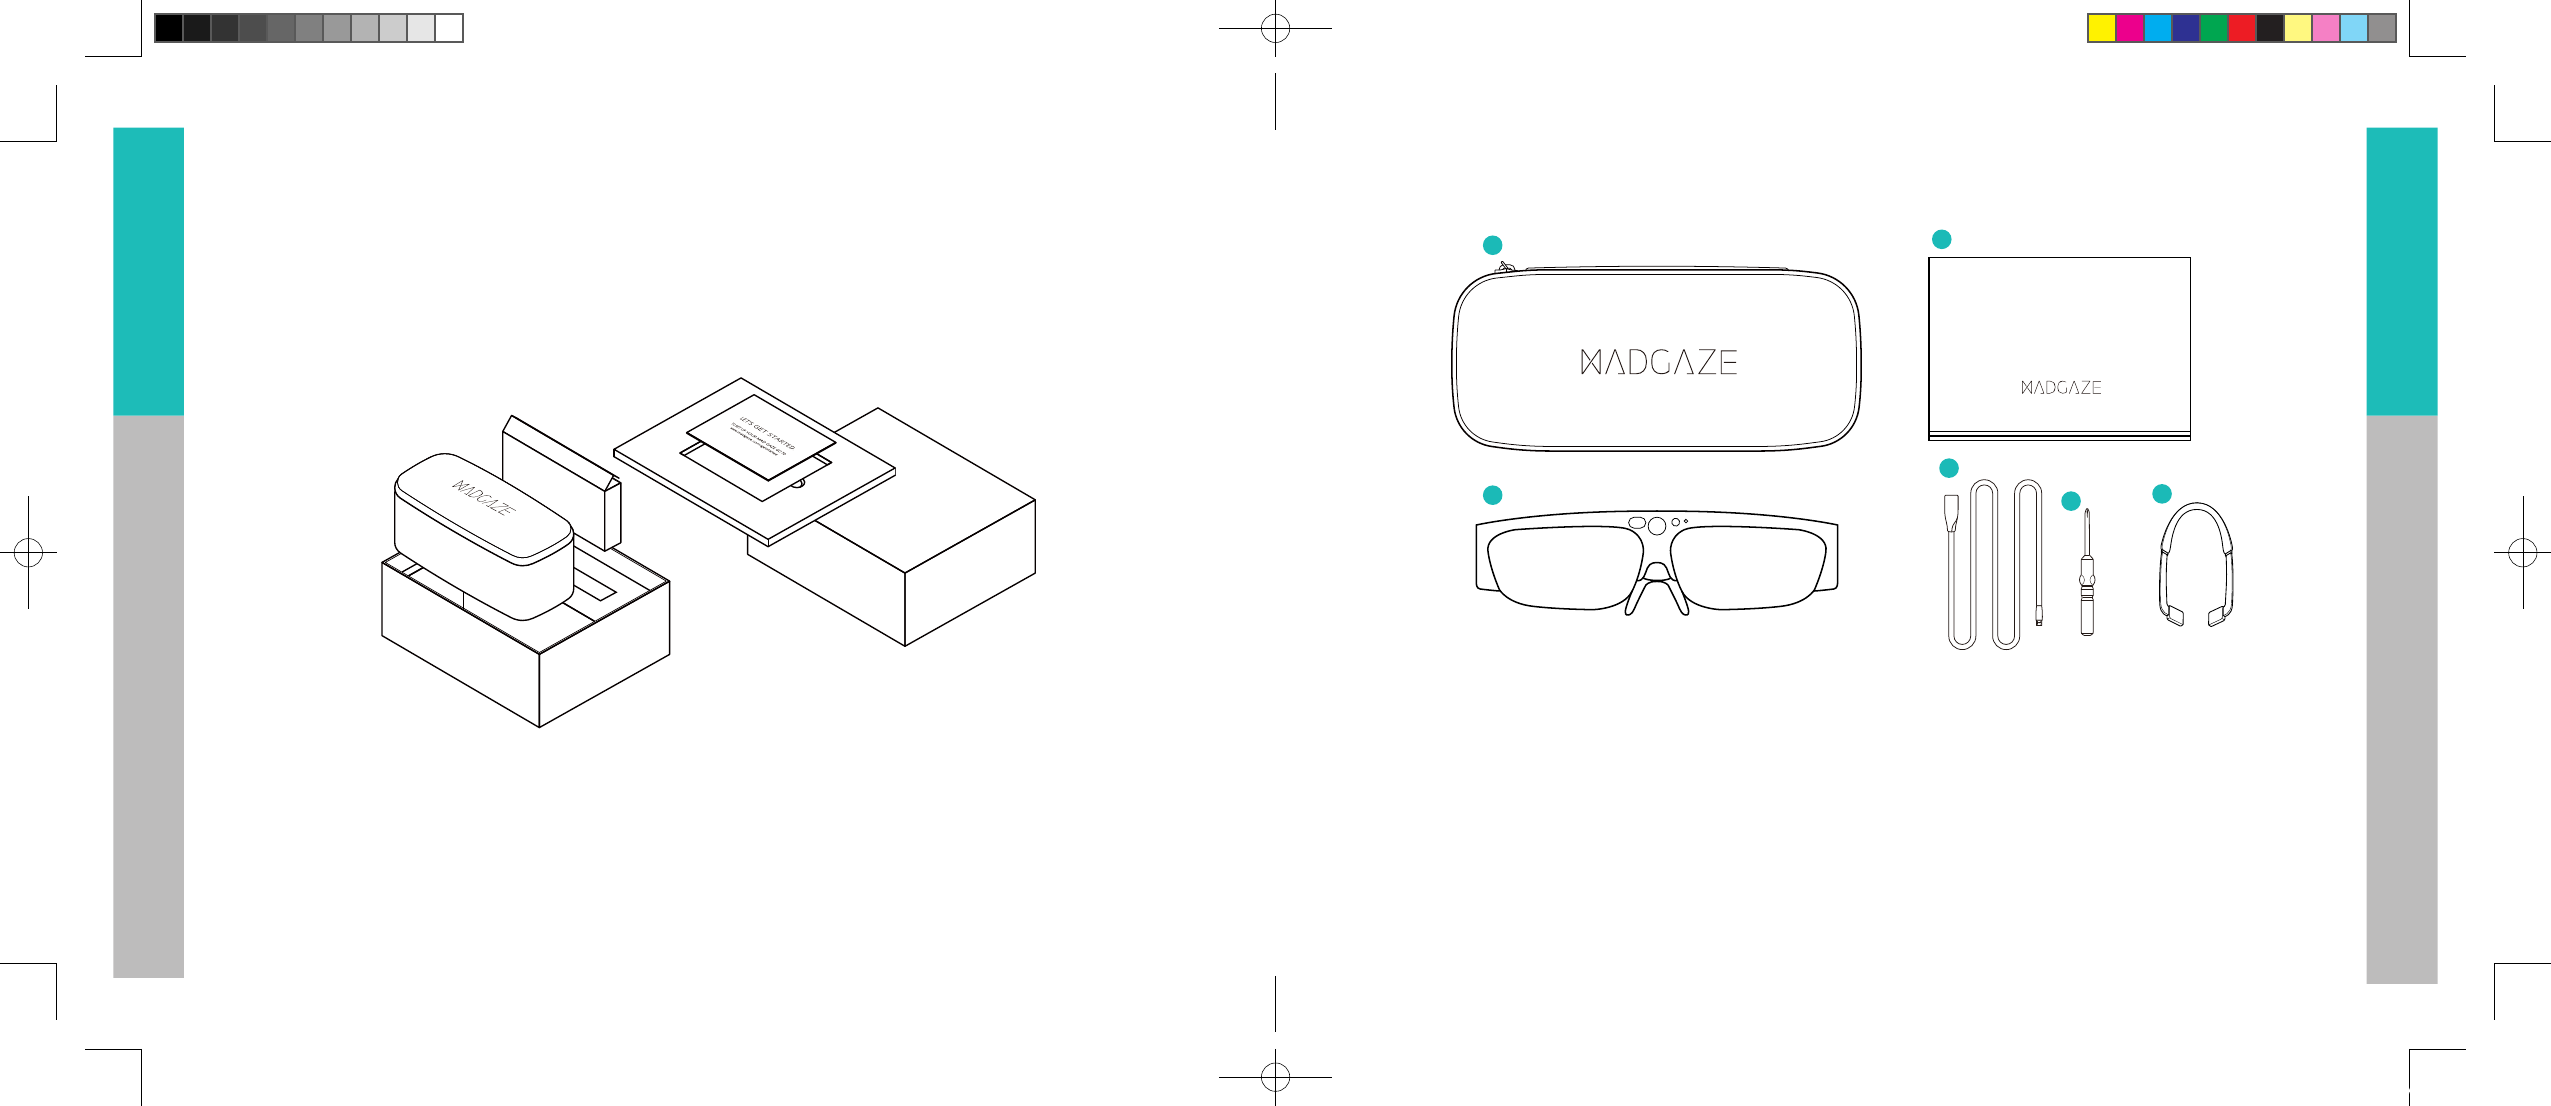
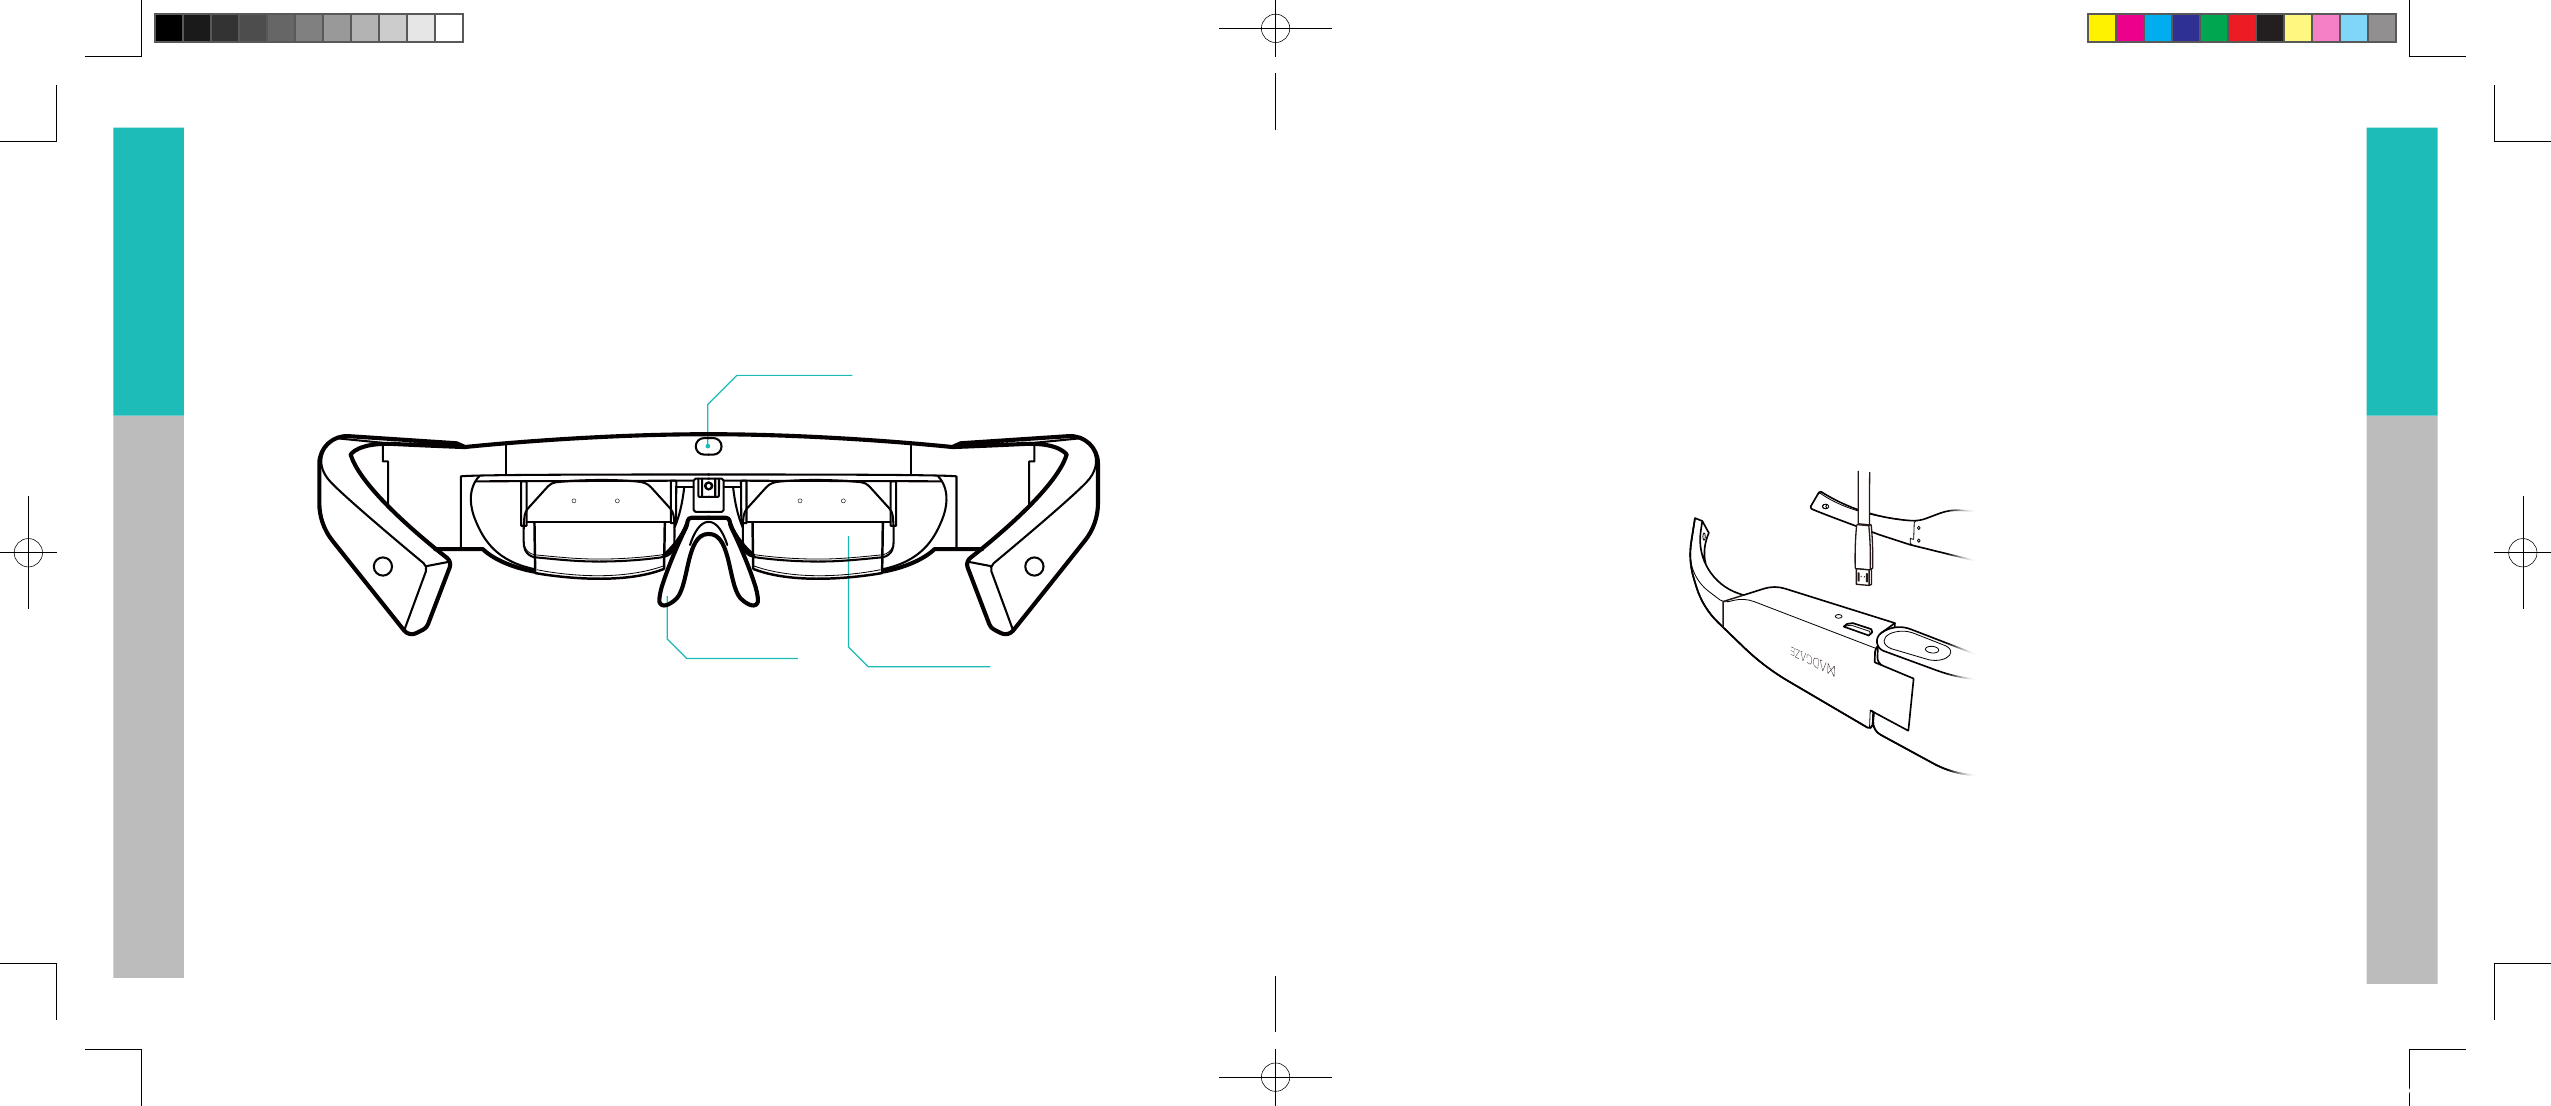
Package Overview
Check the product box for the following items:
MAD Gaze Vader smart glasses, glasses case, Micro-USB to USB cable, screwdriver, glasses strap and use guidelines. VADER USE GUIDELINES
LET’S GET STARTED
A
B
C
D
EF
Glasses case
Vader smart glasses
Vader use guidelines
Micro-USB to USB cable
Screwdriver
Glasses strap
MADGazeVader_V6.2.indd1-2 18/5/20186:26PM
Adjustable Ear Hook
FOV :
45 D e g r ee s
RAM : 3GB
Cap ac it y :
32GB (Ope r a ting sys t em
and system ap p l ica t i ons
have oc cupi ed part of the
storage space, the usable free space
may be less than the
nominal storage capacity.)
Batter y :
1 14 0 m A h
Co n ne c ti o n :
Mic r o USB 2.0 OTG
He a d p h on e Ja c k : 3. 5 m m Ste r eo Au di o
Sens o rs : G yr o s c o p e , A c c e le r o m e t e r,
Magnetometer, Ambient Light
Sensor, Proximity Sensor
Ca m er a :
8M pixels, su p p or t s Flashl ight
and Au t o -fo cus
To u ch Panel :
S u pp o r t M u l t i -t o u c h
Display Adjustment :
Support IPD Adjustments
Co rr e ct iv e Le n s es :
S u pp o r t (D e d i c a t e d C o r r e c t iv e
Lenses can be purchased from
MAD Gaze Mall)
3D Mo de :
Su pport (Us e with relev ant
apps and con tents )
3 4
MAD Gaze Vader_V6.2.indd 3-4 18/5/2018 6:26 PM
ENGLISH
ENGLISH
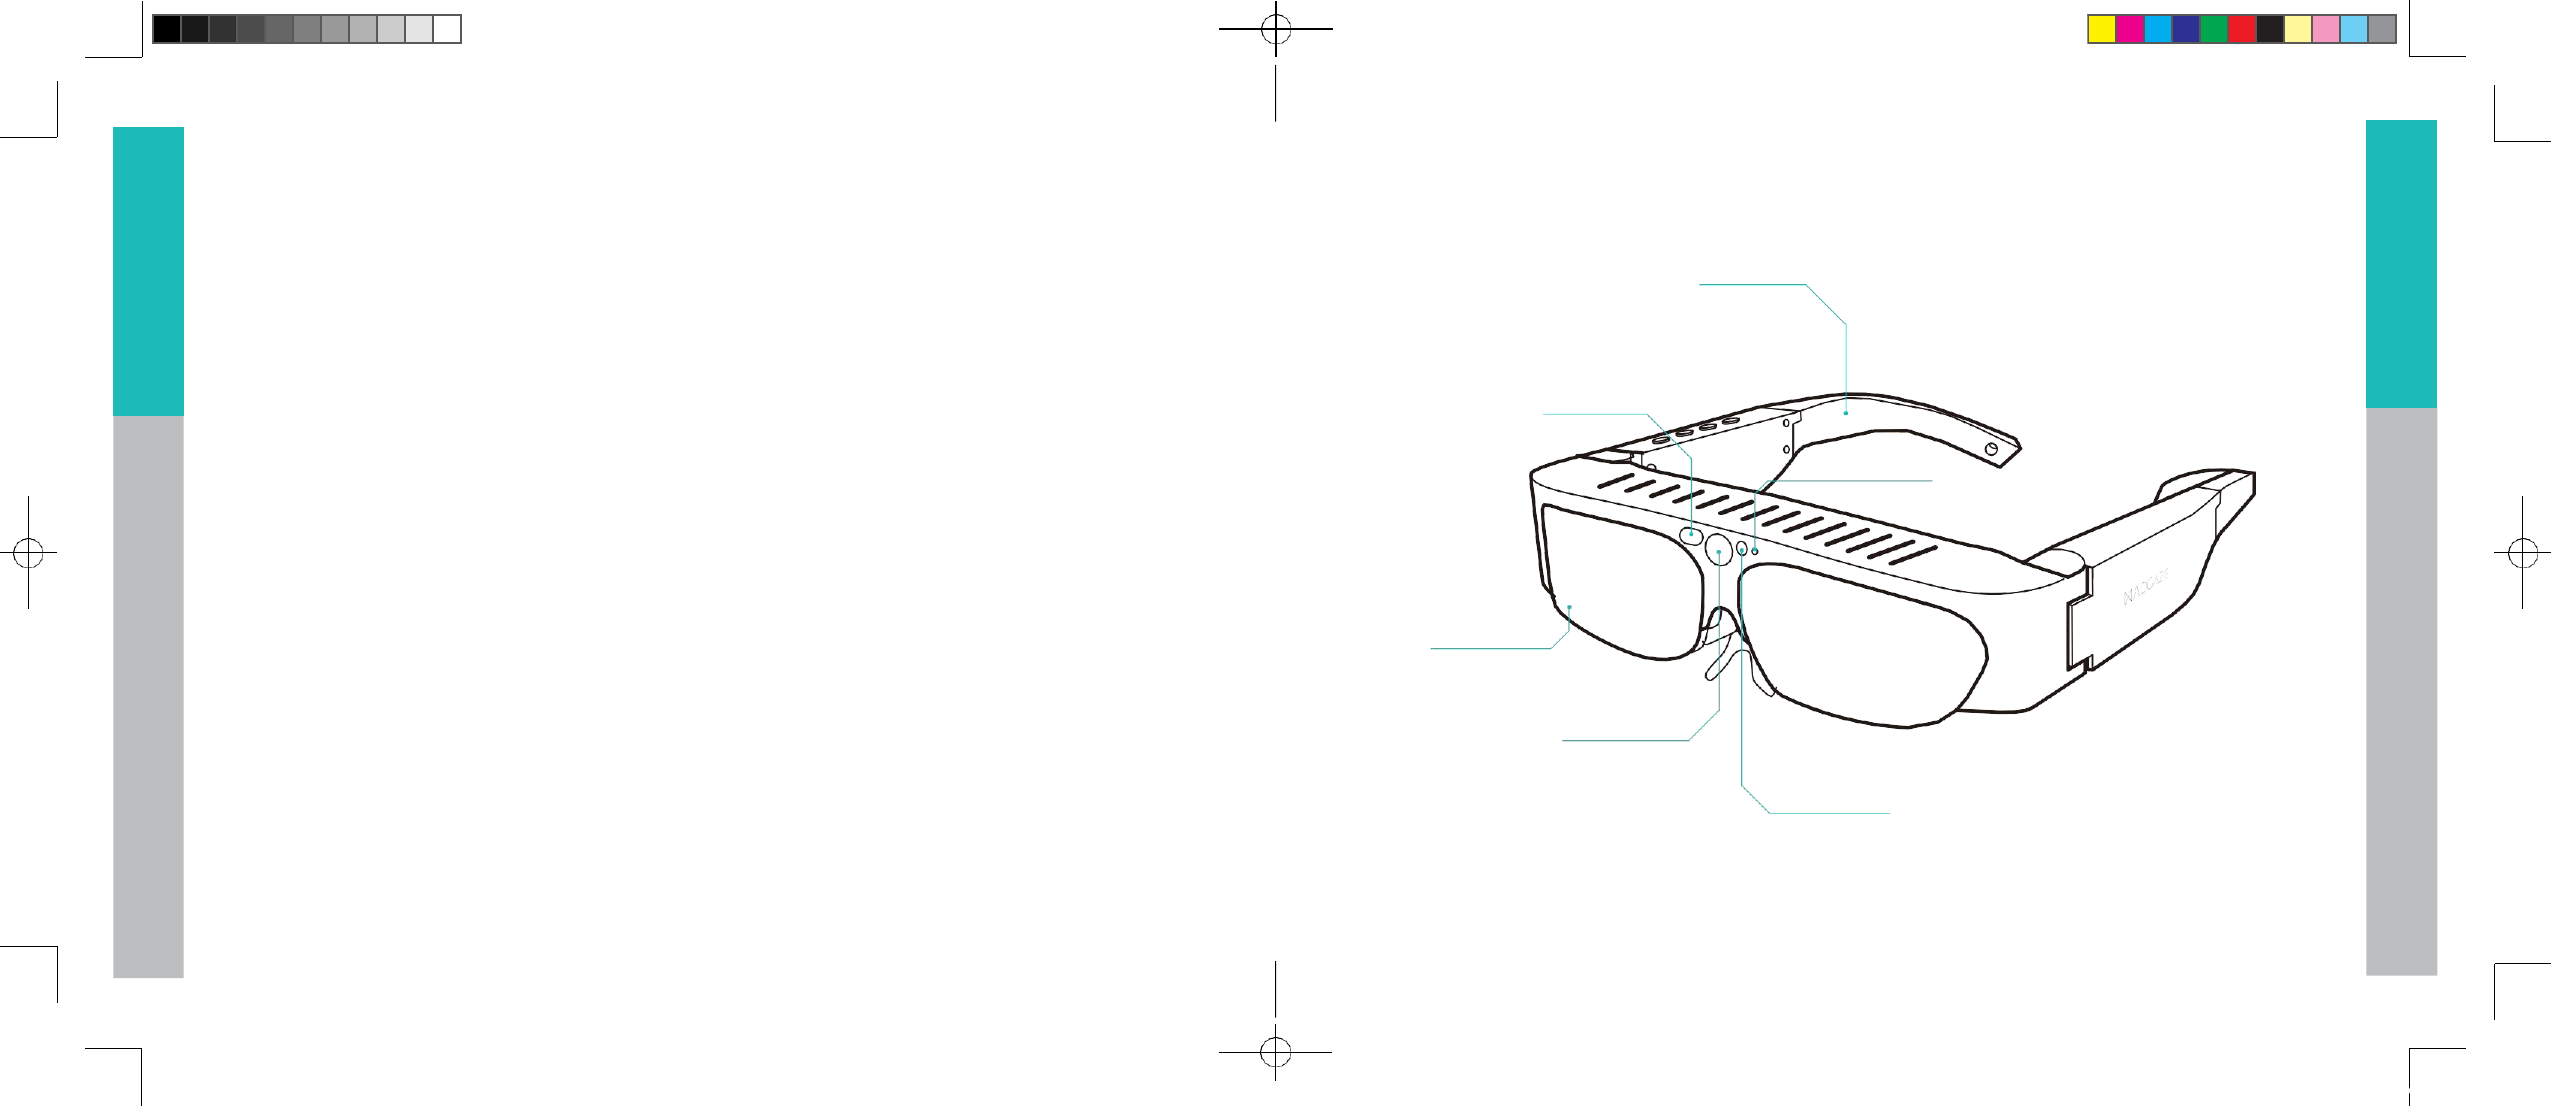
Hardware Specification
Prod uct Model :
Va d er
Pos iti on i n g
:
Mechanism
GPS / WIFI
Ope ra tin g Syste m :
A n dr o i d 7 .0
WIFI
:
802.11 b/g/n (2.4GHz)
CPU :
1 .5 G H z Q u a d - C o r e
Aud io
:
Built-in Stereo Speakers,
R es o l u ti on :
128 0 x 720 pi xel s
Built-in Microphone
简 体 中 文
繁 體 中 文
Ambient Light Sensor
Indicator Light
Coated Lens
Camera
Flashlight
简 体 中 文
繁 體 中 文
5 6
ENGLISH
ENGLISH
简体中文
简体中文
繁體中文
繁體中文
Mechanism
Micro USB
3.5mm Headphone Jack
3D Button
Battery Charger
Indicator Light
See-through Display
Mechanism
Control Buttons
Multi-touch Panel
MADGazeVader_V6.2.indd5-6 18/5/20186:26PM
7 8
ENGLISH
ENGLISH
简体中文
简体中文
繁體中文
繁體中文
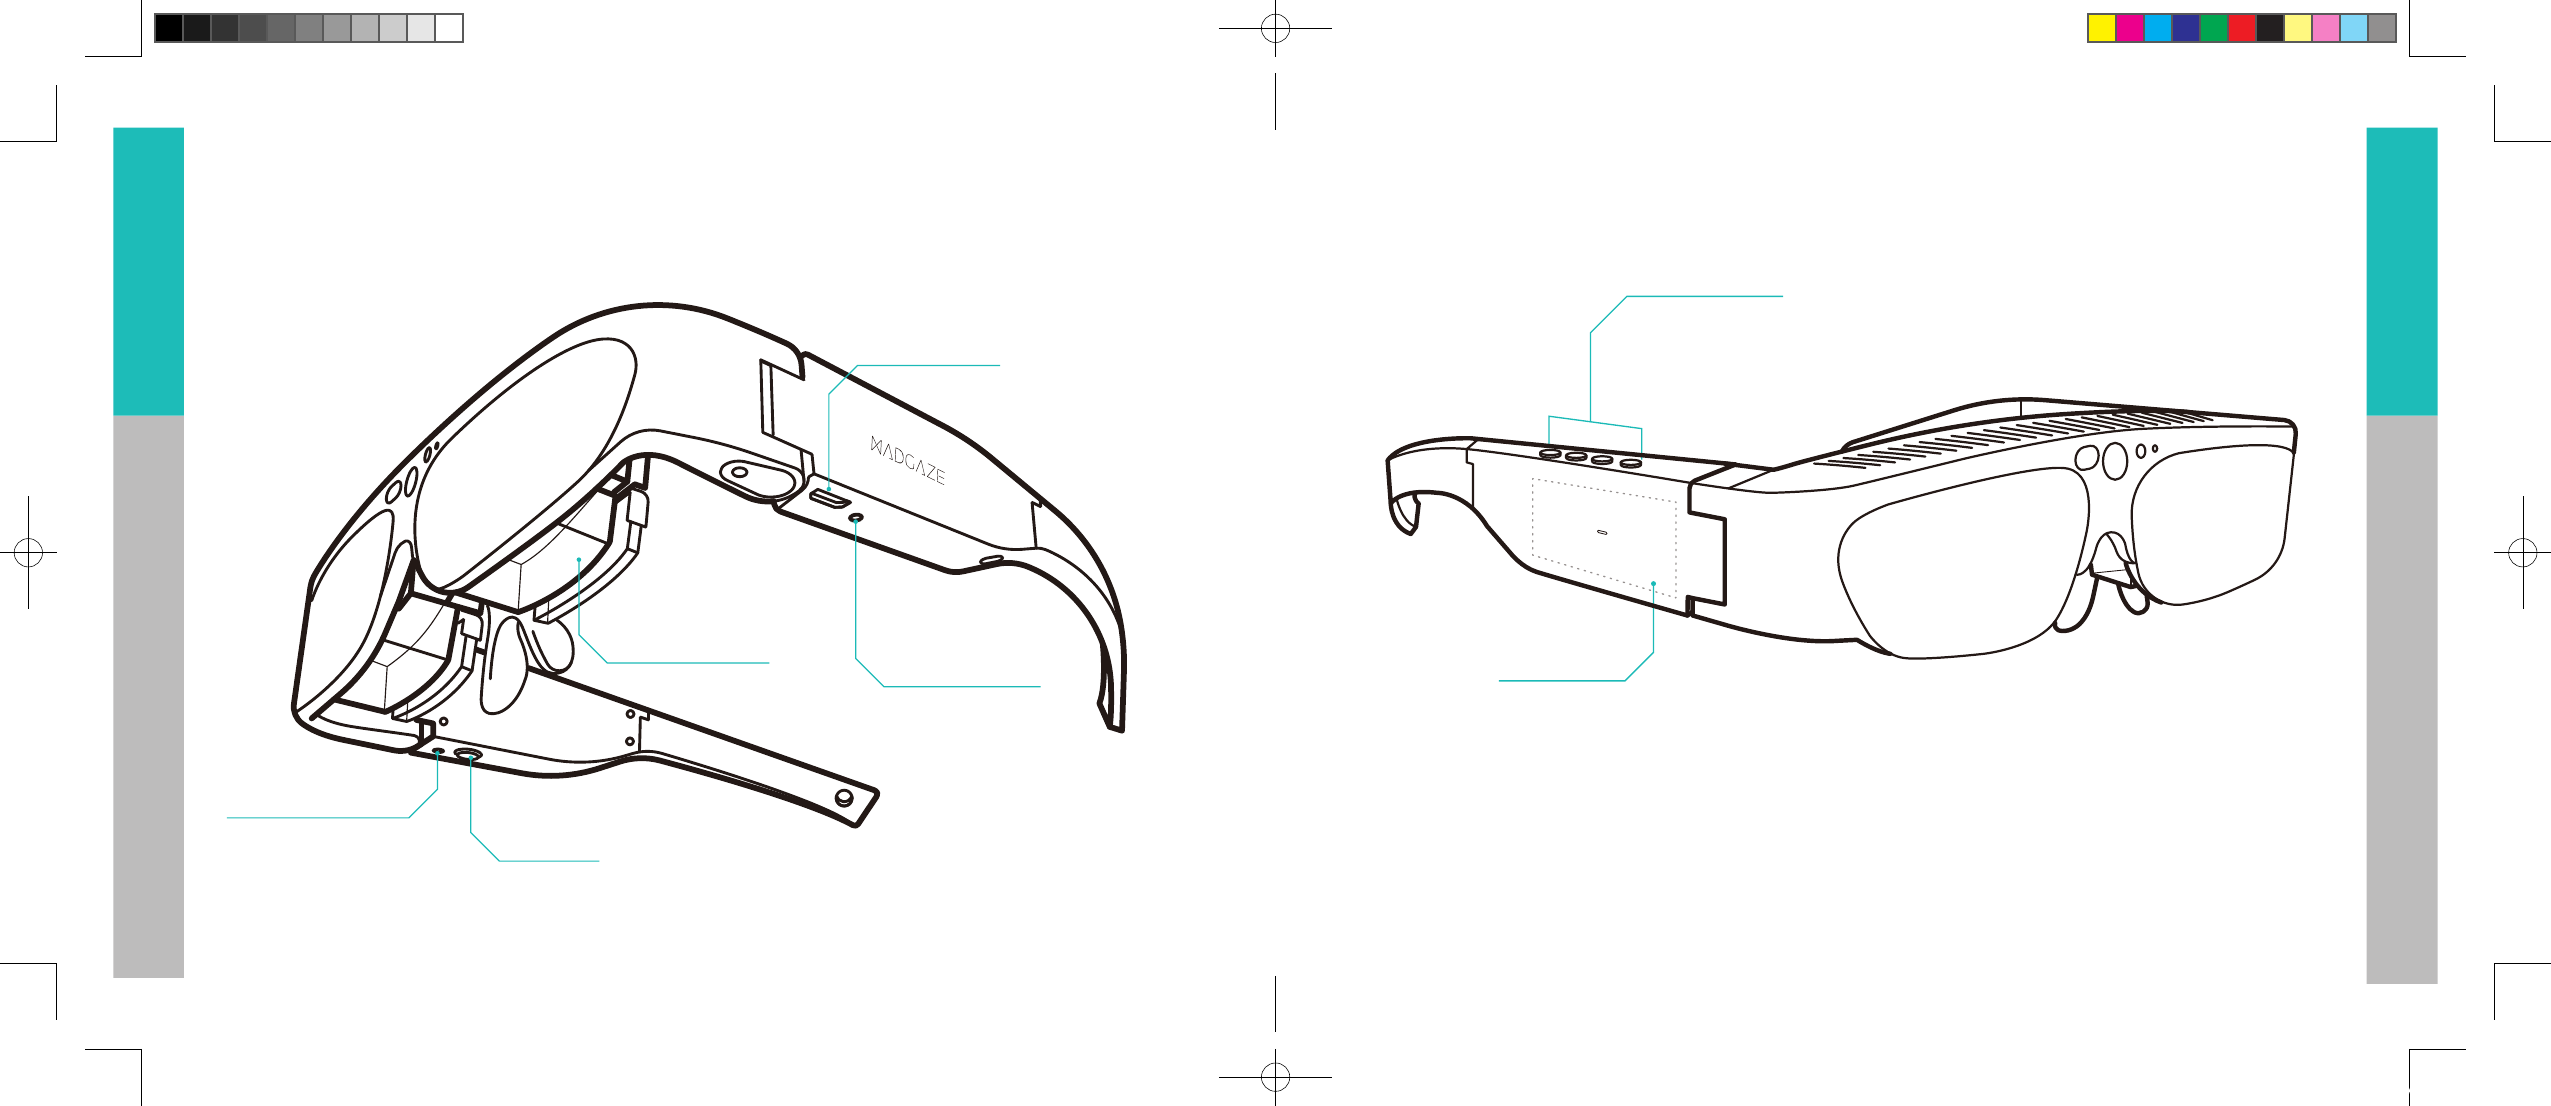
Proximity Sensor
Corrective Lenses
Adjustable Nose Pad
Mechanism Start Using
After unboxing Vader smart glasses, charge the battery for at least 4 hours in the off mode before use. Connect the
Micro-USB cable that comes with Vader to Micro-USB port on Vader body; connect the other end of the Micro USB cable
to the charger USB port. When power indicator is on, the glasses start charging. The smart glasses can be charged either
when its power is on or off.
When charging Vader, you are recommended to place it as shown on the diagram to avoid collision with the see-through
display.
MADGazeVader_V6.2.indd8 18/5/20186:26PM
910
ENGLISH
ENGLISH
简体中文
简体中文
繁體中文
繁體中文
Wearing Vader
Warning
»Do not wear Vader while wearing eyeglasses. Doing so may result in facial injury.
»Keep the screen clean and avoid scratching the screen. If the screen is dirty or fogging, it is recommended to gently
wipe it with a screen cleaning cloth.
»When wearing Vader, the face cushion may become dirty due to sweating on the face. It is recommended to use a clean
soft cloth to slightly wet with cold water, gently wipe the face cushion part you want to clean, and then place it at room
temperature and allow to air dry naturally. Do not dry, iron or place in direct sunlight.
»When not wearing the Vader, do not place objects on the proximity sensor inside Vader. Doing so will cause the
proximity sensor to stay on and deplete Vader's power.
The method of wearing Vader is similar to ordinary glasses, with adjustable nose pads and adjustable ear hooks, allowing
the user to adjust until it fits his own head shape. In addition, Vader has adjustable displays, users can adjust the distance
between two displays, to fit the needs of different interpupillary distance. To learn how to adjust the nose pad and ear
hooks, please refer to: Adjusting Nose Pad, Adjusting Ear Hooks. To learn how to adjust the interpupillary distance,
please read: Adjusting Display Distance.
If you need to use corrective lenses, please read: Using Corrective Lenses.
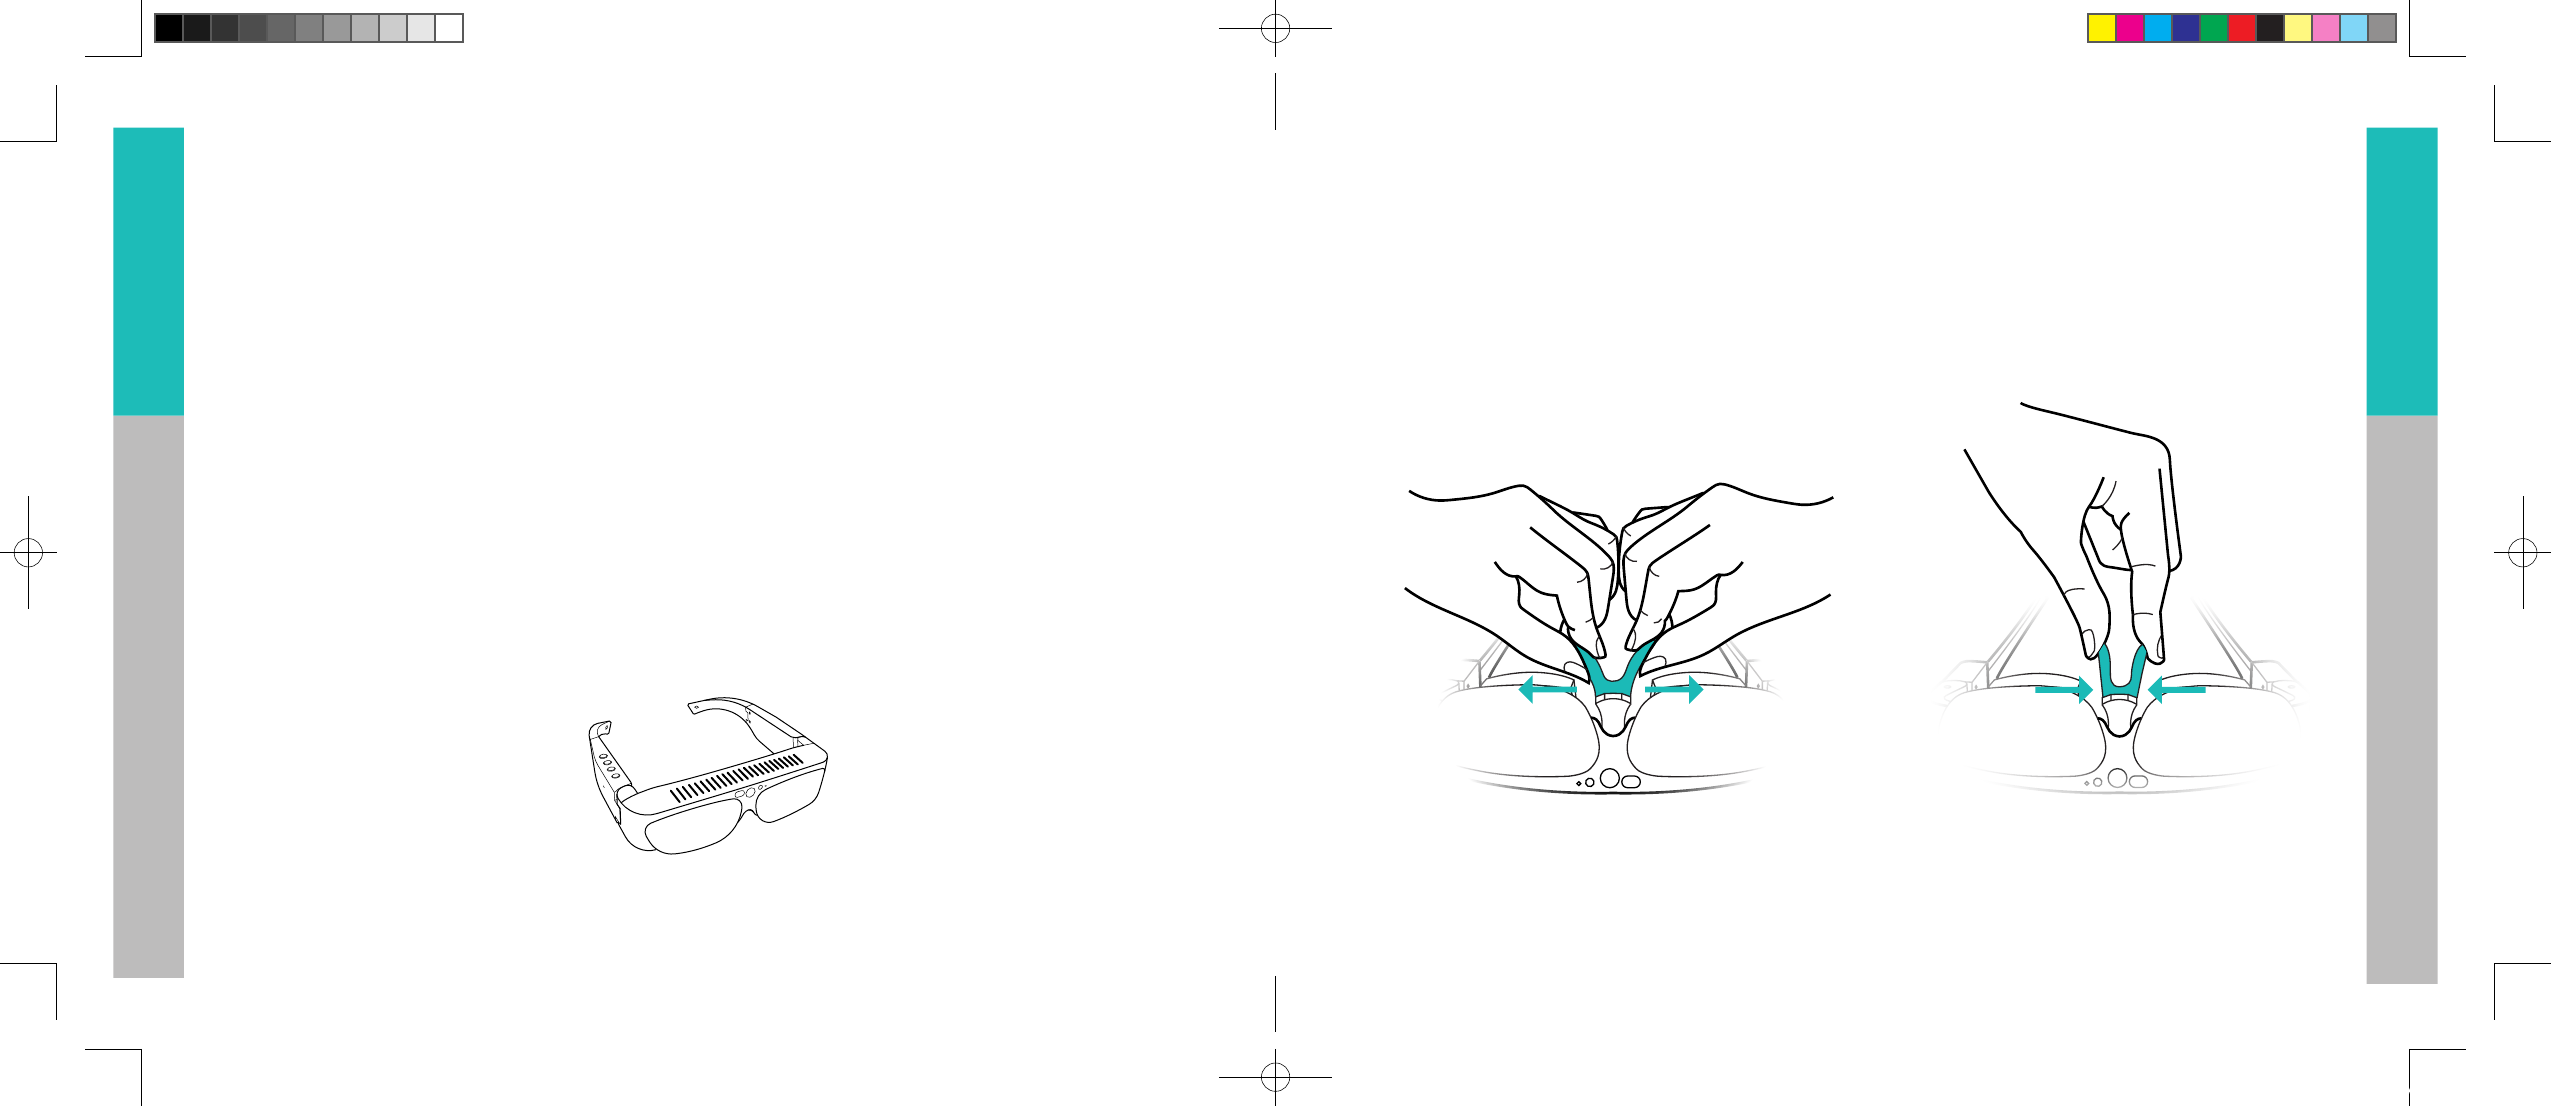
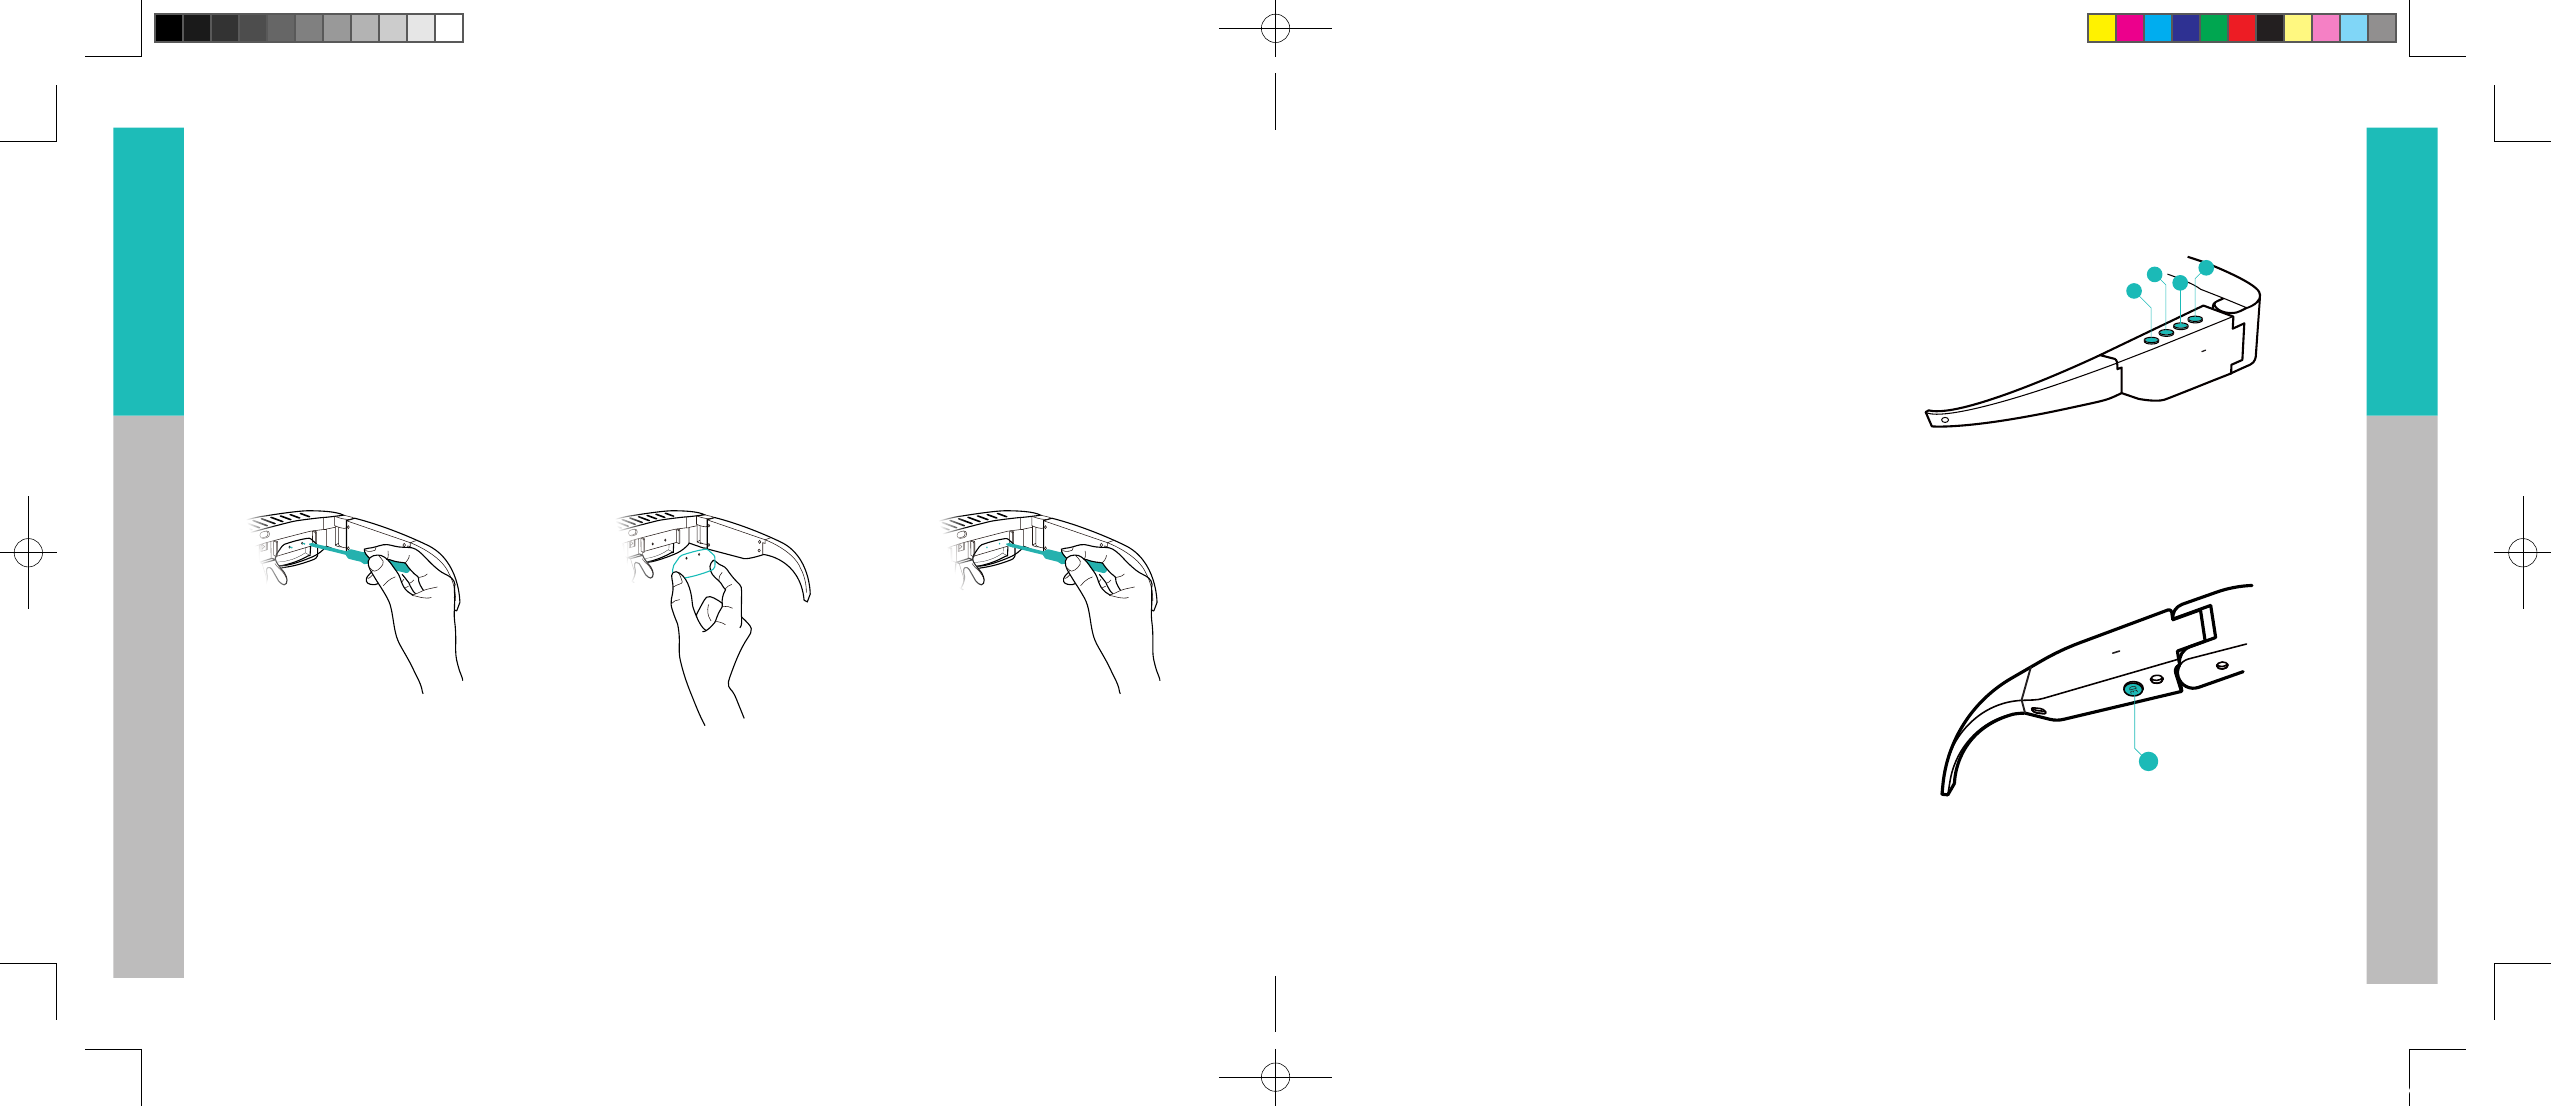
Adjusting Nose Pad
Adjusting Tightness
If Vader is too low on the nose bridge, use your fingers to push the two rubber stilts inward to reduce the spacing until
you feel comfortable. If the position is too high, then slowly prop up the two rubber stilts. The adjustment should not be
excessive. The distance between the front and the rear of the nose pad can also be adjusted to fit you the best by twisting
the screws.
MADGazeVader_V6.2.indd9-10 18/5/20186:26PM
11 12
ENGLISH
ENGLISH
简体中文
简体中文
繁體中文
繁體中文
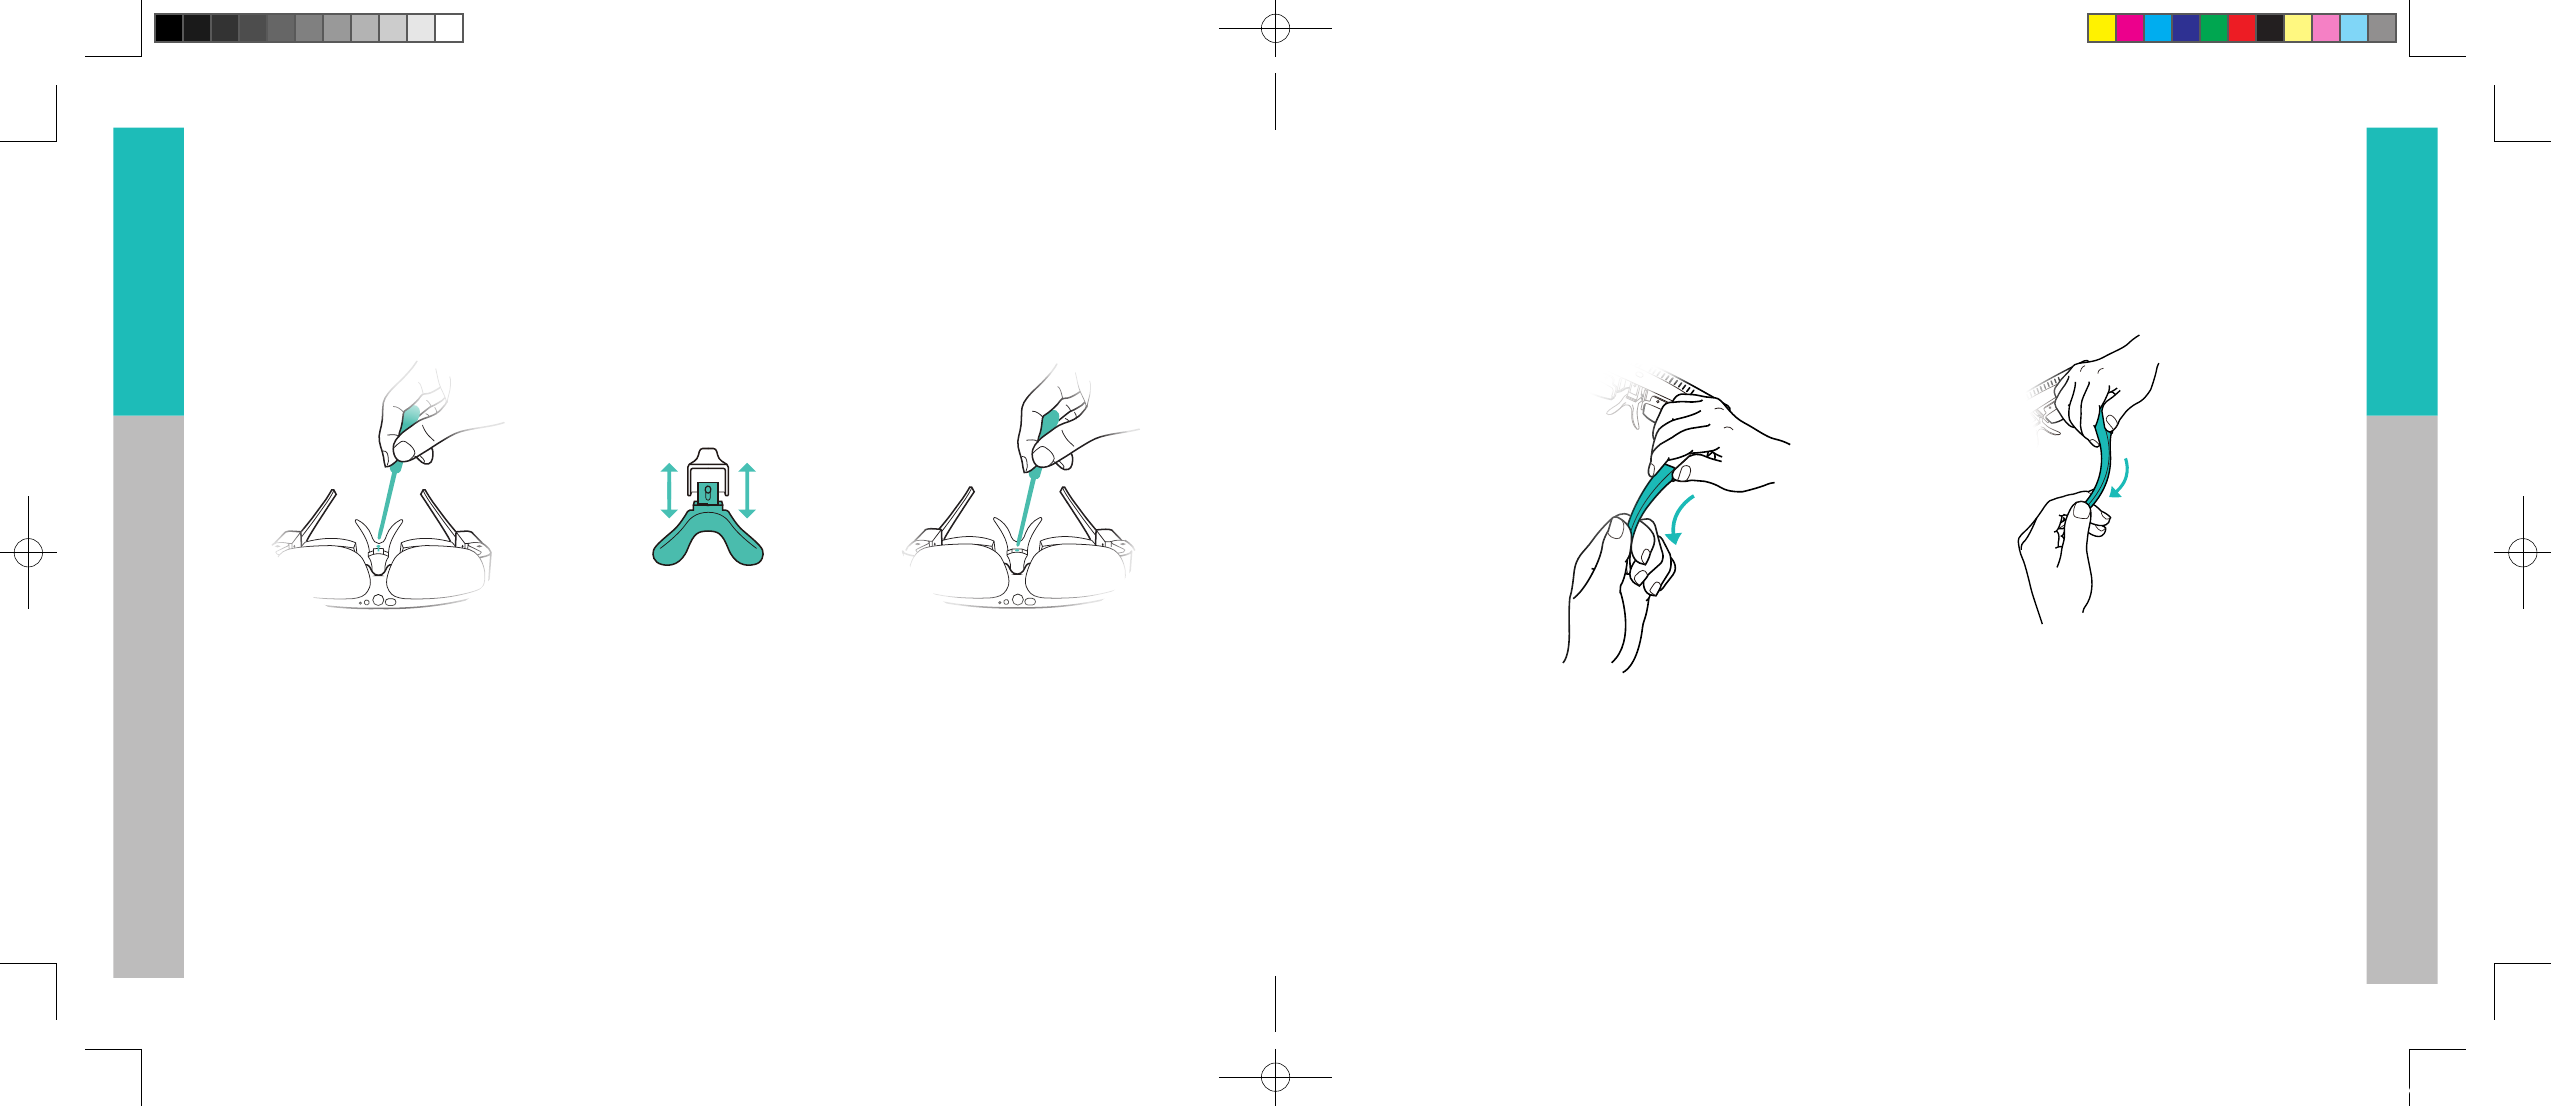
Adjusting Positions
You can use the screwdriver to adjust the positions of the nose pad to ensure that the entire screen is visible and com-
fortable to wear.
Loosen the screw coun-
terclockwise until there is
enough space for the nose
pad to travel to its appro-
priate position (it is not
necessary to loosen the whole
screw)
Adjust the nose pad to the
right position
Tighten the screw clockwise
(tighten until the nose pad
cannot be moved)
Adjusting Ear Hooks
Gently bend the ear hooks downwards Gently bend the ear hooks inwards;
bend them in the opposite direction
if you feel they are too tight
The role of the ear hooks is to make the glasses steady on the head. If your Vader glasses are tilted downwards during use,
you can adjust the ear hooks according to the following two steps.
MADGazeVader_V6.2.indd11-12 18/5/20186:26PM
13 14
ENGLISH
ENGLISH
简体中文
简体中文
繁體中文
繁體中文
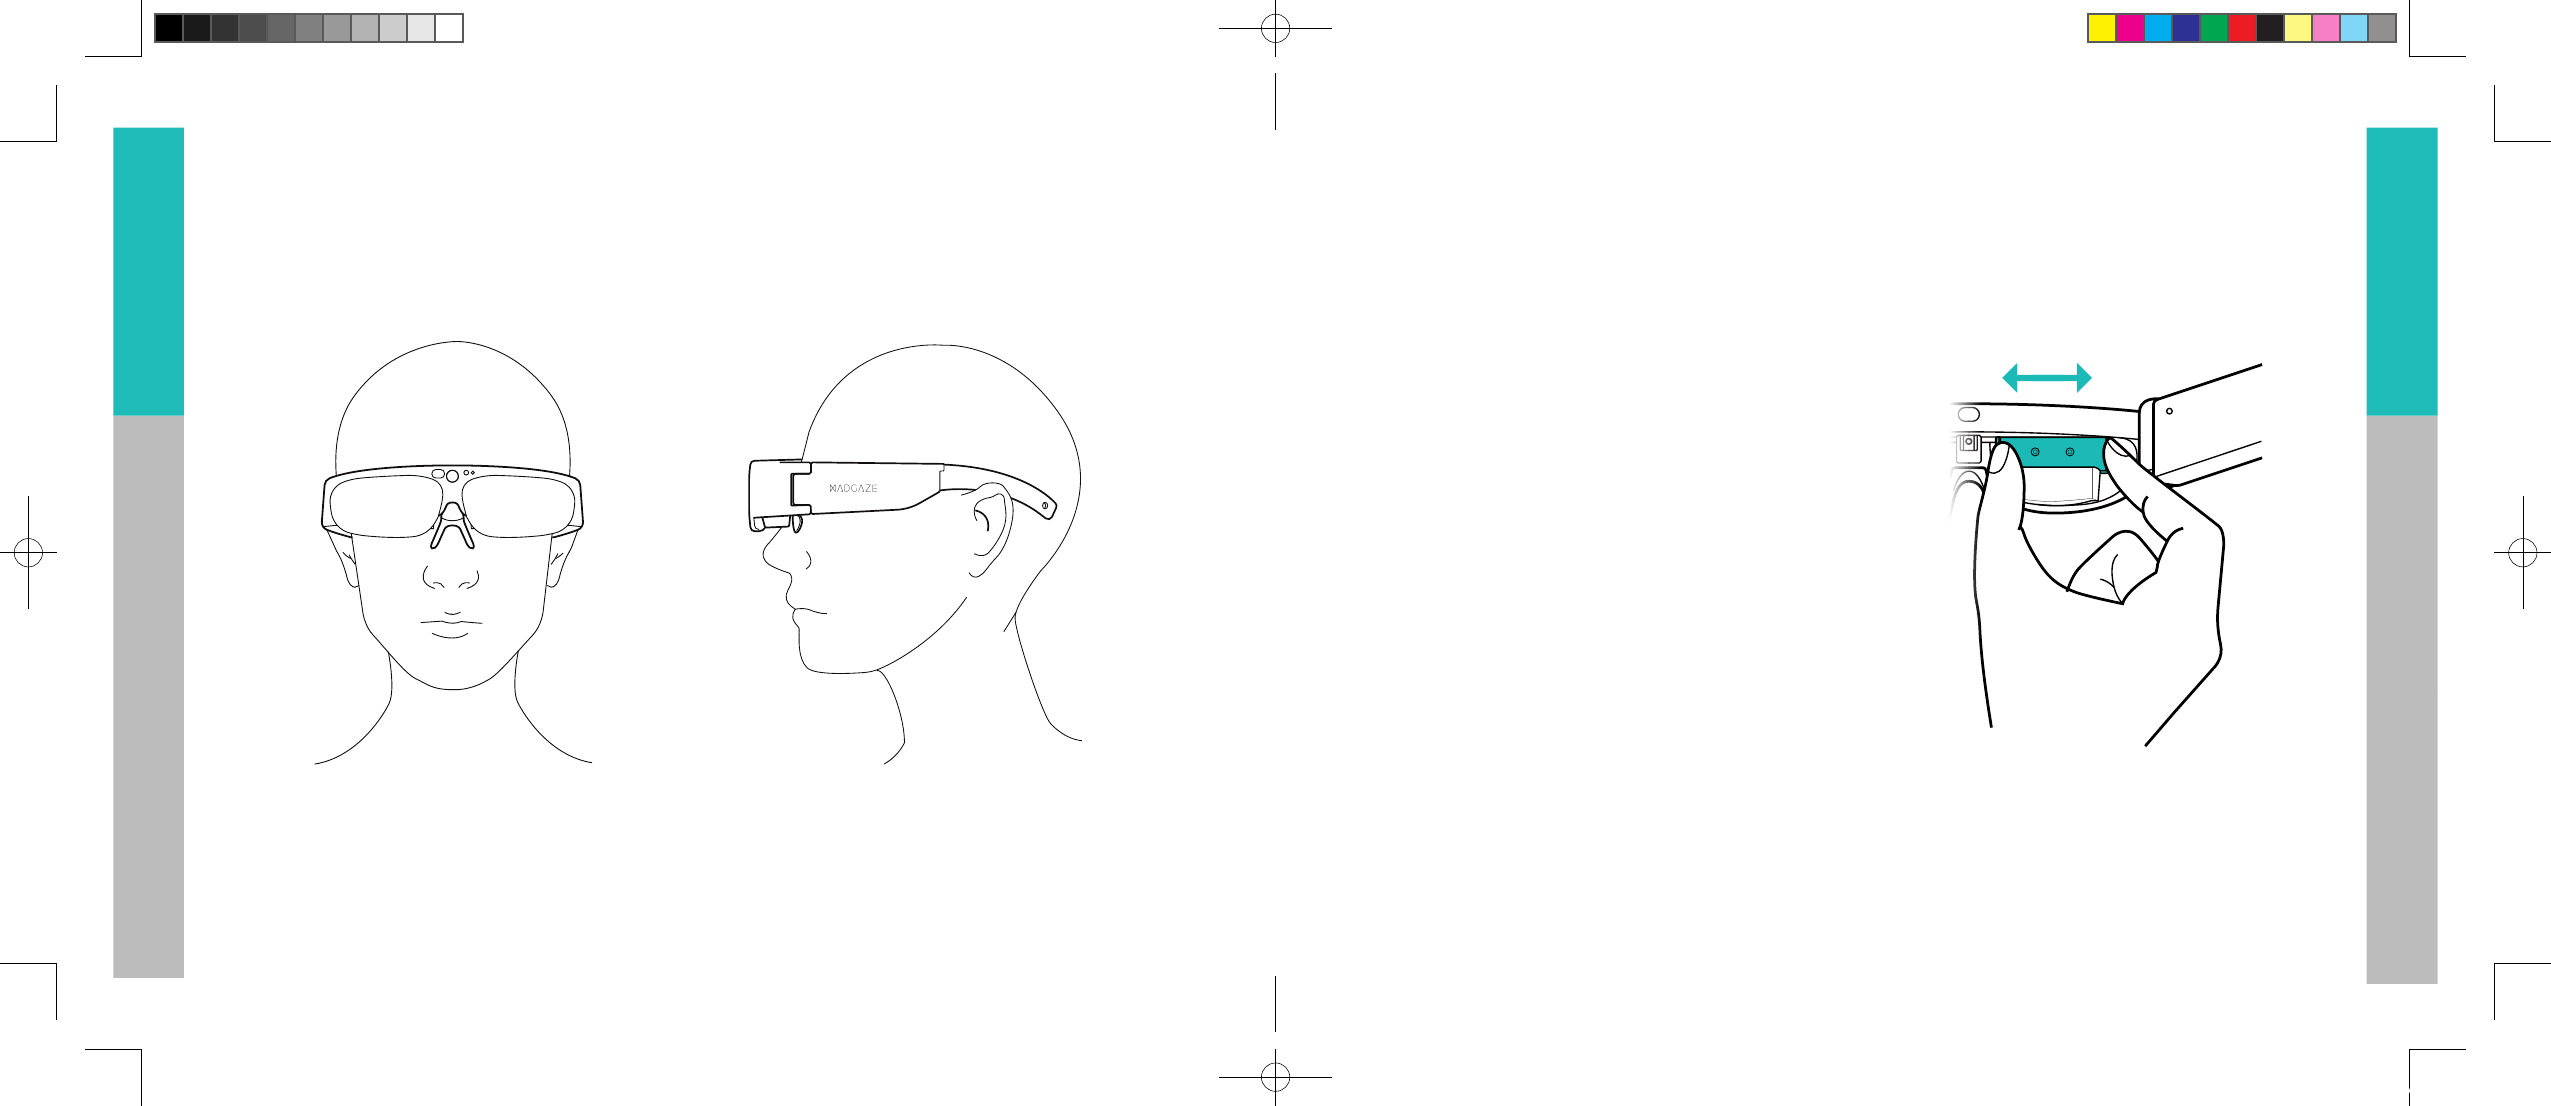
When you wear Vader properly, the screen should be level with the eyes. If the screen is tilted, adjust Vader as shown in
the image below until you see the entire screen.
Front Side
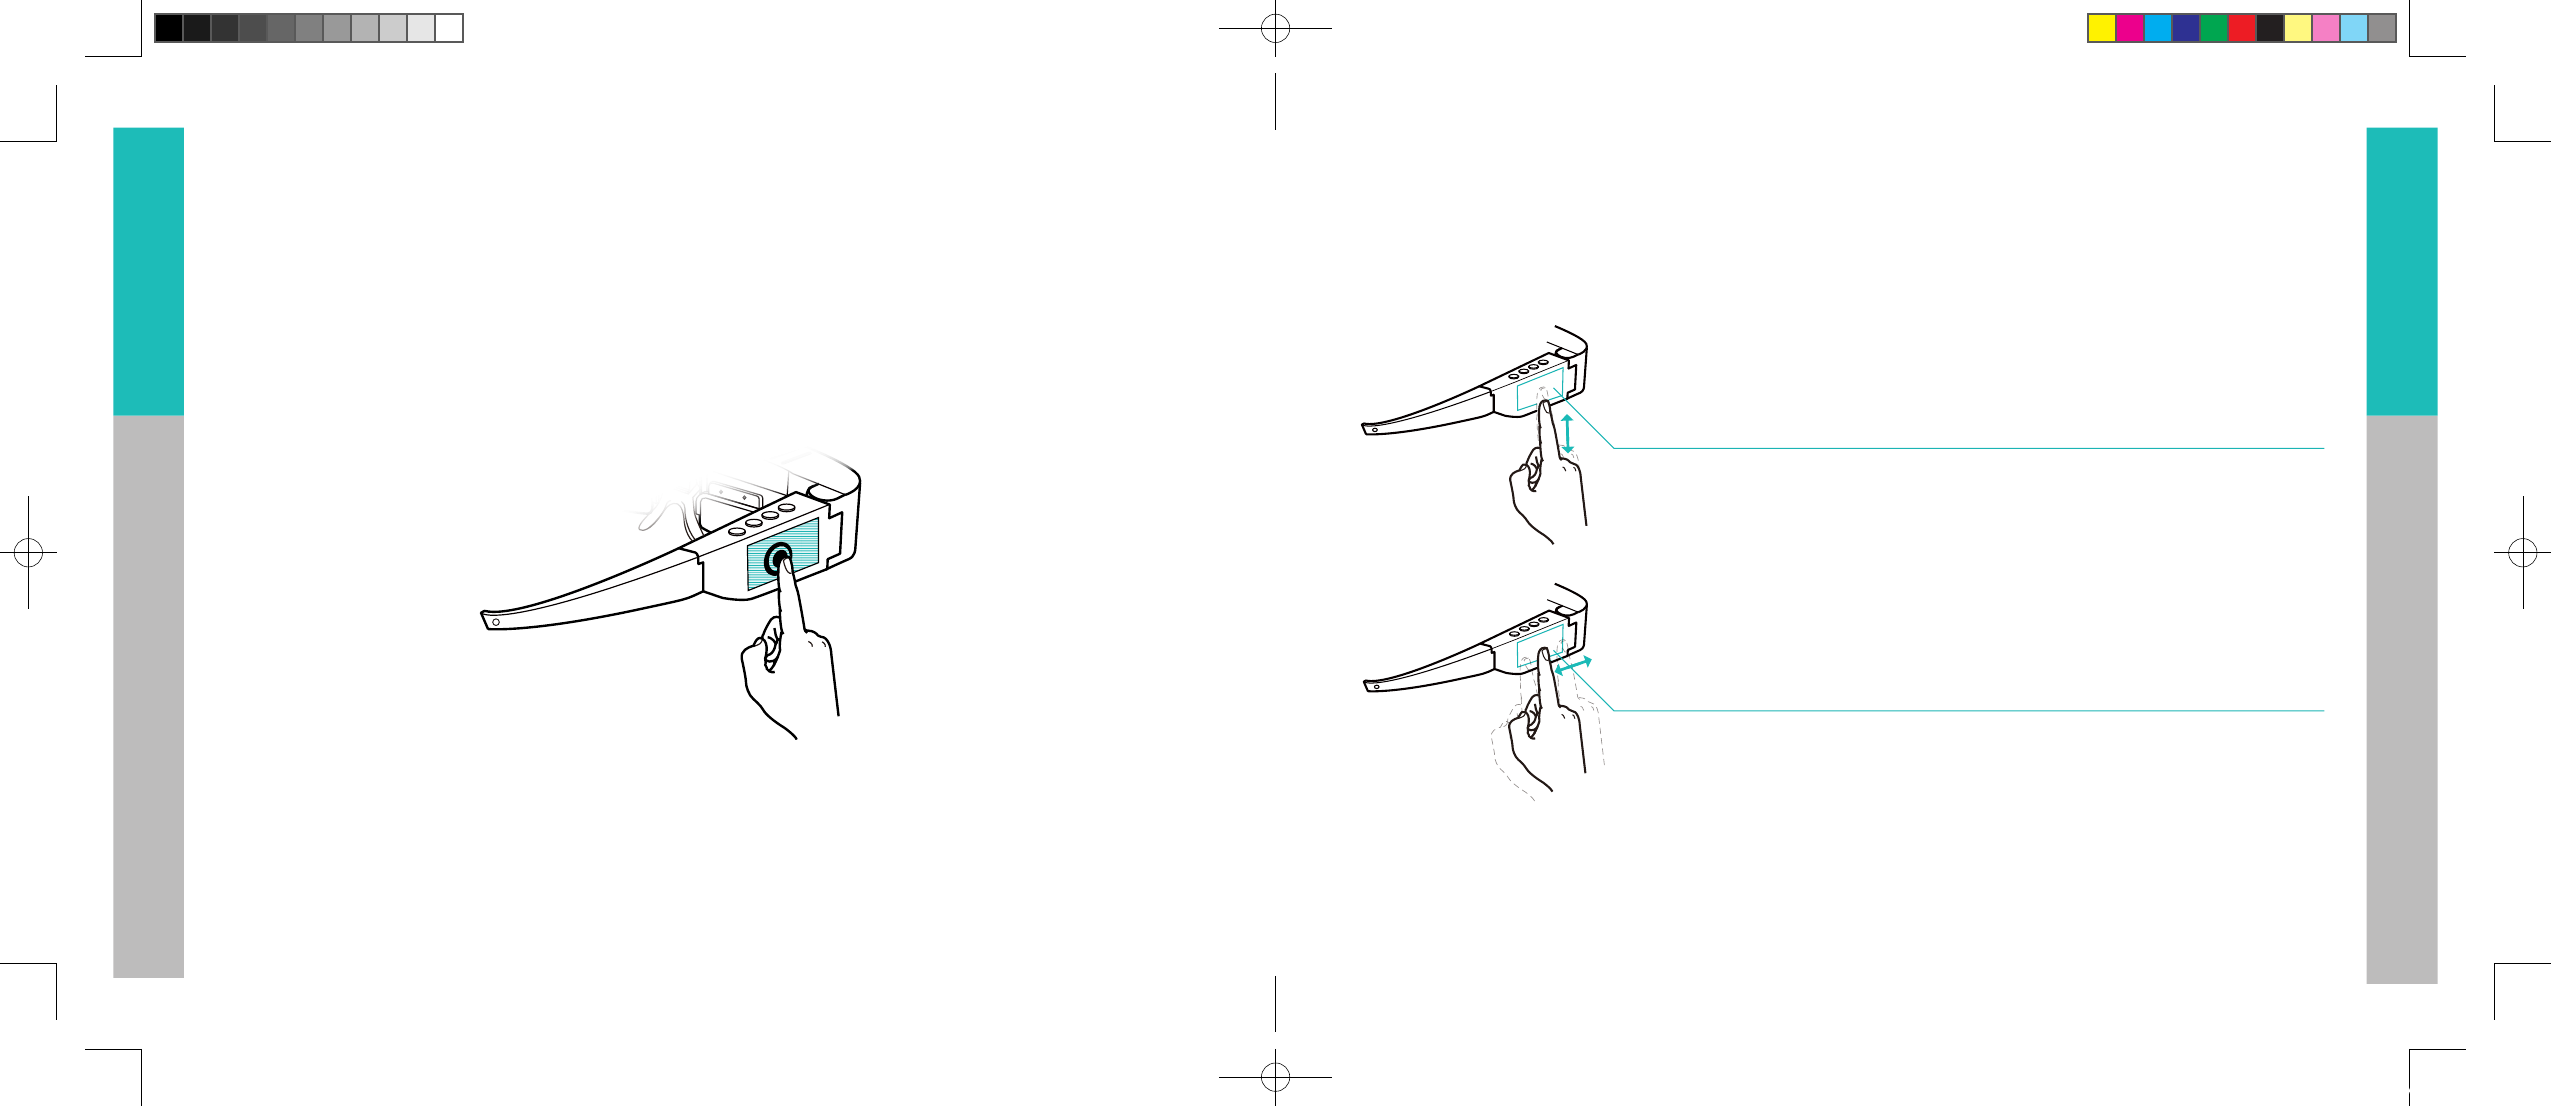
Adjusting Display Distance
Interpupillary distance (IPD) is the distance between
the pupil centers of both eyes. If the distance between
two screens is close to your IPD, you will get a clearer
image.
»If you cannot see a clear image after wearing Vader,
try slowly using your fingers to slide both displays
toward the center, or to the end of the center until
you see a clear image.
»If you still cannot see a clear image, try slowly
using your fingers to slide both displays toward
the glasses temples, or go to the very end until you
see a clear image. For details, please refer to the
official tutorial video.
http://www.madgaze.com/support
Please slide the displays carefully so as not to
damage the smart glasses with excessive force.
MADGazeVader_V6.2.indd13-14 18/5/20186:26PM
15 16
ENGLISH
ENGLISH
简体中文
简体中文
繁體中文
繁體中文
Using Corrective Lenses
If you need to use corrective lenses, you can purchase Vader-dedicated corrective lenses from MAD Gaze Mall. You are
suggested to visit a professional optician to perform optometry.
During optometry, please remind the optometrist that the Vader should be adjusted to the angle to be worn in the future
(nose pad and glasses temples) and try it on to ensure a correct focal length.
Mounting and Dismounting Dedicated Corrective Lenses
Loosen the screws
counterclockwise
Place the dedicated
corrective lenses at the
right positions
Tighten the screws
clockwise until the cor-
rective lenses cannot be
moved
General Controls
Buttons
A: Control Button 1
Short press to select item.
Long press to return to home.
B: Control Button 2
Short press to move right/down to next item.
Long press to enter the app menu.
C: Control Button 3
Short press to move left/up to the previous item.
Long press to return to the previous screen content.
� D: Control Button 4
Short press to sleep/wake up screen
Long press to turn on/off
E: 3D Button
Short press to switch to 3D mode. (Some apps may not support 3D mode.)
E
D
C
B
A
E
D
C
B
A
MADGazeVader_V6.2.indd15-16 18/5/20186:26PM
17 18
ENGLISH
ENGLISH
简体中文
简体中文
繁體中文
繁體中文
Multi-touch Panel
Multi-touch Panel is located on the right side of Vader smart glasses.
»To avoid damage to the multi-touch panel, do not touch the multi-touch panel with any sharp objects, or use excessive
force when touching with your fingertips, or contact with other electronic devices.
»The edge of the multi-touch panel may have less sensitivity. Please operate closer to the center to achieve the best
result.
Best Sensing Area
Please use touch control within the indicated area. The shaded area is the best sensing area.
Sliding
Multi-touch panel can sense the following two types of sliding of a finger.
One finger slides up/down to select up/down
One finger slides left/right to select left/right
MADGazeVader_V6.2.indd17-18 18/5/20186:26PM
19 20
ENGLISH
ENGLISH
简体中文
简体中文
繁體中文
繁體中文
One-finger Control
Confirm: Single tap with one finger to confirm.
Single Tap
Exit app: Long press with one finger (on any page) to home.
Long Press
Return: Double tap with one finger on any page to back.
Double Tap
Two-finger Control
Tap once with two fingers (when an app runs) to enter app settings.
Long press with two fingers (on any page) to control center.
Single Tap
Long Press
MADGazeVader_V6.2.indd19-20 18/5/20186:26PM
21 22
ENGLISH
ENGLISH
简体中文
简体中文
繁體中文
繁體中文
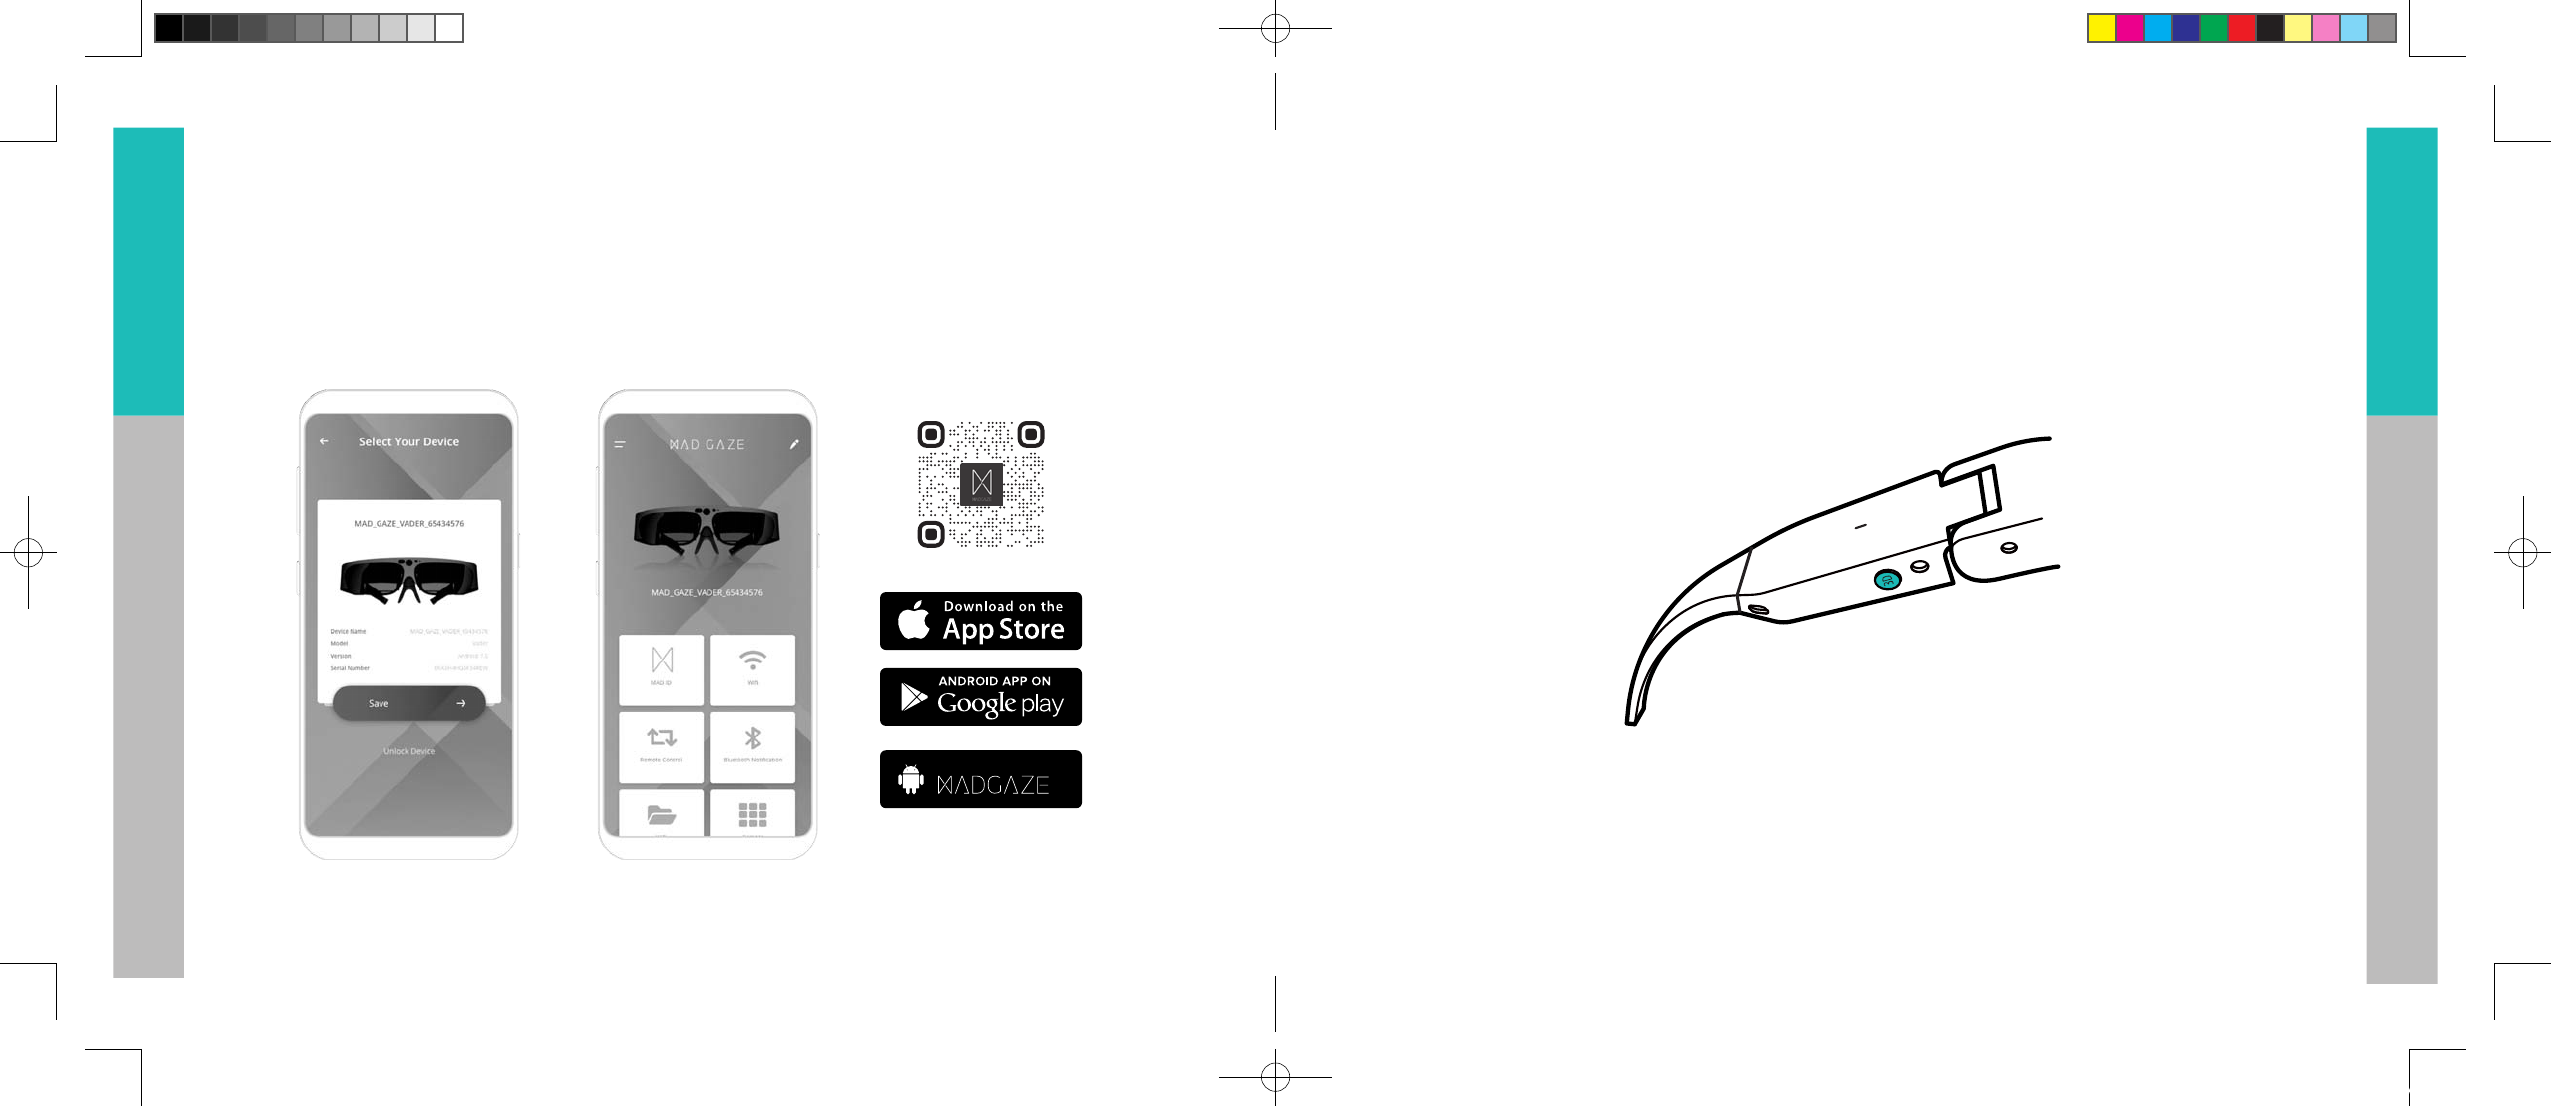
MAD Gaze Connector
You must download the “MAD Gaze Connector” app to your mobile phone to complete the MAD Gaze Vader tutorial. If you
have not downloaded yet, please download "MAD Gaze Connector" from Play Store or App Store.
You may also visit MAD Gaze official website to download the app.
http://www.madgaze.com/support
APK ON
Switching To 3D Mode
Some apps may contain 3D functions or contents. You can press the 3D button to switch to 3D mode. If the app you are
using does not support 3D, a prompt will pop up, you can still press the 3D button again to switch to 3D mode. (Note:
Forcibly switching to 3D mode may affect the screen display. Press the 3D button again to resume normal display.)
MADGazeVader_V6.2.indd21-22 18/5/20186:26PM

23 24
ENGLISH
ENGLISH
简体中文
简体中文
繁體中文
繁體中文
Warranty
»We will provide an all-round Three Guarantees Service for your MAD Gaze Vader smart glasses according to “The
Warranty Regulations of Three Guarantees” enacted by relevant authorities in People’s Republic of China.
»Warranty Period will be counted from the day the product is activated, for one year. The valid warranty period can be
checked up on MAD Gaze Connector or “My Device” on MAD Store.
»Within 7 days after the product is activated, if the product is malfunctioned, you can either return or replace your
product, or you may wish to have it repaired by an authorized maintenance service provider.
»From the 8th to 30th day after the product is activated, if the product is malfunctioned, you can either replace your
product, or you may have it repaired by an authorized maintenance service provider.
»Within 1 year the product is activated, if the product is malfunctioned, you can have it repaired by an authorized main-
tenance service provider. If the product is still malfunctioning after repairing for twice, you can exchange for another
device with same model number and specifications for free, by providing the maintenance records.
»MAD Gaze Warranty Centre is located in People’s Republic of China, our company will not be liable for any costs incurred
as a result of the warranty procedures (including, but not limited to: freight, taxes, customs fees, and all other possible
fees), all buyers must bear all relevant expenses.
Limited Warranty
»Your warranty services are valid under normal usage/application only, the following conditions are excluded from the
Three Guarantees and there will be reasonable charge for the warranty service:
• The free maintenance period of the product has expired.
• Mechanical failure due to application of fittings not recognized by our company.
• Damage caused by disassembling the product by repairer who is unauthorized by our company.
• Damage caused by failing to operate the product according to the manual, or incorrect/improper handling of the
product.
• Malfunction caused by improper use, maintenance or storage.
• Products natural wear and tear (including, but not limited to outer case, display, attachments).
• Damage caused by force majeure.
»All the losses and damage caused by environmental factors, such as rough handling, temperature, and other factors
which beyond our company’s control.
»If user cracked the Android system, or illegally obtained the root privileges, causing malfunction of this product, we
reserve the right to refuse providing warranty services.
MADGazeVader_V6.2.indd23-24 18/5/20186:26PM

25 26
ENGLISH
ENGLISH
简体中文
简体中文
繁體中文
繁體中文
Cautions
»Use only the supplied USB cable. Using other USB cable may cause overheating, fire, explosion, failure or leakage.
»Do not detach the power cable by coercive pulling.
»Do not allow metal objects, flammable materials or other objects insert or fall into the power connector, power port or
speaker it may cause short circuit and trigger fire or electric shock.
»Some users might experience skin irritation or skin allergies with prolonged use of this product. If you notice any
symptoms, please discontinue wearing or using the product. Continuous usage after symptoms subside might cause
symptom reappearance. If the condition persist, please consult your doctor.
»This product contains electronic equipment, improper use might result in injury.
»To avoid exceeding the weight-bearing limit of this product, do not put this product inside bags directly or expose to
any other heavy objects.
»This product has relatively low liquid ingression grade, avoid direct contact with liquid.
»Keep this product clean and dry regularly.
»Do not open the product outer case or disassemble it.
»Stop using the product immediately if any cracks were found.
»Substances contained in this product and its battery might jeopardize the environment or cause injury, please handle
and dispose properly.
»Do not exert force, shake, or place this product in environment with excessive dust, or fluctuating temperature and
humidity.
»Protect this product from vigorous shock or vibration.
»Do not place this product in any dishwashers, washing machines or dryers.
»Do not place this product under extreme temperatures.
»Do not place this product under long and direct sunlight exposure.
»Do not wipe this product with corrosive detergent.
»Do not allow this product to contact with solvents, including, but not limited to alcohol, benzene or thinner, nor use
damp cloth or solvents to clean this product. When the outer case of this product has cracked, it may induce short
circuit, failure or fire.
»Do not disassemble or reassemble this product, it may cause injury or intoxication.
»Do not place this product in fire or heat up this product, nor place inflammable objects, including, but not limited to
candles, near this product, otherwise it may cause fire or (battery) explosion.
»Do not wear this product while it is charging.
»Do not charge this product when it is wet.
»Immediately stop wearing if you feel unusual heat emitted from this product.
»If there is any known condition that might affect normal use of this product, please consult your doctor in advance.
»Do not wear this product when handling hazardous tasks, it may cause accident or injury.
»Do not use this product in unsettling locations, including, but not limited to stairs or slope.
»Moreover, do not use this product in crowded or dim places, it may cause accident or injury.
»Please stay alert to the surroundings if using this product while walking, this may cause accident or injury.
»Please be aware of the surroundings when using this product in compact area.
»Continuous or prolonged wearing of product may affect vision.
»Vision of children (especially pre-school children) is still under development, they should not use this product.
»Do not allow children or animals to chew or swallow the equipment.
»Do not use this product if lights will cause you allergy or nausea. Otherwise, the symptoms may exacerbate.
»Person who has chronic eye disease should not use this product, otherwise, symptoms, including, but not limited to
strabismus, amblyopia or anisometropia, may exacerbate.
»Take regular breaks when using this product. Prolonged viewing image may cause eye fatigue or discomfort, stop using
and take rest. Stop using immediately if fatigue or discomfort persists after resting.
»If problem or failure occurs, stop using this product immediately. Continue using this product may cause injury or
induce nausea.
MADGazeVader_V6.2.indd25-26 18/5/20186:26PM
27 28
ENGLISH
ENGLISH
简体中文
简体中文
繁體中文
繁體中文
»Any unauthorized operating system updates may pose risk to your information.
»Do not duplicate the content in this guide for any use unless permitted by our company.
»The version number of this manual is MANUAL.VADER.v1.0. Final copy is based on the latest version on our website.
Please read http://www.madgaze.com/support.
»Our company has the right to final interpretation of this manual.
»If this product is to be taken to regions which prohibit the use of electromagnetic wave, including, but not limited to
planes, hospitals, the product should be turned off or having Bluetooth or wireless LAN functions disabled, according
to the regional instructions. Do not use Bluetooth or wireless LAN functions near automatic control equipment, such as
automatic doors or fire alarms. Disable the automatic power-on function before turning off this product. Electromag-
netic wave may cause electromagnetic interference or failure to the medical equipment.
»Do not take this product into operating room, intensive care unit (ICU) or coronary care unit (CCU).
»Turn this product off in ward, or shut down the electromagnetic wave emission.
»Turn this product off or shut down the electromagnetic wave emission if there is electronic medical equipment nearby.
»Follow the medical regulations for prohibiting electromagnetic wave emitting equipment, these equipment is prohibited
in special area.
»If you are implanted with a pacemaker or defibrillator, keep this product with your implanted device at least 22cm away
when using. Make sure no one with a pacemaker is near before using this product, turn off the product if you are in a
crowded place.
»Turn this product off or shut down the electromagnetic wave emission on planes.
»Eliminate static electricity from your body before using this product. To avoid electrostatic disturbance, make use of
small metal piece (e.g. keys), cotton wipe, or other applicable objects, to touch the doors, door handles, faucets, etc.,
to eliminate static electricity, and then touching any of these objects with your bare hands.
»The production and manufacture of this product is subject to the national specification of sales territory. If you use this
product outside the country of sales, please contact our Customer Service Department: cs@madgaze.com .
»To use this product for application in high degree of functional reliability/safety and precision, for example, trans-
port-related equipment such as aviation, railways, shipping, vehicle, disaster prevention equipment, safety equipment,
you should consider including failure insurance and redundancy into your application to maintain safety and reliability
of the whole system, before using this product.
»This product is not designed for application that requires extremely high reliability/safety, such as aviation equipment,
main communication equipment, nuclear power control or medical equipment directly related to medical use. User
should access and judge for whether this product is suitable for application.
MADGazeVader_V6.2.indd27-28 18/5/20186:26PM
FCC Statement
This equipment has been tested and found to comply with the limits for a Class B
digital device, pursuant to part 15 of the FCC rules. These limits are designed to
provide reasonable protection against harmful interference in a residential installation.
This equipment generates, uses and can radiate radio frequency energy and, if not
installed and used in accordance with the instructions, may cause harmful interference
to radio communications. However, there is no guarantee that interference will not
occur in a particular installation. If this equipment does cause harmful interference to
radio or television reception, which can be determined by turning the equipment off
and on, the user is encouraged to try to correct the interference by one or more of the
following measures:
-Reorient or relocate the receiving antenna.
-Increase the separation between the equipment and receiver.
-Connect the equipment into an outlet on a circuit different from that to which the
receiver is connected.
-Consult the dealer or an experienced radio/TV technician for help.
To assure continued compliance, any changes or modifications not expressly
approved by the party.
Responsible for compliance could void the user’s authority to operate this
equipment. (Example- use only shielded interface cables when connecting to
computer or peripheral devices).
This equipment complies with Part 15 of the FCC Rules. Operation is subject to
the following two conditions:
(1) This device may not cause harmful interference, and
(2) This device must accept any interference received, including interference that
may cause undesired operation.
RF warning statement:
The device has been evaluated to meet general RF exposure requirement.
The device can be used in portable exposure condition without restriction.