MAESTRO WIRELESS E228VZ 4G WIFI Router User Manual
MAESTRO WIRELESS HOLDINGS LIMITED 4G WIFI Router
User manual
MAESTRO WIRELESS SOLUTIONS
Address: 9th Floor, Wing Cheong Factory Building,
121 King Lam Street, Cheung Sha Wan, Kowloon, Hong Kong
Phone: +852 3955 0222
Fax: +852 35684833
E-mail: contact@maestro-wireless.com http://support.maestro-
wireless.com
Quick Start
Guide v0.1
Maestro Wireless Solutions
Cellular / WAN /
Wi-Fi Router

MAESTRO WIRELESS SOLUTIONS | OVERVIEW
E228 VZ | QUICK START GUIDE http://support.maestro-wireless.com 2
QUICK START GUIDE
TABLE OF CONTENTS
1. OVERVIEW
3
2. PREREQUISITE
4
3. CHECKING THE PACKAGE CONTENT
5
4. DEFAULT CONFIGURATION
6
4.1 WEB ADMIN PAGE 6
4.2 WI-FI ENABLED, WITH WPA/WPA2 TKIP KEY 6
4.3 CONNECTION 6
5. UNDERSTANDING THE MAESTRO ROUTER
7
5.1 LAN PANEL DETAILS 7
5.2 WAN PANEL DETAILS 8
5.3 FRONT PANEL DETAILS 9
6. CONNECTING MAESTRO ROUTER
10
MAESTRO WIRELESS SOLUTIONS | OVERVIEW
E228 VZ | QUICK START GUIDE http://support.maestro-wireless.com 3
1. Overview
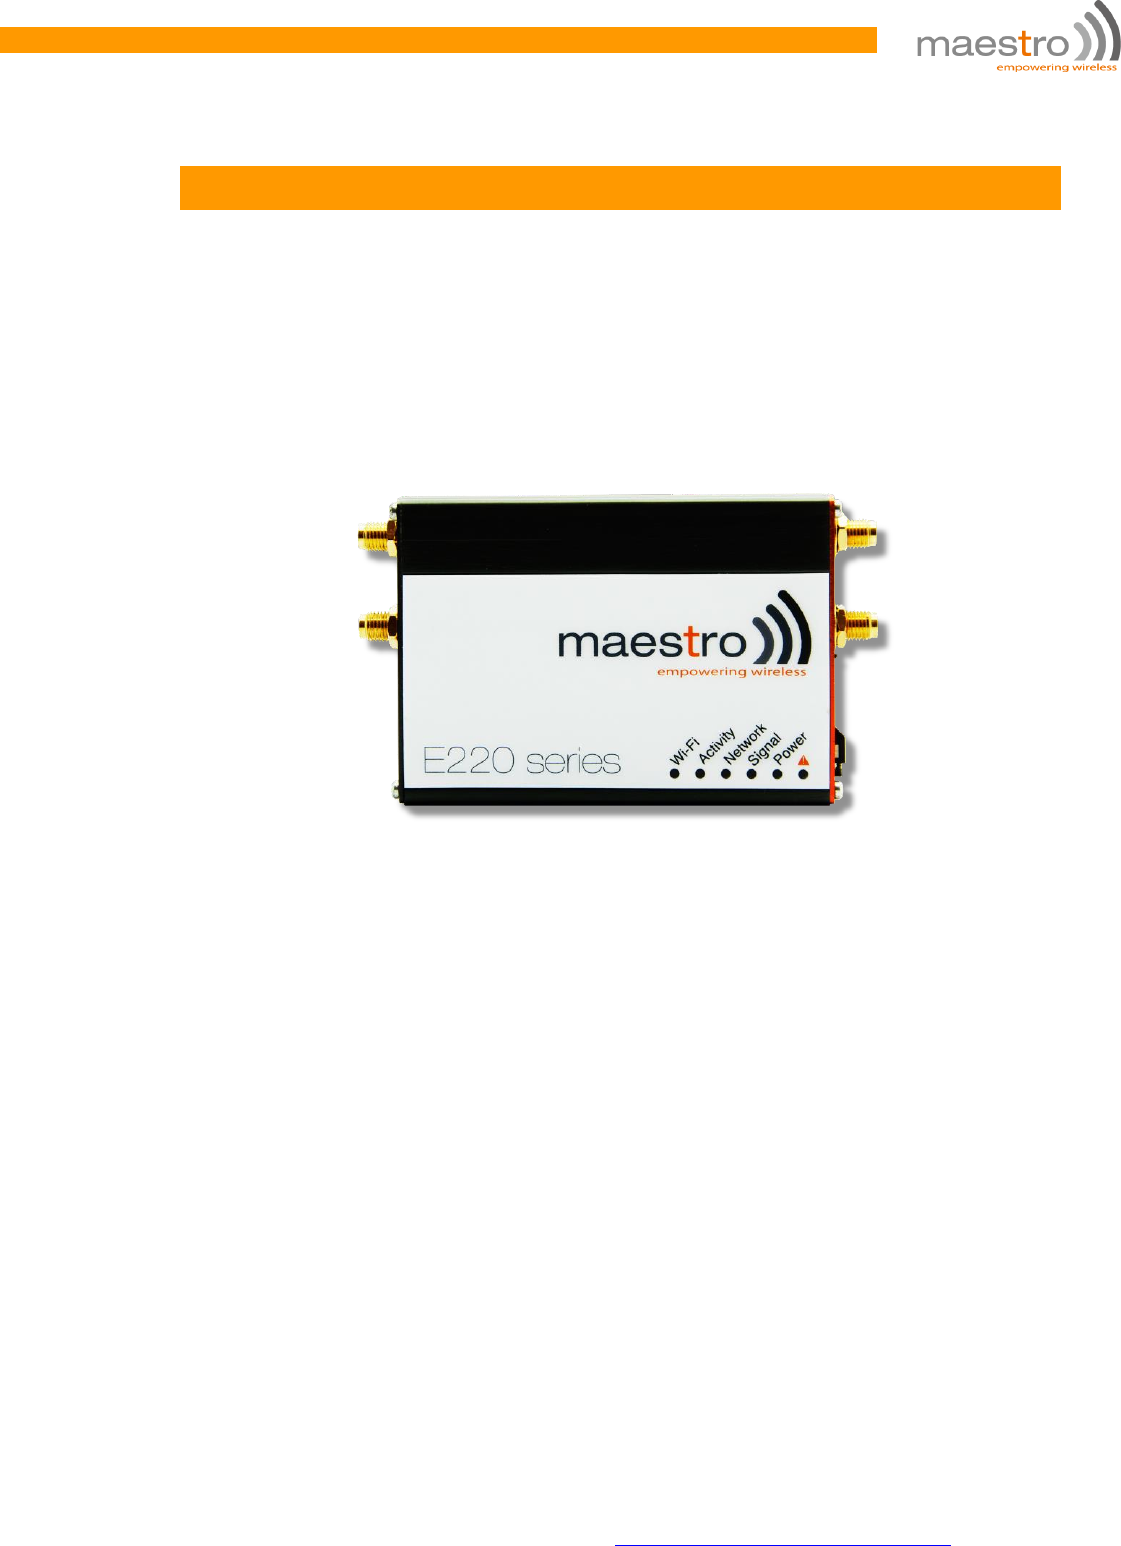
With LTE, WAN, LAN and Wi-Fi connectivity, Maestro’s E228 VZ router are highly
versatile, reliable and rugged router designed for mission-critical enterprise
applications requiring faultless connectivity.
E228 VZ
It is a High-Speed Verizon Wireless LTE router

MAESTRO WIRELESS SOLUTIONS | PREREQUISITE
E228 VZ | QUICK START GUIDE http://support.maestro-wireless.com 4
2. Prerequisite
Before continuing with the installation of your E220 Series router, make sure you
have a computer equipped with the following:
Computer with an Ethernet port or Wi-Fi connectivity and Internet
service
Active SIM card
Web browser such as Internet Explorer 7+ or Google Chrome, Mozilla
Firefox 1.5+ or Apple Safari to access the Maestro Web Admin Console
HCP enabled in the computer. To enable the DHCP, go to Start >
Control Panel > Network and Sharing Centre > Click the existing
Connection > Network Connection Status dialog box appears >
click Properties > Double click Internet Protocol Version 4
(TCP/IPv4) > Internet Protocol Version 4 (TCP/IPv4) Properties
dialog box appears > Under tab General, select following options:
a. Obtain an IP address automatically
b. Obtain DNS server address automatically

MAESTRO WIRELESS SOLUTIONS | CHECKING THE PACKAGE
CONTENT
E228 VZ | QUICK START GUIDE http://support.maestro-wireless.com 5
3. Checking the Package Content
Check the Package contents. Check that the package contents are complete.
One Maestro E228 VZ Router
One AC Power connector cable – 2-pin connector for power supply
One cross Ethernet Cable
Wi-Fi antennas
Diversity Antenna
Cellular Antenna
Quick Start Guide
Note
All the components are exclusive to the Maestro
Router and must be purchased.
If any component(s) from the package are missing, please contact Maestro
Support at support@maestro-wireless.com.
MAESTRO WIRELESS SOLUTIONS | DEFAULT
CONFIGURATION
E228 VZ | QUICK START GUIDE http://support.maestro-wireless.com 6
4. Default Configuration
4.1 Web Admin Page
Parameters
Details
IP Address (LAN)
192.168.1.1
Username
admin
Password
admin
Note
Username and Password are case sensitive.
4.2 Wi-Fi enabled, with WPA/WPA2 TKIP key
Parameter
Details
SSID
Maestro
WPA Key
W1rele$$
Note
Username and Password are case sensitive.
4.3 Connection
WAN Connection – Automatic (DHCP - Automatic IP Address lookup)
Active DHCP with starting IP Address: 192.168.1.100 with pool of 100
clients.
WAN as automatic IP, with Cellular backup
Cellular default APN is “internet”
MAESTRO WIRELESS SOLUTIONS | UNDERSTANDING THE
MAESTRO ROUTER
E228 VZ | QUICK START GUIDE http://support.maestro-wireless.com 7
5. Understanding the Maestro Router
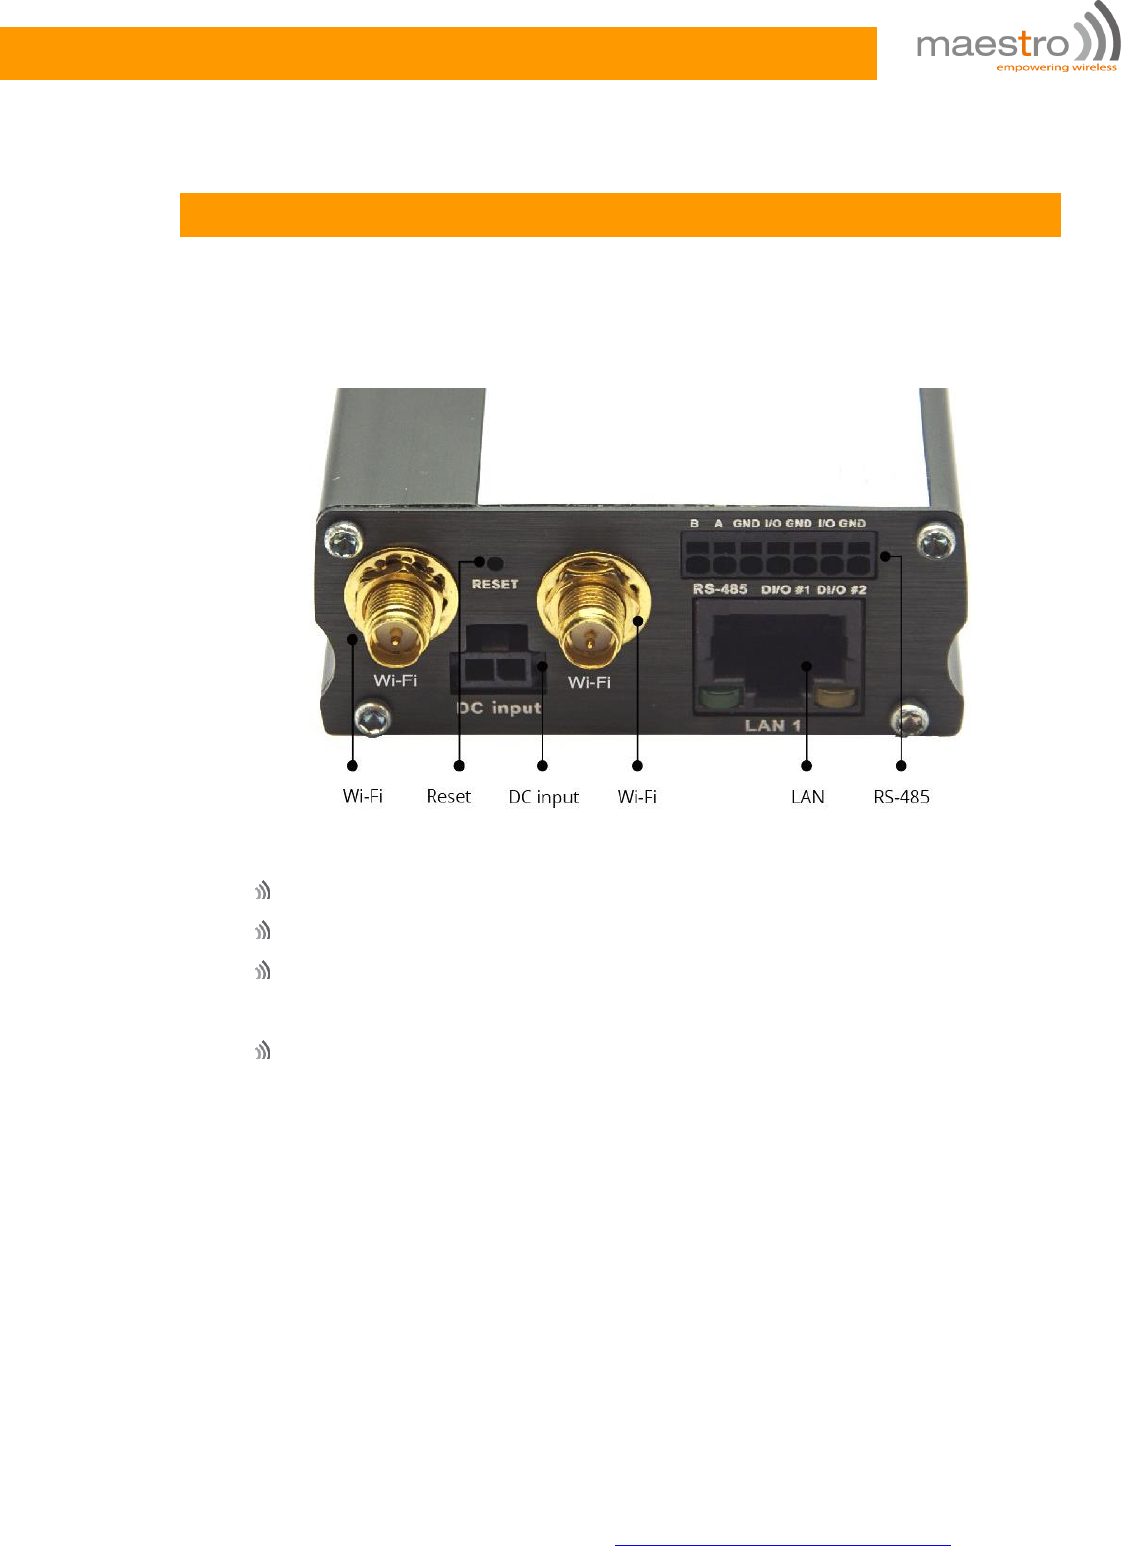
5.1 LAN Panel Details
Figure – Maestro Router LAN Panel
Power Supply – 2-pin Micro-fit 3.0 connector
Ethernet port (LAN) – Ethernet cable connects to LAN.
Reset Button – Push the reset button for 3 seconds and the device will
be reset to default settings.
Wi-Fi Connector – RP-SMA antenna connector
MAESTRO WIRELESS SOLUTIONS | UNDERSTANDING THE
MAESTRO ROUTER
E228 VZ | QUICK START GUIDE http://support.maestro-wireless.com 8
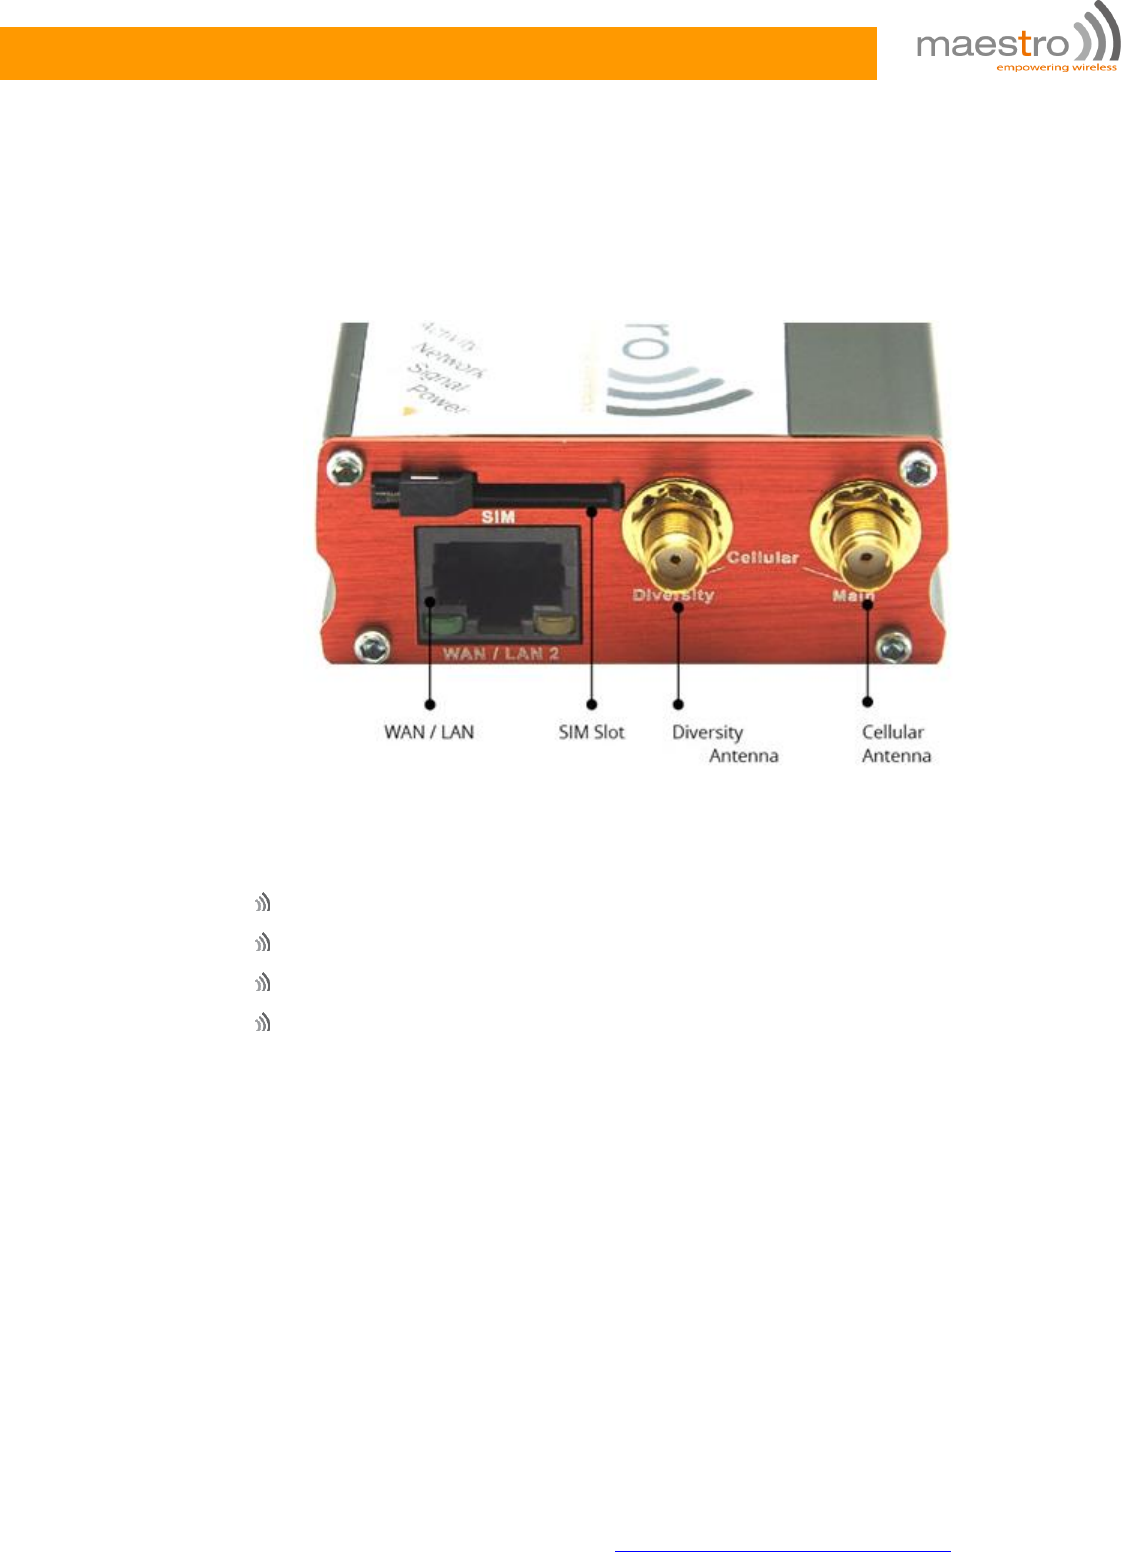
5.2 WAN Panel Details
Figure – Maestro Router WAN Panel
Diversity SMA Antenna Connector
Ethernet port (WAN), switchable to LAN
SIM Card holder
Cellular SMA Antenna Connector
MAESTRO WIRELESS SOLUTIONS | CONNECTING MAESTRO
ROUTER
E228 VZ | QUICK START GUIDE http://support.maestro-wireless.com 10
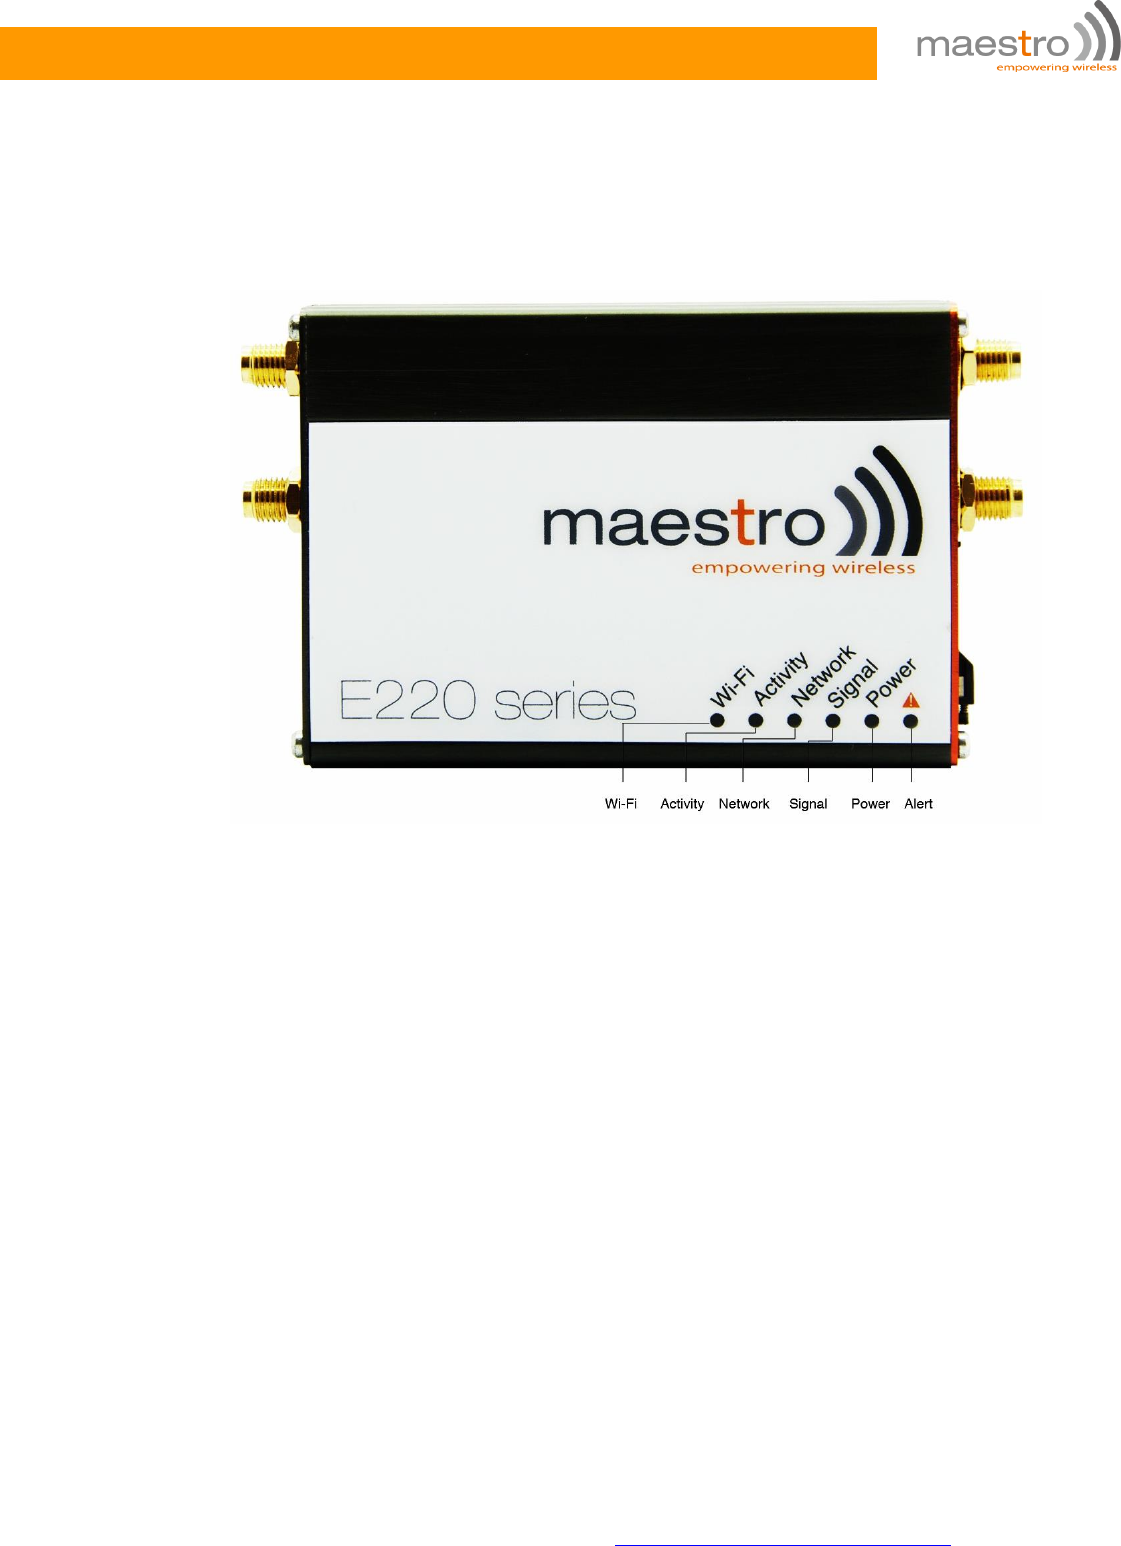
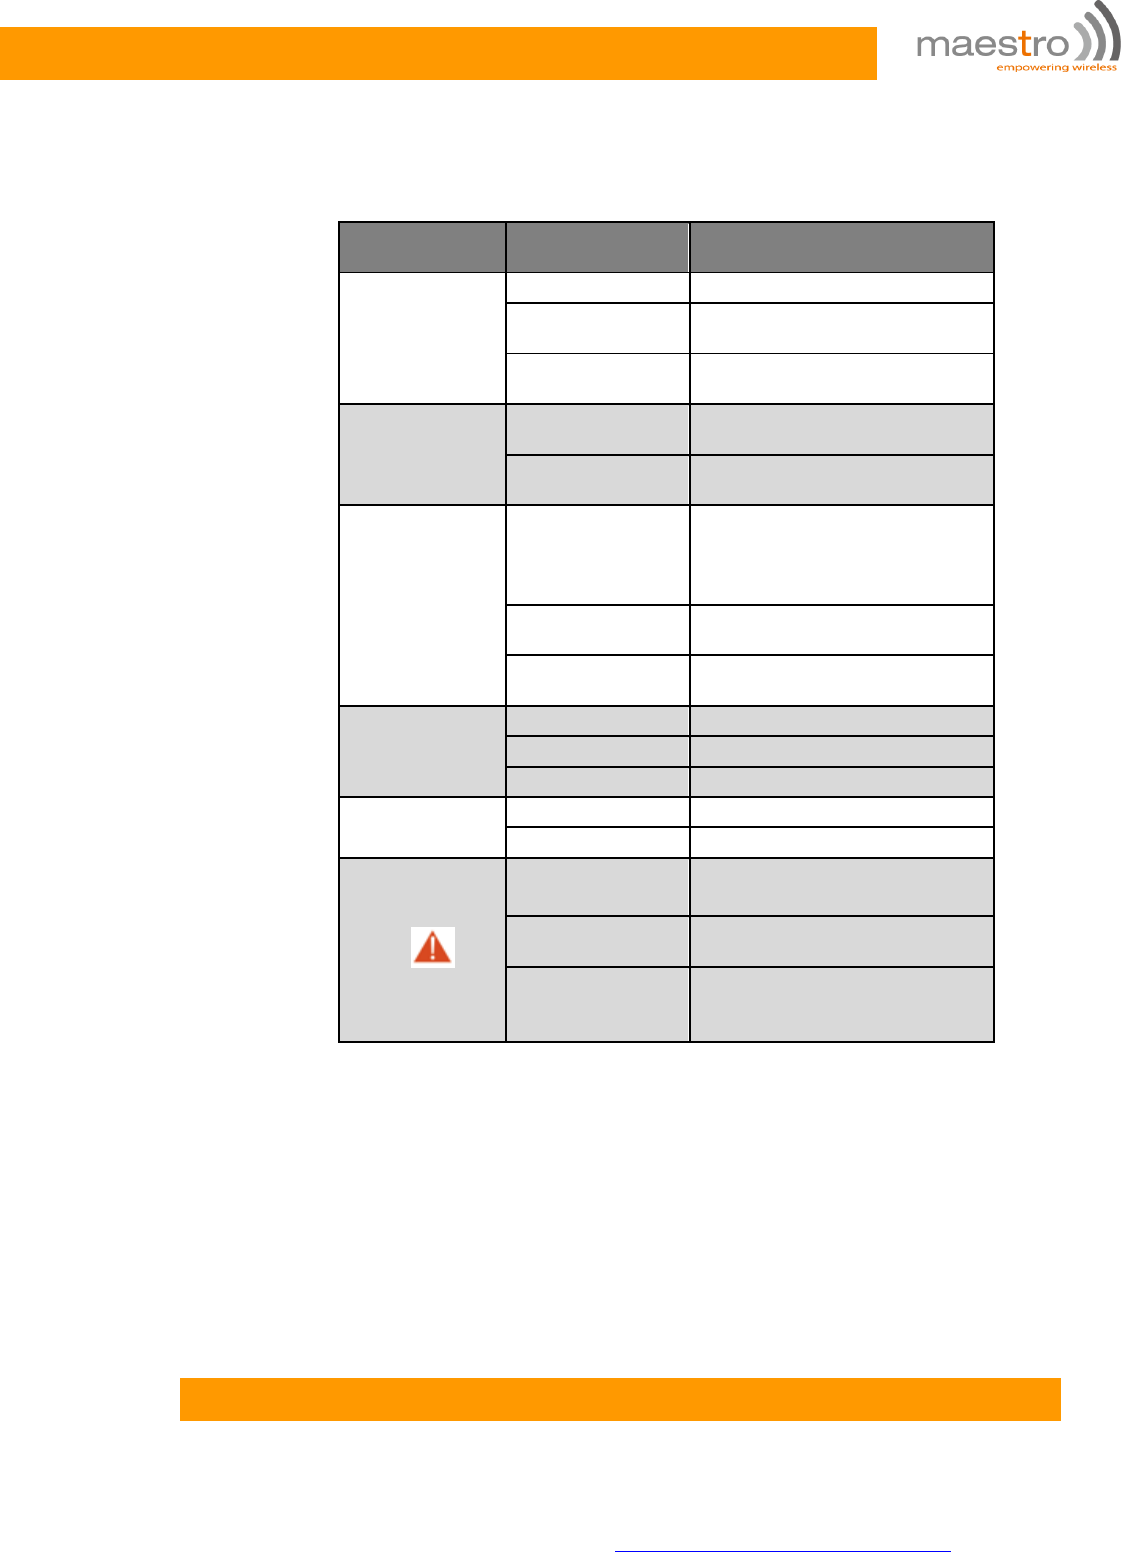
Name
Colour and
State
Description
WI-FI
OFF
Wi-Fi network is inactive
Blue Flashing
Wi-Fi network connection
traffic
Blue ON
Wi-Fi network is up and
activate
Activity
OFF
Cellular data service is not
connected
Amber ON
Cellular data service is
connected
Network
OFF
SIM card is not inserted,
or
Device is not registered on
the cellular network
Amber Flashing
Device is registered on the
cellular home network
Amber ON
Device is registered on the
cellular roaming network
Signal
OFF
No signal (CSQ=0,99)
Amber ON
Weak signal (CSQ<7)
Amber Flashing
Strong signal (CSQ>7)
Power
OFF
Power off
Green ON
Power on
Alert
OFF
No alert, device is running
smoothly
Red Flashing
Software fault (crash,
issues…)
Red ON
Hardware fault (high
temperature, problem with
module or SIM card)
Table – LED States and Description
6. Connecting Maestro Router
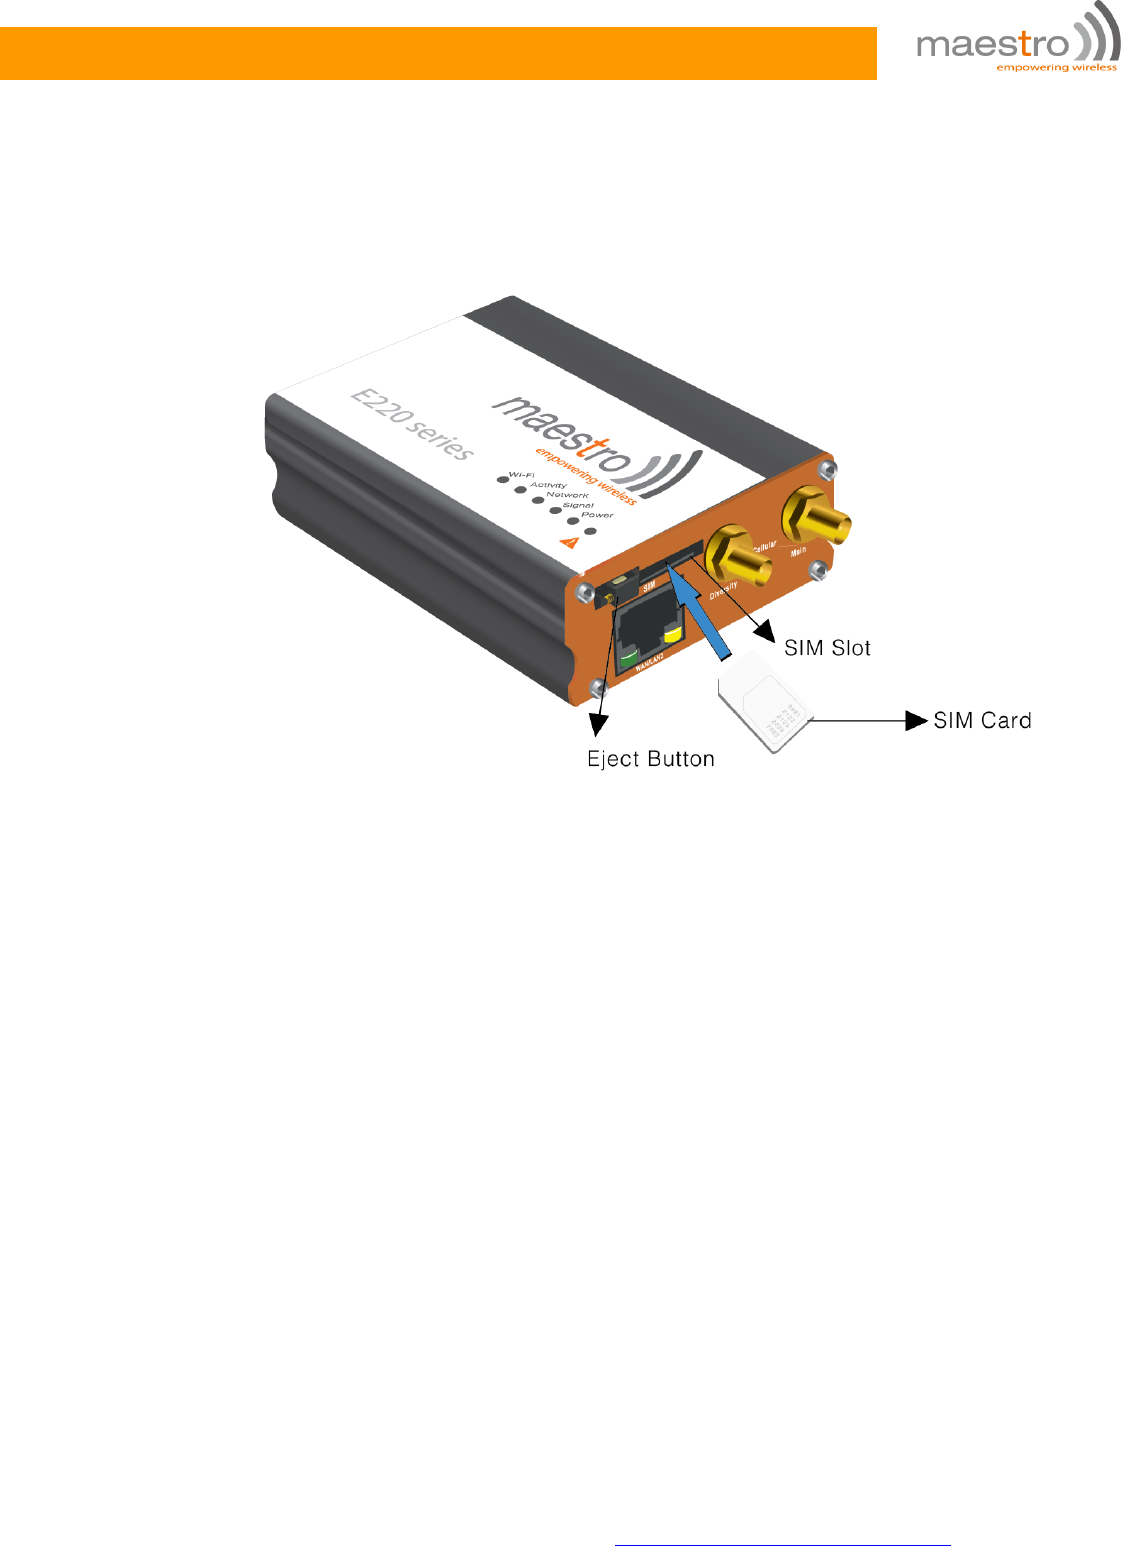
Step1. Insert the SIM card in your router as show below.
MAESTRO WIRELESS SOLUTIONS | CONNECTING MAESTRO
ROUTER
E228 VZ | QUICK START GUIDE http://support.maestro-wireless.com 11
Figure – Installing SIM Card in Maestro Router
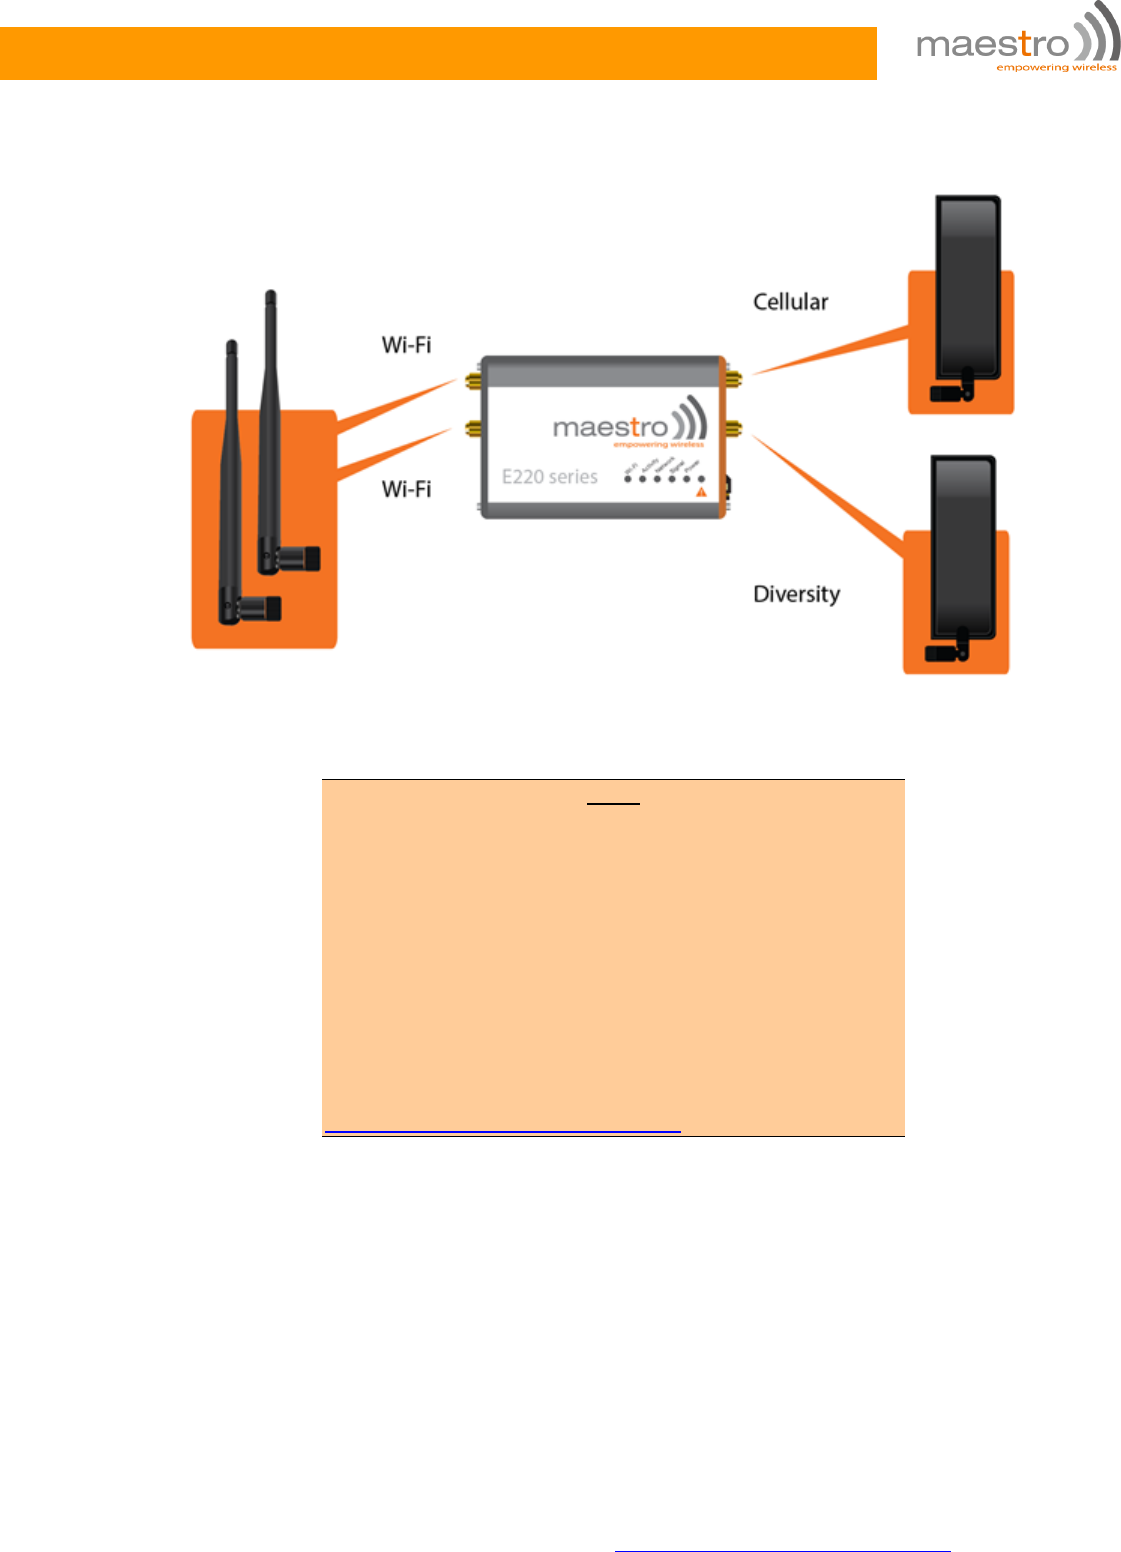
Step2. Connect WWAN antenna with “Main” connector on the E228 VZ. Make sure
the antenna is tightly secured.
Step3. Connect diversity antenna with “Diversity” connector.
MAESTRO WIRELESS SOLUTIONS | CONNECTING MAESTRO
ROUTER
E228 VZ | QUICK START GUIDE http://support.maestro-wireless.com 12
Figure – Connecting WWAN antenna & Cell connector on Maestro Router
Note
We strongly recommend connecting the diversity
antenna with “Diversity” connector, if the Maestro
Router package content includes it. A dual antenna
provides diversification that is improved signal
strength and thus better performance.
For certain circumstances/environments may
require a higher quality of antenna or one
mounted in a different location. In this case,
Maestro has many antenna options to choose from,
please contact Maestro Support at
support@maestro-wireless.com.
MAESTRO WIRELESS SOLUTIONS | CONNECTING MAESTRO
ROUTER
E228 VZ | QUICK START GUIDE http://support.maestro-wireless.com 13
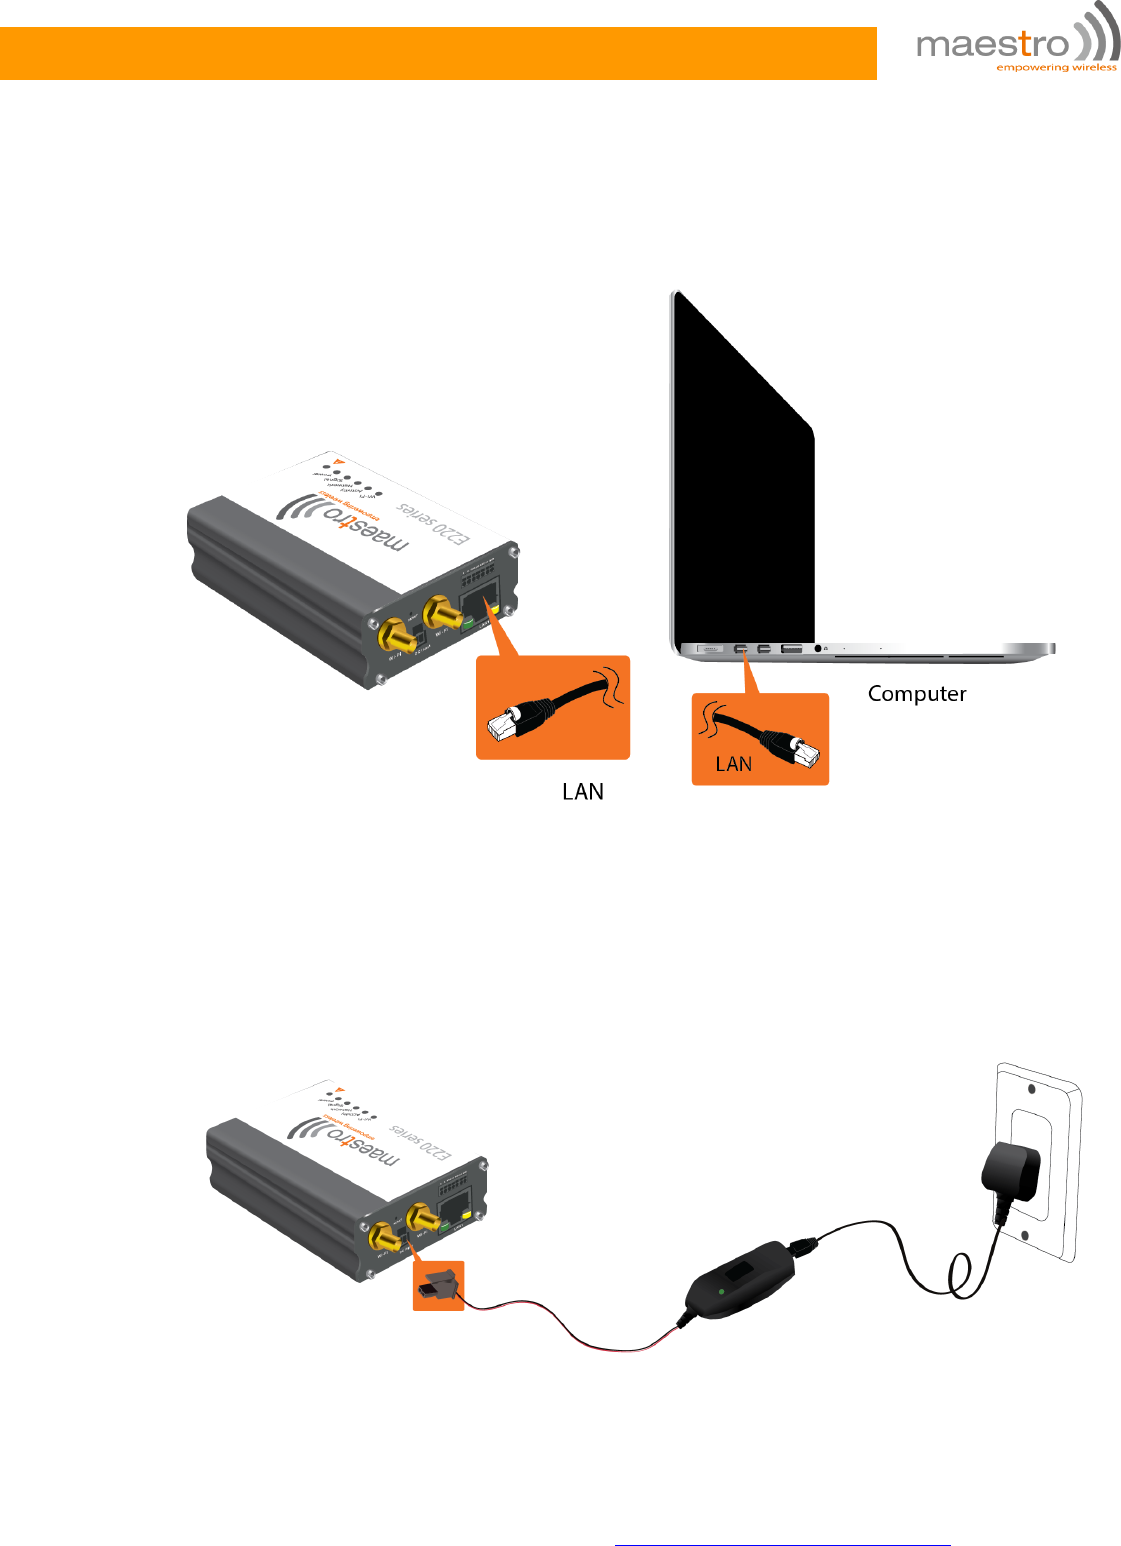
Step4. Use cross Ethernet cable to connect “LAN” port with the LAN port of the
computer.
Figure – Connecting Ethernet cable on Maestro Router & computer
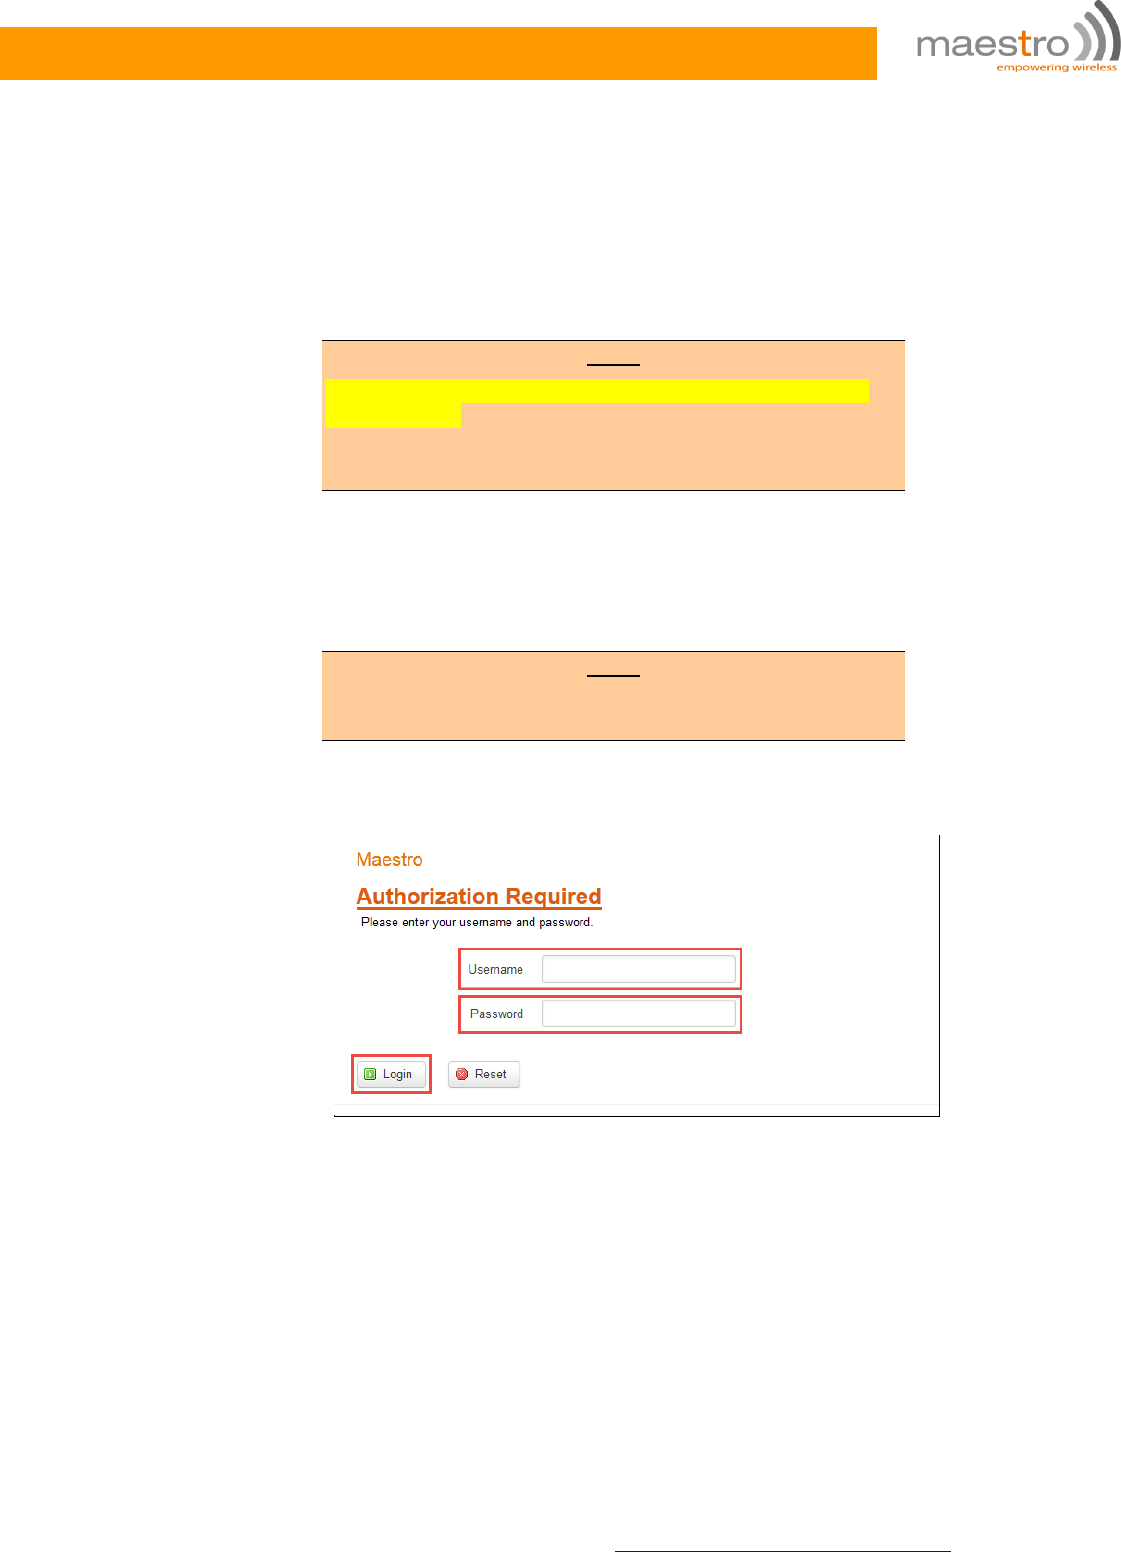
Step5. Connect the AC power connector into the “DC in” jack on LAN-side panel
of the Maestro Router. Plug the other side of the cord to a standard AC receptacle
and turn the power switch ON. The power LED will light when power is applied.
Figure – Connecting Ethernet cable on Maestro Router & computer
MAESTRO WIRELESS SOLUTIONS | CONNECTING MAESTRO
ROUTER
E228 VZ | QUICK START GUIDE http://support.maestro-wireless.com 14
Step6. Open a Web browser on the computer, and enter the LAN IP Address
http://192.168.1.1 of Maestro Router in browser’s URL box. A dialog box appears
prompting to enter Username and Password.
Note
The default LAN IP Address of Maestro Router is
192.168.1.1
DHCP must be enabled on the computer to access
Maestro Router with LAN IP Address 192.168.1.1
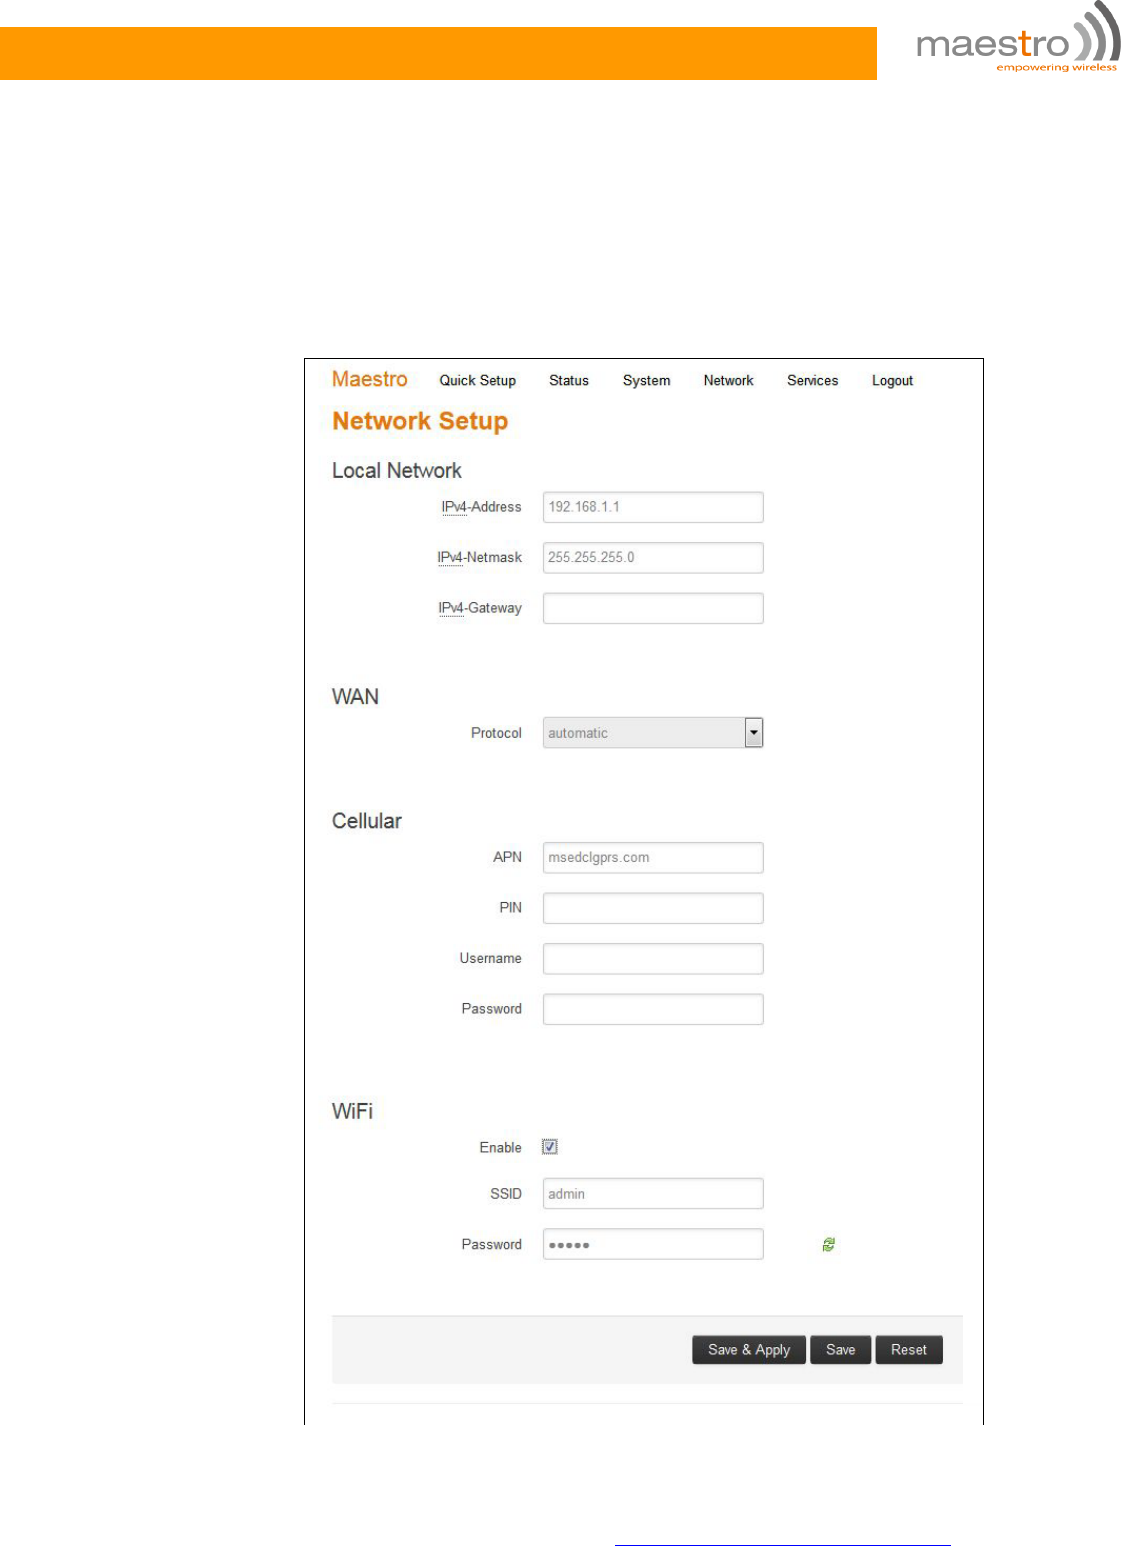
Step7. Enter the Username admin, and the Password admin in the login window.
Click Login.
Note
We strongly recommend you to change your login
password.
Screen – Login Page
MAESTRO WIRELESS SOLUTIONS | CONNECTING MAESTRO
ROUTER
E228 VZ | QUICK START GUIDE http://support.maestro-wireless.com 15
Step8. Click Next on the Quick Setup Page. Configure the network parameters for
LAN, WAN, Cellular and Wi-Fi.
Alternately, go to Management Settings, import and load predefined settings file.
Click Save & Apply to set the configuration.
Screen – Quick Start Network Configuration Page

MAESTRO WIRELESS SOLUTIONS | CONNECTING MAESTRO
ROUTER
E228 VZ | QUICK START GUIDE http://support.maestro-wireless.com 16
Screen Element
Description
Local Network
IPv4-Address
Enter IPv4 Address of LAN
interface.
The default IPv4 Address is
192.168.1.1
IPv4-Netmask
Enter IPv4 Subnet Mask of
LAN interface.
The default Netmask is
255.255.255.0
IPv4-Gateway
Enter the Gateway IPv4 of
the Gateway.
WAN
Protocol
Select the WAN protocol
from the available options:
Available Options
Manual
Automatic
PPPoE
The default WAN protocol is
selected as Automatic.
Cellular
APN
Access Point Name (APN) is
the name (Web address) of
an access point for LTE data
connection. Generally,
wireless cellular network
operator provides the APN to
their end users.
Enter the APN provided by
the cellular network
operator.
PIN
SIM card Personal
Identification Number (PIN)
is used to lock the card,
preventing people from
making unauthorized phone
call or access cellular data.
Enter the PIN of the SIM
card.
Username
Enter the login name.
Password
Enter the password.
Wi-Fi
Enable
By default, Wi-Fi interface is
enabled every time the

MAESTRO WIRELESS SOLUTIONS | CONNECTING MAESTRO
ROUTER
E228 VZ | QUICK START GUIDE http://support.maestro-wireless.com 17
Maestro Router reboots.
Click and disable the Wi-Fi
interface if you do not want
to use them.
SSID
Service Set Identifier (SSID)
is a sequence of characters,
which uniquely names a
wireless local area network
(WLAN).
The default SSID is Maestro .
Password
The default password is
W1rele$$.
Table – Quick Start Network Configuration Page
Congratulations!!!
This finishes the basic configuration of Maestro Router and you are ready to use
the Router.

MAESTRO WIRELESS SOLUTIONS | CONFORMITY
E228 VZ | QUICK START GUIDE http://support.maestro-wireless.com 18
7. Conformity
Federal Communications Commission (FCC) Declaration of Conformity
This device complies with part 15 of the FCC Rules. Operation is subject to the following two
conditions: (1) This device may not cause harmful interference, and (2) this device must accept any
interference received, including interference that may cause undesired operation.
This device has been tested and found to comply with the limits for a Class B digital , pursuant to
Part 15 of the FCC Rules. These limits are designed to provide reasonable protection against
harmful interference in a residential installation. This equipment generates, uses and can radiated
radio frequency energy and, if not installed and used in accordance with the instructions, may
cause harmful interference to radio communications. However, there is no guarantee that
interference will not occur in a particular installation If this equipment does cause harmful
interference to radio or television reception, which can be determined by turning the equipment off
and on, the user is encouraged to try to correct the interference by one or more of the following
measures:
-Reorient or relocate the receiving antenna.
-Increase the separation between the equipment and receiver.
-Connect the equipment into an outlet on a circuit different from that to which the receiver is
connected.
-Consult the dealer or an experienced radio/TV technician for help.
FCC Caution:
Changes or modifications not expressly approved by the party responsible for compliance could
void the user‘s authority to operate the equipment.
RF Exposure Information
This device meets the government’s requirements for exposure to radio waves.
This device is designed and manufactured not to exceed the emission limits for exposure to radio
frequency (RF) energy set by the Federal Communications Commission of the U.S. Government.
This device complies with FCC radiation exposure limits set forth for an uncontrolled environment.
In order to avoid the possibility of exceeding the FCC radio frequency exposure limits, human
proximity to the antenna shall not be less than 20cm (8 inches) during normal operation.
