MAG Technology Co B0001 LCD MONITOR User Manual LA810E p65
MAG Technology Co Ltd LCD MONITOR LA810E p65
Exhibit 7 Users Manual
Operation Manual
LA810E
18.1"Ultra High Resolution
Digital Interface
LCD Monitor
LA810E.p65 2000/8/14, PM 03:0217

1
Sicherheitshinweise
1. Lesen Sie die folgenden Hinweise vollständig durch.
2. Bewahren Sie die Anleitung auf.
3. Befolgen Sie alle Hinweise und Warnungen, die am Produkt selbst
vermerkt sind.
4. Ziehen Sie den Netzstecker aus der Steckdose, bevor Sie das Gerät
reinigen. Verwenden Sie keine flüssigen oder ätzenden
Reinigungsmittel. Benutzen Sie zur Reinigung ein feuchtes,
fusselfreies Tuch.
5. Betreiben Sie das Gerät niemals in der Nähe von Wasser.
6. Stellen Sie das Gerät niemals auf eine instabile Fläche, Regal oder
Tisch. Andernfalls könnte es herunterfallen und beschädigt werden.
7. Sämtliche Schlitze und Öffnungen auf der Unter- und Rückseite des
Gerätes dienen zur Lüftung, so daß es ausreichend vor Überhitzung
geschützt ist. Diese Lüftungsschlitze dürfen niemals verdeckt werden,
auch nicht, indem Sie das Gerät auf ein Bett, Sofa, Kissen oder eine
ähnliche Unterlage stellen. Das Gerät darf niemals in der Nähe oder
auf einem Heizkörper bzw. einer anderen Wärmequelle stellen.
Ebensowenig darf es in Einbauschächte oder Schränken installiert
werden, wenn nicht für ausreichende Belüftung gesorgt wird.
8. Das Gerät muß immer an eine Netzspannung gemäß der Plakette auf
der Gehäuserückseite angeschlossen werden. Falls Sie sich nicht
sicher sind, welche Netzspannung verfügbar ist, wenden Sie sich an
Ihren Fachhändler.
9. Das Gerät ist mit einem 3adrigen Stecker ausgerüstet, der für
ausreichende Erdung sorgt. Der Netzstecker paßt aus
Sicherheitsgründen nur in eine geerdete Steckdose. Falls der
Netzstecker nicht in Ihre Steckdose passen sollte, wenden Sie sich an
einen Elektriker, damit dieser die veraltete Steckdose auswechselt.
10. Stellen Sie keine Gegenstände auf das Netzkabel, und verlegen Sie es
so, daß niemand hierüber stolpern kann.
LA810E.p65 2000/8/14, PM 03:011

2
11. Wenn Sie ein Verlängerungskabel verwenden, vergewissern Sie sich,
daß der Gesamtverbrauch aller angeschlossenen Geräte die maximale
Belastbarkeit des Verlängerungskabels nicht überschreitet. Stellen Sie
ebenso sicher, daß der Gesamtverbrauch aller Geräte den Wert von 15
A nicht überschreitet.
12. Stecken Sie keine Gegenstände durch die Lüftungsschlitze, da die
elektronischen Komponenten im Gehäuseinnern Hochspannungen
ausgesetzt sind. Andernfalls können Kurzschlüsse, Elektroschocks
oder Feuer die Folge sein. Schütten Sie ebenso keine Flüssigkeiten
auf das Gerät.
13. Versuchen Sie nicht, das Gerät selbständig zu warten oder zu
reparieren, da Sie sich ansonsten Hochspannung oder anderen
Risiken aussetzen könnten. Überlassen Sie sämtliche Reparaturen
einem qualifizierten Techniker.
14. Ziehen Sie den Netzstecker aus der Steckdose, und wenden Sie sich
an qualifiziertes Fachpersonal, falls das Gerät folgende Merkmale
zeigt:
A. Wenn das Netzkabel oder der Netzstecker beschädigt oder
ausgefranst sind.
B. Falls Flüssigkeiten in das Gehäuseinnere gelangt sind.
C. Wenn das Gerät Regen oder Wasser ausgesetzt war.
D. Wenn das Gerät nicht einwandfrei arbeitet, obwohl die
nachfolgenden Anweisungen befolgt wurden. Stellen Sie das
Gerät nur mit den Reglern ein, die in dieser
Bedienungsanleitung besprochen werden, da eine
Fehleinstellung anderer Regler das Gerät beschädigen kann
und aufwendige Reparaturarbeiten die Folge wären.
E. Falls das Produkt heruntergefallen ist, oder das Gehäuse
beschädigt wurde.
F. Wenn das Gerät einen außergewöhnlichen Betriebszustand
aufweist, der reparaturbedürftig ist.
LA810E.p65 2000/8/14, PM 03:012

3
Warning
A shielded-type power cord is required in order to meet FCC emission
limits and also to prevent interference to the nearby radio and television
reception. It is essential that only the supplied power cord be used.
Use only shielded cables to connect ATI devices to this equipment.
You are cautioned that changes or modifications not expressly approved
by the party responsible for compliance could void your authority to
operate the equipment.
NOTE
This equipment has been tested and found to comply with the limits for a
Class B digital device, pursuant to Part 15 of the FCC Rules. These limits
are designed to provide reasonable protection against harmful
interference in a residential installation. This equipment generates, uses,
and can radiate radio frequency energy and, if not installed and used in
accordance with the instructions, may cause harmful interference to radio
communications. However, there is no guarantee that interference will not
occur in a particular installation. If this equipment does cause harmful
interference to radio or television reception, which can be determined by
turning the equipment off and on, the user is encouraged to try to correct
the interference by one or more of the following measures:
* Reorient or relocate the receiving antenna.
* Increase the separation between the equipment and receiver.
* Connect the equipment into an outlet on a circuit different from that
to which the receiver is connected.
* Consult a dealer or an experienced radio/TV technician for help.
FCC Compliance Statement
LA810E.p65 2000/8/14, PM 03:013

4
Safety Instructions
1. Read all of these instructions.
2. Save these instructions for later use.
3. Follow all warnings and instructions marked on the product.
4. Unplug this product from the wall outlet before cleaning. Do not use
liquid cleaners or aerosol cleaners. Use a damp cloth for cleaning.
5. Do not use this product near water.
6. Do not place this product on an unstable car, stand, or table. The
product may fall, causing serious damage to the product.
7. Slots and openings in the cabinet and the back or bottom are provided
for ventilation; to ensure reliable operation of the product and to protect
it from overheating, these openings must not be blocked or covered.
The openings should never be blocked by placing the product on a
bed, sofa, rug, or other similar surface. This product should never be
placed near or over a radiator or heat register. This product should not
be placed in a built-in installation unless proper ventilation is provided.
8. This product should be operated from the type of power source
indicated on the marking label. If you are not sure of the type of power
available, consult your dealer or local power company.
9. This product is equipped with a 3-wire grounding type plug, a plug
having a third (grounding) pin. This plug will only fit into a grounding-
type power outlet. This is a safety feature. If you are unable to insert
the plug into the outlet, contact your electrician to replace your obsolete
outlet. Do not defeat the purpose of the grounding-type plug.
10. Do not allow anything to rest on the power cord. Do not locate this
product where people will walk on the cord.
11. If an extension cord is used with this product, make sure that the total
of the ampere ratings on the products plugged into the extension cord
do not exceed the extension cord ampere rating. Also, make sure that
the total of all products plugged into the wall outlet does not exceed 15
amperes.
LA810E.p65 2000/8/14, PM 03:014

5
12. Never push objects of any kind into this product through cabinet slots
as they may touch dangerous voltage points or short out parts that
could result in a risk of fire or electric shock. Never spill liquid of any
kind on the product.
13. Do not attempt to service this product yourself, as opening or
removing covers may expose you to dangerous voltage points or
other risks. Refer all servicing to service personnel.
14. Unplug this product from the wall outlet and refer servicing to
qualified service personnel under the following conditions:
A. When the power cord or plug is damaged or frayed.
B. If liquid has been spilled into the product.
C. If the product has been exposed to rain or water.
D. If the product does not operate normally when the operating
instructions are followed. Adjust only those controls that are
covered by the operating instructions since improper
adjustment of other controls may result in damage and will
often require extensive work by a qualified technician to restore
the product to normal operation.
E. If the product has been dropped or the cabinet has been
damaged.
F. If the product exhibits a distinct change in performance,
indicating a need for service.
15. Jordet Stikkontatkt skal benyttes når apparatet tilkobles tele-/datanett!
(For Nordic Only)
16. Apparaten skall anslutas till jordat uttage när skyddsklenspenning-
Sutgången till ett nät som passerar såväl ojordat som jordat miljö.
(For Nordic Only)
17. This LCD monitor should use AC adaptor, model PA1250,PC1255,
PP1250 or PS1250.
LA810E.p65 2000/8/14, PM 03:015

6
Contents
Introduction ............................................................................... 7
Setup ........................................................................................ 9
Operation ................................................................................ 12
Care and Maintenance ............................................................. 14
Troubleshooting ....................................................................... 15
Technical Specifications ........................................................... 16
LA810E.p65 2000/8/14, PM 03:016

7
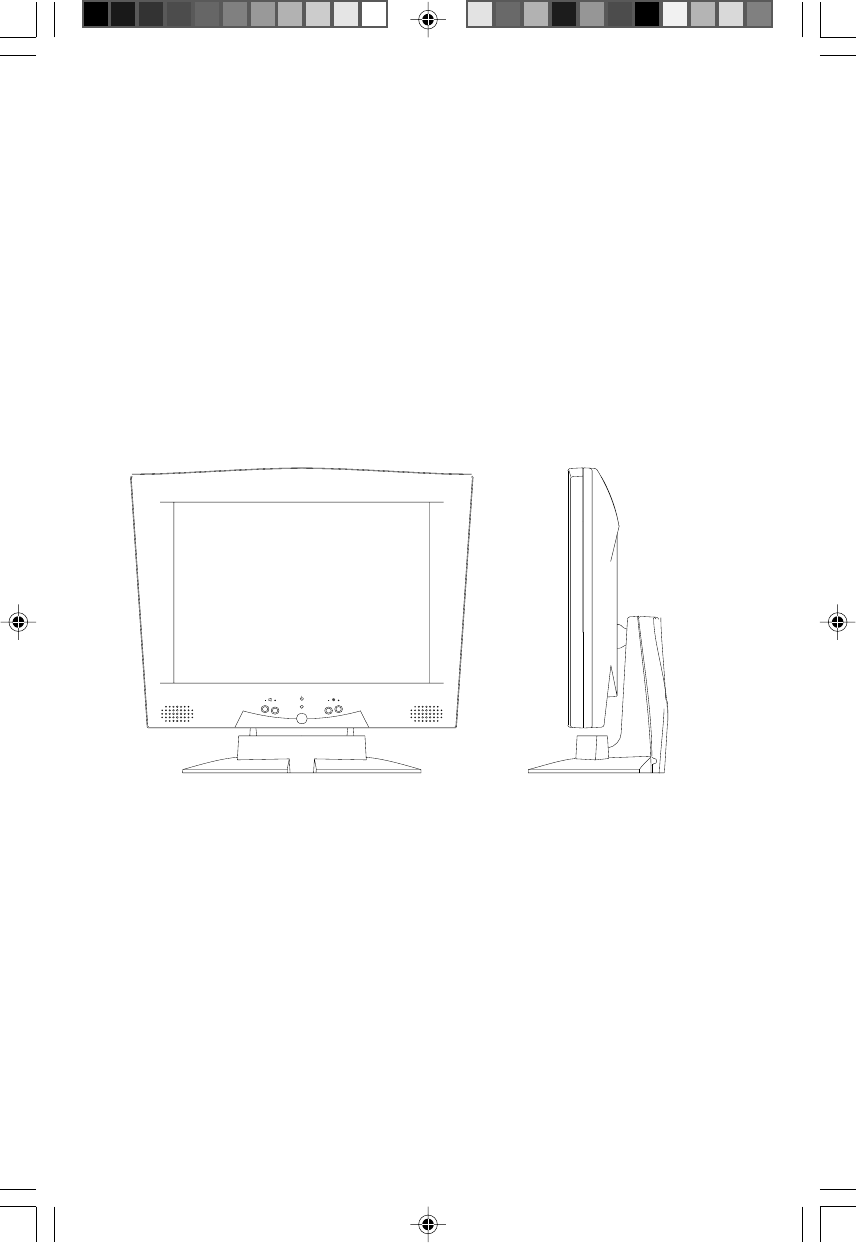
Introduction
Welcome to the exciting world of high resolution graphics with your
purchase of a PanelVision monitor. This 18.1-inch intelligent LCD monitor
features ultra high resolutions of up to 1280 x 1024 pixels.
PanelVision is the most functional LCD you can buy, ensuring the safest,
most productive computing experience possible. Unlike CRT monitors,
PanelVision provides crisp, sharp images from center to edge. There’s no
flicker to cause eyestrain and no electromagnetic radiation. Finally, your
PanelVision monitor consumes approximately 40% of the power of a
comparably sized CRT monitor.
Features
•18.1" Large SXGA TFT LCD Panel
•0.28 mm Pixel pitch
•No Radiation
•Lower Power Consumption (Below 65 Watts)
•Ergonomic Design
•16.7M colors
•Microprocessor-based design with digital controls
•Universal auto-switching power adapter
•TCO’99 Compliant (Optional)
•VESA DPMS compliant
•USB with one up stream port and four down stream ports
•VESA DVI Digital Interface Standard
• Build in Speakers (0.5W x 2)
LA810E.p65 2000/8/14, PM 03:027

8
Unpacking
Carefully unpack your monitor, saving the packing material for future
transportation of your monitor. Confirm that all of the following items are
included:
•LCD monitor
•ATI Rage Fury Pro (or Hercules 3D PROPHLT DDR-DVI) Video Adapter
•AC-DC power adapter
•This manual
•Power Cord
•Audio cable (option)
•ATI (or Hercules) Installation Software CD-ROM or diskettes
LA810E.p65 2000/8/14, PM 03:028

9
Setup
Environment
In planning the environment in which you will use your monitor,
• Avoid placing the monitor in direct sunlight and do not face the panel
into direct sunlight to avoid glare.
• Choose a well-ventilated area to avoid internal heat build up. Do not
place the monitor on or near material which may block ventilation such
as carpets or curtains. Avoid excessively dirty environments, and heat
sources.
• Keep your monitor away from equipment that generates magnetism such
as voltage converters, speakers, motors and televisions.
• Do not place heavy objects on the power cord or place the monitor in a
way that the power cord is under tension.
Installing the Digital Video Card
In order to use your digital LCD monitor, you must first install the digital
display adapter card included with your PanelVision monitor. A complete
online manual for your ATI Rage Fury Pro digital LCD video card is
available on the ATI Installation Software CD-ROM.
If you do not feel comfortable performing this installation, consult a
qualified computer technician for assistance.
LA810E.p65 2000/8/14, PM 03:029
10
1 To insure a smooth installation, reinstall the Standard (VGA) graphics
adapter driver through Control Panel / Display / Settings and set the
display resolution to 1280 x 1024.
2 Power off the computer and display, then disconnect the display cable
from the back of your computer.
3 Remove the computer cover. If necessary, consult your computer’s
manual for help.
4 Discharge your body’s static electric charge by touching a grounded
surface, such as the metal surface of the computer chassis before
touching your computer boards or the graphic adapter card.
5 If your computer has uses an on-board built-in graphics adapter, you
may need to disable it.
6 If your card is a PCI card, install it in a PCI slot. If your card is an
AGP, install it in an AGP slot. If necessary, remove the metal cover
from the expansion slot. Align your card with the expansion slot and
press firmly until the card is fully seated.
7 Replace the screw to fasten the card in place, and replace your
computer’s cover.
8 Once you have completed the card and video driver installation, return
to Control Panel / Display / Settings, and reset the display resolution
and colors to your preferred settings.
For more detailed instructions, open the file \ati\online\english\start.pdf on
the MAG PanelVision Software CD-ROM with a PDF reader. If you do not
have a PDF reader, you may download one from www.adobe.com
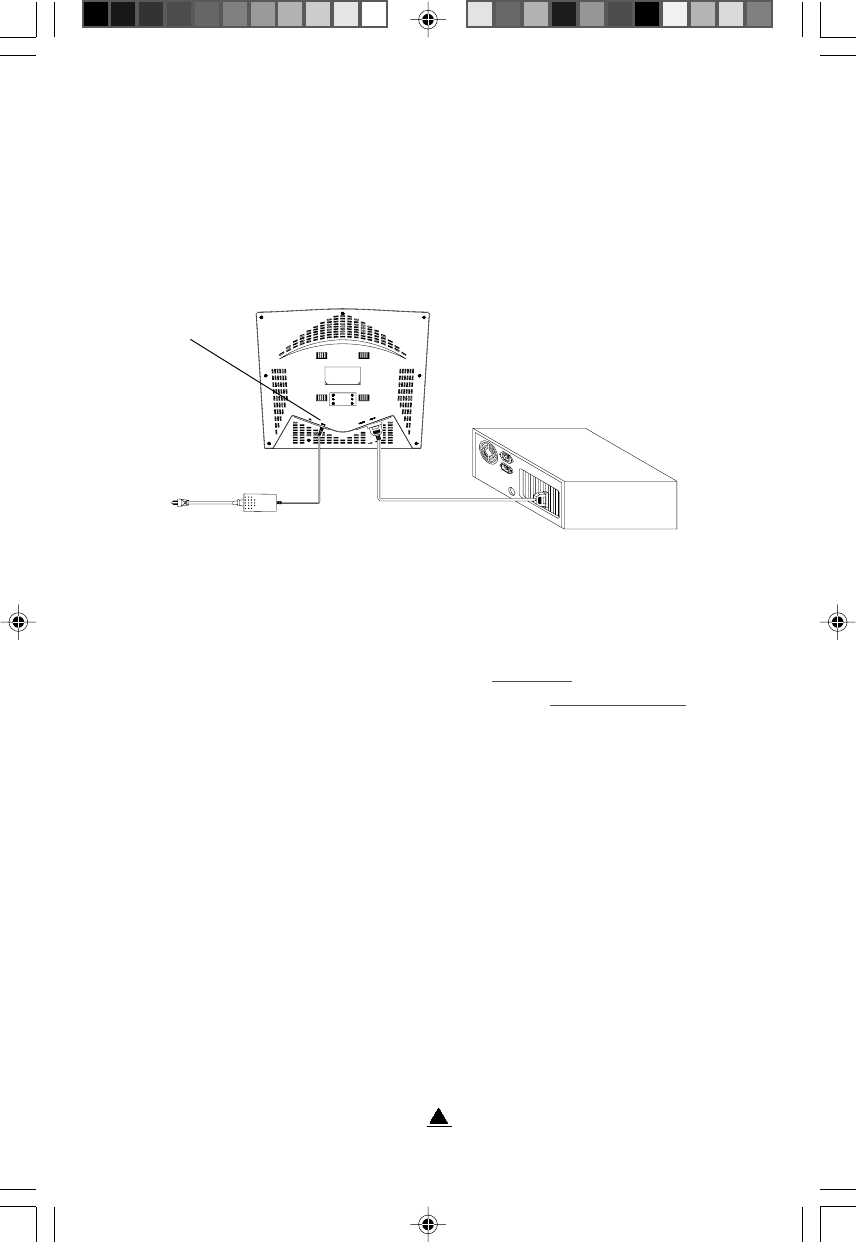
Power Cable Connection
Connect the female end of the power cable to the power input receptacle on
the power adapter. Plug the power cable into the wall outlet. Plug the other
end of the power adapter into the DC-IN jack of the monitor.
Signal Cable Connection
Plug the PanelVision digital signal cable into the digital signal connector on
the video display card.
LA810E.p65 2000/8/14, PM 03:0210
11
USB Connectivity
Your PanelVision monitor is equipped with one up-stream USB port and four
down-stream USB ports. You may optionally connect your monitor to your
computer via USB interface, and you may connect up to four USB
peripherals, such as a keyboard, mouse or printer, directly to your monitor.
Power Up
You are now ready to use your PanelVision monitor. Switch on the power to
both the monitor and to your computer. If you need to make any
adjustments to the displayed image, refer to the Operation Chapter. If the
image does not display or displays improperly, refer to Troubleshooting.
DC LCD MONITOR
REAR COVER
PC
AC Power Adapter Digital VGA Signal Cable
LA810E.p65 2000/8/14, PM 03:0211
12
Operation
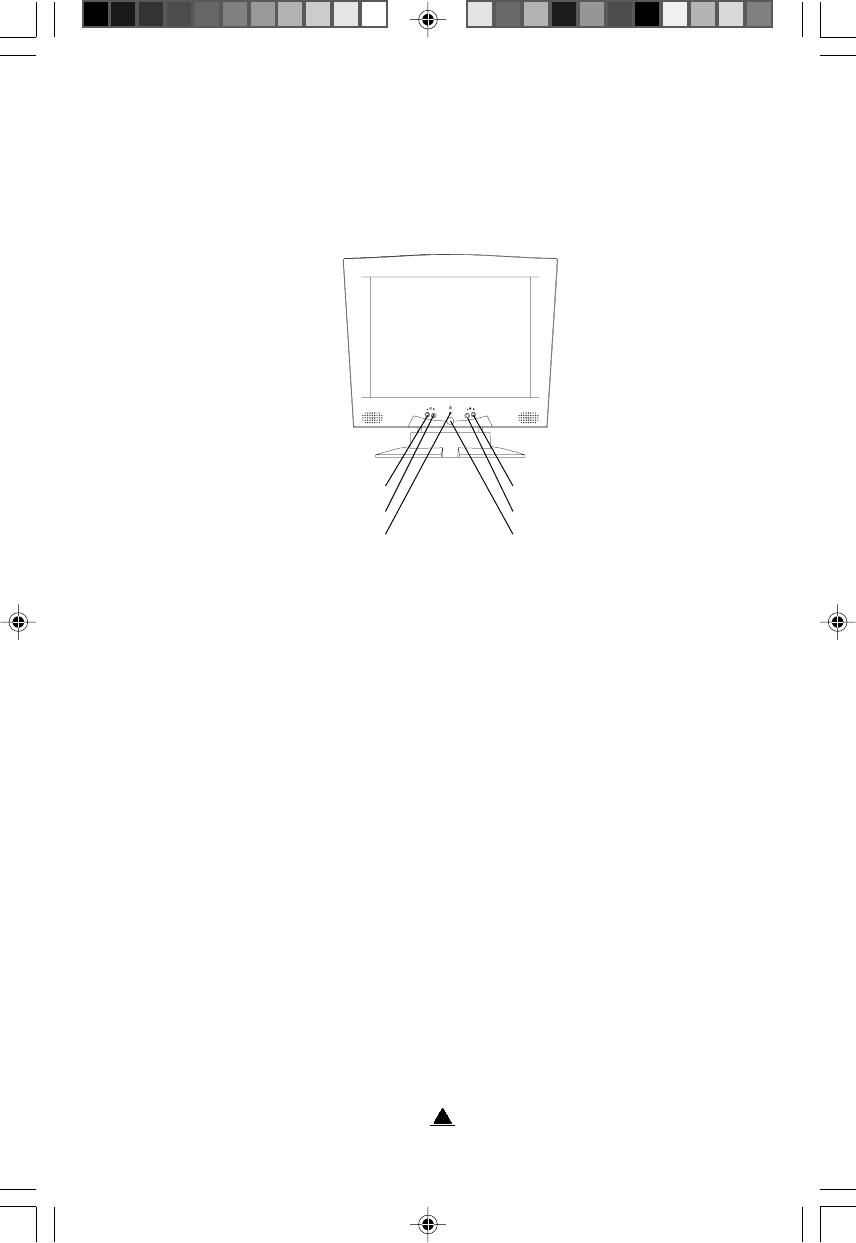
Panel Controls and Indicators
Power Switch
Press this button to turn the power On or Off. You may notice a one second
delay before the monitor starts.
Power Indicator
The Power indicator should be On if the power cord is properly connected
and the power button is switched On. During operation, the indicator light
is green. It will turn orange if the monitor is in Power Saving mode or if there
is no video signal. (In which case the signal cable may not be properly
connected to the computer or the computer may have failed.)
Brightness Control
To adjust screen brightness press the + key to increase brightness or the -
key to decrease brightness.
Volume Control
To adjust audio volume press the + key to increase volume or the - key to
decrease volume.
Volume -
Volume +
LED
Brightness +
Brightness -
Power on/off
LA810E.p65 2000/8/14, PM 03:0212
13
Power Management
Your PanelVision monitor can enter three different power states. These are
On, Suspend and Off. The panel will enter Suspend and then Off to
conserve power and preserve the screen. What state the panel is in
depends on the signal that the panel is receiving from the adapter card in
your computer. Thus your computer’s power management settings will
effectively set your panel’s power states under different conditions.
The monitor will automatically revert to its On state when both horizontal
and vertical signals are present.
Plug & Play
Your PanelVision monitor is DDC Plug & Play compliant. If your monitor is
used with a DDC compliant video adapter, your monitor will inform your
operating system of your monitor’s different operating modes. To
implement DDC, turn on your computer first and then your monitor.
Windows will create a table of your monitor and video adapter’s maximum
refresh rates at different possible resolutions.
nOehtdnalanoitarepoerascnyslacitrevdnalatnozirohhtoB .yllamronsnoitcnufrotinom
dnepsuSni(evitcanieraslangisscnyslacitrevrolatnozirohrehtiE tondna)snoitacificepsSMPDASEVhtiwecnadrocca roftpecxedelbasiderarotinomehtfostrapllA.lanoitarepo .tiucriCcigoLnoitceteDehtdnarellortnocorcimeht
ffOecnadroccani(evitcanierascnyslacitrevdnalatnozirohhtoB llA.lanoitarepotondna)snoitacificepsSMPDASEVhtiw elbissoptsewolehtsisihT.delbasiderarotinomehtfostrap .rotinomehtfoetatsrewop
LA810E.p65 2000/8/14, PM 03:0213

14
Care and Maintenance
•The surface of your PanelVision screen is delicate. Avoid touching
the screen and especially applying pressure to the screen with your
fingers or other objects. Be especially careful to avoid touching the
screen with sharp objects.
•Use only non-ammonia glass cleaner on the screen.
•Avoid spilling liquid on your PanelVision monitor.
•If the LCD panel becomes dirty, wipe off the panel with a dry soft
cloth. If necessary, you may apply slight humidity to the panel with
your breath, then immediately wipe the LCD panel dry with a dry soft
cloth. Leaving humidity on the panel may result in discoloration of the
LCD panel.
•If the panel cannot be cleaned with a dry cloth, you may use a soft
piece of cloth lightly moistened with water. Do not allow any water to
enter the LCD monitor where it may cause damage and wipe dry the
LCD panel immediately.
•Clean the cabinet, panel and controls with a soft dry cloth. If the case is
very dirty, us a soft cloth, lightly moistened with a mild detergent
solution. Do not use abrasive pads or solvents such as alcohol based
cleaners or benzene to clean your monitor
•Always handle your PanelVision monitor with care when moving it.
LA810E.p65 2000/8/14, PM 03:0214

15
Troubleshooting
If your PanelVision monitor is not functioning properly, use the list below to
isolate the problem and find remedies to common problems.
No Picture
1 Is Power connected?
•Connect the power cord
•Check that the power switch is On
2 Is the monitor receiving a video signal?
•Check that the signal cable between the monitor and your
computer is properly connected.
•Check that the computer power switch is On
•Check that the monitor is not in Suspend mode.
Color is Abnormal
Is the signal cable properly attached?
•Check the video signal cable.
LA810E.p65 2000/8/14, PM 03:0215
Technical Specifications
LENAPDCL )rotsisnarTmliFnihT(TFT"1.81latigiD
)HXW(EZISYALPSID)mm2.782xmm0.953("11x"41
NOITULOSERMUMIXAMzH06@4201x0821
SROLOCYALPSIDM7.61
HCTIPLEXIPepirtsBGRmm82.0
EMITESNOPSERsm05
THGILKCAB6xTFCC
ELGNAGNIWEIV)V(055-/+,)H(°07-/+
)ECNANIMUL(SSENTHGIRBpyTstin532
OITARTSARTNOClacipyt1:003
SLORTNOCRESUemulovdnassenthgirB,rewoP
ECAFRETNICP ecafretnI)kniL-lenaP(latigiDIVDASEVni-tliuB MARDSBM23)PGA(orPyruFegaRITA
BSUbuHeruP maertSnwoD4/maertSpU1
OIDUAkcaJiniMoeretS 2xW5.0
YALP&GULPB2CDD
YLPPUSREWOPretpadAzH26-84,CAV462-09CD/CA
LANGISTUPNInip-52deliatgiP)m8.1(.tf9.5 rotcennoCIVD
NOITPMUSNOCREWOP.XAMsttaw8<:gnivaSrewoP,sttaw56:nO )BSUhtiw(
)DxHxW(NOISNEMIDLLAREVO )mm5.59x5.864x5.694("7.7"x5.81x"55.91
THGIEW )gk7.01(.bl45.32:ssorG)gk7.7(.bl49.61:teN
SNOITACIFITREC ,IIICCV,B-CCF,LUC,EC,SG/VUT,LU )lanoitpo(99'OCT
LA810E.p65 2000/8/14, PM 03:0216
100% Recycled Paper
PRINTED IN TAIWAN MAM-502-305-00
LA810E.p65 2000/8/14, PM 03:0218