MAGNAVOX Projection/Digital 42 And Above TV Manual 97100180
User Manual: MAGNAVOX MAGNAVOX Projection/Digital 42 and above TV Manual MAGNAVOX Projection/Digital 42 and above TV Owner's Manual, MAGNAVOX Projection/Digital 42 and above TV installation guides
Open the PDF directly: View PDF ![]() .
.
Page Count: 44


NO
IMAGE
AVAI
SAFETYINSTRUCTIONS- Readbeforeoperatingequipment
Thisproductwasdesignedandmantdacturedto meetstrictqualityand
safetystandards.Thereare, however,someinstallationandoperation
precautionswhichyoushouldbeparticularlyawareof.
1. ReadInstructions- AllthesafetyandoperaUnginstructionsshould
bereadbeforetheapplianceis operated.
?_ Retaininstructions- The safetyandoperatinginstructionsshould
beretainedforfuturereference.
3. ReedWarnings- Allwarningsonthe applianceandinthe operating
instructionsshouldbeadheredto.
4. FollowInstructions- Alloperatinganduseinstructionsshouldbe
followed.
5. WaterandMoisture- Theapplianceshouldnotbe usednearwater
- forexample,neara bathtub,washbowl,kitchensink,laundrytub,
inawetbasementornearaswimmingpool,etc.
6. CartsandStands- Theapplianceshouldbeusedonlywithacartor
standthatis recommendedbythe manufacturer.
6A. _An applianceand cartcombinationshouldbe moved
withcare. Quickstops,excessiveforce,and uneven
surfacesmaycausetheapplianceandcart combination
to overturn.
7. Wall or CeilingMounting- Theapplianceshouldbemountedto a
wallorceilingonlyasrecommendedbythemanufacturer.
8. Ventilation- Theapplianceshouldbesituatedsothatitslocationor
positiondoesnotinterferewithitsproperventilation.Forexample,
the applianceshouldnotbesituatedona bed,sofa,rug,or similar
surfacethat may blockthe ventilationopenings;or, placedin a
built-ininstallation,suchasa bookcaseorcabinetthat mayimpede
theflow ofairthroughthe ventilationopenings.
9. Heat- Theapplianceshouldbe situatedawayfrom hearsources
suchas radiators,heat registers,stoves,or other appliances
(includingamplifiers)that produceheat.
10. Power Sources- Theapplianceshouldbe connectedto a power
supplyonlyofthe typedescribedintheoperatinginstructionsoras
markedontheappliance.
11. Power-CordProtection-Powersupplycordsshouldbe routedso
thattheyare notlikelyto bewalkedonorpinchedby itemsplaced
uponor againstthem, payingparticularattentionto cordsand
plugs,conveniencereceptacles,andthepointwheretheyexitfrom
theappliance.
12. Cleaning-Theapplianceshouldbecleanedonlyasrecommended
bythemanufacturer.
13. PowerLines- Anoutdoorantennashouldbe locatedawayfror_
powerlines.
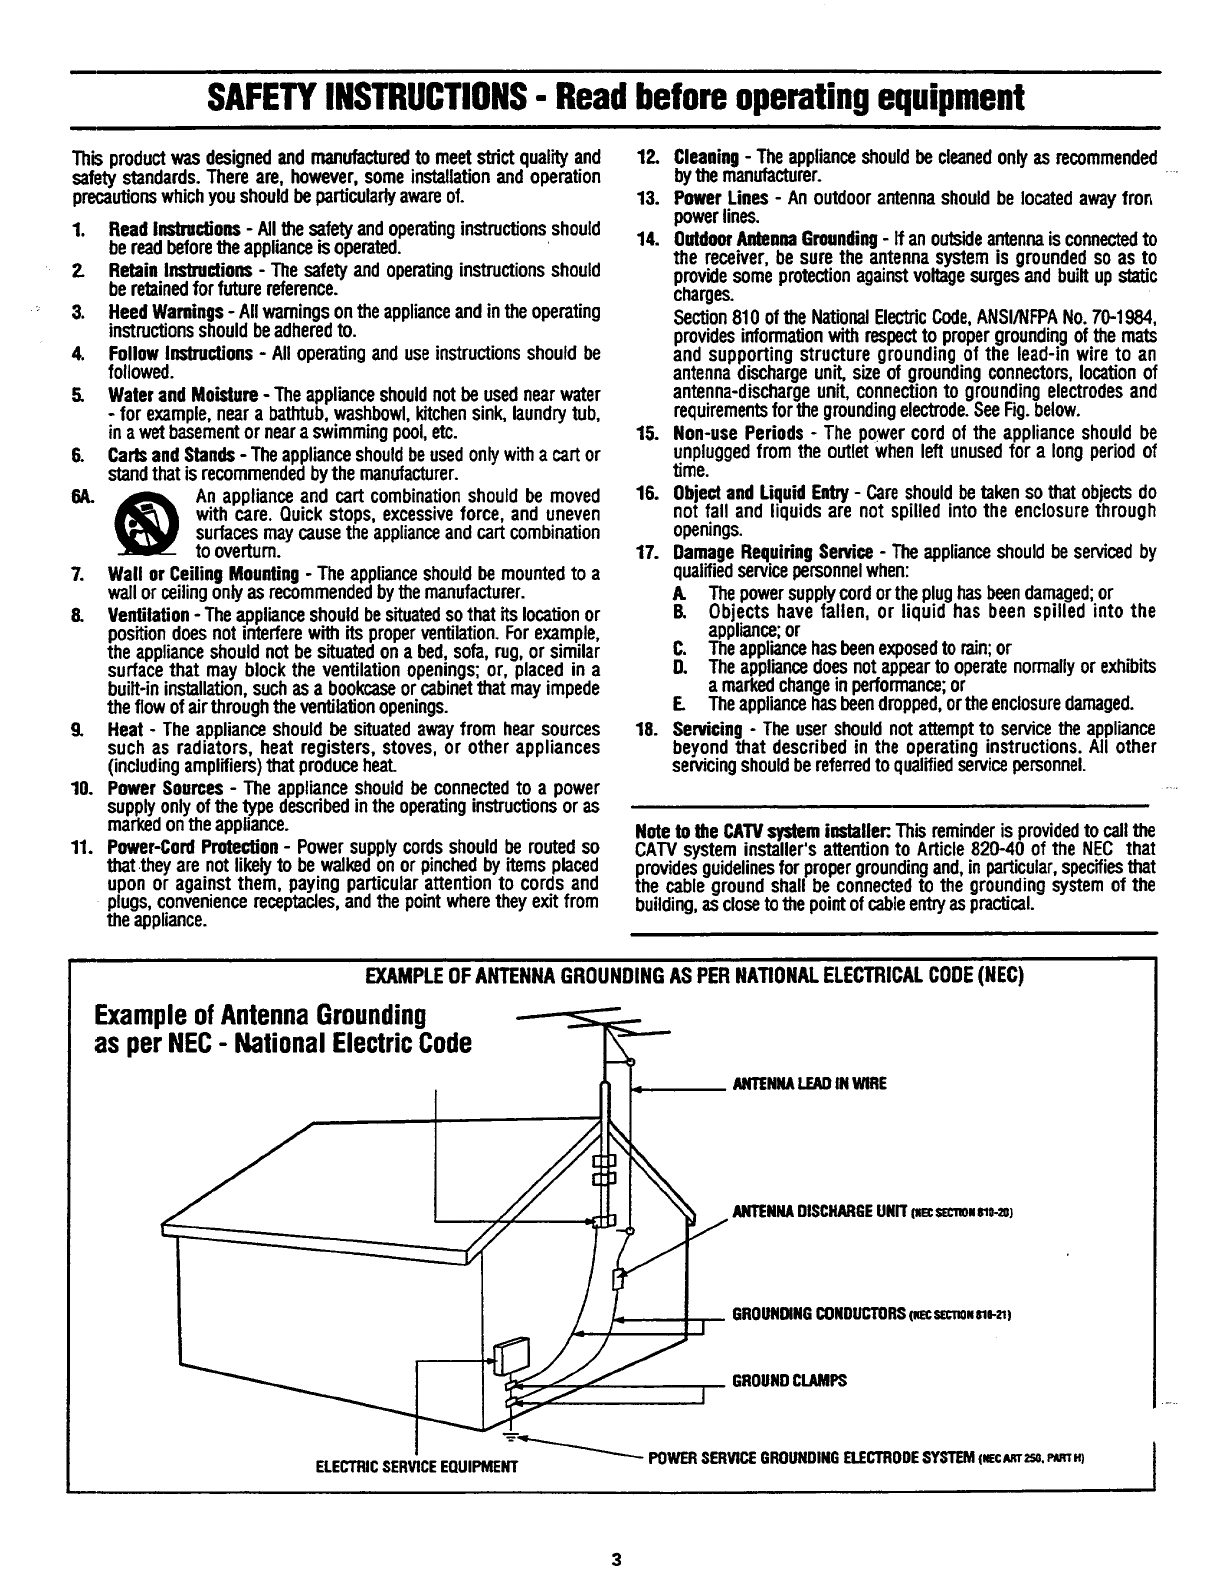
14. OutdoorAntennaGrounding- If an outsideantennais connectedto
the receiver,be surethe antennasystemis groundedso as to
providesomeprotectionagainstvoltagesurgesand builtupslatic
charges.
Section810of the NationalElectricCode,ANSIINFPANo.70-1984,
providesinformationwithrespectto propergroundingof the mats
and supportingstructuregroundingof the lead-inwire to an
antennadischargeunit.sizeof groundingconnectors,locationof
antenna-dischargeunit,connectionto groundingelectrodesand
requirementsforthe groundingelectrode.SeeFig.below.
15. Non-usePeriods - Thepower cordof the applianceshouldbe
unpluggedfromthe outletwhenleftunusedfor a longperiodof
time.
16. ObjectandLiquid Entry- Careshouldbetakensothatobjectsdo
notfall and liquidsare notspilledinto the enclosurethrough
openings.
17. DamageRequiringService- Theapplianceshouldbeservicedby
qualifiedservicepersonnelwhen:
k. Thepowersupplycordortheplughasbeendamaged;or
B. Objects havefallen, or liquid has been spilledinto the
appliance;or
C. Theappliancehasbeenexposedtorain;or
D. Theappliancedoesnotappearto operatenormallyorexhibits
a markedchangeinperformance;or
E. Theappliancehasbeendropped,orthe enclosuredamaged.
18. Servicing- Theusershouldnotattemptto servicetheappliance
beyondthat describedin the operatinginstructions.All other
servicingshouldbereferredto qualifiedservicepersonnel.
Noteto the CATVsysteminstaller:.Thisreminderis providedto callthe
CATVsysteminstaller'sattentionto Article820-40 of the NEC that
providesguidelinesforpropergroundingand,inparticular,specifiesthat
the cablegroundshallbe connectedto the groundingsystemof the
building,asclosetothepointofcableent_aspractical.
EXAMPLEOFANTENNAGROUNDINGASPER NATIONALELECTRICALCODE(NEC)
ExampleofAntennaGrounding
as per NEC- NationalElectricCode
ANTENNALEADIN WIRE
ELECTRICSERVICEEQUIPMENT
ANTENNADISCHARGEUNIT(Ec szc_. _o-,n)
GROUNDINGCONDUCTORS(Ec s_'_oNm-2_)
GROUNDCLAMPS
POWERSERVICEGROUNDINGELECTRODESYSTEM(EcM'r2so.P_.)
_Getting Started
Welcome/Product Registration .................. 5
Safety/Precautions ..................................................... 3
Table of Contents ....................................................... 4
Features and Model Information.............................. .5
F-_ On-Screen Features
PICTURE MENU
€,Adjusting Color, Brightness, Sharpness,
Tint, and Picture Controls ................................... 6
¢,Using the Clearview Control .............................. 7
¢,Adjusting the TV's Convergence Control ........... 8
¢,Using the Flesh Correction Control .................... 9
FEATURES MENU
_,Selecting a Picture Source ................................ 10
_-Setting the TV for Closed Captioning .............. 11
_Setting the TV for Cable or Antenna Signals....12
_'Adding Channels in Memory (Automatically).l 3
_'Adding Channels in Memory (Manually) ......... 14
_Setting the TV Clock and Turn-On Timer ........ 15
¢,Setting the Alternate Channel Control ............. 16
¢'Using the Sleep Timer Control ........................ 16
¢'Adjusting the Channel Display Control ............ 17
_Using the Time/Channel Reminder Control...... 17
SOUND MENU
_'Adjusting Bass, Treble, and Balance Sound
Controls ............................................................. 18
_'Setting the Bass Blbost Control ........................ 18
_'Setting the TV for Stereo and SAP Programs ..19
_'Using the Sound Image Control ........................ 20
_'Using the Volume Display Control ................... 20
_Using the TV Speaker On/Off Control with
the Audio Output jacks ..................................... 21
_Surround Sound Speaker Connections and
Variable Audio Output Control ........................ 22
_'Using the TV's Audio/Video Input and
Output Jacks .............................................. 2..3-24
jRemote (_ontrol Operation
Using Smart Sound Control ....................... .25
Using the Smart Picture Control ............... .25
Setting the Remote to Work VCRs .................... 26-27
Setting the Remote to Work
Cable TV Converters ........................................ 28-29
Setting the Remote to Work VCRs or Cable
Converters - '_3earch Method". ................................ 30
Using the Remote's VCR buttons ............................ 31
_--3 Picture-In-Picture (PIP)
How to Use PIP (Connections) ............ 32-33
How to Use PIP with the TV Remote ...................... 34
Selecting the Picture Source for PIP ........................ 35
Adjusting Picture-in-Picture Color and Tint ............ 36
More PIP Connections (Cable Converter) ............... 37
MGeneral Information
Tips if Something Isn't Working .............. 38
"IV Help Menu ......................................................... 39
Glossary of TV Terms ............................................. 39
Index ........................................................................ 40
Factory Service Locations .................................. 41-42 I
I
Warranty .................................................................. 43
Accessories .............................................................. 44
Use the simple Set-Up Guide (supplied with
your TV information packet) for details on:
•Antenna Hook-ups
• First Time Set-Up
(Automatic Settings)
•Basic TV and Remote
Control Operation
• On-Screen Menu Use
Copyright @1995 Philips Consumer Electronics Company. All fights reserved.
4
Hrst Tune Set Up which automatically sets the TV
for local channels and the correct picture signal
(antenna or cable). It even helps you make the
necessary connections for the Picture-In-Picture (PIP)
feature.
Infrared Remote Control which operates your TV
set and avariety of wireless remote control VCRs and
Cable TV Conveners.
Standard TV broadcast (NrIIF/UItF) or Cable TV
(CATV) channel capability.
Closed Captioning which allows the viewer to read
TV program dialogue or voice conversations as on-
screen text.
Automatic Programming of channels for quick and
easy selection of favorite stations available in your
area.
Picture-In-Picture (PIP) which can show a TV
program and the direct video output from an accessory
(VCR, etc.) onto the TV screen at the same time.
Stereo-Ready TV with built-in audio amplifier and
twin speaker system. Receives TV programs in both
broadcast stereo sound or (SAP) bilingual broadcast.
On-Screen Features which display helpful
information for the setting of TV controls (such as
help messages, operating tips and glossaries).
Audio/Video jacks for direct connections with VCRs
(and other accessories) for quality TV picture and
sound playback.
Surround Sound external audio speaker connections.
Sleep-Timer which automatically turns the TV OFF at
preset time intervals.
Smart Sound for the control of TV volume levels
during program changes or commercial breaks.
Smart Picture allows you to choose from a list of'IV
video control categories set for avariety of viewing
conditions and program sources.
Clock Tuner feature which can tam ON the TV at
any preset time -just like an alarm clock.
As you unpack your TV please note that the _
following items have been included with your se'
Owner's Manual
Warranty Registration Card
Safety Tip Information
Factory Service Center Address Listings
Remote Control Transmitter
Batteries for Remote Control Use
Audio/Video Cables for Direct Input and
Output Connections.
Please take a few minutes to complete your
registration card. The serial number for the TV is
on the back of the set
To ensure that picture screen performance is of
the highest quality, please avoid robbing any
object or material on the screen that could scratch
or damage its surface.
Refer to the back of this manual for instructions
on the cleaning and care of the TV.
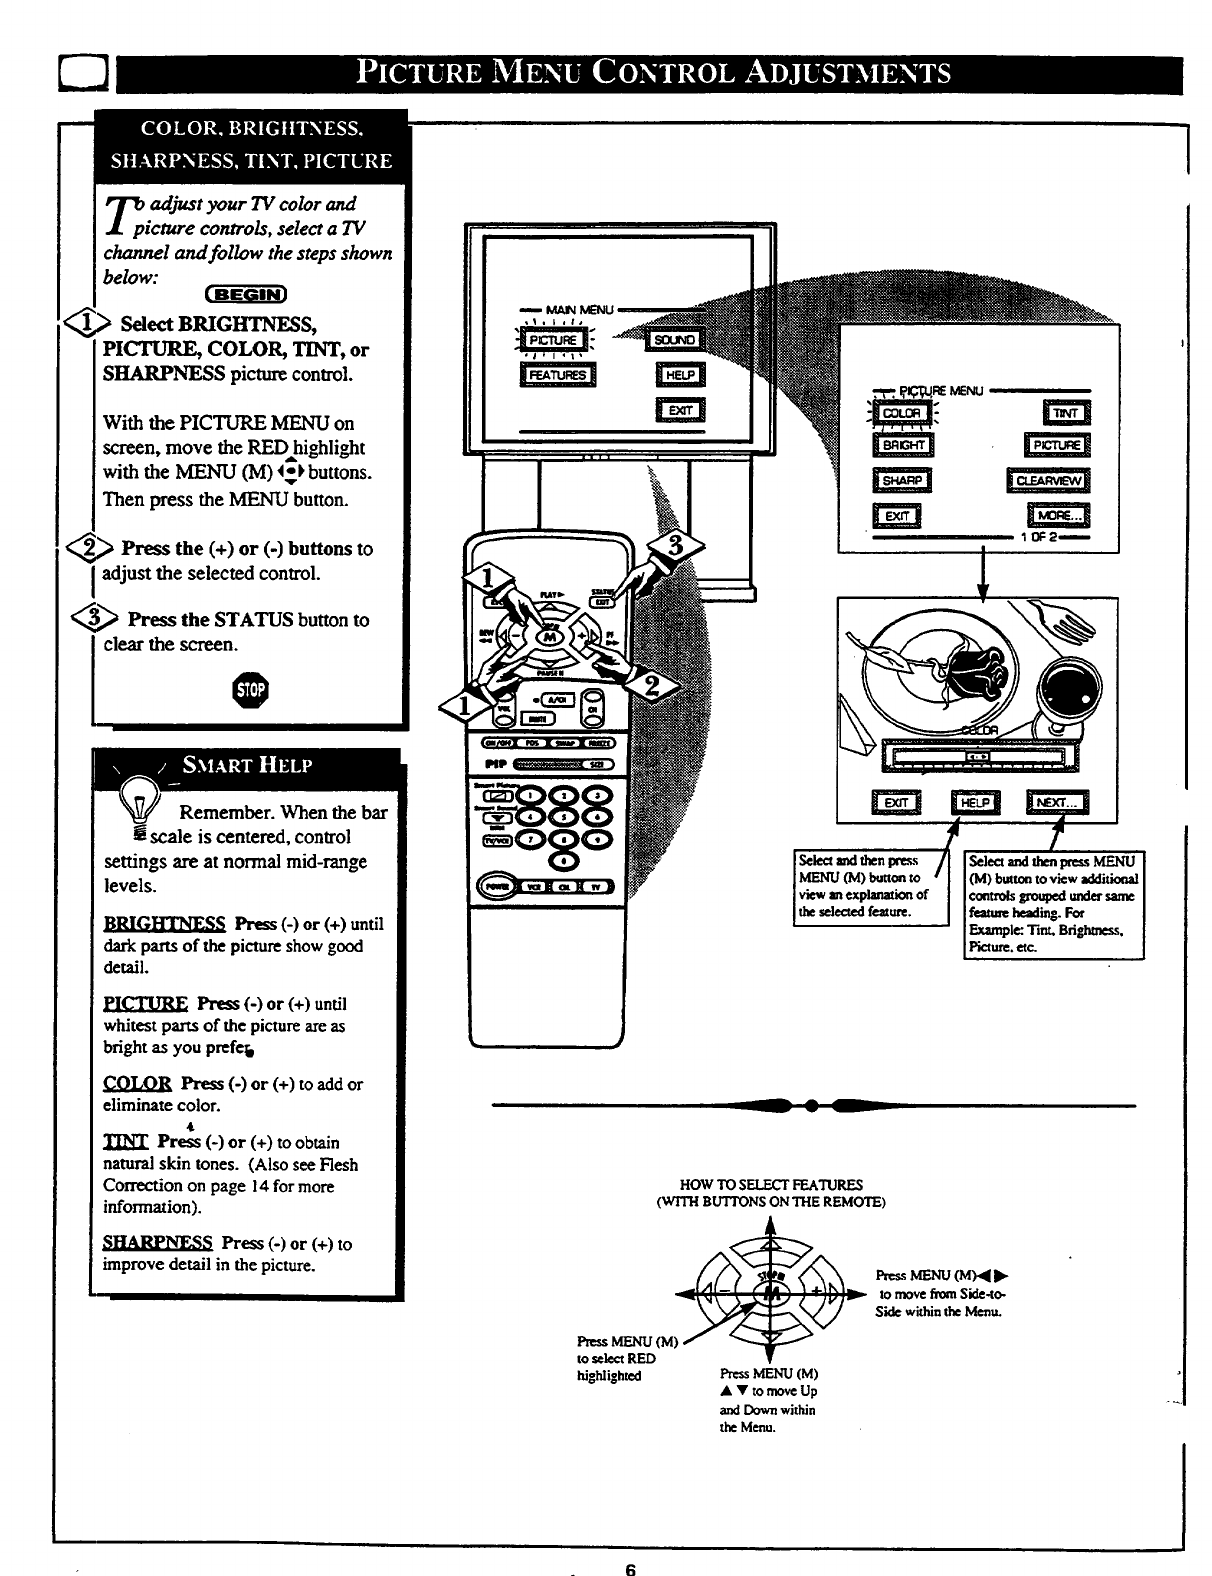
[ BEGIN]
Select BRIGI_NESS,
PICTURE, COLOR, TINT, or
SItARPNESS picture control.
With the PICTURE MENU on
screen, move the RED highlight
with the MENU (M) 4_ buttons.
Then press the MENU button.
_€ ) Press the (+) or (-) buttons to
adjust the selected control.
_Press the STATUS button to
Jolear the screen@
Remember. When the bar
! scale is centered, control
settings are at normal mid-range
levels.
,_RLG,[t_t, fiS Press (-) or (+) until
darkparts of the pictureshowgood
detail.
PICTURE Press (-) or (+) until
whitest parts of the pictureare as
bright as you prefeb
COLOR Press (-) or (+) to add or
eliminate color.
4
TINT Press (-) or (+) to obtain
natural skin tones. (Also see Flesh
Correction on page 14 for more
information).
Press(-)or(+)to
improvedetail inthepicture.
IIII
HOWTO SELECT FEATURES
(WITH BUTTONSON THE REMOTE)
Press MENU (M)
to select RED
highlighted Press MENU (M)
A V to moveUp
and Downwithin
the Menu.
to move from Side-to-
Side within the Menu.
]
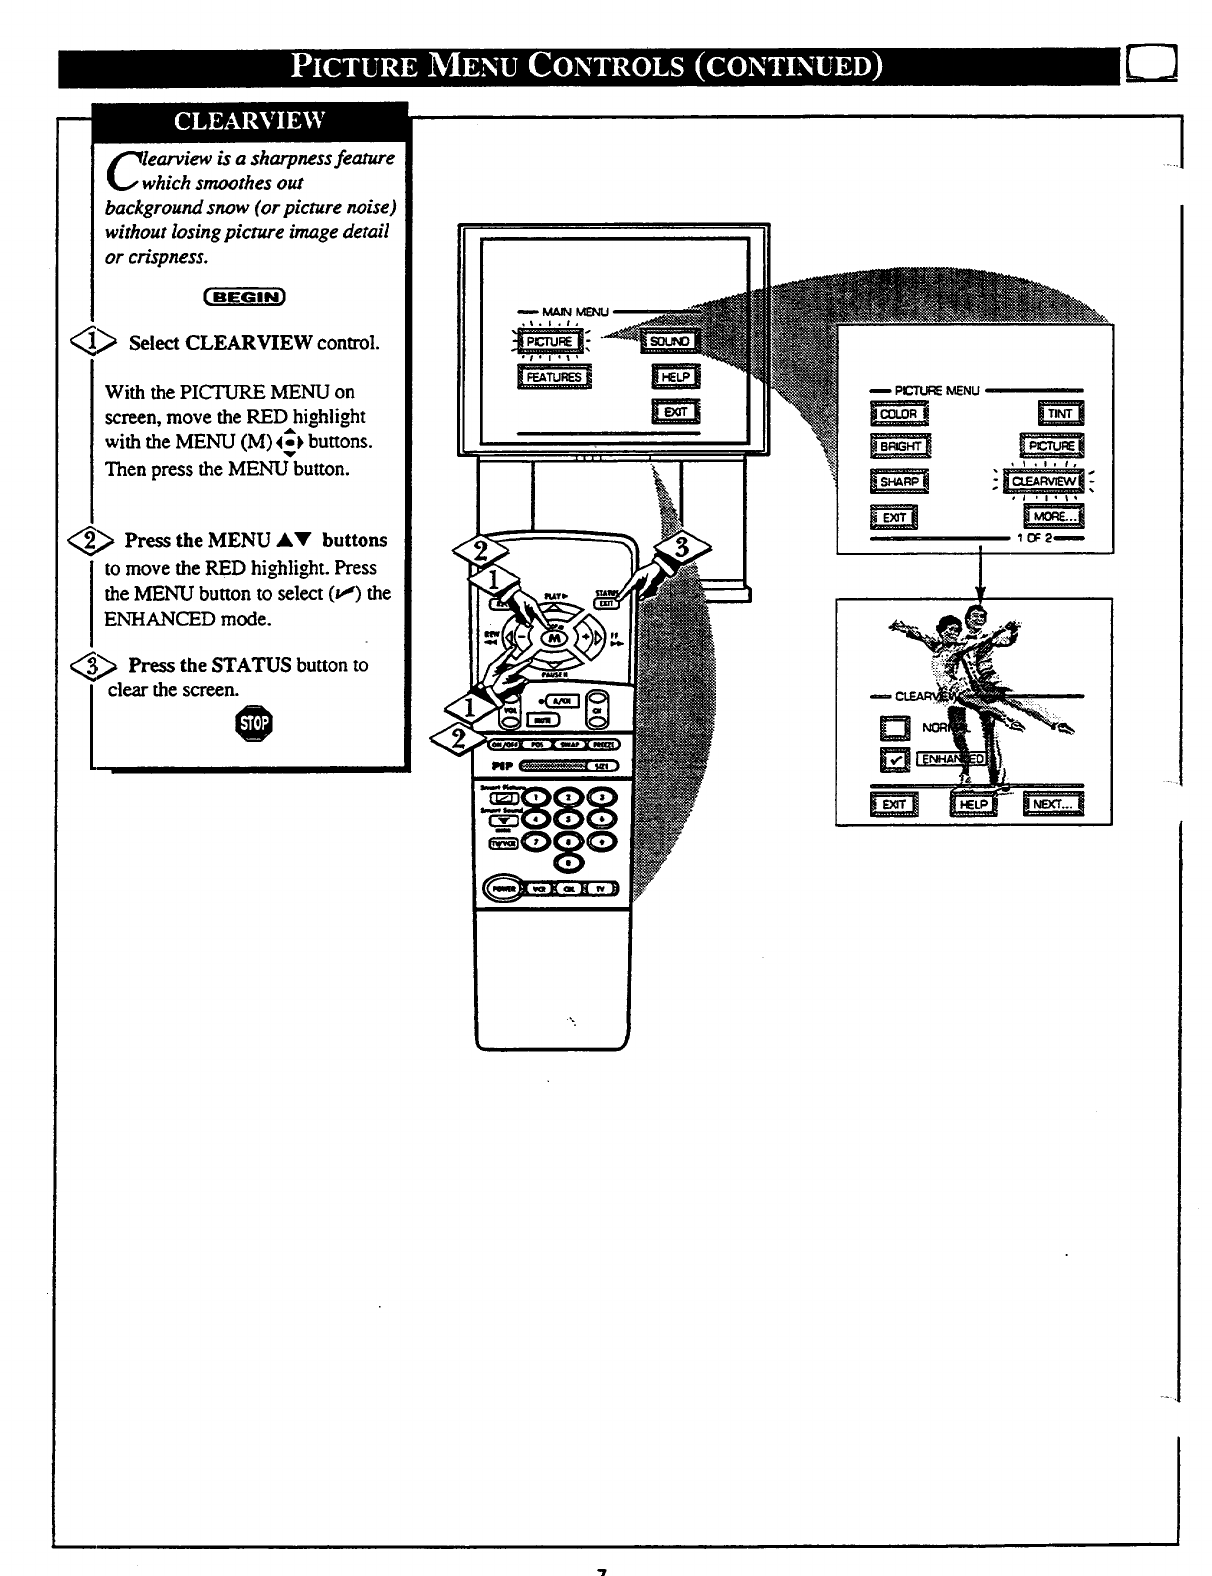
arvi_ is a sharpness feature
ich smoothes out
background snow (or picture noise)
without losing picture image detail
or crispness.
1_ Select CLEARVIEW control.
With the PICTURE MENU on
screen, move the RED highlight
with the MENU (M) _1_}buttons.
Then press the MENU button.
<_ Press the MENU A'V' buttons
to move the RED highli@t. Press
the MENU button to select (t,,,')the
ENHANCED mode.
3_,_ Press the STATUS button to
iclear the screen€
-- P_ ICtENU
1
Dd
_t ,i. t,
!.
.....
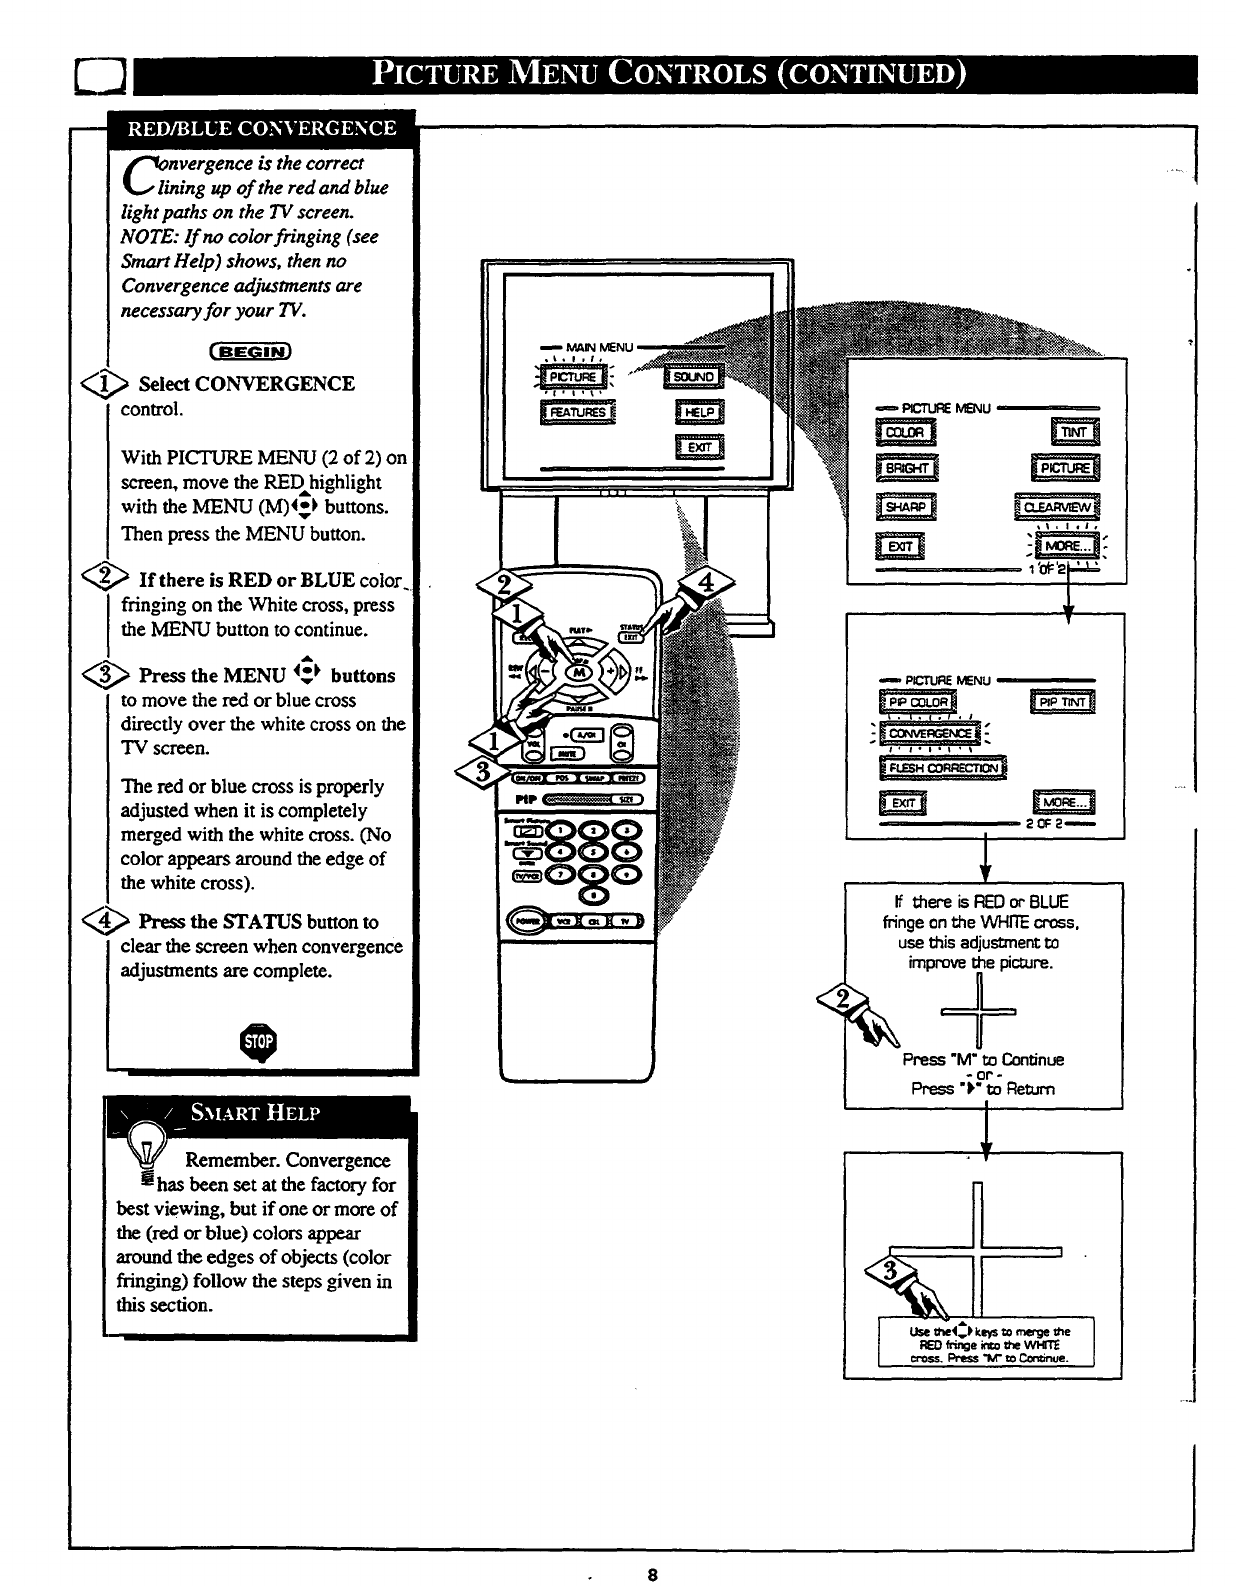
nVergence is the correct
g up of the red and blue
light paths on the TV screen.
NOTE: If no color fringing (see
Smart Help) shows, then no
Convergence adjustments are
necessary for your TV.
_.._ Select CONVERGENCE
control.
With PICTURE MENU (2 of 2) on
screen, move the REDhighlight
with the MENU (M)4_} buttons.
Then press the MENU button.
_,,_If there is RED or BLUE color.
I fringing on the White cross, press
the MENU button to continue.
_._ Press the MENU 4_ buttons
to move the red or blue cross
directly over the white cross on the
TV screen.
The red or blue cross is properly
adjusted when it is completely
merged with the white cross. (No
color appears around the edge of
the white cross).
_._ Press the STATUS buttonto
clearthescreenwhen convergence
adjustmentsarecomplete.
0
Remember. Convergence
has been set at the factory for
best viewing, but if one or more of
the (red or blue) colors appear
around the edges of objects (color
frin_ng) follow the steps given in
thissection.
,#
•.._ plcnJ_ MENu
1'0g'27
<
pu_"TUP.£MENU
t, t° _ot °t
•1, i* lot •t
201:21
If _ere isREDorBLUE
fringeonthe WHITEcross.
usethis adjustmentI_
improvethe picture.
Press"M"mContinue
-or'-
Press "_"m Return
.1
%. I
8
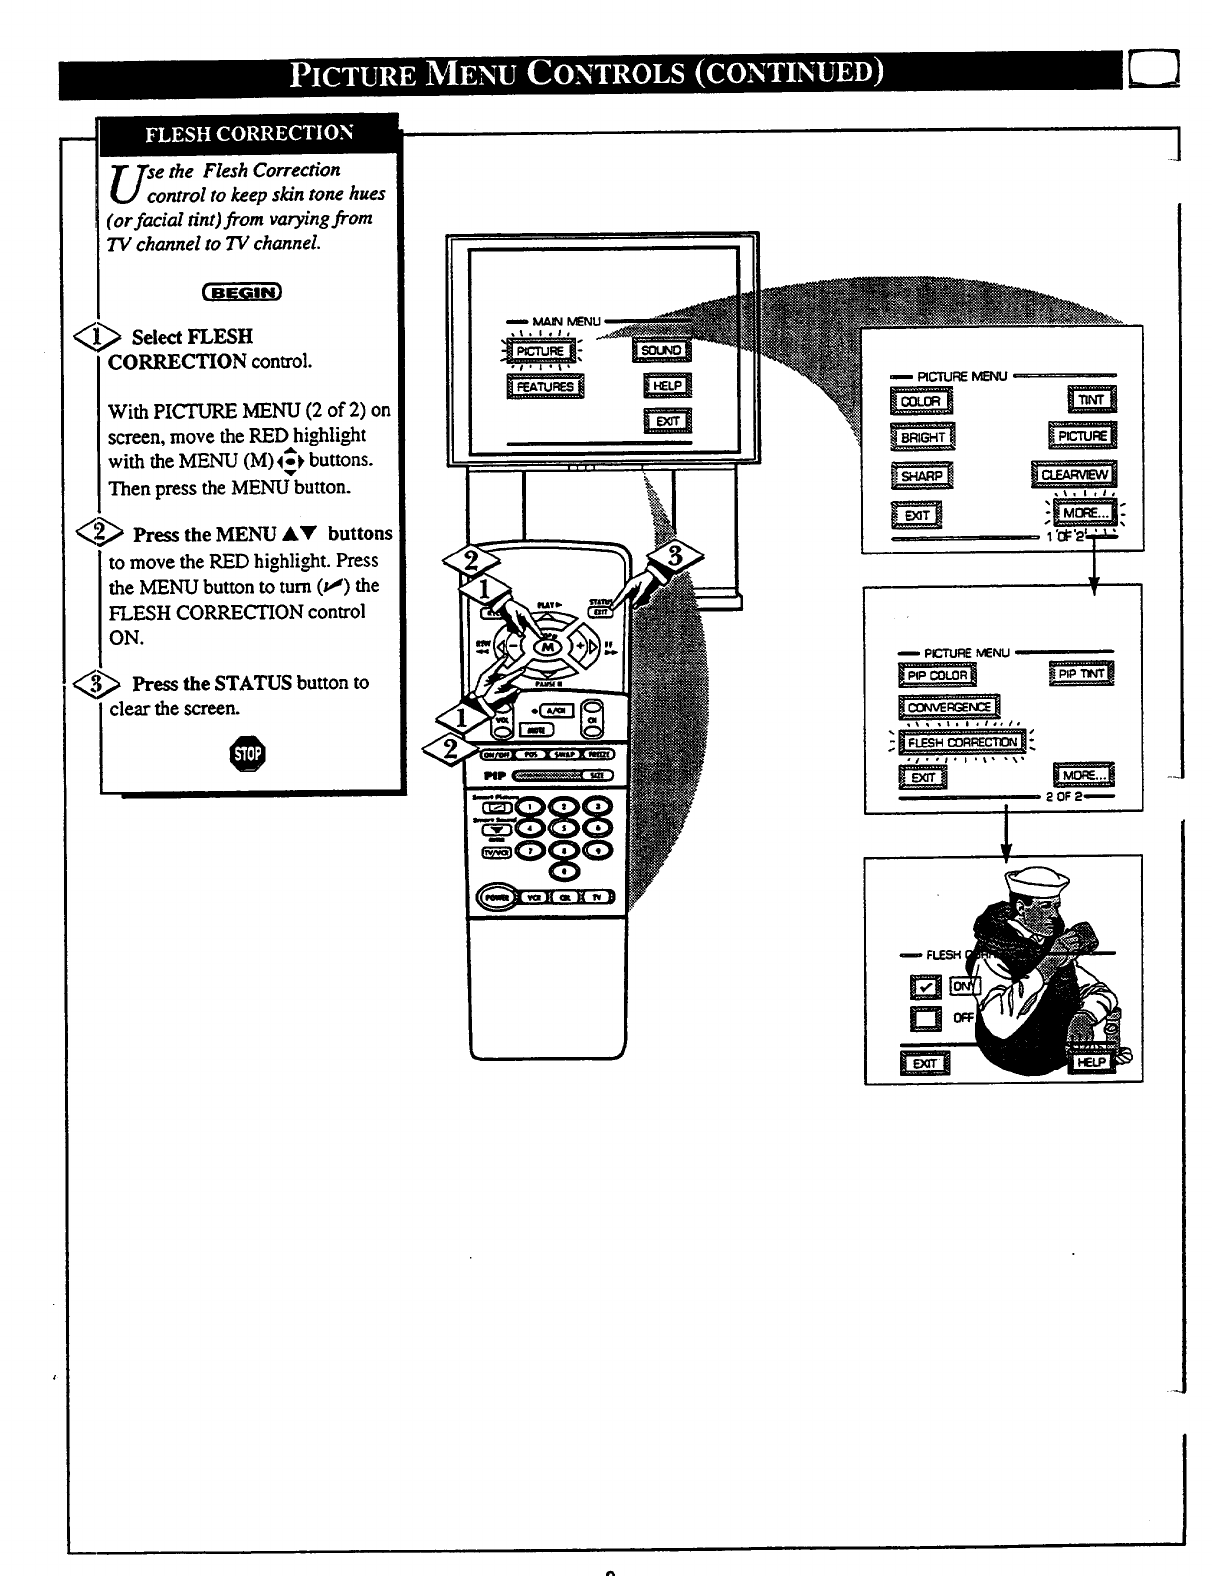
Scoethe Flesh Correction
ntrol to keep skin tone hues
(or facial tint)from varying from
TV channel to TV channel.
1@ Select FLESH
CORRECTION control.
With PICTURE MENU (2 of 2) on
screen, move the RED highlight
with the MENU (M)4_ buttons.
Then press the MENU button.
_Press the MENU &'Y' buttons
to move the RED highlight. Press
the MENU button to turn (v_) the
FLESH CORRECTION control
ON.
3_ Press button m
theSTATUS
clear the screen.
i PICTURE MENU
,_ _,t =I=/a,lm
2 OF2_
]
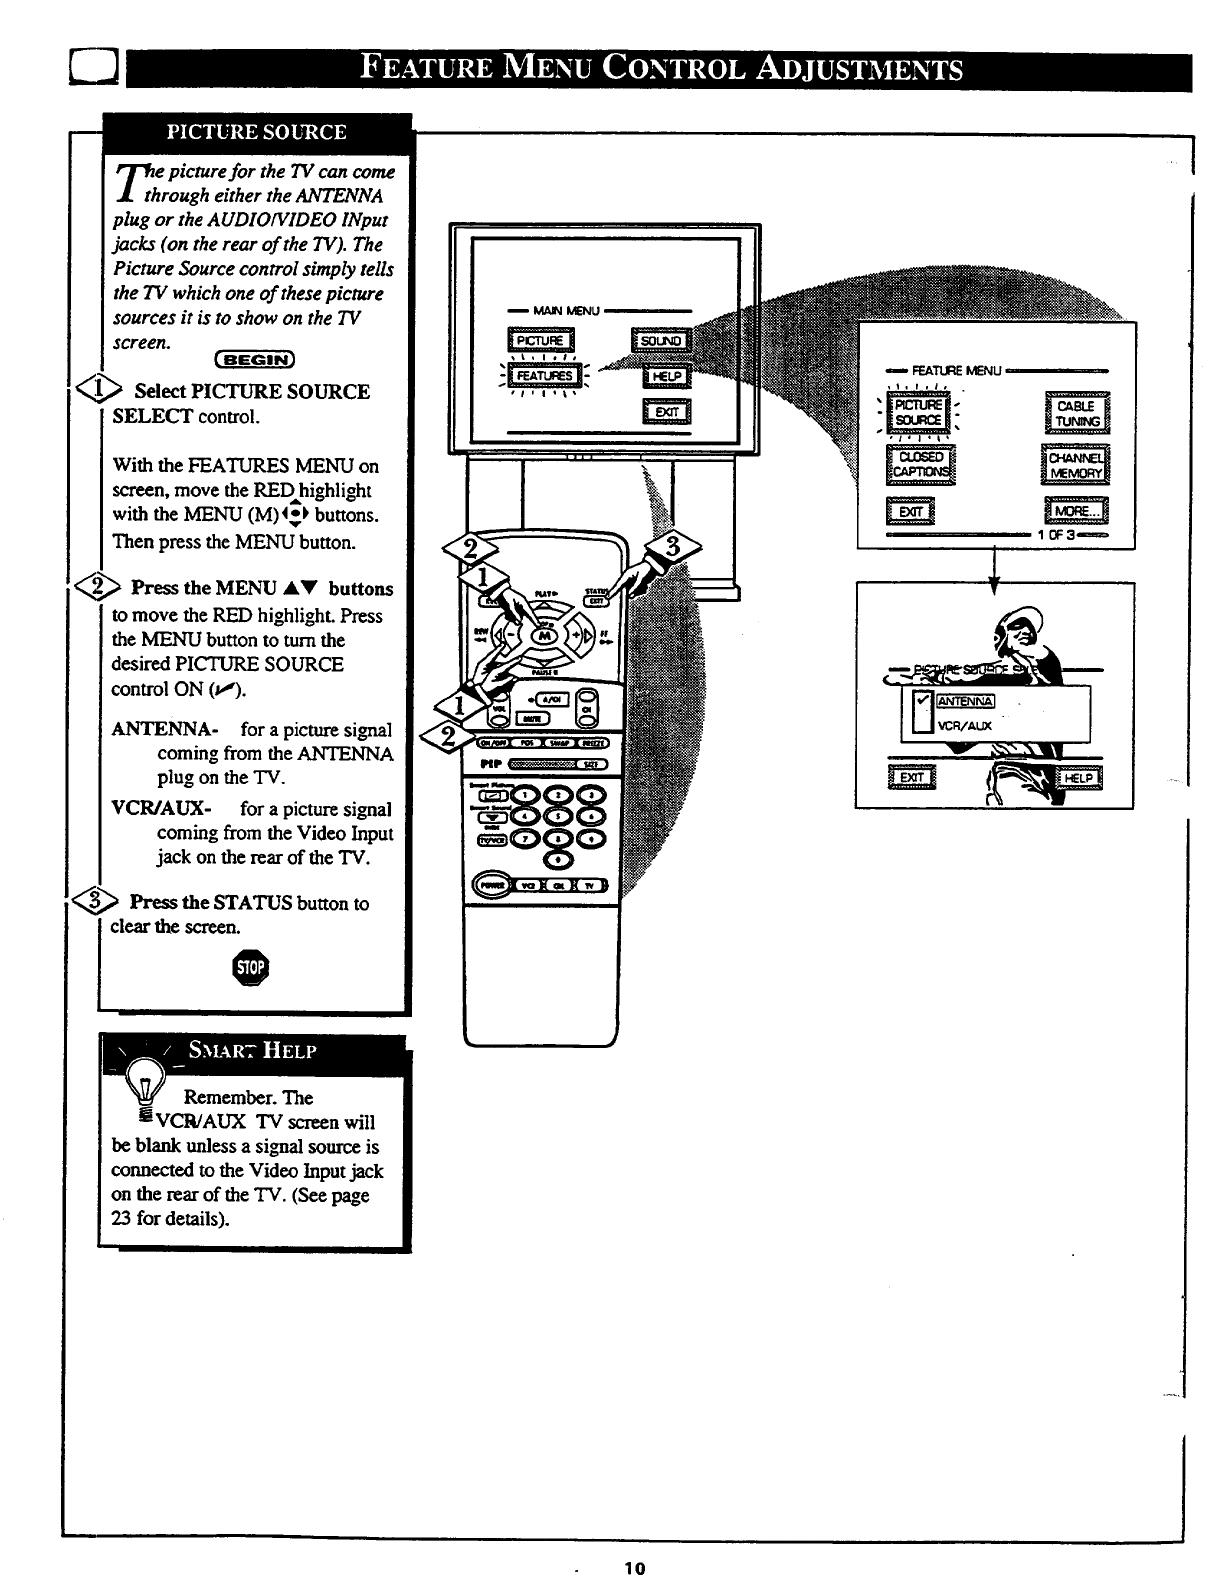
_th e picture for the 7V can come
rough either the ANTENNA
plug or the AUDIOIVIDEO INput
jacks (on the rear of the TV). The
Picture Source control simply tells
the TV which one of these picture
sources it is to show on the TV
screen.
_ Select PICTURE SOURCE
SELECT control.
With the FEATURES MENU on
screen, move the RED highlight
with the MENU (M)4_-} buttons.
Then press the MENU button.
_._ Press the MENU _k_' buttons
to move the RED highlight. Press
the MENU button to turn the
desired PICTURE SOURCE
control ON (v,').
ANTENNA- for a picture signal
coming from the ANTENNA
plug on the TV.
VCR/AUX- for a picture signal
coming from the Video Input
jack on the rear of the TV.
Press the STATUS button to
clear the screen.
@
m _Tt$:_ MENU
,I, I, |o .
NN NN
1 (_: 3"_=_
1
V
Remember. The
tiVCR/AUX TV screen will
be blank unless a signal source is
eormected to the Video Input jack
on the rear of the TV. (See page
23 for details).
lO
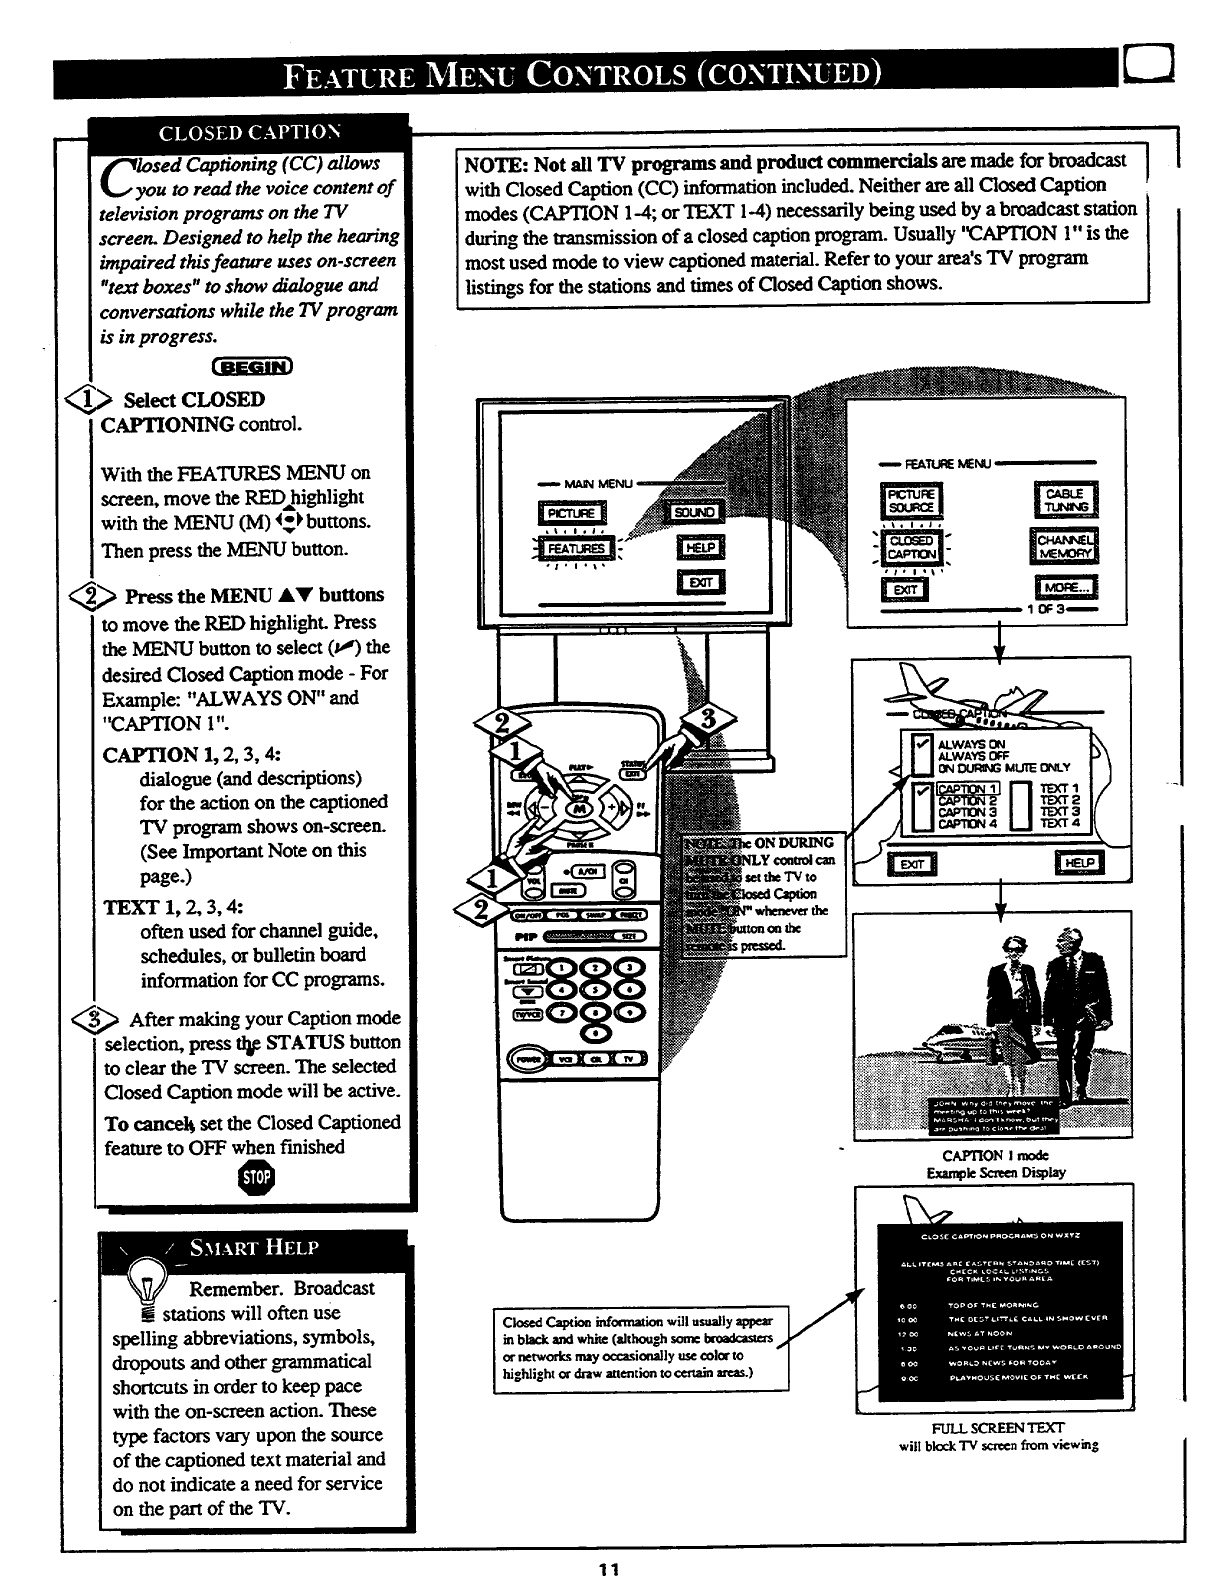
_y;ed Captioning (CC ) allows
uto read the voice content of
television programs on the TV
screen. Designed to help the hearing
impaired this feature uses on-screen
"text boxes" to show dialogue and
conversations while the TV program
is in progress.
_Select CLOSED
CAPTIONING control.
With the FEATURF.S MENU on
screen, move the RED highlight
with the MENU (M) (_ buttons.
Then press the MENU button.
2_ Press the MENU a,y buttons
to move the RED highlight. Press
the MENU button to select (p") the
desired Closed Caption mode -For
Example: "ALWAYS ON" and
"CAPTION 1".
CAPTION 1, 2, 3, 4:
dialogue (and descriptions)
for the action on the captioned
TV program shows on-screen.
(See Important Note on this
page.)
TEXT 1, 2, 3, 4:
often used for channel guide,
schedules, or bulletin board
information for CC programs.
_After making your Caption mode
selection, press tl_ STATUS button
to clear the TV screen. The selected
Closed Caption mode will be active.
To cancel_ set the Closed Captioned
featureto OFF when finished
0
Remember. Broadcast
stations will often use
spelling abbreviations, symbols,
dropouts and other grammatical
shortcuts in order to keep pace
with the on-screen action. These
type factors vary upon the source
of the captioned text material and
do not indicate a need for service
on the part of the TV.
NOTE: Not all TV programs and product commercials are made for broadcast I
with Closed Caption (CC) information included. Neither are all Closed Caption
modes (CAPTION 1-4; or TEXT 1-4) necessarily being used by a broadcast station
during the transmission of a closed caption program. Usually '_APTION 1" is the
most used mode to view captioned material. Refer to your area's "IV program
listings for the stations and times of Closed Caption shows.
IIII I
iX;RING
set the TVto
CAPTIONImode
_,_ Scnma_splay
Closed Caption information will usuallyappear
in black andwhite (althoughsome &oadcaste_
or networksmay o_a.,;iceally use color to
highlight or draw attentio_ to certainla'eas.)
FULL SCREENTEXT
will blockTV screenfrom viewing
11
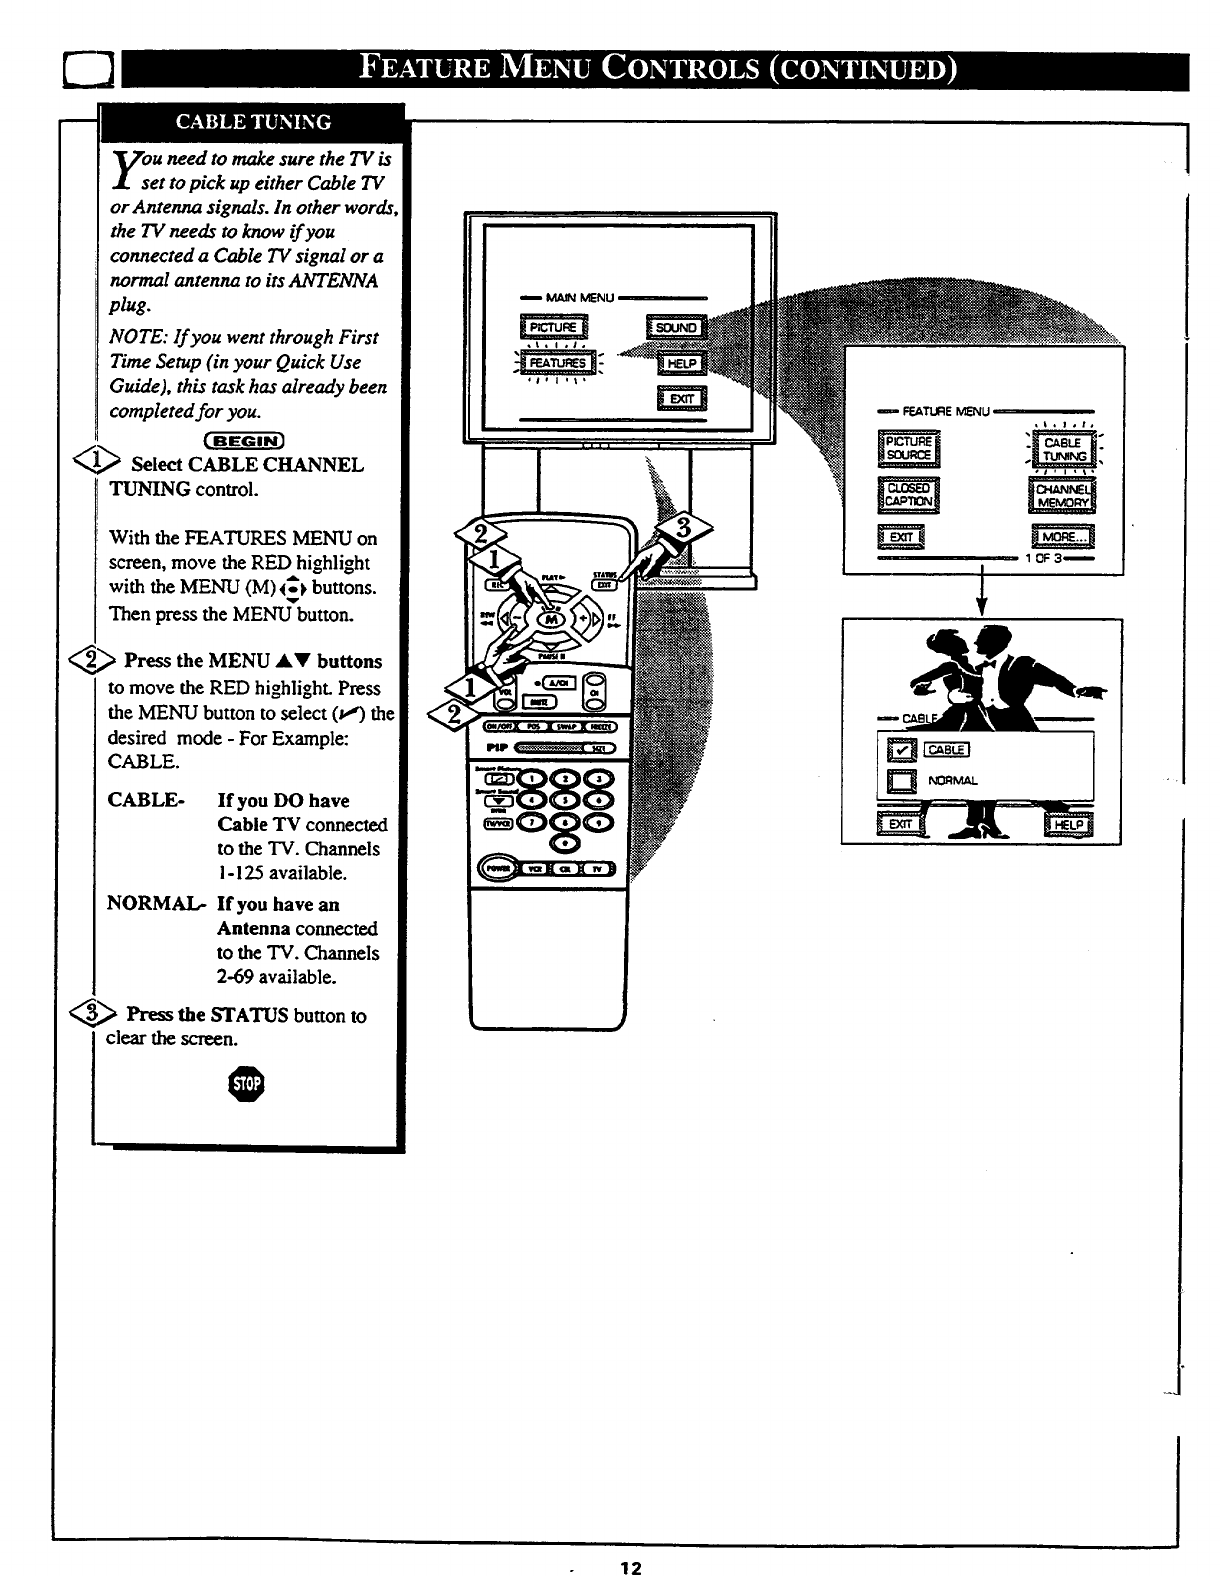
ou need to make sure the TV is
et to pick up either Cable TV
or Antenna signals. In other words
the TV needs to know if you
connected a Cable TV signal or a
normal antenna to its ANTENNA
plug.
NOTE: lf you went through First
Time Setup (in your Quick Use
Guide), this task has already been
completed for you.
_Select CABLE CHANNEL
TUNING control.
With the FEATURES MENU on
screen, move the RED highlight
with the MENU (M) _'_ buttons.
Then press the MENU_button.
_Press the MENU ,I,T buttons
to move the RED highlight. Press
the MENU button to select (wr) th_
desired mode - For Example:
CABLE.
CABLE- If you DO have
Cable TV connected
to the TV. Channels
i-125 available.
NORMAL- If you have an
Antenna connected
to the TV. Channels
2-69 available.
_Press the STATUS button to
clear the screen.
O
!-@:888
j
l
12
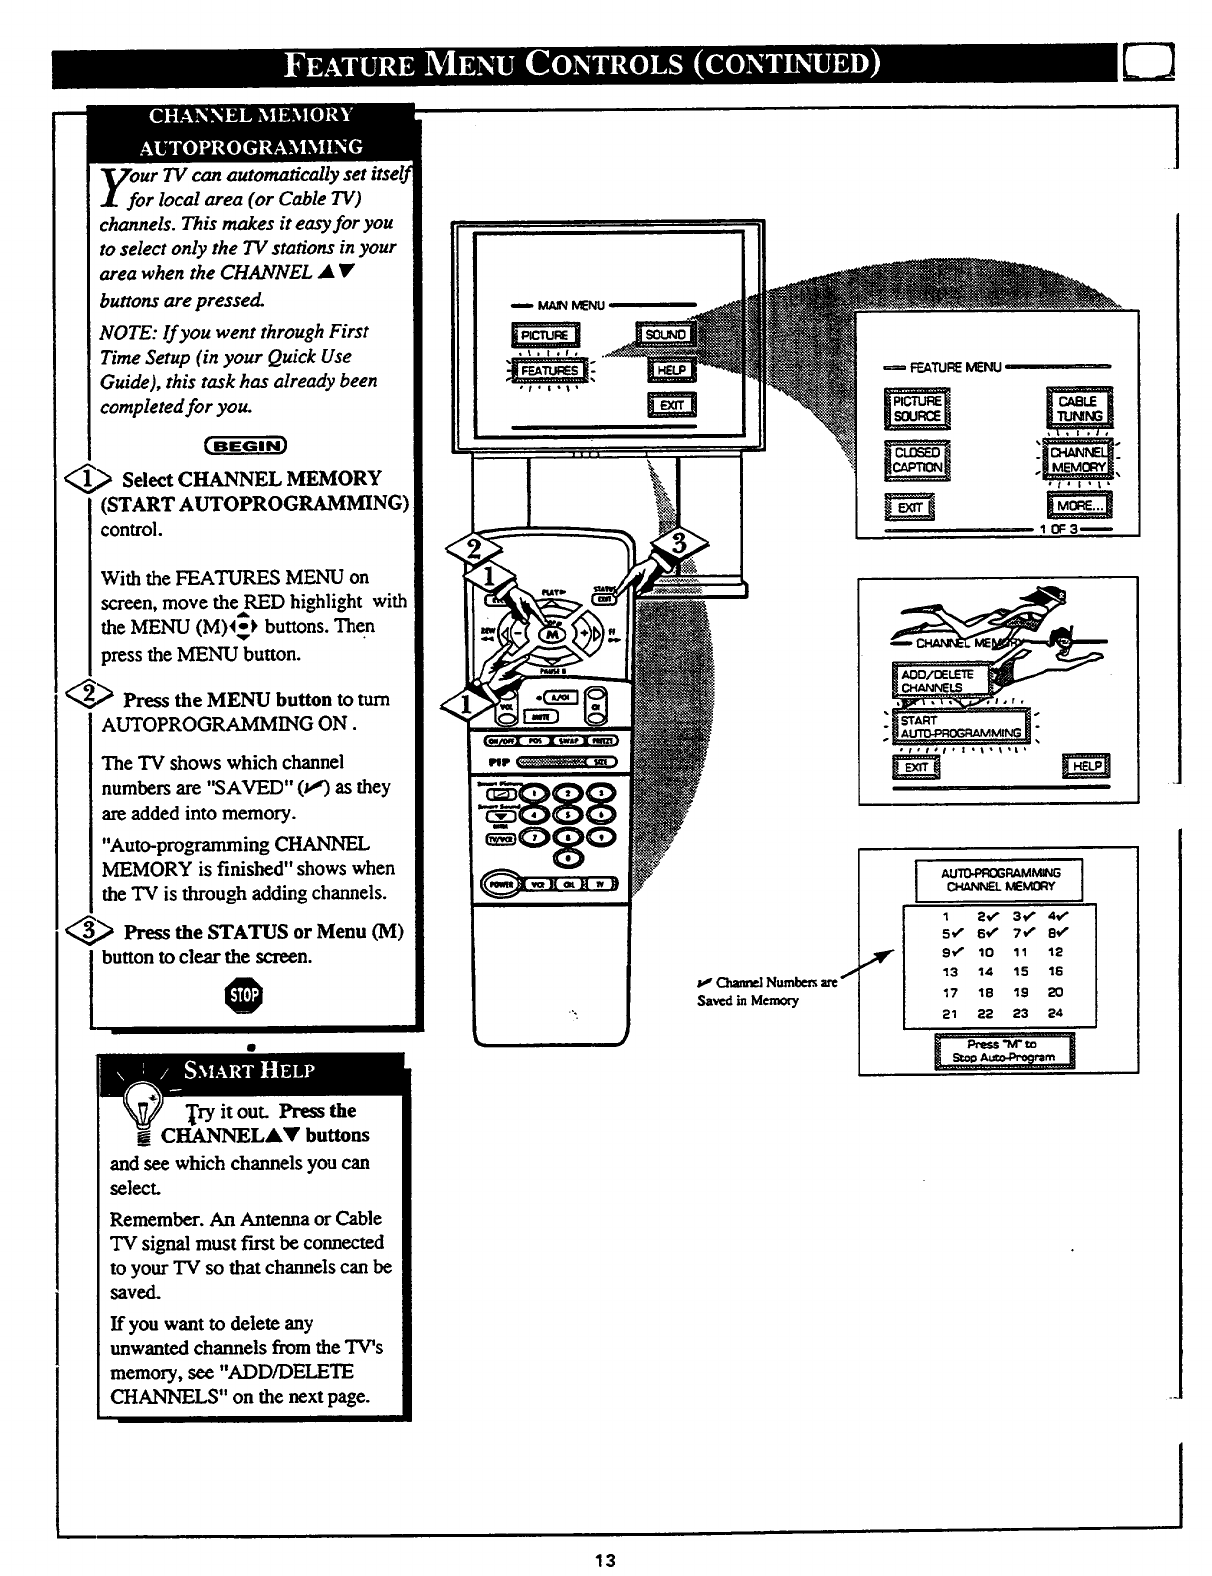
UrTV can automatically set itself
r local area (or Cable TV)
channels. This makes it easy for you
to select only the TV stations in your
area when the CHANNEL • •
buttons are pressed.
NOTE: If you went through First
Time Setup (in your Quick Use
Guide), this task has already been
completed for you.
[ BEGIN]
_Select CHANNEL MEMORY
(START AUTOPROGRAMMING)
control.
With the FEATURES MENU on
screen, move the RED highlight with
the MENU (M)_ buttons. Then
press the MENU button.
_ Press the MENU button to turn
AUTOPROGRAMMING ON.
The TV shows which channel
numbers are "SAVED" (_") as they
are added into memory.
"Auto-programming CHANNEL
MEMORY is finished" shows when
the TV is through adding channels.
Press the STATUS or Menu 0VI)
I button to clear the screen.
0/,JClmm'_lNumbers arcf
Saved mM_nory
FE_TUFE MENU
,__
[START ["
I
AU'/D.FROGRAMMING ]
CHANNELME_Y
1 2,, r3_ 4€"
5v" 6_,f7€* 8_
9€ _ 10 11 12
'13 14 15 115
17 18 19 20
21 22 23 24
.1
Try it out. Press the
_ CHANNELA• buttons
and see which channels you can
select.
Remember. An Antenna or Cable
"IV signal must f'wstbe connected
to your TV so that channels can be
saved.
If you want to delete any
unwanted channels from the TV's
memory, see "ADD/DELETE
CHANNELS" on the next page.
13
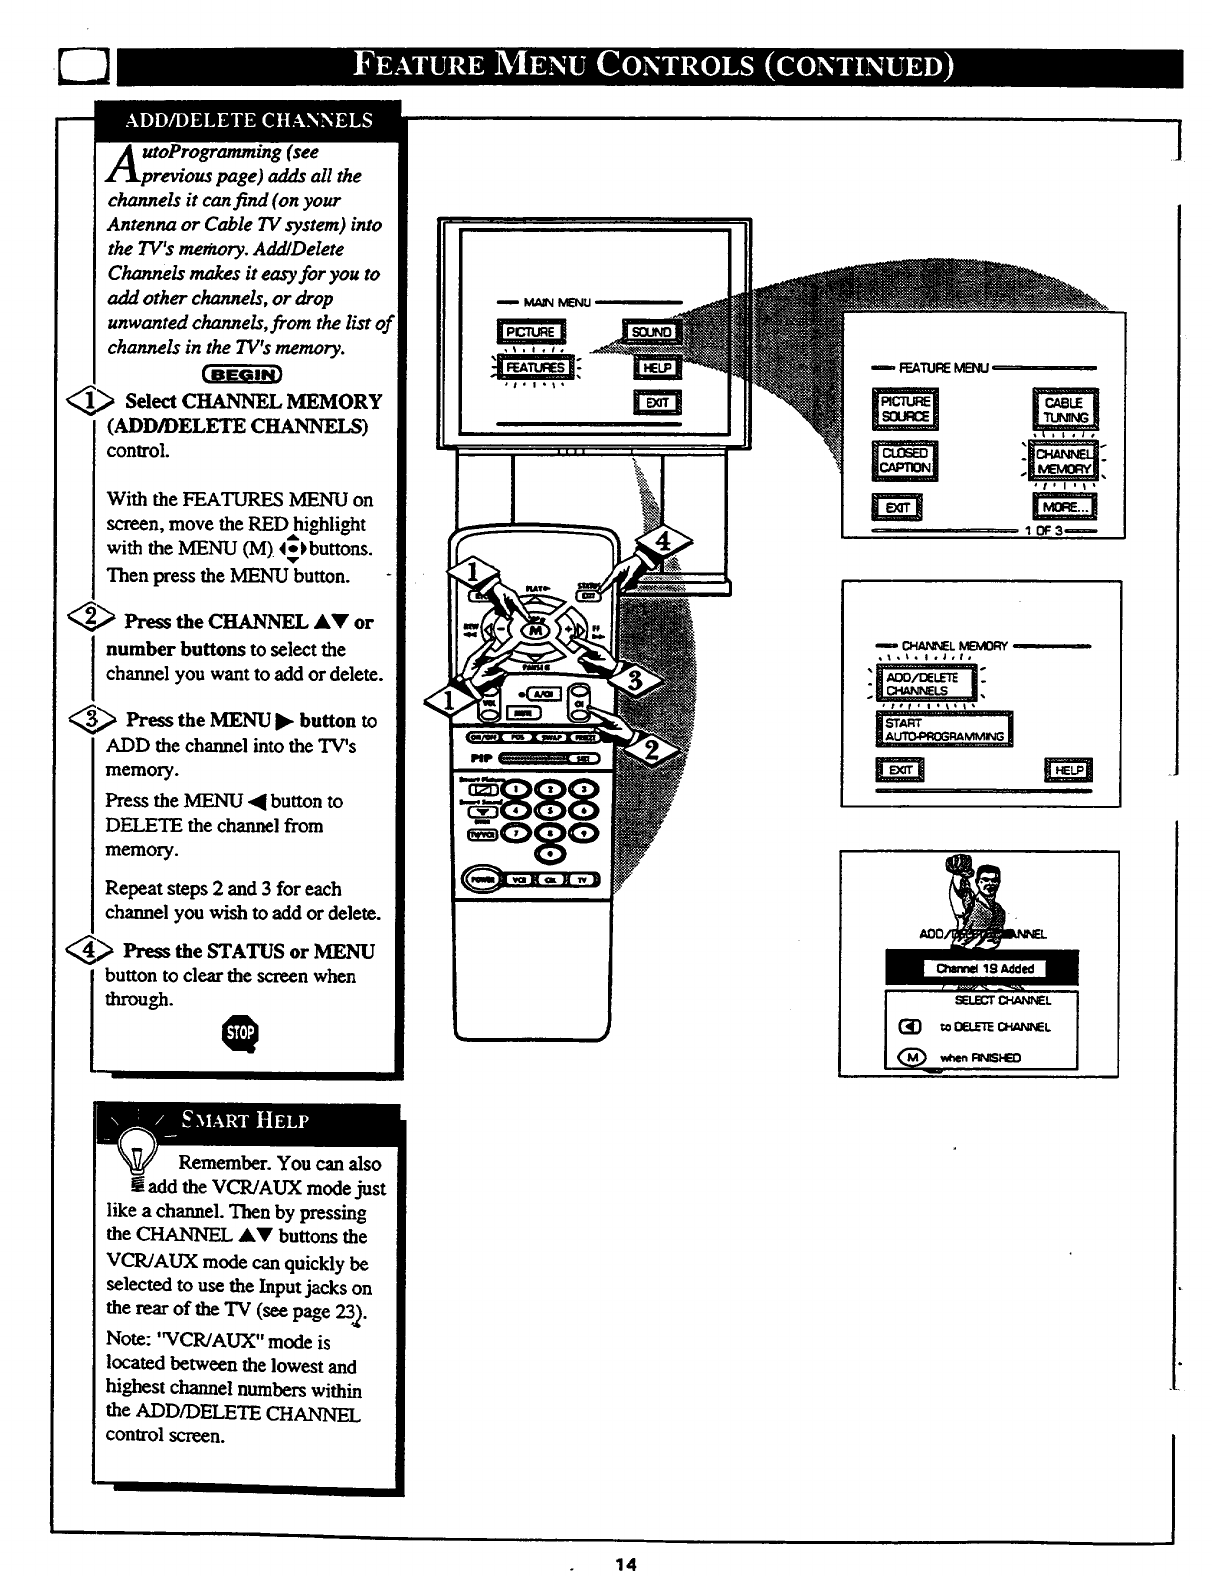
UtOProgramming (see
revioas page) adds all the
channels it can find (on your
Antenna or Cable TV system) into
the TV's mecnory. AddlDelete
Channels makes it easy for you to
add other channels, or drop
unwanted channels, from the list of
channels in the TV's memory.
_.,_ Select CHANNEL MEMORY
(ADD/DELETE Ci]ANNE_)
control.
With the FEATURES MENU on
screen, move the RED highlight
with the MENU (M)4_}buttons.
Then press the MENU button.
2_,_ Press the CHANNEL AY or
number buttons to select the
channel you want to add or delete.
_Press the MENU I_ button to
ADD the channel into the TV's
memo_.
Press the MENU _I button to
DELETE the channel from
memory.
Repeat steps 2and 3 for each
channel you wish to add or delete.
4_ Press the STATUS or MENU
button to clear the screen when
through. Q
Remember. You can also
[[add the VCR!AUX mode just
like a channel. Then by pressing
the CHANNEL &_' buttons the
VCR/AUX mode can quickly be
selected to use the Input jacks on
the rear of the "IV(see page 23._.
Note: 'WCR/AUX" mode is
located between the lowest and
highest channel numbers within
the ADD/DELETE CHANNEL
control screen.
n frr..A'[1Jl_MEMJ
w{>h_NN[L MBVU_Y
_,to o ,J,t,
"i ,_,'_=j_ i;
14
]
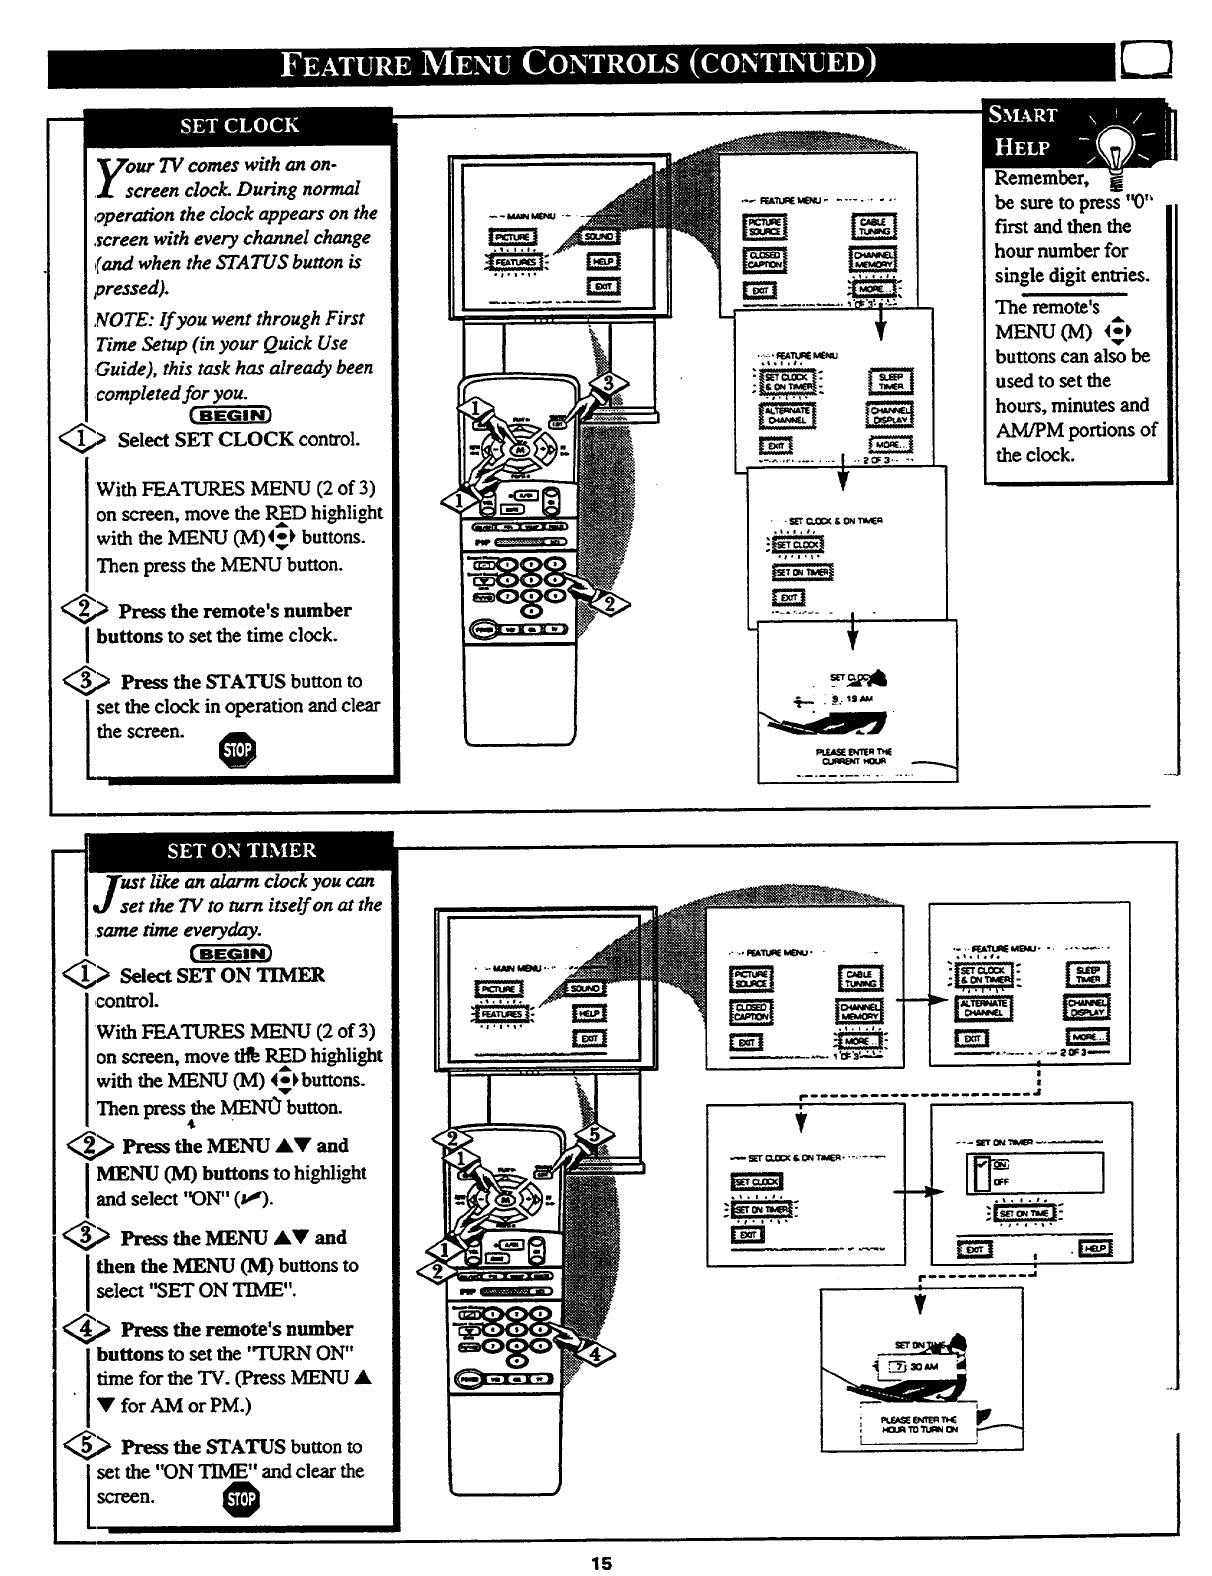
our TV comes with an on-
creen clock. During normal
operation the clock appears on the
screen with every channel change
(and when the STATUS button is
pressed).
,(€OTE: If you went through First
Time Setup (in your Quick Use
Guide), this task has already been
completed for you.
(BEGIN_
_Select SET CLOCK control.
Remember,
be sure to press'_)"
first and then the
hour number for
single digit entries.
The remote's
MENU (IV[) _
buttons can also be
used to set the
hours, minutes and
AM/PM portions of
With FEA'HJRES MENU (2 of 3)
on screen, move the RInD highlight
with the MENU (M)4*_ buttons.
Then press the MENU button.
_,_ Press the remote's number
buttons to set the time clock.
_,.,_ Press the STATUS button to
set the clock in operation and clear
the screen. O.IlW_h'r HDOR
t like an alarm clock you can
et the TV to turn itself on at the
same time everyday.
( BEGIN]
_,_ Select SET ON TIMER
control.
With FEATURES MENU (2 of 3)
on screen, move tl_ I_D highlight
with the MENU (M) 4_buttons.
Then press the ME_N0 button.
_,,,_ Press the MENU AV and
MENU (M) buttons to highlightand select 'ON" (_,,€).
_Press the MENU AV and
then the MENU (M) buttons to
select "SET ON TIME".
_,> Press the remote's number
I buttons tOset the "IIJRN ON"
•[time for the TV. (Press MENU A
I • for AM or PM.)
_,_ Press the STATUS button to
[set the "ON TIME" and clear the
/ O
the clock.
15
- -- SET 0N "nMEn _-_
,l°,.#°
Ngl .
,,...,°
o#..._,
r-_
I
r_-'l
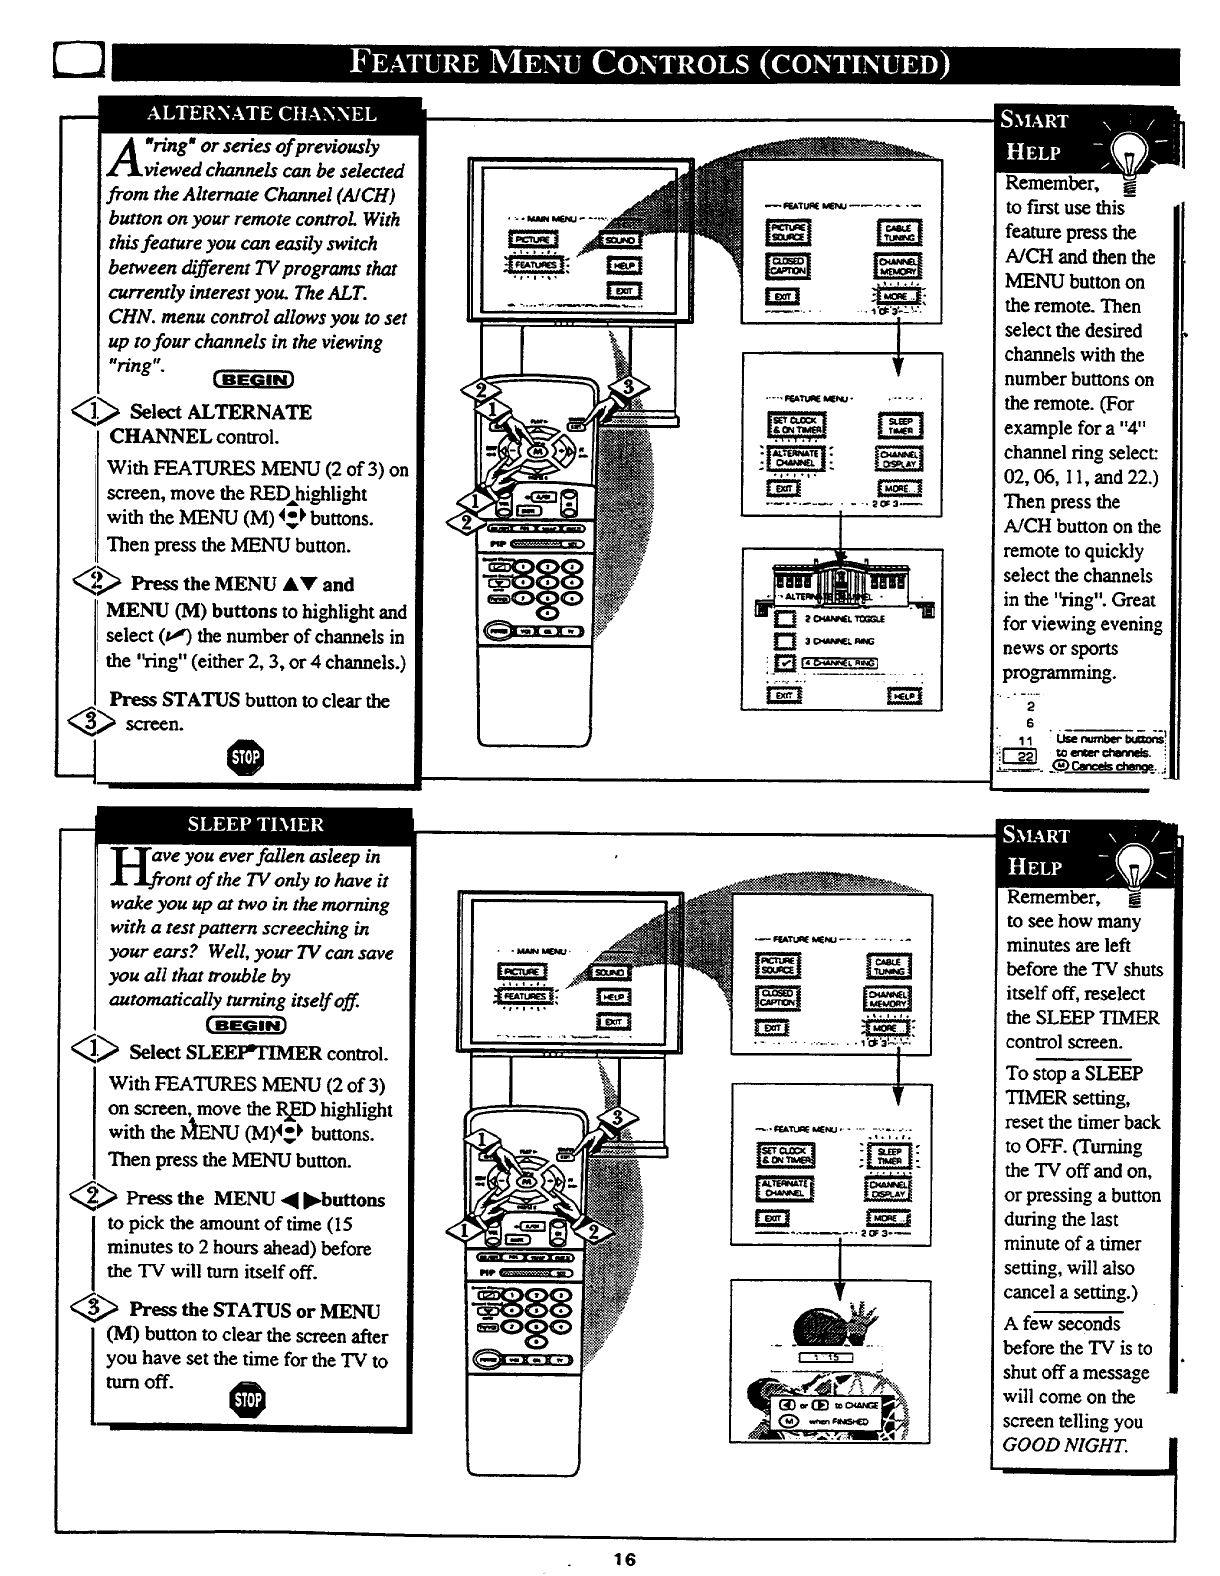
Aring" or series of previously
viewed channels can be selected
from the Alternate Channel (AICH)
button on your remote control. With
this feature you can easily switch
between _'fferent TV programs that
currently interest you. The AL T.
CHN. menu control allows you to set
up tofour channels in the viewing
"ring". [ BEGIN)
_ select ALTERNATE
CHANNEL control.
With FEATURES MENU (2 of 3) on
screen, move the RED,_highlight
with the MENU (M) 4_ buttons.
Then press the MENU button.
_€2_ Press the MENU &Y and
MENU (M) buttons to highlight and
select (t_ the number of channels in
the 'Ying" (either 2, 3, or 4channels.)
Press STATUS button to clear the
0
ol,l,i,
!
, ...,._......
aY; you ever fallen asleep in
nt of the TV only to have it
wake you up at two in the morning
with a test pattern screeching in
your ears? Well, your TV can save
you all that trouble by
automatically turning itself off.
<,_ Select SLE_R control.
with FEATURES MENU (2 of 3)
on screen, move the P-xEDhighlight
with the _ (M)4_*_buttons.
Then press the MENU button.
_Press the MENU •J_buttons
to pick the amount of time (15
minutes to 2 hours ahead) before
the TV will turn itself off.
_Press the STATUS or MENU
(M) button to clear the screen after
you have set the time for the TV to
turn off.
............ +-..-.... 1 '01:'3 ;-:_'--', ,
V
_OF3o_
16
Remember, __
to fast use this
feature press the
A/CH and then the
MENU button on
the remote. Then
select the desired
channels with the
number buttons on
the remote. (For
example for a "4"
channel ring select:
02, 06, I 1, and 22.)
Then press the
A/CH button on the
remote to quickly
select the channels
in the 'Ying". Great
for viewing evening
news or sports
prograrnming.
2
6
1"1
,_. €_c,_._ ¢a_. _.
Remember,
to see how many
minutes are left
before the TV shuts
itself off, reseleet
the SLEEP TIMER
control screen.
To stop a SLEEP
TIMER setting,
reset the timer back
to OFF. (Turning
the TV off and on,
or pressing a button
during the last
minute of a timer
setting, will also
cancel a setting.)
A few seconds
before the TV is to
shut off a message
will come on the
screen telling you
GOOD NIGHT. i
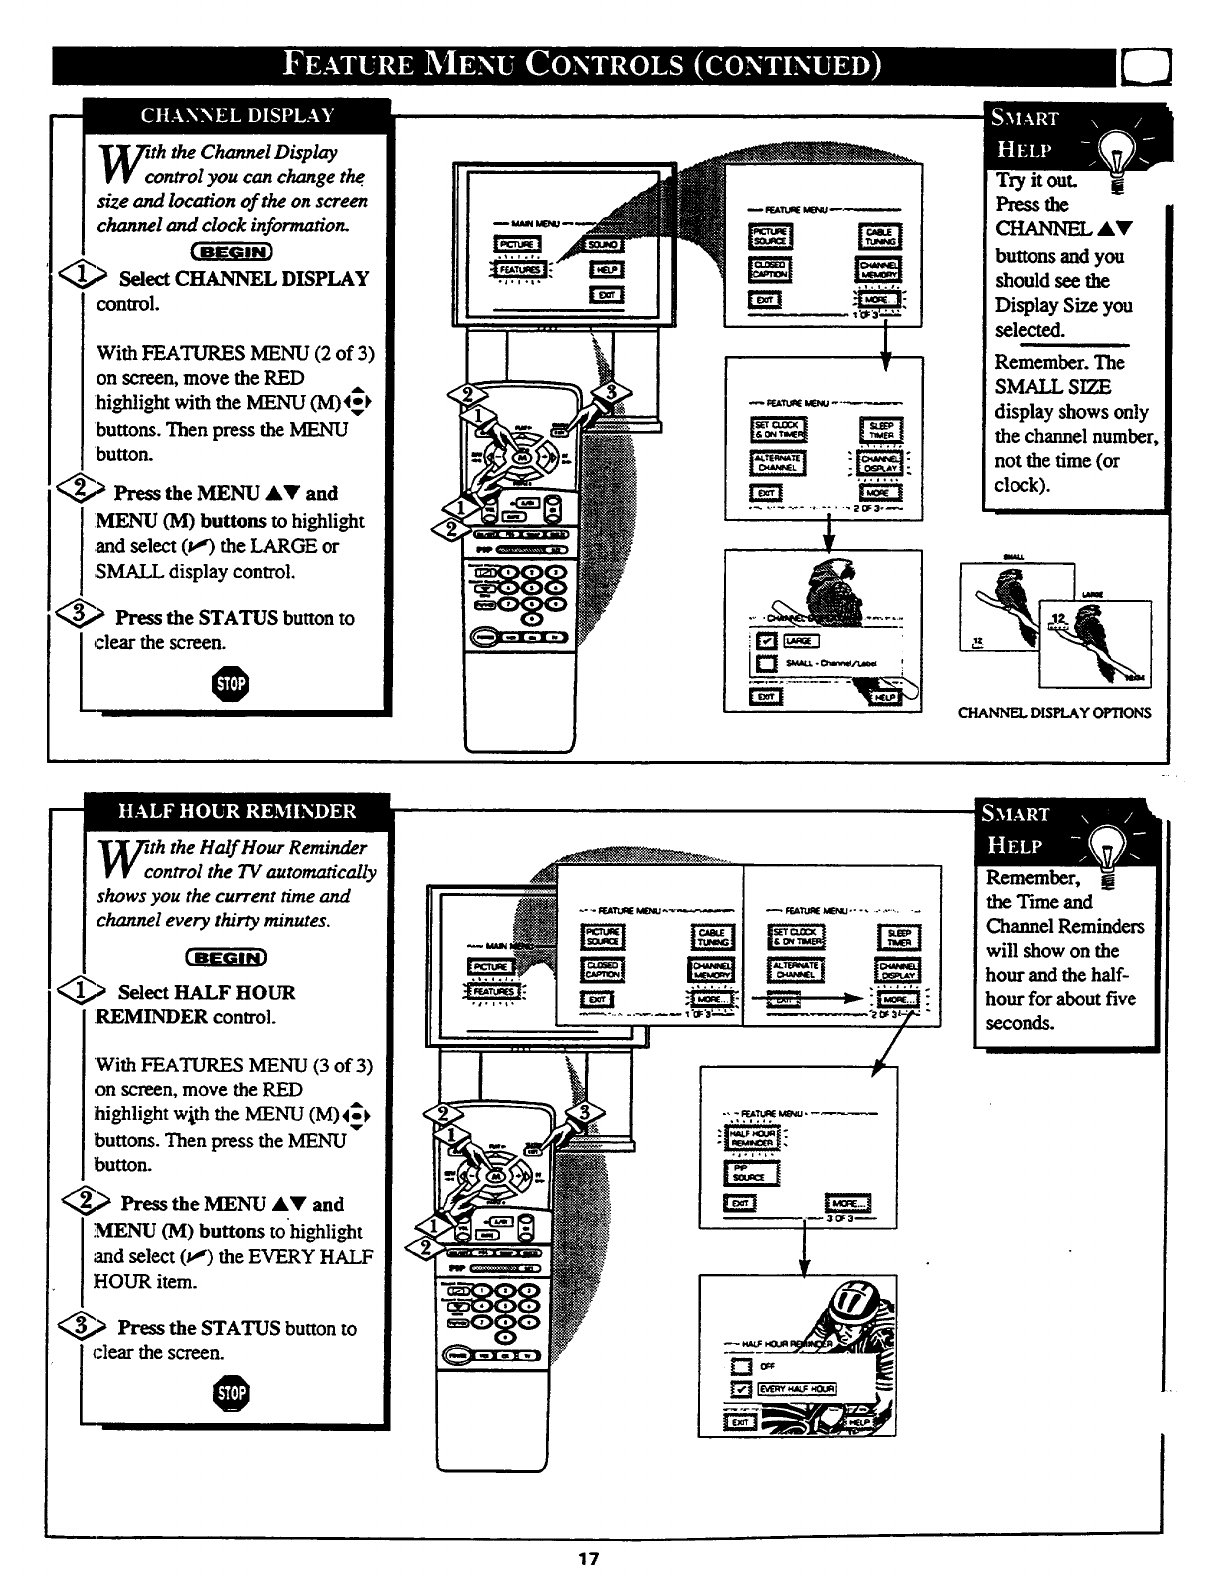
ththeChannelDisplay
ntrolyou canchangethe.
sizeand locationoftheonscreen
channeland clockinformation.
_.,_ Select CHANNEL DISPLAY
control.
With FEATURES MENU (2 of 3)
on screen, lnove the RED
:highlight with the MENU (M)4_k
buttons. Then press the MENU
button.
_,,_ Press the MENU A_' and
:MENU (M) buttons to highlight
and select (t,,') the LARGE or
SMALL display control.
_.,_ Press the STATUS button to
clear the screen.
0
1
Try it out.
Press the
CHANNEL dkV
buttons and you
should see the
Display Size you
selected.
Remember. The
SMALL SIZE
display shows only
the channel number,
not the time (or
clock).
CHANNEL DISPLAY OPTIONS
th the Half Hour Reminder
ontrol the TV automatically
shows you the current time and
channel every thirty minutes.
_.) Select HALF HOUR
REMINDER control.
'With FEATURES MENU (3 of 3)
on screen, move the RED
highlight wj,th the MENU (M) 4_
buttons. Then press the MENU
button.
_,,_ Press the MENU AY and
.,MENU (M) buttons tohighlight
and select (_) the EVERY HALF
HOUR item.
_Press the STATUS button to
I clear the screen.
0
Remember,
the Time and
Channel Reminders
will show on the
hour and the half-
hour for about five
seconds.
17
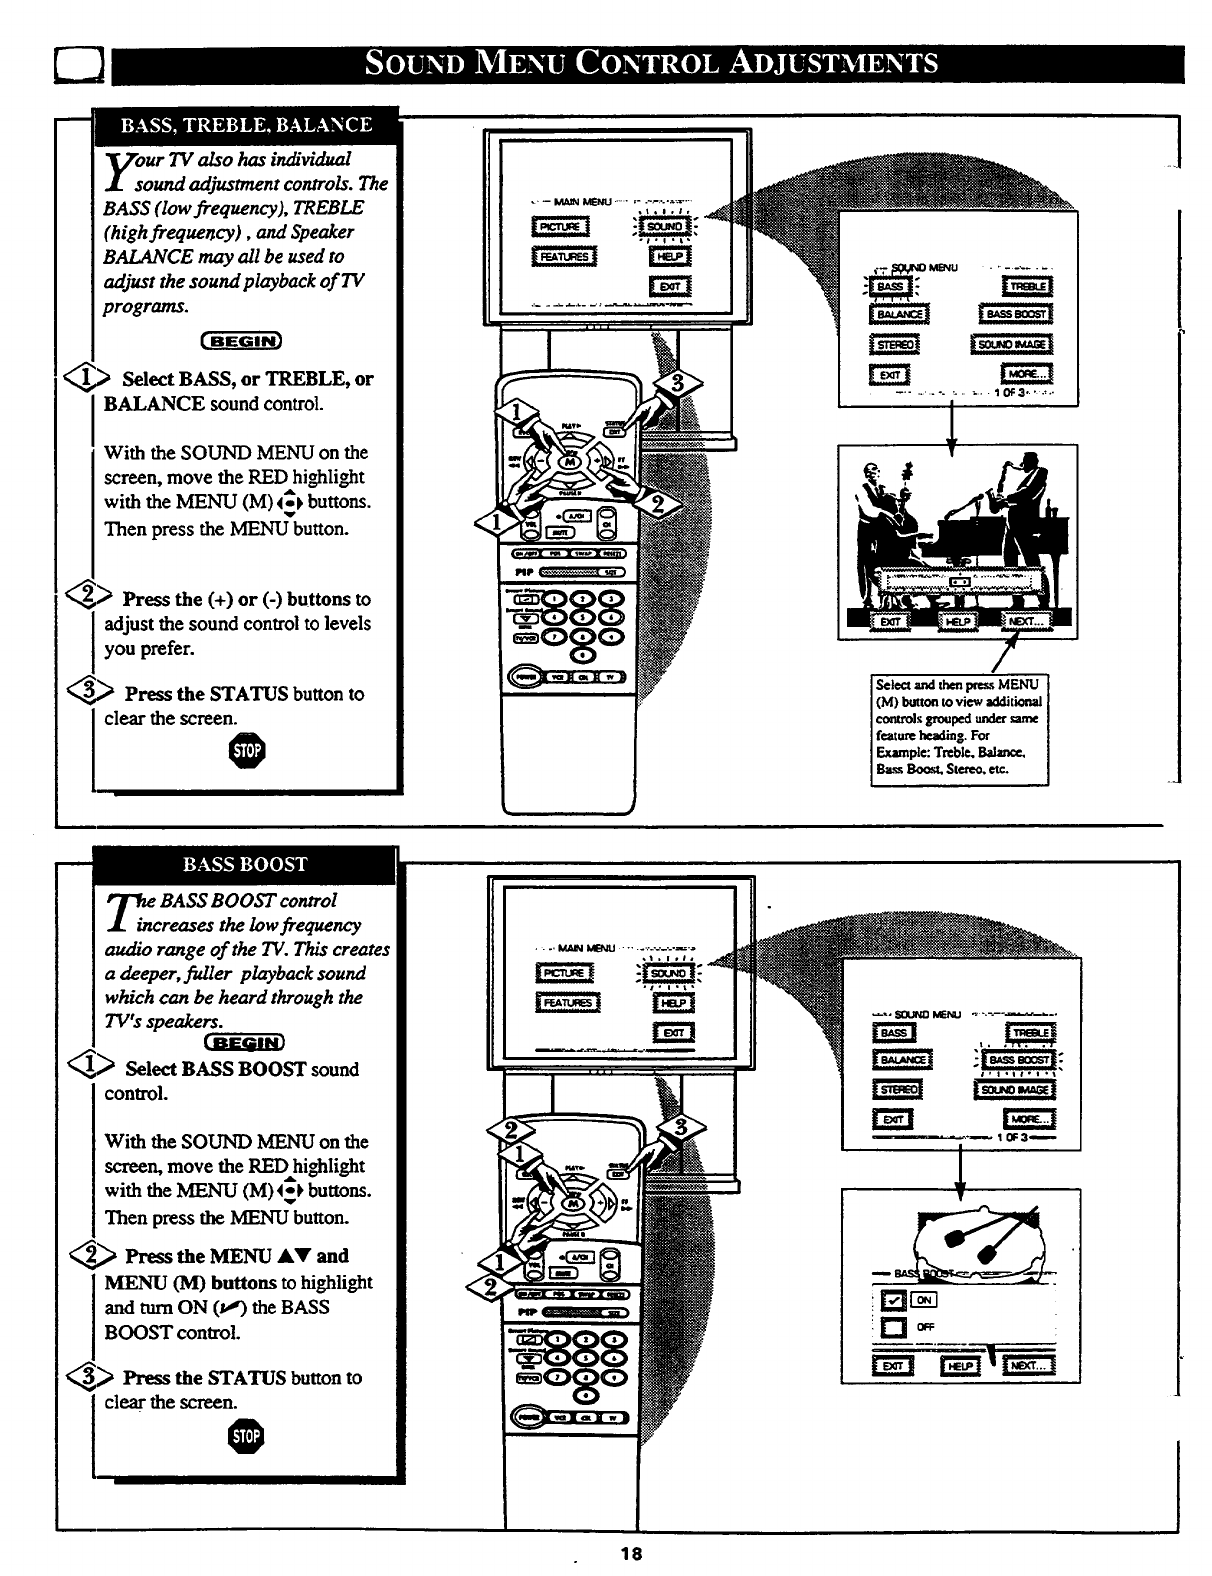
Select BASS, or TREBLE, or
BALANCE sound control.
With the SOUND MENU on the
screen, move the RED highlight
with the MENU (M) _ buttons.
Then press the MENU button.
)Press the (+) or (-) buttons to
adjust the sound control to levels
you prefer.
_.._ Press the STATUS button to
clear the screen.0
...... •.... _. ;.. - I 0F3..' ....
_BASS BOOST control
reases the low frequency
audio range of the TV. This creates
adeeper, fuller playback sound
which can be heard through the
TV's speakers.
Select BASS BOOST sound
control.
With the SOUND MENU on the
screen, move the RED highlight
with the MENU (M) 4_ buttons.
Then press the MENU button.
_Press the MENU AV and
MENU (lVl) buttons to highlight
and turn ON (lJ)the BASS
BOOST control.
_,_ Press the STATUS buttonto
clearthe screen.
O
!r"i _ •
18
]
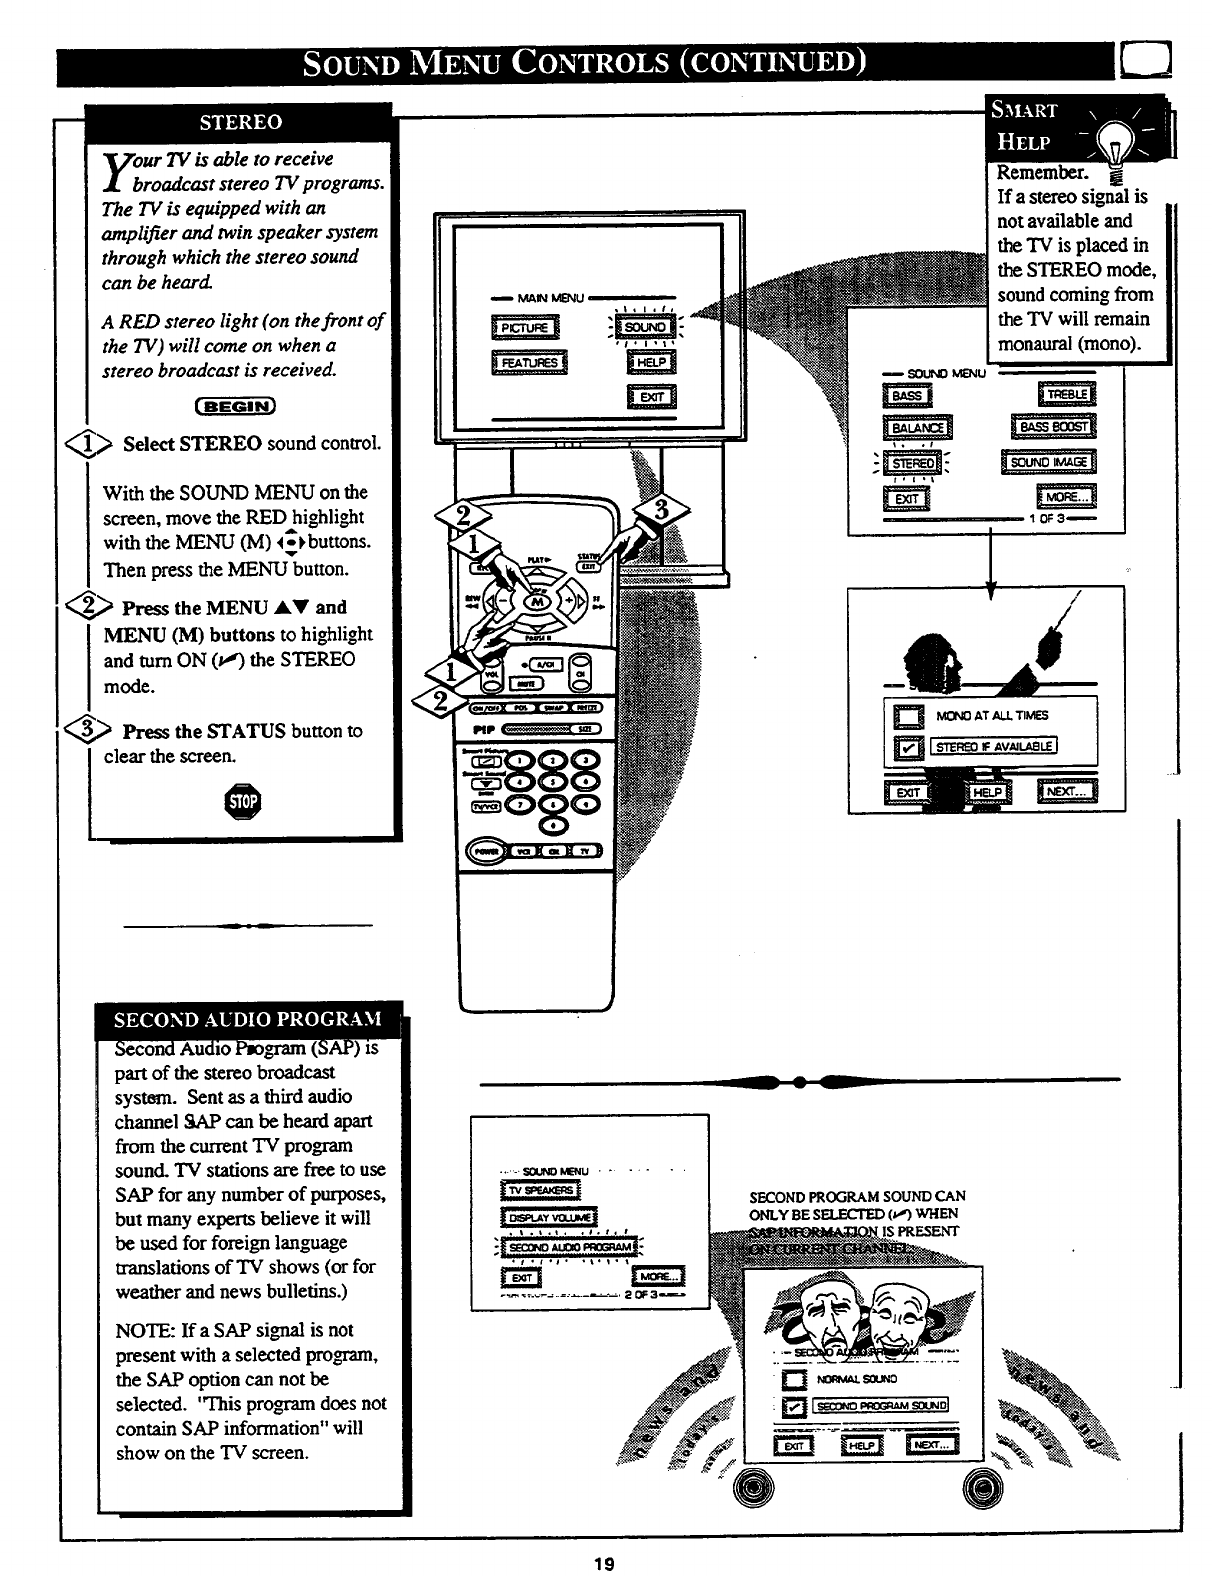
ur TV is able to receive
roadcast stereo TV programs.
The TV is equipped with an
amplifier and twin speaker system
through which the stereo sound
can be heard.
A RED stereo light (on the front of
the 7"V)will come on when a
stereo broadcast is received.
_,_ Select STEREO sound control.
With the SOUND MENU on the
screen, move the RED highli_t
with the MENU (M) 4_buttons.
,qr
Then press the MENU button.
_,_ Press the MENU 4k_' and
MENU (M) buttons to highlight
and turn ON (v'€) the STEREO
mode.
_._ Press the STATUS button to
clear the screen.
0
mMAINMENU
III I [.
Remember.
If astereo signal is
not available and
the "IV is placed in
the STEREO mode,
sound coming from
the "IV will remain
monaural (mono).
/
(
part of the stereo broadcast
system. Sent as athird audio
channel SAP can be heard apart
from the current TV program
sound. TV stations are free to use
SAP for any number of purposes,
but many experts believe it will
be used for foreign language
translations of "IVshows (or for
weather and news bulletins.)
NOTE: If a SAP signal is not
present with aselected program,
the SAP option can not be
selected. 'q'his program does not
contain SAP information" will
show on the TV screen.
SECOND PROGRAM SOUND CAN
ONLY BE SELECTED (_,r)WHEN
PRESENT
19
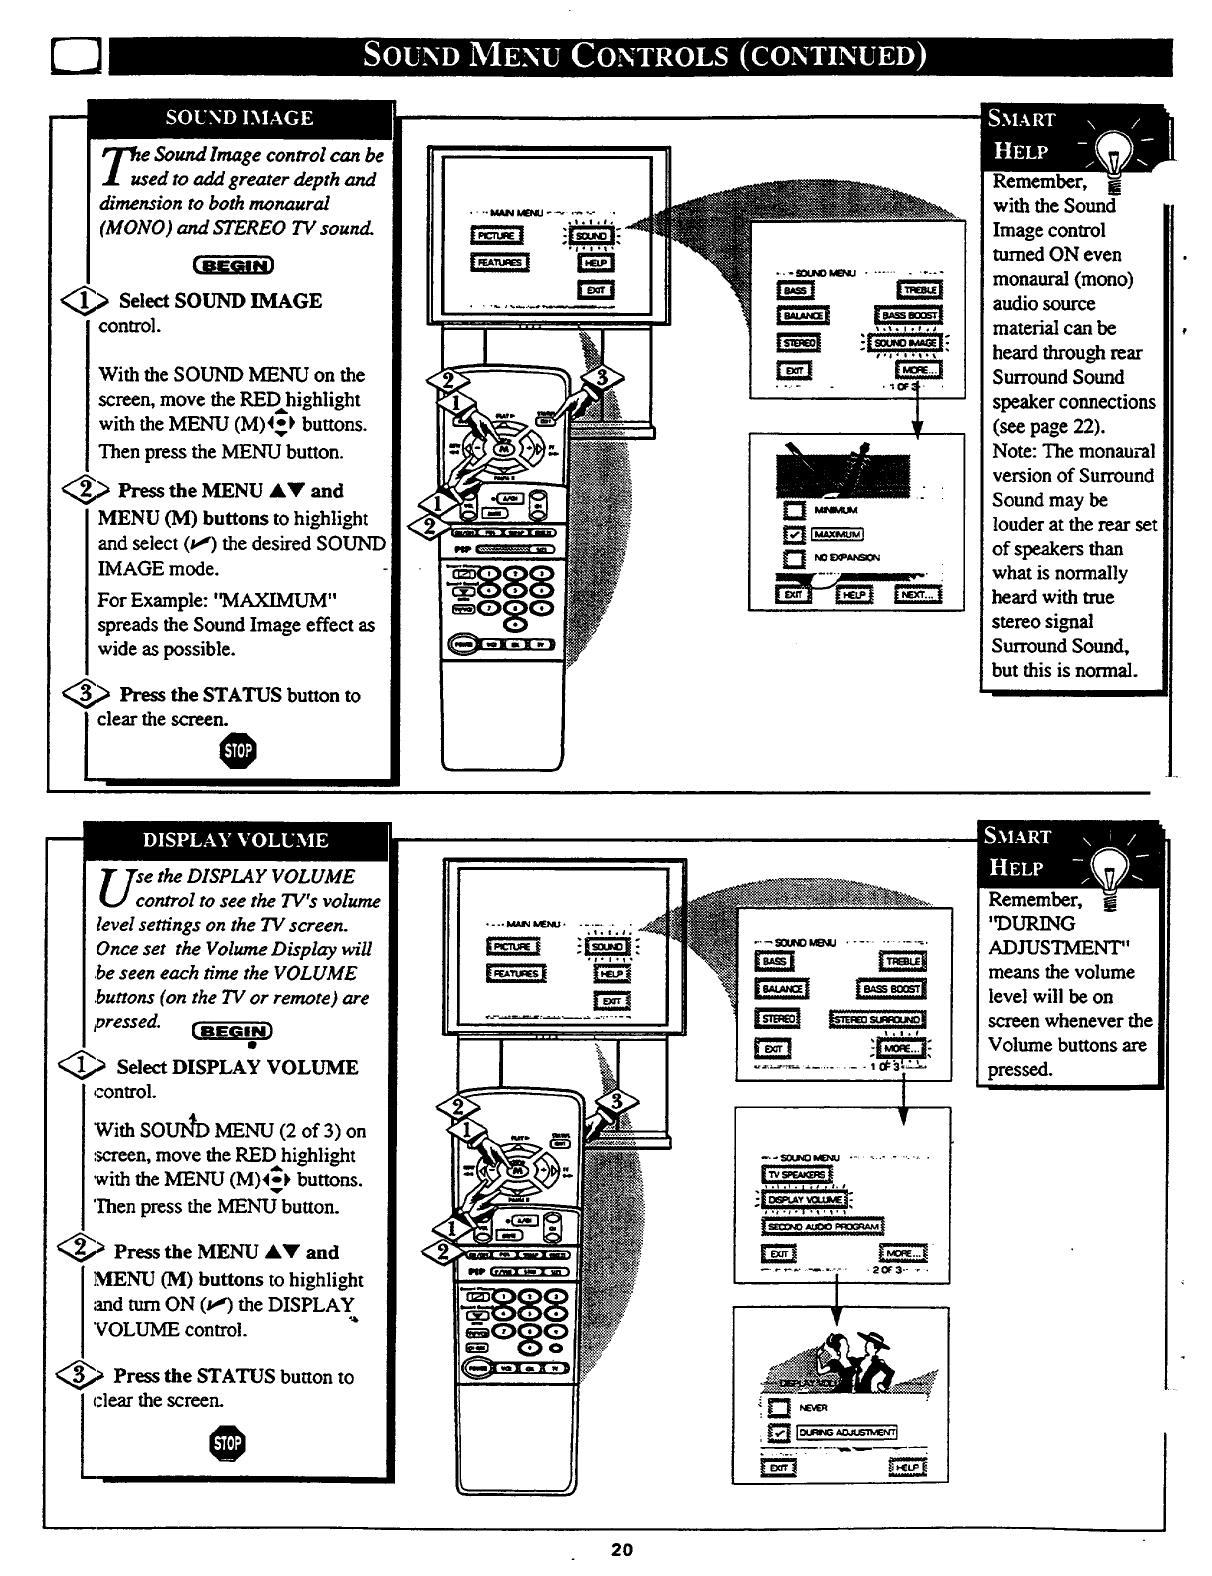
Tus e Sound Image control can be
ed to add greater depth and
dimension to both monaural
(MONO) and STEREO TV sound.
.,> Select SOUND IMAGE
control.
With the SOUND MENU on the
screen, move the REDhighlight
with the MENU (M)4_ buttons.
Then press the MENU button.
_,_ Press the MENU AY and
MENU (M) buttons to highlight
and select (u,') the desired SOUND
IMAGE mode.
For Example: 'qVIAXIMUM"
spreads the Sound Image effect as
wide as possible.
_,_ Press the STATUS button to
clear the screen.O
• - -- ItIAIN M[NU - ._ .... - •
llal t
...._ MG',4U ....... - .....
• -..- -• 'iroOF_-
D W
Remember, g
with the Sound
Image control
turned ON even
monaural (mono)
audio source
material can be
heard through rear
Surround Sound
speaker connections
(see page 22).
Note: The monaural
version of Surround
Sound may be
louder at the rear set
of speakers than
what is normally
heard with true
stereo signal
Surround Sound,
but this is normal.
ethe DISPLAY VOLUME
ontrol to see the TV's volume
level settings on the TV screen.
Once set the Volume Display will
,beseen each time the VOLUME
,buttons (on the TV or remote) are
pressed.
_Select DISPLAY VOLUME
control.
With SOUN_ MENU (2 of 3) on
:_-'reen,move the REDhighlight
with the MENU (M)4_} buttons.
Then press the MENU button.
_,_ Press the MENU AY and
MENU (M) buttons to highlight
and turn ON (t,,€) the DISPLAY
"VOLUME control.
_,_ Press the STATUS button to
I clear the screen.
O
.... _ LfJ_IU ........
1
Remember,
93URING
ADJUSTMENT"
means the volume
level will be on
screen whenever the
Volume buttons are
pressed.
2O
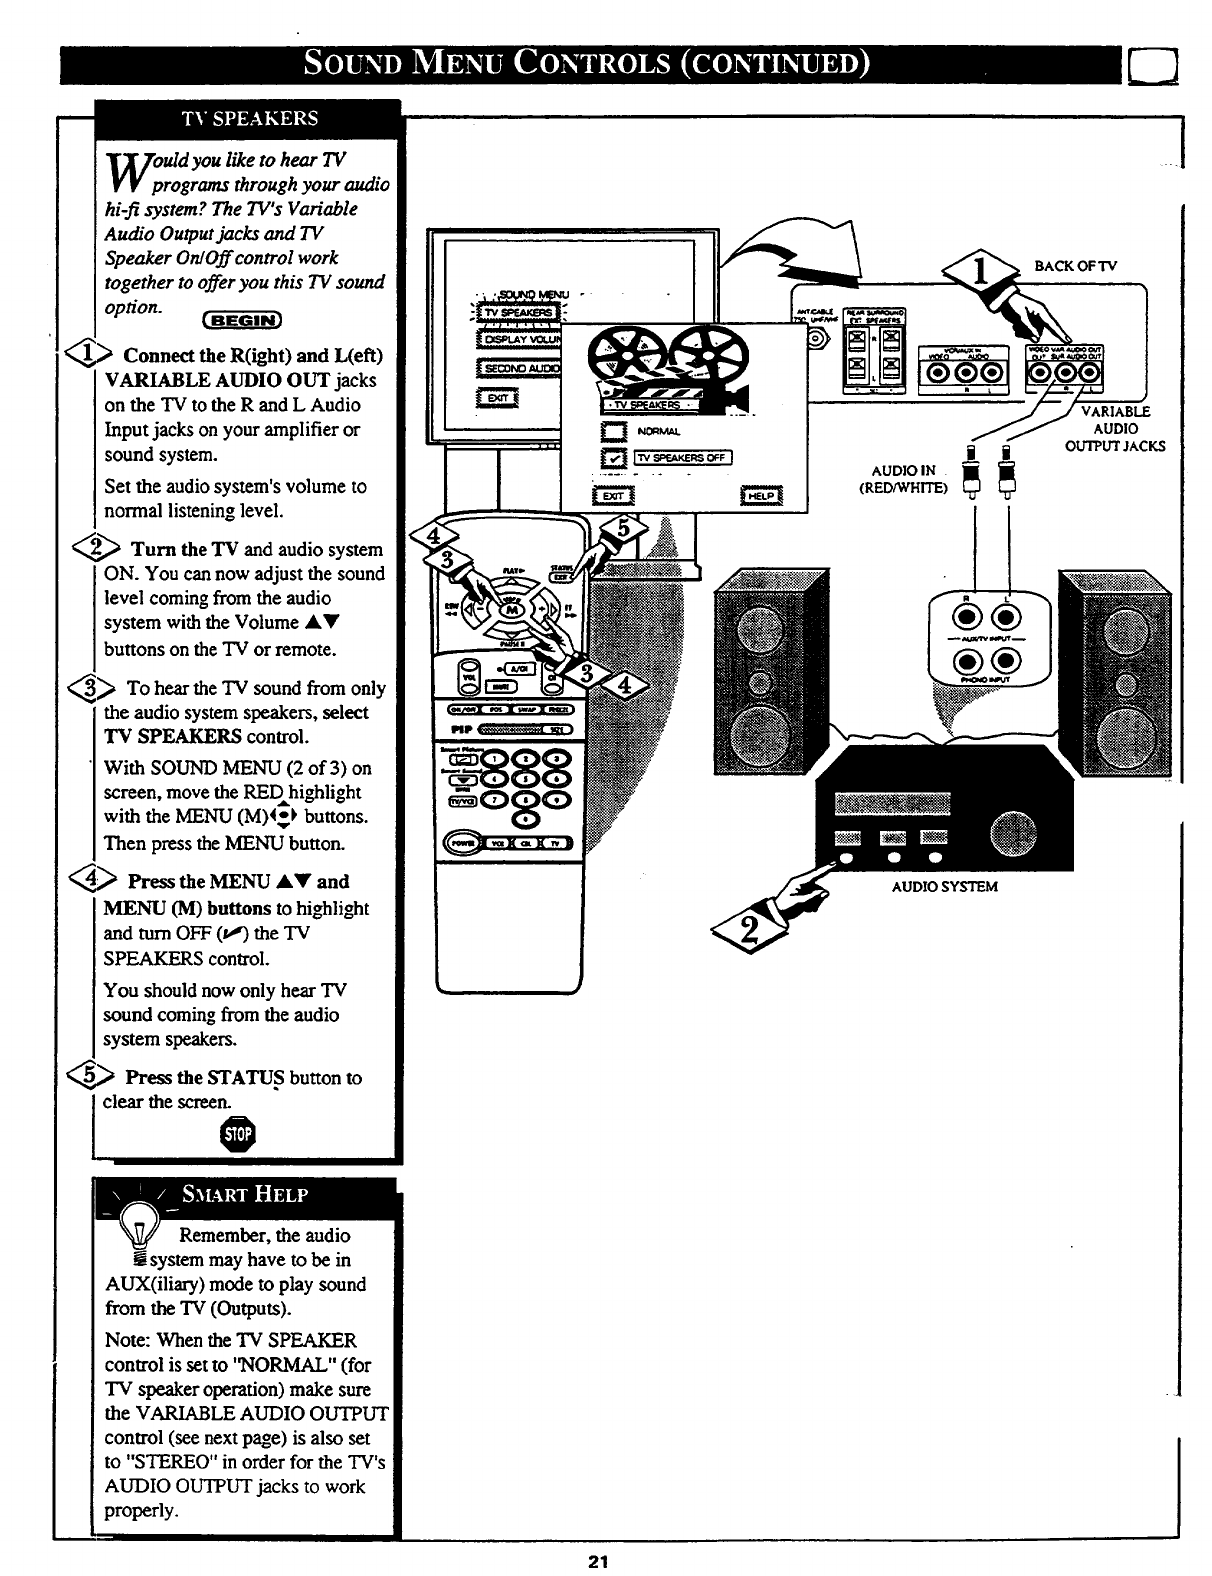
Uldyou like to hear TV
rograms through your audio
hi-fi system? The TV's Variable
Audio Output jacks and TV
Speaker OnlOff control work
together to offer you this TV sound
option.
Connect the R(ight) and L(eft)
VARIABLE AUDIO OUT jacks
on the TV to the R and L Audio
Input jacks on your amplifier or
sound system.
Set the audio system's volume to
normal listening level.
_Turn the TV and audio system
ON. You can now adjust the sound
level coming from the audio
system with the Volume AY
buttons on the TV or remote.
_To hear the TV sound from only
the audio system speakers, select
TV SPEAKERS control.
With SOUND MENU (2 of 3) on
screen, move the REDhighlight
with the MENU (M)_} buttons.
Then press the MENU button.
@Press the MENU _kY and
MENU (M) buttons to highlight
and turn OFF (v,') the "IV
SPEAKERS control.
You should now only hear TV
sound coming from the audio
system speakers.
5_ Press the STATUS button to
clear the scree b
""' I
.L i
AUDIO IN
(RED_VHITE) _ _
¥¥
AUDIO SYSTEM
BACK OF TV
VARIABLE
AUDIO
OUTPUT JACKS
.... .]
Remember, the audio
!system may have to be in
AUX(iliary) mode to play sound
from the TV (Outputs).
Note: When the TV SPEAKER
control is set to "NORMAL" (for
"IV speaker operation) make sure
the VARIABLE AUDIO OUTPUT
control (see next page) is also set
to "STEREO" in order for the TV's
AUDIO OUTPUT jacks to work
properly.
21
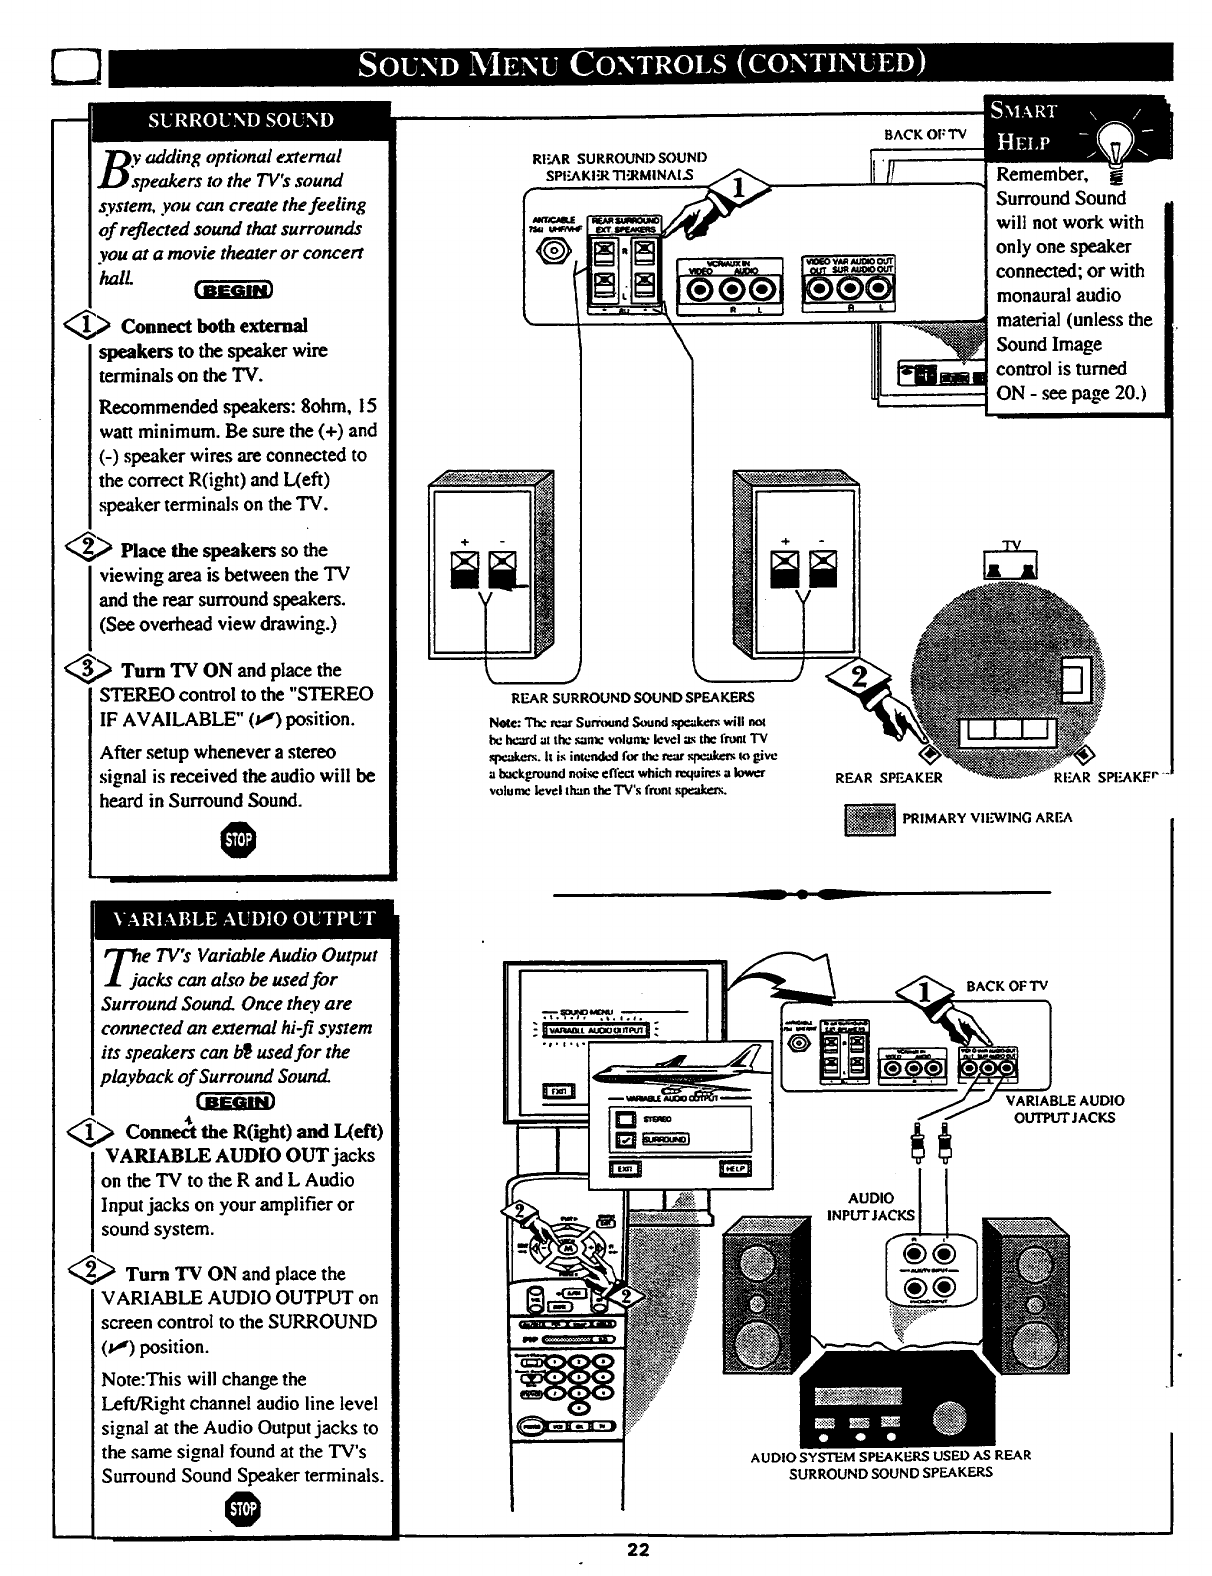
y adding optional external
speakers wthe 7V's sound
system, you can create the feeling
of reflected sound that surrounds
you at amovie theater or concert
_tL
_Connect both external
speakerstothespeakerwire
terminals on the "IV.
Recommended speakers: 8ohm, 15
watt minimum. Be sure the (+) and
(-) speaker wires are connected to
the correct R(ight) and L(eft)
speaker terminals on the "IV.
_,_ Place the speakers so the
viewing area is between the TV
and the rear surroundspeakers.
(See overhead view drawing.)
_,_ Turn "IV ON and place the
STEREO control to the "STEREO
IF AVAILABLE" (t,") position.
After setup whenever a stereo
signal is received the audio will be
heard in Surround Sound.
O
BACK OF TV
\
Remember, t
Surround Sound
will not work with
only one speaker
connected, or with
monaural audio
material (unless the
Sound Image
control is turned
ON - see page 20.)
REAR SURROUND SOUND SPEAKERS
REAR SPEAKER REAR SPF.AKI:r
_PRIMARY VIEWING AREA
__ • L
_ja e TV°sVariable Audio Output
cks can also be used for
Surround Sound Once they are
connected an external hi-fi system
its speakers can b_ usedfor the
playback of Surround Sounz£
con. t theR(ight)andI eft)
VARIABLE AUDIO OUT jacks
on the "IV to the R and L Audio
Input jacks on your amplifier or
sound system.
_Turn TV ON and place the
VARIABLE AUDIO OUTPUT on
screen control to the SURROUND
(v") position.
Note:This will change the
Left/Right channel audio line level
signal at the Audio Output jacks to
the same signal found at the TV's
Surround Sound Speaker terminals.
O
AUDIO
INPUT JACKS
®®
®®
AUDIO SYSTEM SPEAKERS USED AS REAR
SURROUND SOUND SPEAKERS
22
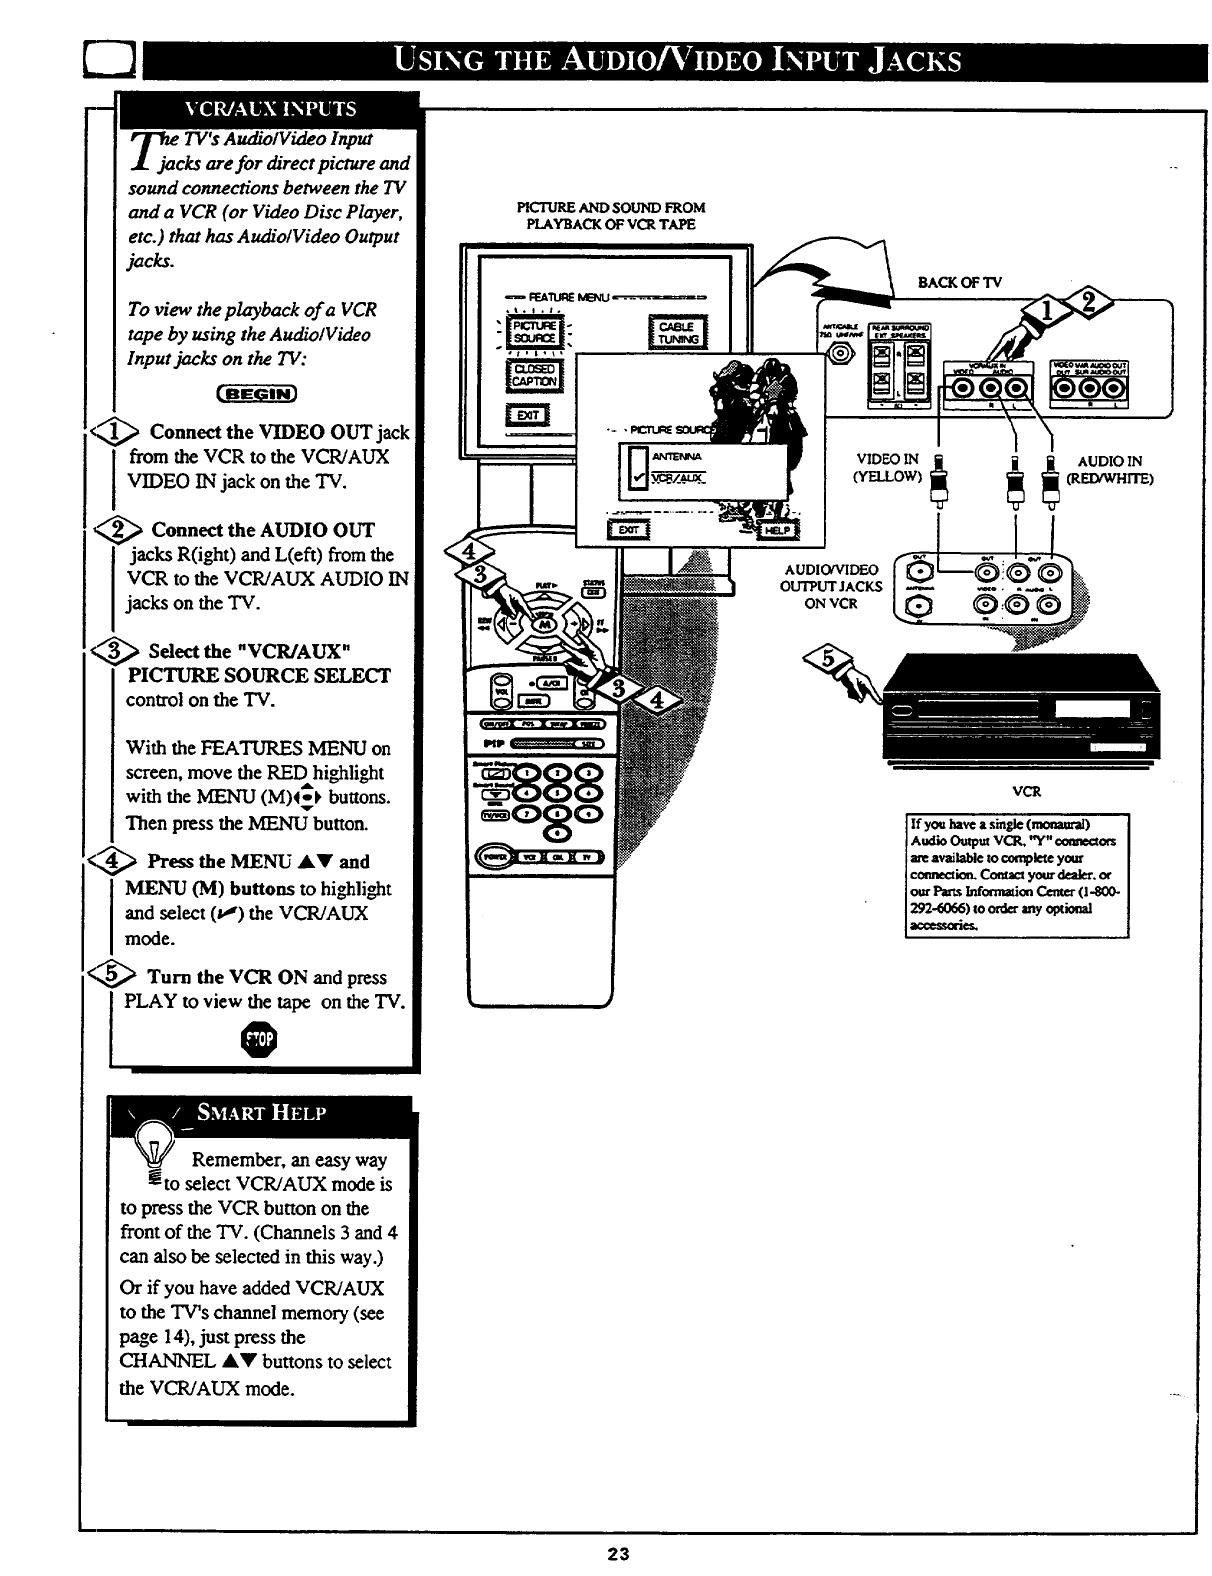
TV's AudiolVideo Input
are for direct picture and
sound connections between the TV
and a VCR (or Video Disc Player,
etc.) that has Audio/Video Output
jacks.
To view the playback of a VCR
tape by using the Audio/Video
Input jacks on the TV:
Connect the VIDEO OUT jack
from the VCR to the VCR/AUX
VIDEO IN jack on the TV.
_,_ Connect the AUDIO OUT
jacks R(ight) and L(eft) from the
VCR to the VCR/AUX AUDIO IN
jacks on the TV.
_,_ Sdect the "VCR/AUX"
PICTURE SOURCE SELECT
control on the TV.
With the FEATURES MENU on
screen, move the RED highli_t
with the MENU (M)4_} buttons.
Then press the MENU button.
<,,_ Press the MENU AV and
I ENU (M) buttons to highlight
and select (u_')the VCR/AUX
mode.
<_ Turn the VCR ON and press
PLAY to view the tape on the TV.0
PICTUREAND SOUND FROM
PLAYBACKOF VCR TAPE
,, b
BACKOF TV
VIDEO IN
(YELLOW)
AUDIO/VIDEO
OUTPUT JACKS
ON VCR
_ _ AUDIO IN
(RED/WHITE)
VCR
If you have a single (_)
Audio Omput VCR, "Y"cormeaors
axe available to complete your
cccmection. Con_cl your dealer, or
our Pa_¢ Information Center (I-800-
292-6066) to order any optional
acccss_es.
Remember, an easy way
to select VCR/AUX mode is
to press the VCR button on the
front of the TV. (Channels 3 and 4
can also be selected in this way.)
Or if you have added VCR!AUX
to the TV's channel memory (see
page 14), just press the
CHANNEL AV buttons to select
the VCR/AUX mode.
23
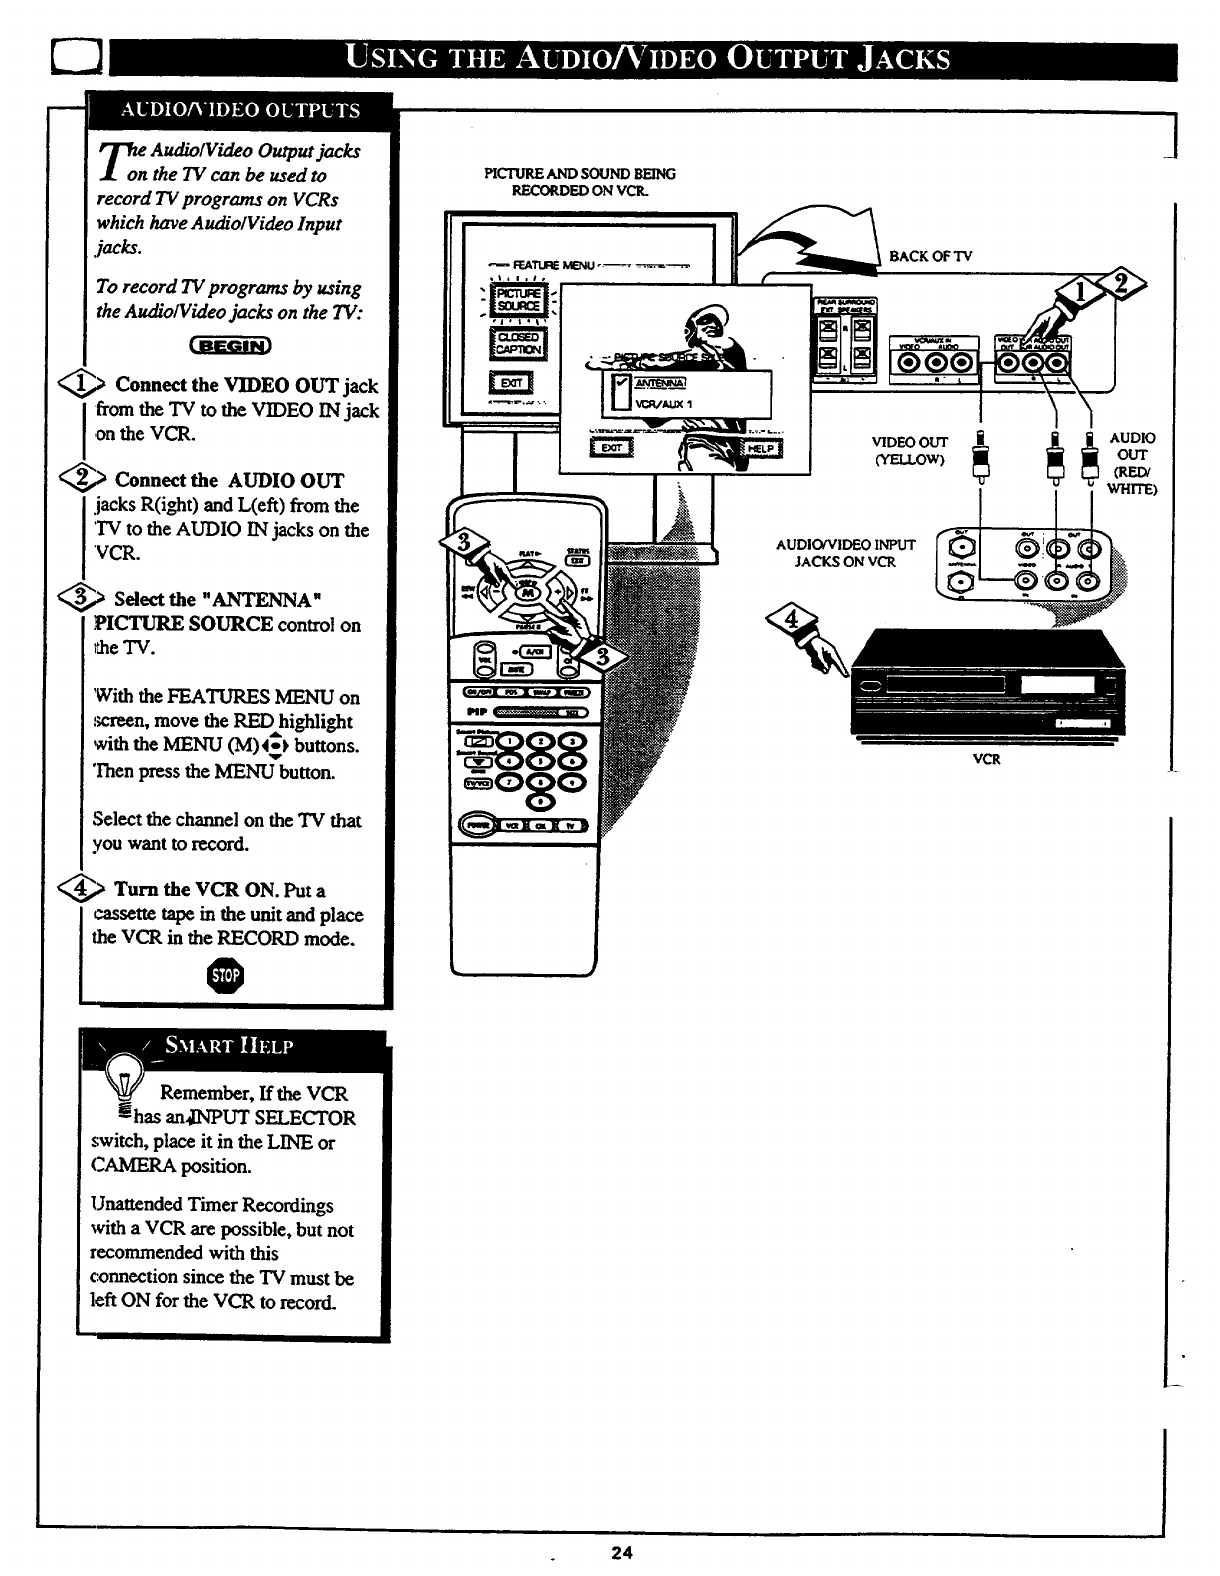
T_on AUdiolVideo Output jacks
the TV can be used to
record TVprograms on VCRs
which have AudiolVideo Input
jacks.
To record TV programs by using
the AudiolVideo jacks on the TV:
_.) Connect the VIDEO OUT jack
[fromthe TV to the VIDEO INjack
on the VCR.
_,> Connect the AUDIO OUT
.jacks R(ight) and L(eft) from the
'IV to the AUDIO IN jacks on the
VCR.
_,_ Select the "ANTENNA"
PICTURE SOURCE control on
_he"IV.
With the FEATURES MENU on
.%'reen,move the RED highlight
with the MENU (M) 4__)buttons.
v
Then press the MENU button.
Select the channel on the TV that
you want to record.
_.) Turn the VCR ON. Put a
cassette tape in the unit and place
the VCR in the RECORD mode.
O
VCR
]
Remember, If the VCR
an41NPUTSELECTOR
switch, place it in the LINE or
CAMERA position.
Unattended Timer Recordings
with a VCR are possible, but not
recommended with this
connection since the "IVmust be
left ON for the VCR to record.
24
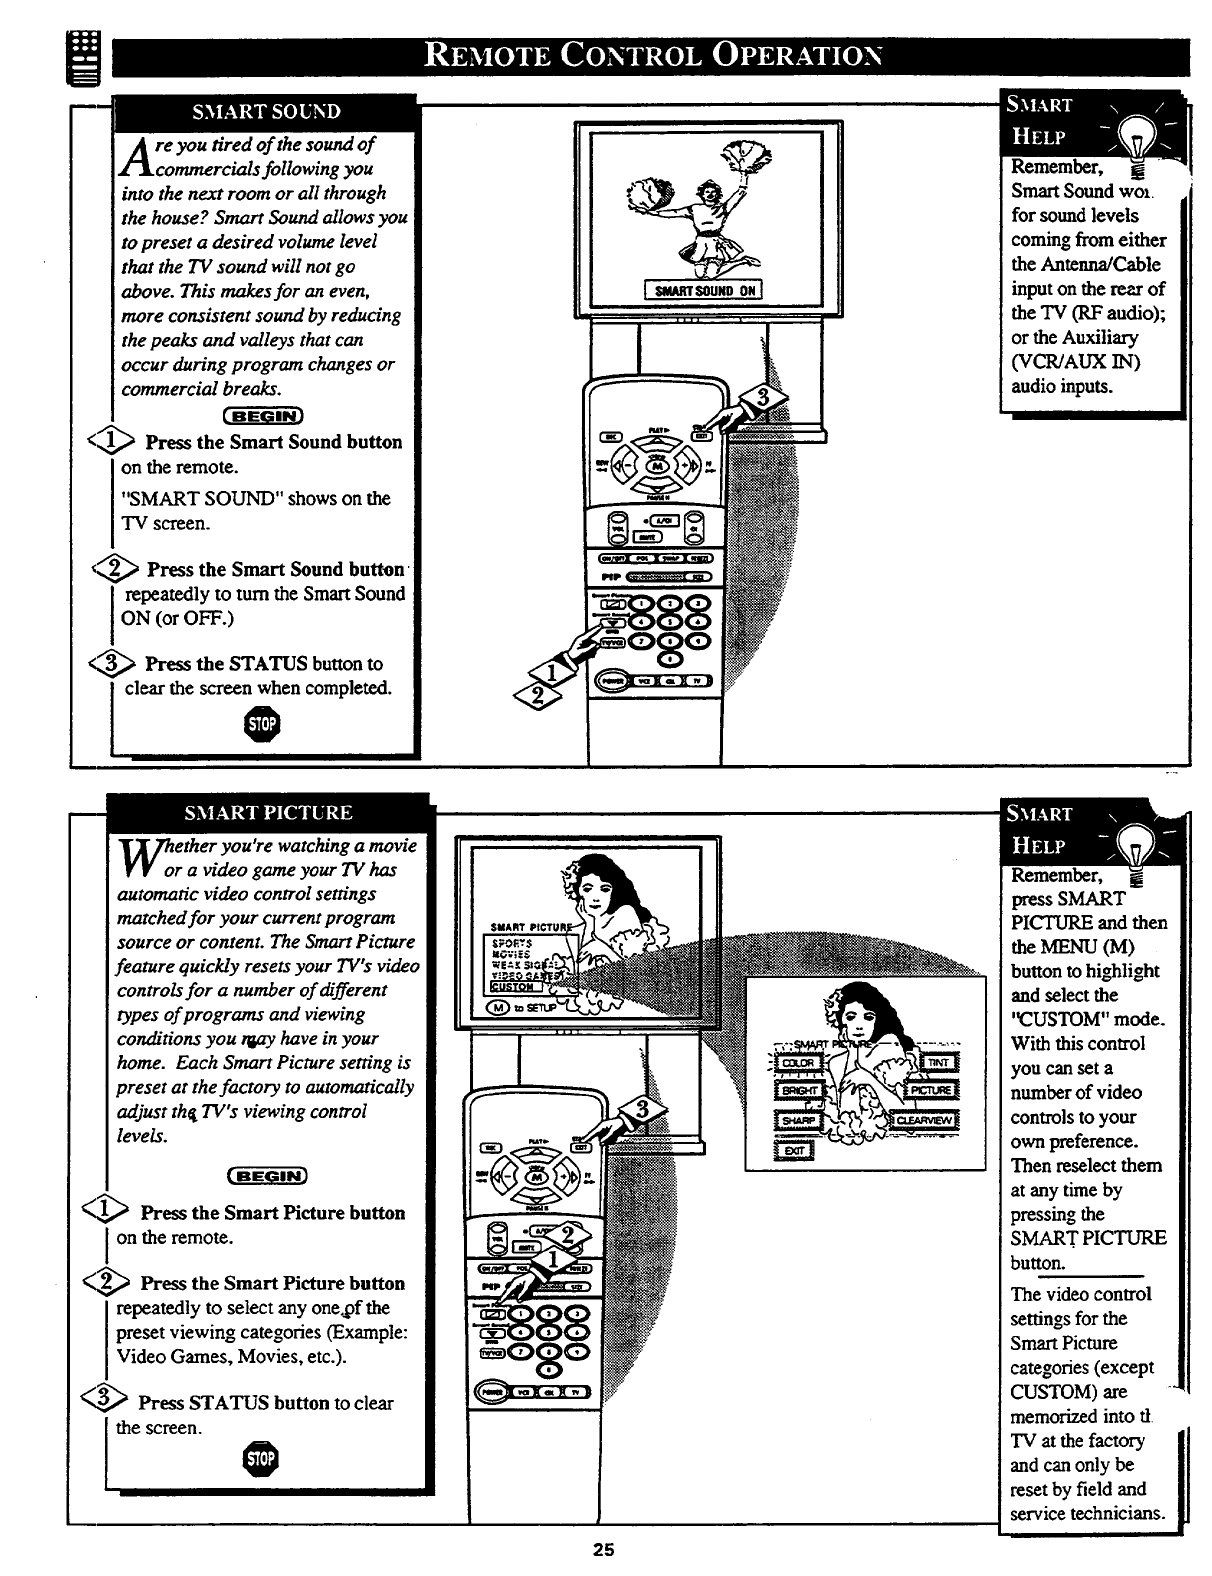
re you tired of the sound of
commercials following you
into the next room or all through
the house? Smart Sound allows you
to preset a desired volume level
that the TV sound will not go
above. This makes for an even,
more consistent sound by reducing
the peaks and valleys that can
occur during program changes or
commercial breaks.
<_1,_ Press the Smart Sound button
on the remote.
"SMART SOUND" shows on the
TV screen.
_,,_ Press the Smart Sound button
n repeatedly to turn the Smart Sound
ON (or OFF.)
<,_ Press the STATUS button to
n clear the screen when completed.
@
ether you're watching a movie
ra video game your TV has
automatic video control settings
matched for your current program
source or content. The Smart Picture
feature quickly resets your TV's video
controls for a number of different
types of programs and dewing
conditions you tGay have in your
home. Each Smart Picture setting is
preset at the factory to automatically
adjust thg TV's viewing control
levels.
(,_ Press the Smart Picture button
on the remote.
(,_ Press the Smart Picture button
repeatedly to select any one,of the
preset viewing categories (Example:
Video Games, Movies, etc.).
(-,_ Press STATUS button to clear
lthescreen
SMA,RT SOUND ON
Remember, i
Smart Sound wo_.
for sound levels
coming from either
the Antenna/Cable
input on the rear of
the TV (RF audio);
or the Auxiliary
(VCR/AOX IN)
audio inputs.
25
Remember,
press SMART
PICTURE and then
the MENU (M)
button to highlight
and select the
'_USTOM" mode.
With this control
you can set a
number of video
controls to your
own preference.
Then reselect them
at any time by
pressing the
SMART PICTURE
button.
The video control
settings for the
Smart Picture
categories (except
CUSTOM) are
memorized into tt
TV at the factory ii
and can only be
reset by field and
service technicians.
i
m
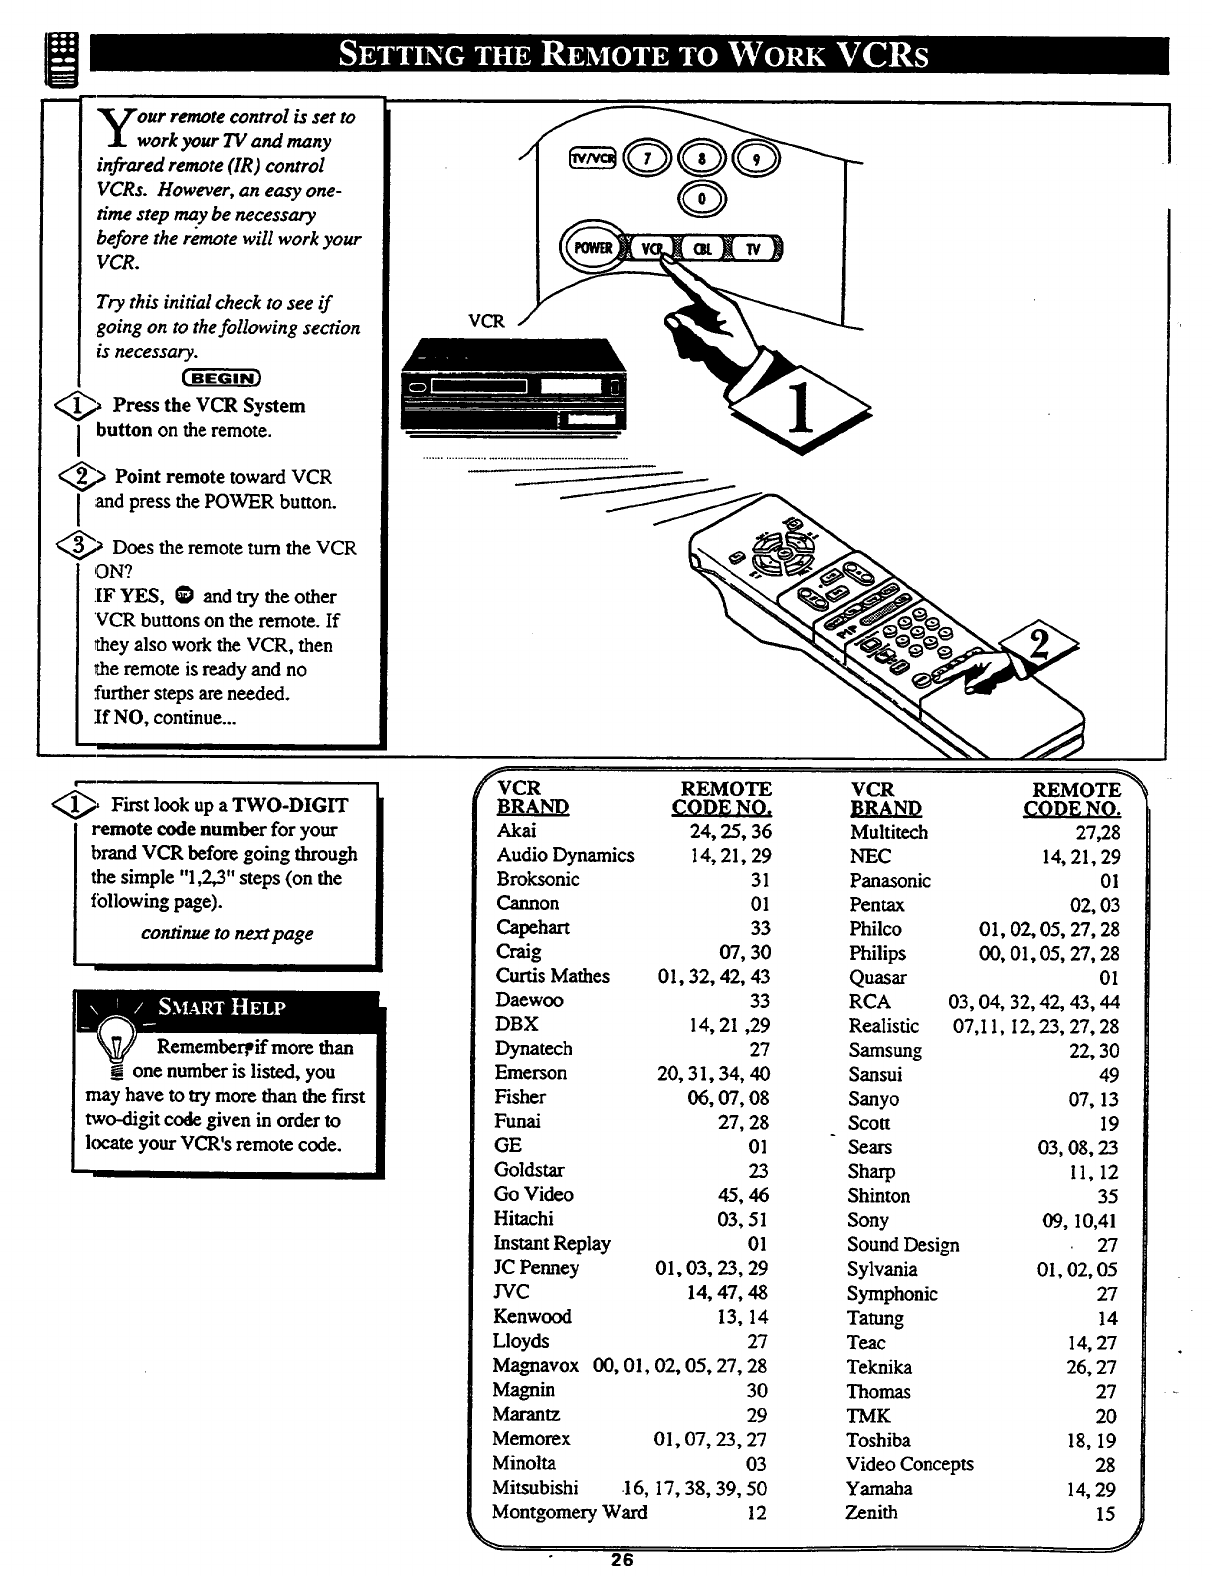
our remote control is set to
work your 1V and many
infrared remote (IR) control
VCRs. However, an easy one-
time step may be necessary
before the remote will work your
VCR.
Try this initial check to see if
going on to thefollowing section
is necessary.
t-a ar
_,_ Press the VCR System
button on the remote.
_,> Point remote toward VCR
and press the POWER button.
_.,_ Does the remote turn the VCR
ON?
IF YES, _ and try the other
VCR buttons on the remote. If
they also work the VCR, then
the remote is ready and no
further steps are needed.
If NO, continue...
VCR
I
__i First look up a TWO-DIGIT
iemote code number for your
brand VCR before going throu_
the simple "1,2,3" steps (on the
tbllowing page).
continue to next page
Rememberpif more than
may have to try more than the first
two-digit code given in order to
_ate your VCR's remote cede.
_VCR REMOTE
CODENO.
Akai 24, 25, 36
Audio Dynamics 14, 21, 29
Broksonic 31
Cannon Ol
Capehart 33
Craig 07, 30
Curtis Mathes 01, 32, 42, 43
Daewoo 33
DBX 14, 21,29
Dynatech 27
Emerson 20, 31,34, 40
Fisher 06, 07, 08
Funai 27, 28
GE 01
Goldstar 23
Go Video 45, 46
Hitachi 03, 51
Instant Replay 01
JC Penney 01, 03, 23, 29
JVC 14, 47, 48
Kenwood 13, 14
Lloyds 27
Magnavox 00, 01, 02, 05, 27, 28
Magnin 30
Marantz 29
Memorex 01, 07, 23, 27
Minolta 03
Mitsubishi .16, 17, 38, 39, 50
Montgomery Ward 12
26
VCR REMOTE _
CODE
Multiteeh 27,28
NEC 14, 21, 29
Panasonic 01
Pentax 02, 03
Philco 01, 02, 05, 27, 28
Philips 00, 01,05, 27, 28
Quasar 01
RCA 03, 04, 32, 42, 43, 44
Realistic 07,11, 12, 23, 27, 28
Samsung 22, 30
Sansui 49
Sanyo 07, 13
Scott 19
Sears 03, 08, 23
Sharp 11, 12
Shinton 35
Sony 09, 10,41
Sound Design 27
Sylvania 01, 02, 05
Symphonic 27
Tatung 14
Teac 14, 27
Teknika 26, 27
Thomas 27
TMK 20
Toshiba 18, 19
Video Concepts 28
Yamaha 14, 29
Zenith 15
m
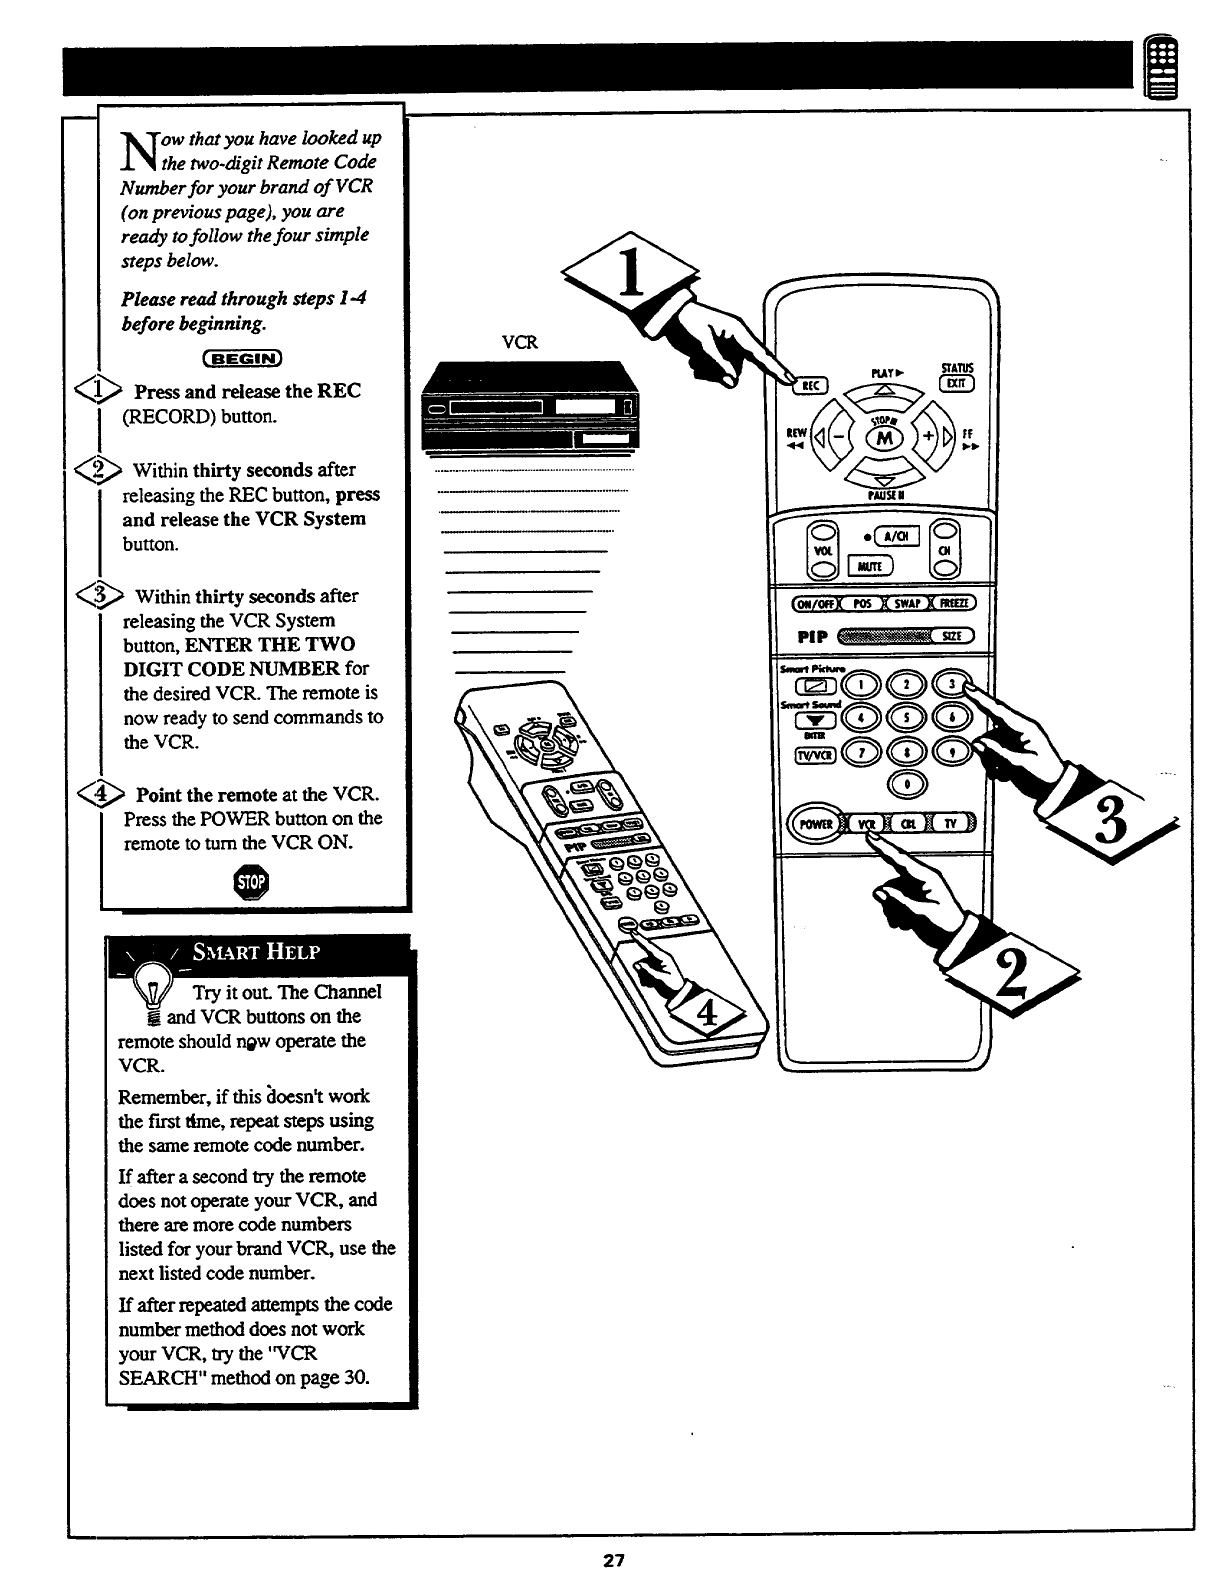
ow that you have looked up
the two-digit Remote Code
Number for your brand of VCR
(on previous page), you are
ready tofollow the four simple
steps below.
Please read through steps 1-4
before beginning.
Press and release the REC
I(RECORD) button.
_.._ Within seconds after
thirty
releasing the REC button, press
and release the VCR System
button.
_ Within thirty seconds after
releasing the VCR System
button, ENTER THE TWO
DIGIT CODE NUMBER for
the desired VCR. The remote is
now ready to send commands to
the VCR.
_.,_ Point the remote at the VCR.
IPress the POWE_ button on the
remote to turn the VCR ON.
Try it out. The Channel
! and VCR buttons on the
remote should r_w operate the
VCR.
Remember, if this [loesn't work
the first lime, repeat steps using
the same remote code number.
If after asecond try the remote
does not operate your VCR, and
there are more code numbers
listed for your brand VCR, use the
next listed code number.
If after repeated attempts the code
number method does not work
your VCR, try the 'WCR
SEARCH" method on page 30.
VCR
PLAT• STAIUS
rAus[ i
t_0!tl/0ffX I_J X SWAP]( RIfle]
PIP _s_]
27
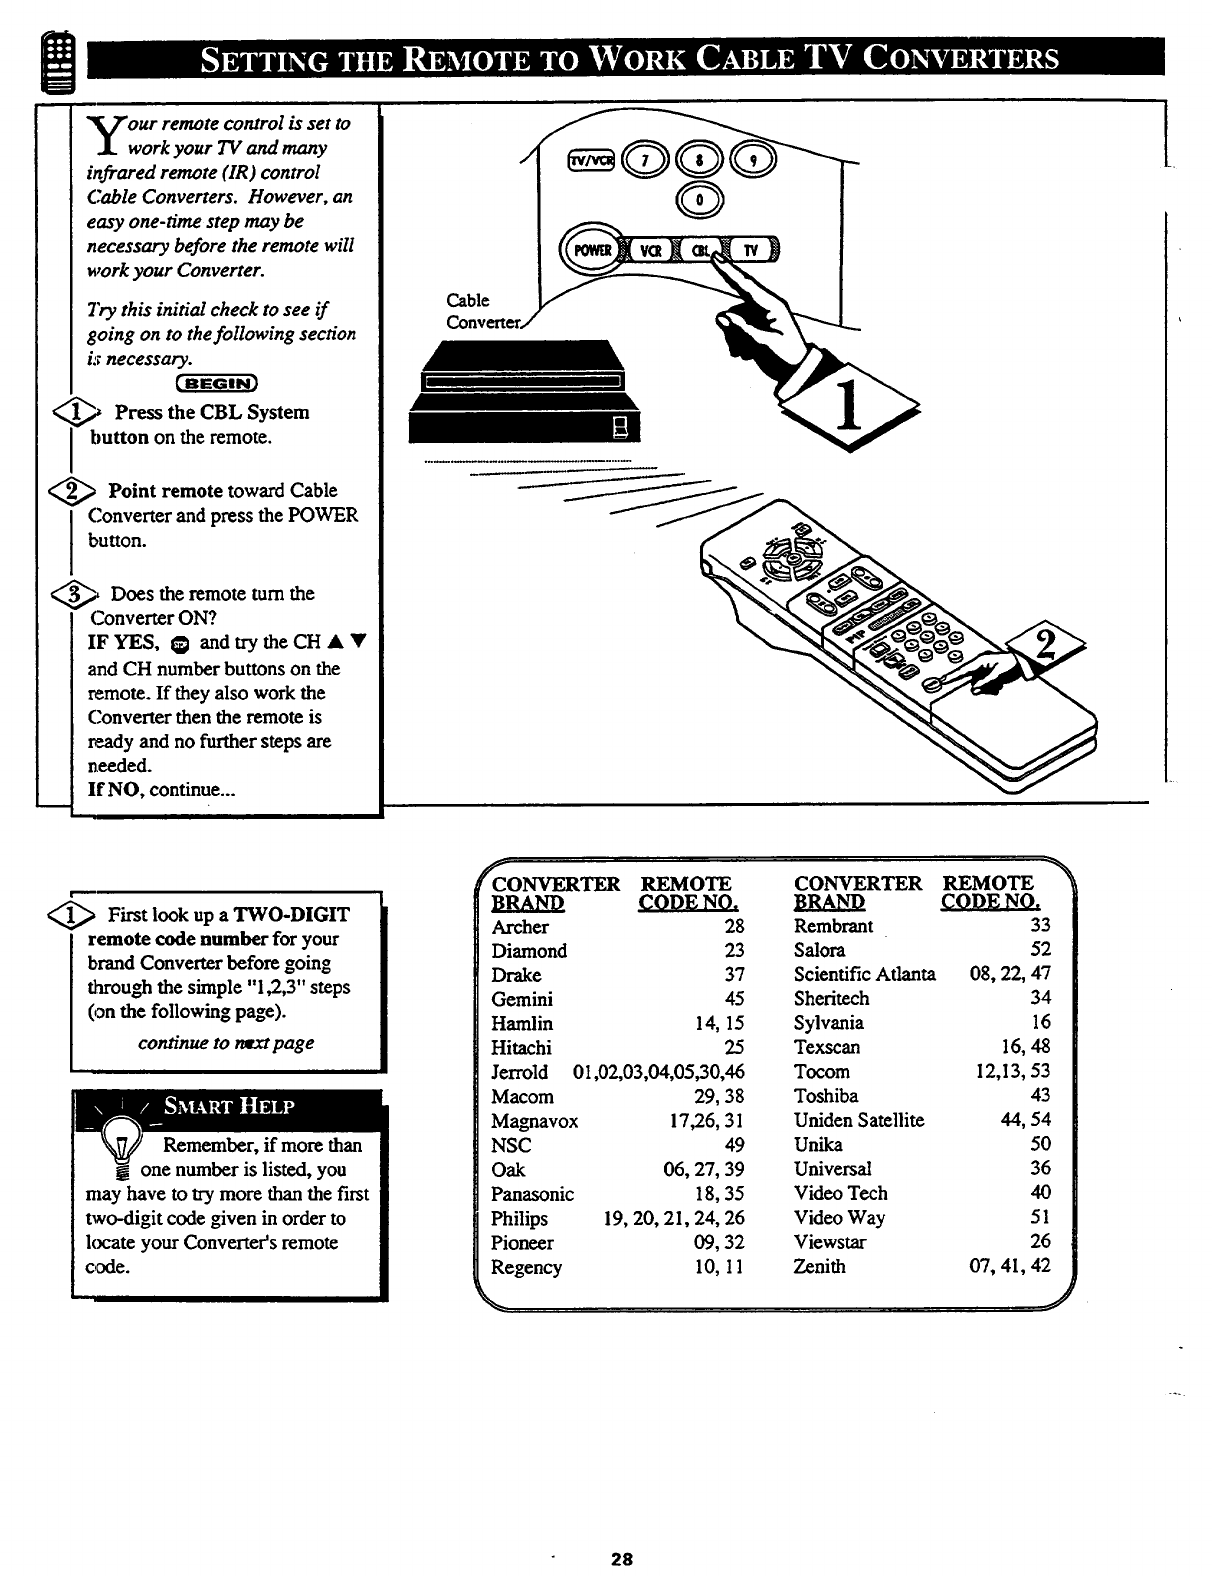
our remote control is set to
work your TV and many
infrared remote (IR) control
Cable Converters. However, an
easy one-time step may be
necessary before the remote will
work your Converter.
Try this initial check to see if
going on to the following section
kr necessary.
_,_ Press the System
CBL
Ibutton on the remote.
<_ Point toward Cable
remote
Converter and press the POWER
button.
_Does the remote turn the
Converter ON?
IFYES, G andtrytheCHAY
and CH number buttons on the
remote. If they also work the
Converter then the remote is
ready and no further steps are
needed.
If NO, continue...
Cable
Converter,
t_.
<_ First look up a TWO-DIGIT
Iemote code number for your
brand Converter before going
through the simple "1,2,3" steps
(,an the following page).
continue to ratxt page
Remember, if more than
one number is listed, you
may have to try more than the first
two-digit code _ven in order to
kx:ate your Converter's remote
code.
CONVERTER REMOTE
BRAND CODE NO.
Archer 28
Diamond 23
Drake 37
Gemini 45
Hamlin 14, 15
Hitachi 25
Jerrold 01,02,03,04,05,30,46
Macom 29, 38
Magnavox 17,26, 31
NSC 49
Oak 06, 27, 39
Panasonic 18, 35
Philips 19, 20, 21, 24, 26
Pioneer 09, 32
Regency 10, I 1
CONVERTER REMOTE -'_
BRAND CODE NO.
Rembrant 33
Salora 52
Scientific Atlanta 08, 22, 47
Shefitech 34
Sylvania 16
Tex._an 16, 48
Tocom 12,13, 53
Toshiba 43
Uniden Satellite 44, 54
Unika 50
Universal 36
Video Tech 40
Video Way 51
Viewstar 26
Zenith 07, 41, 42
.j
28

m
ow that you have looked up
the two-digit Remote Code
Number for your brand of Cable
Converter (on previous page),
you are ready tofollow the four
simple steps below.
Please read through steps 1-4
before beginning.
]_ Press and release the REC
I (RECORD) button.
_,._ Within thirty seconds after
releasing the REC button, press
and release the CBL System
button.
_."_ Within thirty seconds after
releasing the CBL System
button, ENTER THE TWO
DIGIT CODE NUMBER for
the desired Converter. The
remote is now ready to send
commands to the Converter.
_[_ Point the remote at the
Converter. Press the POWER
button on the remote to turn the
Converter ON.
Try it out. The Channel
! and POWER buttons on the
remote should nosy operate the
Converter.
Remember', if this doesn't work
the first time, repeat steps using
the same remote code number.
If after asecond try the remote
does not operate your Converter,
and there are more code numbers
listed for your brand Converter,
use the next listed code number.
If after repeated attempts the code
number method does not work
your Converter, try the
"CONVERTER SEARCH"
method on page 30.
Cable Converter
PAUSEU
(ORIOt'FXmS X$wAeX_t)
29
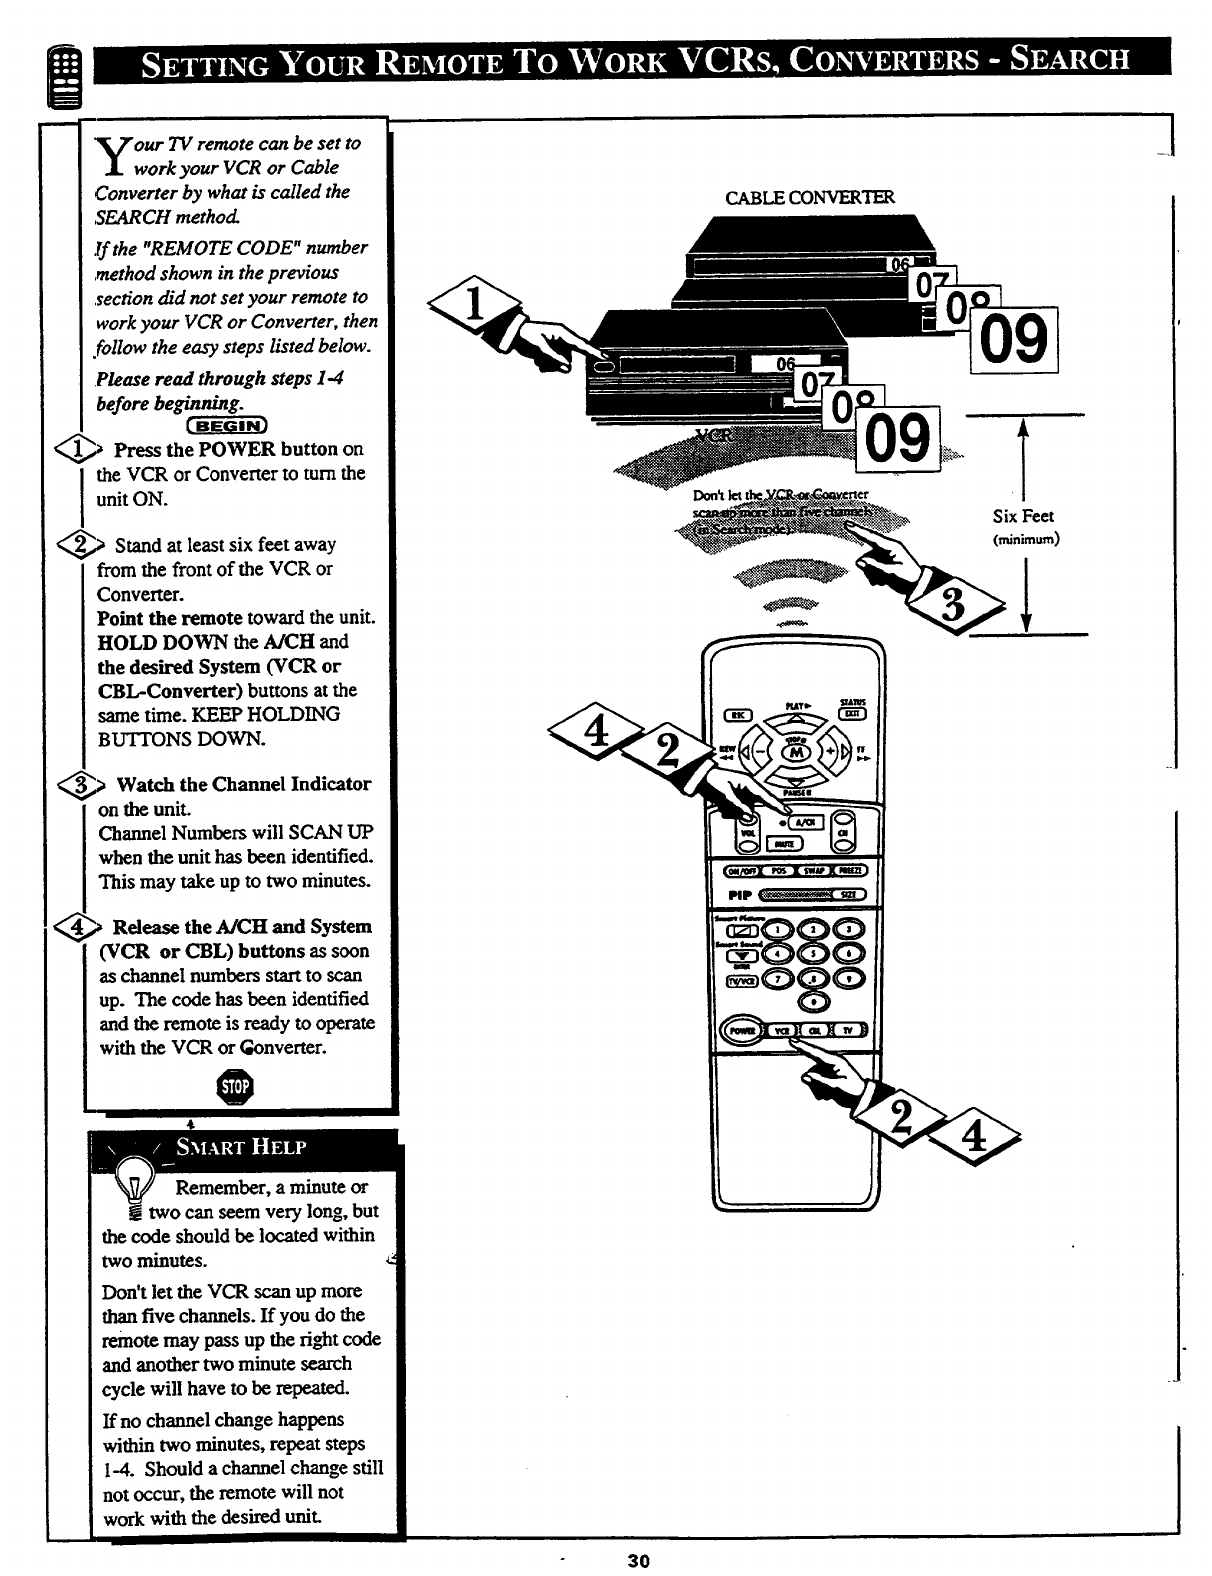
m
our TV remote can be set to
work your VCR or Cable
Converter by what is called the
,SEARCH method.
If the "REMOTE CODE" number
method shown in the previous
section ch'dnot set your remote to
work your VCR or Converter, then
.follow the easy steps listed below.
Please read through steps I-4
before beginning.
[BEGIN)
_,_ Press the POWER on
button
I he VCR or Converter to turn the
unit ON.
_,_ Stand least six feet
at away
from the front of the VCR or
Converter.
Point the remote toward the unit.
HOLD DOWN the A/CH and
the desired System (VCR or
CBL-Converter) buttons at the
same time. KEEP HOLDING
BUTTONS DOWN.
,> Watch the Channel Indicator
on the unit.
Channel Numbers will SCAN UP
when the unit has been identified.
This may take up to two minutes.
_,_ Rdease the A/CH and System
(VCR or CBL) buttons as soon
as channel numbers start to scan
up. The code has been identified
and the remote is ready to operate
with the VCR or Gonverter.
0
Remember, a minute or
two can seem very long, but
the code should be located within
two minutes.
Don't let the VCR scan up more
than five channels. If you do the
remote may pass up the right code
and another two minute search
cycle will have to be repeated.
If no channel change happens
within two minutes, repeat steps
I-4. Should a channel change still
not occur, the remote will not
work with the des'_ed unit.
CABLE CONVERTER
091
Six Feet
(minimum)
l
3O
_[
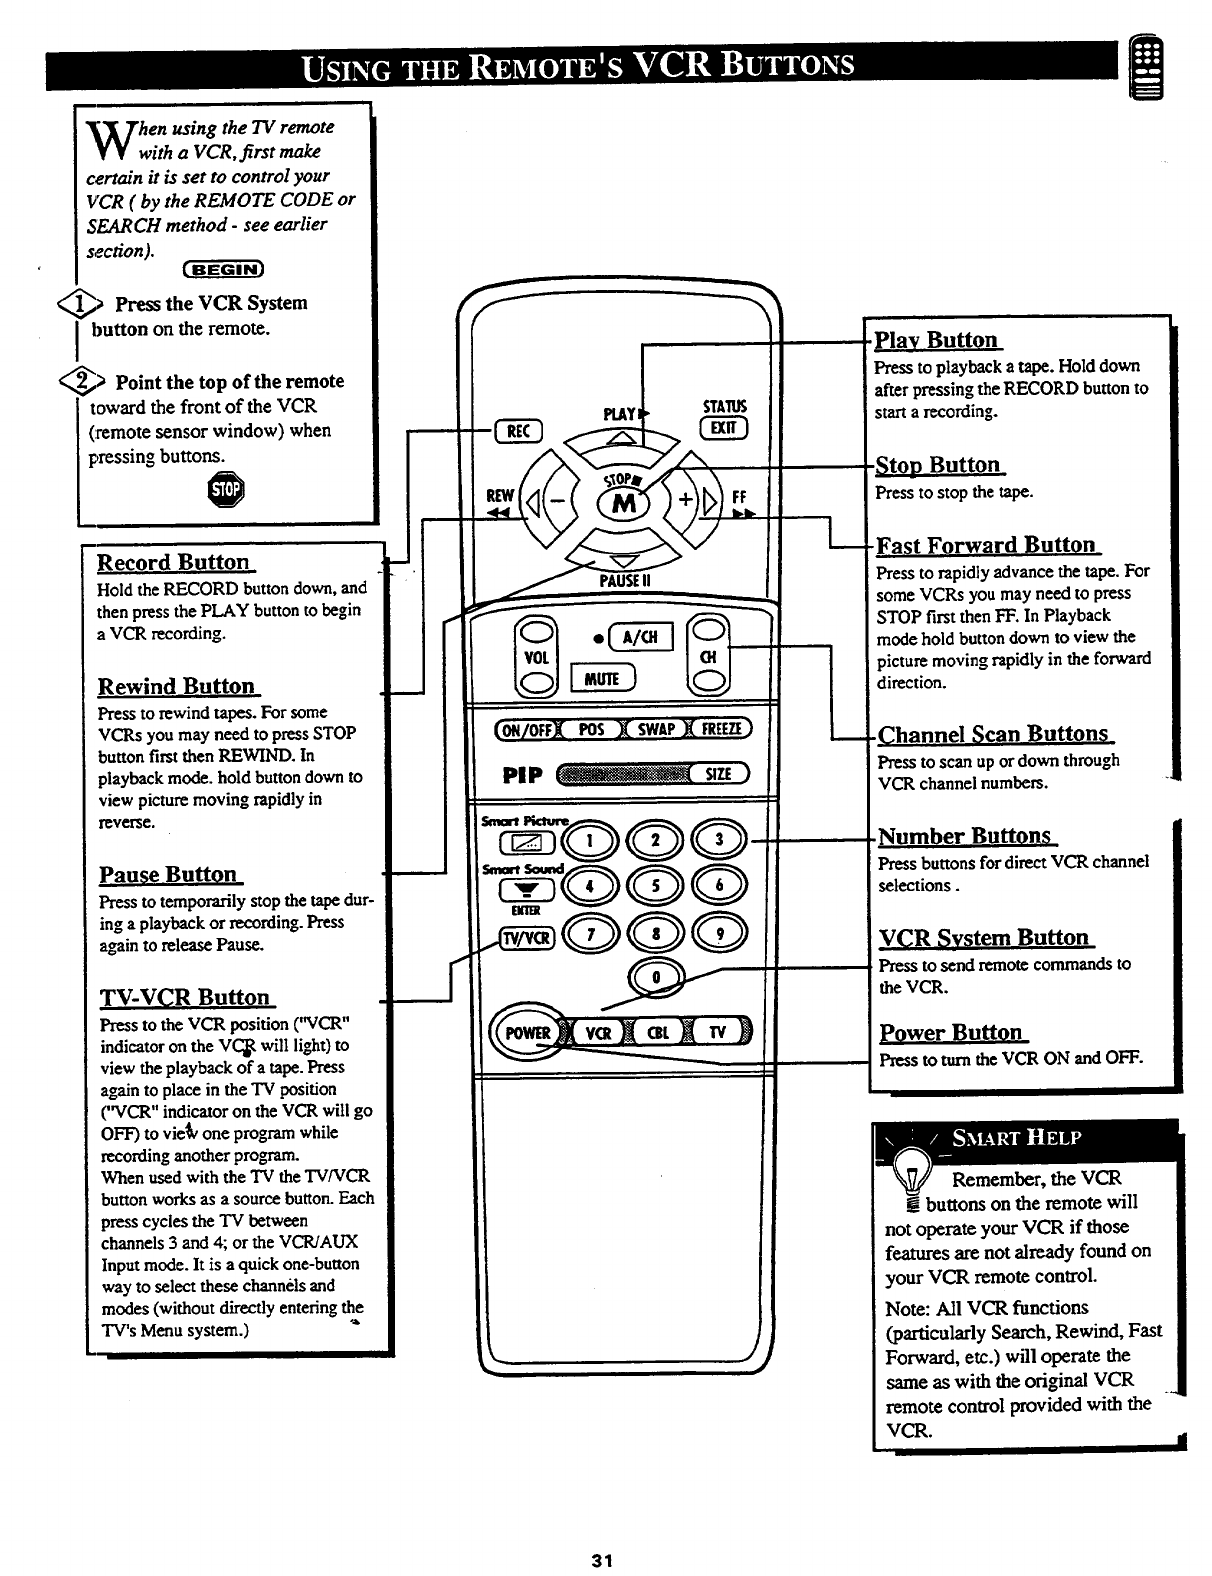
hen using the TV remote
with a VCR, first make
certain it is set to control your
VCR ( by the REMOTE CODE or
SEARCH method -see earlier
section).
_,> Press the VCR System
button on the remote.
_, _> Point the top of the remote
toward the front of the VCR
(remote sensor window) when
pressing buttons.
Record Button
Hold the RECORD button down, and
then press the PLAY button to begin
a VCR recording.
Rewind Button
Press to rewind tapes. For some
VCRs you may need to press STOP
button first then REWIND. In
playback mode. hold button down to
view picture moving rapidly in
reverse.
Pause Button
Press to temporarily stop the tape dur-
ing a playback or recording. Press
again to release Pause.
TV-V(_R Button
Press to the VCR position (WCR"
indicator on the V(_ will light) to
view the playback of a tape. Press
again to place in the "IVposition
("VCR" indicator on the VCR will go
OFF) to vie_v one program while
recording another progcam.
When used with the TV the TV/VCR
button works as a source button. Each
press cycles the TV between
channels 3 and 4; or the VCR/AUX
Input mode. It is a quick one-button
way to select these channels and
modes (without directly entering the
TV's Menu system.) "_
PlAYI STATUS
PAUSEII
(ON/OFFX lOS X SWAPX FREEZE)
PiP _ _n )
J
play Button
Press to playback a tape. Hold down
after pressing the RECORD button to
start a recording.
Press to stop the tape.
-Fast Forward Button
Press to rapidly advance the tape. For
some VCRs you may needtopress
STOP firstthenFIr.InPlayback
mode holdbuttondown toviewthe
picturemoving rapidlyintheforward
direction.
Press to scan up or down through
VCR channel numbers.
Number Butt0n_
Press buttons for direct VC"R channel
selections.
VCR System Button
Press to send remote commandsto
the VCR.
power Button
Press to turn the VCR ON and OFF.
Remember, the VCR
!buttons on the remote will
not operate your VCR if those
features are not already found on
your VCR remote control.
Note: All VCR functions
(particularly Search, Rewind, Fast
Forward, etc.) will operate the
same as with the original VCR
remote control provided with the
VCR. iI
31
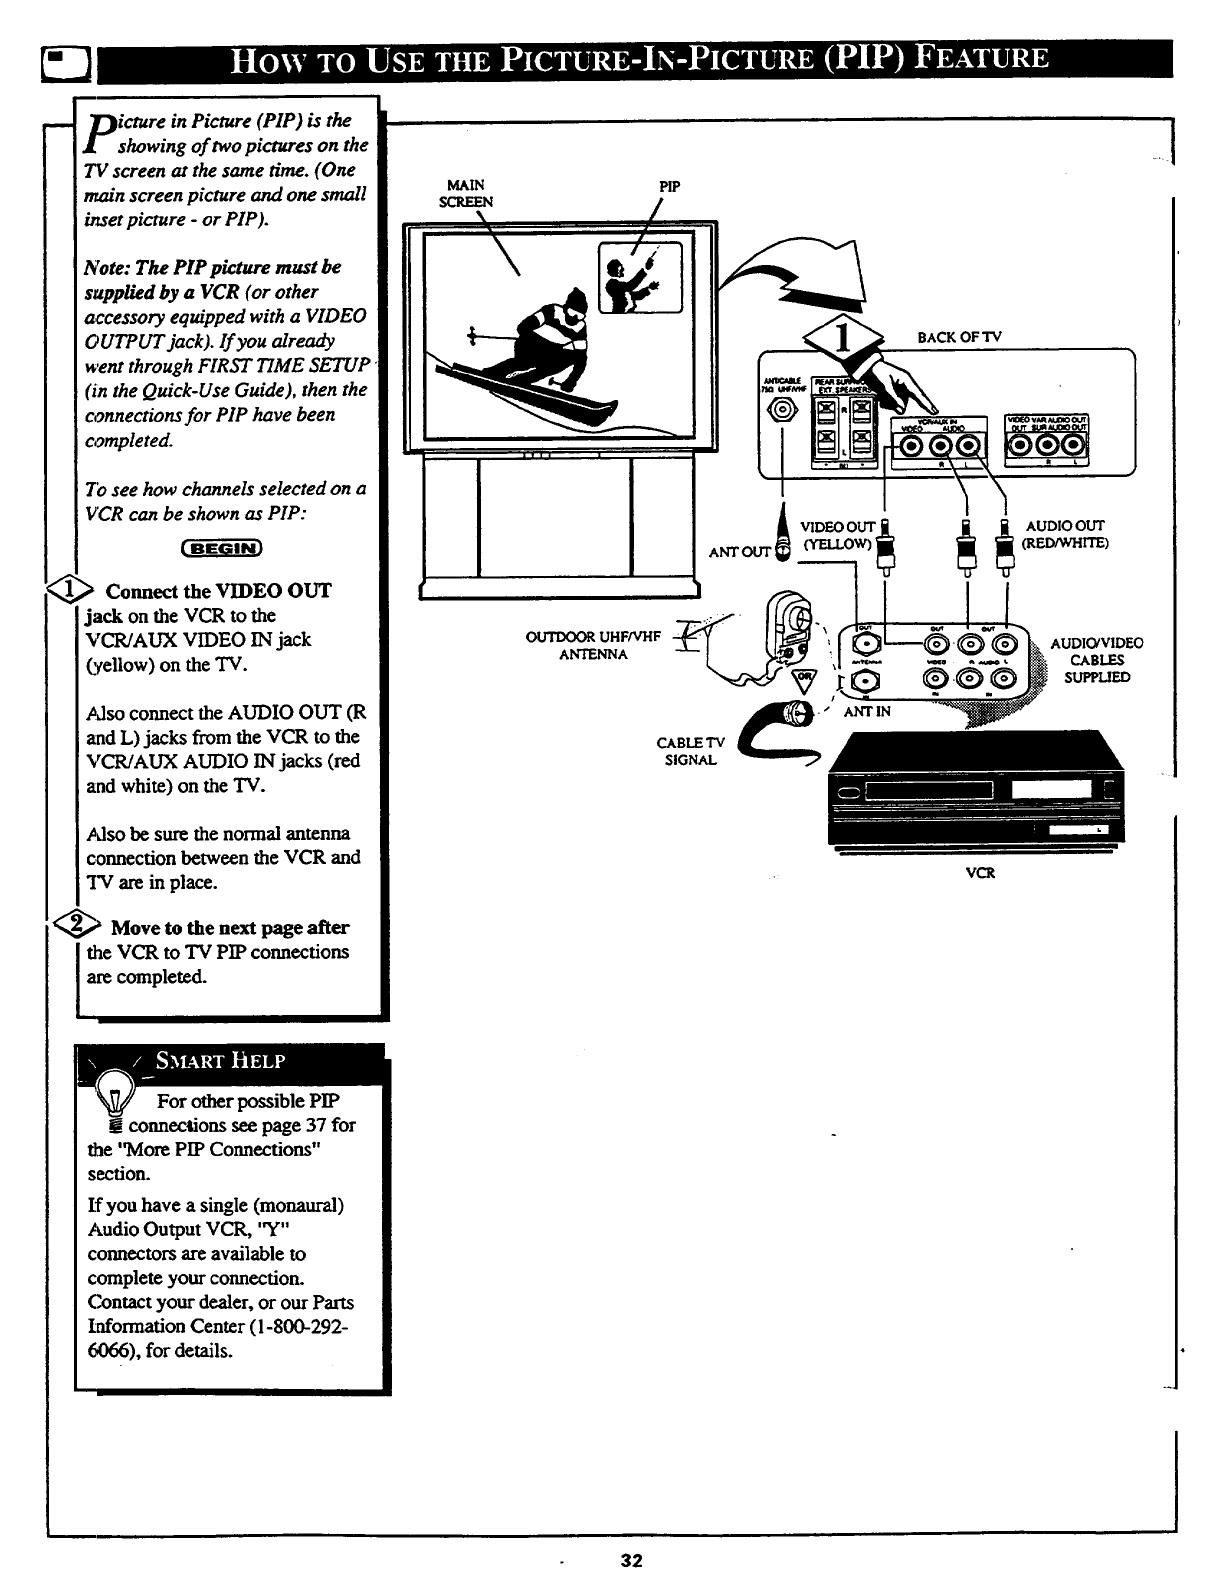
IDicture in Picture (PIP) is the
A[ showing of two pictures on the
TV screen at the same time. (One
main screen picture and one small
inset picture -or PIP).
Note: The PIP picture must be
supplied by aVCR (or other
accessory equipped with a VIDEO
OUTPUT jack). If you already
went through FIRST TIME SETUP
(in the Quick-Use Guide), then the
connections for PIP have been
completed.
7'o see how channels selected on a
VCR can be: PIP:
> Connect the VIDEO OUT
jack on the VCR to the
VCR/AUX VIDEO IN jack
(yellow) on the TV.
IAlso connect the AUDIO OUT (R
I_tndL) jacks from the VCR to the
IVCWAOX AUDIO IN jacks (red
and white) on the TV.
]_dso be sure the normal antenna
] cormecfion between the VCR and
I_€ are in place.
I_'_ Move to the next page after
IIthe VCR to "Iv"PIP connections
[ are completed.
I!connections see page 37 for
Ithe '_VlorePIP Connections"
I section.
[ If you have a single (monaural)
I Audio Output VCR, "Y"
[ connectors are available to
I complete your connection.
I Contact your dealer, or our Parts
IInformation Center (1-800-292-
6066), for details.
PIP
BACK OF "IV
AUDIO OUT
(RED/WHITE)
OUTDOOR UHF/VHF
ANTENNA
CABLE TV
SIGNAL /ANTIN
AUDIO!VIDEO
CABLES
SUPPLIED
vc_
32

N_h w that you have completed
e required connections on
the previous page you are ready to
follow the simple steps shown
below.
_> VCR and TV ON.
Turn the
Place the VCR in the TV mode -
Use the TV/VCR button on
the VCR (or on the TV remote
if it has been set to work with
your VCR -see page 26.)
Place the TV's PIP INPUT
control to "VCR/AUX "-
With FEATURES MENU (3
of 3) on screen, move the RED
h_hlight with the MENU (M)
4=-_ buttons. Then press the
MENU button.
Press the MENU JkY and
MENU (M) buttons to
higghlight and select the
'WCR/AUX" (v_) item.
>Select the channel on the VCR
to view in the PIP window.
Select the channel on the TV to
view on the main screen.
_._ Press the PIP ON/OFF button
on the remote.
The PIP window should show in
one of the comers of the "IV
screen. O
12:00--'
VCR IN "q'V MODE"
(VCR Indicator Light will go out) PIP INPUT CONTROL SET TO 'WCR/AUX"
VCR -FOR PIP CHANNEL
TV - FOR MAIN SCREEN CHANNEL
v_
SELECTED
CHANNEL
"IV
SELECTED
CHANNEL
Remember, if you see the
same picture on the main
screen and in the PIP window, you
need to be sure the TV's PIP
Picture Source control (page 35) is
set to 'WCR/AUX".
No sound will be heard with the
PIP picture. See page 34 on how
to "SWAP" the PIP picture with
the main screen picture so that
sound can be heard.
Also see the following page on
how to operate other PIP features
with the remote controls
Be sure topoim the remote at the
front of the VCR when pressing
VCR function [mttorLs.
33
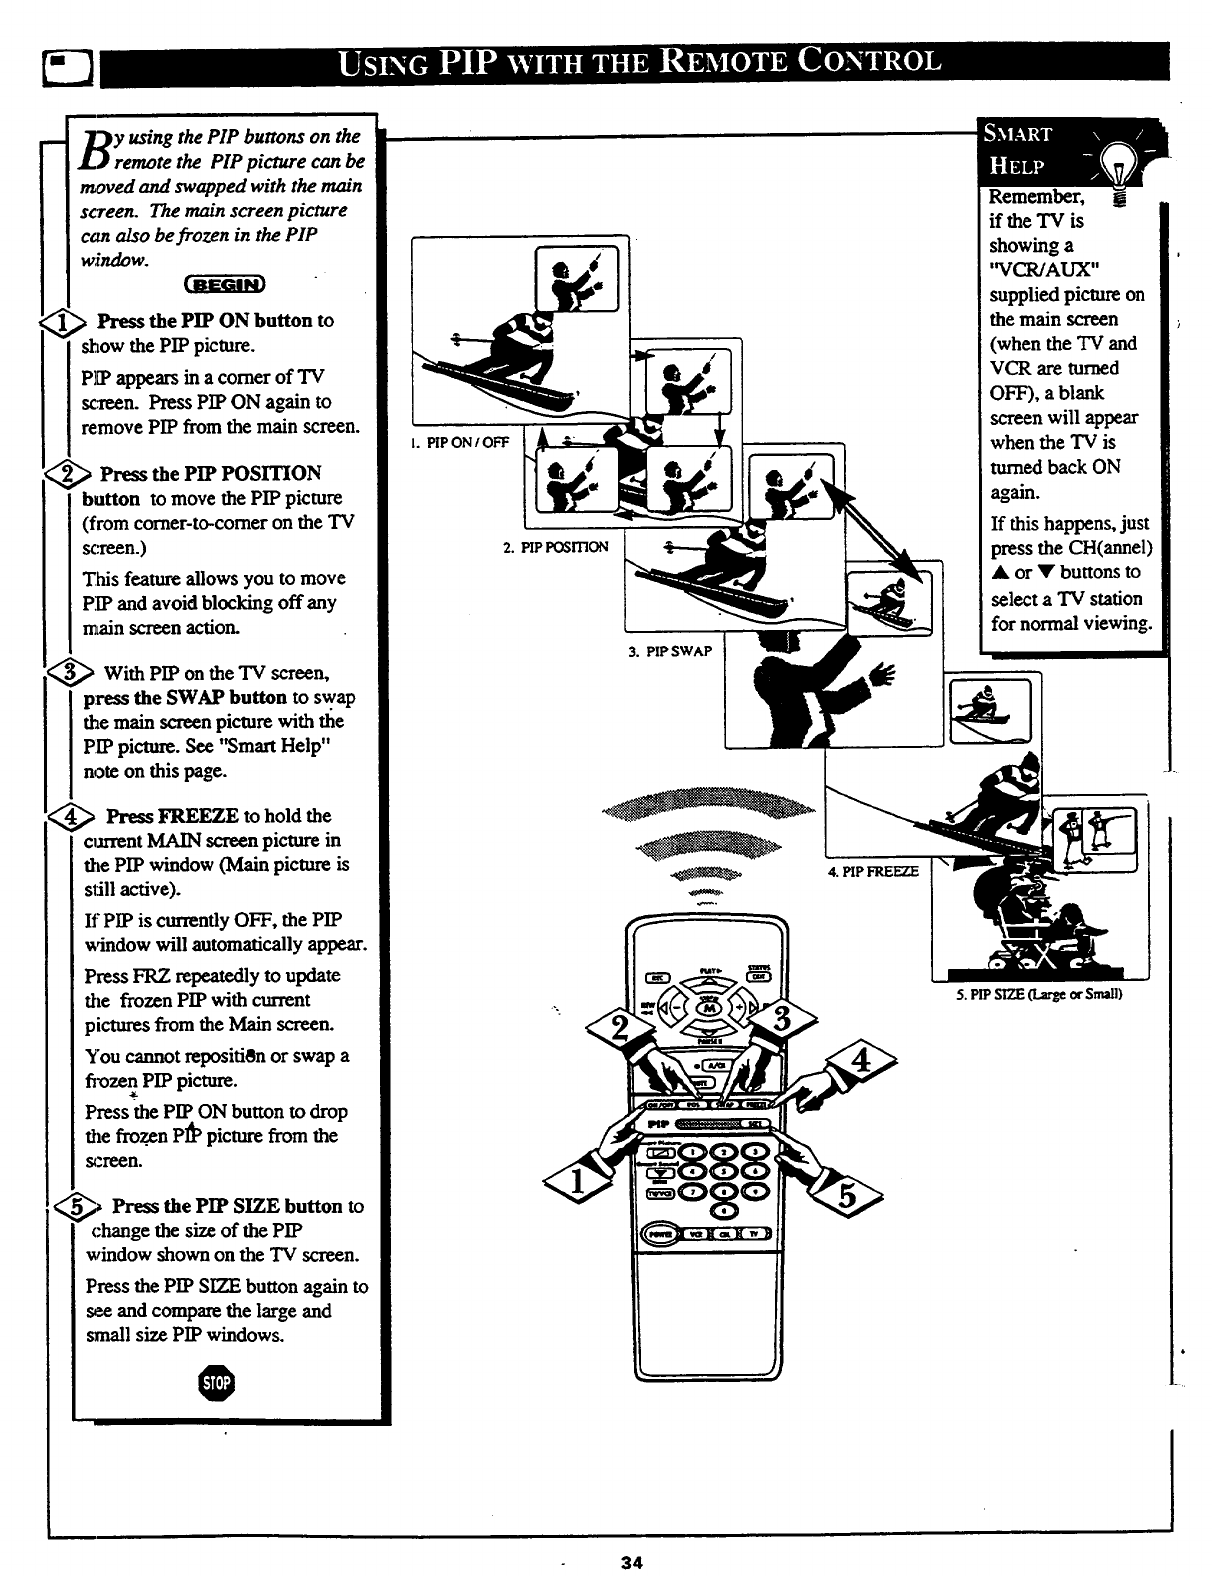
y using the PIP buttons on the
remote the PIP picture can be
_ved and swapped with the main
screen. The main screen picture
can also be frozen in the PIP
window.
> Press the PIP ON button to
show the PIP picture.
PIP appears in a corner of TV
scTeen. Press PIP ON again to
remove PIP from the main screen.
> Press the PIP POSITION
button to move the PIP picture
(from corner-to-comer on the TV
s¢:re_n.)
This feature allows you to move
PIP and avoid blocking off any
main screen action.
_With PIP on the TV screen,
press the SWAP button to swap
the main screen picture with the
PIP picture. See "Smart Help"
note on this page.
_Press FREEZE to hold the
om'ent MAIN screen picun_ in
the PIP window (Main picture is
still active).
If PIP is currently OFF, the PIP
window will automatically appear.
Press FRZ repeatedly to update
the frozen PIP with current
pictures from the Main screen.
You cannot repositi0n or swap a
fi_)zen PIP picture.
Press the PIP ON button to drop
the frozen PI_ picture from the
_,_ Press the PIP SIZE button to
change the size of the PIP
window shown on the TV screen.
Press the PIP SIZE button again to
see and compare the large and
small size PIP windows.
0
I. PIP ON /OFF
2. PIP POSITION
3. PIP SWAP
4. PIP FREEZE
Remember,
if the "IV is
showing a
'WCR/AUX"
supplied picture on
the main screen
(when the "IV and
VCR are turned
OFF), a blank
screen will appear
when the "IV is
turned back ON
again.
If this happens, just
press the CH(annel)
•or • buttons to
select a TV station
for normal viewing.
5. PIPSIZE _ of Small)
34
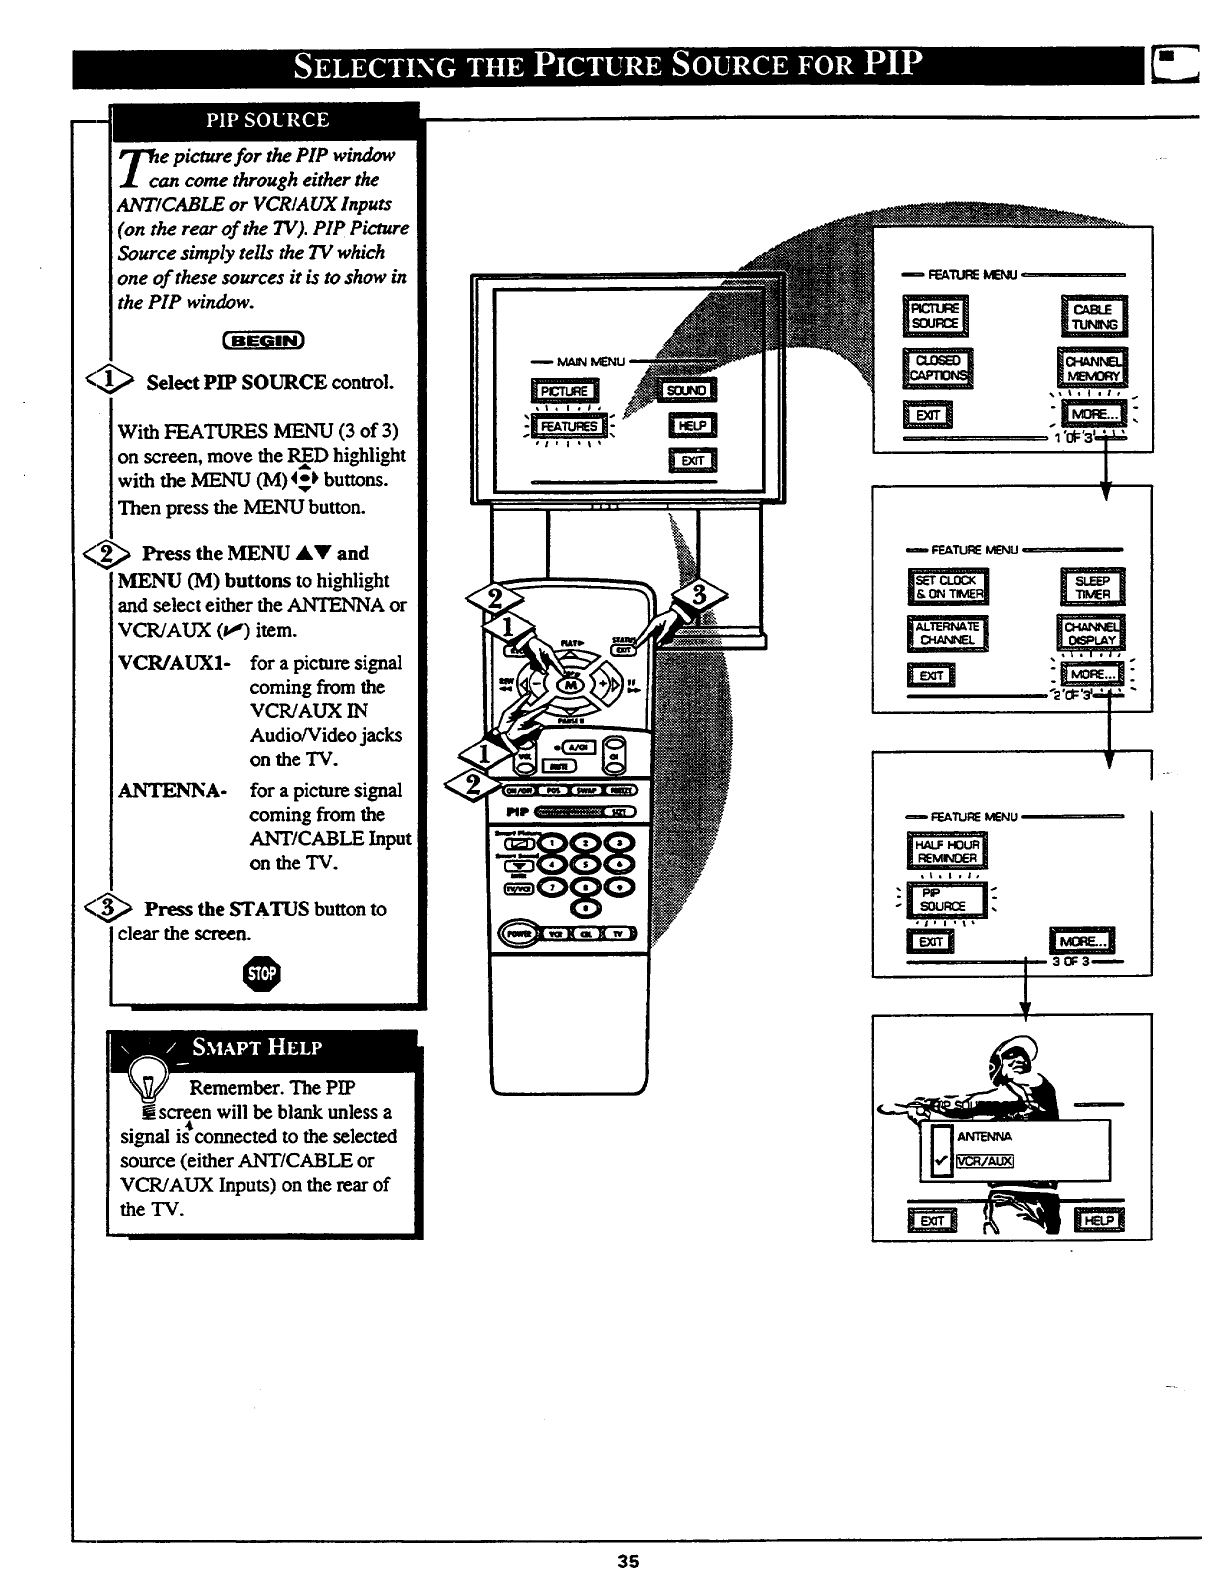
_can e picture for the PIP window
come through either the
ANTICABLE or VCRIA UX Inputs
(on the rear of the TV). PIP Picture
Source simply tells the TV which
one of these sources it is to show in
the PIP window.
<_ Select PIP SOURCE control.
With FEATURES MENU(3 of 3)
on screen, move the RInD highlight
with the MENU (M)4_-_ buttons.
Then press the MENU button.
<Press the MENU AY and
MENU (M) buttons to highlight
and select either the A2qTENNA or
VCR/AUX (_,*) item.
VCR/AUX1- forapicturesignal
coming from the
VCR/AUX IN
Audio/Video jacks
on the TV.
ANTENNA- for apicture signal
coming from the
ANT/CABLE Input
on the "iV.
_,_ Press the STATUS button to
clear the screen.
Remember. The PIP
screen will be blank unless a
. .4k
szgnal ]s connected to the selected
source (either ANT/CABLE or
VCR/AUX Inputs) on the rear of
the TV.
T _
35
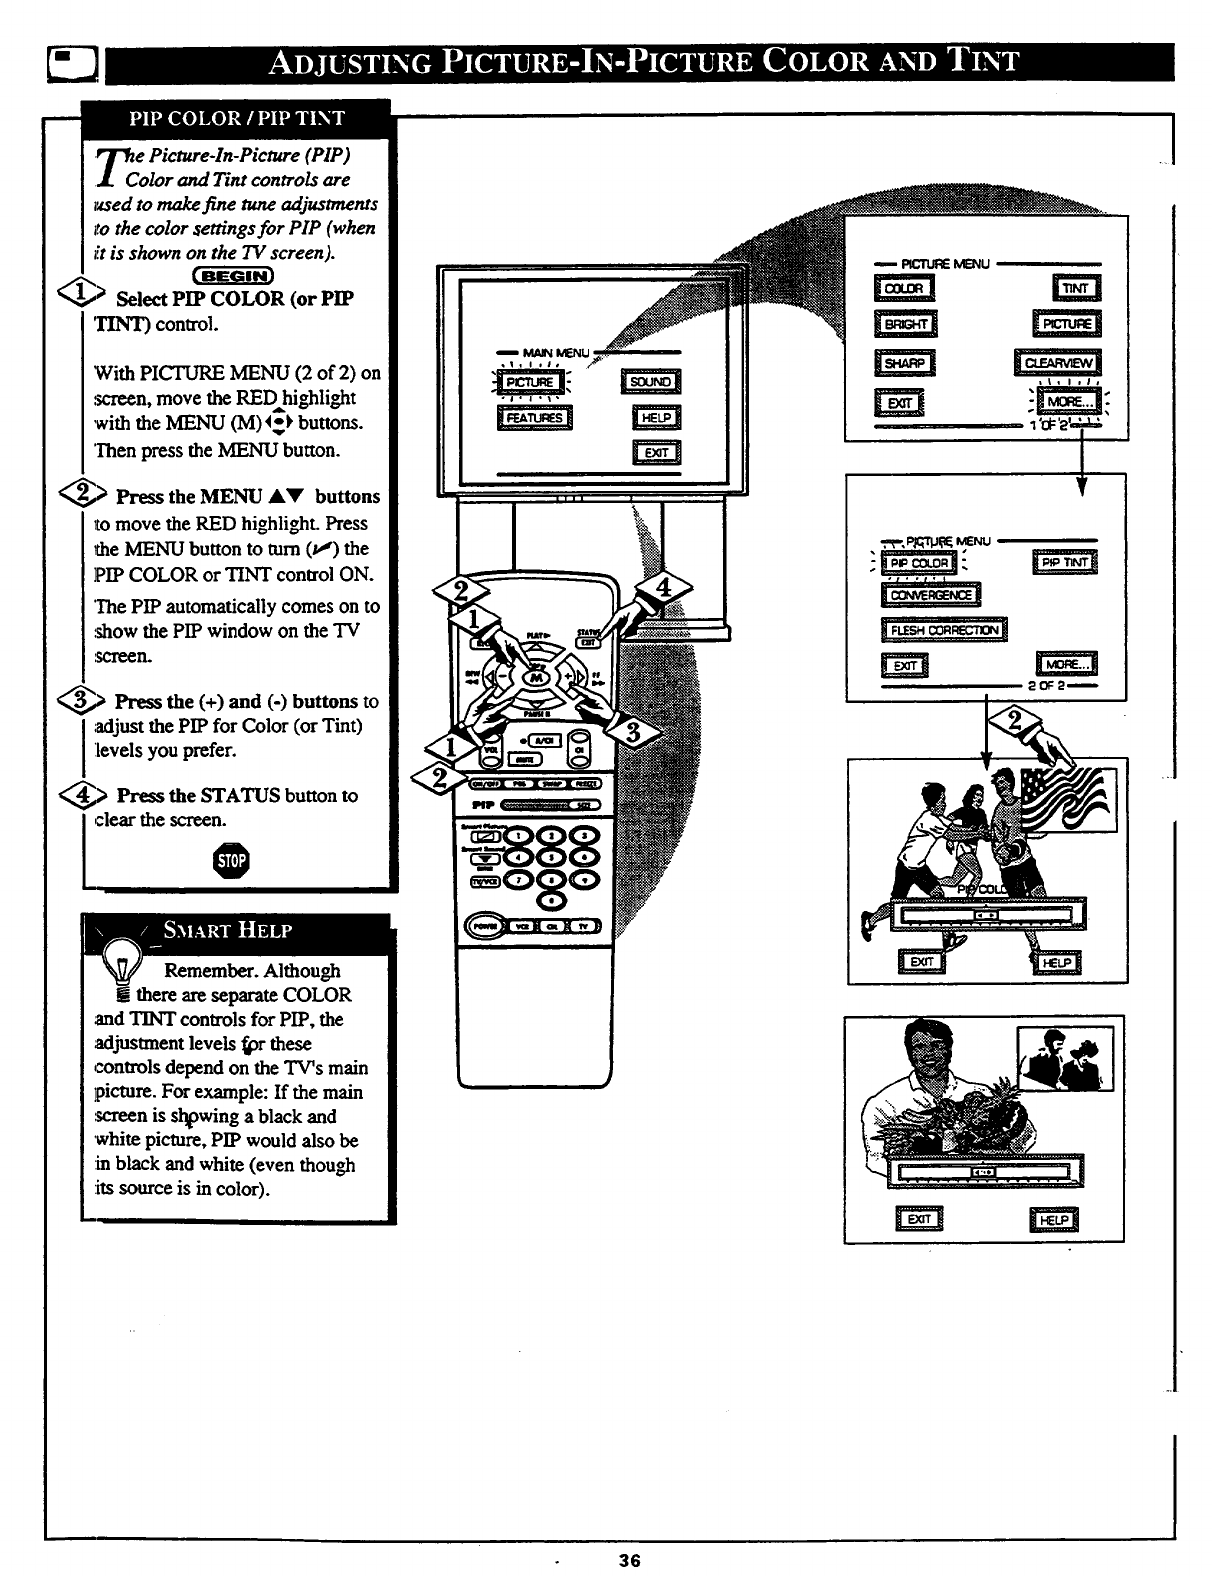
r_e Picture-In-Picture (PIP)
.I.Color and Tint controls are
a_ed to make fine tune adjustments
to the color settings for PIP (when
it is shown on the TV screen).
Select PIP COLOR (or PIP
TINT) control.
With PICTURE MENU (2 of 2) on
.screen, move the REDhighlight
with the MENU (M)4_ buttons.
Then press the MENU button.
_,> Press the MENU &_' buttons
_omove the RED highlight. Press
the MENU button to mm (_') the
PIP COLOR or TINT control ON.
The PIP automatically comes on to
show the PIP window on the "IV
Press the (+) and (-) buttons to
I ;_ljust the PIP for Color (or Tint)
levels you prefer.
,> Press the STATUS button to
I clear the screenz
Remember. Although
gthere are separate COLOR
and TINT controls for PIP, the
adjustment levels _r these
controls depend on the TV's main
picture. For example: If the main
screen is shtawing a black and
white picture, PIP would also be
in black and white (even though
:itssource is in color).
"t'_t'[
.l
36
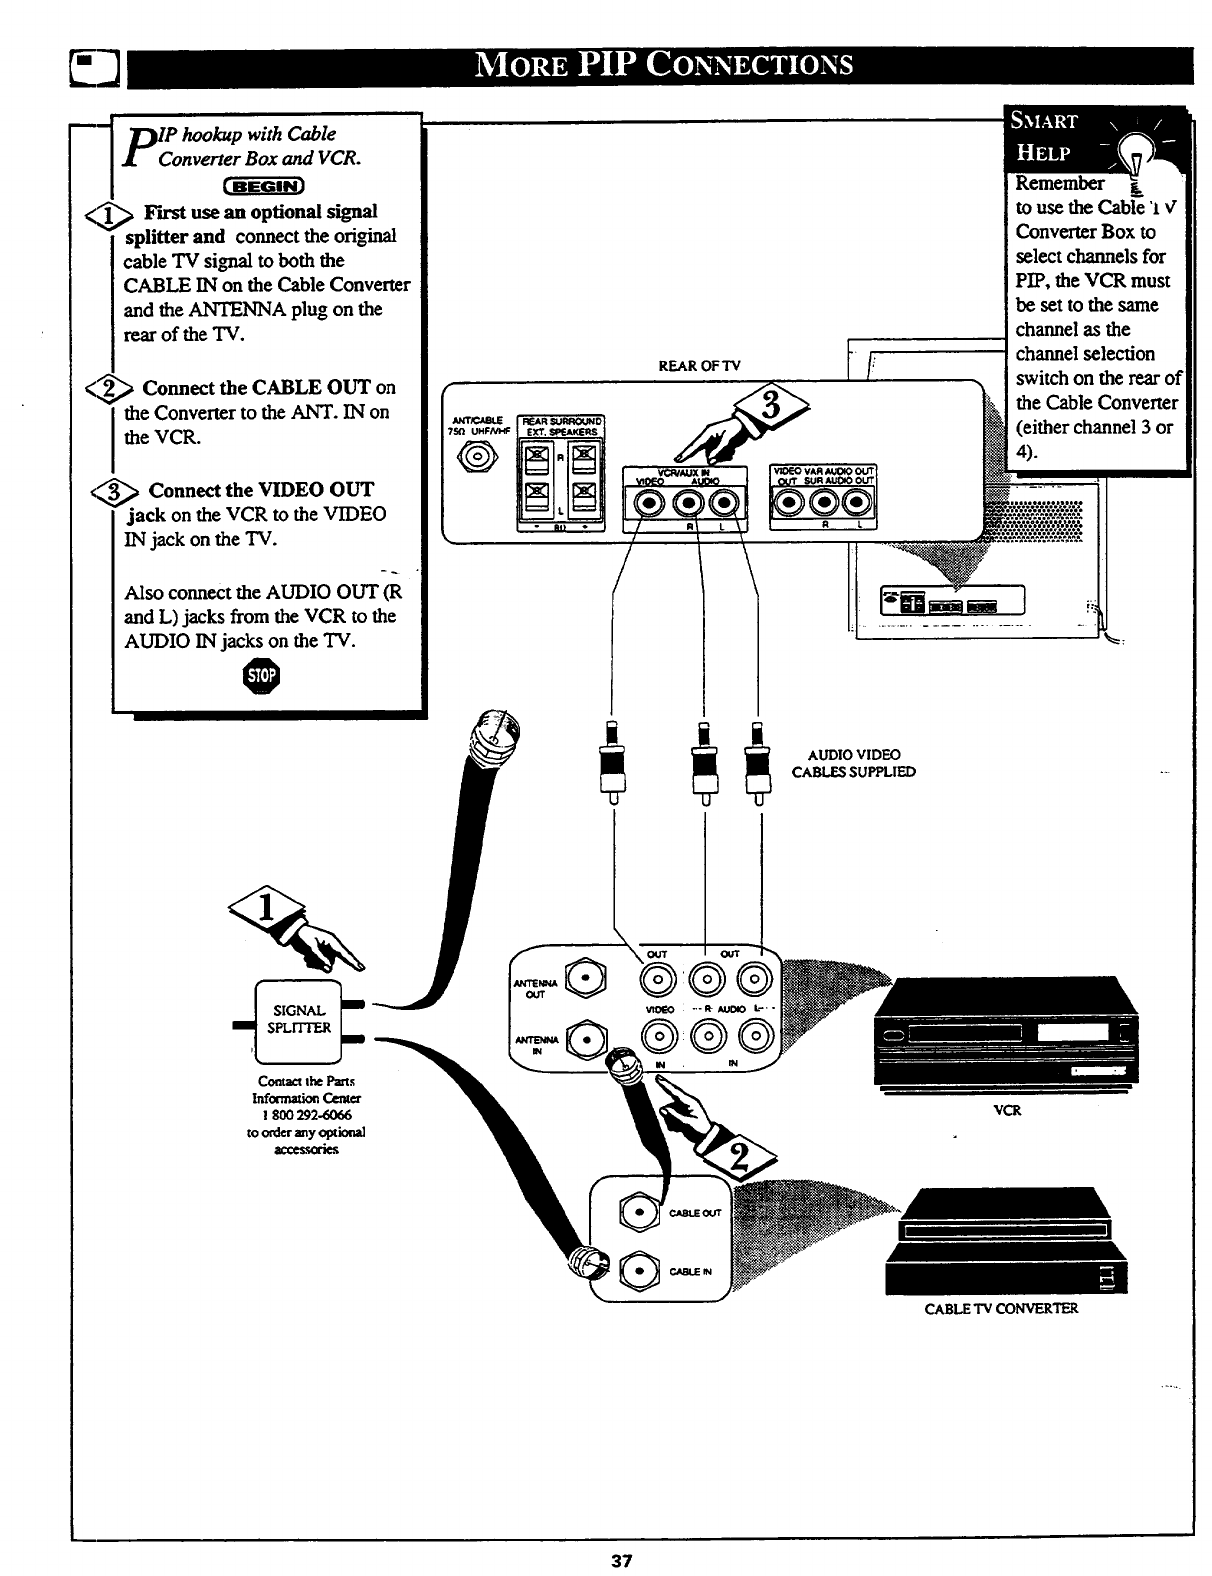
_-_ DIP hookup with Cable
<_ _F'wst use an optional signal
splitter and connect the orivc_lal
cable TV signal to both the
CABLE IN on the Cable Converter
and the ANTENNA plug on the
rear of the TV.
<_'_ Connect the CABLE OUT on
the Converter to the ANT. IN on
the VCR.
,_ Connect the VIDEO OUT
jack on the VCR to the VIDEO
IN jack on the TV.
Also connect the AUDIO OUT (R
and L) jacks from the VCR to the
AUDIO IN jacks on the "IV.
O
7y
®
Remember
to use the Cable "l¢
Converter Box to
select channels for
PIP, the VCR must
be set to the same
channel as the
channel selection
switch on the rear of
the Cable Convener
(either channel 3 or
4).
AUDIO VIDEO
CABLES SUPPLIED
CABLETV CONVERTER
37

lease make these simple
echecks before calling for
service. These tips can save you
time and money since charges for
TV installation and adjustment of
customer controls are not
covered under your warranty.
NoPower
NO Picture
No Sound
Remote Does Not
Work
TV Display_ Wrong
Channel or N0
Channels Above 13
It
('.leaning and Care
CAUTION: Avideo source (such as a video game, Compact Disc Interactive - CDI, or I
TV information channel) which shows a constant non-moving pattern on the TV screen, }
can cause picture tube damage. When your TV is continuously used with such a source
the pattern of the non-moving portion of the game (CDI, etc.) could leave an image
permanently on the picture tube. When not in use, turn the video source OFF. Regularly
alternate the use of such video sources with normal TV viewing.
i Check the TV power cord. Unplug the TV, wait I minute, then reinsert plug into outlet
and push POWER button again.
Check to be sure outlet is not on a wall switch.
Check antenna connections on the rear of the TV. Are they properly secured to the
antenna plug on the TV? I
Check the CABLE TUNING control for correct position. I
Check PICTURE SOURCE control for correct position "VCR/AUX" position without a[
signal source will resu!t in a blank screen. ,I
Check the VOLUME buttons.
Check the MUTE button on the remote control..
Check the TV SPEAKER ON/OFF control for the correct position.
If attempting auxiliary equipment hook-ups, cheek audio jack connections and that the
auxiliary equipment is on and in the proper operating modes.
I
Check TV-VCR-CBL "System" buttons on the remote. Press the remote's TV System
button to send commands to the TV; VCR System to sent to VCR; etc.
Check batteries. Replace with AA Heavy Duty (Zinc Chloride) or Alkaline batteries
if necessary.
Clean the remote and the remote sensor window on the TV.
:Repeat channel selection. [
• Add desired channel numbers (ADD/DELETE CHANNELS control) into TV memory.
. Check CABLE TUNING control for correct position.
This TV is equipped with protective circuitry that shuts the TV off in case of moderate
power surges. Should this occur turnthe TV back on by pressing the POWER button
once or twice, or unplug and then replug the power cord at the AC outlet.
This feature is NOT designed to prevent damage due to high power surges such as flame
caused by lightning, which is not covered by your warranty.
To avoid possible shock hazard be sure the TV is unplugged from the electrical outlet before cleaning.
When cleaning the TV screen take care not to scratch or damage the screen surface (avoid wearing jewelry or using
anything abrasive- do not use household cleaners). Wipe the front screen with a clean cloth dampened with water. Use
even, easy, vertical strokes when cleaning.
Specially designed screen cleaning kits are also available which contain anti-static cleaners and cloths designed to get
into the ridges of the TV screen. If interested, ask your dealer about the MAG4600 Projection TV Screen Cleaning Kit or
call our toll-free Accessory Parts ordering number 1-800-292-6066.
Gently wipe the cabinet surfaces with a clean cloth or sponge dampened in asolution of cool clear water and a mild soap
or detergent. Use a clean dry cloth to dry the wiped surfaces.
Occasionally vacuum the ventilation holes or slots in the cabinet back.
Never use thinners, insecticide sprays, or other chemicals on or near the cabinet, as they might cause permanent marring
of the cabinet finish. 38
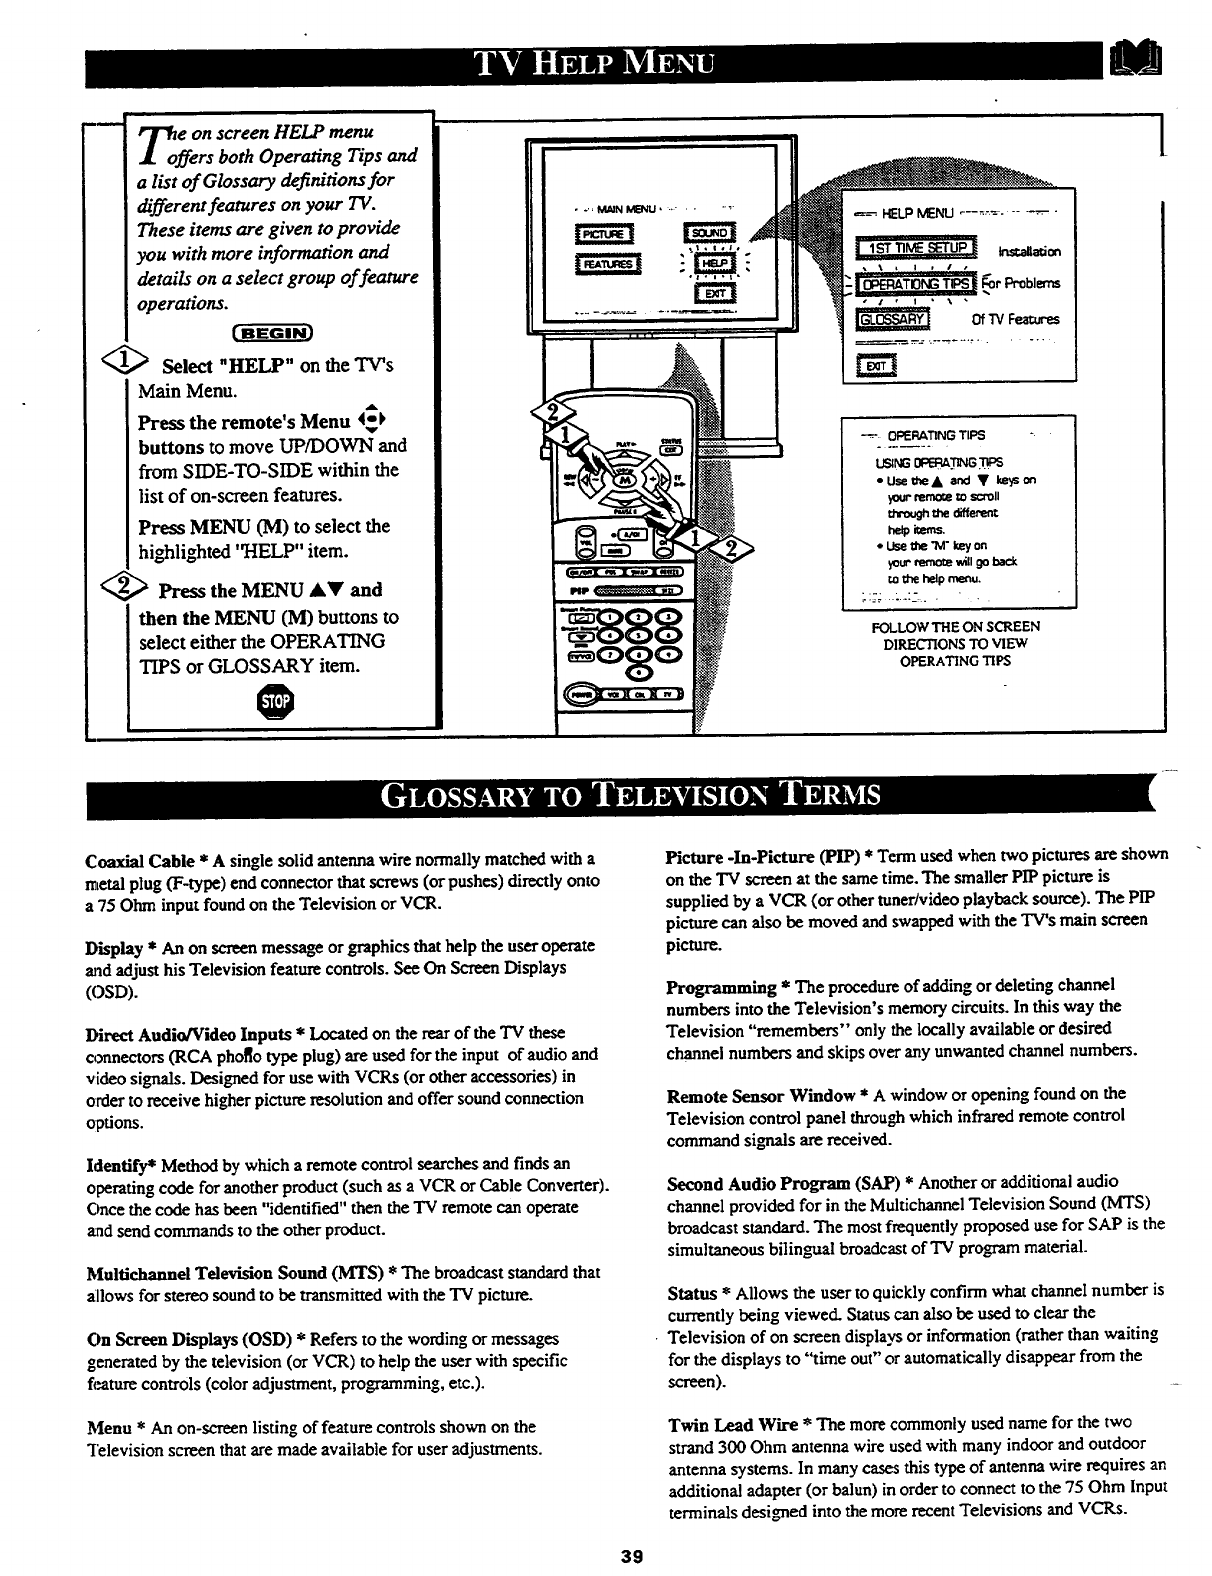
_offe e on screen HELP menu
rs both Operating Tips and
a list of Glossary definitions for
different features on your TV.
These items are given to provide
you with more information and
details on a select group of feature
operations.
<_ Select "HELP" on the TV's
Main Menu.
Press the remote's Menu 4_
buttons to move UP/DOWN and
from SIDE-TO-SIDE within the
list of on-screen features.
Press MENU (M) to select the
highlighted "HELP" item.
€_ Press the MENU AY and
then the MENU (M) buttons to
select either the OPERATING
TIPS or GLOSSARY item.
O
OI_RATtNG TIPS "
* UseC_eA and • I_ysm
_mo_e I_ scroll
the different
ne¢_as.
*Use _e "M" keyon
yourremote _611go I_-.k
mthe he_ menu.
":T -=-_. -•
FOLLOWTHEON SCREEN
DIRECTIONSTO VIEW
OPERATING TIPS
l
Coaxial Cable * A single solid antenna wire normally matched with a
metal plug (F-type) end connector that screws (or pushes) directly onto
a 75 Ohm input found on the Television or VCR.
Display * An on screenmessage or graphicsthathelp the useroperate
andadjust his Television featurecontrols. SeeOn Screen Displays
(OSD).
Direct Audio/Video Inputs * Located on the rear of the TV these
connectors (RCA phof[o type plug) are used for the input of audio and
video signals. Designed for use with VCRs (or other accessories) in
order to receive higher picture resolution and offer sound connection
options.
Identify* Method by which aremote control searches and finds an
operating code for another product (such as a VCR or Cable Converter).
Once the code has been "identified" then the TV remote can operate
• ad send commands to the other product.
Multichannel Television Sound (MRS) * The broadcast standard that
allows for stereo sound to be transmitted with the TV picture.
On Screen Displays (OSD) * Refers to the wording or messages
generated by the television (or VCR) to help the user with specific
fimturecontrols (color adjustment, programming, etc.).
Menu * An on-screen listing of feature controls shown on the
Television screen that are made available for user adjustments.
Picture -In-Picture (PIP) *Term used when two pictures are shown
on the TV screen at the same time. The smaller PIP picture is
supplied by a VCR (or other tuner/video playback source). The PIP
picture can also be moved and swapped with the TV's main screen
picture.
Programming * The procedure of adding or deleting channel
numbers into the Television's memory circuits. In this way the
Television "remembers" only the locally available or desired
channel numbers and skips over any unwanted channel numbers.
Remote Sensor Window * A window or opening found on the
Television control panel through which infrared remote control
command signals are received.
Second Audio Program (SAP) * Another or additional audio
channel provided for in the Multichannel Television Sound (MTS)
broadcast standard. The most frequently proposed use for SAP is the
simultaneous bilingual broadcast of TV program material.
Status * Allows the user to quickly confirm what channel number is
currently being viewed. Status can also be used to clear the
Television of on screen displays or information (rather than waiting
for the displays to "time out" or automatically disappear from the
screcn).
Twin Lead Wire * The more commonly used name for the two
strand 300 Ohm antenna wire used with many indoor and outdoor
antenna systems. In many cases this type of antenna wire requires an
additional adapter (or balun) in order to connect to the 75 Ohm Input
terminals designed into the more recent Televisions and VCRs.
39
Accessories/Optional .................. .21,22, 23-24, 32, 37, *Q/U-I
Adapter Connector .............................................. 32, 37, *Q/U-I
Add/Delete Channels .......................................... 13-14, *Q/U-2
Advance Buttons ........................................................ *Q/U-2, 4
Audio Controls .................................................................. 18-22
Audio/Video Input ........................................ 23, 32, 37, *Q/U-2
°"IR
Automanc Programming .......................................... 13, Q/U-2
Alternate Channel ................................................................... 16
Battery Installation ......................................................... *Q/U-3
Cable TV Connections/Settings ............... 12, 32, 37, *Q/U-1, 2
Channel/Time Display ........................................ !5, 17, *Q/U-3
Channel Memory ................................................. 13-14, *Q/U-2
Channel/Time Reminder ......................................................... i7
Clock Setting .......................................................................... 15
Clock Timer ............................................................................ 15
Closed Captioning .................................................................. !1
Color Controls ................................ :....................... .....6,*Q/U-4
Convergence ............................................................................. 8
Controls/TV ............................................................ *Q/U-2, 3, 4
Controls/Remote ................................... 25-3 I, 34, *Q/U-2, 3, 4
Exit ................................................................................. *Q/U-4
Features ..................................................................................... 5
First Time Set Up ........................................................... *Q/U-2
GIossary/TV Terms ................................................................ 39
Help Menu ............................................................ 39, *Q/U-2, 4
Help Line Information .......................................... I, 38, *Q/U-I
Inputs/Audio and Video ............................................. .23, 32, 37
Menu ........................................................................... *Q/U-2, 4
Minus(-)/Pius (+) Buttons ........................................... *Q/U-3, 4
Pieture-ln-Picture (PIP) ..................................................... 32-3"
Power Light Indicator ................................ ..................... *Q/U-3
Precautions/Safety ...................................... 2, 3, 38, 43, *Q/U- I
Programming Channels ............................................ 13, *Q/U-2
Remote Control ..................................... 25-31, 34, *Q/U-2, 3, 4
Remote with VCRs ................................................ 26-27, 30, 3 I
Requesting Service ..................................................... 38, 39, 43
RF Coaxial Cable ............................................... 32, 37, *Q/U- !
Reminder/Time and Channel .................................................. 17
Safety/Precautions ............................................ 2, 3, 38, *Q/U-1
Second Audio Program (SAP) ................................................. 19
Sensor Remote ................................................................ *Q/U-3
Sleep Timer ............................................................................. 16
Status Button .............................................................. *Q/U-3, 4
Stereo Light Indicator ................................... ............ 19, *Q/U-3
Surround Sound ...................................................................... 22
Speaker Terminals .................................................................. 22
Time/Channel Display .............................................. !7, *Q/U-3
Timer (Turn On) ..................................................................... 15
VCR Button ............................................................................ 23 -
VCR/TV Connections ............................. 23-24, 32, 37, *Q/U-I
Tips for Service ..................................................... 38, 41-42, 43
TV Speaker Control ................................................................ 2 I
Warranty ................................................................................. 43
* Information contained in Quick-Use (Q/U) Guide - page listed
40
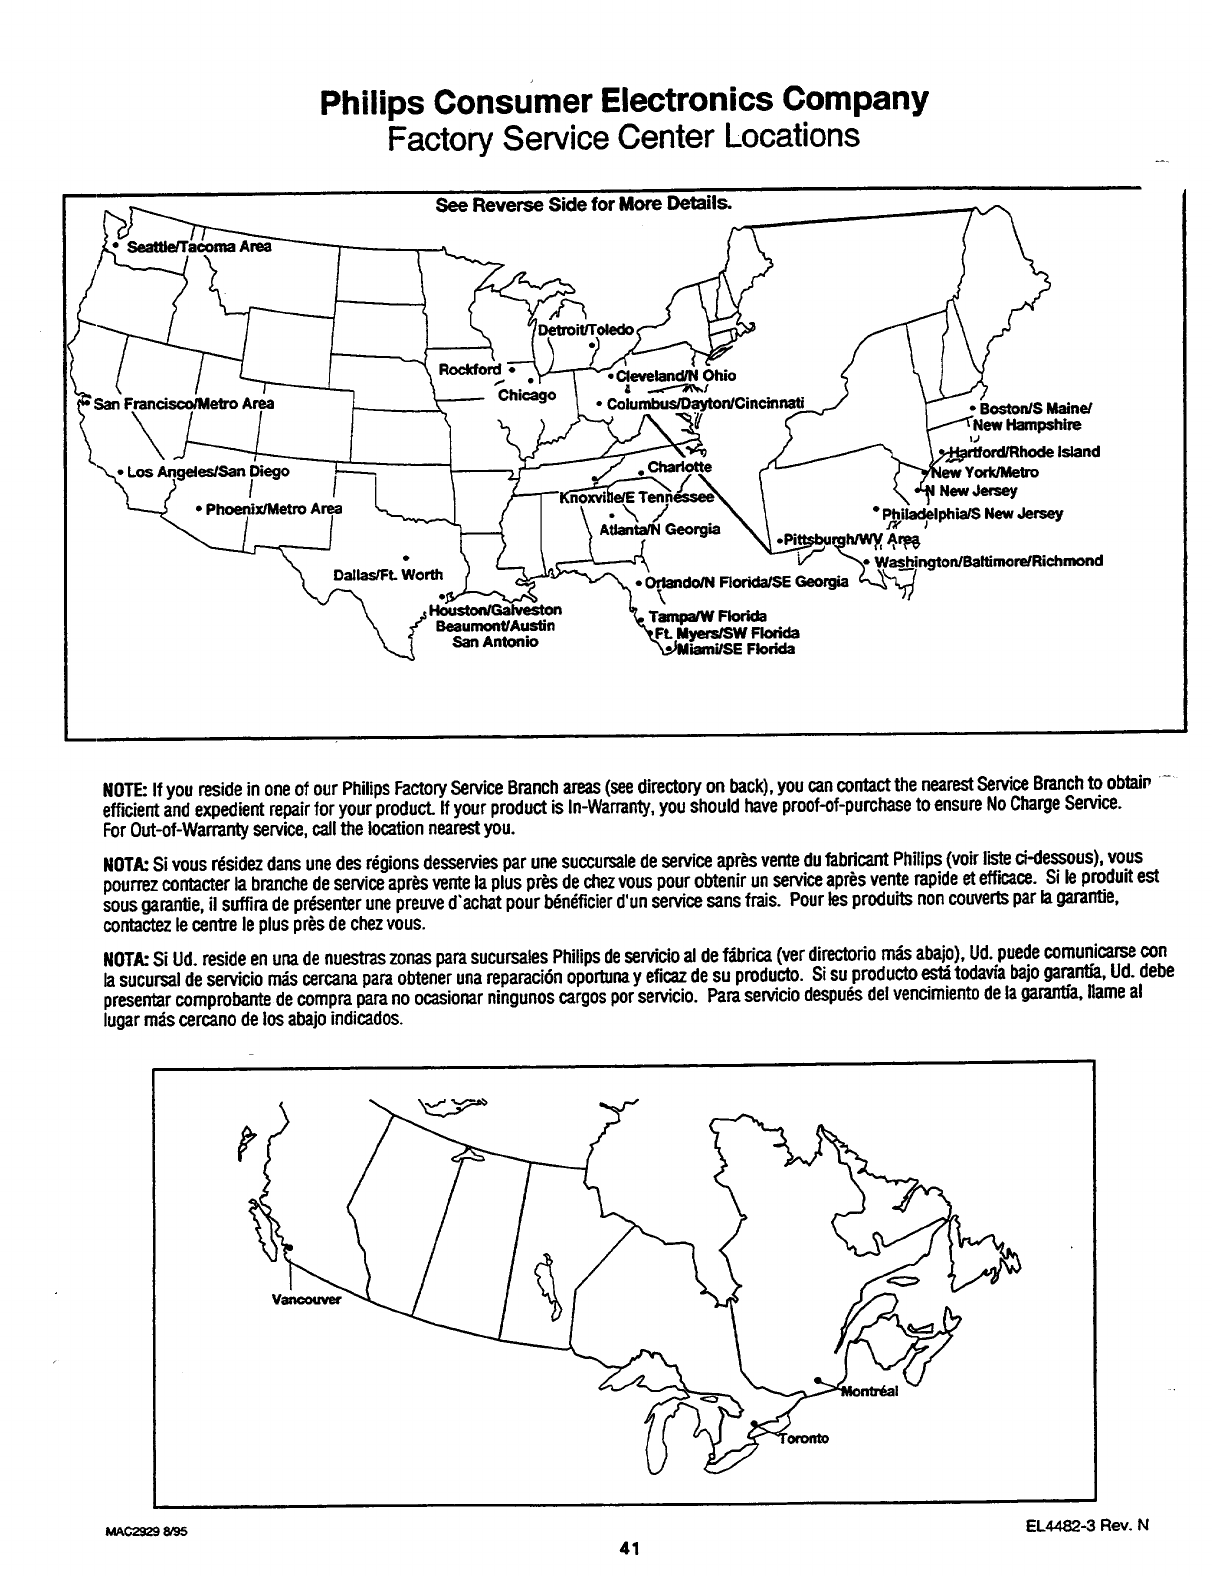
Philips Consumer Electronics Company
Factory Service Center Locations
See Reverse Side for More Details.
Detroit/Toledo
San Francisco/Metro Area
Di_=_ _
I I
• Phoenix/Metro Area
Rockford
"Chi_go
Dallas/FL Worth
San Antonio
Ohio
•Columbus/Dayton/Cincinnati
Charlotte
.\/
Atlanta/N Georgia
• Orlando/N Florida/SE Georgia
LU,_r_W _
iami/SE Florida
•BostoniS Maine/
IJ
,_Island
New Jersey
•New
_r_
NOTE:If youresideinoneofourPhilipsFactoryServiceBranchareas(seedirectoryonhack),youcancontactthenearestServiceBranchtoobtain-
efficientandexpedientrepairforyourproduct.If yourproductisIn-Warranty,youshouldhaveproof-of-purchasetoensureNoChargeService.
ForOut-of-Warrantyservice,callthelocationnearestyou.
NOTA:Sivousrdsidezdartsunedesrdgionsdesserviesparunesuccursaledeserviceapr_sventedufabdcantPhilips(voirlisteci-dessous),vous
pourrezcontacterla branchedeserviceapr_sventelapluspr_.sdechezvouspourobtenirunserviceapr_sventerapideetefficace.Si leproduitest
sousgarantie,il suffiradeprdsenterunepreuved'achatpourb6ndflcierd'unservicesansfrais. Pourlesproduitsnoncouvertsparlagarantie,
contactezlecentreleplusprbsdechezvous.
NOTA:Si Ud.resideenunadenuestraszonasparasucursalesPhilipsdeservicioaldef_bdca(verdirectoriorodsahajo),Ud.puedecomunicarsecon
lasucursaldeserviciorodscercanaparaobtenerunareparaci6noportunay eficazdesu producto.Sisuproductoest_todavfabajogarantia,Ud.debe
presentarcomprohantedecompraparanoocasionarningunoscargosporservicio. Paraserviciodespudsdelvencimientodelagarantfa,Ilameal
lugarrodscercanodelosahajoindicados.
EL4482-3 Rev. N
MAC2929 8/95 41
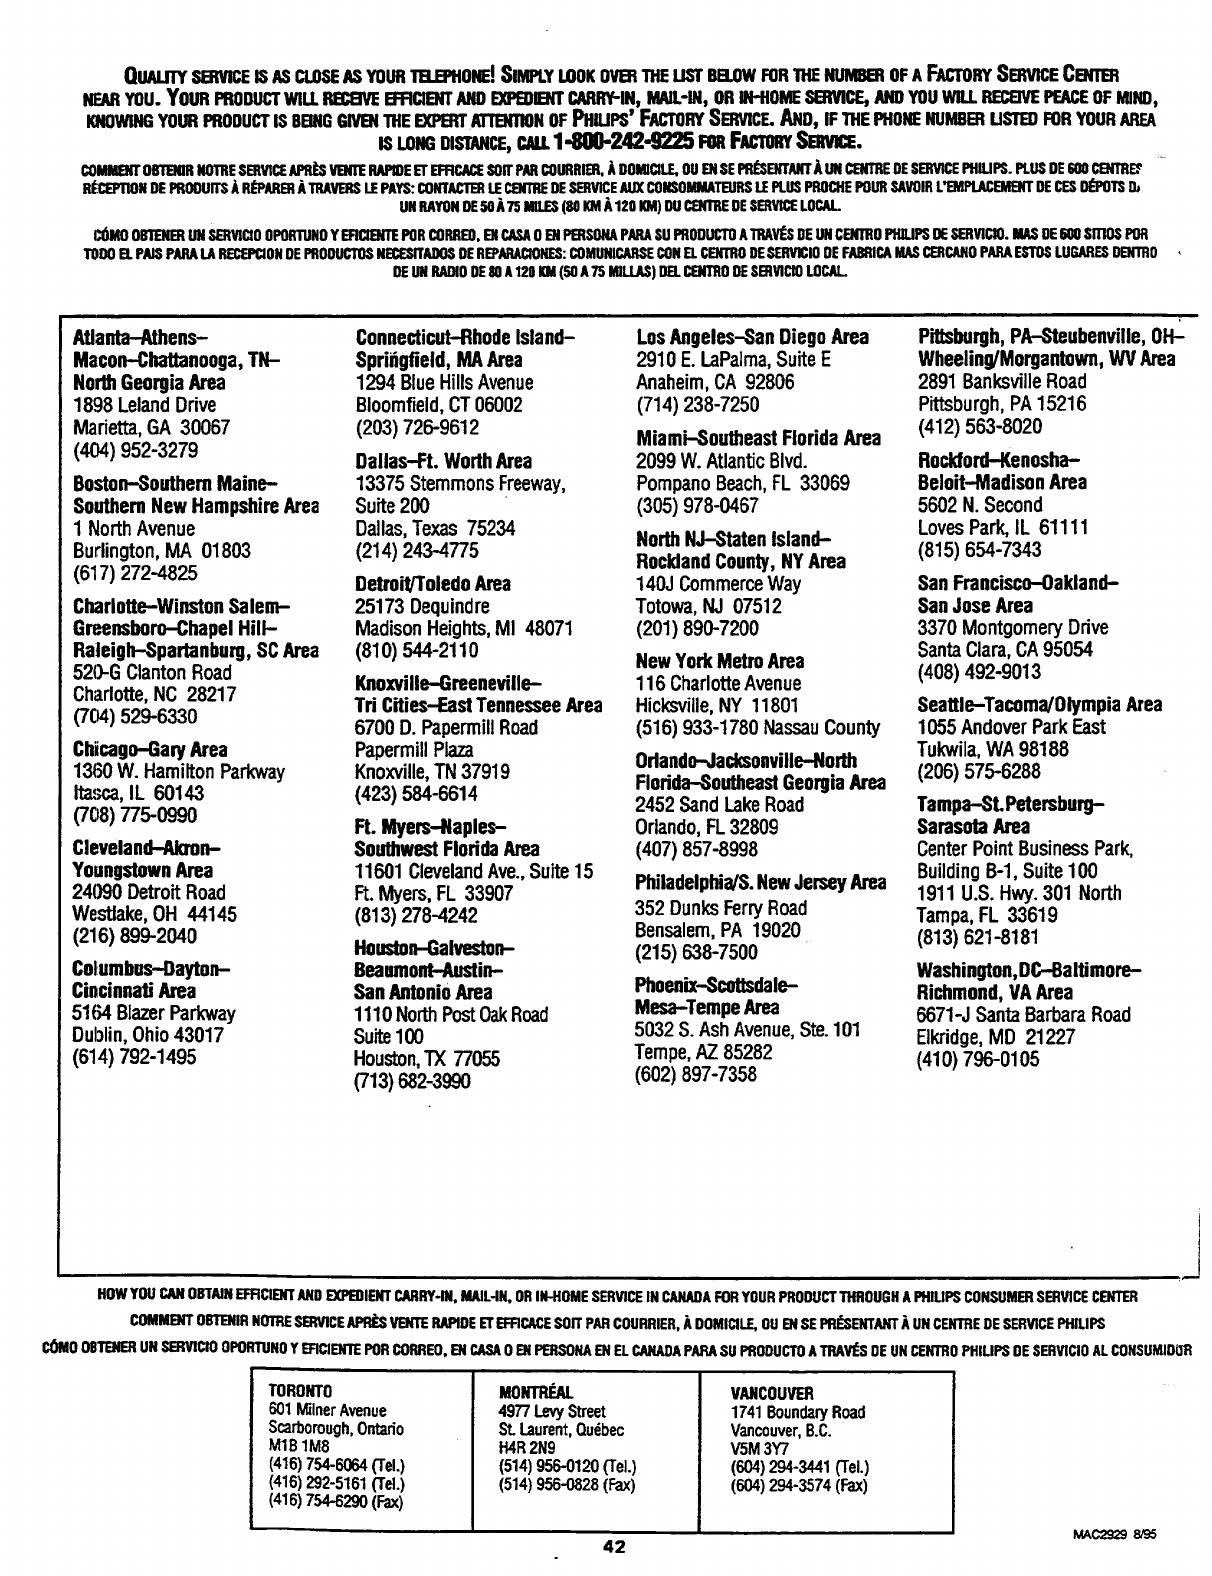
QUALITYSI_VICE IS ASCLOSEAS YOURTB..B_ONE!SIMPLYLOOKOVI_iTHELISTBB.OWFORTHENUMBEROFA FACTORYSERVICECERTER
NEARYOU. YOURPRODUCTWILL_ B_FICIENTANDEXPEDIENTCARRY-IN,MAIL-IN, ORIN-HOMESERVICErANDYOUWILL_PEACEOFMIND,
KNOWINGYOURPRODUCTiSBaNGGnteNTHEEX]U_R'rArl"BfllOROFPINUPS' FACTORYSE_nCF..AND,iFTHEPHONENUMBERUSTEOFORYOURAREA
ISLOemDISTANCE,CALL1-800-242-9225 FenFACTO_Semnce.
CO_ OBTERIRNOTRESERVI_AP91_VlmTERAPIDEEl"EFRCACESOITPARCOURRIER,ADOMICILE,OUEllSEPRI_ENTANT_UINCENTREDESGWICEPHIL.IPS.PLUSDE600CERTRE2
BI_{_PTIONDEPROOUITSARI_PANERATRAVEUSLEPAYS:GONT_ LIECENTREDESERVICEAUXCOUSOMMATEUR$I.EPLUSPROCHEPOURSAVOIRL'EMPLACEMENTDECIESDI_POTSD_
UNRAYONOESOA75 MILIES(80KMA120KM)DUC£NTREDESERVICELOCAL
CI_MO08TERERLINSERVICI00PURTUNOYERCIERTEPORCORRE0,ENCASAOEHPERSONAPAPASUPROOUCT0ATRAVI_SDEIJHCENTR0PffiUPSDESERVICIO.MA$DE600SITIO$POR
1"01)0ELPAlSPAPALARECEP_ONOEPROOUCTOSNECESITADOSDEREPARACIONES:CgMUNICARSECONELCENTRODESERVICIOOEFAERICAMASC_CANOPARAESTUSLUGARES0ERTRO
DEIJNRADIODE80A120KM(50 A75 MILLAS)DELCEHTRODESBWiciOLOCAL..
AtlaMa-Athens-
Macon-Chattanooga,TN-
NorthGeorgiaArea
1898 LelandDrive
Marietta,GA 30067
(404) 952-3279
Boston-SouthernMaine-
SouthernNew HampshireArea
1 NorthAvenue
Burlington,MA 01803
(617) 272-4825
Charlotte-WinstonSalem-
Greensboro-ChapelHill-
Raleigh-Spartanburg,SCArea
520-G ClantonRoad
Charlotte,NC 28217
(704) 529-6330
Chicago-GaryArea
1360 W. HamiltonParkway
Ita.,_,a,IL 60143
(708)775-o99o
Clevelaod--Aio'on-
YoungstownArea
24090 DetroitRoad
Westlake,OH 44145
(216) 899-2040
Columbus-Dayton-
CincinnatiArea
5164 BlazerParkway
Dublin,Ohio43017
(614) 792-1495
Connecticut-RhodeIsland-
Sprifigfield,MAArea
1294 BlueHillsAvenue
Bloomfield,CT06002
(203) 726-9612
Dallas-Ft. WorthArea
13375 StemmonsFreeway,
Suite 200
Dallas,Texas 75234
(214) 243-4775
Detroit/ToledoArea
25173 Dequindre
MadisonHeights,MI 48071
(810) 544-2110
Knoxville-Greeneville-
Td Cities-EastTennesseeArea
6700 D. Papermill Road
PapermillPlaza
Knoxville,"IN37919
(423) 584-6614
Ft. Myers-Naples-
SouthwestFloddaArea
11601 ClevelandAve.,Suite15
Ft.Myers,FL 33907
(813) 278-4242
Hoeston-Galveston-
Beaumont-Aestin-
SanAntonioArea
1110NorthPostOakRoad
Suite100
Houston,TX 77055
(713)682-399o
Los Aageles-SanDiegoArea
2910 E. LaPalma,SuiteE
Anaheim,CA 92806
(714) 238-7250
Miami-SoutheastFloridaArea
2099 W. AtlanticBlvd.
Pompano Beach,FL 33069
(305) 978-0467
NorthNJ-Staten Island--
RocklandCounty,NYArea
140J CommerceWay
Totowa,NJ 07512
(201) 890-7200
NewYorkMetro Area
116 CharlotteAvenue
HicksviUe,NY 11801
(516) 933-1780 NassauCounty
Odando--Jacksonville-North
Florida-SoutheastGeorgiaArea
2452 SandLakeRoad
Orlando,FL32809
(407) 857-8998
Philadelphia/S.NewJerseyArea
352 DunksFerryRoad
Bensalem,PA 19020
(215) 638-7500
Phoenix-Scattsdale-
Mesa-TempeArea
5032 S. Ash Avenue,Ste.101
Tempe,AZ 85282
(602) 897-7358
Pittsburgh,PA-Steubenville,OH-_-
Wheeling/Morgantown,WV Area
2891 BanksvilleRoad
Pittsburgh,PA 15216
(412) 563-8020
Rockford-Kenosha-
Beloit-Madison Area
5602 N. Second
LovesPark,IL 61111
(815) 654-7343
San Francisco-Oakland-
SanJose Area
3370 MontgomeryDrive
SantaClara,CA95054
(408) 492-9013
Seattle-Tacoma/OlympiaArea
1055AndoverParkEast
Tukwila,WA 98188
(206) 575-6288
Tampa-SLPetersburg-
SarasotaArea
CenterPointBusinessPark,
BuildingB-l, Suite100
1911 U.S. Hwy.301 North
Tampa,FL 33619
(813) 621-8181
Washington,DC--BalUmore-
Richmond,VA Area
6671-J SantaBarbaraRoad
E]kridge,MD 21227
(410) 796-0105
J
HOWYOUCANOBTAINEFFICIENTANDEXPEOIERTCARRY-IN,MAIL-IN,ORIN-HOMESERVICEIN CANAGAFORYOURPRODUCTTHROUGHAPHIUPSCONSUMERSERVICECENTER
COMMENTOBTERIRNOTRESERVICE_VERTERAPIDEETEFRCACESOIl"PANCOURRIER,it DOMICILE,OUENSEPRI_'NTANTAUNCENTREDESERVICEPHILIPS
COMOOBTERERUNSERVICIO0POITrUN0YEFICIENTEPORCORREO,Eli CASA0 EliPERSONAENELCANADAPAPASUPRODUCTOATRAVI_SDEUNCENTR0PHIUPSDESERVICI0ALCONSUMIDI]R
TORONTO
601MilnerAvenue
Scarborough,Ontario
M1B 1M8
(416)754-6o64(TEL)
(416)292-5161(Tel.)
(416) 754-6290 (Fax)
MOmP_U.
4977 LevyStreet
St.Laurent,Quebec
H4R2N9
(514)956-0120(TEL)
(514)956-0828(Fax)
VANCOUVER
1741BoundaryRoad
Vancouver,B.C.
V5M3Y7
(604)294-3441(Tel.)
(604)294-3574(Fax)
MAC2929 8/95
42
PROJECTION TELEVISION
Or_: Yt._r Fr(_'. l._t×)r
Onc Year Froo Se.rvic¢: on Pans
TWO Years FrP___Service on Calllode Ray "l_abe Pans /30 Days Free Service on Proje_"aion "Iv Screen
TilLs product can be repaired in-tlome.
WHO IS COVERED?
You musthaveproofofpurchasctoreceivewarrantyscrvice.Asales
rcceiptor otherdocumentshowingthatyoupurchasedtheproduct
isconsidcrcdproofofpurchase.
Wl tAT IS COVERED'?
Warrantycoverage begins tile day you buy ),our product. For oncycar
thereafter (30 days for the projection TVscrcen), all parts will bc
repairedor rcplaccd, and laborand transportation arc rice. From_tc
to _,o yearsfrom the day ofpurchase,you pay fi)r the rcplaccmcnt or
rcpair of all parts except the cathodc ray mbc and the "CIcar-Vu"
lens, and fi)r all labor and transportation charges. Afi'cr two years
from the da_ of purchase,you pay t_r'_h_:replaccment or repairof all
parts except the "ClearVu" lens (which is guarantecdagainst manu-
facturer'sdcfccts for the lifetime of the product), and for all labor and
transportation cha_es.
All parts, including repairedand replaced parts, are covered only for
the original warrantyperiod. When the warrantyon the product
cxpircs, the warrant),on all replaced and repaired partsalso expires.
Wl IAT IS I'_XCI.U[)I'_I)?
Your warrant), dcx_'s not cover:
•labor cha_cs for installation or _tup of the product, adjustment
ofcustomcr controls on the pr(K|uct, and installation or repair of
antenna s3._tcrnsoutside of the product.
•product repair and/or part replacement becau._ of misuse, acd-
dcnt, unauthorized repair or other cat_c not within the control of
Philips Consumer Elcctroni_ Company.
•reception probicms caused by signal conditions or cable or anten-
na systems outside thc unit.
• a product that requires m(_ification or adaptation to enable it to
operate in any country other than the country for which it was
desired, manufactured, approved and/or authorized, or repair
of products damaged by these m(xtificarions.
• incidental or consequential damages resulting from thc product.
(Some states do not allow the cxclusion of incidental or conse-
quential damagcs_ so the above exclusion may not apply to you.
This inClude_s,but is not limited to, prerecorded material, whether
copyrighted or not copyrighted.)
WHERE IS SERVICE AVAILABLE?
Warranty serviceis available in all countries where the product is offi-
dally distributed by Philips Consumer Electronics (_)mpan3: In
countrics where Philips Consumer Electronics Company does not
distribute the product, the local Philips service organization will
attempt to provide service (although there may bca delay if the
appropriate spare parts and technical manual(s) are not readily avail-
ablc).
MAKE SURE YOU KEEP...
Please keep your sales receipt or other dooamcnr showing proof of
purchase. Attach it to this owner's manual and keep both nearby.
Also keep the original box and packing material in case you need to
remm your product.
BEFOF_E F_.QUESTING SERVICE...
Plca._ check your owner's manual before rcqucsting scr_dce.
Adjustments of the controls discussed there may save you a scrx,icc
call.
TO GET WARH_tNTY SERVICE...
Rqyair must be performed by an authorized service center or afac-
tory service center. If ._m live ncar afactory,service center (s¢€enclosed
list), you may contact that center to schedulc a time for in-home
repair. If you do not live near a faczory service center, contact your
dealer. If your dealeris an authorized servicc center, he gill arrange
repair. If your dealer is not an authorized scrvice centcr, he will
direct you to the authorized service center engagcd by him to service
the pr(K|uctshc sells.
(In U.S.A., Puerto Rico and U.S. Virgin Islands, all implied war-
tantics, including implied _rrantic.-s of merchantability and fitr_-_
for a particular purpose, arc limited in duration to the duration o
cxprcss warranty. But, bcx'au.__)mc states do not allow limimn_,,.s
on how long an implied warranty may last, this limitation may not
apply to you.)
(In Canada, this warranty is given in lieu of all other warranties. No
other wan'antics are expressed or implied, including any implied war-
rantiesof merchantability or fimess for a particular purpose. Philips
is not liable under any drcurnstanccs for any direct, indirect, spccial,
inddcntal or conscqucntial damages, howsoever incurred, even if
notified of the possibility of such damages.)
IF YOU HAVE QUESTIONS...
In U.S.A., Puerto Rico, or the U.$. Vir_n IdaY_ts, contact Philips
Service Company at the address listed below.
In Canada, contact Philips ElectronicsLtd. at:
4977 LevyStreet
St. l.aurent, Quebec, H4R 2N9
(514) 956-0210
REMEMBER...
Please record thc modal and ._rial numbers fonnd on the product
below Also, please fill out and mailyour warrant),registration card
prompdy. It will bc easier fbr us to noti_t you if necessary.
MODEL #
SERIAL #
Phifips Service Company 401 East Andrew Johnson Highway
(423) 475-8869
Jefferson City, Tennessee 37760
EL494._1-_001/MAC 4102 /12-94
43
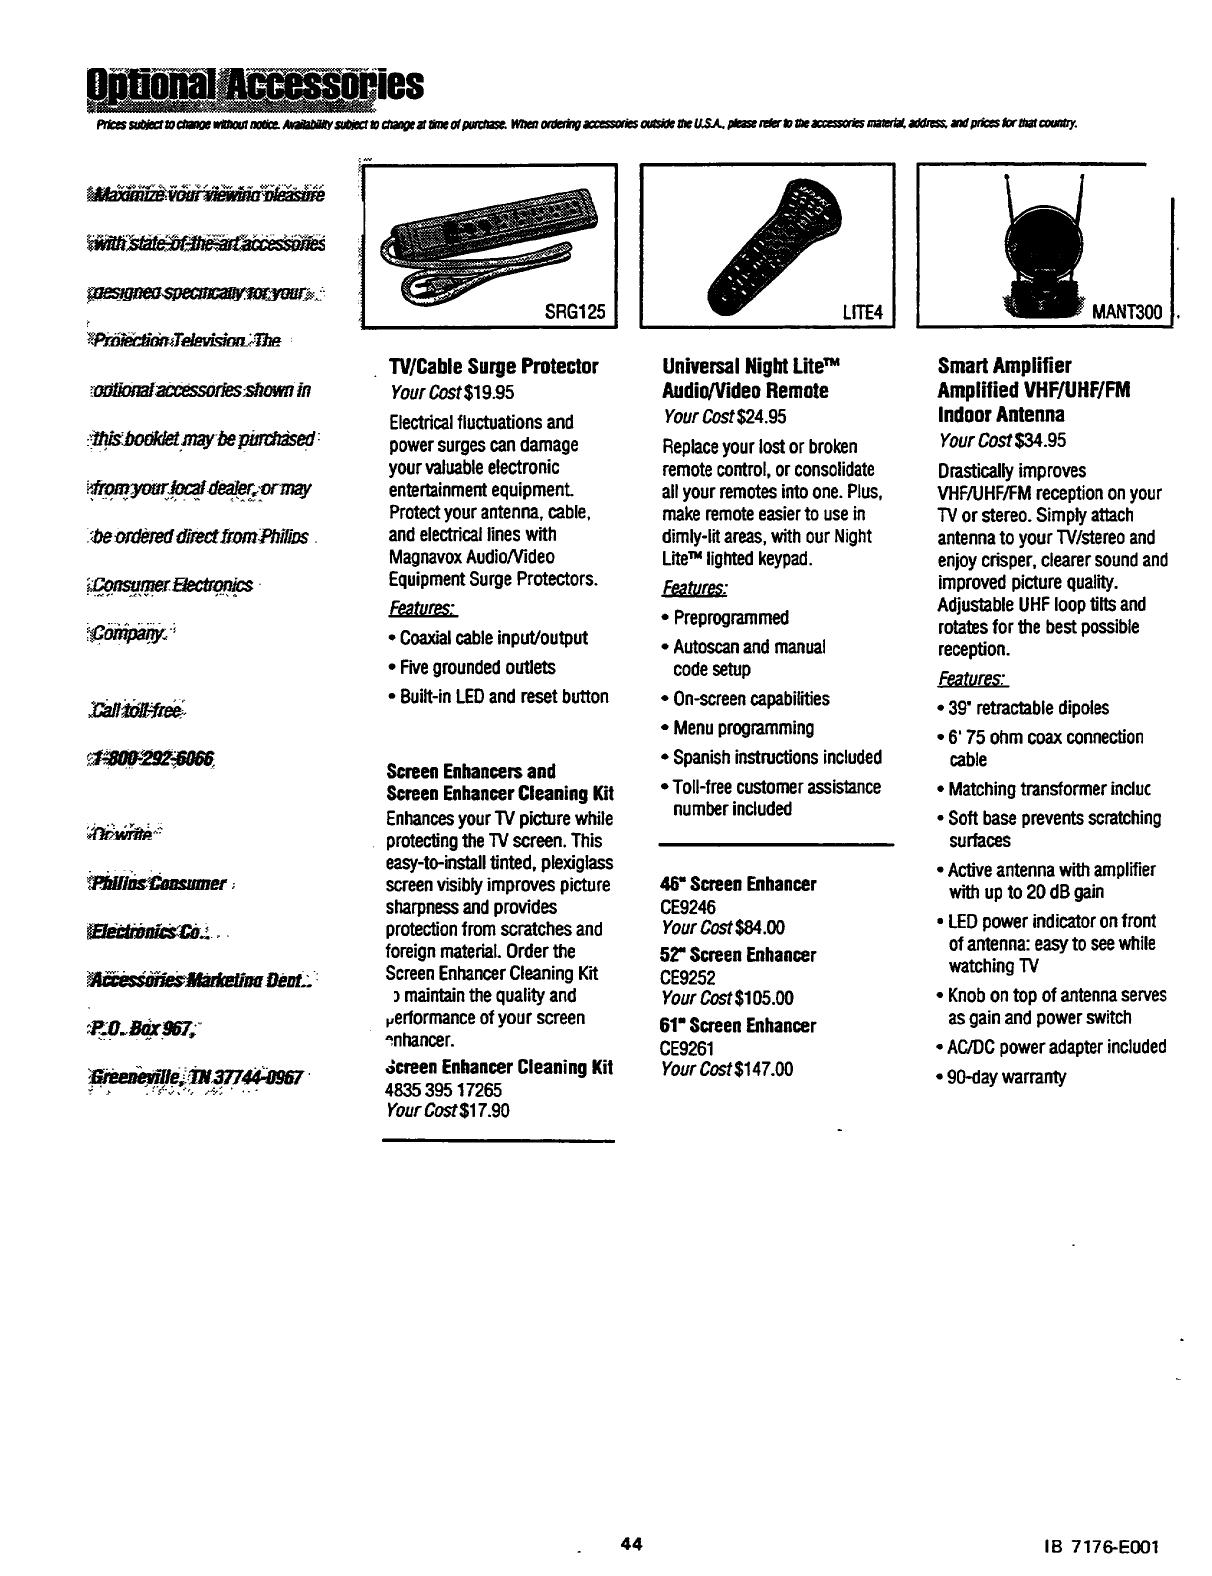
____ji S•_ _ _ "l 8
_od_or_accessories.showain
:'_ ordered_'rectlr_._rms .
_P-MIi_.msumer ;
SRG125
TV]CableSurge Protector
YourCost$19.95
Electricalfluctuationsand
powersurgescandamage
yourvaluableelectronic
entertainmentequipment
Protectyourantenna,cable,
andelectricallineswith
MagnavoxAudio/Video
EquipmentSurgeProtectors.
Features
• Coaxialcableinput/output
•Fivegroundedoutlets
•Built-inLEDandresetbutton
ScreenEnhancersand
ScreenEnhancerCleaningKit
Enhancesyour"IVpicturewhile
protectingtheTVscreen.This
easy-to-installtinted,plexiglass
screenvisiblyimprovespicture
sharpnessandprovides
protectionfromscratchesand
foreignmaterial.Orderthe
ScreenEnhancerCleaningKit
) maintainthe qualityand
verformanceof yourscreen
^nhancer.
,_creenEnhancerCleaningKit
483539517265
YourCost$17.90
LrrE4
UniversalNightLiteTM
Audio/VideoRemote
YourCost$24.95
Replaceyourlostorbroken
remotecontrol,orconsolidate
allyourremctesintoone.Plus,
makeremoteeasierto usein
dimly-litareas,withourNight
LiteTM lightedkeypad.
• Preprogmmmed
•Autoscanandmanual
codesetup
•On-screencapabilities
• Menuprogramming
• Spanishinstructionsincluded
•Toll-freecustomerassistance
numberincluded
46' ScreenEnhancer
CE9246
YourCost$84.00
52"ScreenEnhancer
CE9252
YourCost$105.00
61"ScreenEnhancer
CE9261
YourCost$147.00
MANT300Ii
Smart Amplifier
Amplified VHF/UHF/FM
IndoorAntenna
YourCost$34.95
Drasticallyimproves
VHF/UHF/FMreceptiononyour
TVorstereo.Simplyattach
antennatoyourW/stereoand
enjoycrisper,clearersoundand
improvedpicturequality.
AdjustableUHFlooptilts and
rotatesfor the bestpossible
reception.
•39"retractabledipoles
•6' 75 ohmcoaxconnection
cable
• Matchingtransformerincluc
• Softbasepreventsscratching
surfaces
•Activeantennawithamplifier
withupto 20dBgain
•LEDpowerindicatoronfront
ofantenna:easyto seewhile
watchingTV
•Knobontopofantennaserves
asgainandpowerswitch
•AC/DCpoweradapterincluded
•90-daywarranty
44 IB 7176-E001
