MAGNAVOX Direct View Digital 27 To 40 TV Manual 97100190
User Manual: MAGNAVOX MAGNAVOX Direct View Digital 27 to 40 TV Manual MAGNAVOX Direct View Digital 27 to 40 TV Owner's Manual, MAGNAVOX Direct View Digital 27 to 40 TV installation guides
Open the PDF directly: View PDF ![]() .
.
Page Count: 8
Serial No.
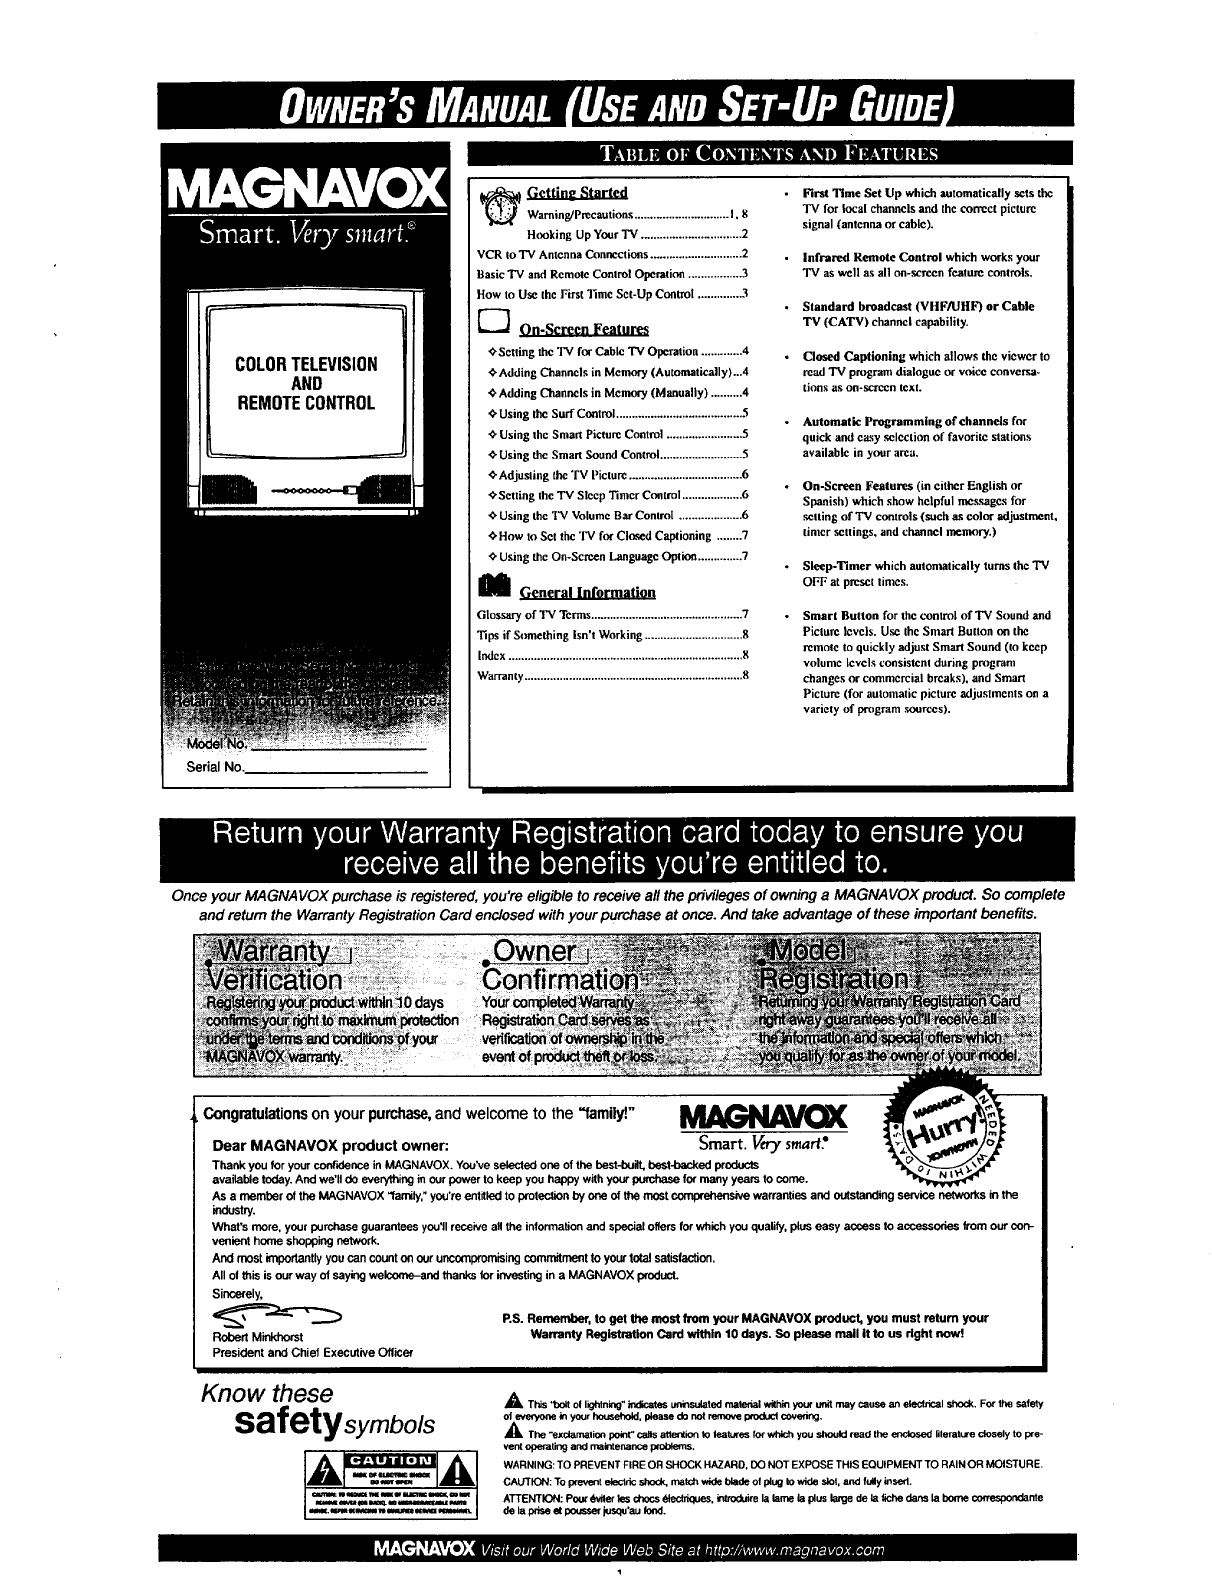
_Gettin_ Started
Warning/Precautions .............................. I. 8
Honking Up Your TV ................................ 2
VCR to "IV Antenna Connections ............................. 2
Basic 'IV and Remote Control Operation ................. 3
How to Use the First Time Set-Up Control .............. 3
_"_ On-Screen Features
'0-Setting the TV for Cable TV Operation ............. 4 .
_Adding Channels in Memory (Automatically)...4
Adding Channels in Memory (Manually) .......... 4
€"Using the Surf Control ........................................ .5
_" Using the Smart Picture Control ........................ 5
€'Using the Smart Sound Control .......................... 5
_'Adjusling the TV Picture .................................... 6
OSetting the 'IV Sleep Timer Control ................... 6
Using the 3%' Volume Bar Control .................... 6
,¢.How to Set the "IV for Closed Captioning ........ 7
_" Using the On-Screen Language Option .............. 7
MGeneral Information
Glossaryof TV Tcrms ................................................7
Tips ifSomething Isn'tWorking ...............................8
Index..........................................................................8
Warranty.....................................................................8
First Time Set Up which automatically sets the
TV for local channels and Ihc correct picture
signal (antenna or cable).
Infrared Remote Control which works your
TV as well as all on-screen feature controls.
Standard broadcast (VHF/UHF) or Cable
TV (CATV) channel capability.
Closed Captioning which allows the viewer to
read "IV pn)gram dialogue or voice conversa-
tiorls as on-screen text.
Automatic Programming of channels for
quick and casy ,selection of favoritc stations
available in your area.
On-Screen Features (in either English or
Spanish) which show helpful nmssagcs for
setting of 'IV controls (such as color adjustment,
tinier ,settings, and channel memory.)
Sleep-Timer which auton)atically turns thel"V
OFF at pmscl limes.
Smart Button for the control of TV Sound and
Piclurc Icvcls. Use the Smart Button on the
remote to quickly adjust Smart Sound (m kccp
volume levels consistent during program
changes ne commcreial breaks), and Smart
Picture (for automatic picture adjustments on a
variety of program ,sources).
Once your MAGNAVOX purchase is registered, you're eligible to receive all the privileges of owning aMAGNAVOX product. So complete
and return the Warranty Registration Card enclosed with your purchaseat once. And take advantage of these important benefits.
Congratulationson your purchase,and welcome to the "family"
Dear MAGNAVOX product owner: Smart. Very smart'
Thank you for your cor_ence in MAGNAVOX. You've selected one of the best-built, best-backed products
availal_e today. And we'll do everything in our power to keep you happy with your _fer many years to come.
As a member of the MAGNAVOX "family," you're entitled to protection by one of the most cor_ warranties and Outstanding service networks in the
industry.
What's more, your purchase guarantees you'll receive aftthe information and special offers for which you qualify, plus easy access to accessories from our con-
venient home shopping network,
And most importantly you can count on our uncompromising commitment to your total satisfaction.
All ol this is our way of saying welcome-and thanks 1orinvesting in a MAGNAVOX product.
Sincerely,
P.S. Remember, to gel the most from your MAGNAVOX product, you must return your
Robert Minkhorst Warranty Registration Card within 10 days. So please mail it to us dght now!
President and Chief Executive Officer
Know ese
safetysymbo/s AThis "bolt ol lightning" indicates uninsulated material within you' unit may cause an electK_.al shock, For the safety
of _in your household, please do not remove producl cove_l.
_kThe "exc_mation po_t" calls attention to leatures for which you should read the enclosed literature closely to I:xe-
vent operating and maintenance p¢O_.
WARNIbIG: TO PREVENT FIRE OR SHOCK HAZARD, DO NOT EXPOSE THIS EQUIPMENT TO RAIN OR MOISTURE.
CAUTION: To pravant elestcic shock, match wide blade of plug to wide slot, and fuly insed.
ATTENTION: Pour _wile¢ les chocs €_lectra_es, iraroduire la lame la plus large de la f_che clans la borne correspondante
de la prise_poussm juso_'au [o_d.
YF €"] _t T'e'--" K--,,, r_ar, g_ ............... r. r
LiIt1 l! II nk_lIlinrAlll k'tl ntl l a
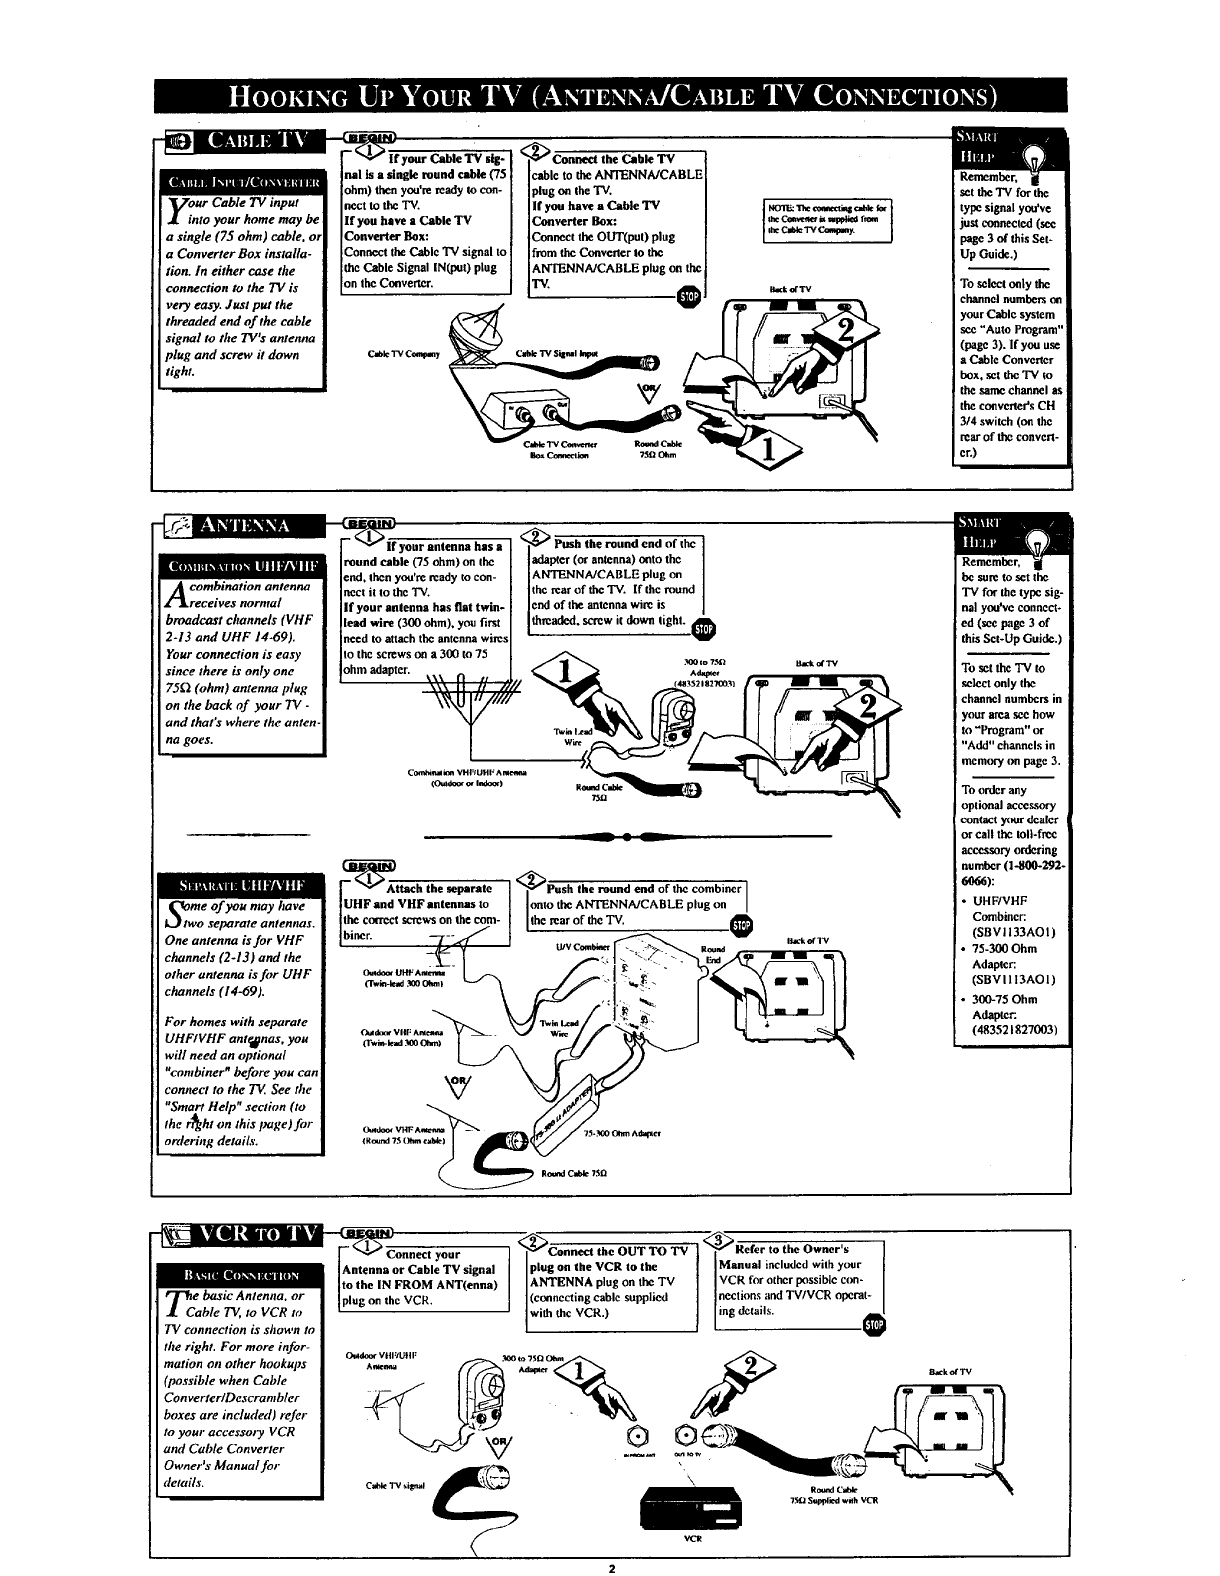
Voar Cable TV input
•into your home may be
a single (75 ohm) cable, or
a Converter Box installa-
lion./n either ca_e the
connection to the TV is
very easy. Just put the
threaded end of the cable
signal to the TV's antenna
plug and screw it down
tight.
ohm) tben you're ready to con-
ncct to the TV.
If you have a Cable TV
Converter Box:
Connect the Cable 'IV signal to
!the Cable Signal IN(put) plug
on tbe Converter.
_Conne¢/the Cable TV
cable to the ANTENNA/CABLE
plug on the "IV.
If you have a Cable 'IV
Converter Box:
Connect the OUT(pu0 plug
from the Converler to the
ANTENNA/CABLE plug on the
rv t_
set the 'IV for the
type signal you've
just connected (see
page 3 of this Set-
Up Guide.)
To select only the
channel numbers on
your Cable system
sac "Auto Program"
(page 3). If yon use
a Cablc Convcrtcr
box, set the TV to
the same channel as
the converter's CH
314 switch (on the
rear of the convert-
er.)
_l'i1_111klTi/i1_lgllTAYllt
Aombination antenna
receives nornra[
broadcast channels (VHF
2-13 and UHF 14-69).
Your connection is easy
since there is only one
75[2 (ohm) antenna plug
on the back of your TV -
and that's where the anten.
na goes.
11 llll tltllltl I I|A| I Ii
i_twome of you may have
$eparate antennas.
One antenna is for VHF
channels (2-13) and the
other antenna is for UHF
channels (14-69).
For homes with separate
UHFIVHF ante_]nas, you
will need an optional
"combiner nbefore you can
connect to the TV See the
"Smart Help" section (to
the r_ght on this lmge)for
mrlering details.
_ur antenna has a
round cable (75 ohm) on the
end, tben you're ready m con-
nect it to the "IV.
If your antenna has flat twin-
lead wire (300 ohm). you first
need to attach thc antcnna wires
.<_ _und end of the
adapter (or antenna) onto the
ANTENNA/CABLE plug on
the rear of tbe TV. If thc round
end of the antenna wire is
threaded, screw tdown light.
to the screws on a300 to 75 _ _0 (o7._ u._ d'rv
ohm adapter. \\\ €1 ,, _.._ | .._ ^_e,
\\\ I|ii /,, (4a3521s27c031
TwinI.,e_l
Com_ km VHFIUHFAm_
__ • L
--_Attach the separate
UHF and VHF antennas to
the correct screws on the com-
biner.
<_Push the round end of the combiner
onto the ANTENNA/CABLE plug on I
the rear of the TV, I_l
be sure to set the
TV for the type sig-
nal you've connect-
ed (sec page 3of
this Set-Up Guide.)
To set the 'IV to
select only the
ichannel numbers in
!your area see how
itO"Program" or
"Add" channels in
memory on page 3.
To order any
optional accessory
contact y(mr dealer
or call the toll-frec
accessory ordering
number (1-1100-292-
6066):
•UHFIVHF
Combiner:
(SBV1133AOI)
• 75-300 Ohm
Adapter:
(SBVI 113AOI)
• 300-75 Ohm
Adapter.
(483521827003)
'F _ Connect your
]Antenna or Cable TV signal
Ito the IN FROM ANT(enna)
,T_eebasic Antenna, or ]pplug on the VCR
• Cableto to
TV cannection is shown to
the right. For more infor-
mation on other hookups
(possible when Cable
ConverterlDescrambler
boxes are included) refer
to your accessory VCR
and Cable Converter
Owner'a" Manual for
detoils.
<,_Connect the OUT TO TV
plug on the VCR to the
ANTENNA plug on tbe TV
(connecting cable supplied
wth the VCR.)
<_Refer to the Owner's
Manual included with your
VCR for other possible con-
Inactions and TV/VCR operat- I
Ling details" ._
\
2
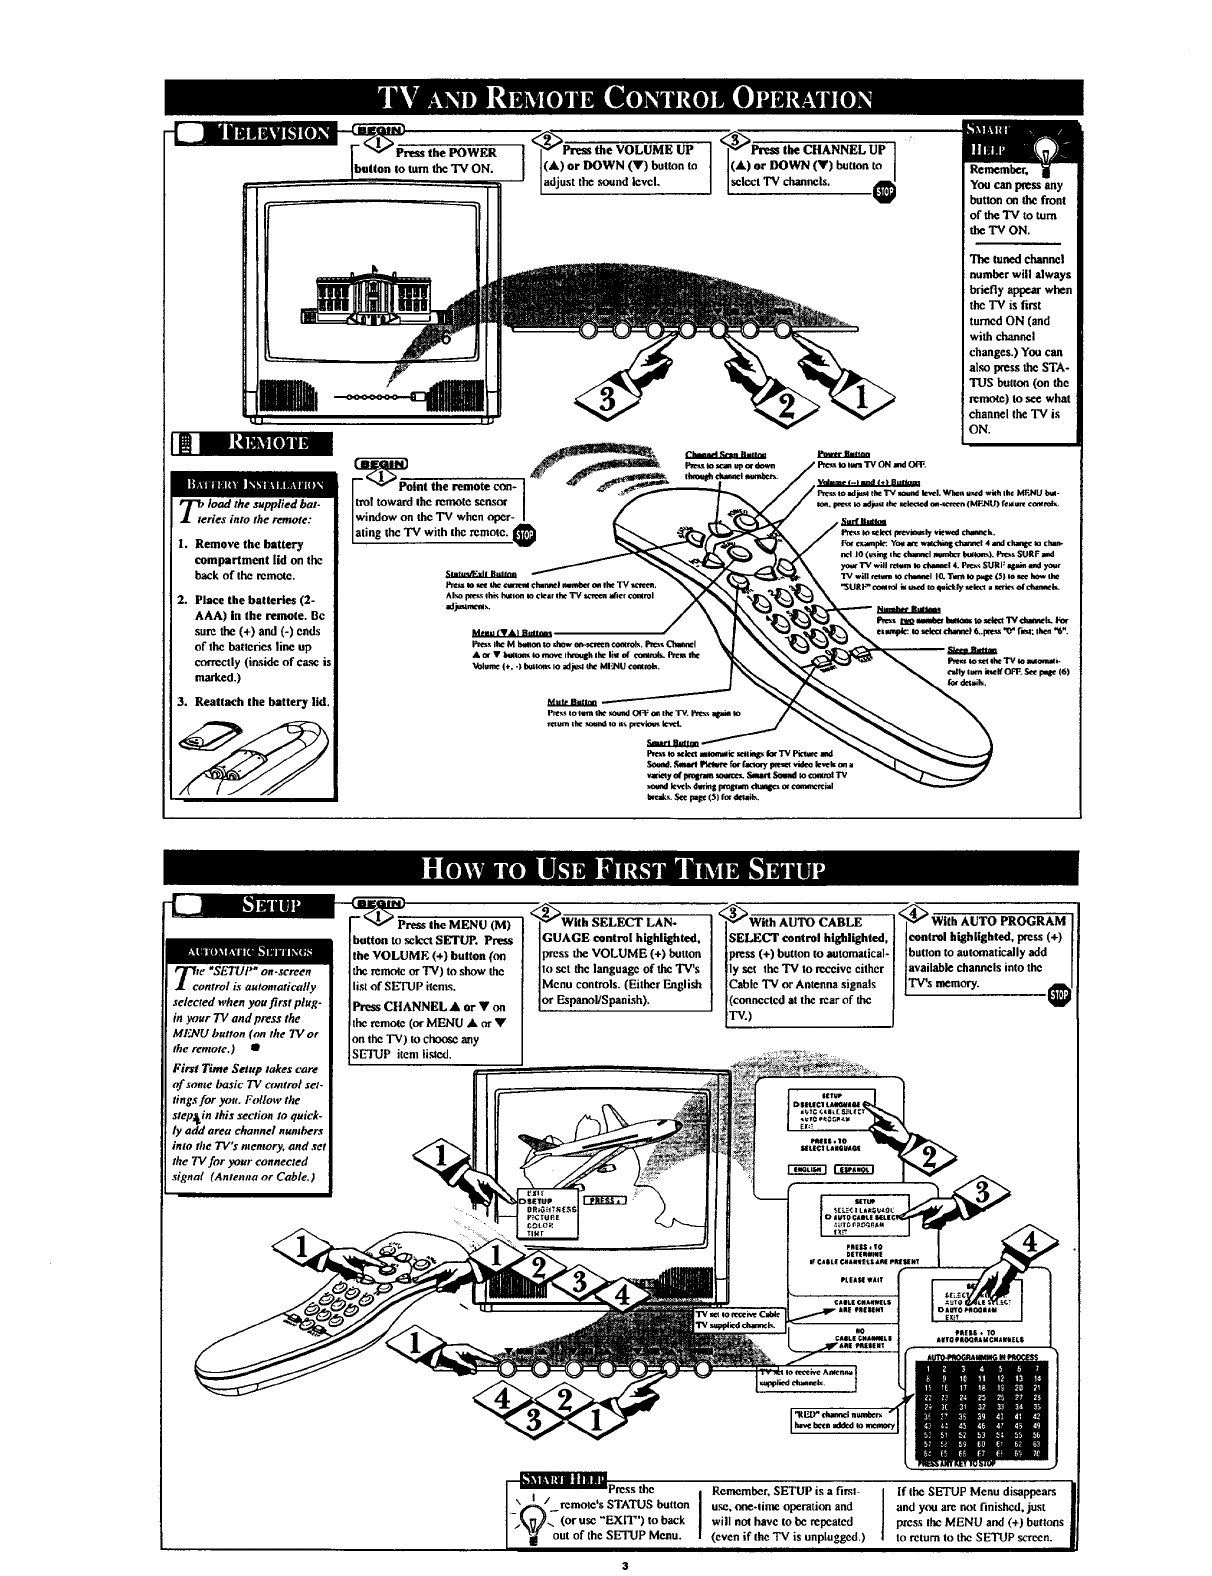
load the supplied bat.
des into the remote:
1. Remove the battery
compartment lid on the
back of the remo_e.
2. Place the batteries (2-
AAA) in the remote. Bc
sure the (+) and (-) ends
of the batteries line up
cca'w,ctly (inside of case
masked.)
3. Reattach the battery lid.
i
<_Press the VOLUME UP '<_Prem the CHANNEL UP
I
(A) or DOWN (Y) button to (A) or DOWN (Y) button to
adjust the m3uad level. Iselect TV channe s. €You can press any
button on the front
of the TV to turn
the TV ON.
le _SET_[ ,_ off-screen
ntrol is automatically
selected ,,hen you first plug-
in your TV and press the
MENU button (on tile 7V or
the remote.) •
First Time Setup lakes care
af ._ome basic 73/control set-
tings for you. Follow the
slep_ in this section Io quick-
ly add area channel numbers
into the TV'$ menmry, and set
the TVfor your connected
signal (Antenna or Cable.)
_ENU (M)
baron to select SETUP. Press
the VOLUME (+) button (on
the remote or TV) to show the
list of SETUP itcms.
Press CHANNEL • or • on
the remote (orMENU • or •
nn the "IV) to eheose any
SETUP item li_ed.
[_uGuWIIh SELECT LAN-
AGE control highlighted,
press the VOLUME (+) button
to set the language of the TV's
Mcnu controls. (Either "English
[or Espanol,'Span sh)+
•<_With AUTO CABLE .<__
SELECT control highlighted, control highl g ted, press ( )
press (+) button to automatical- button to automatically add
ly set the TV to rccoive either [ ]available channels into the
Cable TV or Antenna signals ] [TV's n_mory.
(connectcd at the rear of the II
"IV.) J
I
nAg/ <oruse"EX,',"),oback I
I_outoftheSETUPMe... I
Remcmher, SETUP is a first-
u._. one-time operation and
will not have to bc repeated
(even if the "IV is unplugged.) JIf the SETUP Menu disappears
and you are not finished, just
press the MENU and (+) buttous
to return to the SETUP screen+
(*)
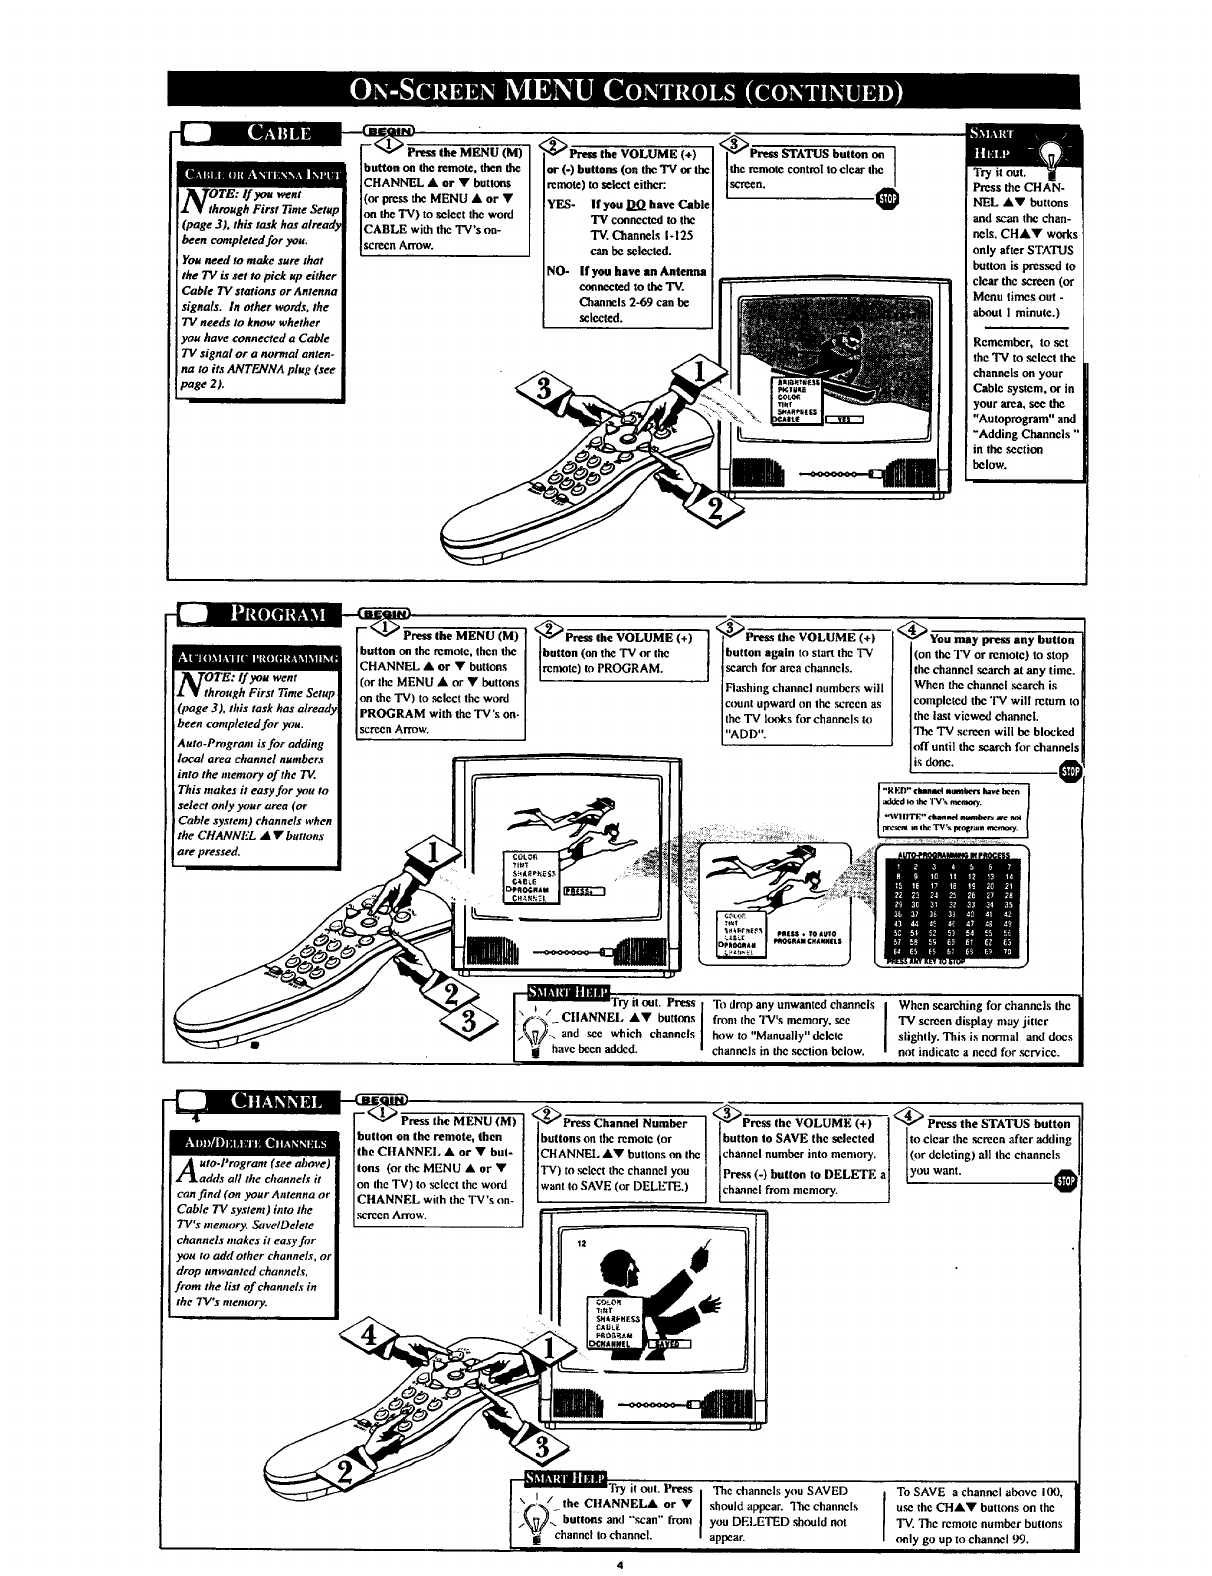
TV oc the
_ttons remote) to select either:
N_ MENU • or • YES- "If you DO haw rohl_
z • throughPirs,71.t0SetupIo.;h_TV_to_ tbewo_d '_" '_';0_____'___,".....
_"r'v",_,,_" _ connected to the
_,_ ....... TV._a.yls1-125
.......... r..... J-' J .... [serecn At'TOw. can _ sel_'t--
............. Call t_ _l_ PAl.
You need to make sure that
the 73; is set to pick up eitheo NO- If you have an Antenna
Cable TV stations or Antenna connected to the "IV.
signals. In other words, the Channels 2-69 can be
TV needs to know whether selected.
you have connected a Cable
TV signal or a normal anten-
na to its ANTENNA plug (see
page 2).
_<__ button on
Ithe remote control to clear the 1
tPress the CHAN-
NEL AV buttons
and _an the chan-
nels. CHAV wades
only after STATUS
button is pressed to
, clear thc screen (or
Menu times out -
about I minute.)
Rcn_mber, to set
the 'IV to select the
channels on your
Cable system, or in
your area, sec the
"Autoprogram" and
"Adding Channels"
'in the section
below.
IhKOZHtltl_
[- _ Press the MENU (M)
Ibutton on the _mote thcn the
|.'tll[|kll_la[lld:(iIfl!_qklklltO[l_ ]CHANNEL • or •_ttons
•TOTE:If you went I(orthe MENU • or • buttons
I•through First 7"ime Setup: ]on the TV) to _lcet the word
(page 3), this task has alread ]PROGRAM with the TV's on-
been completed for yv;u. ]serccn Arrow
Auto-Program is for adding
local area channel numbers
into the memory of the TV
This makes it easy for you to
select only your area (or
Cable system) channels when
the CHANNEL ••buttons
are pressed.
',_PresstheVOLUME(+) ] '_eress the VOLUME (+) I _
button (on the "IV or the [ button again to start the T'V
remote) to PROGRAM. search for area channels.
Flashing channel numhers will
c_mnt upward on the sercen as
the TV looks for channels to
"ADD".
[_You may press any button
(on the TV or rentote) to stop
the channel search at any time.
When the channel search is
eompletcd the TV will return to
the last viewed channel.
The "IV screen will be blocked
<_f until the .search fiw channels
is done. ._
,[_-k_lnlt_llllnllli [ry it ont. Press tTo drop any unwanted channels
[_(_%/ CllANNEI, AV buttons [ from the TV's memory, see
I_\_/_ andsee which channels ] how te "Manually" delete
Ihave been added, i channels in the section below.
Jhen searching for channcls the
TV screen display may jitter
slightly. This is normal and does
not indicatc a nccd for _rvicc.
fi| | []_]L.] [ _
4, ['-_ Press the MENU (M) I ,_PressChanneINumber I _<_Press the VOLUME (+)l
Ibutton on the remote then buttons on the remotc (or I ]button to SAVE the selected
i_'_A _J 01U R S [ol_ I _lk_JIL_l n _! t.It
II [the CItANNEL •or •but- [ CHANNEl, AT buttons on the ] channel number into memory.
uto Irogram (see ahole) •
A"' 'lions (or the MENU •or [
Zladdsallthcchanneisit I°n the TV) t° select the word IwantTV)to select the channelyOUtoSAVE (or DELh-I'E.) ]channel]Pregs(-) button to DELETEafrom actuary.
can find (on your Antenna or ICHANNEL with the *l'V's on- I L
Cable TV system) into tire IsereenArrow ]
TV's memory. SavelDelete I_ "I
channels makes it easy for
you Io add other channels, or
drop unwanted channels,
front the list of channels in
the TV's memory.
Press the STATUS button
to clear the serecn after ndding
(or deleting) all the channels
[you wan. I[_
!ll2
F_IM,'il Illl_
t try it out. Press IThe cbanncls yon SAVED
N/the CltANNEL• or •should appear. The channels
Ibuttonsand"'sea."_ront IyonDELETED onldnot
[_ channel to channel, appear.
To SAVE a channel above I(X),
use the CHANg buttons on the
"IV.The remote number buttons
only go up to channel _Y).
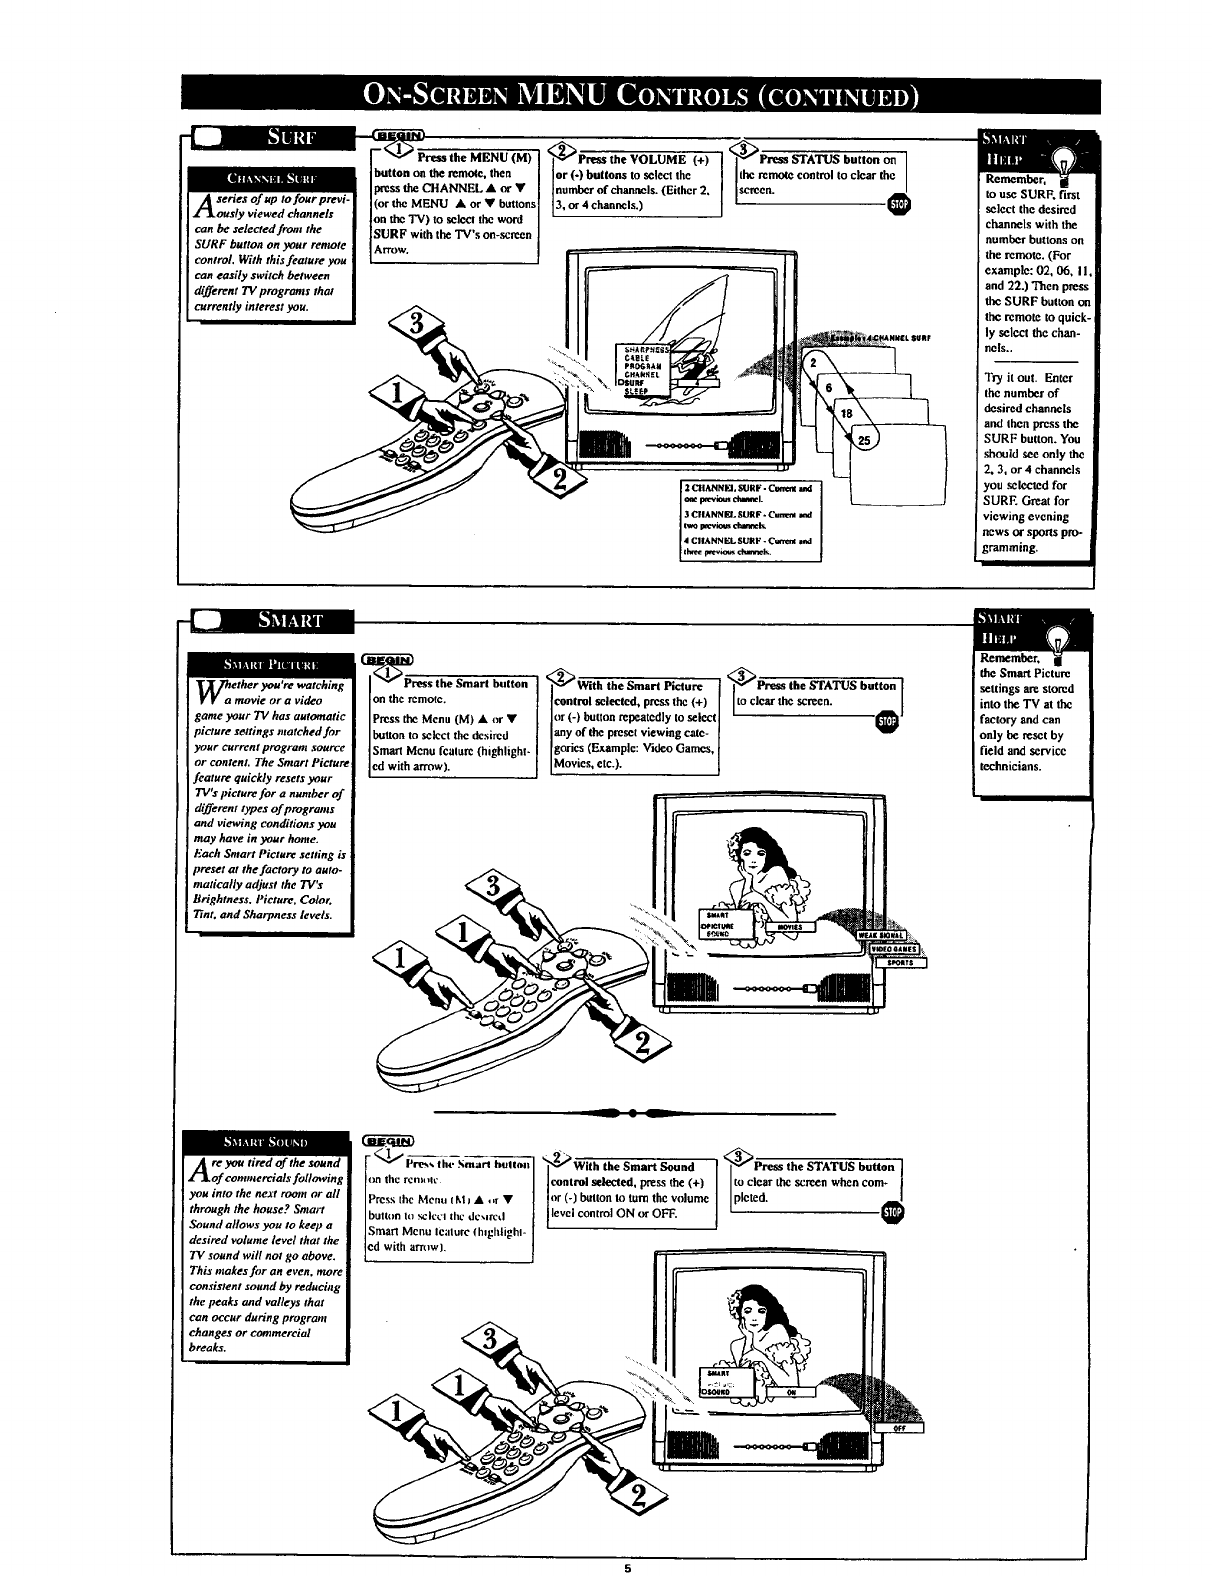
,_Press the VOLUME (+) '<_Press STATUS button on
(M) ]
Ib"tton on the remote, then [ [or (-) buttons to select the the remo_ control to clear the
..... IPresstheCHANNELAOrY I[numberofchanaels.(Either2. screen.
A'eri_p re_i- lior,_M_,_uAorVbuttons 13,o_4ehannels.) _l
Z_J, ously viewed channels Ion the TV) to select the word I
_SURF with the TV's on-screen
SURF button on your remote ]Arrow.
control_'sfeature you ["...... [
can easily switch between
different TV prograals that
currently interest you.
to use SURF, first
select the desired
channels with the
number buttons on
the remote. (For
example: 02, 06, I I,
and 22.) Then press
the SURF button on
the remote to quick-
ly select the chan-
nels..
Try it out. Enter
the number of
desired channels
and then press the
SURF button. You
should see only the
2, 3, or 4 channels
you selected for
SURF. Great for
viewing evening
news or sports pro-
gramming.
k'J_[IITl llltln _r41
ether you're watchin
movie or a video
game your TV has automatic
picture settings matched for
your current program source
or content. The Smart Picture
feature quickly resets your
TV's picture for a number of
different types of programs
and viewing couditions you
may have in your home.
Each Satart Picture setting is
preset at the factory to auto-
matically adjust the TV'x
Brightness. Picture, Color.
Tint. and Sharpness levels.
control selected, pressthe (+)
or (-) button repeatedly to select
button to select the desired I any of the preset viewing cute-
Smart Mcnu feature (highlight- goxics (Example: Video Games,
ed w th arrow). Moves, etc.).
•<_Pre_ the STATUS button
to clcar the screen. _1
the Smart Picture
settings am stored
into the TV at the
factory and can
only be reset by
field and service
technicians.
re you tired of the sound
of commereials fallowing
you into the next room or all
through the house? Smart
Sound allows you to keep a
desired volume level that the
TV sound will not go above.
This makes fiJr an even, more
consistent sound by reducing
the peaks aod valleys that
can occur during progrmn
changes or commercial
breaks.
_z,_,_, th,._,,,_
)n the rellllllv
tess the Menu (Mj • -r •
Utton l(] _iecI tiiL' deMI_d
mart Menu feature (hlghlighl-
with arr_lw].
l2'_With the Smart Sound
control selected, press the (+)
or (-) button to turn the volume
level control ON or OFF.
•<_Press the STATUS button
to clear the screen when corn* I
peted. €
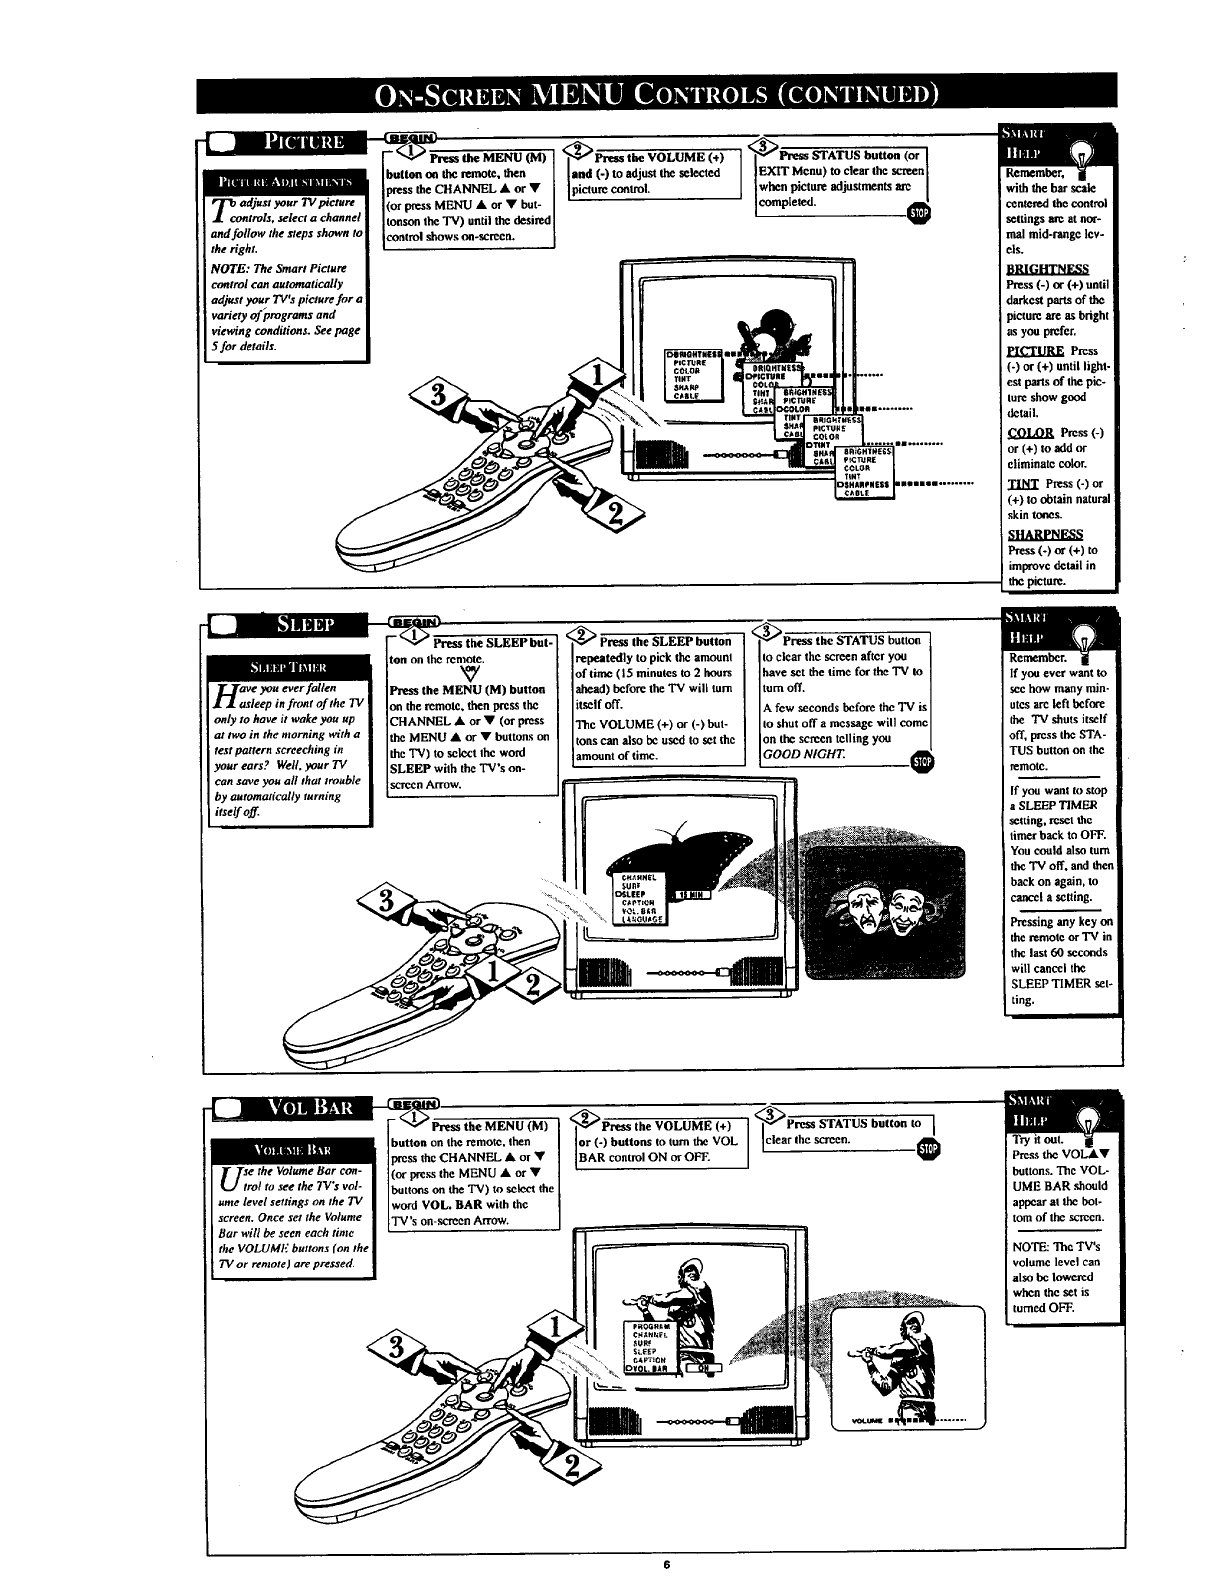
ows on-screen
the right. !""
NOTE: The Smart Picture
control can automatically
adjust your TV's picture for a
variety offprograms and
viewing condilious. See page
5 for details.
,_the VOLUME (÷) at<_ATUS button (or'
.. ,,toadjust seated/ IE TMoou,toelear'ho
picture contro, | when picture adjustments are I
competed. €
mllUil_
__._rave you ever fallen
••asleep in front or'the TV
only to have it wake you up
at two in the morning with a
test pattern screeching in
your ears? Well, your TV
can save you all that trouble
by automatically turning
itself off.
-_--Press"the SLEEP but-
ton on the ren'lote.
Press the MENU (M) button
on the remote, then press tbe
CHANNEL • or • (or press
the MENU •or •buttons on
the "IV) to select the word
SLEEP with the TV's ou-
scrccnArrow.
l
'_'_ Press the SLEEP button
repeatedly to pick the amount
of time 05 minutes to 2 hours
itself off.
ahead) before the "IV will tom
The VOLUME (+) or (-) but-
[tons can also bc used to set the
amount of time,
_P_-ess the STATUS button ]
to clearthe screenafteryou I
have setthe time for theTV to ]
turn off. I
A few ,seconds before the TV isI
to shut off a message will come I
on the screen telling you /
GOOD NIGHT.
with the bar scale
centered the control
settings arc at nor-
mat mid-range lev-
els.
]}RIGHTNESS
Press (-) or (+) until
darkest parts of the
)ictore are as bright
as you prefer.
PICTURE Press
(-) or (+) until light-
est pans of the pic-
lure show good
derail,
COLOR Press (-)
or (+)to add or
eliminate color.
TINT Press(-)or
(+)to obtainnatural
skintones.
SHARPNESS
Press (-) or (+) to
improve detail in
the picture.
If you ever want to
see how many min-
utes arc left hefore
the TV shuts itself
off, press the STA-
TUS button on the
remote,
If yon want to stop
aSLEEP TIMER
setting, reset the
timer back to OFF.
You could also turn
the TV off. and then
back on again, to
cancel a setting.
Pressing any key on
the remote or'IV in
the last 60 seconds
will cancel the
SLEEP TIMER set-
ting.
L BAR with the
B_ each time II'" ....
the VOLUMF buttons (on the |
TV or remote Jare pressecL I
<__(+) "1'<_P_TATUS button to
buttons to turn the VOL Iclear the screen. [
OrBAR(') contro ON or OFF. / "@ Press the VOL&V
buttons. Thc VOL-
UME BAR should
appear at the bot-
tom of the serecn.
NOTE: The TV's
volume level can
also he lowered
when the set is
turned OFF.
_luanato_
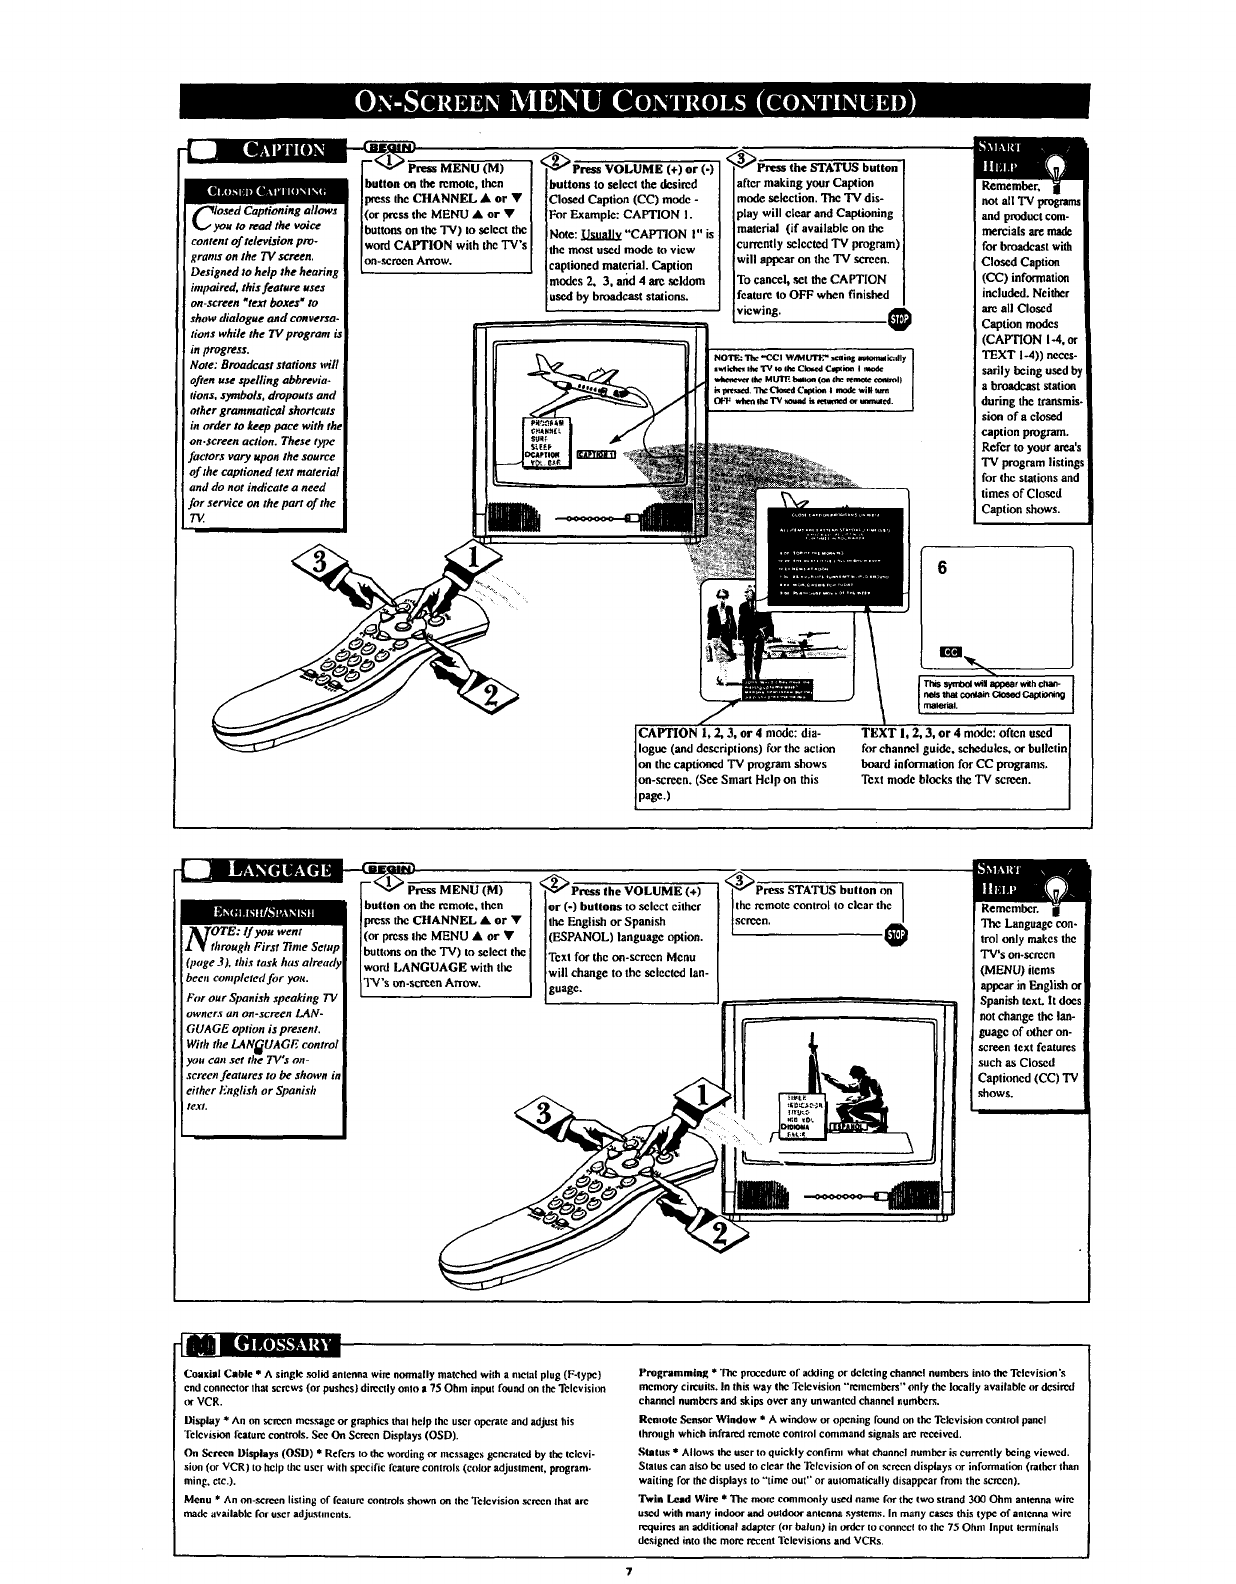
iI1Ull_ln|||14 i Ilk.1I_"[|
['-_losed Captioning allows
yon to read the voice
nll Ull_l n |||_ i [Ik.1 It'[_
content of television pro-
grants on the TV screen.
Designed to help the hearing
intpaired, this feature uses
on-screen Rtexl boxes wtO
show dialogue and conversa-
lions while the TItprogram is
in progress.
Note: Broadcast stations will
often use spelling abbrevia.
tions, symbols, dropouts and
other gramnmtical shortcuts
in order to keep pace with the
on.screen action. These type
factors vary upon the source
of the captioned text material
and do not indicate a need
for service on the part of the
TV
_ress MENU (M)
:button on the remote, tben
]press the CHANNEL Aor •
[(or pressthe MENU •or •
[buttons on the "IV) to seluct the
Iword CAPTION with the TV's
on-screen AITOW.
€"" Prese VOLUME (+) or (-)
buttons to select the desired
Closed Caption (CC) mode -
For Example: CAPTION I.
Note: Usually "CAPTION I" is
the most used mode to view
eaplioned malcrial. Caption
modes 2o 3, and 4arc .seldom
used by broadcast stations.
_Press the STATUS button
after making your Capqion
mode selection. The TV dis-
play will clear and Captioning
material (if available on the
currently selected TV program)
will appear on the TV screen.
To cancel, set the CAPTION
feature to OFF when finished
viewing.
not all "IV programs
and product com-
mercials are made
for broadcast with
CIosod Caption
(CC) information
included. Neither
are all Closed
Caption modes
(CAPTION I-4, or
TEXT I-4)) neces-
sarily being used by
a broadcast station
during the transmis-
sion of aclosed
caption program.
Refer to your ama's
TV program li_ings
for the stations and
times of Closed
ICaption ,shows.
CAPTION 1, 2, 3, or 4mode: dia-
logue (and descriptions) for the action
on the captioned "IV program shows
on-sereon. (See Smart Help on this
page.)
Th_ s_nUOI win _r wSh chan-
nels _co_._n CtD_l C.,_X;oning
material,
TEXT l, 2, 3, or 4 mode: often used
for channel guide, sebedulcs, or bulletin
board information for CC programs,
Text mode blocks the TV screen.
ApTE: Ifyonwent
1_[ through First Time Setup
(page 3), this task h_" alreaa
been completed fiJr yon.
For our Spanish speaking T_
owners an on-screen LAN-
GUAGE option is present,
With the LANGUAGE control
)h'ntcart set the TV's on-
screen features to be shown in
either English or Spanish
te.¥t,
ii _ress MENU (M) I,<_Press the VOLUME (+) '<'_rress STATUS but ton on
I I
utton on the remole, then [ or (-) buttons to select either [ [
sthe CHANNEL •or •[the English or Spanish [ tA_
ho %T°le
control IOc}car
I
press Ihe MENU • or • I (ESPANOL) language option. t,w
ttons on the "IV) to select the [ Text for the on-screen Menu
ord LANGUAGE with the will change to the selected lan-
son-screen Arrow. guage.
The Language con-
trol only makes the
TV's on*screen
(MENU) items
appear in English or
Spanish text. It does
not change the lan-
guage of other on-
.SeI'€¢ntext features
such as Closed
Captioned (CC) 'IV
shows.
Coaxial Cable * A single solid antenna wire normally matched with a mend plug (F-type)
cud connector Ihat screws (or pushes} directly oulO s 75 Ohm input found on the Television
or VCR.
Display *An on screen message or graphics thai help the useropcrare and adjust his
Television feature controls. See On Screen Displays (OSD).
On Screen Displays (OSD) * Refers to the wording or messages gem:rated by the telcvi-
siou (or VCR} to help the user wilh specific feature controls (coh:,r adjuslment, program-
ming. etc.}.
Menu * An on-screen listing of fcalure _nnols shtywn on the 'l_:,levision screen that are
made available for user adjuslments.
Programming * "rhc procedure of adding or deleting channel oumhe_ into the Television's
mem(ry circuits. In this way the Television "remcmhers" only the locally available m"desired
channel oumhers and skips over any unwanted channel numbers.
Remote Sensor Wlndow * A window or opening found (m the Television control panel
through which infrared remote eonlrol command signals arc received.
Status * Allows the user to quickly confirm what channel number is currently heing viewed.
Status can nlso he used to clear the Television ofen screen displays or information (rather than
waiting for the displays to "time out" or automatically disappear front the screen).
Twin Lead Wire * The more commonly used name for the two strand 300 Ohm anlenna wire
usedwith many indour and outdoor antenna systems. In many eases this type of antenna wire
requires an additional adapter (or balun) in twder to connecl to the 75 Ohm Input terminals
designed into Ihe more recent Televisions and VCRs.
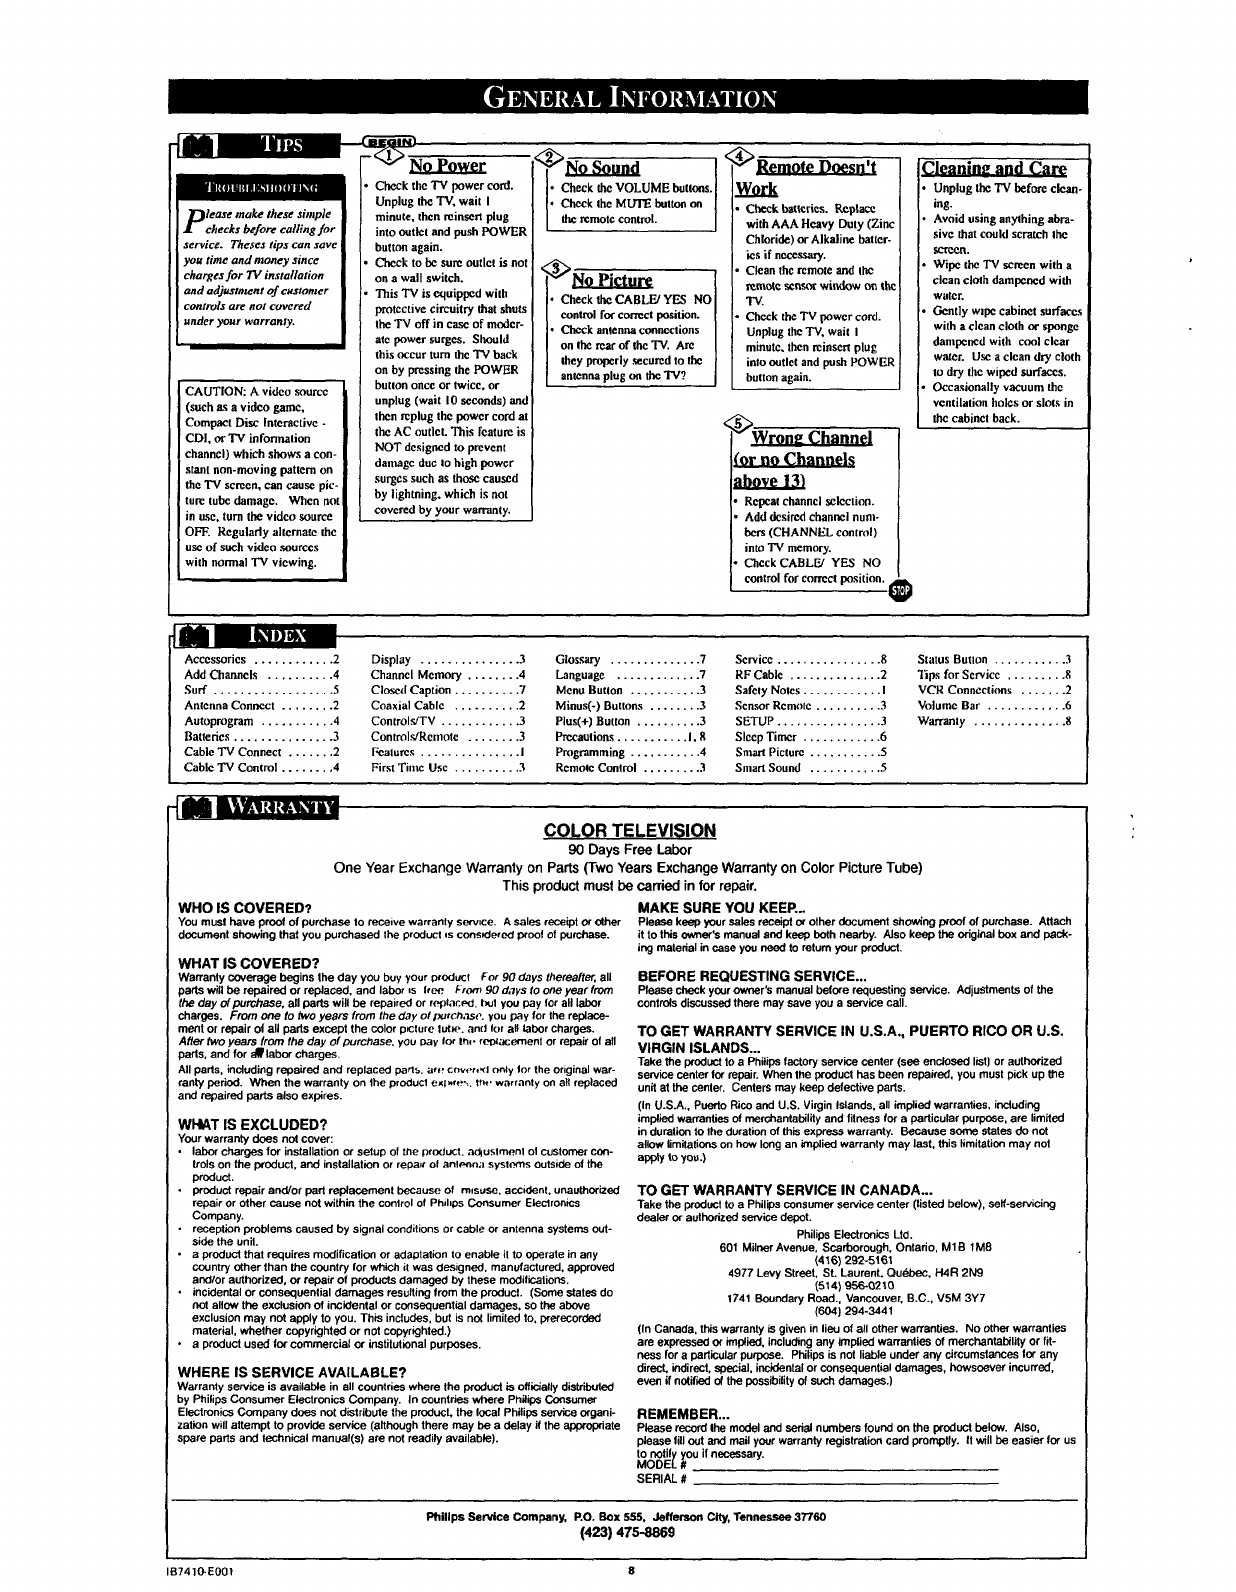
-_-_ Ib,u,
lease make these simple
checks before calling for
service. Theses tips can save
you time and money since
charges for TV installation
and adjusmwnt of easterner
controls are not covered
under your warranty.
CAUTION: A video sou_'c
(such as a video game,
Compact Disc Interactive -
CDI, or TV information
channel) which shows a con-
stant non-moving pattern on
the TV screen, can cause pie-
tun: tube damage. When not
in use, turn the video source
OFF. Regularly alternate the
use of such video sourecs
with normal TV viewing.
-_-_No Power
Check the 'IV power cord.
Unplug the TV, wait I
minute, then reinsen plug
into outlet and push POWER
button again.
C]_ck to he sun: outlet is not
on awall switch.
This TV is equipped with
protective circuitry that shuts
theTV off in case of moder-
ate power surges. Should
this occur turn the TV back
on by pressing the POWER
butlon oecc or twice, or
unplug (wait I0 sneonds) and
then n:plug the power cord at
the AC outlet. This feature is
NOT designed to prevent
damage duc to high power
surges such as those caused
by lightning, which is not
covered by your warranty.
<_No Sound <
•Check theVOLUME battens.
•Check theMUTE button on
the remote centre.
<'_No Picturg
• Check the CABLE/YES NO
control for coffcct position.
•Check anlansa connections I
on the n:arof the TV. An: [
they properly ,_cured to the
antenna pug on the "IV? J
Remote Doesll 't
Work
Check batteries.Replace
withAAA Heavy Duty (Zinc
Chloride)or Alkalinebat[cr-
iesif ne.cessa_.
Clean the remote and the
remote sensorwindow on thc
'IV.
Check theTV power cord.
Unplug the TV, wail I
minute, then reinscn plug
into cutlet and push POWER
button again.
_Wrom, Channel
(or no Channels
Repeat channelselection.
Add &sired channel num-
bers(CHANNEL control)
intoTV memory.
Cheek CABLFJ YES NO
control for correct position. _.
Unplug the 'IV before clean.
ing.
Avoid using anylhing abra-
sivc that could scratch Ihe
segce_.
Wipe the TV screen with a
clean cloth dampened with
water.
Gently wzpe cabinet surfaces
with a clean cloth or sponge
dampcacd with cool clear
water. Use a cleandry cloth
to dry the wiped surfaces.
Occasionally vacuum the
ventilation holes or slots in
tbe cabinet back.
122 L',,-I,;
Accessories ............ 2
Add Channels .......... 4
Surf .................. 5
Antenna Connect ........ 2
Autoprogram ........... 4
Batteries............... 3
Cable "IV Connect ....... 2
Cable TV Control ........ 4
Display ............... 3
Channel Memory ........ 4
Closed Caption .......... 7
Coaxial Cable .......... 2
Controls/TV ............ 3
Controls/Rcolote ........ 3
[;calures ............... I
First Time Use .......... 3
Glossary .............. 7
Language ............. 7
Menu Button ........... 3
Minus(-) Buttons ........ 3
Plus(+) Button .......... 3
Precautions ........... I, 8
Programming ........... 4
Remote Control ......... 3
Service ................ g
RF Cable .............. 2
Safety Notes ............ I
Sensor Remote .......... 3
SETUP ................ 3
Sleep Timer ............ 6
Smart Picture ........... 5
Smart Sound ........... 5
Status Button ........... 3
Tips for Service ......... 8
VCR Connections ....... 2
Volume Bar ............ 6
Warranly .............. 8
COLOR TELEVISION
90 Days Free Labor
One Year Fxchange Warranty on Parts (Two Years Exchange Warranty on Color Picture Tube)
This product must be carried in for repair.
WHO IS COVERED?
You must have proof of purchase to receive warranty service. A sales receipt or other
document showing that you pumhased the product Is cons_ered proof of purchase.
WHAT IS COVERED?
Warranty coverage begins the day you buy your product For 90 days thereafter, all
pads will be repaired or replaced, and labor *s tree From 90 d,'lys to one year from
the day #purchese, all pads will be repaired or rPplac.Pd, but yOU pay for all labor
charges. From one to two years from the d,?yof lxJrC/1,1se,you pay for the replace-
merit or repair el all pads except the color p=cture tutw-, and for all labor charges.
After two years from the day of purei_ase, you pay lot In,. roo_acemenl or repair of all
pads, and for aWtabor charges.
All pads, including repaired and replaced parts, are cnwv_l Only Ior the original war-
ranty pedod. When the warranty on the product ext_re,_. It_, warranty on all replaced
and repaired parts also expires.
WI4AT IS EXCLUDED?
Your warranty does not cooer:
• labor charges for installation or setup of the product, ad4u_,tment el customer con-
trois on the pr'edubl, and installation or repair of anlPnna syslc-rns outside of the
product.
•product repair and/or pad replacement because of misuse, accident, unauthorized
repair or other cause not within the coolrol of Phihps Consumer Eleclronics
Company.
•reception problems caused by signal conditions or cable or antenna systems out-
side the unit.
•aproduct that requires modification or adaptation to enable il to operate in any
country other than the country for which it was designed, manufactured, approved
and/or authorized, or repair o1 products damaged by these modifications.
•incidenta! or consequential damages resulting from the product. (Some states do
not allow the exclusion of incidental or consequential damages, so the above
exclusion may not apply to you. This inefudes, but is not limited to, prerecorded
material, whether copyrighted or not copyi'ighted.)
•a product used for commercial or institutional purposes.
WHERE IS SERVICE AVAILABLE?
Warranty service is available in all countries where the product is officially distributed
by Philips Consumer Electronics Company. In countries where Philips Consumer
Electronics Company does not distribute the product, the local Phitips service organi-
zation will attempt to provide service (although there may be a delay if the appropriate
spare pads and technical manual(s) are not readily available).
MAKE SURE YOU KEEP...
Please keep your sales receipt or other document showing woof of pumhase. Attach
it to this owner's manual and keep both nearby. Also keep the original box and pack-
ing material in ease you need to return your product.
BEFORE REQUESTING SERVICE...
Please check your owner's manual before requesting service. Adjustments of the
controls discussed there may save you a service call.
TO GET WARRANTY SERVICE IN U.S.A., PUERTO RICO OR U.S.
VIRGIN ISLANDS...
Take the product to a Philips factory service center (see enclosed list) or authorized
service center for repair. When the product has been repaired, you must pick up the
unit at the center. Centers may keep defective pads.
(In U.S.A., Puerto Rico and U.S. Virgin Islands, all implied warranties, including
implied warranties of merchantability and fitness for a padicutar purpose, are limited
in duration to the duration of this express warranty. Because some states do nat
allow limitations on how long an implied warranty may last, this limitation may not
app_ to you.)
TO GET WARRANTY SERVICE IN CANADA...
Take the product to a Philips consumer service center (listed below), seff-eervicing
dealer or authorized service depot.
Philips Electronics Ltd.
601 Milonr Avenue, Scarboreugh, Ontario, MIB 1M8
(416) 292-5t61
4977 Levy Street, St. Laurent. Quebec, H4R 2N9
(514) 956-0210
1741 Boundary Road., Vancouver, B.C., VSM 3Y7
(604) 294-3441
(in Canada, this warranty is given in lieu of all other warranties. No other warranties
are expressed or implied, including any implied warranties of merchantability or fit--
ness for apadicuiar purpose. Philips is not liable under any circumstances Ior any
direct, indirect, special, incidental or consequential damages, howsoever incurred,
even if notified of the possibility of such damages.)
REMEMBER...
Please record Ihe model and serial numbers found on the product below. Also,
please till out and mail your warranty registration card promptly, tt will be easier for us
to nofily you if necessary.
MODEL #
SERIAL #
Phillps ServiceCompany, RO, Box555, JeffersonCtty,Tennessee37760
(423) 475-8869
IB7410-EOOt 8
