MAGNAVOX Projection/Digital 42 And Above TV Manual 97120040
User Manual: MAGNAVOX MAGNAVOX Projection/Digital 42 and above TV Manual MAGNAVOX Projection/Digital 42 and above TV Owner's Manual, MAGNAVOX Projection/Digital 42 and above TV installation guides
Open the PDF directly: View PDF ![]() .
.
Page Count: 60
m
Projection Television
Owner's Manual
...................................... ..:;s_ili
:::::::::::::::::::::::::::::::::::::::::::::::::::::::::::::::::::::::.... ..::::::;:_;;;;;;._;;;;;;
....:.:::::::::::::

Once your MAGNAVOX purchase is registered, you're eligible to receive all the privileges of owning a MAGNAVOX
product. So complete and return the Warranty Registration Card enclosed with your purc:hase at once. And take
advantage of these important benefits.
•V arrant
Verification
Registering your product within
10 days confirms your right to
maximum protection under the
terms and conditions of your
MAGNAVOX warranty.
.Owner[
Confirmation
Your completed Warranty
Registration Card serves as
verification of ownership in the
event of product theft or loss.
,Model j
Registration
Returning your Warranty Registration
Card right away guarantee:;you'll
receive all the information and special
offers which you quali_, for' as the
owner of your model.
Congratulations on your purchase, and MA_NAVOX
welcome to the "family!"
Dear MAGNAVOX product owner: Smart. Vet2 smart9
Thank you for your confidence in MAGNAVOX. You've selected one of the best-built, best-backed products
available today. And we'll do everything in our power to keep you happy with your purchase for many yea's to come.
A,_; a member of the MAGNAVOX "family," you're entitled to protection by one of the most comprehensive warranties and outstanding
service networks in the industry.
VVhat's more, your purchase guarantees you'll receive all the information and special offers for which you qualify, plus easy access to
accessories from our convenient home shopping network.
And most impo_cantly you can count on our uncompromising commitment to your total satisfaction.
All of this is our way of saying welcome-and thanks for investing in a MAGNAVOX product.
Sincerely,
Robert Minkhorst
President and Chief Executive Officer
P.S. Remember, to get the most from your
MAGNAVOX product, you must return your
Warranty Registration Card within 10 days.
So please mail it to us right now!
For Customer Use
Enter below the Serial No. which is located on the rear of the cabinet. Retain this information for future reference.
Model No. Serial No.
Know these
safetysymbols
RISK OF: ELECTRIC SHOCK
130 NOT OPEN
CAUTION: TO REDUCE THE RISK OF ELECTRIC SHOCK, DO NOT
REMOVE COVER [OR BACK). NO USEITSER_qCEABLE PARTS
_IL This "bolt of lightning" indicates uninsulated material within your unit may cause an electrical shock.
For the safety of everyone in your household, please do not rer_ove product covering.
_IL The "exclamation point" calls attention to features for which you should read the enclosed literature
closely to prevent operating and maintenance problems.
WARNING: TO PREVENT FIRE OR SHOCK HAZARD, D,D NOT EXPOSE THIS EQUIPMENT TO RAIN
OR MOISTURE.
CAUTION: To prevent electric shock, match wide blade of _lug to wide slot, and fully insert.
ATTENTION: Pour 6viter les chocs 61ectriques, introduire la lame la plus large de la fiche dans la borne
correspondante de la prise et pousser jusqu'au fond•
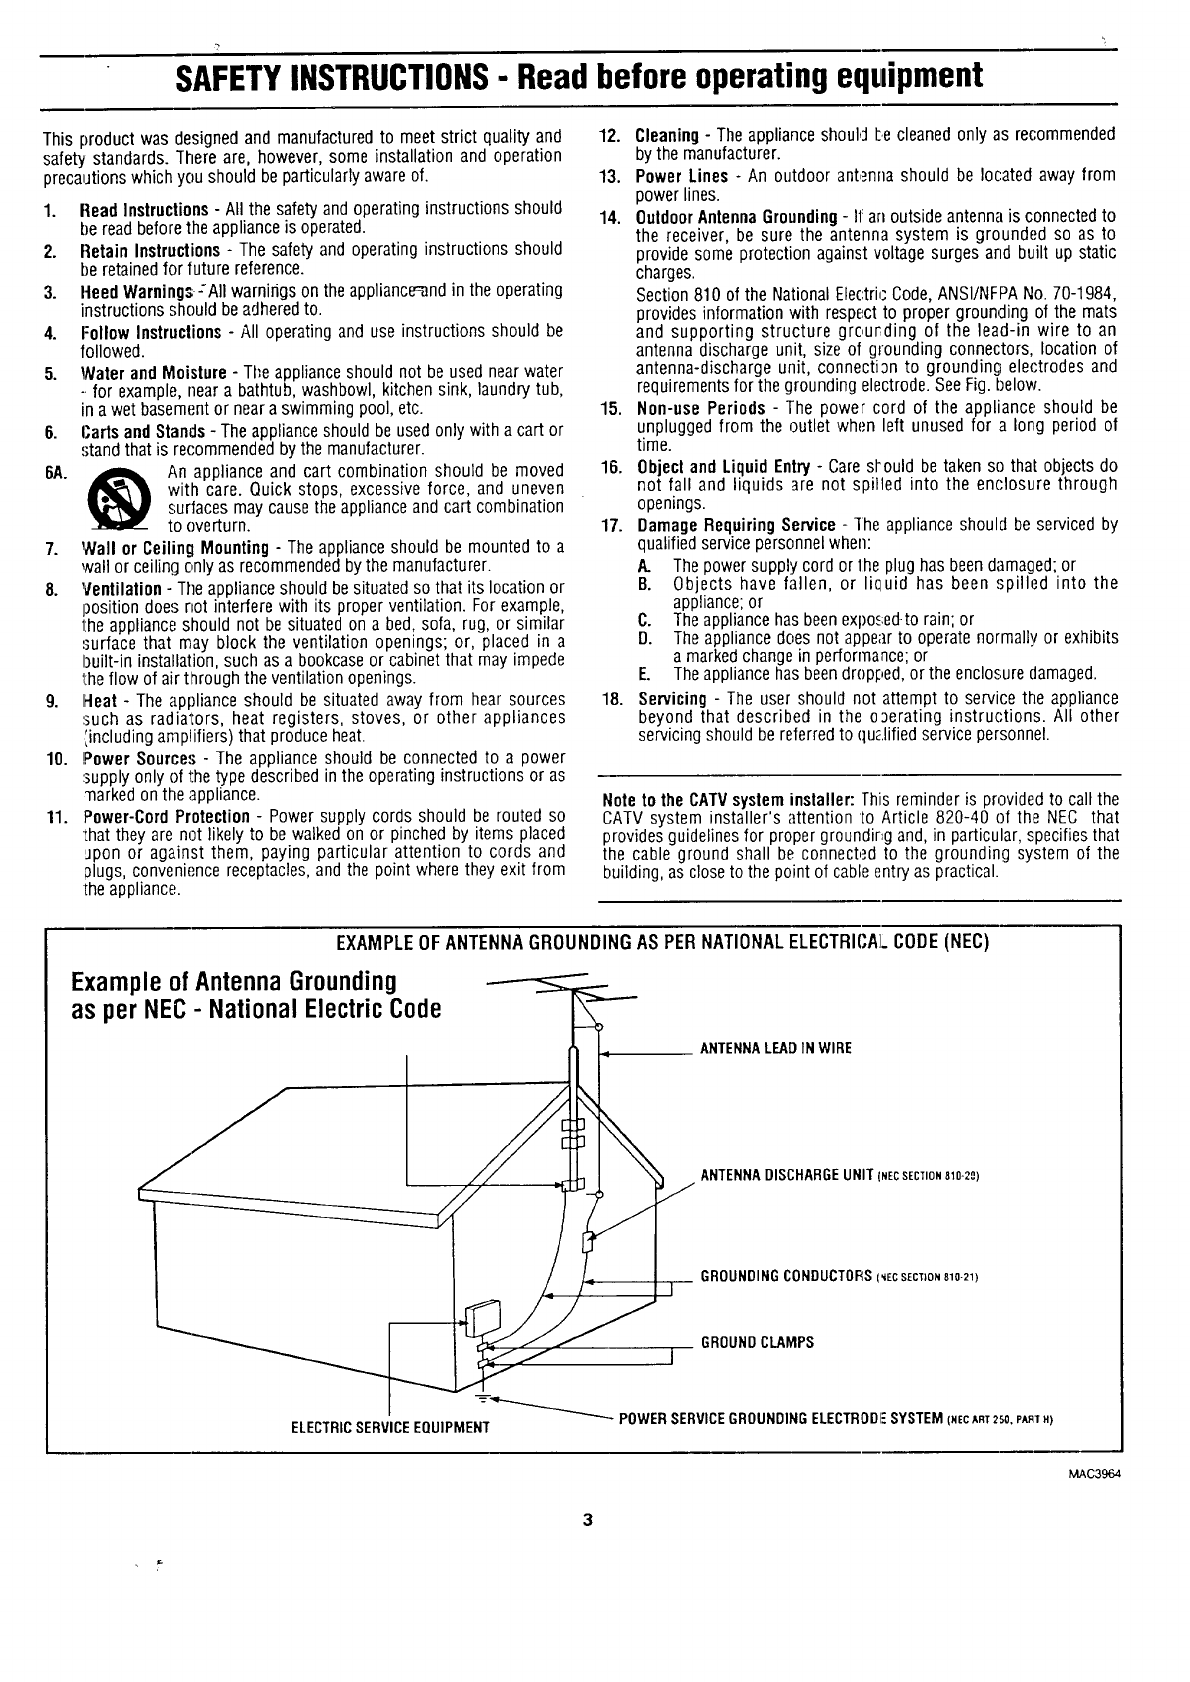
SAFETYINSTRUCTIONS- Readbeforeoperatingequipment
This productwasdesignedandmanufacturedto meetstrict qualityand
safetystandards.Thereare, however,someinstallationandoperation
precautionswhichyou shouldbeparticularlyawareof.
1. Read Instructions- All the safety and operating instructions should
be read before the appliance is operated.
2. Retain Instructions - The safety and operating instructions should
be retainedfor future reference.
3. Heed Warnings-:All warnings on the appliance_nd in the operating
instructions should be adheredto.
4. Follow Instructions - All operating and use instructions should be
followed.
5. Water and Moisture - Tl;e appliance should not be used near water
-.for example, near a bathtub, washbowl, kitchen sink, laundry tub,
in a wet basement or neara swimming pool, etc.
6. Carts and Stands - The applianceshould be used only with a cart or
stand that is re('ommended by the manufacturer.
6A. _ An appliance and cart combination should be moved
with care. Quick stops, excessive force, and uneven
surfaces may cause the appliance and cart combination
to overturn.
7. Wall or Ceiling Mounting - The appliance should be mounted to a
wall or ceiling only as recommendedby the manufacturer.
8. Ventilation - Tile appliance should besituated so that its location or
position does not interfere with its proper ventilation. For example,
the appliance should not be situated on a bed, sofa, rug, or similar
surface that may block the ventilation openings; or, placed in a
built-in installation, such as a bookcaseor cabinet that may impede
the flow of airt_rough the ventilation openings.
9. Heat - The appliance should be situated away from hear sources
,.suchas radiators, heat registers, stoves, or other appliances
',including amplifiers) that produce heat.
10. Power Sources -The appliance should be connected to a power
'.supplyonly of l:hetype described in the operating instructions or as
marked on the appliance.
11. Power-Cord Protection - Power supply cords should be routed so
•that they are not likely to be walked on or pinched by items placed
Jpon or against them, paying particular attention to cords and
Dlugs, convenience receptacles,and the point where they exit from
the appliance.
12. Cleaning- The appliance should L.ecleaned only as recommended
by the manufacturer.
13. Power Lines - An outdoor antenna should be located away from
power lines.
14. OutdoorAntennaGrounding- I1:arl outside antenna is connected to
the receiver, be sure the antenna system is grounded so as to
provide some protection against voltage surges and built up static
charges.
Section 810 of the National Electri,"Code, ANSI/NFPANo. 70-1984,
provides information with respect to proper grounding of the mats
and supporting structure grourding of the lead-in wire to an
antenna discharge unit, size of grounding connectors, location of
antenna-discharge unit, connection to grounding ele('trodes and
requirements for the grounding electrode. SeeFig. below.
15. Non-use Periods - The power cord of the appliance should be
unplugged from the outlet when left unused for a long period of
time.
18. Object and Liquid Entry - Care sl'ould be taken so that objects do
not fall and liquids are not spilled into the enolosu,re through
openings.
17. Damage Requiring Service - ]he appliance should be serviced by
qualified service personnel when:
A. Thepower supply cord or 1heplug has been damasked;or
B. Objects have fallen, or li(_uid has been spilled into the
appliance; or
C. The appliance has beenexpo._;ed-torain; or
D. The appliance does not appe_r to operate normally or exhibits
a marked change in performance; or
E. Theappliance has beendropF,ed,or the enclosure damaged.
18. Servicing - The user should not attempt to service the appliance
beyond that described in the operating instructions. All other
servicing should be referredto qu_.lifiedservice personnel.
Noteto the CATVsystem installer: This reminder is provided to call the
CATV system installer's attention to Article 820-40 of the NEe that
provides guidelinesfor proper groundir,g and, in particular, specifies that
the cable ground shall be connected to the grounding system of the
building, as close to the point of cable entryas practical.
EXAMPLE OF ANTENNA GROUNDING AS PER NATIONAL ELECTRICAL CODE (NEC)
Example of Antenna Grounding
as per NEC- National Electric Code
ANTENNALEADINWIRE
ANTENNADISCHARGEUNIT(NECSECTION810-20)
GROUNDINGCONDUCTORSI_ECSECTION810-21)
GROUNDCLAMPS
I
m
POWERSERVICEGROUNDINGELECTRODFSYSTEM(NECART250,PARIH)
ELECTRICSERVICEEQUIPMENT
MAC3964
3
_Getting Started
'I Welcome/Product Registration ................... 2
Safety/Precautions ..................................................... 3
Table of Contents ....................................................... 4
Features, Model and Cabinet Information ................. 5
_ On-_creen Feature_
PICTURE MENU
<>Adjusting Color, Brightness, Sharpness,
Tint, and Picture Controls ................................... 6
<>Using the Clearview Control ............................... 7
<>Adjusting the TV's Convergence Control ........... 8
<>Using the Flesh Correction Control .................... 9
<>Ghost Cancellation Feature Information ............. 9
FEATURES MENU
<>Selecting a Picture Source/RF Switch .............. 10
<>Setting the TV for Closed Captioning ............... 11
<>Setting the TV for Cable or Antenna Signals....12
<>Adding Channels in Memory (Automatically) .13
<>Adding Channels in Memory (Manually) ......... 14
<>Setting the TV (2lock ......................................... 15
<>Turn-On Timer .................................................. 16
<>Using the Sleep Timer Control ......................... 17
<>Adjusting the Channel Display Control ............ 18
<>Using the Time/Channel Reminder Control ...... 19
<>Using Parental Control to Censor Channels 20-21
<>Using the Channel Label Control ...................... 22
<>Using the Language Selection Control .............. 23
SOUND MENU
<>Adjusting Bass, Treble, and Balance Sound
Controls .............................................................. 24
<>Setting the Bass Boost Control ........................ 24
<>Setting the TV for Stereo and SAP Programs ..25
<>Using the Sound Image Control ........................ 26
<>Using the Volume Display Control ................... 26
<>Using the TV Speaker On/Off Control with
the Audio Output jacks ..................................... 27
<>Surround Sound Speaker Connections and
Variable Audio Output Control ................... 28-29
<>Using the TV's Audio/Video Input and
Output Jacks ............................................... 30-33
[_ Remote (7ontrol Operation
Using the Remote Locator Feature.........34-35
Setting the Smart Picture Control ...........36-37
Using Smart Sound Control ..................................... 38
Using the Smart Surf Control .................................. 39
Setting the Remote to Work VCRs ..................... 40-41
Setting the Remote to Work
Cable TV Converters ........................................... 42-43
Setting the Remote to Work VCRs or Cable
Converters - "Search Method" ................................. 44
Using the Remote's VCR buttons ............................ 45
-"_ Picture-In-Picture (PIP)
How to Use PIP (Connections) .............. 46-47
How to Use PIP with the 'IV Remote ................. 48-49
Selecting the Picture Source for PIP........................ 50
Adjusting Picture-in-Pictttre Color and Tint ............ 51
More PIP Connections (Cable Converter) ............... 52
General Intbrmation
TV Help Menu ........................................... 53
Enhanced Screen Cleaning ...................................... 53
Tips if Something Isn't Working ............................. 54
Glossary of TV Terms ............................................. 55
Index ........................................................................ 56
Factory Service Location_ .................................... 57-58
Warranty ................................................................... 59
Accessories ............................................................... 60
Use the simple Set--Up Guide (supplied with
your TV information packet) for details on:
• Antenna Hook-ups
•First Time Set-Up
(Automatic Settings)
•Basic TV and Ren:tote
Control Operation
•On-Screen Menu Use
Copyright © 1996 Philips Consumer Electronics Company. All rights reserved.
4
FiirstTimeSetUp- automaticallysetstheTVfor
localchannelsandthecorrectpicturesignal-(antenna
orcable).It evenhelpsyoumakethenecessary
connectionsforthePicture-ln-Picture(PIP)feature.
Infrared Remote Control - operates your TV set and
a variety of wireless remote control VCRs and Cable
TV Converters. A special "Locator" feature can also
help you find theremote When it has been sl'fick out of
sight or misplaced.
Standard TV broadcast (VHF/UHF) or Cable TV
(CATV) channel capability.
Closed Captioning - allows the viewer to read TV
program dialogue or voice conversations as on-screen
text.
Automatic Programming of channels - for quick and
easy selection of favorite stations available in your
area.
Picture-In-Picture (PIP) - can show a TV program
and the direct video output from an accessory (VCR,
ele.) onto the TV screen at the same time.
Parental Control for "Censoring" -this feature can
block out channels to keep children from watching
undesirable programming.
Stereo-Ready TV -with abuilt-in audio amplifier and
a twin speaker system, reception of TV programs in
both broadcast stereo sound or (SAP) bilingual
broadcast are available.
On-Screen Features - display helpful information for
the setting of TV controls (such as help messages,
operating tips and glossary).
Audio/Video Jacks -for direct connections with
VCRs (and other accessories) for quality TV picture
and sound playback.
Surround Sound - this TV set contains external;
audio speaker connections for a more dynamic sound
effect.
Sleep-Timer -automatically turns the TV OFF at
preset time intervals.
Smart Button - for the control of TV Sound and the
Picture levels. Use the Smart Button on the remote to
quickly adjust Smart Sound (to set TV Volume levels
during program changes or commercial breaks); Smart
Picture (for programmed video video level
adjustments on a variety of program sources); and
Smart Surf (for quick one button channel selection of
up to 10 of your favorite channels).
5
As you unpack your TV please note that the
following items have been included with your set:
• Owner's Man_ua]
Safety Tip Information
Factory Service Center Locations
• Warranty Registration Card
• Remote Control Transmitter
• Batteries for Remote Control Use
Please take a few minutes to complete your
registration card. The serial numb,er for the TV is
on the back of the set.
Refer to the back of this manual for instructions
on the cleaning and care of the TV.
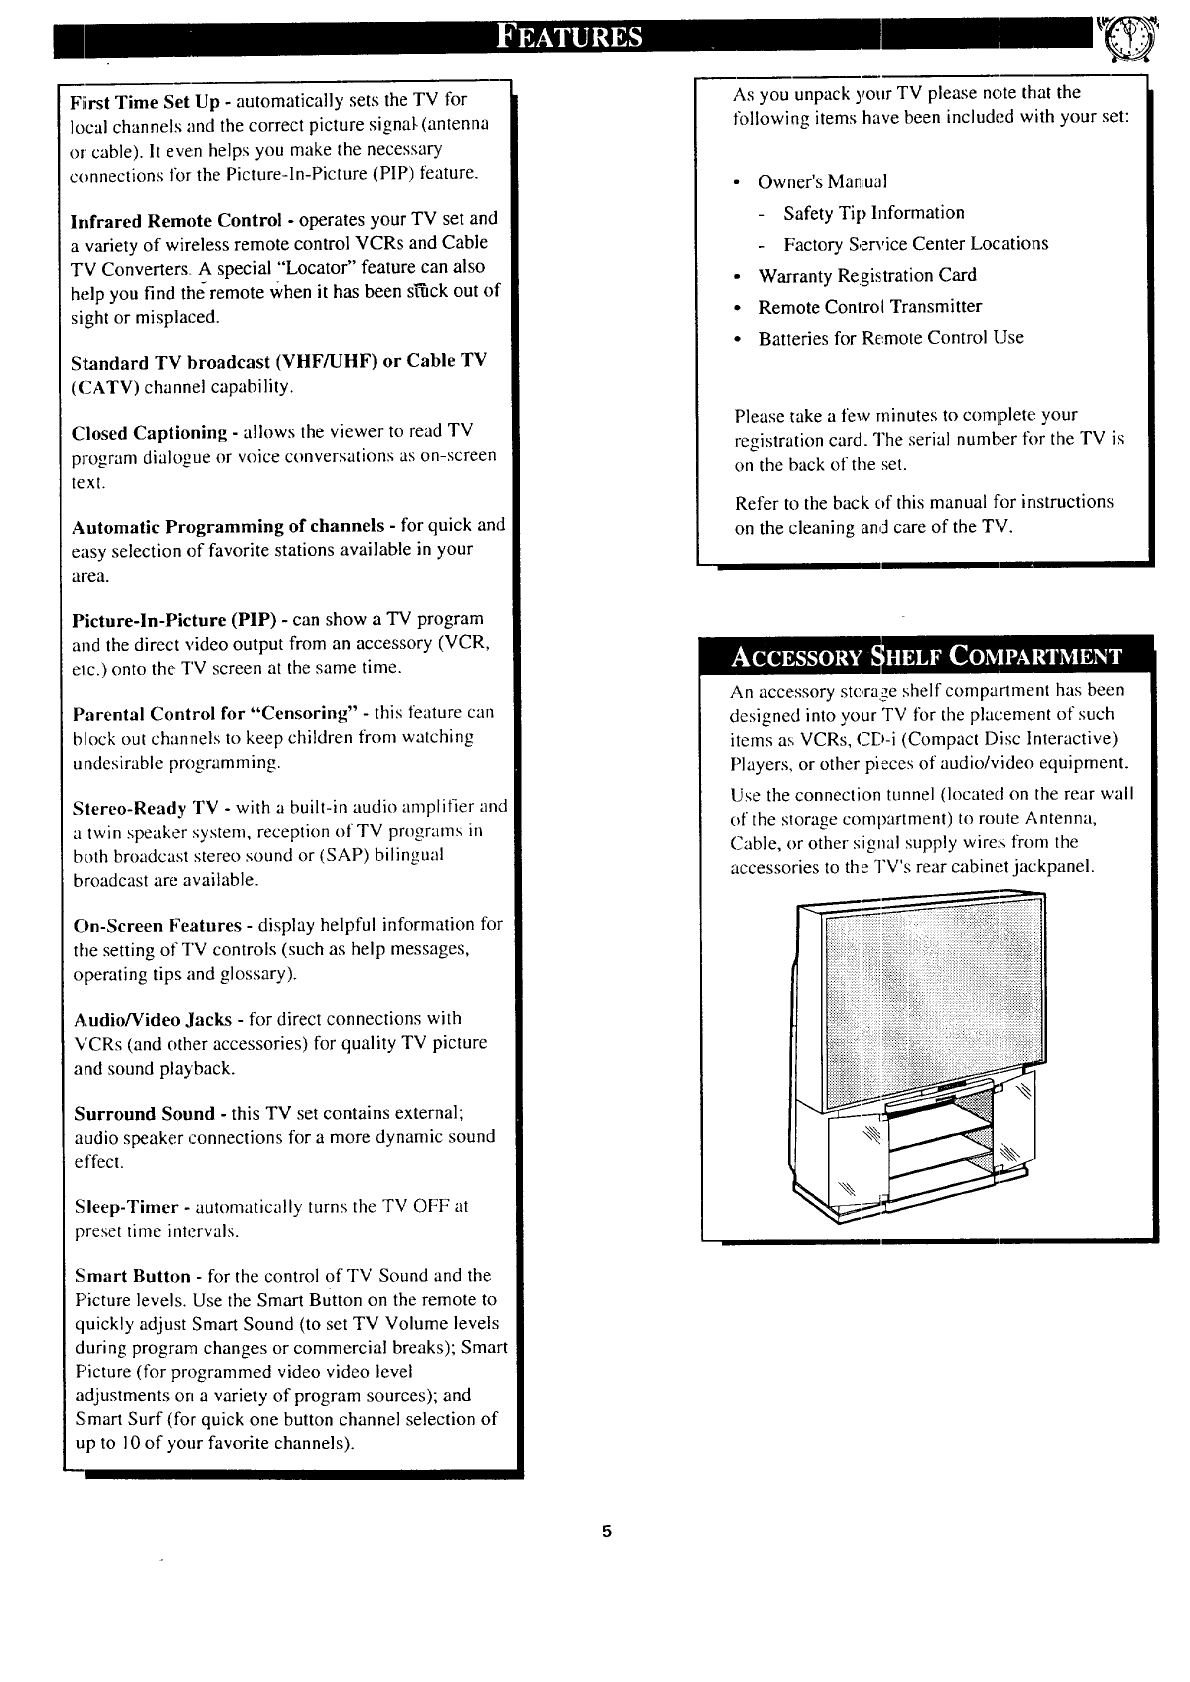
An accessory stora._,eshelf compartment has been
designed into your TV for the placement of such
items as VCRs, CD-i (Compact Disc Interactive)
Players, or other pieces of audio/video equipment.
Use the connection tunnel (located on the rear wall
of the slorage compartment) to route Antenna,
Cable, or other signal supply wires from the
accessories to the TV's rear cabinet jackpanel.
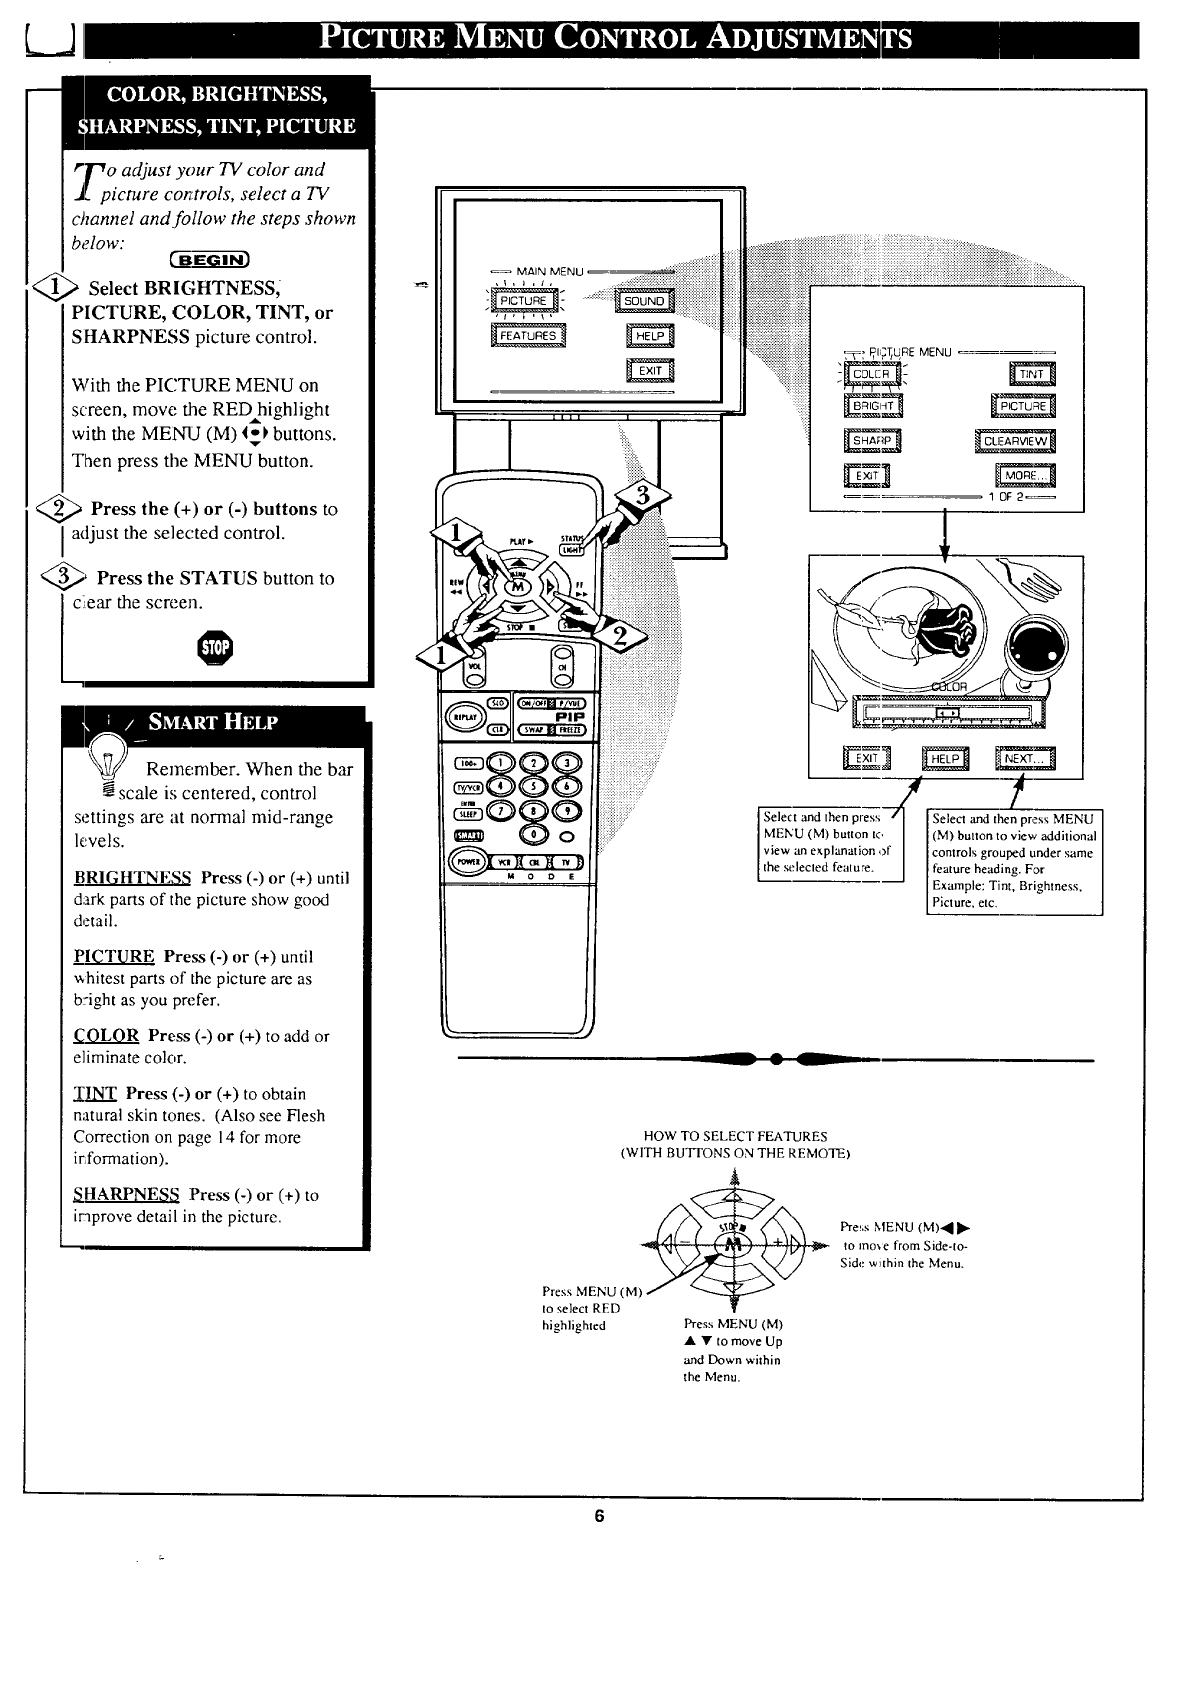
r_r-_o adjust your TV color and
J[ picmre cor_:trols, select a TV
channel and follow the steps shown
below:
Select BRIGHTNESS,
PICTURE, COLOR, TINT, or
SHARPNESS picture control.
With the PICTURE MENU on
screen, move the RED highlight
with the MENU (M) _ buttons.
Then press the MENU button.
<_ Press the (+) or (-) buttons to
adjust the selected control.
_' Press the STATUS button to
ciear the screen.
Remember. When the bar
scale is centered, control
settings are at normal mid-range
levels.
_BRIGHTNESS Press (-) or (+) until
dark parts of the picture show good
detail.
PICTURE Press (-) or (+) until
whitest parts of the picture are as
b::ight as you prefer.
COLOR Press (-) or (+) to add or
eliminate color.
TINT Press (-) or (+) to obtain
natural skin tones. (Also see Flesh
Correction on page 14 for more
irXormation).
_qHARPNES8 Press (-) or (+) to
iraprove detail in the picture.
.....:.:.::::i:?iiiii
, _ ,_ , J ........ _!_!_i!i:i_i_i_i_i!i_i_i_ili_ili_i_iiiii_i_i_i_i_iiiiiiiiiii_ii
i :T: P,I,,:T/REMENU
10F2=_
/t
Select and Ihen press Select and then press MENU
]MENU (M) button to ] (M) button to view additional ]
]view an explanation of] controls grouped under same ]
[the selected feature. [ feature heading. For ]
Example: Tint, Brightness,
Pic ure, e c.
__ • L
HOW TO SELECT FEATURES
(WITH BUTFONS ON THE REMOTE)
Pre_,s MENU (M)'_I _"
to mo_e from Side-to-
Side within the Menu.
Press MENU (M)
to select RED
highlighted Press MENU (M)
• • to move Up
and Down within
the Menu.
6
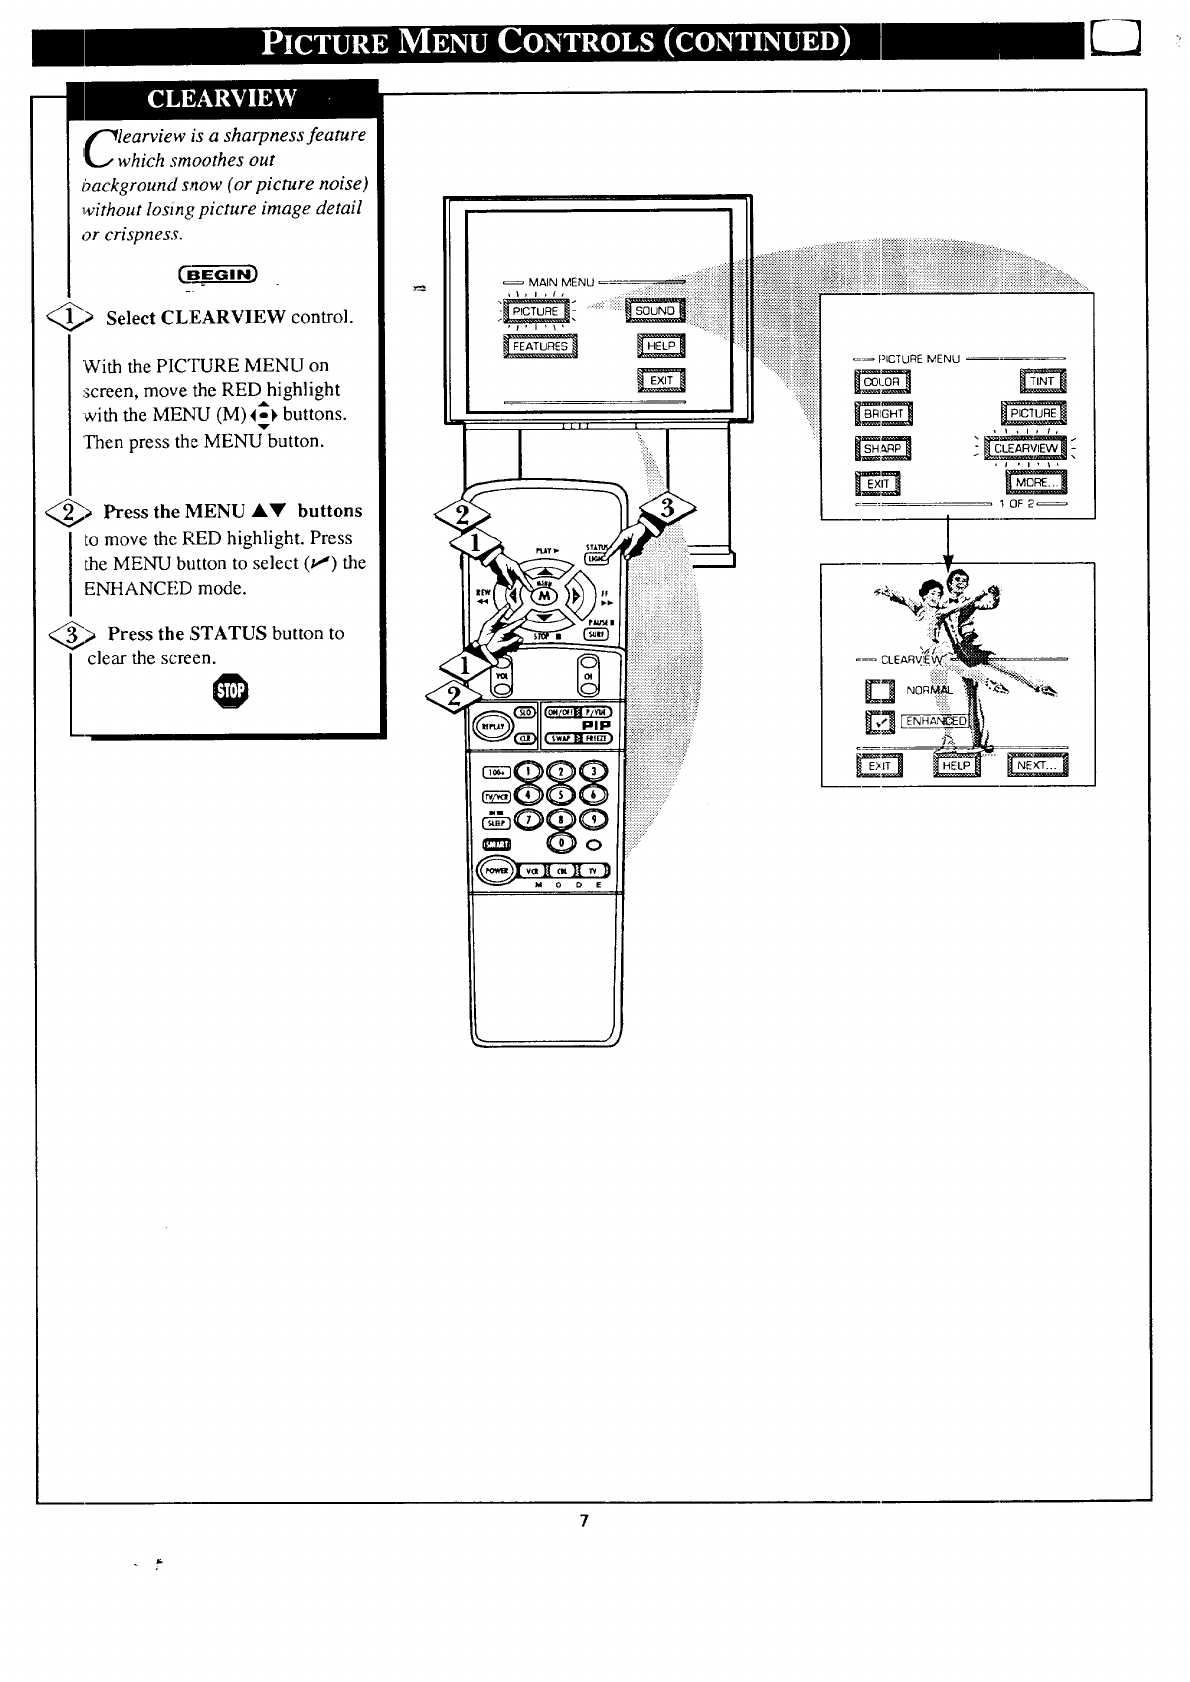
i¢_learview is a sharpness feature
I_, which smoothes out
background snow (or picture noise)
without losing picture image detail
or crispness.
@> Select CLEARVIEW control.
With the PICTURE MENU on
screen, move the RED highlight
with the MENU (M)I_1, buttons.
Then press the MENU_button.
a Press the MENU &Y buttons
to move the RED highlight. Press
the MENU button to select (t,,,") the
ENHANCED mode.
_> Press the ,STATUS button to
clear the screen.
/
=_ PICTURE MENU
IOF2'_
7
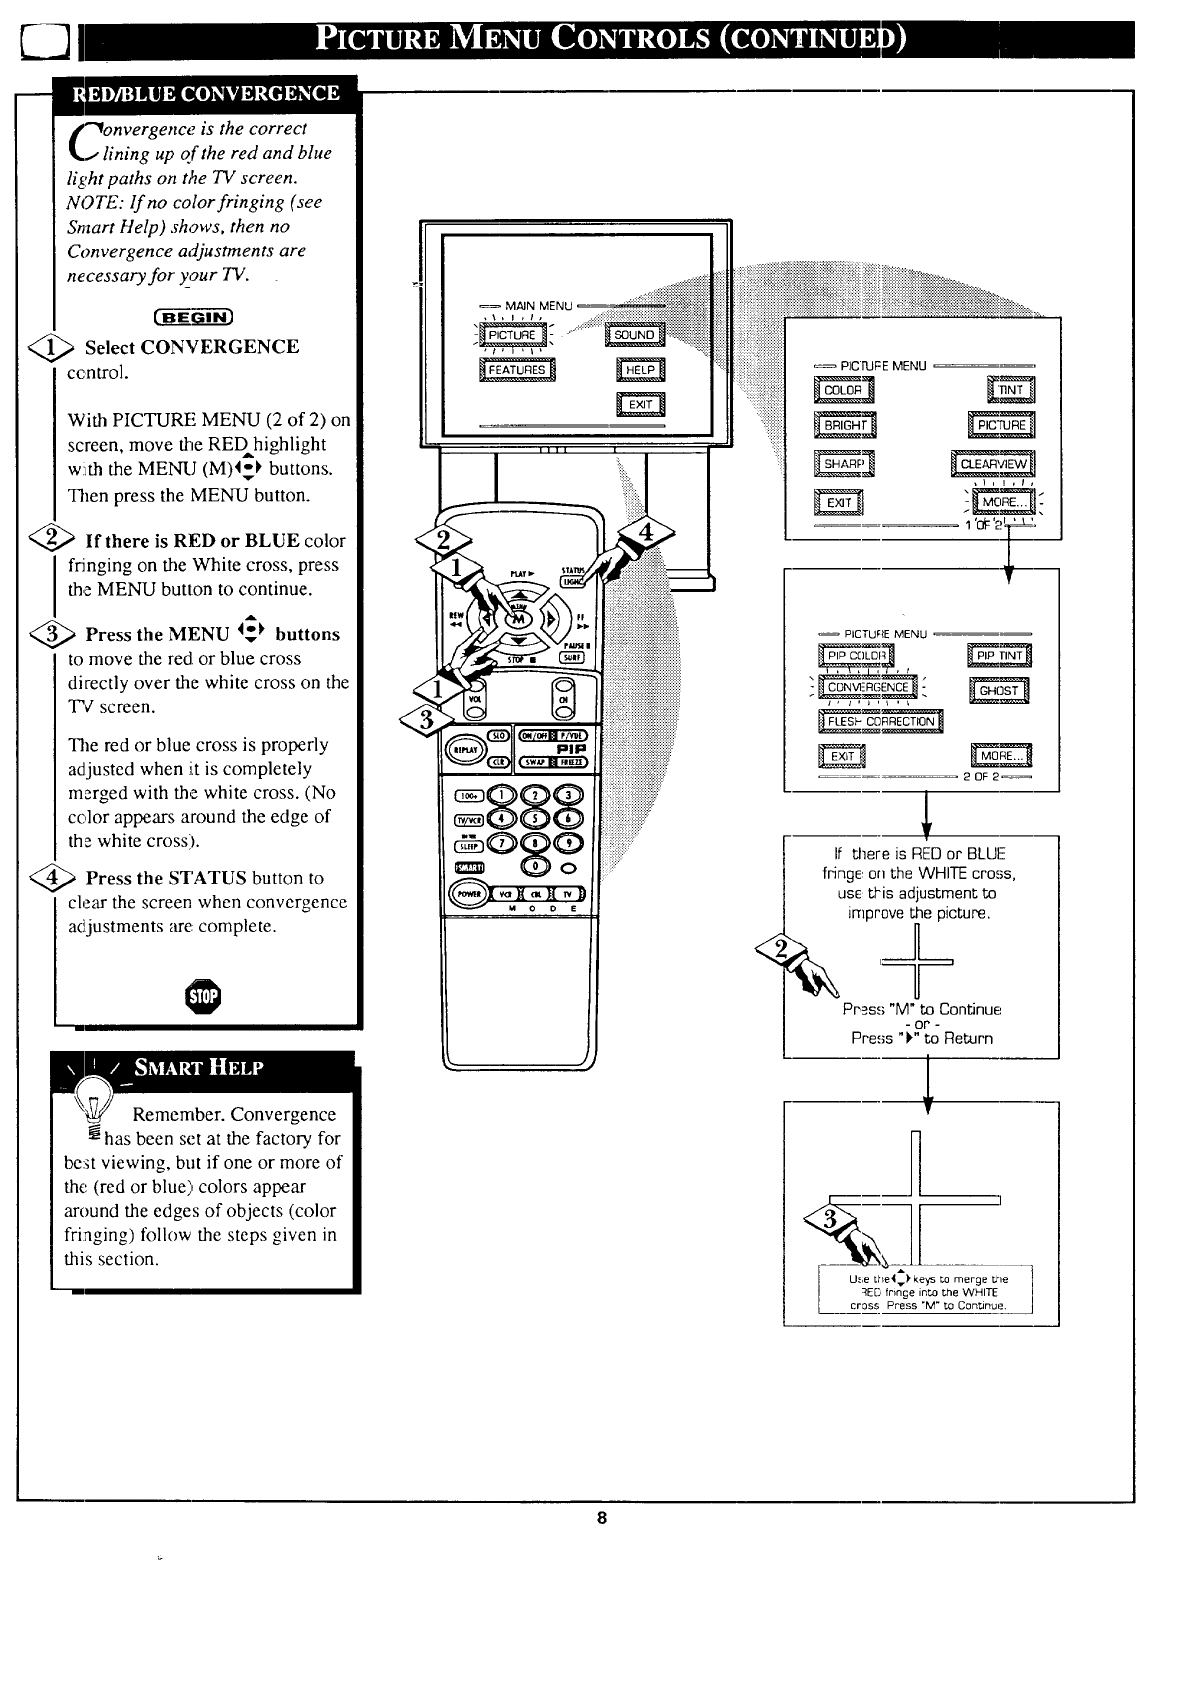
"_onvergenceis the correct
jlining up of the red and blue
light paths on the TV screen.
NOTE: If no color fringing (see
Smart Help) shows, then no
Convergence adjustments are
necessary for your TV.
<_ Select CONVERGENCE
ccntrol.
With PICTURE MENU (2 of 2) on
screen, move the REDhighlight
w!tththe MENU (M)4_ buttons.
Then press the MENU button.
<_ If there is RED or BLUE color
I ringing on the White cross, press
the MENU button to continue.
Press the MENU I_ buttons
to move the redLor blue cross
directly over the white cross on the
TV screen.
The red or blue cross is properly
adjusted when iLtis completely
merged with the white cross. (No
color appears around the edge of
the white cross).
<_ Press the STATUS button to
clear the screen when convergence
adjustments are complete.
Remember. Convergence
has been set at the factory for
be:stviewing, but if one or more of
the (red or blue) colors appear
around the edges of objects (color
fri:aging) follow the steps given in
this section.
S®$?
iiiiiiiiiiiiiiiiiiiiiiiiiiiiiiiiiii _PIC'I'UFEMENU _='
iiiiii_iiiii!_iiiiiiiiiiiiiiiiii!
: " iiiiiiiiiliiiiiiii
1 '_: '2_L
<
PICTURE MENU
20F2_
If there is RED or BLUF
fringe., on the WHITE cross,
use: tl-is adjustment to
improve the picture.
Press "M"to Continue
or
Press "_" to Return
mr,
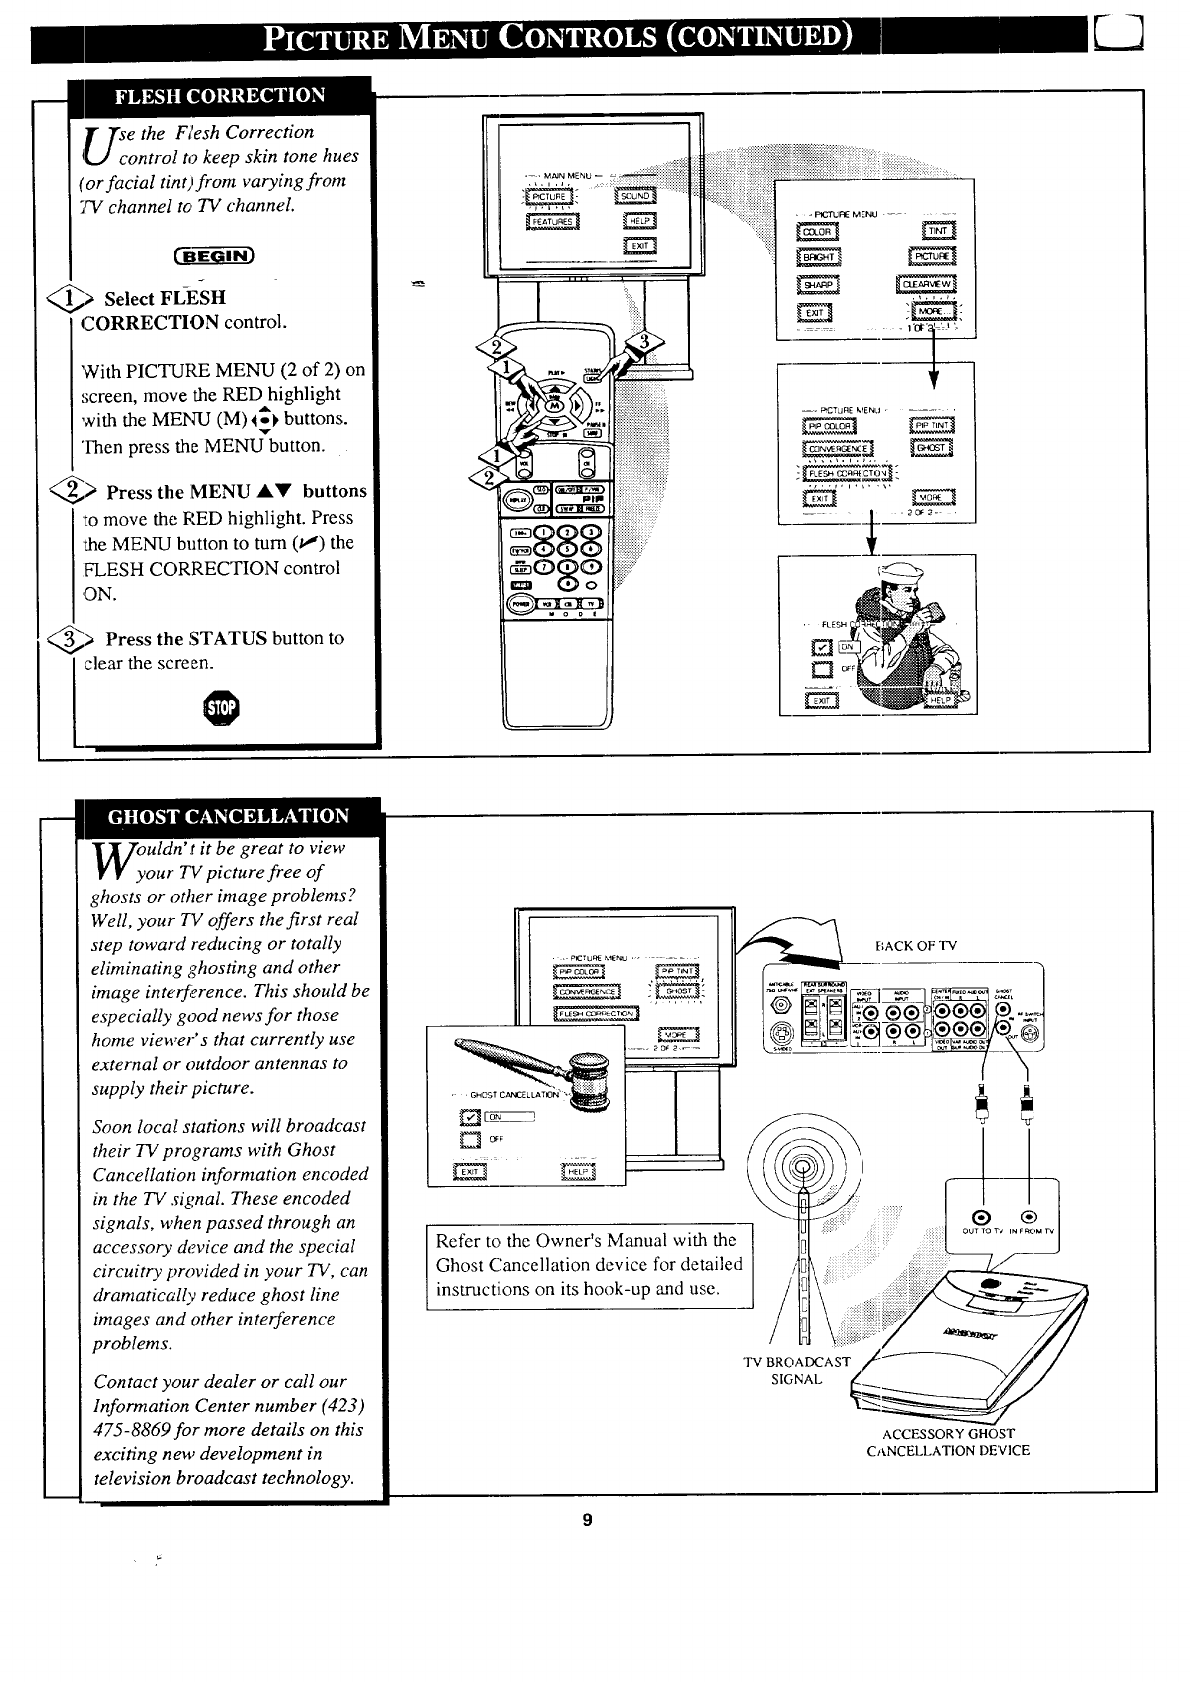
T Tse the Flesh Correction
4[,.J control to keep skin tone hues
(or facial tint)from varying from
7V channel to TV channel.
_> Select FL-ESH
CORRECTION control.
'With PICTURE MENU (2 of 2) on
screen, move the RED highlight
with the MENU (M) 4_1,buttons.
Then press the MENU button.
_> Press the MENU AV buttons
'to move the RED highlight. Press
the MENU button to turn 0!) the
IH..ESH CORRECTION control
,ON.
_> Press the STATUS button to
clear the screen.
......... 1 'Ol-'l': t '-
--_, PICTU[IE K_ENLJ "
--_ / .2o_2= .
uldn' t it be great to view
our TV picture free of
ghosts or other image problems?
Well, your 7V offers the first real
step toward reducing or totally
eliminating ghosting and other
image inte_erence. This should be
especially good news for those
home viewer's that currently use
external or outdoor antennas to
supply their picture.
Soon local stations will broadcast
their TV programs with Ghost
Cancellation information encoded
in the TV signal. These encoded
signals, when passed through an
accessory device and the special
circuitry provided in your TV, can
dramatically reduce ghost line
images and other interference
problems.
Contact your dealer or call our
Information Center number (423)
475-8869for more details on this
exciting new development in
television broadcast technology.
•..P,CrU_E_IENU ......
•GHOST C,_'_E LLA TWIN" ""
Refer to the Owner's Manual with the
Ghost Cancellation device for detailed
instructions on its hook-up and use.
BACK OF TV
TV BROADCAST
SIGNAL
ACCESSORY GHOST
CANCELLATION DEVICE
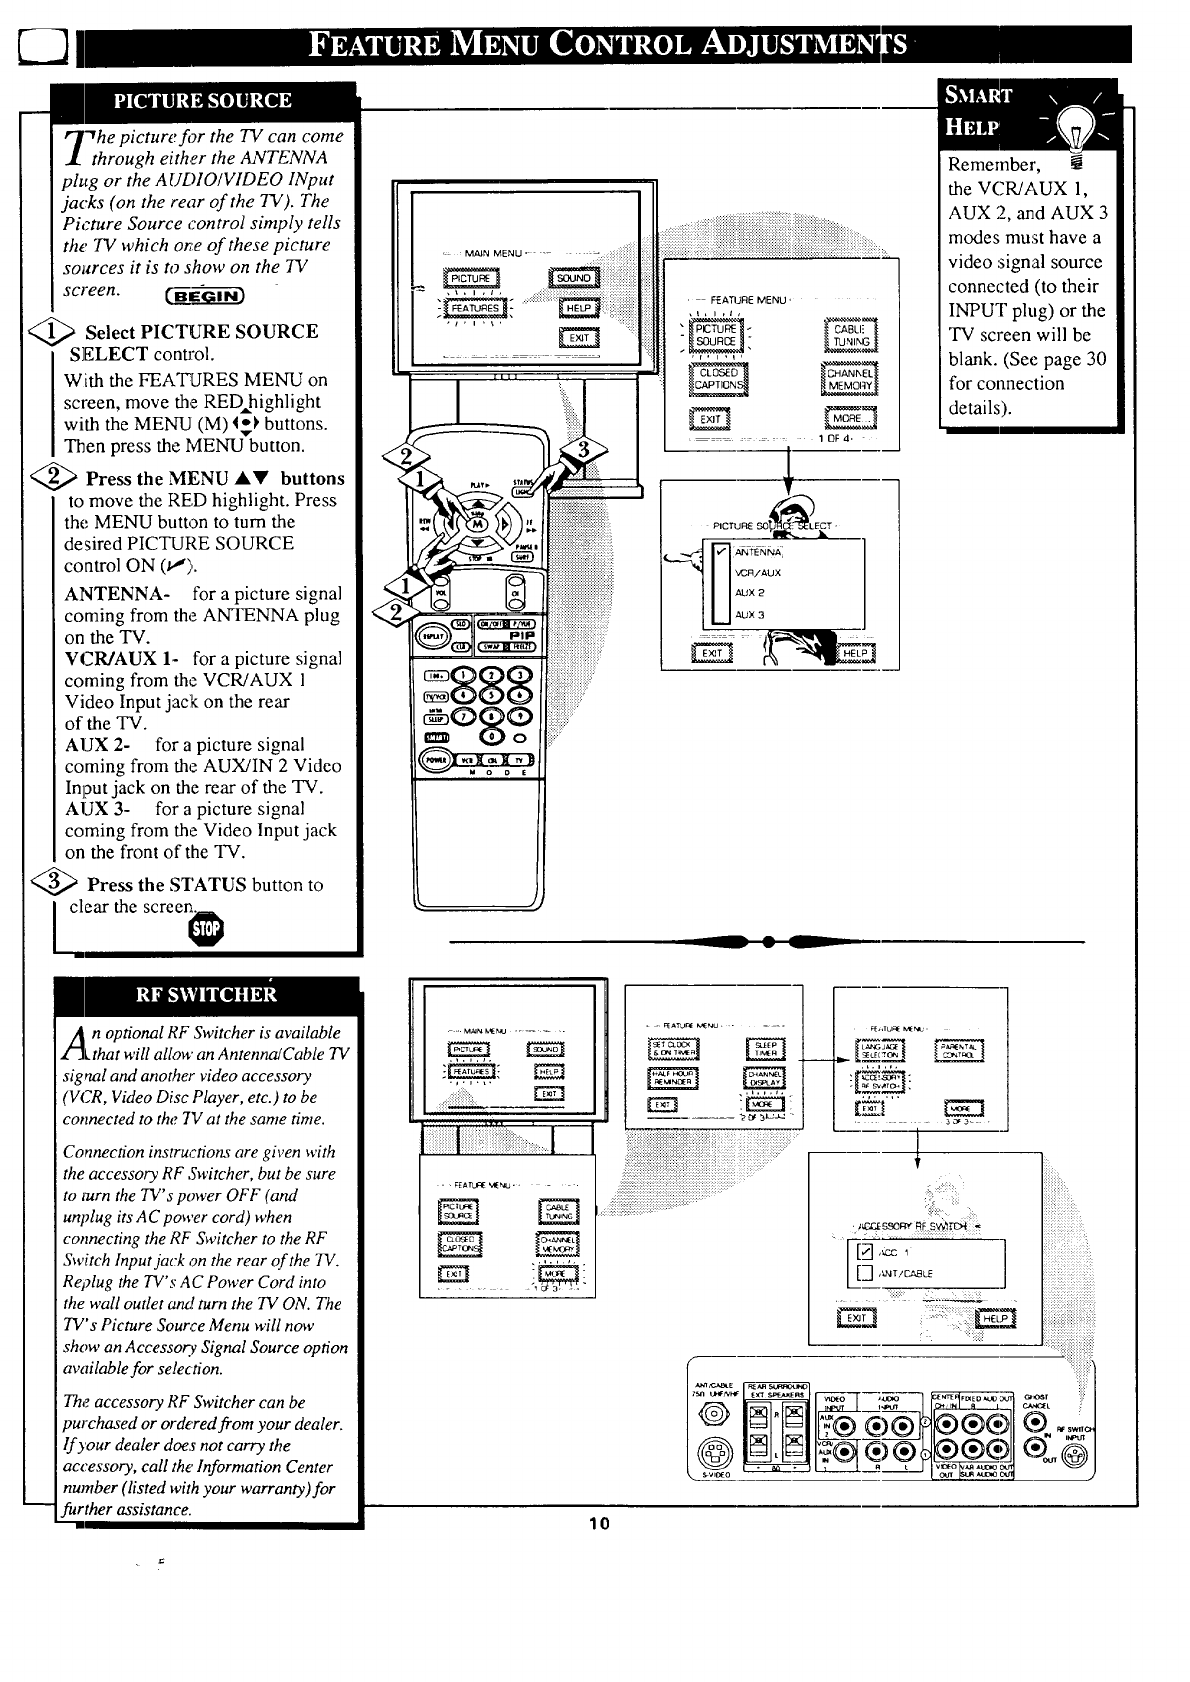
"Thepicture f!)r the TV can come
through either the ANTENNA
ph,g or the AUDIO/VIDEO INput
jacks (on the rear of the TV). The
Picture Source control simply tells
the TV which or,'eof these picture
sources it is to show on the 73/
screen. _-G----------G[_
Select PICTURE SOURCE
SELECT control.
With the FEATURES MENU on
screen, move the RED highlight
with the MENU (M) I_ buttons.
Then press the MENU button.
<_> Press the MENU A!!' buttons
to move the RED highlight. Press
the MENU button to turn the
desired PICTURE SOURCE
control ON (1.,").
ANTENNA- for a picture signal
coming from the ANTENNA plug
on the TV.
VCR/AUX 1- for a picture signal
coming from the VCR/AUX 1
Video Input jack on the rear
of the TV.
AUX 2- for a picture signal
coming from the AUX/IN 2 Video
Input jack on the rear of the TV.
AUX 3- for a picture signal
coming from the Video Input jack
on the front of the TV.
@>Press the STATUS button to
] clear the screen_
<
. iiii!!i!!!ii!!!!i!!!iiill
,FEATURE MENU,
Remember,
the VCR/AUX 1,
AUX 2, and AUX 3
modes must have a
video signal source
connected (to their
INPUT plug) or the
TV screen will be
blank. (See page 30
for connection
details).
An optional RF Switcher is available
Lthat will allow an Antenna/Cable TV
signal and another video accessory
'VCR, Video Disc Player, etc.) to be
connected to the 717 at the same time.
Connection instructions are given with
the accessory RF Switcher, but be sure
to mrn the TV's power OFF (and
unplug its A C power cord) when
connecting the RF Switcher to the RF
Switch Input jack on the rear of the 73/.
Re?lug the TV's AC Power Cord into
the wall outlet o_d turn the TV ON. The
TV's Picture Source Menu will now
show an Accessory Signal Source option
available for selection.
The accessory RF Switcher can be
9urchased or ordered from your dealer.
lf your dealer does not carry the
accessory, call the' Information Center
number (listed with your warranty)for
further assistance.
.... MAINMEr,IJ ........
:.FEAIUClE VI[_ .....
-=, _ATU_ MENU.......
iiii!iiiiiiiiiiiiiiiiiiiiiiiiiiii_iiiiiii;_i_iii_iii_ii!i',!_..................i_:iii_i_*i_!ii;_....
" ":'-":"" • i ¸ .:i:":¸::'': •
.... .... ..
_b =N
_" _"_...mn*-
oLN
,,, ,,,
,3_3- •
: :::::::
:::12
......
: ... [::
[gTt-- .......
i:)i::: il
lO
k_J
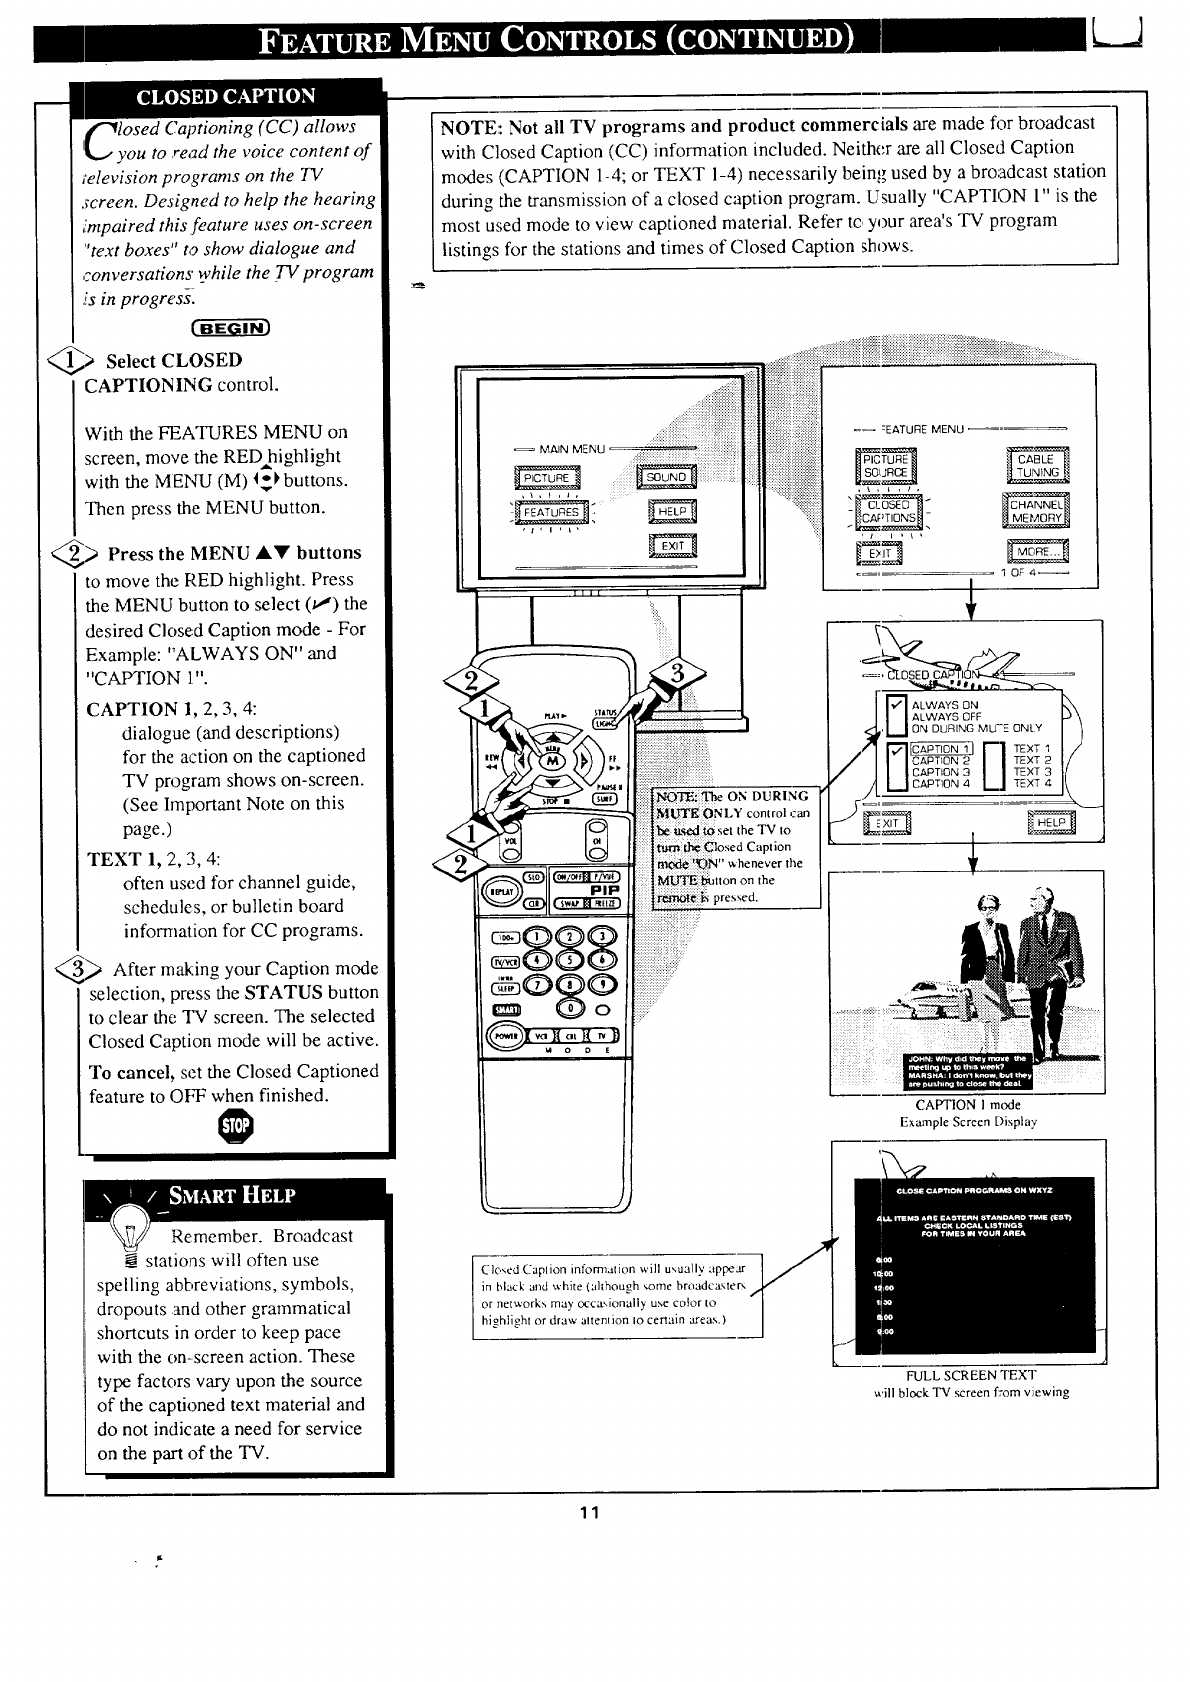
losed Captioning (CC) allows
ou to read the voice content of
;elevision programs on the 73/
screen. Designed to help the hearing
impaired this feature uses on-screen
"text boxes" to ShOW dialogue and
r.onversations while the TV program
.isin progress[
@;a Select CLOSED
CAPTIONING control.
With the FEATURES MENU on
screen, move the RED highlight
with the MENU (M) I_1,buttons.
Then press the MENU button.
_> Press the MENU lkV buttons
to move the RED highlight. Press
the MENU button to select 01) the
desired Closed Caption mode - For
Example: "ALWAYS ON" and
"CAPTION 1".
CAPTION 1, 2, 3, 4:
dialogue (and descriptions)
for the action on the captioned
TV program shows on-screen.
(See Important Note on this
page.)
TEXT 1, 2, 3, 4:
often used for channel guide,
schedules, or bulletin board
information for CC programs.
_ After m_:ing your Caption mode
selection, press the STATUS button
to clear the TV screen. The selected
Closed Caption mode will be active.
To cancel, set the Closed Captioned
feature to OFF when finished.
NOTE: Not all TV programs and product commercials are made for broadcast
with Closed Caption (CC) information included. Neither are all Closed Caption
modes (CAPTION 1-4; or TEXT 1-4) necessarily being used by a broadcast station
during the transmission of a closed caption program. Usually "CAPTION 1" is the
most used mode to view captioned material. Refer to your area's TV program
listings for the stations and times of Closed Caption shows.
I
DURING
|NLY control can
the TV to
tptionthe
CAPTION I mode
Example Screen Displa,.
Remember. Broadcast
stations will often use
spelling abbreviations, symbols,
dropouts and other grammatical
shortcuts in order to keep pace
with the on-screen action. These
type factors vary upon the source
of the captioned text material and
do not indicate a need for service
on the part of the TV.
Closed Caplion informalion will usually appear
in black and white (although some broadca.,,lers
or networks may occa',ionally use color to
higblighl or draw altenlion Io certain ;treat.,.)
FULL SCREEN TEXT
will block TV screen from viewing
11
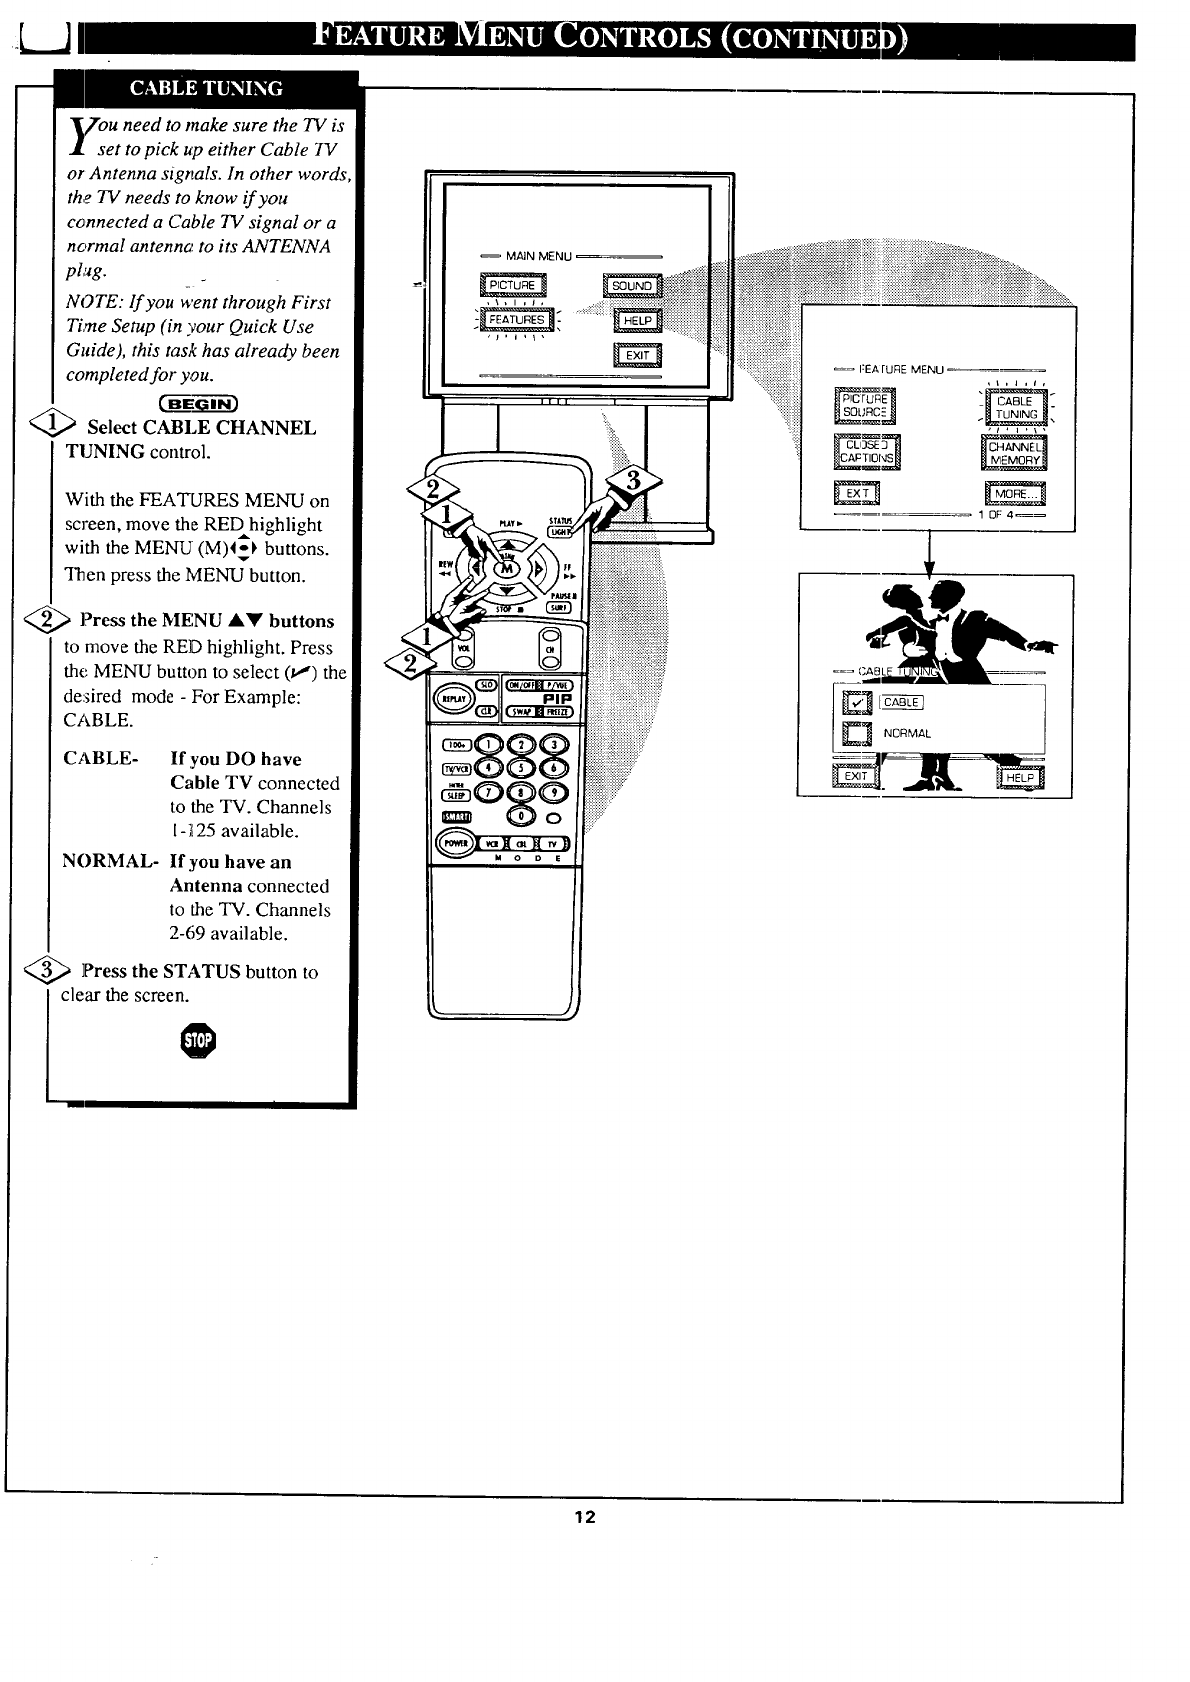
7ou need to make sure the TV is
set to pick up either Cable TV
or Antenna signals. In other words
the TV needs to know if you
connected a Cable TV signal or a
normal antenna to its ANTENNA
plug.
NOTE: lf you went through First
Time Setup (in your Quick Use
Guide), this task has already been
completed for you.
('-ff-E_ _-_i-_
Select CABLE CHANNEL
TUNING control.
With the FEATURES MENU on
screen, move the REDhighlight
with the MENU (M)4_ buttons.
Then press the MENU button.
<_ l?ress AY buttons
the MENU
to move the RED highlight. Press
the MENU button to select (t_") the
de:fired mode - For Example:
CABLE.
CABLE- If you DO have
Cable TV connected
to the TV. Channels
1-;t25 available.
NORMAL- If you have an
Antenna connected
to the TV. Channels
2-69 available.
<_ Press the STATUS button to
clear the screen.
MAIN MENU
,\,l,I,
::::::::x::::
IZEA rURE MENU
ru=_
=== CABLE "
12
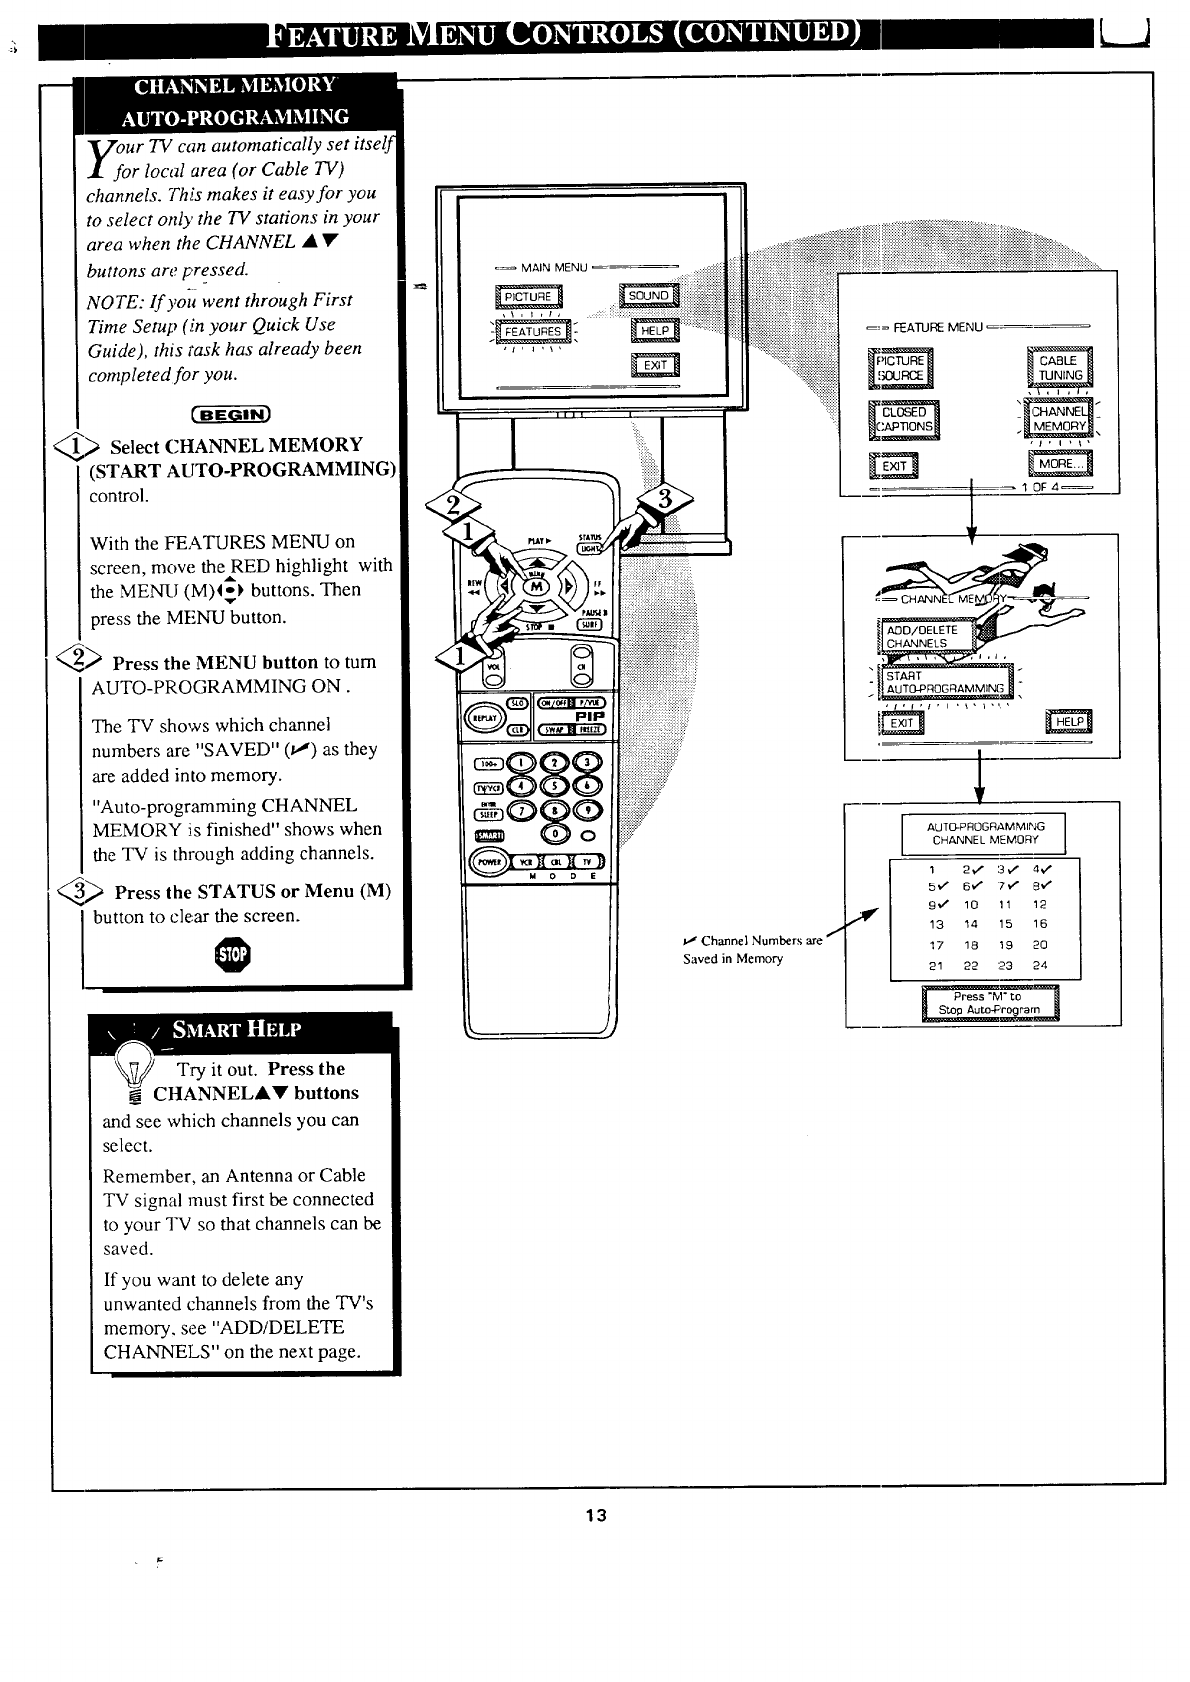
Ur TV can automatically set itself
r local area (or Cable TV)
channels. This makes it easy for you
to select only the 71,"stations in your
area when the CHANNEL • •
buttons are pre_ssed.
NOTE: If yoit went through First
Time Setup (.in your Quick Use
Guide), this task has already been
completed for you.
_) Select CHANNEL MEMORY
(START AUTO-PROGRAMMING
control.
With the FEATURES MENU on
screen, mow. theRED highlight with
the MENU (M)I=-} buttons. Then
press the MENU button.
_ Press the MENU button to turn
AUTO-PROGRAMMING ON.
The TV shows which channel
numbers are "SAVED" (_') as they
are added into memory.
"Auto-programming CHANNEL
MEMORY is finished" shows when
the TV is through adding channels.
_ Press the STATUS or Menu (M)
button to clear the screen.
Try it out. Press the
CHANNELA_' buttons
and see which channels you can
select.
Remember, an Antenna or Cable
TV signal must first be connected
to your TV so that channels can be
saved.
If you want to delete any
unwanted channels from the TV's
memory, see "ADD/DELETE
CHANNELS" on the next page.
_'_ Channel Numbers are f
Saved in Memory
AUTQ-PROGRAMMING
CHANNEL MEMORY
13
LJ
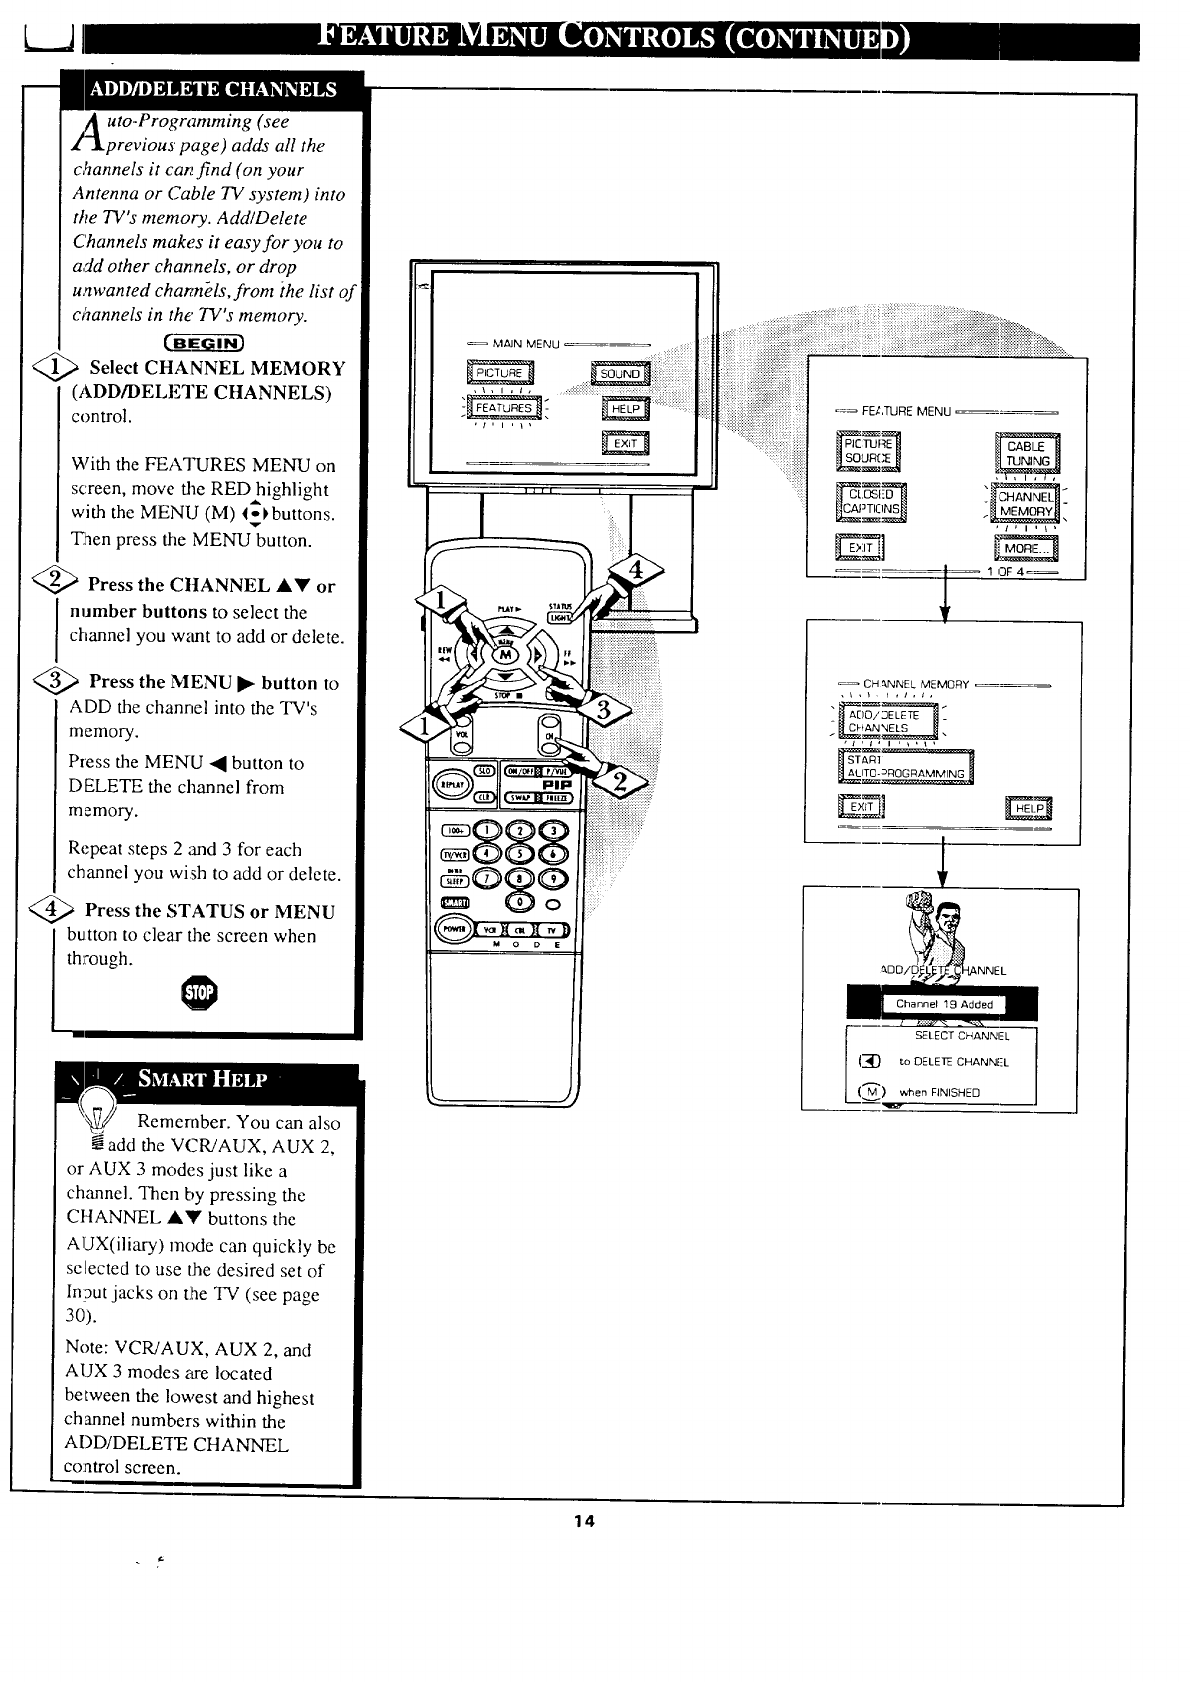
uto-Programming (see
previous page) adds all the
c,%nnels it can find (on your
Antenna or Cable TV system) into
the TV's memory. Add/Delete
Channels make.s it easy for you to
add other channels, or drop
unwanted channels, front the list of
channels in the' TV's memory.
<_ Select CHANNEL MEMORY
(ADD/DELETE CHANNELS)
control.
MAIN MENU
_== FELTURE MENU
With the FEATURES MENU on
screen, move the REDhighlight
with the MENU (M) l-_,buttons.
'T
"Eaen press the MENU button.
4_ Press the CHANNEL AY or
I number buttons to select the
channel you want to add or delete.
<_ Press the MENU button to
ADD the channel into the TV's
memory.
P_ess the MENU • button to
DELETE the channel from
CH _.NNEL MEMORY
An1
_l ALIT0-_ROG RAMMIN_
E3
memory.
Repeat steps 2 and 3 for each
channel you wish to add or delete.
<_ Press the STATUS MENU
or
button to clear the screen when
through.
Remember. You can also
add the VCR!AUX, AUX 2,
or AUX 3 modes just like a
channel. Then by pressing the
CHANNEL A'_' buttons the
AUX(iliary) mode can quickly be
selected to use the desired set of
ln?ut jacks on tlhe TV (see page
30).
Note: VCR/AUX, AUX 2, and
AUX 3 modes are located
between the lowest and highest
channel numbers within the
ADD/DELETE CHANNEL
co:afro] screen.
14
_DDiE XNNEL
Channel 19 Added
I SELECT CHANNI-L
I_ t.c, DELETE CHANN_-L
(,._) wlnen FINISHED
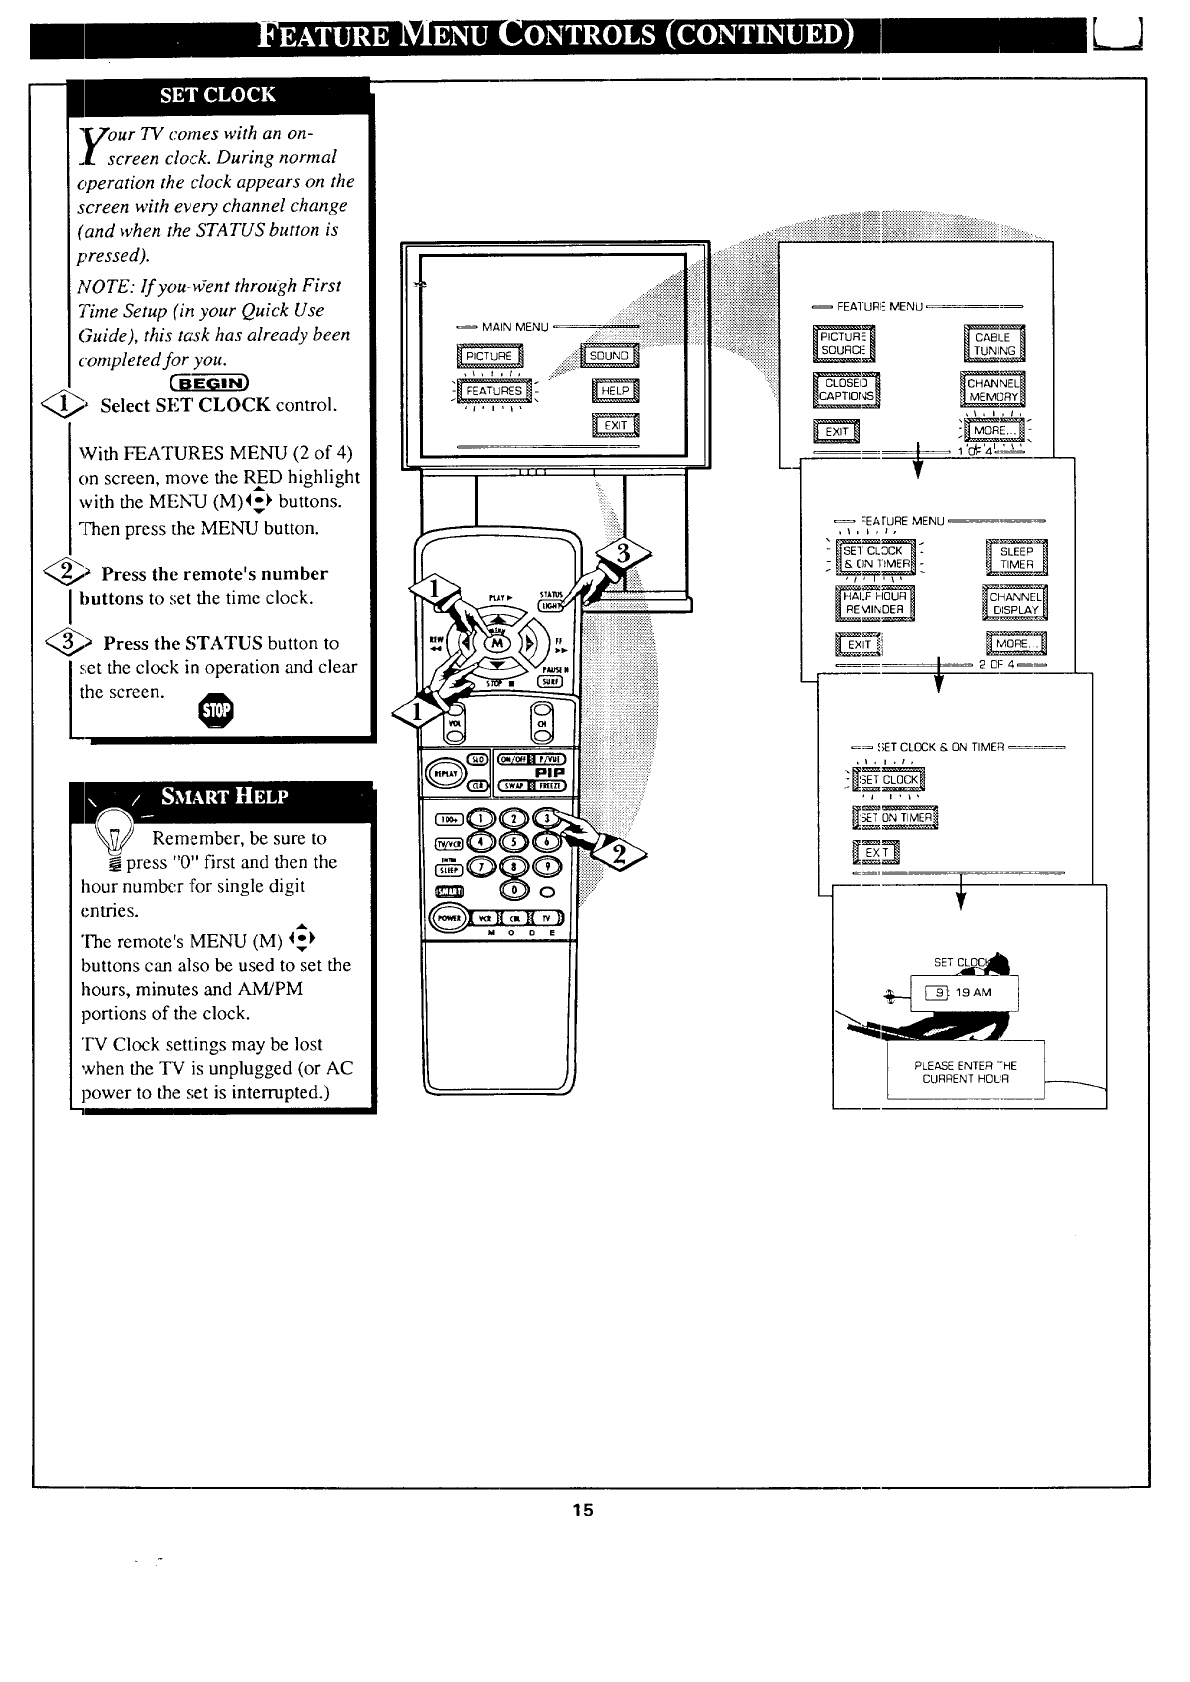
,Vour TV comes with an on-
.I. screen clock. During normal
operation the clock appears on the
screen with every channel change
(and when the STATUS button is
pressed).
NOTE: lf you-uYent through First
Time Setup (it, your Quick Use
Guide), this task has already been
completed for you.
CaEG---_3
_, Select SET CLOCK control.
With FEATURES MENU (2 of 4)
on screen, move the RED highlight
with the MENU (M)l_ buttons.
:['hen press the MENU button.
_Press the remote's number
buttons to set the time clock.
_ Press the STATUS button to
_;etthe clock in operation and clear
he screen.
Remember, be sure to
press "0" first and then the
hour numlx:r :['or single digit
entries.
The remote's MENU (M) l_
buttons can also be used to set the
hours, minutes and AM]PM
portions of the clock.
'IV Clock settings may be lost
when the TV is unplugged (or AC
power to the set is interrupted.)
.....,,..,............
......_iiiiiiiliii!i!!!!!!.....
. ............................
MAIN MENU" !
till I
_ 0 ....................................
.....
7
FEAIURI E MENU
:EArURE MENU
-I_ _,_ _'_[_t
_ _;ET CLOCK & ON TIME_ _
_ I i I , I ,
-IN .
..
S=T_
_111___]: 19 AM
b CURRENT HOLA
15
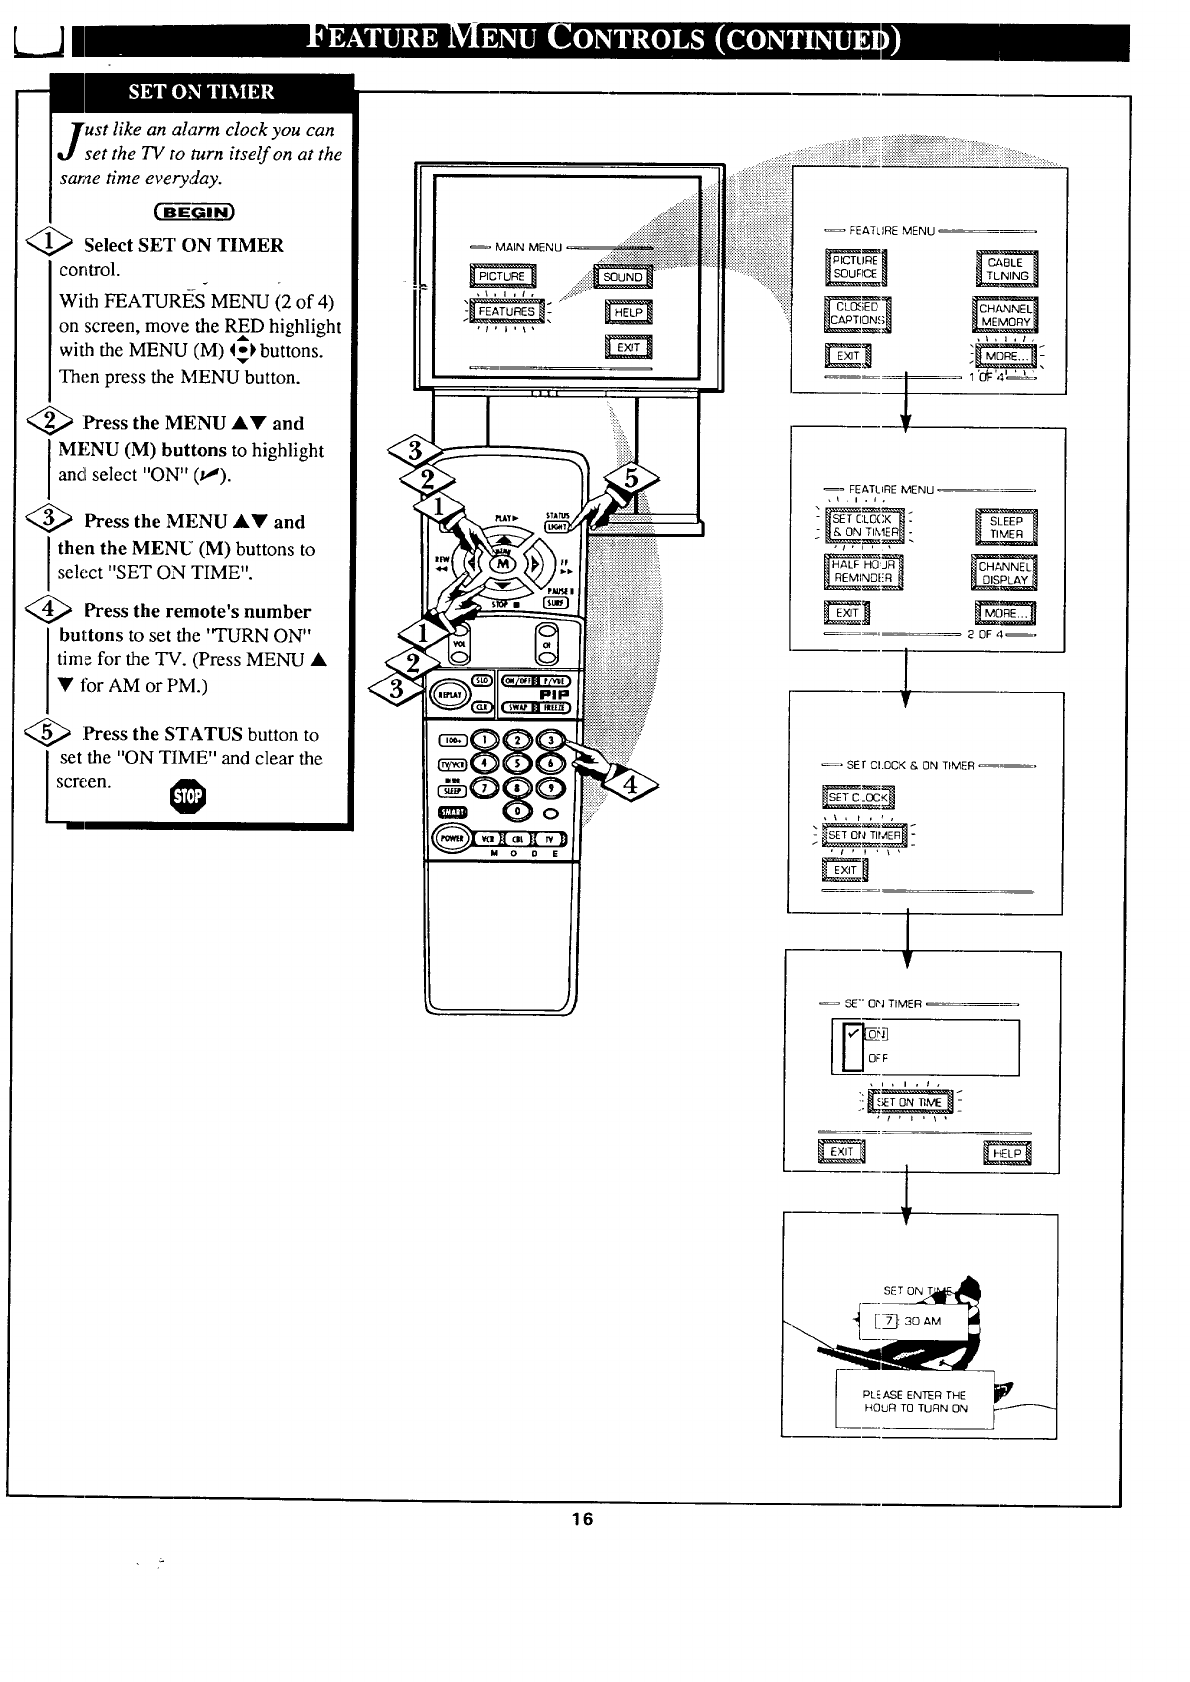
like an alarm clock you can
set the TV to turn itself on at the
same time everyday.
BC-fi-_GI--i-_
<_ Select SET ON TIMER
corttrol.
With FEATURI_iS MENU (2 of 4)
on screen, move the RED highlight
with the MENU (M) 4_l, buttons.
......_iliiiiiiiiiiiiiiiiiiiiiii
..:,::::::::::::::::::::::::::2::::::
_ MALNMENU....._::::ii_iii:::_:::!_:!!!!_:!_!_iiiiiiiiii_iiiiiiiiiiiiiiiii!
Then press the MENU button.
<_ Press the MENU A• and
IMENU (M) buttons to highlight
and select "ON" (v").
'_ Press the MENU A• and
then the MENU (M) buttons to
select "SET ON TIME".
<_ Press remote's number
the
buttons to set the "TURN ON"
time for the TV. (Press MENU •
• for AM or PM.)
<_ Press the STATUS button to
set the "ON TIME" and clear the
screen.
FEATLIRE MENU
"_: r_
2 0F 4 =,
_, SEt CI.OCK & ON TIMER _---,
, \ ,t,, ,
,t , t, _ , -
1
SE'" ON TIMER
[m
U °_ ]
I
P E RTH [
16
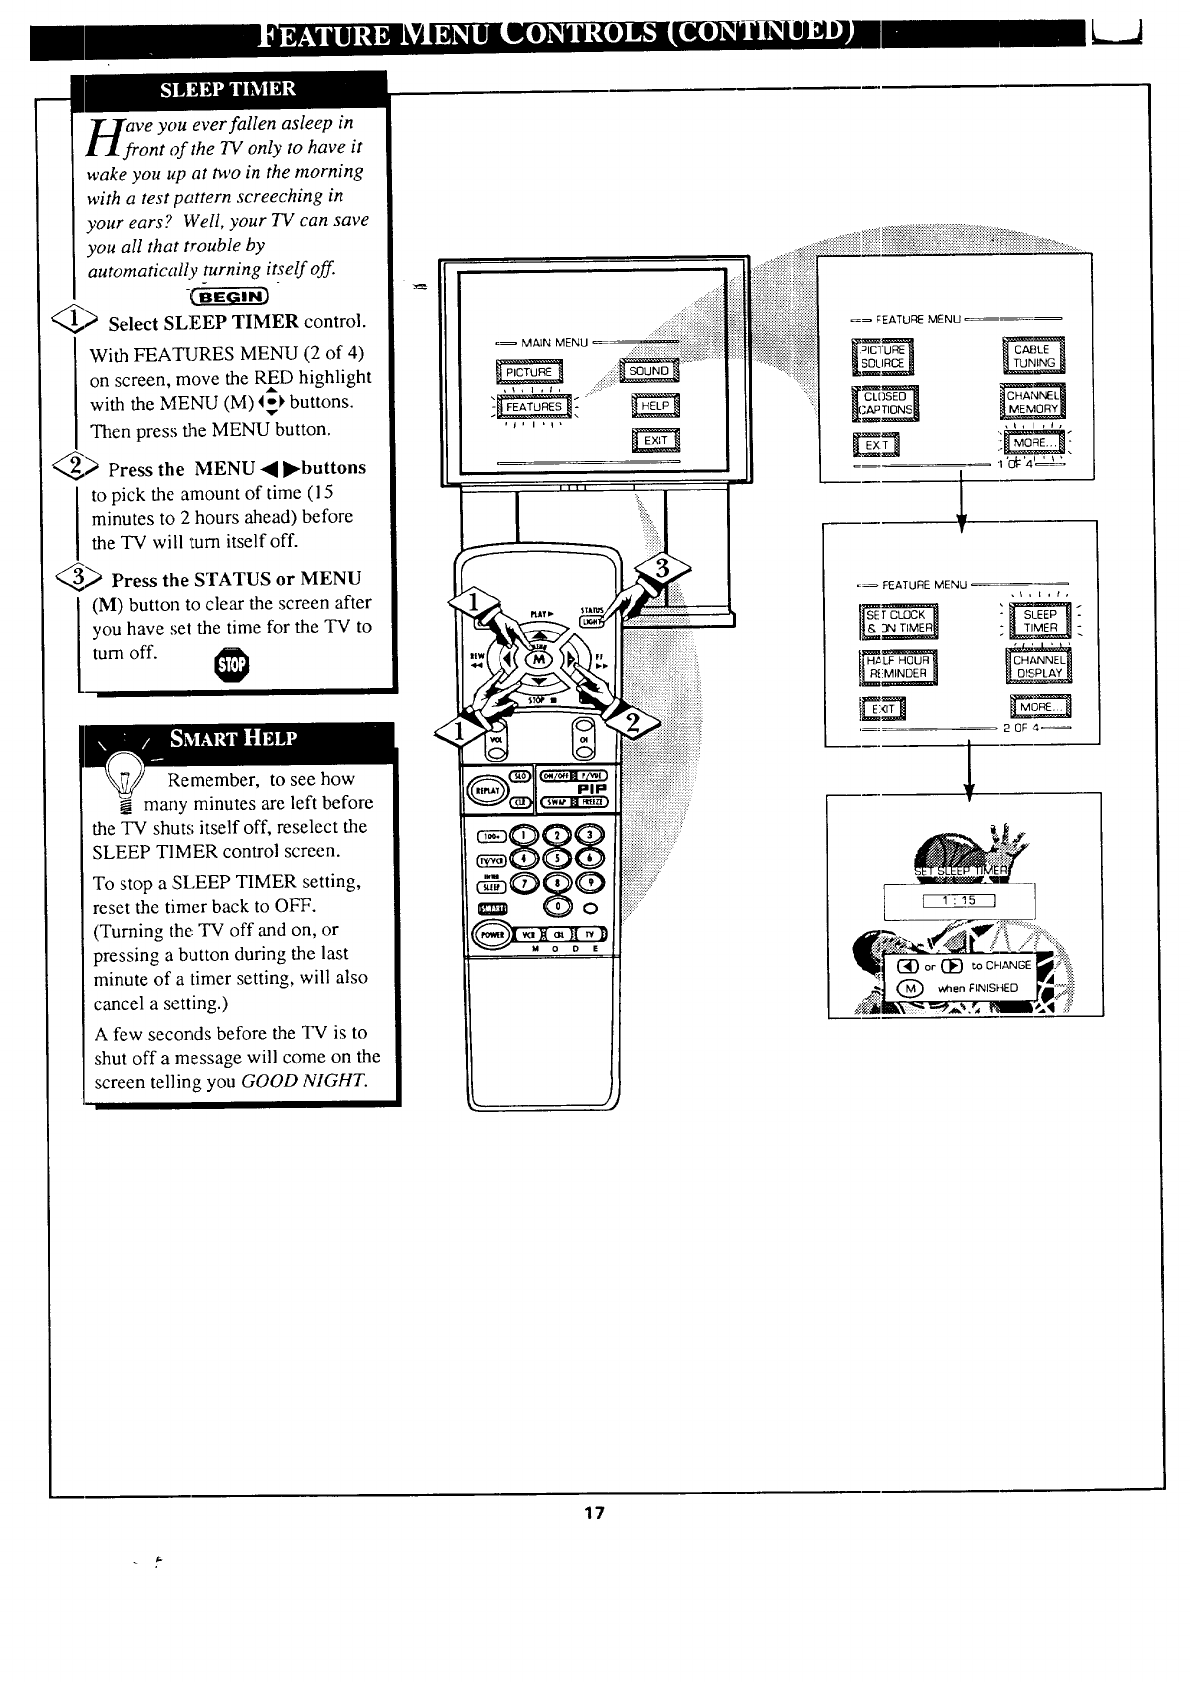
ve you ever fallen asleep in
ont of the TV only to have it
wake you up at m,o in the morning
with a test pattern screeching in
your ears? Well, your TV can save
you all that trouble by
automatically turning itself off.
_> Select SLEEP TIMER control.
With FEATURES MENU (2 of 4)
on screen, move the RED highlight
with the MENU (M) _I_ buttons.
Then press the MENU button.
_> Press the MENU 4 ]l_buttons
to pick the amount of time (15
minutes to 2 hours ahead) before
the TV will 'turn itself off.
_ Press the STATUS or MENU
(M) button to clear the screen after
you have set the time for the TV to
turn off.
Remember, to see how
_. many minutes are left before
the TV shuts; itself off, reselect the
SLEEP TIMER control screen.
To stop a SLEEP TIMER setting,
reset the timer back to OFF.
(Turning the: TV off and on, or
pressing a button during the last
minute of a timer setting, will also
cancel a setting.)
A few seconds before the TV is to
shut off a message will come on the
screen telling you GOOD NIGHT.
<
=_ MAIN MENU
=_ FEATURE MENU
,t, t,t,
2 OF ,4_
17
LJ
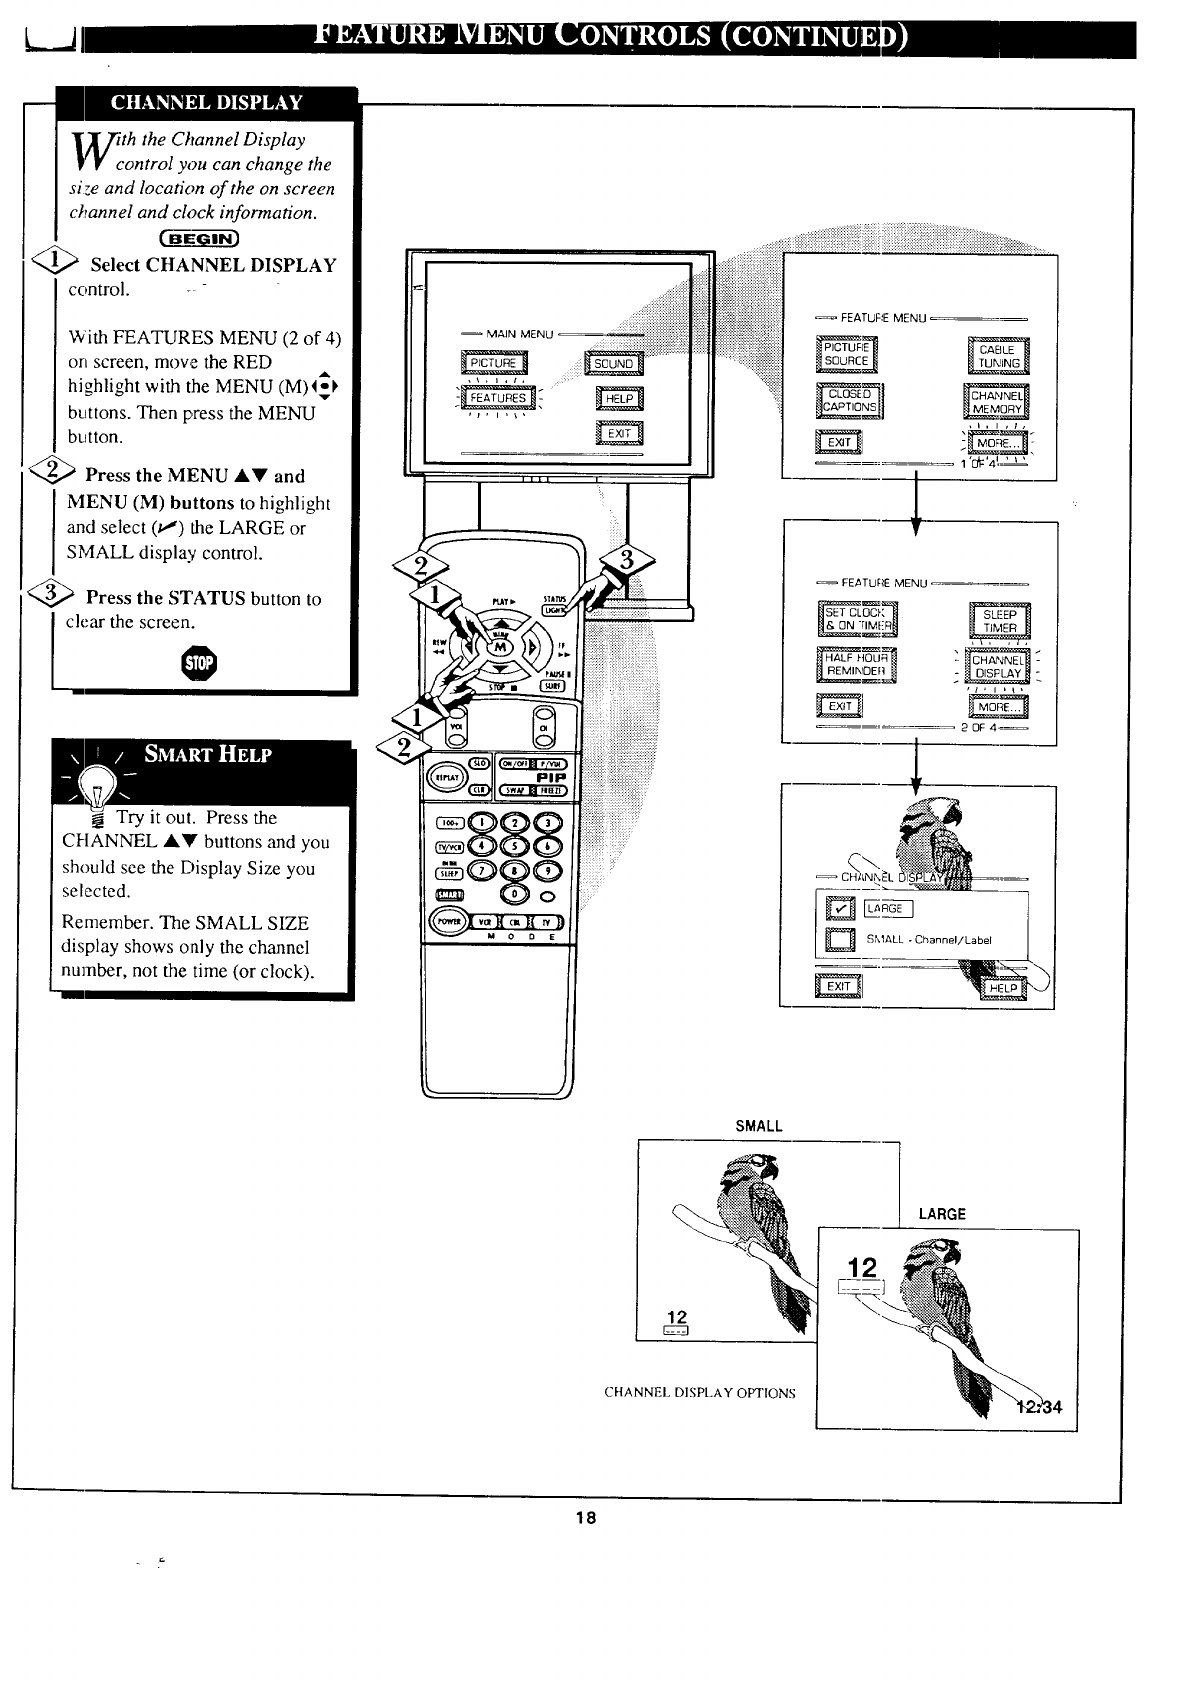
lith the Channel Display
•control you can change the
size and location of the on screen
channel and clock information.
Select CHANNEL DISPLAY
control. - -
With FEATURES MENU (2 of 4)
on screen, mowe the RED
highlight with the MENU (M)4-_
buttons. Then press the MENU
button.
@ Press the MENU ,itV and
MENU (M) buttons to highlight
and select (t,J) the LARGE or
SMALL display control.
<_ Press the STATUS button to
I ch;ar the screen.
Try it out. Press the
CHANNEL ,A.'IVbuttons and you
should see the Display Size you
selected.
Remember. The SMALL SIZE
display shows only the channel
number, not the time (or clock).
MAIN MENU. 17i:i ::ii::iii::i::iii::i::{_ii!_i:;:_i
_iiiiiiiiiiiiiiiiii:?:;?+:::
,\ + i ,t,
FEATURE MENU
20F4,_
DSMALL o Ch .... I/Label I
SMALL
LARGE
12
CHANNEL DISPLAY OPTIONS
12
18
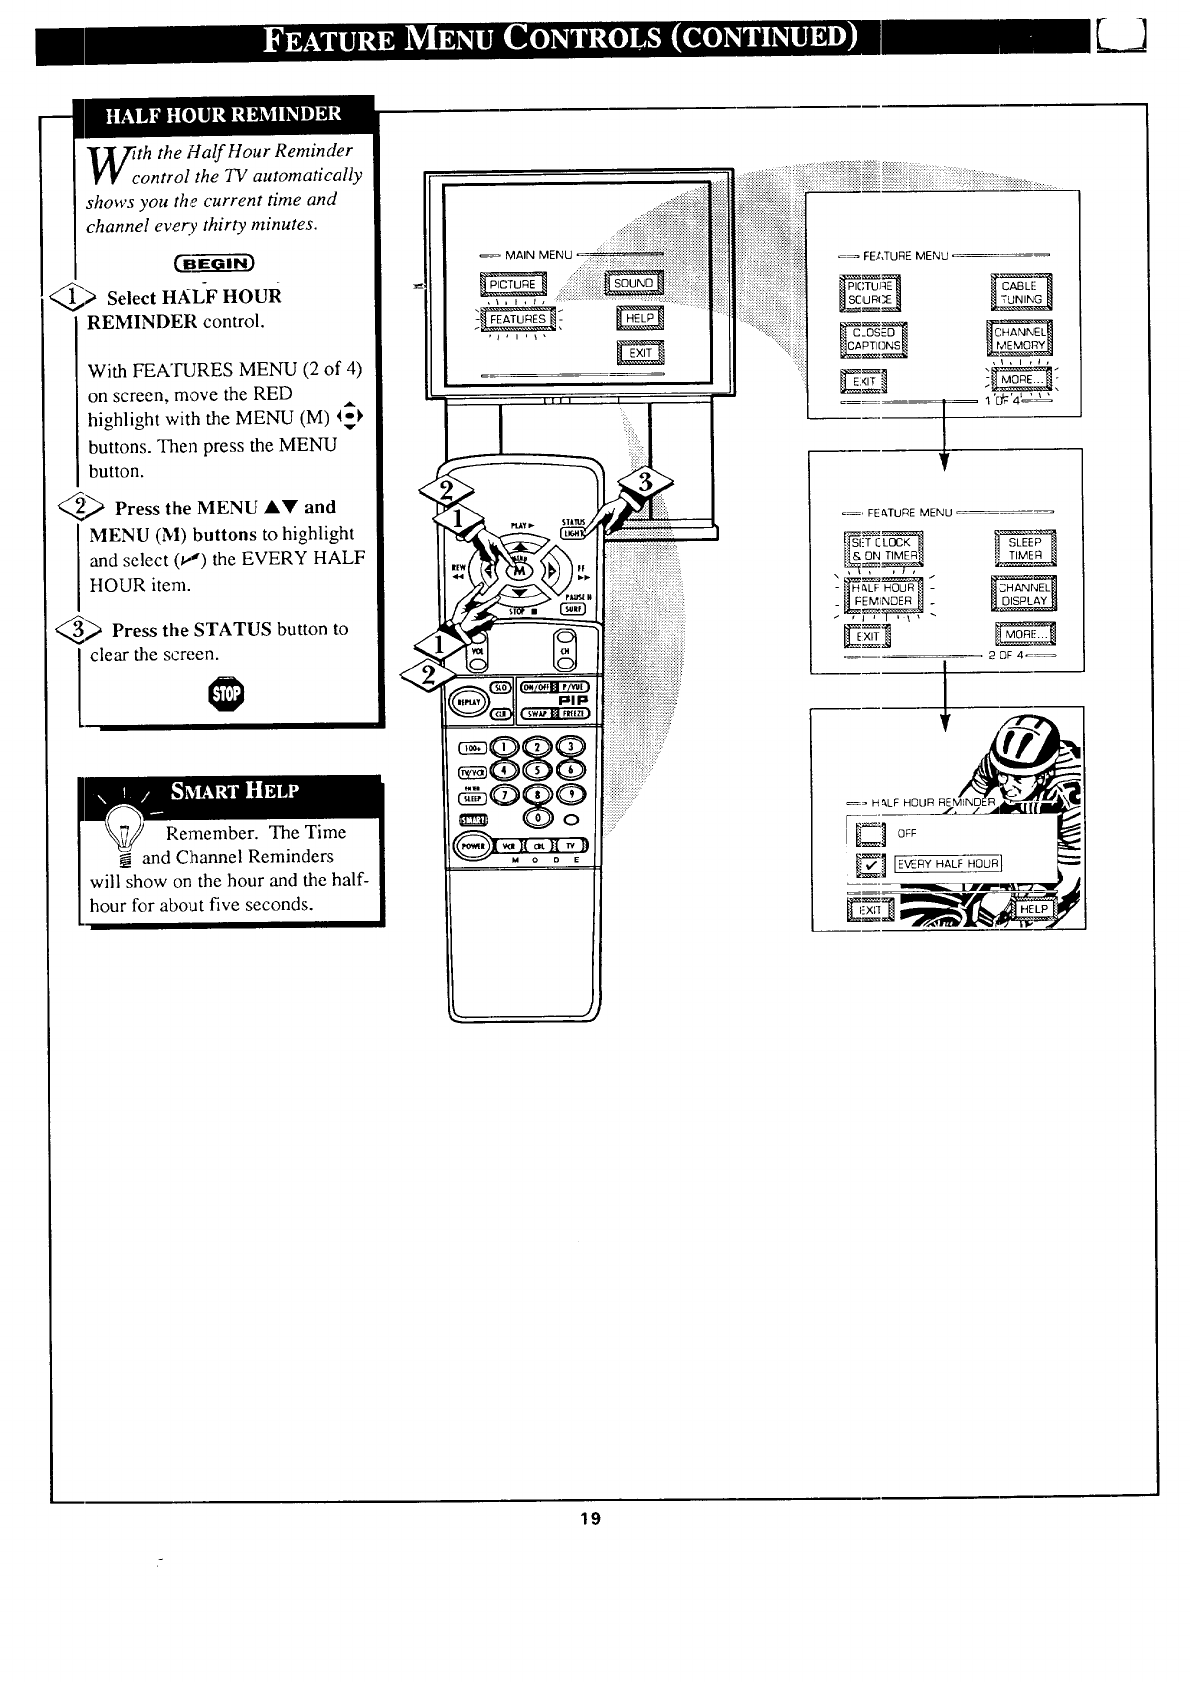
th the Half Hour Reminder
ontrol the TV automatically
shows you the current time and
channel every thirty minutes.
@> Select HALF HOUR
REMINDER control.
With FEA'IRJRES MENU (2 of 4)
on screen, move the RED
highlight with the MENU (M) 4_1,
buttons. Then press the MENU
button.
_;_ Press the MENU AV and
MENU (M) buttons to highlight
and select if,") the EVERY HALF
HOUR item.
_ STATUS button to
Press the
clear the screen.
iiiii!iiiiiiiiiiiiiiqiiiiiiiiiiiiiiiiiiiiiiiiii
i:_:!:!:i:i:5:i:_
=_ FE,t,TURE MENU
E_Z
b ,,7
'c#'4_ _'
19
L_J
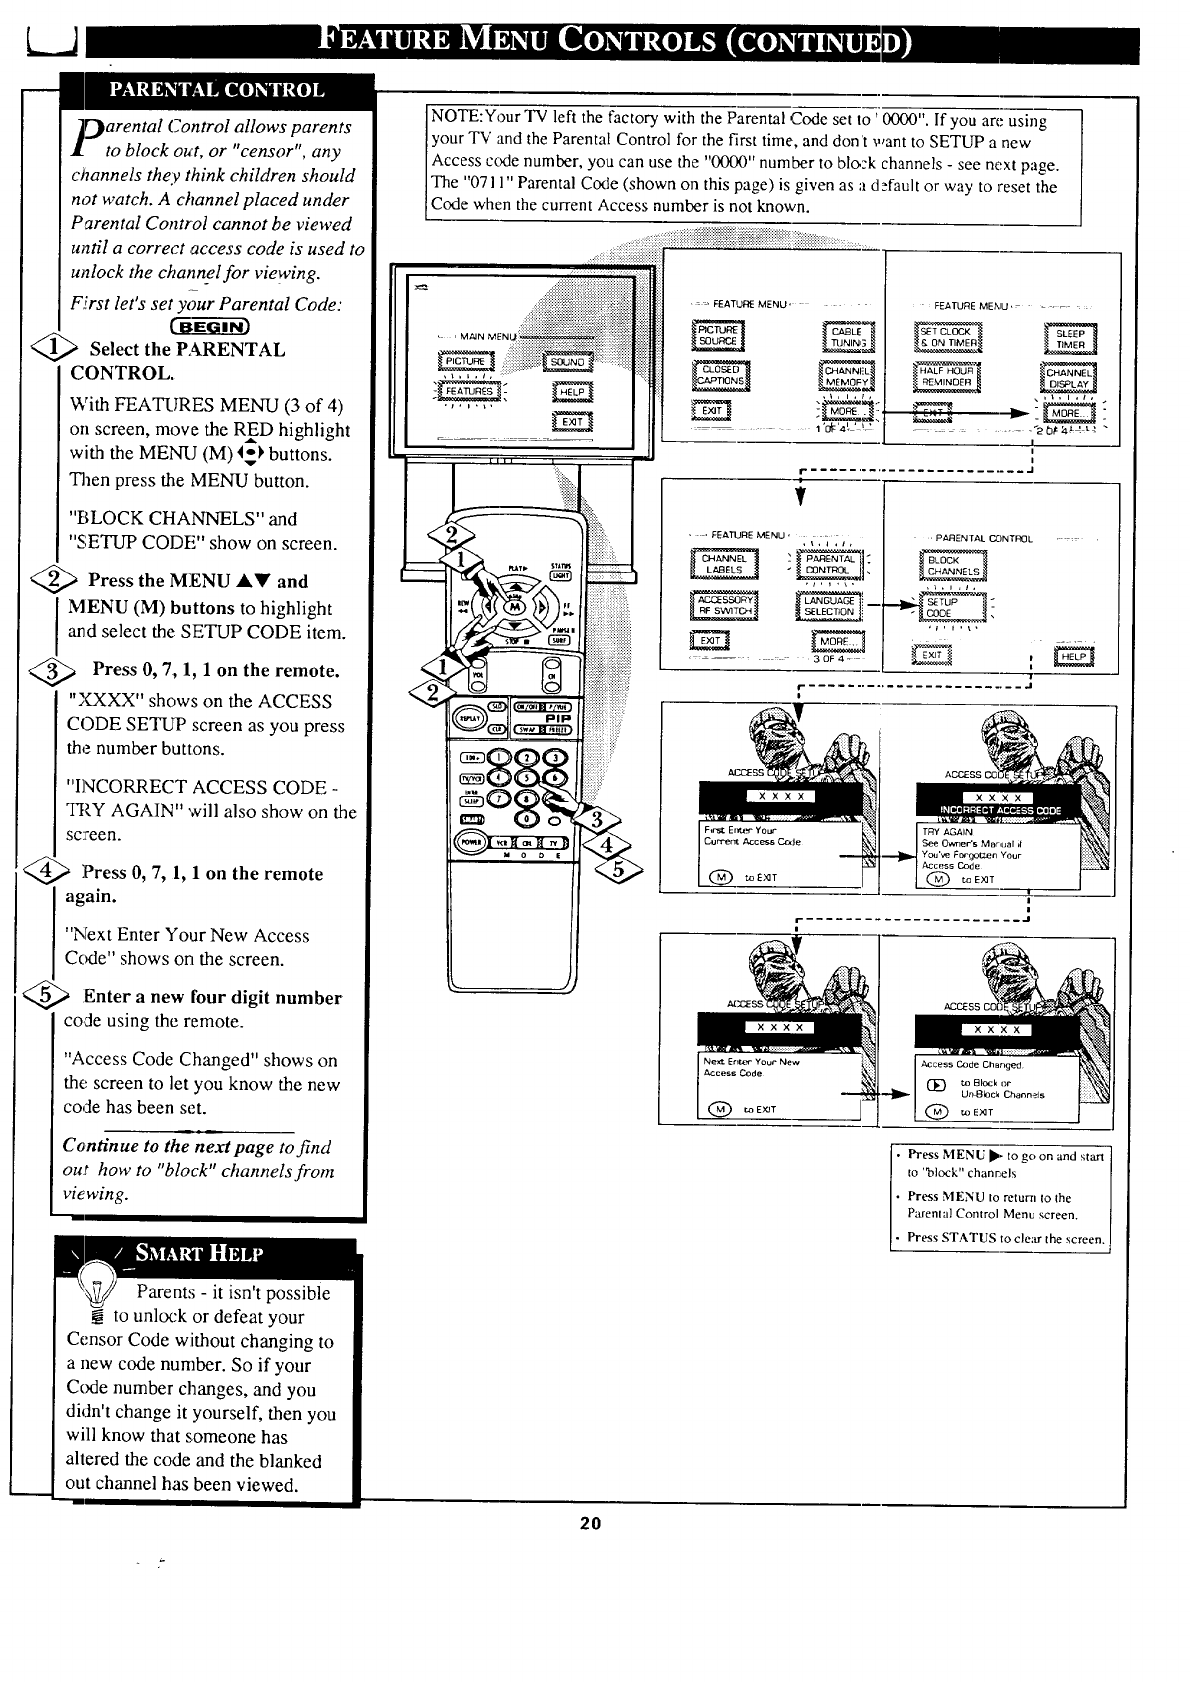
[)arental Control allows parents
to block out, or "censor", any
c)Tannels they think children should
not watch. A channel placed under
Parental Control cannot be viewed
until a correct access code is used to
unlock the channel for viewing.
First let's set your Parental Code:
U6Ee---6i-_
Select the PARENTAL
CONTROL.
With FEATURES MENU (3 of 4)
on screen, move the RED highlight
with the MENU (M) I_) buttons.
Then press the MENU button.
"BLOCK CHANNELS" and
"SETUP CODE" show on screen.
_ Press the MENU _kY and
MENU (M) buttons to highlight
and select the SETUP CODE item.
<_ Press 0, 7, 1, 1 on the remote.
"XXXX" shows on the ACCESS
CODE SETUP screen as you press
the number buttons.
"INCORRECT ACCESS CODE -
TRY AGAIN" will also show on the
sc:men.
_> Press 0, 7, 1, 1 on the remote
I again.
"Next Enter Your New Access
Code" shows on the screen.
_Enter a new four digit number
co,de using the remote.
"Access Code Changed" shows on
the screen to let you know the new
code has been set.
Continue to the next page to find
out how to "block" channels from
vie wing.
Parent,'; - it isn't possible
to unlock or defeat your
Censor Code without changing to
a new code number. So if your
Code number changes, and you
didn't change it yourself, then you
will know that someone has
altered the code and the blanked
out channel has been viewed.
NOTE:Yt)ur TV left the factory with the Parental Code set to ' 0000". If you are using
your TV and the Parental Control for the first time, and don't want to SETUP a new
Access code number, you can use the "0000" number to blozk channels - see next page.
The "0711" Parental Code (shown on this page) is given as a default or way to reset the
Code when the current Access number is not known.
' : = FEATUE MENU" FEA_E MENU ........
HALF HO_J_
............. -20:a_, t_ -
1
i
_ ......................... ,J
V
• • EEA'OJRE MENU -I, i ,t,
......... 30F4=
" ' PAAENTAL C,C)NTREIL .....
i
r -_
i
NeW Ent_€" Your New
Access Code
) to EXJT
i Press MENU I_"to go on and start
to "block" chanc,els [
Press MENU to return to the
Parental Control Menu screen. [
Press STATUS to cle:tr the screen, t
2O

your personal Parental
number has been set (see
previous page), you are now ready
to select the channels you want to
.block out or censor.
CBe6--ff-_i-_
;, Select the BLOCK
CHANNELS control.
With FEATURES MENU (3 of 4)
on screen, move the RED highlight
with the MENU (M) _ buttons.
Then press the MENU button.
_ Press the MENU AY and
MENU (M) buttons to highlight
and select the BLOCK
CHANNELS item.
_> Enter the correct Parental
Code number.
_> Press Channel AY Channel
or
INumber butt.ons to select the
channel you want to block.
_> • button to
Press tile MENU
"BLOCK VIEWING" on the
selected channel.
Press the MENU _1 button to
"ALLOW VIEWING" on a
blocked channel.
Repeat steps 3 and 4 for any other
channels you wish to block out.
Lxxx_
Remember, to make TV
viewing easier all channels
(and Audio/Video Input jacks)
will be unbkx:ked, once the
correct Parental Code number has
been entered.
When the TV is turned OFF and
then back ON again, Parental
Control is back in place for all
channels.
FEATUI:_ MENU" "
............ 1 '0_'4 _ _:_J
'FEATURE MENU - = _ -
!
i
!
i
T
'FEATIJRE MENU _ ,_,r,t
; PARENTAL
...... 30F4- •
,, PARENTAL CQNTRQL :-_
a
!
i- ......................... J
Channel 1 _l blocked
C,NANNEL 19
BLDCKED BY PARENTAL CONTqOt.
P,eBse errc_- Access Code
49_-
Select eno_l_- Channel
for v'_ev¢_£L
Note: You can a]_o block out the
use of the Audio/Video Input jacks
on the TV. 'This stops the viewing
of VCR pro.grams which can be
shown through the A/V IN jacks.
Just select VCR/AUX I, AUX 2, or
AUX 3 (located between the lowest
and highest channel numbers) on
the Channel Blocking screen, and
selecl "blocked".
BLOCKED CHANNEL SCREEN MESSAGE
(Appears when an attempt to selecl a blocked
channel is made and Parental Control 6 ON.)
21
'on which
channel a parn'cular station or
network is located? The Channel
Labels Control is a quick way to
view and seh:ct channels from a
lixt of Labelled channels.-
A Label is a four letter callout you
can set to appear with the on
screen channel number. Example
Label: WXYZ -for a TV station's
call letters.
To select channels from the
Channel Labels Control:
)With the FEATURE MENU
screen (3 of 4) on the TV's screen,
move the REDhighlight using the
MENU (M) _ buttons to select
CHANNEL LABLES. Press the
MENU (M) button.
Press the MENU A!!' and
MENU (M) buttons to highlight
and select either:
"MANUAL" to create your own
label for a channel.
"PRESETS" to choose from a list
of prewritten channel labels.
(See instruction details on this
page.)
<_ Press the STATUS button to
clear the screen.
_ FEATURE MENU
30F4_
iiiiiiiiiiiiiiiiiii!!i!!_i!i_!!!_i!!!i_i_i_iiiii_iiiii_:
L LABELS
Create Your Own
Choose From List
lReturn to Guide
r
LABEL
CHOOSE CHANNEL
(_ 13E)to SELECTLABEL
to EXIT
MANUAL- To create your
own Channel Label:
Press the Channel A• or
Number buttons to select
desired station.
A red highlight shows the
active letter space for the
channel label.
Press the MENU • •
buttons to pick any of the
letters or symbols that are
given for your use.
Press the MENU • •
buttons to nlove the red
highlight to the other letter
spaces and repeat.
Press the STATUS button
to clear the screen when
finished.
PRESETS -To pick aLabel
from the "LABEL" list:
Press the Channel •• or
Number buttons to select
desired station.
Press the MENU ••
buttons to move up and
down the Channel Label
list.
Just stop on any label you
might want to use.
The selected labe)i
automatically appears with
channel changes and when
the STATUS button is
pressed.
Press the STATUS button
to clear the screen when
finished.
22
LJ
Tote: lf you went through First
1¥Time Setup, This task has
already been completed for you.
For our Spanish and French
speaking 73/owners an on-screen
LANGUAGE option is present.
With the LANGUAGE control you
can set the TV' s on-screen
features to be shown in either
English, Spanish or French.
_ Select the LANGUAGE
DISPLAY control.
With FEATURES MENU (3 of 4)
on screen, move the RED A
highlight with the MENU _
buttons. Then press the MENU
(M) button.
_ Press the MENU AY and
MENU (M) buttons to highlight
and select (tl) English, Spanish
(ESPANOL), or French
(FRANCAIS) on the display
control.
Text for the on-screen Menu will
change to the selected language.
_Press the, STATUS button to
clear the screen.
Remember, the
Language control only
makes the "I_l's on-screen
(MENU) items appear in English,
Spanish, or French text. It does not
change the other on-screen text
features such as Closed Captioned
(CC) TV shows.
......;iiiiiiiiiiiiii!ii!!
......_,;!_ii!ii!iiii!iiiiii!iiiii!iiii!ii!iii
_.___, , , , _ ...4:::"
LLII I
_-_!!_!,_.|iii_i|i|i|i|i|i|i,,iii|!|_:,_!,,!,,
PI F_ i!::i::::::::i::::::}i!i)iiii?iiii
:::::::::::::::::::::::::::.
888 ====
,]
.........
[] Ingl_
FEA] URE MENU
F
_= :EATURE MENU
_t'_ ]'_M_ _TIME_._
,t, i ,i,
- _ MORE... -
==_ FE/_TURE MENU
._._._%_- __
. 3 E,F 4_
:_ii'
[3 sp,_,s_ /
LANGUAGE DISPLAY OPTIONS
....
[] Angl_i_
23
L......J
Zour TV also, has individual
sound adjustment controls. The
BASS (low frequency), TREBLE
(high frequency), and Speaker
BALANCE may all be used to
adjust the sound playback of TV
Select BASS, or TREBLE, or
BALANCE sound control.
With the SOUND MENU on the
screen, move the RED highlight
with the MENU (M)I_ buttons.
v
Then press the MENU button.
Press the (+) or (-) buttons to
adjust the sound control to levels
you prefer.
@_ Press the STATUS button to
clear the screen.
• MAIN MENU .....
,i, i , i i i i!iiiiiiiiiiiiii!i iiiiiiiiiiiiiiiiiiiiiiiiiiiiiiii
:_+:+:.:.:.:.:.x.x.:+:_:
,:.:.:.:.:.:.:.x.:.:.:.:.:+
===========================
...._iiiiiiiiiiiiiiiiii
,...,.. i• , I_I_INO MENU =
S[_elect and then press MENU I
[(M) butto_ to view additional [
[ controls grouped under same [
]feature heMing. For n
IExample: Treble. Balance. [
[Bass Boo,;t. Stereo. etc. ]
_e BASS BOOST control
increases the low frequency
audio range of the TV. This creates
a deeper, fuller playback sound
w_ich can be heard through the
Tl/'s speakers.
@),Select BASS BOOST sound
control.
With the SOUND MENU on the
screen, move the REDhighlight
wkh the MENU (M) I_ buttons.
Then press the MENU button.
<_ Press the MENU AY and
MlgNU (M) buttons to highlight
and turn ON (_) the BASS
BOOST control.
<_ lh-ess the STATUS button to
clear the screen.
' MAIN MENU, , _ , i ,i,
888
..:+:+:+:.:.:.:.:
-.::.:.:.:.:.:.:.:.: • _ SOUND MENU
::::::::::::::::::
EEl
E:E:E E:E:E:: :?::: :
=================================
....
! 0F3-
_[o_
E_ OFF
24
I"
ur TV is able to receive
roadcast stereo TV programs.
The 73/is equipped with an
amplifier and twin speaker system
through which the stereo sound
can be heard.
A RED stereo-light (on the front of
the TV) will come on when a
stereo broadcast is received.
_ Select STEREO sound control.
With the SOUND MENU on the
screen, move the RED highlight
with the MENU (M) _ buttons.
v
Then press the MENU button.
_ Press the MENU A.Y and
MENU (M) buttons to highlight
and turn ON (u,") the STEREO
mode.
_ Press the STATUS button to
clear the screen.
Second Audio Program (SAP) is
part of the stereo broadcast
system. Sent as a additional
audio channel SAP can be heard
apart from the current TV
program sound. TV stations are
free to use SAP for any number
of purposes, but many experts
believe it will be used for foreign
language rxanslations of TV
shows (or for weather and news
bulletins.)
NOTE: If a SAP signal is not
present with a selected program,
the SAP option can not be
selected. "This program does not
contain SAP information" will
show on the TV screen.
<
i
7,,"
_= MAIN MENU
Re:member.
If a stereo signal is
not av&ilable and
the TV is placed in
the STEREO mode,
sound coming from
the TV will remain
monaural (mono).
_== SOUND MENU
MON0 AT ALL TIMES;
__ • L
== SOONO MENU .........
_ 20F3-- _,
SECOND PROGRAM SOUND CAN
ONLY BE SELECTED 0 ! ) WHEN
IS PRESENT
Et
25
o,
rVhe Sound Image control can be
•used to add greater depth and
dimension to both monaural
(MONO) and STEREO TV sound.
<_ Select SOUND IMAGE
control.
With the SOUNq) MENU on the
screen, move the RED highlight
with the MENU (M) I-_ buttons.
Then press the MENU button.
@a Press the MENU AY and
MENU (M) buttons to highlight
and turn ON (t,,') the SOUND
INIAGE mode.
For Example: "'MAXIMUM"
spreads the Sound Image effect as
wide as possible.
:a Press the STATUS button to
I clc.ar the screen.
iiiiiiiiiii{i SOUND _NU =
MINIMUM
NO EXPAN,_
Remember,
with the Sound
Image control
turned ON even
monaural (mono)
audio source
material c_m be
heard through rear
Surround Sound
speake,r connections
(see page 28).
Note: 'The monaural
version of Surround
Sound may be
louder at the rear set
of speakers than
what is normally
heard with true
stereo signal
Surround Sound,
but this is normal.
]'se the DISPLAY VOLUME
/control to see the TV's volume
level settings on the TV screen.
Or,ce set the Volume Display will
be seen each time the VOLUME
bu,'tons (on the 7V or remote) are
pressed. (--B--EGI-_i-_
Select DISPLAY VOLUME
control.
With SOUND MENU (2 of 3) on
screen, move the RED highlight
with the MENU (M)%-_ buttons.
Then press the MENU button.
Q_ ]?ress the MENU ,itll' and
MENU (M) buttons to highlight
and turn ON (_,_) the DISPLAY
VOLUME control.
<_ Press the STATUS button to
clear the screen.
........ ,..... : <_i!ii
_.7_,_,,_
i iiiiiiii iliii
_qi!ii!ii!ii!iiiiiiiiiiii!" ,_uNO_EN ___;
t,l,I
ig-:
' ,_3UND M[NU -
-OISPLAY k43LUh'l_ _
..... oo....
2DF3 -
Remember, @
"DURING
ADJUSTMENT"
means the volume
level will be on
screen whenever the
Volume buttons are
pressed.
26
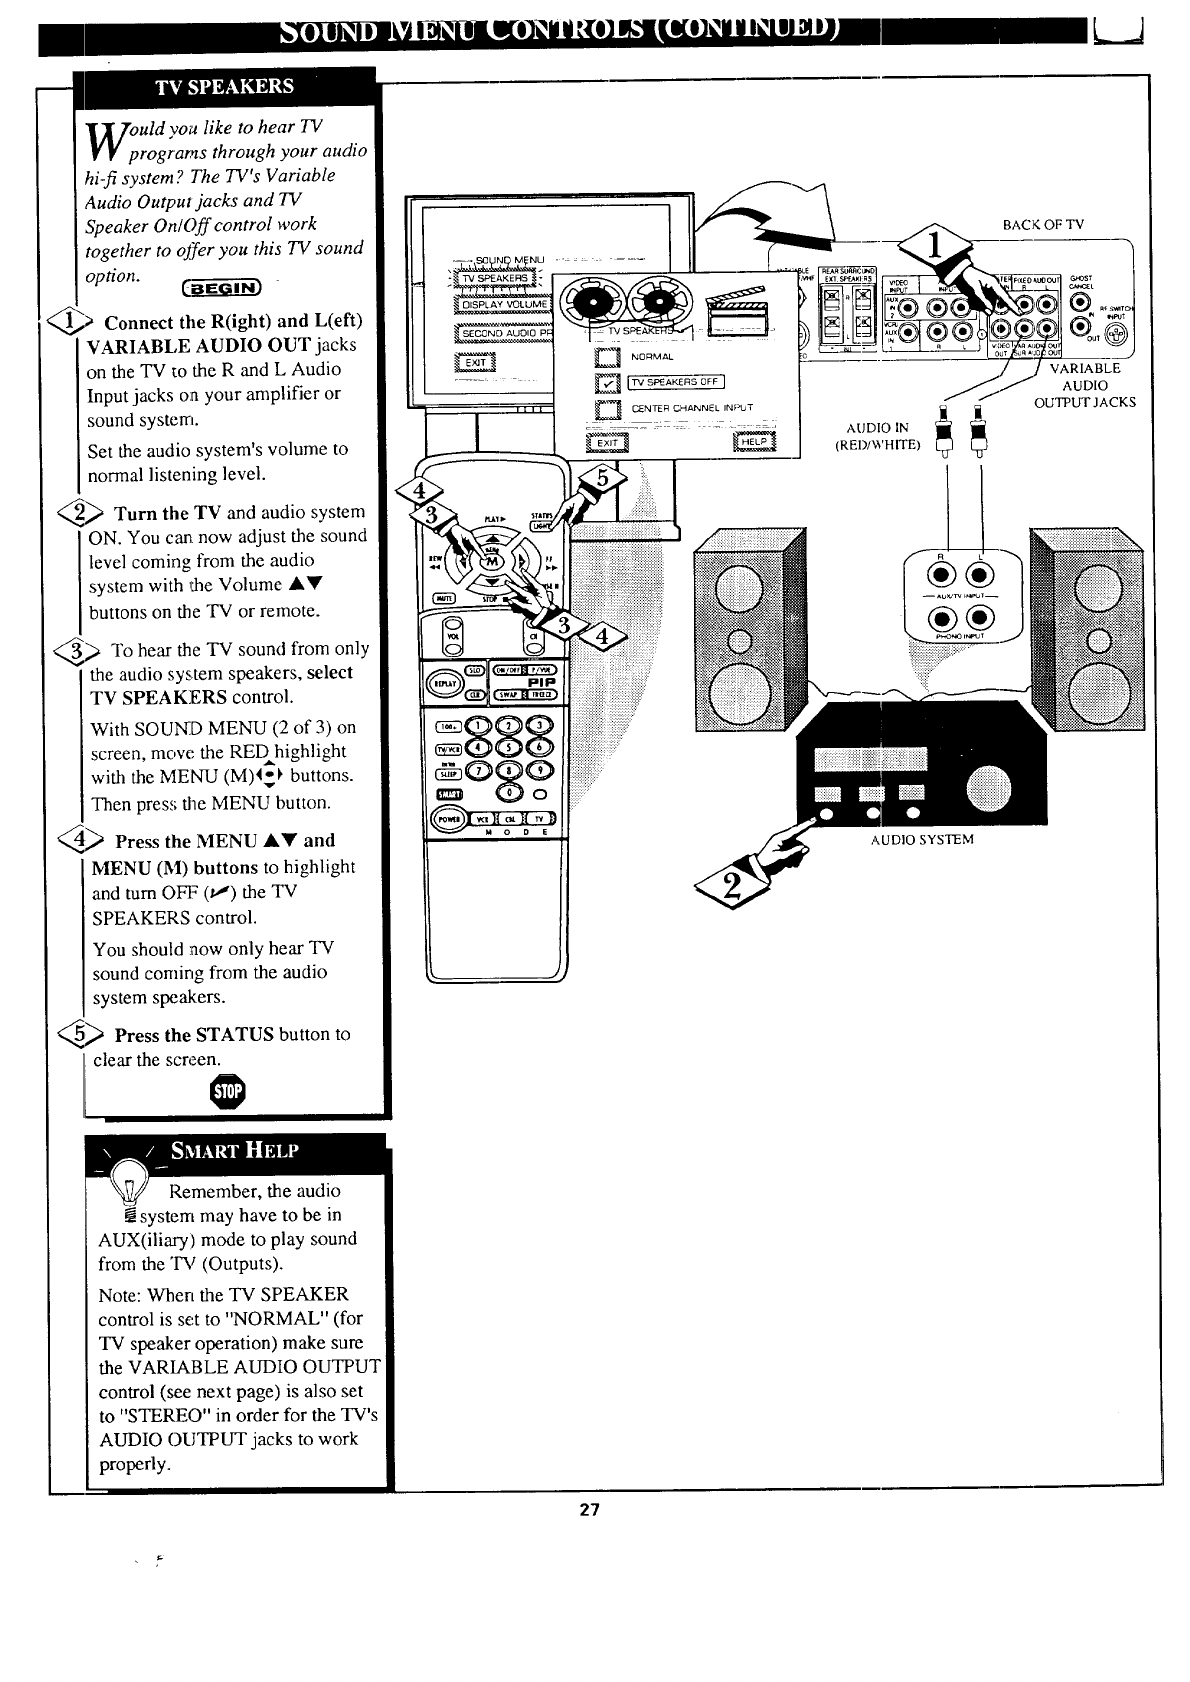
uld you like to hear TV
rograms through your audio
hi-fi system ? The TV's Variable
Audio Output jacks and TV
Speaker On/Off control work
together to offer you this TV sound
option. C_
Connect the R(ight) and L(eft)
VARIABLE AUDIO OUT jacks
on the TV to the R and L Audio
Inputjacks on your amplifier or
sound system.
Set the audio system's volume to
normal listening level.
_ Turn the TV and audio system
ON. You ca_ now adjust the sound
level coming from the audio
system with ,_e Volume ,Y
buttons on the TV or remote.
_) To hear the TV sound from only
the audio system speakers, select
TV SPEAKERS control.
With SOUND MENU (2 of 3) on
screen, move the REDhighlight
with the MENU (M)I_ buttons.
Then press the MENU button.
_ Press the MENU AV and
MENU (51) buttons to highlight
and turn OFF (_,_') the TV
SPEAKERS control.
You should now only hear TV
sound coming from the audio
system speakers.
_Press the STATUS button to
clear the screen.
DISPLAY VOLUME
BACK OF TV
(REI)/WHITE)
VARIABLE
AUDIO
OUTPUT JACKS
AUDIO SYSTEM
Remember, the audio
system may have to be in
AUX(iliary) mode to play sound
from the "IW (Outputs).
Note: When the TV SPEAKER
control is set to "NORMAL" (for
TV speaker operation) make sure
the VARIABLE AUDIO OUTPUT
control (see next page) is also set
to "STEREO" in order for the TV's
AUDIO OUTPUT jacks to work
properly.
27
k...a
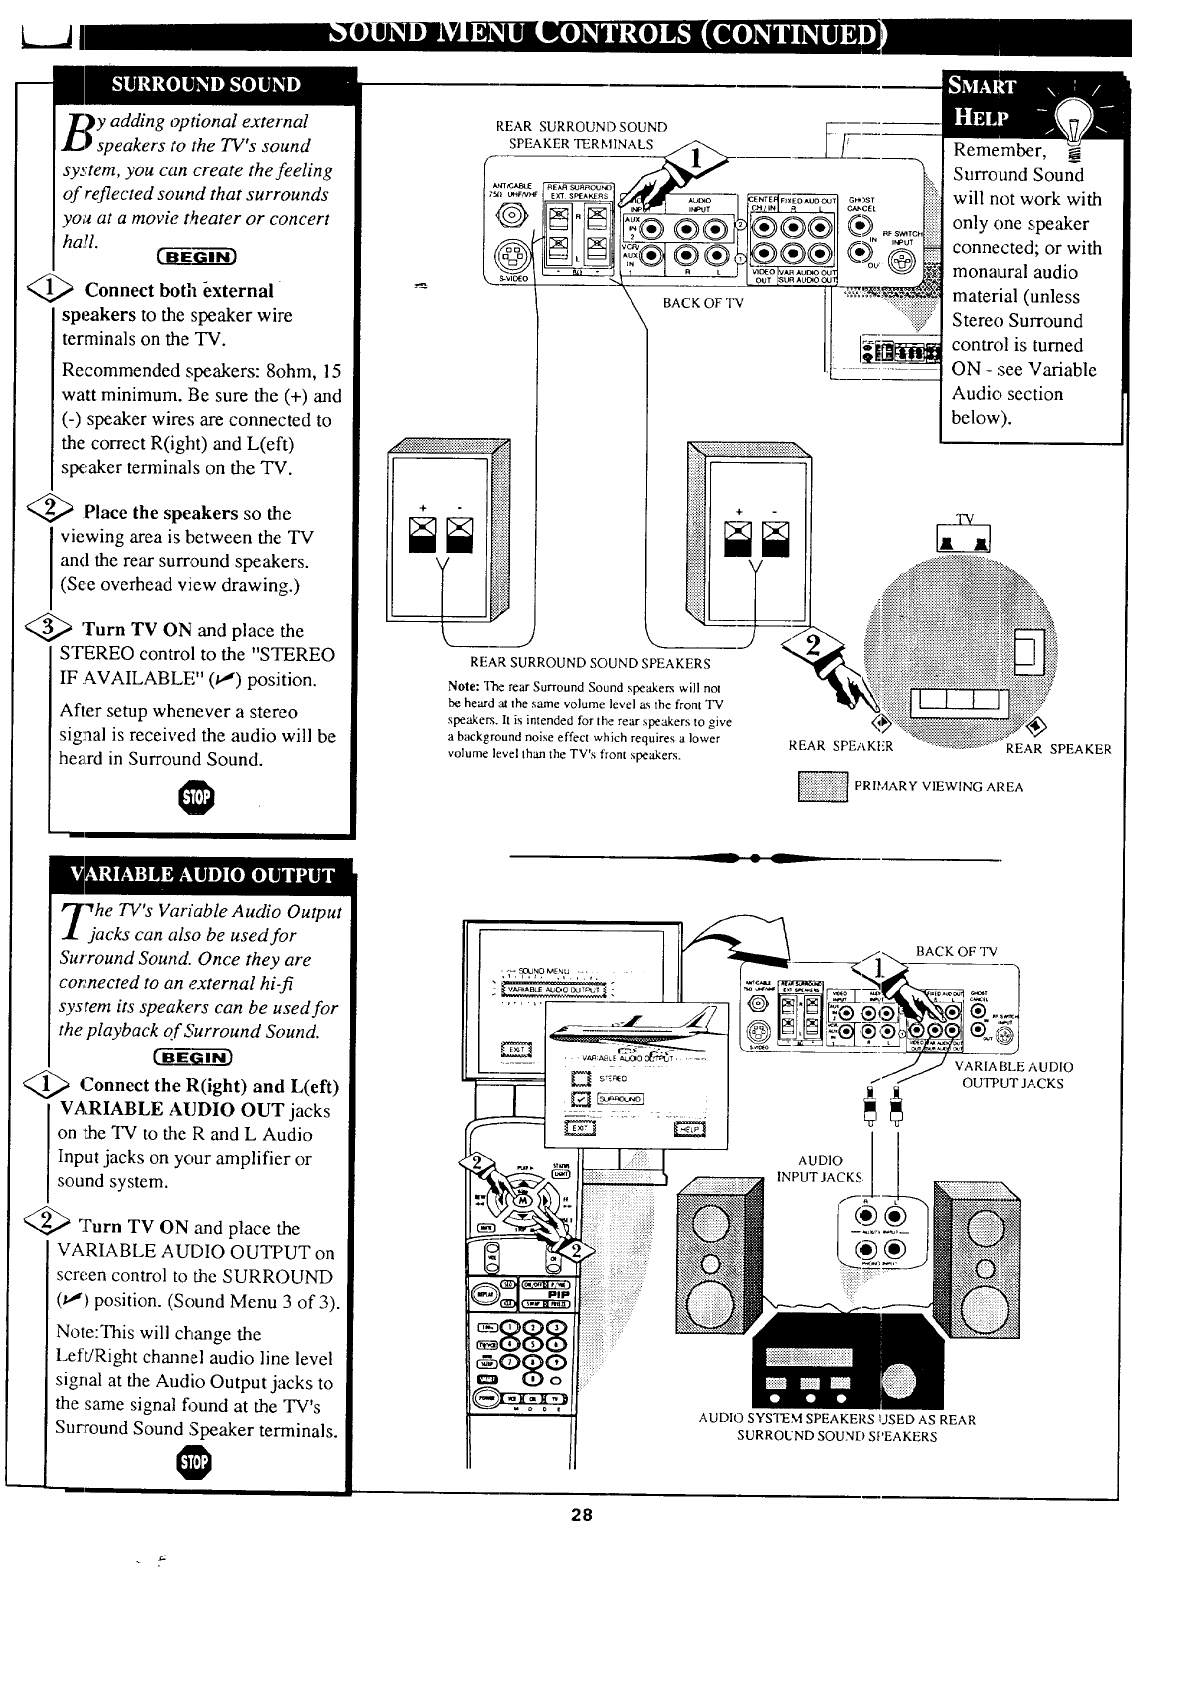
_._y adding optional external
•
JL, speakers to the TV s sound
system, you can create the feeling
of reflected sound that surrounds
you at a movie t_eater or concert
ha!l.
<_a Connect both _xternal
speakers to the speaker wire
terminals on the TV.
Recommended speakers: 8ohm, 15
watt minimum. Be sure the (+) and
(-) speaker wires are connected to
the correct R(ight) and L(eft)
SlX:akerterminals on the TV.
_ Place the speakers so the
viewing area is between the TV
and the rear surround speakers.
(See overhead view drawing.)
<_ 'turn TV ON and place the
STEREO control to the "STEREO
IF AVAILABLE" (u,') position.
After setup whenever a stereo
signal is received the audio will be
he_xd in Surround Sound.
REAR SURROUND SOUND
SPEAKER TERMINALS
BACK OF 'YV
REAR SURROUND SOUND SPEAKERS
Note: The rear Surround Sound speakers will not
be beard at the same volume level a.s the front TV
speakers. It is intended for the rear speakers to give
a background noise effect which requires a lower
volume level lhan lhe TV's front speakers.
...._iii{iiii?
Remember, _
Surround Sound
will not work with
only one speaker
connected; or with
monaural audio
material (lmless
Stereo Surround
control is turned
ON -see Variable
Audio section
below).
REAR SPEi_.KI-R REAR SPEAKER
PRIMARY VIEWING AREA
"Vhe TV's Variable Audio Output
jacks can also be used for
Surround Sound. Once they are
connected to an external hi-fi
system its speakers can be used for
the playback of Surround Sound.
<_ Connect R(ight) L(eft)
the anti
VARIABLE AUDIO OUT jacks
on the TV to the R and L Audio
Input jacks on your amplifier or
sound system.
<@a Turn TV ON and place the
VARIABLE AUDIO OUTPUT on
screen control to the SURROUND
(,u,,')position. (Sound Menu 3 of 3).
Note:This will change the
Left/Right channel audio line level
signal at the Audio Output jacks to
the same signal found at the TV's
Sucround Sound Speaker terminals.
BACK OF TV
AUDIO
INPUT JACKS,
VARIABLE AUDIO
OUTPUT JACKS
AUDIO SYSTEM SPEAKERS USED AS REAR
SURROUND SOUND SPEAKERS
28
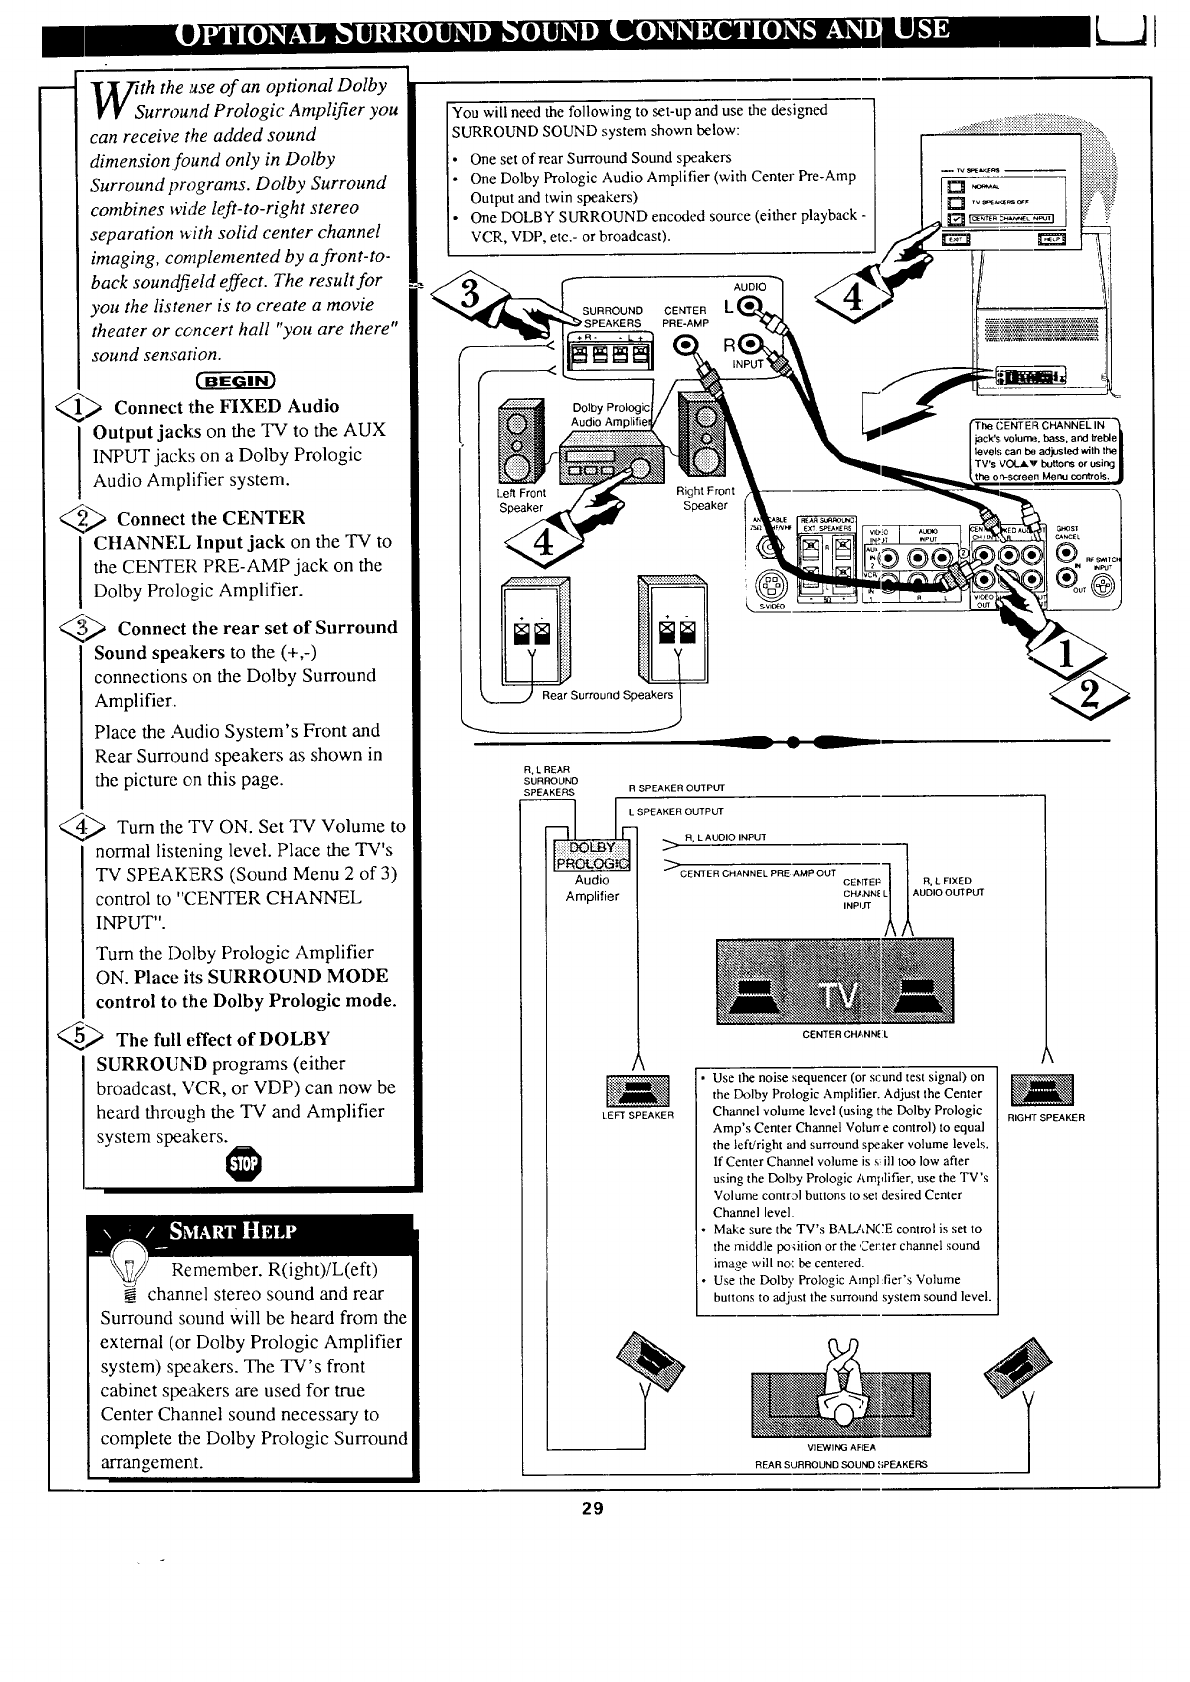
th the use of an optional Dolby
urround Prologic Amplifier you
can receive the added sound
dimension found only in Dolby
Surround programs. Dolby Surround
combines wide left-to-right stereo
separation _rith solid center channel
imaging, complemented by a front-to-
back soundfield effect. The result for
you the listener is to create a movie
theater or concert hall "you are there"
sound sensation.
_Connect the FIXED Audio
Output jacks on the TV to the AUX
INPUT jack,,; on a Dolby Prologic
Audio Amplifier system.
_z2._ Connect the CENTER
CHANNEL Input jack on the TV to
the CENTER PRE-AMP jack on the
Dolby Prologic Amplifier.
_ Connect the rear set of Surround
Sound speakers to the (+,-)
connections on the Dolby Surround
Amplifier.
Place the Audio System's Front and
Rear Surround speakers as shown in
the picture on this page.
.-_ Turn the "IV ON. Set TV Volume to
normal listening level. Place the TV's
TV SPEAKERS (Sound Menu 2 of 3)
control to "(.'ENTER CHANNEL
INPUT".
Turn the Dolby Prologic Amplifier
ON. Place its SURROUND MODE
control to the Dolby Prologic mode.
_ The full effect of DOLBY
SURROUND programs (either
broadcast, VCR, or VDP) can now be
heard throu,;b the TV and Amplifier
system speakers.
Remember. R(ight)/L(eft)
channel stereo sound and rear
Surround sound Will be heard from the
external (or Dolby Prologic Amplifier
system) speakers. The TV's front
cabinet speakers are used for true
Center Channel sound necessary to
complete the Dolby Prologic Surround
arrangemeELt.
You will need the following to set-up and use the designed
SURROUND SOUND system shown below:
One set of rear Surround Sound speakers
One Dolby Prologic Audio Amplifier (with Center Pre-Amp
Output and twin speakers)
One DOLBY SURROUND encoded source (either playback -
VCR,, VDP, etc.- or broadcast).
AUDIO
Dolby Prologic
Left Front Right Front
Speaker
I ('ENTER CHANNEL IN _,
jack's volum,_, bass, and treble[
level.,i can ba adjusted with the I
TV's VOLAV buttons or using I
the omscreen Menu controls. ,_
__ • L
R, L REAR
SURROUND
SPEAKERS RSPEAKER OUTPUT
lO:_ot.oc_ >
Audio CENTER CHANNEL PRE AMP OUT
Amplifier
LEFT SPEAKER
OH/NN_ L AUDIO OUTPUT
INPI
CENTER CHANNE;L
Use the noise sequencer (or scund test signal) on
the Dolby Prologic Amplifier. Adjust the Center
Channel volume level (using the Dolby Prologic
Amp's Center Channel Volurr e control) to equal
the left!right and surround speaker volume levels.
If Center Channel volume is s ill too low after
using the Dolby Prologic Amplifier, use the TV's
Volume control buttons to set desired Center
Channel level.
Make sure the TV's BALANCE control is set to
the middle podtion or the Center channel sound
image will no: be centered.
Use the Dolby Prologic Amp] fier's Volume
buttons to adjust the surround system sound level.
VIEWING AFIEA
REAR SURROUND SOUND ,_iPEAKERS
I
RIGHT SPEAKER
29
k_d
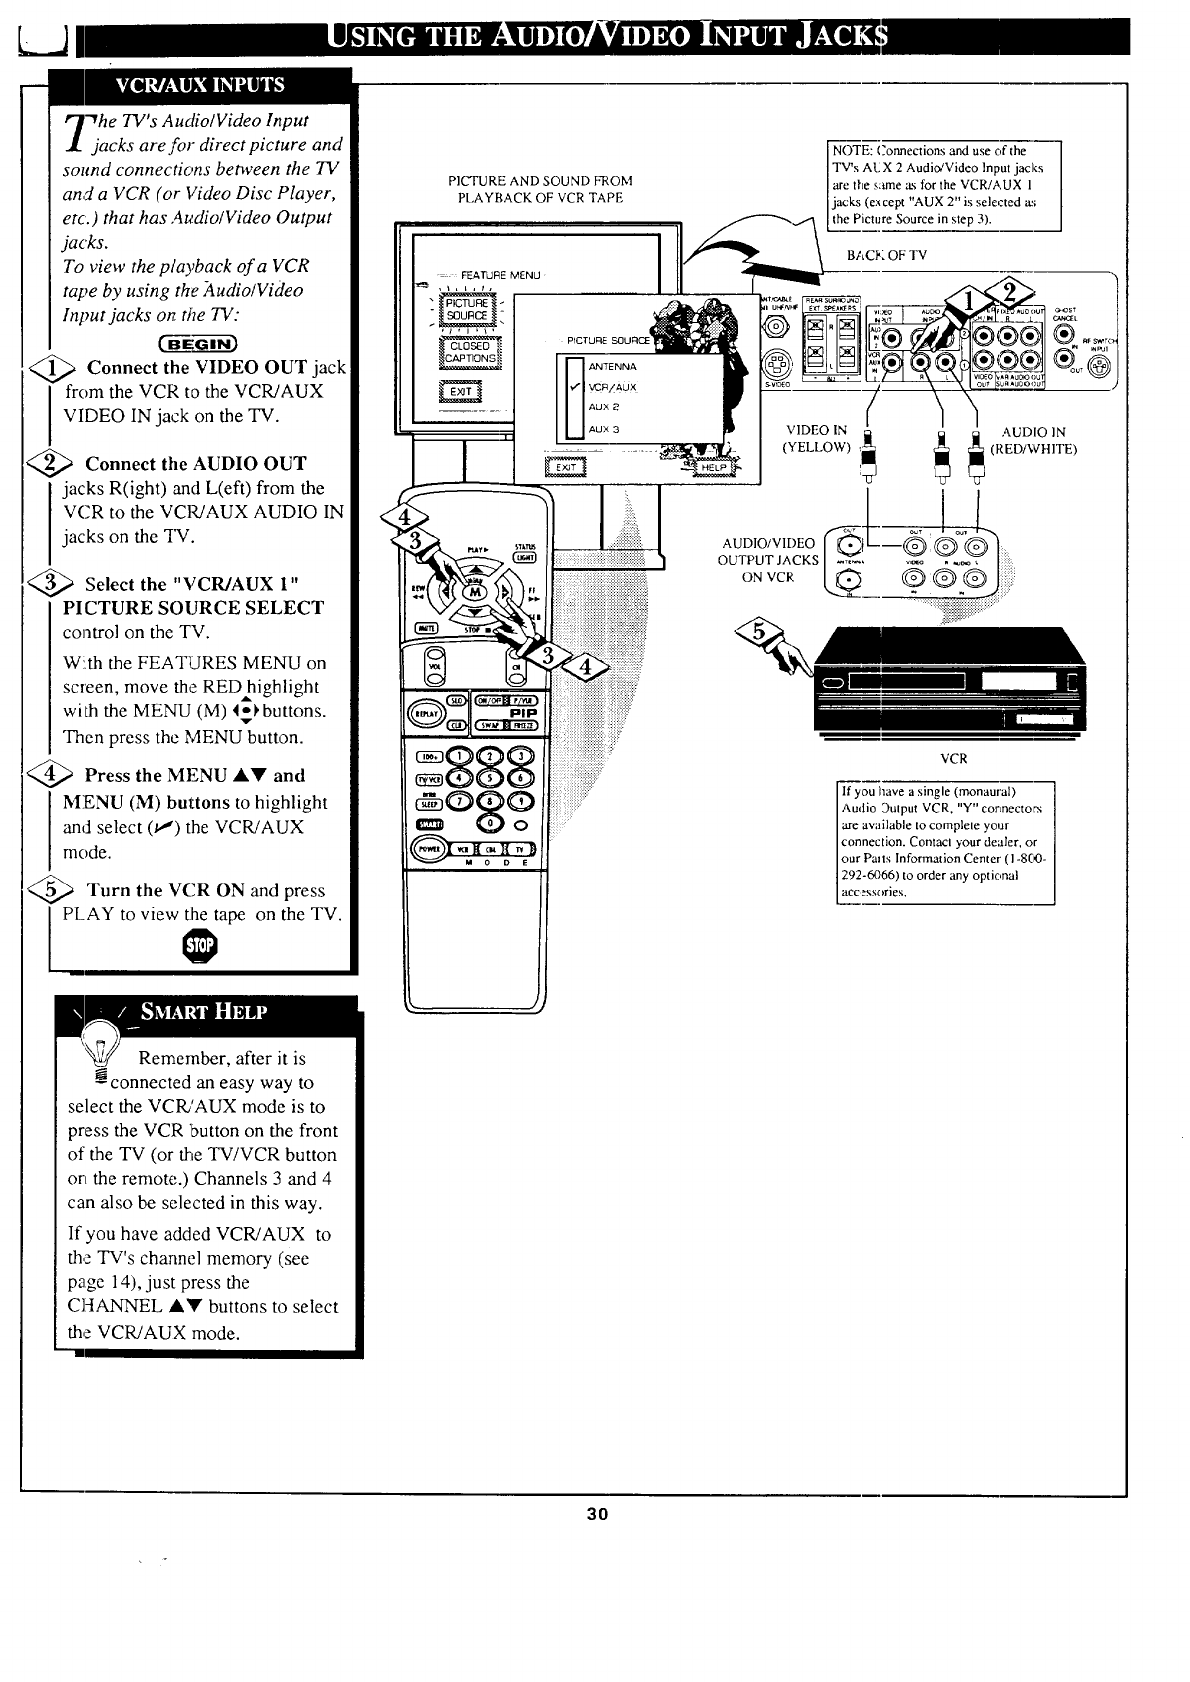
"Whe TV's AudiolVideo Input
jacks are for direct picture and
sound connections between the TV
and aVCR (or Video Disc Player,
etc.) that has Audio/Video Output
jacks.
To view the playback of a VCR
tape by using the _4udio/Video
Input jacks on fl_e TV:
<_ Connect the VIDEO OUT jack
I rom the VCR to the VCR/AUX
VIDEO IN jack on the TV.
<_ Connect AUDIO OUT
the
I jacks R(ight) and L(eft) from the
VCR to the VCl_AUX AUDIO IN
jacks on the _I'v'.
Select the "VCR/AUX 1"
PICTURE SOURCE SELECT
control on the TV.
W!.th the FEATURES MENU on
screen, move the RED highlight
with the MENU (M) 4_l'buttons.
Then press the MENU button.
>Press the MENU &_' and
MENU (M) buttons to highlight
and select (u,') the VCR!AUX
mode.
Turn the VCR ON and press
PLAY to view the tape on the TV.
PICTURE AND SOUND FROM
PLAYBACK OF VCR TAPE
<
PICTURE
NOTE: (?ormections and use of the
TV's A12X 2 Audio!Video Input jacks
the sanne a.sfor the VCR/AUX 1
jacks (except "AUX 2" is selected a:;
the Picture Source in step 3).
BACK OF TV
VCR
If you have a single (monaural)
Audio Dutput VCR, "Y" cortnectorx
are available to complete your
connection. Contact ),'our dealer, or
our Pails Information Center' ( 1-8(_3-
292-6066) to order any optional
accessories.
Remember, after it is
-_connected an easy way to
select the VCR/AUX mode is to
press the VCR 'button on the front
of the TV (or the TV!VCR button
on the remote.) Channels 3 and 4
can also be selected in this way.
If you have added VCR/AUX to
the TV's channel memory (see
page 14), just press the
CHANNEL A"!? buttons to select
the VCR/AUX mode.
30
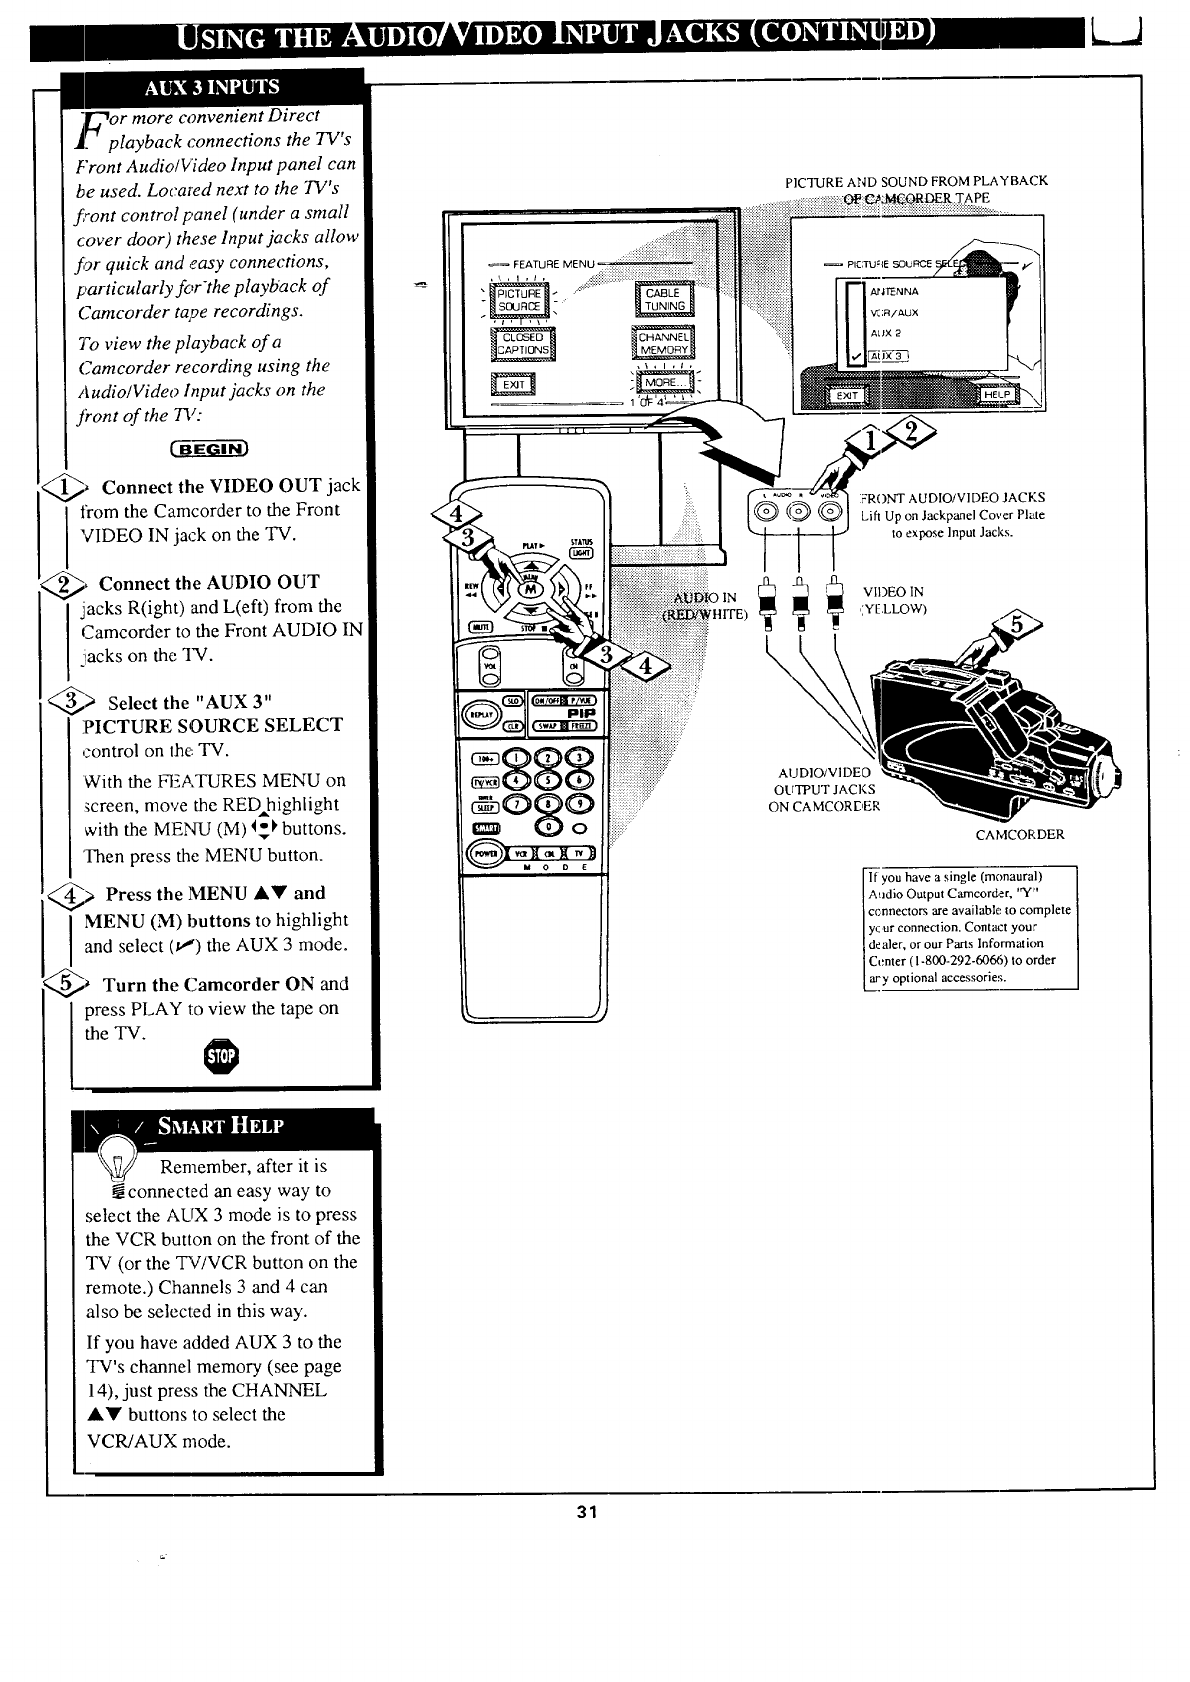
or more convenient Direct
.playback connections the TV's
Front Audio/Video Input panel can
be used. Locared next to the TV's
f_ont control panel (under a small
cover door) these Input jacks allow
fgr quick and easy connections,
particularly for-the playback of
Camcorder tape recordings.
To view the playback of a
Camcorder recording using the
Audio/Video Input jacks on the
front of the 72/:
@_ the VIDEO OUT
Connect jack
from the Camcorder to the Front
VIDEO IN jack on the TV.
,,,,_, Connect the AUDIO OUT
jacks R(ight) and L(eft) from the
Camcorder to the Front AUDIO IN
_iackson the TV.
@) Select the "AUX 3"
PICTURE SOURCE SELECT
control on the TV.
With the FEATURES MENU on
_creen, move the RED highlight
with the MENU (M) I_ buttons.
Then press the MENU button.
@) Press the MENU AY and
I ENU (M) buttons to highlight
and select (tl) the AUX 3 mode.
@_ Turn the Camcorder ON and
press PLAY to view the tape on
the TV.
.................... _iiii_
ii!iiiiiiiiiiiiiiiiiiiiiiiiiiiiiiiiiiiiiii!iiiii
°87
PICTURE AND SOUND FROM PLAYBACK
t:iiii::iiiiiiiii v:.:_/_u×
:_:: [_
:FRONT AUDIO/VIDEO JACKS
Lift Up on Jackpanel Cover Plate
to expose Input Jacks.
VIDEO IN
\,
AUDIO/VIDEO
OLITPUT JACKS
ON CAMCORDER
CAMCORDER
lf you have a single (monaural) ]
Audio Output Camcorder, "Y" [
connectors are available: to complete ]
y_ur connection. Contact your /
de aler, or our Parts Informalion /
Center (1-800-292-60&_) to order ]
ary optional accessories. [
Remember, after it is
connected an easy way to
select the AUX 3 mode is to press
the VCR button on the front of the
TV (or the TV/VCR button on the
remote.) Channels 3 and 4 can
also be selected in this way.
If you have added AUX 3 to the
TV's channel memory (see page
14), just press the CHANNEL
AY buttons to select the
VCR/AUX mode.
31
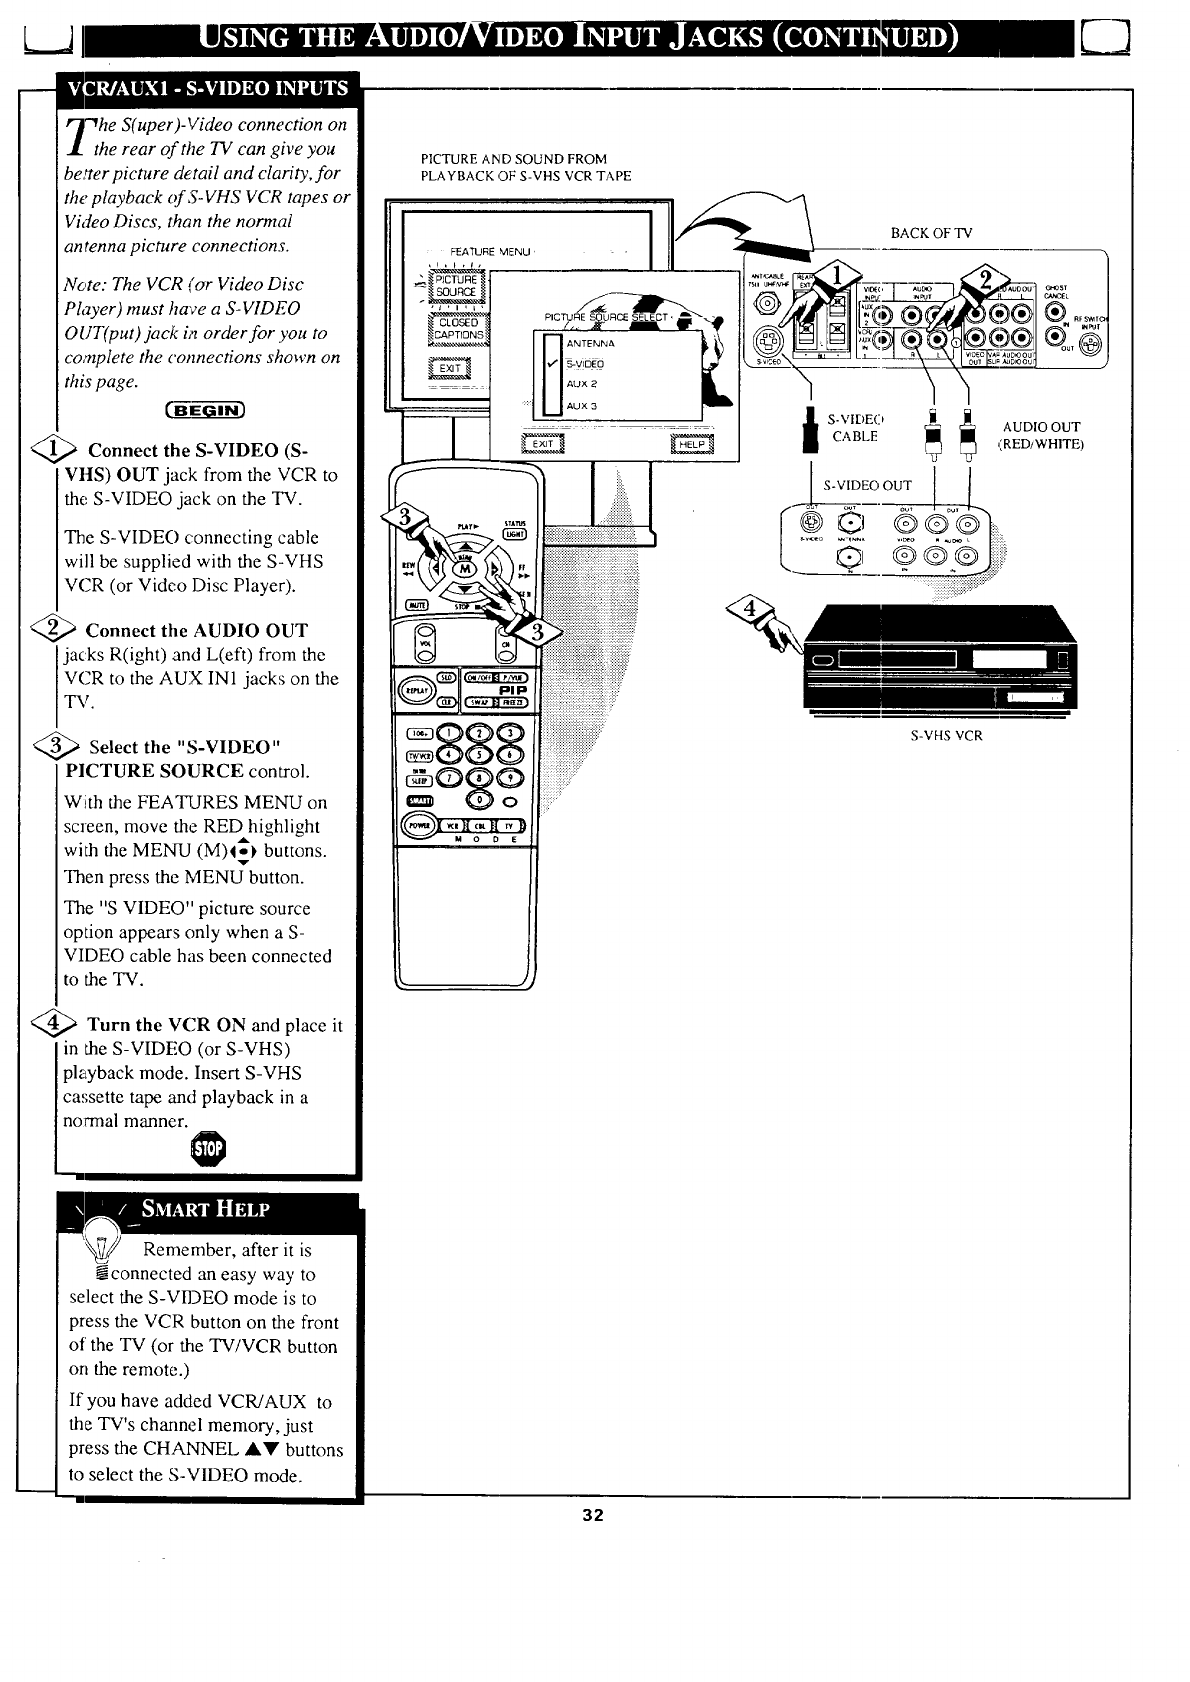
"WheS( uper )-Video connection on
the rear of the TV can give you
better picture detail and clarity for i
the playback of S-VHS VCR tapes or
Video Discs, than the normal
an tenna picture connections.
Note: The VCR (or Video Disc
PhTyer) must have a S-VIDEO
OUT(put)jack i,_ order for you to
complete the connections shown on
ithis page.
C_EG--_i-ff)
Connect the S-VIDEO (S-
VI-IS) OUT jack from the VCR to
the S-VIDEO jack on the TV.
The S-VIDEO connecting cable
will be supplied with the S-VHS
VCR (or Video Disc Player).
<_ Connect the AUDIO OUT
jacks R(ight) and L(eft) from the
VCR to the AUX IN1 jacks on the
TV.
a Select the "S-VIDEO"
PICTURE SOURCE control.
With the FEATURES MENU on
screen, move the REDhighlight
with the MENU (M)4-_ buttons.
Then press the MENU button.
The "S VIDEO" picture source
option appears only when a S-
VIDEO cable has been connected
to the TV.
@Turn the VCR ON and place it
in the S-VIDEO (or S-VHS)
playback mode. Insert S-VHS
cassette tape and playback in a
normal manner.
"'!
PICTURE AND SOUND FROM
PLAYBACK OF S-VHS VCR TAPE
FEATURE MENU,
gggg
gog9
:::::::::::::::::,..•
:::::::::::::::::::::::::_::.::::..•
_,,,..,....,..,,..,....,._,
_"ilxiiiiiiiiiiiiiiiiiiiiiiiiii
iiiiiiiiiiiiiiiiii!ii!__:
BACK OF TV
iS-VIDEO _
CABLE
l S-VIDEO OUT
AUDIO OUT
(RED/WHITE)
S-VHS VCR
Remember, after it is
connected an easy way to
select the S-VIDEO mode is to
press the VCR button on the front
of the TV (or the TV/VCR button
on the remote.)
If you have added VCR/AUX to
the TV's channel memory, just
press the CHANNEL ,IkV buttons
to select the S-VIDEO mode.
"-'1
32
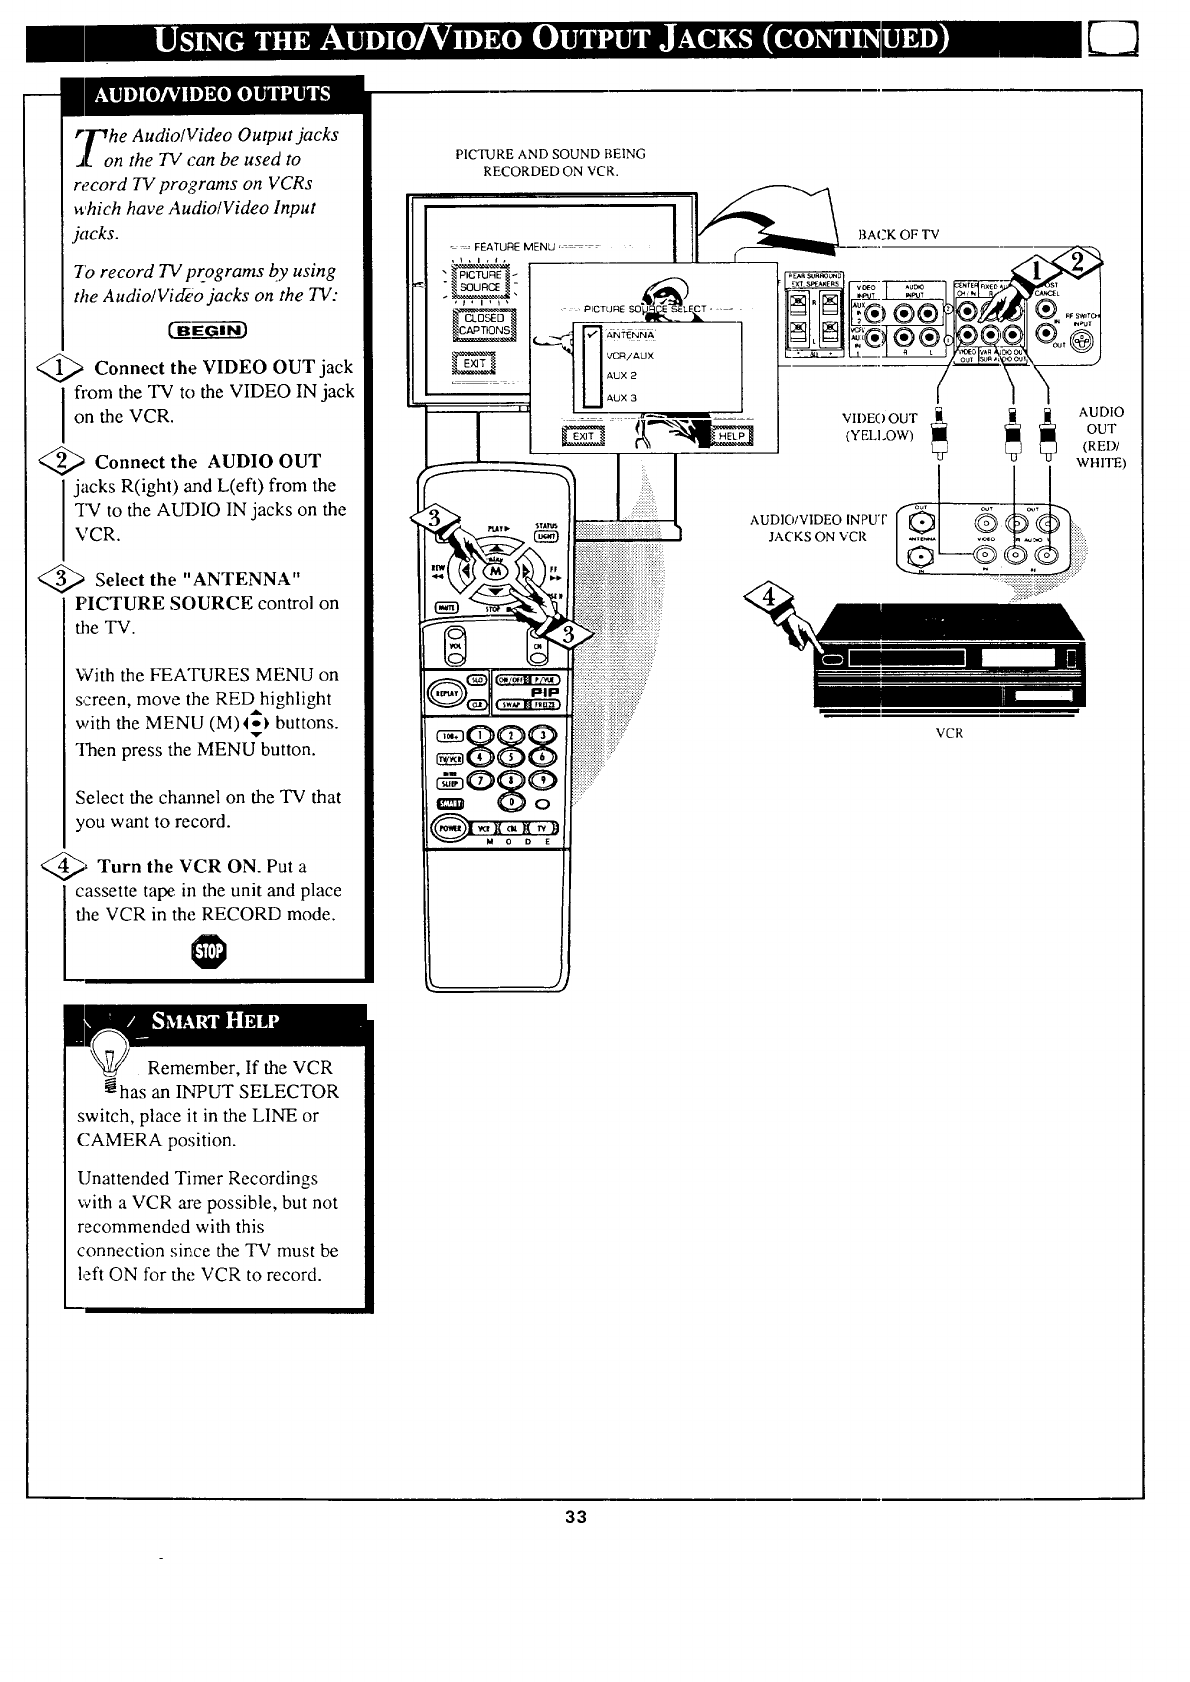
r_r_he Audio/Video Output jacks
J[ on the TV can be used to
record TV programs on VCRs
which have Audio/Video Input
jacks.
7'0 record TV programs by using
the Audio/Vid_;o jacks on the TV:
Ee--gr
Connect the VIDEO OUT jack
Ifrom the TV to the VIDEO IN jack
on the VCR.
<_ Connect the AUDIO OUT
jacks R(ight) and L(eft) from the
TV to the AUDIO IN jacks on the
VCR.
Select the "ANTENNA"
PICTURE SOURCE control on
the TV.
With the FEATURES MENU on
screen, move the RED highlight
with the MENU (M)4_ buttons.
Then press the MENU button.
Select the channel on the TV that
you want to record.
@, Turn the VCR ON. Put a
cassette tape in the unit and place
the VCR in the RECORD mode.
PICTURE AND SOUND BEING
RECORDED ON VCR.
.... FEATURE MENU ...... BACK OF TV
Reme, mber, If the VCR
_has an INPUT SELECTOR
switch, place it in the LINE or
CAMERA position.
Unattended Timer Recordings
with a VCR are possible, but not
recommended with this
connection since the TV must be
left ON for the VCR to record.
33
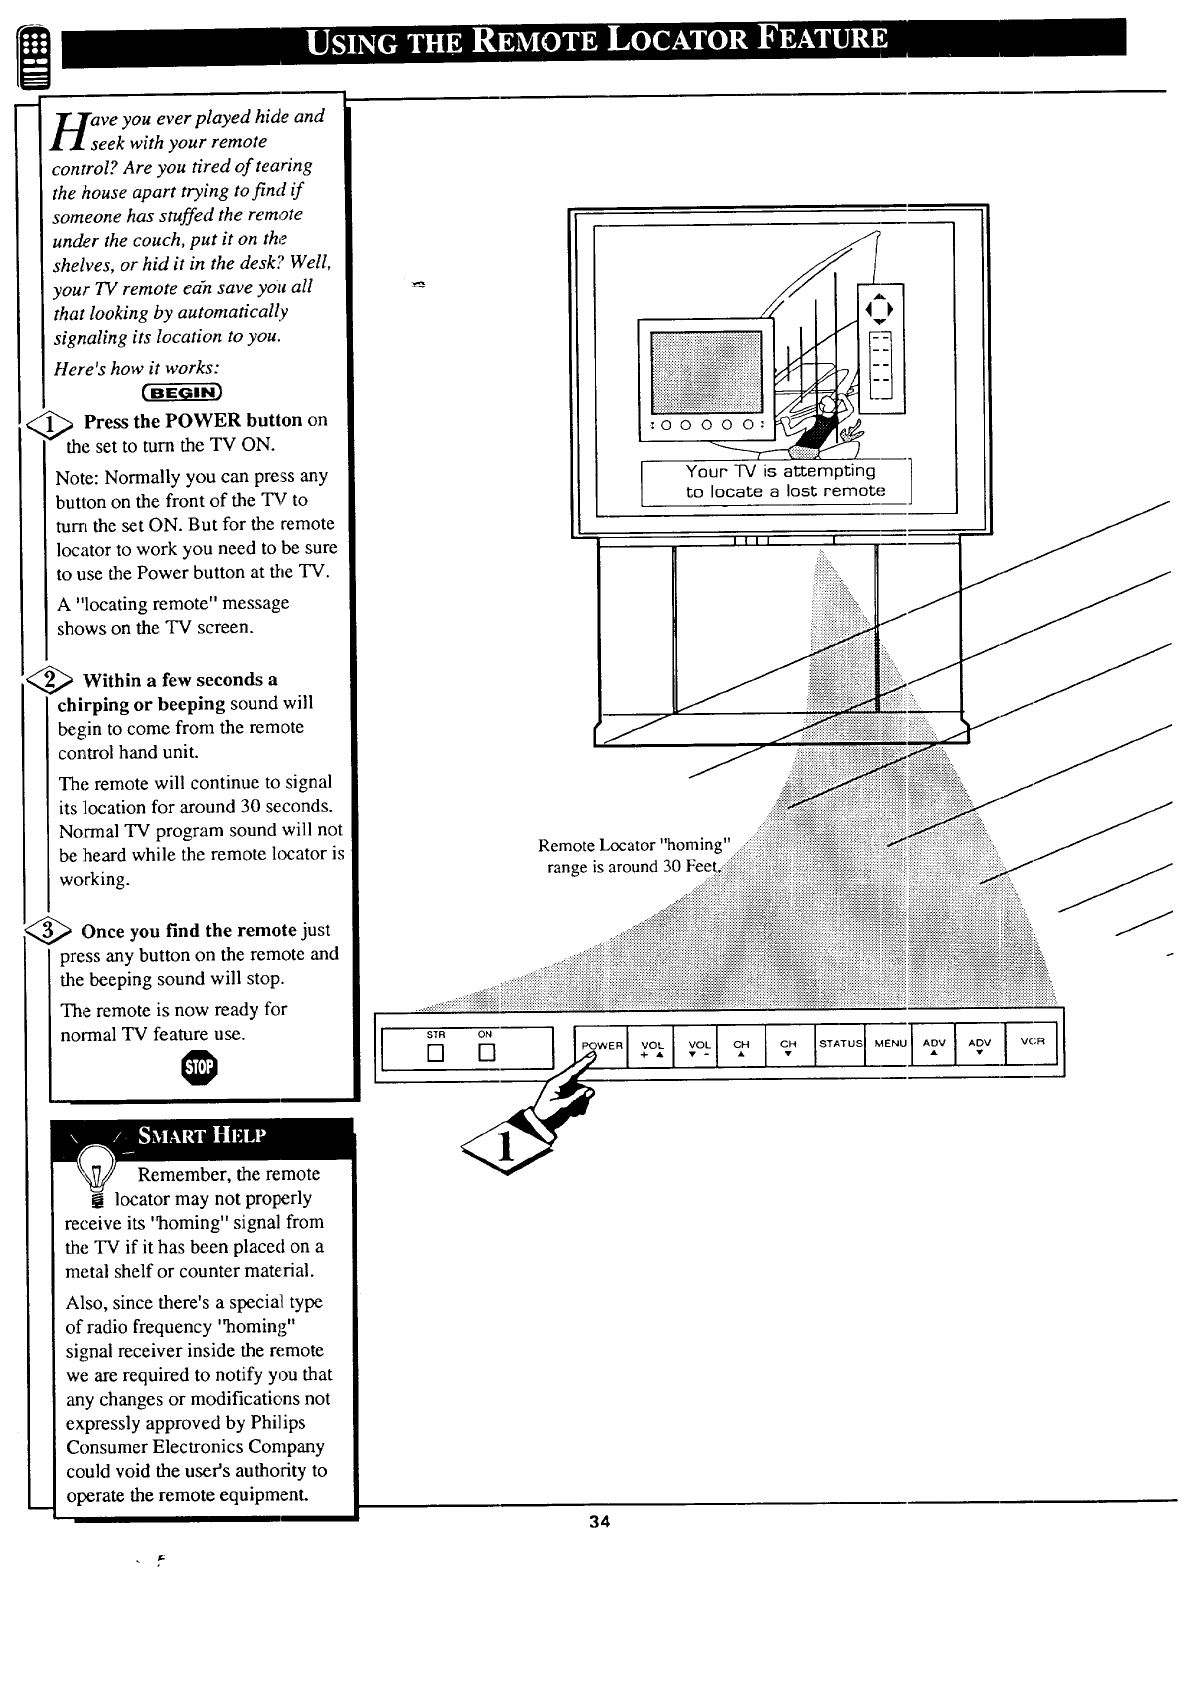
asveyou ever played hide and
eek with your remote
control? Are you tired of tearing
_hehouse apart trying to find if
someone has stuffed the remote
under the couch, put it on the
shelves, or hid it in the desk'.; Well,
vour TV remote edn save you all
that looking by automatically
signaling its location to you.
Here's how it works:
<_ Press the POWER button on
the set to turn the TV ON.
Note: Normally you can press any
button on the front of the TV to
turn the set ON. But for the remote
Iocator to work you need to be sure
to use the Power button at the TV.
A "locating remote" message
shows on the TV screen.
<_ Within a few seconds a
chirping or beeping sound will
begin to come from the remote
control hand unit.
The remote will continue to signal
its ;location for around 30 seconds.
Normal TV program sound will not
be ;heard while the remote locator is
working.
_Once you find the remote just
press any button on the remote and
the beeping sound will stop.
The remote is now ready for
normal TV feature use.
Remember, the remote
locator may not properly
receive its 'qaoming"signal from
the TV if it has been placed on a
metal shelf or counter material.
Also, since there's a special type
of radio frequency "homing"
signal receiver inside the remote
we are required to notify you that
any changes or modifications not
expressly approved by Phi]ips
Consumer Electronics Company
could void the user's autho:rity to
operate the remote equipment.
:oo
Your TV is attempting
to locate a lost remote
/
iiiiiiiiiii!iiiiiiiiiiiii!iiiifiiiiiiiiiiiiiiiiiiiiiiii!iiii :
Remote Locator "homing"
range is around 30 Fee
$TR
[]
34
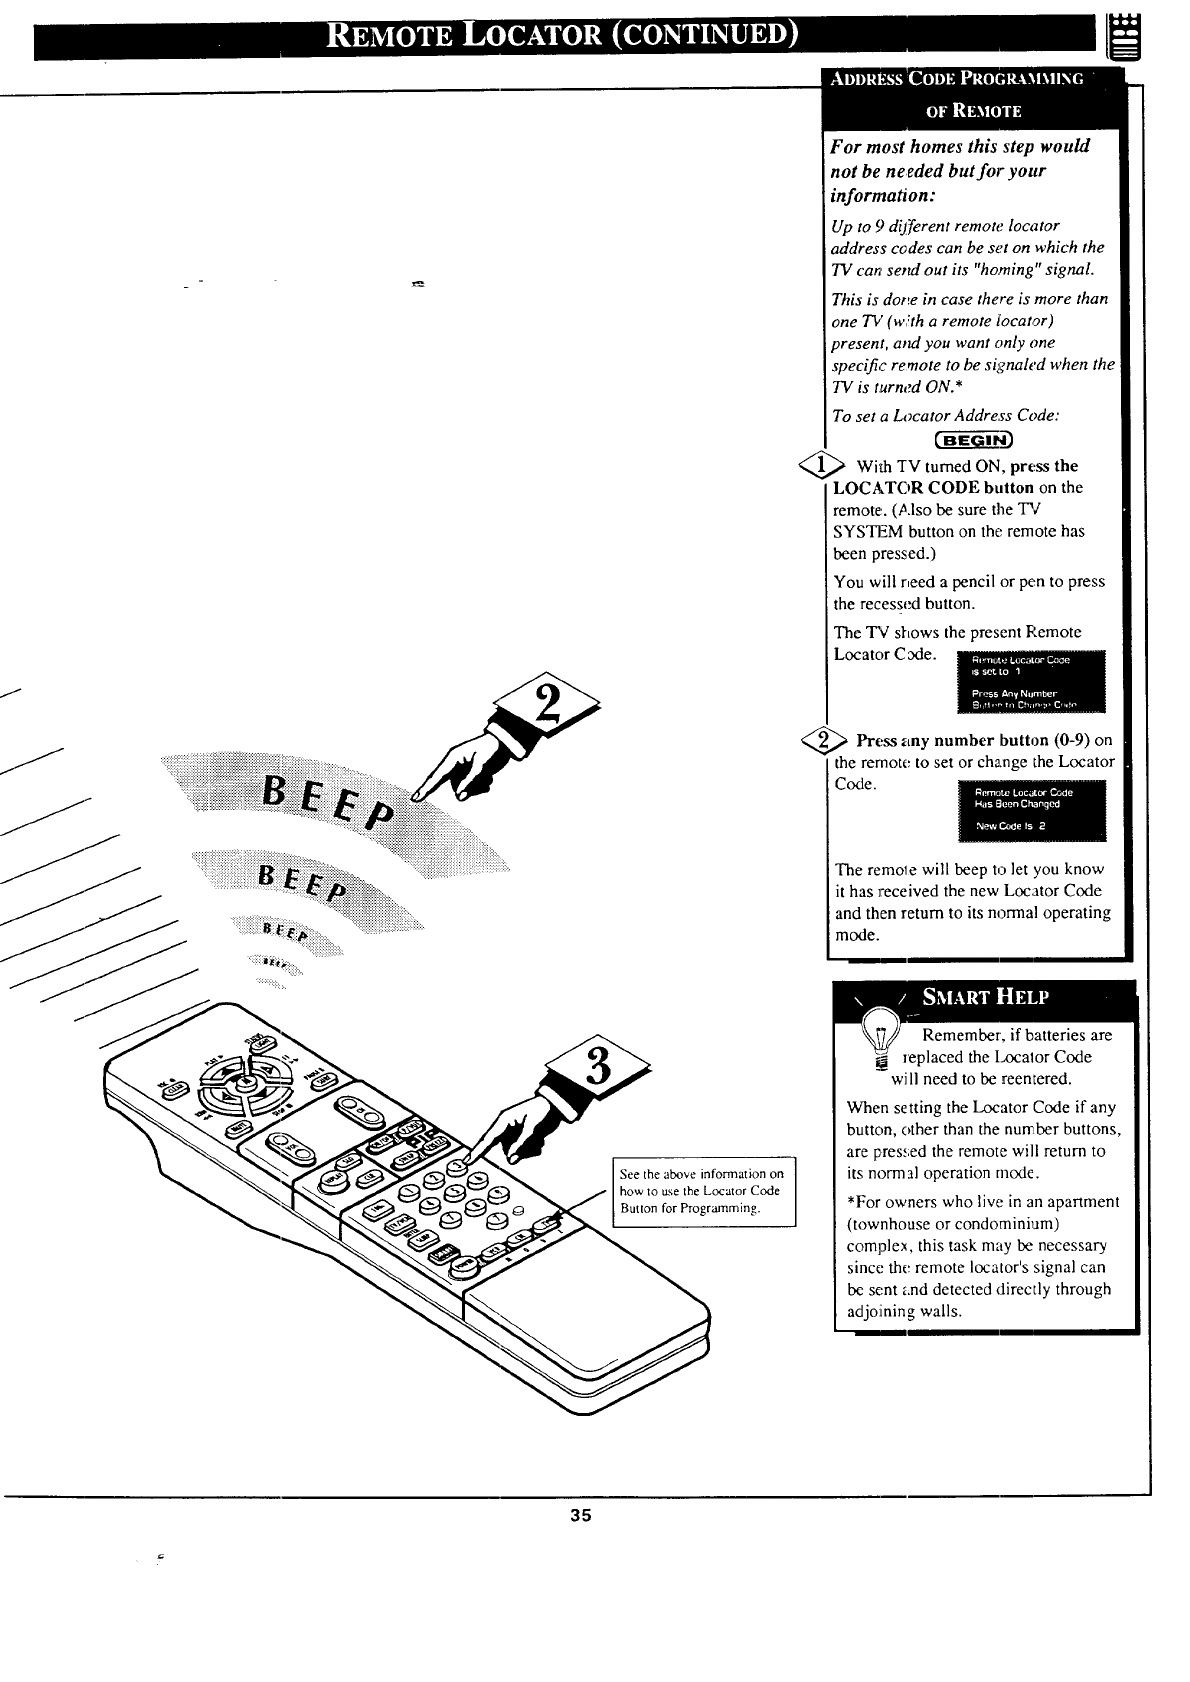
For most homes this step,would
not be needed but for your
information:
Up to 9 different remote locator
_ddress codes can be set on which the
TV can semi out its "homing" signal.
This is dot_e in case there is more than
one TV (w!th a remote tocator)
oresent, amt you want only one
specific remote to be signah'd when the
TV is turned ON.*
To set aLocator Address Code:
<_ With "I-V turned ON, press the
LOCATOR CODE button on the
remoter. (Also be sure the TV
SYSTEM button on the remote has
been pressed.)
You will r,eed a pencil or pen to press
the recessed button.
The "IV shows the present Pemote
Locator C 3de.
_,,_ Press number button (0-9)
any on
the rernote to set or change the Locator
Code.
The remo_e will beep t,-_let you know
it has received the new Locator Code
and then return to its normal operating
mode.
I
See the above information on ]
I
how to use the Locator Code
Button for Programming.
Remember, if batteries are
replaced the Localor Code
will need to be reentered.
When setting the Locator Code if any
button, other than the number buttons,
are pres_,:ed the remote will return to
its normal operation mode.
*For owners who live in an apartment
(townhouse or condominium)
complex, this task may be necessary
since the remote locator's signal can
be sent and detected directly through
adjoining walls.
35
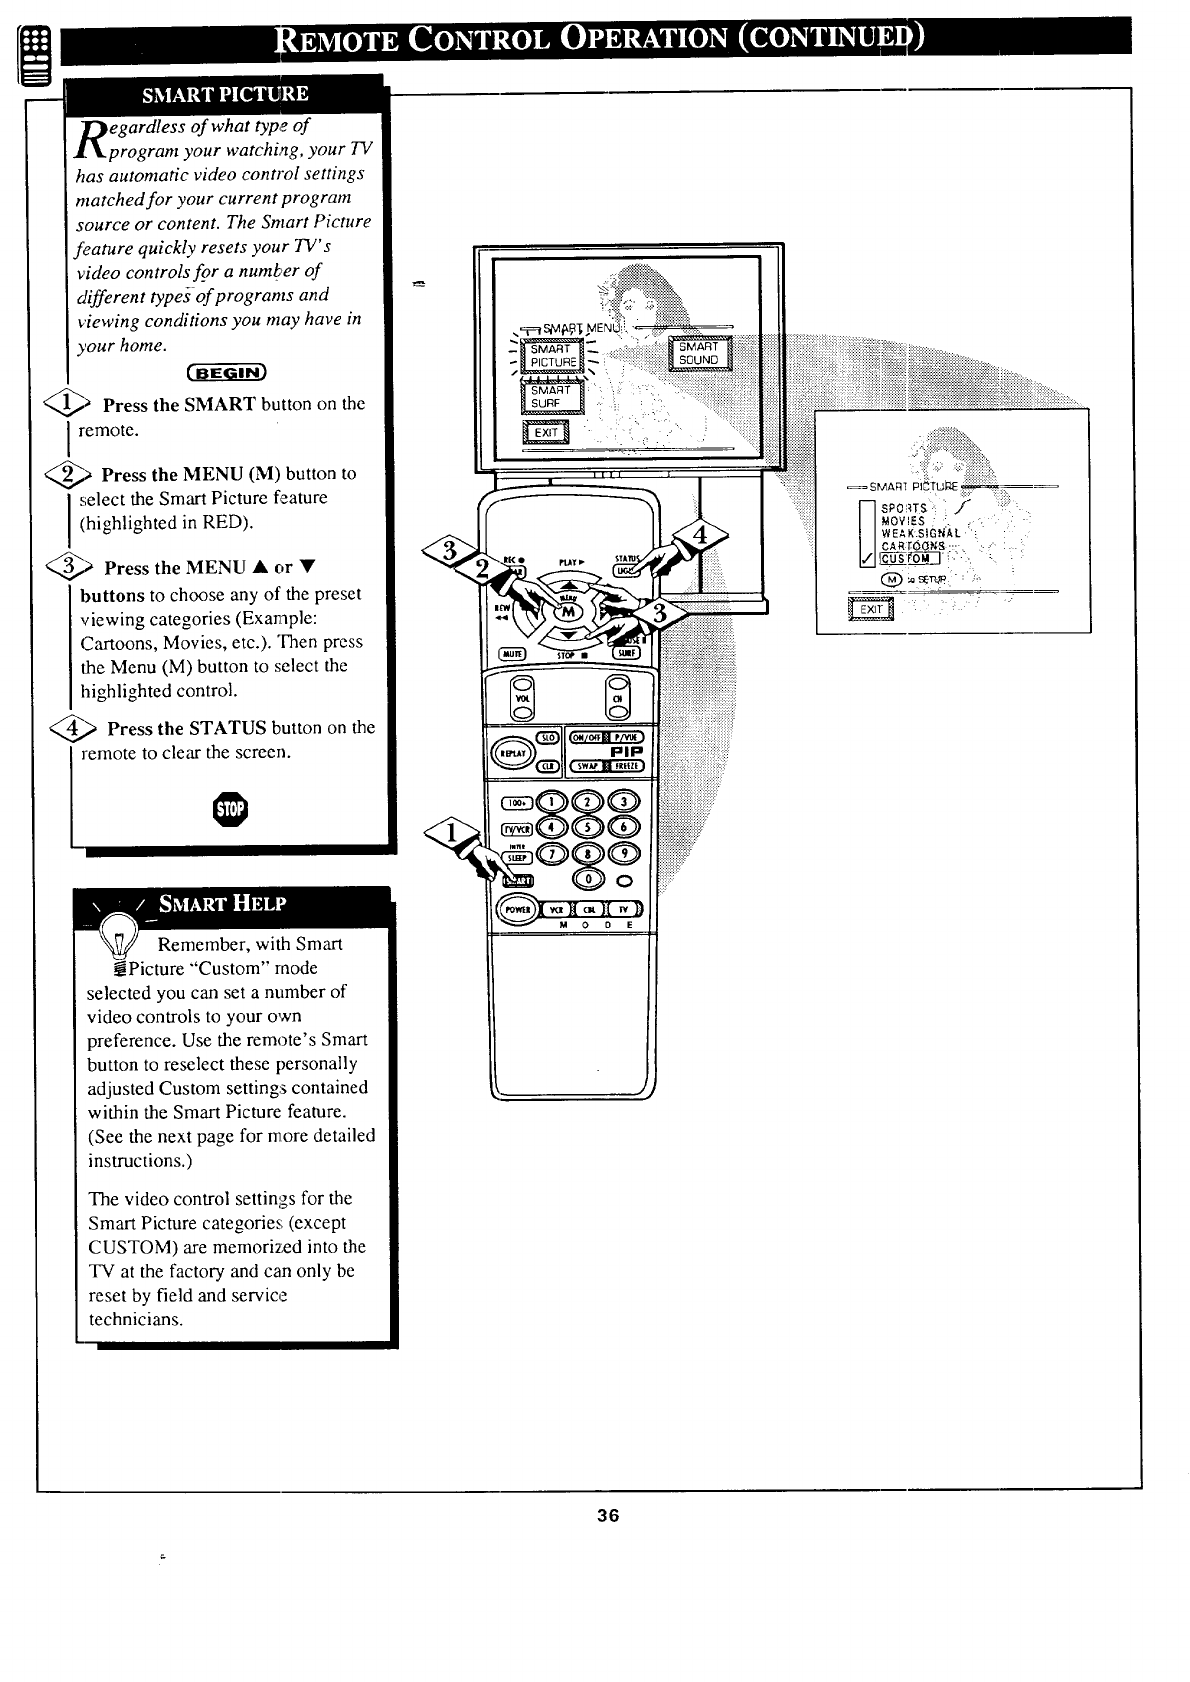
egardless of what type of
program your watching, your TV
has automatic video control settings
matched for your current program
source or content. The Smart Picture
feature quickly resets your TV's
video controls f_ora number of
different types of programs and
viewing conditions you may have in
),our home.
@_ Press the SMART button on the
remote.
aPress the MENU (M) button to
select the Smart Picture feature
(highlighted in RED).
@,_ Press the MENU _k or •
buttons to choose any of the preset
viewing categories (Example:
Cartoons, Movies, etc.). Then press
the Menu (M) button to select the
highlighted control.
@_ Press the STATUS button on the
remote to clear the screen.
Remember, with Smart
_Picture "'Custom" mode
selected you can set a number of
video controls to your own
preference. Use the remote's Smart
button to reselect these personally
adjusted Custom settings contained
within the Smart Picture feature.
(See the next page for more detailed
instructions.)
The video control settings for the
Smart Picture categories; (except
CUSTOM) are memorized into the
TV at the factory and can only be
reset by field and service
technicians.
ST_ •
8 {)
@®$?
_:.::iii!_:;::
J J_OVIES ':. ......'
I I CARi':Od_,S-:-. :...- : :
36
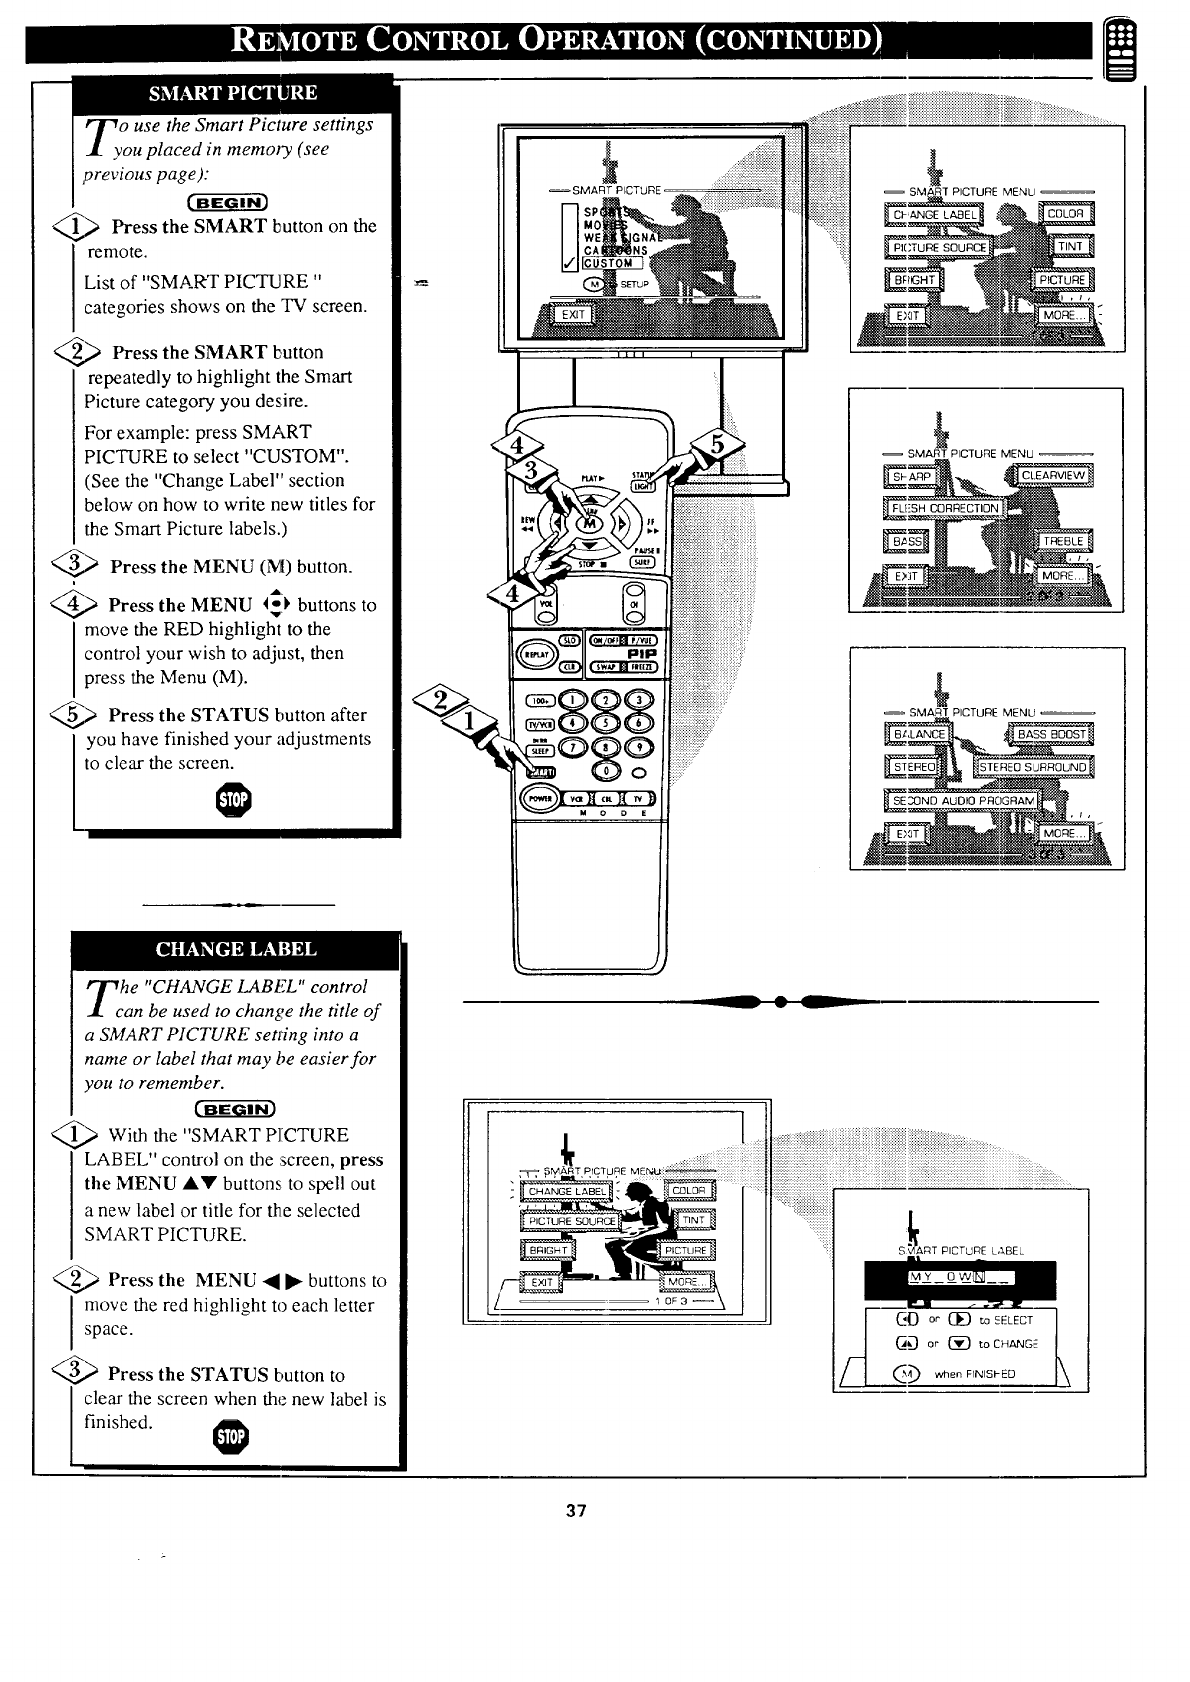
Zv o use the Smart Picture settings
ou placed in memoly (see
previous page):
Press the SMART button the
on
remote.
List of "SMART PICTURE "
categories shows on the TV screen.
Press SMART button
the
repeatedly to highlight the Smart
Picture category you desire.
For example: press SMART
PICTURE to select "CUSTOM".
(See the "Change Label" section
below on how to write new titles for
the Smart Picture labels.)
Press the MENU (M) button.
i
Press the MENU I_), buttons to
move the RED highlight to the
control your wish to adjust, then
press the Menu (M).
Press the STATUS button after
you have finished your adjustments
to clear the screen.
he "CHANGE LABEL" control
an be used to change the title of
a SMART PICTURE setffng into a
name or label that may be easier for
you to remember.
_",> With the "SMART PICTURE
LABEL" control on the screen, press
the MENU A.V buttons to spell out
a new label or title for the selected
SMART PICTURE.
@ Press the MENU -_ • buttons to
move the red highlight to each letter
space.
Press the STATUS button to
clear the screen when the new label is
finished.
.... ....,:.:+:+:+:.:::::::::::::.:::::.:+:.:,:.:.:.:........
._.x+:.:.:.:.:+:_:+:.:.:.:.:+:.:.:.:.:.:.:.:.:.:.:.:.:.:.:+:.:.x+:.x._.:+:+x,.._
SMART PICTURE PICTURE MENU
__ • L
SMART PICTURE MENU
SMART PICTURE MENU
I
PPCTURE
37
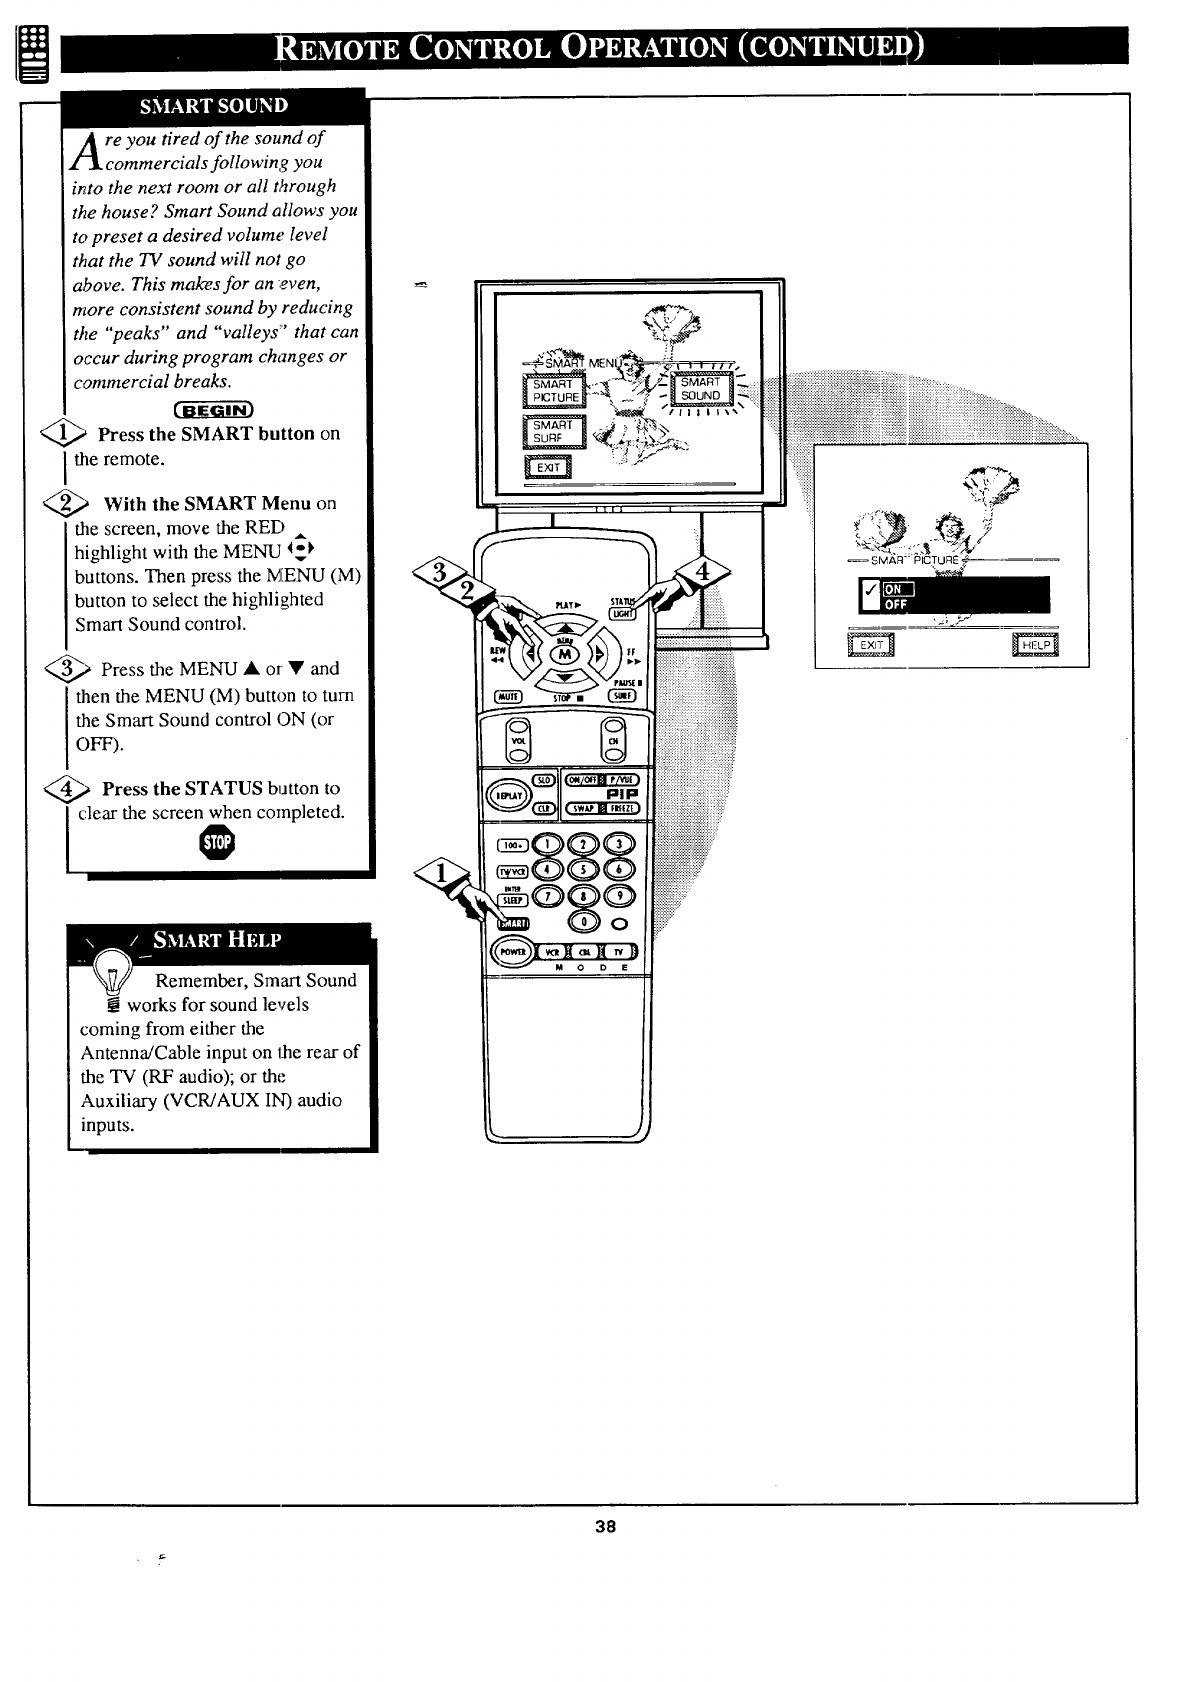
re you tired of the sound of
_ommercials following you
into the next room or all t,_rough
the house? Smart Sound allows you
to preset a desired volume level
that the TV sound will not go
above. This mak-es for an ;even,
more consistent sound by reducing
the "peaks" and "valleys"' that can
occur during program changes or
commercial breaks.
_ Press the SMART button on
the remote.
_,_ With the SMART on
Menu
the screen, move the RED
highlight with the MENU 4_,,
buttons. Then press the MENU (M)
button to select the highlighted
Smart Sound control.
_,,_ Press MENU • • and
the or
then the MENU (M) button to turn
the Smart Sound control ON (or
OFF).
_.a Press the STATUS button to
clear the screen when completed.
Remember, Smart Sound
works for sound levels
coming from either the
Antenna/Cable input on the rear of
the TV (RF audio); or the
Auxiliary (VCR/AUX IN) audio
inputs.
.,_ 11 I | I\
SIWAFI- PICTURE
38
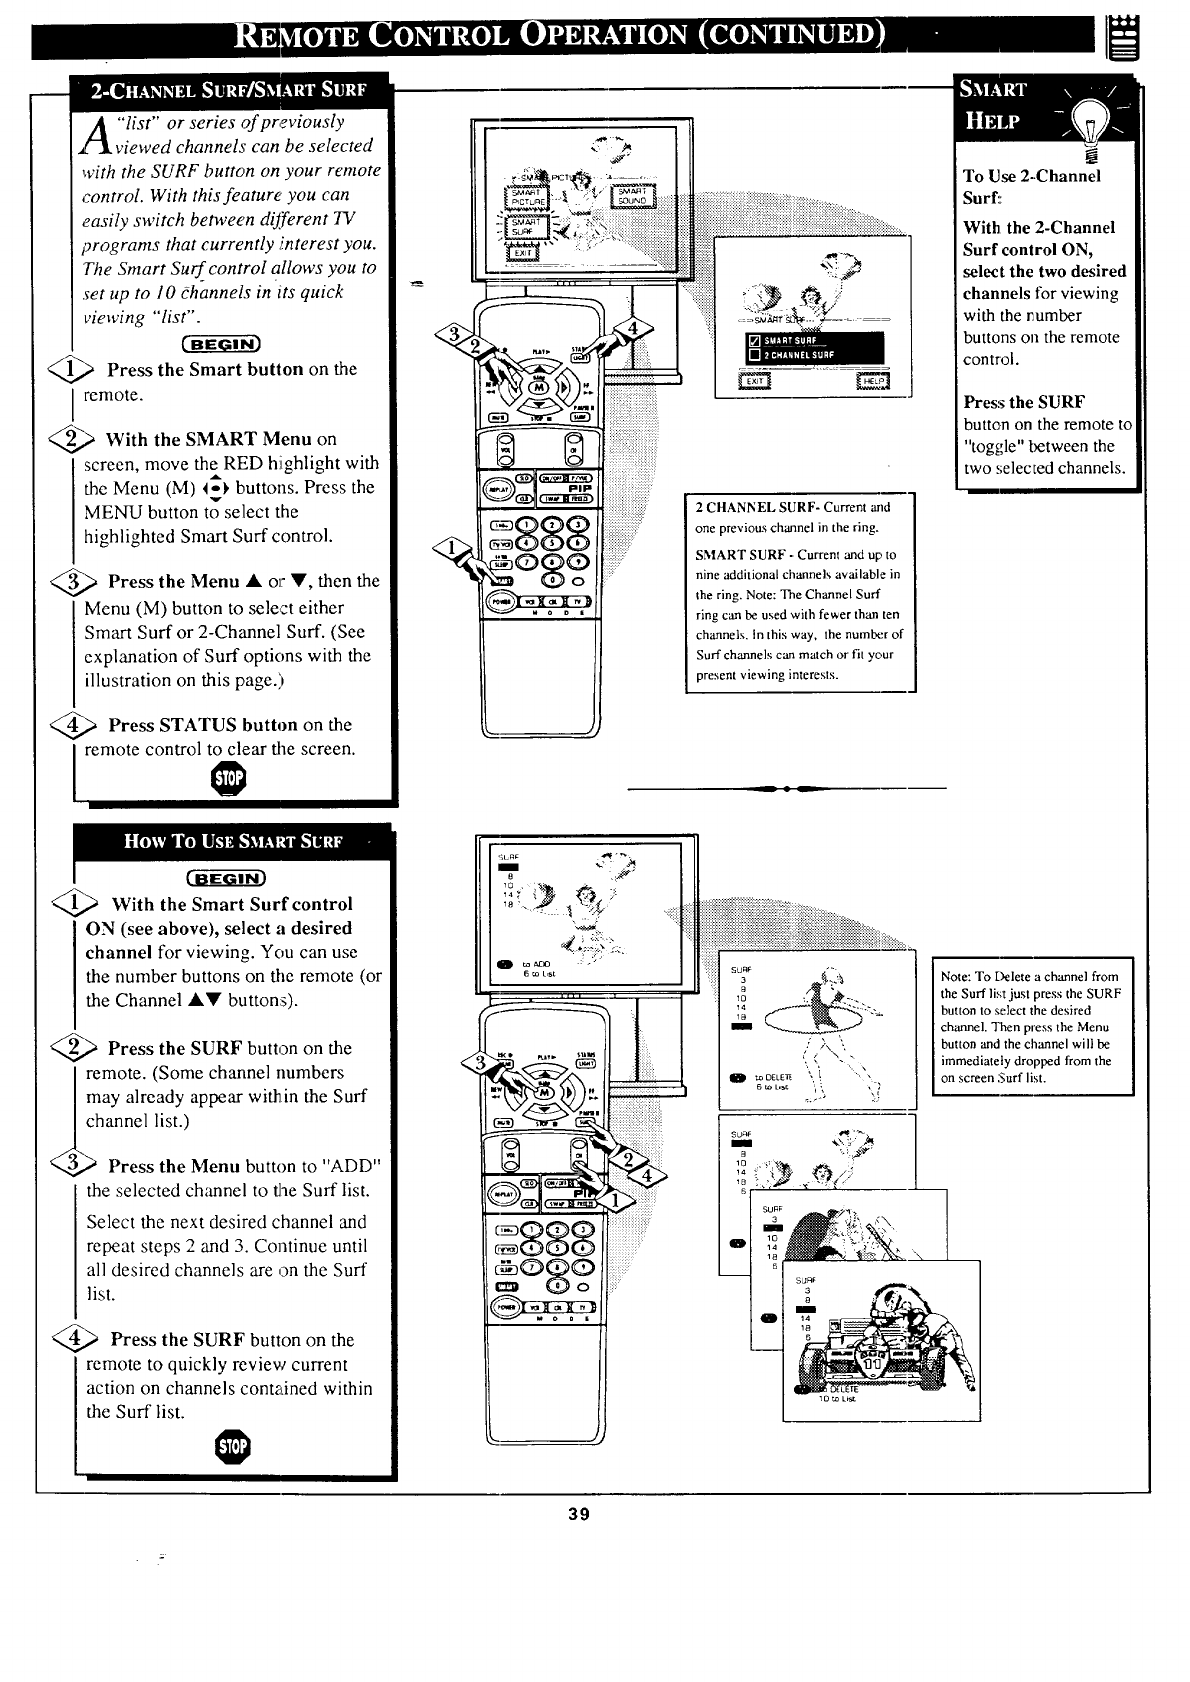
"list" or series of previously
viewed channels can be selected
with the SURF button on your remote
control. With this feature you can
easily switch between different TV
programs that currently ,interest you.
The Smart Surf__control allows you to
set up to 10 dhannels in its quick
viewing "list".
@> Press the on
Smart button the
I remote.
With the on
SMART Menu
screen, move theRED hJighlight with
the Menu (M) 4-1, buttons. Press the
v
MENU button to select the
highlighted Smart Surf control.
_.,,_ Press the Menu • V, then the
or
Menu (M) button to select either
Smart Surf or 2-Channel Surf. (See
explanation of Surf options with the
illustration on this page.)
Press STATUS button the
on
remote control to clear file screen.
#,,
.".._ _ :::::::::::::::::::::
,, _ • _ _:..: ;_.._::::::::::::::::::::::::::::::::
:: .........< !ii!iiiiiiiii
......
I-3 Q
1
2CHANNEL SURF- Current and
one previous channel in the ring.
SMART SURF -Current and up to
nine additional channels available in
the ring. Note: The Channel Surf
ring can be used with fewer than ten
channels, in this way, the numlx:r of
Surf channels can match or fit your
present viewing interests.
To Use 2--Channel
Surf::
With the 2-Channel
Surf control ON,
select the two desired
channels for viewing
with the number
buttons on the remote
control.
Press the SURF
button on the remote to
"toggle" between the
two selected channels.
With the Smart Surf control
ON (see above), select a desired
channel for viewing. You can use
the number buttons on the remote (or
the Channel •Y buttons).
_,) Press the SURF button on the
remote. (Some channel numbers
Imay already appear within the Surf
/_ channel list.)
@ Press the Menu button to "ADD"
the selected channel to the Surf list.
Select the next desired channel and
repeat steps 2 and 3. Continue until
all desired channels are on the Surf
list.
Press the SURF button on the
remote to quickly review current
action on channels contained within
the Surf list.
<
:::::::://
....
39
I Note: To Delete a channel from
the Surf list just press the SURF
button to select the desired
charmel. Then press the Menu
button and the channel will be
immediately dropped from the
on screen Surf list.

ur remote control is set to
ork your TV and many
infrared remote (1R ) control
VCRs. However, an easy one-
time step may be necessary
before the remote will work your
VCR.
Try this initiakcheck to see if
going on to the following section
is necessary.
(g-ga-r
<_ Press the VCR System
I button on the remote.
,_ Point remote toward VCR
and press the POWER button.
3_ Does the remote turn the VCR
ON?
IF YES, t_1 and try the other
VCR buttons on the remote. If
they also work the VCR, then
the remote is ready and no
further steps are needed.
If NO, continue...
VCR
©
@,_ First look up a TWO-DIGIT
I emote code number for your
brand VCR before going through
the simple "1,2,3" steps (on the
following page).
continue to next p_tge
Remember, if more than
___one number is listed, you II
may have to try more than the first I
two-digit code given in order to
locate your VCR's remote code.
VCR REMOTE
BRAND CODE NO.
Akai 24, 25, 36
Capehart 33
Cenoid 13
Curtis Mathes 42
Daewoo 33
Emerson 20, 31, 34, 40
Fisher 06, 07
Goldstar 23
Go Video 45, 46
Hitachi 03, 51
JVC 14, 47, 48
Magnavox 00, 05
Matsushita 01,02
Mitsubishi 16, 17, 38, 39, 50
Multitech 27,28
NEC 21
%
VCR REMOTE
BRAND !;;ODE NO,
Panasonic 01,02, 52
Philips 00, 05
Philips Video CD 37
RCA 04, 32, 42, 43, 44
Samsung 22, 30
Sansui 49
Sanyo 13
Sears 08
Sharp 11, 12
Shintom 35
Sony 09, 10,41
Teknika 26
Toshiba 18, 19
Video Concepts 29
Zenith 15
4O

Tow that you have looked up
1¥the two-digit Remote Code
Number for your brand of VCR
(on previous page), you are
ready to follow the four simple
steps below.
Please read through steps 1-4
before beginning.
Press and release the REC
I(RECORD) button.
@,_ Within seconds afterthirty
releasing the REC button, press
and release the VCR System
button.
@,_ Within thirty seconds after
releasing the VCR System
button, ENTER THE TWO
DIGIT CODE NUMBER for
the desired VCR. The remote is
now ready to send commands to
the VCR.
Point the remote at the VCR.
Press the POWER button on the
Try it out. The Channel
__.and VCR buttons on the
remote should now operate the
VCR.
Remember, if this doesn't work
the first time, repeat steps using
the same remote code number.
If after a second try the remote
does not operate your VCR, and
there are more code numbers
listed for your brand VCR, use the
next listed code number.
If after repeated attempts the code
number method does not work
your VCR, try the "VCR
SEARCH" method on page 44.
VCR
41
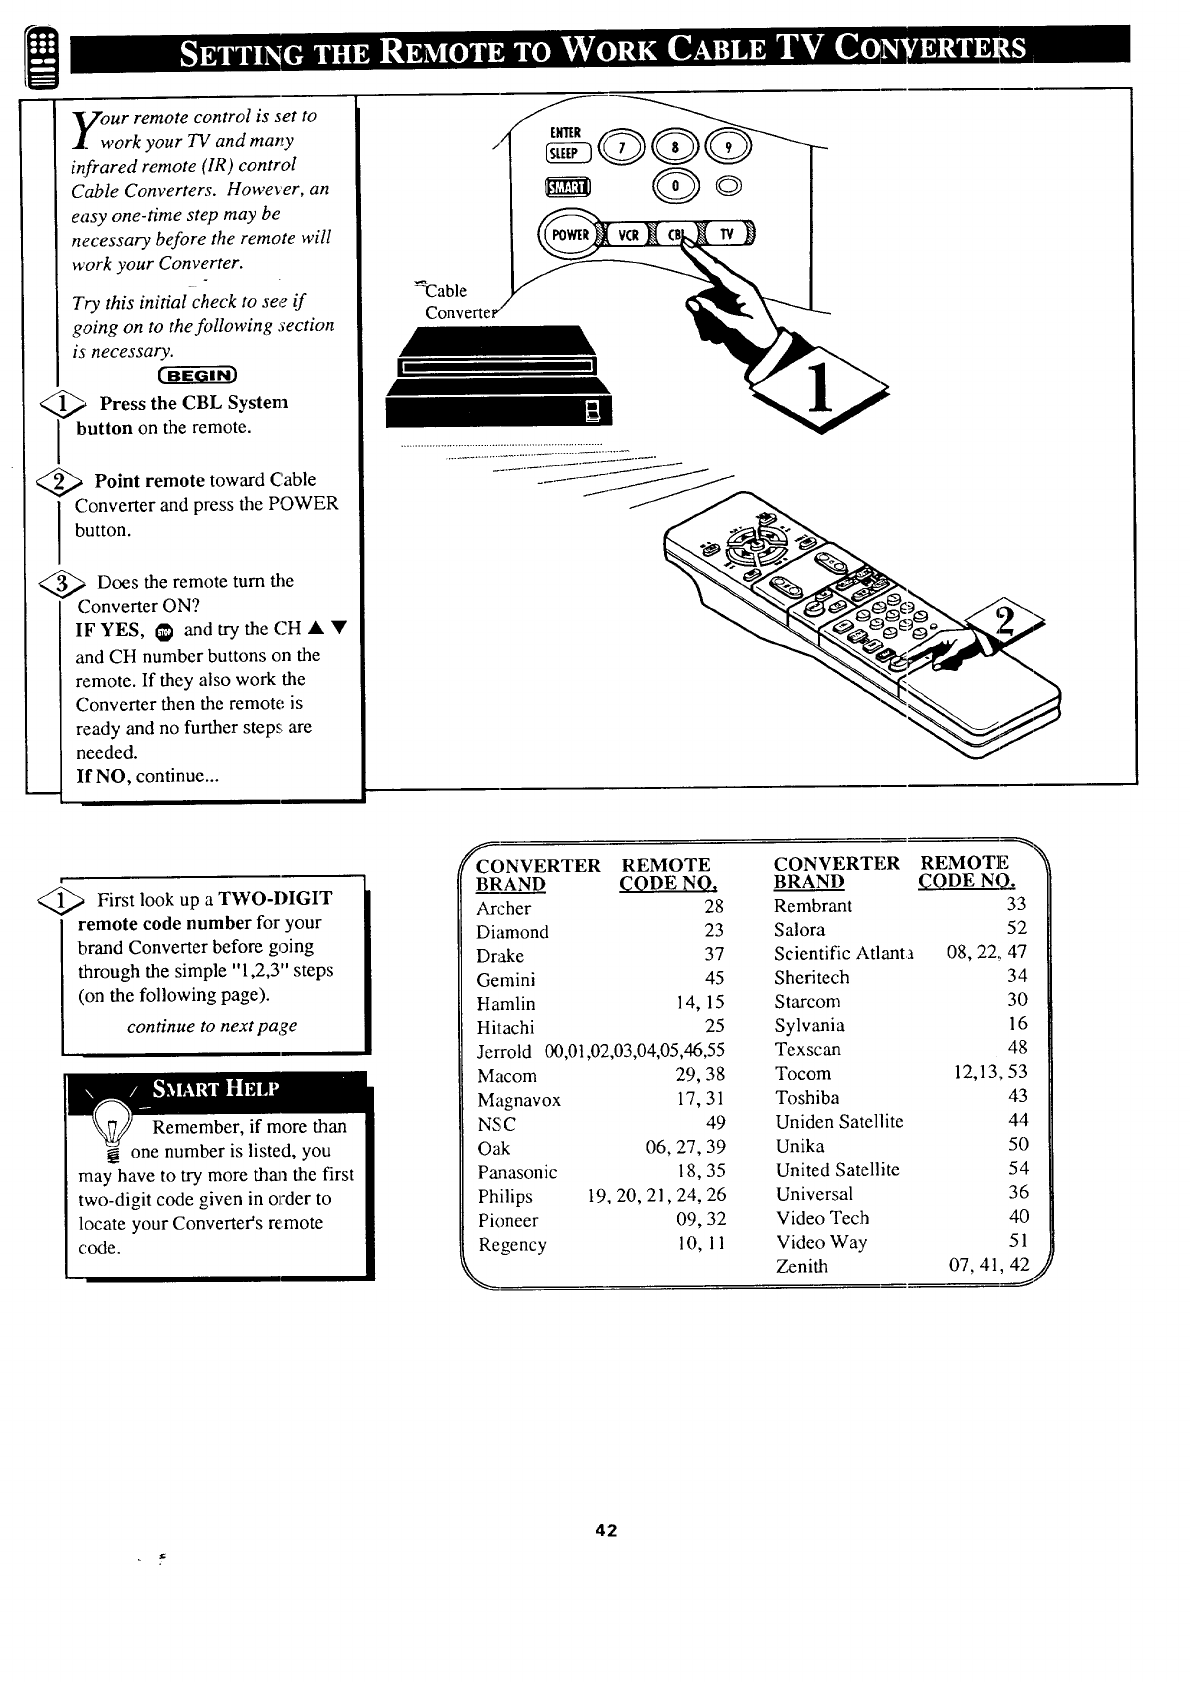
ur remote control is set to
ork your TV and many
infrared remote (IR ) control
Cable Converters. However, an
easy one-time step may be
necessary before the remote will
work your Converter.
Try this initial check to see if
going on to the following section
is necessary.
_Press the CBL
System
button on the remote.
<_ Point remote toward Cable
Converter and press the POWER
button.
<_ Does the remote turn the
Converter ON?
IF YES, _ and try the CH • •
and CH number buttons on the
remote. If they also work the
Converter then the remote is
ready and no further steps are
needed.
If NO, continue...
-Cable
II
<_ First look up a TWO-DIGIT
remote code number for your
brand Converter before going
through the simple "1,2,3" steps
(on the following page).
continue to next page
Remember, if more than
one number is listed, you
may have to try more than the first
two-digit code given in order to
locate your Converter's remote
code.
_CONVERTER REMOTE
BRAND CODE NO.
An.-her 28
Diamond 23
Dn_e 37
Gemini 45
Hamlin 14, 15
Hitachi 25
Jerrold 00,0t,02,03,04,05,46,55
Macom 29, 38
Magnavox 17, 31
NSC 49
Oak 06, 27, 39
Panasonic 18, 35
Philips 19, 20, 21,24, 26
Pioneer 09, 32
Regency 10, 11
CONVERTER REMOTE
BRAND (_ODE N(_
Rembrant 33
Salora 52
Scientific Atlanta 08, 22,, 47
Sheritech 34
Starcom 30
Sylvania 16
Texscan 48
Tocom 12,13, 53
Toshiba 43
Uniden Satellite 44
Unika 50
United Satellite 54
Universal 36
Video Tech 40
Video Way 51
Zenith 07, 41, 42//
42
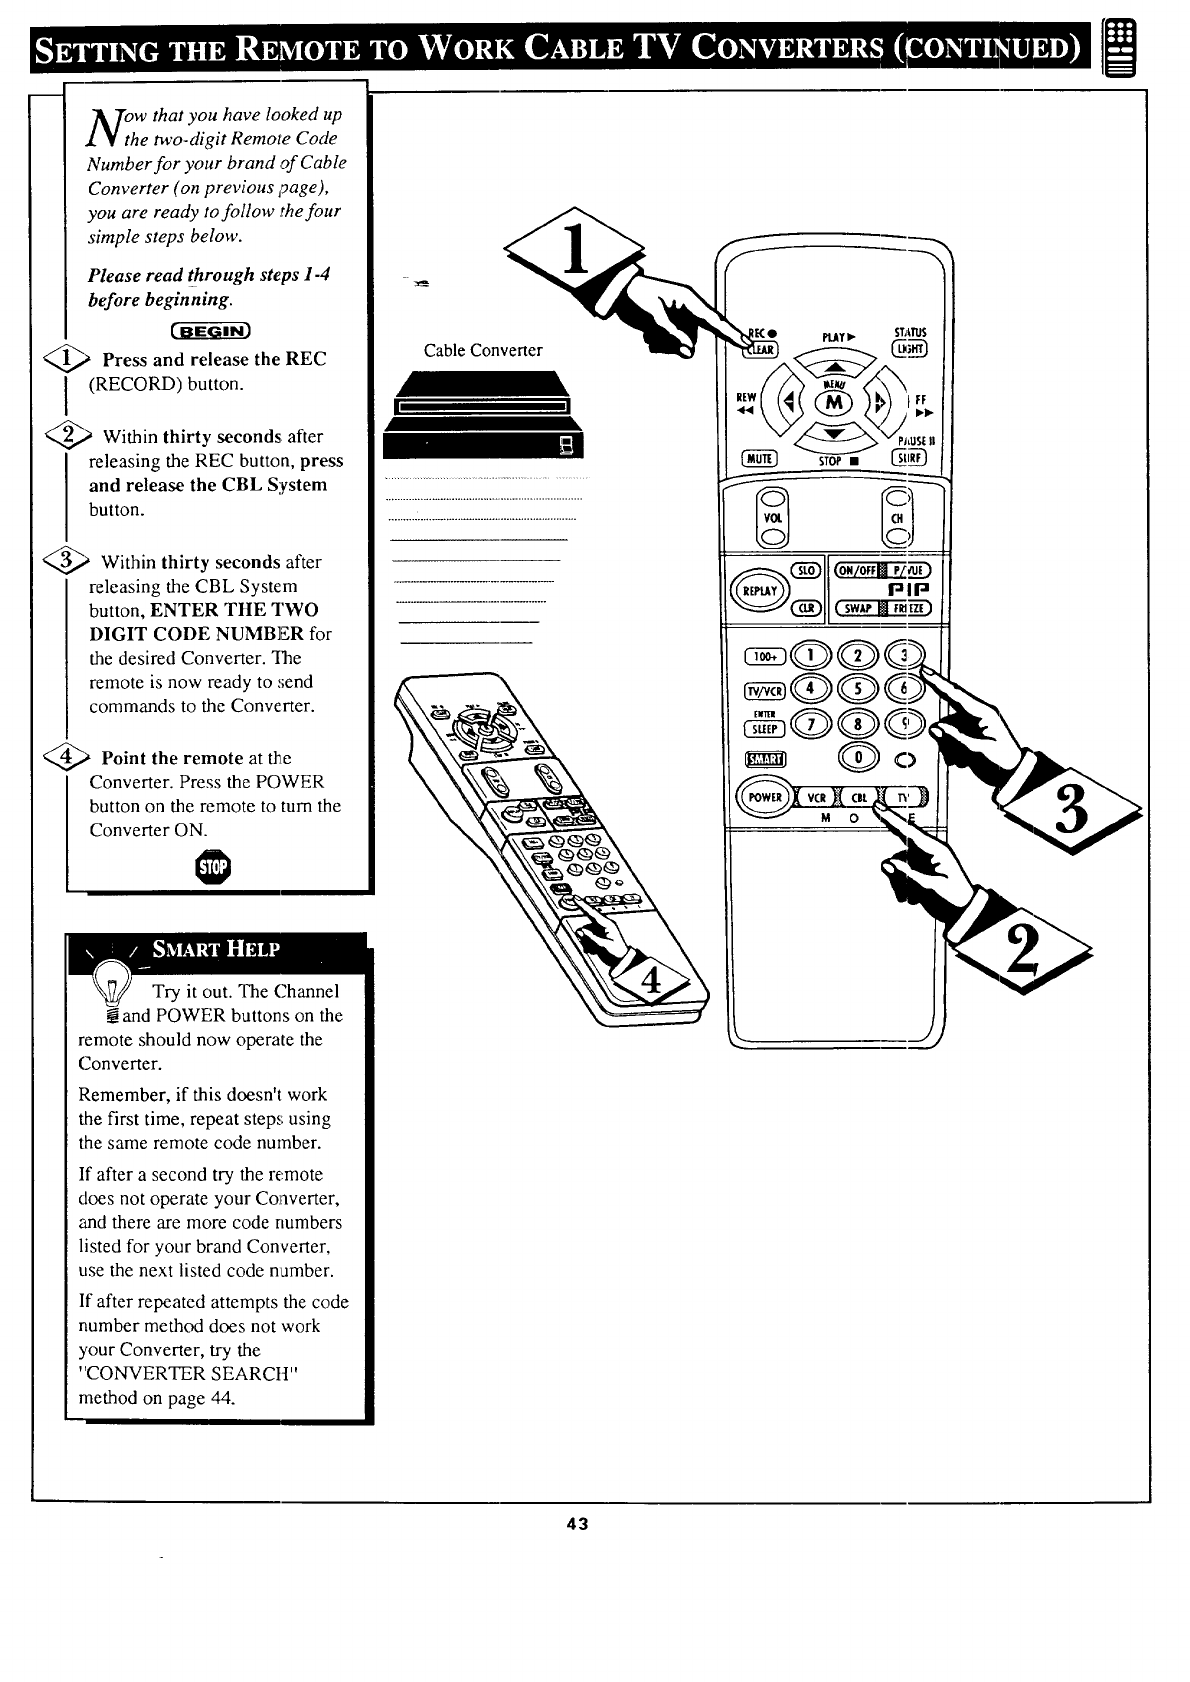
m
OhWthat you have looked up
e two-digit Remote Code
Number for your brand of Cable
Converter (on previous yage),
you are ready to follow the four
simple steps below.
Please read through steps I-4
before beginning.
_._ Press and release the REC
(RECORD) button.
_,,,_ Within thirty seconds after
releasing the REC button, press
and release the CBL System
button.
_-_ Within thirty seconds after
releasing the CBL System
button, ENTER THE TWO
DIGIT CODE NUMBER for
the desired Converter. "Ihe
remote is now ready to .,;end
commands to the Converter.
_.,_ Point the remote at _e
Converter. Press the POWER
button on the remote to turn the
Converter ON.
Try it out. The Channel
and POWER buttons on the
remote should now operate the
Converter.
Remember, if this doesn't work
the first time, repeat steps using
the same remote code number.
If after a second try the remote
does not operate your Converter,
and there are more code numbers
listed for your brand Converter,
use the next listed code namber.
If after repeated attempts the code
number method does not work
your Converter, try the
"CONVERTER SEARCtt"
method on page 44.
Cable Converter
UI
43
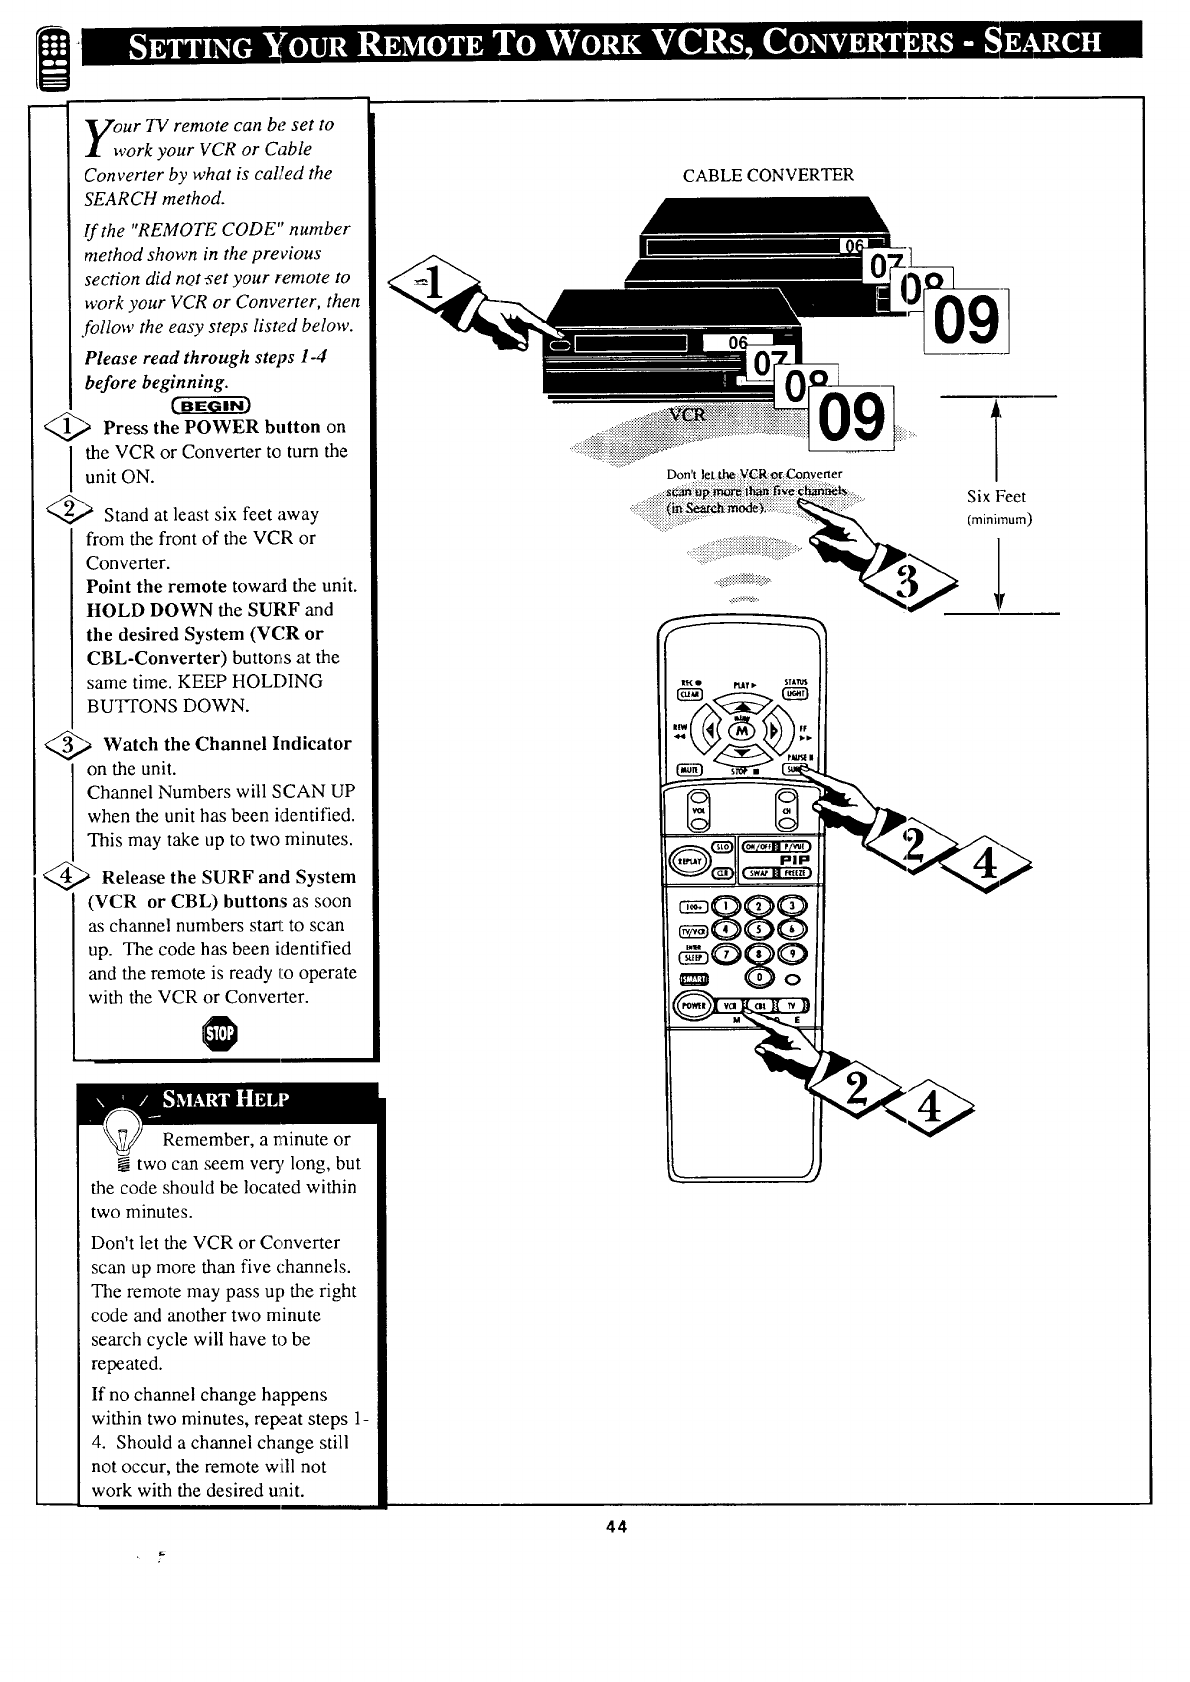
our IV remote can be set to
york your VCR or Cable
Converter by what is caUed the
SEARCH method.
If the "REMOTE CODE" number
method shown in the previous
section did not._et your remote to
work your VCR or Conw;rter, then
follow the easy steps listed below.
Please read through steps 1-4
before beginning.
_,,_ Press the on
POWER button
I he VCR or Converter to turn theunit ON.
_-) Stand at least six feet away
from the front of the VCR or
Converter.
Point the remote toward the unit.
HOLD DOWN the SURF and
the desired System (VCR or
CBL-Converter) button, s at the
same time. KEEP HOLI-_ING
BUTTONS DOWN.
_._ Watch the Channel Indicator
on the unit.
I Channel Numbers will SCAN UP
I when the unit has been identified.
This may take up to two minutes.
_._ Release the SURF and System
(VCR or CBL) buttons as soon
as channel numbers sta_: to scan
up. The code has been identified
and the remote is ready to operate
with the VCR or Conve_ter.
CABLE CONVERTER
Don't let :th¢ :_R. _o_:Convener
....,,, !!i!iiiiiiiiiiii iiiiiiiiiiiiiiii iiiiiiiiiiiiiiiiiiiiiiiii i ?....
,
Six Feet
(minin'num)
1,
Remember, a minute or
two can seem ver3, long, but
the code should be located within
two minutes.
Don't let the VCR or Converter
scan up more than five channels.
The remote may pass up the right
code and another two minute
search cycle will have to be
repeated.
If no channel change happens
within two minutes, repeat steps 1-
4. Should a channel change still
not occur, the remote will not
work with the desired u_ait.
44
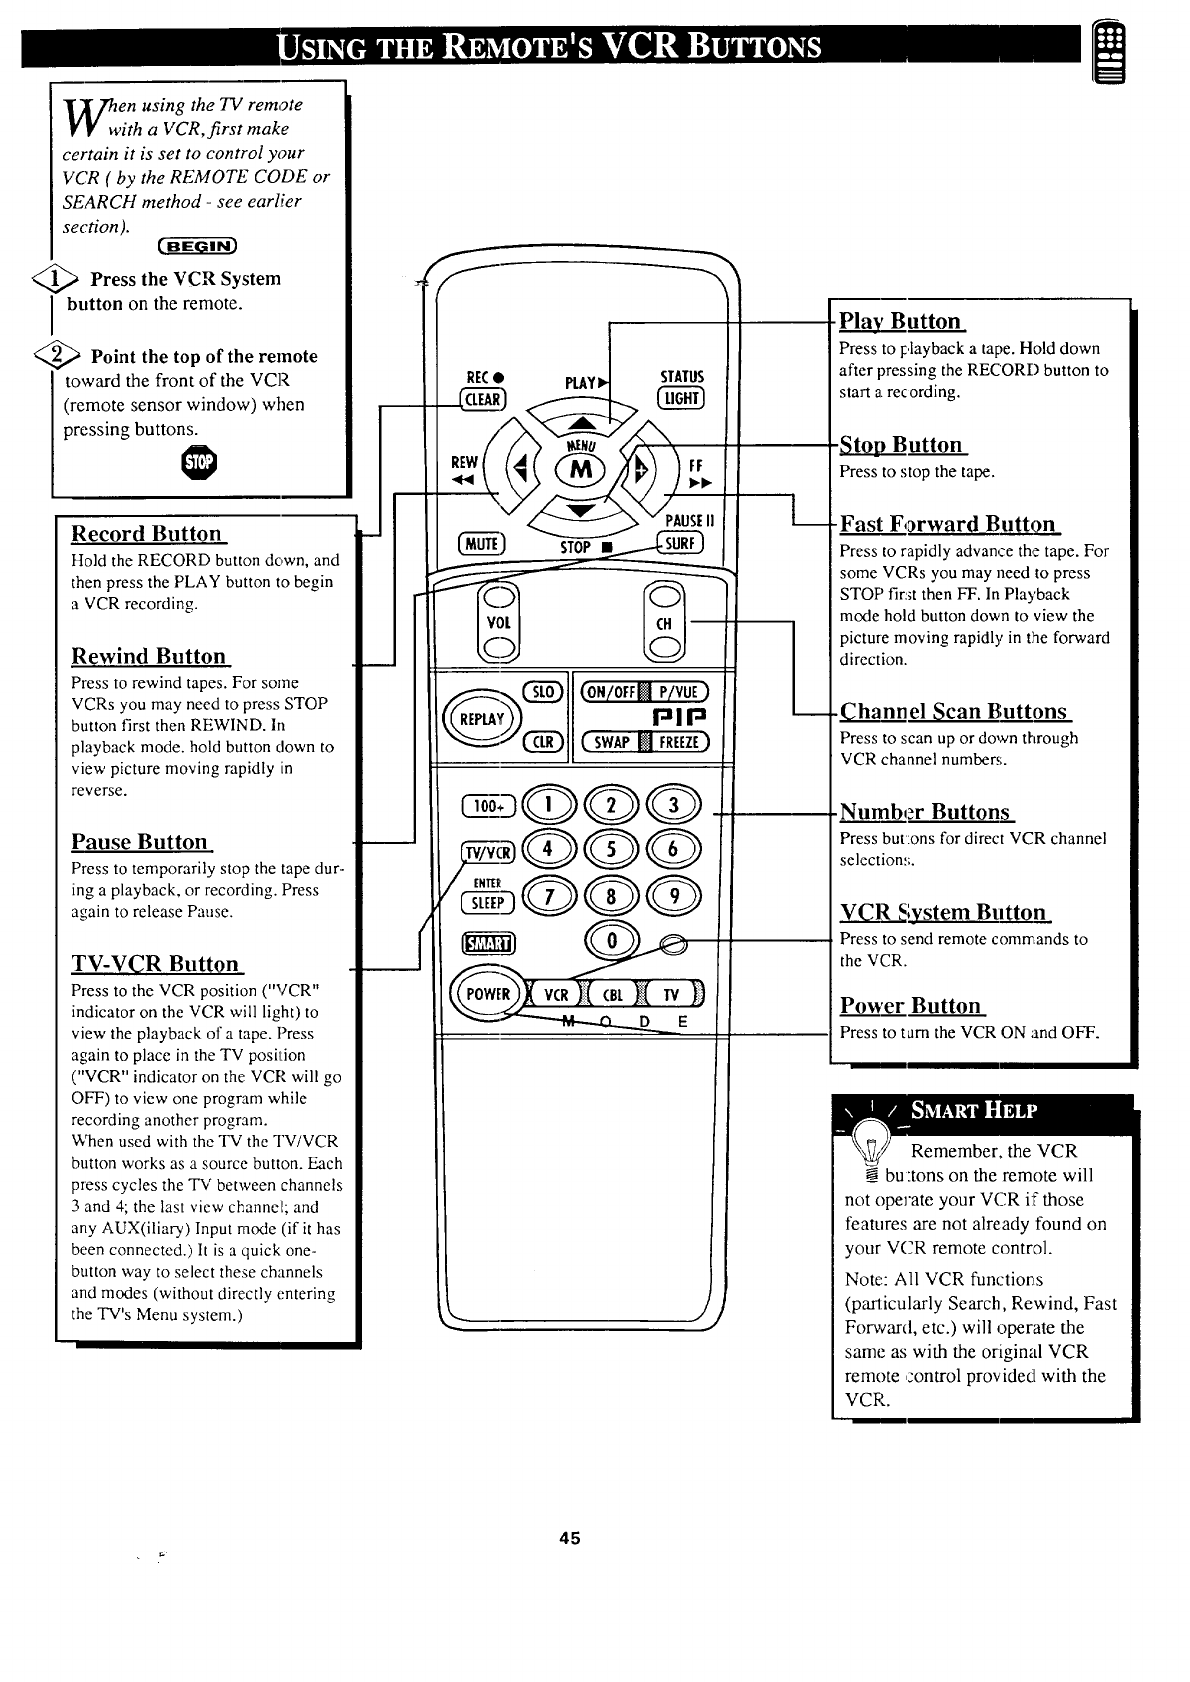
en using the TV remote
ith a VCR, first make
certain it is set to control your
VCR ( by the REMOTE CODE or
SEARCH method -see earlier
section). c-a-_a-cm
Press the VCR System
button on the remote.
<_ Point the top of the remote
toward the front of the VCP,
(remote sensor window) when
pressing buttons.
Record Button
Ho]d the RECORD button down, and
then press the PLAY button to begin
a VCR recording.
Rewind Button
Press to rewind tapes. For some
VCRs you may need to press STOP
button first then REWIND. In
playback mode. hold button clown to
view picture moving rapidly in
reverse.
Pause Button
Press to temporarily stop the tape dur-
ing a playback, or recording. Press
again to release Pause.
TV-V_R Button
Press to the VCR position ("VCR"
indicator on the VCR will light) to
view the playback of a tape. Press
again to place in the TV position
("VCR" indicator on the VCR will go
OFF) to view one program while
recording another program.
When used with the TV the TV/VCR
button works as a source button. Each
press cycles the "IV between channels
3 and 4; the last view channel; and
any AUX(iliary) Input mode (if it has
been connected.) It is a quick one-
button way to select these channels
and modes (without directly entering
the TV's Menu system.) ./
._ Button
Press to l:,layback atape. Hold down
after pressing the RECOR1-) button to
start a recording.
Button
Press to stop the tape.
-Fast Forward Button
Press to rapidly advance the tape. For
some VCRs you may need to press
STOP fira_tthen FF. In Playback
mode hold button down to view the
picture moving rapidly in the forward
direction.
-h__Lh_9__elScan Buttons
Press to scan up or down through
VCR channel number.,;.
•Number Buttons
Press but:ons for direct VCR channel
selectiom;.
_;ystem Button
Press to send remote commands to
the VCR.
Power Button
Press to tam the VCR ON and OFF.
Remember, the VCR
bu:tons on the remote will
not operate your VCR if those
features are not already found on
your VCR remote control.
Note,,: All VCR functions
(particularly Search, Rewind, Fast
Forward, etc.) will operate the
same as with the original VCR
remote control provided with the
VCR.
45
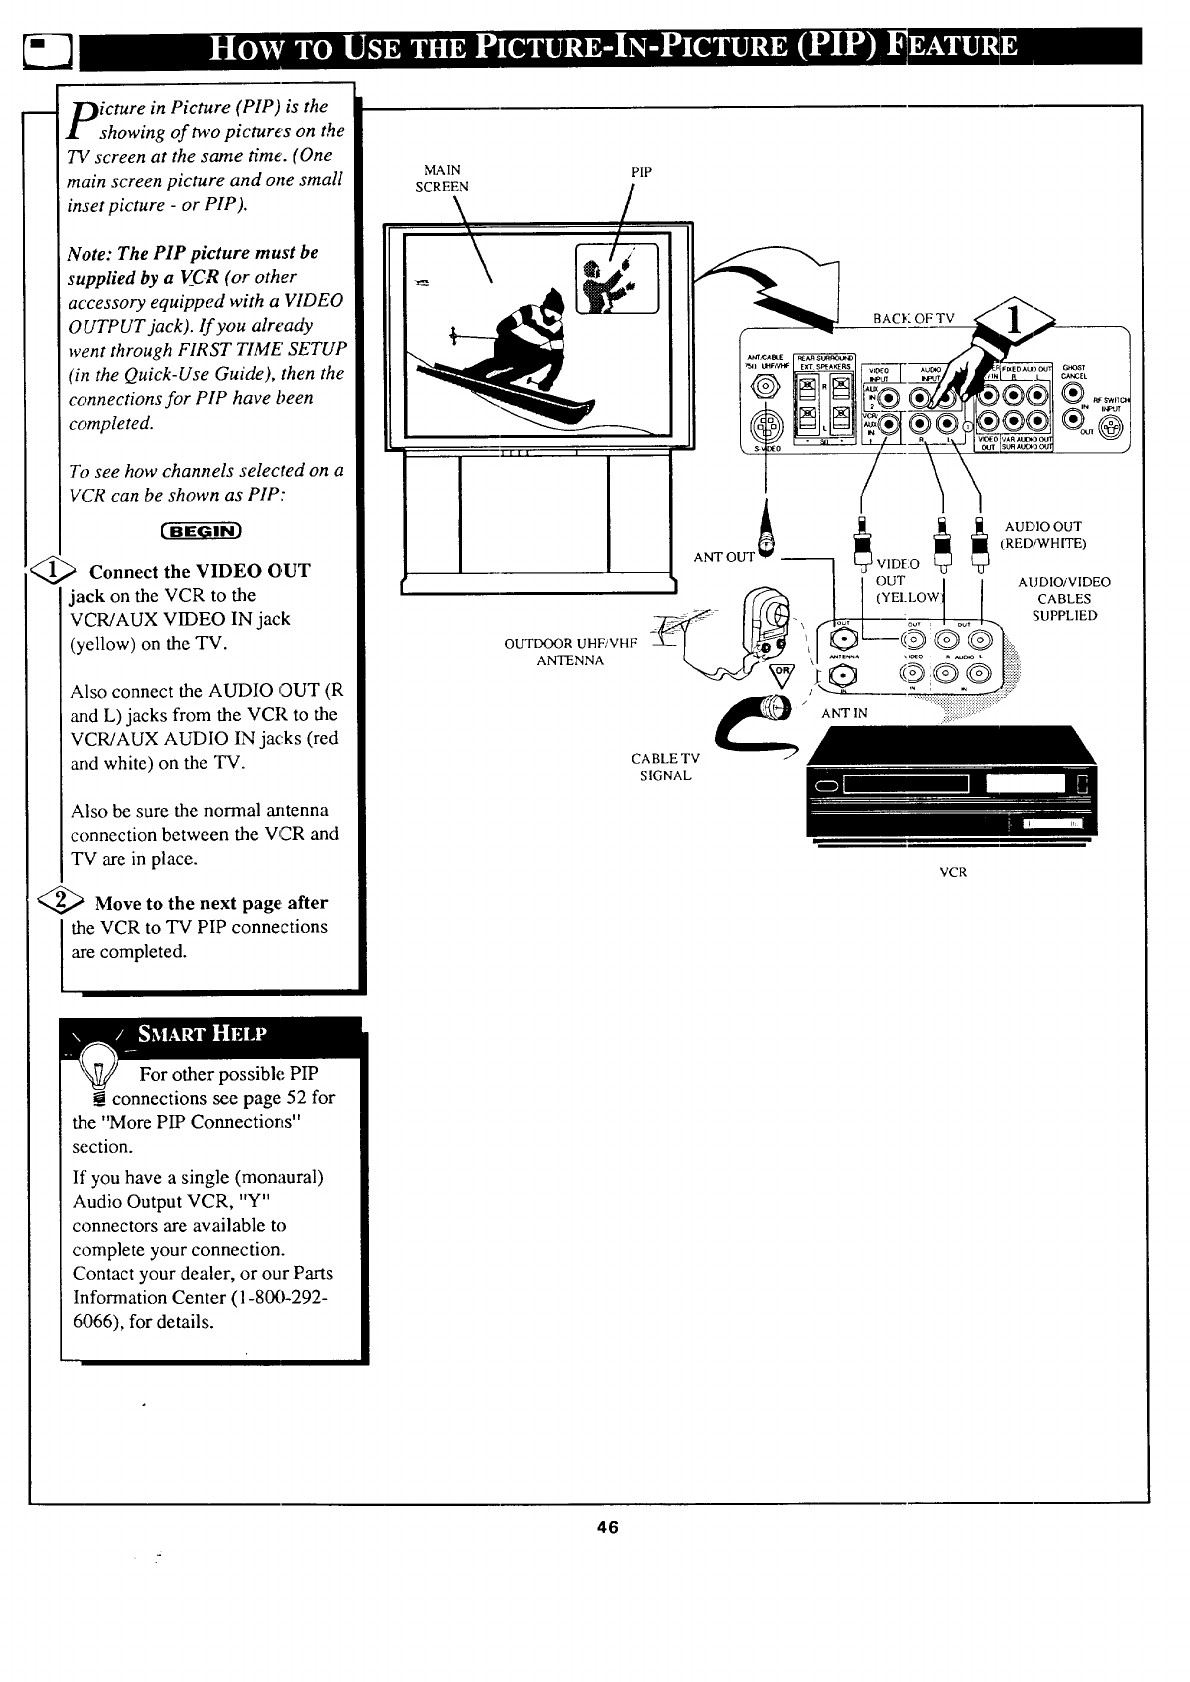
i
icture in Picture (PIP) is the
showing of two picture's on the
TV screen at the same time. (One
main screen picture and one small
inset picture -or PIP).
Note: The PIP picture must be
supplied by a V_CR (or other
accessory equipped with a VIDEO
OUTPUT jack), lf you already
)vent through FIRST TIME' SETUP
(in the Quick-Use Guide), then the
connections for PIP have been
completed.
To see how channels selected on a
VCR can be shown as PIP:
Connect the VIDEO OUT
jack on the VCR to the
VCR/AUX VIDEO IN jack
(yellow) on the TV.
Also connect the AUDIO OUT (R
and L) jacks from the VCR to the
VCR/AUX AUDIO IN jacks (red
and white) on the TV.
Also be sure the normal antenna
connection between the VCR and
TV are in place.
<_ Move to the next page: after
the VCR to TV PIP connections
are completed.
MAIN PIP
_,_ _SCREEN
LIII I
II
OUTDOOR UHF/VHF
ANTENNA
_'aX;AetE
ANT OUT _ --
BACK OF TV
£ AUD,OO:
I I (RED/WHITE)
VIDI::OV V
[ OUT | ] AUDIO/VIDEO
I I (YEI-LOWt I CABLES
/1_ SUPPLIED
.............. i:.:{!:.:
(0 @ ® @ I ;'
ANTIN ......... ......
CA BLE TV
SIGNAL
VCR
For other possible PIP
connections see page 52 for
the "More PIP Connections"
section.
If you have a single (monaural)
Audio Output VCR, "Y"
connectors are available to
complete your connection.
Contact your dealer, or our Parts
Information Center (1-800-292-
6066), for details.
46
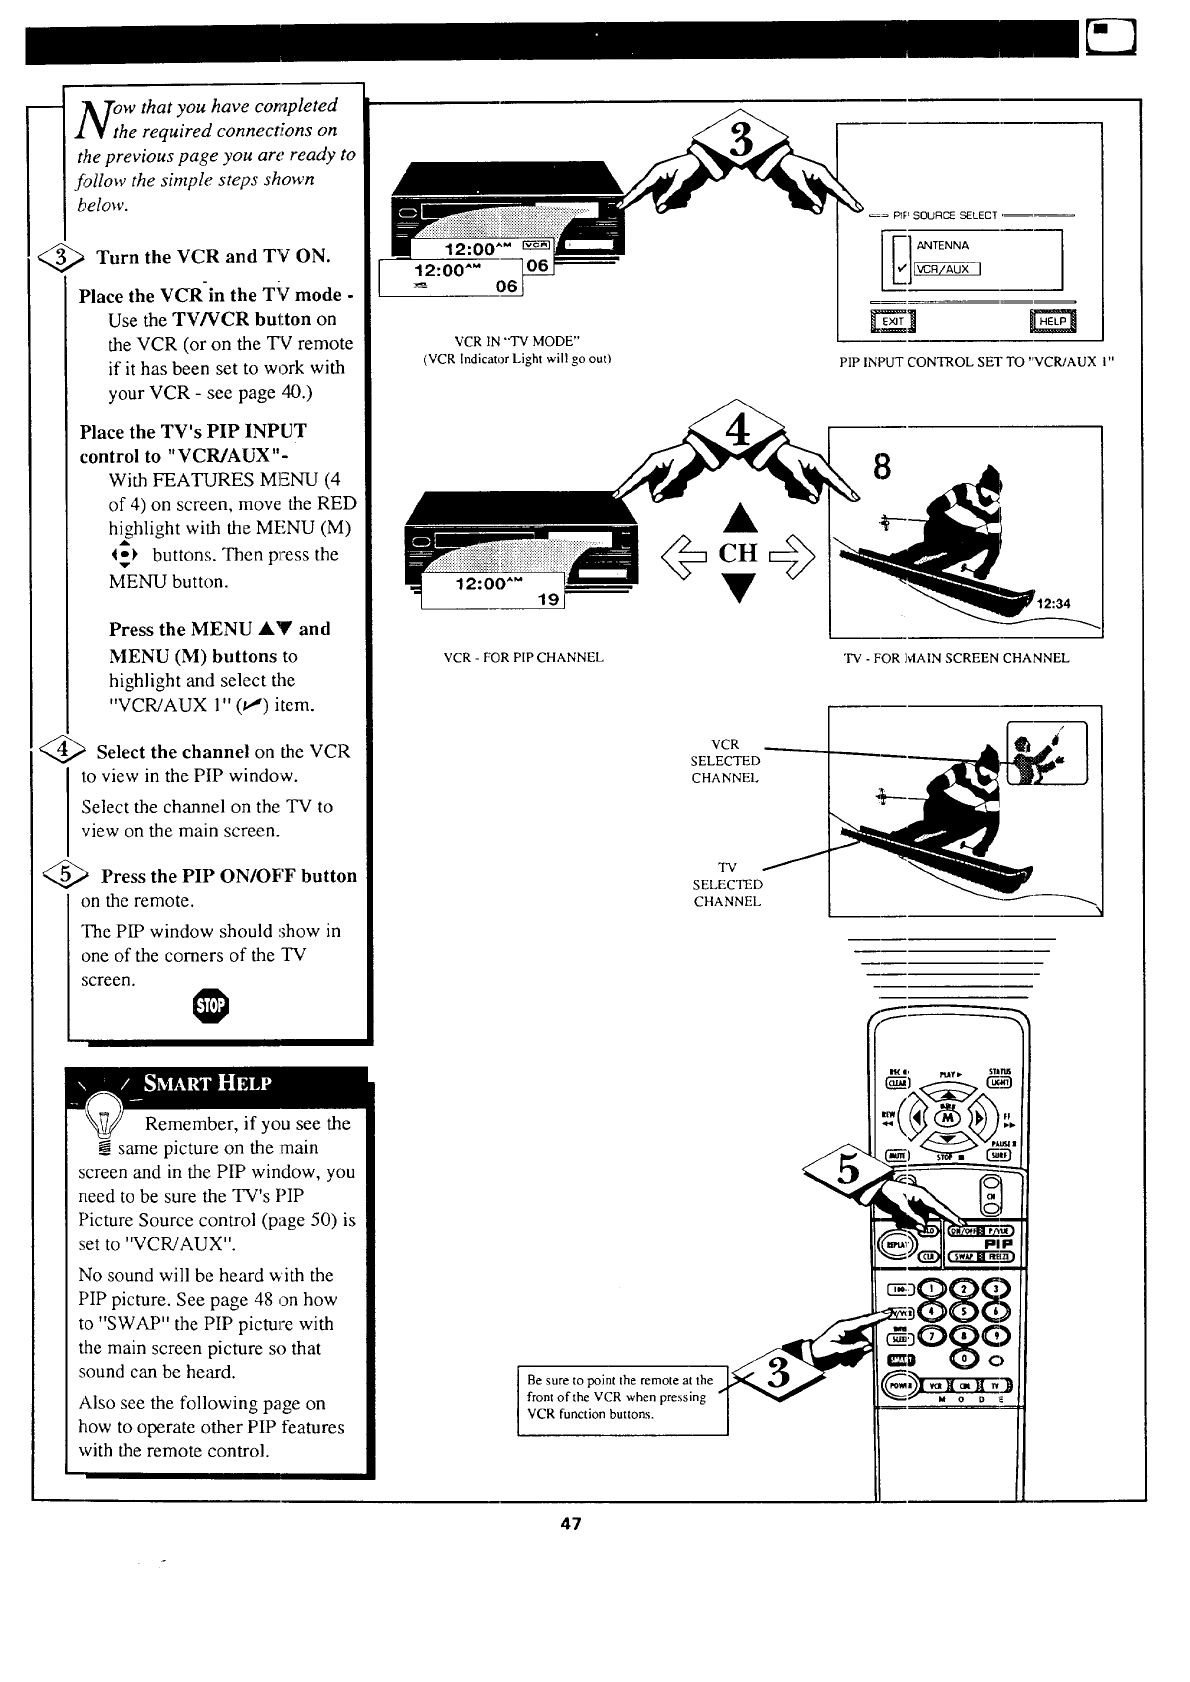
N:h w that you have completed
e required connections on
the previous page you are ready to
follow the simple steps shown
below.
<_ Turn the VCR and TV ON.
Place the VCR-in the TV mode -
Use the TV/VCR button on
the VCR (or on the TV remote
if it has been set to work with
your VCR - see page 40.)
Place the TV's PIP INPUT
control to "VCR/AUX"-
With FEATURES MENU (4
of 4) on screen, move the RED
h_hlight with the MENU (M)
1_1, buttons. Then press the
MENU button.
Press the MENU AY and
MENU (M) buttons to
highlight and select the
"VCR/AUX 1" (t,,") item.
Select the channel on the VCR
to view in the PIP window.
Select the channel on the TV to
view on the main screen.
Press the PIP ON/OFF button
on the remote.
The PIP window should ,,;how in
one of the comers of the TV
screen.
Remember, if you see the
same picture on the :main
screen and in the PIP window, you
need to be sure the TV's PIP
Picture Source control (page 50) is
set to "VCR!AUX".
No sound will be heard with the
PIP picture. See page 48 on how
to "SWAP" the PIP picture with
the main screen picture so that
sound can be he;_d.
Also see the following page on
how to operate other PIP features
with the remote control.
VCR lN "'TV MODE"
(VCR Indicator Light will go out)
12:00"" 19
VCR - FOR PIP CHANNEL
VCR
SELECTED
CHANNEl.
TV
SELECTED
CHANNEL
I
Be sure to point the remote at the
front of the VCR when pressing
VCR function buttons.
47
_= PI__ SOUIqC_ SELECT ,=_
i ANTENNA
PIP INPUT CONTROL SET TO "VCR/AUX I"
8
"IV - FOR MAIN SCREEN CHANNEL
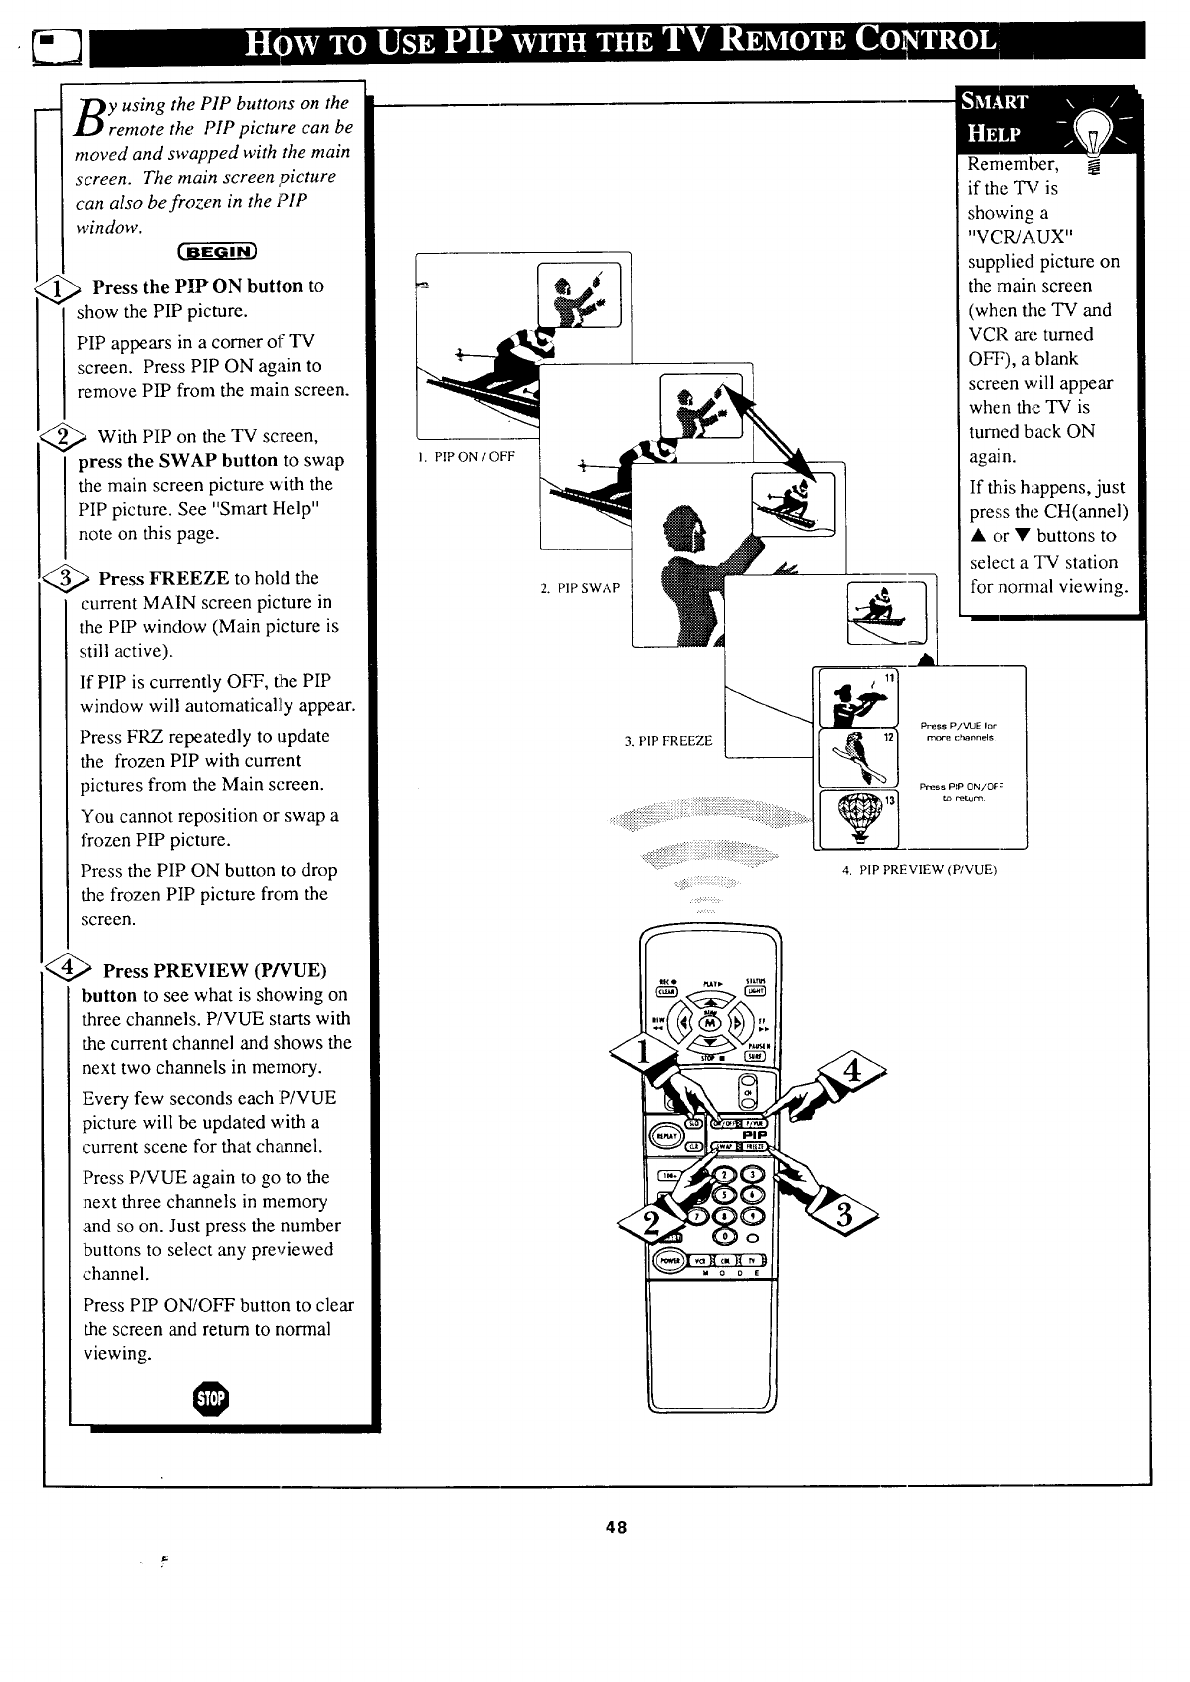
y using the PIP buttons on the
remote the PIP picture can be
moved and swapped with the main
screen. The main screen ,picture
can also be frozen in the PIP
window.
_ Press the PIP" ON button to
show the PIP picture.
PIP appears in a corner of TV
screen. Press PIP ON again to
remove PIP from the main screen.
_With PIP the TV
on screen,
press the SWAP button to swap
the main screen picture with the
PIP picture. See "Smart Help"
note on this page.
_,,_ Press FREEZE hold the
to
current MAIN screen picture in
the PIP window (Main picture is
still active).
If PIP is currently OFF, the PIP
window will automatical]iy appear.
Press FRZ repeatedly to npdate
the frozen PIP with current
pictures from the Main screen.
You cannot reposition or swap a
frozen PIP picture.
Press the PIP ON button to drop
the frozen PIP picture from the
screen.
Press PREVIEW (P/'VUE)
button to see what is showing on
three channels. P/VUE starts with
the current channel and shows the
next two channels in memory.
Every few seconds each P/VUE
picture will be updated with a
current scene for that channel.
Press P/VUE again to go to the
:next three channels in memory
and so on. Just press the number
buttons to select any previewed
channel.
Press PIP ON/OFF button to clear
the screen and return to normal
viewing.
L
PIP ON IOFF
2. PIP SWAP
3. PIP FREEZE
iiii ii ii iii iiiiiiiiiiiii ii!i iiii i! i iii ii!ii ii iiii i i i iiii i iiiiiiiiiii iiiiiiiiiiiiiiiiiiiiii
<iiTi!77i!Ti!Ti!iiiiiiiiiiiiiiiiiiiiiiiiii!i!i!ii!iiiiiiiiiiiii>.....
Remember,
if the TV is
showing a
"VCWAUX"
supplied picture on
the main screen
(when the TV and
VCP. an'. turned
OFF), a blank
screen will appear
when the TV is
turned back ON
again.
If this happens, just
press the CH(annel)
• or • buttons to
select a TV station
for nomml viewing.
4. PIP PREVIEW (P/VUE)
48
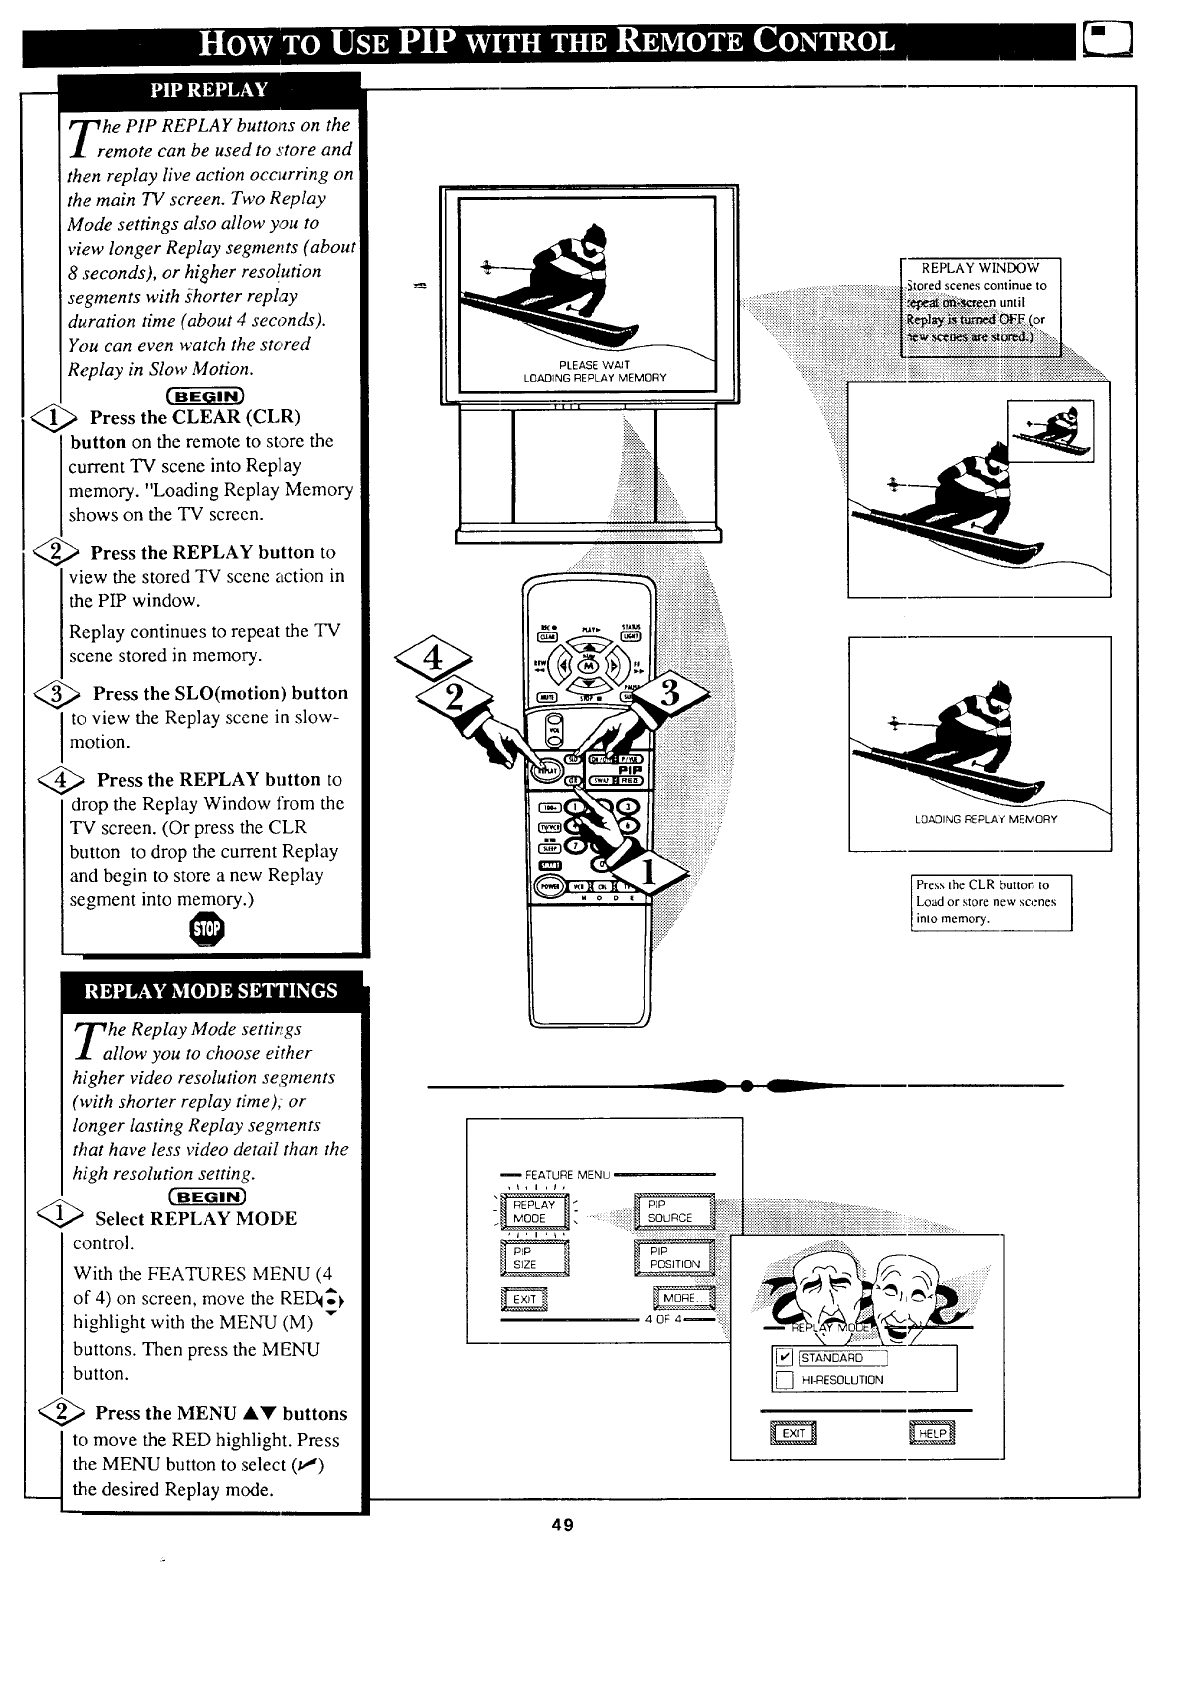
he PIP REPLAY buttons on the
emote can be used to store and
then replay live action occurring on
the main TV screen. Two Replay
Mode settings also allow you to
view longer Replay segments (about
8seconds), or higher resolution
segments with shorter replay
duration time (about 4 seconds).
You can even watch the stored
Replay in Slow Motion.
Press the CLEAR (CLR)
button on the remote to store the
I current TV scene into Replay
I memory. "Loading Replay Memory
shows on the TV screen.
<_ Press the REPLAY button to
I view the stored TV scene action in
the PIP window.
Replay continues to repeat the TV
scene stored in memory.
<_ Press the SLO(motion) button
l to view the Replay scene in slow-
motion.
<_ Press the REPLAY button to
drop the Replay Window from the
TV screen. (Or press the CLR
button to drop the current Replay
and begin to store a new Replay
segment into memory.)
he Replay Mode settings
llow you to choose either
higher video resolution segments
(with shorter replay time); or
longer lasting Replay segments
that have less video detail than the
high resolution setting.
c-ffffa-€_
)Select REPLAY MODE
control.
With the FEATURES MENU (4
of 4) on screen, move the REDI_
highlight with the MENU (M)
buttons. Then press the MENU
button.
<_ Press the MENU AV buttons
Jo move the RED highlight. Press
the MENU button to select (_')
the desired Replay mode.
PLEASE WAIT
LOADING REPLAY MEMORY
Till I
iiii++
%i;!iiiiii_.
iiiiiiiiiiiiiiiiiiiii_
. ...................
::=+x+:+:.:
.................
::_!_i_iiii_i;iiii!ii!iiiiiiiiiiiiiiiiiiiiiiiiiiiiiii_ii!_i_i_;_))ii_i!iiii;iii_:
._:!i_i_!i_[!!ii!i_i!!:_:_:_q:_:_:_:_:_:_:_:_:_:_:_:_:i:_:_!:i:_::i:i:i:_i!i_i_ii!:"
LOADING REPLAnt 'MEIVlORY
Press the CLR buttom to ]
Load or store new scenes I
in o memory.
FEATURE MENU
:?.i::
...:.::5:_:?:+::::.
.......................
Is TANDARD _ --]
H,4qESOLUt,0N
49
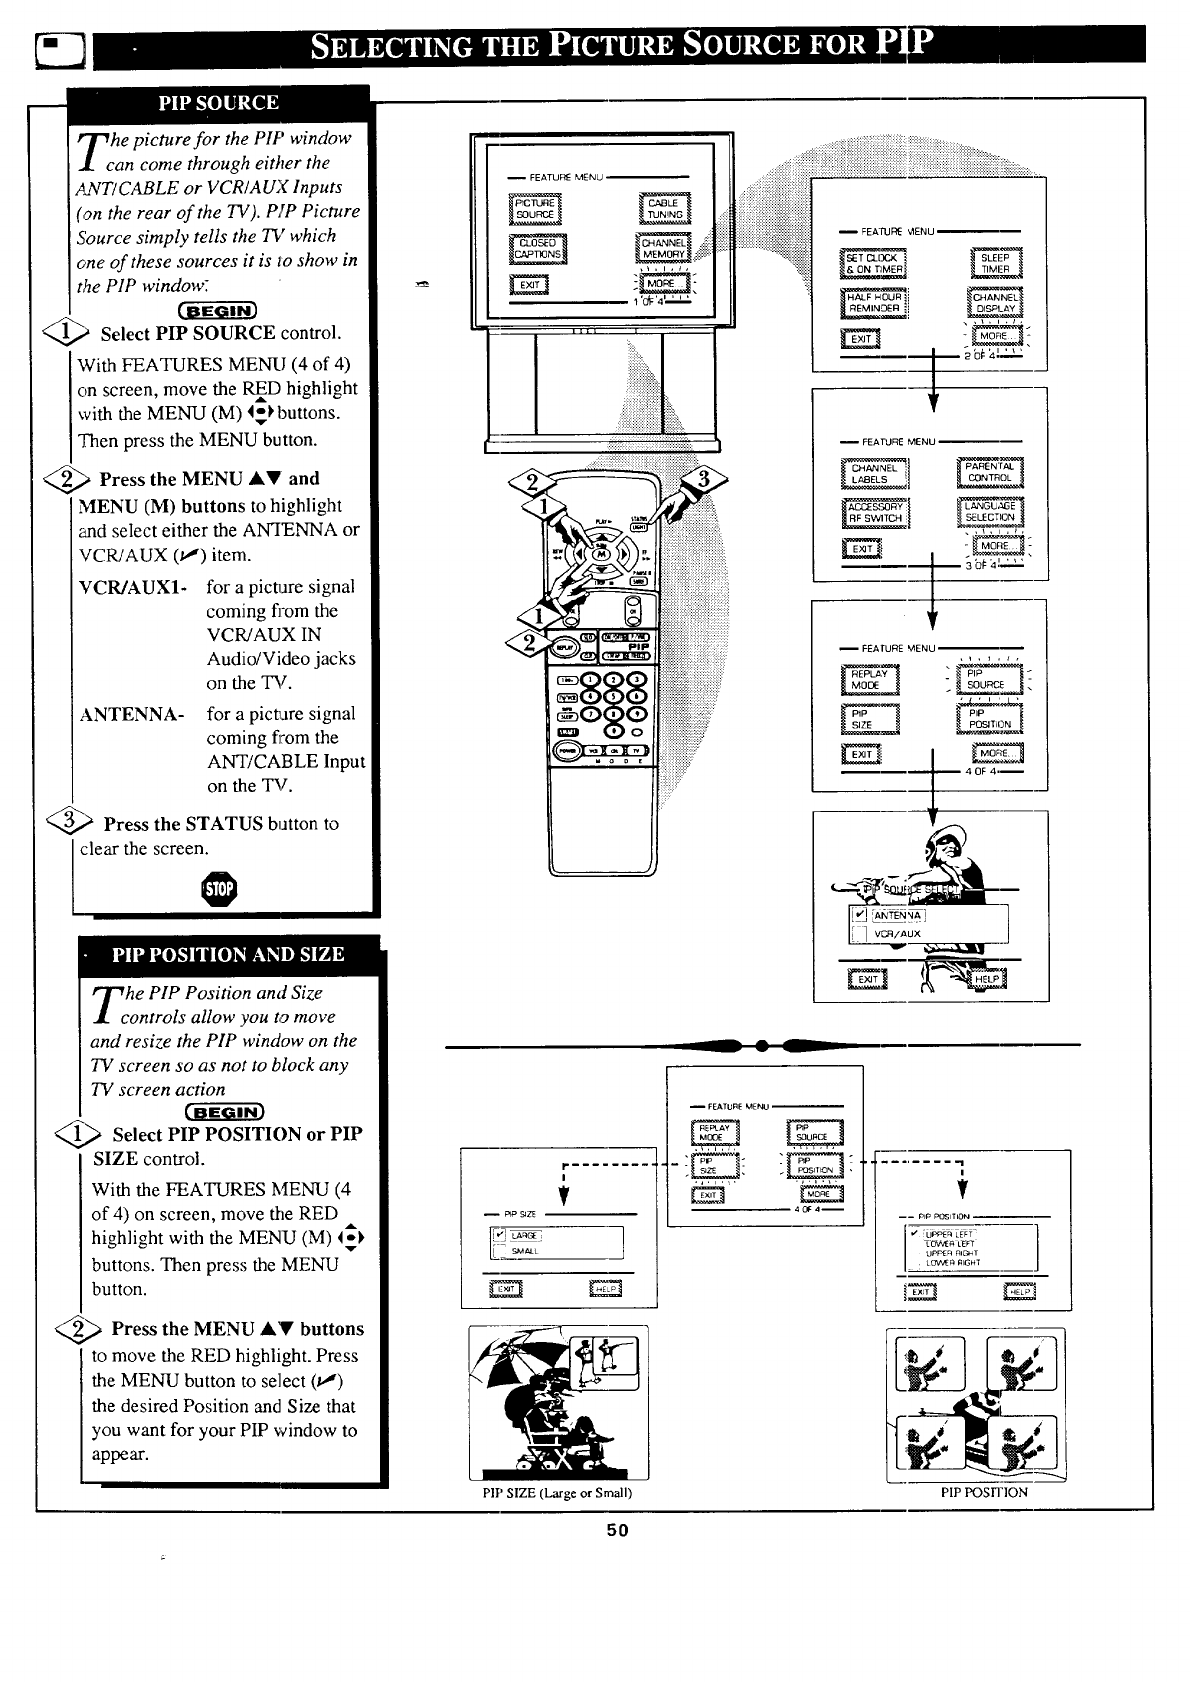
he picture for the Pff' window
an come through either the
ANT/CABLE or VCR/AUX Inputs
(on the rear of the TV). PIP Picture
Source simply tells the TV which
one of these sources it is to show in
the PIP window.
_,_ Select PIP SOURCE control.
With FEATURES MEN{! (4 of 4)
on screen, move the RInD highlight
with the MENU (M) 4°H)uttons.
Then press the MENU button.
_.> Press the MENU A,V and
MENU (M) buttons to highlight
and select either the ANTENNA or
VCR/AUX (u,") item.
VCR/AUX1- for a picture signal
coming fi'om the
VCR/AUX IN
Audio/Video jacks
on the TV.
ANTENNA- for a pictTaresignal
coming flrom the
ANT/CABLE Input
on the TV.
_,> Press the STATUS button to
I clear the screen.
he PIP Position and Size
ontrols allow you to move
and resize the PIP window on the
TV screen so as not to block any
TV screen action
1___ Select PIP POSITION PIP
or
SIZE control.
With the FEATURES MENU (4
of 4) on screen, move the RED
highlight with the MENU (M) _k
buttons. Then press the MENU
button.
_,_ Press the MENU A'!V buttons
to move the RED highlight. Press
the MENU button to select (tl)
the desired Position and Size that
you want for your PIP window to
appear.
-- FEATUR_ MENU
.jiii
1 '0_ '4 ',i_,_
L
I
m
hill i
1111111111111%,
....i:::i_i!iiii:iiii!_i
, iiiiiiiiiiiiiiiiiiiiii!iiiiii!ii ,,,.
!!!ii!i!i:!i!iii!i!iiiiiiiiiii_i_:_:i:_:_:r
=888
::::::::::::::.
.... iiiiiiiiiiiiiiii, ......
::IIII:ilI:IIL_51ilIUilEEIIE!=iI!II!III_LI_
iiiiiiiiiiiiiiii!iiiiiiiii!iiiiiiiiiiiiiiiiiiiiiiil-- FEA'P,JR_ _ENU ----
........._i_iiiiiiiiiiiiiilSET CL[]O< SLEL:P
_ _4_€_,_ _.
)b_:_' ' ' '"
I FEATURE MENU
C_ANN'_L; PAREN'_J_
_--_b#_'""
-- FEATURE MENU
40_ 4._
r
V
PIP SIZE (Large or Small)
-- FEATURE MENU -_
i
---- P_P POSITION
: LOVVEF__GHT
UPPER alc._ T
PIP POSITION
5O
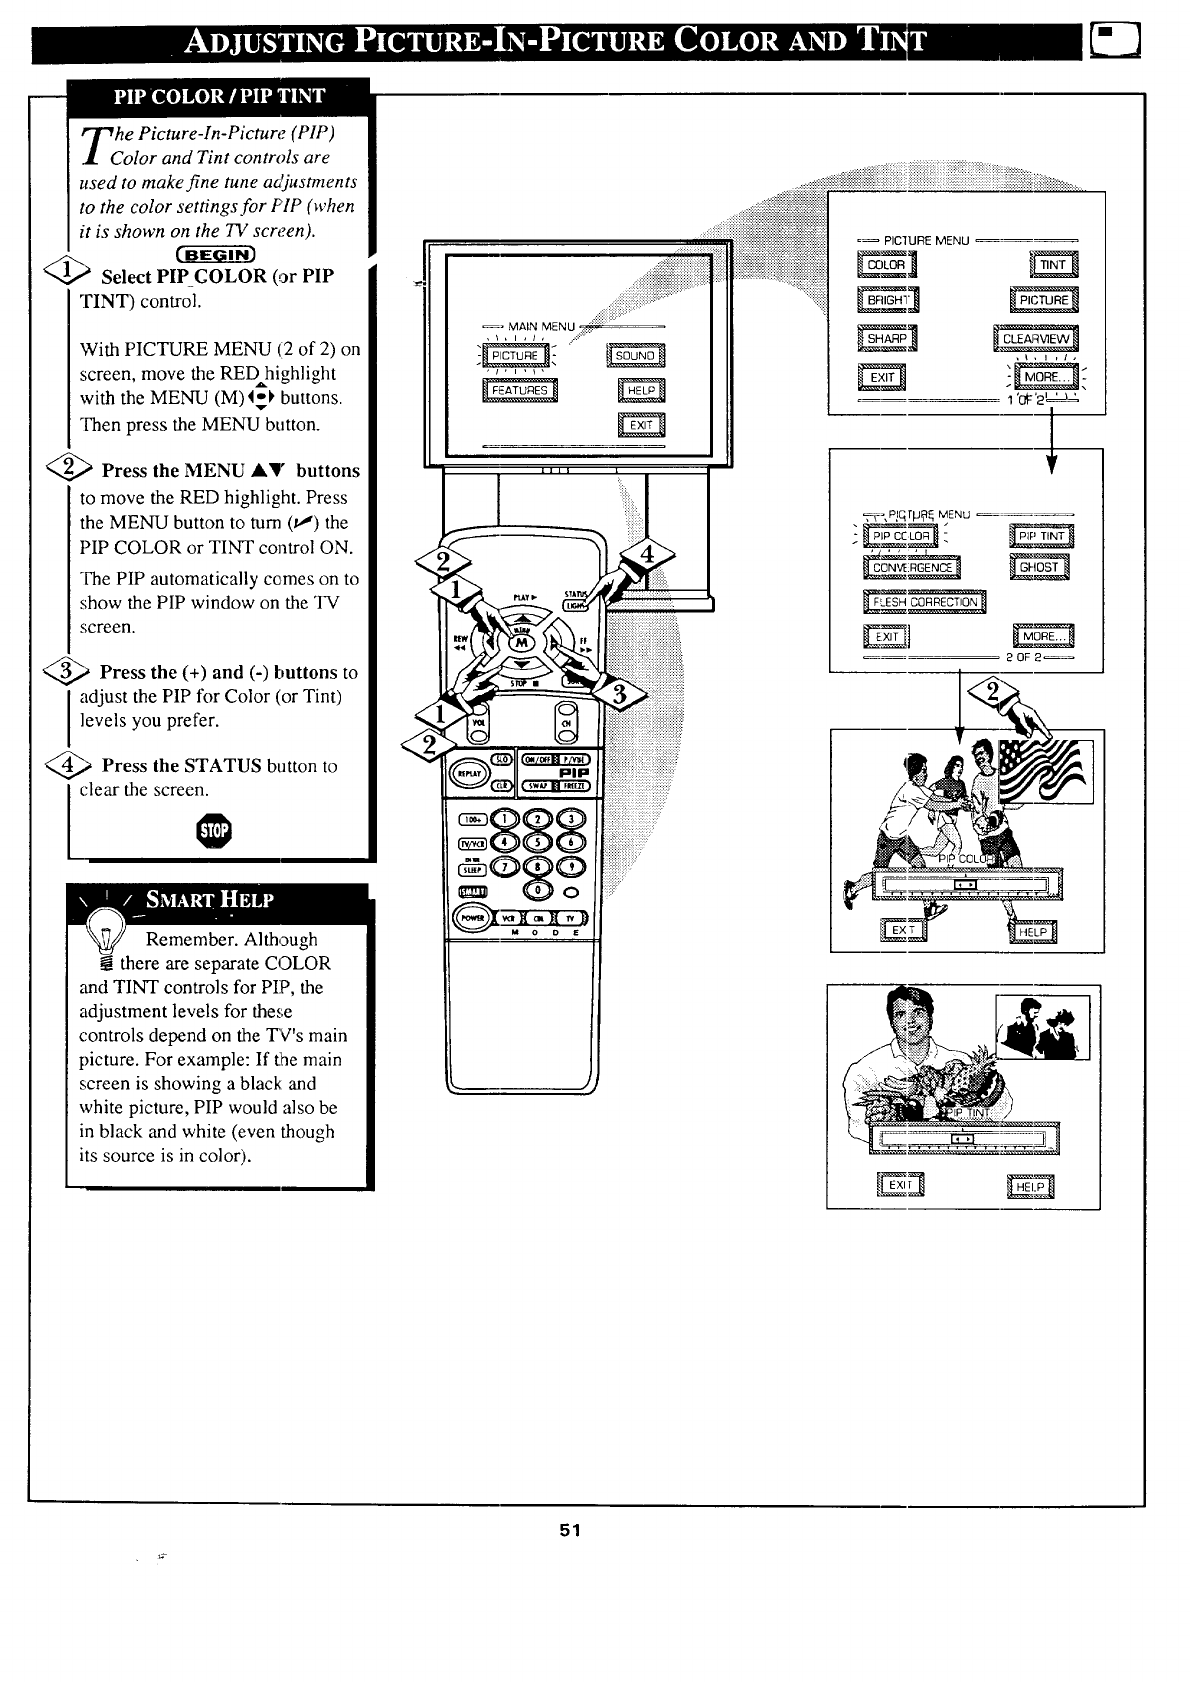
he Picture-In-Picture (PIP)
olor and Tint controls are
used to make fine tune a6_iustments
to the color settings.for PIP (when
it is shown on the TV screen).
c-gger
'a Select PIP COLOR (or PIP
TINT) control.
With PICTURE MENU (12of 2) on
screen, move the RED highlight
with the MENU (M)I_-_ buttons.
"_en press the MENU button.
<_ Press the MENU A,' buttons
to move the RED highlight. Press
the MENU button to turn (11) the
PIP COLOR or TINT control ON.
The PIP automatically comes on to
show the PIP window on the TV
screen.
Press the (+) and (-) buttons to
adjust the PIP for Color (or Tint)
levels you prefer.
aPress the STATUS button to
clear the screen.
Remember. Although
@ there are separate COLOR
,and TINT controls for PIP, the
adjustment levels for these
controls depend on the TV's main
picture. For example: If (he main
screen is showing a black and
white picture, PIP would also be
in black and white (even though
its source is in color).
/
%,
..... ::: :::::::::::::::::::::::::::::::::::::+:.:.,.,.
......._i_ii!_iii_!!_!_ii!!!i_i!i!i!i!iii!!!i!i!iii!iii!iiiii!!iii!!!!!iiiiiii!!i!!!!i!!!i!iiiii!iiiiii!i!iiiiiiiiiiiiiii!iiiiiiiiiiiiiiiiiiiiiiii_iii_iiiiiiiii_iiii_ii_i!_.........
......_iiiiiiiiiiiiiiiiiiiiiiiiiiiiiiiiiiiiiiiiiiiiiiiiiiiiiill
.........
...........
..........
_- MAIN MENU _ .......
_ PIC1URE MENU
_, P!qrp_ MENU
20F 2_
51
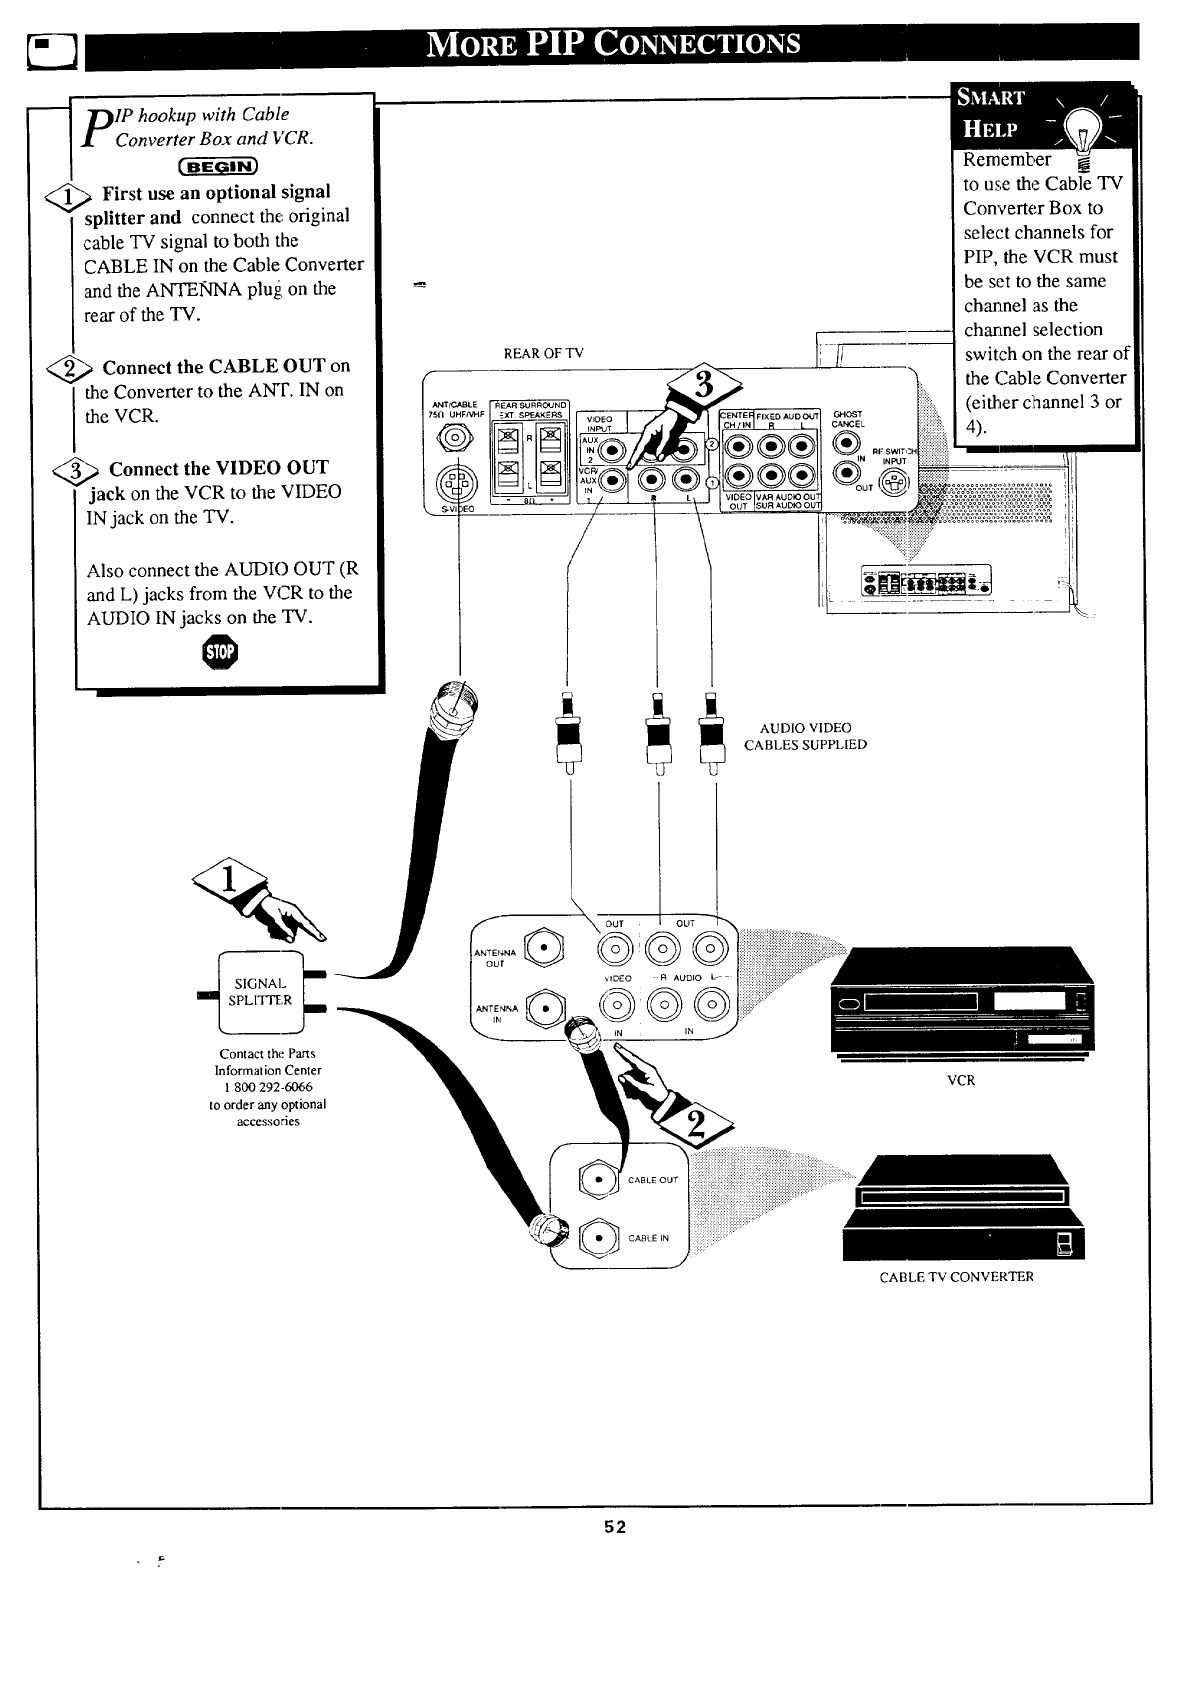
_DIP hookup with Cable
J[ Converter Box and VCR.
_ First use an optional signal
splitter and connect the, original
cable TV signal to both the
CABLE IN on the Cable Converter
and the ANTENNA plu_i on the
rear of the TV.
@>Connect the CABLE OUT on
the Converter to the ANT. IN on
the VCR.
_,' _ Connect the VIDEO OUT
jack on the VCR to the VIDEO
IN jack on the TV.
Also connect the AUDIO OUT (R
and L) jacks from the VCR to the
AUDIO IN jacks on the TV.
REAR OF TV
ANT_ _LE
75fl ul F/V_F --
Remember
to use the Cable TV
Converter Box to
select channels for
PIP, the VCR must
be set to the same
chartnel as the
charmel selection
switch on the rear of
the (::ableConverter
(either clhannel 3 or
4).
Contact the Parts
Information Center
1 800 292-6066
to order any optional
accessories
AUDIO VIDEO
CABLES SUPPLIED
,CABLE TV CONVERTER
52
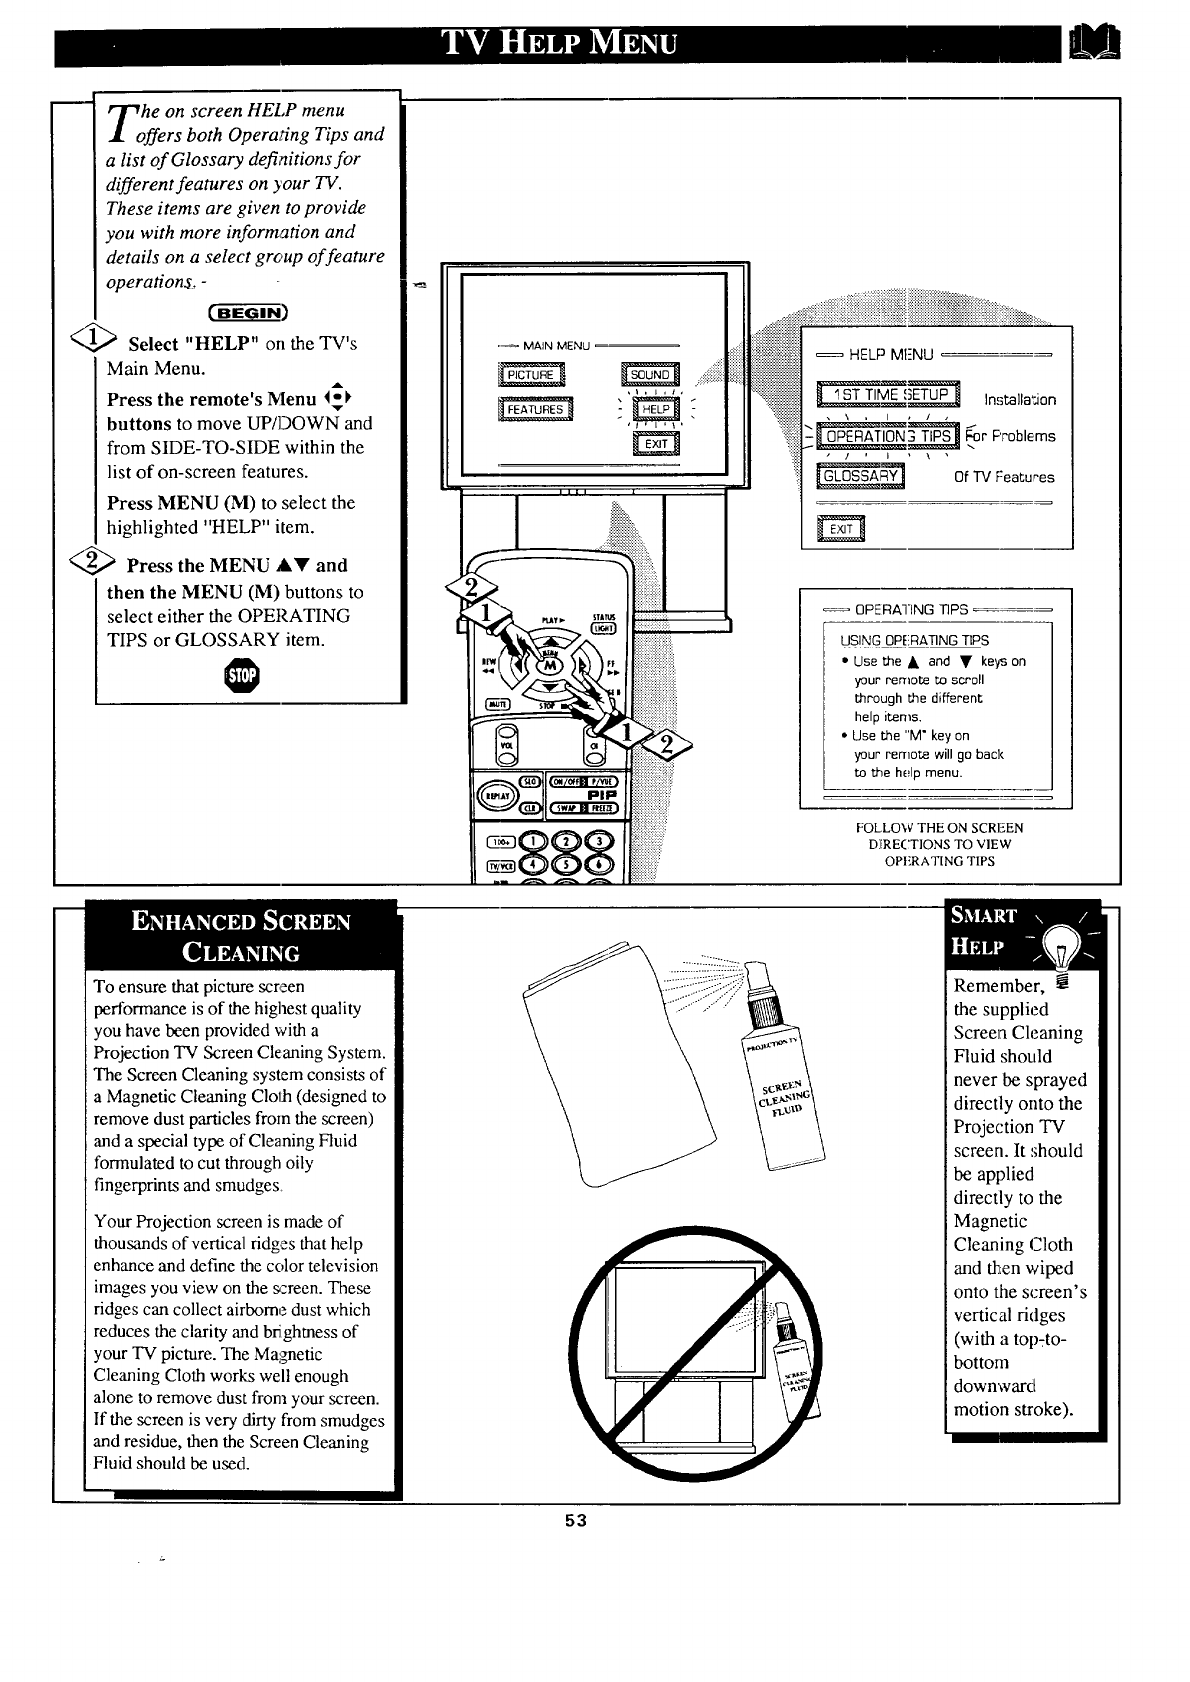
he n screen HEI,P menu
rs both Operai_ng Tips and
a list of Glossary defi;_itionsfor
different features on your TV.
These items are given to provide
you with more information and
details on a select grc, up of feature
operation_. -
BECff - i-a)
Q,_ Select "HELP" orl the TV's
Main Menu.
Press the remote's Menu 4_I,
buttons to move UP/DOWN and
from SIDE-TO-SIDE within the
list of on-screen features.
Press MENU (M) to select the
highlighted "HELP" item.
_-,_ Press the MENU AY and
then the MENU (M) buttons to
select either the OPERATING
TIPS or GLOSSARY item.
•_ MAIN MENU
,J, l'l,
Ililt I
L....... t
iiiiiiiiiiiiiiiiii
__ , iiiiiiiiiiiiiiii!iiiiiii_iiiiil
] iiiiiii!ii!iiiiiiiiii: '
..........._:_z:::ii!::iiiiililliiiiiiiiiii::i::i::]::i::iiiiii!i::i::iiiiiii::iiiiiliiiii::i::iiii_i!Jiiiii::::!_i:;_:;...............
__ Of TV Features
OPERATING TIPS
USING OPERATING TIPS
*Use the • and •keys on
your remote to scroll
through the different
help items.
•Use the "M" key on
your remote will go back
to the help menu.
FOLLO_,V THE ON SCREEN
D][RECTIONS TO VIEW
OPF.RATING TIPS
To ensure that picture screen
performance is of the highest quality
you have been provided with a
Projection TV Screen Cleaning System.
The Screen Cleaning system consists of
a Magnetic Cleaning Cloth (designed to
remove dust particles from the screen)
and a special type of Cleaning Fluid
formulated to cut through oily
fingerprints and smudges.
Your Projection screen is made of
thousands of vertical ridges that help
enhance and define the color television
images you view on the _:reen. These
ridges can collect airborne dust which
reduces the clarity and bfighmess of
your TV picture. The MalNetic
Cleaning Cloth works well enough
alone to remove dust from your screen.
If the screen is very dirty from smudges
and residue, then the Screen Cleaning
Fluid should be used.
/
/
_L
Remember,
the supplied
Screen Cleaning
Fluid should
never be sprayed
directly onto the
Projection TV
screen. It should
be applied
directly to the
Magnetic
Cleaning (Sloth
and then wiped
onto the screen's
vertical ridges
(with a top-to-
bottom
down'ward
motion stroke).
G3
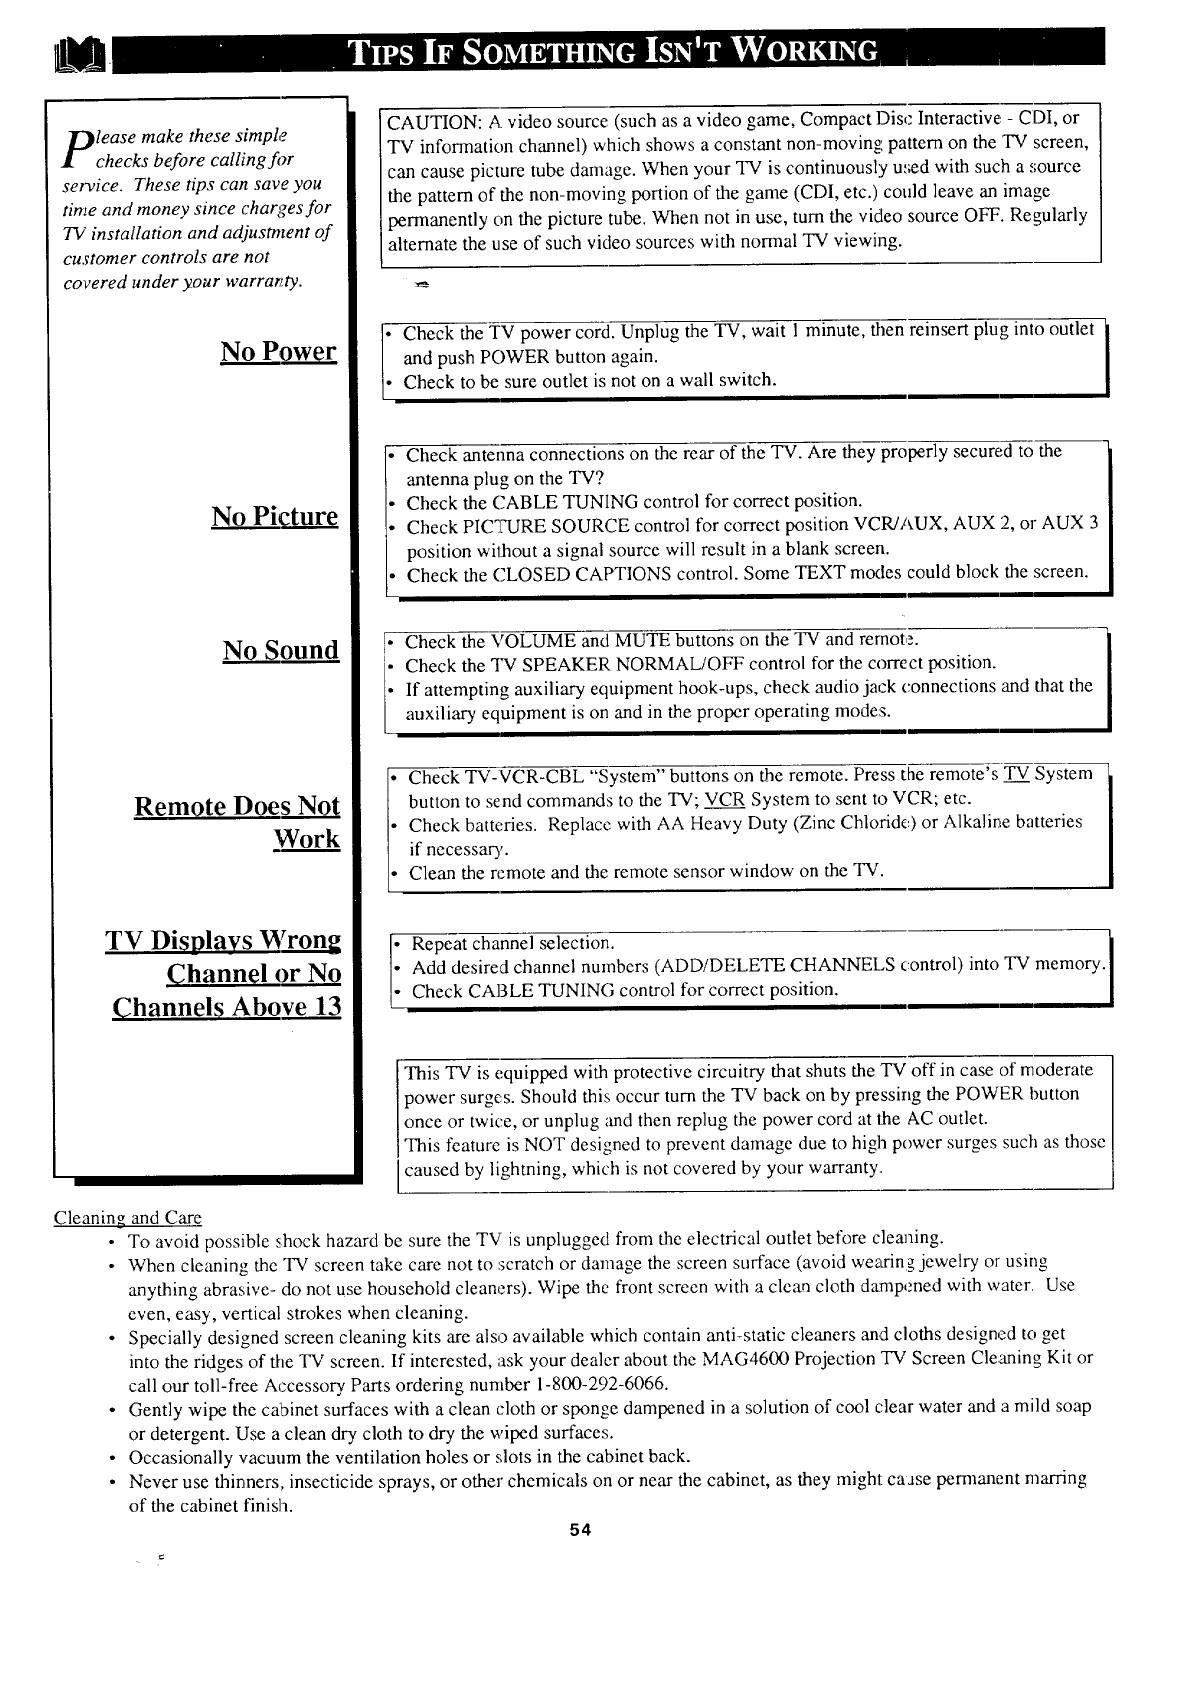
lease make these simple
checks before calling f!_r
service. These tips can save you
time and money since charges for
73/installation and adjustment of
customer controls are not
covered under your warrartty.
No Power
No Picture
No Sound
Remote Does Not
Work
TV Displays Wron
Channel or No
Channels Above 13
CAUTION: A video source (such as a video game, Compact Disc Interactive: - CDI, or
TV information channel) which shows a constant non-moving pattern on the TV screen,
can cause picture tube damage. When your TV is continuously used with such a source
the pattern of the non-moving portion of the game (CDI, etc.) could leave an image
permanently on the picture tube. When not in use, turn the video source OFF. Regularly
alternate the use of such video sources with normal TV viewing.
Check the TV power cord. Unplug the TV, wait 1 minute, then reinsert plug into outlet
and push POWER button again.
Check to be sure outlet is not on a wall switch.
Check antenna connections on the rear of the TV. Are they properly secured to the
antenna plug on the TV?
Check the (2ABLE TUNING control for correct position.
Check PICTFLIRESOURCE control for correct position VCR/AUX, AUX 2, or AUX 3
position without a signal source will result in a blank screen.
Check the CLOSED CAPTIONS control. Some TEXT modes could block the screen.
[• Check the VOLUME and MUTE buttons on the TV and remote.
] heck the TV SPEAKER NORMAL/OFF control for the correct position.
If attempting auxiliary equipment hook-ups, check audio jack connections and that the
auxiliary equipment is on and in the proper operating mode:_.
II
Check TV-VCR-CBL "System" buttons on the remote. Press the remote's TV System
button to send commands to the TV; VC___RRSystem to sent to VCR; etc.
Check batteries. Replace with AA Heavy Duty (Zinc Chloride) or Alkali_e batteries
if necessar3,.
Clean the remote and the remote sensor window on the TV.
i epeat channel selection. I
Add desired channel numbers (ADD/DELETE CHANNELS control) into TV memory.
Check CABLE TUNING control for correct position.
This TV is equipped with protective circuitry that shuts the TV off in case of moderate
power surges. Should this occur turn the TV back on by pressing the POWER button
once or twice, or unplug and then replug the power cord at the AC outlet.
This feature is NOT designed to prevent damage due to high power surges such as those
caused by lightning, which is not covered by your warranty..
Cleaning and Care
• To avoid possible shock hazard be sure the TV is unplugged from the electrical outlet before cleaning.
• When cleaning the TV screen take care not to :_cratch or damage the screen surface (avoid weaxing jewelry or using
anything abrasive- do not use household cleaners). Wipe the front screen with a clean cloth da:mpened with water. Use
even, easy, vertical strokes when cleaning.
• Specially designed screen cleaning kits are also available which contain anti-static cleaners and cloths designed to get
into the ridges of the TV screen. If interested, ask your dealer about the MAG4600 Projection TV Screen Cleaning Kit or
call our toll-free Accessory Parts ordering number 1-800-292-6066.
• Gently wipe the cabinet surfaces with a clean cloth or sponge dampened in a solution of cool clear water and a mild soap
or detergent. Use a clean dry cloth to dry the wiped surfaces.
• Occasionally vacuum the ventilation holes or slots in the cabinet back.
• Never use thinners, insecticide sprays, or other chemicals on or near the cabinet, as they might caase pernmnent marring
of the cabinet finish.
54

A/V Inputs * Connector plugs which allow the introduction of
distinct audio and video signals into the TV from accessory
VCRs, camcorders, etc. These plugs bypass the normal tuner or
RF/Antenna signal circuitry.
Coaxial Cable * A single solid antenna wire normally matched
with a metal plug (F-type) end connector that screws (or pushes)
directly onto a 75Ohm input: found on the Te_vision or VCR.
Display * An on screen message or graphics that help the user
operate and adjust his Television feature controls. See On
Screen Displays (OSD).
Direct Audio/Video Inputs * Located on the rear of the TV
these connectors (RCA phono type plug) are used for the input
of audio and video signals. Designed for use with VCRs (or
other accessories) in order to receive higher picture resolution
and offer sound connection options.
Identify* Method by which a remote control searches and finds
an operating code for another product (such as a VCR or Cable
Converter). Once the code has been "identified" then the:TV
remote can operate and send commands to the other product.
Multichannel Television Sc,und (MTS) * The broadcast
standard that allows for stereo sound to be transmitted with the
"IV picture.
On Screen Displays (OSD) * Refers to the wording or
messages generated by the television (or VCR) to help the user
with specific feature controls (color adjustment, programming,
etc.).
Menu * An on-screen listing of feature controls shown on the
Television screen that are made available for user adjustments.
Picture -In-Picture (PIP) *Term used when two pictmes are
shown on the TV screen at the same time. The smaller PIP
picture is supplied by a VCR (or other tuner/video playback
source). The PIP picture can also be moved and swapped with
the TV's main screen picture.
Pre-Amplifier * The control center of ahi-fi system. Not
only amplifies source inputs, bm also allows for source
selection, volume, tone, balance and all other contn}ls that
affect the sound.
Programming * The procedure of adding or deleting channel
numbers into the Television's mem3ry circuits. In this way
the Television "remembers" only the locally available or
desired channel numbers and skiips over any unwanted
channel numbers.
Remote Sensor Window * A window or opening found on
the Television control panel througla which infl'ared remote
control command signals are received.
Second Audio Program (SAP) */mother or additional audio
channel provided for in the Multichannel Television Sound
(MTS) broadcast standard. The most frequently proposed use
for SAP is the simultaneous bilingual broadcast of 'IV
program material.
Status * Allows the user to quickly confirm what channel
number is currently being viewed. Status can also be used to
clear the Television of on screen displays or information
(rather than waiting for the display., to "time out" or
automatically disappear from the screen).
S-Video Input * Allows direct connection of high-resolution
video sources, such as a Super VHS videocasse.tte iecorder,
Laser Disc player, etc. Provides oplimum picture resolution,
sharpness, and clarity.
Twin Lead Wire * The more commonly used name for the
two strand 300 Ohm antenna wire _sed with many indoor and
outdoor antenna systems. In many cases this type of antenna
wire requires an additional adapter (or balun) in order to
connect to the 75 Ohm Input termir als designed into the more
recent Televisions and VCRs.
Variable Audio Output * An adjustable audio output which
allows for volume variations at the source.
55
Accessories/Optional .............. 10, 27, 28-29, 46, 52, 60, *Q/U-1
Adapter Connector .............................................. 46, 52, *Q/U- 1
Add/Delete Channels .......................................... 13-14, *Q/U-2
Advance Buttons ........................................................ *Q/U-2, 4
Audio Controls ................................................................... 24-26
Audio/Video Input ................................... 30-33, 46, 52 *Q/U-2
Automatic Programming ...... _.......................... _ ...... i 3, *Q/U-2
Battery Installation .......................................................... *Q/U-3
Cable TV Connections/Settings ................ 12, 46, 52 *Q/U-l, 2
Channel!Time Display ......................................... 19, 22, *Q/U-3
Channel Memory ................................................. 13-14, *Q/U-2
Channel/Time Reminder ......................................................... 19
Clock Setting .......................................................................... 15
Clock Timer ............................................................................ 16
Closed Captioning .................................................................. 11
Color Controls ............................................................. 6,*Q/U-4
Convergence ............................................................................. 8
Controls!TV ............................................................ *Q/U-2, 3, 4
Controls/Remote .............................. 34-45, 48-49, *Q/U-2, 3, 4
Exit ................................................................................. *Q/U-4
Features ..................................................................................... 5
First Time Set Up ........................................................... *Q/U-2
Ghost Cancellation ..................................................................... 9
Glossary/TV Terms ................................................................. 55
Help Menu ............................................................ 53, *Q!U-2, 4
Help Line Information .......................................... 1,54, *Q/U-1
Inputs/Audio and Video ........................................ 30-33, 46, 52
Menu ........................................................................... *Q/U-2, 4
Minus(-)/Plus (+) Buttons ........................................... *Q/U-3, 4
Parental Control .................................................................. 20-2 l
Picture-In-Picture (PIP) ...................................... 46, 52, *Q/U-2
Power La_,ht Indicator ...................................................... Q/U-3
Precautions/Safety ...................................... 2, 3, 5;4, 59, *Q/U-1
Programming Channels ............................................. 13, *Q/U-2
Remote Control ................................ 34-45, 48-4o, *Q/U-2, 3, 4
Remote with VCRs ................................................. 40, 41,44-45
Requesting Service ................................................ 54, 57-58, 59
RF Coaxial Cable ............................................... 46, 52, *Q/U-I
RF Switcher ............................................................................. 10
Reminder/Time and Channel ................................................... 19
Remote Locator ................................................................. 34-35
Safety/Precautions ...................................... 2, 3, 'i4, 59, *Q/U-1
Second Audio Program (SAP) .................................................. 25
Sensor Remote ................................................................ *Q/U-3
Sleep Timer .............................................................................. 17
Smart Picture ..................................................................... 36-37
Smart Sound ...................................... ....................................... 38
Status Button ................................................................ *Q/U-3, 4
Surround Sound ................................................................. 28-29
Speaker Terminals ................................................................... 28
Time/Channel Display ......................................... 19, 22, *Q/U-3
Timer (Turn On) ...................................................................... 16
VCR Button ............................................................................. 45
VCR/TV Connections ............................. 30-33, 46, _';2, *Q/U- 1
Tips for Service ............................................................ 54, 57-59
TV Speaker Control ............................................................... 28
Volume Display ....................................................................... 26
Warranty ................................................................................. 59
* Information contained in Quick-Use (Q/U) Guide - page listed
56
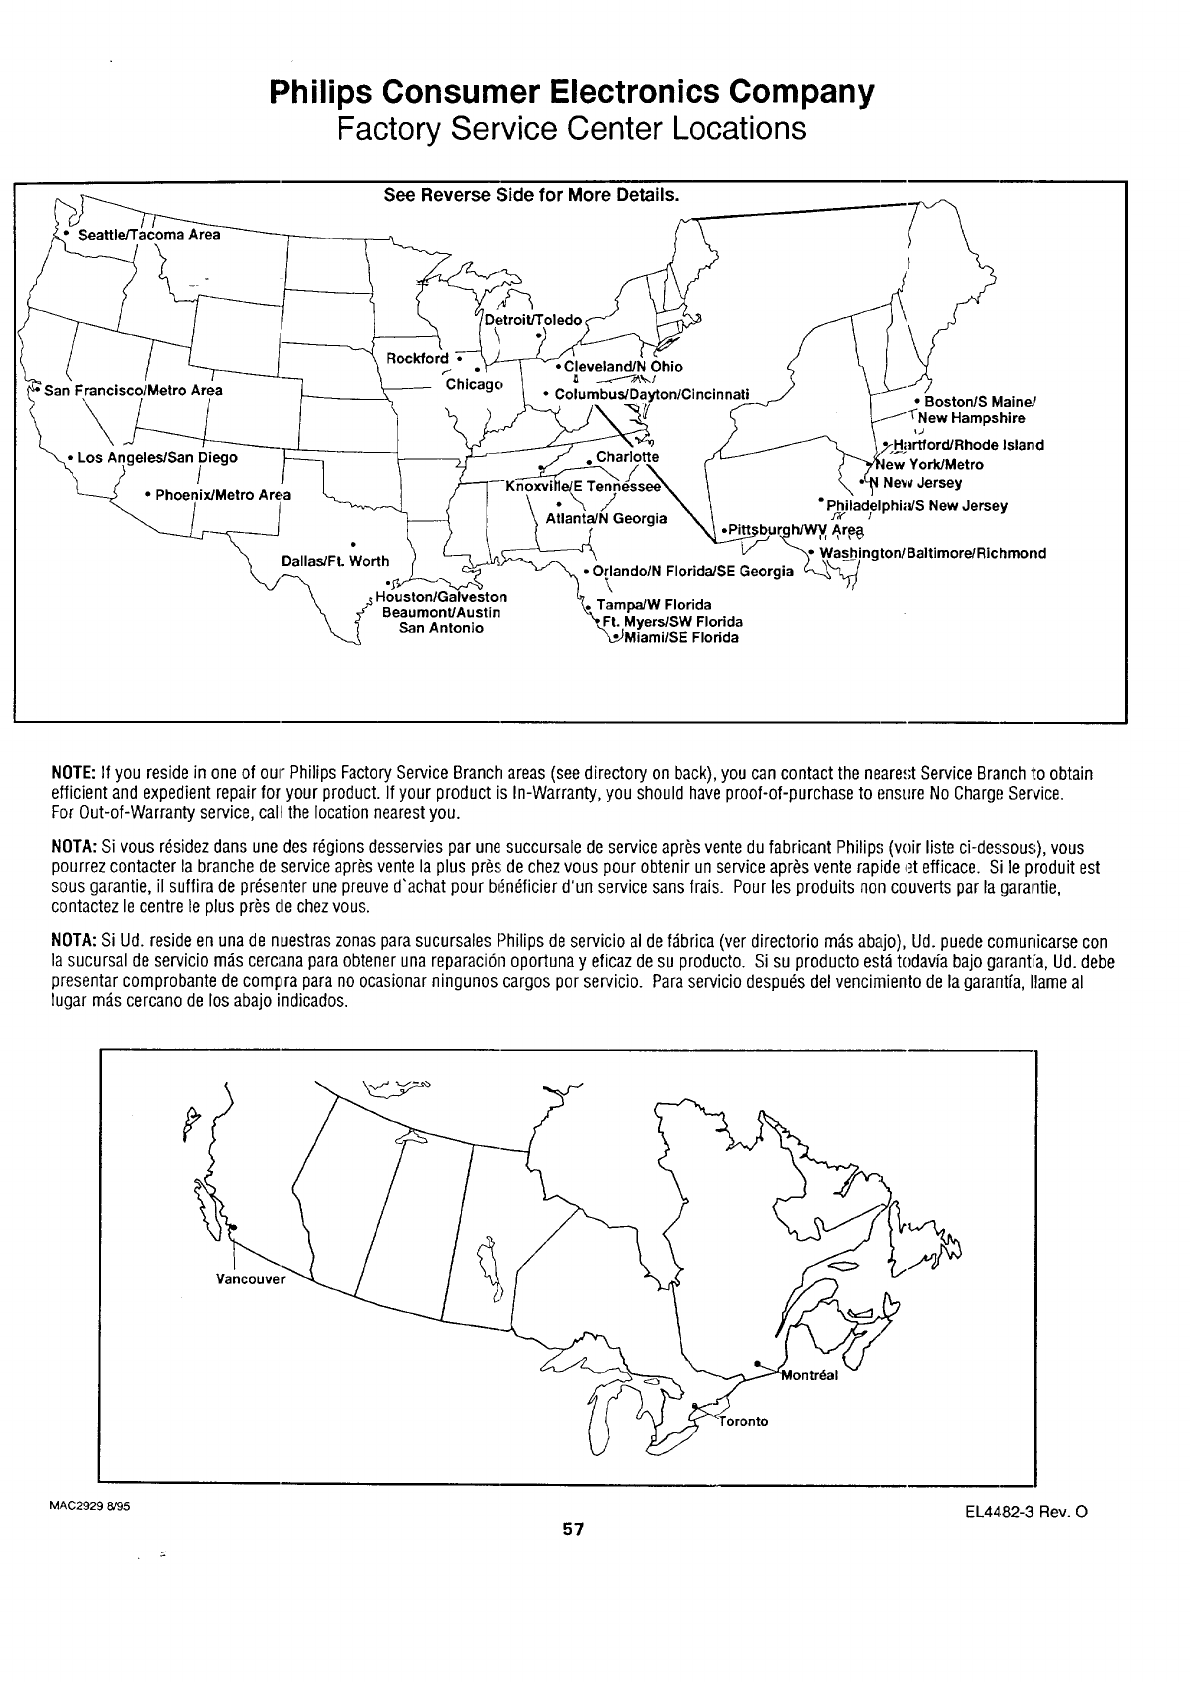
Philips Consumer Electronics Company
Factory Service Center Locations
See Reverse Side for More Details.
Area
Detroit./Toled(
San FranciscolMetro Area
Rockford
f•
Chicago
_geles/San _)iego
•Phoenix/Metro Area
J-_DallasYFt. Worth
_ San Antonio
•Cleveland/N Ohio
Columbus/Dayton/Cincinnati
Charlotte
•BostonlS Main_r
_J
Islan,d
New Jersey
•_'_ .J •Philadelphi_dS New Jersey
Atlanta/N Georgia Ih/V_H Ar_e_,
ng tonl Baltimore/Richmond
•OrlandolN Florida/SE Georgia
\
Tampa/W Florida
Ft. Myers/SW Florida
_JMiam/SE Florida
NOTE:If you reside in one of our PhilipsFactory Service Branch areas (see directory on back), you can contact the neare.,;tService Branch _toobtain
efficient and expedient repair for your product. If your product is In-Warranty, you should haveproof-of-purchase to enstire No ChargeService.
ForOut-of-Warranty service, call the location nearest you.
NOTA:Si vousr_sidez daneune des r_gions desservies par unesuccursale de serviceapr_s ventedu fabricant Philip.,;(voir liste ci-dessou.,;),vous
pourrez contacter la branche de service apr_svente la plus pros de chez vous pour obtenir un serviceapr_s vente rapide _._tefficace. Si le produit est
sous garantie, il suffira de presenter une preuved'achat pour be:n_ficierd'un service sansfrais. Pour lee produits non couverts par la garantie,
contactez le centre le plus pres de chez vous.
NOTA:Si Ud. reside en una de nuestras zonas parasucursales Philips de servicio al def#,brica(ver directorio m_sabaLjo),Ud. puedecornunicarse con
la sucursal de servicio m_s cercana paraobtener una reparaciSn oportuna y eficaz desu producto. Si su producto est_ todavfa bajo garantia, Ud. debe
presentar comprobante de compra parano ocasionar ningunos cargos por servicio. Paraservicio despu_s delvencimiento de la garantfa, Ilameal
lugar m#.scercano de los abajo indicados.
Vancouver
MAC2929 8/95
57 EL4482-3 Rev. 0
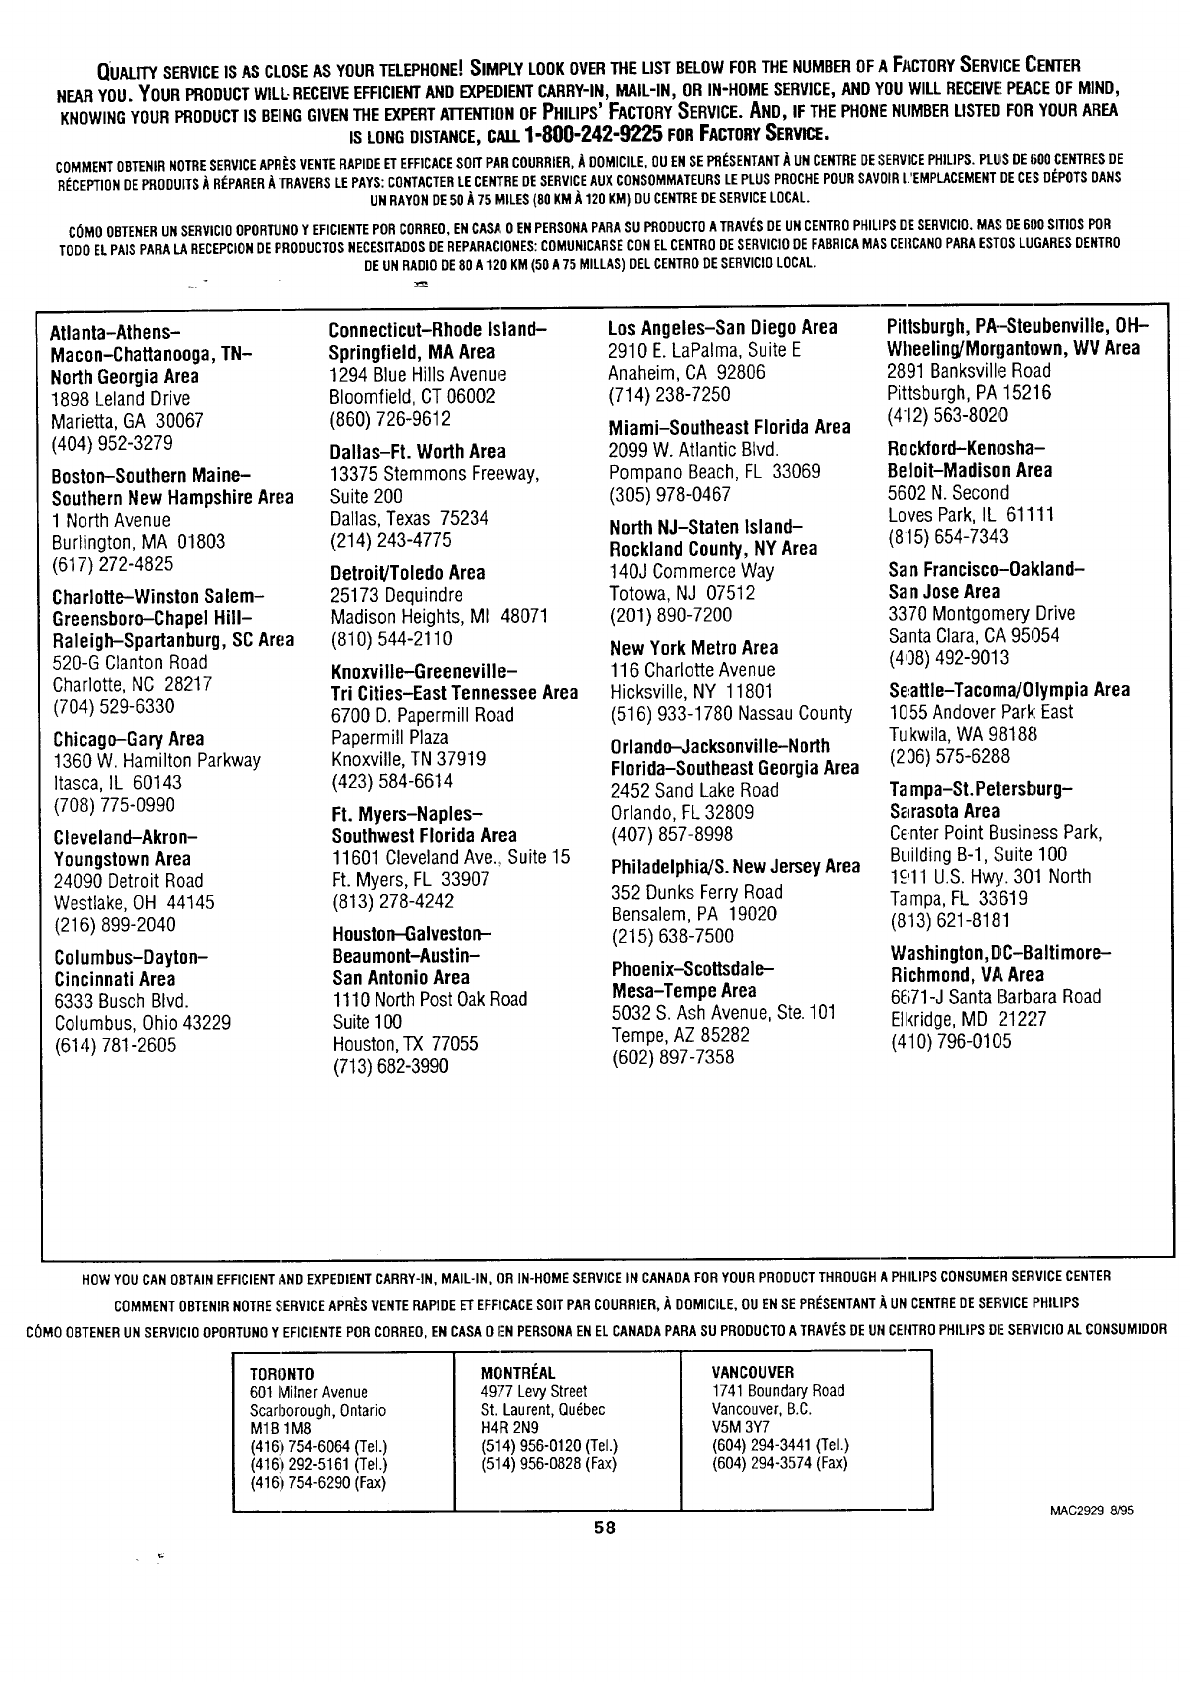
QUALrrYSERVICEIS AS CLOSEAS YOURTELEPHONE!SIMPLY LOOKOVERTHE LIST BELOWFOR THE NUMBEROF A FI_,CTORYSERVICE CENTER
NEARYOU.YOURPRODUCTWILL-RECEIVEEFFICIENTANDEXPEDIENTCARRY-IN,MAIL-IN,ORIN-HOMESERVICE,ANDYOUWILLRECEIVE!PEACEOFMIND,
KNOWINGYOURPRODUCTIS BEINGGIVENTHEEXPERTAIrENTIONOFPHILIPS'FACTORYSERVICE.AND,IFTHEPHONENUMBERLISTEDFORYOURAREA
ISLONGDISTANCE,CALL1-800"242"9225FORFACTO.YSERVe.
COMMENTOBTENIRNOTRESERVICEAPR_:SVENTERAPIDEETEFFICACESOIT PARCOURRIER,ADOMICILE,OU EN SE PR_SENTANT_,UN CENTREDESERVICEPHILIPS. PLIJiSDE600 CENTRESDE
RI_CEPTIONDEPRODUITS/_RI_PARERATRAVERSLEPAYS: CONTACTERLE CENTREDESERVICEAUX CONSOMMATEURSLEPLUS PROCHEPOURSAVOIRL'EMPLACEMENTDECE$ DI_POTSDANS
UNRAYONDE50 A75 MILES(80 KM ]_120 KM) DUCENTREDESERVICELOCAL.
COMOOBTENERUN SERVICIOOPORTUNOY EFICIENTEPORCORREO,ENCASJI,0 ENPERSONAPARASUPRODUCTOATRAV[_SDEUN CENTROPHELPSDESERVICIO.MASDE600 SITIOS POR
TODOELPAlS PARALA RECEPCIONDEPRODUCTOSNECESITADOSDEREPARACIONES:COMUNICARSECONEL CENTRODESERVICIOOEFABRICAMASCEI{CANOPARAESTOSLUGARESDENTRO
DEUN RADIODE80 A 120 KM(50 A75 MILLAS)DELCENTRODESERVICIOLOCAL.
Atlanta-Athens-
Macon-Chattanooga,TN-
NorthGeorgiaArea
1898 LelandDrive
Marietta,GA 30067
(404) 952-3279
Boston-SouthernMaine-
SouthernNew HampshireArea
1 North Avenue
Burlington, MA 01803
(617) 272-4825
Charlotte-WinstonSalem-
Greensboro-ChapelHill-
Raleigh-Spartanburg, SCArea
520-GClantonRoad
Charlotte,NC 28217
(704) 529-6330
Chicago-GaryArea
1360W. Hamilton Parkway
Itasca,IL 60143
(708) 775-0990
Cleveland-Akron-
YoungstownArea
24090 Detroit Road
Westlake,OH 44145
(216) 899-2040
Columbus-Dayton-
Cincinnati Area
6333 Busch Blvd.
Columbus,Ohio43229
(614) 781-2605
Connecticut-RhodeIsland-
Springfield,MAArea
1294 Blue HillsAvenue
Bloomfield, CT06002
(860) 726-9612
Dallas-Ft. WorthArea
13375 StemmonsFreeway,
Suite200
Dallas,Texas 75234
(214) 243-4775
Detroit/ToledoArea
25173 Dequindre
Madison Heights,MI 48071
(810) 544-2110
Knoxville-Greeneville-
Tri Cities-EastTennesseeArea
6700 D. Papermill Road
PapermillPlaza
Knoxville,TN37919
(423) 584-6614
Ft. Myers-Naples-
SouthwestFloridaArea
11601ClevelandAve, Suite 15
Ft. Myers, FL 33907
(813) 278-4242
Houston-Galveston-
Beaumont-Austin-
SanAntonioArea
1110NorthPostOakRoad
Suite1O0
Houston,TX 77055
(713)682-3990
LosAngeles-SanDiegoArea
2910 E. LaPalma,Suite E
Anaheim,CA 92806
(714) 238-7250
Miami-SoutheastFlorida Area
2099 W. Atlantic Blvd.
PompanoBeach,FL 33069
(305) 978-0467
NorthNJ-Staten Island-
RocklandCounty,NYArea
140J CommerceWay
Totowa, NJ 07512
(201) 890-7200
NewYorkMetroArea
116 CharlotteAvenue
Hicksville,NY 11801
(516) 933-1780 NassauCounty
Orlando-Jacksonville-North
Florida-SoutheastGeorgiaArea
2452 SandLake Road
Orlando, FL32809
(407) 857-8998
Philadelphia/&NewJerseyArea
352 Dunks FerryRoad
Bensalem,PA 19020
(215) 638-7500
Phoenix-Scottsdale-
Mesa-TempeArea
5032 S. Ash Avenue,Ste.101
Tempe,AZ 85282
(602) 897-7358
Pittsburgh,PA--Steubenville,OH-
Wheeling/Morgantnwn,WV Area
2891 BanksvilleRoad
Pittsburgh,PA15216
(412)563-80213
Rockford-Kennsha-
Beloit-MadisonArea
5602N. Second
LovesPark,IL 61111
(815) 654-7343
San Francisco-Oakland-
SanJoseArea
3370 MontgomeryDrive
SantaClara,CA95054
(408) 492-9013
Se,attle-Tacoma/OlympiaArea
11_55AndoverPark East
Tukwila,WA 98188
(236) 575-6288
Tampa-St.Petersburg-
SarasotaArea
CenterPoint BusinessPark,
BuildingB-l, Suite 100
1£11 U.S.H_. 301 North
Tampa,FL 33619
(813) 621-8181
Washington,D,C-Baltimore-
Richmond,VAArea
6671-J SantaBarbaraRoad
Ell<ridge,MD :212;!7
(410) 796-0105
HOW YOU CAN OBTAINEFFICIENTAND EXPEDIENTCARRY-IN, MAIL-IN, OR IN-HOME SERVICEIN CANADA FORYOUR PRODUCTTHROUGHA PHILIPS CONSUMERSE£:VICECENTER
COMMENT OBTENIRNOTRE _;ERVICEAPR_:SVENTE RAPIDEEl"EFFNCACESOIT PAR COURRIER,,_ DOMICILE, OU ENSE PR[:SENTANT+_UN CENTREDE SERVICEPHILIPS
COMO OBTENERUN SERVICIOOPORTUNOY EFICIENTEPOR CORREO,EN CASA0 I'N PERSONAENEL CANADAPARA SU PRODUCTOATRAV_:SDE UN CENTROPHILIPS DF SERVICIO AL CONSUMIDOR
TORONTO
601 IVlilnerAvenue
Scarborough, Ontario
M1B 1M8
(416) 754-6064 (Tel.)
(416) 292-5161 (Tel.)
(416) 754-6290 (Fax)
MONTRI_AL
4977 Levy Street
St. Laurent, Qudbec
H4R 2N9
(514) 956-0120 (Tel.)
(514) 956-0828 (Fax)
VANCOUVER
1741Bounda_Road
Vancouver,B.C.
V5M3Y7
(604)294-3441(Tel.)
(604)294-3574(Fax)
58 MAC2929 8/95
PROJECTION TELEVISION
One Year Free Labor
One Year Free Service on Parts
Two Years Free Service on Cathode Ray Tube Parts /30 days Free Service on Projection TV Screen
This product can be repaired in-home.
WHO IS COVERED?
You must have proof of purchase to receive warranty service. Asales
receipt or other document showing that you purchased the product is
considered proof of purchase.
WHAT IS COVERED?
Warranty coverage begins the day you buy your product, for one year
thereafter (30 days for the projection TV screen), all parts will be
repaired or replaced, and labor 2rid transportation are free. From one
to two years from the day of purchase, you pay for the replacement or
repair of all parts except the cathode ray tube and the "Clear-Vu" lens,
and for all labor and transportation charges. After two years from the
day of purchase, you pay for the replacement or repair of all parts
except the "Clear-Vu" lens (which is guaranteed against manufacturer's
defects for the life of the product), and for all labor and transportation
charges.
All parts, including repaired and ;replaced parts, are covered only for
the original warranty period. When the warranty on the product
expires, the warranty on all replaced and repaired parts also e_:pires.
WHAT IS EXCLUDED?
Your warranty does not cover:
labor charges for installation or setup of the product, adjustment of
customer controls on the product, and installation or repair of
antenna systems outside of the product.
product repair and/or part replacement because of misuse, acci-
dent, unauthorized repair or other cause not within the control of
Philips Consumer Electronics Company.
• reception problems caused b'/signal conditions or cable or antenna
systems outside the unit.
• a product that requires modification or adaptation to enable it to
operate in any country other than the country for which it was
designed, manufactured, approved and/or authorized, or repair of
products damaged by these modifications.
• incidental or consequential damages resulting from the product.
(Some states do not allow the exclusion of incidental or consequen-
tial damages, so the above exclusion may not apply to you. This
includes, but is not limited to.. prerecorded material, whether copy-
righted or not copyrighted.)
• a product used for commercial or institutional purposes.
WHERE IS SERVICE AVAILABLE?
HAKE SURE YOU KEER..
Please keep your sales receipt or other document showing proof of
purchase. Attach it to this owner's manual and keep both nearby. Also
keep the original box and packing material in case you need to return
your product.
BEFORE REQUESTING SERVICE...
Please check your owner's manual before requesting service.
Adjustments of the controls discussed there may save you a service
call.
TO GET WARRANTY SERVICIE...
Repair must be performed by an authorized service center or a factory
service center. If you do not live near a factory service center, co,_tact your
dealer. If your dealer is an authorized service center, he will arrange
repair. If your dealer is not an authorized service center, he will direct
you to the authorized service center engaged by him to service the
products he sells.
(In U.S.A., Puerto Rico and U.S. Virgin Islands, all implied warranties,
including implied warranties of merchantability and fitness for a particu-
lar purpose, are limited in duration to the d_Jration of this express war-
ranty. But, because some states do not allow limitations on how long
an implied warranty may last, this limitation may not apply to you.)
(In Canada, this warranty is given in lieu of all other warranties. No
other warranties are expressed or implied, ncluding any implied war-
ranties of merchantability or fitness for a pa-ticular purpose. Philips is
not liable under any circumstances for any cirect, indirect, special, inci-
dental or consequential damages, howsoever incurred, even if notified
of the possibility of such damages.)
IF YOU HAVE QUESTIONS...
In U.S.A.,Puerto Rico, or the U.S. Virgin Islands, contact Philips Service
Company at the address listed below.
In Canada, contact:
Philips Electronics Ltd.
601 Milner Avenue, Scarborough, Ontario, M I B IM8
(416) 292-5161
4977 Levy Street, St. Laurent, Quebec, H4R 2N9
(514) 956-0120
1741 Boundary Road, Vancouver', B.C., V5M 3Y7
(614) 294-3441
Warranty service is available in all countries where the produc: is offi-
cially distributed by Philips Consumer Electronics Company. Ir coun-
tries where Philips Consumer Electronics Company does not distribute
the product, the local Philips service organization will attempt to pro-
vide service (although there may be a delay if the appropriate spare
parts and technical manual(s) are not readily available).
REHEHBER...
Please record the model and serial numbers found on the product
below. Also, please fill out and mail your w;trranty registration card
promptly. It will be easier for us to notify you if necessary.
MODEL #
SERIAL #
i!ii iiiiiiii i ii! !i!!!!i!iiii iiiiii ii ! i !!!! i!i!!iiiiiiiiiiii!iiiiiii ! i iiii ii iii !i i! ii i ! i ii i i !! ii i ii iii o i ! iiiiiiiiiiiiiiiiiiiiiiiiiiiiiiiiiiiiiiiiiiiiiiiiiiiiiiiiiiiiii!iiiiiiiiiiiiiii!iiiiiiiii!!i
Philips Service Company, P.O. Box 555, Jefferson City, Tennessee 37760, (423) 475-8869
EL4945E002 /MAC 4102 /12-95
59
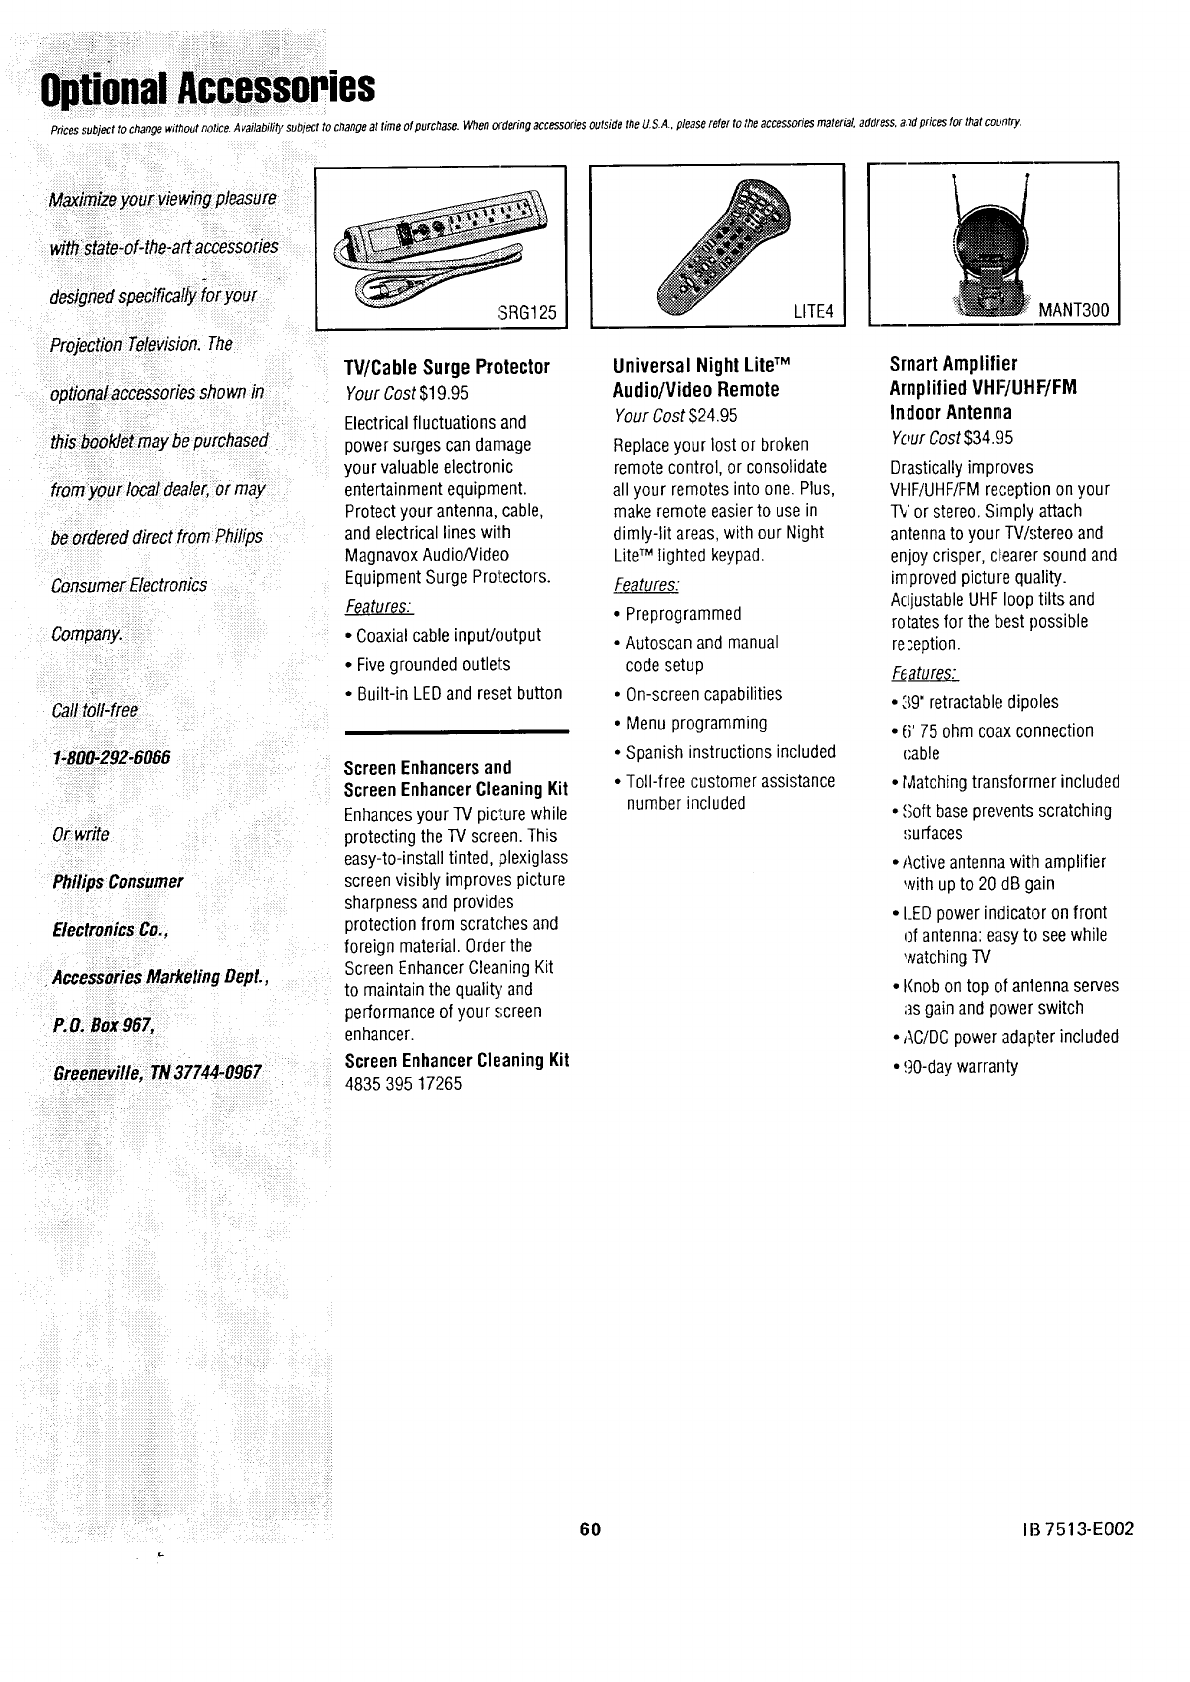
IS
Prices subject to changewithout notice. A vailabili_),SUOleCtto change at time of purchase. When o.dering accessories outside the U.S.A., please refer to the accessories material, address, aTdprices for that country.
Maximize your viewing pleasure
with State-of-the-art accessories
designed s_)ecificaf/yfor your
Projection Television. The
optional accessories shown in
this booklet may be purchased
from your local dealer, or may
be ordered direct from Philips
Consumer Electronics
Company.
Car toll-free
1-800-292-6066
Orwrite
Ph/lipsConsumer
ElectronicsCo.,
•AccessoriesMarketingDept.,
P.O.Box967,
Greeneville,TN37744-0967
3RG125
W/Cable Surge Protector
Your Cost$19.95
Electrical fluctuations and
power surges can damage
your valuable electronic
entertainment equipment.
Protect your antenna, cable,
and electrical lines with
Magnavox Audio/Video
Equipment Surge Protectors.
•Coaxial cable inpuVoutput
•Fivegrounded outlets
•Built-in LEOand reset button
Screen Enhancersand
Screen Enhancer Cleaning Kit
Enhancesyour IV picture while
protecting the TV screen. This
easy-to-install tinted, plexiglass
screenvisibly improves picture
sharpnessand provides
protection from scratches and
foreign material. Orderthe
Screen EnhancerCleaning Kit
to maintain the quality and
performance of your .%reen
enhancer.
Screen Enhancer Cleaning Kit
4835 395 17265
LITE4
Universal Night LiW M
Audio/VideoRemote
Your Cost $24.95
Replaceyour lost or broken
remote control, or consolidate
all your rernotes into one. Plus,
make remote easier to usein
dimly-lit areas,with our Night
LiteTM lighted keypad.
Features:
•Preprogrammed
• Autoscan and manual
code setup
•On-screen capabilities
• Menu programming
• Spanish instructions included
• Toll-free customer assistance
number included
MANT300
Smart Amplifier
AmplifiedVHF/UHIF/FM
Indoor Antenna
YourCost$34.05
Drasticallyimproves
VHF/UHF/FMre,_eptionon your
TV or stereo. Simply attach
antennato your TV/stereo and
enjoy crisper, clearer sound and
in,proved picture quality.
AcljustableUHFloop tilts and
rolates for the best possible
re;eption.
F_atures:
•39" retractabledipoles
• ti' 75 ohm coaxconnection
(;able
• Matching transformer included
• _;oft baseprevents scratching
_;urfaces
• Active antennawitl_ amplifier
with up to 20 dB gain
• LED power indicator on front
of antenna:easyto seewhile
watching TV
• Knob on top of anlenna serves
as gain and power switch
• ACIDC power adapter included
• 90-day warranty
60 IB 7513-E002
