MAGNAVOX DVD Systems Manual L0011150
User Manual: MAGNAVOX MAGNAVOX DVD Systems Manual MAGNAVOX DVD Systems Owner's Manual, MAGNAVOX DVD Systems installation guides
Open the PDF directly: View PDF ![]() .
.
Page Count: 51
Digital Video Disc
Player
Owner's Manual
MODEL SVD 100
Once your purchase is registered, you're eligible to receive all the privileges of owning this prod-
uct. So complete and return the Warranty Registration Card enclosed with your purchase at once.
And take advantage of these important benefits.
Warranty
Verification
Registering your product within
10 days confirms your right to
maximum prote_ion under the
terms and conditions of your
warranty.
Owner
Confirmation
YourcompletedWarranty
RegistrationCard servesas
verificationof ownershipin the
eventof producttheft or loss.
Model
Registration
Returningyour Warrenty
RegistrationCard right away
guaranteesyou'll receiveall
the information andspecial
offers which you qualifyfor
asthe owner of your model.
2000
Congratulations on your purchase, and
welcome to the "family!"
Dear product owner:
Thank you for your confidencein this product.You've selectedone of
the best-built,best-backedproductsavailabletoday.And we'll do
everythingin our power to keep you happywith your purchasefor
many years to come.
As a member of the SV2000 "family;' you're entitled to protection by
one of the most comprehensive warranties and outstanding service
networks in the industry.
What's more, your purchase guarantees you'll receive all the informa-
tion and specialoffersfor which you qualify,plus easyaccessto
accessoriesfrom our convenienthome shopping network.
And most importantly,you cancount on our uncompromisingcom-
mitment to your total satisfaction.
All of this is our way of sayingwelcome - and thanks for investingin
an SV2000 product.
RS. Remember, to get the most from your product,
you must return your Warranty Registration
Card within I 0 days. So please mail it to us right
now!
Know these
safetysymbols
A This "bolt of lightning"indi-
cates uninsulated material
within your unitwhich maycause
an electrical shock. For the safety
of everyone in your household,
please do not remove product
covering.
The "exclamation point"
_,calls attention to features
for which you should read
the enclosed literature closely to
prevent operating and mainte-
nance problems.
WARNING: TO PREVENT
FIREOR SHOCK HAZARD, DO
NOT EXPOSE THIS EQUIP-
MENT TO RAIN OR MOIS-
TURE.
CAUTION: Toprevent electric
shock,match wide blade of plug
to wide slot,fully insert.
ATTENTION: Pour 6viter les
choc electriques, introduire la
lamela pluslarge de la fichedens
la borne correslpondante de la
priseet pousser|usqu'au fond.
For Customer Use
Below,enter your product'smodelnumberandserialnumber,whichare locatedon the rear of the cabinet
Keepthis informationfor future reference.
Model No. SerialNo.
MACEOg7
SafetyInformation3
Safety Precautions
Warning: To preventfire or shockhazard,do not expose thisequipment to rain or
moisture.
Federal Communications Commission (FCC)Warning: Any unauthorized
changesor modifications to thisequipmentvoidthe user'sauthorityto operate i_
Laser Safety
This unit employs a laser.Only a qualifiedservicepersonshouldremove the coveror
attempt to servicethisdevice,dueto possibleeye injury.
CAUTION: USEOF CONTROLS OR ADJUSTMENTSOR PERFORMANCEOF PRO-
CEDURESOTHERTHANTHOSE SPECIFIEDHEREINMAY RESULTIN HAZ-
ARDOUS RADIATION EXPOSURE.
CAUTION:VISIBLE AND INVISIBLELASERRADIATION WHEN OPEN AND INTER-
LOCK DEFEATED.DO NOT STAREINTO BEAM.THEBEAM IS LOCATED INSIDE,
NEARTHE DECK MECHANISM.
Special Information for Canadian Users
This ClassB digital apparatuscomplies with CanadianICES-003.
Cet appareilnum_rique de la classeBest conforme _ la norme NMB-003 du Canada.
Radio/TV Interference
This equipmenthasbeentested andfoundto complywith the limitsfor a Class B digi-
tal device,pursuantto Part 15of the FCC Rules.Theselimitsare designedto provide
reasonableprotectionagainstharmfulinterferencein a residential installation.This
equipmentgenerates,uses,and canradiate radio frequencyenergyand,if not installed
andusedinaccordancewith the instructions,maycauseharmfulinterference to radio
communications.However,there is no guaranteethat interferencewill not occur ina
particularinstallation.If this equipment doescauseharmfulinterferenceto radio or
television reception, whichcanbe determinedbyturning the equipment off andon,the
userisencouragedto try to correct the interferencebyone or more of the following
measures:
I) Reorientor relocate the receivingantenna.
2) increasethe separationbetweenthe equipmentandthe receiver.
3) Connect the equipment into an outlet on acircuitdifferentfrom that to which
the receiver is connected.
4) Consult the dealer or an experienced radio/TV technician for help.
Copyright Protection
Unauthorizedcopying,broadcasting,publicperformanceandlendingof Discsare pro-
hibited,
This product incorporates copyright protection technology that is protected by
method claims of certain U.S.patents and other intellectual property rights owned by
Macrovision Corporation and other rights owners.
Use of this copyright protection technology must be authorized by Macrovision
Corporation and is intended for home and other limited viewing usesonly unlessoth-
erwise authorized by Macrovision Corporation. Reverseengineeringor disassemblyis
prohibited.
._TAs an ENERGYSTAR® Partner, Philips Consumer Electronics has determined that this product
® ®
meets the ENERGYSTARguidelines for energyefficiency. ENERGYSTAR iSa U.S.registered
mark. Using productswith the ENERGYSTAR®label can save energy.Savingenergy reduces air
pollution and lowers utility bills.
Manufactured under license from Dolby Laboratories."Dolby" and the double-D symbol are trademarks
of Dolby Laboratories. Confidential Unpublished Works. (© 1992-1997 Dolby Laboratories, Inc. All rights
reserved.)
DTS is a trademark of Digital Theater Systems Inc. in the United States of America.
Copyright 1999 Philips Consumer Electronics. All rights reserved.
4 TableofContents
t601 • OOOI IOtO0 tOOaJOOe, •D,, •,e,,, ,t, •t,O, ,O,,OtO0 •tO,OI OOe,at IO0,,QI •tO,O,, ••JO0,,,.I,,,,,, ,tO0, •tOtOt,, •••IO_t
General Information
Safety Information ...................................................... 3
Table of Contents ...................................................... 4
Introduction ........................................................... 5
Playable Discs .......................................................... 6
Getting Started
Remote Control Setup ................................................... 7
Hookups ........................................................... 8-12
DVD Player Display .................................................... 13
Front Panel .......................................................... 14
Rear Panel ........................................................... 15
Remote Control Buttons ............................................. 16-17
Disc Playback and Features
Playing aDisc ......................................................... 18
Disc Menus .......................................................... 19
PauSingPlayback ....................................................... 20
Step by Step Playback ................................................... 21
Fast Forward/Reverse Search ............................................. 22
Slow Motion .......................................................... 23
Track Playback ........................................................ 24
Title/Chapter Playback .................................................. 25
Specific Time Playback .................................................. 26
Repeat Playback ....................................................... 27
A-B Repeat Playback ................................................... 28
Programmed Playback .................................................. 29
Random Playback ...................................................... 30
Audio Language/SoundMode ............................................. 31
Subtitle Language ...................................................... 32
Camera Angles ........................................................ 33
Parental Lock Password ................................................. 34
Parental Lock Levels .................................................... 35
DVD Player Setup and Features
Status Display ......................................................... 36
Video Settings ........................................................ 37
Audio Settings ...................................................... 38-39
Language Settings ................................................... 40-42
Other Menu Settings ................................................... 43
Information You May Need
Helpful Hints ....................................................... 44-45
Care and Maintenance .................................................. 46
Glossary ............................................................. 47
Specifications ......................................................... 48
Limited Warranty ................................. "..................... 49
Index ............................................................... 50
Supplied Accessories ................................................... 52
Introduction5
Welcome!
This DigitalVideo Disc Playerwill allow you to enjoy better picture quality, clearer
sound, and endless playback features available on DigitalVideo Discs (DVDs).
Expanding technology allows you to add options to your viewing - watch a direc-
tor's cut of a movie, listen to the producer's comments, or play your favorite scene
over and over again.Hear a movie in different languages,or listen only to the
soundtrack.The possibilities are limited only by your choices and the materials avail-
able on the DVD.
Of course, you can listen to your favorite Audio Compact Discs on this DVD Player
as well. Determine the order in which you want to hear the songs,or play the Disc
repeatedly - all while seeing the status of the CD on your television.
We hope you enjoy this DVD Player and learn to use all of its features.To get the
most out of the DVD Player,read this owner's manual carefully.It will describe how
you can accessall the features listed below.
Features
•Audio Language/SoundMode Choices
•Automatic Detection of Disc Type
(Audio CD or DVD)
• Dolby Digital Sound
• DVD Menus in a Desired Language*
• On-Screen Display for DVD Player
• Parental Lock
• Paused/Fast/Slow/Step-by-StepPlayback
•Program Playback(Audio CD only)
0 Random Playback(Audio CD only)
• Screen Saver
• Selectinga Camera Angle *
• Subtitles in a Desired Language*
*If available on the Disc
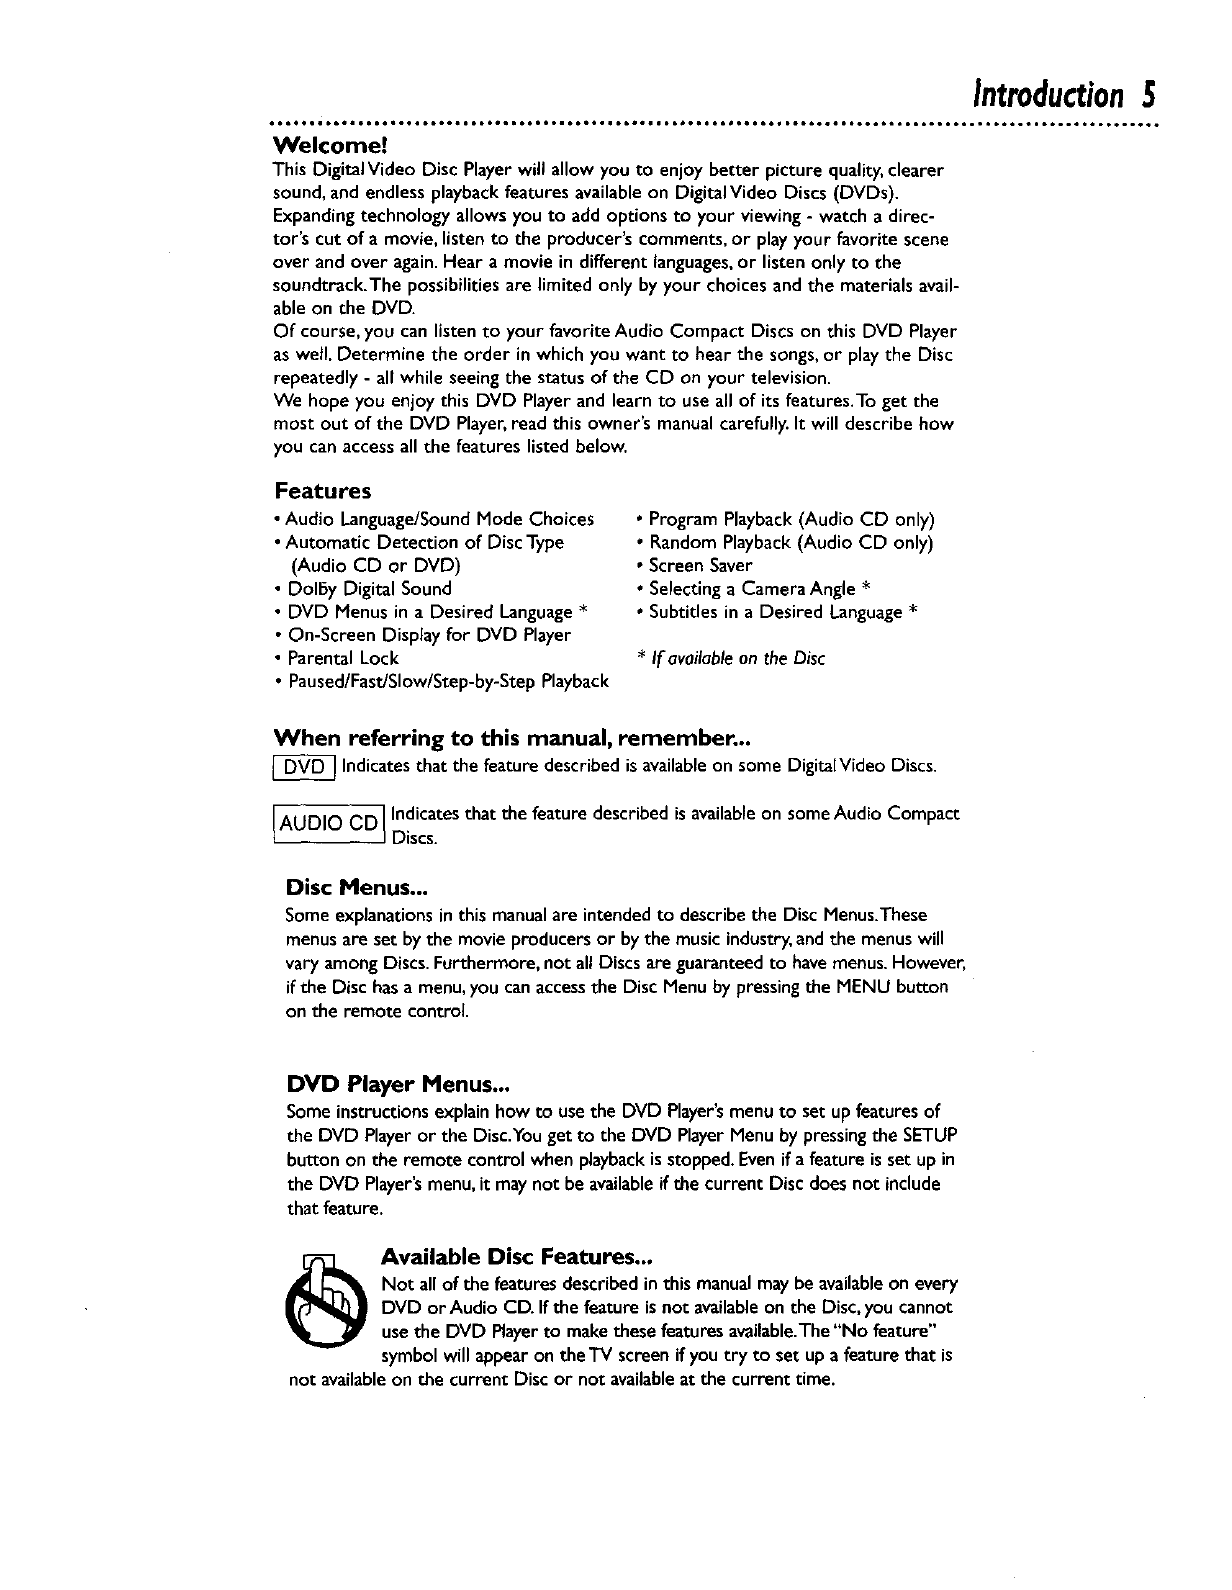
When referring to this manual, remember...
[_ Indicatesthat the feature described is availableon some DigitaIVideo Discs.
AUDIO CD] Indicatesthat the feature described isavailableon someAudio Compact
JDiscs.
Disc Menus...
Some explanationsin this manualare intendedto describethe Disc Menus.These
menusare set by the movie producers or by the music industry,and the menus will
vary among Discs. Furthermore, not all Discs are guaranteedto havemenus.However,
if the Disc hasa menu,you canaccessthe Disc Menu by pressingthe MENU button
on the remote control.
DVD Player Menus...
Someinstructionsexplainhowto usethe DVD Player'smenu to setup featuresof
the DVD Playeror the Disc.Youget to the DVD PlayerMenu by pressingthe SETUP
buttonon the remote controlwhenplaybackisstopped.Evenif a featureisset up in
the DVD Player'smenu,it maynot be availableif the currentDisc doesnot include
that feature.
_Available Disc Features...
Not all of the features described inthis manualmaybe availableon every
DVD or Audio CD. If the feature is not availableon the Disc,you cannot
use the DVD Playerto makethese features available.The"No feature"
symbol will appear on the TV screen if you try to set up afeature that is
not availableon the current Disc or not availableat the current time.
6PlayableDiscs
Playable Discs
This DVD Playerwill playDigitalVideoDiscs(DVDs) andAudio CDs. In order to playa
DVD or Audio CD on thisDVD Player,makesurethe Discmeets the requirements for
Region CodesandColor Systemsasdescribedon this page.Also,the Discsshouldbe
labelledwith the followingIogosandshouldmeet these standards.
Disc Typ_
Digital
Video
Disc
Audio
CD
Logo
mITAL _JOIO
Contents
Sound
and
Pictures
Sound
Disc Siz_
12cm
8 cm
t2 cm
8 cm
(singles)
Maximum
Playback Time
Approx. 4 hours
(single-sided)
Approx. 8 hours
(double-sided)
Approx, 80 minutes
(single-sided)
Approx. 160 minutes
(double-sided)
74 minutes
20 minutes
Disc
Segments
DVDs are
divided into Titles,
which are divided
into Chapters.
Titles and Chapters
are numbered,
Audio CDs are divided
into numberedTracks, i.e
a track may be one song.
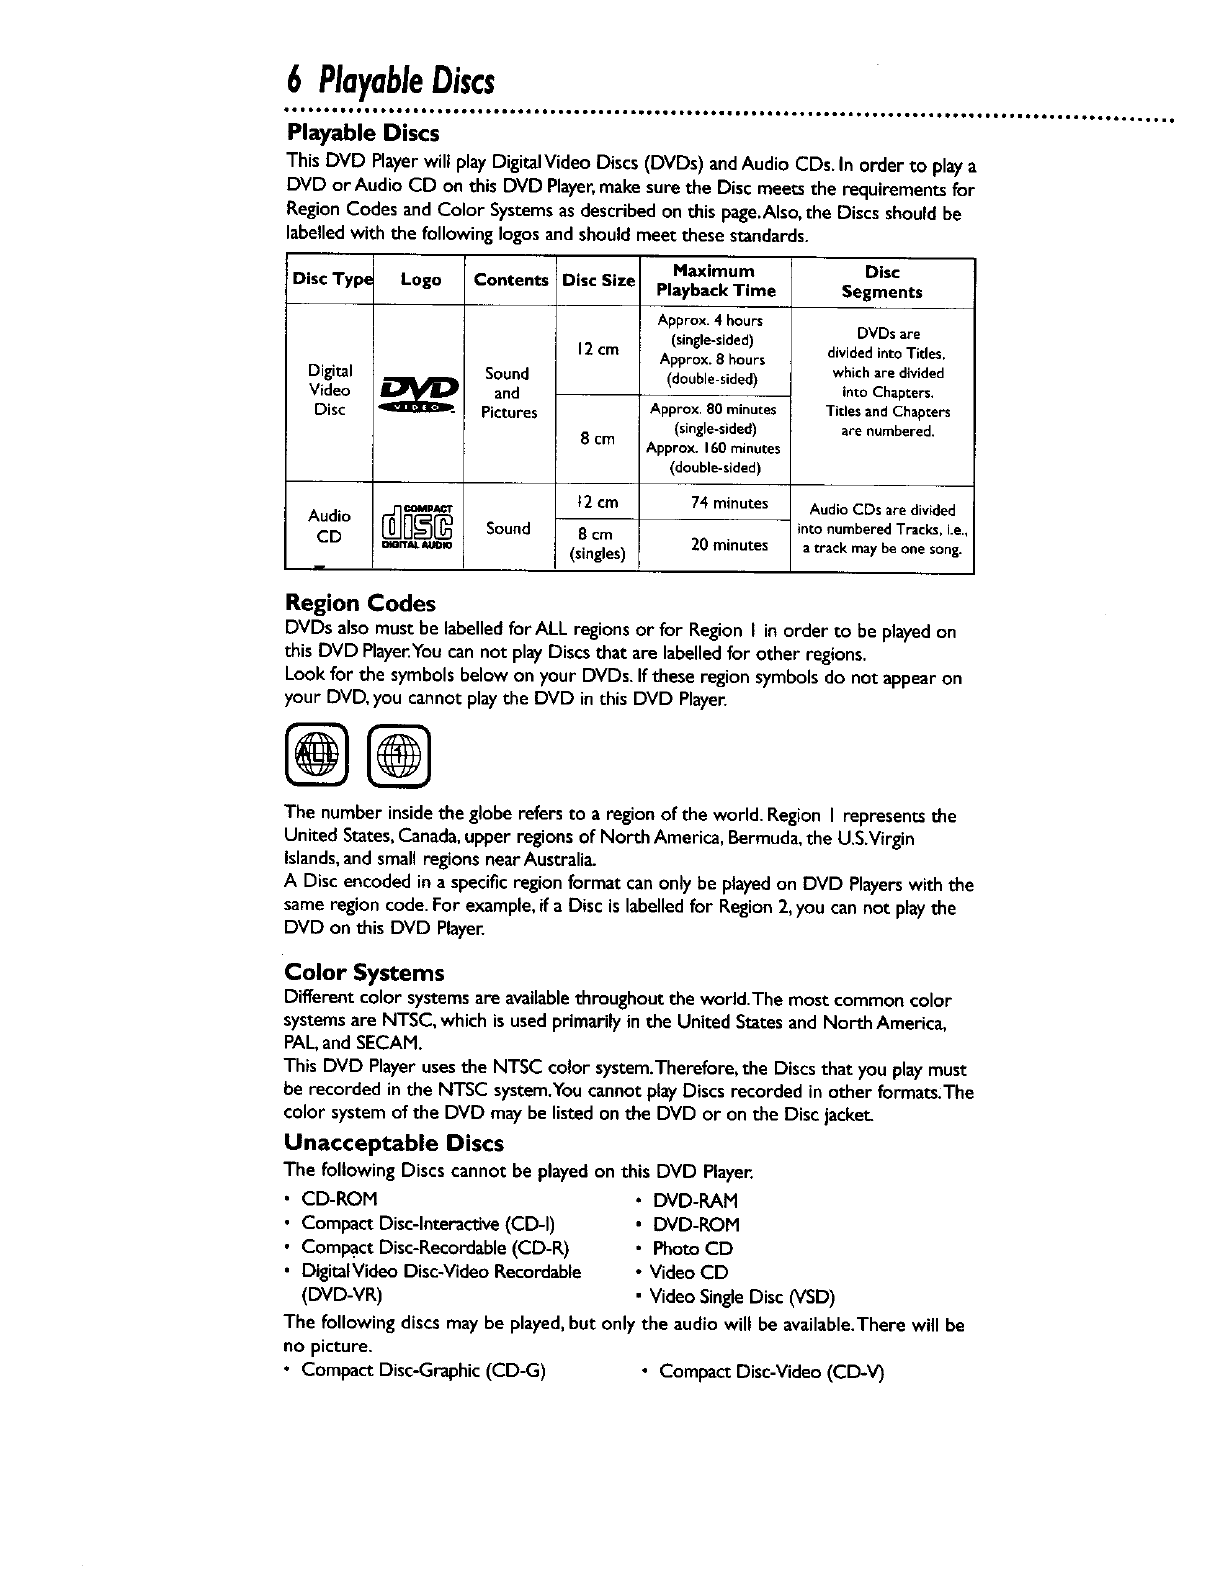
Region Codes
DVDs alsomustbe labelledfor ALL regions or for Region I in order to be playedon
this DVD Playe_Youcan not play Discsthat are labelledfor other regions.
Look for the symbols below on your DVDs.If these region symbols do not appearon
your DVD, you cannot play the DVD in this DVD Player.
@@
The number insidethe globerefers to aregion of the world.Region I represents the
United States,Canada,upper regions of North America, Bermuda,the U.S.Virgin
Islands,and small regions nearAustralia.
A Disc encoded in a specificregion format can only be playedon DVD Playerswith the
same region code. For example,if a Disc is labelledfor Region 2,you can not play the
DVD on this DVD Player.
Color Systems
Different color systemsare availablethroughout the world.The most commoncolor
systemsare NTSC,which is used primarily in the United States and North America,
PAL,and SECAM.
This DVD Playerusesthe NTSC color system.Therefore,the Discsthat you playmust
be recorded in the NTSC system.Youcannot play Discs recorded in other formats.The
color system of the DVD maybe listed on the DVD or on the Disc jacket
Unacceptable Discs
The followingDiscs cannot be playedon this DVD Player.
•CD-ROM
•Compact Disc-Interactive(CD-I)
• Compact Disc-Recordable(CD-R)
• DigitalVideo Disc-Video Recordable
(DVD-VR)
•DVD-RAM
• DVD-ROM
• Photo CD
•Video CD
• Video Single Disc (VSD)
The following discs may be played,but only the audio will be available.There will be
no picture.
• Compact Disc-Graphic (CD-G) •Compact Disc-Video (CD-V)
RemoteControlSetup7
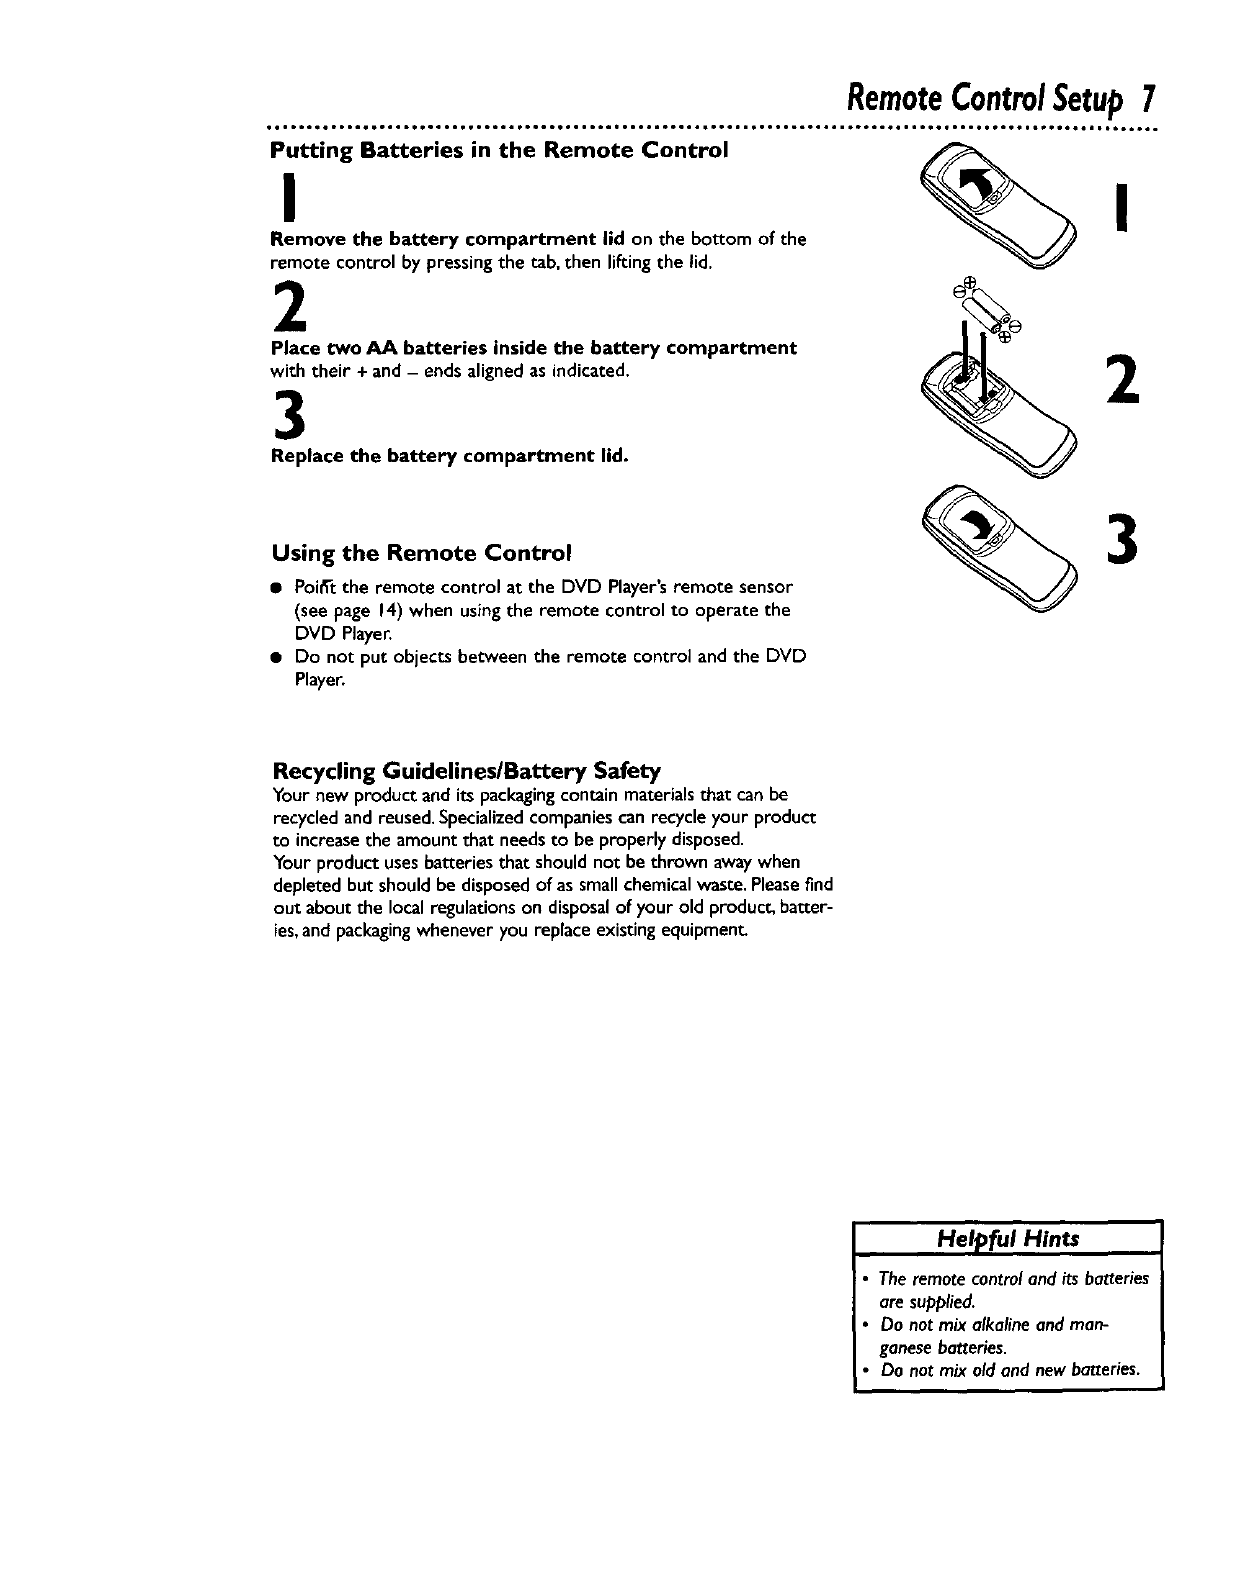
Putting Batteries in the Remote Control
I
Remove the battery compartment lid on the bottom of the
remote control by pressingthe tab,then liftingthe lid.
2
Place two AA batteries inside the battery compartment
with their + and- ends alignedas indicated.
3
Replace the battery compartment lid.
I
Using the Remote Control
•Poi_'t the remote control at the DVD Player'sremote sensor
(see page 14) when using the remote control to operate the
DVD Player.
• Do not put objects between the remote control and the DVD
Player.
3
Recycling Guidelines/Battery Safety
Your new product and its packagingcontain materialsthat can be
recycled and reused.Specializedcompaniescan recycle your product
to increasethe amount that needs to be properly disposed.
Your product usesbatteriesthat should not be thrown awaywhen
depleted but should be disposedof as small chemical waste.Pleasefind
out about the local regulationson disposalof your old product, batter-
ies,and packagingwhenever you replace existing ecluipmen_
Helpful Hints
The remotecontroland its batteries
are supplied.
Do not mix alkaline and man-
ganesebatteries.
Do not mix oldand newbatteries.
8 Hookups
•ooooo • oo6* t,too oo61 i. oeoo Loom • oQt • o°l, o_o • • 6°1 • • oil., ._ooo o°to • • oo°tJ • • o66oo • • oo6o ••to • • or, • •oo6oo° • • .oote6Q, t
You mayconnectthe DVD Playerseveraldifferent ways,dependingon your existingequipmentandyour prefer-
encesfor sound and picture quality.Todetermine which hookup is best for you,examine the options on the fol-
lowing pages,then see which best matchesyour situation. Before you hook up the DVD Player,remember:
•Connect the DVD Playerdirectly to ate. If you connect the DVD Playerto aVCR, then connect theVCR to
the _ the picture may be distorted by the copyright protection system.
• Turn off the power of all equipment before makingany connections.
• Refer to the owner's manualsof your other equipment for additional information.
• Depending on your connection, you may need to purchaseadditional cables.
• If you do not connect the DVD Playerto a Dolby Digital or DTS Decoder,set DOLBY DIGITAL and DTS to
OFF on the DVD Player.Detailsareon pagesI I and 38-39. If you playa DVD when the settingsare wrong,
the sound will be distorted or you may damagethe speakers.
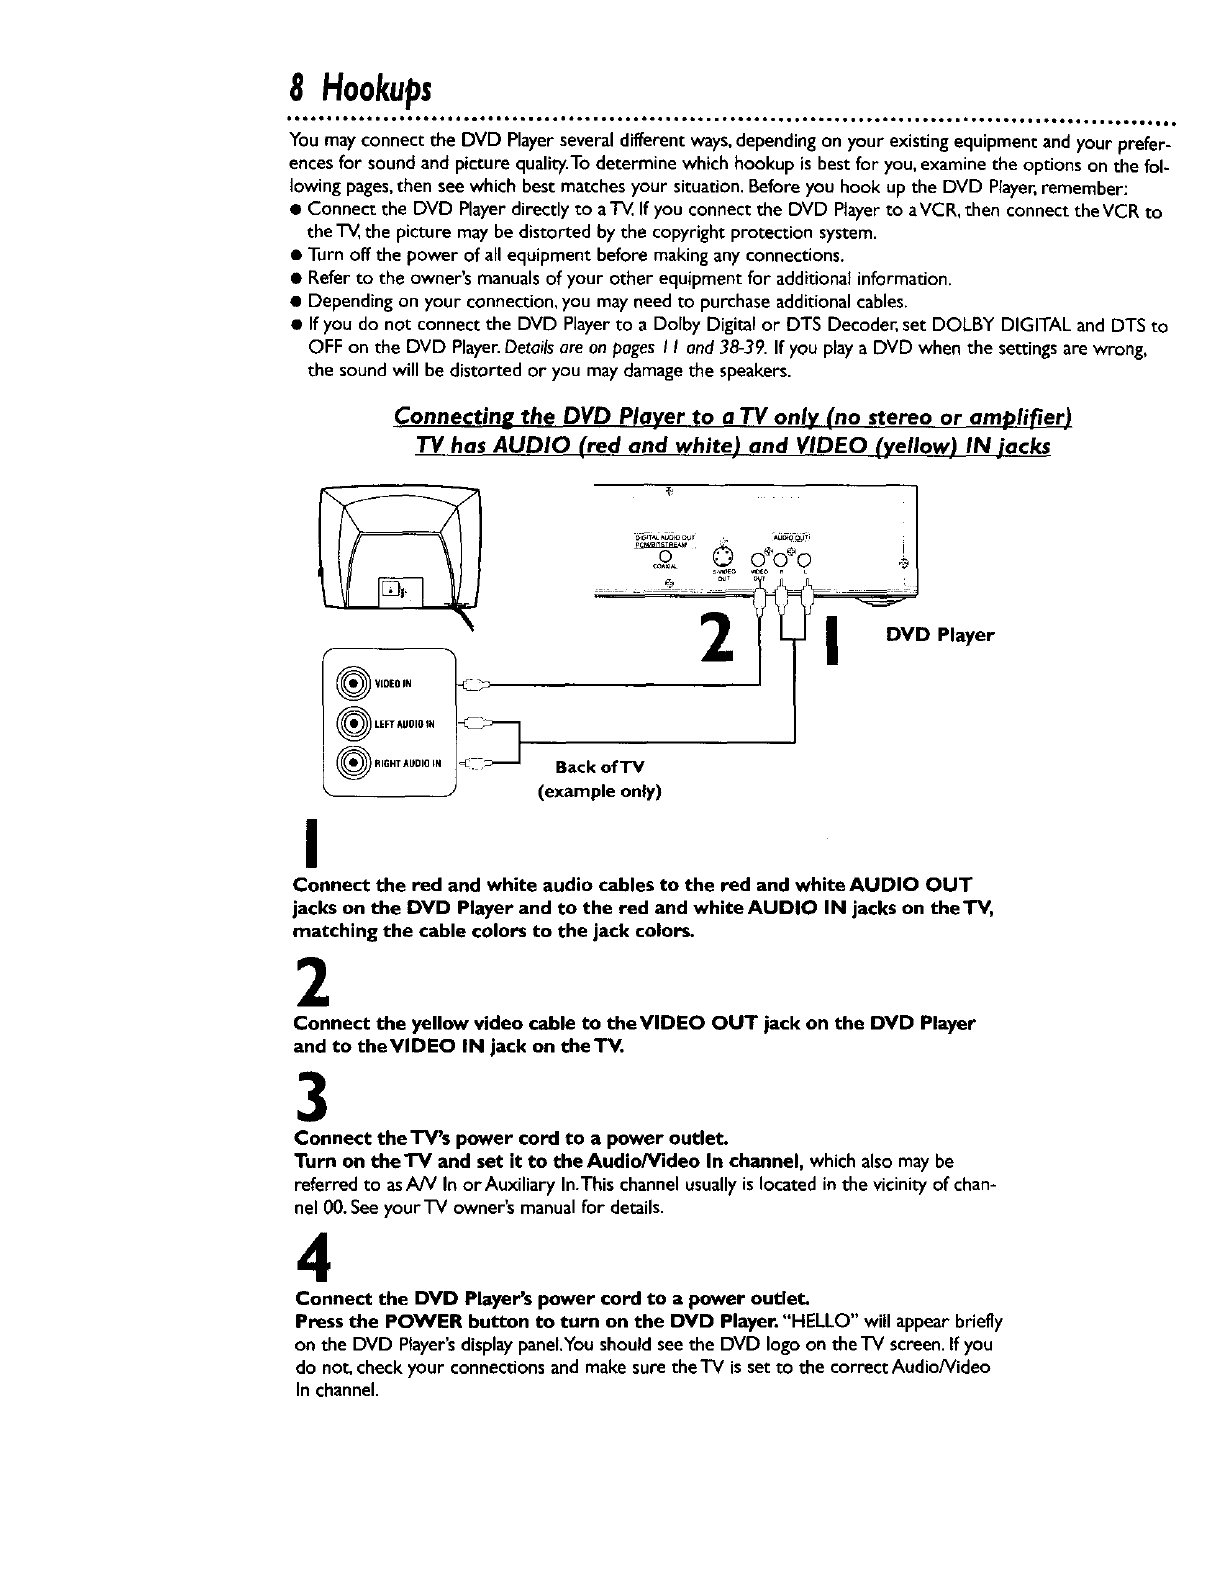
Connecting the DVD Player to a TV only (no stereo or amplifier)
TV has AUDIO (red and white) and VIDEO (yellow) IN jacks
C.q,_T_^U=ODUT _EO00_ii I
s _o
DVD Player
m
®,0EoN
LEFT AUDIO IN
RIGHT AUDIO IN
/
Back of'IV
(example only)
I
Connect the red and white audio cables to the red and white AUDIO OUT
jacks on the DVD Player and to the red and white AUDIO IN jacks on theTV,
matching the cable colors to the jack colors.
2
Connect the yellow video cable to theVIDEO OUT jack on the DVD Player
and to theVIDEO IN jack on the'IV.
3
Connect the TV's power cord to a power outlet.
Turn on the "IV and set it to the Audio/Video In channel, which alsomay be
referred to asA/V In or Auxiliary In.Thischannel usuallyis located in the vicinity of chan-
nel 00.Seeyour'IV owner's manualfor details.
4
Connect the DVD Player's power cord to a power outlet.
Press the POWER button to turn on the DVD Player. "HELLO" will appearbriefly
on the DVD Player'sdisplaypanel.Youshould seethe DVD logo on the'IV screen.If you
do not, check your connections and makesure the'IV is set to the correct Audio/Video
In channel.
Hookups(cont'd)9
oeootoo,eoto,,o ° o.,66, oo6t i ooot*ooo e,oo_ o_,,Q_,o6oo oo6g leo*.ooeog,*,oeolo,,,eo,,_ _ J0QQt _0eet _O e_lt O ° Qtlll,tooo6
Connectine the DVD Player to a TV only (no stereo or arr_lifier)
TV has audio (red and white) and S-Video In jacks
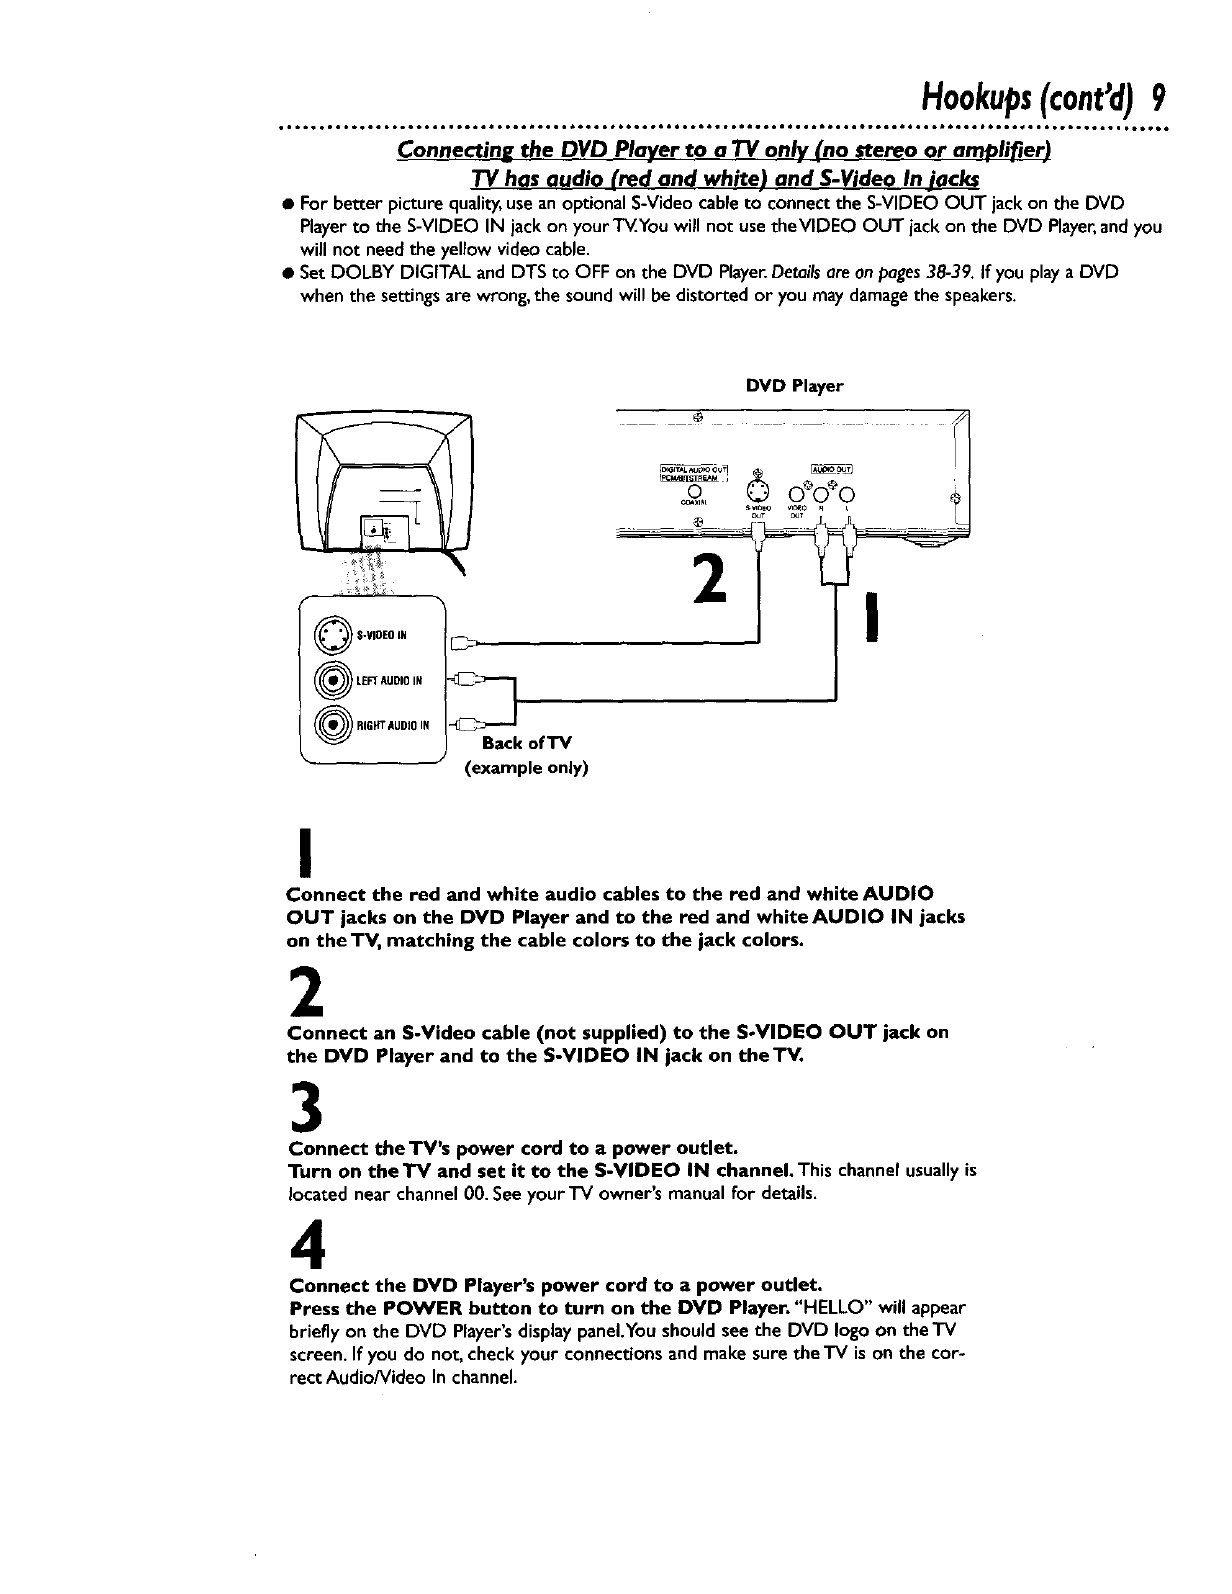
•For better picturequality,usean optionalS-Videocableto connectthe S-VIDEO OUT jack on the DVD
Playerto the S-VIDEO IN jack on your T_.Youwill not use theVIDEO OUT jack on the DVD Player,andyou
will not needthe yellow video cable.
• Set DOLBY DIGITAL and DTS to OFF on the DVD Player.Detailsareon pages38-39. If you playa DVD
when the settingsare wrong, the sound will be distorted or you maydamagethe speakers.
QS-VIDEO IN
OLEFT AUDIO IN
RIGHT AUDIO IN
• J
E_
DVO Player
°f
Back of TV
(example only)
I
Connect the red and white audio cables to the red and white AUDIO
OUT jacks on the DVD Player and to the red and whiteAUDIO IN jacks
on the TV, matching the cable colors to the jack colors.
2
Connect an S-Video cable (not supplied) to the S-VIDEO OUT jack on
the DVD Player and to the S-VIDEO IN jack on the'IV.
3
Connect the TV's power cord to a power outlet.
Turn on theTV and set it to the S-VIDEO IN channel.This channelusuallyis
located near channel 00. Seeyour'IV owner's manual for details.
4
Connect the DVD Player's power cord to a power outlet.
Press the POWER button to turn on the DVD Player. "HELLO" will appear
brieflyon the DVD Player's displaypanel.Youshouldseethe DVD logoon theTV
screen.If you do not, checkyour connectionsand make surethe TV is on the cor-
rect Audio/Video In channel.
I0 Hookups(cont'd)
Connectin__ to a TV and a Stereo
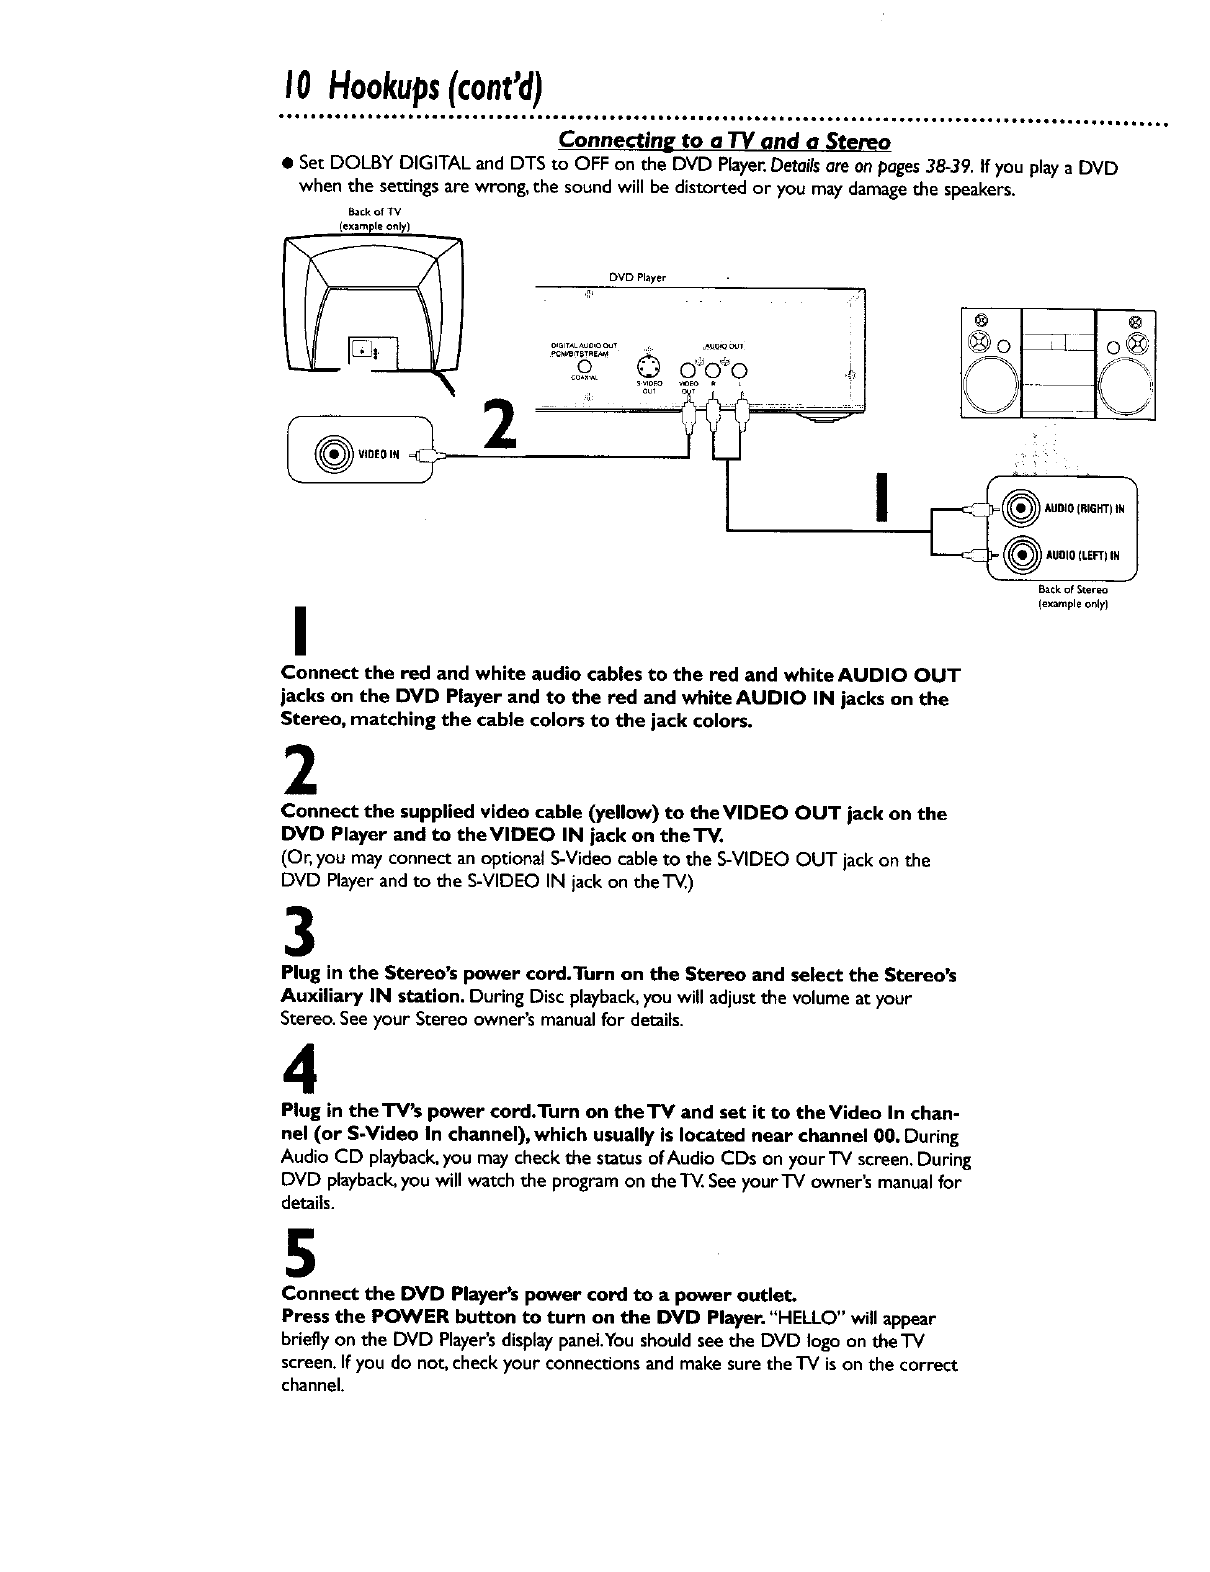
•Set DOLBY DIGITAL and DTS to OFF on the DVD Player.Detailsareon pages38-39. If youplay aDVD
when the settings are wrong, the sound will be distorted or you may damagethe speakers.
Backof TV
DVD Player I
oo © o,,ooo
I
Connect the red and white audio cables to the red and white AUDIO OUT
jacks on the DVD Player and to the red and white AUDIO IN jacks on the
Stereo, matching the cable colors to the jack colors.
2
Connect the supplied video cable (yellow) to theVIDEO OUT jack on the
DVD Player and to theVIDEO IN jack on the'IV.
(Or, you may connect an optional S-Videocable to the S-VIDEO OUT jack on the
DVD Playerand to the S-VIDEO IN jack on the'l-_.)
3
Plug in the Stereo's power cord.Turn on the Stereo and select the Stereo's
Auxiliary IN station. During Disc playback,youwill adjustthe volumeat your
Stereo.Seeyour Stereo owner's manualfor details.
4
Plug in theTV's power cord.Turn on theTV and set it to theVideo In chan-
nel (or S-Video In channel),which usually is located near channel 00. During
Audio CD playback,youmay checkthe status ofAudio CDs on yourTV screen,During
DVD playback,youwill watch the programon the T_. Seeyour"iV owner'smanualfor
details.
1
j
I_¢k of Stereo
(example only)
5
Connect the DVD Player's power cord to apower outlet.
Press the POWER button to turn on the DVD Player."HELLO" will appear
brieflyon the DVD Player'sdisplaypanel.Youshouldseethe DVD logoontheTV
screen.If you do not, checkyour connectionsandmake sure theTV ison the correct
channel.
Connectin_ to a Dolb.v D_ital Decoder or DTS Decoder
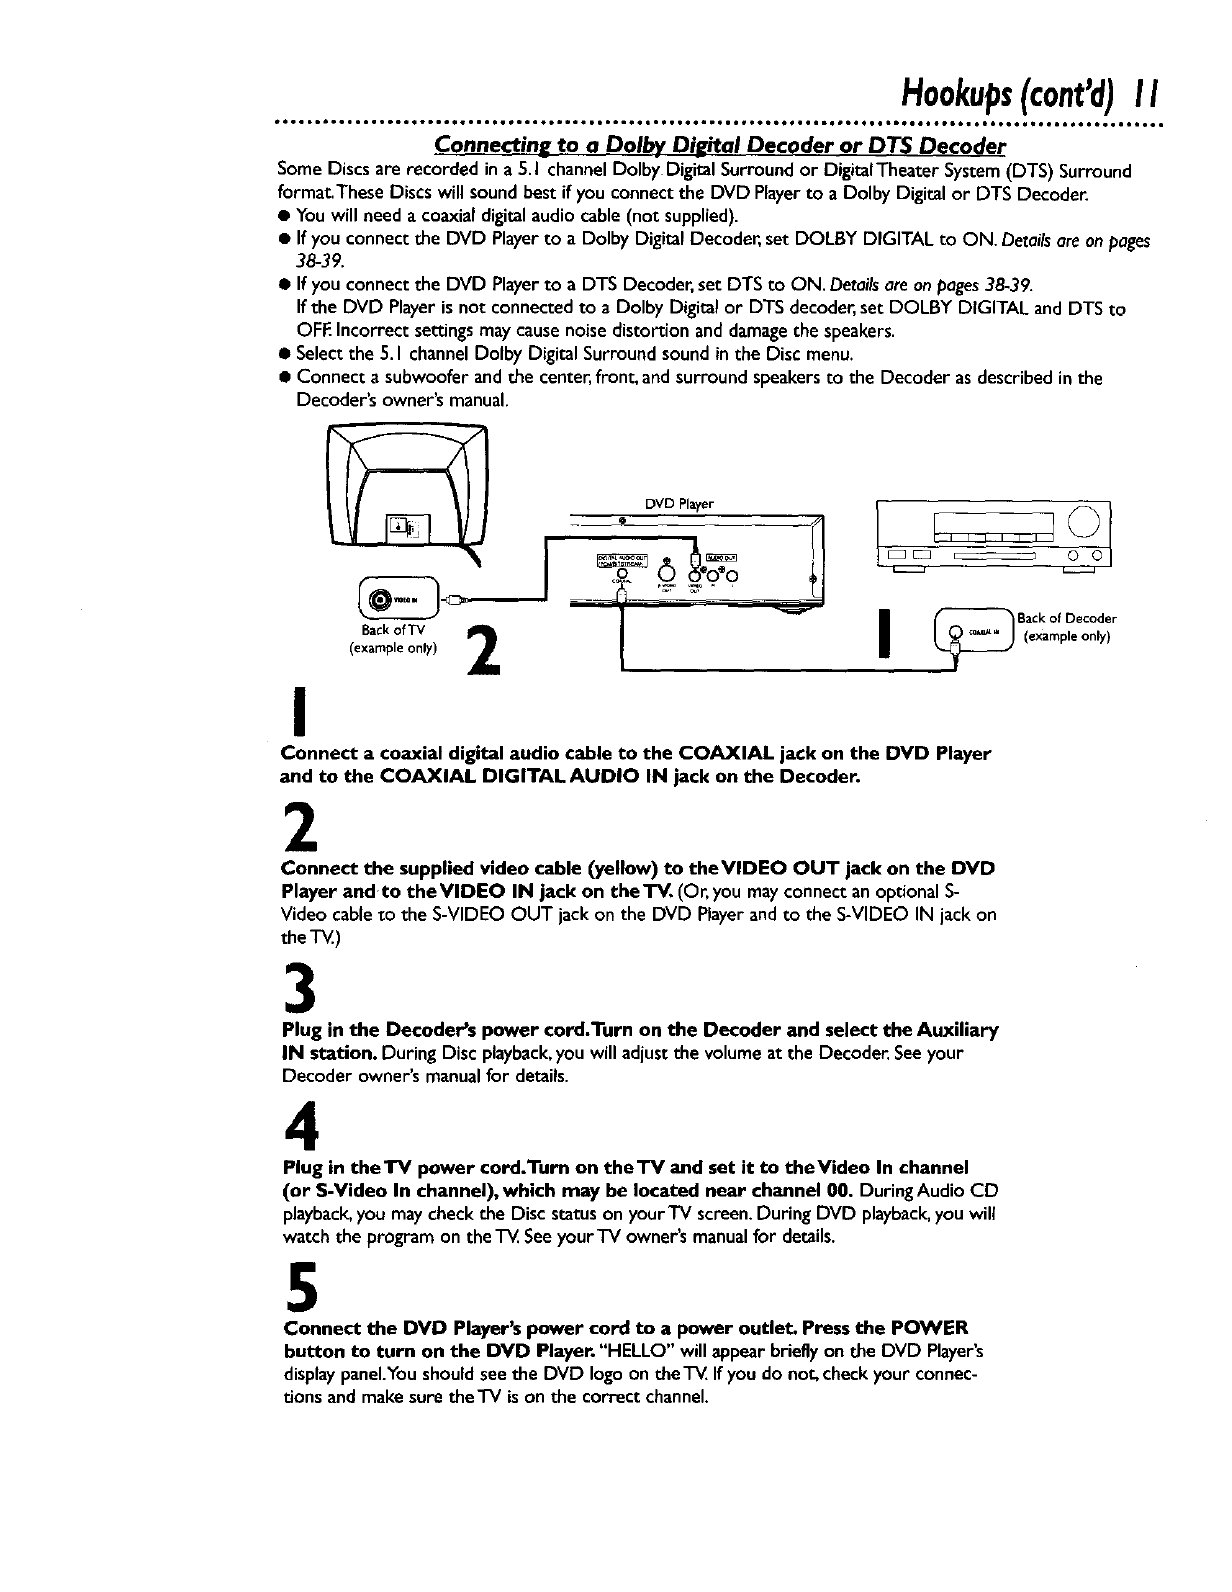
Some Discsare recorded in a S.I channelDolby Digital Surroundor DigitalTheater System(DTS) Surround
format.These Discswill soundbest if you connectthe DVD Playerto a Dolby Digital or DTS Decoder.
•Youwill need a coaxialdigitalaudiocable(not supplied).
• If you connect the DVD Playerto aDolby Digital Decoder, set DOLBY DIGITAL to ON. Detailsareon pages
38-39.
• If you connect the DVD Playerto a DTS Decoder, set DTS to ON. Detailsareon pages38-39.
If the DVD Player is not connected to a Dolby Digital or DTS decoder,set DOLBY DIGITAL and DTS to
OFF.Incorrect settingsmay causenoise distortion and damagethe speakers.
• Selectthe 5.I channel Dolby Digital Surround sound in the Disc menu.
• Connect asubwoofer and the center,front, and surround speakersto the Decoder asdescribed in the
Decoder's owner's manual.
DVD Player
Backof TV 21
(example only)
I
I {_ B(%CXkaO{PIDeOCOIdy;r
Connect a coaxial digital audio cable to the COAXIAL jack on the DVD Player
and to the COAXIAL DIGITAL AUDIO IN jack on the Decoder.
2
Connect the supplied video cable (yellow) to theVIDEO OUT jack on the DVD
Player andto theVIDEO IN jack on theTV. (Or'you mayconnect an optional S-
Video cable to the S-VIDEO OUT jack on the DVD Playerand to the S-VIDEO IN jack on
the'i-_.)
3
Plug in the Decoder's power cord.Turn on the Decoder and select the Auxiliary
IN station. During Disc playback,you will adjustthe volume at the Decoder. See your
Decoder owner's manual for details.
4
Plug in theTV power cord.Turn on theTV and set it to theVideo In channel
(or S-Video In channel), which may be located near channel 00. DuringAudioCD
playback,youmay checkthe Discstatuson yourTV screen,DuringDVD playback,youwill
watchthe programon the TV.Seeyour'iV owner'smanualfor details.
5
Connect the DVD Player's power cord to a power outlet. Press the POWER
button to turn on the DVD Player. "HELLO" will appearbrieflyon the DVD Player's
displaypanel.Youshouldseethe DVD logoon the TV,If youdo not, checkyour connec-
t.ionsand makesurethe'IV is on the correctchannel.

12Hookups(cont'd)
ooeoo .°°°o Jtoo ooQo oooooQmooo oooo .B°ol oooQ, oooooo oo.°ooo.ooeQoo • too° • JooQoo otoooo lot, ,ooo • oooot, ,,ooo • totoeooooo
Connectin_ to a TV and an Amplifier with DiE_ital In._ut iacks, Mini-Disc Deck or
Diu_ital Audio Tape Deck
• Use acoaxial digital audiocable (not supplied)for this connection.
• If the Disc is recorded in 5.I channel Dolby Digital Surround,you cannot dub the Disc in digital sound usinga
Mini-Disc or Digital Audio Tape Deck.
• Set DOLBY DIGITAL and DTS to OFF on the DVD Player.Detailsare on pages38-39. If you playa DVD
when the settingsare wrong, the sound will be distorted or you maydamagethe speakers.
Back of TV
(example only)
I
Connect a coaxial digital audio cable to the COAXIAL jack on the DVD
Player and to the COAXIAL DIGITAL AUDIO IN jack on the Amplifier.
2
Connect the supplied video cable (yellow) to the VIDEO OUT jack on the
DVD Player and to theVIDEO IN jack on the TV. (Or, you may connect an
optionalS-Video cable to the S-VIDEO OUT jack on the DVD Player andto the S-
VIDEO IN jack on the T_.)
3
Plug in the Amplifier's power cord.Turn on the Amplifier and select the
Auxiliary IN station. During Disc playback,you will adjust the volume at the
Amplifier. See your Amplifier owner's manual for details.
4
Plug in theTV's power cord.Turn on theTV and set it to the Video In
channel (or S-Video In channel). This channelusuallyis located near channel
00. During Audio CD playback,you may checkthe status of the Disc on your TV
screen. During DVD playback,you will watch the program on the "IV.Seeyour TV
owner's manual for details.
5
Plug in the DVD Player's power cord. Press the POWER button to turn
on the DVD Player. "HELLO" will appear briefly on the DVD Player's display
panel.You should see the DVD logo on the TV. If you do not, check your connec-
tions and make sure theTV is on the correct channel.
DVDPlayerDisplay13
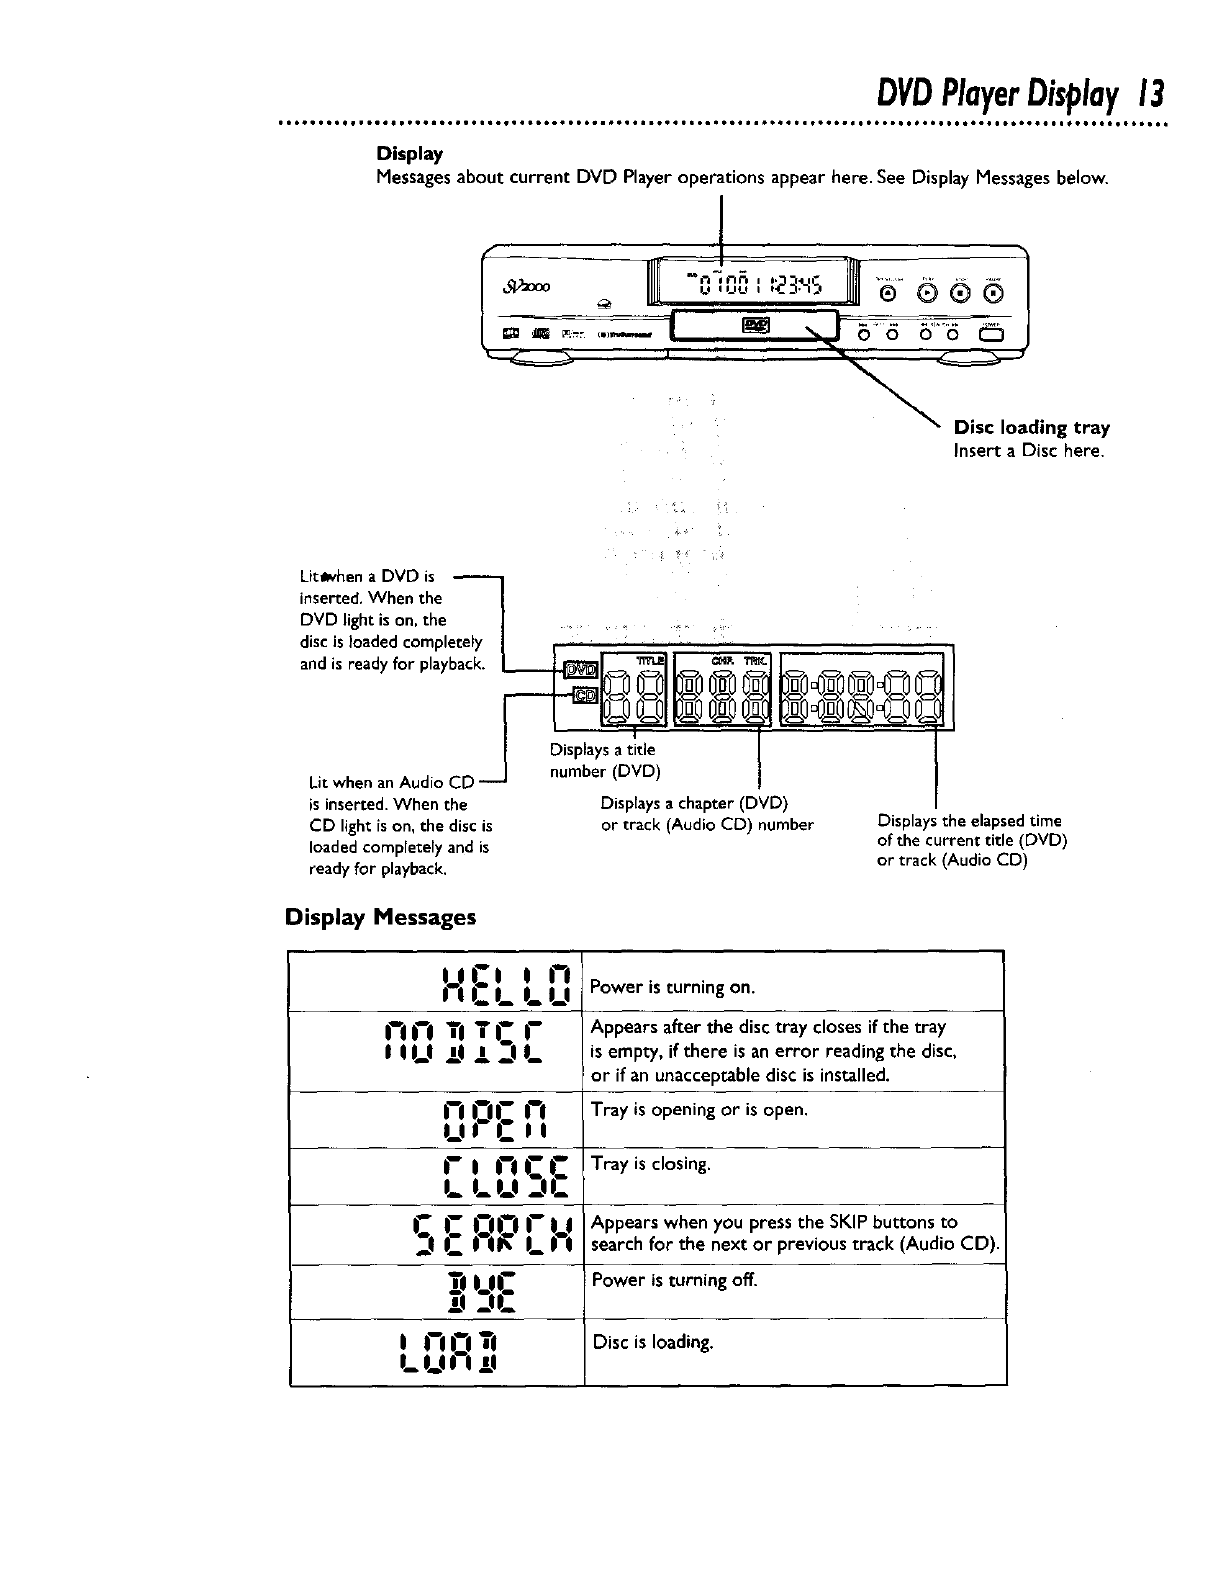
Display
Messages about current DVD Player operations appear here. See Display Messages below.
I
Insert aDisc here.
Lit_when a DVD is
inserted.When the
DVD light is on, the ...... .
disc is loaded completely
andis ready for playback. _
Lit when anAudio CD
is inserted.When the
CD light is on, the disc is
loaded completely and is
ready for playback.
Display Messages
Displays a title
number (DVD)
Displays a chapter (DVD)
or track (Audio CD) number Displays the elapsedtime
of the current title (DVD)
or track (Audio CD)
LOCi in
I li_.L LLI
i-in i-
, ,,_, ili S,_
horn
Ul L-i;
r_nrr
l_ l_!_l _-IL-
noru
'_sL:,,. ,_,,
DI-IL-I
I_ L,,-i ,TII
Power is turning on.
Appears after the disc tray closes if the tray
Is empty, if there is an error reading the disc,
or if an unacceptable disc is installed.
Tray is opening or is open.
Tray is closing.
Appears when you press the SKIP buttons to
search for the next or previous track (Audio CD).
Power is turning off.
Disc is loading.
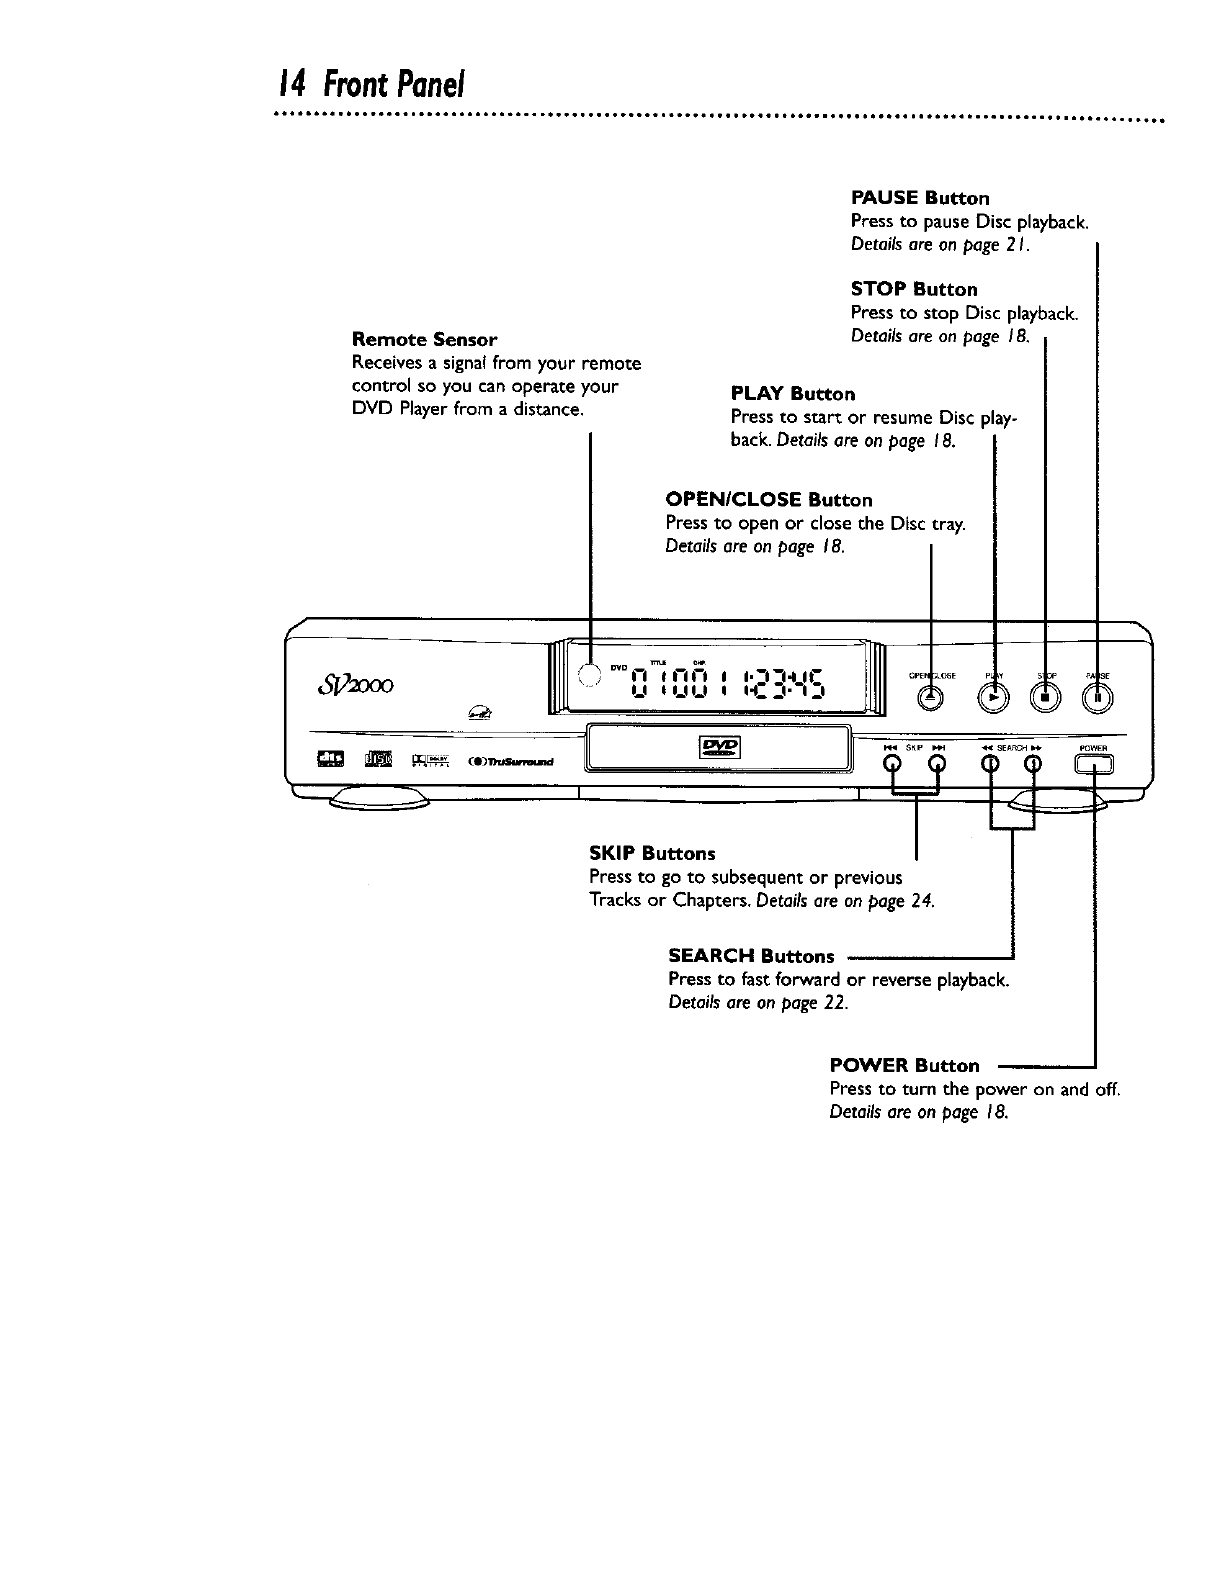
14FrontPanel
Remote Sensor
Receivesa signal from your remote
control so you can operate your
DVD Playerfrom a distance.
PAUSE Button
Press to pause Disc playback.
Details are on page 2 I.
STOP Button
Pressto stop Disc playback.
Detailsare on page 18.
PLAY Button
Pressto start or resume Disc play-
back. Detailsare on page 18.
OPENICLOSE Button
Pressto open or close the Disc tray.
Details are on page 18.
_J-," o,oi-i_, i'_i-I- * ,.-,-.,,- ........' u ,uu , ,'c:,.',:, ® (_
SKIP Buttons
Pressto go to subsequent or previous
Tracks or Chapters. Detailsare on page 24.
SEARCH Buttons
Pressto fast forward or reverse playback.
Details are on page22.
POWER Button
Pressto turn the power on and off.
Details are on page 18.

RearPanel15
@
AC Power Cord
Connect to astandard AC outlet to
supply power to the DVD Player.
S-VIDEO OUT Jack
Connect an optional S-Video
cable here andto the S-Video
In jack of a television.Details
are on pages 9-12.
VIDEO OUT Jack
Connect the yellow
video cable (supplied)
here and to the TV's
Video In jack.Details are
on pages 8 and 10-12.
@
[PCM/BITSTREAM ]
COAXIAL Jack
Connect an optionalaudio
coaxialdigital cable here
and to the coaxialdigital
Audio In jack of a decoder
or amplifier.Detailsare an
pages I I- 12.
S-VIDEO
OUT
,zi
AUDIO OUT Jacks
Connect the supplied audio
cables here andto the Audio
Injacksof a television or
stereo. Detailsare on pages8-
I0.
I
16 RemoteControlButtons
••..••n ••.. .•• •••...•• .. •
• OI••tOOO.6.O•,.OJO6OIIO •OmlOOOO_OOOOOII• Ot. OOOOO6011 OOee_O*II ••••._O t•.OOO_ Iol•_l•t
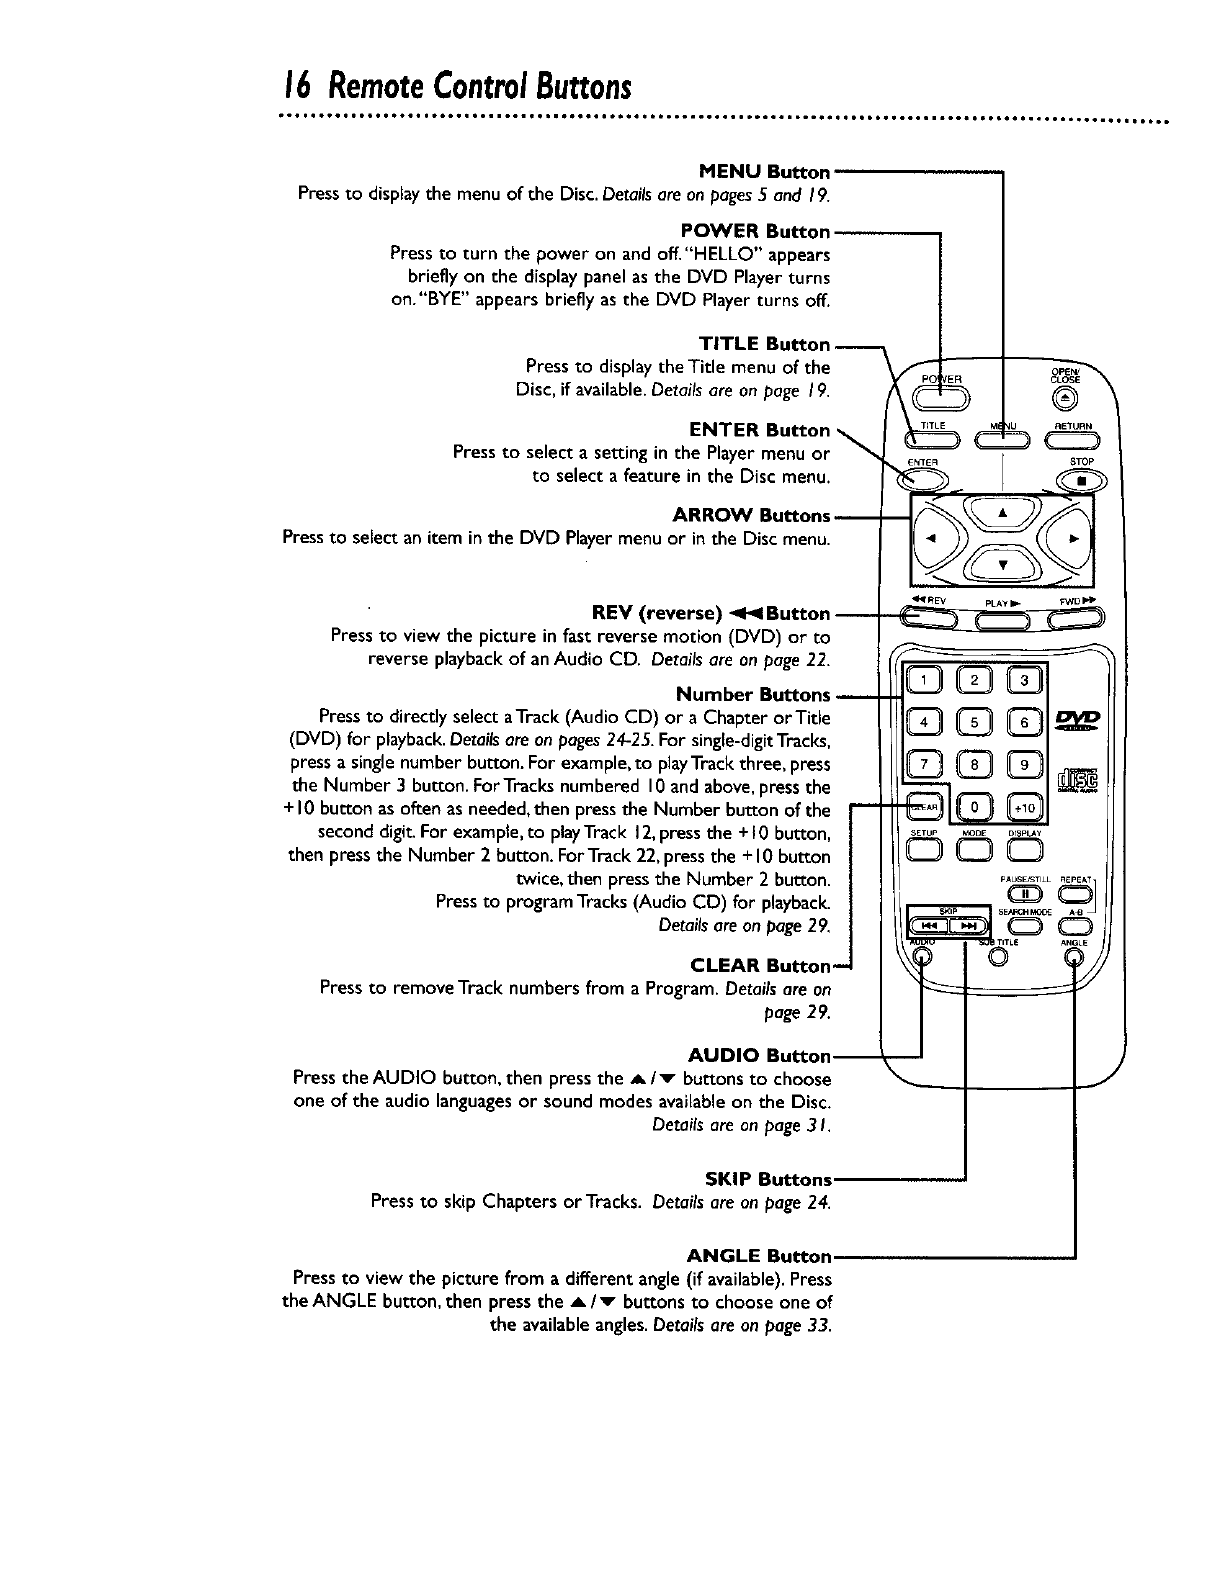
MENU Button
Pressto displaythe menu of the Disc.Detailsare onpages5 and 19.
POWER Button
Pressto turn the power on andoff."HELLO" appears
briefly on the displaypanel as the DVD Playerturns
on."BYE" appears briefly as the DVD Player turns off.
TITLE Button-
Pressto display theTitle menu of the
Disc, if available.Details are on page 19.
ENTER Button
Pressto select a setting in the Player menu or
to select a feature in the Disc menu.
ARROW Buttons
Pressto select an item inthe DVD Player menu or in the Disc menu.
REV (reverse) _Button
Pressto view the picture in fast reverse motion (DVD) or to
reverse playback of anAudio CD. Details are on page22.
Number Buttons
Pressto directly select aTrack(Audio CD) or a Chapter orTitle
(DVD) for playback.Detailsare on pages24-25.For single-digitTracks,
pressa single number button. For example,to playTrack three, press
the Number 3 button. ForTracks numbered 10and above,pressthe
+10 button as often as needed,then pressthe Number button of the
second digit. For example,to playTrack 12,press the +I 0 button,
then pressthe Number 2 button. ForTrack 22,pressthe + I0button
twice, then pressthe Number 2 button.
Pressto program Tracks(Audio CD) for playback.
Detailsare on page29,
CLEAR Button--
Press to remove Track numbers from a Program. Details are an
page 29.
AUDIO
Press the AUDIO button, then press the A/v buttons to choose
one of the audio languagesor sound modes availableon the Disc.
Detailsare onpage 31.
SKIP Buttons.
Pressto skip Chapters or Tracks. Detailsare on page24.
ANGLE Button.
Pressto view the picture from a different angle (if available).Press
the ANGLE button,then pressthe _,/v buttonsto chooseone of
the availableangles.Detailsare onpage33.
RemoteControlButtons(cant'd)17
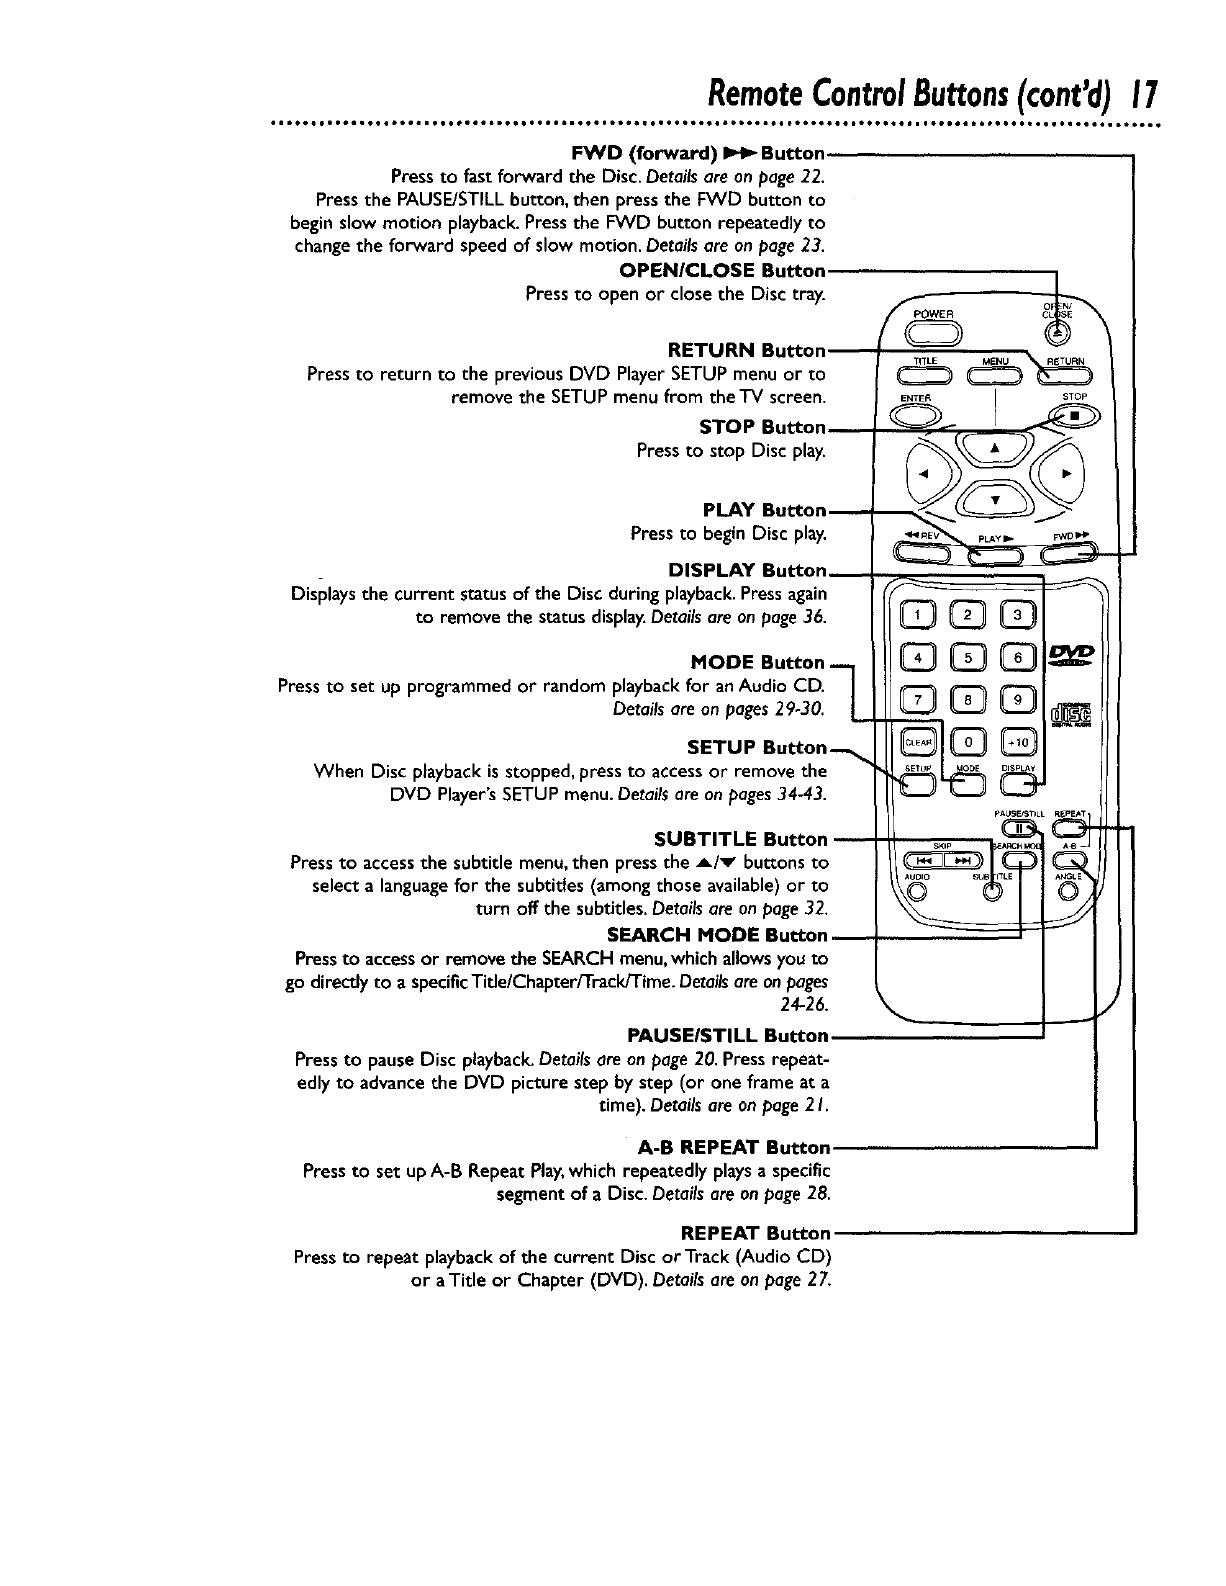
FWD (forward) _ Button,
Pressto fast forward the Disc.Details are on page22.
Pressthe PAUSE/STILLbutton,then press the FWD button to
begin slow motion playback.Pressthe FWD button repeatedly to
change the forward speed of slow motion. Details are on page23.
OPENICLOSE Button
Pressto open or close the Disc tray.
RETURN Button
Pressto return to the previous DVD Player SETUPmenu or to
remove the SETUPmenu from the TV screen.
STOP Button
Press to stop Disc play.
PLAY Bu_on_
Pressto begin Disc play.
DISPLAY Button
Displays the current status of the Disc during playback.Pressagain
to remove the status display.Detailsare onpage36.
MODE Button-
Pressto set up programmed or random playback for anAudio CD.
Details are on pages29-30.
SETUP Button_
When Disc playback isstopped, press to accessor remove the
DVD Player'sSETUPmenu. Detailsare on pages34-43.
SUBTITLE Button
Pressto accessthe subtitle menu,then pressthe A/v buttonsto
select a languagefor the subtitles (amongthose available)or to
turn off the subtitles. Detailsare on page32.
SEARCH MODE Button
Pressto accessor remove the SEARCHmenu,which allows you to
go directly to a specificTitle/Chapter/Track/Time. Detailsareon pages
24-26.
PAUSEISTILL Button
Press to pause Disc playback.Details are on page 20. Press repeat-
edly to advancethe DVD picture step by step (or one frame at a
time). Detailsare onpage2 I.
A-B REPEAT Button.
Press to set up A-B Repeat Play, which repeatedly plays aspecific
segment of a Disc. Details are on page 28.
REPEAT Button
Pressto repeat playback of the current Disc or Track (Audio CD)
or aTitle or Chapter (DVD). Detailsare onpage27.
18 PlayingaDisc
IAUDUOcDI
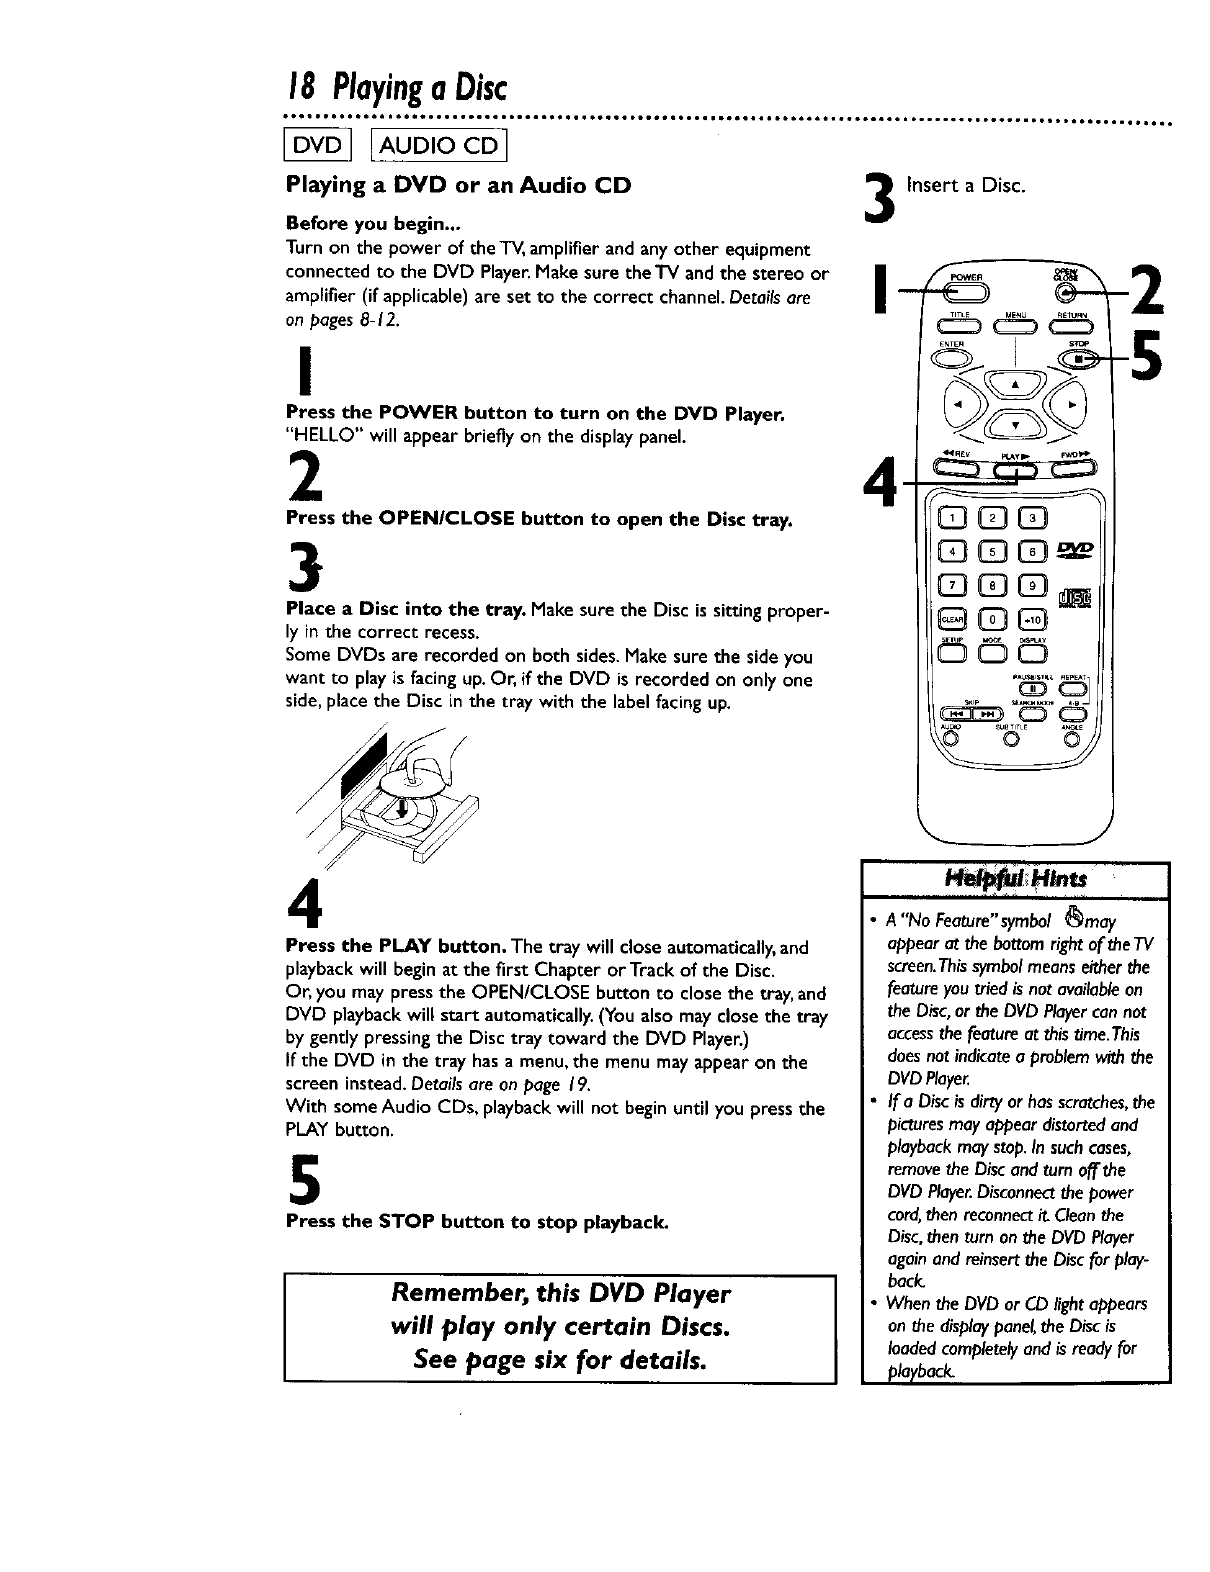
Playing a DVD or an Audio CD
Before you begin...
Turn on the power of the TV,amplifierand anyother equipment
connected to the DVD Player.Make sure theTV andthe stereo or
amplifier (if applicable) are set to the correct channel.Details are
on pages 8-12.
I
Press the POWER button to turn on the DVD Player.
"HELLO" will appear brieflyon the displaypanel.
2
Press the OPEN/CLOSE button to open the Disc tray.
3
Place a Disc into the tray. Make sure the Disc is sitting proper-
ly Jn the correct recess.
Some DVDs are recorded on both sides. Make sure the side you
want to play is facing up. Or, if the DVD is recorded on only one
side, place the Disc in the tray with the label facing up.
4
Press the PLAY button. The tray will close automatically,and
playbackwill begin at the first Chapter or Trackof the Disc.
Or, you maypress the OPEN/CLOSE buttonto close the tray, and
DVD playbackwill start automatically.(Youalsomay closethe tray
by gently pressingthe Disc tray toward the DVD Player.)
If the DVD in the tray hasa menu, the menu may appearon the
screen instead.Details are on page 19.
With some Audio CDs, playback will not begin until you press the
PLAY button.
5
L
Press the STOP button to stop playback.
Remember, this DVD Player
will play only certain Discs.
See page six for details.
Insert a Disc.
A"No Feature"symbol _may
appear at the bottom right of the TV
screen.Thissymbol means either the
feature you tried is not available on
the Disc, or the DVD Player can not
accessthe feature at this time.This
does not indicate a problem with the
DVD Player.
IfaDisc isdirty or has scratches,the
pictures may appear distorted and
playback may stop. In such cases,
remove the Disc and turn off the
DVD Player.Disconnect the power
cord,then reconnect it. Clean the
Disc, then turn on the DVD Player
again and reinsert the Disc for play-
back.
When the DVD or CD light appears
on the display panel, the Disc is
loaded completely and is ready for
playback.
DiscMenus19
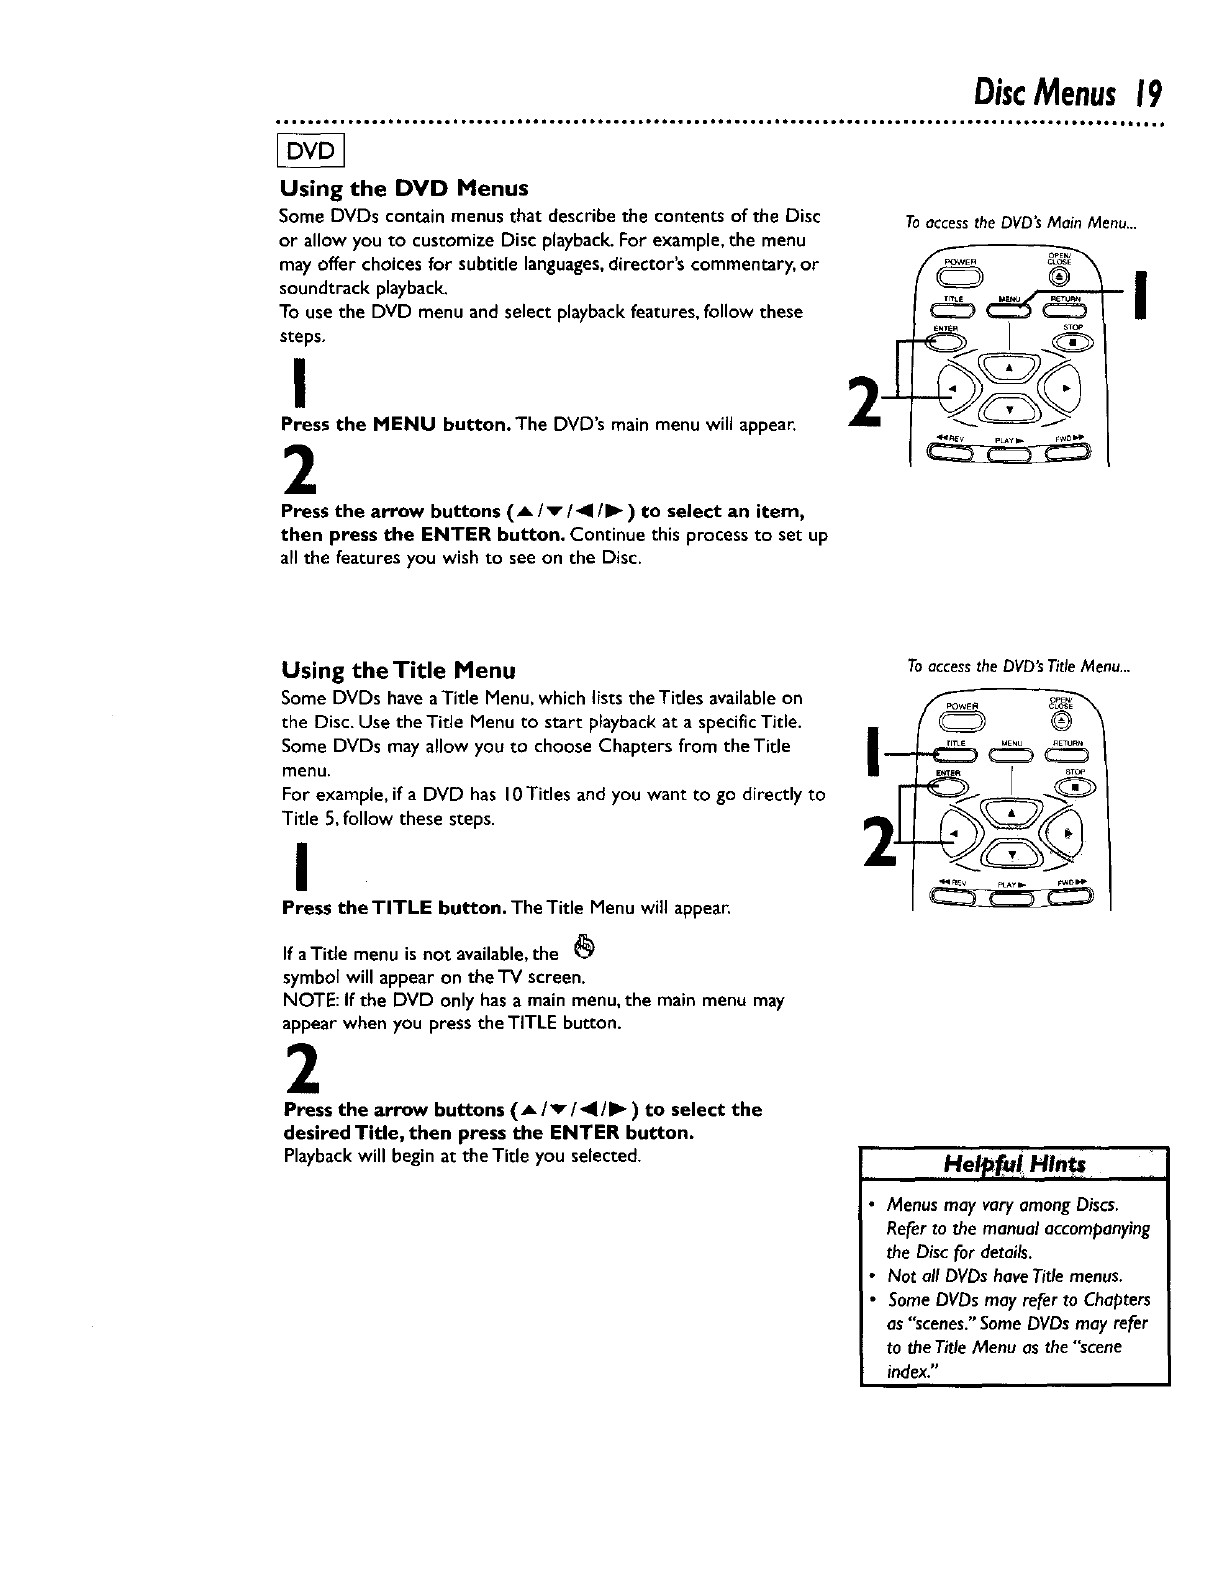
Using the DVD Menus
Some DVDs contain menus that describe the contents of the Disc
or allow you to customize Disc playback. For example, the menu
may offer choices for subtitle languages, director's commentary, or
soundtrack playback.
To use the DVD menu and select playback features, follow these
steps.
I 2-[
Press the MENU button• The DVD's main menu will appear.
2
Press the arrow buttons (_/v/41/1_) to select an item,
then press the ENTER button. Continue this process to set up
all the features you wish to see on the Disc.
Toaccessthe DVD'sMain Menu...
Using theTitle Menu
Some DVDs have a Title Menu, which lists the Titles available on
the Disc. Use the Title Menu to start playback at a specific Title.
Some DVDs may allow you to choose Chapters from the Title
menu.
For example, if a DVD has 10Titles and you want to go directly to
Title 5, follow these steps.
I
Press the TITLE button. The Title Menu will appear.
If a Title menu is not available, the
symbol will appear on the TV screen.
NOTE: If the DVD only has a main menu, the main menu may
appear when you press the TITLE button.
2
Press the arrow buttons (,Llvl41111_) to select the
desired Title, then press the ENTER button•
Playback will begin at theTitle you selected.
Toaccessthe DVD'sTitleMenu...
oPEN_
CLOSE
®
Hel_[ui H!n_
Menus may vary among Discs,
Refer to the manual accompanying
the Disc for details.
Not all DVDs haveTitle menus.
Some DVDs may refer to Chapters
as "scenes." Some DVDs may refer
to the Title Menu as the "scene
index."
20 PausingPlayback
[Auo,ocol
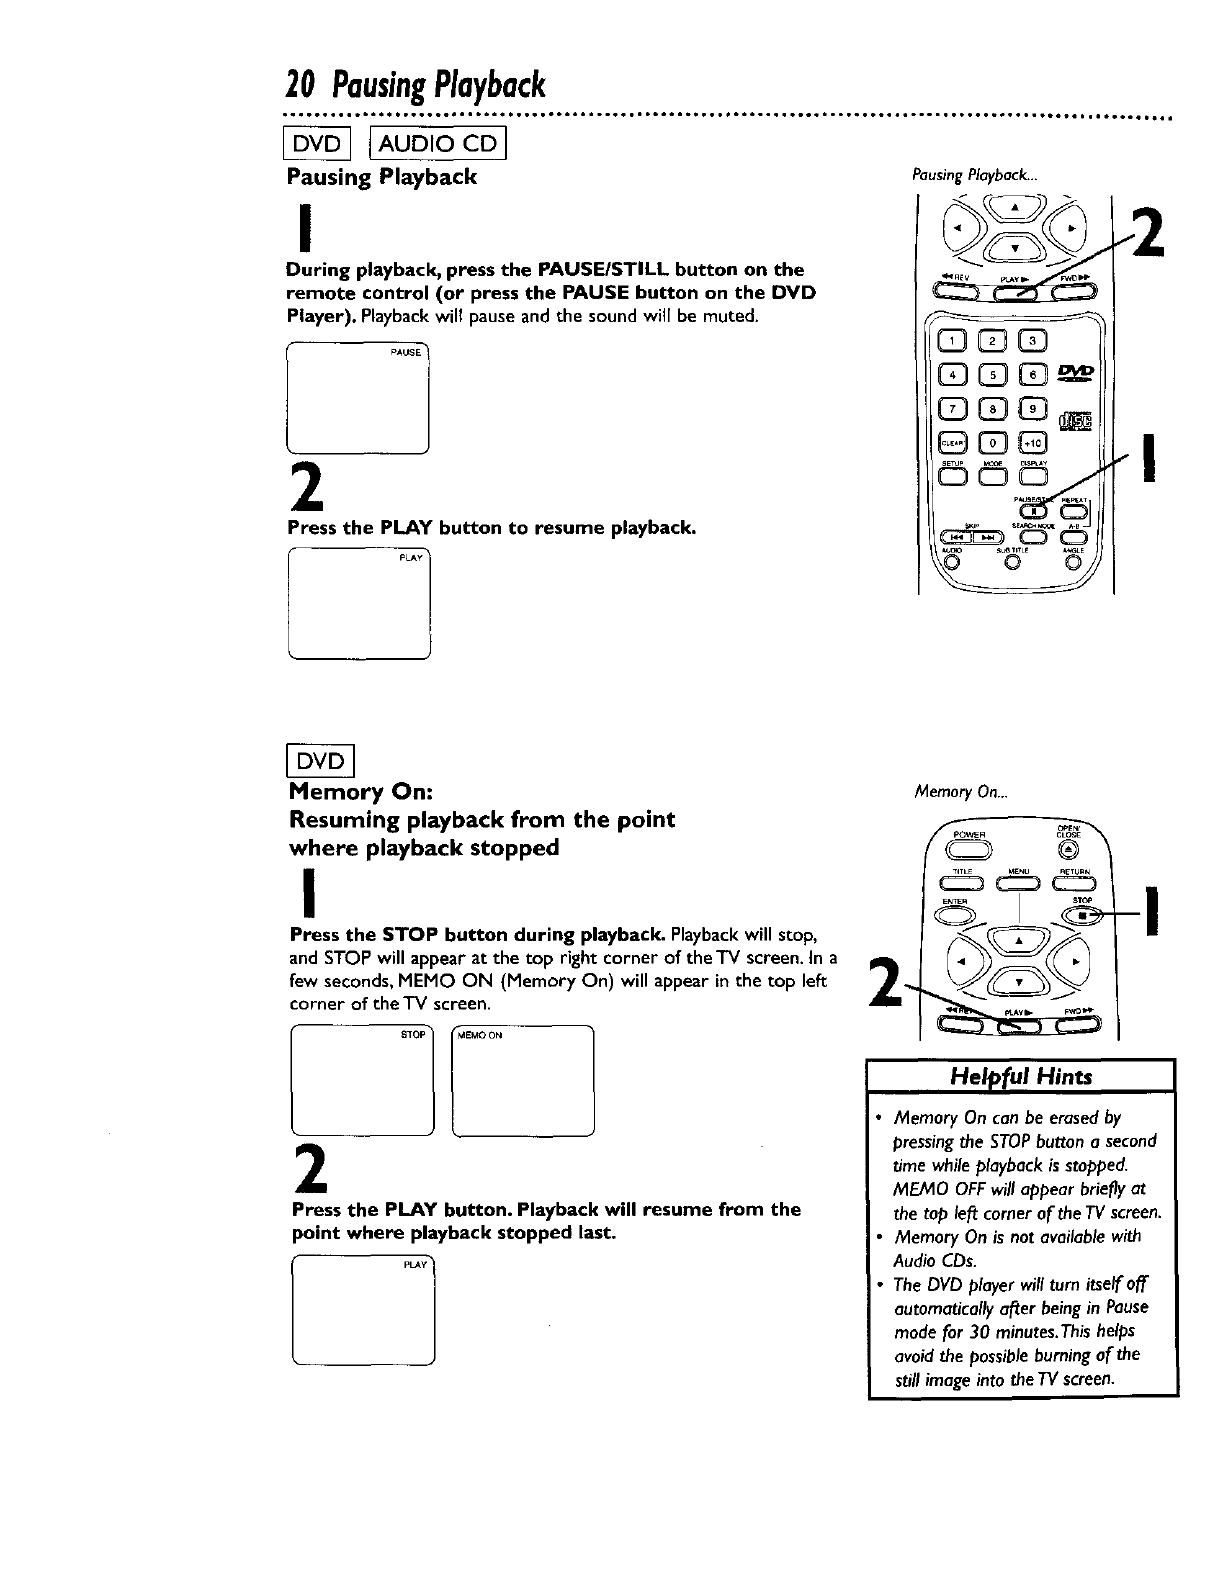
Pausing Playback
I
During playback, press the PAUSE/STILL button on the
remote control (or press the PAUSE button on the DVD
Player). Playback will pause and the sound will be muted.
2
Press the PLAY button to resume playback.
PLAY ]
Pausing Playback... .2
QE?Q
OG_ _
©© ....
_ s_ L_ _LE
Memory On:
Resuming playback from the point
where playback stopped
I
Press the STOP button during playback. Playbackwill stop,
and STOP will appearat the top rightcorner of the TV screen.In a
few seconds,MEMO ON (Memory On) will appearin the top left _.
corner of the TV screen.
MemoryOn...
_POwE R °_E_
-I
2
Press the PLAY button. Playback will resume from the
point where playback stopped last.
I p_yl
Helpful Hints
Memory On can be erased by
pressing the STOPbutton a second
time while playback is stopped.
MEMO OFF will appear briefly at
the top left comer of the TV screen.
Memory On is not available with
Audio CDs.
•The DVD player will turn itself off
automatically after being in Pause
mode for 30 minutes.This helps
avoid the possible burning af the
still image into the TV screen.
StepbyStepPlayback21
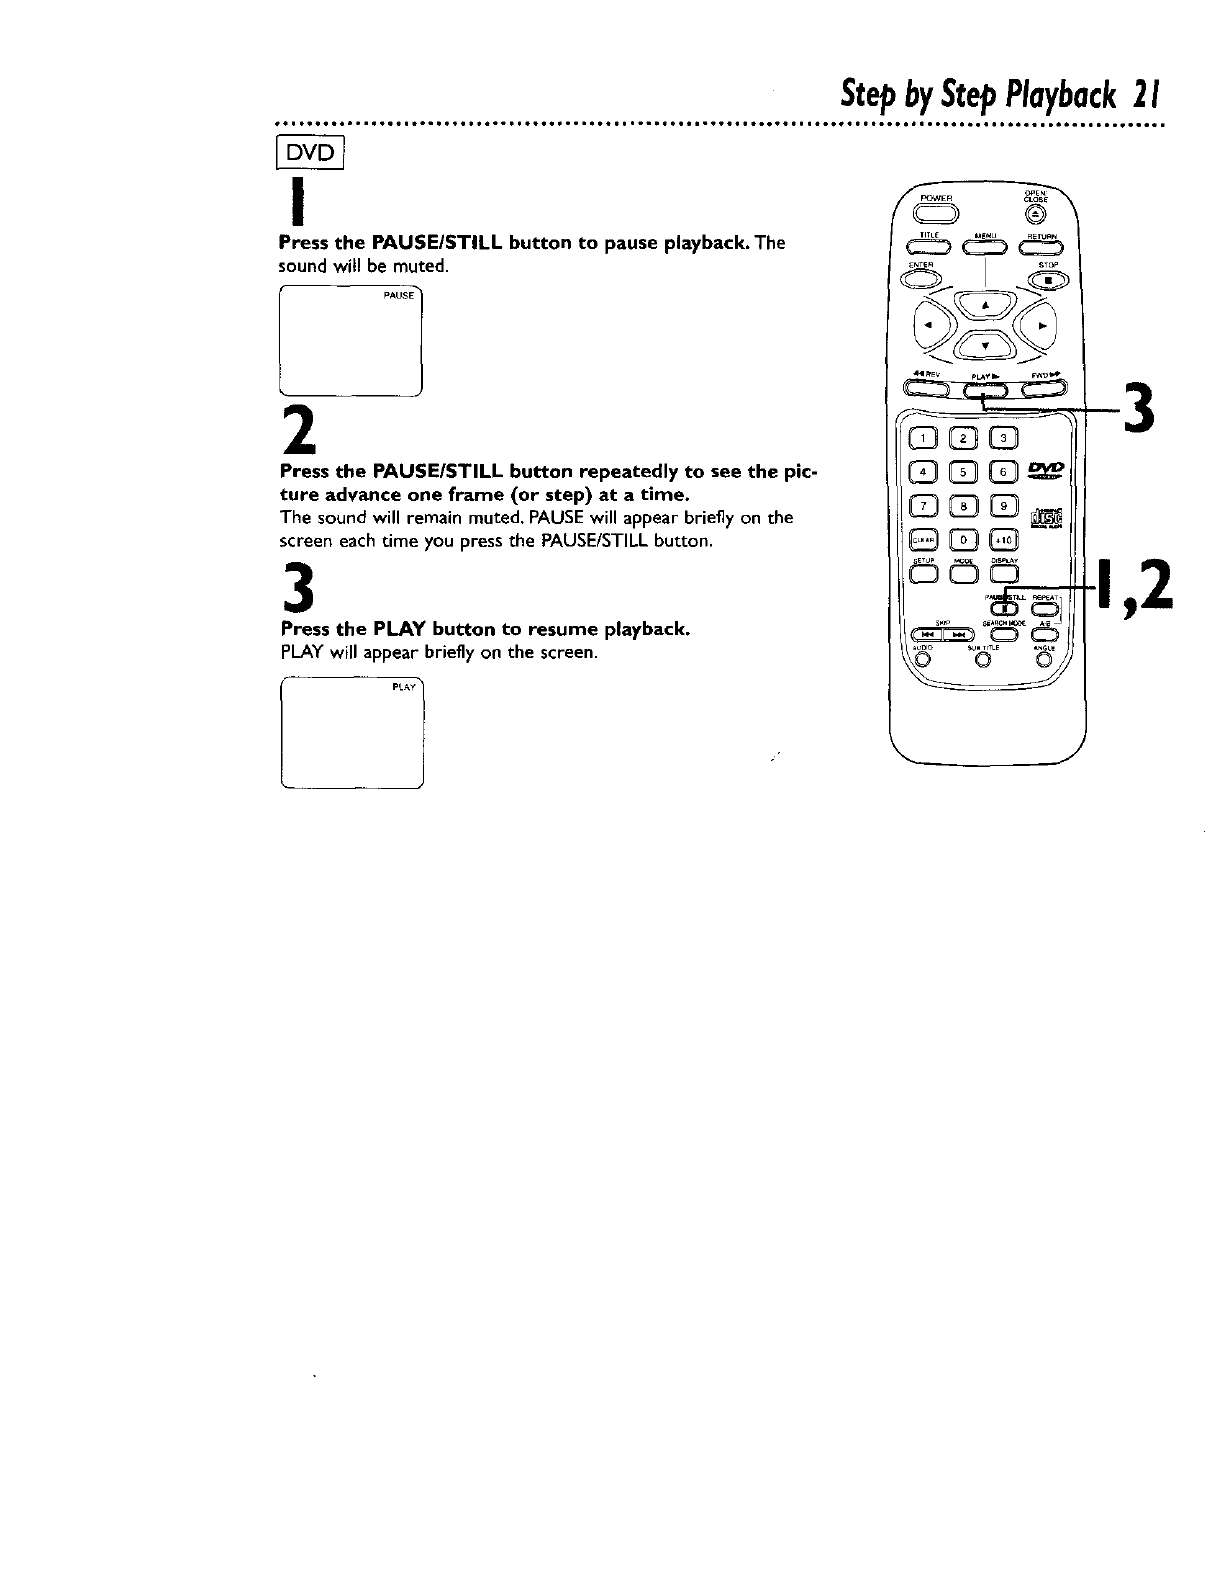
I
Press the PAUSEISTILL button to pause playback. The
sound witl be muted.
2
Press the PAUSE/STILL button repeatedly to see the pic-
ture advance one frame (or step) at a time.
The sound will remain muted. PAUSE will appear briefly on the
screen each time you press the PAUSE/STILL button.
3
Press the PLAY button to resume playback.
PLAYwill appear brieflyon the screen•
[AUD,OcDI
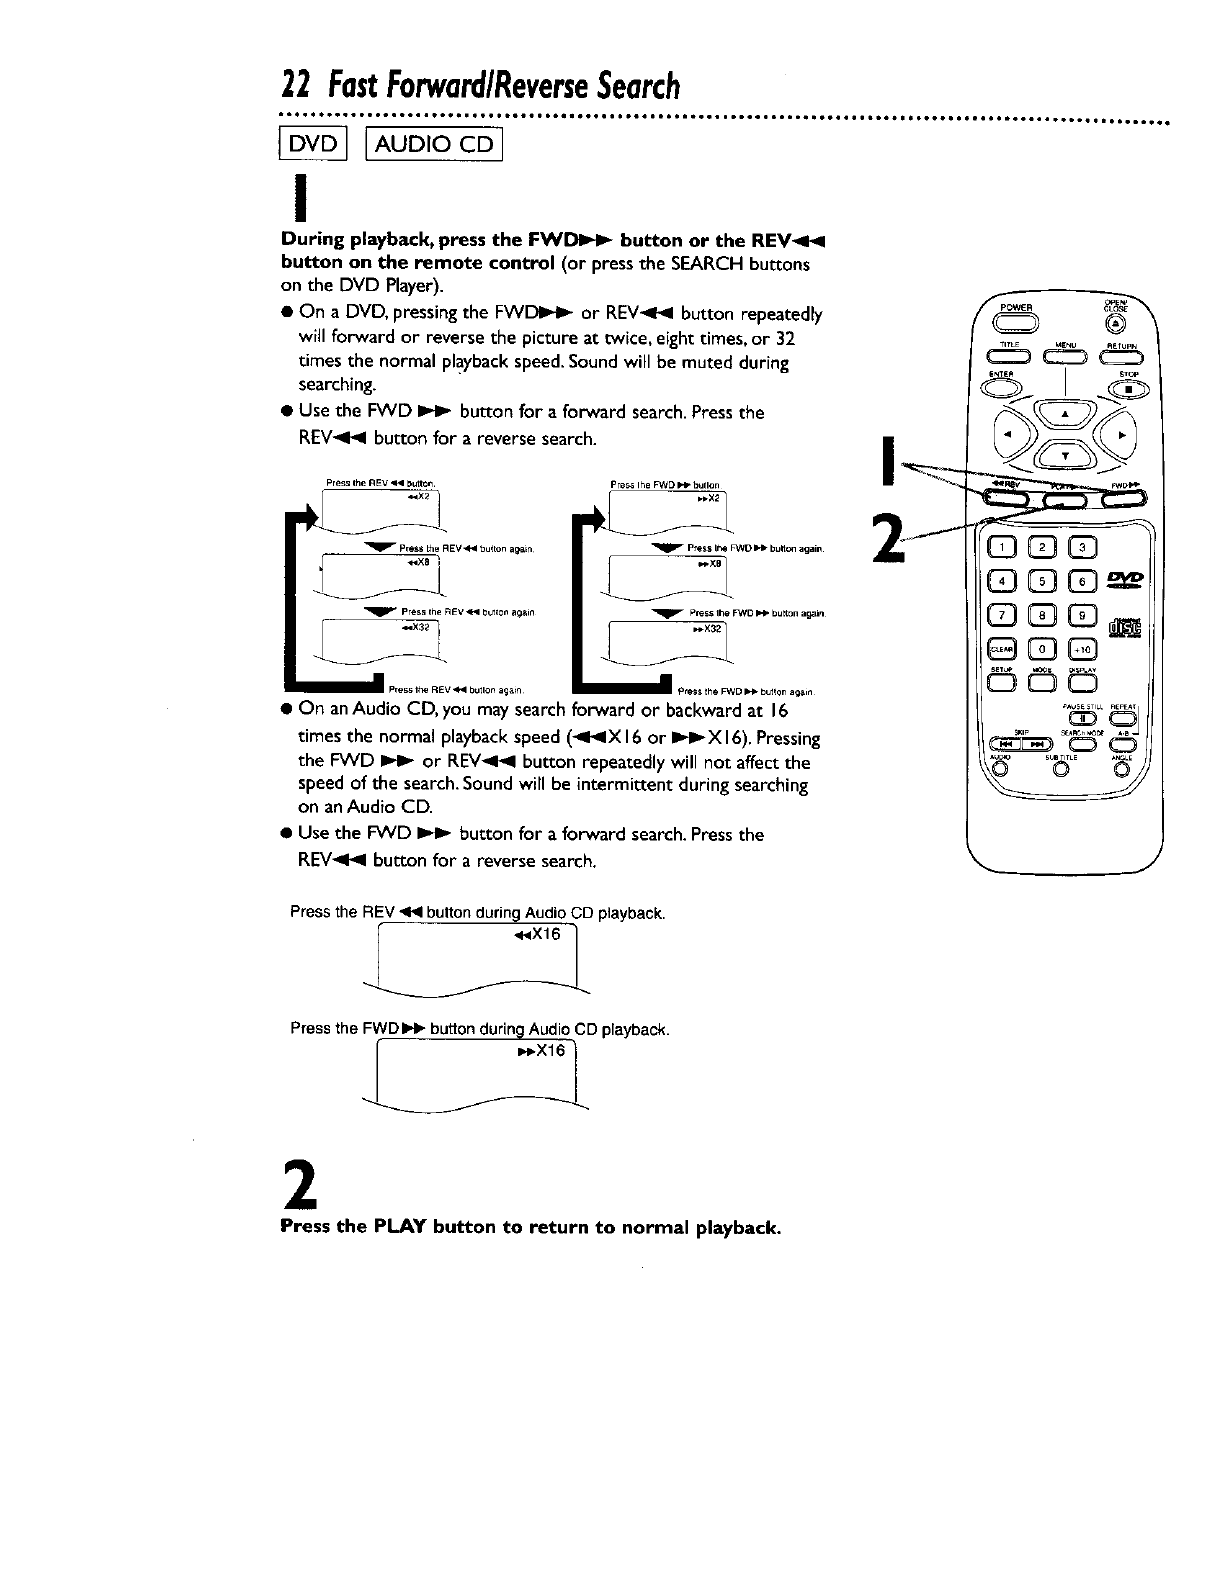
I
During playback, press the FW_ button or the REV_I_I
button on the remote control (or press the SEARCH buttons
on the DVD Player).
• On a DVD, pressingthe FWIDI_ or REV_I_ button repeatedly
will forward or reverse the picture at twice, eight times, or 32
times the normal playbackspeed.Soundwill be muted during
searching.
• Use the FWD _ button for a forward search.Pressthe
REV_I_I button for a reverse search.
Press the REV _ Button¸ pre_ Ihe FWD _1_ butlon
_ P_ I_ _D _ btJ_n agaJn
/
_ Press I1_ _D _ button _ln
__X32
• On anAudio CD, you may searchforward or backward at 16
times the normal playbackspeed (_I_IX 16or I_X 16).Pressing
the FWD _ or REV_I_I button repeatedly will not affect the
speed of the search.Sound will be intermittent during searching
on anAudio CD.
•Use the FWD I_ button for a forward search.Pressthe
REV_I_I button for a reverse search.
®
I °T_
11 _3_
_3 _3 _3
Press the REV _ button during Audio CD playback.
•_lX16v_L"
Press the FWD _ button during Audio CD playback.
_-X16, ]
2
Press the PLAY button to return to normal playback.
SlowMotion23
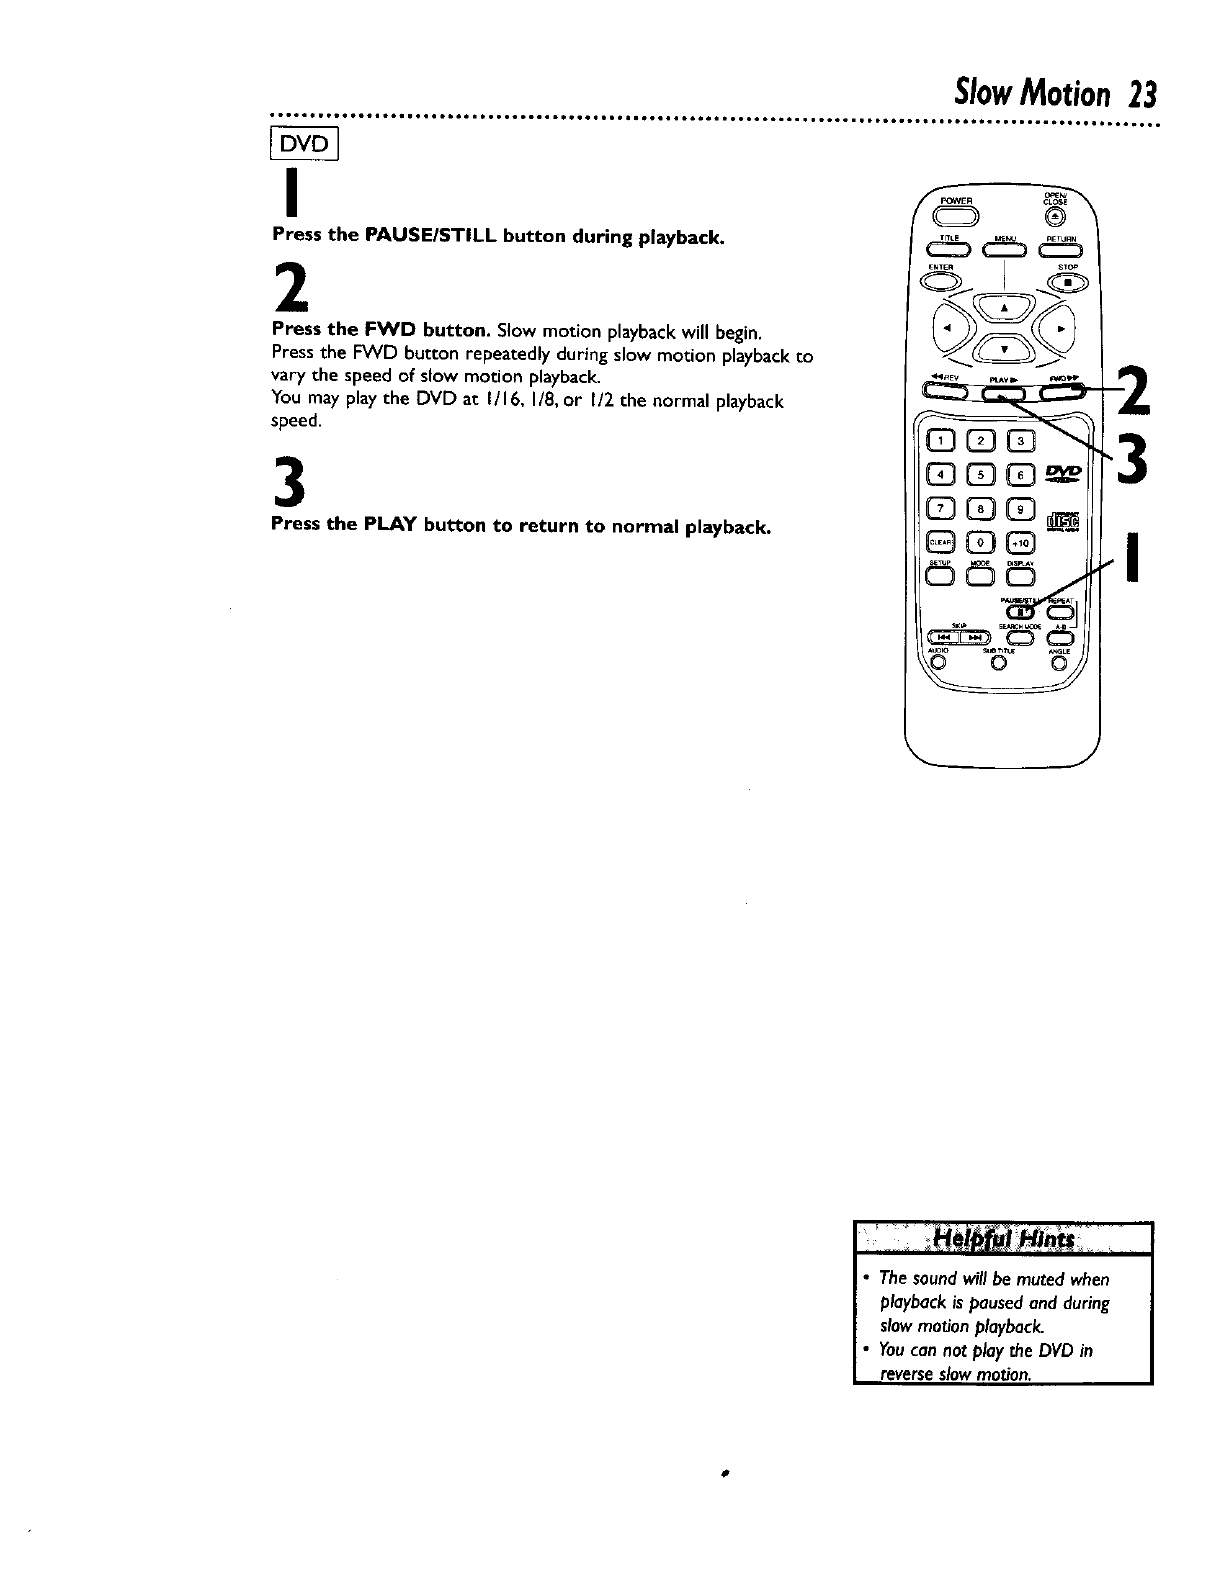
I
Press the PAUSEIST|LL button during playback.
2
Press the FWD button, Slow motion playback will begin.
Press the FVVD button repeatedly during slow motion playback to
vary the speed of slow motion playback.
You may play the DVD at 1/16, I/8, or I12 the normal playback
speed.
3
Press the PLAY button to return to normal playback. I
Thesound willbe muted when
playbackis pausedand during
slowmotion playback.
Youcan not play the DVDin
reverseslowmotion.
24 TrackPlayback
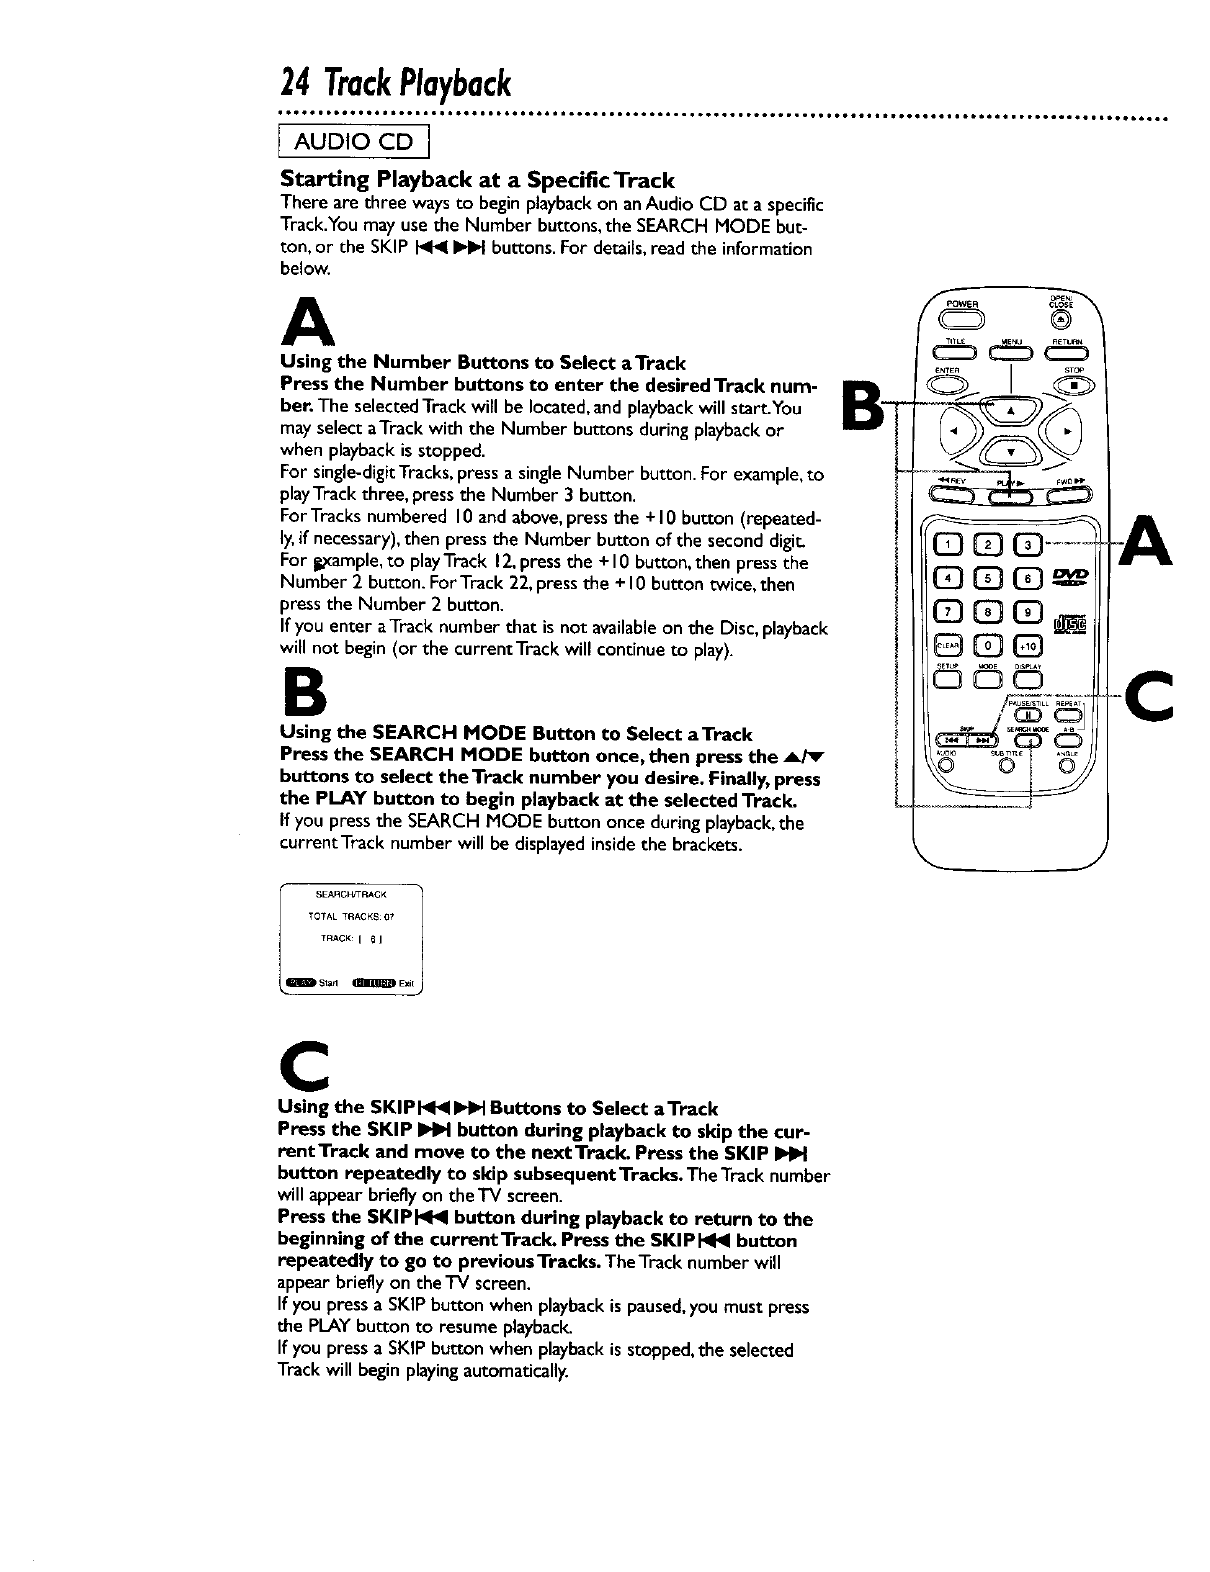
Starting Playback at a Specific'l'rack
There are three ways to begin playbackon anAudio CD at a specific
Track.Youmay use the Number buttons, the SEARCH MODE but-
ton, or the SKIP _ I_ buttons. For details,read the information
below.
A
Using the Number Buttons to Select aTrack
Press the Number buttons to enter the desired'l'rack num-
ber. The selectedTrackwill be located,andplaybackwill start.You
mayselect aTrack with the Number buttons during playbackor
when playbackis stopped.
For single-digitTracks,press a singleNumber button. For example,to
playTrackthree, pressthe Number 3 button.
For Tracksnumbered 10andabove,pressthe +10 button (repeated-
ly,if necessary),then press the Number button of the second digit
For t.xample,to playTrack 12,pressthe + I0 button, then pressthe
Number 2 button. For Track 22, pressthe + I0 button twice, then
pressthe Number 2 button.
If you enter aTrack number that is not availableon the Disc,playback
will not begin (or the current Track will continue to play).
B
Using the SEARCH MODE Button to Select aTrack
Press the SEARCH MODE button once, then press the _/_
buttons to select the Track number you desire. Finally, press
the PLAY button to begin playback at the selected Track.
If you pressthe SEARCH MODE button once during playback,the
currentTrack number will be displayedinside the brackets.
t
I_ SEARGF_r'RACK 1
TOTAL TRACKS07
TRACK:[ _1
C
Using the SKIPI_I_I _Buttons to Select aTtack
Press the SKIP _button during playback to skip the cur-
rentTrack and move to the next Track. Press the SKIP
button repeatedly to skip subsequent Tracks. TheTrack number
will appearbrieflyon the TV screen.
Press the SKIPI_I_I button during playback to return to the
beginning of the current Track. Press the SKIP[_I_I button
repeatedly to go to previous Tracks. TheTracknumber will
appearbrieflyon the -IV screen.
If you pressa SKIPbutton when playbackis paused,you must press
the PLAYbutton to resume playback.
If you pressa SKIPbutton when playbackis stopped,the selected
Track will begin playingautomatically.
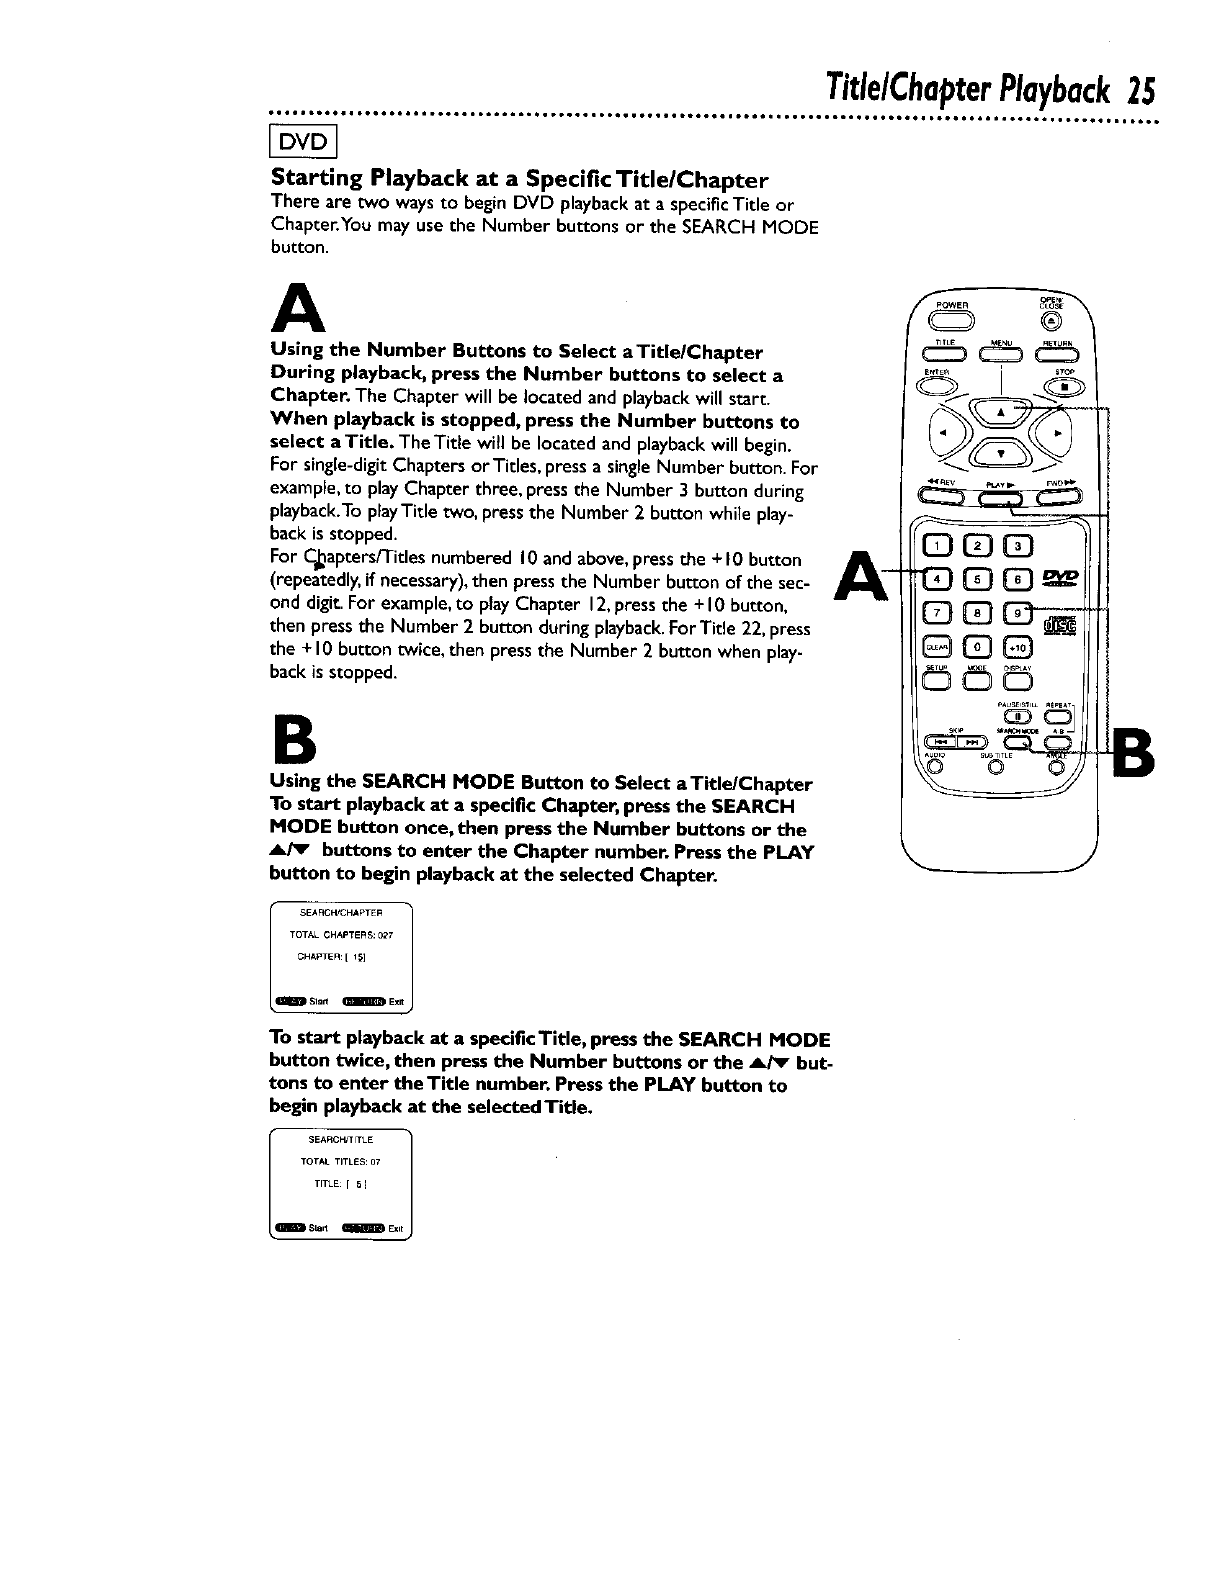
Starting Playback at a Specific Title/Chapter
There are two ways to begin DVD playback at a specific Title or
Chapter.You may use the Number buttons or the SEARCH MODE
button.
A
Using the Number Buttons to Select aTitle/Chapter
During playback, press the Number buttons to select a
Chapter. The Chapter will be located and playback will start.
When playback is stopped, press the Number buttons to
select a Title, The Title will be located and playback will begin.
For single-digit Chapters or Titles, press a single Number button. For
exampFe,to play Chapter three, press the Number 3 button during
playback.To pFayTitle two, press the Number 2 button while play-
back is stopped.
For C_apters/Titles numbered 10 and above, press the +10 button
(repeatedly, if necessary), then press the Number button of the sec-
ond digit. For example, to play Chapter 12, press the + I 0 button,
then press the Number 2 button during playback.For Title 22, press
the +10 button twice, then press the Number 2 button when play-
back is stopped.
B
Using the SEARCH MODE Button to Select aTitle/Chapter
To start playback at a specific Chapter, press the SEARCH
MODE button once, then press the Number buttons or the
A/_ buttons to enter the Chapter number. Press the PLAY
button to begin playback at the selected Chapter.
EHI_D MARCH/CHAPTER 1
TOTAL GHAPTERS:027
CHA_TER[I_]
Sla_ m ExR
To start playback at a specificTitle, press the SEARCH MODE
button twice, then press the Number buttons or the A/_ but-
tons to enter theTitle number. Press the PLAY button to
begin playback at the selected Title.
SMARt-TITLE 1
TOTAL TITLES:07
TITLE:I E]
$_ _Exit
26 SpecificTimePlayback
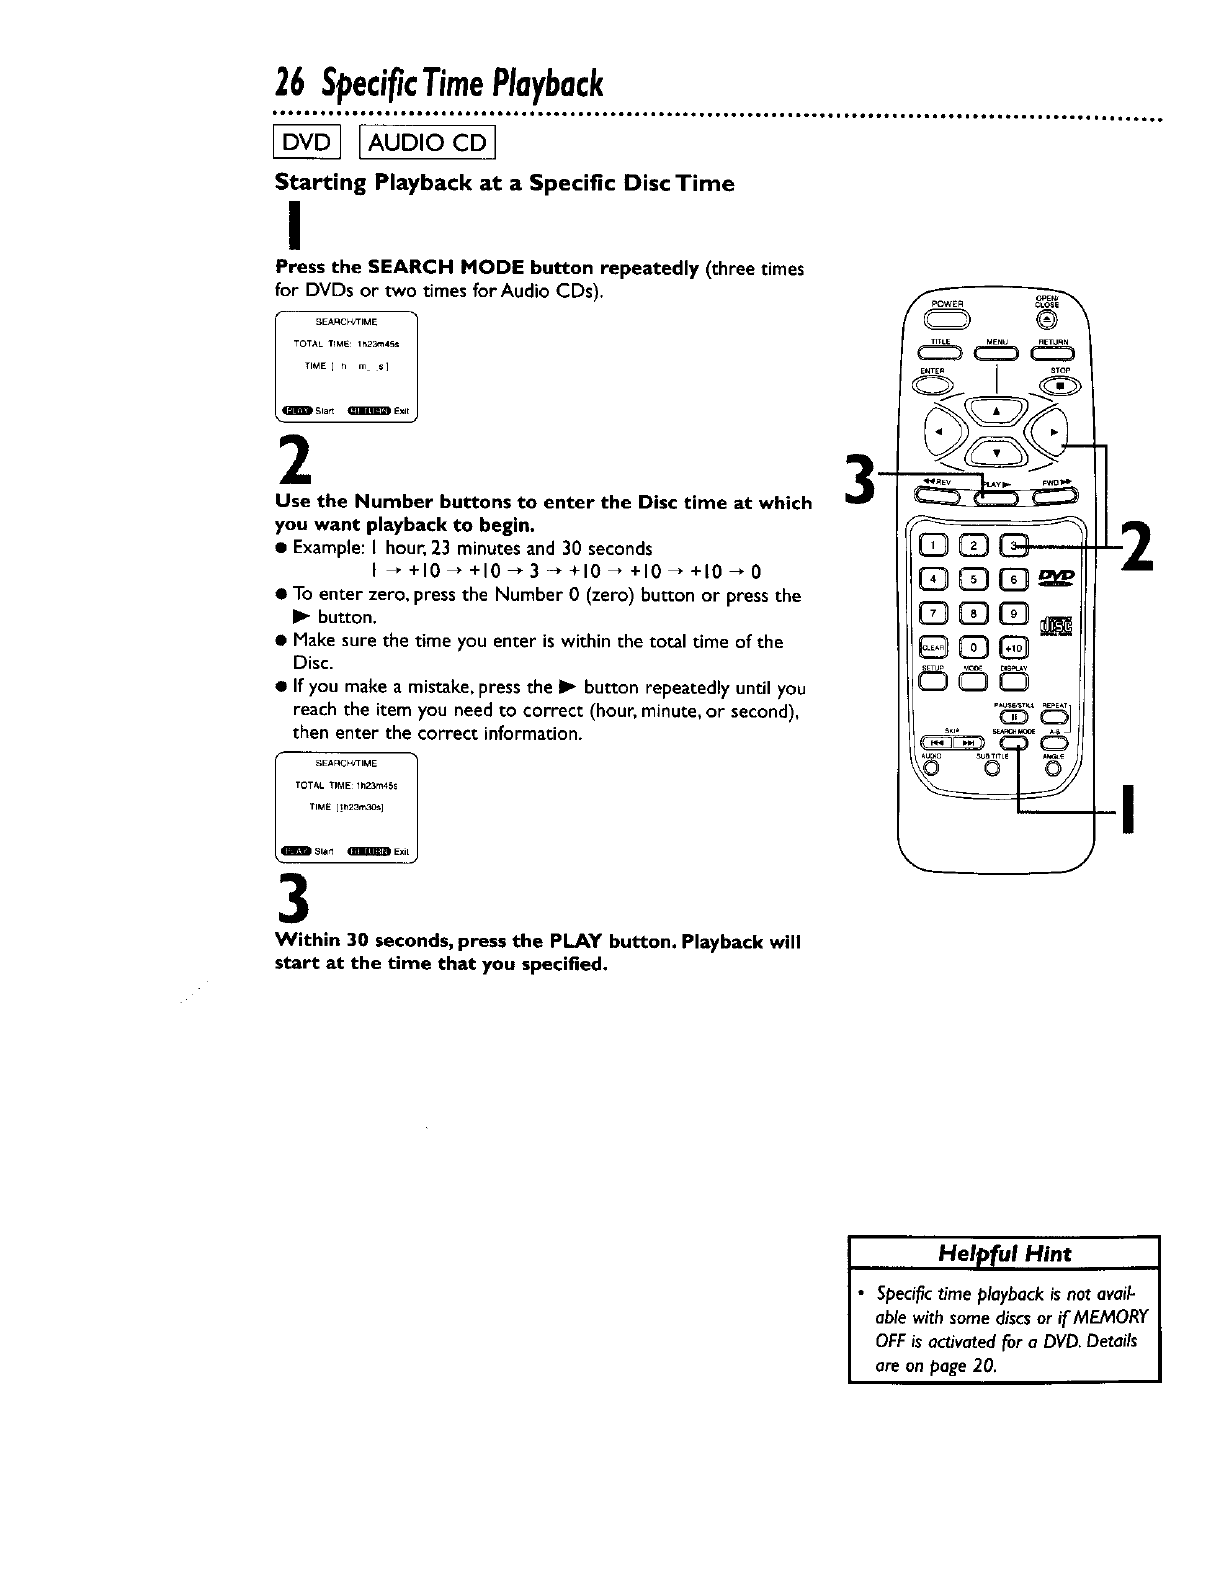
Starting Playback at a Specific Disc Time
I
Press the SEARCH MODE button repeatedly (three times
for DVDs or two times for Audio CDs).
"OT,_L TI_tE: I_,,?_,iSs
'rIME I _ m s]
SI_I_ _ Exit
2
Use the Number buttons to enter the Disc time at which _lP--
you want playback to begin.
• Example:I hour.23 minutes and 30 seconds
I_+10 _+10-+ 3 -+ +10 _+10 _+10 _ 0
• To enter zero. pressthe Number 0(zero) button or pressthe
I_ button.
• Make sure the time you enter is within the total time of the
Disc.
• If you make a mistake, press the I_ button repeatedly until you
reach the item you need to correct (hour, minute, or second),
then enter the correct information.
TOTAL TIME lh23m45s
TIME [!h23rn,30s]
3
Within 30 seconds, press the PLAY button. Playback will
start at the time that you specified.
fPOWEA 0_
®
2
Helpful Hint
Specifictime playbackis not avail-
able with somediscsor if MEMORY
OFFis activatedfor a DVD.Details
are on page 20.
RepeatPlayback27
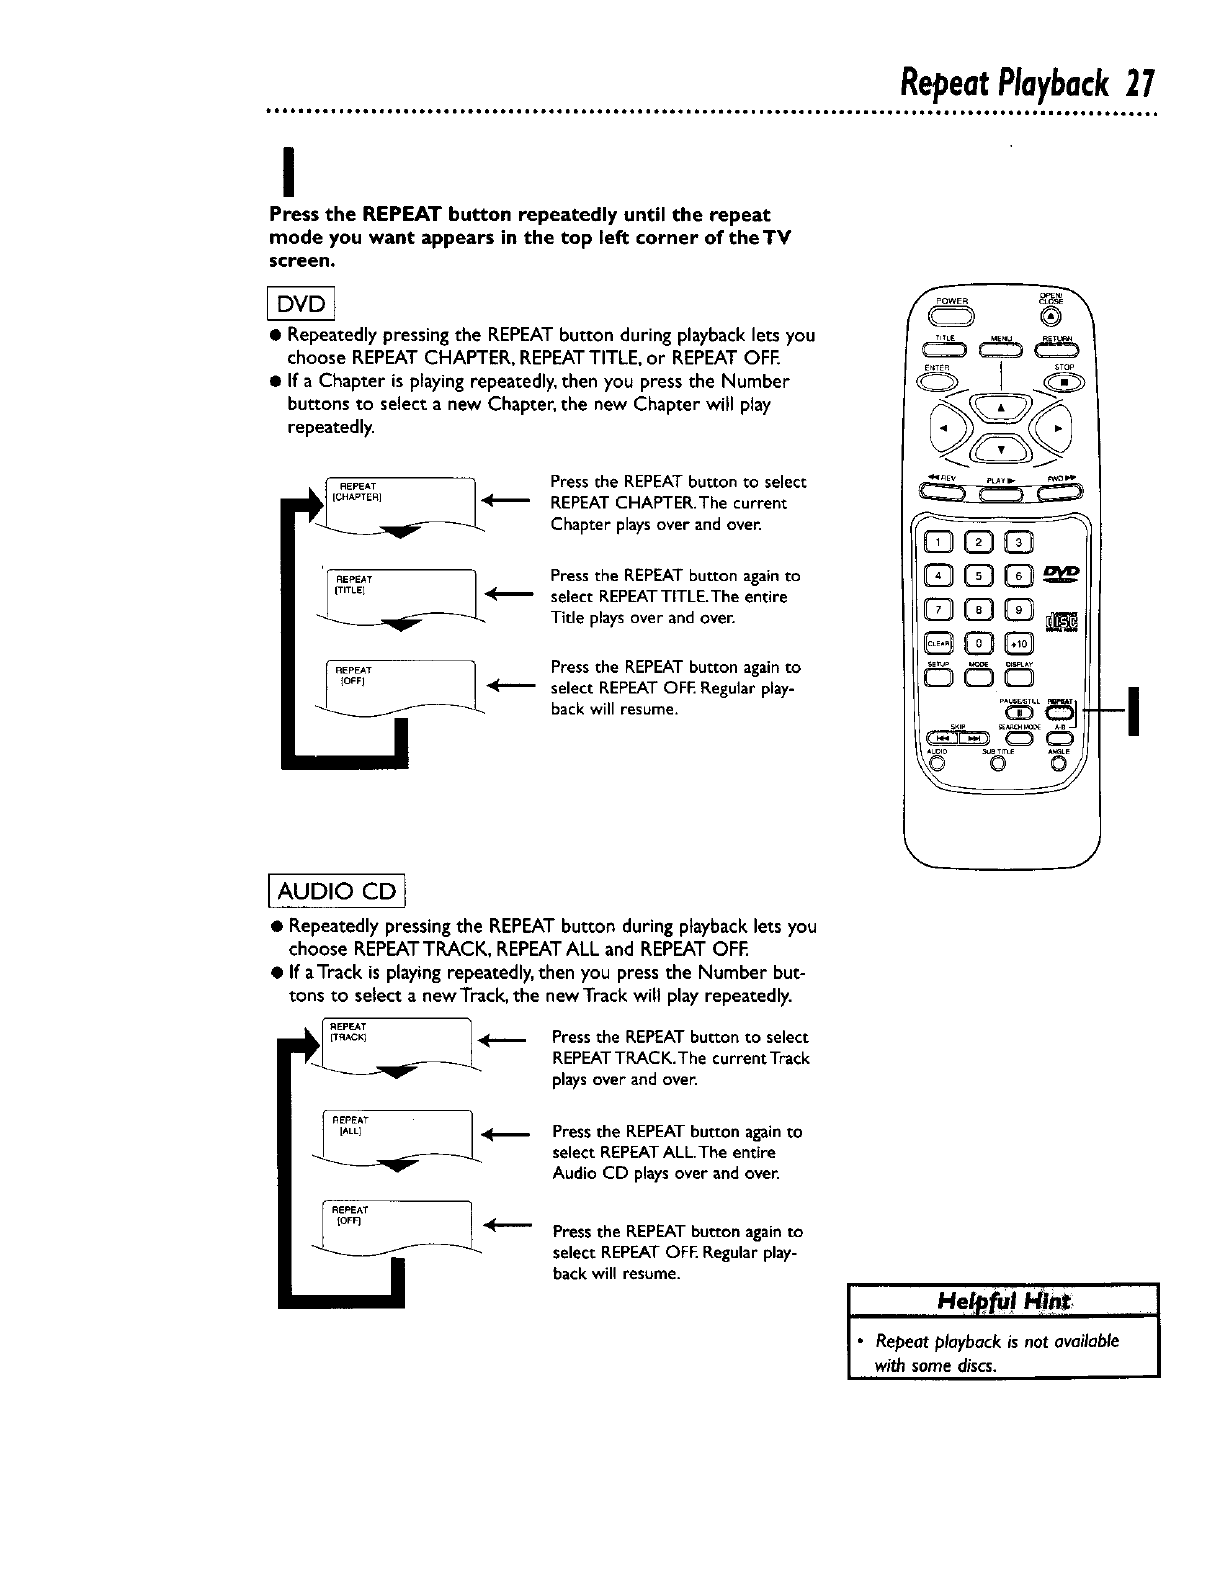
I
Press the REPEAT button repeatedly until the repeat
mode you want appears in the top left corner of the TV
screen.
•Repeatedly pressing the REPEAT button during playback lets you
choose REPEAT CHAPTER, REPEAT TITLE, or REPEAT OFE
• If a Chapter is playing repeatedly, then you press the Number
buttons to select a new Chapter, the new Chapter will play
repeatedly.
REPEAT
[CHA_TER]
IEPEAT j
IOFFI
Press the REPEATbutton to select
REPEATCHAPTER.The current
Chapter playsover and over.
Press the REPEAT button again to
select REPEATTITLE.The entire
Title plays over and over.
Press the REPEATbutton again to
select REPEATOFE Regular play-
back will resume.
®
dgb
GG3C3
AUDIO CD j
• Repeatedly pressing the REPEAT button during playback lets you
choose REPEATTRACK, REPEAT ALL and REPEAT OFE
•If aTtack is playing repeatedly, then you press the Number but-
tons to select a new Track, the new Track will play repeatedly.
I_nACKI _ Pressthe REPEATbutton to select
REPEATTRACK.The current Track
'_ playsover and over.
I REPEAT 1
IALL] _ Press the REPEATbutton againto
select REPEATALL.The entire
Audio CD playsover and over.
REPEAT
<_"'- Press the REPEATbutton againto
select REPEATOFE Regular play-
back will resume. I I
28 A.BRepeatPlayback
oo° ° °° ° ,
IOtQOeOtJO6,*BtO.,0Qt,6611OteO,tOO10OOee,tOO, ,Je,OOOl t,eet6o,,oto_oel _oe,*o_ll toeeo6t,_ eetet6oolo,,ot,
[AUDIO CD I
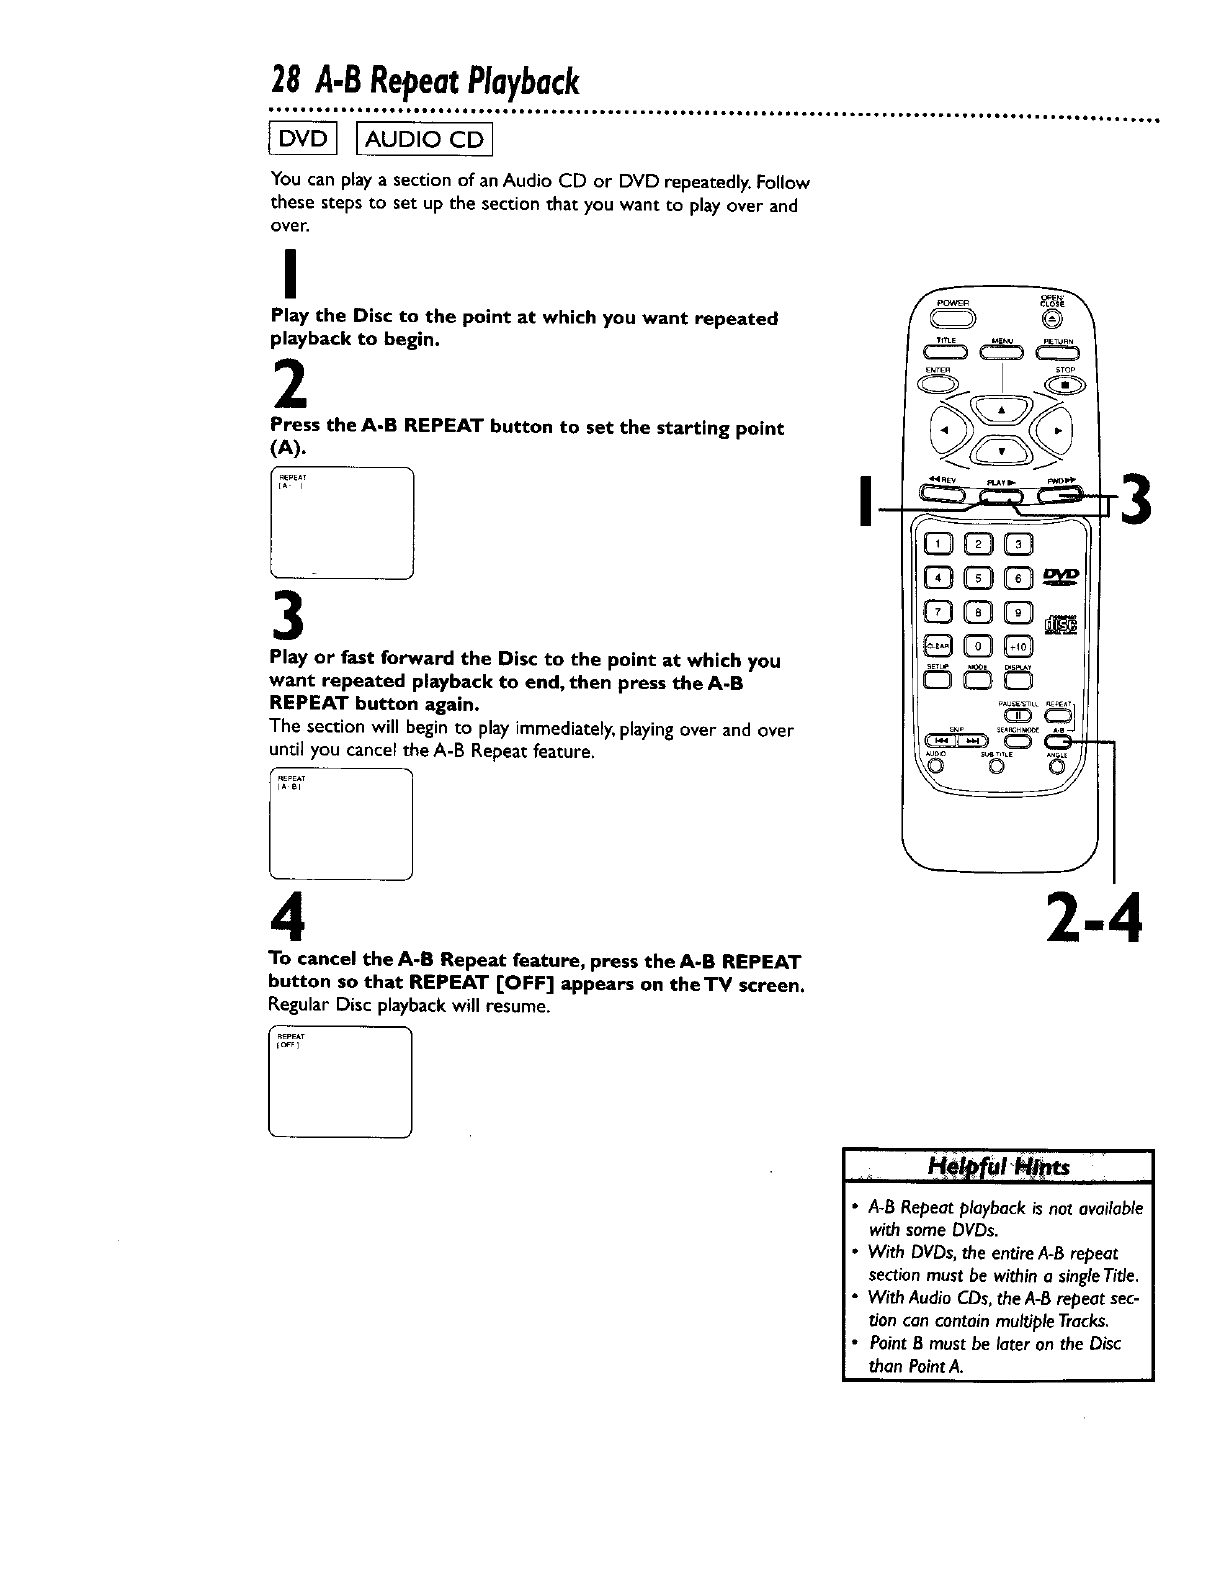
You can play asection of an Audio CD or DVD repeatedly. Follow
these steps to set up the section that you want to play over and
over.
I
Play the Disc to the point at which you want repeated
playback to begin.
2
Press the A-B REPEAT button to set the starting point
(A).
3
Play or fast forward the Disc to the point at which you
want repeated playback to end, then press the A-B
REPEAT button again.
The section will begin to play immediately, playing over and over
until you cancel the A-B Repeat feature.
4
To cancel the A-B Repeat feature, press the A-B REPEAT
button so that REPEAT [OFF] appears on theTV screen.
Regular Disc playbackwill resume.
•A-B Repeat playback is not available
with some DVDs.
With DVDs, the entire A-B repeat
section must be within a singleTitle.
With Audio CDs, the A-B repeat sec-
tion can contain mu_ple Tracks.
Point Bmust be later on the Disc
than Point A.
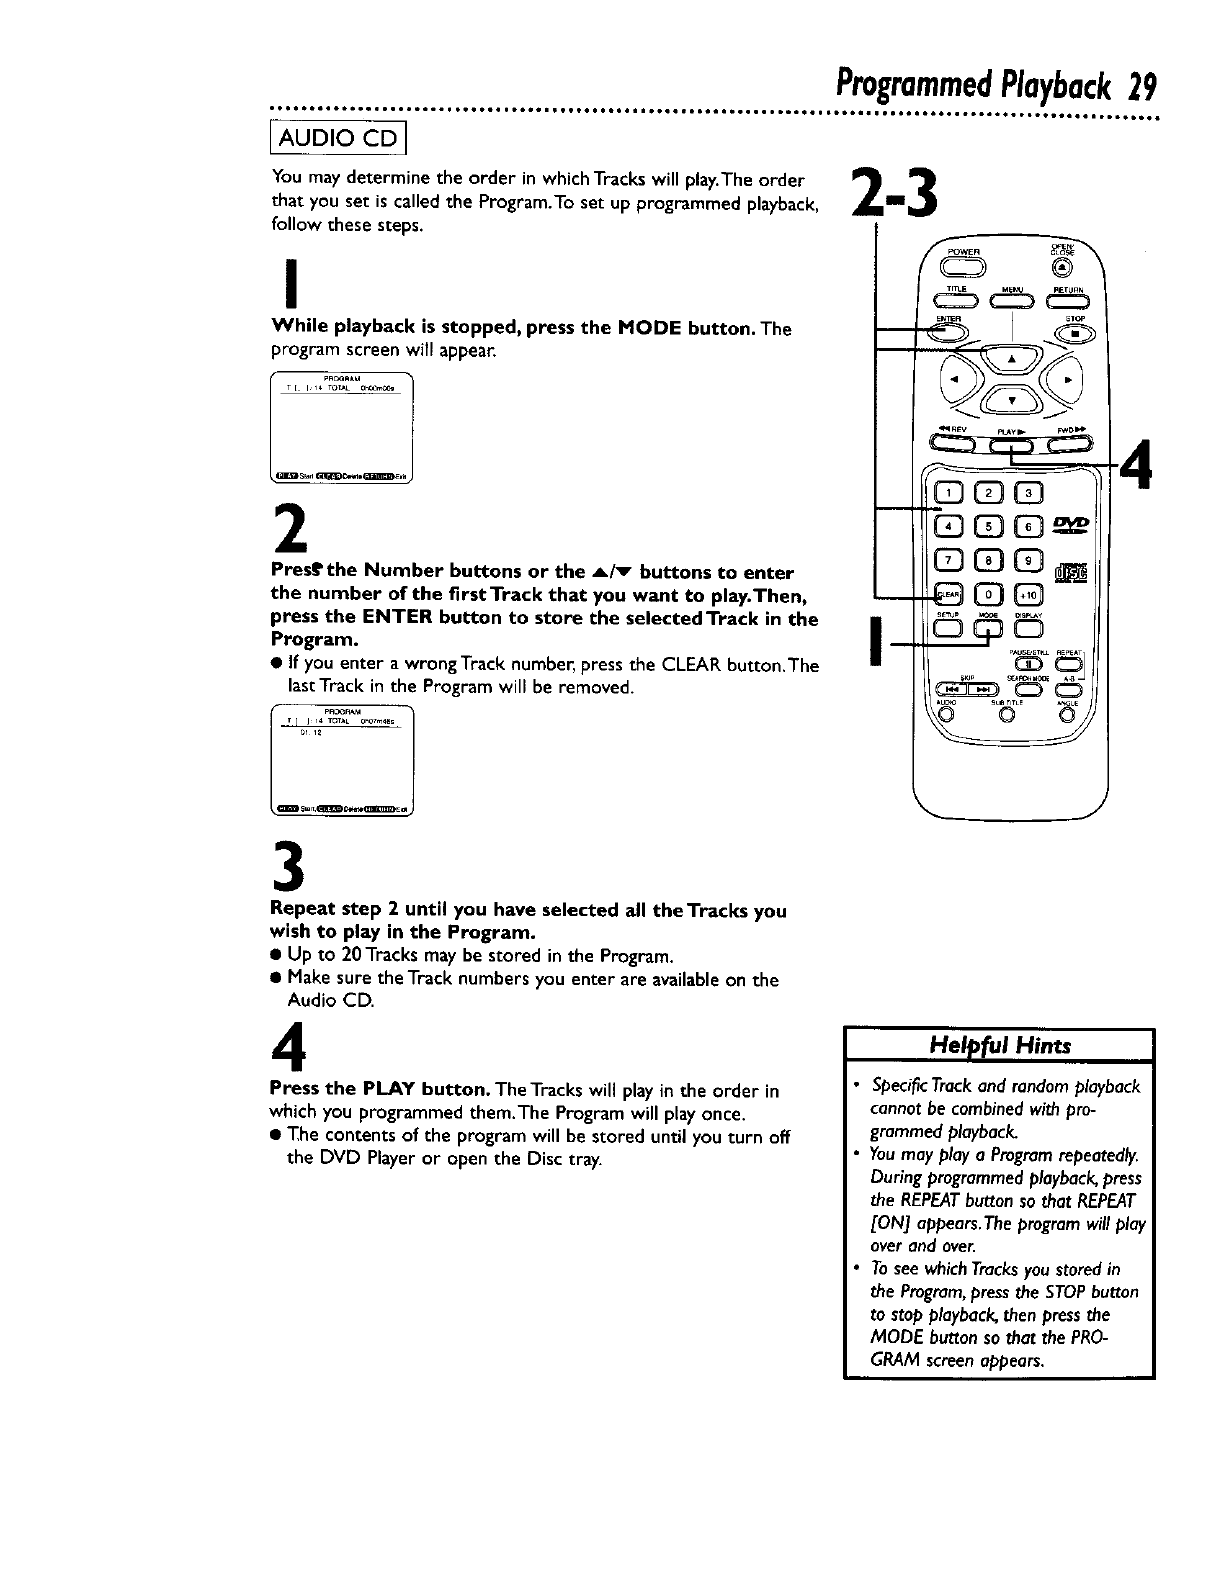
You may determine the order in which Tracks will play.The order _1_
that you set is called the Program.To set up programmed playback, i_.
follow these steps.
I
While playback is stopped, press the MODE button. The
program screen will appear,
T [ I 14 TOt,*L O'Oa_
2
Prestthe Number buttons or the _/_ buttons to enter
the number of the firstTrack that you want to play.Then,
press the ENTER button to store the selectedTrack in the
Program.
• If you enter a wrong Track number, press the CLEAR button.The
last Track in the Program will be removed.
l 1......
T[ i 14 TOTAL 0h07_4_
3
Repeat step 2 until you have selected all theTracks you
wish to play in the Program.
• Up to 20Tracks may be stored in the Program,
• Make sure the Track numbers you enter are availableon the
Audio CD.
4
Press the PLAY button. The Tracks will play in the order in
which you programmed them.The Program will play once.
• The contents of the program will be stored until you turn off
the DVD Player or open the Disc tray.
Helf_ful Hints
Specific Track and random playback
cannot be combined with pro-
grammed playback.
You may play a Program repeatedly.
During programmed playback, press
the REPEATbutton so that REPEAT
[ON] appears.The program will play
over and over.
Tosee whichTracksyou stored in
the Program,press the STOPbutton
to stop playback, then press the
MODE button so that the PRO-
GRAM screen appears.
30 RandomPlayback
,060,1Or,,,06010 •ItOOtet001 °teOOt_et6¢,*,JtO_et660,gOtt_O •tgOOOOOO,IOeQ_IIO_'tOeetOOOtBOQ_tlOOtO6,,,*Wtl,l,t,t o•
IAUaIOCa!
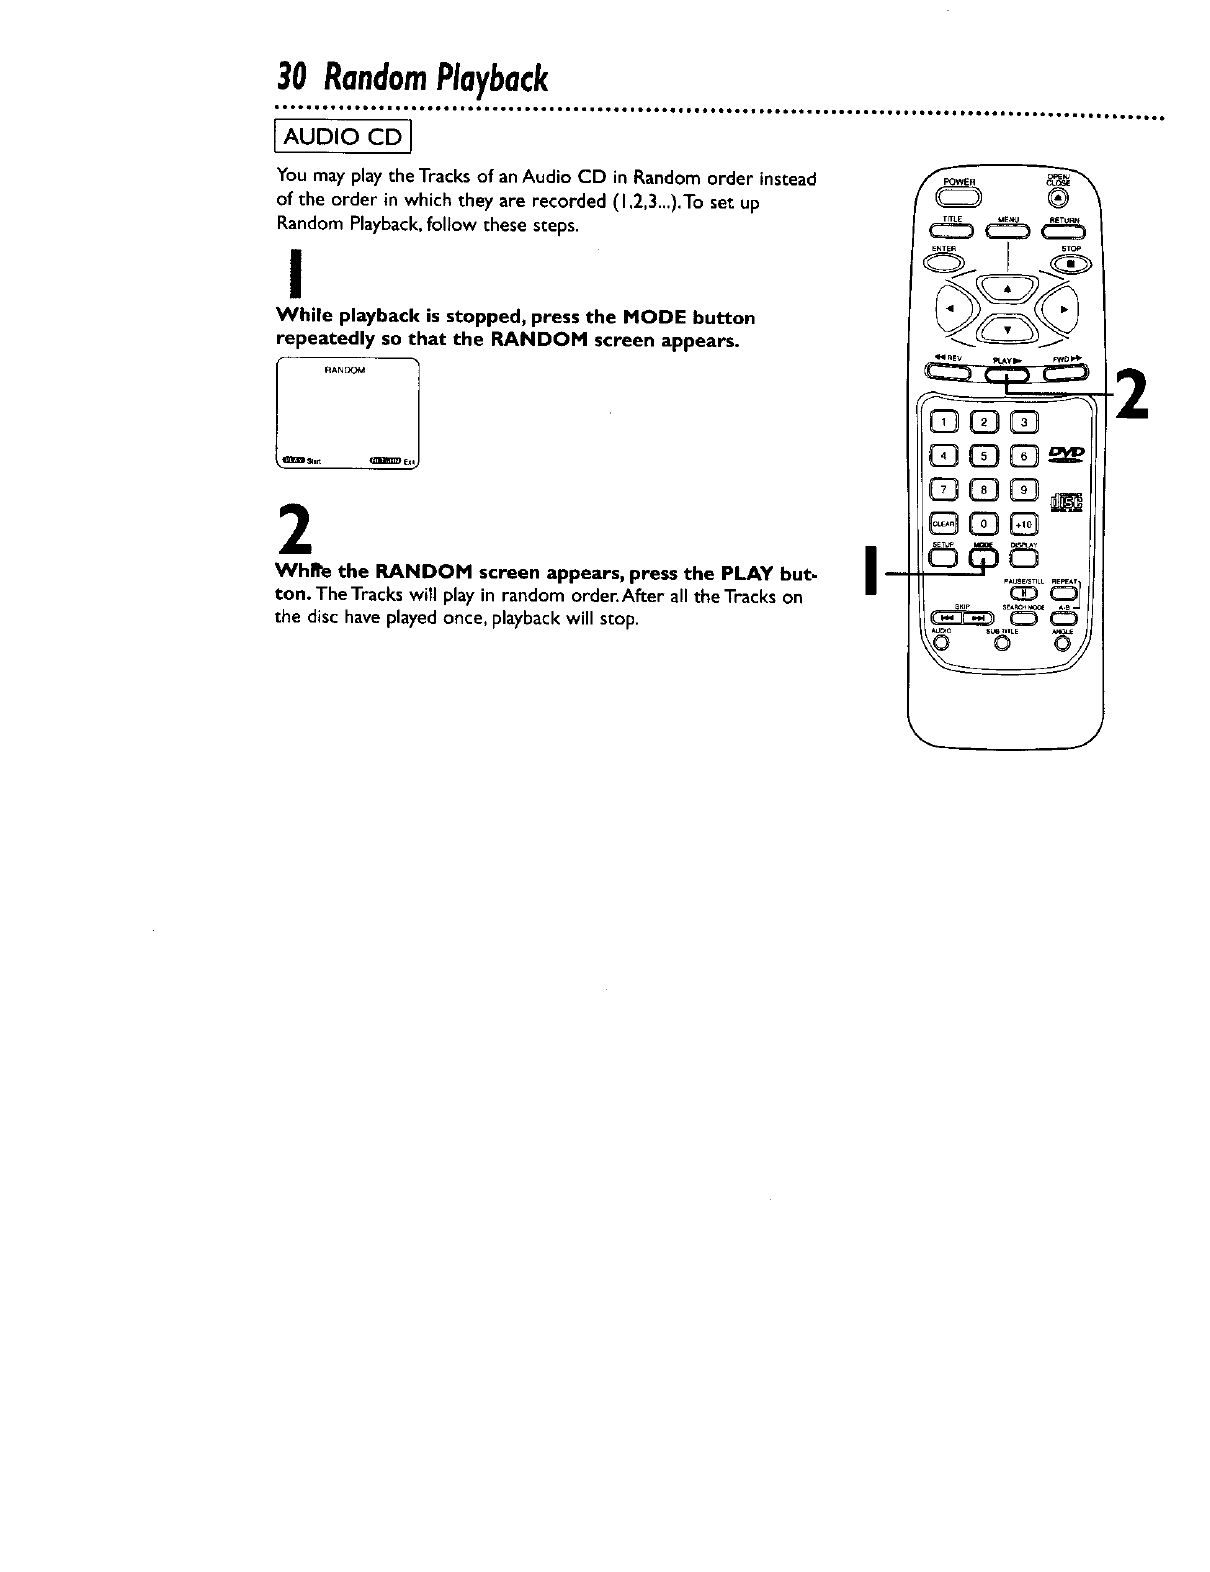
You may play the Tracks of an Audio CD in Random order instead
of the order in which they are recorded (I ,2,3...).'I"o set up
Random Playback, follow these steps.
I
While playback is stopped, press the MOOE button
repeatedly so that the RANDOM screen appears.
Ij°j
2
WhRe the RANDOM screen appears, press the PLAY but-
ton. The Tracks will play in random order. After all the Tracks on
the disc have played once, playback will stop.
I m
Q ®
C3C_
AudioLanguage/SoundMode31
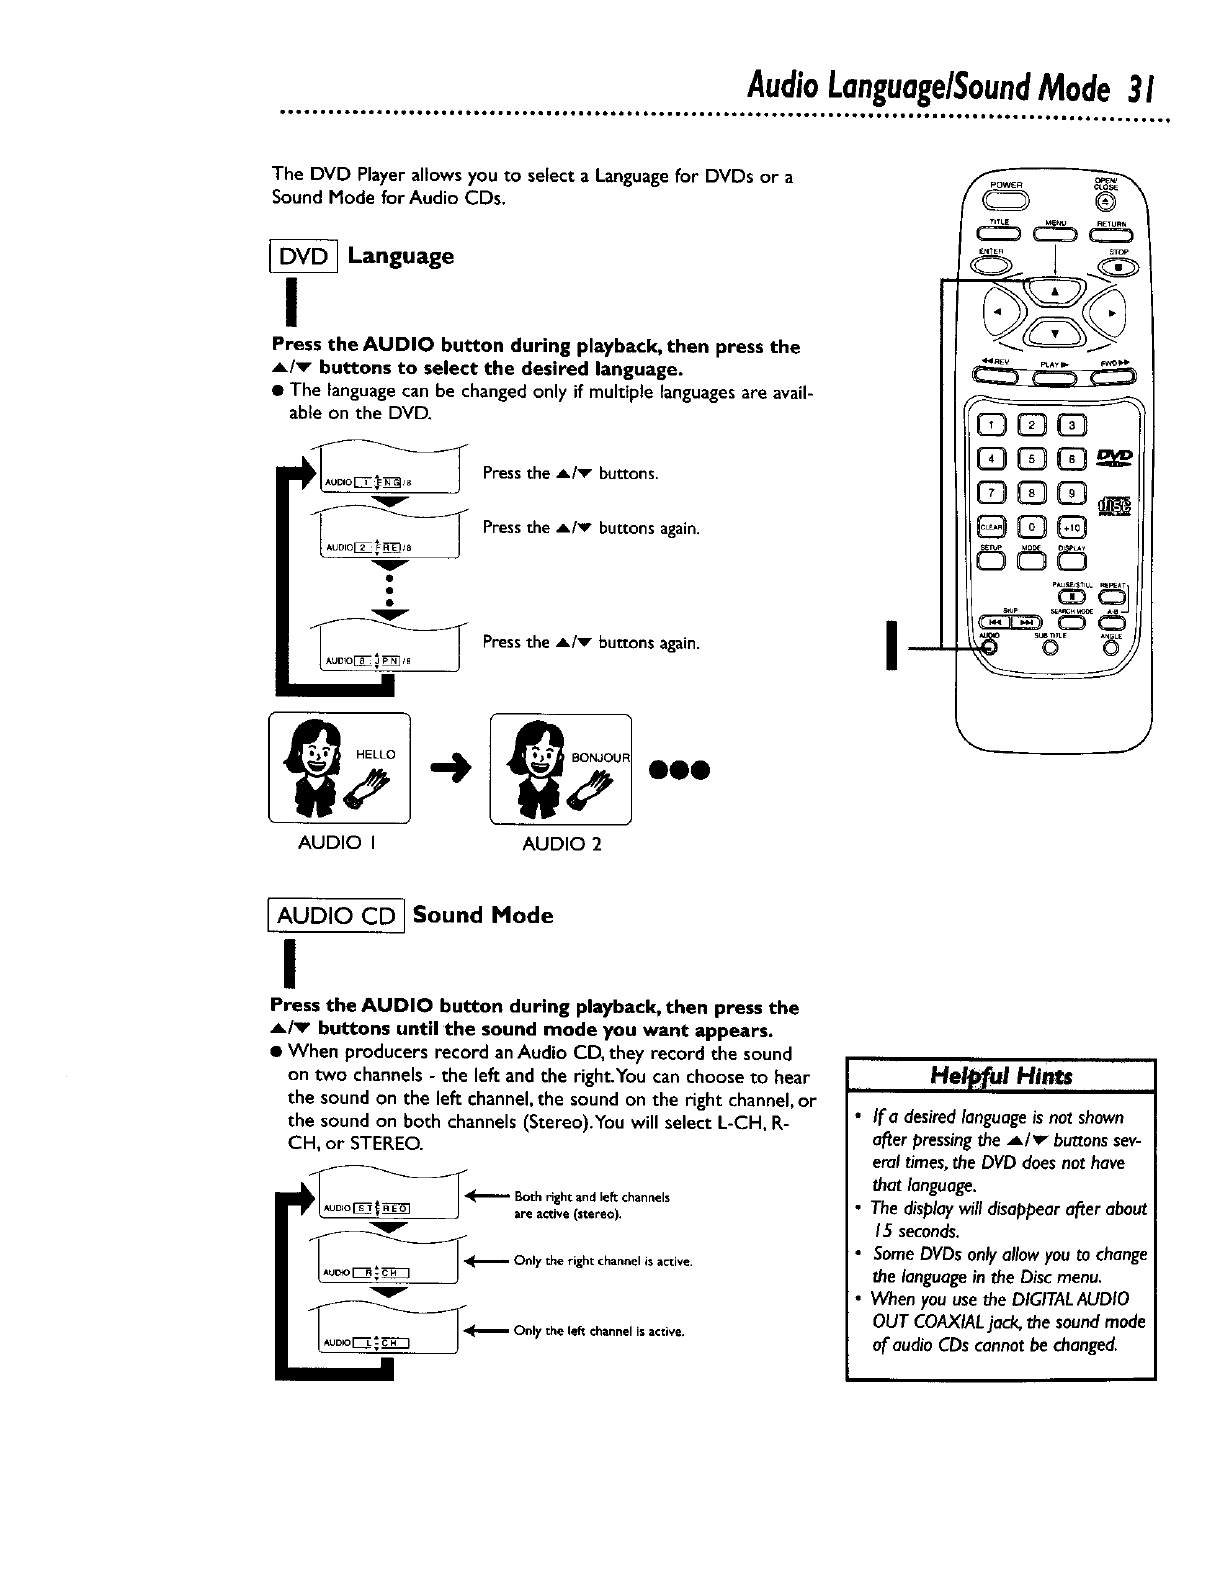
The DVD Player allows you to select a Language for OVOs or a
Sound Mode for Audio CDs.
[_ Language
I
Press the AUDIO button during playback, then press the
A/v buttons to select the desired language.
•The languagecan be changedonly if multiplelanguagesare avail-
able on the DVD.
v
Press the A/v buttons.
Pressthe A/v buttons again.
PresstheA/_ buttonsagain. I
AUDIO I AUDIO 2
I AUDIO CD I Sound Mode
I
Press the AUDIO button during playback, then press the
A/_ buttons until the sound mode you want appears.
•When producersrecord anAudio CD, they record the sound
on two channels- the lee andthe right.You can chooseto hear
the sound on the lee channel,the sound on the right channel,or
the sound on both channels (Stereo).Youwill select L-CH, R-
CH, or STEREO.
__-_- Only the right channelis active.
__ Only the lef_channel is active.
,Helpful Hints
If a desired language is not shown
after pressing the A/v" buttons sev-
eral times, the DVD does not have
that language.
The display will disappear after about
15 seconds.
Some DVDs only allow you to change
the language in the Disc menu.
When you use the DIGITALAUDIO
OUT COAXIAL jack, the sound mode
of audio CDs cannot be changed.
32 SubtitleLanguage
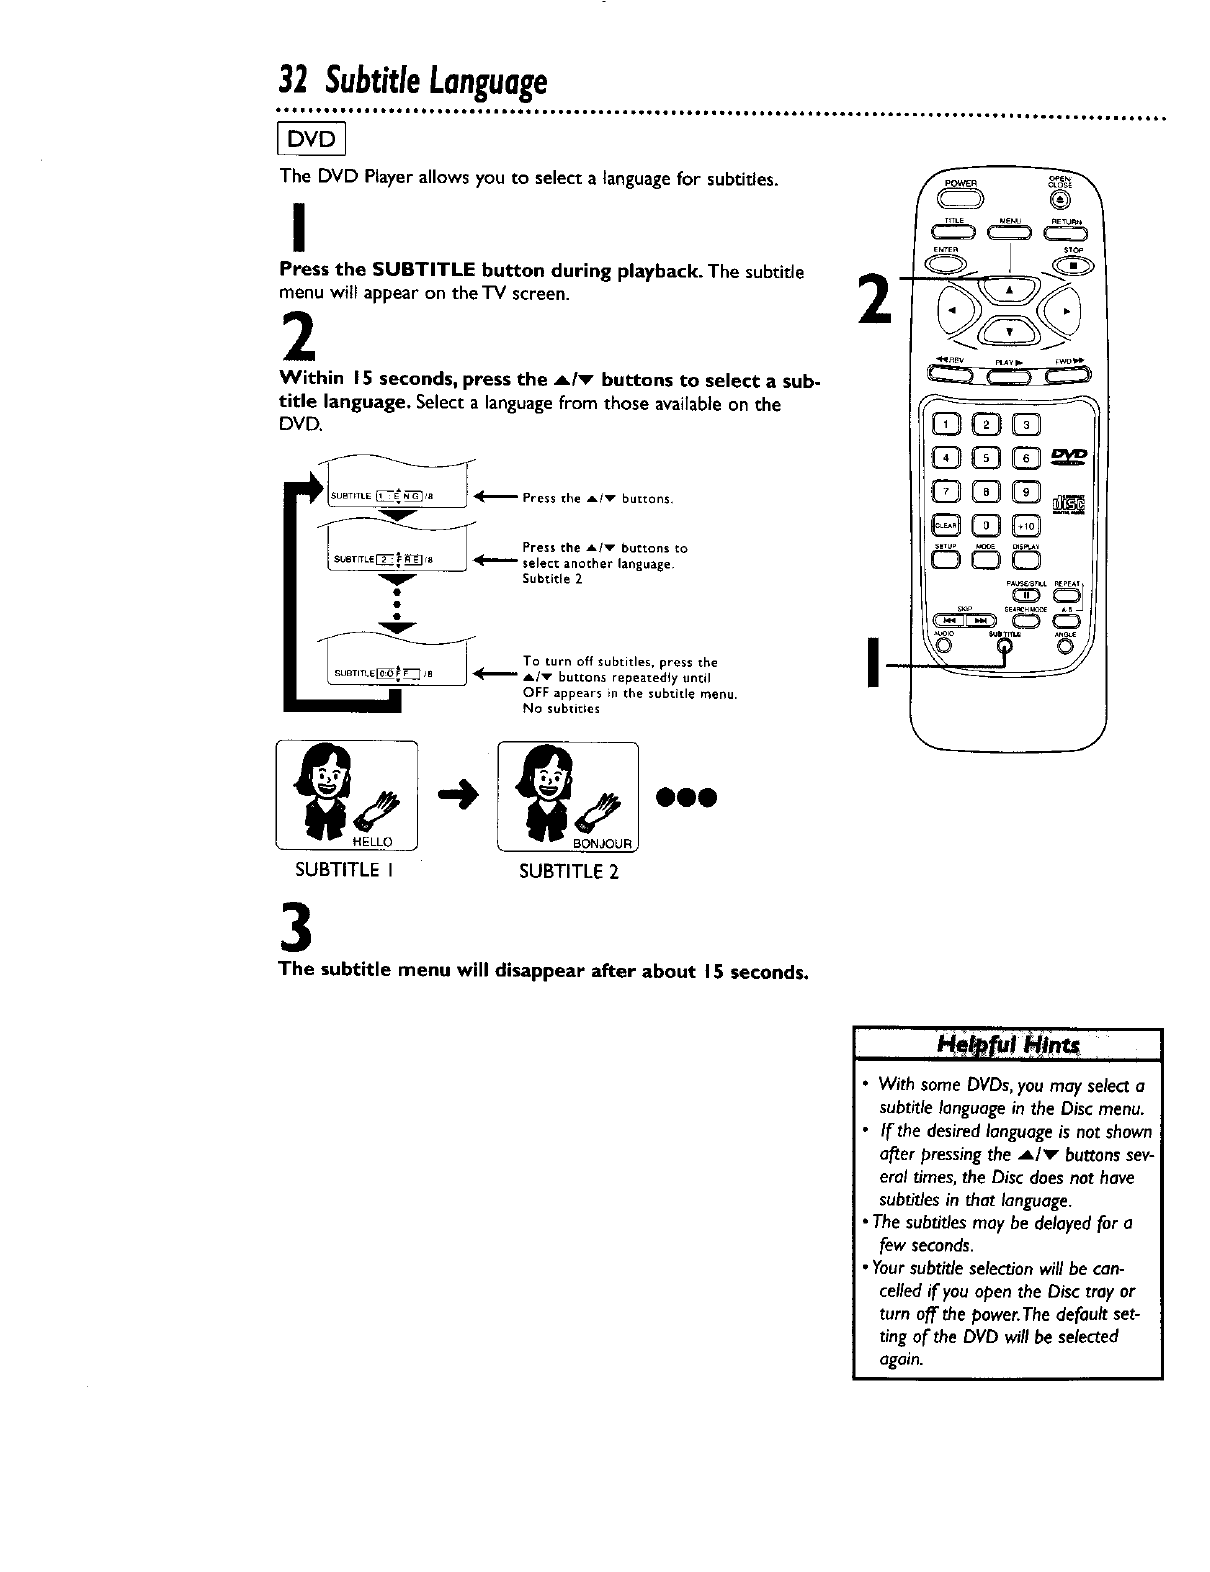
The DVD Player allows you to select a_anguage for subtitles.
ss he SUBTITLE button during playback. The subtitle
will appear on the TV screen. Z
Within 15 seconds, press the A/v buttons to select a sub-
title language. Select a languagefrom those availableon the
DVD.
___'_ Press the A/_ buttons.
Press the A/v buttons to
__"" select another language¸
Subtitle 2
To turn off subtitles, press the
__'_" A/v buttons repeatedl 7 until
OFF appears in the subtitle menu.
NO subtitles
®_
C3CD03
G3G3G]_
GC3Q
_c_cD
SUBTITLE I SUBTITLE 2
3
The subtitle menu will disappear after about 15 seconds.
With same DVDs, you may select a
subtitle language in the Disc menu.
If the desired language is not shown
after pressing the _,/_ buttons sev-
eral times, the Disc does not have
subtit/es in that language.
The subtit/es may be delayed for a
few seconds.
•Your subtitle selection will be can-
celled if you open the Disc tray or
turn off the power.The default set-
ting of the DVD will be selected
again.
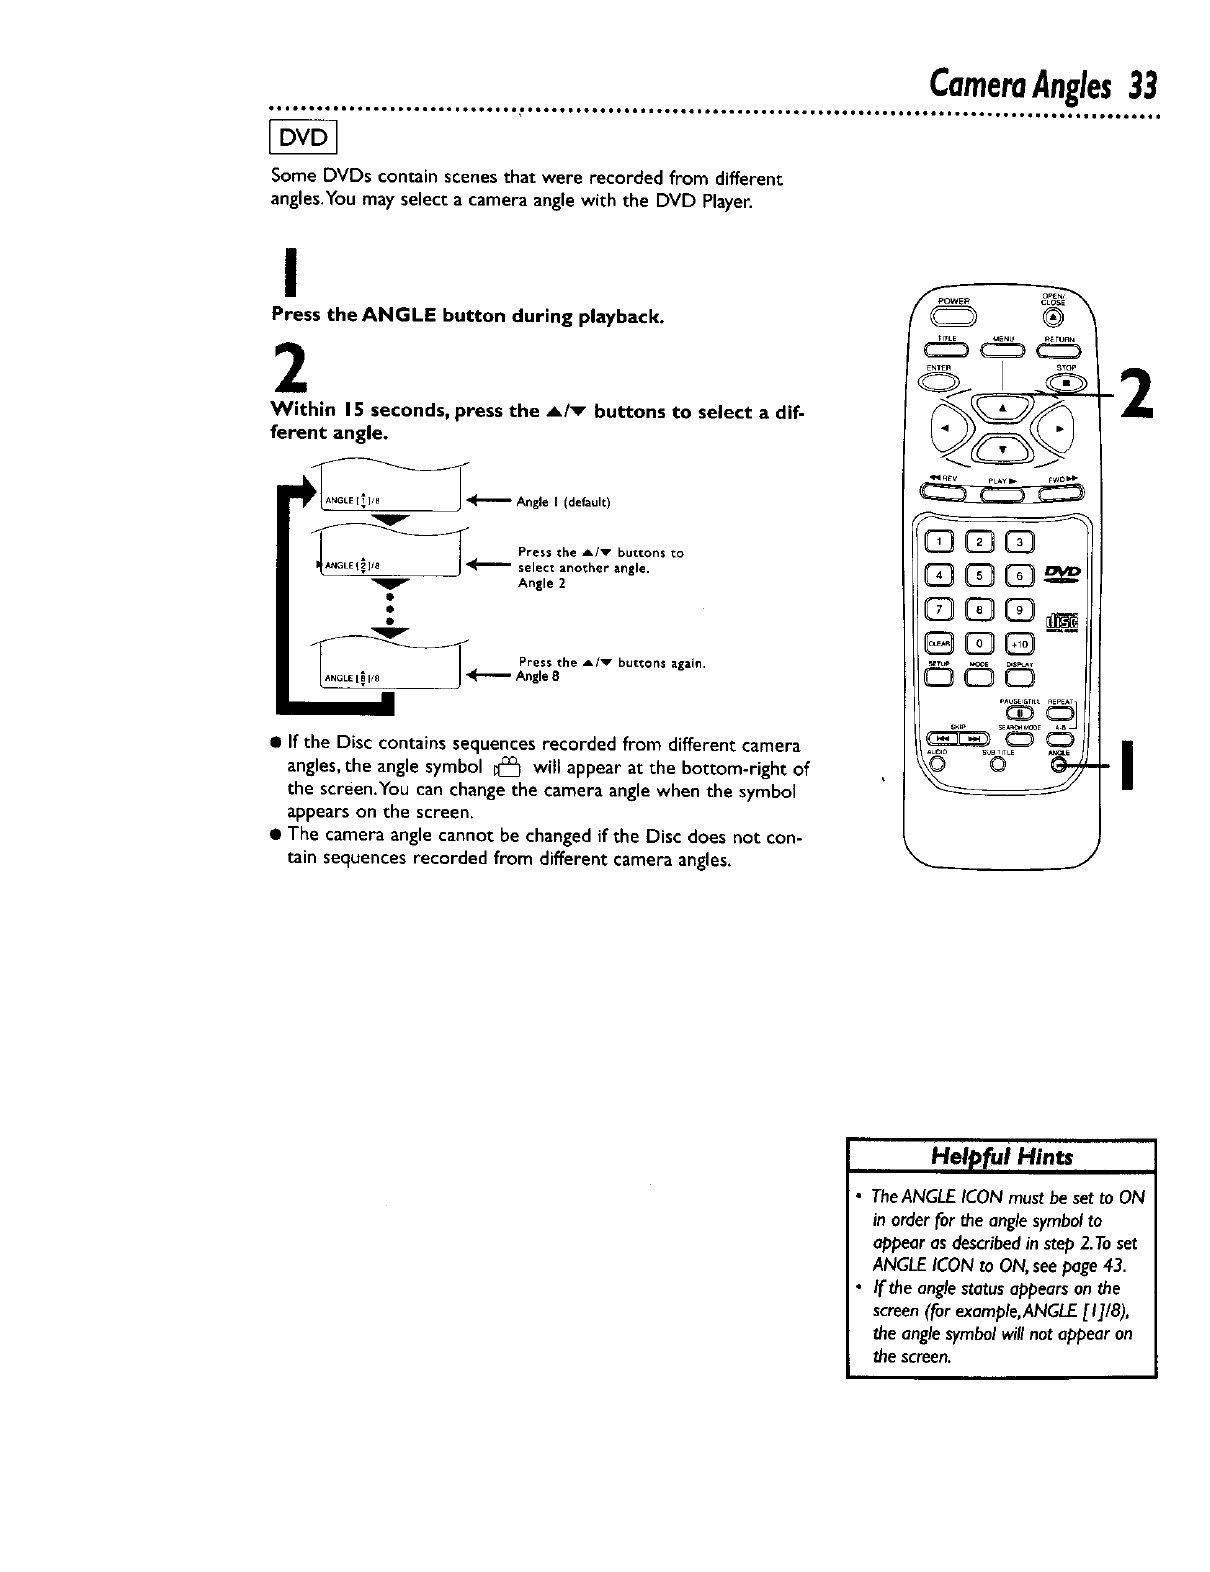
Some DVDs contain scenesthat were recorded from different
angles.Youmay select a camera angle with the DVD Player.
I
Press the ANGLE button during playback.
2
Within 15 seconds, press the A/v buttons to select a dif-
ferent angle.
I (default)
_4_.- ress the A/v buttons to
select another angle.
Angle 2
Press the
__ Angle gA/v buttons again.
• If the Disc contains sequences recorded from different camera
angles,the angle symbol _ will appear at the bottom-right of
the screen.You can change the camera anglewhen the symbol
appears on the screen.
• The camera angle cannot be changed if the Disc does not con-
tain sequences recorded from different camera angles,
f"_'_OWE _ o_
G3QC3
C3
G3G--
J
2
I
I-lelp[ui Hints
TheANGLE ICON must be set to ON
in order for the angle symbol to
appear as described in step 2.To set
ANGLE ICON to ON, seepage 43.
If the angle status appears an the
screen (for example, ANGLE [I]/8),
the angle symbol will not appear on
the screen.
34 ParentalLockPassword
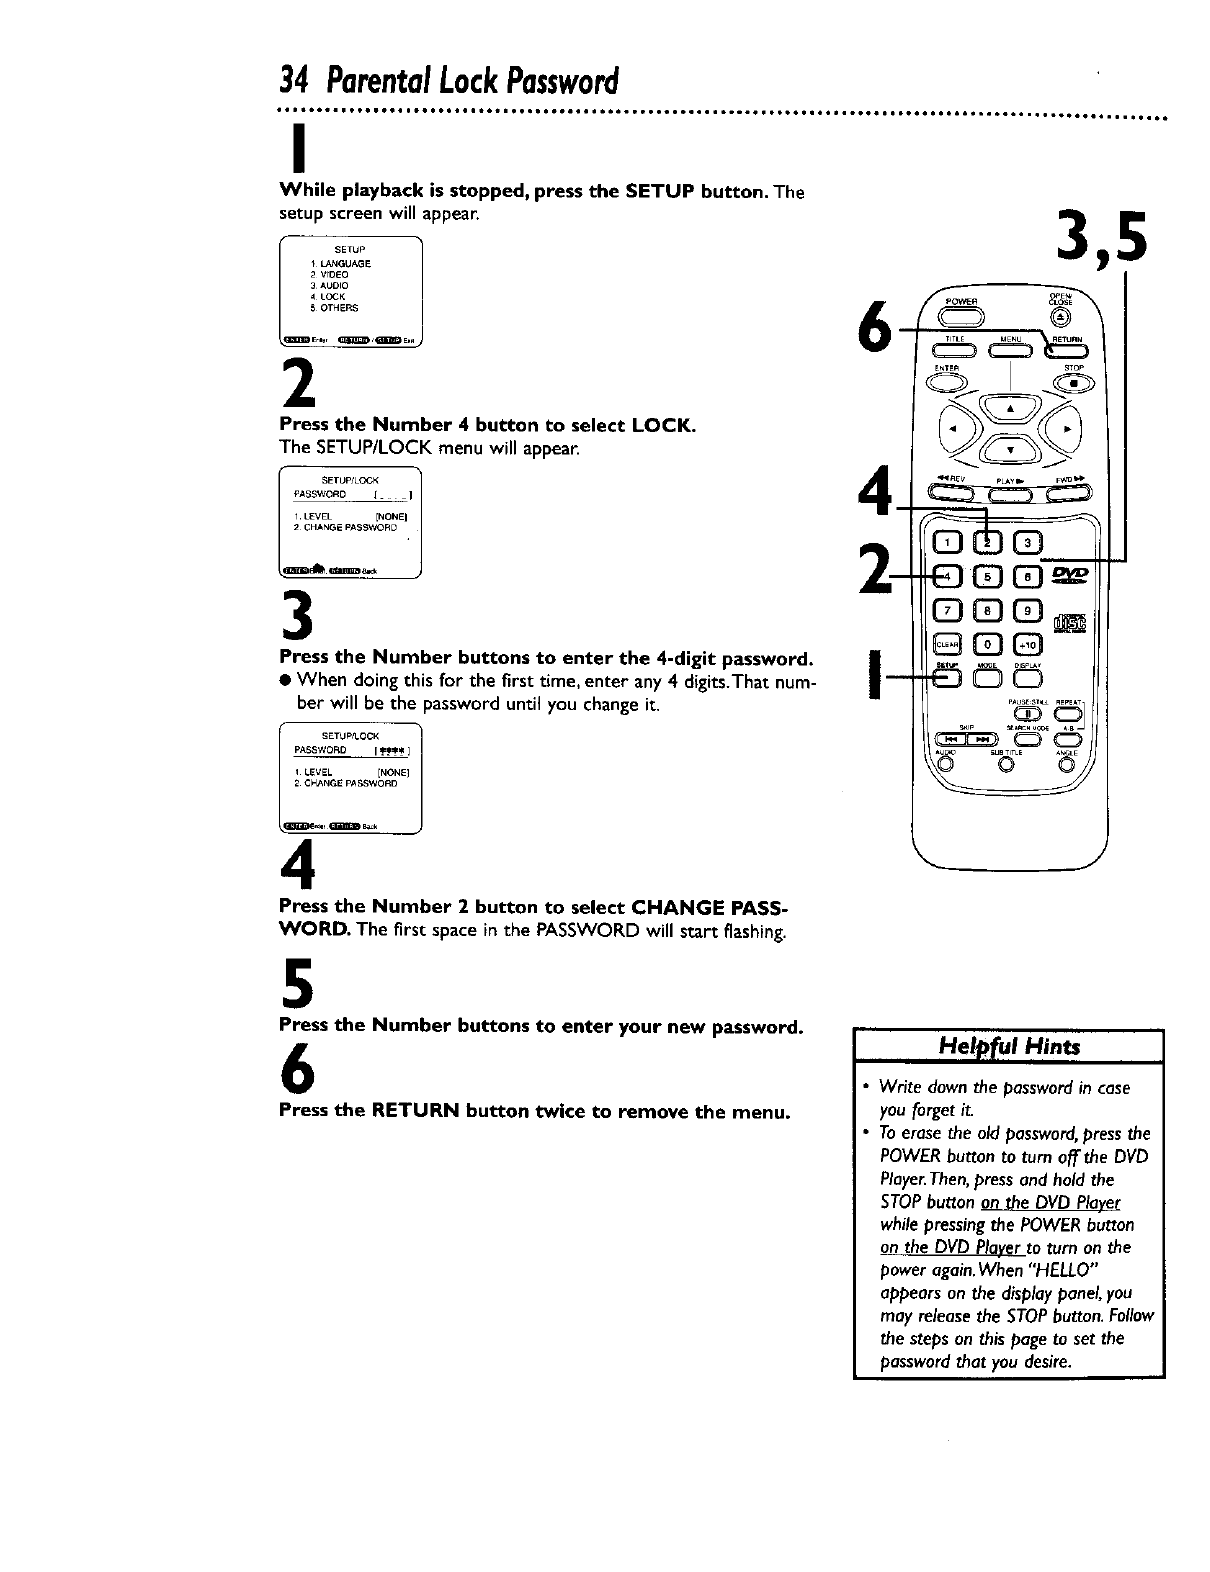
I
While playback is stopped, press the SETUP button. The
setup screen will appear.
+ k_IGUAG E
2 VrDEO
3_UDIO
4 LOCK
5OTHERS
Emer _ E.,
2
Press the Number 4 button to select LOCK.
The SETUP/LOCK menu will appea_
I++l
1 LEVEL [NONEI
2CHAN_E PASSWORD
3
Press the Number buttons to enter the 4-digit password.
•When doing this for the first time, enter an)' 4 digits.That num-
ber will be the password until you change it.
PASSW0R0 I.*_** ]
I LgVEL [NONE]
2 CHAN_E PASSWOND
_lf _ Ba_k
4
Press the Number 2 button to select CHANGE PASS-
WORD. The first space in the PASSWORD will start flashing.
5
Press the Number buttons to enter your new password.
6
Press the RETURN button twice to remove the menu.
+-+e+f,.+H+..
Write down the passwordin case
you forgetit.
Toerasethe old password,pressthe
POWERbutton to turn off the DVD
Player.Then,pressand hold the
STOPbutton on the DVDPlayer
while pressingthe POWERbutton
on.the DVD Playerto turn on the
power again.When '•HELLO"
appearson the displaypanel,you
may releasethe STOPbutton.Follow
the stepson this page to setthe
passwordthat you desire.
ParentalLockLevels35
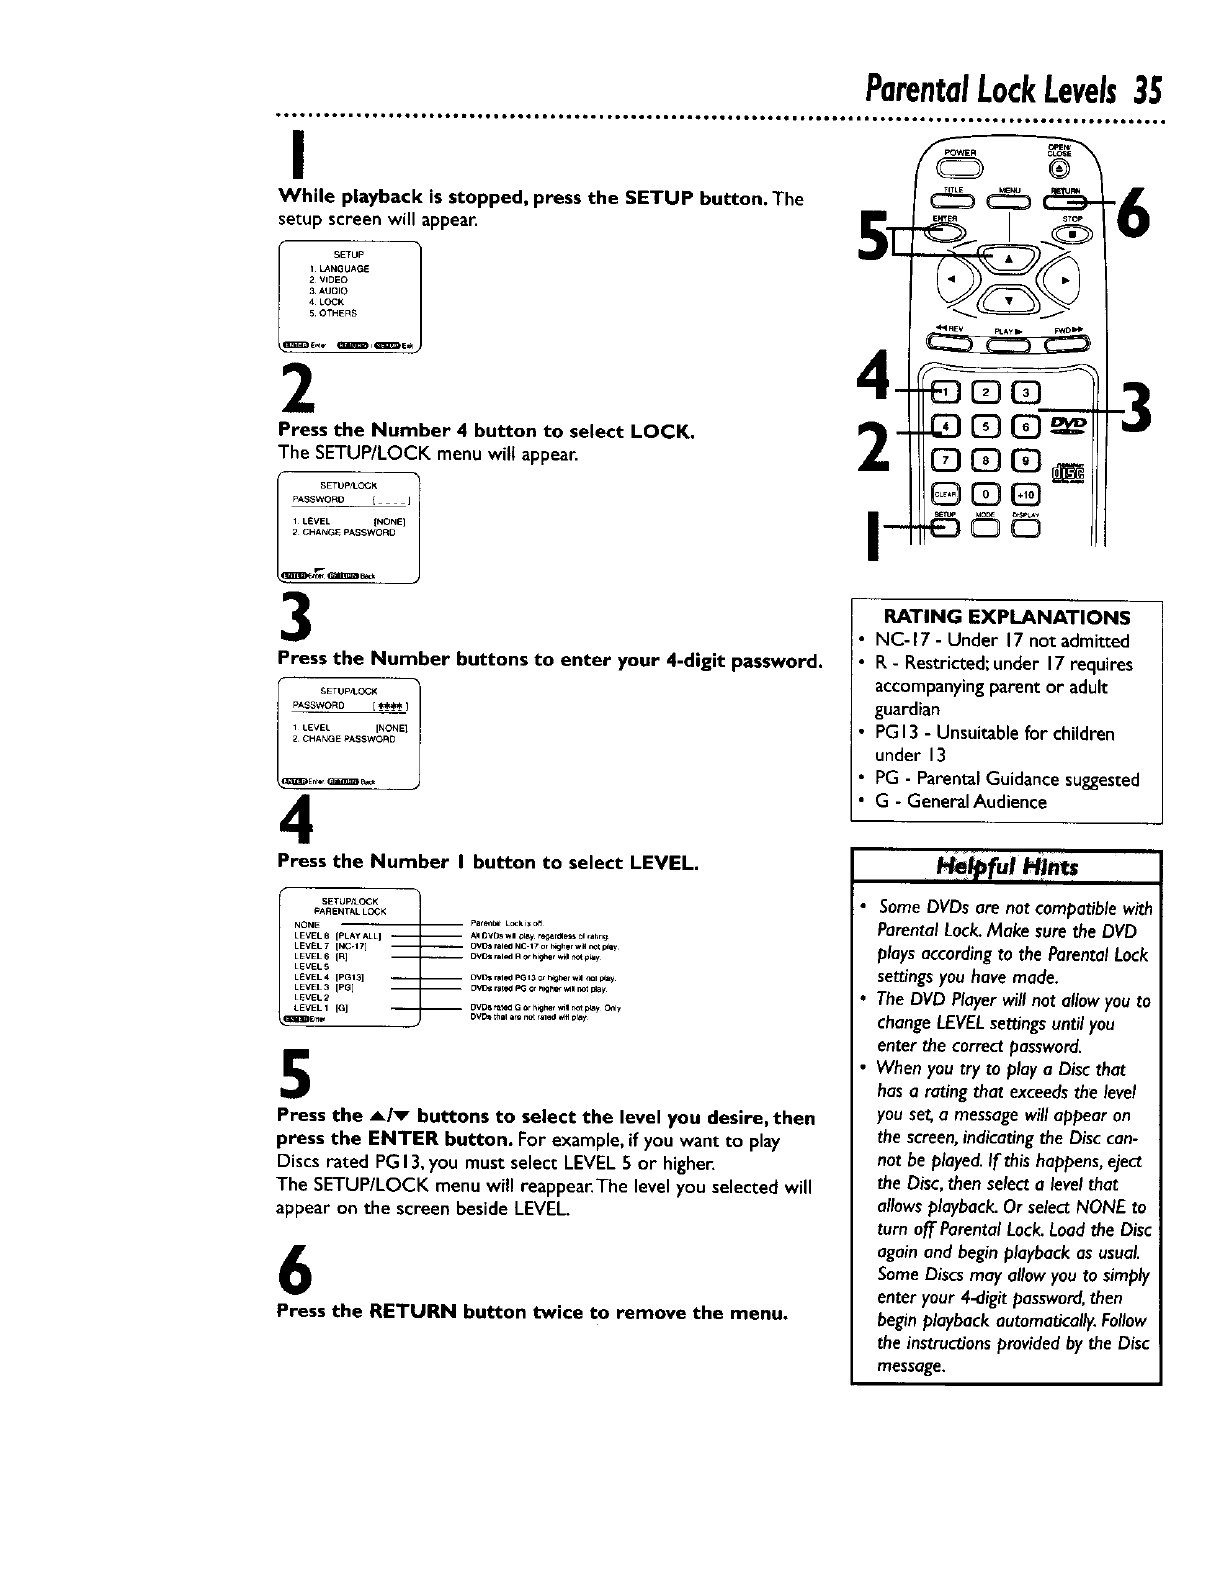
I
While playback is stopped, press the SETUP button. The
setup screen will appear.
ikANGI/AGE
2 VIDEO
3 AtlDIO
,_ LOCK
5 OTHERS
Press the Number 4 button to select LOCK.
The SETUP/LOCK menu will appear.
SETUP/LOCK l
PASSWORO II
1LEVEL [NONE]
2CHANG_ PASSWOAD
3
Press the Number buttons to enter your 4-digit password.
SETUP_.OCK
PASSWOR0 [ _)
1LEVEL [NONE I
2CHANGE PASSWORD
4
Press the Number I button to select LEVEL.
i5ETUp/LCCK
PARENTAL LOCK
NONE Pa_e_a_ L_ i_ off
LEVEL 8 [PLAy ALL] A__vos will_l_y _gar_ess 01,a_ng
LEVEL7 [NC-17] OVC_rale_N¢ 17or _g_erwi_r_ey
LEVEL 6 (R] OVOSral_ R_ higher v_l n_ p_y
LEVEL 5
LEVEL 4 IPGI3] OVD_r_ed PGI3 _ r_er w_l _1 _ay
LEVEL 2
LEVEL1 IG] 0vo_aGor_mr_p_y _ly
5
Press the _/_ buttons to select the level you desire, then
press the ENTER button. For example, if you want to play
Discs rated PG 13, you must select LEVEL 5 or higher,
The SETUP/LOCK menu will reappear.The level you selected will
appear on the screen beside LEVEL,
6
Press the RETURN button twice to remove the menu.
©©
RATING EXPLANATIONS
•NC-17 - Under 17not admitted
• R -Restricted;under 17requires
accompanyingparentor adult
guardian
• PG13- Unsuitablefor children
under 13
• PG - ParentalGuidance suggested
•G - GeneralAudience
Some DVDs are not compatible with
Parental Lock. Make sure the DVD
plays according to the Parental Lock
settings you have made.
The DVD Player will not allow you to
change LEVELsettings until you
enter the correct password.
When you try to play a Disc that
has a rating that exceeds the level
you set, a message will appear on
the screen, indicating the Disc can-
not be played. If this happens, eject
the Disc, then select a level that
allows playback. Or select NONE to
turn off Parental Lock. Load the Disc
again and begin playback as usual
Some Discs may allow you to simply
enter your 4-digit password, then
begin playback automatically. Follow
the instructions provided by the Disc
message.
36 StatusDisplay
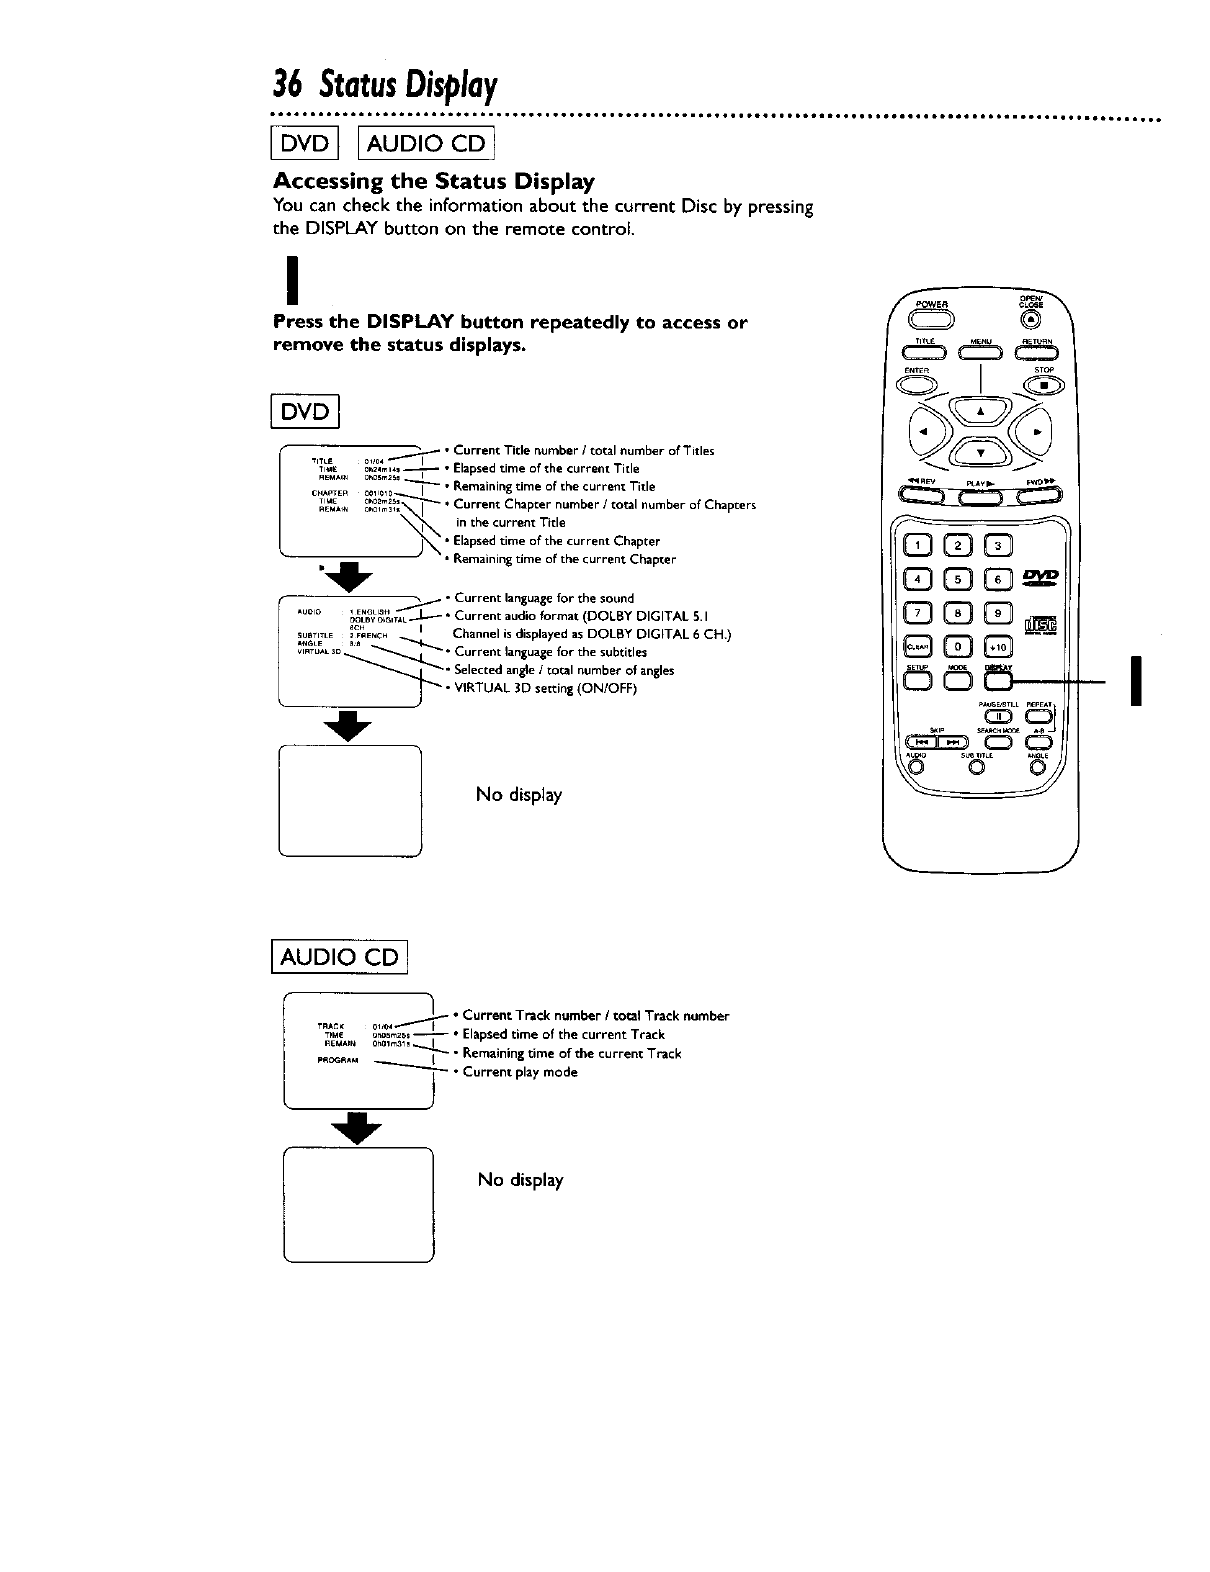
Accessing the Status Display
You can check the informationabout the current Disc by pressing
the DISPLAYbutton on the remote control.
I
Press the DISPLAY button repeatedly to access or
remove the status displays•
I _ •Current Title number /total number of Titles
Tlu_ Oh_4ml4, _•Ela sed time of the cur_'ellt Tide
nEMAI_ ohosm_ _ P
CHAPTEn 001_010 I"Remaining time of the current Title
T'E%_ O%0_] "Current Chapter number /total number of Chapters
_N in the current Title• Elapsedtime of the current Chapter
• Remainingtime of the current Chapter
i _ •Current language for the sound
OaLBVO_,TAL.---L-----Current audaoformat (DOLBY DIGITAL 5.1
SUbTiTLE_.. __.._a_ENCH Channel _sdusplayedas DOLBY DIGITAL 6CH.)
_,_%_L
_o_. Curront_anguage_orthesubtitles
_.L_ _ •Selected angle/total number of angles
J_ • VIRTUAL 3D setting (ON/OFF)
IAUD,OCDI
No display
_ER
CDCD_
C]3CD_
GCD_
© © _---
J
-I
[
._] •Current Track number /total Track number
TPME o_os_ -- " E _psed time of the current T_ack
_EIAA_N
°Remaining _ime of the current Track
pRC_R^_ _°Current pl_y mode
No display
VideoSettings37
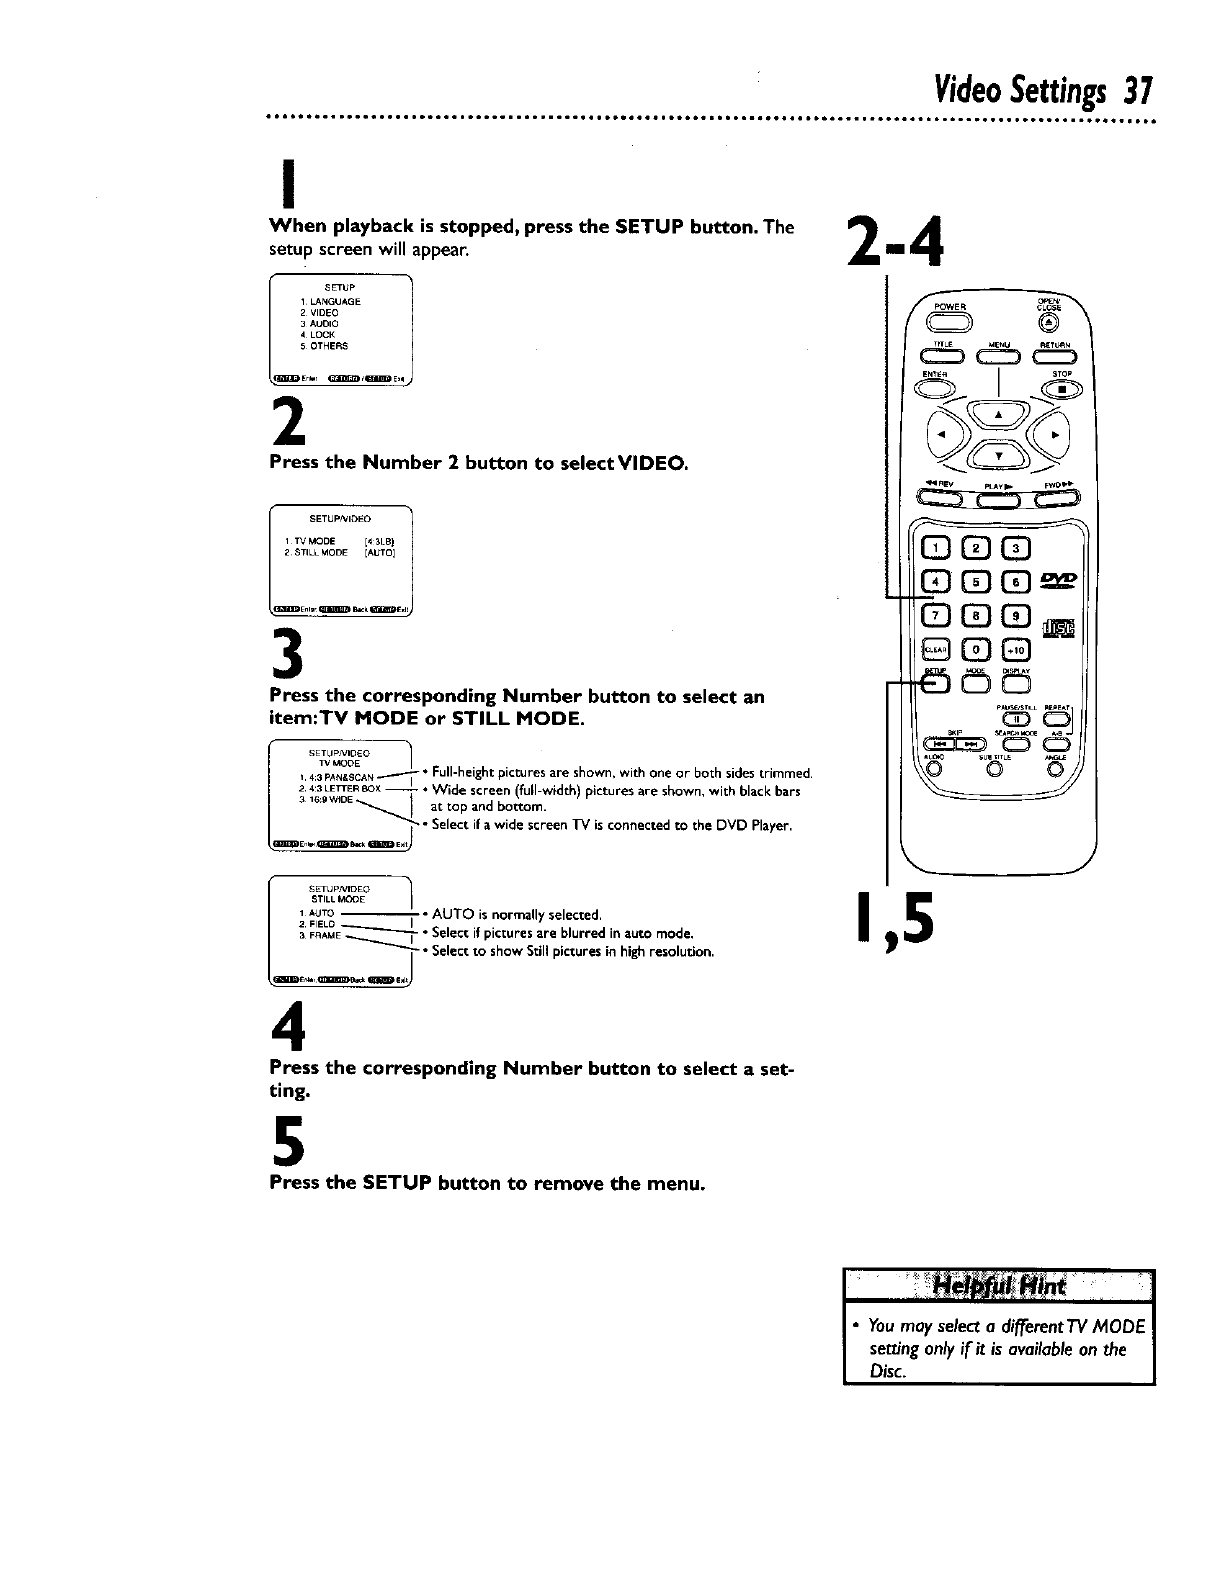
I
When playback is stopped, press the SETUP button. The
getup screen will appear.
!_ SETUP
1 kAI'tGUAG E
2 VIDEO
3 AUDIO
,i LOCK
5 OTHERS
2
Press the Number 2 button to selectVIDEO.
SETUPNIDEO
1TVMODE [43LB 1
2 STILL MODE [AUTO I
Ennwr_B_k_E,
3
Press the corresponding Number button to select an
item:TV MODE or STILL MODE.
43 PAN,SCANT"----'-- Full-height pictures are shown, with one or both sides trimmed•
2143LETTERBOX_ °Wide screen (full-width) pictures are shown, with black bars
/ 31_:0w,oE_ 1 at top and bottom.
•Select if a wide screen TV is connected to the DVD Player.
/1AssUT_t_ _°_E° _-_ AUTO is normally selected,
2 FIELO _.I • .
h
FRAE4E_--_ - " Select nfpnctures are blurred nn auto mode,
• Select to show Still pictures in high resolution.
4
Press the corresponding Number button to select aset-
ting.
5
Press the SETUP button to remove the menu.
_POWE RCLOS_
®
CDC_CD
_CD_e
GCDC_
IH_|
|
•You may select a differentTV MODE /
setting only if it is available on the I
Disc. |

38AudioSettings
I
While playback is stopped, press the SETUP button. The
setup screen will appear.
1 L_*t_GtlAGE
2VIDEO
3 AtlDIO
_, LOCK
50THEFIS
En_ _qEE_J E_
2
Press the Number 3 button to select AUDIO.
SETUp/AUDIO 1
1DIGITALOUT
2 VIRTUAL3D [OFF]
IZ_D_Qr_xK_IIEJ
3
Press the corresponding Number button to select an
item: DIGITAL OUT orVIRTUAL 3D.
S_TUP/AUDIO _/• Sets the sample rate for playing a disc recorded with high sound
,pc'G'T_OU[48kHZ]/I_T.4 quality .. .
2 [_OLByDIGITALON -- "Seect when a Do by Digital decoder _sconnected.
3 DTS ION] I •Select when a DTS decoder _sconnected.
Go to step 4 to change these settings.
B m
®
SETUP/AUDIO /
VIRTUFd-3D
_OFF
o_ •Select ON to activate the 3D effec_
This unit employs TruSurround system
(_'_ruSurrou/ld" of SRS Labs, Inc. as the
VIRTUAL 3D technology.
TruSurround and the(_" symbol are trademarks of
SRS Labs, Inc. in the United States and selected
foreign countries.
TruSurround technology is incorporated under
license from SRS Labs, Inc.
To enjoy Dolby Digital Surround or
DTS Surround sound, you must have
the DVD Player connected to a
Dolby Digital or DTS decoder.
Details are on page I I.
AudioSettings(cont'd)39
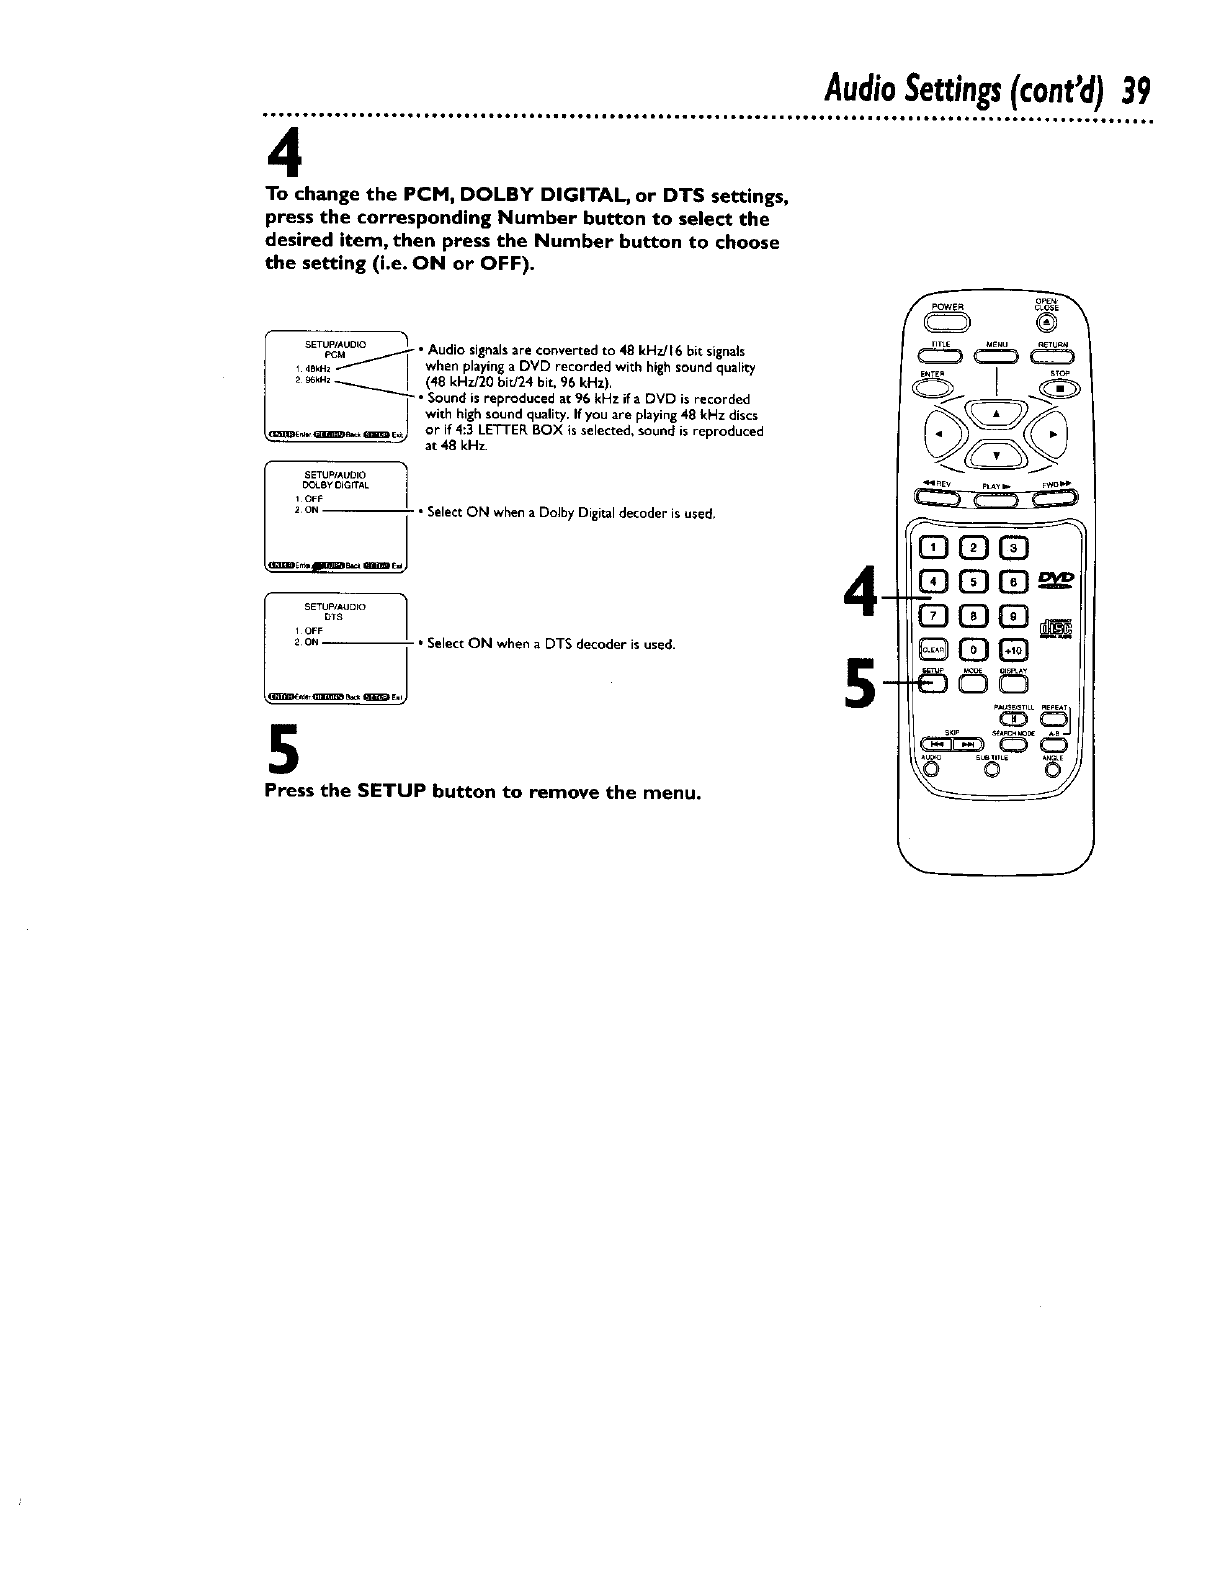
4
To change the PCM, DOLBY DIGITAL, or DTS settings,
press the corresponding Number button to select the
desired item, then press the Number button to choose
the setting (i.e. ON or OFF).
SETUP/AUOIO Audio Sl nals * ,
PC_" ' 'g are convertecl to 48 kHzJl6 bit signals
i4BkH2--'_ ! when playing aDVD recorded with high sound quality
/ _ _kHz _. (4g kHz/20 birJ24 bit, 96 kHz),
•Sound is reproduced at 96 kHz if aDVD is recorded
with high sound quality, If you are playing 48 kHz discs
L_.,_ _E_J or if 4:3 LETTER BOX is selected, sound is reproduced
at 48 kH_
E_I-By OIGrrAk
tOFF
/2ON-- _ "Select ON when a Dolby Digital decoder is used,
J
E_BmB_ r_l_D E_
1OFFDTS I Select ON when a DTS decoder is used.
l__o_J
5
Press the SETUP button to remove the menu.

40 LanguageSettings
I
While playback is stopped, press the SETUP button. The
setupscreen appears.
SETUp 1
I LANGUAGE
2 VIOEO
3 AUDIO
4 LOCk
5OTHERS
2
Press the Number I button to select LANGUAGE.
SETUP/LANGUAGE 1
tAUDIO [•RIG]
2 SUBTITLE [AUTO]
30ISC MENU [AUTO]
4 _LAyER MENU [ENG]
3
Press a Number button to select an item:AUDIO, SUBTI-
TLE, DISC MENU, or PLAYER MENU.
SETUp/LANGUAGE _
AUDIO ._- •The or gnal language of each disc will be selected
IORIGINA + .
2ENGUSH_"Voice is played back in English.
E SPANISH -- = Voice is played back in Spanish.
4 FRENCH
5 OTHER_ " Voice is played back in French.
=U_,,r _e=_=_ ,,I " YOU can select other languages for audio playback.
SETUp/LANGUAGE "_
1AL/TOSU E_TITLE_ "Subtitles are shown n the automatically selected language.
ENGUSH_°Subtitles are shown in English.
43FRENcHSPANSH-- °l Subtitles. are shown in Spanish.
sOTHEn_---__.__" Subt_des are shown in French.
=mme_r_'_'---- I • YOu can select other languagesfor subtitles.
FPOWE R ow_N
QGffl
._ .2
SETUP_'t_GUAGE /
_uToO=SCMENU_ • The disc. menu is shown n the automatically selected language.
ENGU_ _•The d_se menu appears in English.
_F_C_S_A_SH--i " The disc menu appears in Spanish.
• THEn _ •The disc menu appears in French.
m.= _=" _'m_m_ I" You can select other languages for the disc menu.
SETUp/LANGUAGE
PLAYER MENU
1 ENGLISH • The on-screen display and DVD Player menus appear in English
SPANISH _
_RENCH"_---.-- I•The on-screen display and DVO Player menus appear in Spanish,
-T • The on-screen display and DVD Player menus appear in French.
Go to step 4 to change the settings within AUDIO, SUB-
TITLE, DISC MENU or PLAYER MENU.
Help[ul Hints
If the automatic settings for AUDIO
and SUBTITLEare the samelan-
guage,the subtit/eswill not be
shown.
Language settings for AUDIO and
SUBTITLE are not available with
some discs. Use the AUDIO and
SUBTITLE buttons instead to select
different languagesfor the audio
and subtitles. Details are on pages
31 and 32.
LanguageSettings(cant'd)41
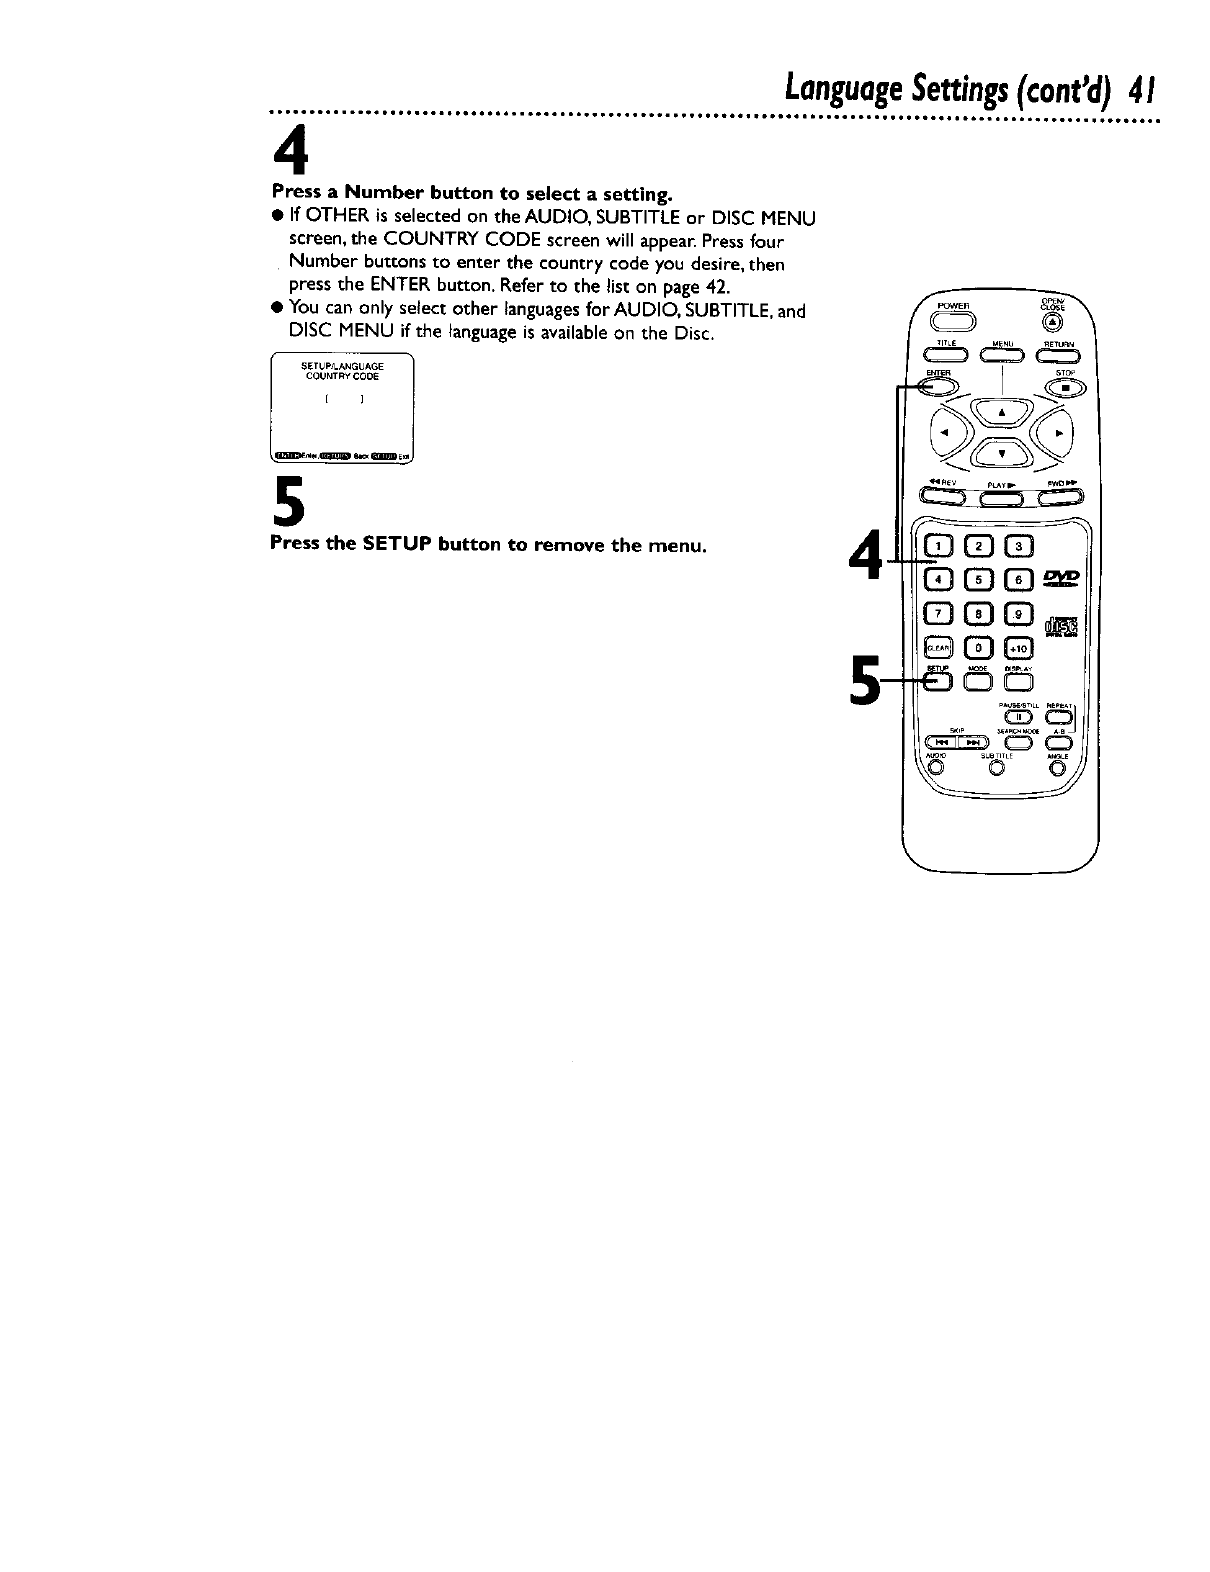
4
Press a Number button to select a setting.
• If OTHER is selected on the AUDIO, SUBTITLEor DISC MENU
screen,the COUNTRY CODE screen will appear.Pressfour
Number buttonsto enter the country code you desire,then
pressthe ENTER button. Refer to the list on page42.
• You can only select other languagesfor AUDIO, SUBTITLE,and
DISC MENU if the languageis availableon the Disc.
SETUP/LANGUAGE
¢OUNTRYCOOE
[ ]
5
Press the SETUP button to remove the menu.

42 LanguageSettings(cont'd)
Country Code Lanuguag_ Country Code _ Coun_
A-B I-K S
Abkhazian 4748 Icelandic 5565 Samoan 6559
Afar 4747 Indonesian 5560 Sangho 6553
Afrikaans 4752 Interlingua 5547 Sanskrit 6457
Albanian 6563 Interlingue 5551 Serbian 6564
Amharic 4759 Inupiak 5557 Serbo-Croatian 6554
Arabic 4764 irish 5347 Sesotho 6566
Armenian 5471 italian (ITA) 5566 Setswana 6660
Assamese 4765 Japanese(JPN) 5647 Shona 6560
Aymara 4771 Javanese 5669 Sindhi 6550
Azerbaijani 4772 Kannada 5760 Singhalese 6555
Bangla 4860 Kashmiri 5765 Siswat 6565
Bashkir 4847 Kazakh 5757 SIovak 6557
Basque 5167 Kinyarwanda 6469 SIovenian 6558
Bengali 4860 Kirghiz 5771 Somali 6561
Bhutani 5072 Kirundi 6460 Spanish(SPA) 5165
Biha_ 4854 Korean (KOR) 5761 Sundanese 6567
Bislama 4855 Kurdish 5767 Swahili 6569
Breton 4864 L-N Swedish 6568
Bulgarian 4853 Laothian 5861 T
Burmese 5971 Latin 5847 Tagalog 6658
Byelorussian 4851 Latvian 5868 Tajik 6653
C-E Lettish 5868 Tamil 6647
Cambodian 5759 Lingala 5860 Tatar 6666
Catalan 4947 Lithuanian 5866 Telugu 6652
Chinese (CHI) 7254 Macedonian 5957 Thai 6654
Corsican 4961 Malagasy 5953 Tibetan 486 I
Croatian 5464 Malay 5965 Tigrinya 6655
Czech 4965 Malayalam 5958 Tonga 666I
Danish 5047 Maltese 5966 Tsonga 6665
Dutch (DUT) 6058 Maori 5955 Turkish 6664
English(ENG) 5160 Marathi 5964 Turkmen 6657
Esperanto 5161 Moldavian 5961 Twi 6669
Estonian 5166 Mongolian 5960 U-Z
F-H Nauru 6047 Ukrainian 6757
Faroese 5261 Nepali 6051 Urdu 6764
Fiji 5256 Norwegian 6061 Uzbek 6772
Finnish 5255 O-R Vietnamese 6855
French (FRE) 5264 Occitan 6149 Volapuk 696I
Frisian 5271 Oriya 6164 Welsh 497I
Gaelic (Scots) 5350 Oromo (Afan) 6159 Wolof 696I
Galician 5358 Panjabi 6247 Xhosa 7054
Georgian 5747 Pashto 6265 Yiddish 5655
German (GER) 5051 Persian 5247 Yoruba 7161
Greek 5158 Polish 6258 Zulu 7267
Greenlandic 5758 Portugese 6266
Guarani 5360 Pushto 6265
Gujarati 5367 Quechua 6367
Hausa 5447 Rhaeto-Romance 6459
Hebrew 5569 Romanian 646 I
Hindi 5455 Russian 6467
Hungarian 5467
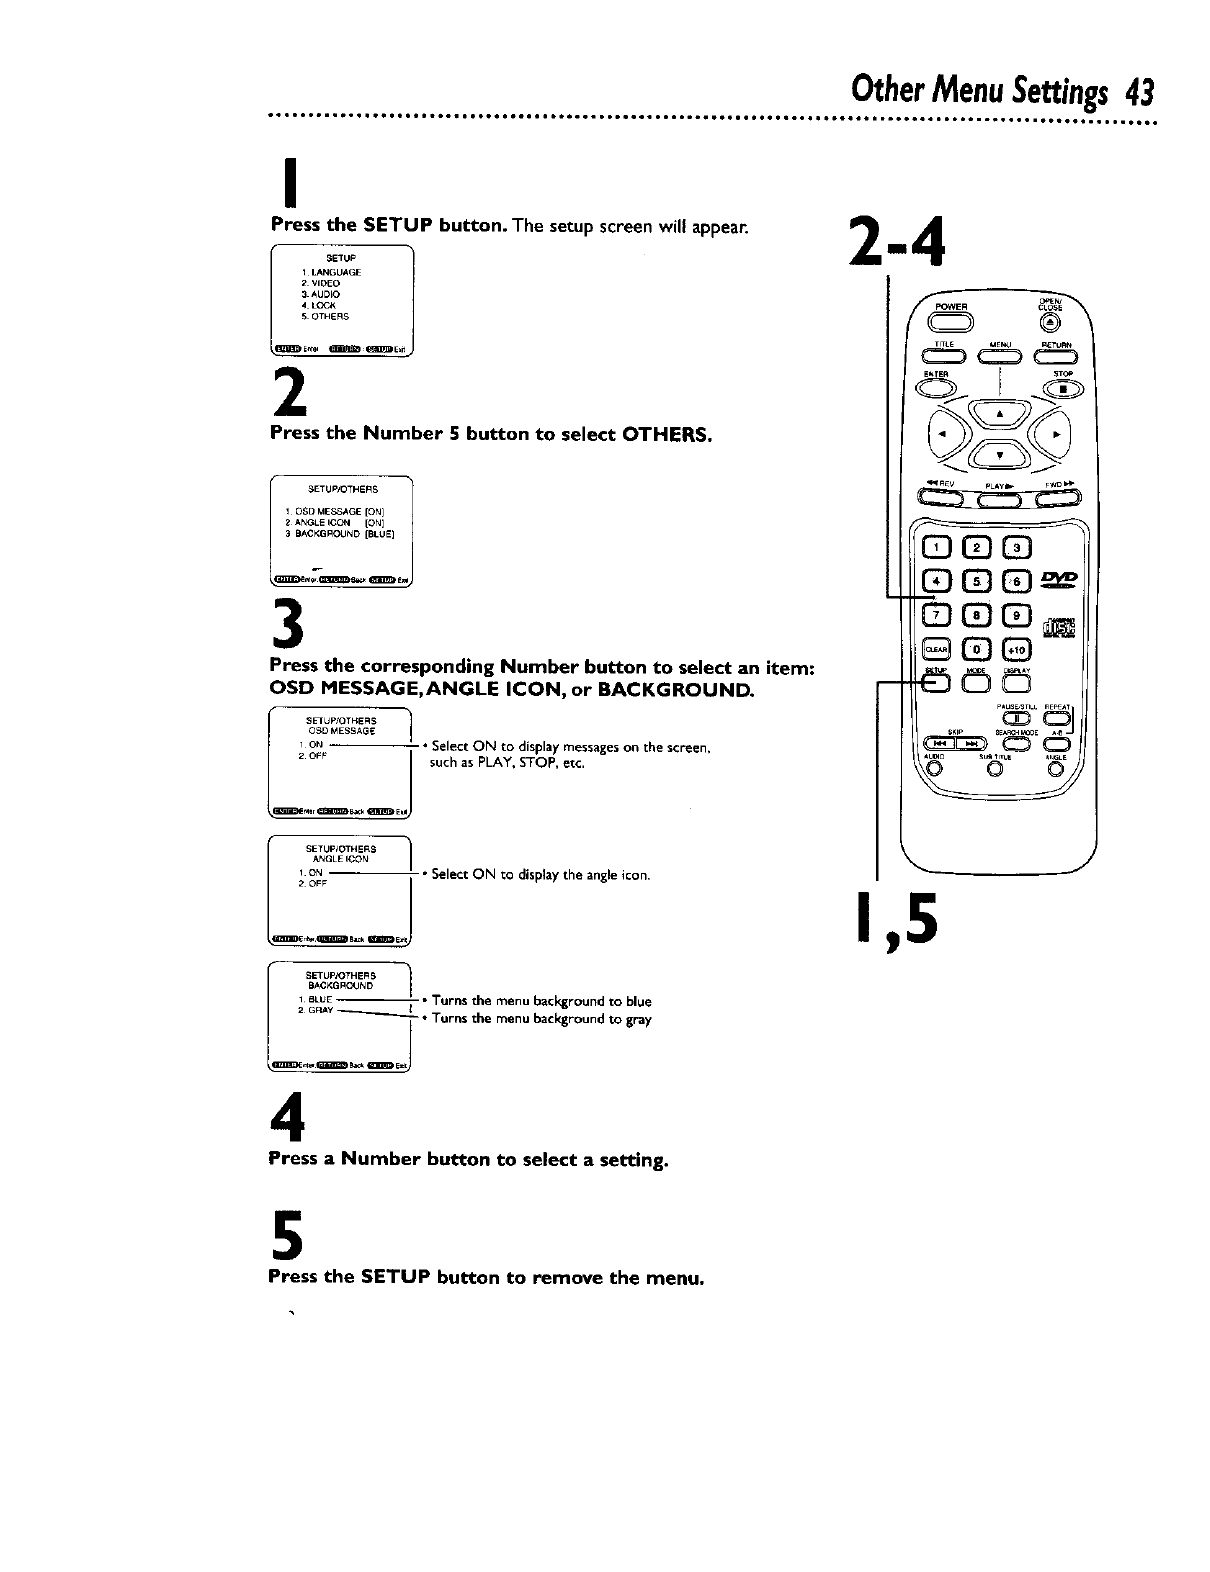
I
Press the SETUP button. The setup screen will appear.
1LANG[IAGE
2 VIDEO
3 AklD_O
4L(X;,_:
SOTHERS
2
Press the Number 5 button to select OTHERS,
I_ SETUp/OTHERB
1 DSD MESSAGE [ON]
2 ANGLE ICCN [ON]
3 BACKGROUND [BLUE]
3
Press the corresponding Number button to select an item:
OSD MESSAGE,ANGLE ICON, or BACKGROUND.
I---1
OSD MESSAGE
_, O_ -- _ ° Select ON to display messages on the screen,
2 OFF such as PLAY, STOP, etc.
J
i l_
,_NGLE ICON
LiO_-- j " Select ON tO display the angle icon,
i --'--B 1BAC,_GFtOIJND
/* BLUE-- "Turns the menu background to blue
_•Turns the menu background to gray2GRAy l
4
Press a Number button to select a setting.
®
C_ MENU _TU_
2a_c_
-_
,,_,d__
5
Press the SETUP button to remove the menu,
44 HelpfulHints
olo ••tt. • • •.. • •.. D°Ii.. • I_Q.. ••.. ••°..° lift.. • ••e.. ••.tree. • ••••... totoJ • • o•Q...1 ..°J I•.° • • • •or.. •i Joe..°. • • • • •
If you are having problems with your product, check this list of problems and possi-
ble solutions before requesting service.You may be able to solve the problem your-
self.
If you need to call a customer service representative, please know the model num-
ber and serial number of your product before you call.This information is displayed
on the back of the product. Also, please take a moment to identifythe problem you
are having,and be prepared to explain this to the representative. If you believe the
representative will need to help you with operations, please stay near the product.
Our representatives will be happy to assistyou.
The DVD Player has no power.
• Make sure the power cord is connected completely to anAC (alternating current)
outlet.
•Pressthe POWER button to turn on the DVD Player."HELLO" will appear briefly
on the display panel as the power is turning on.
The remote control will not operate the DVD Player,
• Aim the remote control directly at the DVD Player'sremote sensor.Detailsare on
page 14.
• R_l'moveall obstacles between the remote control and the DVD Player.
•Inspect and/or replace the batteries in the remote control. Details are on page
seven.
• Use the remote control within 23 feet of the DVD Player.
No picture
• Make sure the video cable is connected correctly.You mayconnect either the yel-
low video cable (supplied) or an optional S-Video cable.Details are on pages8-12.
• Make sure theTV is set to the correctVideo or S-Video In channel (usually the
AUX IN,A/V IN,Auxiliary In, or S-Video In channel). Check your TV owner's man-
ual for details.
• Insert a Disc that is playableon this DVD Player.Details are on pagesix.
Disc cannot be played.
• Insert a playable Disc. Detailsare onpagesix.
• Place the Disc correctly in the recessesin the Disc tray. If the Disc is one-sided,
placethe Disc in the tray with the labelfacing up.If the Disc istwo-sided, make
sure the side you want to playis facingup.
• Clean the Disc.
• Cancel the parentallock,enter the password,or changethe control level.Details
are on pages34-35.
• Make sure the Disc is labelled for use in Region I orALL regions.Detailsare on
pagesix.
No sound
• Connect the audiocablesfirmly.Make sure the cablesare connectedto the
AUDIO IN jacks on theTV or audioequipment.Details ere on pages8-12.
• Check the audio settings of the DVD Player.Details are on pages38-39.
• Turn on the power of the audio equipment and make sure it is set to the correct
channel,usuallyAuxiliary IN. Refer to the owner's manual of the audio equipment
for details.
• Check the audio settings of the Disc. For example,you may haveselected "sound-
track" playback on a DVD. Only the music of the movie will play,not the charac-
ters' dialog; music might not be recorded throughout the entire DVD.
HelpfulHints(cant'd)45
ot •,,,ooot ,mooo.tto_ o_ott • o6el _°°tm iooo • teto • to6o.lttQ_ • _6ool •°tol • to6ol • • tttoo • to6om • oo_ • _61, o,,,_ • • 6o°mo • o_4
Distorted picture
•Connect the DVD Player directly to the'iV.
•There are some cases where the picture may be distorted slightly; this is not a
malfunction of the DVD Player.
The camera angle cannot be changed.
• The DVD might not contain segments recorded from difTerent camera angles.See
if multiple angles are available. Details are on page 33.
The audio or subtitle language cannot be changed.
•The DVD does not contain audio or subtitles in the desired language. Not all
DVDs contain audio or subtitles in multiple languages.See if other languages are
available. Details are on pages 31-32.
"No feature" symbol appears on the screen, prohibiting an operation.
•That operation isprohibited bythe DVD Player or is not availableon the Disc.
Details are on pagefive.
The DVD Player turns off after 30 minutes.
•ThcPDVD Playerturns off automaticallyif playbackis stopped for more than 30
minutes and no buttonsare pressedon the remote control or the DVD Player.
A screen saver appears on theTV screen,
• The DVD whale will appear on theTV screen if Disc playback is stopped for
more than one minute (and no buttons are pressed on the remote control or the
DVD Player).The DVD whale moves around on the screen to prevent damageto
your TV's picture tube.A prolonged still image,includingTV station identification
Iogos or video games,may damagethe picture tube.
46 CareandMaintenance
• •oeeQ•• ,t6ot.to6el J61,,otol• ooQ••.oo6t _66t *or••• oo•_ •_o6ol _ooo• • oeettl tt66•• 1•11•• • ,•_o _o,_• _o6••_ •Jt6•_°_oo •o
Cleaning the DVD Player
•Wipe the front panel and other exterior surfaces of the DVD
Player with a sof_ slightly damp cloth.
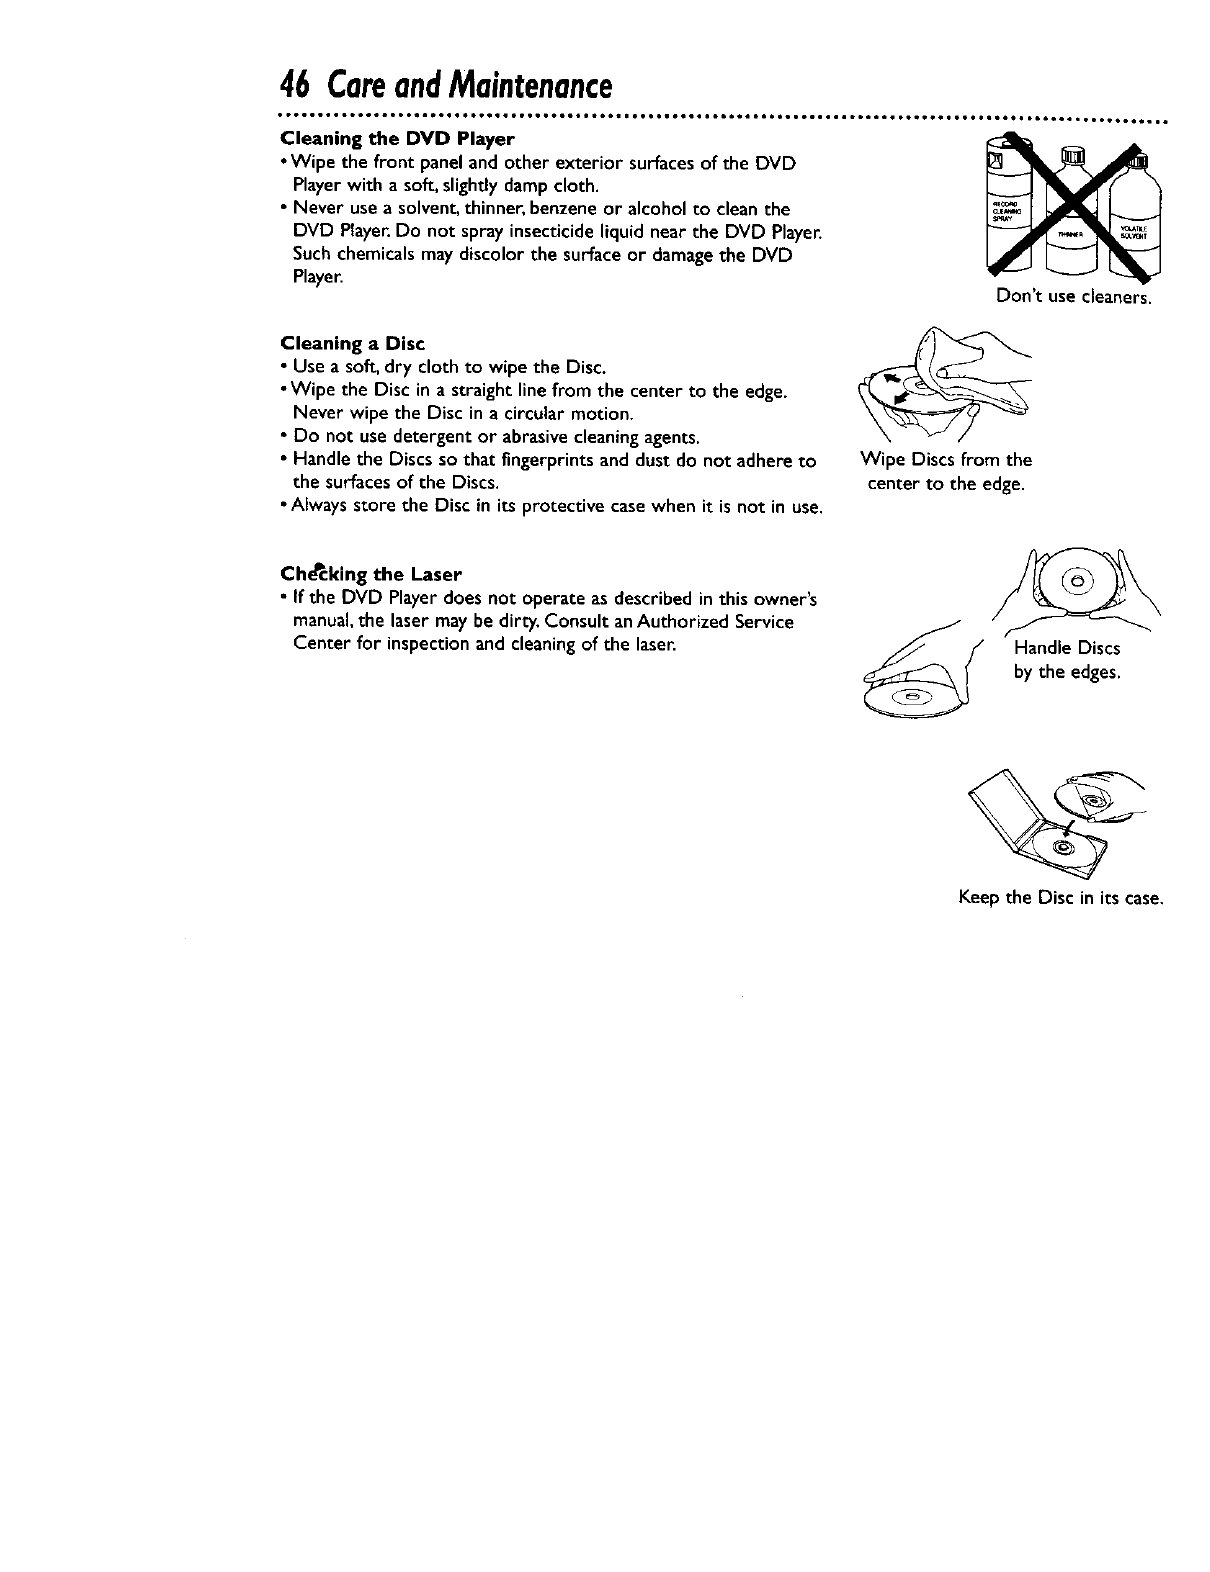
•Never use a solvent, thinner, benzene or alcohol to clean the
DVD Player. Do not spray insecticide liquid near the DVD Player.
Such chemicals may discolor the surface or damage the DVD
Player.
Cleaning a Disc
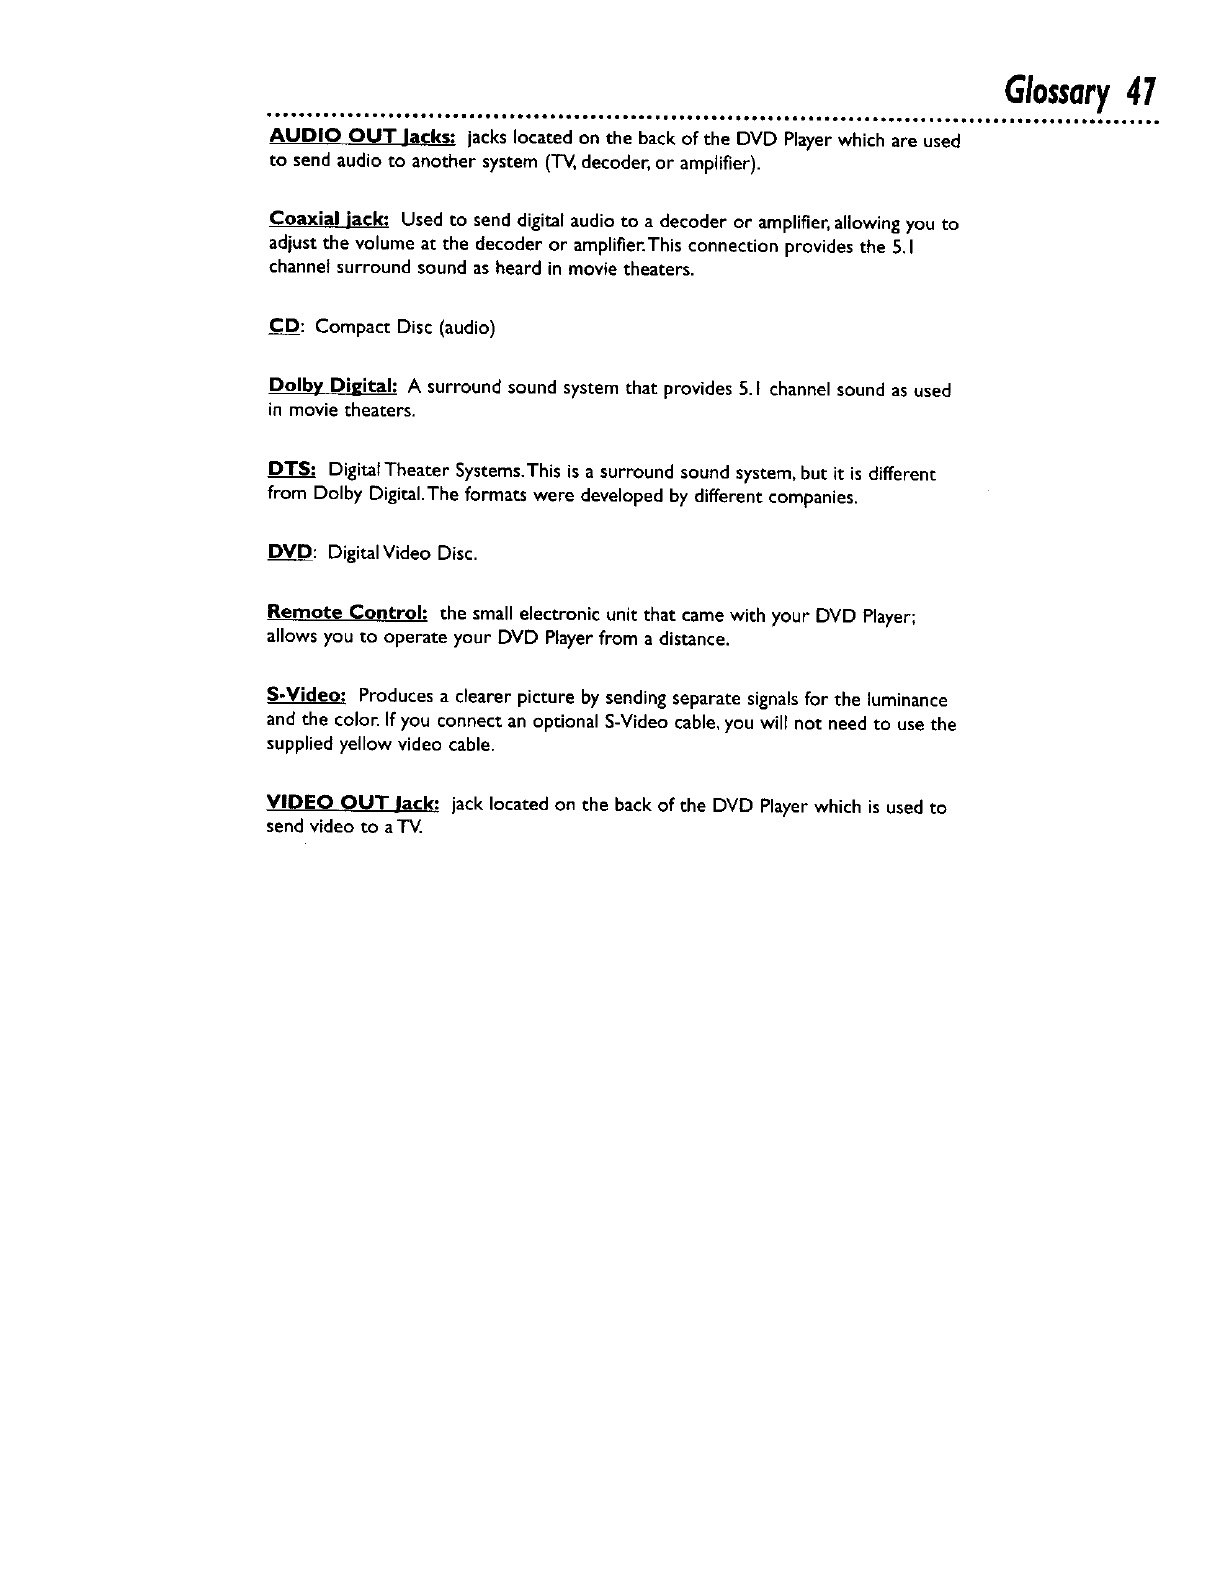
• Use a soft, dry cloth to wipe the Disc.
•Wipe the Disc in a straight line from the center to the edge.
Never wipe the Disc in acircular motion.
• Do not use detergent or abrasive cleaning agents.
•Handle the Discs so that fingerprints and dust do not adhere to
the surfaces of the Discs.
• Always store the Disc in its protective case when it is not in use.
Don't use cleaners.
Wipe Discs from the
center to the edge.
CheCking the Laser
• If the DVD Player does not operate as described in this owner's
manual, the laser may be dirty. Consult an Authorized Service
Center for inspection and cleaning of the laser. Handle Discs
by the edges.
Keep the Disc in its case.
Glossary47
•ooQ,ooe,loo* • ooooot_, .° ,.BtOOOO_tQO6OgOOQ_t tO6OleOOOeOO6OtBOOO_t6OII,,,OttI,,OO_tll . oJeltool_ •ttoo_eto6to_oet .
AUDIO OUT lacks; jacks located on the back of the DVD Player which are used
to send audio to another system (T_, decoder, or amplifier).
Coaxial jack: Used to send digital audio to adecoder or amplifier, allowing you to
adjust the volume at the decoder or amplifier.This connection provides the 5.1
channel surround sound as heard in movie theaters.
C D: Compact Disc (audio)
Dolby Digital: A surround sound system that provides 5.1 channel sound as used
in movie theaters.
DTS: DigitalTheater Systems.This is a surround sound system, but it is different
from Dolby Digital.The formats were developed by different companies.
DVD: Digital Video Disc.
Remote Control: the small electronic unit that came with your DVD Player;
allows you to operate your DVD Player from a distance.
S-Video_ Produces a clearer picture by sending separate signalsfor the luminance
and the color. If you connect an optional S-Video cable, you will not need to use the
supplied yellow video cable.
VIDEO OUT lack: jack located on the back of the DVD Playerwhich is used to
send video to aT_
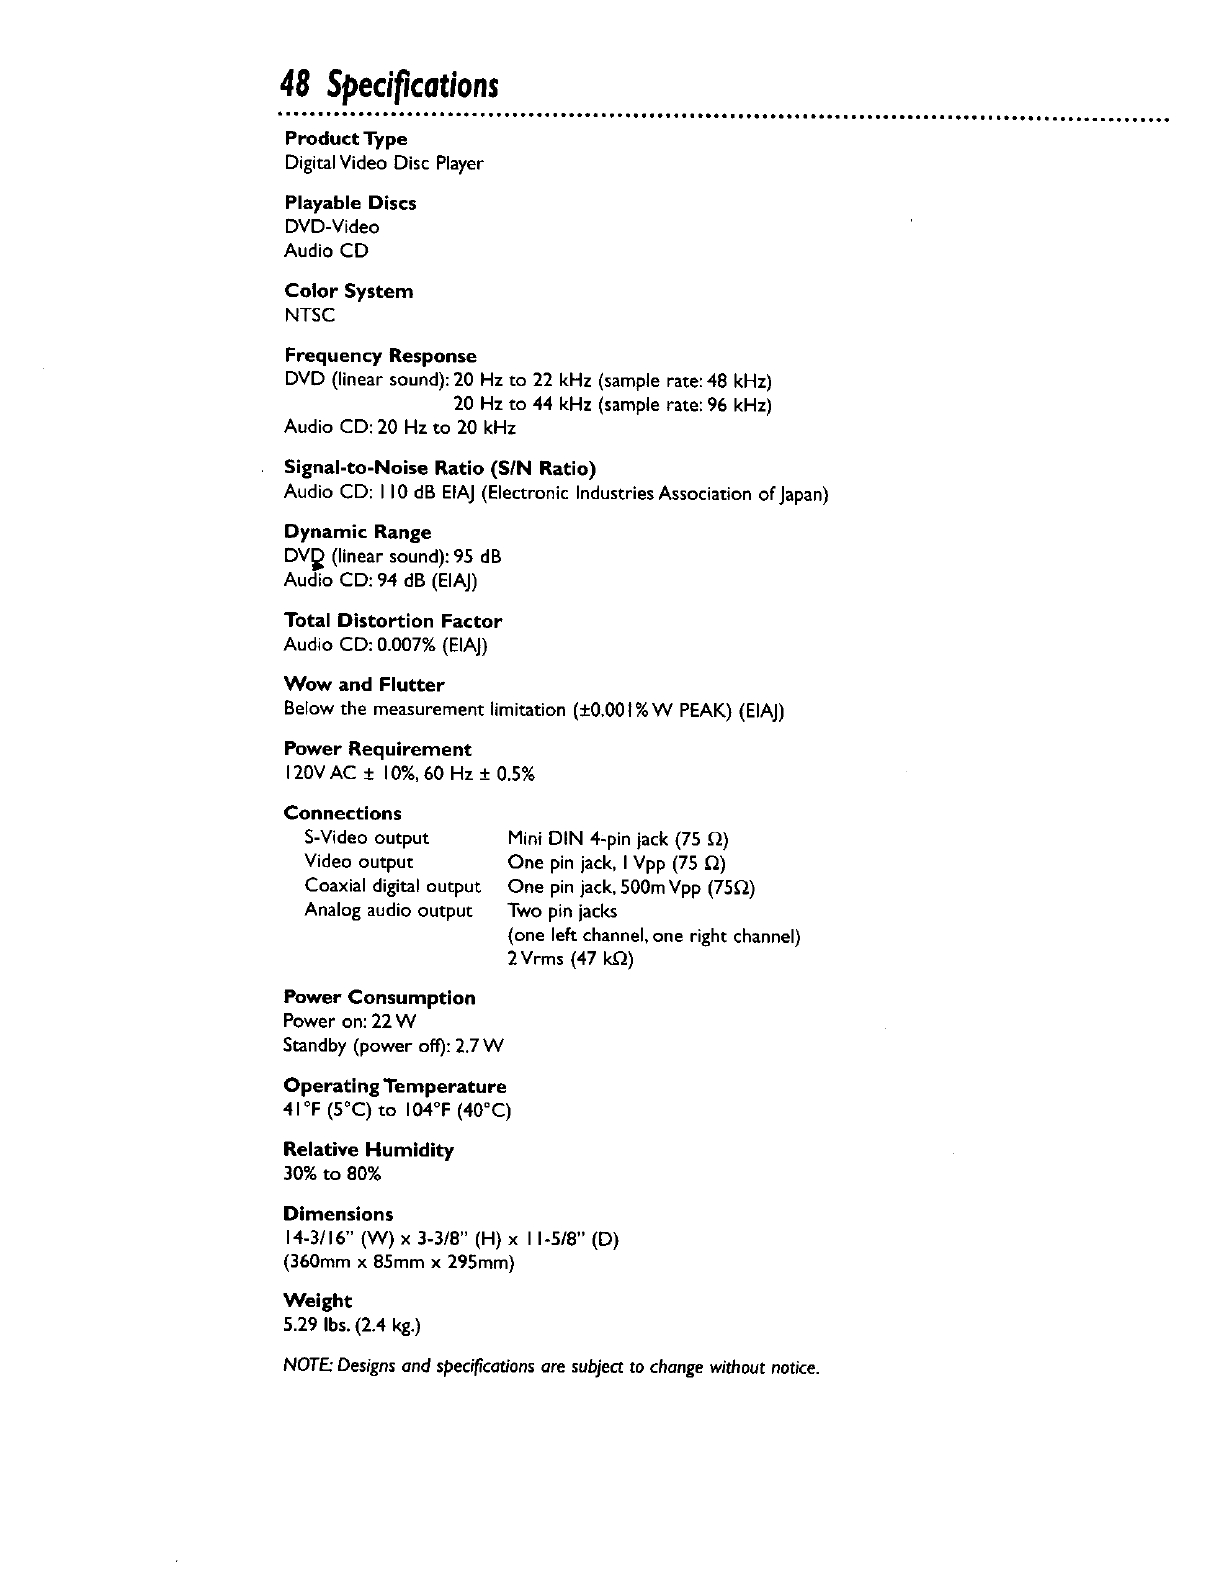
48 Specifications
Playable Discs
DVD-Video
Audio CD
Color System
NTSC
Frequency Response
DVD (linear sound): 20 Hz to 22 kHz (sample rate: 48 kHz)
20 Hz to 44 kHz (samplerate: 96 kHz)
Audio CD: 20 Hz to 20 kHz
Signal-to-Noise Ratio (SIN Ratio)
Audio CD: II0 dB EIAJ (Electronic Industries Association of Japan)
Dynamic Range
DV_ (linear sound): 95 dB
Audio CD: 94 dB (EIAJ)
Total Distortion Factor
Audio CD: 0.007% (EIAJ)
Wow and Flutter
Below the measurement limitation (+0.00 t%WPEAK) (EIAJ)
Power Requirement
120VAC + 10%,60 Hz + 0.5%
Connections
S-Video output
Video output
Coaxial digital output
Analog audio output
Power Consumption
Power on: 22W
Standby (power off): 2.7 W
Operating Temperature
41°F (S°C) to 104°F (40°C)
Relative Humidity
30% to 80%
Mini DIN 4-pin jack (75 _2)
One pin jack, I Vpp (75 _)
One pin jack, 500m Vpp (75_2)
Two pin jacks
(one left channel,one right channel)
2Vrms (47 k.Q)
Dimensions
14-3/16" (W) x3-3/8" (H) x I I-5/8" (D)
(360mm x85mm x 295mm)
Weight
5.29 Ibs. (2.4 kg.)
NOTE: Designs and specifications are subject to change without notice.
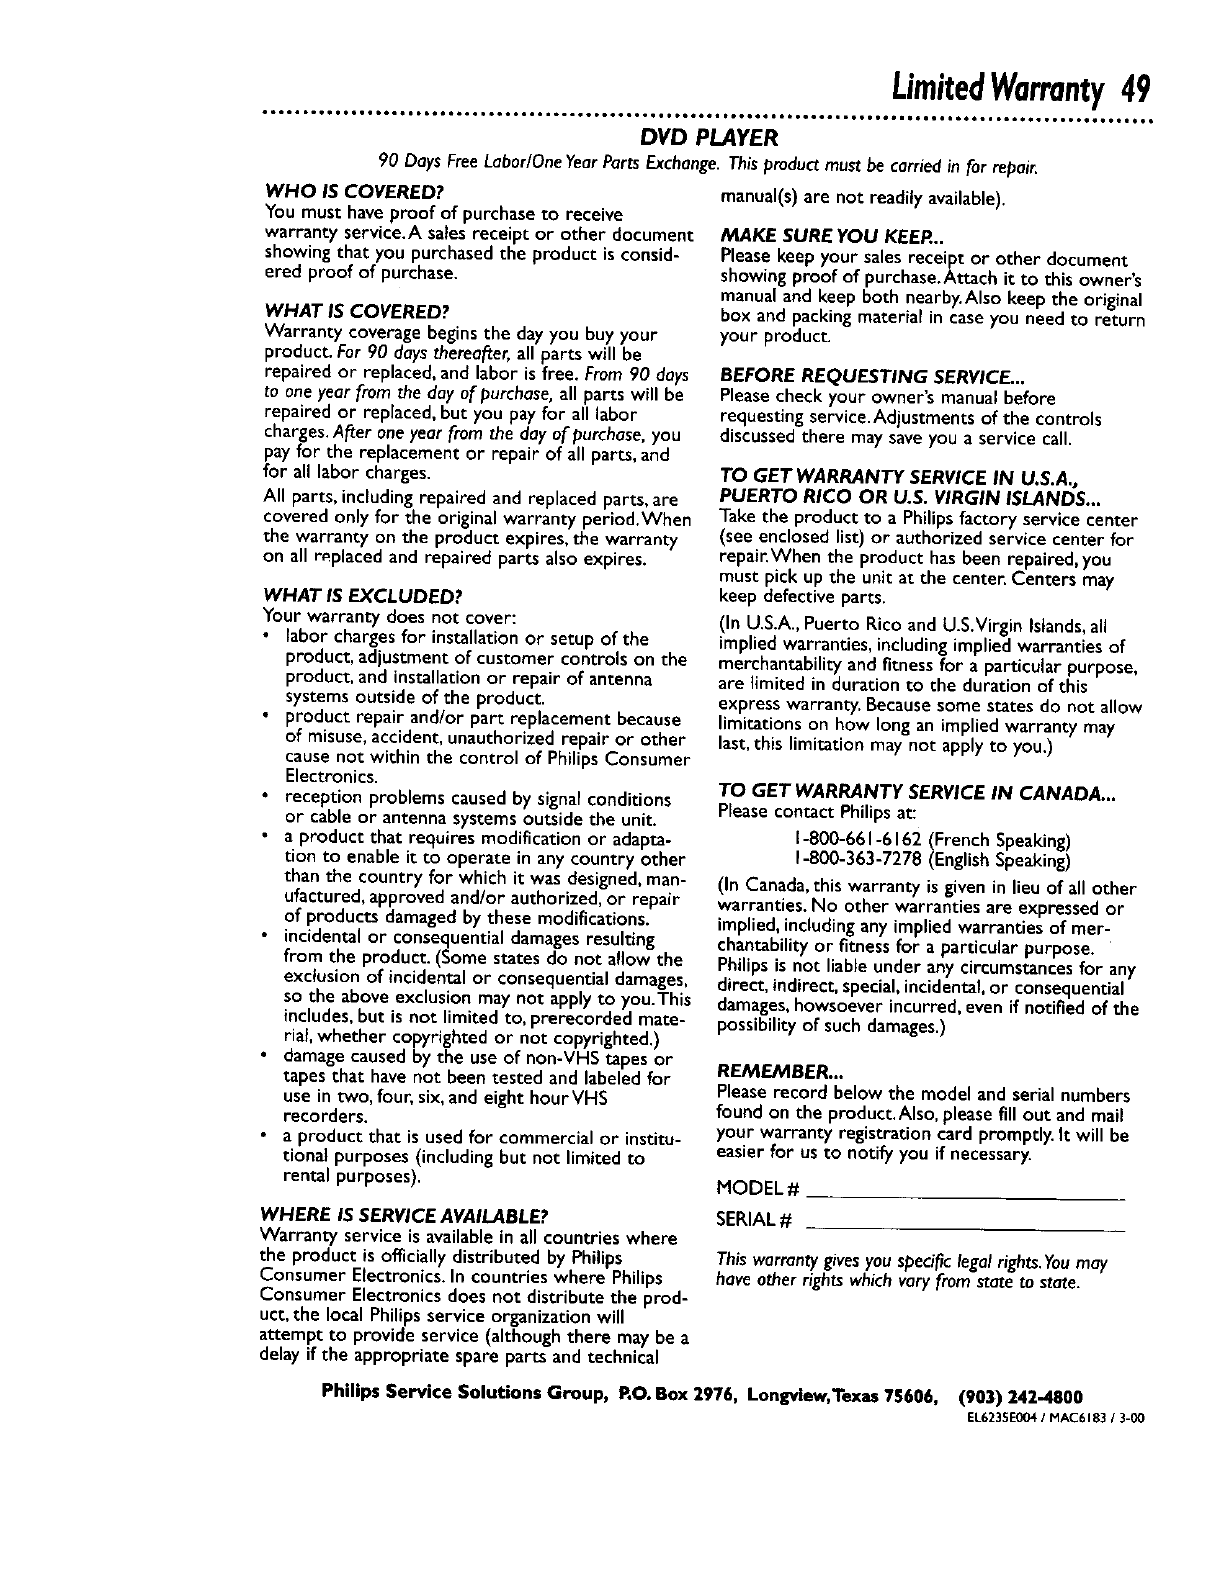
LimitedWarranty49
DVD PLAYER
90 Days FreeLabor/OneYearPartsExchange.Thisproductmust be carriedin for repair.
WHO IS COVERED?
You must have proof of purchaseto receive
warranty service.A sales receipt or other document
showing that you purchasedthe product is consid-
ered proof of purchase.
WHAT IS COVERED?
Warranty coverage beginsthe day you buy your
product. For 90 daysthereafter,all parts will be
repaired or replaced,and labor is free. From90 doys
to oneyear from the day of purchase,all parts will be
repaired or replaced,but you pay for all labor
charges.After oneyear from the dayof purchase,you
payfor the replacement or repair of all parts, and
for all labor charges.
All parts, including repaired and replaced parts, are
covered onlyfor the originalwarranty period.When
the warranty on the product expires, the warranty
on all replaced and repaired parts also expires.
WHAT IS EXCLUDED?
Your warranty does not cover:
•labor chargesfor installationor setup of the
product, adjustment of customer controls on the
product, and installation or repair of antenna
systemsoutside of the product.
•product repair and/or part replacement because
of misuse,accident,unauthorizedrepair or other
causenot within the control of Philips Consumer
Electronics.
• reception problems causedby signal conditions
or cable or antenna systems outside the unit.
• a product that requires modification or adapta-
tion to enable it to operate in any country other
than the country for which it was designed,man-
ufactured, approvedand/or authorized, or repair
of products damaged by these modifications.
• incidental or consequential damagesresulting
from the product.(Some states do not allow the
exclusion of incidentalor consequential damages,
so the above exclusion may not apply to you.This
includes, but is not limited to, prerecorded mate-
rial, whether copyrighted or not copyrighted.)
damage caused by the use of non-VHS tapes or
tapes that have not been tested and labeled for
use in two, four, six, and eight hourVHS
recorders.
a product that is used for commercial or institu-
tional purposes (including but not limited to
rental purposes).
WHERE IS SERVICE AVAILABLE?
Warranty service is available in all countries where
the product is ofl'lcially distributed by Philips
Consumer Electronics. In countries where Philips
Consumer Electronics does not distribute the prod-
uct, the local Philips service organization will
attempt to provide service (although there may be a
delay if the appropriate spare parts and technical
manual(s) are not readily available).
MAKE SURE YOU KEEP...
Pleasekeepyour salesreceipt or other document
showing proof of purchase.Attach it to this owner's
manual and keep both nearby.Also keep the original
box and packing material in caseyou need to return
your product.
BEFORE REQUESTING SERVICE...
Please check your owner's manual before
requesting service.Adjustments of the controls
discussed there may save you a service call.
TO GET WARRANTY SERVICE IN U.S.A.,
PUERTO RICO OR U.S. VIRGIN ISLANDS...
Takethe productto aPhilips factory service center
(see enclosed list) or authorized service center for
repair.When the product has been repaired, you
must pick up the unit at the center. Centers may
keep defective parts.
(In U.S.A.,Puerto Rico and U.S.Virgin Islands,all
impliedwarranties, including implied warranties of
merchantability and fitness for a particularpurpose,
are limited in duration to the duration of this
express warranty. Becausesome states do not allow
limitations on how long an impliedwarranty may
last, this limitation may not apply to you.)
TO GET WARRANTY SERVICE IN CANADA...
PleasecontactPhilips at:
1-800-661-6162 (FrenchSpeaking)
1-800-363-7278 (EnglishSpeaking)
(In Canada,this warranty is givenin lieu of all other
warranties. No other warranties are expressed or
implied, including any implied warranties of mer-
chantability or fitness for a particular purpose.
Philips is not liable under any circumstancesfor any
direct, indirect, special,incidental, or consequential
damages,howsoever incurred, even if notified of the
possibility of such damages.)
REMEMBER...
Pleaserecord below the model and serialnumbers
found on the product.Also, pleasefill out andmall
your warranty registration card promptly. It will be
easier for us to notify you if necessary.
MODEL#
SERIAL#
This worroaty givesyou specific legal rights.Youmay
have other rights which vary from state to state.
Philips Service Solutions Group, p.O.Box 2976, Longview,Texas 75606, (903) 242-4800
EL6235E004 /MAC6183 /3-00
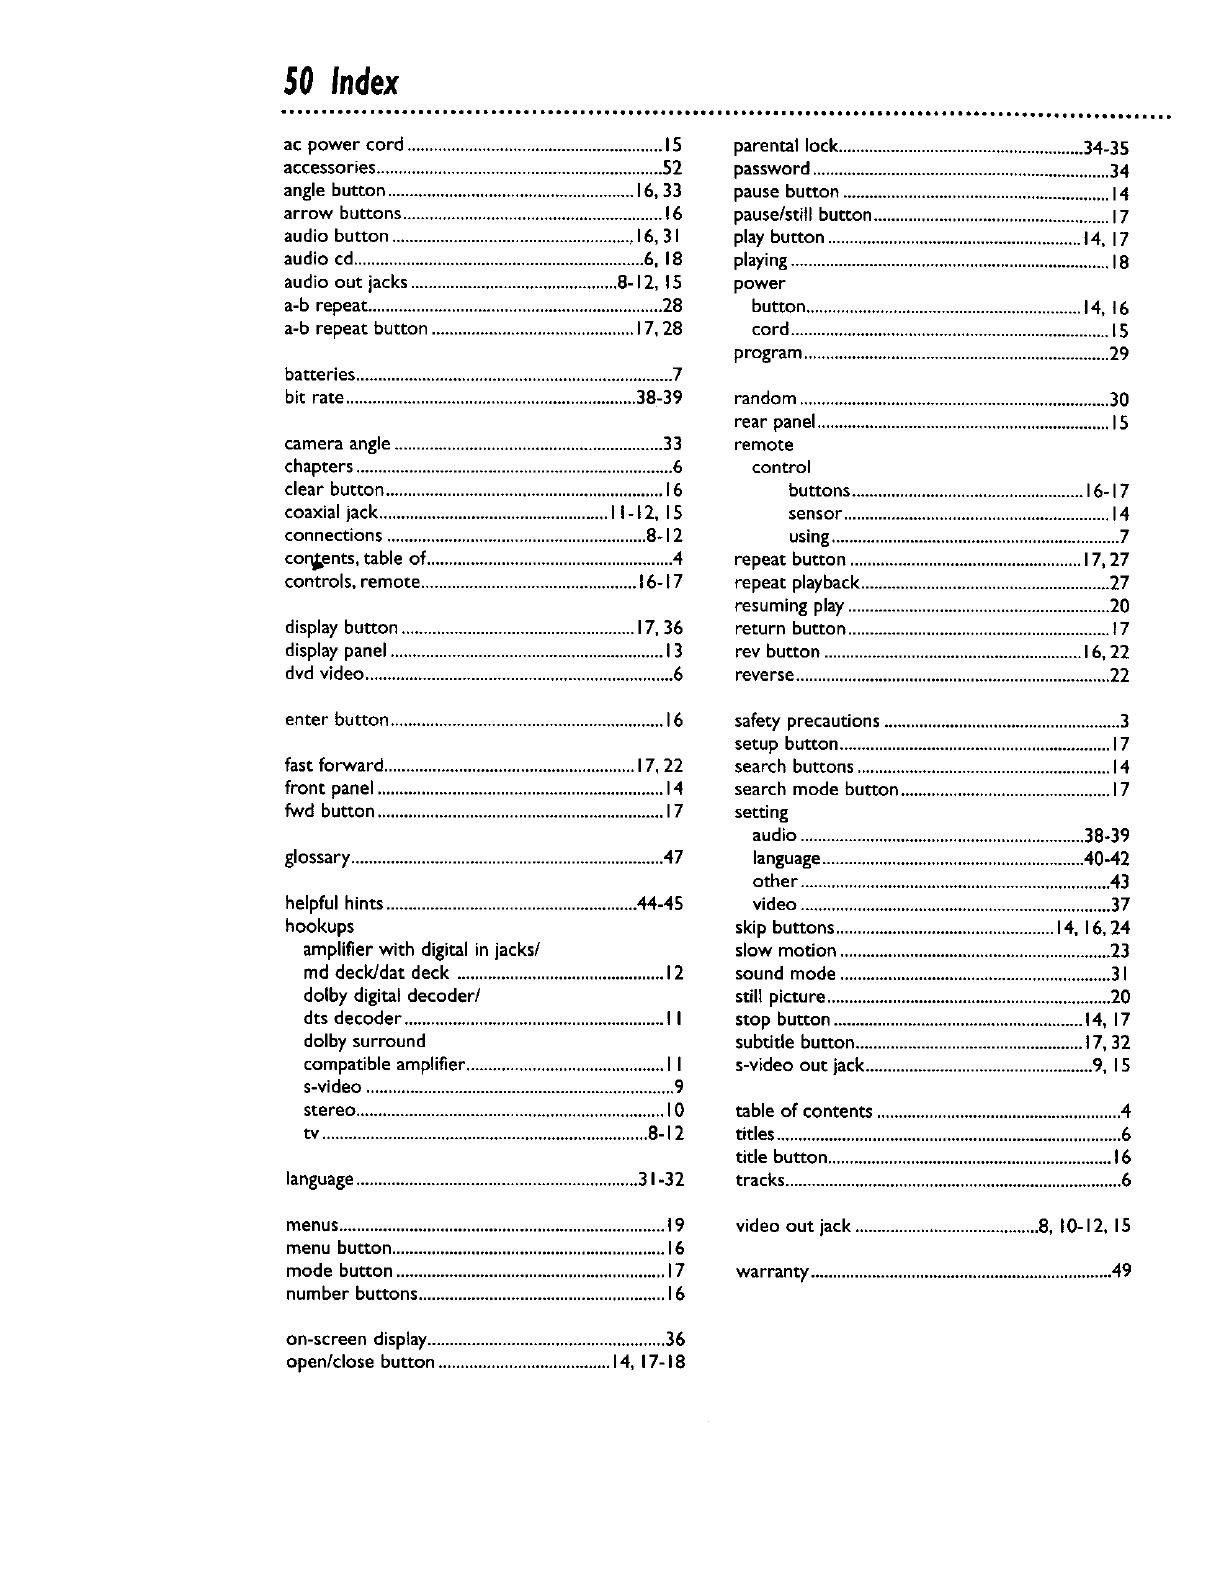
50 Index
ac power cord ..........................................................15
accessories.................................................................52
angle button ........................................................16,33
arrow buttons ...........................................................16
audio button .......................................................16,31
audio cd..................................................................6, 18
audio out jacks ...............................................8-12, 15
a-b repeat...................................................................28
a-b repeat button ..............................................17,28
batteries ........................................................................ 7
bit rate ..................................................................38-39
camera angle.............................................................33
chapters ........................................................................6
clear button ...............................................................16
coaxial jack....................................................I I-12, 15
connections ...........................................................8-12
cor_ents, table of ........................................................4
controls, remote .................................................16-17
display button .....................................................17,36
display panel..............................................................13
dvd video ......................................................................6
parental lock ........................................................34-35
password ....................................................................34
pause button .............................................................14
pause/stitl button ......................................................17
play button ..........................................................14, 17
playing.........................................................................18
power
button ...............................................................14, 16
cord .........................................................................15
program ......................................................................29
random .......................................................................30
rear panel...................................................................15
remote
control
buttons .....................................................16-17
sensor.............................................................14
using..................................................................7
repeat button .....................................................17,27
repeat playback.........................................................27
resuming play ............................................................20
return button ............................................................17
rev button ...........................................................16,22
reverse........................................................................22
enter button ..............................................................16
fast forward .........................................................17,22
front panel .................................................................14
fwd button .................................................................17
glossary.......................................................................47
helpful hints .........................................................44-45
hookups
amplifier with digital in jacks/
md deck/dat deck ...............................................12
dolby digital decoder/
dts decoder ...........................................................II
dolby surround
compatible amplifier.............................................I I
s-video ......................................................................9
stereo ......................................................................I0
tv ..........................................................................8-12
language................................................................31-32
safety precautions ......................................................3
setup button ..............................................................17
search buttons ..........................................................14
search mode button ................................................17
setting
audio .................................................................38-39
language............................................................40-42
other .......................................................................43
video .......................................................................37
skip buttons ..................................................14, 16,24
slow motion ..............................................................23
sound mode ..............................................................3I
still picture .................................................................20
stop button .........................................................14, 17
subtitle button ....................................................17,32
s-video out jack....................................................9, 15
table of contents ........................................................4
titles ...............................................................................6
title button .................................................................16
tracks.............................................................................6
menus..........................................................................19
menu button ..............................................................16
modebutton .............................................................17
number buttons ........................................................16
video out jack ..........................................8, 10-12, 15
warranty .....................................................................49
on-screen display......................................................36
open/close button .......................................14, 17-18
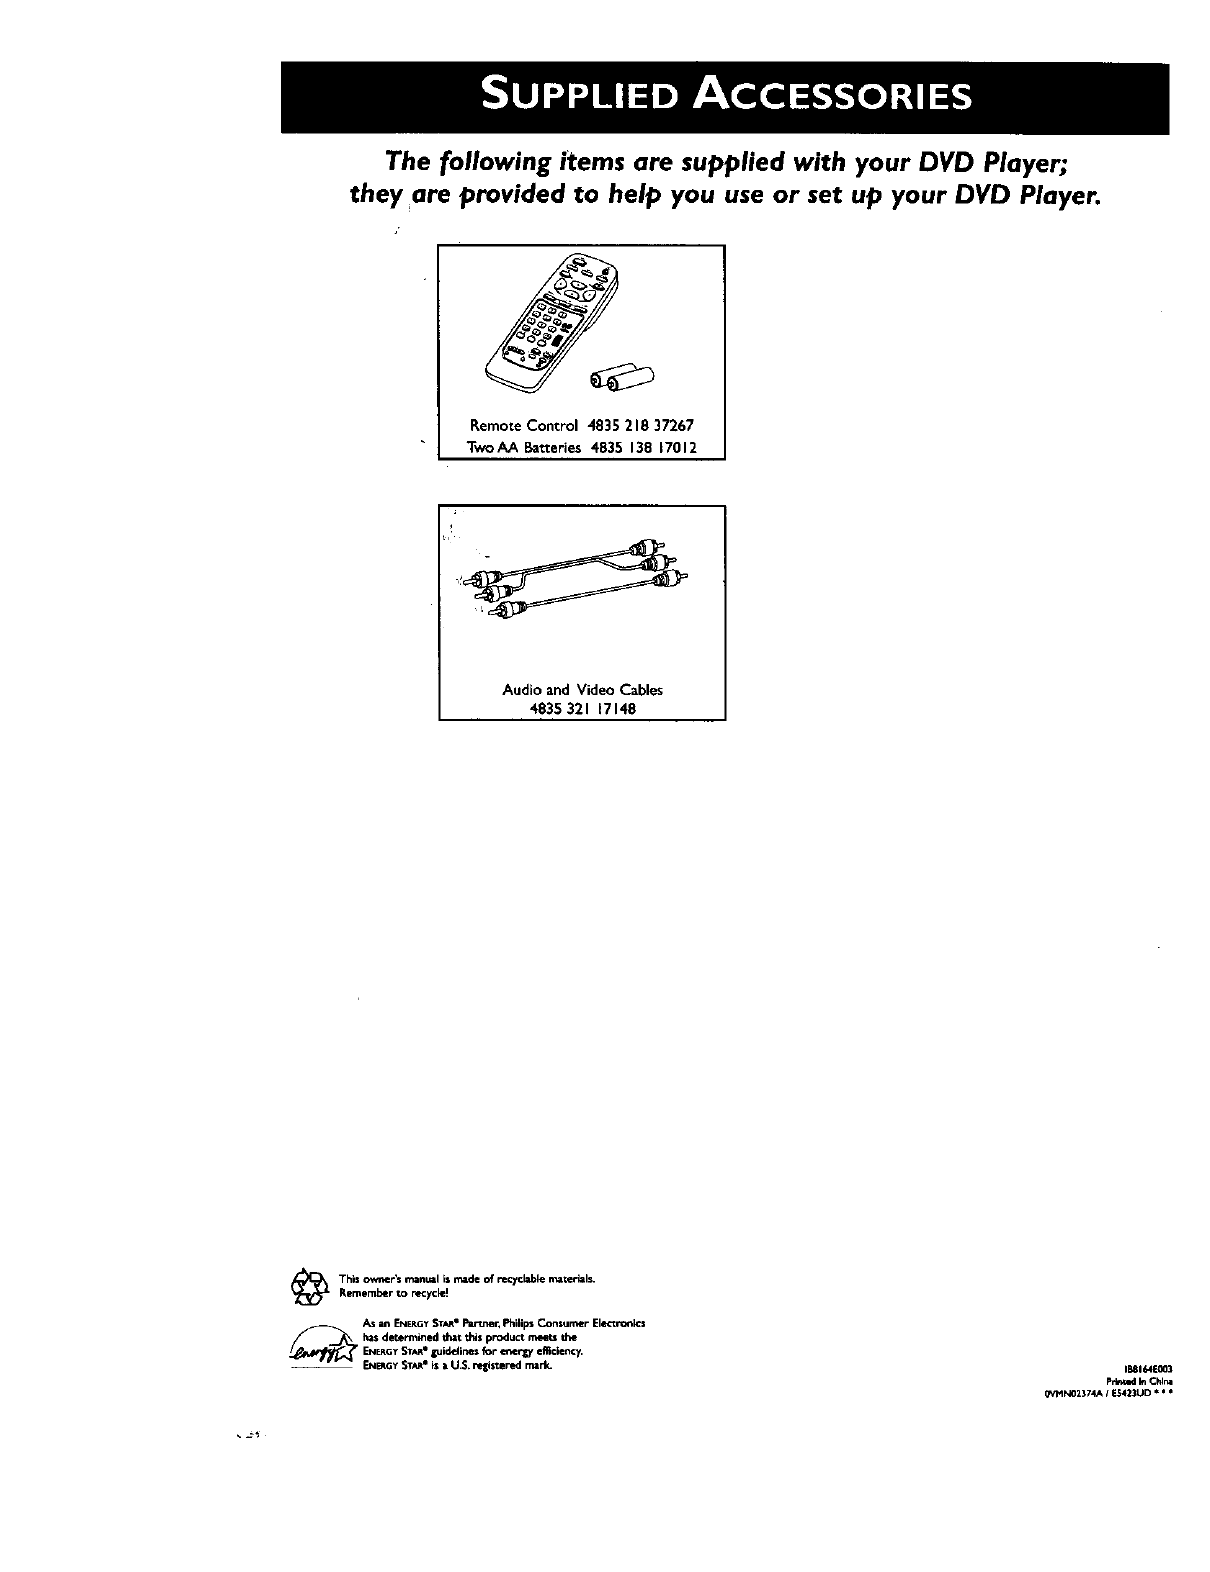
The following items are supplied with your DVD Player;
they are provided to help you use or set up your DVD Player.
Remote Control 4835 218 37267
TwoAA Batteries 4835 138 _7012
Audio and Video Cables
4835 321 17148
The_embtO_rr_o_ r_deofrecyct_ema_er_ls.
As in EN_GY STAJ_Planer. Philips Consumer Elmics
h_sdetermined d_zt this p_,duct meres theENERG_SX/_, guidelines for ener_7 elltclen_,
EN_GY STY" is •U.$. _'lisze r_l mzrk. IRI_IE003
Petted In Chlr4
G_cIN02374A IL423UO * * *
