MARS TOHKEN SOLUTION MID100 Bluetooth scanner User Manual
MARS TOHKEN SOLUTION CO. LTD. Bluetooth scanner Users Manual
Users Manual

Intelligent Data Collector
MID-100 Series
Operation Manual
2nd Edition
July 21st, 2017

i
Update Information
Date
Edition
Description of Change
May 26th, 2017
1
New Release
July 21st, 2017
2
Modify the contents of FCC statement.

ii
Introduction Thank you for your Purchase
This manual explains the features, system configuration, specifications, and operation of
the of the MID-100 series. In order to use the product properly, please read this manual
carefully. The contents of this manual or catalogue may change without any notice for
product improvement or some reasons. Check our website for the latest version.
If any problems occurred during use, keep the record for a smooth support.
Registered Trademark
Bluetooth is a registered trademark of Bluetooth SIG.Inc., We use it under license.
Windows is a registered trademark of Microsoft Corporation. The other product names and
company names in this manual are the respective trademarks or registered trademarks of
Bluetooth SIG.Inc., or Microsoft Co. Ltd.

iii
Safety notice
DO NOT disassemble. Disassembly will void the warranty and could cause
damage or personal injury.
● This product is intended for use in general electronics equipment
(electronic computer, OA equipment, communications equipment, test
and measurement equipment, machine tools, industrial robots, AV
equipment, home appliances etc.).
Appropriate measures should be taken at use of unit/system related to
safety and operation of transportation equipment (aircraft, train,
automobile), traffic signal, gas leak detector and safety devices.
Also, please do not use it for requiring extremely high reliability such
as satellite equipment, nuclear equipment, submarine relay equipment,
medical equipment directly related to human life.
● Industrial, scientific and medical equipment such as microwave ovens,
private radio stations for mobile identification used in factory
manufacturing lines etc. (license stations which require licenses) and
specific low-power radio stations (radio stations which do not require
licenses) and amateur radio stations (radio stations which require
licenses) are used in the frequency band used by MID-100.
1. Before using MID-100, make sure that a local radio station for mobile
identification and amateur radio stations are not in operation nearby.
2. If a harmful radio wave interference is generated from MID-100 to a
local radio station for mobile identification, change the operating
frequency immediately or stop transmitting of the radio wave, and
contact us at the following number/address to consult about measures
to avoid a crosstalk (e.g. installing partition etc.).
3. If you encounter any harmful cases of radio interference from MID-100
to a specific low power radio station for mobile identification or an
amateur radio station, contact us at the following contact information.
Contact:MARS TOHKEN SOLUTION CO.LTD.
(Address and telephone number at the end of this manual.)
● MID-100 is a Class 1 laser product.
DO NOT look into the reading window or turn it towards the other people,
when irradiating the laser and flash is on.
iv
Handle with Care
● DATA BACKUP
This product has a memory backup function. This backup data
restoration cannot be guaranteed if repair, reconstruction, or
upgrades are performed on this product.
● To clean the reading window, follow the steps below:
- Wipe gently with cloth or cotton swab moistened with alcohol etc.
- Wipe gently again with a dry cloth.
● DO NOT expose this product to water, moisture, oil, etc.
● This product may be damaged in environments containing
corrosive gas.
● DO NOT use any chemicals when cleaning.
Wipe gently with a neutral detergent diluted, when the case is very
dirty.
● DO NOT use this product at temperature or humidity ranges
beyond that documented in the product specifications, or in direct
sunlight.
● This is a high-precision optical device, avoid exposing this product
to excessive force such as that sustained by a drop.
● DO NOT use highly volatile organic solvents, chemicals, chemical
wipes.
● Follow the warnings and cautions that are instructed by the
manufacturer of your computer or peripheral equipments when
using MID-100.
● Do not install electrical wiring or plugin/unplug of cable (except
LAN cable) when this product is powered on. These may result in
an electrical damage to this product.
● To minimize the risk of data loss, make sure to backup the hard
drive before install the software. Our company shall not be
responsible for any troubles such as data loss or damages.

v
Locations for operation and storage
● Avoid the following locations that could cause an accident or
damage to the product.
Exposed to ambient temperature outside the rating.
In the presence of the risk of condensation.
In the presence of the risk of water leak & electronic leak.
Exposed to direct sunlight.
In the presence of dust, salt, or iron particles
In the presence of static electricity.
In the presence of the fire & retain the heat.
In the presence of flammable or explosive gases.(No
Explosion-proof)
In the presence of corrosive gas.
Exposed to direct vibration or shock
Exposed to rapid temperature fluctuations
In the presence of the magnet.

vi
Proper Use
How to Prolong the Battery (Li-ion Rechargeable Battery Pack)
Battery life becomes shorter due to the battery characteristics.
If the battery life lasts only for a short time even after charging, it is
considered to be almost dead. Exchange it with a new battery.
Battery life varies depending on the ambient air temperature /
conditions of use of the device. Depending on the usage
environment, the number of years that can be used may be short,
or the number of usable charge/discharge cycles may decrease.
If the battery has been left for a long time, recharge it before use.
Make sure to lock the battery cover before turn on the device.
DO NOT wet battery or handle with wet hands.
DO NOT give a shock or drop the battery.
DO NOT use the other batteries except the dedicated
rechargeable Li-ion battery (FHTBA122Y).
DO NOT use the other charger except the dedicated charging
Cradle (MBC-100).
Li-ion battery may bulge as a result of being left for a long term,
use environment and aging-deterioration. Exchange the battery
with a new one if the battery bulges.
Make sure to turn off the power when exchanging the battery.
Prohibition

vii
Operation in Cold Climate
If the temperature is below 0 ° C, the performance of the
battery deteriorates. Therefore, operation time may be
shortened or the power may suddenly turns off due to rapid
voltage drop in cold climates. The following methods are
recommended for a better operation.
Place a spare battery in a pocket etc. and keep it warm until
just before replacing the battery.
Keep the battery warm in such as a pocket until just before
replacing the battery. When warming battery with a pocket
warmer etc., do not place the pocket warmer directly to the
battery.
The optimal room temperature for charging battery is 10~
30°C.
How to Handle Batteries
Handle the device with care not to adhere foreign substance
such as dust or sand to the terminal part. If foreign substance
adheres on the battery, please remove it completely with a
soft cotton swab, etc. After cleaning, repeat attach and detach
the battery pack on the charger several times.
Even if the battery is charged, it spontaneously discharges
little by little. Recharge the battery before use (within 1-2
days).
Store the battery in a cool place and charge it at a
temperature around10-30℃.These methods help to lengthen
battery life.
Long Storage
For the storage of MID-100, avoid vibration, dust, high
temperature, low temperature, high humidity, direct sunlight.
To prevent battery drain, remove the battery when not in use for a
long term (one month or more).
If the uncharged term is over three months, charge the battery
periodically for three months. The battery rapidly deteriorates if it
is left for more than one month with full discharge.

viii
Regulations and Cautions Regarding Standard
CE Marking
:
Mars Tohken Solution has confirmed that this product meets the
requirements of the EC Directive based on the following requirements.
Note the following requirements when using MID-100 in EU countries.
EMC(2014/53/EU)
The requirement is not to guarantee of satisfied the essential
requirement of EMC into the whole machine device. Confirmation of
compatibility with the device is the responsibility of the machine
equipment manufacturer.
Federal Communications Commission (FCC) Statement
15.21
You are cautioned that changes or modifications not expressly
approved by the part responsible for compliance could void the
user’s authority to operate the equipment.
15.105(b)This equipment has been tested and found to comply with the
limits for a Class B digital device, pursuant to part 15 of the FCC Rules.
These limits are designed to provide reasonable protection against
harmful interference in a residential installation. This equipment
generates, uses and can radiate radio frequency energy and, if not
installed and used in accordance with the instructions, may cause
harmful interference to radio communications. However, there is no
guarantee that interference will not occur in a particular installation. If this
equipment does cause harmful interference to radio or television
reception, which can be determined by turning the equipment off and on,
the user is encouraged to try to correct the interference by one or more of
the following measures:
—Reorient or relocate the receiving antenna.
—Increase the separation between the equipment and receiver.
—Connect the equipment into an outlet on a circuit different from that to
which the receiver is connected.
—Consult the dealer or an experienced radio/TV technician for help.
Caution: Changes or modifications not expressly approved by the party
responsible for compliance could void the user’s authority to operate the
equipment.

ix
Radiation Exposure Statement: This equipment complies with FCC
radiation exposure limits set forth for an uncontrolled environment. End
users must follow the specific operating instructions for satisfying RF
exposure compliance.This transmitter must not be co-located or
operating in conjunction with any other antenna or transmitter.
This device complies with Part 15 of the FCC Rules. Operation is subject to the
following two conditions:
1) this device may not cause harmful interference and
2) this device must accept any interference received, including interference that may
cause undesired operation of the device.
x
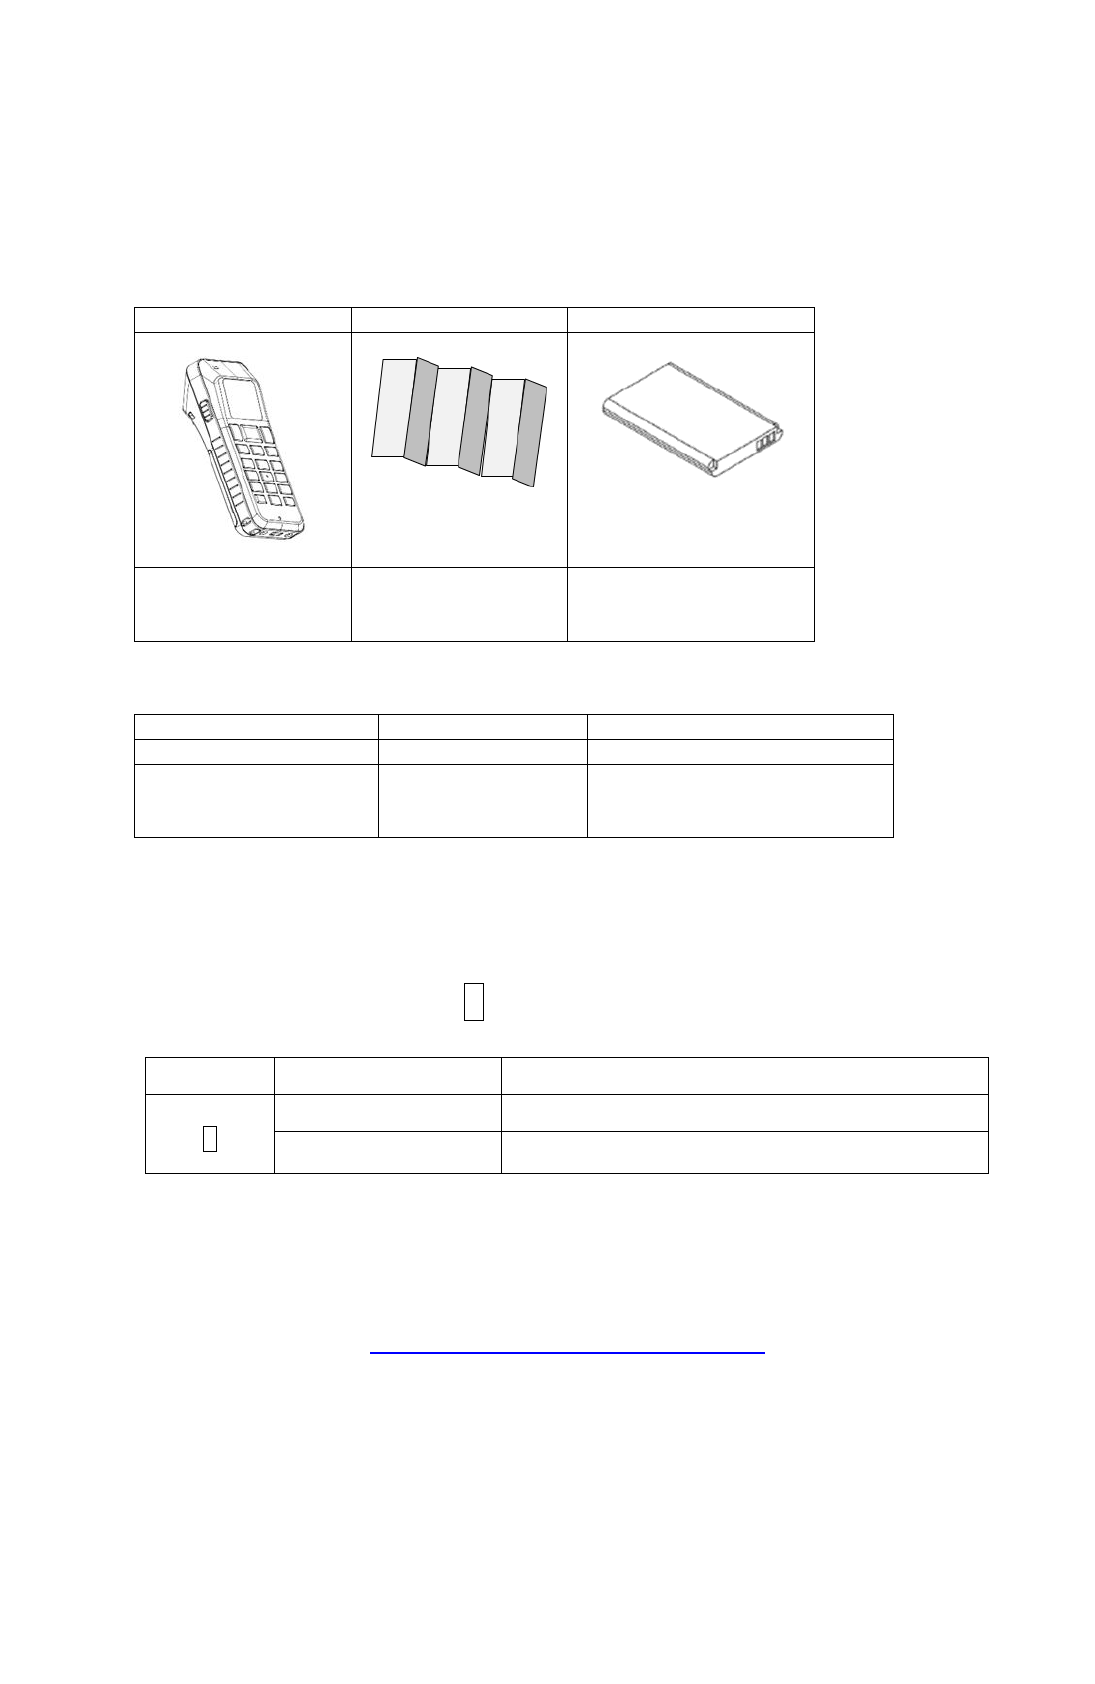
Included Items
Check that the box includes the items listed below. If any items are missing or damaged,
contact your sales representative.
MID-100
QuickGuide
Battery
MID-100(H)
This
QuickGuide
Rechargeable Lithium
Ion Battery Pack
FHTBA122Y
Optional Items
Item
Model
Description
Charging Cradle
MBC-100
Packed with AC adaptor
Rechargeable
Lithium ion
Battery pack
FHTBA122Y
Dedicated battery
※ Contact our sales representative for optional items.
Lineup
The lineup of MID-100 and product model are as follows:
Product Model MID-100 1
Character
Description
1
None
Regular type
-H
High-Resolution type (Reading Distance:Short)
Download Information
The operation manual and setting software can be downloaded from our company’s website.
https://www.mars-tohken.co.jp/DL/
Operation Manual MID-100(this manual)


xii
Contents
Update Information .................................................................................................................. i
Introduction .............................................................................................................................. ii
Registered Trademark ............................................................................................................ ii
Safety notice ........................................................................................................................... iii
Handle with Care .................................................................................................................... iv
Locations for operation and storage .................................................................................... v
Proper Use .............................................................................................................................. vi
How to Prolong the Battery (Li-ion Rechargeable Battery Pack) ..................................... vi
Long Storage ......................................................................................................................... vii
Regulations and Cautions Regarding Standard ............................................................... viii
Included Items ......................................................................................................................... x
Optional Items .......................................................................................................................... x
Lineup ....................................................................................................................................... x
Download Information ............................................................................................................ x
1. SUMMERY ............................................................................................................................ 1
1.1. Description of Key Operation in This Manual ................................................................... 1
1.2. Parts Name ....................................................................................................................... 2
1.3. LCD Screen ....................................................................................................................... 2
1.4. Scanner Window ............................................................................................................... 3
1.5. Monitor LED、Buzzer、Vibrator ....................................................................................... 3
1.6. Keypad and Side Trigger Key ........................................................................................... 4
1.7. Battery ............................................................................................................................... 5
Battery Cover ............................................................................................................................ 5

xiii
Removing Battery ..................................................................................................................... 6
Insert the Battery ...................................................................................................................... 6
Battery Charge.......................................................................................................................... 7
Low Battery Level ..................................................................................................................... 8
2. How to Use ........................................................................................................................... 9
2.1. Preparation ........................................................................................................................ 9
2.2. Bluetooth ......................................................................................................................... 10
HID Profile .............................................................................................................................. 10
SPP Profile ............................................................................................................................. 10
Connection Example .............................................................................................................. 10
Manual Connection from Scanner(Refer to「5.6Bluetooth CFG」).................................. 10
2.3. Storage Connection by USB ........................................................................................... 11
3. Scanner Menu Operation .................................................................................................. 12
3.1. Start Scanner .................................................................................................................. 12
3.2. Stop Scanner .................................................................................................................. 12
3.3. Suspend Scanner ........................................................................................................... 12
3.4. Start System Menu ......................................................................................................... 12
3.5. Turn Off Scanner Forcibly ............................................................................................... 12
3.6. Key Operation in Menu ................................................................................................... 13
Cursor ..................................................................................................................................... 13
Input Number .......................................................................................................................... 13
Check Boxes ........................................................................................................................... 13
Radio Button ........................................................................................................................... 13
Input Character ....................................................................................................................... 13
4. Device Settings .................................................................................................................. 14
4.1. Menu Settings ................................................................................................................. 14
5. System Menu ..................................................................................................................... 16
5.1. Information ...................................................................................................................... 16
5.2. General Setting ............................................................................................................... 18

xiv
5.3. Barcode Setting............................................................................................................... 22
5.4. Beep & Vibrator ............................................................................................................... 24
5.5. Data & Memory ............................................................................................................... 25
5.6. Bluetooth CFG ................................................................................................................ 27
5.7. Data Transfer .................................................................................................................. 30
5.8. Active APP ...................................................................................................................... 31
6. General Specification ........................................................................................................ 32
6.1. General Specification ...................................................................................................... 32
6.2. External Dimensions ....................................................................................................... 33
6.3. Reading Specifications ................................................................................................... 34
View ........................................................................................................................................ 34
Reading Range ....................................................................................................................... 34
7. Troubleshooting ................................................................................................................ 35
7.1. Even if [SCAN] is selected, the LED pointer or light does not light up. .......................... 35
7.2. Battery cannot be charged .............................................................................................. 35
7.3. Cannot read symbol. ....................................................................................................... 36
7.4. Data cannot be sent ........................................................................................................ 36
7.5. PIN is required at Bluetooth connection ......................................................................... 36
8. 【Optional Item】Charging Cradle MBC-100 ................................................................ 37
8.1. External Dimensions of Cradle ....................................................................................... 37
8.2. External Dimensions of AC Adaptor ............................................................................... 38

1
1. SUMMERY
MID-100 is an ultra-compact data collector with a liquid crystal display and numeric keypad
input in a compact code reader adopting state-of-the-art digital camera technology and
image recognition software.
MID-100 is a dust-proof and anti-immersion type protection structure (IP 54) and it can be
used in harsh environments.
MID-100 has a Bluetooth interface and can be used as a wireless type barcode reader.
There are two types (Standard / High resolution) appropriate for the reading resolution.
We pursued miniaturization of the device by adopting simple display and input.
High-speed processing ARM Core CPU and 1.8 GByte of large capacity memory are
mounted to support various applications
We provide development environment to develop dedicated programs for free of charge.
The sample program is preinstalled on the main unit.
A sample program for PC can be downloaded from our company’s website.
We adopted a simple but easy-to-use input key such as double-sided buttons and function
keys, a key arrangement that reminiscent of mobile phones.
1.1. Description of Key Operation in This Manual
Words with box brackets such as [MENU] are described as the key in this manual.
e.g. [Menu]: Press Menu key
2
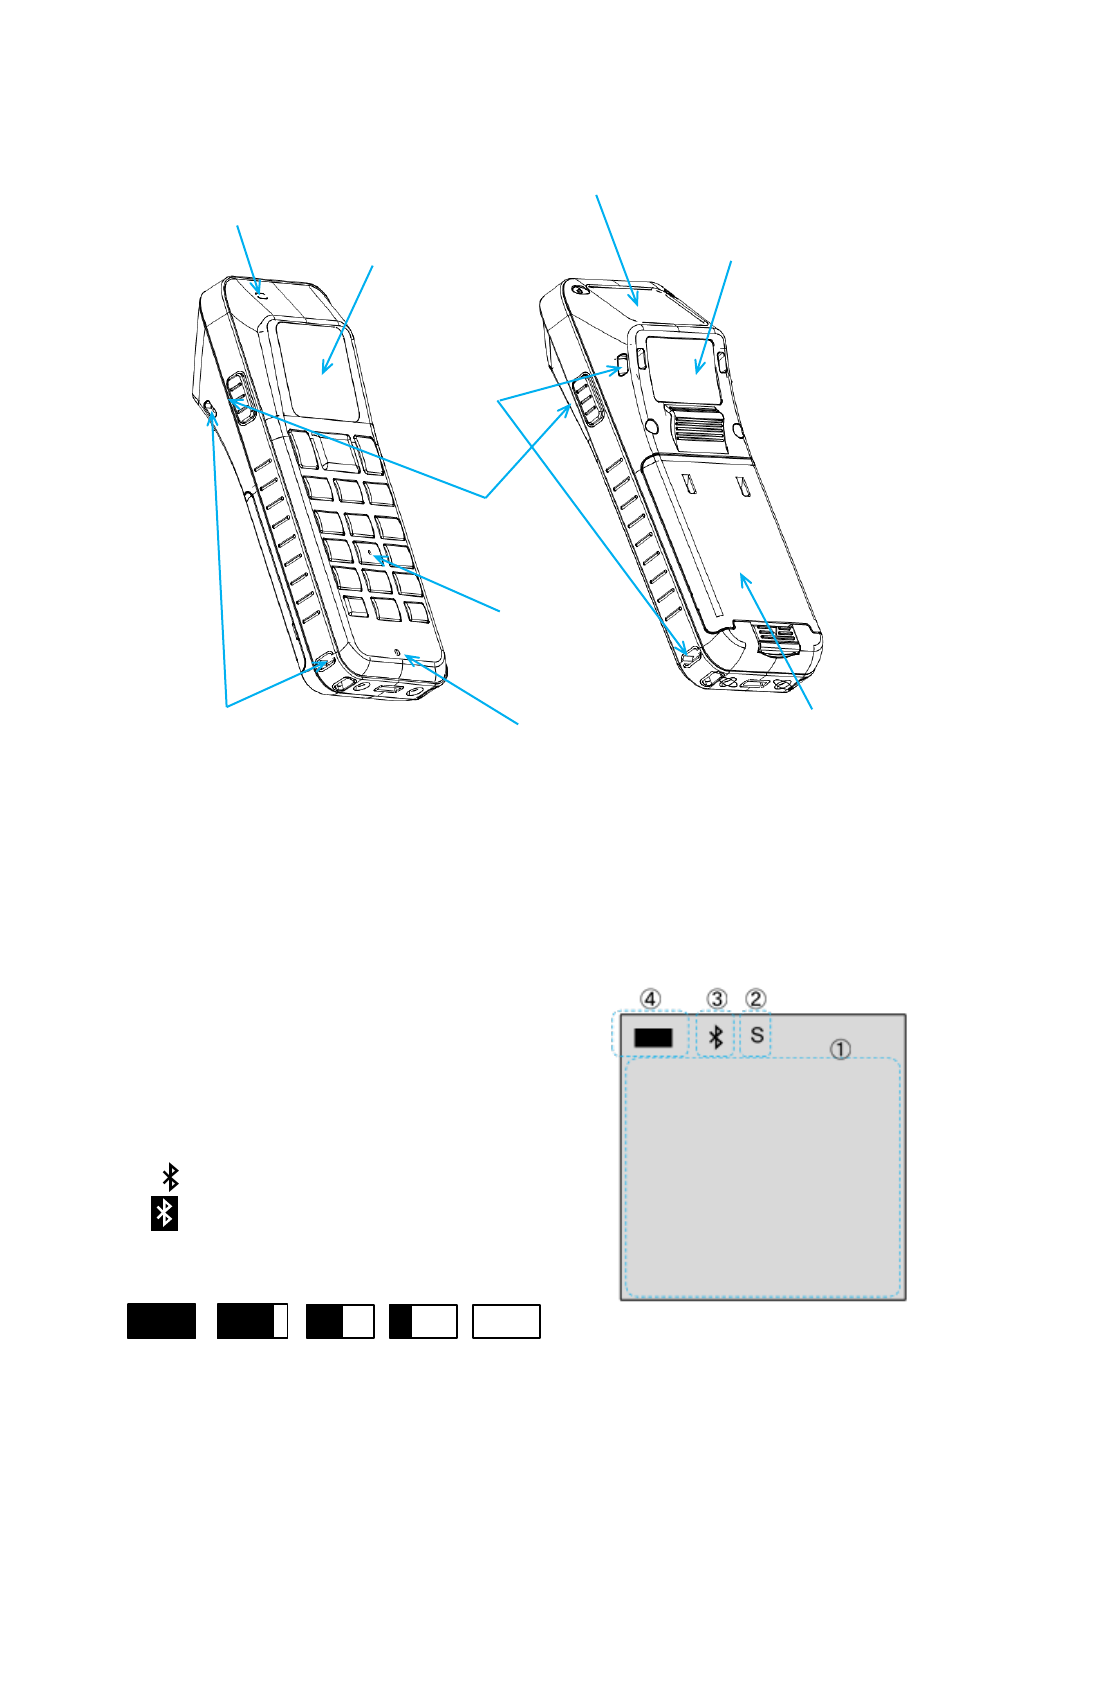
1.2. Parts Name
1.3. LCD Screen
MID-100 is equipped with a 128 × 128 dot monochrome LCD that can display half-width
alphanumeric characters, symbols, Japanese (Chinese characters, katakana etc.). Various data
can be displayed depending on the program.
【Screen image】
① Data Display Area
② BT Connection Mode
S
:
SPP Connection
H
:
HID Connection
③ BT Connection Status
:
Disconnected
:
Connected
④ Battery Level
Full
High
Middle
Low
Empty
LCD Screen
Side Trigger
Keypad
Scanner Window
Buzzer Sound Hole
Battery Cover
Strap Hole
Strap Hole
Product Label
Monitor LED
3
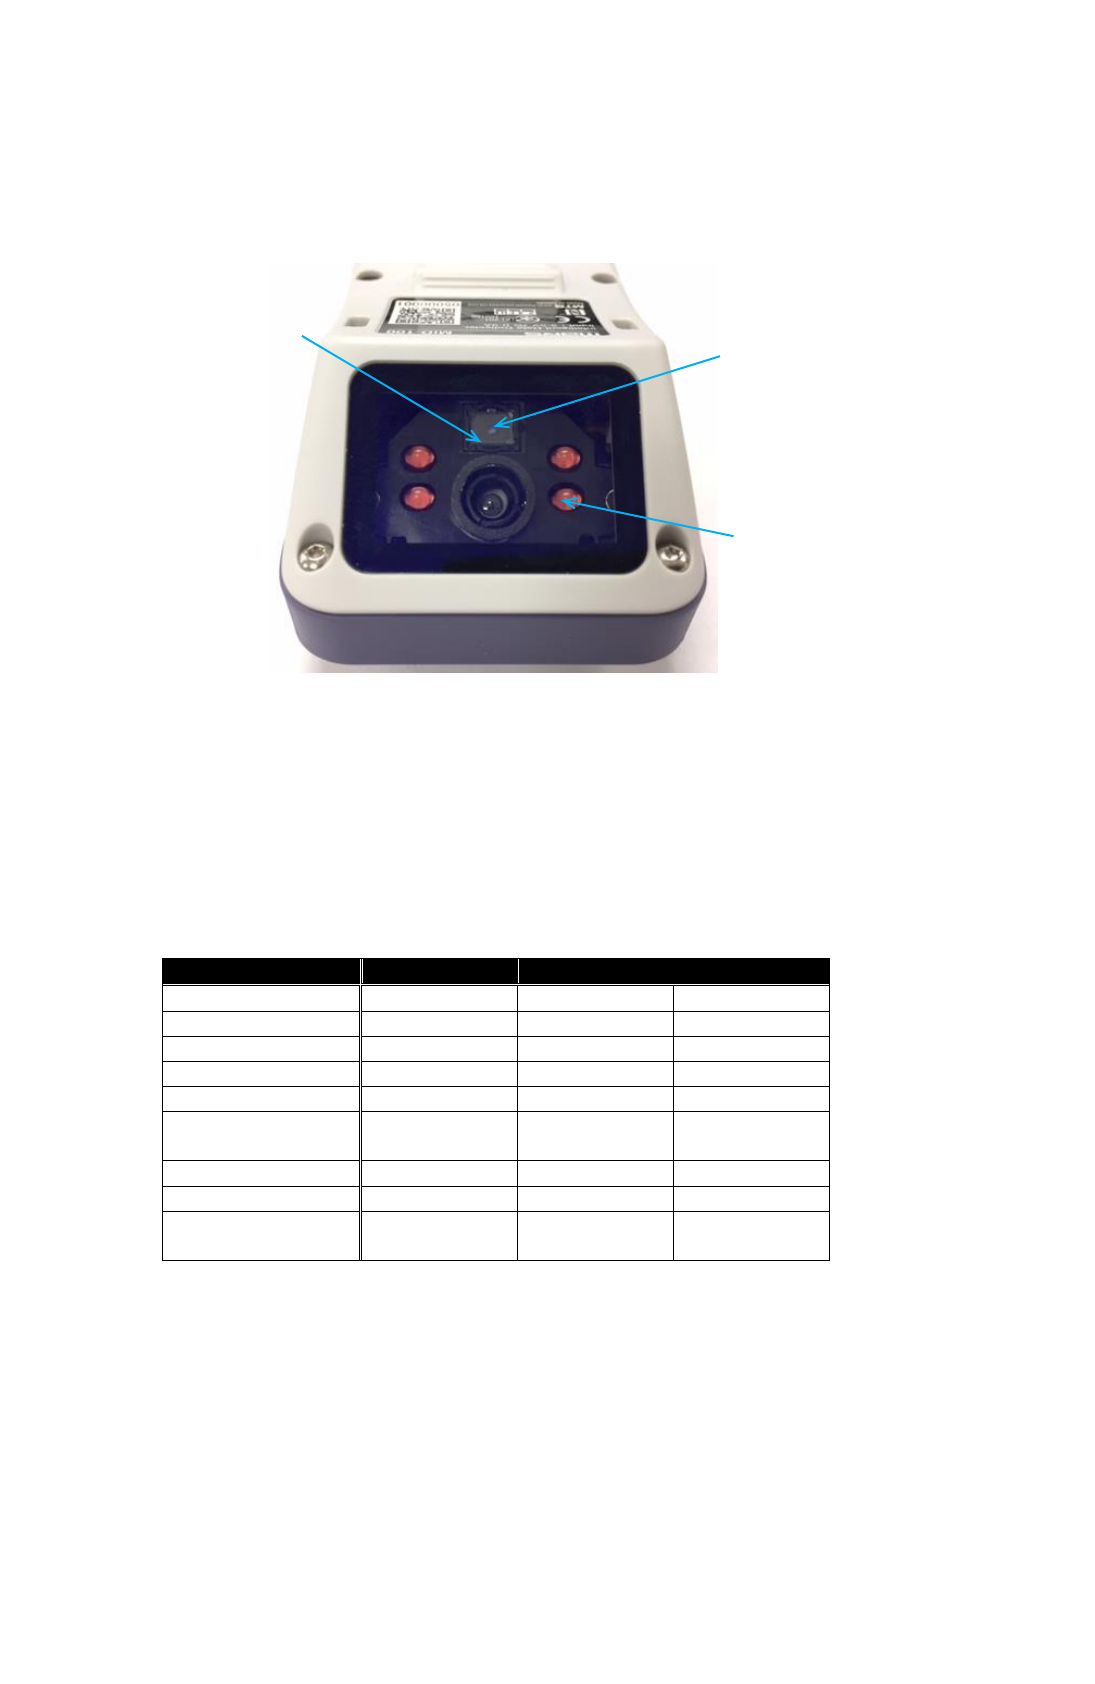
1.4. Scanner Window
This scanner window is used for imaging by the camera unit of the symbol reading scanner. This
is also used for illumination and laser pointer emission. Do not look in when using the device.
1.5. Monitor LED、Buzzer、Vibrator
The monitor LED is an indicator light for displaying the status of MID-100 and the result of
processing. The buzzer sounds from the sound emission hole at the bottom of the keypad when
displaying the result of the key operation or alarm. The built-in vibrator vibrates during system
operation and reading. The three units operate as shown in the table below.
Status
Monitor LED
Buzzer
Vibrator
Power OFF
LED Off
OFF
OFF
Power ON
Green
150ms
150ms
Charging
Red
OFF
OFF
Full Charge
Green
OFF
OFF
Charge Error
Orange
OFF
OFF
Long Press
Power Key
Red(100ms)
300ms
300ms
Shutting Down
Red(100ms)
100ms
OFF
Low Battery Alarm
Red(100ms)
100ms
OFF
Reading
Succeeded
Green(100ms)
100ms
100ms
Light Receiving Lens
Illumination LED 4pcs
Laser Pointer
Floodlight Window
4
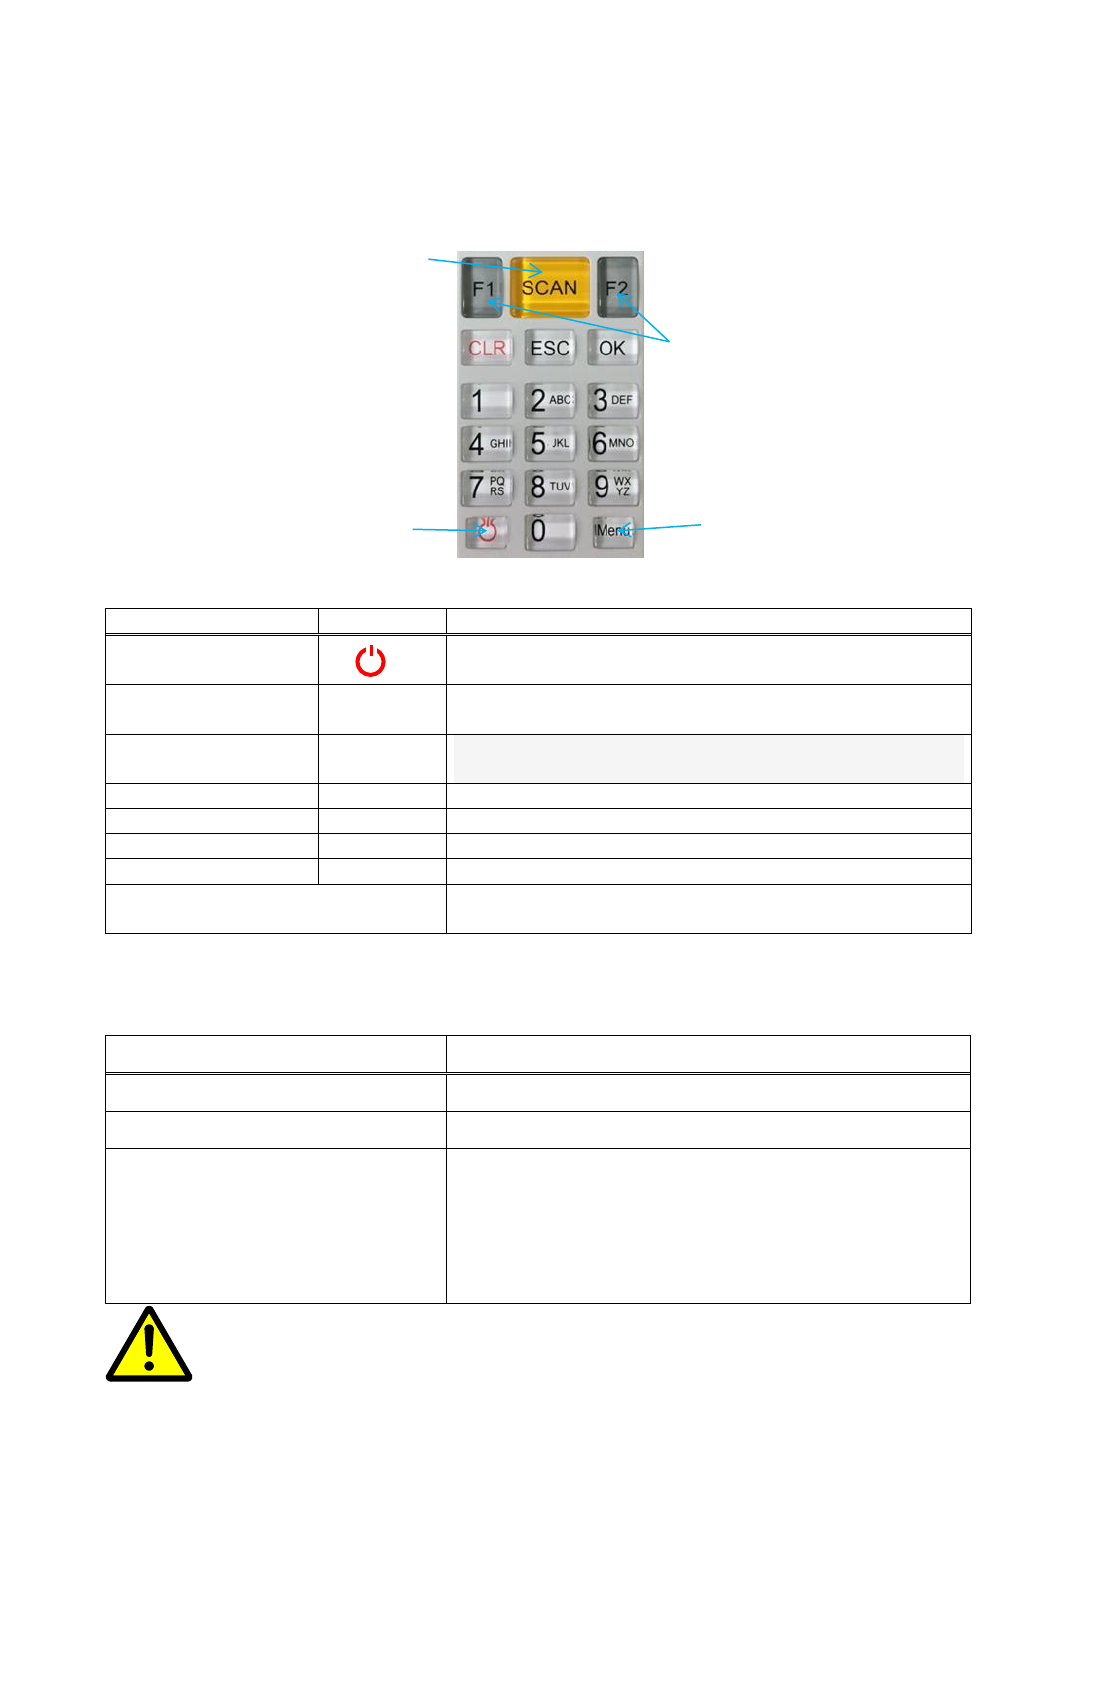
1.6. Keypad and Side Trigger Key
MID-100 has a key pad at the bottom of LCD monitor which consists of 18 keys. There are two
side triggers adjacent to the LCD screen and on both sides of the main body.
【Key Name and Function】
Name
Key
Description
Power
Turns the power ON/OFF and starts the system
menu.
Menu
[Menu]
Displays the setting menu of the sound volume,
vibrator and backlight.
Function
[F1]、[F2]
Moves the cursor or decide the item in the select
menu.
Scan
[SCAN]
Reads symbols.
Clear
[CLR]
Clear the characters being entered.
Back
[ESC]
Returns to the previous view.
OK
[OK]
Decides the item selection or input.
Side Trigger (on both sides of the
main body)
Reads symbols.
【Special Operation】
Key Operation
Description
[Menu]+[OK] ⇒ + [Power]
Starts system menu
Both Side Triggers ⇒ + [Power]
Forced Power OFF*
[POWER] while the power is ON
Less than1.5
:
Suspend
1.5~5 Sec
:
Power OFF(Displayed
For Confirmation)
More than 5 Sec
:
Force Power OFF*
* Do not forcibly turn off the power in case of other than emergency. Or files and
memory under operation may be damaged.
Function Key
Power Key
Menu Key
Scan Key
CAUTION
5
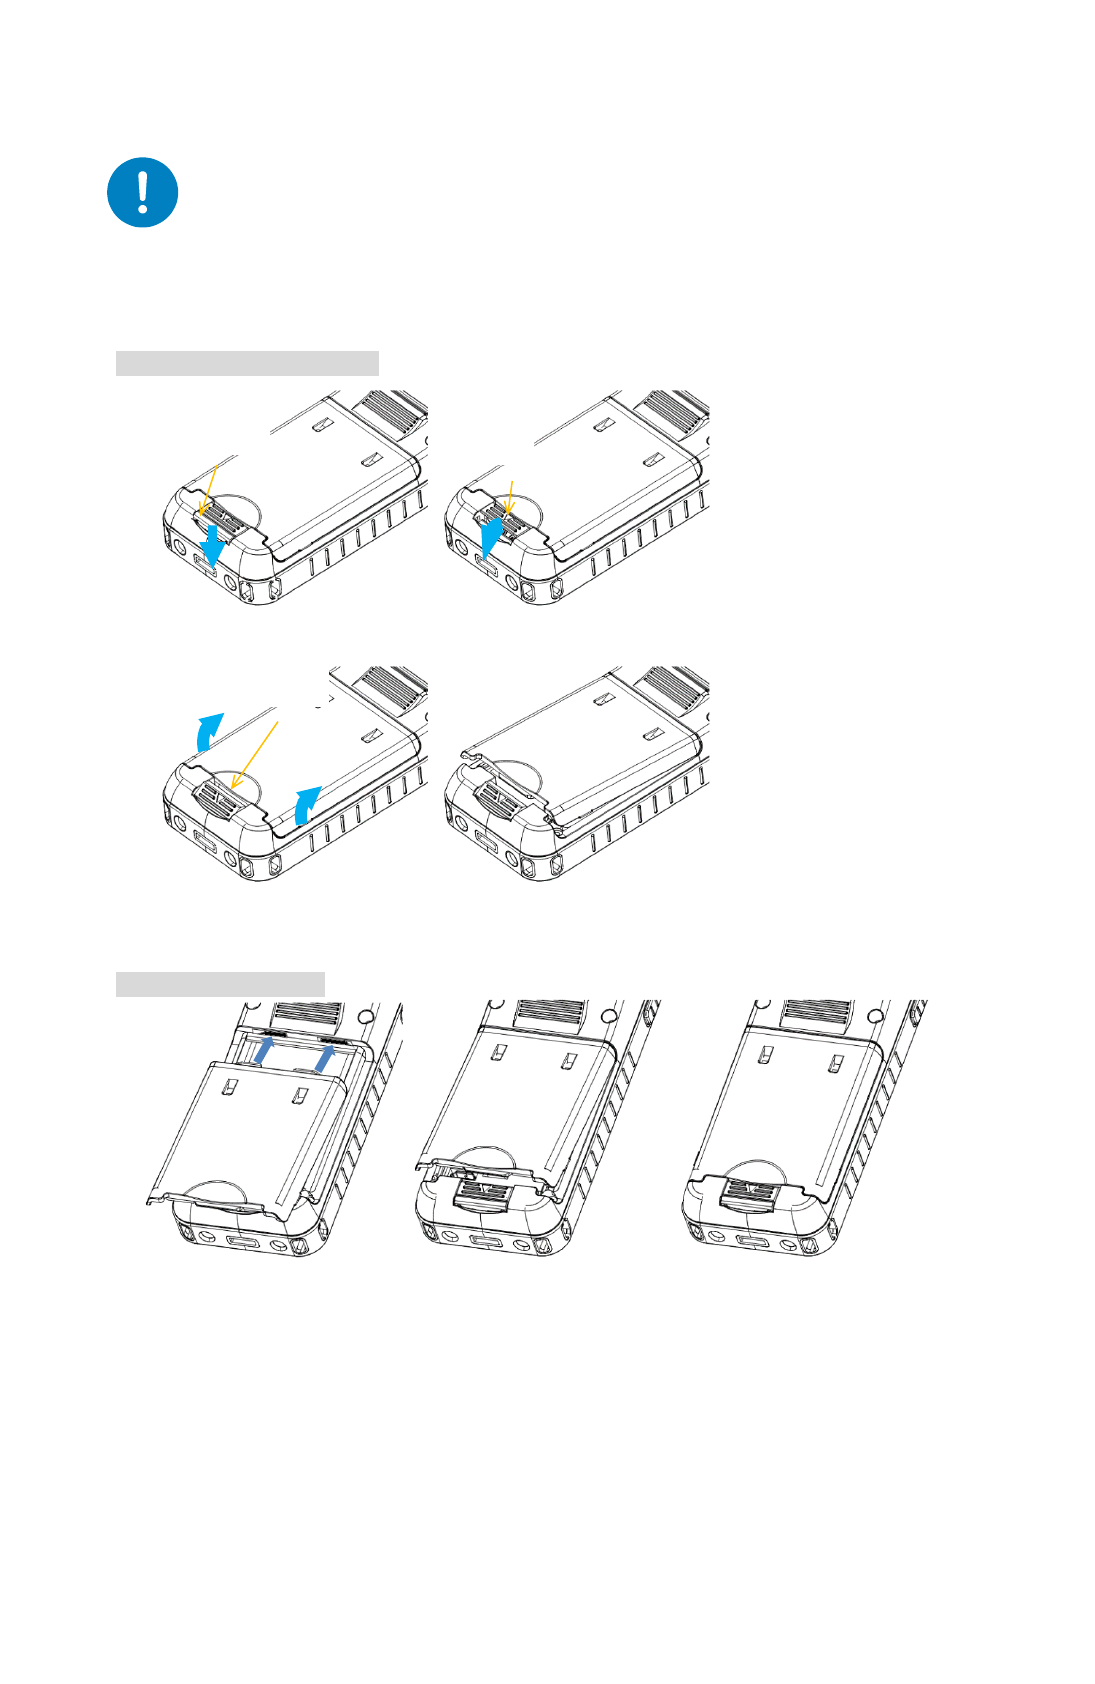
1.7. Battery
Make sure to use a dedicated rechargeable li-on battery (FHTBA122Y). Also, use the
dedicated charging cradle (MBC - 100) to charge.
Battery Cover
Remove the Battery Cover
Attach Battery Cover
1. Press lock button.
2. Hold down the lock button and
tilt the lever to the lock button
side.
3. Pull off the battery cover
tab from the lever and take
up the cover.
Lock Button
Lever
4. Remove the battery cover.
Battery cover
Tab side
2. Press and hold the lock button
and tilt the lever as
described in the method (1).
1. Hook the tab of the
battery cover into the
hole of the device.
3. Attach the battery cover
until hearing a snap
sound. Make sure there
is no float on the cover.
Observance

6
Removing Battery
The battery can be removed easily by
pulling the ribbon towards the operator.
Insert the Battery
※ To remove the battery properly, make sure the ribbon come out from the bottom.
①Hang down the
ribbon as shown.
②Insert the battery from
the terminal side.
③Hook the battery to the tab
at the bottom side.
Tab
Terminal Side
Ribbon
7
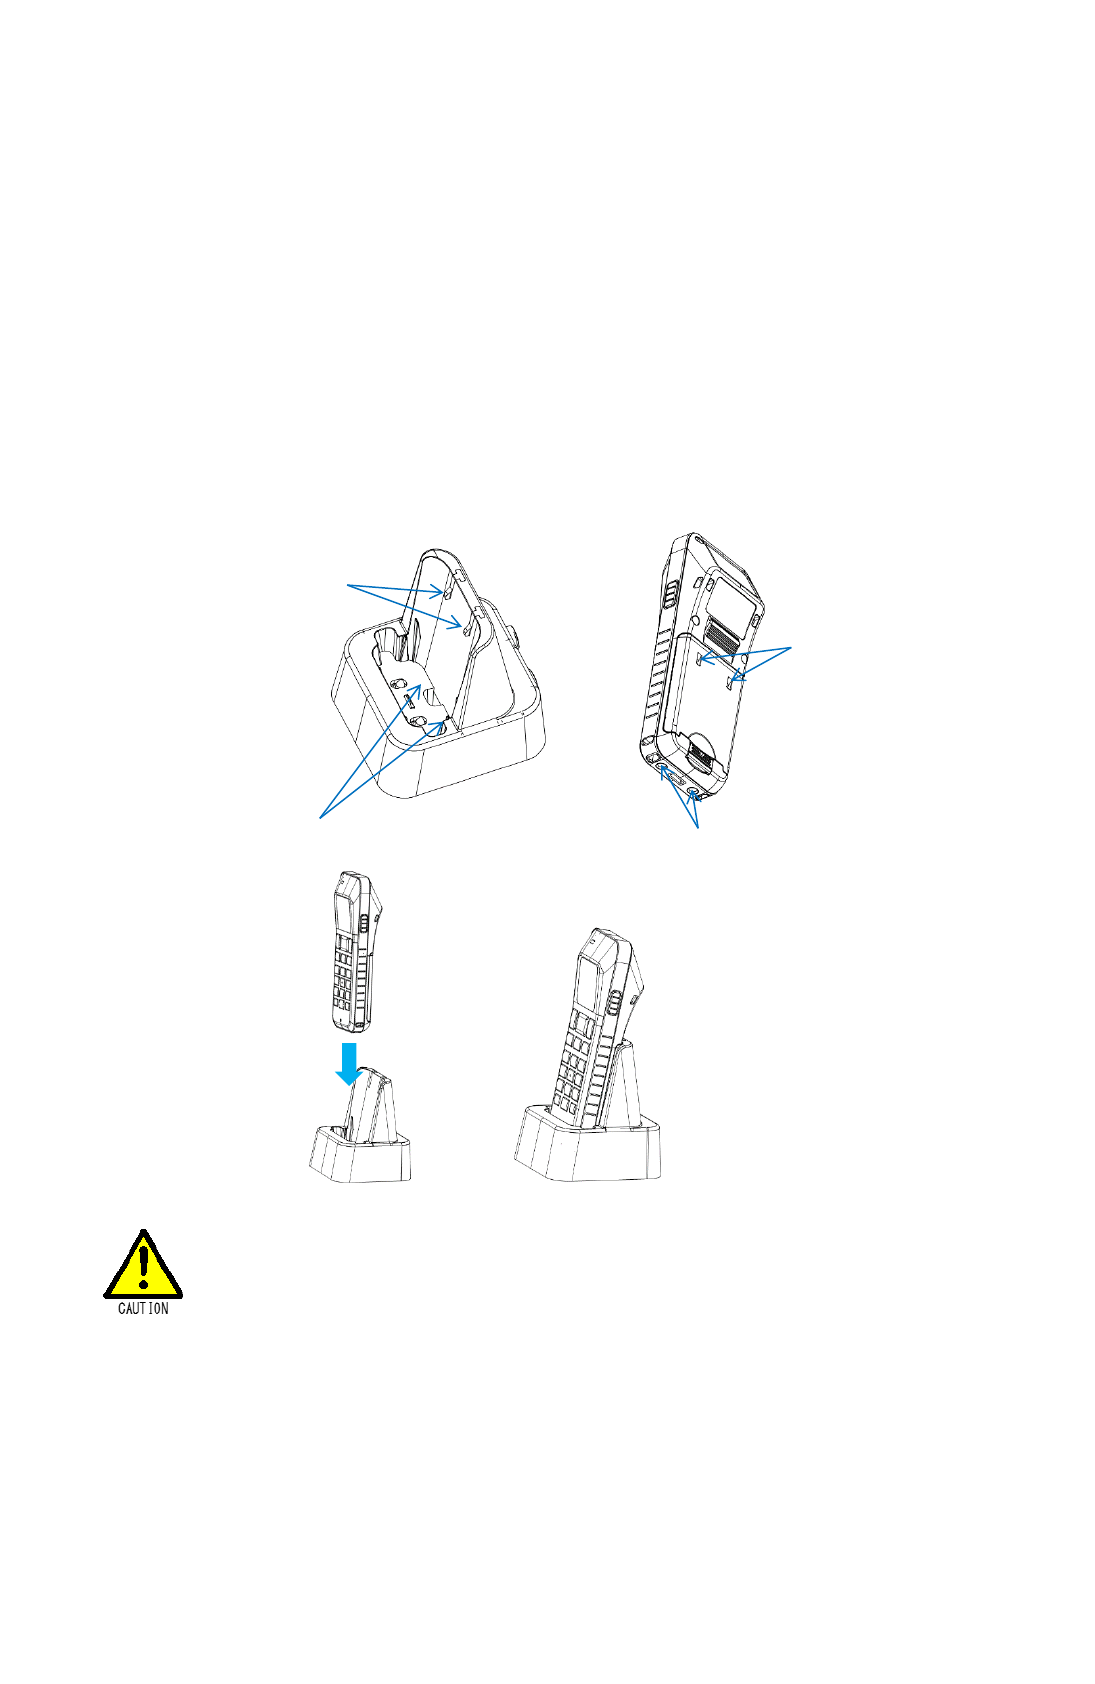
Battery Charge
For charging the battery, Use the dedicated Charging Cradle (MBC-100).
Fully charge the battery immediately after purchase using the dedicated battery charger
MBC-100. Monitor LED lights red during charging and lights green when charging is completed.
When the remaining battery power becomes insufficient, a warning is displayed on the screen
to request a battery charge. Charge the battery when the warning is displayed.
① Set the scanner in the charger by aligning the bottom with the charging terminal of the cradle.
② Cradle’s hook supports the groove of the battery cover.
③ If the battery cannot be charged properly, lift the battery to check if the terminal and hook are
set in the right direction.
● Before the charge, make sure that the battery cover is locked properly without float.
Charging Terminal
Charging Terminal
Hook
Groove

8
Low Battery Level
When the remaining battery level of MID-100 is low, a battery alarm sounds. The LED lights red,
the buzzer sounds and a message “Battery Alarm” is displayed on the screen. Also the battery
indicator turns into “Empty”.
After a certain time, the power turns off automatically. After the power is off due to the worn-out
battery, MID-100 can be turn on again by charging the battery or exchanging the battery with a
charged one.
Remove the battery from the device and store it, if you do not use
MID-100 for more than a week.
Make sure to charge the battery once every three months. DO
NOT leave the battery fully discharged to prevent a rapid
deterioration.
Finish exchanging the battery in three minutes. If no power is
supplied from the battery over three minutes, the values of
calendar/time are reset. Initialize the calendar/time when using
MID-100 again.
9
2. How to Use
2.1. Preparation
Insert the battery pack to charge. Refer to Section 1.7,”Battery,” for the charging method.
Confirm Basic Operation (When initializing SCAN MODE and every setting)
① Press and hold [POWER] for two seconds. A message “Hello” is displayed on the screen and
the monitor LED lights green. The monitor LED turns off after a while and the scanner
activates. The backlight on the LCD screen lights and a message “SCAN MODE” is displayed
on the screen.
② MID-100 is disconnected with the host during SCAN MODE. Search and select MID-100 from
the Bluetooth Connection of the host to connect. Refer to Section 2.2,”Bluetooth,” for the
method of connecting with Computer.
③ After MID-100 is disconnected, the message ”Disconnected” disappears and a
confirmation message whether to send the data which was read before the connection is
displayed on the screen. Select [F1] to send or [F2] not to send.
To send stored data, make sure the host is ready to receive.
Receiving a large amount of data may make the computer inactive
or perform unpredictably.
④ Connection method can be skipped at the performance check. Select “Start” while MID-100 is
disconnected.
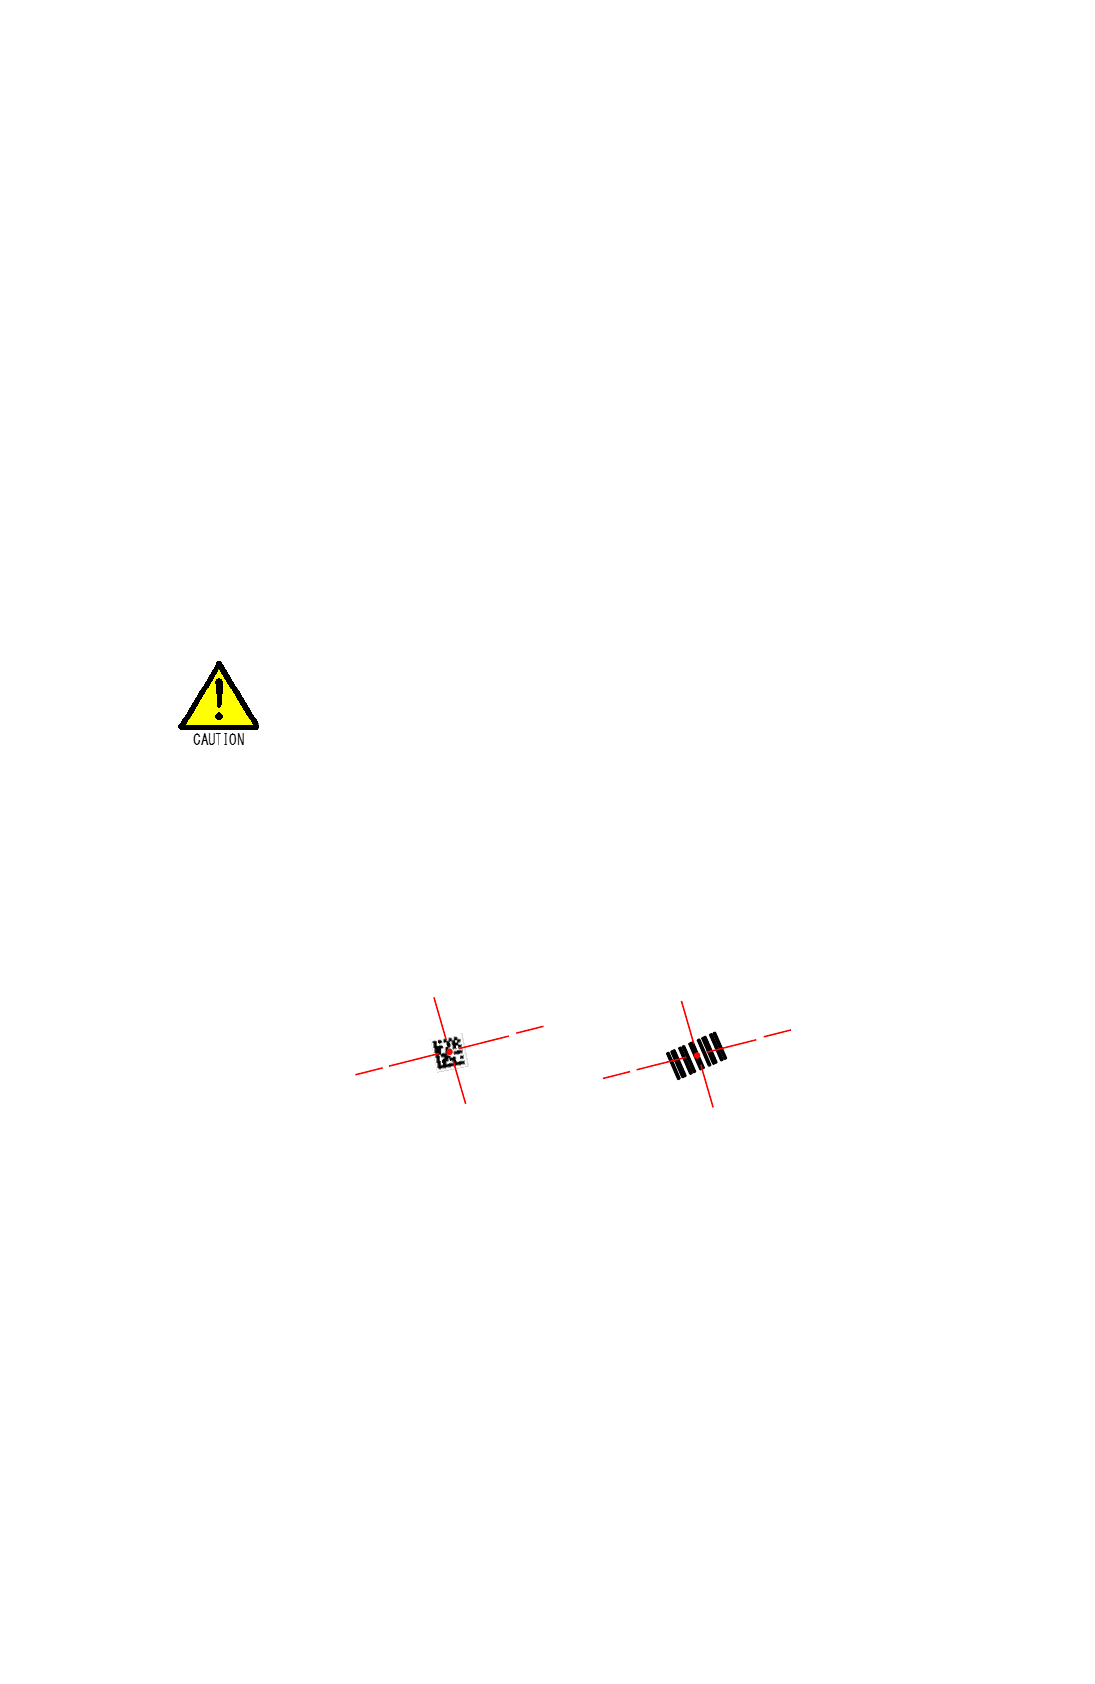
After the method ③ or ④, the message “Reading” is displayed on the screen. Press [SCAN]
(or side trigger key) to start reading. Press and hold [SCAN] to adjust the center of symbols in
the center of the cross pointer.
When the reading is successful, the buzzer sounds once, monitor LED lights green and the
vibrator vibrates.

10
2.2. Bluetooth
Bluetooth interface provides transmission with various Bluetooth devices. MID-100 supports the
profiles of HID and SPP.
HID Profile
The data sent to upper host can be handled as if it was input by keyboard.
SPP Profile
Connects by virtual COM. Host requires an application to communicate with an allocated virtual
COM. Refer to「1. Scanner Type」in Section 5.2,”General Setting,” for the detail of Switching the
Profile.
Connection Example
Manual Connection from Host
1. Search for a Bluetooth device from the host.
2. Select 「MID-100」from the search result to establish a connection.
3. MID-100 connects with the set profile when receiving a connection request.
Manual Connection from Scanner(Refer to Section 5.6,”Bluetooth CFG,”)
1. Select“6. Bluetooth CFG”from the system Menu.
2. Select“1. Search”from the search result.
3. Select a connection destination.

11
2.3. Storage Connection by USB
Micro USB connector is located inside the battery cover. After establishing connection with a PC
through a micro USB cable while the system menu is displayed, user can access to the files in
MID-100 like a USB storage device.
Keep the battery installed when establishing a storage connection.
Folder configuration in storage device is as follows:
*1
Can be used as a storage folder for such as master files, transaction data.
*2
Recording files of scanner operation log are stored in this folder. A log folder is
created with the name "log-date-hour-minute-second". Up to 50 log folders are
created, and after 51 copies are overwritten from the old log folder
\apps // Application
\app-data // Application Data(*1)
\logs // MID-100 Operation Log(*2)
\scan-data // Data of Code Reader
\download // Other Files
Micro USB Connector
12
3. Scanner Menu Operation
3.1. Start Scanner
Press and hold [Power] for 1.5 seconds to turn on the power.
3.2. Stop Scanner
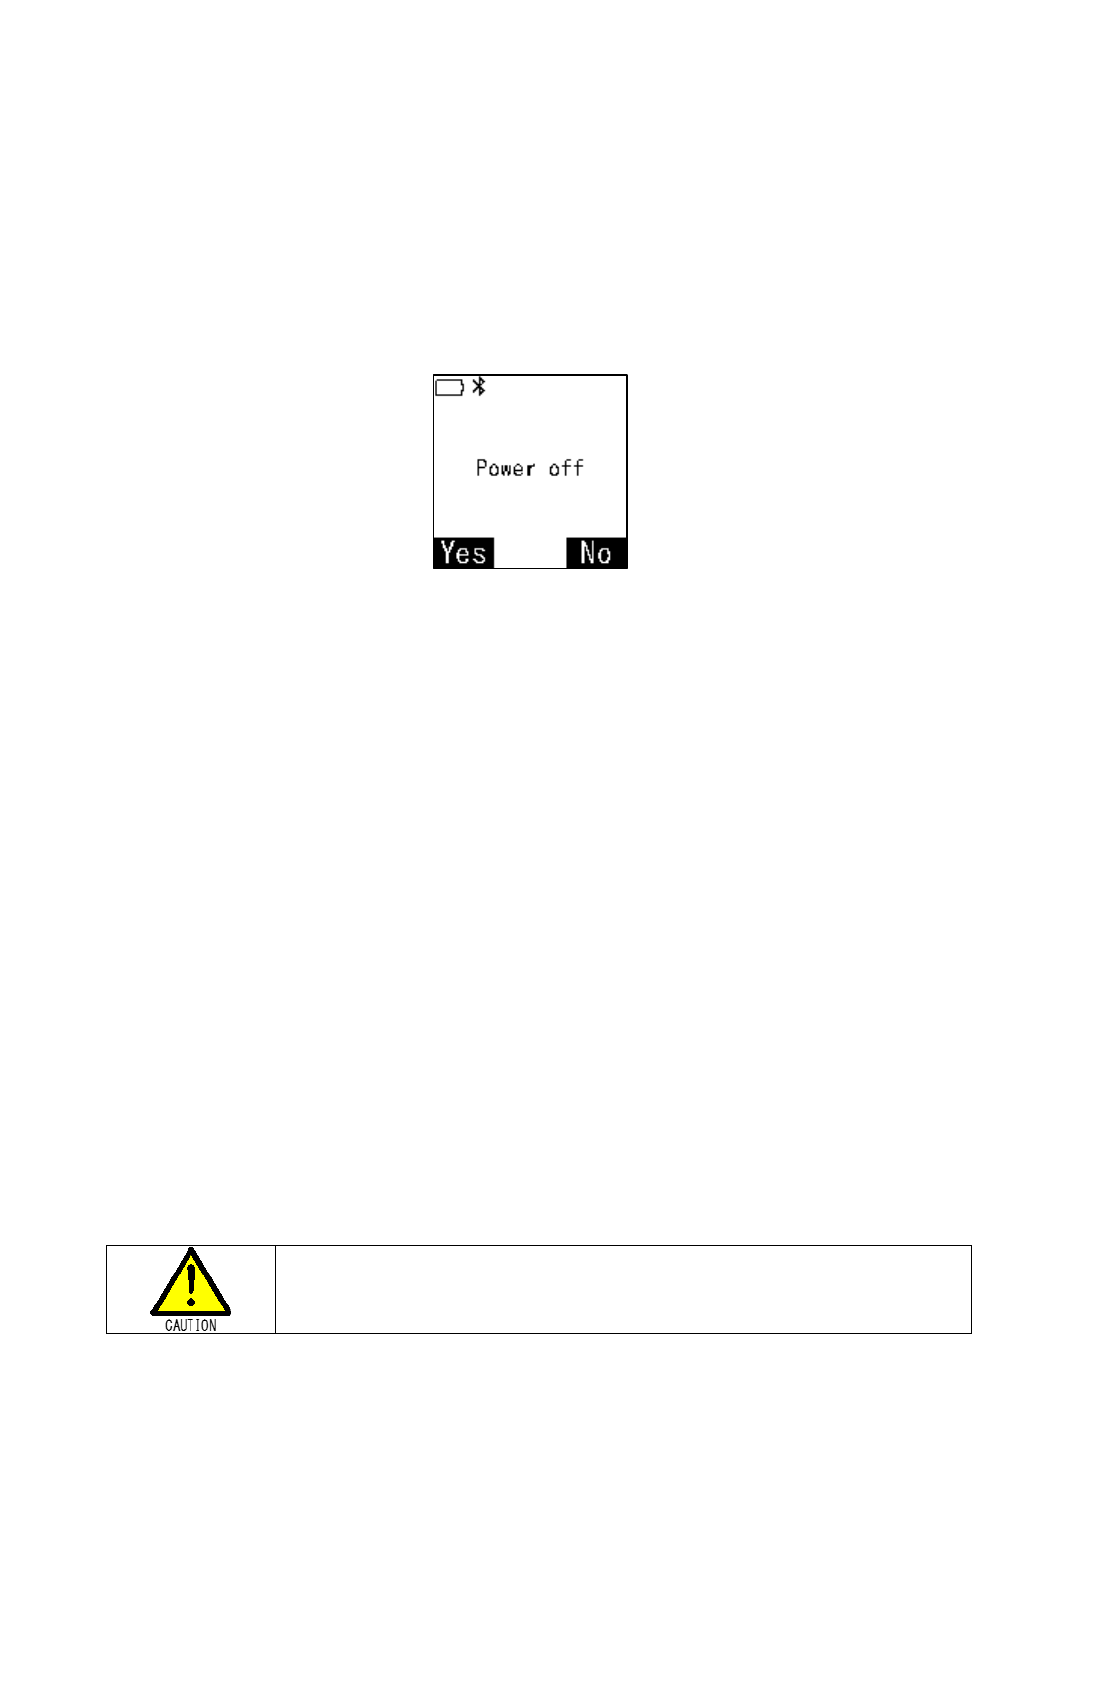
Press and hold [Power] for 1.5 seconds to turn off the power and displayed 「Power off」
「Yes」「No」on the screen.
Press [F1] and choose「Yes」, The power off
Press [F2] and choose「No」, Stop the power off and return to the previous menu.
[ESC] operates same function with「No」.
3.3. Suspend Scanner
After press [Power] less than 1.5 sec, Scanner enters Suspend state (low-power consumption
state). Suspend can be canceled by pressing [Power] again. MID-100 automatically enters
Suspend when being not operated for a while.
3.4. Start System Menu
Hold down [OK] and [Menu] while the power is off and press [Power] over 1.5 sec to start the
system menu.
3.5. Turn Off Scanner Forcibly
Hold down the two side triggers on both sides of MID-100 and press [Power] to turn off MID-100
due to some abnormality. Also, MID-100 can be turned off forcibly by pressing and holding
[Power] for more than 5 seconds.
Do not turn off the power forcibly of MID-100 in cases other than
emergency. Or files and memory under operation may be corrupted.
13
3.6. Key Operation in Menu
Select Menu with cursor or keypad input while the menu is displayed on the screen.
Cursor
Use function keys [F1], [F2], [OK], and [ESC] to move cursor.
Press [F1] to move the cursor up, and press [F2] to move the cursor down. Selected item is
highlighted or surrounded by a square frame. Press [OK] at the cursor position to select an item.
Press [ESC] to return to the previous menu. Pressing [ESC] at the first menu has no function.
Input Number
If there is a number on the menu choice, you can jump to the selection item by pressing the
number key. When the item is highlighted, press [OK] to decide.
Check Boxes
A check box is displayed if there is On/Off selection on the
item. A check mark appears when the item of ON. By
pressing [OK] user can check/uncheck the item with the
selection cursor. Press [OK] at unchecked box to check and
press [OK] at checked box to uncheck.
Radio Button
A radio button is displayed if only one of several items can
be selected. Press [OK] to decide a desired item with it is
selected with the cursor.
Input Character
A cursor appears when character input is required. Cursor
move to the left pressing [F1] and to the right pressing [F2].
Use numeric keypad to input. Press [CLR] to delete
characters to the left of the cursor and the cursor moves to
the left. Characters can be input in the same method for
portable phones.
E.g. Character on the cursor changes from A-B-C-a-b-c-2
by repeating the method [2] continuously. After a while, the
cursor moves to the right and the selection is determined.
Check Box
Selection Cursor
Radio Button
Input Cursor
Input Cursor
|
14
4. Device Settings
4.1. Menu Settings
※The items set up by moving curser. (No Need [OK] Button)
Menu Settings
To display the menue settings, press [Menu] on the bottom right of
the Keypad.
Press [ESC] to return.
1.Beep Volume
Setting the buzzer volume.
Default is “Mid”.
Press [ESC] to return.
2.Brightness
Setting the brightness of the LCD backlight.
Default is “Normal”.
Press [ESC] to return.
3.Vibrator
Setting the vibrator function.
Default is “Enable”.
Press [ESC] to return.
15
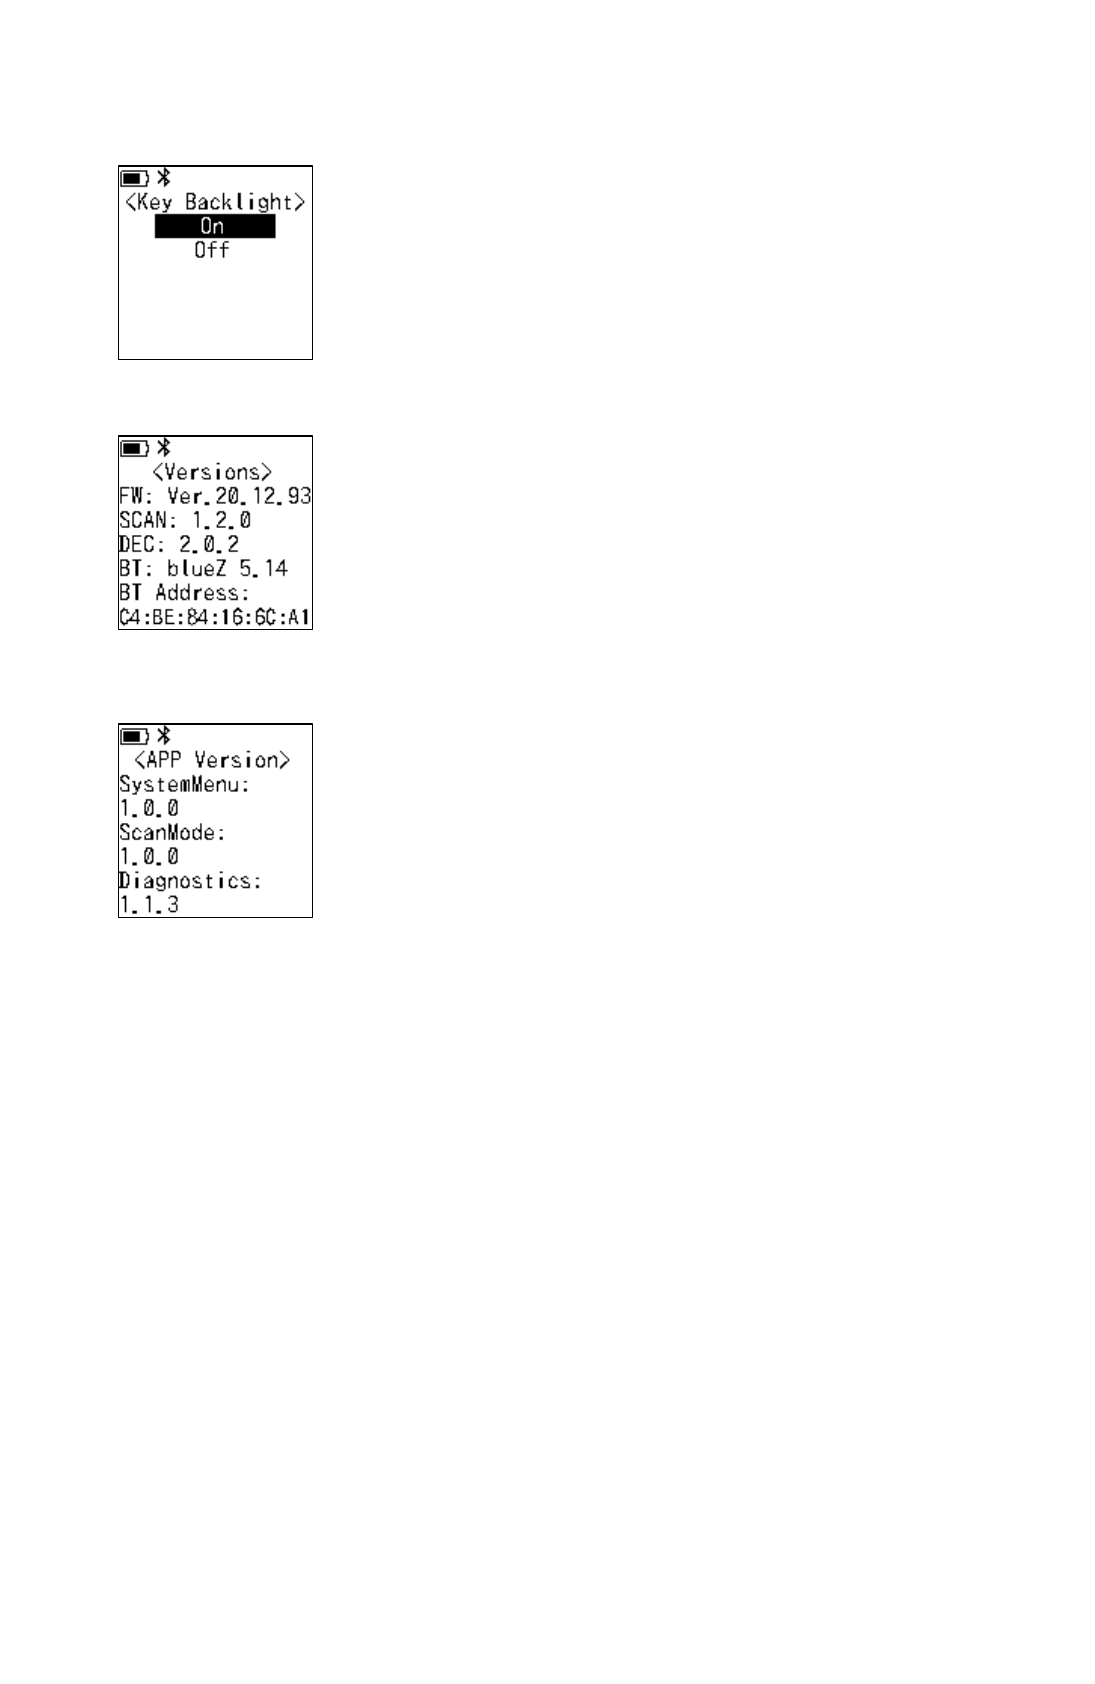
4.Key Backlight
Setting the function of key backlight
Default is “On”.
Press [ESC] to return.
5.FW Version
Versions of firmwares and various drivers
FW
:
Firmware version of scanner main unit
SCAN
:
Driver version of scanner engine
DEC
:
Decode version of scanner engine
BT
:
Driver version of Bluetooth
BT Address
:
Bluetooth Address
Press [ESC] to return.
6.APP Version
Application Version
SystemMenu
:
Version of system menu
ScanMode
:
Version of scan mode
Diagnostics
:
Version of diagnostics
Press [ESC] to return.
16
5. System Menu
To set various settings and download user application programs, use
the system menu.
To display the system menu, hold down [Menu] and [OK] on the keypad
and press [Power]. After a while, turn on the power to display the
system menu.
Cursor move to the up with [F1] and to the down with [F2].
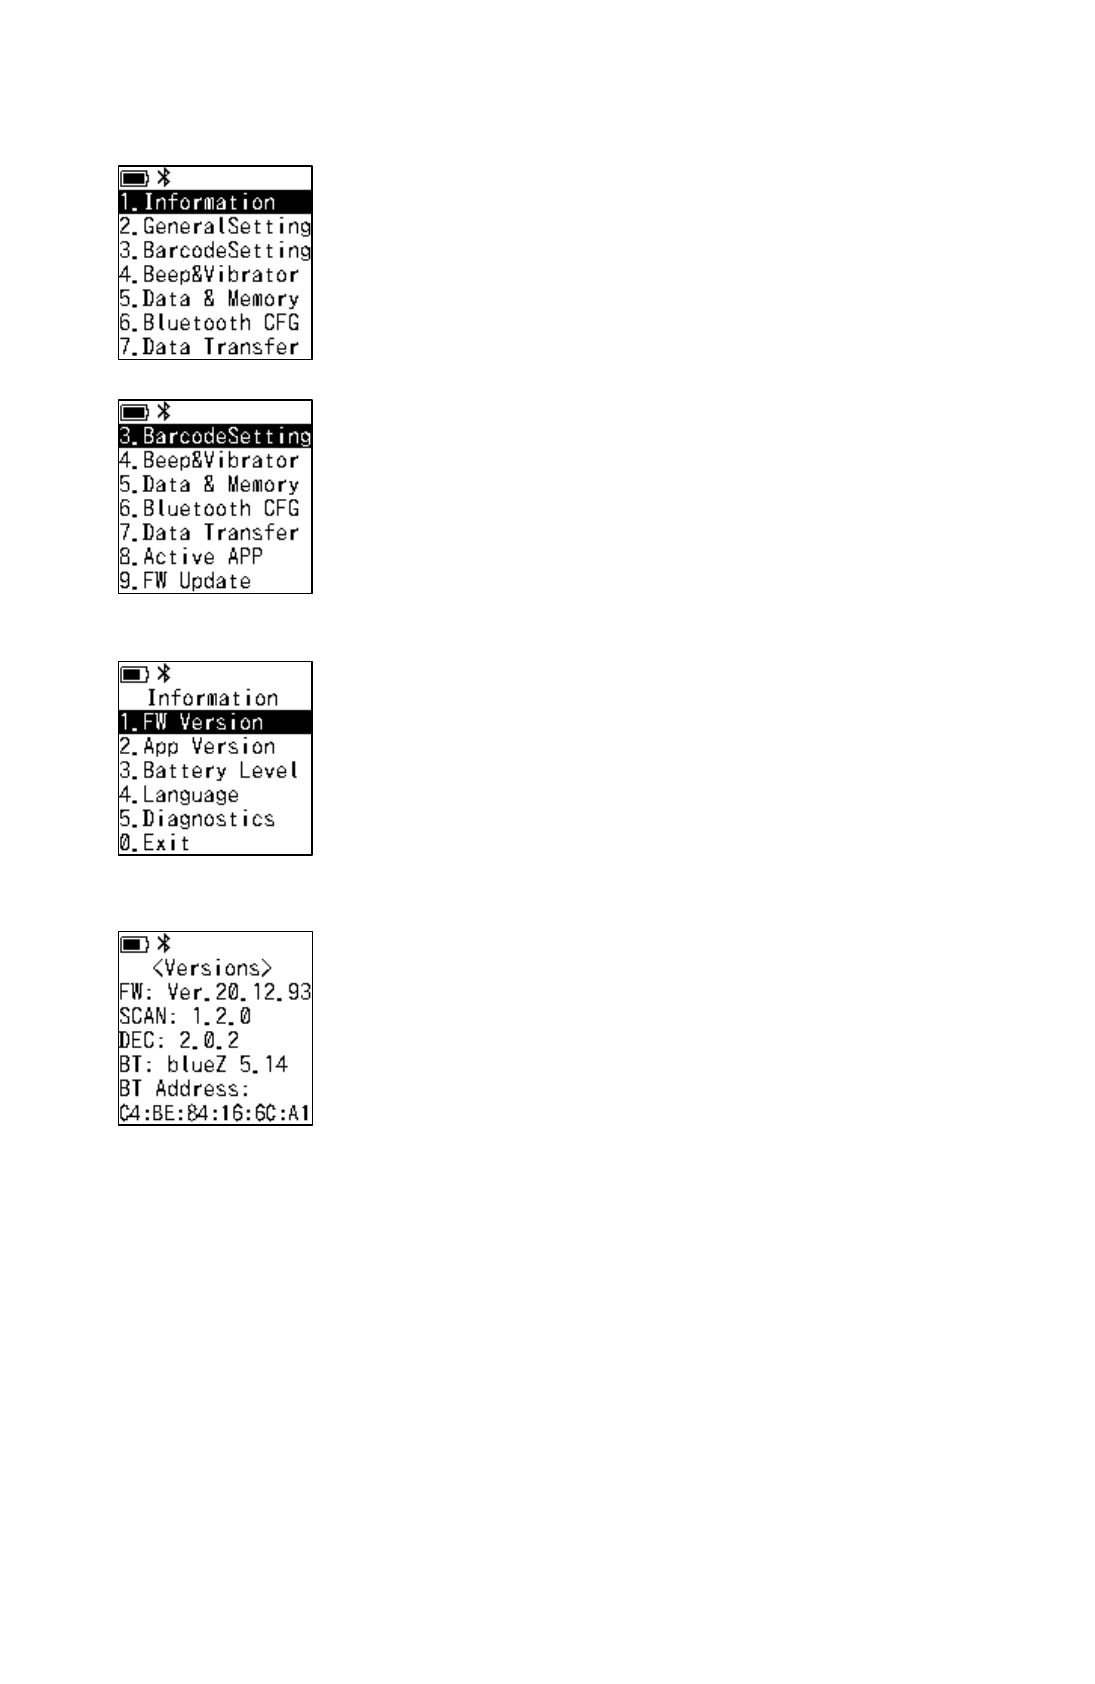
5.1. Information
The sub menu is displayed by selecting “Information” from the system
menu.
Press [ESC] or [0.Exit] and then [OK] to return.
1.FW Version
Versions of firmwares and various drivers
FW
:
Firmware version of scanner
SCAN
:
Driver version of scanner engine
DEC
:
Decoder version of scanner engine
BT
:
Driver version of Bluetooth
BT Address
:
Bluetooth Address
Press [ESC] to return.

17
2.APP Version
Application Version
SystemMenu
:
Version of system menu
ScanMode
:
Version of scan mode
Diagnostics
:
Version of diagnostics
Press [ESC] to return.
3.Battery Level
Displays the battery level
3:
Full
:
Full charged
2:
High
:
~79%
1:
Middle
:
~59%
0:
Low
:
~39%
No Mark:
Empty
:
Less than ~19%
(Warning state of voltage drop)
Press [ESC] to return.
* Temporary measurement error could exist depending on the
environment.
4.Select Language
Selecting language
English
:
Display English
Japanese
:
Display Japanese
Press [ESC] to return.
The default language is Japanese.
5.Diagnostics
Diagnoses the various function of MID-100
1.All Test
:
Automatic self-diagnosis test
2.Single Test
:
Self-diagnosis test by item
0.Exit
:
Back to the previous menu
Press [ESC] to return.
* It is our manufacturing inspection application.
18
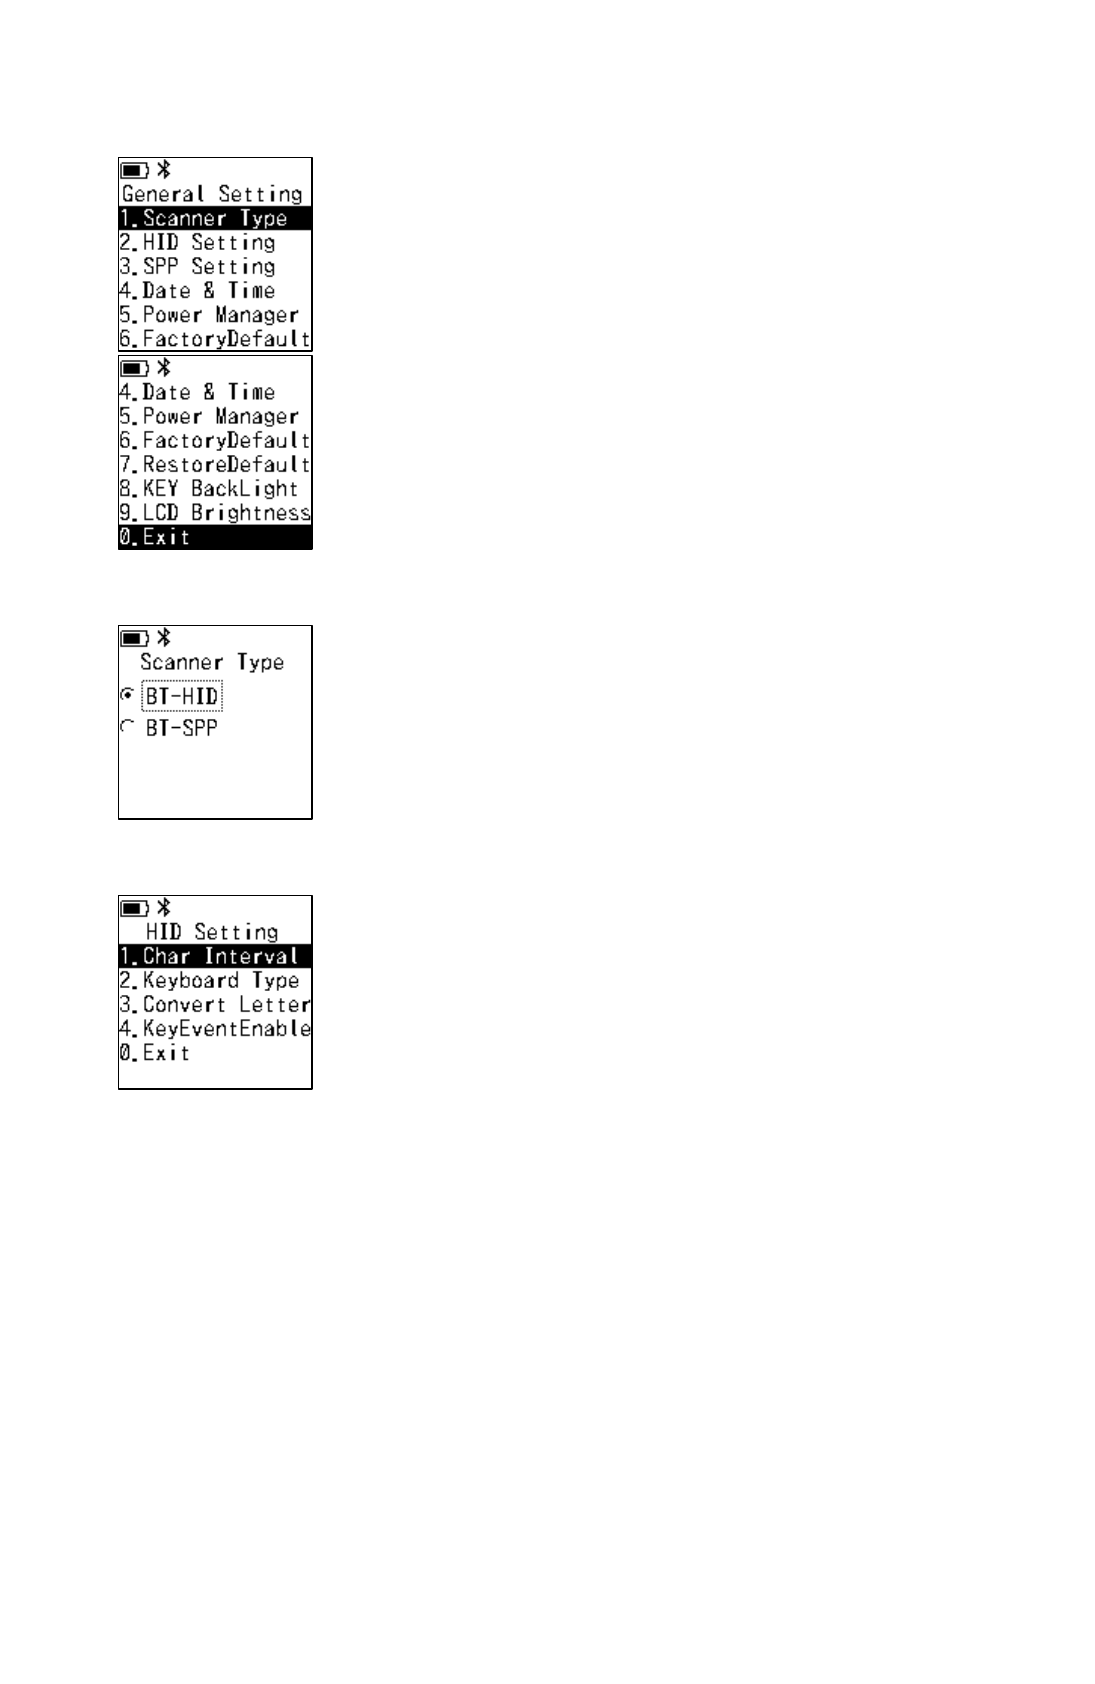
5.2. General Setting
The sub-menu is displayed by selecting “General Setting” from the
system menu.
Press [ESC] or [0.Exit] and then [OK] to return.
1.Scanner Type
Selecting Bluetooth profile
BT-HID
:
HID Profile
BT-SPP
:
SPP Profile
Press [ESC] to return.
The default setting is “BT-HID”.
2.HID Setting
Advanced settings of HID connection
1.Char Interval
:
Sets the interval time between
characters.
The default interval is 40ms.
2.Keyboard Type
:
Sets the keyboard type of HID.
The default setting is Japanese
keyboard.
3.Convert Letter
:
Sets the case conversion setting
of transmission data.
The default setting is None.
4.KeyEventEnable
:
Sets the permission of keypad
input.
The default setting is Enable.
0.Exit
:
Back to the previous menu
Press [ESC] to return.
19
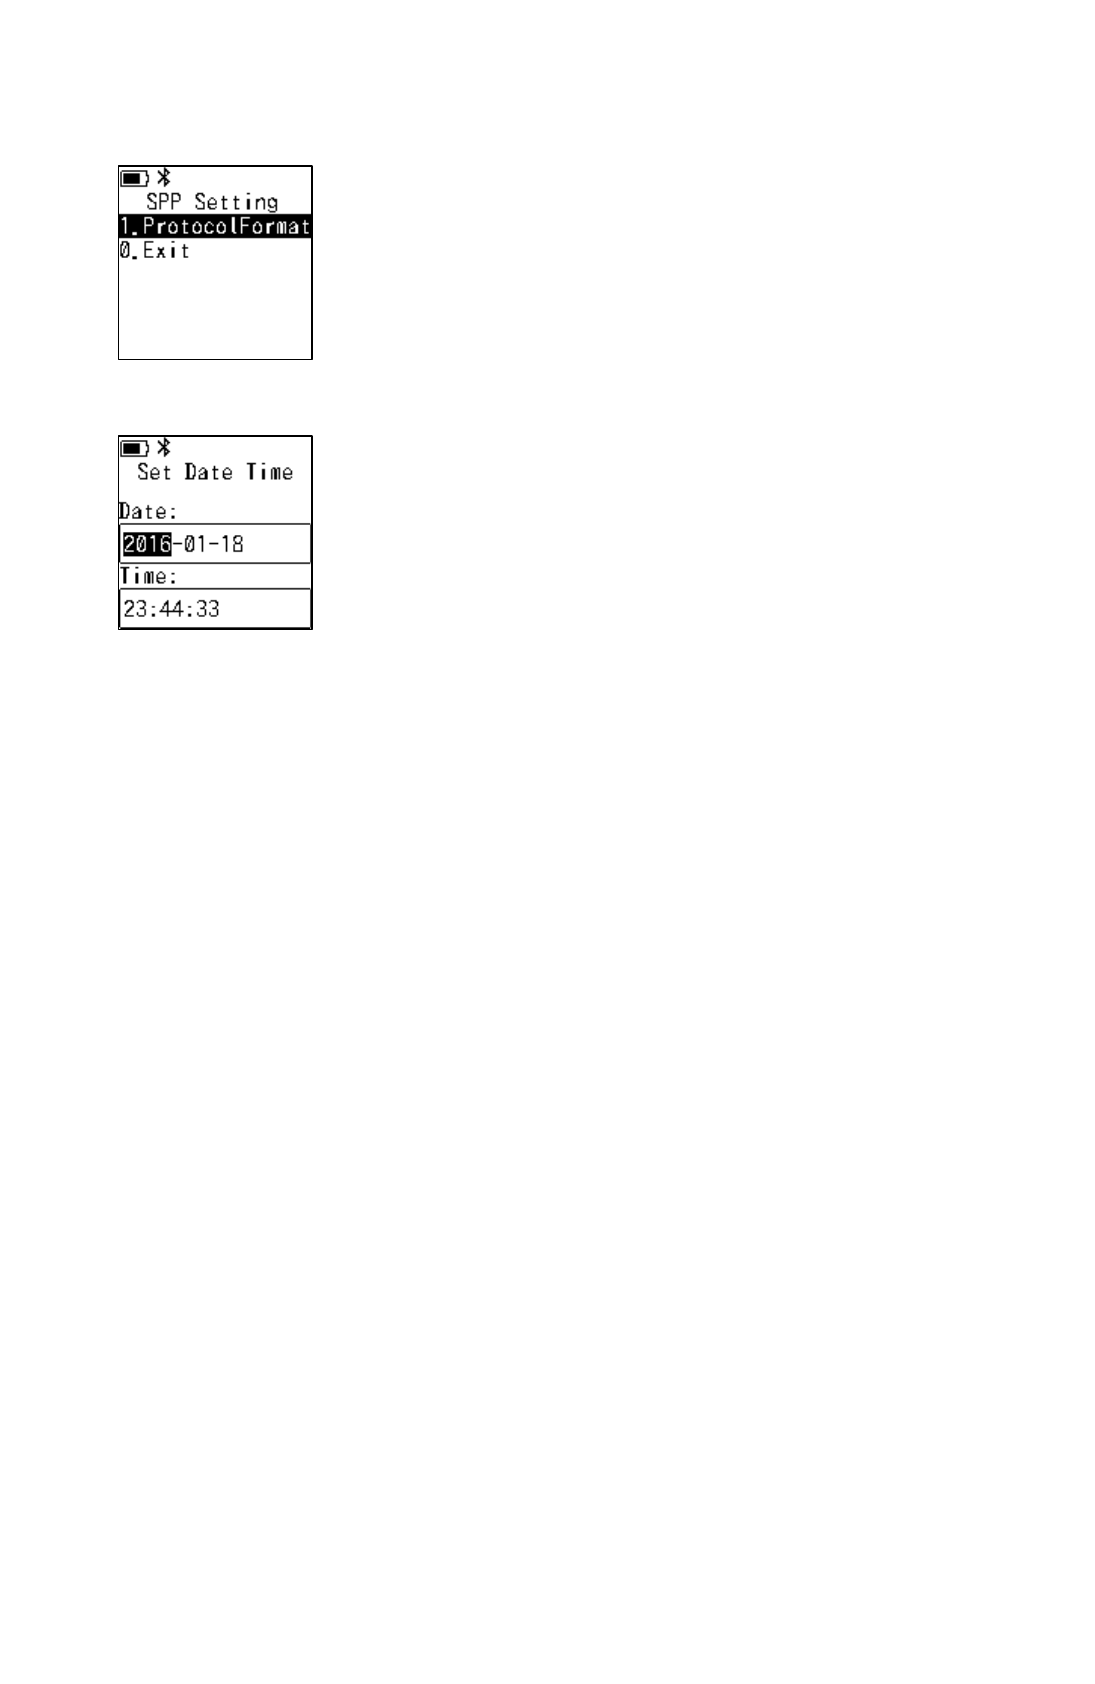
3.SPP Setting
SPP(Serial Port Profile)
1.ProtocolFormat
:
Sets protocol format.(JSON or
RAW)
The default setting is JSON.
0.Exit
:
Back to the previous menu
Press [ESC] to return.
4.Date & Time
Setting the system timer.
①
Press OK to change input mode of Date/Time.
②
Rewrite desired date and time.
③
Press OK to set the new time.
Press [ESC] to return without setting date/time.
The timer will reset to initial value if there is no power supply for more
than 3 minutes. Please set the date and time again when reuse it.

20
5.Power Manager
Setting the manager settings
1.Power Saving
:
Sets the time until the scanner
enters suspend mode. The
default setting is 60 seconds.
2.Auto Power Off
:
Sets the time until the scanner
turns off.
Operating conditions:
1
:
The Power On Mode
setting is “Restart”.
2
:
The scanner is in
suspend mode.
3
:
The Auto Connect
setting of the Bluetooth
CFG is disable.
Alternatively, the Auto
Connect setting is
enable, and the scanner
has no Bluetooth
connection history.
The default setting is 5 minutes.
3.Power ON Mode
:
Sets the operation after the time
of the Auto Power Off has
elapsed.
Restart
:
Power off
Resume
:
Keep suspend
mode
The default setting is Resume.
0.Exit
:
Back to the previous menu
Press [ESC] to return.
21
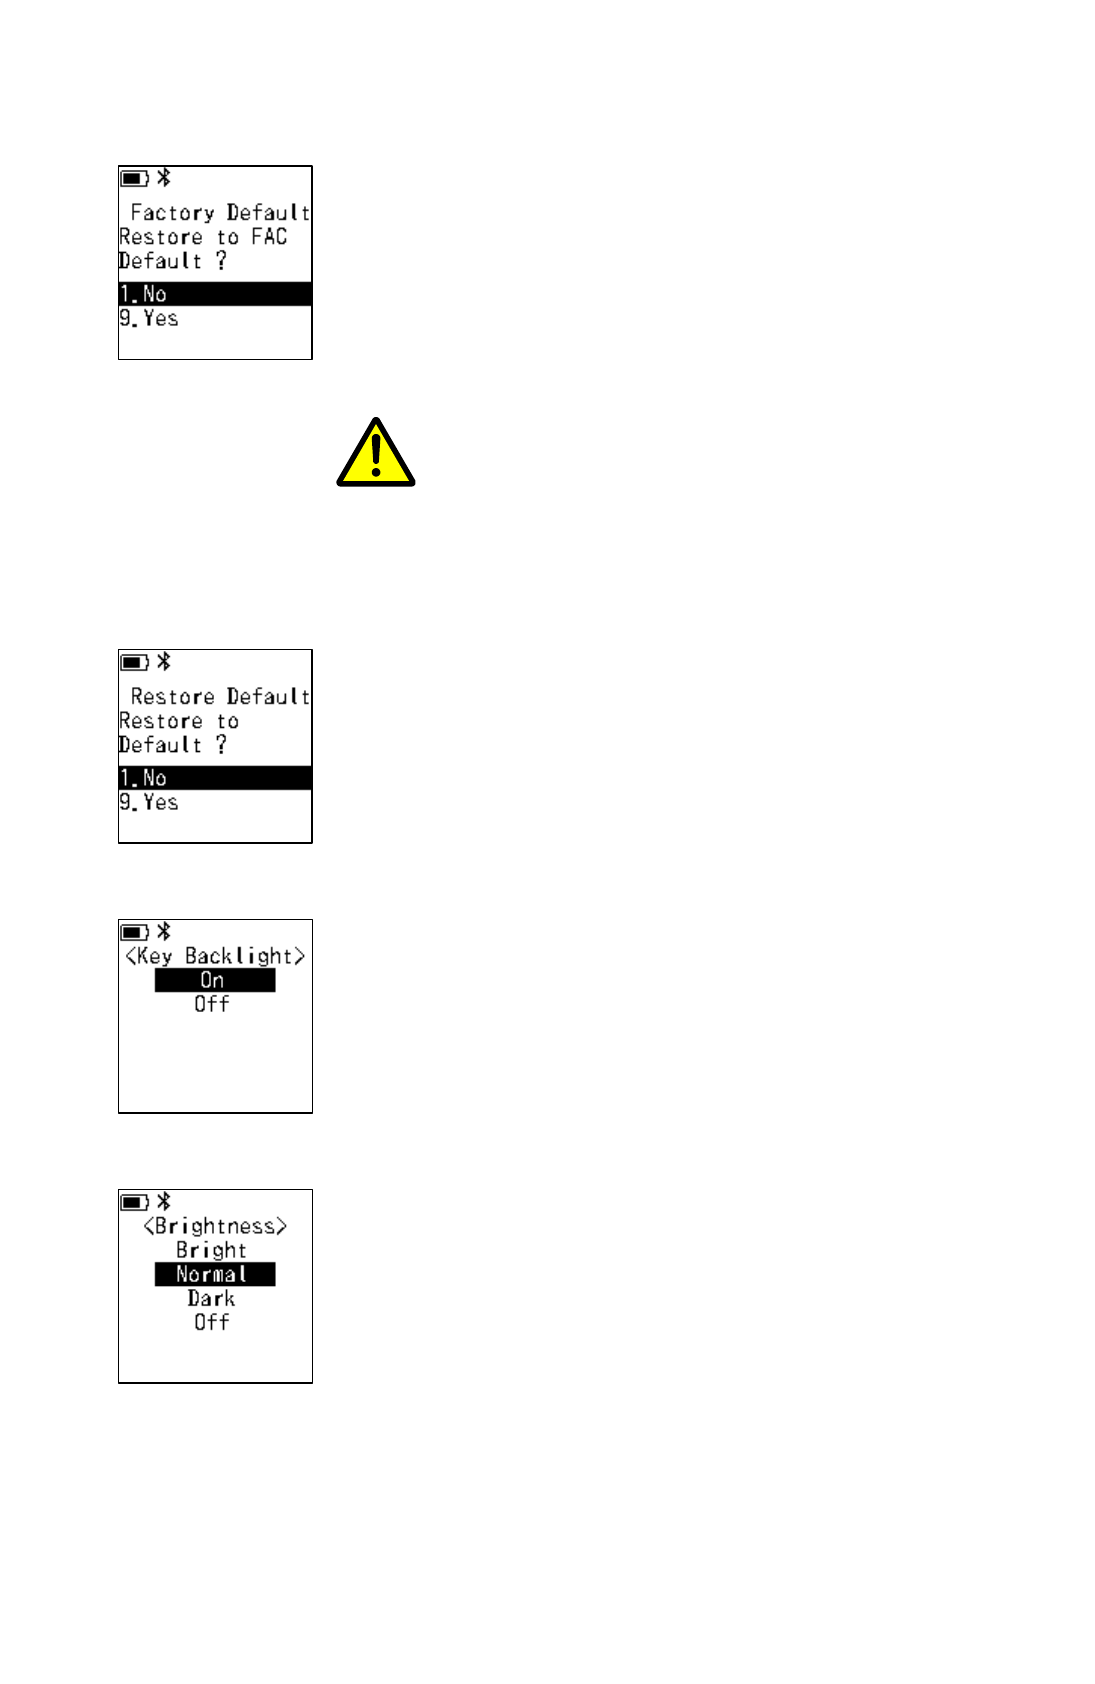
6.Factory Default
Initializing to the factory-default settings
1.No
:
Back to the previous menu
9.Yes
:
Resets the factory default.
All the settings and user memory
are initialized. Be sure to consult
with the administrator before
execution.
Press [ESC] to return.
When Factory Default is run, all the installed applications will be
deleted (except SCAN MODE).
7.Restore Default
Initializing the setting parameter
1.No
:
Back to the previous menu
9.Yes
:
Only the setting parameter is
reset to the default value.
Press [ESC] to return.
8.KEY BackLight
Setting the key backlight
On
:
Backlight is on
Off
:
Backlight is off
Press [ESC] to return.
The default setting is On.
9.LCD Brightness
Setting the brightness of LCD backlight
Bright
:
Brightness is 80%.
Normal
:
Brightness is 40%.
Dark
:
Brightness is 20%.
Off
:
Backlight is off.
Press [ESC] to return.
The default setting is Normal.
CAUTION
22
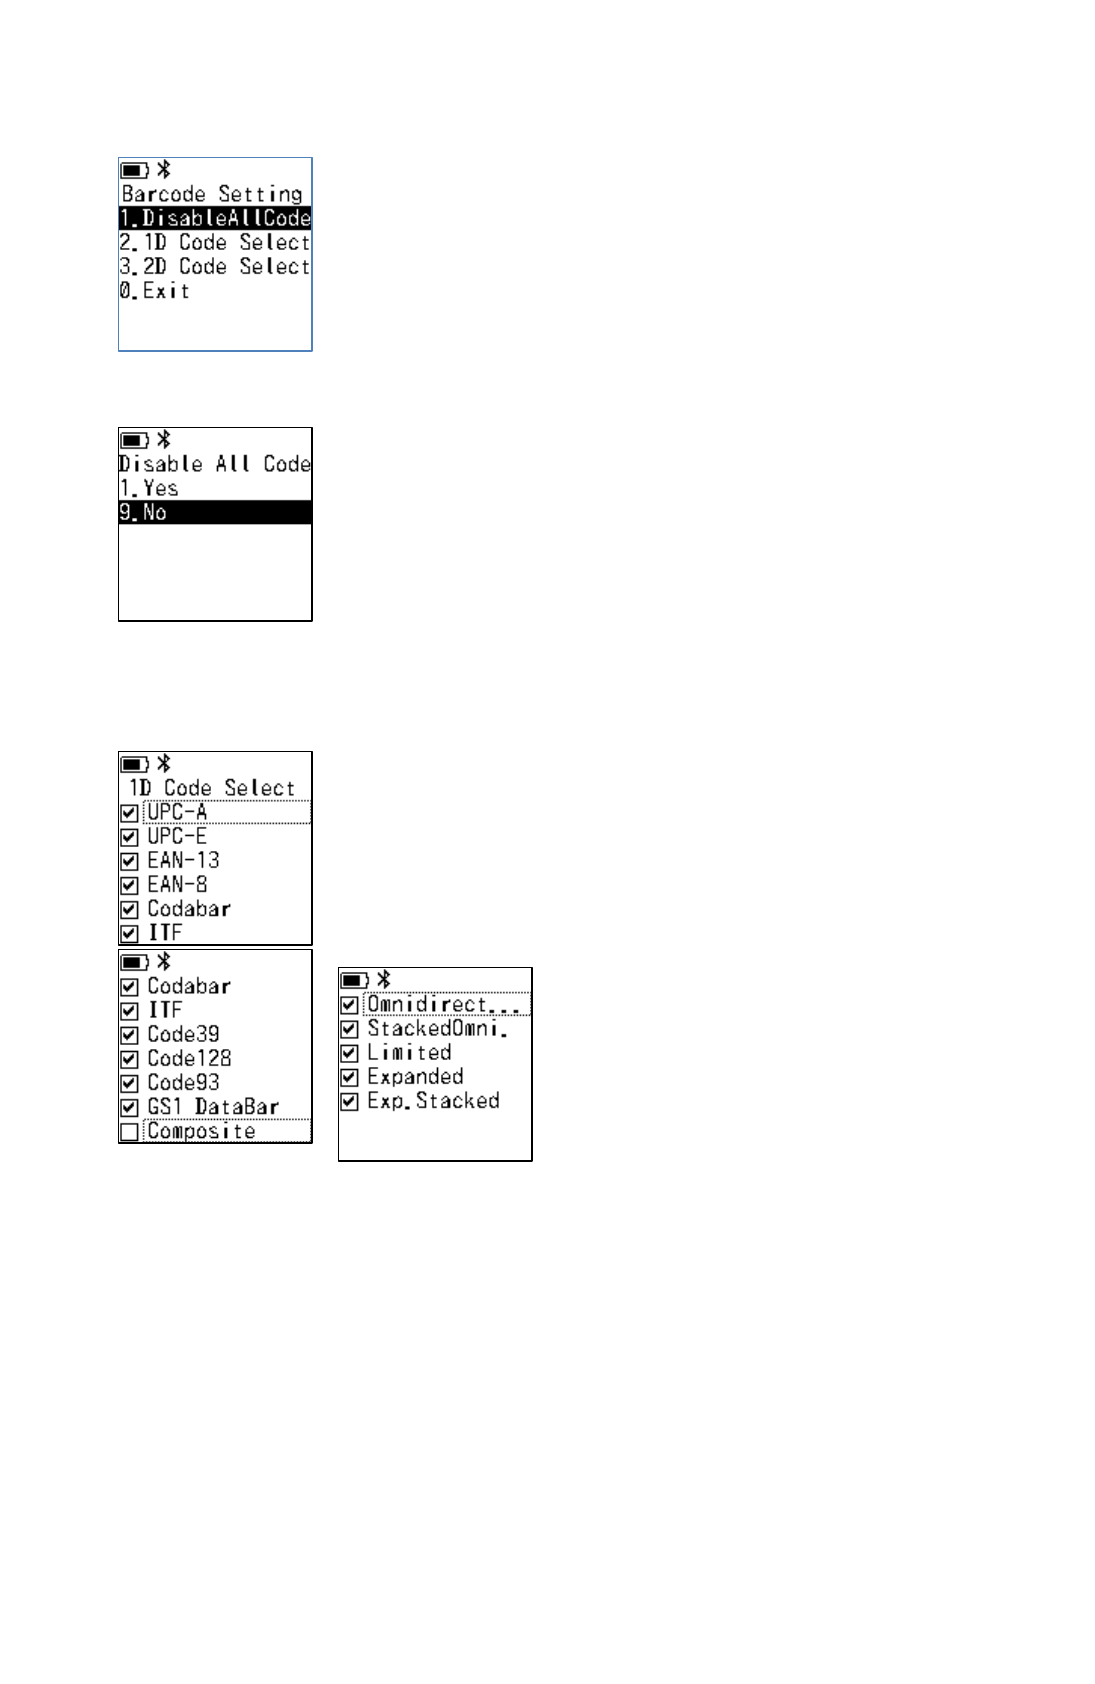
5.3. Barcode Setting
The sub-menu is displayed by selecting “Barcode Setting” from the
system menu.
Press [ESC] or [0.Exit] and then [OK] to return.
1.Disable All Code
Prohibiting the reading of all symbols
1.Yes
:
Prohibit the reading of all symbols.
To read only specific symbols,
prohibiting all symbols once with this
item helps the user to allow only the
desired symbol easily.
9.No
:
Back to the previous menu
Press [ESC] to return.
2.1D Code Select
Setting permission / prohibition of reading for each one-dimensional
symbols.
The default setting is On (permit) except Composite.
Press [ESC] to return.
Composite cannot be read even by setting "On" alone. Set the
combination symbol to On too.
Sub-menu of GS1 DataBar
Displays the sub-menue when GS1 DataBar is sellected.
The default setting is all ON.
23
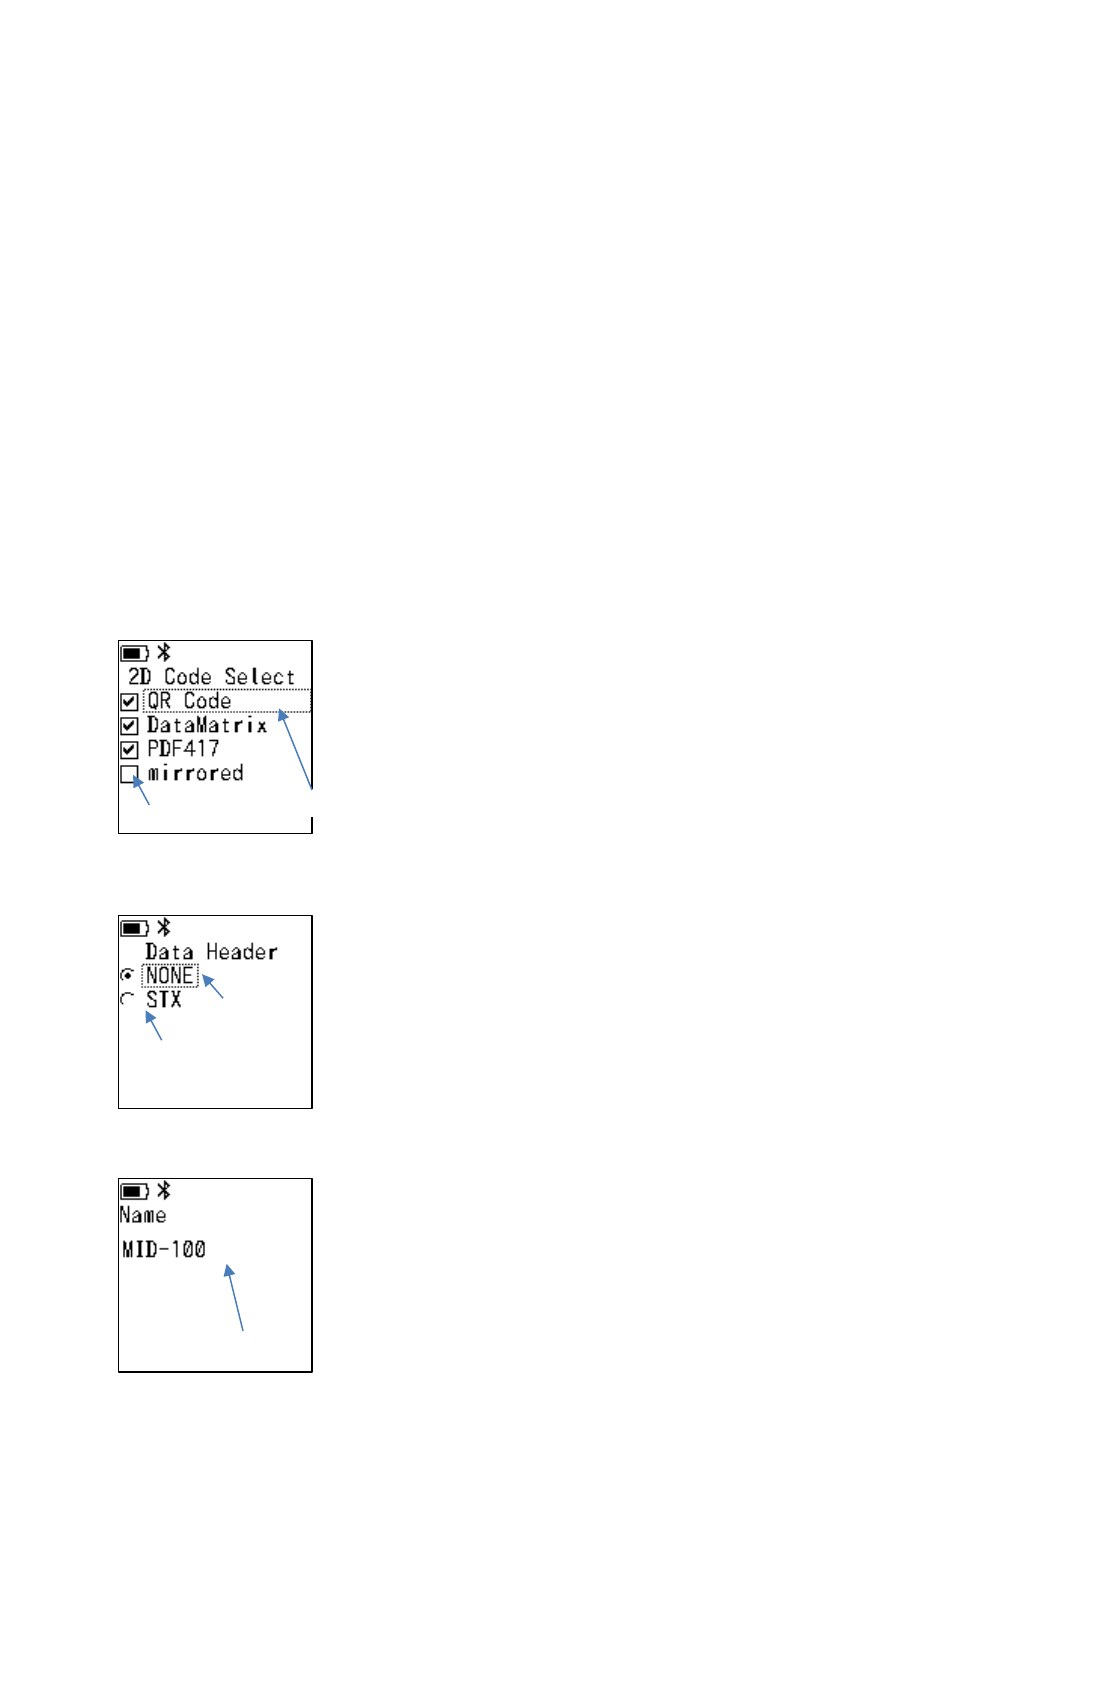
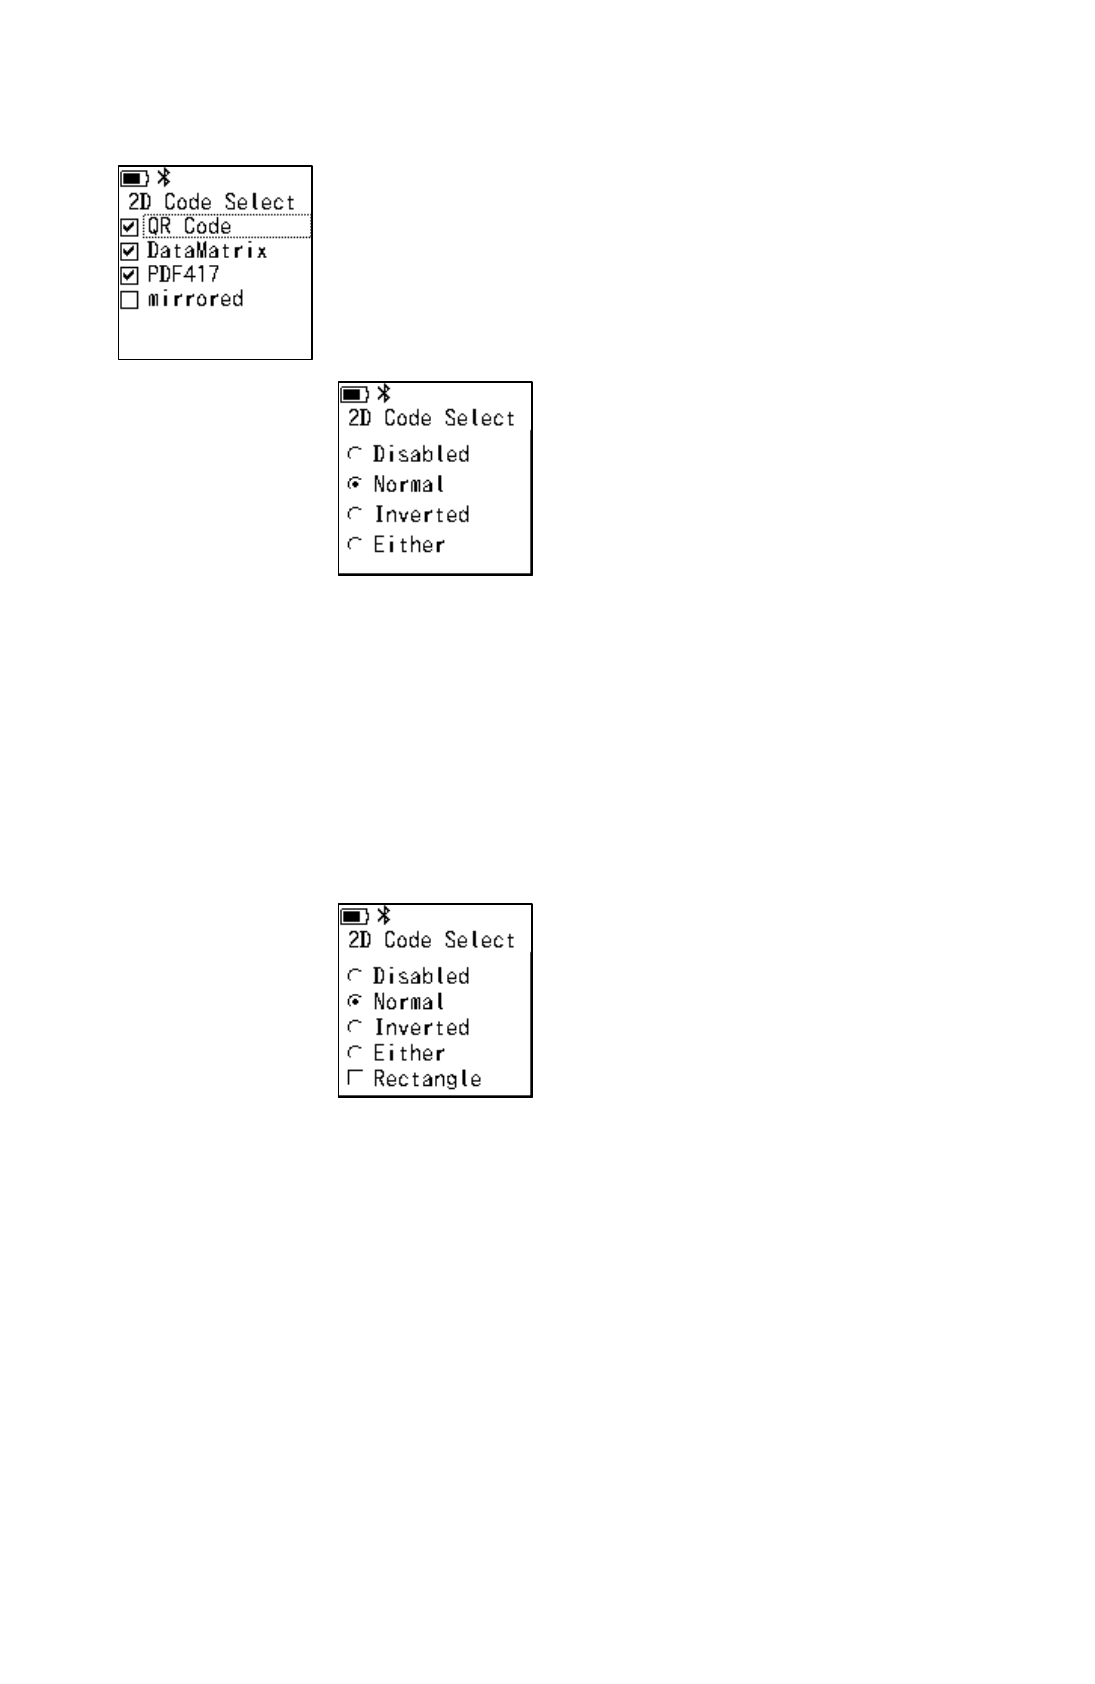
3.2D Code Select
Setting permission / prohibition of reading for each two-dimensional
symbol system.
The default setting is all ON (permit) except mirrored.
Press [ESC] to return.
The “mirrored” is the reading setting for mirror inversion symbol. Both
inversion and non-inversion can be read when this setting is ON.
Sub-menu of QR Code
Disabled
:
The read is invalid.
Normal
:
Reads only the code without inversion.
(Black on White)
Inverted
:
Reads only the code with inversion code.
(White on Black)
Either
:
Reads both inverted and non-inverted code.
The default setting is Normal.
Sub-menu of DataMatrix
Disabled
:
The read is invalid.
Normal
:
Reads only the code without inversion code.
(Black on White)
Inverted
:
Reads only the code with inversion code.
(White on Black)
Either
:
Reads both inverted and non-inverted code.
The default setting is Normal.
Rectangle
:
Sets whether to allow reading of rectangular
symbols. The default setting is Off. After
selected Disabled, Rectangle cannot be On。
Press [ESC] to return.
24
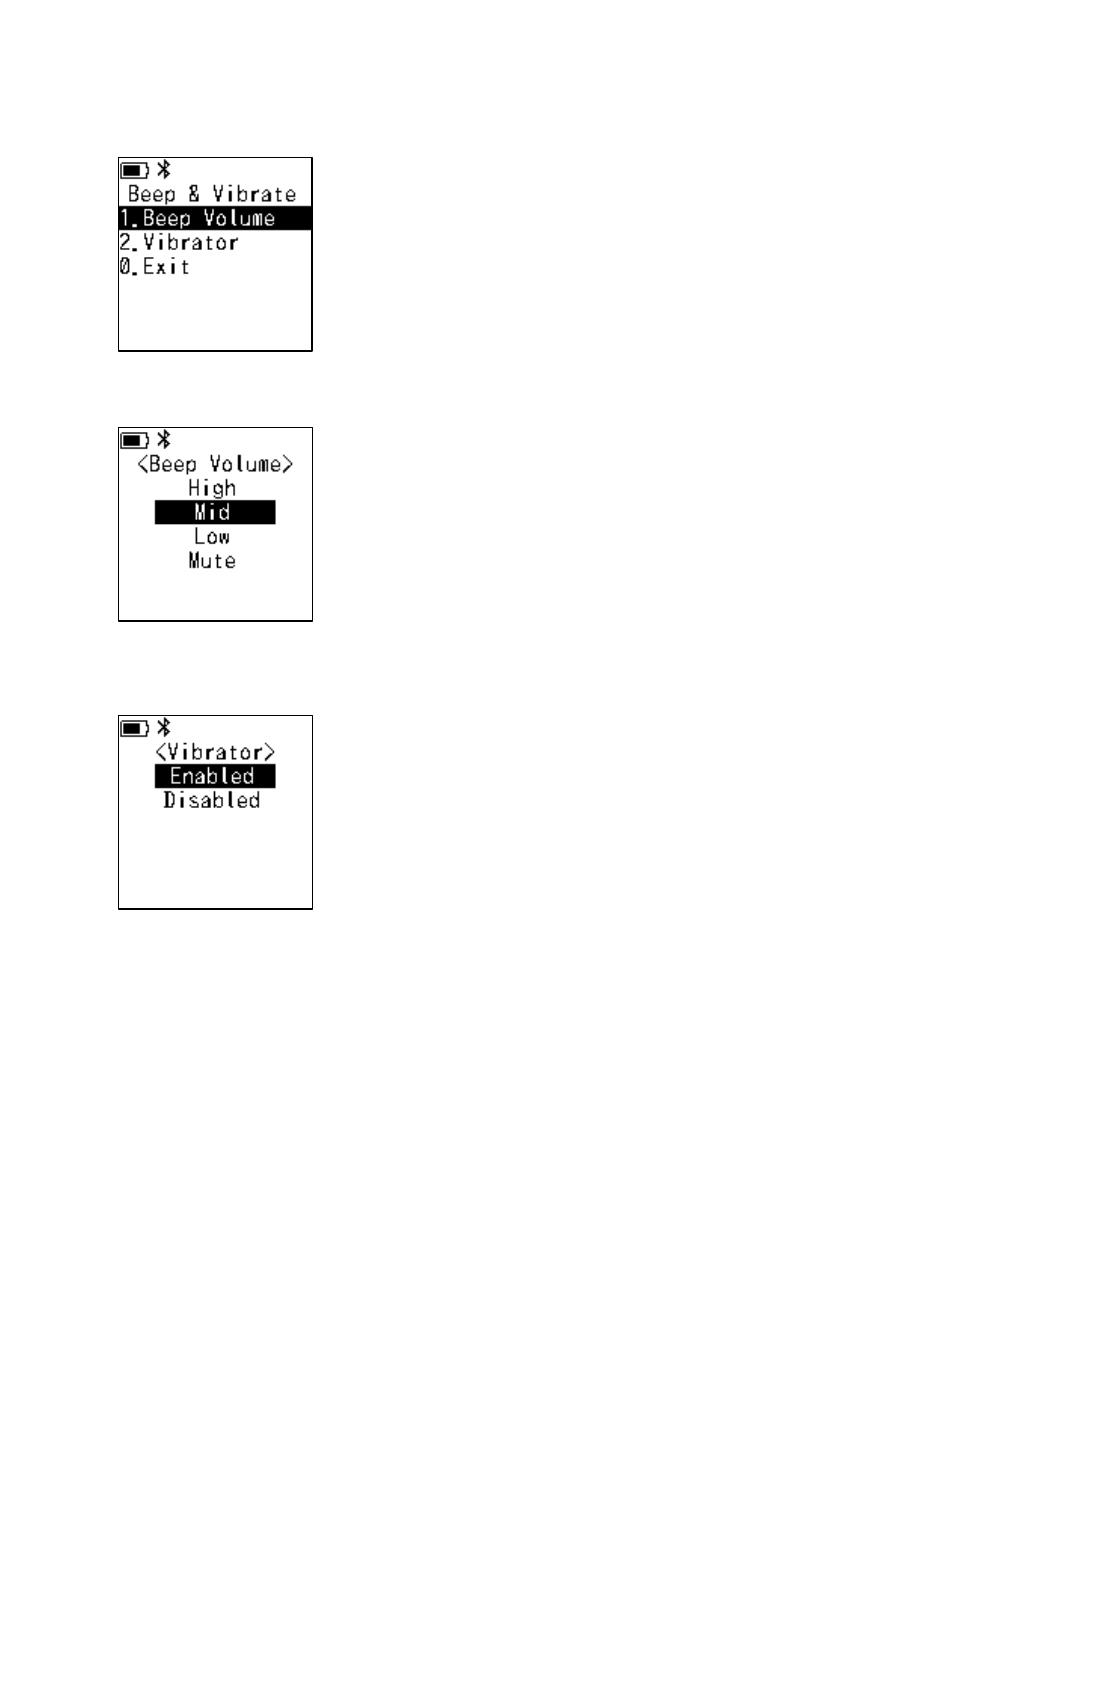
5.4. Beep & Vibrator
The sub-menu is displayed by selecting “Beep & Vibrate” from the
system menu.
Press [ESC] or [0.Exit] and then [OK] to return.
1.Beep Volume
Setting the buzzer sound volume
High
:
Sets volume to high.
Mid
:
Sets volume to Mid.
Low
:
Sets volume to Low.
Mute
:
Sets to mute.
The default setting is Mid.
Press [ESC] to return.
2.Vibrator
Setting the vibrator operation
Enabled
:
Enable vibrator
Disabled
:
Disable vibrator
The default setting is Enable.
Press [ESC] to return.
25
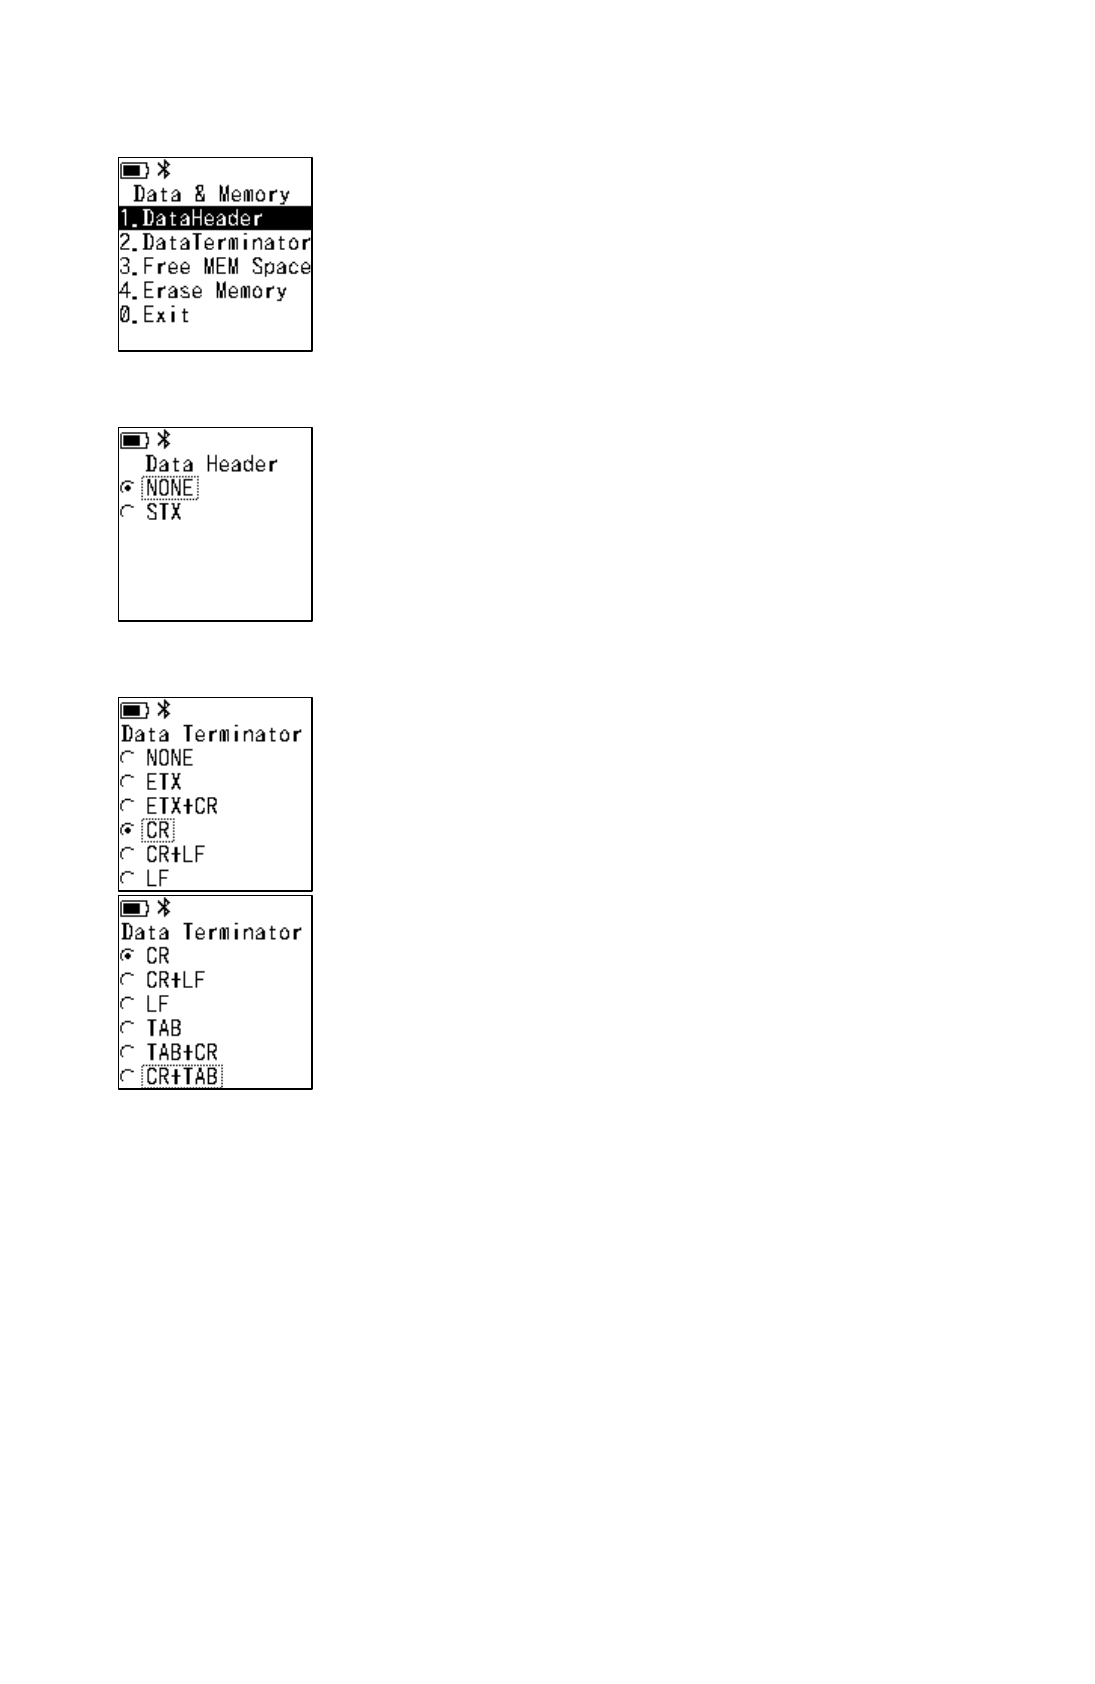
5.5. Data & Memory
The sub-menu is displayed by selecting “Data & Memory” from the
system menu.
Press [ESC] or [0.Exit] and then [OK] to return.
1.Data Header
Setting the header for data transmission
NONE
:
Do not add Header.
STX
:
Adds STX
The default setting is NONE.
Press [ESC] to return.
2.Data Terminator
Setting the terminator for data transmission
NONE
:
Do not add Header.
ETX
:
Adds ETX
ETX+CR
:
Adds ETX and CR
CR
:
Adds CR
CR+LF
:
Adds CR and LF
LF
:
Adds LF
TAB
:
Adds TAB
TAB+CR
:
Adds TAB and CR
CR+TAB
:
Adds CR and TAB
The default setting is CR.
Press [ESC] to return.
26
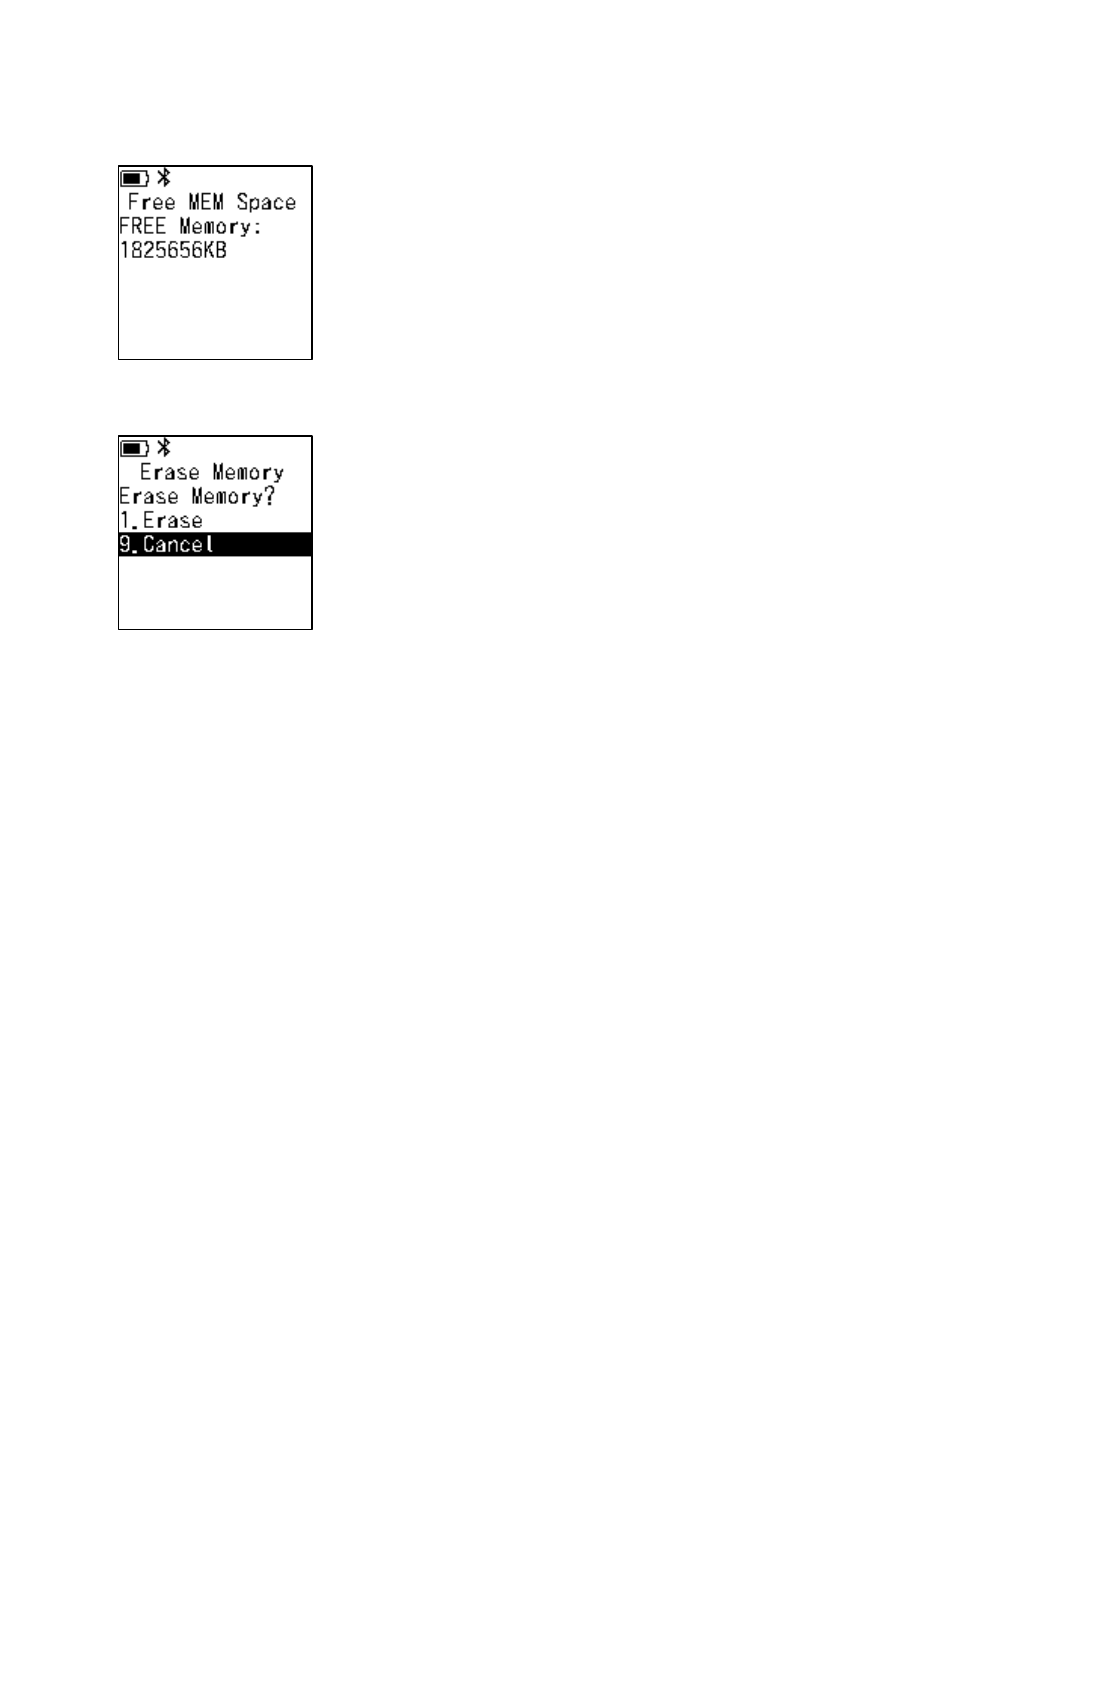
3.Free MEM Space
Displays the free space of user memory area. The unit is KB
(kilobyte).
Press [ESC] to return.
4.Erase Memory
Initializing the user memory area
1.Erase
:
All contents of user memory are erased.
9.Cancel
:
Back to the previous menu
Press [ESC] to return.
27
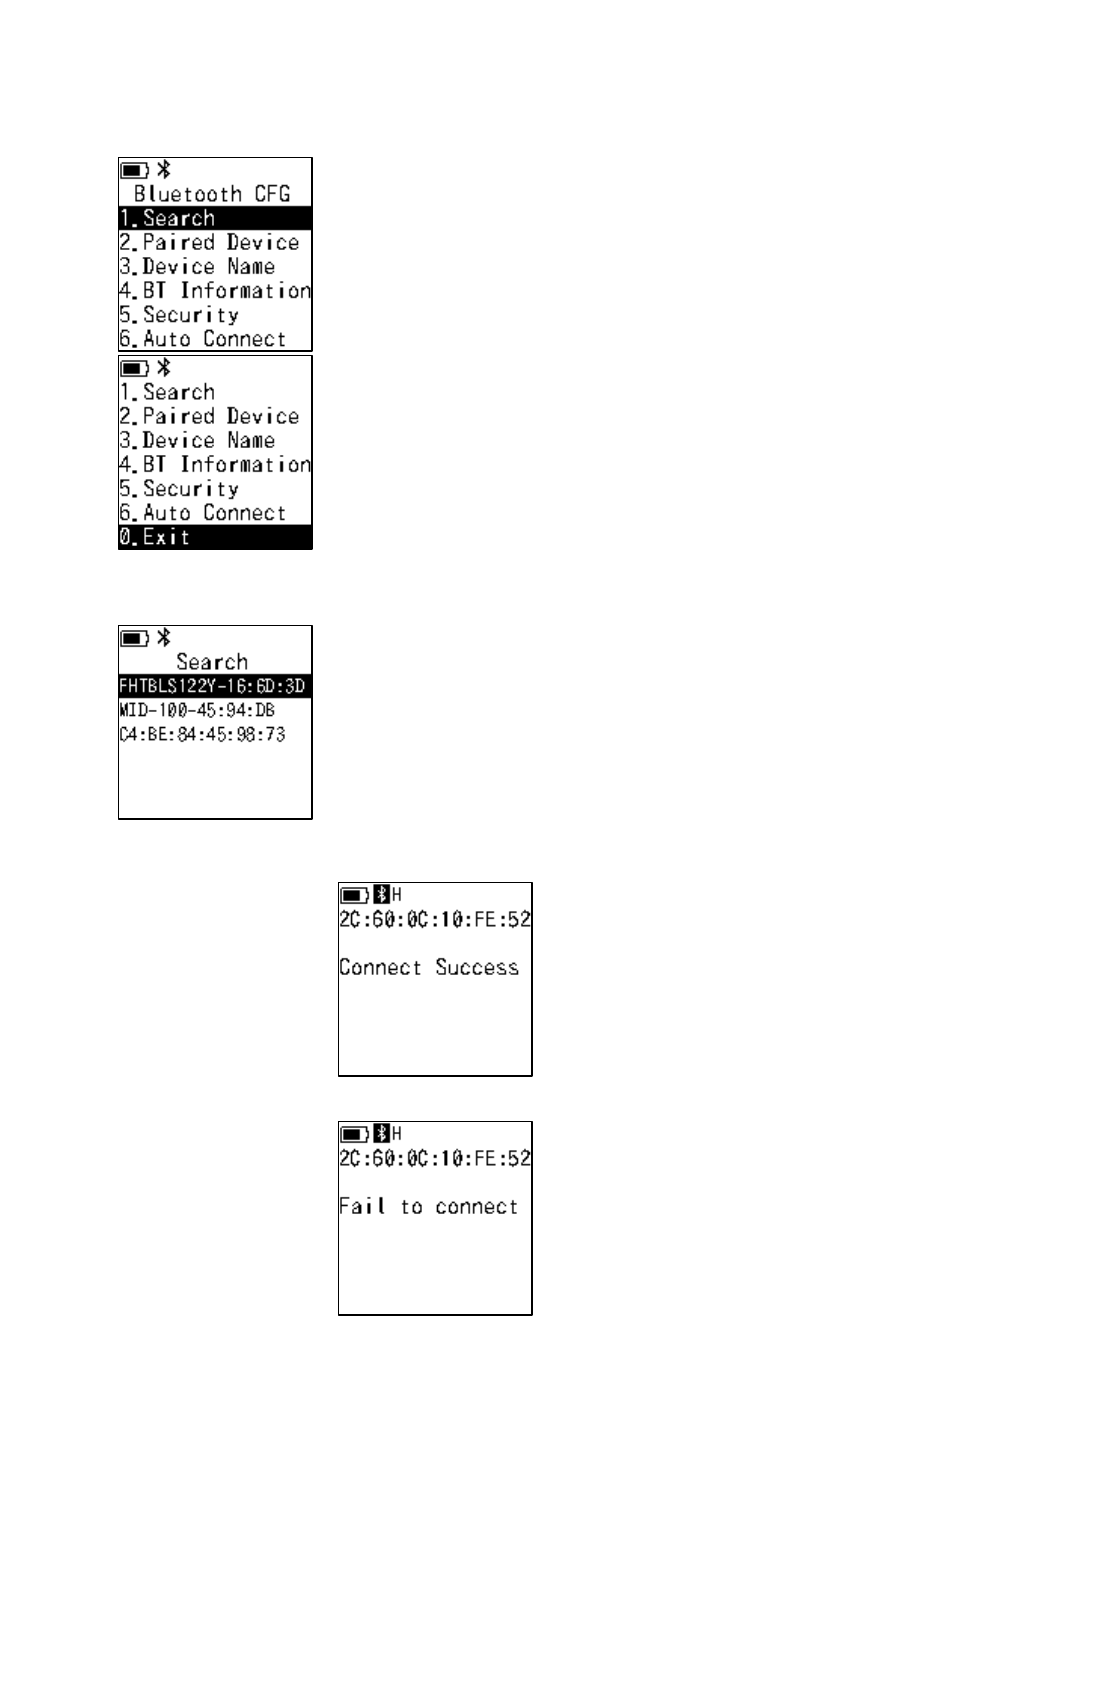
5.6. Bluetooth CFG
Various setting menus for Bluetooth communication are displayed
when Bluetooth CFG is selected from the system menu.
Press [ESC] or [0.Exit] and then [OK] to return.
1.Search
Searches for nearby Bluetooth devices and displays the device
name.
* Only permit to search Bluetooth devices nearby.
Select desired device name and press [OK] to return to switch to
the Connect screen.
Press [ESC] to return.
Example (Select the device name for connection):
・Succeeded Connection
・Failed Connection
28
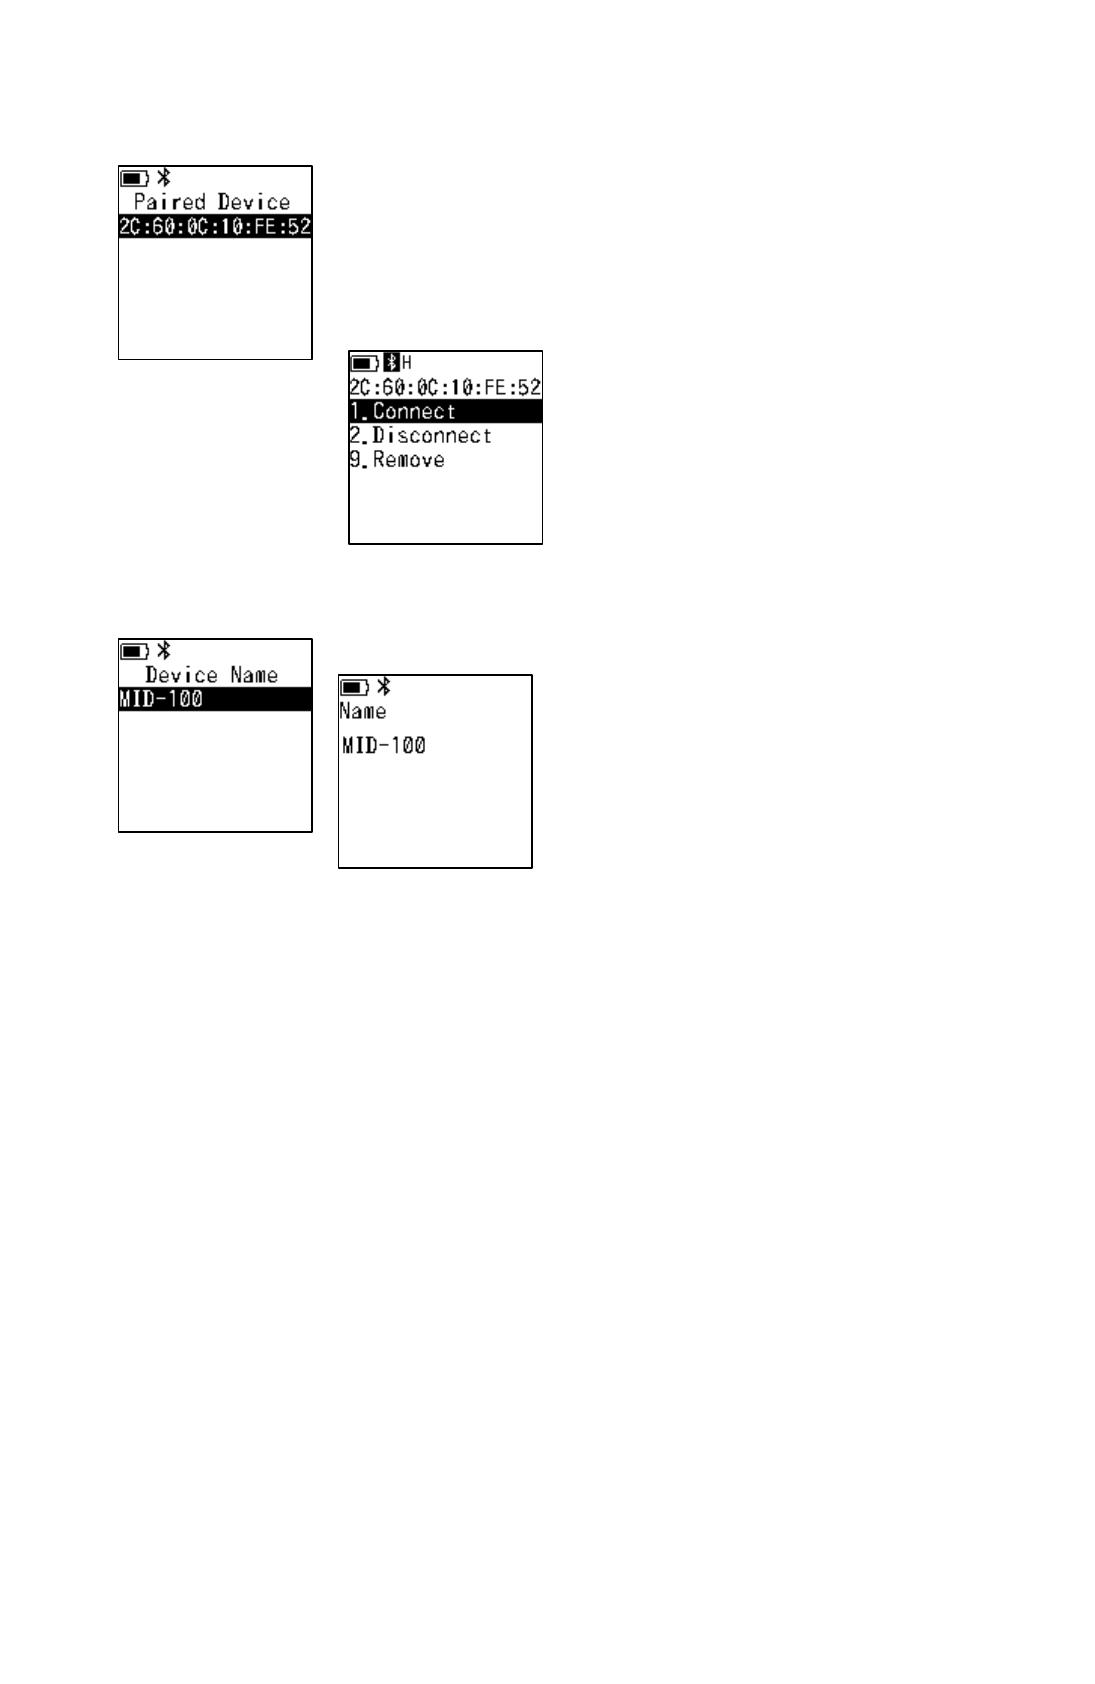
2.Paired Device
Displays Bluetooth address of the paired device.
When selecting Bluetooth address and pressing [OK], moves to the
Connection screen.
Press [ESC] to return.
Example (Select displayed Bluetooth address):
Connection screen
1.Connect
:
Connects with
Bluetooth.
2.Disconnect
:
Disconnecs with
Bluetooth.
9.Remove
:
Removes the list of
paired devices.
3.Device Name
Displays and sets Bluetooth device name of MID-100.
Press [OK] to move to the changing screen.
The default Bluetooth device’s name is MID-100.
Press [ESC] to return.
29
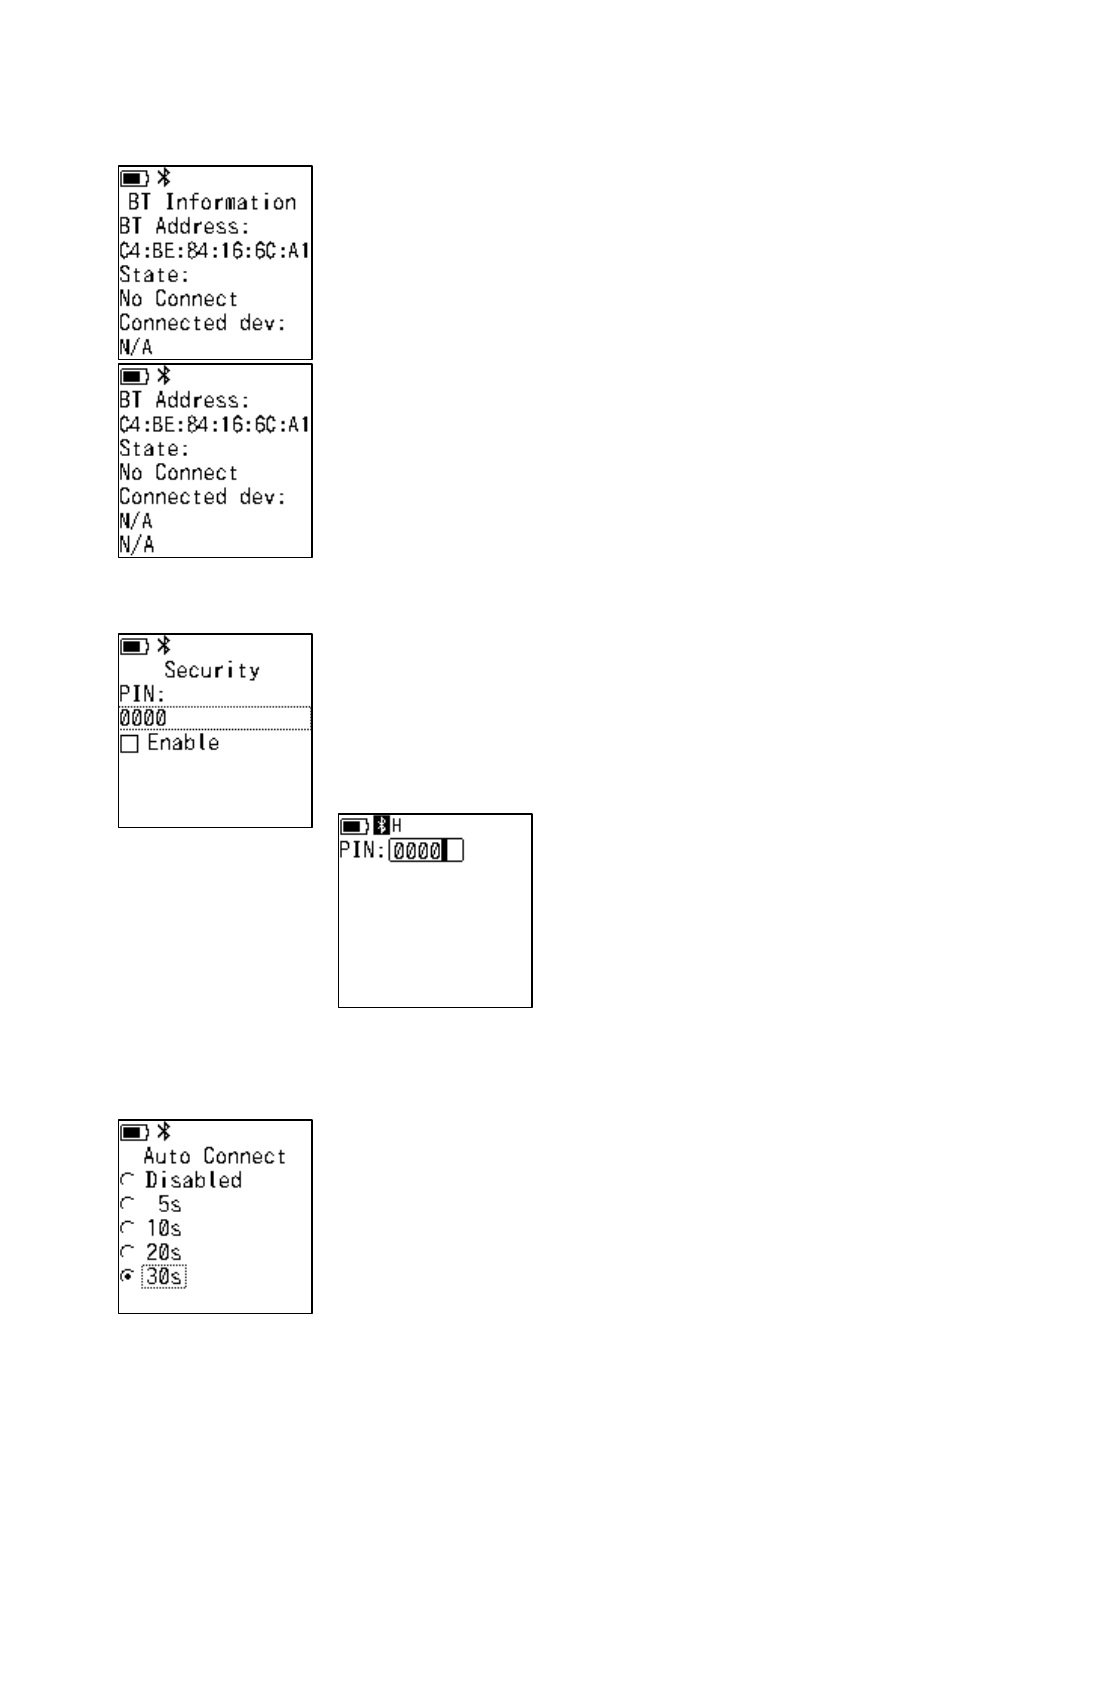
4.BT Information
Displays MAC address of Bluetooth and paring information.
BT Address
:
Bluetooth Address
State
:
Connection Status
Connected
:
Connected State
No Connect
:
Unconnected state
Connected dev
:
Information of Connected device
Up
:
Bluetooth Address
Down
:
Device Name
Press [ESC] to return.
5.Security
Setting the PIN code identification at Bluetooth paring.
When Enable is checked, 4 digit PIN code input is required. Set the
same PIN as the connection destination.
The default “Enable” is Off and PIN is 0000.
Select PIN and press [OK] to enter the setting screen.
Press [ESC] to return.
6.Auto Connect
Setting the time until automatic reconnection, when the connection
is lost.
Disabled
:
Automatic reconnection is invalid
5s
:
Tries to reconnect after 5 sec.
10s
:
Tries to reconnect after 10 sec.
20s
:
Tries to reconnect after 20 sec.
30s
:
Tries to reconnect after 30 sec.
The default setting is 30s.
Press [ESC] to return.
30
5.7. Data Transfer
The sub-menu is displayed by selecting “Data Transfer” from the
system menu.
Press [ESC] or [0.Exit] and then [OK] to return.
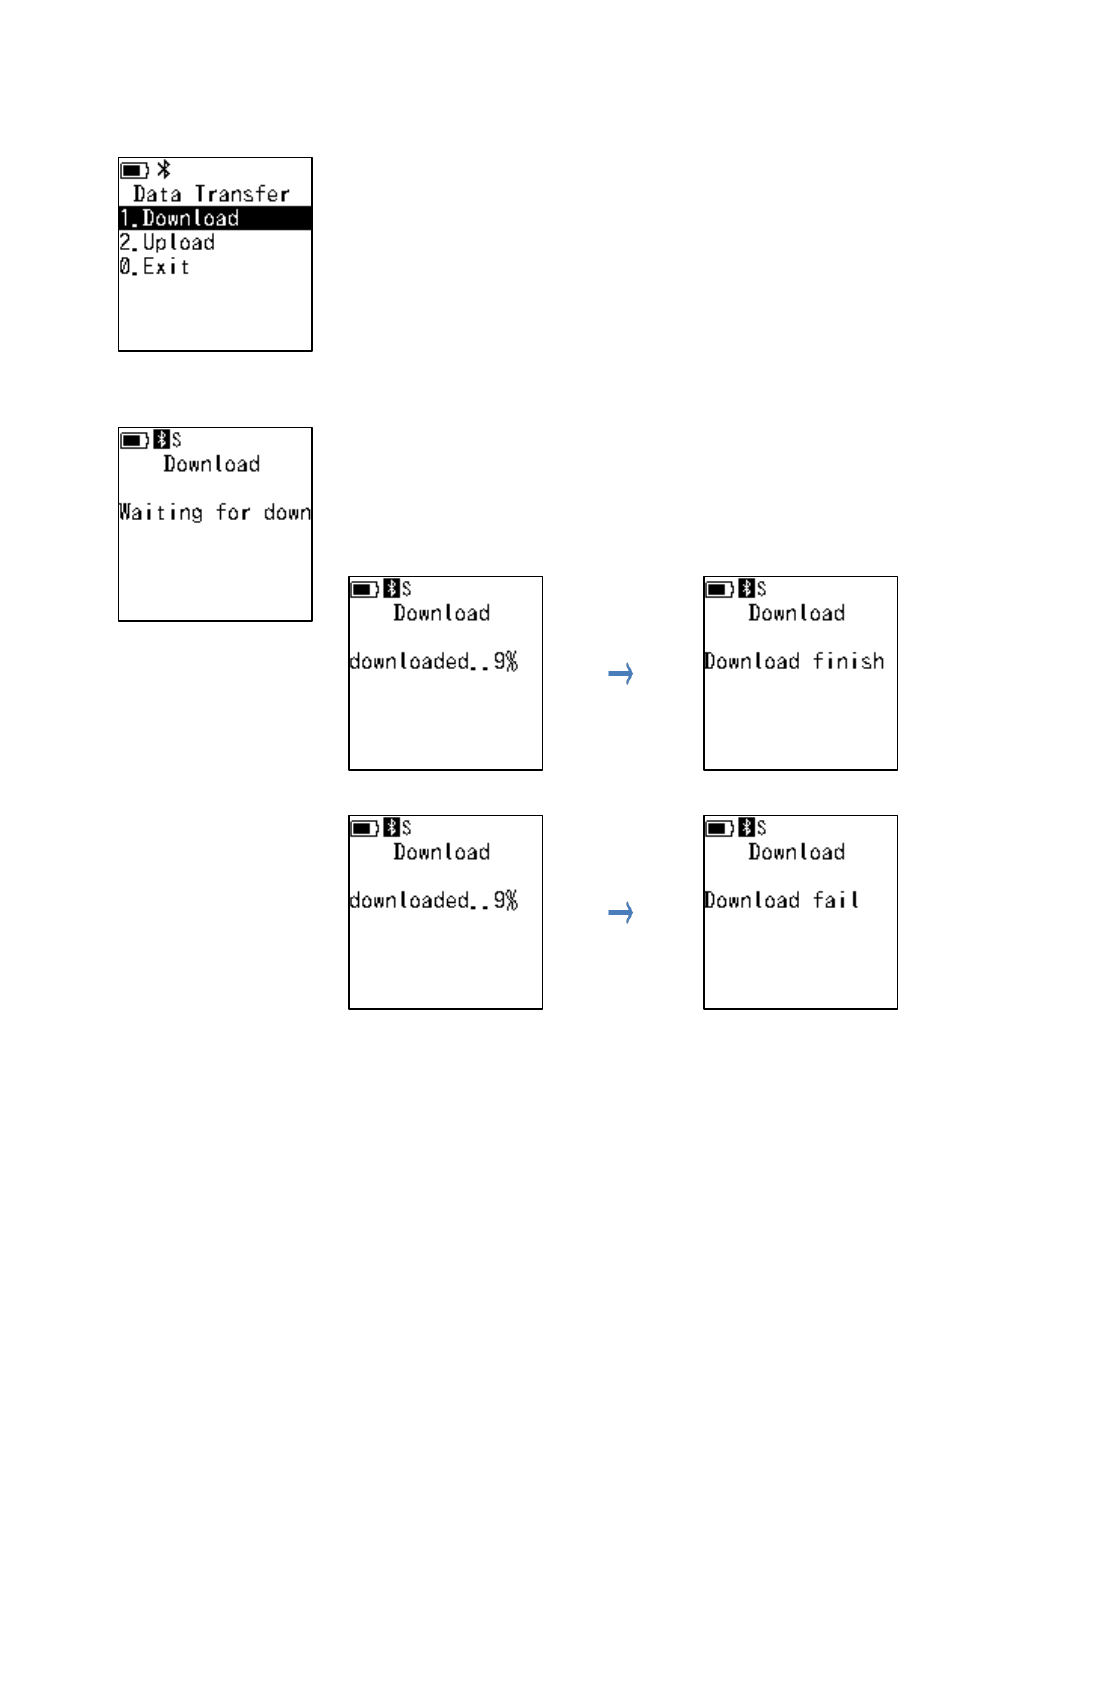
1.Download
Receives data files from host device.
Send required files from the host device when waiting for reception.
Download Execution flow;
Success Example:
Failure Example:
Press [ESC] to return.
31
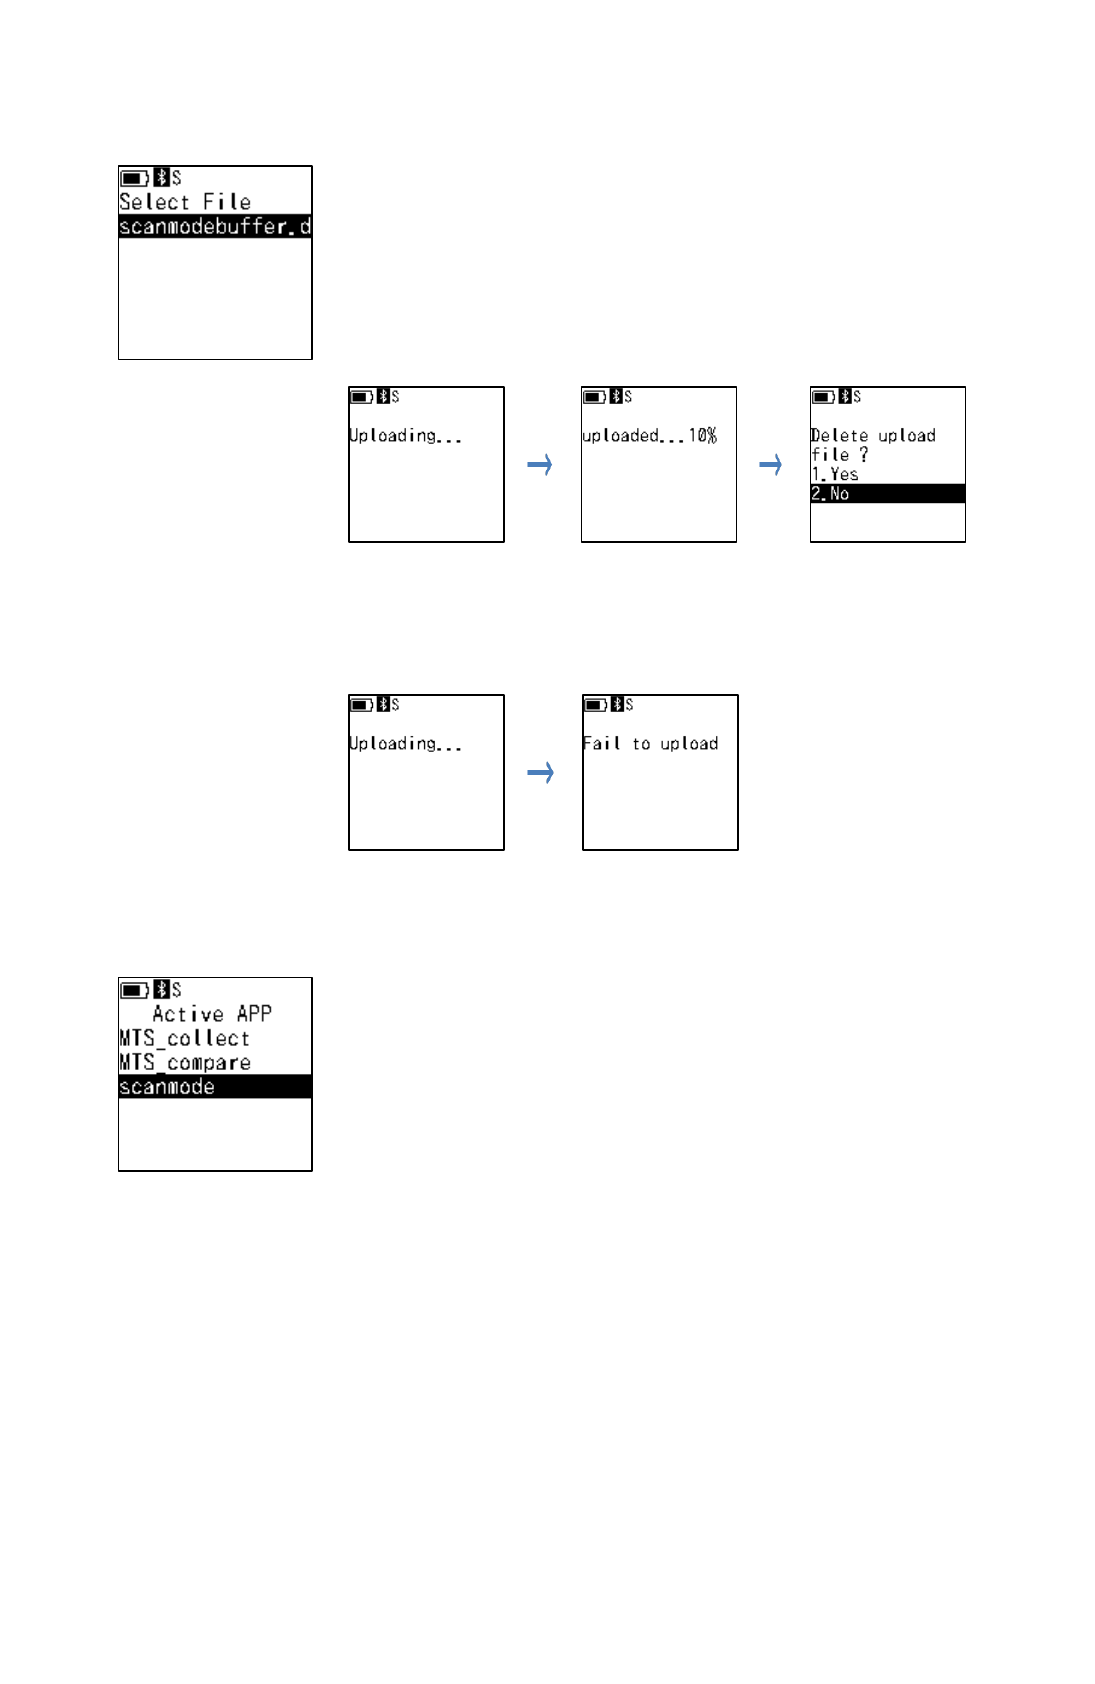
2.Upload
Sends data files to host device.
Files “scanmodebuffer.d…” on the list is from saving files in
/data/media/scan-data/.
After selecting the file and pressing [OK], MID-100 starts data
sending.
Upload Execution flow;
Success Example:
Select whether to delete the last upload file or not.
1.Yes
:
Delete the file from device.
2.No
:
Back to the previous screen without delete.
Failure Example:
Press [ESC] to return.
5.8. Active APP
When Active App is selected from the system menu, the Active App
screen is displayed.
Displays the list of application registered in MID-100.
To start the application, Select the application and press [OK].
This application will be executed when MID-100 starts next time.
The system menu is not displayed.
Press [ESC] to return.

32
6. General Specification
6.1. General Specification
Item
Specification
OS
Linux (ver. 3.10.53)
CPU
ARM Cortex-A9, 1GHz
Memory
RAM
128 MB DDR2
ROM
4GB(Useable area : Approx. 1.8GB) FlashROM
Communication
Bluetooth
Bluetooth V2.1+EDR Compliant with Class2.0
Supported Profile:HID、SPP
USB
MicroUSB(Mass Storage Device)
LCD
LCD Type
Monochrome LCE with backlight
Resolution
128×128 dots
Size
Approx.22.6mm x 22.6mm
LED Monitor
Two-color LED (Green, Red and Orange)
Input Key
Numeric Keys, Function Keys (F1/F2), Clear,
ESC, OK, Power, Menu, Scan Key and Side Trigger
(On both sides of the main body)
Key Backlight
Scanner
1D Symbols
Codabar(NW-7)、ITF、Code39、Code128、
JAN/EAN/UPC
Code93、GS1 DataBar、Composite
2D Symbols
QR Code, PDF417, DataMatrix(ECC200)
Reading Method
360,000 pixel CMOS Sensor
Resolution
1D Code:0.167mm or more
2D Code:0.25mm or more
Light
Red Color LED
Aiming
Cross Shaped Laser Pointer
Vibrator
On/Off
Sound Volume Adjust
4 Levels: Mute / Low / Middle / High
Strap Hole
4 on the left, right, top and bottom
Size
Dimension
Approx.130 x 47 x 33(21) mm () is grip parts size
Weight
Approx. 130g
Battery
Specification
Rechargeable Li-ion Battery, 1,150mAh
Charging Time
Approx.4 hours
Operation Time
Approx.16 hours (*1)
Charging Method
Charge with Dedicated Cradle
Battery backup
Approx. 3 minutes
Environmental
specifications
Operation
Tem./ Humidity
0~50℃ / 20~85%RH
Storage
Tem./ Humidity
-20~70℃ / 20~85%RH
Shock
1.5m, No obstruction due to natural falling (*2)
Environmental
resistance
Compliant with IP54
*1. Using new battery, Room temperature and operating condition are mmeasured at 1 scan / 60 second cycle. (1 scan + data transmission +
high brightness screen + key backlight ON (15 seconds), repeats the total of 60 seconds cycle of screen OFF + key backlight OFF (45
seconds). This is a test value according to our company’s standard, not a guaranteed value.
*2. This is a test value according to our company’s standard, not a value to guarantee breakdown or breakage of the main unit.
33
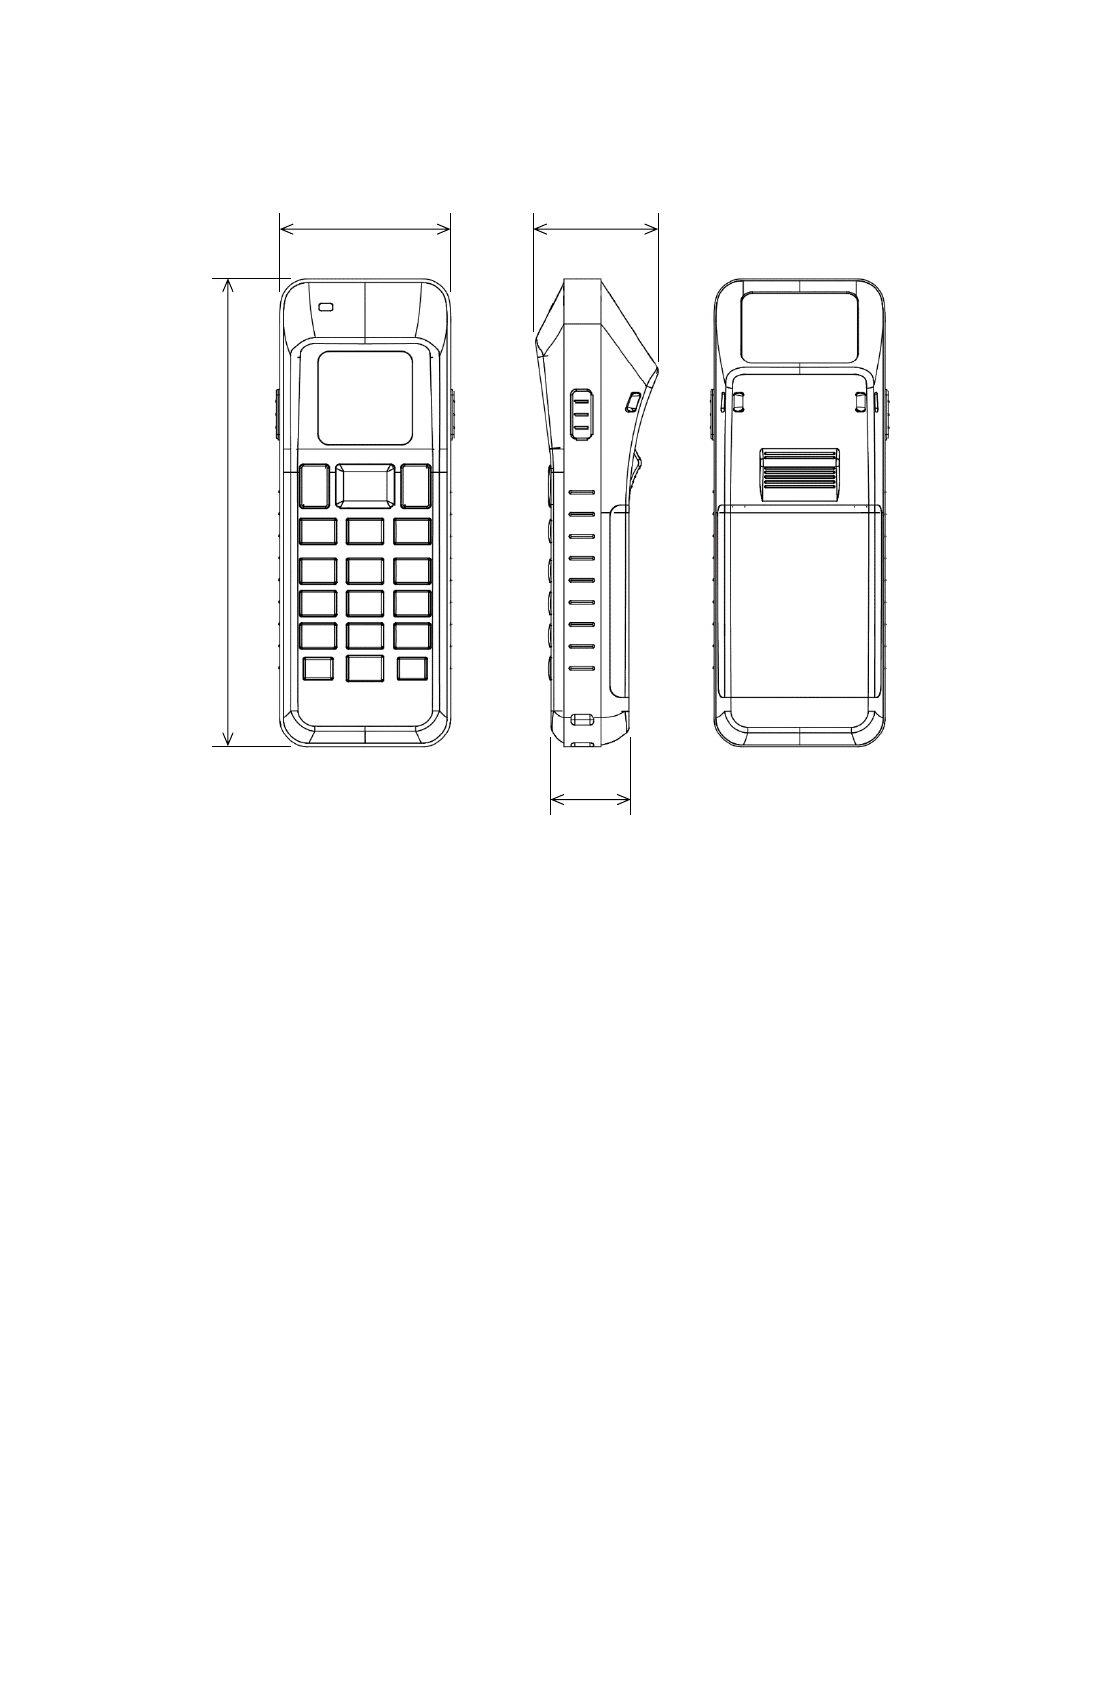
6.2. External Dimensions
33
47
21
130
Unit: mm
34
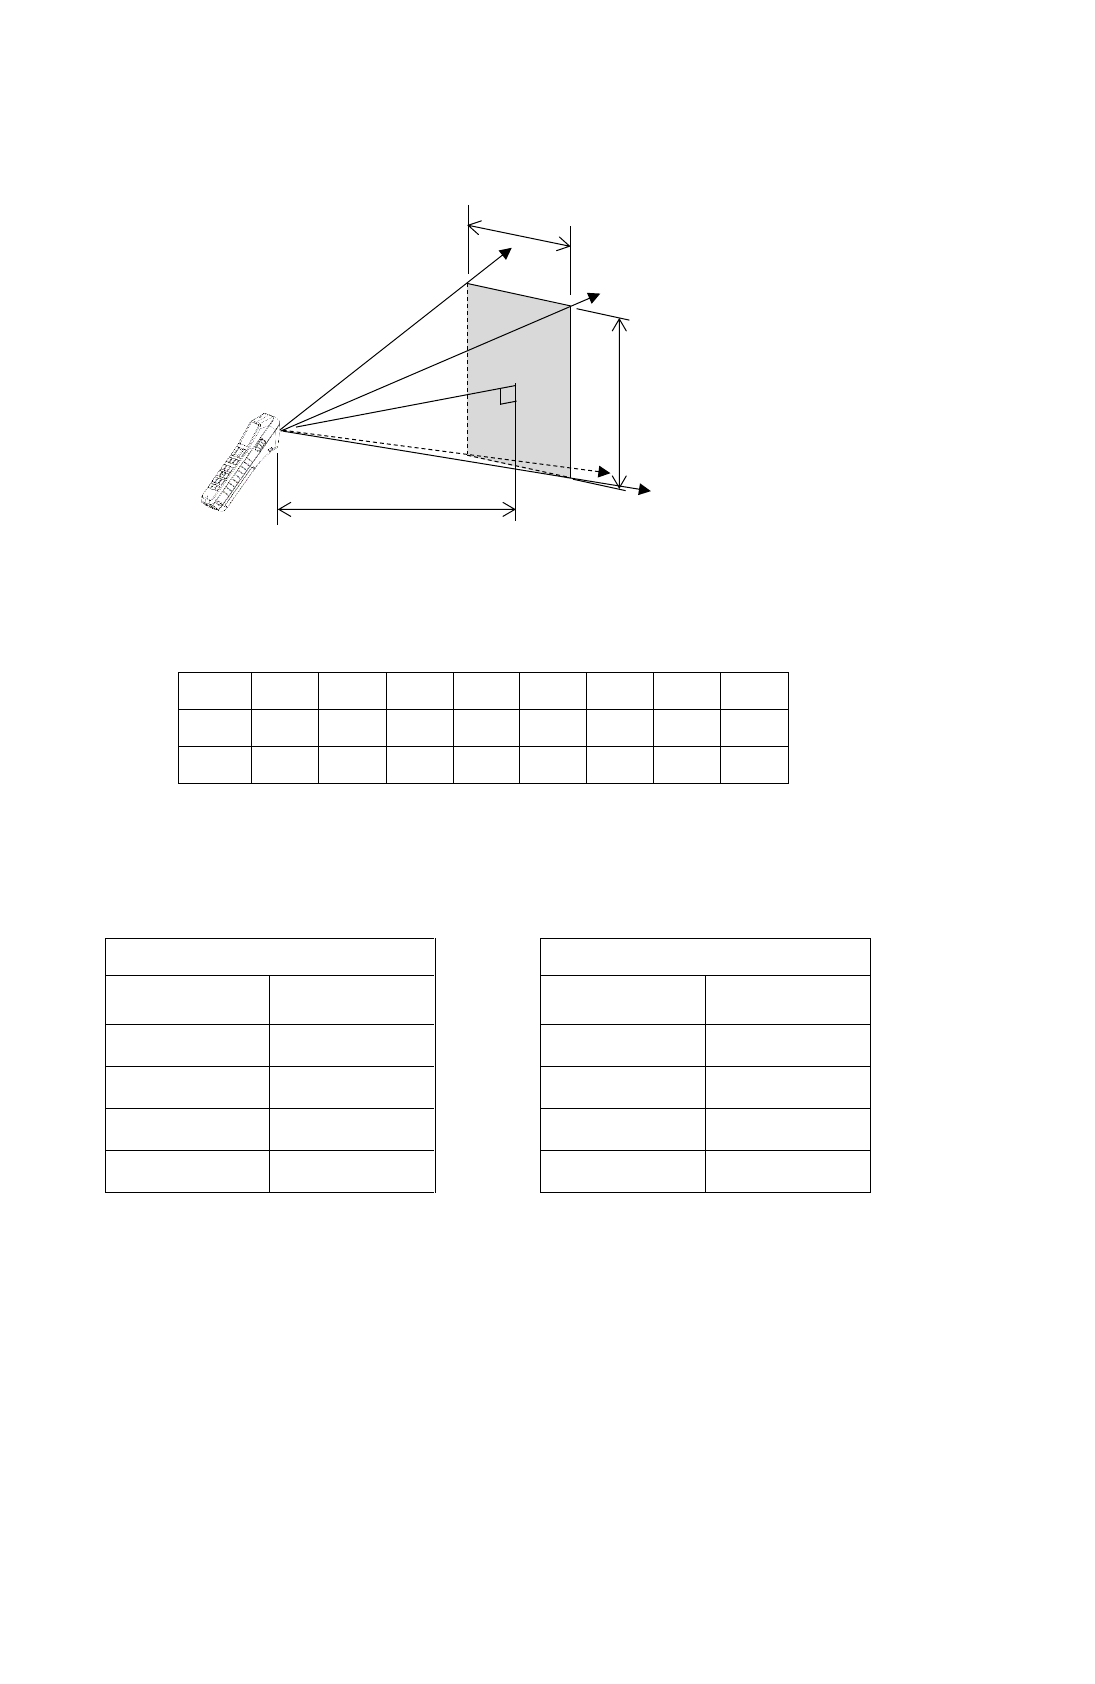
6.3. Reading Specifications
View
L
40
70
100
115
135
175
220
270
H
28
46
64
73
85
110
135
170
V
17
29
40
47
54
71
85
108
Unit:mm
Reading Range
Regular Type
High-Resolution Type
Symbol
Reading
Range
Symbol
Reading
Range
1D(0.25)
70 ~ 220
1D(0.15)
50 ~ 115
1D(0.33)
40 ~ 270
1D(0.25)
40 ~ 130
2D(0.25)
100 ~ 175
2D(0.167)
55 ~ 95
2D(0.33)
80 ~ 225
2D(0.25)
45 ~ 115
Unit:mm
※ The distance is based on the scanner window surface as reference.
※ This is a performance when measured with our company's standard bar code label (PCS value 0.9),
homogeneous brightness approx. 1000 lx (paper surface's illuminance) and a position parallel to the scanner
window.
Distance (L)
Horizontal View Angle (H)
Vertical View Angle (V)
Reference surface:
Scanner Window

35
7. Troubleshooting
7.1. Even if [SCAN] is selected, the LED pointer or light does not light up.
Does the application be started for [SCAN]?
Without starting application, [SCAN] does not work.
Also even if the application is started, [SCAN] does not work when the screen show up the
other programs such as Setting Menu except Reading screen.
7.2. Battery cannot be charged
Is the MID-100 set to the charging cradle properly?
MID-100 cannot be charged when it is not set to the cradle properly.
Refer to [Charging Battery].
Is the AC adaptor connected to the cradle properly?
MID-100 cannot be charged when AC adaptor is not connected to the cradle properly.
Is the charging terminal clean?
MID-100 cannot be charged properly when the charging terminal is not clean. Wipe off
the dirt on the charging terminal with a cotton swab immersed in neutral detergent or
ethanol periodically.
Is the battery usage time short?
The battery is a consumable item. If the battery life lasts only for a short time even after
being fully charged, it is considered to be almost dead. Exchange it with a new battery
as soon as possible
For the detail of battery pack replacement, contact our sales department.

36
7.3. Cannot read symbol.
Is the symbol system setting correct?
When the symbol system setting is limited, MID-100 cannot read symbols other than the
setting.
Refer to Section,”5.3 Barcode Setting,” for a required symbol setting.
Is the reading range appropriate?
When the symbol is out of the specification of reading range or depth, reading may not
be operated. Refer to Section,”6.3 Reading Specifications
Is the symbol quality good?
Even if the reading range is within the specifications, reading may not be operated when
the symbol quality is low. Make sure whether the basic width/width ratio for 1D codes
and cell position, code size etc. for 2D codes conform to the standards. Low-quality
nonstandard symbols such as with thin, chipped, dirty prints may not be read.
Is print surface glossy?
Glossy surfaces may reflect the illumination light like a mirror. Adjust the position of the
reader such as tilting the reader not to make the reflect light enter the reading window.
Is reading window clean?
If reading window is dirty, lighting becomes dark or decoded image becomes
distorted/dark. Wipe off the dirt on the reading window with a cotton swab or dry cloth
immersed in alcohol and wipe with a dry cloth again.
7.4. Data cannot be sent
Is MID-100 connected via Bluetooth connection?
Check the paring information. If it is not connected, reconnection is required.
(Refer to Section,”2.2 Bluetooth” and ”5.6 Bluetooth CFG,”)
7.5. PIN is required at Bluetooth connection
PIN is not set as factory default.
Refer to Section,”5.6 Bluetooth CFG,” at the use of PIN.
37
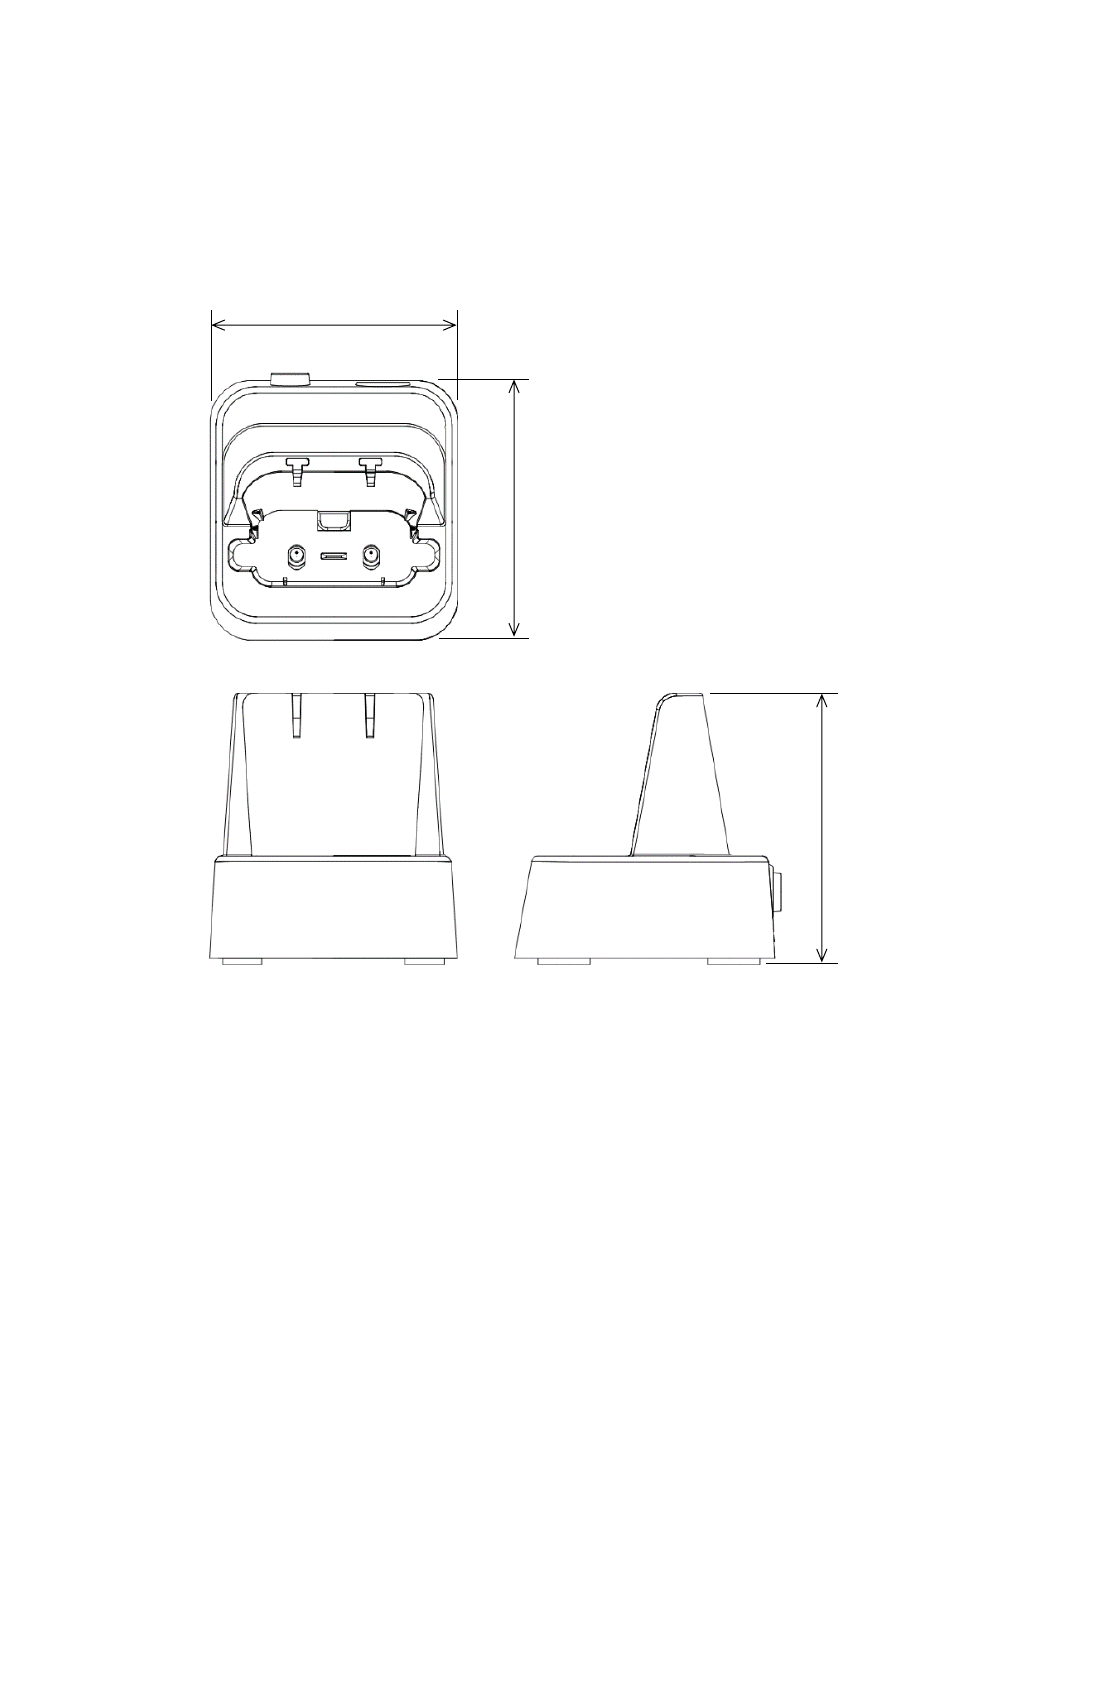
8. 【Optional Item】Charging Cradle MBC-100
Charging cradle is an optional item. Contact our sales representative.
8.1. External Dimensions of Cradle
76
80
84
Unit: mm
38
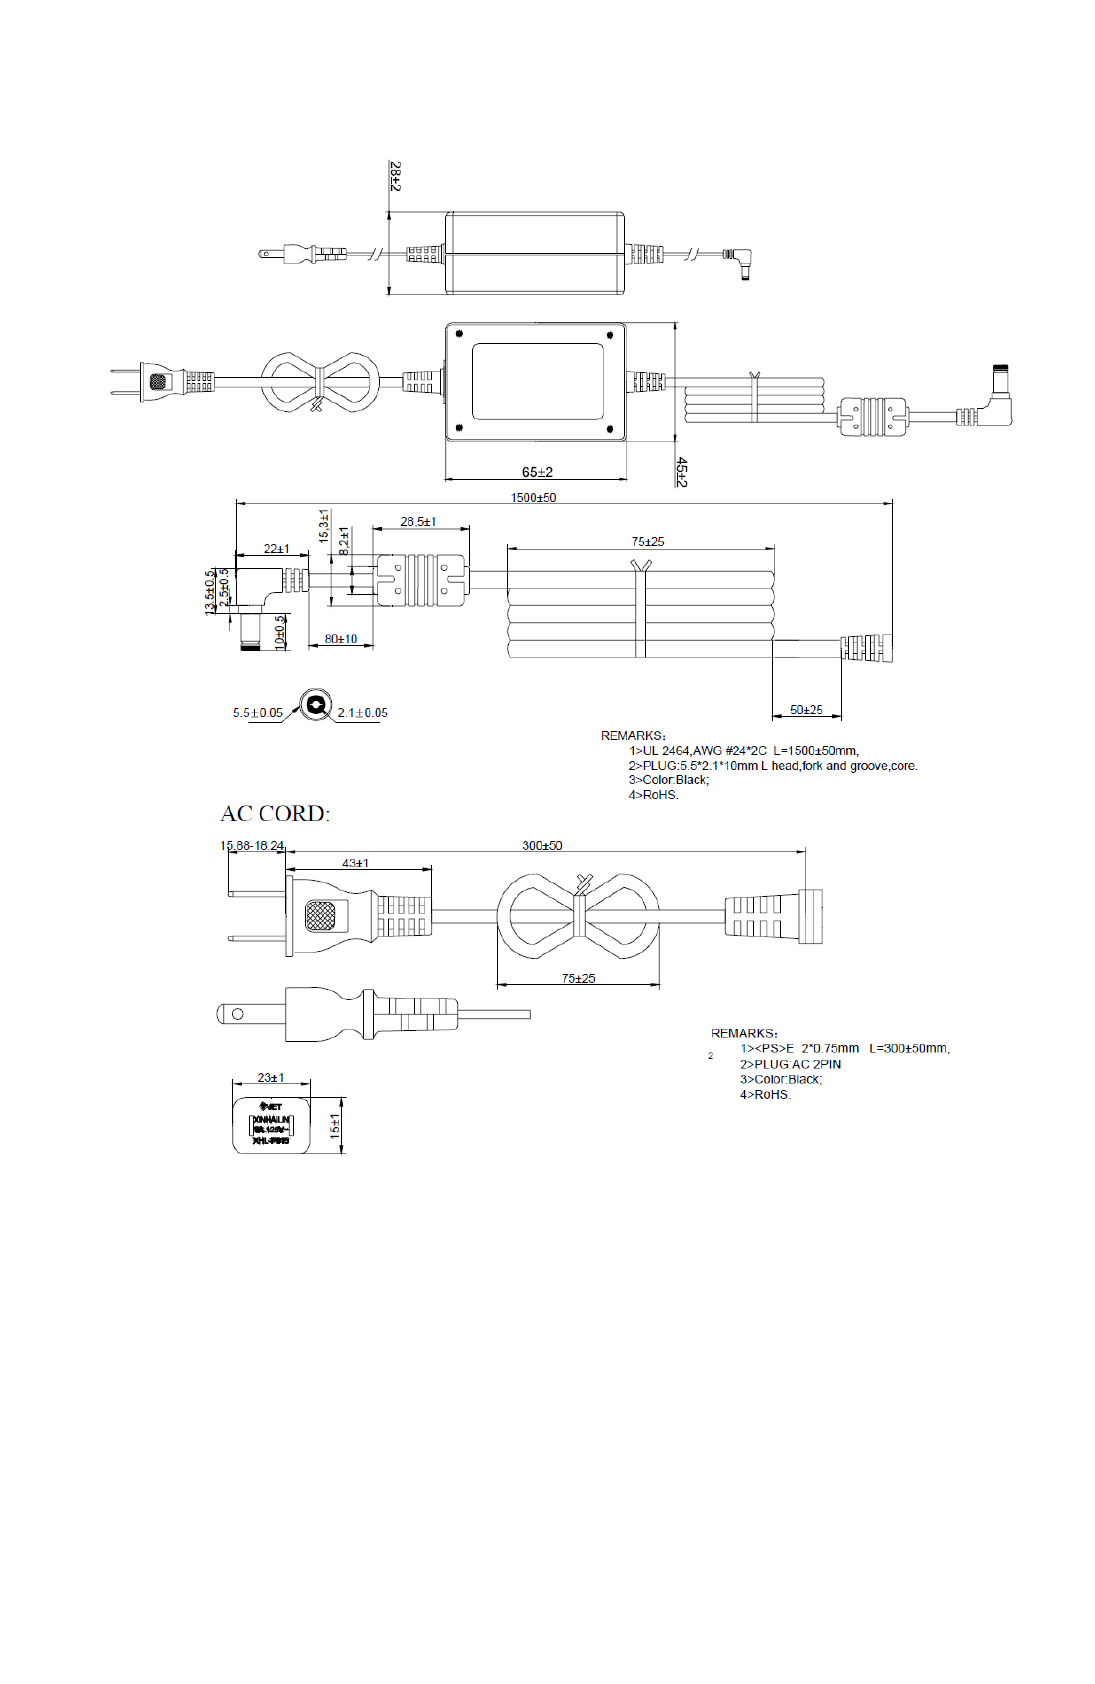
8.2. External Dimensions of AC Adaptor
Unit: mm

39
[MEMO]

40
[MEMO]

Warranty Obligations
Exclusive of the cases with special mentions in quotations, contracts or
specifications, MARS TOHKEN SOLUTION warrants this product as follows.
1. Term of warranty
One year from the date of purchase.
2. Warranty Coverage
MARS TOHKEN SOLUTION shall repair or replace the products without any
payment if any defects in the products are suspected to be due to design or
manufacturing error.
This warranty does not cover, and MARS TOHKEN SOLUTION will not to be
held liable, for any damages incurred by the use of products。The above
warranty shall not apply to any product below;
① Which has not used and maintained in accordance with the instructions
② Which has been repaired or altered by anyone other than MARS TOHKEN
SOLUTION authorized personnel.
③ When the cause other than MID-100
④ When the cause that does not depend on the company's responsibility,
such as natural disasters and disasters
Also, This warranty includes only MID-100, excludes the damage that induced
by trouble of MID-100
3. Coverage
It is assumed to be used in Japan. When use MID-100 outside Japan,
Contact our sales representative.
MARS TOHKEN SOLUTION CO.LTD.
Head Office
Sinjuku-Gyoen Muromachi Bldg, 1-8-5, Shinjuku-ku, Tokyo 160-0022 Japan
TEL +81-3-3352-8522
Website
https://www.mars-tohken.co.jp/
(20160920a)