MARUSYS DMS1004HDHM4K Cable set-top-box User Manual
MARUSYS Co., Ltd. Cable set-top-box Users Manual
MARUSYS >
User Manual

REPORT No.:TR
RFCC16-0006
FCC ID : 2AIQQDMS1004HDHM4K
Copyright
ཱྀ
2016. Lab-T, Inc.
User Manual

QUICK START USER GUIDE
FLOW 4K SET-TOP BOX
Safety Instructions
2
The lightning flash with arrowhead symbol within an equilateral
triangle, is intended to alert the user of the presence of non-
insulated “dangerous voltage” within the product’s enclosure that
may be of sucient magnitude to constitute a risk of electric shock
to persons.
The exclamation point within an equilateral triangle is intended
to alert the user to the presence of important operating and
maintenance (servicing) instructions in the literature accompanying
the product.
SAFETY INSTRUCTIONS
1. Read, follow and keep these instructions.
2. Pay attention to all warnings.
3. Do not use this device near water.
4. Clean only with a dry rag.
5. Do not block any ventilation openings. Install according to the manufacturer’s instructions.
6. Do not install near any heat sources such as radiators, heat registers, stoves, or
other devices (including amplifiers) that produce heat.
7. Do not try to eliminate the safety function of the polarized plug or the grounding-type
plug. A polarized plug has two prongs with one which is wider than the other. A
grounding-type plug has two prongs and a third ground pin. The widest prong or the
third ground pin are intended for your safety. If the plug provided does not enter your
electrical outlet, consult an electrician in order to replace the obsolete electrical outlet.
8. Protect the power cord from being walked on or pinched particularly at plugs.
9. Only use attachments/accessories specified by the manufacturer.
10. Unplug this device during lightning storms or when unused for long periods of time.
11. Refer all servicing to qualified service personnel. Servicing is required when the device
has been damaged in any way, such as power-supply cord or plug is damaged, liquid
has been spilled or objects have fallen on the apparatus, the apparatus has been
exposed to rain or moisture, does not operate normally, or has been dropped.
12. Do not expose this device to dripping or splashing liquid and ensure that no objects
filled with liquids, such as vases, are placed on the device.
13. To completely disconnect this apparatus from the AC power, disconnect the power
supply cord plug.
WARNING: To reduce the risk of fire or electric shock, do not expose this
device to rain or moisture.

Contents
3
CONTENTS
S
a
f
ety Instruction
s
.....................................
2
C
h
a
p
ter
1
B
e
f
ore You B
eg
in
...
.....................................
4
Ge
n
e
ral F
e
atur
es
.....................................
4
Acce
ss
o
r
ies
................................................
4
C
h
a
p
ter 2
Co
nt
ro
l
s
a
n
d
F
un
ct
io
ns
............................
5
Fr
o
nt Pan
el
................................................
5
R
e
ar Pan
el
..................................................
5
Remote Contro
l
Unit
..............................
6
C
h
apter
3
Connections
..................................................
8
Connect
i
ng your Set-Top Box to
t
h
e T
V
..
..
..
..
..
..
..
..
..
..
..
..
..
..
..
..
..
..
..
..
..
..
..
..
..
..
8
L
ocation of
y
our Set-Top Box
.............
9
Chapter
4
B
as
i
c Operat
i
o
n
..........................................
10
S
witchin
g
Channels
................................
10
Vol
um
e
Co
ntr
ol
........................................
10
P
rogram In
f
ormatio
n
..............................
1
0
S
electin
g
the Lan
g
ua
g
e
........................
1
1
S
e
l
ecting t
h
e C
l
ose
d
C
aption
/
Subtitles
...................................
1
1
P
ro
g
ram Grid Guide
...............................
11
C
h
a
p
ter
5
M
ain M
e
nu
.....................................................
12
F
av
o
r
i
t
e
s
.....................................................
12
TV
..................................................................
13
TV
G
ui
de
...............................................
13
Searc
h
....................................................
1
3
TV List
....................................................
1
3
V
o
D
...............................................................
14
P
arental Control
.......................................
1
5
Loc
k
in
g
Status
....................................
15
Loc
k
e
d
Ratings
..................................
15
Hide Adult Titles
...............................
17
Locked Time
........................................
17
Chan
g
e PIN
..
..
..
..
..
..
..
..
..
..
..
..
..
..
..
..
..
..
..
..
.
18
Locked Channels
..
..
..
..
..
..
..
..
..
..
..
..
..
..
..
18
C
onfi
g
uratio
n
............................................
19
A
/V Output Settings
........................
19
L
anguage
s
............................................
19
C
l
ose
d
Captioning
..
..
..
..
..
..
..
..
..
..
..
..
..
..
.
2
0
T
roubleshooting
..........................................
2
3

Chapter 1 - Before You Begin
4
BEFORE YOU BEGIN
Thank you for choosing the High Definition Flow 4K Set-Top Box. This innovative
Set-Top Box lets you enjoy and watch HDTV with menus and on-screen navigation
that are easy to use, combining a multitude of functions in a bright and user-
friendly interface.
We are excited to provide you with the latest in cable Hybrid technology. Please,
feel free to contact us directly if you have any questions.
GENERAL FEATURES
User-Friendly On-Screen Display, multi-language menu
• Favorites and Parental Lock Function
• In-Guide Search Function
• Programming Information
• Search your favorite programs and movies
ACCESSORIES
• Quick Start User Guide
• Remote Control Unit
• Batteries (AAA)
• Power Cable
• A/V Cable (mini connector)
• Extender IR Cable
• HDMI Cable

Chapter 2 - Controls and Functions
5
REAR PANEL
1 CABLE IN
Connection to the cable service
signal through the cable coming
from the exterior.
2 A/V OUT (AUDIO AND
VIDEO OUTPUT)
Mini connector connection
of A/V to the television for
standard-definition video
and audio.
3 HDMI
Connects to the TV with a
HDMI cable.
4 USB PORT
To Support Future Accessories
5 ETHERNET
Connects to the network using
an Ethernet cable.
6 SIM CARD SLOT
Slot for a SIM card. Insert the
card with the chip downwards
and inwards. NEVER REMOVE
THE CHIP FROM THE STB.
7 IR IN (IR Extender Cable)
Connect the IR Extender cable
to place the Set-Top Box out of
sight and still allow remote
control usage.
8 POWER SUPPLY
Connects to electrical current
by means of a wall outlet.
9 On/O Switch
Turns the divice on and o.
FRONT PANEL
42 63 8 91 5 7
Chapter 2 - Controls and Functions
6
12
6
7
11
13
14
16 17
19 20
21
22 23
24 25
27
30
26
28
29
12
10
15
34
5
8
9
18

Chapter 2 - Controls and Functions
7
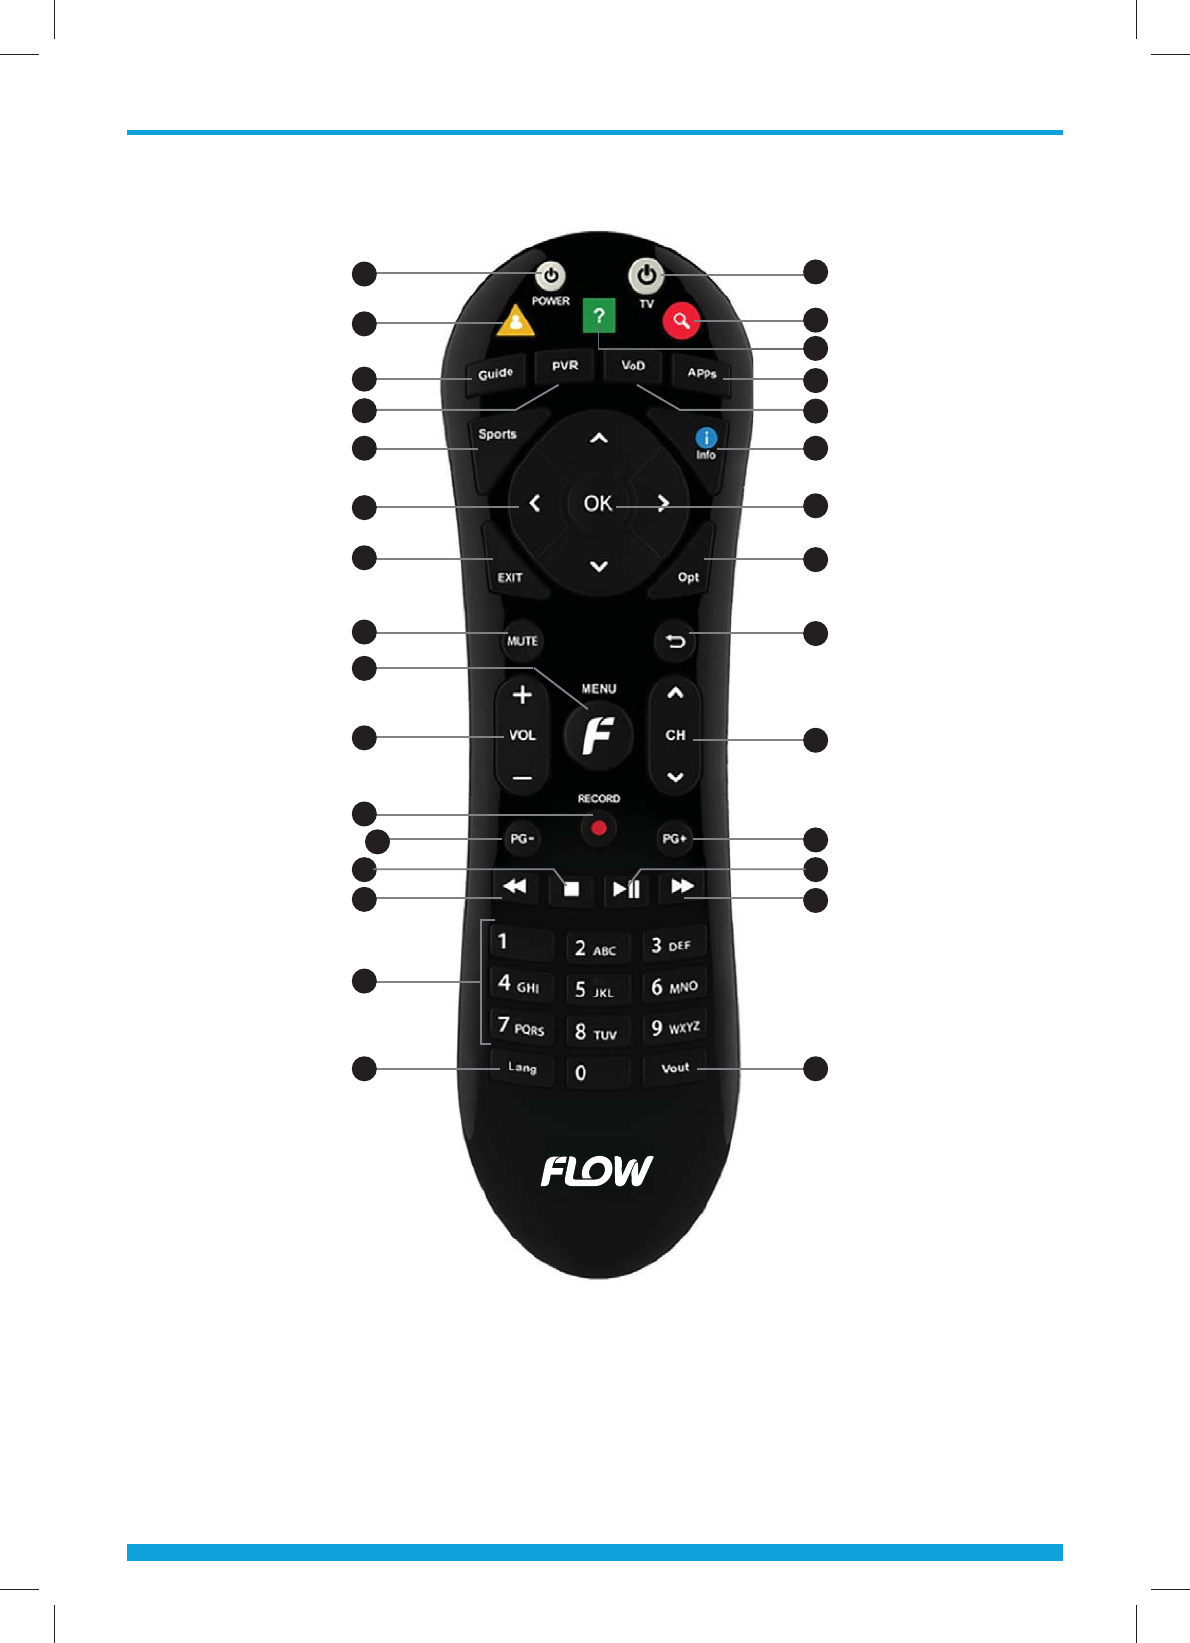
1 Power ( ) Button
Turn your Set-Top Box On/O.
2 TV ( ) Button
Turn your television On/O.
3
Profile Button
Press once for list of Profiles. Press
twice to go to Profile page.
4 Search Button
Search for show, category, channel, etc.
5 Help Button
Display the help window.
6 Guide Button
Display the grid guide.
7 PVR Button
Display the PVR (Personal Video
Recorder) menu.
8 Apps Button
Displays Apps menu.
9 VoD Button
Displays Video on Demand menu.
10 Sports Button
Displays a list of sports channels.
11 Info Button
Display channel and program
information on the screen.
12 Arrow buttons (Up/Down/Left/Right)
Move the cursor up, down, left or right.
Turn volume up/down (Right/Left).
Switch channel up/down (Up/Down).
13 OK Button
Select a menu or confirm selection.
14 Exit Button
Close a menu or go to the
previous menu.
15 Opt Button
Display more options when applicable.
16 Mute Button
Press once for half mute. Press twice
for full mute. Third press will unmute.
17 Last Button
Switch back to the last viewed channel.
18 Menu Button
Display the main menu.
19 VOL +/- Button
Adjust volume level.
20 CH +/- Button
Switch channel up or down.
21 REC ( ) Button
Start recording a program.
GUIDE: Sets the selected program to
be recorded.
22 Page Down Button
Move down pages on the menu
and TV/ Music List.
23 Page Up Button
Move up pages on the menu
and TV/ Music List.
24 STOP ( ) Button
Stop a recording or playback.
Return to live program on the Instant
Recording mode.
25 Play/Pause ( ) Button
Play/Pause the program.
26 REW ( ) Button
Rewind the program.
27 FF ( ) Button
Fast forward the program.
28 Number Buttons
Go to appropriate live TV channel.
29 Lang Button
Select among available languages.
30 Vout Button
Select among video output options.
REMOTE CONTROL UNIT
Chapter 3 - Connections
8
CONNECTIONS
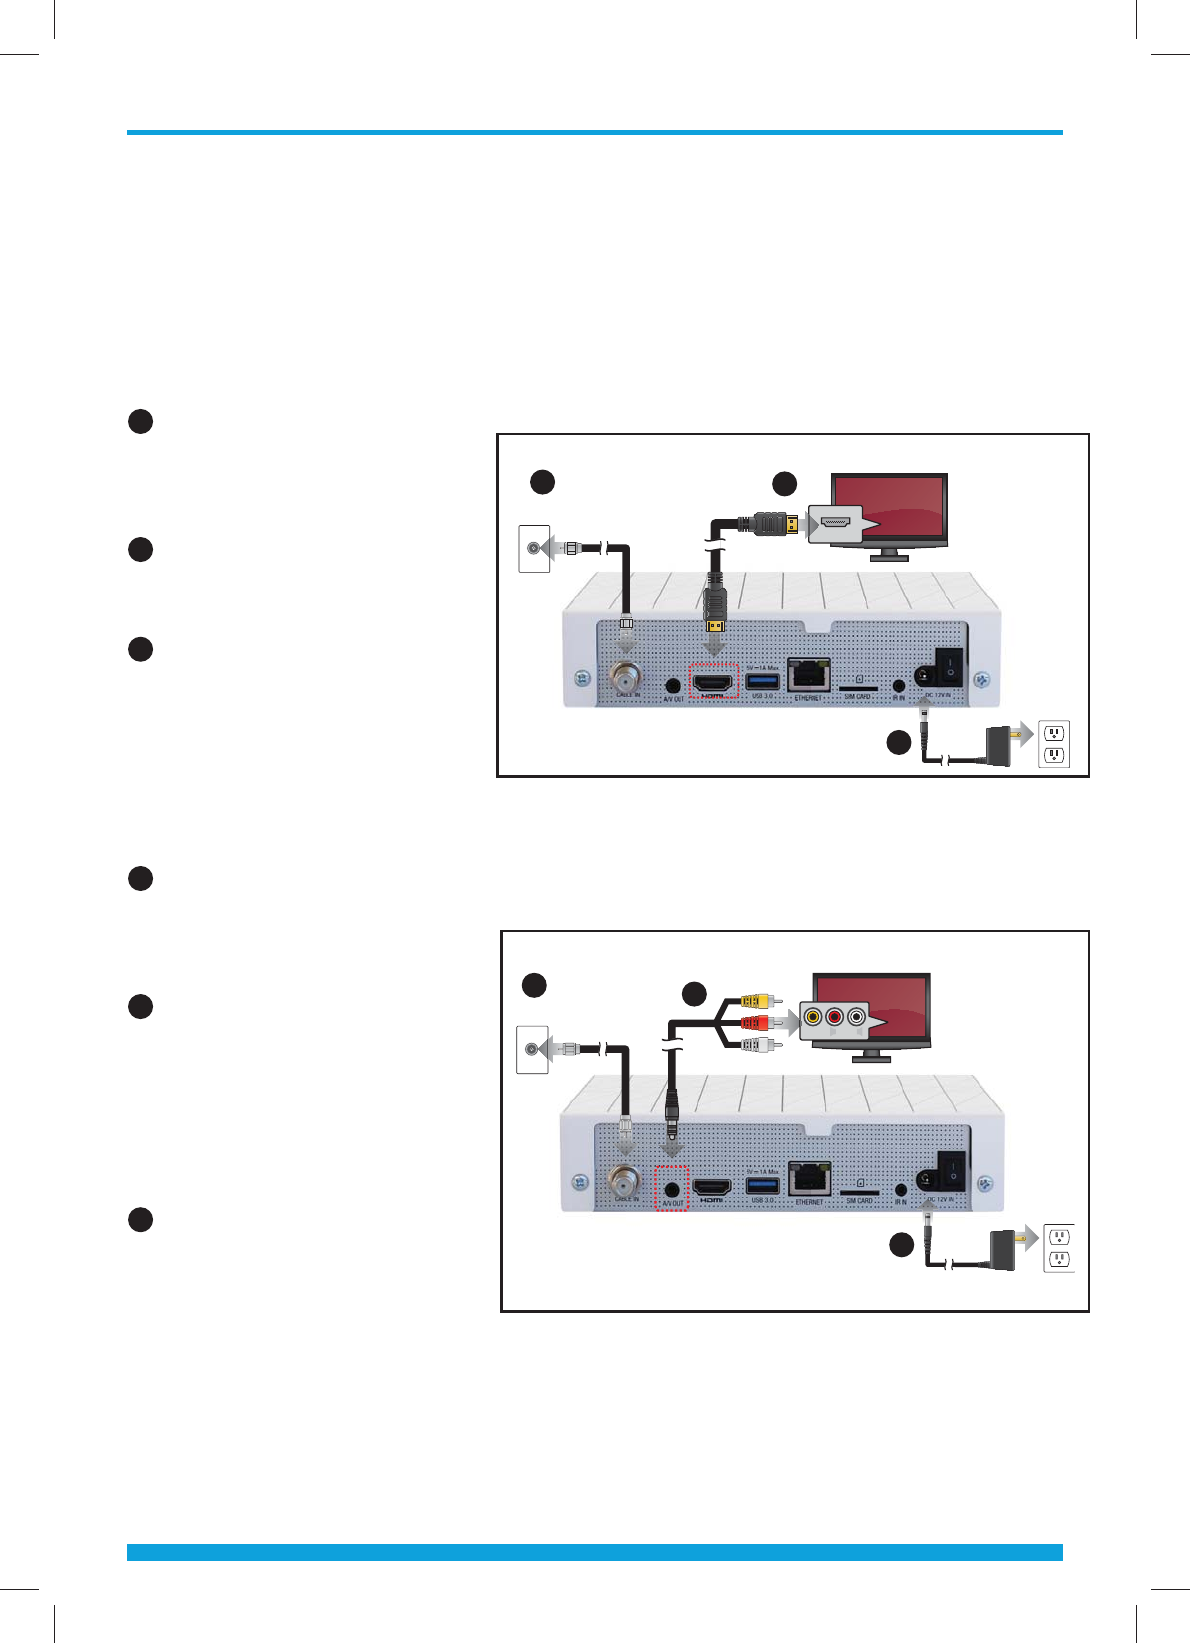
Connecting your Set-Top Box to the TV
To connect the Set-Top Box to your television, you can use two dierent
methods: HDMI cable and Audio/Video Composite.
HDMI Cable (recommended)
1 Connect the RF coaxial
cable from the exterior
to the CABLE IN port on
the Set-Top Box
2 Connect the HDMI cable
to the HDMI port on the
Set-Top Box on your HDTV.
3 Plug the power cable in
to the electrical outlet.
Audio/Video Composite (SD)
1 Connect the RF coaxial
cable from the exterior
to the CABLE IN port on
the Set-Top Box.
2 Connect the yellow, red
and white cables to the
ports of the same color
on the television. Connect
the mini connector to the
A/V OUT port of the
Set-Top Box.
3 Plug the power cable in to
the electrical outlet.
To Coaxial Wall Outlet
HDMI (IN)
To T V
To Coaxial Wall Outlet
To Electrical Outlet
To T V
VIDEO
L
AUDIO
R
1
1
2
2
3
3

Chapter 3 - Connections
9
Location of your Set-Top Box
• Install your Set-Top Box in a horizontal position.
• Do not put any heavy objects such as your television on your Set-Top Box.
• Do not install your Set-Top Box in places with excessive vibrations,
direct sunlight, high humidity, extreme temperatures and no ventilation.
• Do not install near equipment that radiates radio frequency energy; if
in close proximity of RF emitting devices (ex: wireless router)
interference in audio and video output may occur.
Chapter 4 - Basic Operation
10
BASIC OPERATION
This section explains the various functions available while watching live TV or
listening to Music Channels.
Switching Channels
You can switch the current channel using three dierent methods
Method 1) Press the Arrow (Ÿź) or CH +/- buttons to switch channel up/down.
Method 2) Press the Numeric (0-9) buttons to select a specific channel.
Method 3) Press the OK button to display the channel list. Select a channel you
want to watch using the Arrow (Ÿź) buttons and press the OK button
[Note] Press the “Last” button to go back to the last viewed channel.
Volume Control
To control the volume:
Press the VOL +/- or Arrow (ŻŹ) buttons.
Press the “Mute” () button 1 time to lower the volume.
Press the “Mute” () button 2 times to completely silence the audio.
Press the “Mute” () button 3 times to restore audio.
Program Information
Press the “Info” button to display a
banner with the following information.
1 Name of the selected channel list
2 Channel number / name
3 Additional information about
the program
4 Title of the current program
5 Title of the next program
6 Current time / date
7 Icons (widescreen, surround sound, lock,
subtitles, high definition, language,
parental rating)
If you press the “Info” button again, detailed program information will be
displayed on the right side. The banner and detailed information will disappear
when you press the “Info” button for the third time.
3
1 2
456
7
Chapter 4 - Basic Operation
11
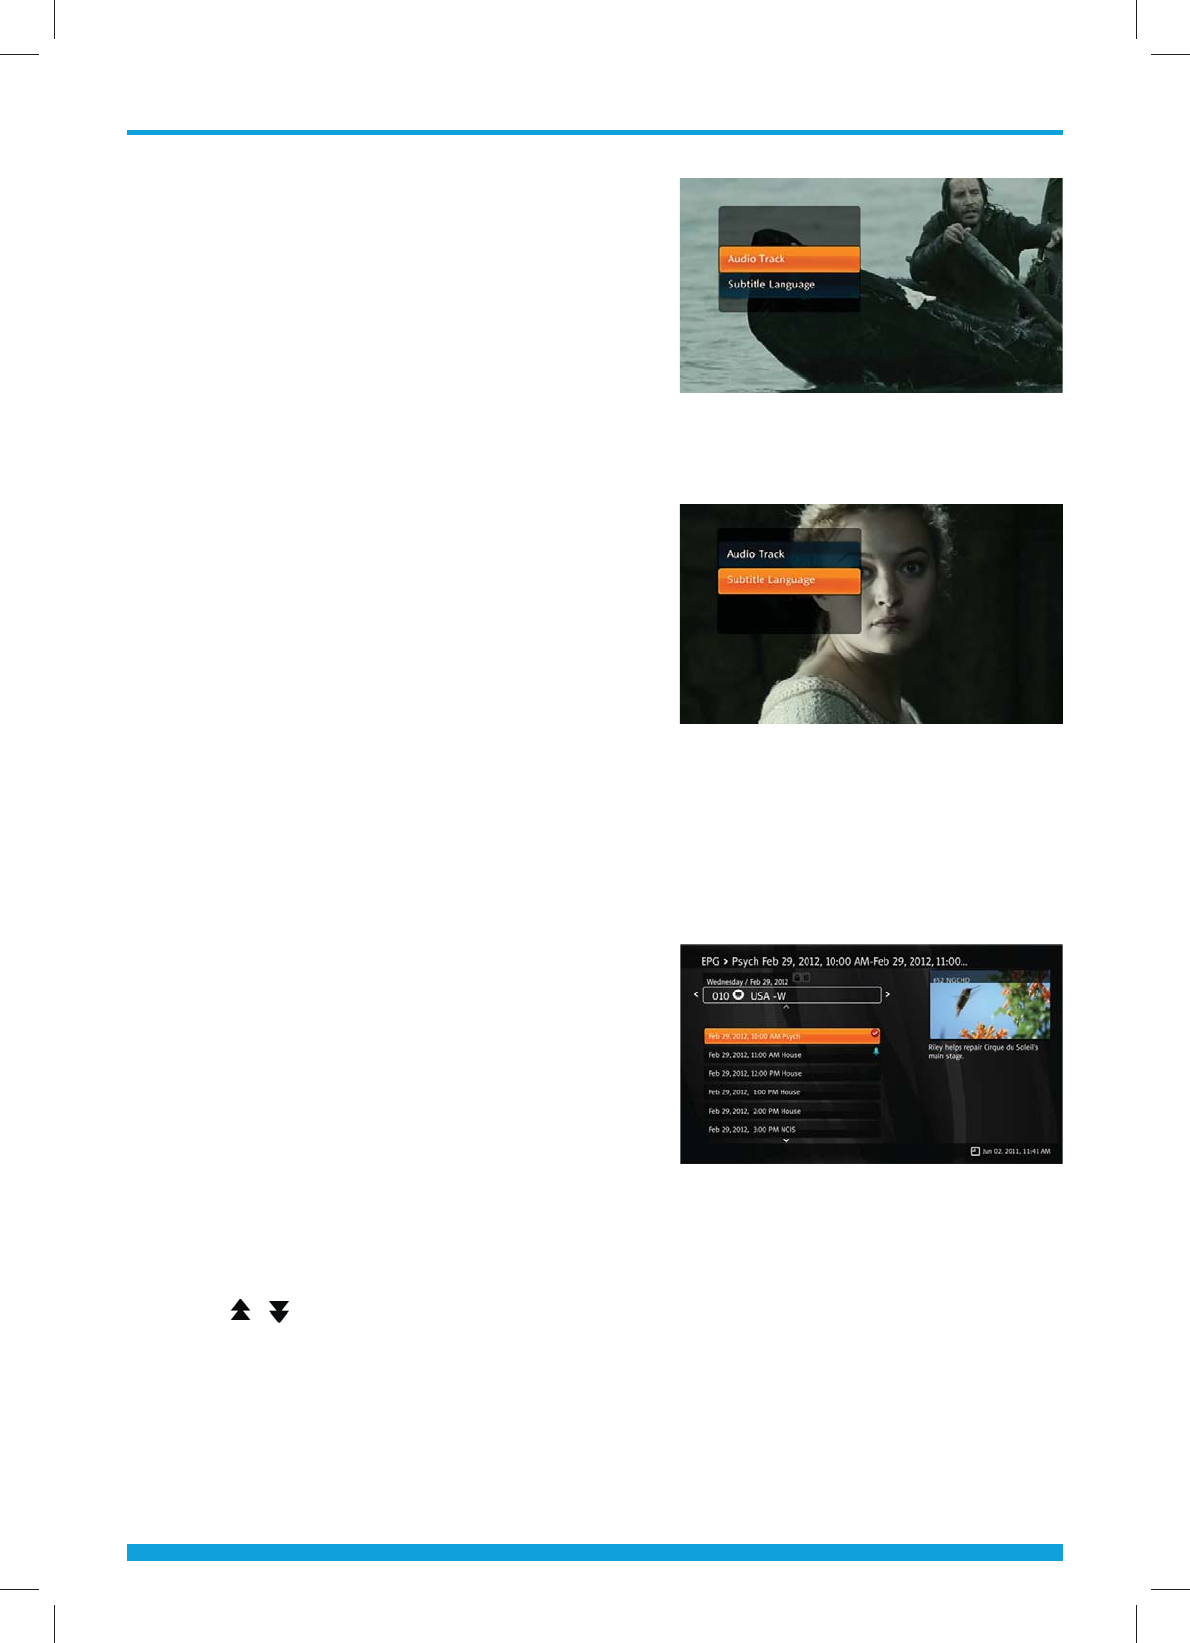
Selecting the Language
To select the language:
1 Press the “Lang” button and then the
OK button to display the language
pop-up menu.
2 Select language using the Arrow (Ÿź)
buttons and press the OK button to confirm
your selection.
Selecting the Closed Captioning/Subtitles
To select the subtitle language:
1 Press the “CC” button and then the OK
button to display the subtitle language
pop-up menu.
2 Select subtitle language using the
Arrow (Ÿź) buttons and press the OK
button to confirm your selection.
Program Grid Guide
The grid guide shows information about the program, such as its name and channel
number, program title, airing time and synopsis of the program.
1 Press GUIDE button to enter the Electronic Program Guide.
2 To change the Guide Mode (all channels or one channel),
press the Guide button again.
3 Select a program to view more
information about it.
• Arrow (Ÿź) buttons: Move program
selection up/down to another channel on
the program grid. In the channel Guide
Mode, move program selection up/
down on the program list.
• Arrow (ŻŹ) buttons: Move program selection left/right on the timeline
within the same channel. In the channel Guide Mode, changes the channel
that is being viewed.
• Page ( /) buttons: Move up/down the channels (or programs in channel
Guide Mode) one page at a time.
• Yellow button: Move the timeline one day forward.
• Green button: Move the timeline to current time.
• Red button: Move the timeline one day back.
Note: The timeline displays programs at an hour intervals. A light blue vertical line marks the current time.
12
Chapter 5 - Main Menu
MAIN MENU
This menu consists of many dierent menu categories:
1 Press the “Menu” button to enter the Menu mode. Menu will open at
the last remembered state.
2 Use the Arrow (ŸźŻŹ) buttons to move up, down, left, and right
on the menus.
3 Navigate to the submenu you are looking for and press the OK button
to confirm your choice.
4 Use the Arrow (Ż) button to return to the previous menu.
5 To exit the current menu, press the “Exit” button.
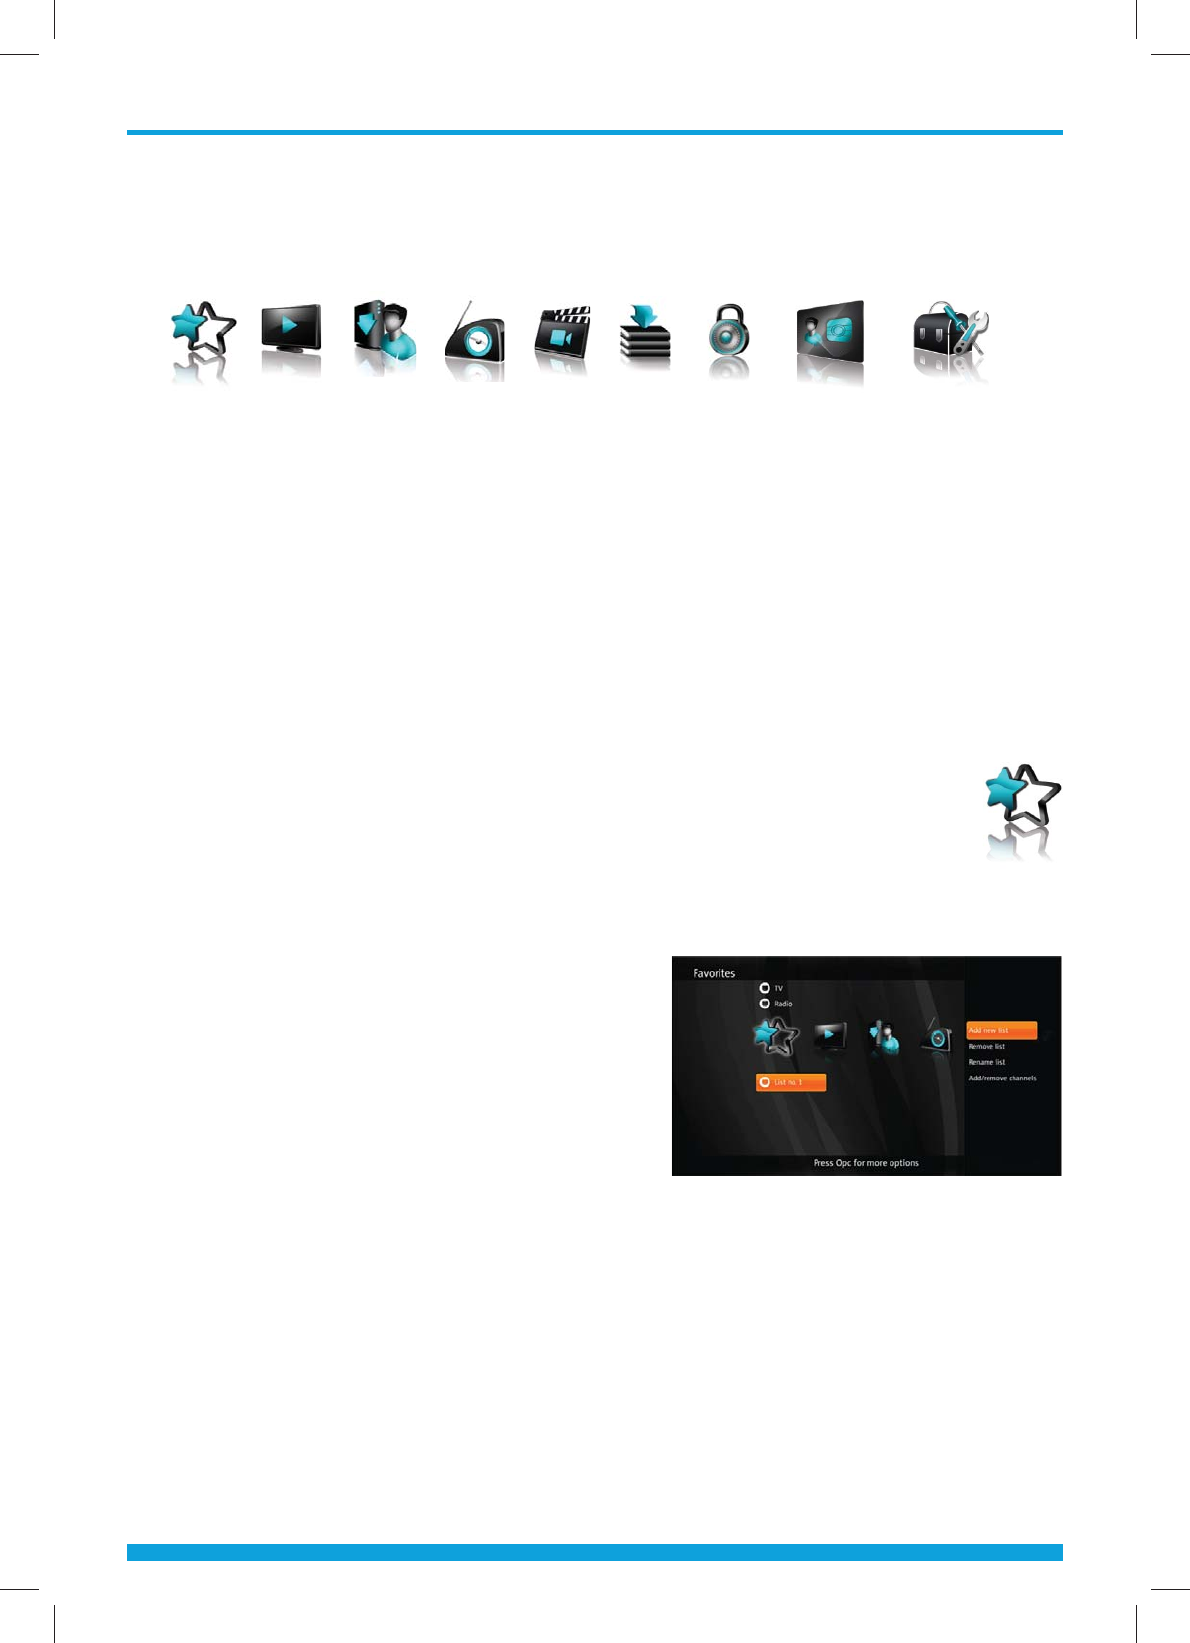
FAVORITES
Press the “Menu” button to enter the Menu Mode. Select Favorites using the
Arrow
(
ŻŹ
) buttons and press the
“
Opt
”
button to open more options.
Add new list: Create new favorite list.
Remove list: Remove an existing list.
You cannot remove default lists (HDTV,
TV, Music).
Rename list: Rename an existing list.
(max. 10 characters)
Rearrange list: Rearrange channels in a list.
When done with rearranging, press the Arrow
(Ź) button, and then select Save and press
the OK button to save your changes.
Add/remove channels: Add/remove channels on the selected list. When you are
done with adding/removing channels, press the Arrow (Ź) button, select Save
and press the OK button to save your changes.
h
e
e
e
e
Favorites TV nPVR Radio USBVoD Parental
Control Messages Conguration
13
Chapter 5 - Main Menu
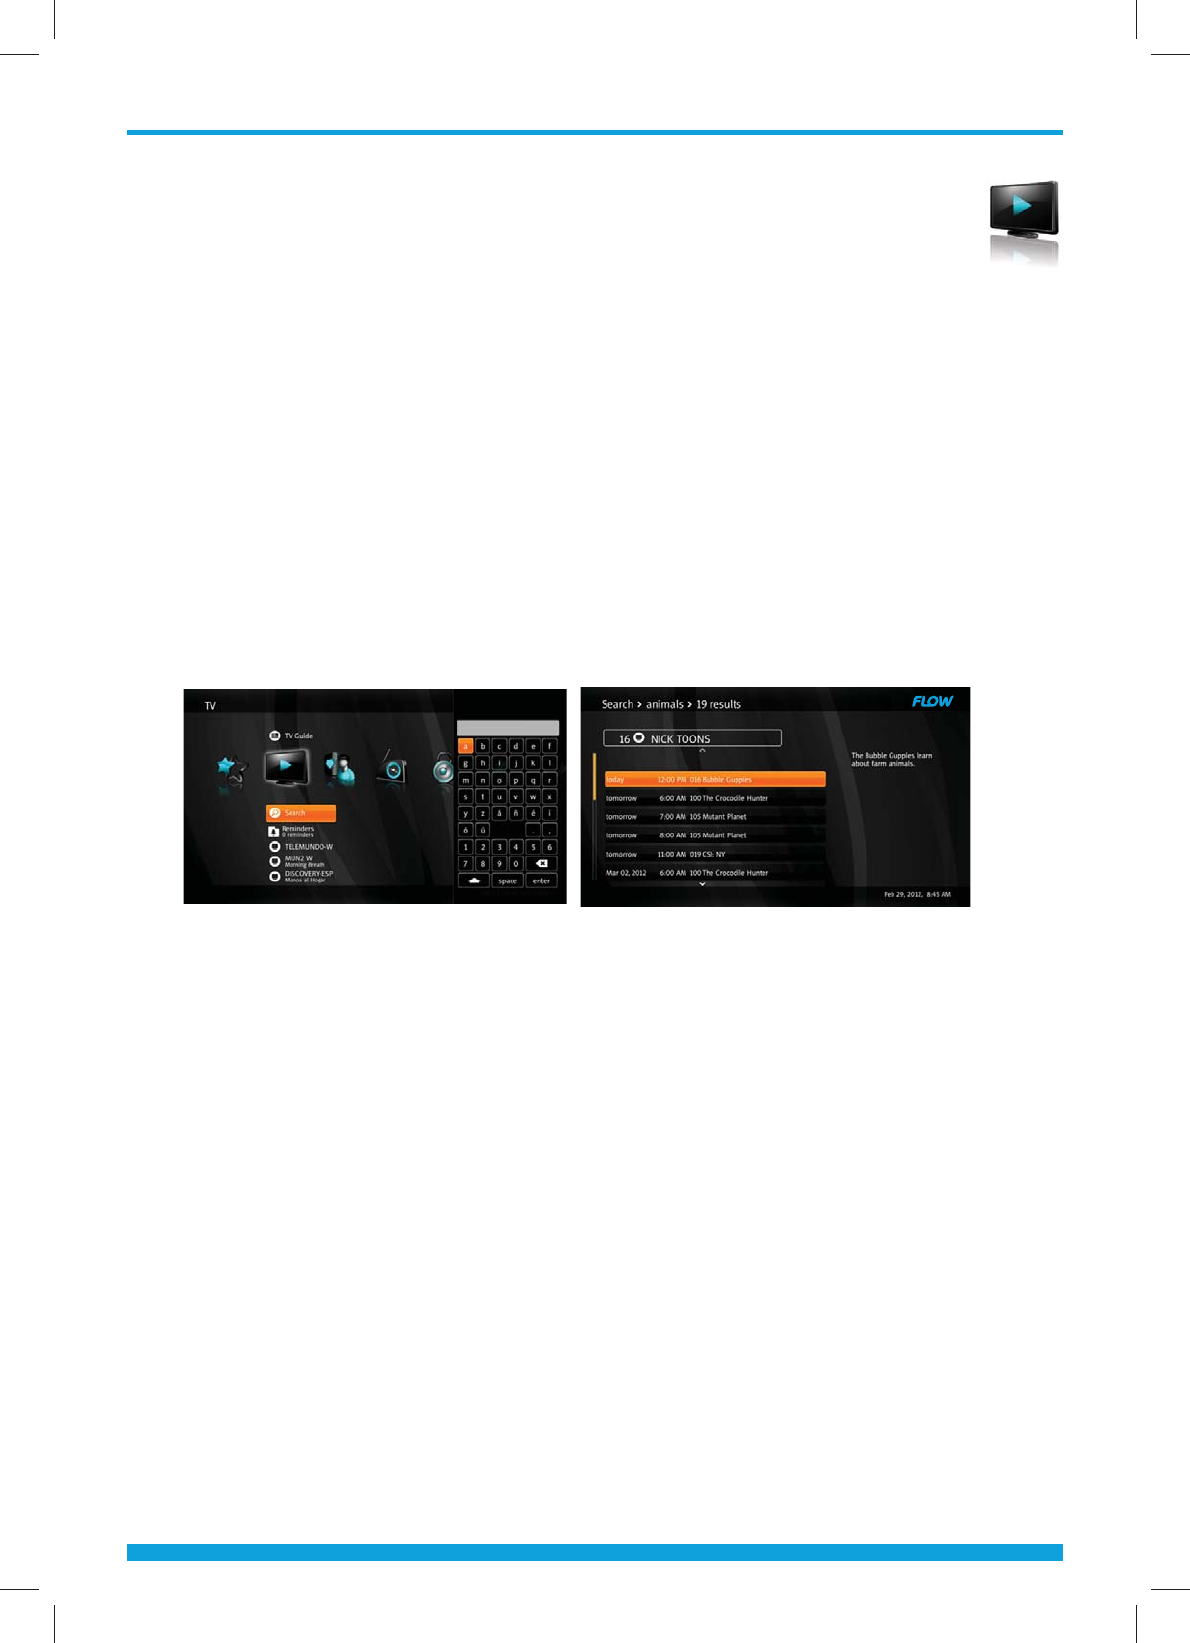
TV
TV Guide
Press the “Menu” button to enter the Menu Mode.
1 Select TV Guide using the Arrow (Ÿź) buttons on the TV menu and
press OK button.
2 TV Guide will be displayed.
Search
1 Select Search using the Arrow (Ÿź) buttons on the TV menu and
press OK button to open the Keypad.
2 Enter a keyword using the Arrow (ŸźŻŹ) and OK buttons. Then
select enter and press the OK button to start your search.
3 A list of matching programs will be displayed on the screen.
TV List
This part of the menu lists all TV channels with current
program information.
14
Chapter 5 - Main Menu
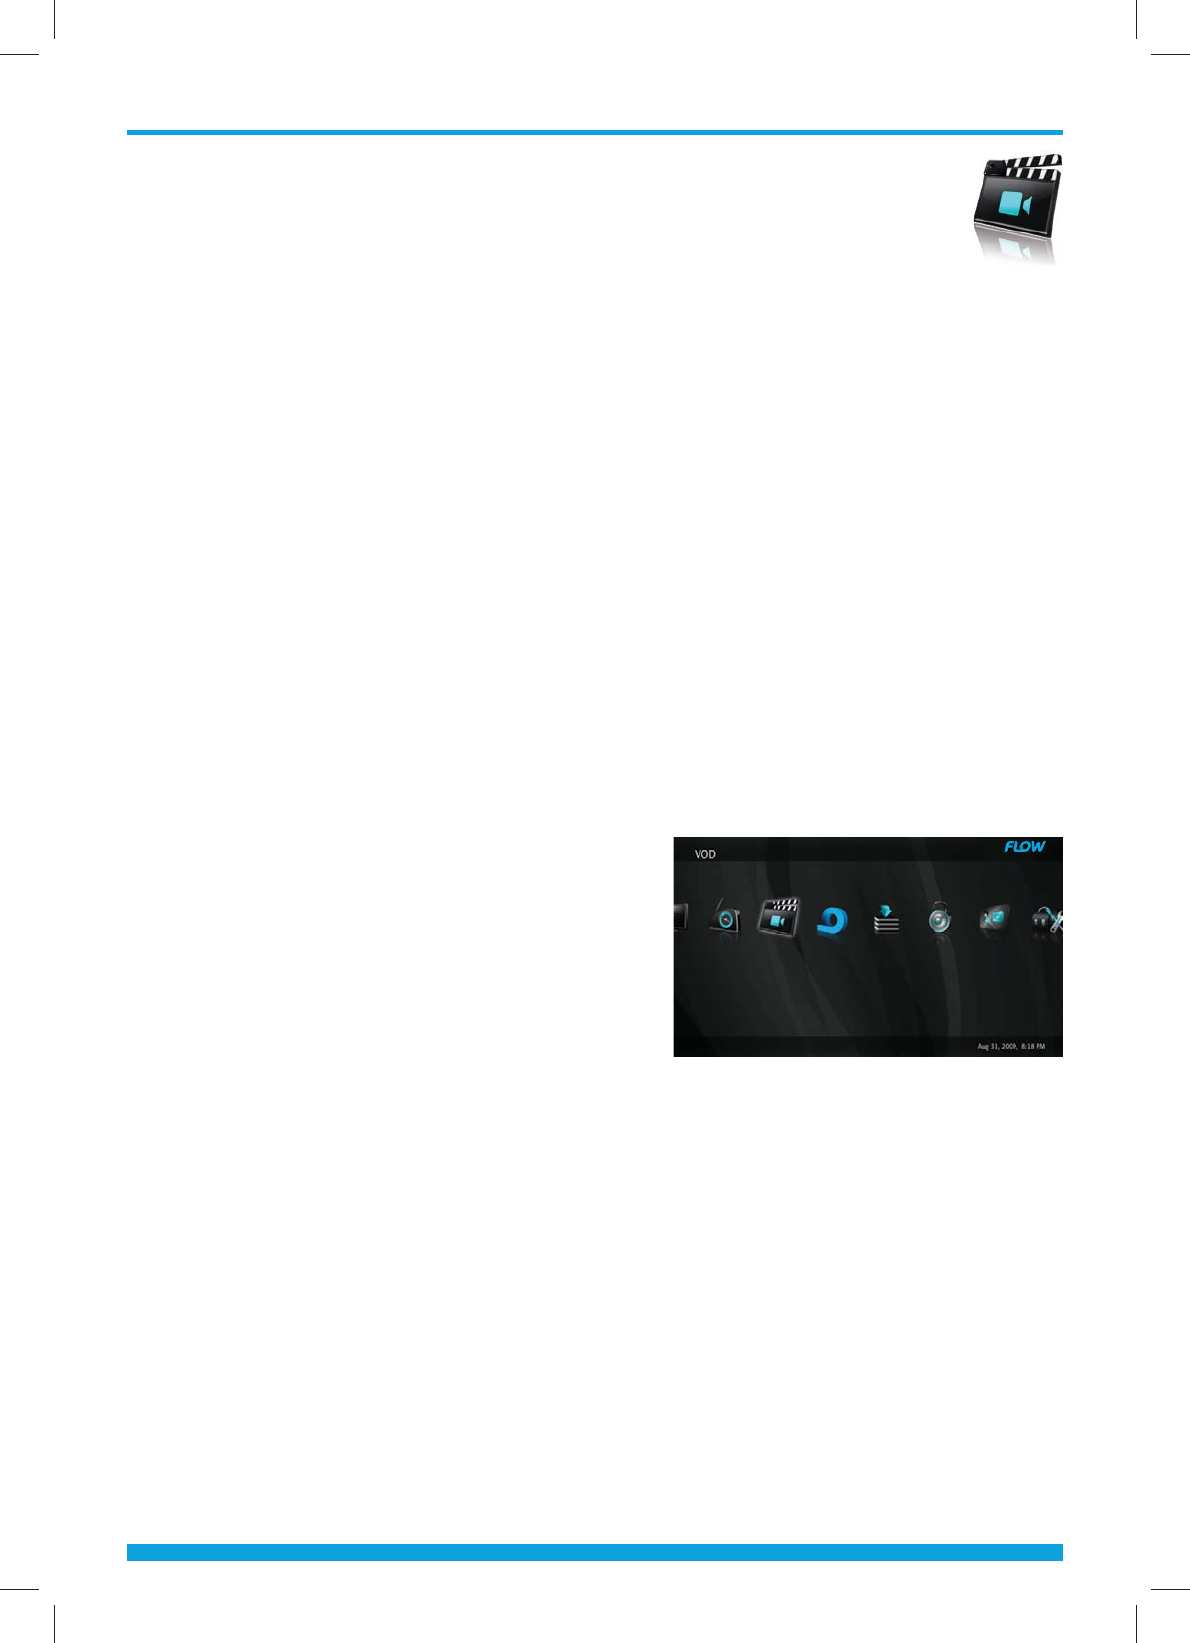
VIDEO ON DEMAND (VOD)
Video on Demand (VoD) channels enable you to purchase programs using your
remote control. You may select and purchase programs from a library of titles
and watch those videos during a limited period of time. You can use the playback
keys on your remote to pause, stop, fast forward, and rewind shows.
Entering and Exiting VoD
You can enter and exit the VoD menu through the use of the remote.
By selecting either the Menu button or VoD button you can navigate to the VoD
Catalog. To exit theVoD catalog, you select the Exit button on the remote.
Restricting VoD Purchases
VOD purchases can be restricted by securing the purchase pin. The purchase pin
is required to purchase any paid program. To restrict viewing of purchased or free
programs, the parental control feature must be used. For more information, see
Parental Control on page 15.
To purchase VoD programs from a VoD Library
1 Launch a VoD Library channel using any standard channel selection method.
2 Browse categories using the
Arrow (ŻŹ) buttons on your remote.
Browse titles using the Arrow (Ÿź)
buttons.
3 Press the OK button on your remote to
purchase the highlighted title. A
purchase confirmation dialog is
displayed, showing the price and
duration of the VoD viewing period.
4 Press OK button. Once the system has
accessed the purchased title, the VoD
Just Purchased screen is displayed. The Just Purchased rental period duration,
title duration, as well as a progress bar.
5 Press the PLAY button on your remote to view the VoD title. The VoD cover
screen is displayed.
Note: If the Purchase PIN is enabled, the standard PIN Entry dialog will be displayed when you press the
OK button. Enter a valid PIN to continue.
To review your VoD purchases
Press the Arrow (ŻŹ) buttons, then select the Recently Purchased category on
the scrolling category bar. Your household’s most recent VoD purchases will be
displayed. Press the Arrow (Ÿź) buttons on your remote to scroll the vertical
title list.

15
Chapter 5 - Main Menu
PARENTAL CONTROL
Parental Control enables you to restrict the viewing of certain channels, ratings,
content and time periods. For example, you can use Parental Control if you do
not want your children to watch certain channels or programs that are intended
for mature audiences, or if you want to restrict TV viewing at certain times, such
as late in the evening.
You can also block the program titles and descriptions of adult-oriented programs
so that they do not appear in the Program Guide, Channel Banner, or General
Settings menu.
To access Parental Control press the “Menu” button to enter the Menu mode.
Select Parental Control using the Arrow (ŻŹ) buttons.
IMPORTANT: You will need a PIN code to make changes in Parental Control.
The default PIN code is "1234". To change your PIN see page 18.
Locking Status
Use the Locking Status to set or disable
Parental Control.
1 Select Locking Status using the Arrow
(
Ÿź) buttons on the Parental Control
menu and press OK button.
2 Authentication required pop-up will
be displayed.
3 Input your PIN using the Numeric (0-9) buttons and press the OK button.
4 Select lock status using the Arrow (Ÿź) buttons and press the OK button
Locked Ratings
Enable Locked Ratings to prevent household
members from viewing programs intended for
relatively mature audiences.
1 Select Locked Ratings using the Arrow
(
Ÿź) buttons on the Parental Control
menu and press OK button.
2 Authentication required pop-up will
be displayed.
3 Input your PIN using the Numeric (0-9)
buttons and press the OK button.
4 Select preferred locked ratings using the Arrow (Ÿź) buttons and press the
OK button to lock/unlock the ratings. Locked ratings are marked by an open
or closed lock icon.
5 To unlock all ratings, select the Clear All option and press the OK button.
Note: An open lock icon indicates that a rating is locked but Parental Control is currently turned o in
Locking Status.
ti
n
ng
ng
ng
ng
n
ng
ng
g
ng
ng
ng
ng
ng
g
ng
n
g
ng
g
n
g
n
ng
n
n
g
ng
g
ng
g
g
n
ng
ng
g
n
ng
ng
g
s
s
s
s
s
s
s
s
s
s
s
s
s
s
s
s
s
s
s
s
s
s
s
s
s
s
s,
s
s
s
s,
s
s,
s,
s,
,
s,
s
s,
d

16
Chapter 5 - Main Menu
Rating Meaning
NA No rating information available.
TV-Y Program is appropriate for children of all ages, but is specifically
designed for children ages 2 through 6.
TV-Y7 Program is appropriate for children age 7 and older.
NR (General) General Audience. This program is not rated.
G/TV-G General Audience. Program is appropriate for viewers of all
ages.
PG/TV-PG Parental guidance suggested. The program contains material
that parents may find inappropriate for young children.
PG-13 Parents Strongly Cautioned. The program contains material that
parents may find inappropriate for children under 13 years of
age.
TV-14 Parents Strongly Cautioned. The program contains some mate-
rial that many parents would find unsuitable for children under
14 years of age. Parents are strongly urged to exercise greater
care in monitoring this program and are cautioned against
letting children under the age of 14 watch unattended. This
program contains one or more of the following: intense violence
(V), intense sexual situations (S), strong coarse language (L), or
intensely suggestive dialogue (D).
TV-MA Mature Audience Only. The program is specifically designed to
be viewed by adults and therefore may be unsuitable for chil-
dren under 17 years of age. The program contains one or more
of the following: graphic violence (V), explicit sexual activity
(S), or crude indecent language (L).
R Restricted. Under 17 requires an accompanying parent
or adult guardian.
NC-17 No one under 17 permitted. The program or movie is considered
too adult (containing violence, sex, aberrational behavior, or
drug use) for youngsters under 17.
NR (Adult) Not Rated — for Adults only. A stronger version of NC-17. The
program or movie is considered too adult (containing violence,
sex, aberrational behavior, or drug use) for youngsters under 17.
17
Chapter 5 - Main Menu
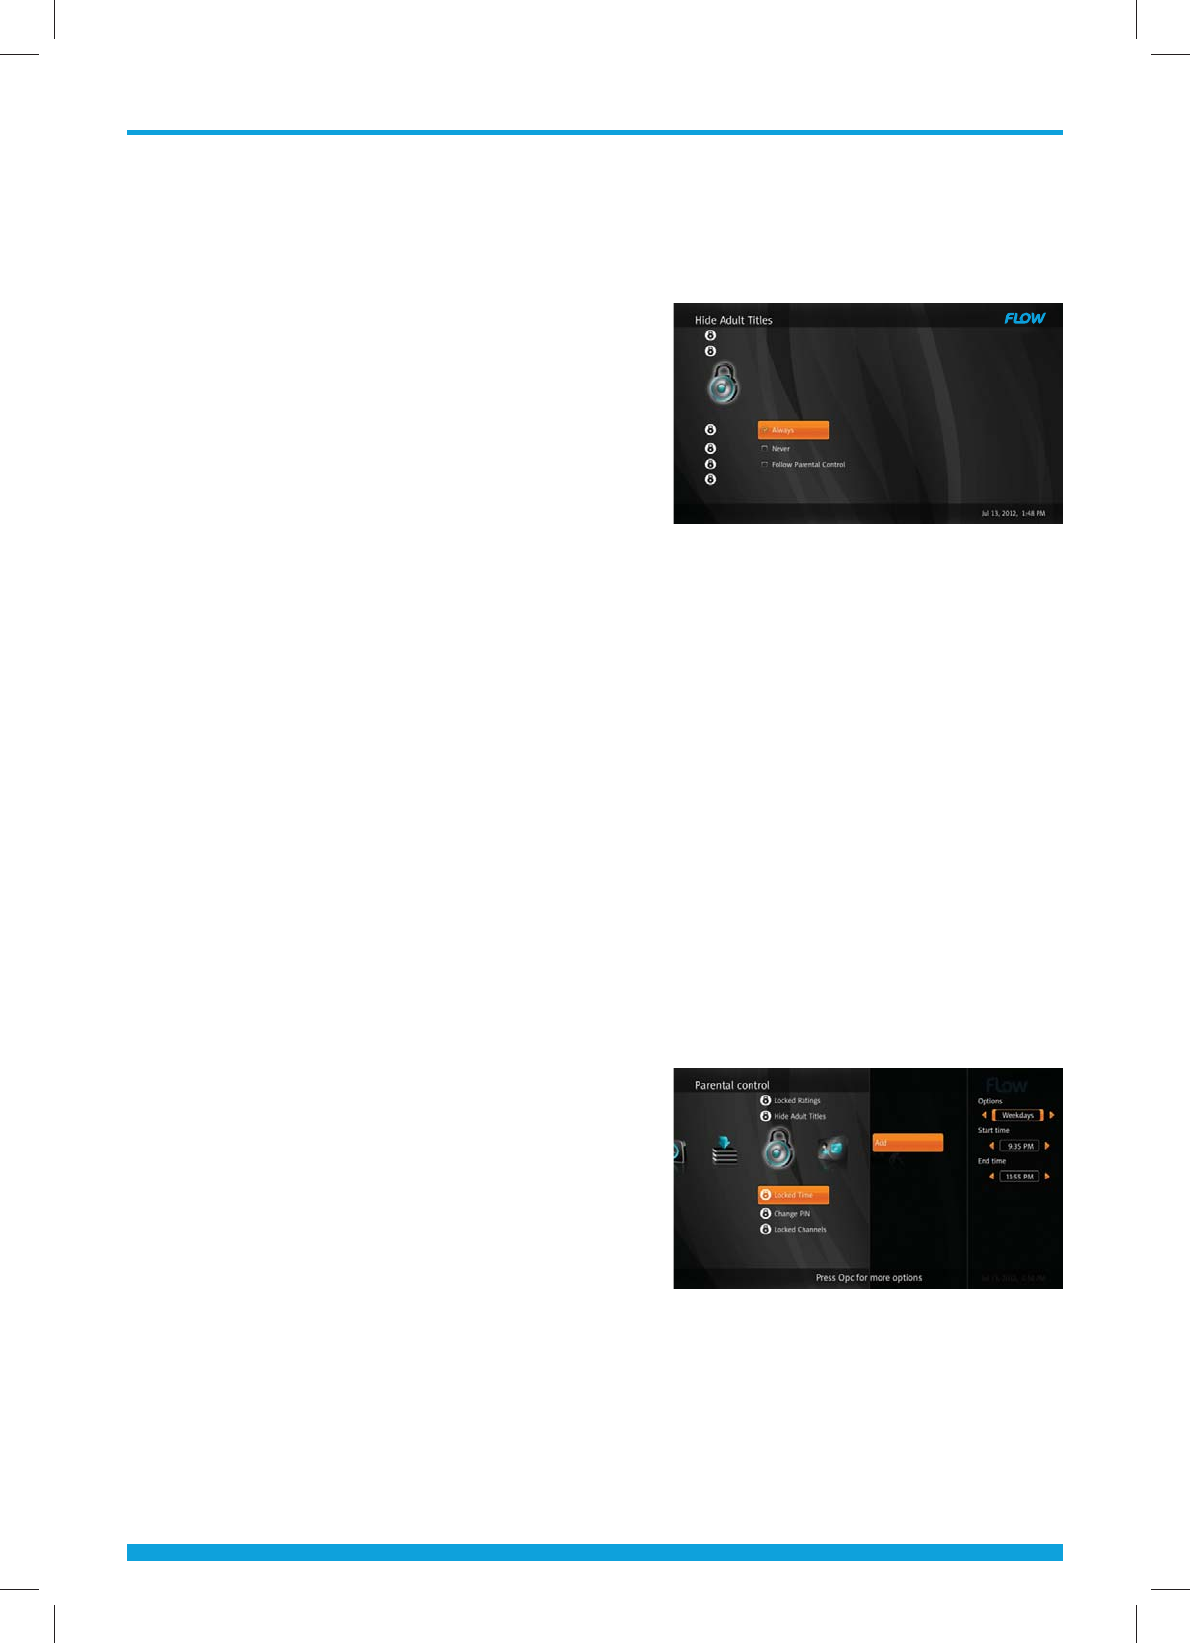
Hide Adult Titles
The Hide Adult Titles preference lets you block adult-oriented program titles
and descriptions from appearing in the Program Guide, Info Banner and Channel
Banner. It also automatically adds NC-17 and
NR (Adult) ratings to the Locked ratings list.
Note: Enabling the Hide Adult Titles preference blocks the
title and description from appearing in the noted places and
automatically adds NC-17 and NR (Adult) to the locked rat-
ing list. It does not prevent the program from being viewed.
You must also lock the rating or channel, see page 15 or 18.
The program title is replaced with a “Title
Blocked” indication if any of the
following are true:
• Rating is “Adult”
• Rating is “NC17”
• Rating is “X”
• Rating is “NR (Adult)”
To lock the video from being viewed, see Locked Ratings on page 15 or Locked
Channels on page 18.
To enable the Hide Adult Titles preference:
1 Select Hide Adult Titles using the Arrow (Ÿź) buttons on the Parental
Control menu and press OK button.
2 Authentication required pop-up will be displayed.
3 Input your PIN using the Numeric (0-9) buttons and press the OK button.
4 Select the preferred option using the Arrow (Ÿź) buttons and press the
OK button.
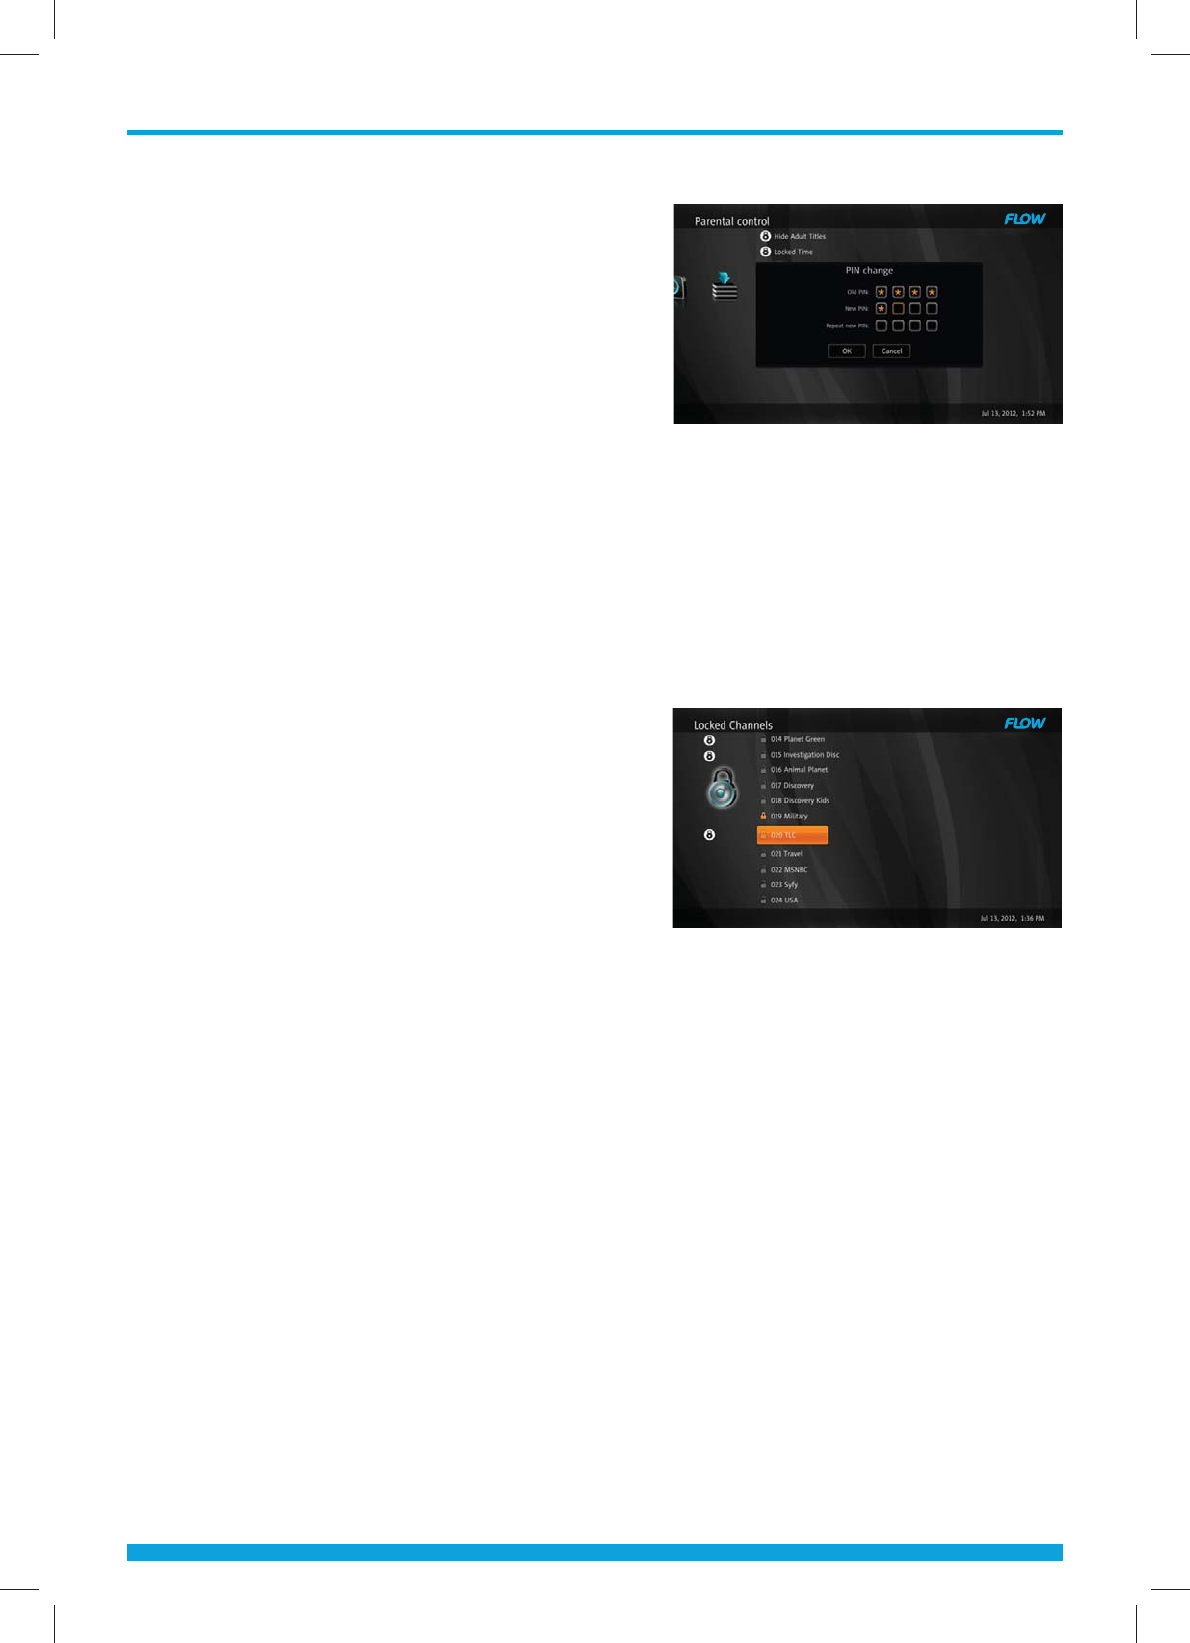
Locked Time
Parental Control enables you to lock time
periods so that household members can
watch programs only during unlocked time
periods. To lock a time period, use the Locked
Time preference in the Parental Control menu
as described below.
1 Select Locked Time using the Arrow (Ÿź)
buttons on the Parental Control menu and
press OK button.
2 Authentication required pop-up will be displayed.
3 Input your PIN using the Numeric (0-9) buttons and press the OK button.
4 Select Add and press the OK button.
5 Select your Day and Time options using the Arrow (ŸźŻŹ) buttons and
press the OK button.
• Category is “Adult Series”
• Category is “Adult Movie”
• Content Advisory is “Strong Sexual Content”
18
Chapter 5 - Main Menu
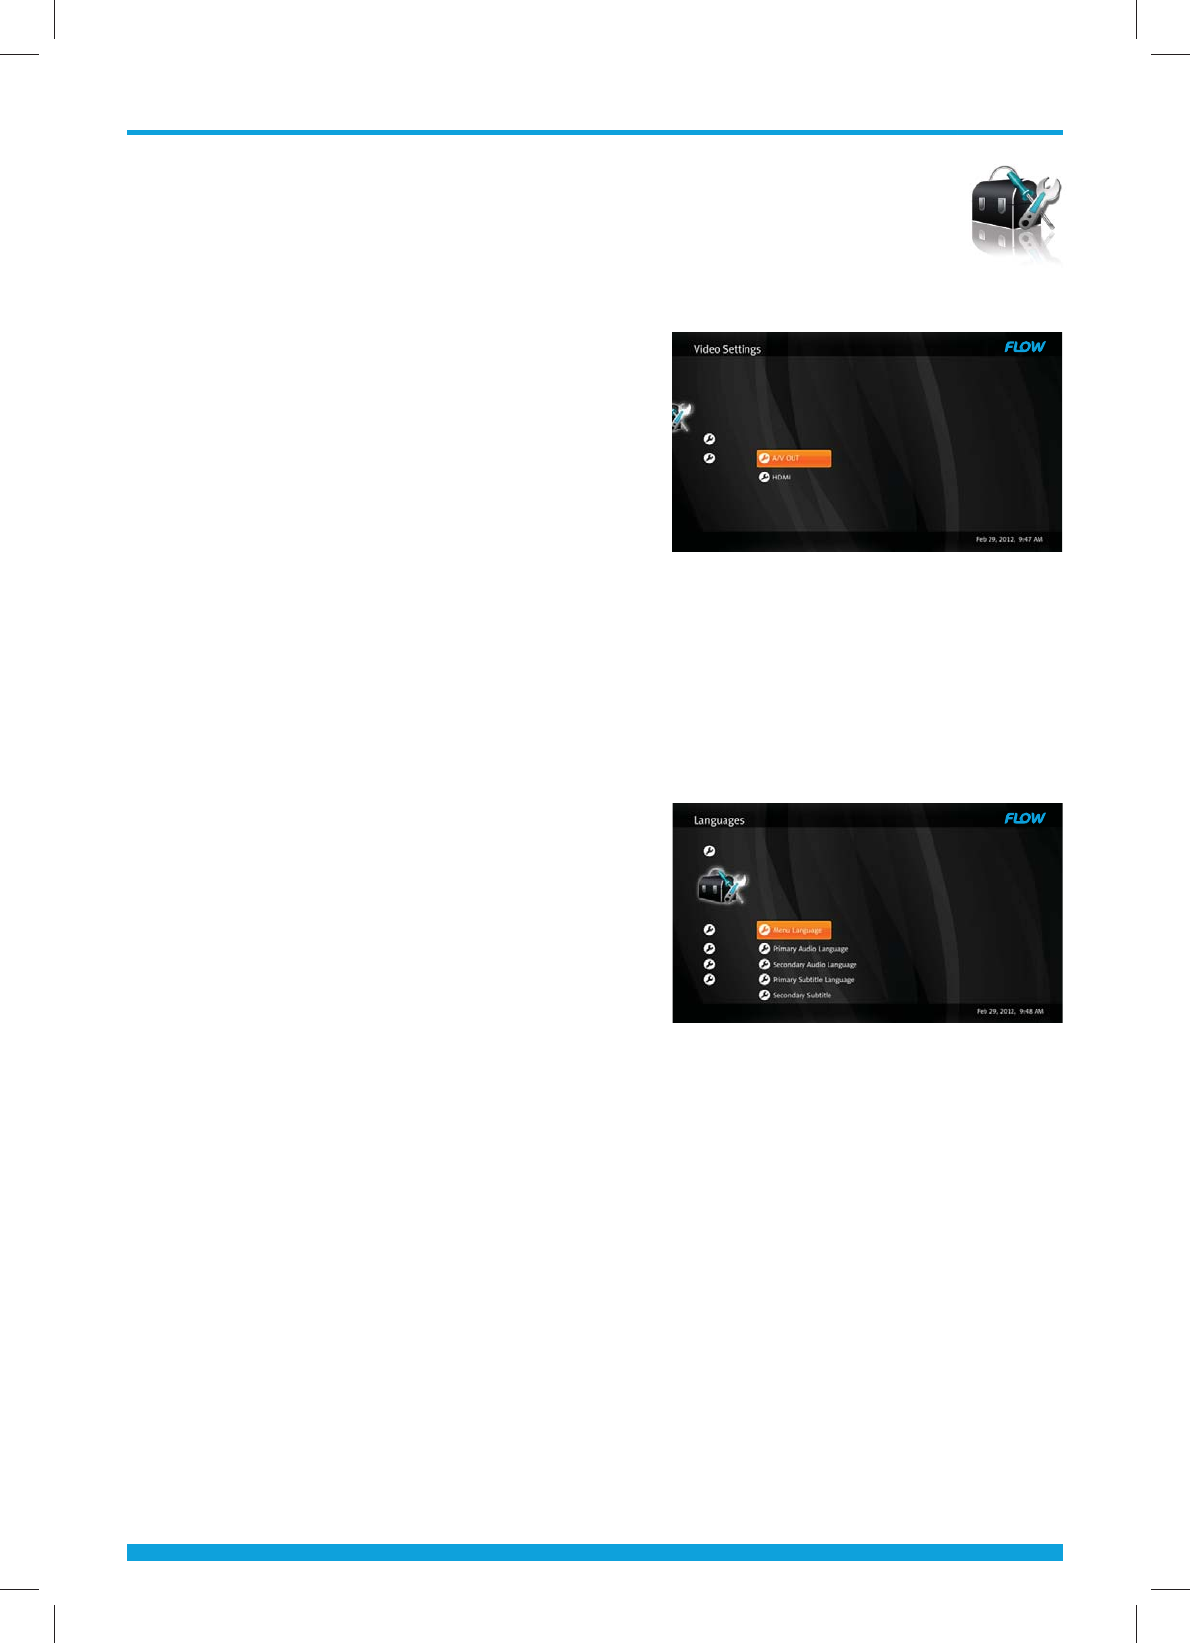
Change PIN
When Parental Control is turned on, you must
enter your Parental Control PIN to view locked
items. You can establish or change your
Parental Control PIN using the Change PIN
preference in the Parental Control menu.
The default PIN code is "1234".
1 Select Change PIN using the Arrow (Ÿź)
buttons on the Parental Control menu
and press OK button.
2 Authentication required pop-up will be displayed.
3 Input your old PIN using the Numeric (0-9) buttons.
4 Input your new PIN twice using the Numeric (0-9) buttons and press the
OK button.
Locked Channels
Use Locked Channels to prevent other
household members from viewing the
programs that are broadcast on those
channels.
1 Select Locked Channels using the Arrow
(
Ÿź) buttons on the Parental Control
menu and press OK button.
2 Authentication required pop-up will be displayed.
3 Input your PIN using the Numeric (0-9) buttons and press the OK button.
4 Select preferred channels using the Arrow (Ÿź) buttons and press the OK
button to lock/unlock the selected channels.
Note: Locked channels are marked by a closed lock icon. Unlocked channels are marked by an open lock icon
19
Chapter 5 - Main Menu
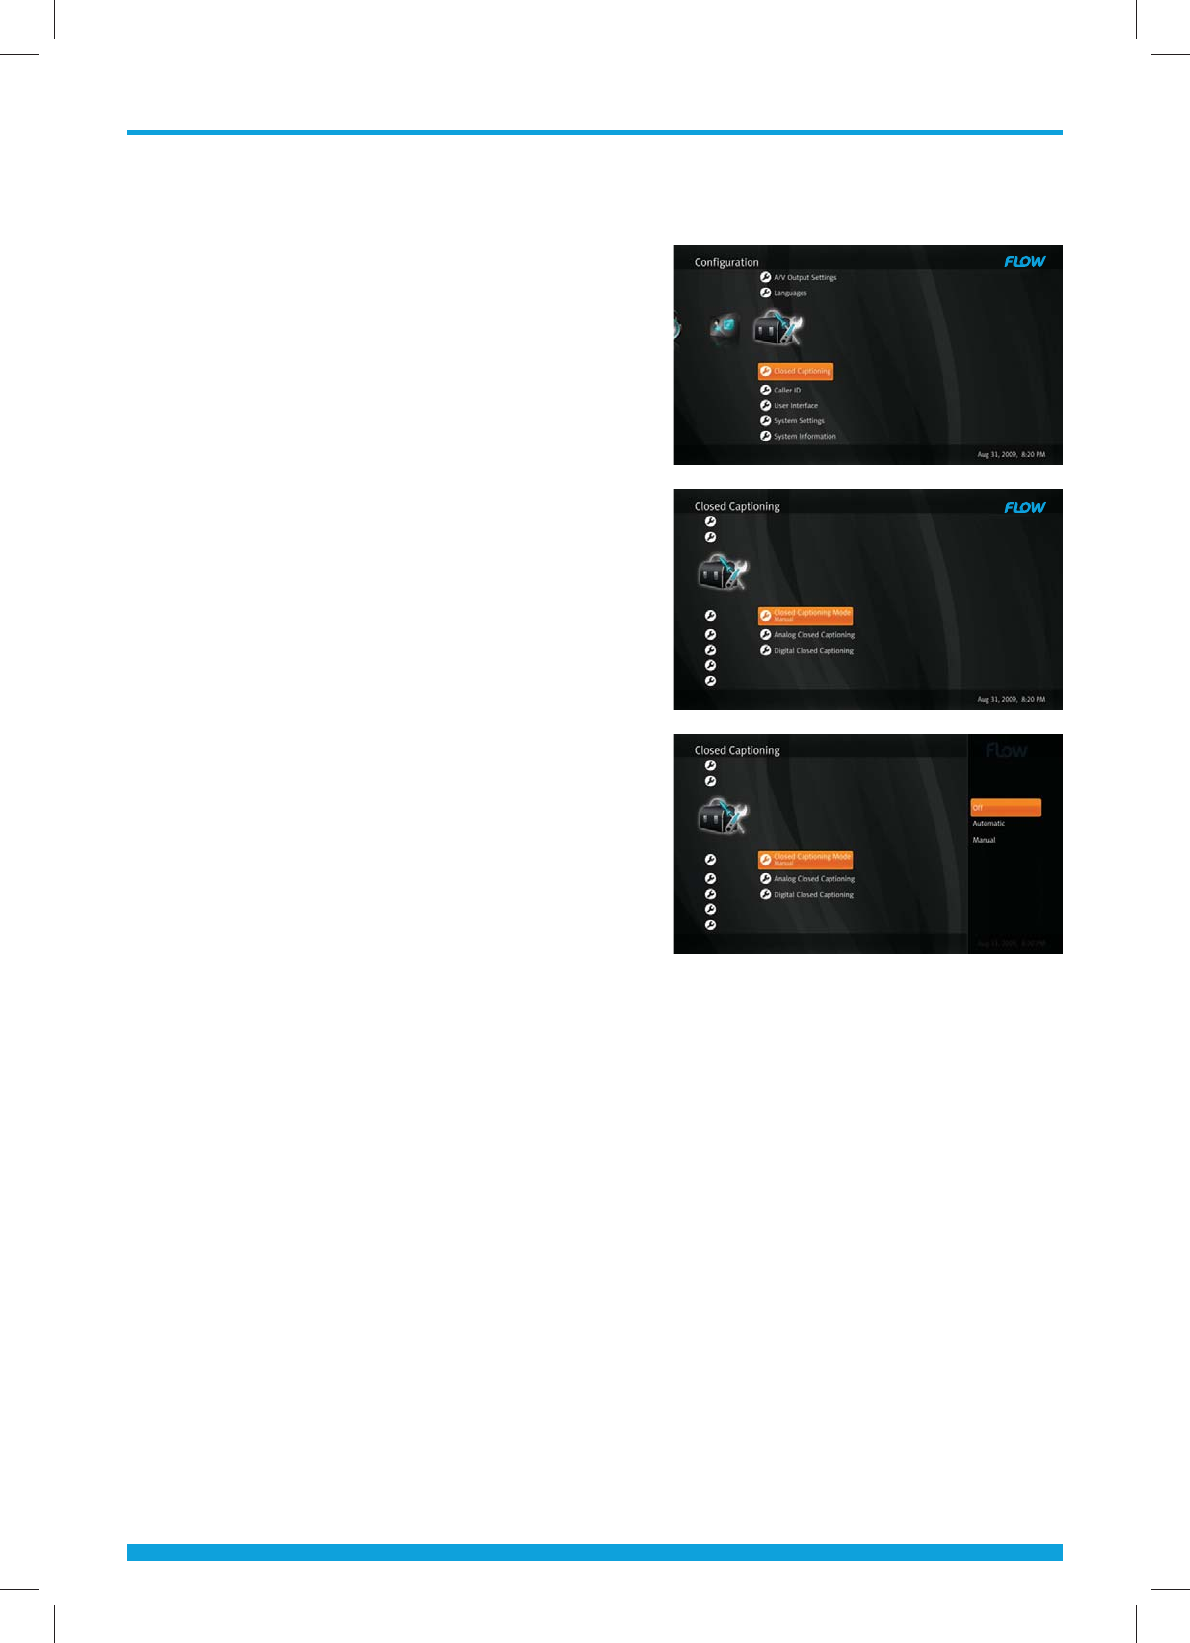
CONFIGURATION
Press the “Menu” button to enter the Menu Mode. Select Configuration using
the Arrow (ŻŹ) buttons.
A/V Output Settings
1 Select A/V Output Settings using the
Arrow (Ÿź) buttons on the Configuration
menu and press the OK button.
2 Select a setting to be modified using
the Arrow (Ÿź) buttons and press the
OK button.
3 Select a value for each setting using the
Arrow (Ÿź) buttons and press the
OK button. Available values are listed below:
TV Aspect Ratio: 16:9 or 4:3
Display Format (HDMI): Fullscreen or Letterbox
HDMI Video Format: Automatic, 480p, 720p, or 1080i.
Languages
1 Select Languages using the Arrow (Ÿź)
buttons on the Configuration menu and
press the OK button.
2 Select a language setting using the
Arrow (Ÿź) buttons and press the
OK button. The available settings are
listed below:
Menu language
Primary Audio Language
Secondary Audio language
Primary Subtitle Language
Secondary Subtitle language
3 Select a value for each language setting using the Arrow (Ÿź buttons and
press the OK button.
[Note] If you want to delete all channels, select Drop and press OK button.
20
Chapter 5 - Main Menu
CLOSED CAPTIONING
Closed captions typically show a transcription
of the audio portion of a program as it occurs
as well as non-speech elements. The Set top
allows you to manage the CC features thru the
Configuration menu.
Within this menu option you can select the
Mode for display.
The Closed Caption menu oers three menu
choices; O, Automatic or Manual. The default
setting is “Automatic” and will display the
Closed Caption content if available.
21
Chapter 5 - Main Menu
Activating or Deactivating Closed Captions
Closed captions display text for the dialog and other non-visual events (such as
sound eects) during a program.
Note: This procedure turns the closed caption option on automatically or o.
To display closed captions:
1 Press the Menu button, then scroll to the Configuration menu option. Within
that menu is the Closed Caption features menu .
2 Press the Arrow (Ÿź buttons to highlight the Closed Captions Menu option.
3 Press OK or the left arrow to change the setting to Automatic. Closed
captions will be displayed (if available).
To Manually control closed captions:
1 Press the Menu button, then scroll to the Configuration menu option. Within
that menu is the Closed Caption features menu .
2 Press the Arrow (Ÿź buttons to highlight the Closed Captions Mode option.
3 Press the OK button to change the setting to Manual. Closed captions are
turned on and you will need to select the language options to be displayed.
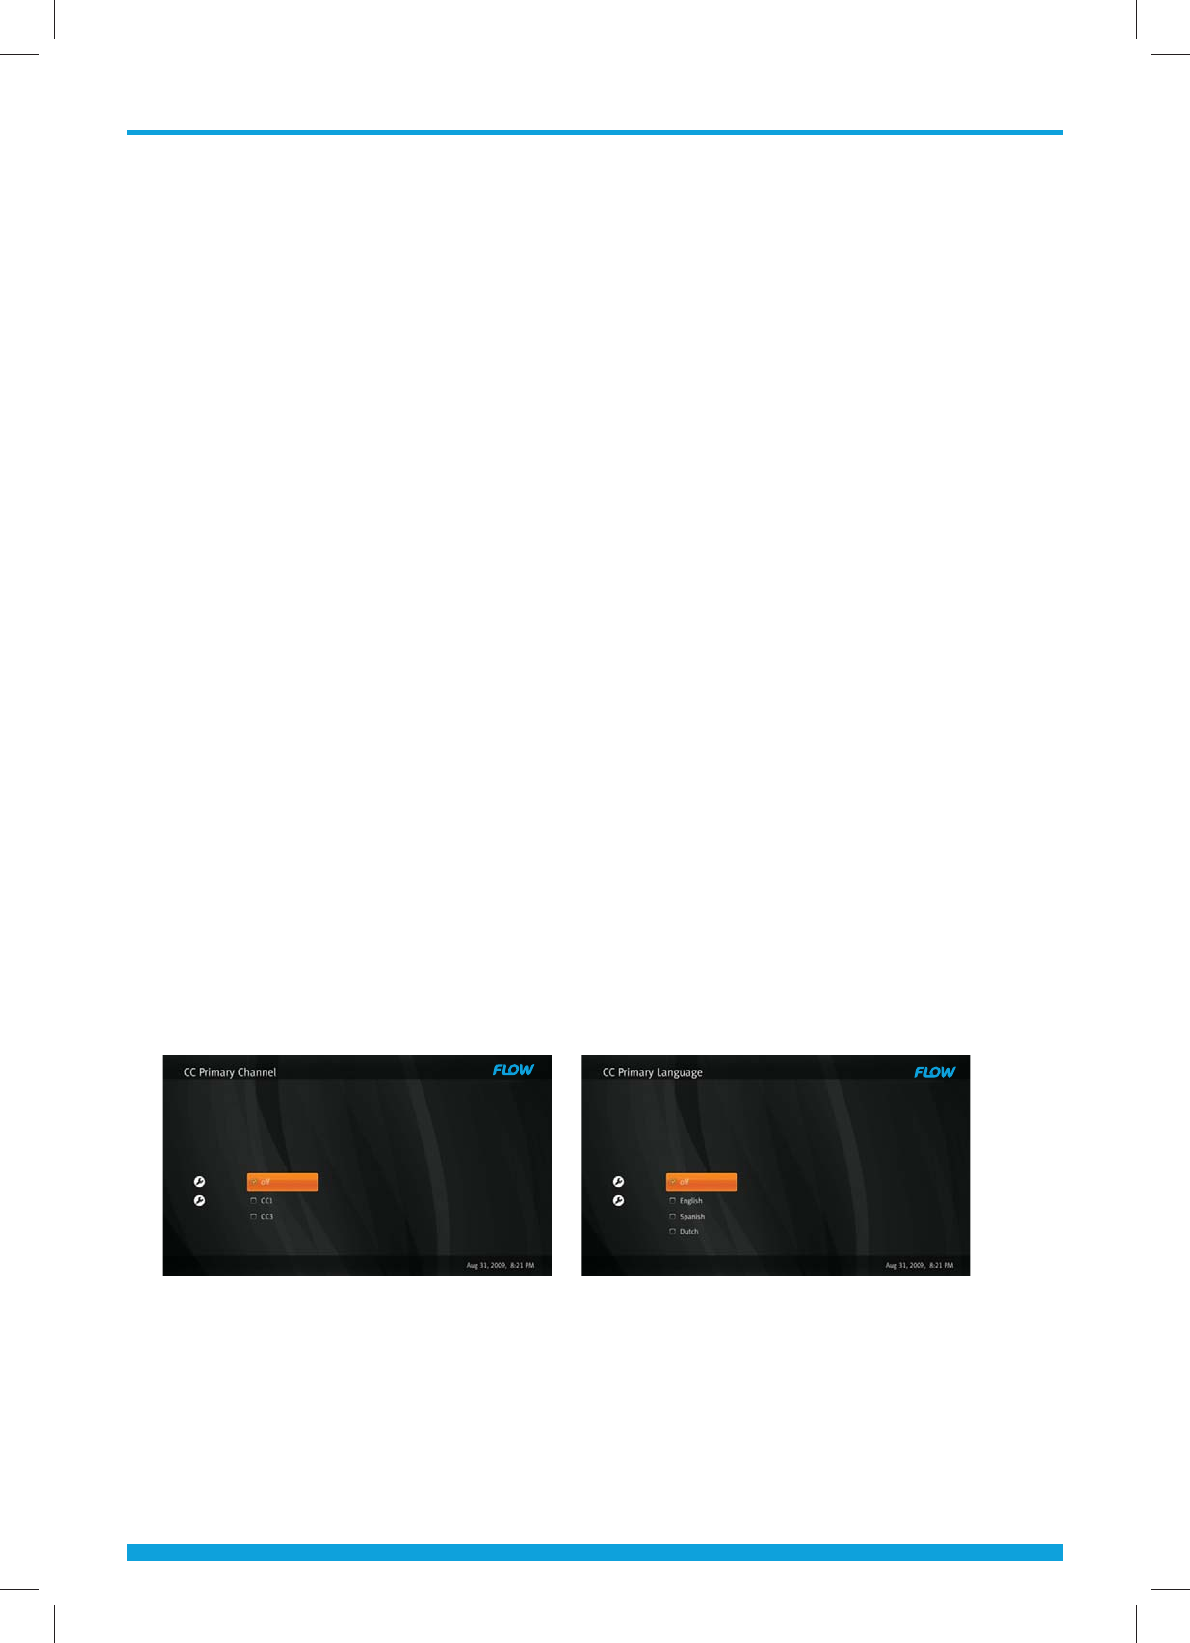
4 Under the Analog Closed Captioning you have the selection option of CC1 and
CC3 for Primary and secondary languages.
5 Under the Digital Closed Captioning you have the options of English, Spanish
and Dutch for primary and secondary languages.
Analog Digital

22
Chapter 5 - Main Menu
To deactivate closed captions:
1 Press the Menu button, then press the Configuration menu option. Within that
menu is the Closed Caption features menu .
2 Press the Arrow (Ÿź buttons to highlight the Closed Captions Mode option.
3 Press the OK button to change the setting to O. Closed captions are turned
o and will not be displayed.

Troubleshooting
23
TROUBLESHOOTING
Problem Solution
No display on the front panel
No power supply
Make sure your power cord is securely
plugged into your electrical wall
outlet.
No image Check the A/V or HDMI cable
connections between the Set-Top
Box and TV to make sure they are
connected correctly. (See page 8-9).
Check that your TV is set to the
correct video input source.
Try using both A/V and HDMI outputs.
See guide but no video Make sure the coax cable is securely
tightened onto both the cable wall
outlet and the CABLE IN port on the
Set-Top Box (see page 8-9)
No sound Check the volume level of the TV and
Set-Top Box.
Check the mute status of the TV and
Set-Top Box.
Make sure the audio cables are
connected correctly (see page 8-9).
Remote Control does not
operate
Point remote control directly towards
the Set-Top Box. Check and replace
batteries.
Make sure nothing is blocking the
front panel.
Try using the provided external IR
Receiver by connecting it to the STB
and placing the receiver away from
other electronics
No card inserted Insert the correct smart card.
Remove the smart card and
reinsert it.
Correct Disposal of This Product
(Waste Electrical & Electronic Equipment)
This marking shown on the product or its literature, indicates
that it should not be disposed with other household waste
once its working life is done.
To prevent possible harm to the environment or human health
from uncontrolled waste disposal, please separate this from
other type of waste and recycle it responsibly to promote the
sustainable reuse of material resources.
Household users should contact either the retailer where they purchased this product,
or their local government oce, for details of where and how they can take this item
for environmentally safe recycling.
Business users should contact their supplier and check the terms and conditions
of the purchase contract. This product should not be mixed with other commercial
wastes for disposal.
Manufactured under license from Dolby Laboratories. Dolby and the double-D symbol are trademarks of Dolby
Laboratories. HDMI, the HDMI logo and High-Definition Multimedia Interface are trademarks or registered
trademarks of HDMI licensing LLC. All other trademarks are the property of their respective owners.
DMS1004HDHMC3E 120 1DE COL [ENGLISH] Version 1
This appliance and its antenna must not be co-located or operation in conjunction with any
other antenna ortransmitter. A minimum separation distance of 20 cm must be maintained
between the antenna and the person forthis appliance to satisfy the RF exposure
requirements.
FCC Note
FCC Certification Requirements
-Caution
A
ny changed or modifications not expressly approved by the party responsible for
compliance could void the user`s authority to operate this equipment.
-User Information
This device complies with Part 15 of the FCC`s Rule. Operation is subject to the following
to conditions;
1. This device may not cause harmful interference, and
2. This device must accept any interference received, including interference that may
cause undesirable operation.