MARUSYS MOMMYFRAME Digital Picture Frame User Manual
MARUSYS Co., Ltd. Digital Picture Frame
MARUSYS >
User Manual


Table of Contents
1
Basic Operation
Description of Parts..............................................................................................................3
Turning the Power On/Off ....................................................................................................5
Making Use of the Menu ......................................................................................................6
Setup
Setting up the Current Time...............................................................................................7
Setting up the Automatic On/Off Time ...............................................................................9
Setting up the Dial-Up Number ........................................................................................11
Setting up the Network.....................................................................................................13
Connecting to the Server ................................................................................................15
Operation
Selecting Images..............................................................................................................18
Copying Images ..............................................................................................................19
Deleting Images ...............................................................................................................20
Rotating Images...............................................................................................................21
Setting up the Slide Interval ............................................................................................22
Setting up the Slide Transition Effect...............................................................................23
Adjusting the Back Light Control......................................................................................24
(For Ml0WM / M10WL Only)

2
Advanced Operation
Connecting MommyFrame's Server and Registering Your Product.....................................25
Guide for Server Uses..........................................................................................................26
Uploading Photos to the Server ...........................................................................................27
Editing Photos on the Server ...............................................................................................29
Inserting Text into the Photo ................................................................................................30
Finding Friends on the Server..............................................................................................31
Sending Photos to your Friends...........................................................................................32
What are the MommyFrame Channel Services? .................................................................33
About Screen Messages......................................................................................................34
Installing the MommyFrame Software on your PC...............................................................35
Installing the USB driver manually .......................................................................................36
Using the MommyFrame Software ......................................................................................38
Other
Troubleshooting ...................................................................................................................39
Safety Instructions................................................................................................................41
Specifications.......................................................................................................................42
(For Ml0WM / M10WL Only)

3
Left Side Components
On/Off
(1)
(2)
(3)
(4)
(1) Operating Lamp
Insert the Smart Media card to view the digital
images stored in the Smart Media card.
Indicates that the Smart Media or Compact
Flash is working. Do not remove the memory
card while the Lamp is on. This may cause
damage to the card.
(2) Smart Media Card Slot
Insert the Compact Flash card to view the digital
images stored in the Compact Flash card.
Press this button to turn the power on/off.
(3) Compact Flash Card Slot
(4) Power-On/Off Button
Description of Parts
Base Components
(1) Reset
To restart the apparatus when
MommyFrame does not work
properly, press down with any
sharp object such as a pin.
(2) Power In Connector
Connect the Power Adapter
supplied as an accessory.
(2)
(1)
4
Top Components
(1) Sleep Button
Press this button to put MommyFrame into sleep mode.
Restarting from sleep mode won change [MommyFrame]
default settings.
Press this button for the [MommyFrame] Menu to appear.
If you press this button again, the Menu will disappear.
(2) Menu Button
(3) Move Forward
Button Functions as a [Move to Next Image] button in Slideshow.
Functions as a [Move between Items] button in the Menu
screen.
(4) Stop/Play Button
Functions as a [Stop/Play] button in Slideshow.
Functions as a [Select] or [Change Numbers] button in the
Menu screen.
(5) Move Backward
Button Functions as a [Move to Previous Image] button in the
Slideshow. Functions as a [Move between Items] button in the
Menu screen.
(6) Mode Switch
Button Pressing this button, switches the Mode between [Slideshow]
---> [Channel] and [Clock] in that order.(M10WM, M10WL)
For the M8W Model, the Mode switches between [Slideshow]
and [Help].
(1) (2) (3) (4) (5) (6)
Right Side Components
(1)
(2)
(3)
(1) USB Connector
(2) Ethernet Connector
Connect an RJ45 jack when you purchase the
MommyFrame Ethernet version.
Before connecting to your PC using the USB cable,
install the MommyFrame USB software.
(3) Modem Connector
Connect a modem-connecting jack when you
purchase the MommyFrame Modem version.
Turning the Power On/Off
5
11
Press the Power (On/Off) button on the left side to turn the MommyFrame on.
-.When you disconnect the power cord or press the On/Off button, the time setting will be changed.
Connect the power cord to a power outlet.
Accessories
USB Cable Power Adapter Owner's Instructions
Stand Customer Card Phone Lines
(For M10WM) "Y" Adapter
(For M10WM)
Installation CD
MommyFrame Connecting Diagram (M10WM)
-..It is not recommended that you use your phone
while transmitting digital images. It may
abruptly stop transmitting the images.
MommyFrame
Telephone
Phone Line
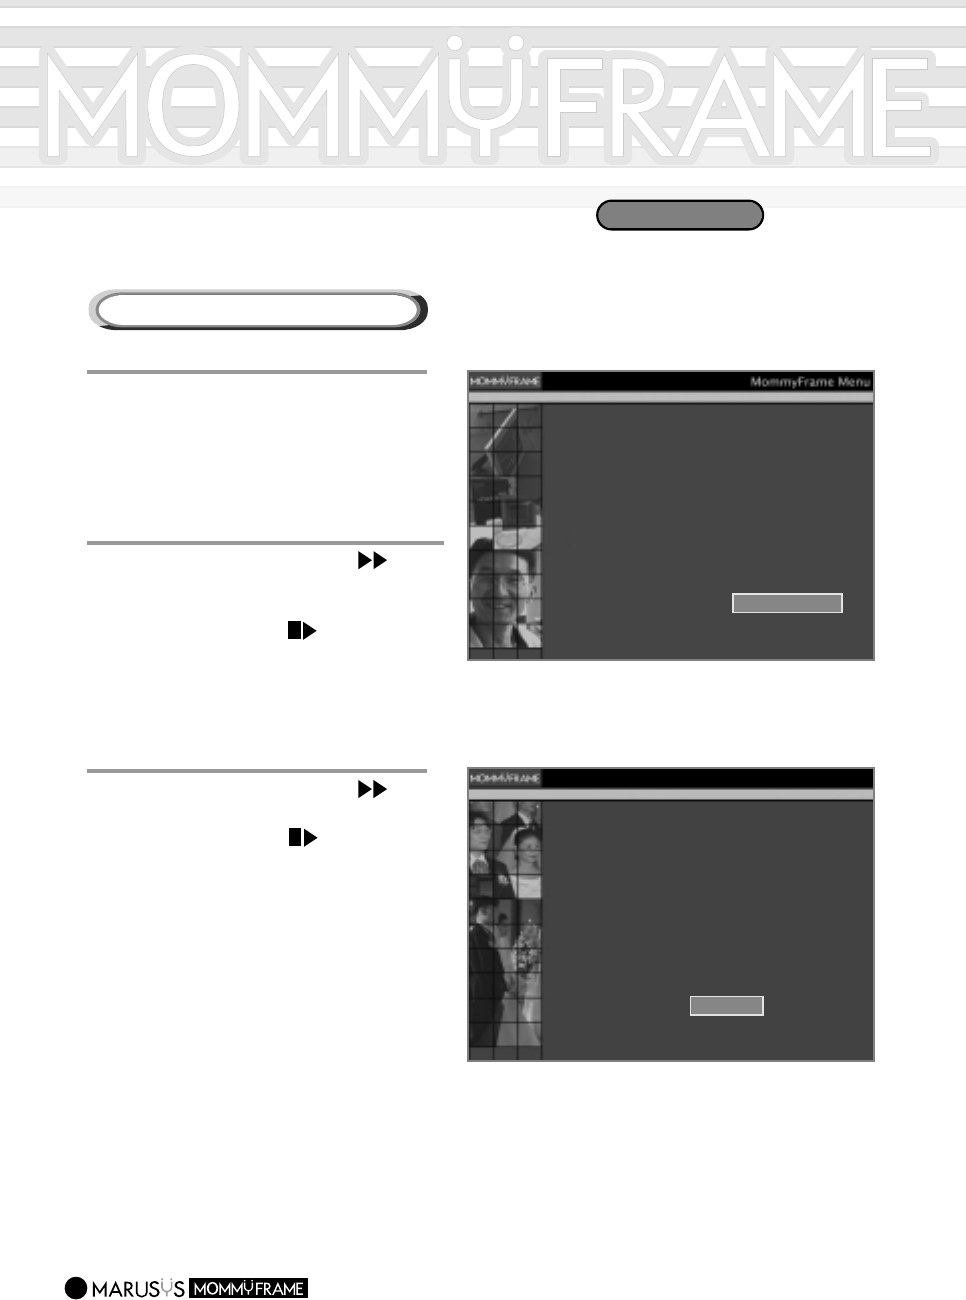
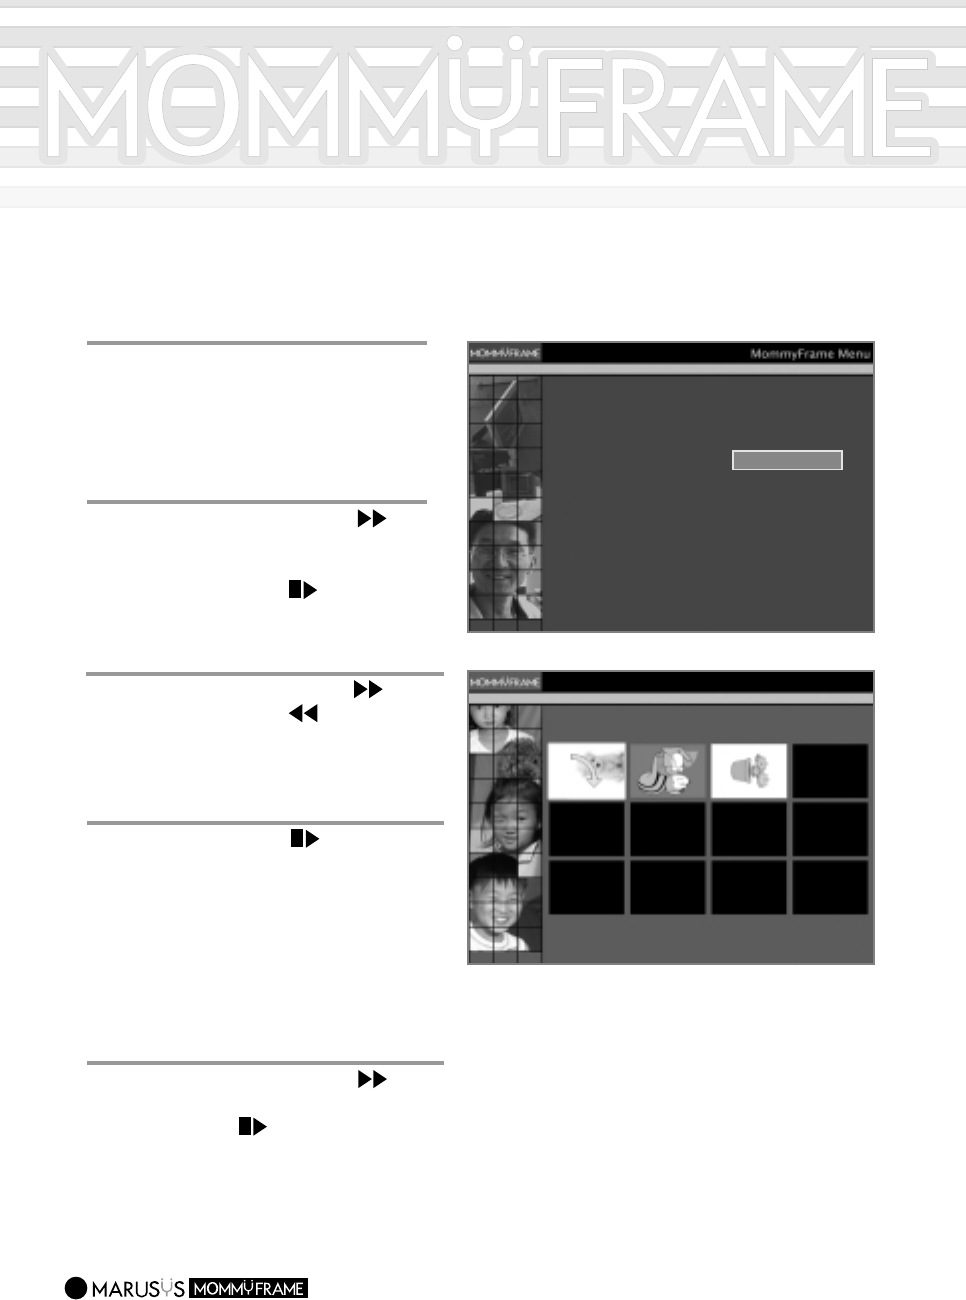
Making Use of the Menu
6
The MommyFrame Menu allows you to set up the apparatus according to your requirements.
1
1
If you press the Menu Button on the top of the MommyFrame, the menu items will be
displayed on the screen. If you press this button again, the items will disappear.
Image Menu
Copy Images
Delete Images
Rotate Images
Select Images
Image Menu
Back Light Control
Auto On / Off
Advanced Settings
Upadate Now
Slide Settings
2
2
Press the Move Forward ( )/or Backward ( ) buttons on the top of the
MommyFrame to move for each Menu item.
3
3
Press the Select ( )button on the top of the MommyFrame to select an item.
Image Settings Menu
This menu allows you to set images in
[MommyFrame].
Frame Settings Menu
This menu allows you to set [MommyFrame]
and the connections to external devices.
-.
The M8W Model does not support the
Auto On/Off, Advanced Settings, and
Update Now features.
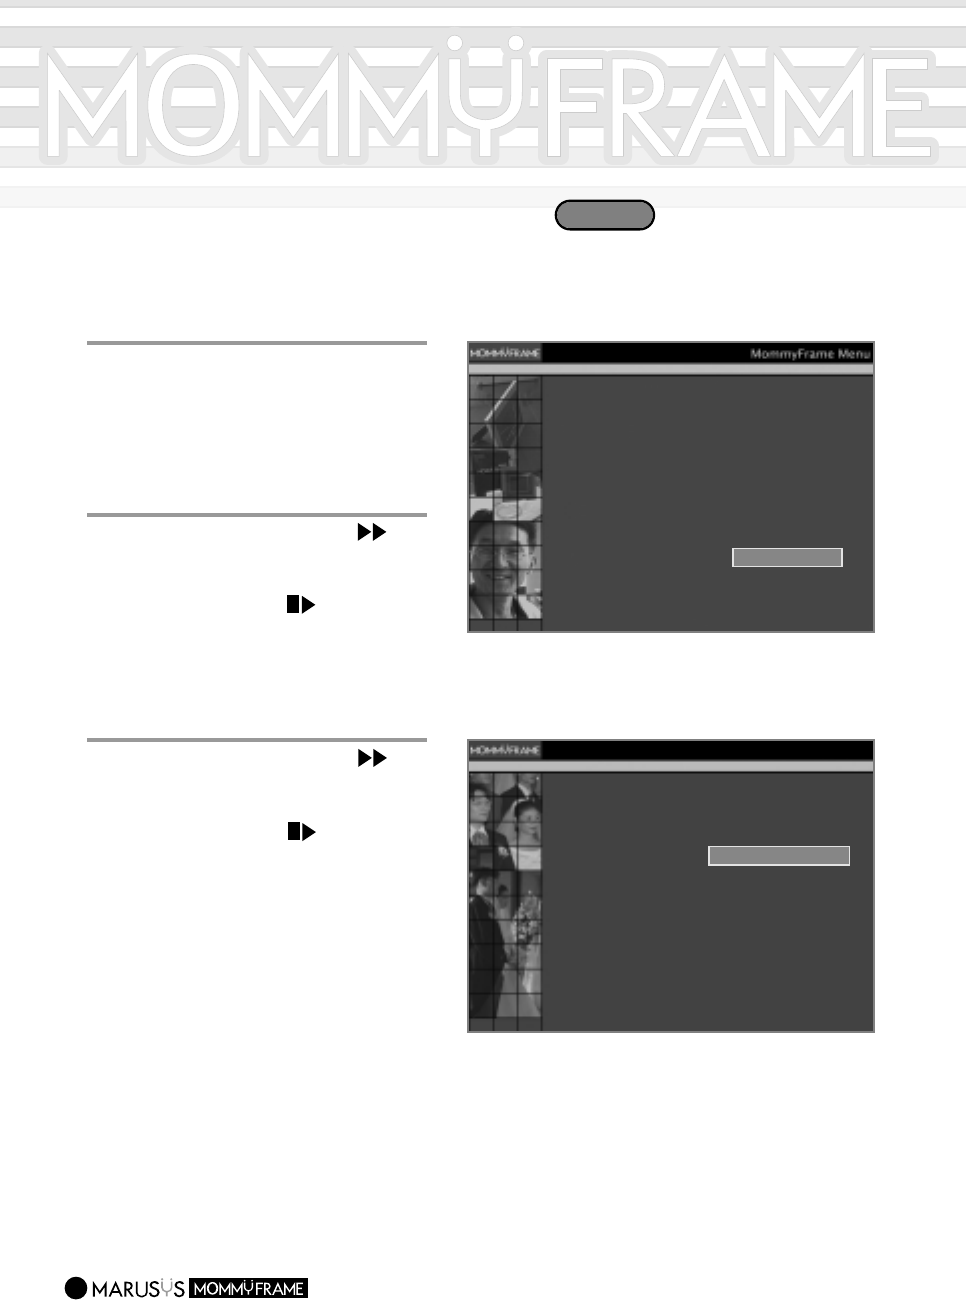
Setting up the Current Time
7
1
1
Press the Menu button.
-.The Menu will appear.
Image Menu
Copy Images
Delete Images
Rotate Images
Select Images
Image Menu
Back Light Control
Auto On / Off
Advanced Settings
Upadate Now
Slide Settings
Setting time
Set the regular update time
Set the network options
Cancel
Advanced Settings
3
3
Press the Move Forward ( )
button to move to the [Set the
time] item.
Press the Select ( ) button.
-.
The "Set the time" screen will appear.
-.
MommyFrame for Modems' does not
support the Network Setting Item.
-.
MommyFrame for Ethernet' does not
support the Dial-Up Number Setting
Item.
2
2
Press the Move Forward ( )
button to move to the [Advanced
Settings] item.
Press the Select ( ) button.
Do you want to set the time automatically? Yes
No
CancelOK
Set the time
1
Press the Move Forward ( )button
to move to the [Yes] item.
Press the Select ( ) button.
-.
MommyFrame will automatically connect to the
server to retrieve the current "Mean Time".
-.
To set up the current time automatically, be
sure to connect MommyFrame to the network.
Setting up the Current Time Automatically
M10WL/M10WM
8
1 Press the Move Forward ( )
button to move to the [No] item.
Press the Select ( ) button.
-.The "Set the time manually" message will
appear.
Do you want to set the time automatically? Yes
Set the time manually. (YYYY MM DD)
No
2001 . 01 . 01
09 : 30 AM
CancelOK
Set the time
Do you want to set the time automatically? Yes
Set the time manually.
(YYYY MM DD)
No
2001 . 09 . 17
10 : 30 AM
CancelOK
Set the time
2 Press the Select and Move buttons to
set up the [Year, Month, Day, Hour,
Minute].
-.
Press the Select button to increase the number.
-.
Press the Move button to move between the items.
[Year]-->[Month]-->[Day]-->
[Hour]-->[Minute]-->[AM/PM]
Setting up the Current Time Manually
44
Press the Move Forward ( ) button to move to the [OK] item. Press the Select ( ) button.
The current time setting has been completed.
Checking the Current Time
Press the Mode button on the top of the
MommyFrame until the [Clock] mode screen
appears.
Press the Mode button to switch between
[Slideshow] -->[Channel]-->[Clock].
M10WL/M10WM
Setting up the Automatic On/Off Time
9
1
1
Press the Menu button.
In the following example, we will set up the On/Off Time to 6:30 AM and 12:00 PM, respectively.
Image Menu
Copy Images
Delete Images
Rotate Images
Select Images
Image Menu
Back Light Control
Auto On / Off
Advanced Settings
Upadate Now
Slide Settings
The ’Auto On / Off ’ is running.
Do you want to run ’Auto On / Off ’ ?
Set the ’Frame-Auto-On Time’ 09 : 00 AM
11 : 30 PM
Set the ’Frame-Auto-Off Time’
Yes
No
CancelOK
Auto On / Off
3
3
Press the Move Forward ( )
button to move to the [Yes] item.
Press the Select ( ) button.
2
2
Press the Move Forward ( )
button to move to the [Auto On/Off]
item.
Press the Select ( ) button.
-.The ["Auto On/Off"] screen will appear.
4
4
Press the Move Forward ( )
button to move to the [Hour] item.
Press the Select ( ) button to
adjust the hour to [06].
-.Pressing the Select button increases the
hour.
Set the ’Frame-Auto-On Time’ 06 : 00 AM
01 : 00 AM
Set the ’Frame-Auto-Off Time’
M10WL/M10WM
10
The ’Auto On / Off ’ is running.
Do you want to run ’Auto On / Off ’ ?
Set the ’Frame-Auto-On Time’ 06 : 30 AM
12 : 00 PM
Set the ’Frame-Auto-Off Time’
Yes
No
CancelOK
Auto On / Off
Set the ’Frame-Auto-On Time’ 06 : 30 AM
01 : 00 AM
Set the ’Frame-Auto-Off Time’
6
6
Press the Move Forward ( )
button to move to the [AM, PM]
item.
Press the Select ( ) button to
select [AM].
5
5
Press the Move Forward ( )
button to move to the [Minute]
item.
Press the Select ( ) button to
adjust the minutes to [30].
Follow the steps in "Setting up the Automatic On Time".
7
7
Press the Move Forward ( )
button to move to the [OK] item.
If you press the Select ( )
button, the set time will be
automatically saved.
If you select the Cancel item, you
will return to the first menu.
Set the ’Frame-Auto-On Time’ 06 : 30 AM
01 : 00 AM
Set the ’Frame-Auto-Off Time’
Setting up the Automatic Off Time

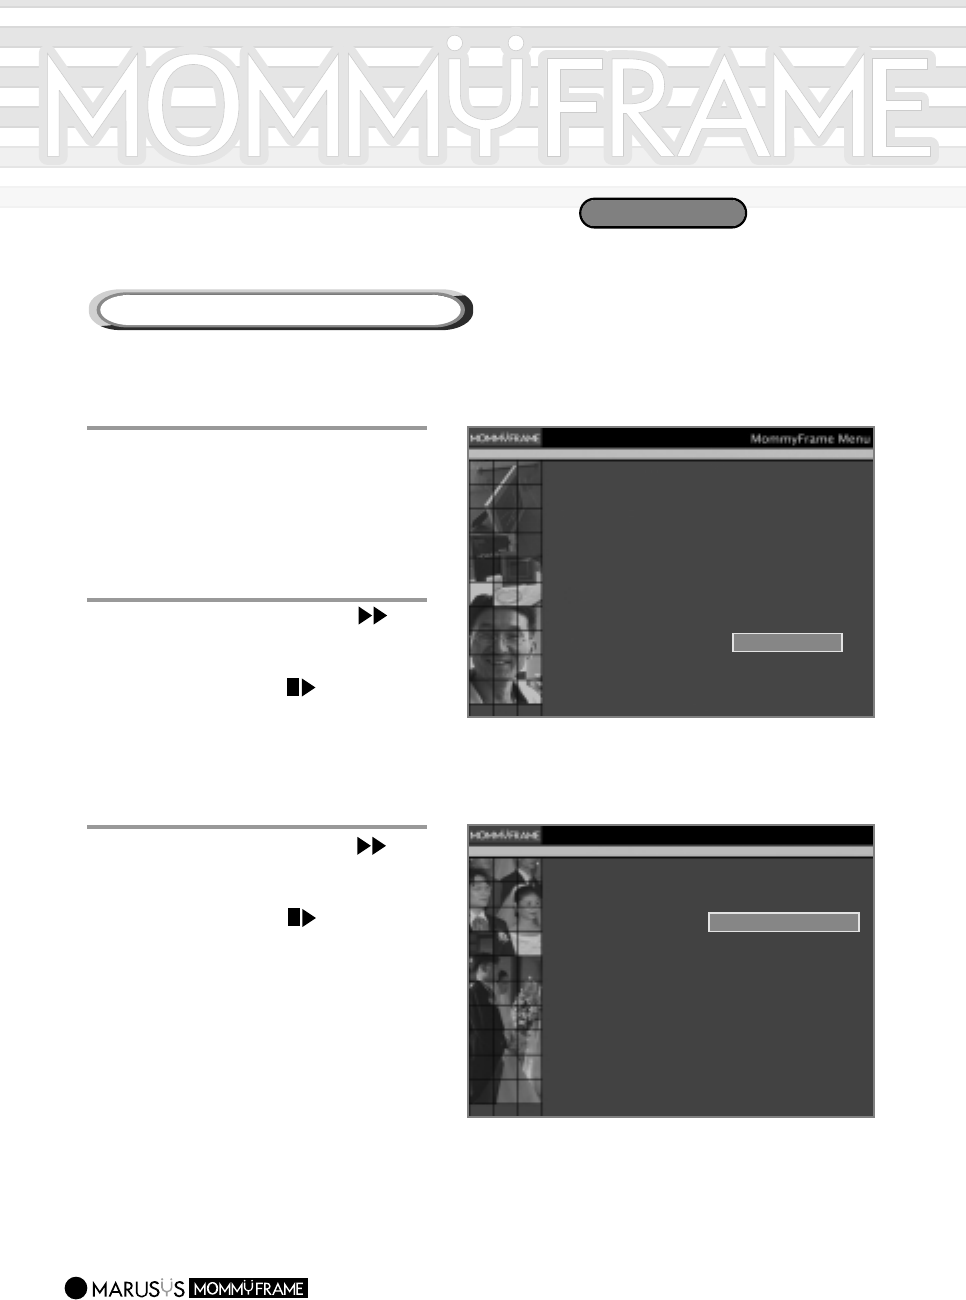
Setting up the Dial-Up Number
11
1
1
Press the Menu button.
-.The Menu will appear.
Image Menu
Copy Images
Delete Images
Rotate Images
Select Images
Image Menu
Back Light Control
Auto On / Off
Advanced Settings
Upadate Now
Slide Settings
Setting time
Set the regular update time
Set Dialing Options
Cancel
Advanced Settings
3
3
Press the Move Forward ( )
button to move to the [Set Dialing
Options] item.
Press the Select ( ) button.
-.
The "Set Dialing Options" screen
will appear.
2
2
Press the Move Forward ( )
button to move to the [Advanced
Settings] item.
Press the Select ( ) button.
-.
The Advanced Settings screen will
appear.
M10WM

12
5
5
Press the Move Forward ( )
button to move to the [OK] item.
Press the Select ( ) button.
-.Now, the Dial-Up number setting has
been completed.
If you select Cancel, you will return to the
first menu.
4
4
Setting up your extension number.
Press the Select ( ) button to
select one from No Ext. # -->
Ext. # 9 -->Ext. # 0.
Press the Move Forward ( )
button and [OK] to save the
settings
-.The extension number refers to having
to press the number 9 or 0 before
making an external phone call for
example from within a switchboard
environment.
For a normal phone, select the No Ext.
# item.
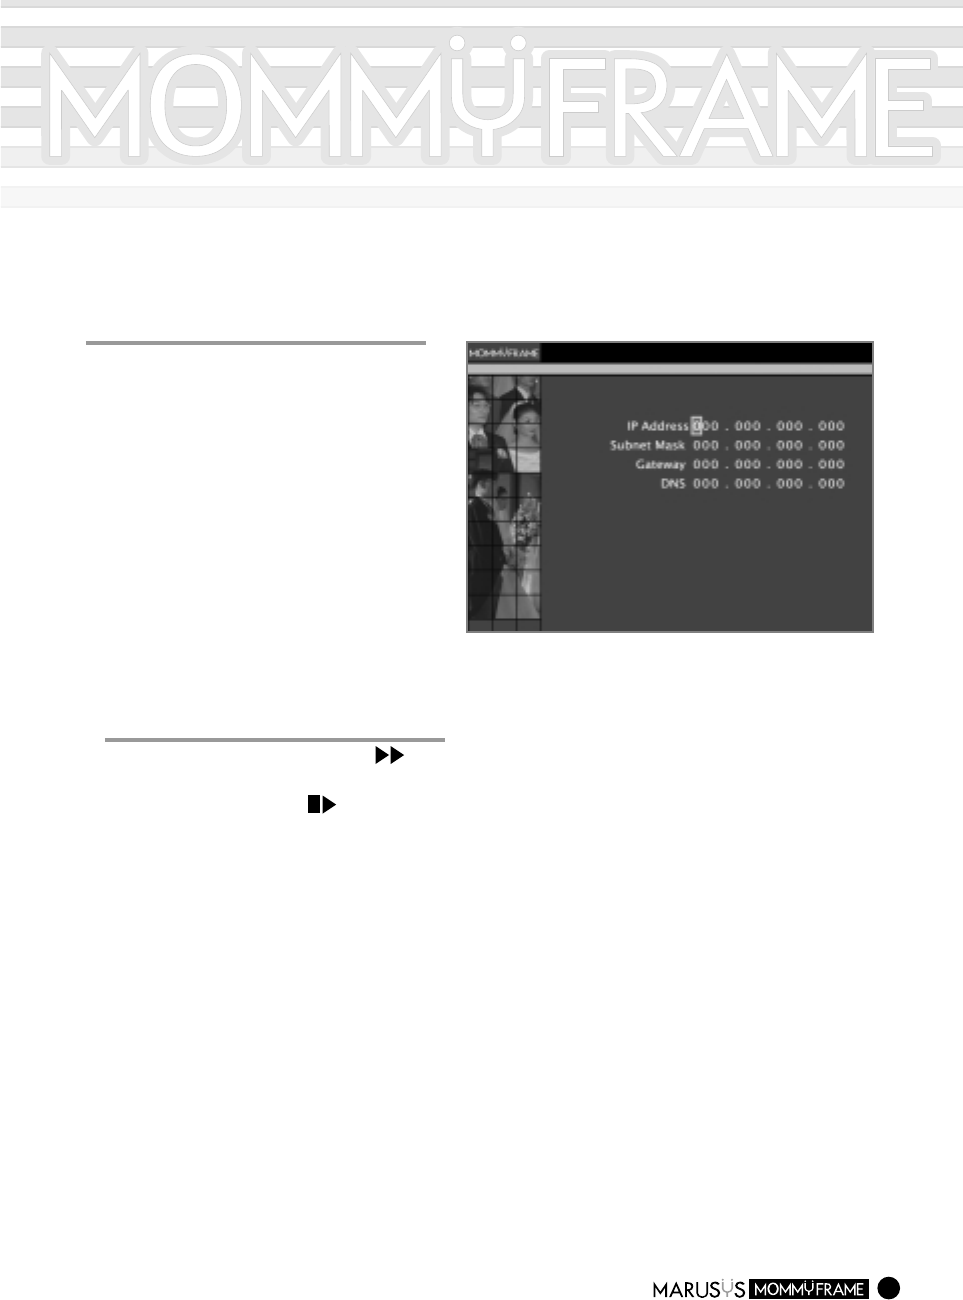
Setting up the Network
13
11
Press the Menu button.
-.The Menu will appear.
Image Menu
Copy Images
Delete Images
Rotate Images
Select Images
Image Menu
Back Light Control
Auto On / Off
Advanced Settings
Upadate Now
Slide Settings
Setting time
Set the regular update time
Set Dialing Options
Cancel
Advanced Settings
3
3
Press the Move Forward ( )
button move to the [Set the network
options] item.
Press the Select ( ) button.
-.
The "Set the network options" screen
will appear.
2
2
Press the Move Forward ( )
button to move to [Advanced
Settings].
Press the Select ( ) button.
-.
The "Advanced Settings" screen will
appear.
M10WL
14
4
4
Press the Select and the Move
buttons to set up the [IP Address,
Subnet Mask, Gateway, DNS].
-.Press the Select button to increase the
value for each item.
-.Press the Move button to move to each
item.
Set the network options
OK Cancel
Network Settings
5
5
Press the Move Forward ( )
button to move to the [OK] item.
Press the Select ( ) button.
-.Now, the network setting has
been completed.
-.Select the [Cancel] to move to
the first menu.
-.Please contact your network
administrator for the IP Address.
15
Connecting to the Sever
Connecting to the Server Automatically
1
1
Press the Menu button.
-.The Menu items will appear.
Image Menu
Copy Images
Delete Images
Rotate Images
Select Images
Image Menu
Back Light Control
Auto On / Off
Advanced Settings
Upadate Now
Slide Settings
Setting time
Set the regular update time
Set the network options
Cancel
Advanced Settings
3
3
Press the Move Forward ( )
button to move to the [Set the
regular update time] item.
Press the Select ( ) button.
-.
The "Set the regular update time" screen
will appear.
2
2
Press the Move Forward ( )
button to move to the [Advanced
Settings] item.
Press the Select ( ) button.
-.
The "Advanced Settings" screen will
appear.
You can enable MommyFrame to connect to the server automatically at a time set in the [Set the
regular update time] menu.
M10WL/M10WM
16
4
4
Press the Select ( ) button to
select the Server Connecting Time:
[Disable/Everyday/Every Two days/Every
Three days]
-.Whenever you press the Select button, it
switches between Disable --->Everyday -->
Every Two days -->Everyday Three days,
in that order.
Set the regular update time.
Disable 06 : 00 AM
CancelOK
Set the regular update time
5
5
Press the Move Forward ( )
button to move to the [Hour] item.
Press the Select ( ) button to
select your server connecting [Hour].
7
7
Press the Move Forward ( )
button to move to the [AM/PM] item.
Press the Select ( ) button to
select your preference.
Set the regular update time.
Everyday 10 : 30 AM
CancelOK
Set the regular update time
6
6
Press the Move Forward ( )
button to move to the [Minute] item.
Press the Select ( ) button to
select your server connecting [Minute].
8
8
Press the Move Forward ( )
button to move to [OK].
Press the Select ( ) button to
complete the setup.
-.Select Cancel to return to the first menu.
Connecting to the Server
17
Connecting to the Server Manually
1
1
Press the Menu button.
-.The Menu items will appear.
Image Menu
Copy Images
Delete Images
Rotate Images
Select Images
Image Menu
Back Light Control
Auto On / Off
Advanced Settings
Upadate Now
Slide Settings
Do you want to update now?
CancelOK
Update Now
3
3
Press the Move Forward ( )
button to move to [OK].
Press the Select ( ) button.
-.
The "Getting 13 Images...." message
will appear at the center of the screen.
A new image will appear after connecting
to the server.
-.
For more information about the server
connection, see Page 34 in which related
messages are listed.
If you press the Select button while
connecting to the server, the connection
is canceled.
2
2
Press the Move Forward ( )
button to select the [Update Now]
item.
Press the Select ( ) button.
-.
The "Update Now" screen will appear.
M10WL/M10WM
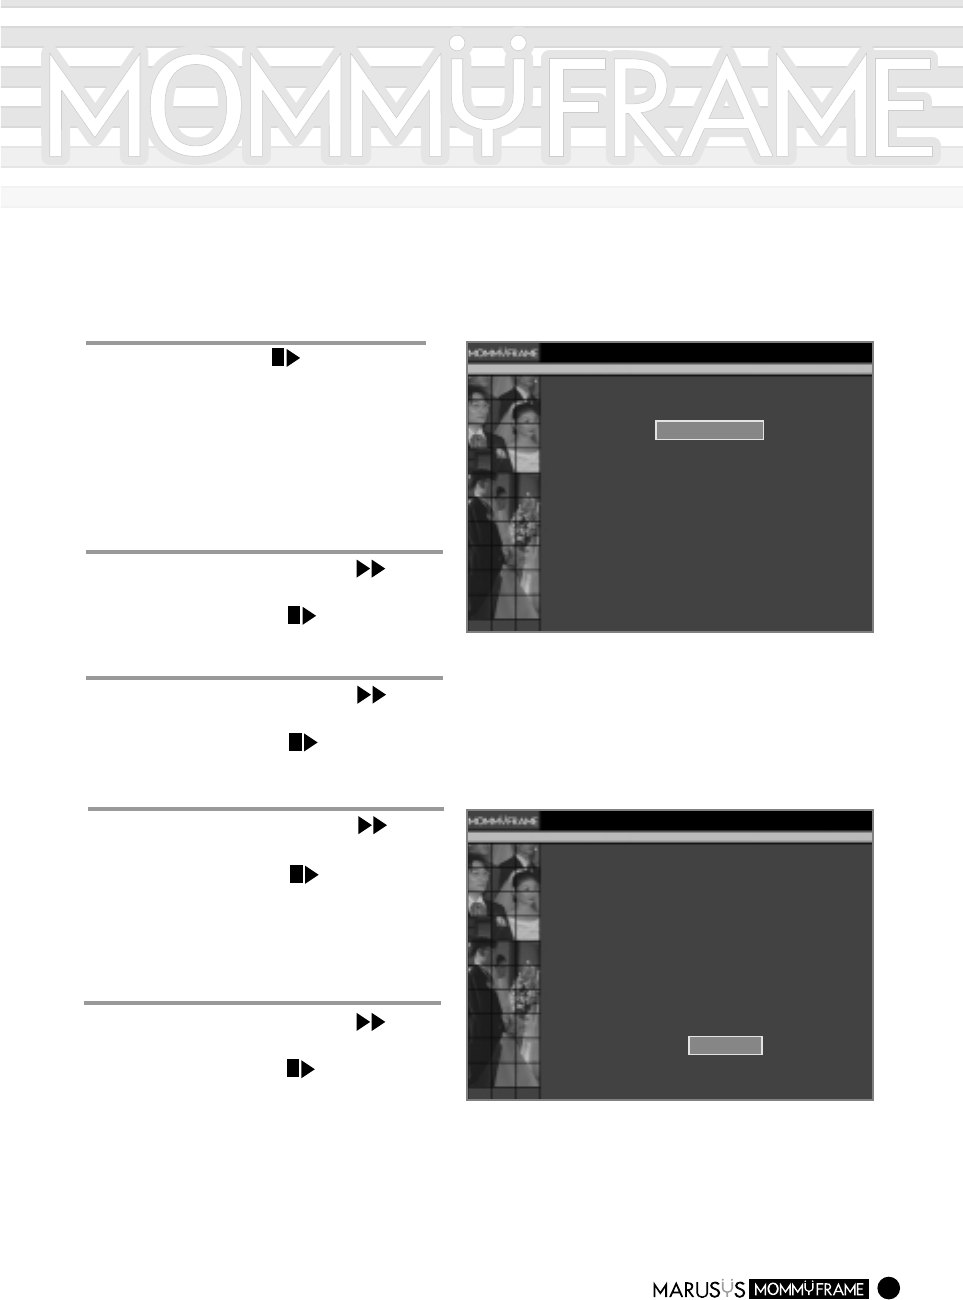
Selecting Images
You can select images to be displayed in MommyFrame.
18
1
1
Press the Menu button.
-.The Menu items will appear.
Image Menu
Copy Images
Delete Images
Rotate Images
Select Images
Image Menu
Back Light Control
Auto On / Off
Advanced Settings
Upadate Now
Slide Settings
Select Images to display.
The ’O’ marked Images will be displayed.
Select Images
OK
Previous Page
Next Page Cancel
3
3
Press the Move Forward ( )/
Move Backward ( ) buttons to
move to the image that you want to
display.
Press the Select ( ) button.
-.
The selected image will be marked with
an "O".
You can continue to select another
image.
22
Press the Move Forward ( )
button to the [Select Images] item.
Press the Select ( ) button.
-.
The "Select Images" screen will appear.
4
4
Press the Move Forward ( )
button to move to [OK]. Then, press
the Select ( ) button to display
the image in MommyFrame.
-.
Select [Cancel] to return to the previous
menu.
Copying Images
You can copy the images stored in a Smart Media or Compact Flash card to MommyFrame.
Before copying the images, first insert the Smart Media or Compact Flash card into the appropriate
slot in the MommyFrame.
19
1
1
Press the Menu button.
-.The Menu items will appear.
Image Menu
Delete Images
Rotate Images
Select Images
Image Menu
Back Light Control
Auto On / Off
Advanced Settings
Upadate Now
Slide Settings
Copy Images
Copy Images
Select Images to copy.
The ’ ’ marked Images will be copied.
OK
Previous Page
Next PageCancel
2
2
Press the Move Forward ( )
button to move to the [Copy Images]
item.
Press the Select ( ) button.
-.The "Copy Images" screen will appear.
3
3
Press the Move Forward ( )/
Move Backward ( ) buttons to
move to the image that you want to
copy.
Press the Select ( ) button.
-.The images stored in Smart Media are
indicated with an "S", and the ones in
Compact Flash with a "C".
-.The images that are to be displayed in
MommyFrame will be copied.
You can continue to select other images
to copy.
4
4
Press the Move Forward ( )
button to move to [OK]. Then, press
the Select ( ) button to select
an image to be displayed in
MommyFrame.
-.
Select [Cancel] to return to the previous menu.
-.Do not remove the cards while the
Operating lamp is on. This may cause
damage to the cards.
-.When MommyFrame does not have
enough disk space, you can not copy
images. In this case, remove existing
images and try again.
Deleting Images
You can delete images from MommyFrame.
It is impossible to retrieve deleted images after they have been deleted.
20
1
1
Press the Menu button.
-.The Menu items will appear.
Image Menu
Delete Images
Rotate Images
Select Images
Image Menu
Back Light Control
Auto On / Off
Advanced Settings
Upadate Now
Slide Settings
Copy Images
Delect Images
Select Images to Delete.
The ’X’ marked Images will be deleted.
OK
Previous Page
Next Page Cancel
2
2
Press the Move Forward ( )
button to move to [Delete Images]
item.
Press the Select ( ) button.
-.The "Delete Images" screen will appear.
3
3
Press the Move Forward ( )/
Move Backward ( ) buttons to
move to the image that you want to
delete.
Press the Select ( ) button.
-.
The selected image will be marked with an "X".
You can continue to select another image
to delete.
4
4
Press the Move Forward ( )
button to move to [OK]. Then, press
the Select ( ) button to delete the
image from MommyFrame.
-.Select [Cancel] to return to the previous
menu.
Rotating Images
You can rotate images to be displayed in MommyFrame.
21
1
1
Press the Menu button.
-.The Menu items will appear.
Image Menu
Delete Images
Rotate Images
Select Images
Image Menu
Back Light Control
Auto On / Off
Advanced Settings
Upadate Now
Slide Settings
Copy Images
Rotate Images
Select Images to Rotate.
The Image will be rotated an angle of 90 degrees clockwise.
OK
Previous Page
Next PageCancel
2
2
Press the Move Forward ( )
button to move to the [Rotate
Images] item.
Press the Select ( ) button.
-.The "Rotate Images" screen will appear.
33
Press the Move Forward( )/
Move Backward ( ) buttons to
move to the image that you want to
rotate.
44
Press the Select ( ) button.
-.Pressing the Select button, will cause the
image to rotate 90 clockwise.
Continue pressing the Select button until the
image is in the desired position.
Repeat steps 3 and 4 to rotate another image.
5
5
Press the Move Forward ( )
button to move to [OK]. Then, press
the Select ( ) button to rotate the
image in MommyFrame.
-.Select [Cancel] to return to the previous
menu.
Setting up the Slide Interval
You can set the interval at which MommyFrame displays images.
22
11
Press the Menu button.
-.The Menu items will appear.
Image Menu
Delete Images
Rotate Images
Select Images
Image Menu
Back Light Control
Auto On / Off
Advanced Settings
Upadate Now
Slide Settings
Copy Images
Slide Interval Setting
Slide Transition Effect Setting
Cancel
Slide Settings
Stop
5 Sec.
10 Sec.
20 Sec.
1 Min.
10 Min.
1 Hour
1 Day
Select an Interval of Each Slide
Cancel
Slide Interval
2
2
Press the Move Forward ( )
button to move to the [Slide
Settings] item.
Press the Select ( ) button.
-.The "Slide Settings" screen will appear.
3
3
Press the Move Forward ( )
button to move to the [Slide Interval
Setting] item.
Press the Select ( ) button.
-.The "Slide Interval Setting" screen will
appear.
4
4
Press the Move Forward ( )
button to move to the desired time
setting.
Press the Select ( ) button.
-.The Slide interval setting has been
completed.
Select [Cancel] to return to the first menu.
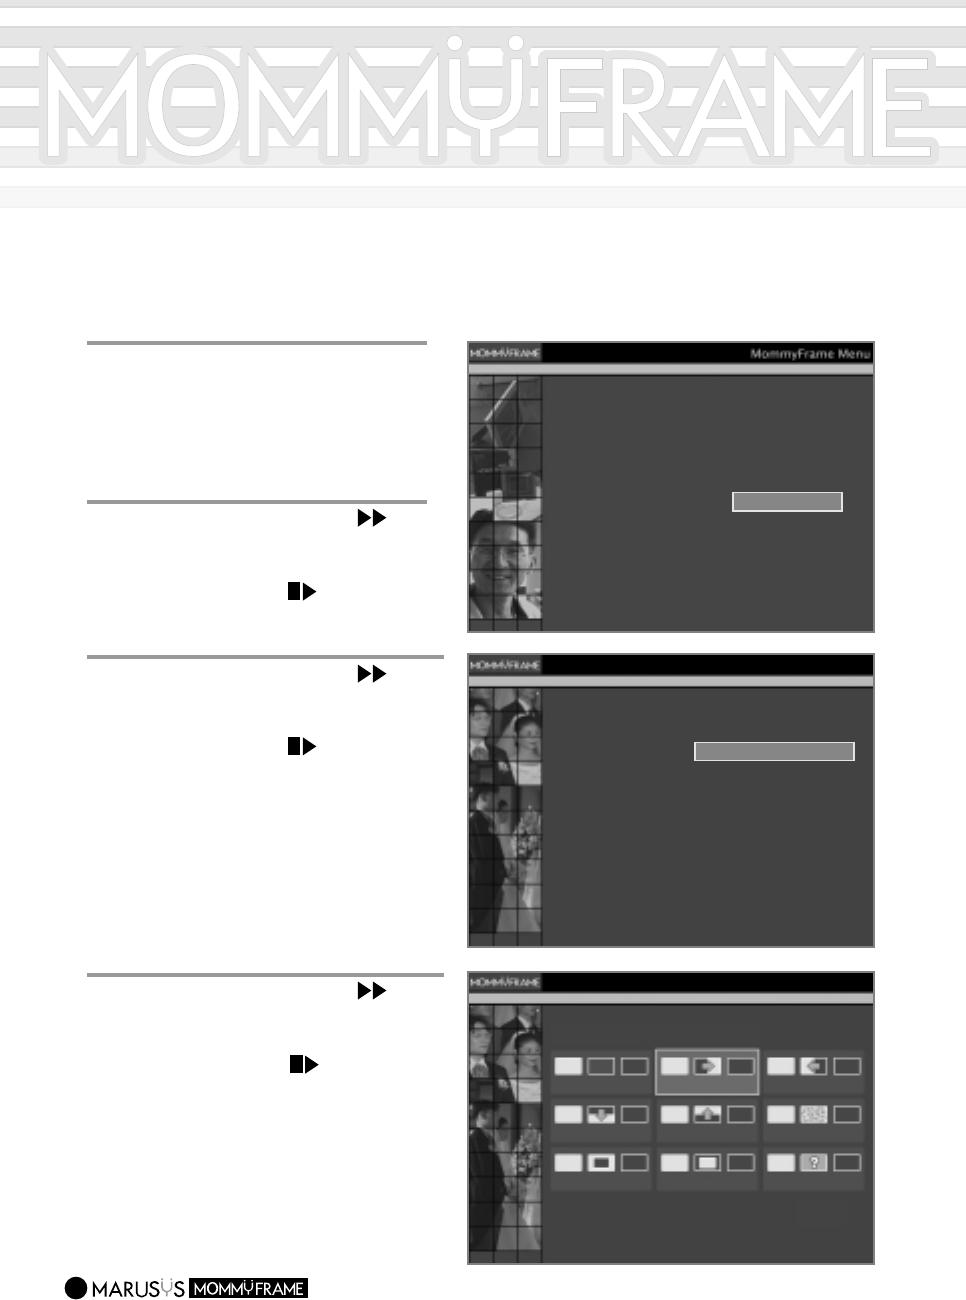
Setting up the Slide Transition Effect
23
1
1
Press the Menu button.
-.The Menu items will appear.
Image Menu
Delete Images
Rotate Images
Select Images
Image Menu
Back Light Control
Auto On / Off
Advanced Settings
Upadate Now
Slide Settings
Copy Images
Slide Interval Setting
Slide Transition Effect Setting
Cancel
Slide Settings
Select a Transition of Slide Show
None
Top to Bottom Bottom to Top Dot Dissolve
Center Out Center In
Cancel
Random
Left to Right Right to Left
Slide Effect
2
2
Press the Move Forward ( )
button to move to the [Slide
Settings] item.
Press the Select ( ) button.
-.
The "Slide Settings" screen will appear.
3
3
Press the Move Forward ( )
button to move to the [Slide
Transition Effect Settings] item.
Press the Select ( ) button.
-.
The "Slide Transition Effect Settings"
screen will appear.
4
4
Press the Move Forward ( )
button to move to the [Slide Effect]
item that you wish to select.
Press the Select ( ) button.
-.
The Slide Transition Effect setting has
been completed.
Select [Cancel] to return to the first menu.
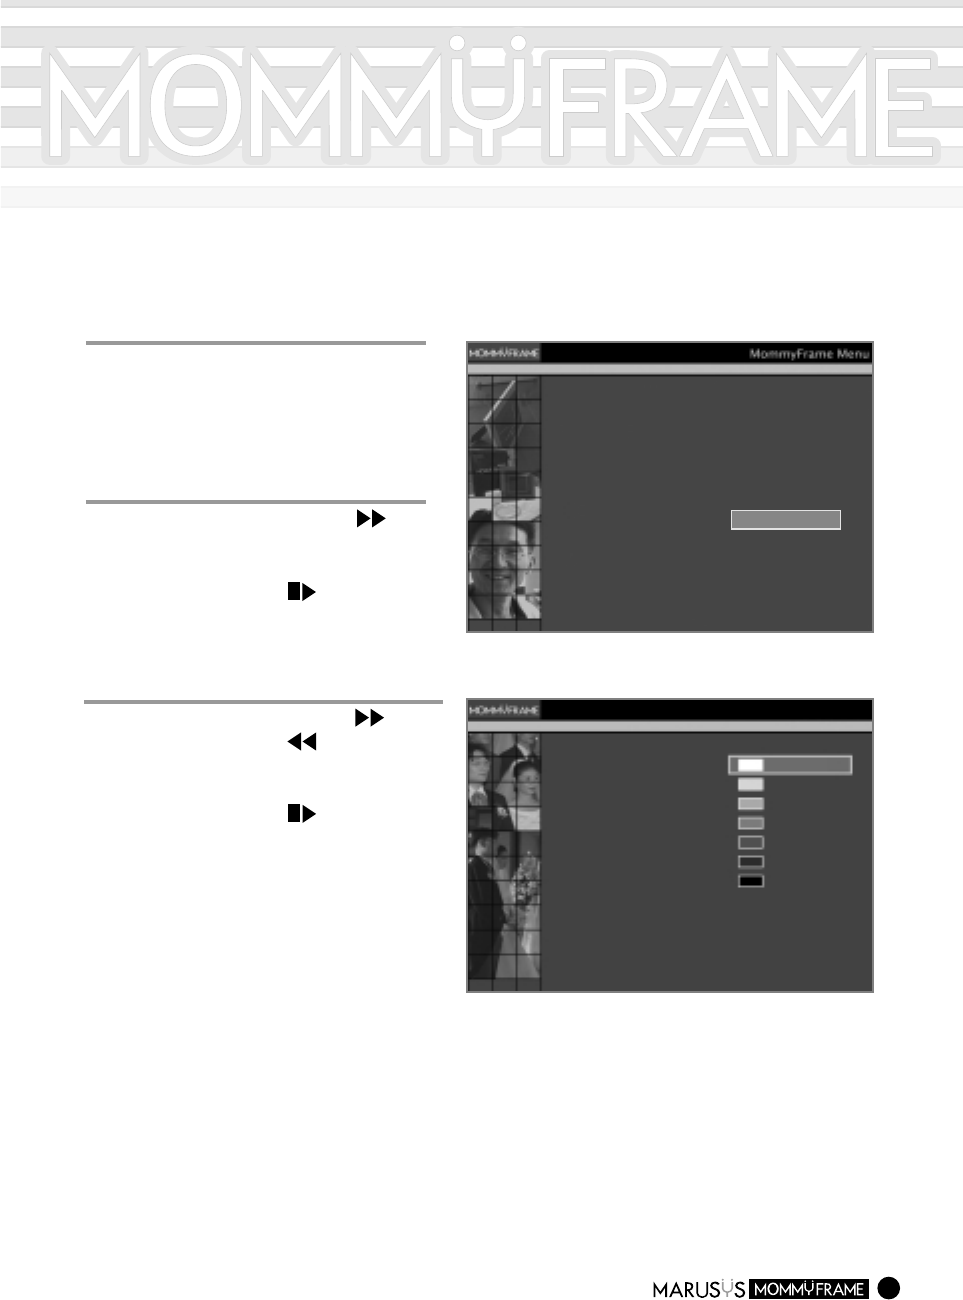
Adjusting Back Light Control
You can adjust the LCD brightness.
24
1
1
Press the Menu button.
-.The Menu items will appear.
Image Menu
Delete Images
Rotate Images
Select Images
Image Menu
Back Light Control
Auto On / Off
Advanced Settings
Upadate Now
Slide Settings
Copy Images
Back Light Control
Select the Back Light Brightness Brightest
Brighter
Bright
Normal
Dark
Darker
Darkest
Cancel
2
2
Press the Move Forward ( )
button to move to the [Back Light
Control] item.
Press the Select ( ) button.
-.The "Back Light Control" screen will
appear.
3
3
Press the Move Forward ( )/
Move Backward ( ) buttons to
move to the desired Screen
Brightness setting.
Press the Select ( ) button.
-.The Back Light Control Setting has been
completed.
Select [Cancel] to return to the first menu.
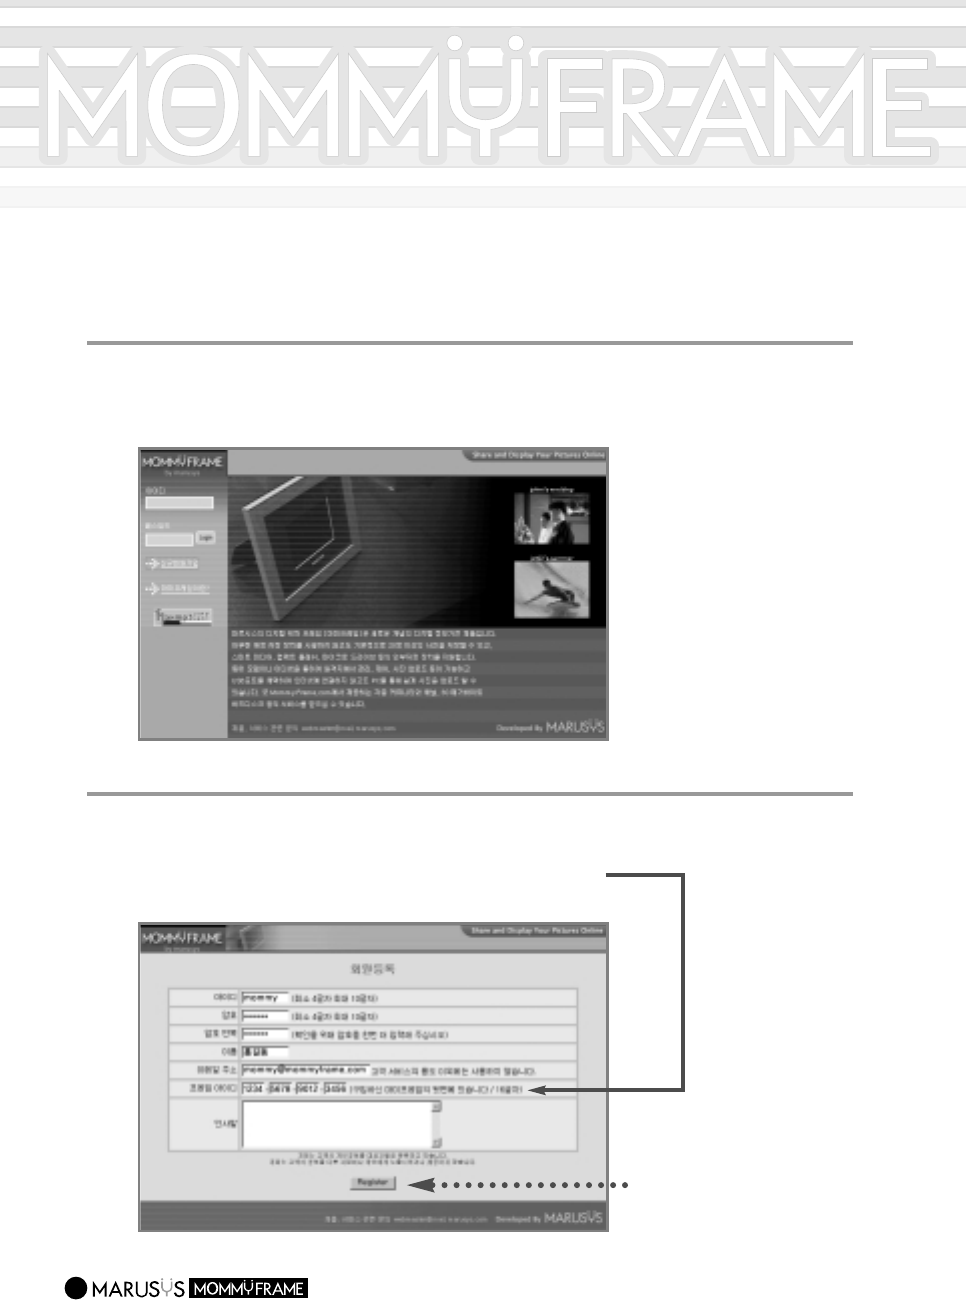
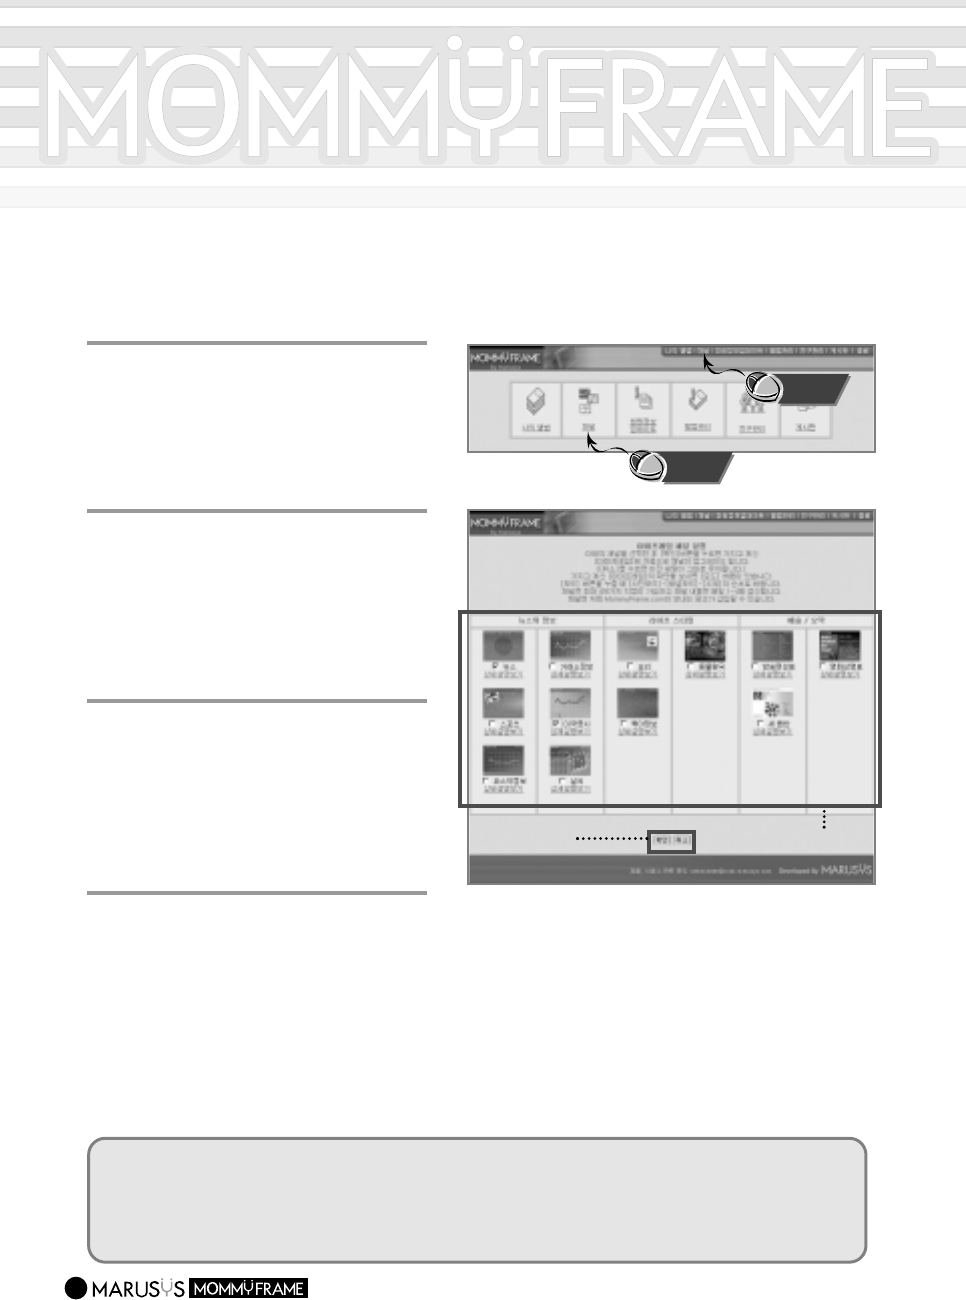
Connecting MommyFrame Server and
Registering Your Product
Registration and access is available for all models of MommyFrame, but some online services, such as image
transmission to MommyFrame and channel services, are only available for the M10WM and the M10WL.
25
1
1
Visit MommyFrame website at http://www.mommyframe.com
-. MommyFrame website at http://www.mommyframe.com
22
Click on the Signup button and fill out the form.
-.For the frame ID, enter the serial number on the back of your product.
The MommyFrame server will identify your frame with this number.
3
3
Click the [Register] button to
complete your registration.
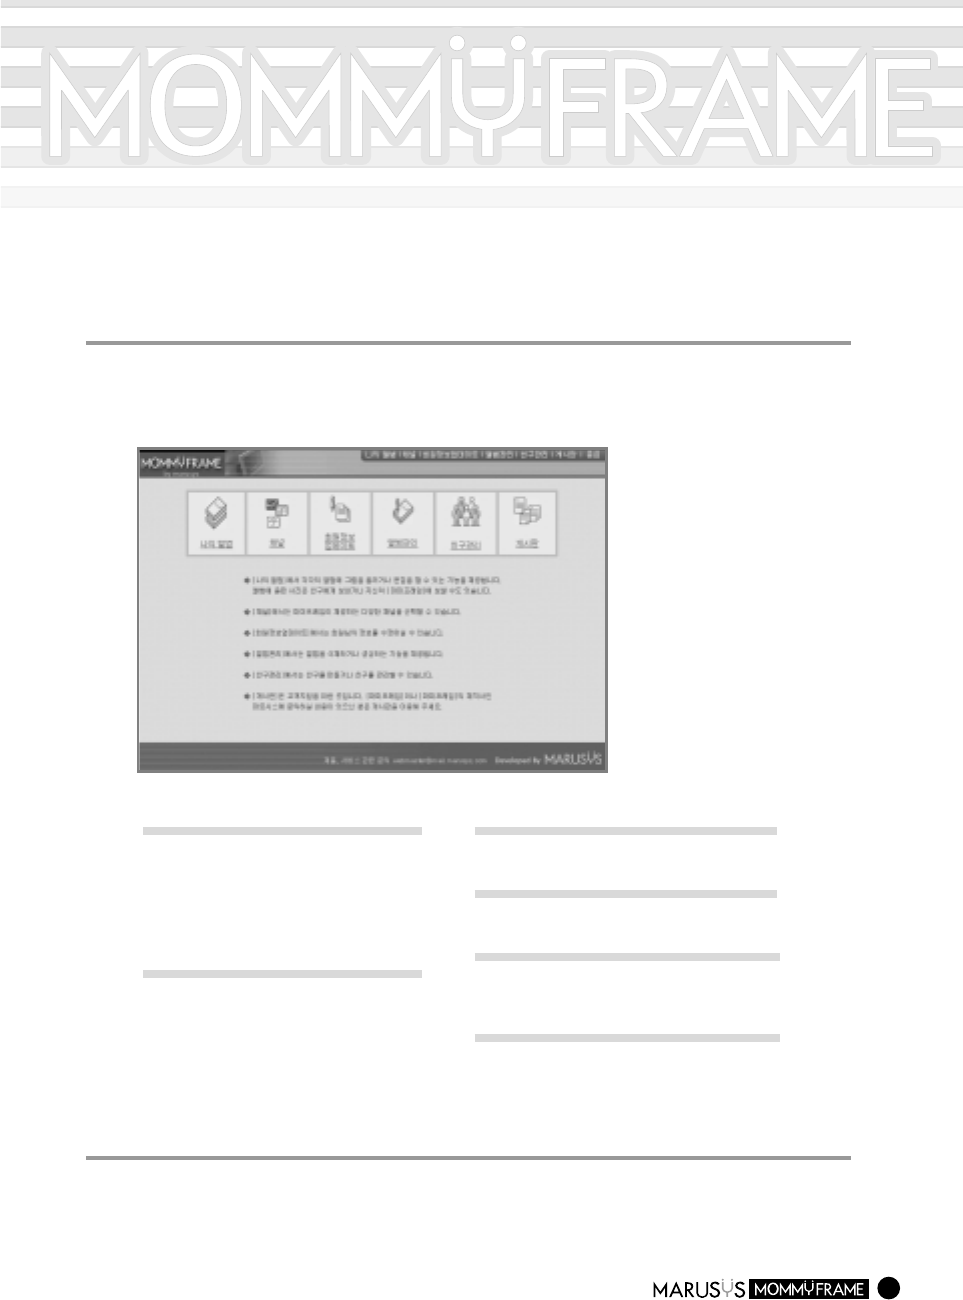
Guide on Server Uses
26
1
1
Enter your ID and password and click the Login button.
-.The MommyFrame main page will appear.
2
2
Click the desired menu item to enter the appropriate menu.
[My Albums]
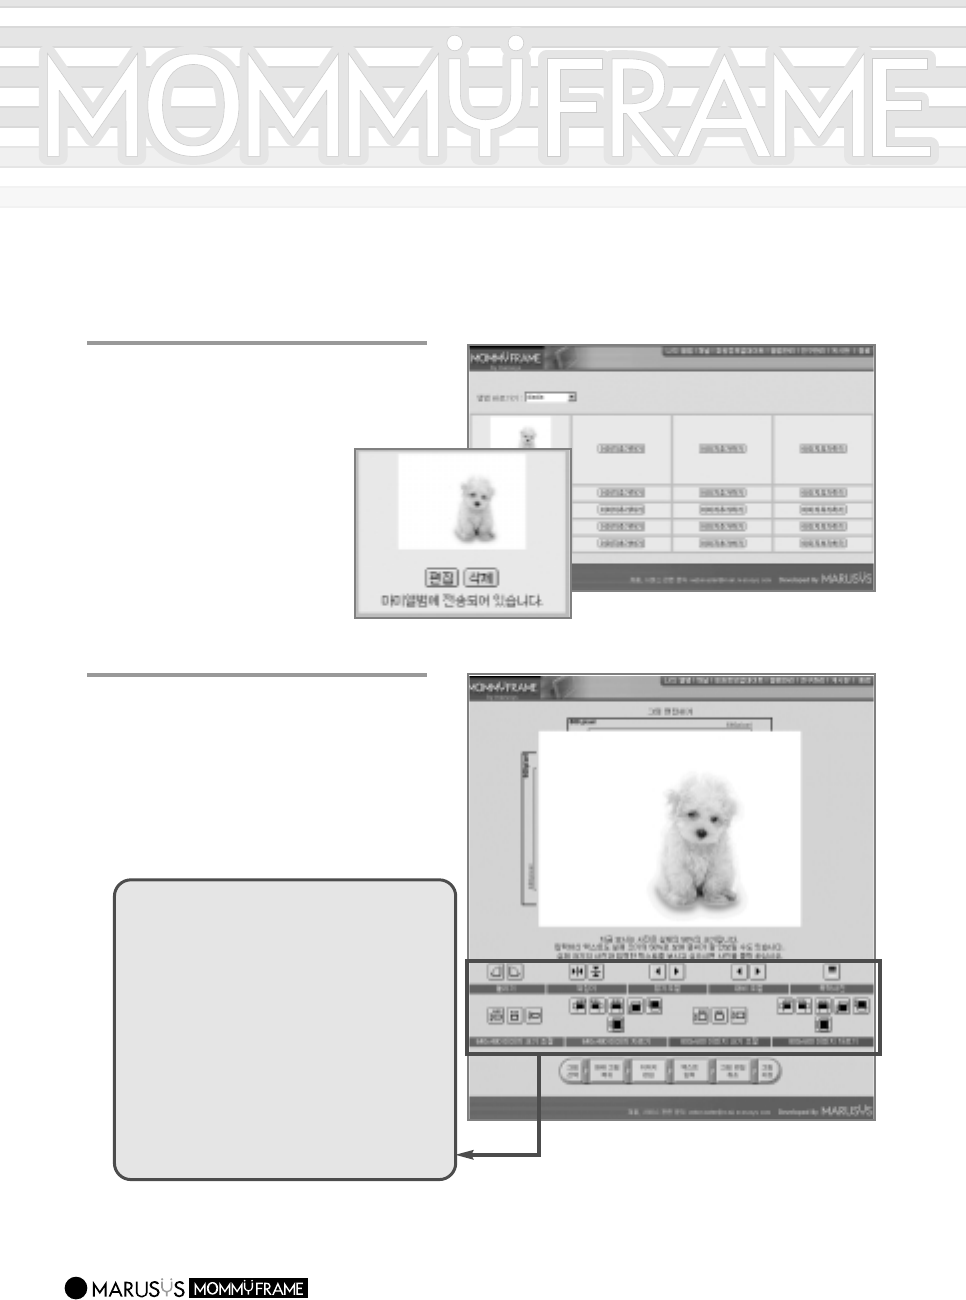
View your photo albums.
You can upload, edit and delete your images
as well as insert text into them. In addition,
you can exchange images between your
friends.
[Channel]
Enjoy various channel services, such as
News, Entertainment, Education and Arts.
These are updated daily.
MommyFrame will automatically connect to
the Homepage and download your chosen
channel images.
[Personal Information Update]
Update your personal information in this section.
[Album Management]
Create, delete and manage your photo album.
[Manage Friend Lists]
Find and make friends. You can also authorize
them as online friends.
[Bulletin Board]
This is for customer support. For any questions
and comments to Marusys, please use this
Bulletin Board.
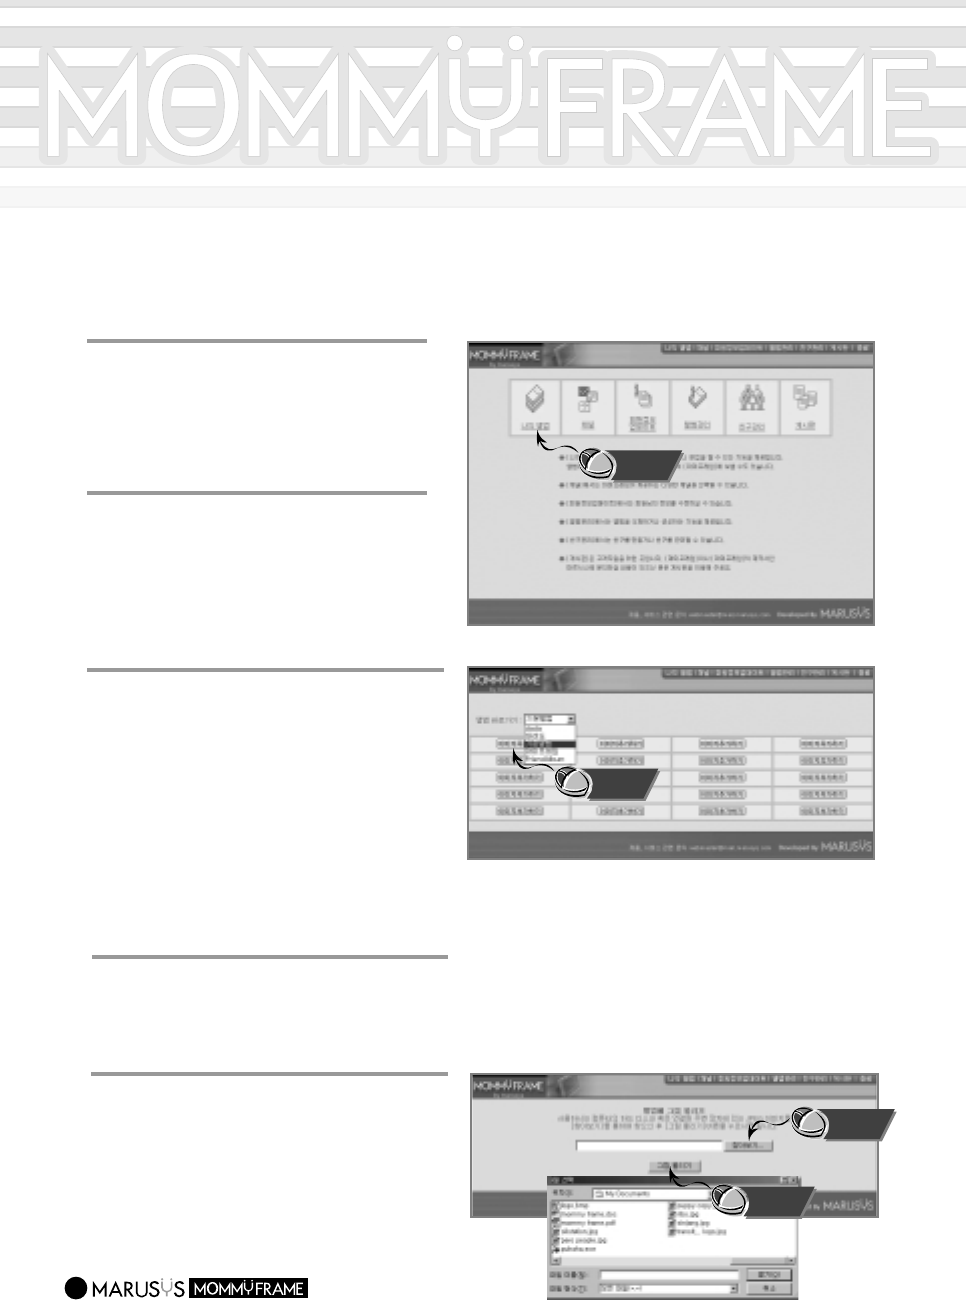
Uploading Photos to the Server
27
1
1
Enter your ID and password and
click the Login button.
-.The MommyFrame main page will appear.
3
3
Select Main Album.
-. Allocated spaces for your photos will
appear for you to upload up to 20 photos.
-.
If you select the Album Management menu
on the top of the page, the (Managing Albums)
screen will appear for you to create a new
album or delete the existing one.
-.To create a new album, enter an album
title(e.g., Car, Wedding, etc.) and click
[Create] from the Album Management
menu.
44
Click the [Add Images] button.
-. A new window will popup for you to upload
your photos.
5
5
Click the [Browse] button to select an
image file on your computer and click
the [Upload Image] button.
-. The image screen will appear and the [Edit],
[Delete], and [Send To MommyFrame]
buttons will be created below the uploaded
image.
2
2
Select [My Albums].
-.The [Main Album],[MommyFrame], and
[Friend Album] items will be created.
You cannot upload photos to the
[MommyFrame] and [Friend Album]
items.
Click
Click
Click
Click
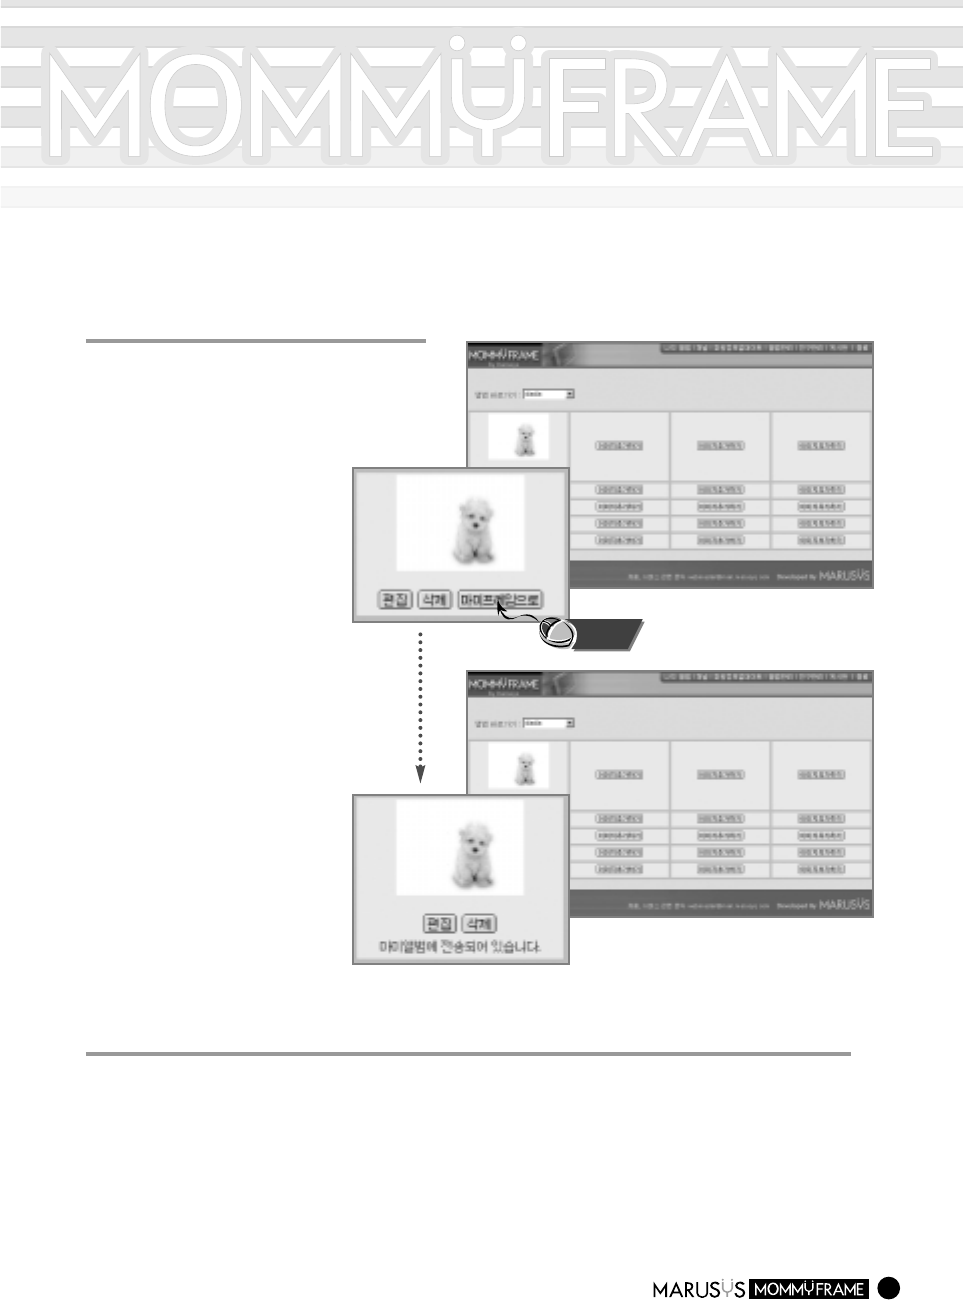
28
6
6
If you click the [Send To
MommyFrame] button, a "Transfer
Finished Successfully" message
will appear.
7
7
If you set up the [Server Connecting Time] in the MommyFrame menu, photos will be
transferred at that time.
-.
To send photos to MommyFrame, be sure to connect to a phone line or a LAN.
If you want to download photos immediately, select [Connect the Server Now](see page 17) in the MommyFrame menu.
-.When free disk space in MommyFrame is insufficient, you will not be able to download photos from the server.
In this case, remove some existing photos and try again.
Click
Editing Photos on the Server
29
1
1
Press the [Edit] button below the
photo.
-. The Edit screen will appear.
2
2
Edit the images.
-. You can rotate the photo, change the
size, adjust the contrast, and change it to
black-and-white.
Click the appropriate buttons below the
photo to edit.
Rotate
:
Rotate a photo.
Reverse
:
Reverse a photo right/left and
up/down.
Brightness
:
Adjust a photo brightness.
Contrast
:
Adjust a photo contrast between
bright and shade.
Black-and-White
:
Make a photo black-and-white.
Size
:
Adjust a photo size.
Trim
:
Trim a photo to a desired size.
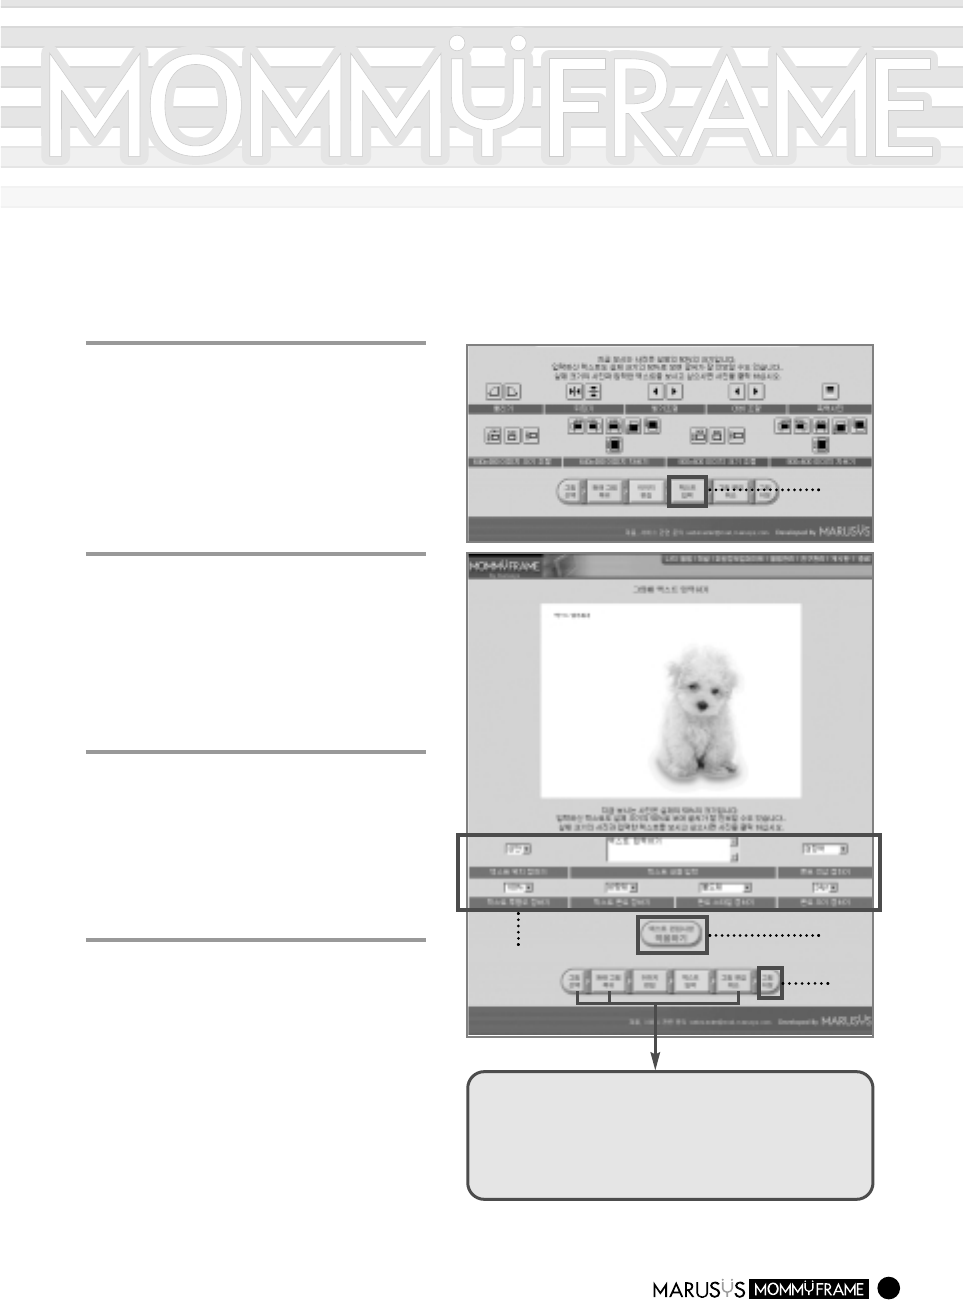
Inserting Text into a Photo
30
1
1
Press the [Edit] and [Insert Text]
buttons.
-. The Insert Text screen will appear.
2
2
Select the text location, content,
font color, text transparency, font,
font style, and/or font size.
3
3
Press the [Apply Text Edits] button
to insert the text.
4
4
Press the [Save Image] button. (2) (3)
(1)
(4)
Restore : Restore the original image when you are
unhappy with the edited photo.
Cancel : Cancel the image edit and return to the image
selection screen, Album state.
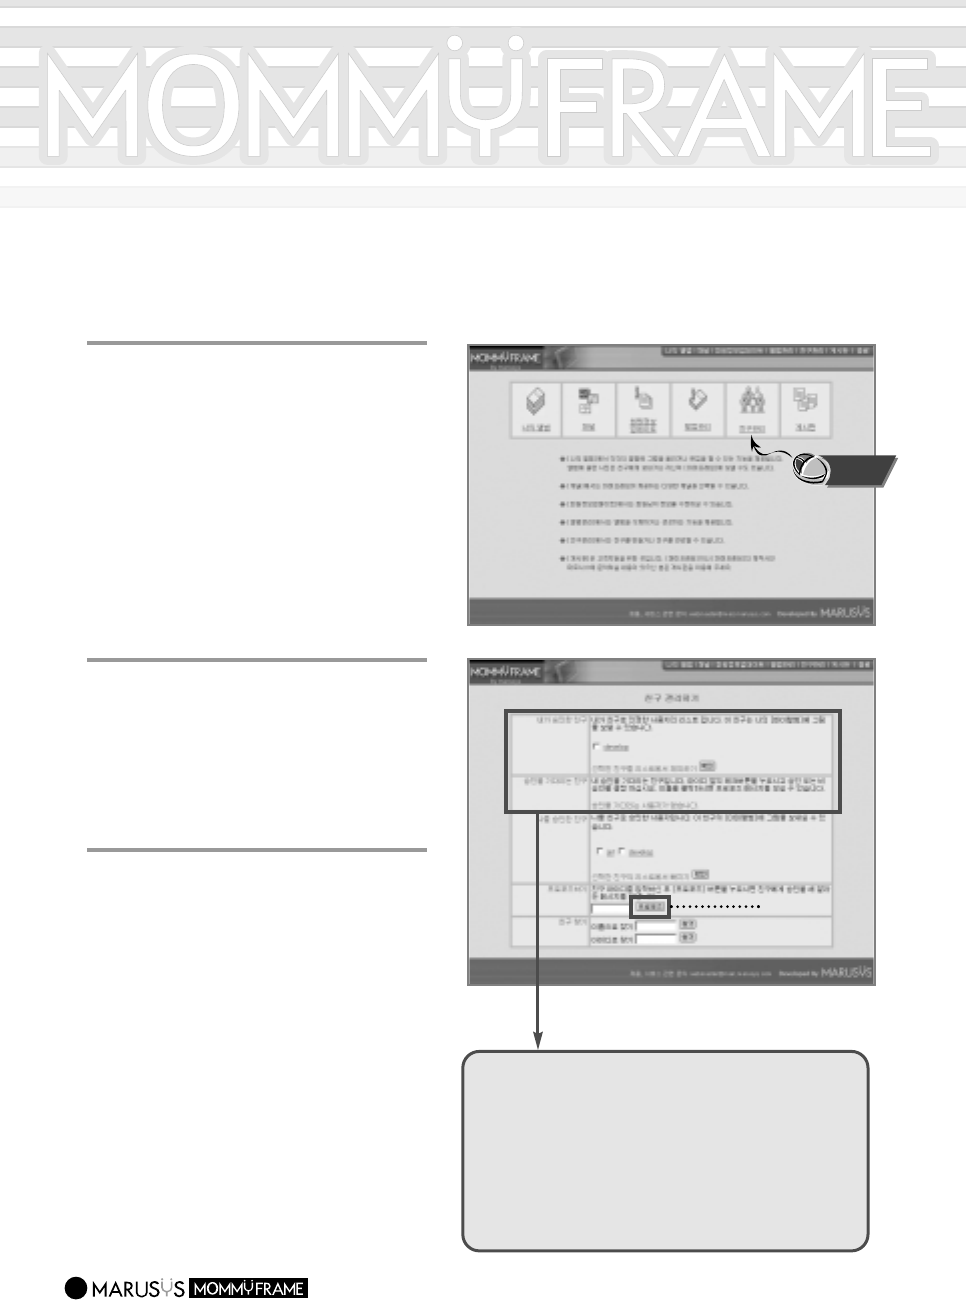
Finding Friends on the Server
31
1
1
Press the [Manage Friend Lists] in
the Login state.
-. The Manage Friend Lists screen will
appear.
2
2
Enter the ID of a friend and press
the [Propose] button.
-. If you do not know the ID of your friend,
you can find your friend in the Find
Friends section.
3
3
When you have been accepted by
your friend, the ID of your friend will
be registered in the "My Friends"
list.
-. You will be able to sent photos to the
[Friend Album] of your friend.
(2)
My Friends : This section is the list of your friends who
have been accepted to send photos to
[My Albums].
Friends Waiting for Acceptance :
This section is the list of your friends
for
Acceptance
who are waiting for your
acceptance. If accepted, he/she will move
to the "My Friends" list.
Click
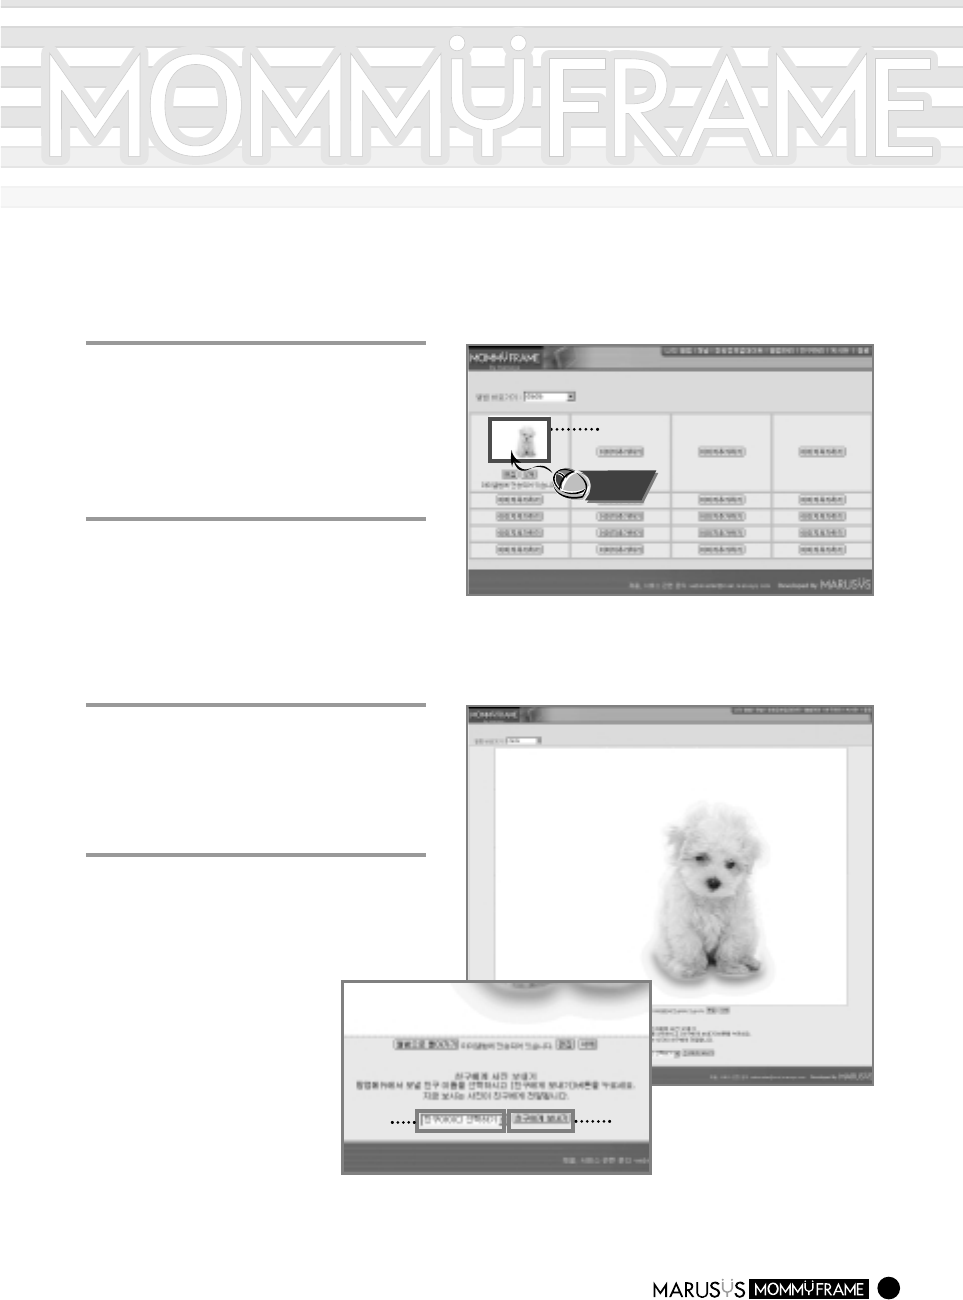
Sending Photos to your Friends
32
1
1
Upload a photo to your Main Album
or another album created from the
Album Management.
-. The photo will be transferred and
registered to My Albums.
3
3
Select a friend ID from the [Select
Friend ID] menu.
2
2
Click the photo in the Album state.
4
4
Click [Send to Friend].
-. The photo will be transferred to the
[Friend Album] of your friend.
(2)
(3) (4)
Click
33
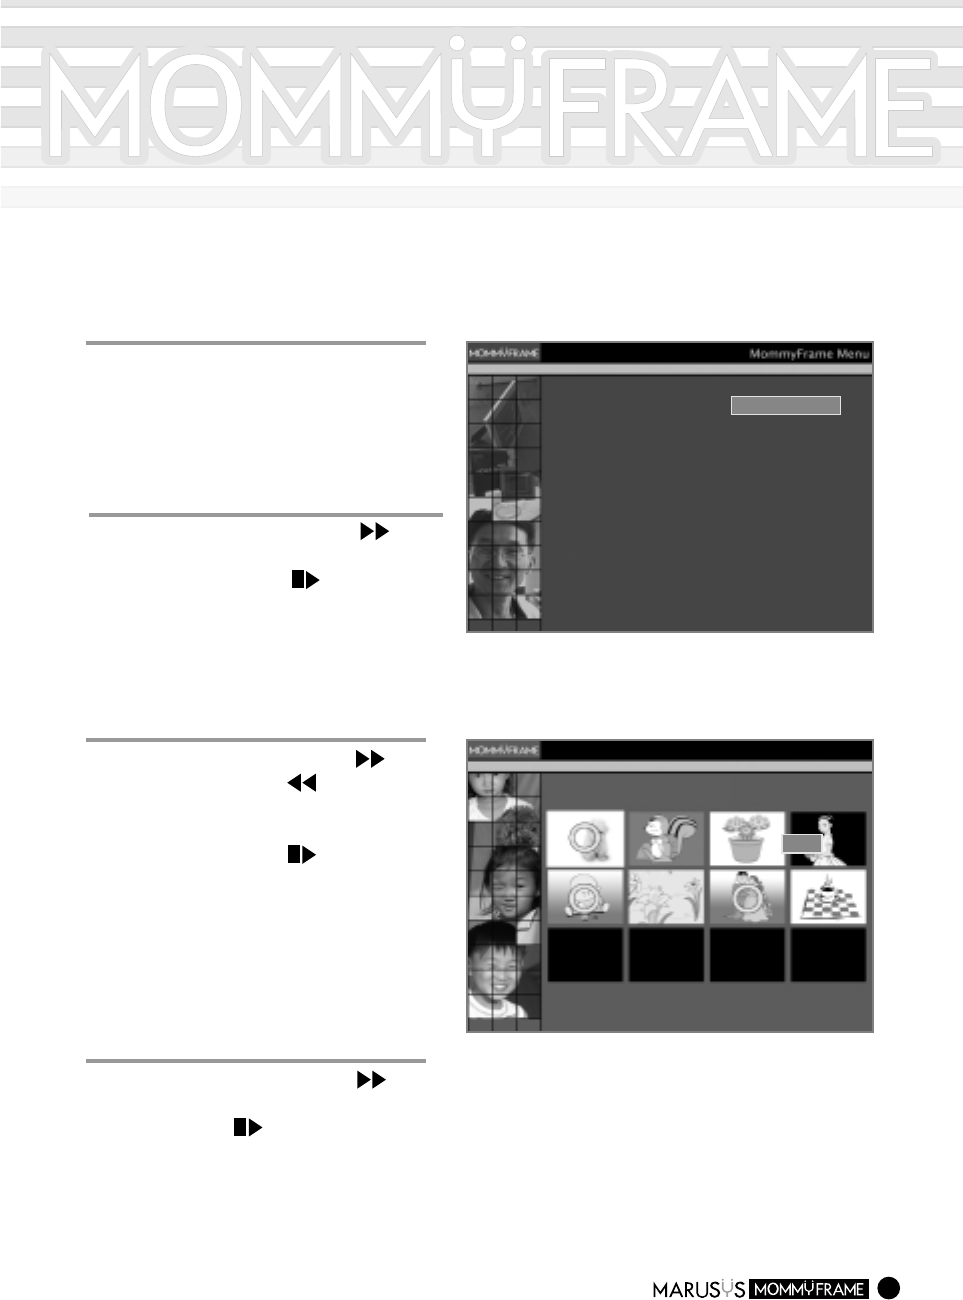
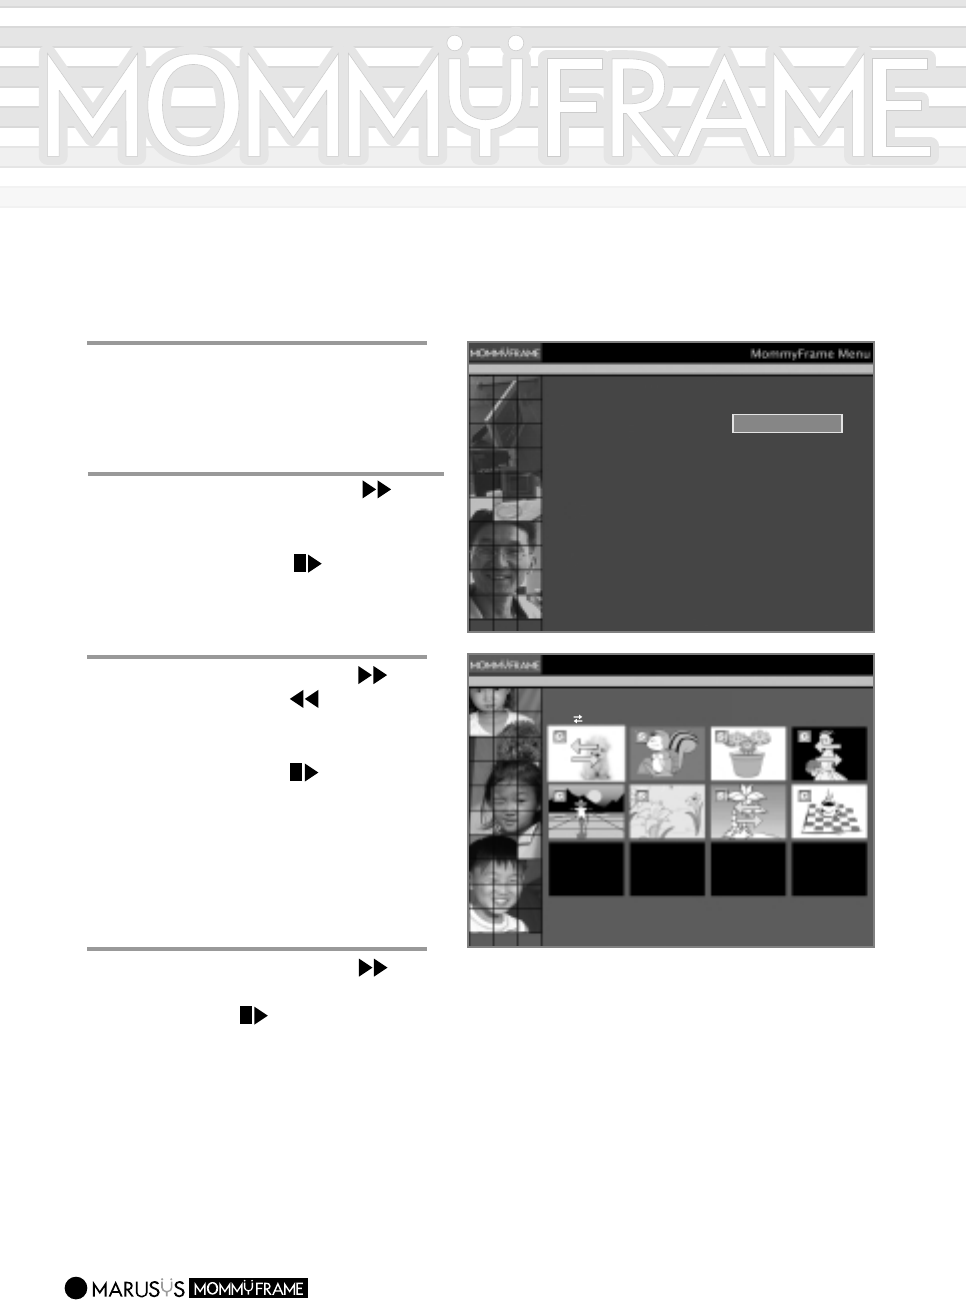
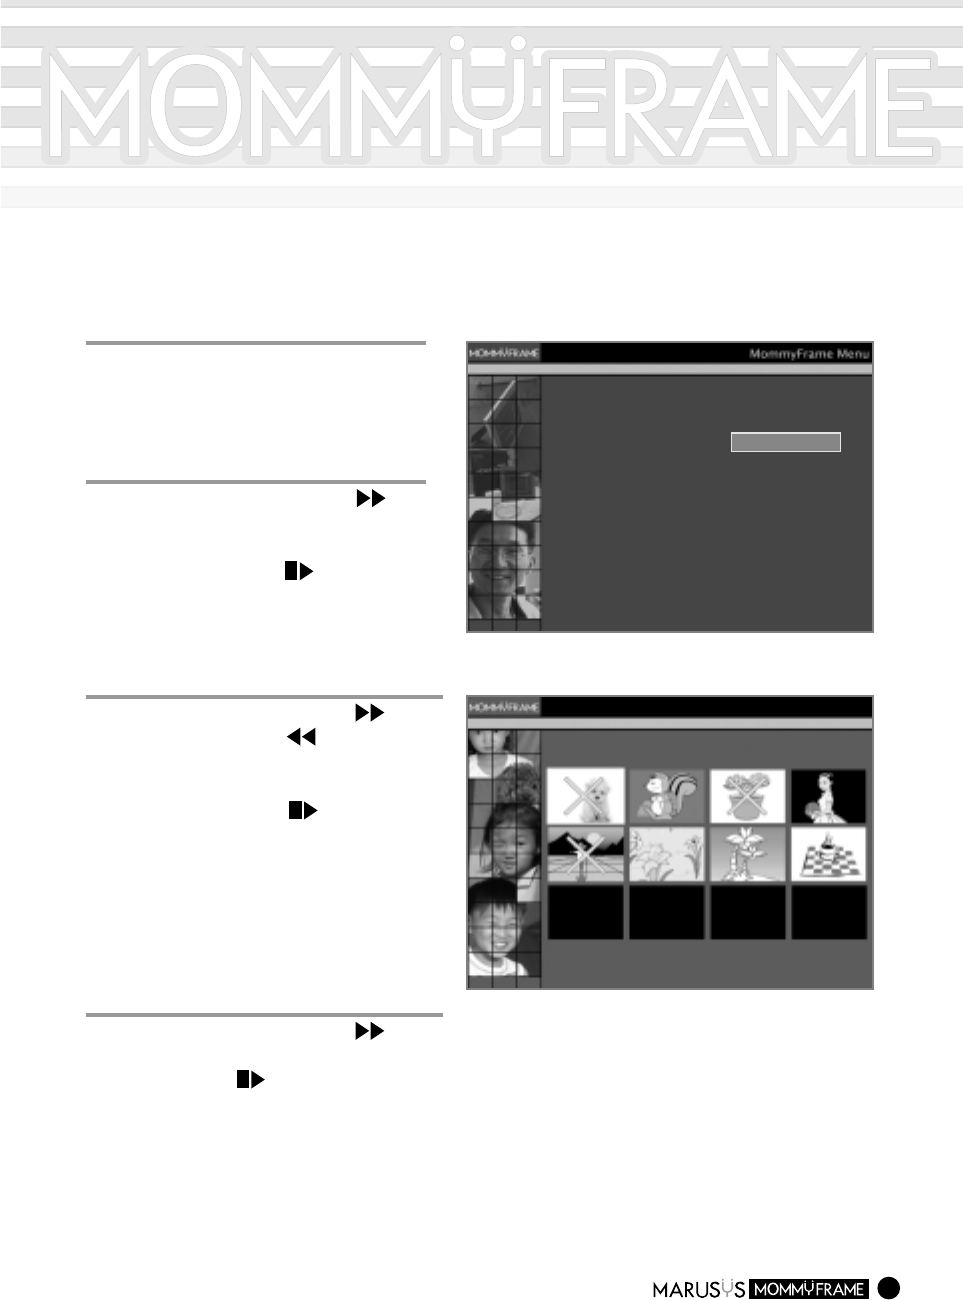
What is MommyFrame's Channel Services?
MommyFrame's Channel Services refer to other information besides photos provided
by MommyFrame's [Channel].
1
1
Click the [Channel] menu in Login
state.
-. You may select the Channel menu from
the MY SPACE screen.
2
2
Select a channel from the categories.
-. You can designate up to 4 channels, and
the channel content will be updated on a
regular basis.
3
3
If you click the [OK] button, the
channels in your [MommyFrame] will
be automatically updated.
-. If you click the [Cancel] button, it will revert
to the previous settings. (2) (3)
Channels may contain advertisements from Mommyframe.com.
Of free/pay channels, only channels you have selected will be transmitted to your MommyFrame.
For more information, select [See Details].
Channel services may be rescheduled according to situations.
Click
Click
4
4
Press the [Mode] button on the top
of [MommyFrame] to select the
channel mode.
-. If you press the [Mode] button, the mode
switches between [Photo Mode]-[Channel
Mode]-[Time/Calendar], in that order.
The channels are categorized into [News
& Info], [Lifestyle], and
[Arts/Entertainment] sections.
34
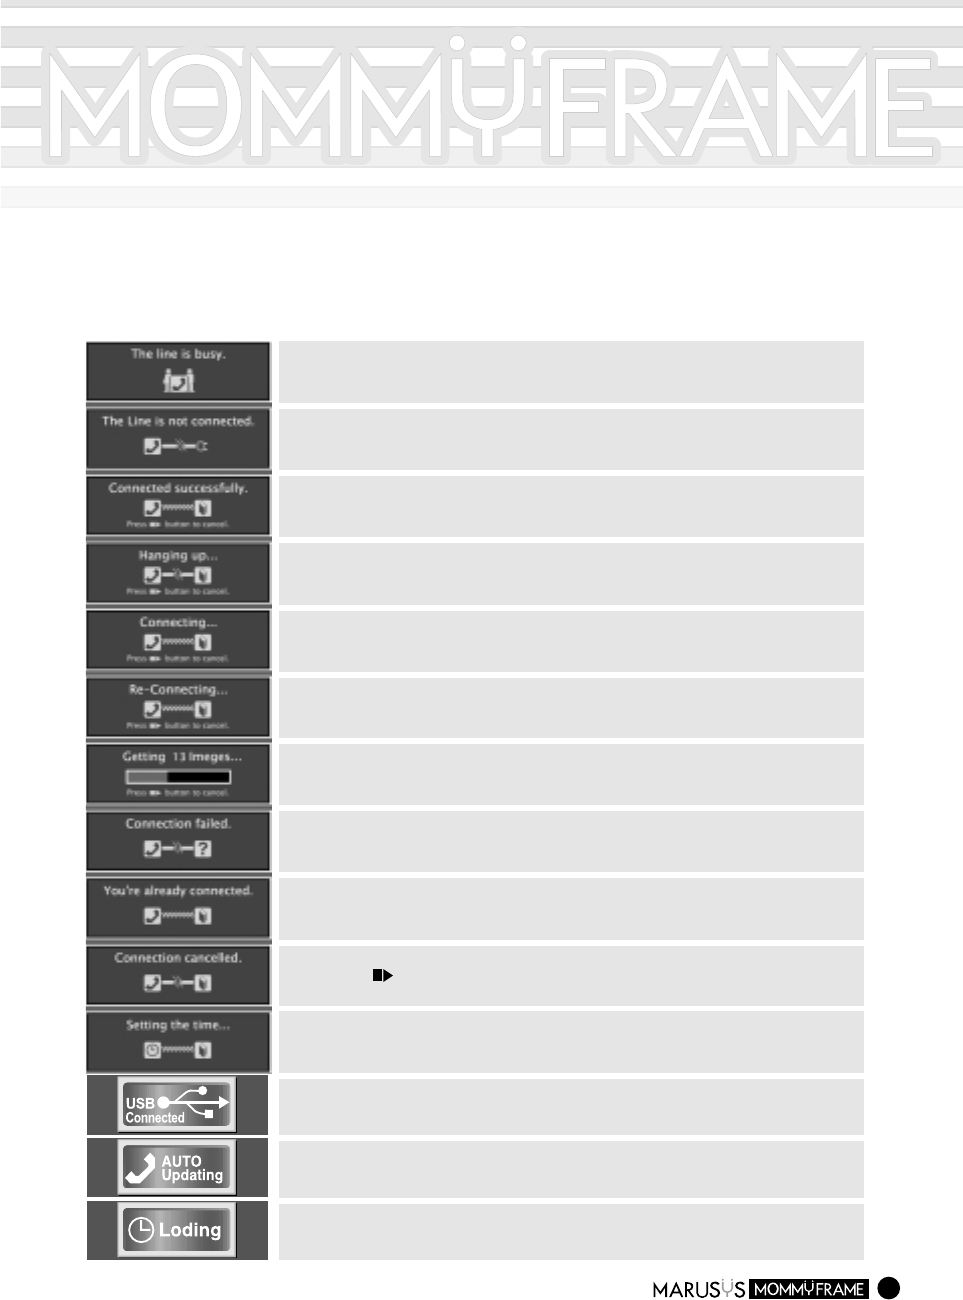
About Screen Messages
This message indicates that the line connected to MommyFrame is busy when
trying to "Update Now" or "Auto On/Off".
This message indicates that the line is not connected to MommyFrame when
trying to "CUpdate Now" or "Auto On/Off".
This message indicates that "Update Now" has been successfully
completed.
This message occurs after downloading images or retrieving the current time
has completed.
This message occurs when trying to "Update Now" or selecting "Auto On/Off".
If the connection was successful, the "Successfully Connected" message will
appear.
This message occurs if the connection attempts (up to 3 times) either with
"
Update Now
" or "Auto On/Off" have failed.
This message occurs while downloading images from the server.
The number of images being downloaded is shown
This message indicates that attempts to "Update Now" or "Auto On/Off"
have failed.
This message indicates that the server is already connected when trying to
"Update Now" or selecting "Auto On/Off".
This message indicates that the connection has been canceled when pressing
the Select ( ) button while downloading images or setting up the current time
automatically.
This message occurs when setting up the current time automatically.
This message indicates that MommyFrame is receiving images from the server.
This message indicates that MommyFrame is trying to connect to the server
automatically. If you press the [Menu] button while this message is displayed,
the auto connection is canceled.
This message indicates that the USB connector is connected to your PC.
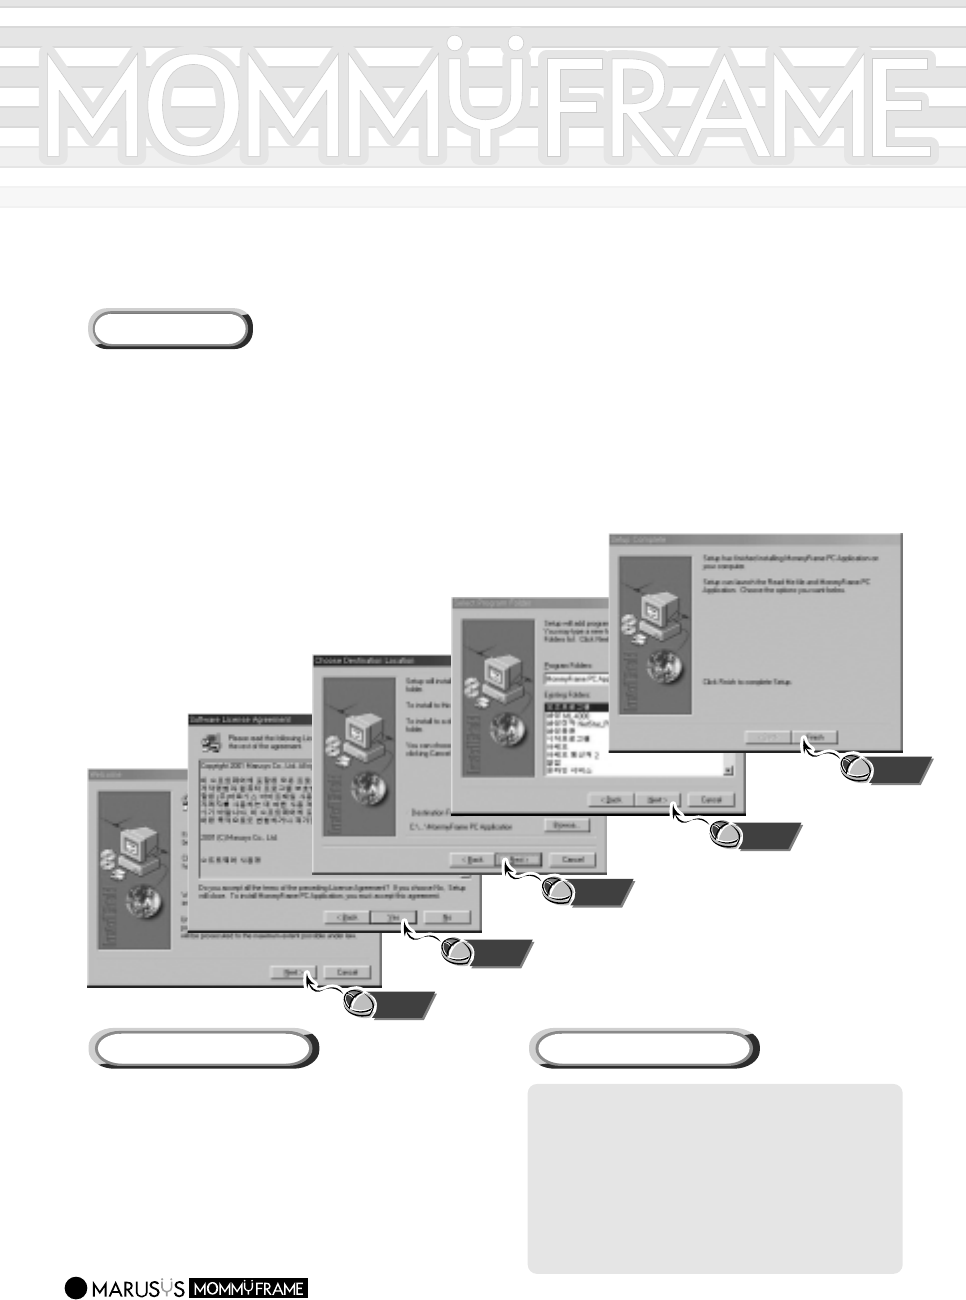
Installing MommyFrame Software on your PC
To use MommyFrame in conjunction with your PC, you should install the "MommyFrame Software"
onto your PC.
Be sure to install the MommyFrame Software onto your PC before connecting MommyFrame
to your PC. If you see the "Add New Hardware Wizard" when connecting the cable, press the
Cancel button and install the Software.
35
Installing
Click
1
1
After inserting the CD into the CD-ROM drive, run Setup.exe from the CD-ROM.
2
2
Click "Next" or "Yes" in the subsequent windows.
Connecting to your PC
1
1
Connect the "USB Cable" to the
USB Port of your PC.
2
2
Connect the "USB Cable" to the
USB Connector of MommyFrame.
Click
Click
Click
Click
CPU : IBM-compliant Pentium or higher
that supports a USB Port
Memory : 32MB or higher
Operating System :
Windows 98 / Me / 2000
Hard Disk : 20MB or more hard disk space
CD-ROM Drive : 2x-speed or faster
VGA Graphic Card supported
System Requirements
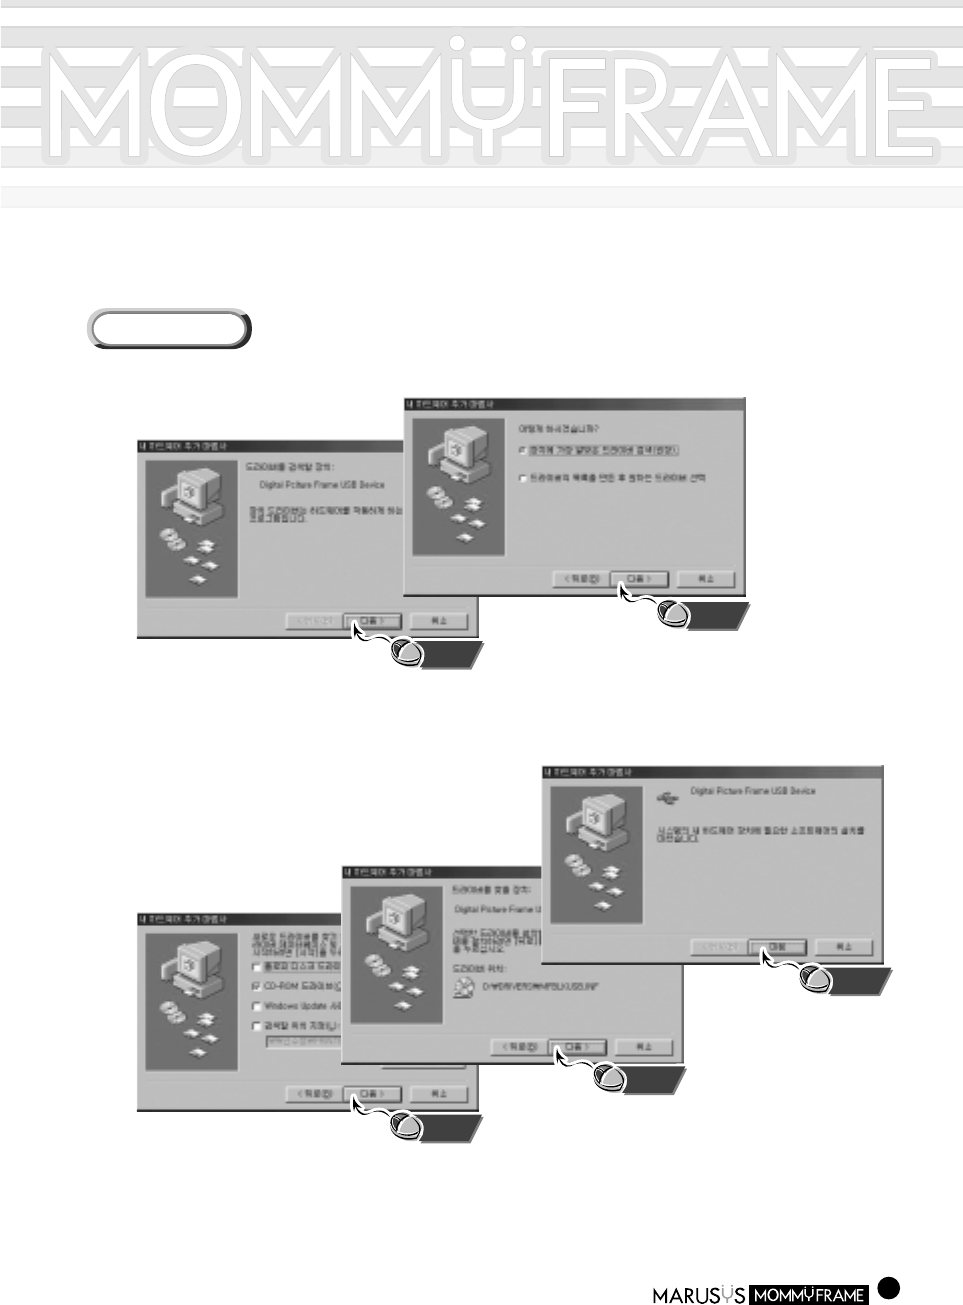
Installing the USB driver manually (Win98/Me)
If you turn MommyFrame on and connect the USB cable, the "Hardware Installation Wizard" window
will appear.
36
Installing
Click
1
1
Click "Next" in the subsequent windows.
2
2
Select the driver from the installation CD or the MommyFrame program folder.
Click "Next" in the subsequent windows.
3
3
Restart your system to finish the installation.
Click
Click
Click
Click
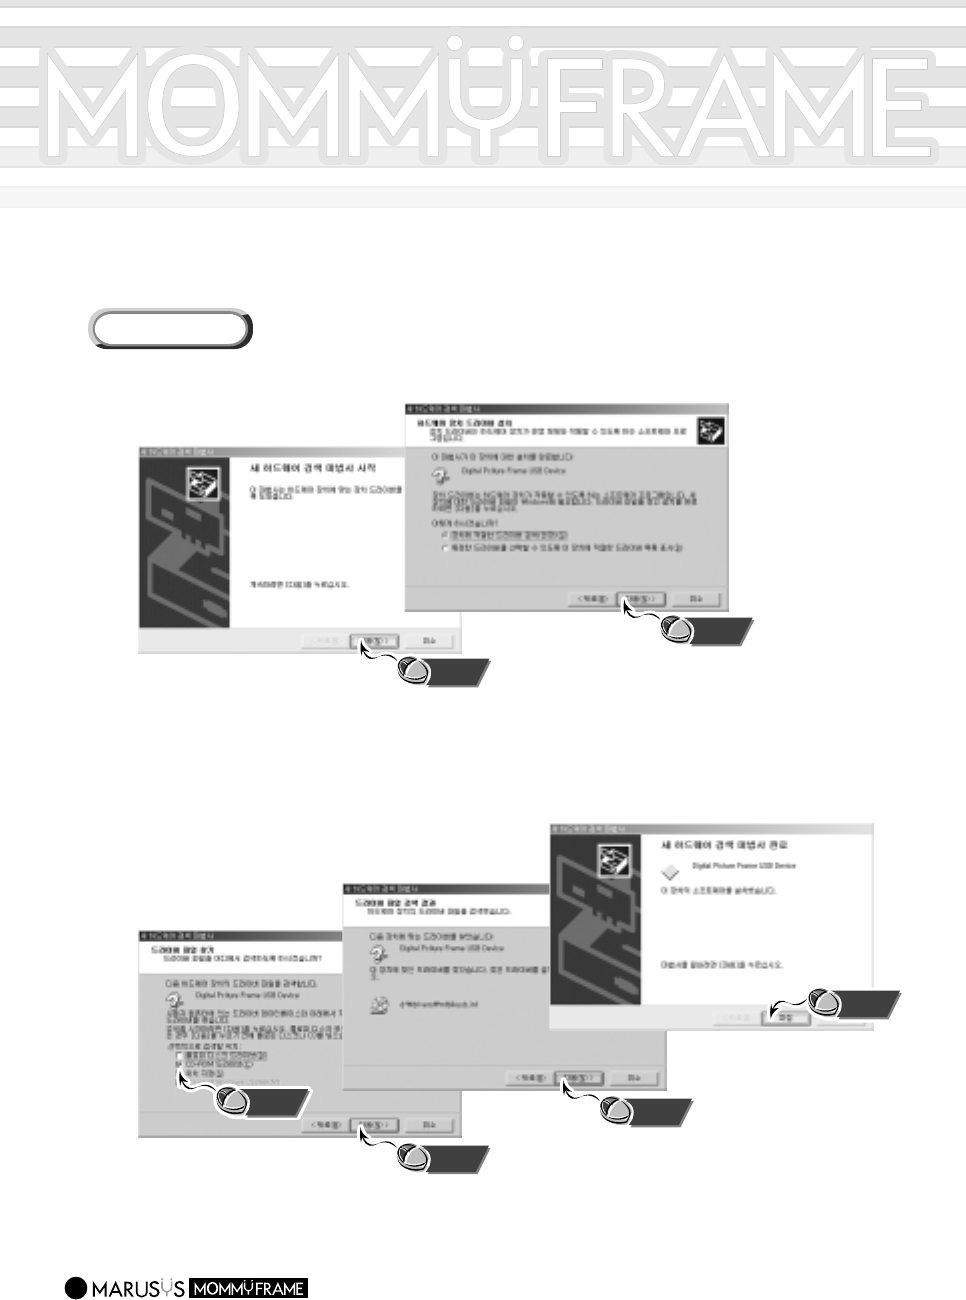
Installing the USB driver manually (Win2000)
If you turn MommyFrame on and connect the USB cable, the "Hardware Installation Wizard" window
will appear.
37
Installing
Click
1
1
Click "Next" in the subsequent windows.
2
2
Select the driver from the installation CD or the MommyFrame program folder.
Click "Next" in the subsequent windows.
Click
Click
Click
Click
Click
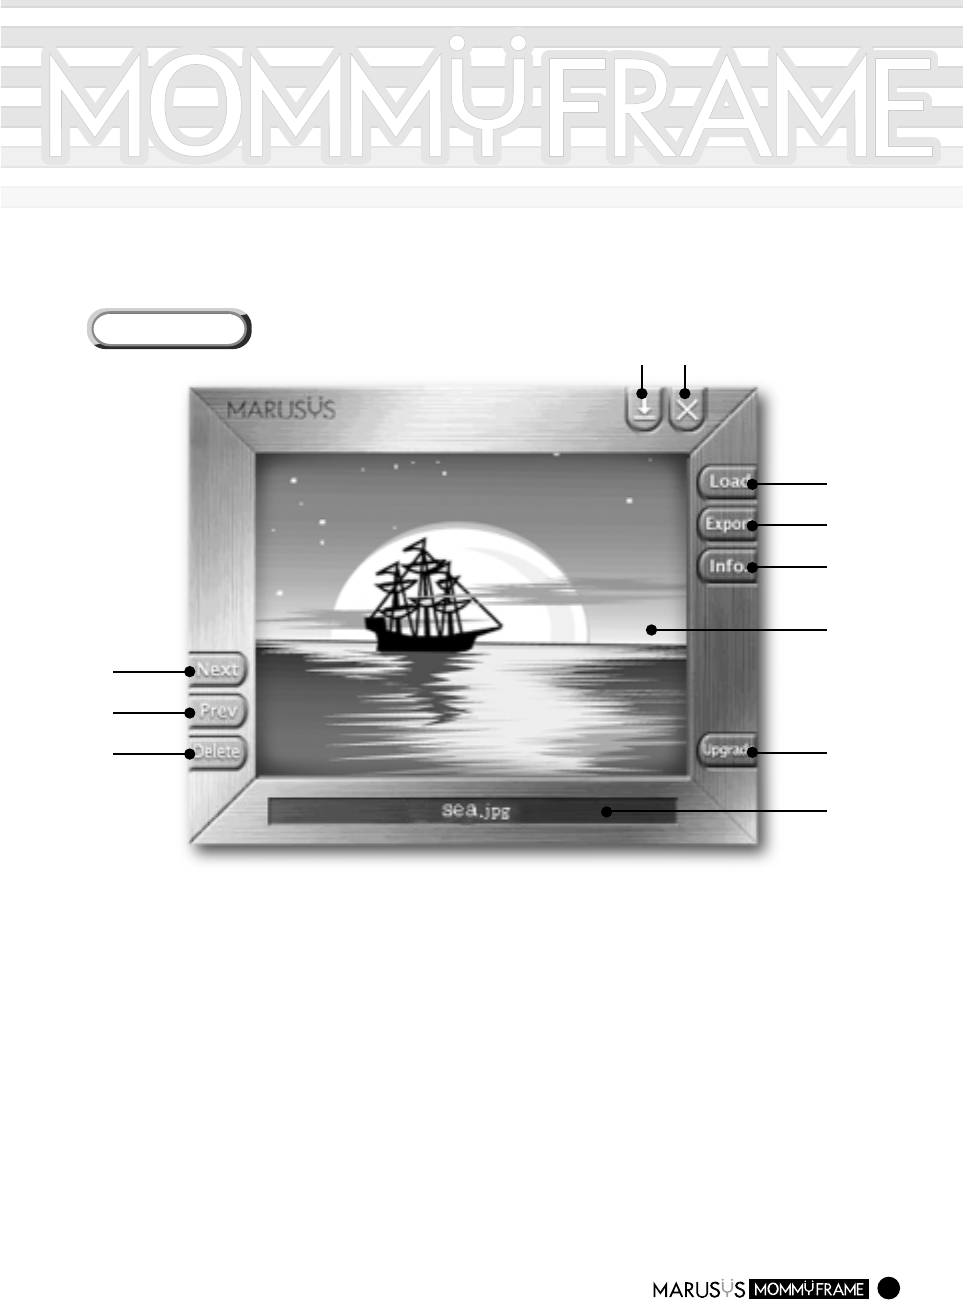
Using the MommyFrame Software
38
Main Screen
(1) Load :
Loads an image file onto MommyFrame. (Drag & Drop Enabled)
(2) Export : Transfers images to MommyFrame via the USB Port.
(3) Info. : Provides information about how to use MommyFrame.
(4)
Image View Window
: Shows images in MommyFrame.
(5) Upgrade : Upgrades the software for MommyFrame.
(6)
Status Window
: Shows the current upload/download status.
(7) Delete :
Deletes the images in the MommyFrame Software(Image View Window).
(Del key Enabled)
(8) Prev : Shows the previous images in the MommyFrame Software.
(Left Arrow Key Enabled)
(9) Next : Shows the next images in the MommyFrame Software.
(Right Arrow Key Enabled)
(10) Minimize the Window
(11) Exit
(1)
(10)(11)
(9)
(8)
(7)
(2)
(3)
(5)
(6)
(4)
39
Troubleshooting
The following is subject to change without notice.
For the latest information about the product, visit MommyFrame website at www.mommyframe.com.
Problems Solutions
No images in
MommyFrame. In the Auto Shutdown state or in Sleep mode, images are not
displayed. Disable this by pressing the Sleep button.
The Menu screen does
not appear even when
the Menu button is
pressed.
The Menu screen does not appear at times while MommyFrame
draws photos. However, the screen will appear after drawing of
the photo has completed.
Connecting to the
server fails.
For "MommyFrame for Ethernet", check the line status of the
network. If there is no problem with the line status, check if
the network settings are correct. For "MommyFrame for
Modem", check the phone line connection. If the line is
engaged, the server connection will fail.
Cannot select an
image from the Copy
Images.
Check if the image is supported by MommyFrame. Only images
stored in Compact Flash or Smart Media can be selected from
the Copy Images.
-->
-->
-->
-->
The current time is set
to Jan. 1st, 1970.
Set the current time in the Advanced Settings item in the menu.
For "MommyFrame for Ethernet", the current time is
automatically set if the network settings are correct.
-->
The USB icon does
not appear in
MommyFrame even
when the USB Port is
connected.
Check if the USB Software is working. Even if the USB Cable is
connected, the icon may not show up. If the icon does not
appear while the software is working, remove the cable and
insert it again.
-->
When trying to view a
downloaded photo from
the server, the "No
Image" message occurs.
-->
The number of
uploaded photos doesn
match the number of
downloaded ones.
The number of downloaded images combines both Channel
images and photos. If you have subscribed to Channel Services,
the number of uploaded and downloaded images may differ.
-->
MommyFrame only shows existing photos. If the downloaded
photo didn't exist in the Frame, the "No Image" message may
occur. Click the Next button to see the new image.
40
Problems Solutions
The MommyFrame
starting time is slower
after upgrading.
-->
-->
-->
The "Device Removal"
warning occurs when
removing the USB Cable.
-->
Cannot view photos
even after inserting a
Memory Card.
-->
This is normal since it takes some time to update the software.
Once the upgraded is completed, the apparatus works as fast as before.
Image files may be damaged when transferring images while
running slideshow. When sending the files via USB, stop the
slideshow or press the Stop button.
Check if photos to be displayed have been selected. MommyFrame
does not display photos if they have not been selected.
This does not affect actual behavior. Press the ESC key or OK
button to exit.
Eject and insert the Memory Card again. If this does not work,
check if the Memory Card actually contains photos.
Can I eject a memory
card while photos are
being displayed?
-->
It is highly recommended that you stop the slideshow before
ejecting a memory card.
I forgot the serial
number.
-->
You can have the serial number reissued if you have submitted
your Customer Card after purchasing the product.
Does MommyFrame
support broadband
connections?
-->
MommyFrame does not currently support broadband
connections.
The image to be deleted
won be marked with "X".
-->
Images in Compact Flash or Smart Media cannot be deleted.
Only images on MommyFrame can be deleted.
Cannot copy images.
-->
The storage space in MommyFrame may not insufficient.
Delete existing images in MommyFrame and try again.
Cannot download
images from the server.
-->
The storage space in MommyFrame may be insufficient.
Delete existing images in MommyFrame and try again.
MommyFrame won start
when pressing the On/Off
button.
-->
Try to restart MommyFrame after 5 seconds.
Images are impaired
after sending them
via USB.
Cannot view some
photos in MommyFrame.
41
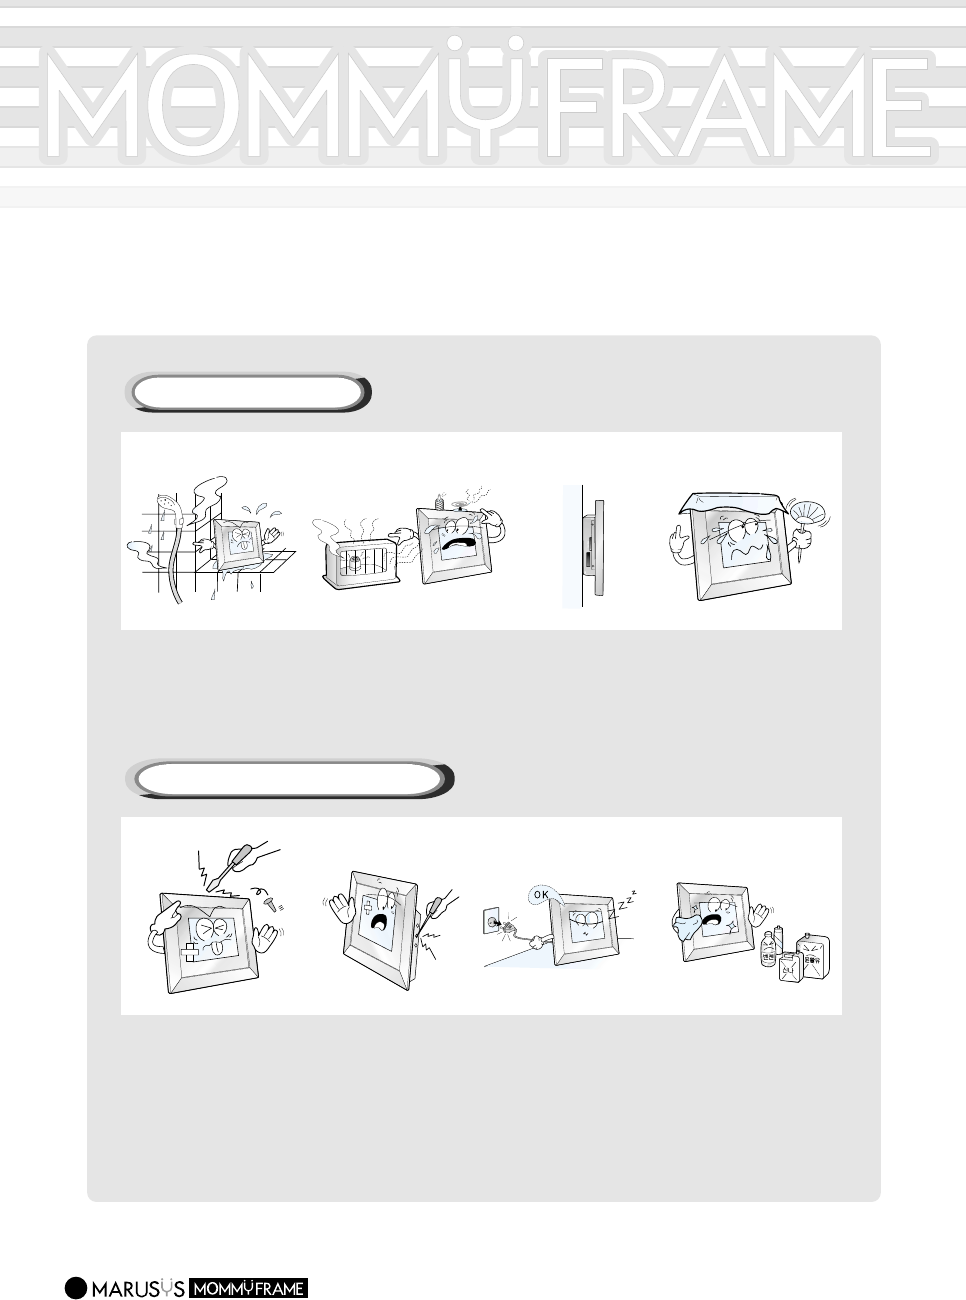
Safety Instructions
Please read the following instructions carefully before using.
Do not expose the apparatus
to oil, smoke, moisture or
water.
-.This could cause electric
shock or fire.
Do not install the
apparatus near a fire or a
heater.
-. This may cause a fire.
When installing
MommyFrame onto a
wall, remove the stand
from the apparatus and
hang it onto the peg.
Do not block the vent
with a table cover or by
a curtain.
-.This may cause fire due
to the increase in the
internal temperature.
Do not disassemble, repair,
alter or modify the
apparatus in any way.
-.This may cause fire or
electric shock.
If repairs are needed,
contact us at the locations
listed in the User Manual.
Never insert any metal
objects or inflammable
material in the vent or
connectors.
-.This may cause fire or
electric shock.
Keep the apparatus
unplugged while it is not
being used over a long
period.
-. This may cause a short
circuit, fire or electric
shock.
Clean with a soft, dry
cloth after unplugging the
apparatus.
-. Do not use chemicals
such as wax, benzene,
alcohol, thinners, aerosol
cleaner, detergent, or
lubricant.
Instructions for Installing
Instructions for Cleaning and Use

Specifications
The following specifications are subject to change without notice for the purpose of quality
improvement.
42
M8W(8.4inch Non-Network)
M10WL(10.4inch Ethernet) M10WM(10.4inch Modem)
Model
CPU
Graphic Chip
Display
Memory
Port & Media
Network
Power
Mode
Clock
Supported Image
Formats
Frame Material
Frame Material
Intel Strong ARM 1110
SED13504(65536 Colors Supported)
8.4inch TFT LCD Display
(800 x 600 Pixel)
8MB Flash Memory16M SDRAM
USB Port, Smart Media, Compact
Flash, Micro Drive
Not Supported
6.5V 1.5A Adapter
Slide - Help
Not Supported
JPEG, TIFF(1600 Pixels or lower Wide)
Wood
MommyFrame, Stand, User Manual,
Customer Card, CD-ROM, Adapter,
USB Cable
Intel Strong ARM 1110
SED13504(65536 Colors Supported)
10.4inch TFT LCD Display
(800 x 600 Pixel)
8MB Flash Memory16M SDRAM
USB port, Smart Media, Compact
Flash, Micro Drive
Ethernet
8V 2A Adapter
Slide - Channel - Clock
NTP, Real Time Clock*
JPEG, TIFF(1600 Pixels or lower Wide)
Wood
MommyFrame, Stand, User Manual,
Customer Card, CD-ROM, Adapter,
USB Cable
Intel Strong ARM 1110
SED13504(65536 Colors Supported)
10.4inch TFT LCD Display
(800 x 600 Pixel)
8MB Flash Memory16M SDRAM
USB port, Smart Media, Compact
Flash, Micro Drive
56K Modem
8V 2A Adapter
Slide - Channel - Clock
Real Time Clock*
JPEG, TIFF(1600 Pixels or lower Wide)
Wood
MommyFrame, Stand, User Manual,
Customer Card, CD-ROM, Adapter,
USB Cable, Phone Lines(2m, 10cm),
"Y" Adapter
-. The LCD has a life of 18,000 hours on average.
To extend the LCD life, keep the apparatus unplugged while storing it over long periods or turn the power off while it is not in use.
Press the Sleep button to put the apparatus into sleep mode as often as possible while you are out or not using it.
-. The guarantee does not cover damage or failure caused by user misuse or abuse.
-. The LCD may have up to 10 defective pixels due to peculiarities of the manufacturing process.
*: Option

43
!
"
#
$
$ "
$
$ %&'
%(